Conservation
Version
Ce module a été intégré à Koha à partir de sa version 23.11.
Le module Consevation peut être rejoint de deux manières différentes : sur la page principale de l’interface professionnelle, en cliquant sur “Conservation” ou par le menu “Plus” au sommet de la page.
Le module Conservation de Koha est utilisé pour l’intégration des traitements de conservation dans le déroulement des opérations et en conserver trace. A chacune des étapes du processus de conservation, des données sont enregistrées sur les exemplaires. Pour chaque processus, les exemplaires rejoignent d’abord une liste d’attente avant d’être ajoutés à un train de reliure.
Afin d’utiliser le module, vous devez d’abord l’activer grâce à la préférence système PreservationModule. Ensuite, dans la catégorie de valeurs autorisées NOT_LOAN, créez les statuts dont vous aurez besoin pour suivre les exemplaires tout au long du processus.
Aller à : Plus > Conservation
Note
Seuls les bibliothécaires avec la permission preservation (ou la permission superlibrarian) auront accès à ce module.
Paramétrages
Les paramétrages de conservation concernent deux sortes d’information :
enregistrer les statuts (configurés comme valeurs autorisées NOT_LOAN) des exemplaires choisis pour le processus;
ajouter de nouveaux traitements, liés aux trains de reliure.
Aller à : Plus > Conservation > Paramétrages
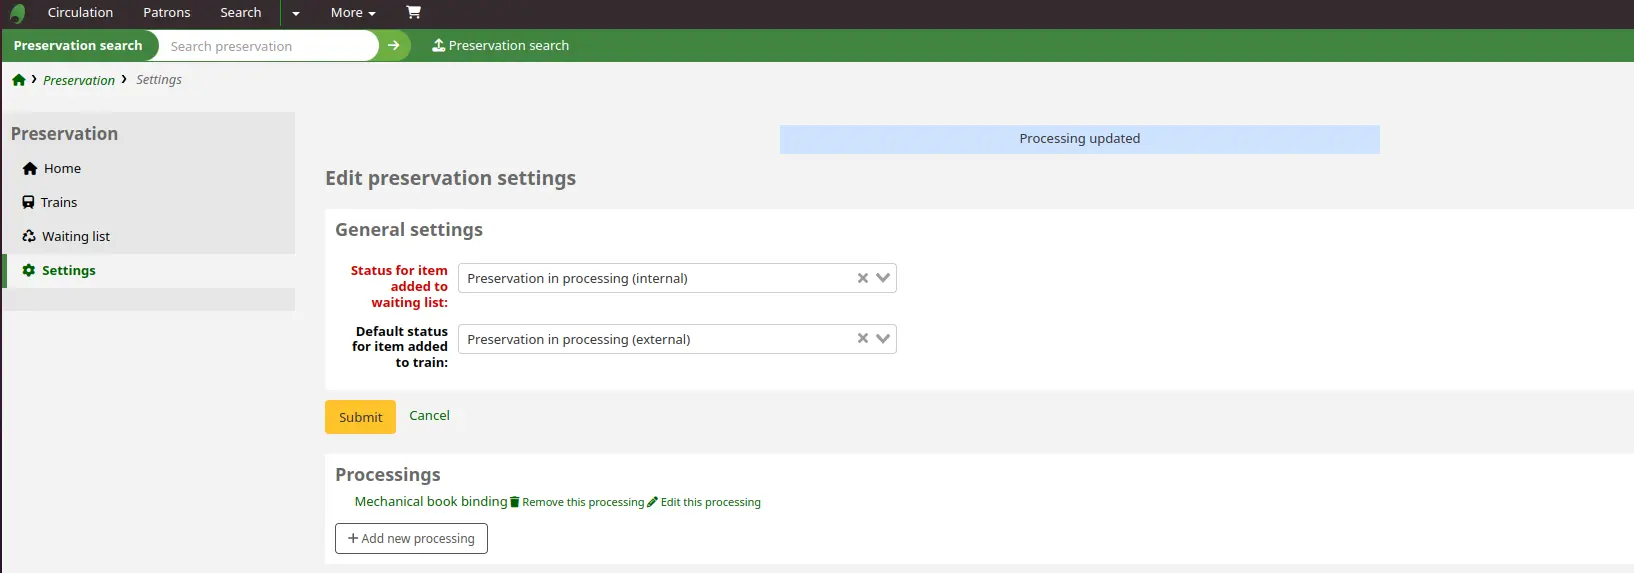
Paramètres généraux
Dans cette section, vous pouvez paramétrer deux statuts différents d’exemplaires choisis dans la catégorie de préférence système NOT_LOAN :
le statut pour l’exemplaire ajouté à la liste d’attente : le statut items.notforloan par défaut pour chaque exemplaire sur la liste d’attente (le début du processus du module de conservation).
le statut par défaut pour l’exemplaire ajouté au train de reliure : le statut items.notforloan par défaut pour chaque exemplaire du train de reliure (la surveillance du processus de conservation).
Il est aussi possible de les paramétrer par les préférences sytème PreservationNotForLoanWaitingListIn and PreservationNotForLoanDefaultTrainIn.
Traitements
Pour ajouter un nouveau traitement, cliquer sur le bouton “Ajouter un nouveau traitement”.
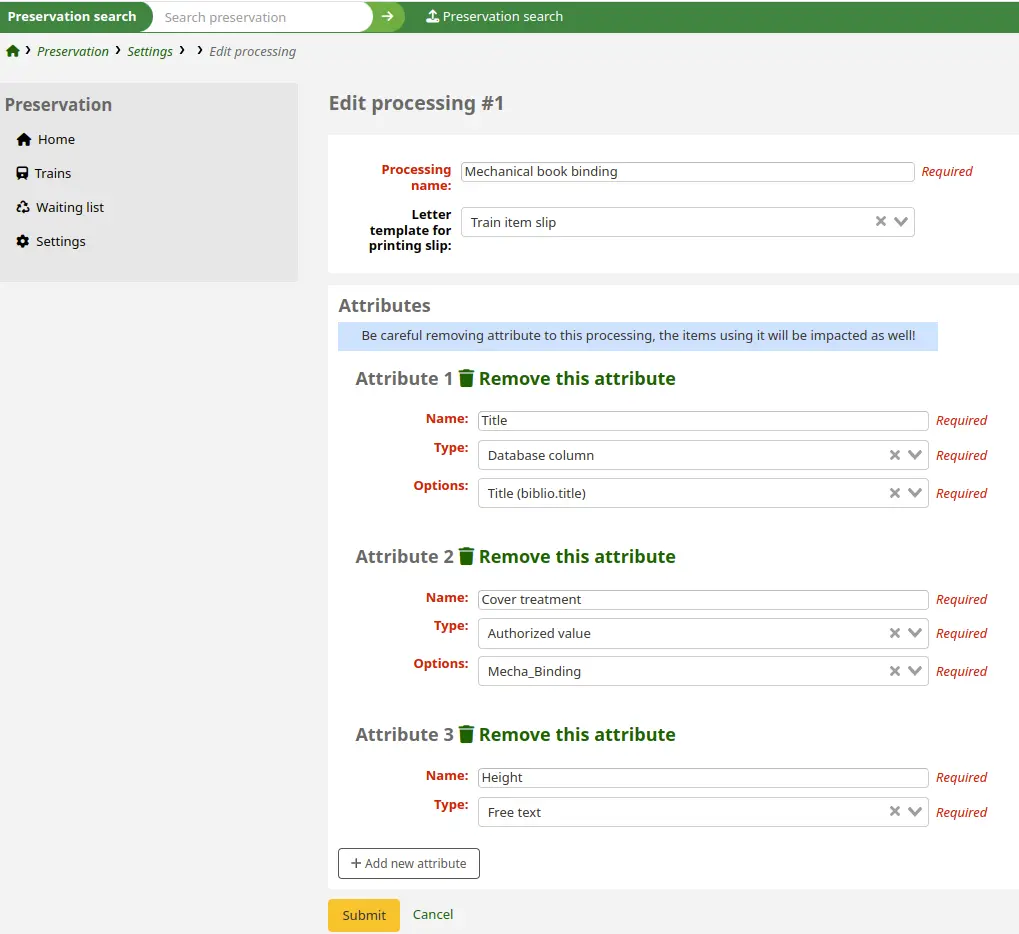
Nom du traitement : c’est le nom qui apparaîtra dans le menu déroulant lors de la création d’un nouveau train.
Modèle de lettre pour l’impression de ticket : notification utilisée pour imprimer une liste des exemplaires dans un train.
Si aucun n’est sélectionné, vous ne pourrez pas générer un ticket à imprimer.
Vous pouvez utiliser le ticket par défaut Exemplaires du train (notification PRES_TRAIN_ITEM) ou créer une nouvelle notification.
Si vous choisissez de créer une nouvelle notification, assurez-vous de sélectionner le module Conservation. Il pourrait être plus simple de commencer en copiant la notification PRES_TRAIN_ITEM plutôt que d’en créer une à partir de rien.
Chaque traitement a sa propre liste d’attributs. Pour ajouter un nouvel attribut, cliquer sur le bouton “Ajouter un nouvel attribut”.
Nom : le nom de l’attribut. Il apparaîtra comme une des en-têtes du tableau du train auquel le traitement a été attaché.
Type : le type de donnée nécessaire pour le train. Ce peut être une valeur autorisée, du texte libre ou une colonne de la base de données.
Options : apparaît si un type de valeurs autorisées ou une colonne de la base de données a été sélectionné. Il affichera un menu déroulant des valeurs possibles pour l’attribut.
Astuce
Pour les champs “Type” et “Options”, l’autocomplétion est disponible : commencez à saisir dans le champ pour trouver rapidement la valeur souhaitée.
Note
Assurez-vous d’avoir bien conçu vos traitements avant de les créer sur Koha. Bien que les traitements soient modifiables par la suite, il est recommandé de ne pas le faire au cas où ils seraient déjà attachés à un train.
Si vous devez vraiment effectuer des modifications, il est plutôt conseillé de créer un nouveau traitement.
Liste d’attente
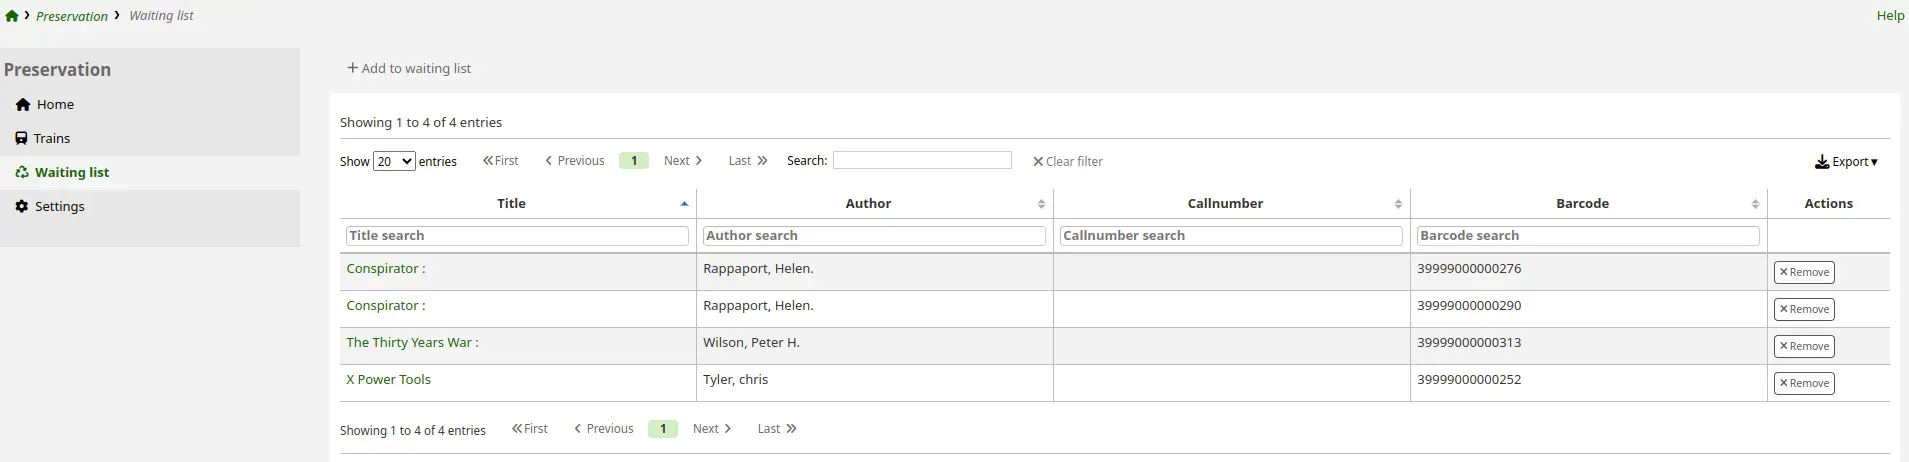
La liste d’attente est la première étape du processus de conservation. C’est un peu le hall d’entrée du module Conservation pour les exemplaires.
Aller à : Plus > Conservation > Liste d’attente
Ajouter un exemplaire à la liste d’attente mettra à jour son statut “Non disponible” en fonction de la valeur définie dans les paramètres de conservation. Tant que son statut n’est pas à nouveau modifié, l’exemplaire restera dans la liste d’attente.
Cela permet aux bibliothécaires de rendre un document indisponible même s’il n’a pas encore été envoyé ailleurs pour reliure.
Ajouter à la liste d’attente
Pour ajouter des exemplaires à la liste d’attente, cliquez sur le bouton “Ajouter à la liste d’attente”.
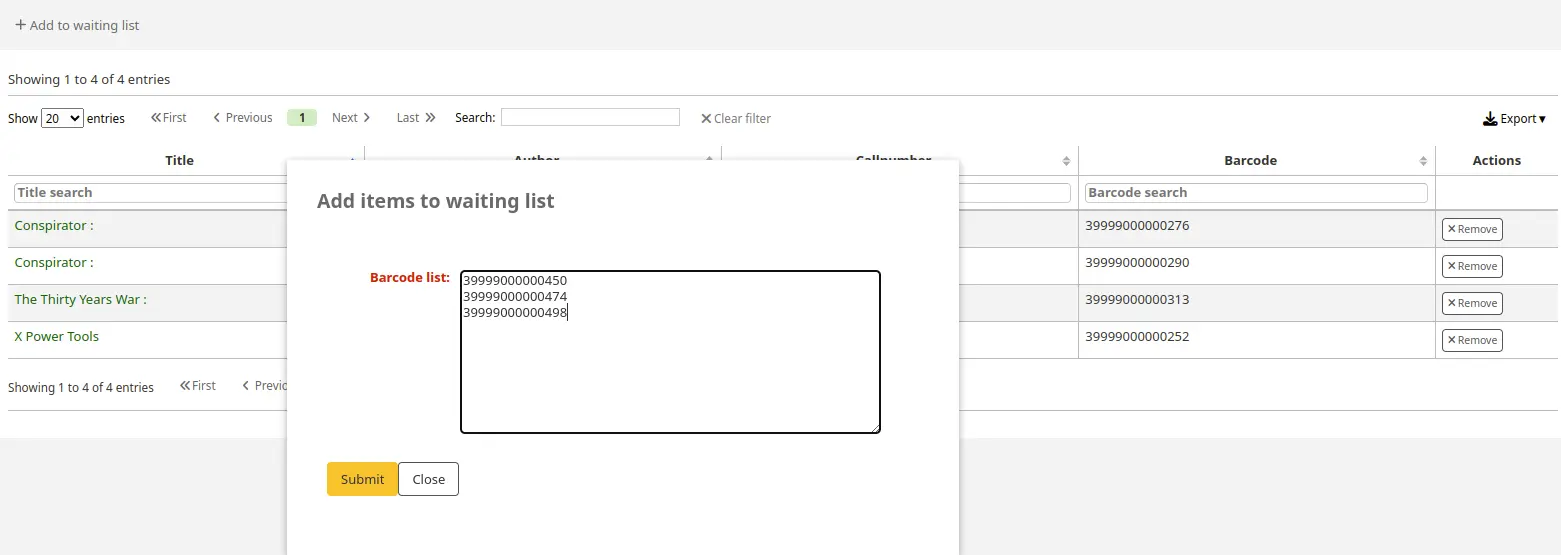
Un pop-up apparaîtra, avec un champ de saisie. Tapez ou scannez vos codes à barres.
Astuce
Entrez un code à barres par ligne, sans espace ni virgule. Si les codes à barres sont mal saisis, seul le dernier de la liste sera ajouté.
Après avoir appuyé sur “Valider”, vos nouveaux exemplaires apparaîtront dans le tableau.
Un nouveau bouton “Ajouter les x derniers exemplaires au train” s’affichera aussi. Vous pouvez l’utiliser si vous souhaitez ajouter immédiatement vos exemplaires au train par lot.
Trains
La page Trains est le pivot central du module Conservation. C’est ici que vous créerez et surveillerez tous vos trains de reliure.
Note
Le terme “Trains” a été retenu pour deux raisons.
En premier lieu, parce que d’autres terminologies -“chariot”, “panier”, lot”, etc. - étaient déjà utilisées pour des fonctionnalités bien précises dans d’autres modules de Koha.
Ensuite, le terme “train” est souvent utilisé par les bibliothécaires français parce que les chariots de livres ressemblent à des wagons liés entre eux quand ils sont alignés.
Aller à : Plus > Conservation > Trains
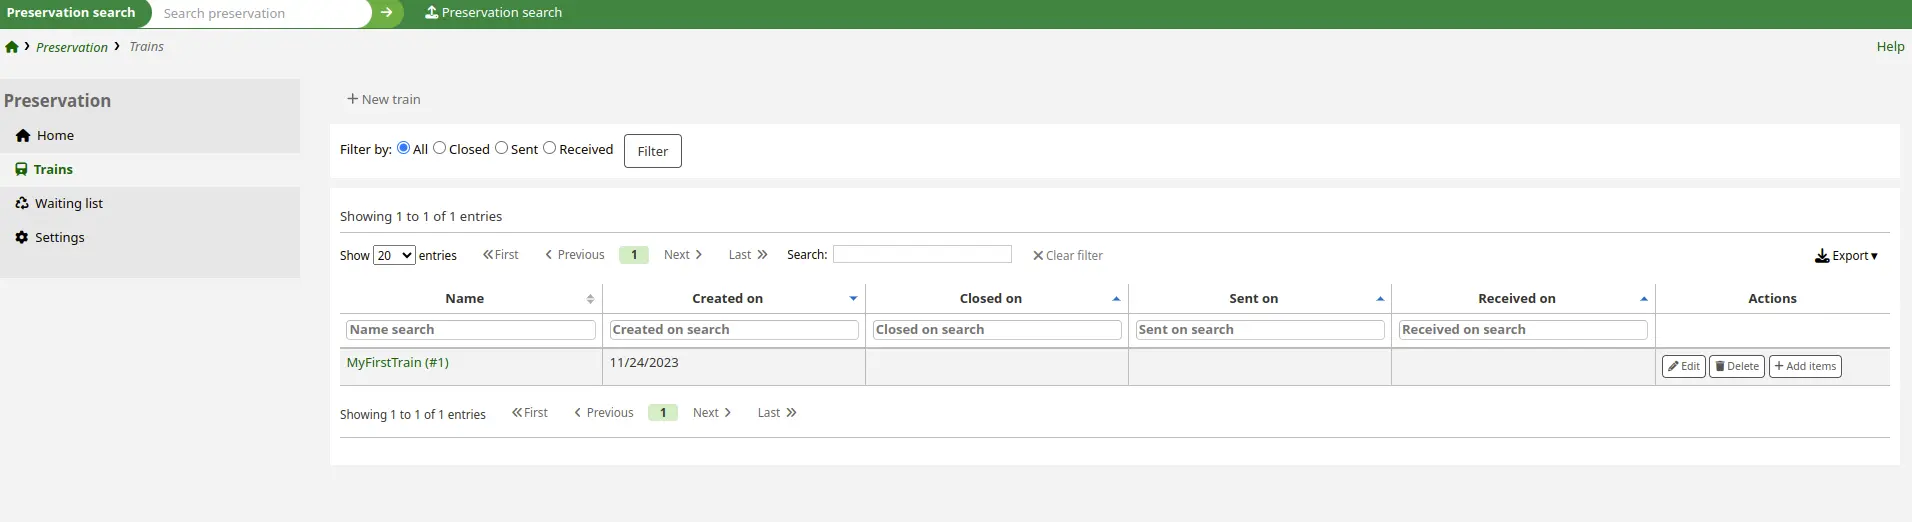
Ceci est la liste de tous vos trains. Le tableau contient les informations suivantes :
Nom : le nom que vous avez donné au train
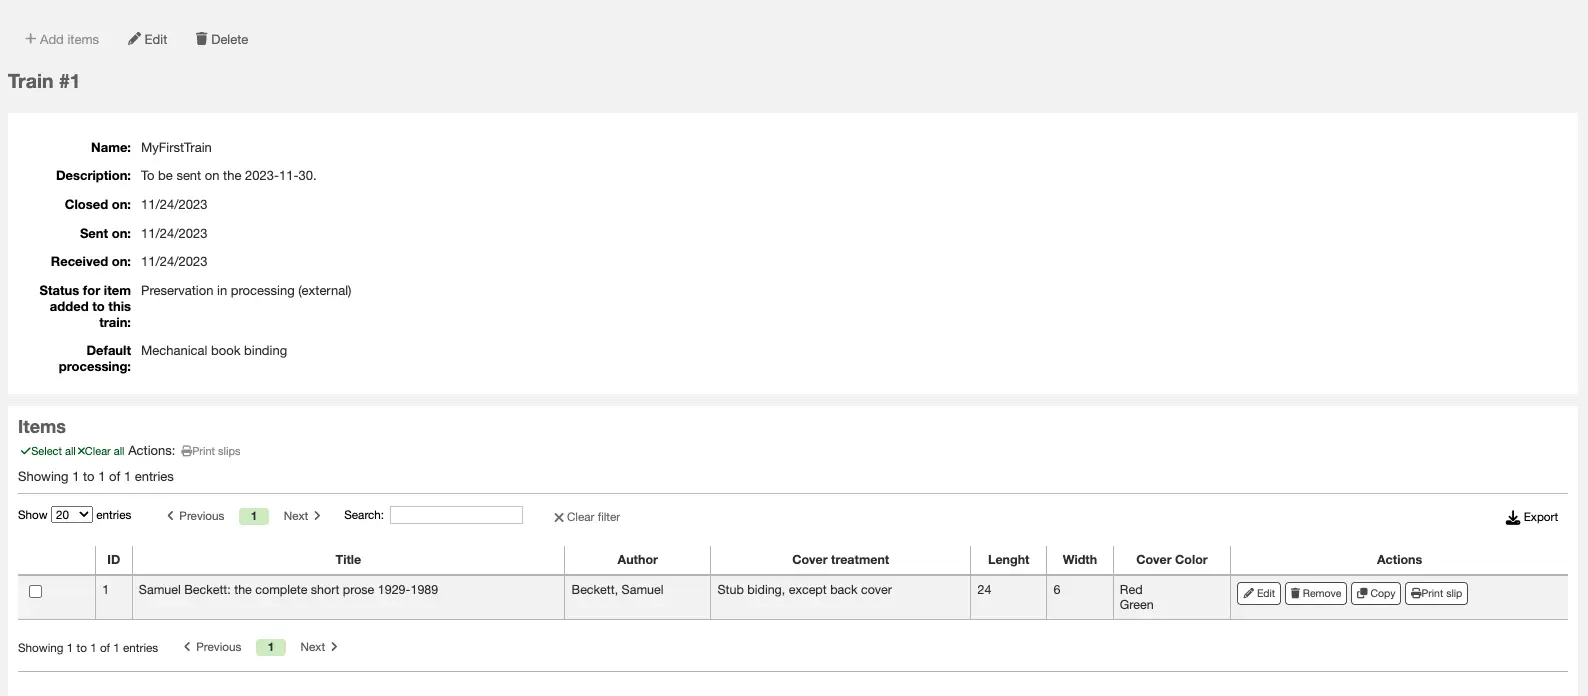
Créé le : la date de création du train
Fermé le : la date à laquelle vous avez décidé que plus aucun exemplaire ne pourrait être ajouté au train
Envoyé le : la date à laquelle le train a été envoyé physiquement au relieur
Reçu le : la date à laquelle les exemplaires du train sont physiquement revenus à la bibliothèque
Actions :
Modifier : pour modifier les paramétrages du train
Supprimer : pour retirer le train de la page
Ajouter des exemplaires : pour ajouter directement des exemplaires au train à partir de la liste d’attente grâce au code à barres
Nouveau train
Pour ajouter un nouveau train, cliquez sur le bouton “Nouveau train”.
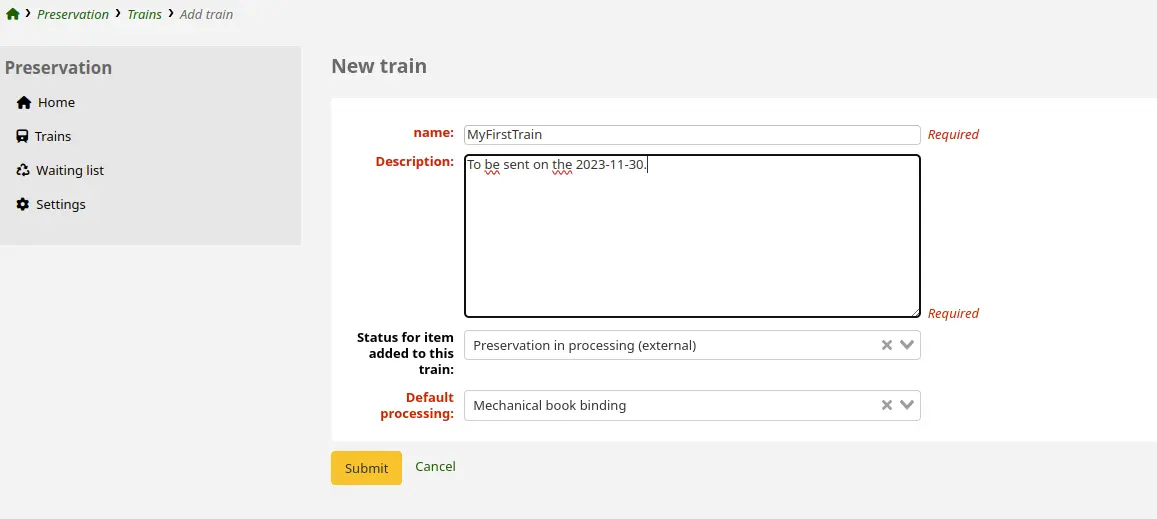
Nom : le nom que vous souhaitez donner au train
Description : tout ce que vous avez besoin d’expliquer à propos de ce train
Statut des exemplaires ajoutés à ce train : choisissez parmi les options définies dans la catégorie de valeurs autorisées NOT_LOAN. La valeur proposée par défaut est celle définie dans les paramétrages du module Conservation ou la préférence système PreservationNotForLoanDefaultTrainIn.
Traitement par défaut : le traitement auquel vous souhaitez lier votre train. Les nouveaux traitements sont ajoutés dans les paramétrages du module Conservation.
Cliquez sur le bouton “Valider” pour créer le nouveau train et revenir à la page Trains.
Ajouter des exemplaires
Une fois votre train créé, l’étape suivante consiste à ajouter les exemplaires qui seront de cet envoi à la reliure.
Vous pouvez ajouter des exemplaires à un train :
un à un, à partir de la page Trains;
par lot, à partir de la page Liste d’attente.
Ajouter des exemplaires à partir de la page Trains
Note
Vous devez ajouter vos exemplaires à la liste d’attente avant de pouvoir les ajouter à un train.
A partir de la page Trains, soit :
Cliquez sur le bouton “Ajouter des exemplaires” dans la colonne Actions.
Saisissez le code à barre de l’exemplaire.
Soit, cliquez sur le nom du train.
Cliquez sur le bouton “Ajouter des exemplaires” en haut de la page.
Saisissez le code à barre de l’exemplaire.
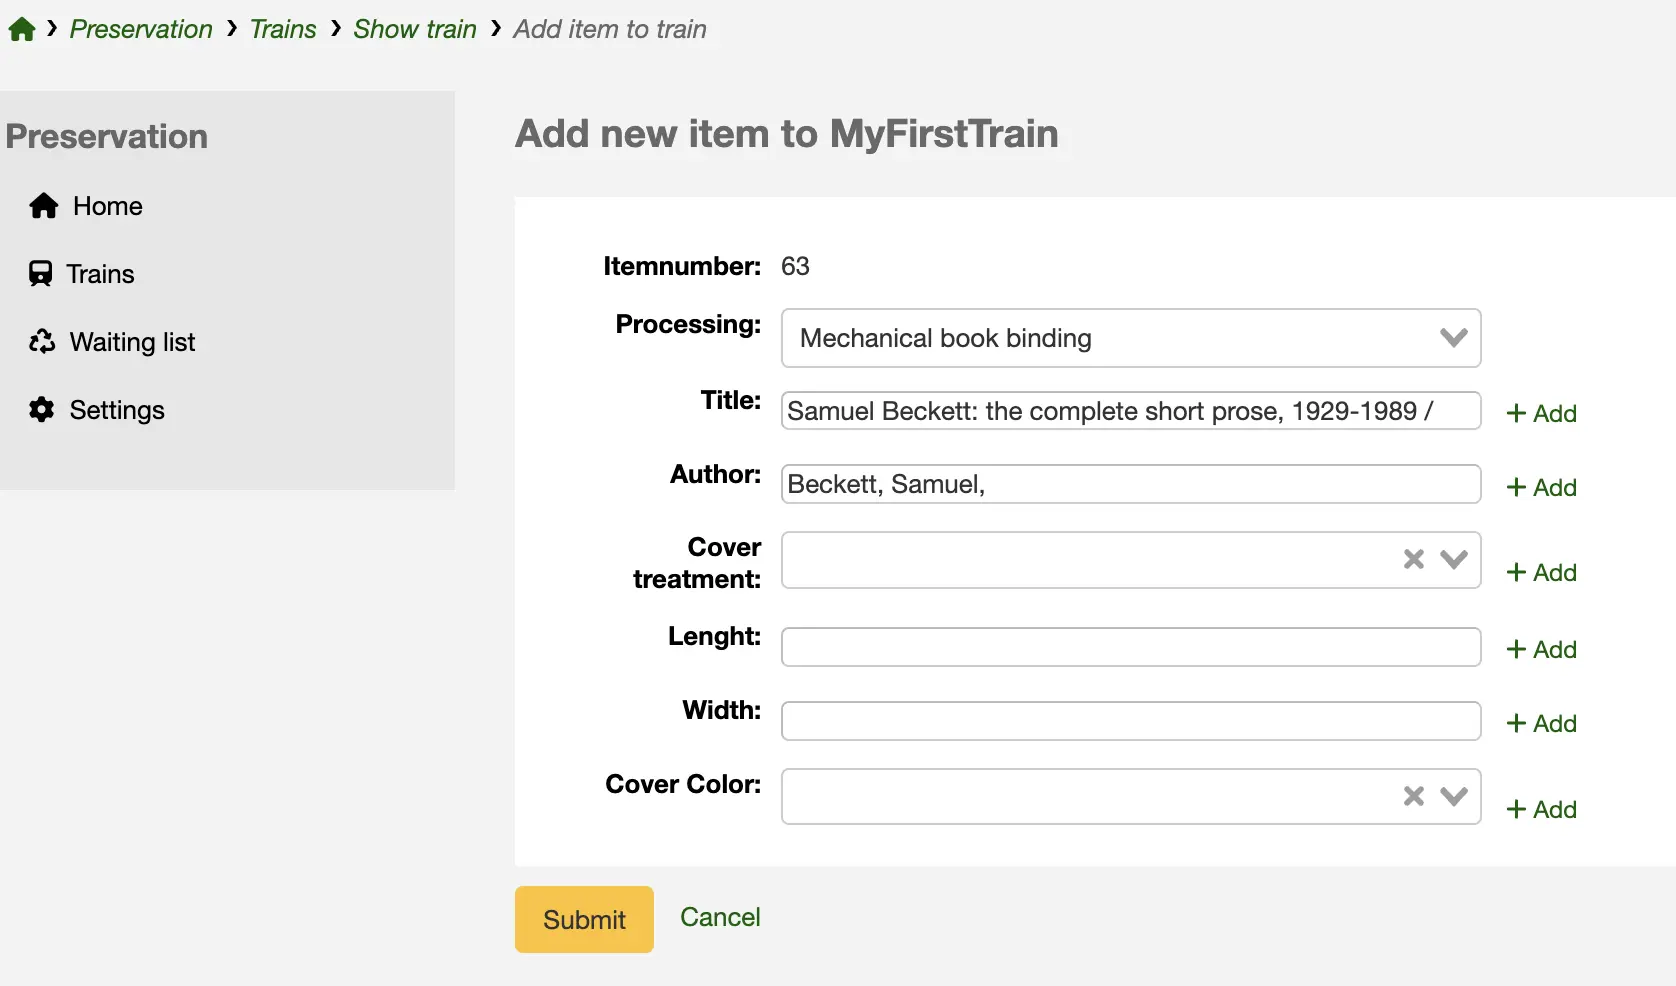
Le formulaire présenté affiche le nombre d’exemplaires et les attributs du traitement par défaut (choisis lors de la création du train).
Tous les attributs du traitement qui sont des colonnes de la base de données sont renseignés avec les données des champs concernés.
Tous les attributs sont modifiables, même s’ils sont extraits de la base de données Koha ou de valeurs autorisées.
Note
Aucune des modifications apportées ici ne modifiera les données MARC ni les valeurs autorisées. La donnée modifiée n’a d’usage que dans le module Conservation.
Chaque attribut peut être dupliqué.
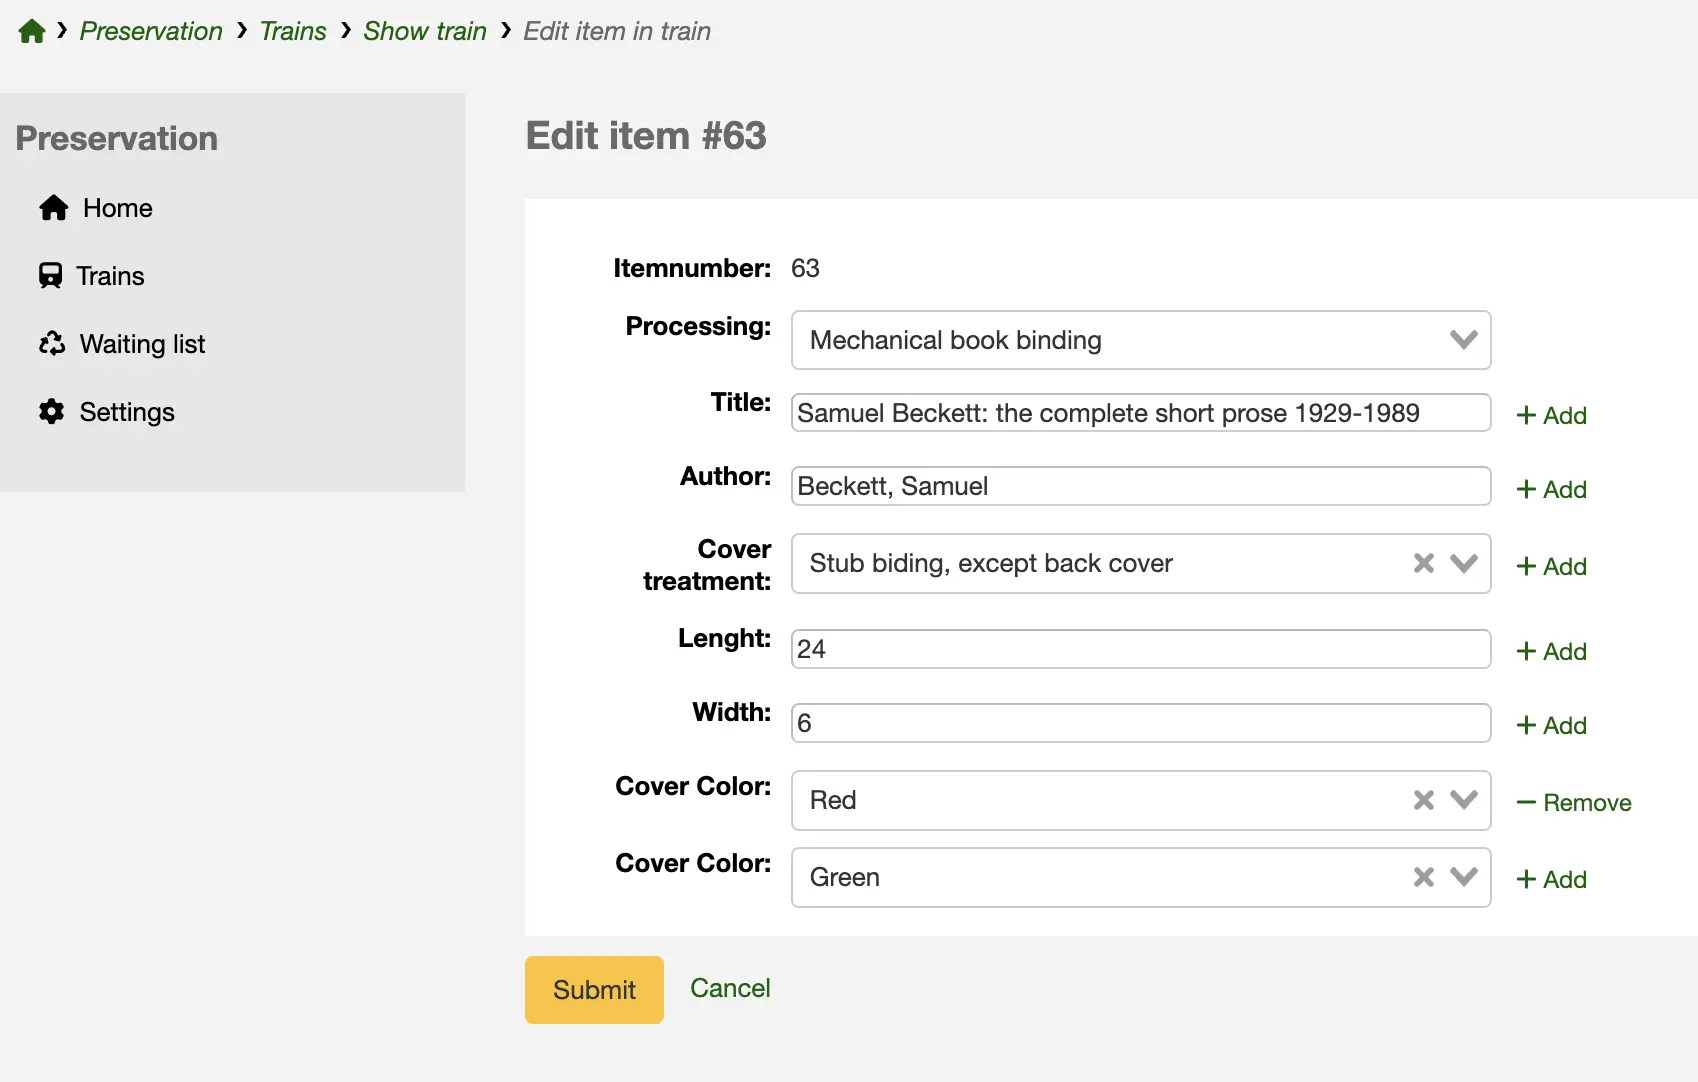
Vous pouvez aussi modifier les champs dont vous avez besoin pour cet exemplaire en particulier en le basculant sur un autre traitement.
Note
Dans le cas d’un échange avec un autre traitement, la page Trains ne pourra affiché un résumé.
Ajouter des exemplaires à partir de la liste d’attente
Pour gagner du temps, vous pouvez ajouter des exemplaires à un train immédiatement après les avoir ajoutés à la liste d’attente.
Cliquez sur le bouton “Ajouter les x derniers exemplaires à un train” (où x est le nombre d’exemplaires que vous avez tout juste ajoutés).
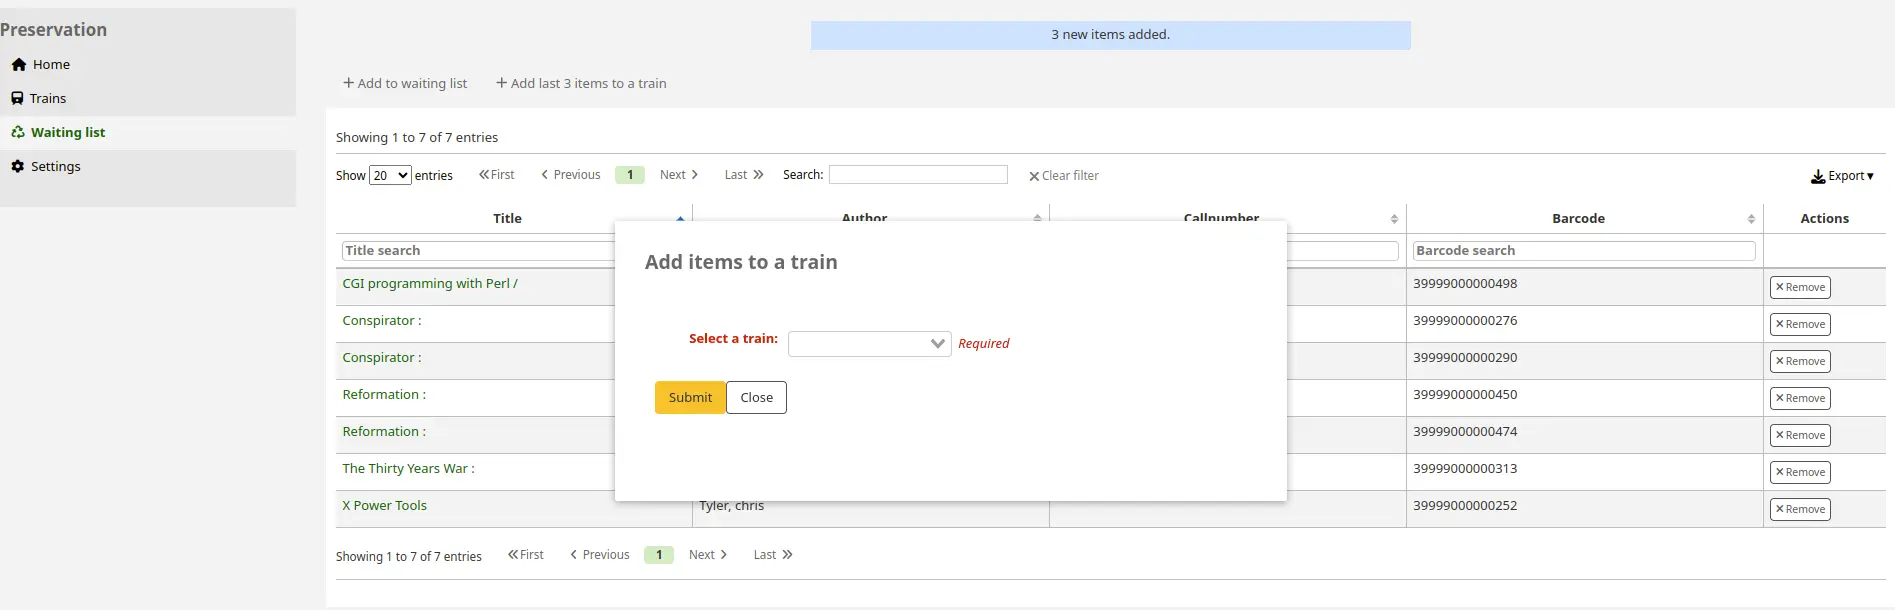
Dans le pop-up qui apparaît, sélectionnez le train désiré dans la liste des tains de reliure actuellement disponibles; cliquez ensuite sur “Valider”.
Note
Cela ajouter vos exemplaires au train comme un lot. Vous n’aurez pas la possibilité de modifier les attributs du traitement pour des exemplaires en particulier.
Si vous avez besoin de modifier ensuite les attribut du traitement, vous pourrez le faire à partir du train : utilisez le bouton “Modifier” dans le tableau des Exemplaires.
Gestion du train
Pour visualiser un train de reliure, cliquez sur le nom du train dans le tableau de la page Trains.
Afficher le train
Aller à : Plus > conservation > Train > Afficher un train
Le train vous permet de réaliser quatre actions différentes :
Ajouter un exemplaire : cliquez sur le bouton et un pop-up pour ajouter un exemplaire apparaîtra.
Modifier : le bouton Modifier vous renverra aux paramètres du train que vous aviez renseignés afin de créer le train.
Supprimer : supprime le train. La liste des exemplaires de ce train sera effacée.
Avertissement
Lors de la suppression d’un train, le statut Non disponible des exemplaires repasse en statut Disponible.
Fermer / Envoyé / Reçu : un bouton pour horodater et surveiller le processus de votre train de reliure.
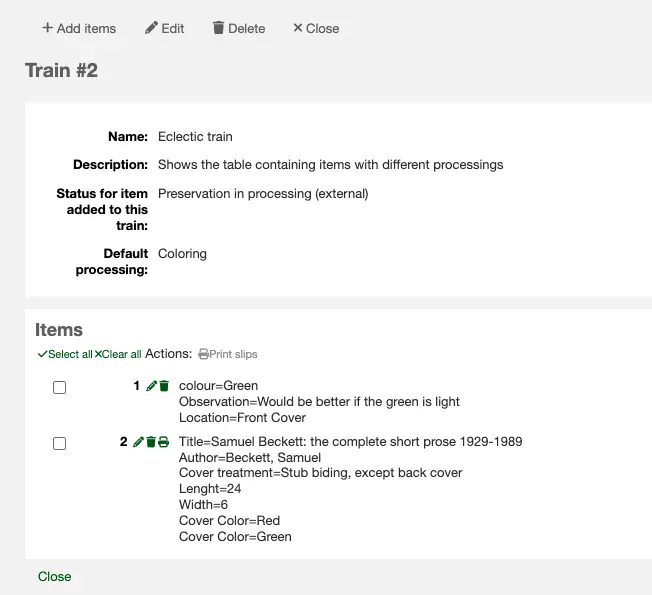
Sous ces quatre boutons, vous verrez s’afficher les paramètres du train et le tableau des exemplaires inclus dans le train.
Note
Les en-têtes de colonnes du tableau des exemplaires correspondent aux attributs du traitement choisi.
Si les valeurs par défaut de NOT_LOAN de la liste d’attente et du train sont différentes, l’exemplaire disparaît de la liste d’attente quand il est ajouté au train. Sinon, il apparaît dans les deux listes.
Avertissement
Il est recommandé de maintenir inchangé le traitement par défaut tout au long du processus du train de reliure. Le modifier quand le train a des exemplaires désactivera la visualisation du tableau des exemplaires.
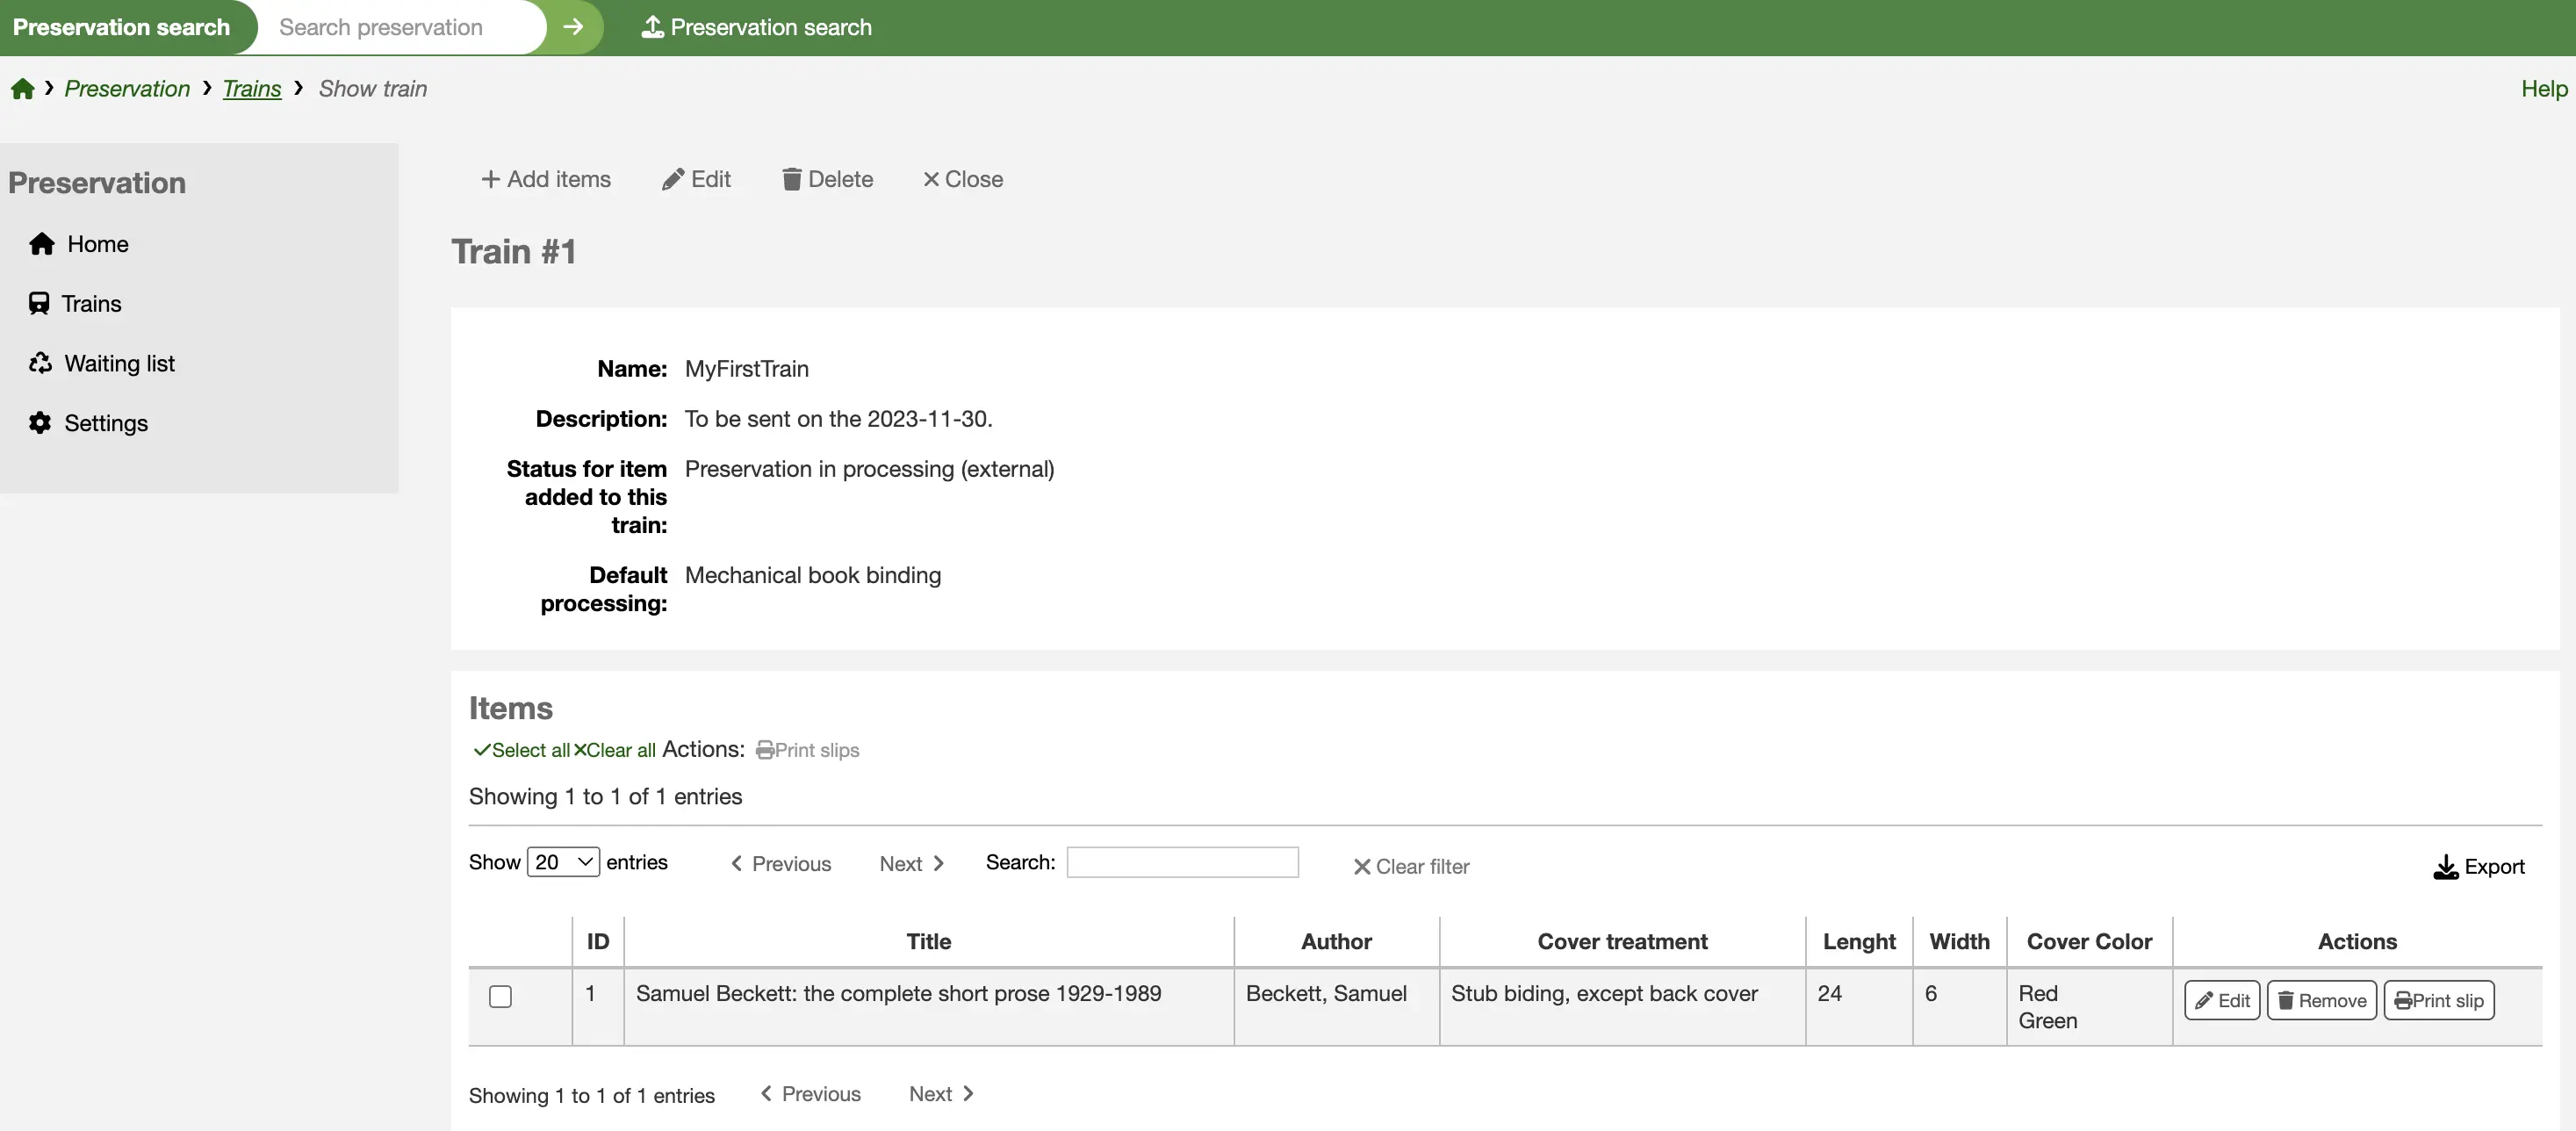
Le tableau des exemplaires du train de reliure contient les informations choisies lors de l’ajout de l’exemplaire. Sur sa droite, vous avez trois actions :
Modifier : pour changer les valeurs des attributs de son traitement de conservation.
Retirer : pour retirer l’exemplaire du train.
Avertissement
Lors du retrait d’un exemplaire, son statut Non disponible ne repasse pas automatiquement en statut Disponible.
Imprimer le ticket : s’il est activé dans les paramétrages par défaut du traitement, le bouton “Imprimer le ticket” apparaît dans ces actions.
Cochez la case à gauche de l’exemplaire, puis cliquez sur “Imprimer les tickets” en haut du tableau des exemplaires.
Si le “Ticket de transfert” par défaut (code de la notification PRES_TRAIN_ITEM) est utilisé, le ticket généré contiendra toutes les informations d’exemplaires affichées dans le tableau.
Fermer et envoyer
Une fois tous les exemplaires ajoutés et modifiés, vous devrez fermer le train. Cliquez sur le bouton “Fermer” au sommet de la page. Ceci ajoutera une date “Fermé le” dans les détails du train.
Quand un train a été fermé, plus aucun exemplaire ne peut lui être ajouté.
L’étape suivante est d’envoyer physiquement le train au relieur. Pour conserver trace de cette information dans Koha, cliquez sur le bouton “Envoyer”, là où le bouton “Fermer” se situait. Cela mettra à jour le statut du train sur Envoyé et ajoutera une date “Envoyé le” dans les détails du train.
Réceptionner le train
Finalement, quand le train revient physiquement à la bibliothèque, cliquez sur le bouton “Reçu”. Ceci ajoutera une date “Reçu le” dans les détails du train.
Occasionnellement, les exemplaires arrivant du relieur ont des défauts et doivent être renvoyés.
Vous pouvez déplacer n’importe quels exemplaires du train réceptionné vers un autre train ouvert : utilisez le bouton “Copier” dans la colonne Actions et sélectionnez le train suivant pour que cet exemplaire soit envoyé. Faire cela gardera les données de conservation du premier train, mais vous pouvez les modifier.
Note
Si le train de reliure contient des exemplaires avec différents traitements, le tableau des exemplaires ne s’affichera pas. En effet, chaque exemplaire nécessitant un tableau différent avec différentes colonnes, cela ne peut faire l’objet d’une visualisation unique.
Dans ce cas, le tableau apparaîtra alors comme une liste brute d’exemplaires avec leurs données de traitement.