Gestion des ressources électroniques (ERM)
Le module de Gestion des ressources électroniques (ERM) permet de suivre la sélection, l’acquisition, les licences, l’accès, la maintenance, l’utilisation, l’évaluation, la conservation et la désélection des ressources électroniques d’une bibliothèque. Ces ressources peuvent être des revues électroniques, des livres électroniques, des médias en streaming, des bases de données, des jeux de données et des logiciels.
Pour utiliser le module de Gestion des ressources électroniques (ERM), vous devez activer la préférence système ERMModule.
Note
Seuls les bibliothécaires ayant la permission erm (ou la permission superlibrarian ) auront accès à ce module.
Page d’accueil de la Gestion des ressources électroniques
Aller à : Plus > Gestion des ressources électroniques
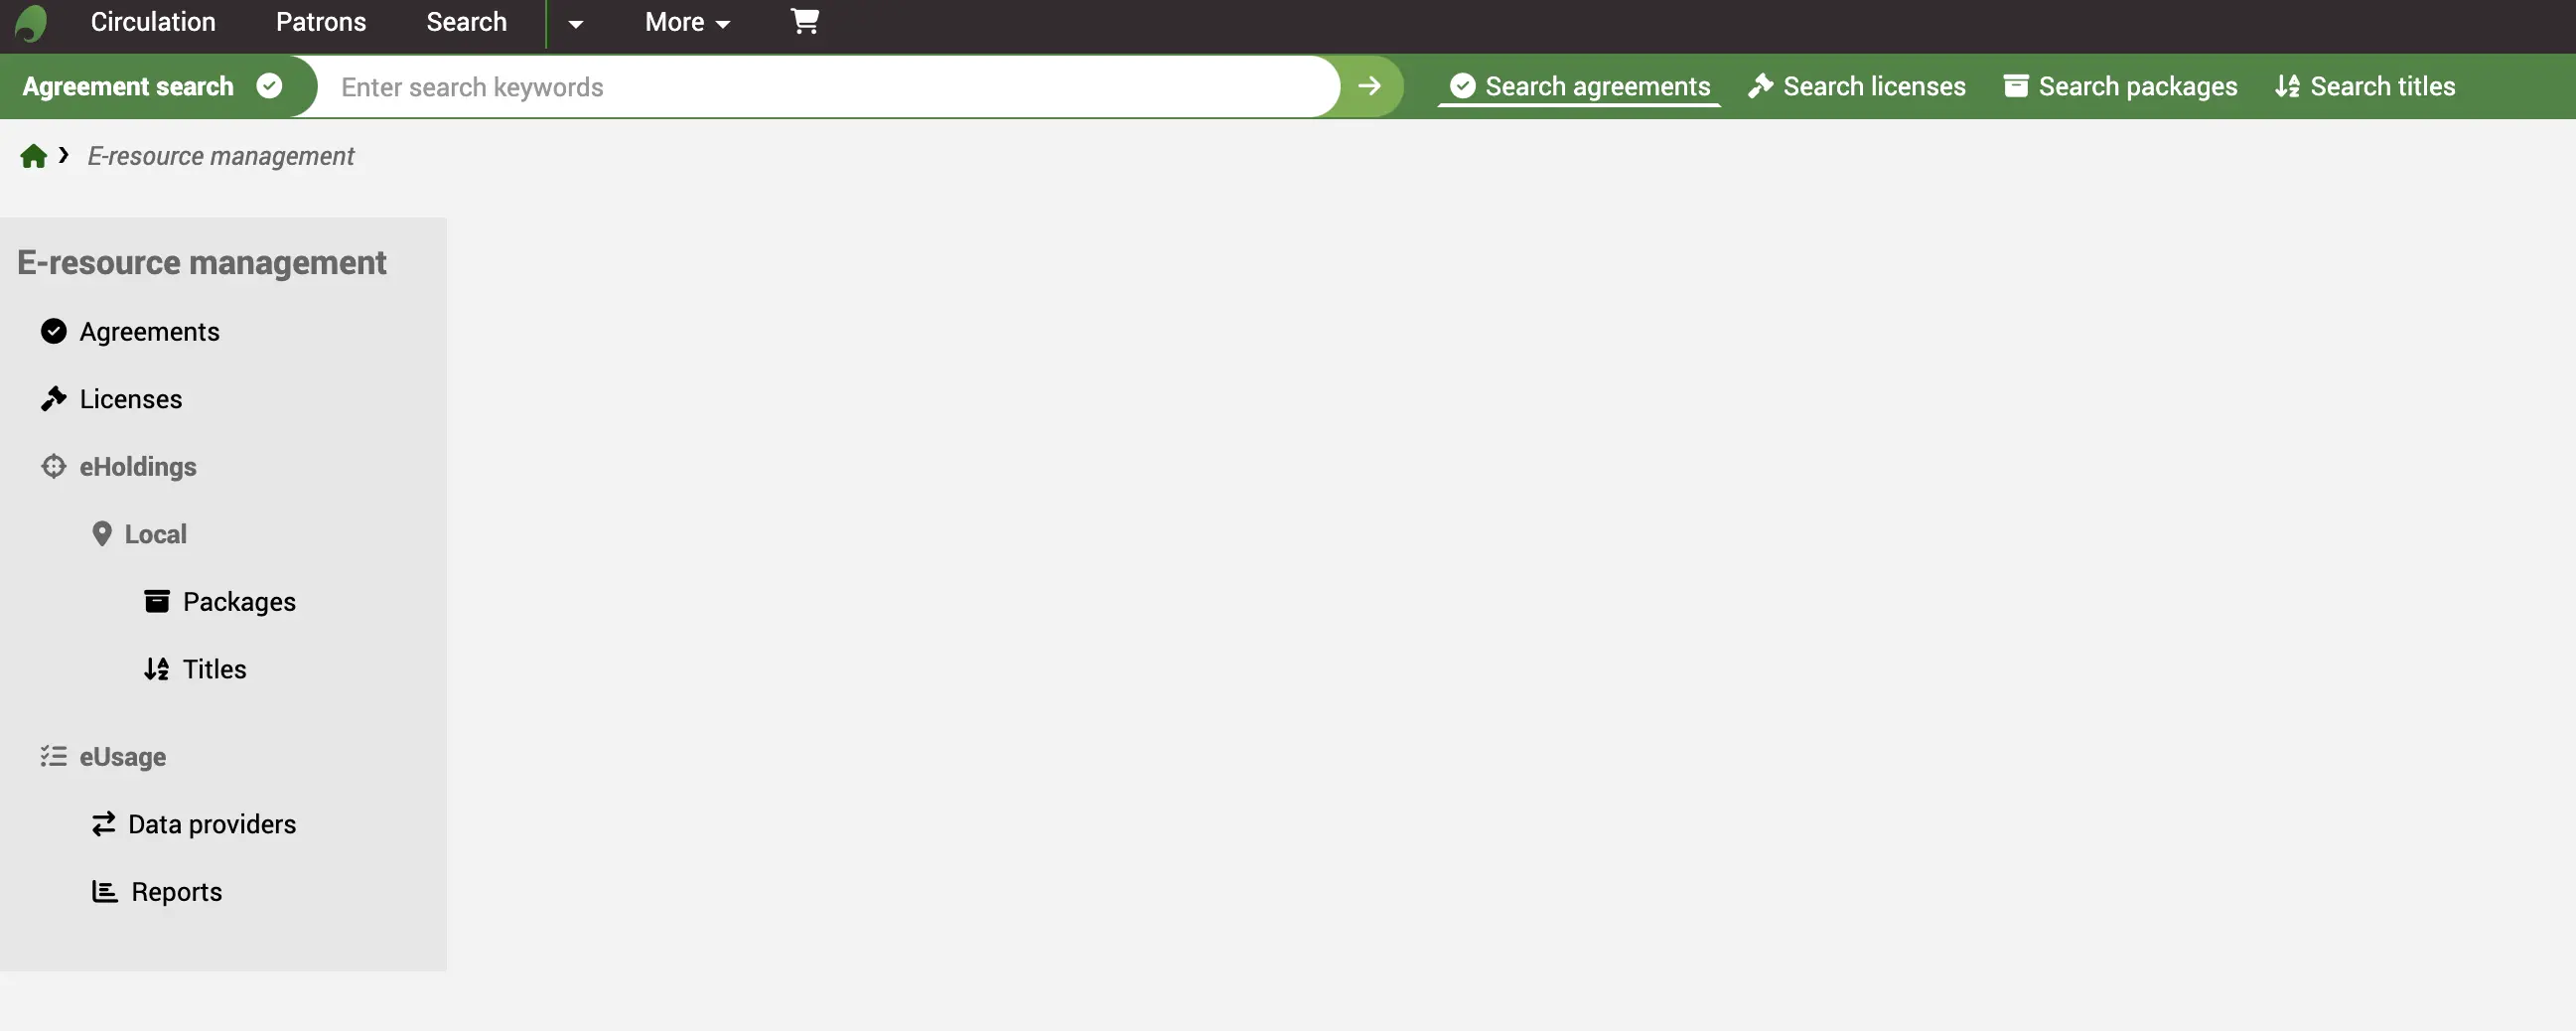
Barre de recherche
La barre de recherche vous permet de rechercher rapidement des notices de contrat et des bouquets ou des titres (parmi les ressources locales).
Il n’est pas possible des chercher ici des bouquets ou les titres de bases de connaissances tierces. Rendez vous sur eHoldings pour les chercher.

Contrats
Dans la terminologie de la gestion des ressources électroniques, les Contrats les abonnements auxquels vous avez accès tandis que les Licences précisent ce que vous pouvez faire avec ces ressources.
Note
Avant de commencer la création de nouveaux Contrats, assurez-vous que les bibliothécaires disposent bien de la permission superbibliothécaire ou la permission erm et que vous avez configuré la valeur autorisée ERM selon vos besoins. Assurez-vous aussi d’avoir positionné la préférence système erm.
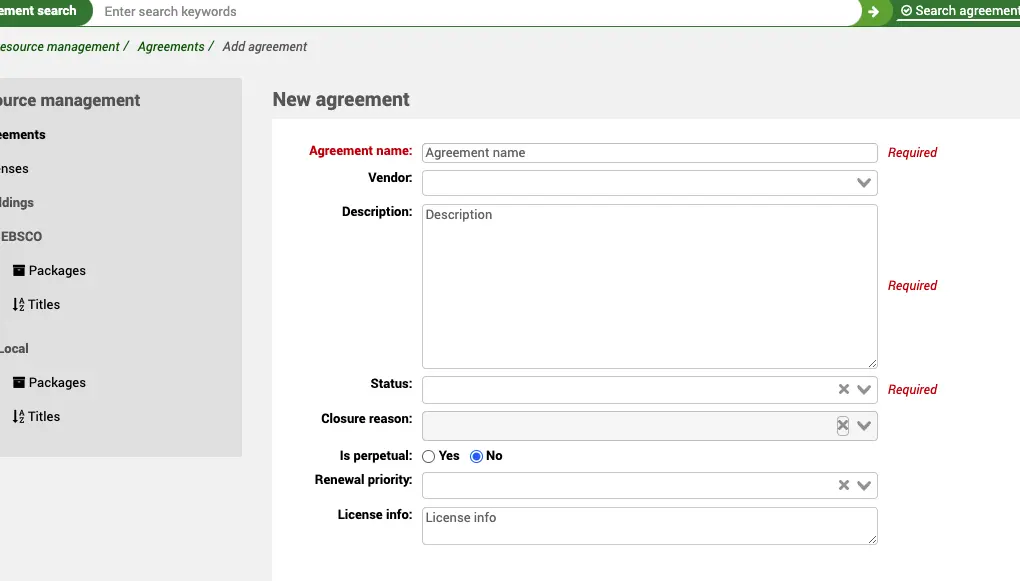
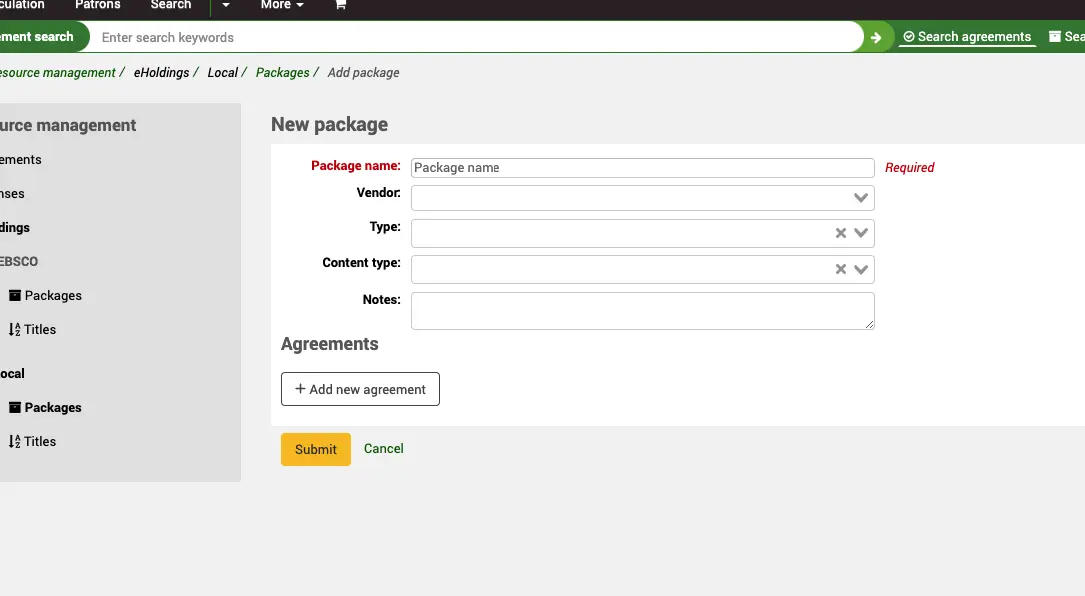
Créer une notice de Contrat
A partir de la page d’accueil de la Gestion des ressources électroniques, cliquez sur le lien Contrat dans le menu de gauche.
Aller à : Plus > Gestion des ressources électroniques > Contrats
Utilisez le bouton + Nouveau Contrat au dessus du tableau des Contrats.
Vous devez donner un nom, une description et un statut au Contrat. Le statut définit si le contrat est actif ou non. Tous les autres champs sont facultatifs.
Le contrat peut être rattaché (c’est facultatif) à un fournisseur existant du module Acquisitions. Ceci vous permet de conserver une trace du fournisseur et de lui attacher des commandes.
Le champ Raison de fermeture restera grisé jusqu’à ce que vous donniez le statut « Fermé » au contrat; ce champ deviendra alors actif.
Le champ Licence peut être utilisée ici si vous ne souhaitez pas utiliser la rubrique Licence du module mais désirez tout de joindre au contrat des informations concernant la licence.
Si vous avez des champs supplémentaires pour les contrats ERM (erm_agreements), ils seront affichés ici.
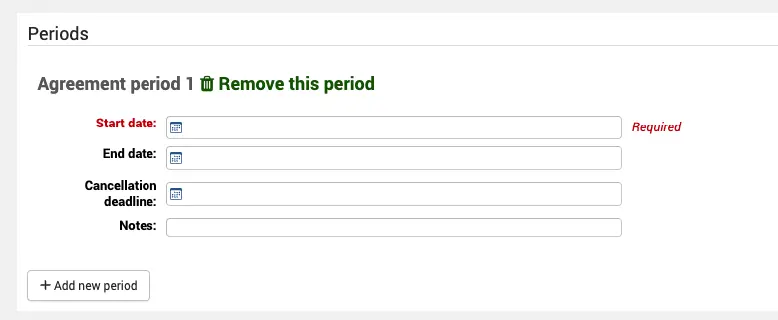
Périodes
Plusieurs périodes peuvent être rattachées à un Contrat.
La période décrit la durée du lien que vous entretenez avec le fournisseur. A chaque renouvellement de contrat, vous pouvez saisir une nouvelle période afin de tenir le compte du nombre de renouvellements passés. Vous pouvez aussi créer des périodes de contrat pour des dates à venir. Ainsi, par exemple, vous pouvez avoir une période en cours, des périodes révolues et une période à venir.
La date limite d’annulation peut servir à vous alerter de dates de fin à venir et donc, vous inciter à lancer le renouvellement avec le fournisseur.
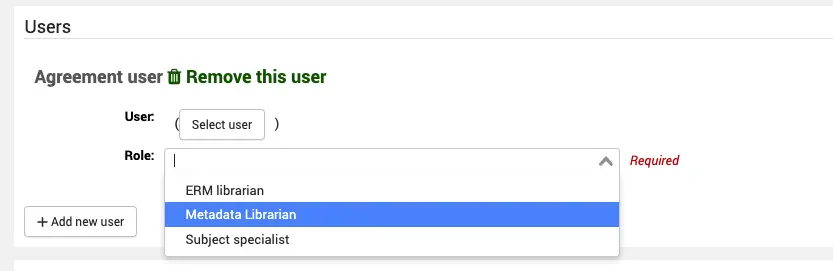
Utilisateurs
Dans ce contexte, un utilisateur est un membre du personnel impliqué d’une manière ou d’une autre dans la gestion du Contrat. Il peut s’agir d’un personnel chargé de l’acquisition de la ressource électronique, de la gestion des licences, d’un spécialiste du domaine, etc.
Vous pouvez rattacher plusieurs utilisateurs à un contrat.
Afin d’être rattaché à un contrat, un bibliothécaire doit avoir la permission erm (ou la permission superlibrarian), sinon il n’apparaîtra pas dans la liste lorsque vous essaierez de sélectionner un utilisateur. Ceci permet aussi de garder raisonnable le nombre d’utilisateurs ayant accès à cet fonctionnalité en excluant les autres bibliothécaires.
Quand vous rattachez un utilisateur, assignez-lui aussi un rôle à partir de la valeur autorisée ERM_USER_ROLES.
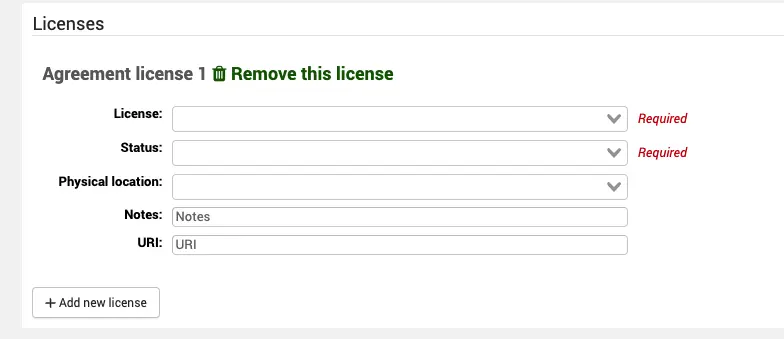
Licences
Pour lier un Contrat à une Licence, utilisez le bouton « Ajouter nouvelle licence ». Un contrat peut être lié à une ou plusieurs licences.
Sélectionner le nom de la licence à partir du menu déroulant des licences préalablement créées et lui assigner un statut.
La localisation physique est le lieu où sont conservés les documents papier.
Vous pouvez aussi ajouter des notes et une URI (si la licence est effectivement accessible en ligne).
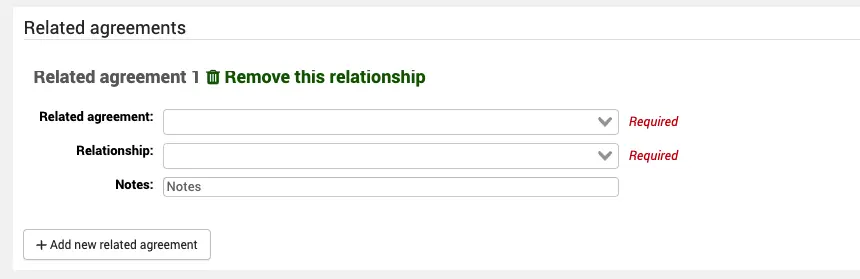
Contrats en lien
Un contrat en lien est un contrat ayant une certaine relation à un contrat déjà présent. Par exemple, un contrat qui a remplacé un contrat existant.
Vous pouvez lier un contrat à un ou plusieurs contrats.
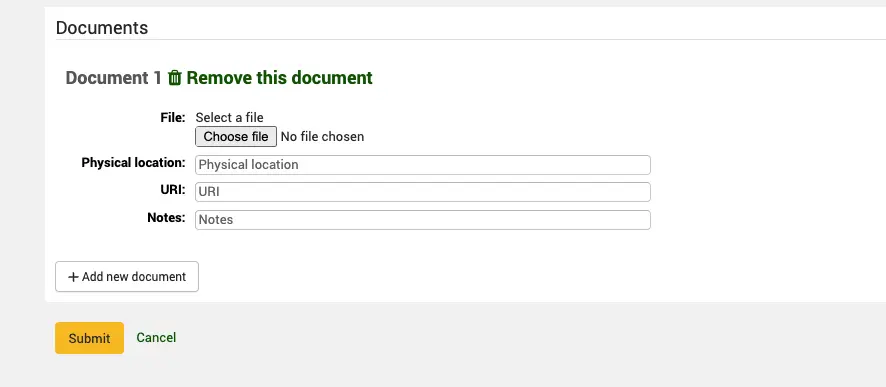
Documents liés au contrat
Vous pouvez attacher un ou plusieurs document à un contrat.
Ce ne sont pas censé être des documents de licence (qui sont rattachés aux notices de licences), mais d’autres types de correspondance avec un fournisseur, information sur les ressources, etc. Si vous décidez de ne créer que les information de contrat et pas les licences, alors vous pouvez bien sûr attacher les documents de licence.
La localisation physique est le lieu où sont conservés les documents papier, et l’URI fournit un lien vers toute version en ligne.
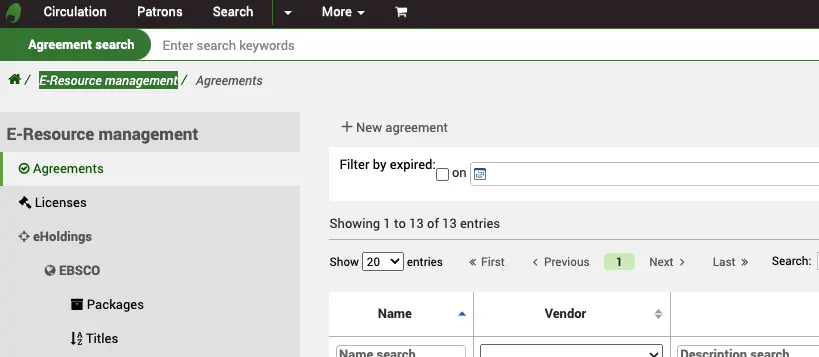
Rechercher et visualiser la notice d’un Contrat
A partir de la page d’accueil de la Gestion des ressources électroniques, cliquez sur le lien Contrat dans le menu de gauche.
Aller à : Plus > Gestion des ressources électroniques > Contrats
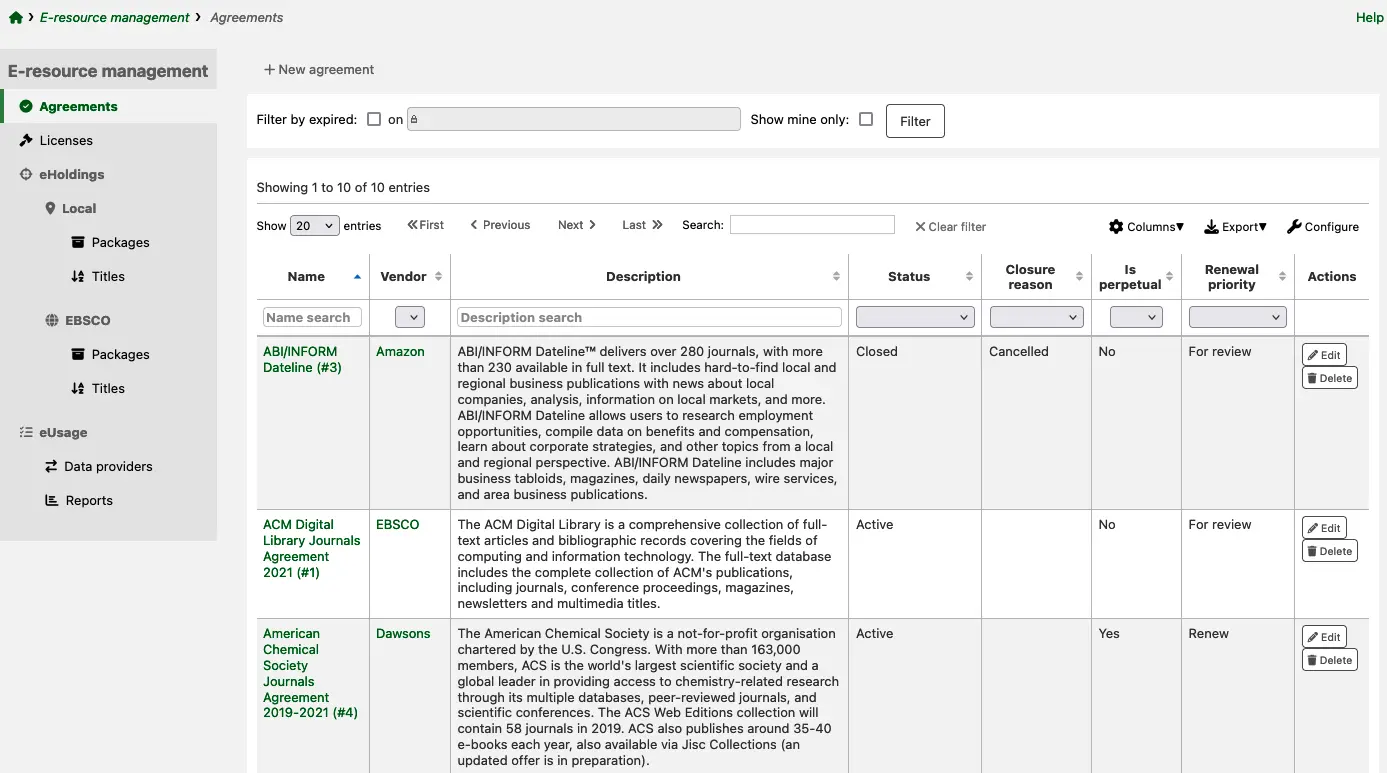
Une liste des contrats existants dans le système s’affiche, triée sur le nom du contrat.
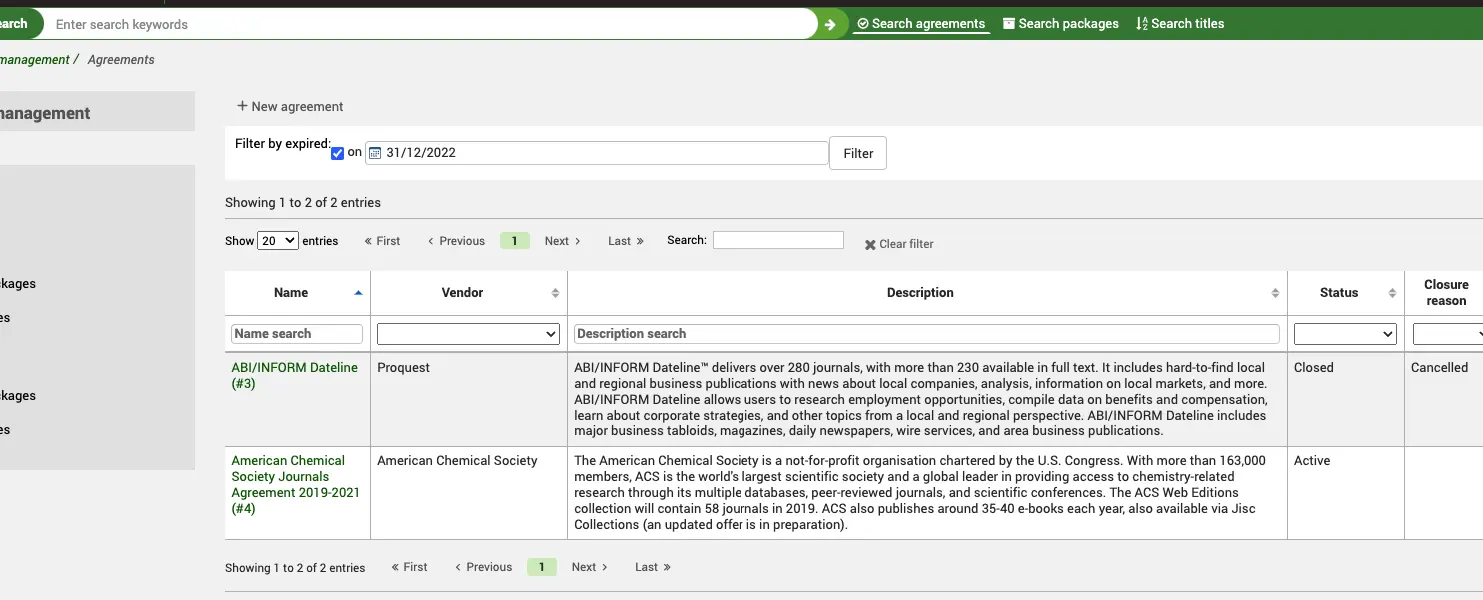
Pour voir uniquement les contrats expirés, cocher “Filtrer par expiration” au-dessus du tableau. Saisir une date et cliquer “Filtrer”.
Pour voir uniquement les contrats liés au compte avec lequel vous êtes connecté, cocher “Afficher uniquement les miens” et cliquer “Filtrer”.
Vous pouvez utiliser les filtres de tableau ou de colonne pour rechercher et filtrer les données recherchées (par exemple, toutes les contrats ayant le statut “Clôturé”).
Note
Vous pouvez personnaliser les colonnes de ce tableau en cliquant le bouton “Configurer”. Ceci renvoie vers le module Administration, spécifiquement vers la section “référence du tableau : agreements” du module Configurer les colonnes.
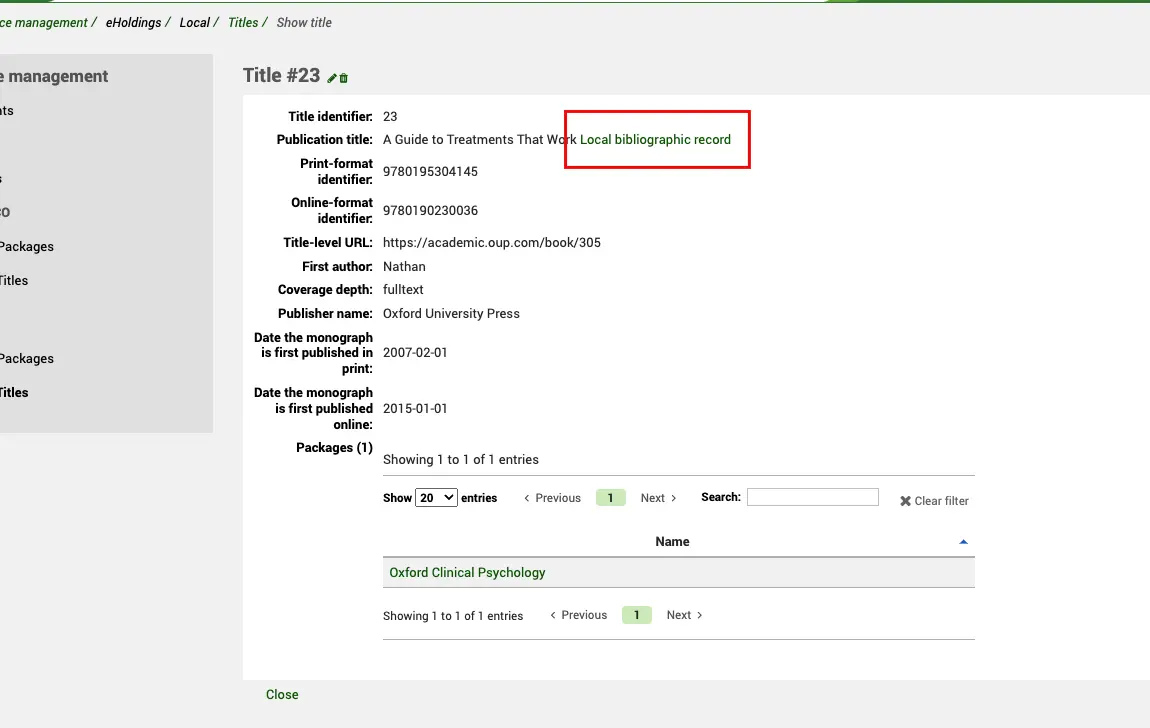
Cliquez sur le nom du contrat pour afficher la vue complète.
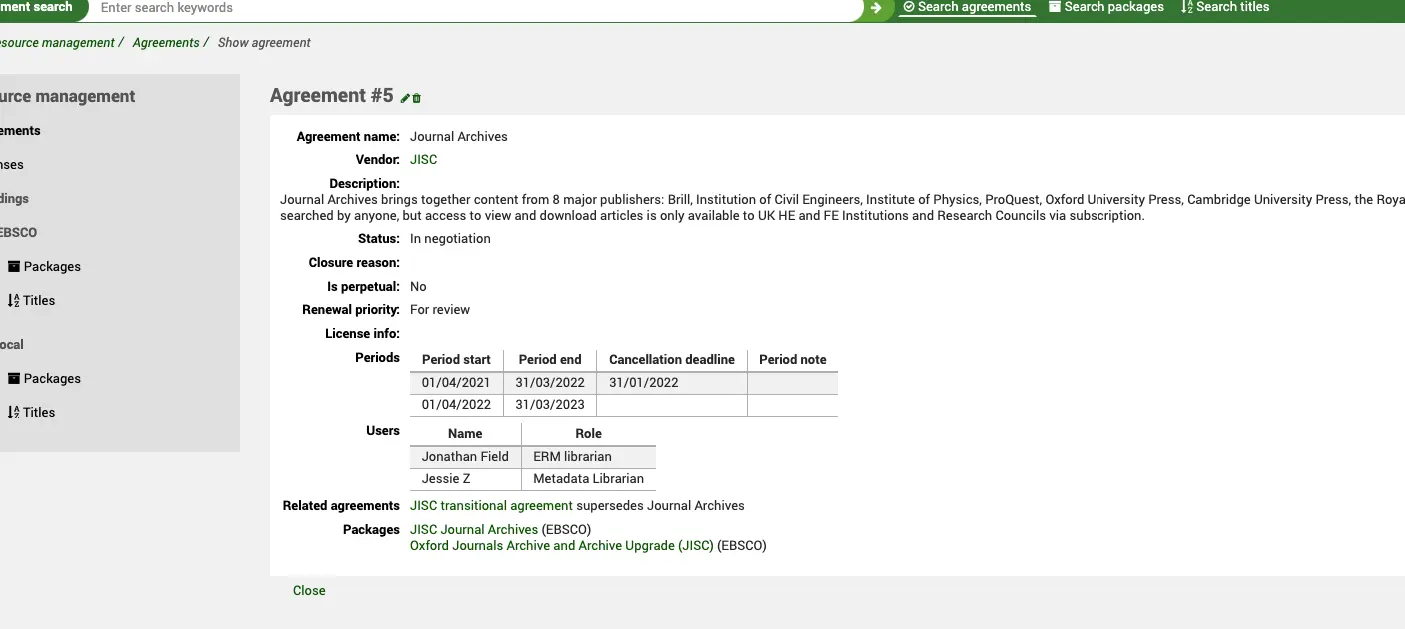
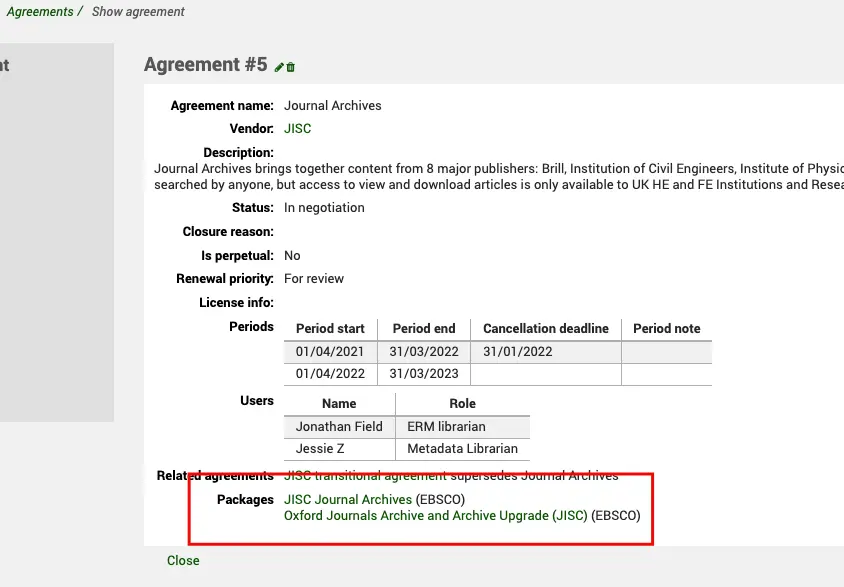
La vue complète récapitule toutes les informations saisies lors de la création du contrat. Le fournisseur auquel il est rattaché (lien vers la fiche du fournisseur), le statut, chaque période du contrat, chaque utilisateur rattaché au contrat, chaque contrat en lien, et, élément essentiel, le contenu du contrat (les bouquets du fournisseur inclus dans le contrat). Le champ “Contrats en lien” est également un lien vers l’autre contrat et le lien est bidirectionnel. Le lien vers les bouquets amène à la section “Collections numériques”.
Un bouquet est une collection de titres numériques qui ont été regroupés ensemble pour la diffusion par un fournisseur/vendeur. Plutôt que vendre une licence pour un seul titre, un vendeur va proposer une sélection de ressources numériques regroupées ensemble dans un bouquet identifié (exemple Journal Archives). Celui-ci peut souvent contenir des dizaines ou des centaines de titres. Des bouquets personnalisés sont souvent négociés localement avec les fournisseurs dans les différentes parties du monde. L’intérêt d’acheter des bouquets est que la bibliothèque n’a pas besoin de négocier avec chaque éditeur individuellement pour des titres spécifiques, c’est fait par le fournisseur.
Filtres de contrats : En haut de la page des contrats se trouve un champ de filtrage. Elle permet de filtrer rapidement les contrats expirés ou susceptibles d’être renouvelés prochainement (et donc susceptibles de nécessiter une action).
Licences
Une licence explique ce que vous pouvez faire du contenu auquel vous avez souscrit. C’est, en effet, le contrat ou les conditions d’utilisation.
Aller à : Plus > Gestion des ressources électroniques > Licences
Les licences accompagnent les contrats, ou peuvent être saisies indépendamment si vous préférez enregistrer simplement une liste de licences.
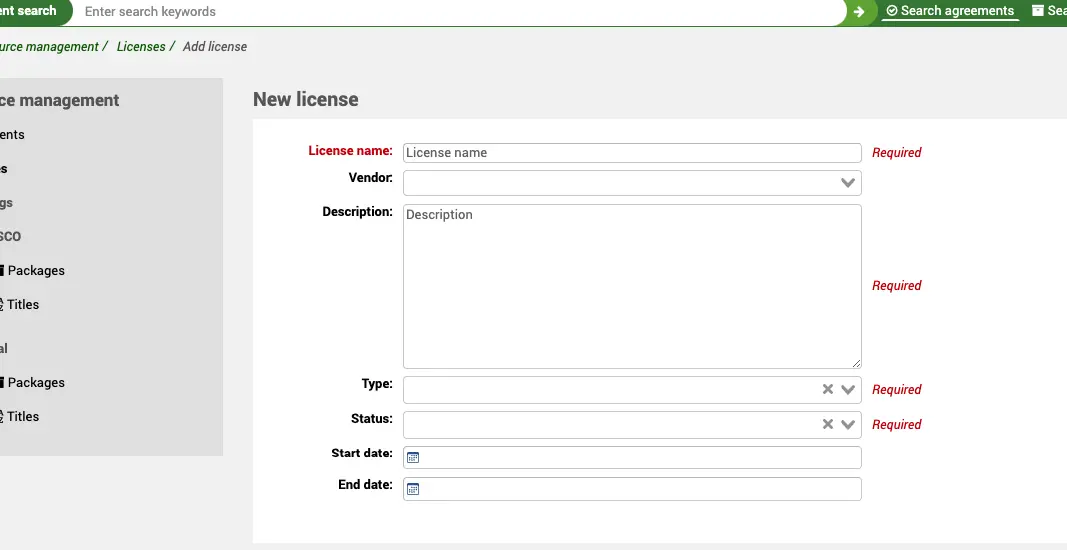
Créer une notice de Licence
A partir de la page d’accueil de la Gestion des ressources électroniques, cliquez sur le lien Licences dans le menu de gauche.
Aller à : Plus > Gestion des ressources électroniques > Licences
Utilisez le bouton “Nouvelle Licence” en haut du tableau des Licences.
Vous devez donner un Nom, une Description, un Type et un Statut à la licence. Le statut définit si le contrat est actif ou non. Tous les autres champs sont facultatifs.
La licence peut être de manière optionnelle rattachée à une Fiche fournisseur du module Acquisitions. Cela vous permet de garder une trace du fournisseur auquel la licence est rattachée.
La Licence a une date de début et une date de fin, et ces dates peuvent être différentes de celles du Contrat.
Si vous avez des champs supplémentaires pour les licences ERM (erm_licenses), ils seront affichés ici.
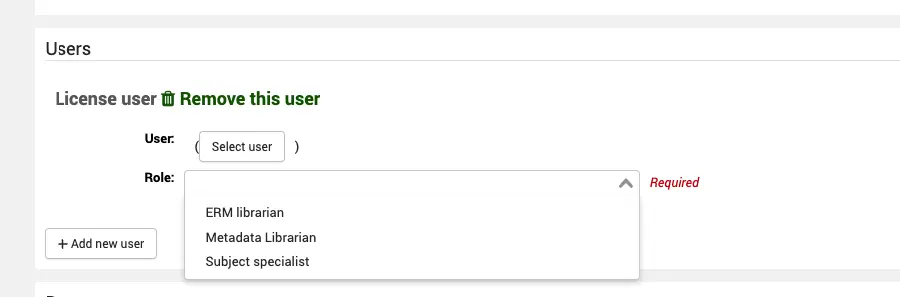
Utilisateurs
Dans ce contexte, un utilisateur est un utilisateur professionnel qui est impliqué dans la gestion des licences. Il peut être impliqué dans la négociation ou la signature de la licence par exemple.
Vous pouvez ajouter plusieurs utilisateurs à une licence.
Afin d’être rattaché à une licence, un bibliothécaire doit avoir la permission erm (ou la permission superlibrarian), sinon il n’apparaîtra pas dans la liste lorsque vous essaierez de sélectionner un utilisateur. Ceci permet aussi de garder raisonnable le nombre d’utilisateurs ayant accès à cet fonctionnalité en excluant les autres bibliothécaires.
Quand vous rattachez un utilisateur, assignez-lui aussi un rôle à partir de la valeur autorisée ERM_USER_ROLES.
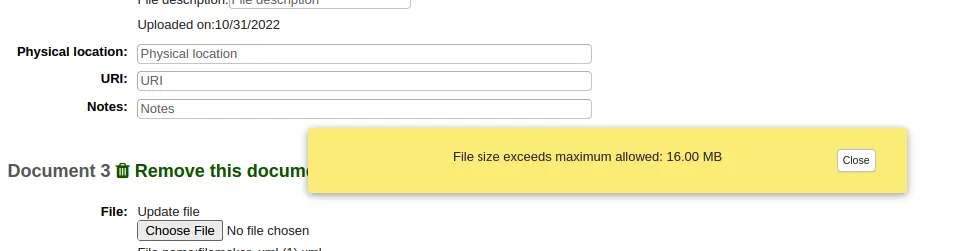
Documents de licence
Vous pouvez joindre un ou plusieurs documents à une notice de licence. Vous pouvez ainsi joindre des copies PDF de la licence ou des conditions d’utilisation.
La localisation physique est le lieu où sont conservés les documents papier, et l’URI fournit un lien vers toute version en ligne.
Note
La taille des fichiers contenant les documents téléchargés pour les licences et les contrats est limitée par la valeur de max_allowed_packet dans votre configuration MariaDB. Si vous dépassez cette taille, vous recevrez un avertissement concernant la taille du fichier. Contactez votre administrateur système pour augmenter cette valeur.
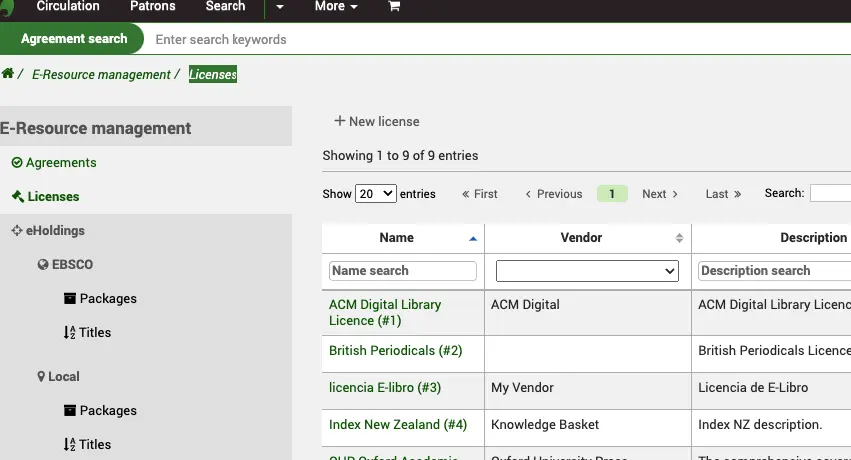
Rechercher et visualiser la notice d’une Licence
A partir de la page d’accueil de la Gestion des ressources électroniques, cliquez sur le lien Licences dans le menu de gauche.
Aller à : Plus > Gestion des ressources électroniques > Licences
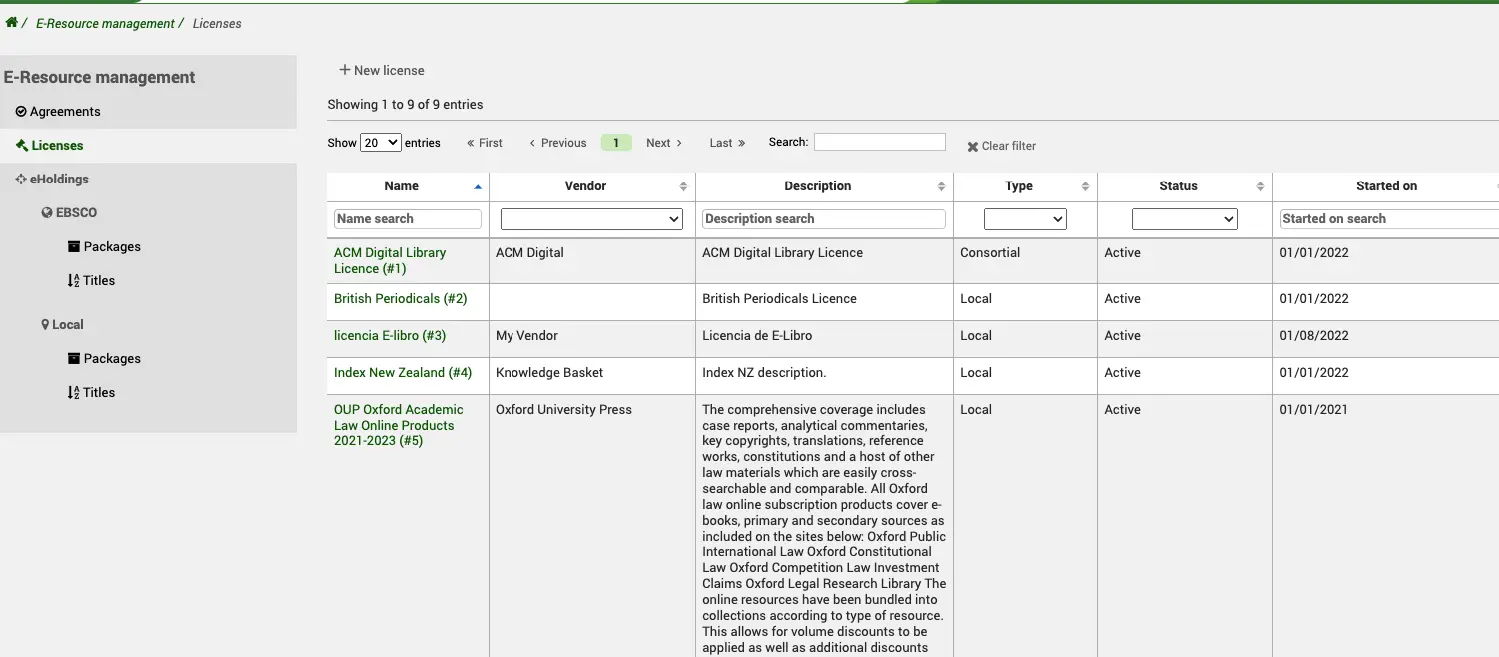
Vous obtiendrez une liste des licences existantes dans le système, classées par nom de licence. Vous pouvez utiliser les filtres de tableau ou de colonne pour rechercher et filtrer les données recherchées (par exemple, toutes les licences ayant le statut “Expiré”).
Note
Vous pouvez personnaliser les colonnes de ce tableau en cliquant le bouton “Configurer”. Ceci renvoie vers le module Administration, spécifiquement vers la section “référence du tableau : licenses” du module Configurer les colonnes.
Cliquez sur le nom du licence pour afficher la vue complète.
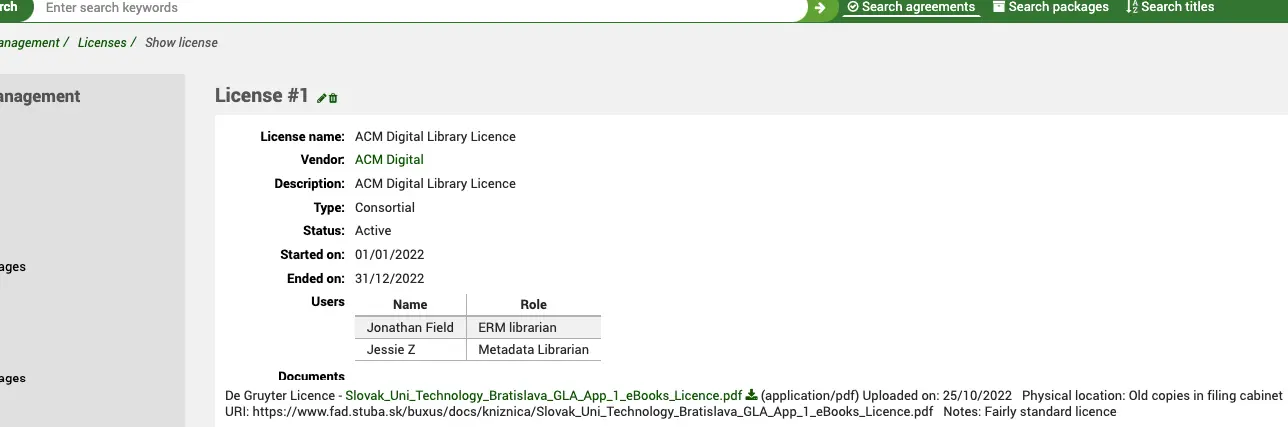
La vue complète résume toutes les informations que vous avez saisies lors de la création de la licence. Le fournisseur auquel elle est rattachée (lien vers la fiche du fournisseur), le statut, le type, les dates de début et de fin, les utilisateurs associés à la licence et, surtout, le lien vers le(s) document(s) de la licence.
Collections numériques
Définition des termes :
Ressource
Une ressource est une instance d’un titre. En conséquence une ressource devrait avoir un identifiant de ressource distinct pour chaque occurrence du titre dans le bouquet.
Par exemple : Teise / Law appartient à
DOAJ
Criminal Justice Abstracts with Full Text
etc.
Base de connaissance
Une base de connaissance est une base de données maintenue par un prestataire (par exemple EBSCO) qui contient des informations sur des ressources électroniques, telles que la liste de titres, les dates de couverture, etc. Les bases de connaissances organisent typiquement les ressources fournies par un fournisseur de contenu en collections ou bases de données qui reflètent le contenu spécifique proposé par le fournisseur, par exemple des bouquets de revues électroniques, de livres électroniques ou d’autres ressources.
Fournisseurs
Le fournisseur d’une ressource électronique, par exemple, le vendeur, le consortium ou l’éditeur.
Bouquets
Un ensemble de titres électroniques regroupés et distribués par un fournisseur.
Titres
Les ressources électroniques individuelles, par exemple un journal ou un livre électronique, habituellement contenues dans un bouquet.
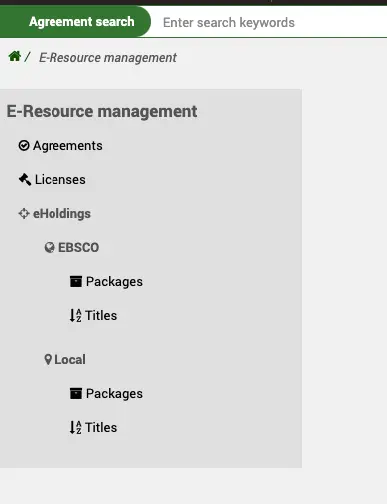
Aller à : Plus > Gestion des ressources électroniques
Dans le menu de navigation de gauche, vous verrez des liens pour chaque fournisseur que vous avez configuré dans la préférence système ERMProviders.
EBSCO
L’intégration avec la base de connaissances globale d’EBSCO est facilitée via leur outil HoldingsIQ. Il s’agit d’une API bidirectionnelle qui vous permet de mettre à jour ou de lire à partir de la base de connaissances d’EBSCO qui contient des millions de titres. Votre instance de la base de connaissances EBSCO devient consultable et gérable via Koha en utilisant votre identifiant client dans la configuration. Rappelez-vous que la base de connaissances se trouve toujours chez EBSCO, vous ne faites que la manipuler à travers Koha de la même manière que vous le feriez si vous utilisiez EBSCOadmin. Aucune donnée n’est conservée localement dans votre système Koha.
Bouquets
Aller à : Plus > Gestion des ressources électroniques > EBSCO > Bouquets
Sur l’écran d’accueil des Bouquets se trouve une boite de recherche
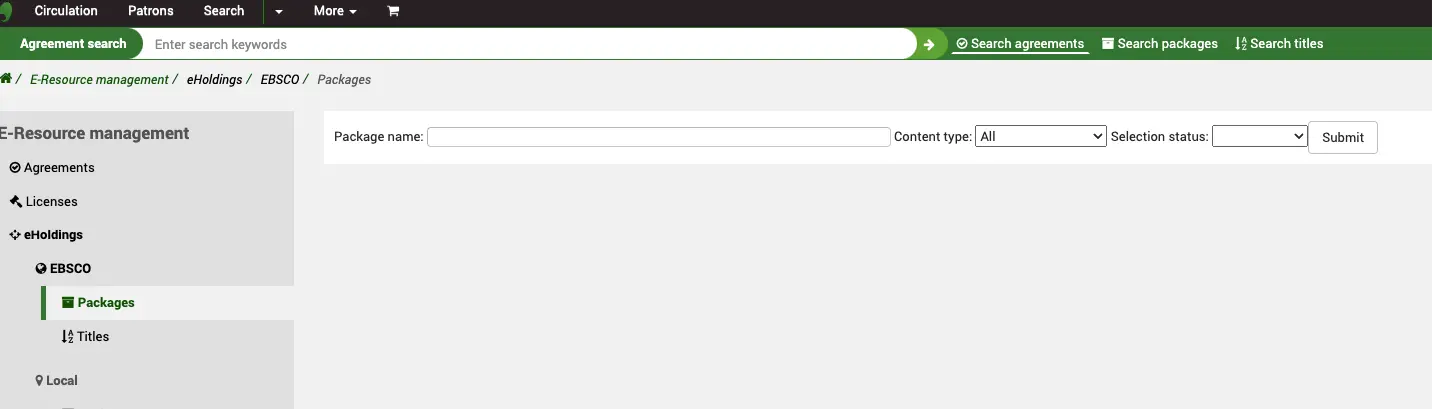
Koha fonctionne comme un intermédiaire pour le service HoldingsIQ d’EBSCO, de sorte que toute recherche que vous faites ici est effectuée en temps réel dans la base de connaissances EBSCO (en utilisant votre identifiant client dans la préférence système ERMProviderEbscoCustomerID). Il existe deux filtres :
Type de contenu : Ce filtre est fourni par EBSCO dans le cadre de leur API HoldingsIQ et permet de restreindre votre recherche à un type de contenu (tel que défini par EBSCO).
Sélectionner le statut : Ce filtre est fourni par EBSCO dans le cadre de leur API HoldingsIQ et permet de restreindre votre recherche aux documents que vous avez déjà ajoutés à vos fonds par le biais d’EBSCOadmin. Ainsi, par exemple, vous pouvez rechercher des bouquets auxquels vous avez déjà souscrit.
Tout bouquet déjà sélectionné est indiqué par une coche à droite du titre.
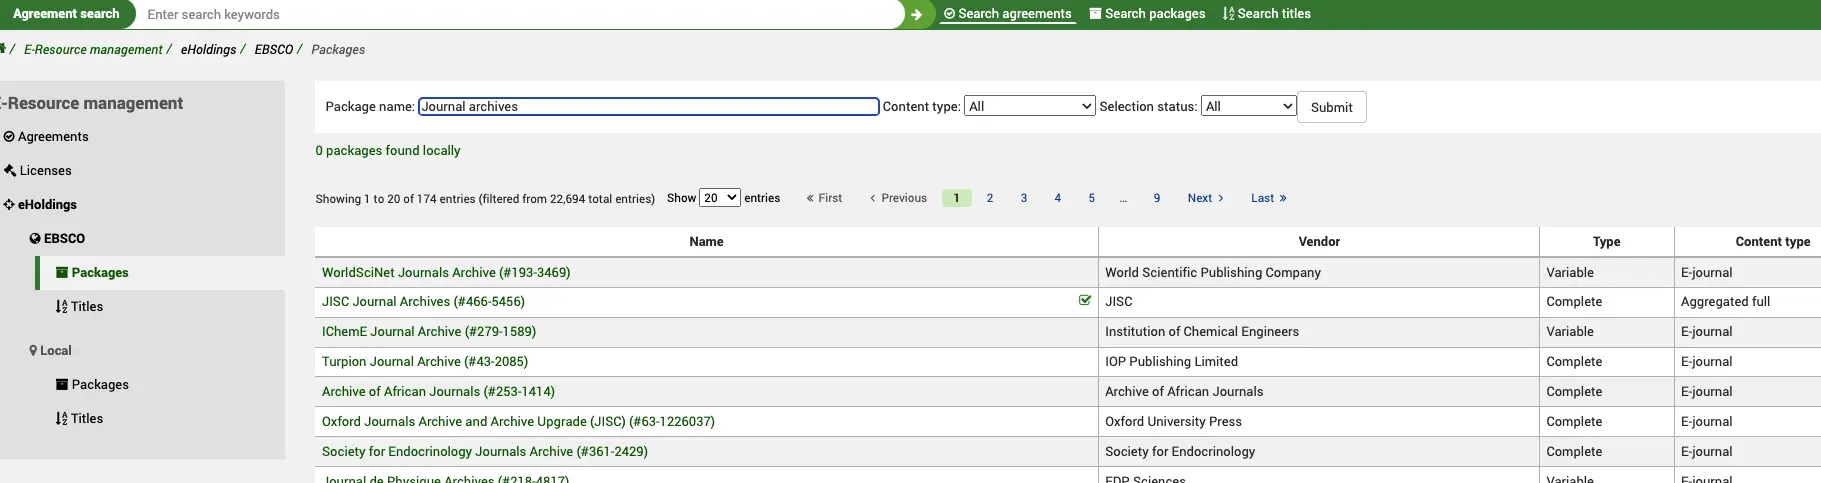
Entre parenthèses, vous pouvez lire l’identifiant du bouquet EBSCO.
En cliquant sur le lien du bouquet vous accéderez à la vue complète du bouquet.

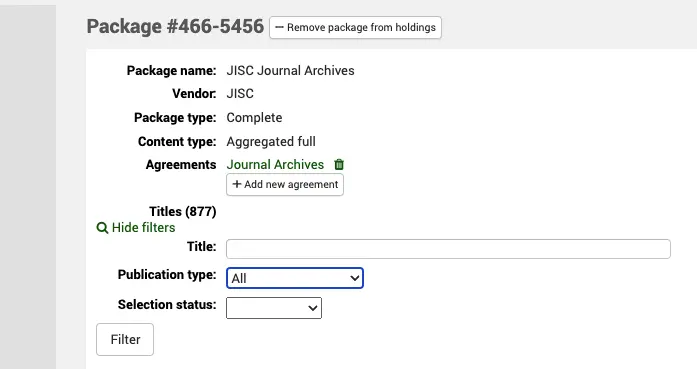
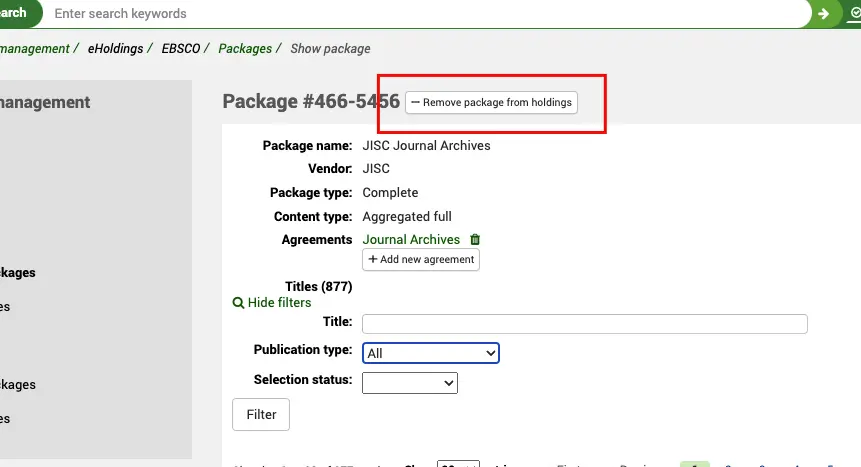
Certaines informations affichées ici proviennent de l’API de HoldingsIQ, vous pouvez voir le Fournisseur (ce n’est pas la fiche fournisseur définie dans Koha), le type de contenu et le type de bouquet. Vous pouvez également voir sur cet écran que le bouquet contient (dans ce cas) 877 titres. Comme pour la liste des bouquets, vous pouvez voir ici (par les coches) quels titres ont été sélectionnés et lesquels ne l’ont pas été.
En cliquant sur le lien Afficher les filtres, vous obtiendrez des filtres supplémentaires qui vous permettront de rechercher un titre ou un groupe de titres particulier dans le bouquet. Il peut s’agir du type de publication, du statut de la sélection (titres déjà sélectionnés ou non dans EBSCOadmin) et d’une boîte de recherche de titre.
Ajouter un bouquet un Contrat
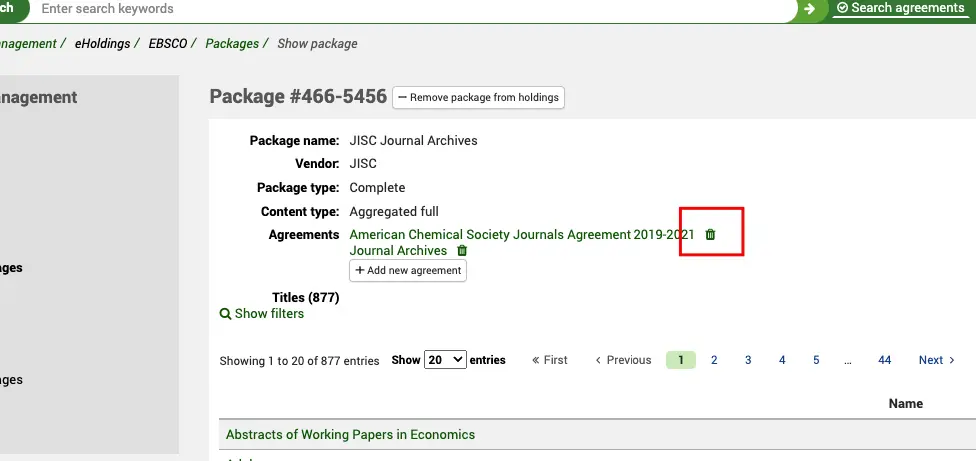
Dans l’exemple ci-dessus, vous pouvez voir que ce bouquet a déjà été ajouté à la notice du Contrat existant dans Koha (appelé Journal Archives). Un bouquet peut être ajouté à plusieurs notices de Contrat. En cliquant sur le lien, vous accéderez à la notice du Contrat.
Une fois cette liaison réalisée, vous verrez le bouquet listé dans la notice du contrat.
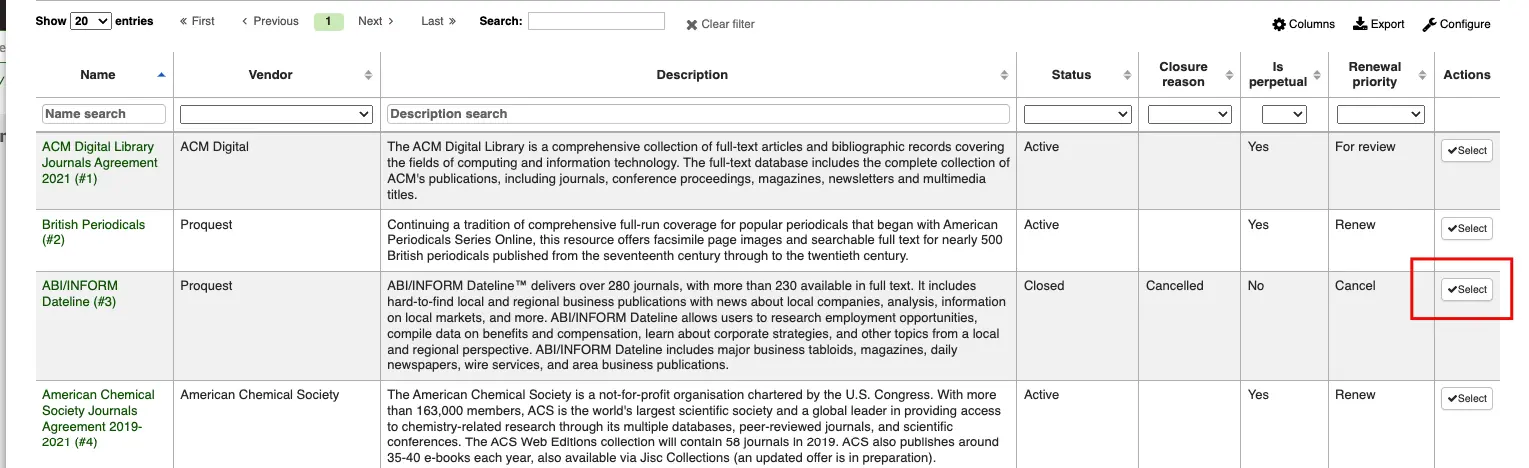
Pour l’ajouter à un nouveau bouquet, cliquez sur le bouton “Ajouter un nouvel contrat” et vous accéderez à une boîte de dialogue contenant une liste de contrats filtrable. Utilisez le bouton Sélectionner pour établir la connexion entre les deux notices.
Utilisez l’icône “Supprimer” pour retirer un bouquet d’un contrat.
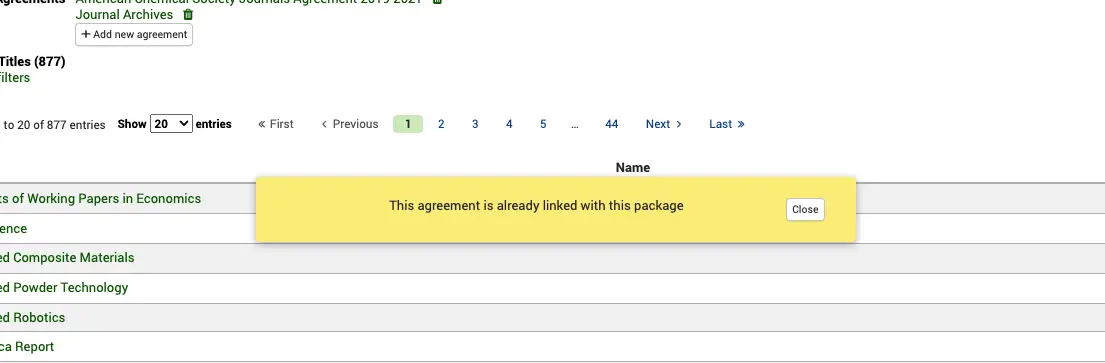
Si vous tentez d’ajouter un bouquet plus d’une fois au même contrat, vous aurez le message d’erreur suivant :
Ajouter/Retirer un bouquet des collections numériques
A partir de la vue du bouquet, vous pouvez aussi ajouter ou retirer un bouquet complet de vos collections numériques EBSCO.
Il s’agit d’un appel API via le service HoldingsIQ pour ajouter ou supprimer le paquet de votre collections gérées par EBSCO. Comme il s’agit d’un appel en temps réel, vous devriez voir vos fonds mis à jour dans EBSCOadmin.
Vous pouvez également cliquer sur le lien d’un titre ici et entrer dans le détail d’un titre spécifique dans un bouquet.
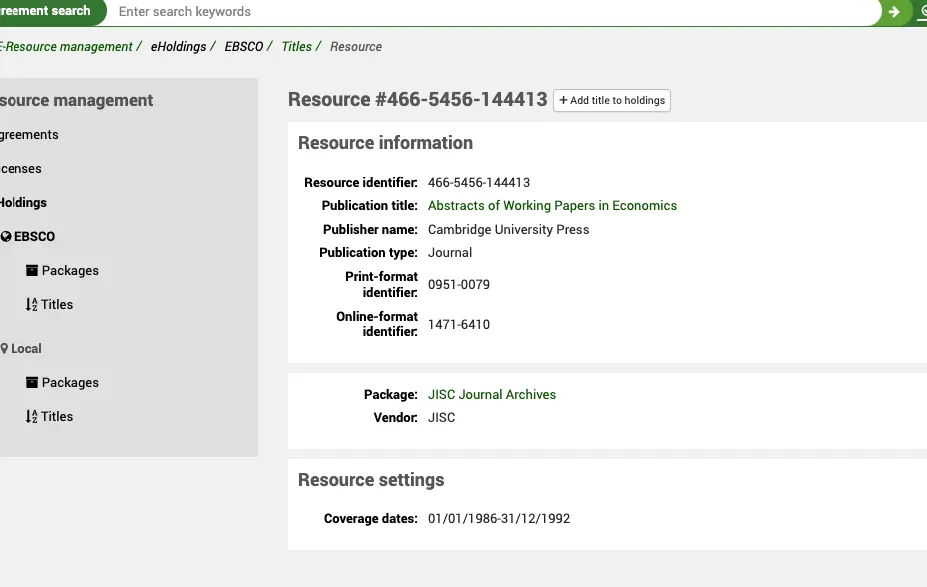
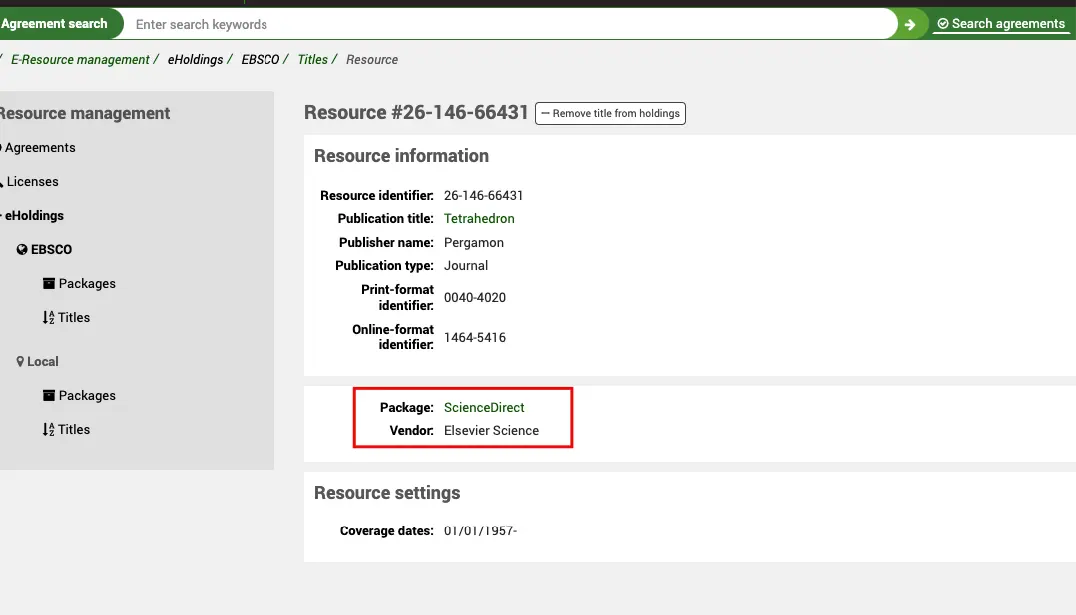
Le numéro de ressource en haut de l’écran est l’identifiant de la ressource EBSCO. Les métadonnées sont également renvoyées par l’API de HoldingsIQ à partir de la base de connaissances d’EBSCO. Vous pouvez voir le titre et le nom de la publication, le type de publication, les identifiants de la version imprimée/en ligne, ainsi que les dates de couverture. N’oubliez pas que les dates de couverture d’un titre peuvent être différentes en fonction du bouquet dans lequel le titre est inclus. Vous pouvez également voir le Fournisseur et le Bouquet (lien vers la page du bouquet complet d’où vous venez).
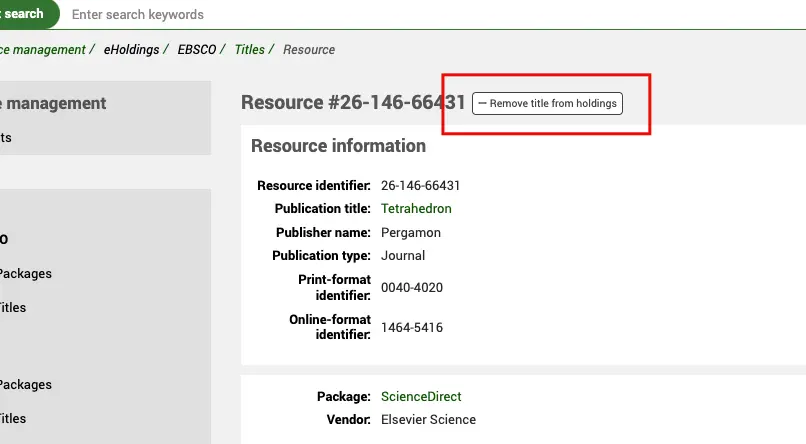
Ajouter/Retirer un titre d’un bouquet
Vous pouvez ajouter ou retirer un titre d’un bouquet auquel vous êtes abonnés.
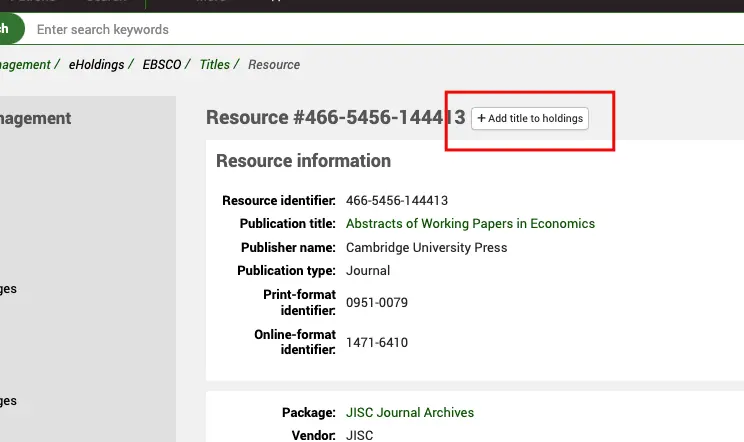
Bien que vous puissiez vous abonner à un bouquet complet, il se peut que vous souhaitiez inclure ou exclure certains titres. Pour ce faire, utilisez le bouton “Ajouter/supprimer un titre de la collection numérique”.
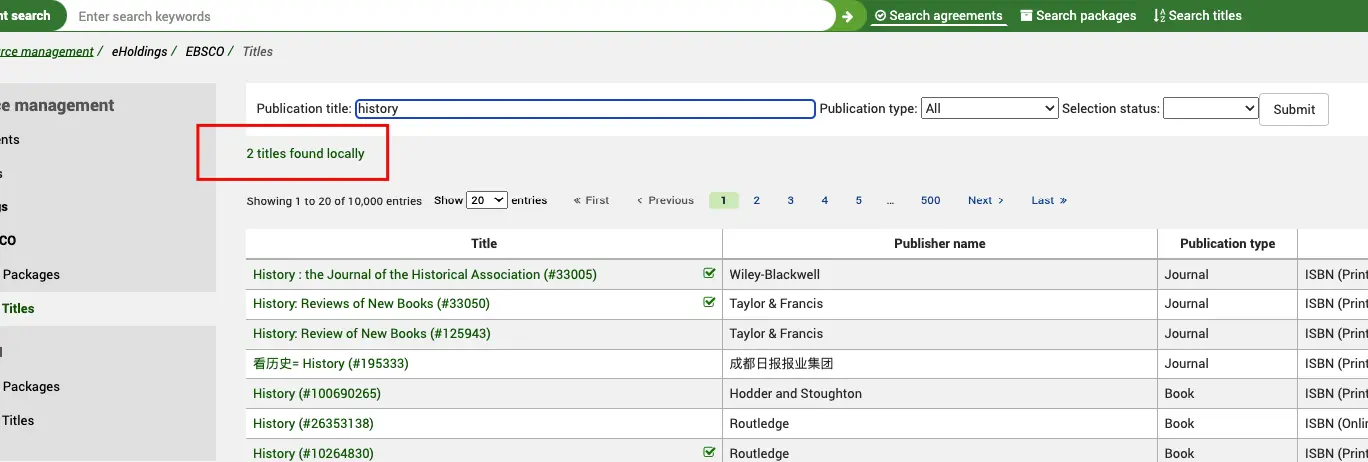
Titres
Aller à : Plus > Gestion des ressources électroniques > EBSCO > Titres
Sur l’écran d’accueil des Titres se trouve une boîte de recherche.
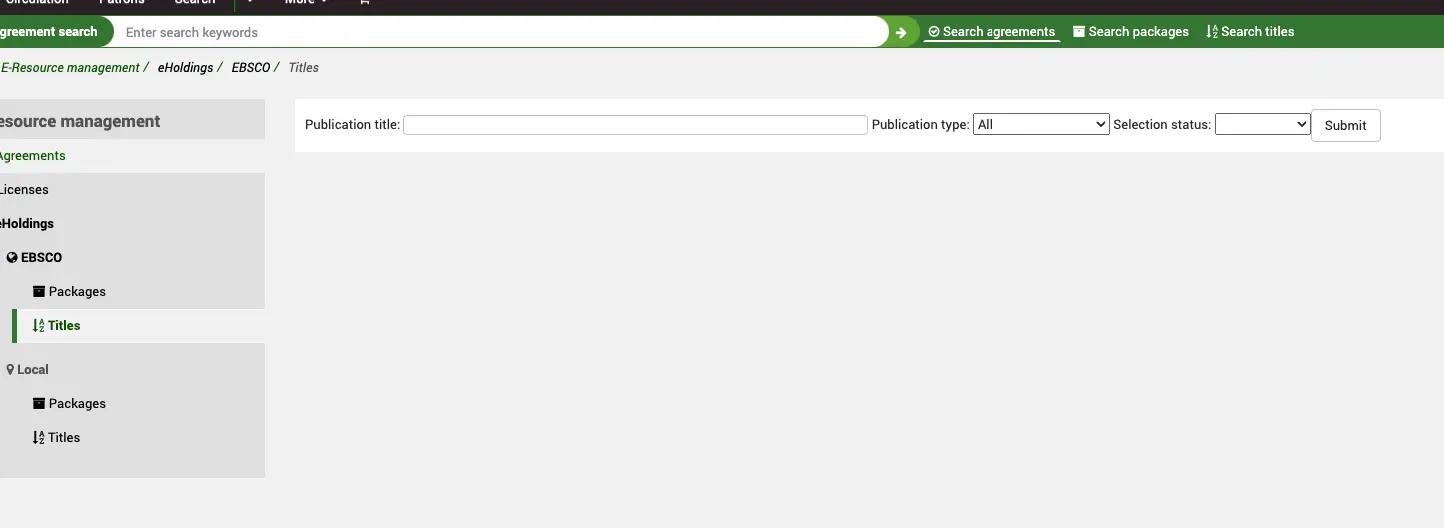
Koha fonctionne comme un intermédiaire pour le service HoldingsIQ d’EBSCO, de sorte que toute recherche que vous faites ici est effectuée en temps réel dans la base de connaissances EBSCO (en utilisant votre identifiant client dans la préférence système ERMProviderEbscoCustomerID). Il existe deux filtres :
Type de publication : Ce filtre est fourni par EBSCO via leur API HoldingsIQ et vous permet de restreindre votre recherche à un type de publication particulier (tel que défini par EBSCO).
Sélectionner le statut : Ce filtre est fourni par EBSCO via leur API HoldingsIQ et permet de restreindre votre recherche aux titres que vous avez déjà ajoutés à vos fonds via EBSCOadmin. Ainsi, par exemple, vous pouvez rechercher des titres auxquels vous avez déjà souscrit.
Tout titre déjà sélectionné est indiqué par une coche à droite à sa droite.
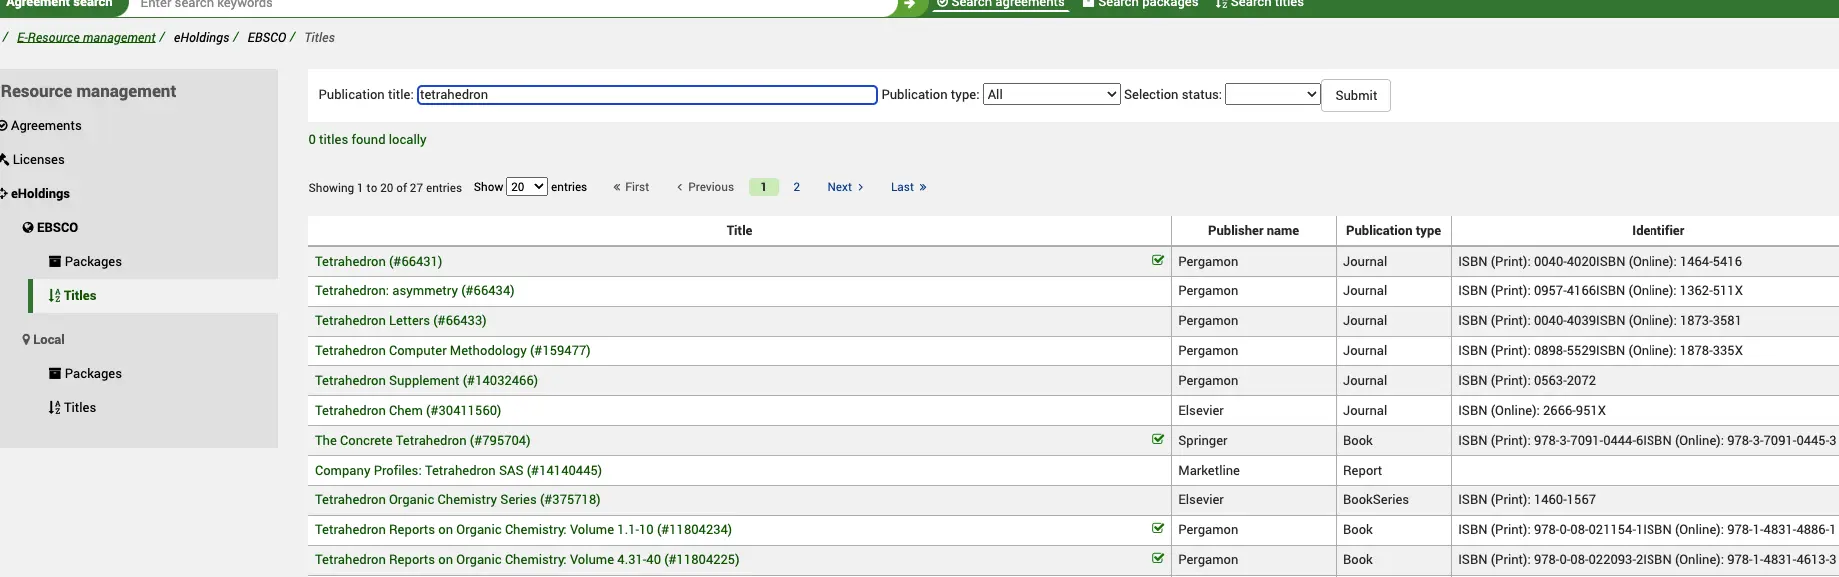
Vous remarquerez également que cette recherche porte également sur les titres locaux en plus des titres EBSCO. Les titres locaux sont indiqués au-dessus de la liste des titres et il s’agit d’un lien qui vous permet d’accéder au tableau des titres locaux.
En cliquant sur un titre, vous pouvez accéder à la vue complète de la notice.
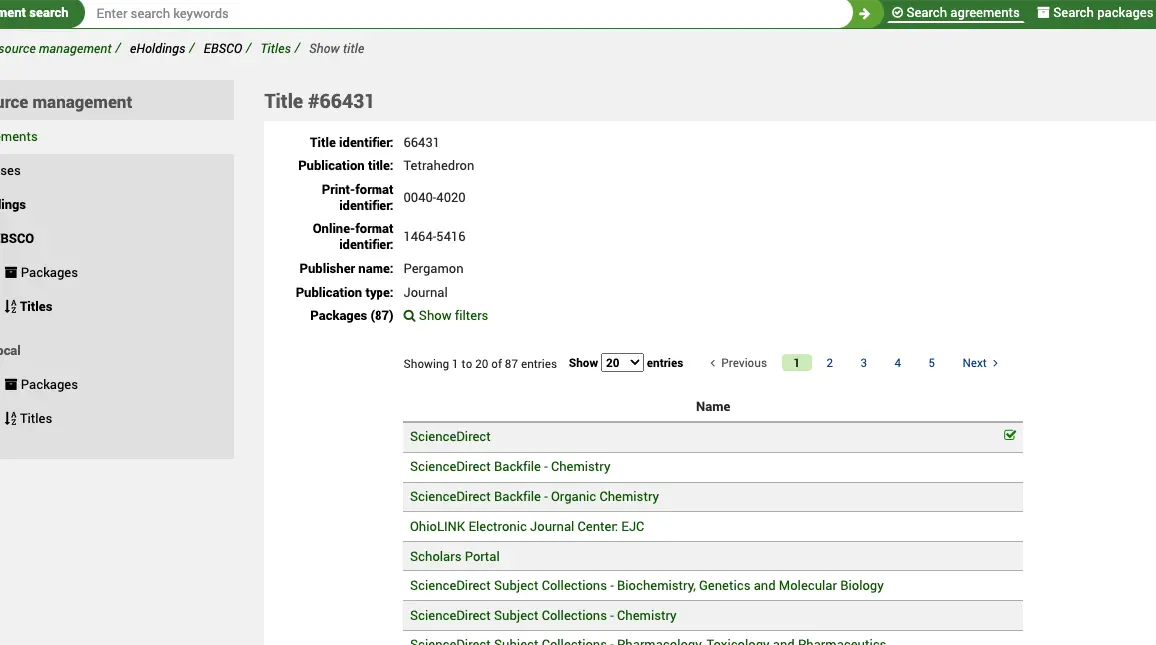
En haut, vous voyez le numéro du titre. Il s’agit de la référence du titre donnée par EBSCO. Le reste des métadonnées provient de l’API HoldingsIQ et comprend des éléments tels que les identifiants, les éditeurs, etc.
Vous pouvez également voir ici tous les bouquets dans lesquels ce titre est contenu. La coche indique que vous êtes déjà abonné à ce bouquet. Ainsi, dans l’exemple ci-dessus, nous avons ce titre via le bouquet ScienceDirect mais pas via Scholars Portal.
Si vous cliquez sur le lien du Bouquet, vous verrez la vue de cette ressource dans ce bouquet.
Cela inclut la couverture fournie par ce fournisseur.
Si vous souhaitez ajouter ou supprimer sélectivement ce titre de votre collection, vous pouvez le faire à partir de cet écran.
Vous pouvez également voir l’identifiant de la ressource fourni par EBSCO sur cet écran. Rappelez-vous que l’identifiant de la ressource représente l’instance d’un titre au sein d’un bouquet.
Si vous souhaitez revenir à la notice de titre, vous pouvez cliquer sur le lien Titre.
Sur la page du titre, vous disposez également de filtres pour restreindre votre recherche. Vous y accédez en cliquant sur le lien Afficher/Masquer les filtres.
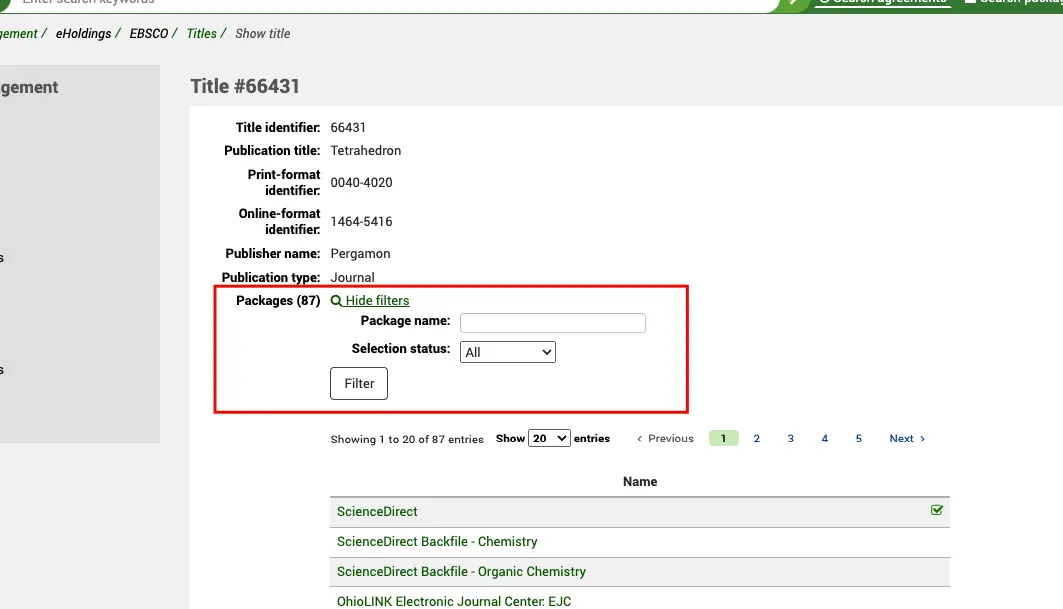
Cette fonction est utile si vous souhaitez restreindre votre recherche à un bouquet spécifique ou à des bouquets déjà sélectionnés dans votre collection numérique.
Ressources locales
Les Ressources locales sont des collections numériques qui n’appartiennent pas à une base de connaissances globale, mais qui (contrairement aux ressources EBSCO) sont stockés dans les tables locales de la base de données Koha (erm_eholdings_titles).
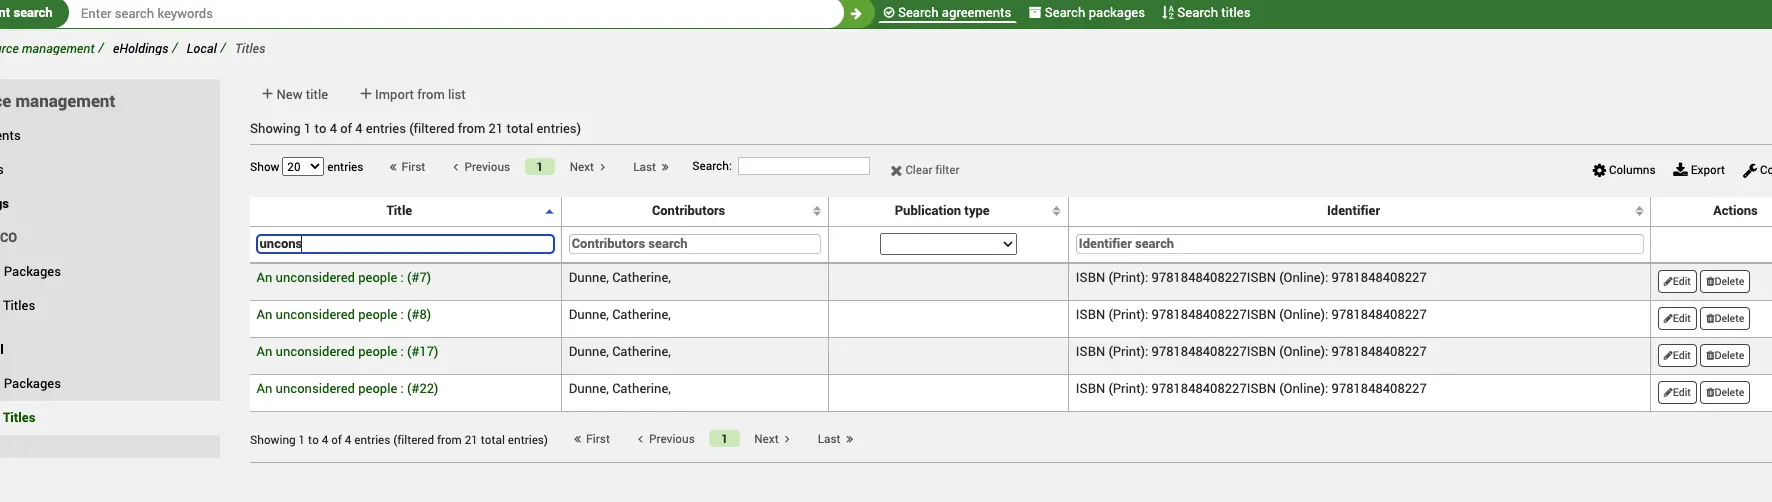
Titres
Aller à : Plus > Gestion des ressources électroniques > Collections numériques > Ressources locales > Titres
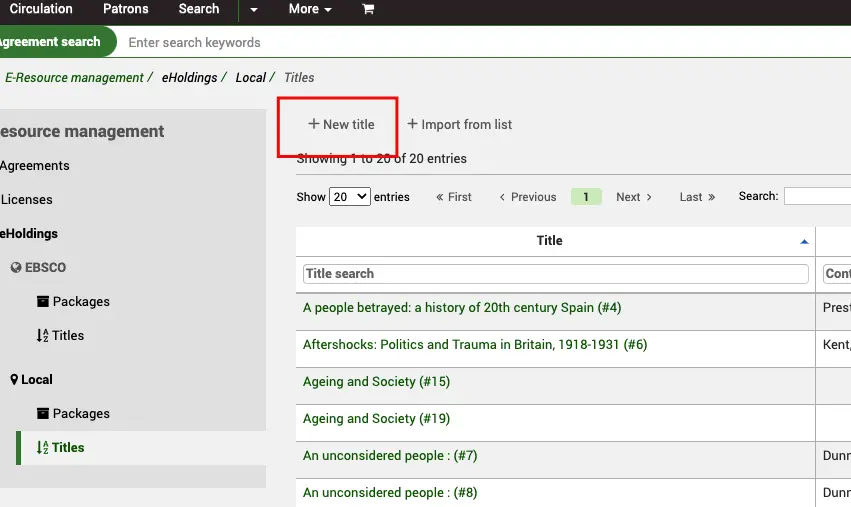
L’écran d’accueil Titres locaux affiche une liste des titres locaux actuellement créés.
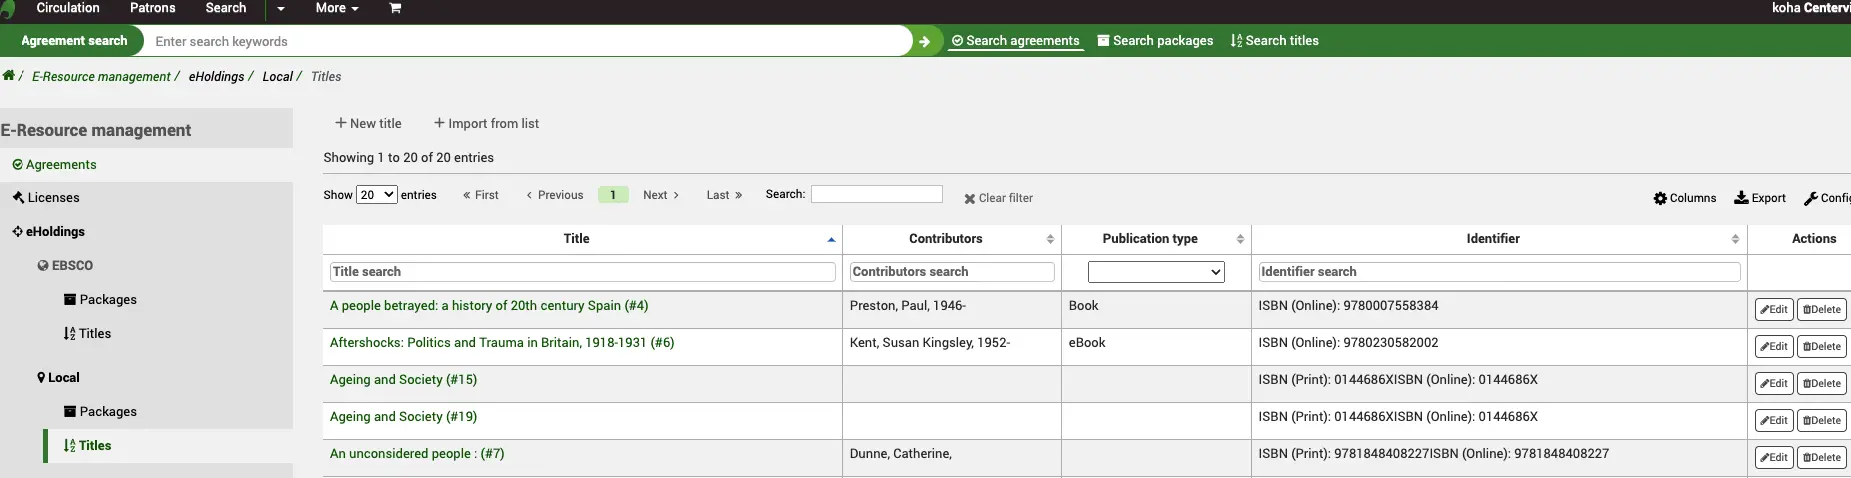
Vous pouvez utiliser les filtres de tableau et de colonne pour restreindre votre liste à un titre ou à un groupe de titres sélectionnés.
Note
Vous pouvez personnaliser les colonnes de ce tableau en cliquant le bouton “Configurer”. Ceci renvoie vers le module Administration, spécifiquement vers la section “table id : titles” du module Configurer les colonnes.
En cliquant sur un titre, vous pouvez accéder à la vue complète de la notice.
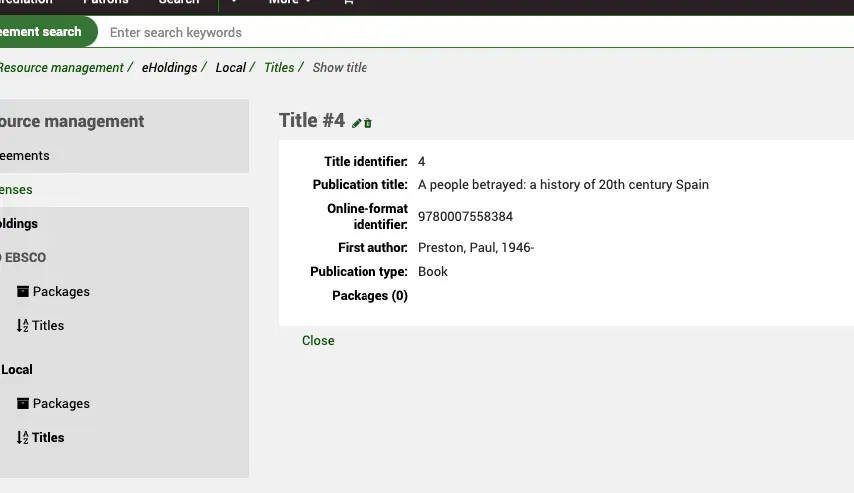
Ici, vous pouvez Modifier ou Supprimer la notice.
Si la notice appartient à un bouquet créé localement, vous verrez cette information ici.
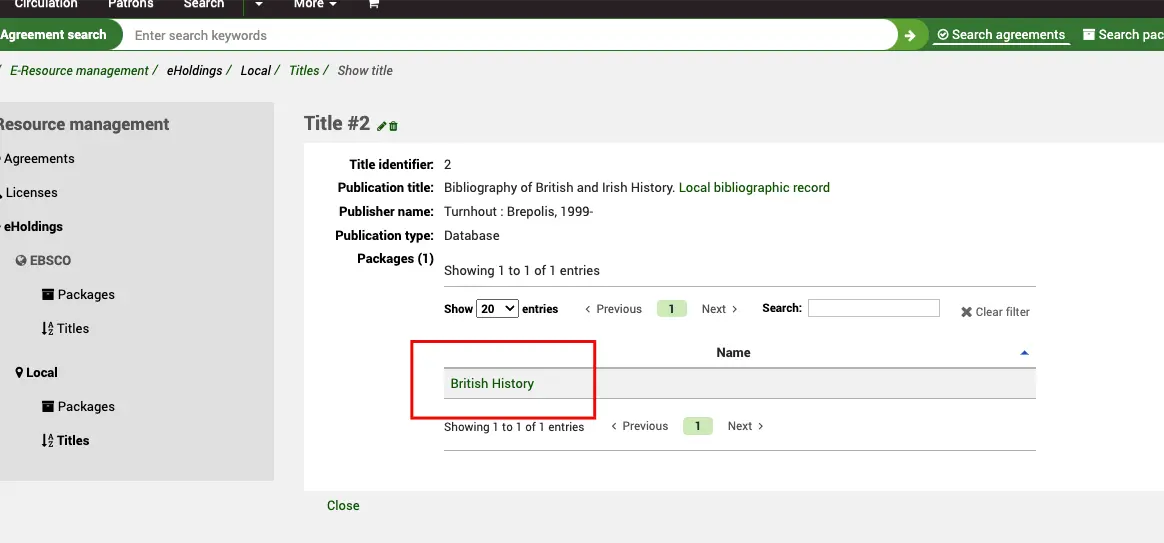
Si le titre fait partie de plus d’un bouquet, vous pouvez utiliser les filtres du tableau pour restreindre davantage votre recherche. En cliquant sur le lien Bouquet, vous accéderez au bouquet lui-même.
Crée une nouvelle notice de titre local
A partir de la page d’accueil de la Gestion des ressources électroniques, cliquez sur le lien Titres dans le menu de gauche sous Ressources Locales.
Aller à : Plus > Gestion des ressources électroniques > Collections numériques > Ressources locales > Titres
Utilisez le bouton “Nouveau titre” en haut du tableau des Titres.
Vous devriez voir apparaître un modèle de métadonnées basé sur le format KBART.
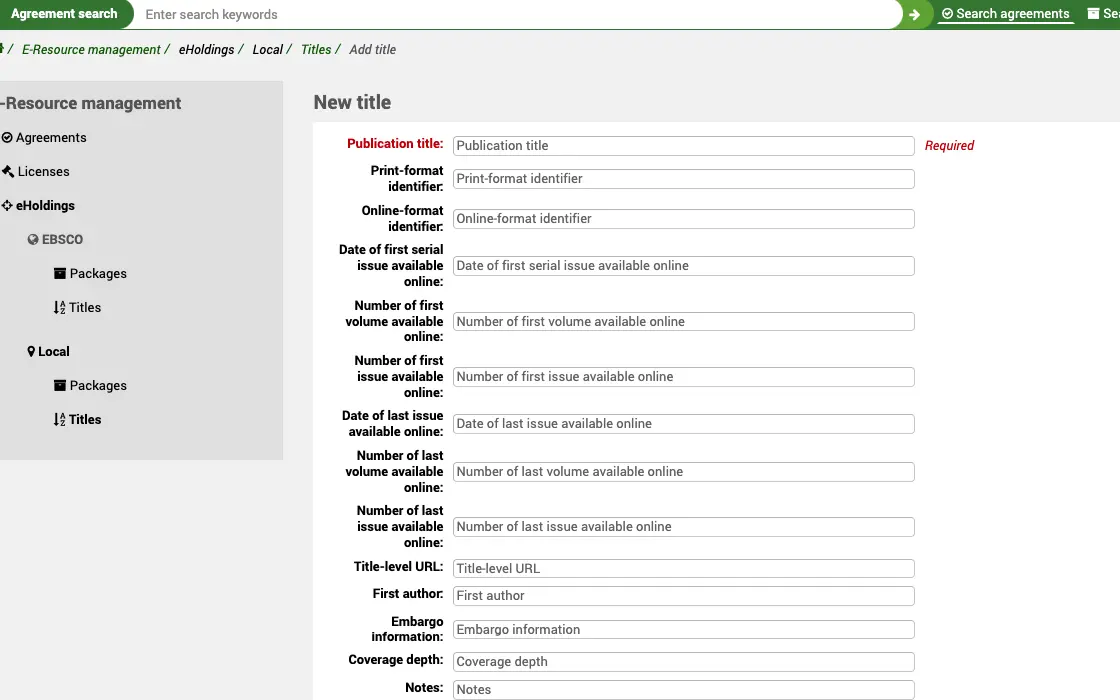
Lorsque vous enregistrez le titre, Koha crée automatiquement une notice bibliographique avec le plus grand nombre possible de métadonnées. Les métadonnées KBART sont mises en correspondance avec MARC21 de la manière suivante :
publication_title = biblio.title
print_identifier = 020$a||020$z||022$a||022$y
online_identifier = 020$a||020$z||022$a||022$y
date_first_issue_online = 866$a (avant “-“)
date_last_issue_online = 866$a (après “-“)
num_first_vol_online = 863$a (avant “-“)
num_last_vol_online = 863$a (après “-“)
title_url = 856$u
first_author = biblio.first_author
coverage_depth = title_url ? “fulltext” : “print”
notes = $852$z
publisher_name = 260$b
Lorsque vous enregistrez la notice et que vous consultez la vue complète, vous verrez un lien vers la notice bibliographique.
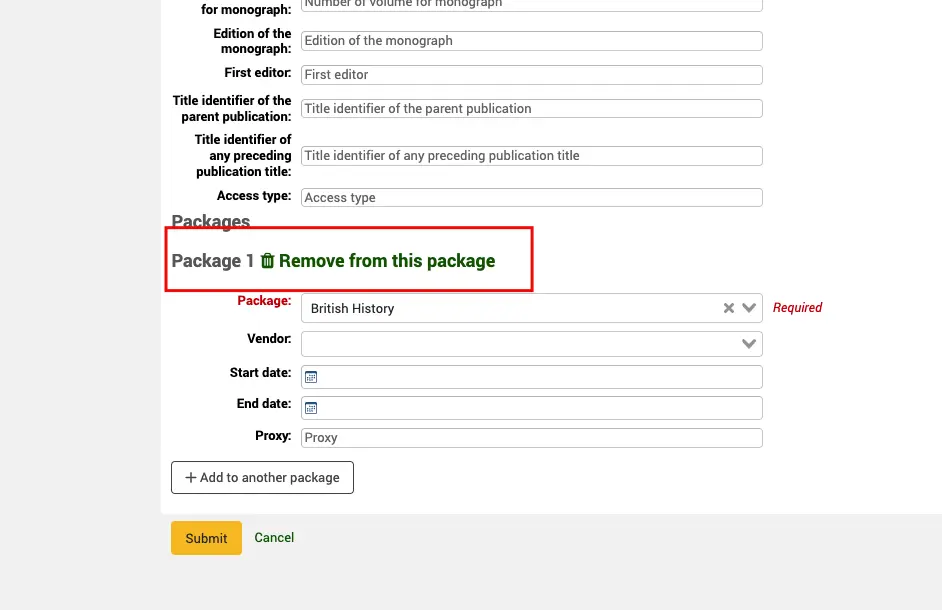
En bas du modèle de création/modification, vous verrez l’option pour ajouter le titre à un bouquet local.
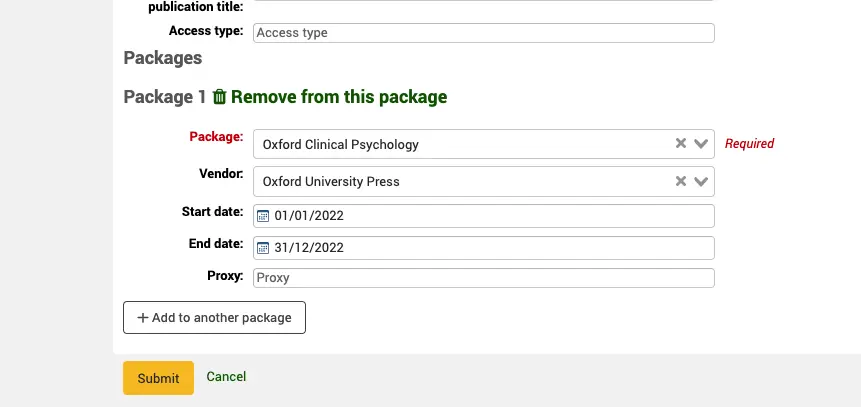
La notice du bouquet doit déjà exister avant que vous n’essayiez de la lier à partir du menu déroulant. Vous pouvez également spécifier le Fournisseur, les dates de début et de fin et une référence à un serveur proxy si ce service en nécessite un (non implémenté actuellement dans Koha, information indiquée à titre de référence uniquement).
Un titre peut appartenir à plusieurs bouquets.
Importer une nouvelle notice de titre local depuis une Liste
Pour ajouter rapidement plusieurs titres à vos Ressources locales, vous pouvez les importer depuis une liste Koha.

Commencez par créer une liste Koha et ajoutez-y des notices (en les créant manuellement, en les important via z39.50, ou en utilisant l’outil “Télécharger ds notices dans le réservoir”). Une fois la liste créée, elle apparaîtra dans le tableau.

Sélectionnez d’abord le bouquet auquel vous souhaitez ajouter les titres, puis sélectionnez la liste dans le tableau. Utilisez le bouton Importer pour les lier ensemble.
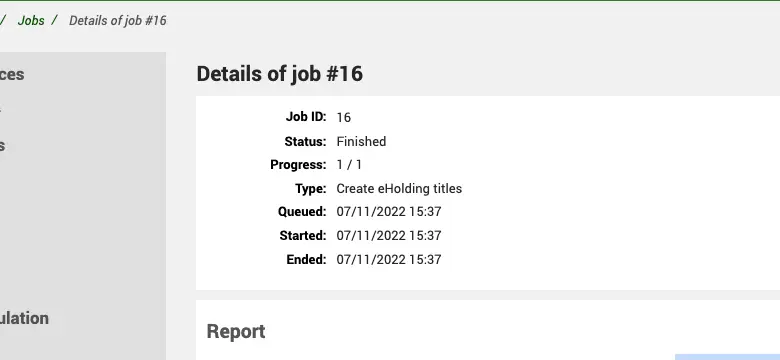
Vous verrez apparaître le message “importation en cours” et la tâche devrait être terminé dans quelques instants. Vous pouvez cliquer sur le numéro de la tâche si vous souhaitez voir l’état d’avancement.
A ce stade, vous devriez voir les titres dans la liste des titres et également attachés au bouquet sélectionné.
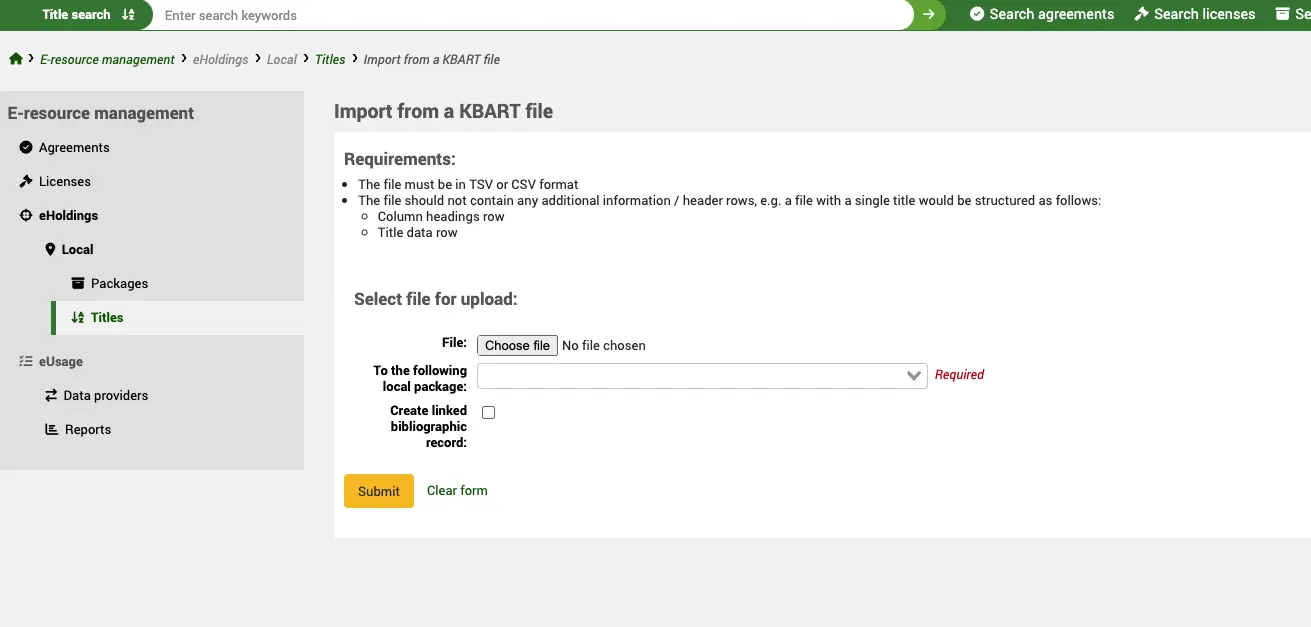
Importer une nouvelle notice de titre local depuis un fichier KBART
Version
Ce composant du module Gestion des ressources électroniques a été introduit dans la version 24.05 de Koha.
Pour ajouter rapidement plusieurs notices de titres à vos Ressources locales, et que votre fournisseur peut fournir des notices au format KBART, vous pouvez les intégrer à Koha.
Commencez par créer un Bouquet local pour lui rattacher les titres.
Aller à : Plus > Gestion des ressources électroniques > Collections numériques > Ressources locales > Bouquets
Allez ensuite dans vos Ressources locales et utilisez le bouton “Importer depuis un fichier KBART”.
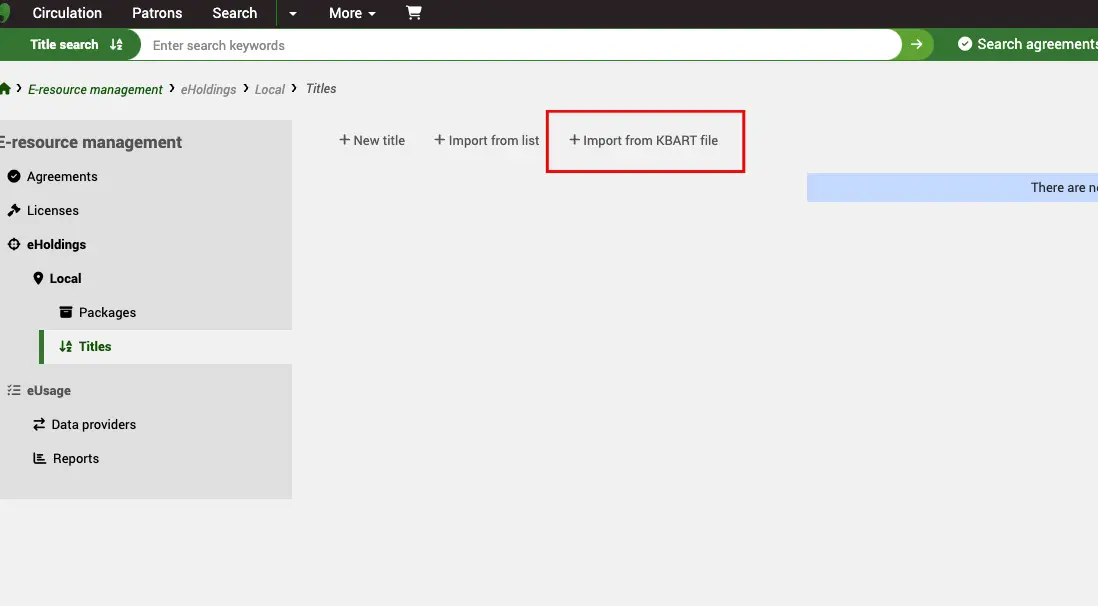
Utiliser ensuite le bouton Fichier pour sélectionner un fichier KBART sur votre ordinateur. Sélectionnez le Bouquet auquel vous voulez attacher les titres et, enfin, choisissez si vous voulez que Koha tente de créer des notices bibliographiques minimales à partir des données du fichier KBART (optionnel).
Une fois le fichier importé il sera traité en tâche de fond. Vous pouvez vérifier l’état d’avancement dans les Tâches de fonds, mais une fois l’import achevé les titres apparaîtront dans votre liste de Ressources locales.
Quelques ressources utiles :
Note
Le fichier KBART importé doit être au format TSV ou CSV
Bouquets
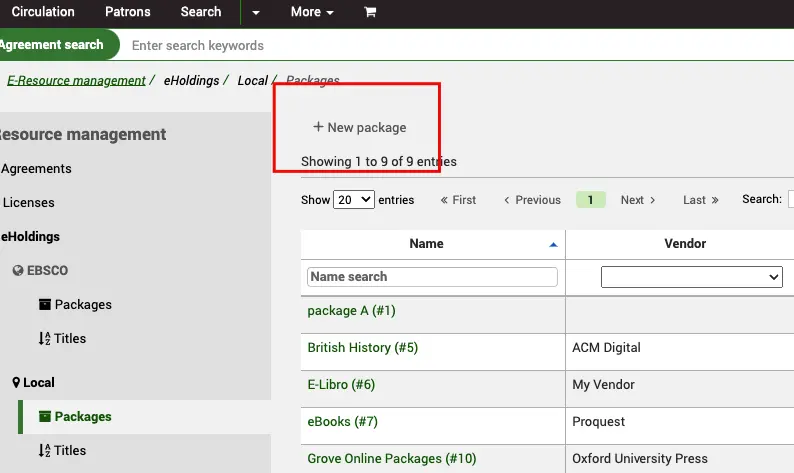
Aller à : Plus > Gestion des ressources électroniques > Collections numériques > Ressources locales > Bouquets
Sur l’écran Bouquet local se trouve une liste des bouquets actuellement créés.

Note
Vous pouvez personnaliser les colonnes de ce tableau en cliquant le bouton “Configurer”. Ceci renvoie vers le module Administration, précisément vers la section “Bouquet” de la configuration des colonnes.
Cliquez sur le nom du bouquet pour afficher la vue complète.
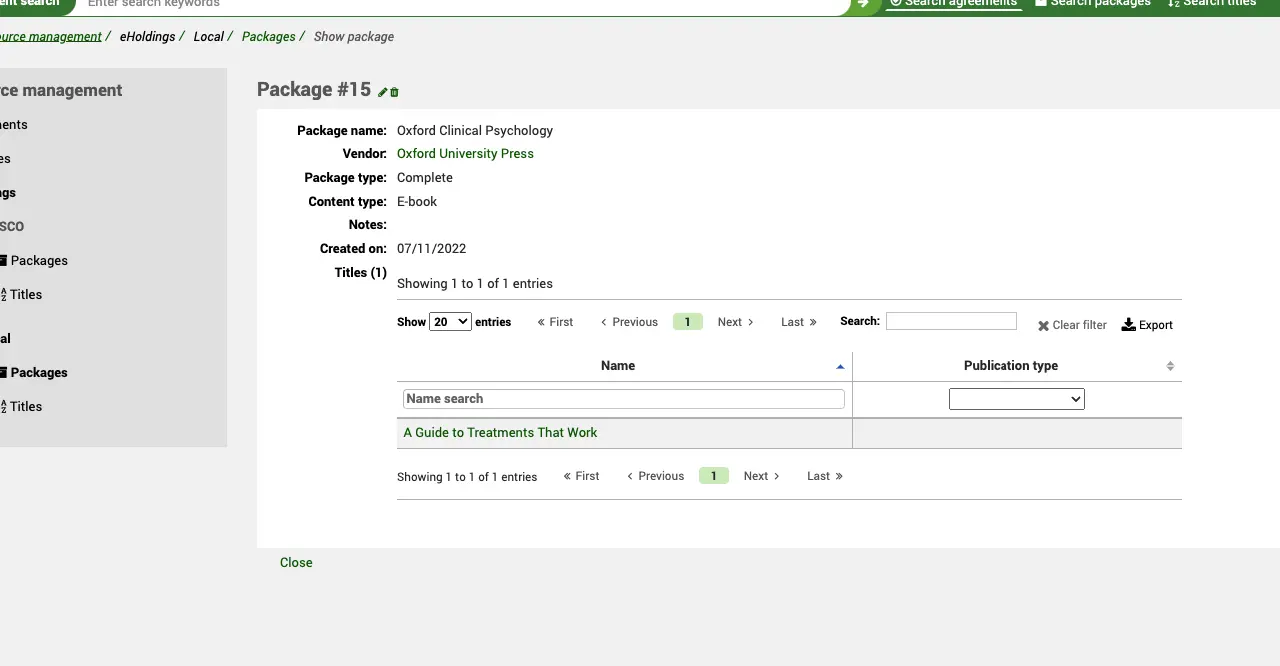
Vous pouvez utiliser le filtre du tableau pour restreindre la liste des titres.
En cliquant sur le titre, vous accédez à la vue complète du titre et en cliquant sur le fournisseur, vous accédez à sa fiche dans le module Acquisitions.
Dans cet écran, vous pouvez également utiliser les boutons Modifier ou Supprimer.
Lorsque vous modifiez un bouquet, vous avez la possibilité de le joindre à un contrat précédemment créé.
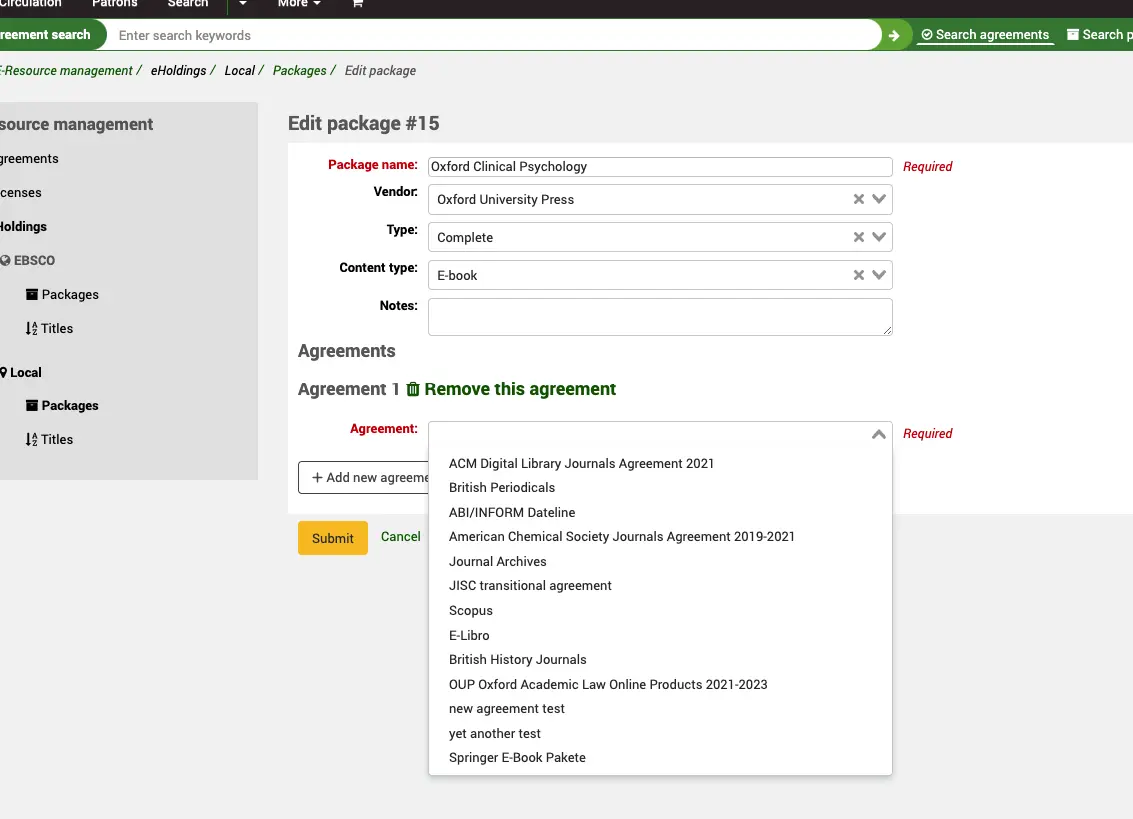
Ce bouquet deviendra visible dans la notice du contrat.
Crée une nouvelle notice de bouquet local
Aller à : Plus > Gestion des ressources électroniques > Collections numériques > Ressources locales > Bouquets
Sélectionner le bouton “Nouveau bouquet”.
Le nom du bouquet est un champ obligatoire. Vous devez avoir créé votre contrat avant d’y attacher un bouquet.
Les champs Fournisseur, Type, Type de contenu et Notes sont facultatifs.
Si vous avez des champs supplémentaires pour les bouquets ERM (erm_packages), ils seront affichés ici.
Supprimer un titre local d’une notice de bouquet
Aller à : Plus > Gestion des ressources électroniques > Collections numériques > Ressources locales > Titres
Recherchez le titre à supprimer dans la liste des Ressources locales.
Cliquez sur le détail du titre et utilisez le bouton “Modifier”.
En bas de l’écran utilisez le lien “Supprimer de ce bouquet”.
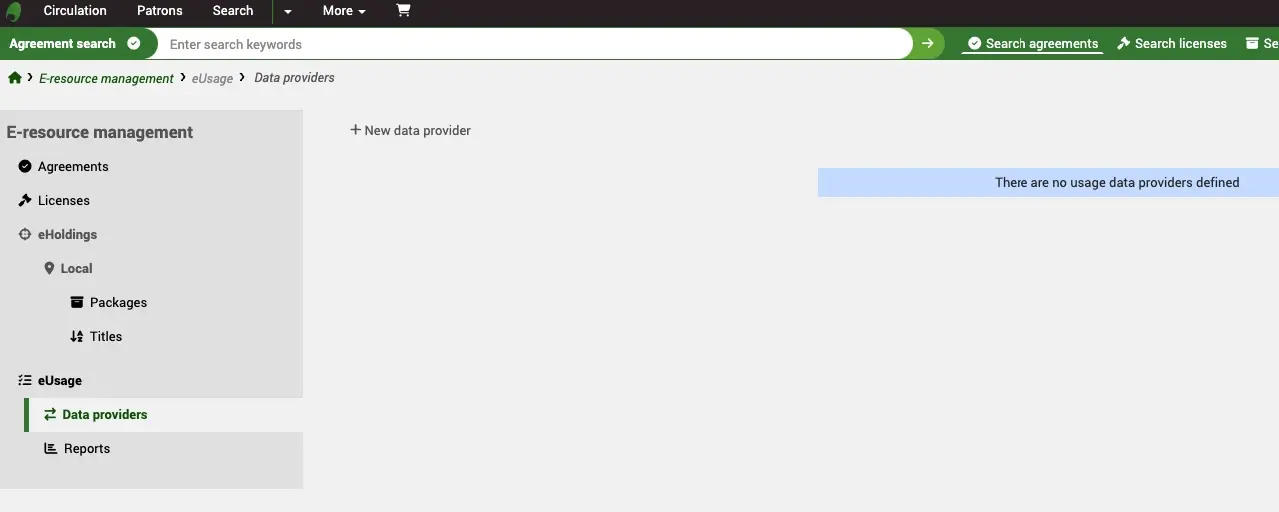
Fournisseur de données
Version
Ce composant du module Gestion des ressources électroniques a été introduit dans la version 23.11 de Koha.
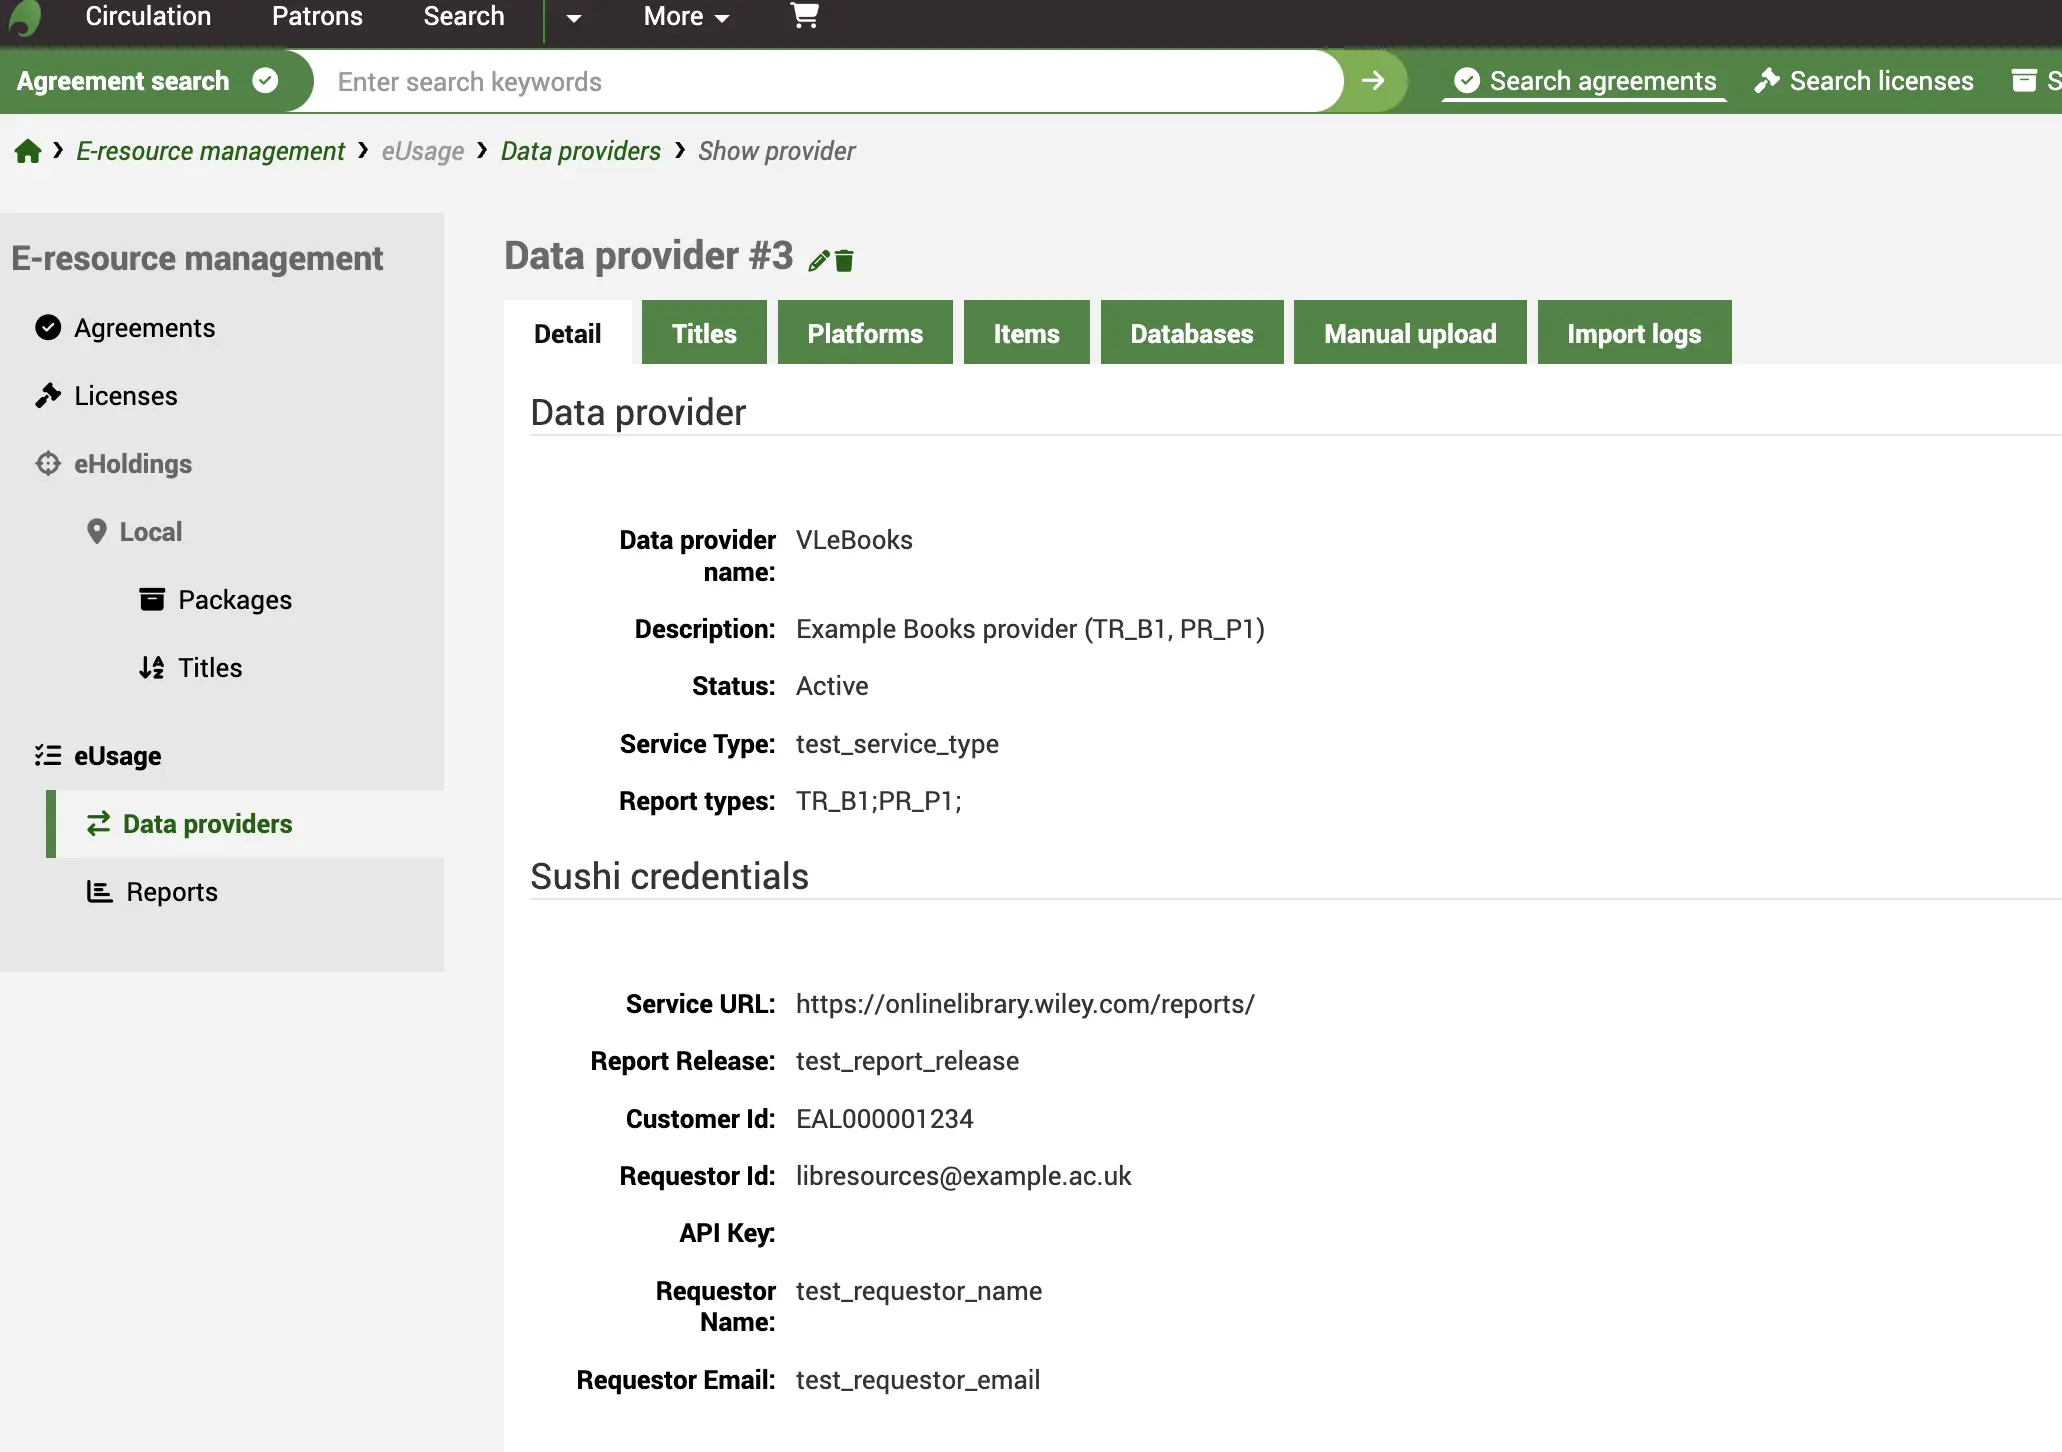
Les fournisseurs de données (ou plateformes de données) sont les organisations qui fournissent des statistiques d’utilisation de vos ressources électroniques. Il peut s’agir d’un fournisseur ou d’une plateforme. La fiche du fournisseur de données contient des informations sur les informations de connexion SUSHI et toutes les données COUNTER qui ont été collectées auprès du fournisseur.
Définitions :
SUSHI (Standardized Usage Statistics Harvesting Initiative) est une norme ANSI/NISO qui définit le modèle de collecte des données d’utilisation des ressources électroniques. Il est conçu pour fonctionner avec COUNTER.
COUNTER fournit les standards permettant à communauté utilisatrice de compter les usages faits des ressources électroniques. Connue sous le nom de Code of Practice, ce standard garantit que les fournisseurs et les éditeurs peuvent fournir à leurs clients bibliothécaires des données d’utilisation cohérentes, fiables et comparables. Koha ne supporte actuellement que la version 5 de COUNTER.
Note
Avant de commencer à créer de nouveaux Fournisseurs de données, assurez-vous que vos utilisateurs professionnels disposent de la Gérer le module de ressources électroniques (ou de la permission superbibliothécaire) et que vous avez revu les valeurs autorisés ERM pour les adapter à vos besoins. Assurez-vous également d’avoir revu les Préférences système ERM.
Créer une fiche de Fournisseur de données
A partir de la page d’accueil de la Gestion des ressources électroniques, cliquez sur le lien Fournisseurs de données dans le menu de gauche.
Aller à : Plus > Gestion des ressources électroniques > Fournisseurs de données
Utilisez le bouton “Nouveau fournisseur de données” en haut du tableau des Fournisseurs de données.
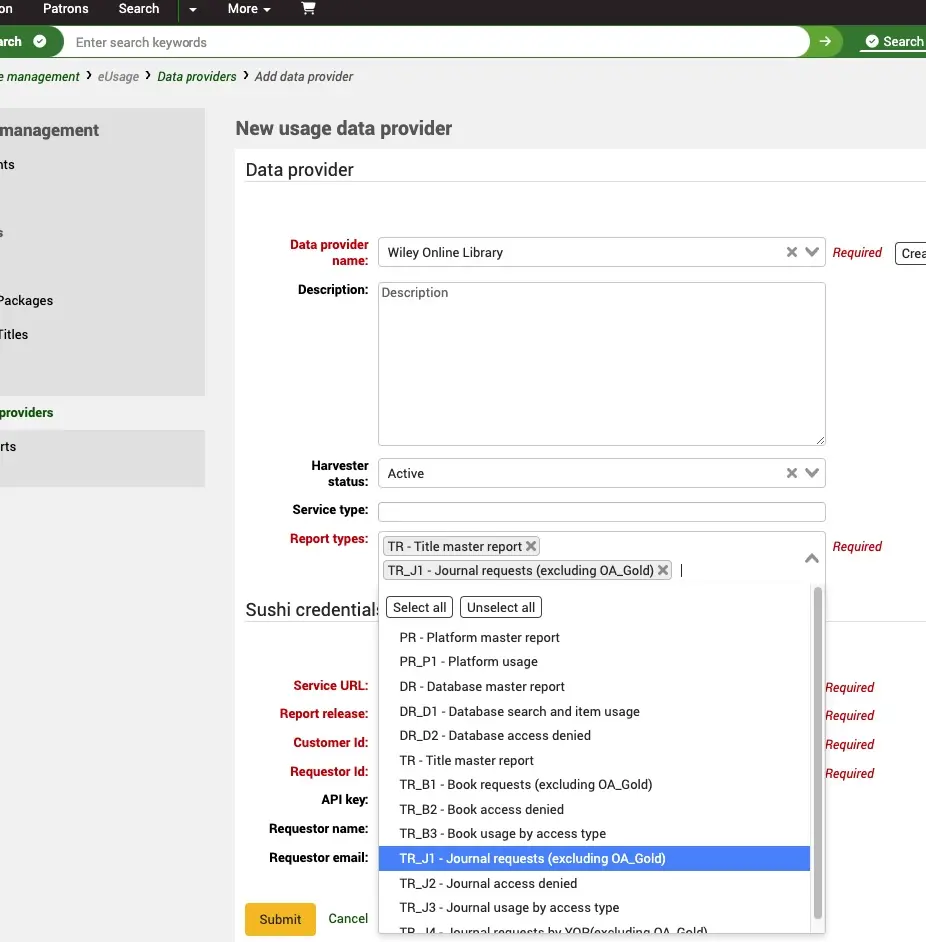
Vous devez donner au fournisseur de données un nom et une liste de types de rapports. Par défaut, Koha recherchera dans le registre COUNTER et ajoutera automatiquement les détails du fournisseur pour vous, à moins que vous ne sélectionniez le bouton “Créer manuellement”.
Commencez à saisir dans le champ Nom du fournisseur de données pour afficher la liste des fournisseurs enregistrés dans le Registre COUNTER.
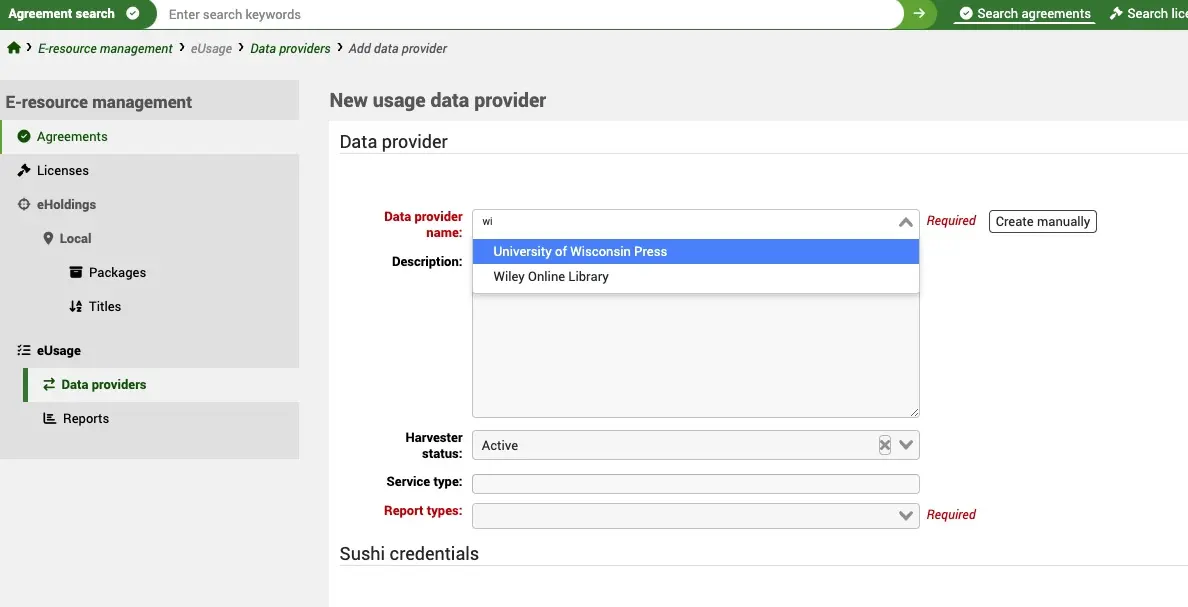
En définissant le statut du Moissonneur sur “Actif”, il sera pris en charge par le cronjob de moissonnage en arrière-plan (erm_run_harvester.pl).
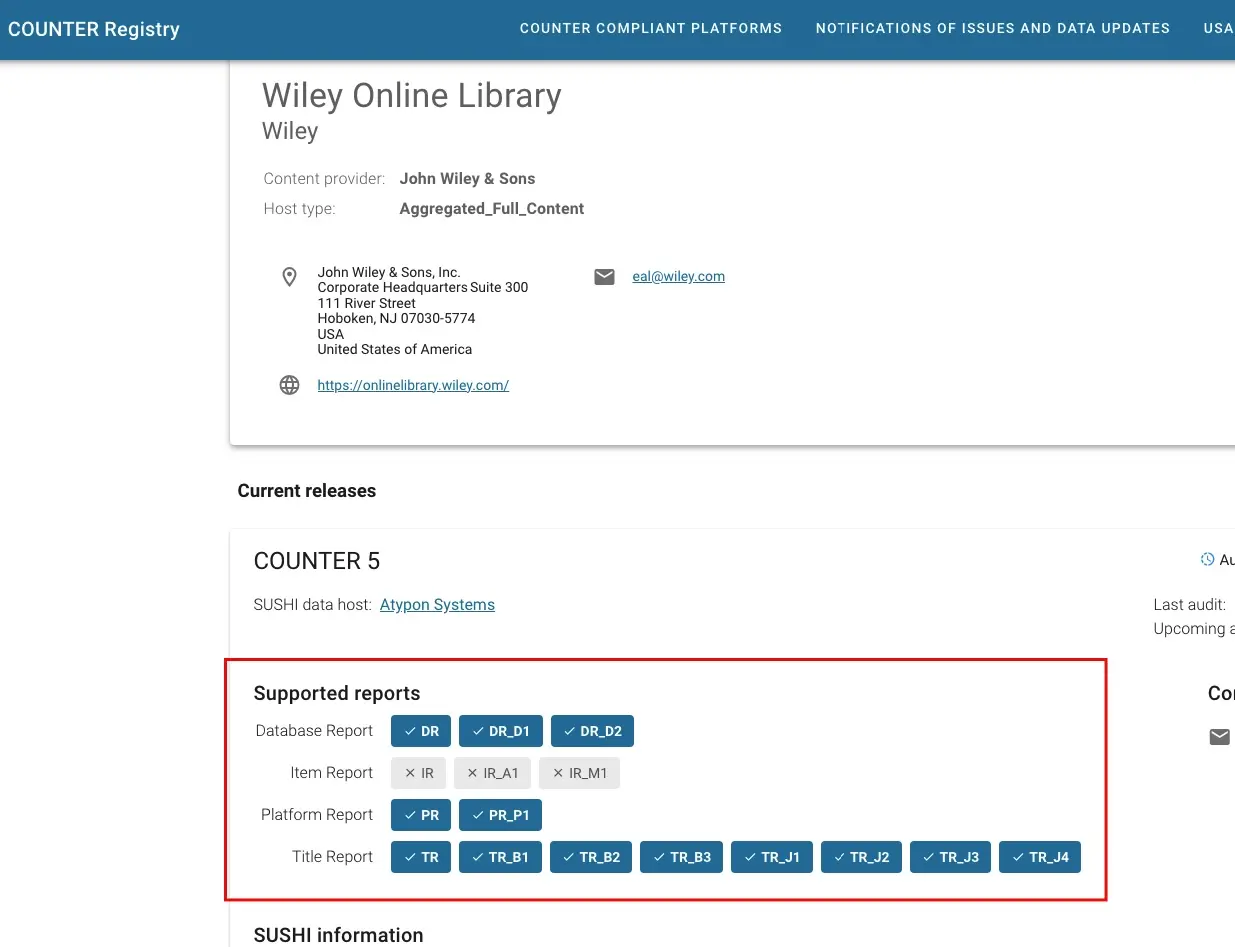
Types de rapport est un champ obligatoire qui définit quelles données de type de rapport sont moissonnées par le fournisseur. Si vous avez créé le fournisseur à partir du registre COUNTER, alors les types de rapports pris en charge seront automatiquement affichés dans la liste des types de rapports et vous pourrez choisir de les sélectionner dans cette liste ou de les sélectionner tous. Pour plus d’informations sur les types de rapports, voir 4. COUNTER reports, COUNTER Code of Practice. Si vous n’êtes pas sûr des types de rapports pris en charge par votre fournisseur et que vous créez votre fournisseur manuellement, consultez le registre COUNTER et recherchez le fournisseur.
Si vous ne créez pas le fournisseur manuellement, les informations de connexion SUSHI seront complétées par des informations provenant du registre COUNTER. La rubrique “Informations d’identification” est également utilisée pour vous aider à obtenir les informations que vous devez demander au fournisseur. Il peut s’agir d’un identifiant de client, d’un identifiant de demandeur ou d’une clé API. Il peut également vous être demandé de fournir le nom et l’adresse de courriel du demandeur.

Vous pouvez basculer entre les boutons “Créer manuellement” et “Créer à partir du registre” selon que vous souhaitez saisir les informations vous-même ou les extraire du registre. Vous pouvez également extraire les informations du registre, puis basculer vers “Créer manuellement” si vous souhaitez mettre à jour des éléments tels que le nom.
Écran d’accueil des Fournisseurs de données
L’écran d’accueil des Fournisseurs de données affiche la liste de vos Fournisseurs de données actuels. Vous pouvez voir en un coup d’œil s’ils sont actifs ou inactifs et la date du dernier moissonnage de cette plateforme. Utilisez les filtres du tableau pour rechercher un fournisseur de données spécifique. Les quatre boutons d’action fonctionnent comme suit :
Tester
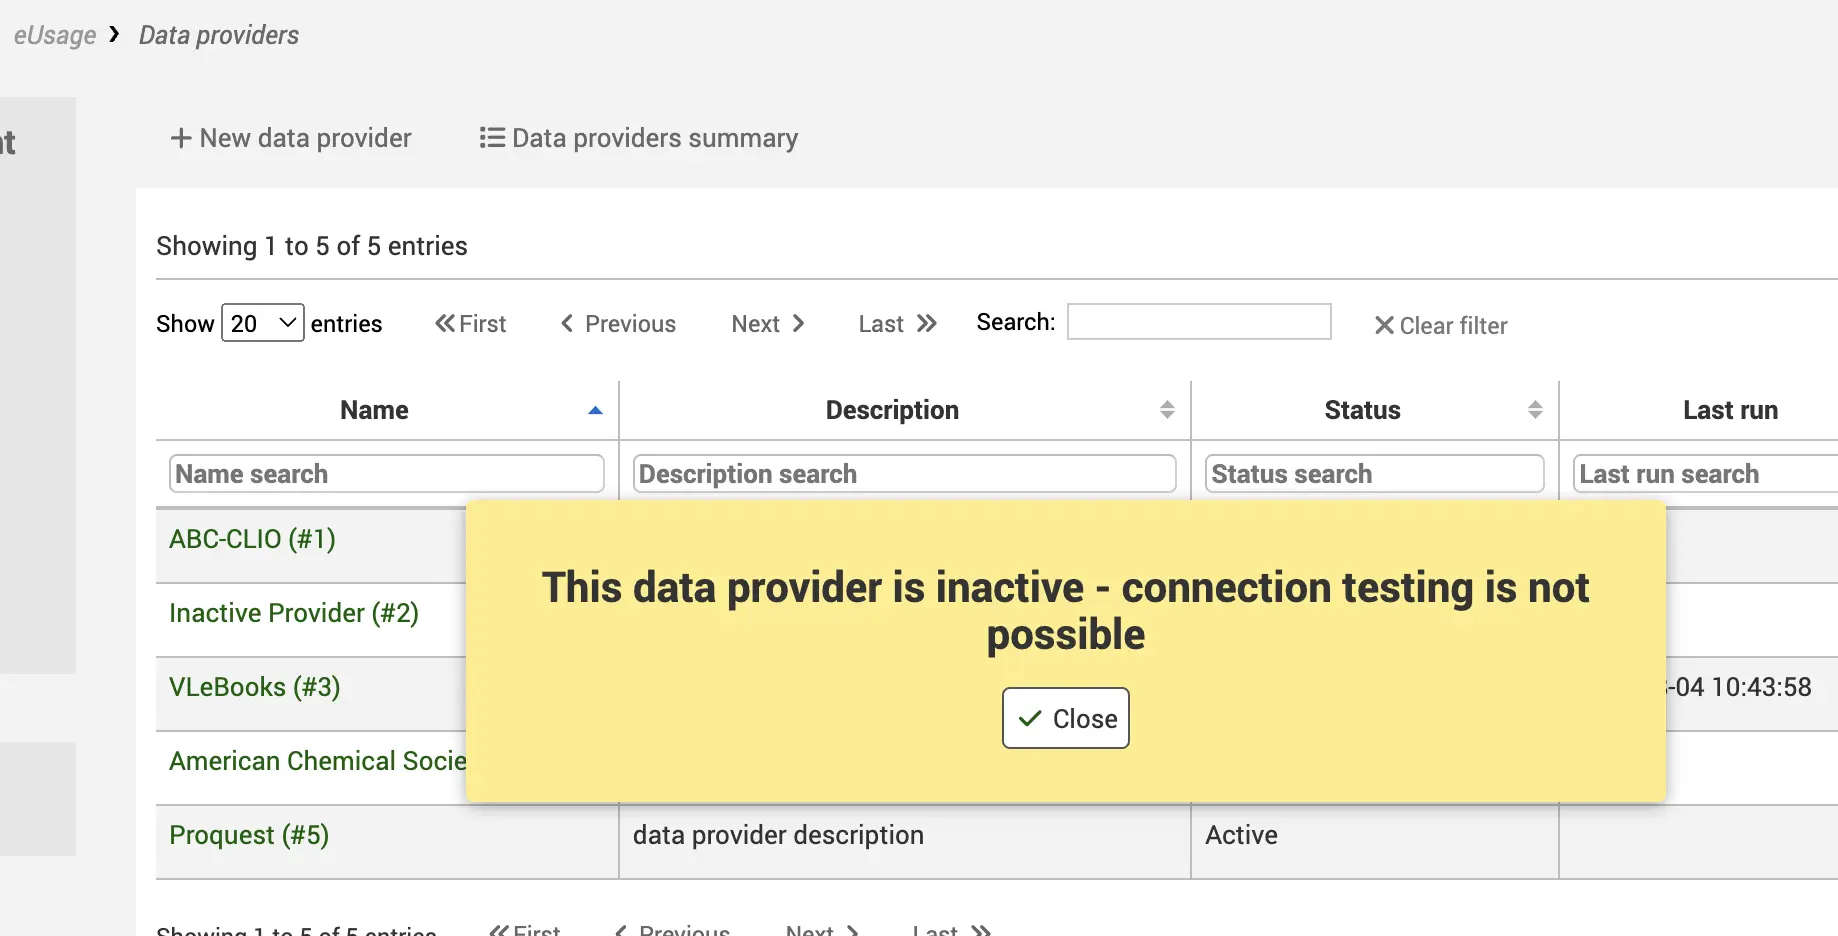
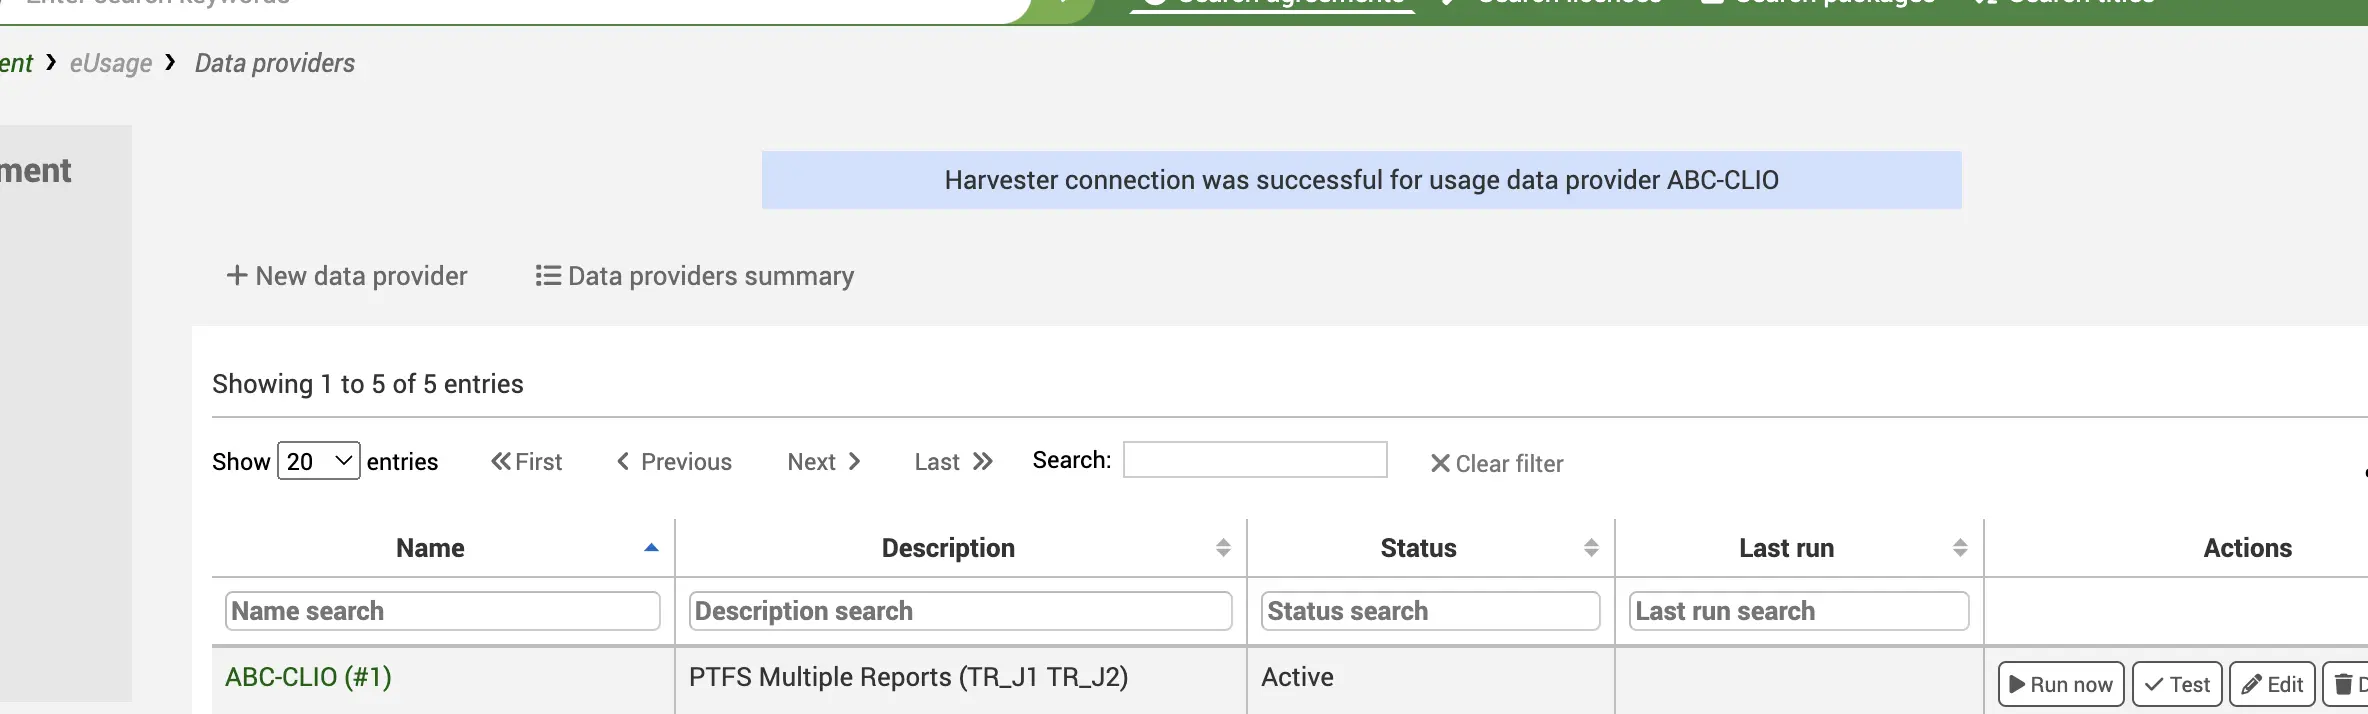
Le bouton “Tester maintenant” permet d’accéder au point de terminaison SUSHI que vous avez configuré et de tester vos informations de connexion pour s’assurer qu’elles sont valides. Si le fournisseur de données est inactif, vous recevrez un avertissement indiquant que le test ne peut pas être effectué.
Si le fournisseur de données est actif, vous recevrez un message de réussite ou d’échec.
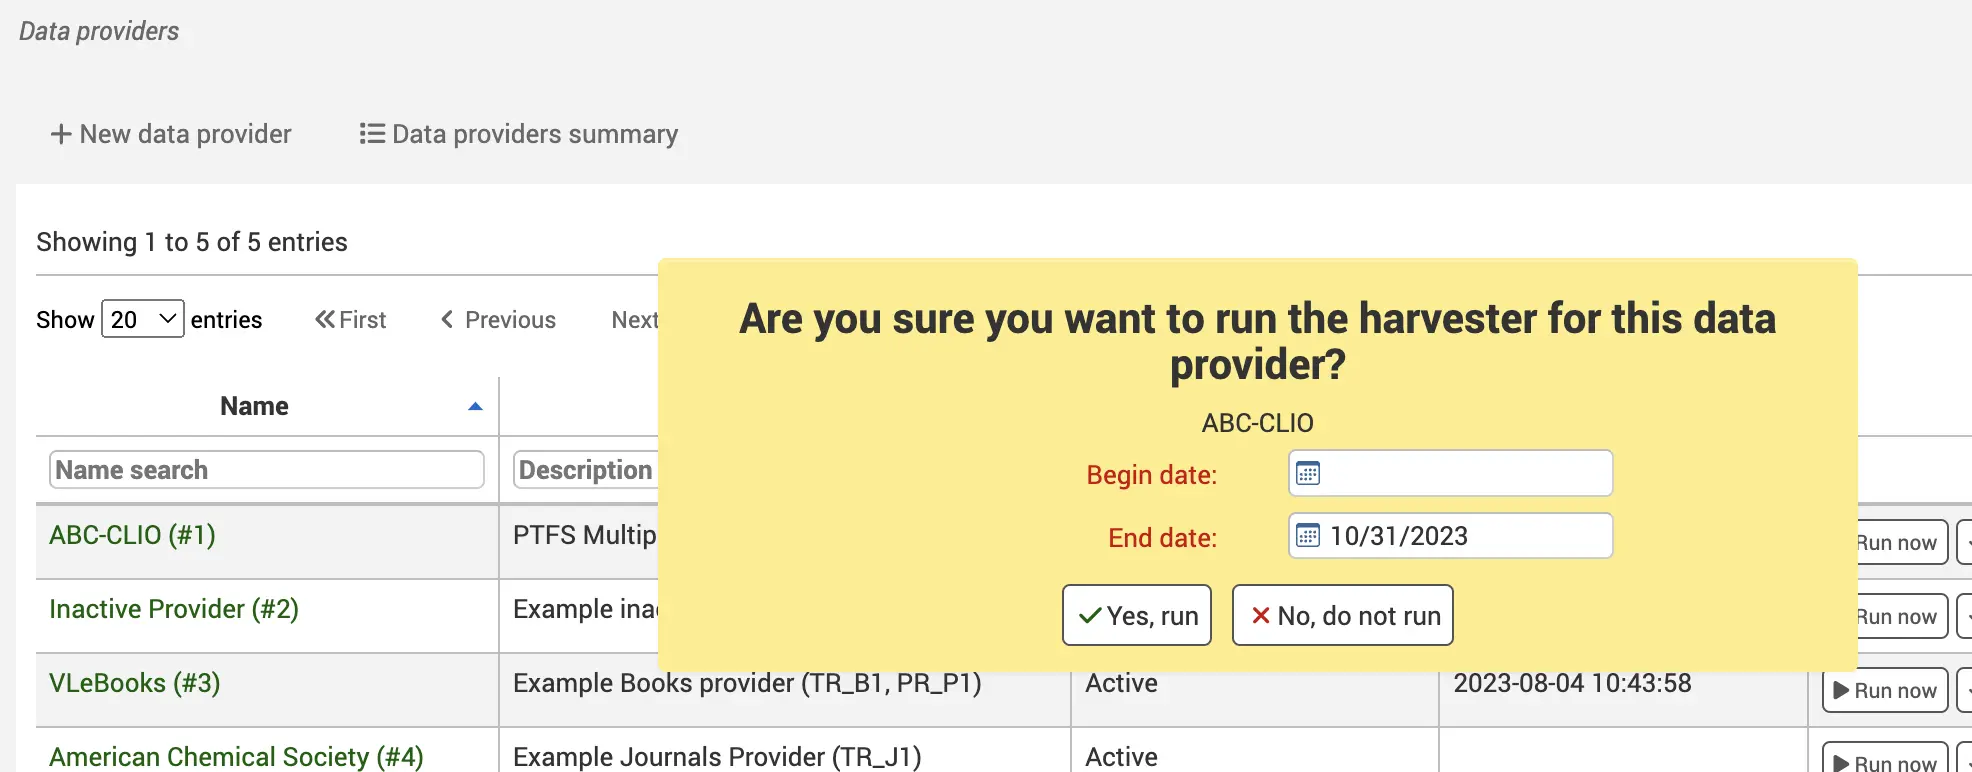
Lancer maintenant
Cela déclenchera un moissonnage immédiat de la source. “Lancer maintenant” vous invite également à fournir une date de début et de fin de récolte.
Astuce
Au lieu de cliquer manuellement sur “Exécuter maintenant” pour chaque fournisseur lorsque vous avez besoin de vérifier les nouvelles statistiques d’utilisation, vous pouvez configurer le cronjob de moissonnage sur votre serveur. Le script erm_run_harvester.pl récoltera à intervalles réguliers les données SUSHI pour tous les fournisseurs de données d’utilisation actifs.
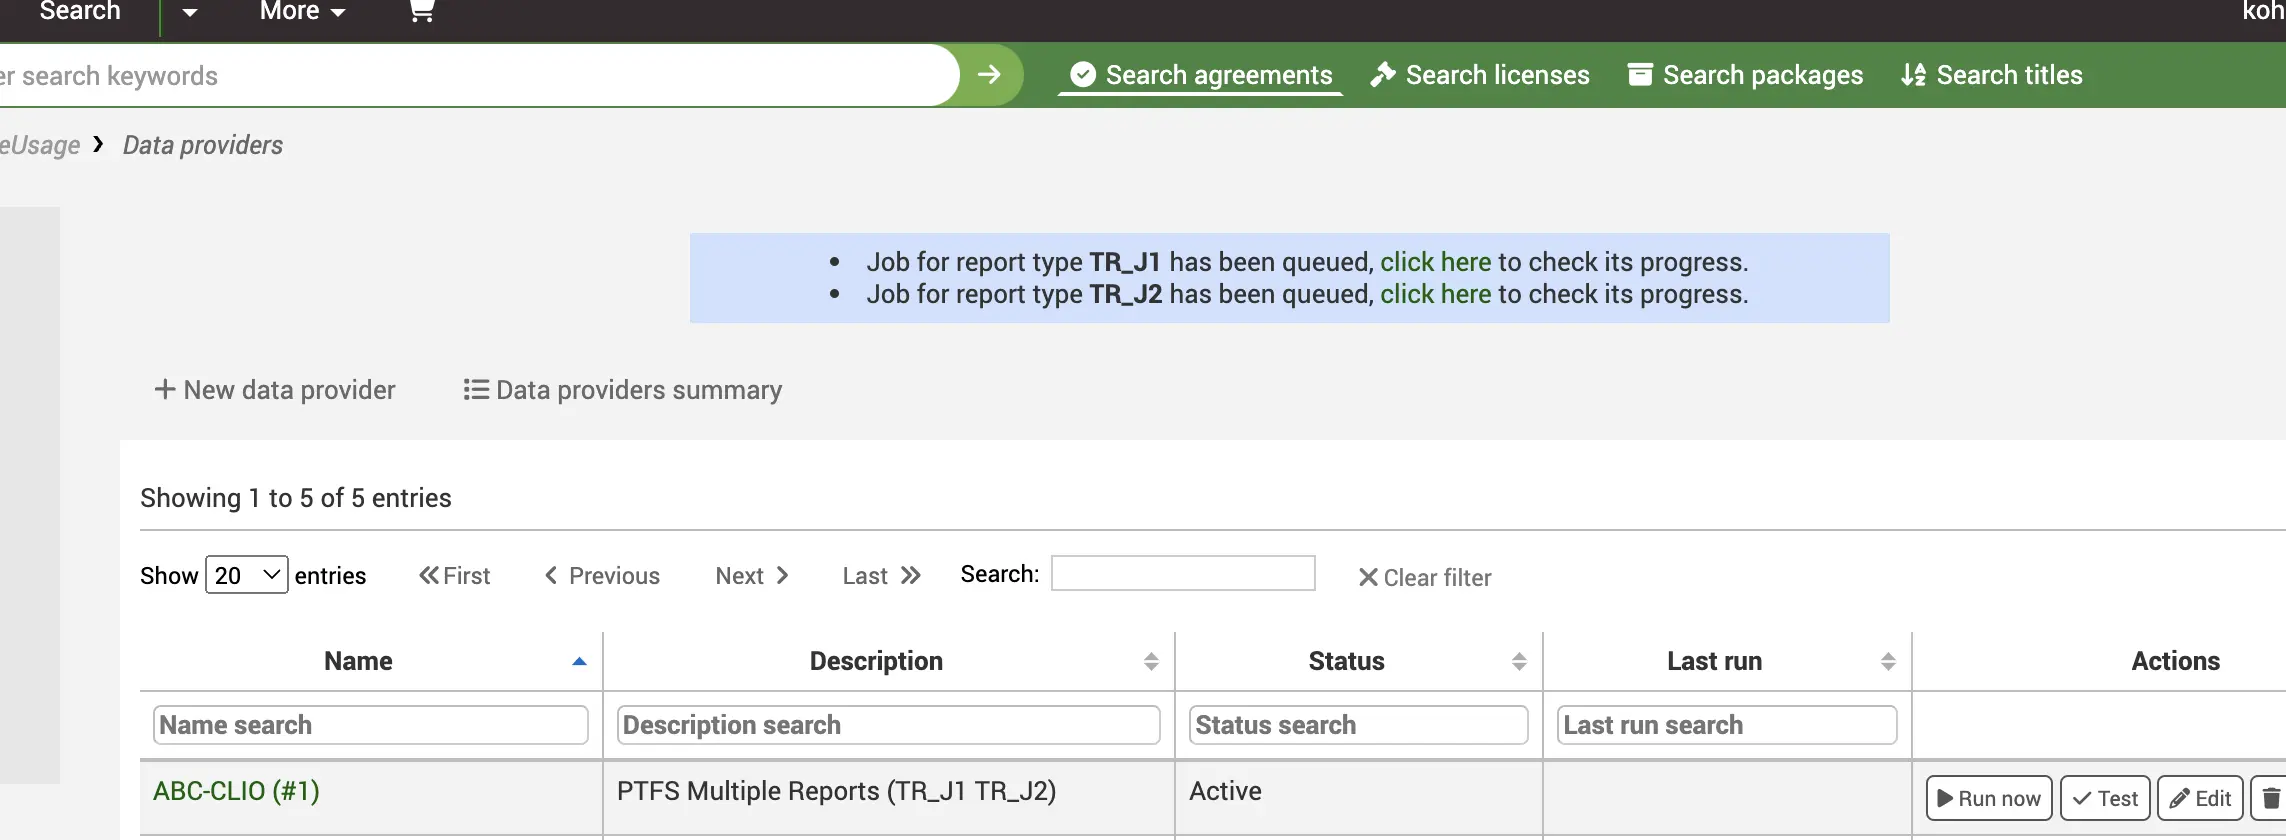
Vous verrez également un lien vers les tâches d’arrière-plan. Il y a une tâche d’arrière-plan par type de rapport.
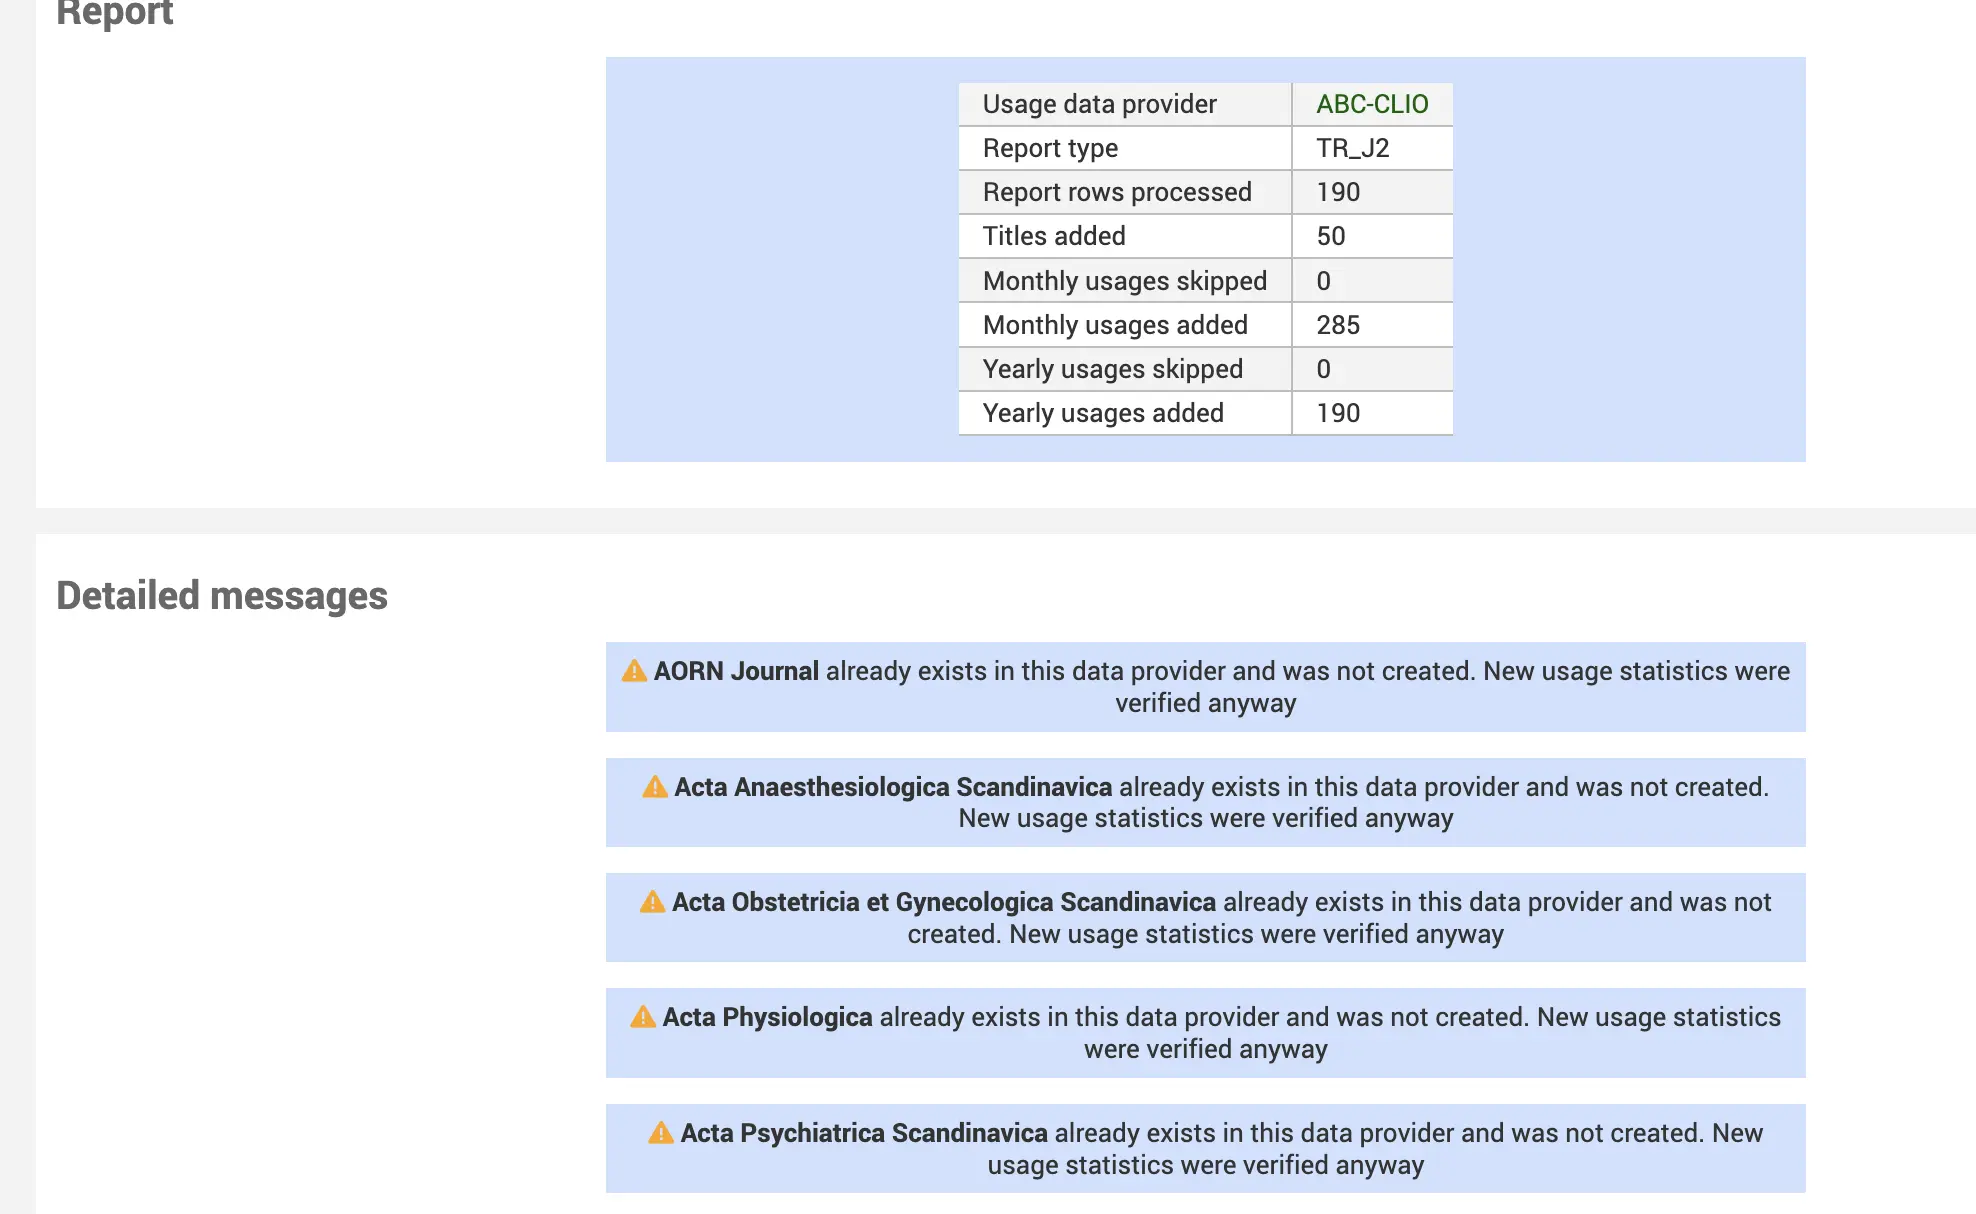
La page de résumé affiche une liste des lignes de rapport traitées à partir du fichier COUNTER entrant et le nombre de titres importés dans Koha. En outre, elle indique le nombre de comptes de statistiques d’utilisation qui ont été ajoutés aux tableaux des titres des fournisseurs de données. Chaque nouveau titre ajouté avec succès aura une coche à côté de lui pour indiquer qu’il a été nouvellement ajouté.
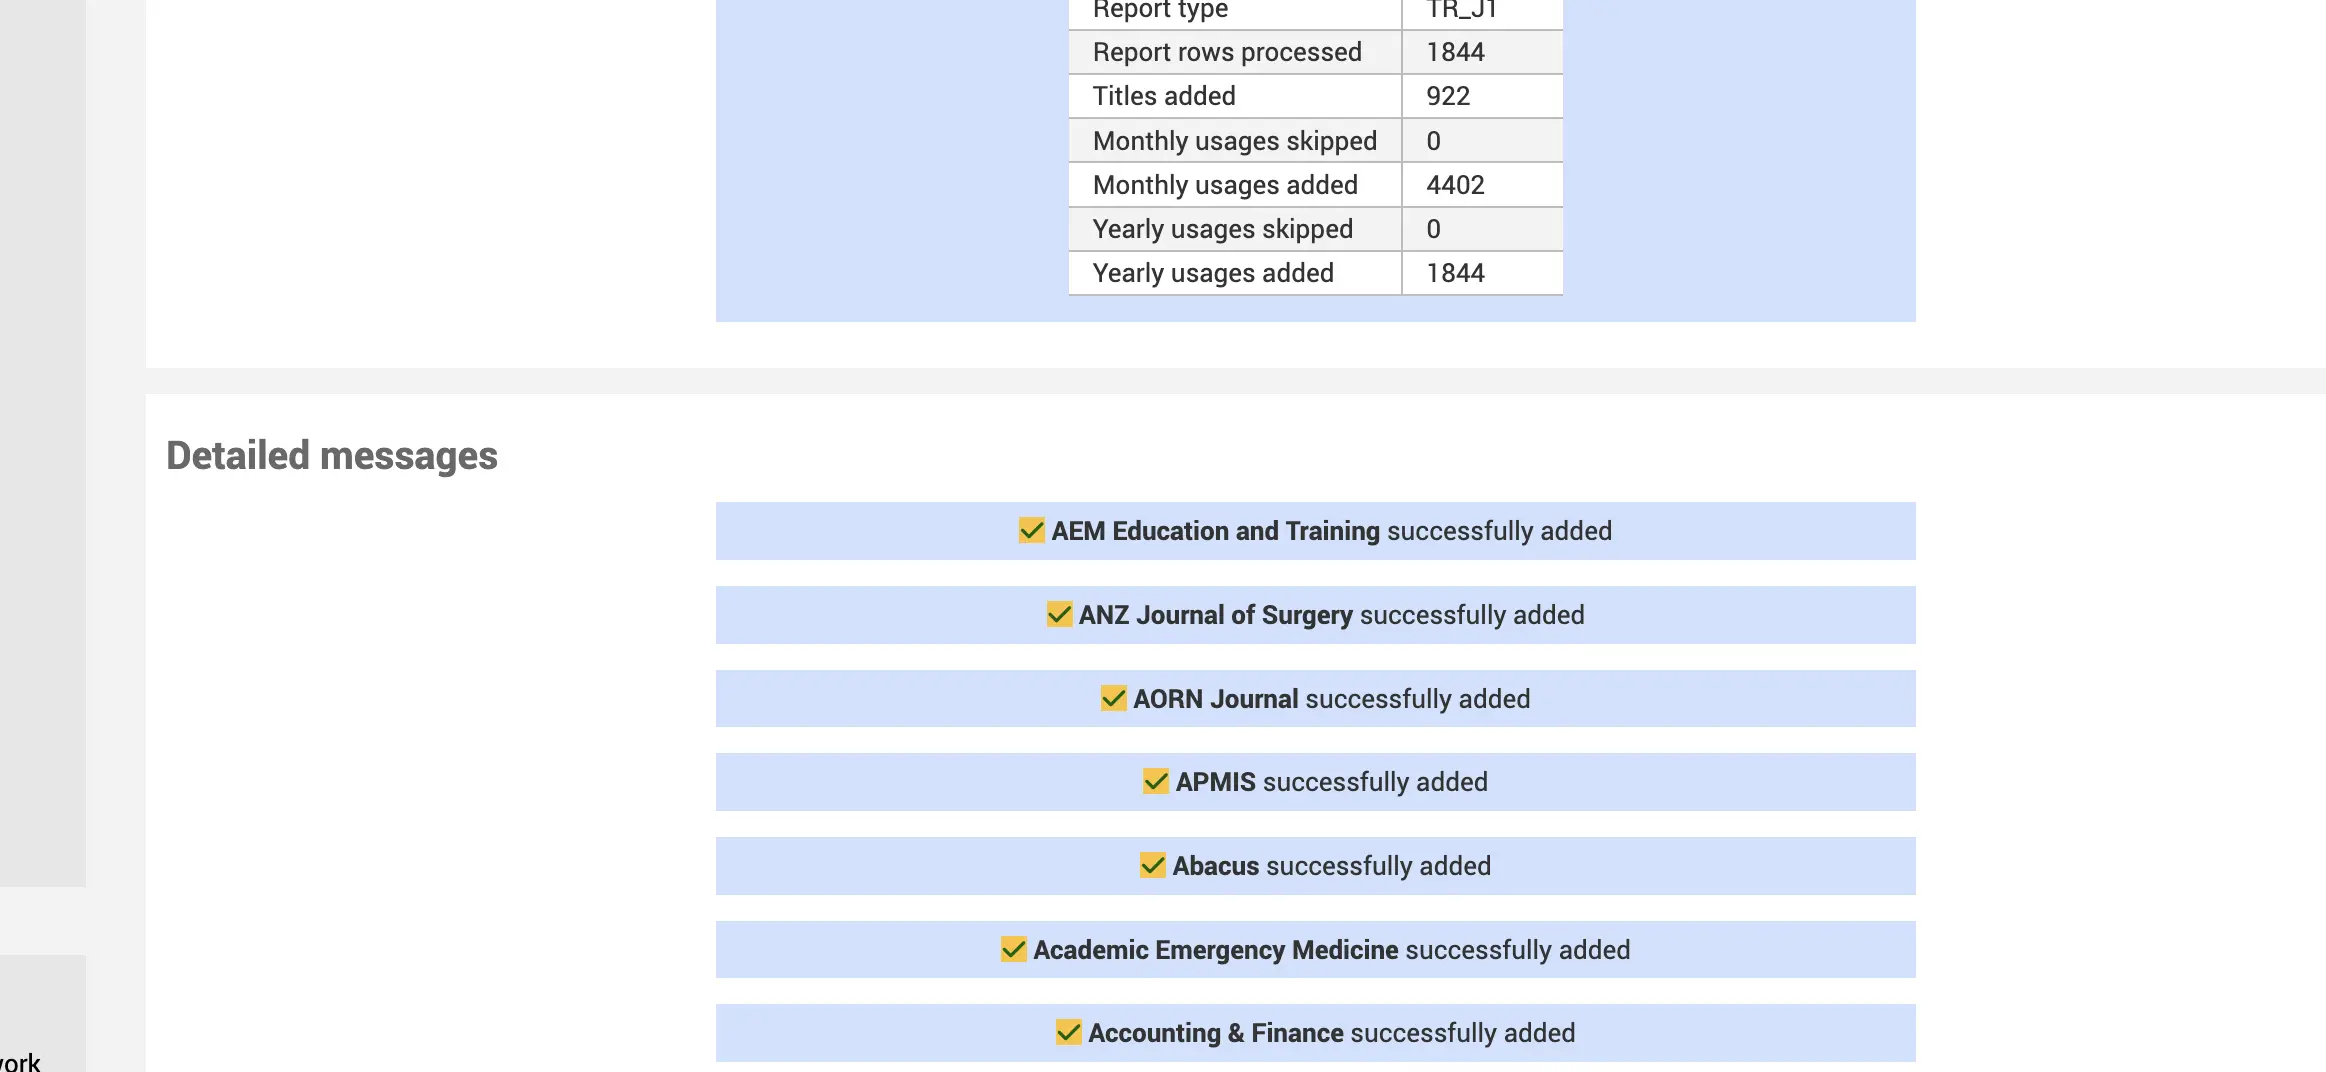
Si le titre existe déjà dans Koha, vous verrez une alerte indiquant qu’il existe mais que tous les comptes ont été mis à jour.
Modifier
Pour modifier un Fournisseur de données existant
Supprimer
Pour supprimer un Fournisseur de données
Résumé du fournisseur de données
À côté du bouton “Nouveau fournisseur de données” se trouve un lien vers le résumé du Fournisseur de données. Ce lien vous permet de voir d’un coup d’œil tous vos fournisseurs de données, ainsi que les données les plus anciennes et les plus récentes dont vous disposez pour chaque type de rapport.

Rechercher et visualiser la fiche d’un Fournisseur de données
A partir de la page d’accueil de la Gestion des ressources électroniques, cliquez sur le lien Fournisseurs de données dans le menu de gauche.
Aller à : Plus > Gestion des ressources électroniques > Fournisseurs de données
Une liste des fournisseurs de données existant dans le système s’affiche. Vous pouvez utiliser les filtres de tableau ou de colonne pour rechercher et filtrer les données recherchées (par exemple, tous les fournisseurs de données ayant le statut “Actif”).
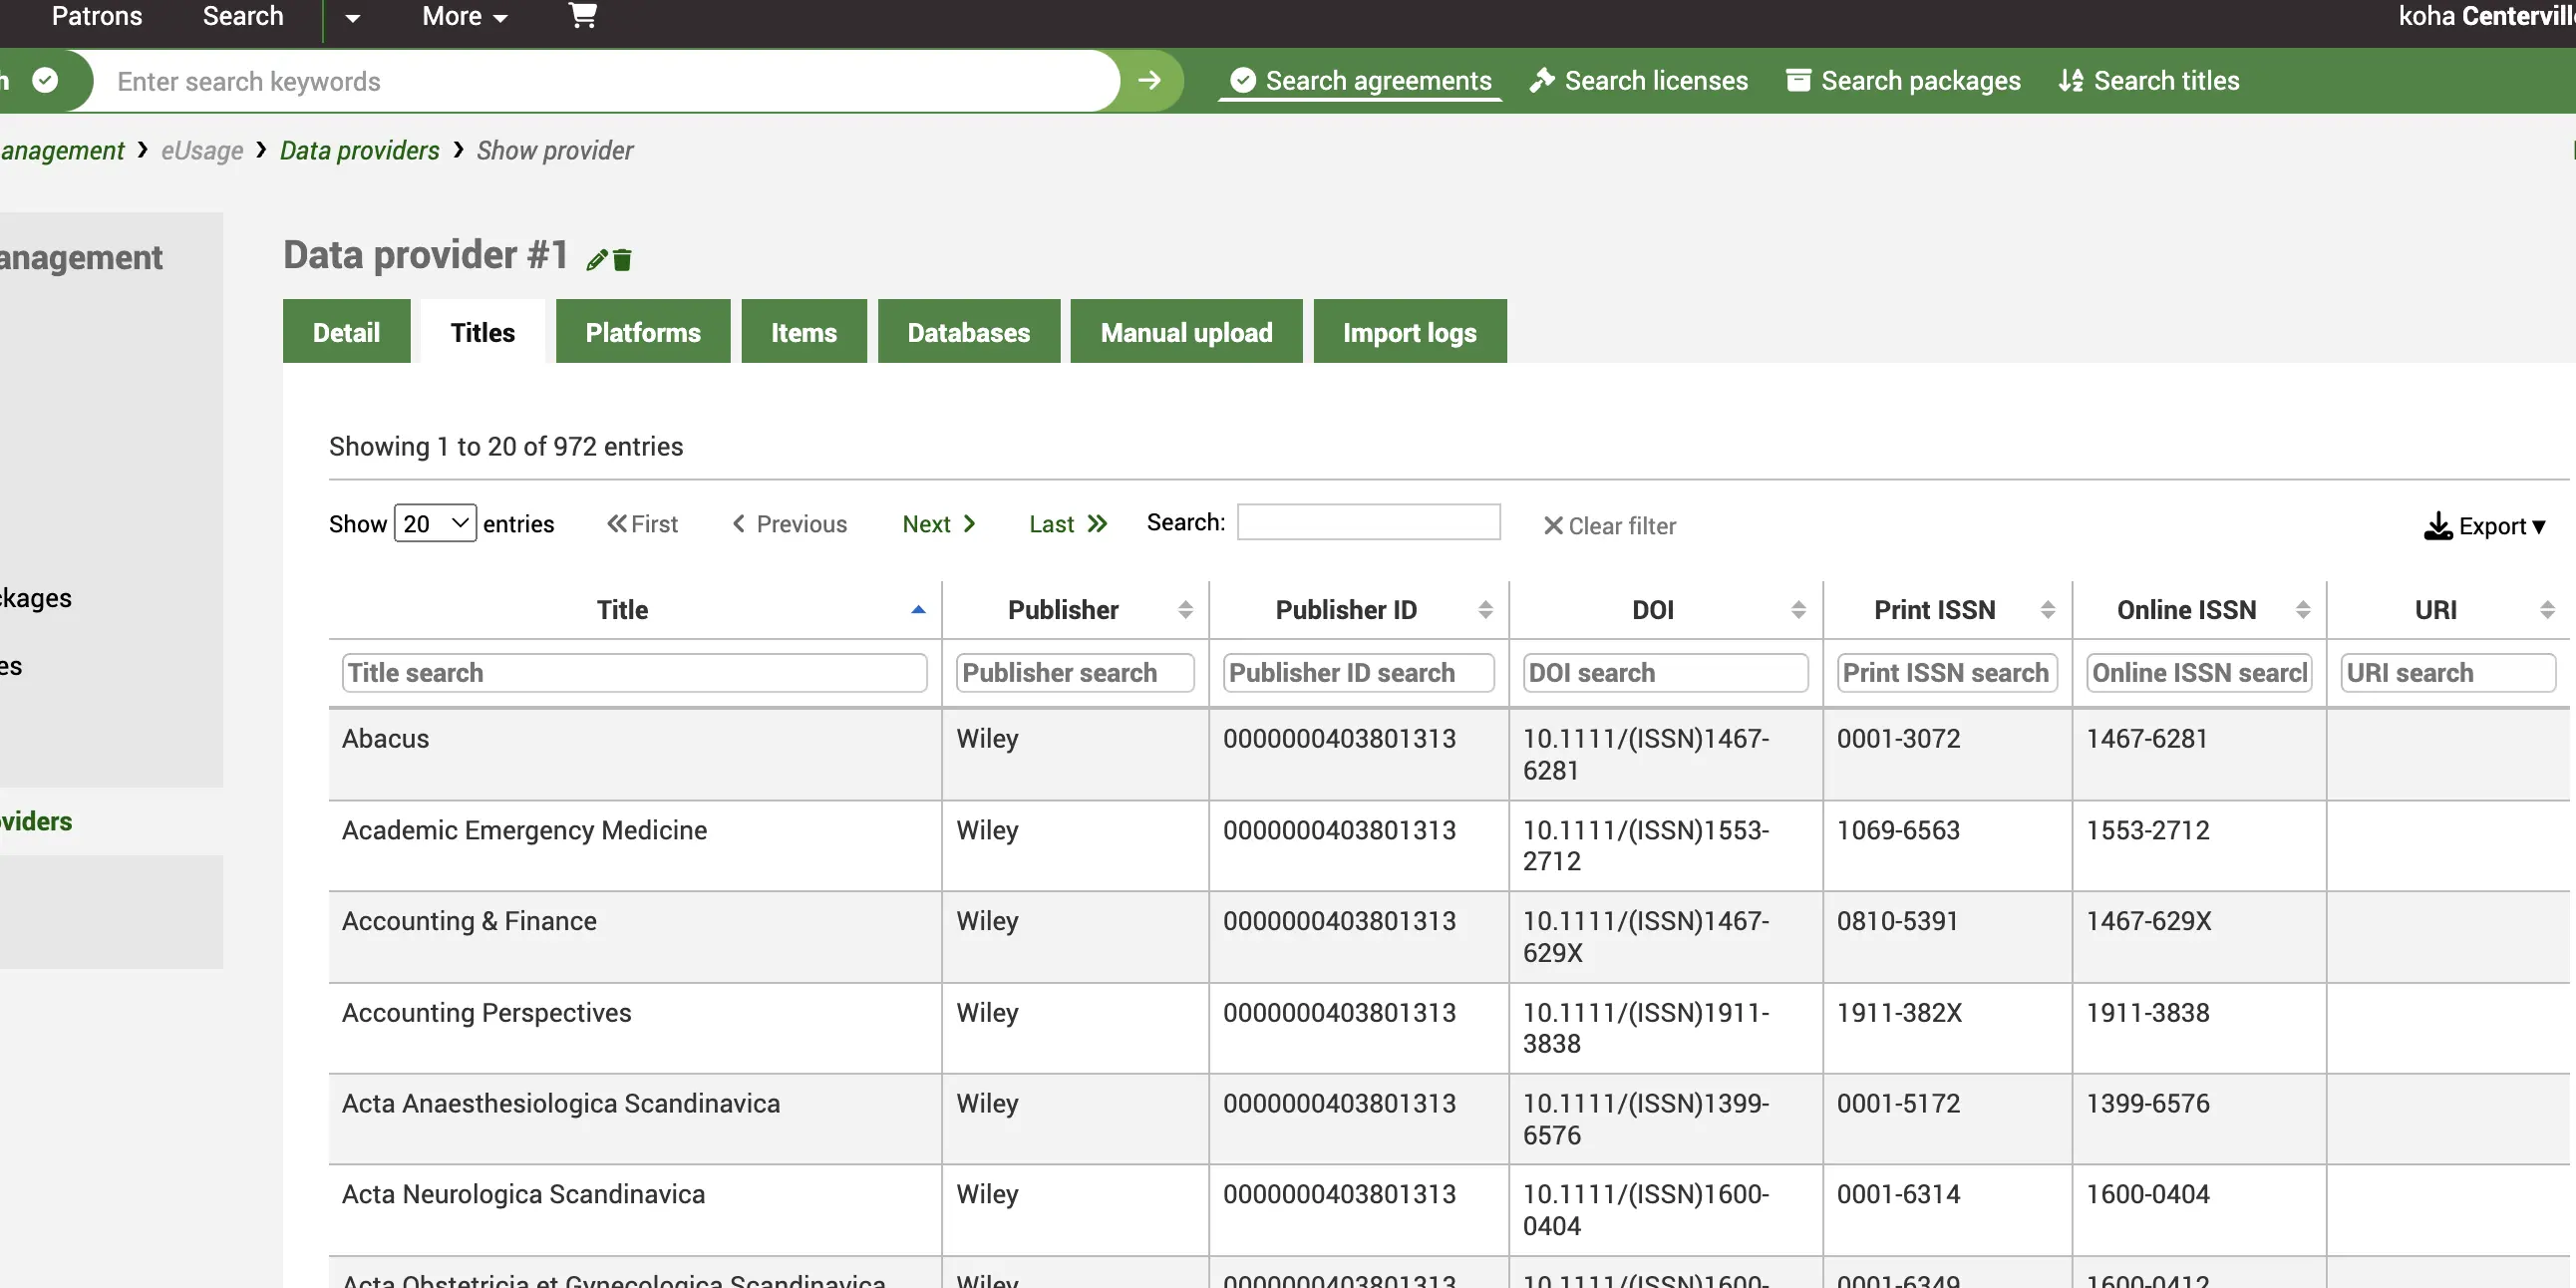
Cliquez sur le nom du Fournisseur de données pour afficher la vue complète.
Vous y trouverez un résumé des types de rapports et des informations de connexion SUSHI, ainsi que des onglets contenant les données récoltées pour les rapports sur les titres (TR), les plateformes (PR), les articles (IR) et les bases de données (DR).
Dans l’onglet “Titres” par exemple, vous pouvez voir une liste de tous les titres moissonnés sur cette plateforme avec les identifiants du rapport COUNTER. Utilisez les champs de recherche pour affiner vos résultats.
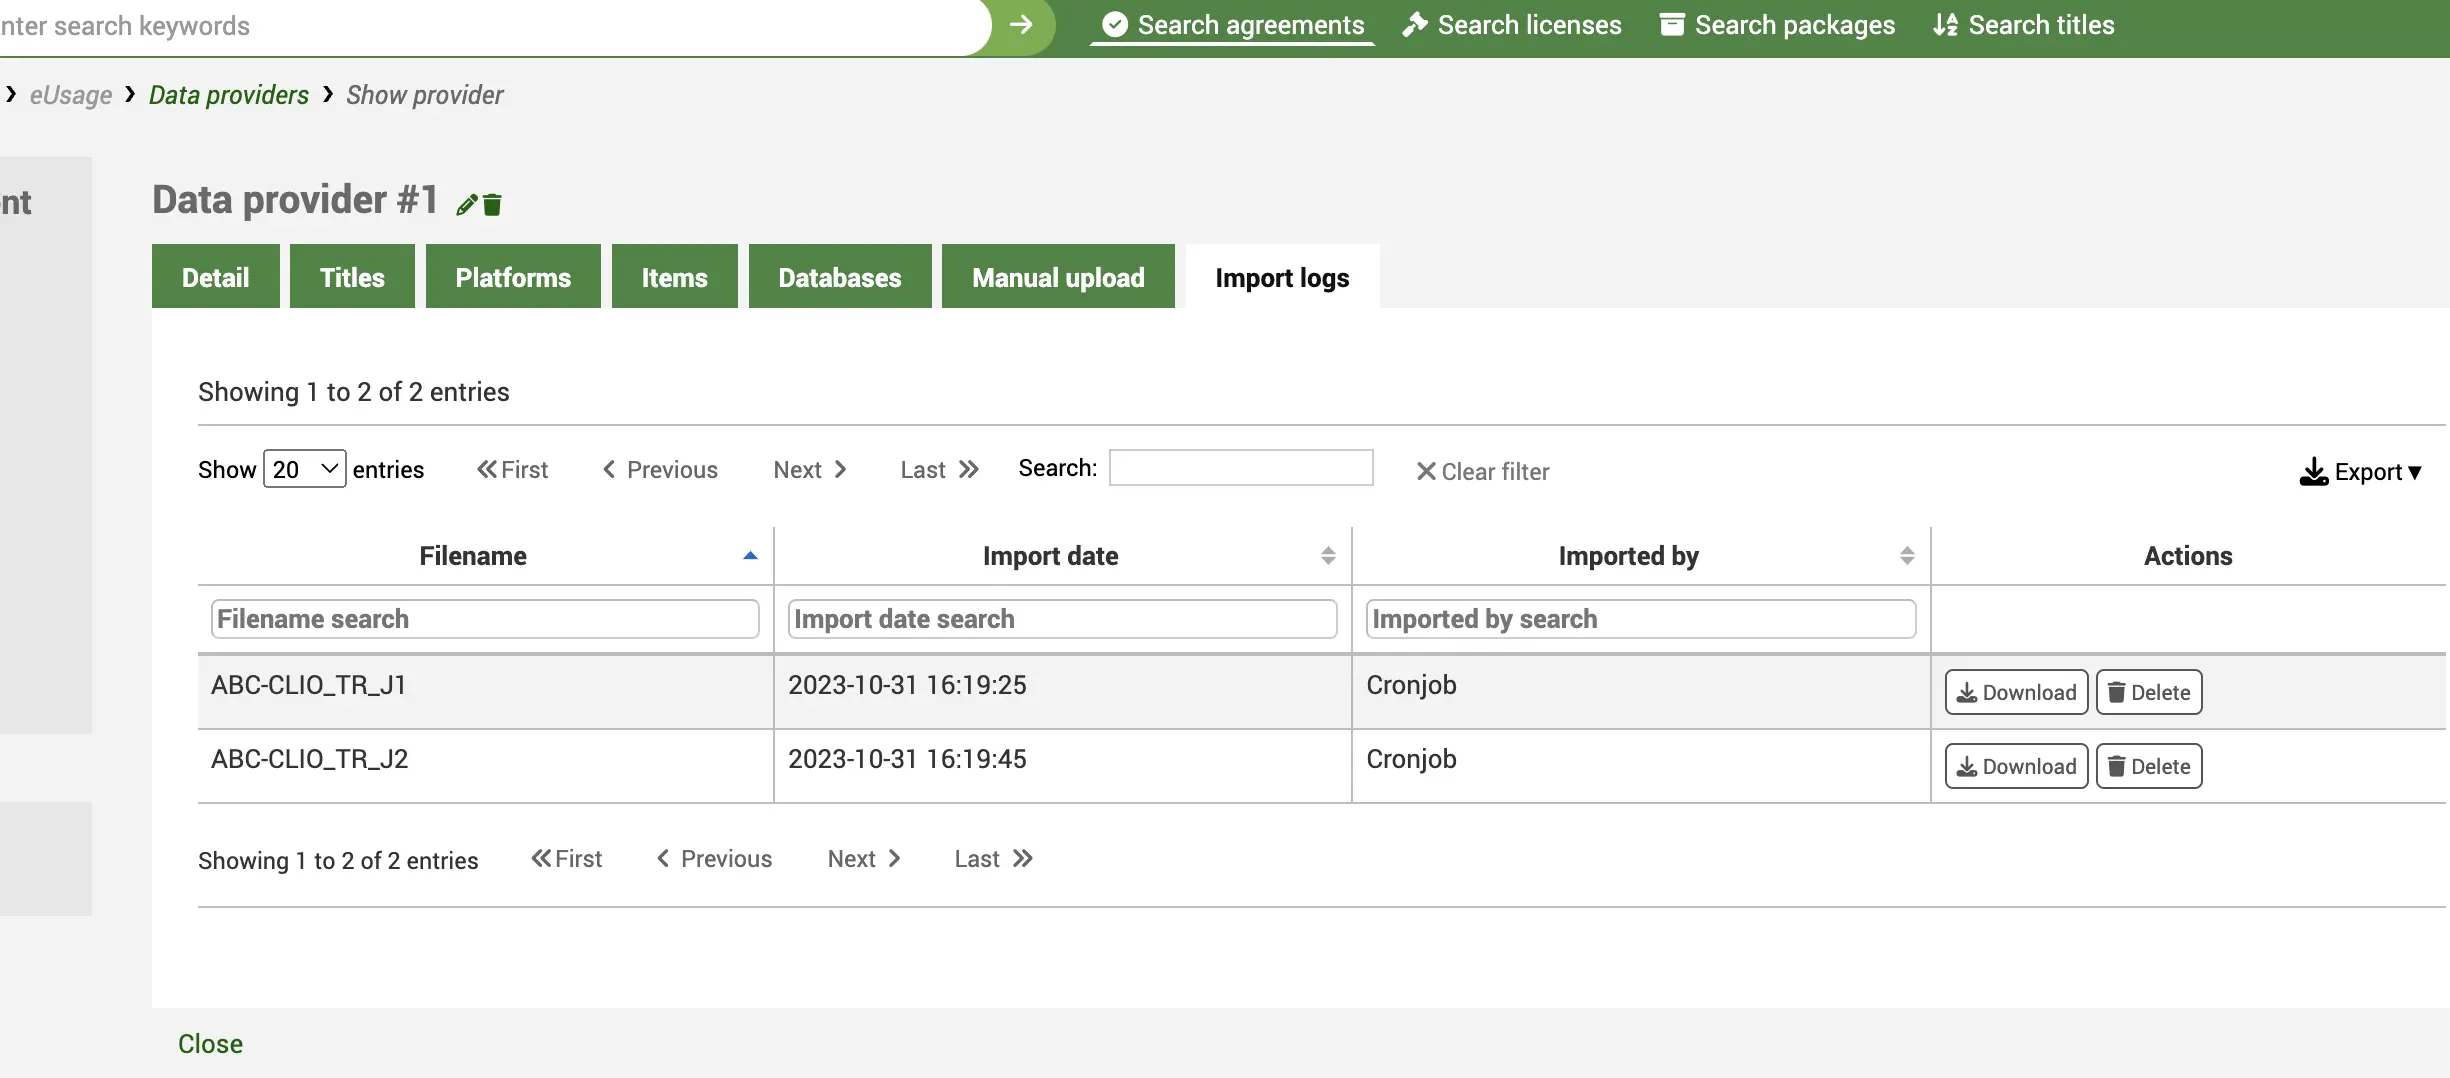
L’onglet Journaux d’importation fournit une piste d’audit de tous les moissonnages, y compris la date et l’heure d’importation. Vous verrez également un bouton “Télécharger” qui vous permet de télécharger le fichier COUNTER 5 original si vous souhaitez l’utiliser dans une autre application ou l’importer dans une feuille de calcul. Vous pouvez également supprimer le fichier à partir d’ici, ainsi que l’entrée dans le journal.
L’onglet Téléchargement manuel vous permet de télécharger manuellement un fichier COUNTER 5 à partir de votre ordinateur. Utilisez cette option pour les fournisseurs qui n’offrent pas de point de terminaison SUSHI mais qui peuvent vous fournir des fichiers compatibles COUNTER par courrier électronique ou par un autre mécanisme.
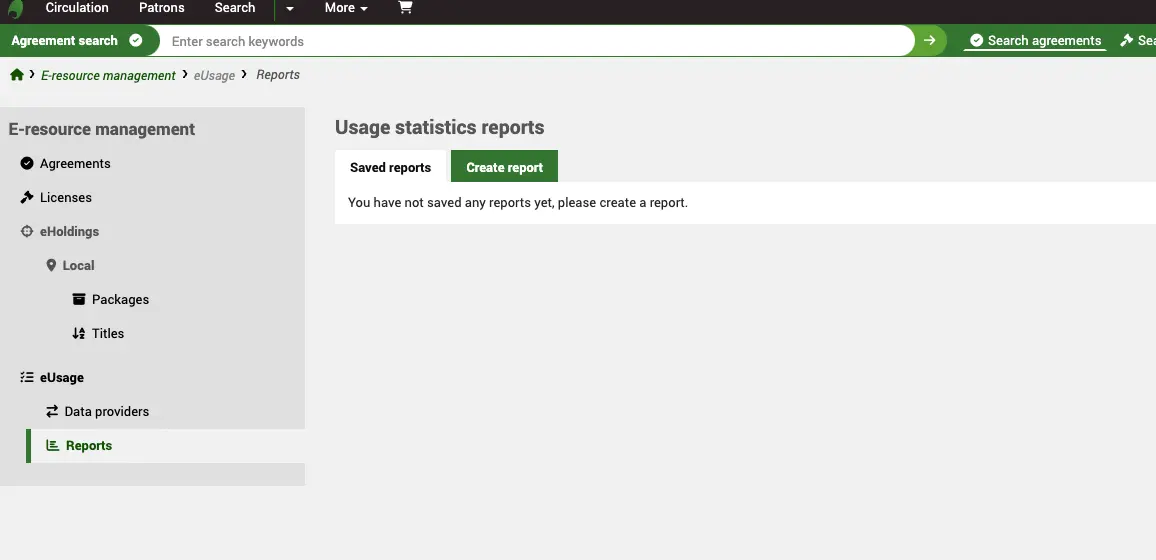
Rapports
A partir de la page d’accueil de la Gestion des ressources électroniques, cliquez sur le lien Rapports dans le menu de gauche.
Aller à : Plus > Gestion des ressources électroniques > Rapports
Cliquez sur l’onglet “Créer un rapport” pour créer un nouveau rapport.
Sur la page d’accueil des rapports, vous verrez une liste de tous les “Rapports enregistrés” ainsi que la possibilité de “Créer un rapport”.
Créer un rapport
Les rapports de statistiques d’utilisation se trouvent dans le module ERM plutôt que dans le module général des rapports Koha en raison de la spécificité de ces données statistiques.
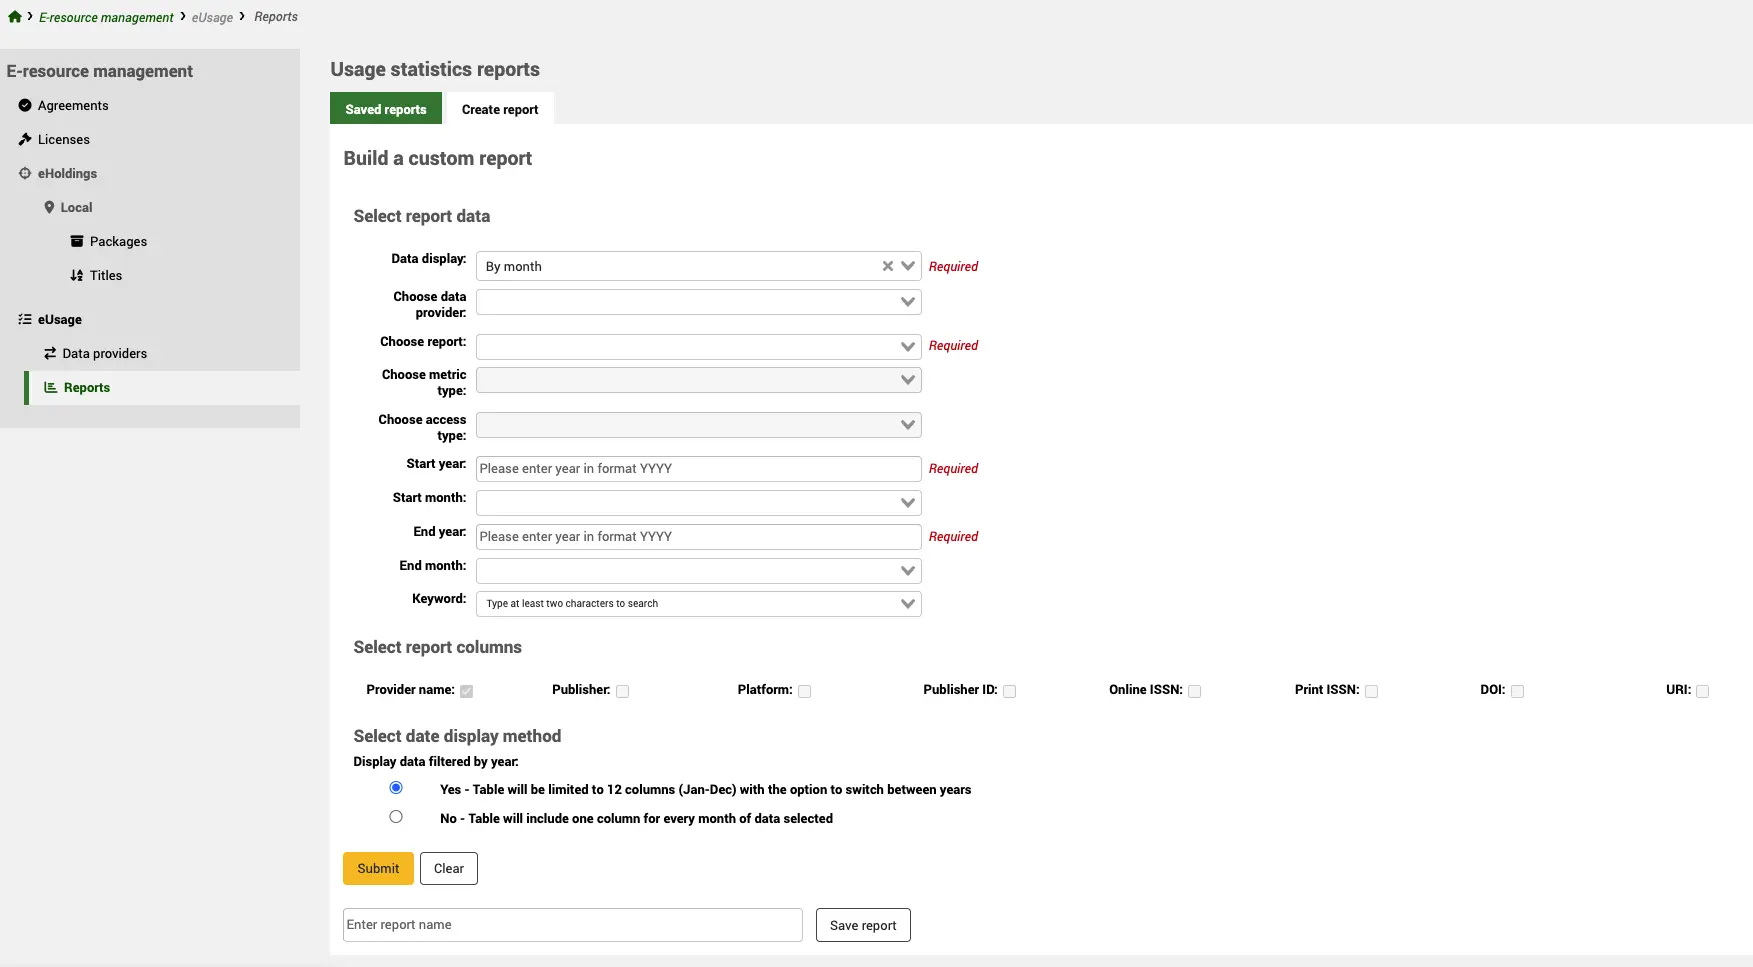
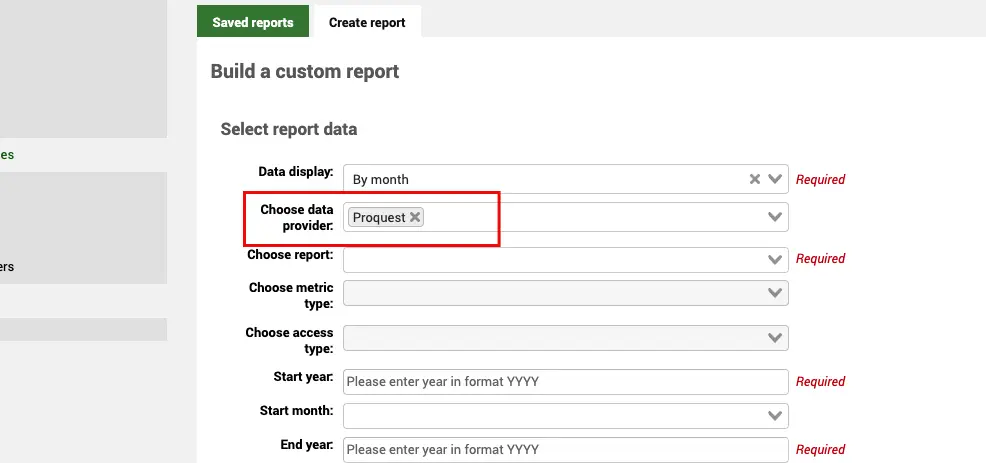
Sélectionner un rapport de données
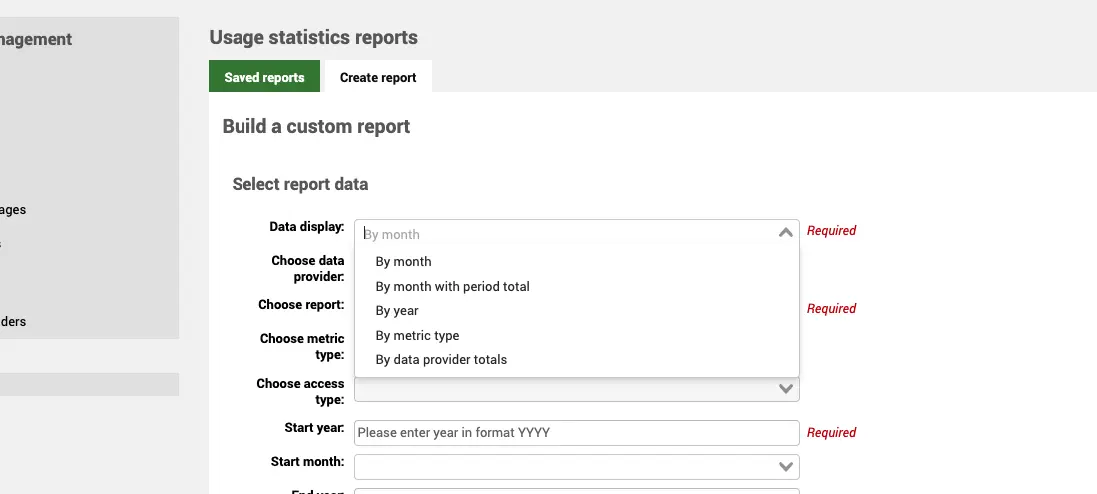
Affichage des données (Obligatoire)
En fonction de la nature des données que vous recherchez, vous disposez d’un certain nombre d’affichages : décomptes mensuels et annuels, avec ou sans totaux ; décomptes par type de mesure, demandes totales ou uniques. Vous pouvez également utiliser les totaux des fournisseurs de données pour obtenir un seul compte global.
Choisir un Fournisseur de données
Vous pouvez consulter les données d’un seul Fournisseur de données (plateforme) en sélectionnant le fournisseur de données dans la liste déroulante.
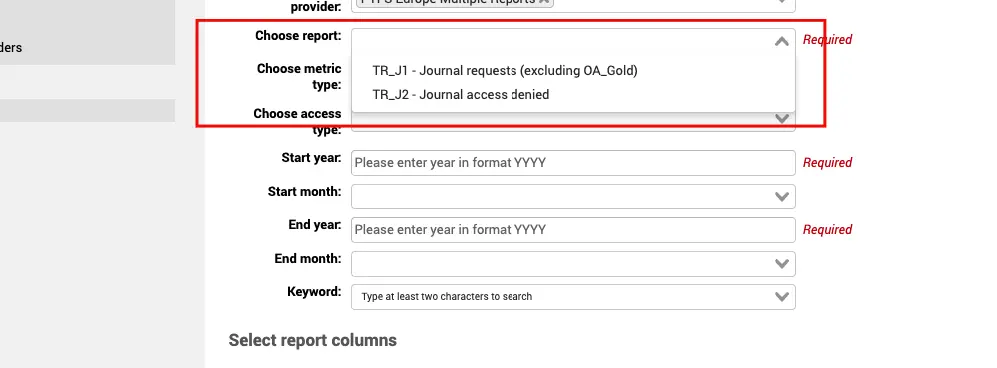
Choisir un rapport (Obligatoire)
Une fois que vous avez sélectionné un fournisseur de données, vous ne pouvez sélectionner qu’un type de rapport utilisé dans la fiche du fournisseur. Ainsi, si le fournisseur de données prend en charge TR_J1 et TR_J2, seuls ces types de rapport seront listés.
Si vous sélectionnez le type de rapport avant le fournisseur, la liste déroulante des fournisseurs sera limitée à ceux qui prennent en charge ce type de rapport.
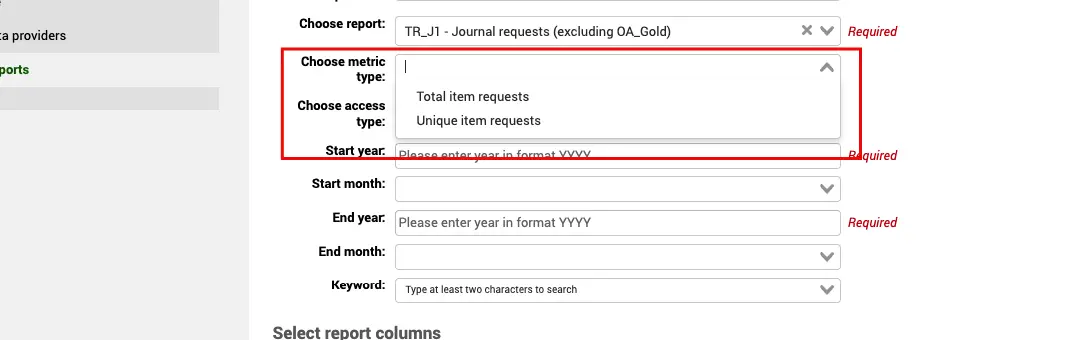
Choisir un type de mesure
Les types d’indicateurs affichés dépendent du type de rapport sélectionné. Certains types de mesures ne s’appliquent qu’à certains types de rapports. Par exemple, TR_J1 prend en charge les Demandes d’articles totales et les Demandes d’articles uniques, tandis que PR_P1 vous donnera la Recherche sur les plateformes.
Si vous ne choisissez pas un type de mesure, tous les types de mesures seront affichés dans votre rapport.
Choisir un type d’accès
Pour certains rapports très spécifiques (par exemple TR_J3 et TR_B3), les données sont ventilées en fonction des types d’accès. Lorsque vous sélectionnez l’un de ces rapports, vous verrez que le champ du type d’accès devient actif et offre une option entre Contrôlé et OA_Gold.
Année de début (Obligatoire)
Vous devez saisir une année de départ pour votre rapport.
Mois de départ
Vous pouvez (facultativement) préciser un mois si vous souhaitez visualiser les données d’une période précise.
Année de fin (Obligatoire)
Vous devez préciser une année de fin pour votre rapport.
Mois de fin
Vous pouvez (facultativement) préciser un mois si vous souhaitez visualiser les données d’une période précise.
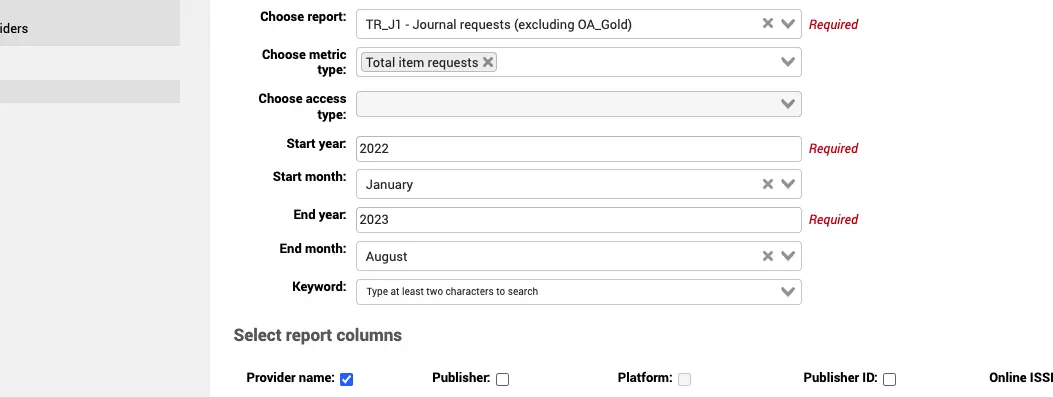
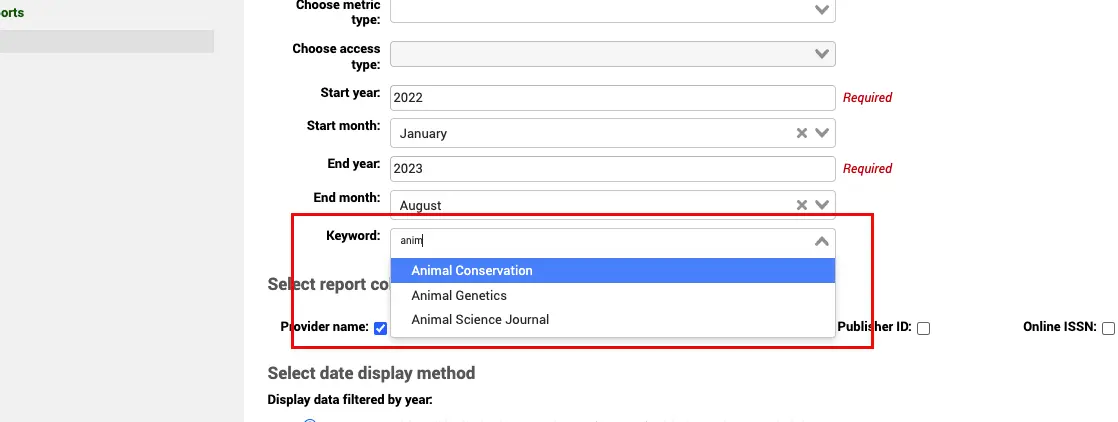
Mot-clef
Une fois que vous avez sélectionné un fournisseur de données, vous pouvez utiliser l’option Mot-clé pour rechercher un titre. Cela vous permet de consulter les statistiques relatives à une publication particulière.
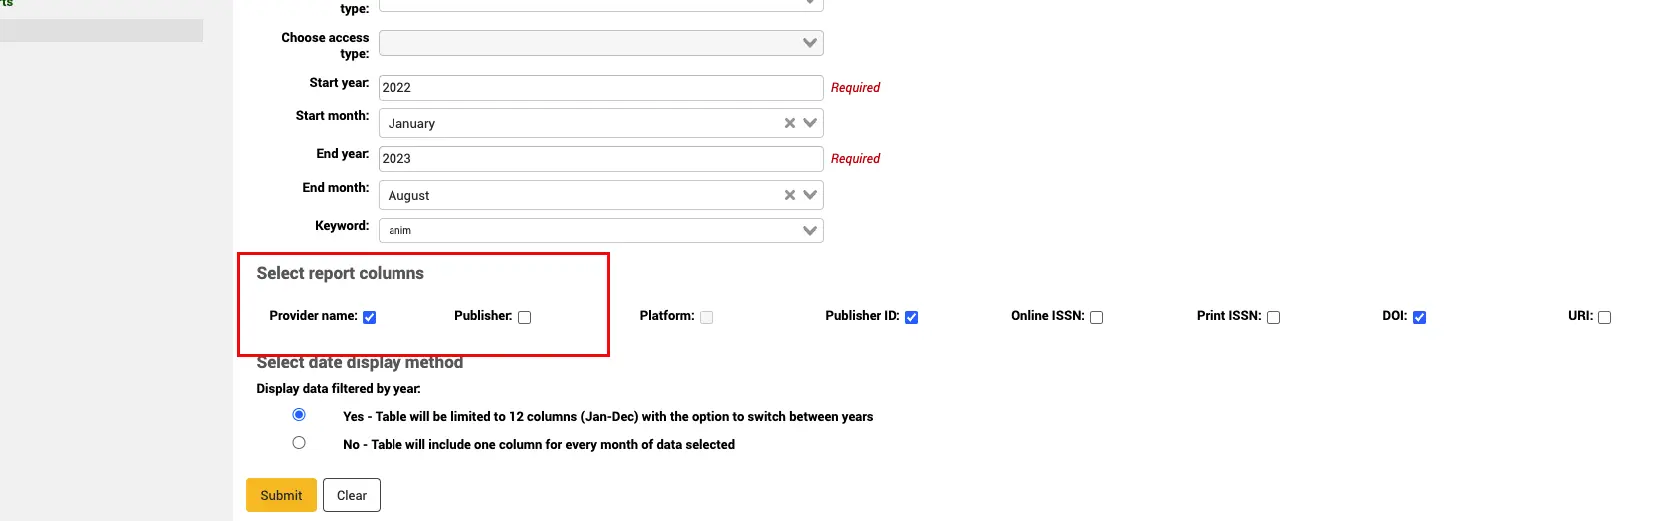
Sélectionner les colonnes du rapport
Par défaut, le nom du Fournisseur est ajouté à votre rapport, mais vous pouvez également inclure des données supplémentaires dans votre rapport COUNTER, telles que l’éditeur, le DOI, etc.
Consultez la section 4. COUNTER reports, COUNTER Code of Practice pour obtenir des informations sur tous les rapports COUNTER.
Méthode d’affichage de la date de début
Lorsque cette option est réglée sur Oui, les données sont toujours classées par période de 12 mois, de janvier à décembre. Cela permet de rendre le rapport lisible à l’écran. Sur le rapport, vous aurez la possibilité de basculer d’une année à l’autre si vous avez sélectionné des données pour plus d’une année.
Si cette option est réglée sur Non, vous aurez une colonne pour chaque mois sélectionné. Évidemment, si vous avez sélectionné de nombreux mois, vous devrez peut-être utiliser votre barre de défilement pour naviguer dans les résultats de la page.
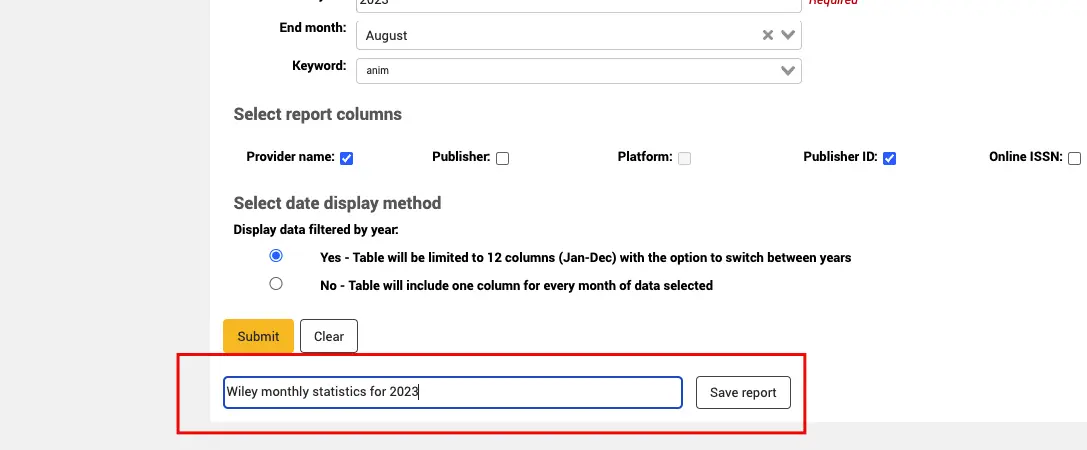
Vous pouvez enregistrer votre rapport en saisissant un nom et en sélectionnant “Enregistrer le rapport”.
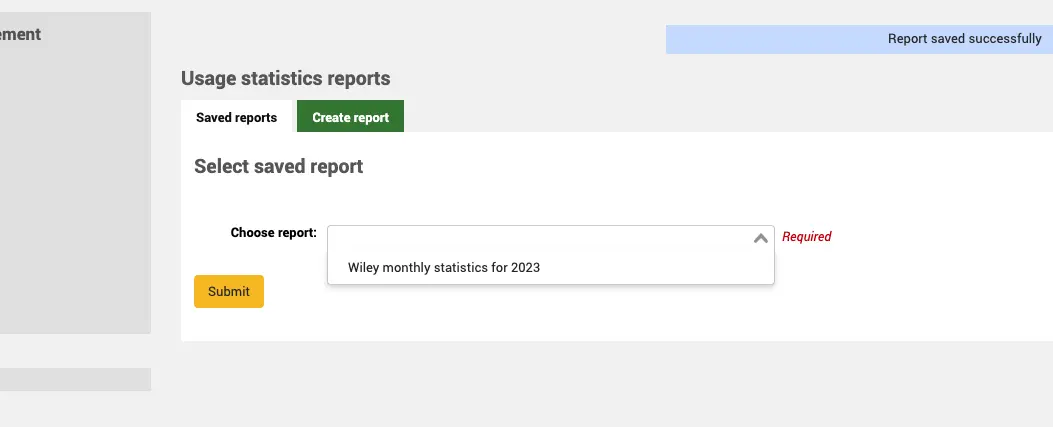
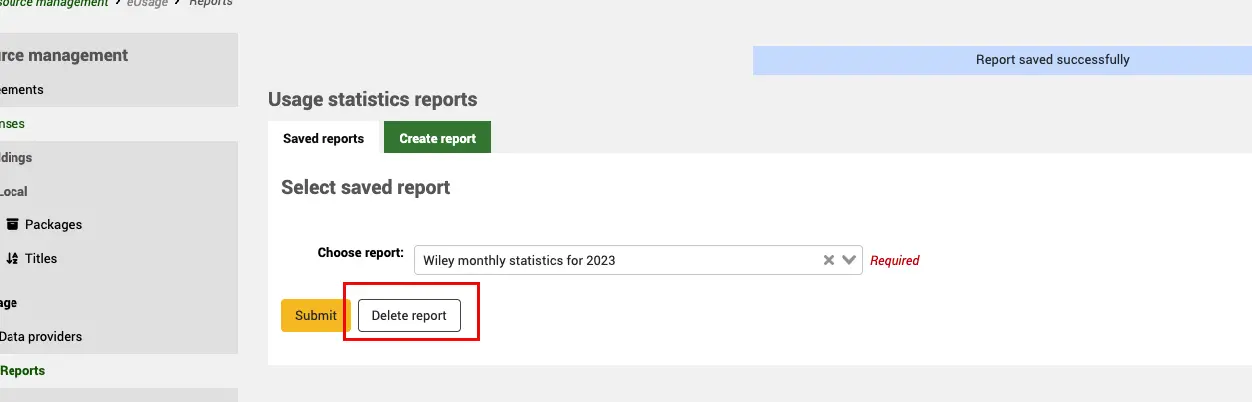
Rapports enregistrés
Une fois que vous avez créé un rapport, il apparaîtra dans l’onglet “Rapports enregistrés” pour une utilisation ultérieure.
Pour supprimer un rapport enregistré, utilisez le bouton Supprimer de la page Rapports enregistrés une fois que vous avez sélectionné le rapport que vous souhaitez supprimer.
Une fois le rapport configuré, sélectionnez Soumettre pour exécuter la requête. Un rapport dont l’affichage des données est réglé sur Oui se présente comme suit
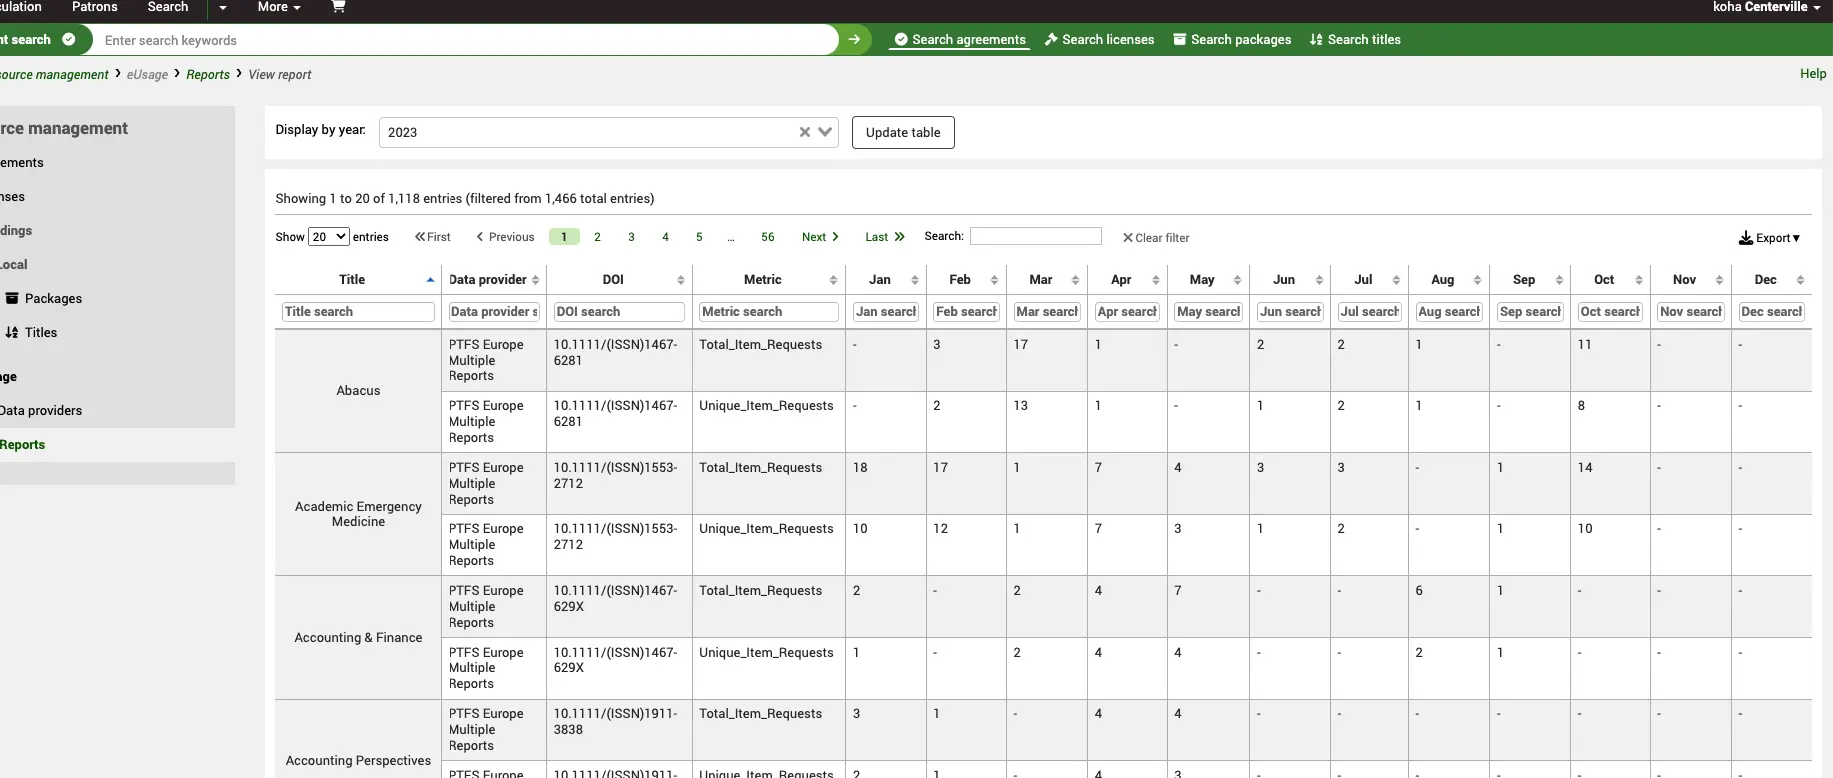
Remarquez l’option “Afficher par année” en haut de la page. S’il y a plus d’une année, vous pouvez l’utiliser pour mettre à jour le tableau avec les données des années précédentes.
Si vous sélectionnez Non, une liste de mois à sélectionner/désélectionner vous sera proposée.
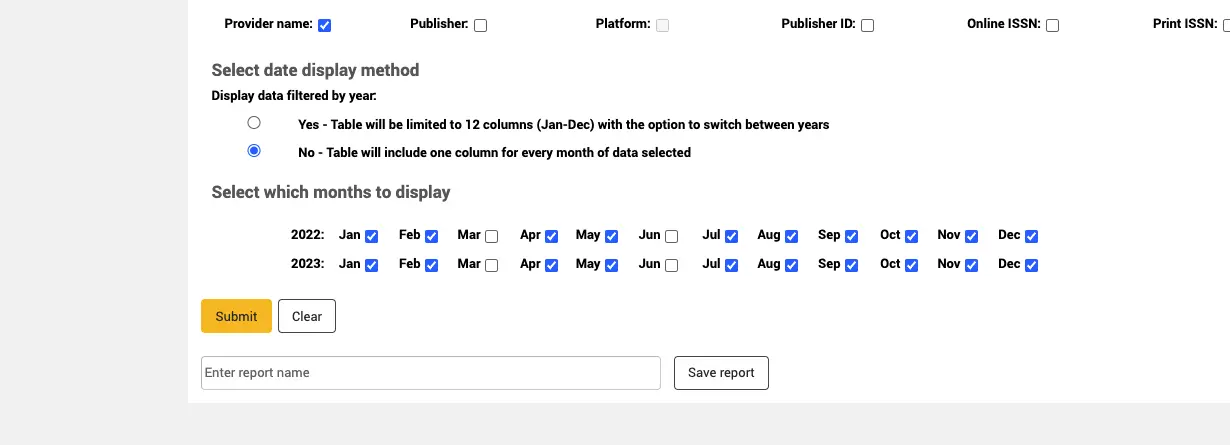
En raison du nombre de mois sélectionnés, il se peut que le rapport défile sur la droite de votre page.
Astuce
Assurez-vous d’avoir récolté les données les plus récentes auprès de votre fournisseur avant d’exécuter le rapport. Vous pouvez le faire manuellement en cliquant sur “Exécuter maintenant” dans l’écran d’accueil des Fournisseurs de données, ou bien en utilisant le cronjob de moissonnage pour récolter automatiquement les données à intervalles réguliers.