Catalogazione
Before you start cataloging in Koha you’re going to want to do some basic setup. Refer to the Implementation checklist for a full list of these things. Most importantly you’re going to want to make sure that your MARC bibliographic frameworks are all defined the way you want. Once in the cataloging module you will not be able to add or remove fields and subfields so your frameworks must be ready before you start cataloging.
Puoi anche usare OCLC Connexion per inviare direttamente i record in Koha. Per maggiori informazioni al riguardo per favore vedi la Appendice Configurazione di OCLC Connexion Gateway.
Vai a: Più > Catalogazione
Bibliographic records
In Koha the bibliographic record contains the main information related to the material. This includes things like the title, author, ISBN, etc. This information is stored in Koha in Marc (different flavors of Marc are supported in Koha). Once this information is saved, item records can be attached.
Adding records
I record bibliografici possono essere aggiunti a Koha tramite catalogazione originale o derivata. È possibile utilizzare l’interfaccia di catalogazione di base o quella avanzata.
Se vuoi catalogare un record partendo da un template vuoto nell’interfaccia di catalogazione di base
Click “New record”
Choose the framework you would like to base your record on
Nota
You can create or modify frameworks in the Administration module.
Se vuoi catalogare un record partendo da un template vuoto partendo dall’interfaccia di catalogazione avanzata
Abilitare la preferenza EnableAdvancedCatalogingEditor
Fare clic sul pulsante “Editor avanzato”

If you want to catalog a record based on an existing record at another library in the basic or advanced editor
Clicca “Nuovo da Z39.50/SRU”
Click on the arrow to pre-select a framework for your imported your catalog record (the Default framework is used if you do not make a selection).
Cerca le opere che vuoi catalogare
Nota
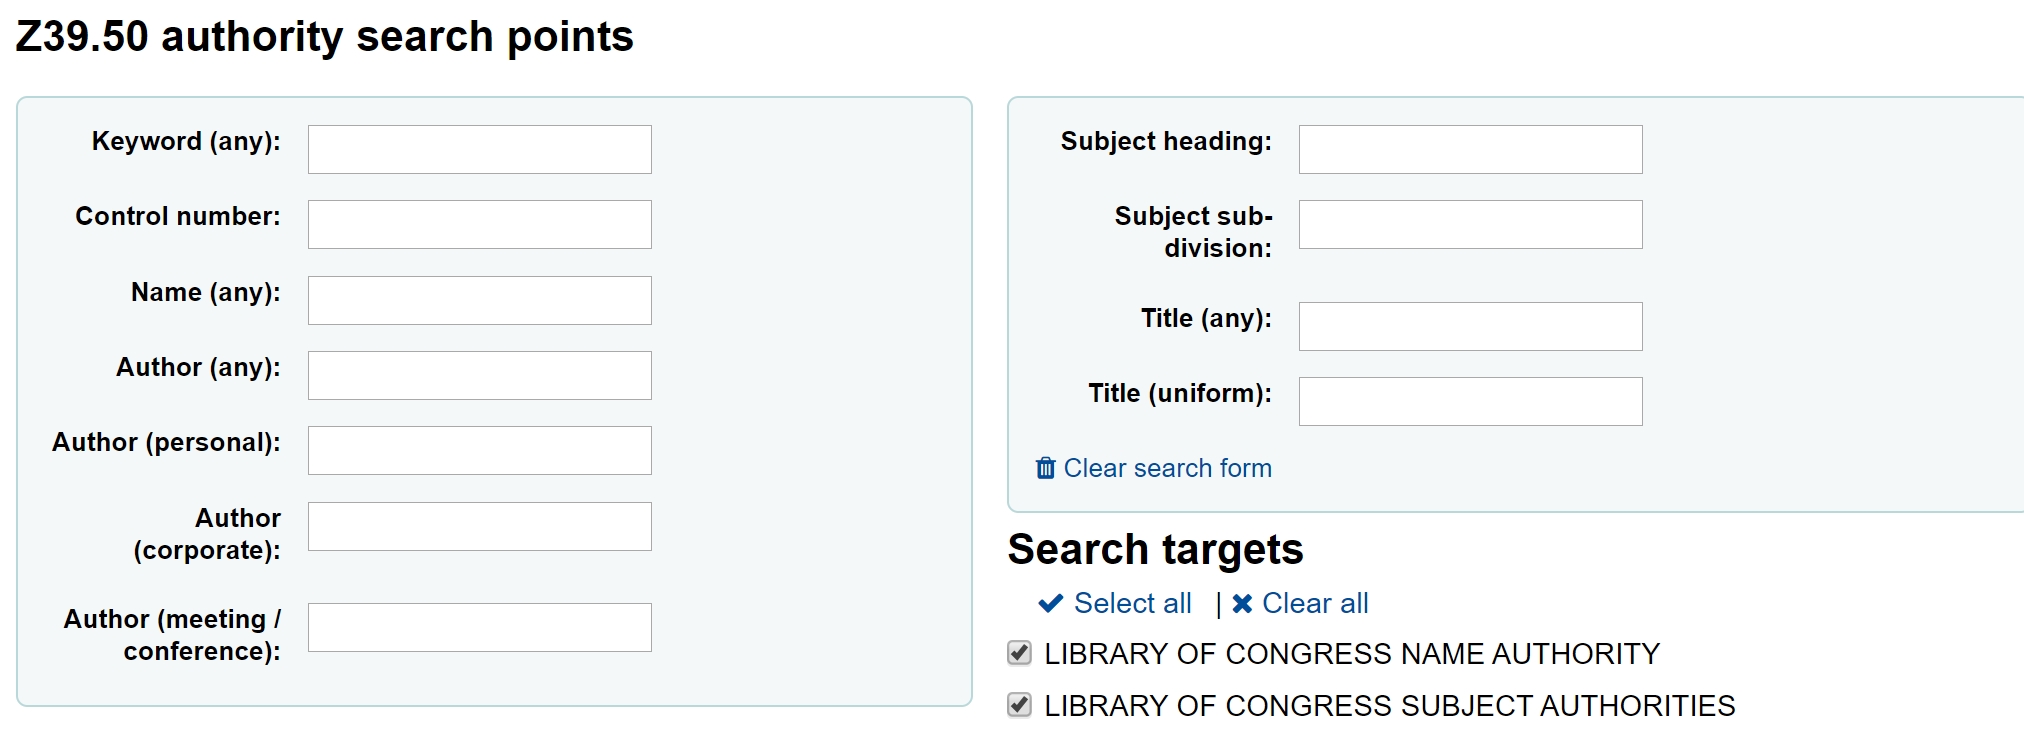
Se non vengono trovati risultati, prova a cercare su meno campi. Non tutti i server Z39.50 offrono la ricerca su tutti i campi sopraelencati.
Search targets can be altered by using the Z39.50 admin area.
The display of extra MARC fields and subfields can be configured via the AdditionalFieldsInZ3950ResultSearch preference.
From the results” “Actions” button you can view the MARC or Card view for the record or choose to import it into Koha.
Nota
You can customize the columns of this table in the “Table settings” section of the Administration module (table id: resultst).
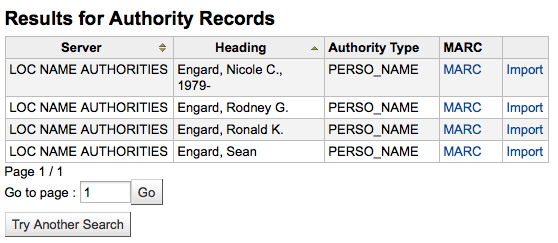
Se non trovi l’opera che cerchi tra i risultati della ricerca Z39.50, puoi provare a cliccare «Prova un’altra ricerca» a sinistra in basso

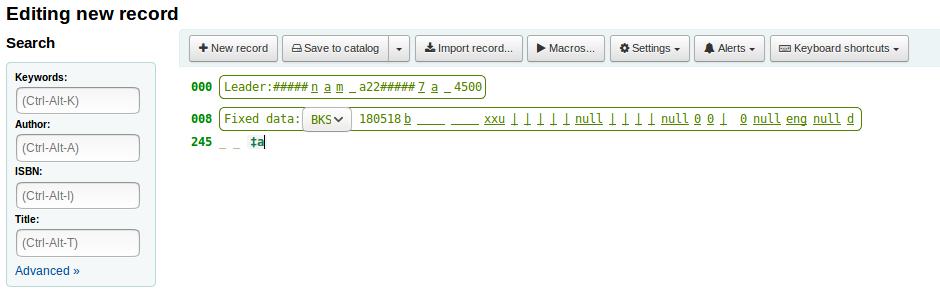
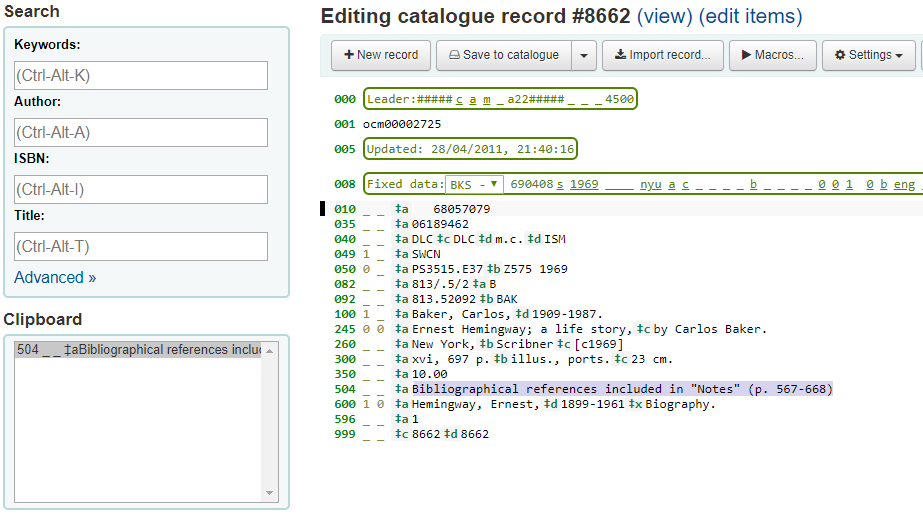
Basic editor cataloging
Nell’editor di base dopo aver aperto una griglia vuota o aver importato un record via Z39.50, ti verrà presentata la form per continuare a catalogare
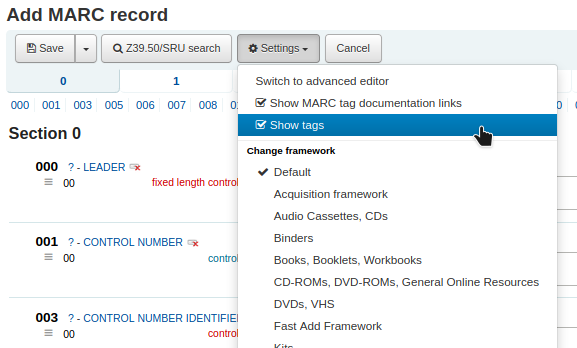
If you would rather not see the MARC tag numbers you can change the value in your hide_marc system preference or each user can check the box next to “Show tags” found under “Settings”.
Per espandere un tag compresso, clicca sul suo numero
To get help from the Library of Congress on a MARC tag click the question mark (?) to the right of each field number
It is possible to change the source of the MARC documentation using the MARCFieldDocURL system preference
Se ti sembra che ingombri lo schermo, puoi nascondere i punti interrogativi togliendo la spunta alla casella “Mostra i link alla documentazione MARC” che trovi nel menu “Impostazioni”
Alcune volte i campi possono essere non modificabili per via del valore impostato nella preferenza di sistema BiblioAddsAuthorities. Se hai questa preferenza impostata per non permettere ai catalogatori di digitare liberamente nei campi controllati dalle autorità, puoi notare un’icona con un lucchetto sul lato sinistro del campo.

Se appare questa icona, premi sui tre puntini a destra del campo per cercare una voce di autorità esistente.
Dalla lista dei risultati, scegli “Utilizza authority” per copiare il valore nel record bibliografico
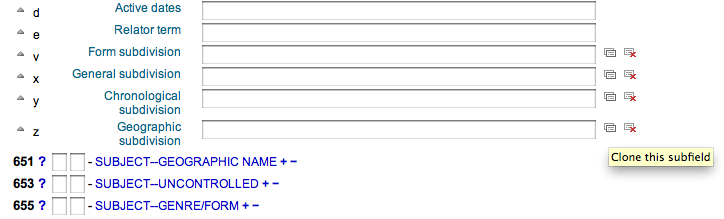
Per duplicare un campo clicca sull’icona “Ripeti questo tag” a destra del tag

Per spostare i sottocampi nell’ordine desiderato, clicca la piccola freccia verticale a sinistra del campo
Per duplicare/rimuovere un sottocampo clicca sull’icona clona/cancella alla destra del campo
Per rimuovere un sottocampo (se ce n’è più di uno dello stesso tipo), premi il link “(-)” a destra del campo
To use a plugin click on the icon to the right of the field
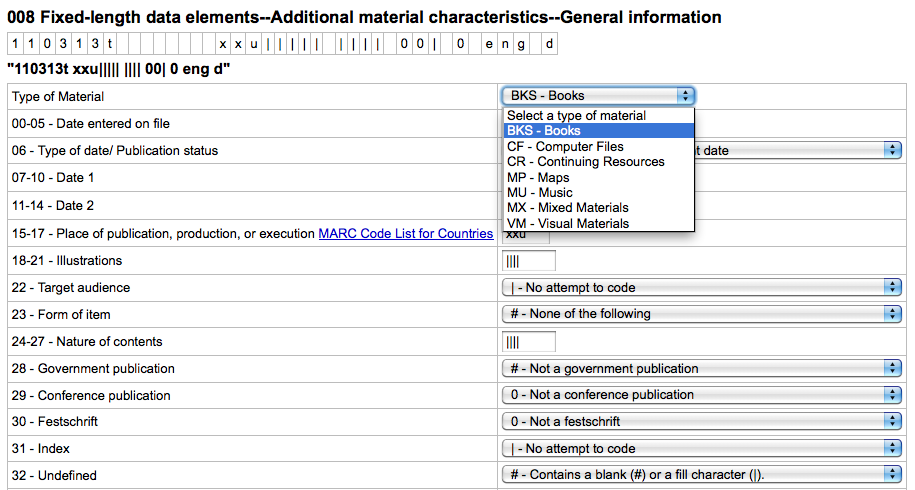
Alcuni campi a lunghezza fissa hanno l’editor che cambia in funzione del tipo di materiale che stai catalogando (per esempio i campi 006 e 008)
Quando hai finito clicca il tasto “Salva” in alto e scegli se salvare e vedere il record bibliografico appena creato oppure continuare con l’aggiunta delle copie collegate al record
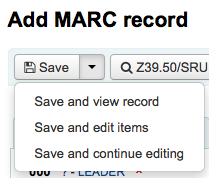
Se scegli Salva e vedi il record vedi il record che hai appena catalogato
Se scegli Salva e modifica le copie dopo aver salvato il record bibliografico arrivi a aggiungi/modifica le copie così puoi collegare il posseduto
Se scegli Salva e continua a modificare salvi il lavoro fatto e rimani in modifica per continuare a lavorare
Se stai per salvare un record duplicato, riceverai un avviso prima del salvataggio

Nota
To find possible duplicates, the system searches for the ISBN, and if there is not ISBN, it searches for the same combination of title and author.
Advanced editor cataloging
Per poter utilizzare l’editor avanzato di catalogazione è necessario abilitare la preferenza EnableAdvancedCatalogingEditor.
Nota
This feature does not currently include any support for UNIMARC or NORMARC fixed fields.
Nell’editor avanzato dopo aver aperto una griglia vuota o aver importato un record via Z39.50, ti verrà presentata la form per continuare a catalogare
Utilizzando la casella di ricerca a sinistra è possibile eseguire ricerche Z39.50

E da quei risultati di Z39.50 è possibile visualizzare il record marc cliccando sul link a destra

Facendo clic su “Importa” porterà il record nell’editor in cui è possibile eseguire le modifiche
Nota
Quando aggiungi un nuovo record con l’editor avanzato, devi inserire un underscore per un indicatore vuoto e circondare gli indicatori con spazi.
Nota
Devi inserire uno spazio prina del primo delimitatore di sottocampo ma non prima o dopo gli altri delimitatori di sottocampo all’interno del campo.
At the bottom of the editor you will see help from the Library of Congress for the field you are on. In cases where your MARC is invalid you will see red highlighting. To edit the record using only keyboard functions the Keyboard shortcuts button will inform you of the necessary commands.
A clipboard is available to copy and paste text between fields. See the image and table below for the shortcuts used with the clipboard.
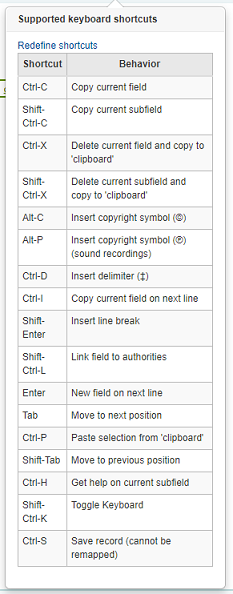
Advanced cataloging keyboard shortcuts
Le seguenti scorciatoie da tastiera possono essere utilizzate nella catalogazione avanzata per risparmiare tempo e click.
Scorciatoia |
Comportamento |
|---|---|
Ctrl-C |
Copy current field |
Shift-Ctrl-C |
Copy current subfield |
Ctrl-X |
Delete current field and copy to “clipboard” |
Shift-Ctrl-X |
Delete current subfield and copy to “clipboard” |
Alt-C |
Insert copyright symbol (©) |
Alt-P |
Insert copyright symbol (℗) (sound recordings) |
Ctrl-D |
Inserisci delimitatore (‡) |
Ctrl-I |
Copy current field on next line |
Shift-Enter |
Inserisci a capo |
Shift-Ctrl-L |
Link field to authorities |
Inserisci |
Nuovo campo sulla nuova linea |
Tab |
Sposta alla posizione successiva |
Ctrl-P |
Paste selection from “clipboard” |
Shift-Tab |
Ritorna alla posizione precedente |
Ctrl-H |
Ricevi aiuto sul presente sottocampo |
Shift-Ctrl-K |
Toggle Keyboard |
Ctrl-S |
Save record (cannot be remapped) |
Advanced cataloging virtual keyboard
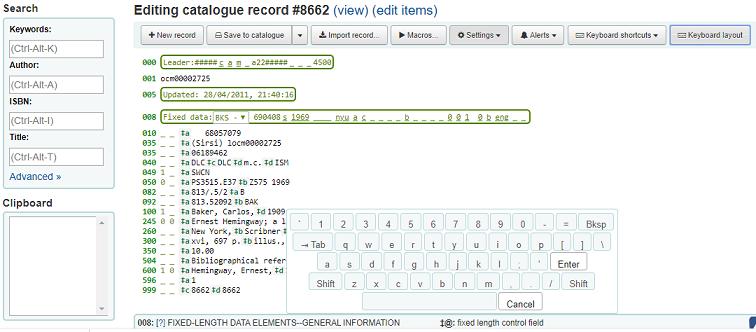
A virtual keyboard is available for adding diacritics and symbols. Use the shortcut Shift-Ctrl-K to display the keyboard. A “Keyboard layouts” button will display at the top of the advanced editor that allows you to set the virtual keyboard layout for different languages.
Macros in advanced cataloging
Per creare una nuova macro:
Select the «Macros…» button
Apparirà un finestra pop up. In questa finestra seleziona «Nuova macro …», inserisci il nome della macro e clicca su OK.
Ora clicca alla destra del piccolo numero 1 e inserisci la prima linea della tua macro. Per una macro multilinea, per esempio perchè lavori più campi, dai invio cosi che appaia un piccolo numero 2. Ora inserisci la seconda linea e continua così via via.
Le tue macro verranno salvate automanticamente. Quando hai finito puoi selezionare la «x» per chiudere la finestra, o seleziona una macro da far girare sul record che stai modificando o seleziona una nuova macro da far girare.
Per modificare una macro esistente:
Select the «Macros…» button
Apparirà un finestra pop up. In questa finestra seleziona la macro che vuoi modificare e fai i tuoi cambiamenti.
Le tue macro verranno salvate automanticamente, quando hai finito puoi selezionare la «x» per chiudere la finestra, o seleziona una macro da far girare sul record che stai modificando o seleziona una nuova macro da far girare.
La sintassi di base del linguaggio delle macro:
new 500=‡aEdited with Rancor
Crea un nuovo tag 500 con un sottocampo ǂa e lo imposta a «Edited with Rancor».
245c= by J.K. Rowling.
Imposta il primo sottocampo ‡c del primo tag 245 nel record a «di J.K. Rowling», creandolo se necessario.
082a={084a}
Imposta il sottocampo ǂa del primo tag 082 (creando il sottocampo se necessario) al contenuto del primo 084‡a.
indicators=_1
Imposta gli indicatori dell’ultimo tag citato (in questo caso, 082) a “_” e «1».
new 090a=Z674.75.W67
Crea un nuovo sottocampo ǂa sul primo 090 (ma solo se quel campo già esiste) e lo imposta a Z674.75.W67.
new 090a at end=Z674.75.W67
Idem come sopra.
nuovo 245b dopo a = a tale of might and magic /
Crea un nuovo ‡b dopo il primo sottocampo a e lo imposta a » a tale of might and magic /».
delete 245b
Cancella il primo ‡b nel primo 245
Adding analytic records
Alcune volte le biblioteche offrono agli utenti la possibilità di ricerca degli articoli di rivista e quelli all’interno di monografie tramite la catalogazione analitica. La catalogazione analitica crea dei record separati per questi articoli, capitoli, sezioni eccetera compresi in una risorsa più estesa, sia un libro, un articolo di rivista, quotidiano o seriale. Nella catalogazione analitica, sebbene venga creato un record separato, questo non è fisicamente separato dalla copia superiore. Maggiori informazioni sugli Analitici al capitolo 13 dell’AACR2.
If you would like to catalog analytic records there are two options. One is to use the Easy analytics function; the other is the Analytics enhanced workflow.
Easy analytics
The easy analytics feature makes linking analytic records together easier. The first thing you need to do is set the EasyAnalyticalRecords preference to “Display” and the UseControlNumber preference to “Don’t use.”
After cataloging your analytic record (see adding records for more on creating records) click “Edit” from the normal view and choose to “Link to host item”

Ti verrà chiesto di inserire il barcode della copia a cui questo record deve essere collegato.
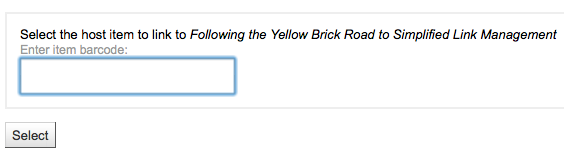
Dopo aver indicato il barcode della copia e aver cliccato “Scegli”, ti verrà presentato un messaggio di conferma.

Il record avrà ora il campo 773 riempito per definire il legame.
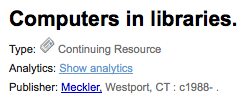
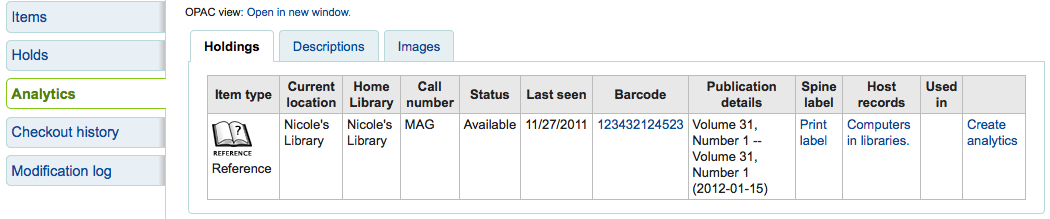
To view all of the items tied to the host record, do a search for the record, click the “Analytics” tab on the left and the analytics tied to each barcode will be shown under the “Used in” column.

Nota
It is also possible to create analytic records from this screen by clicking on “Create analytics”
You can also see the analytics attached to this record by clicking the “Show analytic” link towards the top of the record in the normal view.
Quando guardi un record analitico puoi vedere anche un collegamento alla copia della superiore nella colonna Record superiore nella tabella delle copie mentre guardi la tabella Analitici.
Analytics enhanced workflow
To use the enhanced workflow method of adding analytics, the first thing you need to do is set the EasyAnalyticalRecords preference to “Don’t display” and the UseControlNumber preference to “Use.”
After cataloging your original record (see adding records for more on creating records) click “New” from the normal view and choose to “New child record.”
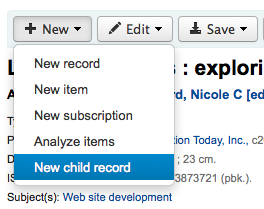
This will open a new blank record for cataloging. The blank record will have the 773 field filled in properly to complete the link once the record is saved.
The “Show analytics” link from the host record will now use the hosts record control number (001) to search for all records on the system of the type “monographic component part” or “serial component part” (Leader position 7) with a 773 subfield w that contains the hosts record control number.
Editing analytics
If you have linked an analytic record incorrectly you can remove that link by editing the analytic record (not the host record).
To do this, go to the analytic record and click the “Edit” button. For UseControlNumber simply edit or remove the corresponding 773.
If using EasyAnalytics choose to “Edit items”; To the left of each item you will see two options.

Clicking “Edit in host” will allow you to edit the item on the host record.
Cliccando “Sgancia” verrà rimosso il campo 773 e il relativo link tra scheda analitica e madre.
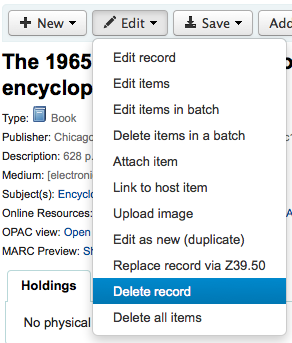
Editing records
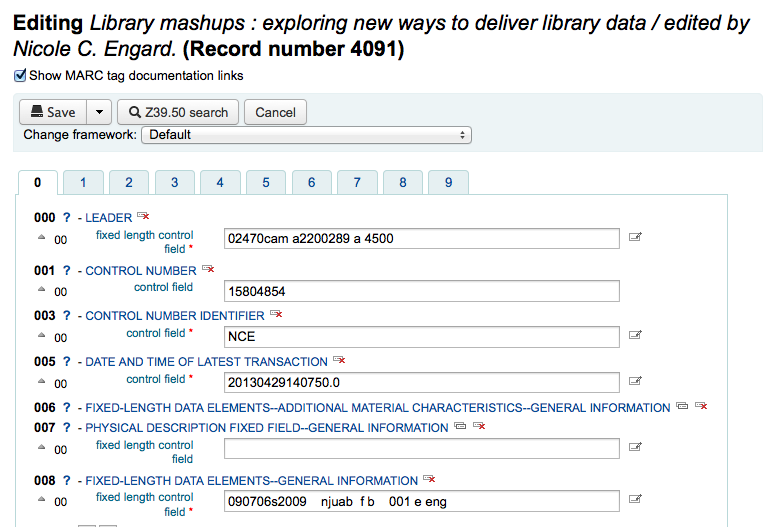
To edit a record you can click the “Actions” button and choose “Edit biblio” from the search results on the cataloging search page
oppure cliccare il tasto Modifica nel record bibliografico e scegliere “Modifica il record”

Il record si aprirà nell’editor MARC
The alternative is to search via Z39.50 to overlay your record with a fuller record found at another library. You can do this by choosing “Replace record via Z39.50/SRU” from the “Edit” menu.
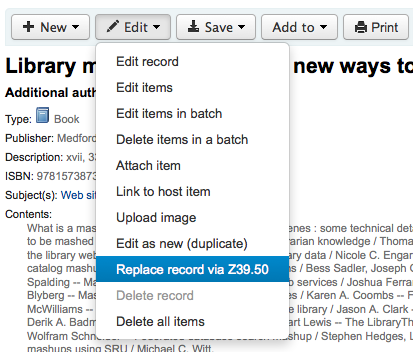
Once you choose that, you will be brought to a Z39.50 search window to search other libraries for the record in question.
Quando hai finito le modifiche, clicca “Salva”.
You can also use the edit menu to add your own custom cover image if you have either OPACLocalCoverImages and/or LocalCoverImages set to “Display” by choosing “Upload image” from the menu.
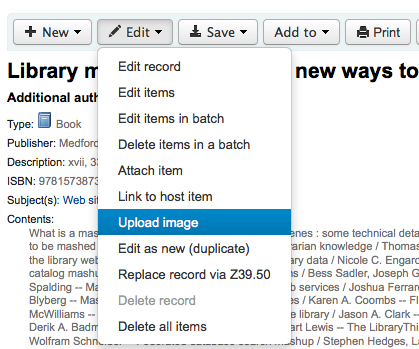
Choosing “Upload image” will take you to the Upload Local Cover Image Tool.
Duplicating records
Sometimes a copy of the record you need to catalog can’t be found via Z39.50. In these cases you can create a duplicate of similar record and edit the necessary pieces to create a new record. To duplicate an existing record click “Edit as new (duplicate)” from the “Edit” menu on the bibliographic record.
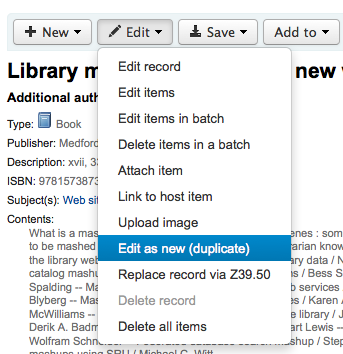
This will open a new MARC record with the fields filled in with the values from the original bibliographic record.
Attaching files to records
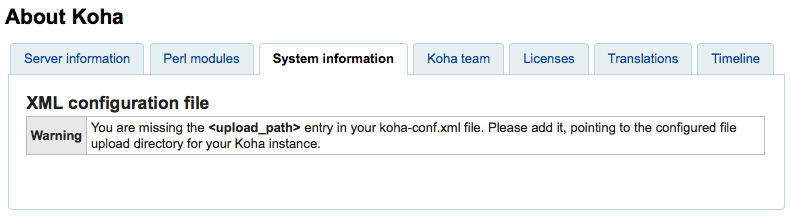
Se si desidera caricare dei file su Koha è possibile farlo con poche impostazioni.
Sarà necessario chiedere all’amministratore di sistema di impostare la variabile di configurazione “upload_path” per puntare alla posizione dove verranno memorizzati i file
You can see if your upload path is set correctly by visiting About Koha > System information. If there is an error you will see it there.
Sincerarsi che la preferenza di sistema OPACBaseURL sia impostata in modo corretto
You will want to add the upload.pl plugin to the 856$u subfield in one (or multiple) of your frameworks
Una volta che tutto è impostato, è possibile continuare con la catalogazione normale. Si vedrà un’icona del plugin accanto all’856$u che aprirà la finestra per l’upload e/o la ricerca
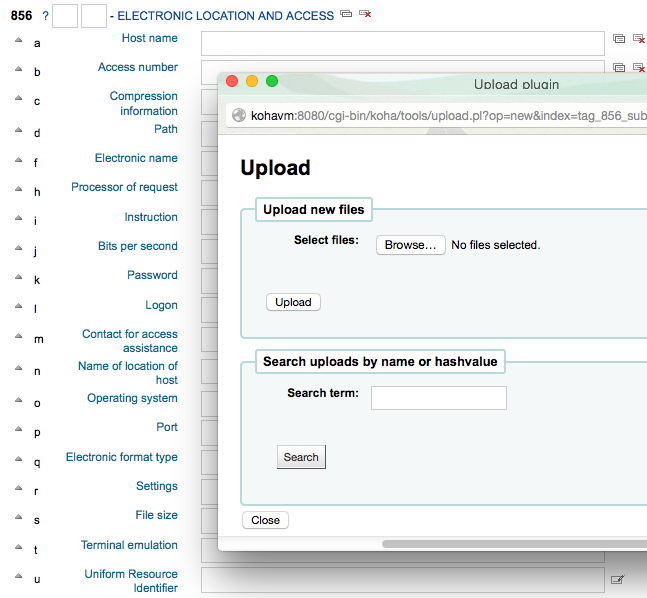
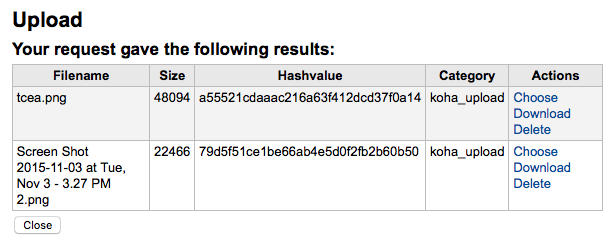
Da questo menu è possibile scegliere Sfoglia per trovare un file e allegarlo, o è possibile cercare files che hai caricato in precedenza utilizzando la casella di ricerca. Dai risultati di ricerca è possibile scegliere quali file allegare.
Una volta scelto il file verrà visualizzato come un link nel record MARC e sul display del dettaglio.

Nota
If the file is a PDF, it will be opened directly in the user’s browser whereas if the file is an image or another type of file, the user will be prompted to download it.
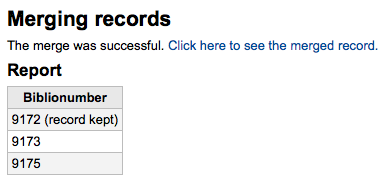
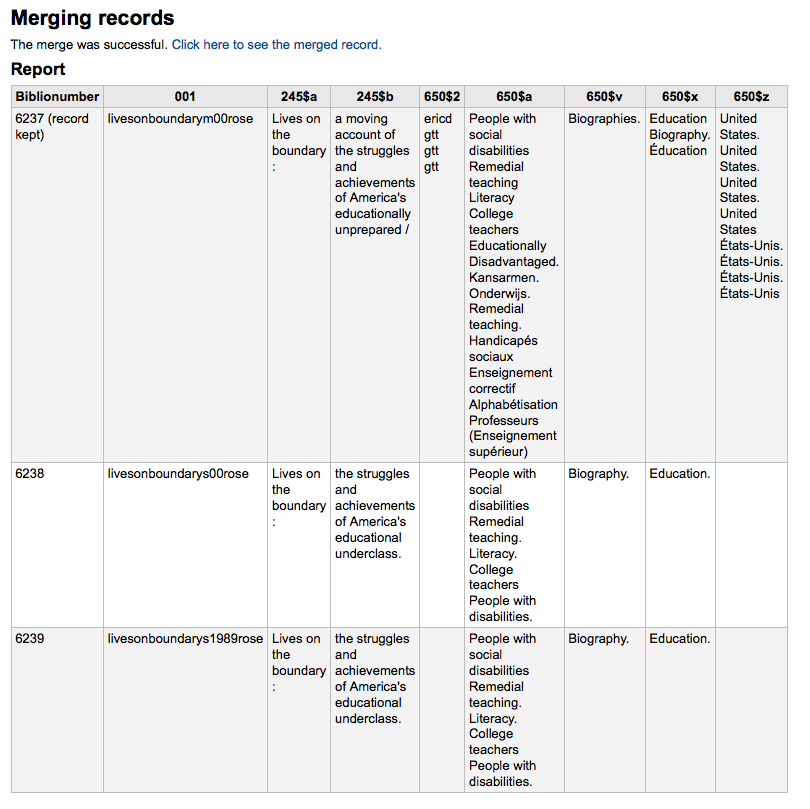
Merging records
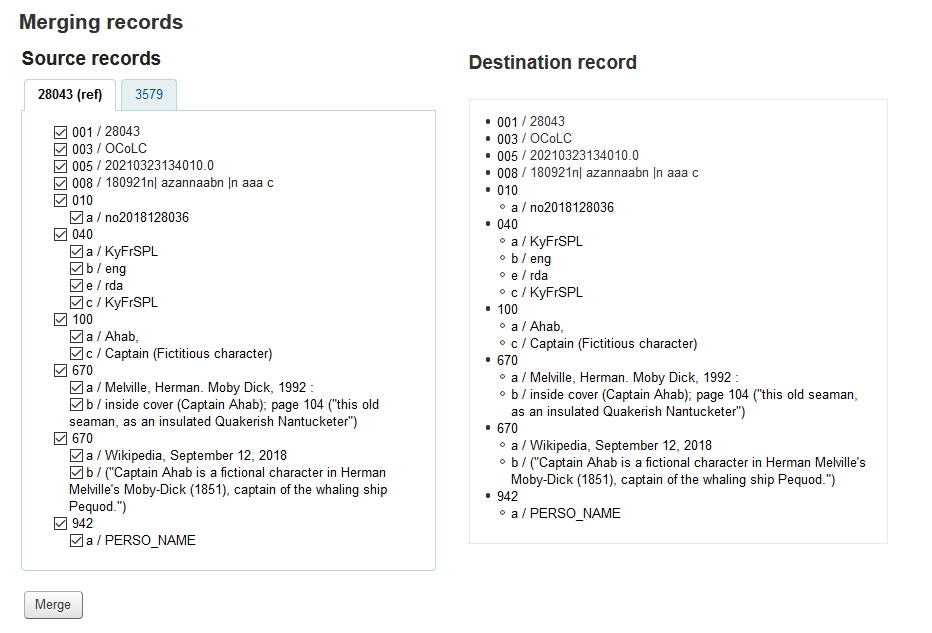
Per fondere dei records bibliografici, inizia andando nel modulo catalogazione fai una ricerca.
Se vedete dei duplicati tra i risultati, è possibile selezionare le caselle accanto ai duplicati e fare clic sul pulsante “Unione selezionati” nella parte superiore dei risultati.
Una volta che hai selezionato i record che vuoi fondere, clicca sul bottone “Fondi i record selezionati” in alto sulla lista. Ti verrà chiesto quale dei due record vuoi tenere come record primario e quale vuoi cancellare dopo la fusione. Se i record sono stati creati usando diverse griglie per la catalogazione, Koha ti chiederà anche quale griglia dovrà usare il record creato dalla fusione.
Verranno presentati i dati MARC di entrambi i record, ognuno accessibile dalla scheda con il bib number del record. Di default il primo record sarà selezionato, deseleziona i campi che non vuoi portare nel record finale poi vai nel secondo record e scegli i campi che vuoi portare nel record finale.
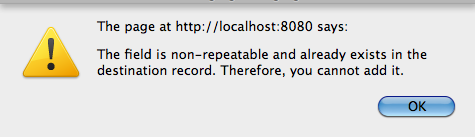
Se provi ad aggiungere un campo che non può essere ripetuto due volte (tipo il campo 200 per entrambi), ti verrà mostrato un errore
Sotto i record da unire, c’è un’opzione per indicare i campi per il report. Questo vi permetterà di controllare i campi che appariranno sulla pagina di conferma dell’unione:

Se non metti nulla, ti verrà presentato una pagina di conferma con i soli biblionumbers
I campi indicati verranno mostrati nella pagina di conferma unione (è possibile impostare valori predefiniti con la preferenza MergeReportFields)
Quando le hai finito le tue scelte, clicca il bottone “fondi”. Il record primario ora CONTERRA” i dati che hai scelto insieme a tutte le linee di copia di entrambi i record bibliografici, il sendo record verrà cancellato.
Nota
If you would like you can also use the Lists tool for merging records together. Learn more here.
Deleting records
Per cancellare un record bibliografico clicca il tasto Modifica e scegli Cancella record
Bibliographic records can only be deleted once all items have been deleted. If you try to delete a bibliographic record with items still attached you will see that the delete option is grayed out.
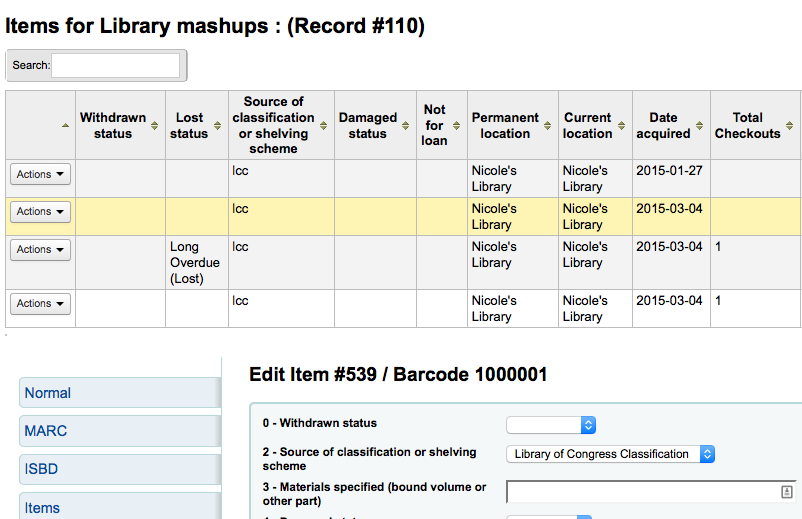
Item records
In Koha ogni record bibliografico può avere una o più copie collegate. Ogni copia contiene informazioni sullo specifico esemplare posseduto dalla biblioteca.
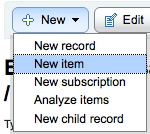
Adding items
After saving a new bibliographic record, you will be redirected to a blank item record so that you can attach an item to the bibliographic record. You can also click “Add/Edit items” from the cataloging search results
or you can add new item at any time by clicking “New” on the bibliographic record and choosing “New item”
La fattura richiamata da questo id (invoiceid) non esiste.
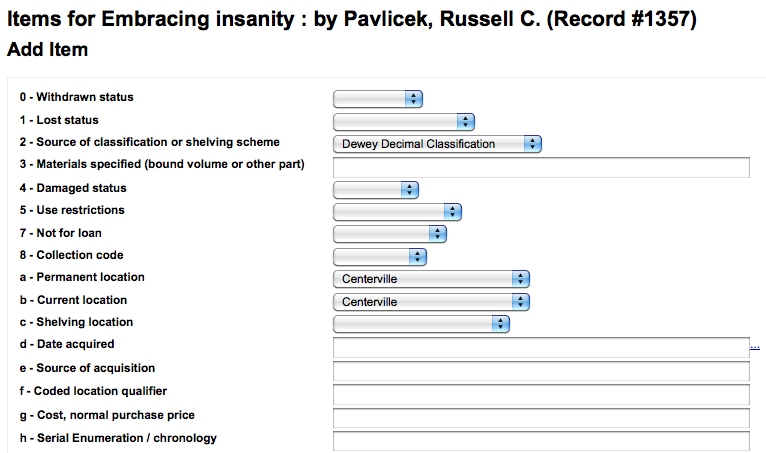
Infine se pensi di far circolare le copie, i seguenti campi devono essere specificati per le nuove copie:
2 - Fonte della classificazione
a - Localizzazione permanente
c - Biblioteca che possiede o presta la copia
o - Segnatura
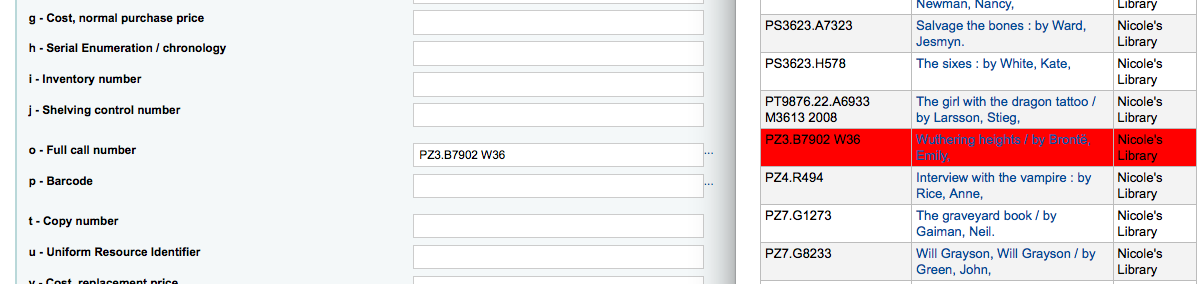
If you’d like you can use the cataloguing plugin “call number browser” (cn_browser.pl) for this field. If it’s enabled you’ll see a … to the right of the field. When clicked that will open a call number browser window if the row is highlighted in Red then the call number is in use, if there is a thin Green line instead then the call number can be used.
p - Codice a barre
v - Costo, prezzo di sostituzione
Questo è il valore che viene addebitato all’utente quando segni come “Persa” una copia a lui prestata.
y - Tipo copia Koha
Per essere sicuro che questi valori vengano inseriti puoi renderli obbligatori nella griglia di catalogazione che usi e questi compariranno in rosso con un’etichetta “obbligatorio”. La copia non verrà salvata finché i valori non verranno inseriti.

Nota
Per rendere obbligatorio un sottocampo della copia devi modificare il campo 952 di MARC21 nell’editor delle griglie di catalogazione.
You can add a new authorized value directly from the add and edit item screen for any fields that are linked to authorized value categories such as Shelving location (subfield$c) or Collection code (subfield$8).
Start to type the authorized value description, if a match is not found you will see the option “(Select to create)”.
Click on this option to display a pop-up window where you can create you new authorized value.
The authorized value category will be pre-populated from the field you are using, for example LOC for Shelving location, CCODE for Collection code. Take care when choosing your authorized value code. Refer to the notes on adding new authorized values for the correct format of these codes. Use the Description field for the actual value that will be displayed
You can add authorized values in the same way from bibliographic and authority records.
Nota
You must have the manage_auth_values administration permission to add authorized values from cataloguing.
Below the add form there are 3 buttons for adding the item.

“Add item” will add just the one item
“Add & duplicate” will add the item and fill in a new form with the same values for you to alter
“Add multiple items” will ask how many items and will then add that number of items adding +1 to the barcode so each barcode is unique
Le copie aggiunte appariranno sopra la form

Nota
You can customize the columns of this table in the “Table settings” section of the Administration module (table id: Items Editor).
Le tue copie appariranno anche nella zona dei dettagli bibliografici del record mostrato.
Se hai la preferenza di sistema SpineLabelShowPrintOnBibDetails impostata su “Mostra”, accanto ad ogni copia ci sarà un link per stampare rapidamente un’etichetta per il dorso.

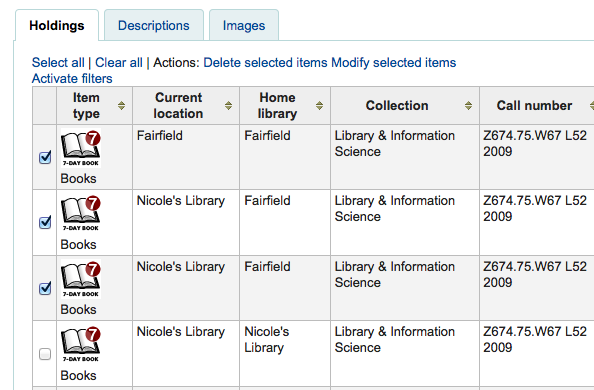
Puoi filtrare il contenuto dei tuoi dati di copia cliccando il collegamento Attiva filtri. Appare una riga in alto e puoi digitare in ogni colonna per filtrare i risultati della ricerca
Editing items
Le copie possono essere editate in diversi modi.
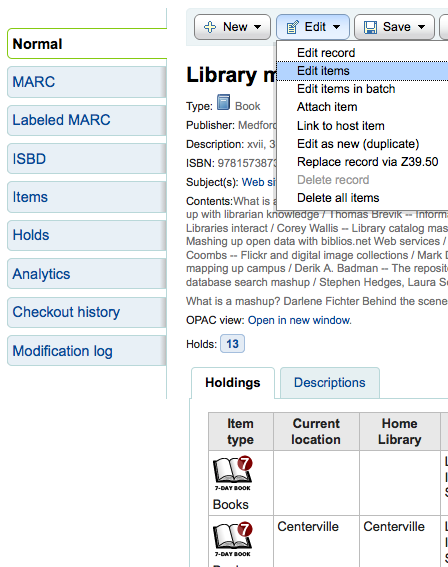
Clicking “Edit” and “Edit items” from the bibliographic record
Ciò aprirà una lista di copie in cui potrai cliccare sul bottone “Azioni” a sinistra della copia da modificare e scegliere “Edit”.
Clicking “Edit items” beside the item on the “Items” tab
Si aprirà l’editor della copia che vuoi modificare
Oppure ancora cliccando “Modifica” e poi “Modifica copie via batch”
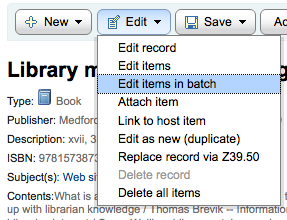
Ciò aprirà lo strumento Modificare copie via batch <batch-item-modification-label> in cui puoi effettuare modifiche massive su tutte le copie del record in questione.
E” anche possibile abilitare StaffDetailItemSelection per far sì che appaiano caselle di controllo a sinistra di ciascun elemento nella visualizzazione di dettaglio. Diventa allora possibile selezionare gli elementi desiderati e fare clic sul pulsante «Modifica elementi selezionati» nella parte superiore dell’elenco.
Puoi cliccare Modifica sulla destra di ogni copia nella scheda delle copie
C’è anche un link per modificare la copie direttamente dai risultati di ricerca nell’interfaccia per i bibliotecari
Finally you can use the batch item modification tool
Quick item status updates
Spesso il personale della circolazione deve cambare lo status di una copia a Perso o Danneggiato. Questo non richiede di modificare l’intero record di copia. Cliccando sul barcode della copia nel riassunto dei prestiti o sullo storico delle restituzioni, sarai portato a un riassunto dei dati di copia. Ci puoi arrivare anche cliccando la linguetta “copie” sula sinistra nella visualizzazione di dettaglio del record.
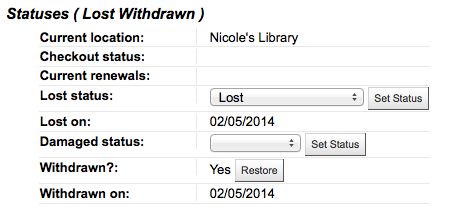
From this view you can mark an item lost by choosing a lost status from the pull down and clicking the “Set status” button.
You can also mark an item as damaged by choosing a damaged status from the pull down and clicking the “Set status” button.
Duplicating items
You can easily duplicate each item by clicking the “Actions” button the left of each item on the edit items screen
Da qui è possibile scegliere di “Duplicare” la copia e questo popolerà il modulo con i valori della copia scelta.
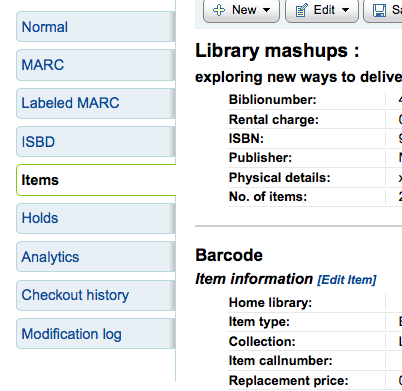
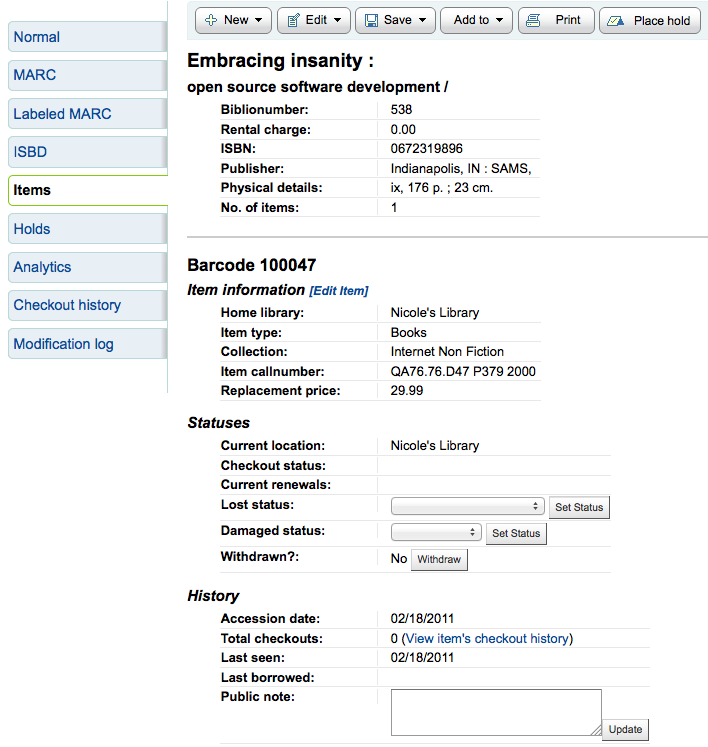
Item information
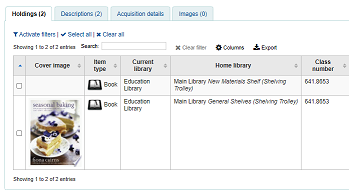
Nel menu a sinistra di ogni record bibliografico è presente una scheda dedicata alle copie.
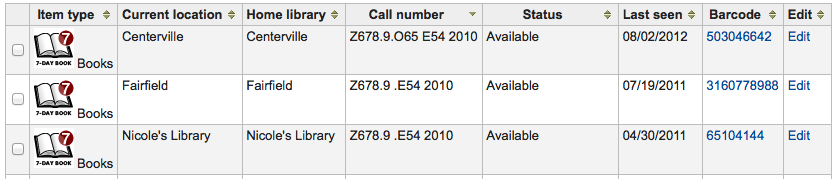
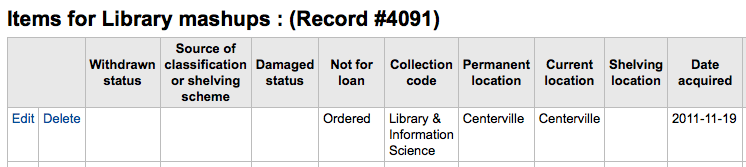
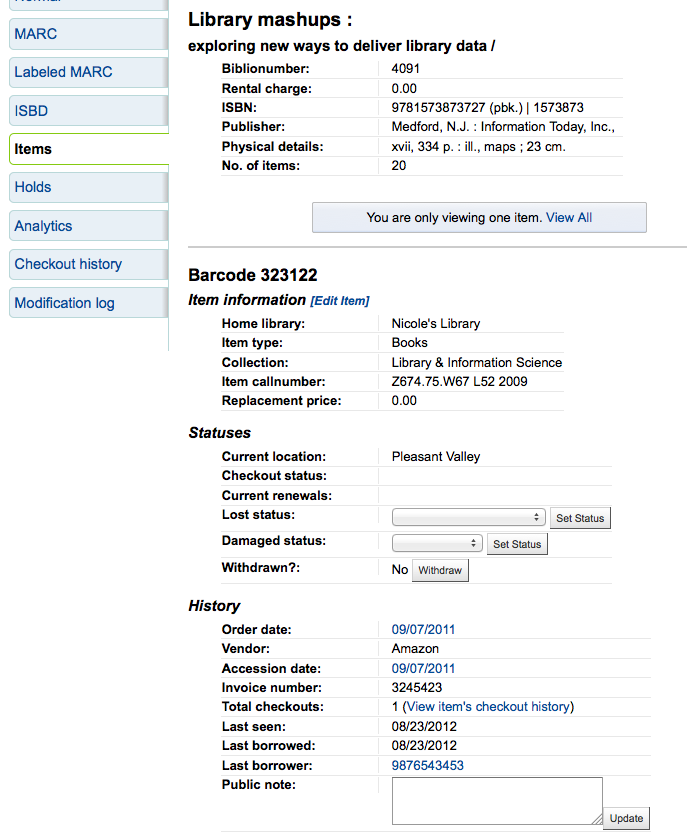
Facendo clic su questa tabella puoi avere le informazioni di base sulla copia. Da qui puoi vedere le informazioni di base sulla copia come la biblioteca di appartenenza, il tipo di copia, il codice di collezione, la collocazione e il prezzo di sostituzione. Puoi anche vedere e modificare le informazioni sullo status. Se una copia è persa o ritirata puoi vedere la data in cui lo status è stato modificato.
In the “History” section you will see information about the check out history of the item and if you ordered the item via the acquisitions module then this section will include information about the order.
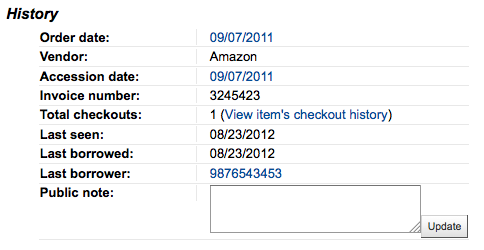
Se la data dell’ordine o di accesso è un link, cliccandoci verrai portato alle informazioni di acquisizione per quella copia.
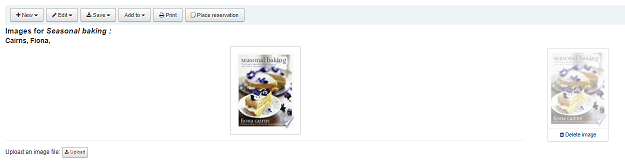
Adding cover images for items
If you have either OPACLocalCoverImages and/or LocalCoverImages set to ‘Display’ you can upload cover images for individual item records from the “Upload image” option from the Edit button on the right of the Holdings table.
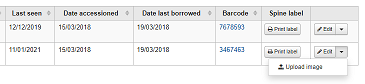
Click Choose file to find the image file on your computer and then Upload file.
On the next screen you are given the option to replace existing images. You can then click on Process images.
The image will display in a Cover image column in the holdings display.
To delete an image, click on the image in the holdings display. You will see a greyed out copy of the image with the option to delete.
Moving items
Items can be moved from one bibliographic record to another using the “Attach item” option
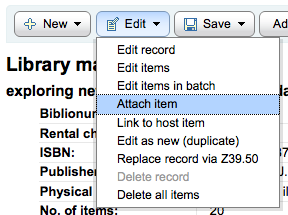
Visit the bibliographic record you want to attach the item to and choose “Attach item” from the “Edit” menu.
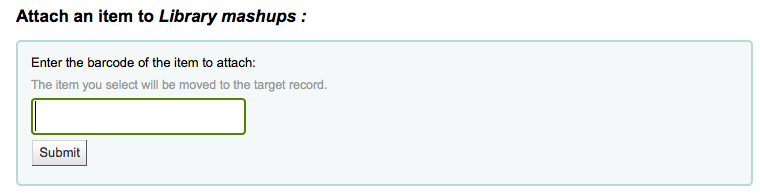
Simply enter the barcode for the item you want to move and click “Submit”
If this is the last remaining item attached to a bibliographic record you will be presented with a button to delete the original host record.
If you want to move all items to a new record creating only one bibliographic record you can use the merge Records tool instead.
Deleting items
Ci sono diversi modi di cancellare record di copia. Si si tratta di cancellare una sola copia, puoi farlo dalla pagina dei dettagli del record bibliografico, con il bottone Edit. Da lì scegli “Modifica copie”.
Ti verrà presentata una lista di copie con accanto il link “Cancella”. Clicca sul link per cancellare la copia che non sia in prestito.
Se pensi che tutte le copie del record non siano in prestito, puoi usare la casella «Cancella tutte le copie» sotto il menù Edit, e tutte le copie verranno rimosse dal record.
E” anche possibile abilitare StaffDetailItemSelection per far sì che appaiano caselle di controllo a sinistra di ciascun elemento nella visualizzazione di dettaglio. Diventa allora possibile selezionare gli elementi desiderati e fare clic sul pulsante «Cancella elementi selezionati» nella parte superiore dell’elenco.
Infine puoi usare lo strumento Cancellazione copie via batch per cancellare un insieme di copie.
Item specific circulation history
Ogni record bibliografico ha uno storico della sua circolazione (con o senza i dati degli utenti, dipende dalle tue preferenze), ma ogni copia ha pur sempre il suo storico della circolazione. Per vederlo, clicca sul tab “Copie” a sinistra del record che stai vedendo.
Sotto il link “Storico” si trova il link dello “Storico dei prestiti”. Lo storico dei prestiti si presenta diverso dallo storico del record bibliografico.
Authority
I record di autorità sono modi per controllare i campi dei tuoi record bibliografici. Usando i record di autorità, puoi uniformare nomi, soggetti, luoghi, ecc.
Adding authorities
To add a new authority record you can either choose the authority type from the “New authority” button or search another library by clicking the “New from Z39.50” button.
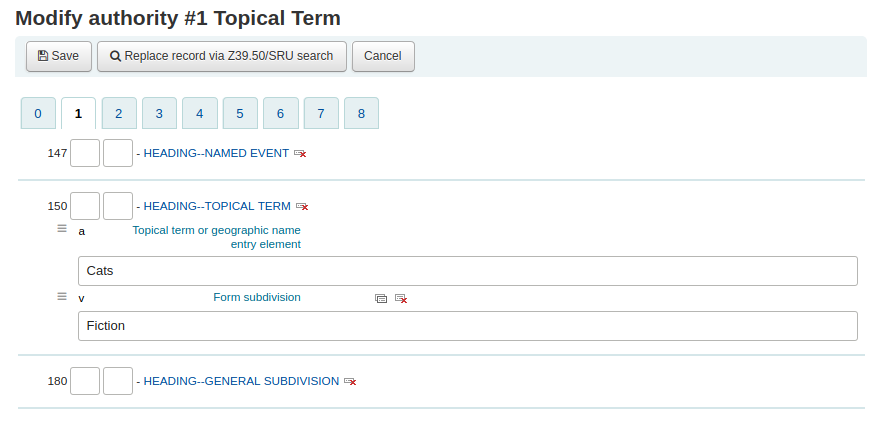
Se scegli di inserire una nuova authority da zero, la form che appare ti permetterà di inserire tutti i dati necessari del record di autorità.
Per espandere valori compressi, clicca sul titolo e appariranno i sottocampi. Per duplicare un campo, clicca su (+). Per accedere al plugin del campo premi “…” a destra del campo.
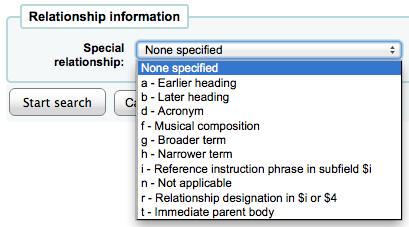
Legando authority ad altre intestazioni, premi su “…” a destra del campo per usare il plugin di ricerca.
Da qui puoi cercare sull’authority file per indicare il record da agganciare. Se non lo trovi, puoi crearne uno premendo “Crea nuovo” a aggiungere il record al link. Questo plugin ti permette anche di scegliere la relazione tra le autorità.
Se scegli di cercare in un’altra biblioteca per il record di authority, ti verrà presentato un form di ricerca.
Dalla pagina dei risultati puoi cliccare il link “Importa” a destra del record che vuoi aggiungere in Koha
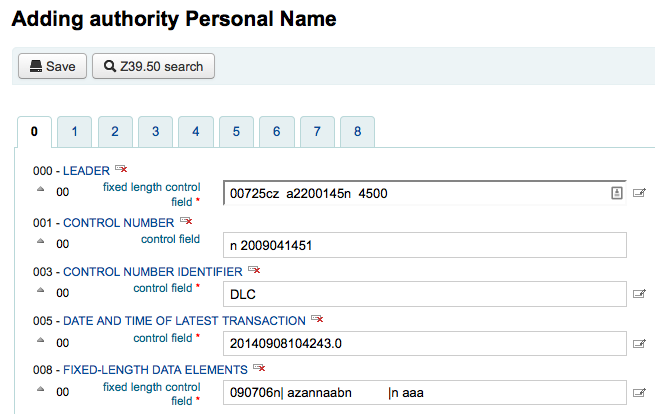
Ti verrà presentata una form per modificare l’authority prima di salvarla nel sistema.
Searching authorities
Dalla pagina dei record di autorità puoi cercare termini esistenti e i record bibliografici ad essi associati.

Dai risultati puoi vedere il record di autorità, quanti record bibliografici sono legati ad esso, un menu “Azioni” che include la possibilità di modificare, fondere e cancellare (se non ci sono record bibliografici legati).
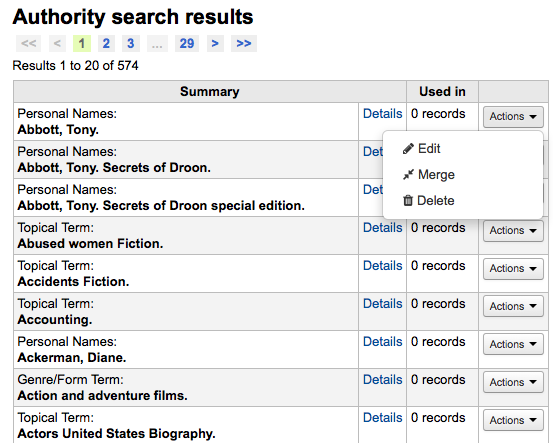
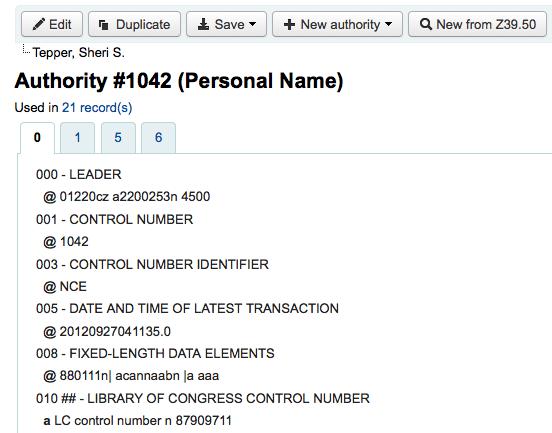
Clicking on the “Details” link to the right of the authority record summary will open the full record and the option to edit the record.
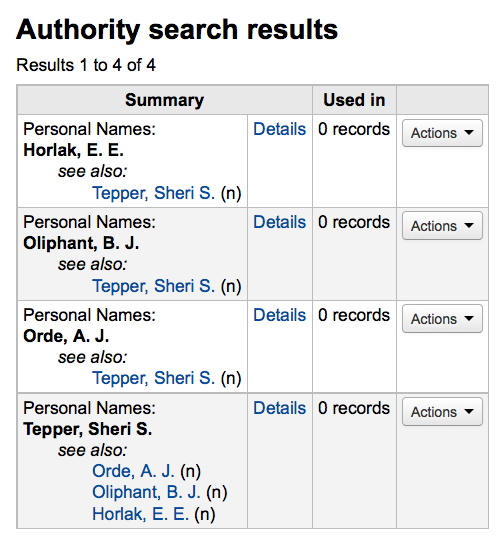
If the authority has “See also’s in it you will see those broken out on the search results, clicking the linked headings will run a search for that heading instead.
Editing authorities
Le Authority possono essere modificate cliccando sulla breve descrizione dei risultati della ricerca e e cliccando sul tasto Modifica sopra il record. Oppure cliccando sul collegamento Modifica a sinistra dell’authority nei risultati della ricerca
Once you’ve made the necessary edits, simply click “Save”.
Depending on the number of bibliographic records this authority record is linked to, the bibliographic records may be updated right away. This depends on the value in the AuthorityMergeLimit system preference (the default is 50). If the number of bibliographic records is under the value of AuthorityMergeLimit, the bibliographic records will be changed right away. If the number of bibliographic records exceeds the value of AuthorityMergeLimit, they will only be updated when the merge_authorities.pl script is run.
Per cancellare un record di autorità devi prima essere sicuro che non sia associato a record bibliografici. Se non è usato, ci sarà disponibile un bottone “Cancella” a destra del record nella pagina dei risultati e all’interno della pagina del record intero.
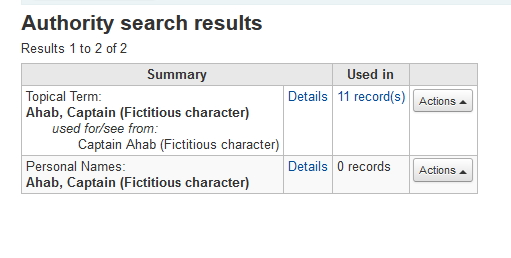
Merging authorities
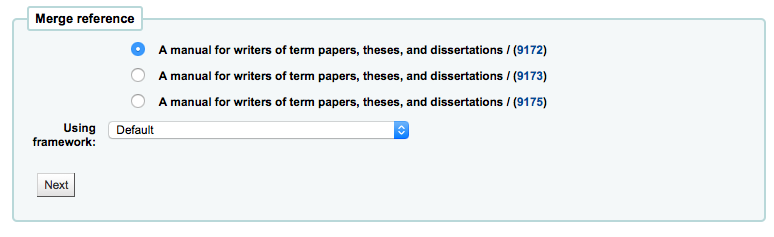
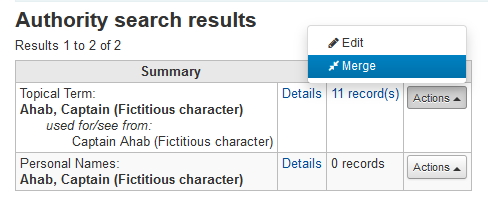
If you have duplicate authority records you can merge them together by clicking the “Merge” link, found in the Actions menu, next to two results on an authority search.

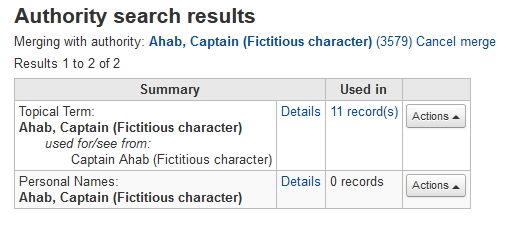
Dopo aver cliccato “Unisci” sul primo risultato vedrai quell’autorithy elencata in testa ai risultati.
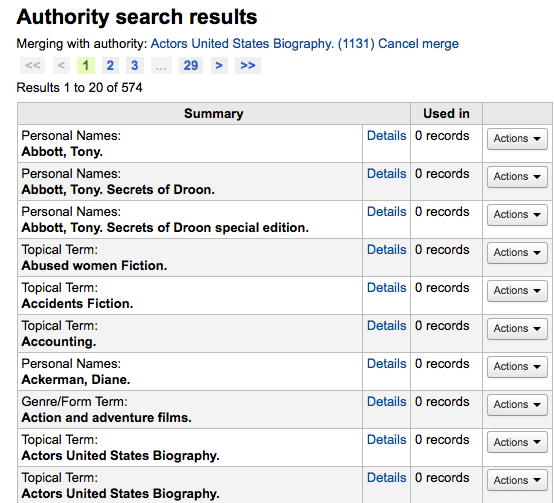
Successivamente è necessario fare clic su “Fondi” accanto al secondo risultato che si desidera unire.
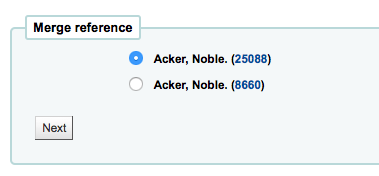
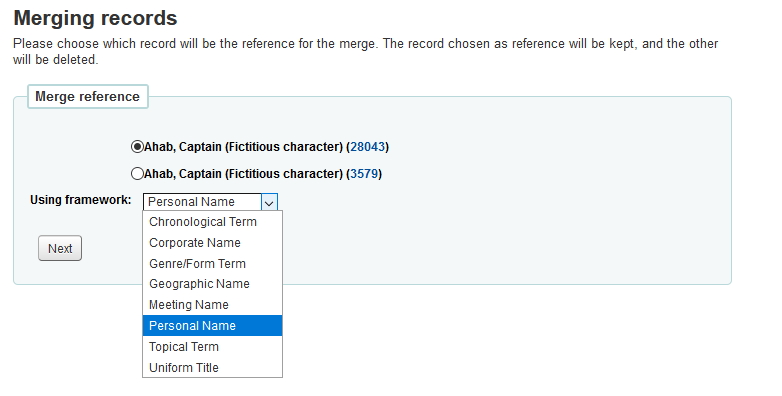
Ti sarà chiesto quale dei due record vuoi che dopo la fusione rimanga come record principale e quale che sia cancellatao
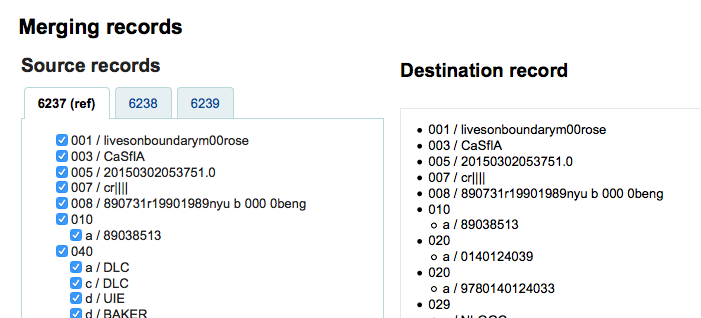
Verranno presentati i dati MARC di entrambi i record, ognuno accessibile dalla scheda con il bib number del record. Di default sarà selezionato il primo record, deseleziona i campi che non vuoi portare nel record finale poi spostati sul secondo tab per scegliere i campi che vuoi portare nel record finale.
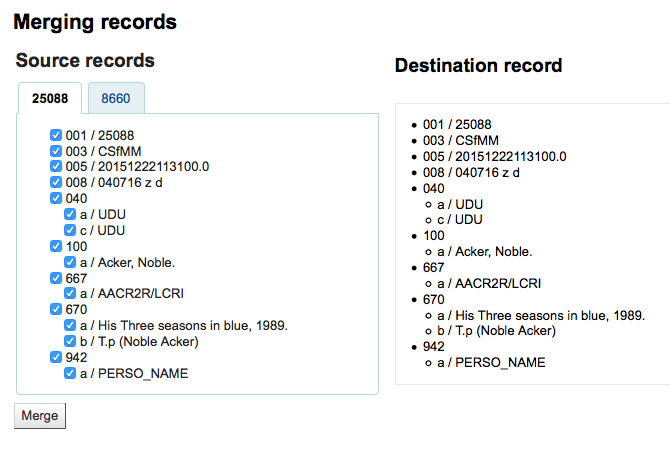
Una volta che hai completato la selezione clicca sul tasto Fondi. Il record principale conterrà i dati che hai scelto e il secondo sarà cancellato.
If you have two authority records for the same heading in different frameworks, you can merge them together by clicking the ‘Merge’ link, found in the actions menu, next to two results on an authority search. For example, these authority records using different frameworks can be merged.
If you select the “Merge” link, found in the action menu of the top record.
You will see that authority record listed at the top of the results.
Next you need to select ‘Merge’ next to the second result you’d like to merge.
You will be asked which of the two records you would like to keep as your primary record and which will be deleted after the merge. You will also use the dropdown menu to pick which framework to use.
You will be presented with the MARC for both of the records (each accessible by tabs labeled with the authority numbers for those records). By default the entire first record will be selected, uncheck the fields you don’t want in the final (destination) record and then move on to the second tab to choose which fields should be in the final (destination) record.
The «ref» record (the primary record) will be in the framework that you chose:
Once you have completed your selections click the ‘Merge’ button. The primary record will now contain the data you chose for it and the second record will be deleted.
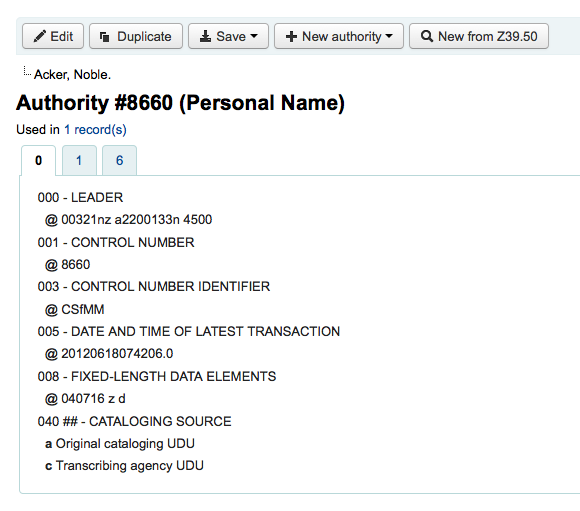
The MARC tag of the linked headings will have been updated accordingly.
Cataloging guides
Bibliographic record cataloging cheat sheet
Tag |
Etichetta |
Descrizione |
Istruzioni |
|---|---|---|---|
000 |
LEADER |
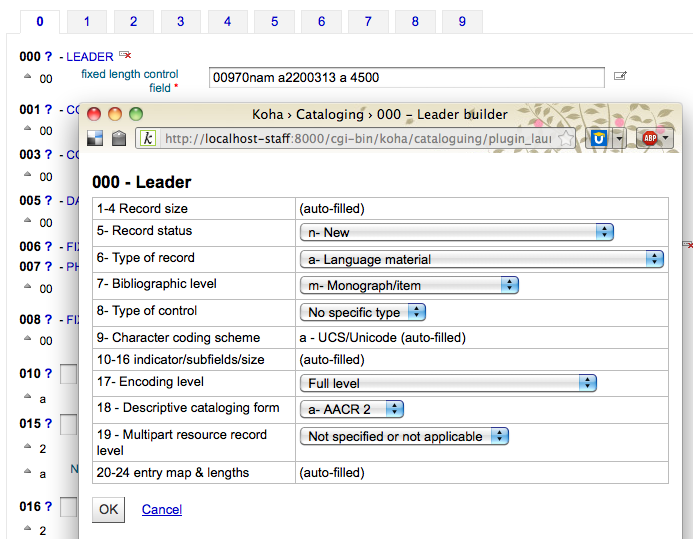
Descrive il record (cioè il sostituto) – è un record per una monografia? Un periodico? |
Fare clic in questo campo per modificarlo. Quindi impostare il «livello bibliografico» su “a” per gli articoli o su “s” per i periodici. Altrimenti lasciare tutto com’è. |
001 |
CONTROL NUMBER |
Numero di acquisizione. |
Immettere il numero di acquisizione riportato all’interno dell’elemento. Per gli articoli ed altri elementi che non hanno un numero di acquisizione, lasciare in bianco. |
003 |
CONTROL NUMBER IDENTIFIER |
Your MARC organizational code |
Fare clic all’interno di questo campo per compilarlo (verrà compilato automaticamente se è stata impostata la preferenza ref:MARCOrgCode |
005 |
D & T LATEST TRANSACTION |
Data ed ora corrente. |
Clicca su questo campo per riempirlo. |
008 |
FIXED-LENGTH DATA ELEMENTS |
Campo che contiene una rappresentazione, comprensibile dal computer, di una quantità di cose. |
In genere si useranno solo le opzioni “s” (singola) o “m” (multiple) per la posizione 06 - usare la prima se l’elemento è stato pubblicato una sola volta nell’anno; usare la seconda se l’elemento è stato pubblicato nel corso di più anni. Se c’è una sola data, immettere solo una data nelle posizioni 07-10. Immettere il codice di nazione a tre cifre nelle posizioni 15-17, assicurandosi di aggiungere spazi se il codice di nazione è lungo meno di tre caratteri. Se c’è un indice, annotare il fatto alla posizione 31. Immettere il codice della lingua a tre lettere nelle posizioni 35-37. |
010 |
LCCN |
Un numero assegnato dalla Library of Congress per identificare l’opera in modo univoco |
Cercalo nella pagina del copyright del libro (se è stato pubblicato negli Stati Uniti) o nel catalogo della Library of Congress. Se non lo trovi, non te ne preoccupare |
020 |
ISBN |
Numero univoco usato dall’editore per identificare il libro |
Se questo numero non è presente sul libro, probabilmente non c’è |
022 |
ISSN |
Numero univoco usato dall’editore per identificare il periodico |
Se questo numero non è presente sul libro, probabilmente non c’è |
033 |
DATE/TIME OF EVENT |
Utilizzato per le date delle aste. Obbiglatorio per i cataloghi delle aste. |
Per le aste che si sono tenute in un solo giorno, immettere la data dell’incanto nel formato AAAAMMGG nel sottocampo “a” e “0” nel primo indicatore. Per le aste che hanno avuto luogo in due giorni consecutivi, o in un numero qualsiasi di giorni non consecutivi, create un sottocampo “a” per ogni giorno, con la data nel formato AAAAMMGG ed immettere “1” nel primo indicatore. Per le aste che si sono tenute in più di due giorni consecutivi, creare un sottocampo “a” per il primo giorno (in formato AAAAMMGG) ed un sottocampo “a” per l’ultimo (sempre in formato AAAAMMGG); immettere “2” nel primo indicatore. |
040 |
FONTE DELLA CATALOGAZIONE |
Identifica quale biblioteca ha creato o modificato il record bibliografico |
Per i record importati, aggiungere un sottocampo “d”, compilato con il codice OCLC della propria organizzazione. Per i nuovi record, assicurarsi che il sottocampo “c” sia compilato con il codice OCLC della propria organizzazione. |
041 |
LANGUAGE CODE |
Identifica tutte le lingue utilizzate in un elemento, quando sono presenti due o più lingue. |
Per porzioni significative di un testo in una data lingua, ci dovrebbe essere un sottocampo “a” con quel codice della lingua. Se ci sono solo sommari o riassunti in una lingua specifica, creare un sottocampo “b” con quel codice della lingua. |
100 |
MAIN ENTRY–PERSONAL |
Forma normalizzata del nome dell’autore principale |
Vedere scheda Intestazioni normalizzate e AACR2. Il primo indicatore, generalmente, dev’essere impostato ad “1”, per indicare che nell’elemento viene prima il cognome. Se il nome è costituito dal solo prenome, però, il primo indicatore dev’essere impostato a “0”. |
110 |
MAIN ENTRY–CORPORATE |
Forma normalizzata del nome dell’azienda che risulta autore principale. Obbligatorio per i cataloghi di aste. |
Per i cataloghi di aste si dovrebbe utilizzare un campo 110, invece di un campo 100. Vedasi scheda Intestazioni normalizzate e AACR2, Impostare il primo indicatore a “2”. |
111 |
MAIN ENTRY–MEETING |
Forma normalizzata del titolo di una conferenza che ha rappresentato l’offerta principale (p. es. atti di un convegno) |
Vedere scheda Intestazioni normalizzate e AACR2. Impostare il primo indicatore a “2”. |
245 |
TITLE STATEMENT |
Trascrizione dell’indicazione del titolo, desunta dalla pagina di frontespizio (od altra primaria fonte di informazione) |
Immettere il titolo nel sottocampo “a”, il sottotitolo nel sottocampo “b” e l’indicazione di responsabilità nel sottocampo “c”. Se si crea un record per un singolo volume, o parte, di un elemento composto da più parti, si deve indicare il numero della parte nel sottocampo “n” ed il titolo della parte nel sottocampo “p”. Per i cataloghi di aste, la data (in formato GG/MM/AAAA) dev’essere riportata tra parentesi quadre nel sottocampo “f”. Vedasi la scheda per la punteggiatura ISBD. Impostare il primo indicatore a “0” se non c’è autore, altrimenti impostarlo ad “1”. Impostare il secondo indicatore con il numero di caratteri da non indicizzare (cioè i caratteri di un articolo iniziarle e lo spazio seguente: per «La «, compilare il secondo indicatore con “3”) . |
246 |
VARYING FORM OF TITLE |
Variante alternativa del titolo, a scopo di ricerca ed indicizzazione |
Se l’utente può ricercare l’opera sotto un titolo differente, immetterlo qui. Non immettere l’articolo iniziale. Il primo indicatore dev’essere impostato a “3”, a meno che non si tratti soltanto di una variante ortografica; in tal caso impostare il primo indicatore ad “1”. |
250 |
EDITION STATEMENT |
Trascrizione dell’indicazione di edizione, desunta dalla pagina di frontespizio (od altra primaria fonte di informazione) |
Trascrivere l’indicazione di edizione esattamente come appare sulla pagina di frontespizio. E” permesso abbreviarla, se l’indicazione di edizione è molto lunga. |
260 |
PUBLICATION (IMPRINT) |
Informazioni sulla pubblicazione. |
Immettere il luogo di pubblicazione nel sottocampo “a”, l’editore nel sottocampo “b” e l’anno di pubblicazione (o di probabile pubblicazione) nel sottocampo “c”. Vedasi la scheda di punteggiatura ISBD. |
264 |
PRODUCTION, PUBLICATION ETC. |
Production, Publication, Distribution, Manufacture, and Copyright Notice. |
Put the location of publication in subfield “a”, the publisher in subfield “b”, and the year (or probable year) in subfield “c”. See ISBD punctuation sheet. The label is set dynamically from the second indicator so generally this would be set to “1” for Publisher: . |
300 |
PHYSICAL DESCRIPTION |
Descrizione fisica |
Inserire il numero di pagine nel sotttocampo “a”, una breve descrizione di contenuti «speciali», quali illustrazioni o cartine, nel sottocampo “b” (cfr. AACR2) e le dimensioni dell’elemento nel sottocampo C. Vedasi la scheda di punteggiatura ISBD. |
490 |
SERIES STATEMENT |
Mostra l’indicazione di periodicità esattamente come appare sull’elemento. |
Trascrivere l’indicazione di periodicità nel sottocampo “a”, riportando il numero del volume nel sottocampo “v”. Vedasi la scheda di punteggiatura ISBD. Impostare il primo indicatore ad “1” se si usa un campo 830; di regola, bisogna farlo. |
500 |
GENERAL NOTE |
Annotazioni che non trovano posto altrove. |
Immettere le note come frasi complete, con un campo 500 diverso per ciascun distinto argomento. |
501 |
WITH NOTE |
Indicare se l’opera è collegata con opere descritte da altri record. |
Immettere la descrizione della relazione nel sottocampo “a” |
504 |
BIBLIOGRAPHY, ETC. NOTE |
Indica se ill’opera comprende una bibliografia |
Se l’opera include una bibliografia ed un indice analitico, immettere la frase «Include riferimenti bibliografici (p. XXX-XXX) ed indice analitico.» nel sottocampo “a”. Se l’opera non possiede indice analitico, omettere la relativa parte della frase. Se i riferimenti bibliografici sono diffusi in tutto il testo, e non raccolti in un unico punto, omettere la parentesi. |
505 |
FORMATTED CONTENTS |
Elenco dei contenuti in un formato standard. Contenuti non formattati possono essere elencati in un campo 500 (note generiche). |
Vedasi la scheda di punteggiatura ISBD. Impostare il primo indicatore a 0. Se si codificano separatamente autori e titoli, impostare il secondo indicatore a “0”; altrimenti lasciarlo in bianco. |
518 |
DATE/TIME OF EVENT NOTE |
Usato per date di asta. |
Per i cataloghi di aste, immettere la data dell’incanto nel formato “2 gennaio 1984” nel sottocampo “a” |
520 |
SUMMARY, ETC. |
Un breve estratto o riassunto del libro od articolo. |
In generale, non è necessario scrivere un riassunto. Invece un riassunto può essere richiesto per quegli elementi che non sono facilmente consultabili dagli utenti, quali ad esempio libri di carta particolarmente acida o CD-ROM. |
546 |
LANGUAGE NOTE |
Nota che indica le lingue utilizzate nell’opera |
Necessaria solo per opere plurilingue. Vedasi scheda di punteggiatura ISBD. |
561 |
PROVENANCE INFORMATION |
Indica il precedente proprietario dell’elemento |
Utilizzato solo per libri rari. |
563 |
BINDING INFORMATION |
Descrive la rilegatura dell’elemento. |
Utilizzato solo per libri rari. |
590 |
LOCAL NOTE |
Note locali. Obbligatorio per i cataloghi di aste. |
Utilizzato per i cataloghi di aste, allo scopo di indicare quali tipi di monete erano vendute nell’incanto: romane, greche, ecc. |
600 |
SUBJECT ADDED–PERSONAL |
Forma normalizzata di nomi propri di persone citate nell’opera. |
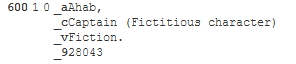
Vedere scheda Intestazioni normalizzate e AACR2. Il primo indicatore in genere si imposta ad “1”, per indicare che nell’elemento viene prima il cognome. Se il nome è costituito dal solo prenome, però, il primo indicatore dev’essere impostato a “0”. Se il nome si trova nel file di autorità LC, impostare il secondo indicatore a “0”; altrimenti impostarlo a “4” |
610 |
SUBJECT ADDED–CORPORATE |
Forma normalizzata dei nomi di società, per le organizzazioni citate nell’opera. |
Vedere scheda Intestazioni normalizzate e AACR2. Impostare il primo indicatore a “2”. Se il nome si trova nel file di autorità LC, impostare il secondo indicatore a “0”; altrimenti impostarlo a “4” |
611 |
SUBJECT ADDED–MEETING |
Forma normalizzata dei tioli di convegno, per le conferenze citate nell’opera. |
Vedere scheda Intestazioni normalizzate e AACR2. Impostare il primo indicatore a “2”. Se il nome si trova nel file di autorità LC, impostare il secondo indicatore a “0”; altrimenti impostarlo a “4” |
630 |
SUBJECT ADDED–UNIFORM TITLE |
Forma normalizzata dei titoli di altri lavori citati nell’opera. |
Vedere scheda Intestazioni normalizzate e AACR2. Immettere nel primo indicatore il numero di caratteri da non indicizzare (cioè i caratteri dell’articolo iniziale e lo spazio seguente: per «La «, impostare il primo indicatore a “3”). Se il nome si trova nel file di autorità LC, impostare il secondo indicatore a “0”; altrimenti impostarlo a “4” |
650 |
SUBJECT ADDED–TOPICAL |
Termini della «Library of Congress Subject Heading» che descrivono l’argomento dell’opera |
Vedere scheda Intestazioni normalizzate e AACR2. Se il nome si trova nel file di autorità LC, impostare il secondo indicatore a “0”; altrimenti impostarlo a “4” |
651 |
SUBJECT ADDED–GEOGRAPHICAL |
Termini geografici della «Library of Congress Subject Heading» che descrivono l’argomento dell’opera |
Vedere scheda Intestazioni normalizzate e AACR2. Se il nome si trova nel file di autorità LC, impostare il secondo indicatore a “0”; altrimenti impostarlo a “4” |
655 |
INDEX TERM–GENRE/FORM |
Spiega che cos’è un elemento, invece dell’argomento di cui tratta. |
Generalmente utilizzato per cataloghi di asste, che devono avere il genere «Cataloghi di aste» (Assicurarsi di trovare l’intestazione normalizzata!). Se il nome si trova nel file di autorità LC, impostare il secondo indicatore a “0”. Se si usa un termine da un vocabolario specifico, impostare il secondo indicatore a “7” ed immettere il codice del vocabolario nel sottocampo “2”. Negli altri casi impostare il secondo indicatore a “4”. |
690 |
LOCAL SUBJECT ADDED–TOPICAL |
Utilizzato per le intestazioni che provengono da un qualsiasi file di argomenti normalizzati. |
Se non c’è nessun termine appropriato nella LCSH, si può usare un campo 690 con intestazioni di argomento che si trovano in altri elementi del catalogo |
691 |
LOCAL SUBJECT ADDED–GEOGRAPHICAL |
Utilizzato per le intestazioni che provengono da un qualsiasi file di argomenti normalizzati. |
Se non c’è nessun termine appropriato nella LCSH, si può usare un campo 691 con intestazioni di argomento che si trovano in altri elementi del catalogo |
700 |
ADDED ENTRY–PERSONAL |
Utilizzazto pergli autori secondari ed altre persone aventi a che fare con la produzione dell’opera |
Vedere scheda Intestazioni normalizzate e AACR2. Il primo indicatore, generalmente, dev’essere impostato ad “1”, per indicare che nell’elemento viene prima il cognome. Se il nome è costituito dal solo prenome, però, il primo indicatore dev’essere impostato a “0”. |
710 |
ADDED ENTRY–CORPORATE |
Utilizzato per persone giuridiche aventi a che fare con la produzione dell’opera (p. es. gli editori). |
Vedere scheda Intestazioni normalizzate e AACR2. Impostare il primo indicatore a “2”. |
711 |
ADDED ENTRY–MEETING |
Utilizzato per convegni aventi a che fare con la produzione dell’opera (p. es. simposi che hanno contribuito al lavoro). |
Vedere scheda Intestazioni normalizzate e AACR2. Impostare il primo indicatore a “2”. |
730 |
ADDED ENTRY–UNIFORM TITLE |
Utilizzato per titoli normalizzati correlati con la produzione dell’opera (p. es. un’opera che ha ispirato il lavoro in esame) |
Vedere scheda Intestazioni normalizzate e AACR2. Immettere nel primo indicatore il numero di caratteri da non indicizzare (cioè i caratteri dell’articolo iniziale e lo spazio seguente: per «La «, impostare il primo indicatore a “3”). |
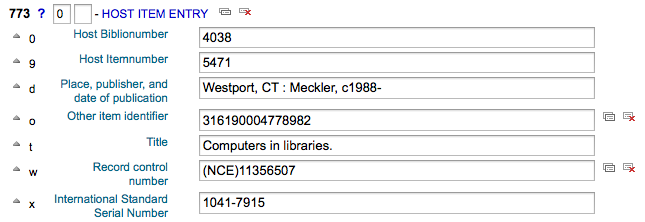
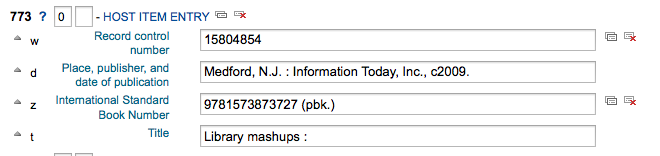
Campo 773 |
HOST ITEM ENTRY |
Descrive l’elemento bibliografico più vasto che contiene l’opera (p. es libro o rivista che contengono l’articolo in corso di catalogazione) |
Se la pubblicazione che contiene il lavoro è un’opera principale dell’autore, immettere la forma normalizzata del nome dell’autore nel sottocampo “a”. Immettere il titolo nel sottocampo “t”. Se la pubblicazione contenitrice è un un lavoro indipendente, immettere le informazioni sulla pubblicazione nel sottocampo “d”. Quando possibile, i codici ISSN e ISBN devono sempre essere registrati, rispettivamente nei sottoccampi “x” e “y”. Le informazioni di legame (cioè numero del volume, della pagina, ecc.) devono essere registrate nel sottoccampo “g”. Il sottocampo “q” contiene una rappresentazione codificata della collocazione dell’elemento: i numeri di volume, uscita e sezione devono essere separati da segni di due punti (:); il numero della prima pagina deve essere seguito da un segno di “<” al termine del sottocampo. Vedasi la scheda di punteggiatura ISBD. Impostare il primo indicatore a “0”; se si desidera che venga generata l’etichetta «In:», lasciare vuoto il secondo indicatore. Se si desidera che venga visualizzata un’etichetta a piacere prima del contenuto del campo 773, impostare il secondo indicatore a “8” ed aggiungere un sottocampo “i”, contenente il testo dell’etichetta all’inizio del campo (p. es. «$iEstratto da:»). |
830 |
SERIES ENTRY–UNIFORM TITLE |
Forma normalizzata del nome della serie, trascritta nel campo 490. Spesso è lo stesso contenuto del campo 490. |
Vedere scheda Intestazioni normalizzate e AACR2. Immettere nel secondo indicatore il numero di caratteri da non indicizzare (cioè i caratteri dell’articolo iniziale e lo spazio seguente: per «La «, impostare il primo indicatore a “3”). |
852 |
LOCATION/CALL NUMBER |
Contiene il nome della sezione per libri, libretti, ed alcuni articoli e periodici, senza codice a barre. |
Lasciare in bianco questo campo se si sta catalogando un volume che prevede solo un record ed un codice a barre. Se l’elemento non prevede il codice a barre, se si sta creando un record per un articolo all’interno di un volume, inserire la sezione nel sottocampo “a” (Vedere la ANS cataloging documentation>) ed il codice di collocazione nel sottocampo “i”. Impostare il primo indicatore ad “8”. |
856 |
ELECTRONIC ACCESS |
Link a materiali disponibili on-line |
Immettere nel sottocampo “u” l’URL un eventuale copia, o riassunto, ecc., in formato elettronico ed un titolo per il link nel sottocampo “y”. Impostare il primo indicatore a “4”. |
942 |
ADDED ENTRY ELEMENTS (KOHA) |
Usato per dati specifici di Koha |
Impostare il sottocampo “c” con il tipo di elemento appropriato |
Tabella: Guida alla catalogazione
Koha-specific fields
Koha uses three fields to store information specific to it.
At the record level, 942 is used to store information such as record-level item type, record-level call number and classification scheme.
The item (holding) information is stored in 952 in MARC21 and 995 in UNIMARC.
System control numbers for Koha are stored in 999 in MARC21 and 090 in UNIMARC.
Added entry elements (942)
942$0 - Koha issues (borrowed), all copies
This field contains the total number of issues/checkouts of all items of this record. It is populated using the update_totalissues.pl cronjob.
Mapped to: biblioitems.totalissues
Indexed in: totalissues
Avvertimento
This field should not be editable nor edited manually.
942$2 - Source of classification or shelving scheme
This field contains the source of classification used by the record’s call number (942$h and 942$i).
There is a choice of classification sources as they are defined in administration. If no classification scheme is entered, the system will use the value entered in the DefaultClassificationSource preference.
The source of classification will be used, along with the call number itself (942$h and 942$i) to create the normalized call number used when sorting by call number.
Mapped to: biblioitems.cn_source
Indexed in: cn-bib-source
942$6 - Koha normalized classification for sorting
This field contains the normalized call number used for sorting, based on the record-level call number (942$h and 942$i) and the classification source (942$2).
Mapped to: biblioitems.cn_sort
Indexed in: cn-bib-sort
Avvertimento
This field should not be editable nor edited manually.
942$c - Koha item type
This field contains the record-level item type.
The record-level item type is used in various places in Koha.
The value from 942$c is copied to 952$y as the default value when adding a new item to that record
The record-level item type can be used for the circulation rules if the item-level_itypes system preference allows it (this system preference lets you choose between using the record-level or item-level item type for the circulation rules, among other things)
The record-level item type is indexed and used in the search (see also the AdvancedSearchTypes system preference) as well as the facets (this is useful to find records that don’t have items, like records for online resources, ebooks, pdf files, etc.)
The record-level item type is used for record-level/»next available» holds
The record-level item type is used for record-level article requests
The record-level item type is displayed in various tables in the staff interface, in the circulation module among other places (it is possible to hide unwanted columns in the “Table settings” section of the Administration module)
Mapped to: biblioitems.itemtype
Indexed in: itemtype (mc-itemtype), itype (mc-itype)
942$e - Edition
This field contains the edition information.
942$h - Classification part
This field contains classification part of the call number. It is used, along with 942$2 and 942$i to create the normalized call number (942$6) used when sorting by call number.
Mapped to: biblioitems.cn_class
Indexed in: cn-class
942$i - Item part
This field contains item part of the call number. It is used, along with 942$2 and 942$h to create the normalized call number (942$6) used when sorting by call number.
Mapped to: biblioitems.cn_item
Indexed in: cn-item
942$k - Call number prefix
This field contains prefix to the call number.
Mapped to: biblioitems.cn_prefix
Indexed in: cn-prefix
942$m - Call number suffix
This field contains suffix to the call number.
Mapped to: biblioitems.cn_suffix
Indexed in: cn-suffix
942$n - Suppress in OPAC
If the OpacSuppression system preference is set to “hide”, this field indicates if the record should be hidden from the OPAC.
In this field, “1” means the record will be hidden in the OPAC, and “0” (or empty) means the record will be visible in the OPAC.
You can use the YES_NO authorized value list in this field if you don’t want to remember the numerical values.
Indexed in: suppress
942$s - Serial record flag
This field is used by the serials module to indicate whether or not the record is associated with a serial subscription.
Mapped to: biblio.serial
Avvertimento
This field should not be editable nor edited manually.
Location and item information (952)
Koha uses field 952 to store item (holding) information.
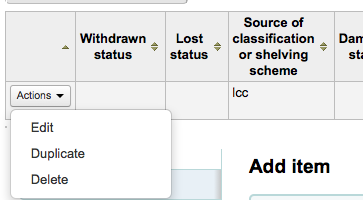
952$0 - Withdrawn status
Uses
This field is used to set the withdrawn (weeded) status of the item.
You can use the withdrawn status to weed items without deleting the items.
In the search results, the withdrawn item will be marked as unavailable.
Effects on circulation
A withdrawn item will not be able to be checked out.
A withdrawn item will not be able to be checked in unless the BlockReturnOfWithdrawnItems system preference allows it.
Values
The withdrawn status is numerical, “0” (or empty) means “not withdrawn” and any other number means “withdrawn”.
By default, the field is associated with the WITHDRAWN authorized value category so you don’t have to remember the numerical values. The default values in the WITHDRAWN authorized value category are:
1: Withdrawn
Display
Staff interface
Search results (withdrawn items will be marked as unavailable)
Holdings table in the record’s detail page
“Items” tab of the bibliographic record, “Withdrawn status” under “Statuses”
OPAC
Search results (withdrawn items will be marked as unavailable)
Holdings table in the record’s detail page
To hide withdrawn items from the OPAC, use the OpacHiddenItems system preference.
Mapped to: items.withdrawn
Indexed in: withdrawn
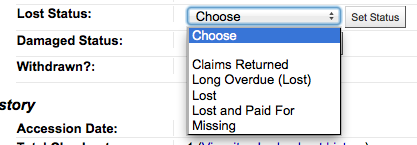
952$1 - Lost status
Uses
This field is used to set the lost status of the item.
You can use the lost status to mark items as lost or missing
In the search results, the lost item will be marked as unavailable.
Marking an item lost while it is checked out can charge the replacement cost (952$v) to the patron (see WhenLostChargeReplacementFee), as well as a processing fee (the processing fee is set at the item type level)
The lost status can be changed automatically after a number of days overdue with the longoverdue.pl cronjob
Effects on circulation
The ability to check out a lost item depends on the IssueLostItem system preference.
The ability to check in a lost item depends on the BlockReturnOfLostItems system preference.
Values
The lost status is numerical, “0” (or empty) means “not lost” and any other number means “lost”.
By default, the field is associated with the LOST authorized value category so you don’t have to remember the numerical values. The default values in the LOST authorized value category are:
1: Lost
2: Long Overdue (Lost)
3: Lost and Paid For
4: Missing
Display
Staff interface
Search results (lost items will be marked as unavailable)
Holdings table in the record’s detail page
“Items” tab of the bibliographic record, “Lost status” under “Statuses”
OPAC
Search results (lost items will be marked as unavailable)
Holdings table in the record’s detail page
It’s possible to configure Koha so that lost items don’t display in the OPAC with the hidelostitems system preference.
Mapped to: items.itemlost
Indexed in: lost
952$2 - Source of classification or shelving scheme
Uses
This field contains the source of classification used by the record’s call number (952$o).
The source of classification will be used, along with the call number itself (952$o) to create the normalized call number (952$6) used when sorting by call number.
Values
There is a choice of classification sources as they are defined in administration.
If no classification scheme is entered, the system will use the value entered in the DefaultClassificationSource preference.
Display
This is not displayed either in the OPAC or in the staff interface. The information is only available in the item’s editing form.
Mapped to: items.cn_source
Indexed in: classification-source
952$3 - Materials specified
Uses
This field is used to add information about accompanying materials or to specify how many pieces the item has.
Effects on circulation
This information will be displayed when circulation the item so that the circulation staff knows to make sure all the accompanying material is there when checkout out and it’s still there when checking the item back in.

Values
This is a free text field, but it is possible to associate it to an authorized value category in the MARC framework to make it into a drop-down menu.
Display
Staff interface
This information will appear when checking out or checking in an item
Holdings table in the record’s detail page
Nota
Use “Table settings” if you want to hide that column - Module: Catalogue - Table id: holdings_table and/or otherholdings_table - Column: holdings_materials or otherholdings_materials
“Items” tab of the bibliographic record, “Materials specified” under “Item information”
OPAC
Holdings table in the record’s detail page (it is hidden by default)
Nota
Use “Table settings” if you want to show that column - Module: OPAC - Table id: holdingst - Column: item_materials
Mapped to: items.materials
Indexed in: materials-specified
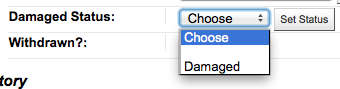
952$4 - Damaged status
Uses
This field is used to set the damaged status of the item.
In the search results, the damaged item will be marked as unavailable.
Effects on circulation
The damaged status does not affect the ability to check out or check in an item.
The AllowHoldsOnDamagedItems system preference indicates whether or not damaged items can be put on hold.
Values
The damaged status is numerical, “0” (or empty) means “not damaged” and any other number means “damaged”.
By default, the field is associated with the DAMAGED authorized value category so you don’t have to remember the numerical values. The default values in the DAMAGED authorized value category are:
1: Damaged
Display
Staff interface
Search results (damaged items will be marked as unavailable)
Holdings table in the record’s detail page
“Items” tab of the bibliographic record, “Damaged status” under “Statuses”
OPAC
Search results (damaged items will be marked as unavailable)
Holdings table in the record’s detail page
To hide damaged items from the OPAC, use the OpacHiddenItems system preference.
Mapped to: items.damaged
Indexed in: damaged
952$5 - Use restrictions
Uses
This field is used to set the restricted status of the item.
In the search results, the restricted item will be marked as available.
Effects on circulation
A restricted item will not be able to be checked out.
Values
The restricted status is numerical, “1” means restricted and “0” (or empty) means unrestricted.
Nota
Unlike other statuses, the restricted status can only be 0 (not restricted) or 1 (restricted).
By default, the field is associated with the RESTRICTED authorized value category so you don’t have to remember the numerical values. The default values in the RESTRICTED authorized value category are:
1: Access Restricted
Display
Staff interface
Search results (restricted items will be marked as available)
Holdings table in the record’s detail page
OPAC
Search results (restricted items will be marked as available)
Holdings table in the record’s detail page
Mapped to: items.restricted
Indexed in: restricted
952$6 - Koha normalized classification for sorting
Avvertimento
This field should not be editable nor edited manually.
Uses
This field contains the normalized call number used for sorting, based on the item-level call number (952$o) and the classification source (952$2).
Display
This information is not displayed anywhere in the OPAC or in the staff interface, it is for Koha’s internal use only.
Mapped to: items.cn_sort
Indexed in: cn-sort
952$7 - Not for loan status
Uses
This field is used to set the not for loan status of the item.
In the search results, the not for loan item will be marked as unavailable or for reference use only (see Reference_NFL_Statuses)
Effects on circulation
Items with a not for loan status cannot be checked out (unless AllowNotForLoanOverride allows it)
Depending on the value, items may or may not be put on hold (see below)
Depending on TrapHoldsOnOrder and SkipHoldTrapOnNotForLoanValue not for loan items may be used to fill holds
The UpdateNotForLoanStatusOnCheckin system preference can be used to automatically change not for loan values upon checkin
Values
The not for loan status is numerical, “0” (or empty) means available.
Negative values (< 0) mean that the item cannot be checked out, but can be put on hold.
Positive values (> 0) mean that the item cannot be checked out nor be put on hold.
By default, the field is associated with the NOT_LOAN authorized value category so you don’t have to remember the numerical values. The default values in the NOT_LOAN authorized value category are:
-1: Ordered
1: Not For Loan
2: Staff Collection
Display
Staff interface
Search results (not for loan item will be marked as unavailable or for reference use only (see Reference_NFL_Statuses))
Holdings table in the record’s detail page
“Items” tab of the bibliographic record, “Withdrawn status” under “Statuses”
OPAC
Search results (not for loan item will be marked as unavailable or for reference use only (see Reference_NFL_Statuses))
Holdings table in the record’s detail page
To hide not for loan items from the OPAC, use the OpacHiddenItems system preference.
Mapped to: items.notforloan
Indexed in: notforloan
952$8 - Collection
Uses
This field is used to set the collection of the item.
Collections in Koha are used to group items in ways other than physically (the physical location can be stored in 952$c). An example of a collection could be “Local authors”.
Collections can also be used to limit transfers in multi-branch systems (see the Library transfer limits section of the administration) if BranchTransferLimitsType is set to “collection code”
The collection of an item is used in the search (see the AdvancedSearchTypes system preference) as well as the facets.
Values
By default, the field is associated with the CCODE authorized value category. The default values in the CCODE authorized value category are:
FIC: Fiction
NFIC: Non-fiction
REF: Reference
Display
Staff interface
The collections will be part of the facets in the search results
Holdings table in the record’s detail page
Nota
Use “Table settings” if you want to hide that column - Module: Catalogue - Table id: holdings_table and/or otherholdings_table - Column: holdings_ccode or otherholdings_ccode
Checkouts table in the patron’s file
Nota
Use “Table settings” if you want to hide that column - Module: Circulation and Patrons - Table id: issues-table - Column: collection
Many other places all throughout Koha
OPAC
Search results, if OpacItemLocation allows it
The collections will be part of the facets in the search results
Holdings table in the record’s detail page
Nota
Use “Table settings” if you want to hide that column - Module: OPAC - Table id: holdingst - Column: item_ccode
Many other places throughout the OPAC
Mapped to: items.ccode
Indexed in: collection-code
952$9 - Itemnumber
Avvertimento
This field should not be editable nor edited manually.
Uses
The itemnumber is the internal number assigned to each item by Koha. It is unique and cannot be reattributed even when the item is deleted.
Display
This information is not displayed anywhere in the OPAC or in the staff interface, it is for Koha’s internal use only.
Mapped to: items.itemnumber
Indexed in: itemnumber
952$a - Home library
Required
Uses
This field indicates the home library of the item.
The home library is important for many things in Koha, including, but not limited to
The home library of an item is used in the search as well as the facets (see the DisplayLibraryFacets system preference)
Effects on circulation
As previously stated, the circulation rules are based on the item’s library (see the HomeOrHoldingBranch system preference)
Values
Libraries are defined in the libraries section of the administration page.
Display
Staff interface
Depending on the DisplayLibraryFacets system preference, the home library may be part of the facets in the search results
Holdings table in the record’s detail page
Nota
Use “Table settings” if you want to hide that column - Module: Catalogue - Table id: holdings_table and/or otherholdings_table - Column: holdings_homebranch or otherholdings_homebranch
This information is displayed in the staff interface, in the “Items” tab of the bibliographic record, “Home library” under “Item information”
Checkouts table in the patron’s file
Nota
Use “Table settings” if you want to hide that column - Module: Circulation and Patrons - Table id: issues-table - Column: homebranch
Many other places all throughout Koha
OPAC
Search results (if OpacItemLocation allows it)
Depending on the DisplayLibraryFacets system preference, the home library may be part of the facets in the search results
Holdings table in the record’s detail page, if OpacLocationBranchToDisplay allows it
Nota
Use “Table settings” if you want to hide that column - Module: OPAC - Table id: holdingst - Column: item_home_location
Many other places throughout the OPAC
Mapped to: items.homebranch
Indexed in: homelibrary
952$b - Current library
Required
Uses
This field indicates the current library (holding library) of the item.
The current library is important for many things in Koha, including
The current library of an item is used in the search as well as the facets (see the DisplayLibraryFacets system preference)
Effects on circulation
As previously stated, the circulation rules are based on the item’s library (see the HomeOrHoldingBranch system preference)
Values
Libraries are defined in the libraries section of the administration page.
Display
Staff interface
Depending on the DisplayLibraryFacets system preference, the holding library may be part of the facets in the search results
Holdings table in the record’s detail page
Nota
Use “Table settings” if you want to hide that column - Module: Catalogue - Table id: holdings_table and/or otherholdings_table - Column: holdings_holdingbranch or otherholdings_holdingbranch
This information is displayed in the staff interface, in the “Items” tab of the bibliographic record, “Current library” under “Item information”
Many other places all throughout Koha
OPAC
Search results (if OpacItemLocation allows it)
Depending on the DisplayLibraryFacets system preference, the holding library may be part of the facets in the search results
Holdings table in the record’s detail page, if OpacLocationBranchToDisplay allows it
Nota
Use “Table settings” if you want to hide that column - Module: OPAC - Table id: holdingst - Column: item_current_location
Many other places throughout the OPAC
Mapped to: items.holdingbranch
Indexed in: holdinglibrary
952$c - Shelving location
Uses
This field indicates the location of the item (physical place in the library).
Shelving locations in Koha are used to group items physically. An example of a shelving location could be “Children’s section”.
The location of an item is used in the search (see the AdvancedSearchTypes system preference) as well as the facets.
The UpdateItemLocationOnCheckin system preference can be used to automatically change location values upon checkin
Values
By default, the field is associated with the LOC authorized value category. The default values in the LOC authorized value category are:
FIC: Fiction
CHLID: Children’s Area
DISPLAY: On Display
NEW: New Materials Shelf
STAFF: Staff Office
GEN: General Stacks
AV: Audio Visual
REF: Reference
CART: Book Cart
PROC: Processing Center
The default value for new items can be set using the NewItemsDefaultLocation system preference
Display
Staff interface
The locations will be part of the facets in the search results
Holdings table in the record’s detail page (under the home library)
This information is displayed in the staff interface, in the “Items” tab of the bibliographic record, “Home library” under “Item information”
Checkouts table in the patron’s file
Nota
Use “Table settings” if you want to hide that column - Module: Circulation and Patrons - Table id: issues-table - Column: location
Many other places all throughout Koha
OPAC
Search results (if OpacItemLocation allows it)
The locations will be part of the facets in the search results
Holdings table in the record’s detail page, the OpacLocationOnDetail system preference indicates in which column this information is located
Nota
Use “Table settings” if you want to hide that column - Module: OPAC
Table id: holdingst
Column: item_shelving_location (if OpacLocationOnDetail is set to “separate column”)
Many other places throughout the OPAC
Mapped to: items.location
Indexed in: location
952$d - Date acquired
Uses
This field is used to enter the date of acquisition of the item.
The acquisition date can be used in the search and the sort function in the search results
When using the Acquisitions module, this should be filled automatically with the acquisition date
Values
This should be a date in the YYYY-MM-DD format (there is a handy date picker to ensure the date is in the correct format)
Display
Staff interface
Holdings table in the record’s detail page
Nota
Use “Table settings” if you want to hide that column - Module: Catalogue - Table id: holdings_table and/or otherholdings_table - Column: holdings_dateaccessioned or otherholdings_dateaccessioned
“Items” tab of the bibliographic record, “Accession date” under “History”
Mapped to: items.dateaccessioned
Indexed in: date-of-acquisition
952$e - Source of acquisition
Uses
This field is used to enter the vendor where the item was acquired
When using the Acquisitions module, this should be filled automatically with the vendor upon receiving
Values
This is a free text field
If using the Acquisitions field, the value in this field will be the vendor id rather than the vendor’s name
Display
This is not displayed either in the OPAC or in the staff interface. The information is only available in the item’s editing form.
Mapped to: items.booksellerid
Indexed in: acqsource
952$f - Coded location qualifier
Uses
This field is used to enter a three-character code that identifies the specific issues of the item that are located apart from the main holdings of the same item (same as MARC21 852$f).
Values
This is a free text field
The field in the database is limited to 10 characters
Display
This is not displayed either in the OPAC or in the staff interface. The information is only available in the item’s editing form.
Mapped to: items.coded_location_qualifier
Indexed in: coded-location-qualifier
952$g - Cost, normal purchase price
Uses
This field is used to enter the purchase price of the item
When using the Acquisitions module, this should be filled automatically with the purchase price upon receiving
Values
This is a free text field
The price must be digits, with a period as the decimal, with no currency symbols (e.g. 24.95)
The field in the database limits to two decimal points (e.g. 24.95 is OK but 24.94875 is not)
Display
This is not displayed either in the OPAC or in the staff interface. The information is only available in the item’s editing form.
Mapped to: items.price
Indexed in: price
952$h - Serial enumeration / chronology
Uses
This field is used to enter the issue number of serials or the volume number of series
When using the Serials module, this should be filled automatically with the issue number
Values
This is a free text field
Display
Staff interface
Holdings table in the record’s detail page
Nota
Use “Table settings” if you want to hide that column - Module: Catalogue - Table id: holdings_table and/or otherholdings_table - Column: holdings_enumchron or otherholdings_enumchron
“Items” tab of the bibliographic record, “Serial enumeration” under “History”
OPAC
Holdings table in the record’s detail page
Nota
Use “Table settings” if you want to hide that column - Module: OPAC - Table id: holdingst - Column: item_enumchron
Mapped to: items.enumchron
952$i - Inventory number
Uses
This field is used to enter an inventory number for the item
Nota
The inventory number is not Koha’s internal itemnumber (which is stored in 952$9)
Values
This is a free text field
The field in the database is limited to 32 characters
Display
Staff interface
Holdings table in the record’s detail page
Nota
Use “Table settings” if you want to hide that column - Module: Catalogue - Table id: holdings_table and/or otherholdings_table - Column: holdings_stocknumber or otherholdings_stocknumber
Mapped to: items.stocknumber
Indexed in: number-local-acquisition
952$j - Shelving control number
Uses
This field is used to enter a shelf number where the item is located
Values
The stack number should be numerical
By default, the field is associated with the STACK authorized value category so you don’t have to remember the numerical values. There are no default values.
Display
This is not displayed either in the OPAC or in the staff interface. The information is only available in the item’s editing form.
Mapped to: items.stack
Indexed in: stack
952$l - Total checkouts
Avvertimento
This field should not be editable nor edited manually.
Uses
This field contains the total number of past and present issues/checkouts of this item
The number of issues is used to sort search results by popularity
The number of issues for each item is used to update the total number of issues for the record (942$0)
Display
Staff interface
“Items” tab of the bibliographic record, “Total checkouts” under “History”
Mapped to: items.issues
Indexed in: issues
952$m - Total renewals
Avvertimento
This field should not be editable nor edited manually.
Uses
This field contains the total number of past renewals of this item
Display
Staff interface
“Items” tab of the bibliographic record, “Current renewals” under “Statuses”
Mapped to: items.renewals
Indexed in: renewals
952$n - Total holds
Avvertimento
This field should not be editable nor edited manually.
Uses
This field contains the total number of past and present holds on this item
The number of holds is used to create a RSS feed for most reserved items
Display
This is not displayed either in the OPAC or in the staff interface.
Mapped to: items.renewals
Indexed in: renewals
952$o - Full call number
Uses
This field is used to store the item’s call number
The call number of an item can used in the search
Values
The records call number can be copied into the item’s call number, the itemcallnumber system preference indicates which record field to use as the source
Display
Staff interface
Holdings table in the record’s detail page
Nota
Use “Table settings” if you want to hide that column - Module: Catalogue - Table id: holdings_table and/or otherholdings_table - Column: holdings_itemcallnumber or otherholdings_itemcallnumber
“Items” tab of the bibliographic record, “Item callnumber” under “Item information”
Checkouts table in the patron’s file
Nota
Use “Table settings” if you want to hide that column - Module: Circulation and Patrons - Table id: issues-table - Column: callno
Many other places all throughout Koha
OPAC
Search results, if OpacItemLocation allows it
Holdings table in the record’s detail page
Nota
Use “Table settings” if you want to hide that column - Module: OPAC - Table id: holdingst - Column: item_callnumber
Checkouts table in the patron’s online account
Many other places throughout the OPAC
Mapped to: items.itemcallnumber
Indexed in: local-classification
952$p - Barcode
Required for circulation
Uses
This field is used to store the item’s barcode
The barcode of an item can used in the search
Effects on circulation
The barcode is essential for circulating items
Values
This should be a date in the YYYY-MM-DD format (there is a handy date picker to ensure the date is in the correct format)
This is a free text field
The field in the database is limited to 20 characters
Display
Staff interface
Holdings table in the record’s detail page
Nota
Use “Table settings” if you want to hide that column - Module: Catalogue - Table id: holdings_table and/or otherholdings_table - Column: holdings_barcode or otherholdings_barcode
“Items” tab of the bibliographic record
Checkouts table in the patron’s file (in the title column)
Mapped to: items.barcode
Indexed in: barcode
952$q - Date due
Avvertimento
This field should not be editable nor edited manually.
Uses
When the item is checked out, the due date is stored in this field (YYYY-MM-DD)
This field is used in the “Limit to currently available items” in the facets
Display
The due date appears in a lot of pages in the circulation module, but it is the due date that comes from the issues, not the item
Mapped to: items.onloan
Indexed in: onloan
952$r - Date last seen
Avvertimento
This field should not be editable nor edited manually.
Uses
When the item is checked out or in, edited, inventoried, or during any other transaction that affects the item, the date is stored in this field (YYYY-MM-DD)
Display
Staff interface
Holdings table in the record’s detail page
Nota
Use “Table settings” if you want to hide that column - Module: Catalogue - Table id: holdings_table and/or otherholdings_table - Column: holdings_lastseen or otherholdings_lastseen
“Items” tab of the bibliographic record, “Last seen” under “History”
Mapped to: items.datelastseen
Indexed in: datelastseen
952$s - Date last checked out
Avvertimento
This field should not be editable nor edited manually.
Uses
When the item is checked out, the date is stored in this field (YYYY-MM-DD)
Display
Staff interface
Holdings table in the record’s detail page
Nota
Use “Table settings” if you want to hide that column - Module: Catalogue - Table id: holdings_table and/or otherholdings_table - Column: holdings_datelastborrowed or otherholdings_datelastborrowed
“Items” tab of the bibliographic record, “Last borrowed” under “History”
Mapped to: items.datelastborrowed
Indexed in: datelastborrowed
952$t - Copy number
Uses
This field is used to enter the copy number of the item
Values
This is a free text field
The field in the database is limited to 32 characters
Display
Staff interface
Holdings table in the record’s detail page
Nota
Use “Table settings” if you want to hide that column - Module: Catalogue - Table id: holdings_table and/or otherholdings_table - Column: holdings_copynumber or otherholdings_copynumber
“Items” tab of the bibliographic record, “Copy number” under “History”
OPAC
Holdings table in the record’s detail page
Nota
Use “Table settings” if you want to hide that column - Module: OPAC - Table id: holdingst - Column: item_copy
Mapped to: items.copynumber
Indexed in: copynumber
952$u - URI
Uses
This field is used to enter a URL or URN specific to the item
It is not necessary to enter a URL here if there is already a URL in 856$u at the record-level, unless the URL for the specific item differs from the one in 856$u (for example, if you have an online periodical, you can put the URL to the periodical in 856$u and the URL to the specific issue in 952$u)
Values
Display
Staff interface
Holdings table in the record’s detail page
Nota
Use “Table settings” if you want to hide that column - Module: Catalogue - Table id: holdings_table and/or otherholdings_table - Column: holdings_uri or otherholdings_uri
OPAC
Holdings table in the record’s detail page
Nota
Use “Table settings” if you want to hide that column - Module: OPAC - Table id: holdingst - Column: item_url
Mapped to: items.uri
Indexed in: uri
952$v - Cost, replacement price
Uses
This field is used to enter the replacement cost that will be charged to the patron who loses the item
When using the Acquisitions module, this should be filled automatically with the replacement price upon receiving
Values
This is a free text field
The price must be digits, with a period as the decimal, with no currency symbols (e.g. 24.95)
The field in the database limits to two decimal points (e.g. 24.95 is OK but 24.94875 is not)
Display
Staff interface
Checkouts table in the patron’s file (in the price column)
Nota
Use “Table settings” if you want to hide that column - Module: Circulation and Patrons - Table id: issues-table - Column: price
“Items” tab of the bibliographic record, “Replacement price” under “Item information”
Mapped to: items.replacementprice
Indexed in: replacementprice
952$w - Price effective from
Uses
This field is used to enter the date of the replacement price of the item
When using the Acquisitions module, this should be filled automatically with the acquisition date upon receiving
If left empty, it will default to the acquisition date (952$d)
Values
This should be a date in the YYYY-MM-DD format
Display
This is not displayed either in the OPAC or in the staff interface. The information is only available in the item’s editing form.
Mapped to: items.replacementpricedate
Indexed in: replacementpricedate
952$x - Non-public note
Uses
This field is used to enter internal notes about the item
Values
This is a free text field
Display
Staff interface
Holdings table in the record’s detail page
Nota
Use “Table settings” if you want to hide that column - Module: Catalogue
Table id: holdings_table and/or otherholdings_table
Column: holdings_itemnotes_nonpublic or otherholdings_itemnotes_nonpublic
“Items” tab of the bibliographic record, “Non-public note” under “History”
Mapped to: items.itemnotes_nonpublic
952$y - Koha item type
Required
Uses
This field contains the item-level item type.
The item-level item type is used in various places in Koha.
The item-level item type is generally used for the circulation rules unless the item-level_itypes system preference is set to use the record-level item type (this system preference lets you choose between using the record-level or item-level item type for the circulation rules, among other things)
The item-level item type is indexed and used in the search (see also the AdvancedSearchTypes system preference) as well as the facets
Effects on circulation
The item type is used as the basis for circulation rules, it will affect the number of items a patron can take out at the same time, number of holds, etc.)
Values
The values are managed in item types
Display
Staff interface
The itemtypes will be part of the facets in the search results
Holdings table in the record’s detail page
Nota
Use “Table settings” if you want to hide that column - Module: Catalogue - Table id: holdings_table and/or otherholdings_table - Column: holdings_itype or otherholdings_itype
“Items” tab of the bibliographic record, “Item type” under “Item information”
Checkouts table in the patron’s file
Nota
Use “Table settings” if you want to hide that column - Module: Circulation and Patrons - Table id: issues-table - Column: item_type
Many other places all throughout Koha
OPAC
The item types will be part of the facets in the search results
Holdings table in the record’s detail page
Nota
Use “Table settings” if you want to hide that column - Module: OPAC - Table id: holdingst - Column: item_itemtype
Many other places throughout the OPAC
Mapped to: items.itype
Indexed in: itemtype (mc-itemtype), itype (mc-itype)
952$z - Public note
Uses
This field is used to enter notes about the item
Values
This is a free text field
Display
Staff interface
Holdings table in the record’s detail page
Nota
Use “Table settings” if you want to hide that column - Module: Catalogue - Table id: holdings_table and/or otherholdings_table - Column: holdings_itemnotes or otherholdings_itemnotes
“Items” tab of the bibliographic record, “Public note” under “History”
OPAC
Holdings table in the record’s detail page
Nota
Use “Table settings” if you want to hide that column - Module: OPAC - Table id: holdingst - Column: item_notes
Mapped to: items.itemnotes
Indexed in: note
System control numbers (999)
Koha stores its system control numbers in the 999 field in MARC21 and in the 090 field in UNIMARC.
Nota
The itemnumber is stored in 952$9 (see above).
999$c - Biblionumber
The biblionumber is the internal number assigned to each record by Koha. It is unique and cannot be reattributed even when the record is deleted.
Mapped to: biblio.biblionumber
Indexed in: local-number (sn, biblionumber)
Avvertimento
This field should not be editable nor edited manually.
Nota
In UNIMARC, the biblionumber is stored in the 090$9 subfield.
999$d - Biblioitemnumber
The biblioitemnumber is the internal number assigned to each record by Koha. It is unique and cannot be reattributed even when the record is deleted.
Mapped to: biblioitems.biblioitemnumber
Indexed in: biblioitemnumber
Avvertimento
This field should not be editable nor edited manually.
Nota
In UNIMARC, the biblioitemnumber is stored in the 090$a subfield.
Koha XSLT material type icons
When you have any of the XSLT system preferences (OPACXSLTDetailsDisplay, OPACXSLTResultsDisplay, XSLTDetailsDisplay, and/or XSLTResultsDisplay) along with the DisplayOPACiconsXSLT and DisplayIconsXSLT preferences turned on you will see material type icons on the related screen.
Importante
Queste immagini dipendono dai valori che hai nel leader, se non hai inserito bene i dati nel leader è meglio disattivare la preferenza DisplayOPACiconsXSLT. Le altre preferenze XSLT possono rimanere attive.

Libro [BK}
leader6 = a (e uno dei valori qui messi per leader7)
leader7 = a
leader7 = c
leader7 = d
leader7 = m
leader6 = t
Computer File [CF]
leader6 = m

Seriale [CR}
leader7 = b
leader7 = i
leader7 = s

Materiale cartografico [MP}
leader6 = e
leader6 = f

Materiale misto [MX]
leader6 = p
Musica [MU]
leader6 = c
leader6 = d
leader6 = i
leader6 = j
Audiovisivi [VM}
leader6 = g
leader6 = k
leader6 = r

Kit
leader6 = o
Gestione degli ordini e delle prenotazioni
Se siete soliti importare i record MARC al momento dell’ordine dei libri (invece che alla ricezione), e se volete permettere agli utenti di prenotare quei libri, è possibile che dobbiate aggiungere i record delle copie al file *.mrc prima di importarlo.
Il modo più semplice di importare l’ordine più recente è innanzitutto di passare i vostri record al MARCEdit. Scaricate i vostri record MARC, salvando il file sul desktop od un’altra locazione abituale/facile da ricordare. Se MARCEdit è già installato sul computer, sarà sufficiente fare doppio clic sui vostri record MARC e questi si apriranno automaticamente in MARCEdit.
Importante
Questo tutorial è stato scritto per MARCEdit versione 5.2.3769.41641 su Windows XP, le istruzioni possono variare per altre versioni o sistemi.
Il file originale sarà automaticamente utilizzato in input; assicurarsi di aver selezionato MarcBreaker, quindi fare clic su «Execute».
Il sistema presenta, nella parte inferiore della finestra, una lista dei record che saranno elaborati.
Fare clic su “Edit Records” per proseguire ed aggiungere i record delle copie.
La finestra sarà sostituita da una più grande, che conterrà i record MARC.
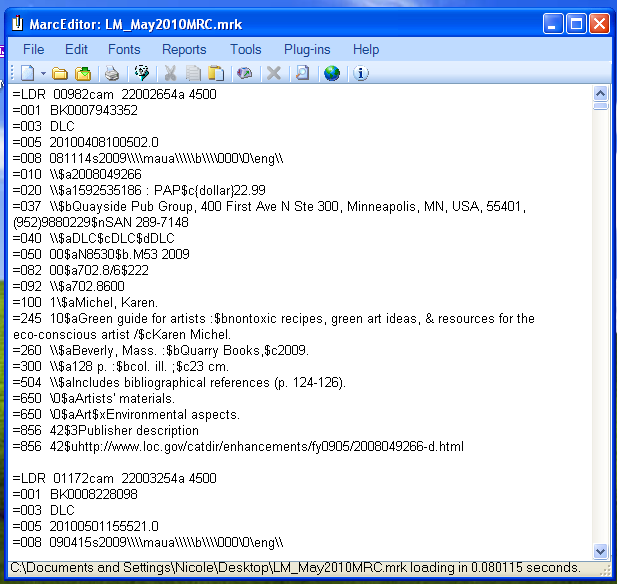
Fare clic su Strumenti > Aggiungi/modifica campo
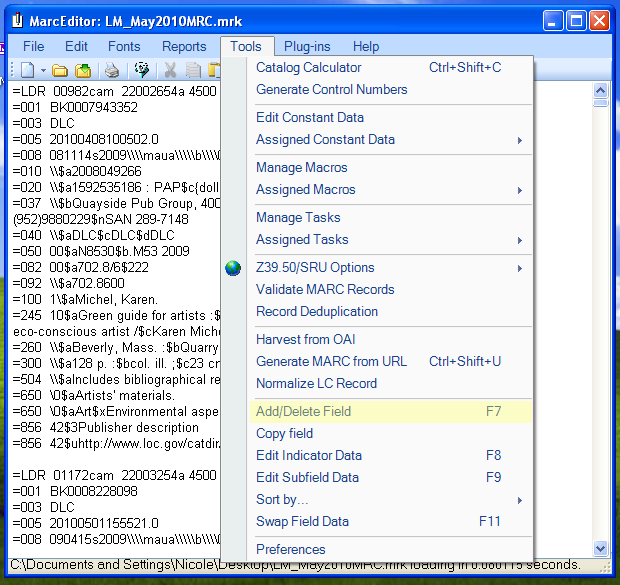
Immettere le informazioni sulla copia nel formato di Koha
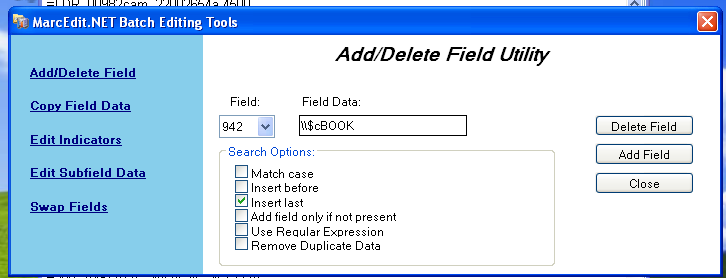
Nella casella Field, digitare 942
Nella casella Field Data digitare \\$c ed il codice del tipo di copia (\\$cBOOK, nell’esempio)
Selezionare l’opzione “Insert last”
Fare clic su Add Field”
Immettere i dati del record copia
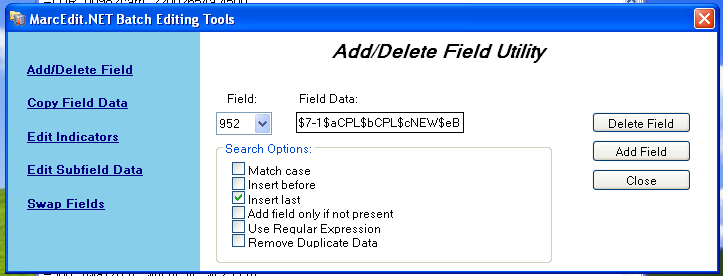
Nella casella Field, digitare 952
Nella casella Field Data, digitare: $7ORDERED_STATUS$aPERM_LOC$bCURR_LOC$cSHELVING_LOCATION$eSOURCE_OF_ACQ$yITEM_TYPE
esempio: $7-1$aCPL$bCPL$cNEW$eBrodart$yBOOK
Nell’installazione predefinita di Koha -1 è il valore per lo stato Ordinato
Se lo si desidera, è possibile apportare modifiche ad altri campi che si vogliono compilare; per esempio si può cambiare il codice della collezione, per registrattre tutte le copie nella stessa collezione (8), compilare automaticamente la data di acquisizione (d), o scrivere una nota visibile agli utenti (z)
Assicurarsi di usare il segno $ per separare i sottocampi; se si immettesse ciascun sottocampo su una riga separata, verrebbero generate altrettante copie, durante l’importazione del record MARC. Nell’esempio soprastante, verrebbero create quattro copie, una per ciascun campo corretto.
Consultate la sezione Amministrazione > Valori autorizzati di Koha, per accertarsi di immettere i codici corretti in ciascun campo
Selezionare l’opzione “Insert last”
Fare clic su Add Field”
Chiudere la finestra dell’editor
Fare clic su File > Compila in MARC
Scegli dove salvare il file
Adesso entra in Koha e segui le istruzioni per importare record MARC.
Una volta che le copie saranno arrivate, sarà necessario aprire i relativi record, modificare individualmente ciascuna copia per registrare il codice a barre corretto, e cambiare manualmente lo stato da Ordinato a nessun valore nel campo Non prestabile
Nota
Se acquistate le informazioni di catalogazione delle vostre copie, se lo desiderate potete chiedere al venditore di inserire nei record MARC le informazioni di cui avete bisogno per vostro conto. In qesto modo potette importare il file modificato dal venitore, che sovrascriverà i record esistenti e sostituirà automaticamente i dati con quelli desiderati.