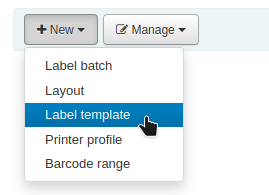
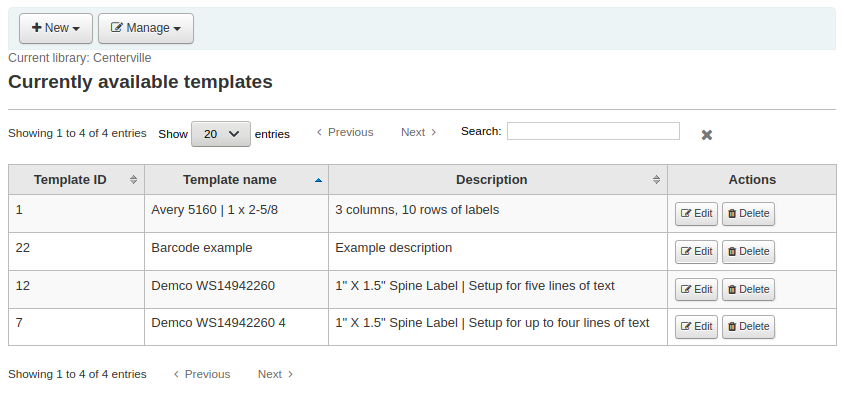
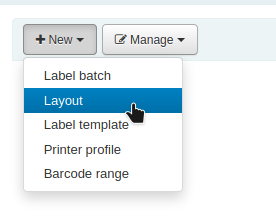
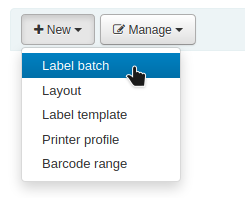
Strumenti
Tutti gli strumenti di Koha eseguono determinate operazioni. Spesso voci del menù Strumenti di Koha corrispondono a report in altri sistemi di gestione di biblioteca.
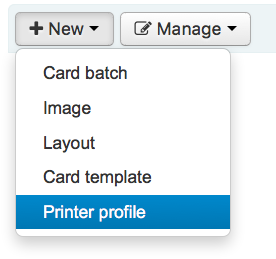
Vai a: Più > Strumenti
Patrons and circulation
Liste utenti
Get there: More > Tools > Patrons and circulation > Patron lists
Gli elenchi utenti sono un modo per raggruppare utenti e apportare modifiche di gruppo tramite lo strumento Modifica utenti via batch <batch-patron-modification-label> o i report.
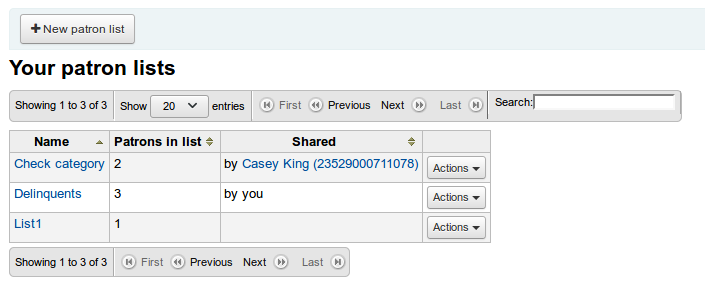
Per creare una nuova lista di utenti clicca il tasto “Nuova lista di utenti”
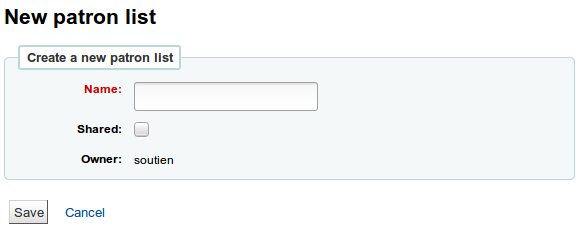
Enter a list name.
Checking the “Shared” box will make this list visible to all users with the manage_patron_lists permission.
Save the list.
Ogni “Lista” ha un menù “Azioni” con altre opzioni.
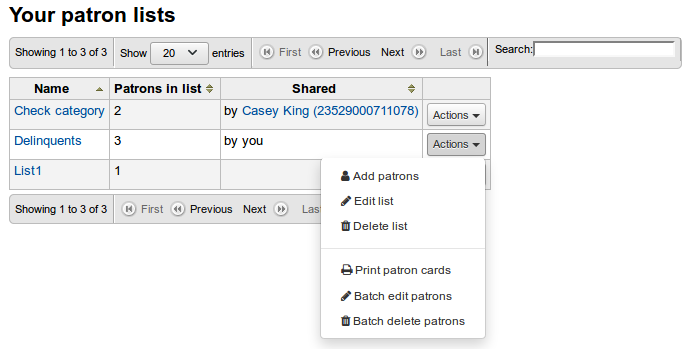
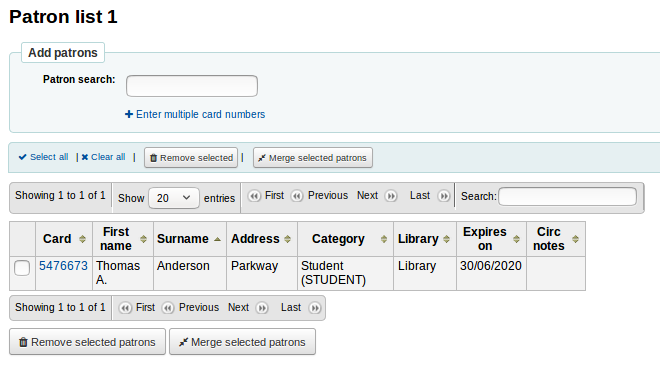
Per aggiungere utenti all’elenco clicca sul link “Aggiungi utenti” nel menu “Azioni”.
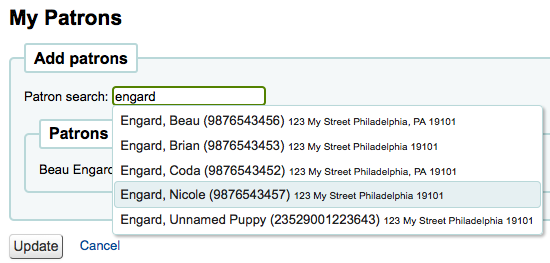
Inserisci il nome o il numero di tessera nel riquadro per la ricerca e clicca sul risultato giusto per aggiungere l’utente.
Alternatively, you can click on the “Enter multiple card numbers” link and scan (or type in) barcodes in the box.
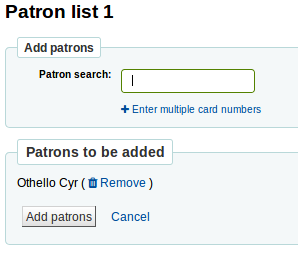
Una volta che si hanno tutti gli utenti che si desidera aggiungere, clicca sul pulsante “Aggiungi utenti” per salvarli nella lista.

Nota
You can customize the columns of this table in the “Table settings” section of the Administration module (table id: patron-list-table).
Clubs degli utenti
Get there: More > Tools > Patrons and circulation > Patron clubs
Patron clubs create clubs in which patrons may be enrolled. It is useful for tracking summer reading programs, book clubs and other such clubs.
Importante
Staff will need the clubs permissions to edit clubs, templates and enroll patrons. To learn how to set patron permissions, go to the patron permissions section of this manual.
Creating a new club template
Click on the “New club template” button. Here you can add fields that can be filled out at the time a new club is created based on the template, or a new enrollment is created for a given club based on the template.
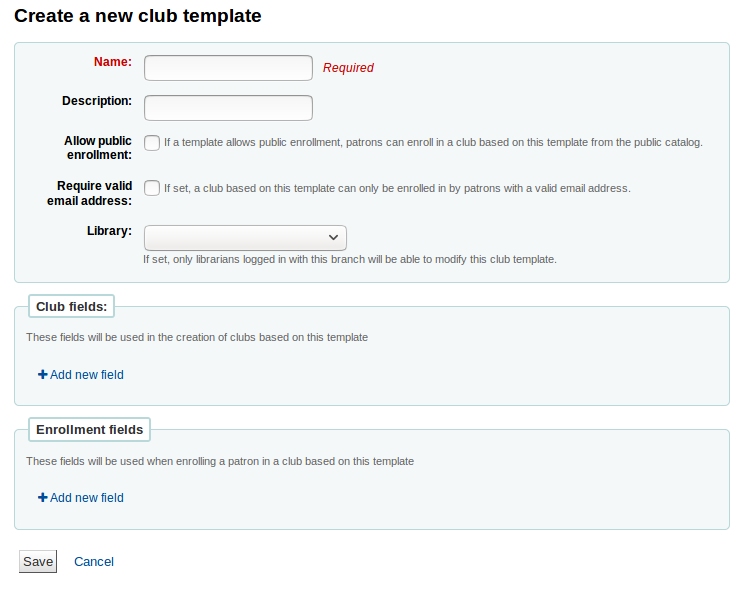
The name is required. This could be something like “Adult book club”, “Children’s book club” or “Summer reading program”. Remember these templates will be starting point for each club you create.
The description can be any additional information.
Allow public enrollment: if this box is checked it will allow patrons to enroll in a club based on this template from the OPAC.
Require valid email address: if this box is checked only patrons with a valid email address can enroll. So they will need a email address to enroll.
The library drop down gives you the flexibility to let staff from specific branches create clubs with this template. If you let it set to blank, staff from any branch will be able to create a new club using this template.
Club fields: these fields will be used when creating a club based on this template. For example, this can be the name of the club, the name of the animator, the theme, etc.
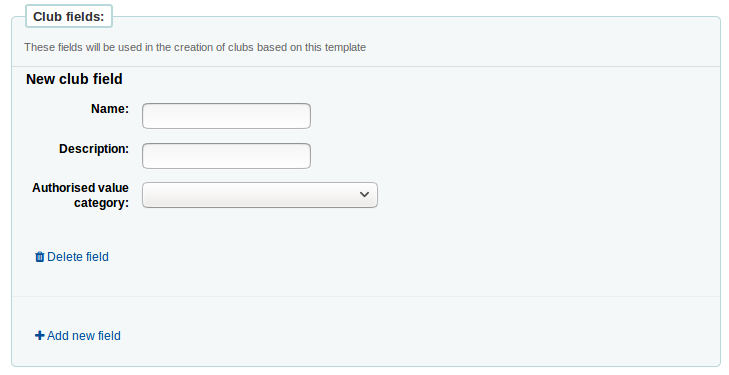
“Name” is the label of the field
“Description” is additional information about this field.
You can connect authorized values here.
Enrollment fields: you can add any additional fields you want to have filled out by your patrons when they enroll in a club base on this template.
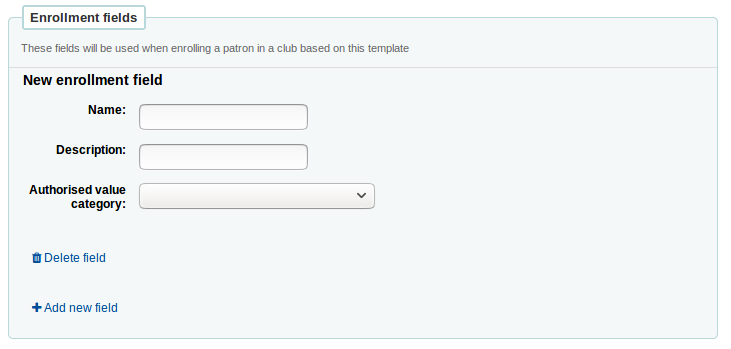
“Name” is the label of the field
“Description” is additional information about this field.
You can connect authorized values here.
Creating a new club based on a template
Click on the “New club” dropdown menu and select the template you want to use. Here you can add information about a new club using a template you created.
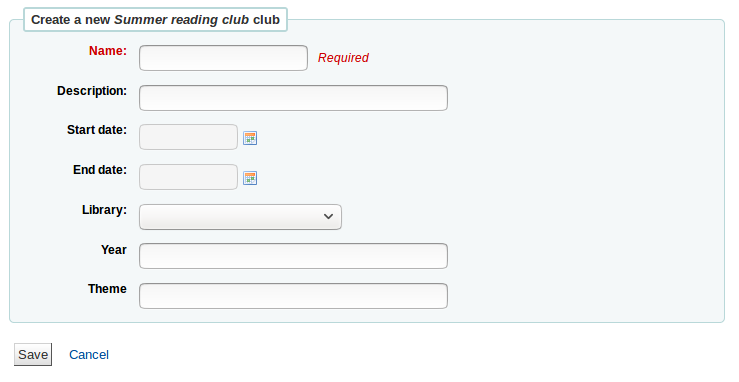
The name is required, this will be the name of the specific club using the template you created. For example, “Summer 2018 reading club”.
The description can be any additional information.
Start and End date will depict when this club runs, the entire duration of the club. Once the club expires, enrollment will not be possible.
The library drop down gives you the flexibility to enroll patrons from specific branches. If you let it set to blank, patrons from any branch will be able to enroll.
Enrolling a patron in a club from the staff client
To enroll a patron in a club from the staff client, go to the patron’s account.
On the “Details” page or the “Check out” page, click on the “Clubs” tab. All ongoing clubs will be displayed in this tab.

Click on the “Enroll” button and fill in the fields.
You can also cancel enrollment by clicking on the cancel enrollment.
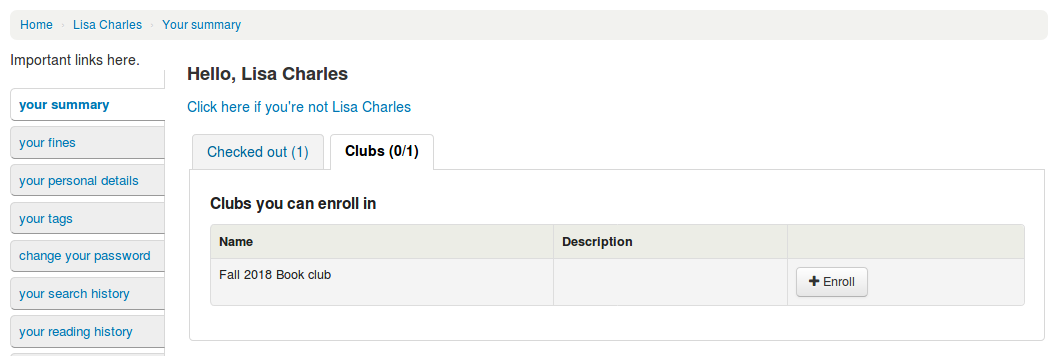
Enrolling a patron in a club from the OPAC
If you allow public enrollment, the club will be visible on the OPAC.
Patrons have to sign into their account. In the “Your summary” section, they will be able to click on the “Clubs” tab and enroll.
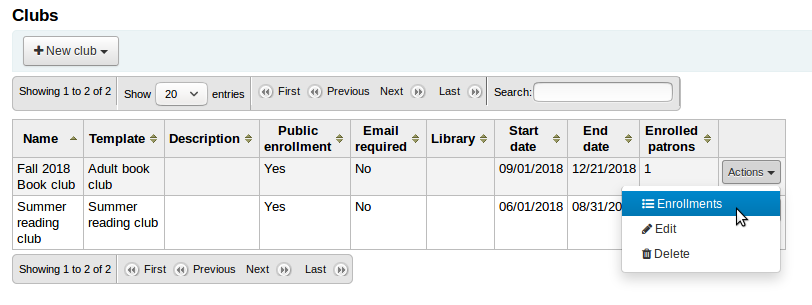
Viewing enrollments
You can monitor the enrollments in each club by going to the “Patron clubs” tool page and choosing “Enrollment” from the “Actions” button.
Placing a hold for a patron club
You can place holds for a patron club - holds are placed for club members in a random order.
To place a hold for a patron club:
Go to the patron clubs tool (“Home > Tools > Patron clubs”).
Click the “Actions” button for the club and select “Search to hold”.
Search for a title and select a record.
Select “Place hold for [CLUBNAME]” from either the action links for the record, or from the “Place hold” action in the menu bar.
The place holds page is displayed and lists the club members.
Click the “Place hold” button.
Result: Holds are placed for all club members.
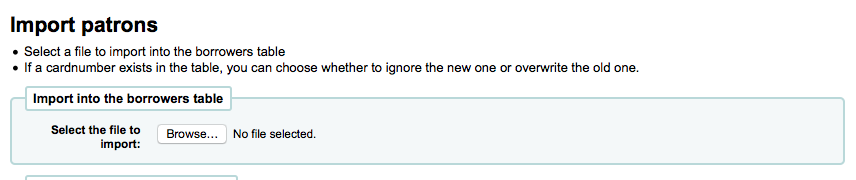
Patron import
Get there: More > Tools > Patrons and circulation > Import patrons
L’importazione utenti può essere usata in qualunque momento per aggiungere utenti in gruppo. Si utilizza titpicamente in scuole o università per nuovi gruppi di studenti da registrare.
Creating a patron import file
You can download a blank CSV file with a header from the start page of the patron import tool that you can use as a template for your patron import. The header contains all fields that can be used with the patron import tool. You can delete fields and columns you don’t need with the exception of a few mandatory ones. When overlaying, if your new .csv includes blank columns, any existing values in patron records will be overwritten with blanks. It is best to remove any blank columns in a .csv to ensure no existing data is removed.
Importante
cardnumber, surname, and all fields you have defined in the BorrowerMandatoryField preference are required and must match valid entries in your database.
Importante
Le “password” dovranno essere in chiaro, e saranno convertite in codifica Bcrypt.
Se le tue password sono già criptate, parla con il tuo amministratore di sistema per le opzioni
Importante
Date formats should match your system preference, and must be zero-padded, e.g. “01/02/2008”. Alternatively you can supply dates in ISO format (e.g. “2008-12-01”).
Importante
If your data contains special characters or diacritics, make sure your file is encoded in UTF-8. Otherwise, the special characters will not be imported correctly.
Nota
Se si caricano gli :ref:` attributi utente <patron-attribute-types-label>`, il campo “patron_attributes” deve contenere un elenco delimitato da virgole dei tipi di attributi e valori.
Il codice tipo di attributo e due punti deve precedere ogni valore.
Per esempio: «INSTID:12345,BASEBALL:Cubs»
Questo campo deve esser compreso tra doppie virgolette se sono definti valori multipli.
Poiché i valori possono contenere spazi, possono essere richieste doppie virgolette:
«INSTID:12345,BASEBALL:Cubs,»»BASEBALL:White Sox»»
Nota
It’s possible to set restrictions using the patron import tool. If the expiration date and comment match an existing restriction, the one in the import file will be skipped. So a patron import can be repeated multiple times without creating duplicate restrictions. But if one of the criteria is different, a new restriction will be added.
Importing patrons
Once you have created your file, you can use the patron import tool to bring the data into Koha.
Scegli il tuo file CSV
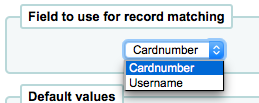
Choose to match on “cardnumber” or “username” to prevent adding of duplicate card numbers to the system. Additional matchpoints can be set up using patron attributes marked as unique.
Poi puoi scegliere i valori di default da assegnare a tutti gli utenti che stai importando
For example, if you’re importing patrons specific to one branch you can use the field on the import form to apply the branch code to all those you are importing.
Finally, you need to decide on what data you want to replace if there are duplicates.
Un record equivalente viene trovato usando i valori già presenti nel campo scelto per il controllo delle equivalenze, questo per evitare duplicazioni

When using patron attributes in your installation, you can choose how they are handled on import. You can either decide to always overlay all patron attributes or you choose to only replace patron attributes included in your import file. This will leave other attributes untouched.

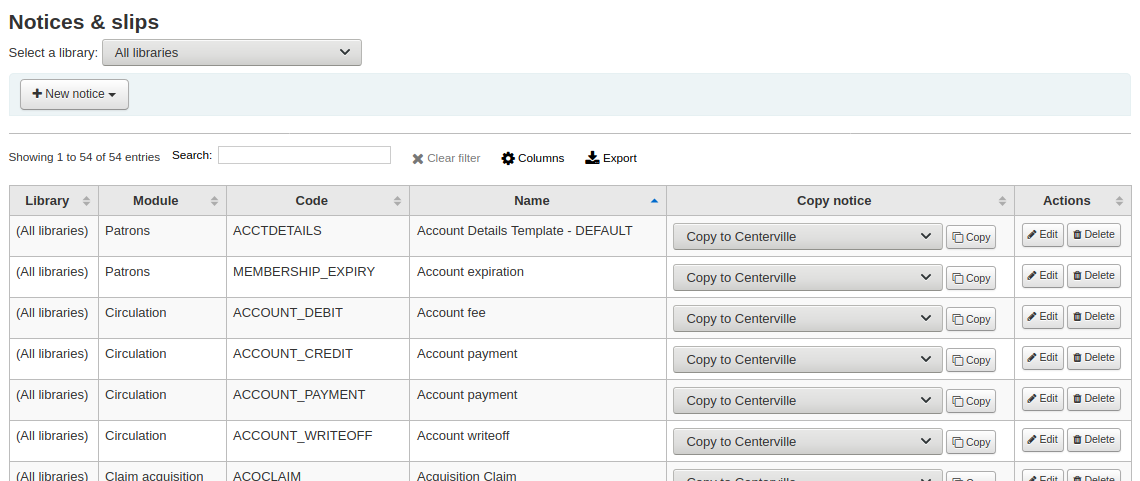
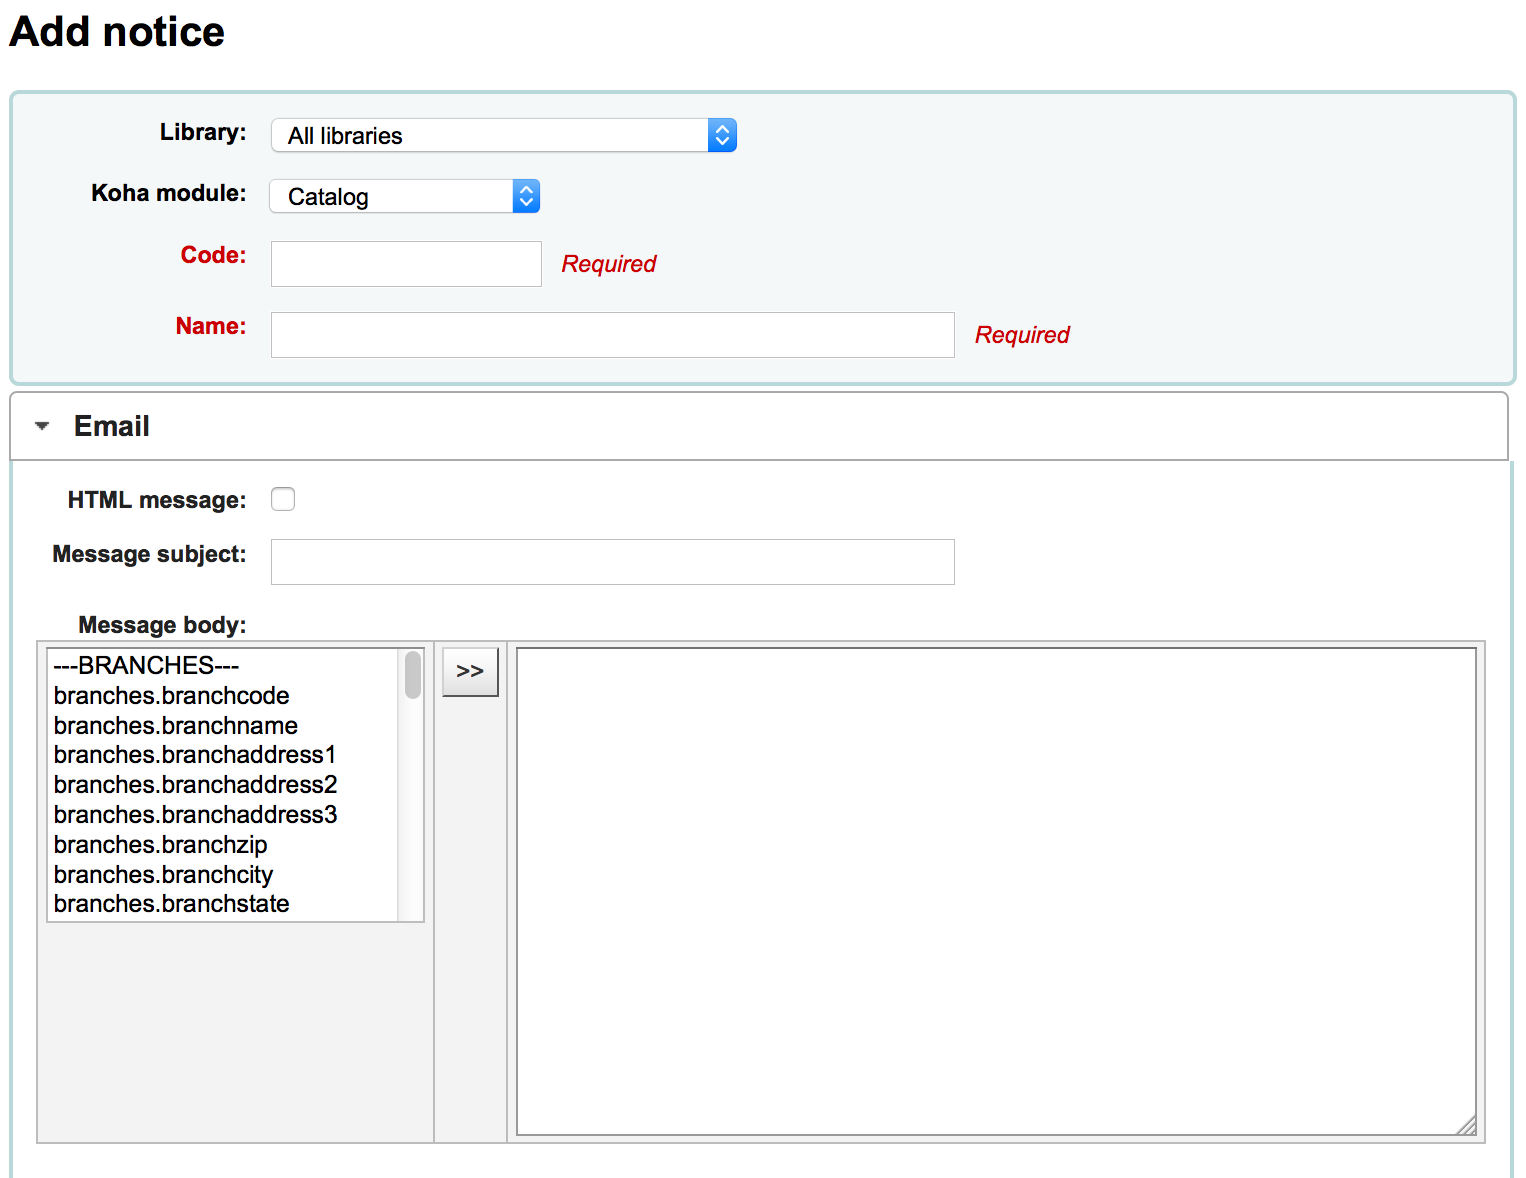
Notices & slips
Get there: More > Tools > Patrons and circulation > Notices & slips
All notices and circulation receipts (or slips) generated by Koha can be customized using the Notices & slips tool. The system comes with several predefined templates that will appear when you first visit this tool.
Nota
You can customize the columns of this table in the “Table settings” section of the Administration module (table id: lettert).
Ogni avviso può essere modificato ma pochi possono essere cancellati, per evitare errori al sistema che avverrebbero se si tentasse di mandare un avvisoo senza un testo di default. Ogni avviso e ogni ricevuta può esser modificata per singola biblioteca, di default vedi gli avvisi per tutte le biblioteche.
Se si dispone di uno stile che ci piace applicare a tutte le ricevute, si può impostare la preferenza SlipCSS a un foglio di stile. Lo stesso vale per le comunicazioni, utilizzando la preferenza NoticeCSS per definire un foglio di stile.
You will also want to review the Customising notices and slips wiki page for more information on formatting these notices.
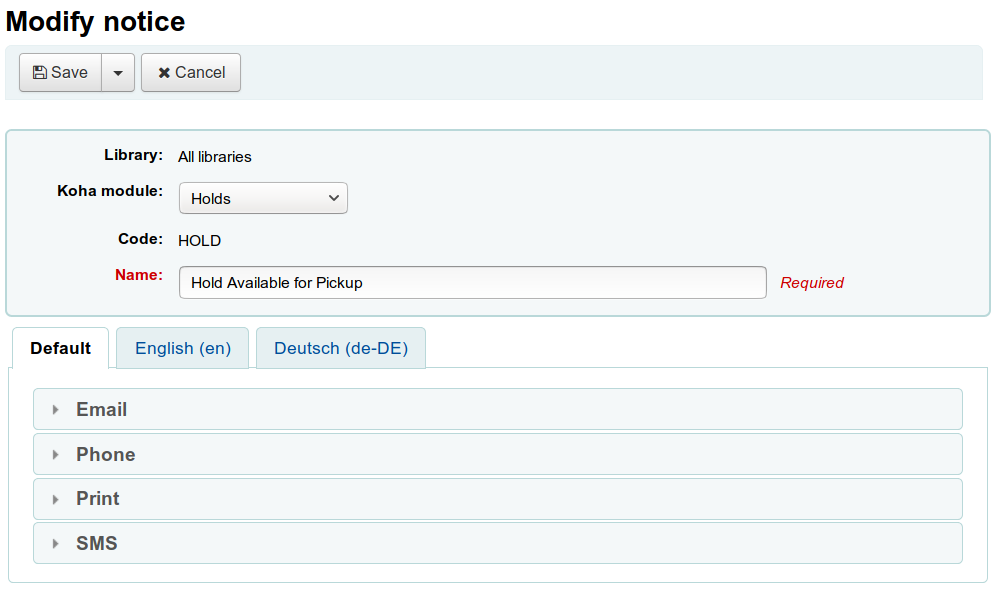
Adding notices and slips
Per aggiungere un nuovo avviso o ricevuta
Click “New notice”
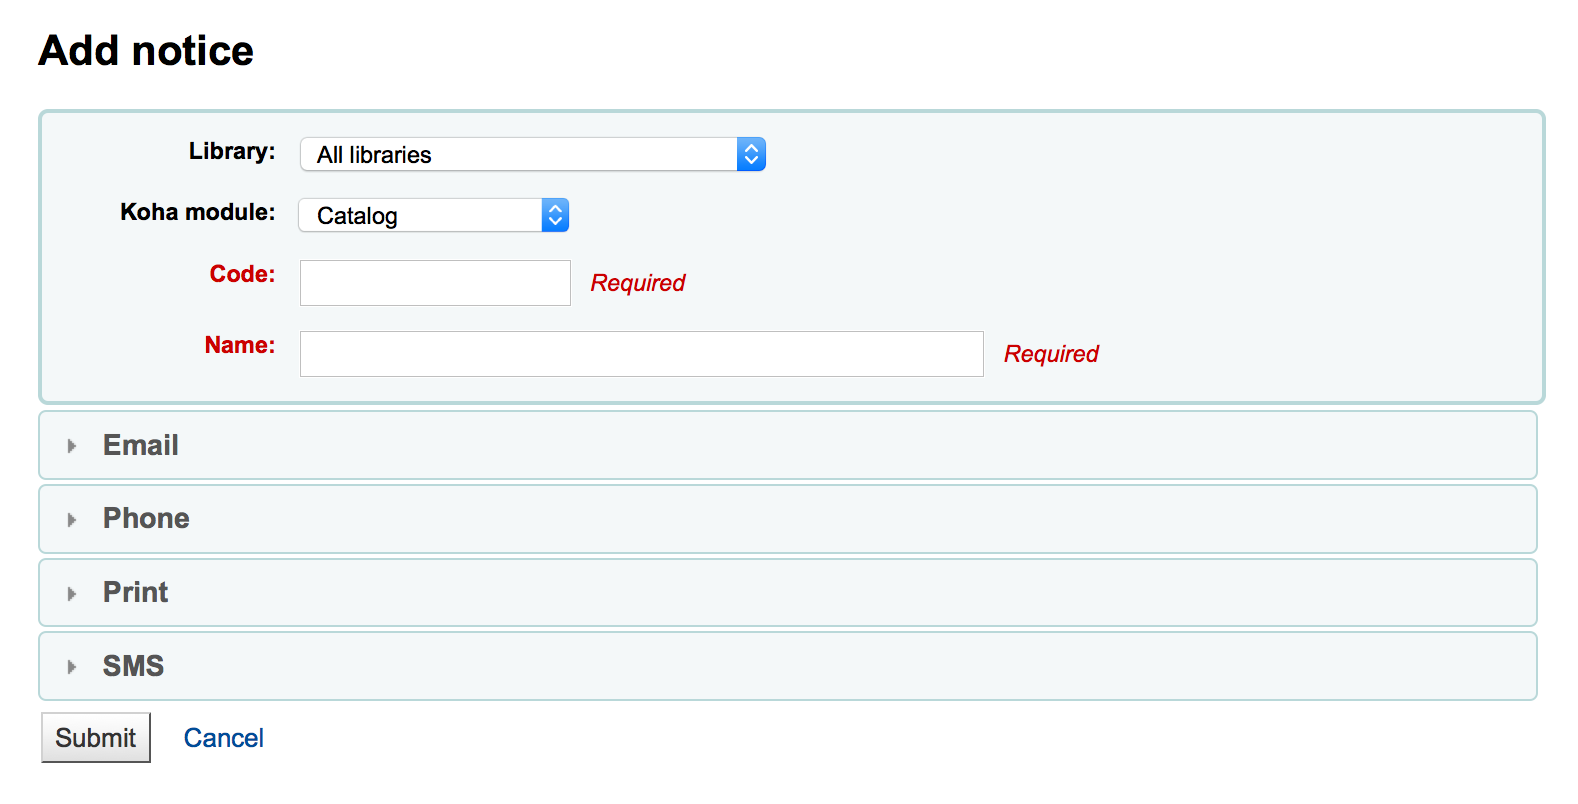
Scegli a quale biblioteca inviare l’avviso o la ricevuta
Importante
Not all notices can be branch specific for more information review the Customising notices and slips wiki page.
Scegli il modulo a cui l’avviso e” relativo
Il codice ha un limite di 20 caratteri
Usa il campo “nome” per espandere il tuo codice
Nota
Con i messaggi di sollecito, assicurati di mettere il nome della biblioteca nella descrizione in modo che sia visibile prima di impostare i trigger.
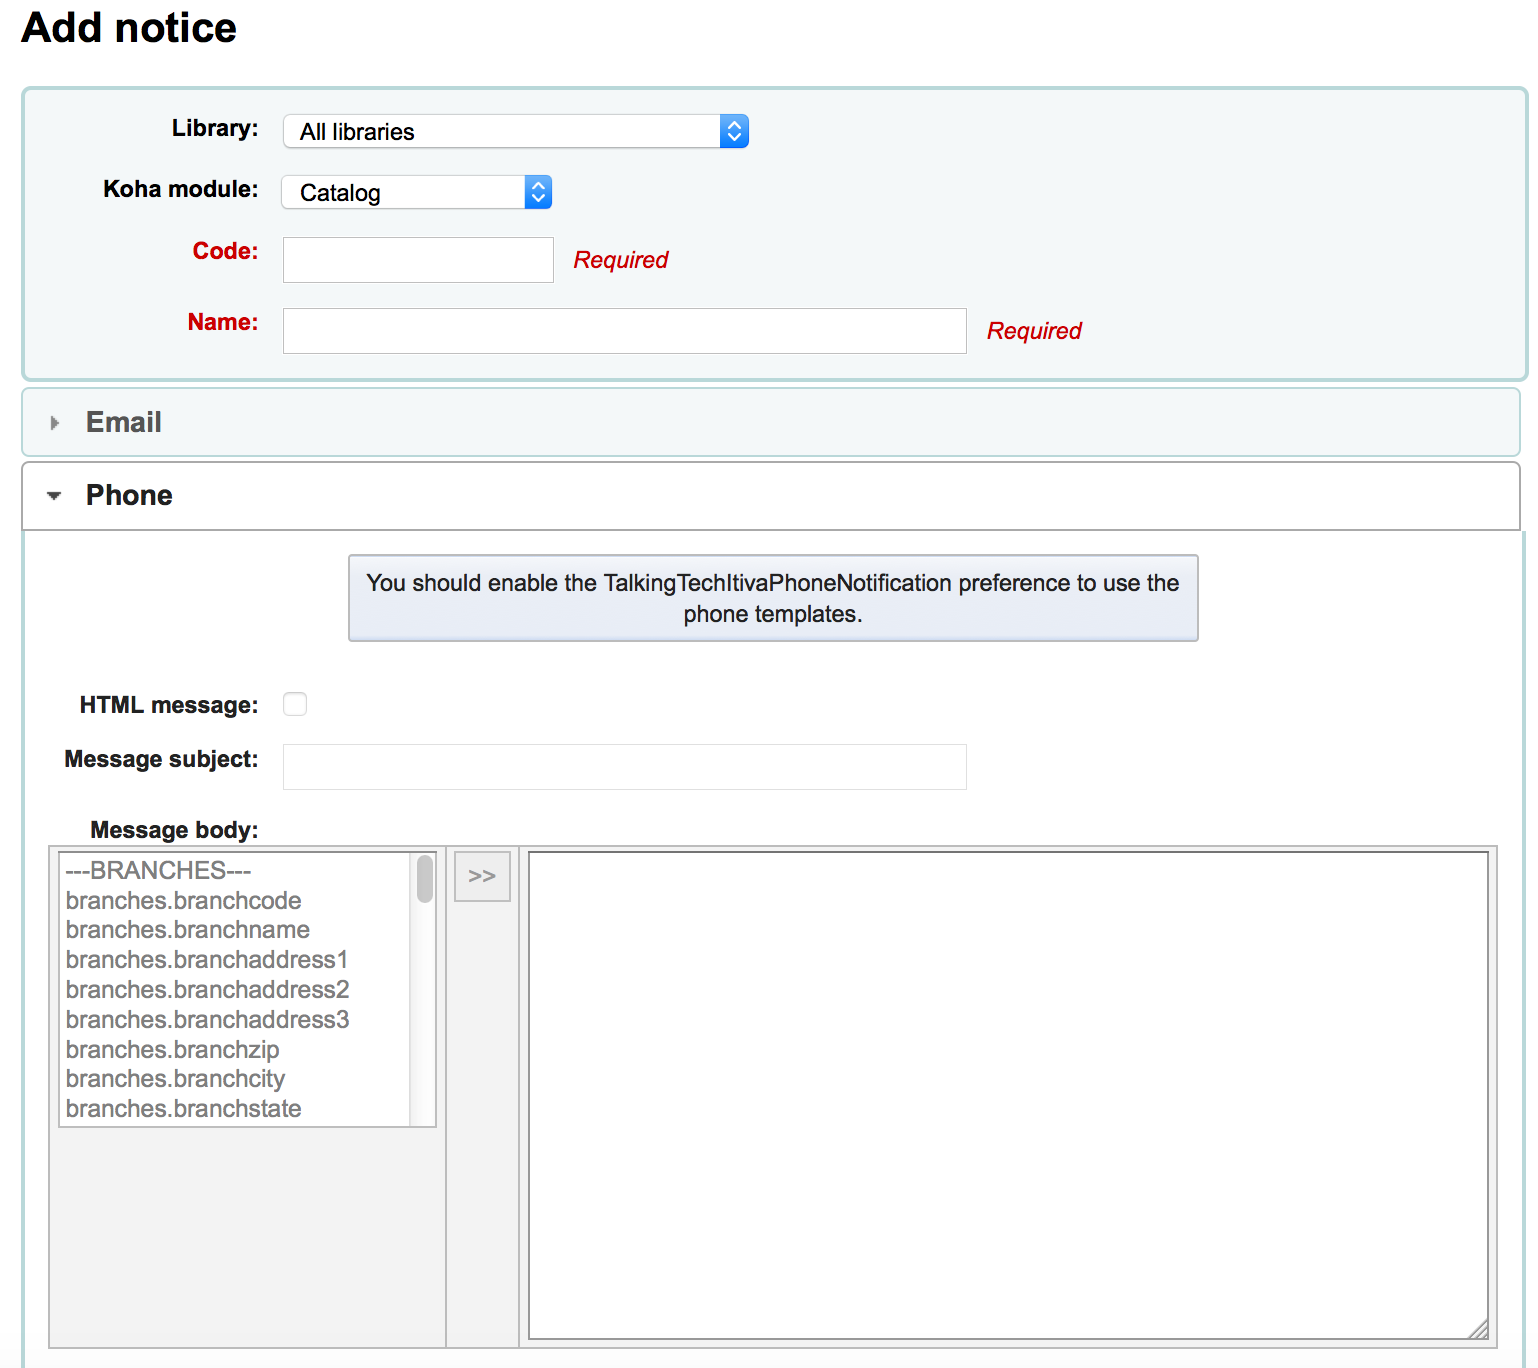
Successivamente è possibile personalizzare l’avviso per ogni metodo di spedizione possibile
Ogni avviso può avere un testo di email specifico
Se si utilizza il servizio:ref:TalkingTechItivaPhoneNotification è possibile impostare una notifica via telefono
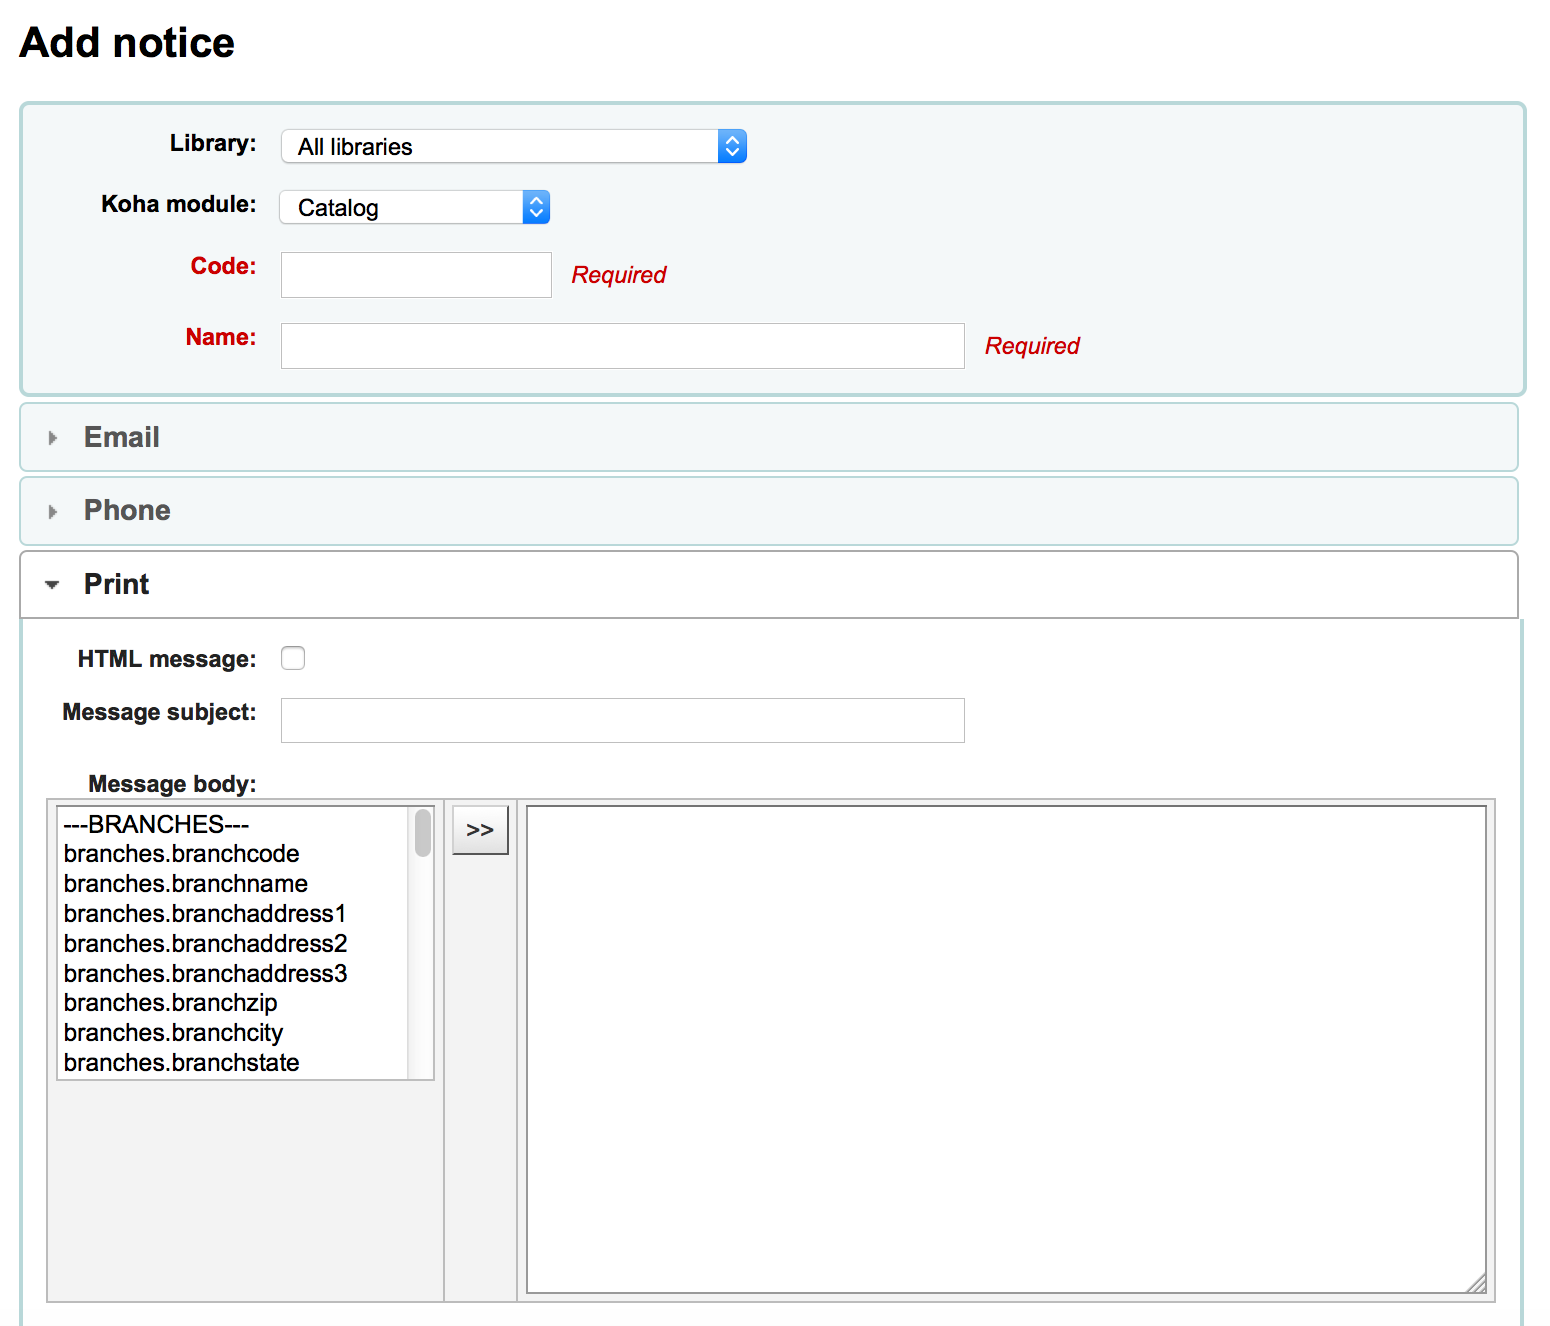
Se pensi di stampare questo avviso, puoi successivamente impostare il template per la stampa.
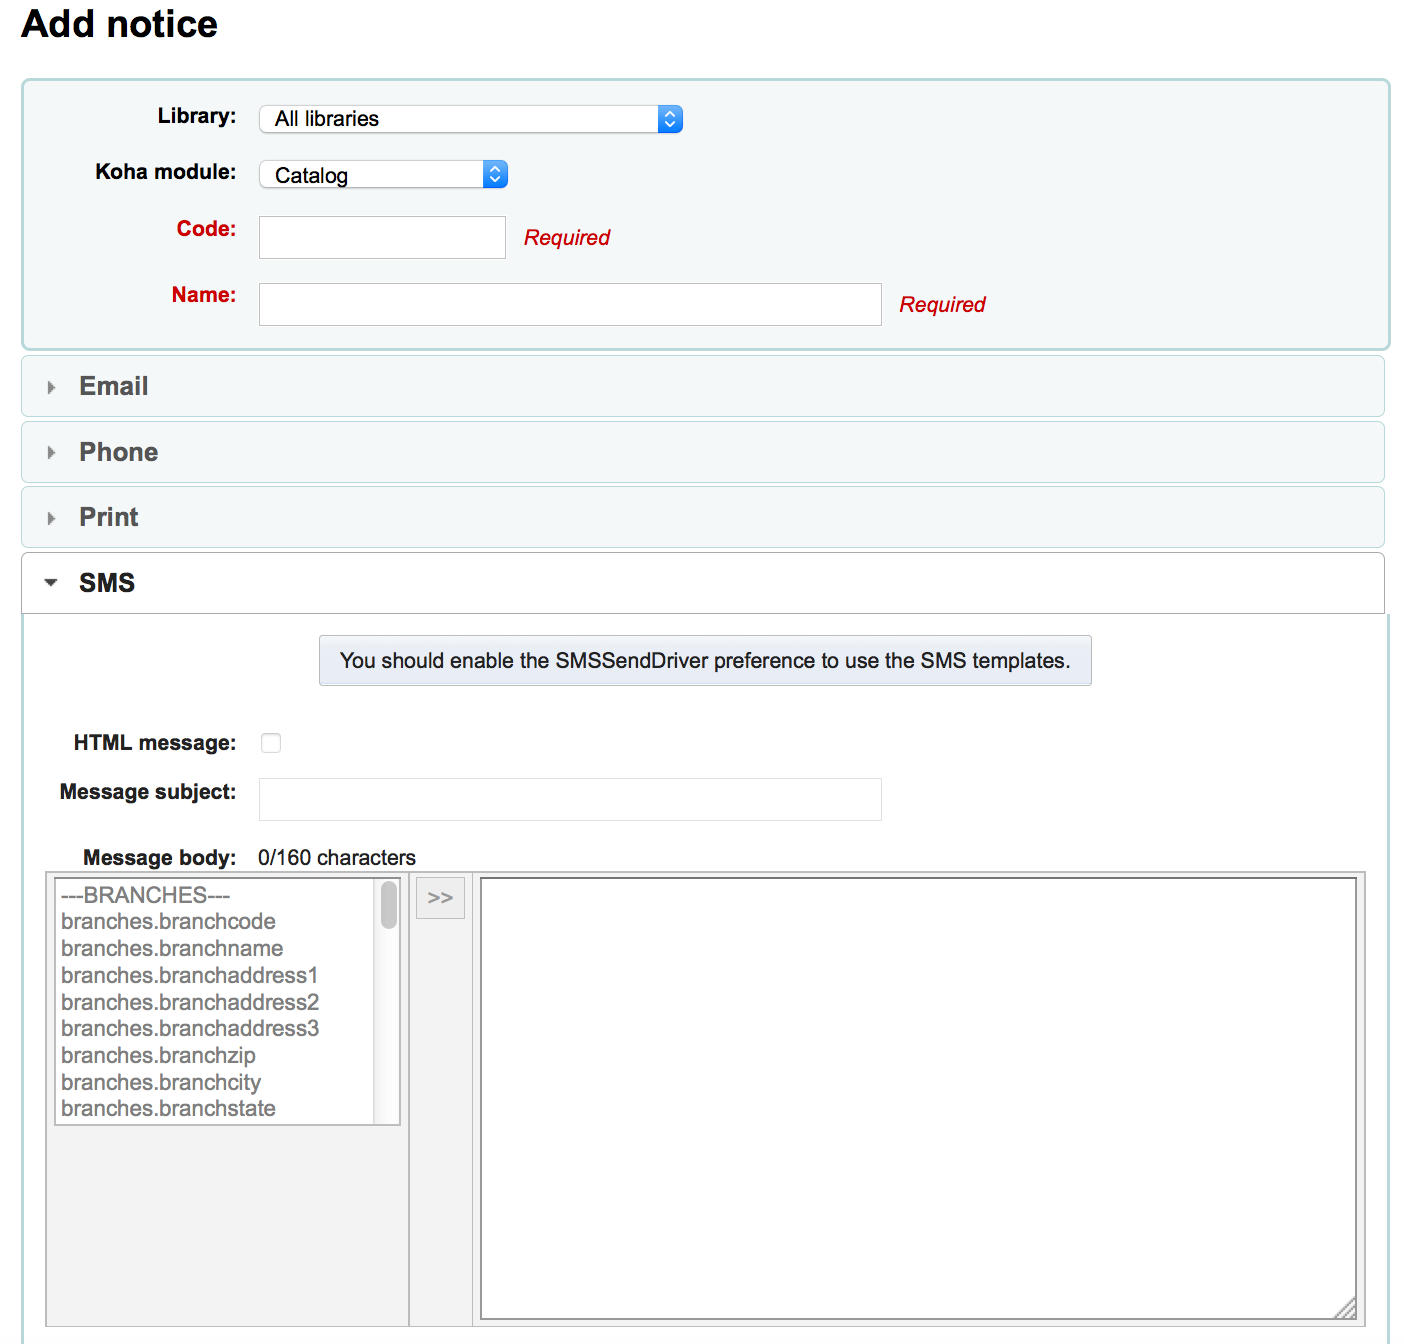
If you have enabled SMS notices with the SMSSendDriver preference you can set the text for your SMS notices next
Ogni avviso offre le stesse opzioni
If you plan on writing the notice or slip in HTML check the “HTML message” box, otherwise the content will be generated as plain text
Message subject is what will appear in the subject line of the email
Nel corpo del messaggio inserisci il testo che preferisci, usa i campi a sinistra per specificare dati provenienti dal database.
Nota
Review the Customising notices and slips wiki page for more information.
Importante
Overdue notices can use <<items.content>> tags by themselves, or use <item></item> to span all of the tags. Learn more about the Overdue notice markup
Negli avvisi per i ritardi usa il tag <<items.content>> per stampare la data di tutte le copie che sono in ritardo.
The other option, only for overdue notices, is to use the <item></item> tags to span the line so that it will print out multiple lines. One example for the <item></item> tag option is:
<item>»<<biblio.title>>» by <<biblio.author>>, <<items.itemcallnumber>>, Barcode: <<items.barcode>> , Checkout date: <<issues.issuedate>>, Due date: <<issues.date_due>> Fine: <<items.fine>> </item>
Importante
Solo i solleciti di restituzione prestiti in ritardo potranno sfruttare i tag <item></item>, tutti gli altri messaggi relativi a copie dovranno usare <<items.content>>
Nota
Per aggiungere la data di oggi puoi usare la sintassi <<today>>
Nota
Se non si desidera stampare il nome completo dell’utente sui ricevute e negli avvisi o nota è possibile immettere dati in “Altro nome” o in “Iniziali” per ogni utente e utilizzare tale valore invece.
The system preference TranslateNotices will add tabs for each installed language to the notices editor. The notice defined in the “Default” tab will be used if there is no preferred language set for a patron.
Preview notice templates
For some notices it is possible to preview the notice template showing how it would look to a specified patron for a particular item or record.
If a notice template is previewable the notice template header will contain a field to enter preview data
Fill in the necessary information for the template then click the Preview button below the message body. The preview dialog will indicate if there are any problems generating the notice template preview.
Overdue notice markup
When creating your overdue notices there are two tags in addition to the various database fields that you can use in your notices. You will also want to review the Customising notices and slips wiki page for information on formatting item information in these notices.
Importante
Questi nuovi tag funzionano solo sui solleciti di restituzione prestiti, e non per altri avvisi di circolazione, al momento.
Questi tag sono <item> e </item>; che può includere tutti i campi dalle tabelle biblio, biblioitems, e items.
Un esempio d’uso di questi due tag in un template per un un avviso può essere:
The following item(s) is/are currently overdue:

<item>"<<biblio.title>>" by <<biblio.author>>, <<items.itemcallnumber>>, Barcode: <<items.barcode>> Fine: <<items.fine>></item>
Dunque, assumento che due copie siano in ritardo, genererà un avviso fatto così:
The following item(s) is/are currently overdue:

"A Short History of Western Civilization" by Harrison, John B, 909.09821 H2451, Barcode: 08030003 Fine: 3.50
"History of Western Civilization" by Hayes, Carlton Joseph Huntley, 909.09821 H3261 v.1, Barcode: 08030004 Fine: 3.50
Existing notices and slips
Among the default notices are notices for several common actions within Koha. All of these notices can be customized by altering their text via the Notices & slips tool and their style using the NoticeCSS preference to define a stylesheet. You will also want to review the Customising notices and slips wiki page for information on formatting item information in these notices. Here are some of what those notices do:
ACCEPTED
This notice is sent when a patron’s suggestion is accepted.
Note: If you don’t want to send this notice, just delete it.
ACCOUNT_PAYMENT
This notice is sent for each payment transaction in a patron’s account if the UseEmailReceipts system preference is set to “Send”.
ACCOUNT_WRITEOFF
This notice is sent for each writeoff transaction in a patron’s account if the UseEmailReceipts system preference is set to “Send”.
ACCTDETAILS
Sent to patrons when their account is set up if the AutoEmailOpacUser preference is set to “Send”
Important: The notice will only be sent correctly if a username, password and email address is added to the patron record before saving it for the first time. The notice can’t be resend or triggered again after the patron account has been created.
ACQCLAIM (Acquisition claim)
Used for claiming orders in the aquisitions module
ACQCLAIM is the code of the sample notice, but it’s possible to define several notices choosing any code. Only the module “Claim acquisition” will be taken into account. All notices with this module will appear in the pull down on the late orders page.
Get there: More > Acquisitions > Late orders
This notice is sent if several criteria are met:
The staff patron triggering the email has a valid email address.
The vendor contact marked as “Contact about late orders?” has a valid email address.
ACQORDER (Acquisition order)
Used in the acquisitions module to send order information to the vendor
The notice is triggered manually from the basket summary page using the “Email order” button in the toolbar.
This notice is sent if several criteria are met:
The staff patron triggering the email has a valid email address.
The vendor contact marked as “Primary acquisitions contact” and “Contact when ordering” has a valid email address.
ACQ_NOTIF_ON_RECEIV
Used in the acquisition module to inform patrons on receiving orders they have been added to.
AR_CANCELED
This notice is sent to the patron when an article request is cancelled by staff.
AR_COMPLETED
This notice is sent to the patron when an article request is marked as completed by staff.
AR_PENDING
This notice is sent to the patron when an article request is changed to “pending” status
AR_PROCESSING
This notice is sent to the patron when an article request is marked as being processed by staff.
AR_REQUESTED
This notice is sent to the patron when an article request has been made in order to confirm the request.
AUTO_RENEWALS
This notice is sent to the patron if automatic renewals are enabled and the patron has chosen to receive it in their messaging preferences.
In order to send this notice, you must set the AutoRenewalNotices system preference to «according to patron messaging preferences».
This notice is set so that, depending on the result of the renewal, whether is was successful or not, the message will be different.
AUTO_RENEWALS_DGST
This notice is sent to the patron if automatic renewals are enabled and the patron has chosen to receive the digest in their messaging preferences.
In order to send this notice, you must set the AutoRenewalNotices system preference to «according to patron messaging preferences».
This notice is set so that, depending on the result of the renewal, whether is was successful or not, the message will be different.
AVAILABLE
This notice is sent to the patron who made a suggestion, when the order created from the suggestion is received.
Note: If you don’t want to send this notice, just delete it.
CHECKIN
Questo avviso è inviato come avviso di rientro di tutte le copie rientrate dal prestito.
Questo avviso viene utilizzato se sono soddisfatti due criteri:
La preferenza EnhancedMessagingPreferences è impostata su “Consenti”
L’utente ha richiesto di ricevere questo avviso
Get there:OPAC > Login > your messaging
Get there:Staff client > Patron record > Avvisi
CHECKINSLIP
This slip lists all items that were checked in today for this patron
To print this slip, click Print > Print checkin slip from the patron file
You can also print this slip from the Check in page
CHECKOUT
Questo avviso è inviato come avviso di prestito per tutte le copie che sono state prestate.
Questo avviso viene utilizzato se sono soddisfatti due criteri:
La preferenza EnhancedMessagingPreferences è impostata su “Consenti”
L’utente ha richiesto di ricevere questo avviso
Get there:OPAC > Login > your messaging
Get there:Staff client > Patron record > Avvisi
DISCHARGE
This notice is used to generate a PDF to document a successful discharge request
The PDF can either be downloaded by the patron from their patron account or from the staff interface when discharging a patron
The discharge feature is controlled by the useDischarge system preference.
DUE
Questo avviso è inviato come “copia da rientrare” per ciascuna copia che deve rientrare dal prestito
Questo avviso viene utilizzato se sono soddisfatti due criteri:
La preferenza EnhancedMessagingPreferences è impostata su “Consenti”
L’utente ha richiesto di ricevere questo avviso
Get there:OPAC > Login > your messaging
Get there:Staff client > Patron record > Avvisi
DUEDGST
Questo avviso è inviato come “copia in ritardo” per tutte le copie che sono in ritardo.
Questo avviso viene utilizzato se sono soddisfatti due criteri:
La preferenza EnhancedMessagingPreferences è impostata su “Consenti”
L’utente ha richiesto di ricevere questo avviso come digest
Get there:OPAC > Login > your messaging
Get there:Staff client > Patron record > Avvisi
HOLD (Hold available for pickup)
Questo avviso viene utilizzato se sono soddisfatti due criteri:
La preferenza EnhancedMessagingPreferences è impostata su “Consenti”
L’utente ha richiesto di ricevere questo avviso
Get there:OPAC > Login > your messaging
Get there:Staff client > Patron record > Avvisi
Quando questo avviso si riferisce alla tabella delle biblioteche, riporta l’informazione della biblioteca di prelevamento.
HOLDPLACED (un avviso allo staff della biblioteca che è stata fatta una nuova prenotazione)
Questo avviso richiede la preferenza di sistema emailLibrarianWhenHoldIsPlaced impostata su “Attiva”
Quando questo avviso si riferisce alla tabella delle biblioteche, riporta l’informazione della biblioteca di prelevamento.
MEMBERSHIP_EXPIRY
Questo avviso può essere inviato agli utenti per avvertirli che le loro tessere stanno per scadere.
Requires that you have the MembershipExpiryDaysNotice set and the related cron job set.
NOTIFY_MANAGER
This notice is sent to a staff member when they are assigned as manager of a suggestion in the acquisitions module.
ODUE (Overdue notice)
This notice is used to send overdue notices to patrons
ODUE is the code of the sample notice, but it’s possible to use any code and define multiple different messages for different patron categories and notice levels
Requires that you set Overdue notice/status triggers
ORDERED
This notice is sent to the patron who made a suggestion, when the “from a suggestion” option is used to create an order from it.
Note: If you don’t want to send this notice, just delete it.
PASSWORD_RESET
This notice is sent when a patron requests a new password from the OPAC in order to validate the email address.
The password reset feature is controlled by the OpacResetPassword system preference.
PICKUP_RECALLED_ITEM
This notice is sent to the patron who has requested a recall when the item is ready for them to pick up.
PREDUE
Questo avviso è usato “Preavviso” agli utenti i cui prestiti stanno per scadere
Questo avviso viene utilizzato se sono soddisfatti due criteri:
La preferenza EnhancedMessagingPreferences è impostata su “Consenti”
L’utente ha richiesto di ricevere questo avviso
Get there:OPAC > Login > your messaging
Get there:Staff client > Patron record > Avvisi
PREDUEDGST
Questo avviso è spedito come “preavviso” per tutte le copie che sono in scadenza
Questo avviso viene utilizzato se sono soddisfatti due criteri:
La preferenza EnhancedMessagingPreferences è impostata su “Consenti”
L’utente ha richiesto di ricevere questo avviso come digest
Get there:OPAC > Login > your messaging
Get there:Staff client > Patron record > Avvisi
REJECTED
This notice is sent when a patron’s suggestion is rejected.
Note: If you don’t want to send this notice, just delete it.
RENEWAL
Questo avviso è inviato come avviso di prestito per tutti i rinnovi.
Questo avviso viene utilizzato se sono soddisfatti tre criteri:
La preferenza EnhancedMessagingPreferences è impostata su “Consenti”
La preferenza RenewalSendNotice è impostata su “Invia”
L’utente ha richiesto di ricevere l’avviso di prestito
Get there:OPAC > Login > your messaging
Get there:Staff client > Patron record > Avvisi
RETURN_RECALLED_ITEM
This notice is sent to the patron who currently has an item in their possession that has been recalled. It serves to notify them of the new due date for the checked out item.
SERIAL_ALERT (New serial issue)
Notice used in the serials module to notify patrons/staff of new issues of a serial. SERIAL_ALERT (RLIST in older versions) is provided as a sample notice, but the notice code can be chosen freely as only the module is taken into account. Multiple notices can also be managed.
Get there: More > Serials > New subscription
You have the option to select the notice used to inform the patron about a received serial issue for a subscription. Choose from the “Patron notification” drop down.
If a notice has been selected for a subscription, patrons can subscribe to the email notification from the subscription tab in the detail view in the OPAC.
Nota
Si noti anche che se si desidera comunicare agli utenti di nuove fascicoli di un periodico, è possibile fare clic su “definire un avviso” che vi porterà allo strumento “Avvisi”
SHARE_ACCEPT
E” usato per notificare a un utente che un altro utente ha accettato di condividere la lista.
Richiede di impostare OpacAllowSharingPrivateLists a “Permettere”
SHARE_INVITE
E” usato per notificare a un utente che un altro utente vuole condividere una lista con lui.
Richiede di impostare OpacAllowSharingPrivateLists a “Permettere”
TO_PROCESS
Utilizzato per notificare un membro del personale se un suggerimento di acquisto è stato spostato sul fondo che gestisce
Requires the notice_unprocessed_suggestions cron job
There are also a set of predefined slips (or receipts) listed on this page. All of these slips can be customized by altering their text via the Notices & slips tool and their style using the SlipCSS preference to define a stylesheet. Here is what those slips are used for:
AR_SLIP
Used to print a slip for an article request
The slip or receipt can be printed manually when managing article requests from the staff interface.
Get there: Circulation > Article requests > Actions > Print slip
ISSUEQSLIP
Usato per stampare una ricevuta veloce di prestito
La ricevuta veloce include solo le copie prestate oggi
ISSUESLIP
Usato per stampare una ricevuta completa nella circolazione
La ricevuta mostrerà le copie prestate oggi cosi come le copie ancora in prestito
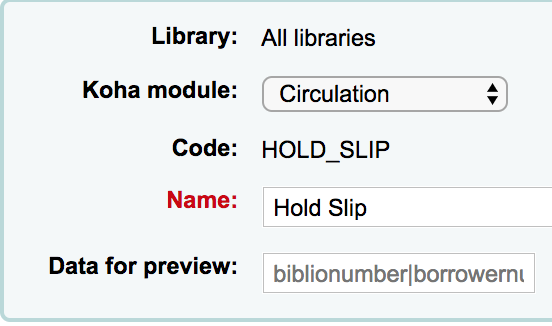
HOLD_SLIP
Usato per stampare una ricevuta di prenotazione
The holds slip is generated when a hold is confirmed and set to waiting.
OVERDUE_SLIP
Used to print an overdues slip
The overdues slip can be generated manually using the “print” menu in the patron account in staff. It will show all items overdue.
RECALL_REQUESTER_DET
Used to print the details of the patron who has requested a recall on an item.
TRANSFERSLIP
Usato per stampare una ricevuta di trasferimento
La ricevuta di trasferimento è stampata quando confermi il trasferimento da una biblioteca all’altra nel tuo sistema
Overdue notice/status triggers
Get there: More > Tools > Patrons and circulation > Overdue notice/status triggers
In order to send the overdue notices that you defined using the Notices & slips tool, you need to first set the triggers to have these messages.
Importante
Per inviare agli utenti solleciti di prestiti da restituire, occorre indicare che alla categoria utente vanno inviati solleciti.
Importante
A seconda del valore della preferenza OverdueNoticeCalendar, il ritardo può includere o non includere i giorni di chiusura della biblioteca in base al calendario delle festività.
The Overdue notice/status triggers tool gives the librarian the power to send up to three notices to each patron type notifying them of overdue items
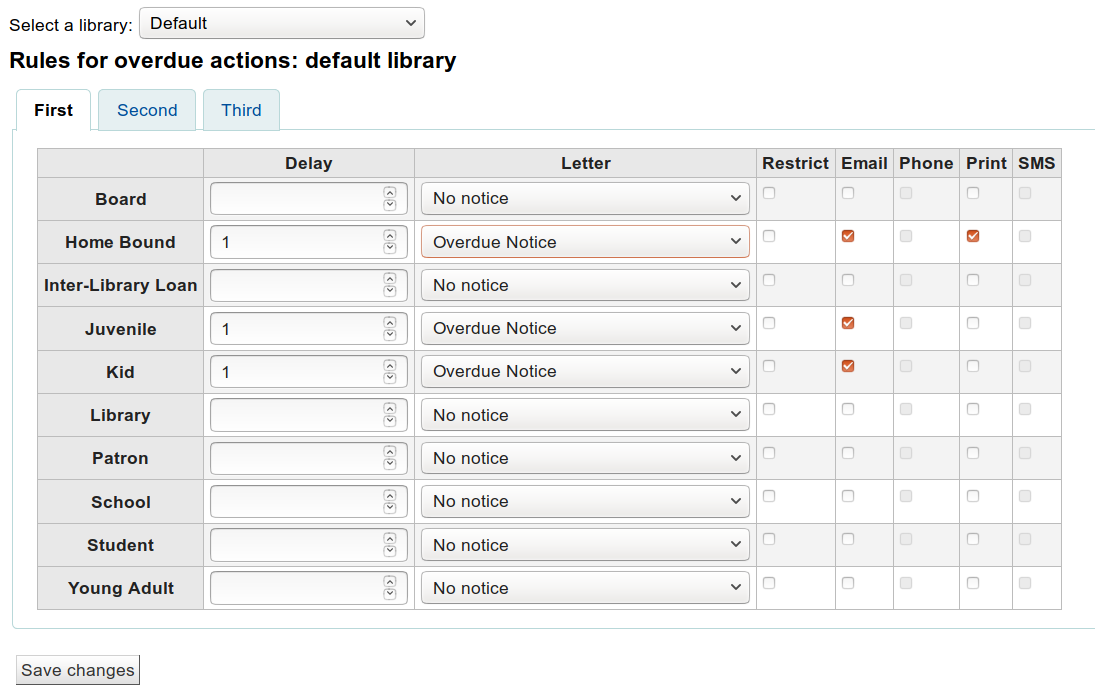
Il ritardo è il numero di giorni dopo che un problema si è verificato e prima che venga attivata un’azione.
Importante
Se volete che Koha attivi un’azione (inviare una lettera o limitare un utente), è necessario indicare un valore di ritardo.
Per inviare ulteriori avvisi circa i ritardi, clicca sulle schede “Secondo” e “Terzo” avviso
Se vuoi impedire a un utente di fare prestiti perché ha delle copie in ritardo, seleziona la casella “Sospeso dal prestito”; questo inserirà una notizia sul record utente, e al momento del prestito il bibliotecario verrà avvisato che l’utente non può ricevere prestiti perché ha copie in ritardo.
Se si sceglie di limitare un utente in questo modo, si può anche chiedere a Koha di rimuovere automaticamente la restrizione con la preferenza AutoRemoveOverduesRestrictions.
Next you can choose the delivery method for the overdue notice. You can choose from Email, Phone (if you are using the iTiva Talking Tech service), Print and SMS (if you have set your SMSSendDriver).
Patron card creator
Get there: More > Tools > Patron card creator
The patron card creator allow you to use layouts and templates which you design to print your custom patron cards on your printer. Here are some of the features of the patron card creator module:
Personalizzare i layout di tessere utente con il testo recuperato dai dati utente
Definisce dei template personalizzati per le stampe delle tessere utente (per usare al meglio i fogli delle etichette)
Costruisci e gestisci batch di stampa tessere utenti
Esportare (in formato PDF) lotti singoli o multipli da stampare
Esportare (in formato PDF) tessere utente singole o multiple da un processo batch
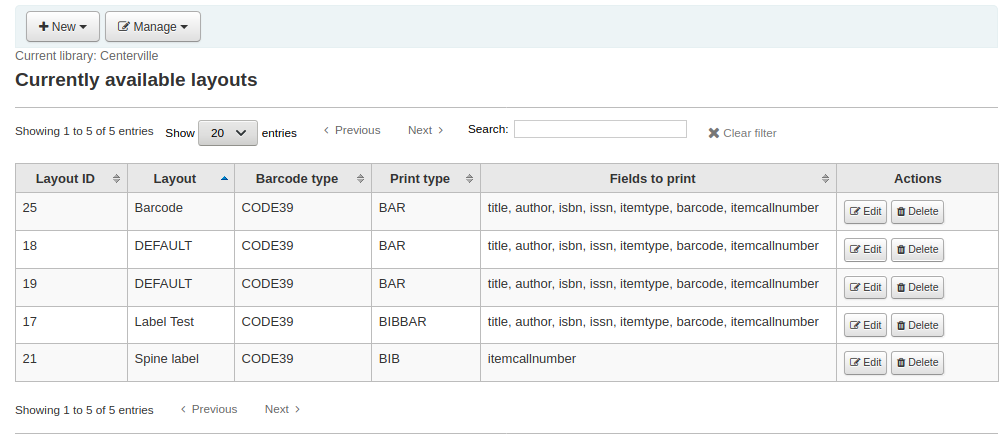
Layouts
Get there: More > Tools > Patron card creator > Manage > Layouts
Il layout definisce il testo e l’immagine che verranno stampate sulla scheda e il punto in cui appariranno.
Nota
Possono essere stampate sulla tessera fino a tre righe di testo, il numero dell’utente in formato barcode e fino a due immagini.
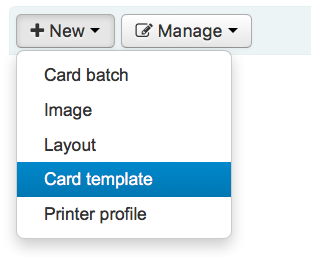
Add a layout
Se non si hanno i layout definiti, si aggiungerà un nuovo layout facendo clic sul pulsante “Nuovo” e scegliendo “Layout”.
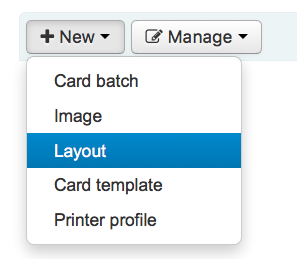
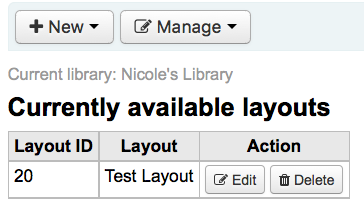
Si può anche scegliere di premere il tasto “Gestire il layout” sul lato sinistro. Qui vi verrà offerto un elenco di layout disponibili, da selezionare per la modifica. Comunque nella parte superiore della pagina c’è sempre il pulsante “Nuovo layout”.
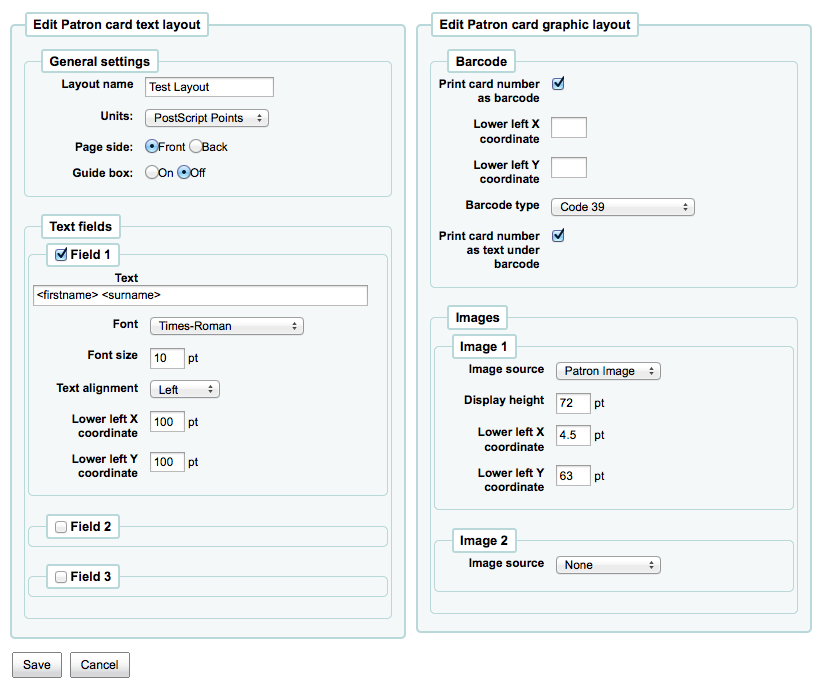
Il nome assegnato al layout è a tuo beneficio, dovrebbe essere qualcosa che ti permetta di identificarlo facilmente in futuro.
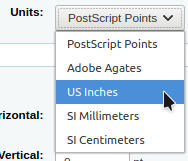
La lista “Unita” è utilizzata per definire la scala di misura che stai usando per i tuoi layout.
Nota
A Postscript Point is 1/72», an Adobe Agate is 1/64», an Inch is 25.4 SI Millimeters
Next, note if this layout is for the front or the back of the patron card
Nota
Occorre un layout sia per la parte anteriore e posteriore della tessera se si dispone di tessere di biblioteca con 2 facce, questa opzione non consente di stampare le due facce, consente solo di tenere traccia di quale lato della tessera si sta progettando.
Hai la possibilità di aggiungere fino a 3 linee di testo sulla tessera. Può essere una frase statica, con campi dal record utente. Se vuoi inserire campi dal record utente, metti i nomi dei campi tra uncinate, così: <firstname>
Nota
Un elenco completo dei nomi dei campi può essere trovata nello schema del database di http://schema.koha-community.org
Per ogni linea di testo puoi scegliere il tipo di font, la dimensione del font e la collocazione del testo sulla tessere usando le coordinate X e Y
In order to show the barcode and the patron card number you will need to check the “Print card number as barcode” option. This will turn the patron card number into a barcode. If you want the number to print in human readable format you will need to check the “Print card number as text under barcode” option.
Infine puoi scegliere fino a due immagini da stampare sulla tessera.
Una può essere l”immagine utente che puoi ridimensionare a piacimento.
The other image can be something like a library logo or symbol that you uploaded using the “manage images” module of the patron card creator Tool.
Importante
È responsabilità dei progettisti definire linee di testo, codici a barre e le immagini in modo che non si sovrappongano.
Dopo aver salvato, i tuoi layout appariranno nella pagina “Gestisci i layout”.
Templates
Get there: More > Tools > Patron card creator > Manage > Card templates
Un template è la collezione di etichette/schede che stai usando. Il template può essere Avery 5160 per le etichette degli indirizzi, Gaylord 47-284 per le etichette dei dorsi oppure Avery 28371 per le schede degli utenti. Queste etichette contengono tutte le informazioni di cui hai bisogno per configurare Koha, queste informazioni possono essere contenute nell’involucro oppure si possono trovare sul sito del fornitore.
Add a template
Per aggiungere un nuovo modello fai clic sul pulsante “Nuovo modello” nella parte superiore della pagina, che porta al modulo di modifica del modello. Si può anche scegliere di premere il tasto “Gestisci modelli” sul lato sinistro. Qui verrà offerto un elenco di modelli disponibili che è possibile selezionare per l’editing. Ma nella parte superiore della pagina vi è ancora il pulsante “Nuovo modello”.
Using the form that appears after pressing either “Edit” or “New template” you can define the template for your sheet of labels or cards.

Template ID è semplicemente un ID univoco generato dal sistema
Template code should be the name of this template to identify it on a list of templates
You can use the template description to add additional information about the template
La tendina Unità viene utilizzata per definire quale scala di misura utilizzare per il modello.
Nota
A Postscript Point is 1/72», an Adobe Agate is 1/64», an Inch is 25.4 SI Millimeters
Le misure (altezza pagina, larghezza della pagina, larghezza tessera, altezza tessera) possono essere sulla confezione, o sul sito del venditore o possono essere misurate da un foglio di esempio.
Un profilo è un insieme di «aggiustamenti» ad un dato modello appena prima della stampa che compensa anomalie uniche e peculiari di una determinata stampante (a cui viene assegnato il profilo).
Prima di raccogliere un profilo cerca di stampare alcune schede di esempio così da poter definire facilmente il profilo adatto alla combinazione scelta di templatate / stampante.
Dopo aver trovato e la documentazione di eventuali anomalie nel documento stampato, allora si può creare un profilo e assegnarlo al modello.
Importante
Non specificare un profilo se non necessario, vale a dire non fare clic per definire un profilo della stampante. Non è possibile rimuovere un profilo da un modello, ma è possibile passare a un altro profilo.
Nota
Se devi usare più stampanti, puoi definire diversi template identici ma che differiranno per il profilo usato.
Dopo aver salvato, i tuoi template appariranno nella pagina “Gestisci i template”.

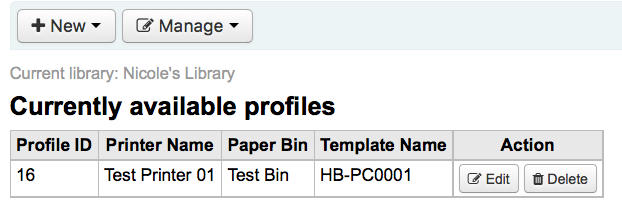
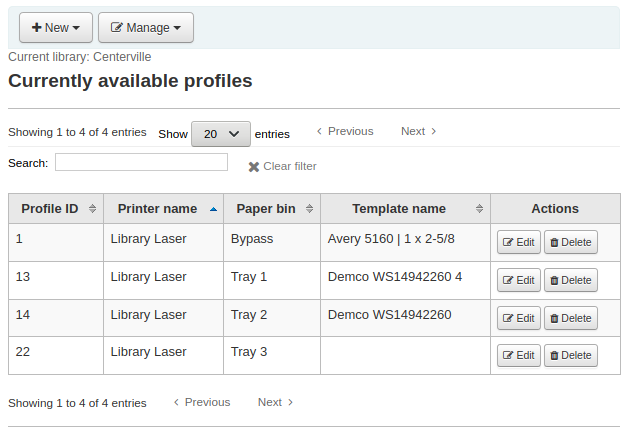
Profili
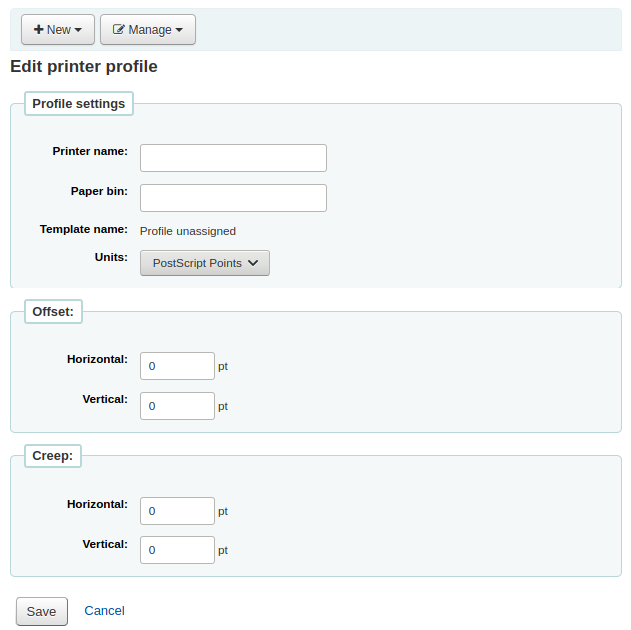
Get there: More > Tools > Patron card creator > Manage > Profiles
Un profilo è un insieme di «perfezionamenti» da applicare a un dato template subito prima della stampa, per compensare anomalie o peculiarità di ogni stampante (a cui il profilo è assegnato). Questo significa che se imposti un template e poi stampi una prova e noti che i dati delle tessere non sono allineati correttamente alle etichette, devi impostare un profilo per la stampante (o addirittura per un determinato vassoio) per migliorare la stampa, per esempio introducendo spostamenti del testo a destra o a sinistra, in alto o in basso.
Se le tessere utente sono stampate cosi come vuoi, non è necessario che tu crei un profilo
Add a profile
To add a new profile, you want to click on the “Profiles” button at the top of your page and choose “New profile”
To add a new profile, you want to click on the “New profile” button at the top of your page. Using the form that appears you can define the values to correct the card misalignment on your label sheet. You may also choose “Manage profiles” on the left side and select one of the currently available profiles for editing.
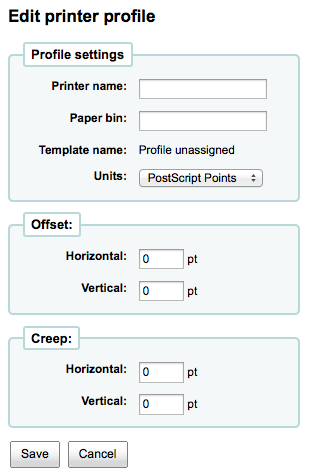
The Printer name and Paper bin do not have to match your printer exactly, they are for your reference so you can remember what printer you have set the profile for.
Nota
Ad esempio: se si desidera utilizzare il numero di modello della stampante nel nome della stampante è possibile, o si può chiamare “la stampante sulla mia scrivania”
Il templeta va compilato una volta che hai scelto quale template collegare al profilo nel form di modifica template
La lista “Unità” è utilizzata per definire la scala di misura che stai usando per i profili
Nota
A Postscript Point is 1/72», an Adobe Agate is 1/64», an Inch is 25.4 SI Millimeters
Offset deve essere usato quando l’intera immagine è fuori centro orizzontalmente o verticalmente. Intervallo descrive una condizione in cui la distanza tra le etichette cambia all’interno della pagina o su e giù la pagina
Per i valori di offset e intervallo, i numeri negativi spostano le informazioni su e a sinistra sul foglio stampato e numeri positivi le spostano verso il basso e a destra
Esempio: il testo è .25» (pollici) dal margine sinistro della prima etichetta, .28» dal margine sinistro della seconda etichetta, e da .31» dal margine ministro della terza. Questo significa che il margine orizzontale va messo a .03» per gestire questa differenza.
After saving, your profiles will appear on the “Manage printer profiles” page.
Una volta che hai salvato il tuo nuovo profilo, puoi tornare alla lista dei templates e scegliere di modificare il template che usa questo profilo.
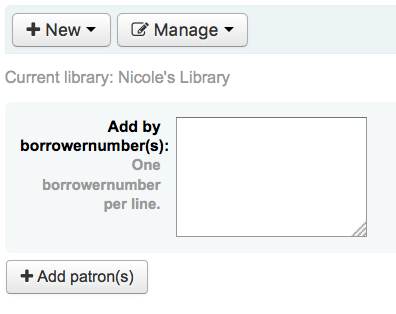
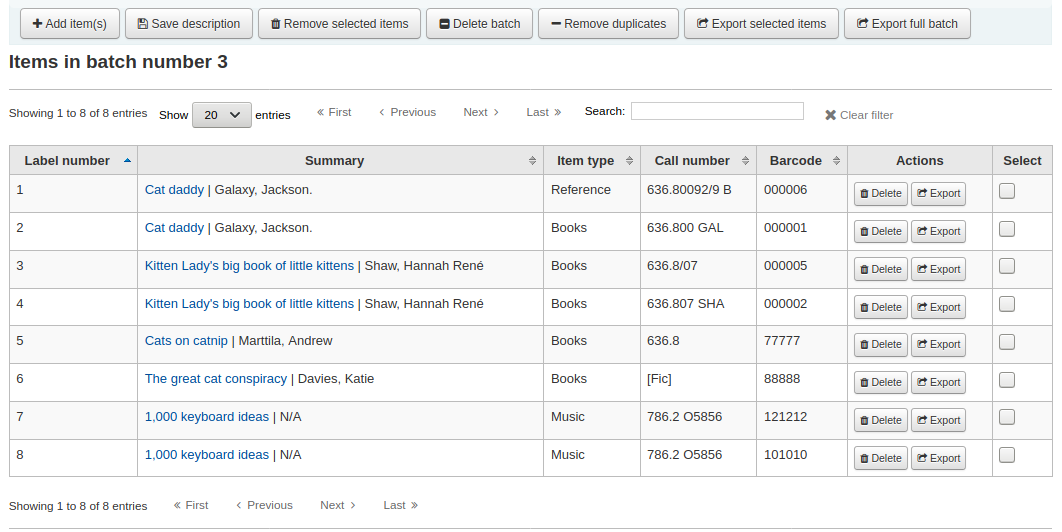
Lavorazioni batch
Get there: More > Tools > Patron card creator > Manage > Card batches
Un batch è una collezione di utenti per i quali vuoi generare delle schede.
Add a batch
Per aggiungere un nuovo batch, si fa clic sul pulsante “Nuovo batch” nella parte superiore della pagina. Scegliendo la voce di menu “Gestione batch” sulla sinistra viene visualizzato un elenco dei batch già definiti. In questa schermata si può selezionare un batch per la modifica o aggiungere un nuovo batch.
Per un nuovo batch, si apre un messaggio che chiede di selezionare gli utenti da elaborare nel batch.
After choosing the “Add patron(s)” button the Patron Search window pops up.
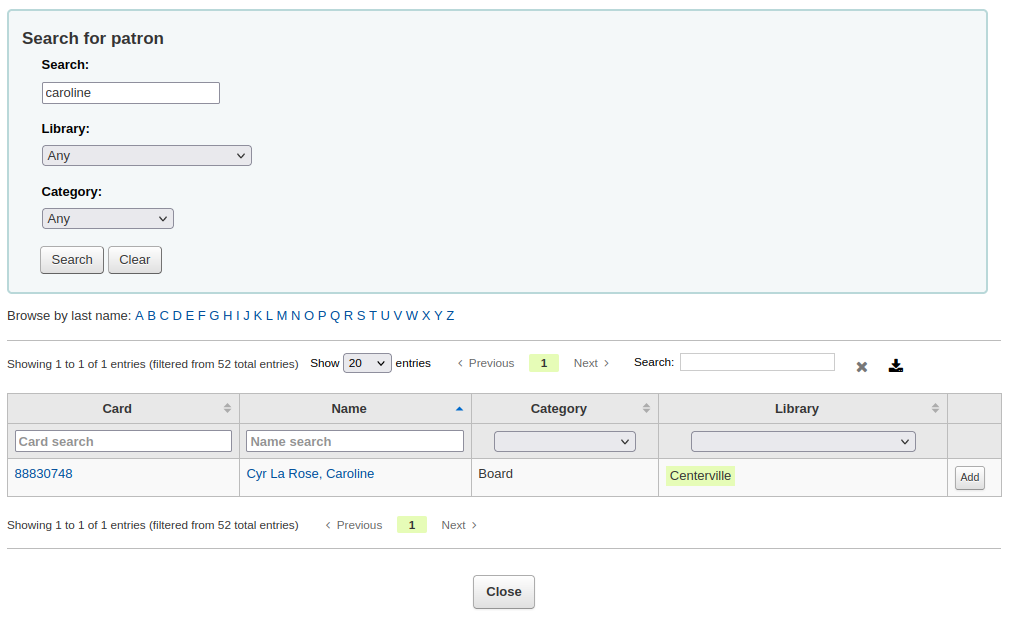
Da qui è possibile cercare gli utenti da aggiungere al batch tramite parte del loro nome, categoria e/o biblioteca. Usando * nella ricerca, verranno visualizzati tutti gli utenti.
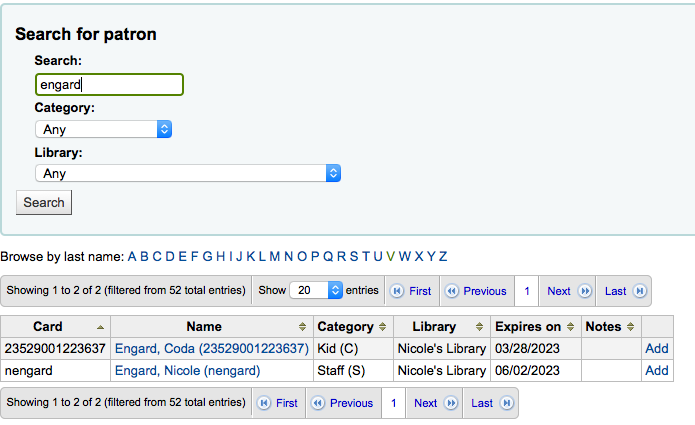
Dai risultati è possibile aggiungere utenti al lotto facendo clic sul pulsante “Aggiungi”. Dopo aver aggiunto utenti dai risultati si può ricominciare da capo e effettuare un’altra ricerca o fare clic su “Chiudi” nella parte inferiore dello schermo per indicare che si è concluso. Verrà quindi presentato il batch.
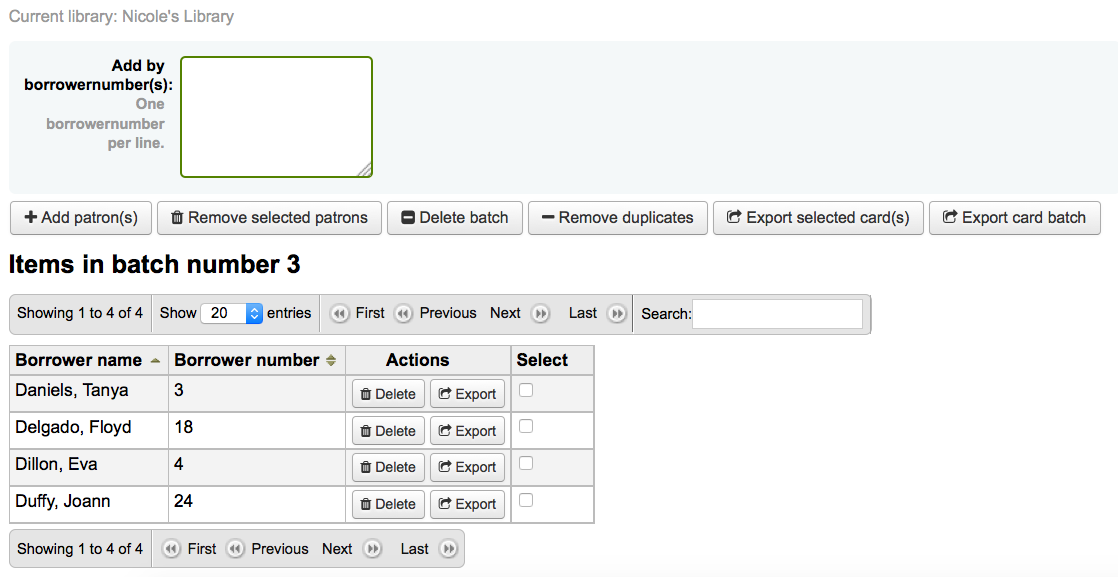 Se sei soddisfatto del batch, è possibile procedere all’esportazione. Se si vuole correggere o eliminare il batch, i pulsanti per farlo si trovano nella parte superiore dello schermo. Si può sempre tornare qui attraverso il bottone “Gestione batch tessere”.
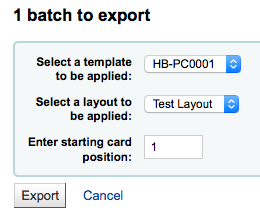
Se vuoi esportare tutte le tessere utente puoi cliccare su “Esporta batch tessere”, altrimenti puoi scegliere alcuni utenti cliccando la casella di spunta a destra del nome e poi cliccare “Esporta tessere selezionate” in alto.
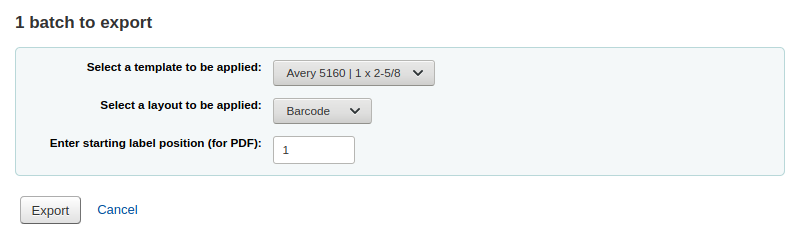
Il menu di esportazione chiederà di scegliere un modello, un layout e la posizione di partenza (dove deve iniziare la stampa sul foglio).
Nota
Per la posizione di partenza, se p.es. sono già stati utilizzate le prime 6 etichette sul foglio, è possibile avviare la stampa dall’etichetta nella posizione 7 del foglio. Le etichette sono numerate da sinistra a destra, dall’alto verso il basso.
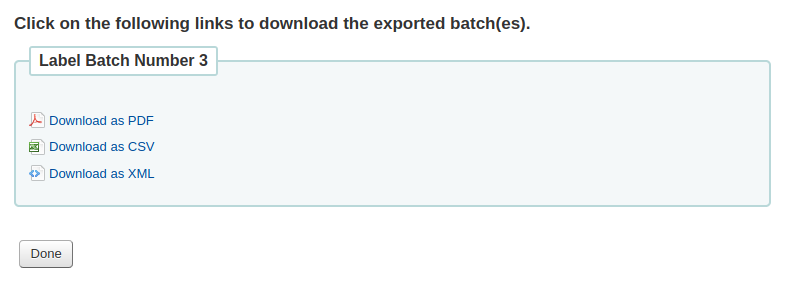
Una volta che si fa clic su “Esporta”, si presenterà un PDF delle etichette da stampare
Quando si apre il PDF si vedrà le tessere da stampare

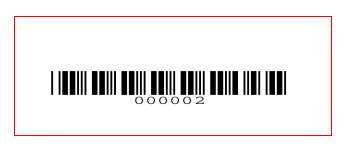
L’immagine qui sopra mostra un layout fatto con due righe di testo. La prima è testo libero, la seconda è composta dai campi <firstname> <surname>. L’immagine utente viene stampata (se disponibile) e il barcode utente viene mostrato nel formato code 39. Il tutto è stampato su un template di tre colonne e 8 righe usando le posizioni 1-3. Stampando in formato PDF, fare attenzione che la stampa non cambi la scala del PDF (p.es. che non esegua un “adatta alla pagina”) altrimenti la stampante non obbedirà al template.
Manage images
Get there: More > Tools > Patron card creator > Manage > Images
Le immagini caricate utilizzando questo strumento verranno visualizzate nel menu quando si crea un layout per tessere utente. Sei limitato nel numero di immagini caricabili (senza contare le immagini utente) dalla preferenza di sistema ImageLimit.
Importante
IMPORTANTE: Le immagini non devono superare i 500k.
Nota
CONSIGLIO: Le immagini caricate con questo strumento dovrebbero almeno avere 300 dpi, che è il minimo per stampare un’immagine.
Al centro dello schermo si trova una semplice form per inviare un file. Cercalo sul tuo computer e associa un nome per lavorarlo dopo averlo caricato su Koha.
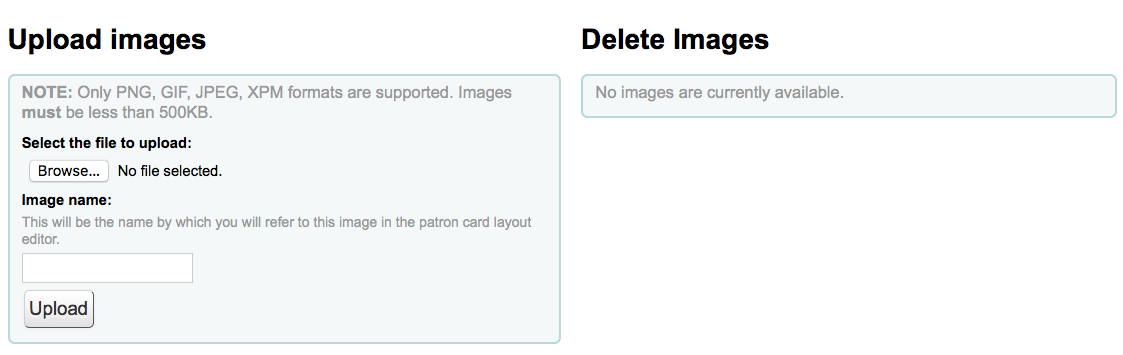
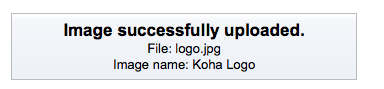
A caricamento del file avvenuto, ti verrà presentato un messaggio di conferma.
E l’immagine verrà elencata insieme alle altre sulla parte destra della pagina.
Per cancellare una o più di queste immagini, spunta la casella rispettiva e premi il bottone “Cancella”
Batch patron deletion/anonymization
Get there: More > Tools > Patrons and circulation > Batch patron deletion/anonymization
Questo strumento permette di rendere anonimo le registrazioni di circolazione o cancellare in massa dei records utente. Questo significa che il sistema tiene un link fra vecchi prestiti e le loro copie ma tronca il link all’utente.
Importante
Utenti con multe o copie in prestito non vengono salvati. Essi non sono completamente rimossi dal sistema (sono spostati nella tabella delete_borrowers), ma questo strumento non fornisce tutti i controlli che si potrebbero desiderare.
Importante
Prima di usare questo strumento conviene fare un backup del database. Le modifiche fatte qui saranno permanenti.
Importante
La trasformazione in forma anonima fallirà silenziosamente se la preferenza AnonymousPatron non contiene un valore valido.
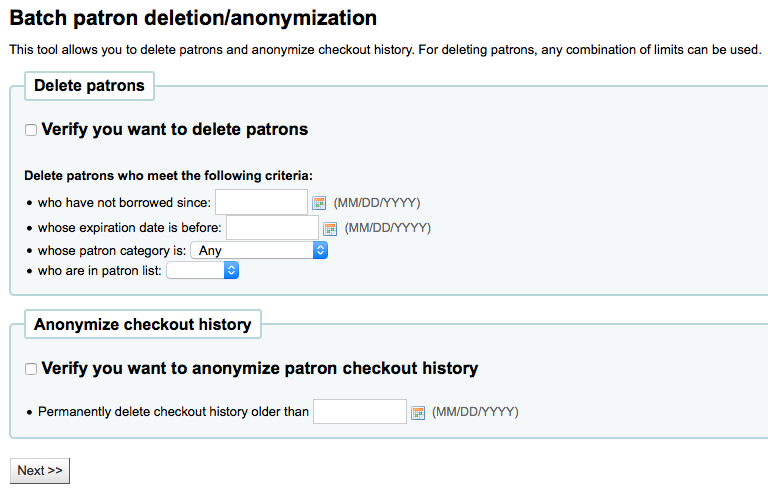
Per cancellare o rendere anonimi gli utenti
Check the “Verify” box on the task you would like to complete (delete or anonymize)
Indica una data massima prima della quale intendi modificare i dati
Se stai cancellando degli utenti puoi anche cercare quegli utenti che
non hanno effettuato prestiti da una certa data
hanno accounts che scadranno prima della data indicata
sono di una specifica categoria utente
sono in una lista utenti
Clicca “Successivo”
Per confermare ti verrà chiesto se sei sicuro che questo avvenga
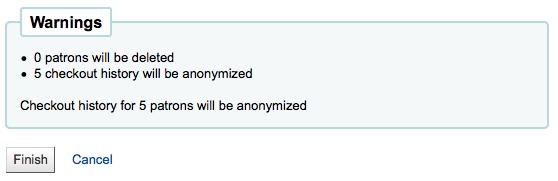
Premendo “Fine” i dati verranno cancellati o resi anonimi

Modifica utente via batch
Get there: More > Tools > Patrons and circulation > Batch patron modification
Con questo strumento è possibile apportare modifiche a un lotto di record utente. Basta caricare un file di numeri tessera (uno per riga), scegliere tra una lista di utenti o scansire i numeri di tessera utente nella casella apposita.
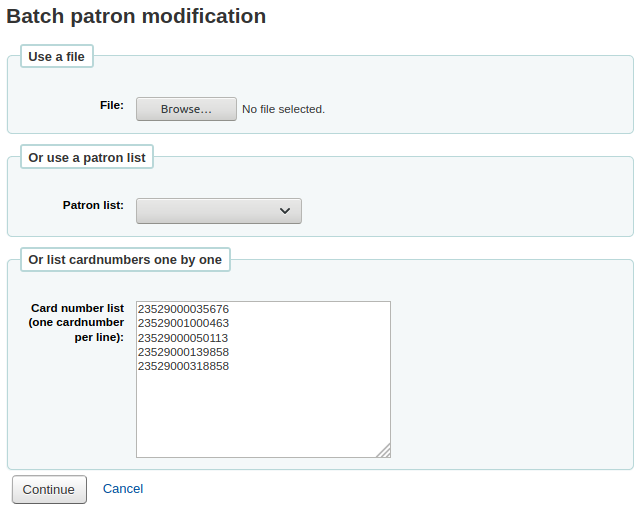
Una volta che hai caricato il file o scansito i barcode, fai click su “Continua”. Vedrai una lista di utenti e dei cambiamenti che puoi apportare.
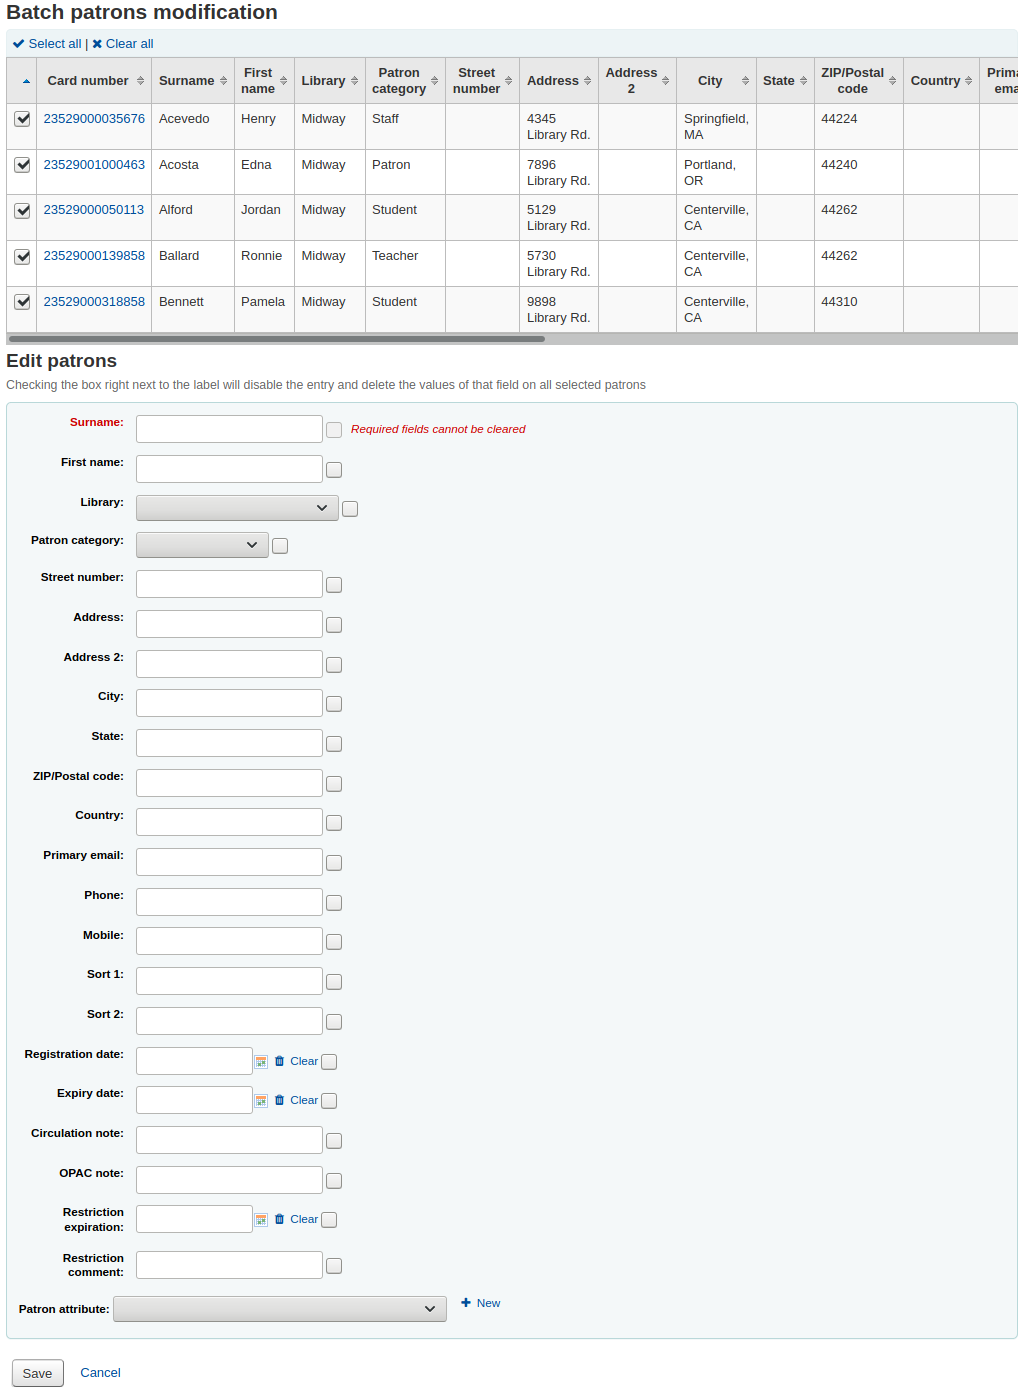
A sinistra di ogni casella di testo c’è una casella di spunta. Se viene cliccata, i campi verranno svuotati.
Importante
Se il campo è obbligatorio, non si sarà in grado di cancellare il valore in esso.
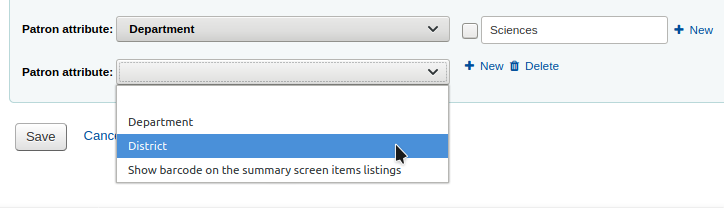
If you have multiple patron attributes you can change them all by using the “+ New” link to the right of the text box. This will allow you to add another attribute value.
Una volta fatti i cambiamenti, clicca “Salva” e ti saranno presentati gli utenti modificati.
Batch extend due dates
Get there: More > Tools > Patrons and circulation > Batch extend due dates
This tool allows you to update due dates in bulk, this can be useful if a library needs to close unexpectedly and cannot accept returns.
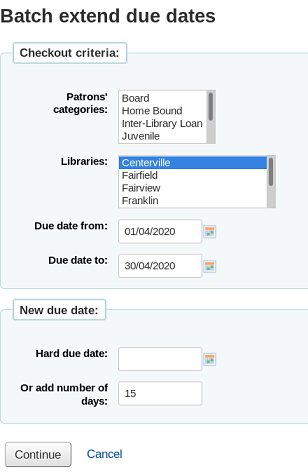
You can filter the selection of checkouts based on patron category, library or a combination of both. You can select multiple options in the dropdown lists if needed.
Next, specify a date range for the current due date of the materials on loan. For example, you may want to extend the due dates for recent checkouts but exclude long overdue loans.
Choose to extend the due dates either to a new hard due date or by a number of days. Using the number of days option can prevent large numbers of loans being due on the same date.
You can choose whether to preview the results of your selections.
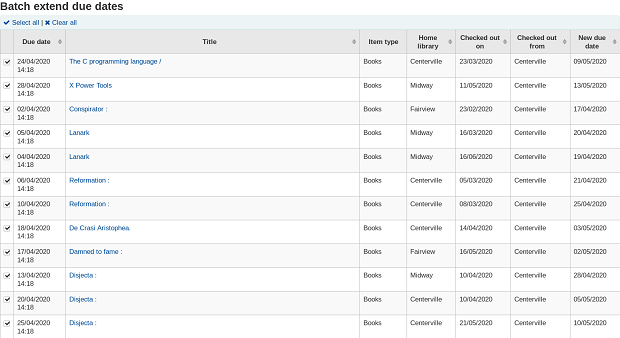
If you preview the results you will see a table which shows you the current due date and the new due date so that you can check your selections. You can untick checkouts if they are incorrect or go back and change your selection.
Click on the Modify selected checkouts button to see a confirmation screen showing the checkouts that have been modified.
Nota
Access to this tool requires the Tools permission batch_extend_due_dates.
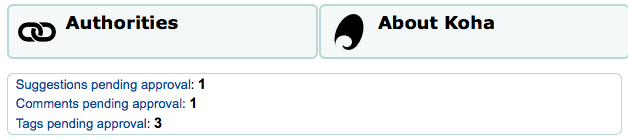
Tag moderation
Get there: More > Tools > Patrons and circulation > Tags
Depending on your tagging system preferences, librarians may need to approve tags before they are published on the OPAC. This is done via the tag moderation tool. If there are tags awaiting moderation they will be listed on the main staff dashboard under the module labels:
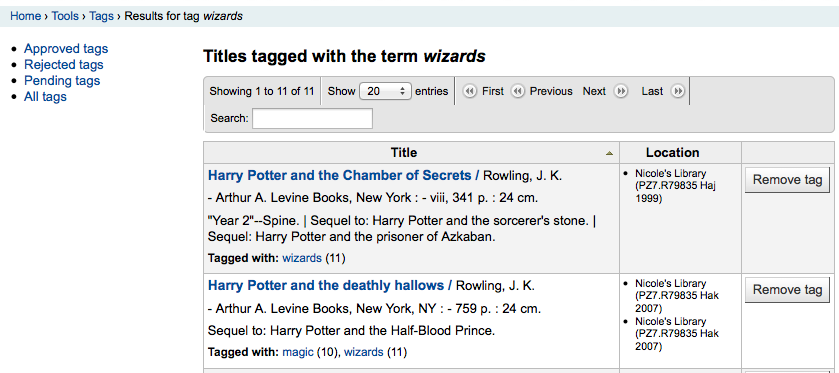
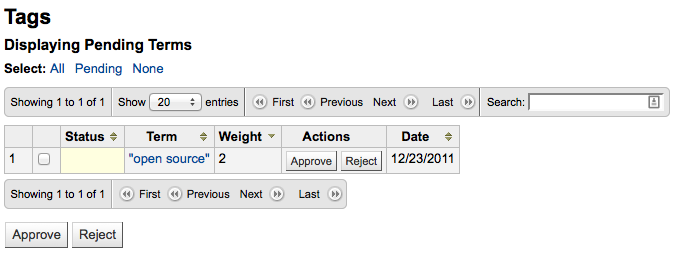
Per moderare i tag usa lo strumento Tags. Quando usi questo strumento per la prima volta, ti sara presentata una lista di tag che aspettano di essere approvati o rifiutati da un bibliotecario
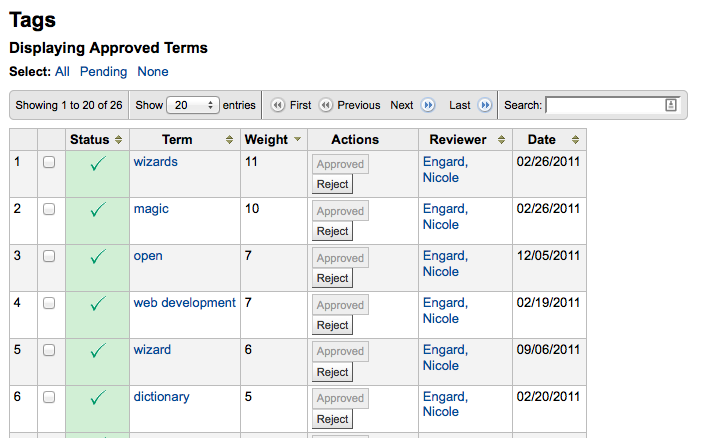
Per vedere tutti i titoli a cui questo tag è stato collegato, semplicemente clicca sul termine
Da questo elenco di titoli è possibile rimuovere un tag senza impedirne l’uso futuro facendo clic sul pulsante “Rimuovi tag” a destra del titolo.
Per approvare un tag, clicca “approva” sulla linea del termine o seleziona i termini che vuoi approvare e clicca “approva” sotto la tabella.
To reject a tag, you can either click the “Reject” button in line with the term, or check all terms you want to reject and click “Reject” below the table.
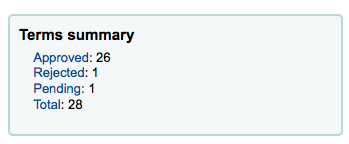
Una volta che un tag è stato approvato o scartato, viene messo nell’apposita lista di tag. Un riassunto di tutti i tag apparirà nella parte destra della pagina
Anche se un tag è approvato o scartato, può essere ancora spostato in un’altra lista. Quando guardi i tag approvati, ogni tag ha l’opzione per essere scartato:
Per controllare i termini dei tag rispetto alle liste di termini approvati o respinti (e, eventualmente, rispetto al dizionario che è stato assegnato per il tag moderazione) è sufficiente inserire il termine nella casella di ricerca nella parte inferiore destra dello schermo per visualizzare lo stato del termine
Infine si possono cercare tag utilizzando i filtri sulla sinistra.
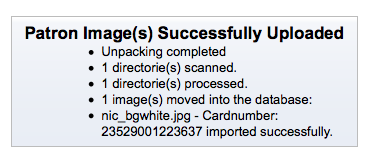
Upload patron images
Get there: More > Tools > Patrons and circulation > Upload patron images
Patrono immagini possono essere caricate in blocco se permettere immagini utente consente di allegarle ai record utente. Queste immagini possono essere utilizzate anche durante la creazione di tessere utente.
Crea un file txt e dagli nome «DATALINK.TXT» o «IDLINK.TXT»
Su ogni riga nel file di testo inserire numero di tessera utente seguito da virgola (o tab) e poi il nome file dell’immagine
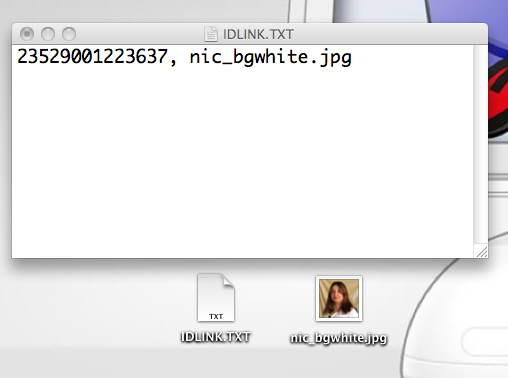
Assicurati che il tuo file TXT sia un documento di testo in chiaro, non un RTF.
Comprimi il file di testo e le immagini
Go to the Upload patron images tool
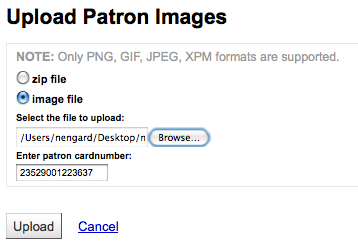
Per una singola immagine, indica il nome del file e il numero tessera dell’utente
Per più immagini, scegli di caricare un file zip
Dopo aver caricato, ti verrà presentato un messaggio di conferma.
Importante
C’è un limite di 100K sulla dimensione dell’immagine caricata e si raccomanda che l’immagine sia 200 x 300 pixel, ma immagini più piccole funzionerà pure.
Catalogo
Cancellazione copie via batch
Vai a: Più > Strumenti > Catalogazione > Cancellazione di copie in blocco
Questo strumento ti permette di cancellare delle copie da Koha con una lavorazione in batch
Da questo strumento puoi scegliere di caricare un file con i barcode o con gli id delle copie, oppure puoi inserire i barcode con la pistola uno alla volta nel box sotto lo strumennto di carico.
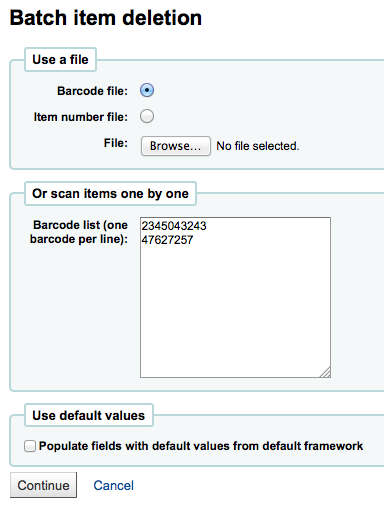
Una volta che hai caricato il file o scansito i barcode, puoi fare click su “Continua”.
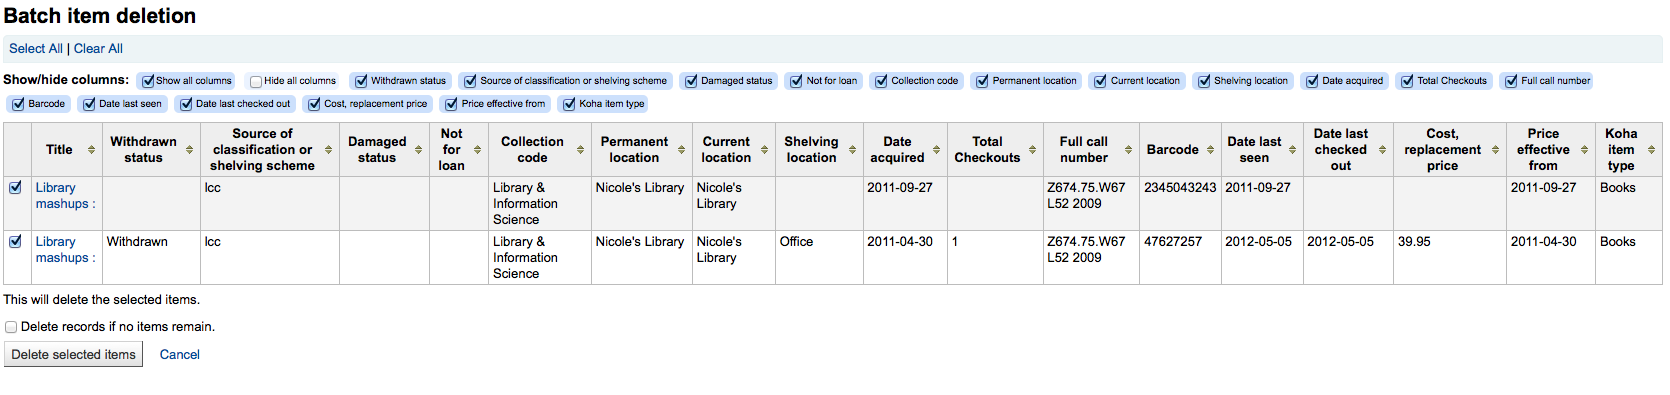
You will be presented with a confirmation screen. From here you can uncheck the items you don’t want to delete and decide if Koha should delete the bib record if the last item is being deleted before clicking “Delete selected items.” If you’d like you can delete the bibliographic record if you’re deleting the last item by clicking the checkbox next to “Delete records if no items remain”.
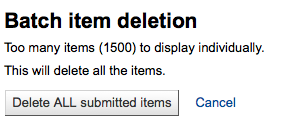
Se il tuo file (o lista di barcode) ha più di 1000 barocde, Koha non sarà in grado di farti vedere la lista delle copie. Potrai sempre cancellarle, ma non potrai indicare quali vanno in concreto cancellate e quali record bibliografici cancellare.
Se la copia è in prestito, premendo “Cancella copie selezionate” comparirà un messaggio di errore e le copie non verranno cancellate.
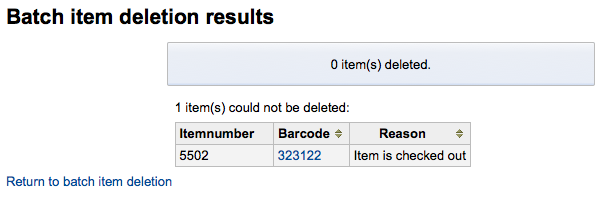
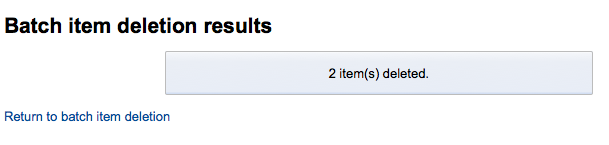
Se le copie possono essere cancellate, lo saranno e ti verrà chiesta conferma della tua cancellazione
Modificare copie via batch
Vai a: Più > Strumenti > Catalogo > Modificare copie via batch
Questo strumento ti permette di modificare delle copie in Koha con una lavorazione in batch
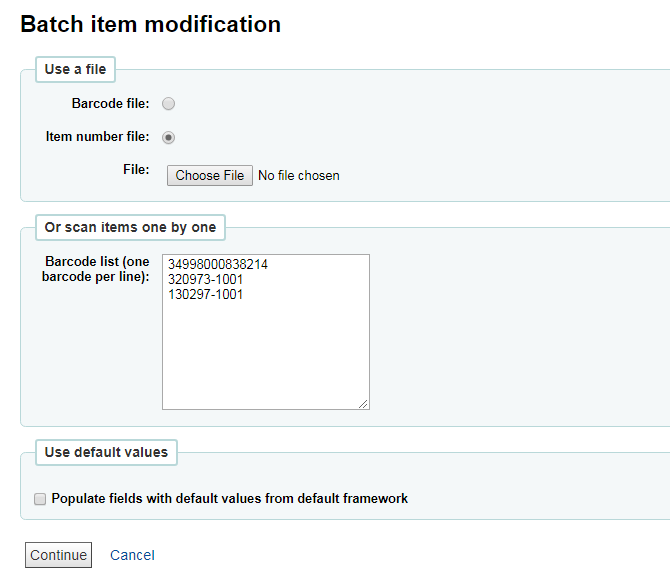
Dallo strumento è possibile scegliere di caricare un file di codici a barre o ID di copia, o scansire le copie una alla volta nella casella sotto lo strumento di caricamento. È inoltre possibile decidere che le copie da modificare asumano valori predefiniti definiti nel framework di default.
Una volta che il file è caricato o i codici a barre sono nell’elenco, si può fare clic su «Continua».
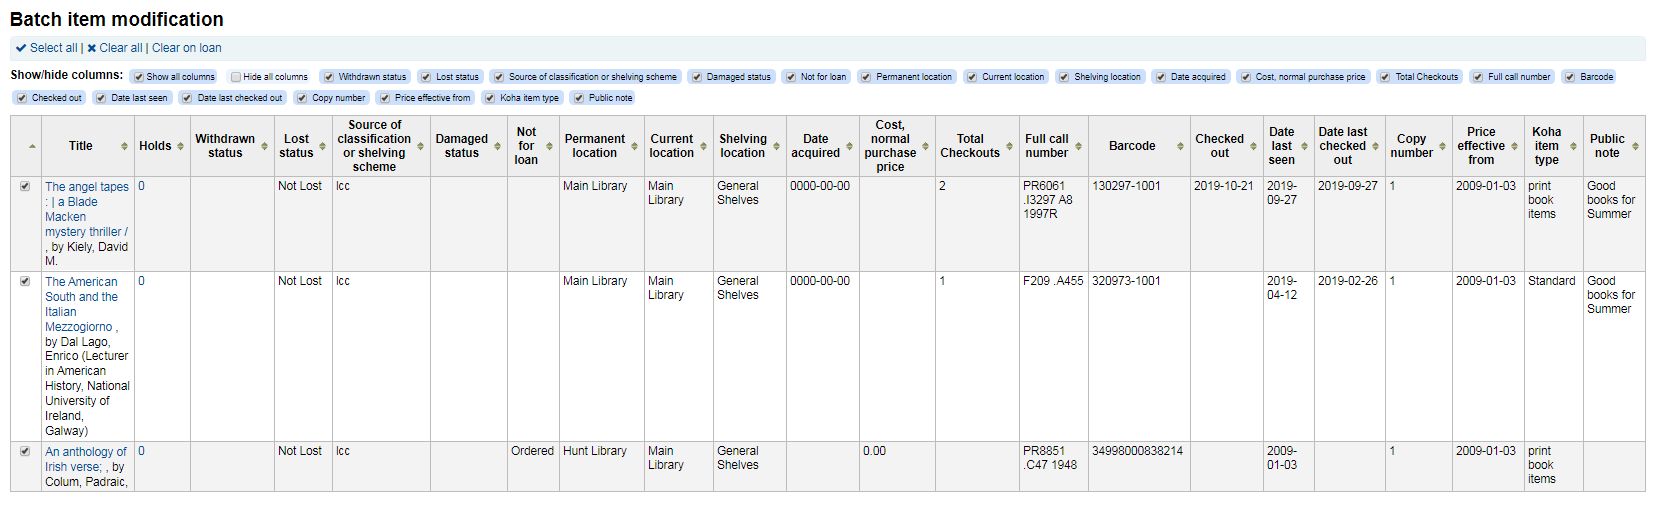
You will be presented with a summary of the items you want to modify. From here you can uncheck the items you don’t want to modify before making changes in the form below. You can also hide columns you don’t need to see to prevent having to scroll from left to right to see the entire item form. The holds column displays a count of the current holds for the item.
Nota
To uncheck all items that are currently checked out you can click the “Clear on loan” link at the top of the form.
Usando la maschera di edit, puoi scegliere su quali campi effettuare le modifiche. Attivando la casella a destra di ogni campo, puoi cancellare i valori di quel campo nei record su cui stai lavorando.
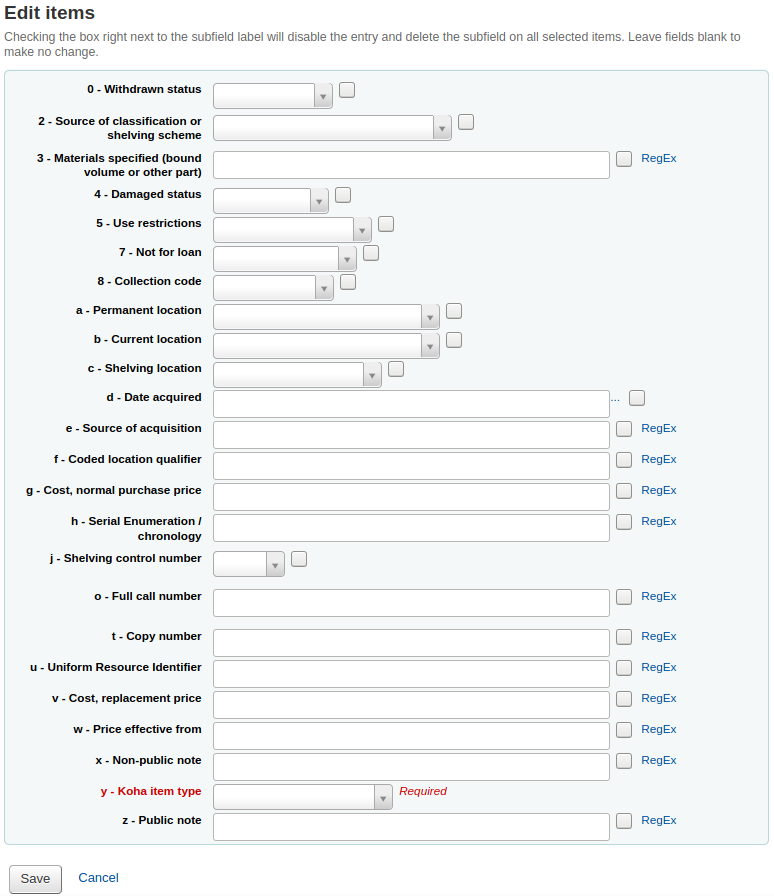
You can also click the “RegEx” link to change the text field to a regular expression substitution. This is used to change only a part of a text string.

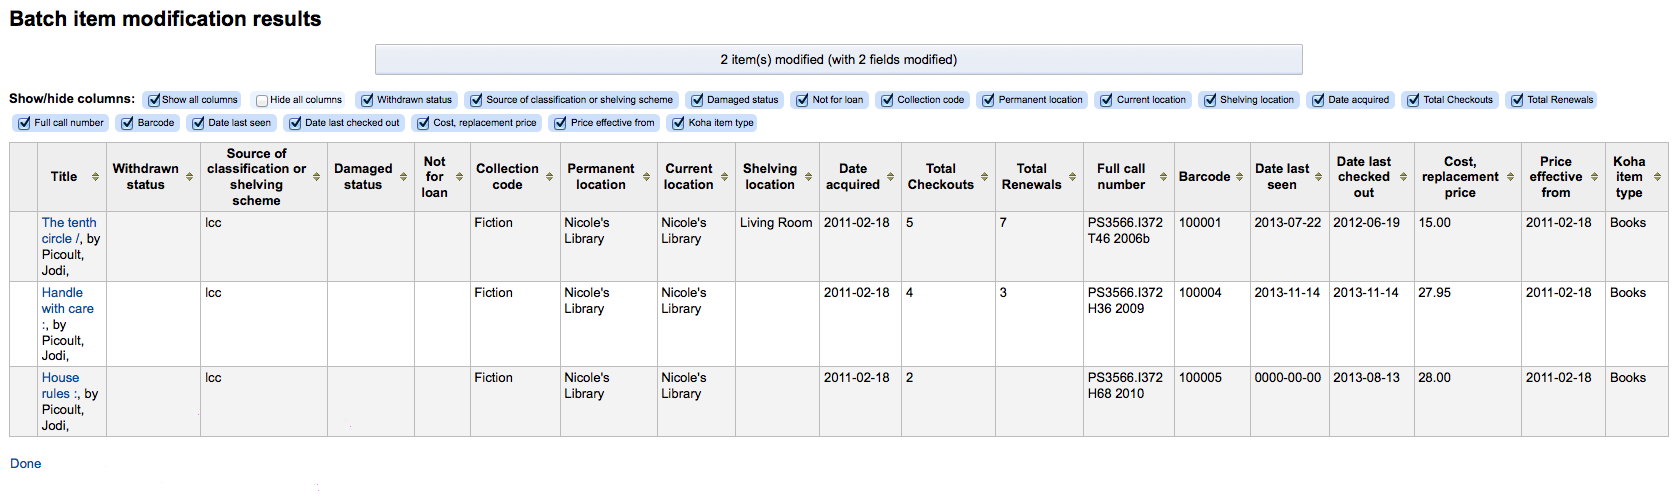
Una volta fatti i cambiamenti, ti saranno presentate le copie risultanti.
Nota
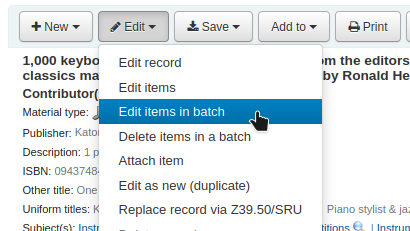
You can also edit items on one bibliographic record in a batch by going to the bibliographic record and clicking Edit > Edit items in batch
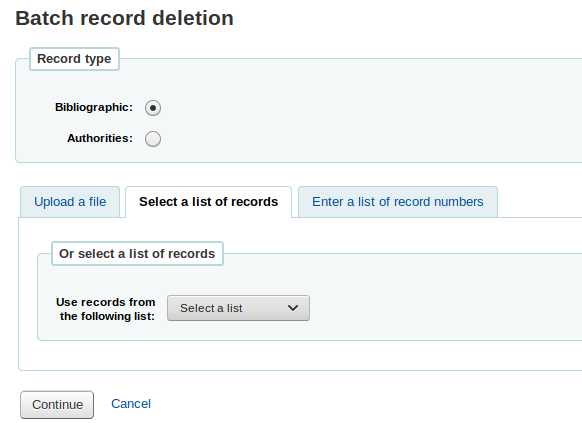
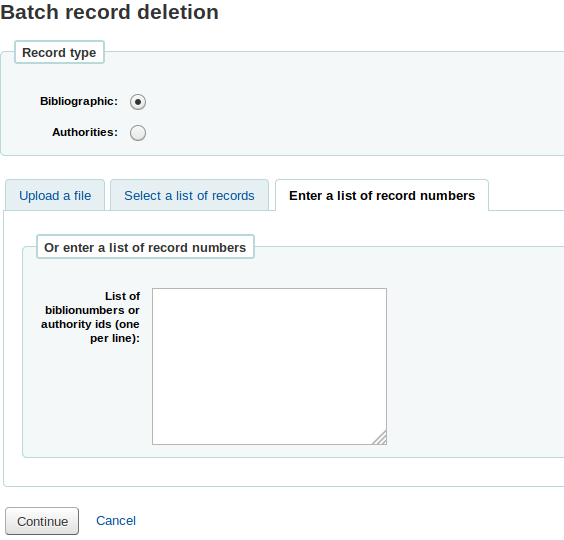
Cancella records via batch
Questo strumento esegue una procedura batch sui numeri di record per ciascun record bibliografico o record di authority e ti permette di cancellare tutti questi record e ogni copia ad essi attaccata.
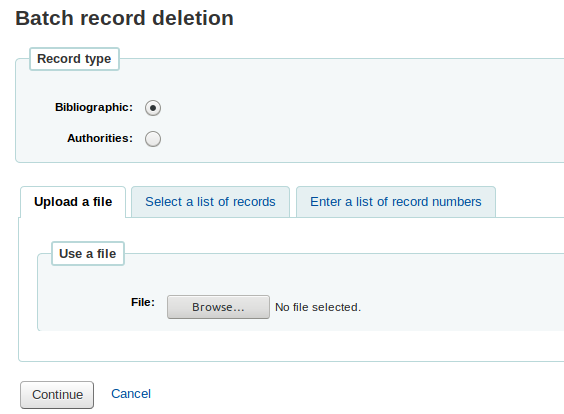
First you need to tell the tool if you’re deleting bibliographic or authority records.
Next, you can:
load a file with biblionumbers or authids;
use a list;
or enter the list of numbers in the box provided.
Once you submit the form you will be presented with a summary of the records you are trying to delete.
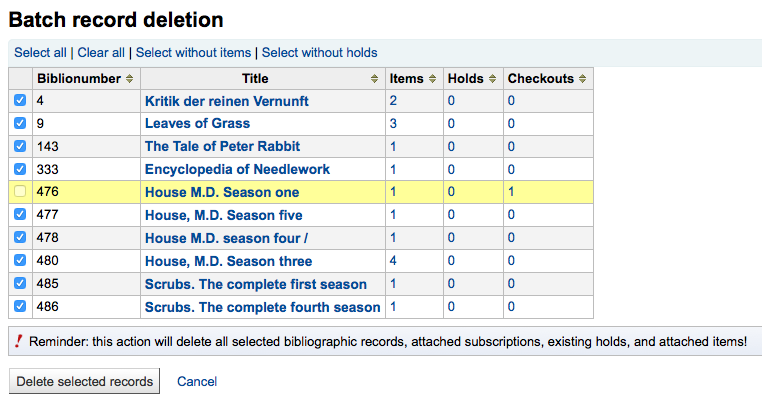
Se un record che vuoi cancellare non può essere cancellato verrà evidenziato.
Marca i record che vuoi cancellare e clicca sul pulsante “Cancella i record selezionati” per terminare l’operazione.
Modifica record via batch
Vai a: Più > Strumenti > Catalogo > Modificare record via batch
This tool will allow you to edit batches of bibliographic and authority records using MARC modification templates. Before visiting this tool you will want to set up at least one MARC modification template.
Quando visiti questo strumento ti verra chiesto:
Scegli se vuoi vedere editare i record bibliografici o di authority
Inserisci un biblionumber o un id di authority
You can upload a file of these numbers;
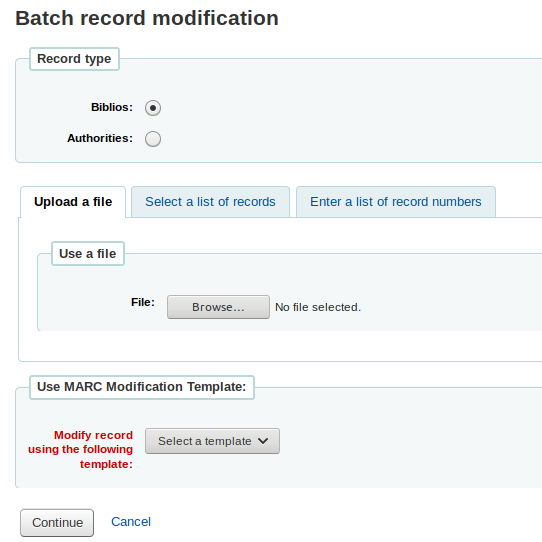
You can use a list;
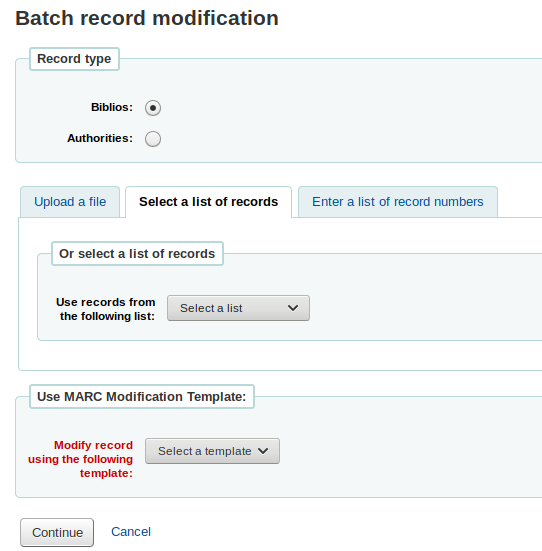
Or enter the numbers (one per line) in the box provided.
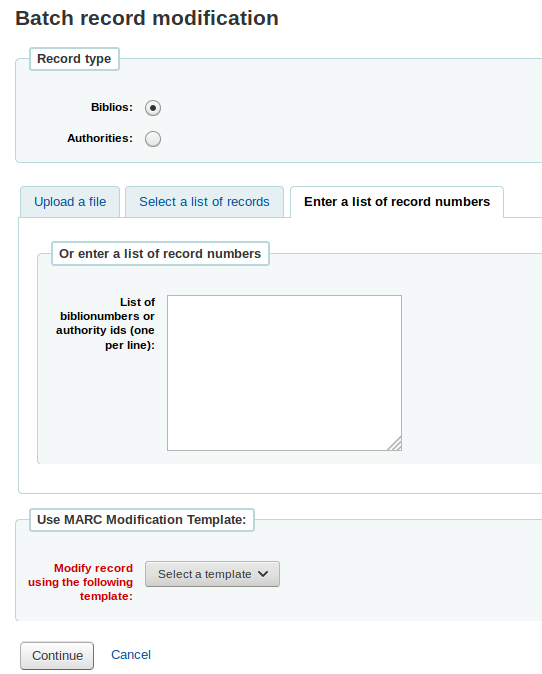
Finally choose the MARC modification template you’d like to use to edit these records.
Quando hai inserito i tuoi criteri, clicca “Continua”
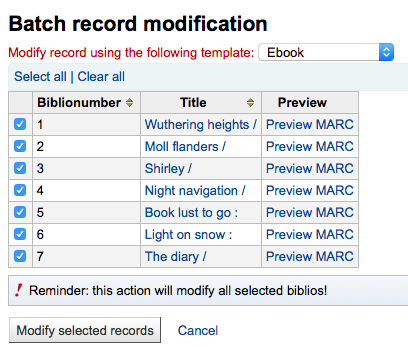
Ti verrà presentata una lista di records che verranno modificati. Vicino ad ogniuno di essi c’e” una casella di spunta, così che puoi togliere ogni record che non vuoi sia modificato in questa occasione.
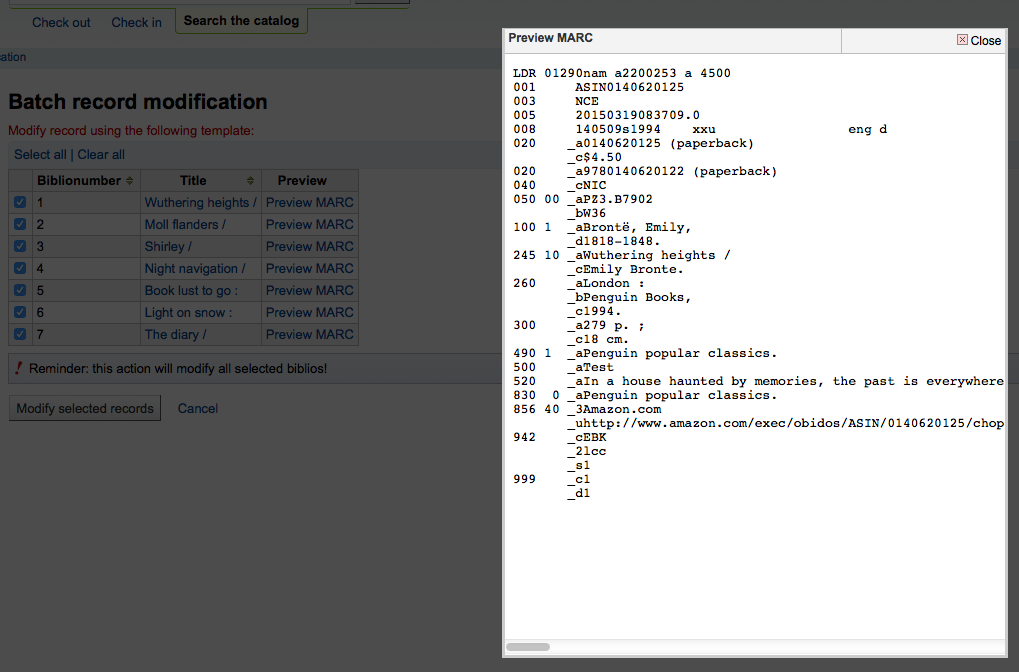
Clicking “Preview MARC” will allow you to see what edits will be made when you finalize the edit.
Una volta che sei sicuro che tutto è come tu vuoi, clicca il bottone “Modifica i record selezionati” e i records saranno modificati.
Modifiche automatiche copie per età
Vai a: Più > Strumenti > Catalogo > Modifica automatica di copie per età
Questo strumento permette di modificare campi determinati in base al raggiungimento di una certa età della copia.
Nota
Nota che è necessario avere il permesso items_batchmod per accedere allo strumento
Importante
The settings in this tool will be acted upon by the corresponding cron job
Se non hai ancora creato regole, vedrai l’opzione “Aggiungi regole” nella pagina Strumenti. Clicca sul bottone per creare regole.
Se hai già creato regole, vedrai il bottone “Modifica regole”. Per creare una nuova regola, clicca su “Modifica regole” in alto nella pagina
You will be brought to a page where you can edit existing rules or create a new rule
Nel form che appare puoi inserire:
il numero di giorni dopo cui l’elemento verrà aggiornato (età)
quali criteri sono necessarii per attivare l’aggiornamento (Condizioni)
quali cambiamenti vengono fatti quando lo script viene eseguito (Sostituzioni)

Una volta che hai finito è possibile fare clic sul link «Aggiungi questa regola» e quindi aggiungere ulteriori regole oppure è possibile fare clic sul pulsante “Invia queste regole” per salvare le modifiche.
Export data
Get there: More > Tools > Catalog > Export data
In Koha c’è uno strumento per esportare i tuoi dati bibliografici, di autorità e di copia in massa. Può essere usato per inviare i dati ad altre biblioteche o servizi oppure per backup.
Export bibliographic records
In alto sullo schermo, scegli quali dati stai per esportare. Se si tratta di record bibliografici, fai click sul tab “Esporta record bibliografici”.
Compila il modulo per limitare la esportazione a un intervallo specifico (tutti i campi sono facoltativi)
Scegli di limitare l’esportazione con una o più tra le seguenti opzioni
Limita a un intervallo di numeri di sistema
Limita a tipi di copia
Importante
Questo limite utilizzerà il tipo definito nella preferenza item-level_itypes. Se la preferenza voce-level_itypes è impostata su “copia specifica” e non ci sono copie collegate ad un record bibliografico, questo non verrà esportato. Per ottenere tutti i record bibliografici di un tipo specifico è necessario che la preferenza item-level_itypes sua impostata a “biblio record”.
Limita a una biblioteca o ad un gruppo determinato di biblioteche
Importante
Questo è un filtro: se lasciato sul default (tutte le biblioteche selezionate) o messo su una o più biblioteche, i record bibliografici senza copie non verranno esportati. Per esportare i records senza copia devi “deseliziona tutto” ( nessuna biblioteca selezionata).
Limita con un intervallo di segnature
Limita a un intervallo di date di acquisto
Se lo desideri puoi caricare un file con la lista dei biblionumber per i record che vuoi esportare. Il tipo di file deve essere .csv o .txt

Successivamente scegliere cosa saltare quando si esporta
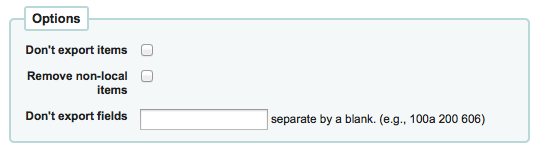
Per default tutte le copie sono esportate a meno che la casella “Non esportare copie” non sia spuntata
Per limitare l’export alle sole copie della biblioteca con cui sei collegato (se hai lasciato nel campo “Biblioteca” “Tutti”) o alla biblioteca che hai selezionato sopra, allora seleziona l’opzione “Rimuovi copie non locali”
Devi scegliere quali campi non vuoi esportare. Puoi rimuovere tutti i campi locali prima di inviare i tuoi dati a un’altra biblioteca
Infine, scegliere il tipo di file e il nome file
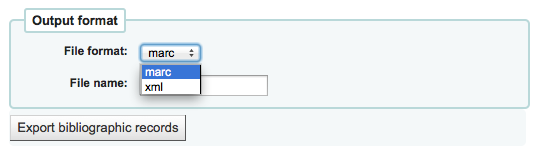
Scegli di esportare i tuoi dati in MARC oppure nel formato MARCXML
Scegli il nome del file in cui salvi
Clicca “Esporta record bibliografici”
Export authority records
In alto sullo schermo, scegli quali dati stai per esportare. Se si tratta di record di autorità, fai click sul tab “Record di autorità”.
Compila il form per limitare il tuo export a un insieme specifico o tipologia di records di autorità (tutti i campi sono opzionali)
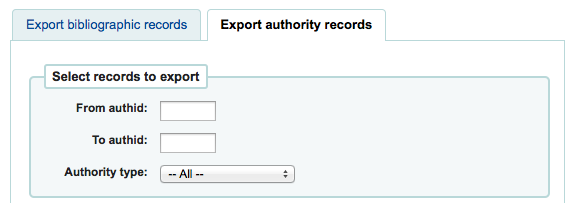
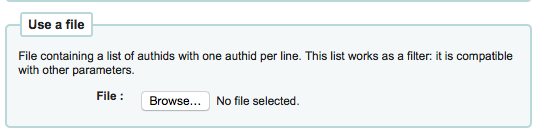
Oppure si può scegliere un file con degli authids che verrano esportati
Il tipo di file deve essere . csv o. txt
Poi scegli campi che si desidera escludere dalla esportazione separati da uno spazio (senza virgole)

Se vuoi escludere tutti i sottocampi del campo 200, indica solamente 200
Se vuoi escludere un sottocampo specifico, indicalo dopo il nome del campo; per esempio 100a escluderà il sottocampo “a” del campo 100
Infine, scegliere il tipo di file e il nome file
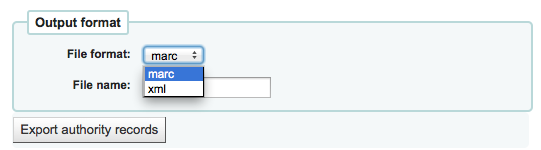
Scegli di esportare i tuoi dati in MARC oppure nel formato MARCXML
Scegli il nome del file in cui salvi
Clicca “Esporta records di authority”
Inventario
Get there: More > Tools > Catalog > Inventory
Koha’s inventory tool can be used in one of three ways:
By creating a shelf list that you can then mark items off on;
By uploading barcodes gathered by a portable scanner;
By comparing barcodes gathered by a portable scanner or scanned directly to a generated shelf list.
Creating a shelf list
If you do not have the ability to use your barcode scanner on the floor of the library, the option available to you is to generate a shelf list based on criteria you enter. You can then print it to use while walking around the library checking your collection or use it directly in Koha on a portable device.
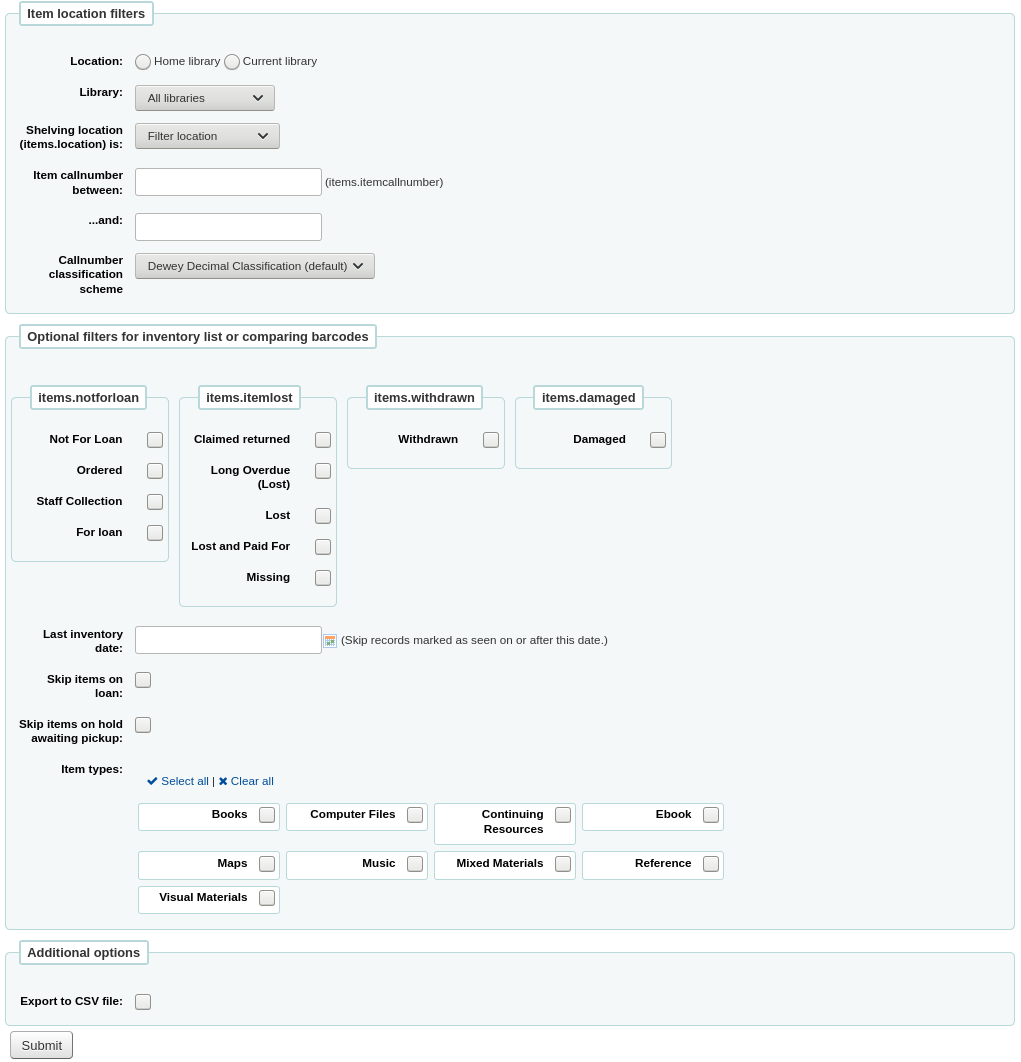
First, choose the criteria for the items you want to print out on a list. All parameters are optional, but if none are selected, the resulting list might be quite large.
Library: choose the branch you want to check, as well as if that branch is the home library or the current holding library of the items.
Shelving location (items.location) is: you can filter by location.
Item callnumber between … and …: you can also limit the list to a specific range of callnumbers.
If filtering by callnumber, make sure to choose the correct classification scheme
You can filter even more with item statuses (not for loan status, lost status, withdrawn status or damaged status). Check the boxes next to the statuses you want to include. For example, if you are using the list to shelf read, check only the “for loan” status as the other items probably won’t be on the shelves.
Last inventory date: enter a date here to skip items that have been marked as seen recently.
Skip items on loan: check this box to filter out loaned items from the list.
Skip items on hold awaiting pickup: check this box to filter out items that are awaiting pickup by patrons
Item types: check the boxes next to the item types you want to include in your shelf list
Export to CSV file: check this box to generate a CSV file for altering in an application on your desktop. If this box is unchecked, the list will be presented on the screen.
Click on “Submit” to generate your shelf list.
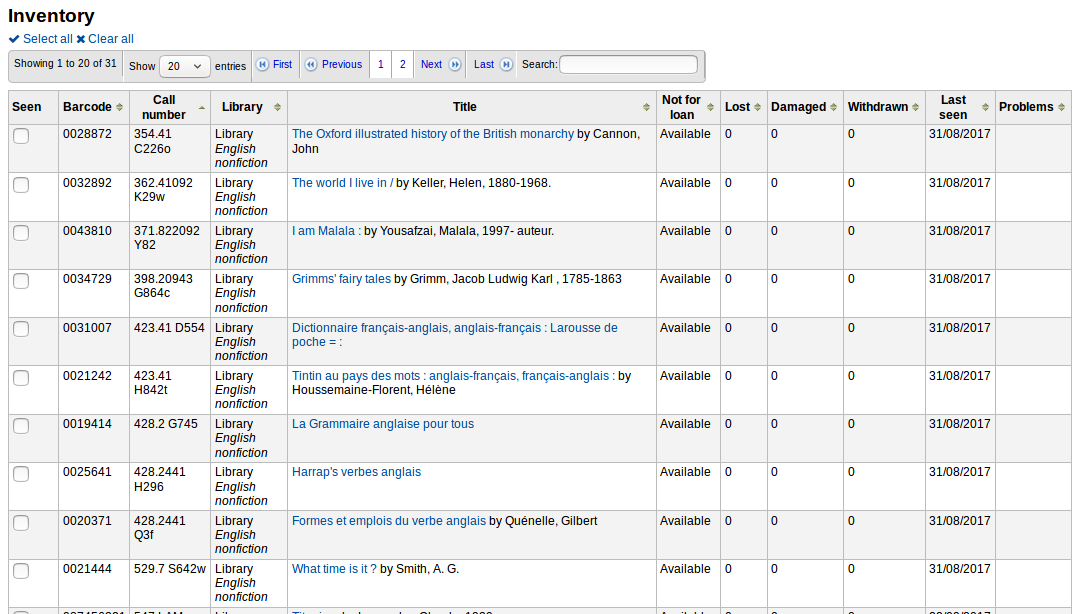
Once you have found the items on your shelves, return to this list and check the boxes next to the items you found. Next, click on one of the three buttons to continue:
Mark seen and quit: updates the “last seen” date of the checked items to today and returns to the previous screen.
Mark seen and continue: updates the “last seen” date of the checked items to today and shows the next page of the list.
Continue without marking: doesn’t update any of the items on this page and shows the next page of the list.
Uploading barcodes with a scanner
If you have a portable scanner (or a laptop and USB scanner) you can walk through the library with the scanner in hand and scan barcodes as you come across them (on a laptop, scan the barcodes into a text file or directly into the on screen text box). Once finished you can then upload the text file generated by the scanner to Koha.
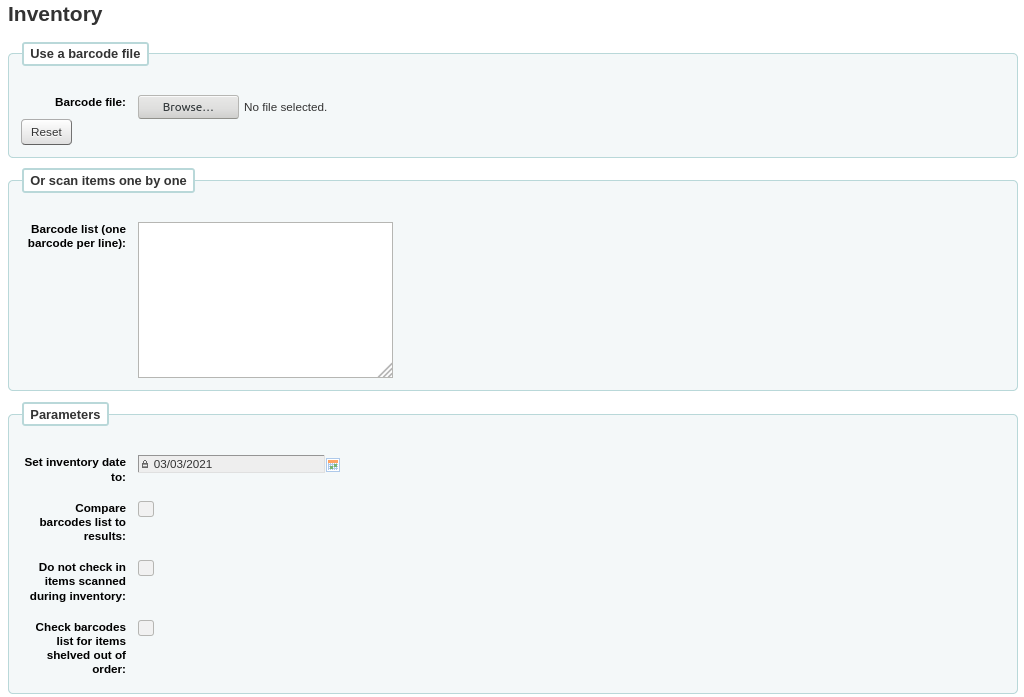
Set inventory date to: choose the date you want to mark all items as last seen.
Compare barcodes list to results: uncheck for this method.
Do not check in item scanned during inventory: unless this is checked, Koha will check in items scanned, as it is assumed that they are on the shelf and so not loaned out. If you do not want to check in scanned items, check this option.
Check barcodes list for items shelved out of order: if this option is checked, Koha will compare the call numbers and make sure they are in the correct order.
Click “Submit”. This will update all the items” “last seen” date to the chosen date.
Once you have the updated the last seen date for all items scanned during the inventory it is possible to use reports to identify items that were not scanned and can therefore be assumed missing (you can use the batch item modification tool to change the LOST status of these items). There are sample reports you can use on the Koha SQL Reports Library.
Comparing scanned barcodes to a shelf list
Alternatively, you can combine the two methods to automatically compare a list of scanned barcodes with a generated list.
First, upload you barcode file or scan the barcodes in the box.
Set inventory date to: choose the date you want to appear in the items” “last seen” field.
Compare barcodes list to results: should automatically be checked.
Do not check in items scanned during inventory: make sure to check this option if you do not want the scanned items to be automatically checked-in if they are checked-out.
Choose the filters (library, shelving location, callnumbers, statuses or item types) to generate a list with which to compare your barcodes. Click on “Submit”.
Nota
Depending on the number of barcodes you are comparing, this may take a few minutes. It is not recommended to compare lists of more than 1000 barcodes as this may cause a session timeout.
Once Koha has finished comparing the barcodes file to the generated list, it will return the number of items updated and a list of problematic items.
Nota
Unlike when creating a shelf list, the list that will be presented here will only contain the items that Koha has determined are problematic.
Missing (not scanned): the item is in the generated list but not in the barcodes file.
Found in wrong place: the item is in the barcodes list, but not in the generated list.
Still checked out: the item is checked out, but is in the generated list. It was not automatically checked in.
No barcode: the barcode doesn’t exist.
Unknown not-for-loan status: the item has “not for loan” status that is not in the NOT_LOAN authorized values list
Item may be shelved out of order: the callnumber is out of order
Label creator
Get there: More > Tools > Catalog > Label creator
The label creator tool allows you to use layouts and templates which you design to print a nearly unlimited variety of labels including barcodes. Here are some of the features of the label creator tool:
Personalizza il layout delle etichette
Definire dei template personalizzati per stampare etichette
Costruisci e gestisci batch di etichette
Esporta batch singoli o multipli
Esporta una o pià etichette all’interno di un batch
Esporta i dati delle etichette in uno di questi tre formati:
PDF - Leggibile da ogni lettore PDF standard, rende le etichette stampabili direttamente su una stampante
CSV - Esporta i dati delle etichette dopo che il layout è stato scelto permettendo di importare le etichette in una grande varietà di applicazioni
XML - Incluso come formato alternativo di export
Templates
Get there: More > Tools > Label creator > Manage > Label templates
A template is based on the label/card stock you are using. This might be Avery 5160 for address labels, Gaylord 47-284 for spine labels or Avery 28371 for your patron cards, just to give a couple of examples. These labels will include all of the information you will need for setting up in Koha. This information may be on the packaging, and if not it can usually be found on the vendor’s website.
Add a template
To add a new template, you want to click on the “New” button at the top of the label creator page and choosing “Label template”.
Usando il form che appare puoi definire il template per il foglio che usi per stampare le etichette o le tessere.
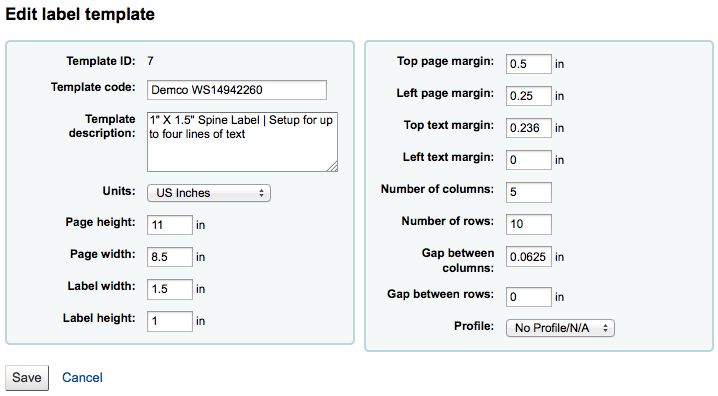
“Template ID” will be automatically generated after saving your template, this is simply a system generated unique id
“Template code” should be something you can use to identify your template on a list of templates
You can use the “Template description” to add additional information about the template
The “Units” pull down is used to define what measurement scale you’re going to be using for the template. This should probably match the unit of measurement used on the template description provided by the product vendor.
Le misure, numero di colonne e numero di righe possono essere trovate sulla confezione del prodotto o sul sito web del fornitore.
Page height: height of the page
Page width: width of the page
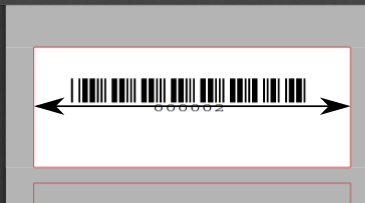
Label width: width of the label
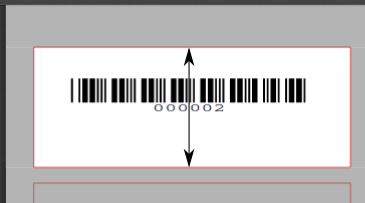
Label height: height of the label
Top page margin: height between the top of the page and the top of the first row of labels
Left page margin: width between the left side of the page and the left side of the first column of labels
Top text margin: height between the top of the label and the top of the first line of text
Left text margin: width between the left side of the label and the start of the text
Importante
Se non si fornisce un margine sinistro nel modello, si applica per impostazione predefinita il margine di 3/16» (13,5 punti).
Number of columns: number of columns of labels in a page, or number of labels per row
Number of rows: number of rows of labels in a page, or number of labels per column
Gap between columns: width between two columns of labels
Gap between rows: height between two rows of labels
Un profilo è un insieme di «aggiustamenti» ad un dato modello appena prima della stampa che compensa anomalie uniche e peculiari di una determinata stampante (a cui viene assegnato il profilo).
Prima di raccogliere un profilo cerca di stampare alcune schede di esempio così da poter definire facilmente il profilo adatto alla combinazione scelta di templatate / stampante.
Dopo aver trovato eventuali anomalie nel documento stampato, creare un profilo e assegnarlo al modello.
Dopo aver salvato, i tuoi template appariranno nell’area “Gestione” sotto “Template etichetta”.
Profili
Get there: More > Tools > Label creator > Manage > Printer profiles
Un profilo è un insieme di «perfezionamenti» da applicare a un dato template subito prima della stampa, per compensare anomalie o peculiarità di ogni stampante (a cui il profilo è assegnato). Questo significa che se imposti un template e poi stampi una prova e noti che i dati delle copie non sono allineati correttamente alle etichette, devi impostare un profilo per la stampante (o addirittura per un determinato vassoio) per migliorare la stampa, per esempio introducendo spostamenti del testo a destra o a sinistra, in alto o in basso.
Se le etichette sono già stampate come le vuoi, non è necessario che tu crei un profilo.
Add a profile
To add a new profile, you want to click on the “New” button at the top of the label creator tool and choose “Printer profile”.
Usa il modulo che appare quando crei un profilo per sistemare eventuali problemi con il tuo template.
The “Printer name” and “Paper bin” do not have to match your printer exactly, they are for your reference so you can remember what printer you have set the profile for. So if you want to use the Printer model number in printer name or you can call it “the printer on my desk”
“Template name” will be filled in once you have chosen which template to apply the profile to on the template edit form
The “Units” pull down is used to define what measurement scale you’re going to be using for your profile.
“Offset” descrive cosa succede quando l’intera immagine è fuori centro o verticalmente o orizzontalmente e “margini” descrive una condizione quando la distanza tra le etichette varia attraverso o su e giù della pagina
In questi valori, i numeri negativi muovono l’errore in su e a sinistra, i numeri positivi muovono l’errore in giù e a destra
Esempio: il testo è .25» (pollici) dal margine sinistro della prima etichetta, .28» dal margine sinistro della seconda etichetta, e da .31» dal margine ministro della terza. Questo significa che il margine orizzontale va messo a .03» per gestire questa differenza.
Dopo aver salvato, i tuoi profili appariranno nell’area “Gestione” sotto “Profili stampanti”.
Una volta che hai salvato il tuo nuovo profilo, puoi tornare alla lista dei templates e scegliere di modificare il template che usa questo profilo.
Layouts
Get there: More > Tools > Label creator > Manage > Layouts
Devi definire quali campi o sottocampi vuoi esportare, separandoli con barra verticale.
Add a layout
To add a new layout, you want to click on the “New” button at the top of the Label creator tool and choose “Layout”.
Using the form that appears you can decide what appears on your labels.
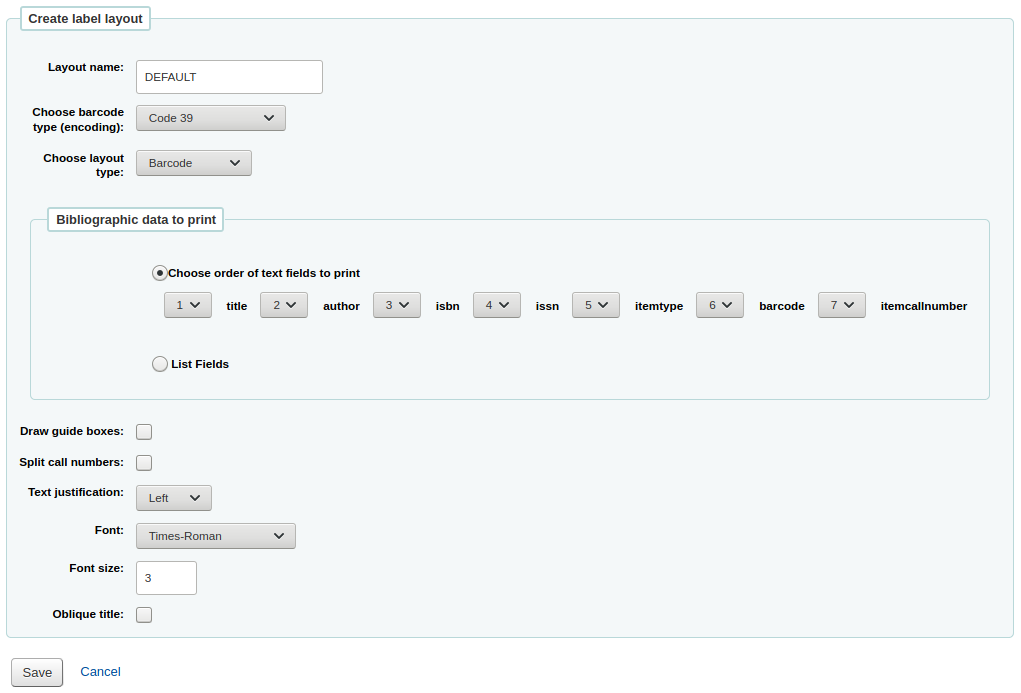
Il nome del layout può essere qualsiasi cosa che aiuti a identificarlo in un secondo momento.
Se questo è un codice a barre ti consigliamo di scegliere la codifica (Code 39 è il più comune)
Il tipo di layout può essere una combinazione di informazioni bibliografiche e / o codice a barre. Per esempio un’etichetta sul dorso sarebbe solo Biblio mentre un’etichetta per lo staff della circolazione per il prestito di un libro sarebbe probabilmente Biblio / Barcode.
Biblio: only bibliographic information will appear on the label (e.g. spine labels)
Barcode/Biblio: the barcode will appear at the top of the label and the bibliographic information underneath
Biblio/Barcode: the bibliographic information will appear at the top of the label and the barcode underneath
Alternating: the bibliographic information will appear on one label, and the barcode on the next label, alternating for each item
Barcode: only the barcode will appear on the label
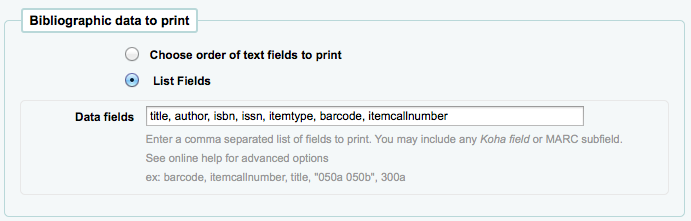
The Bibliographic data to print includes any of the data fields that may be mapped to your MARC frameworks. You can choose from the preset list of fields or you can click on “List fields” and enter your own data. In “List fields”, you can specify MARC subfields as a 4-character tag-subfield string, for example 254a for the title field. You can also enclose a whitespace-separated list of fields to concatenate on one line in double quotes, for example «099a 099b» or «itemcallnumber barcode». The fields available are from the database tables list below. Finally you could add in static text strings in single-quote, for example “Some static text here.”
È possibile utilizzare il visualizzatore di schema (http://schema.koha-community.org) con le seguenti tabelle per trovare i nomi dei campi da utilizzare:
Attualmente tutti i campi nelle seguenti tabelle sono utilizzati: items, biblioitems, biblio, branches
Scegliere se l’etichettatrice deve stampare le linee guida intorno a ogni etichetta
Choose if you’d like Koha to try to split your call numbers (usually used on spine labels)
Nota
Call number splitting rules are managed under Administration > Classification sources.
Choose your text settings such as alignment, font type and size. You can also italicize the title by checking the “Oblique title” box.
Dopo aver salvato, i tuoi layout appariranno nella pagina “Gestisci i layout”.
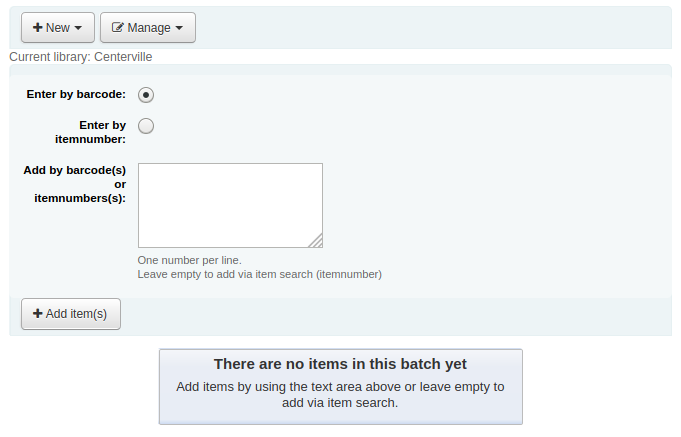
Lavorazioni batch
Get there: More > Tools > Label creator > Manage > Label batches
Batches are made up of the items for which you would like to print labels. Once in this tool you can search for the item records you would like to print out labels for.
Add a batch
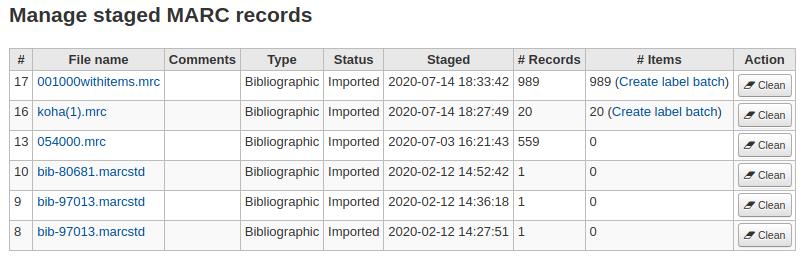
Batches can be created in one of two ways. The first is to click the “Create label batch” link on the “Staged MARC management” page:
L’altro è creare un nuovo batch dallo strumento di creazione etichette
Sarai portato a un form con un bottone “Aggiungi copia(e)” nella parte inferiore della pagina e una casella riempibile con la scansione di codici a barre o con numeri di copia.
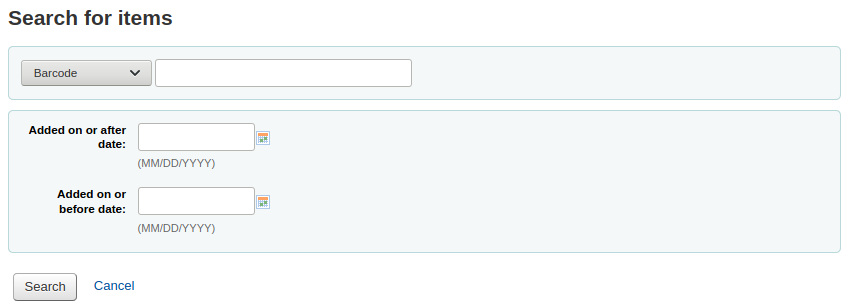
È possibile sia inserire i codici a barre nella casella (usando il lettore a pistola ad esempio)e cliccare sul pulsante “Aggiungi copia(e)” oppure è possibile fare clic sul pulsante “Aggiungi copia (s)” lasciando vuota la casella. Facendo clic su “Aggiungi copia(e)” con niente nella casella si aprirà una finestra di ricerca per permetteri di cercare le copie che si desidera aggiungere al batch.
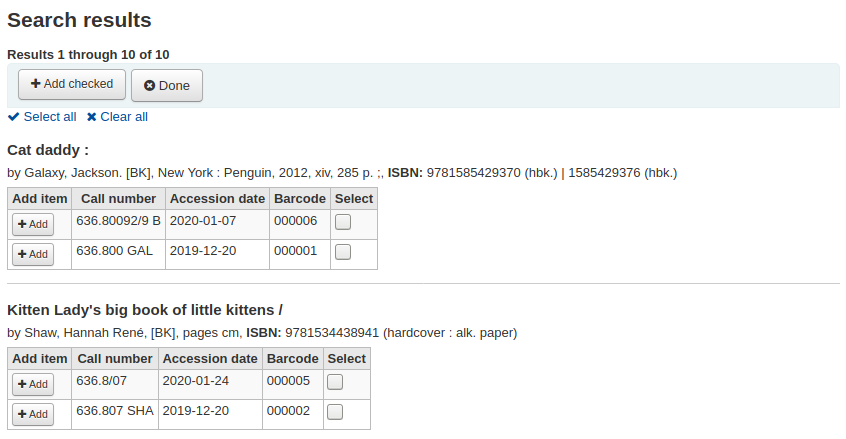
Dai risultati, clicca la casella di spunta di ciascuna copia che vuoi aggiungere al batch, poi clicca il bottone “Aggiungi selezionati al batch”. Puoi anche aggiungere le copie una ad una cliccando “Aggiungi” alla sinistra di ogni copia.
Once you have added all of the items click the “Done” button. Click again on the “Add item(s)” button to transfer the items from the barcode box to the batch. The resulting page will list the items you have selected.
To print your labels, click the “Export full batch” button. To print only some of the labels, click the “Export selected item(s)” button. Either way you will be presented with a confirmation screen where you can choose your template and layout. If you’re using a sheet of labels that is not complete, you can enter the starting label (labels are counted horizontally).
Ti verranno offerte tre opzioni di download: PDF, Excel e CSV.
After saving your file, simply print on the blank labels you have in your library.
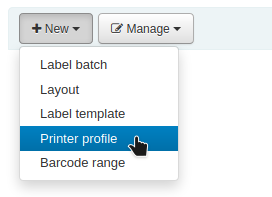
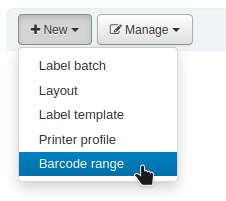
Barcode range
Get there: More > Tools > Label creator > New > Barcode range
If you want to print your barcode labels in advance, before even cataloging the items, you can choose to add a batch of a range of barcodes.
Click “New” and choose “Barcode range” from the label creator tool.
Enter the starting and ending barcodes.
Nota
The barcode range tool does not accept leading zeroes. If you enter 0001234 the barcode that will be printed will be 1234.
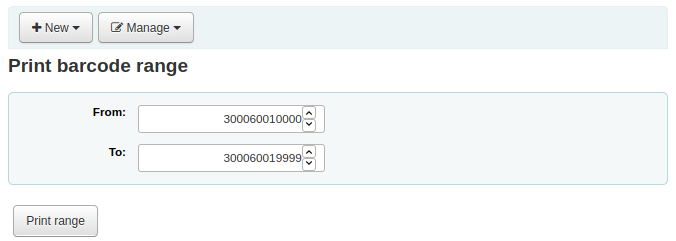
Click “Print range”.
You will be presented with the confirmation screen where you can choose your template and layout and enter the starting label if using an incomplete sheet of labels.
The only download option for barcode ranges is PDF.
Save the file and print it on a blank sheet of labels.
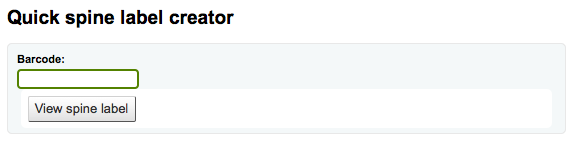
Quick spine label creator
Get there: More > Tools > Catalog > Quick spine label creator
Nota
Questo strumento non utilizza i layout o modelli di etichette, ma stampa semplicemente un’etichetta sul dorso nel primo posto sul foglio di etichette.
Definisci i campi da stampare sull’etichetta del dorso nella preferenza di sistema SpineLabelFormat
Formatta la stampa delle etichette modificando il css spinelabel.css che trovi in koha-tmpl/intranet-tmpl/prog/en/css/
Per usare questo strumento hai bisogno solo del barcode dell’opere di cui vuoi stampare l’etichetta per il dorso.
Rotating collections
Get there: More > Tools > Catalog > Rotating collections
Rotating collections is a tool for managing collections of materials that frequently get shifted from library to library. It adds the ability to store not only an item’s home library and current location but also information about where it is supposed to be transferred to next to ensure that all items in the collection are sent to the correct library. When an item in a rotating collection is checked in, library staff is notified that the item is part of a rotating collection and which branch it should be sent to if it is not at the correct one.
Importante
The AutomaticItemReturn system preference must be set to «Don’t automatically transfer items to their home library when they are returned» for rotating collections to function properly.
To create a new rotating collection, click the «New collection» button, fill in the title and description, and click «Submit». Once submitted you’ll see «Collection name added successfully»; click «Return to rotating collections home» to return to the main Rotating collections management page (or click Rotating collections in the sidebar).
To add items to a collection, click «Actions» and choose «Add or remove items» next to the collection’s name in the list of collections. Under «Add or remove items» scan or type in the barcode of the item you wish to add to the collection, and hit enter or click “Submit” if necessary.
To remove an item from a collection, either click “Remove” next to the item’s barcode in the list of items within the collection or check the «Remove item from collection» box next to the Barcode text box under «Add or remove items», and scan or type in the barcode, clicking «Submit» or hitting Enter if necessary. Note: The «Remove item from collection» checkbox will remain checked as long as you are on the «Add or remove items» page, unless you uncheck it, to facilitate quickly removing a number of items at a time by scanning their barcodes.
Transfer a rotating collection
Trasferendo una rotating collection accadrà:
Cambia l’attuale localizzazione delle copie nella collezione in quella in cui vengono trasferite
Inizia a trasferire dalla corrente localizzazione alla localizzazione in la collezione si trasferisce. Quando la biblioteca riceve la collezione deve far rientrave le copie per completare il traserimento-
Puoi trasferire una collezione in uno di questi due modi:
From the main Rotating collections page, click on «Actions» and choose «Transfer» next to the title of the collection you wish to transfer; choose the library you wish to transfer the collection to and click «Transfer collection».
Or, from the «add or remove items» page for a collection, you can click the «Transfer» button, choose the library you wish to transfer the collection to and click «Transfer Collection».
Importante
Per completare il processo di trasferimento, la biblioteca che riceve la rotating collection deve far rientrare tutte le copie quando le riceve. Questo chiuderà la fase di trasferimento così le copie non risulteranno più “in transito”.
Se una copia di una rotating collection viene prestata/rientra in una biblioteca diversa da quella dove doveva essere trasferita, una notifica apparira al personale della biblioteca avvisando che si tratta di una copia di una rotating collection. Inoltre dirà a quale biblioteca va inviata.
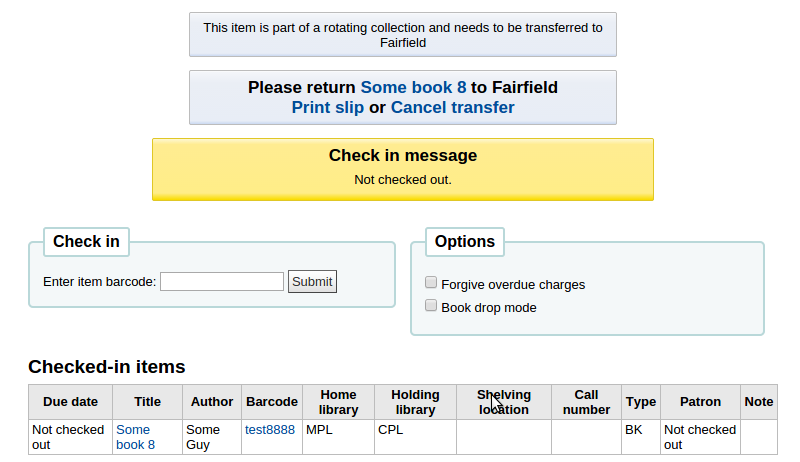
Stock rotation
Stock rotation helps to spread resources more fairly among library branches and allows patrons to see a wider range of titles.
Items are popular whilst they are new at a particular branch. However, their use often tails off over time. This tool empowers librarians to automate the movement of items on to another branch before usage declines and thereby extends the items useful life.
Library staff create rotation plans and then assign them to items. A cronjob is then used to cycle these items round the specified libraries on the rotation plan, moving them to the next stage after the prescribed period of time has passed at the current stage.
Email notices may be used to provide the library branches with a list of items to be put in-transit to the next branch and if an item is found to be on loan at the time that it should be transferred then an alert will be displayed when it is next returned.
From the stock rotation tool page you can add new rotation plans and see a summary of your currently configured rotation plans. You can then edit plan details, activate and deactivate plans and manage stages and items on a given rotation plan.
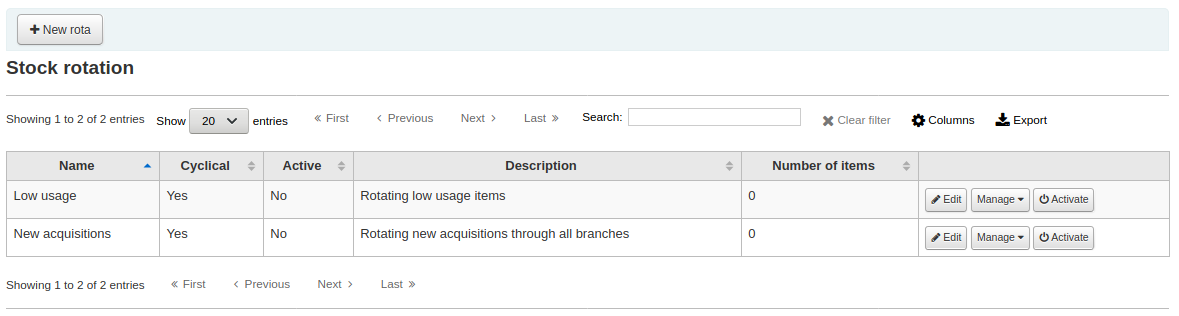
Nota
You can customize the columns of this table in the “Table settings” section of the Administration module (table id: stock_rotation).
This tool utilizes a cron job that must be configured to run on a daily basis.
Editing rota details
Name: A clear name or code to identify the rota
Cyclical: Denotes whether items remain (No) at the last library on the rotation plan upon reaching the end of the rota or whether they continue (Yes) to rotate, returning back to the first library on the rotation plan once they have completed their allotted time at the last library, indefinitely until manually removed from the rota.
Active: Denotes whether a rota is active and as such whether items on it are rotating. It also governs whether items may be added to and removed from the rota. A rota may be switched between active and inactive at any time allowing for rota maintenance.
Description: One may optionally add an expanded description of the rota for display in summary views.
Managing rota stages
Stages may be edited, added, removed and re-ordered at any time from this page.
Library: The library the item will be at during this stage
Duration: The amount of time the item should stage at this stage
Managing rota items - Tool view
Nota
You can customize the columns of this table in the “Table settings” section of the Administration module (table id: stock_rotation_manage_items).
Items can be added to a rota individually (by barcode) or in bulk (via the upload of a line delimited barcode file) on this page.
You will also be presented with a summary of all items on the rota with their current location and you have the options to immediately progress items, mark items as “in demand” and remove an item from rotation.
In demand: If an item is marked as “in demand” then the duration the item will stay at it’s current stage will be doubled compared to what is set in the rota. This is often used for items that are found to be unexpectedly popular at a particular library.
Managing rota items - Catalog view
Rotating items may also be managed from the catalog view: When stock rotation is enabled a new menu tab “Rota” will appear on a catalog records detail view.
All attached items will appear in the summary view with their current status in relation to rotas and the option to mark items as “in demand” or immediately progress them. You can also remove items from rotation and add items to rotas here too.
Managing rota items - EDI
Items can be automatically added to rotas at acquisition time by using the LRP (Library Rotation Plan) field in EDI.
Managing rotation notices
Stock rotation can send email notices to branch libraries to aid in selecting the items due for rotation. Branch “Reply-to” addresses will be used in preference to “Email” addresses for the notice recipients.
The contents of the notices can be customized in the normal manor through the notices tool and the relevant notice has the code SR_SLIP.
Permissions
The stock rotation tool uses two distinct permissions:
- manage_rotas:
this governs a users ability to create, update and delete a rota.
- manage_rota_items:
this governs a users ability to add, remove and progress items on a rota.
Templates di modifica MARC
The MARC modification templates system gives Koha users the power to make alterations to MARC records automatically while staging MARC records for import or making batch record modifications.
Questo strumento è utile per modificare record MARC provenienti da diverse fonti. Il sistema permette di creare uno script di livello base usando le azioni Copia, Muovi, Modifica e Cancella sui campi MARC.

Click on “New template” (a template can be made up of one or more actions), enter a name and click “Submit”. Optionally, you can decide to copy an existing template by choosing the template to copy in the “Duplicate a template” drop-down menu.
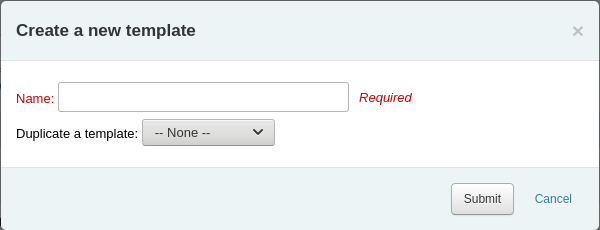
Next you can add actions to the template. Click on “New action”. A “Add a new action” box will appear that you can use to specify what exactly you want to do. For example if you’re loading in a batch of files from your EBook vendor you might want to add the biblio item type of EBOOK to the 942$c.
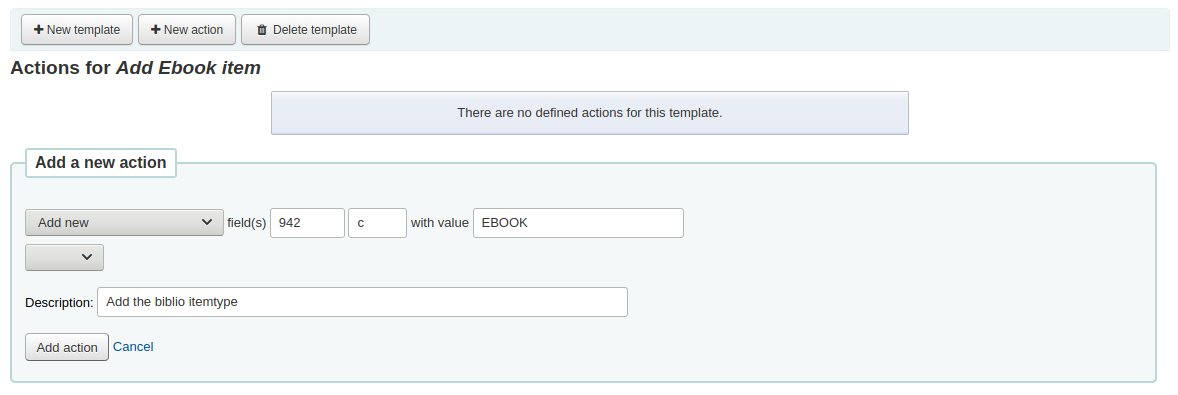
Choose “Add new”
Inserisci il campo “942” e il sottocampo “c”
Inserisci il valore “EBOOK” (o qualunque sia il tuo codice di tipo di copia per gli e-book)
Inserisci una descrizione affinché tu possa identificare l’azione in un secondo momento
Clicca “Aggiungi azione”
Nota
If you wish to update the values in an existing field choose the option ‘Update existing or add new’. This will update existing values where found and add a new field if one doesn’t exist.
Ogni azione può avere un’opzione aggiuntiva che controlla il valore o l’esistenza di un altro campo. Ad esempio, se la collocazione della copia non è presente, puoi aggiungerla in questa maniera.
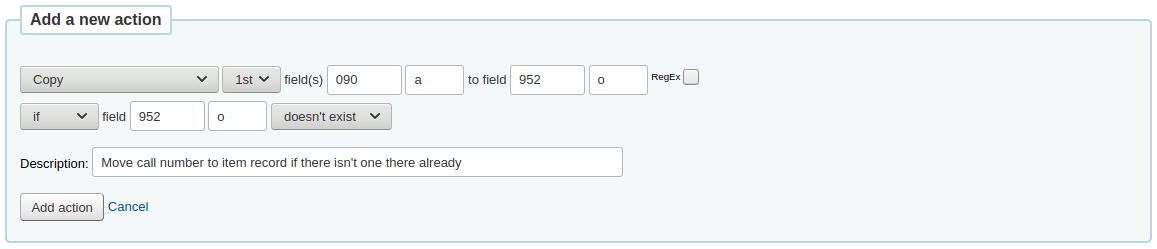
Scegli “Copia”
Decidere se si desidera copiare la prima occorrenza o tutte le occorrenze del campo
Enter the field 090 (or other bibliographic call number field) and subfield a to copy
Inserisci “952” e “o” da copiare in
Scegli “se”
Inserisci “952” e “o” da copiare in
Scegli «non esiste»
Inserisci una descrizione affinché tu possa identificare l’azione in un secondo momento
Clicca “Aggiungi azione”
The Copy & Move actions also support regular expressions, which can be used to automatically modify field values during the copy/move. An example would be to strip out the “$” character in field 020$c.

Scegli “Copia e sostituisci”
Scegli se copiare la solo prima oppure tutte le occorrenze del campo
Inserisci il campo 020 e il sottocampo c da copiare
Inserisci “020” e “c” da copiare in
Selezionare la casella “RegEx” e immettere l’espressione regolare (in questo caso s/\$// )
Scegli “se”
Inserisci il campo 020 e il sottocampo c
Scegli «corrisponde»
Selezionare la casella “RegEx” e immettere l’espressione regolare (in questo caso m/^\$/ )
Inserisci una descrizione affinché tu possa identificare l’azione in un secondo momento
Clicca “Aggiungi azione”
Nota
Il valore di un update può includere variabili che cambiano ogni volta che il template viene usato. Attualmente il sistema supporta due variabili, __BRANCHCODE__ e __CURRENTDATE__ . La prima e” il valore della biblioteca che usa il template, la seconda è la data corrente in formato ISO ( YYYY-MM-DD).
Si potrebbero anche utilizzare espressioni regolari per aggiungere l’URL del proxy della biblioteca come prefisso dei link nel record MARC.
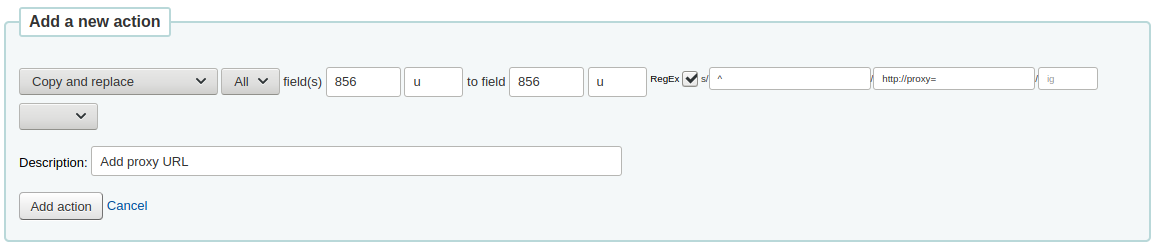
Scegli “Copia e sostituisci”
Scegli se copiare la solo prima oppure tutte le occorrenze del campo
Inserire il campo 856 e il sottocampo u da copiare
Inserire il campo 856 e il sottocampo u di destinazione
Selezionare la casella “RegEx” e immettere l’espressione regolare (in questo caso s/^/PROXY_URL/ )
Inserisci una descrizione affinché tu possa identificare l’azione in un secondo momento
Clicca “Aggiungi azione”
Al momento di scegliere tra “Copia” e “Copia e sostitisci” tieni il seguente esempio in mente:
245 _aThe art of computer programming _cDonald E. Knuth.
300 _aA_exists _bB_exists
Se applichiamo (a) Copia l’intero campo 245 su 300, otteniamo:
245 _aThe art of computer programming _cDonald E. Knuth.
300 _aA_exists _bB_exists
300 _aThe art of computer programming _cDonald E. Knuth.
Se applichiamo (b) Copia il sottocampo 245$a su 300$a, otteniamo:
245 _aThe art of computer programming _cDonald E. Knuth.
300 _aThe art of computer programming _bB_exists
Una volta che le azioni sono salvate le puoi vedere in cima alla pagina. Le azioni posso essere spostate usando le frecce alla loro sinistra.

Actions will be done in the order they appear. Depending on your actions the order may be very important. For example you don’t want to delete a field before you copy it to another field. You can use the blue arrows to move actions up or down the list.
The up arrow will move the action up one position
The up arrow with a line at the top will move the action to the first position
The down arrow with a line at the bottom will move the action to the last position
The down arrow will move the action down one position
Once your template is saved you will be able to pick it when using the Stage MARC records for import tool or when using the batch record modification tool.

Stage MARC records for import
Vai a: Più > Strumenti > Catalogo > Deposito MARC records per l’importazione
Questo strumento può essere usaro per importare sia recorda bibliografici che di authority salvati in formato MARC. L’import di record in Koha include due passaggi. Il primo è immagazzinare record per l’import.
Per prima cosa trova il file MARC sul tuo computer
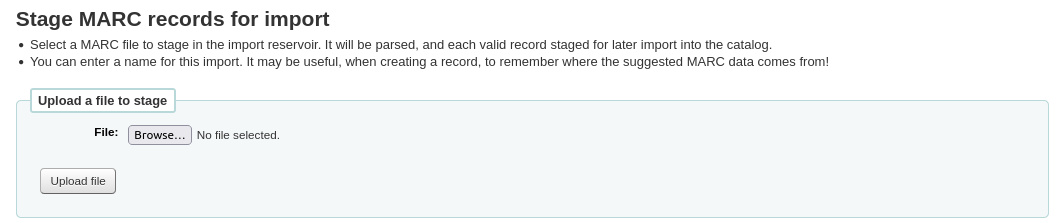
Poi ti verranno presentate le opzioni per il match tra i record e l’importazione nelle copie
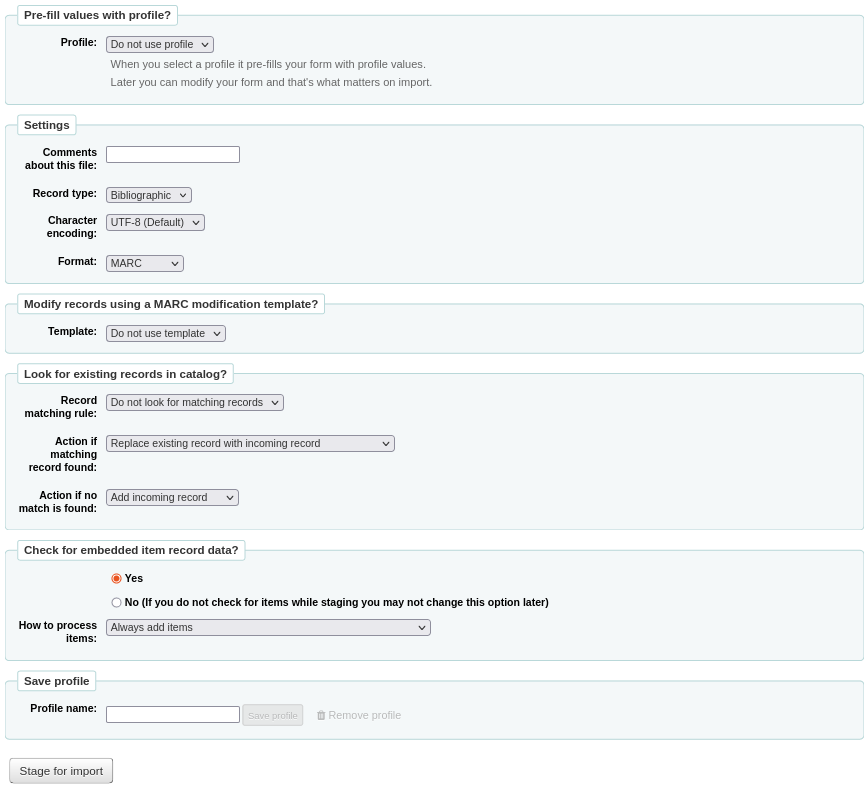
Pre-fill values with profile: if you already have staging profiles set up, you can choose the appropriate profile from the dropdown list
Profiles are used to pre-fill the rest of the staging settings form.
You can create a profile by choosing the various settings in the sections below and enter a profile name at the end of the form. Next time you stage records, the profile will be available.
Comments about this file: enter comments to identify your upload when going to the “Manage staged MARC records” tool
Record type: choose which type of records are in this file, bibliographic or authority
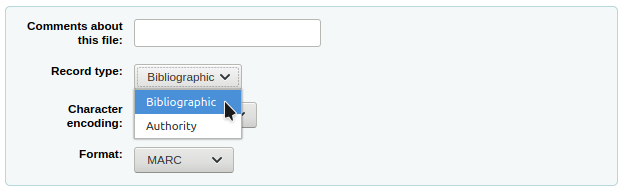
Character encoding: choose the character encoding of your file
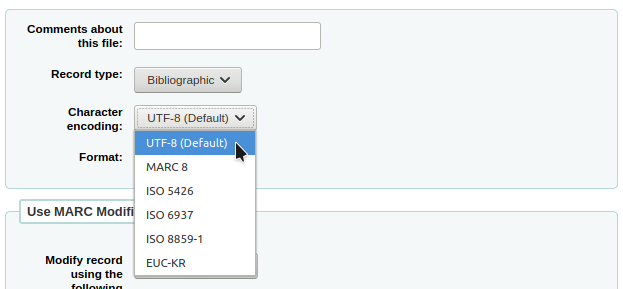
Format: choose the MARC format of your file
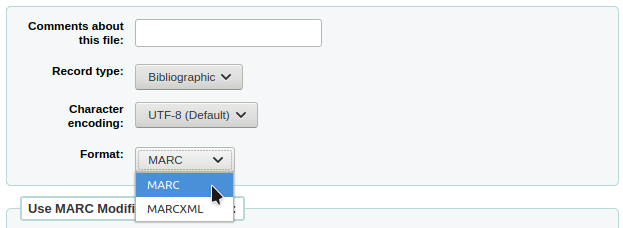
Modify record using a MARC modification template: choose if you would like to use a MARC modification template to alter the data you’re about to import
Scegliere se si desidera o meno cercare record corrispondenti
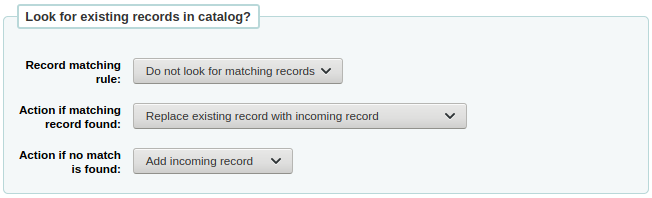
Record matching rule: choose which rules to use to check your catalog if these records already exist.
Nota
You can set up record matching rules in the administration area
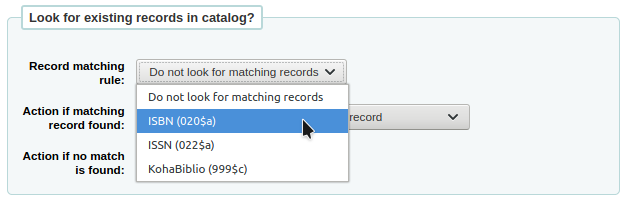
Quando si utilizza la regola di corrispondenza ISBN Koha troverà solo corrispondenze esatte. Se si scopre che l’uso degli ISBN non funziona bene è possibile cambiare la preferenza AggressiveMatchOnISBN in modo da attivarla e quindi eseguire di nuovo l’importazione.
Action if matching record found: choose what to do with matching records if they are found
Replace existing record with incoming record: choose this if you are importing more complete records than the ones you currently have, or if you made some changes using an external tool (MarcEdit for example)
Add incoming record: this will keep the existing record and add the incoming record, so you may end up with duplicates
Ignore incoming record (its items may still be processed): choose this if you do not want to replace existing records
Action if no match is found: choose what to do with records that are unique
Add incoming record: choose this if you wish to import records that are not already in your catalog (new titles for example)
Ignore incoming record: choose this if you don’t want to import records that are not already in your catalogue (for example, if you’re only replacing existing records and don’t want to add anything)
Check for embedded item record data?: choose whether or not to import the item data (field 952) found in the MARC records (if the file you’re loading is a bibliographic file)
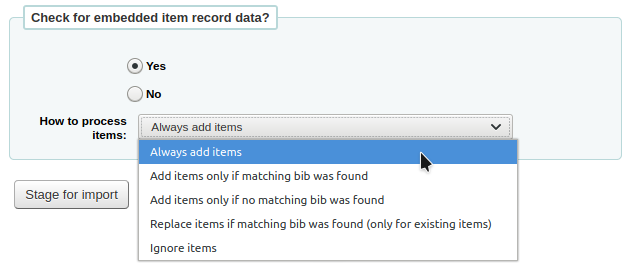
Always add items: always add items regardless of matching status
Add items only if matching bib was found: this will only add items to existing records in your catalog
Add items only if no matching bib was found: this will only add items to the new records you’re importing, not the ones that already exist
Replace items if a matching bib was found: the match will look at the itemnumbers and barcodes to match on for items and will only replace existing items.
Nota
Itemnumbers take precedence over barcodes
Ignore items: this will not add any items
Save profile: you can choose to save the chosen settings under a profile to use again later
Clicca su “Prepara per l’importazione”
Verrà richiesta una conferma all’import MARC
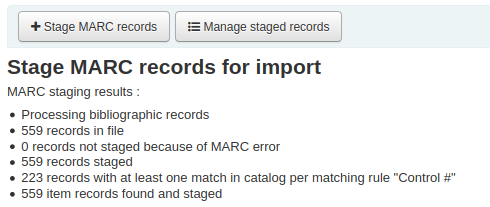
Number of records in file
Number of records with MARC errors
Number of records staged
Number of records matching existing records in the catalog
Number of items staged
To complete the process continue to the Manage staged MARC records tool by clicking on the “Manage staged records” button.
If these records are to be used in acquisitions, you can stop here and add these records to a basket by ordering from a staged file
Staged MARC record management
Get there: More > Tools > Catalog > Staged MARC record management
Once you have staged your records for import you can complete the import using this tool.
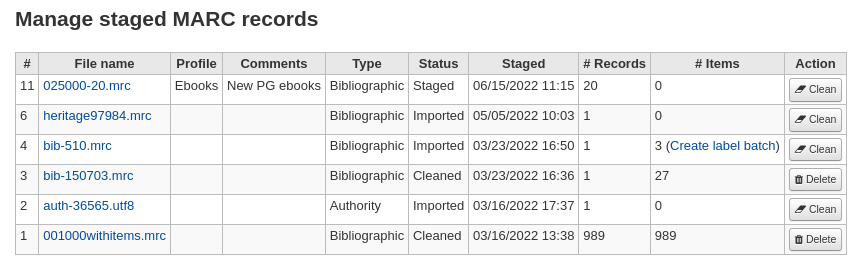
Dall’elenco di record in deposito, fare clic sul nome del file che si desidera importare
Note that records that have already been imported will say so under “Status”
Nota
If you’re coming directly from the Stage MARC records for import tool you will not see this list of staged files, you will be taken automatically to the right file summary
A summary of your staged file will appear along with the option to change your matching rules
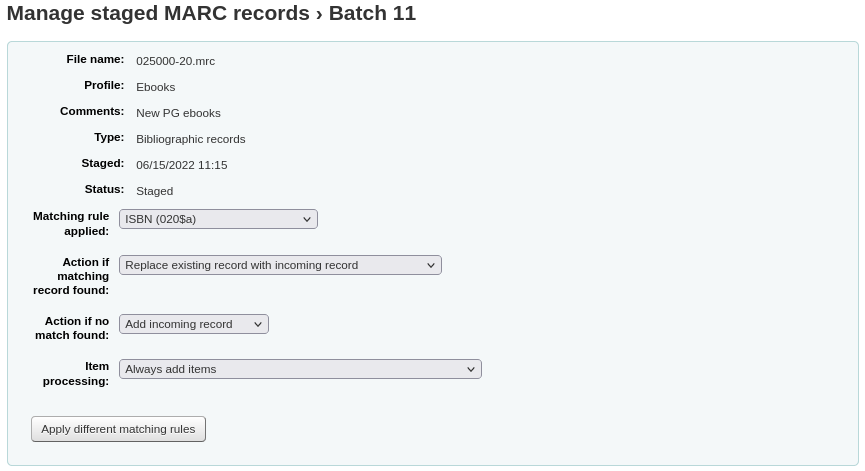
Below the summary is the option to import the batch of records using a specific framework
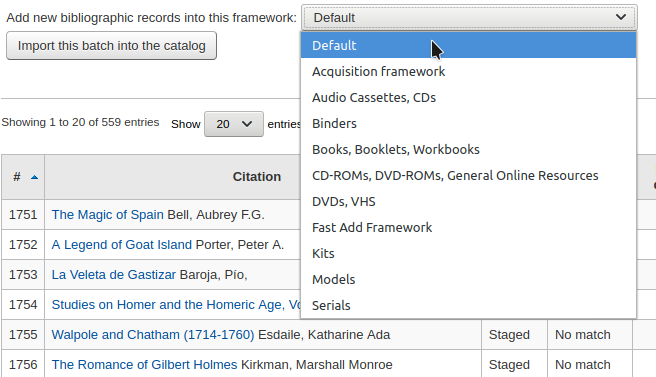
Choosing a framework other than “Default” isn’t necessary, but it’s helpful for running reports.
Sotto la griglia di catalogazione ci sarà una lista di record che saranno importati
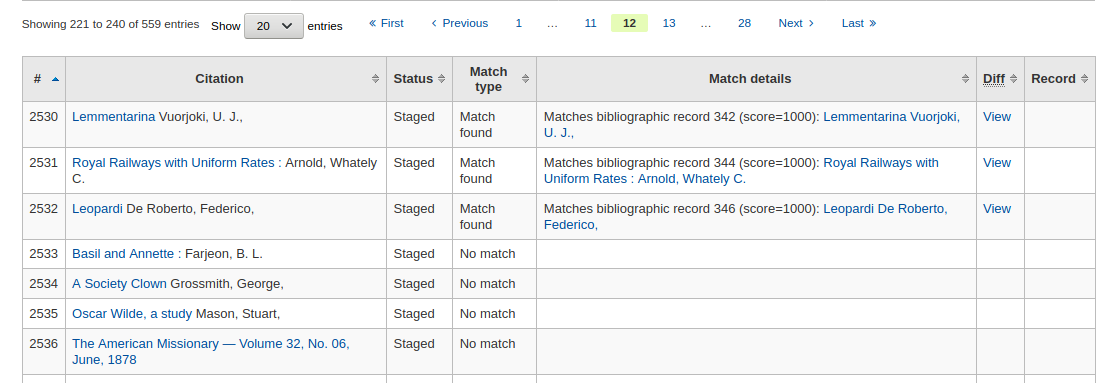
Controlla il sommario prima di completare il tuo import, per essere sicuro che le regole per il match abbiano funzionato come ti aspettavi
Le concordanze appariranno nella colonna «Dettagli concordanza»

e quando si fa clic sul collegamento “Visualizza” sotto “Differenze” si può vedere la differenza tra le versioni.
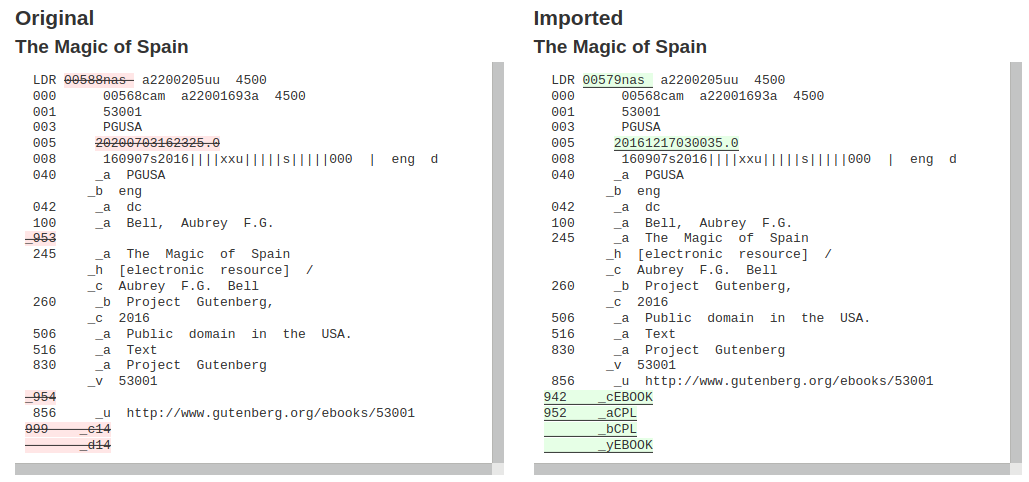
Click “Import this batch into the catalog” to complete the import
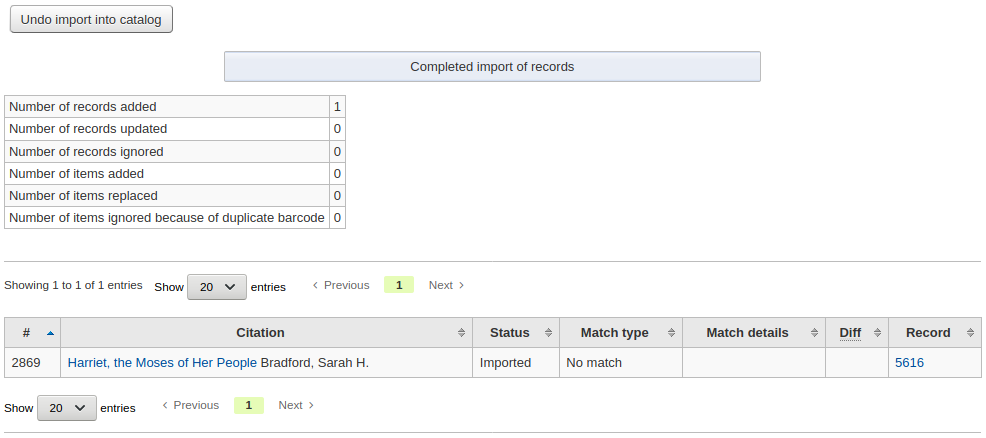
Number of records added: new records added
Number of records updated: existing records replaced with the incoming ones
Number of records ignored: records that were ignored due to the matching rule
Number of items added: new items added
Number of items replaced: existing items updated with the incoming ones
Number of items ignored because of duplicate barcode: items that were ignored because the barcode already exists in the database
Once your import is complete a link to the new records will appear to the right of each title that was imported
You can undo your import by clicking the “Undo import into catalog” button
Records imported using this tool remain in the “reservoir” until they are cleaned either through the “Clean” button in the Staged MARC record management home page (see below) or through the cleanup_database cronjob. Reservoir records will appear when searching the catalog from the cataloging module
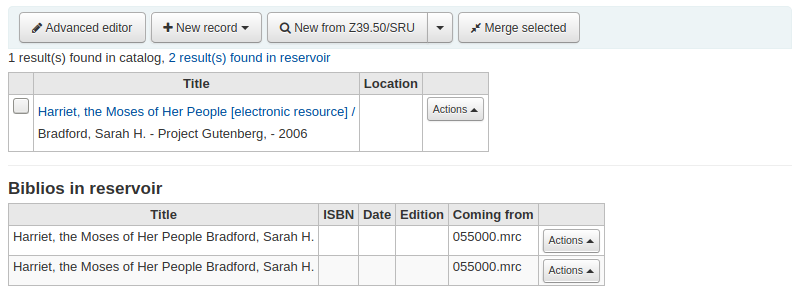
To manually clean items out of the “reservoir”:
Visit the main screen of the manage staged MARC records tool
Per eliminare una lavorazione batch, clicca sul bottone “Cancella” sulla destra
Verrà presentato un messaggio di conferma
Accetta la cancellazione e i record verranno rimossi dall’area temporanea e lo stato diventerà “vuoto”
Upload local cover image
Get there: More > Tools > Catalog > Upload local cover image
This tool allows you to upload cover images for the materials in your catalog.
To access this tool staff need the upload_local_cover_images permission.
For images to show in the staff client and OPAC you need to set LocalCoverImages and OPACLocalCoverImages preferences to “Display”.
Images can be uploaded in batches or individually.
Notes
Koha does not have a maximum file size limit for this tool, but the web-server (such as Apache) may limit the maximum size of uploads (talk to your system administrator).
Where there are multiple images for a record they will display left to right (then top to bottom, depending on screen size) in the order they were uploaded. The image on the left (the first one uploaded) is used as a thumbnail cover in search results and on the details page. There is no way to reorder cover images uploaded in this way, so be sure to upload them in the order you’d like them to appear.
To upload a single image:
Go to the tool, click the “Browse” button, and find the image on your local machine.
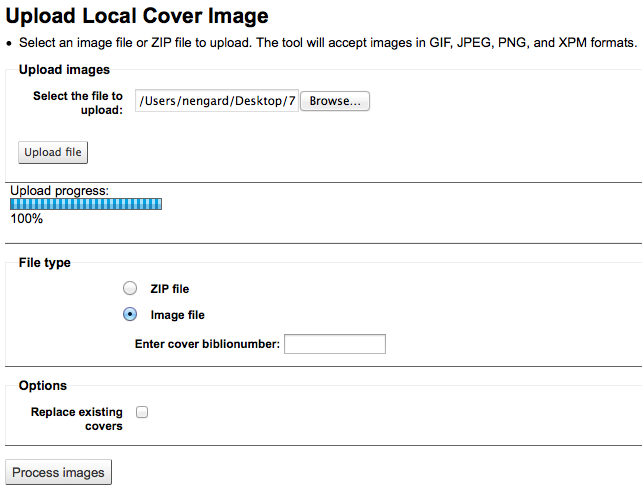
Click “Upload file”.
Choose “Image file” under the “File type” section.
inserisci il biblionumber del records a cui stai collegando l’immagine. Non è lo stesso valore del barcode, è il numero di sistema assegnato da Koha.
Find the biblionumber by looking at the end of the URL in the address bar when on the details page

or by clicking on the MARC tab on the details page in the staff client.
If you would like to replace any other cover images you may have uploaded in the past, check the “Replace existing covers” box under the “Options” section.
Click “Process images”.
You are presented with a summary of the upload and a link to the record you have just added the image to.
To upload a batch of images:
Create a folder with the images to upload in it.
Create a text file (*.txt) named either datalink.txt or idlink.txt listing the biblionumber followed by the image name for each image, one per line.
For example: 4091,image4091.jpg
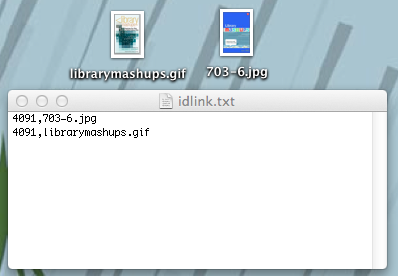
Create a ZIP file that includes all the images to upload and the text file.
Go to the tool, click the “Browse” button, and browse to the ZIP file on your computer.
Click “Upload file”.
Scegli “file zip” nella sezione “tipo file”
If you would like to replace any other cover images you may have uploaded in the past, check the “Replace existing covers” box under the “Options” section.
Clicca “Lavorazione immagini”
You are presented with a summary of the upload.
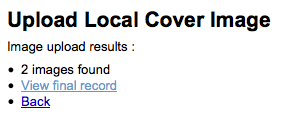
Importante
The source image is used to generate a 140 x 200 px thumbnail image and a 600 x 800 px full-size image. The original sized image uploaded is not kept by Koha.
In the staff client the cover images appear on the details page under the “Images” tab in the holdings table at the bottom.
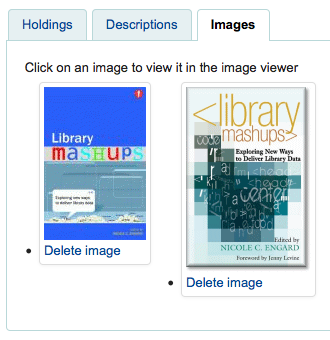
In the OPAC the cover images appear in the “Images” tab, as well as next to the title and on the search results.
To remove a cover image click “Delete image” below the image in the staff client if you have the upload_local_cover_images permission.
Strumenti aggiuntivi
Calendario
Get there: More > Tools > Additional tools > Calendar
Libraries can define library closings and holidays to be used when calculating due dates. You can make use of the calendar by turning on the proper system preferences:
useDaysMode: Choose the method for calculating due date - either include days the library is closed in the calculation or don’t include them
finesCalendar: This will check the holiday calendar before charging fines
Adding events
Prima di aggiungere degli eventi, scegli la biblioteca a cui vuoi applicare delle chiusure. Quando aggiungi degli eventi ti verrà chiesto di applicare l’evento a una o più biblioteche. Per aggiungere un evento, semplicemente
Clicca sulla data nel calendario per impostare la chiusura a
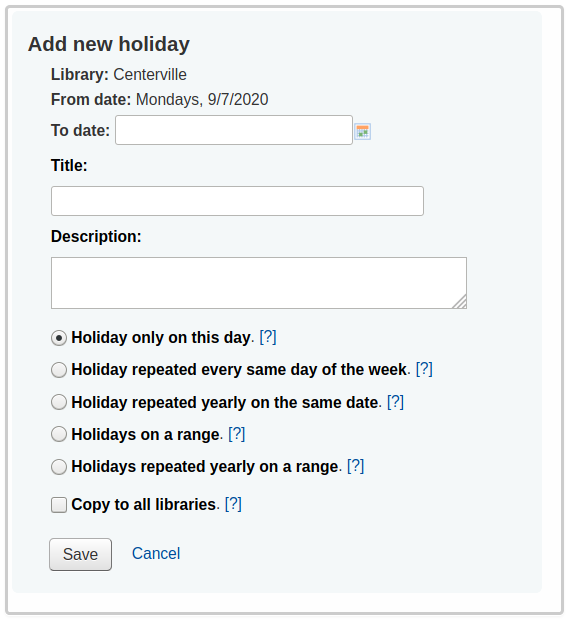
Nel modulo che appare sopra il calendario, inserire le informazioni di chiusura (per ulteriori informazioni su ogni opzione fare clic sul punto di domanda [?] alla destra dell’opzione)
La biblioteca viene messa in automatico basandosi sulla biblioteche che hai scelto nella lista all’inizio della pagina
L’informazione sul giorno viene inserita in automatico basandosi sulla data che tu scegli sul calendario
If this holiday extends on more than one day, enter the end date in “To date”
In the “title” enter the name of the holiday or the reason for the closing
In the “description” enter more information about this holiday
Poi si può scegliere se questo evento è un evento di una volta o se è ripetibile.
“Holiday only on this day”: this is a one day holiday
“Holiday repeated every same day of the week”: this is a weekly closing (if you’re closed every Sunday, for example)
“Holiday repeated yearly on the same date”: this is an annual holiday closing (if you’re closed on January 1st each year, for example)
“Holiday on a range”: this is a holiday that extends on several days
Nota
Make sure to enter a “To Date” at the top if you choose “Holiday on a range”
“Holiday repeated yearly on a range”: this is a holiday that extends on several days each year (such as summer holidays for schools)
Nota
Make sure to enter a “To Date” at the top if you choose “Holiday repeated yearly on a range”
Infine, decidere se questo evento deve essere applicato a tutte le biblioteche o solo quello che avete originariamente selezionato
Se si preferisce immettere tutte le vacanze e poi copiarle ad un’altra biblioteca tutto in una volta, è possibile utilizzare il menu di copia sotto il calendario
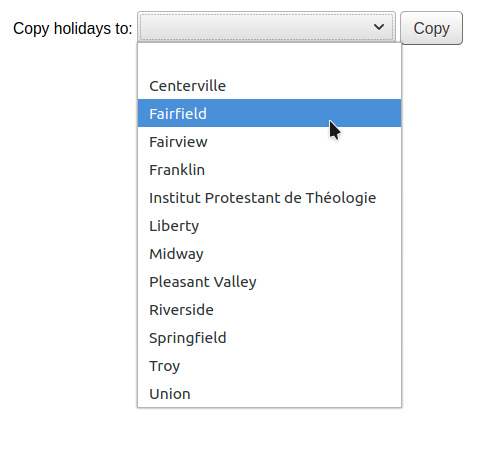
Dopo il salvataggio l’evento verrà mostrato nel sommario alla destra del calendario
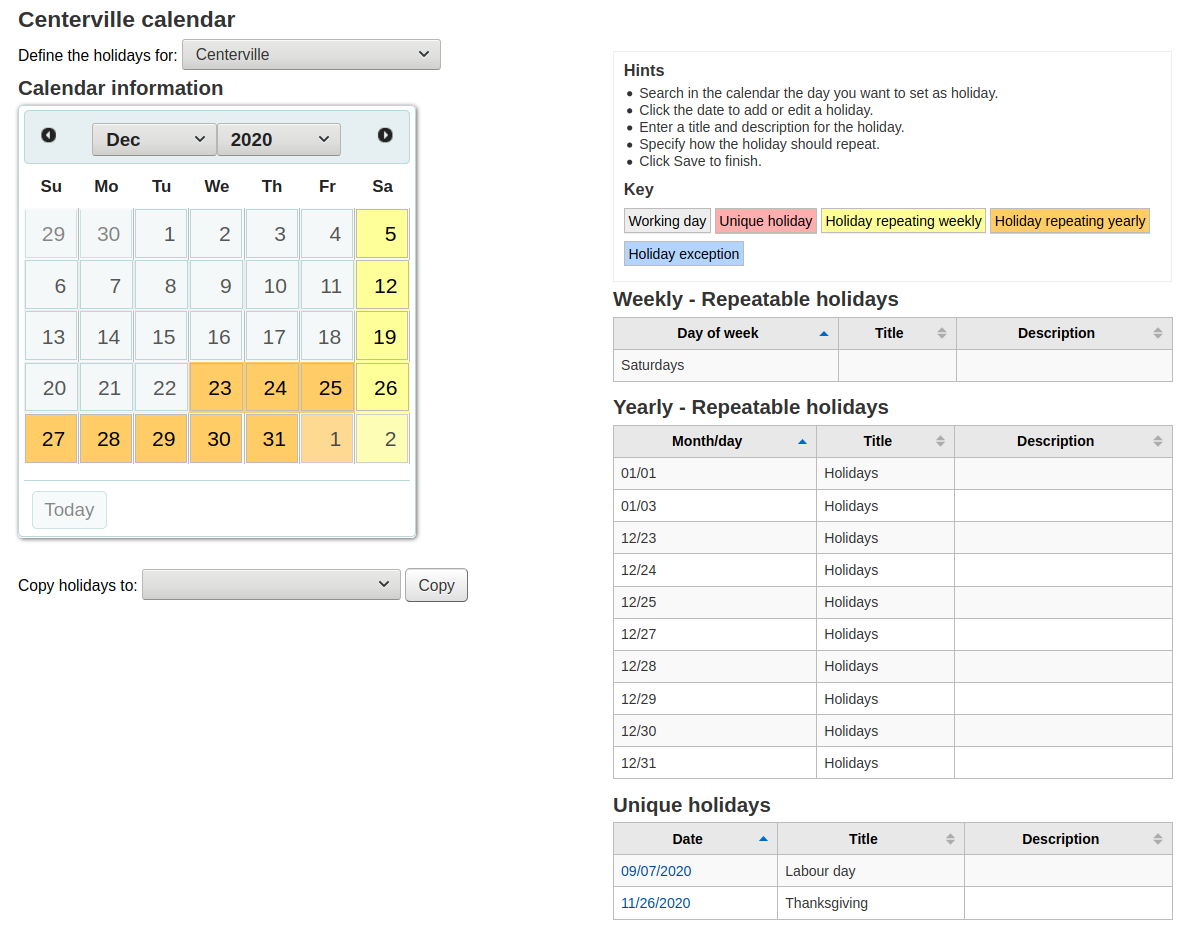
Editing events
Per modificare gli eventi
Clicca sull’evento nel calendario se vuoi fare dei cambiamenti (per fare i cambiamenti clicca sulla data nel calendario, non sull’evento elencato nella tabella riassuntiva)
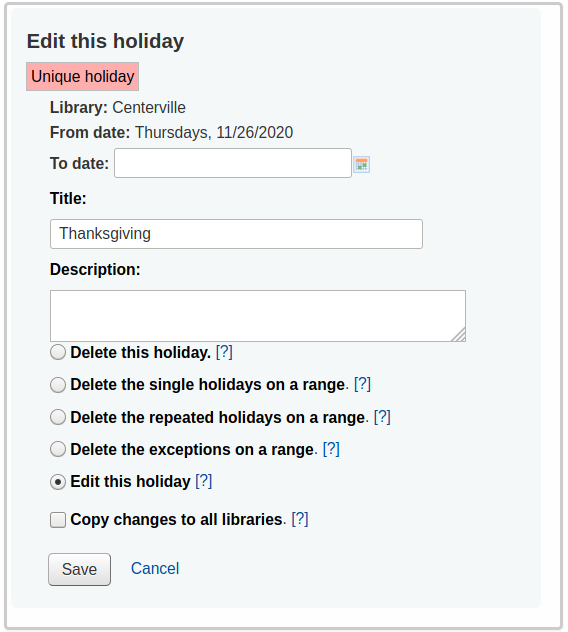
Da questo modulo è possibile apportare modifiche alla vacanza o eliminare completamente la vacanza.
Tutte le azioni richiedono di fare clic su “Salva” prima che la modifica venga apportata.
Cliccando su eventi ripetibili offrirà opzioni leggermente diverse
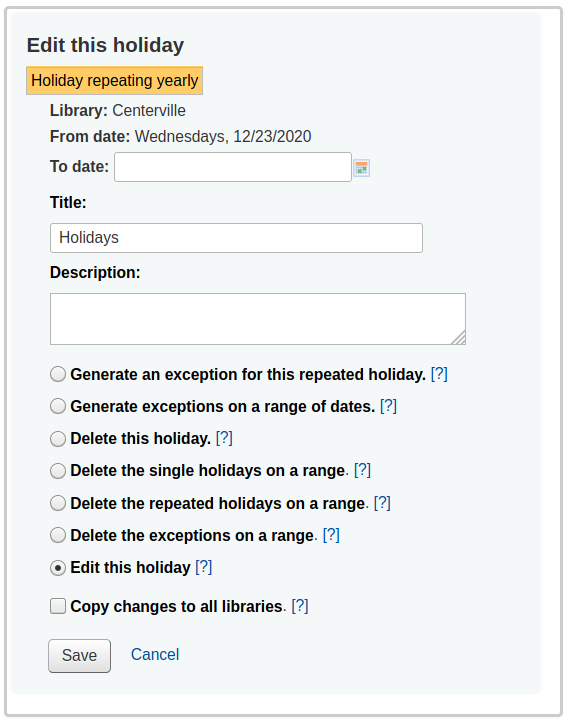
In the form above you will note that there is now an option to “Generate an exception for this repeated holiday” and “Generate exceptions on a range of dates” choosing one of these options will allow you to make it so that this date is not closed even though the library is usually closed on this date.
Tutte le azioni richiedono di fare clic su “Salva” prima che la modifica venga apportata.
Additional help
Quando aaggiungi o modifichi eventi, puoi avere una help aggiuntivo cliccando sul segno ? vicino a diverse opzioni del form
CSV profiles
Get there: More > Tools > Additional tools > CSV profiles
CSV profiles are created to define how you would like your cart or list to export.
Add CSV profiles
To add a CSV profile
Click on “New CSV profile”
Il “Nome profilo” apparirà nell’export nella lista di selezione quando scegli di scaricare dal tuo carrello o lista
Il “tipo di profilo” determina quale tipo di campi si intende utilizzare (MARC o SQL) per definire un profilo
Se scegli MARC sarà necessario immettere campi MARC
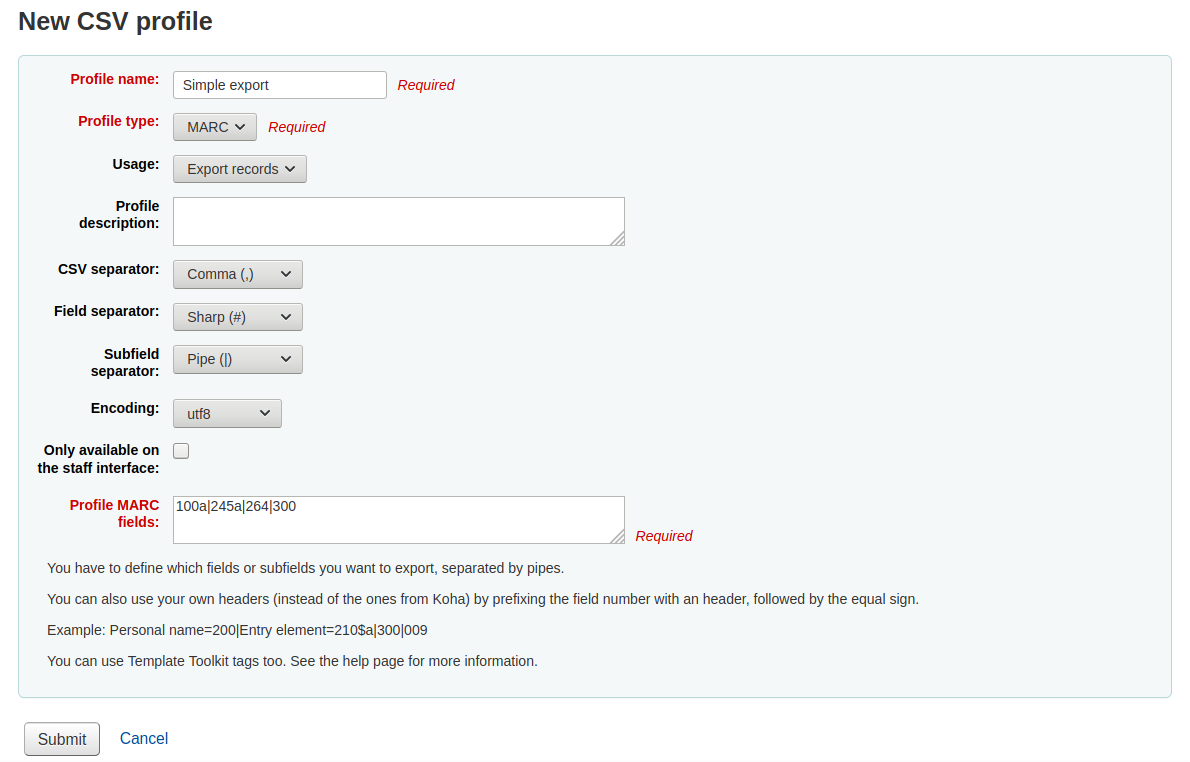
Se scegli SQL, sarà necessario inserire campi di database SQL

The “Usage” field is used to indicate what type of report this CSV profile is used with
“Export records” (only available with MARC profile type): this is used to export records from your cart or lists
“Late serial issues claims” (only available with SQL profile type): this is used to export late issues of serial subscriptions
“Export late orders” (only available with SQL profile type): this is used to export late orders in the acquisitions module
- “Basket export in acquisition” (only available with SQL profile
type): this is used to download records from acquisitions baskets
- “Export lost items in report” (only available with SQL profile
type): this is used to export a CSV from the lost items report
The “Profile description” is for your own benefit, but will also appear in the OPAC when patrons download content, so make sure it’s clear for your patrons as well
Il “Separatore CSV” è il carattere usato per separare valori o gruppi di valori
Nota
L’opzione più comune qui è virgola, dato che molti programmi di fogli elettronici sanno come aprire file con dati separati da virgole.
Il Separatore di campo è il carattere utilizzato per separare i campi duplicati
Esempio: il campo 650 può essere ripetuto e questo è il carattere che li separerà nella colonna

Il “separatore di sottocampo” è il carattere utilizzato per separare i sottocampi duplicati
Esempio: in un campo possono esserci sottocampi $a ripetuti
Il campo “Codifica” permette di indicare il set di caratteri usato per salvare il file
The “Only available on the staff interface” checkbox (only for MARC profile types) lets you limit this CSV profile to staff interface only, meaning patrons will not be able to use this profile to export their cart or lists from the OPAC
Finally format your CSV file using the “Profile MARC fields” or “Profile SQL fields” box
Define which fields or subfields you want to export, separated by pipes. Example : 200|210$a|301 for MARC or biblio.title|biblio.author for SQL
Nota
You can also use your own headers (instead of the ones from Koha) by prefixing the field number with a header, followed by the equal sign. Example: Personal name=100|title=245$a|300
When you have entered in all of the information for your profile, simply click “Submit” and you will be presented with a confirmation that your profile has been saved.

Modify CSV profiles
Once you have created at least one CSV profile an “Edit profile” tab will appear next to the “New profile” button.
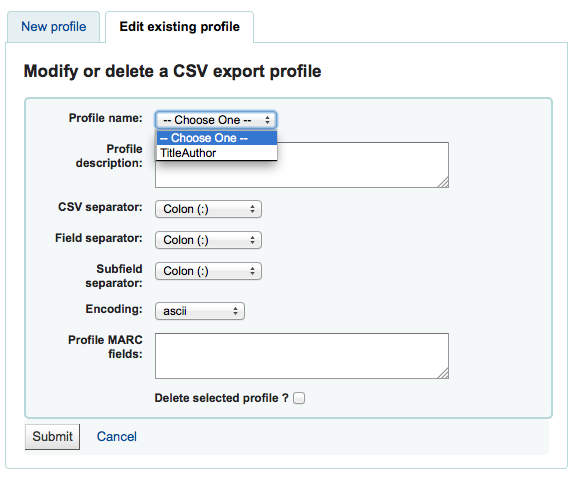
Scegli il profilo da modificare e cambia i campi necessari.
Dopo aver inviato i cambiamenti, ti verrà presentato un messaggio di conferma.

Per cancellare un profilo, seleziona l’opzione “Cancella profilo selezionato” prima di cliccare “Invia”
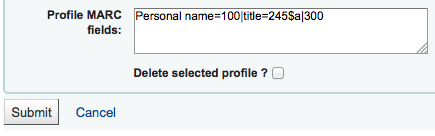
Using CSV profiles
Your CSV profiles will appear on the export list or cart menu under the “Download” button in both the staff client and the OPAC
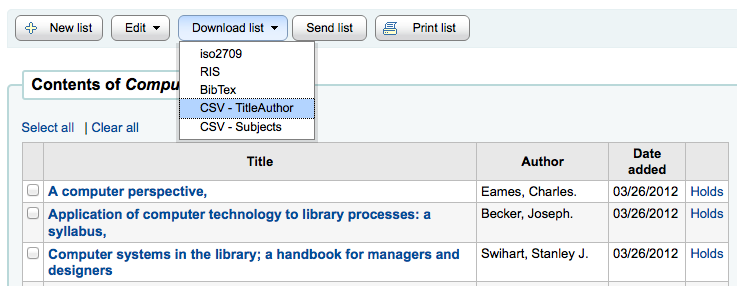
Log viewer
Get there: More > Tools > Additional tools > Log viewer
Actions within the Koha system are tracked in log files. Your system preferences can be changed to prevent the logging of different actions. These logs can be viewed using the log viewer.
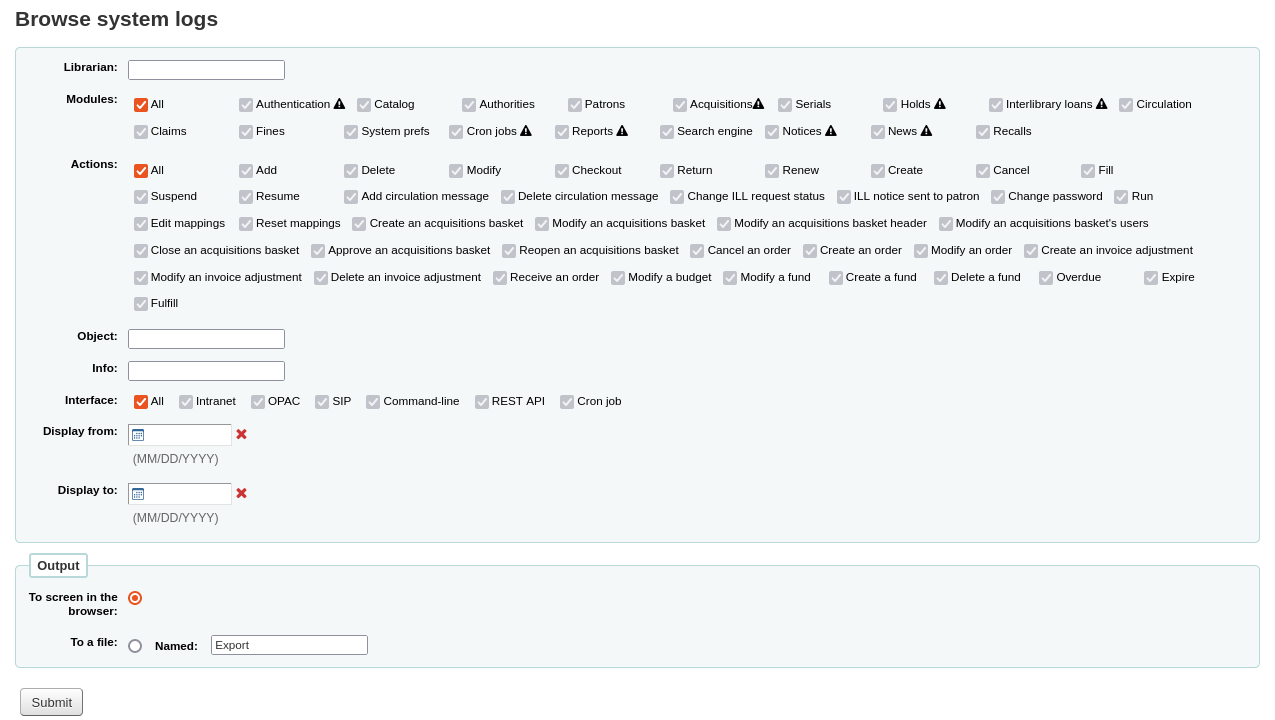
Nota
The warning sign next to a module name indicates that the actions in this module are not logged. Change your logs preferences to log actions from a module.
Scegliendo differenti combinazioni del menù opzioni produrrà il file di log della query.
A query for all logs related to the Circulation module produces a result
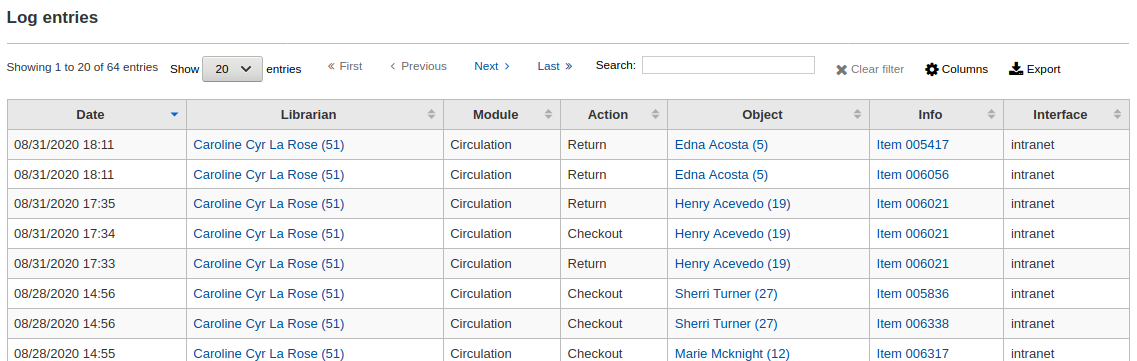
Nota
You can customize the columns of this table in the “Table settings” section of the Administration module (table id: logst).
News Koha
Get there: More > Tools > Additional tools > News
Il modulo “News” di Koha permette ai bibliotecari di inserire notizie e avvisi nell’Opac, nell’interfaccia staff e nelle ricevute della circolazione.
To add news to either the OPAC, the staff interface or a circulation receipt:
Click “New entry”
Code: enter a unique code for this news item
Display location: choose where to put the news
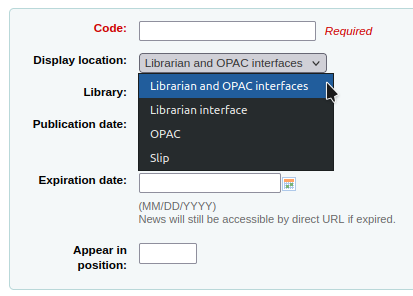
Librarian and OPAC interfaces: content will appear on the staff interface main page as well as in the news block on the OPAC
Librarian interface: content will appear on the staff interface main page
OPAC: content will appear in the top middle part of the OPAC page
Below the news in the OPAC there will be an RSS icon allowing you and your users to subscribe to library news
You can allow your users to choose to see branch-specific news with the OpacNewsLibrarySelect system preference
Slip: content will appear on the circulation receipts
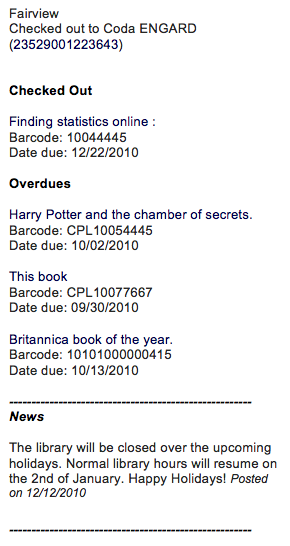
Nota
This can be activated or deactivated in the Notices & slips tool
Library: choose the library for which this news item will be shown
Prior to end users logging in to the OPAC only new items listed to appear for “All libraries” will display unless your system administrator has configured an “OPAC_BRANCH_DEFAULT” override in virtual host configuration. See installation for details.
Publication date: use the publication date field to control from which date your news item appears
Examples: (these assume today’s date as 7 May 2019)
Publish on current date: set publication date as 7 May 2019
Schedule for publishing in future: set date later than 7 May 2019
Backdate the news item: set date earlier than 7 May 2019
Expiration date: use the expiration date field to automatically stop showing the news item when it is no longer relevant.
If this field is empty the news item will be shown until you remove it manually
Appear in position: you decide in what order your news items appear
If the field is left empty, the news will appear from newest to oldest
In this field, 0 is the top-most position; the larger the number, the lower in the list the news will appear
You can enter the news title and text for each language installed
Nota
You can choose which type of editor to use here (either a text editor or a WYSIWYG (what you see is what you get) editor) with the AdditionalContentsEditor system preference.
Dopo aver compilato i campi clicca su “Invia”
Depending on your choice for the NewsAuthorDisplay system preference, you will also see the person who created the news item (this uses the logged in person).
HTML customizations
Get there: More > Tools > Additional tools > HTML customizations
Koha’s HTML customizations tool allows staff to post content to the OPAC.
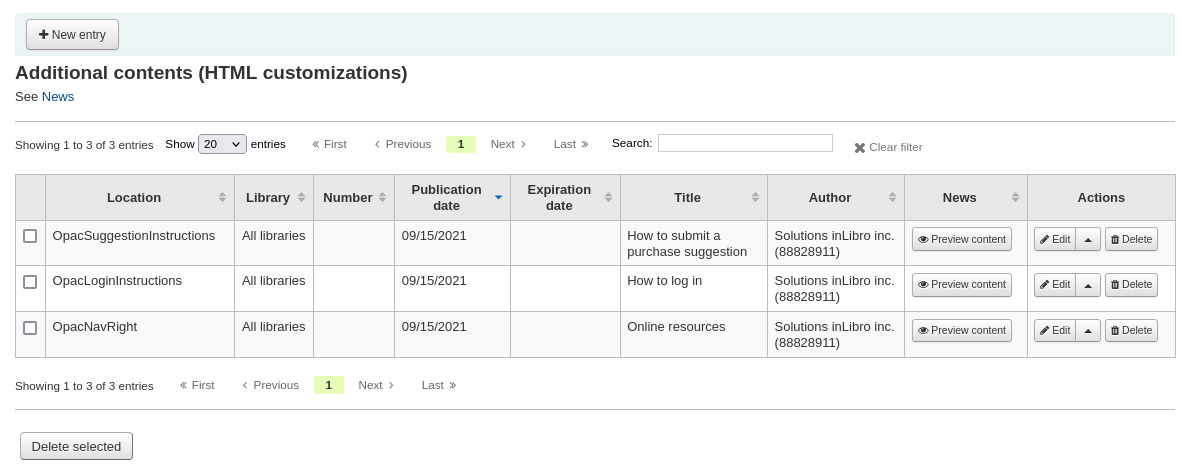
To add content to the OPAC:
Click “New entry”
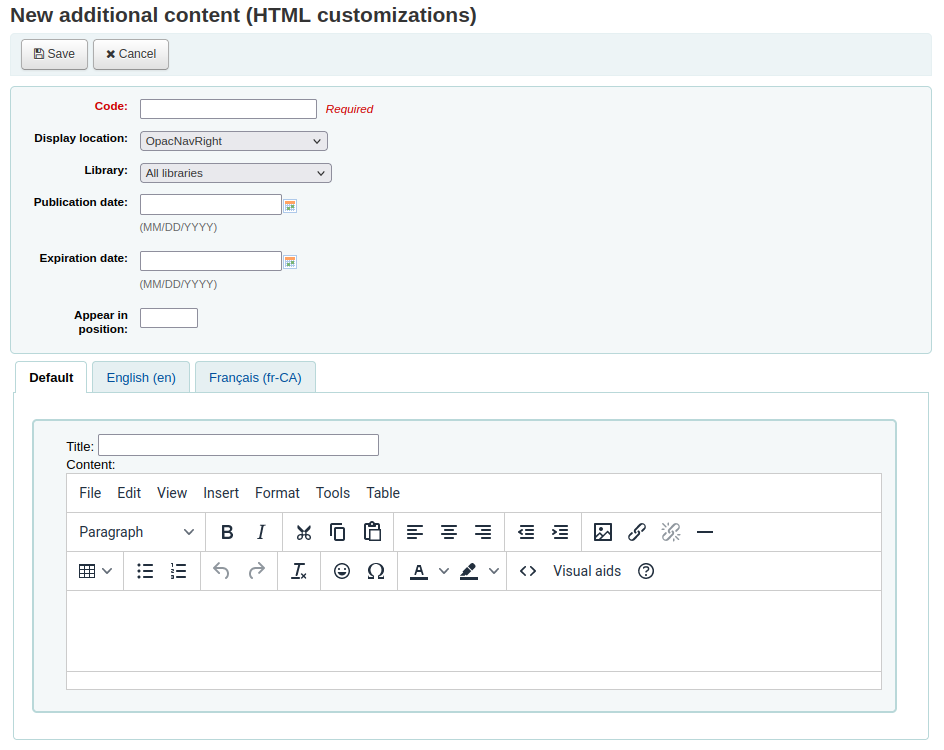
Code: enter a unique code for this additional content item
Display location: choose where to put the content
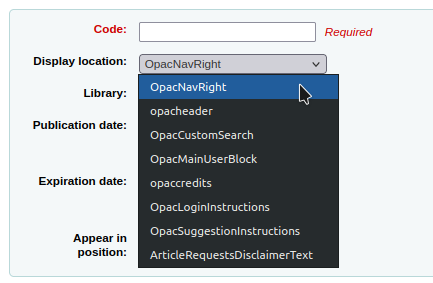
The following image shows where each block is displayed on the OPAC’s main page
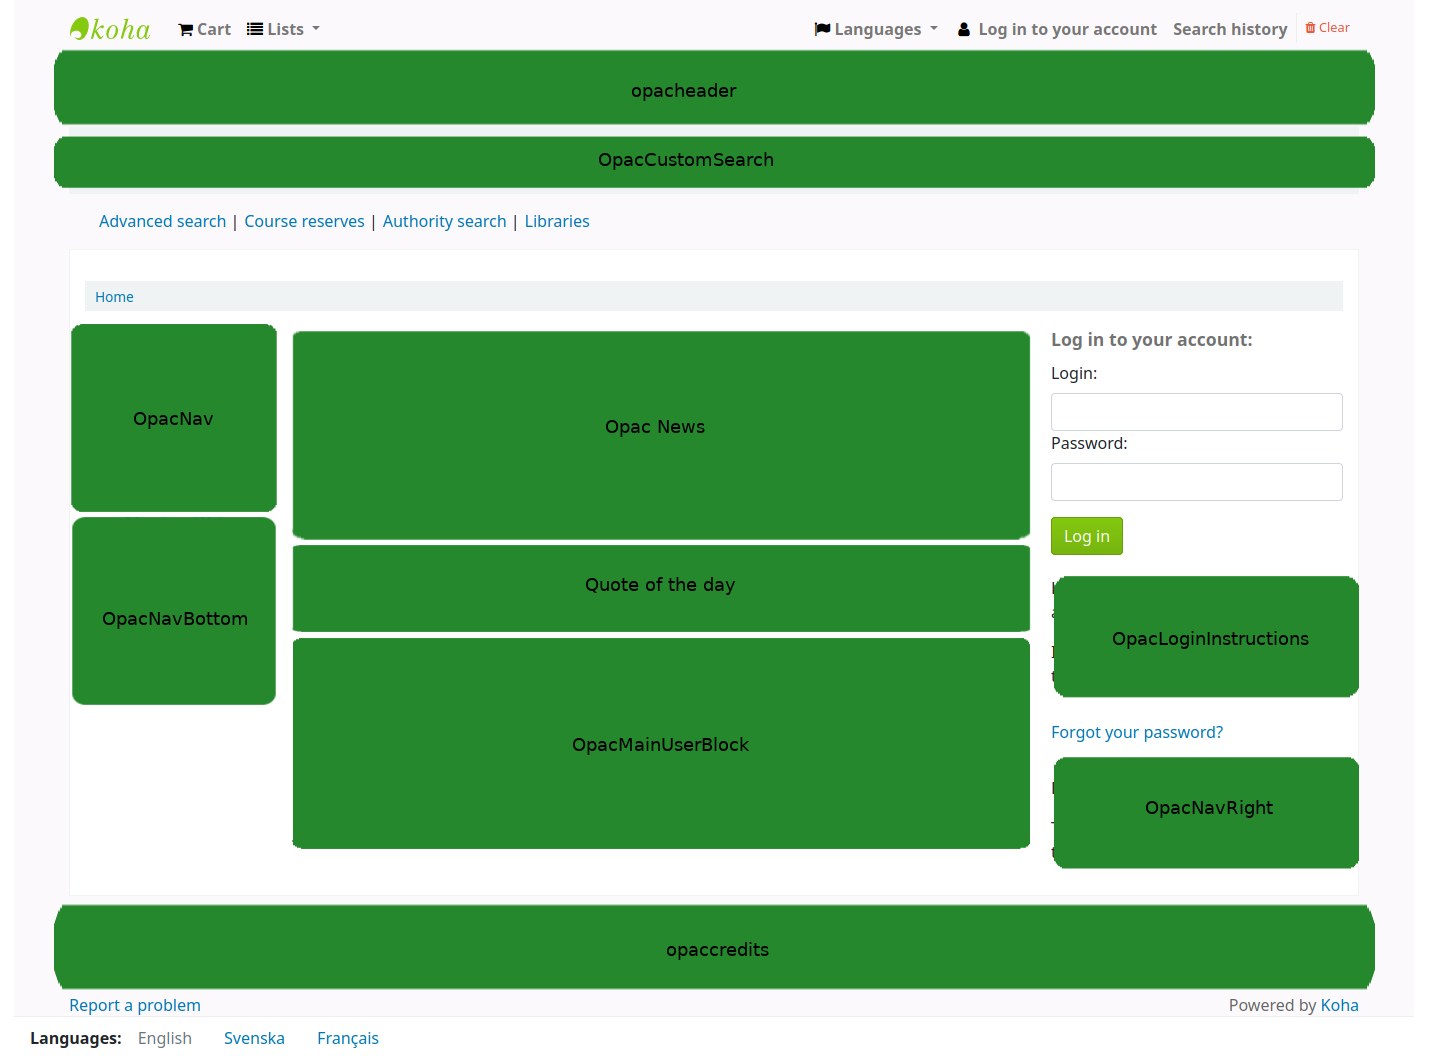
Nota
OpacNav and OpacNavBottom are system preferences and the Quote of the day feature is found in the tools module. The rest of the customizable blocks are managed in the HTML customizations tool.
OpacNavRight: content will appear on the right side of the OPAC page
opacheader: content will appear at the top of the OPAC page
OpacCustomSearch: content will replace the simple search bar at the top of the page
OpacMainUserBlock: content will appear in the middle of the OPAC’s main page
opaccredits: content will appear at the bottom of the page
OpacLoginInstructions: content will appear under the login box on the OPAC’s main page
OpacSuggestionInstructions: content will replace the text at the top of the purchase suggestion form on the OPAC
ArticleRequestsDisclaimerText: content will appear and patron will have to accept before they can continue to the article request form; use for any copyright/disclaimer patrons need to be aware of regarding photocopies or scans of articles or chapters
Library: choose the library for which this content will be shown
Prior to end users logging in to the OPAC only content blocks listed to appear for “All libraries” will display unless your system administrator has configured an “OPAC_BRANCH_DEFAULT” override in virtual host configuration.
Publication date: use the publication date field to control from which date your content appears
Examples: (these assume today’s date as 7 May 2019)
Publish on current date: set publication date as 7 May 2019
Schedule for publishing in future: set date later than 7 May 2019
Backdate the news item: set date earlier than 7 May 2019
Expiration date: use the expiration date field to automatically stop showing the content when it is no longer relevant.
If this field is empty the content will be shown until you remove it manually
Appear in position: you decide in what order your content appear, when there is more than one in the same display location
If the field is left empty, the content will appear from oldest to newest
In this field, 0 is the top-most position; the larger the number, the lower in the list the content will appear
You can enter the content title and text for each language installed
Nota
The title is not shown for additional content. It mostly serves to know at a glance what the content is about when looking at the list of additional content items. If you want a title to appear, you must add it in the text portion.
Nota
You can choose which type of editor to use here (either a text editor or a WYSIWYG (what you see is what you get) editor) with the AdditionalContentsEditor system preference.
Dopo aver compilato i campi clicca su “Invia”
Task scheduler
Get there: More > Tools > Additional tools > Task scheduler
Lo schedulatore è uno strumento per impostare la creazione di report da eseguire ogni volta che ti serve.
To schedule a task, visit the task scheduler and fill in the form
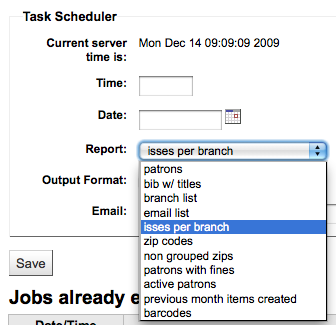
L’ora del server è l’orario sul tuo server (lo schedulatore di tutti i report si basa su quell’orario, non sul tuo orario locale)
L’orario deve essere inserito nella forma hh::mm (due cifre per l’ora, due cifre per i minuti)
Inserisci la data usando il calendario pop-up
Da Report scegli il report che vuoi schedulare
Scegli se ricevere il testo oppure un link ai risultati
Nel campo email scrivi l’email di chi vuoi riceva il tuo report
Sotto il form dello schedulatore c’è una lista dei report schedulati

Puoi programmare quando verrà compilato il report direttamente dalla lista dei report salvati cliccando sul link “Schedulatore”
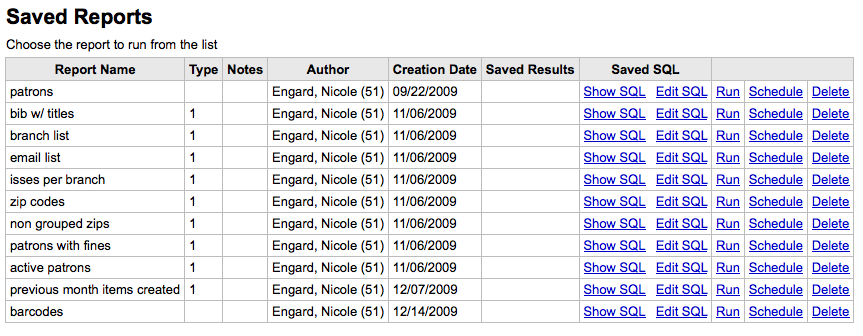
Risoluzione problemi
Lo schedulatore non funzionerà se l’utente Unix del server web non ha i permessi per usarlo. Di” al tuo gestore del sistema di controllare la configurazione al riguardo in /etc/at.allow e in /etc/at.deny. E” lavoro del sistemista sistemare questo problema.
Edit quotes for QOTD feature
Vai a: Più > Strumenti > Strumenti aggiuntivi > Editor delle citazioni del giorno
This tool will allow you to add and edit quotes to show on the OPAC or the staff interface.
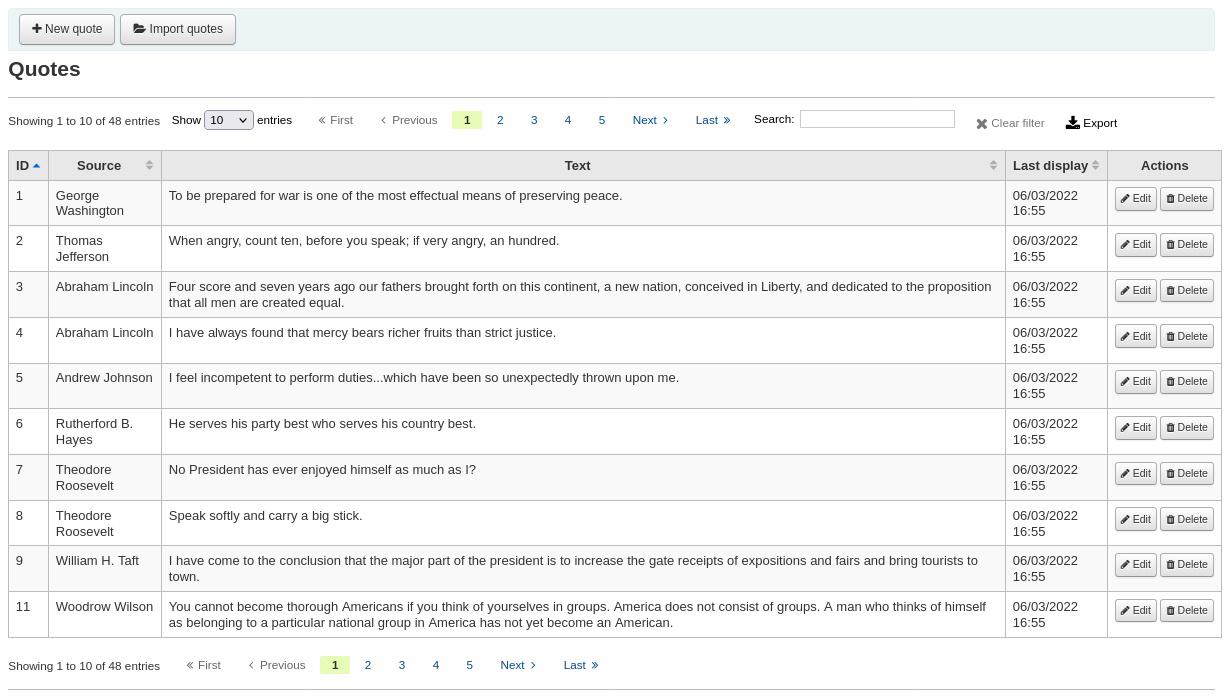
To turn this feature on set the QuoteOfTheDay system preference to either “OPAC”, “staff interface”, or both, and add at least one quote using this tool.
In the OPAC, the quotes will appear above the “OpacMainUserBlock” news block.
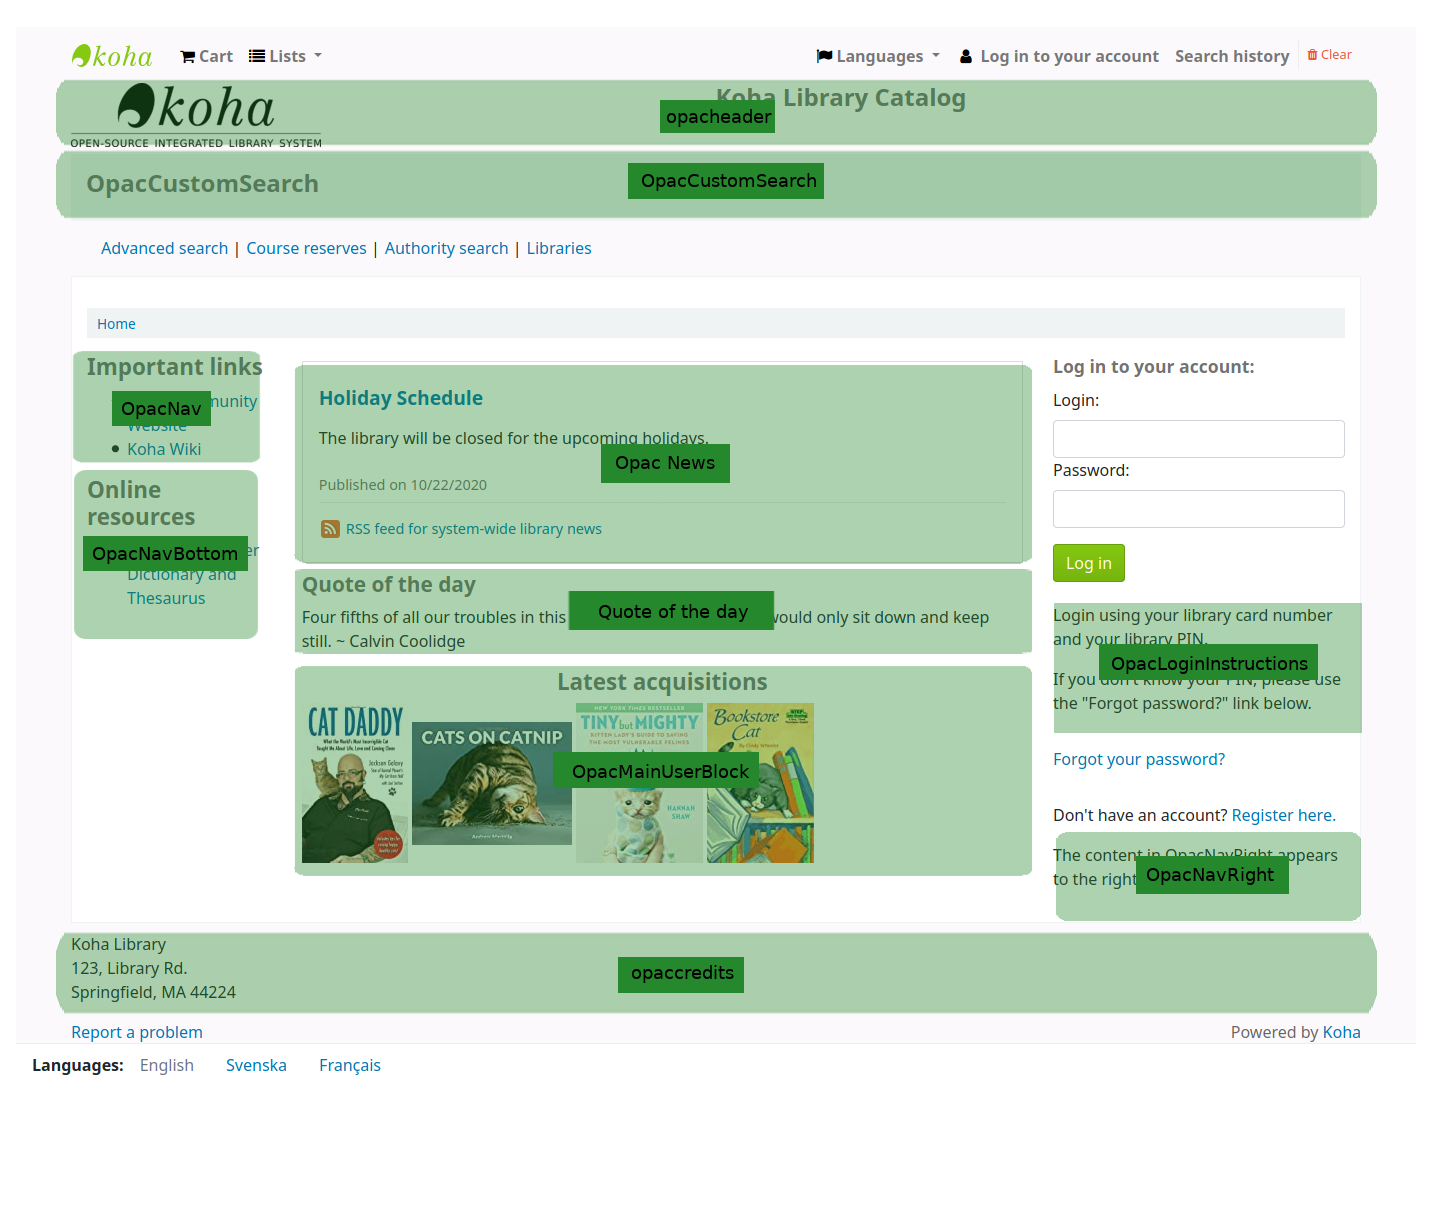
In the staff interface, the quotes will appear under the news on the left side.
Add a quote
Per aggiungere una citazione:
Click the “New quote” button in the toolbar.
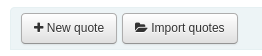
Fill out the form.

Source: enter the source of the quote, e.g. the name of the person who said the quote
Text: enter the text of the quote
Avvertimento
Entrambi i campi di “Testo” e “Fonte” devono essere compilati al fine di salvare la nuova citazione.
Click “Submit” to save the new quote.
The new quote should now be visible in the list.
Import quotes
You can import a batch of quotes as a CSV file. Your file must contain two columns in the form: «source»,»text» with no header row.
Nota
Ti verrà presentato un messaggio di conferma per caricare file più grandi di 512KB
Per avviare il processo di importazione, fare clic sul pulsante “Importa citazioni” nella parte superiore dello schermo
Una volta arrivati alla schermata di importazione citazioni, è possibile cercare nel proprio computer il file che si desidera importare
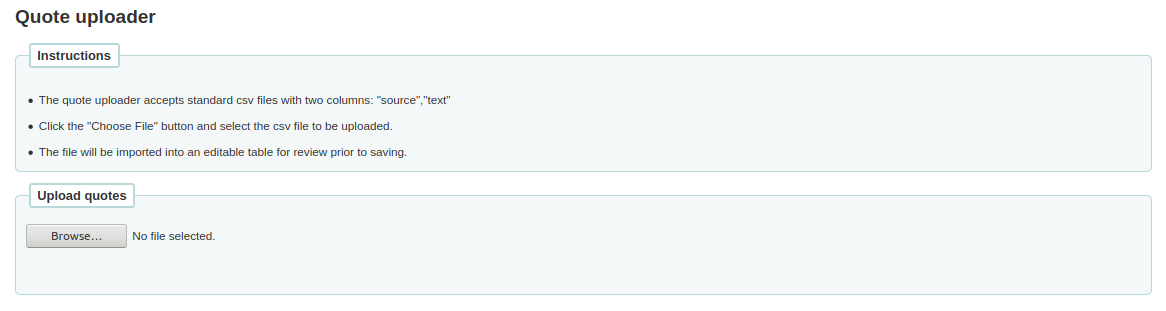
Dopo aver scelto un file CSV, premi sul bottone “Apri” e il file verrà caricato in una tabella temporanea per le modifiche.

Dalla lista è possibile modificare i campi “Fonte” o «Testo» facendo clic sul campo desiderato. Quando si è finito di modificare un campo, premere il tasto <Enter> sulla tastiera per salvare le modifiche.

Una volta che sei soddisfatto delle citazioni, fai clic sul pulsante “Salva citazioni” nella barra degli strumenti nella parte superiore e le citazioni verranno salvate.

Edit a quote
To edit a quote, click on the “Edit” button to the right of the quote.
Edit either the “Source” or “Text” fields.
Click “Submit” to save the quote.
Delete a quote
To delete a quote, click on the “Delete” button to the right of the quote.
Confirm the deletion by clicking “Delete”.
Carica
Vai a: Più > Strumenti > Strumenti aggiuntivi > Carica
Questo strumento ti permetterà di caricare files nel tuo Koha per selezionarli nel Form di catalogazione.
Carica files
Quando si visita prima lo strumento di caricamento si potrebbe vedere un avvertimento relativo alla mancanza di una categoria.
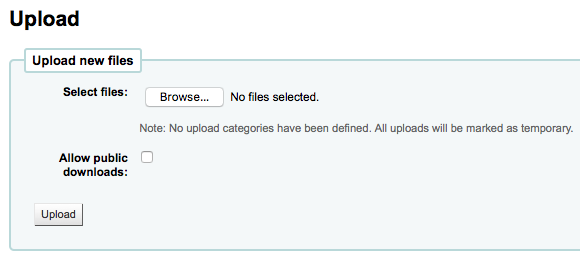
Le categorie sono definite con i vari valori autorizzati della categoria UPLOAD. Se non hai categorie di carico i file saranno temporanei e verranno cancellati al successivo riavvio del server. Un volta che hai messo dei valori nella categoria UPLOAD, vedrai un menù di scelta sotto il bottone “Scorri”.
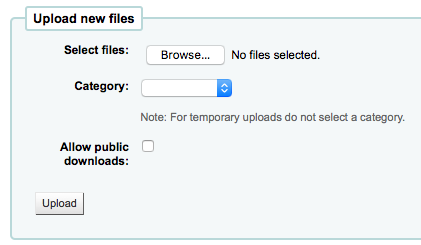
Scegli un file dal tuo computer, scegli una categoria e decidi se il pubblico generico può scaricare il file dall’OPAC. Una volta che il tuo file è caricato, ti verra chiesta una conferma.

Search files
Tutti i file caricati sono cercabile da questo form. Usando il form puoi cercare i file caricati con ogni parte del nome e/o del valore di Hashvalue.Search
You will be presented with the results of your search.
Access files
Get there: More > Tools > Additional Tools > Access files
This option allows access to files stored on the server from the staff interface. The directories where the files are stored need to be defined in the koha-conf.xml file. In order to be able to access the tool, a staff patron requires the superlibrarian or access_files patron permission
OPAC problem reports
Get there: More > Tools > Additional tools > OPAC problem reports
This tool is used to manage the problem reports sent by patrons via the OPAC.
Nota
This tool only appears if you have enabled the OpacReportProblem system preference.
From this tool, you will see all the problems that were reported by patrons on the OPAC.

From the “Actions” column, you can
“Mark viewed”: mark this problem report as viewed, this will change the status of the problem report to “Viewed”
“Mark closed”: close this problem report, this will change the status of the problem report to “Closed”
“Mark new”: mark this problem as new (i.e. not viewed), this will revert the status back to “New”.
You can also batch change statuses by checking the boxes next to the problem reports you want to change and use the button at the top of the page.
Cash management
Koha includes a number of options for dealing with monetary transactions and actions to allow for fine grained tracking of these processes for audit and analytic processes.
Cash registers
Cash registers can be used to track transactions to a specific location in your library. This can be especially helpful for detailing where cash has been taken for payments and then when this cash is subsequently removed and taken to the bank.
Setup
To enable the use of cash registers, you must turn on the UseCashRegisters system preference.
You can then configure cash registers for your library from the cash registers page in the administration module.
Cashup
The action of “cashing up” can be recorded against a cash register from both the library details and register details pages.
Clicking the Record cashup button will simply record the date and time that the action has taken place and is intended to allow the regular record of when money is collected from the cash register and taken to the bank.
Both of the above pages utilize the cashup record to limit the display of transactions/summaries to only pertinent information, since the last cashup.
Once a cashup has taken place, a summary of the transactions taken during that cashup period is available for display, and printing, via the Summary link found next to the last cashup date on the register details page.

Cash summary for library
Get there: Home > Tools > Cash summary for library
A summary of transaction amounts associated to a libraries cash registers can be found under the “Cash summary for library” page tool.
The summary will list registers associated with your logged in branch alongside information about how much money should be found in each register, what is available to take to the bank and a breakdown of income vs outgoings.
Note: You can also access this page from the left hand menu available on the Point of sale page when that module is enabled.
Transaction history for register
Get there: Home > Tools > Cash management > Transaction history for register
A list of all transactions to have taken place at a register is available by clicking on the cash register name from the library details page.
If you have the correct permissions, you can re-print receipts, issue refunds and record cashups from this page.
Note: You can also access this page from the left hand menu available on the Point of sale page when that module is enabled.
Commenti
Get there: More > Tools > Patrons and circulation > Comments
Tutti i commenti aggiunti dagli utenti tramite l’OPAC ai record bibliografici richiedono moderazione dello staff. Se ci sono commenti in attesa di moderazione, saranno elencati sulla pagina principale dello staff sotto il modulo Liste:
and next to the Comments tool on the Tools page
To moderate comments click on the notification on the main dashboard or go directly to the Comments tool and click “Approve” or “Delete” to the right of the comments awaiting moderation.
Se non ci sono commenti da moderare, apparirà un messaggio
Puoi anche rivedere e togliere l’approvazione a commenti che avevi approvato in passato, scegliendo la voce “Approvazione commenti”