OPAC
Suchergebnisse
Sie können Ihre Suchbegriffe entweder direkt in das Suchfeld eintippen, oder Sie klicken auf den Link ‚Erweiterte Suche‘, um eine detailliertere Suche durchzuführen.

Wenn Elasticsearch verwendet wird und die Systemparameter OpacBrowseSearch aktiviert ist, wird auch die Option Alphabetische Suche angezeigt.
Bemerkung
For more on searching check the Searching chapter in this manual.
Suchergebnisse
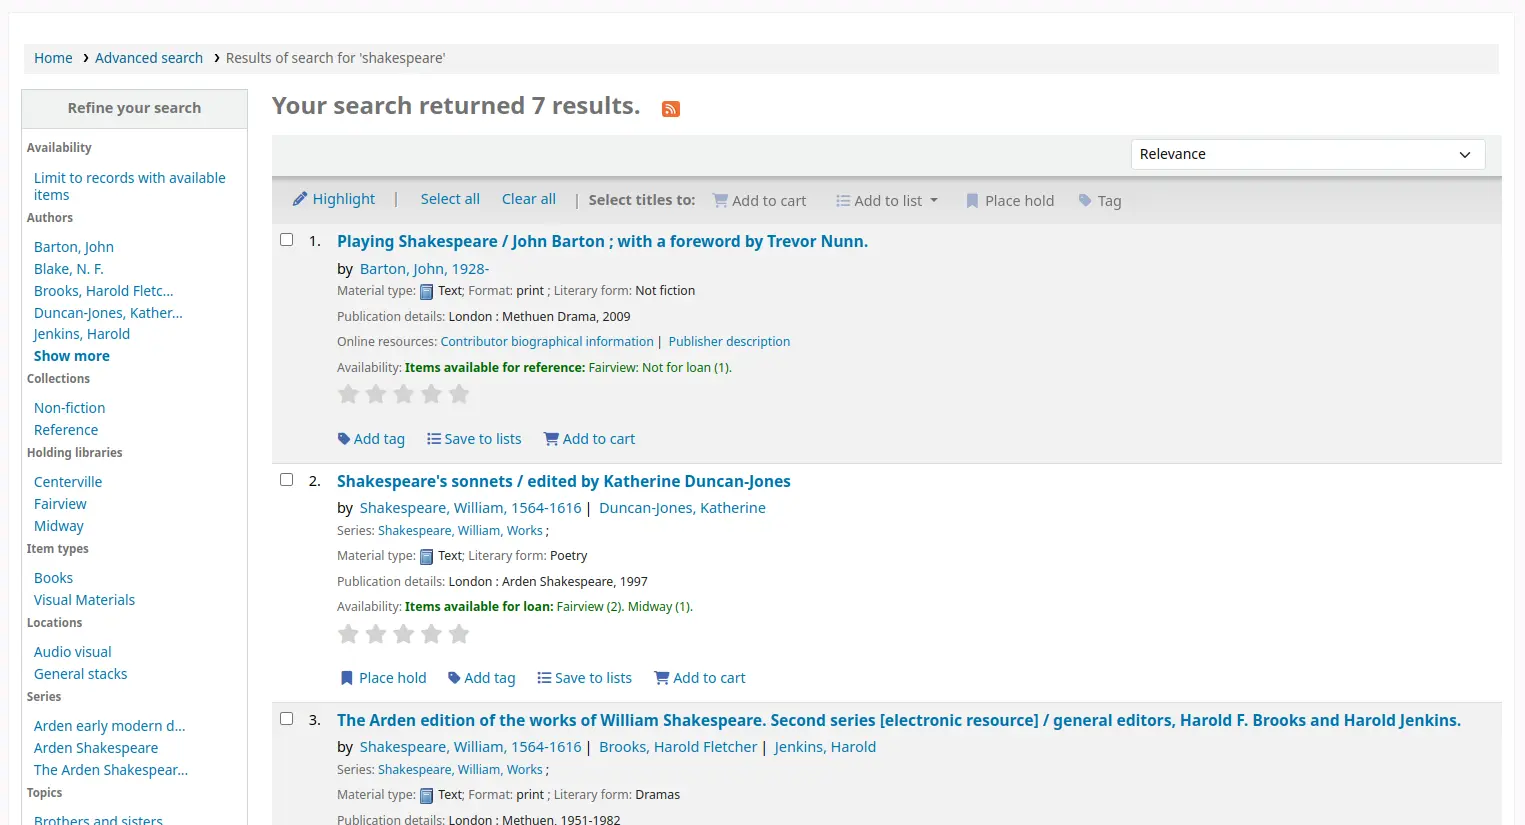
Nachdem Sie eine Suche durchgeführt haben, erhalten Sie die Anzahl der Treffer oberhalb der Trefferliste.
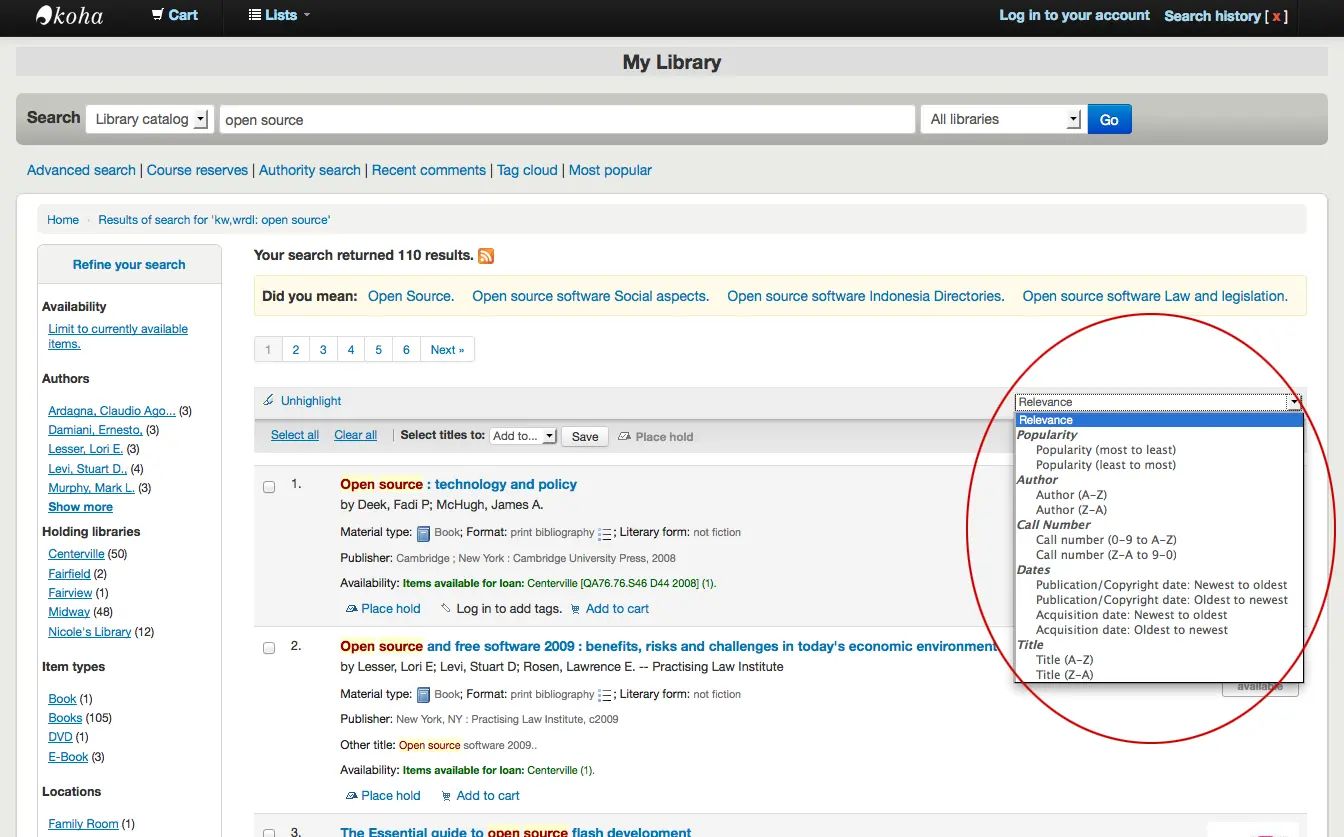
Standardmäßig werden Ihre Suchergebnisse anhand der Einstellungen in den Systemparametern OPACdefaultSortField und OPACdefaultSortOrder sortiert. Über die Auswahlliste auf der rechten Seite können Sie die Suchergebnisse umsortieren.
Unter jedem Titel in der Trefferliste finden Sie eine Reihe von Werten aus dem Leader des Datensatzes (Feld 000).

Bemerkung
Diese Werte haben nichts mit den Exemplartypen oder Sammlungscodes zu tun, die Sie auf Ihre Datensätze oder Exemplare angewendet haben. Diese Daten werden alle aus den Kontrollfeldern des Datensatzes gezogen.
Dies kann mit dem Systemparameter DisplayOPACiconsXSLT ein- oder ausgeschaltet werden.
Unterhalb der einzelnen Titel sehen Sie die Verfügbarkeitsanzeige der am Datensatz angehängten Exemplare.
Bemerkung
Auch wenn Sie Ihre Suche auf einen Bibliotheksstandort eingeschränkt haben, erscheinen alle Standorte der Exemplare in den Suchergebnissen.
Warnung
Der Vormerkstatus eines Exemplars hat solange keinen Effekt darauf, ob das Exemplar ‚verfügbar‘ ist, bis es den Status ‚Bereitgestellt‘ hat. Auch Exemplare mit Vormerkungen auf verfügbare Titel erscheinen solange als verfügbar, bis ein*e Mitarbeiter*in ein Exemplar aus dem Regal genommen und es zurückgebucht hat, um es auf ‚Bereitgestellt‘ zu setzen.
Wenn Sie den Systemparameter enhanced content aktiviert haben, können neben den Suchergebnissen Cover-Bilder angezeigt werden.
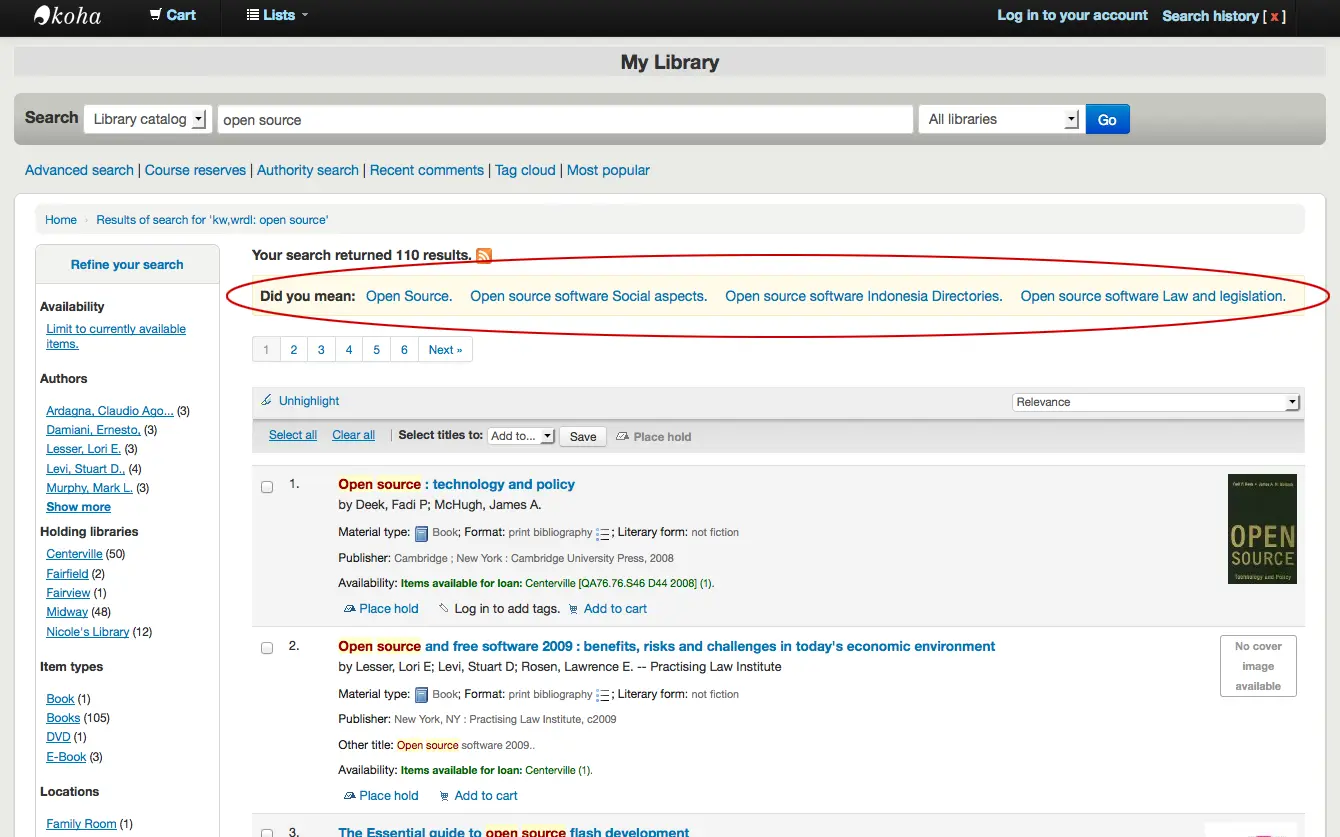
Wenn Sie die Einstellung Meinten Sie? entsprechend gesetzt haben, erhalten Sie oberhalb der Trefferliste eine gelbe Leiste mit weiteren Suchbegriffen.
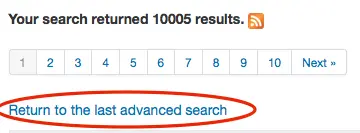
Wenn Sie eine Erweiterte Suche durchgeführt haben, erhalten Sie einen Link ‚Zurück zur letzten Erweiterten Suche‘ um die Suche anzupassen.
Filter (Facetten)
Mit den Links unter dem Bereich ‚Präzisieren Sie die Suche‘ auf der linken Seite können Sie Ihre Suchergebnisse verfeinern.

Nachdem Sie auf eine Facette geklickt haben, können Sie diese auch wieder entfernen, indem Sie auf das kleine ‚x‘ rechts neben der Facette klicken.
![Nahansicht der Facetten, in den Autor-Facetten ist „Shakespeare, William“ kein klickbarer Link mehr und hat ein [x] daneben](_images/removefilter.webp)
Weitere Einzelheiten zu den Facetten finden Sie im Bereich Suchergebnis-Facetten.
Sie können benutzerdefinierte Inhalte unterhalb der Facetten mit dem OPACResultsSidebar-Anzeigeort im Werkzeug HTML-Anpassung hinzufügen.
RSS Feeds für Suchen
You will be able to subscribe to your search results as an RSS feed by clicking the RSS icon in your address bar or next to the number of results.

Wenn Sie die Suchergebnisse abonnieren, können Sie sehen, wenn für diese Suchergebnisse neue Exemplare hinzugefügt werden.
Bibliographischer Datensatz
Wenn Sie auf einen Titel aus der Trefferliste klicken, gelangen Sie in die Detailansicht des Titels. Die Detailansicht ist in verschiedene Bereiche aufgeteilt.
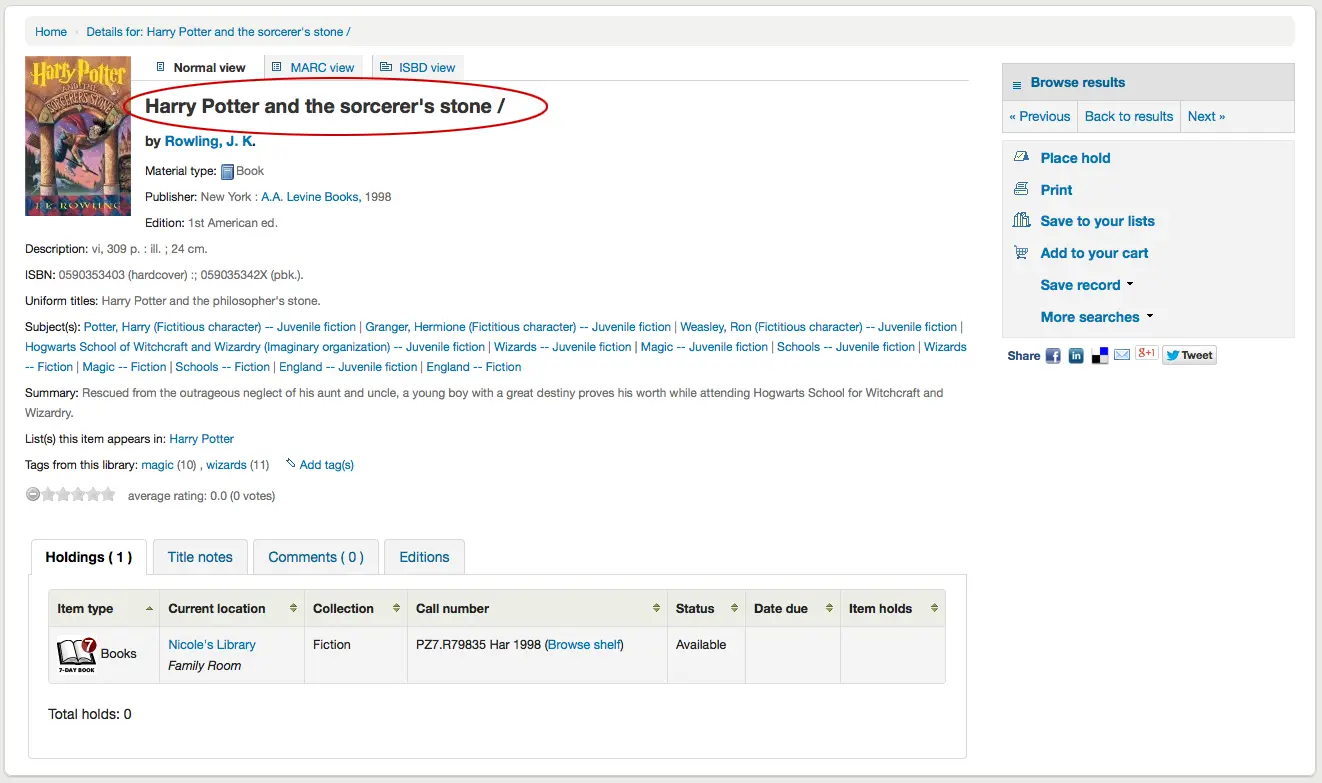
Im oberen Bereich des Bildschirms befindet sich der Titel und die Materialart:
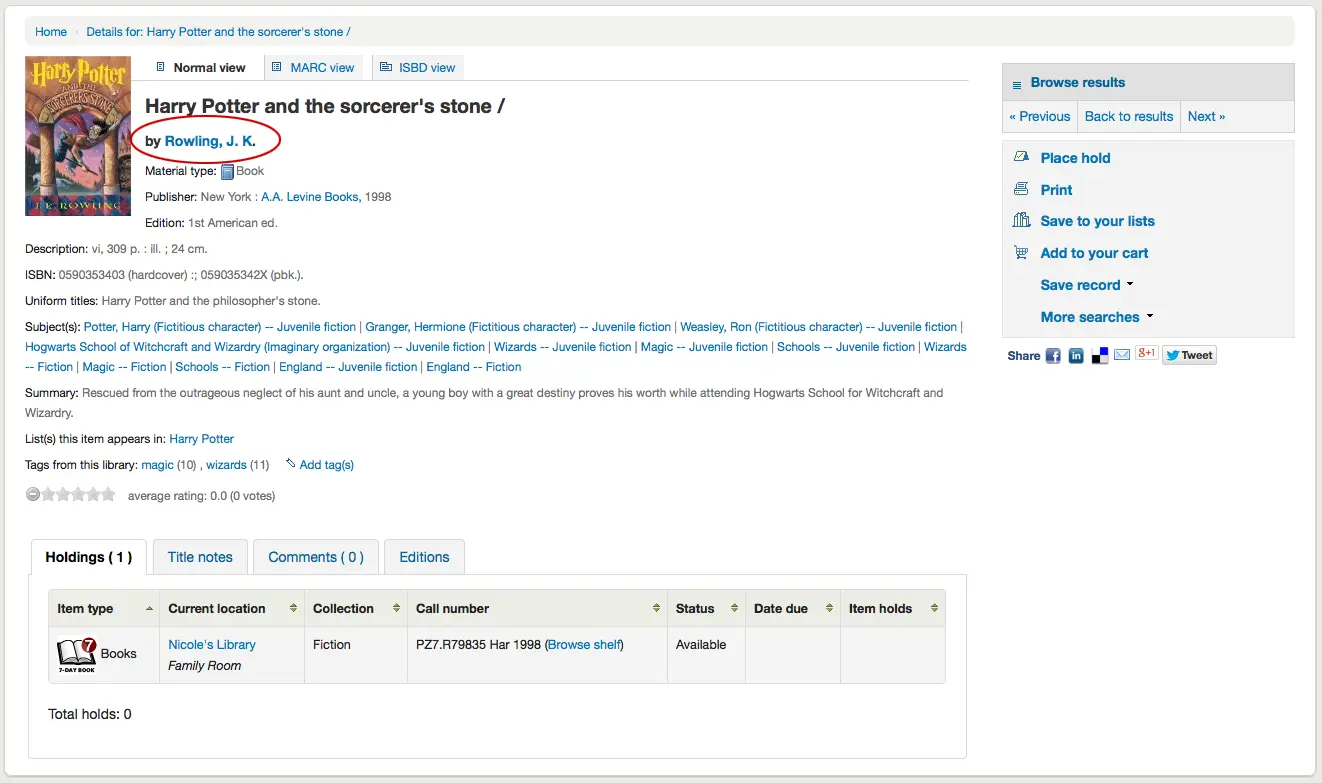
Unterhalb des Titels werden die Autoren aufgeführt. Diese stammen aus den 1xx und 7xx MARC-Feldern. Wenn Sie auf einen Autor klicken, wird eine Suche ausgeführt und Sie erhalten eine Liste mit allen Titeln dieses Autors.
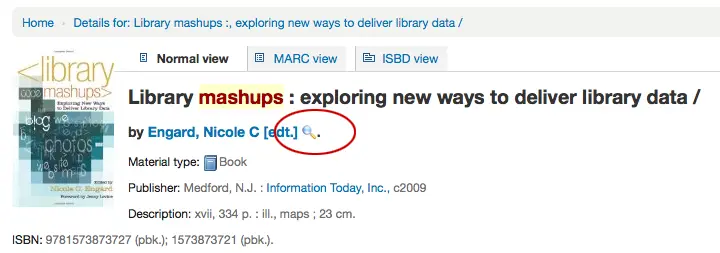
Wenn es sich um Normdaten handelt, sehen Sie neben dem entsprechenden Autor (oder einer anderen Normdatenart) eine Lupe. Wenn Sie auf die Lupe klicken, gelangen Sie direkt auf den Normdatensatz.
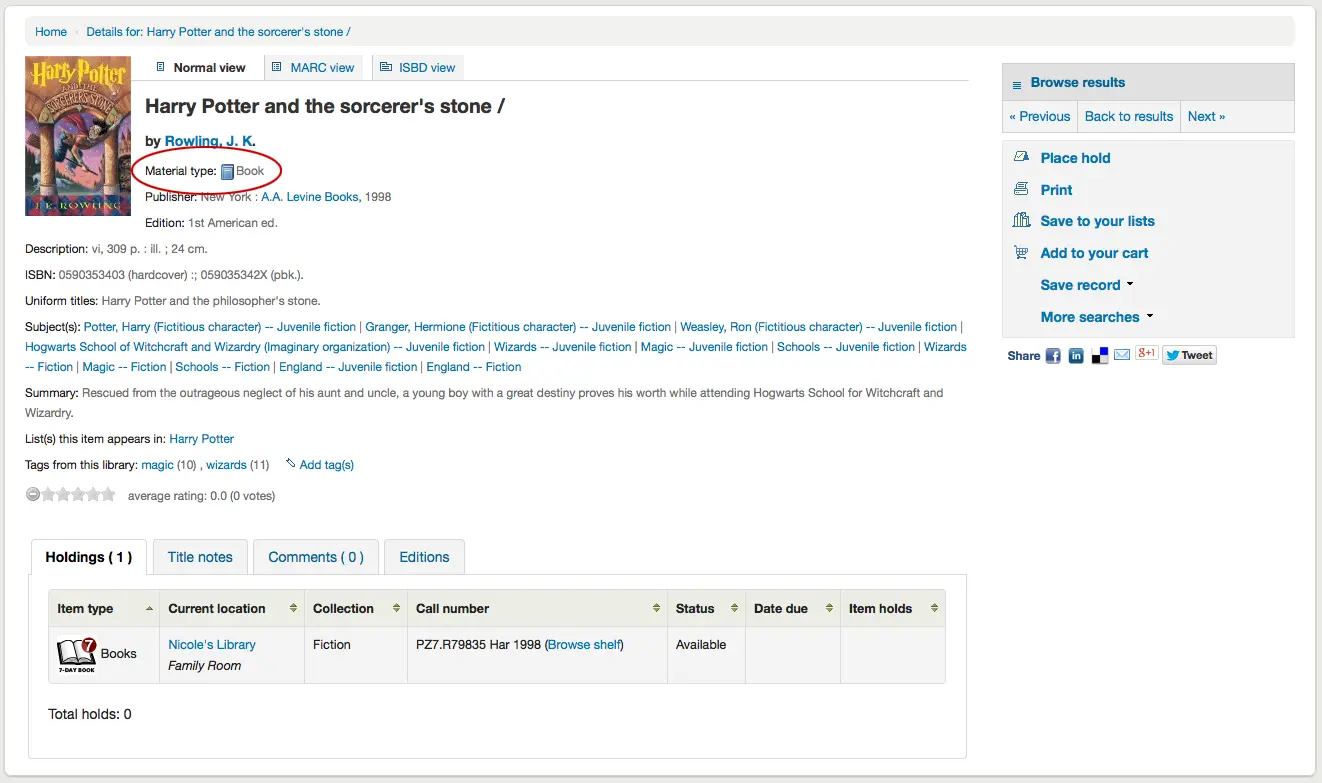
If you have your DisplayOPACiconsXSLT preference set to ‚show‘ you will see a material type that is determined by values in your fixed fields (learn more in the XSLT material type icons cataloging guide).
Hier sehen Sie die Beschreibung des Titelsatzes:
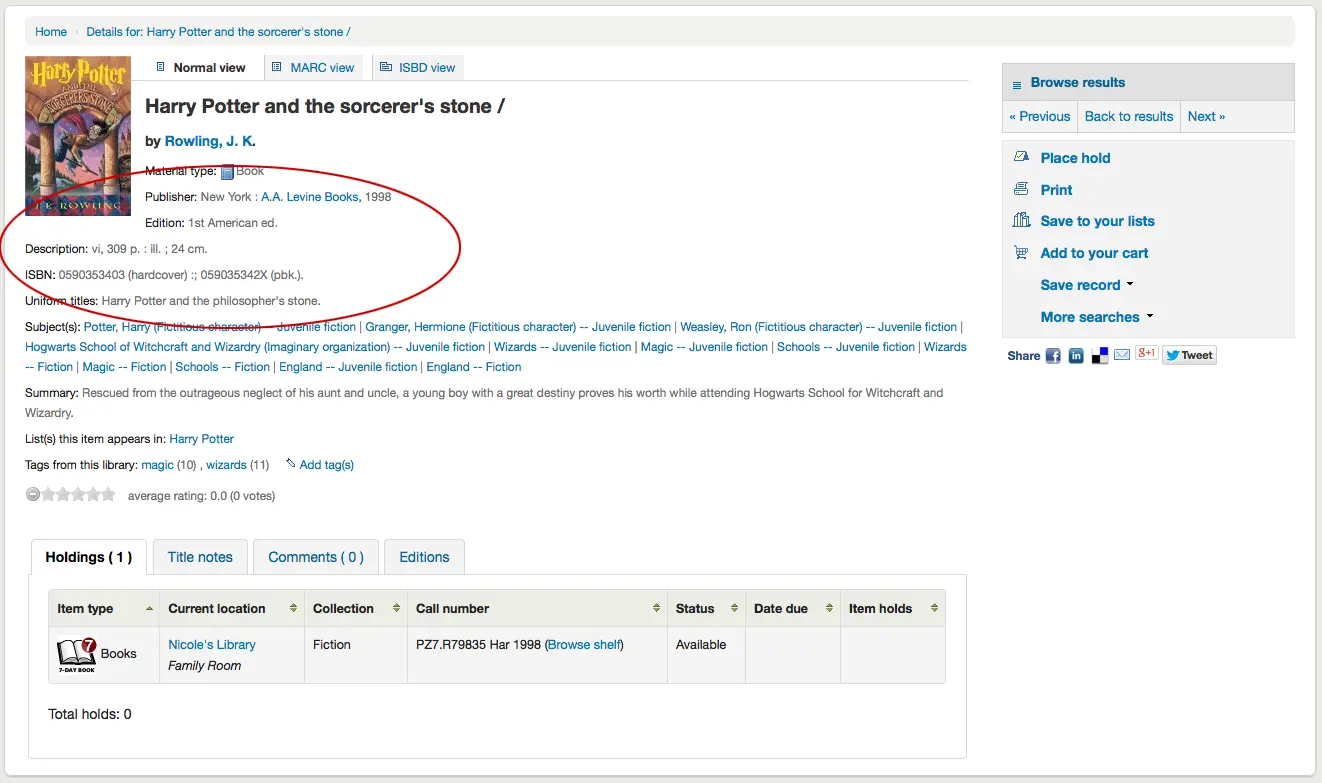
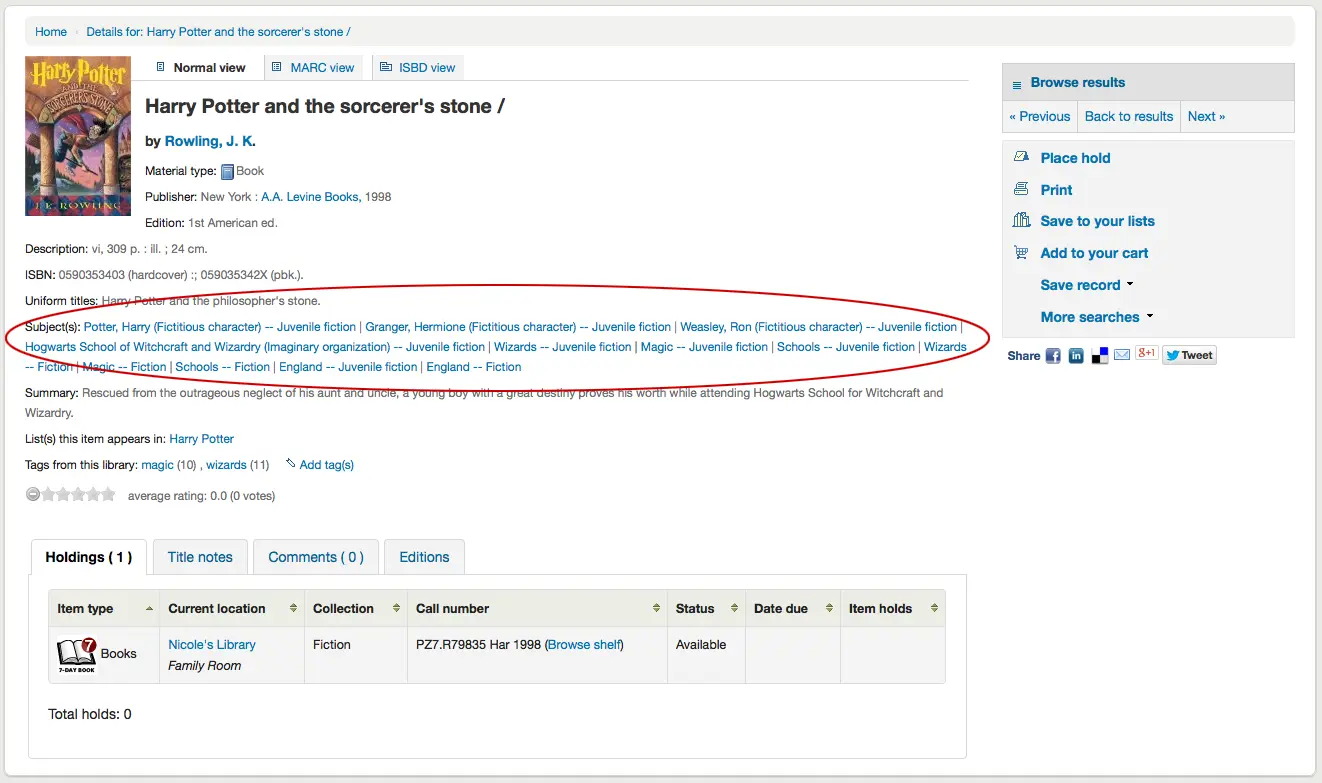
Wenn Sie auf die Schlagwörter klicken, wird eine Suche nach Titeln mit diesem Schlagwort durchgeführt
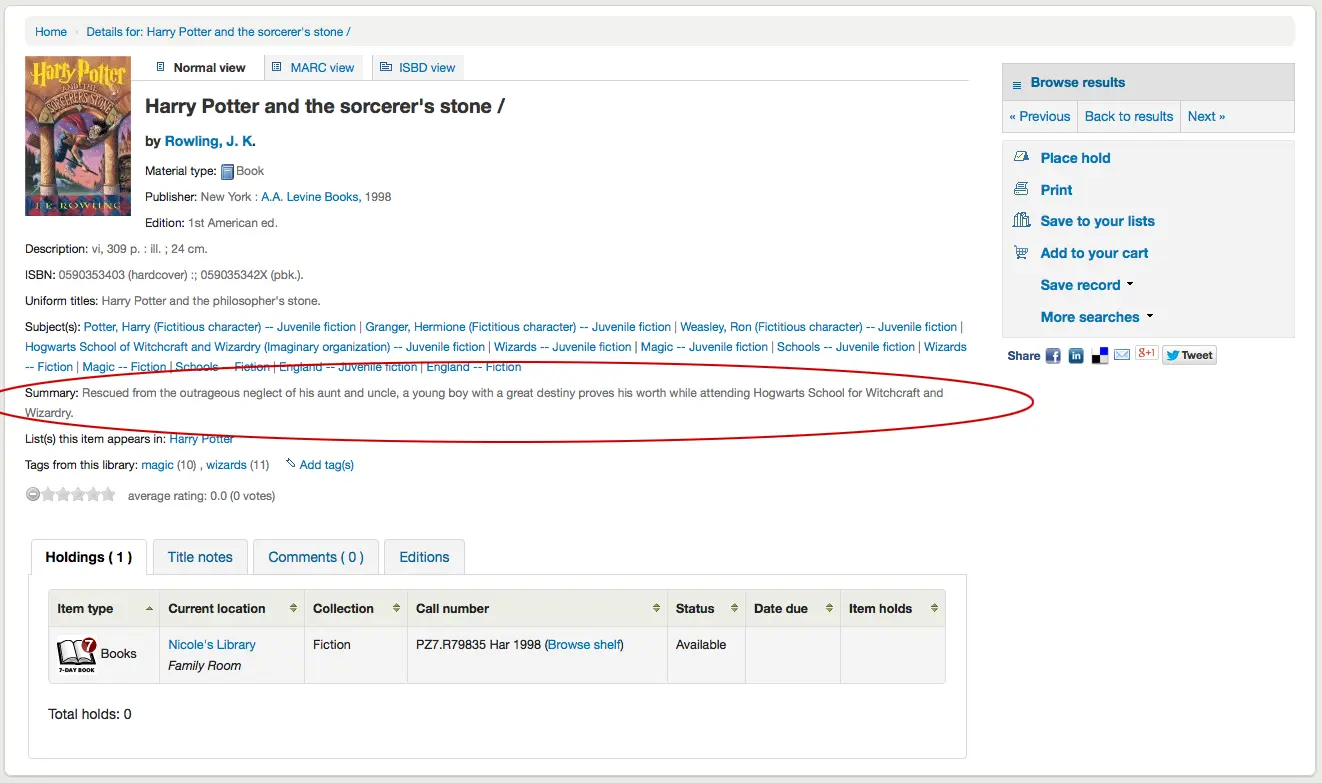
Wenn der Titelsatz eine Inhaltsangabe und / oder eine Zusammenfassung hat, erscheinen diese hier ebenfalls
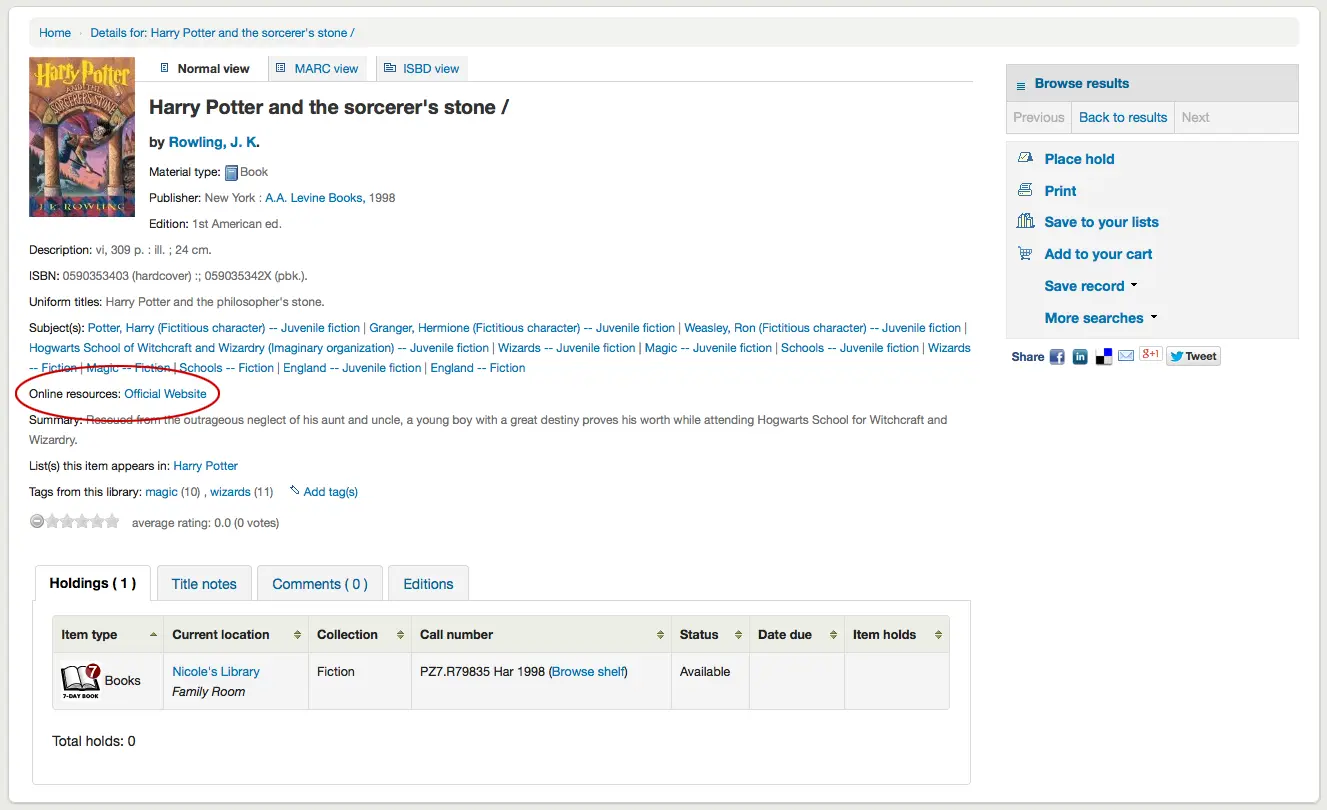
Wenn Daten in den MARC-Feldern 856 vorhanden sind, werden entsprechend Links unter der Rubrik ‚Online-Ressourcen‘ angezeigt
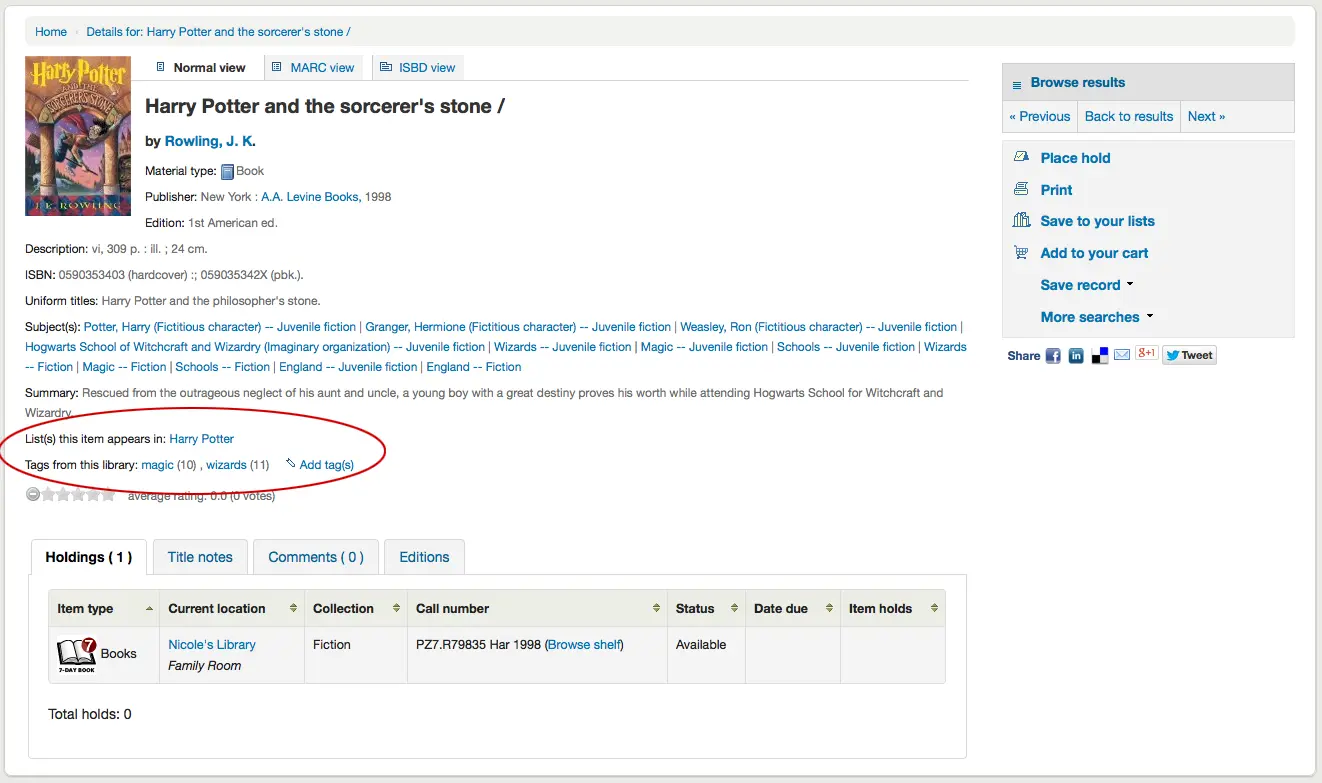
Wenn der Titel in einer öffentlichen Liste enthalten ist, erscheint die Rubrik ‚Listen, auf denen dieser Titel steht:‘ mit dem Namen der Liste. Darüber hinaus werden ‚Tags dieser Bibliothek‘ angezeigt, wenn diese entsprechend vorhanden sind
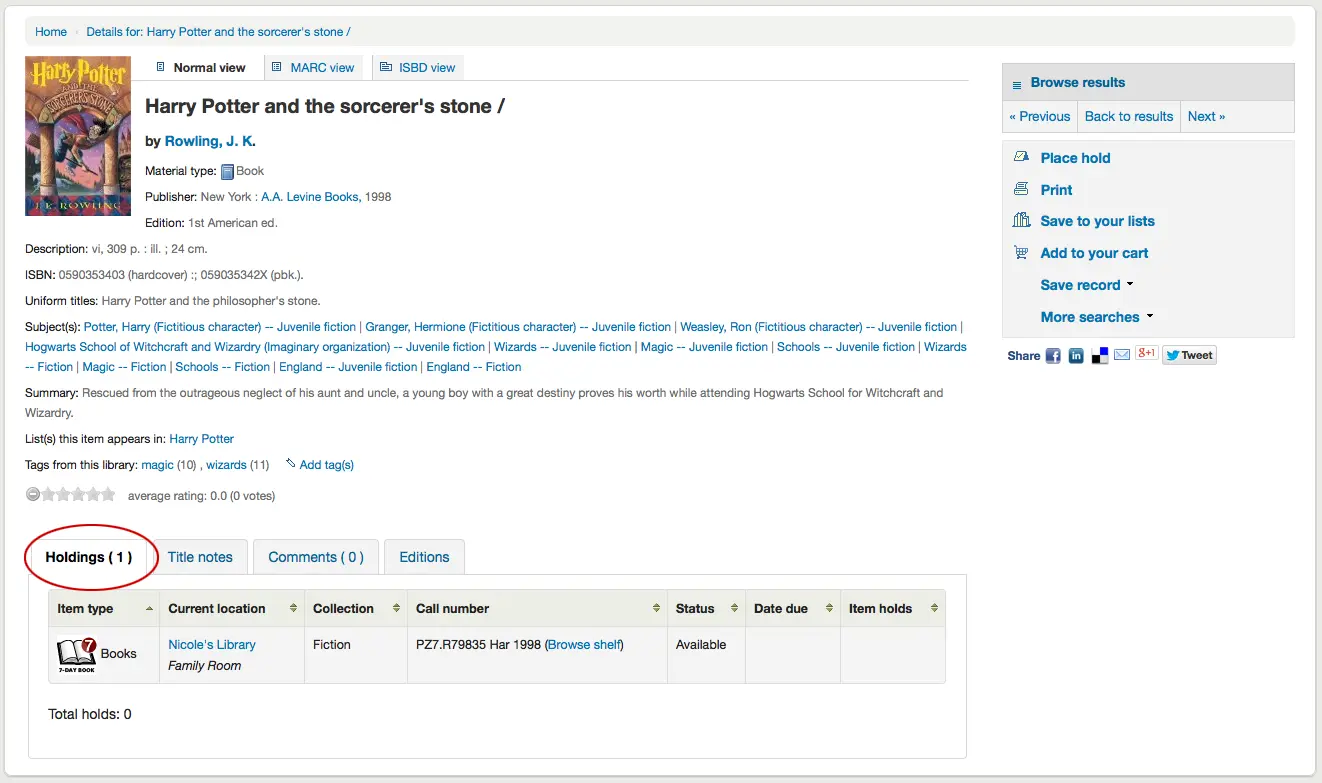
In den Reitern unterhalb des Titelsatzes befinden sich die Exemplarangaben
Hinweis
You can customize the columns of this table in the Table settings section of the Administration module (table id: holdingst).
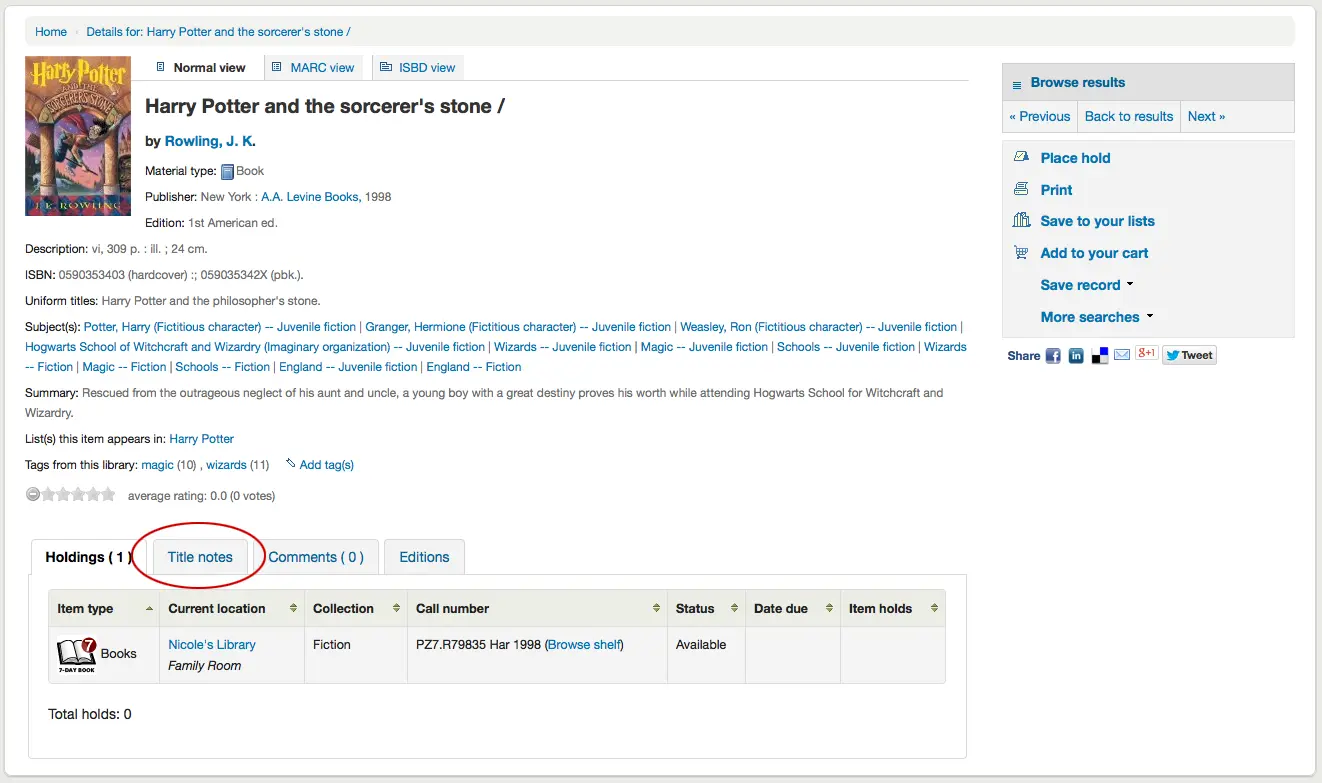
Wenn Notizfelder (MARC Felder 5xx) erfasst wurden, erscheinen die Angaben unter ‚Titelinformationen‘
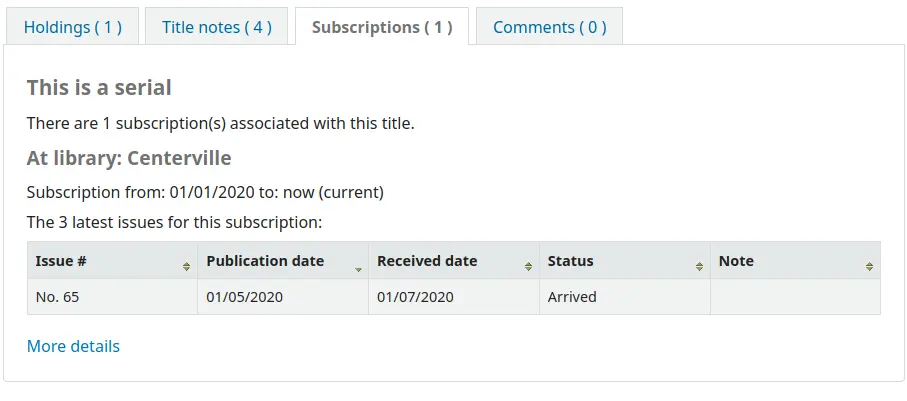
If the bibliographic record is linked to a subscription in the Serials module, there will be a ‚Subscriptions‘ tab with the subscription and issues information.
Bemerkung
You can customize the columns of this table in the Table settings section of the Administration module (table id: subscriptionst).
Bemerkung
Wenn Sie beim Hinzufügen des Abonnements im Feld „Benutzer-Benachrichtigung“ einen Hinweis ausgewählt haben, gibt es eine Schaltfläche, auf die Benutzer*innen klicken können, um per E-Mail benachrichtigt zu werden, wenn ein neues Heft eingegangen ist.
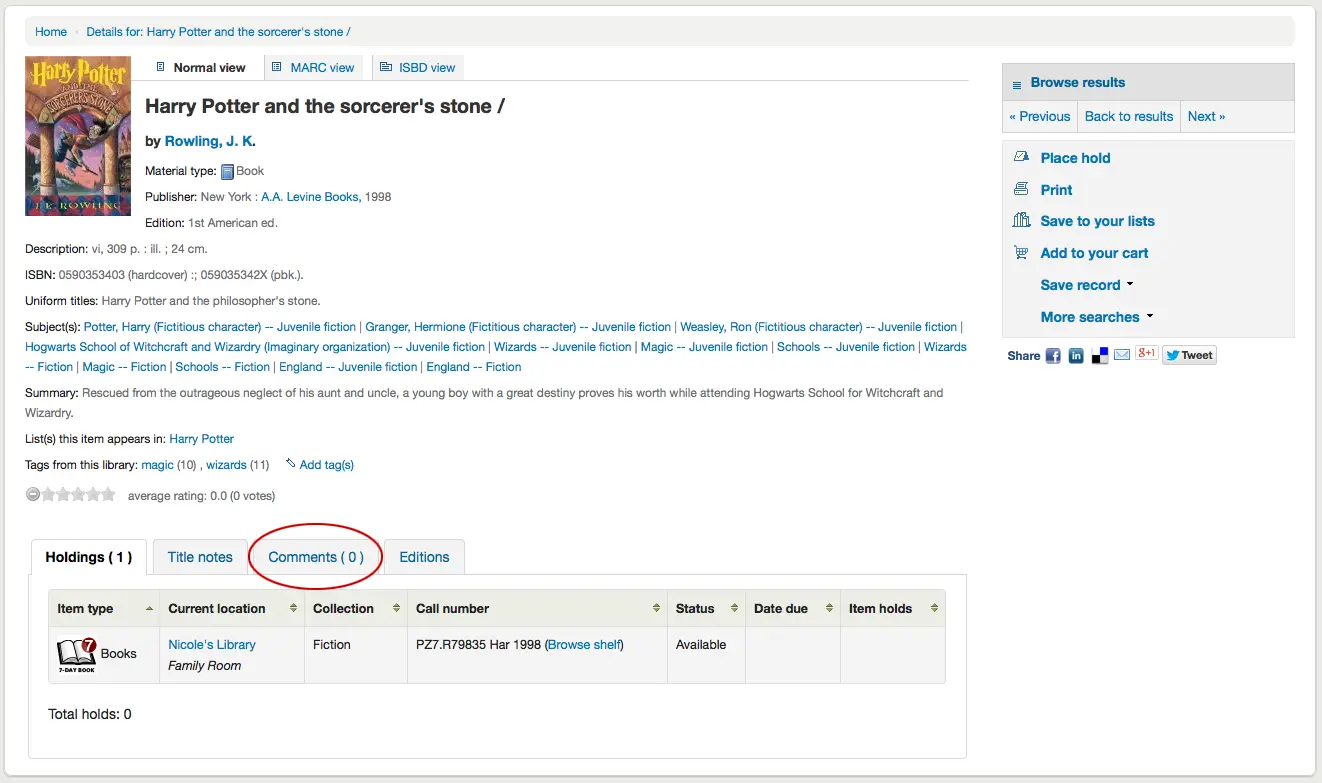
Wenn Sie die Kommentarfunktion zulassen, erscheinen Kommentare hier im nächsten Reiter
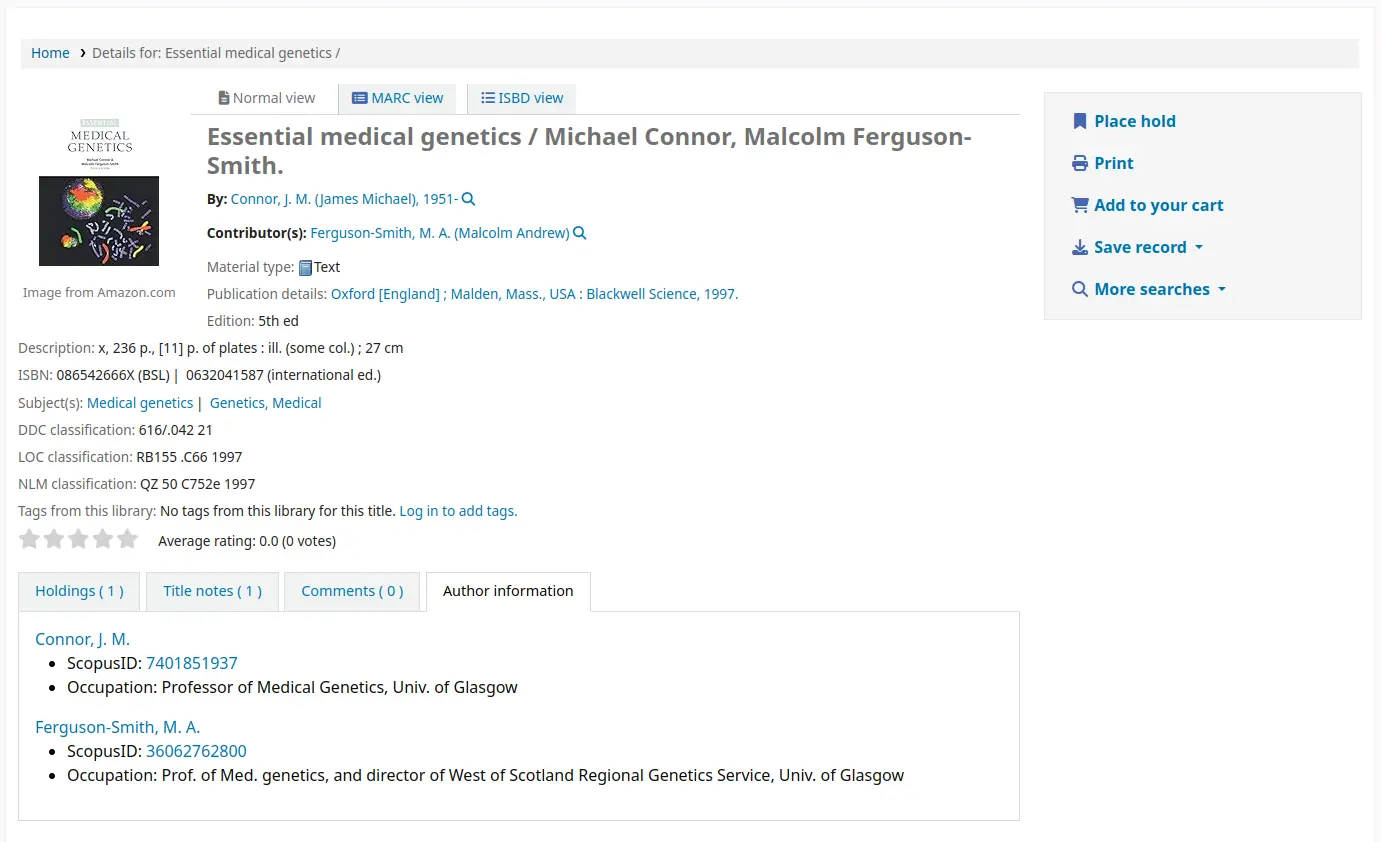
Wenn der Systemparameter OPACAuthorIdentifiers aktiviert ist und Ihre Normdatensätze Standardidentifikatoren haben, gibt es einen Reiter „Autorenidentifikatoren“, der die Identifikatoren mit Links zu den Normdatensätzen auf der Quellwebsite anzeigt.
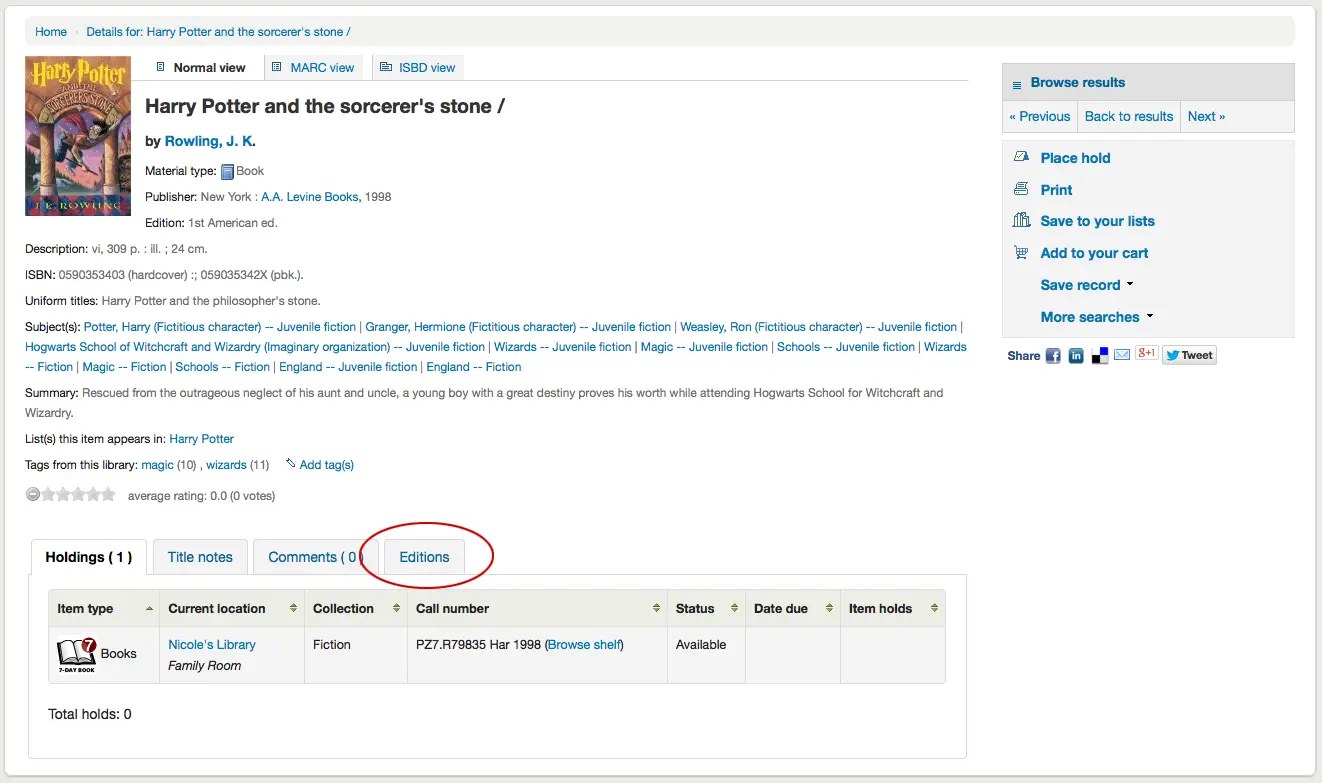
Und wenn Sie die FRBR Parameter aktiviert haben, erhalten Sie andere Ausgaben des Titels unter dem Reiter ‚Ausgaben‘ angezeigt, wenn es welche gibt.
Rechts neben den Titelangaben befinden sich Boxen mit verschiedenen Optionen. Die erste Box hilft Ihnen durch die Trefferliste zu navigieren. Von dort können Sie auch zum nächsten oder vorherigen Treffer, oder zu Ihrer Trefferliste gelangen.
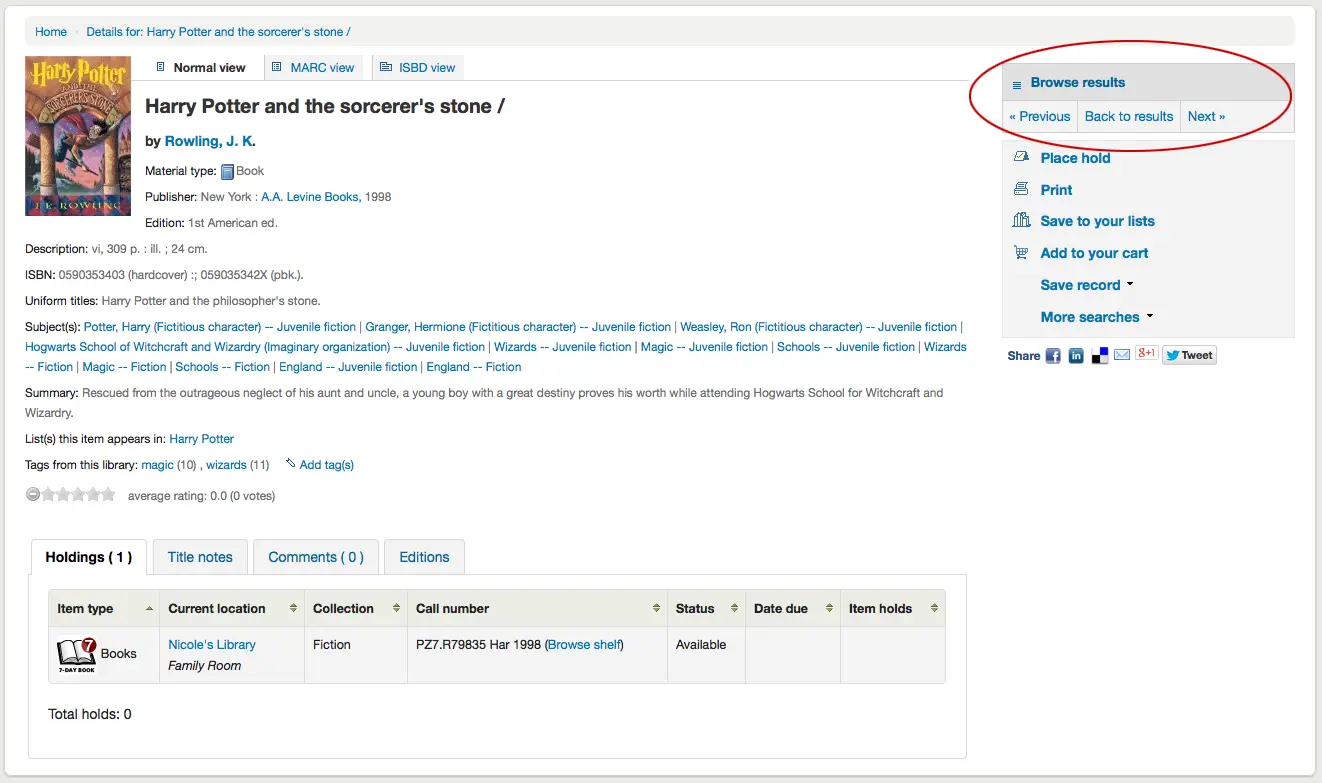
Wenn Sie auf ‚Trefferliste durchstöbern‘ klicken, erhalten Sie eine verkürzte Trefferliste Ihrer Suchergebnisse direkt auf der Detailansichtsseite
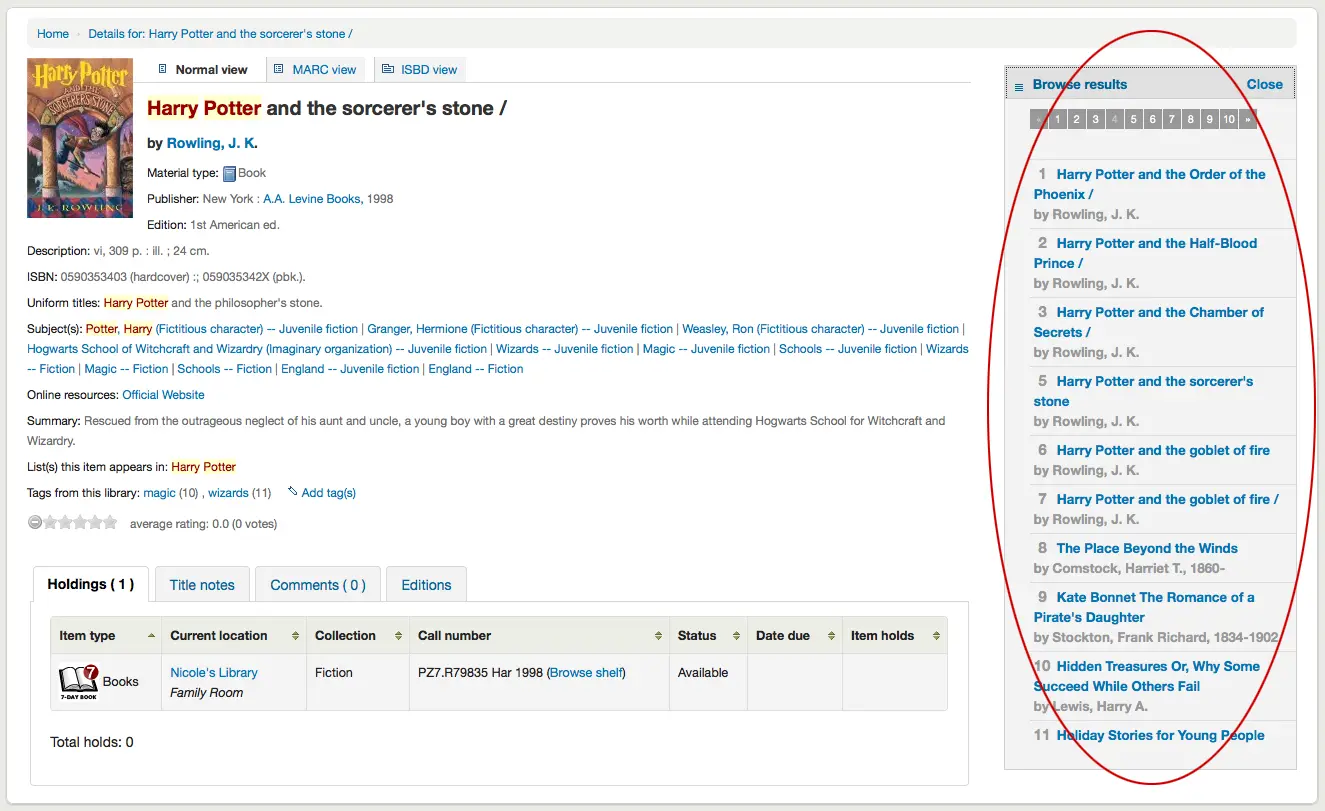
Darunter finden Sie Links um eine Vormerkung abzusetzen, den Titelsatz zu drucken, den Satz zu Ihren Listen oder zu Ihrem Korb hinzuzufügen oder an eines Ihrer Geräte zu senden (über einen QR-Code).
Another option that will appear on this right hand side bar, if a library is allowing purchase suggestions (see the suggestion system preference), is the ability to ‚Suggest for Purchase‘. Clicking this link will bring the user to the purchase suggestion form to fill out.
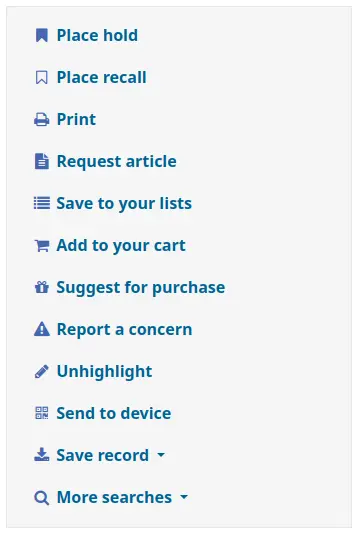
Wenn Sie auf „Weitere Suchen“ klicken, wird die Liste der Bibliotheken angezeigt, die Sie in Ihrem Systemparameter OPACSearchForTitleIn eingegeben haben
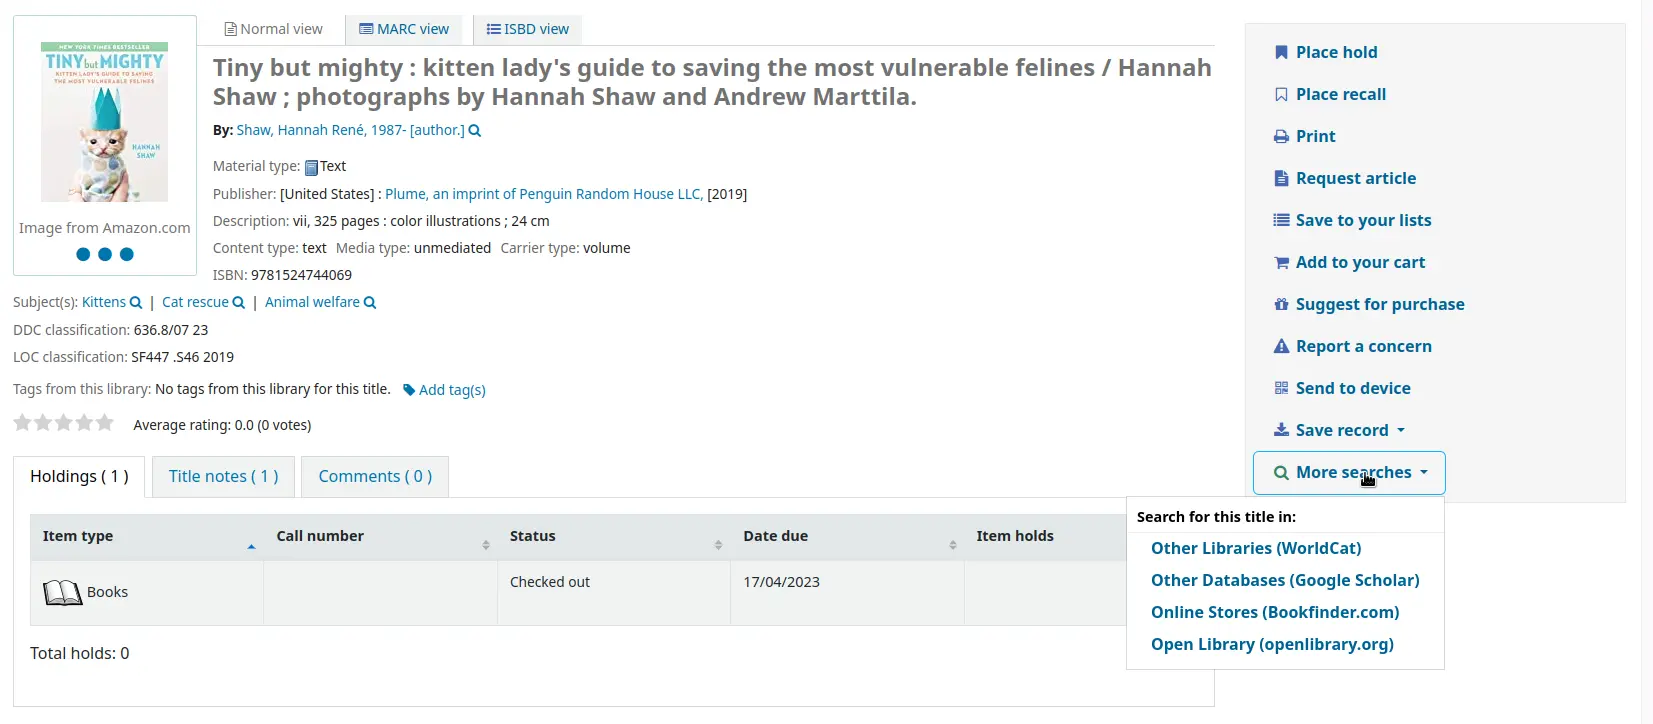
Unter dem link ‚Datensatz speichern‘ öffnen sich verschiedene Formate unter denen der Titelsatz abgespeichert werden kann. Die Liste kann über den Systemparameter OpacExportOptions angepasst werden.
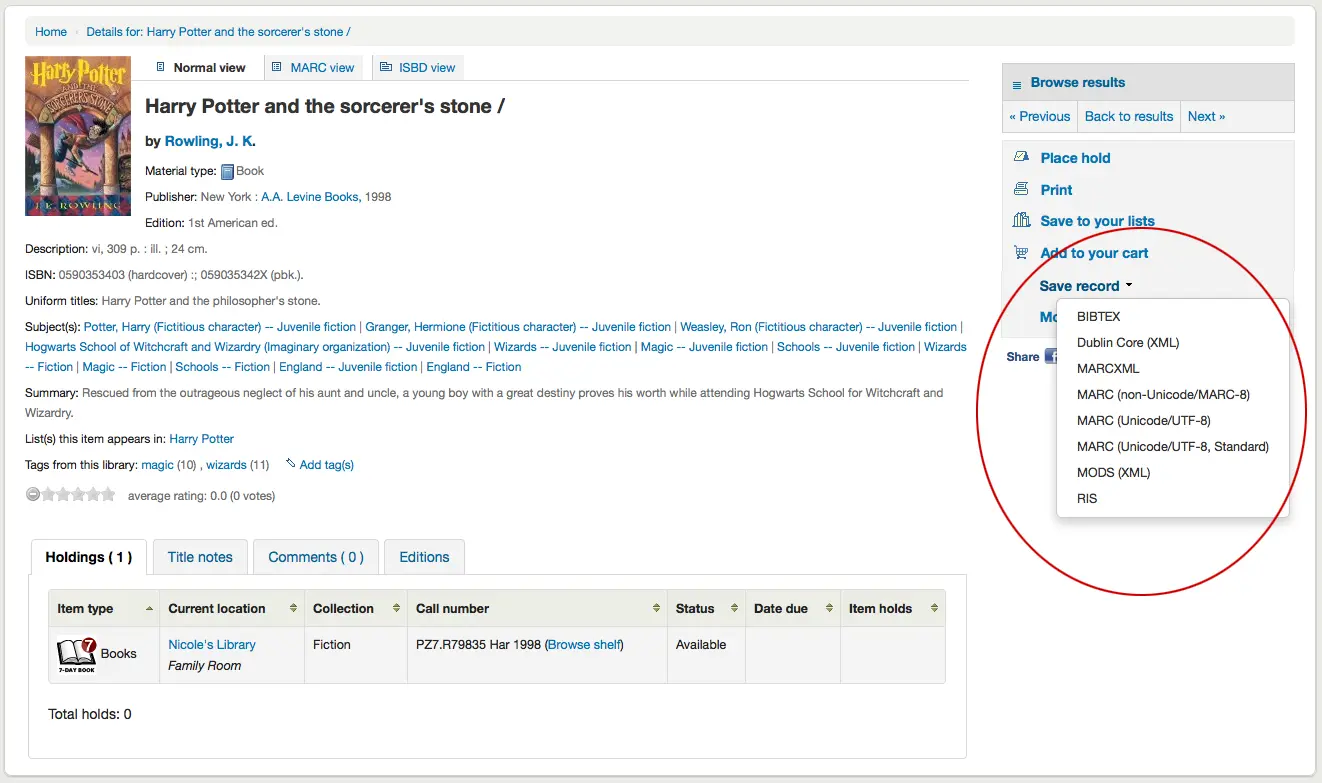
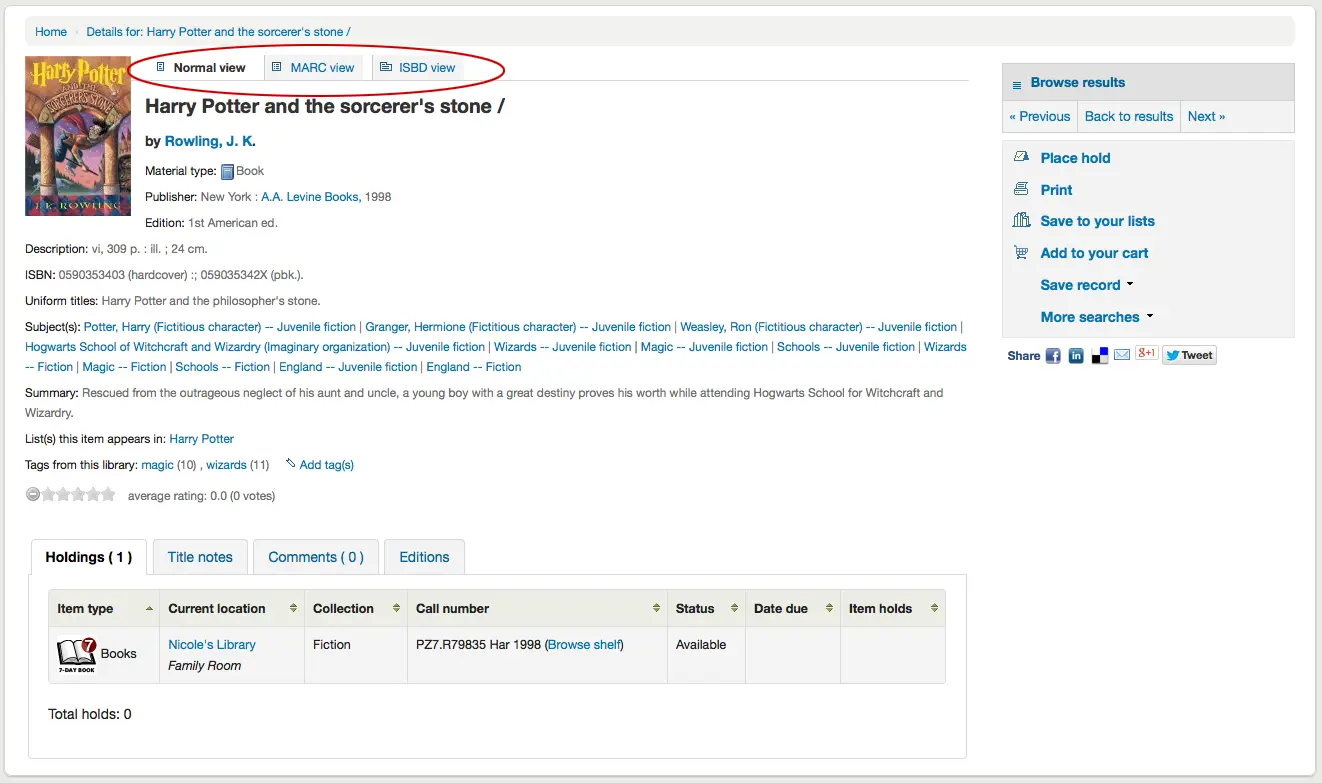
Sie können die Ansicht des Titelsatzes ändern, und anstelle der ‚Normal‘-Ansicht die MARC- oder ISBD-Anzeige oberhalb des Titelsatzes auswählen
Probleme mit bibliographischen Datensätzen melden
Wenn der Systemparameter OPACHoldsHistory auf „Erlaube“ gesetzt ist, können Benutzer*innen Anfragen zu bestimmten bibliographischen Datensätzen stellen.
Diese Funktion ähnelt dem Problembericht, ist aber mit einem bestimmten bibliografischen Datensatz verknüpft, und es besteht die Möglichkeit, eine Lösung zu finden.
Um ein neues Problem zu melden,
Klicken Sie auf der Detailseite des bibliografischen Datensatzes in den Optionen auf der rechten Seite auf den Link „Problem melden“.

Bemerkung
Benutzer*innen müssen angemeldet sein, um ein Anliegen zu melden. Wenn sie nicht eingeloggt sind, werden sie vom System nach ihren Anmeldedaten gefragt.
Füllen Sie das Formular zum Problem aus.
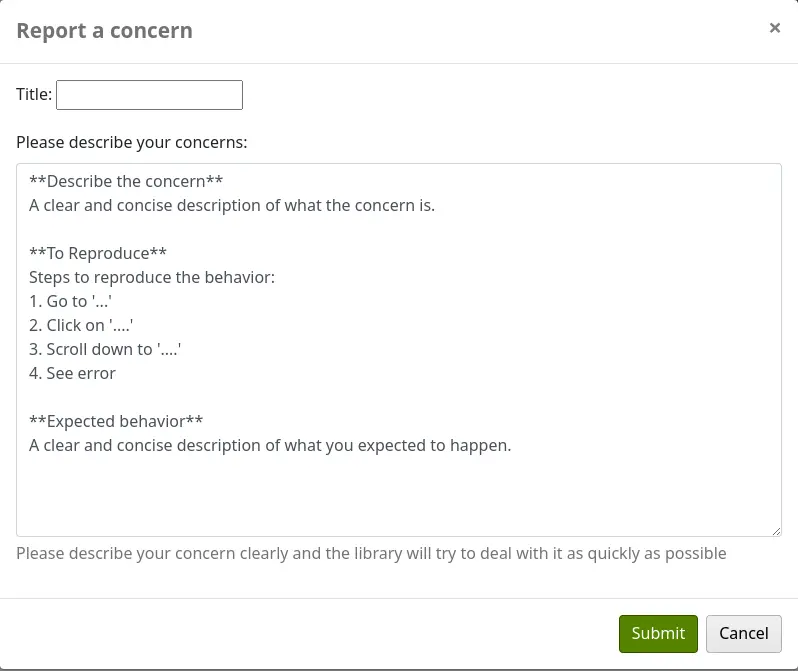
Titel: Geben Sie einen aussagekräftigen Titel zur Beschreibung des Problems ein.
Bitte beschreiben Sie Ihr Anliegen: Geben Sie Einzelheiten über das Problem an, und zwar so ausführlich wie möglich, damit der Mitarbeiter, der die Meldung erhält, das Problem nachvollziehen und verstehen kann.
Ein Beispiel dafür, was in der Beschreibung erwartet wird, ist im Feld angegeben:
**Describe the concern**

A clear and concise description of what the concern is.

**To Reproduce**

Steps to reproduce the behavior:
1. Go to '...'
2. Click on '....'
3. Scroll down to '....'
4. See error

**Expected behavior**

A clear and concise description of what you expected to happen.
Bemerkung
Dieser Text kann im Werkzeug HTML-Anpassung geändert werden, indem der Eintrag ‚CatalogConcernTemplate‘ angepasst wird.
Der Text am Ende des Formulars („Bitte beschreiben Sie Ihr Anliegen klar und deutlich…“) ist auch im Werkzeug HTML-Anpassung anpassbar, indem der Eintrag ‚CatalogConcernHelp‘ geändert wird.
Klicken Sie auf ‚Absenden‘.
Dies sendet eine E-Mail an das Katalogisierungsteam, um es zu benachrichtigen, dass ein neues Anliegen erstellt worden ist. Die E-Mail wird an die E-Mail-Adresse gesendet, die in dem Systemparameter CatalogerEmails angegeben ist. Bei der gesendeten E-Mail handelt es sich um die Benachrichtigung TICKET_NOTIFY, die im Werkzeug Benachrichtigungen und Quittungen angepasst werden kann.
Außerdem wird eine E-Mail an den Meldenden geschickt, um ihn über den Erhalt des Anliegens zu informieren. Bei der gesendeten E-Mail handelt es sich um die Benachrichtigung TICKET_ACKNOWLEDGE, die über das Werkzeug Benachrichtigungen und Quittungen. angepasst werden kann.
Anliegen, die zu diesem Datensatz gemeldet wurden, sind im Reiter „Anliegen“ sichtbar.

Alle Anliegen werden im Bericht zu den Kataloganliegen angezeigt.
Neu geöffnete Problemberichte werden auch im Benachrichtigungsbereich am unteren Rand der Hauptseite der Dienstoberfläche angezeigt.

Listen und Korb
Ein Korb ist ein temporärer Ablageort für Datensätze, an denen Sie interessiert sind, dieser bleibt nur während der aktuell geöffneten Session aktiv. Das bedeutet, wenn Sie sich aus dem OPAC ausloggen oder den Browser schließen, werden auch die Exemplare aus dem Korb entfernt.
Eine Liste ist ein dauerhafterer Ort zum Speichern von Exemplaren.
Um mehr über Listen zu erfahren, lesen Sie das Kapitel Listen und Korb in diesem Handbuch, das sich mit diesen Funktionen in der Dienstoberfläche beschäftigt.
Listen
Benutzer*innen können Ihre eigenen privaten Listen verwalten und alle öffentlichen Listen einsehen, indem Sie den Bereich ‚Ihre Listen‘ im Benutzerkonto öffnen.
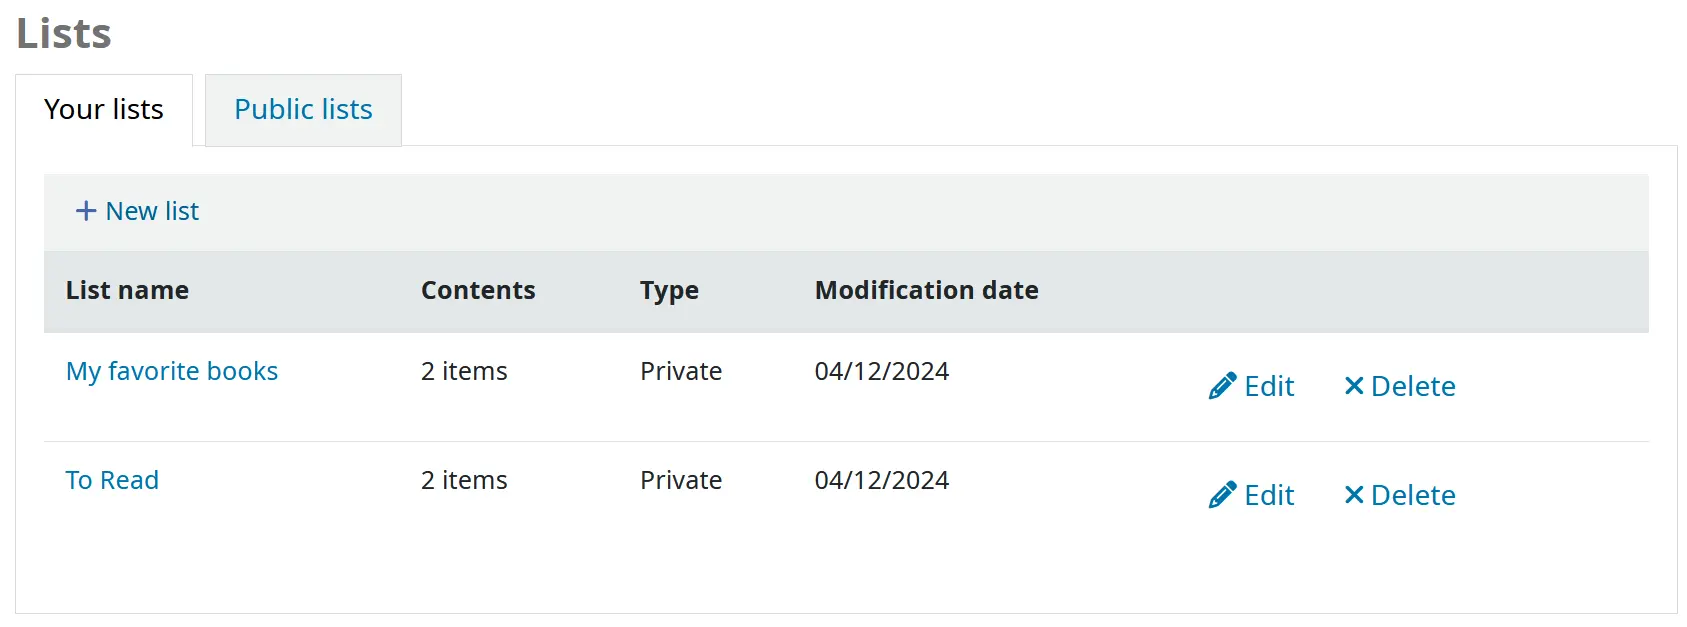
Die Spalte „Änderungsdatum“ zeigt an, wann die Liste zuletzt geändert wurde und ist hilfreich, um schnell herauszufinden, wie aktuell die Liste ist.
Listen erstellen
Um eine Liste zu erstellen, muss der/die Benutzer*in lediglich auf den Link „Neue Liste“ klicken und das daraufhin angezeigte Formular ausfüllen.

Listenname: Der/die Benutzer*in muss einen Listennamen eingeben, das ist das einzige Pflichtfeld
Sortieren der Liste nach: Der/die Benutzer*in kann wählen, wie die Liste sortiert werden soll (nach Titel, Autor, Erscheinungsjahr, Signatur oder Datum der Aufnahme in die Liste).
Kategorie: Der/die Benutzer*in kann wählen, ob er diese Liste privat oder öffentlich halten möchte. Eine öffentliche Liste wird für alle OPAC-Benutzer*innen sichtbar sein.
Bemerkung
Dieses Feld erscheint nur, wenn der Systemparameter OpacAllowPublicListCreation auf „Erlauben“ gesetzt ist. Andernfalls sind alle Listen, die von Benutzern erstellt werden, privat.
Änderungen am Inhalt zulassen von: Der/die Benutzer*in kann wählen, wer Titel zur Liste hinzufügen oder aus ihr entfernen darf.
Niemand: Niemand, auch nicht der/die Benutzer*in selbst, kann Titel hinzufügen oder entfernen.
Nur Besitzer*innen: Nur der/die Benutzer*in, der die Liste erstellt hat, kann Titel hinzufügen oder entfernen. Wenn die Liste öffentlich ist oder geteilt wird, können die OPAC-Benutzer*innen oder gemeinsame Benutzer*innen den Inhalt der Liste nicht ändern.
Jeder, der diese Liste sieht: Jeder, der Zugriff auf die Liste hat, kann Titel hinzufügen oder entfernen. Wenn die Liste öffentlich ist, meint dies jeden. Wenn die Liste privat ist, kann nur der Eigentümer den Inhalt ändern. Und wenn die Liste freigegeben ist, haben der Eigentümer und die Freigabeberechtigten diese Möglichkeit.
Nur Bibliothekspersonal: Diese Option wird nur für Mitarbeiter*innen angezeigt, damit die Liste von allen Mitarbeiter*innen bearbeitet werden kann.
Neue Listen können auch erstellt werden indem Sie im Auswahlmenü ‚Hinzufügen zu …‘ der Trefferliste ‚Neue Liste‘ auswählen

Titel zu Listen hinzufügen
Titel können aus den Suchergebnissen oder aus dem bibliografischen Datensatz in die Listen aufgenommen werden.
In den Suchergebnissen erscheint unter jedem Ergebnis die Option, Exemplare zur Liste hinzuzufügen (Schaltfläche „In Listen speichern“)

und oben auf der Ergebnisseite, neben „Titel auswählen für: Hinzufügen zu…“

Wählen Sie die Option ‚In Listen speichern‘ wenn Sie einen einzelnen Titel zu einer Liste hinzufügen möchten. Wählen Sie anschließend die Liste, zu der Sie den Titel hinzufügen möchten. Um mehrere Titel zu einer Liste hinzuzufügen, verwenden Sie die Checkboxen auf der linken Seite bei den Titeln die Sie hinzufügen möchten und setzen dort Häkchen, wählen dann die Option ‚Hinzufügen zu…‘ oberhalb der Trefferliste, und wählen schließlich die Liste aus.
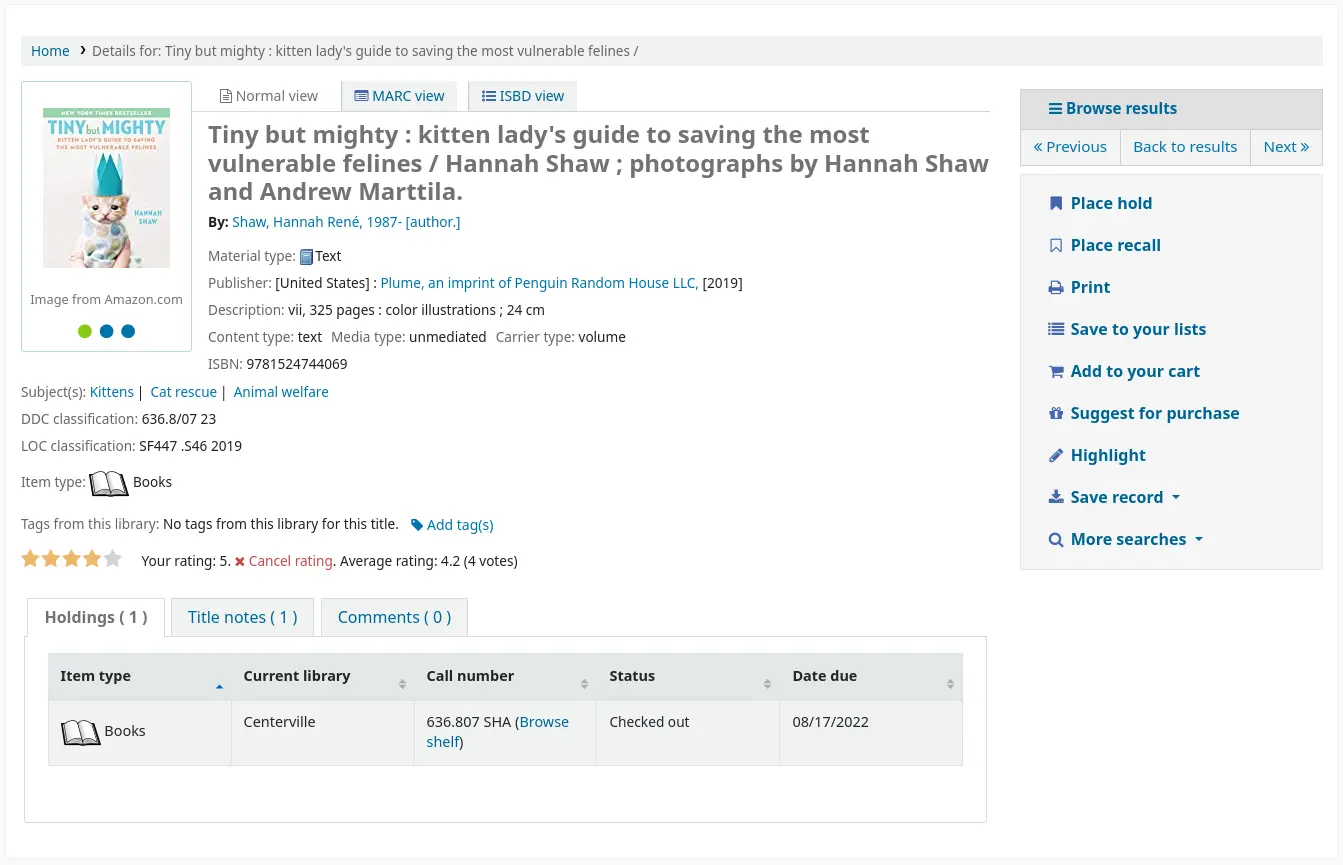
Im bibliografischen Datensatz finden Sie rechts im Menü die Option, den Titel in einer Liste zu speichern.
Titel können auch aus dem Korb zu einer Liste hinzugefügt werden.
Listeninhalte anzeigen
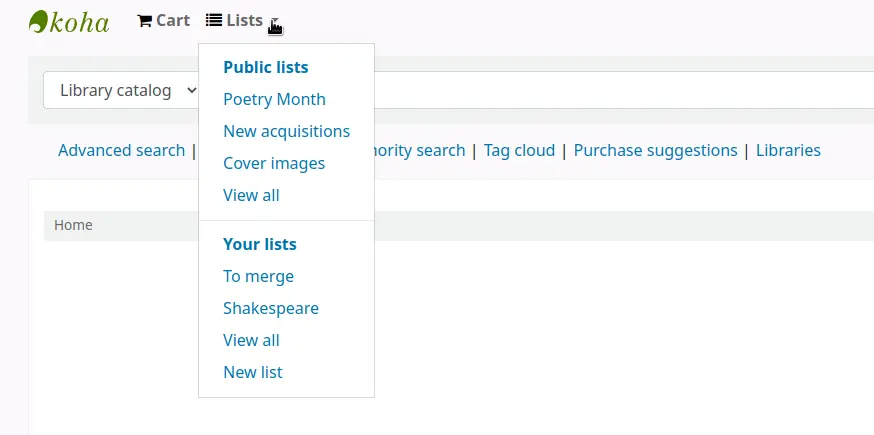
Möchten Sie den Inhalt einer Liste anschauen, dann klicken Sie auf den Listenname unter der Schaltfläche „Listen“.
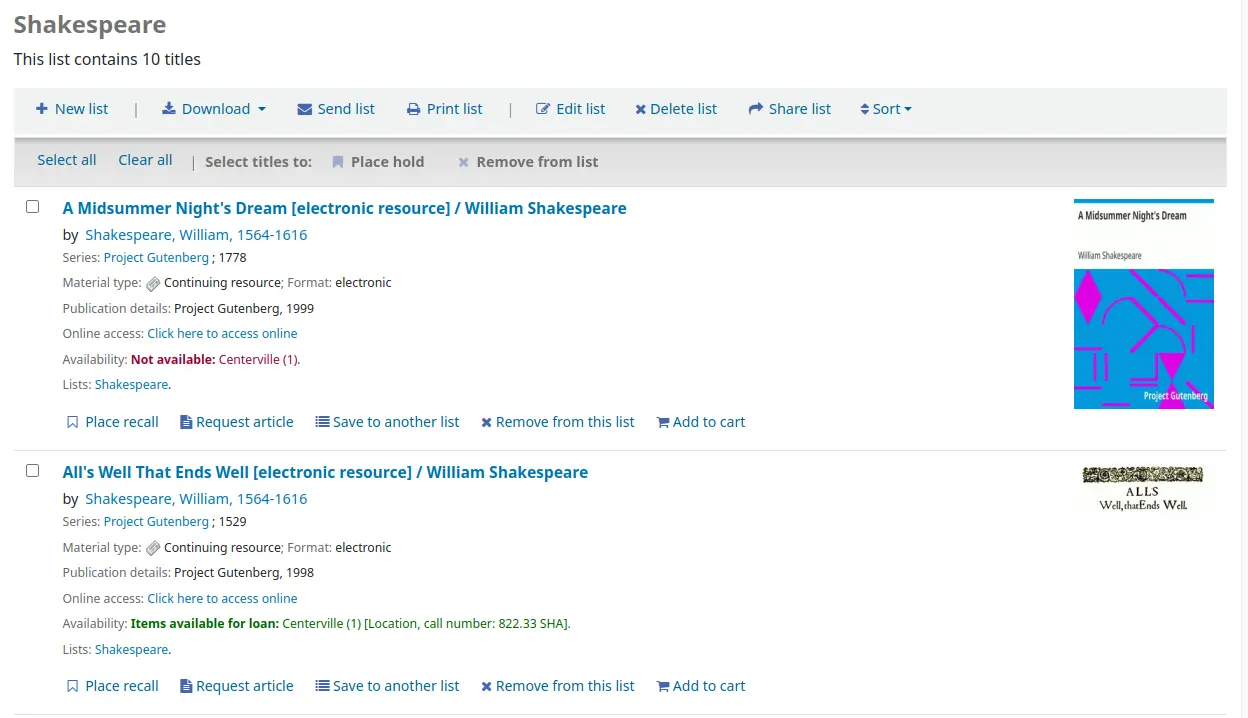
Die Inhalte der Liste sind ähnlich wie die Trefferliste mit Ausnahme von verschiedenen Optionen, die Ihnen über der Liste angezeigt werden.
Rechts vom Listentitel befindet sich ein RSS Icon. Dieses erlaubt Ihnen Updates zur Liste zu abonnieren.
Bemerkung
Das RSS-Symbol erscheint nur auf öffentlichen Listen.
Sie können mehrere Exemplare auf Vormerkungen setzen, den Inhalt der Liste herunterladen, die Liste verschicken, oder ausdrucken, indem Sie die Optionen über der Liste verwenden.
Wenn Sie Vormerkungen auf ein oder mehrere Exemplare setzen möchten, die sich auf einer Liste befinden, können Sie die Checkboxen auf der linken Seite anklicken und dann oben die Vormerk-Schaltfläche aktivieren
Um Listeninhalte herunterzuladen, klicken Sie die Schaltfläche ‚Liste herunterladen‘ und wählen Sie das Format aus
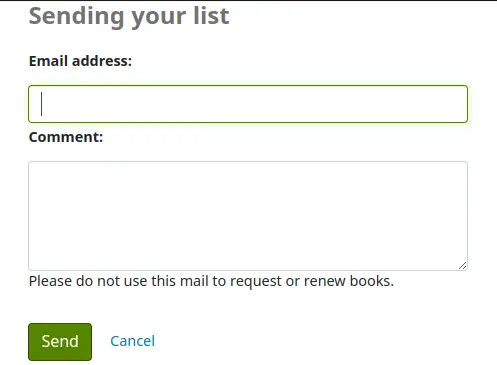
Um den Listeninhalt verschicken zu können, klicken Sie auf die Schaltfläche ‚Liste verschicken‘ und geben Sie in dem PopUp die Email-Details ein
Bemerkung
Die Nachricht, die beim Versenden der Liste per E-Mail gesendet wird, ist LIST, die in Notices and slips tool angepasst werden kann.
Bemerkung
The ‚Send list‘ option will only appear if the OPACDisableSendList system preference is set to ‚Allow.‘
Um den Inhalt der Liste zu drucken, klicken Sie auf die Schaltfläche ‚Liste drucken‘
Titel von Listen entfernen
Um einen Titel von einer Liste zu entfernen,
Zeige den Inhalt einer Liste an.

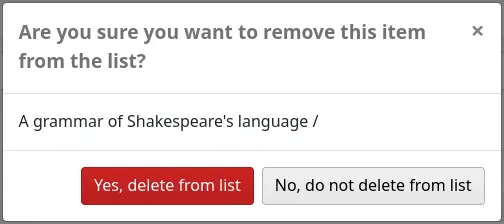
Klicken Sie auf „Von dieser Liste entfernen“ unter dem Titel.
Klicken Sie auf „Ja, von Liste entfernen“, um die Entfernung des Titels von der Liste zu bestätigen.
Listen verwalten
Ist die Liste gespeichert, können Benutzer*innen Exemplare hinzufügen. Ausgehend vom Reiter „Ihre Listen“ im Benutzerkonto kann der/die Benutzer*in Listen, die er/sie erstellt hat bearbeiten und löschen, indem er/sie auf die entsprechende Schaltfläche rechts des Listennamens klickt.

Um den Titel einer Liste zu bearbeiten oder Benutzer*innen zu sortieren, klicken Sie auf die Schaltfläche ‚Bearbeiten‘ rechts neben der Listenbeschreibung.

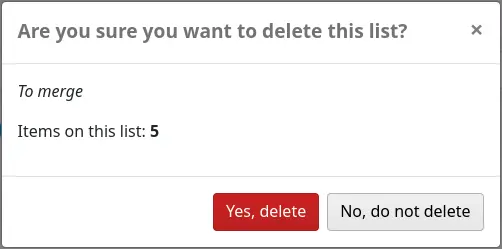
Wenn Sie auf die Schaltfläche ‚Löschen‘ klicken, müssen Sie bestätigen, dass Sie die Liste wirklich löschen möchten.
Wenn der Systemparameter OpacAllowSharingPrivateLists auf „Zulassen“ gesetzt ist, sehen die Benutzer*innen die Schaltfläche „Teilen“ in der Liste der Listen und die Schaltfläche „Teile Liste“ oben in jeder einzelnen Liste. Wenn Sie auf diese Schaltfläche klicken, werden Sie aufgefordert, die E-Mail-Adresse eines/einer Benutzer*in einzugeben.

Ist die E-Mail-Adresse eingegeben, sendet Koha eine Bestätigungsnachricht

und schickt auch eine Nachricht an den Benutzer.
Sobald der/die andere Benutzer*in die geteilte Liste akzeptiert, erhält der/die Benutzer*in, der/die Liste freigegeben hat, eine Bestätigung.
Bemerkung
Die Nachricht, die zur Freigabe der Liste gesendet wird, ist SHARE_INVITE und die Nachricht, die an den/die freigebende*n Benutzer*in gesendet wird, um zu bestätigen, dass der/die andere Benutzer*in die Freigabe akzeptiert hat, ist SHARE_ACCEPT. Beide Nachrichten können im Werkzeug Benachrichtigungen und Quittungen angepasst werden.
Der/die andere Benutzer*in sieht die gemeinsame Liste zusammen mit seinen eigenen privaten Listen (der Typ ist „Geteilt“ und nicht „Privat“). Sie haben auch die Möglichkeit, die Freigabe zu entfernen, wenn sie keinen Zugriff mehr auf diese Liste haben möchten.
Der/die Besitzer*in der/die gemeinsamen Liste hat die Möglichkeit, den Besitz an der Liste auf einen der Benutzer*innen zu übertragen, mit denen gemeinsam die Liste genutzt wird.
Wenn der Systemparameter TagsInputOnDetail aktiviert ist, haben Benutzer^*innen die Möglichkeit, aus der Listenansicht Tags zu Titeln hinzuzufügen.
Korb
Titel einem Korb hinzufügen
Titel können aus den Suchergebnissen oder aus dem bibliografischen Datensatz in den Korb gelegt werden.
In den Suchergebnissen erscheint unter jedem Ergebnis die Option, Exemplare zum Korb zu hinzuzufügen (Schaltfläche „Zum Korb hinzufügen“)

und oben auf der Ergebnisseite, neben „Titel auswählen für: Hinzufügen zu…“

Wenn Sie auf die Schaltfläche „Zum Korb hinzufügen“ unter einem einzelnen Ergebnis klicken, wird dieser Titel Ihrem Korb hinzugefügt.
Um mehrere Titel auf einmal hinzuzufügen, markieren Sie die Checkbox links neben jedem Ergebnis und wählen Sie dann „Korb“ aus dem Pulldown-Menü „Hinzufügen zu“ oben auf dem Bildschirm. Sobald die Titel in den Korb gelegt wurden, erhalten Sie oben auf der Seite eine Bestätigung.

Sie können die Exemplare, die sich im Korb befinden auch wieder entfernen, indem Sie auf ‚Entfernen‘ klicken.

Im bibliografischen Datensatz finden Sie im Menü auf der rechten Seite die Option, den Titel dem Korb hinzuzufügen.

Korb verwalten
Wenn Sie Titel in Ihrem Korb haben, können Sie den Inhalt verwalten, indem Sie auf die Schaltfläche ‚Korb‘ oben am Bildschirm klicken. Ihr Korb öffnet sich in einme neuen Fenster.
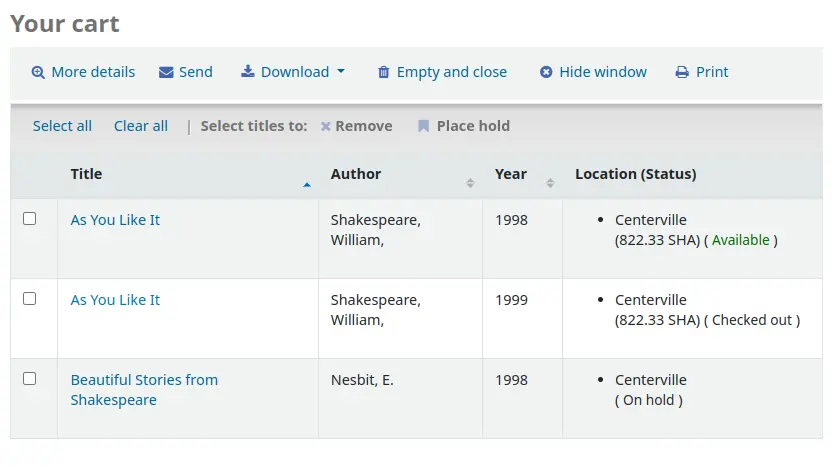
Ausgehend von diesem Fenster, bekommen Sie verschiedene Möglichkeiten angezeigt. In der Kopfzeile Ihres Korbes haben Sie verschiedene Schaltflächen.
Weitere Details: Wenn Sie hierauf klicken, erhalten Sie zusätzliche Informationen zum Titel in Ihrem Korb (ISBNs, Themen, Verlagsinformation, Notizen und weiteres).
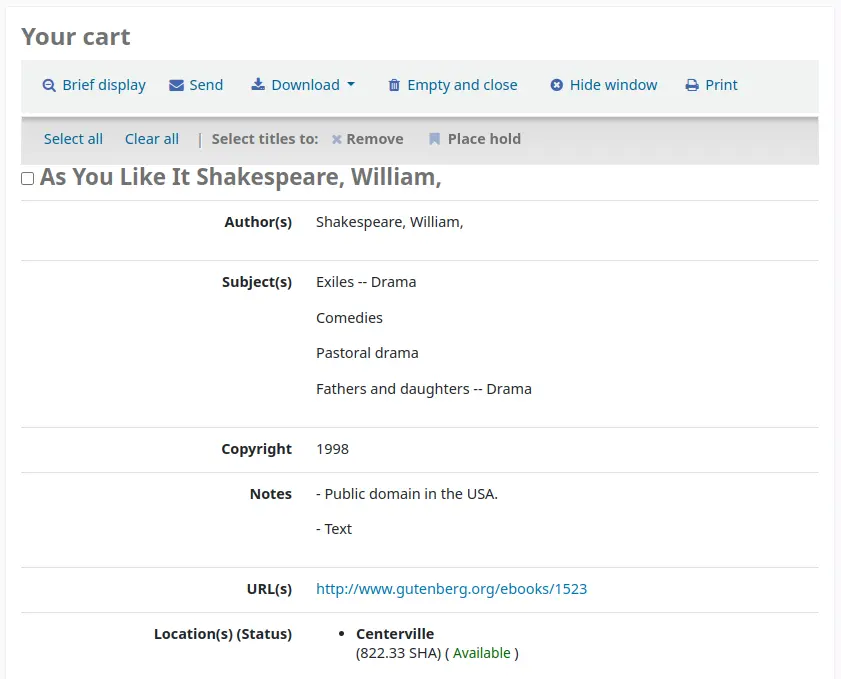
When clicked, the ‚More details‘ button will become ‚Brief display‘. Clicking this will return to the default display in table form of the title, author, copyright date and item location and status.
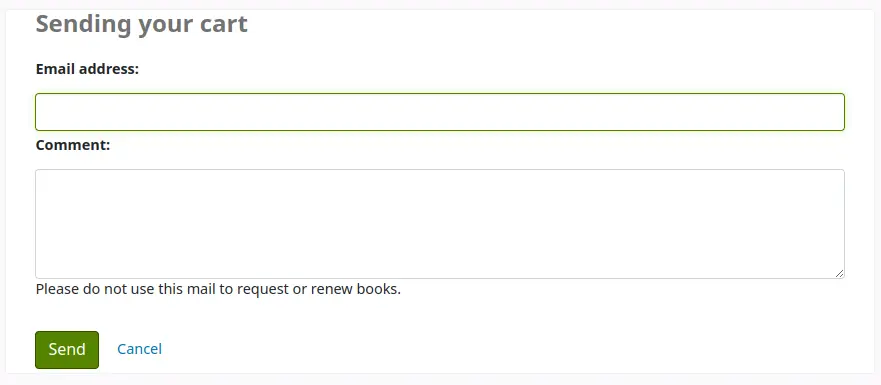
Senden: Mit dieser Option können Sie den Inhalt eines Korbes an eine Email-Adresse weiterleiten. Dies ist hilfreich, wenn Sie die Quellen, die Sie gefunden haben von der Bibliothek an Ihren Emailaccount zu Hause schicken möchten oder wenn Sie einem/einer Benutzer*in zu einem bestimmten Thema Material zusenden möchten. Wenn Sie auf ‚Abschicken‘ klicken, öffnet sich ein neues Fenster, in dem Sie die Emailadresse und eine Nachricht eingeben können.
Warnung
Sie können nur als eingeloggte*r Benutzer*in einen Korb per Email versenden. Dies verhindert, dass die Email-Funktion des Korbes als Spam verwendet wird.
Bemerkung
Die Nachricht, die beim Versenden des Warenkorbs per E-Mail gesendet wird, ist CART, die in Notices and slips tool angepasst werden kann.
Download: you can download the contents of the cart in several predefined formats or using a CSV profile that you defined in the tools module.
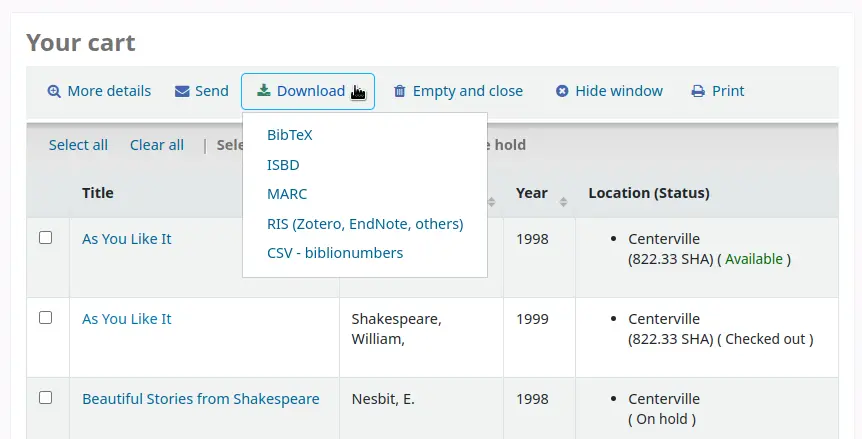
Leeren und schließen: Der Korb wird geleert und das Fenster geschlossen.
Fenster ausblenden: Das Fenster wird geschlossen, aber der Korb wird nicht geleert.
Drucken: Damit wird der Inhalt des Korbs ausgedruckt.
Zusätzlich zu den verschiedenen Möglichkeiten, den Inhalt des Korbs zu speichern, gibt es Möglichkeiten, den Daten im Korb einen Mehrwert zu verleihen.
Wählen Sie einen oder mehrere Titel aus dem Korb aus und wählen Sie eine der Optionen:
Entfernen: Damit werden die ausgewählten Titel aus dem Korb entfernt.
Zu einer Liste hinzufügen: Fügt die ausgewählten Titel zu einer Liste hinzu
Vormerkung setzen: Dies wird Vormerkungen für alle ausgewählten Titel setzen
Tag: Wenn der Systemparameter TagsInputOnDetail aktiviert ist, können Benutzer*innen Tags zu ausgewählten Titeln hinzufügen.
Vormerken
Benutzer*innen können im OPAC Exemplare vormerken, wenn Sie eingeloggt sind und wenn Sie den Systemparameter OPACHoldRequests auf ‚Erlaube‘ gesetzt haben. Wenn das Exemplar vorgemerkt werden kann, erscheint diese Option an mehreren Stellen im OPAC.
Wenn der Systemparameter DisplayMultiPlaceHold aktiviert ist, besteht bei der Anzeige einer Liste oder einer Trefferliste die Möglichkeit, mehrere Exemplare vorzumerken, indem Sie die Checkboxen links neben den Ergebnissen ankreuzen und oben auf „Vormerken“ klicken.

Befinden Sie sich auf einer Listenseite oder einer Trefferliste bekommen Sie die Option zum Vormerken eines Exemplars unterhalb der Basisinformation des Titels angezeigt.

Wenn Sie sich die Detailansicht eines Titels anschauen, sehen Sie die Option zur Vormerkung in dem Kasten rechts auf Ihrem Bildschirm

Alle der obenstehenden Links zeigen Ihnen den gleichen Vormerkbildschirm an.
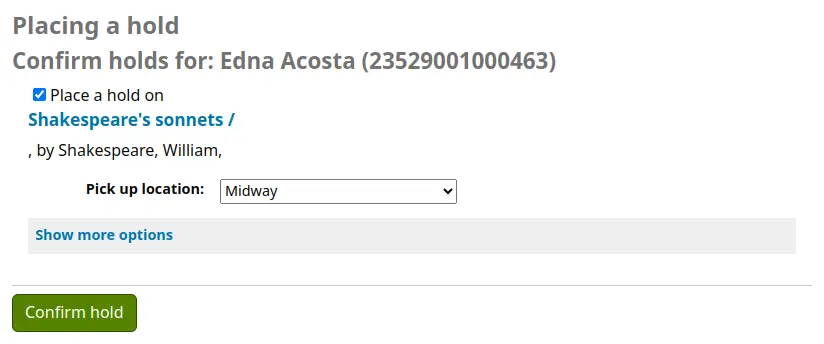
Die Checkbox links neben den vorzumerkenden Exemplaren sollte markiert sein.
Der Titel enthält einen Link zurück zur Detailansicht eines Datensatzes.
Ihre Priorität: Wenn der Systemparameter OPACShowHoldQueueDetails so eingestellt ist, dass das Prioritätslevel angezeigt wird, wird die Priorität angezeigt, an welcher Stelle in der Warteschlange diese Vormerkung eingeordnet wird.
Abholort: Haben Sie den Systemparameter OPACAllowUserToChooseBranch auf ‚Erlaube‘ gesetzt, können die Benutzer*innen die Bibliothek auswählen, in der Sie ihre Vormerkung abholen möchten. Die Liste der verfügbaren Abholorte enthält alle Bibliotheken, bei denen in der Bibliothekskonfiguration bei ‚Abholstandort‘ ‚Ja‘ eingetragen ist.
Klicken Sie auf „Weitere Optionen anzeigen“, um weitere Einstellungen für diese Vormerkung anzuzeigen.
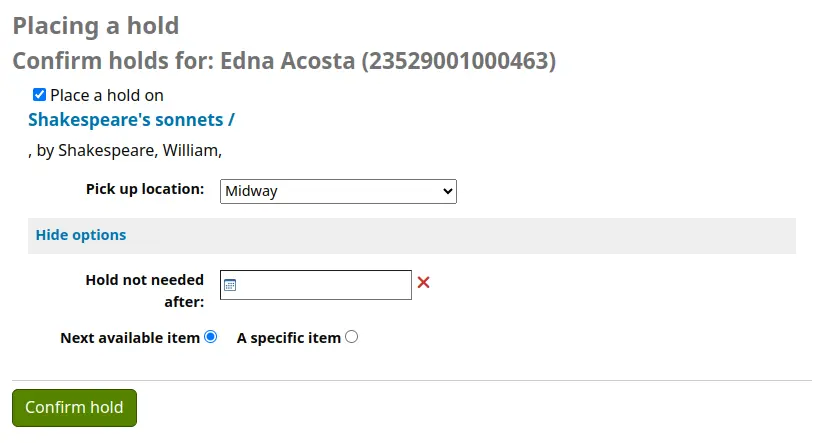
Vormerkung startet zum Datum: Haben Sie den Systemparameter OPACAllowHoldDateInFuture auf ‚Erlaube‘ gesetzt, wird dieses Feld angezeigt und erlaubt einem Benutzer, dass die Vormerkung an einem Datum in der Zukunft starten kann.
Vormerkung nicht benötigt nach: Über Standardeinstellungen bleiben Vormerkungen im System, bis sie gelöscht werden. Gibt der/die Benutzer*in allerdings ein Datum ein, ab welchem die Vormerkung nicht mehr benötigt wird, dann hat die Vormerkung ein Ablaufdatum.
Wichtig
Abgelaufene Vormerkungen werden durch den Cron-Job cancel_expired_holds.pl entfernt. Dies ist kein automatischer Prozess und muss vom Systemadministrator eingerichtet werden.
Bestimmten Exemplartyp anfordern: Wenn Sie den Systemparameter AllowHoldItemTypeSelection auf ‚Erlaube‘ gesetzt haben, wird diese Option angezeigt und der/die Benutzer*in hat die Möglichkeit, bei der Vormerkung einen spezifischen Exemplartyp auszuwählen.
Spezifische Exemplargruppe anfordern: Wenn der Systemparameter EnableItemGroupHolds auf „Aktivieren“ gesetzt ist und der Datensatz Mediengruppen hat, kann der/die Benutzer*in wählen, ob er/sie das nächste verfügbare Exemplar einer Gruppe vormerken möchte, anstatt das nächste verfügbare Exemplar des gesamten Datensatzes oder ein bestimmtes Exemplar.
Ist der Systemparameter OpacHoldNotes auf ‚Erlaube‘ gesetzt, kann der/die Benutzer*in beim Setzen einer Vormerkung eine Vormerknotiz eintragen.
Abhängig von den Ausleihregeln für Exemplar-spezifische Vormerkungen kann der/die Benutzer*in auswählen, ob er die Vormerkung auf das nächste verfügbare Exemplar setzen möchte oder auf ein bestimmtes Exemplar.
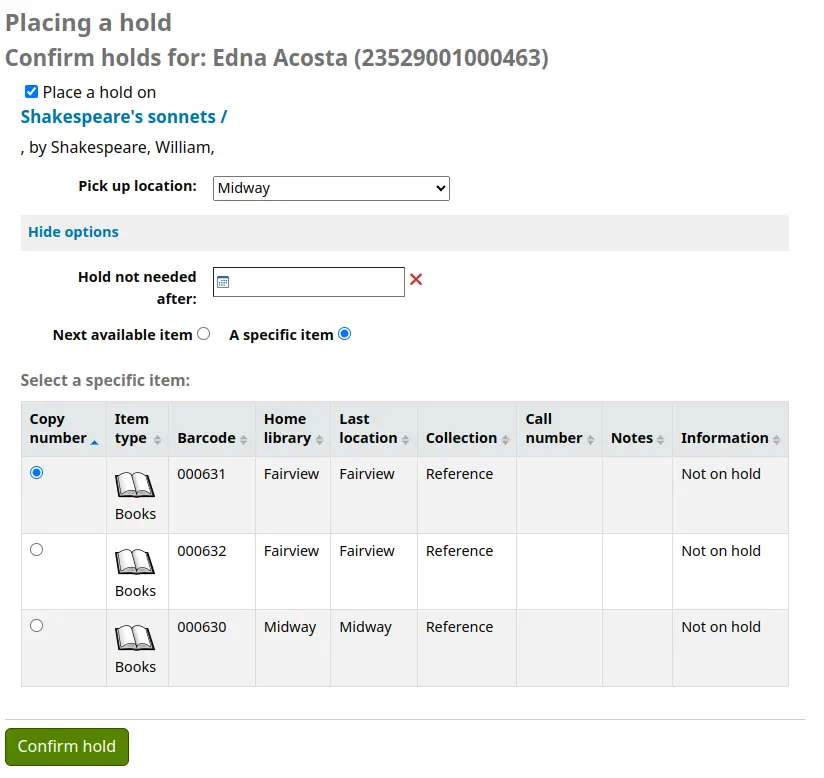
Nach Klick auf die Schaltfläche ‚Vormerkung bestätigen‘ wird dem/der Benutzer*in sein/ihr Benutzeraccount angezeigt, wo alle gesetzten Vormerkungen aufgelistet sind.
Rückruf eintragen
If your library accepts recalls (see setting up recalls for more information), patrons will be able to place recalls on items.
Die Option für einen Rückruf wird an verschiedenen Stellen im OPAC angezeigt:
In der Trefferliste nach einer Suche, wird die Option für den Rückruf bei jedem rückrufbaren Treffer angezeigt.

In der Detailansicht wird der Link auf der rechten Seite (oder am unteren Bildschirmrand auf kleinen Bildschirmen) bei den Optionen angezeigt

Jeder dieser Links führt zum Rückrufformular.
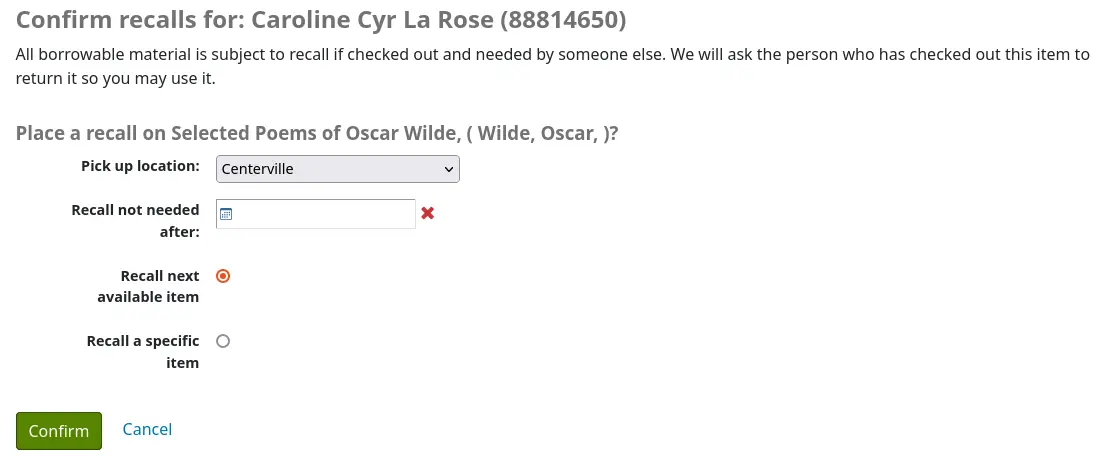
Abholort: der Benutzer/die Benutzerin kann auswählen, wo Sie das zurückgerufene Exemplar abholen möchten.
Recall not needed after: if the patron not need this item after a certain date, they can enter it here. The recall will be automatically expired (with the expire_recalls.pl cronjob) after that date.
Das nächste verfügbare Exemplar oder ein bestimmtes Exemplar zurückrufen: der Benutzer/die Benutzerin kann auswählen, ob irgendein oder ein spezifisches Exemplar zurückgerufen wird. Wenn „Bestimmtes Exemplar zurückrufen“ ausgewählt wird, muss ein Exemplar aus der Liste gewählt werden.
Sobald der/die Benutzer*in den Rückruf bestätigt hat, wird eine Meldung ausgegeben, dass der/die aktuelle Entleiher*in benachrichtigt wurden.
Bemerkung
Die Benachrichtigung an den Benutzer, der das Exemplar gerade hat, lautet RETURN_RECALLED_ITEM. Sie kann im Werkzeug Benachrichtigungen und Quittungen bearbeitet werden.
Der Rückruf wird im Reiter „Rückrufe“ im Benutzerkonto angezeigt und ebenso in der Rückrufhistorie.
Kataloganreicherung
OverDrive
If the OverDrive system preferences are used, an OPAC search will also search the library’s OverDrive collection.
After conducting a search, you will see a hyperlink above the library catalogue results: ‚Found X results in the library’s OverDrive collection‘.
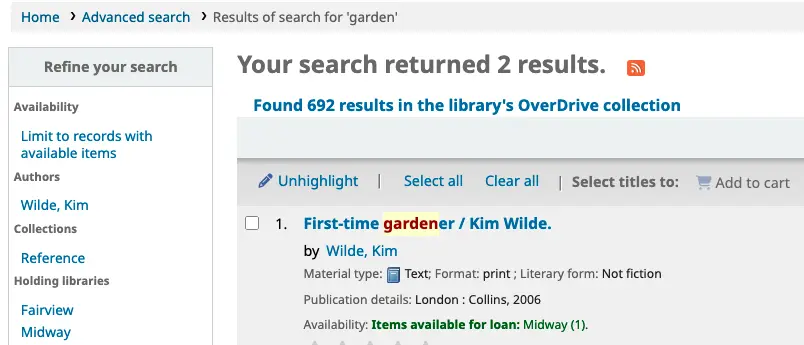
When you click on this link, you will see all the corresponding OverDrive results without navigating away from the OPAC.
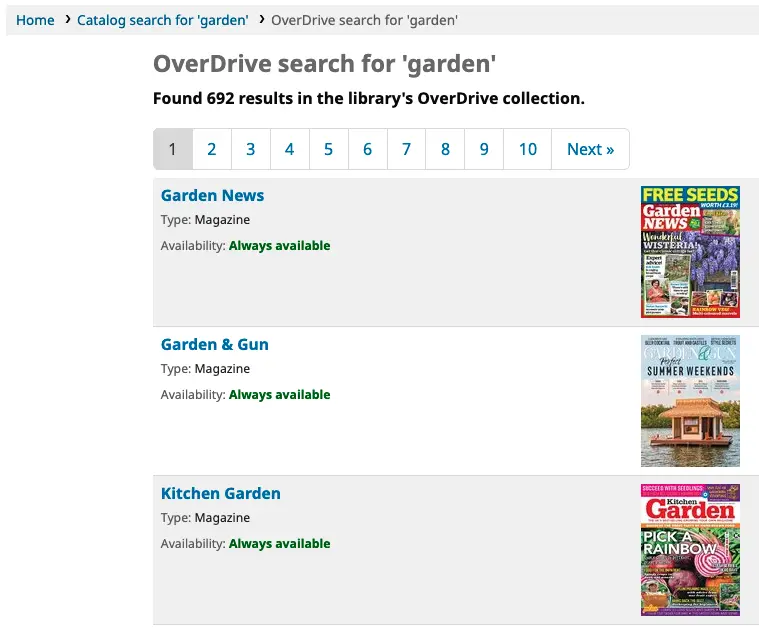
Clicking on a title in this list will take you to the record on the OverDrive website.
Tagging
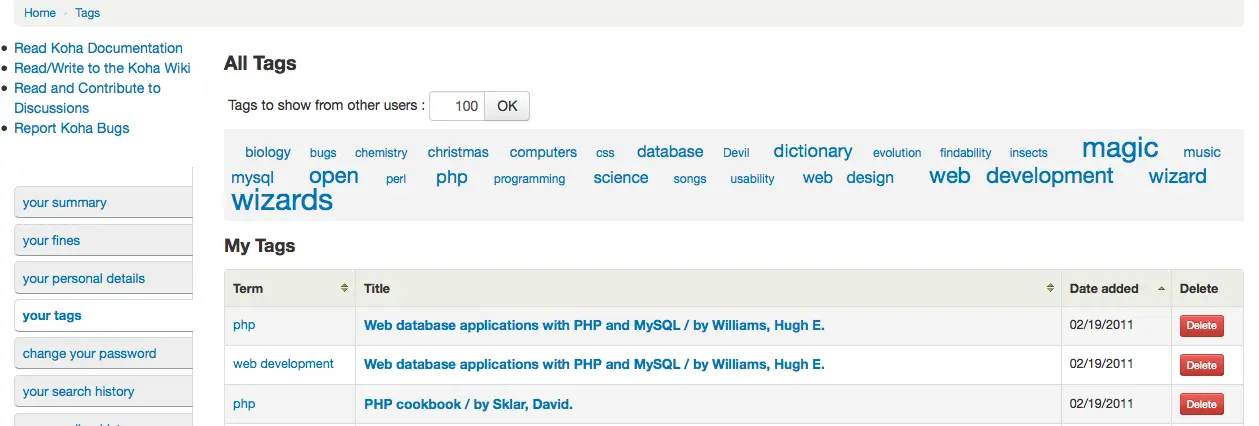
Abhängig von Ihren Einstellungen in den Systemparametern TagsEnabled, TagsInputOnList und TagsInputOnDetail können Benutzer*innen einem bibliographischen Datensatz Tags hinzufügen, ausgehend von der Trefferliste, oder der Detailansicht eines Datensatzes.
Wenn Sie Benutzer*innen die Möglichkeit geben, Tags aus der Liste der Suchergebnisse hinzuzufügen (siehe TagsInputOnDetail), sehen Benutzer*innen eine Schaltfläche „Tag hinzufügen“ unter jedem Ergebnis und eine Option „Tag“ am oberen Rand des Bildschirms.

Um ein Tag einem Exemplar hinzuzufügen, klicken Sie auf ‚Tag hinzufügen‘, geben Sie die neuen Tags (getrennt durch Komma) in der Checkbox ‚Neue Tags‘ ein und klicken danach auf die Schaltfläche ‚Hinzufügen‘ Sie erhalten eine Bestätigung, welche Tags Sie hinzugefügt haben.

Ausgehend von der Trefferliste können Sie auch mehreren Exemplaren gleichzeitigs Tags vergeben, indem Sie die Exemplare über die Checkboxen links auswählen und die Option ‚Tag‘ über der Trefferliste auswählen. Es öffnet sich ein Kasten ‚Neuer Tag‘ in den Sie die Tags für alle ausgewählten Exemplare schreiben können.
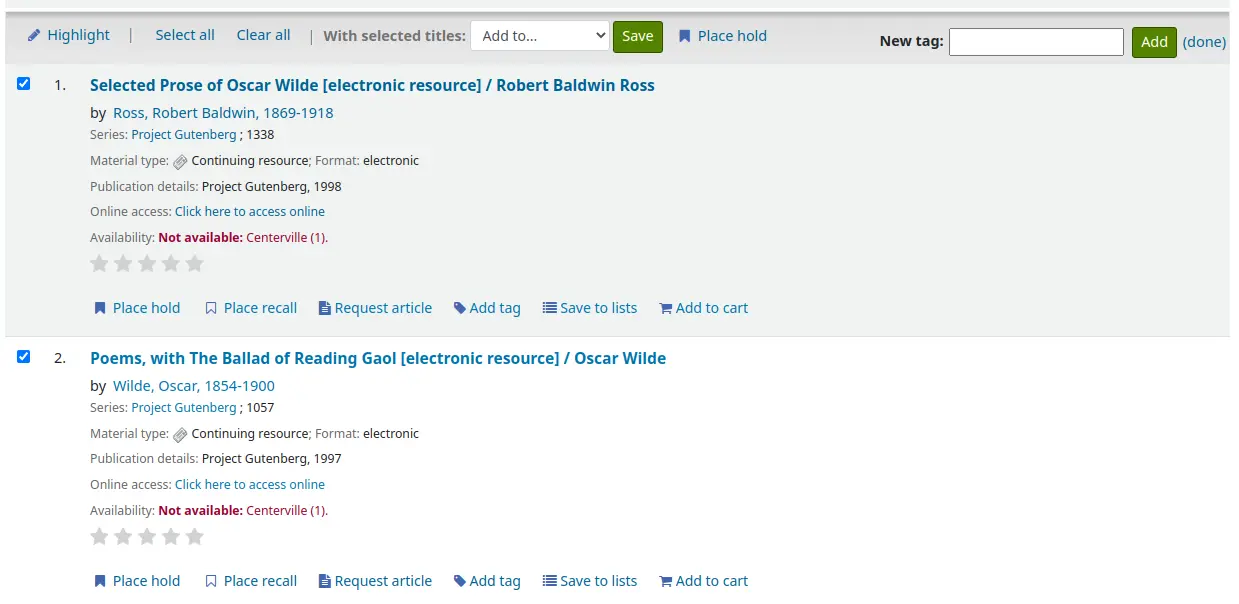
Wenn der Systemparameter TagsInputOnDetail aktiviert ist, haben Benutzer*innen auch die Möglichkeit, Tags aus einer Liste und aus dem Korb hinzuzufügen.
Wenn der Systemparameter TagsInputOnDetail aktiviert ist, haben Benutzer*innen die Möglichkeit, auf der Datensatz-Detailseite Tags hinzuzufügen, indem sie auf den Link „Tag(s) hinzufügen“ klicken. Der Link wird durch ein Eingabefeld ersetzt.
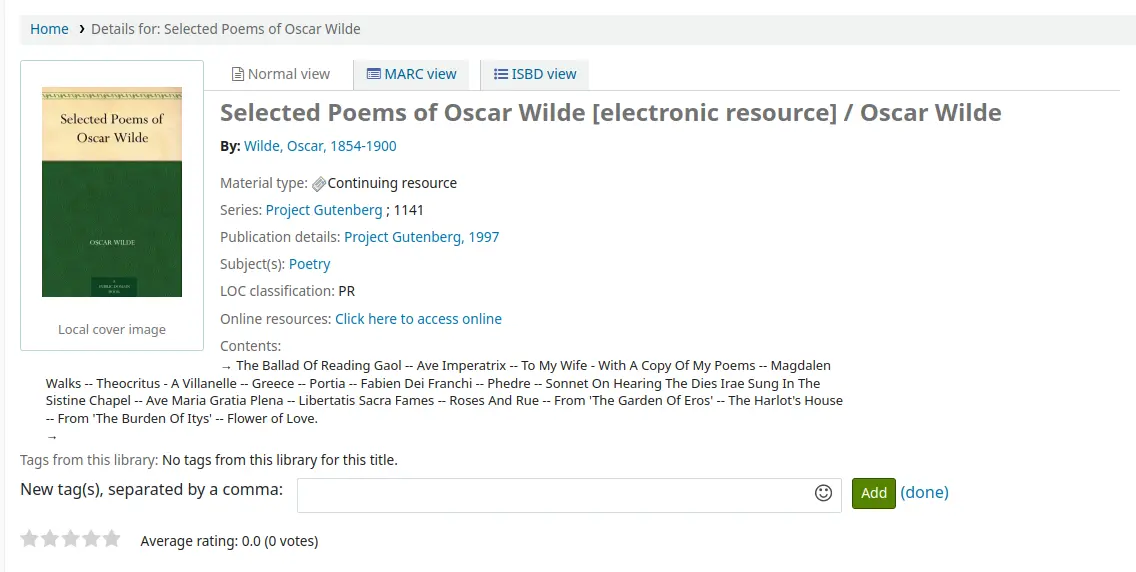
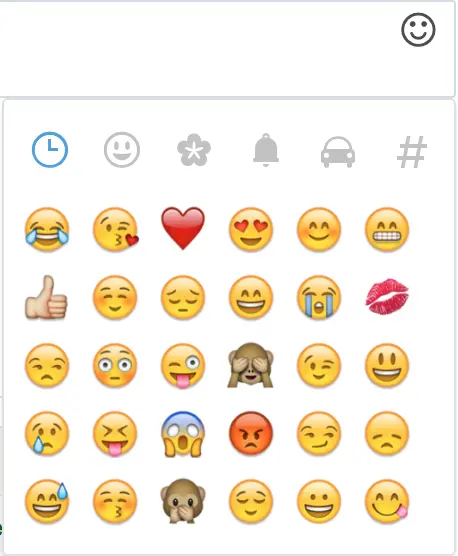
Emojis können auch eingefügt werden, indem Sie den Emoji-Picker nutzen wenn Sie Tags von der Detailseite eines Datensatzes aus hinzufügen.
Zotero
Zotero is an open source reference manager for saving and managing a bibliography. Learn more about and download Zotero at https://www.zotero.org.
Wenn Sie Zotero installiert haben, sehen Sie in der Trefferliste im Koha-OPAC ein Ordner-Icon in der Adresszeile rechts der URL. Klicken Sie darauf öffnet sich eine Liste von Titeln, die Sie von der Liste Zotero hinzufügen können.
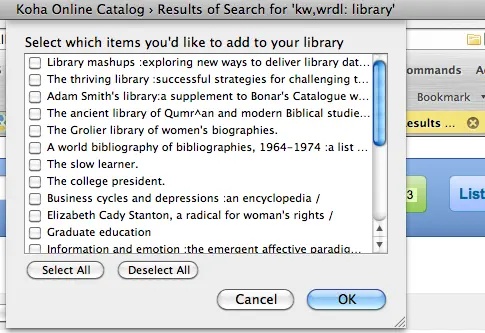
Wählen Sie die Titel aus, die Sie Zotero hinzufügen möchten und betätigen Sie die Schaltfläche ‚OK‘. Die Titel werden angezeigt, wenn Sie Ihre Zotero-Bibliothek öffnen.

Benutzerdefinierte RSS-Feeds
Indem Sie den Cronjob für RSS-Feeds verwenden, können Sie einen RSS-Feed für jede SQL-Abfrage (zum Beispiel für Neuerwerbungen in der Erwerbung) generieren. Der Cronjob läuft über die Kommandozeile um ein RSS XML Dokument zu produzieren.
Die Datenausgabe sollte in einem Verzeichnis zugänglich von der OPAC- (oder Dienstoberfläche) erfolgen, so dass der/die Benutzer*in das RSS feed herunterladen kann.
An example of usage can be found at: misc/cronjobs/rss/lastAcquired.conf
Der RSS-Cronjob sollte regelmäßig laufen (zum Beispiel täglich) um den Feed auf dem aktuellen Stand zu halten.
Die Konfigurationsdatei (zum Beispiel lastAcquired.conf) listet
den Namen der Templatedatei auf, die benutzt werden sollte
Pfad zur Ausgabedatei
SQL-Abfrage
Der RSS-Cronjob läuft durch die SQL-Abfrage und gibt dann die Feeds der Abfrage aus, druch das Template, welches die Ausgabedatei erstellt.
Wichtig
Für die Benutzung der benutzerdefinierten RSS-Feeds müssen Sie den RSS-Cronjob aktivieren.
OPAC self-registration
Erlauben Sie die Selbstregistrierung, können sich Benutzer*innen über den OPAC für Ihre eigenen Accounts registrieren. Wenn Sie den Systemparameter PatronSelfRegistration auf ‚Erlaube‘ gesetzt haben bekommt der/die Benutzer*in unterhalb der Login-Box auf der Hauptseite des OPACs einen Link zur Registrierung angezeigt.
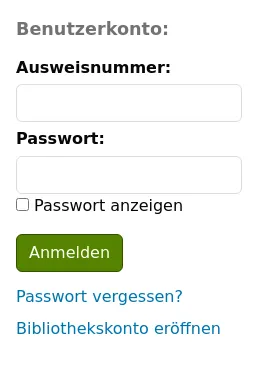
Wenn der/die Benutzer*in auf den ‚Hier anmelden‘ Link klickt, wird er auf die Registrierungsseite weitergeleitet. Die Optionen der Registrierungsseite können durch die Einstellungen in den Systemparametern PatronSelfRegistrationBorrowerMandatoryField und PatronSelfRegistrationBorrowerUnwantedField kontrolliert werden.
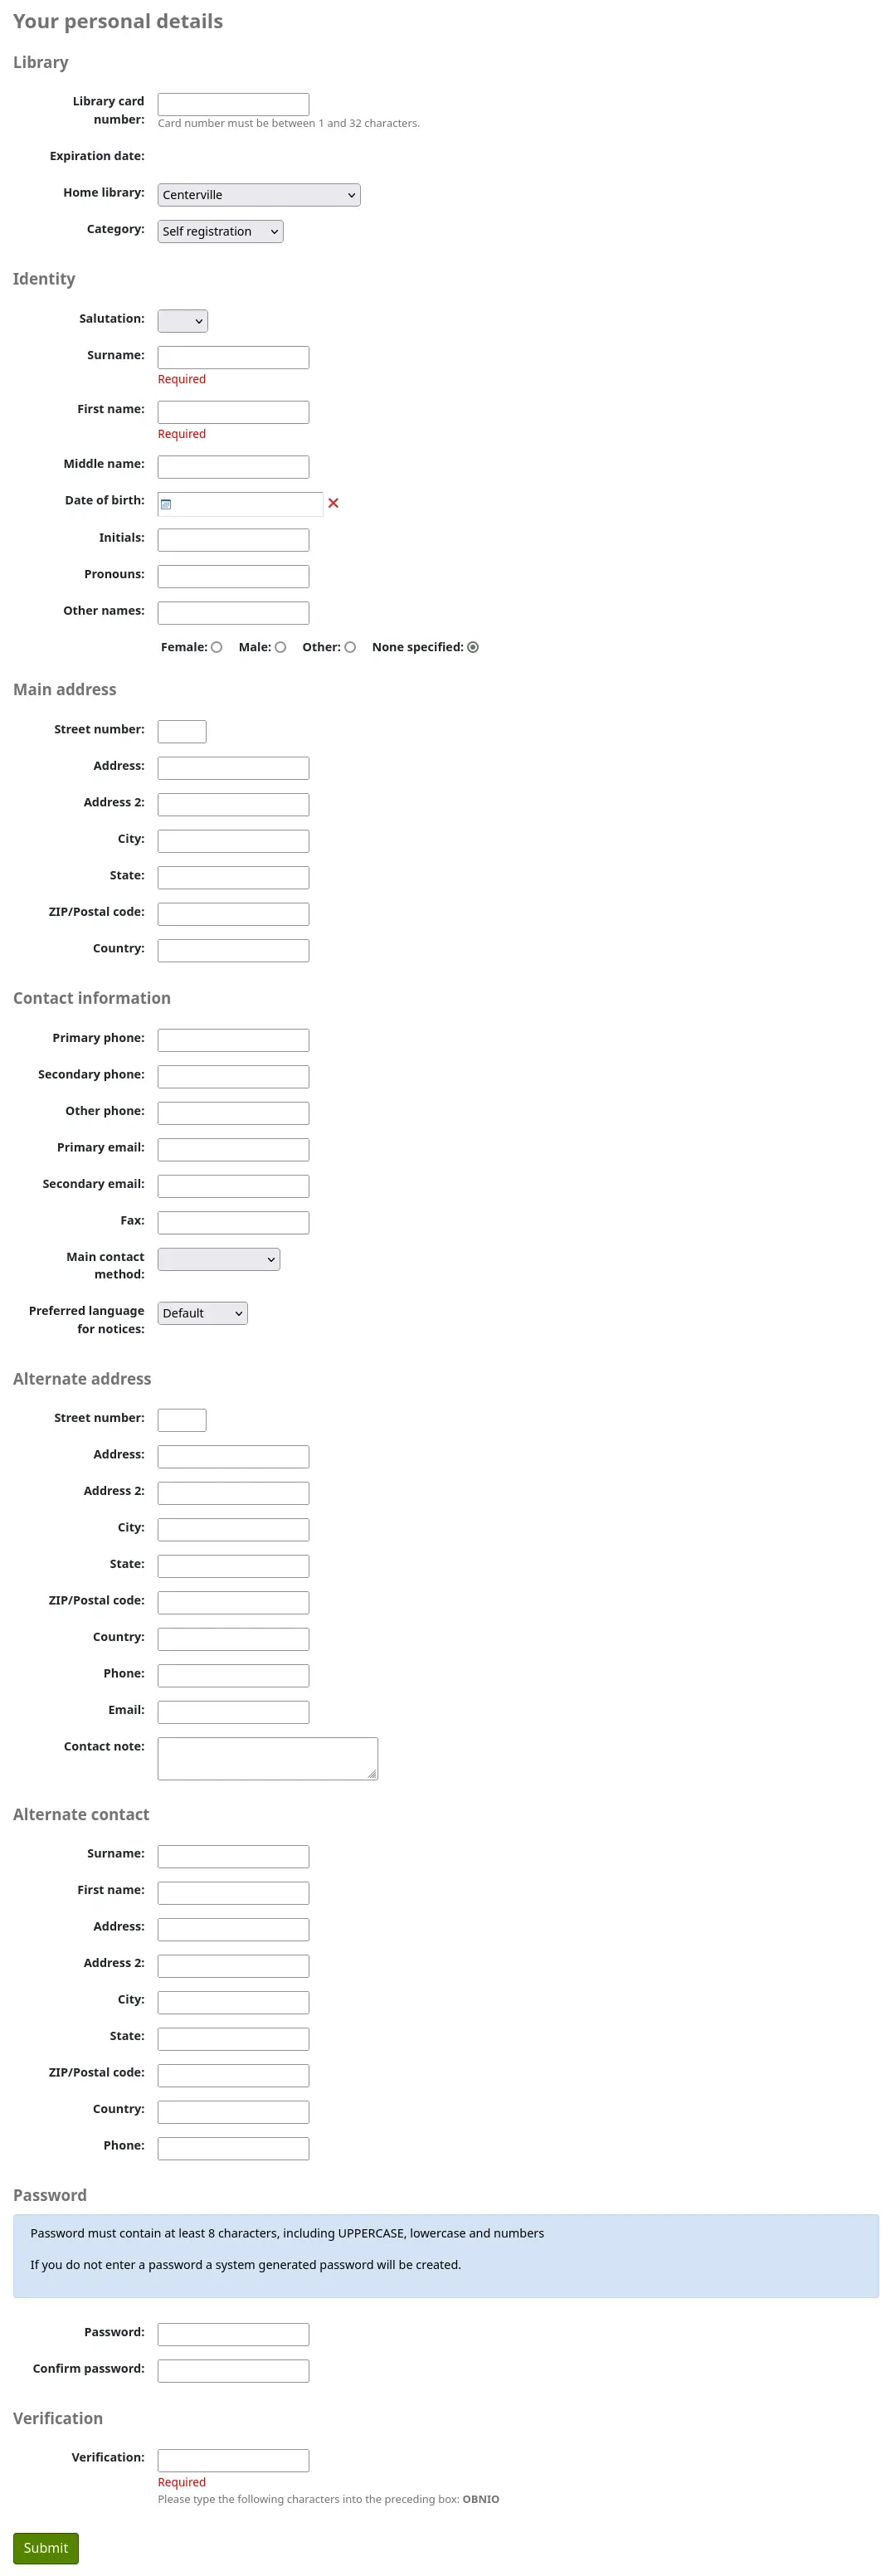
Bemerkung
To prevent errors in birth years, you can enable the PatronSelfRegistrationAgeRestriction system preference. This adds a maximum age check to the self-registration.
Wenn der/die Benutzer*in seine Registrierung bestätigt hat, bekommt er/sie eine E-Mail mit seinem/ihrem neuen Benutzernamen und Passwort zugeschickt um den Account zu bestätigen (wenn Sie den Systemparameter PatronSelfRegistrationVerifyByEmail auf „Erfordere“ gesetzt haben) oder es werden der neue Benutzername und das Passwort angezeigt. Wurde der Systemparameter PatronSelfRegistrationPrefillForm auf „Anzeige und automatisches Ausfüllen“ gesetzt, wird ein vorausgefülltes Login-Formular angezeigt.

Sie können auf dieser Seite zusätzliche Anweisungen hinzufügen, indem Sie eine HTML-Anpassung mit dem Anzeigeort ‚PatronSelfRegistrationAdditionalInstructions‘ erstellen.
To be notified when a patron registers via the OPAC, use the EmailPatronRegistrations system preference, or the PatronSelfRegistrationAlert system preference.
Patrons registered in this way will not have a card number until assigned one by the library, but will have access to all OPAC functionality immediately. For this reason it is recommended that you:
einen vorläufigen Benutzertyp für selbstregistrierte Benutzer*innen einrichten (z. B. „Selbstregistriert“), anstatt einen vorhandenen Benutzertyp zu verwenden, und diesen Wert im Systemparameter PatronSelfRegistrationDefaultCategory festlegen
geben Sie diesem Benutzertyp minimale Ausleihrechte, die Sie in den Ausleih- und Gebührenregeln definieren (wie zum Beispiel das Erlauben von Vormerkungen, aber keine Ausleihen)
That way patrons will either have to come in to the library to verify their identity before given a card number and the ability to check items out or the library will have to come up with internal policy on generating card numbers before providing them to self-registered patrons. Once this is done the library can change the category to one that is more appropriate (be it an adult, resident, non resident, student, etc) and add a card number/barcode.
Benutzerkonto
Wenn der Systemparameter opacuserlogin auf „Erlaube“ gesetzt ist, können sich Benutzer*innen anmelden und auf ihr Bibliothekskonto zugreifen.
Sobald Benutzer*innen sich anmelden, gelangen sie auf ihre Kontoübersicht.
Wenn Benutzer*innen die Startseite aufrufen, während sie angemeldet sind und der Systemparameter OPACUserSummary auf „Zeige“ gesetzt ist, dann sehen sie eine Zusammenfassung Ihrer Kontoinformationen statt des Anmeldebereichs.

Wenn OPACShowSavings so eingestellt ist, dass die Ersparnisse im Zusammenfassungsfeld angezeigt werden, enthält dieser Bereich auch die Ersparnisse, die der/die Benutzer*in durch die Nutzung der Bibliothek statt durch den Kauf der Medien erzielt hat.
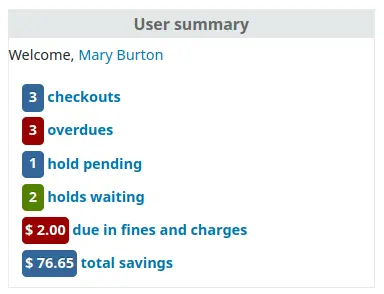
Auf jeder Seite des OPACs können Benutzer über einen Klick auf Ihren Namen in der oberen rechten Ecke ihr Benutzerkonto aufrufen.
Ihr Password zurücksetzen
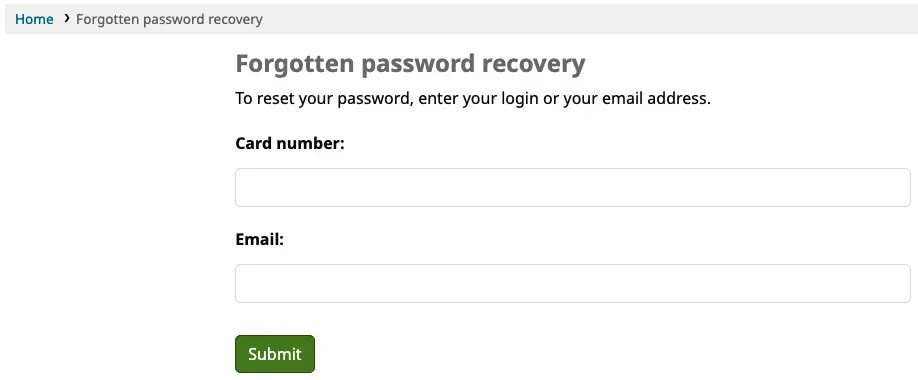
Haben Sie den Systemparameter OpacResetPassword auf „Erlaube“ gesetzt, erlaubt dies den Benutzern ihr Passwort zurückzusetzen, indem Sie auf den Link ‚Passwort vergessen‘ unter der Anmeldebox klicken.

Once clicked, they will be presented with a form asking for their login or their email address.
Warnung
Benutzer müssen in ihrem Benutzerkonto eine E-Mail-Adresse angegeben haben, um ihr Passwort zurücksetzen zu können. Wenn Sie noch keine E-Mail-Adresse angegeben haben, wird eine Fehlermeldung angezeigt

Das System sendet eine E-Mail mit einem Bestätigungslink und weiteren Hinweisen an den Benutzer.

Der Text der E-Mail kann über das Werkzeug Benachrichtigungen und Quittungen angepasst werden. Der Code der Benachrichtigung ist PASSWORD_RESET.
Wenn der Systemparameter NotifyPasswordChange aktiviert ist, erhält der Benutzer/die Benutzerin eine E-Mail mit der Information, dass das Passwort geändert wurde.
Der Text der E-Mail kann über das Werkzeug Benachrichtigungen und Quittungen angepasst werden. Der Code der Benachrichtigung ist PASSWORD_CHANGE.
Kontoübersicht
Auf dem Reiter „Kontoübersicht“ sehen die Benutzer alle von ihnen entliehenen Exemplare, wobei die überfälligen Exemplare in rot hervorgehoben werden.
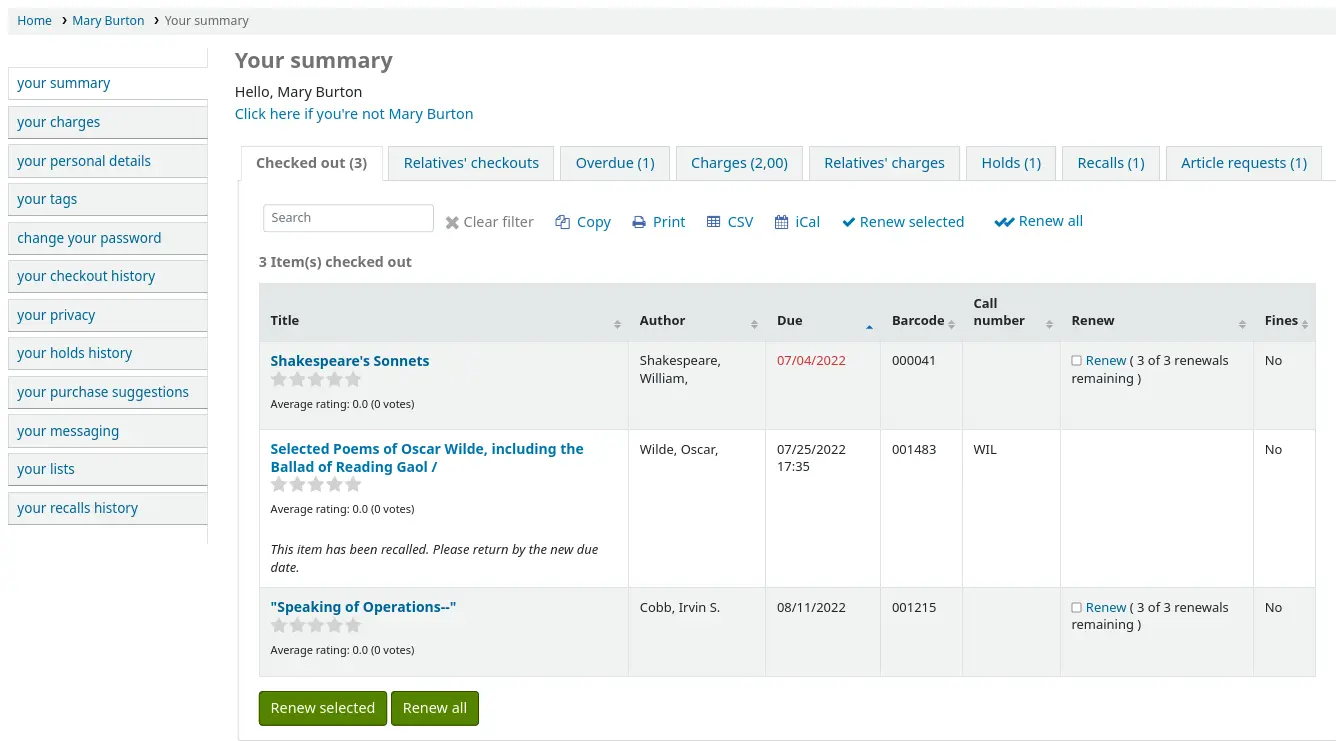
OPAC-Nachrichten und OPAC-Notizen werden oben auf dieser Seite angezeigt. Bei OPAC-Nachrichten hat der Benutzer die Möglichkeit, die Nachricht zu ignorieren. Dadurch wird die Nachricht aus seinem OPAC-Konto ausgeblendet und als gelesen markiert, aber nicht gelöscht.

Sie können dieser Seite mit der dem benutzerdefinierten HTML-Anzeigeort OpacMySummaryNote Inhalt hinzufügen. Der dort hinzugefügte Inhalt erscheint über der Zusammenfassung des Benutzers und unter der Willkommensnachricht.

Wenn OPACShowSavings so eingestellt ist, dass die Einsparungen auf der Seite „Ihre Zusammenfassung“ angezeigt werden, enthält dieser Bereich auch die Einsparungen, die der/die Benutzer*in durch die Nutzung der Bibliothek anstelle des Kaufs der Medien erzielt hat.

Wenn OpacRenewalAllowed auf „Erlaube“ gesetzt ist, können Benutzer ihre Ausleihen im OPAC selbst verlängern.
Wenn der Benutzer offene Gebühren, die den im Systemparameter OPACFineNoRenewals angegebenen Betrag übersteigen, wird ein Hinweis angezeigt, dass nicht verlängert werden kann.

Es wird ein Hinweis angezeigt, wenn das Eintragen von Vormerkungen aufgrund von Gebühren, welche die Angabe im Systemparameter maxoutstanding überschreiten, nicht mehr möglich sind.

Wenn AllowPatronToControlAutoRenewal auf „Erlaube“ gesetzt ist, können Benutzer*innen auswählen, ob ihre Ausleihen automatisch verlängert werden sollen oder nicht. Wählen sie „Ja“, werden die Exemplare für die eine automatische Verlängerung in den Ausleihkonditionen vorgesehen ist, wie erwartet verlängert. Wählen sie „Nein“, werden keine automatischen Verlängerungen für die Ausleihen durchgeführt.

Wenn Sie HTML-Code im Systemparameter OPACMySummaryHTML eingegeben haben, sehen Sie diesen rechts der Spalte „Gebühren“.
Tipp
Standardmäßig wird der Barcode nicht in der Ausleihtabelle des Benutzers im OPAC angezeigt. Wenn Ihre Benutzer die Barcodes auf ihrer Liste der ausgeliehenen Exemplare sehen möchten, können Sie ein Benutzerattribut mit dem Wert SHOW_BCODE und normiertem Wert von YES_NO einrichten.
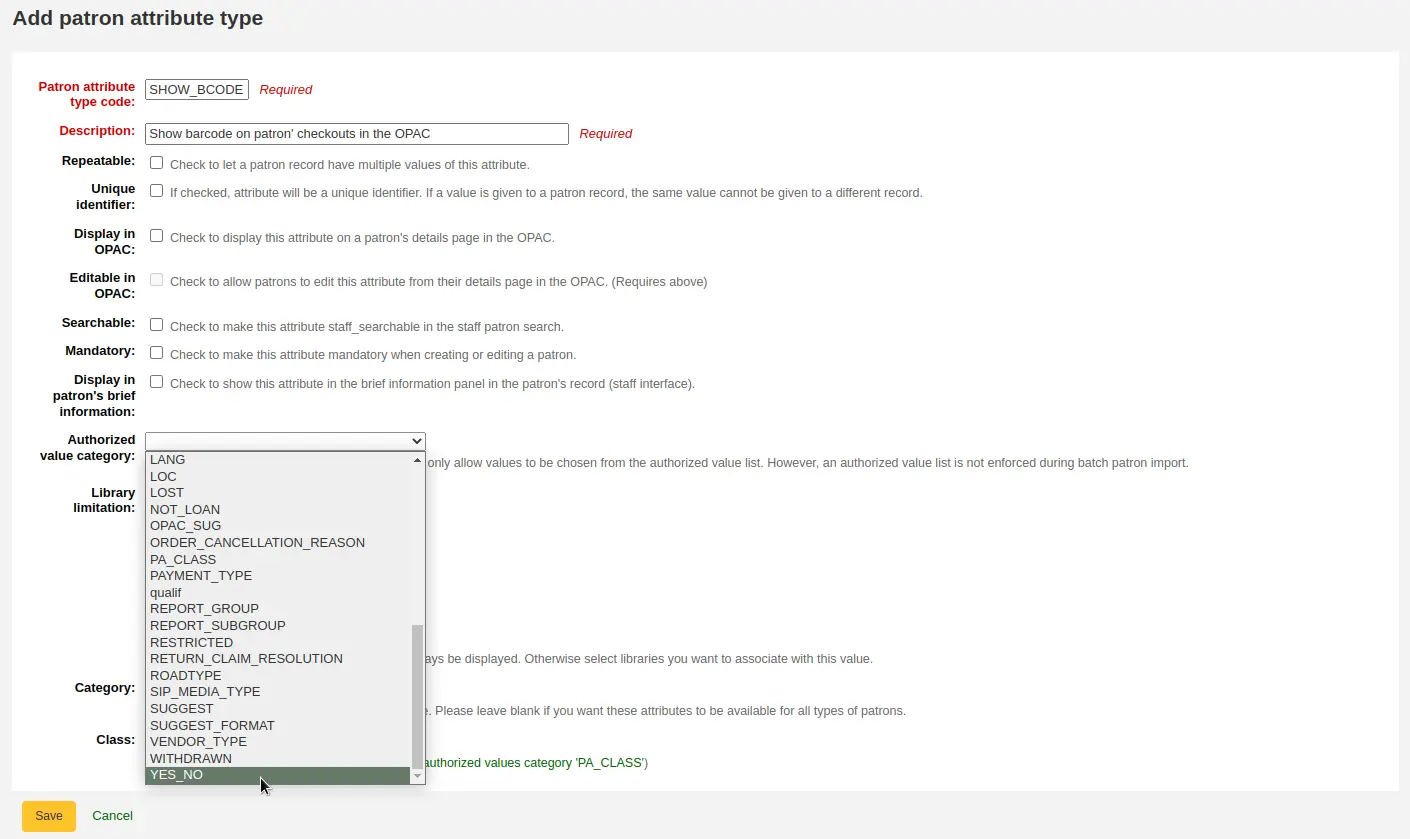
Setzen Sie im Benutzerdatensatz den Wert für SHOW_BCODE auf ‚ja‘.

Dies fügt eine Spalte in der Ausleihübersicht im OPAC hinzu, welche dem/der Benutzer*in die Barcodes der Exemplare anzeigt, die er ausgeliehen hat.
Wenn Sie möchten, dass der/die Benutzer*in eine Notiz zu ausgeliehenen Exemplaren hinterlegen kann, müssen Sie den Systemparameter AllowCheckoutNotes auf ‚Erlaube‘ setzen.
In der Ausleihübersicht eines/einer Benutzer*in erscheint eine zusätzliche Spalte, die dem/der Benutzer*in erlaubt eine Notiz zu hinterlegen (zum Beispiel: erste Seite fehlt, oder DVD ist zerkratzt).
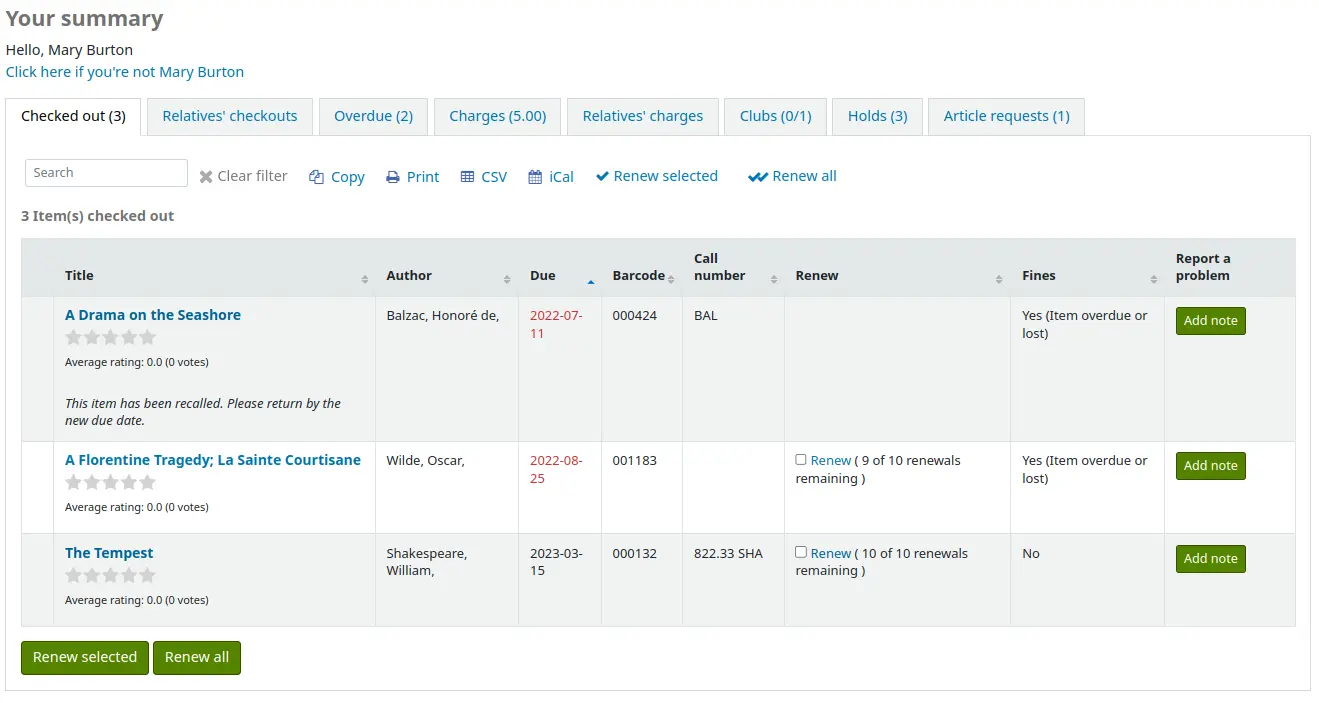
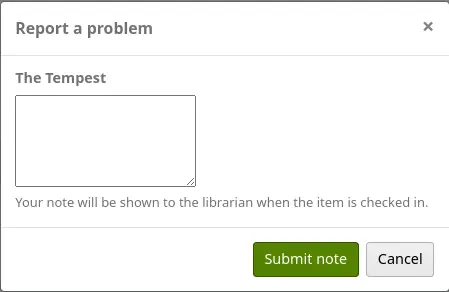
Wenn der/die Benutzer*in auf „Notiz hinzufügen“ klickt, kann er/sie eine Notiz zu dieser Ausleihe schreiben.
Das Bibliothekspersonal kann in der Dienstoberfläche Ausleihnotizen sehen und verwalten.
Wenn der Benutzer, für den/die gebürgt wurde, es über ihre Datenschutzeinstellungen, oder alternativ, wenn das Bibliothekspersonal die Datenschutzeinstellungen über den Systemparameter AllowStaffToSetCheckoutsVisibilityForGuarantor in der Dienstoberfläche verändern kann und dies getan hat, sieht der Bürge/die Bürgin nach Anmeldung einen Reiter mit „Ausleihen der Verwandten“ in seinem/ihrem Bibliothekskonto.

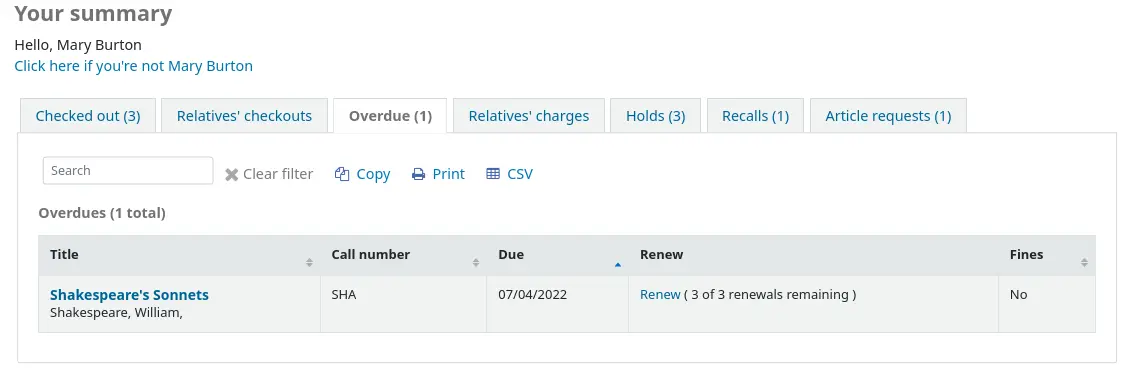
Ein Klick auf den Tab ‚Überfällig‘ zeigt nur die Exemplare an die überfällig sind.
Der Gebührentabelle zeigt nur die Summe der offenen Gebühren eines/einer Benutzers*in an. Klickt man auf die Summe wird man auf den Tab ‚Ihre Gebühren‘ weitergeleitet, wo der/die Benutzer*in dann eine Auflistung seiner Gebühren und Rechnungen angezeigt bekommt. Erheben Sie keine Gebühren in Ihrer Bibliothek können Sie diesen Reiter ausblenden, indem Sie den Systemparameter OPACFinesTab auf ‚Erlaube nicht‘ setzen

Wenn der Benutzer, für den/die gebürgt wurde, es über ihre Datenschutzeinstellungen, oder alternativ, wenn das Bibliothekspersonal die Datenschutzeinstellungen über den Systemparameter AllowStaffToSetFinesVisibilityForGuarantor in der Dienstoberfläche verändern kann und dies getan hat, sieht der Bürge/die Bürgin nach Anmeldung einen Reiter mit „Gebühren der Verwandten“ in seinem/ihrem Bibliothekskonto.

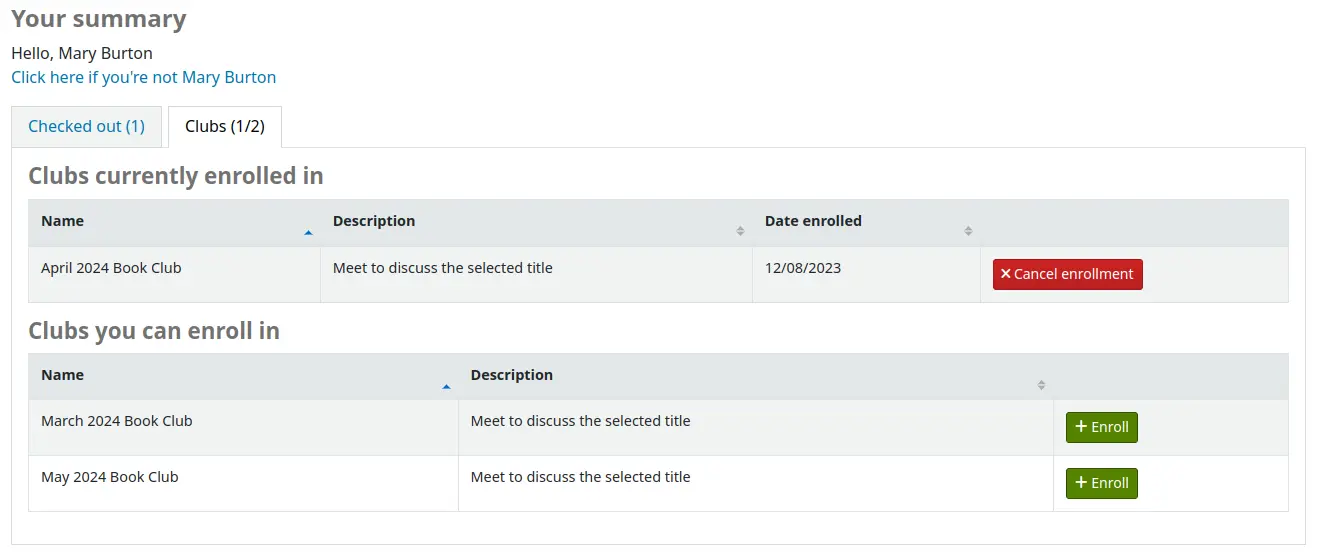
Der Reiter „Clubs“ zeigt alle laufenden Clubs, die eine öffentliche Anmeldung erlauben. Von hier aus können sich Benutzer*innen in Clubs einschreiben, indem sie auf die Schaltfläche „Einschreiben“ klicken.
Der Reiter „Vormerkungen“ zeigt dem Benutzer/der Benutzerin den Status aller Titel, die vorgemerkt wurden.
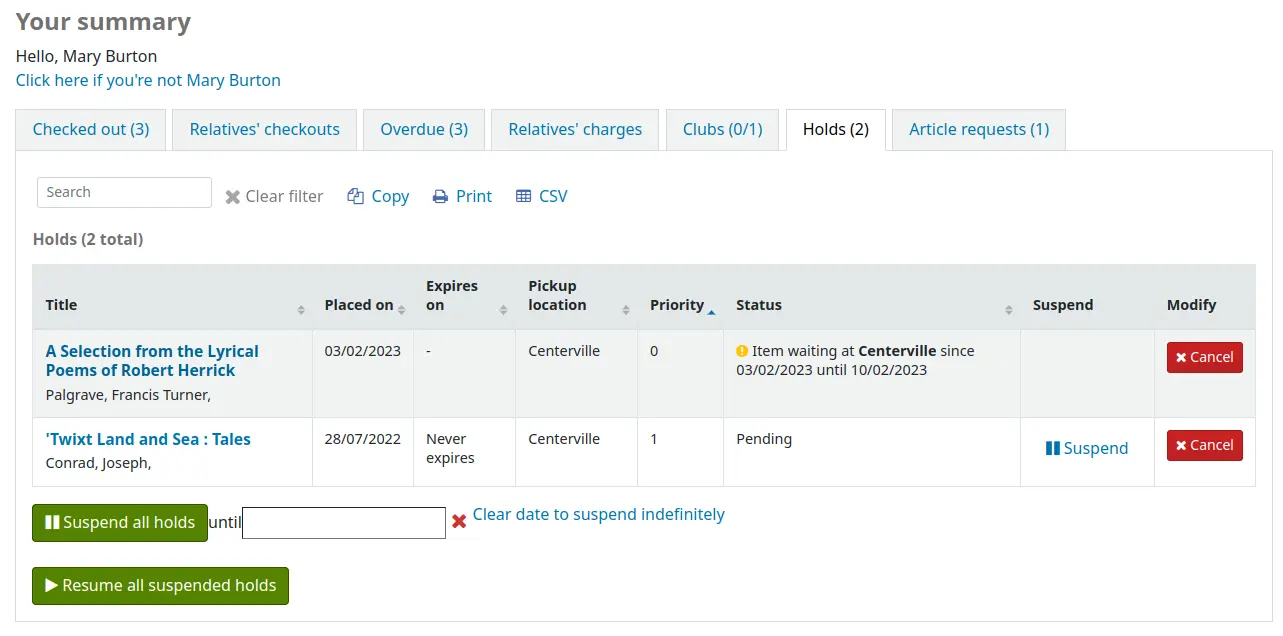
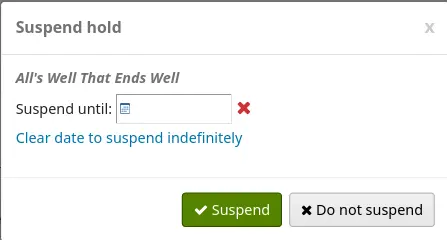
Je nach dem Wert des Systemparameters SuspendHoldsOpac können Benutzer*innen ihre eigenen Vormerkungen aussetzen, wenn sie sich nicht im Transfer befinden oder bereits auf sie warten. Wenn sie auf „Aussetzen“ klicken, haben sie die Möglichkeit, ein Datum zu wählen, an dem die Vormerkung wieder aufgenommen werden soll.
Der/die Benutzer*in kann die Vormerkungen auch auf unbestimmte Zeit aussetzen, oder diese auf ein spezielles Datum setzen. Hierfür müssen Sie die Optionen unten auf der Seite ausfüllen.
Bemerkung
Wenn der Systemparameter AutoResumeSuspendedHolds auf „Erlaube nicht“ gesetzt ist, kann kein Datum für die Reaktivierung der Vormerkung angegeben werden.
Im Reiter können Benutzer*innen auch Vormerkungen stornieren. Je nach der Richtlinie zur Stornierung bereitliegender Vormerkungen können sie auch Vormerkungen stornieren, die bereits auf sie warten.
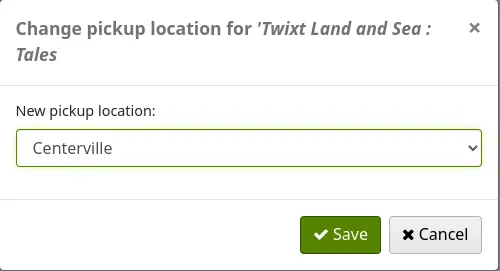
Je nach dem Wert des Systemparameters OPACAllowUserToChangeBranch kann der/die Benutzer*innen die Abholbibliothek von Vormerkungen ändern. Wenn ein oder mehrere Status im Systemparameter ausgewählt sind, erscheint ein Link „Ändern“ unter dem Namen der aktuellen Abholbibliothek für Vormerkungen, die diesen Status haben.
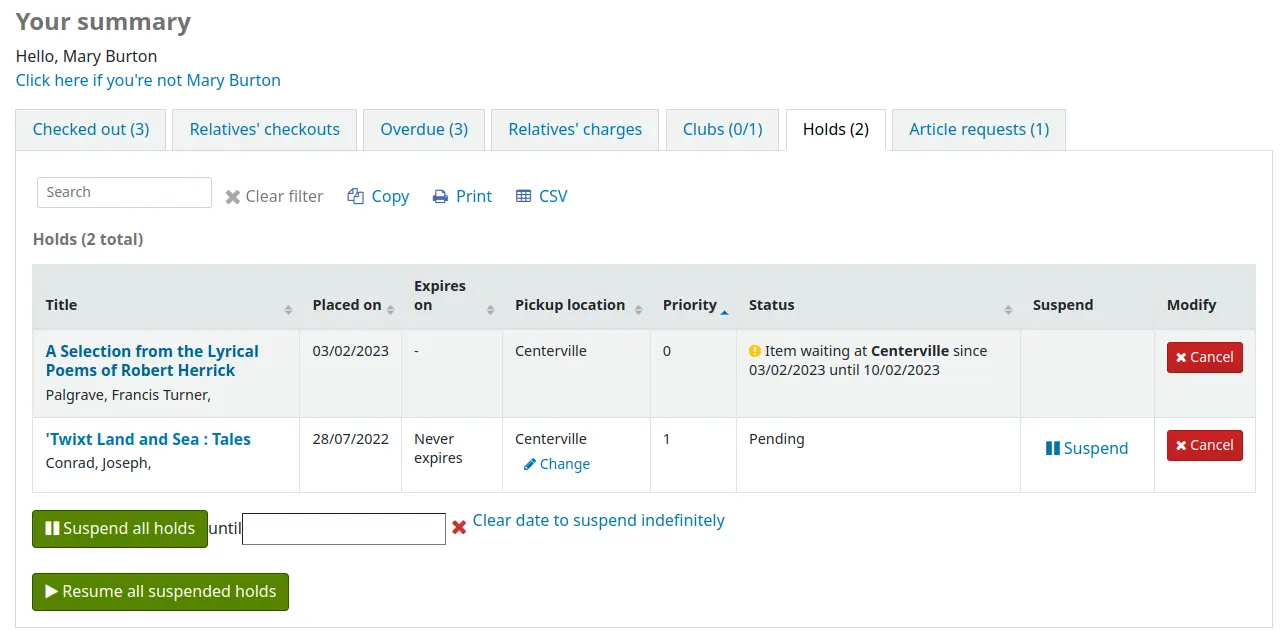
Wenn der/die Benutzer*in auf den Link „Ändern“ klickt, erscheint ein Pop-up-Fenster mit einer Auswahl von Bibliotheken, die die Abholung von Vormerkungen erlauben.
If your library allows recalls, the patron can see the recalls they have requested and their various statuses in the ‚Recalls‘ tab.
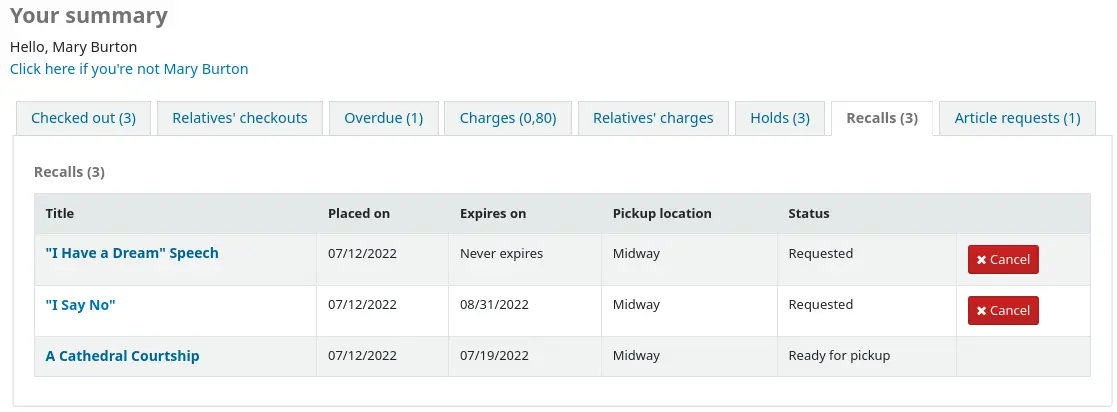
Der Benutzer/die Benutzerin kann einen Rückruf über Klick auf die Schaltfläche „Stornieren“ beenden, wenn dieser noch nicht abholbereit ist.
Benutzer-Flaggen
Wenn Sie das Konto eines/einer Benutzer*in geflaggt haben, kann der/die Benutzer*in eine der folgenden Fehlermeldungen oben im Benutzerkonto angezeigt bekommen.
Benutzerausweis wurde als verloren markiert

Benutzeradresse fraglich

Hinweis
diese Fehlermeldung enthält keinen Link zum Aktualisierungsformular, wenn Sie OPACPatronDetails auf „Nicht erlauben“ gesetzt haben
Benutzer ist gesperrt

Library card
Version
Dieses Feature kam in Koha-Version 24.11 hinzu.
If the OPACVirtualCard system preference is set to ‚Allow‘, patrons will see a ‚Library card‘ tab where their library card barcode is displayed.
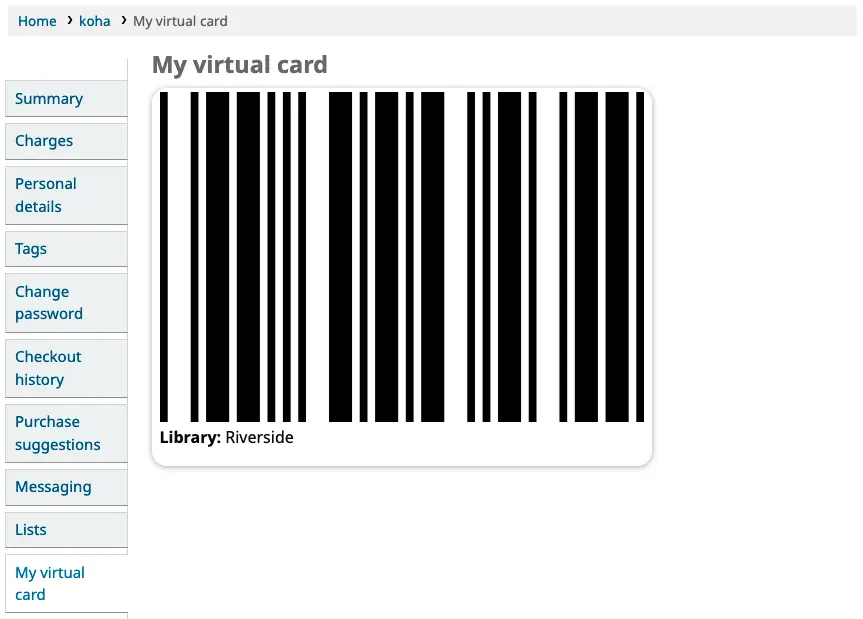
If the patron has logged in to their OPAC account from a mobile device, their barcode can then easily be scanned by library self-service kiosks and other services.
Ihre Gebühren
Erhebt Ihre Bibliothek Gebühren, ist der zweite Reiter im Benutzeraccount der Reiter ‚Gebühren‘. Klicken Sie auf diesen Reiter, bekommt der/die Benutzer*in die gesamte Historie der Abrechnung der Bibliothek angezeigt.
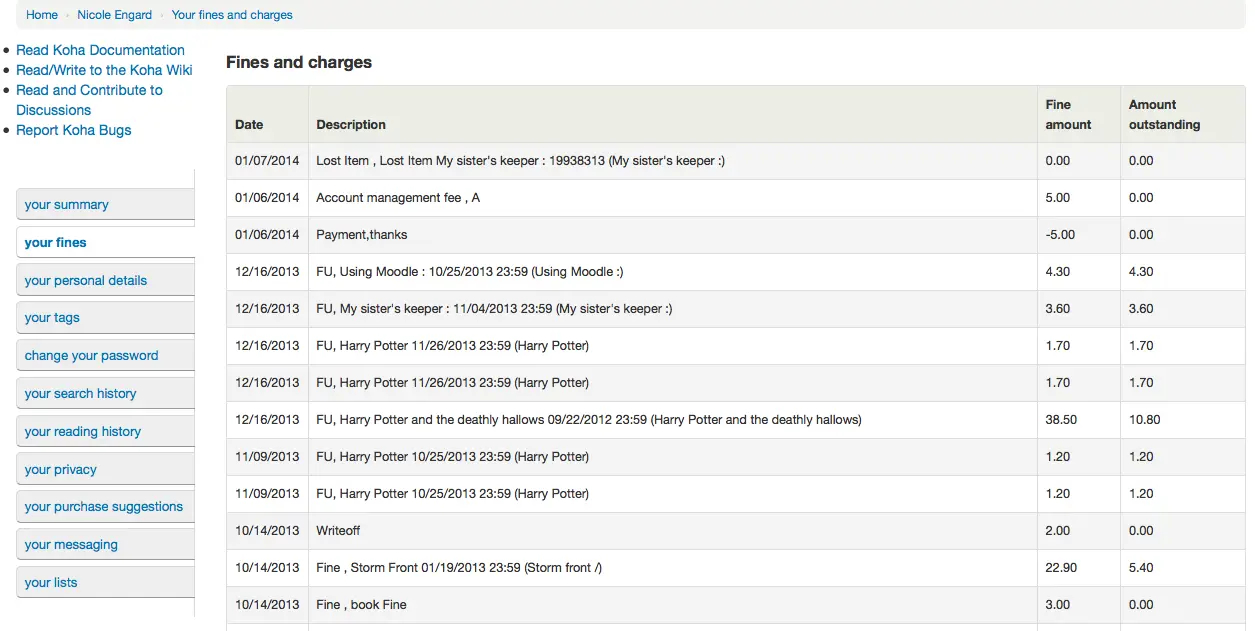
Wenn Sie Benutzern erlauben Gebühren mit PayPal über den OPAC zu bezahlen, indem der Systemparameter EnablePayPalOpacPayments auf ‚Erlaube‘ gesetzt ist, erscheinen Checkboxen auf der linken Seite jeder angezeigten ausstehenden Gebühr.
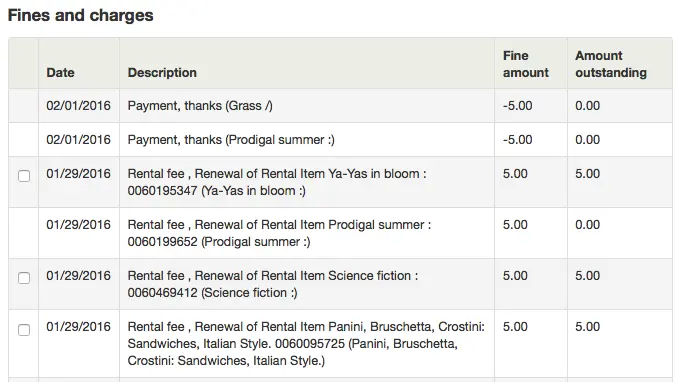
Darunter bekommt der/die Benutzer*in die PayPal-Option für jedes Exemplar angezeigt.
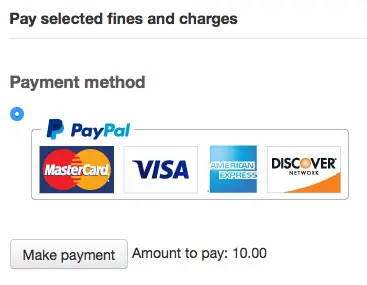
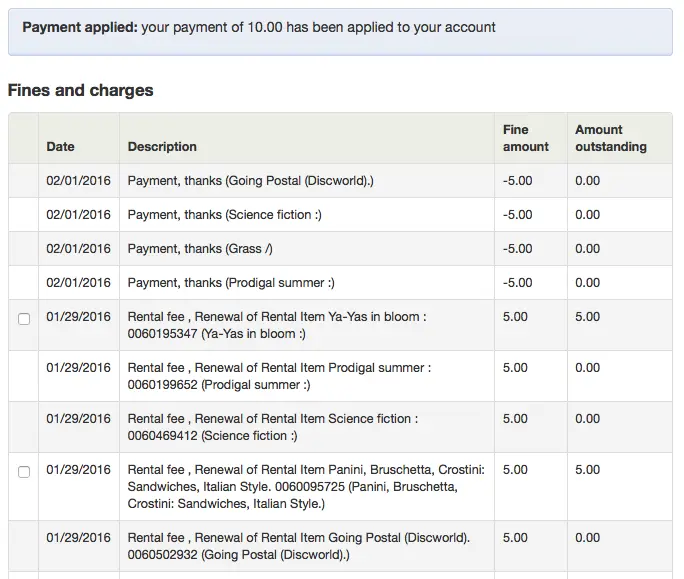
Nach dem Bezahlen bekommen sie eine Bestätigung angezeigt
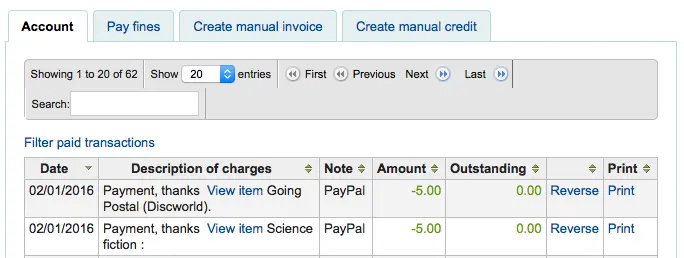
Sie können auch auf der Seite der Dienstoberfläche sehen, dass die Gebühr mit PayPal bezahlt wurde.
Persönliche Daten
Wenn Sie Ihren Systemparameter OPACPatronDetails auf ‚Erlaube‘ gesetzt haben, bekommt der/die Benutzer*in eine Seite mit seinen Kontaktinformationen angezeigt, wenn er auf den Reiter ‚Persönliche Daten‘ klickt. Sie können kontrollieren, welche Felder der/die Benutzer*in angezeigt bekommen soll und können diese mit den Systemparametern PatronSelfModificationBorrowerUnwantedField und PatronSelfModificationMandatoryField konfigurieren.
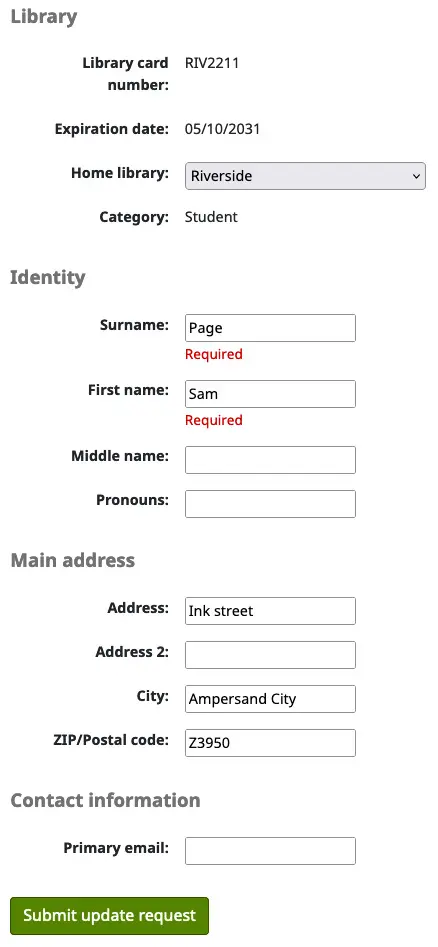
Die Benutzer*innen können Ihre persönlichen Daten bearbeiten und mit dem Klick auf die Schaltfläche ‚Aktualisierte Daten abschicken‘. Die Aktualisierung wird an die Bibliothek zur Kontrolle weitergeleitet. Alle Adressänderungswünsche werden auf der Startseite der Dienstoberfläche unterhalb der Module angezeigt zusammen mit anderen Optionen.

Wenn der Systemparameter AutoApprovePatronProfileSettings aktiviert ist, muss das Bibliothekspersonal Änderungen nicht genehmigen.
Ist der Systemparameter OPACPatronDetails auf ‚Erlaube nicht‘ gesetzt, bekommen die Benutzer*innen nur ihre persönlichen Details angezeigt und eine Nachricht, dass sie sich für Änderungen an die Bibliothek wenden sollen.
Einwilligungen
Wenn Sie den Systemparameter PrivacyPolicyConsent auf „tolerant“ oder „erzwungen“ gesetzt haben, dann haben angemeldete Benutzer*innen im OPAC einen Reiter mit der Bezeichnung „Einwilligungen“, in dem ihre Einwilligungserklärungen gespeichert sind. Standardmäßig wird in der Einwilligungserklärung auf die Datenschutzrichtlinie der Bibliothek verwiesen. Mit dem Systemparameter PrivacyPolicyURL können Sie eine URL verwenden, die auf Ihre eigene Datenschutzrichtlinie verweist.

Version
Ein neuer Plugin-Hook für ‚patron_consent_type‘ wurde in Koha-Version 23.11 hinzugefügt, um weitere Arten der Einwilligung im OPAC zu ermöglichen. Weitere Informationen finden Sie auf der Seite Plugin Hooks im Wiki.
Passwort ändern
Haben Sie den Systemparameter OpacPasswordChange auf ‚Erlaube‘ gesetzt, so wird im Benutzeraccount des OPACs der Reiter ‚Passwort ändern‘ angezeigt, wo Benutzer*innen das Passwort für das Einloggen im OPAC ändern können. Der/die Benutzer*in bekommt ein Standardformular präsentiert, welches das alte Passwort und dann das neue Passwort mit Wiederholung abfragt.
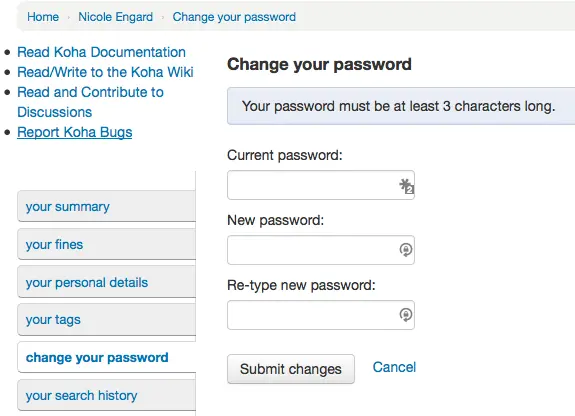
Wenn der Systemparameter NotifyPasswordChange aktiviert ist, erhält der Benutzer/die Benutzerin eine E-Mail mit der Information, dass das Passwort geändert wurde.
Der Inhalt dieser E-Mail kann unter Benachrichtigungen und Quittungen angepasst werden. Der Code der Benachrichtigung lautet PASSWORD_CHANGE.
Suchhistorie
Ist Ihr Systemparameter EnableOpacSearchHistory auf ‚Speichere‘ gesetzt, können die Benutzer*innen durch den Reiter ‚Suchhistorie‘ Ihre Suchhistorie aufrufen.
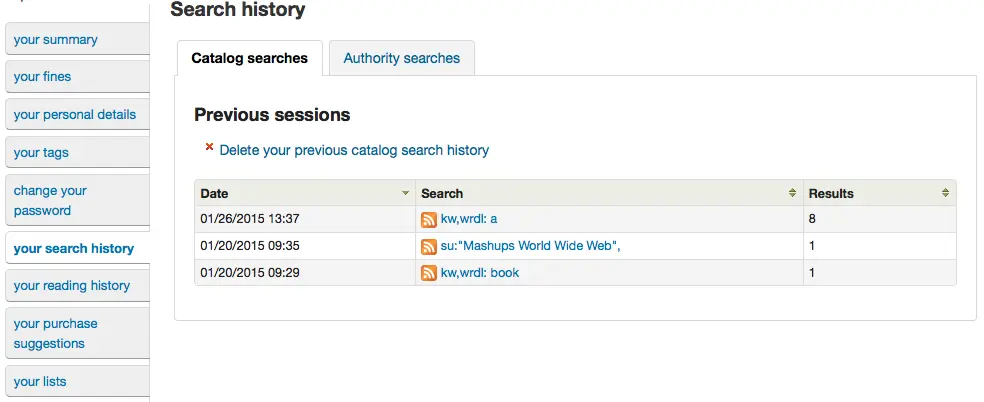
Die Suchhistorie zeigt alle Suchschritte auf, die der/die Benutzer*in ausgeführt hat. Klicken Sie auf eine Suchabfrage, wird diese Suche wieder ausgeführt. Der/die Benutzer*in kann die Suchhistorie jederzeit löschen in dem er auf den Link ‚Markierte Suchen entfernen‘ klickt, der in diesem Reiter unter der Historie angezeigt wird, oder über der Liste auf das kleine ‚x‘ ‚Löschen‘ klickt.

Ausleihhistorie
Abhängig von der Einstellung im Systemparameter opacreadinghistory wird dem/der Benutzer*in seine Ausleihhistorie in einem Reiter im Benutzerkonto angezeigt. Dort wird dem/der Benutzer*in seine/ihre gesamte Ausleihhistorie angezeigt, wenn er nicht über den Reiter Datenschutzeinstellungen festgelegt hat, dass diese Informationen nicht gespeichert werden sollen.
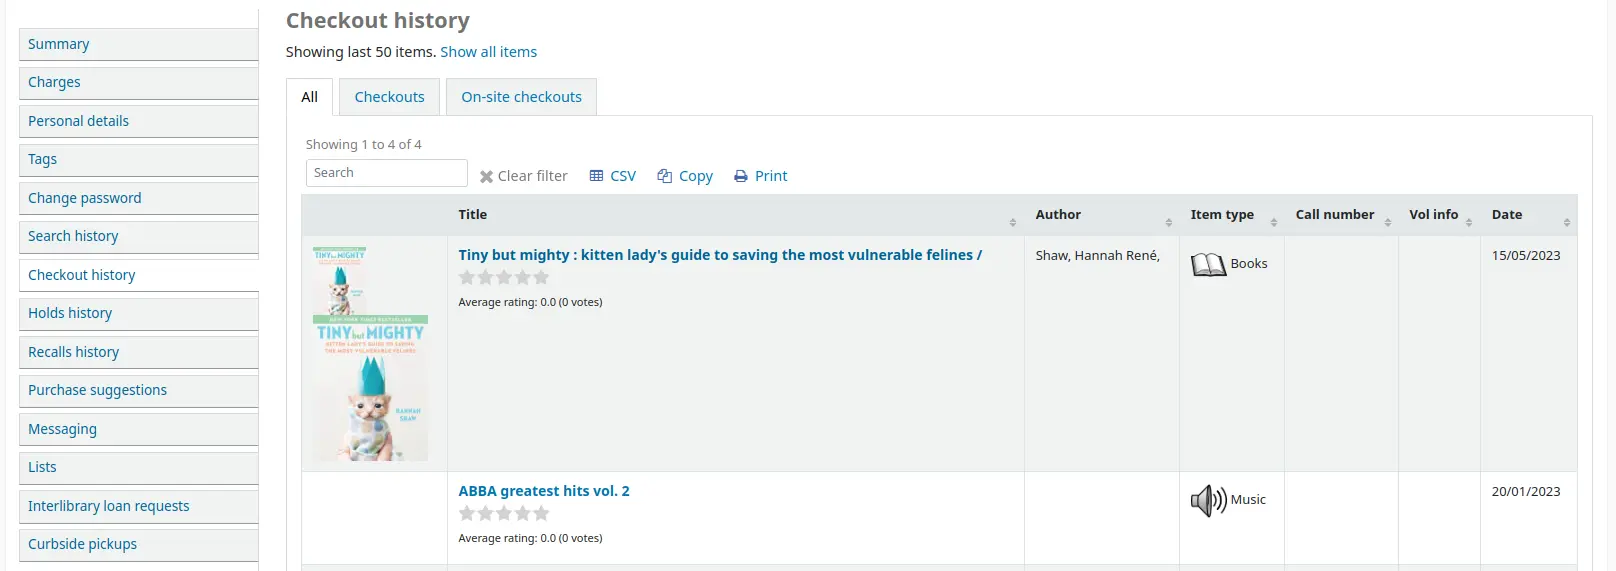
Wenn OPACShowSavings so eingestellt ist, dass die Einsparungen auf der Seite „Ihre Zusammenfassung“ angezeigt werden, enthält dieser Bereich auch die Einsparungen, die der/die Benutzer*in durch die Nutzung der Bibliothek anstelle des Kaufs der Medien erzielt hat.

Datenschutzoptionen
Der Reiter „Datenschutzeinstellungen“ wird angezeigt, wenn die Systemparameter opacreadinghistory und OPACPrivacy auf ‚Erlaube‘ gesetzt sind. Dieser Reiter erlaubt dem Benutzer, seine eigenen Datenschutzeinstellungen für die Ausleihhistorie festzulegen.
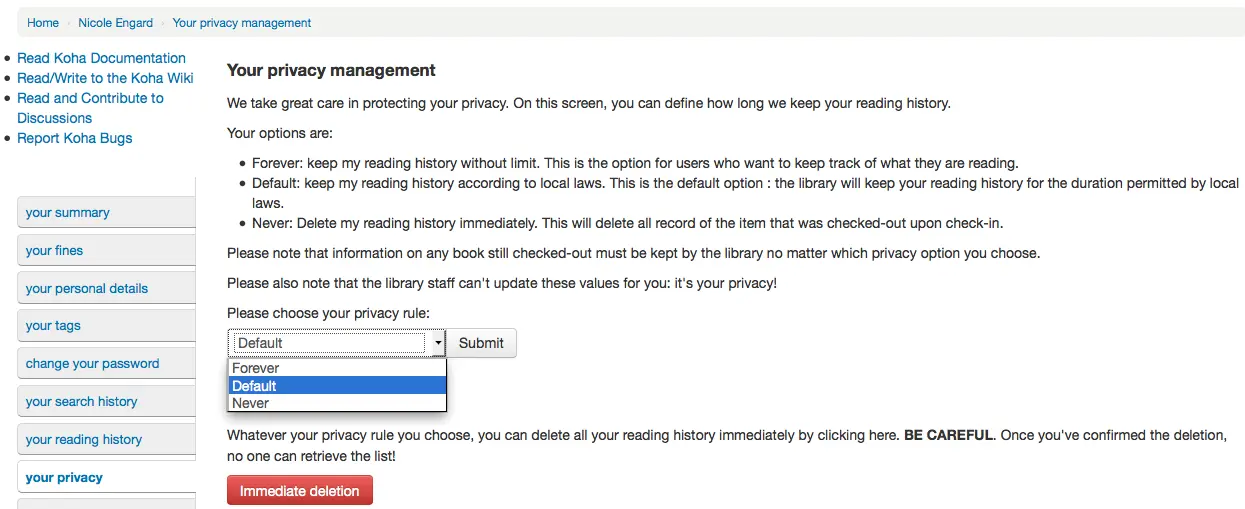
Der/die Benutzer*in kann zwischen 3 Optionen wählen:
Für immer: Meine Lesehistorie wird ohne Einschränkung gespeichert. Dies ist die Option für Benutzer, die den Überblick über das Gelesene bewahren möchten.
Standard: Speichern Sie meine Lesehistorie nach den geltenden Datenschutzbestimmungen. Dies ist die Standardeinstellung: Die Bibliothek wird die Daten so lange speichern, wie die geltenden Datenschutzbestimmungen dies erlauben.
Niemals: Lösche meine Suchhistorie sofort. Mit dieser Option wird die Lesehistorie sofort nach der Rückgabe des Titels gelöscht.
Abhängig vom Vorschlag des Benutzers kann der Inhalt der ‚Lesehistorie‘ und der Inhalt der ‚Ausleihhistorie‘ in der Dienstoberfläche voneinander abweichen.
Unabhängig von der Wahl des Benutzers kann die Lesehistorie jederzeit im Stapel gelöscht werden.

Wenn Sie diese Schaltfläche klicken, werden keine Exemplare gelöscht, die aktuell ausgeliehen sind, sondern es wird die vergangene Lesehistorie des Benutzers geleert.
Wichtig
Um dem/der Benutzer*in zu ermöglichen seine Lesehistorie zu löschen, muss der Systemparameter AnonymousPatron aktiviert sein.
Mit dem Systemparameter AllowPatronToSetCheckoutsVisibilityForGuarantor erlauben Sie Bürgen die aktuellen Ausleihen von der Person zu sehen, für die er/sie die Bürgschaft übernommen hat.
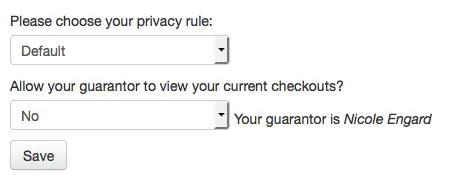
Wenn sich der Bürge einloggt, bekommt er in seiner Kontoübersicht den Reiter ‚Ausleihen von Angehörigen‘ angezeigt.

Vormerkhistorie
Wenn der Systemparameter OPACHoldsHistory auf „Erlaube“ gesetzt ist, können Benutzer*innen Ihre aktuellen und vorherigen Vormerkungen einsehen.
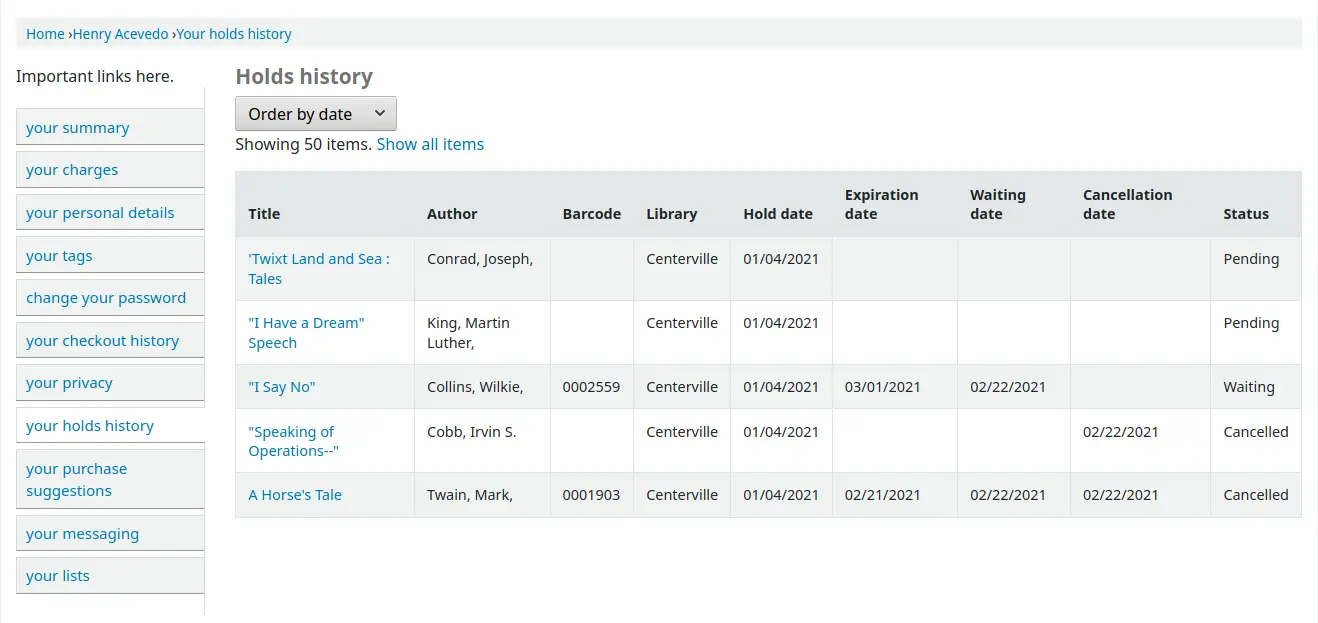
Anschaffungsvorschläge
Erlaubt Ihre Bibliothek Benutzer*innen Anschaffungsvorschläge zu machen, bekommen Benutzer*innen in ihrer Kontoübersicht den Reiter ‚Anschaffungsvorschläge‘ angezeigt. Dieser enthält alle Anschaffungsvorschläge, die der/die entsprechende Benutzer*in für die Bibliothek gemacht hat, mit Statusanzeige. Um diesen Reiter und die Möglichkeit Anschaffungsvorschläge zu machen zu deaktivieren, setzen Sie den Systemparameter suggestion auf ‚Erlaube nicht.‘
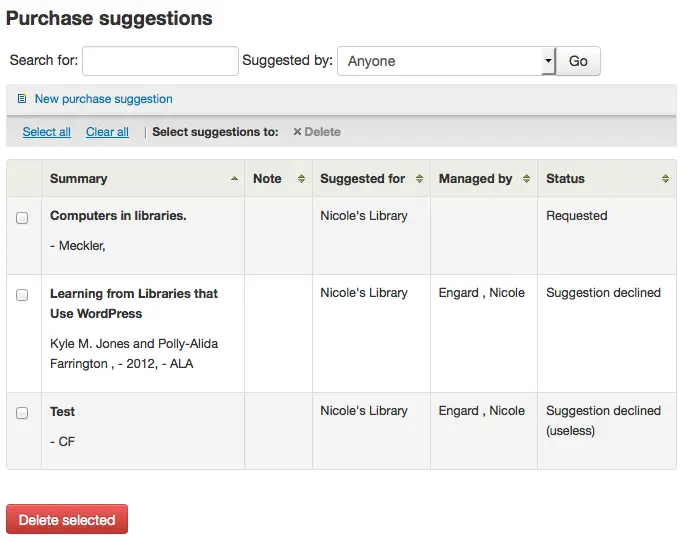
Haben Sie den Systemparameter OPACViewOthersSuggestions auf ‚Zeige‘ gesetzt, haben die Benutzer*innen die Möglichkeit, Anschaffungsvorschläge anderer Benutzer*innen zu sehen.
Versand von Benachrichtigungen
Hat Ihre Bibliothek die Systemparameter EnhancedMessagingPreferences und EnhancedMessagingPreferencesOPAC auf ‚Erlaube‘ gesetzt, können Ihre Benutzer*innen wählen, welche Benachrichtigungen Sie von der Bibliothek erhalten möchten (mit Ausnahme von Mahnbenachrichtigungen, welche die Bibliothek kontrolliert).
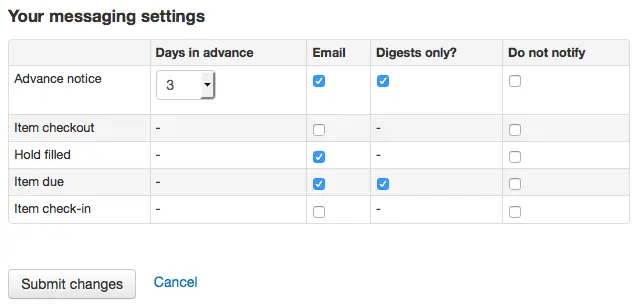
Verwenden Sie einen anderen Versandtreiber um Textnachrichten zu verschicken aktivieren Sie den Systemparameter SMSSendDriver und Sie bekommen eine zusätzliche Spalte angezeigt, um diese Benachrichtigungen als SMS (oder Textnachricht) zu erhalten und es wird ein Feld für eine Mobil- bzw. SMS-Nummer angezeigt.
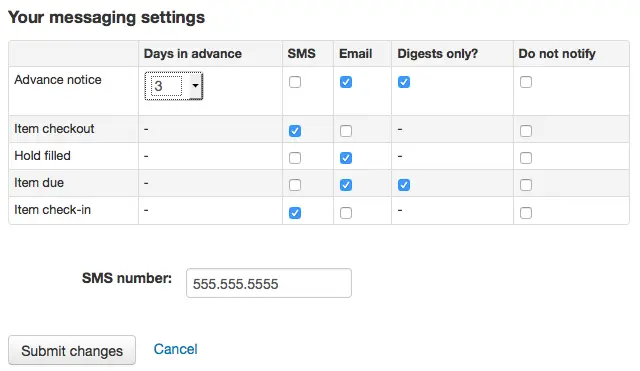
Benutzen Sie das E-Mail-Protokoll um Textnachrichten zu versenden, bekommen Sie mit dem Setzen des Systemparameters SMSSendDriver eine zusätzliche Spalte angezeigt, um diese Nachrichten als SMS (oder Textnachrichten) zu erhalten, ein Feld für eine Mobil- oder SMS-Nummer und eine Auswahlliste mit Mobilfunkanbietern, die im Administrationsmodul konfiguriert wurden, zu erhalten.
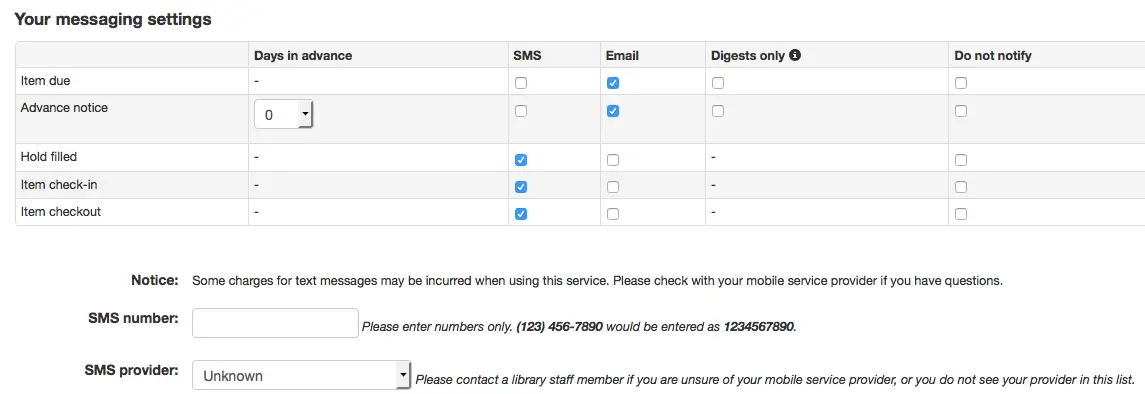
Nutzen Sie den Service i-tiva Talking Tech bekommen Sie eine zusätzliche Spalte angezeigt um diese Nachrichten per Telefon zu erhalten.
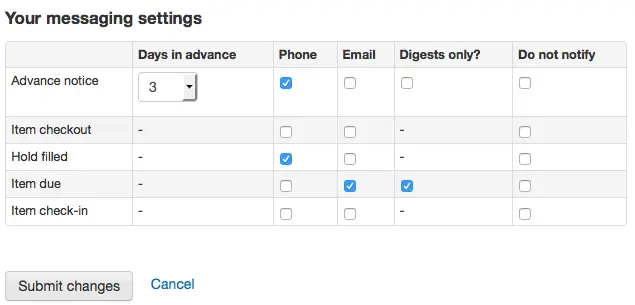
Diese Benachrichtigungen sind:
Erinnerungsbenachrichtigung: diese Benachrichtigung wird im Voraus an den/die Benutzer*in versandt mit dem Hinweis, wann die ausgeliehenen Medien fällig sind (die Anzahl der Tage wie lange vor dem Fälligkeitsdatum die Nachricht verschickt wird, kann vom/von der Benutzer*in gewählt werden)
Ausleihquittung: diese Benachrichtigung listet alle Medien auf die der/die Benutzer*in soeben ausgeliehen oder verlängert hat. Das ist die elektronische Version der Ausleihquittung
Vormerkbenachrichtigung: ist diese Benachrichtigungsart angehakt, wird der/die Benutzer*in darüber informiert, dass eine Vormerkung abholbereit ist
Fälligkeitsbenachrichtigung: am Tag der Fälligkeit des ausgeliehenen Mediums wird diese Benachrichtigung verschickt
Rückgabequittung: Diese Benachrichtigung listet alle Medien auf, die der/die Benutzer*in zurückgegeben hat
Bemerkung
Diese Benachrichtigung kann über das Werkzeug Benachrichtigungen und Quittungen angepasst werden. Der Code der Benachrichtigung ist CHECKIN.
Ausleihquittung: diese Benachrichtigung listet alle Medien auf die der/die Benutzer*in soeben ausgeliehen oder verlängert hat. Das ist die elektronische Version der Ausleihquittung
Bemerkung
Die Benachrichtigung kann über das Werkzeug Benachrichtigungen und Quittungen angepasst werden. Der Code der Benachrichtigung ist CHECKOUT.
Automatische Verlängerung: Eine Benachrichtigung, die den/die Benutzer*in darüber informiert, dass seine/ihre Ausleihen automatisch verlängert wurden oder dass es ein Problem mit der automatischen Verlängerung gab.
Bemerkung
Diese Benachrichtigung kann angepasst werden, indem die Benachrichtigungen AUTO_RENEWAL oder AUTO_RENEWAL_DGST im Werkzeug Benachrichtigungen und Quittungen bearbeitet werden.
Diese Option wird nur angezeigt, wenn die Option AutoRenewalNotices auf „entsprechend der Benachrichtigungseinstellungen der Benutzer“ gesetzt ist.
Nutzer können diese Benachrichtigungen gesammelt erhalten, wenn die Checkbox in der Spalte ‚Sammelmail‘ angehakt, und die Benachrichtigungsart gewählt wird. Bei einer Sammelbenachrichtigung werden alle Benachrichtigungen eines Benachrichtigungstyps in einer Mail zusammengefasst (z. B. alle Exemplare die in drei Tagen fällig werden in einer Mail) anstelle von mehreren Mails für jedes Exemplar.
Wenn der Systemparameter TranslateNotices auf „Erlaube“ gesetzt ist, wird den Benutzern eine Option für die „Bevorzugte Sprache für Benachrichtigungen“ mit einer Liste der verfügbaren Sprachen angezeigt.
Wichtig
Möchten Sie nur eine kurze Zusammenfassung der Nachrichten erhalten, müssen Sie eine Lieferart auswählen (SMS, Email oder Telefon).
Listen
If the virtualshelves system preference is set to ‚Allow‘, patrons will see a ‚Lists‘ tab.
Von hier aus können Benutzer*innen öffentliche Listen einsehen und ihre eigenen privaten Listen erstellen oder bearbeiten.

Benachrichtigungsabonnements
Version
Dieser Bereich wurde in Koha-Version 23.11 hinzugefügt.
Wenn der Systemparameter RoutingSerials aktiviert ist, sehen Benutzer, die sich über den Reiter „Abonnements“ im bibliographischen Datensatz für E-Mail-Benachrichtigungen über neue Hefte entschieden haben, in ihrem Konto den Reiter „Benachrichtigungsabonnements“.

In diesem Reiter werden alle E-Mail-Benachrichtigungsabonnements aufgelistet, die der/die Benutzer*in abonniert hat. Benutzer*innen können die Benachrichtigungen abbestellen, indem sie auf den Link „E-Mail-Benachrichtigungen abbestellen“ klicken, falls gewünscht.
Entlastung beantragen
Haben Sie den Systemparameter useDischarge aktiviert, können Benutzer*innen über den OPAC eine Entlastung beantragen. Eine Entlastung ist eine Bescheinigung, die besagt, dass der/die Benutzer*in keine aktuellen Ausleihen und keine Vormerkungen hat.
Benutzer können eine Entlastung von der Bibliothek anfordern, indem sie in ihrem Online-Konto den Reiter „Entlastung beantragen“ aufrufen.
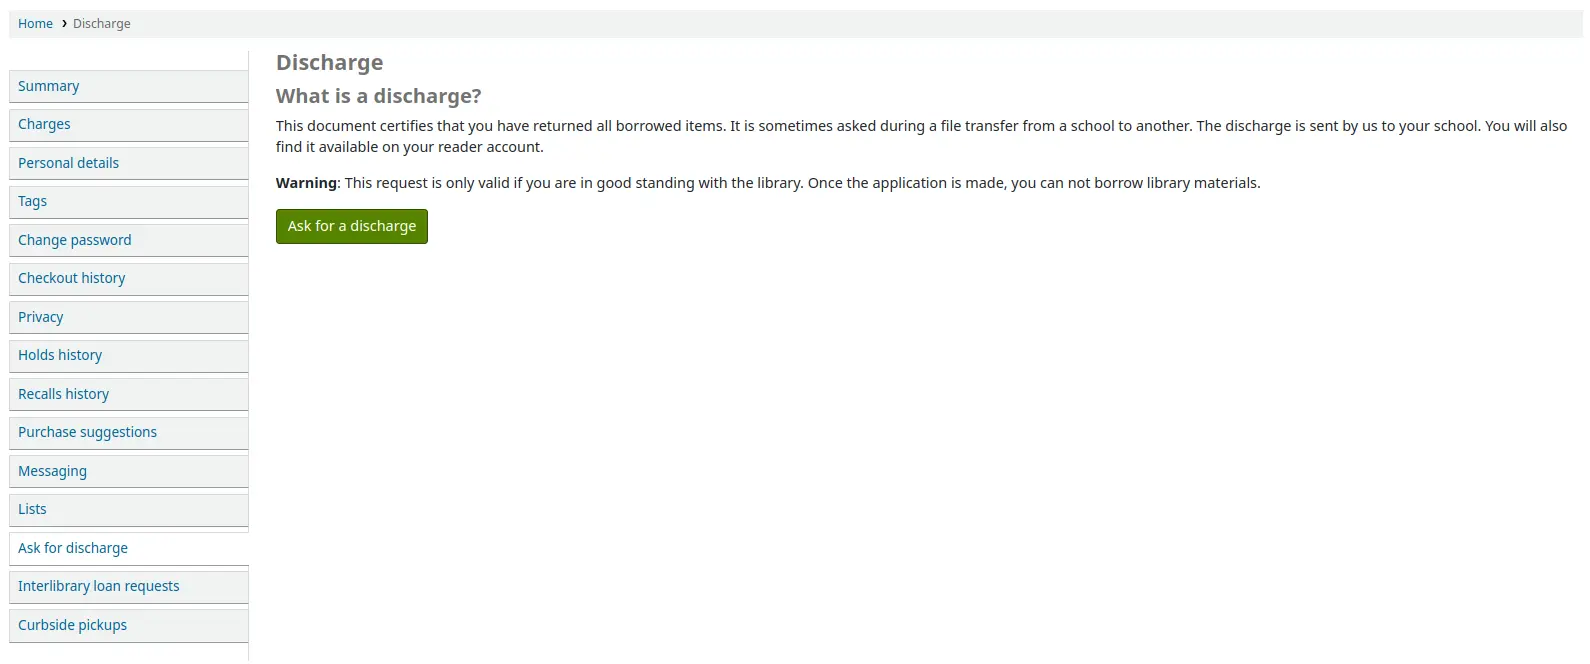
Von hier aus können sie eine Entlastung beantragen, indem sie auf die Schaltfläche „Entlastung beantragen“ klicken. Sie erhalten dann eine Bestätigung ihrer Anfrage.
Sobald die Entlastung vom Bibliothekspersonal genehmigt wurde, wird dem/der Benutzer*in ein Download-Link angezeigt, über den er/sie eine PDF-Datei seiner/ihrer Entlastung herunterladen kann.

Ihre Umlauflisten
Wenn Sie als Empfänger auf einer der Zeitschriftenumlauflisten stehen, werden Sie hier eine Übersicht sehen. Es wird ein Hinweis angezeigt: „Sie stehen auf den Umlauflisten für die folgenden Zeitschriftentitel. Wenn Sie Änderungen vornehmen möchten, sprechen Sie bitte das Bibliothekspersonal an“.
Fernleihbestellungen
Hat Ihre Bibliothek den Systemparameter ILLModule auf ‚Aktiviere‘ gesetzt, haben Benutzer*innen die Möglichkeit Fernleih-Anfragen zu stellen wenn Sie in Ihrem Benutzerkonto eingeloggt sind. Dort können Sie ihre Anfragen sehen oder neue platzieren.

Um eine Fernleihbestellung anzulegen, klicken Sie auf „Neue Bestellung“ und wählen Sie ein Bestellformat aus.
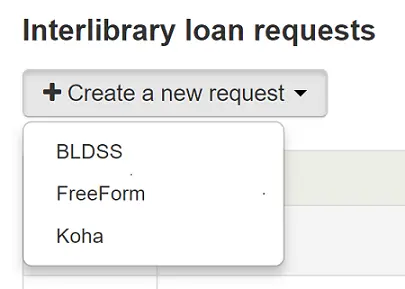
Hinweis
Die angezeigten Optionen hängen von Ihrer Fernleihkonfiguration ab. Weitere Informationen zu Fernleih-Backends finden Sie auf der Wiki-Seite https://wiki.koha-community.org/wiki/ILL_backends.
Bemerkung
Wenn in einem ‚ILLModuleCopyrightClearance‘ Anzeigeort für die HTML-Anpassung ein Copyright-Clearance-Text enthalten ist, wird dieser Text hier angezeigt und Benutzer*innen müssen auf „Ja“ klicken, um ihn zu akzeptieren, bevor sie fortfahren.
Füllen Sie die Informationen zur Veröffentlichung so genau wie möglich aus. Abhängig vom Formular sehen Sie die Optionen zum Hinzufügen benutzerdefinierter Felder, wie zum Beispiel Notizfelder. Der vorgesehene branch ist ein notwendiges Feld, da die Anfrage dort hin gesendet wird.
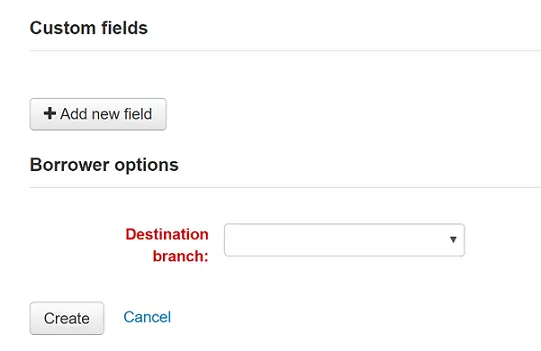
Klicken Sie auf ‚Erstelle‘, um die Anfrage bei Ihrer Bibliothek einzureichen.
Ihre eingereichte Anfrage wird mit dem Status ‚Neue Anfrage‘ aufgelistet. Ist die Anfrage erledigt, wird der Status auf ‚Angefordert‘ gesetzt.
Klicken Sie auf ‚Zeige‘ um Änderungen oder eine Stornierung Ihrer Anfrage vorzunehmen.
Sie können die Details des Formulars nicht bearbeiten aber Sie können eine Notiz für eine Änderungsanfrage hinterlegen. Klicken Sie dann auf ‚Änderung beantragen‘ unten am Bildschirm. Ihre Änderung wird zur Bearbeitung an die Bibliothek geschickt.
Bemerkung
Wenn ein*e Benutzer*in eine Fernleihbestellung ändert, wird eine E-Mail an das Bibliothekspersonal gesendet, so dass dieses die Änderungen im Fernleih-Modul einsehen kann.
Die Benachrichtigung kann über das Werkzeug Benachrichtigungen und Quittungen angepasst werden. Der Code der Benachrichtigung ist ILL_REQUEST_MODIFIED.
Für neue Anfragen haben Sie auch die Möglichkeit eine Stornierung zu beantragen. Ihre Anfrage erhält dann den Status ‚Stornierung angefragt‘ und kann dann vom Bibliothekspersonal entfernt werden.
Bemerkung
Wenn ein*e Benutzer*in eine Fernleihbestellung storniert, wird eine E-Mail an das Bibliothekspersonal gesendet, damit dieses die Bestellung über das Modul Fernleih-Modul stornieren kann.
Die Benachrichtigung kann über das Werkzeug Benachrichtigungen und Quittungen angepasst werden. Der Code der Benachrichtigung ist ILL_REQUEST_CANCEL.
Rückrufhistorie
If your library allows recalls, the patron can see all their past and current recalls they have requested and their various statuses in the ‚your recalls history‘ tab.

Der Benutzer/die Benutzerin kann einen Rückruf über Klick auf die Schaltfläche „Stornieren“ beenden, wenn dieser noch nicht abholbereit ist.
Abholungen
Wenn Ihre Bibliothek Abholungen anbietet, kann der/die Benutzer*in seine geplanten Abholungen unter „Abholungen“ sehen.

Der/die Benutzer*in kann angeben, dass er/sie sich außerhalb der Bibliothek aufhält, indem er/sie auf „Personal über Ihre Ankunft informieren“ klickt.
Der/die Benutzer*in hat auch die Möglichkeit, seine/ihre geplante Abholung mit der Schaltfläche „Diese Abholung stornieren“ abzubrechen.
Wenn die Einstellung „Abholung nach Benutzerwunsch“ in der Konfiguration für Abholungen aktiviert ist, kann der/die Benutzer*in seinen eigenen Abholtermin festlegen.

Der/die Benutzer*in muss zunächst eine Bibliothek auswählen, in der er/sie seine/ihre Medien abholen möchte
Bemerkung
Im Dropdown-Menü werden nur Bibliotheken angezeigt, bei denen die Abholung aktiviert ist.
Wenn die Einstellung „Nur für abholbereite Vormerkungen aktivieren“ aktiviert ist, werden außerdem nur die Bibliotheken aktiviert, in denen der/die Benutzer*in bereitstehende Vormerkungen hat.
Der/die Benutzer*in muss dann ein Datum auswählen
Bemerkung
Es werden nur Tage mit verfügbaren Zeitfenstern angezeigt.
Die möglichen Abholzeiten werden abhängig vom Wochentag angezeigt

Bemerkung
The number in parentheses under each time slot is the number of available appointments for that time. If the maximum number of appointments has been reached, based on the ‚Maximum patrons per interval‘ setting in the curbside pickup configuration, the time slot will be grayed out and the patron will not be able to select it.
Der/die Benutzer*in kann optional eine Notiz über seine/ihre Abholung hinzufügen
Der/die Benutzer*in muss dann auf „Abholung vereinbaren“ klicken, um seinen Termin zu speichern
Anschaffungsvorschläge
Hat Ihre Bibliothek den Systemparameter suggestion auf „Erlaube“ gesetzt, können Benutzer*innen an verschiedenen Stellen im OPAC Anschaffungsvorschläge machen.
Wenn Sie über den Systemparameter OPACViewOthersSuggestions erlauben, dass jeder Benutzer/jede Benutzerin die Anschaffungsvorschläge von anderen Benutzer*innen sehen darf, wird ein Link „Anschaffungsvorschläge“ unterhalb der einfachen Suche angezeigt.

Es gibt auch einen Link, wenn die Suchanfrage eines Benutzers nicht erfolgreich war.

Es gibt dann eine Option „Zur Anschaffung vorschlagen“ in der Detailansicht eines Titels.

Und es gibt einen Link im Reiter Anschaffungsvorschläge im Bibliothekskonto.
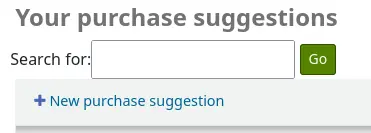
Jede dieser Optionen öffnet das Formular für einen Anschaffungsvorschlag.
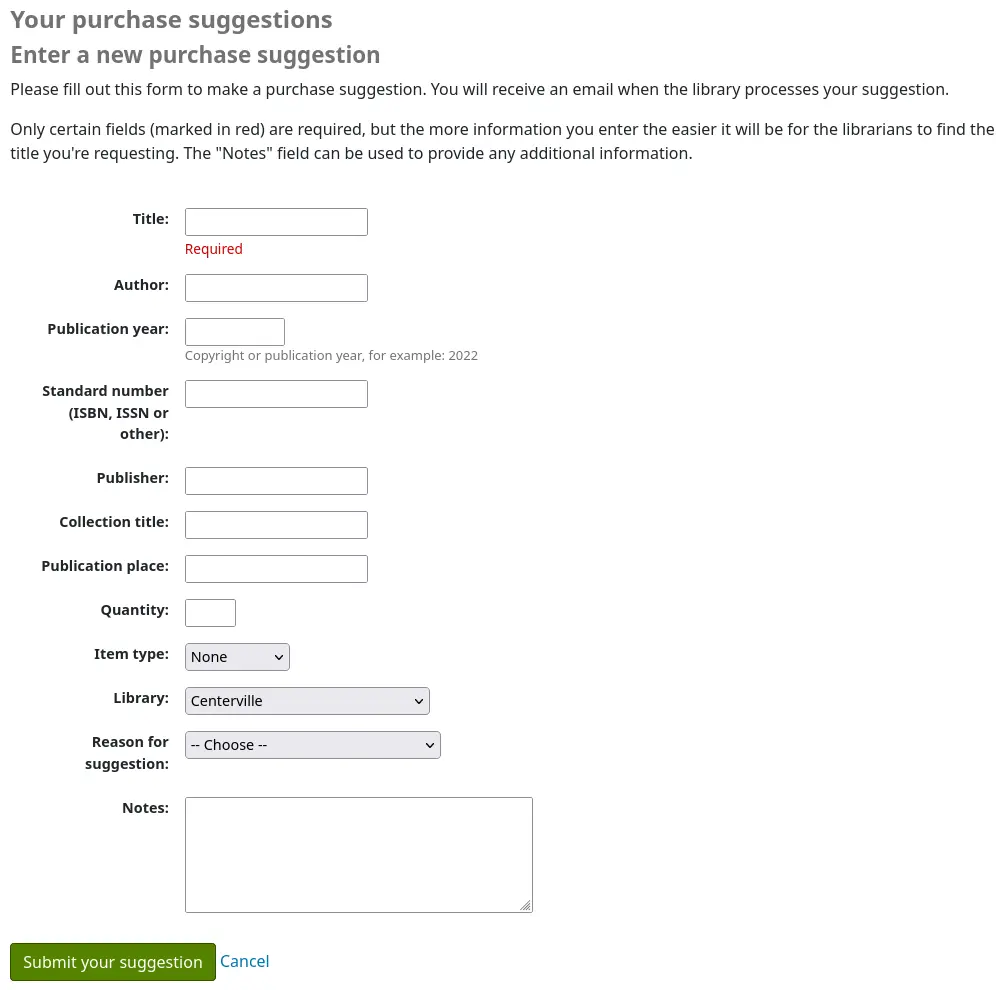
The informational text at the top of the form can be replaced using the HTML customizations tool, display location OpacSuggestionInstructions.
In diesem Formular ist nur der „Titel“ ein Pflichtfeld.
Die Pflichtfelder können über den Systemparameter OPACSuggestionMandatoryFields definiert werden.
Über den Systemparameter OPACSuggestionUnwantedFields können nicht benötigte Felder ausgeblendet werden.
Der Systemparameter OPACSuggestionAutoFill kann verwendet werden, um Benutzer*innen beim Ausfüllen des Formulars mit Informationen aus Google Books zu helfen.
The item type list can be edited by editing the SUGGEST_FORMAT authorized value list.
The ‚Reason for suggestion‘ list can be edited by editing the OPAC_SUG authorized value list.
Wenn das Exemplar bereits im Katalog vorhanden ist, erhält der/die Benutzer*in eine Meldung mit dem Titel, den Koha für den entsprechenden Titel hält. Der Abgleich erfolgt anhand von Titel/Autor, ISBN oder ISSN. Wenn der Titel nicht dem entspricht, was der/die Benutzer*in vorschlagen möchte, kann er/sie auf „Bestätigen Sie Ihren Vorschlag“ klicken, um ihn trotzdem vorzuschlagen.

Once the form is submitted the purchase suggestion will appear in the acquisitions module for the librarians to manage.
If a purchase suggestion has been ordered through the acquisitions module, the patron’s purchase suggestion title will be clickable and bring the patron directly to the ordered record in the OPAC.
Libraries / Contact
If you have the OPACShowLibraries system preference set to ‚Show‘ and at least one of your libraries is ‚Public‘, a link to the Libraries page will be displayed below the search bar.
Achtung
As of Koha version 25.05, the link is labeled ‚Contact‘ if there is only one library set as ‚public‘.
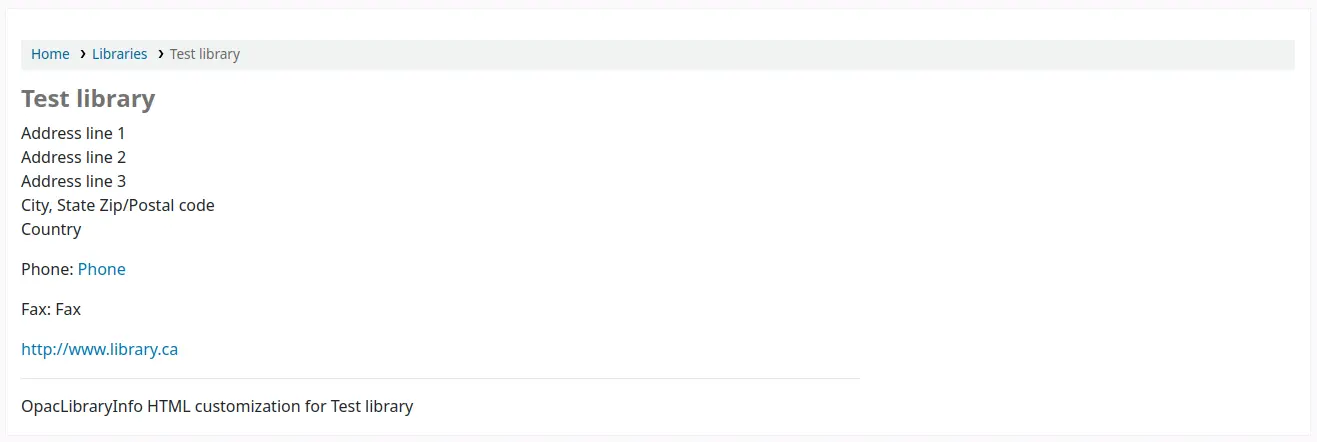
The Libraries page shows a list of all libraries set as ‚Public‘, with their contact information (address lines, city, state, zip/postal code, country, phone number, fax number, website).
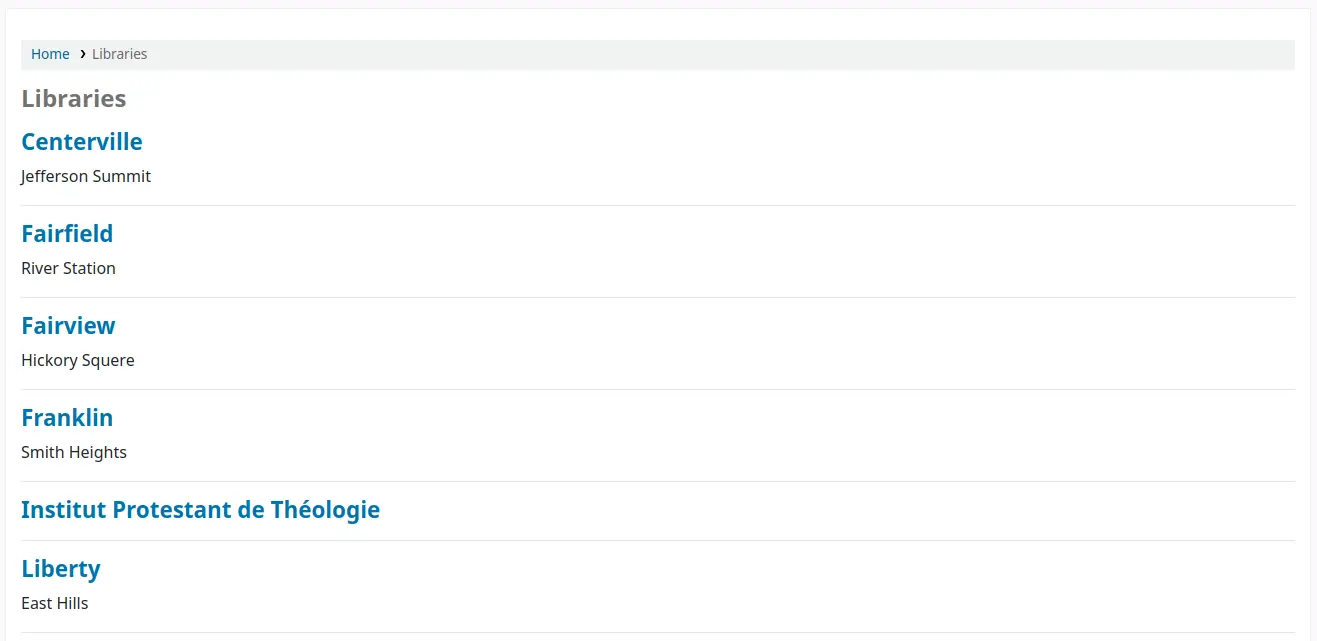
The library name itself is a link to a specific page for that library. This second page also includes ‚OpacLibraryInfo‘ HTML customizations for that library.
Probleme melden
Wenn der Systemparameter OPACReportProblem aktiviert ist, haben die Benutzer*innen die Möglichkeit Probleme im OPAC zu melden (z.nB. defekte Links oder falsche Informationen).
Am Ende jeder Seite befindet sich ein Link „Problem melden“.
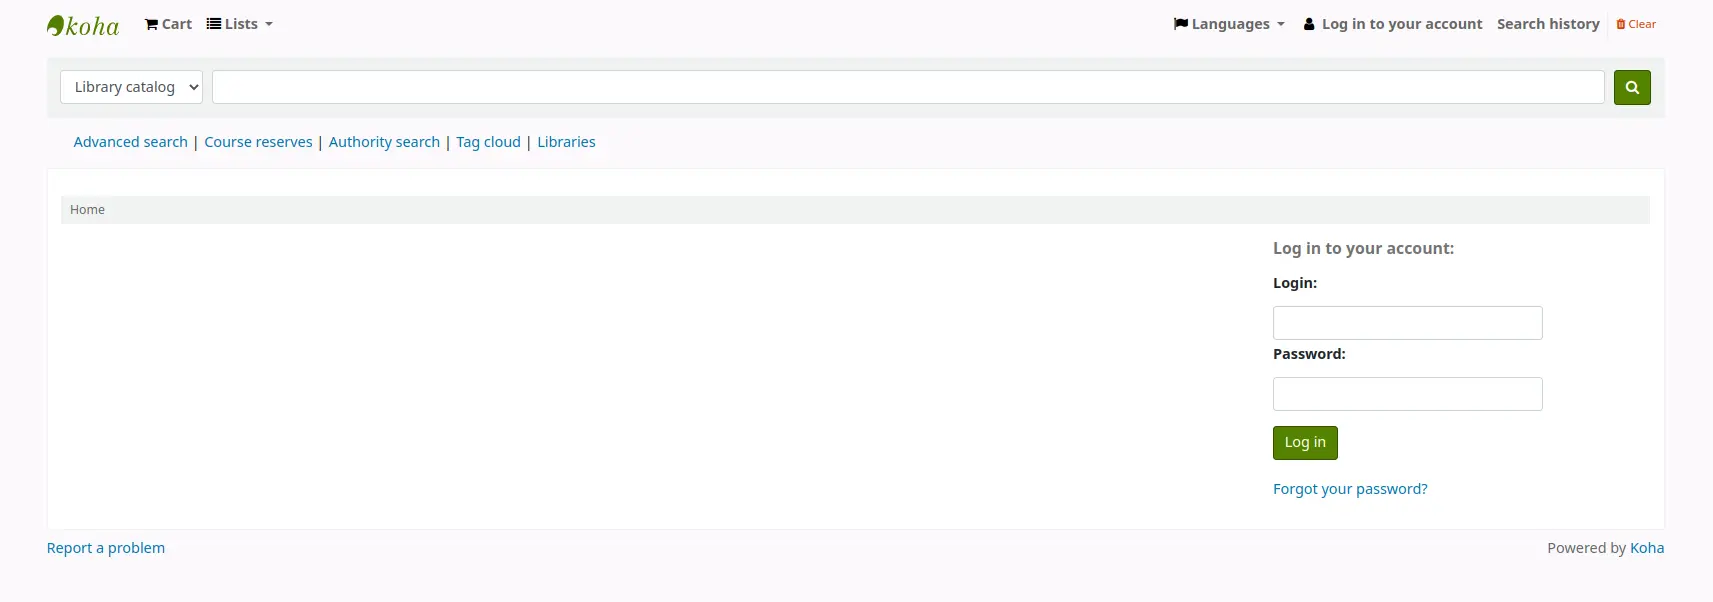
Klickt der/die Benutzer*in auf den Link, wird er/sie zu einem Formular weitergeleitet, in dem er/sie angeben kann, worin genau das Problem besteht.
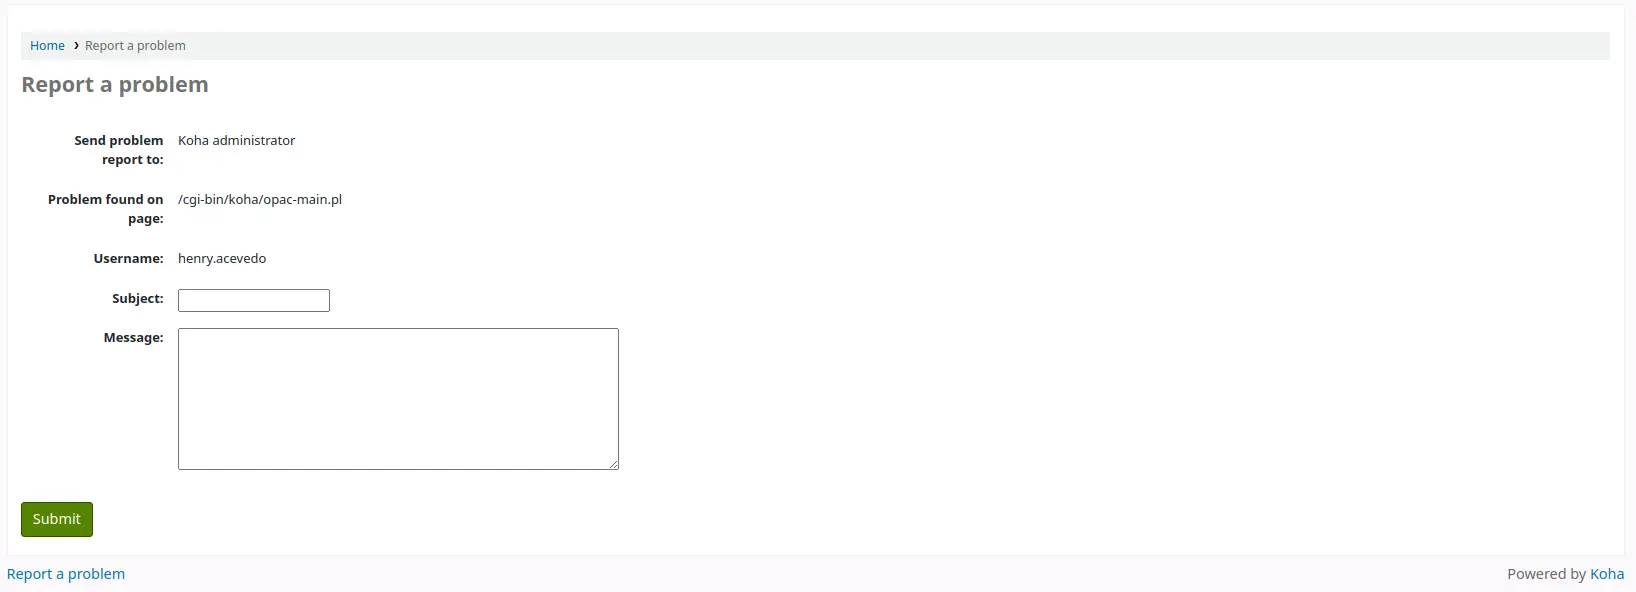
Die Meldung wird per E-Mail an den/die Koha-Administrator*in (an die in KohaAdminEmailAddress hinterlegte Adresse) geschickt und erscheint im Werkzeug für Problemberichte aus dem OPAC. Wenn die Bibliothek eine E-Mail-Adresse hat, kann sich der/die Benutzer*in entscheiden, den Problembericht an die Bibliothek oder den/die Administrator*in zu senden.
Bemerkung
Die per E-Mail gesendete Benachrichtigung kann im Werkzeug Benachrichtigungen und Quittungen angepasst werden. Der Buchstabencode lautet PROBLEM_REPORT.
OPAC Selbstverbuchung
Version
Dieses Feature gibt es in Koha seit Version 23.11.
Zusätzlich zur webbasierten Selbstausleihe gibt es für Bibliotheken mit kleineren, vertrauenswürdigen Gemeinschaften eine einfachere Möglichkeit. Diese ermöglicht es Benutzer*innen über ihr OPAC-Konto Medien an sich selbst auszuleihen, ohne Aufsicht durch Mitarbeiter*innen. Diese Selbstausleihe kann auf jedem Computer oder Gerät mit OPAC-Zugang genutzt werden, im Gegensatz zur webbasierten Selbstausleihe, das für die Nutzung auf speziellen Computern gedacht ist.
Sobald der Systemparameter OpacTrustedCheckout aktiviert ist, sehen angemeldete Benutzer*innen oben auf der Seite im OPAC die Option „Selbstausleihe“.

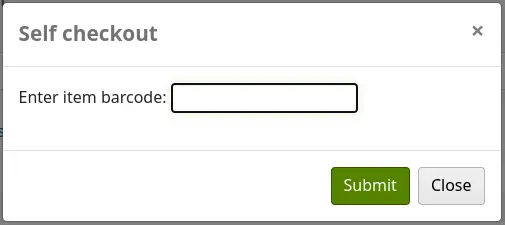
Wenn Sie auf den Link „Selbstausleihe“ klicken, öffnet sich ein Dialogfenster, in das der Kunde den Barcode des Mediums eingeben und auf „Absenden“ klicken oder die Eingabetaste drücken kann.
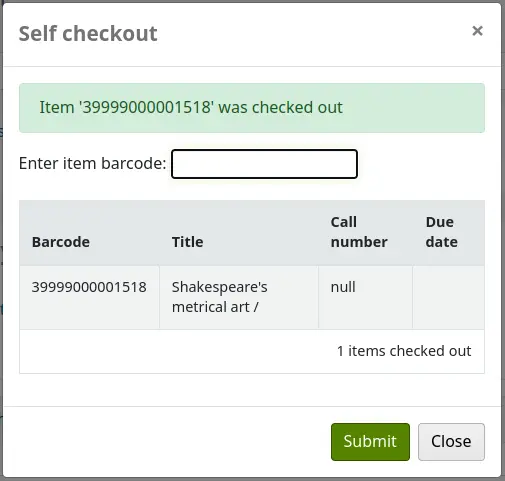
Nach Eingabe des Barcodes erscheint im oberen Bereich des Dialogfensters eine Bestätigungsmeldung, und im unteren werden der Barcode, der Titel, die Signatur und das Fälligkeitsdatum des Mediums angezeigt. Der/die Benutzer*in kann einen weiteren Barcode scannen oder eingeben.
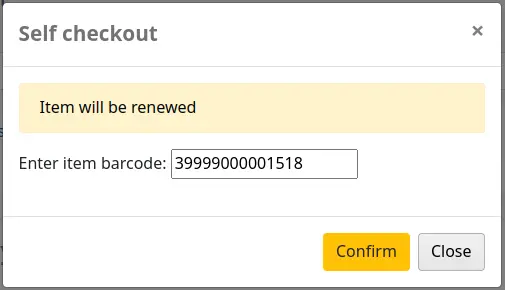
Um die Ausleihe zu verlängern, muss der/die Benutzer*in nur erneut ausleihen (oder über seine Zusammenfassung verlängern).
Wenn ein Medium bereits an eine*n andere*n Benutzer*in ausgeliehen ist, erscheint eine entsprechende Meldung.
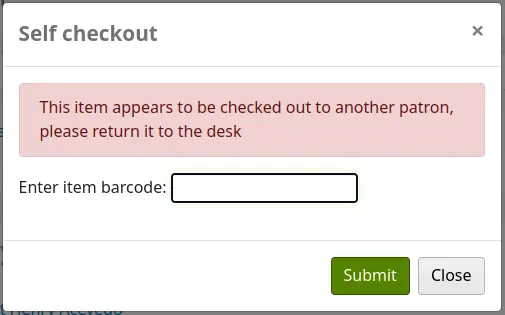
Die Ausleihe wird auch unterbunden, wenn:
der Barcode nicht gefunden wird;
das Medium für eine*n andere*n Benutzer*in vorgemerkt ist;
die ausstehenden Gebühren des Benutzers über dem Limit liegen;
der/die Benutzer*in bereits die maximale Anzahl an Ausleihen erreicht hat;
der/die Benutzer*in nicht das erforderliche Alter hat, um das Medium auszuleihen;
Das Exemplar kann nicht ausgeliehen werden, weil er nicht ausleihbar oder zurückgenommen ist.


Kommentare
Benutzer*innen können Kommentare im OPAC verfassen, wenn der Systemparameter OPACComments auf „Erlaube“ gesetzt ist. Jeder bibliografische Datensatz hat einen Reiter „Kommentare“ unterhalb der bibliografischen Informationen.
Ist der/die Benutzer*in eingeloggt, bekommt er/sie einen Link angezeigt, wo er/sie einen Kommentar zum Exemplar verfassen kann. Durch Klicken auf diesen Link wird ein PopUp-Fenster geöffnet, die eine Box für die Kommentare anzeigt.
Ist der Kommentar eingegeben und abgeschickt, bekommt der/die Benutzer*in angezeigt, dass sich der Kommentar noch in der Vorschau befindet und auf Moderation wartet. Andere Benutzer*innen bekommen den Kommentar nicht angezeigt, wenn sie auf das Exemplar klicken.
Once the comment is approved the patron will see the number of comments on the ‚Comments‘ tab and their comment labeled among the other comments. If the ShowReviewerPhoto system preference is set to ‚Show‘, the patron’s photo pulled from the Libravatar library will be displayed next to their comment.
Andere Benutzer*innen bekommen den Kommentar mit dem Namen des/der Benutzer*in, der den Kommentar verfasst hat, angezeigt (sofern Sie nicht den Systemparameter ShowReviewer auf ‚Zeige keinen Namen‘ gesetzt haben).
Haben Sie den Systemparameter OpacShowRecentComments auf ‚Zeige‘ gesetzt, bekommen Sie einen Link zu den akzeptierten Kommentaren angezeigt.
Ausgehend von dieser Seite können Benutzer*innen über das RSS-Sheet kürzlich verfasste Kommentare abonnieren.