Katalogisierung
Pfad in Koha: Mehr > Katalogisierung
Before you start cataloging in Koha, you need to do some basic setup. Refer to the Implementation checklist for a full list of these things. Most importantly, you need to make sure that your MARC bibliographic frameworks are all defined the way you want. Once in the cataloging module you will not be able to add or remove fields and subfields, so your frameworks must be ready before you start cataloging.
You can also use OCLC Connexion to send records directly in to Koha. For more information on that please review the OCLC Connexion Gateway setup appendix.
Bibliographische Datensätze
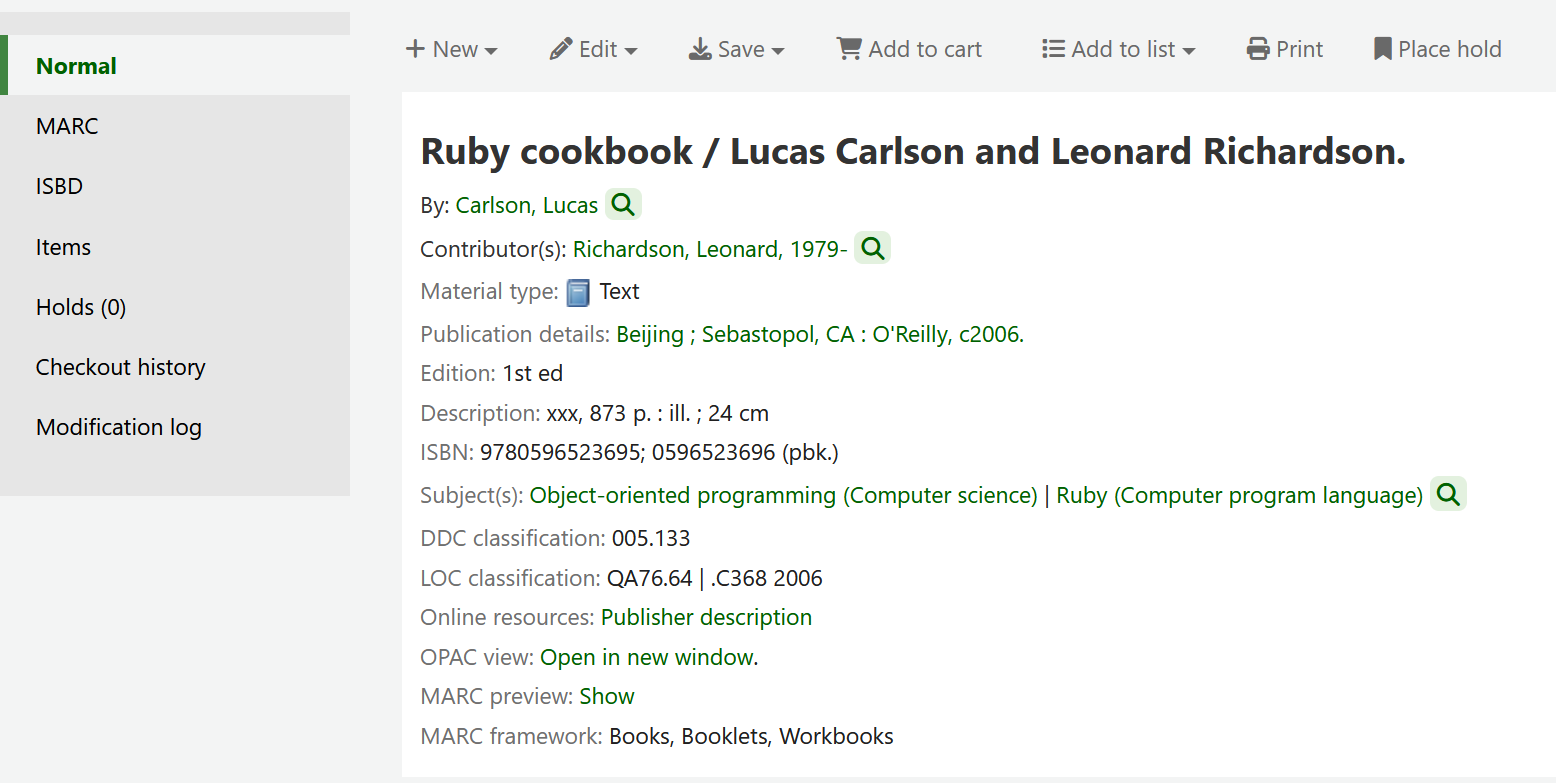
In Koha, the bibliographic record contains the main information related to the material. This includes things like the title, author, ISBN, etc. This information is stored in Koha in MARC. By default, the record details page displays in the ‚Normal‘ tab and shows the most important details of the record.
Bemerkung
The ‚Normal‘ tab of the record details page also shows which MARC bibliographic framework was used to add the record.

Bemerkung
Koha unterstützt MARC21 und UNIMARC.
Sobald diese Titelinformationen abgespeichert wurden, können :ref:`Exemplarsätze <item-records-label>`hinzugefügt werden.
Datensätze hinzufügen
Titel können in Koha durch Fremddatenübernahme oder Eigenkatalogisierung angelegt werden. Sie können auch den Einfachen oder den Erweiterten Editor benutzen.
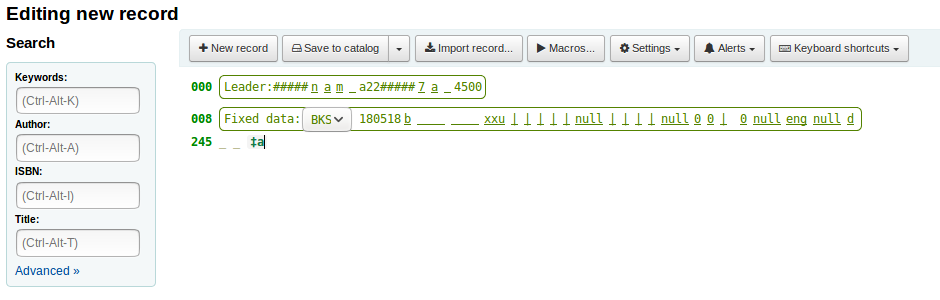
Wenn Sie einen Datensatz katalogisieren möchten, können Sie ein leeres Template im einfachen Editor nutzen:
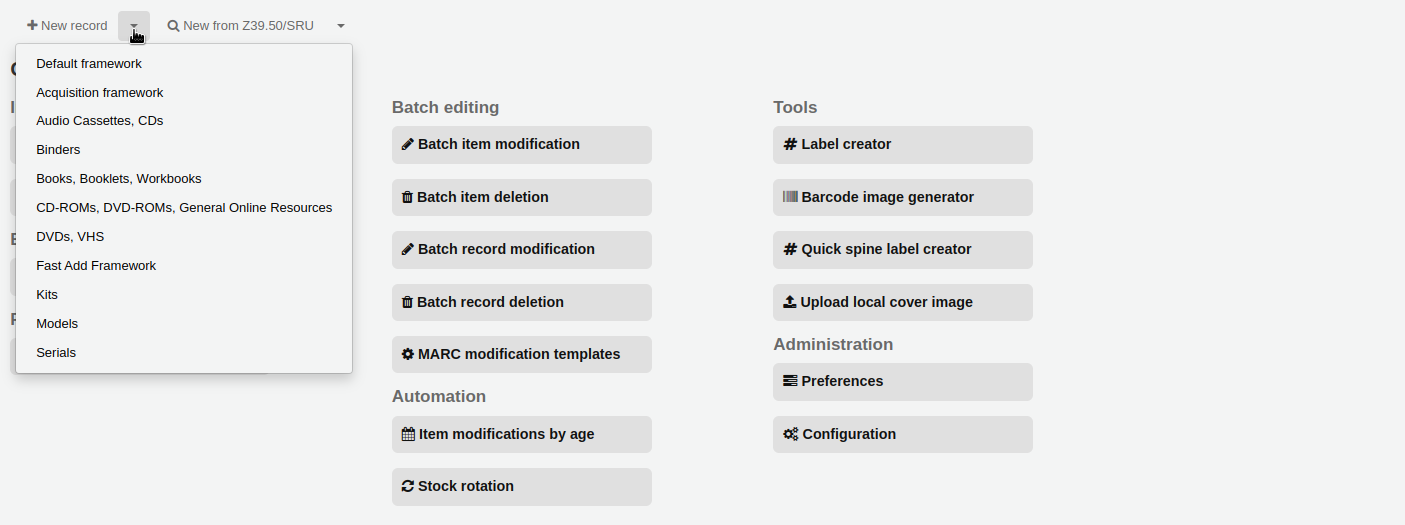
‚Neuer Titel‘ anklicken

Bemerkung
Mit dem Button ‚Neuer Titel‘ wird das bibliographische Standardframework für die Katalogisierung eines neuen Satzes geöffnet. Wenn Sie ein anderes Framework verwenden möchten, klicken Sie auf den kleinen Pfeil rechts neben dem Button ‚Neuer Titel‘ und wählen Sie das gewünschte Framework aus.
Bemerkung
Sie können Frameworks im Administrationsmodul neu erstellen oder bearbeiten.
Wenn Sie einen Datensatz katalogisieren möchten, verwenden Sie ein leeres Template im Erweiterten Editor:
Aktivieren Sie das Erweiterte Katalogisierungsmodul mit dem Systemparameter EnableAdvancedCatalogingEditor
Klicken Sie die Schaltfläche „Erweiterter Editor“
Wenn Sie einen neuen Datensatz aus einem vorhandenen Datensatz einer anderen Bibliothek erstellen möchten, nutzen Sie den Einfachen oder den Erweiterten Editor:
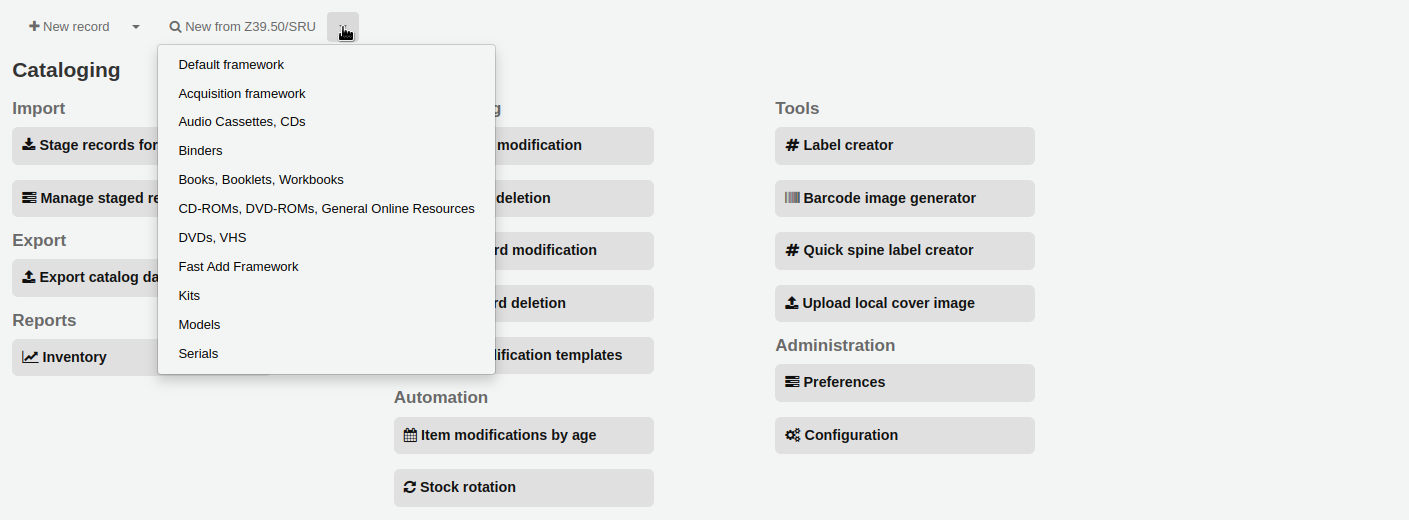
Klicken Sie die Schaltfläche „Import über Z39.50/SRU“
Bemerkung
The ‚New from Z39.50/SUR‘ button will import the record into the default bibliographic framework. If you want to use a different framework, click the small arrow to the right of the ‚New from Z39.50/SRU‘ button and choose the framework.
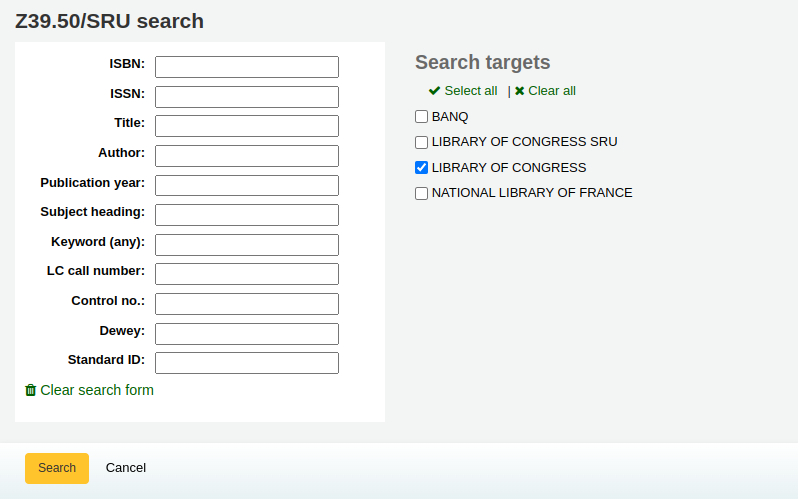
Suchen Sie nach dem Titel, den Sie katalogisieren möchten
Bemerkung
Versuchen Sie eine Suche mit weniger Suchoptionen, wenn keine Treffer gefunden werden. Nicht alle Z39.50/SRU-Vorgaben unterstützen alle Suchoptionen.
Bemerkung
Search targets can be edited by using the Z39.50/SRU servers section of the administration module.
Bemerkung
The display of extra MARC fields and subfields can be configured via the AdditionalFieldsInZ3950ResultSearch system preference.
Wenn Sie auf den Pfeil neben einem Suchergebnis klicken (oder auch auf eine beliebige Stelle der Ergebniszeile) klicken, werden Ihnen Vorschau- und Importmöglichkeiten angezeigt.
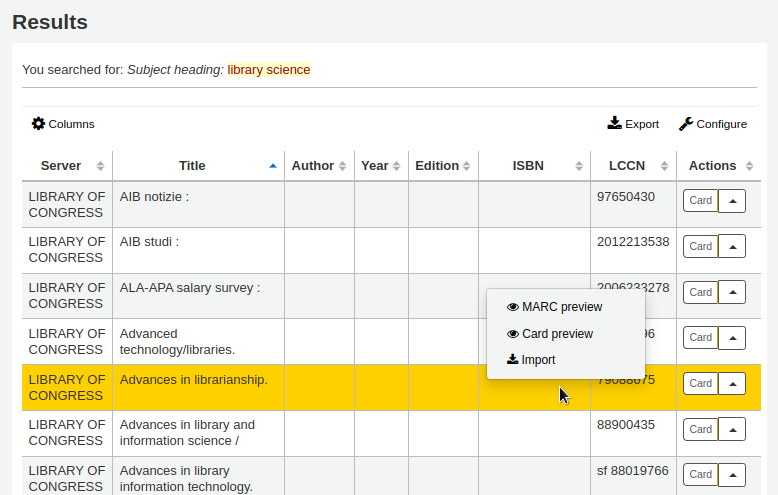
Bemerkung
Standardoption beim Button neben einem Suchergebnis ist die zuletzt verwendete Option. Im oben angezeigten Screenshot war die letzte verwendete Option „ISBD-Vorschau“ (Card preview), daher ist für den Button diese Voreinstellung eingestellt.
Bemerkung
Sie können die Spalten dieser Tabelle über die ref:Tabellenkonfiguration <column-settings-label> im Administrationsmodul anpassen (Tabellen-ID: resultst).
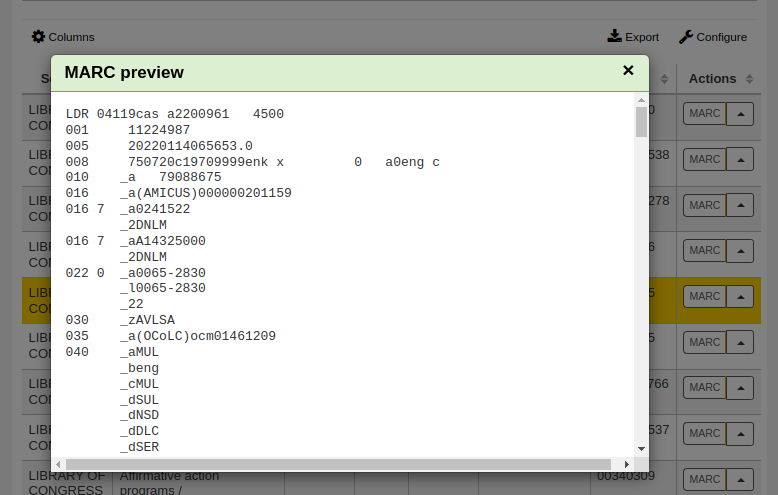
MARC preview: this option will open the record in plain MARC format.
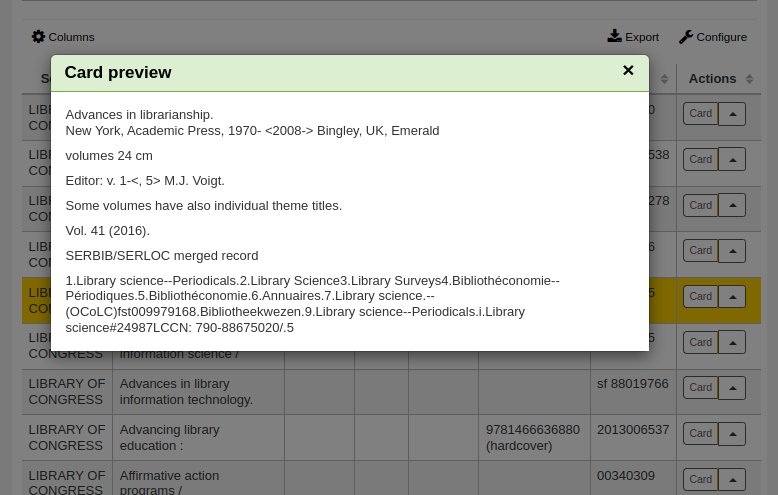
ISBD-Vorschau: Diese Option öffnet den Satz im Katalogkartenformat.
Import: Dies öffnet den Satz im Katalogisierungseditor von Koha, so dass Sie ihn bearbeiten und in Ihrem eigenen Katalog abspeichern können.
If you don’t find the title you need in the Z39.50 search results, you can click the ‚Try another search‘ button at the bottom left of your results
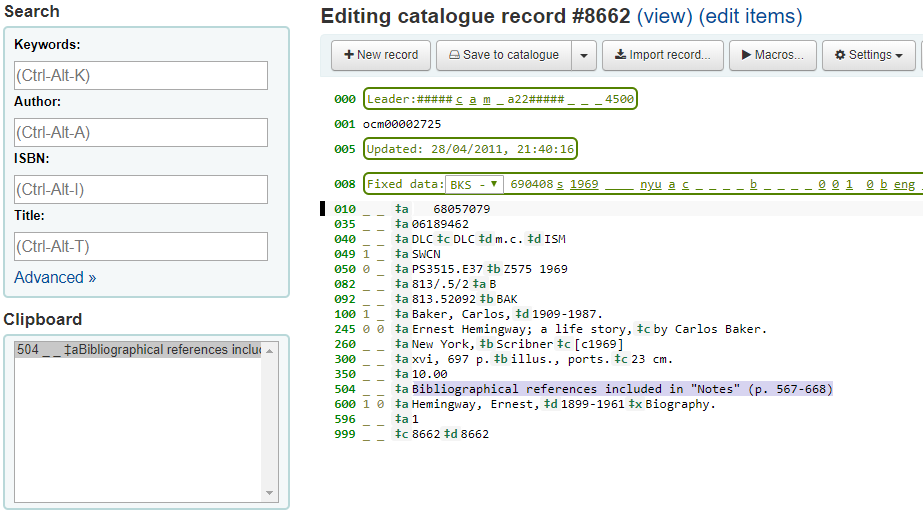
Einfacher Editor
Wenn Sie im Einfachen Editor ein leeres Framework öffnen oder einen Datensatz per Z39.50/SRU-Schnittstelle importieren, erscheint die Katalogisierungsmaske, um die Katalogisierung fortzusetzen
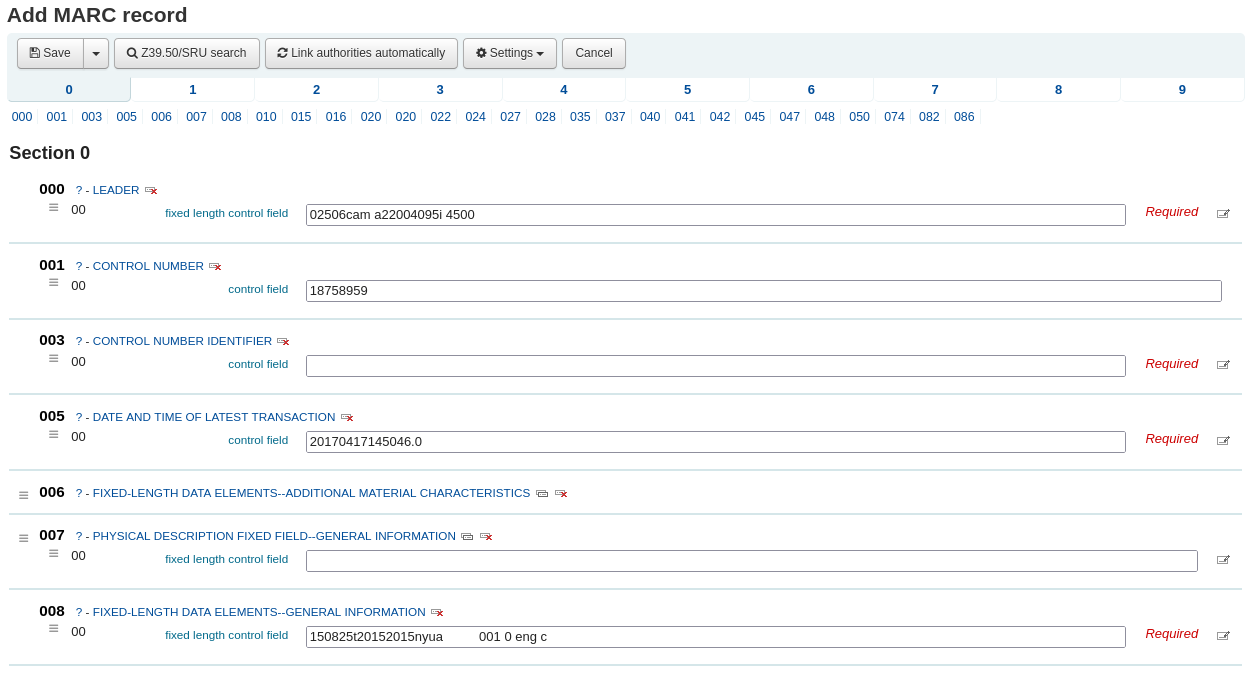
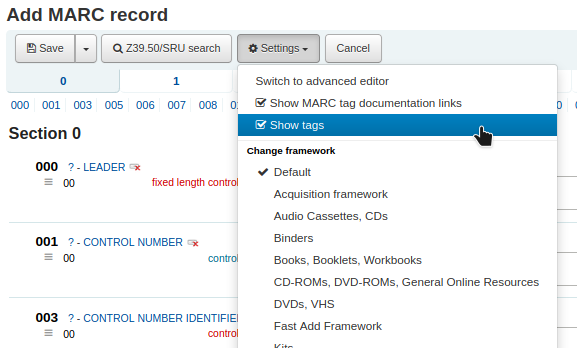
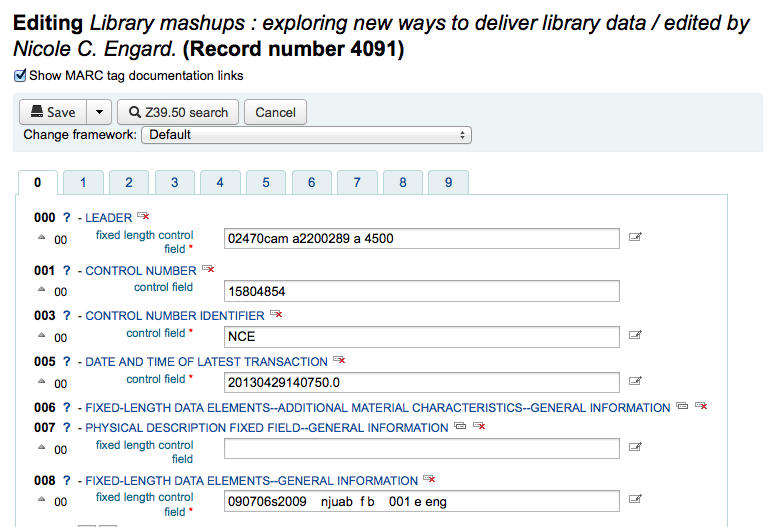
Wenn lieber keine MARC-Feldnummern angezeigt werden sollen, kann man den Wert über den hide_marc Systemparameter ändern oder es mit der Checkbox ‚Tags anzeigen‘ unter „Einstellungen“ in der Katalogisierung dem Benutzer selber überlassen.
Klicken Sie auf die Feldbezeichnung, um ein eingeklapptes Feld aufzuklappen
Wenn Sie die Dokumentation der Library of Congress zu einem MARC-Feld aufrufen möchten, klicken Sie auf das Fragezeichen (?) rechts neben der Feldnummer.
Es ist möglich, die Quelle der MARC-Dokumentation zu ändern, indem Sie den Systemparameter MARCFieldDocURL setzen.
Wenn Sie glauben, dass der Bildschirm überfüllt ist, oder Sie die Dokumentationslinks als störend empfinden oder nicht brauchen, können Sie diese über die Checkbox ‚MARC-Felddokumentationslinks‘ unter „Einstellungen“ ausblenden.
Manchmal sind Felder aufgrund der Einstellung des Systemparameters BiblioAddsAuthorities nicht editierbar. Wenn Sie diesen so gesetzt haben, dass beim Katalogisieren die von Normdaten kontrollierten Felder nicht frei bearbeitet werden können, wird neben dem Feld ein Vorhängeschloss angezeigt.

Wenn diese Grafik angezeigt wird, klicken Sie darauf und suchen Sie in dem neu geöffneten Fenster nach dem zu verknüpfenden Normsatz.
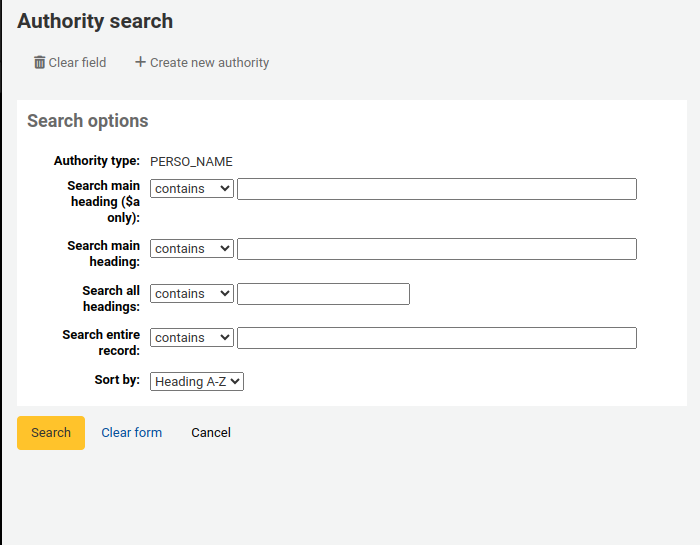
In der Resultatenliste klicken Sie auf ‚Wähle Normdaten‘ um dies in Ihr Katalogdatensatz einzubringen

Klicken Sie auf das Symbol „Tag wiederholen“ auf der rechten Seite des Feldes, um dieses zu wiederholen.

Um die Reihenfolge der Felder zu verändern, ziehen Sie die Unterfelder mithilfe der Symbole auf der linken Seite an die gewünschte Position.
Bemerkung
You can change the default order of the subfields in the bibliographic framework by dragging and dropping the subfield tabs when editing subfields.
Um ein Unterfeld zu verdoppeln, klicken Sie auf das Klonen-Icon (für das Entfernen eines kopierten Feldes, klicken Sie auf das Löschen-Icon) rechts neben dem Feld
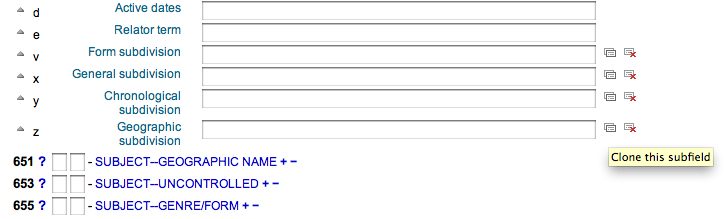
Um ein Unterfeld zu entfernen (wenn mehr als eines vom gleichen Typ da ist), klicken Sie auf - (Minuszeichen) rechts neben dem Feld
Klicken Sie auf das Icon rechts neben dem Feld, um ein Plugin zu aktivieren
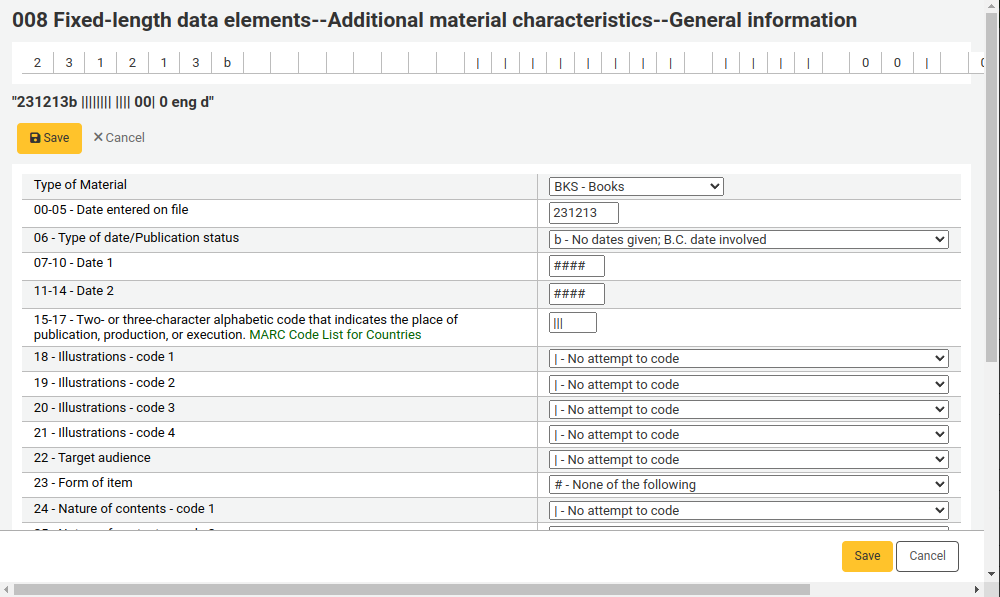
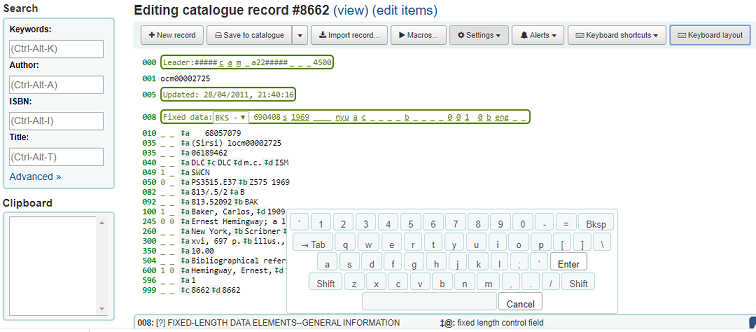
Einige Felder mit fester Länge haben Editoren, die sich je nach dem Matrialtyp ändern, das Sie katalogisieren (zum Beispiel die Felder 006 und 008)
Bemerkung
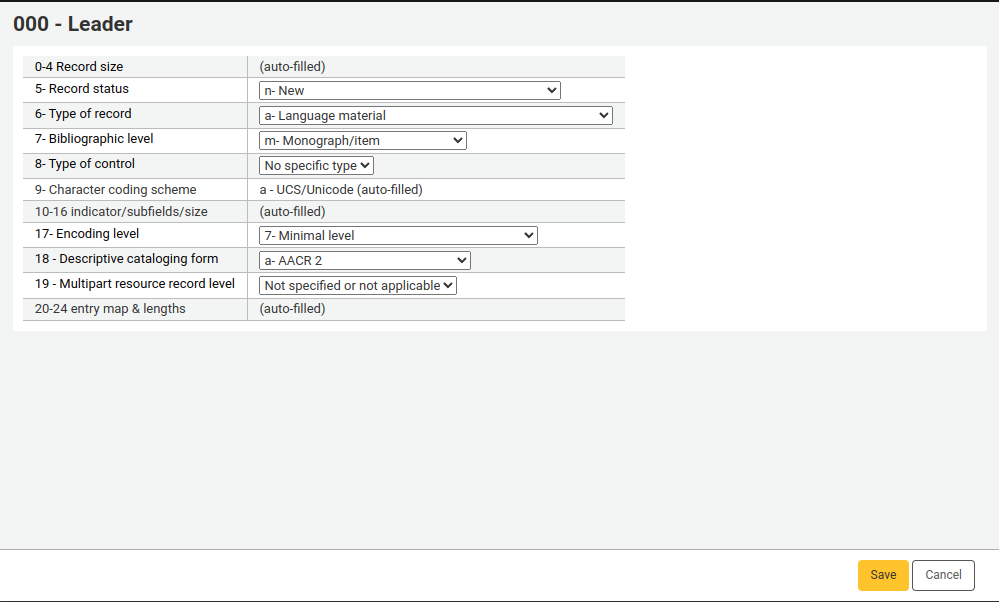
Die ‚Art des Materials‘ in 008 wird durch den Wert an Position 06 des Leaders bestimmt.
Wenn Sie den Titel erfasst haben, klicken Sie auf ‚Speichern‘ und wählen Sie, ob Sie den angelegten Datensatz speichern und danach anzeigen oder Exemplare für den neuen Titel erfassen möchten
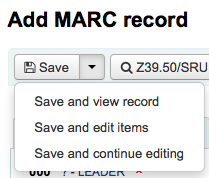
„Datensatz speichern und anzeigen“ zeigt Ihnen den soeben katalogisierten Datensatz
Nach dem Speichern des Datensatzes bringt Sie die Schaltfläche „Speichern und Exemplare bearbeiten“ zur „Maske Exemplare hinzufügen und bearbeiten“, um den Bestand hinzuzufügen.
Die Schaltfläche „Speichern und fortfahren“ erlaubt Ihnen den katalogisierten Datensatz zu speichern und Sie können im Editor bleiben um mit dem Katalogisieren fortzufahren.
Wenn Sie versuchen eine Dublette im System zu erzeugen, wird vor dem Speichern eine Warnung ausgegeben

Bemerkung
Um mögliche Dubletten zu identifizieren, sucht das System nach der ISBN. Falls es keine ISBN gibt, wird nach der betreffenden Kombination von Titel und Autor gesucht.
Wenn Pflicht- oder wichtige Felder oder Unterfelder nicht ausgefüllt werden, erscheinen entsprechende Warnmeldungen. Klicken Sie hier jeweils auf ‚Zum Feld‘ und ergänzen Sie dieses.

Wenn Sie weiter heruntergescrollt haben und die Warnmeldung erneut ansehen möchten, klicken Sie auf „Fehler“ in der Werkzeugleiste rechts.

Bemerkung
Das Fehlen als wichtig gekennzeichneter Felder oder Unterfelder verhindert nicht das Abspeichern des Satzes.
Nur das Fehlen von Pflichtfeldern oder -unterfeldern verhindert das Abspeichern des Satzes.
Erweiterter Editor
Der Systemparameter EnableAdvancedCatalogingEditor ermöglicht Ihnen, den Erweiterten Katalogisierungseditor zu benutzen.
Hinweis
Dieses Feature unterstützt aktuell keinen Support für UNIMARC oder NORMARC-Felder.
Wenn Sie ein leeres Framework im Erweiterten Editor öffnen oder einen Datensatz per Z39.50/SRU-Suche importieren, erscheint die Katalogisierungsmaske, um die Katalogisierung fortzusetzen.
Verwenden Sie das Suchformular auf der linken Seite, um Z39.50-Suchen durchzuführen

Von der Z39.50-Trefferliste ausgehend können Sie den MARC-Datensatz sehen, indem Sie auf den Link auf der rechten Seite klicken.
Wenn Sie auf „Import“ klicken, wird der Datensatz in den Editor übernommen, wo er bearbeitet werden kann.
Hinweis
Um ein neues Feld im Erweiterten Editor anzulegen, benötigen Sie einen leeren Indikator und umgeben die Indikatoren mit Leerzeichen.
Hinweis
Vor dem ersten Unterfeldtrennzeichen muss ein Leerzeichen gesetzt werden, aber nicht vor oder nach anderen Unterfeldtrennzeichen in diesem Feld.
Unten im Editor finden Sie die Hilfe der Library of Congress für das aktuell ausgewählte Feld. Wenn Ihre MARC-Struktur ungültig ist, wird diese in rot hervorgehoben. Um den Datensatz ausschließlich mit Tastaturkürzeln zu bearbeiten, können Sie die Kürzel über die entsprechende Schaltfläche nachschlagen.
Eine Zwischenablage ist verfügbar, um Text zwischen Feldern zu kopieren und einzufügen. In der Tabelle in der untenstehenden Abbildung finden Sie die Tastaturkürzel, die Sie mit der Zwischenablage verwenden können.
Tastaturkürzel für den Erweiterten Editor
Die folgenden Tastaturkürzel können im Erweiterten Editor des Katalogisierungsmoduls benutzt werden um Zeit zu sparen.
Tastenkürzel |
Verhalten |
|---|---|
Strg+C |
Aktuelles Feld kopieren |
Shift+Strg+C |
Aktuelles Unterfeld kopieren |
Strg-X |
Aktuelles Feld löschen und in Zwischenablage kopieren |
Shift+Strg+X |
Aktuelles Unterfeld löschen und in Zwischenablage kopieren |
Alt-C |
Copyright-Symbol einfügen (©) |
Alt-P |
Copyright-Symbol einfügen (©) (Tonaufnahmen) |
Strg+D |
Separator einfügen (‡) |
Strg+I |
Aktuelles Feld auf nächste Zeile kopieren |
Shift+Enter |
Zeilenumbruch einfügen |
Shift+Strg+L |
Feld mit Normdaten verknüpfen |
Eingabe |
Neues Feld auf neuer Zeile |
Reiter |
An nächste Position verschieben |
Strg+P |
Auswahl aus der Zwischenablage einfügen |
Shift+Tab |
An vorherige Position verschieben |
Strg+H |
Hilfe zum aktuellen Unterfeld |
Shift+Strg+K |
Tastatur wechseln |
Strg+S |
Datensatz speichern (kann nicht geändert werden) |
Virtuelle Tastatur für den Erweiterten Editor
A virtual keyboard is available for adding diacritics and symbols. Use the shortcut Shift-Ctrl-K to display the keyboard. A ‚Keyboard layouts‘ button will display at the top of the advanced editor that allows you to set the virtual keyboard layout for different languages.
Makros im Erweiterten Editor
Ein neues Makro hinzufügen:
Wählen Sie die Schaltfläche „Makros…“ aus
Ein neues Fenster geht auf. Wählen Sie hier „Neues Makro…“ aus, geben Sie den neuen Name des Makros in das Popup-Fenster ein und klicken Sie „OK“.
Klicken Sie danach auf die kleine „1“ und füllen Sie die erste Zeile Ihres Makros aus. Um mehrere Makrozeilen bzw. mehrere Makrofelder zu erhalten, drücken Sie die Returntaste, so dass eine kleine „2“ erscheint. Füllen Sie dann die zweite Zeile/das zweite Feld aus etc.
Ihre Makros werden automatisch gespeichert. Nach dem Speichern können Sie „x“ klicken, um das Fenster zu schließen oder ein Makro auswählen, das Sie auf den aktuell in Bearbeitung befindlichen Datensatz anwenden möchten, oder ein anderes Makro auswählen.
Wie bearbeitet man ein bereits vorhandenes Makro:
Wählen Sie die Schaltfläche „Makros…“ aus
Ein Fenster öffnet sich. Wählen Sie in diesem Fenster ein gewünschtes Makro aus, welches Sie bearbeiten oder ändern möchten.
Ihr Arbeitsgang wird automatisch gespeichert und danach können Sie „x“ klicken um das Fenster zu schließen, oder Sie wähen ein Makro für den Datensatz aus.
Die grundlegende Syntax für die Makrosprache:
Legen Sie ein neues Feld mit Unterfeld a an 500=‡a und setzen es auf „Bearbeiten mit Rancor“
Legen Sie ein neues Feld 500 mit Unterfeld a ‡a an und setzen Sie es auf „Bearbeiten mit Rancor“.
245c = von J.K.Rowling.
Wenn nötig legen Sie im Datensatz „by J.K.Rowling“ im ersten 245 Feld das Unterfeld c ‡c an.
082a={084a}
Setzen Sie im ersten 082 Feld das Unterfeld a ‡a (wenn nötig legen Sie das Unterfeld an) mit dem gleichen Inhalt des ersten 084‡a Feldes.
Indikatoren=_1
Setzen Sie die Indikatoren des zuletzt erwähnten Feldes (in diesem Fall Feld 082) auf „_“ und „1“.
neu 090a=Z674.75.W67
Erstellen Sie ein neues Unterfeld #a im ersten 090-Feld (aber nur wenn das Feld bereits existiert) und setzen Sie es auf Z674.75.W67.
neu 090a am Ende=Z674.75.W67
Das Gleiche wie oben.
neu 245b nach a= a tale of migth and magic /
Legen Sie nach dem ersten Unterfeld a ein neues Unterfeld b ‡b an und setzen Sie es auf „a tale of might and magic /“.
Löschen Sie Feld 245b
Löschen Sie das erste Unterfeld b ‡b im ersten 245 Feld
Sätze importieren
Sowohl bibliografische Sätze als auch Normdatensätze können in Koha importiert werden. Die zu importierenden Daten können im Format MARC oder MARCXML vorliegen.
Der Import von Sätzen in Koha besteht aus zwei Schritten.
Der erste Schritt, MARC-Datensätze für Import zwischenspeichern, besteht darin, die Sätze vorzubereiten und in das Reservoir zu laden.
Im zweiten Schritt, Zwischengespeicherte Datensätze verwalten, können die Sätze aus dem Reservoir in den Katalog importiert werden.
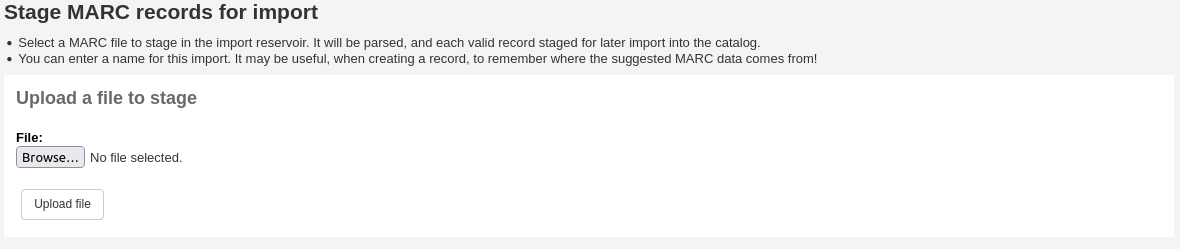
MARC-Datensätze für Import zwischenspeichern
Pfad in Koha: Mehr > Katalogisierung > Import > MARC-Datensätze für Import zwischenspeichern
Wählen Sie zunächst die MARC-Datei auf Ihrem Computer aus
- Als nächstes werden Ihnen die Optionen für den Abgleich und den Exemplardatenimport angeboten
Importe

Werte aus dem Profil vorbelegen: Wenn Sie bereits Importprofile angelegt haben, können Sie das passende Profil aus der Auswahlliste auswählen
Profile werden verwendet, um das restliche Importformular automatisch auszufüllen.
Sie können ein Profil anlegen, indem Sie die verschiedenen Einstellungen im unteren Abschnitt eintragen und dann einen Profilnamen am Ende des Formulars vergeben. Das nächste Mal, wenn Sie Daten importieren, ist das Profil dann verfügbar.
‚Kommentar zu dieser Datei‘: Geben Sie einen Kommentar an, der Ihnen hilft, die Datei leichter zu erkennen, wenn Sie diese im Werkzeug ‚Bereitgestellte MARC-Datensätze verwalten‘ suchen.
Datensatztyp: Geben Sie an, um welche Art von Datensätzen es sich in dieser Datei handelt, Titel- oder Normdaten.

Zeichensatz: Wählen Sie den Zeichensatz Ihrer Datei
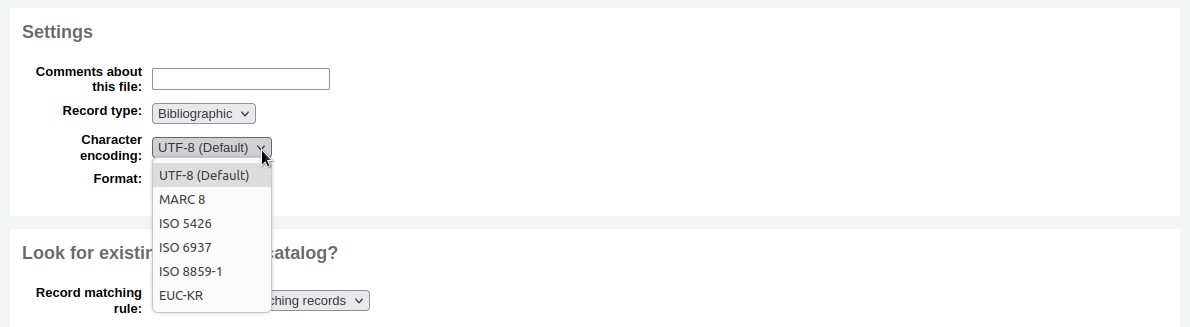
Format: Wählen Sie das MARC-Format Ihrer Datei aus
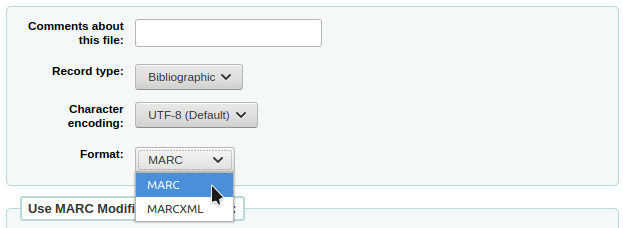
Datensätze mit einem Template für MARC-Modifikationen bearbeiten: Legen Sie fest, ob Sie die zu importierenden Daten mit einem Template für MARC-Modifikationen bearbeiten möchten

Wählen Sie, ob Sie nach übereinstimmenden Sätzen suchen möchten

Datensatzabgleichregel: Wählen Sie, mit welcher Regel geprüft werden soll, ob die Sätze im Katalog bereits vorhanden sind.

Bemerkung
Sie können die :ref:`Datensatzabgleichregeln <record-matching-rules-label>`im Bereich Administration einrichten
Bemerkung
Wenn die Datensatzabgleichregel anhand der ISBN verwendet wird, wird Koha nur exakte Übereinstimmungen als solche erkennen. Wenn Sie feststellen, dass die ISBN-Abgleichregel nicht zufriedenstellend funktioniert, können Sie den Systemparameter :ref:`AggressiveMatchOnISBN <aggressivematchonisbn-label>`auf ‚Versuche‘ setzen und den Import erneut starten.
Aktion, wenn eine Übereinstimmung gefunden wurde: wählen Sie, was bei einem Treffer im Katalog getan werden soll
Vorhandenen Datensatz mit importiertem Datensatz ersetzen: wählen sie diese Option, wenn Sie bessere Datensätze importieren, als die, die Sie aktuell im Katalog haben oder wenn Sie Änderungen mit einem externen Tool (z.B. MarcEdit) vorgenommen haben
Datensatz anlegen: dies lässt den vorhandenen Datensatz unverändert und legt den neuen Datensatz zusätzlich an, kann also zu Dubletten führen
Bereitgestellten Datensatz ignorieren (Exemplare können trotzdem verarbeitet werden): wählen sie diese Option, wenn Sie vorhandene Datensätze überschreiben möchten
Aktion, wenn keine Übereinstimmung gefunden wurde: wählen Sie, was getan werden soll, wenn der Datensatz nicht im Katalog gefunden wurde
Bereitgestellten Datensatz anlegen: wählen Sie diese Option, wenn Sie die Datensätze, die noch nicht in Ihrem Katalog sind, anlegen möchten (z.B. für neue Titel)
Bereitgestellten Datensatz ignorieren: wählen Sie diese Option, wenn Sie die Datensätze ohne Übereinstimmung mit einem vorhandenen Datensatz ignorieren möchten (z.B., wenn Sie vorhandene Datensätze ersetzen, aber nichts hinzufügen möchten)
Auf enthaltene Exemplardaten prüfen?: entscheiden Sie, ob Sie Exemplare (Feld 952) aus den MARC-Datensätzen importieren möchten (wenn Sie eine Datei mit Titeldaten laden)
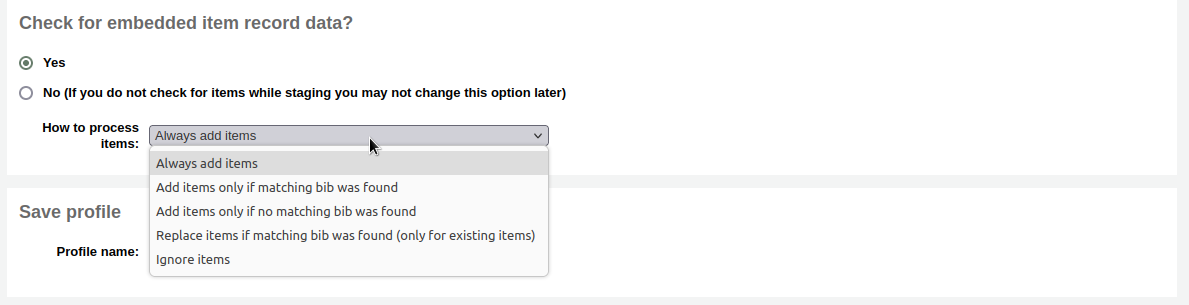
Exemplare immer anlegen: die Exemplare unabhängig von einer Übereinstimmung immer anlegen
Exemplare nur anlegen, wenn ein passender Titel gefunden wurde: dies legt nur Exemplare bei Titeln an, die bereits in Ihrem Katalog sind
Exemplare nur anlegen, wenn kein passender Titel gefunden wurde: dies legt nur Exemplare bei neu importierten Titeln an, nicht bei bereits vorhandenen
Exemplare ersetzen, wenn ein passender Titel gefunden wurde: der Abgleich erfolgt über die Exemplarnummern (itemnumbers) und Barcodes, um sicher zu stellen, dass nur bereits vorhandene Exemplare überschrieben werden.
Bemerkung
Exemplarnummern (itemnumbers) haben Vorrang vor Barcodes
Exemplare ignorieren: es werden keine Exemplare angelegt
Profil speichern: Sie können entscheiden, ob Sie die gewählten Einstellungen als Profil für die spätere Wiederverwendung speichern möchten

Klicken Sie auf ‚Zum Import bereitstellen‘
Das Zwischenspeichern der Datensätze wird wie ein Background Job behandelt. Eine Fortschrittsbalken informiert Sie über den Fortgang des Jobs.

Click ‚View detail of the enqueued job‘ to see the summary of the staging
You will be presented with a confirmation of your MARC import
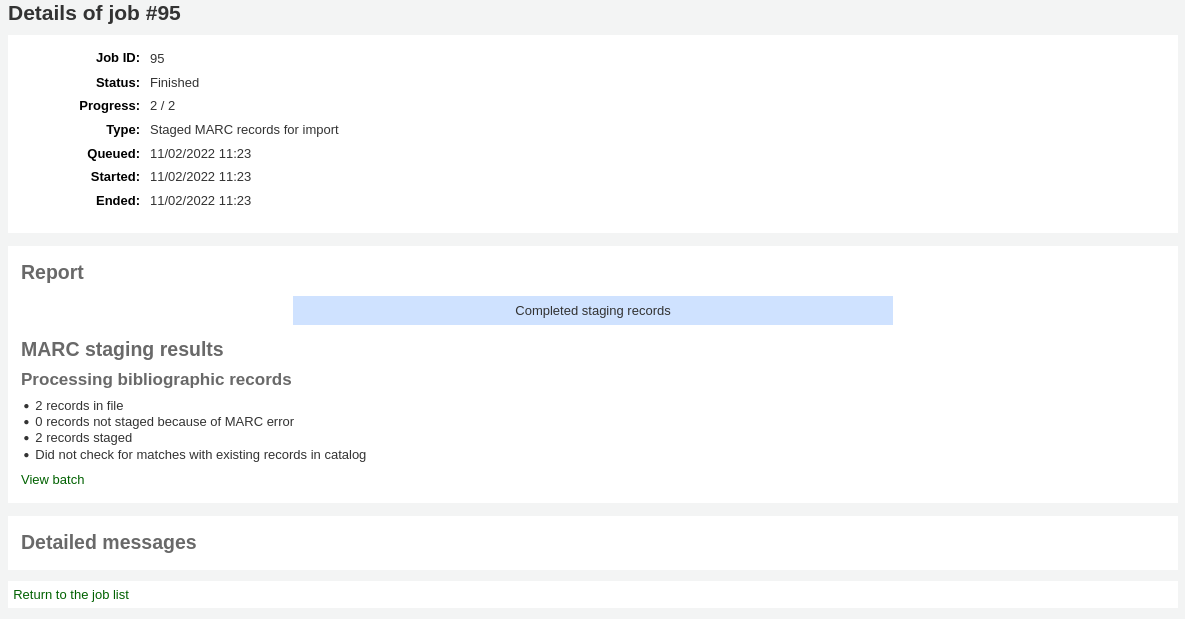
Anzahl der Sätze in der Datei
Number of records with MARC errors
Anzahl der bereitgestellten Sätze
Anzahl der Sätze mit mindestens einer Übereinstimmung im Katalog
Anzahl der bereitgestellten Sätze
To complete the process, continue to the Manage staged records tool by clicking on the ‚View batch‘ link.
If these records are to be used in acquisitions, you can stop here and add these records to a basket by ordering from a staged file
Managing staged records
Get there: More > Cataloging > Import > Manage staged records
Once you have staged your records for import you can complete the import using this tool.
From the list of staged files, click on the file name that you want to finish importing
Note that records that have already been imported will say so under ‚Status‘
Bemerkung
If you’re coming directly from the Stage records for import tool you will not see this list of staged files, you will be taken automatically to the right file summary
A summary of your staged file will appear along with the option to change your matching rules
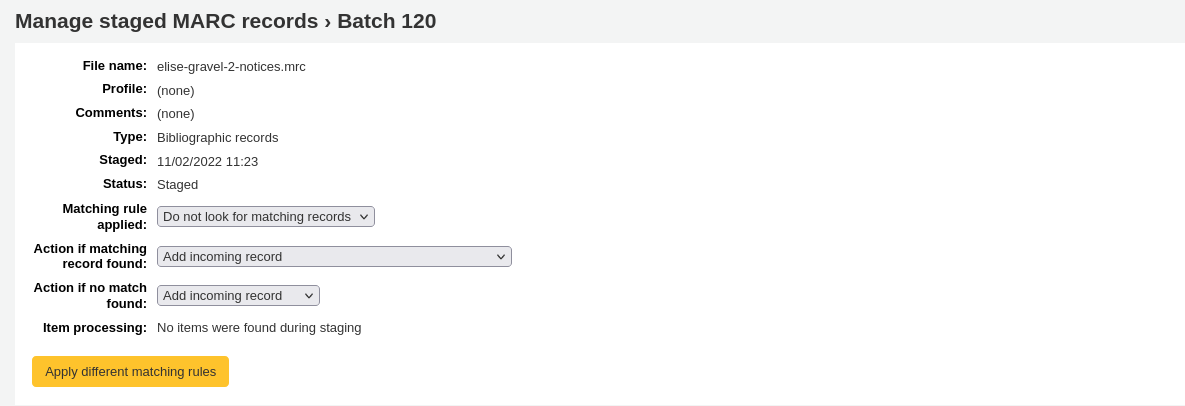
Below the summary is the option to import the batch of records using a specific framework
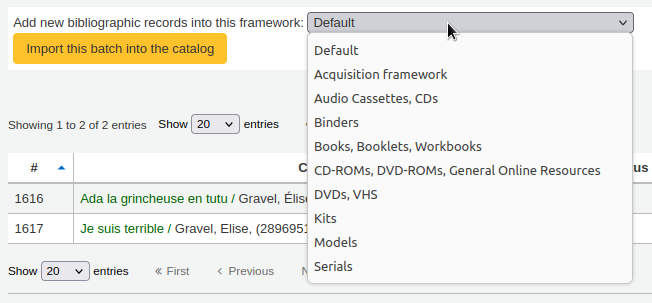
Choosing a framework other than ‚Default‘ isn’t necessary, but it’s helpful for running reports.
Unterhalb der Auswahl für das Framework befindet sich eine Liste der Datensätze, die importiert werden
Überprüfen Sie die Zusammenfassung vor dem endgültigen Import um sicher zu stellen, dass die Abgleichregel funktioniert wie erwartet und die Datensätze so importiert werden, wie Sie dies möchten
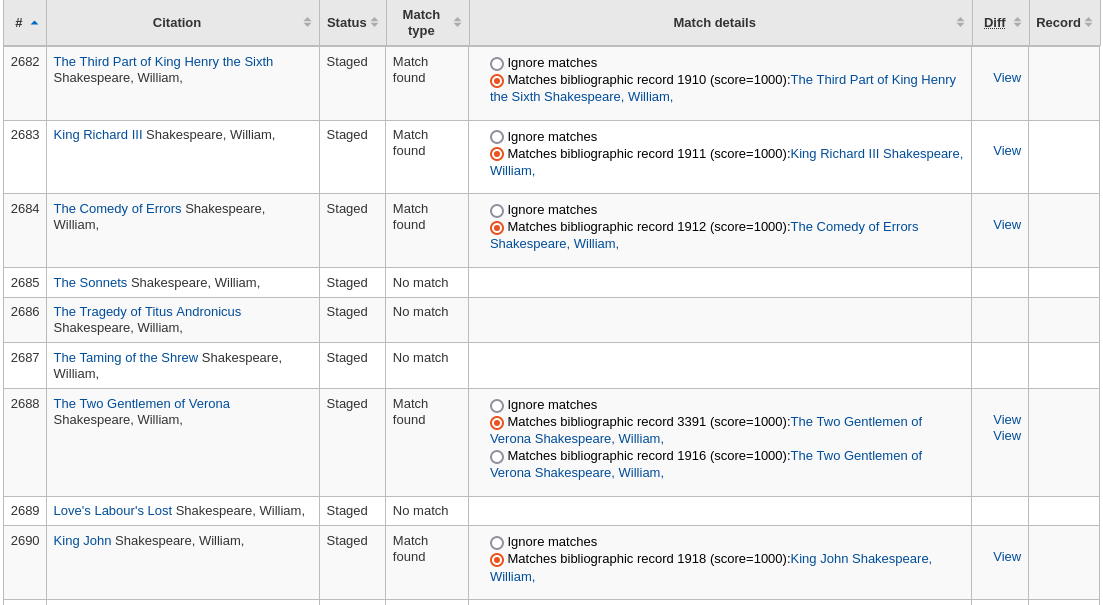
Übereinstimmungen werden angezeigt mit Informationen in der Spalte ‚Übereinstimmungsdetails‘

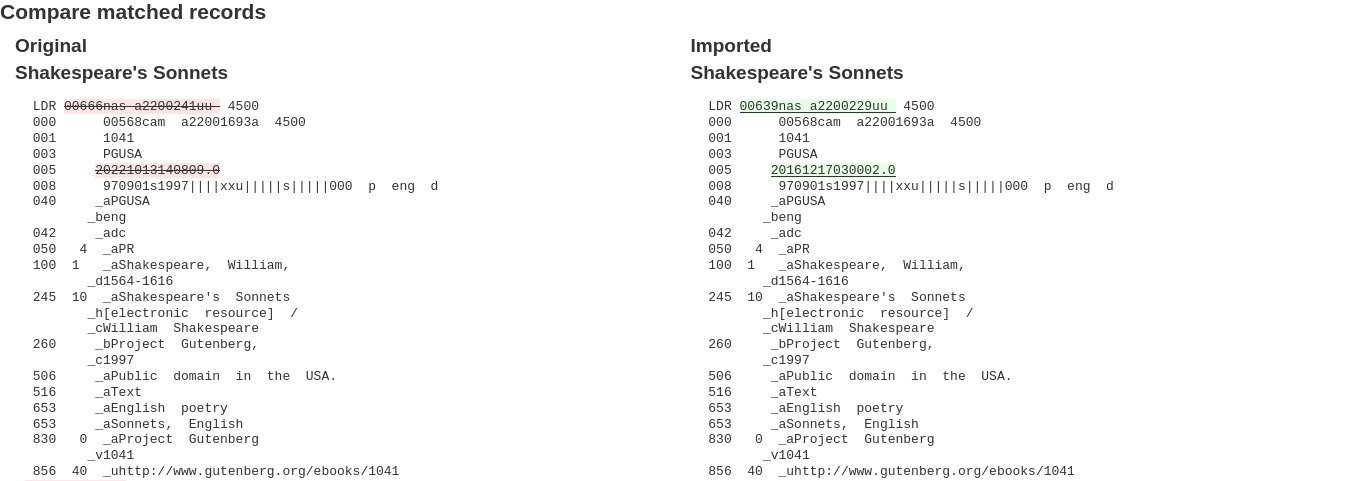
Übereinstimmungen erscheinen mit Informationen in der ‚Details des Abgleichs‘-Spalte, mit einem Klick auf ‚Ansehen‘ unter ‚Diff‘ können Sie sich die Unterschiede zwischen den Versionen anzeigen lassen.
For each match, you can choose to ignore the match by selecting the ‚Ignore matches‘ radio button. If more than one matching record was found, they will all be listed and you can choose with which to match your incoming record.

If ‚Ignore matches‘ is selected, the action chosen in ‚Action if no match is found‘ from the staging step will be applied.
Bemerkung
Here are the different behaviors depending on the ‚Action if matching record found‘ choice from the staging step and if a match is selected or if ‚Ignore matches‘ is selected.
Aktion, wenn Übereinstimmung gefunden wurde
Match selected
‚Ignore matches‘ selected
Vorhandenen Datensatz mit importiertem Datensatz ersetzen
Importierter Datensatz überschreibt übereinstimmender ausgewählter Datensatz
„Aktion, wenn keine Übereinstimmung gefunden wurde“ wird angewendet
Datensatz anlegen
Neuer Datensatz wurde hinzugefügt
Neuer Datensatz wurde hinzugefügt
Eingehenden Datensatz ignorieren
Eingehender Datensatz wurde ignoriert
„Aktion, wenn keine Übereinstimmung gefunden wurde“ wird angewendet
Klicken Sie auf ‚In Katalog übernehmen‘ um den Import zu vervollständigen
The record importation will be treated as a background job.

You will be presented with a confirmation of your MARC import
Anzahl der hinzugefügten Sätze: neu angelegte Datensätze
Anzahl der aktualisierten Datensätze: vorhandene Datensätze, die mit importierten Datensätzen überschrieben wurden
Anzahl der ignorierten Datensätze: Datensätze die aufgrund der Abgleichregeln ignoriert wurden
Anzahl hinzugefügter Exemplare: neu angelegte Exemplare
Anzahl ersetzter Exemplare: vorhandene Exemplare, die mit importieren Exemplaren überschrieben wurden
Anzahl an ignorierten Exemplaren mit dublettem Barcode: Exemplare, die ignoriert wurden, da der Barcode bereits in der Datenbank vorhanden ist
Nachdem der Import abgeschlossen wurde, wird ein Link zum Titel auf der rechten Seite jedes importierten Titels angezeigt
Sie können Ihren Import auch rückgängig machen, in dem Sie auf „Übernahme in den Katalog rückgängig machen“ klicken
Titel die mit diesem Werkzeug importiert wurden verbleiben im ‚Datenpool‘ bis sie entweder über die Schaltfläche „Bereinigen“ in der Übersichtsliste der Importe (siehe unten) oder durch den Cronjob :ref:`cleanup_database <cron-clean-up-database-label> gelöscht werden. Die Titelsätze im Datenpool sind über die Suche im :ref:`Modul Katalogisierung <cataloging-label>`recherchierbar
Um Datensätze aus dem „Datenpool“ zu entfernen:
Besuchen Sie die Startseite des Werkzeugs zur Verwaltung bereitgestellter MARC-Datensätze

Um die Importdaten zu bereinigen, klicken Sie auf ‚Bereinigen‘ auf der rechten Seite
Sie erhalten eine Bestätigungsnachricht.
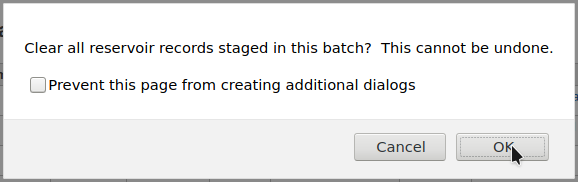
Bestätigen Sie die Löschung und die Datensätze werden aus dem Datenpool entfernt. Der Status ändert sich zu ‚bereinigt‘
Datensatz hinzufügen
Zeitschriftenaufsätze und Artikel innerhalb von Monographien und Periodika können über das Katalogisieren von unselbstständigen Werken erschlossen werden. Dabei wird für jeden Teil dieser Artikel, Kapitel, Abteilungen etc. (‚unselbständiges Werk‘) innerhalb des Materials (‚übergeordnetes Werk), wie ein Buch, ein Artikel in einer Zeitschrift, eine Zeitung oder Fortsetzung ein eigener Titelsatz angelegt, auch wenn der einzelne Teil nicht physisch vom übergeordneten Werk getrennt ist. Mehr Informationen dazu finden Sie im Kapitel 13 der AACR2 (Anglo-American Cataloguing Rules).
Wenn Sie unselbstständige Werke katalogisieren möchten, haben Sie zwei Möglichkeiten. Zum einen die Funktion EasyAnalytics, zum anderen den Erweiterter Workflow für unselbständige Werke.
Einfache Aufsätze
Die Funktion zur einfachen Erstellung von Teil-Ganzes-Beziehungen zwischen Datensätzen macht die Verknüpfung von Titelsätzen einfacher. Zuerst müssen Sie den Systemparameter EasyAnalyticalRecords auf ‚Aktiviere‘ und den Systemparameter UseControlNumber auf ‚Verwende keine‘ setzen .
Nach der Katalogisierung des unselbständigen Werkes, (adding records um mehr Datensätze anzulegen) klicken Sie ‚Bearbeiten‘ in der normalen Ansicht und wählen Sie ‚Mit übergeordnetem Werk verlinken‘.
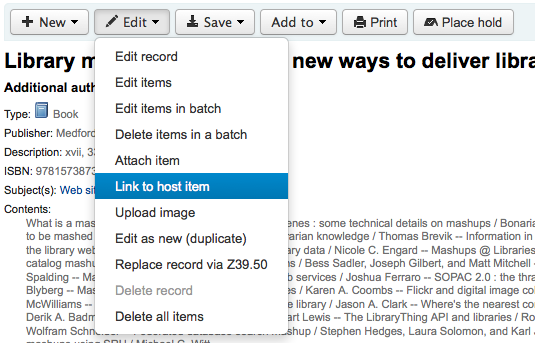
Hier werden Sie nach dem Barcode des Exemplares gefragt, das mit diesem Datensatz verknüpft werden soll.
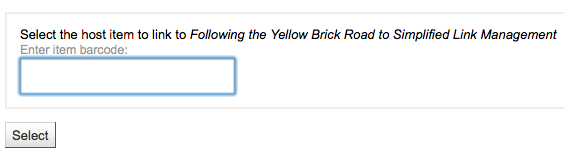
Nach Abschluss der Eingabe des Exemplar-Barcodes erscheint eine Bestätigung.

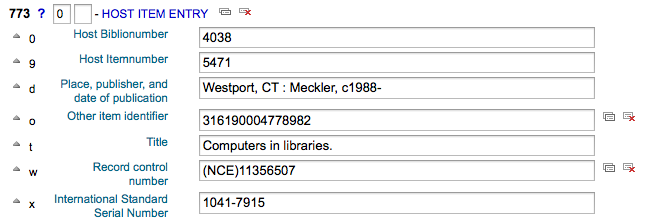
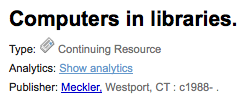
Feld 773 des Datensatzes wird automatisch mit den Informationen für den Link ausgefüllt.
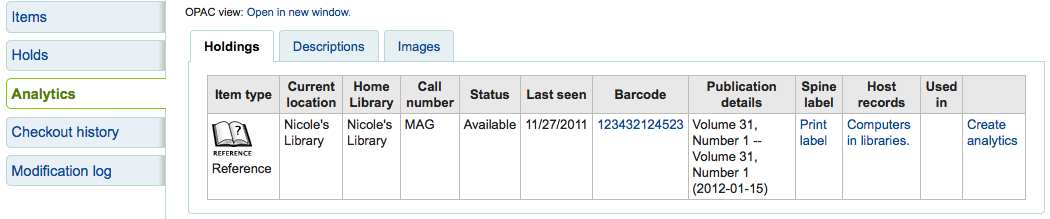
Um alle mit dem übergeordneten Werk verknüpften unselbständigen Datensätze anzuzeigen, starten Sie eine Suche nach dem Datensatz, klicken Sie im linken Bereich auf den entsprechenden Tab und das unselbständige Werk, welches mit dem Barcode verbunden ist, wird in der Spalte „Benutzt in“ angezeigt.

Hinweis
Tipp: Sie können auch von diesem Bildschirm ausgehend unselbstständige Werke erfassen, indem Sie die entsprechende Schaltfläche verwenden.
Sie erhalten auch eine Liste der zu diesem Datensatz gehörenden unselbständigen Werke, wenn Sie auf die Schaltfläche ‚Unselbständige Werke anzeigen‘ klicken, die sich in der normalen Ansicht über dem Datensatz befindet.
Es wird auch eine Verknüpfung zum übergeordneten Exemplar in der Spalte „übergeordneter Titel“ in der Tabelle Vormerkungen angezeigt.
Erweiterter Workflow für unselbständige Werke
Um den erweiterten Workflow benutzen zu können, müssen Sie den Systemparameter EasyAnalyticalRecords auf ‚Deaktiviere‘ setzen und den Systemparameter UseControlNumber auf ‚Verwende‘.
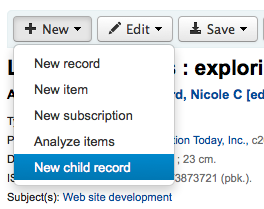
Nach der Katalogisierung Ihres Datensatzes, (Datensatz hinzufügen mehr zum Anlegen von Datensätzen) klicken Sie ‚Neu‘ in der normalen Ansicht und wählen Sie ‚Mit übergeordnetem Werk verlinken‘.
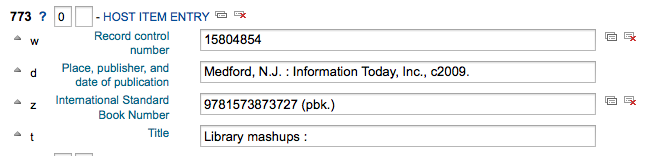
Dies öffnet einen leeren Datensatz zur Katalogisierung. Der leere Datensatz enthält nur das Feld 773, welches bereits ausgefüllt ist. Um den Link zu vervollständigen, wird der Datensatz nochmal gespeichert.
Der Link „Zeige unselbstständige Werke“ beim übergeordneten Satz zeigt nun unter Verwendung von dessen Datensatzkontrollnummer (001) sämtliche dazugehörigen untergeordneten Sätze des Typs „Unselbständiger Teil einer Monografie“ oder „Unselbständiger Teil einer fortlaufenden Publikation“ (Position 7 im Leader) an, wenn diese ein Feld 773 mit Unterfeld w aufweisen und darin die Datensatzkontrollnummer (001) des übergeordneten Satzes steht.
Unselbständige Werke bearbeiten
Wenn Sie einen Titeldatensatz falsch verknüpft haben, können Sie den Link entfernen indem Sie den verlinkten Datensatz bearbeiten (nicht den übergeordneten Datensatz).
Dazu gehen Sie in den untergeordneten Satz und klicken auf ‚Edit‘. Um UseControlNumber zu verwenden, bearbeiten oder entfernen Sie einfach das betreffende Feld 773.
Falls EasyAnalytics verwendet wird, wählen Sie ‚Exemplare bearbeiten‘. Links neben jedem Exemplar sehen Sie zwei Optionen.

‚übergeordnetem Titel bearbeiten‘ erlaubt die Bearbeitung des Exemplars im übergeordneten Titel.
Die Schaltfläche ‚Link löschen‘ entfernt das Feld 773 und die Verknüpfung mit dem übergeordneten Werk.
Titel bearbeiten
Um einen Datensatz zu bearbeiten, klicken Sie auf die Schaltfläche „Aktion“ in der Trefferliste und verwenden Sie die Schaltfläche ‚Titel bearbeiten‘.
Klicken Sie auf die Schaltfläche ‚bearbeiten‘ in der Trefferliste und verwenden Sie den Eintrag ‚Datensatz bearbeiten‘.
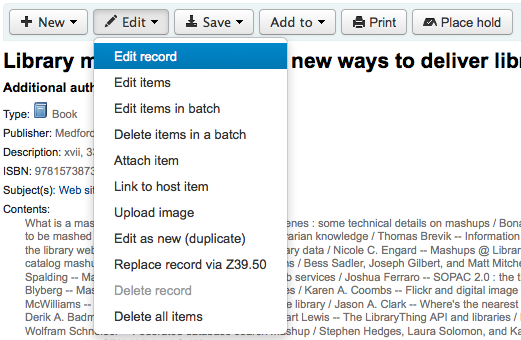
Der Datensatz wird im MARC-Editor geöffnet
Über eine Z39.50/SRU-Suche können Sie den Datensatz mit einem vollständigeren Datensatz, den Sie in einer anderen Bibliothek gefunden haben überlagern. Verwenden Sie dazu die Funktion ‚Datensatz über Z39.50/SRU überschreiben‘ im Menü ‚Bearbeiten‘.

Wenn Sie dies auswählen, gelangen Sie in die Z39.50/SRU-Suche, wo Sie in anderen Bibliotheken nach dem Datensatz suchen können.
Nachdem Sie alle Änderungen vorgenommen haben (egal auf welche Weise), klicken Sie auf ‚Speichern‘ in der oberen linken Ecke des Editors.
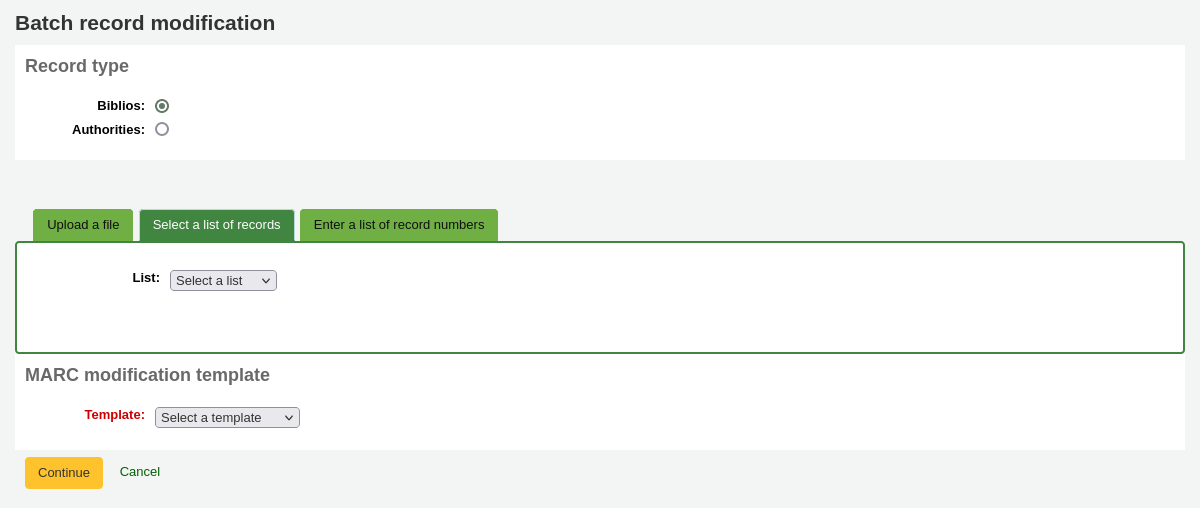
Stapelbearbeitung von Titeln
Pfad in Koha: Mehr > Katalgisierung > Stapelbearbeitung > Stapelbearbeitung von Titeln
Das Tool wird verwendet um Stapel von Titel- und Normdaten unter Verwendung des Templates für MARC-Modifikationen zu bearbeiten. Vor der Verwendung des Werkzeug müssen Sie mindestens ein Template für MARC-Modifikationen angelegt haben.
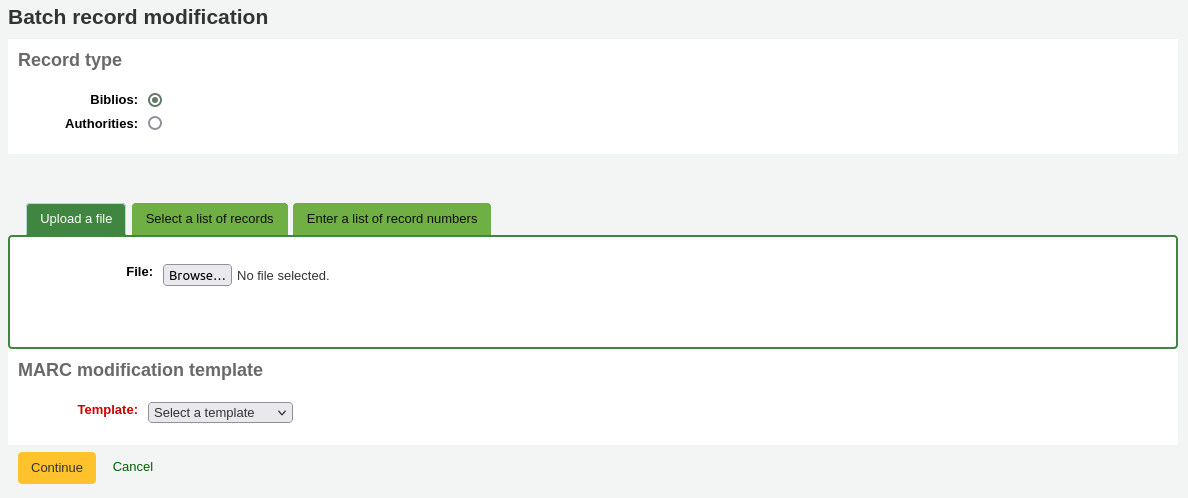
Datensatztyp: Legen Sie fest, ob Sie Titel- oder Normdatensätze ändern
Geben Sie die zu bearbeitenden Titeldatensatznummer (biblionumbers) oder Normdatensatz-IDs ein, auf eine von drei möglichen Arten
Hochladen einer Datei mit biblionumbers oder authids
verwenden Sie eine Liste;
Oder die Nummern (eine pro Zeile) im angezeigten Eingabefeld eingeben.
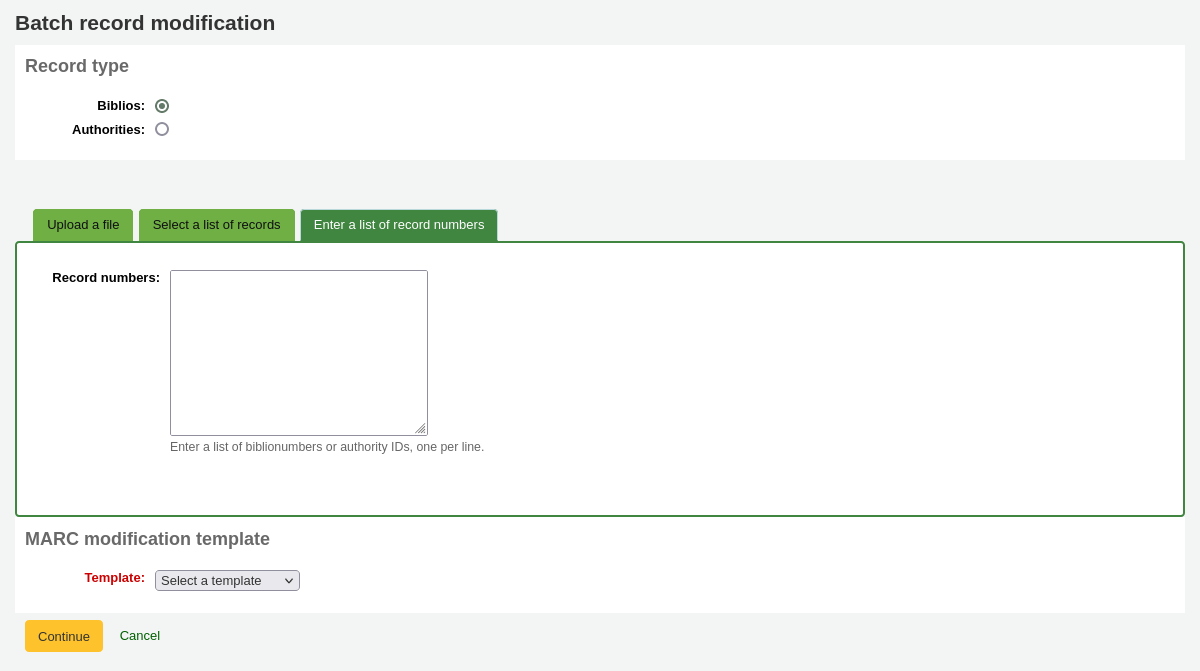
Template für MARC-Modifikationen: wählen Sie das Template für MARC-Modifikationen um diese Datensätze zu bearbeiten.
Wenn Sie die Kriterien eingegeben haben, klicken Sie ‚Fortsetzen‘
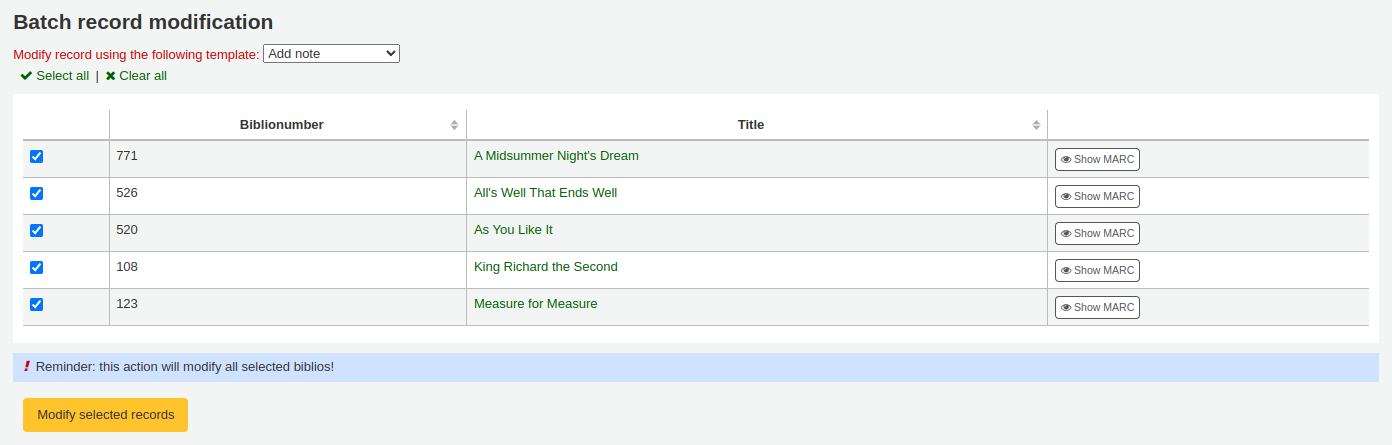
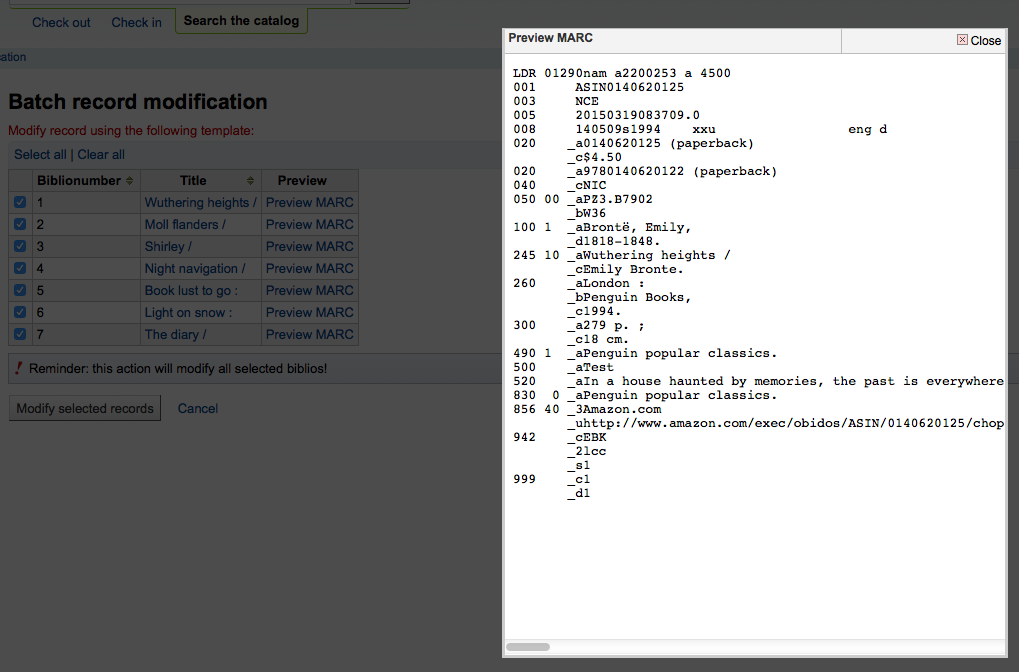
Es erscheint eine Liste der zu ändernden Datensätze. Neben jedem Eintrag erscheint eine Checkbox. Haken neben Exemplaren, die nicht geändert werden sollen, können entfernt werden.
Mit einem Klick auf die MARC-Ansicht können Sie sehen, welche Änderungen vollzogen wurden nach Abschluß der Bearbeitung.
Wenn alles zu ihrer Zufriedenheit ist, können Sie die Änderungen mit einem Klick auf ‚Ausgewählte Datensätze bearbeiten‘ durchführen.
Templates für MARC-Modifikationen
Pfad in Koha: Mehr > Katalogisierung > Stapelbearbeitung > Templates für MARC-Modifikationen
Templates für MARC-Modifikation erlauben es, MARC-Datensätze während der Bereitstellung für den Import oder der Stapelbearbeitung von Titeln automatisch zu bearbeiten.
Dieses Werkzeug erlaubt es, MARC-Datensätze aus unterschiedlichen Quellen an Ihr MARC-Framework anzupassen. Dazu wird ein einfaches Skript mit den Aktionen ‚Copy‘, ‚Move‘, ‚Add‘, ‚Update‘ und ‚Delete fields‘ eingesetzt.
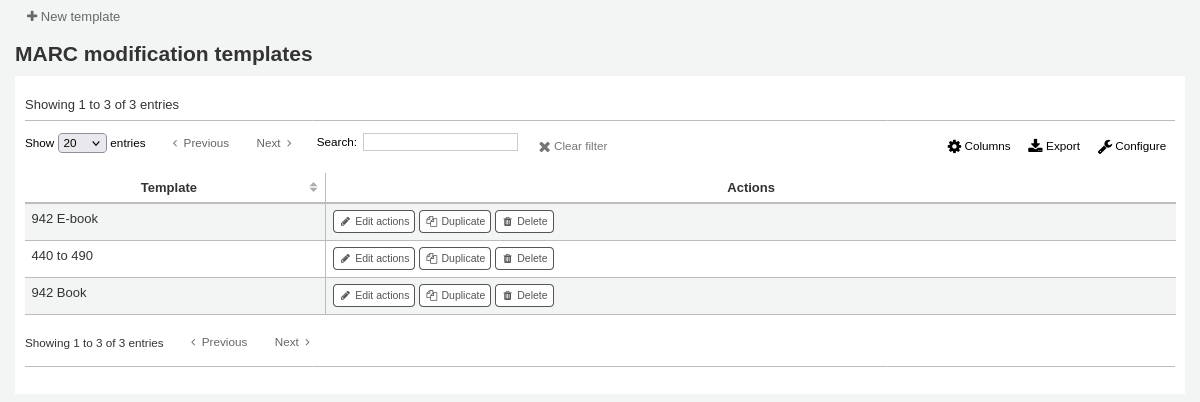
Legen Sie zunächst ein neues Template an, indem sie einen Namen eingeben und auf ‚Template erstellen‘ klicken. (Ein Template kann aus einer oder mehreren Aktionen bestehen.).
Optional können Sie auch ein existierendes Template kopieren indem Sie bei ‚Template kopieren‘ das zu kopierende Template in der Auswahlliste auswählen.
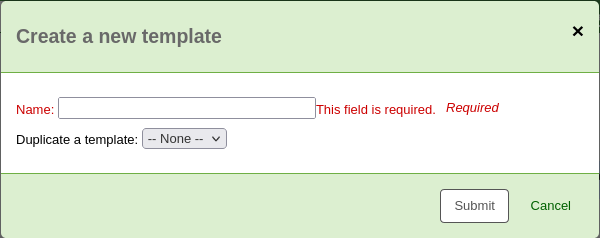
Als Nächstes können Sie Aktionen zum Template hinzufügen. Klicken Sie auf ‚Neue Aktion‘.
Ein Fenster ‚Neue Aktion‘ erscheint, indem Sie festlegen können, welche Aktionen durchgeführt werden sollen.
For example if you’re loading in a batch of files from your EBook vendor you might want to add the biblio item type of EBOOK to 942$c.
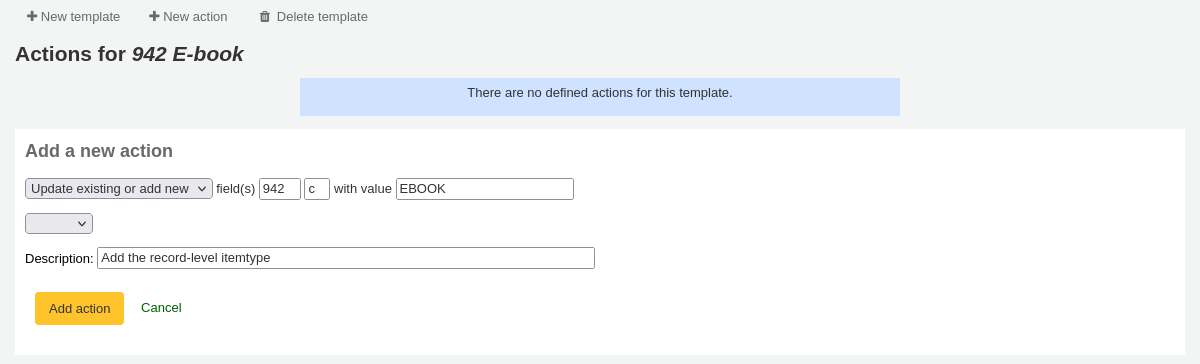
Choose ‚Add new‘
Enter the field 942 and subfield c
Enter the value of ‚EBOOK‘ (or whatever your ebook item type code is)
Provide a description so you can identify this action later
Click ‚Add action‘
Bemerkung
If you wish to update the values in an existing field choose the option ‚Update existing or add new‘. This will update existing values where found and add a new field if one doesn’t exist.
Each action can also have an optional condition to check the value or existence of another field. For example you might want to add the call number to the item record if it’s not already there.
Bemerkung
Editing item fields only works when using the template when staging records. Once records are in Koha, the item is ‚separated‘ from the record and can only be edited using the batch item modification tool

Choose ‚Copy‘
Decide if you want to copy the first occurrence or all occurrence of the field
Enter the field 090 (or other bibliographic call number field) and subfield a to copy
Enter the 952 field and o subfield to copy to
Choose ‚if‘
Enter the 952 field and o subfield
Choose „doesn’t exist“
Provide a description so you can identify this action later
Click ‚Add action‘
The move, copy, and copy and replace actions support regular expressions, which can be used to automatically modify field values during the copy or move. An example would be to strip out the ‚$‘ character in field 020$c.

Choose ‚Copy and replace‘
Decide if you want to copy the first occurrence or all occurrences of the field
Enter the field 020 and subfield c to copy
Enter the 020 field and c subfield to copy to
Check the ‚RegEx‘ box and enter your regular expression (in this case s/\$// )
Choose ‚if‘
Enter the 020 field and c subfield
Choose „matches“
Check the ‚RegEx‘ box and enter your regular expression (in this case m/^\$/ )
Provide a description so you can identify this action later
Click ‚Add action‘
Bemerkung
The value for an update can include variables that change each time the template is used. Currently, the system supports two variables, __BRANCHCODE__ which is replaced with the branchcode of the library currently using the template, and __CURRENTDATE__ which is replaced with the current date in ISO format ( YYYY-MM-DD ).
You could also use regular expressions to add your library’s proxy URL in front of links in your MARC record.

Choose ‚Copy and replace‘
Decide if you want to copy the first occurrence or all occurrences of the field
Enter the field 856 and subfield u to copy
Enter the 856 field and u subfield to copy to
Check the ‚RegEx‘ box and enter your regular expression (in this case s/^/PROXY_URL/ )
Provide a description so you can identify this action later
Click ‚Add action‘
When choosing between ‚Copy‘ and ‚Copy and replace‘ keep the following example in mind:
245 _aThe art of computer programming _cDonald E. Knuth.
300 _aA_exists _bB_exists
If we apply action (a) Copy the whole field 245 to 300, we get:
245 _aThe art of computer programming _cDonald E. Knuth.
300 _aA_exists _bB_exists
300 _aThe art of computer programming _cDonald E. Knuth.
If we apply action (b) Copy the subfield 245$a to 300$a, we get:
245 _aThe art of computer programming _cDonald E. Knuth.
300 _aThe art of computer programming _bB_exists
Sobald die Aktionen gespeichert sind, erscheinen diese im oberen Bildschirmbereich. Die Aktionen können mit den Pfeilen neu angeordnet werden.

Aktionen werden in der Reihenfolge ihres Erscheinens abgearbeitet. Abhängig von Ihren Aktionen kann die Reihenfolge sehr wichtig sein. Zum Beispiel möchten Sie ein Feld nicht löschen lassen, bevor es in ein anderes Feld kopiert wird. Sie können die Pfeile verwenden, um Aktionen nach oben oder nach unten zu bewegen.
Der Pfeil nach oben verschiebt die Aktion eine Position nach oben
Der Pfeil nach oben mit einer Linie oben verschiebt die Aktion an die erste Position
Der Pfeil nach unten mit einer Linie unten verschiebt die Aktion an die letzte Position
Der Pfeil nach unten verschiebt die Aktion eine Position nach unten
Once your template is saved you will be able to pick it when using the Stage MARC records for import tool or when using the batch record modification tool.
Titel duplizieren
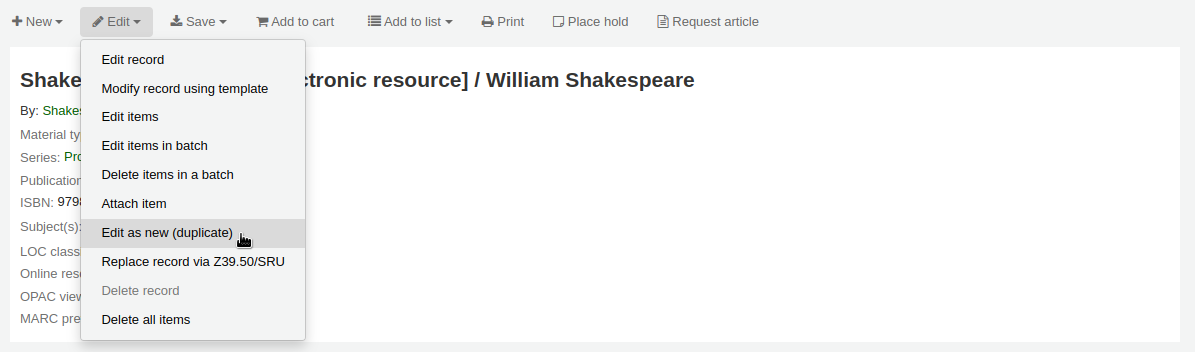
Nicht immer können Sie einen passenden Datensatz via Z39.50/SRU finden. In diesem Fall können Sie einen ähnlichen Datensatz duplizieren und die notwendigen Änderungen und Ergänzungen für Ihren Datensatz vornehmen. Um einen vorhandenen Datensatz zu duplizieren, klicken Sie ‚Titel duplizieren‘ im Menü ‚Bearbeiten‘ des Datensatzes.
Dies öffnet einen neuen MARC-Datensatz, bei dem die Felder mit den Werten aus dem ursprünglichen Datensatz belegt sind.
Bearbeiten nach Bedarf und Speichern.
Bemerkung
Dies wird den originalen Datensatz nicht verändern.
Dateien anhängen
Wenn Sie Dateien in Koha hochladen möchten, können Sie dies mit einigen Einstellungen tun.
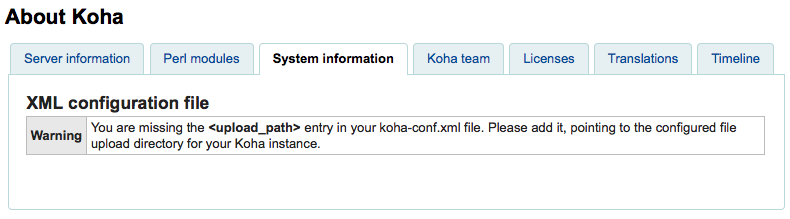
Ihr Systemadministrator muss ‚upload_path‘ config so einstellen, dass es darauf hinweist, wo die Dateien gespeichert sind.
Sie merken, ob Ihr Upload-Pfad richtig gesetzt ist, indem Sie im Modul ‚Über Koha‘> Systeminformation überprüfen.
Überprüfen Sie, ob Ihr Systemparameter OPACBaseURL richtig eingestellt ist.
Sie können das upload.pl Plugin für das Unterfeld 856$u in einem (oder mehreren) Ihrer Frameworks hinzufügen.
Wenn Sie alles eingerichtet haben, können Sie mit dem Katalogisieren fortfahren. Ein Plugin Icon wird neben dem Feld 856$u angezeigt und das Upload und/oder Suchfenster klappt auf.
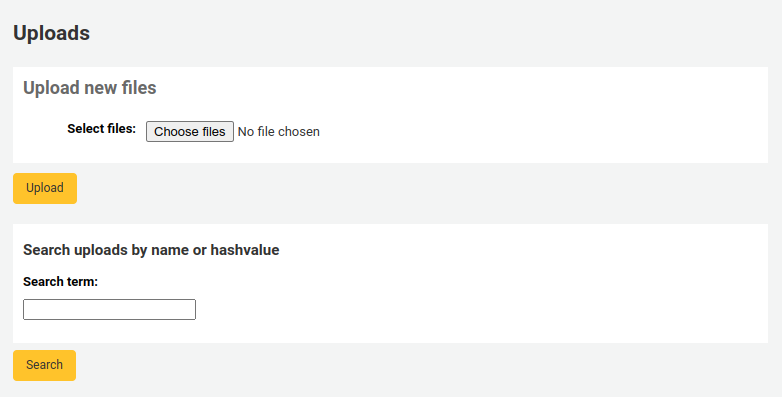
Von diesem Menü aus können Sie ‚durchsuchen‘ anklicken um eine Datei auszuwählen und sie anzuhängen, oder Sie benutzen die Suchbox um kürzlich heruntergeladene Dateien zu suchen. Ausgehend von der Trefferliste können Sie auswählen, welche Datei Sie anhängen möchten.
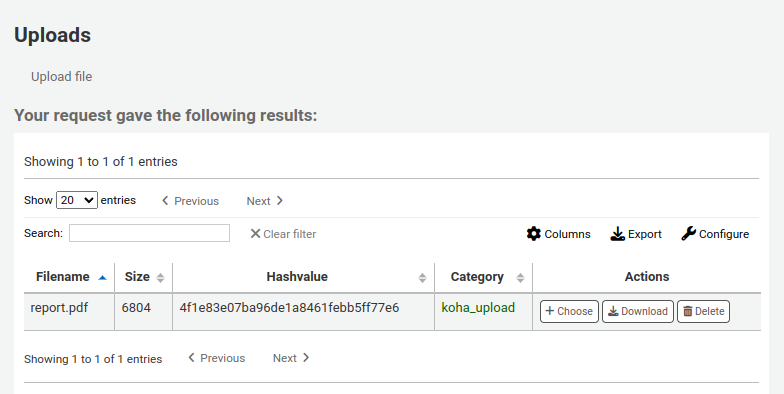
Wenn Sie die Datei ausgewählt haben wird diese als Link im MARC-Datensatz und in der Detailanzeige angezeigt.
Hinweis
Handelt es sich bei der Datei um ein PDF wird sie direkt im Benutzerbrowser geöffnet, handelt es sich hingegen um ein Bild oder um einen anderen Dateityp, wird der Benutzer aufgefordert die Datei herunterzuladen.
Coverbilder hinzufügen
Verschiedenste freie und kostenpflichtige Services sind in Koha integriert um Coverbilder für Ihren Katalog zur Verfügung zu stellen, zum Beispiel Amazon, Baker and Taylor, Google books, NovelList Select, Open Library, und Syndetics. Beachten Sie die entsprechenden Systemparameter.
Es gibt auch andere Optionen, wie zum Beispiel einen Coce image cache server, oder Remote-Coverbilder mit benutzerdefinierten URLs.
Warnung
Wenn Sie mehr als einen Coverservice aktivieren, werden Ihnen ggf. mehrere Coverbilder in einem Datensatz angezeigt.
Die meisten dieser Services verwenden die ISBN des Datensatzes um das Coverbild vom Anbieter abzurufen.
Um eigene Coverbilder hochzuladen, verwenden Sie das Werkzeug Coverbilder hochladen unter ‚Katalogisierung‘.
Warnung
Make sure you are respecting copyright when using images.
Adding a single local cover image
Before adding local cover images, make sure either the OPACLocalCoverImages system preference and/or the LocalCoverImages system preference is set to ‚Show‘.
To upload local cover images staff need the upload_local_cover_images permission.
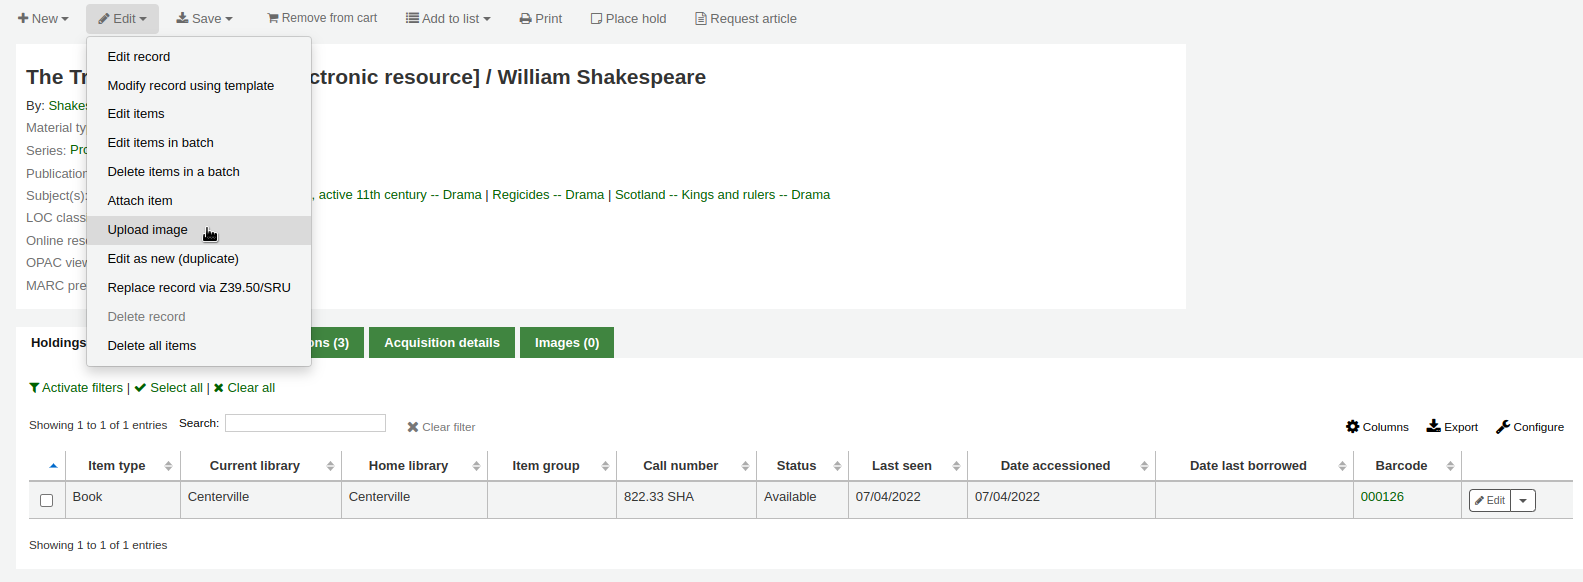
In a bibliographic record, choose ‚Upload image‘ from the edit menu to add your cover image.
Drag and drop the image to the area, or click on ‚Drop files here or click to select a file‘ a select the image file on your computer.

Warnung
Koha does not have a maximum file size limit for this tool, but the web-server (such as Apache) may limit the maximum size of uploads (ask your system administrator).
Wenn der Systemparameter AllowMultipleCovers auf „Erlaube“ gesetzt ist, haben Sie die Wahl, ob Sie vorhandene Cover ersetzen möchten oder nicht. Wenn der Parameter auf „Erlaube nicht“ gesetzt ist, wird das Bild existierende Coverbilder für diesen Datensatz ersetzen.
Bemerkung
Wenn Sie mehrere Bilder für einen Datensatz hochladen möchten, werden diese von links nach rechts (dann von oben nach unten, abhängig vom Fassungsvermögen Ihres Bildschirms) in der Reihenfolge des Uploads angezeigt. Das Bild auf der linken Seite (das erste, das hochgeladen wurde) wird als Miniaturbild in der Trefferliste und in der Detailansicht angezeigt. Es gibt keine Möglichkeit Coverbilder neu zu ordnen, wenn sie auf diesem Weg hochgeladen wurden, darum beachten Sie beim Upload die gewünschte Anzeigereihenfolge.
Klicken Sie auf ‚Bilder verarbeiten‘
Alternativ können Sie das Werkzeug zum Hochladen von Coverbildern über Katalogisierung > Werkzeuge > Coverbilder hochladen ansteuern. Dort müssen Sie dann die biblionumber des Datensatzes angeben, für den Sie das Bild hochladen.

Bemerkung
Die biblionumber oder Titeldatensatznummer ist nicht der Barcode, es ist die vom System automatisch generierte Nummer für jeden Titeldatensatz. Sie können die biblionumber an verschiedenen Stellen finden, nämlich:
Am Ende der URL in der Adresszeile Ihres Browsers auf der Detailansichtsseite. Die URL sieht in etwa so aus
Im Reiter MARC auf der Detailansichtsseite des Datensatzes der Dienstoberfläche
Einen Stapel an Coverbildern hinzufügen
Das Werkzeug zum Hochladen von Coverbildern erlaubt auch einen Stapel von Bildern in Form einer ZIP-Datei hochzuladen.
Mehrere Bilder hochladen:
Legen Sie ein Verzeichnis mit den Bildern an, die Sie hochladen möchten
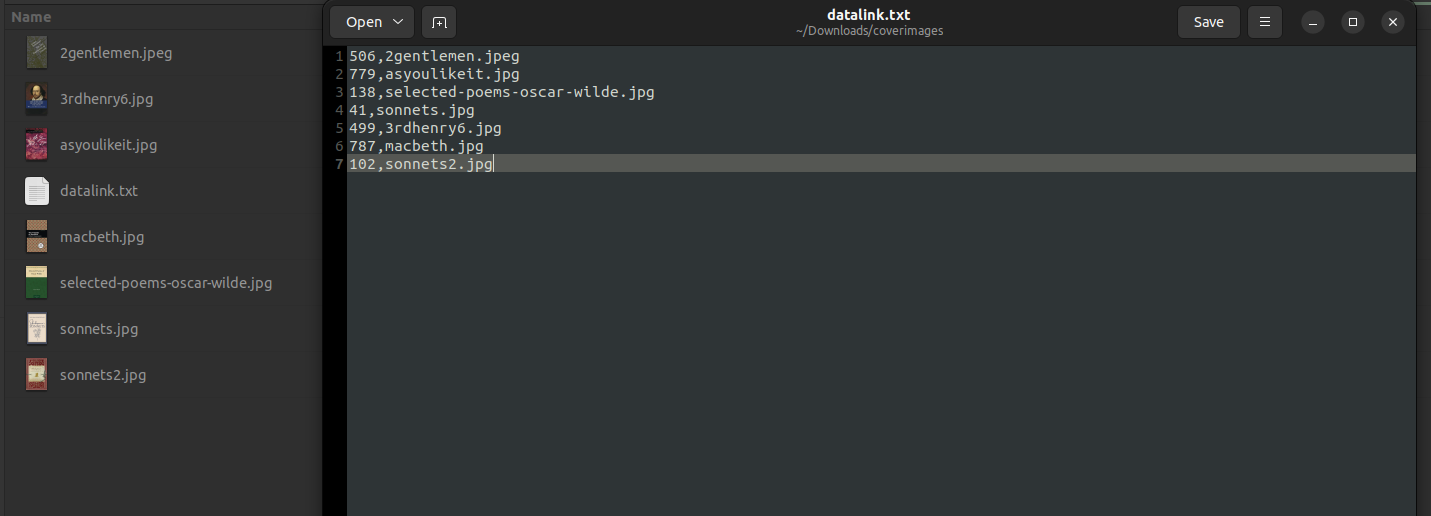
Legen Sie eine Textdatei (*.txt) mit dem Namen datalink.txt oder idlink.txt an, die pro Bild eine Zeile mit der Titelsatznummer (biblionumber) gefolgt vom Bildnamen enthält. Zum Beispiel:
- ::
506,2gentlemen.jpeg 779,asyoulikeit.jpg 138,selected-poems-oscar-wilde.jpg 41,sonnets.jpg 499,3rdhenry6.jpg 787,macbeth.jpg 102,sonnets2.jpg
Warnung
Stellen Sie sicher, dass die Textdatei keine zusätzlichen Zeilen oder Zeichen enthält.
Erstellen Sie eine ZIP-Datei die alle Bilder und die zugehörige Textdatei enthält
In Koha’s staff interface, go to the upload cover image tool in Cataloging > Tools > Upload local cover image, and drag and drop or select the ZIP file from your computer
The file type ‚ZIP file‘ should be selected
Wenn der Systemparameter AllowMultipleCovers auf „Erlaube“ gesetzt ist, haben Sie die Wahl, ob Sie vorhandene Cover ersetzen möchten oder nicht. Wenn der Parameter auf „Erlaube nicht“ gesetzt ist, wird das Bild existierende Coverbilder für diesen Datensatz ersetzen.
Klicken Sie auf ‚Bilder verarbeiten‘
You are presented with a summary of the upload

Bemerkung
The source image is used to generate a 140 x 200 px thumbnail image and a 600 x 800 px full-size image. The original sized image uploaded is not kept by Koha.
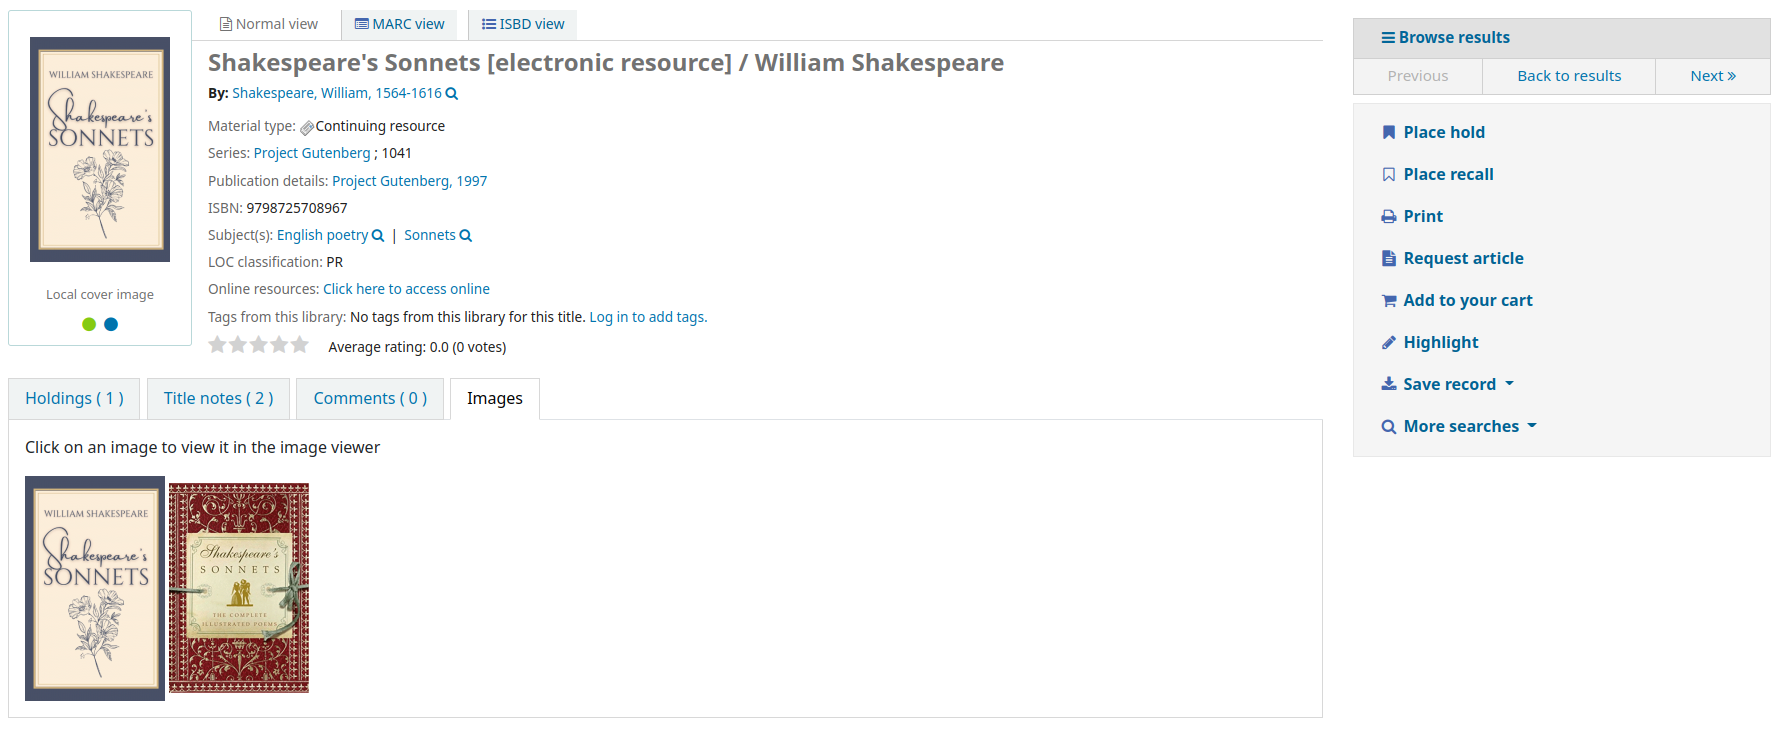
In the staff interface, the cover images appear in the search results, in the record details page on the right of the title, and in the ‚Images‘ tab in the holdings table at the bottom.

In the OPAC, the cover images appear in the search results, in the record details page on the left of the title, and in the ‚Images‘ tab in the holdings table at the bottom.
Deleting a local cover image
To remove a cover image, you need the upload_local_cover_images permission.
Click ‚Delete image‘ below the image in the ‚Images‘ tab in the staff interface.
Verschmelze Datensätze
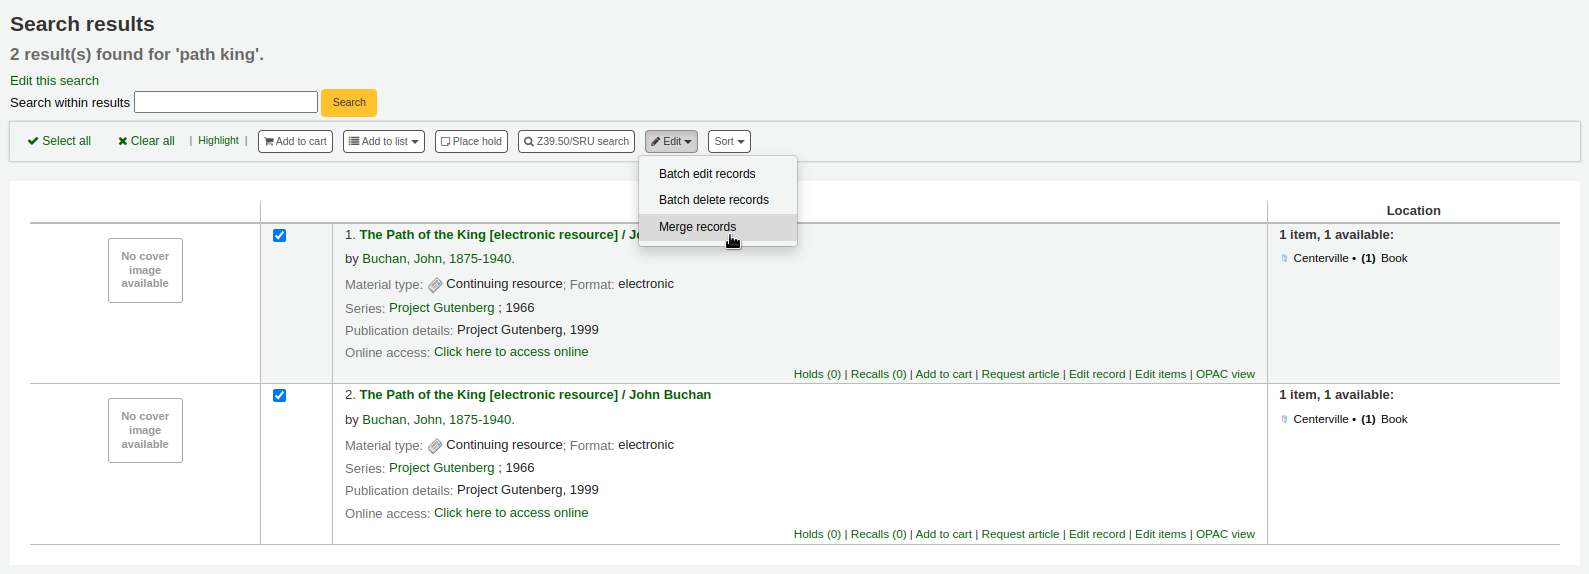
To merge bibliographic records together,
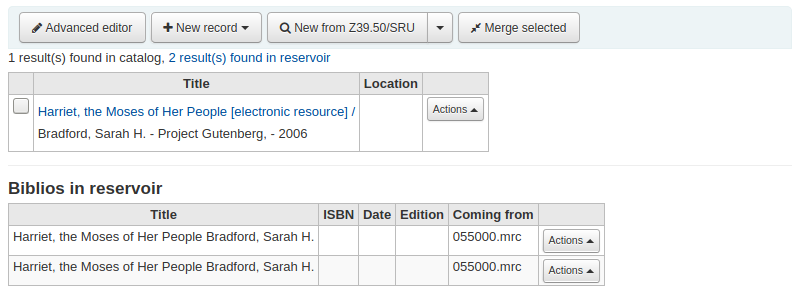
Perform a search in the catalog to find the records that need to be merged.
Check the boxes next to the duplicates to select them.
Click „Edit“ and choose the „Merge records“ option
Bemerkung
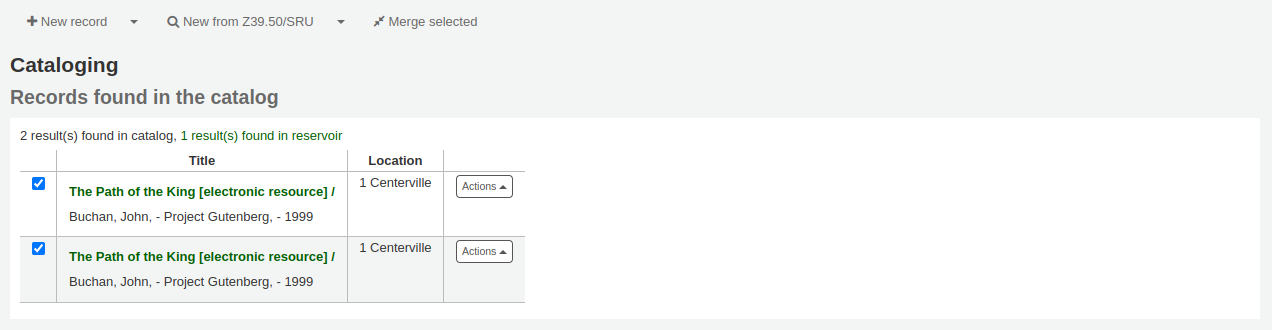
Alternatively, you can go through the cataloging module to merge bibliographic records.
After searching for the records in the cataloging search and selecting the records to be merged, click the ‚Merge selected‘ button at the top of the list.
Choose which record to keep as the primary record, the other records will be deleted after the merge
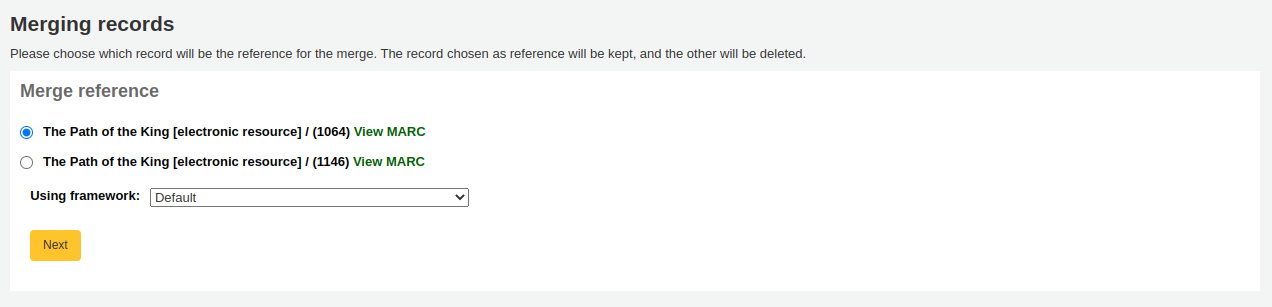
Wählen Sie das Framework, das für den verschmolzenen Datensatz verwendet werden soll
Ihnen wird das MARC für alle Datensätze angezeigt, Sie können darauf jeweils über einen Reiter zugreifen, der mit der biblionumber für diesen Datensatz gekennzeichnet ist. Standardmäßig wird der gesamte erste Datensatz ausgewählt.
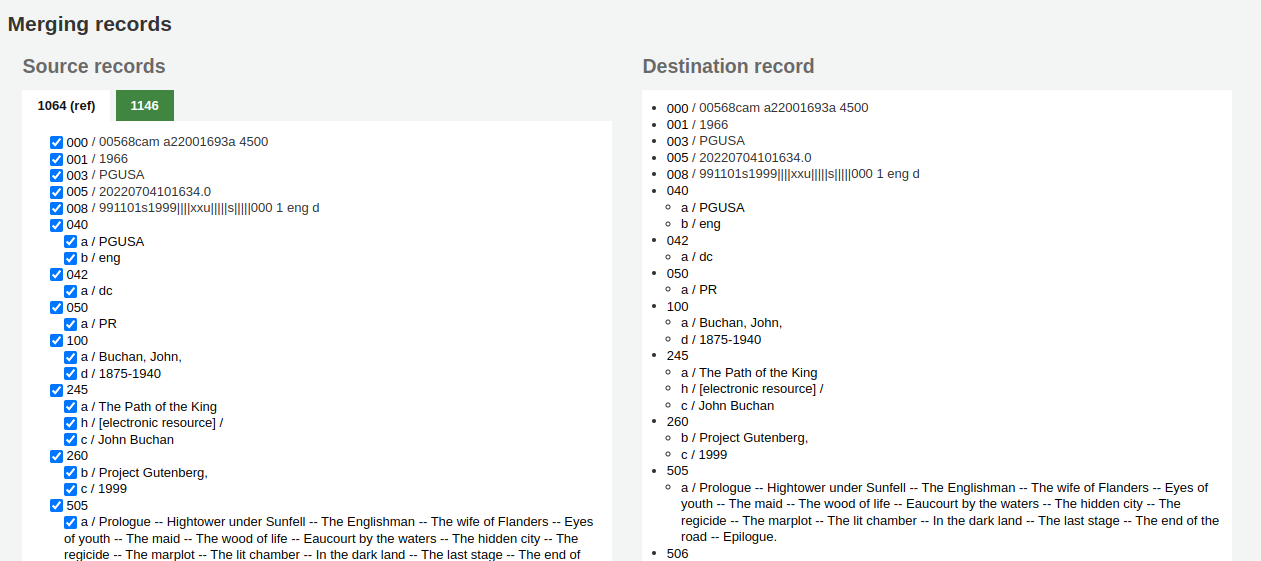
Nehmen Sie das Häkchen in den Feldern bei jedem Datensatz heraus, die Sie nicht im (finalen) Zieldatensatz haben möchten.
Setzen Sie einen Haken bei den Feldern, die Sie im (finalen) Zieldatensatz hinzufügen möchten
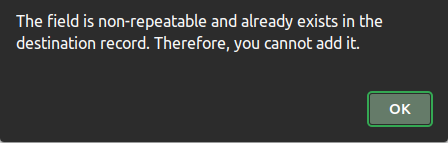
Bemerkung
Wenn Sie versuchen, ein Feld mehrfach anzugeben, das nicht wiederholbar ist, erhalten Sie eine Fehlermeldung (Beispiel: Sie wählen 245 in beiden Titeldatensätzen)
Bemerkung
Wenn Pflichtfelder im Zieldatensatz nicht vorhanden sind, werden die Titeldatensätze nicht verschmolzen. Sie müssen einen Wert für Pflichtfelder auswählen.
Wenn wichtige Felder im Zieldatensatz fehlen erhalten Sie eine Warnung, Sie können die Titeldatensätze aber dennoch verschmelzen.
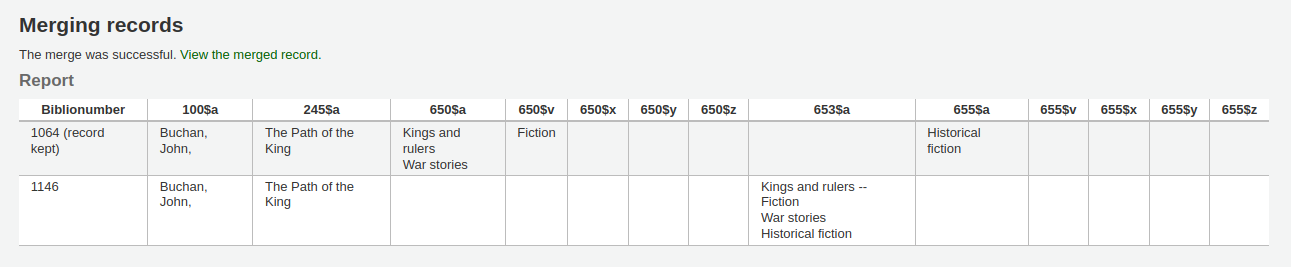
Unter den Datensätzen, die Sie verschmelzen möchten, finden Sie eine Option ‚im Report anzuzeigende Felder‘. Hierüber können Sie auswählen, welche Felder angezeigt werden, wenn die Verschmelzung erfolgreich war.

Wenn Sie nichts eintragen bekommen Sie auf der Bestätigungsseite nur die Titelsatznummern angezeigt.

Wenn Sie Felder eingeben sehen Sie diese auf der Bestätigungsseite.
Bemerkung
Sie können Standards für diesen Report angeben über den Systemparameter MergeReportFields.
Wenn Sie Ihre Auswahl beendet haben, klicken Sie auf den Button „Verschmelzen“.
Der primäre Datensatz enthält nun alle ausgewählten Daten und alle Exemplare sowie Erwerbungsinformationen beider Datensätze, der zweite Datensatz wird gelöscht.
Titeldatensätze über Listen verschmelzen
Eine weitere Möglichkeit zwei dublette Titel zusammenzuführen ist, diese einer Liste hinzuzufügen und von dort aus zu verschmelzen.
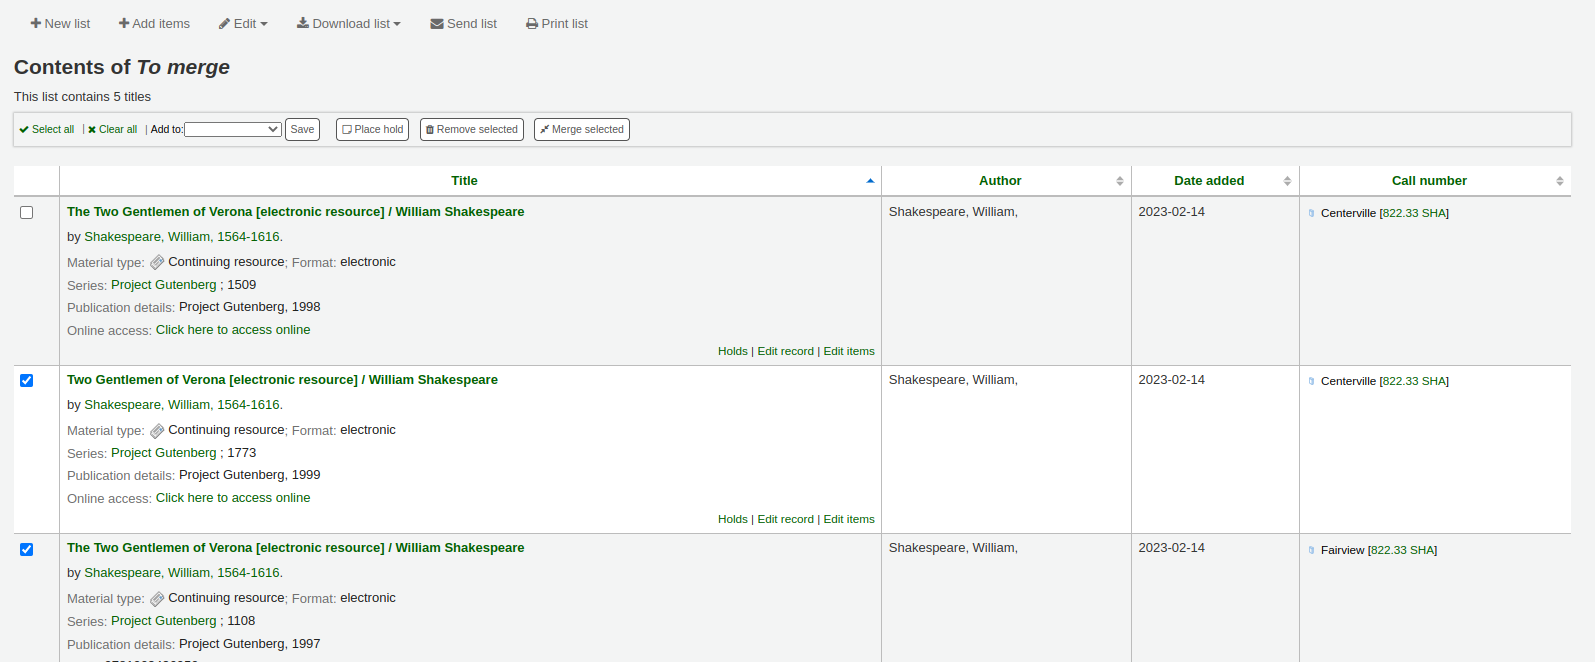
Gehen Sie zu den Listen und klicken Sie auf den Listentitel um die Liste anzusehen
Wählen Sie die zu verschmelzenden Datensätze aus
Klicken Sie auf „Titel verschmelzen“ oberhalb der Liste
Haben Sie die Datensätze ausgewählt, die verschmolzen werden sollen, ist der Ablauf der gleiche, wie wenn Sie die Datensätze in der Katalogisierung verschmelzen würden.
Datensätze löschen
Um einen bibliographischen Datensatz zu löschen, klicken Sie auf die Schaltfläche ‚Bearbeiten‘ und wählen Sie ‚Titel löschen‘ aus.
Bibliografische Datensätze können nur dann gelöscht werden, wenn alle dazugehörigen Exemplare gelöscht sind. Versuchen Sie einen bibliographischen Datensatz mit angehängten Exemplaren zu löschen, wird die Löschoption ausgegraut angezeigt. (Siehe den Abschnitt Deleting items in diesem Handbuch, um zu erfahren, wie Sie Exemplare löschen können.)
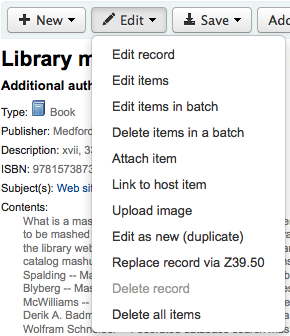
Stapellöschung von Titeln
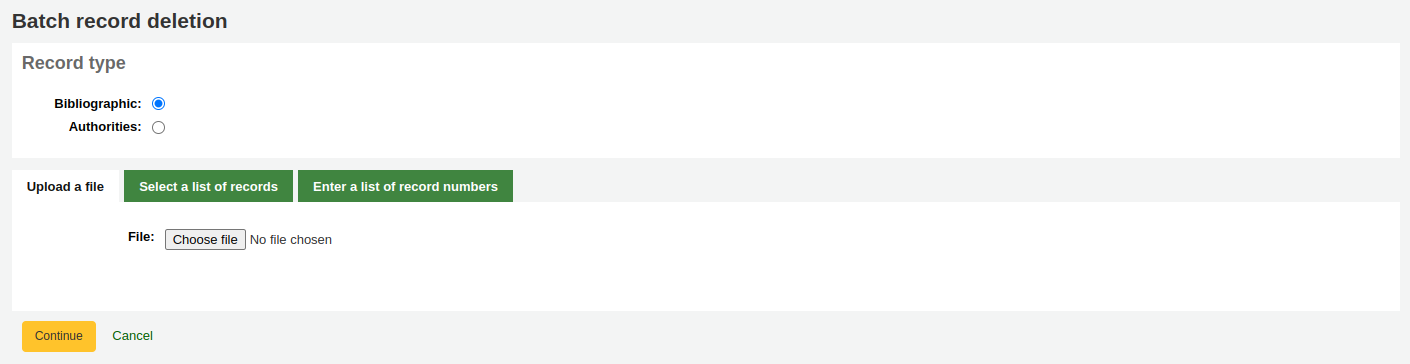
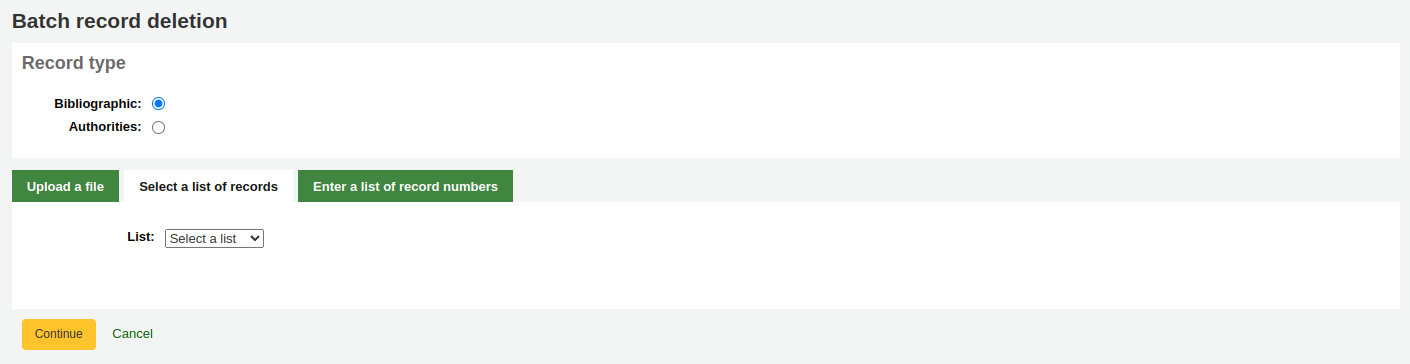
Pfad in Koha: Mehr > Katalogisierung > Stapelbearbeitung > Stapellöschung von Titeln
Dieses Werkzeug verwendet einen Stapel Datensatznummern von Titel- oder Normdatensätzen, um diese Datensätze und alle zugehörigen Exemplare zu löschen.
Zuerst müssen Sie festlegen, ob Sie Titel- oder Normsätze löschen möchten.
Als nächstes können Sie:
eine Datei mit biblionumbers oder authids hochladen;
use a list;
or enter the list of numbers in the box provided.

Once you submit the form you will be presented with a summary of the records you are trying to delete.
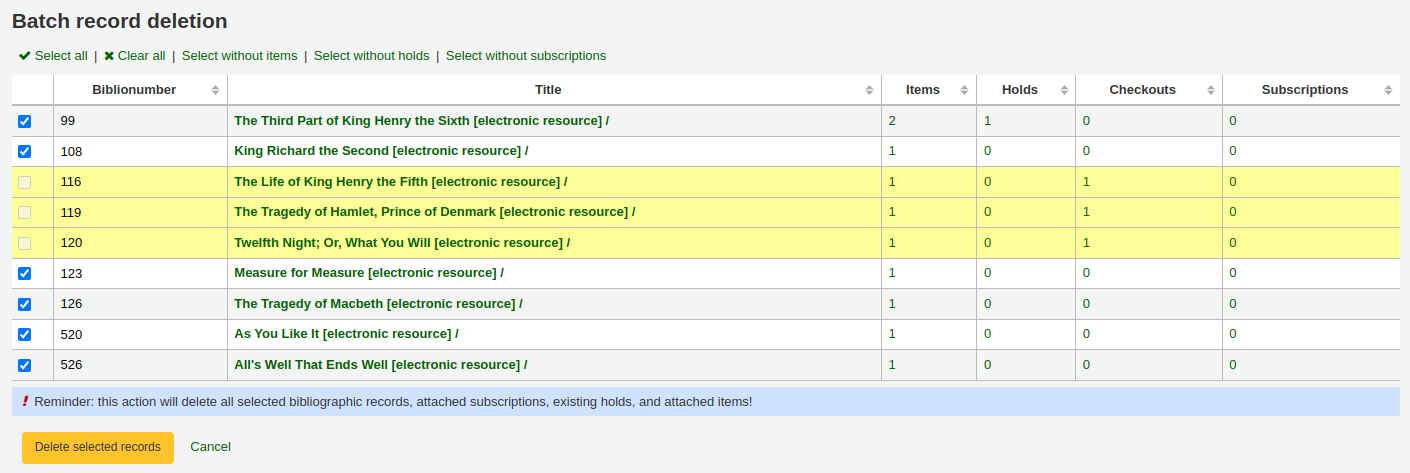
If a record you want to delete can’t be deleted, it will be highlighted.
Check the records you want to delete and click the ‚Delete selected records‘ button to finish the process.
You can also use the links at the top of the table to select only the records without items, holds, or subscriptions.
Catalog concerns
Reporting concerns about bibliographic records
If the CatalogConcerns system preference is enabled, staff will be able to report concerns regarding specific bibliographic records.
Um ein neues Problem zu melden,
In the bibliographic record’s detail page, click the ‚New‘ button and choose ‚New catalog concern‘.
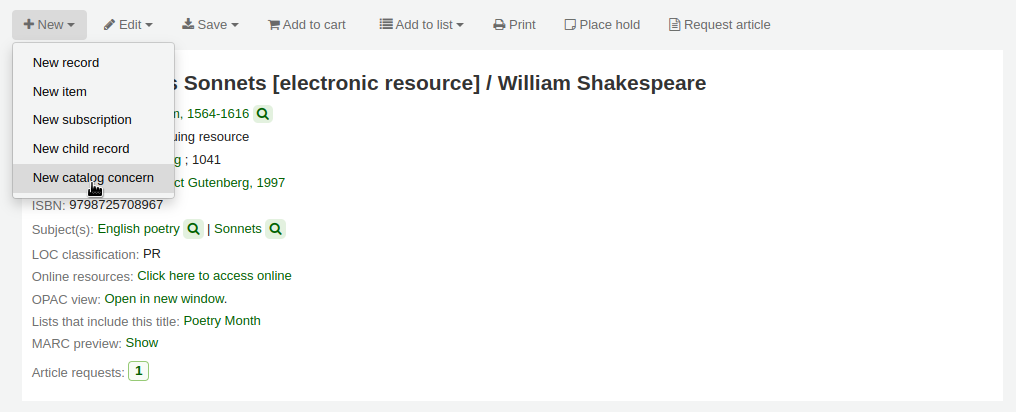
Fill in the concern form.
Title: enter a title describing succinctly the problem.
Please describe your concern: enter details about the problem, being the more descriptive possible so that the staff member who receives this is able to replicate and see the problem.
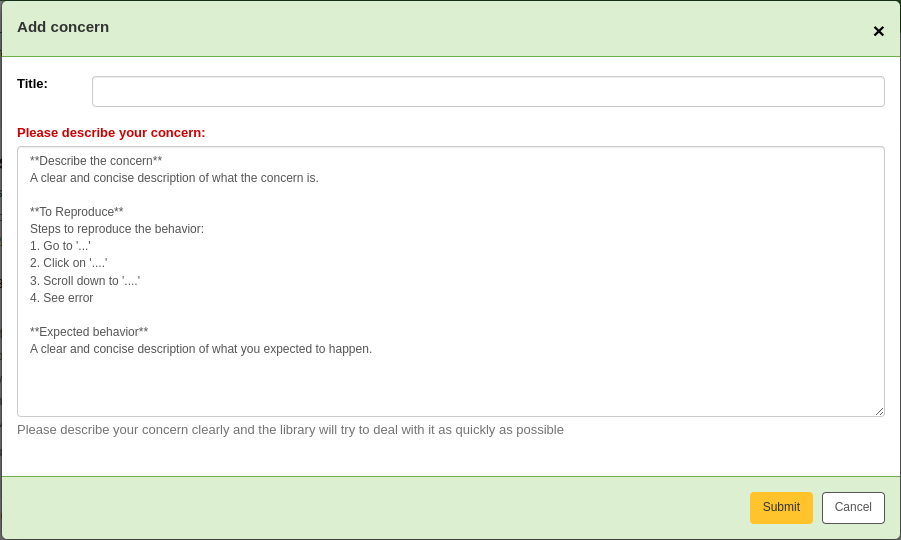
An example of what is expected in the description is provided in the field:
**Describe the concern**

A clear and concise description of what the concern is.

**To Reproduce**

Steps to reproduce the behavior:
1. Go to '...'
2. Click on '....'
3. Scroll down to '....'
4. See error

**Expected behavior**

A clear and concise description of what you expected to happen.
Bemerkung
This text is customizable in the HTML customizations tool, by changing the ‚CatalogConcernTemplate‘ entry.
The text at the bottom of the form („Please describe your concern clearly…“) is also customizable in the HTML customizations tool, by changing the ‚CatalogConcernHelp‘ entry.
Click ‚Submit‘.
This will send an email to the cataloging team to notify them that a new concern has been created. The email will be sent to the email address in the CatalogerEmails system preference. The email sent is the TICKET_NOTIFY notice, which can be customized in the Notices and slips tool.
An email will also be sent to the reporter to notify them that the concern has been received. The email sent is the TICKET_ACKNOWLEDGE notice, which can be customized in the Notices and slips tool.
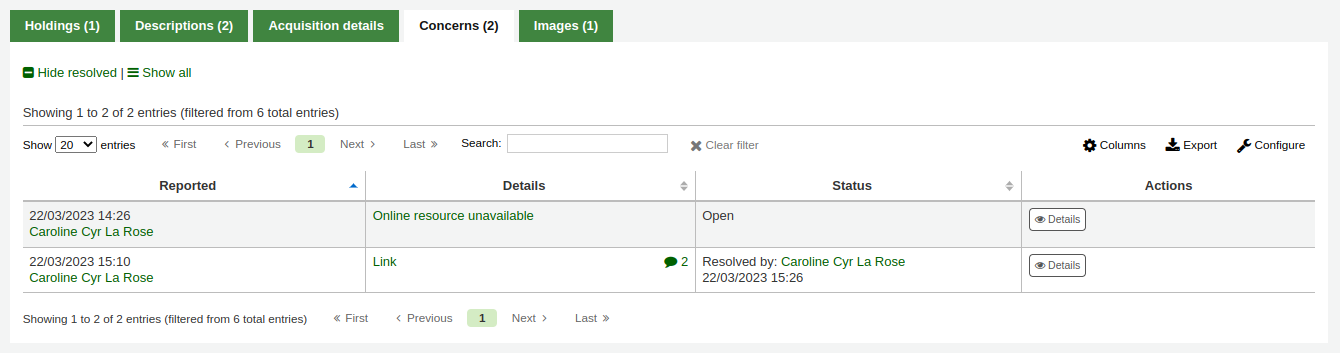
Concerns reported about this record are visible in the ‚Concerns‘ tab.
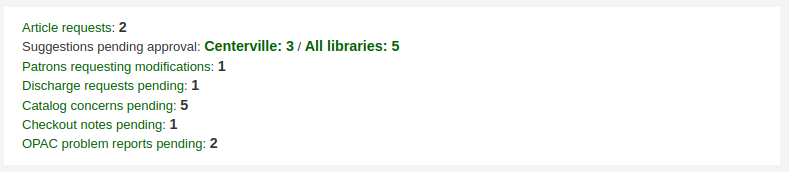
All concern tickets will be visible in the catalog concerns report.
Newly opened concern reports will also appear in the notification section at the bottom of the staff interface main page.
Managing catalog concerns
When staff or patrons report concerns about bibliographic records, all concerns will be accessible through the catalog concerns report.
Get there: More > Cataloging > Reports > Catalog concerns
Bemerkung
This report will only be visible if either the CatalogConcerns system preference or the OpacCatalogConcerns system preference are enabled.
Bemerkung
Um auf diese Seite zugreifen zu können, benötigt das Bibliothekspersonal die Berechtigung.
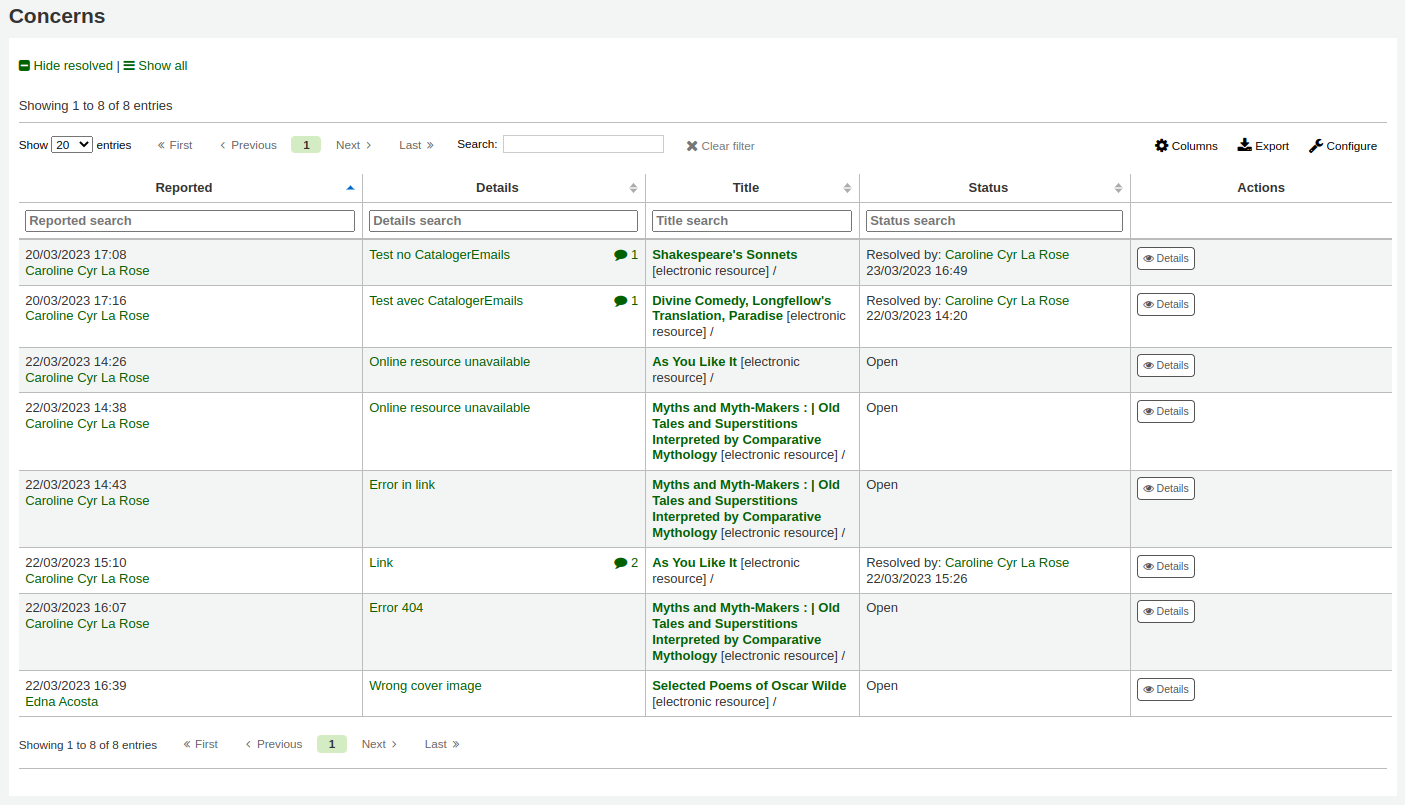
From this report, you can see all concerns, ordered by date, with the name of the reporter, the details of the concern, the title of the bibliographic record, the status (open or resolved), and if resolved, the date and name of the staff member who managed it.
Bemerkung
By default, all concerns are shown. If needed, you can click on ‚Hide resolved‘ at the top of the page to hide concerns that have already been resolved.
Click ‚Show all‘ to return to the full table.
To see the details of a concern, either click the text in the ‚Details‘ column, or click the ‚Details‘ button in the ‚Actions‘ column.
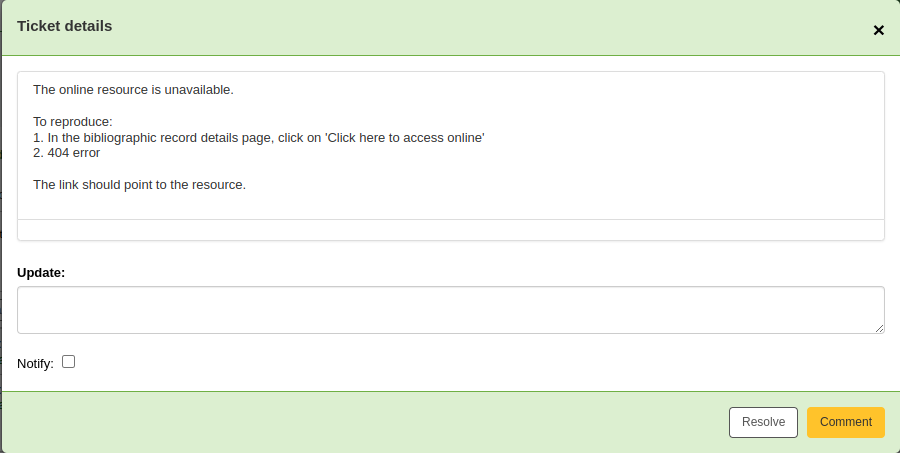
From this view, you can enter a comment in the ‚Update‘ field.
To simply add the comment as an update, click the ‚Comment‘ button.
If this concern is resolved, click the ‚Resolve‘ button.
If ‚Notify‘ is checked, the reporter will receive an email indicating that the concern was updated. The email sent for an update is the TICKET_UPDATE notice, and the email sent when the concern is resolved is the TICKET_RESOLVE notice, both of which can be customized in the Notices and slips tool.
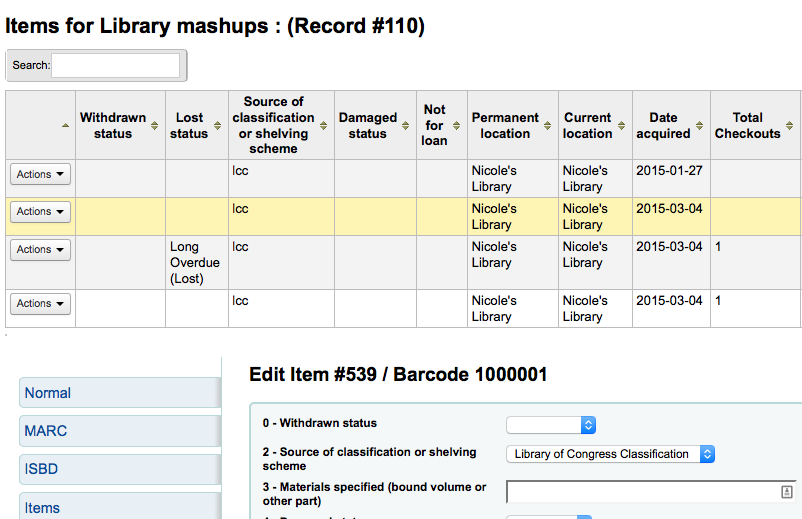
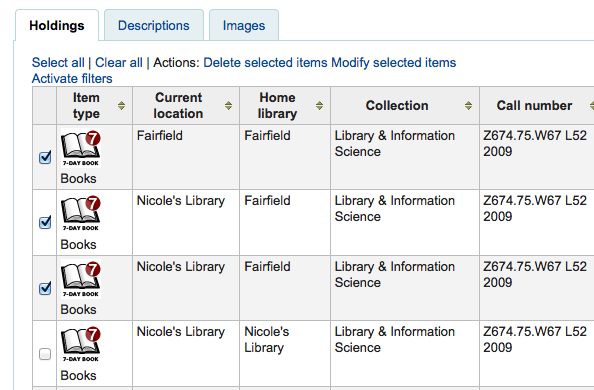
Exemplare
In Koha kann an jedem bibliographische Datensatz ein oder mehrere Exemplare hängen. Diese Exemplare beziehen sich auf den Bestand. Jedes Exemplar enthält Informationen über das physische Exemplar der Bibliothek.
Exemplare hinzufügen
Nachdem ein bibliographischer Datensatz gespeichert wurde, werden Sie auf die leere Exemplarerfassungsmaske weitergeleitet und können dort ein neues Exemplar anhängen. Sie können auch ausgehend von der Trefferliste auf die Schaltfläche ‚Exemplare hinzufügen‘ klicken.
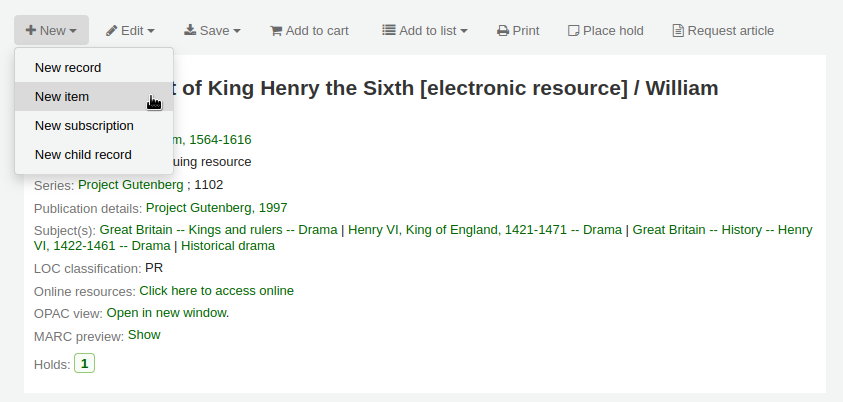
oder Sie können jederzeit ein neues Exemplar anlegen indem Sie ausgehend vom bibliographischen Datensatz auf ‚Neu‘ klicken und dann ‚Neues Exemplar‘ auswählen.
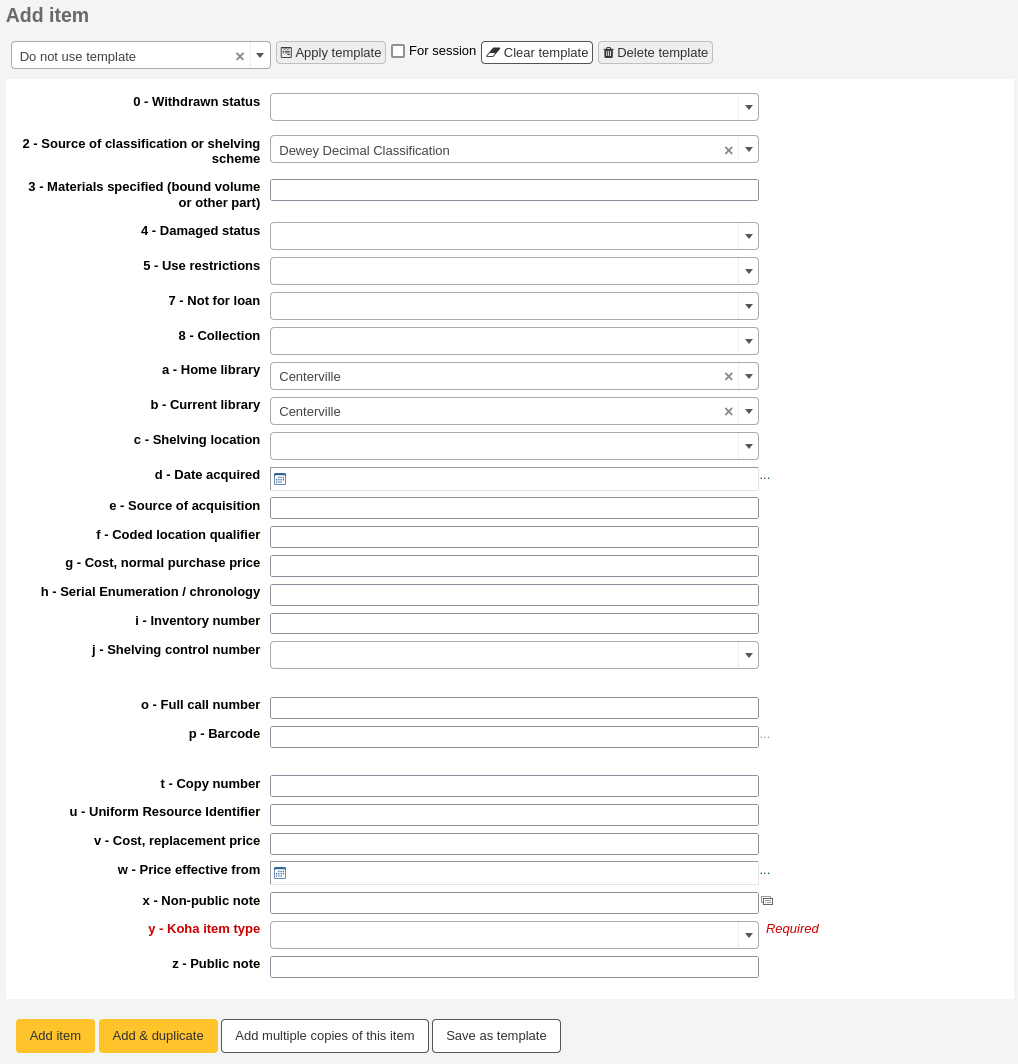
Das Formular zum Bearbeiten von Exemplaren erscheint:
If you already have item templates, you can choose the template to apply and click ‚Apply template‘. This will pre-fill the item form with the template values.
Folgende Felder sollten mindestens ausgefüllt werden, damit das Exemplar später ausgeliehen werden kann:
-
Für dieses Feld können Sie das Katalogisierungs-Plugin für den Signaturenbrowser (cn_browser.pl) verwenden. Ist das Plugin eingerichtet sehen Sie drei Punkte (…) rechts neben dem Feld. Werden diese angeklickt, öffnet sich ein Fenster mit dem Signaturenbrowser. Ist die Zeile rot unterstrichen, ist die Signatur bereits in Benutzung, erscheint stattdessen eine dünne grüne Linie, können Sie die gewünschte Signatur verwenden.
-
Dieser Wert wird den Benutzern berechnet, wenn ein Exemplar als ‚Verloren‘ markiert wird, das bereits ausgeliehen wurde.
Um sicherzustellen, dass diese Werte ausgefüllt sind, können Sie diese im Framework als Pflichtfelder Framework konfigurieren. In der Anzeige werden sie entsprechend in rot markiert. Der Datensatz wird erst dann gespeichert, wenn alle erforderlichen Felder ausgefüllt sind.

Bemerkung
To make item subfields required in a framework, edit the 952 field in the framework editor.
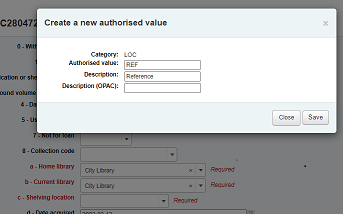
Sie können neue normierte Werte direkt aus dem Formular für das Hinzufügen und Bearbeiten von Exemplaren heraus für alle Felder anlegen, die mit Kategorien normierter Werte verknüpft sind, z.B. Standort ($c) oder Sammlung ($8).
Geben Sie die Beschreibung des normierten Werts ein, wenn kein entsprechender Eintrag gefunden wird, sehen Sie die Option ‚(auswählen um anzulegen)‘.
Klicken Sie auf diese Option um ein Pop-Up-Fenster anzuzeigen, über das Sie den neuen normierten Wert anlegen können.
The authorized value category will be pre-populated from the field you are using, for example LOC for Shelving location, CCODE for Collection code. Take care when choosing your authorized value code. Refer to the notes on adding new authorized values for the correct format of these codes. Use the Description field for the actual value that will be displayed
Sie können auf die gleiche Weise auch neue normierte Werte aus Titel- und Normsätzen heraus anlegen.
Bemerkung
Sie benötigen die Berechtigung manage_auth_values um normierte Werte aus der Katalogisierung heraus anzulegen.
Unterhalb des Eingabeformulars fnden Sie drei Schaltflächen um Exemplare hinzuzufügen.

‚Exemplar hinzufügen‘ wird ein einzelnes neues Exemplar hinzufügen
‚Hinzufügen & duplizieren‘ speichert das Exemplar mit den eingegebenen Daten und behält diese im Formular für das nächste Exemplar
‚Mehrere Exemplare hinzufügen‘ generiert so viele Exemplare, wie Sie als Anzahl angegeben haben. Der Barcode wird dabei jeweils um eins hochgezählt, so dass jeder generierte Barcode einmalig ist.

‚Save as template‘ will save this item as an item template to reuse later.
Warnung
Saving as template will not save the item. It will only create the template.
Die Exemplare, die Sie beigefügt haben, erscheinen oberhalb des Eingabeformulars, sobald sie übermittelt sind

Bemerkung
Sie können die Spalten dieser Tabelle über die ref:Tabellenkonfiguration <column-settings-label> im Administrationsmodul anpassen (Tabellen-ID: Items Editor).
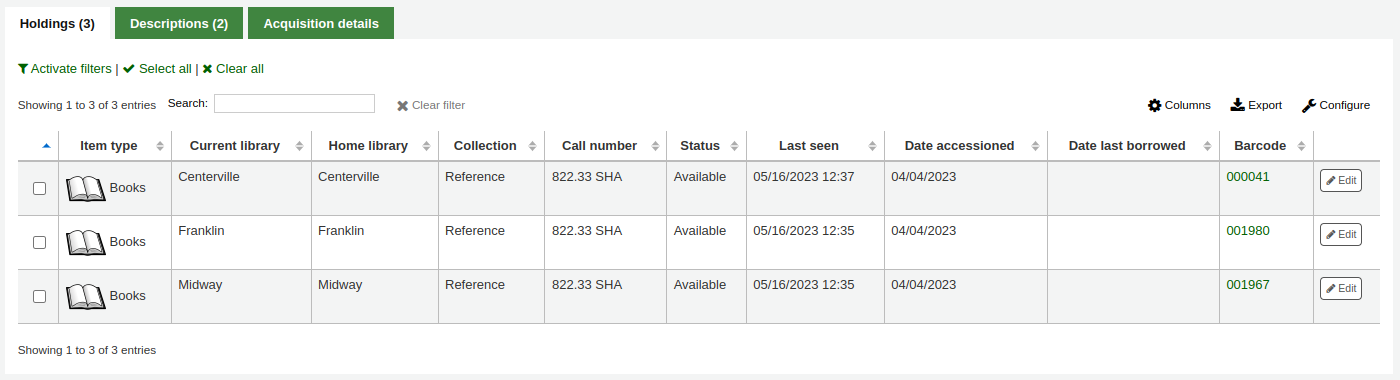
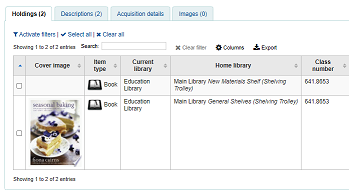
Your items will also appear below the bibliographic details on the record details page, in the ‚Holdings‘ tab.
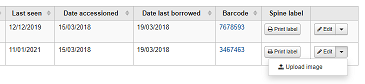
Wenn Sie den Systemparameter SpineLabelShowPrintOnBibDetails auf ‚Zeige‘ gesetzt haben, wird ein Link für den schnellen Signaturdruck neben jedem Exemplar angezeigt.
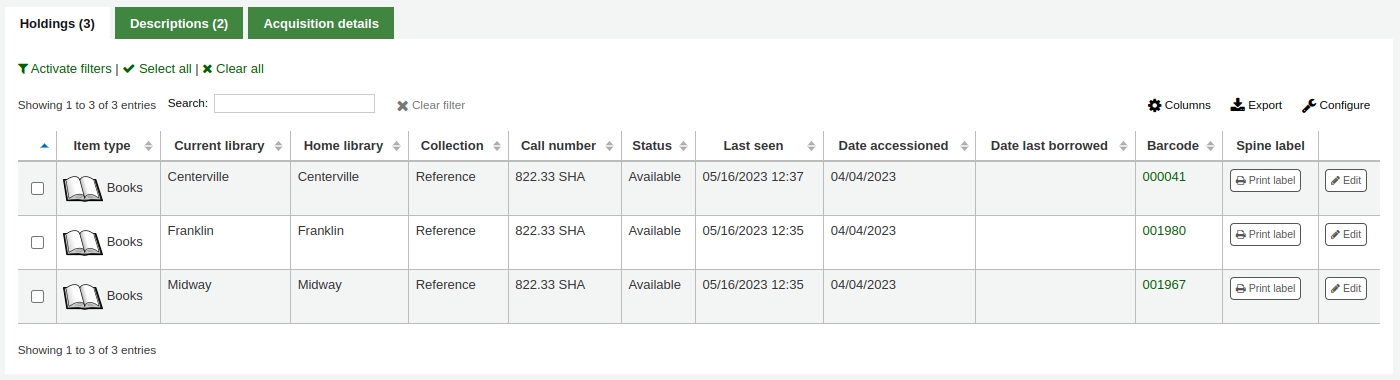
Wenn Sie auf die aktivierten Filter-Links klicken, können Sie auch den Inhalt Ihrer Bestandstabelle filtern. Ihnen wird eine Reihe angezeigt, in der Sie in jede Spalte schreiben können um die Ergebnisse in der Tabelle zu filtern.
Hinzufügen und Verwenden von Templates
Sie können teilbare und wiederverwendbare Templates erstellen um ein neues Exemplarerfassungsformular einfach auszufüllen.
Bemerkung
Jede Person mit der edit_items Berechtigung kann Templates erstellen und bearbeiten sowie ihre eigenen Templates löschen.
Die manage_item_editor_templates (oder superlibrarian) Berechtigung jedoch wird benötigt um Templates zu verwalten die von anderen erstellt wurden.
Ein neues Template erstellen
Um ein Template zu erstellen
gehen Sie zu ein neues Exemplar hinzufügen
Füllen das Exemplarformular mit den Werten aus, die Sie zum Template hinzufügen möchten
Anstatt das Exemplar zu speichern, klicken Sie auf den Button „Als Template speichern“

Wählen Sie „Als neues Template speichern“
Enter a template name
Wählen Sie ob Sie dieses Template mit allen anderen Katalogisiererinnen teilen möchten
Klicken Sie auf „Speichern“
Ein vorhandenes Template aktualisieren
Um ein vorhandes Template zu bearbeiten,
gehen Sie zu ein neues Exemplar hinzufügen
wählen Sie das zu aktualisierende Template oberhalb des Formulars

Klicken Sie auf „Template anwenden“
Verändern Sie die Einträge wie gewünscht
Klicken Sie auf den Button „Als Template speichern“.
Wählen Sie das zu aktualisierende Template
Wählen Sie ob Sie dieses Template mit allen anderen Katalogisiererinnen teilen möchten
Klicken Sie auf „Speichern“
Ein Template verwenden
To use a template,
gehen Sie zu ein neues Exemplar hinzufügen
wählen Sie das zu aktualisierende Template oberhalb des Formulars
Klicken Sie auf „Template anwenden“
If checking ‚For session‘, all new items will be based on this template, unless otherwise specified
Verändern Sie die Einträge wie gewünscht
Save the item
Deleting a template
To delete a template,
gehen Sie zu ein neues Exemplar hinzufügen
Choose the template to delete at the top of the form
Click ‚Delete template‘
Exemplare bearbeiten
Exemplare können auf unterschiedlichen Wegen bearbeitet werden.
Klicken Sie ‚Bearbeiten‘ und ‚Exemplare bearbeiten‘ im Titeldatensatz
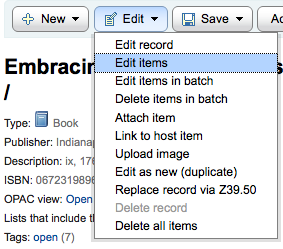
Es wird die Liste der zugehörigen Exemplare angezeigt. Wählen Sie das Exemplar aus, das Sie bearbeiten möchten, indem Sie links auf die Schaltfläche „Aktion“ klicken, und bearbeiten Sie es dann.
Wählen Sie in der Maske ‚Exemplare‘ im Menü ‚Bearbeiten->Exemplare bearbeiten‘ aus.
Nun wird der Editor geöffnet und das Exemplare angezeigt, welches Sie bearbeiten möchten.
Klicken Sie auf ‚Bearbeiten‘ und dann auf ‚Stapelbearbeitung von Exemplaren‘
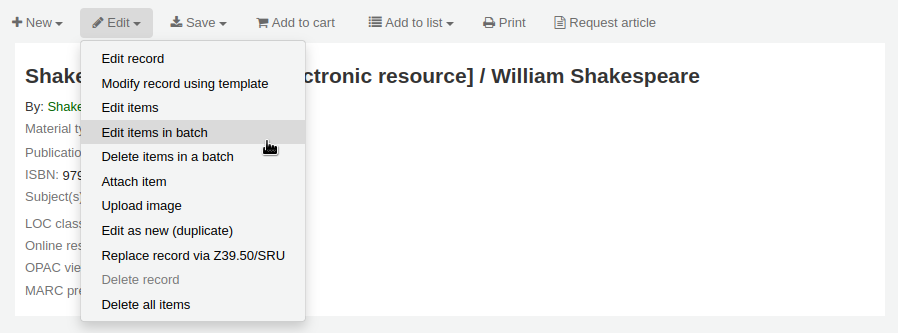
Dies öffnet die Stapelverarbeitung für Exemplare batch item modification tool, in welcher Sie alle zu diesem Datensatz gehörenden Exemplare im Stapel bearbeiten können.
Sie können auch den Systemparameter StaffDetailItemSelection aktivieren, um in der Detailansicht links von jedem Exemplar eine Checkbox anzeigen zu lassen. Dann können Sie die Exemplare, die Sie bearbeiten möchten, durch Setzen eines Häkchens auswählen und oberhalb der Liste auf die Schaltfläche ‚Ausgewählte Exemplare bearbeiten‘ klicken.
Sie können sich auch im Reiter ‚Bestand“ die Liste der Exemplare anzeigen lassen und bei jedem Exemplar rechts auf ‚Bearbeiten‘ klicken.

In der Dienstoberfläche ausgehend von der Trefferliste gibt es auch einen Link um Exemplare zu bearbeiten.
Schlussendlich können Sie auch im Modul ‚Werkzeuge‘ die Stapelbearbeitung von Exemplaren batch item modification benutzen.
Schnelle Aktualisierung des Exemplarstatus
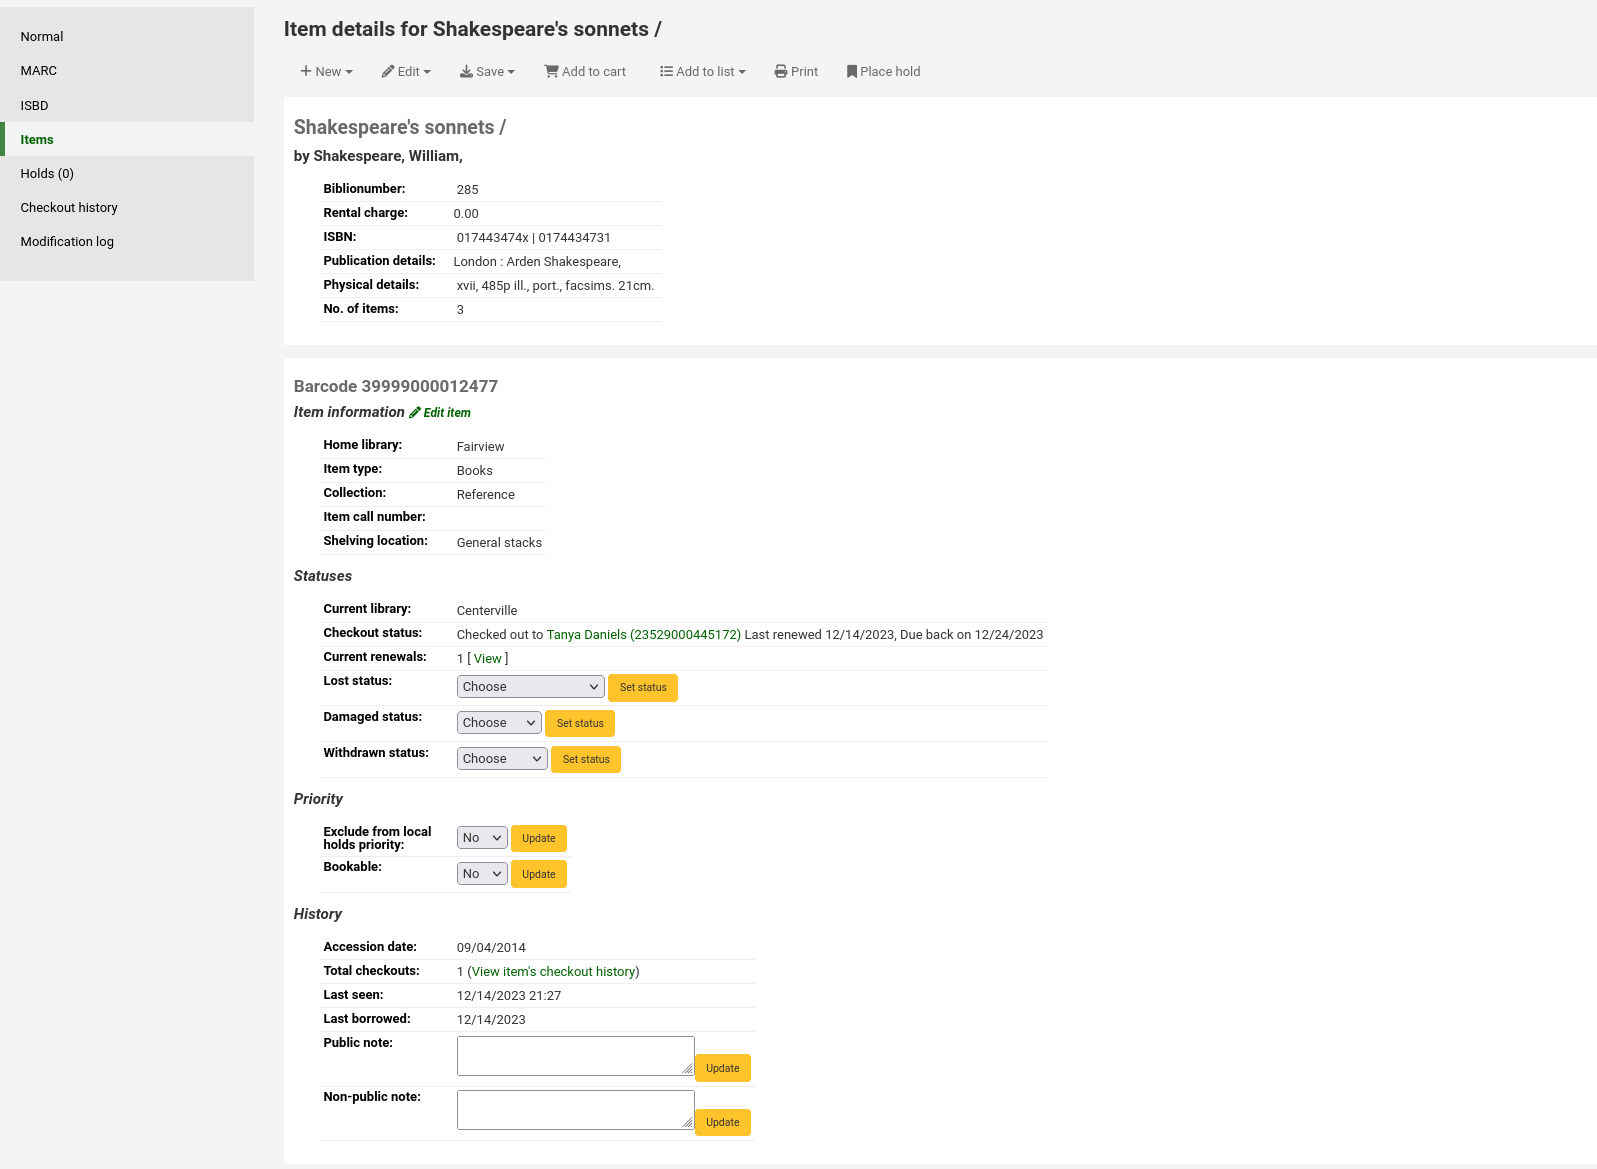
Circulation staff often need to change the status of an item to Lost or Damaged. This doesn’t require you to edit the entire item record. Instead, clicking on the item barcode on the checkout summary or checkin history will bring you to an item summary. You can also get to the item summary by clicking on the Items tab to the left of the bibliographic record’s detail page.
From this view, you can mark an item lost by choosing a lost status from the pull down and clicking the ‚Set status‘ button. Same applies to the damaged and withdrawn statuses.

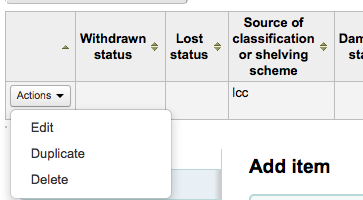
Exemplare duplizieren
Sie können jedes Exemplar ganz einfach duplizieren, indem Sie ausgehend vom Bearbeitungsbildschirm die Schaltfläche ‚Aktionen‘ klicken, die sich links von jedem Exemplar befindet.
Von hier aus können Sie das Exemplar duplizieren und das duplizierte Exemplar wird mit den Werten des ausgewählten Exemplars bestückt.
Batch editing items
Get there: More > Cataloging > Batch editing > Batch item modification
This tool will allow you to modify a batch of item records in Koha.
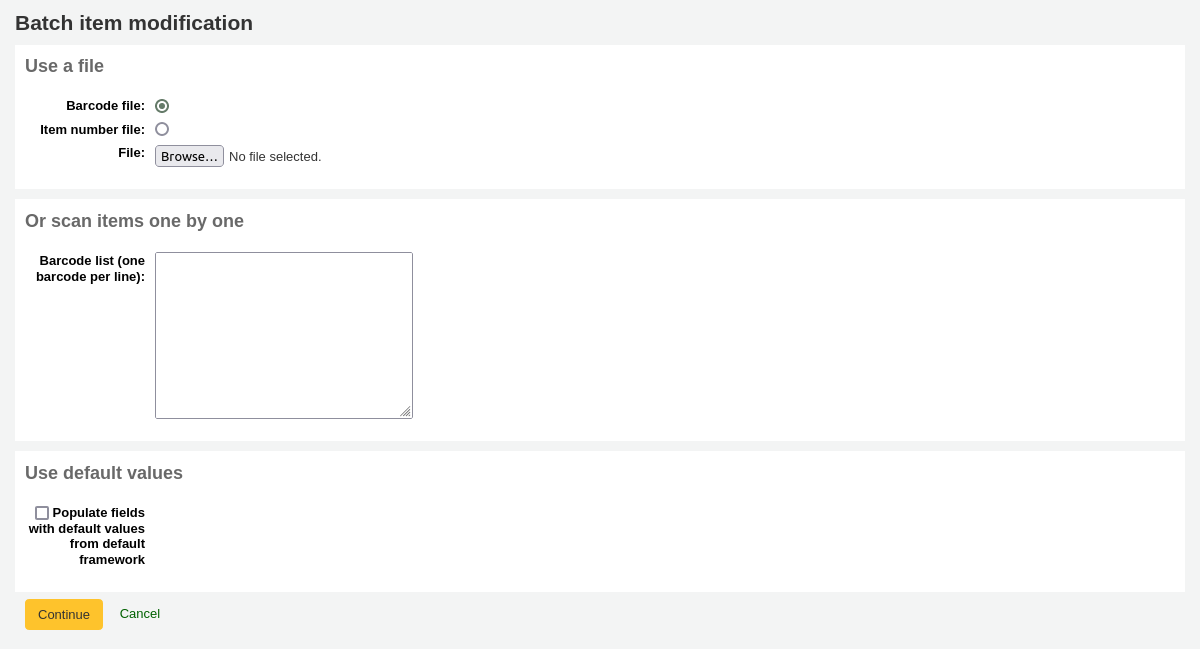
From the tool, choose to either upload a file of barcodes or itemnumbers, or scan item barcodes one by one into the box below the upload tool. You can also decide the items edited should be populated with the default values defined in the default framework.
Once the file is uploaded or the barcodes listed, click ‚Continue.‘
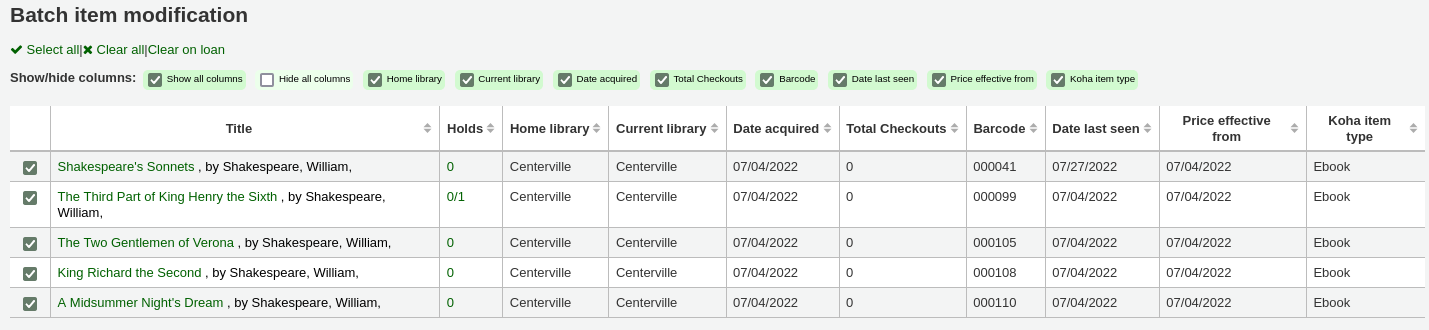
You will be presented with a summary of the items you want to modify. From here, you can uncheck the items you don’t want to modify before making changes in the form below. You can also hide columns you don’t need to see to prevent having to scroll from left to right to see the entire item table. The holds column displays a count of the current holds for the item.
Bemerkung
To uncheck all items that are currently checked out you can click the ‚Clear on loan‘ link at the top of the form.
Using the edit form, choose which fields to make edits to. By checking the checkbox to the right of each field you can clear the values in that field for the items you are modifying.
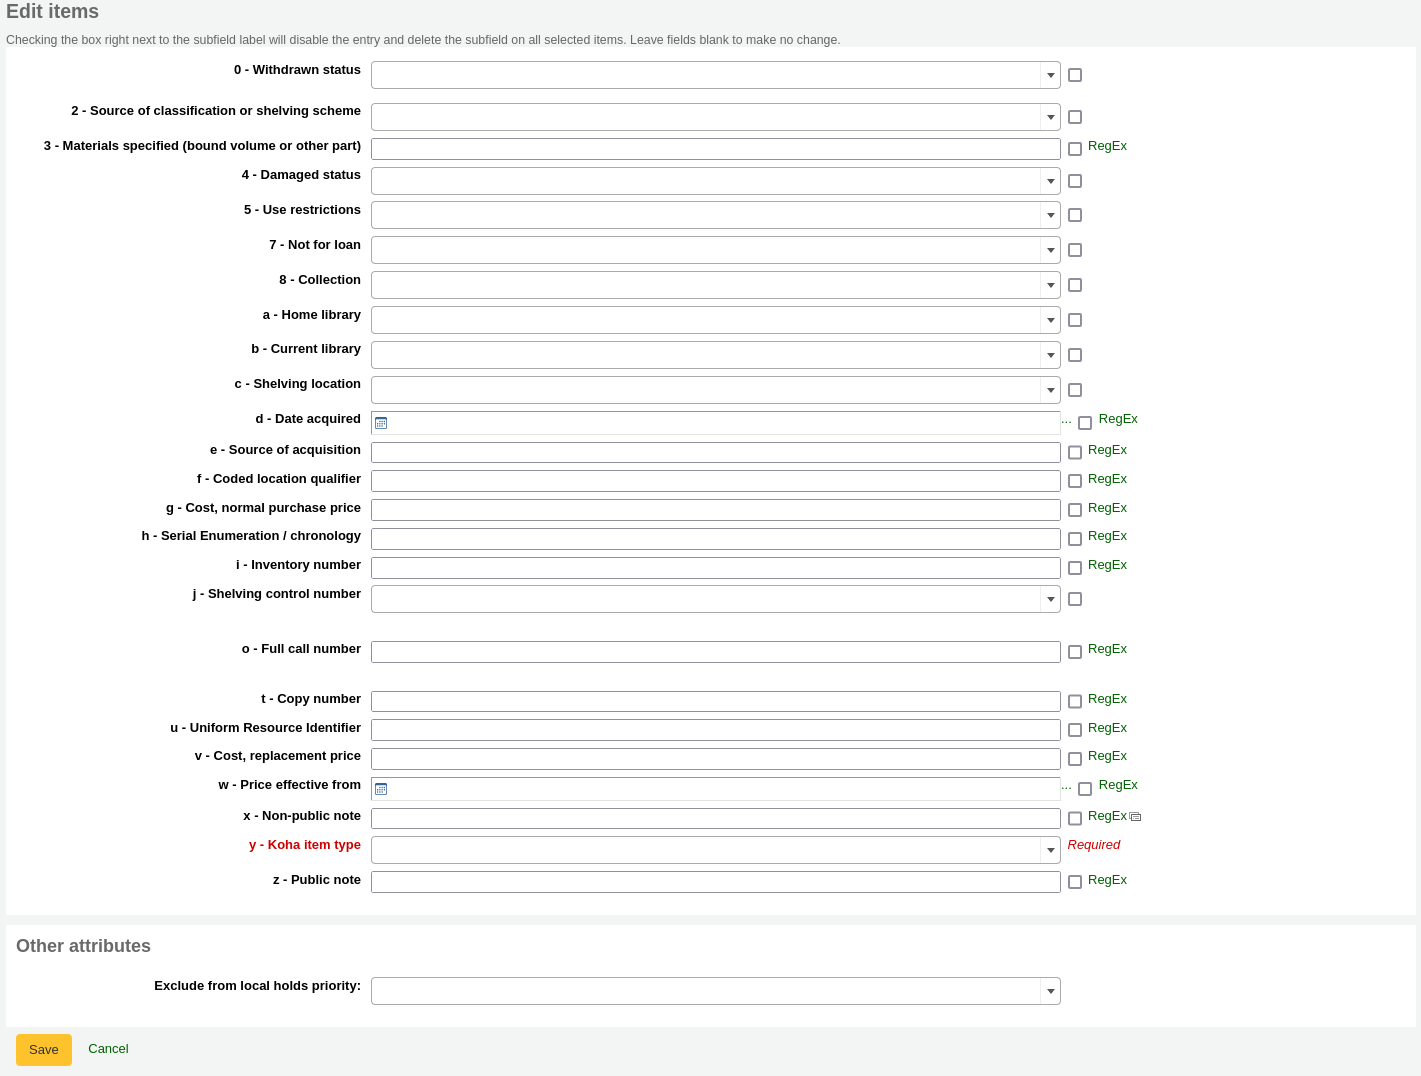
You can also click the ‚RegEx‘ link to change the text field to a regular expression substitution. This is used to change only a part of a text string.

Once the changes are made, the job will be enqueued in the background jobs.

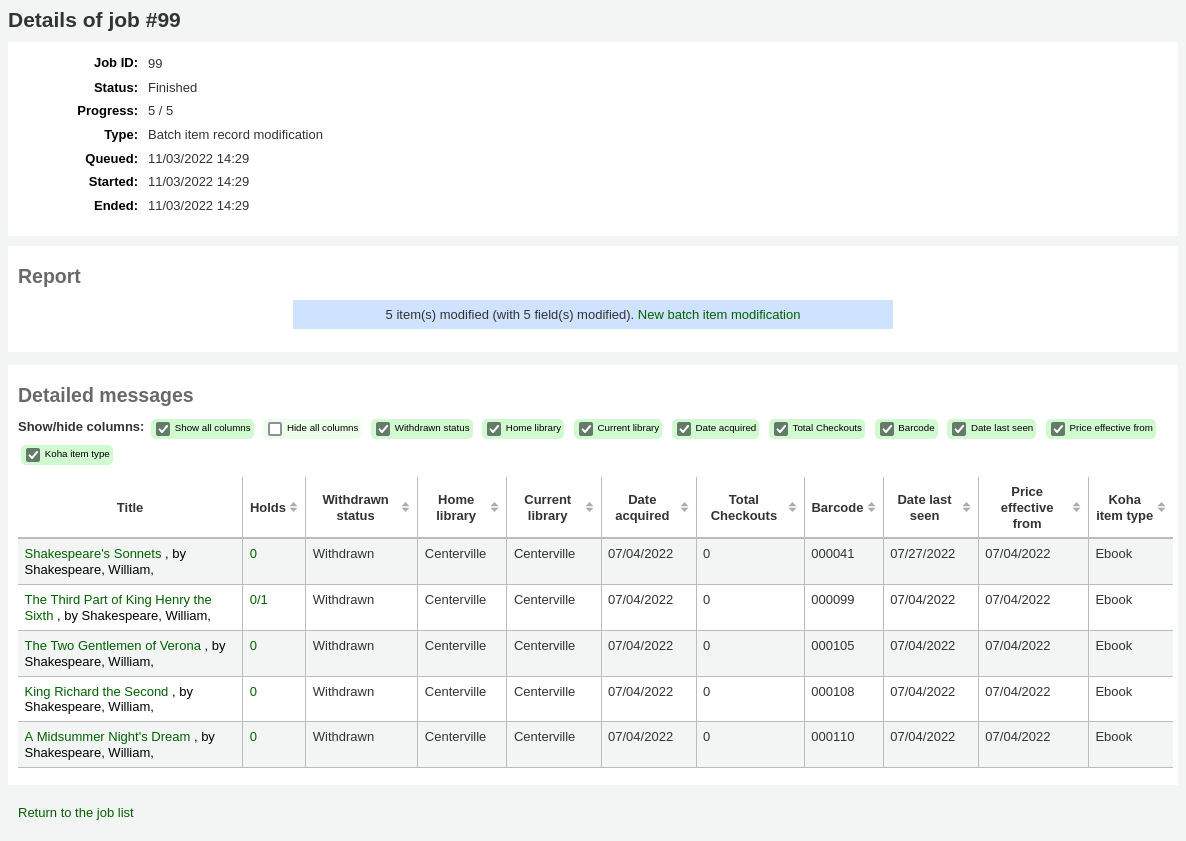
To see the edited items, click on ‚View detail of the enqueued job‘.
Stapelbearbeitung von Exemplaren eines Titels
Sie können auch mehrere Exemplare an einem Titel auf einmal bearbeiten, indem sie Bearbeiten > Exemplare im Stapel bearbeiten auswählen
Das führt Sie zum gleichen Stapelbearbeitungs-Werkzeug.
Stapelbearbeitung von Exemplaren aus einem Report
Die Stapelverarbeitung für Exemplare, kann auch über das Reports-Modul angesteuert werden, wenn die Reportergebnisse itemnumbers enthalten.
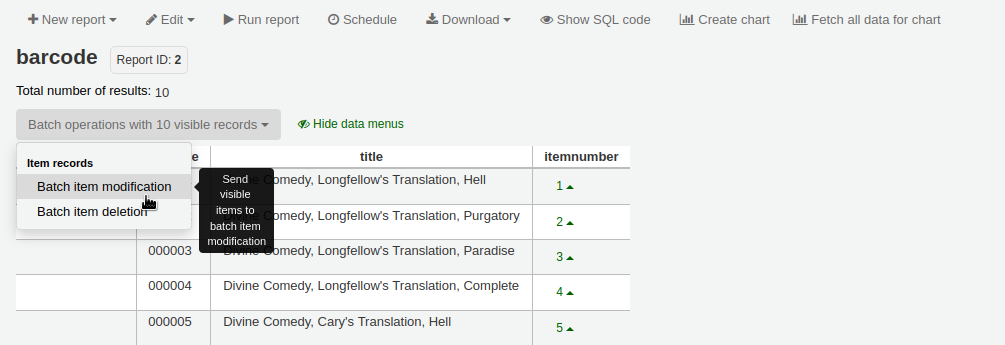
When the report contains the itemnumber, the option ‚Batch operations with X visible records‘ will automatically appear. This option contains batch item modification and batch item deletion.
Im Standard werden nur 20 Treffer beim Ausführen eines Reports angezeigt, daher werden bei der Stapeloperation auch nur 20 Treffer berücksichtigt. Sollen mehr als die angezeigten Treffer im Stapel bearbeitet werden, ändern Sie zuerst die Anzahl der Treffer pro Seite bevor Sie die Stapeloperationen ausführen.
Automatische Exemplarbearbeitung nach Alter
Pfad in Koha: Mehr > Katalogisierung > Automatisierung > Exemplarbearbeitung nach Alter
Dieses Werkzeug ermöglicht es spezifische Exemplarfelder zu aktualisieren, wenn ein Exemplar ein bestimmtes Alter hat.
Bemerkung
Das Bibliothekspersonal benötigt die Berechtigung zur Exemplarstapelbearbeitung items_batchmod um dieses Werkzeug benutzen zu können.
Bemerkung
Die Einstellungen in diesem Werkzeug funktionieren über den entsprechenden Cronjob.
If you haven’t created any rules, you will see the option to ‚Add rules‘ on the page. Click this button to create rules.

If you have rules already there will be a button that reads ‚Edit rules‘. To create a new rule click the ‚Edit rules‘ button at the top of the page.

You will be brought to a page where you can edit existing rules or create a new rule.

Click ‚Add rule‘.
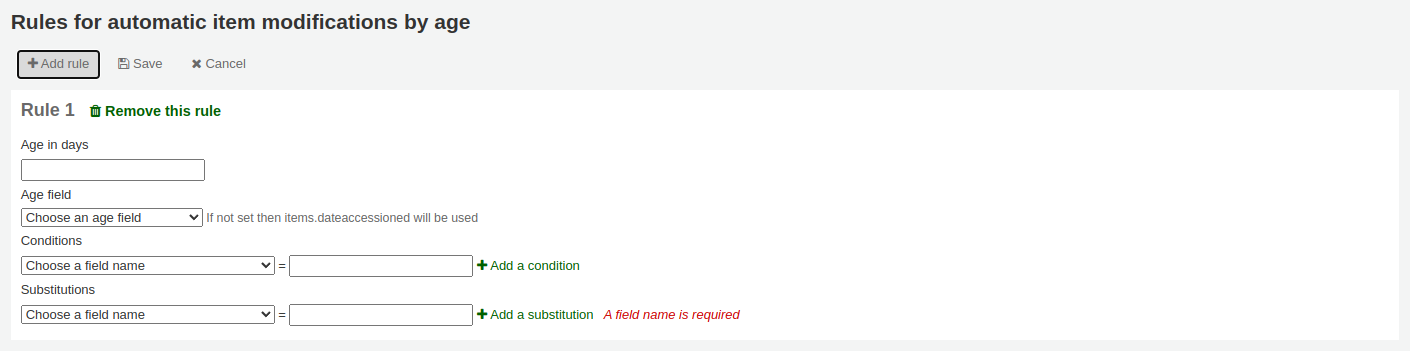
Fill out the form that appears to set the new rule:
Age in days: the age in days at which the item will update
Age field: the field on which the age is based
items.dateaccessioned (default): Erwerbungsdatum des Exemplars; in MARC21 wird das normalerweise auf das Feld 952$d gemappt.
items.replacementpricedate: date the replacement price is effective from; in MARC21, it is normally mapped to 952$w
items.datelastborrowed: date the item was last checked out; in MARC21, it is normally mapped to 952$s (not editable manually)
items.datelastseen: date of the last transaction made on the item; in MARC21, it is normally mapped to 952$r (not editable manually)
items.damaged_on: date on which the damaged status was set (not editable manually)
items.lost_on: date on which the lost status was set (not editable manually)
items.withdrawn_on: date on which the withdrawn status was set (not editable manually)
Conditions: what criteria is needed to trigger the update
Choose the field to check from the dropdown menu
Enter the value the field should have to trigger the update
If you need more than one condition, click ‚Add a condition‘
Substitutions: what changes are made when the script runs
Choose the field to change from the dropdown menu
Enter the value the field should have after the update
If you need to do more than one change, click ‚Add a substitution‘
Once you’re done, click the ‚Save‘ button to save the rule and go back to the main page, or click ‚Add rule‘ again to add another rule.
Rotating items through libraries automatically
Pfad in Koha: Mehr > Katalogisierung > Automatisierung > Bestandsrotation
Bemerkung
Dieses Werkzeug ist nur verfügbar wenn der Systemparameter StockRotation aktiviert ist.
Bemerkung
Um auf das Automatisierungswerkzeug zugreifen zu können benötigt das Bibliothekspersonal folgende Berechtigungen:
manage_rotas: this grants the ability to create, update and delete rotas
manage_rota_items: this grants the ability to add, remove and progress items on a rota.
Stock rotation helps to spread resources more fairly among library branches and allows patrons to see a wider range of titles.
Items are popular whilst they are new at a particular branch. However, their use often tails off over time. This tool empowers librarians to automate the movement of items on to another branch before usage declines and thereby extends the items useful life.
Library staff create rotation plans (rotas) and then assign them to items. A cronjob is then used to cycle these items round the specified libraries on the rotation plan, moving them to the next stage after the prescribed period of time has passed at the current stage.
Bemerkung
This tool requires the stockrotation.pl cron job that must be configured to run on a daily basis.
Email notices may be used to provide the library branches with a list of items to be put in transit to the next branch and if an item is found to be on loan at the time that it should be transferred, an alert will be displayed when it is next returned.
Bemerkung
The notice used is SR_SLIP. It can be customized with the Notices and slips tool.
Ausgehend von der Seite der Bestandsrotation können Sie neue Rotationspläne hinzufügen und Sie bekommen auch eine Kurzansicht Ihrer aktuell konfigurierten Rotationspläne. Sie können Details um Plan hinzufügen, Sie können Pläne aktivieren und deaktivieren und Sie können Standorte und Exemplare auf einem bereits bestehenden Plan bearbeiten und verwalten.
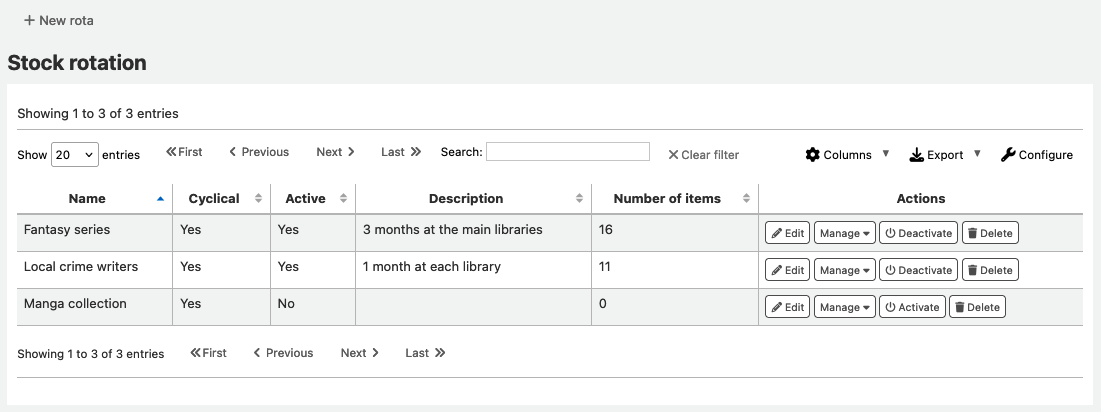
Bemerkung
Sie können die Spalten dieser Tabelle über die ‚Tabellenkonfiguration‘ im Administrationsmodul anpassen (Tabellen-ID: stock_rotation).
Einen neuen Rotationsplan erstellen
Klicken Sie auf „Neuer Plan“ ganz oben auf der Seite um einen neuen Rotationsplan zu erstellen.
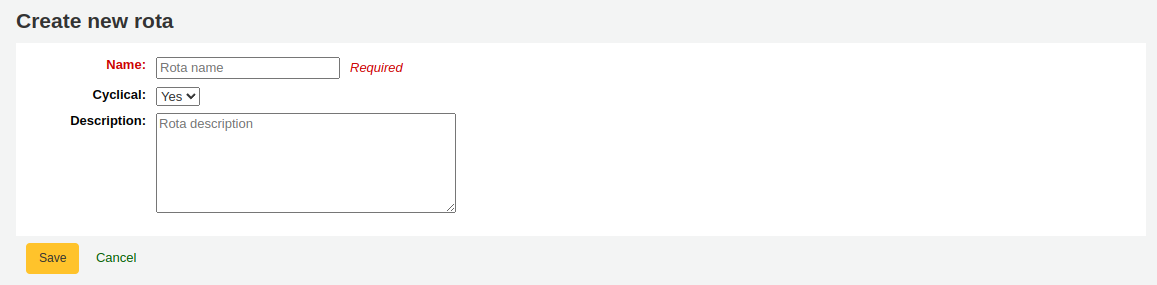
Name: geben Sie einen Namen oder Code ein um den Plan ermitteln zu können
Zyklisch:
Nein: die Exemplare verbleiben beim Erreichen der letzten Bibliothek des Rotationsplans in dieser
Ja: die Exemplare zirkulieren weiter zur ersten Bibliothek im Rotationsplan wenn ihre zugewiesene Zeit in der letzten Bibliothek abgelaufen ist, solange bis sie manuell aus dem Plan entfernt werden
Beschreibung: optional können Sie eine erweiterte Beschreibung Ihrem Plan hinzufügen um diese in der Zusammenfassung anzeigen zu lassen
Wenn im Rotationsplan alle Stationen und Exemplare eingetragen sind, kann der Plan aktiviert und die Exemplare durch die Rotation bewegt werden.
From the stock rotation tool main page, click on ‚Activate‘ next to the rota.
Adding stages to a rota
Once the rota is created, you can add stages to it. Stages are a length of time that an item will stay at a particular library before moving on.
From the stock rotation summary page, click the ‚Manage‘ button and choose the ‚Stages‘ option.
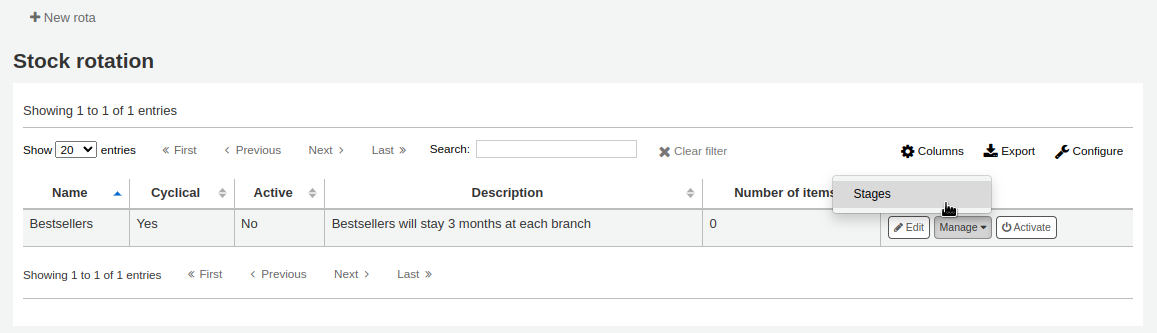
Click the ‚Add stage‘ button.
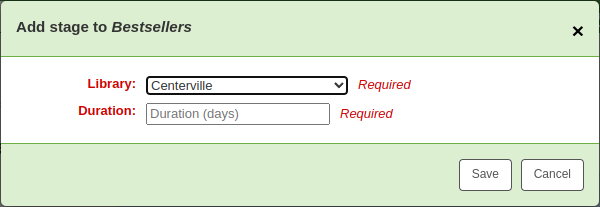
Library: choose the library this stage is for
Duration: enter the number of days the item should stay at this library before moving on
Click ‚Save‘.
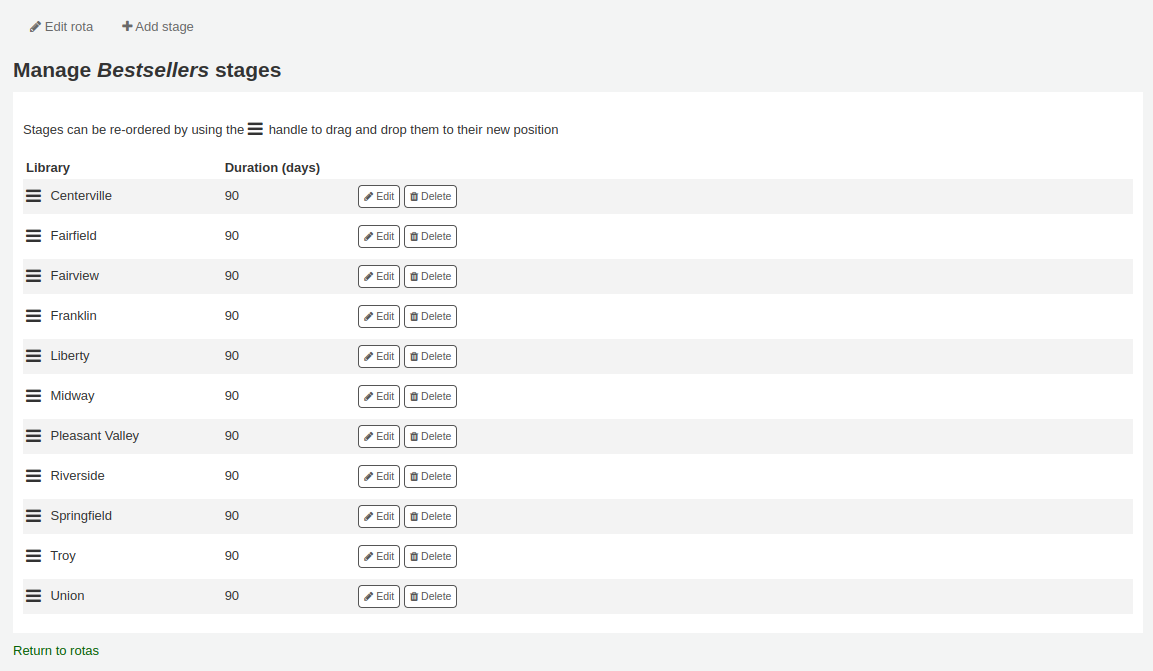
Wenn alle Stationen hinzugefügt wurden, können diese mithilfe der Symbole auf der linken Seite verschoben werden.
Exemplare einem Rotationsplan hinzufügen
Sobald ein Plan Stationen hat, können auch Exemplare hinzugefügt werden.
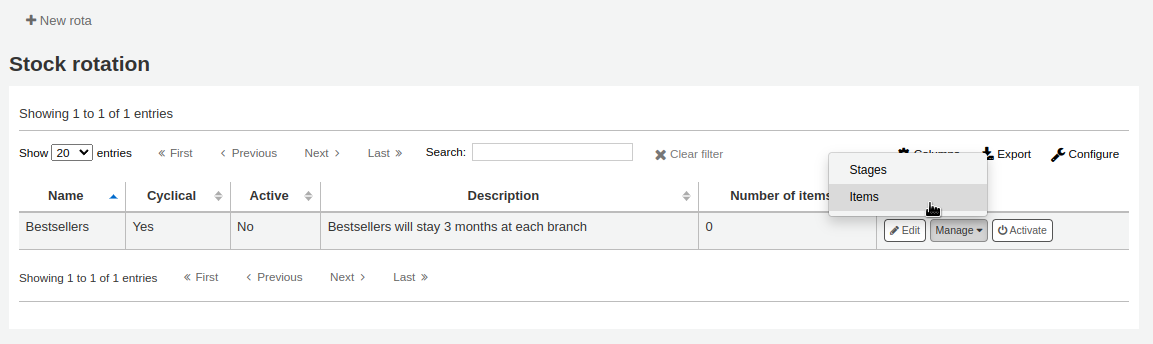
Ausgehend von der Bestandsrotationsseite, klicken Sie auf den Button „Verwalte“ und dann „Exemplare“.
Klicken Sie auf den Button „Exemplare hinzufügen“.
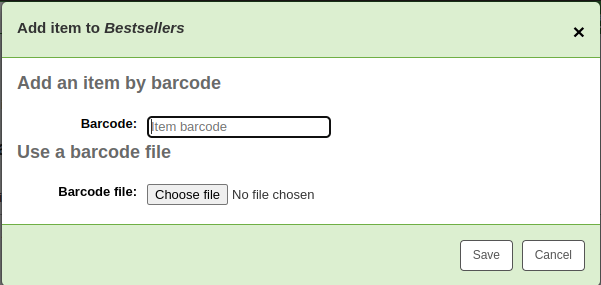
Exemplare können einzeln einem Plan hinzugefügt werden (über den Barcode) oder im Stapel (über das Hochladen einer zeilengetrennten Barcodedatei).
Exemplare können auch über den Katalog der Dienstoberfläche hinzugefügt werden, über den Reiter „Plan“ auf der linken Seite in der Detailansicht eines Titels.
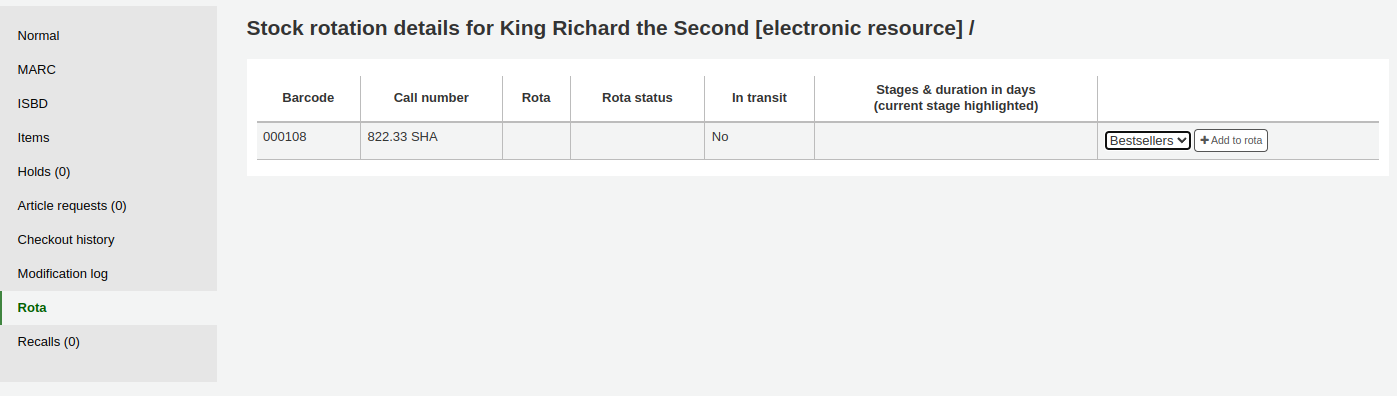
Wählen Sie den Rotationsplan dem Sie das Exemplar hinzufügen möchten, und klicken Sie auf „Zum Plan hinzufügen“.
Exemplare können im Erwerbungsprozess automatisch zu einer Bestandsrotation hinzugefügt werden, indem das LRP-Feld (Library Rotation Plan) in EDI belegt wird.
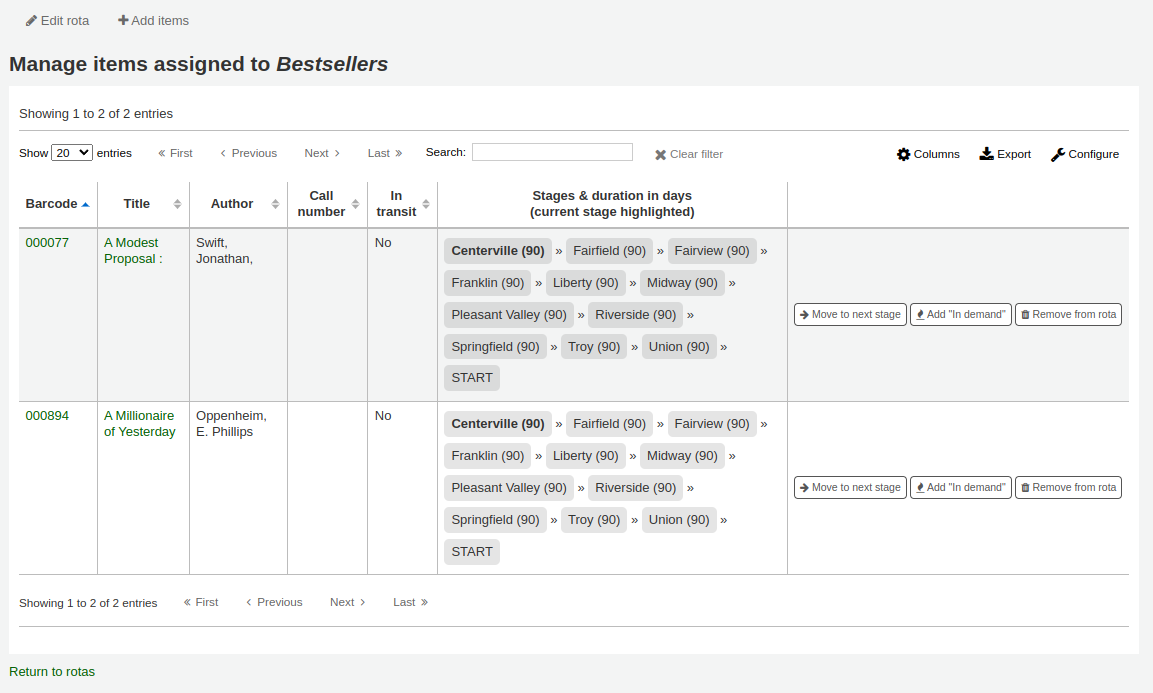
On the Manage > Items page, there will be a summary of all items on the rota with their current location. You have the options to immediately progress items, mark items as ‚in demand‘ and remove an item from rotation.
Bemerkung
You can customize the columns of this table in the ‚Table settings‘ section of the Administration module (table id: stock_rotation_manage_items).
Move to next stage: progress the item directly to the next stage even if the duration at the current stage is not complete.
Add „In demand“: double the duration the item will stay at it’s current stage compared to what is set in the rota. This is often used for items that are found to be unexpectedly popular at a particular library.
Remove from rota: remove the item from the rota.
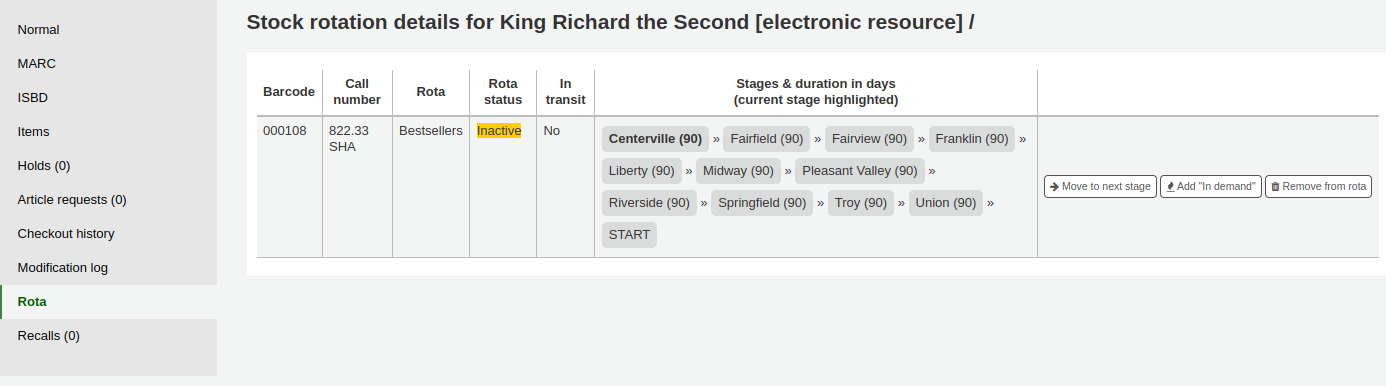
Individual items can also be managed from the staff interface catalog, in the ‚Rota‘ tab.
Grouping items
You can group items in order to place holds on a subset of items on a bibliographic record, rather than a specific item or the next available item. For example, if you have a bibliographic record for a series, and several items of each volume, you can group items by volumes and then place holds on the next available item of „Vol. 4“.
Bemerkung
Staff users need the manage_item_groups permission
Sie müssen die Exemplargruppenfunktion zunächst aktivieren über den Systemparameter EnableItemGroups.
Wenn der Systemparameter aktiviert wurde, erscheint auf der Titeldetailansicht der Dienstoberfläche der Reiter „Exemplargruppen“.
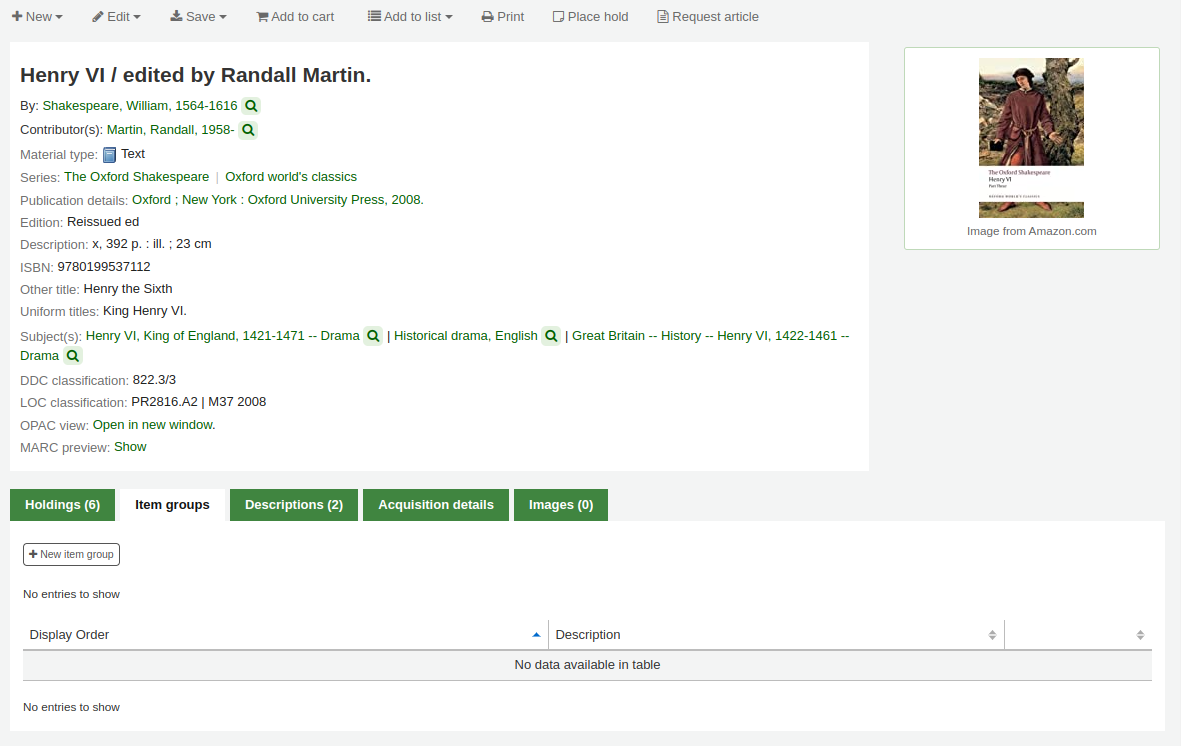
Klicken Sie auf den Button „Neue Exemplargruppe“
Im erscheinenden Formular

Name: geben Sie einen Namen für die Exemplargruppe ein, der Name ist in der Dienstoberfläche und im OPAC sichtbar
Reihenfolge der Anzeige: Geben Sie eine Zahl für die Position ein, an der diese Gruppe im Vergleich zu den anderen Gruppen desselben Datensatzes angezeigt werden soll (wenn Sie zum Beispiel Gruppen mit der Anzeigereihenfolge 0, 1 und 2 haben, wird die Gruppe 0 zuerst angezeigt, die Gruppe 1 als zweites, und die Gruppe 2 als drittes. Sie können irgendeine Zahl hier eingeben. Ihr Gruppen können auch 3, 11 und 27 sein. In diesem Fall wird 3 zuerst, dann 11, und 27 zuletzt angezeigt)
Klicken Sie auf „Bestätigen“ um die Gruppe zu erstellen
Wenn die Gruppe erstellt wurde, können Exemplare hinzugefügt werden.
Setzen Sie im Reiter „Exemplare“ ein Häkchen bei den Exemplaren die Sie zur Gruppe hinzufügen möchten
Klicken Sie oberhalb der Exemplartabelle auf „Zur Exemplargruppe hinzufügen/verschieben“
Wählen Sie die Gruppe aus zu der die ausgewählten Exemplare hinzugefügt werden sollen
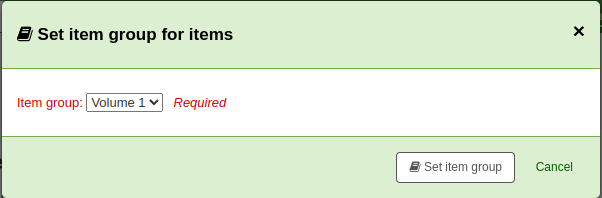
Klicken Sie auf „Exemplargruppe eintragen“
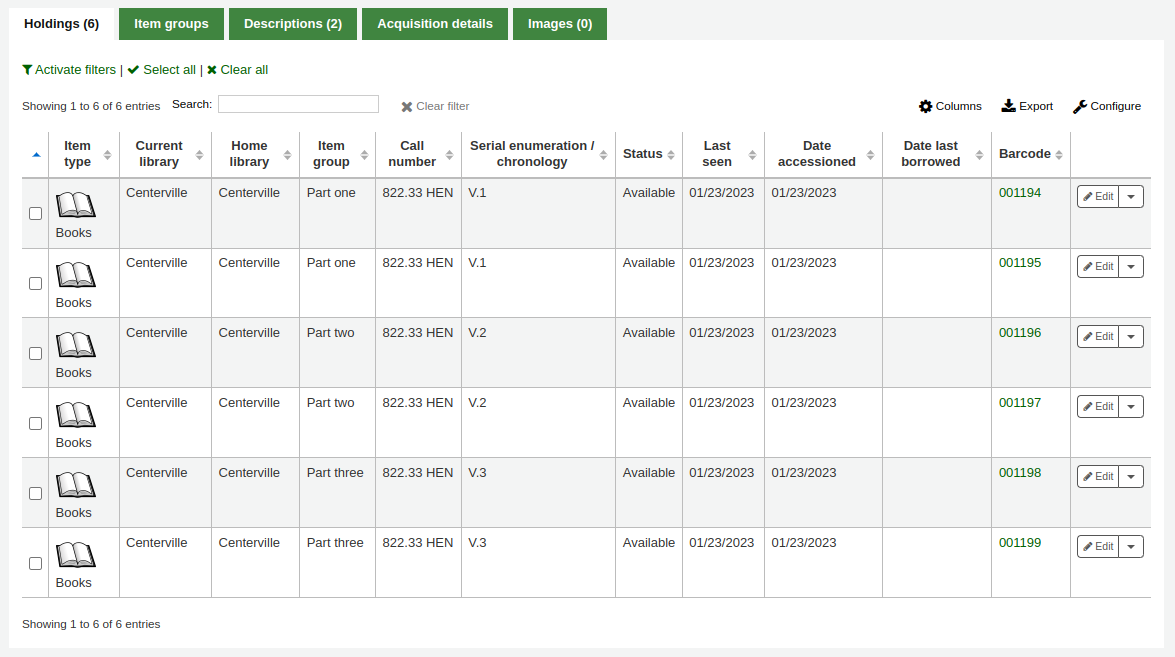
Die Exemplargruppe in der sich jedes Exemplar befindet wird im Reiter „Exemplare“ angezeigt.
To delete an item group, go to the ‚Item groups‘ tab, and click the ‚Delete‘ button. This will only delete the group, the items will remain, but ungrouped.
Angaben zum Datensatz
Auf der linken Seite jedes Titeldatensatzes befindet sich ein Reiter ‚Exemplare‘.
Clicking that tab will give you basic information about the items.
The ‚Item information‘ section shows basic information about the item such as the home library, item type, collection, call number, copy number, shelving location, replacement price, and accompanying materials.

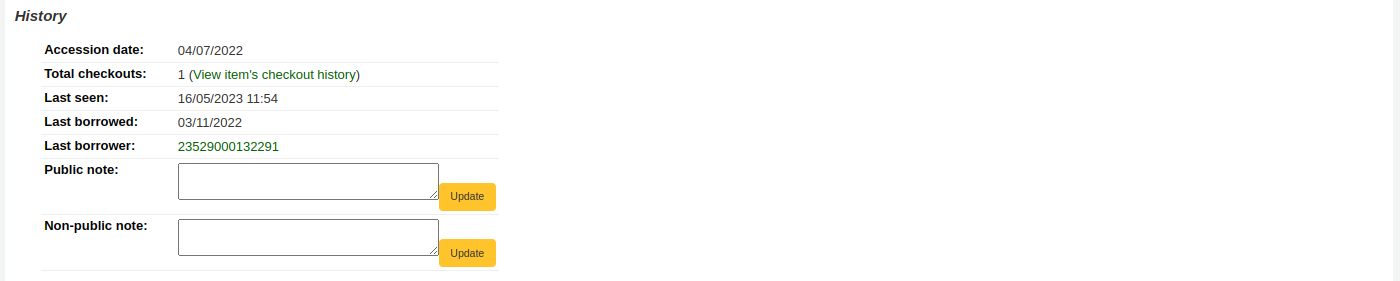
The ‚Statuses‘ section shows the current status of the item. If the item is on loan, the loan details are displayed. If the item was renewed, you can click ‚View‘ to see the details of any renewals, which include the date, the staff member who renewed the checkout, as well as if it was done manually or automatically (through the automatic_renewals.pl cronjob).
You can also view and edit the status information in this section. If an item is marked lost, damaged or withdrawn, you will see the date that status was applied.

The ‚Priority‘ section shows if the item is excluded from local holds priority.

The ‚History‘ section shows information about the acquisition and check out history of the item. If you ordered the item through the acquisitions module, this section will include the order date, vendor, accession (receiving) date and invoice number. Clicking the order or accession date will bring you to the acquisitions information for that item. This section also shows the number of total checkouts (with a link to see the checkout history), the date and time the item was last seen, the date it was last borrowed and the last patron to borrow this item (if the StoreLastBorrower system preference is enabled), if the item was paid for by the patron, the volume or serial number information, and public and non-public notes.
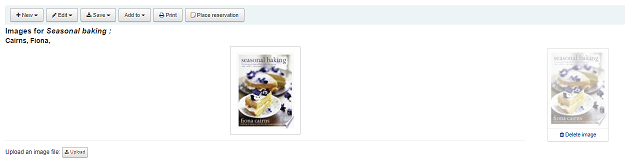
Coverbilder für Exemplare hinzufügen
Wenn Sie entweder OPACLocalCoverImages und/oder :ref:`LocalCoverImages <LocalCoverImages-label> aktiviert haben, können Sie Coverbilder für einzelne Exemplare über die Option ‚Bild hochladen‘ in der Auswahlliste der Schaltfläche ‚Bearbeiten‘ rechts in der Exemplartabelle hinzufügen.
Klicken Sie auf „Datei auswählen“ um das Bild auf Ihrem Rechner zu finden und anschließend „Datei hochladen“.
On the next screen you are given the option to replace existing images. You can then click on Process images.
Das Bild wird in einer eigenen Spalte „Coverbild“ in der Exemplartabelle angezeigt.
To delete an image, click on the image in the holdings display. You will see a greyed out copy of the image with the option to delete.
Exemplare umhängen
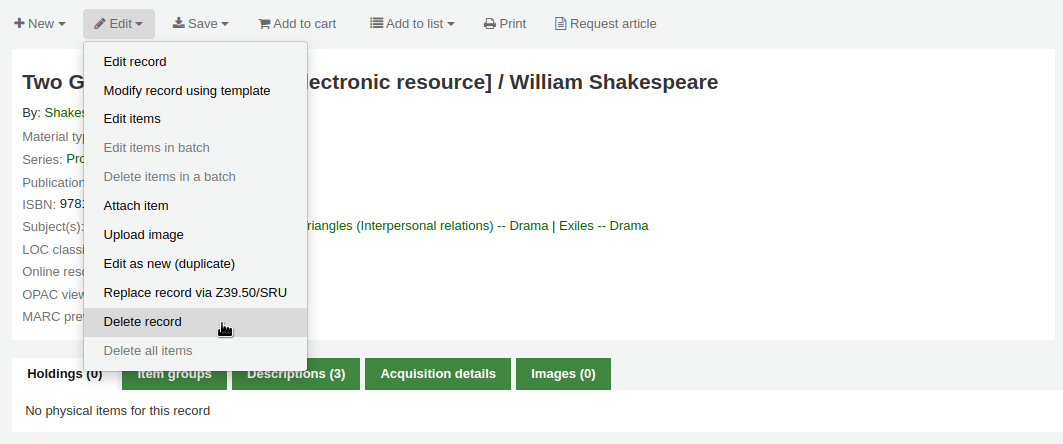
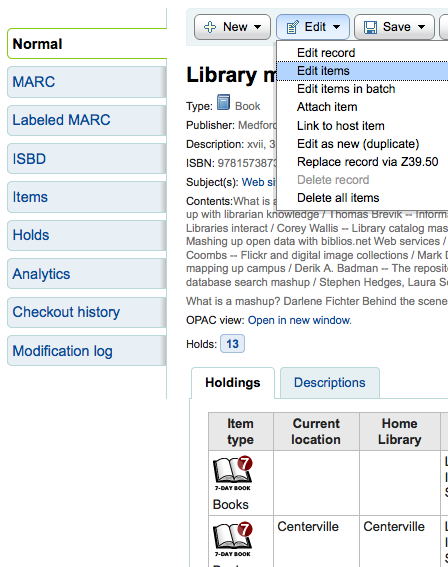
Items can be moved from one bibliographic record to another using the ‚Attach item‘ option.
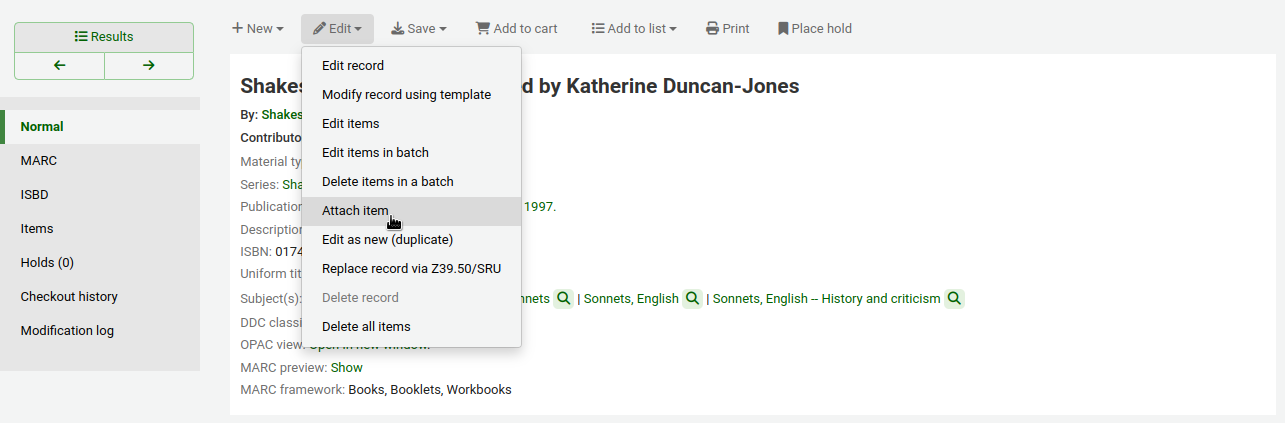
Gehen Sie Titel, an den das Exemplar gehängt werden soll und wählen Sie ‚Exemplar anhängen‘ im Menü ‚Bearbeiten‘.
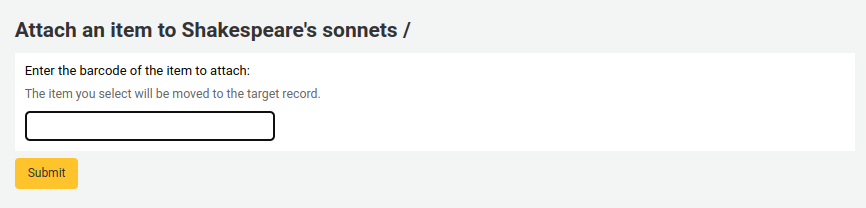
Simply enter the barcode for the item you want to move and click ‚Submit‘.
Wenn dies das letzte Exemplare an dem anderen Titel war, wird eine Schaltfläche angeboten, über die der Ausgangsdatensatz gelöscht werden kann.

If you want to move all items to a new record creating only one bibliographic record you can use the merge records tool instead.
Exemplare löschen
Es gibt viele Wege um Exemplardatensätze zu löschen. Wenn Sie nur ein einzelnes Exemplar löschen möchten, können Sie dies über die Detailansicht tun, indem Sie auf ‚Bearbeiten‘ klicken. Hier können Sie dann ‚Exemplare bearbeiten‘ auswählen.
In der Liste mit Exemplaren finden Sie neben jedem Eintrag einen Link ‚Löschen‘. Klicken Sie auf diesen Link, um das Exemplar zu löschen, wenn es nicht ausgeliehen ist.
Wenn Sie wissen, dass keines der Exemplare aktuell ausgeliehen ist, können Sie über ‚Alle Exemplare löschen‘ im Menü ‚Bearbeiten‘ alle Exemplare am Datensatz auf einmal löschen.
In der Detailansicht können Sie auch mit Hilfe des Systemparameters StaffDetailItemSelection eine Checkbox auf der linken Seite jedes Exemplars anzeigen lassen. Dadurch können Sie jedes Exemplar markieren, das gelöscht werden soll, und dann über der Exemplarliste auf ‚Markierte Exemplare löschen‘ klicken.
Sie können auch im Modul ‚Werkzeuge‘ die Stapellöschung von Exemplaren batch delete tool verwenden, um mehrere Exemplare auf einmal zu löschen.
Batch deleting items
Get there: More > Cataloging > Batch editing > Batch item deletion
This tool will allow you to delete a batch of item records from Koha.
From the tool, choose to either upload a file of barcodes or itemnumbers, or scan item barcodes one by one into the box below the upload tool.
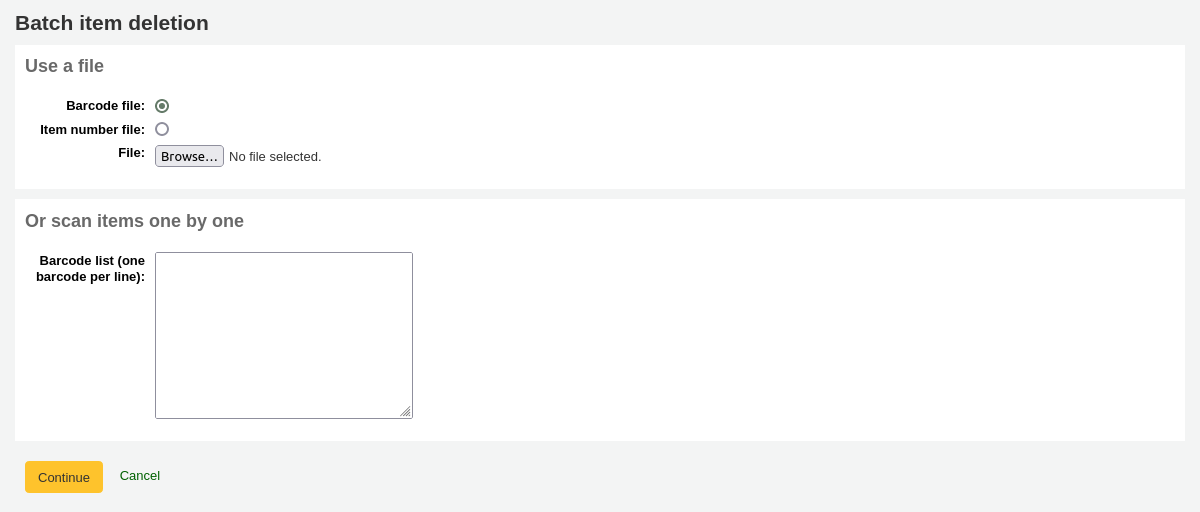
Once the file is uploaded or the barcodes listed, click ‚Continue.‘
You will be presented with a confirmation screen. From here you can uncheck the items you don’t want to delete. You can check the ‚Delete records if no items remain‘ box to delete the bibliographic record if the last item is being deleted.
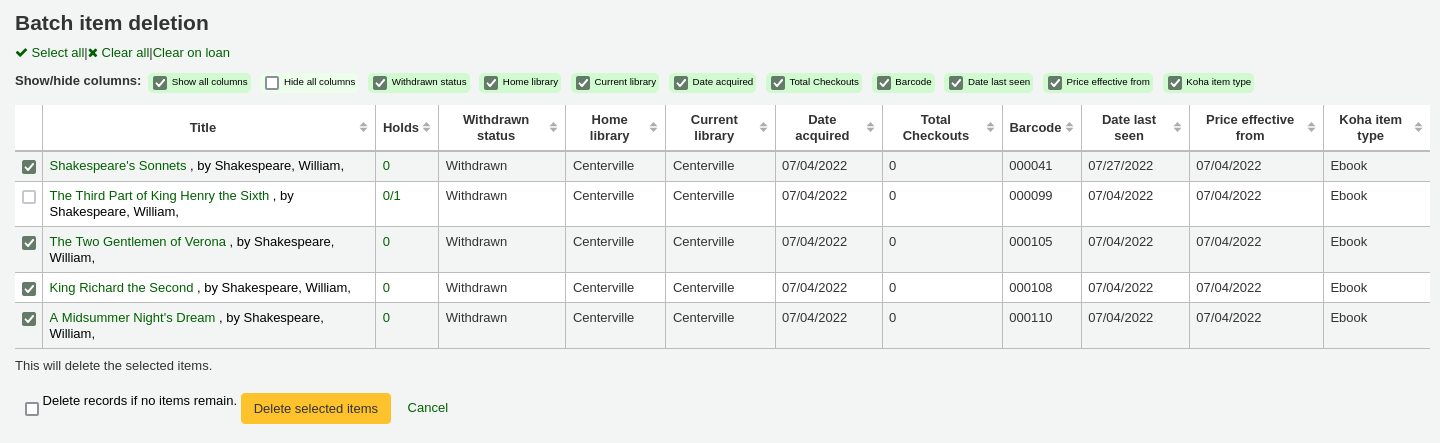
Bemerkung
Exemplare, die das letzte Exemplar sind, das an einem Titelsatz mit einer oder mehreren Vormerkungen auf Titelsatzebene hängt, werden automatisch ausgeschlossen. Sie müssen die Vormerkung löschen bevor Sie das Exemplar löschen können.
Exemplare die ausgeliehen sind werden ebenfalls automatisch ausgeschlossen. Sie müssen vor dem Löschen zuerst zurückgegeben werden.
Wenn die Datei (oder die Liste der gescannten Barcodes) mehr als 1000 Barcodes umfasst, kann Koha diese nicht mehr in einer Liste anzeigen. Die Daten können dennoch gelöscht werden, aber es ist nicht möglich einzelne Exemplare ab- oder auszuwählen und die Titelsätze mit dem letzten Exemplare zu löschen.

Klicken Sie auf „Markierte Exemplare löschen“.
Bemerkung
Wenn die Exemplare ausgeliehen sind werden sie nicht gelöscht.
Der Löschjob wird in die Hintergrundjobs eingereiht.

Klicken Sie auf „Zeige Details des Jobs in der Warteliste“ um Details über den Job anzusehen.

Klicken Sie auf „Stapellöschung von Exemplaren“ um eine neue Stapellöschung durchzuführen.
Stapellöschung von Exemplaren ausgehend vom Titelsatz
das Tool Stapellöschung von Exemplaren steht auch auf der Detailansicht des Titelsatzes zur Verfügung.
Klicken Sie ausgehend von der Detailansicht eines Titels auf den Button „Bearbeiten“ und wählen Sie dann „Stapellöschung von Exemplaren“.
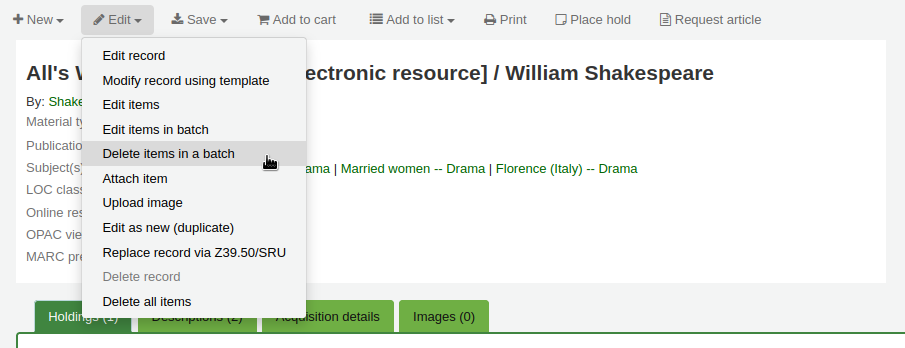
Das öffnet das Tool Stapellöschung von Exemplaren für diesen spezifischen Titel.
Spapellöschung von Exemplaren aus einem Report
The batch item deletion tool is also available from reports results when the results contain itemnumbers.
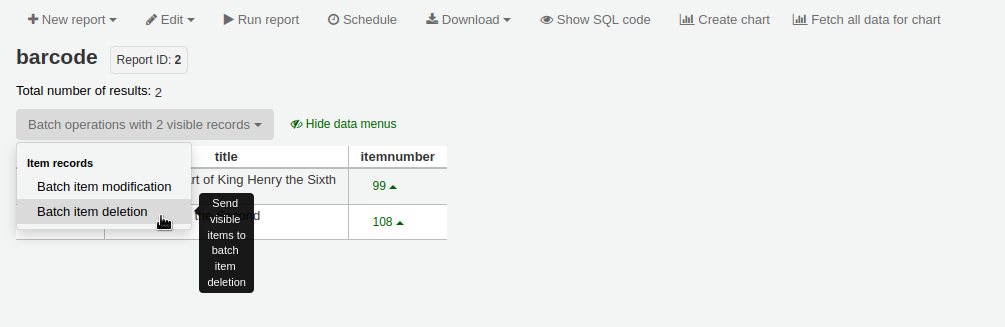
Wenn der Report die itemnumber enthält, erscheint automatisch die Option „Stapeloperationen mit X sichtbaren Datensätzen“. Diese Option beinhaltet die Stapelbearbeitung und Stapellöschung von Datensätzen.
By default, only 20 results are shown when running reports, therefore, the batch deletion will only be done on 20 results. If you have more results that you want to delete in a batch, make sure to change the number of results per page before choosing the batch operation.
Exemplarbezogene Ausleihhistorie
Jeder bibliographische Datensatz verfügt über eine Ausleihhistorie (mit oder ohne Benutzerinformationen, abhängig von Ihren Einstellungen), zusätzlich hat jedes Exemplar seine eigene Seite zur Ausleihhistorie. Um diese anzuzeigen, klicken Sie auf den Reiter ‚Exemplare‘ links neben dem Datensatz, den Sie gerade ansehen.
Unter der Rubrik ‚Ausleihhistorie‘ befindet sich ein Link zu ‚Ausleihhistorie des Exemplars anzeigen‘. Wenn Sie diesen anklicken, werden die Ausleihhistorie des Exemplars geöffnet. Diese sieht etwas anders aus, als die titelbezogene Ausleihhistorie.
Creating labels
Get there: More > Cataloging > Tools > Label creator
The label creator tool allows you to use layouts and templates which you design to print a nearly unlimited variety of labels including barcodes. Here are some of the features of the label creator tool:
Customize label layouts
Design custom label templates for printed labels
Build and manage batches of labels
Export single or multiple batches
Exportieren Sie eine oder mehrere Etiketten aus einem Stapel
Exportieren Sie die Etikettendaten in einem von drei Formaten:
PDF - Können in jedem PDF-Reader geöffnet und direkt auf einem Drucker ausgedruckt werden.
CSV - Exportieren Sie den Etikettenstapel, nachdem das gewählte Layout angewendet wurde, um ihn in verschiedene andere Anwendungen zu importieren
XML - als alternatives Export-Format
Label Layouts
Pfad in Koha: Mehr > Katalogisierung > Werkzeuge > Etikettendruck > Verwalte > Layouts
Das Layout wird verwendet um festzulegen welche Felder auf die Etiketten gedruckt werden sollen.
Ein Layout hinzufügen
Um ein neues Layout zu erstellen, klicken Sie auf ‚Neu‘ am Anfang der Seite des Etikettendrucks und wählen Sie ‚Layout‘ aus.
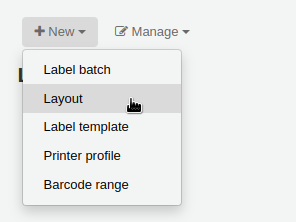
Über das angezeigte Formular können Sie festlegen, was auf Ihre Etiketten gedruckt werden soll.
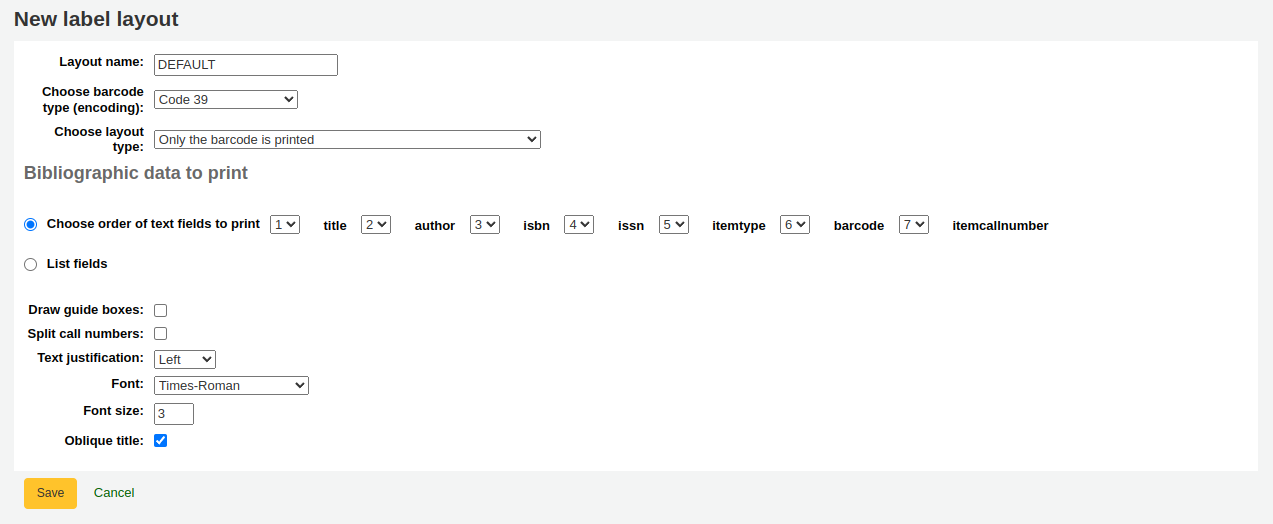
„Layoutname“: geben Sie einen passenden Namen für das Layout ein.
„Barcodetyp (Codierung) auswählen:“ wenn es sich um Barcodeetiketten handelt, wählen Sie die Codierung (Code39 ist am meisten verbreitet)
„Layout-Typ auswählen:“ wählen Sie welche Informationen auf dem Etikett gedruckt werden.
Nur Titelangaben werden gedruckt: es erscheinen nur Titelinformationen auf dem Etikett (das kann zum Beispiel für Signaturschilder verwendet werden)
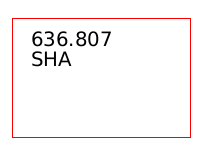
Bemerkung
Die Titeldaten enthalten alle Datenfelder die möglicherweise zu Ihren MARC frameworks gemappt sind.
Der Barcode steht vor den Titeldaten: Der Barcode erscheint oben auf dem Etikett und die bibliografischen Informationen darunter
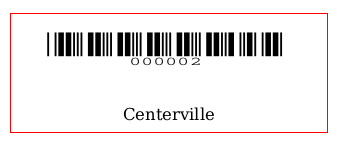
Die Titeldaten stehen vor dem Barcode: die bibliografischen Informationen erscheinen oben auf dem Etikett und der Barcode darunter

Barcode und Titeldaten werden alternierend gedruckt: die bibliografischen Informationen erscheinen auf einem Etikett und der Barcode auf dem Nächsten, abwechselnd für jedes Exemplar
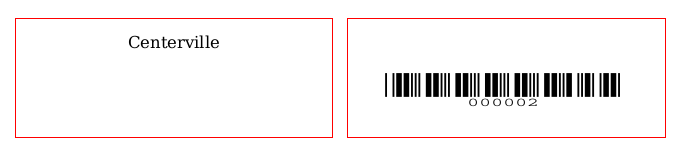
Nur der Barcode wird gedruckt: nur der Barcode erscheint auf dem Etikett
„Bibliographische Daten für den Druck“: wenn Sie Titeldaten auf dem Etikett drucken möchten, wählen Sie aus der voreingestellten Liste von Feldern, welche davon in welcher Reihenfolge auf dem Etikett erscheinen sollen. Alternativ können Sie auch auf „Felder auflisten“ klicken, und Ihre eigenen Daten eingeben.
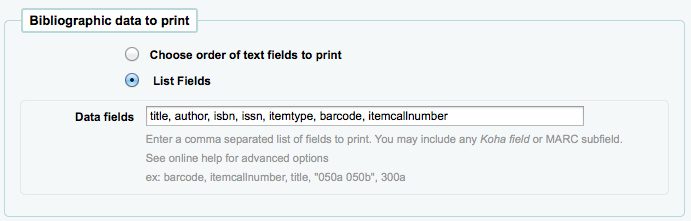
Bemerkung
Unter „Felder auflisten“ können Sie jedes Datenbankfeld aus den folgenden Tabellen angeben (verwenden Sie den Schema Viewer (http://schema.koha-community.org) um die Feldnamen herauszufinden):
items
biblioitems
biblio
branches
Sie können auch MARC Unterfelder als 4-stellige Unterfeldzeichenfolge angeben, zum Beispiel 245a für das Titelfeld in MARC21.
Sie können auch eine durch Leerzeichen getrennte Liste von Feldern, die in einer Zeile zusammengefasst werden sollen, in doppelte Anführungszeichen setzen, zum Beispiel „099a 099b“ oder „itemcallnumber barcode“.
Abschließend können Sie auch statische Textzeichenfolgen in einfachen Anführungszeichen einfügen, zum Beispiel ‚Hier etwas statischen Text‘.
„Zeichne Umrandung“: wählen Sie ob Sie Orientierungslinien um jedes Etikett ausgedruckt haben möchten (das kann beim ersten Einrichten des Etikettendrucks nützlich sein, um die Ausrichtung mit Ihren Etikettenbögen zu überprüfen)
‚Split call numbers‘: choose if call numbers should be split (usually used on spine labels)
Bemerkung
Call number splitting rules are managed under Administration > Classification sources.
‚Text justification‘: choose the text alignment (left, center or right)
‚Font‘: choose the font type
Font type choices are currently limited to:
Times-Roman (regular, bold, italic, or bold-italic): a serif font type
Courier (regular, bold, oblique (italic), or bold-oblique (bold-italic)): a monospace font type
Helvetica (regular, bold, oblique (italic), or bold-oblique (bold-italic)): a sans-serif font type
‚Font size‘: enter the font size in points
‚Oblique title‘: choose if the title should be italicized
Click ‚Save‘ to save the new layout.
After saving, your layouts will appear under Manage > Layouts.

Editing a layout
To edit an existing layout, click on the ‚Manage‘ button at the top of the label creator tool and choose ‚Layout‘.
In the table of currently available layouts, click the ‚Edit‘ button next to the layout you want to edit.
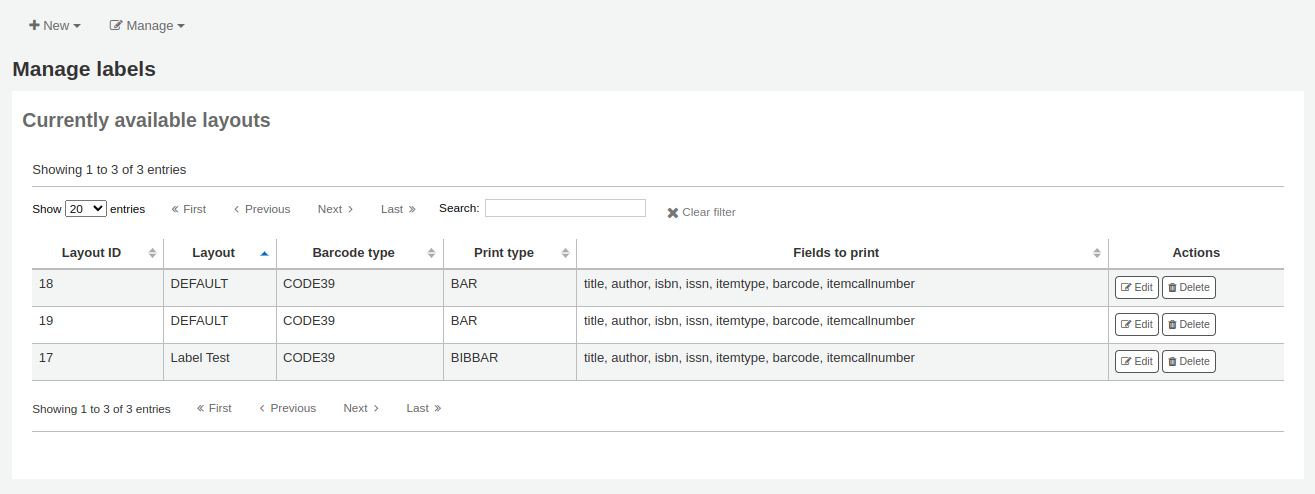
Change the necessary values and click ‚Save‘.
Deleting a layout
To delete an existing layout, click on the ‚Manage‘ button at the top of the label creator tool and choose ‚Layout‘.
In the table of currently available layouts, click the ‚Delete‘ button next to the layout you want to delete, and confirm the deletion.
Label templates
Get there: More > Cataloging > Tools > Label creator > Manage > Label templates
A template is based on the label/card stock you are using. This might be Avery 5160 for address labels, Gaylord 47-284 for spine labels or Avery 28371 for your patron cards, just to give a couple of examples. These labels will include all of the information you will need for setting up in Koha. This information may be on the packaging, on the vendor’s website or it can be measured manually.
Adding a template
To add a new template, click on the ‚New‘ button at the top of the label creator page and choose ‚Label template‘.
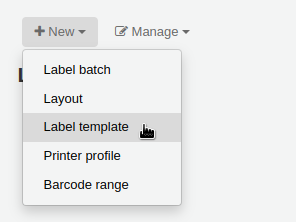
Using the form that appears you can define the template for your sheet of labels or cards.
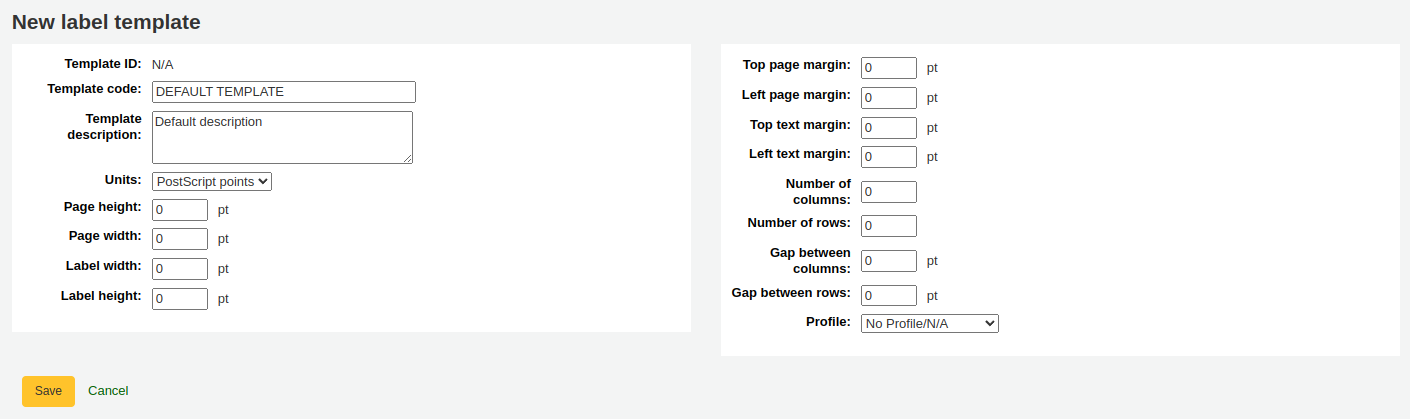
‚Template ID‘: this will be automatically generated after saving your template, this is simply a system-generated unique id
„Templatecode“: geben Sie einen Code für das Template ein, der Ihnen bei der späteren Identifizierung des Templates hilft
„Templatebeschreibung“: hier können Sie zusätzliche Informationen über das Template eingeben
„Einheiten“: wählen Sie welche Maßeinheit Sie für Ihr Template verwenden möchten. Es sollte am besten den Maßeinheiten entsprechen, die der Hersteller für Ihre Druckvorlagen angegeben hat.
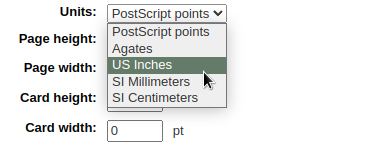
Die Maße, Anzahl der Spalten und Reihen können auf der Packung stehen, auf der Website des Herstellers, oder können manuell nachgemessen werden.
Seitenhöhe: Höhe der Seite
Seitenbreite: Breite der Seite
Etikettenbreite: Breite des Etiketts
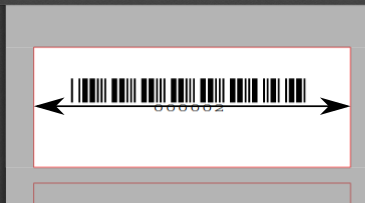
Label height: height of the label
Oberer Seitenrand: Abstand zwischen dem oberen Seitenrand und dem Beginn der ersten Etikettenreihe

Linker Seitenrand: Abstand vom linken Seitenrand zum Beginn der ersten Etikettenreihe
Oberer Textrand: Abstand zwischen dem oberen Rand des Etiketts und dem Beginn der ersten Textzeile
Linker Textrand: Abstand zwischen dem linken Etikettenrand und dem Textbeginn
Bemerkung
Wenn Sie im Template keinen linken Textrand angeben, wird automatisch ein Rand mit 3/16‘‘ (13.5 Punkten) eingetragen.
Anzahl Spalten: Anzahl der Etikettenspalten auf einer Seite bzw. die Anzahl der Etiketten in einer Zeile
Anzahl Reihen: Anzahl der Etikettenreihen auf einer Seite bzw. Anzahl der Etiketten je Spalte
Abstand zwischen den Spalten: Abstand zwischen den Etikettenspalten

Abstand zwischen den Zeilen: Abstand zwischen zwei Reihen von Etiketten
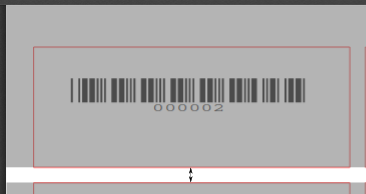
Ein Profil (Eigenschaften) ist ein Satz von „Einstellungen“, das einem bestehenden Template vor dem Druck zugeordnet wird, um Eigenschaften eines bestimmten Druckers auszugleichen (dem das Profil zugeordnet ist).
Drucken Sie versuchsweise ein paar Etiketten, bevor Sie ein Profil auswählen. So können Sie einfacher ein Profil definieren, dass für Ihre Kombination von Drucker und Template passt.
Wenn Sie Unstimmigkeiten auf dem gedruckten Dokument gefunden haben, können sie ein Druckerprofil create a profile erstellen und es dem Template zuweisen.
Klicken Sie auf „Speichern“ um das Template zu speichern.
Nach dem Speichern werden Ihre Templates unter Verwalte > Templates angezeigt.
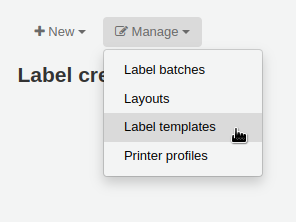
Ein Template bearbeiten
Um ein bestehendes Template zu bearbeiten, klicken Sie auf den Button „Verwalte“ und wählen Sie dann „Templates“.
Klicken Sie auf den Button „Bearbeiten“ bei dem Template das Sie bearbeiten möchten in der Tabelle der derzeit verfügbaren Templates.
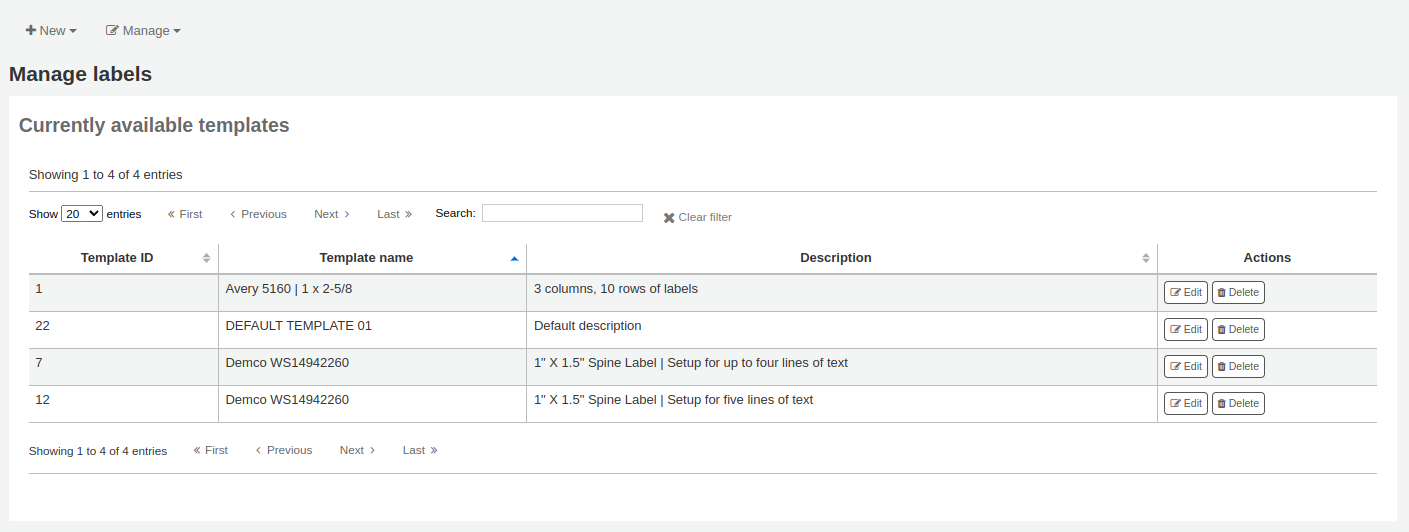
Change the necessary values and click ‚Save‘.
Deleting a template
Um ein bestehendes Template zu löschen, klicken Sie auf den Button „Verwalte“ und wählen Sie dann „Templates“.
In the table of currently available layouts, click the ‚Delete‘ button next to the layout you want to delete, and confirm the deletion.
Druckerprofile
- Pfad in Koha: Mehr > Katalogisierung > Werzeuge > Etikettendruck > Verwalte >
Druckerprofile
A profile is a set of „adjustments“ applied to a given template just prior to printing which compensates for anomalies unique and peculiar to a given printer (to which the profile is assigned). This means if you set a template up and then print a sample set of data and find that the items are not all aligned the same on each label, you need to set up a profile for each printer to make up for the differences in printing styles, such as the shifting of text to the left, right, top or bottom.
If your labels are printing just the way you want, you will not need a profile.
Adding a printer profile
To add a new profile, click on the ‚New‘ button at the top of the label creator tool and choose ‚Printer profile‘.

Using the form that appears you can create a profile to fix any problems with your template.
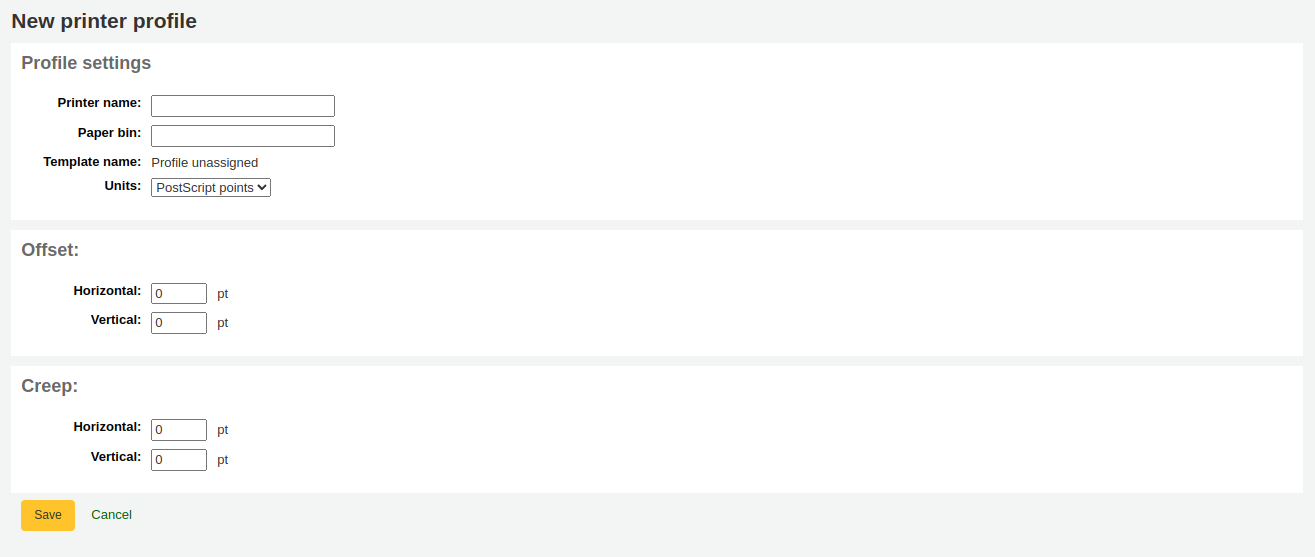
‚Printer name‘: enter a name for the printer. It does not have to match your printer exactly, it is only used for reference within Koha, so you can use the printer model number or you can call it ‚the printer on my desk‘.
‚Paper bin‘: enter a name for the printer’s paper tray. Like the printer name, it is only used as a reference.
‚Template name‘ will be filled in once you have chosen which template to apply the profile to in the template edit form
‚Units‘: define what measurement scale you’re using for your profile.
The next sections are used to adjust the label printing.
Offset describes what happens when the entire image is off center either vertically or horizontally
Creep describes a condition where the distance between the labels changes across the page or up and down the page
Bemerkung
For these values, negative numbers move the error up and to the left and positive numbers move the error down and to the right
Example: the text is .25“ from the left edge of the first label, .28“ from the left edge of the second label and .31“ from the left edge of the third label. This means the horizontal creep should be set to .03“ to make up for this difference.
Click ‚Save‘ to save the new profile.
Nach dem Speichern werden Ihre Profile auf der Seite ‚Verwalte > Verfügbare Profile‘ angezeigt.
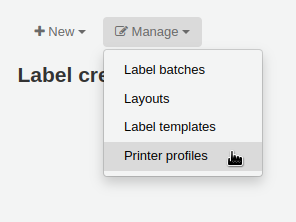
Nachdem Sie Ihr neues Profil gespeichert haben, können Sie zu der Liste der Templates zurückkehren und das Template für dieses Profil bearbeiten.
Ein Druckerprofil bearbeiten
Um ein bestehendes Druckerprofil zu bearbeiten, klicken Sie auf den Button „Verwalte“ und wählen Sie dann „Druckerprofile“.
Klicken Sie auf den Button „Bearbeiten“ bei dem Druckerprofil das Sie bearbeiten möchten in der Tabelle der derzeit verfügbaren Druckerprofile.
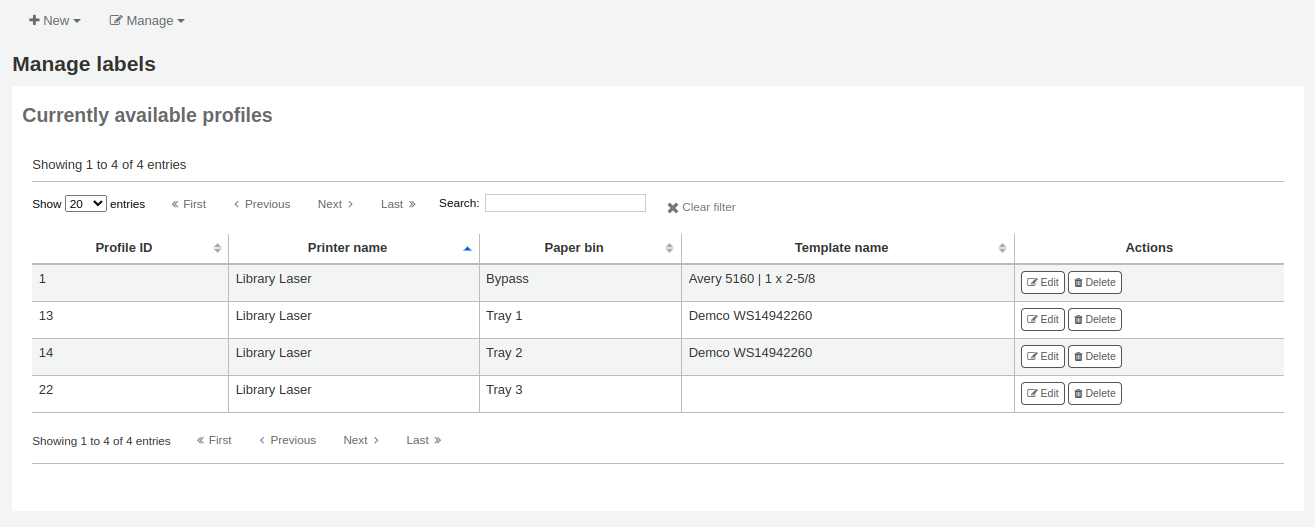
Change the necessary values and click ‚Save‘.
Ein Druckerprofil löschen
Um ein bestehendes Druckerprofil zu löschen, klicken Sie auf den Button „Verwalte“ und wählen Sie dann „Druckerprofile“.
Klicken Sie in der Tabelle der derzeit verfügbaren Druckerprofile auf den „Button“ Löschen bei dem Profil das Sie löschen möchten, und bestätigen Sie die Nachfrage.
Batches verwalten
Pfad in Koha: Mehr > Katalogisierung > Werkzeuge > Etikettendruck > Verwalte > Batches verwalten
Stapel beinhalten die Exemplare, für die Sie Etiketten drucken möchten. Sobald Sie in diesem Werkzeug sind, können Sie nach den Exemplaren suchen, für die Sie Etiketten drucken möchten.
Einen Batch hinzufügen
Stapel können auf zwei Arten erstellt werden. In der ersten kann der Link ‚Neuer Stapel‘ auf der Seite ‚Bereitgestellte MARC-Datensätze verwalten‘ ‚Staged MARC management‘ angeklickt werden.
Bei der anderen kann vom Werkzeug Etikettendruck aus ein neuer Stapel erstellt werden
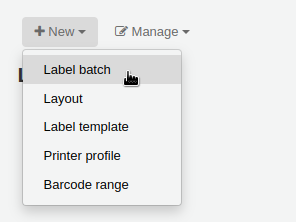
Sie bekommen einen leeren Stapel angezeigt mit einem Feld in dem Sie Barcodes oder Exemplarnummern einscannen können. Klicken Sie danach auf „Exemplar(e) hinzufügen“ unten auf der Seite.
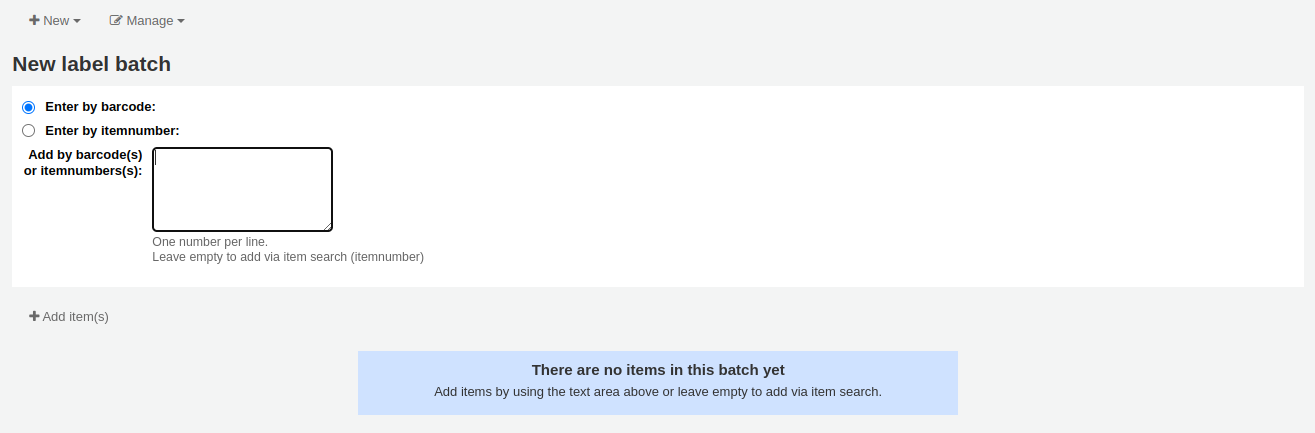
Scannen Sie die Barcodes ein im Feld „Über Barcode(s) oder Exemplarnummer“ und klicken Sie anschließend auf „Exemplare hinzufügen“, oder klicken Sie direkt auf „Exemplar hinzufügen“, dann öffnet sich ein Suchfenster für die Suche nach Exemplaren, die Sie hinzufügen können.
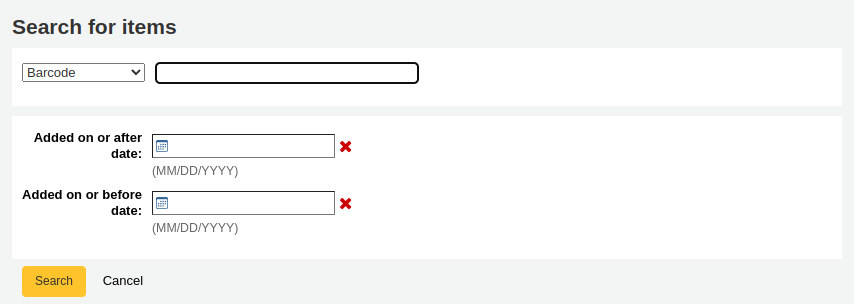
In der Trefferliste können Sie über die Checkboxen neben den Einzeltreffern auswählen, welche Exemplare zu einem Stapel hinzugefügt werden sollen. Klicken Sie hierzu auf ‚Markierte hinzufügen‘. Sie können auch einzelne Exemplare nacheinander über den Link ‚Hinzufügen‘ neben den einzelnen Einträgen hinzufügen.
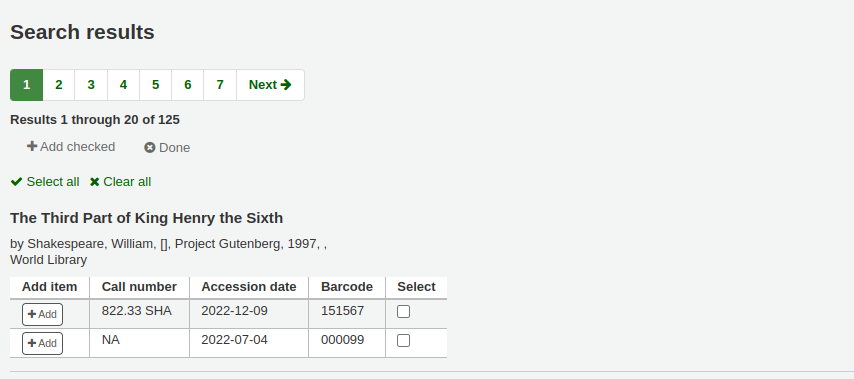
Wenn Sie alle Exemplare hinzugefügt haben, klicken Sie auf den Button „Fertig“. Klicken Sie erneut auf „Exemplar(e) hinzufügen“, um die Exemplare dem Stapel hinzuzufügen. Die anschließend erscheinende Tabelle listet die Exemplare auf die Sie ausgewählt haben.
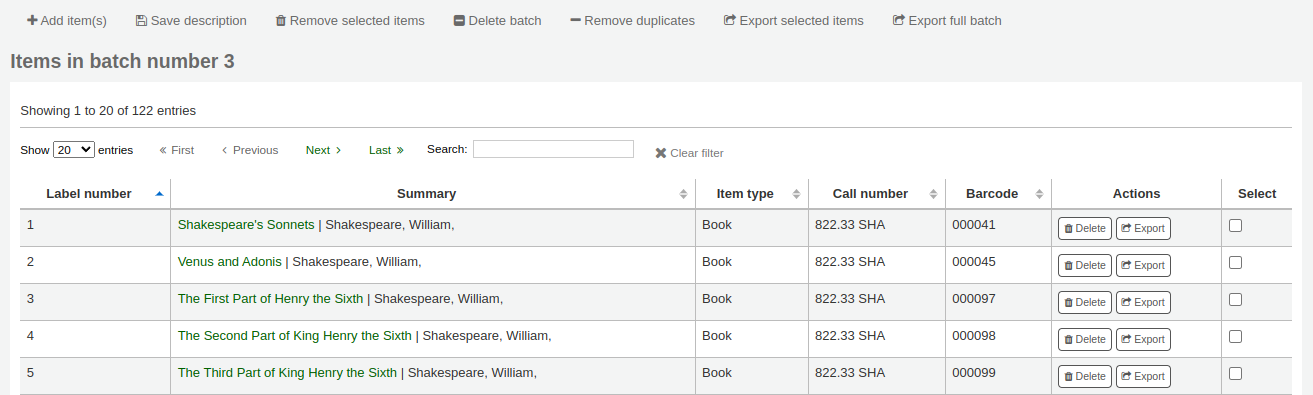
Wurden manche Exemplare aus Versehen mehr als einmal hinzugefügt, können Sie diese über den Button „Dubletten entfernen“ aus dem Stapel löschen.
Wenn Sie einzelne Exemplare aus dem Stapel entfernen möchten, wählen Sie diese mit einem Häkchen in der Checkbox auf der rechten Seite aus, und klicken Sie auf den Button „Markierte Exemplare entfernen“.
Optional können Sie eine Beschreibung eintragen, um den Batch später leichter zu finden. Geben Sie im Feld „Batch-Beschreibung:“ eine Beschreibung ein und klicken Sie auf „Beschreibung speichern“. Die Beschreibung wird auf der Seite ‚Aktuell verfügbare Stapel erscheinen.
Um Ihre Etiketten zu drucken, klicken Sie die Schaltfläche „Gesamten Batch exportieren“. Um nur einige der Etiketten zu drucken verwenden Sie die Schaltfläche „Markierte exportieren“. Bei beiden Optionen erscheint ein Dialogfenster, in dem Sie das Template und Ihr Layout auswählen können. Wenn Sie Etikettenblatt verwenden, bei dem bereits einige Etiketten fehlen, können Sie angeben, bei welchem Etikett begonnen werden soll (die Etiketten werden dabei horizontal durchgezählt).
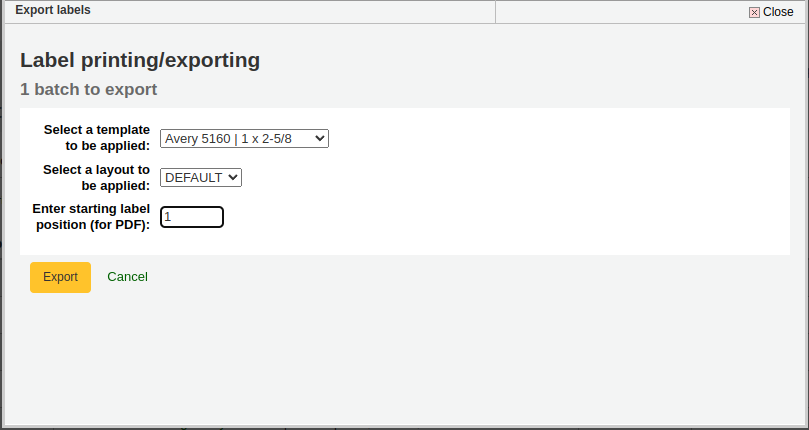
Sie können aus drei Download-Optionen wählen: PDF, CSV und XML.
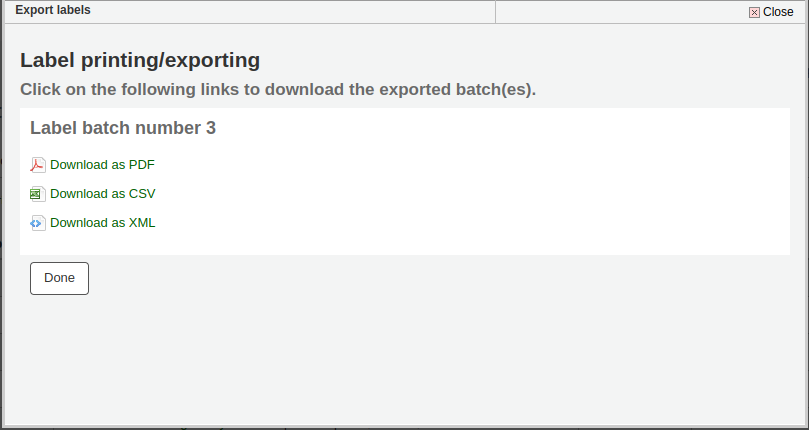
Nachdem die Datei gespeichert wurde, können Sie diese auf die leeren Etiketten drucken.
Der Batch ist gespeichert, und kann unter Verwalte > Batches verwalten aufgerufen werden.
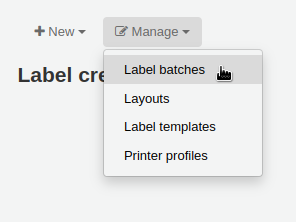
Ein Batch bearbeiten
Um ein bestehenden Batch zu bearbeiten, klicken Sie auf den Button „Verwalte“ und wählen Sie dann „Batches verwalten“.
Sie können dann auf die aktuell verfügbare Stapel zugreifen.
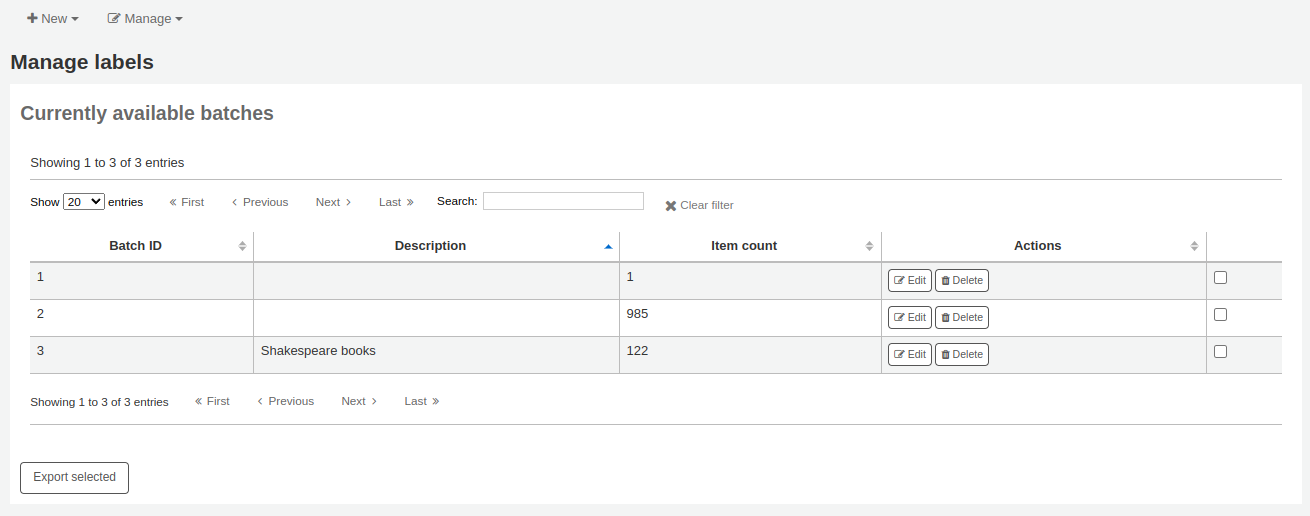
You can print one or more batches directly from this page by checking the box to the right of the batch or batches to print and clicking ‚Export selected‘.
To edit a batch, click the ‚Edit‘ button next to the batch you want to edit.
Deleting a label batch
To delete an existing label batch, click on the ‚Manage‘ button at the top of the label creator page and choose ‚Label batches‘.
Sie können dann auf die aktuell verfügbare Stapel zugreifen.
Click the ‚Delete‘ button next to the batch you want to delete, and confirm the deletion.
You can also delete a batch from the batch page itself, by clicking the ‚Delete batch‘ button above the table of items in the batch.
Barcodebereich
Get there: More > Cataloging > Tools > Label creator > New > Barcode range
If you want to print your barcode labels in advance, before even cataloging the items, you can choose to add a batch of a range of barcodes.
Click ‚New‘ and choose ‚Barcode range‘ from the label creator tool.
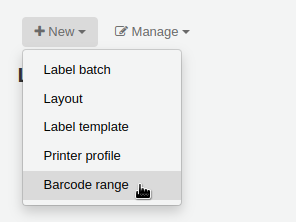
Enter the starting and ending barcodes.

Warnung
Das Werkzeug für den Barcodebereich akzeptiert im Moment keine führenden Nullen. Wenn Sie 0001234 angeben, wird der Barcode als 1234 gedruckt.
Klicken Sie auf „Bereich drucken“.
Es wird ein Dialogfenster angezeigt, in dem Sie das Template, das Layout sowie das erste zu bedruckende Etikett für ein angefangenes Etikettenblatt angeben können.
Bemerkung
Die einzige Download-Option für Barcodebereiche ist PDF.
Speichern Sie die Datei und drucken Sie sie auf ein leeres Etikettenblatt.
Barcode-Generator
Pfad in Koha: Mehr > Katalogisierung > Werkzeuge > Barcodebild-Generator
Der Barcode-Generator kann genutzt werden um Bilder von Barcodes zu generieren (zum Beispiel für Benachrichtigungen).
Dieses Werkzeug kann für unterschiedliche Arten von Barcodes sowie für QR Codes genutzt werden.
Es wird ein Barcode erzeugt in dem gewählten Barcodeformat, und generiert außerdem ein einzigartiges HTML-Tag, das überall verwendet werden kann.
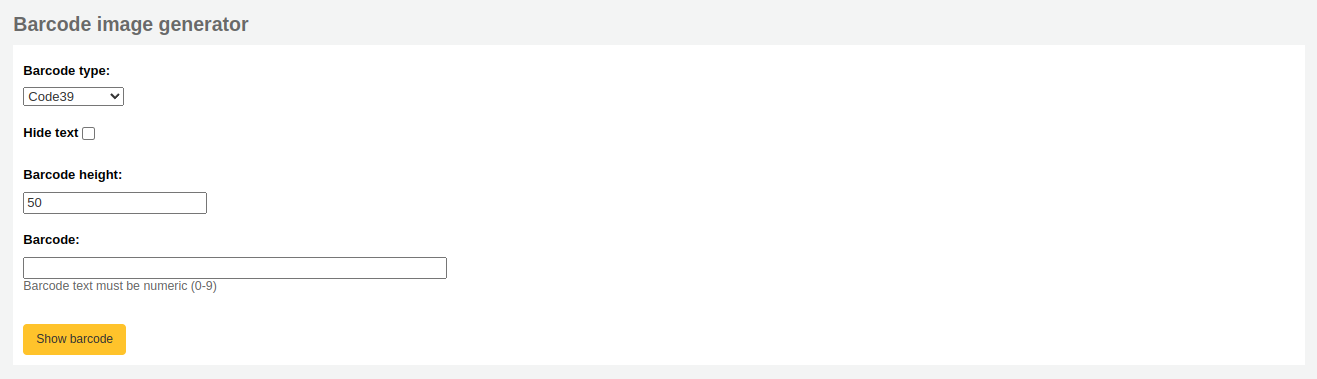
Füllen Sie das Formular aus um ein neues Bild zu erzeugen.
Barcodetyp: wählen Sie den Barcodetyp aus der verwendet werden soll
Bemerkung
Die meisten Barcodetypen erlauben nur numerische Zeichen.
Die folgenden erlauben alphanumerische Zeichen:
Code39
NW7
QRcode
Einige Barcodetypen (EAN13, EAN8, UPCA, and UPCE) erwarten spezifische Muster (die können hier eingesehen werden https://barcode.tec-it.com/en/ unter EAN/UPC).
Text ausblenden: setzen Sie hier ein Häkchen wenn Sie nur den Barcode als Bild erzeugen möchten. Wenn hier kein Häkchen gesetzt ist, erscheint die zu druckende Nummer auch im lesbaren Format unterhalb des Barcodes.
Barcodehöhe: geben Sie die Höhe des Barcodebildes in Pixeln an
Barcode: geben Sie den zu druckenden Barcode ein
Klicken Sie auf „Zeige Barcode“.
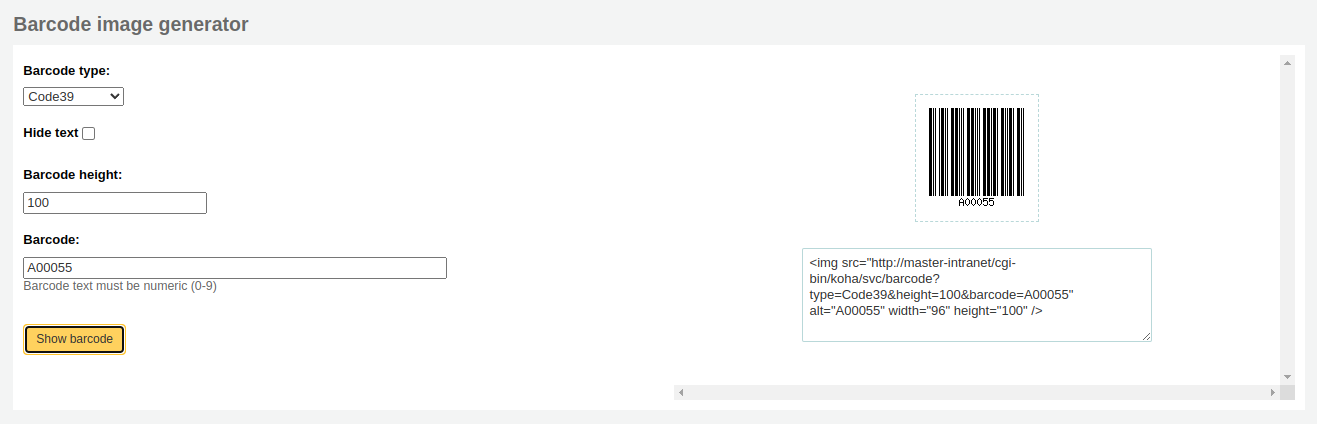
Auf der rechten Seite wird das Barcodebild generiert, das dann heruntergeladen oder gedruckt werden kann.
Unterhalb des Bildes wird ein HTML „img“ Tag erzeugt. Sie können den Code kopieren, und irgendwo an einer Stelle einfügen an der Sie den Barcode benötigen (beachten Sie jedoch, das dies nur in der Dienstoberfläche verfügbar ist).
Beim QR Code gibt es leicht unterschiedliche Optionen. Anstelle des Feldes „Barcodehöhe“ gibt es ein „Modulgröße für QR-Code“ Feld, das über einen Regler angepasst werden kann. Die Nummer bezieht sich auf die Größe in Pixel eines jedes schwarzen und weißen Quadrats im Code (Module). Je größer die Module, desto größer wird das erzeugte Bild sein.
Ein QR Code kann nicht nur alphanumerische Zeichen, sondern auch jede Art von Textinformationen enthalten, beispielsweise eine URL oder sogar einen kurzen Text.
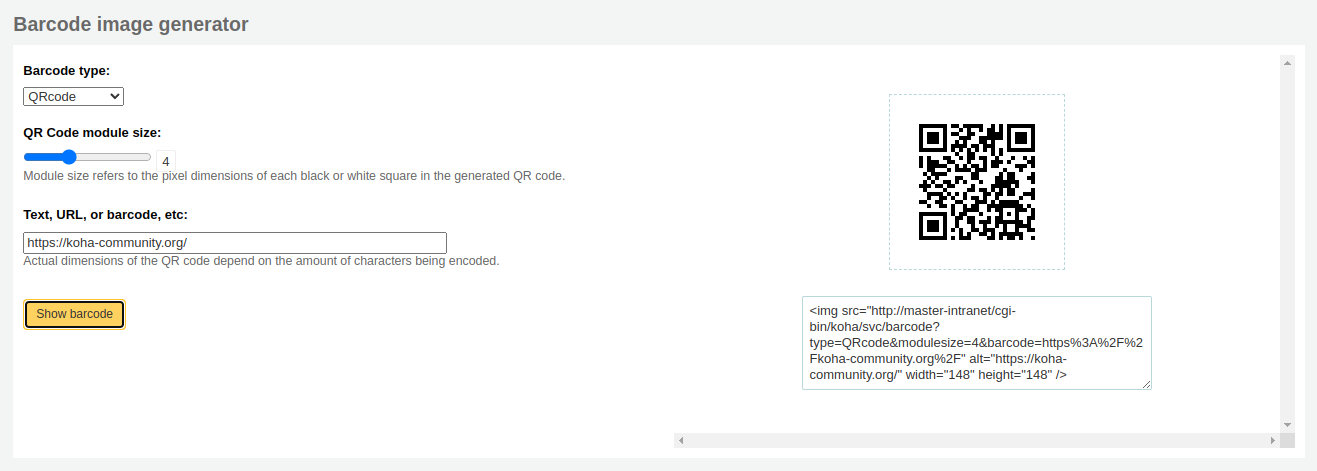
Schneller Signaturschilddruck
Pfad in Koha: Mehr > Katalogisierung > Werkzeuge > Schneller Signaturschilddruck
Bemerkung
Dieses Werkzeug verwendet nicht die Etikettenlayouts oder -templates. Es wird einfach ein Signaturschild auf das erste Etikett des Blattes, oder auf ein einzelnes Etikett eines Etikettendruckers gedruckt.
Define the fields you want to print on the spine label in the SpineLabelFormat system preference.
Format your label printing by either editing the spinelabel.css file found in koha-tmpl/intranet-tmpl/prog/en/css/ or adding the CSS directly in the IntranetUserCSS system preference.
For example, adding the following CSS code in IntranetUserCSS will alter the label’s font.
/* Modify the Quick Spine Label Creator Font etc */
.tools.labels #spinelabel {
           font-size:11.5pt;
           font-family:courier new;
           font-weight:bold;
  }

Um diese Funktion zu nutzen benötigen Sie lediglich den Barcode des Buches, für das ein Rückenschild gedruckt werden soll, und klicken Sie anschließend auf „Etikett drucken“.
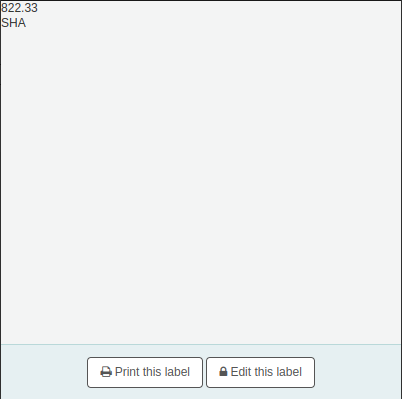
Klicken Sie im erscheinenden Fenster auf „Etikett drucken“.
Wenn Sie die Signatur noch ändern möchten, klicken Sie auf „Etikett bearbeiten“. Sie können anschließend in die Signatur klicken und sie bearbeiten.
Normdaten
Normsätze sind ein Mittel um die Einträge in den MARC-Feldern zu normieren. Die Verwendung von Normsätzen gibt Ihnen Kontrolle über Schlagworte, Personennamen und Orte.
Neuer Normdatensatz
Wählen Sie den Normdatensatz entweder aus der Auswahlliste ‚Neuer Normdatensatz‘ oder suchen Sie in einer anderen Bibliothek über die Schaltfläche ‚Neuer Normdatensatz via Z39.50‘.
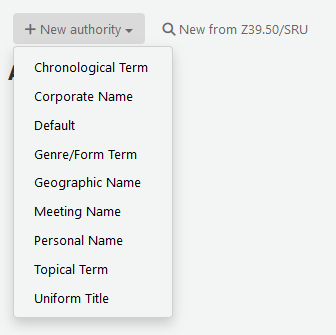
Wenn Sie entscheiden einen neuen Normdatensatz anzulegen, wird das angezeigte Formular alle erforderlichen Felder enthalten..
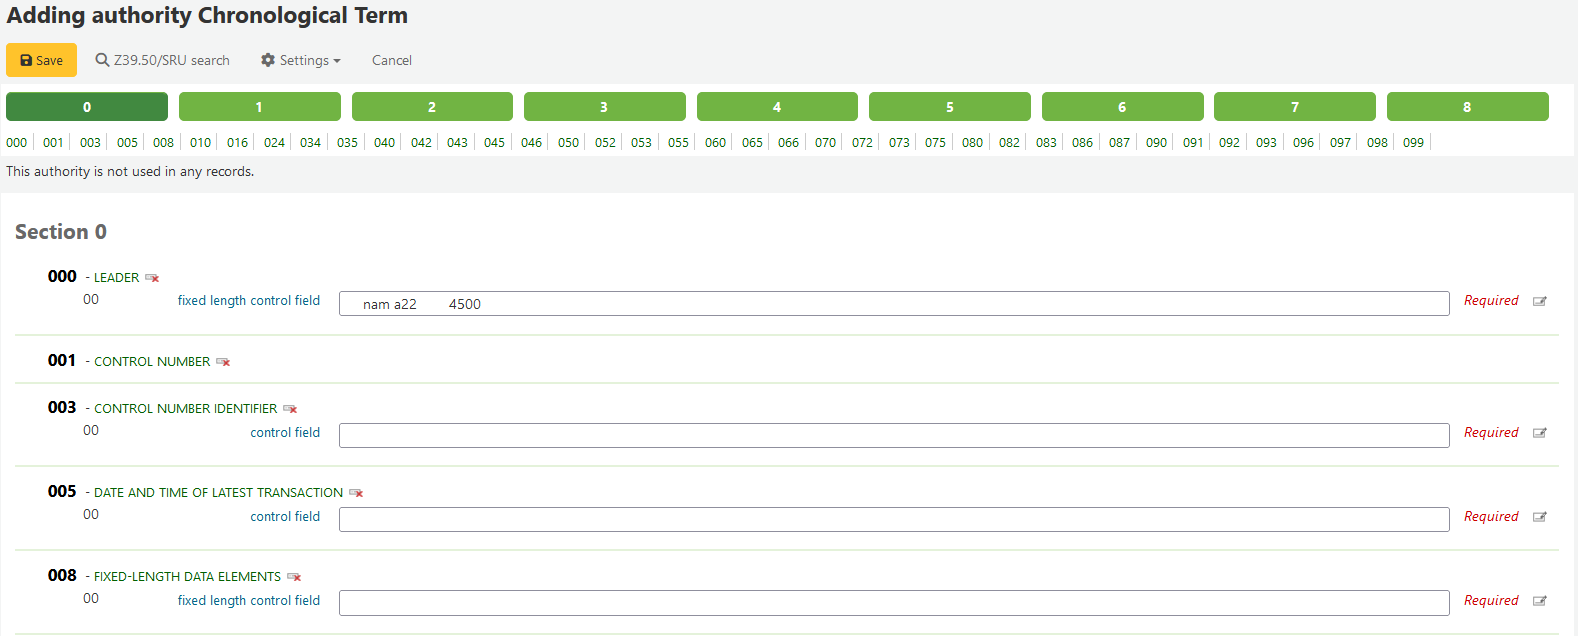
You can also change the authority type of the record in the ‚Settings‘ menu above the cataloging form.
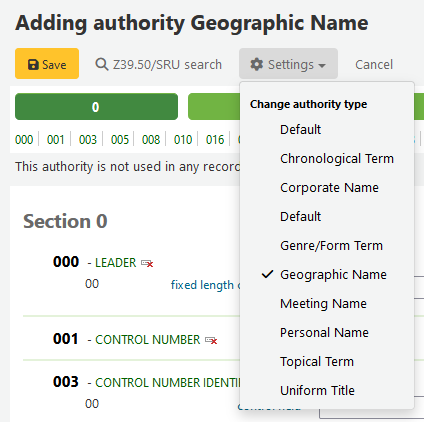
Um eingeklappte Werte anzuzeigen, klicken Sie auf die Bezeichnung des Feldes und die Unterfelder werden angezeigt. Um ein Feld oder Unterfeld zu duplizieren, klicken Sie auf das Symbol rechts neben dem Feld. Um Plugins zu verwenden, klicken Sie ebenfalls auf das entsprechende Symbol neben dem Feld oder Unterfeld.
When linking authorities to other headings, you can use the authority finder plugin by clicking the ‚Tag editor‘ button to the right of the field.
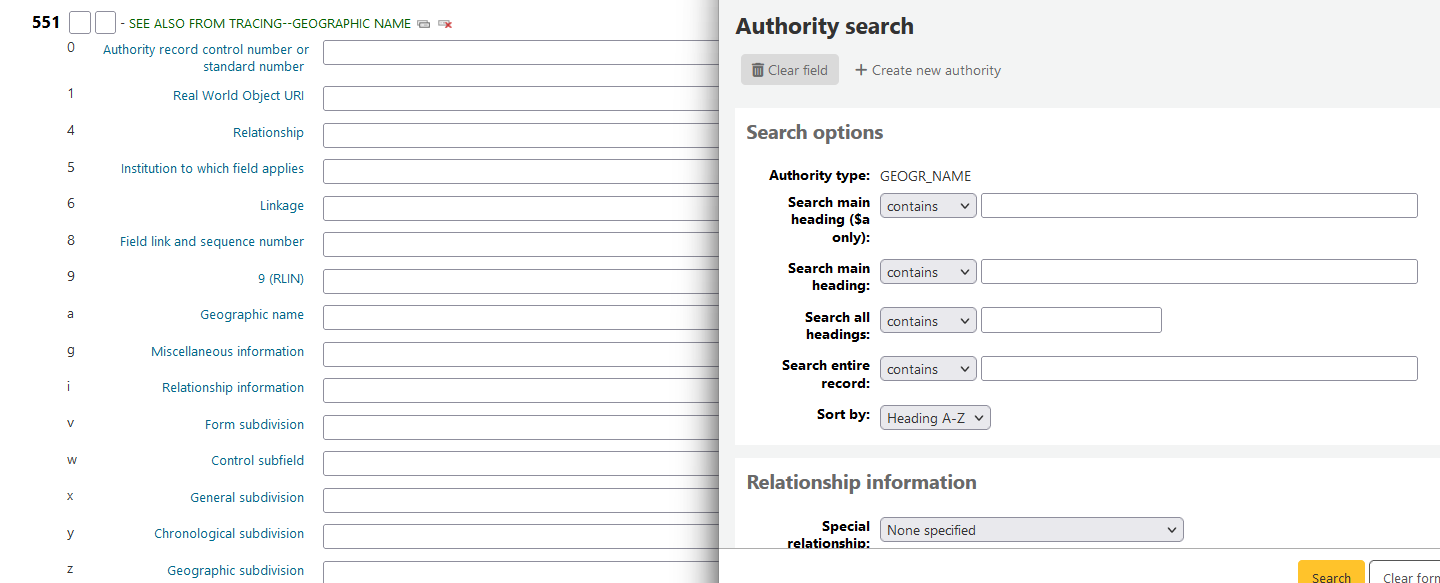
Von hier aus können Sie nach dem Normdatensatz für den Link suchen. Wenn Sie keinen passenden Normdatensatz finden können, kann ein neuer Satz angelegt werden. Das Plugin erlaubt es außerdem die Art der Beziehung zwischen zwei Datensätzen zu wählen.
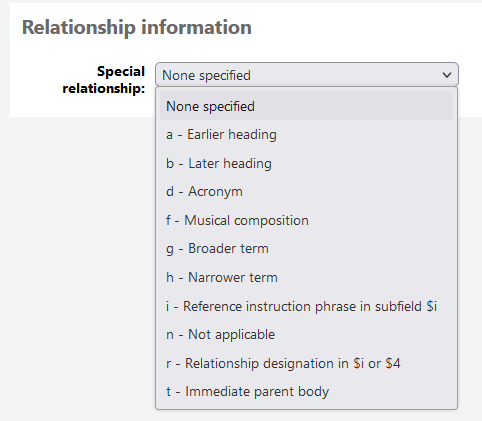
You can also import an authority record by clicking on ‚Z39.50/SRU search‘ above the cataloging form. The Z39.50/SRU search form will open in a new window.
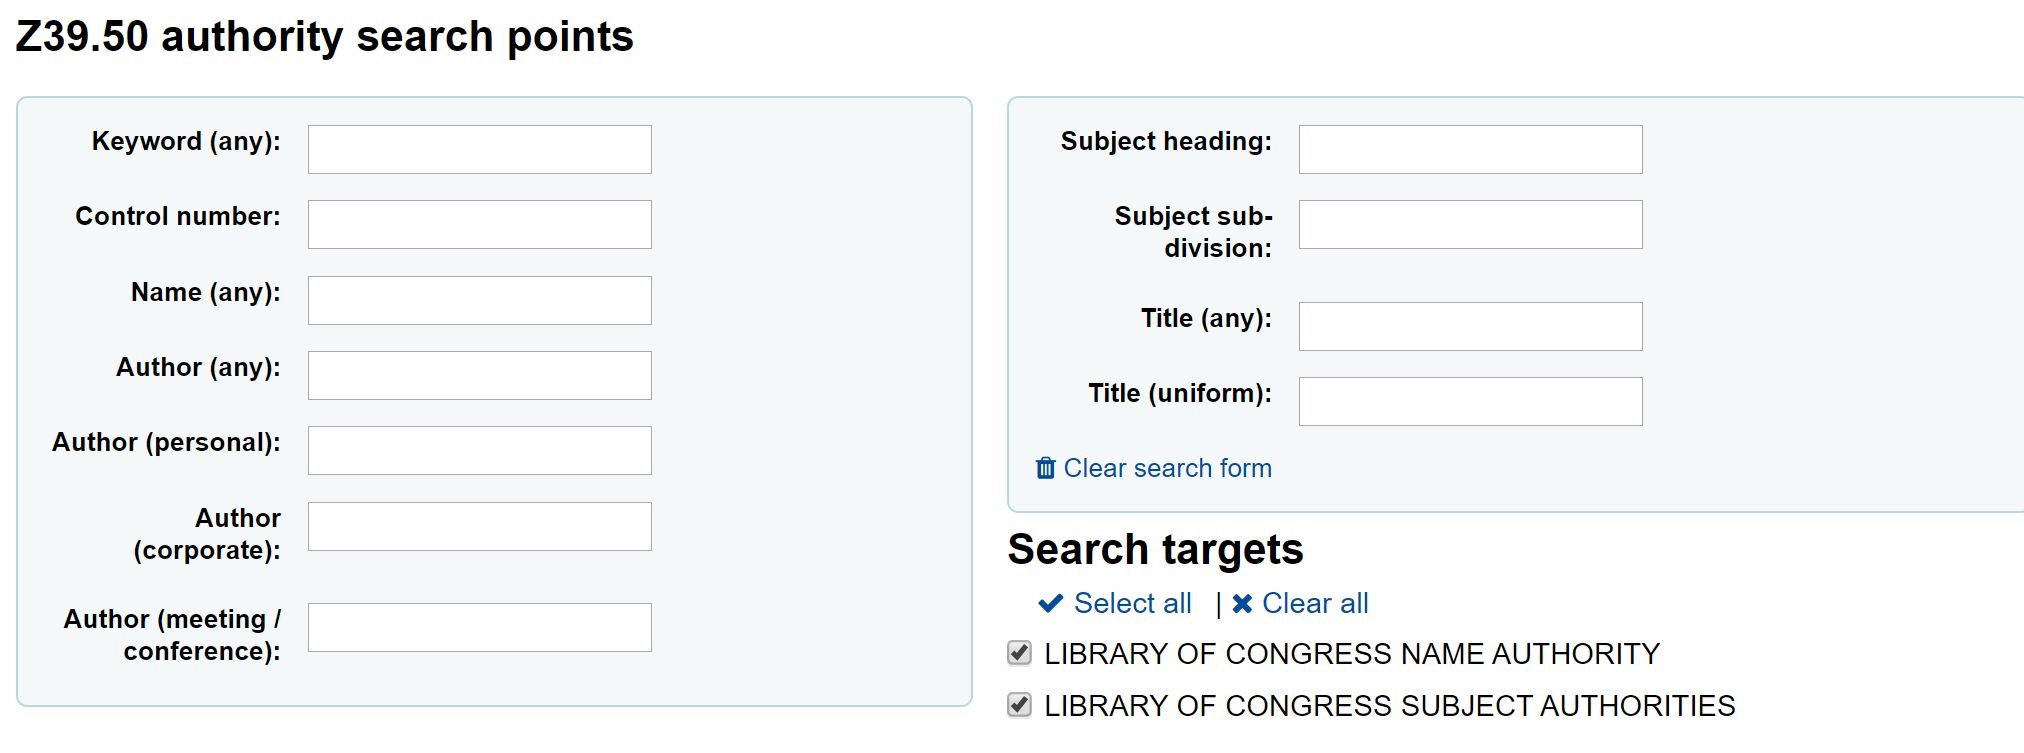
From the results you can use the ‚Actions‘ menu to the right of the record you would like to add to Koha and select ‚Import‘ to import it.
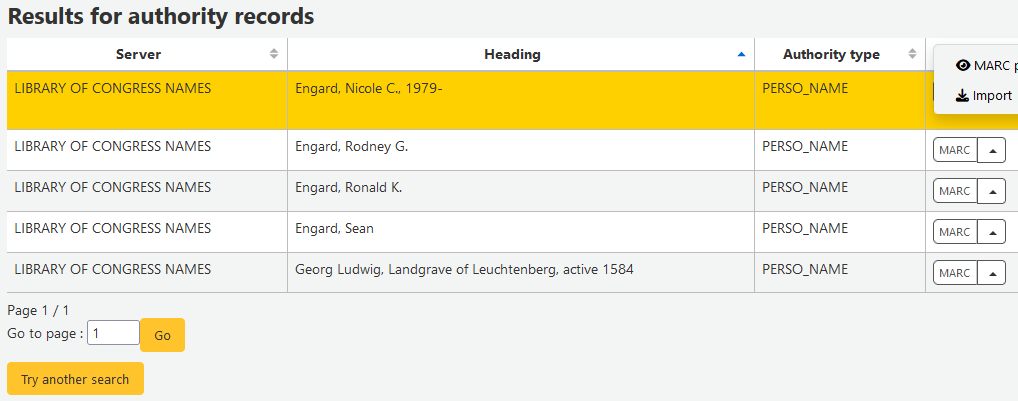
You will then be presented with the form to edit the authority before saving it to your system.
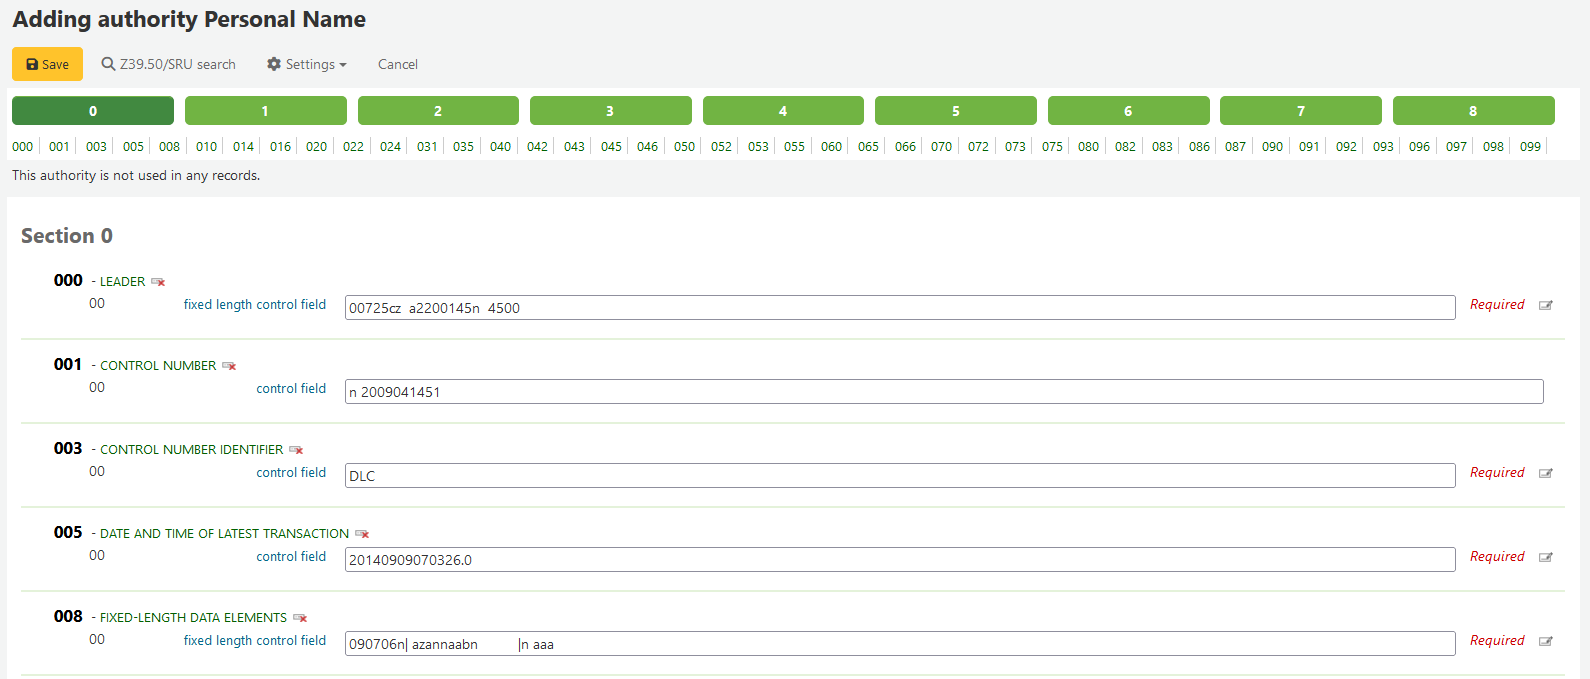
Normdaten suchen
Von der Normdaten-Seite aus können Sie nach existierenden Begriffen mit den ihnen zugeordneten Datensätzen suchen.

Bei den Ergebnissen sehen Sie den Normdatensatz und die Anzahl der zugeordneten Titeldatensätze. Das Menü ‚Aktionen‘ erlaubt, den Satz zu bearbeiten, zu verschmelzen und zu löschen (sofern dem Satz keine Titeldatensätze zugeordnet sind).
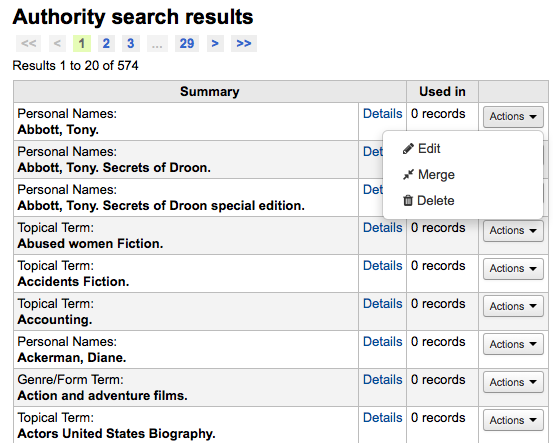
Wenn Sie auf die Schaltfläche ‚Details‘ im Normdatensatzes klicken, öffnet sich der vollständige Satz mit der Möglichkeit, diesen zu bearbeiten.
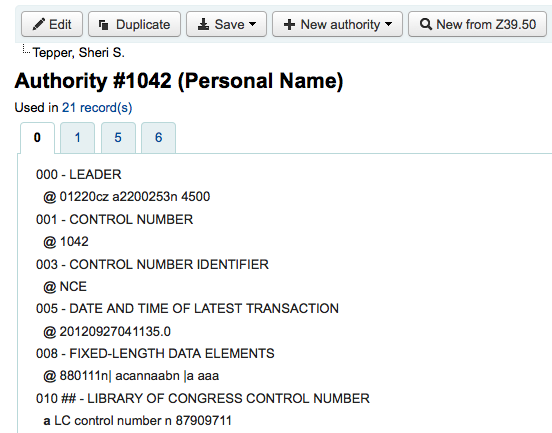
Wenn der Normdatensatz ‚Siehe auch‘-Verweisungen enthält, werden diese in der Trefferliste angezeigt und ein Klick auf diesen Link führt eine Suche nach der Ansetzung durch.
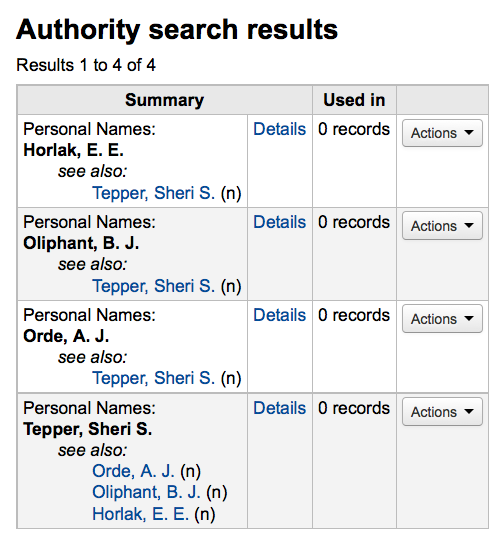
Normdaten bearbeiten
Normdaten können bearbeitet werden, indem Sie auf die Zusammenfassung in den Suchergebnissen und dann auf die Schaltfläche ‚Bearbeiten‘ über dem Datensatz klicken. Sie können auch ausgehend von der Trefferliste auf die ‚Bearbeiten‘-Schaltfläche links des Normsatzes klicken.
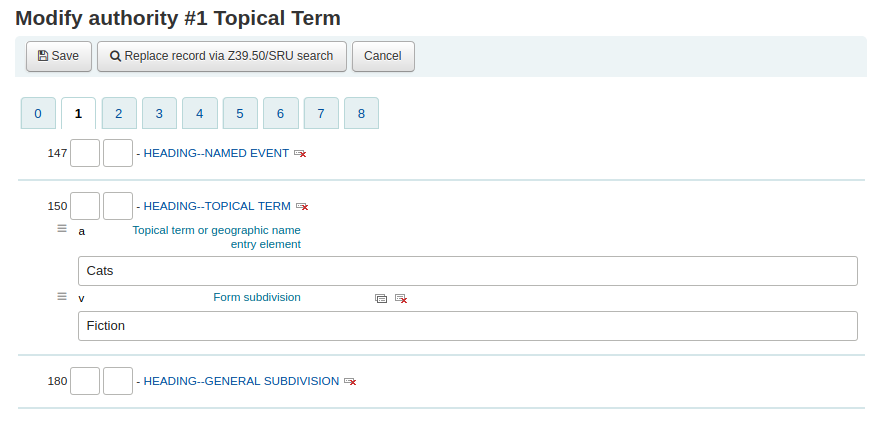
Nachdem Sie die erforderlichen Änderungen eingetragen haben, klicken Sie auf „Speichern“.
Abhängig davon, wie viele Titelsätze mit diesem Normsatz verknüpft sind, werden die Titelsätze sofort aktualisiert. Dies ist abhängig vom Wert im Systemparameter AuthorityMergeLimit (Voreinstellung ist 50). Wenn die Anzahl der Titelsätze unter dem Wert von AuthorityMergeLimit liegt, werden die Titelsätze sofort aktualisiert. Wenn die Anzahl der Titelsätze über dem Wert von AuthorityMergeLimit liegt, werden die Titelsätze erst aktualisiert, wenn das Skript merge_authorities.pl ausgeführt wird.
Um einen Normdatensatz löschen zu können, müssen Sie zuerst sicher sein, dass er nicht mit irgendeinem bibliographischen Datensatz verbunden ist. Wenn er nicht von einem bibliographischen Satz verwendet wird, erscheint ein ‚Löschen‘ Link rechts neben dem Datensatz bei den Suchresultaten und als Schaltfläche, die aufscheint, wenn Sie die summarische Darstellung des Normdatensatzes wählen.
Normdaten verschmelzen
Wenn Sie dublette Normdatensätze haben, können Sie diese verschmelzen, indem Sie in der Trefferliste im Menü ‚Aktionen‘ auf ‚Verschmelzen‘ klicken.

Wenn Sie auf ‚Verschmelzen‘ geklickt haben, wird dieser Normdatensatz oberhalb der Trefferliste angezeigt.
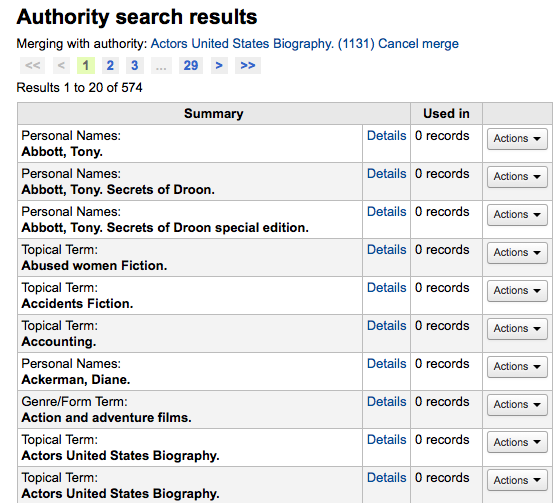
Dann müssen Sie beim zweiten Normdatensatz, den Sie verschmelzen möchten nochmals die Schaltfläche ‚Verschmelzen“ klicken.
Nachdem Sie die Datensätze für die Verschmelzung ausgewählt haben, werden Sie gefragt, welcher der beiden Datensätze als Referenz dienen soll und welcher Datensatz anschließend gelöscht werden soll.
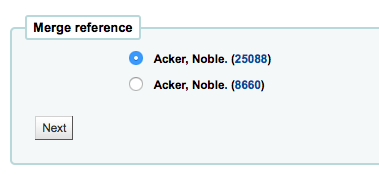
Es werden die MARC-Daten beider Titel angezeigt. Alle Felder sind über Reiter mit den Titelsatznummern der beiden Titel zugänglich. In der Voreinstellung sind alle Felder des primären Titels ausgewählt. Sie können die Felder abwählen, die nicht in den endgültigen Titel übernommen werden sollen und dann Felder aus dem zweiten Datensatz dazuwählen.
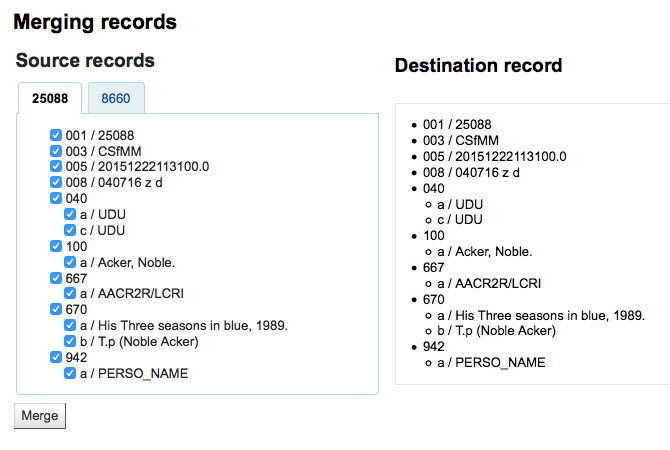
Wenn Sie Ihre Auswahl beendet haben, klicken Sie auf die Schaltfläche ‚Verschmelzen‘. Der Zieldatensatz enthält nun die Daten, die Sie ausgewählt haben, und der zweite Datensatz wird gelöscht.
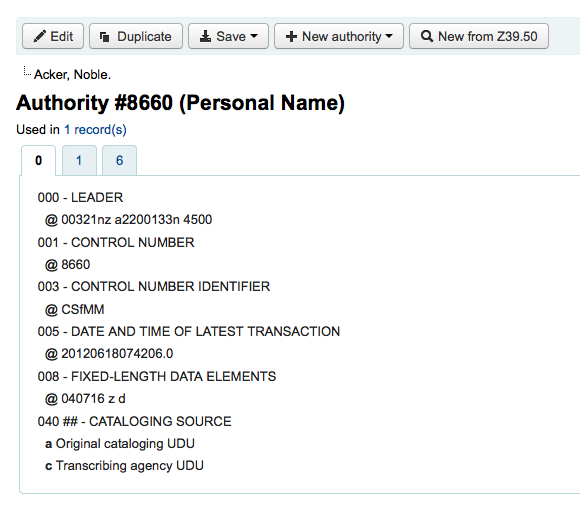
If you have two authority records for the same heading in different frameworks, you can merge them together by clicking the ‘Merge’ link, found in the actions menu, next to two results on an authority search. For example, these authority records using different frameworks can be merged.
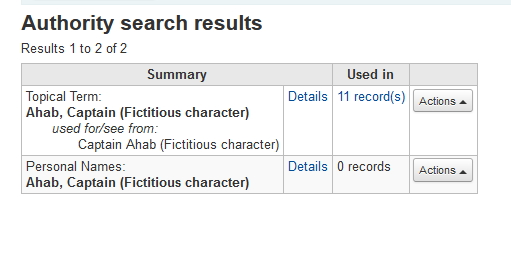
If you select the ‚Merge‘ link, found in the action menu of the top record.
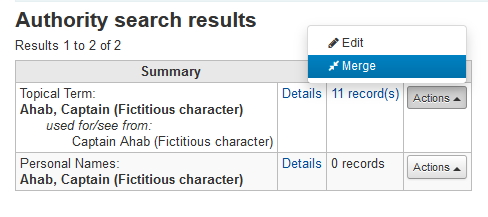
Dieser Normdatensatz wird oberhalb der Trefferliste angezeigt.
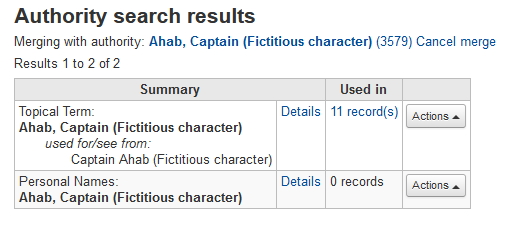
Dann müssen Sie beim zweiten Normdatensatz, den Sie verschmelzen möchten, nochmals die Schaltfläche ‚Verschmelzen‘ klicken.
You will be asked which of the two records you would like to keep as your primary record and which will be deleted after the merge. You will also use the dropdown menu to pick which framework to use.
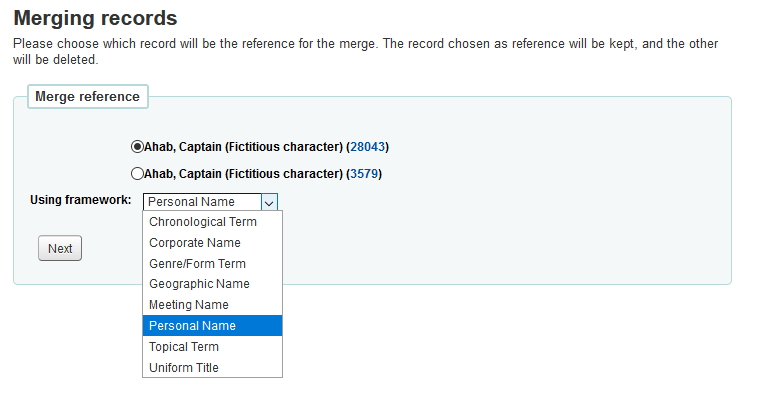
You will be presented with the MARC for both of the records (each accessible by tabs labeled with the authority numbers for those records). By default the entire first record will be selected, uncheck the fields you don’t want in the final (destination) record and then move on to the second tab to choose which fields should be in the final (destination) record.
Der (primäre) Referenz-Datensatz wird im ausgewählten Framework angezeigt:
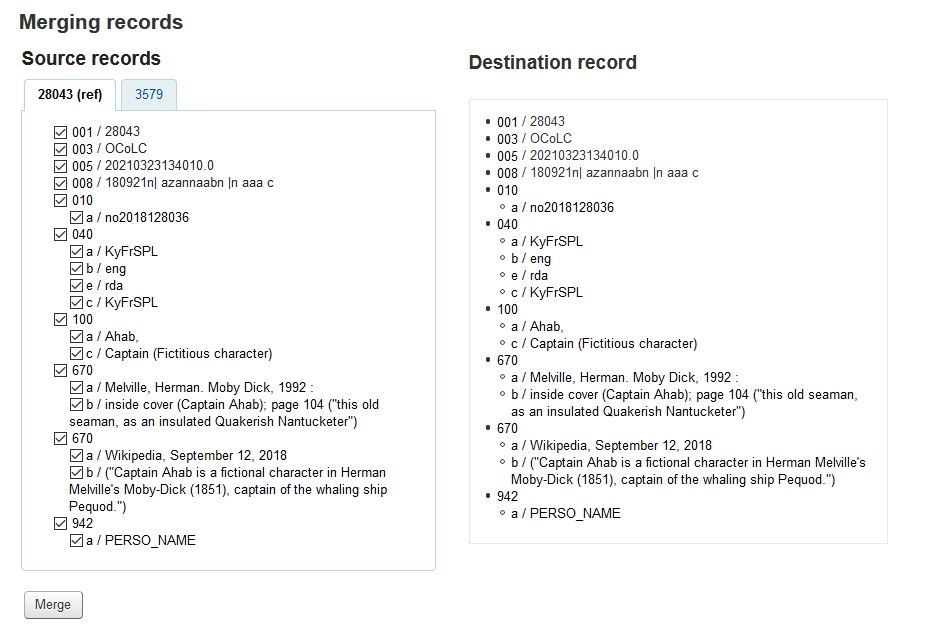
Once you have completed your selections click the ‘Merge’ button. The primary record will now contain the data you chose for it and the second record will be deleted.
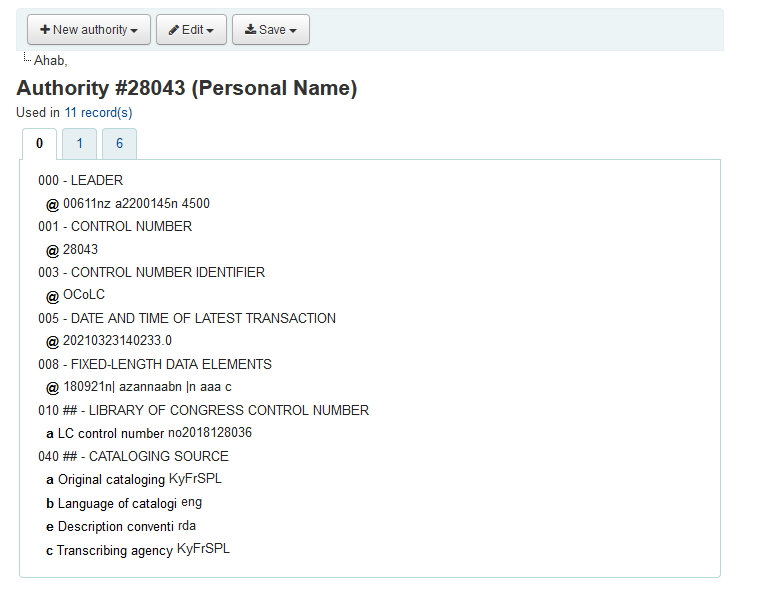
The MARC tag of the linked headings will have been updated accordingly.
Exporting data
Get there: More > Cataloging > Export > Export catalog data
Koha comes with a tool that will allow you to export your bibliographic, items and authority records in bulk. This can be used to send your records to fellow libraries, organizations or services; or simply for backup purposes.
Exporting bibliographic records
At the top of the screen you need to pick what data you’re exporting. If you’re exporting bibliographic records with or without the item information, click the ‚Export bibliographic records‘ tab.
Fill in the form in order to limit which records are exported (all fields are optional)
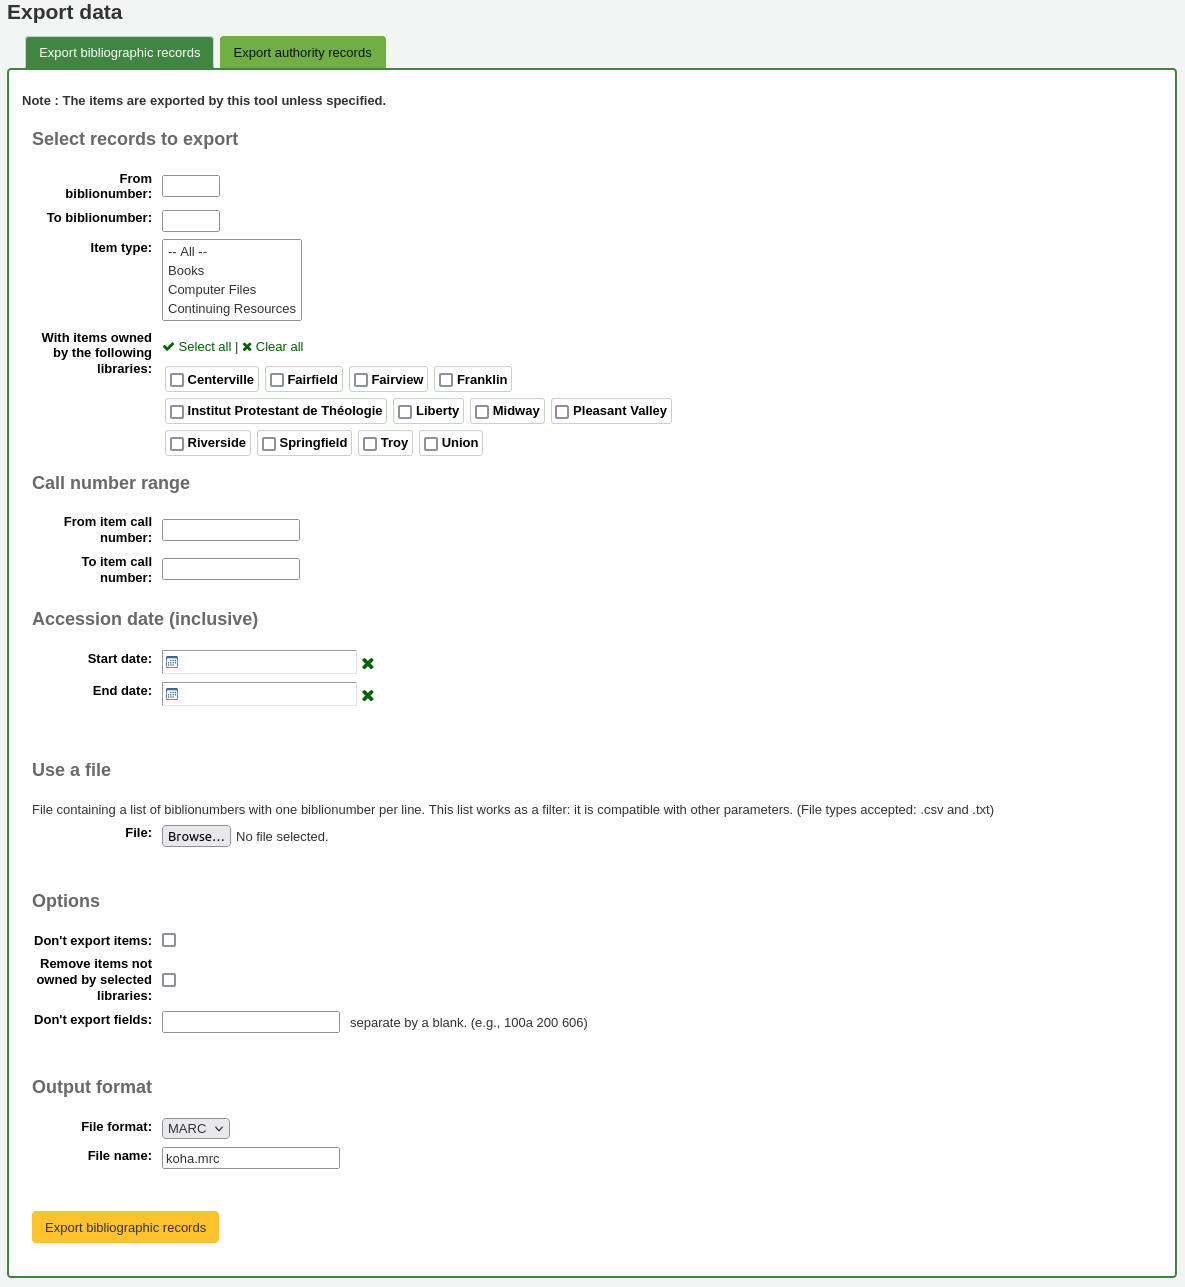
From biblionumber / To biblionumber: limit the exportation to a range of biblionumbers
Item type: limit to a specific item type, or several item types
Warnung
This limit will use the item type defined in the item-level_itypes system preference.
If the item-level_itypes system preference is set to ‚specific item‘ and there are no items attached to a bibliographic record, that record will not be exported.
To export all bibliographic records of a specific type, the item-level_itypes system preference needs to be set to ‚bibliographic record‘.
With items owned by the following libraries: limit to a specific library or group of libraries
Warnung
This is a filter; if this is set to the default value (all libraries selected), or select one or more libraries, bibliographic records with no items attached will not be exported.
To get bibliographic records with no items, ‚clear all‘ selected libraries (i.e. de-select all libraries).
Call number range: limit to a call number range
Accession date (inclusive): limit to an acquisition date range
Use a file: you can load a file of biblionumbers of the records to be exported. The file type needs to be .csv or .txt
Don’t export items: by default, items will be exported. Check this box to only export bibliographic records
Remove items not owned by selected libraries: check this box to limit the exported items to items from the library you’re logged in as (if the ‚With items owned by the following libraries‘ field above is set to ‚All‘) or to the library or libraries selected above
Don’t export fields: enter which fields that should not be exported, separated by spaces. This can be handy if you’re sharing your data, you can remove all local fields before sending your data to another library
File format: choose the file type, MARC or MARCXML
File name: if needed, enter a new file name for the export file
Click ‚Export bibliographic records‘
Exporting authority records
At the top of the screen you need to pick what data you’re exporting. If you’re exporting authority records, click the ‚Export authority records‘ tab.
Fill in the form in order to limit which records are exported (all fields are optional)
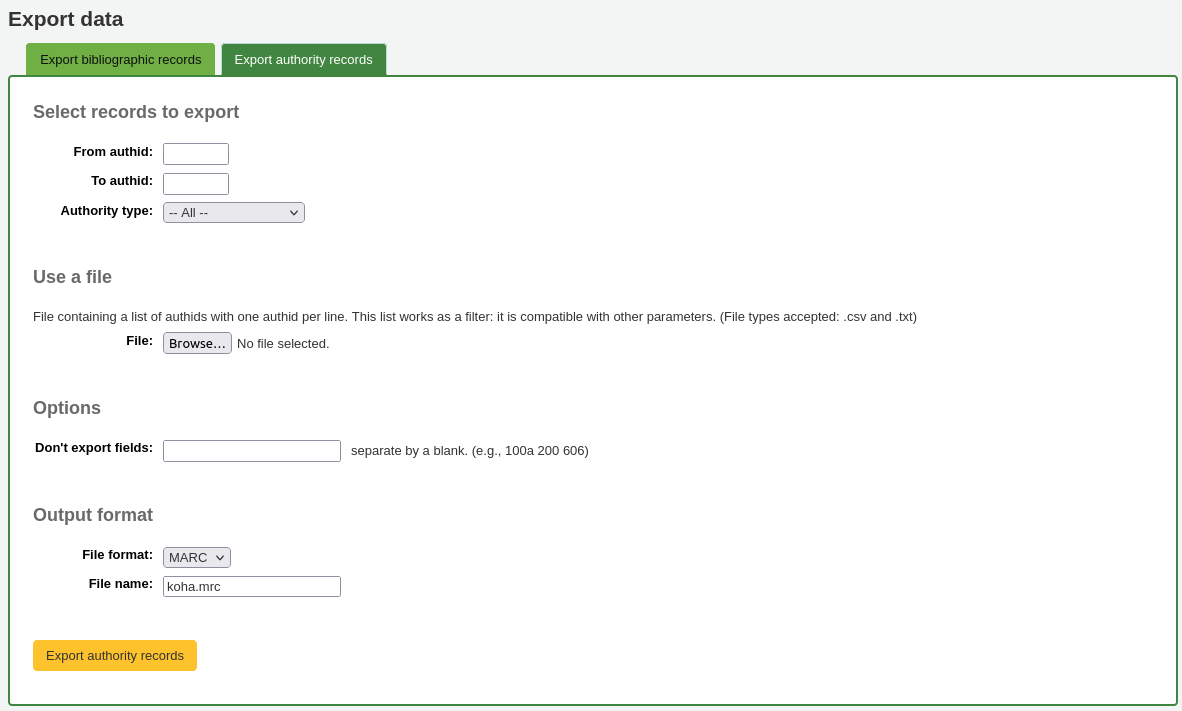
From authid / To authid: limit the exportation to a range of authids
Authority type: limit the exportation to records of a specific authority type
Use a file: you can load a file of authids of the records to be exported. The file type needs to be .csv or .txt
Next choose fields that you would like to exclude from the export separated by a space (no commas)
Don’t export fields: enter which fields that should not be exported, separated by spaces.
To exclude all subfields of the 200 field, for example, just enter 200
To exclude a specific subfield, enter it beside the field value. For example, 100a will exclude just the subfield ‚a‘ of the 100 field
File format: choose the file type, MARC or MARCXML
File name: if needed, enter a new file name for the export file
Click ‚Export authority records‘
Inventory
Get there: More > Cataloging > Reports > Inventory
Koha’s inventory tool can be used in one of three ways:
By creating a shelf list that you can then mark items off on;
By uploading barcodes gathered by a portable scanner;
By comparing barcodes gathered by a portable scanner or scanned directly to a generated shelf list.
Creating a shelf list
If you do not have the ability to use your barcode scanner on the floor of the library, the option available to you is to generate a shelf list based on criteria you enter. You can then print it to use while walking around the library checking your collection or use it directly in Koha on a portable device.
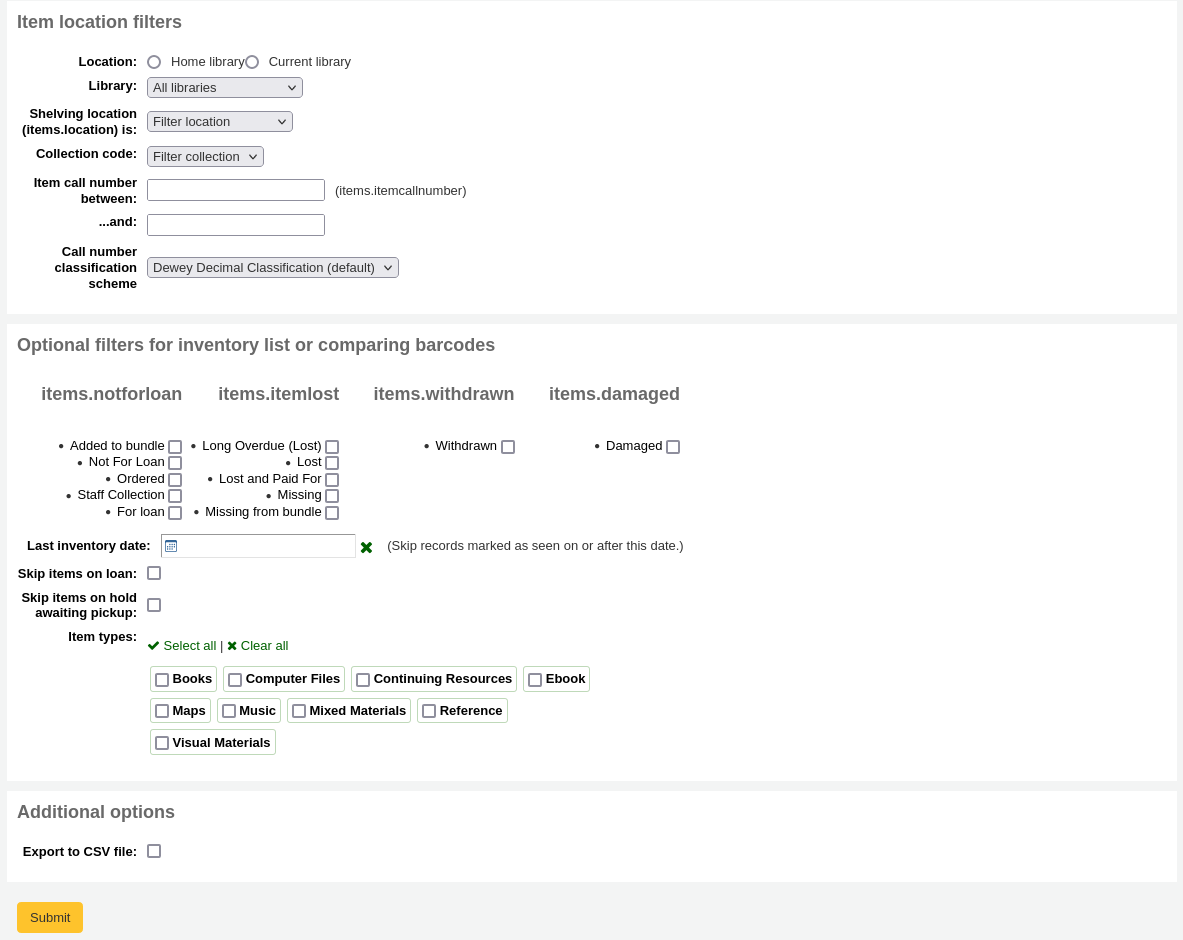
First, choose the criteria for the items you want to print out on a list. All parameters are optional, but if none are selected, the resulting list might be quite large.
Library: choose the branch you want to check, as well as if that branch is the home library or the current holding library of the items.
Shelving location (items.location) is: you can filter by location.
Item callnumber between … and …: you can also limit the list to a specific range of callnumbers.
Call number classification scheme: if filtering by call number, make sure to choose the correct classification scheme
You can filter even more with item statuses (not for loan status, lost status, withdrawn status or damaged status). Check the boxes next to the statuses you want to include. For example, if you are using the list to shelf read, check only the ‚for loan‘ status as the other items probably won’t be on the shelves.
Last inventory date: enter a date here to skip items that have been marked as seen recently.
Skip items on loan: check this box to filter out loaned items from the list.
Skip items on hold awaiting pickup: check this box to filter out items that are awaiting pickup by patrons
Item types: check the boxes next to the item types you want to include in your shelf list
Export to CSV file: check this box to generate a CSV file for altering in an application on your desktop. If this box is unchecked, the list will be presented on the screen.
Click on ‚Submit‘ to generate your shelf list.
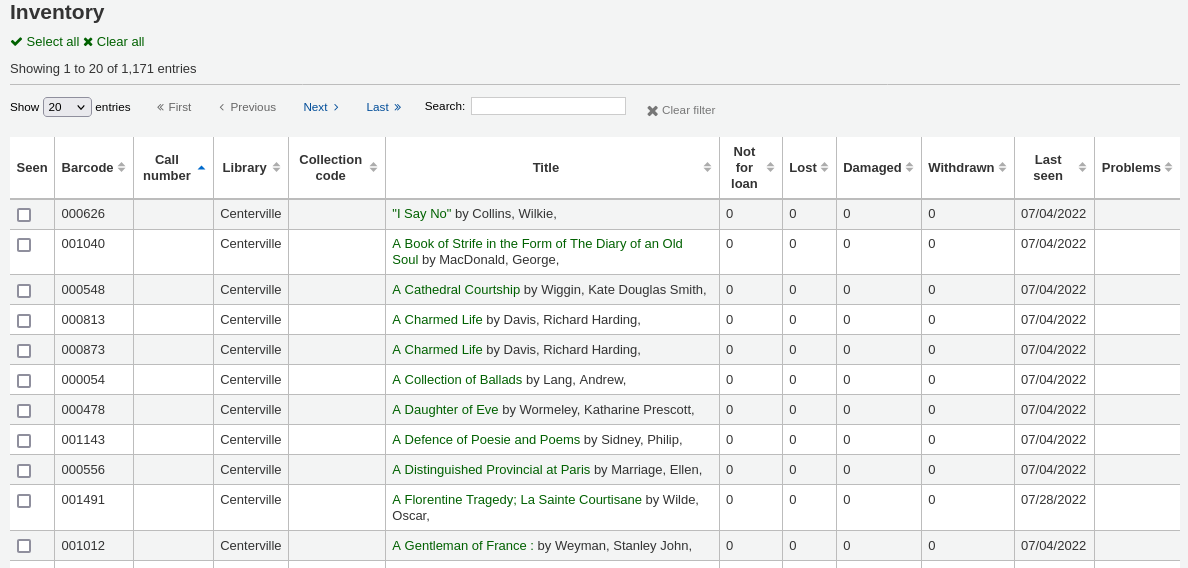
Once you have found the items on your shelves, return to this list and check the boxes next to the items you found. Next, click on one of the three buttons to continue:

Mark seen and quit: updates the ‚last seen‘ date and time of the selected items to now and returns to the previous screen.
Mark seen and continue: updates the ‚last seen‘ date and time of the selected items to now and shows the next page of the list.
Continue without marking: doesn’t update any of the items on this page and shows the next page of the list.
Uploading barcodes with a scanner
If you have a portable scanner (or a laptop and USB scanner) you can walk through the library with the scanner in hand and scan barcodes as you come across them (on a laptop, scan the barcodes into a text file or directly into the on screen text box). Once finished you can then upload the text file generated by the scanner to Koha.
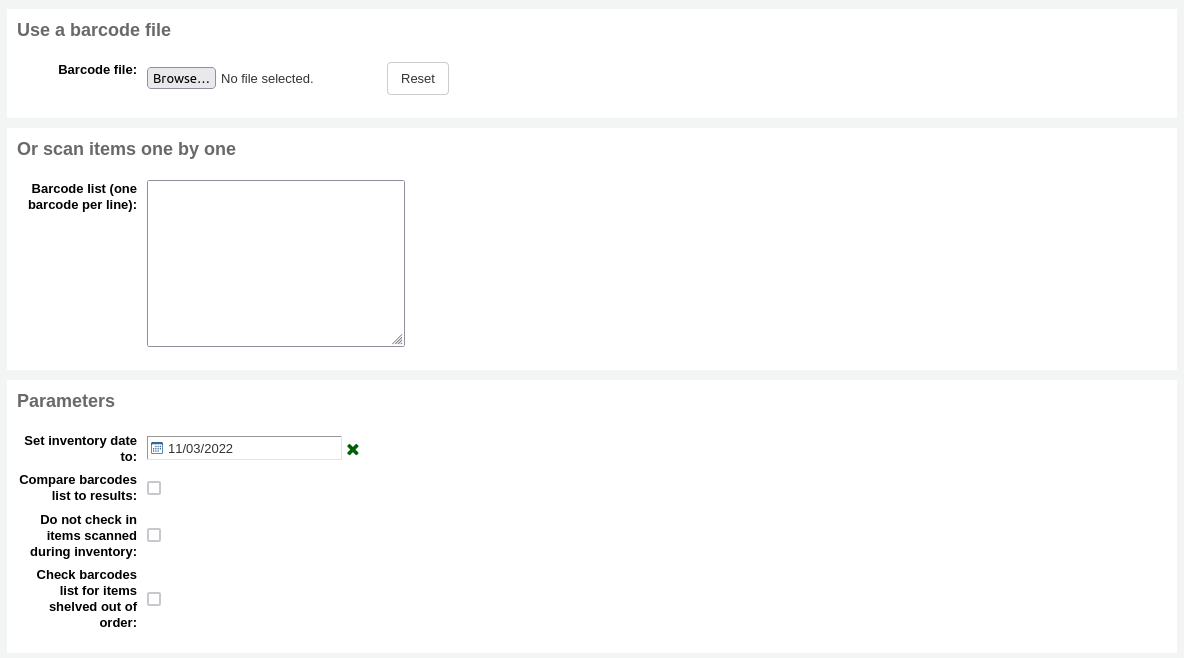
Set inventory date to: choose the date you want to mark all items as last seen.
Compare barcodes list to results: uncheck for this method.
Do not check in item scanned during inventory: unless this is checked, Koha will check in items scanned, as it is assumed that they are on the shelf and so not loaned out. If you do not want to check in scanned items, check this option.
Check barcodes list for items shelved out of order: if this option is checked, Koha will compare the call numbers and make sure they are in the correct order.
Click ‚Submit‘. This will update all the items‘ ‚last seen‘ date to the chosen date (time last seen will be 00:00).
Once you have the updated the last seen date for all items scanned during the inventory it is possible to use reports to identify items that were not scanned and can therefore be assumed missing (you can use the batch item modification tool to change the LOST status of these items). There are sample reports you can use on the Koha SQL Reports Library.
Comparing scanned barcodes to a shelf list
Alternatively, you can combine the two methods to automatically compare a list of scanned barcodes with a generated list.
First, upload you barcode file or scan the barcodes in the box.
Set inventory date to: choose the date you want to appear in the items‘ ‚last seen‘ field (the time last seen will be set to 00:00).
Compare barcodes list to results: should automatically be checked.
Do not check in items scanned during inventory: make sure to check this option if you do not want the scanned items to be automatically checked-in if they are checked-out.
Choose the filters (library, shelving location, callnumbers, statuses or item types) to generate a list with which to compare your barcodes. Click on ‚Submit‘.
Bemerkung
Depending on the number of barcodes you are comparing, this may take a few minutes. It is not recommended to compare lists of more than 1000 barcodes as this may cause a session timeout.
Once Koha has finished comparing the barcodes file to the generated list, it will return the number of items updated and a list of problematic items.
Bemerkung
Unlike when creating a shelf list, the list that will be presented here will only contain the items that Koha has determined are problematic.
Missing (not scanned): the item is in the generated list but not in the barcodes file.
Found in wrong place: the item is in the barcodes list, but not in the generated list.
Still checked out: the item is checked out, but is in the generated list. It was not automatically checked in.
No barcode: the barcode doesn’t exist.
Unknown not-for-loan status: the item has ‚not for loan‘ status that is not in the NOT_LOAN authorized values list
Item may be shelved out of order: the callnumber is out of order
Leitfaden für die Katalogisierung
Titeldatensatz Katalogblatt
This section is for MARC21.
Tag |
Label |
Beschreibung |
Anleitungen |
|---|---|---|---|
000 |
Satzkennung |
Describes the record (i.e. surrogate) – is it a record for a monograph? A serial? |
Click in this field to fill it in. Then set „Bibliographic level“ to ‚a‘ for articles or ‚s‘ for serials. Otherwise, leave everything as is. The value in position 6 influences the type of material in 008. |
001 |
Kontrollnummer |
Zugangsnummer |
Enter the accession number written inside the item here. For articles and items which do not have accession numbers, leave blank. You can use the autoControlNumber system preference to automatically fill this field with the biblionumber of the record. |
003 |
Kontrollnummer Identifier |
Ihr MARC-Organisationscode |
Klicken Sie in dieses Feld, um es auszufüllen (das Feld wird automatisch ausgefüllt, wenn der Systemparameter MARCOrgCode gesetzt ist). |
005 |
Datum und Zeit der letzten Transaktion |
aktuelles Datum und Zeit |
Klicken Sie in dieses Feld um es auszufüllen |
008 |
Datenelemente mit fester Länge |
Das Feld enthält etliches über computerlesbare Darstellungen. |
The type of material is automatically set according to the leader, position 06. Generally you will only use ‚s‘ (single) or ‚m‘ (multiple) options for position 06- use the former when the item was published in a single year, the latter when it was published over the course of several. If there is a single date, only enter a date in the first date field (positions 07-10). Enter the three-digit country code in positions 15-17, being sure to add spaces if the country code is fewer than three characters long. If there is an index, note that fact in position 31. Enter the three-letter language code in positions 35-37. |
010 |
LCCN |
Eine von der Library of Congress zugeordnete Nummer kennzeichnet die Arbeit als eindeutig. |
Überprüfen Sie, ob die Nummer auf der Seite, wo das Copyrigt verzeichnet ist (wenn das Buch in den USA veröffentlicht wurde) zu finden ist, oder im LC-Katalog. |
020 |
ISBN |
Die eindeutige Nummer wird von Verlagen benutzt um Bücher eindeutig zu kennzeichnen. |
Wenn die Nummer nicht im Buch verzeichnet ist, dann gibt es wahrscheinlich keine. |
022 |
ISSN |
Die eindeutige Nummer wird von Verlagen benutzt um Zeitschriften eindeutig zu kennzeichnen. |
Wenn die Nummer nicht im Buch verzeichnet ist, dann gibt es wahrscheinlich keine. |
033 |
Datum/Zeit von Vorgängen |
Wird benutzt für das Auktions-Datum. Ist erforderlich für Auktionskataloge. |
Für Auktionen, die an einem einzelnen Tag stattfinden, geben Sie im Unterfeld ‚a‘ das Datum der Auktion im Format JJJJMMTT ein und eine ‚0‘ im ersten Indikator. Für Auktionen die auf zwei aufeinanderfolgenden Tagen stattfinden, legen Sie für jeden Tag ein Unterfeld ‚a‘ im Format JJJJMMTT an und vermerken Sie eine’1‘ im ersten Indikator. Für Auktionen, die an mehreren Tage stattfinden, legen Sie ein Unterfeld ‚a‘ im Format JJJJMMTT für den ersten Tag an und ein Unterfeld ‚a‘ auch im Format JJJJMMTT für den letzten Tag und schreiben Sie eine ‚2‘ in den ersten Indikator. |
040 |
Katalogisierungsquelle |
Kennzeichnet, welche Bibliothek den Datensatz angelegt und geändert hat. |
Fügen Sie ein Unterfeld ‚d‘ für importierte Datensätze hinzu und schreiben Sie den OCLC-Code als Wert hinein. Für neue Datensätze überprüfen Sie, dass das Unterfeld ‚c‘ den OCLC-Code enthält. |
041 |
Sprachcode |
Wenn zwei oder mehrere Sprachen vorhanden sind,kennzeichnet es alle Sprachen, die in einem Exemplar verzeichnet sind. |
Für wichtige Teile eines Textes in einer bestimmten Sprache, sollte im Unterfeld ‚a‘ der Sprachcode angegeben werden. Handelt es sich nur um Zusammenfassungen oder Abstracts in einer bestimmten Sprache, dann legen sie das Unterfeld ‚b‘ an und schreiben den Sprachcode dort hinein. |
100 |
Haupteintragung - Personenname |
autorisierte Form des Namens des Hauptautors |
Überprüfen Sie das Kopfblatt und AACR2. Der erste Indikator sollte immer eine ‚1‘ sein, um zu kennzeichnen, dass der Nachname zuerst eingegeben werden muss. Wenn der Name nur aus dem Vornamen besteht, muss der erste Indikator jedoch eine ‚0‘ enthalten. |
110 |
Haupteintragung - Körperschaft |
autorisierte Form der Hauptansetzung für Körperschaften. Erforderlich für Auktionskataloge. |
Für Auktionskataloge sollten Sie lieber das Feld 110 benutzen, als das Feld 100. Überprüfen Sie das Kopfblatt und AACR2. Setzen Sie den ersten Indikator auf ‚2‘. |
111 |
Haupteintragung - Kongressname |
Autorisierte Form eines Kongressnamen, der als Hauptansetzung fungiert. |
Überprüfen Sie das Kopfblatt und AACR2. Setzen Sie den ersten Indikator auf ‚2‘. |
245 |
Titel |
Abschrift des Titels von der Titelseite (oder Hauptquelle) |
Geben Sie den Titel in das Unterfeld ‚a‘ ein, den Untertitel in das Unterfeld ‚b‘ und den Hauptverantwortlichen in das Unterfeld ‚c‘. Wenn Sie einen Datensatz für ein einzelnes Heft oder für ein mehrbändiges Exemplar erstellen, sollten Sie die Teilnummer im Unterfeld ‚n‘ und den Teiltitel im Unterfeld ‚p‘ unterbringen. Für Auktionskataloge sollten Sie das Datum (im Format MM/TT/JJJJ) in eckigen Klammern in das Unterfeld ‚f‘ schreiben. Schauen Sie auf das ISBD Zeichenblatt. Setzen Sie den ersten Indikator auf ‚0‘ wenn kein Autor vorhanden ist, ansonsten setzen Sie den Indikator auf ‚1‘. |
246 |
Titelvarianten |
Ersatzform für Titel, die den Zweck zur Suche oder Archivierung haben |
Wenn der Benutzer die Möglichkeit hätte unter einem anderen Titel zu suchen, dann vermerken Sie das hier. Dies schliesst keine einleitenden Artikel mit ein. Der erste Indikator sollte eine ‚3‘ beinhalten, es sei denn, der Titel hat eine abweichende Schreibweise. In diesem Fall sollte der erste Indikator eine ‚1‘ sein. |
250 |
Ausgabebezeichnung |
Abschreiben der Ausgabeinformation von der Titelseite (oder der Hauptquelle) |
Schreiben Sie die Information zur Ausgabe genau so ab, wie sie auf der Titelseite steht. Sie können sie abkürzen, wenn der Ausgabevermerk sehr lang ist. |
260 |
Publikation (Impressum) |
Information zur Veröffentlichung |
Schreiben Sie den Veröffentlichungsort in das Unterfeld ‚a‘ und den Verlag in das Unterfeld ‚b‘ (oder das mutmaßliche Jahr) in das Unterfeld ‚c‘. Prüfen Sie das ISBD-Zeichensetzungsblatt. |
264 |
Produktion, Veröffentlichung, etc. |
Datum der Herstellung, der Veröffentlichung, des Vertriebs oder des Urheberschutzvermerks. |
Schreiben Sie den Veröffentlichungsort in das Unterfeld ‚a‘ und den Verlag in das Unterfeld ‚b‘ und das Jahr (oder das mutmaßliche Jahr) in das Unterfeld ‚c‘. Beachten Sie die ISBD-Zeichensetzung. Die Feldbeschriftung wird dynamisch aus dem zweiten Indikator erzeugt und wird üblicherweise ‚1‘ für ‚Verlag:‘ sein. |
300 |
Physische Beschreibung |
Physische Beschreibung |
Geben Sie die Informationen zur Seitenzahl in das Unterfeld ‚a‘ ein, eine kurze Beschreibung spezieller Inhalte, wie zum Beispiel Illustrationen oder Karten in das Unterfeld ‚b‘ (AACR2) und die Größe des Exemplars in das Unterfeld ‚c‘. Prüfen Sie das ISBD-Zeichensetzungsblatt. |
490 |
Gesamttitelangabe |
Geben Sie die Serieninformation genau so an, wie sie auf dem Exemplar erscheint. |
Übertragen Sie die Serie in das Unterfeld ‚a‘ mit der Heftnummer im Unterfeld ‚v‘. Prüfen Sie das ISBD-Zeichensetzungsblatt. Setzen Sie den ersten Indikator auf ‚1‘ wenn Sie das Feld 830 belegt haben. Dies sollten Sie generell so machen. |
500 |
Allgemeine Fußnote |
Notizen, die nirgendwo anders passen. |
Geben Sie Notizen in ganzen Sätzen ein, mit einem separaten 500 er-Feld für jedes individuelle Thema. |
501 |
Fußnote zu enthaltenen Werken |
Notizen, bei denen die Arbeit verbunden ist mit anderen. |
Geben Sie Beschreibungen von Verknüpfungen in das Unterfeld ‚a‘ ein. |
504 |
Fußnote zu Literaturverzeichnissen usw. |
Geben Sie Bibliographien an, wenn das Werk welche enthält. |
Enthält das Werk eine Bibliographie und einen Index, dann geben Sie den Text „Enthält bibliographische Verweise (S. XXX-XXX) und einen Index“ in das Unterfeld ‚a‘ ein. Wenn das Werk keinen Index enthält, lassen Sie diesen Part im Text weg. Sind die Verweise im ganzen Werk verstreut und nicht deutlich in einem Satz zusammengefasst, dann entfernen Sie den Eintrag in Klammern. |
505 |
Fußnote zu strukturierten Inhaltsangaben |
Inhaltsangabe in einem Standard Format. Unformatierte Inhalte können in einem 500er-Feld (allgemeine Notiz) angegeben werden. |
Prüfen Sie das ISBD-Zeichensetzungsblatt. Setzen Sie den ersten Indikator auf ‚0‘. Haben Sie getrennt codierte Autoren und Titel, dann setzen Sie den zweiten Indikator auf ‚0‘. Ansonsten lassen Sie den zweiten Indikator leer. |
518 |
Fußnote zu Datum/Uhrzeit und Ort eines Ereignisses |
Wird für Auktions-Daten benutzt. |
Geben Sie das Datum für Auktionskataloge im Format ‚Januar 2, 1984‘ im Unterfeld ‚a‘ an. |
520 |
Fußnote zu Zusammenfassungen usw. |
Fußnote zu Zusammenfassungen usw. |
Normalerweise müssen Sie keine Zusammenfassung schreiben. Eine Zusammenfasssung könnte dennoch nötig sein, bei Exemplaren, die von einem Benutzer nicht leicht eingesehen werden können, wie zum Beispiel Bücher mit hoch säurehaltigem Papier oder CD-ROM’s. |
546 |
Fußnote zur Sprache |
Fußnote zur Sprache |
Das Feld wird nur für Werke in mehreren Sprachen benötigt, Prüfen Sie das ISBD-Zeichensetzungsblatt. |
561 |
Fußnote zur Besitz- und Aufbewahrungsgeschichte |
Das Feld beschreibt, wer der vorherige Besitzer des Exemplars war. |
Das Feld wird nur für seltene Bücher benutzt. |
563 |
Fußnote zu Einbandangaben |
Fußnote zu Einbandangaben |
Das Feld wird nur für seltene Bücher benutzt. |
590 |
Lokale Fußnote (RLIN) |
lokale Fußnoten sind für Auktionskataloge erforderlich. |
Wird für Auktionskataloge benutzt um zu kennzeichnen welche Art von Münzen in einer Auktion verkauft wurden - römische, griechische, etc. |
600 |
Nebeneintragung unter einem Schlagwort - Personenname |
autorisierte Form für persönliche Namen von Leuten, die in einem Werk genannt werden. |
Prüfen Sie das autorisierte Bestandsblatt und AACR2. Der erste Indikator sollte generell eine ‚1‘ enthalten, um festzuhalten, dass der Nachname zuerst angegeben werden muss. Wenn der Name nur aus einem Vornamen besteht, sollte der erste Indikator allerdings eine ‚0‘ bekommen. Haben Sie den Namen in der LC-Normdatendatei ermittelt, dann setzen Sie den zweiten Indikator auf ‚0‘. Ansonsten schreiben Sie eine ‚4‘ in den zweiten Indikator. |
610 |
Nebeneintragung unter einem Schlagwort - Körperschaftsname |
autorisierte Form von Körperschaftsnamen, für Organisationen, die in einem Werk genannt sind. |
Prüfen Sie das autorisierte Bestandsblatt und AACR2. Setzen Sie den ersten Indikator auf ‚2‘. Haben Sie den Namen in der LC-Normdatendatei ermittelt, setzen Sie den zweiten Indikator auf ‚0‘. Andernfalls setzen Sie den zweiten Indikator auf ‚4‘. |
611 |
Nebeneintragung unter einem Schlagwort - Kongressname |
autorisierte Form von Kongressnamen von Kongressen, die in Werken erwähnt werden. |
Prüfen Sie das autorisierte Bestandsblatt und AACR2. Setzen Sie den ersten Indikator auf ‚2‘. Haben Sie den Namen in der LC-Normdatendatei ermittelt, setzen Sie den zweiten Indikator auf ‚0‘. Andernfalls setzen Sie den zweiten Indikator auf ‚4‘. |
630 |
Nebeneintragung unter einem Schlagwort - Einheitstitel |
autorisierte Form von Titeln anderer Werke, die in einem Werk erwähnt werden. |
Prüfen Sie das autorisierte Bestandsblatt und AACR2. Setzen Sie den ersten Indikator auf die Nummer nicht gefüllter Merkmale (z.Bsp. Merkmale in einem einleitenden Artikel plus ein Leerzeichen für „der/die/das“ und setzen Sie den ersten Indikator auf ‚4‘). Haben Sie den Namen in der LC-Normdatendatei gefunden, setzen Sie den zweiten Indikator auf ‚0‘. Ansonsten setzen Sie den zweiten Indikator auf ‚4‘. |
650 |
Nebeneintragung unter einem Schlagwort - Sachschlagwort |
Library of Congress Bestandsschlagwörter, die das Thema eines Werkes beschreiben. |
Prüfen Sie das autorisierte Bestandsblatt und AACR2. Haben Sie den Namen in der LC-Normdatendatei ermittelt, setzen Sie den zweiten Indikator auf ‚0‘. Ansonsten setzen Sie den zweiten Indikator auf ‚4‘. |
651 |
Nebeneintragung unter einem Schlagwort - Geografischer Name |
Die geographischen Bestandsschlagwörter der Library of Congress beschreiben das Thema eines Werkes. |
Prüfen Sie das autorisierte Bestandsblatt und AACR2. Haben Sie den Namen in der LC-Normdatendatei ermittelt, setzen Sie den zweiten Indikator auf ‚0‘. Ansonsten setzen Sie den zweiten Indikator auf ‚4‘. |
655 |
Indexierungsterm - Genre/Form |
Indexierungsterm - Genre/Form |
Wird normalerweise nur für Auktionskataloge genutzt, welche im Bestand das Genre „Auktionskatalog“ haben ( stellen Sie sicher, dass Sie den autorisierten Bestand haben). Wenn Sie den Namen in der LC-Normdatendatei ermittelt haben, setzen Sie den zweiten Indikator auf ‚0‘. Wenn Sie einen Begriff aus einem spezifischen Thesaurus benutzen, setzen Sie den zweiten Indikator auf ‚7‘ und hinterlegen den Code für den Thesaurus im Unterfeld ‚2‘. Ansonsten setzen Sie den zweiten Indikator auf ‚4‘. |
690 |
Nebeneintragung unter einem Schlagwort - Sachschlagwort |
Wird für den Bestand der Schlagwortnormdatendatei verwendet. |
Wenn es keinen geeigneten LCSH Begriff gibt, können Sie ein 690er Feld benutzen mit Schlagwörtern, die Sie in Exemplaren anderer Kataloge finden. |
691 |
LOCAL SUBJECT ADDED ENTRY–GEOGRAPHIC NAME (RLIN) |
Wird für den Bestand der Schlagwortnormdatendatei verwendet. |
Wenn es keinen geeigneten LCSH Begriff gibt, können Sie ein 691er Feld benutzen, mit Schlagworten, die Sie im Katalog in anderen Exemplaren finden. |
700 |
Nebeneintragung - Personenname |
Wird für zweite Autoren verwendet und andere Personen, die bei der Veröffentlichung eines Werkes beteiligt waren. |
Überprüfen Sie das Kopfblatt und AACR2. Der erste Indikator sollte immer eine ‚1‘ sein, um zu kennzeichnen, dass der Nachname zuerst eingegeben werden muss. Wenn der Name nur aus dem Vornamen besteht, muss der erste Indikator jedoch eine ‚0‘ enthalten. |
710 |
Nebeneintragung - Körperschaftsname |
Wird für Körperschaften benutzt, die an der Veröffentlichung eines Werkes beteiligt waren (z.Bsp. Verlage). |
Überprüfen Sie das Kopfblatt und AACR2. Setzen Sie den ersten Indikator auf ‚2‘. |
711 |
Nebeneintragung - Kongressname |
Wird verwendet für Veranstaltungen, die bei der Veröffentlichung eines Werkes beteiligt waren (z.Bsp. ein Symposium, das einen Beitrag zum Werk geleistet hat) |
Überprüfen Sie das Kopfblatt und AACR2. Setzen Sie den ersten Indikator auf ‚2‘. |
730 |
Nebeneintragung - Einheitstitel |
Wird für Einheitstitel verwendet, die bei der Veröffentlichung des Werkes von Bedeutung waren (z.Bsp. wenn das vorliegende Werk von einem anderen Werk inspiriert wurde). |
Prüfen Sie das autorisierte Bestandsblatt und AACR2. Setzen Sie den ersten Indikator auf die Zahl der non-filling Merkmale (bei Merkmalen in einem einleitenden Artikel plus Leerzeichen… für „der/die/das“ setzen Sie den ersten Indikator auf ‚4‘. |
773 |
Übergeordnete Einheit |
Beschreibt die übergeordnete Einheit eines Werkes (z.Bsp. Buch oder Zeitschrift, die den Artikel beinhalten, der in dem aktuellen Datensatz beschrieben wird). |
Wenn die Veröffentlichung bestimmt, dass der Autor die Haupteintragung bekommen soll, dann geben Sie die normierte Form des Autorennamens im Unterfeld ‚a‘ an. Schreiben Sie den Titel in das Unterfeld ‚t‘. Wenn es sich bei der Veröffentlichung um ein unabhängiges Werk handelt, dann schreiben Sie die Information zur Veröffentlichung in das Unterfeld ‚d‘. Wenn verfügbar, dann sollten Sie die ISSN und die ISBN immer verwenden, und zwar in den Unterfeldern ‚x‘ bzw. ‚z‘. Informationen zum Verhältnis (z.Bsp. Bandnummer, Seitenzahl etc.) werden im Unterfeld ‚g‘ hinterlegt. Das Unterfeld ‚q‘ enthält eine verschlüsselte Information des Standortes des Exemplars: Band, Heft und Sektionsnummern werden durch Doppelpunkte getrennt, und der ersten Seite folgt a ‚<‘ am Ende des Unterfeldes. Prüfen Sie auch das ISBD-Zeichensetzungsblatt. Setzen Sie den ersten Indikator auf ‚0‘. Wenn Sie möchten, dass die Kennzeichnung „In:“ generiert wird, dann lassen Sie den zweiten Indikator leer. Wenn Sie vor dem Text in 773 noch etwas anderes angezeigt haben möchten, dann setzen Sie den zweiten Indikator auf ‚8‘ und fügen Sie ein Unterfeld ‚i‘ mit der gewünschten Kennzeichnung hinzu (z.Bsp. „$iOffprint von:“). |
830 |
Nebeneintragung unter dem Gesamttitel - Einheitstitel |
autorisierte Form des Namen der Serie, welche im Feld 490 aufgeführt wird. Oft handelt es sich um die gleiche Form wie im Feld 490. |
Beachten Sie auch das autorisierte Bestandsblatt und AACR2. Setzen Sie den zweiten Indikator auf die Nummer der non-filling Merkmale ( bei Merkmalen in einem einleitenden Artikel plus einem Leerzeichen… für „der/die/das“ setzen Sie den zweiten Indikator auf ‚4‘. |
852 |
Standort/Signatur |
Stellt den Sektionsnamen für Bücher ohne Barcode, Broschüren und einige Artikel und Serien bereit. |
Geben Sie nichts in dieses Feld ein, wenn Sie einen Band katalogisieren, der nur einen Datensatz und einen Barcode erhalten soll. Bekommt das Exemplar keinen Barcode oder Sie legen gerade einen Datensatz für einen Artikel in einem Band an, dann schreiben Sie die Sektion in das Unterfeld ‚a‘ (siehe auch ANS Katalogdokumentation) und die Signatur in das Unterfeld ‚i‘. Setzen Sie den ersten Indikator auf ‚8‘. |
856 |
Elektronische Adresse und Zugriff |
Verknüpfungen zu Online-Material. |
Geben Sie die URL jeder elektronischen Kopie oder Inhaltsübersicht etc. im Unterfeld ‚u‘ und die Verknüpfung zum Titel im Unterfeld ‚y‘ an. Setzen Sie den ersten Indikator auf ‚4‘. |
942 |
Zusätzliche Felder (Koha) |
Zusätzliche Felder (Koha) |
Setzen Sie das Unterfeld ‚c‘ auf den entsprechenden Medientyp. |
Tabelle: Katalogaufnahme
Zusätzliche Felder (Koha)
Koha verwendet drei Felder, in denen die betreffenden Informationen gespeichert werden können.
At the record level, 942 (MARC21) or 942 and 099 (UNIMARC) is used to store information such as record-level item type, record-level call number and classification scheme.
The item (holding) information is stored in 952 (MARC21) or 995 (UNIMARC).
System control numbers for Koha are stored in 999 (MARC21) or 001 and 090 (UNIMARC).
Added entry elements (942 / 099)
942$0 / 099$x - Koha issues (borrowed), all copies
MARC21: 942$0
UNIMARC: 099$x
This field contains the total number of issues/checkouts of all items of this record. It is populated using the update_totalissues.pl cronjob.
Mapped to: biblioitems.totalissues
Indexed in: totalissues
Warnung
This field should not be editable nor edited manually.
942$2 - Source of classification or shelving scheme
MARC21: 942$2
UNIMARC: 942$2
This field contains the source of classification used by the record’s call number (942$h and 942$i (MARC21)).
Eine Auswahl von Klassifikationsquellen Klassifikationsquellen finden Sie im Menü ‚Administration‘. Wenn kein Klassifikationsschema angegeben wurde, richtet sich Koha nach dem Wert, der im Systemparameter DefaultClassificationSource festgelegt wurden.
The source of classification will be used, along with the call number itself (942$h and 942$i (MARC21)) to create the normalized call number used when sorting by call number.
Mapped to: biblioitems.cn_source
Indexed in: cn-bib-source
942$6 - Sortierform der Signatur
MARC21: 942$6
UNIMARC: 942$6
This field contains the normalized call number used for sorting, based on the record-level call number (942$h and 942$i (MARC21)) and the classification source (942$2).
Mapped to: biblioitems.cn_sort
Indexed in: cn-bib-sort
Warnung
This field should not be editable nor edited manually.
942$c - Koha Medientyp
MARC21: 942$c
UNIMARC: 942$c
Dieses Feld enthält den Medientyp auf Exemplarebene.
Der Medientyp auf Exemplarebene wird an unterschiedlichen Stellen in Koha verwendet.
The value from 942$c is copied to 952$y (MARC21) or 995$r (UNIMARC) as the default value when adding a new item to that record
The record-level item type can be used for the circulation rules if the item-level_itypes system preference allows it (this system preference lets you choose between using the record-level or item-level item type for the circulation rules, among other things)
The record-level item type is indexed and used in the search (see also the AdvancedSearchTypes system preference) as well as the facets (this is useful to find records that don’t have items, like records for online resources, ebooks, pdf files, etc.)
The record-level item type is used for record-level/“next available“ holds
The record-level item type is used for record-level article requests
The record-level item type is displayed in various tables in the staff interface, in the circulation module among other places (it is possible to hide unwanted columns in the ‚Table settings‘ section of the Administration module)
Zugeordnet zu: biblioitems.itemtype
Indexiert in: itemtype (mc-itemtype), itype (mc-itype)
942$e - Ausgabe
MARC21: 942$e
UNIMARC: N/A
Dieses Feld enthält Informationen zur Ausgabe.
942$h - Klassifikationsteil
MARC21: 942$h
UNIMARC: N/A
This field contains classification part of the call number. It is used, along with 942$2 and 942$i (MARC21) to create the normalized call number (942$6) used when sorting by call number.
Mapped to: biblioitems.cn_class
Indexed in: cn-class
942$i - Exemplarteil
MARC21: 942$i
UNIMARC: N/A
This field contains item part of the call number. It is used, along with 942$2 and 942$h (MARC21) to create the normalized call number (942$6) used when sorting by call number.
Mapped to: biblioitems.cn_item
Indexed in: cn-item
942$k - Signatur-Präfix
MARC21: 942$k
UNIMARC: N/A
Dieses Feld enthält das Präfix der Signatur.
Mapped to: biblioitems.cn_prefix
Indexed in: cn-prefix
942$m - Signatur-Suffix
MARC21: 942$m
UNIMARC: N/A
Dieses Feld enthält das Suffix der Signatur.
Mapped to: biblioitems.cn_suffix
Indexed in: cn-suffix
942$n / 955$n - Suppress in OPAC
MARC21: 942$n
UNIMARC: 955$n
Wenn der Systemparameter OpacSuppression auf ‚Verberge‘ eingestellt ist, gibt dieses Feld an, ob der Datensatz im OPAC ausgeblendet wird.
In this field, ‚1‘ means the record will be hidden in the OPAC, and ‚0‘ (or empty) means the record will be visible in the OPAC.
You can use the YES_NO authorized value list in this field if you don’t want to remember the numerical values.
Indexed in: suppress
942$s / 099$s - Serial record flag
MARC21: 942$s
UNIMARC: 099$s
Diese Feld gibt an ob der Datensatz mit einem Zeitschriftenabonnement verknüpft ist, und wird vom Zeitschriften-Modul verwendet.
Zugehörig zu: biblio.serial
Warnung
This field should not be editable nor edited manually.
Standort und Exemplarinformationen (952)
Koha uses field 952 to store item (holding) information in MARC21, and field 995 in UNIMARC.
952$0 / 995$0 - Withdrawn status
MARC21: 952$0
UNIMARC: 995$0
Uses
Dieses Feld wird verwendet, um den Ausgeschieden-Status (ausgesondert) des Exemplars anzugeben.
Sie können den Ausgeschieden-Status verwenden um Exemplare auszusondern ohne sie zu löschen.
In den Trefferlisten wird das ausgeschiedene Exemplar als nicht verfügbar angezeigt.
Auswirkungen auf die Ausleihe
Ein ausgeschiedenes Exemplar kann nicht ausgeliehen werden.
Ein ausgeschiedenes Exemplar kann nicht zurückgegeben werden, es sei denn, der Systemparameter BlockReturnOfWithdrawnItems erlaubt dies.
Werte
Der Ausgeschieden-Status ist numerisch, „0“ (oder leer) bedeutet „nicht ausgeschieden“, und jede andere Nummer bedeutet „Ausgeschieden“.
Im Standard ist das Feld verknüpft mit dem Normierten Wert WITHDRAWN, die Bedeutung der numerischen Werte wird dort hinterlegt. Die Standard-Werte im Normierten Wert WITHDRAWN sind:
1: Ausgeschieden
Anzeige
Dienstoberfläche
Trefferlisten (ausgeschiedene Exemplare werden als nicht verfügbar angezeigt)
Exemplartabelle in der Detailansicht des Titels
‚Items‘ tab of the bibliographic record, ‚Withdrawn status‘ under ‚Statuses‘
OPAC
Trefferlisten (ausgeschiedene Exemplare werden als nicht verfügbar angezeigt)
Exemplartabelle in der Detailansicht des Titels
Über den Systemparameter OpacHiddenItems lassen sich ausgeschiedene Exemplare im OPAC verstecken.
Zugeordnet zu: items.withdrawn
Indexiert in: withdrawn
952$1 / 995$2 - Lost status
MARC21: 952$1
UNIMARC: 995$2
Uses
Dieses Feld wird verwendet, um das Exemplar als verloren zu markieren.
Sie können den Status Verloren setzen um Exemplare als verloren oder vermisst zu kennzeichnen
In the search results, the lost item will be marked as unavailable.
Marking an item lost while it is checked out can charge the replacement cost (952$v (MARC21) or 995$g (UNIMARC)) to the patron (see WhenLostChargeReplacementFee), as well as a processing fee (the processing fee is set at the item type level)
The lost status can be changed automatically after a number of days overdue with the longoverdue.pl cronjob
Auswirkungen auf die Ausleihe
Der Systemparameter IssueLostItem legt fest, ob verlorene Exemplare entliehen werden können.
Mit dem Systemparameter BlockReturnOfLostItems wird geregelt, ob verlorene Exemplare zurückgegeben werden können.
Werte
The lost status is numerical, ‚0‘ (or empty) means ‚not lost‘ and any other number means ‚lost‘.
By default, the field is associated with the LOST authorized value category so you don’t have to remember the numerical values. The default values in the LOST authorized value category are:
1: Lost
2: Long Overdue (Lost)
3: Lost and Paid For
4: Missing
Anzeige
Dienstoberfläche
Search results (lost items will be marked as unavailable)
Exemplartabelle in der Detailansicht des Titels
‚Items‘ tab of the bibliographic record, ‚Lost status‘ under ‚Statuses‘
OPAC
Search results (lost items will be marked as unavailable)
Exemplartabelle in der Detailansicht des Titels
Mit dem Systemparameter hidelostitems können Sie den OPAC so konfigurieren, dass verlorene Exemplare nicht angezeigt werden.
Mapped to: items.itemlost
Indexed in: lost
952$2 / 995$4 - Source of classification or shelving scheme
MARC21: 952$2
UNIMARC: 995$4
Uses
This field contains the source of classification used by the record’s call number (952$o (MARC21) or 995$k (UNIMARC)).
The source of classification will be used, along with the call number itself (952$o (MARC21) or 995$k (UNIMARC)) to create the normalized call number (952$6 (MARC21) or 995$s (UNIMARC)) used when sorting by call number.
Werte
There is a choice of classification sources as they are defined in administration.
Wenn kein Klassifikationsschema angegeben wurde, richtet sich Koha nach dem Wert, der im Systemparameter DefaultClassificationSource festgelegt wurde.
Anzeige
This is not displayed either in the OPAC or in the staff interface. The information is only available in the item’s editing form.
Mapped to: items.cn_source
Indexed in: classification-source
952$3 / 995$l - Materials specified
MARC21: 952$3
UNIMARC: 995$l (L)
Uses
This field is used to add information about accompanying materials or to specify how many pieces the item has.
Auswirkungen auf die Ausleihe
This information will be displayed when circulation the item so that the circulation staff knows to make sure all the accompanying material is there when checkout out and it’s still there when checking the item back in.

Werte
This is a free text field, but it is possible to associate it to an authorized value category in the MARC framework to make it into a drop-down menu.
Anzeige
Dienstoberfläche
This information will appear when checking out or checking in an item
Exemplartabelle in der Detailansicht des Titels
Bemerkung
Use ‚Table settings‘ if you want to hide that column - Module: Catalogue - Table id: holdings_table and/or otherholdings_table - Column: holdings_materials or otherholdings_materials
‚Items‘ tab of the bibliographic record, ‚Materials specified‘ under ‚Item information‘
OPAC
Holdings table in the record’s detail page (it is hidden by default)
Bemerkung
Use ‚Table settings‘ if you want to show that column - Module: OPAC - Table id: holdingst - Column: item_materials
Mapped to: items.materials
Indexed in: materials-specified
952$4 / 995$1 - Damaged status
MARC21: 952$4
UNIMARC: 995$1
Uses
This field is used to set the damaged status of the item.
In the search results, the damaged item will be marked as unavailable.
Auswirkungen auf die Ausleihe
The damaged status does not affect the ability to check out or check in an item.
The AllowHoldsOnDamagedItems system preference indicates whether or not damaged items can be put on hold.
Werte
The damaged status is numerical, ‚0‘ (or empty) means ‚not damaged‘ and any other number means ‚damaged‘.
By default, the field is associated with the DAMAGED authorized value category so you don’t have to remember the numerical values. The default values in the DAMAGED authorized value category are:
1: Damaged
Anzeige
Dienstoberfläche
Search results (damaged items will be marked as unavailable)
Exemplartabelle in der Detailansicht des Titels
‚Items‘ tab of the bibliographic record, ‚Damaged status‘ under ‚Statuses‘
OPAC
Search results (damaged items will be marked as unavailable)
Exemplartabelle in der Detailansicht des Titels
Über den Systemparameter OpacHiddenItems lassen sich beschädigte Exemplare im OPAC verstecken.
Mapped to: items.damaged
Indexed in: damaged
952$5 / 995$3 - Use restrictions
MARC21: 952$5
UNIMARC: 995$3
Uses
This field is used to set the restricted status of the item.
In the search results, the restricted item will be marked as available.
Auswirkungen auf die Ausleihe
A restricted item will not be able to be checked out.
Werte
The restricted status is numerical, ‚1‘ means restricted and ‚0‘ (or empty) means unrestricted.
Bemerkung
Unlike other statuses, the restricted status can only be 0 (not restricted) or 1 (restricted).
By default, the field is associated with the RESTRICTED authorized value category so you don’t have to remember the numerical values. The default values in the RESTRICTED authorized value category are:
1: Zugriff eingeschränkt
Anzeige
Dienstoberfläche
Trefferlisten (eingeschränkte Exemplare werden als verfügbar angezeigt)
Exemplartabelle in der Detailansicht des Titels
OPAC
Trefferlisten (eingeschränkte Exemplare werden als verfügbar angezeigt)
Exemplartabelle in der Detailansicht des Titels
Zugeordnet zu: items.restricted
Indexed in: restricted
952$6 / 995$s - Koha normalized classification for sorting
MARC21: 952$6
UNIMARC: 995$s
Warnung
This field should not be editable nor edited manually.
Uses
This field contains the normalized call number used for sorting, based on the item-level call number (952$o (MARC21) or 995$k (UNIMARC)) and the classification source (952$2 (MARC21) or 995$4 (UNIMARC)).
Anzeige
This information is not displayed anywhere in the OPAC or in the staff interface, it is for Koha’s internal use only.
Mapped to: items.cn_sort
Indexed in: cn-sort
952$7 / 995$o - Not for loan status
MARC21: 952$7
UNIMARC: 995$o
Uses
This field is used to set the not for loan status of the item.
In der Trefferliste wird das nicht ausleihbare Exemplar als nicht verfügbar oder als Präsenzexemplar angezeigt (see Reference_NFL_Statuses)
Auswirkungen auf die Ausleihe
Items with a not for loan status cannot be checked out (unless AllowNotForLoanOverride allows it)
Depending on the value, items may or may not be put on hold (see below)
Depending on TrapHoldsOnOrder and SkipHoldTrapOnNotForLoanValue not for loan items may be used to fill holds
The UpdateNotForLoanStatusOnCheckin system preference can be used to automatically change not for loan values upon checkin
The UpdateNotForLoanStatusOnCheckout system preference can be used to automatically change not for loan values when checking out the item
Werte
The not for loan status is numerical, ‚0‘ (or empty) means available.
Negative values (< 0) mean that the item cannot be checked out, but can be put on hold.
Positive values (> 0) mean that the item cannot be checked out nor be put on hold.
By default, the field is associated with the NOT_LOAN authorized value category so you don’t have to remember the numerical values. The default values in the NOT_LOAN authorized value category are:
-1: Ordered
1: Not For Loan
2: Personalbibliothek
Anzeige
Dienstoberfläche
Trefferliste (nicht ausleihbare Exemplare werden als nicht verfügbar oder als Präsenzexemplare angezeigt, (siehe Reference_NFL_Statuses))
Exemplartabelle in der Detailansicht des Titels
‚Items‘ tab of the bibliographic record, ‚Withdrawn status‘ under ‚Statuses‘
OPAC
Trefferliste (nicht ausleihbare Exemplare werden als nicht verfügbar oder als Präsenzexemplare angezeigt, (siehe Reference_NFL_Statuses))
Exemplartabelle in der Detailansicht des Titels
Über den Systemparameter OpacHiddenItems lassen sich nicht ausleihbare Exemplare im OPAC verstecken.
Mapped to: items.notforloan
Indexed in: notforloan
952$8 / 995$h - Collection
MARC21: 952$8
UNIMARC: 995$h
Uses
This field is used to set the collection of the item.
Collections in Koha are used to group items in ways other than physically (the physical location can be stored in 952$c (MARC21) or 995$e (UNIMARC)). An example of a collection could be ‚Local authors‘.
Collections can also be used to limit transfers in multi-branch systems (see the Library transfer limits section of the administration) if BranchTransferLimitsType is set to ‚collection code‘
The collection of an item is used in the search (see the AdvancedSearchTypes system preference) as well as the facets.
Werte
By default, the field is associated with the CCODE authorized value category. The default values in the CCODE authorized value category are:
FIC: Fiction
NFIC: Non-fiction
REF: Reference
Anzeige
Dienstoberfläche
The collections will be part of the facets in the search results
Exemplartabelle in der Detailansicht des Titels
Bemerkung
Use ‚Table settings‘ if you want to hide that column - Module: Catalogue - Table id: holdings_table and/or otherholdings_table - Column: holdings_ccode or otherholdings_ccode
Checkouts table in the patron’s file
Bemerkung
Use ‚Table settings‘ if you want to hide that column - Module: Circulation and Patrons - Table id: issues-table - Column: collection
Many other places all throughout Koha
OPAC
Trefferliste, wenn die Einstellung des Parameters OpacItemLocation dies zulässt
The collections will be part of the facets in the search results
Exemplartabelle in der Detailansicht des Titels
Bemerkung
Use ‚Table settings‘ if you want to hide that column - Module: OPAC - Table id: holdingst - Column: item_ccode
Many other places throughout the OPAC
Mapped to: items.ccode
Indexed in: collection-code
952$9 / 995$9 - Itemnumber
MARC21: 952$9
UNIMARC: 995$9
Warnung
This field should not be editable nor edited manually.
Uses
The itemnumber is the internal number assigned to each item by Koha. It is unique and cannot be reattributed even when the item is deleted.
Anzeige
This information is not displayed anywhere in the OPAC or in the staff interface, it is for Koha’s internal use only.
Mapped to: items.itemnumber
Indexed in: itemnumber
952$a / 995$b - Home library
MARC21: 952$a
UNIMARC: 995$b
Required
Uses
This field indicates the home library of the item.
The home library is important for many things in Koha, including, but not limited to
The home library of an item is used in the search as well as the facets (see the DisplayLibraryFacets system preference)
Auswirkungen auf die Ausleihe
As previously stated, the circulation rules are based on the item’s library (see the HomeOrHoldingBranch system preference)
Werte
Libraries are defined in the libraries section of the administration page.
Anzeige
Dienstoberfläche
Depending on the DisplayLibraryFacets system preference, the home library may be part of the facets in the search results
Exemplartabelle in der Detailansicht des Titels
Bemerkung
Use ‚Table settings‘ if you want to hide that column - Module: Catalogue - Table id: holdings_table and/or otherholdings_table - Column: holdings_homebranch or otherholdings_homebranch
This information is displayed in the staff interface, in the ‚Items‘ tab of the bibliographic record, ‚Home library‘ under ‚Item information‘
Checkouts table in the patron’s file
Bemerkung
Use ‚Table settings‘ if you want to hide that column - Module: Circulation and Patrons - Table id: issues-table - Column: homebranch
Many other places all throughout Koha
OPAC
Trefferliste (wenn die Einstellung des Parameters OpacItemLocation dies zulässt)
Depending on the DisplayLibraryFacets system preference, the home library may be part of the facets in the search results
Holdings table in the record’s detail page, if OpacLocationBranchToDisplay allows it
Bemerkung
Use ‚Table settings‘ if you want to hide that column - Module: OPAC - Table id: holdingst - Column: item_home_location
Many other places throughout the OPAC
Mapped to: items.homebranch
Indexed in: homelibrary
952$b / 995$c - Current library
MARC21: 952$b
UNIMARC: 995$c
Required
Uses
This field indicates the current library (holding library) of the item.
The current library is important for many things in Koha, including
The current library of an item is used in the search as well as the facets (see the DisplayLibraryFacets system preference)
Auswirkungen auf die Ausleihe
As previously stated, the circulation rules are based on the item’s library (see the HomeOrHoldingBranch system preference)
Werte
Libraries are defined in the libraries section of the administration page.
Anzeige
Dienstoberfläche
Depending on the DisplayLibraryFacets system preference, the holding library may be part of the facets in the search results
Exemplartabelle in der Detailansicht des Titels
Bemerkung
Use ‚Table settings‘ if you want to hide that column - Module: Catalogue - Table id: holdings_table and/or otherholdings_table - Column: holdings_holdingbranch or otherholdings_holdingbranch
This information is displayed in the staff interface, in the ‚Items‘ tab of the bibliographic record, ‚Current library‘ under ‚Item information‘
Many other places all throughout Koha
OPAC
Trefferliste (wenn die Einstellung des Parameters OpacItemLocation dies zulässt)
Depending on the DisplayLibraryFacets system preference, the holding library may be part of the facets in the search results
Holdings table in the record’s detail page, if OpacLocationBranchToDisplay allows it
Bemerkung
Use ‚Table settings‘ if you want to hide that column - Module: OPAC - Table id: holdingst - Column: item_current_location
Many other places throughout the OPAC
Mapped to: items.holdingbranch
Indexed in: holdinglibrary
952$c / 995$e - Shelving location
MARC21: 952$c
UNIMARC: 995$e
Uses
This field indicates the location of the item (physical place in the library).
Shelving locations in Koha are used to group items physically. An example of a shelving location could be ‚Children’s section‘.
The location of an item is used in the search (see the AdvancedSearchTypes system preference) as well as the facets.
The UpdateItemLocationOnCheckin system preference can be used to automatically change location values upon checkin
The UpdateItemLocationOnCheckout system preference can be used to automatically change location values upon checkout.
Werte
Das Feld ist standardmäßig mit der Normierten Wert der Kategorie LOC verknüpft. Die Standarfwerte in der Kategorie LOC für Normierte Werte sind:
FIC: Fiction
CHLID: Children’s Area
DISPLAY: On Display
NEW: New Materials Shelf
STAFF: Staff Office
GEN: General Stacks
AV: Audio Visual
REF: Reference
CART: Book Cart
PROC: Processing Center
Der Standardwert für neue Exemplare kann im Systemparameter NewItemsDefaultLocation festgelegt werden
Anzeige
Dienstoberfläche
Die Standorte werden bei den :ref:`Facetten für Suchergebnisse <search-results-label>`verwendet
Exemplarübersicht in der Detailansicht des Titelsatzes (unterhalb der Heimatbibliothek des Exemplars)
This information is displayed in the staff interface, in the ‚Items‘ tab of the bibliographic record, ‚Home library‘ under ‚Item information‘
Checkouts table in the patron’s file
Bemerkung
Use ‚Table settings‘ if you want to hide that column - Module: Circulation and Patrons - Table id: issues-table - Column: location
Many other places all throughout Koha
OPAC
Trefferliste (wenn die Einstellung des Parameters OpacItemLocation dies zulässt)
Die Standorte werden bei den :ref:`Facetten für Suchergebnisse <search-results-label>`verwendet
Holdings table in the record’s detail page, the OpacLocationOnDetail system preference indicates in which column this information is located
Bemerkung
Use ‚Table settings‘ if you want to hide that column - Module: OPAC
Table id: holdingst
Column: item_shelving_location (if OpacLocationOnDetail is set to ‚separate column‘)
Many other places throughout the OPAC
Mapped to: items.location
Indexed in: location
952$d / 995$5 - Date acquired
MARC21: 952$d
UNIMARC: 995$5
Uses
This field is used to enter the date of acquisition of the item.
The acquisition date can be used in the search and the sort function in the search results
When using the Acquisitions module, this should be filled automatically with the acquisition date
Werte
Das Datum muss im Format JJJJ-MM-TT eingetragen werden (um sicherzustellen, dass das Datum im korrekten Format eingetragen wird, wird ein Werkzeug für die Datenauswahl angeboten)
Anzeige
Dienstoberfläche
Exemplartabelle in der Detailansicht des Titels
Bemerkung
Use ‚Table settings‘ if you want to hide that column - Module: Catalogue - Table id: holdings_table and/or otherholdings_table - Column: holdings_dateaccessioned or otherholdings_dateaccessioned
‚Items‘ tab of the bibliographic record, ‚Accession date‘ under ‚History‘
Mapped to: items.dateaccessioned
Indexed in: date-of-acquisition
952$e / 995$a - Source of acquisition
MARC21: 952$e
UNIMARC: 995$a
Uses
Dieses Feld wird verwendet, um den Lieferanten einzutragen, bei dem das Exemplar erworben wurde
Bei Verwendung des Erwerbungsmoduls wird der jeweilige Lieferant bei Eingang des Exemplars automatisch in das Feld eingetragen
Werte
Dies ist ein Freitextfeld
If using the Acquisitions field, the value in this field will be the vendor id rather than the vendor’s name
Anzeige
This is not displayed either in the OPAC or in the staff interface. The information is only available in the item’s editing form.
Mapped to: items.booksellerid
Indexed in: acqsource
952$f / 995$8 - Coded location qualifier
MARC21: 952$f
UNIMARC: 995$8
Uses
This field is used to enter a three-character code that identifies the specific issues of the item that are located apart from the main holdings of the same item (same as MARC21 852$f).
Werte
Dies ist ein Freitextfeld
The field in the database is limited to 10 characters
Anzeige
This is not displayed either in the OPAC or in the staff interface. The information is only available in the item’s editing form.
Mapped to: items.coded_location_qualifier
Indexed in: coded-location-qualifier
952$g / 995$p - Cost, normal purchase price
MARC21: 952$g
UNIMARC: 995$p
Uses
This field is used to enter the purchase price of the item
When using the Acquisitions module, this should be filled automatically with the purchase price upon receiving
Werte
Dies ist ein Freitextfeld
The price must be digits, with a period as the decimal, with no currency symbols (e.g. 24.95)
The field in the database limits to two decimal points (e.g. 24.95 is OK but 24.94875 is not)
Anzeige
This is not displayed either in the OPAC or in the staff interface. The information is only available in the item’s editing form.
Mapped to: items.price
Indexed in: price
952$h / 995$v - Serial enumeration / chronology
MARC21: 952$h
UNIMARC: 995$v
Uses
This field is used to enter the issue number of serials or the volume number of series
When using the Serials module, this should be filled automatically with the issue number
Werte
Dies ist ein Freitextfeld
Anzeige
Dienstoberfläche
Exemplartabelle in der Detailansicht des Titels
Bemerkung
Use ‚Table settings‘ if you want to hide that column - Module: Catalogue - Table id: holdings_table and/or otherholdings_table - Column: holdings_enumchron or otherholdings_enumchron
‚Items‘ tab of the bibliographic record, ‚Serial enumeration‘ under ‚History‘
OPAC
Exemplartabelle in der Detailansicht des Titels
Bemerkung
Use ‚Table settings‘ if you want to hide that column - Module: OPAC - Table id: holdingst - Column: item_enumchron
Mapped to: items.enumchron
952$i / 995$j - Inventory number
MARC21: 952$i
UNIMARC: 995$j
Uses
This field is used to enter an inventory number for the item
Bemerkung
The inventory number is not Koha’s internal itemnumber (which is stored in 952$9 (MARC21) or 995$9 (UNIMARC))
Werte
Dies ist ein Freitextfeld
The field in the database is limited to 32 characters
Anzeige
Dienstoberfläche
Exemplartabelle in der Detailansicht des Titels
Bemerkung
Use ‚Table settings‘ if you want to hide that column - Module: Catalogue - Table id: holdings_table and/or otherholdings_table - Column: holdings_stocknumber or otherholdings_stocknumber
Mapped to: items.stocknumber
Indexed in: number-local-acquisition
952$j / 995$q - Shelving control number
MARC21: 952$j
UNIMARC: 995$q
Uses
This field is used to enter a shelf number where the item is located
Werte
The stack number should be numerical
By default, the field is associated with the STACK authorized value category so you don’t have to remember the numerical values. There are no default values.
Anzeige
This is not displayed either in the OPAC or in the staff interface. The information is only available in the item’s editing form.
Mapped to: items.stack
Indexed in: stack
952$l / 995$w - Total checkouts
MARC21: 952$l (L)
UNIMARC: 995$w
Warnung
This field should not be editable nor edited manually.
Uses
This field contains the total number of past and present issues/checkouts of this item
The number of issues is used to sort search results by popularity
The number of issues for each item is used to update the total number of issues for the record (942$0 (MARC21) or 099$x (UNIMARC))
Anzeige
Dienstoberfläche
‚Items‘ tab of the bibliographic record, ‚Total checkouts‘ under ‚History‘
Mapped to: items.issues
Indexed in: issues
952$m / 995$x - Total renewals
MARC21: 952$m
UNIMARC: 995$x
Warnung
This field should not be editable nor edited manually.
Uses
This field contains the total number of past renewals of this item
Anzeige
Dienstoberfläche
‚Items‘ tab of the bibliographic record, ‚Current renewals‘ under ‚Statuses‘
Mapped to: items.renewals
Indexed in: renewals
952$n / 995$t - Total holds
MARC21: 952$n
UNIMARC: 995$t
Warnung
This field should not be editable nor edited manually.
Uses
This field contains the total number of past and present holds on this item
The number of holds is used to create a RSS feed for items with the most holds
Anzeige
This is not displayed either in the OPAC or in the staff interface.
Mapped to: items.reserves
Indexed in: reserves
952$o / 995$k - Full call number
MARC21: 952$o
UNIMARC: 995$k
Uses
This field is used to store the item’s call number
The call number of an item can used in the search
Werte
The records call number can be copied into the item’s call number, the itemcallnumber system preference indicates which record field to use as the source
Anzeige
Dienstoberfläche
Exemplartabelle in der Detailansicht des Titels
Bemerkung
Use ‚Table settings‘ if you want to hide that column - Module: Catalogue - Table id: holdings_table and/or otherholdings_table - Column: holdings_itemcallnumber or otherholdings_itemcallnumber
‚Items‘ tab of the bibliographic record, ‚Item callnumber‘ under ‚Item information‘
Checkouts table in the patron’s file
Bemerkung
Use ‚Table settings‘ if you want to hide that column - Module: Circulation and Patrons - Table id: issues-table - Column: callno
Many other places all throughout Koha
OPAC
Trefferliste, wenn die Einstellung des Parameters OpacItemLocation dies zulässt
Exemplartabelle in der Detailansicht des Titels
Bemerkung
Use ‚Table settings‘ if you want to hide that column - Module: OPAC - Table id: holdingst - Column: item_callnumber
Checkouts table in the patron’s online account
Many other places throughout the OPAC
Mapped to: items.itemcallnumber
Indexed in: local-classification
952$p / 995$f - Barcode
MARC21: 952$p
UNIMARC: 995$f
Für die Ausleihe erforderlich
Uses
This field is used to store the item’s barcode
The barcode of an item can used in the search
Auswirkungen auf die Ausleihe
The barcode is essential for circulating items
Werte
Das Datum muss im Format JJJJ-MM-TT eingetragen werden (um sicherzustellen, dass das Datum im korrekten Format eingetragen wird, wird ein Werkzeug für die Datenauswahl angeboten)
Dies ist ein Freitextfeld
The field in the database is limited to 20 characters
Anzeige
Dienstoberfläche
Exemplartabelle in der Detailansicht des Titels
Bemerkung
Use ‚Table settings‘ if you want to hide that column - Module: Catalogue - Table id: holdings_table and/or otherholdings_table - Column: holdings_barcode or otherholdings_barcode
‚Items‘ tab of the bibliographic record
Checkouts table in the patron’s file (in the title column)
Mapped to: items.barcode
Indexed in: barcode
952$q / 995$n - Date due
MARC21: 952$q
UNIMARC: 995$n
Warnung
This field should not be editable nor edited manually.
Uses
When the item is checked out, the due date is stored in this field (YYYY-MM-DD)
This field is used in the ‚Limit to currently available items‘ in the facets
Anzeige
The due date appears in a lot of pages in the circulation module, but it is the due date that comes from the issues, not the item
Mapped to: items.onloan
Indexed in: onloan
952$r / 995$y - Date last seen
MARC21: 952$r
UNIMARC: 995$y
Warnung
This field should not be editable nor edited manually.
Uses
When the item is checked out or in, inventoried, or during any other transaction that affects the item, the date and time is stored in this field (YYYY-MM-DD HH:MM:SS)
Anzeige
Dienstoberfläche
Exemplartabelle in der Detailansicht des Titels
Bemerkung
Use ‚Table settings‘ if you want to hide that column - Module: Catalogue - Table id: holdings_table and/or otherholdings_table - Column: holdings_lastseen or otherholdings_lastseen
‚Items‘ tab of the bibliographic record, ‚Last seen‘ under ‚History‘
Mapped to: items.datelastseen
Indexed in: datelastseen
952$s / 995$m - Date last checked out
MARC21: 952$s
UNIMARC: 995$m
Warnung
This field should not be editable nor edited manually.
Uses
When the item is checked out, the date is stored in this field (YYYY-MM-DD)
Anzeige
Dienstoberfläche
Exemplartabelle in der Detailansicht des Titels
Bemerkung
Use ‚Table settings‘ if you want to hide that column - Module: Catalogue - Table id: holdings_table and/or otherholdings_table - Column: holdings_datelastborrowed or otherholdings_datelastborrowed
‚Items‘ tab of the bibliographic record, ‚Last borrowed‘ under ‚History‘
Mapped to: items.datelastborrowed
Indexed in: datelastborrowed
952$t / 995$6 - Copy number
MARC21: 952$t
UNIMARC: 995$6
Uses
This field is used to enter the copy number of the item
Werte
Dies ist ein Freitextfeld
The field in the database is limited to 32 characters
Anzeige
Dienstoberfläche
Exemplartabelle in der Detailansicht des Titels
Bemerkung
Use ‚Table settings‘ if you want to hide that column - Module: Catalogue - Table id: holdings_table and/or otherholdings_table - Column: holdings_copynumber or otherholdings_copynumber
‚Items‘ tab of the bibliographic record, ‚Copy number‘ under ‚History‘
OPAC
Exemplartabelle in der Detailansicht des Titels
Bemerkung
Use ‚Table settings‘ if you want to hide that column - Module: OPAC - Table id: holdingst - Column: item_copy
Mapped to: items.copynumber
Indexed in: copynumber
952$u / 995$7 - URI
MARC21: 952$u
UNIMARC: 995$7
Uses
This field is used to enter a URL or URN specific to the item
It is not necessary to enter a URL here if there is already a URL in 856$u at the record-level, unless the URL for the specific item differs from the one in 856$u (for example, if you have an online periodical, you can put the URL to the periodical in 856$u and the URL to the specific issue in 952$u)
Werte
Anzeige
Dienstoberfläche
Exemplartabelle in der Detailansicht des Titels
Bemerkung
Use ‚Table settings‘ if you want to hide that column - Module: Catalogue - Table id: holdings_table and/or otherholdings_table - Column: holdings_uri or otherholdings_uri
OPAC
Exemplartabelle in der Detailansicht des Titels
Bemerkung
Use ‚Table settings‘ if you want to hide that column - Module: OPAC - Table id: holdingst - Column: item_url
Mapped to: items.uri
Indexed in: uri
952$v / 995$g - Cost, replacement price
MARC21: 952$v
UNIMARC: 995$g
Uses
This field is used to enter the replacement cost that will be charged to the patron who loses the item
When using the Acquisitions module, this should be filled automatically with the replacement price upon receiving
Werte
Dies ist ein Freitextfeld
The price must be digits, with a period as the decimal, with no currency symbols (e.g. 24.95)
The field in the database limits to two decimal points (e.g. 24.95 is OK but 24.94875 is not)
Anzeige
Dienstoberfläche
Checkouts table in the patron’s file (in the price column)
Bemerkung
Use ‚Table settings‘ if you want to hide that column - Module: Circulation and Patrons - Table id: issues-table - Column: price
‚Items‘ tab of the bibliographic record, ‚Replacement price‘ under ‚Item information‘
Mapped to: items.replacementprice
Indexed in: replacementprice
952$w / 995$i - Price effective from
MARC21: 952$w
UNIMARC: 995$i
Uses
This field is used to enter the date of the replacement price of the item
When using the Acquisitions module, this should be filled automatically with the acquisition date upon receiving
If left empty, it will default to the acquisition date (952$d (MARC21) or 995$5 (UNIMARC))
Werte
This should be a date in the YYYY-MM-DD format
Anzeige
This is not displayed either in the OPAC or in the staff interface. The information is only available in the item’s editing form.
Mapped to: items.replacementpricedate
Indexed in: replacementpricedate
952$x / 995$z - Non-public note
MARC21: 952$x
UNIMARC: 995$z
Uses
This field is used to enter internal notes about the item
Werte
Dies ist ein Freitextfeld
Anzeige
Dienstoberfläche
Exemplartabelle in der Detailansicht des Titels
Bemerkung
Use ‚Table settings‘ if you want to hide that column - Module: Catalogue
Table id: holdings_table and/or otherholdings_table
Column: holdings_itemnotes_nonpublic or otherholdings_itemnotes_nonpublic
‚Items‘ tab of the bibliographic record, ‚Non-public note‘ under ‚History‘
Mapped to: items.itemnotes_nonpublic
952$y / 995$r - Koha item type
MARC21: 952$y
UNIMARC: 995$r
Required
Uses
This field contains the item-level item type.
The item-level item type is used in various places in Koha.
The item-level item type is generally used for the circulation rules unless the item-level_itypes system preference is set to use the record-level item type (this system preference lets you choose between using the record-level or item-level item type for the circulation rules, among other things)
The item-level item type is indexed and used in the search (see also the AdvancedSearchTypes system preference) as well as the facets
Auswirkungen auf die Ausleihe
The item type is used as the basis for circulation rules, it will affect the number of items a patron can take out at the same time, number of holds, etc.)
Werte
The values are managed in item types
Anzeige
Dienstoberfläche
The itemtypes will be part of the facets in the search results
Exemplartabelle in der Detailansicht des Titels
Bemerkung
Use ‚Table settings‘ if you want to hide that column - Module: Catalogue - Table id: holdings_table and/or otherholdings_table - Column: holdings_itype or otherholdings_itype
‚Items‘ tab of the bibliographic record, ‚Item type‘ under ‚Item information‘
Checkouts table in the patron’s file
Bemerkung
Use ‚Table settings‘ if you want to hide that column - Module: Circulation and Patrons - Table id: issues-table - Column: item_type
Many other places all throughout Koha
OPAC
The item types will be part of the facets in the search results
Exemplartabelle in der Detailansicht des Titels
Bemerkung
Use ‚Table settings‘ if you want to hide that column - Module: OPAC - Table id: holdingst - Column: item_itemtype
Many other places throughout the OPAC
Mapped to: items.itype
Indexiert in: itemtype (mc-itemtype), itype (mc-itype)
952$z / 995$u - Public note
MARC21: 952$z
UNIMARC: 995$u
Uses
This field is used to enter notes about the item
Werte
Dies ist ein Freitextfeld
Anzeige
Dienstoberfläche
Exemplartabelle in der Detailansicht des Titels
Bemerkung
Use ‚Table settings‘ if you want to hide that column - Module: Catalogue - Table id: holdings_table and/or otherholdings_table - Column: holdings_itemnotes or otherholdings_itemnotes
‚Items‘ tab of the bibliographic record, ‚Public note‘ under ‚History‘
OPAC
Exemplartabelle in der Detailansicht des Titels
Bemerkung
Use ‚Table settings‘ if you want to hide that column - Module: OPAC - Table id: holdingst - Column: item_notes
Mapped to: items.itemnotes
Indexed in: note
System control numbers (999)
Koha stores its system control numbers in the 999 field in MARC21 and in the 001 and 090 field in UNIMARC.
Bemerkung
The itemnumber is stored in 952$9 (MARC21) or 995$9 (UNIMARC) (see above).
999$c / 001 - Biblionumber
The biblionumber is the internal number assigned to each record by Koha. It is unique and cannot be reattributed even when the record is deleted.
MARC21: 999$c
UNIMARC: 001
Mapped to: biblio.biblionumber
Indexed in: local-number (sn, biblionumber)
Warnung
This field should not be editable nor edited manually.
999$d / 090$a - Biblioitemnumber
The biblioitemnumber is the internal number assigned to each record by Koha. It is unique and cannot be reattributed even when the record is deleted.
MARC21: 999$d
UNIMARC: 090$a
Mapped to: biblioitems.biblioitemnumber
Indexed in: biblioitemnumber
Warnung
This field should not be editable nor edited manually.
Koha XSLT Icons für den Materialtyp
Wenn Sie einen der XSLT-Systemparameter (OPACXSLTDetailsDisplay, OPACXSLTResultsDisplay, XSLTDetailsDisplay, und/oder XSLTResultsDisplay) zusammen mit den Systemparametern DisplayOPACiconsXSLT und DisplayIconsXSLT angeschaltet haben, sehen Sie die Icons für den Materialtyp auf dem zugehörigen Bildschirm.
Wichtig
Diese Bilder kommen von den Werten, die im Leader hinterlegt sind. Wenn Ihr Leader nicht richtig katalogisiert ist, wäre es das Beste, den Systemparameter DisplayOPACiconsXSLT auszuschalten (dies ist auch möglich, wenn die anderen XSLT-Parameter angeschaltet bleiben).

Buch
leader6 = a (und einer der leader7 Werte darunter)
leader7 = a
leader7 = c
leader7 = d
leader7 = m
leader6 = t
Computerdateien
leader6 = m

Periodikum
leader7 = b
leader7 = i
leader7 = s

Karten
leader6 = e
leader6 = f

Gemischtes
leader6 = p
Musikalien
leader6 = c
leader6 = d
leader6 = i
leader6 = j
Visuelle Materialien
leader6 = g
leader6 = k
leader6 = r

Medienkombination
leader6 = o
Handhabung für Bestellexemplare und Vormerkungen
Wenn Sie Ihre MARC-Datensätze üblicherweise nach Bestellung der Bücher importieren (und nicht bei Eingang der Bücher) und den Benutzern erlauben, darauf Vormerkungen zu machen, ist es notwendig, dass Sie die Exemplardatensätze vor dem Import dem *.mrc file hinzufügen.
Der einfachste Weg Ihre letzte Bestellung zu importieren, ist die Datensätze zuerst durch MARCEdit. laufen zu lassen. Laden Sie Ihre MARC Datensätze herunter und speichern Sie diese auf Ihrem Desktop oder an einem anderen Ort, wo sie wieder gefunden werden können. Wenn Sie MARCEdit bereits installiert haben, können Sie einfach nur mit einem Doppelklick auf Ihre MARC-Datensätze klicken und dadurch wird MARCEdit automatisch geöffnet.
Wichtig
Die Anleitung wurde mit der MARCEdit-Version 5.2.3769.41641 geschrieben auf Windows XP. Die Befehle können je nach Version und Betriebssystem unterschiedlich sein.
Ihre Orginaldatei ist automatisch im Input auffindbar. Stellen Sie sicher, dass MarcBreaker ausgewählt ist und klicken Sie dann auf „Ausführen“

Es wird eine Zusammenfassung des Uploads unten am Bildschirm angezeigt.
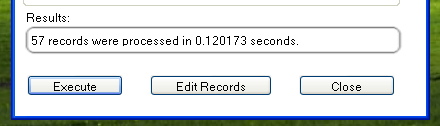
Klicken Sie ‚Datensatz bearbeiten‘ wenn Sie weitere Exemplardatensätze hinzufügen möchten.
Die Anzeige wir durch eine größere ersetzt, welche die MARC-Datensätze enthält
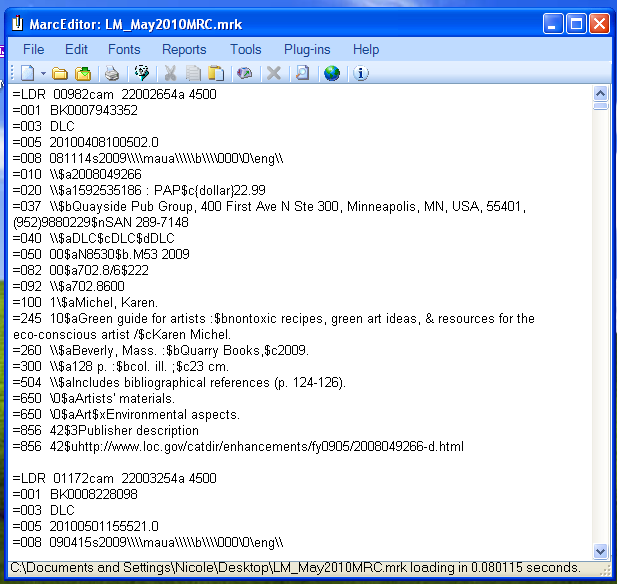
Klicken Sie auf Werkzeuge>Feld hinzufügen/bearbeiten
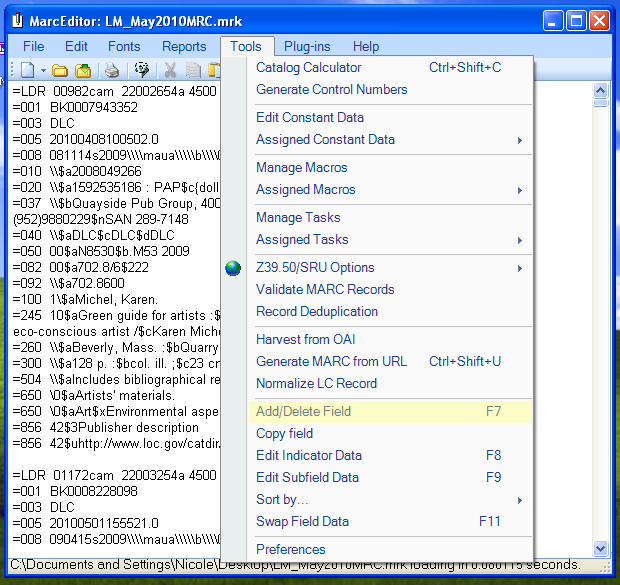
Geben Sie die Koha spezifische Exemplarinformation ein.
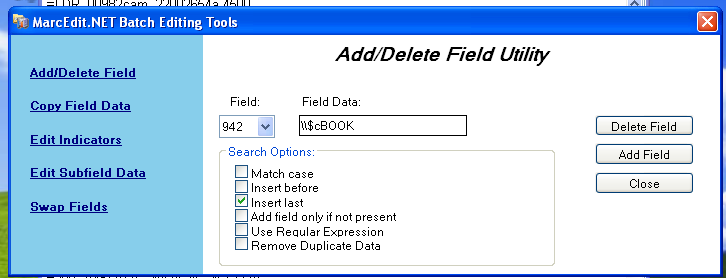
In der Feld Box, Typ 942
In der Feld-Dateibox, Typ \\$c und dem Medientypcode (\\$cBUCH in diesem Beispiel).
Überprüfen Sie die Option, was zuletzt eingegeben wurde.
Klicken Sie auf ‚Neues Feld‘
Geben Sie die Exemplardatendatei ein.
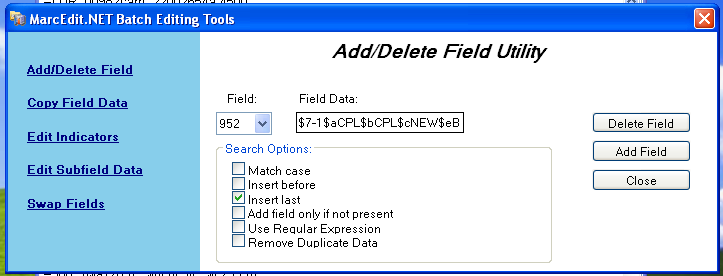
In der Feldbox, Typ 952
In der Feld Dateibox, Typ $7bestellt_STATUS$aPERM_LOC$bCURR_LOC$cSHELVING_LOCATION$eQuelle_der_ACQ$yITEM_TYPE
Ex. $7-1$aCPL$bCPL$cNEW$eBrodart$yBUCH
In einer Standardeinstellung von Koha ist -1 der Wert für den Bestellt-Status.
Sie können auch andere Unterfelder anschauen, in denen Sie Daten ablegen möchten, zum Beispiel können Sie den Sammlungscode ändern, damit alle Exemplare die gleiche Sammlung (8) haben. Es wird automatisch das Erwerbungsdatum (d) ausgefüllt. Sie können auch eine OPAC-Notiz hinzufügen.
Stellen Sie sicher, dass Sie das $-Zeichen eingeben, um die Unterfelder voneinander zu trennen. Wenn Sie jedes Unterfeld, das Sie hinzufügen, in eine separate Zeile schreiben, bewirkt dies, dass entsprechend viele Exemplare mit dem MARC-Datensatz importiert werden (im Beispiel oben handelt es sich um vier Exemplare, jedes mit seinen richtigen Unterfeldern).
Schauen Sie in Koha in, der Administration>Normierte Werte, damit Sie den richtigen Code in das Feld eingeben.
Überprüfen Sie die Option, was zuletzt eingegeben wurde.
Klicken Sie auf ‚Neues Feld‘
Schließen Sie das Fenster des Editors.
Klicken Sie auf die Datei>in MARC erstellen
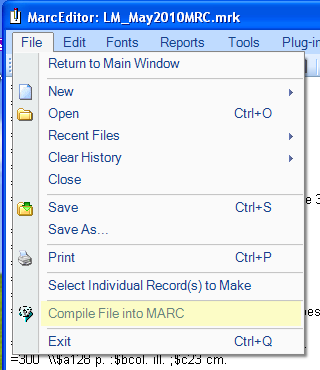
Geben Sie den Namen an, unter dem Sie die Datei speichern möchten
Gehen Sie nun in Ihre Koha-Datenbank und folgen Sie den Anweisungen im Modul ‚Werkzeuge‘ MARC-Datensätze für Import bereitstellen.
Wenn Sie das Exemplar eingegeben haben, klicken Sie auf das Exemplar und beschriften Sie es mit dem richtigen Barcode. Ändern Sie von Hand den Status von Bestellt auf eine leere Linie im Feld ‚Nicht entleihbar‘.
Hinweis
Wenn Sie die katalogisierten Exemplardatensätze beschaffen, bitten Sie ggf. Ihren Lieferanten, die für Ihren MARC-Satz benötigten Informationen zu liefern. So können Sie den aktuellen Datensatz mit dem vom Lieferanten bereitgestellten Satz überschreiben und erhalten damit im überschriebenen Satz automatisch alle Informationen, die Sie benötigen.