OPAC
Suchergebnisse
Sie können Ihre Suchbegriffe entweder direkt in das Suchfeld eintippen, oder Sie klicken auf den Link ‚Erweiterte Suche‘, um eine detailliertere Suche durchzuführen.

If Elasticsearch is used and the OpacBrowseSearch system preference is enabled, you will also see the Browse search option.
Bemerkung
For more on searching check the Searching chapter in this manual.
Suchergebnisse
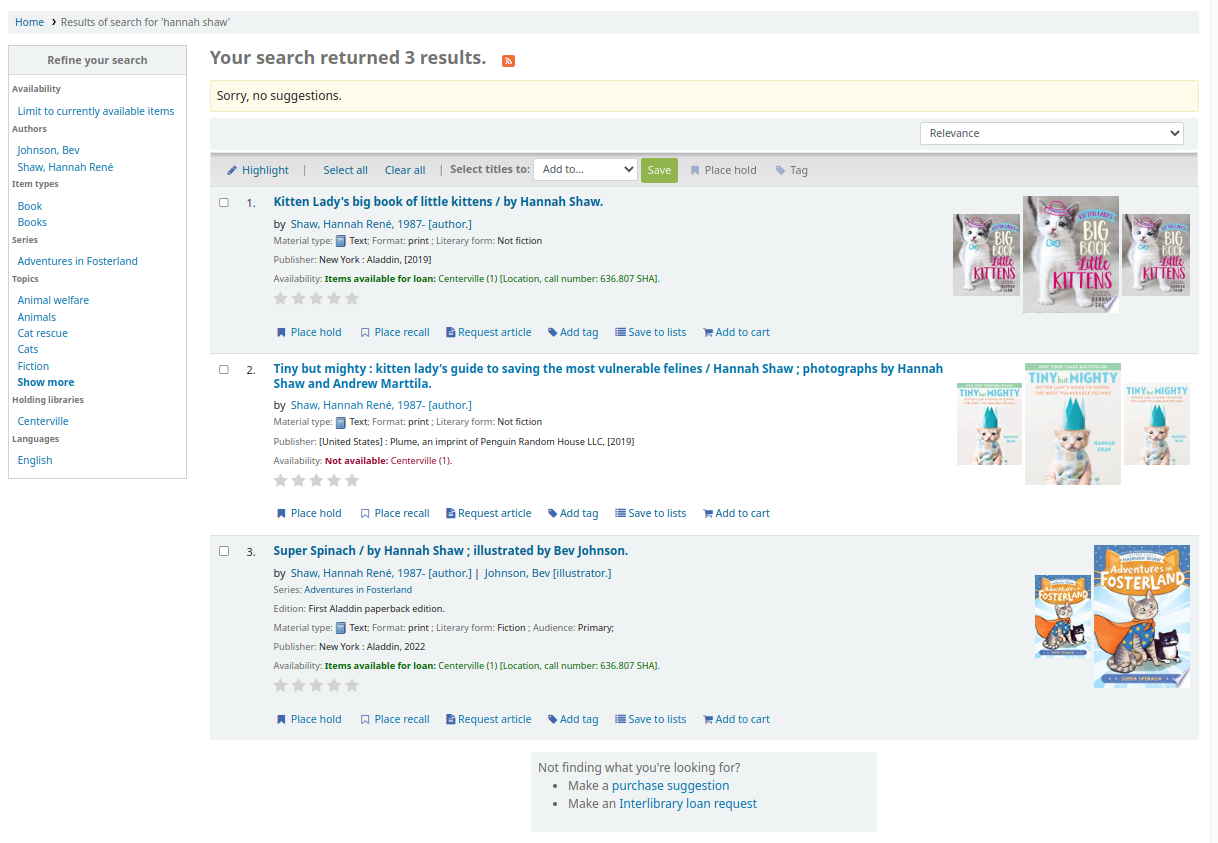
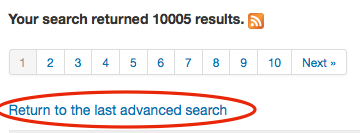
After performing a search, the number of results found for the search will appear above the results.
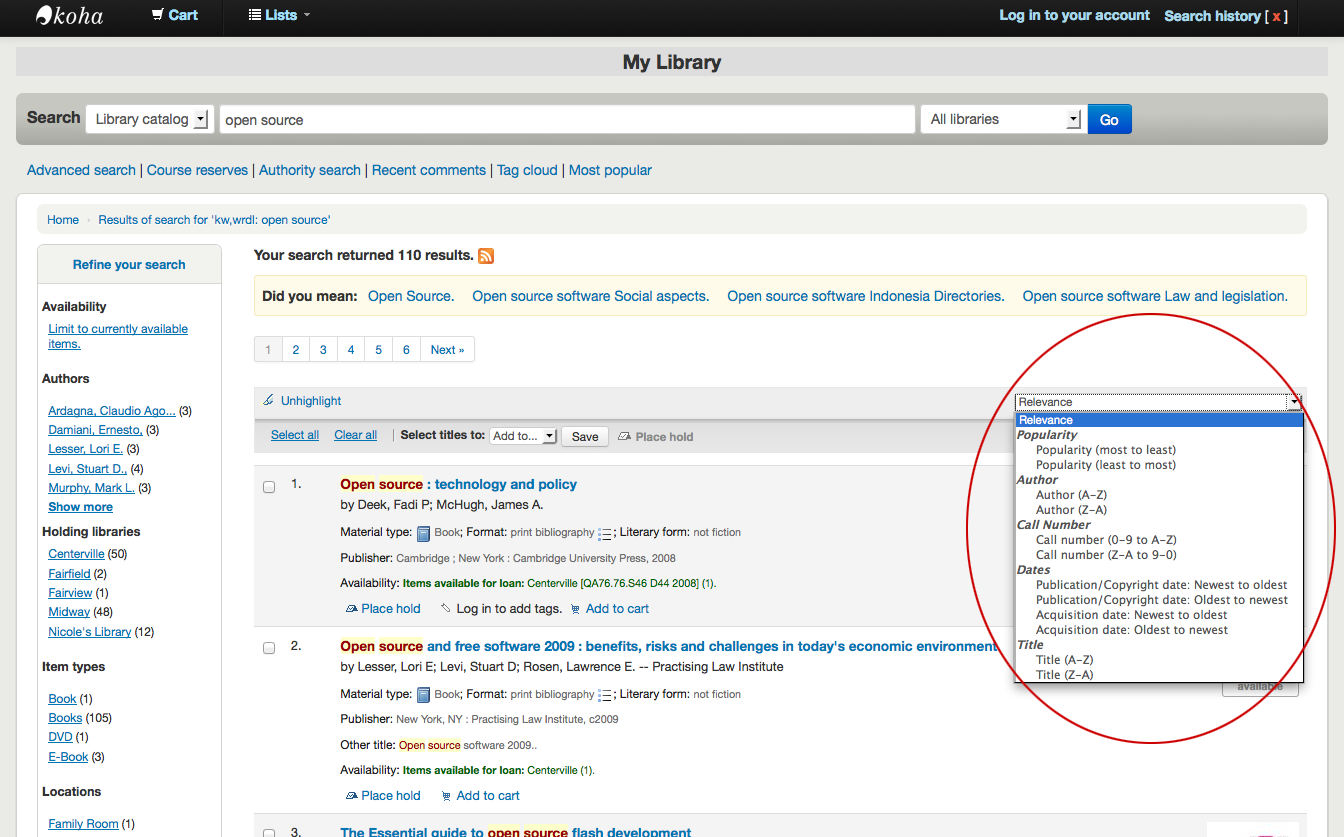
By default, the search results are sorted based on the OPACdefaultSortField and OPACdefaultSortOrder system preference values. To change the sort order of these results, you can choose another sorting method from the drop-down menu on the right.
Under each title in the results list, there will be a series of values from the record’s leader (field 000).
Bemerkung
These values have nothing to do with the item types or collection codes you have applied to your records or items. This data is all pulled from the record’s control fields.
This can be turned on or off with the DisplayOPACiconsXSLT system preference.
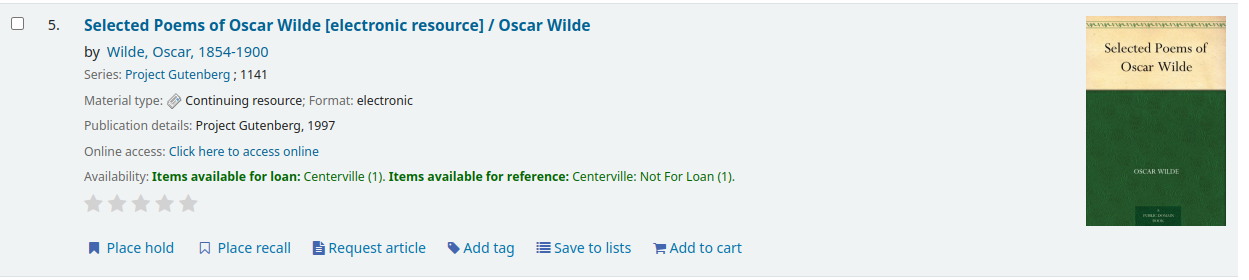
Below each title, there will be the availability for the items attached to the record.
Bemerkung
Even if you filtered on one library location, all locations that hold the item will appear on the search results.
Warnung
An item’s hold status does not affect whether or not the item is ‚available‘ until the item is in ‚waiting‘ status. Items with on-shelf holds will show as available until a staff member has pulled them from the shelf and checked the item in make it show ‚waiting‘.
If any enhanced content system preferences are turned on, there may be cover images next to the search results.
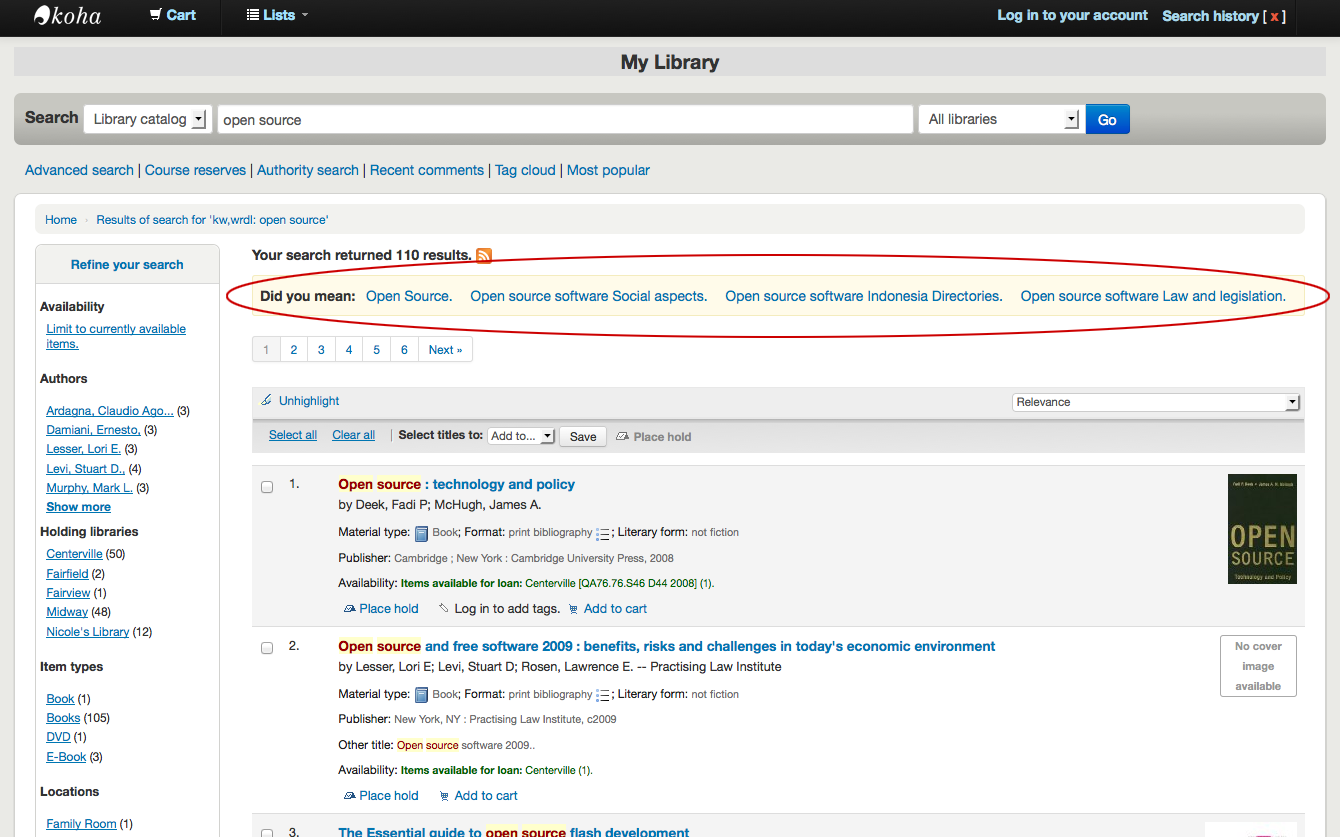
If Did you mean? options are set, there will be a yellow bar across the top of your results will other related searches.
Wenn Sie eine erweiterte Suche durchgeführt haben, erhalten Sie einen Link ‚Zurück zur letzten Erweiterten Suche‘ um die Suche anzupassen.
Filters (facets)
To filter your results click on the links below the ‚Refine your search‘ menu on the left of your screen.
Nachdem Sie auf eine Facette geklickt haben, können Sie diese auch wieder entfernen indem Sie auf das kleine ‚x‘ rechts neben der der Facette klicken.
![Close-up view of the facets, in the author facets, "Shakespeare, William" is not longer a clickable link and has a [x] next to it](_images/removefilter.png)
See the section on search results facets for more details on facets.
You can add custom content below the facets with the OPACResultsSidebar display location in the HTML customizations tool.
RSS Feeds für Suchen
Sie können Ihre Suchergebnisse über einen RSS Feed abonnieren indem Sie auf das RSS Feed Icon rechts neben der Anzahl der Suchergebnisse klicken. Mehr Informationen zu RSS Feeds erhalten Sie in diesem Video <http://www.youtube.com/watch?v=0klgLsSxGsU>`__.
Wenn Sie die Suchergebnisse abonnieren, können Sie sehen wenn für diese Suchergebnisse neue Exemplare hinzugefügt werden.
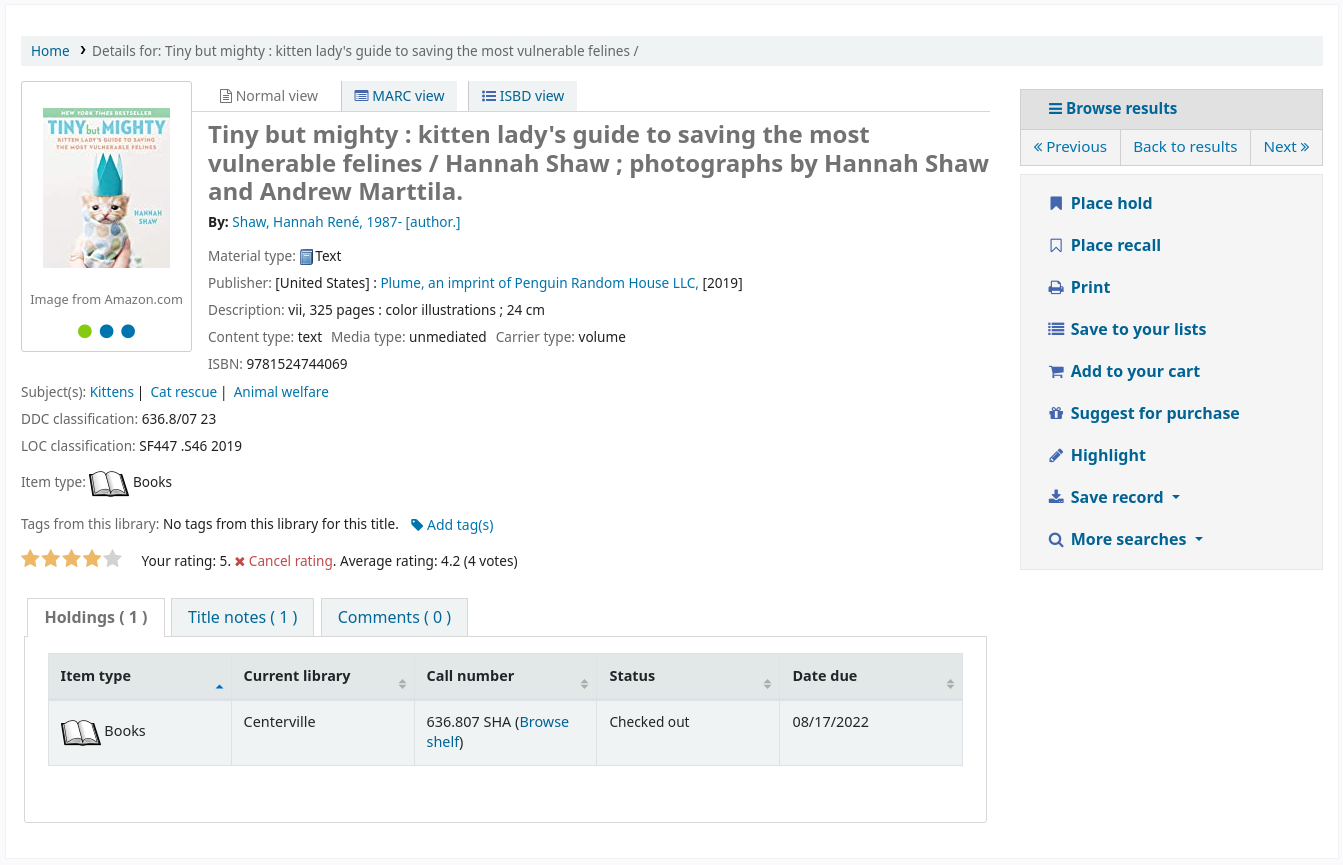
Bibliographischer Datensatz
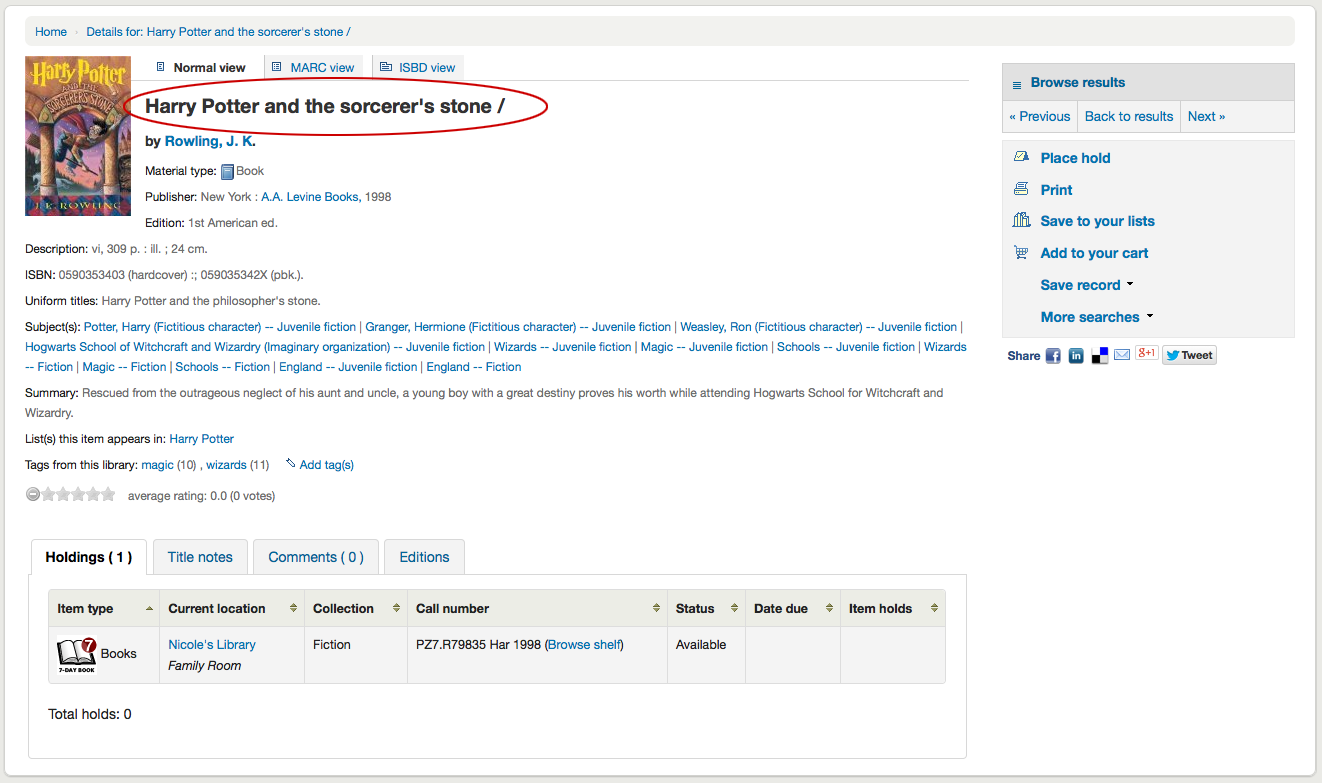
Wenn Sie auf einen Titel aus der Trefferliste klicken gelangen Sie in die Detailansicht des Titels. Die Detailansicht ist in verschiedene Bereiche aufgeteilt.
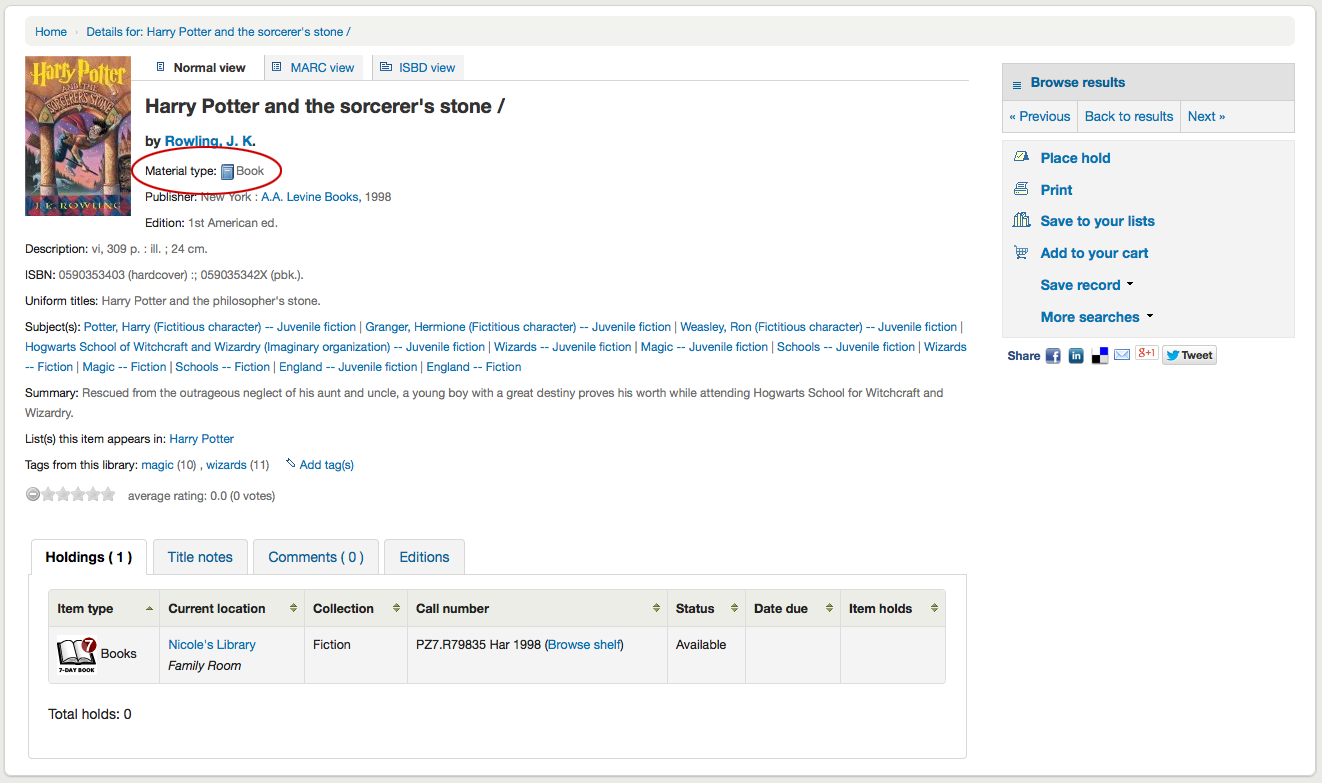
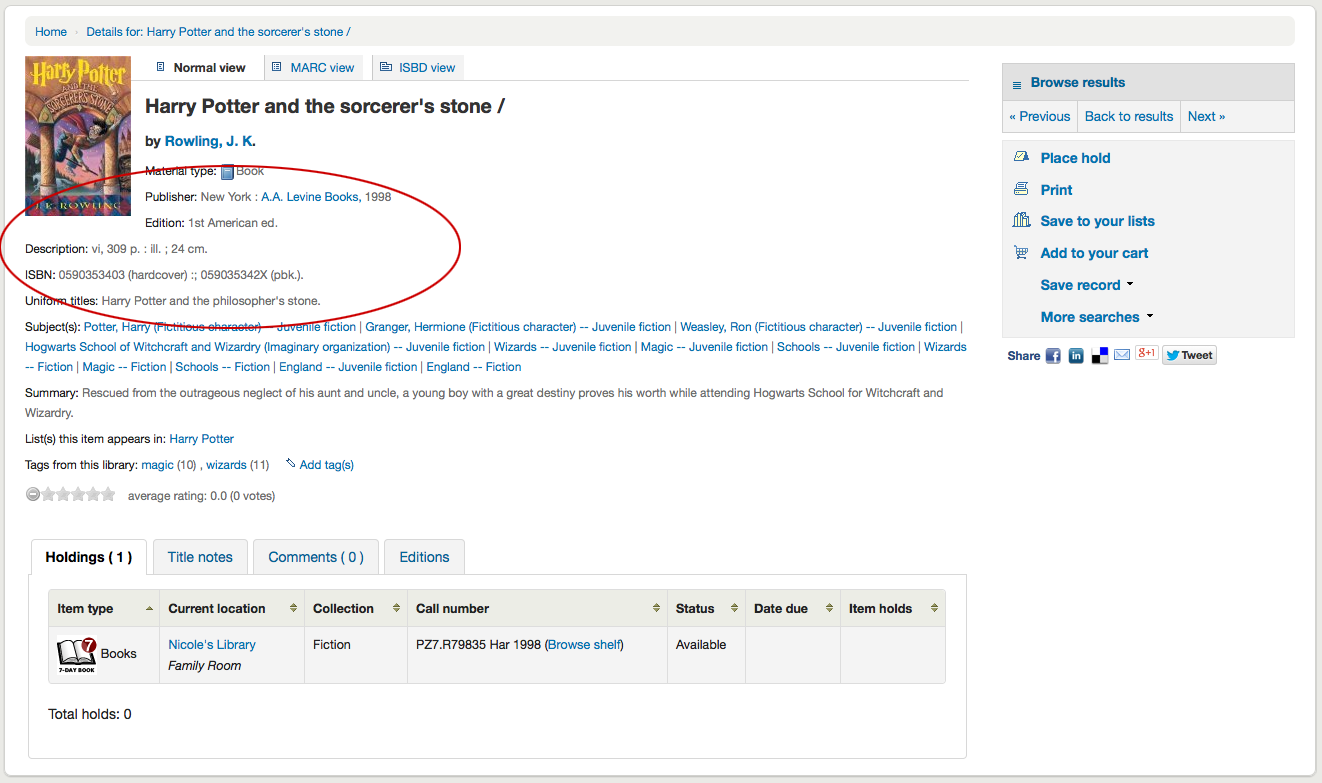
Im oberen Bereich des Bildschirms befindet sich der Titel und die Materialart:
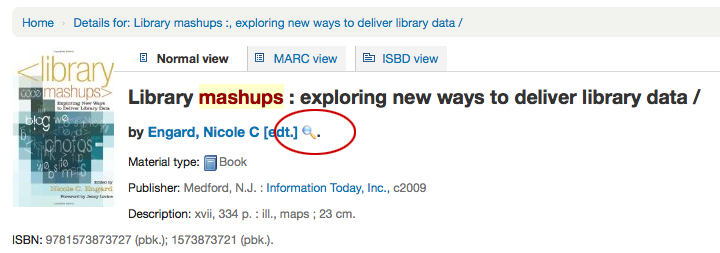
Unterhalb des Titels werden die Autoren aufgeführt. Diese stammen aus den 1xx und 7xx MARC-Feldern. Wenn Sie auf einen Autor klicken, wird eine Suche ausgeführt und Sie erhalten Sie eine Liste mit allen Titeln von und mit dieses Autors.
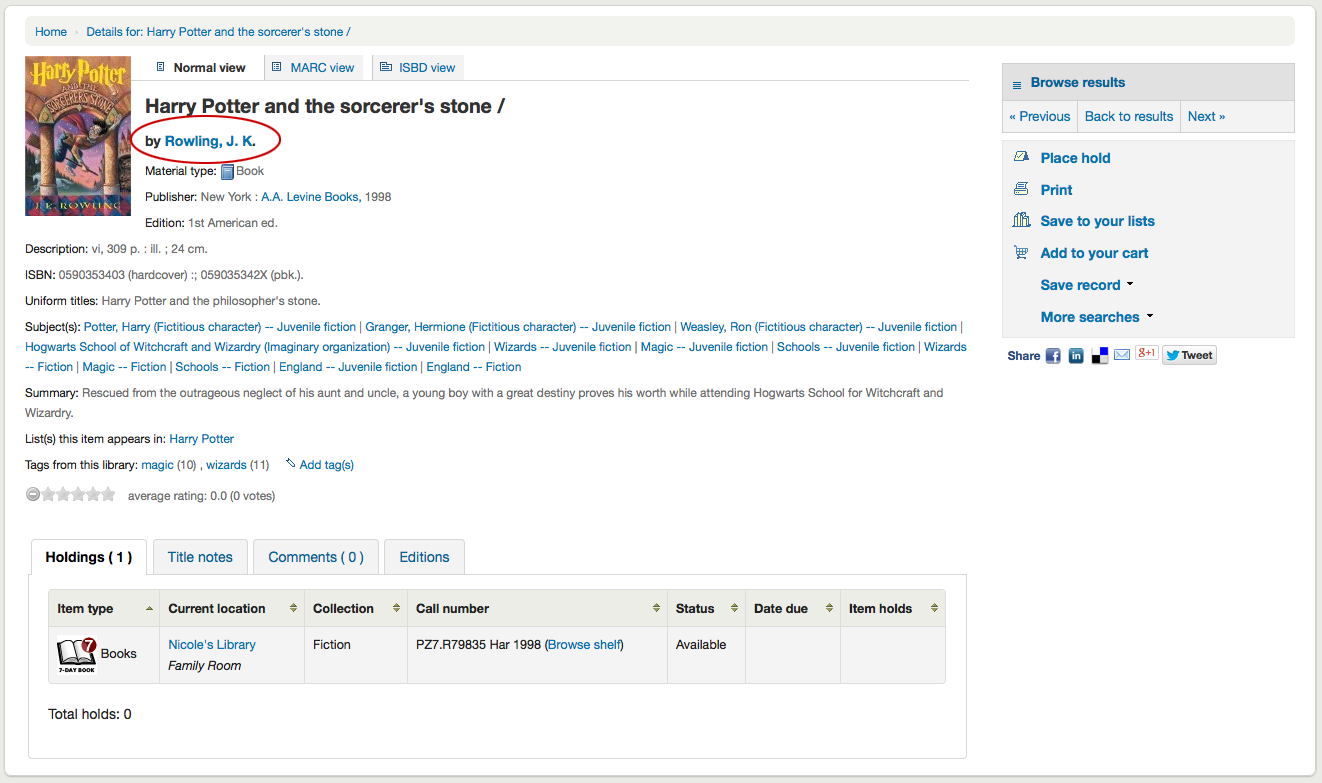
Wenn es sich um Normdaten handelt, sehen Sie neben dem entsprechenden Autor (oder einer anderen Normdatenart) eine Lupe. Wenn Sie auf die Lupe klicken, gelangen Sie direkt auf den Normdatensatz.
If you have your DisplayOPACiconsXSLT preference set to ‚show‘ you will see a material type that is determined by values in your fixed fields (learn more in the XSLT material type icons cataloging guide.
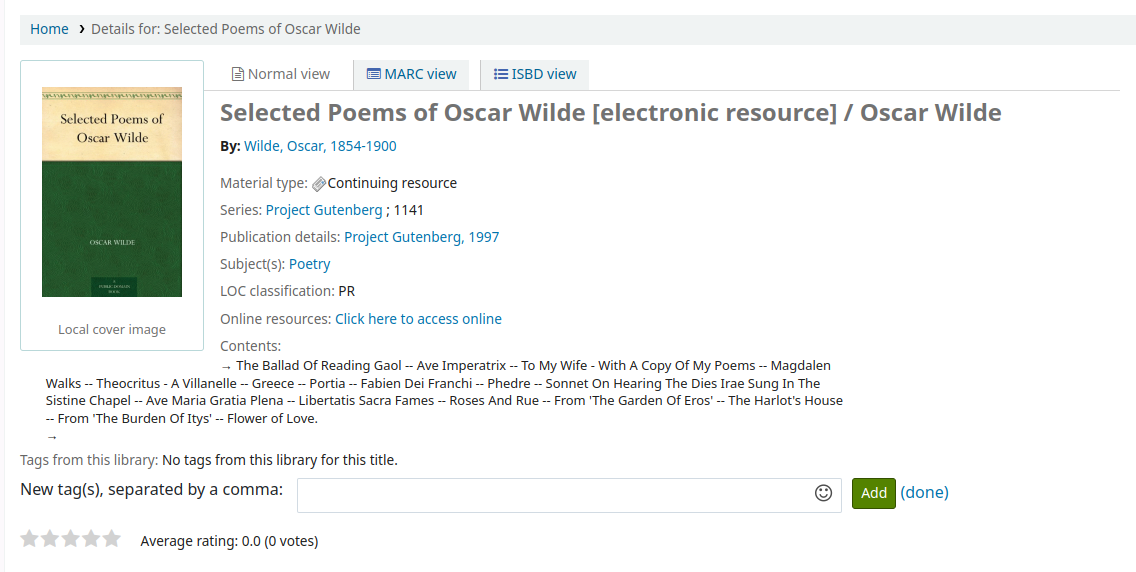
Hier sehen Sie die Beschreibung des Titelsatzes:
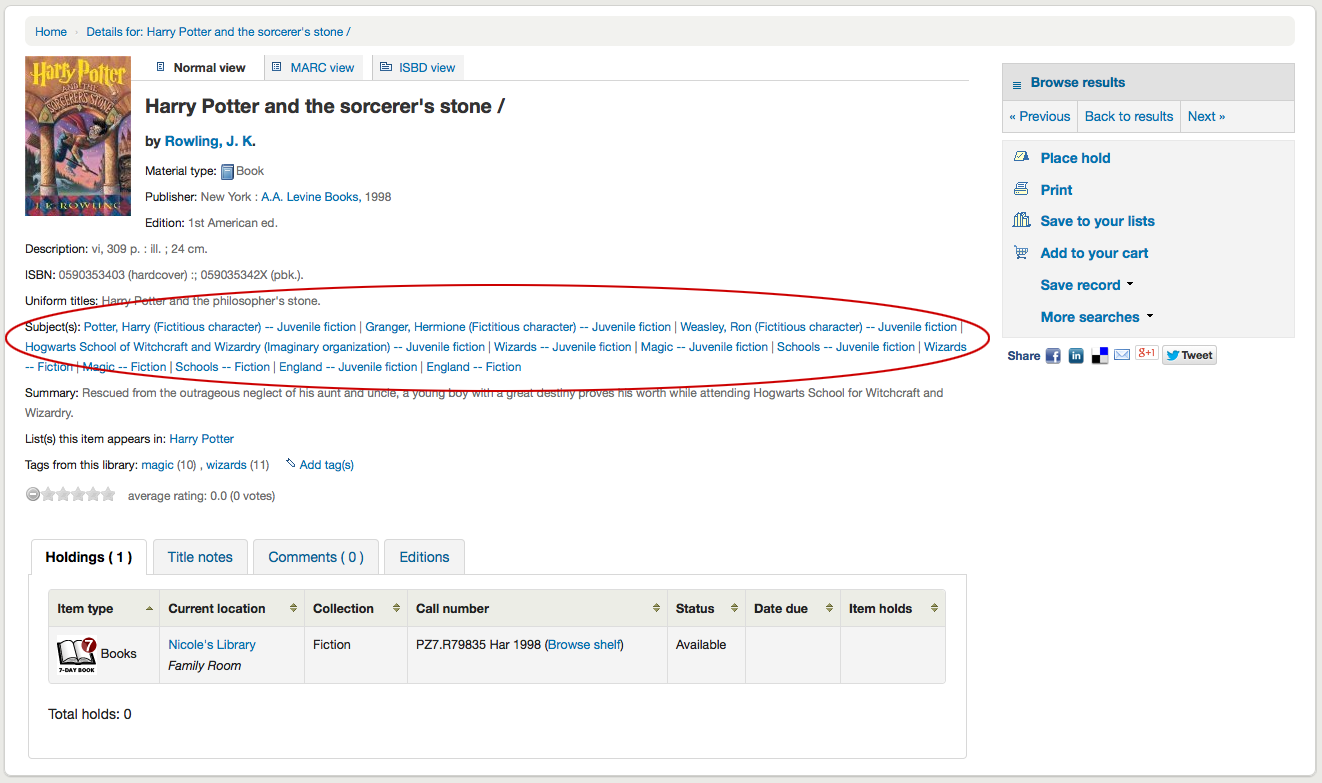
Wenn Sie auf die Schlagwörter klicken, wird eine Suche nach Titeln mit diesem Schlagwort durchgeführt
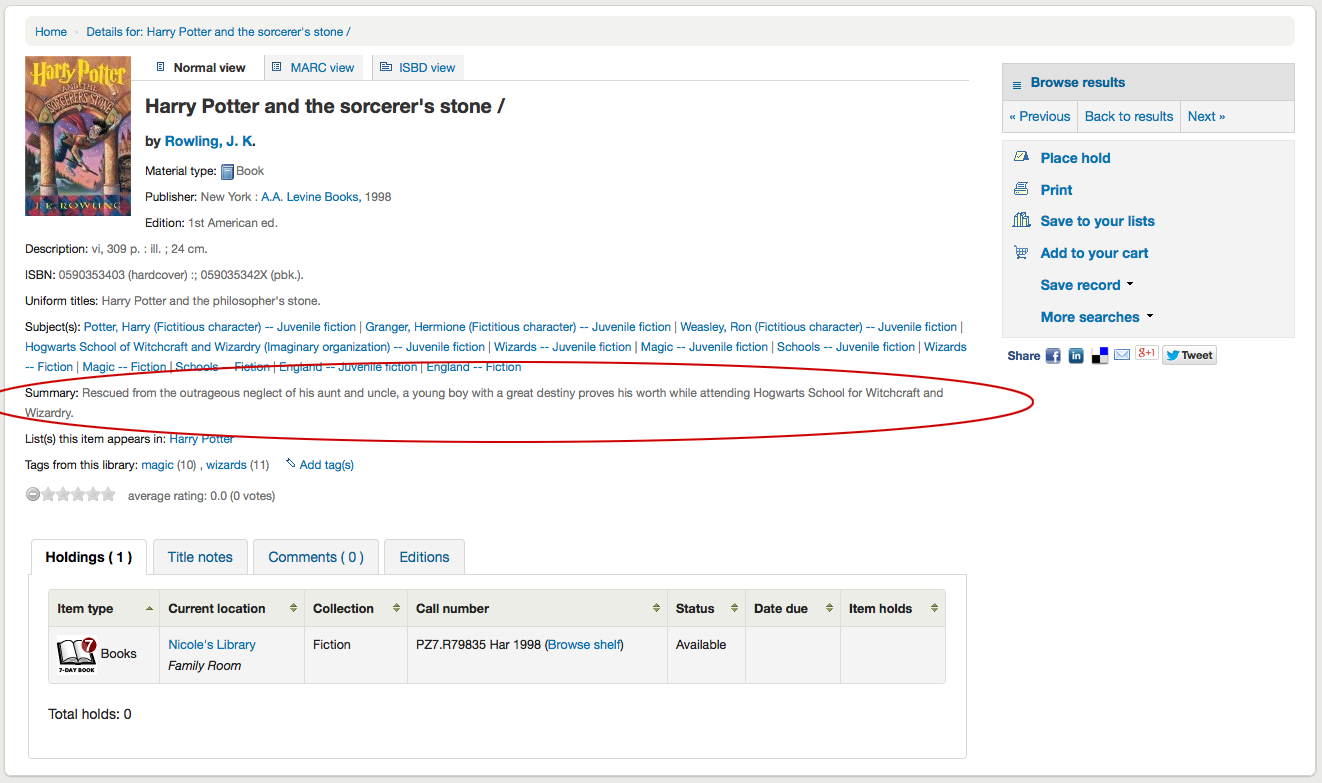
Wenn der Titelsatz eine Inhaltsangabe und / oder eine Zusammenfassung hat, erscheinen diese hier ebenfalls.
Wenn Daten in den MARC-Feldern 856 vorhanden sind, werden entsprechend Links unter der Rubrik ‚Online-Ressourcen‘ angezeigt.
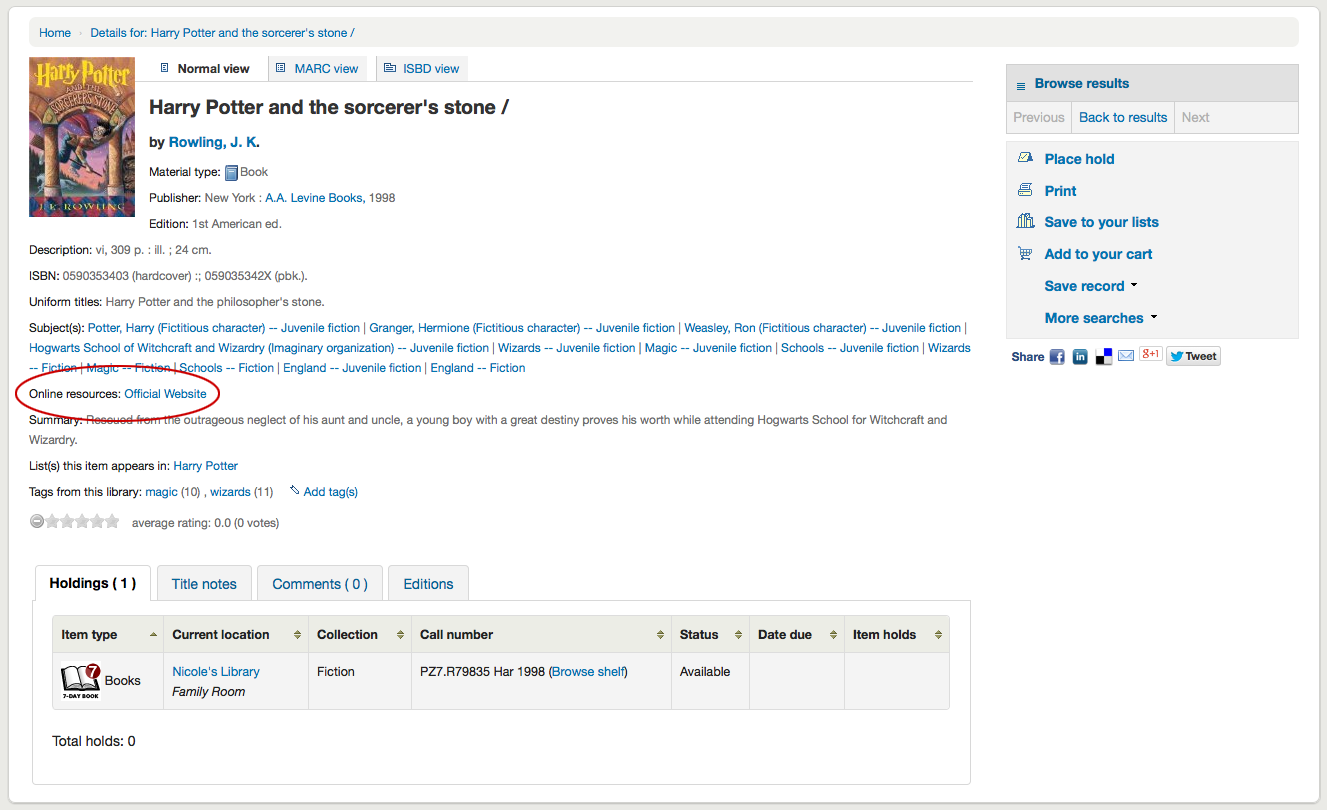
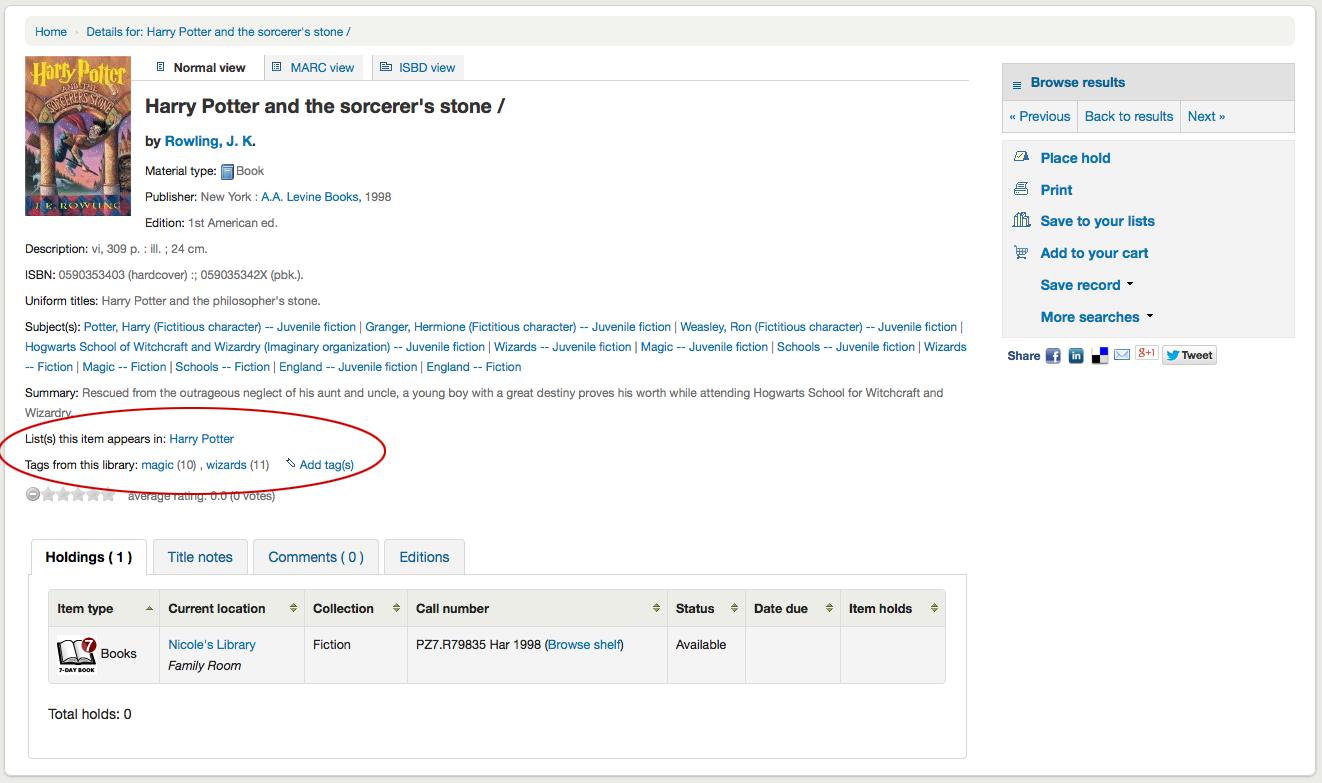
Wenn der Titel in einer öffentlichen Liste enthalten ist, erscheint die Rubrik ‚Listen, auf denen dieser Titel steht:‘ mit dem Namen der Liste. Darüber hinaus werden ‚Tags dieser Bibliothek‘ angezeigt, wenn diese entsprechend vorhanden sind
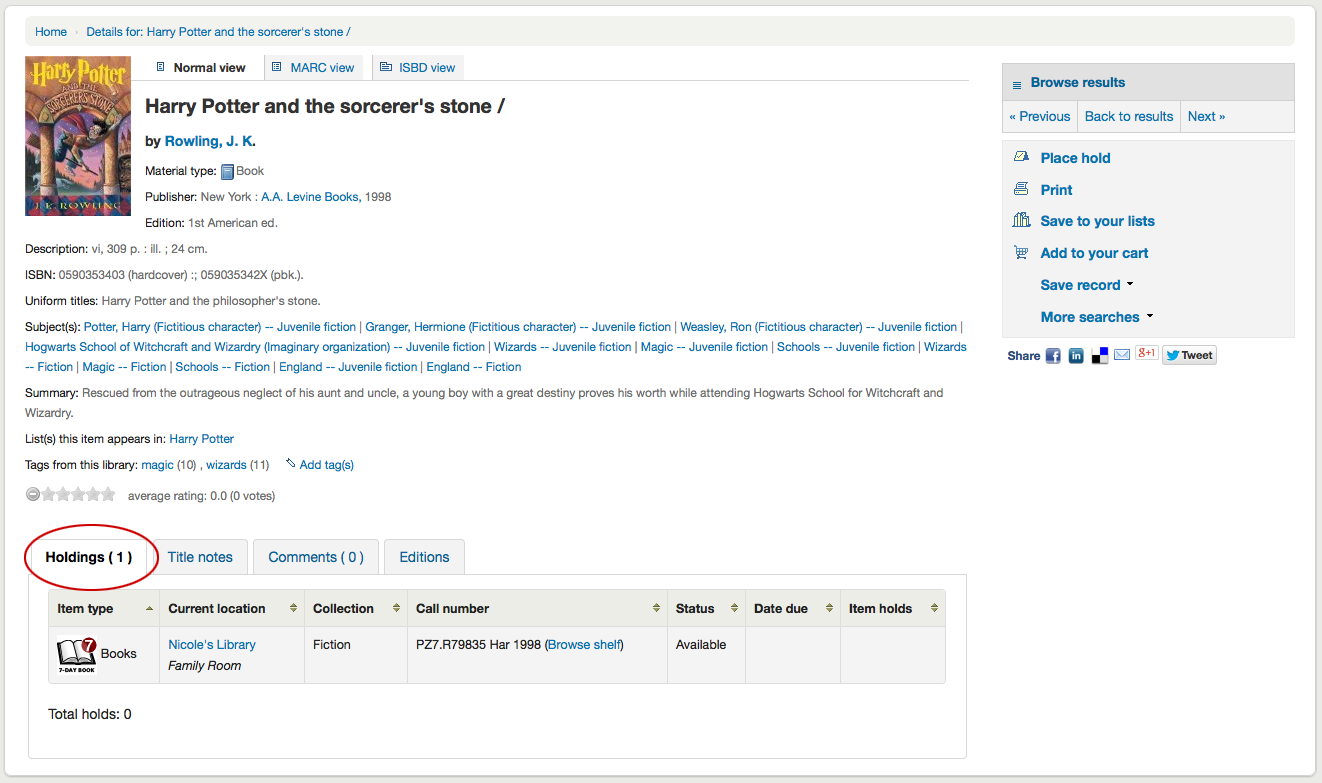
In den Reitern unterhalb des Titelsatzes befinden sich die Exemplarangaben
Hinweis
Sie können die Spalten dieser Tabelle über die ref:Tabellenkonfiguration <column-settings-label> im Administrationsmodul anpassen (Tabellen-ID: holdingst).
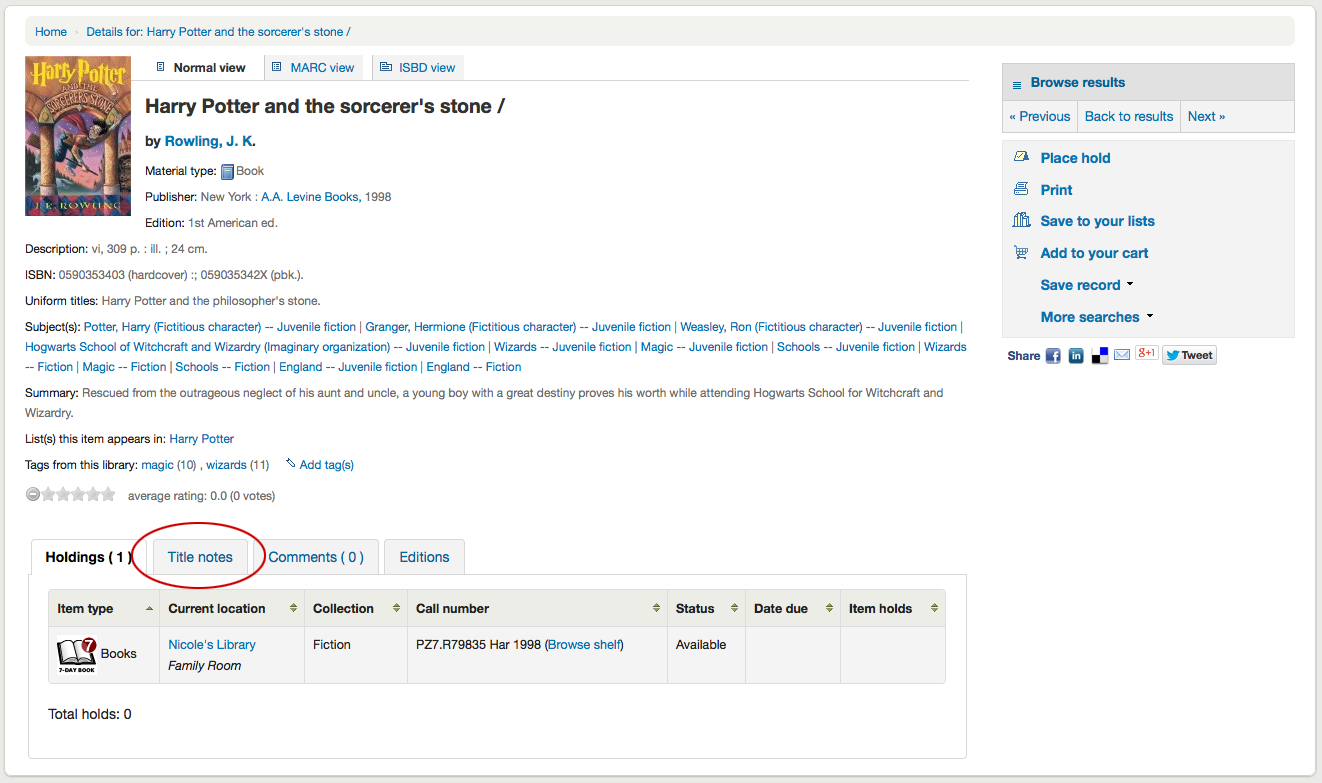
Wenn Notizfelder (MARC Felder 5xx) erfasst wurden, erscheinen die Angaben unter ‚Titelinformationen‘
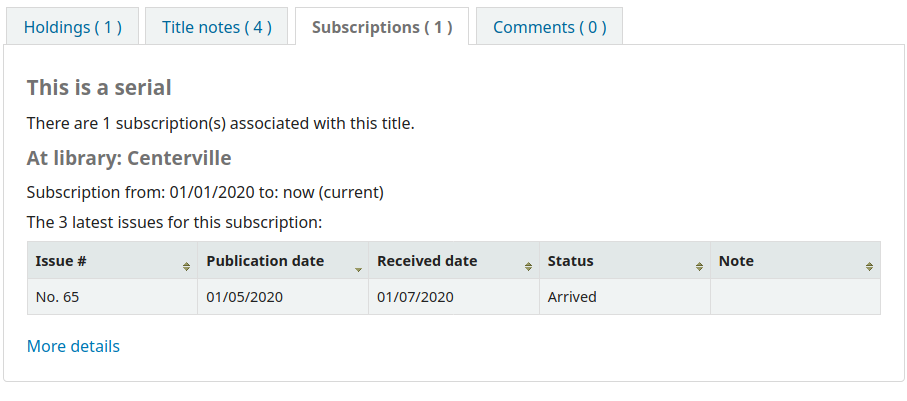
Wenn der Titelsatz über das Zeitschriftenmodul mit einem Abonnement verknüpft ist, dann wird ein Reiter „Abonnements“ mit den Informationen zum Abo und den Heften angezeigt.
Bemerkung
Sie können die Spalten dieser Tabelle über die ref:Tabellenkonfiguration <column-settings-label> im Administrationsmodul anpassen (Tabellen-ID: subscriptionst).
Bemerkung
If you chose a notice in the ‚Patron notification‘ field when adding the subscription, there will be a button patrons can click to be notified by email when a new issue is received.
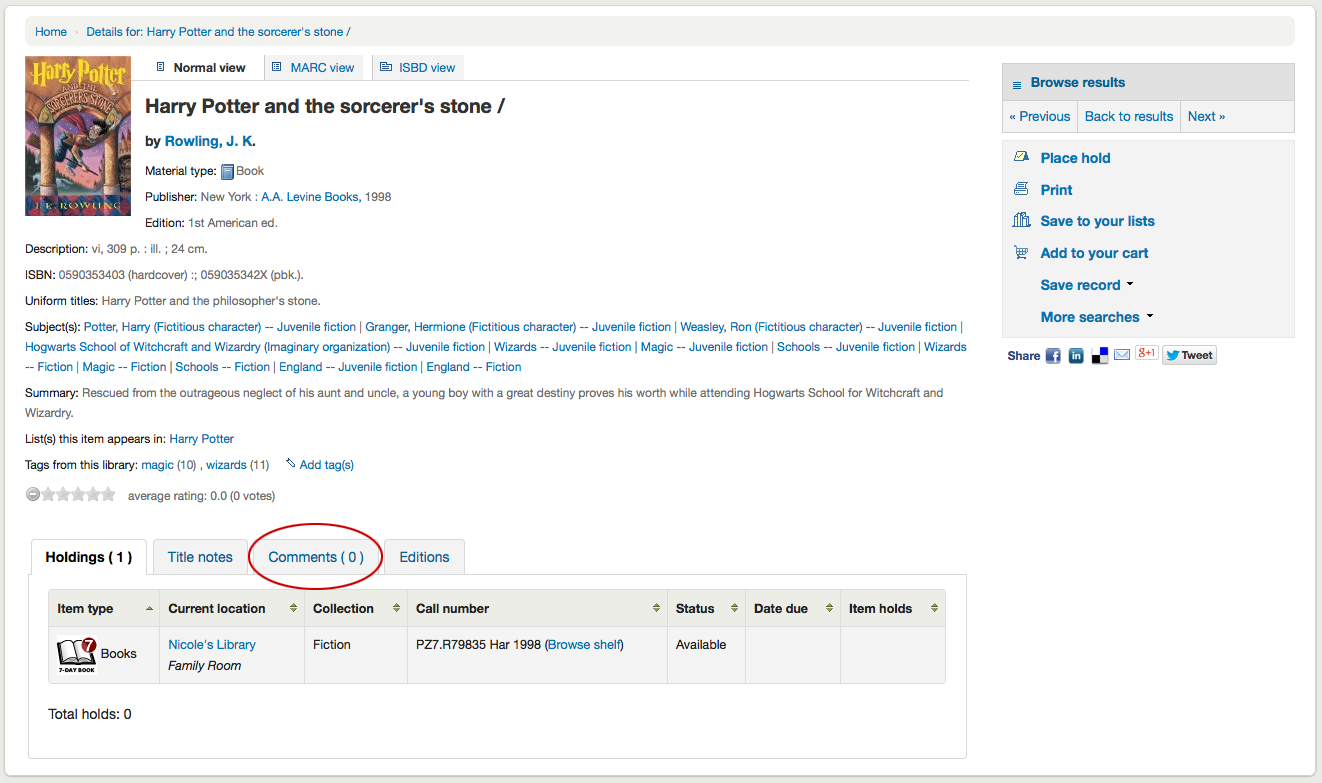
Wenn Sie die Kommentarfunktion zulassen, erscheinen Kommentare hier im nächsten Reiter
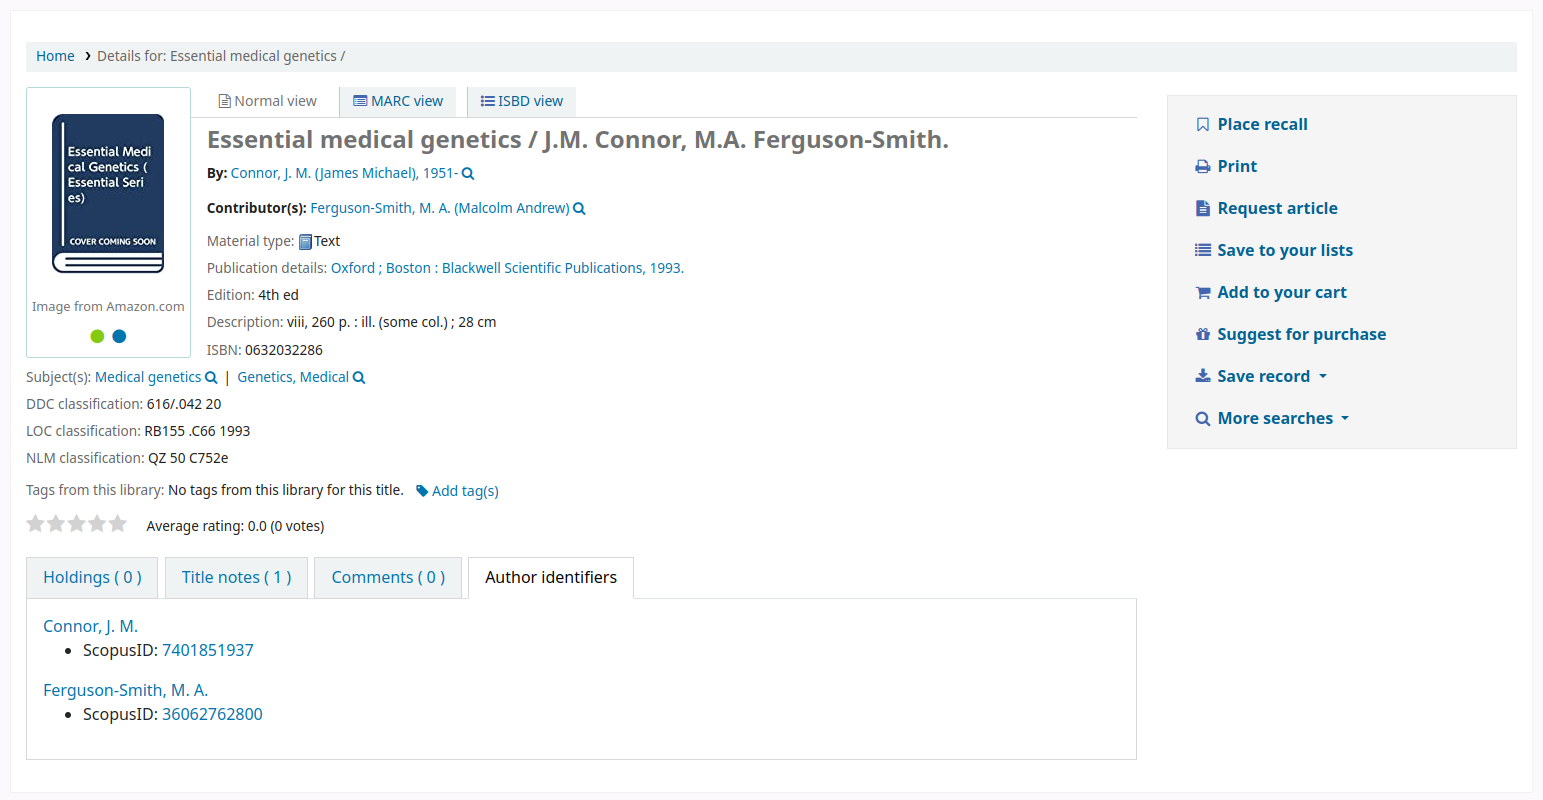
If the OPACAuthorIdentifiers system preference is turned on, and that your author authority records have standard identifiers, there will be an ‚Author identifiers‘ tab showing the identifiers with links to the author record on the source website.
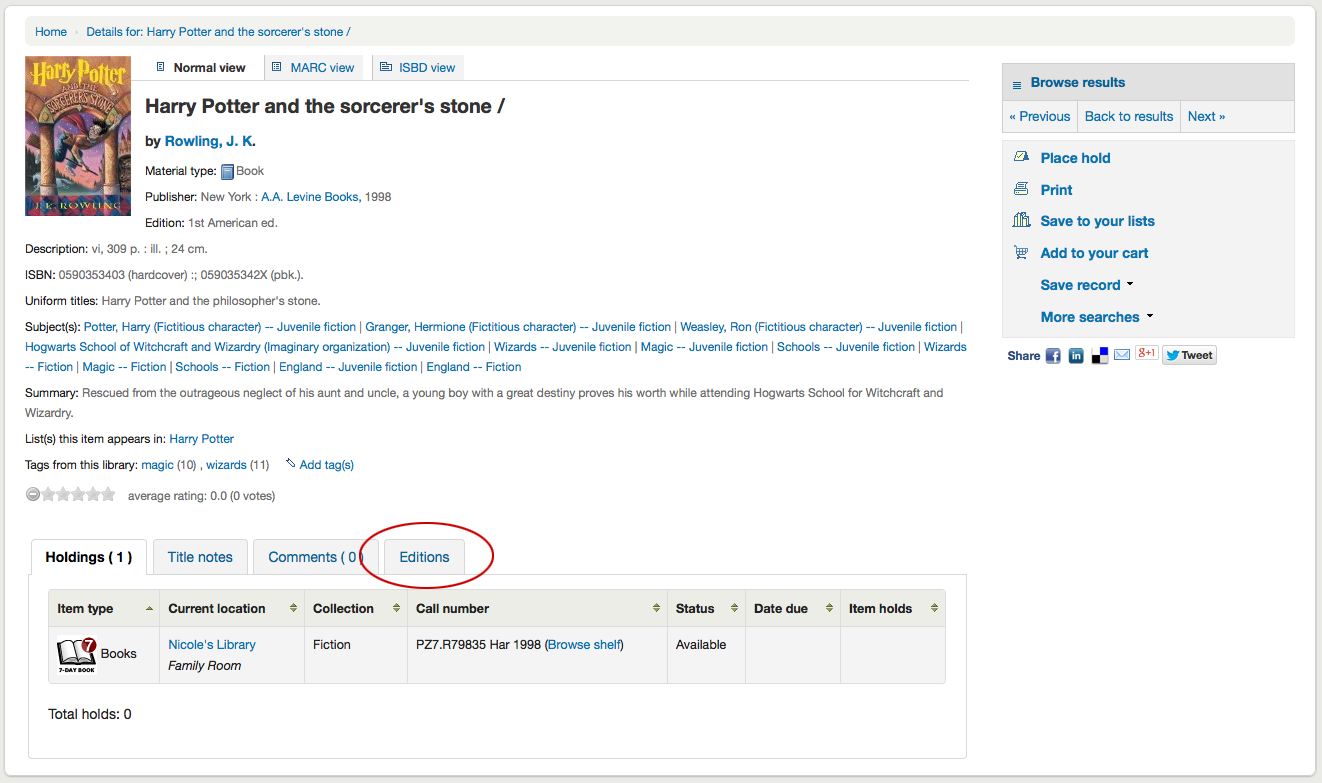
Und wenn Sie die FRBR Parameter aktiviert haben, erhalten Sie andere Ausgaben des Titels unter dem Reiter ‚Ausgaben‘ angezeigt, wenn es welche gibt.
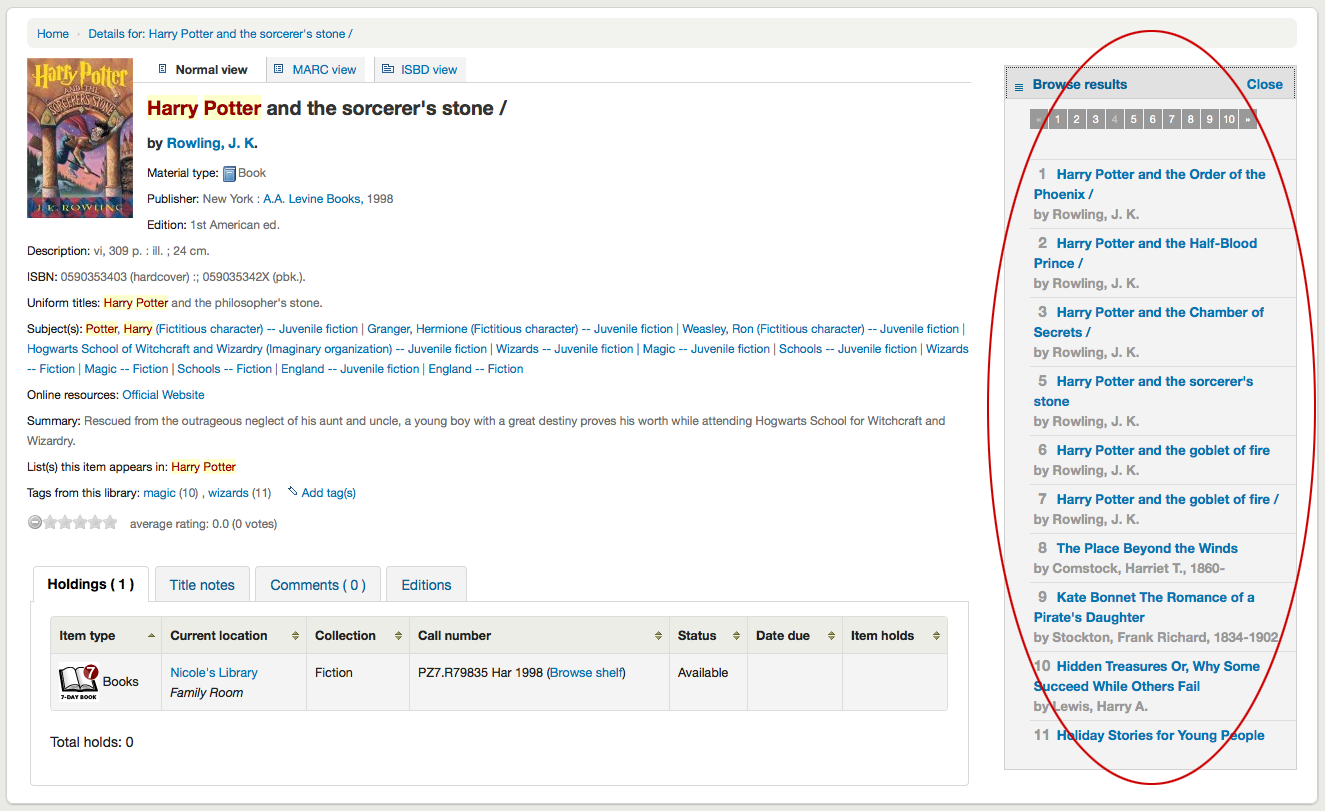
Rechts neben den Titelangaben befinden sich Boxen mit verschiedenen Optionen. Die erste Box hilft Ihnen durch die Trefferliste zu navigieren. Von dort können Sie auch zum nächsten oder vorherigen Treffer, oder zu Ihrer Trefferliste gelangen.
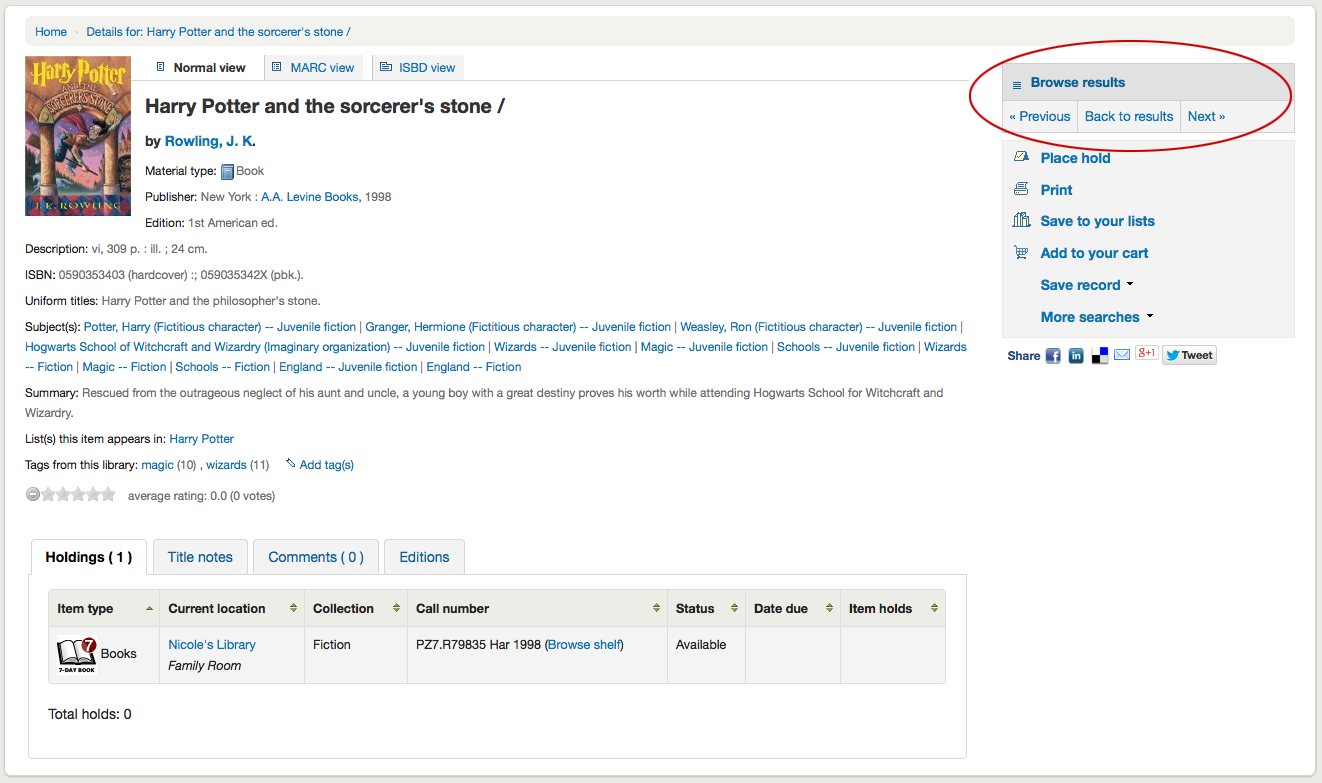
Wenn Sie auf ‚Trefferliste durchstöbern‘ klicken erhalten Sie eine verkürzte Trefferliste Ihrer Suchergebnisse direkt auf der Detailansicht
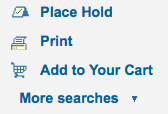
Darunter finden Sie Links um eine Vormerkung abzusetzen, den Titelsatz zu drucken, den Satz zu Ihren Listen oder zu Ihrem Korb hinzuzufügen oder an eines Ihrer Geräte zu senden (über einen QR-Code).
Another option that will appear on this right hand side bar, if a library is allowing purchase suggestions (see the suggestion system preference), is the ability to ‚Suggest for Purchase‘. Clicking this link will bring the user to the purchase suggestion form to fill out.
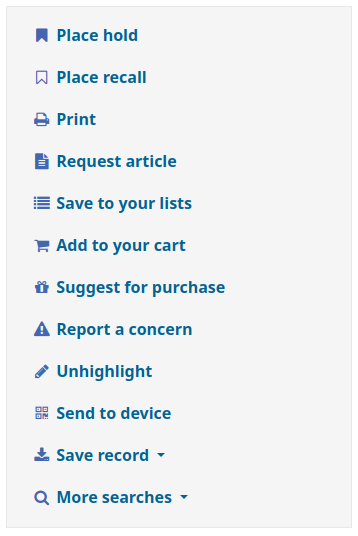
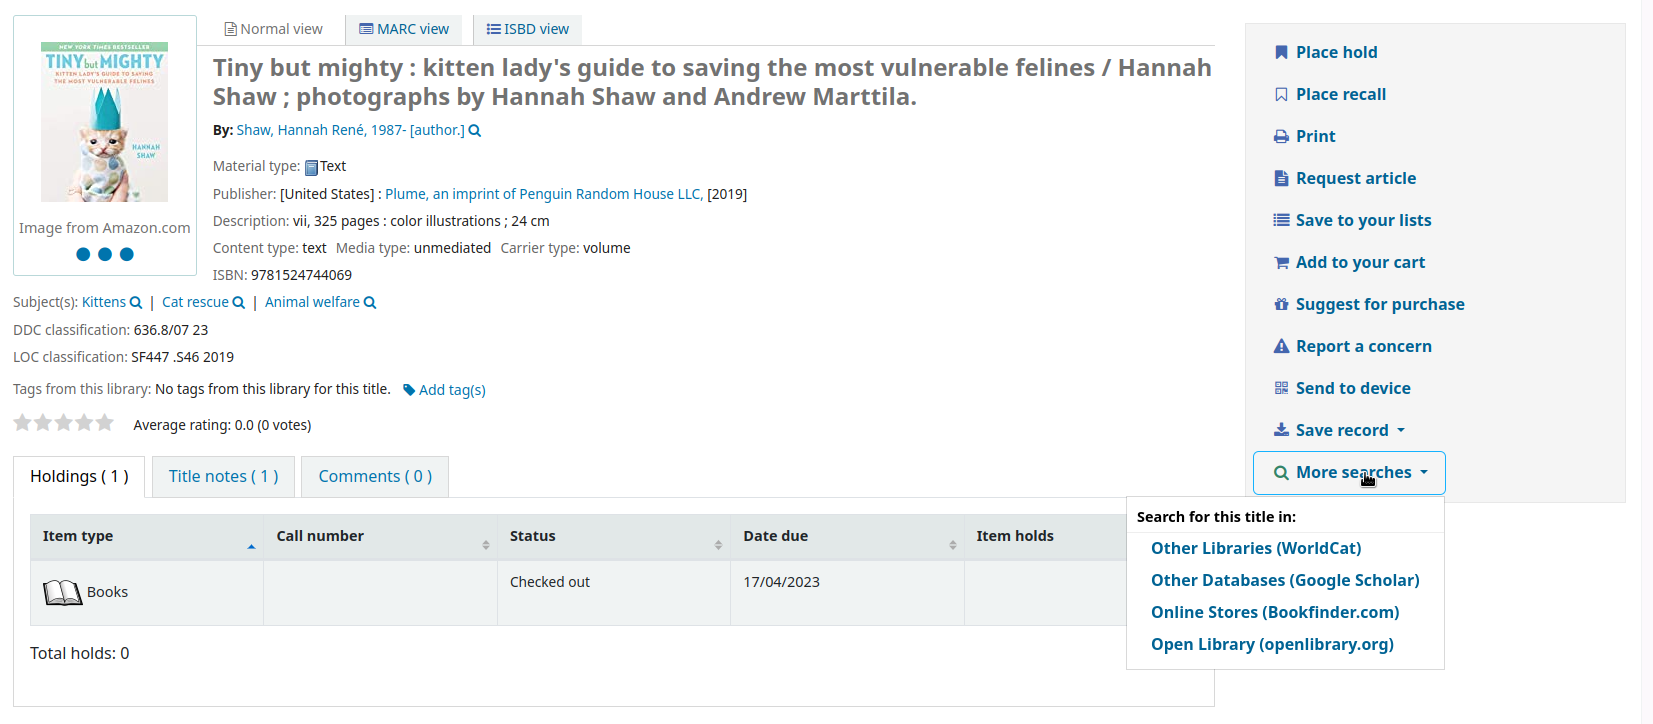
Clicking ‚More searches‘ will show the list of libraries you entered in your OPACSearchForTitleIn preference
Under the ‚Save record‘ label you will find a series of file formats you can save the record as. This list can be customized by altering the OpacExportOptions system preference.
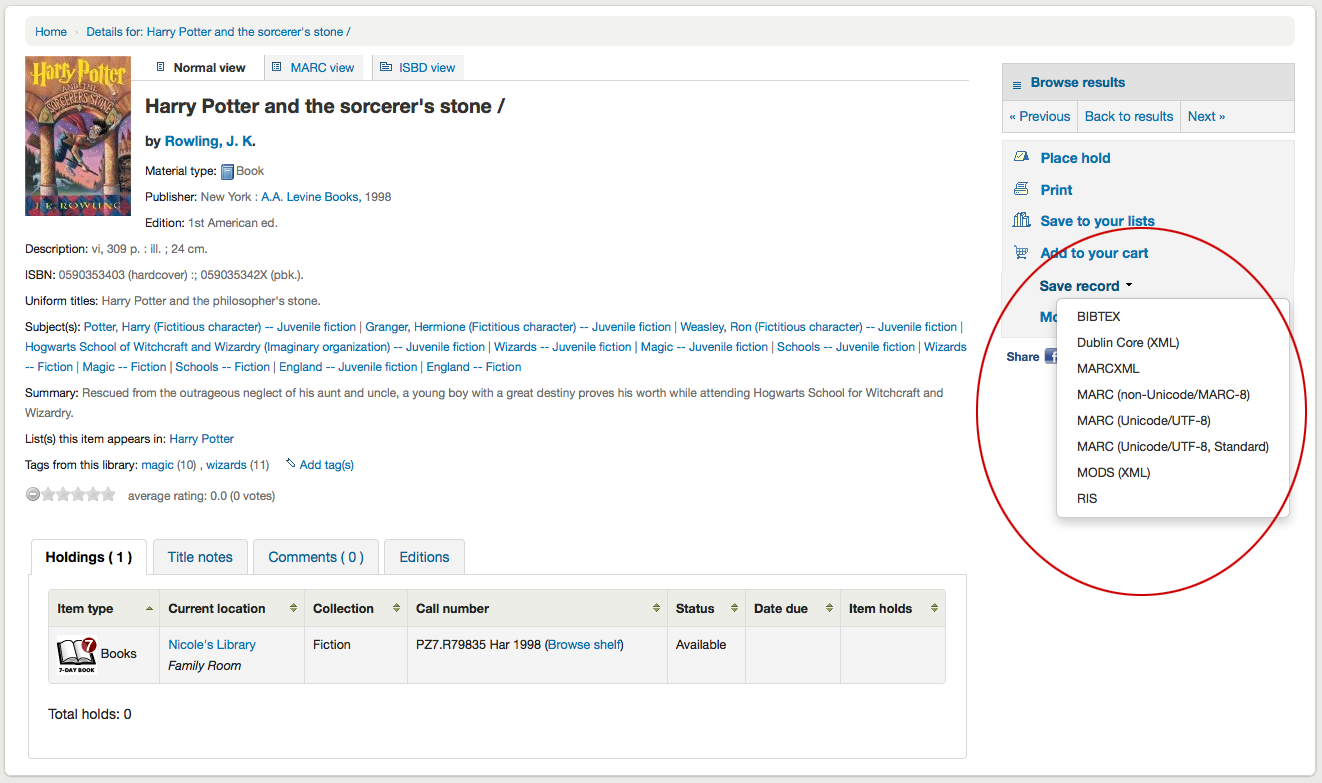
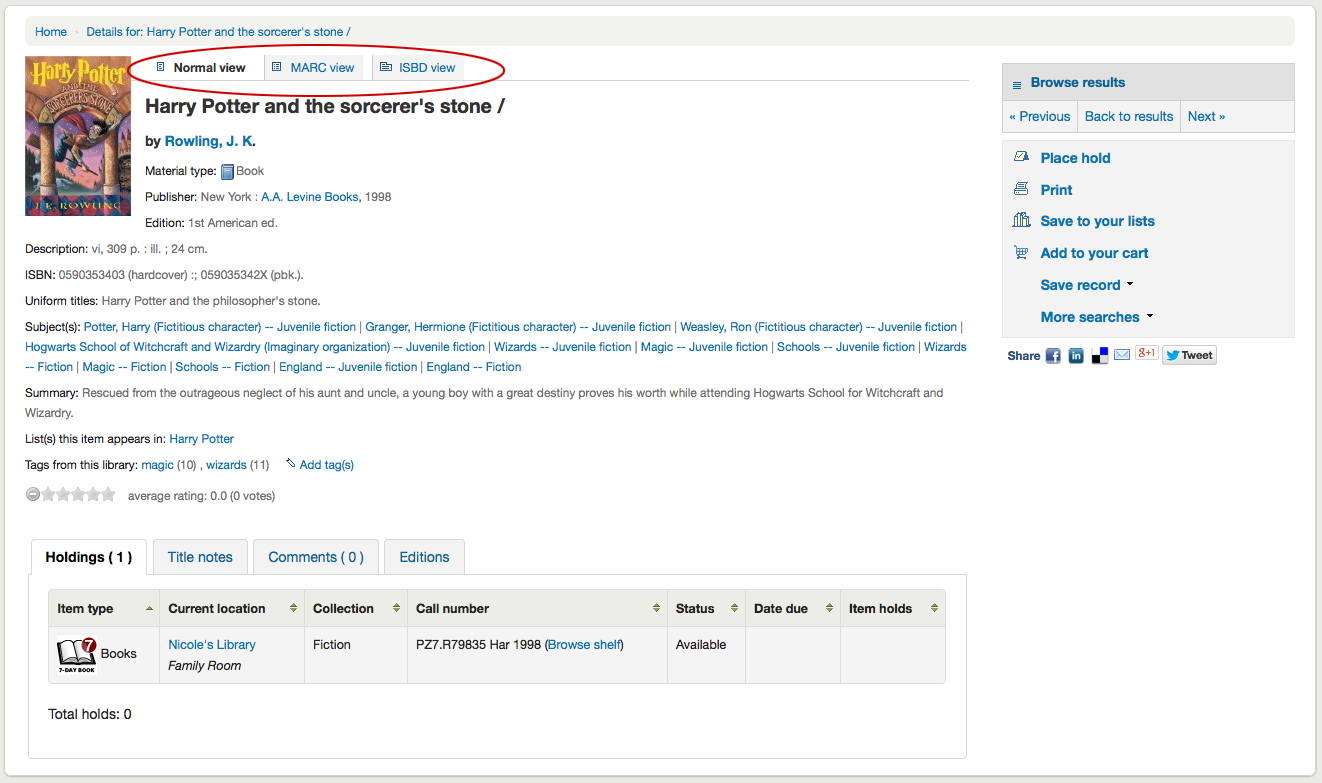
Sie können die Ansicht des Titelsatzes ändern, und anstelle der ‚Normal‘-Ansicht die MARC- oder ISBD-Anzeige oberhalb des Titelsatzes auswählen
Reporting concerns about bibliographic records
If the OpacCatalogConcerns system preference is enabled, patrons will be able to report concerns regarding specific bibliographic records.
This is similar to the problem report feature but is linked to a specific bibliographic record, and there is the possibility to have a resolution.
Um ein neues Problem zu melden,
In the bibliographic record’s detail page, click the ‚Report a concern‘ link in the options at the right side.
Bemerkung
Patrons must be logged in to report a concern. If they are not logged in, the system will ask them for their login information.
Fill in the concern form.

Title: enter a title describing succinctly the problem.
Please describe your concern: enter details about the problem, being the more descriptive possible so that the staff member who receives this is able to replicate and see the problem.
An example of what is expected in the description is provided in the field:
**Describe the concern**

A clear and concise description of what the concern is.

**To Reproduce**

Steps to reproduce the behavior:
1. Go to '...'
2. Click on '....'
3. Scroll down to '....'
4. See error

**Expected behavior**

A clear and concise description of what you expected to happen.
Bemerkung
This text is customizable in the HTML customizations tool, by changing the ‚CatalogConcernTemplate‘ entry.
The text at the bottom of the form („Please describe your concern clearly…“) is also customizable in the HTML customizations tool, by changing the ‚CatalogConcernHelp‘ entry.
Click ‚Submit‘.
This will send an email to the cataloging team to notify them that a new concern has been created. The email will be sent to the email address in the CatalogerEmails system preference. The email sent is the TICKET_NOTIFY notice, which can be customized in the Notices and slips tool.
An email will also be sent to the reporter to notify them that the concern has been received. The email sent is the TICKET_ACKNOWLEDGE notice, which can be customized in the Notices and slips tool.
Concerns reported about this record are visible in the ‚Concerns‘ tab.
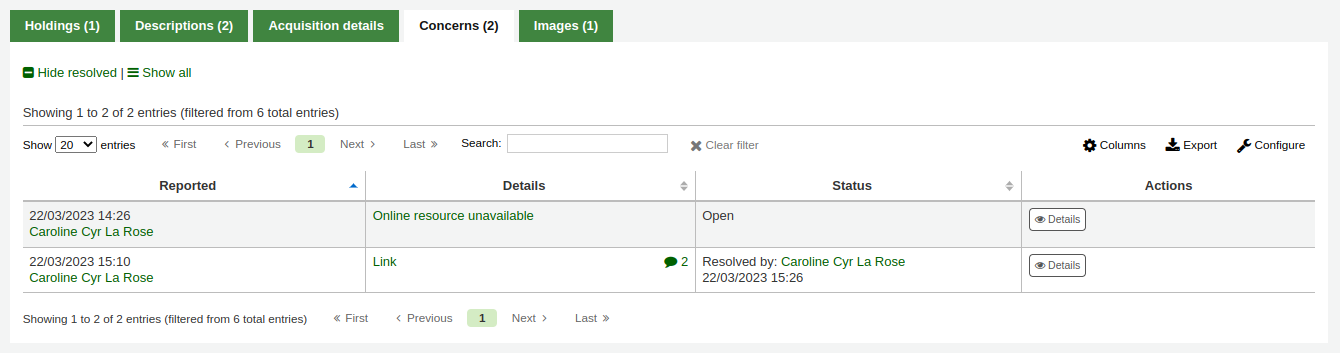
All concern tickets will be visible in the catalog concerns report.
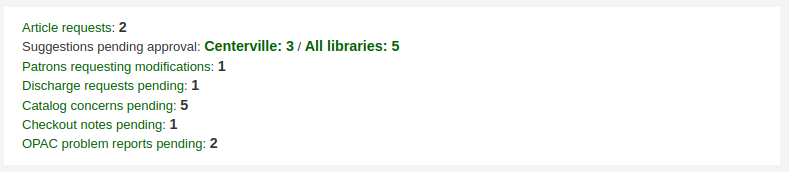
Newly opened concern reports will also appear in the notification section at the bottom of the staff interface main page.
Authority search
If the OpacAuthorities system preference is set to ‚Allow‘, patrons will be able to search authority records from the OPAC.
The authority search is accessed by the ‚Authority search‘ link under the search bar at the top of the page.
The search form allows patrons to search authorities by type and terms.
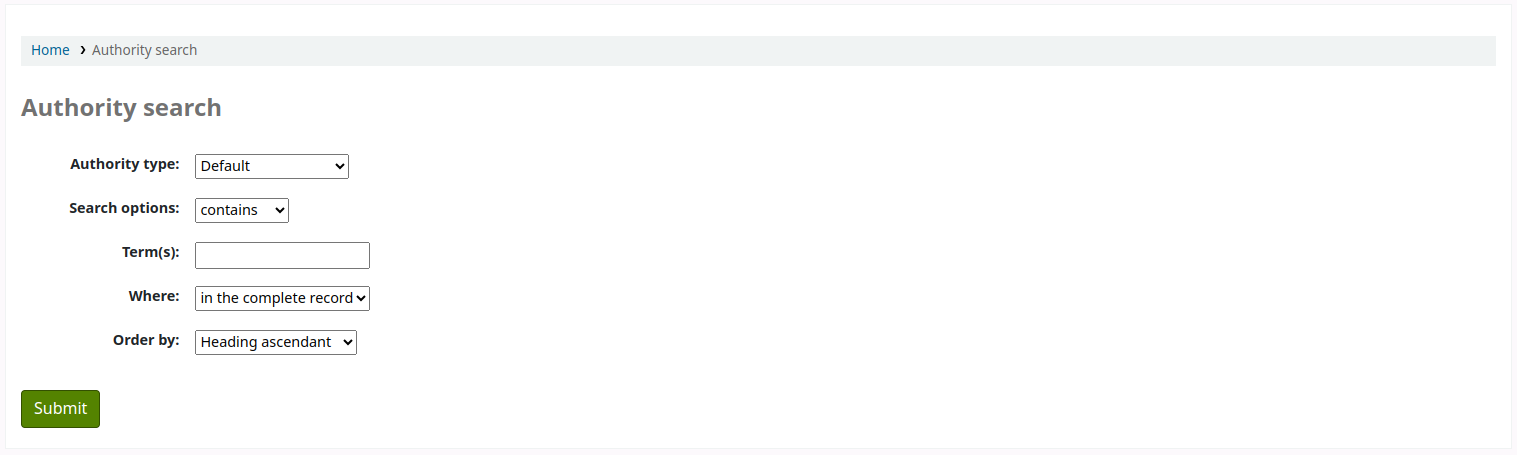
The results show the headings, the type of heading, and the number of bibliographic records this authority record is used in.

If the authority record contains notes, a ‚Notes‘ link will appear under the heading.
Clicking on ‚Details‘ will show the complete record.
Clicking on the number of records will do a catalog search for records linked to this authority record.
Listen und Korb
A cart is a temporary holding place for records you’re interested in finding during this session. That means that once you log out of the OPAC or close the browser you lose the items in your cart.
A list is a more permanent location for saving items.
To learn more about lists, check the Lists and cart chapter of this manual, which deal with these features in the staff interface.
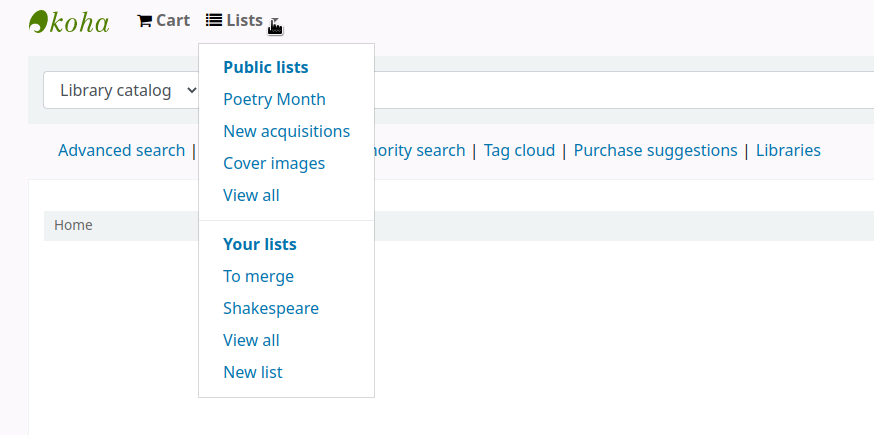
Listen
Patrons can manage their own private lists and find all public lists by visiting the ‚Lists‘ section of their account.
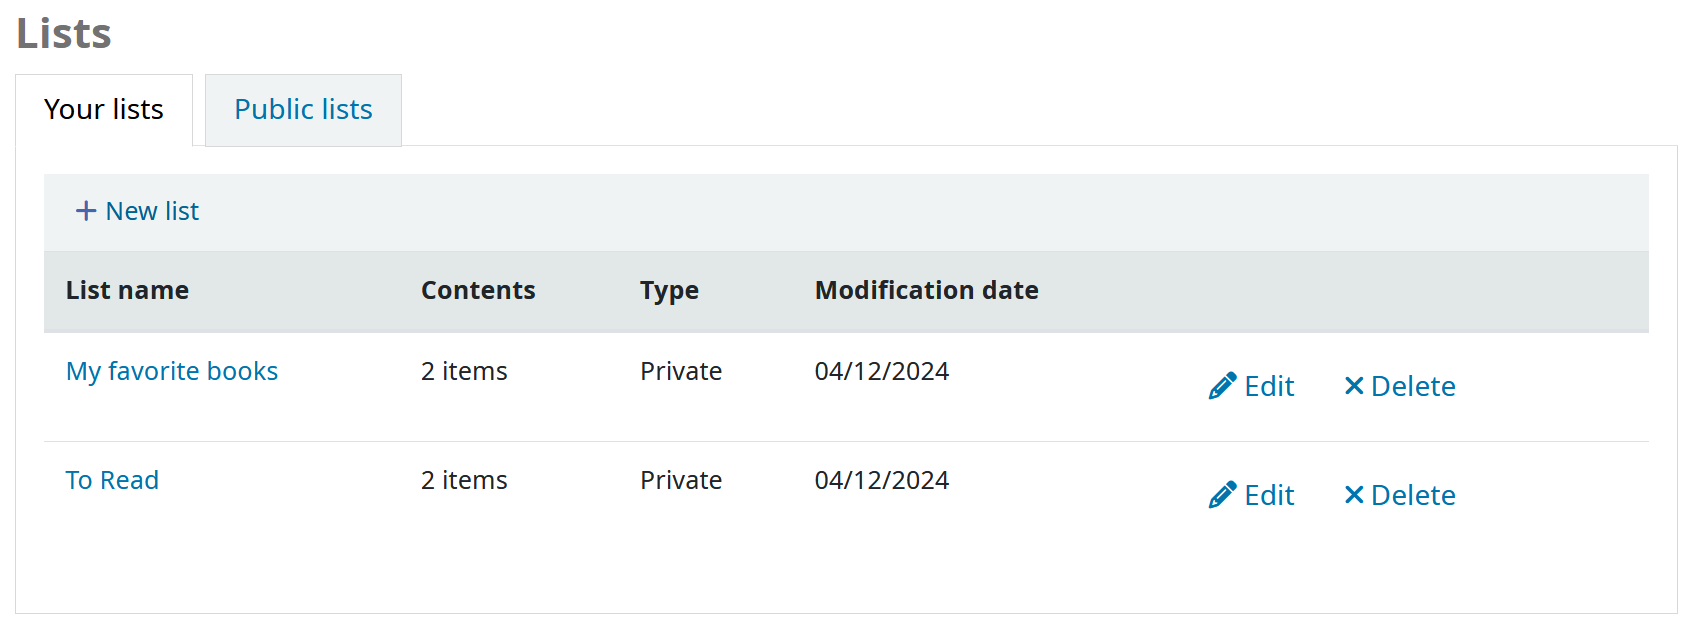
The ‚Modification date‘ column shows when the list was last modified and is helpful for quickly finding out how up to date the list is.
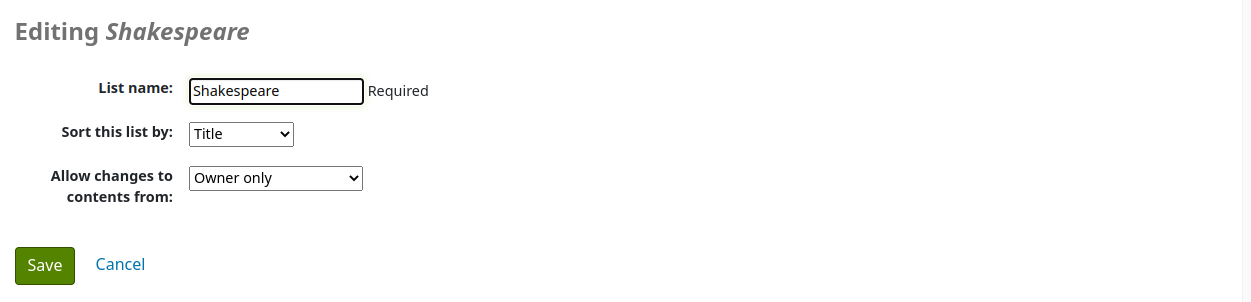
Listen erstellen
To create a list the patron simply needs to click the ‚New list‘ link and populate the form that appears.
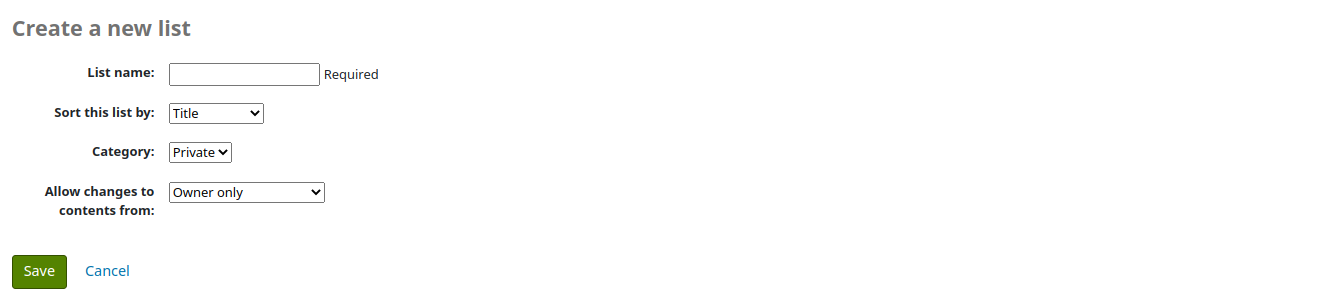
List name: the patron must enter a list name, it is the only required field
Sort this list by: the patron can choose how they want the list sorted (by title, author, publication year, call number or date added to the list).
Category: the patron can choose to keep this list private or make it public. A public list will be visible to all OPAC users.
Bemerkung
This field will only appear if the OpacAllowPublicListCreation system preference is set to ‚Allow‘. Otherwise all lists created by patrons will be private.
Allow changes to content from: the patron can choose who will be able to add or remove titles from the list.
Nobody: nobody, including the patron themselves will be able to add or remove titles.
Owner only: only the patron who created the list will be able to add or remove titles. If the list is public or shared, the OPAC users or sharers will not be able to change the list contents.
Anyone seeing this list: everyone who has access to the list will be able to add or remove titles. If the list is public, this means everyone. If the list is private, only the owner will have the ability to change the contents. And if the list is shared, the owner and sharers will have this ability.
Staff only: this option will only appear to staff members, to make the list editable by all staff members.
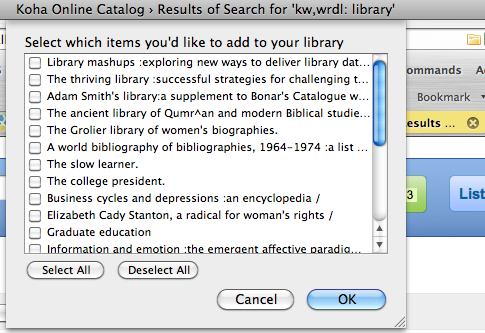
Neue Listen können auch erstellt werden indem Sie im Auswahlmenü ‚Hinzufügen zu …‘ der Trefferliste ‚Neue Liste‘ auswählen
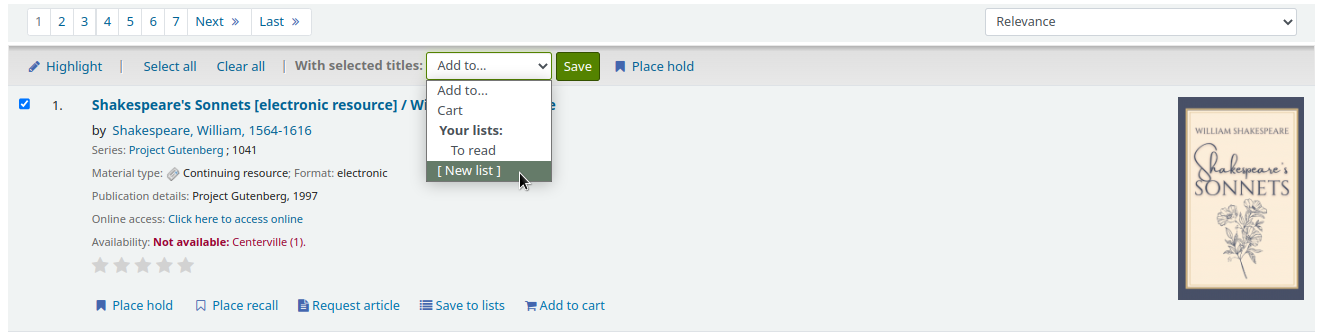
Titel zu Listen hinzufügen
Titles can be added to lists from the search results or from the bibliographic record.
In the search results, the option to add items to the list appear below each result (‚Save to lists‘ button)
and across the top of the results page, next to ‚Select titles to: Add to…‘
Wählen Sie die Option ‚In Listen speichern‘ wenn Sie einen einzelnen Titel zu einer Liste hinzufügen möchten. Wählen Sie anschließend die Liste, zu der Sie den Titel hinzufügen möchten. Um mehrere Titel zu einer Liste hinzuzufügen, verwenden Sie die Checkboxen auf der linken Seite bei den Titeln die Sie hinzufügen möchten und setzen dort Häkchen, wählen dann die Option ‚Hinzufügen zu…‘ oberhalb der Trefferliste, und wählen schließlich die Liste aus.
From the bibliographic record, the option to save the title to a list is in the menu on the right.
Titles can also be added to a list from the cart.
Listeninhalte anzeigen
Möchten Sie den Inhalt einer Liste anschauen, dann klicken Sie auf den Listenname unter der Schaltfläche „Listen“.
Die Inhalte der Liste sind ähnlich wie die Trefferliste mit Ausnahme von verschiedenen Optionen, die Ihnen über der Liste angezeigt werden.
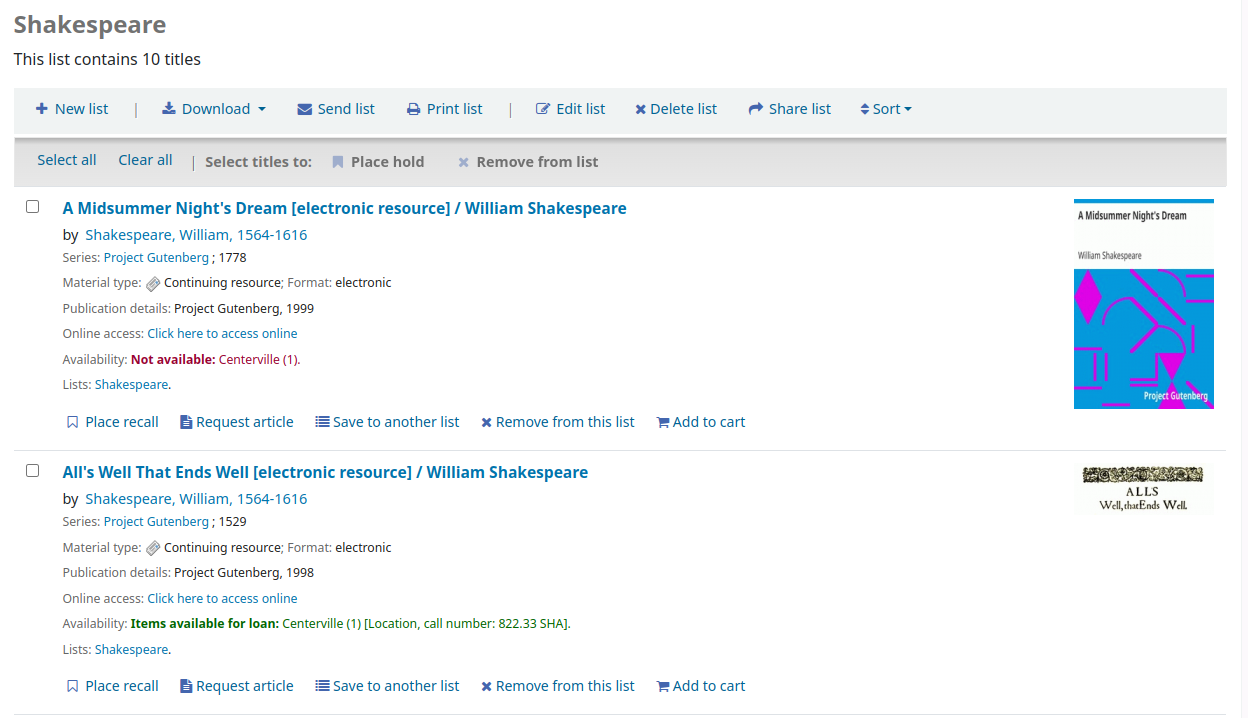
Rechts vom Listentitel befindet sich ein RSS Icon. Dieses erlaubt Ihnen Updates zur Liste zu abonnieren.
Bemerkung
The RSS icon only appears on public lists.
Sie können mehrere Exemplare auf Vormerkungen setzen, den Inhalt der Liste herunterladen, die Liste verschicken, oder ausdrucken, indem Sie die Optionen über der Liste verwenden.
Wenn Sie Vormerkungen auf ein oder mehrere Exemplare setzen möchten, die sich auf einer Liste befinden, können Sie die Checkboxen auf der linken Seite anklicken und dann oben die Vormerk-Schaltfläche aktivieren.
Um Listeninhalte herunterzuladen, klicken Sie die Schaltfläche ‚Liste herunterladen‘ und wählen Sie das Format aus.
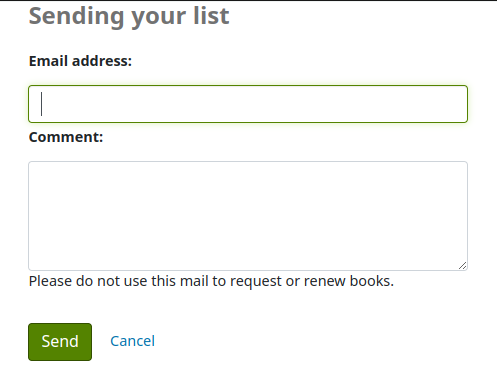
Um den Listeninhalt verschicken zu können, klicken Sie auf die Schaltfläche ‚Liste verschicken‘ und geben Sie in dem PopUp die Email-Details ein.
Bemerkung
The message sent when emailing the list is LIST, which can be customized in the Notices and slips tool.
Um den Inhalt der Liste zu drucken, klicken Sie auf die Schaltfläche ‚Liste drucken‘.
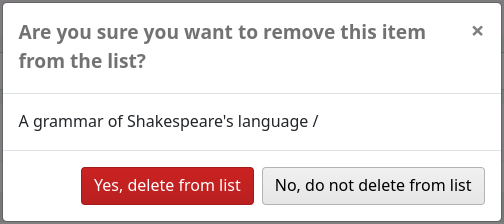
Removing titles from lists
To remove a title from a list,
-
Click ‚Remove from this list‘ under the title to remove.
Click ‚Yes, delete from list‘ to confirm the removal of the title from the list.
Listen verwalten
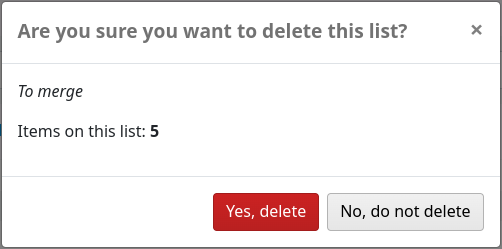
Once the list is saved, patrons can begin adding items to it. From the ‚Lists‘ tab in their account, the patron can edit and delete the lists they have created by clicking the appropriate button to the right of the list name.
To edit the list’s title or sorting patrons click the ‚Edit‘ button to the right of the list description.
Wenn Sie auf die Schaltfläche ‚Löschen‘ klicken, müssen Sie bestätigen, dass Sie die Liste wirklich löschen möchten.
If the OpacAllowSharingPrivateLists system preference is set to ‚Allow‘, patrons will see the ‚Share‘ button on the list of lists and the ‚Share list‘ button at the top of each individual list. Clicking this will ask you to enter the email address of a patron.

Ist die E-Mail-Adresse eingegeben, sendet Koha eine Bestätigungsnachricht.

und schickt auch eine Nachricht an den Benutzer.
Once the other patron accepts the shared list, the sharing patron will receive a confirmation.
Bemerkung
The message sent to share the list is SHARE_INVITE and the message sent to the sharing patron to confirm the other patron has accepted the share is SHARE_ACCEPT. Both messages are customizable in the Notices and slips tool.
The other patron will see the shared list with their own private lists (the type will be ‚Shared‘ rather than ‚Private‘). They will also have the option to remove the share, if they don’t want to have access to this list anymore.
The owner of the shared list will have the option to transfer the ownership of the list to one of the patrons with whom the list is shared.
If the TagsInputOnDetail system preference is enabled, patrons will have the possibility of adding tags to titles from the list view.
Korb
Titel einem Korb hinzufügen
Titles can be added to the cart from the search results or from the bibliographic record.
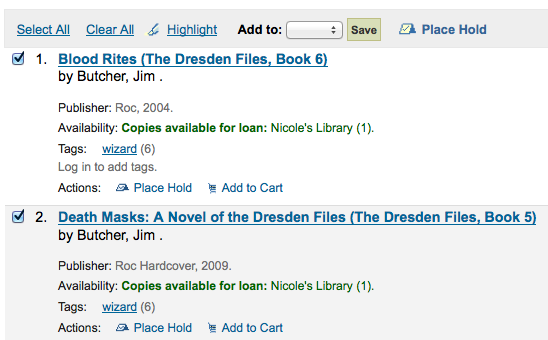
In the search results, the option to add items to the cart appear below each result (‚Add to cart‘ button)
and across the top of the results page, next to ‚Select titles to: Add to…‘
Clicking the ‚Add to cart‘ button under a single result will add the one title to your cart.
To add multiple titles at once, check the box to the left of each result and then choose ‚Cart‘ from the ‚Add to‘ pull down at the top of the screen. Once titles are added to the cart you will be presented with a confirmation at the top of the page.

Sie können die Exemplare, die sich im Korb befinden auch wieder entfernen, indem Sie auf ‚Entfernen‘ klicken.
From the bibliographic record, the option to add the title to the cart is in the menu on the right.
Korb verwalten
Once there are titles in the cart, you can manage the contents by clicking on the ‚Cart‘ button usually found at the top of the screen. Your cart will open in a new window.
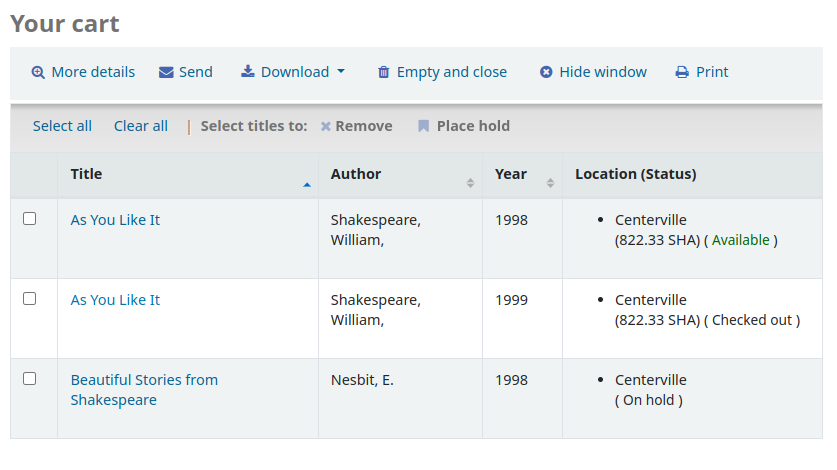
Ausgehend von diesem Fenster, bekommen Sie verschiedene Möglichkeiten angezeigt. In der Kopfzeile Ihres Korbes haben Sie verschiedene Schaltflächen.
More details: clicking this will show additional information about the titles in the cart (ISBNs, subjects, publisher info, notes and more).
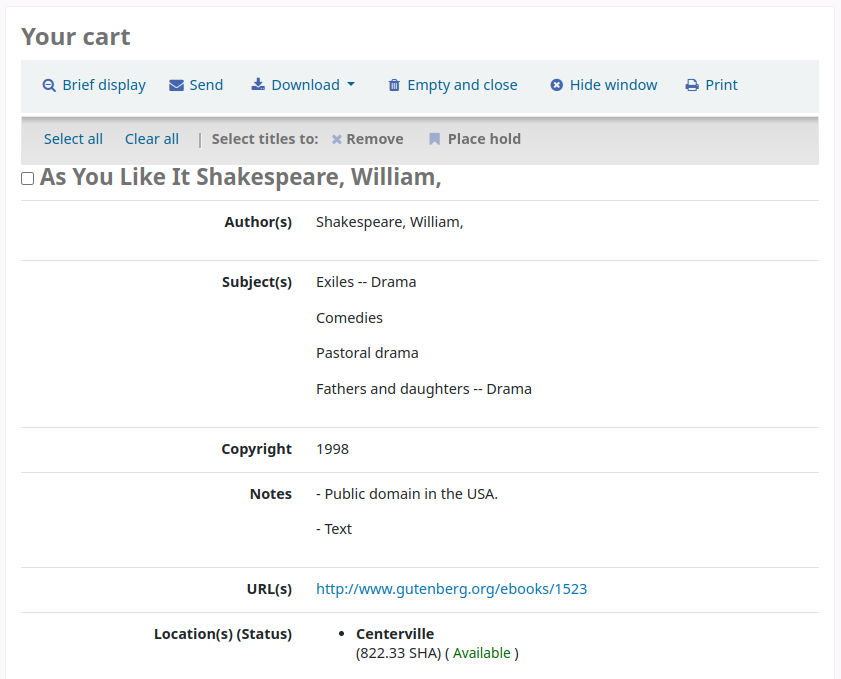
When clicked, tThe ‚More details‘ button will become ‚Brief display‘. Clicking this will return to the default display in table form of the title, author, copyright date and item location and status.
Send: the option to send the contents of the cart to an email address. This is handy if you want to send the resources you found at the library to your home email account to refer to later or to send to a patron researching a specific topic. Clicking this link will open up a new window that asks for the email address and message to send.
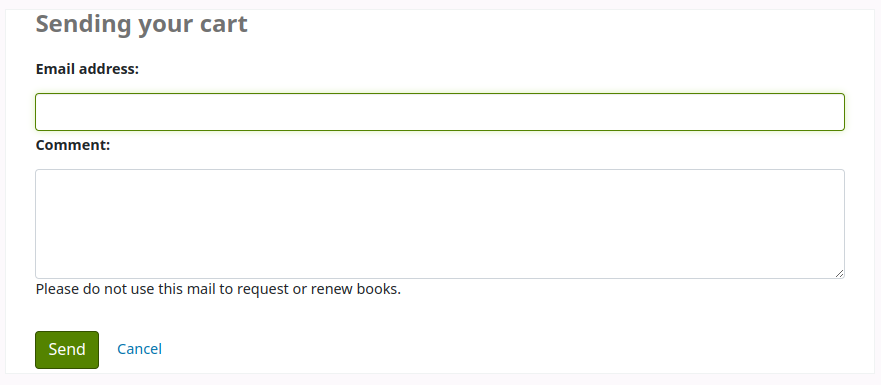
Warnung
The cart can only be emailed by logged in users. This will prevent the cart email function from being used for spamming.
Bemerkung
The message sent when emailing the cart is CART, which can be customized in the Notices and slips tool.
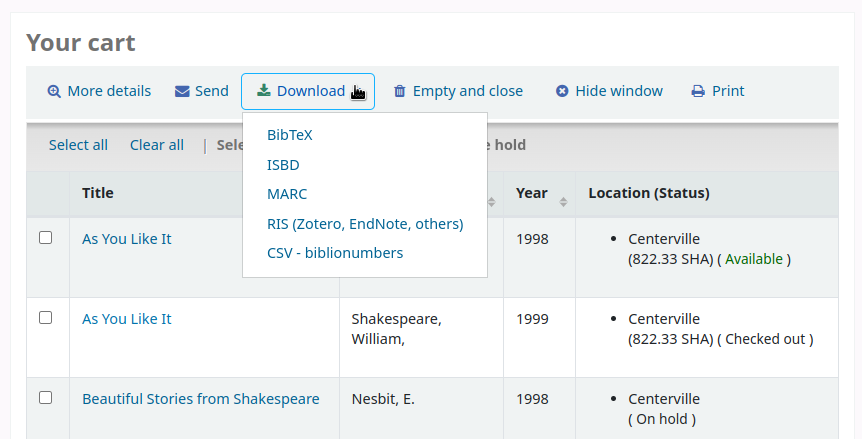
Download: you can download the contents of the cart in several pre-defined formats or using a CSV profile that you defined in the tools module.
Empty and close: this will empty the cart and close the window.
Hide window: this will close the window, but the cart will not be emptied.
Print: this will print out the contents of the cart.
In addition to the various different ways to save the contents of the cart, there are ways to add value to the data in your cart.
Select one or more titles from the cart and choose one of the options:
Remove: this will remove the selected titles from the cart.
Add to a list: this will add the selected titles to a list
Place hold: this will place a hold on all selected titles
Tag: if the TagsInputOnDetail system preference is enabled, patrons will be able to add tags to selected titles.
Vormerken
Patrons can place holds on items via the OPAC if they’re logged in and you have the OPACHoldRequests preference set to ‚Allow‘. If the item can be placed on hold the option to place it on hold will appear in several different places.
Befinden Sie sich auf einer Listenseite oder einer Trefferliste, dann wird Ihnen die Option ‚Vormerken‘ auf mehrere Exemplare angezeigt, indem Sie ausgehend von der Trefferliste die Checkboxen links anklicken und oberhalb der Trefferliste auf die Schaltfläche ‚Vormerken‘ klicken.
Befinden Sie sich auf einer Listenseite oder einer Trefferliste bekommen Sie die Option zum Vormerken unterhalb der Basisinformation des Titels angezeigt.
Wenn Sie sich die Detailansicht eines Titels anschauen, sehen Sie die Option zur Vormerkung in dem Kasten rechts auf Ihrem Bildschirm.
Es spielt keine Rolle welchen dieser Links Sie verwenden, sie zeigen Ihnen alle den gleichen Vormerkbildschirm an.
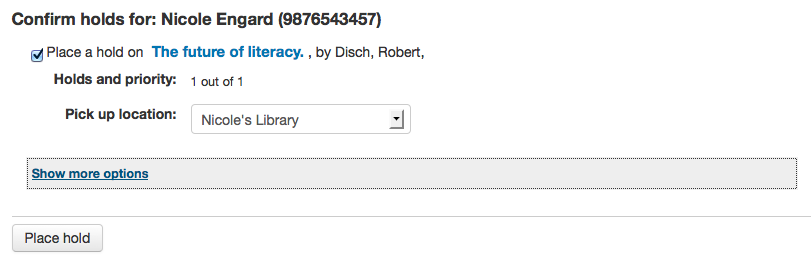
Markieren Sie die Checkbox auf der linken Seite des Exemplars, auf welches Sie eine Vormerkung setzen möchten.
Der Titel enthält einen Link zurück zur Detailansicht eines Datensatzes.
Das Feld ‚Priorität‘ zeigt Ihnen an welcher Stelle in der Vormerktabelle die Vormerkung steht.
If allowed by your OPACAllowUserToChooseBranch preference the patron can choose where they’d like to pick up their hold. The list of available pickup locations will include all libraries that have ‚Pickup location‘ set to ‚Yes‘ on the library configuration page.
Wenn Sie mehrere Optionen sehen möchten, verwenden Sie die entsprechende Checkbox.
Vormerkungen setzen mit mehreren Optionen
If you have the AllowHoldItemTypeSelection preference set to ‚Allow‘ and the record had more than one item type attached you will see an option to choose to limit the hold to a specific item type
If allowed by your OPACAllowHoldDateInFuture preference, the ‚Hold starts on date‘ column will show. This field allows the patron to have their hold start on a future date.
Über Standardeinstellungen bleiben Vormerkungen im System, bis sie gelöscht werden. Gibt der Benutzer allerdings ein Datum ein, ab welchem die Vormerkung nicht mehr benötigt wird, dann hat die Vormerkung ein Ablaufdatum.
Wichtig
Durch den Cronjob ‚abglaufene Vormerkungen‘ werden abglaufene Vormerkungen aus dem System entfernt. Hierbei handelt es sich allerdings nicht um einen automatischen Prozess. Der Cronjob muss durch Ihren Systemadministrator aktiviert werden.
If allowed by the OpacHoldNotes preference then patrons can leave notes about their holds for the library by clicking the ‚Edit notes‘ button
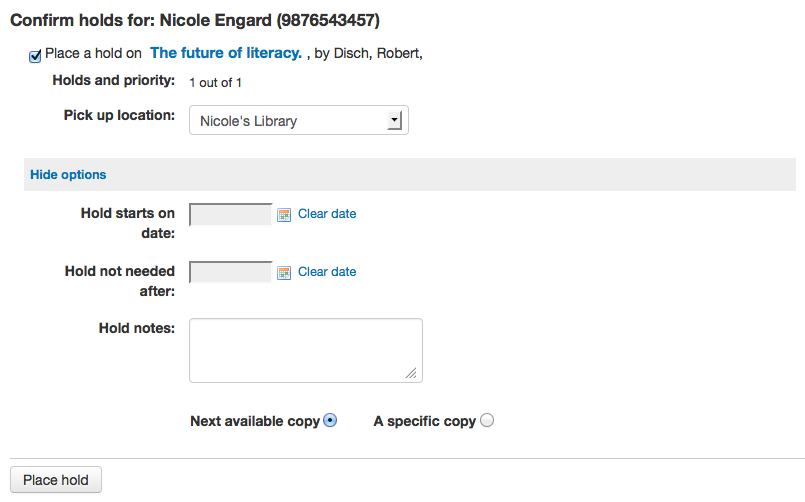
If the EnableItemGroupHolds system preference is set to ‚Enable‘ and the record has item groups, the patron can choose to place a hold on the next available item of a group, rather than the next available item on the whole record or a specific item.
Abhängig von den Regeln, die für die Vormerkungen in Ihren Ausleihkonditionen konfiguriert wurden, kann der Benutzer auswählen, ob er die Vormerkung auf das nächste verfügbare Exemplar setzen möchte oder auf ein bestimmtes Exemplar.
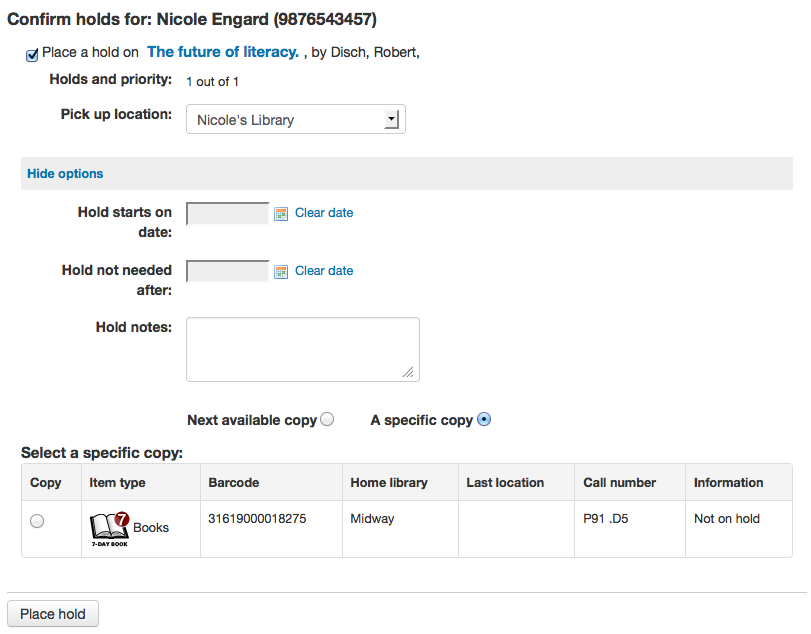
Nachdem Sie auf die Schaltfläche ‚Vormerken‘ geklickt haben, wird dem Benutzer sein Benutzeraccount angezeigt, wo alle gesetzten Vormerkungen aufgelistet sind.
Rückruf eintragen
Wenn Ihre Bibliothek Rückrufe akzeptiert (siehe Rückrufe einrichten für mehr Informationen) können Benutzer*innen Rückrufe auf Exemplare eintragen.
Die Option für einen Rückruf wird an verschiedenen Stellen im OPAC angezeigt:
In der Trefferliste nach einer Suche, wird die Option für den Rückruf bei jedem rückrufbaren Treffer angezeigt.
In der Detailansicht wird der Link auf der rechten Seite (oder am unteren Bildschirmrand auf kleinen Bildschirmen) bei den Optionen angezeigt.
Jeder dieser Links führt zum Rückrufformular.
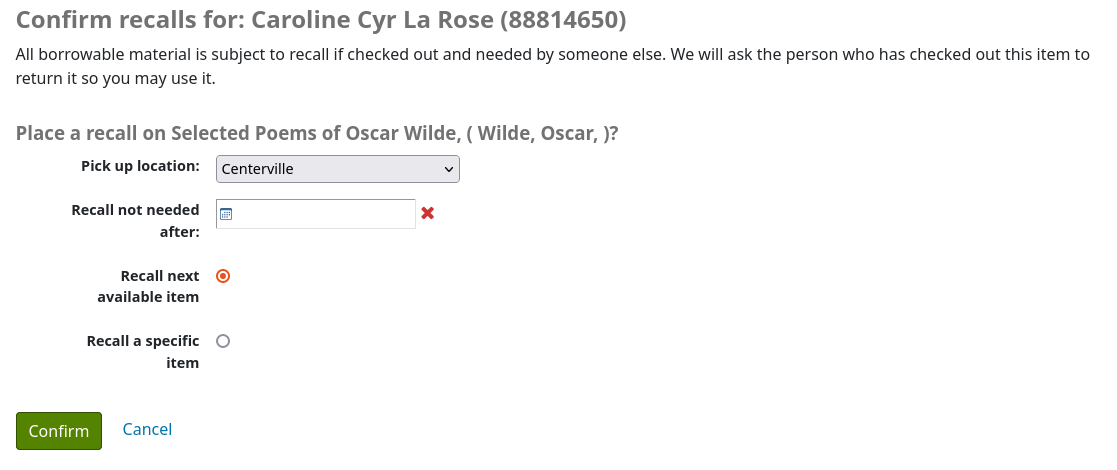
Abholort: der Benutzer/die Benutzerin kann auswählen, wo Sie das zurückgerufene Exemplar abholen möchten.
Rückruf nicht mehr benötigt ab: wenn der Benutzer/die Benutzerin das Exemplar nach einem bestimmtem Datum nicht mehr benötigt, kann dies hier angegeben werden. Der Rückruf läuft dann automatisch (mit dem the Cronjob expire_recalls.pl) nach diesem Datum ab.
Das nächste verfügbare Exemplar oder ein bestimmtes Exemplar zurückrufen: der Benutzer/die Benutzerin kann auswählen, ob irgendein oder ein spezifisches Exemplar zurückgerufen wird. Wenn „Bestimmtes Exemplar zurückrufen“ ausgewählt wird, muss ein Exemplar aus der Liste gewählt werden.
Once the patron confirms their recall request, they will have get a message saying the the patron who currently has the item will be notified.
Bemerkung
The notice sent to the patron who currently has the item is RETURN_RECALLED_ITEM. It can be edited in the Notices and slips tool.
The request will be added to the recalls tab in their account summary, as well as in their recall history list.
Kataloganreicherung
Tagging
Depending on the settings for the TagsEnabled, TagsInputOnList and TagsInputOnDetail system preferences, patrons may be able to add tags to bibliographic records from the search results and/or from the bibliographic records‘ detail page.
If you are allowing patrons to add tags from the search results list (see TagsInputOnDetail), patron will see an ‚Add tag‘ button below each result and a ‚Tag‘ option at the top of the screen.
To add a tag to one item, click ‚Add tag‘, type the tag or tags (separated by commas) in the ‚New tag‘ box and click ‚Add‘. You will be presented with a confirmation of your tags being added.
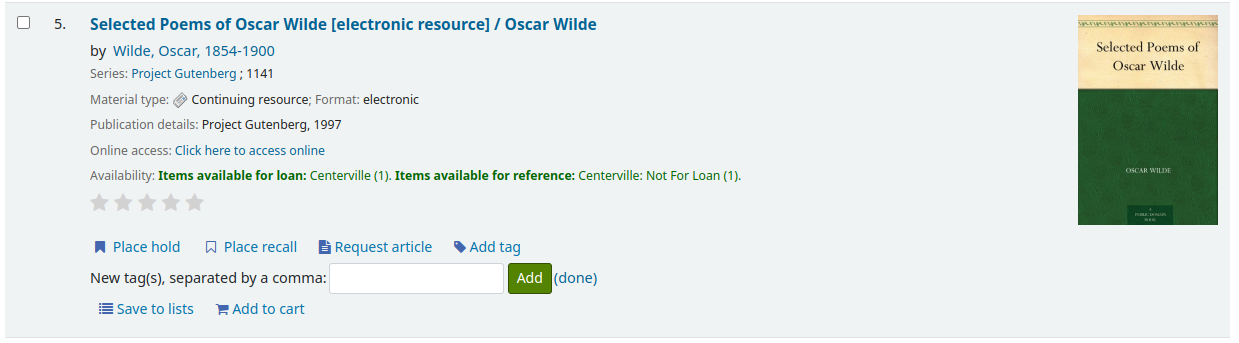
Ausgehend von der Trefferliste können Sie auch mehreren Exemplaren gleichzeitigs Tags vergeben, indem Sie die Exemplare über die Checkboxen links auswählen und die Option ‚Tag‘ über der Trefferliste auswählen. Es öffnet sich ein Kasten ‚Neuer Tag‘ in den Sie die Tags für alle ausgewählten Exemplare schreiben können.

If the TagsInputOnDetail system preference is enabled, patrons will also have the possibility to add tags from a list and from the cart.
If the TagsInputOnDetail system preference is enabled, patrons will have the possibility of adding tags from the record detail page by clicking the ‚Add tag(s)‘ link. The link will be replaced by an input box.
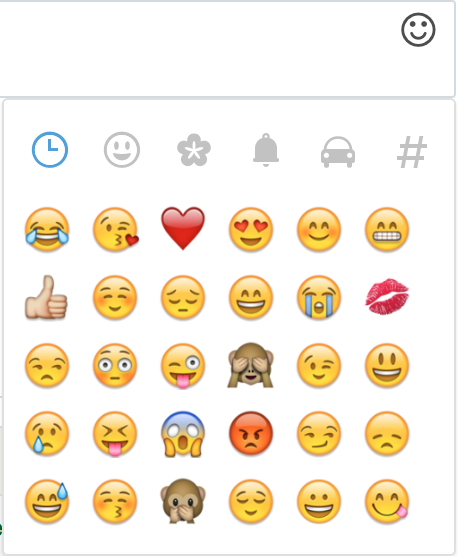
Emojis can also be included using the emoji picker when adding tags from the record detail page.
Zotero
Zotero ist eine Firefox-Applikation, die das Speichern und Generieren einer Bibliographie erlaubt. Lernen Sie mehr darüber über http://zotero.org, wo Sie Zotero auch herunterladen können.
Wenn Sie Zotero installiert haben, sehen Sie in der Trefferliste im Koha-OPAC ein Ordner-Icon in der Adresszeile rechts der URL. Klicken Sie darauf öffnet sich eine Liste von Titeln, die Sie von der Liste Zotero hinzufügen können.
Wählen Sie die Titel aus, die Sie Zotero hinzufügen möchten und betätigen Sie die Schaltfläche ‚OK‘. Die Titel werden angezeigt, wenn Sie Ihre Zotero-Bibliothek öffnen.
Benutzerdefinierte RSS-Feeds
Indem Sie den Cronjob für RSS-Feeds verwenden, können Sie einen RSS-Feed für jede SQL-Abfrage (zum Beispiel für Neuerwerbungen in der Erwerbung) generieren. Der Cronjob läuft über die Kommandozeile um ein RSS XML Dokument zu produzieren.
Die Datenausgabe sollte in einem Verzeichnis zugänglich von der OPAC- (oder Dienstoberfläche) erfolgen, so dass der Benutzer das RSS feed herunterladen kann.
Ein Beispiel zur Benutzung finden Sie unter: misc/cronjobs/rss.pl lastAcquired.conf
Der RSS-Cronjob sollte regelmäßig laufen (zum Beispiel täglich) um den Feed auf dem aktuellen Stand zu halten.
Die Konfigurationsdatei (zum Beispiel lastAcquired.conf) listet
den Namen der Templatedatei auf, die benutzt werden sollte
Pfad zur Ausgabedatei
SQL-Abfrage
Der RSS-Cronjob läuft durch die SQL-Abfrage und gibt dann die Feeds der Abfrage aus, druch das Template, welches die Ausgabedatei erstellt.
Wichtig
Für die Benutzung der benutzerdefinierten RSS-Feeds müssen Sie den RSS-Cronjob aktivieren.
Cookies information
You can add information about cookies to your OPAC, with a banner and policy.

From the cookie banner, users have the option to accept essential cookies or to view more information. When they click ‚More information‘, the Cookies policy pops up.
The cookie banner will be displayed on all pages until the user accepts cookies.
To set up cookie information:
Check whether you use non-essential cookies on your site.
Check for analytics tracking code in the OpacUserJS system preference.
Move any tracking code you have to the CookieConsentedJS system preference.
Decide what text you want displayed on the cookie banner: add it to the CookieConsentBar HTML customization.
Decide what content you want for the Cookies policy pop-up: add it to the CookieConsentPopup HTML customization.
Switch the CookieConsent system preference to ‚Require‘ and check the result.
Selbstregistrierung im OPAC
If you allow it, patrons can register for their own accounts via the OPAC. If you have the PatronSelfRegistration preference set to ‚Allow‘ then patrons will see a link to register below the log in box.
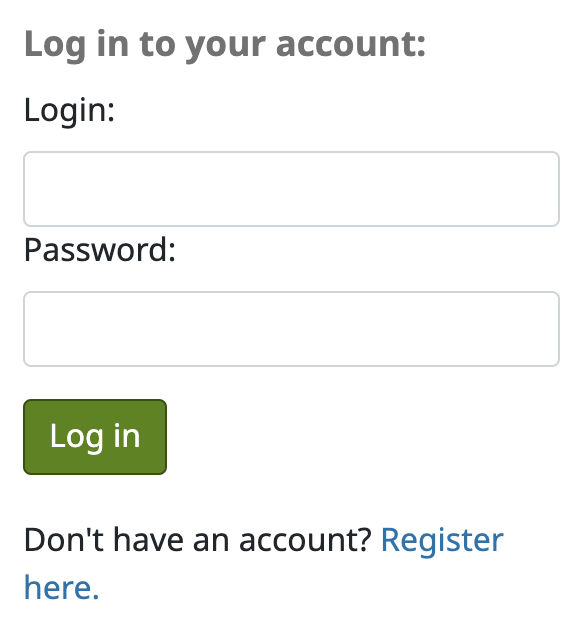
When the patron clicks the ‚Register here‘ link they will be brought to a registration page. The options on the registration page can be controlled by editing the PatronSelfRegistrationBorrowerMandatoryField and the PatronSelfRegistrationBorrowerUnwantedField preferences.
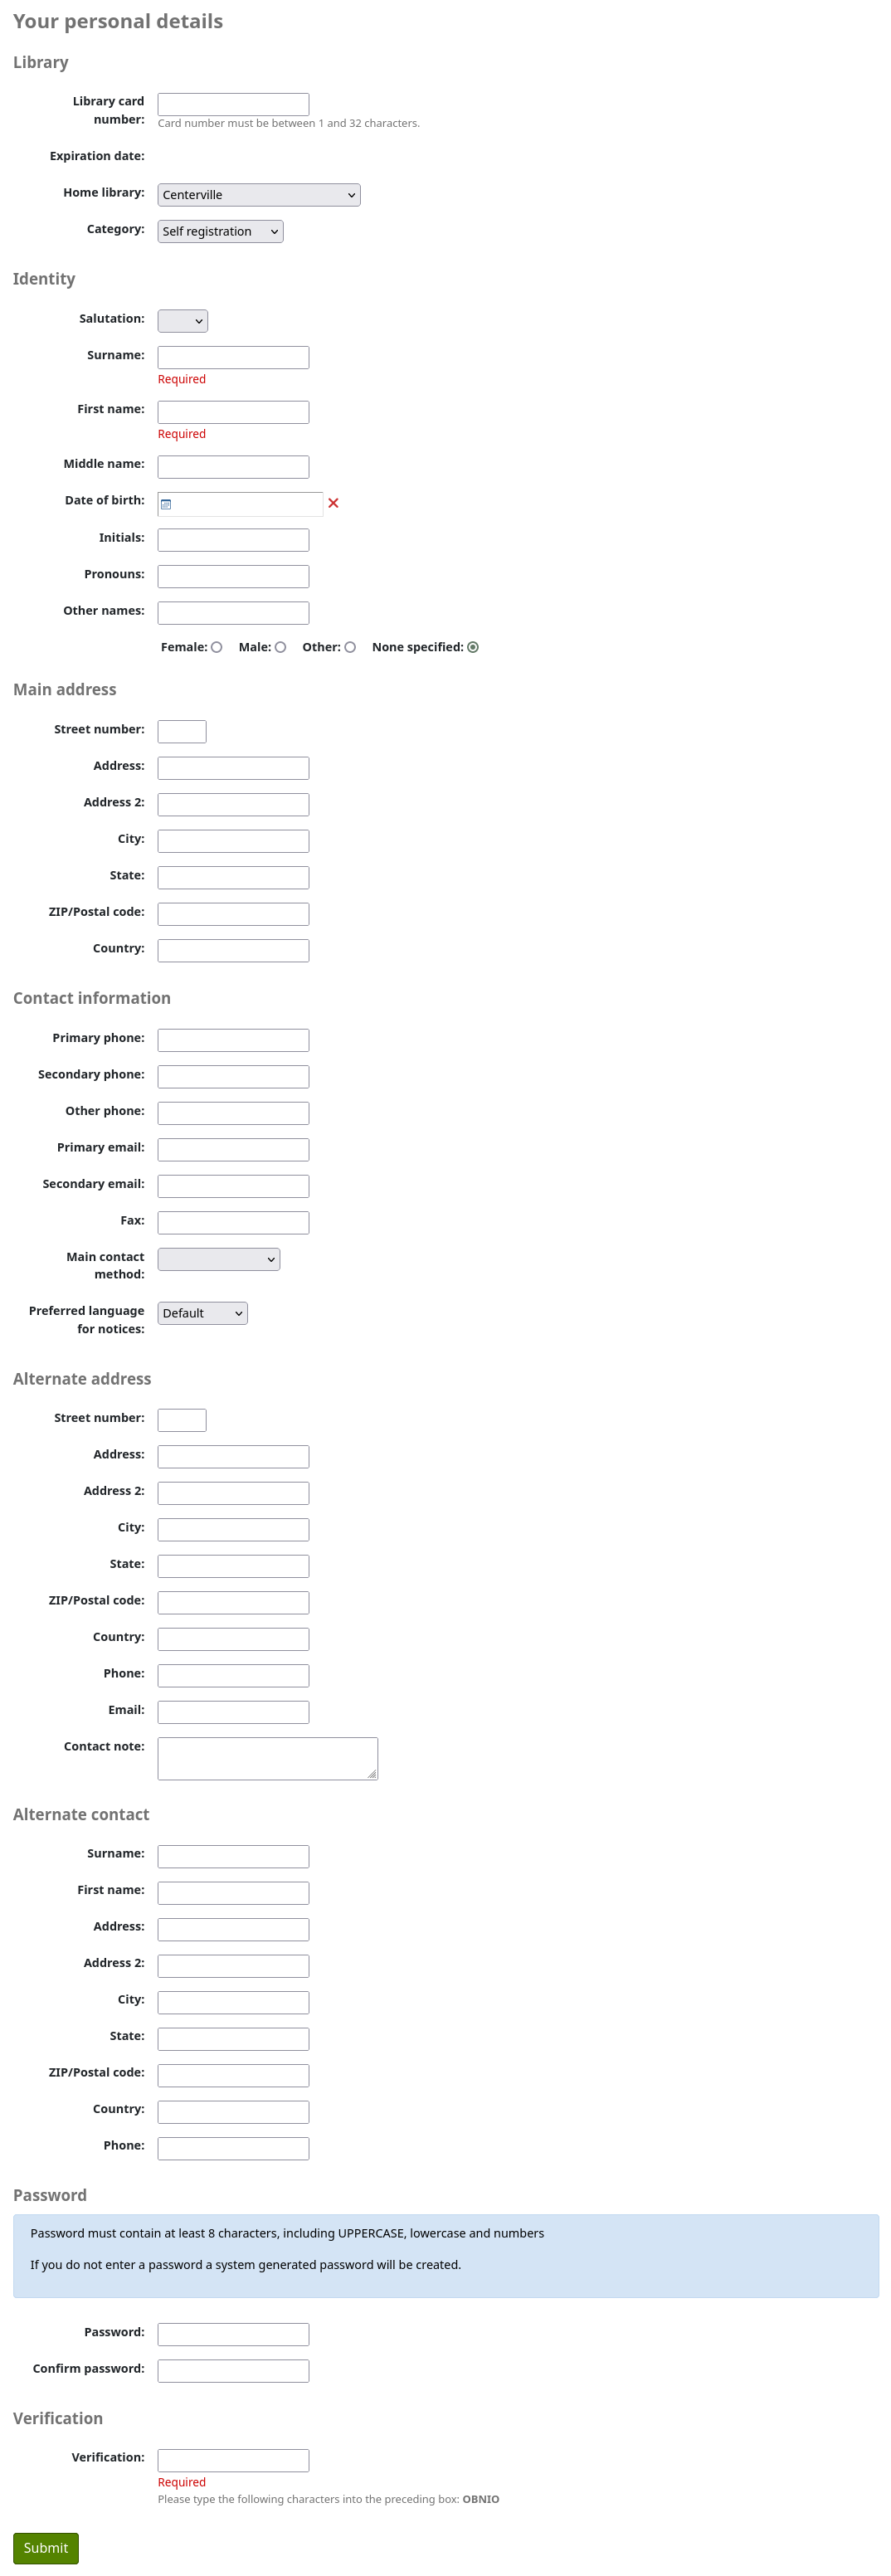
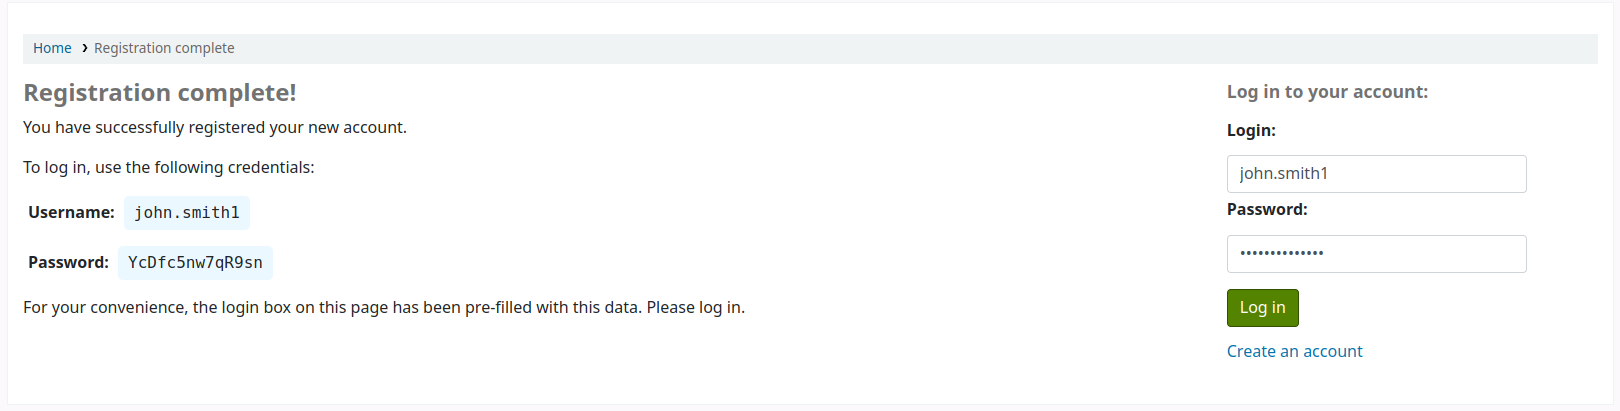
Once the patron has submitted their registration they will either be sent an email to confirm their account (if you have the PatronSelfRegistrationVerifyByEmail preference to require this) or presented with their new username and password. If the PatronSelfRegistrationPrefillForm system preference is set to ‚Show and prefill‘, they will be presented with the prefilled login form.
You can add additional instructions on this page by creating an HTML customization with the display location ‚PatronSelfRegistrationAdditionalInstructions‘.
To be notified when a patron registers via the OPAC, use the EmailPatronRegistrations system preference.
Benutzer die sich auf diesem Weg angemeldet haben, erhalten keinen Benutzerausweis, bis die Bibliothek Ihnen einen zugeteilt hat. Er erhält aber sofort Zugang zu allen OPAC-Funktionen. Darum ist es empfehlenswert, dass Sie:
set up a provisional patron category for self registered patrons (such as ‚Self Registered) instead of using an existing patron category and set that value in the PatronSelfRegistrationDefaultCategory preference
give this patron category minimal circulation privileges in the circulation and fines rules (such as allowing a couple holds, but no check outs)
Benutzer müssen aus datenschutzrechtlichen Gründen in die Bibliothek kommen um Ihre Identität zu bestätigen, bevor Sie einen Benutzerausweis erhalten und Exemplare ausleihen können. Danach kann die Bibliothek eine entsprechende Benutzerkategorie vergeben (sollte es sich um einen Erwachsenen, einen Ortsansässigen, nicht Ortsansässigen, einen Student etc. handeln) und einen Benutzerausweisnummer/Barcode vergeben.
Benutzerkonto
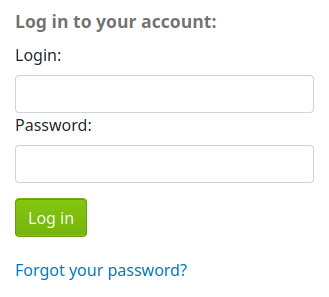
If the opacuserlogin system preference is set to ‚Allow‘, patrons can log in and access their account.
Sobald Benutzer sich anmelden, gelangen Sie auf Ihre Kontoübersicht.
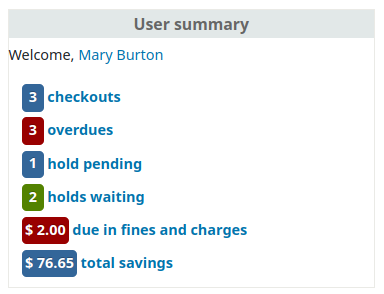
If patrons access the home page while logged in, and OPACUserSummary is set to ‚Show‘, they will see a small summary of their account instead of the login fields.
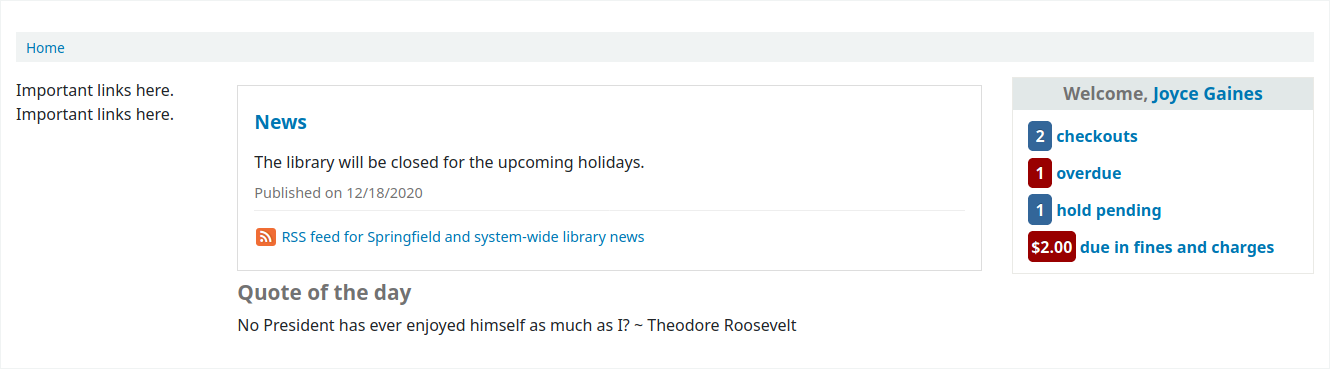
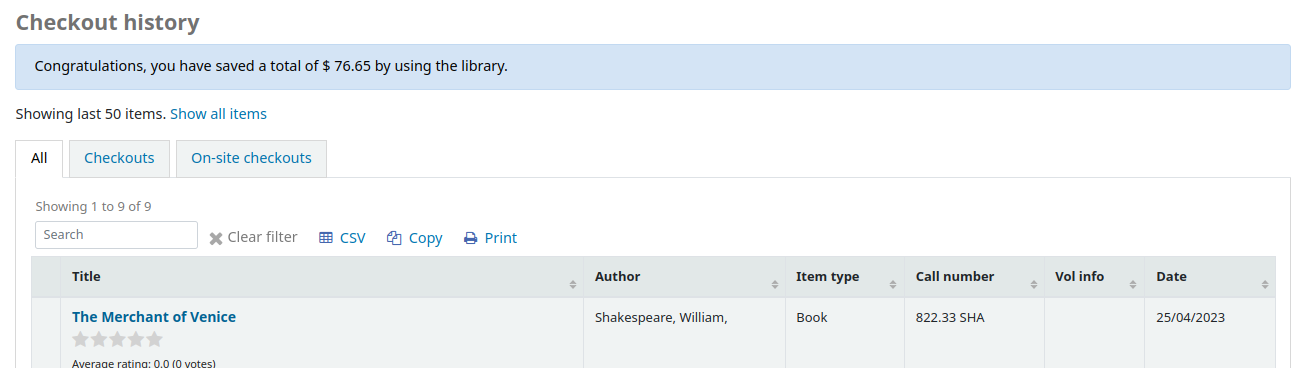
If OPACShowSavings is set to display savings in the summary box, this summary section will also contain the savings the patron made by using the library rather than purchasing the items.
Auf jeder Seite des OPACs können Benutzer über einen Klick auf Ihren Namen in der oberen rechten Ecke ihr Benutzerkonto aufrufen.
Ihr Password zurücksetzen
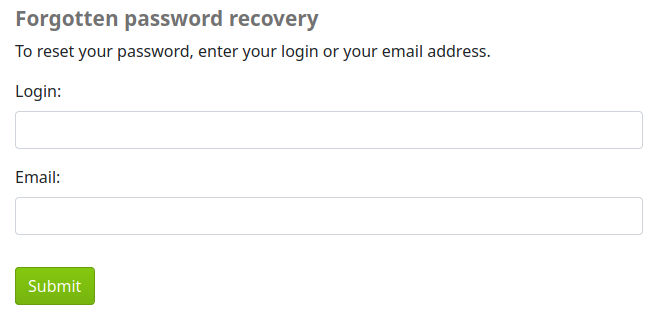
If you have the OpacResetPassword system preference set to ‚Allow‘, patrons can reset their password by clicking the ‚Forgot your password?‘ link found under the login box.
Hat ein Benutzer auf den Link geklickt, wird er nach seinem Benutzernamen und seiner E-Mail-Adresse gefragt.
Warnung
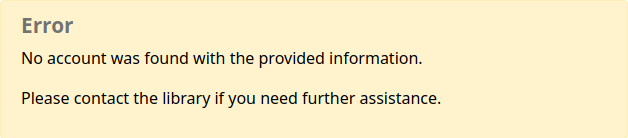
Benutzer müssen in ihrem Benutzerkonto eine E-Mail-Adresse angegeben haben, um ihr Passwort zurücksetzen zu können. Wenn Sie noch keine E-Mail-Adresse angegeben haben, wird eine Fehlermeldung angezeigt.
Das System sendet eine E-Mail mit einem Bestätigungslink und weiteren Hinweisen an den Benutzer.
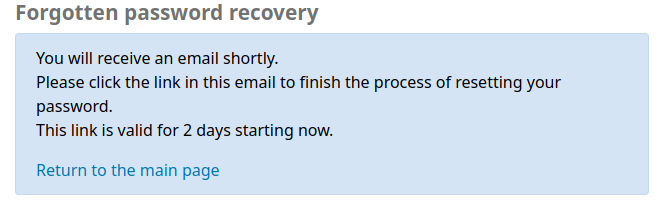
Der Text der E-Mail kann über das Werkzeug Benachrichtigungen und Quittungen angepasst werden. Der Code der Benachrichtigung ist PASSWORD_RESET.
Wenn der Systemparameter :ref:`NotifyPasswordChange <notifypasswordchange-label>`aktiviert ist, erhält der Benutzer/die Benutzerin eine E-Mail mit der Information, dass das Passwort geändert wurde.
The content of that email can be customized with the Notices and slips tool. The code of the letter is PASSWORD_CHANGE.
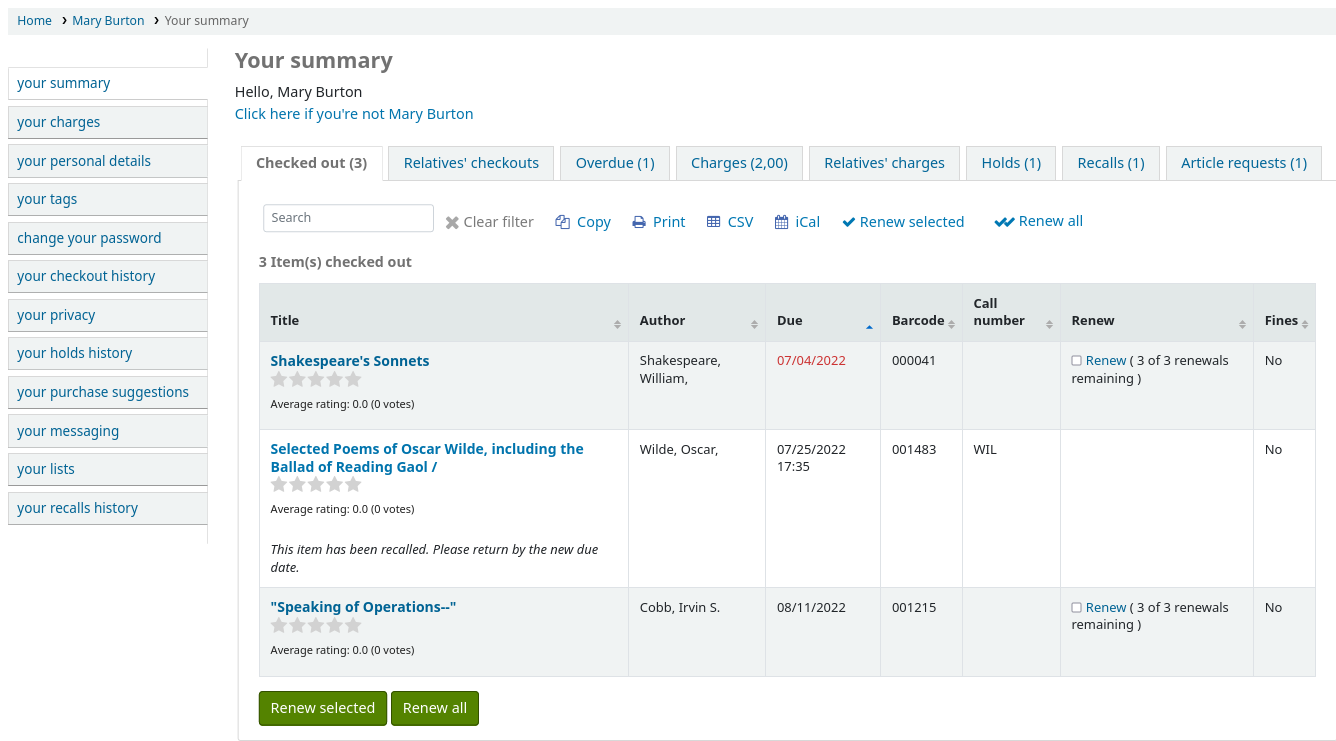
Kontoübersicht
Auf dem Reiter „Kontoübersicht“ sehen die Benutzer alle von ihnen entliehenen Exemplare, wobei die überfälligen Exemplare in rot hervorgehoben werden.
OPAC messages and OPAC notes will be displayed at the top of this page. For OPAC messages, the patron will have the option to dismiss the message. This will hide the message from their OPAC account and mark it as read, but it will not delete the message.

You can add content to this page with the OpacMySummaryNote HTML customization location. Content added there will appear above the patron’s summary and below the welcome message.

If OPACShowSavings is set to display savings in the ‚your summary‘ page, this section will also contain the savings the patron made by using the library rather than purchasing the items.

If OpacRenewalAllowed set to ‚Allow‘, patrons will be able to renew their checkouts from the OPAC.
If the patron has pending charges exceeding the value set in OPACFineNoRenewals, a note will display explaining that renewals cannot be made.

A note will display if the patron cannot place holds due to their charges exceeding the value set in the maxoutstanding system preference.

If AllowPatronToControlAutoRenewal is set to ‚Allow patrons‘, patrons will be able to choose whether or not they want their checkouts to be renewed automatically. If they choose ‘Yes’, items for which automatic renewal is enabled in the circulation rules will renew as expected. If they choose ‘No’, the automatic renewals that would have applied to this patron’s checkouts will not take place.

If you have HTML entered in the OPACMySummaryHTML preference then you will see that to the right of the ‚Fines‘ column.
Tipp
By default, the barcode is not displayed in the patron’s checkout table on the OPAC. If your patrons would like to see the items barcodes on their list of checked out items you can set up a patron attribute with the value of SHOW_BCODE and authorized value of YES_NO.
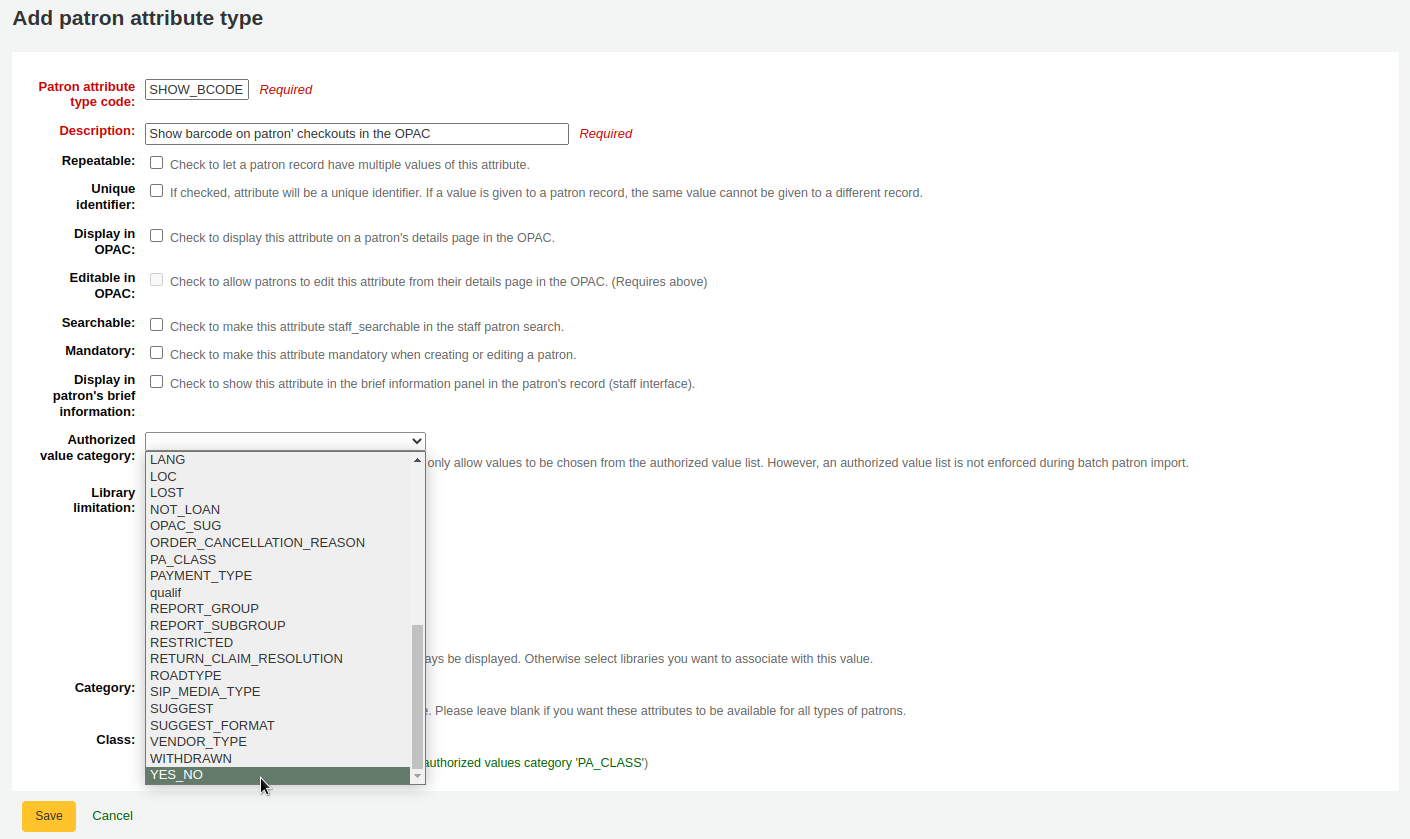
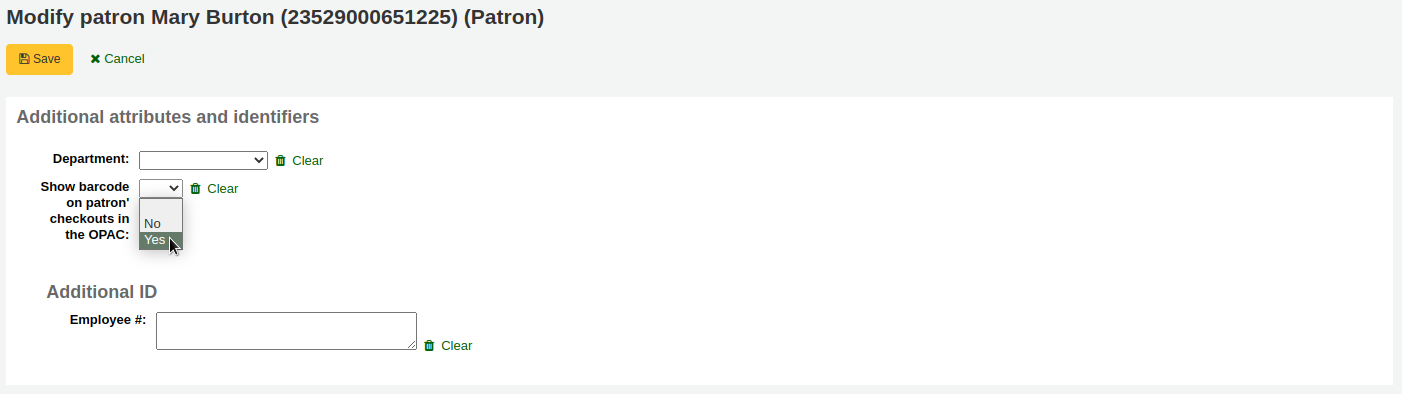
Then, on the patron’s record set the value for SHOW_BCODE to ‚Yes‘.
This will add a column to the checkout summary in the OPAC that shows the patron the barcodes of the items they have checked out.
If you would like your patrons to leave a note on an item they have checked out AllowCheckoutNotes preference must be set to allow.
In the patron’s summary of checkouts, there will be an added column to allow the patron to leave a note (for example: missing first page, or DVD is scratched).
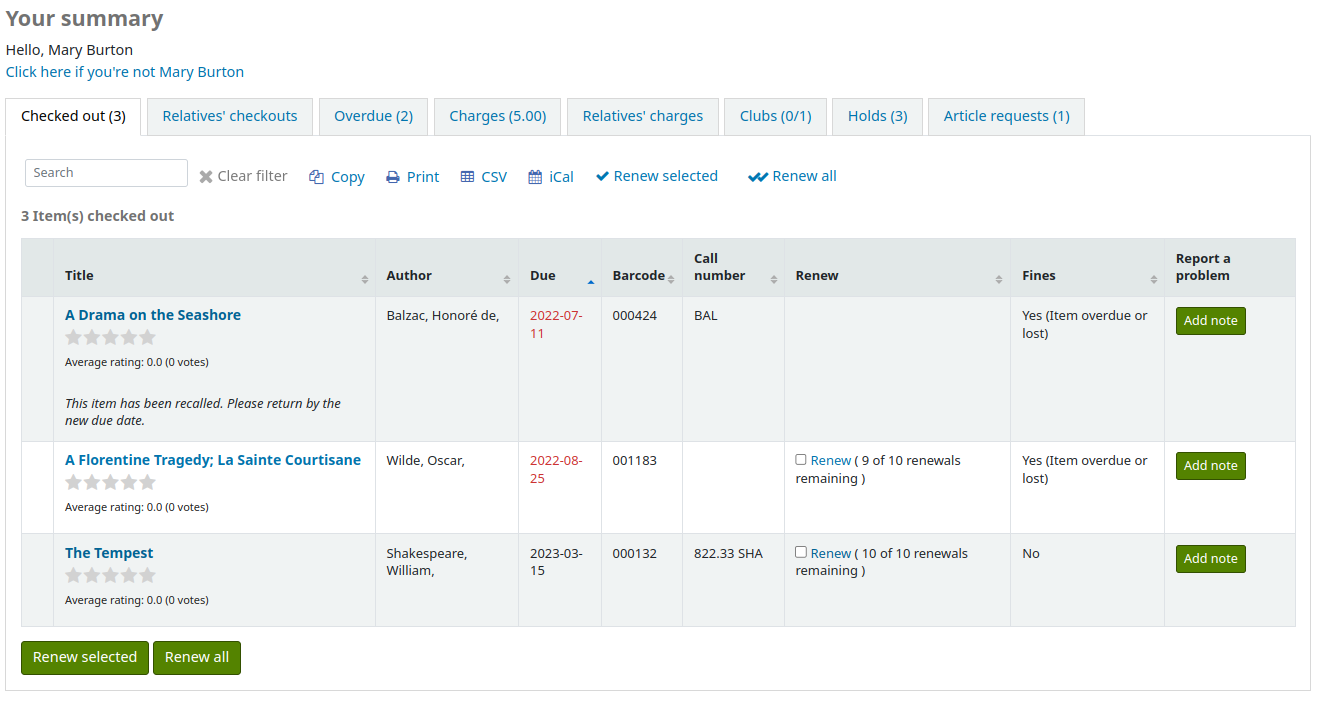
When the patron clicks on ‚Add note‘, they will be able to write a note about this checkout.
Staff will be able to see and manage checkout notes from the staff interface.
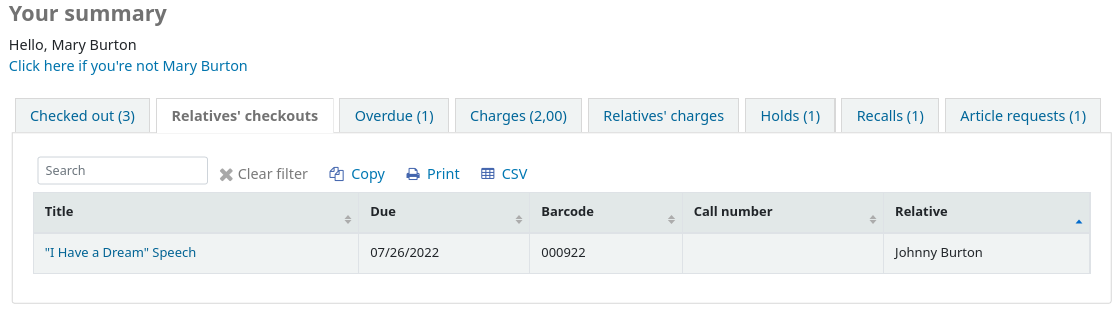
If their guarantee has allowed it via their privacy, or alternatively, if the staff is allowed to change this privacy setting in the staff interface with the AllowStaffToSetCheckoutsVisibilityForGuarantor system preference and this setting is turned on, when the guarantor logs in they will see a tab labeled „Relatives‘ checkouts“ on their summary tab.
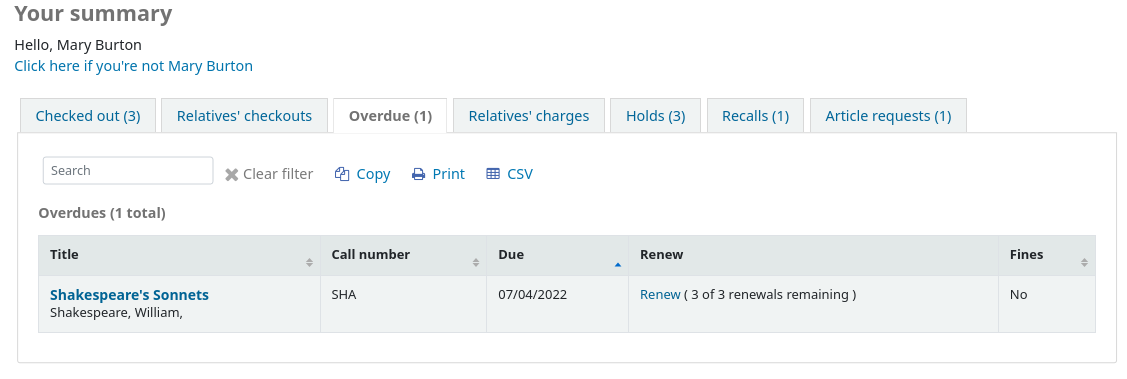
Ein Klick auf den Tab ‚Überfällig‘ zeigt nur die Exemplare an die überfällig sind.
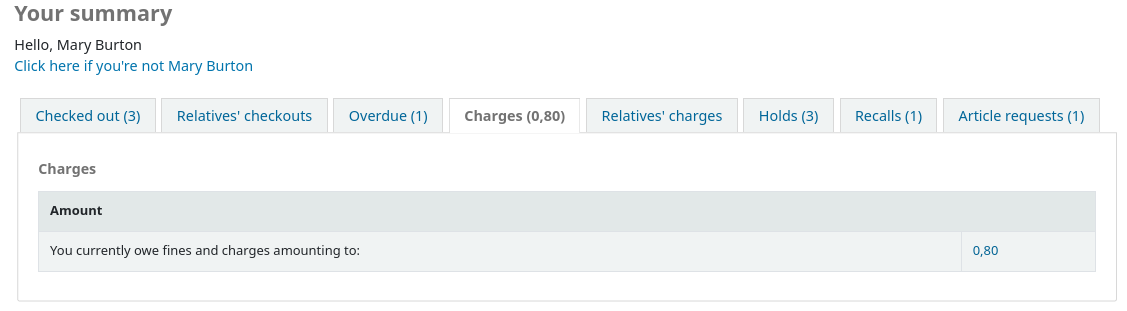
The ‚Fines‘ tab will show just a total of what the patron owes. Clicking on the total will take them to the ‚your fines‘ tab where they will see a complete breakdown of their fines and bills. If you don’t charge fines at your library you can turn the display of these tabs off by setting the OPACFinesTab preference to ‚Don’t allow.‘
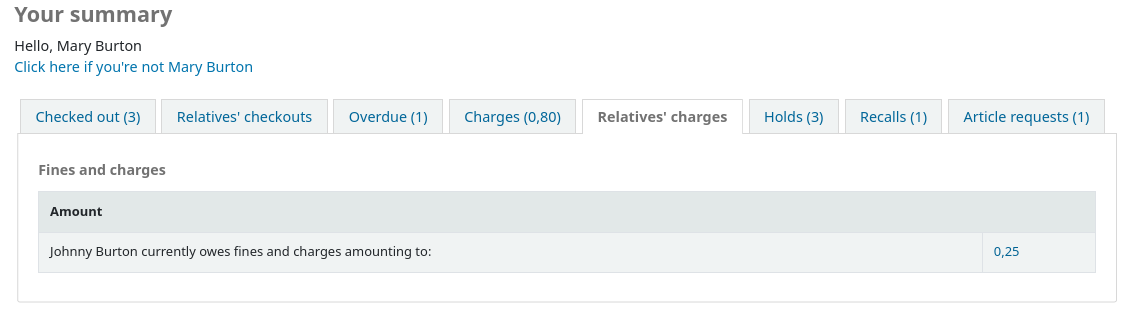
If their guarantee has allowed it via their privacy, or alternatively, if the staff is allowed to change this privacy setting in the staff interface with the AllowStaffToSetFinesVisibilityForGuarantor system preference and this setting is turned on, when the guarantor logs in they will see a tab labeled „Relatives‘ charges“ on their summary tab.
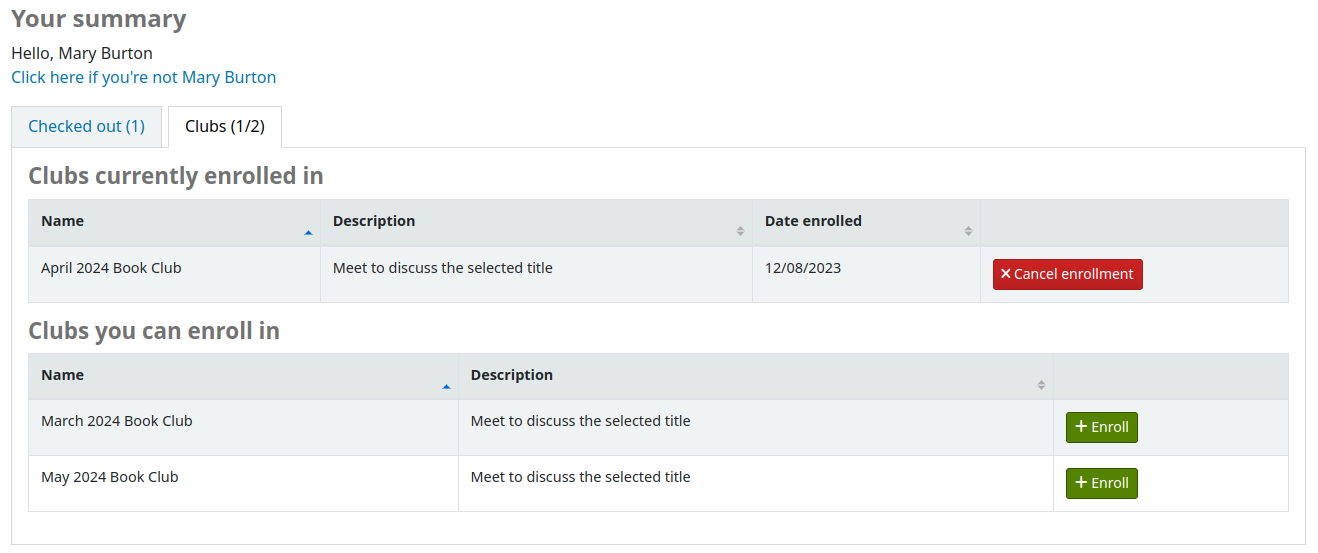
The ‚Clubs‘ tab shows all ongoing clubs which allow public enrollment. From here, patrons can enroll in clubs by clicking the ‚Enroll‘ button.
Der Reiter „Vormerkungen“ zeigt dem Benutzer/der Benutzerin den Status aller Titel, die vorgemerkt wurden.
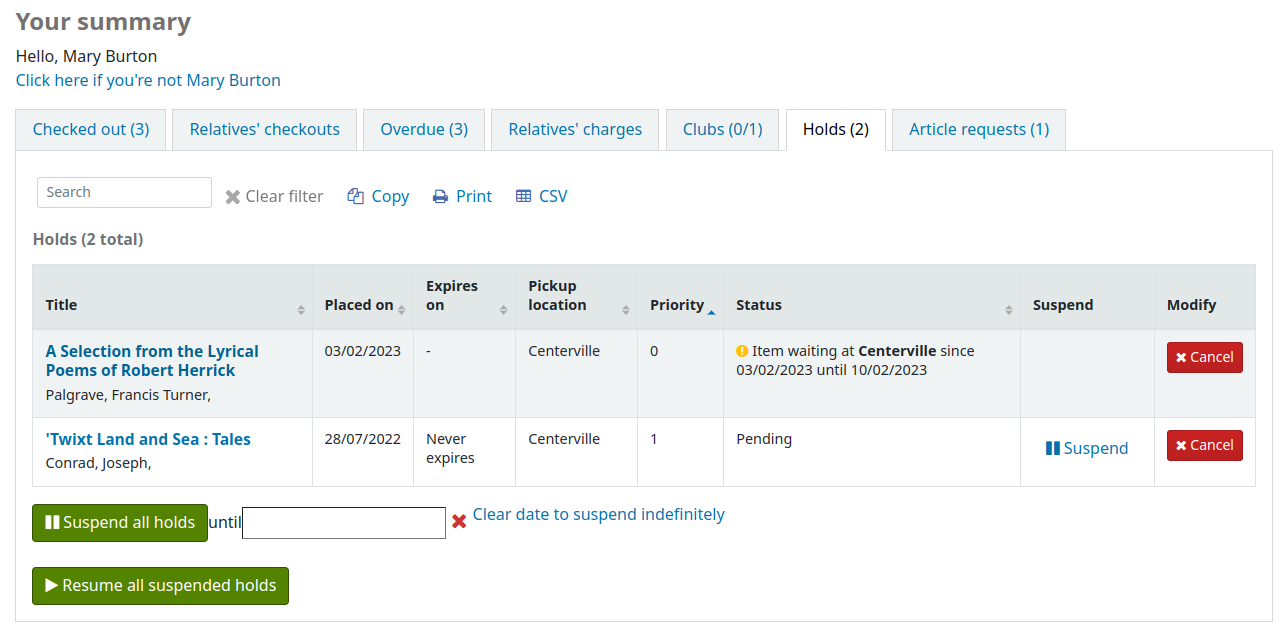
Depending on the value of the SuspendHoldsOpac system preference, patrons can suspend their own holds if they are not in transit or already waiting for them. When they click ‚Suspend‘ they will be presented with the option to choose a date for their hold to resume.
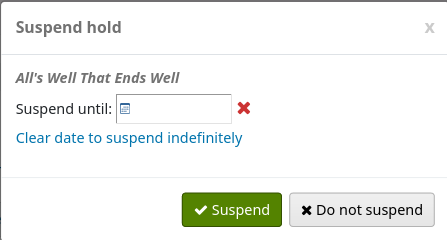
Der Benutzer kann die Vormerkungen auch auf unbestimmte Zeit aussetzen, oder diese auf ein spezielles Datum setzen. Hierfür müssen Sie die Optionen unten auf der Seite ausfüllen.
Bemerkung
If the AutoResumeSuspendedHolds system preference is set to „Don’t allow“, patrons will not have the option to put an end date on the hold suspension.
From this tab, patrons can also cancel holds. Depending on the waiting hold cancellation policy, they may also be able to cancel holds that are already waiting for them.
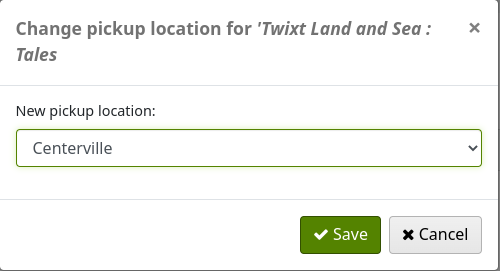
Depending on the value of the OPACAllowUserToChangeBranch system preference, the patron may be able to change the pickup library of holds. When one or more status is selected in the system preference, a ‚Change‘ link will appear under the current pickup library’s name for holds that have that status.
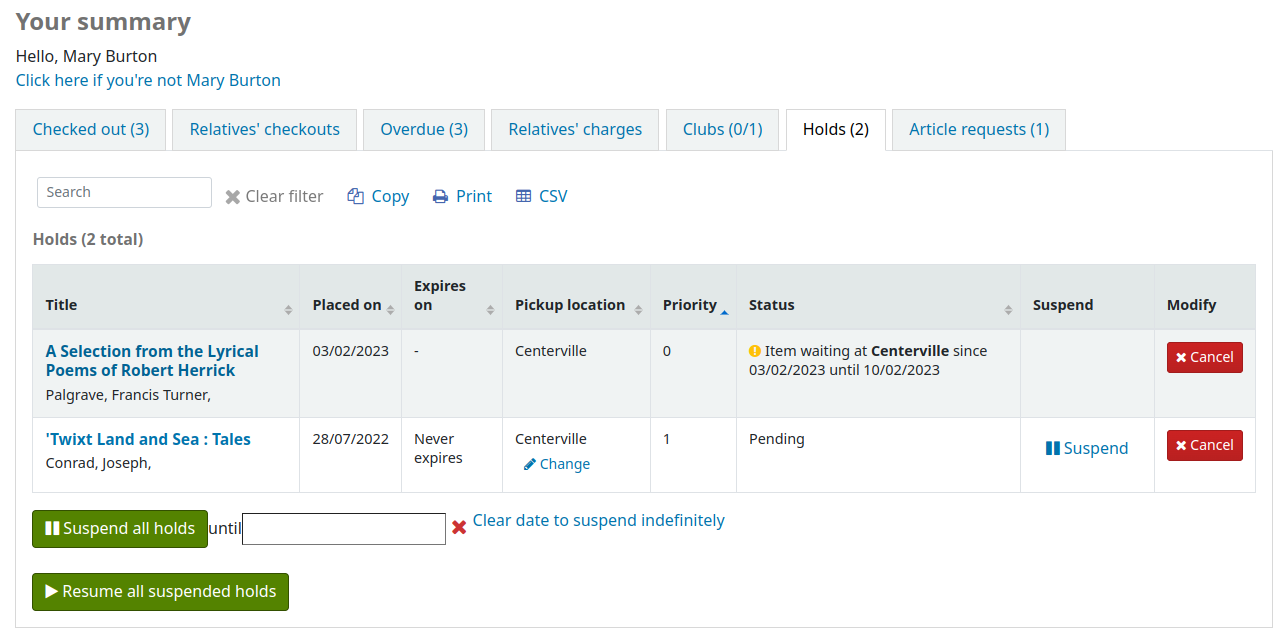
When the patron clicks on the ‚Change‘ link, there is a pop-up with a selection of libraries that allow hold pickups.
Wenn Ihre Bibliothek Rückrufe erlaubt, können Benutzer*innen alle Rückfrage, die Sie gemacht haben, und deren Status im Reiter „Rückrufe“ sehen.
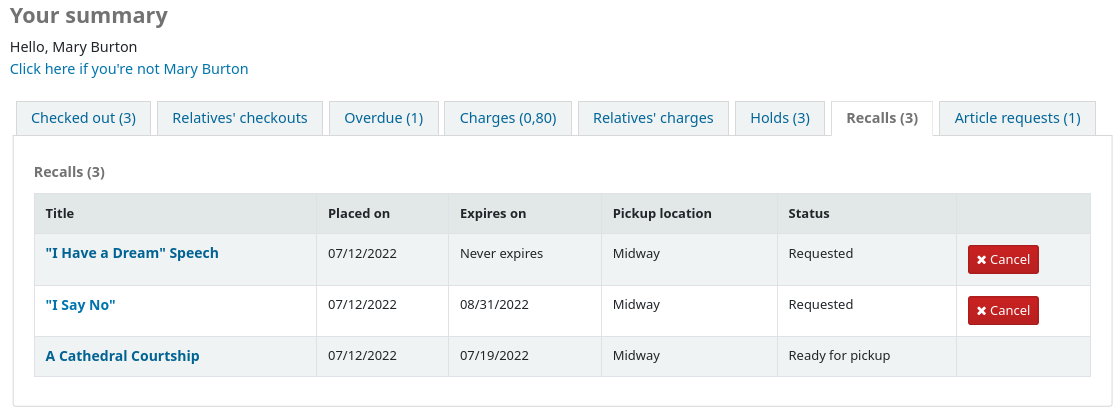
Der Benutzer/die Benutzerin kann einen Rückruf über Klick auf die Schaltfläche „Stornieren“ beenden, wenn dieser noch nicht abholbereit ist.
Kontosperren
If you have flagged your patron’s account they may see one of the following error messages at the top of their account.
Benutzerausweis wurde als verloren markiert

Benutzeradresse fraglich

Hinweis
this error message will not include a link to the update form if you have OPACPatronDetails set to ‚Don’t allow‘
Benutzer ist gesperrt

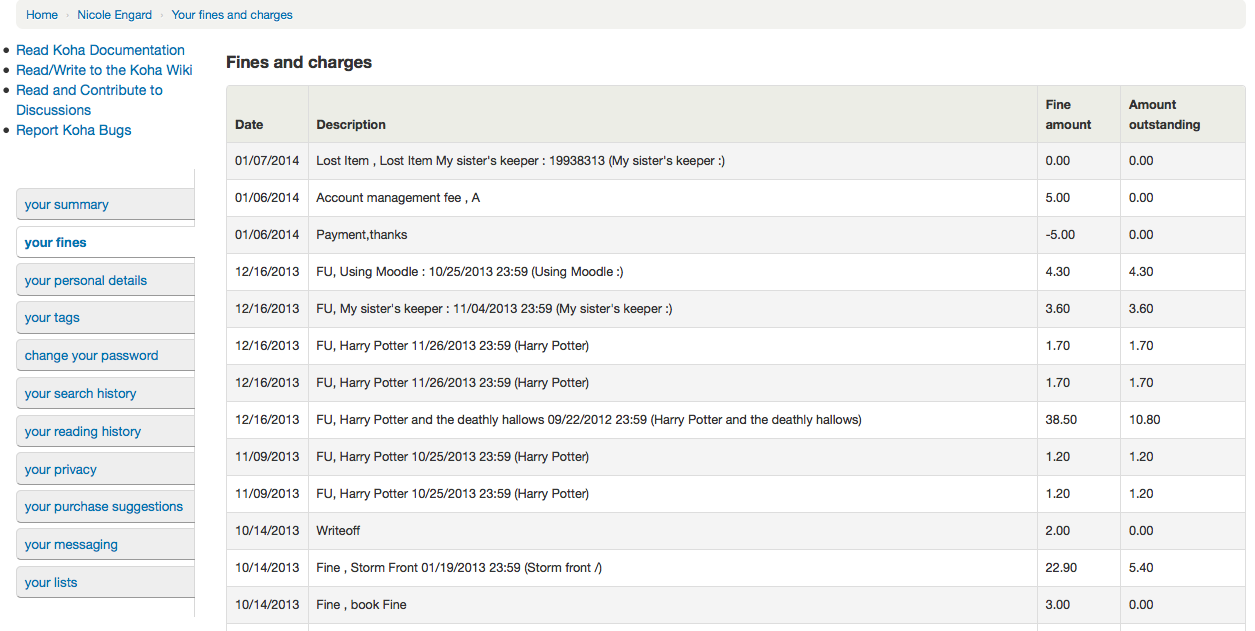
Ihre Gebühren
Erhebt Ihre Bibliothek Gebühren, ist der zweite Reiter im Benutzeraccount der Reiter ‚Gebühren‘. Klicken Sie auf diesen Reiter, bekommt der Benutzer die gesamte Historie der Abrechnung der Bibliothek angezeigt.
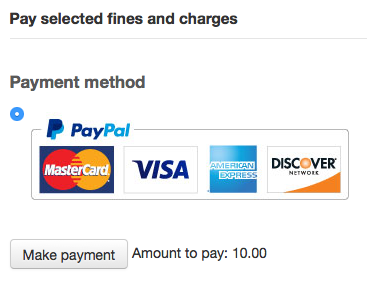
Wenn Sie Benutzern erlauben Gebühren mit PayPal über den OPAC zu bezahlen, indem der Systemparameter EnablePayPalOpacPayments auf ‚Erlaube‘ gesetzt ist, erscheinen Checkboxen auf der linken Seite jeder angezeigten ausstehenden Gebühr.
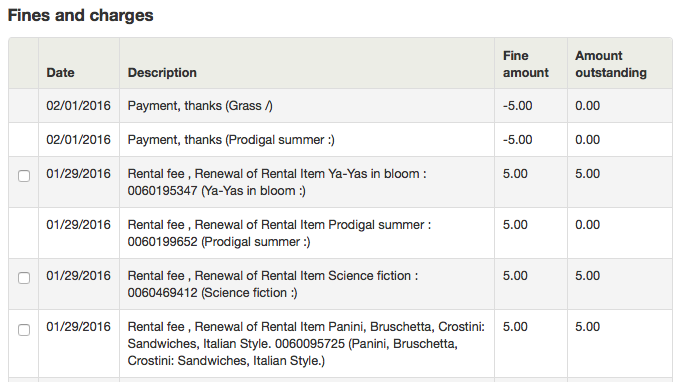
Darunter bekommt der Benutzer die PayPal-Option für jedes Exemplar angezeigt.
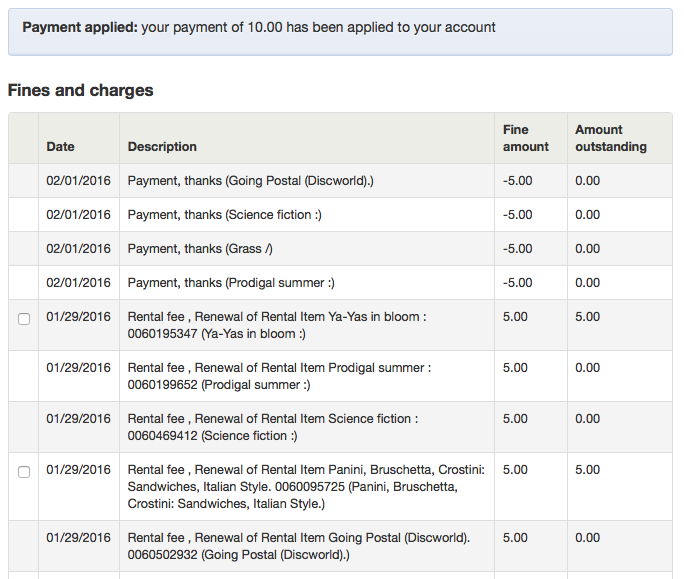
Nach dem Bezahlen bekommen Sie eine Bestätigung angezeigt.
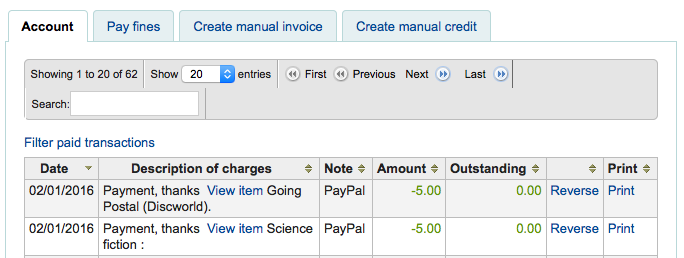
Sie können auch auf der Seite der Dienstoberfläche sehen, dass die Gebühr mit PayPal bezahlt wurde.
Persönliche Daten
If you have your OPACPatronDetails preference set to ‚Allow‘, your patrons will see a form filled in with their contacting information by clicking on the ‚Your personal details‘ tab. You can control what fields patrons see and can modify via the OPAC by setting the PatronSelfModificationBorrowerUnwantedField and PatronSelfModificationMandatoryField preferences.
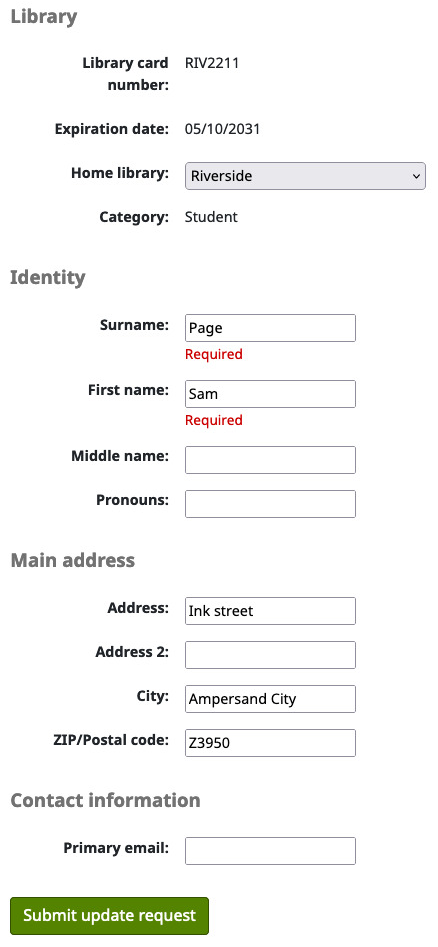
Die Benutzer können Ihre persönlichen Daten bearbeiten und mit dem Klick auf die Schaltfläche ‚Aktualisierte Daten abschicken‘. Die Aktualisierung wird an die Bibliothek zur Kontrolle weitergeleitet. Alle Adressänderungswünsche werden auf der Startseite der Dienstoberfläche unterhalb der Module angezeigt zusammen mit anderen Optionen.
If the OPACPatronDetails preference is set to ‚Don’t allow‘ then patrons will simply see their details and a message stating that they should contact the library for changes.
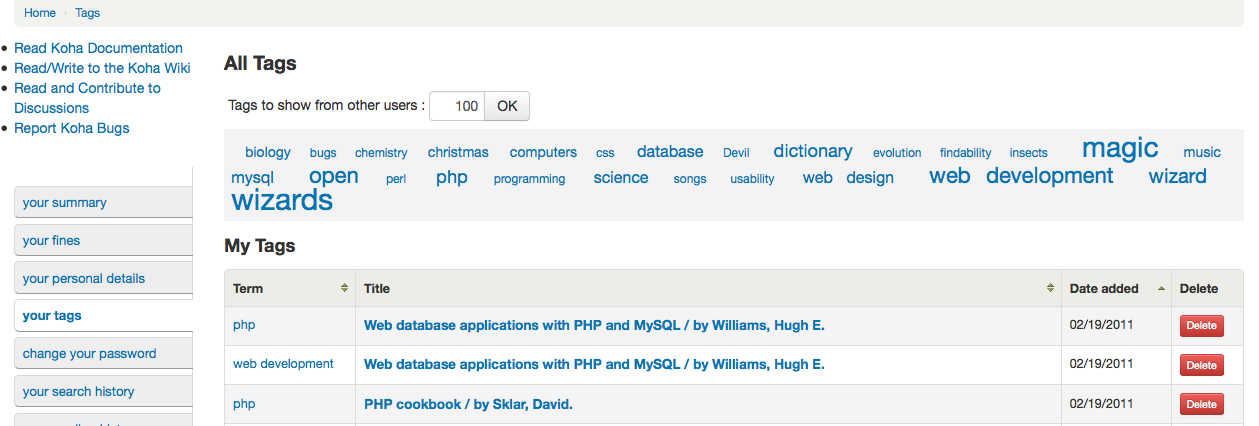
Ihre Tags
If your library has TagsEnabled set to ‚Allow‘ then the next tab on the left will be ‚your tags‘. This tab will show patrons all of the tags in the system as a cloud and then all of the tags they have applied in a list format. From here patrons have the ability to remove tags that they have added if they want.
Passwort ändern
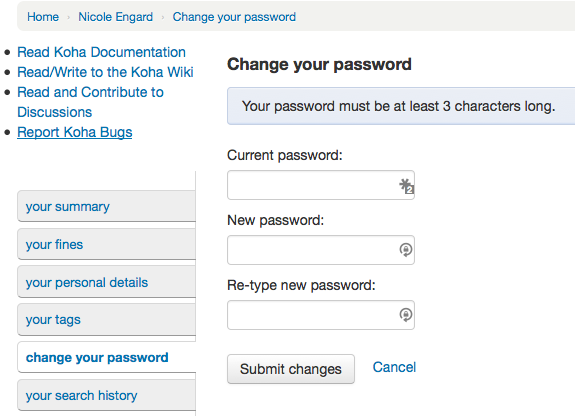
Next, if you have OpacPasswordChange set to ‚Allow‘ the next tab will be ‚change your password,‘ where patrons can change their password for logging into the OPAC. Patrons will be presented with a standard form asking them to enter their old password and then their new password twice.
Wenn der Systemparameter :ref:`NotifyPasswordChange <notifypasswordchange-label>`aktiviert ist, erhält der Benutzer/die Benutzerin eine E-Mail mit der Information, dass das Passwort geändert wurde.
Der Inhalt dieser E-Mail kann unter Benachrichtigungen und Quittungen angepasst werden. Der Code der Benachrichtigung lautet PASSWORD_CHANGE.
Suchhistorie
If you have your EnableOpacSearchHistory preference set to ‚Keep‘ then your patrons can access their search history via the ‚your search history‘ tab.
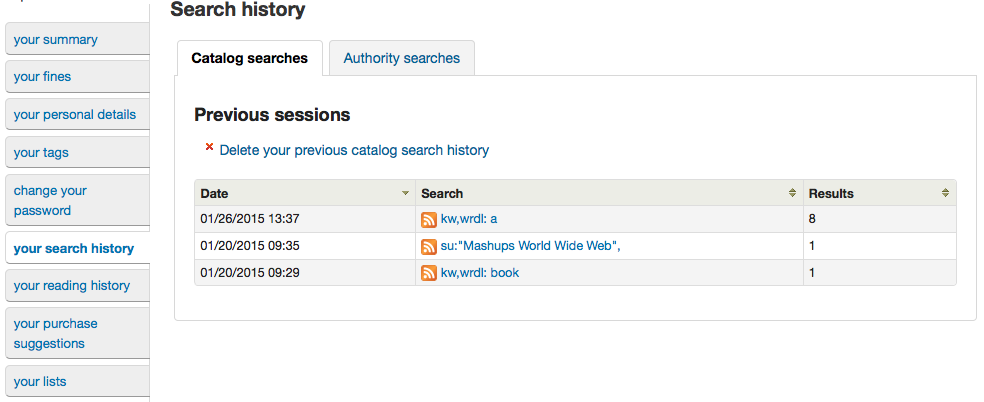
Die Suchhistorie zeigt alle Suchschritte auf, die der Benutzer ausgeführt hat. Klicken Sie auf eine Suchabfrage, wird diese Suche wieder ausgeführt. Der Benutzer kann die Suchhistorie jederzeit löschen in dem er auf den Link ‚Markierte Suchen entfernen‘ klickt, der in diesem Reiter unter der Historie angezeigt wird, oder über der Liste auf das kleine ‚x‘ ‚Löschen‘ klickt.

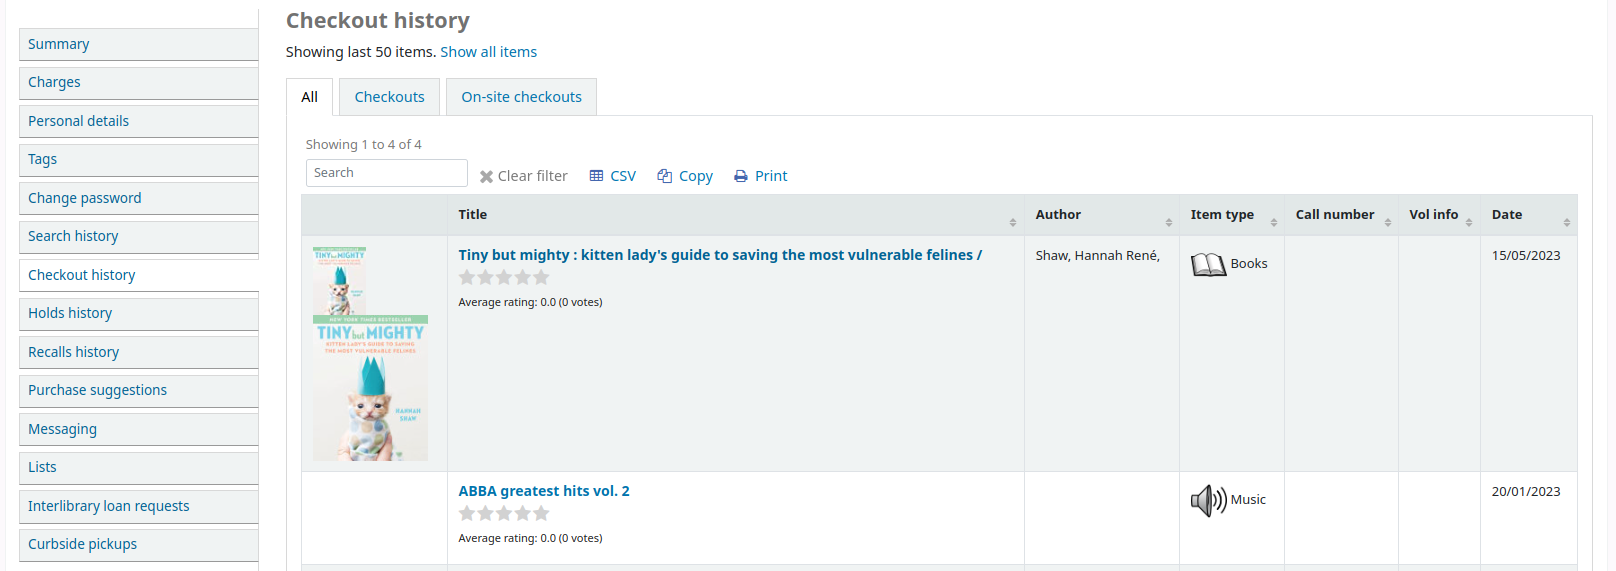
Checkout history
If the opacreadinghistory system preference is set to ‚Allow‘, patrons will have access to the ‚Checkout history‘ tab. This will show the patron their entire borrowing history, unless they have asked the library to not keep that information via the ‚Privacy‘ tab.
If OPACShowSavings is set to display savings in the ‚your summary‘ page, this section will also contain the savings the patron made by using the library rather than purchasing the items.
Datenschutzoptionen
The ‚your privacy‘ tab will appear if you have both the opacreadinghistory and the OPACPrivacy preferences set to ‚Allow.‘ This tab will allow the patrons to decide how the library keeps their circulation history data.
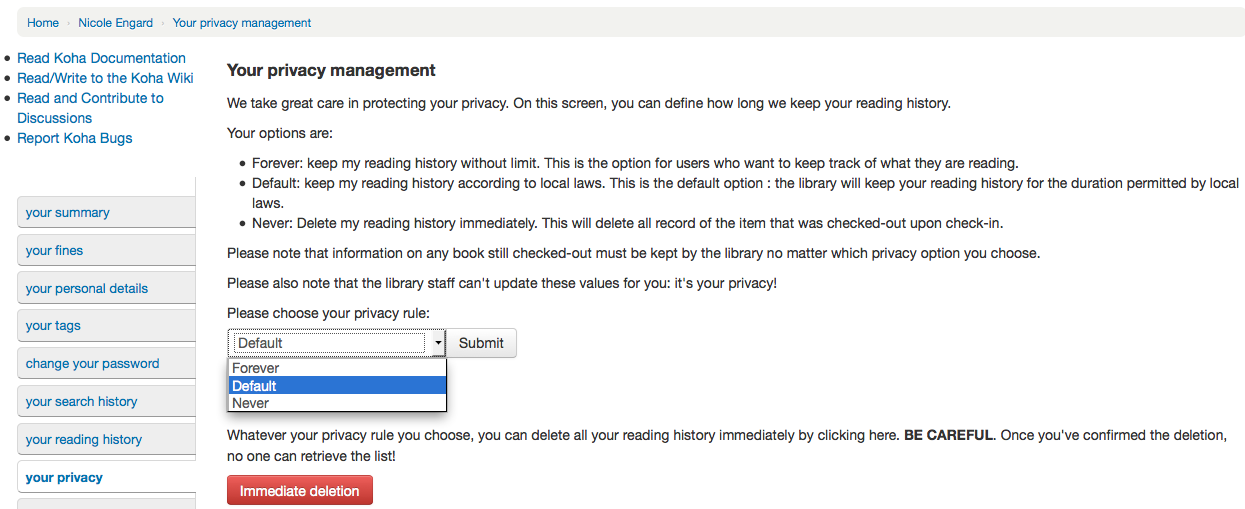
Der Benutzer kann zwischen 3 Optionen wählen:
Für immer: Meine Lesehistorie wird ohne Einschränkung gespeichert. Dies ist die Option für Benutzer, die den Überblick über das Gelesene bewahren möchten.
Standard: Speichern Sie meine Lesehistorie nach den geltenden Datenschutzbestimmungen. Dies ist die Standardeinstellung: Die Bibliothek wird die Daten so lange speichern, wie die geltenden Datenschutzbestimmungen dies erlauben.
Niemals: Lösche meine Suchhistorie sofort. Mit dieser Option wird die Lesehistorie sofort nach der Rückgabe des Titels gelöscht.
Abhängig vom Vorschlag des Benutzers kann der Inhalt der ‚Lesehistorie‘ und der Inhalt der ‚Ausleihhistorie‘ in der Dienstoberfläche voneinander abweichen.
Unabhängig von der Wahl des Benutzers kann die Lesehistorie jederzeit im Stapel gelöscht werden.
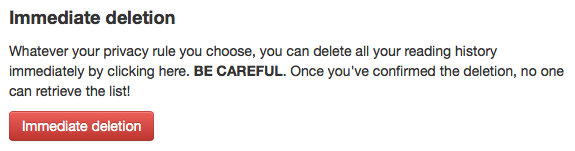
Wenn Sie diese Schaltfläche klicken, werden keine Exemplare gelöscht, die aktuell ausgeliehen sind, sondern es wird die vergangene Lesehistorie des Benutzers geleert.
Wichtig
In order for the patron to be able to delete their reading history you must have the AnonymousPatron preference set.
If you’re allowing guarantees to grand permission to their guarantors to view their current checkouts with the AllowPatronToSetCheckoutsVisibilityForGuarantor preference they will see that option on this screen.
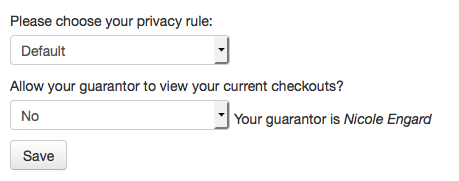
Wenn sich der Bürge einloggt, bekommt er in seiner Kontoübersicht den Reiter ‚Ausleihen von Angehörigen‘ angezeigt.
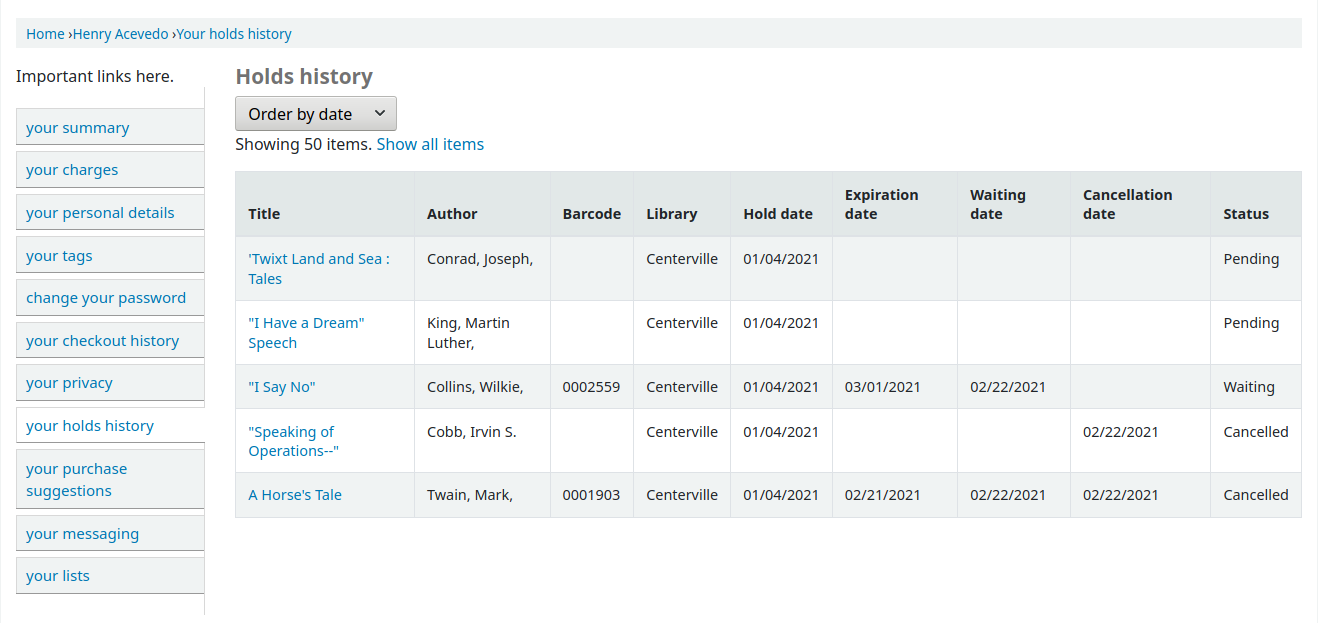
Vormerkhistorie
If the OPACHoldsHistory system preference is set to ‚Allow‘, patrons will be able to see all their current and past holds.
Anschaffungsvorschläge
If your library allows patrons to make purchase suggestions the next tab will show all suggestions that the patron made to the library and their statuses. To disable this tab and the suggestion functionality set the suggestion preference to ‚Don’t allow.‘
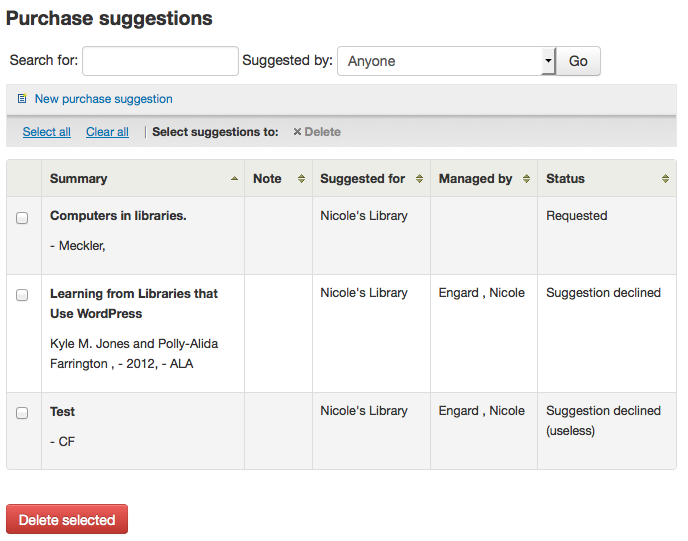
If you have OPACViewOthersSuggestions set to ‚Show‘ then patrons will be able to search suggestions from the top of this list.
Messaging
If your library has the EnhancedMessagingPreferences and the EnhancedMessagingPreferencesOPAC preferences set to ‚Allow‘ then your patrons will be able to choose which messages they receive from the library (with the exception of overdue notices which the library controls).
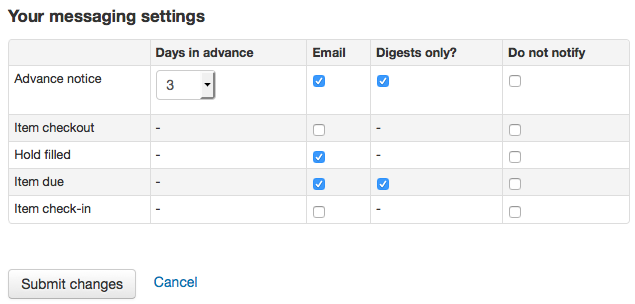
If you use an outside driver for sending text messages set with the SMSSendDriver preference, you will see an additional column to receive these messages as SMS (or text messages) and a field for a cell (or SMS) number.

If you are using the Email protocol for sending text messages set with the SMSSendDriver preference, you will see an additional column to receive these messages as SMS (or text messages), a field for a cell (or SMS) number, and a pull down listing cellular providers entered in administration.
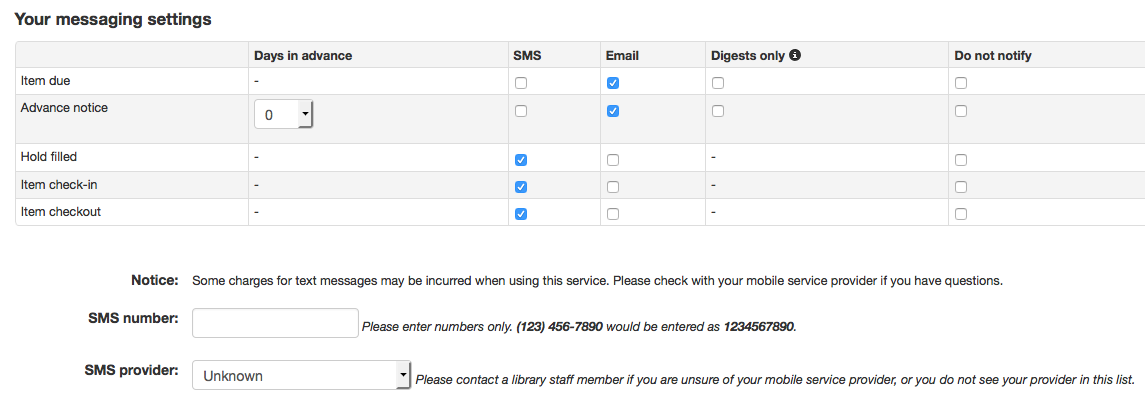
If you are using the i-tiva Talking Tech service you will see an additional column to receive these messages via Phone.
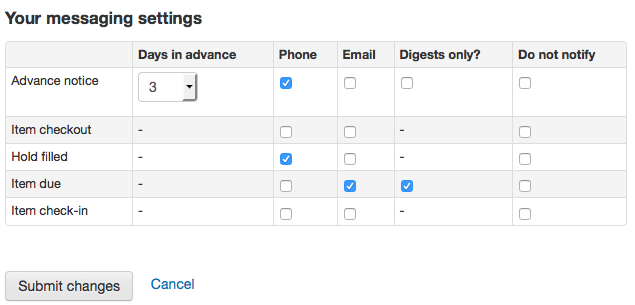
Diese Benachrichtigungen sind:
Erinnerungsbenachrichtigung: diese Benachrichtigung wird im Voraus an den Benutzer versandt mit dem Hinweis, wann die ausgeliehenen Medien fällig sind (die Anzahl der Tage wie lange vor dem Fälligkeitsdatum die Nachricht verschickt wird, kann vom Benutzer gewählt werden).
Ausleihquittung: diese Benachrichtigung listet alle Medien auf die der Benutzer soeben ausgeliehen oder verlängert hat. Das ist die elektronische Version der Ausleihquittung
Vormerkbenachrichtigung: ist diese Benachrichtigungsart angehakt, wird der Benutzer darüber informiert das eine Vormerkung abholbereit ist
Fälligkeitsbenachrichtigung: am Tag der Fälligkeit des ausgeliehenen Mediums wird diese Benachrichtigung verschickt
Rückgabequittung: Diese Benachrichtigung listet alle Medien auf, die der Benutzer zurückgegeben hat
Bemerkung
This notice can be customized by editing the CHECKIN notice in the Notices and slips tool.
Ausleihquittung: diese Benachrichtigung listet alle Medien auf die der Benutzer soeben ausgeliehen oder verlängert hat. Das ist die elektronische Version der Ausleihquittung
Bemerkung
This notice can be customized by editing the CHECKOUT notice in the Notices and slips tool.
Auto renewal: A notice that notifies the patron that their checkouts have been automatically renewed, or if there was a problem with their automatic renewal.
Bemerkung
This notice can be customized by editing the AUTO_RENEWAL or AUTO_RENEWAL_DGST notices in the Notices and slips tool.
This option will only appear if the AutoRenewalNotices is set to „according to patrons messaging preferences“.
Nutzer können diese Benachrichtigungen gesammelt erhalten, wenn die Checkbox in der Spalte ‚Sammelmail‘ angehakt, und die Benachrichtigungsart gewählt wird. Bei einer Sammelbenachrichtigung werden alle Benachrichtigungen eines Benachrichtigungstyps in einer Mail zusammengefasst (z. B. alle Exemplare die in drei Tagen fällig werden in einer Mail) anstelle von mehreren Mails für jedes Exemplar.
If the TranslateNotices preference is set to Allow the patron will also see an option to choose ‚Preferred language for notices‘ with a dropdown list of available languages.
Wichtig
Möchten Sie nur eine kurze Zusammenfassung der Nachrichten erhalten, müssen Sie eine Lieferart auswählen (SMS, Email oder Telefon).
Listen
If the virtualshelves system preference is set to ‚Allow‘, patron will see a ‚Lists‘ tab.
From here, patrons can view public lists and create or edit their own private lists.
Entlastung beantragen
If the useDischarge system preference is enabled, patrons will be able to request a discharge via the OPAC. A discharge is a certificate that says the patron has no current checkouts and no holds.
Patrons can request a discharge from the library by going to the ‚Ask for discharge‘ tab in their online account.
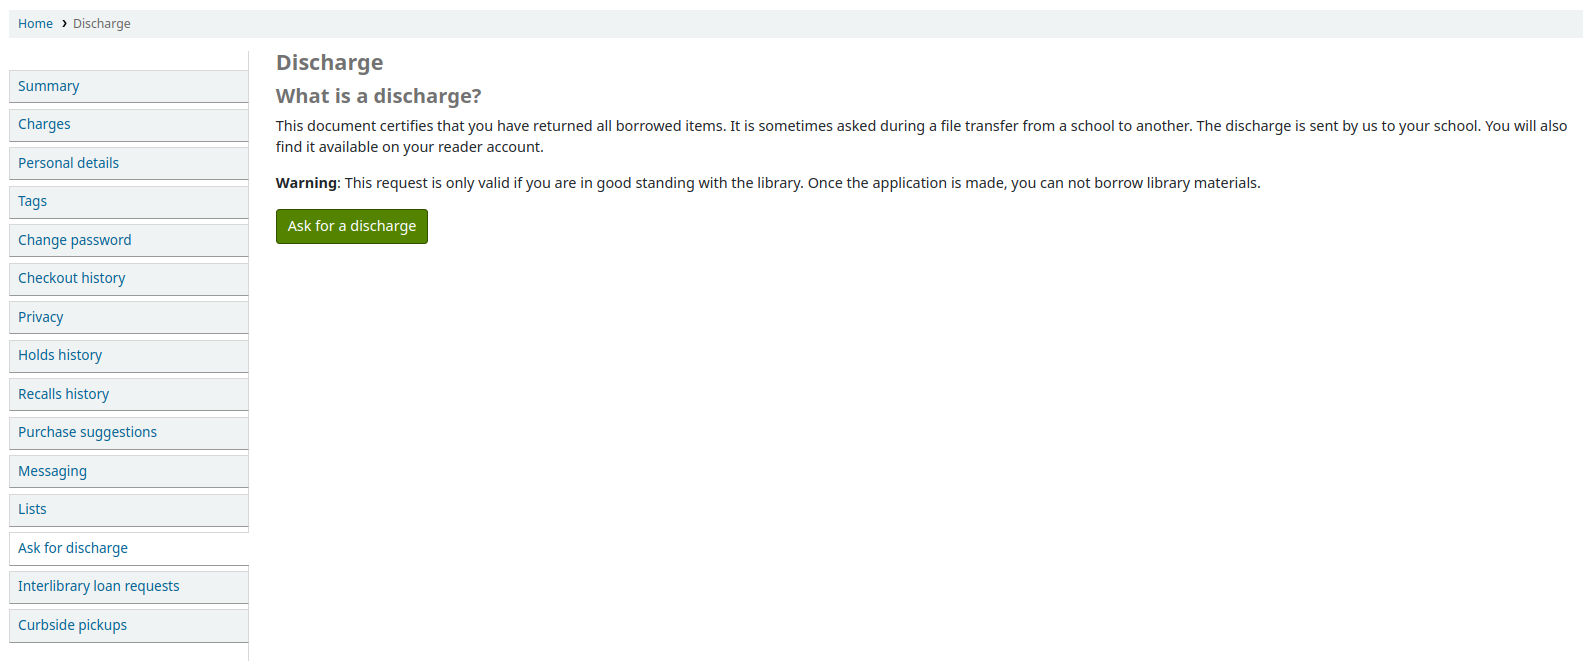
From here they can request a discharge by clicking the ‚Ask for a discharge‘ button. They will receive a confirmation of their request.
Once the discharge is approved by library staff, the patron will see a download link to download a PDF of their discharge.

Ihre Umlauflisten
Wenn Sie als Empfänger auf einer der Zeitschriftenumlauflisten stehen, werden Sie hier eine Übersicht sehen. Es wird ein Hinweis angezeigt: „Sie stehen auf den Umlauflisten für die folgenden Zeitschriftentitel. Wenn Sie Änderungen vornehmen möchten, sprechen Sie bitte das Bibliothekspersonal an“.
Fernleihbestellungen
If your library has the ILLModule preference set to ‘Enable’ patrons will have the option to make ILL requests when logged in to their OPAC account. From here they can view their existing requests and place new ones.
Um eine Fernleihbestellung anzulegen, klicken Sie auf „Neue Bestellung“ und wählen Sie ein Bestellformat aus.

Hinweis
The options displayed are dependent on your ILL configuration. See the ILL backends wiki page at https://wiki.koha-community.org/wiki/ILL_backends further explanation.
Hinweis
If you have entered copyright text in the ILLModuleCopyrightClearance preference the text displays here and you need to click ‘Yes’ to accept before continuing.
Complete the publication details as fully as possible. Depending on the form in use you may see the option to add Custom fields for additional information such as notes. Destination branch is a required field, this is the branch you would like the request to be sent to.
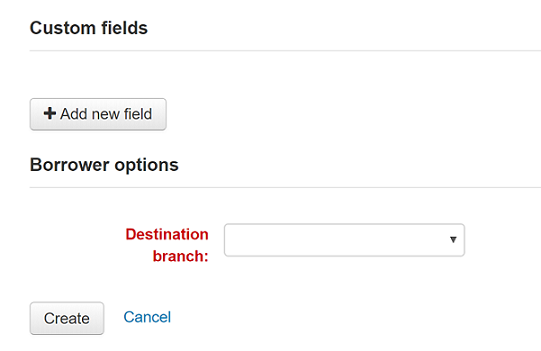
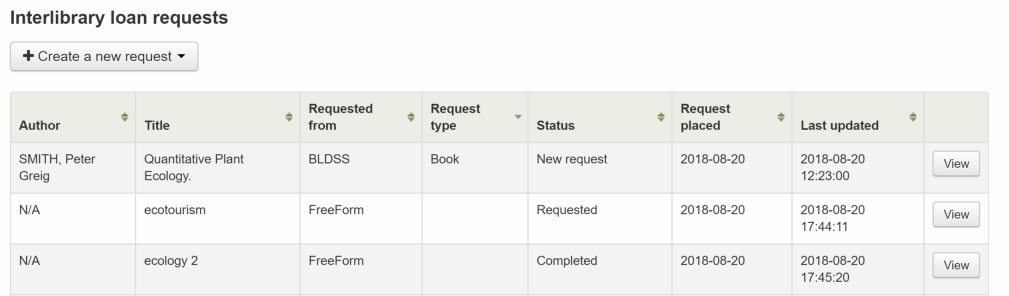
Klicken Sie auf ‚Erstelle‘, um die Anfrage bei Ihrer Bibliothek einzureichen.
Your submitted request will be listed with a status of ‘New request’. Once processed the status will be updated to ‘Requested’.
Klicken Sie auf ‚Zeige‘ um Änderungen oder eine Stornierung Ihrer Anfrage vorzunehmen.
You cannot edit the form details but you can add a note to request a modification and then click on ‘Submit modifications’ at the bottom of the screen. Your modification will be sent to the library for processing.
Bemerkung
When a patron modifies an inter-library loan request, an email is sent to library staff so that they can view the changes from the ILL module.
The email sent is based on the ILL_REQUEST_MODIFIED template. It can be customized in the Notices and slips tool.
Für neue Anfragen haben Sie auch die Möglichkeit eine Stornierung zu beantragen. Ihre Anfrage erhält dann den Status ‚Stornierung angefragt‘ und kann dann vom Bibliothekspersonal entfernt werden.
Bemerkung
When a patron cancels an inter-library loan request, an email is sent to library staff so that they can cancel it from the ILL module.
The email sent is based on the ILL_REQUEST_CANCEL template. It can be customized in the Notices and slips tool.
Rückrufhistorie
Wenn Ihre Bibliothek Rückrufe erlaubt, können Benutzer*innen alle ihre vergangenen und aktuellen Rückrufe sowie deren Status im Reiter „Rückrufhistorie“ einsehen.
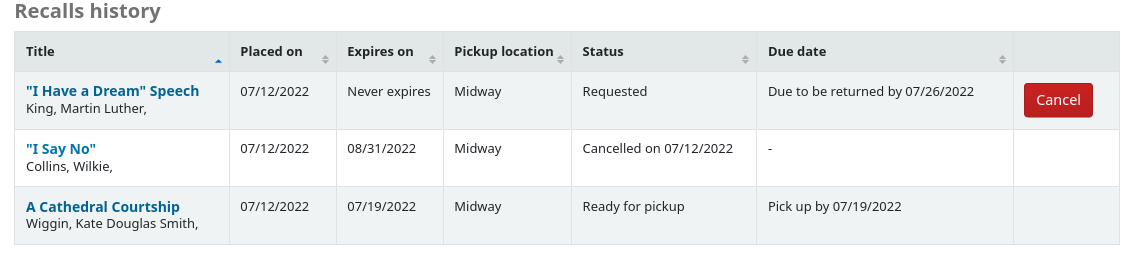
Der Benutzer/die Benutzerin kann einen Rückruf über Klick auf die Schaltfläche „Stornieren“ beenden, wenn dieser noch nicht abholbereit ist.
Curbside pickups
If your library offers curbside pickup, the patron will be able to see their scheduled pickups under ‚Curbside pickups‘.
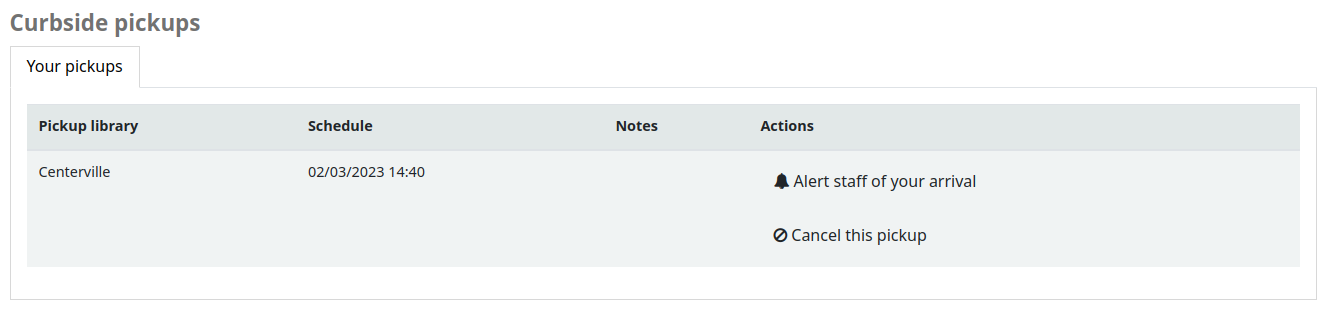
The patron has the option to indicate that they are outside the library by clicking ‚Alert staff of your arrival‘.
The patron also has the option to cancel their scheduled pickup with the ‚Cancel this pickup‘ button.
If the ‚Patron-scheduled pickup‘ setting is turned on in the curbside pickup configuration, the patron will be able to schedule their own curbside pickup appointment.

The patron must first choose a library at which they want to pick up their items
Bemerkung
Only libraries with curbside pickup enabled will be displayed in the drop-down menu.
Furthermore, if the ‚Enable for waiting holds only‘ setting is turned on, only the libraries at which the patron has waiting holds will be enabled.
The patron must then choose a date
Bemerkung
Only dates with available time slots will be displayed.
The possible pickup times will be displayed, depending on the day of the week
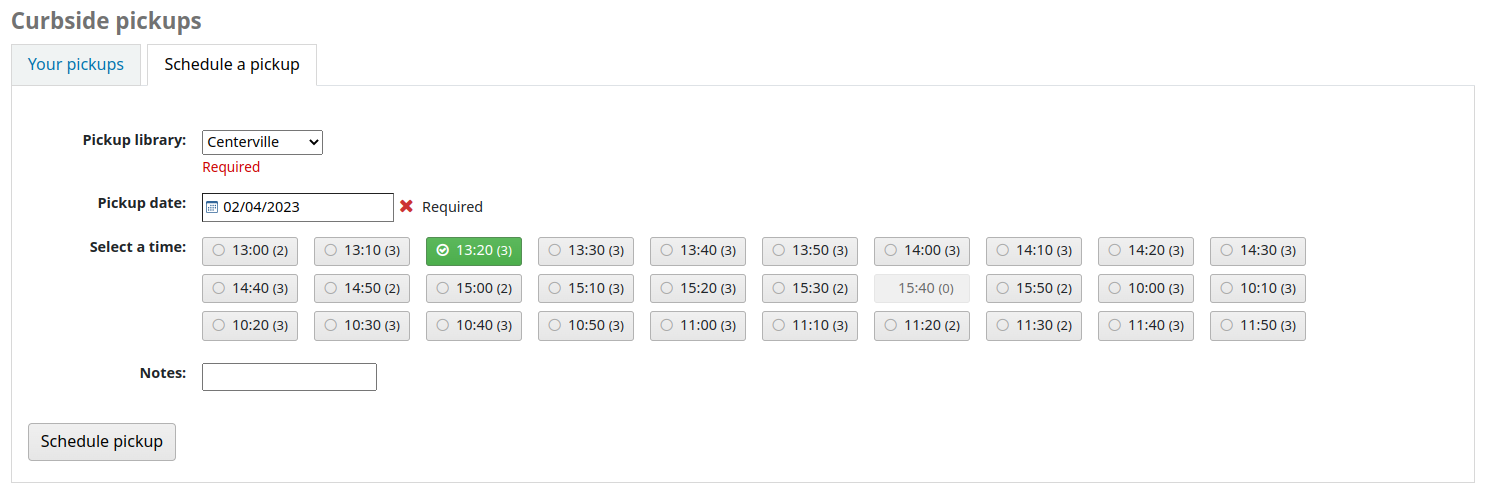
Bemerkung
The number in parentheses under each time slot is the number of available appointments for that time. If the maximum number of appointments has been reached, based on the ‚Maximum patrons per interval‘ setting in the curbside pickup configuration, the time slot will be greyed out and the patron will not be able to select it.
The patron can optionally add a note about their pickup
The patron must then click ‚Schedule pickup‘ to save their appointment
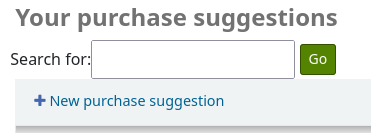
Anschaffungsvorschläge
If your library has the suggestion preference set to ‚Allow‘, patrons will have the option to make purchase suggestions in several areas in the OPAC.
If you are allowing everyone to see the purchase suggestions made by others with the OPACViewOthersSuggestions preference, there will be a link at the top of your OPAC under the search box.

Es gibt auch einen Link, wenn die Suchanfrage eines Benutzers nicht erfolgreich war.

Es gibt dann eine Option „Zur Anschaffung vorschlagen“ in der Detailansicht eines Titels.
Und es gibt einen Link im Reiter Anschaffungsvorschläge im Bibliothekskonto.
Jede dieser Optionen öffnet das Formular für einen Anschaffungsvorschlag.
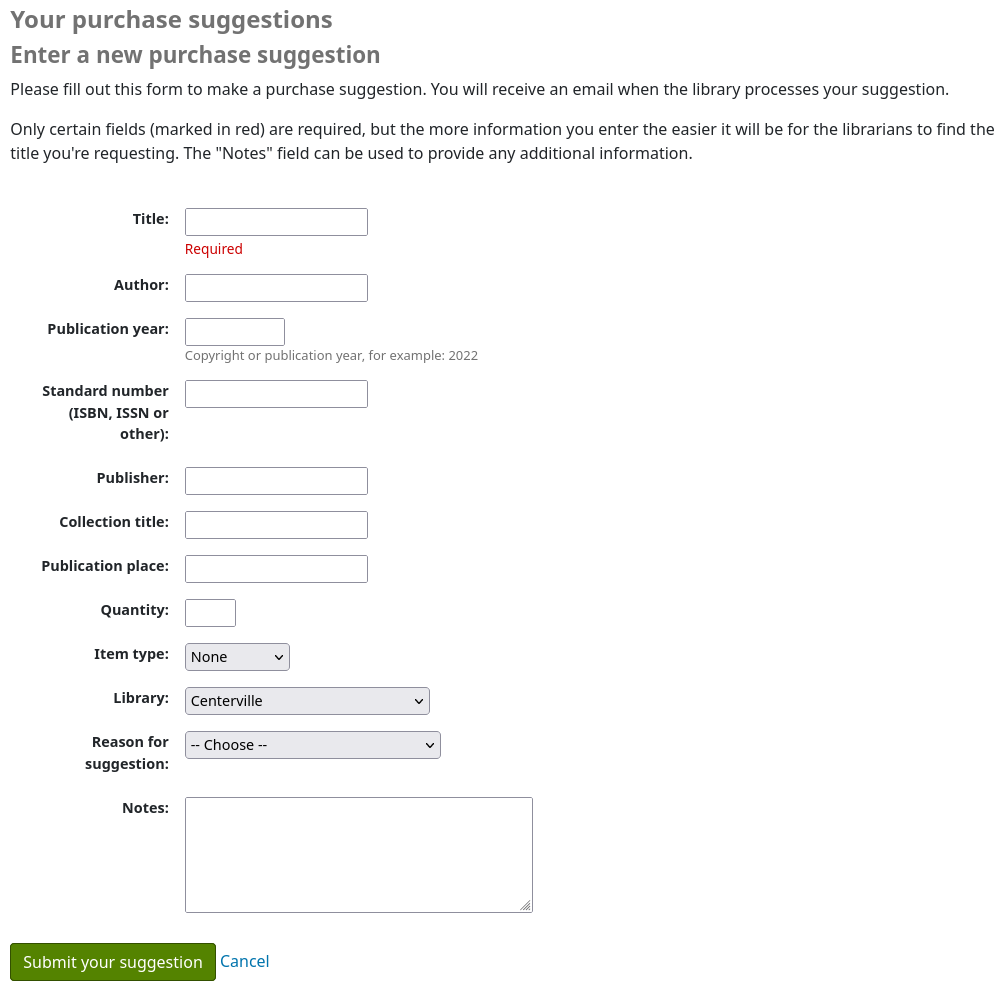
Der informative Text am Anfang des Formulars kann über das Werkzeug HTML-Anpassungen und OpacSuggestionInstructions individuell angepasst werden.
In diesem Formular ist nur der „Titel“ ein Pflichtfeld.
Mandatory fields can be set using the OPACSuggestionMandatoryFields system preference.
The OPACSuggestionUnwantedFields system preference can be used to hide unnecessary fields.
The OPACSuggestionAutoFill system preference can be used to help patrons fill out the form using information from Google Books.
Die Liste der Medientypen kann durch Bearbeitung der Normierten Werte für SUGGEST_FORMAT angepasst werden.
Die Auswahlliste mit Begründungen für den Vorschlag, kann über die normierten Werte für OPAC_SUG angepasst werden.
If the item already exists in the catalog, the patron will see a message with what Koha thinks is the corresponding title. Matches are made on the title/ author, ISBN or ISSN. If the title isn’t what the patron is trying to suggest, they can click ‚Confirm your suggestion‘, to suggest it anyway.

Wenn der Anschaffungsvorschlag eingereicht wurde, wird er im Erwerbungsmodul angezeigt und kann dort vom Bibliothekspersonal bearbeitet werden.
Wenn ein Anschaffungsvorschlag im Erwerbungsmodul bestellt wurde, wird der Titel des Anschaffungsvorschlags anklickbar und führt zum Titel im Katalog.
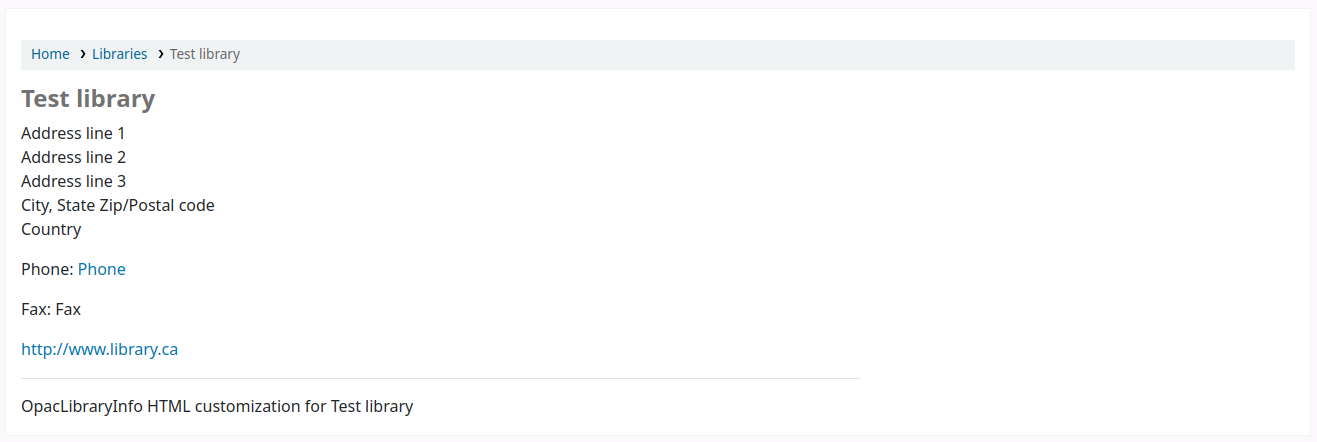
Libraries
The ‚Libraries‘ page shows the contact information (address lines, city, state, zip/postal code, country, phone number, fax number, website) for libraries in the system that are set as ‚Public‘.
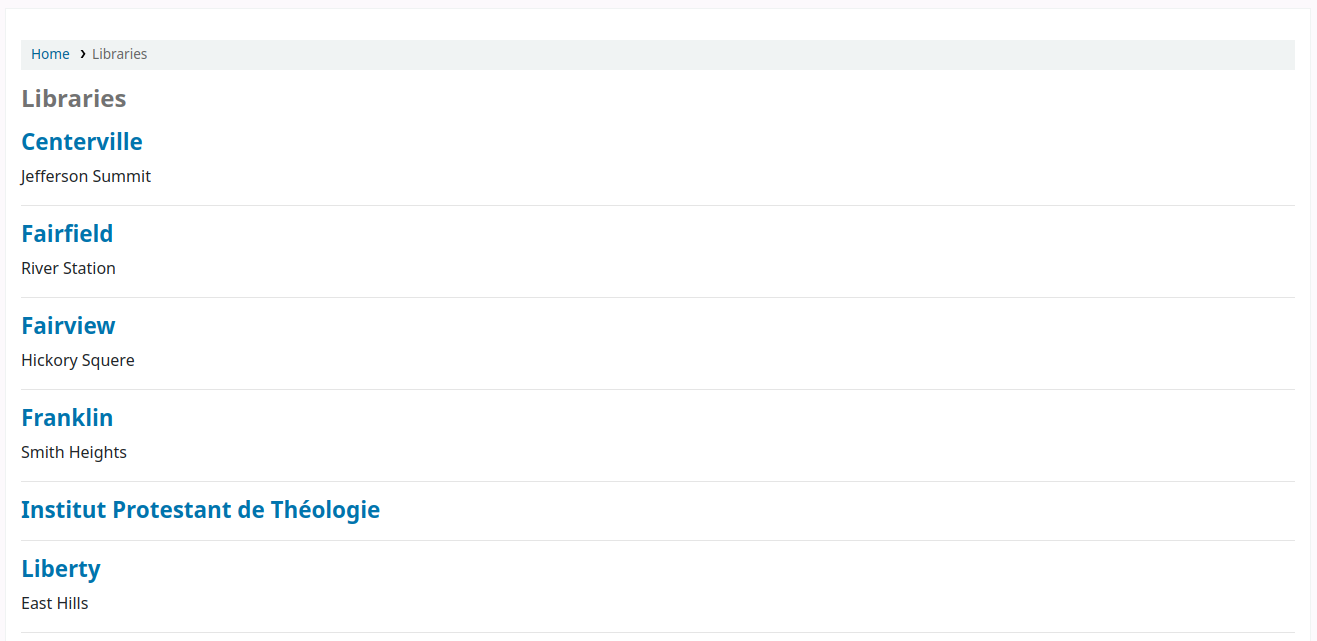
The library name is a link to a specific page for this library. This second page also includes ‚OpacLibraryInfo‘ HTML customizations for this library.
Reporting problems
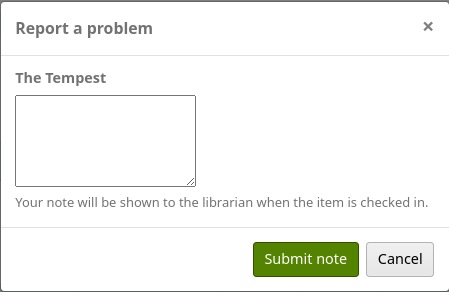
If the OPACReportProblem system preference is enabled, patrons will have the option to report problems on the OPAC (broken links or inaccurate information for example).
At the bottom of each page is a ‚Report a problem‘ link.
When the patron clicks on the link, they are brought to a form where they can specify what exactly is the problem.
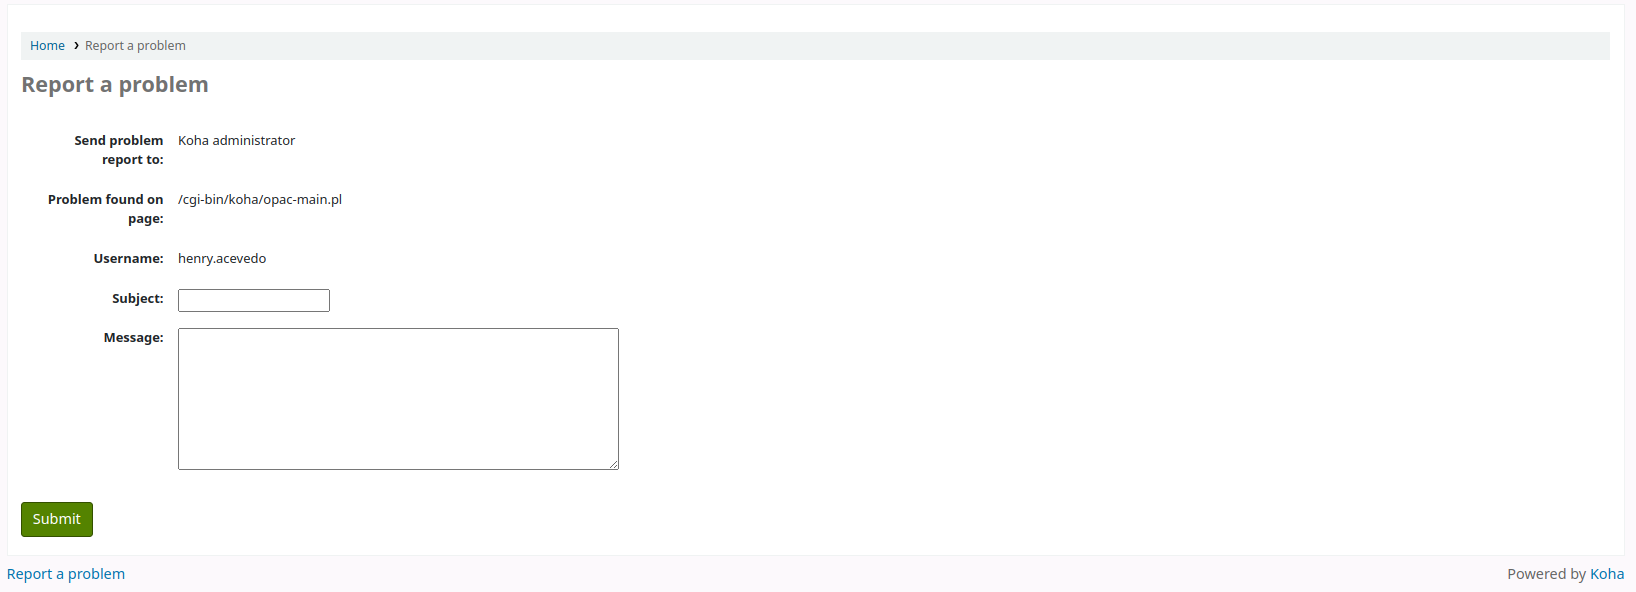
The problem report is sent to the Koha administrator by email (to the address in KohaAdminEmailAddress), and will appear in the OPAC problem reports tool. If the library has an email address, the patron will have the choice to either send the problem report to the library or to the administrator.
Bemerkung
The notice sent by email is customizable in the Notices and slips tool. The letter code is PROBLEM_REPORT.
OPAC self checkout
Version
This feature was added in Koha version 23.11.
In addition to the self checkout module, there is a lighter weight option for libraries with smaller, trusted communities. With this option, patrons are allowed to check out items to themselves through their OPAC account with no oversight from library staff. This self checkout feature can be used on any computer or device with access to the OPAC, as opposed to the self checkout module which is meant to be used on dedicated computers.
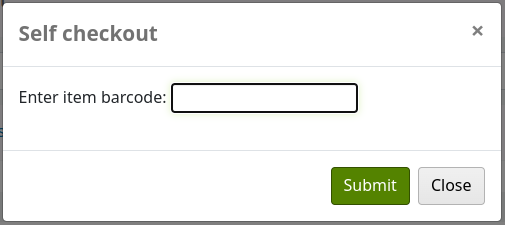
Once the OpacTrustedCheckout system preference is enabled, logged in patrons will see a ‚Self checkout‘ option at the top of the page in the OPAC.

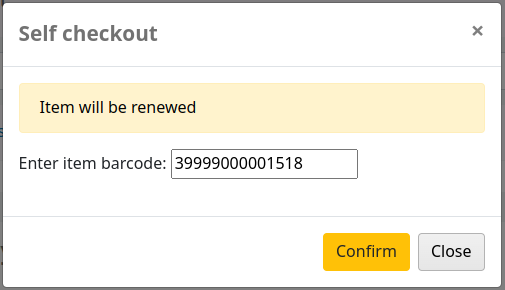
Clicking on the ‚Self checkout‘ link will open a pop-up where the patron can enter the item’s barcode and click ‚Submit‘ or press the enter key.
Once the item’s barcode has been entered, a confirmation message appears at the top of the pop-up and the item’s barcode, title, call number and due date are listed at the bottom. The patron has the option to scan or enter another barcode.
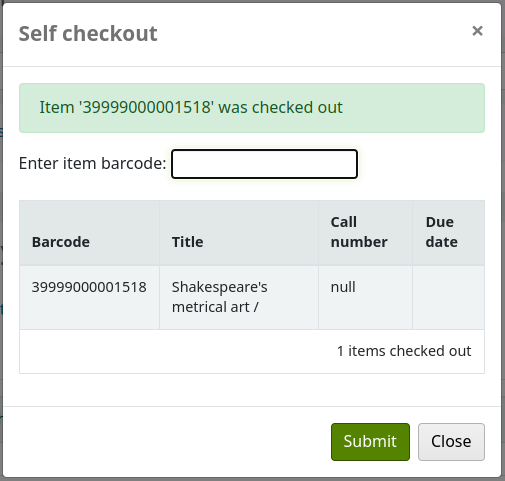
To renew the checkout, the patron only has to check out again (or renew from their summary).
If an item is already checked out to another patron, a message will say so.
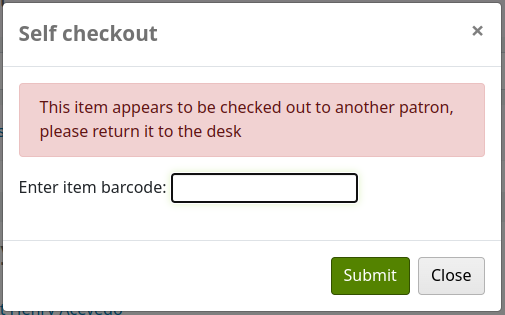
Checkout will also be blocked if:
the barcode is not found;
the item is on hold for another patron;
the patron’s outstanding charges are over the limit;
the patron already has the maximum amount of checkouts;
the patron does not have the required age to checkout the item;
the item cannot be checked out because of a not for loan or withdrawn status.
Kommentare
Patrons can leave comments in the OPAC if you have the OPACComments preference set to allow this. Each bibliographic record has a comments tab below the bibliographic information.
Ist der Benutzer eingeloggt, bekommt er einen Link angezeigt, wo er einen Kommentar zum Exemplar verfassen kann. Durch Klicken dieses Links wird ein PopUp-Fenster geöffnet, die eine Box für die Kommentare anzeigt.
Ist der Kommentar eingegeben und abgeschickt, bekommt der Benutzer angezeigt, dass sich der Kommentar noch in der Vorschau befindet und auf Moderation wartet. Andere Benutzer bekommen den Kommentar nicht angezeigt, wenn sie auf das Exemplar klicken.
Once the comment is approved the patron will see the number of comments on the ‚Comments‘ tab and their comment labeled amongst the other comments. If the ShowReviewerPhoto system preference is set to ‚Show‘, the patron’s photo pulled from the Libravatar library will be displayed next to their comment.
Other patrons will see the comment with the name of the patron who left the comment (unless you have set the ShowReviewer preference to not show patron names).
If you have your OpacShowRecentComments set to show then you’ll see the approved comments on that page.
Ausgehend von dieser Seite können Benutzer über das RSS-Sheet kürzlich verfasste Kommentare abonnieren.