Administration
Paramètres de base
Aller à : Plus > Administration
Important
Configurer tous ces paramètres dans leur ordre d’apparition.
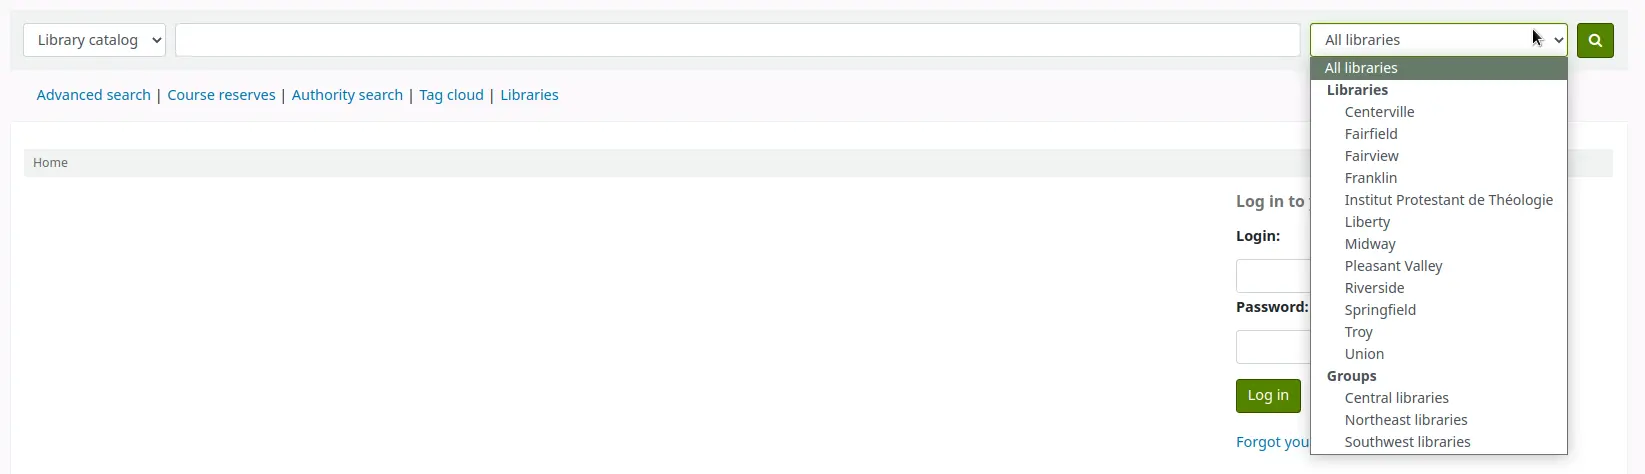
Bibliothèques
Quand vous configurez votre système Koha, vous voudrez ajouter des informations sur chaque bibliothèque de votre réseau. Ces informations sont ensuite utilisées à de nombreux endroits dans Koha.
Comment y accéder: Plus > Administration > Paramètres de base > Bibliothèques
Note
Seuls les membres du personnel avec la permission manage_libraries (ou la permission superlibrarian) auront accès à cette section.
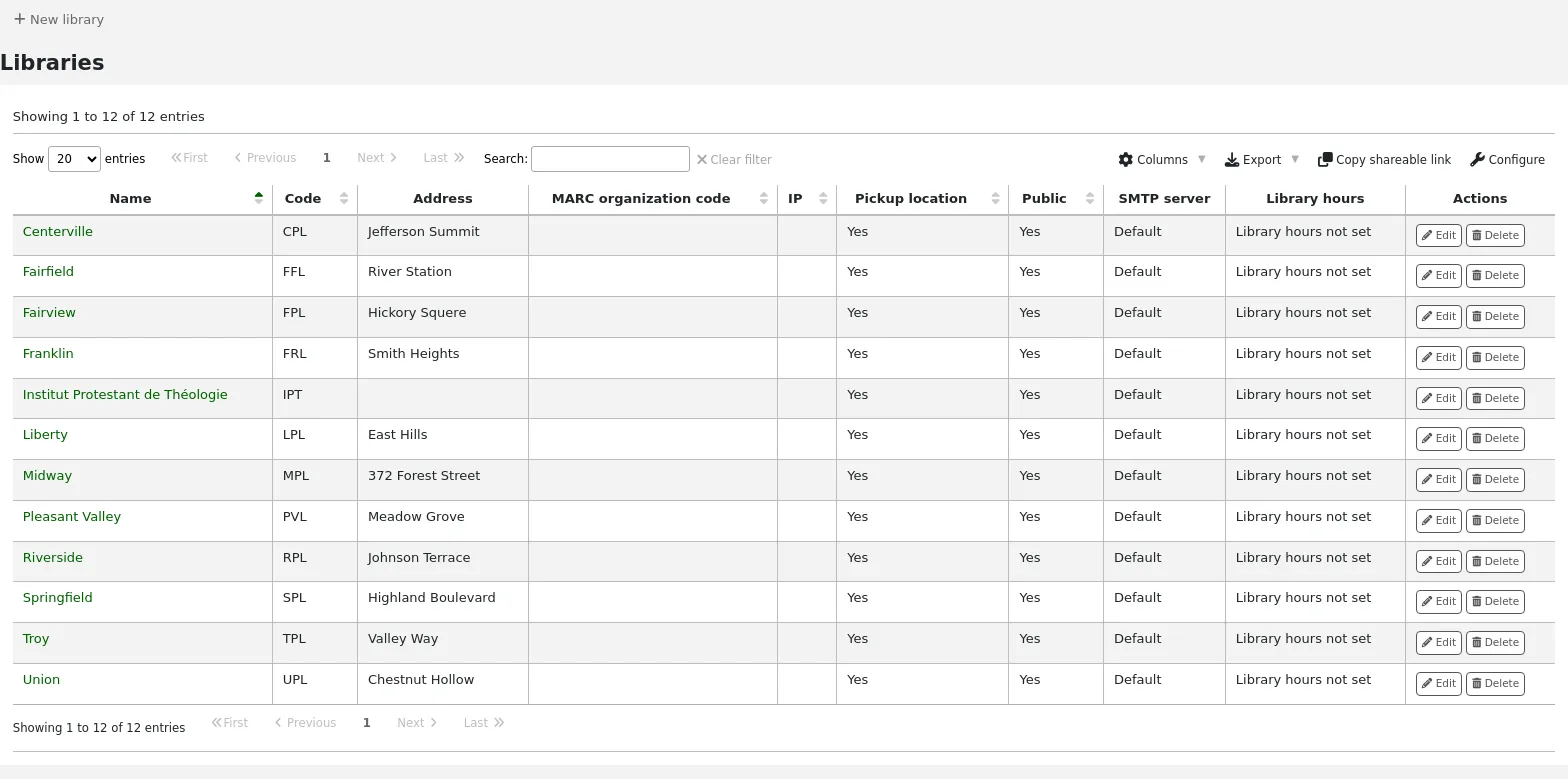
Dans cette page, vous verrez une liste de bibliothèques qui ont déjà été créées dans le système.
Note
Vous pouvez personnaliser les colonnes de ce tableau dans la section Configurer les colonnes du module Administration (référence du tableau : libraries).
En cliquant sur le nom d’une bibliothèque, vous accéderez à une vue détaillée des informations de cette bibliothèque.
Ajouter une bibliothèque
Pour ajouter une nouvelle bibliothèque :
Cliquer sur “Nouvelle bibliothèque”
Remplir le formulaire
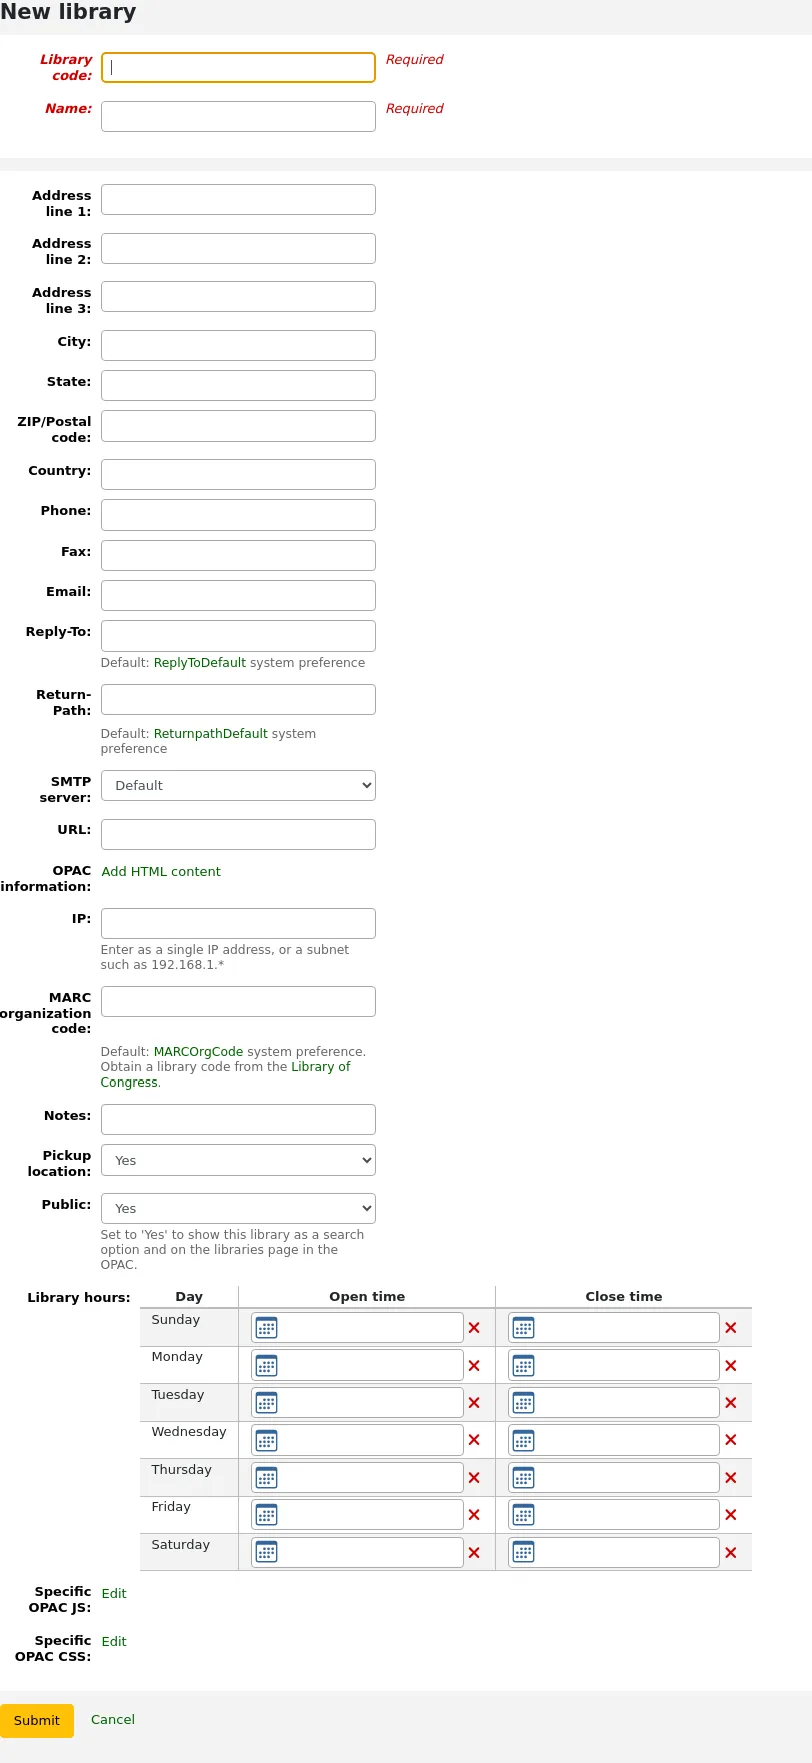
Code de la bibliothèque (obligatoire) : le code ne devrait contenir ni espace ni trait d’union et devrait avoir 10 caractères ou moins. Ce code sera utilisé comme un identifiant unique dans la base de données.
Nom (obligatoire) : le nom sera visible à l’OPAC et dans l’interface professionnelle partout où le nom de la bibliothèque s’affiche. Celui-ci devrait être un nom qui a un sens pour vos utilisateurs et votre personnel.
Adresse, ville, province, code postal, pays, numéro de téléphone, numéro de télécopieur : l’adresse et les informations de contact peuvent être utilisés pour créer des notifications personnalisées pour chaque bibliothèque. Ces informations apparaissent également dans la page “Bibliothèques” de l’OPAC, si cette bibliothèque est marquée comme “Publique”
Courriel : le champ pour l’adresse de courriel n’est pas obligatoire, mais il devrait être rempli pour chaque bibliothèque dans votre système
Note
Veuillez saisir une adresse courriel pour la bibliothèque, afin que les notifications soient envoyées à partir de la bonne adresse et vers celle-ci
Note
Si aucune adresse courriel n’est entrée ici, l’adresse dans la préférence système KohaAdminEmailAddress sera utilisée pour envoyer des notifications à partir de cette bibliothèque
Courriel de l’équipe PEB : si la bibliothèque utilise une adresse de courriel spécifique pour la gestion du PEB, la saisir ici
Note
Si aucune adresse courriel n’est entrée ici, l’adresse dans la préférence système ILLDefaultStaffEmail sera utilisée pour recevoir les demandes de PEB pour cette bibliothèque
Répondre à : vous pouvez entrer une adresse courriel différente pour “Répondre à”. C’est à cette adresse courriel que seront envoyées les réponses.
Note
Si aucune adresse courriel n’est entrée ici, l’adresse dans la préférence système ReplytoDefault sera utilisée pour recevoir les réponses pour cette bibliothèque
Adresse de retour : vous pouvez entrer une adresse de courriel différente pour les “Rebonds”. C’est à cette adresse que seront envoyés tous les messages qui rebondissent.
Note
Si aucune adresse courriel n’est entrée ici, l’adresse dans la préférence système ReturnpathDefault sera utilisée pour recevoir les rebonds pour cette bibliothèque.
Serveur SMTP : si cette bibliothèque utilise un serveur SMTP différent de celui par défaut, le préciser ici.
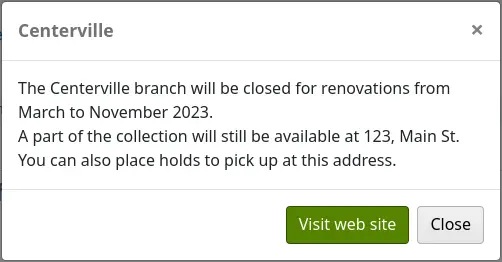
URL : si le champ URL est rempli, il y aura alors un lien sous le nom de la bibliothèque dans les informationss d’exemplaire à l’OPAC
Note OPAC : ce lien mène vers l’outil de personnalisations HTML afin que vous puissiez ajouter de l’information supplémentaire à propos de cette bibliothèque. Cette information sera affichée dans la page “Bibliothèques” à l’OPAC, ainsi que dans le tableau des exemplaires à l’OPAC.
Cliquer sur le nom de la bibliothèque qui est suivi d’une icône de “i” ouvrira une fenêtre affichant l’information.
IP : ce champ n’a pas besoin d’être rempli sauf si vous avez l’intention de limiter l’accès à l’interface professionnelle en fonction d’un adresse IP spécifique ou d’une plage d’adresses IP.
Note
Les adresses IP et plages d’adresses IP de bibliothèques sont utilisées par les préférences système StaffLoginLibraryBasedOnIP et StaffLoginRestrictLibraryByIP.
Code d’organisation MARC : si ce site a son propre code d’organisation MARC, vous pouvez le saisir ici.
Note
Si ce champ est laissé vide, le code entré dans la préférence système MARCOrgCode sera utilisé pour cette bibliothèque.
Notes : si vous avez des notes à ajouter vous pouvez les entrer ici. Elles ne seront pas visibles à l’OPAC.
Pickup location: choose whether this library will display as an available pickup location for holds and interlibrary loans.
Public : choisissez si cette bibliothèque apparaitra dans la page “Bibliothèque” à l’OPAC, et comme un filtre lors de la recherche avancée à l’OPAC.
Heures d’ouverture de la bibliothèque : Si vous faites des prêts en heures, remplissez les horraires d’ouverture de la bibliothèque chaque jour de la semaine. Vous pouvez ensuite utiliser la préférence système ConsiderLibraryHoursInCirculation suivant votre politique de prêt.
Version
Cette option a été ajoutée à Koha dans la version 24.05.
JS spécifique pour l’OPAC : utilisez ce champ pour ajouter du JavaScript spécifique à l’OPAC de cette bibliothèque (lorsque les utilisateurs sont connectés, ou s’il y a une entrée
SetEnv OPAC_BRANCH_DEFAULTdans le fichier de configuration apache)Version
Cette fonctionnalité a été ajoutée à Koha dans la version 23.11.
Note
Les modifications générales applicables à toutes les bibliothèques peuvent être entrées dans la préférence système OPACUserJS.
CSS spécifique pour l’OPAC : utilisez ce champ pour ajouter du CSS spécifique à l’OPAC de cette bibliothèque (lorsque les utilisateurs sont connectés, ou s’il y a une entrée
SetEnv OPAC_BRANCH_DEFAULTdans le fichier de configuration apache)Version
Cette fonctionnalité a été ajoutée à Koha dans la version 23.11.
Note
Les modifications générales applicables à toutes les bibliothèques peuvent être entrées dans la préférence système OPACUserCSS.
Si vous avez des champs additionnels pour les bibliothèques (branches), ils seront affichés à la fin de ce formulaire.
Cliquez sur “Enregistrer” pour sauvegarder votre nouvelle bibliothèque.
Modifier/supprimer une bibliothèque
Depuis le tableau des bibliothèques, cliquer sur “Modifier” ou “Supprimer” pour modifier ou supprimer une bibliothèque.
Avertissement
Il vous sera impossible de modifier le “Code de la bibliothèque”.
Avertissement
Vous ne pourrez pas supprimer un site qui a des adhérents ou des exemplaires qui lui sont rattachés.

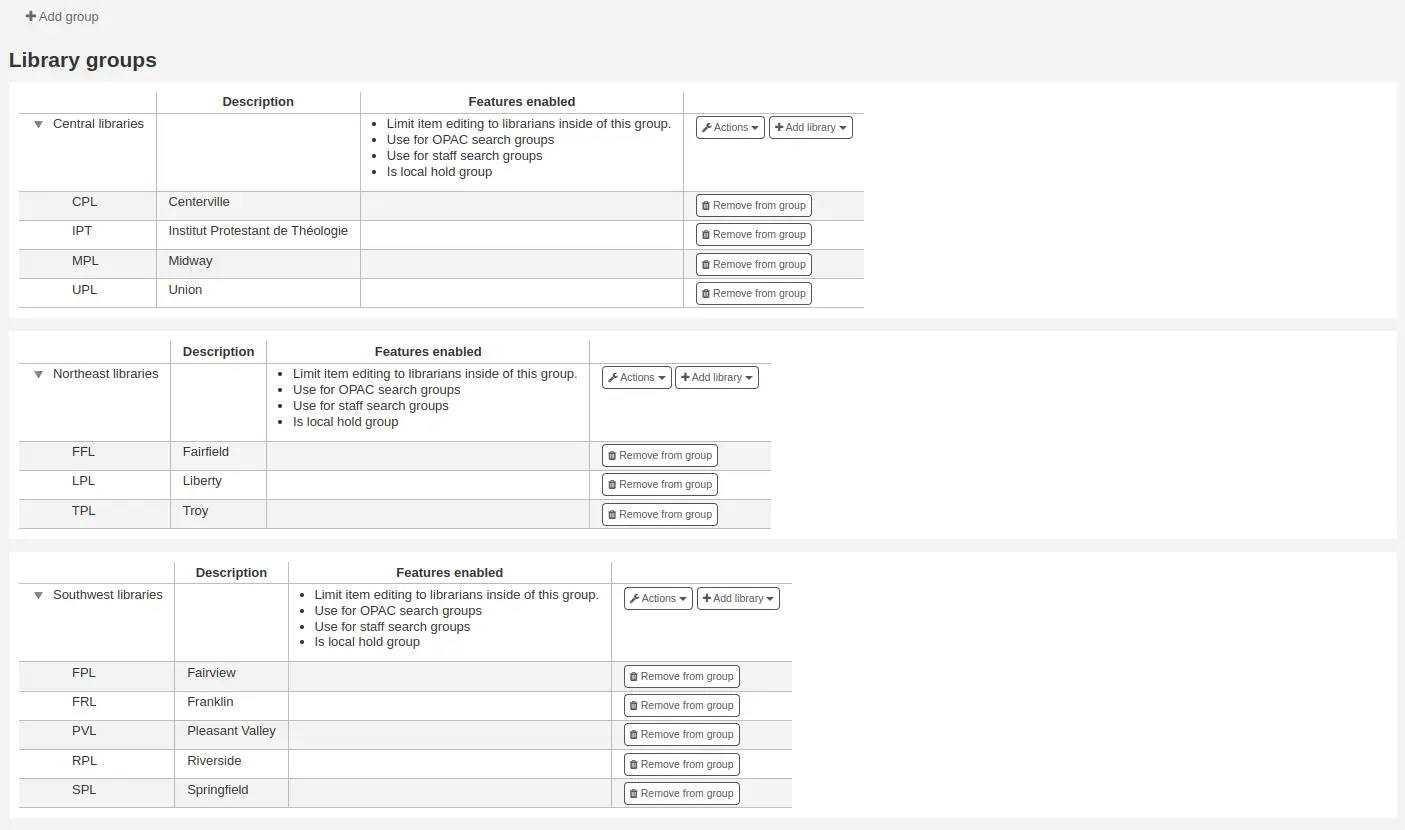
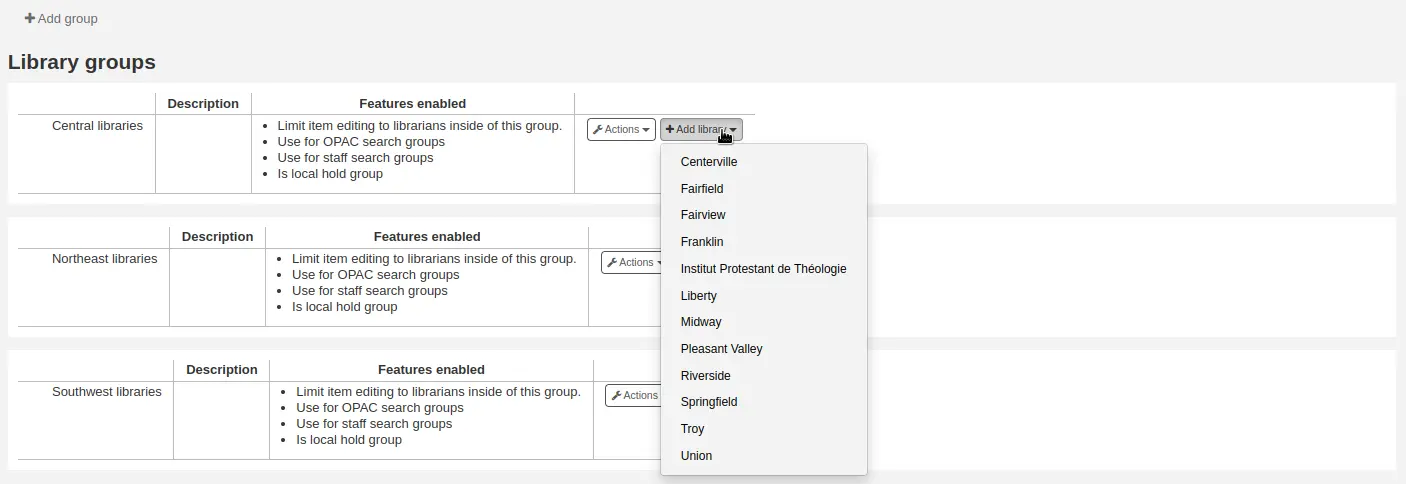
Groupes de sites
Les groupes de bibliothèques peuvent servir plusieurs objectifs : limiter l’accès aux données des usagers, limiter la modification d’exemplaire, limiter les recherches à l’OPAC et à l’interface professionnelle et/ou définir le comportement des réservations.
Aller à : Plus > Administration > Paramètres de base > Groupes de bibliothèques
Note
Seuls les membres du personnel avec la permission manage_libraries (ou la permission superlibrarian) auront accès à cette section.
Quand vous visitez cette page, une liste vous présente les groupes qui ont déjà été créés dans le système.
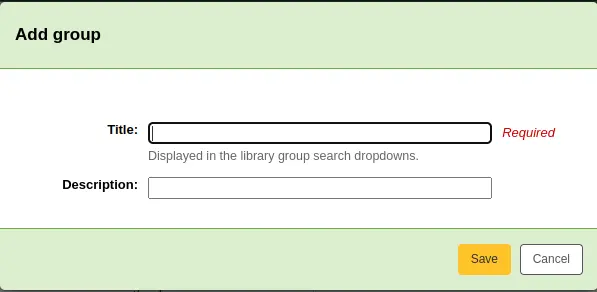
Ajout d’un groupe
Pour ajouter un groupe de bibliothèques,
Cliquez sur le bouton “Ajouter un groupe” au haut de l’écran.
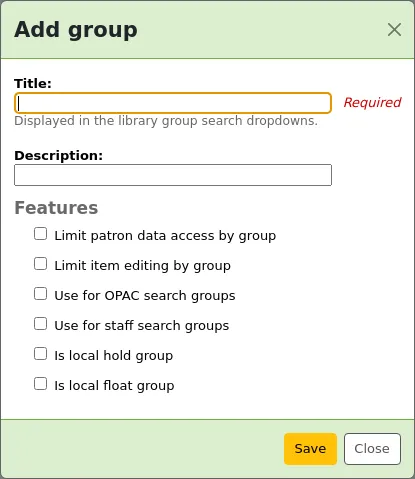
Titre (obligratoire) : donnez un titre au groupe. Ce titre sera affiché dans le menu déroulant pour filtrer la recherche avancée.
Description : optionnellement, ajoutez une description pour le groupe. La description n’est utilisée que sur cette page-ci pour décrire l’utilisation du groupe.
Fonctionnalités : sélectionnez l’usage de ce groupe
Limiter l’accès aux données des adhérents par groupe : cela empêchera les bibliothécaires de voir les adhérents d’autres groupes.
Note
Cette option peut être outrepassée par la permission view_borrower_infos_from_any_libraries (ou la permission superbibliothécaire).
Limiter la modification d’exemplaire par groupe : cela empêchera les bibliothécaires de modifier des exemplaires d’autres groupes.
Note
Cette option peut être outrepassée par la permission edit_any_item (ou la permission superbibliothécaire).
Utilisé pour les groupes de recherche à l’Opac : cela rendra le groupe visible dans le menu déroulant des sites en haut de la page de l’OPAC (si la préférence OpacAddMastheadLibraryPulldown est sur “Ajouter”) et dans la page de recherche avancée.
Utilisé pour les groupes de recherche dans l’interface professionnelle : cela rendra le groupe visible dans le menu déroulant des sites dans la page de recherche avancée de l’interface professionnelle.

Est un groupe de réservation local :cela rendra ce groupe un groupe de réservation locale, qui pourra être ajouté dans les règles de réservation dans les règles de circulation pour imposer aux adhérents de faire des réservations dans le groupe uniquement.
Est un groupe local flottant : cela fera de ce groupe un groupe local flottant, cela peut être utiliser dans une règle de retours ou une règle de réservation dans les règles de circulation pour déterminer si un exemplaire est “flottant” (reste dans la bibliothèque de retour) ou est transféré vers la bibliothèque propriétaire.
Cliquez sur “Enregistrer” pour créer le groupe.
Ajouter un site au groupe
Cliquez sur le bouton « Ajouter un site » à côté du nom du groupe pour ajouter un site à ce groupe. Vous verrez alors une liste des sites qui ne sont pas déjà dans ce groupe.
Ajout d’un sous-groupe
Si votre réseau est très grand, vous pouvez créer des sous-groupes. Cliquez sur le bouton “Actions” à côté du groupe et sélectionnez “Ajouter un sous-groupe”.

Saisissez le titre et la description (facultative) du sous-groupe. Les autres options seront héritées du groupe parent.
Suppression d’un groupe
Pour supprimer un groupe, cliquez sur le bouton « Actions » à côté du groupe et choisissez l’option « Supprimer ».
Koha demandera une confirmation de la suppression.
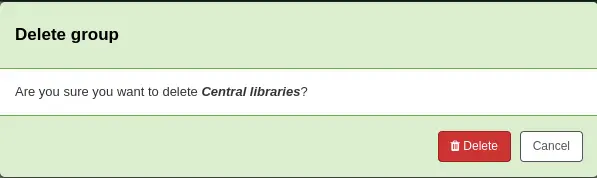
Cliquez sur “Supprimer” pour confirmer et supprimer le groupe.
Banques de prêt
Koha vous permet de définir plusieurs banques de prêt au sein d’une même bibliothèque. Par exemple, si vous avez une banque de prêt pour adultes et une banque de prêt pour enfants, ou si vous avez une banque de prêt différente pour chaque étage ou chaque département.
Assurez-vous d’activer la préférence système UseCirculationDesks pour utiliser cette fonctionnalité.
Aller à : Plus > Administration > Adhérents et Circulation > Banques de prêt
Ajouter des banques de prêt
Pour ajouter une nouvelle banque de prêt, cliquez sur le bouton « Nouvelle banque de prêt » en haut de la page.
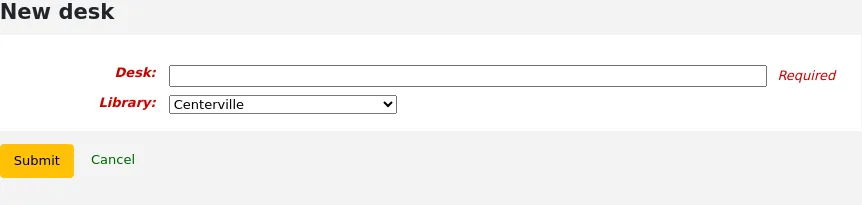
Dans le champs “Banque de prêt”, entrez un nom pour votre banque de prêt.
Choisissez la bibliothèque qui utilisera ce comptoir de service.
Cliquez sur “Valider”.
Modifier une banque de prêt
Pour modifier une banque de prêt existante, cliquez sur le bouton “Modifier” à droite de son nom.
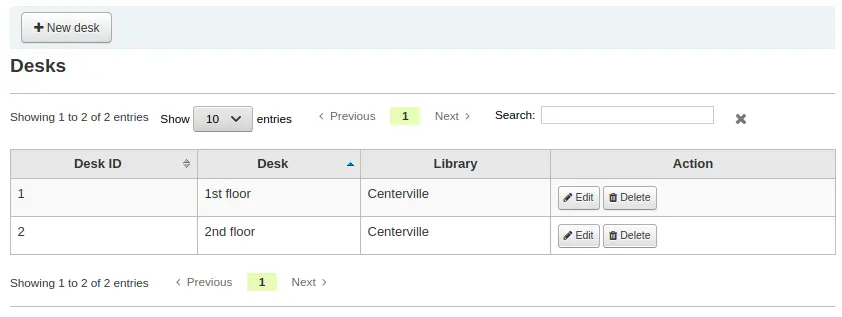
Ici, vous pouvez changer le nom et/ou la bibliothèque de la banque de prêt.
Supprimer une banque de prêt
Pour supprimer un comptoir de service, cliquez sur le bouton “Supprimer” à sa droite.
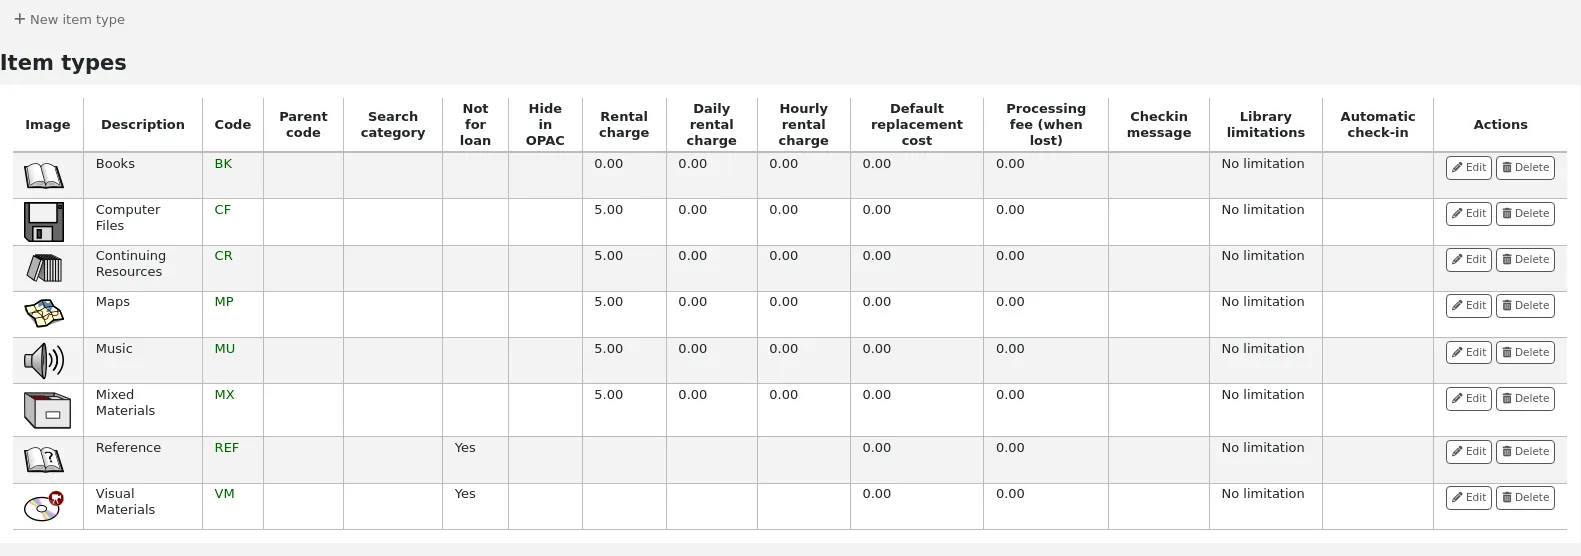
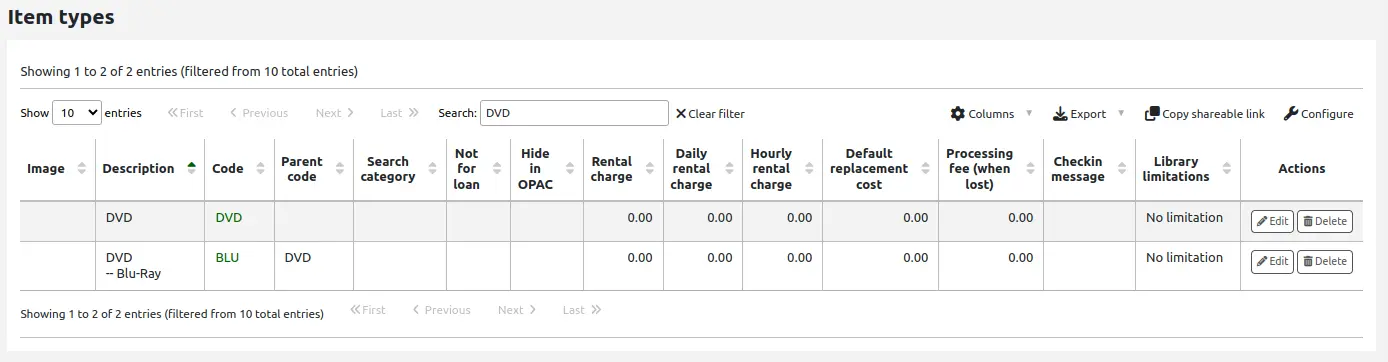
Types de document
Aller à : Plus > Administration > Paramètres de base > Types de documents
Note
Seuls les bibliothécaires avec la permission manage_itemtypes permission (ou la permission superlibrarian) auront accès à cette section.
Koha vous permet d’organiser vos documents par type de document et code de collection. Les type de document sont utilisés, en addition des sites et des catégories d’adhérents, pour contrôler les règles de circulation.
Les types de document désignent généralement la forme physique du document (Livre, CD, DVD, etc), mais ils peuvent être employés différemment.
Note
Vous pouvez personnaliser les colonnes de ce tableau dans la section Configurer les colonnes du module Administration (référence du tableau : table_item_type).
Ajouter des types de documents
Pour ajouter un nouveau type de document,
Cliquez sur le bouton « Ajouter type de document » en haut de la page des types de document.
Remplissez le formulaire :
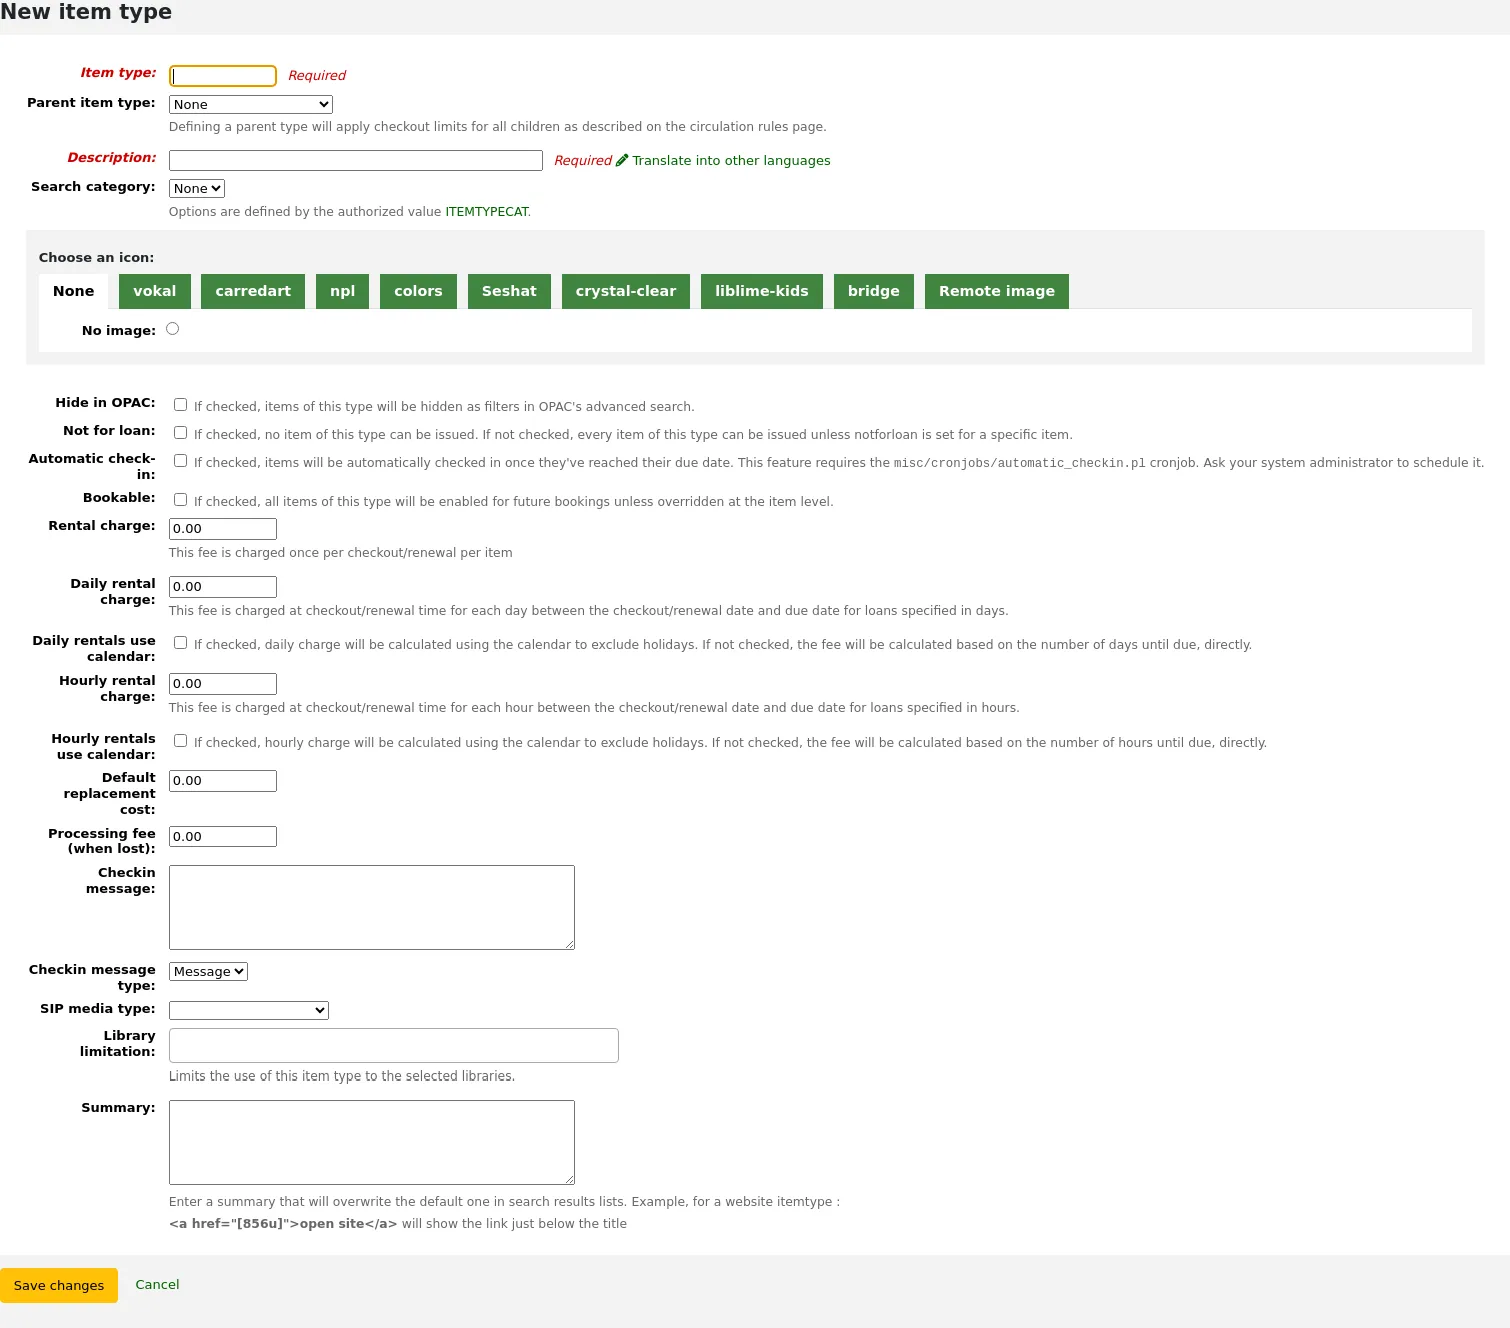
Type de document: inscrire un code pour ce type de document (maximum de 10 caractères)
Type de document parent : vous pouvez choisir un type de document qui servira de catégorie parent pour ce type de document. Vous pouvez ensuite définir les règles de circulation en fonction de ces types de document parents.
Par exemple, vous pouvez avoir des types de document DVD et Blu-Ray, et DVD serait le parent de Blu-Ray.
Vous pouvez ensuite créer une règle de circulation soit pour les Blu-ray seulement soit pour les DVD et les Blu-ray (DVD (Tous))
Description : saisissez une version plein texte du type de document
Dans un environnement multilingue, vous pouvez traduire la traduction du type de document dans toutes vos langues en cliquant sur le lien “Traduire dans d’autres langues”.
Catégorie de recherche : les types de documents peuvent être regroupés pour une recherche simultanée dans la recherche avancée de l’OPAC. Par exemple, vous pouvez mettre DVD et Bluray dans un groupe appelé “Films” et ces deux types de documents seront recherchés en même temps. Ces groupes sont définis dans la catégorie de valeurs autorisées ITEMTYPECAT.
Note
Les catégories de recherche sont uniquement utilisées à l’OPAC. Les bibliothécaires peuvent chercher sur des types individuels dans la recherche avancée de l’interface professionnelle.
Choisir une icône : vous pouvez choisir une icône associée à votre type de document. Ces icônes apparaîtront à l’interface professionnelle et à l’OPAC, dans la recherche avancée et le tableau des exemplaires ou la notice bibliographique si la préférence système item-level_itypes est au niveau de la notice bibliographique. Vous pouvez choisir une icône depuis une série existante ou ajouter un lien vers une image distante.
Avertissement
Si cette option n’est pas activée, vous pouvez modifier la configuration de noItemTypeImages ou de OPACNoItemTypeImages.
Note
Pour obtenir des images de vos types de document à l’OPAC, modifiez la préférence système OPACnoItemTypeImages en choisissant l’option “Afficher”.
Masquer à l’OPAC: vous pouvez cacher les types d’exemplaires que vous ne souhaitez pas voir affichés à l’OPAC.
Important
Cela n’empêchera pas ces exemplaires d’apparaître dans les résultats de recherche, cela supprimera simplement le type d’exemplaire du formulaire de recherche avancée.
Si vous souhaitez masquer complètement les exemplaires d’un type d’exemplaire précis, par exemple si vous avez une bibliothèque professionnelle avec des livres réservés au personnel et que vous ne voulez pas que ceux-ci apparaissent dans l’OPAC, utilisez la préférence système OpacHiddenItems.
Exclu du prêt : cochez cette case pour les exemplaires ne devant pas être empruntés. Les exemplaires indiqués comme “Exclus du prêt” apparaîtront dans le catalogue, mais ne pourront être prêtés aux adhérents.
Retour automatique : pour les exemplaires qui ne sont pas physiques, mais pour lesquels vous avez néanmoins des règles de circulation, comme les pass de musées ou les livres numériques, vous pouvez configurer des retours automatiques.
Note
Cette option nécessite le cronjob misc/cronjobs/automatic_checkin.pl. Demandez à votre administrateur système de le programmer.
Réservation programmable : cochez cette option pour autoriser les réservations programmables sur tous les exemplaires de ce type de document.
Version
Cette option a été ajoutée à Koha dans sa version 24.11.
Coût du prêt: si vous appliquez un coût de location pour certains documents, entrez la somme ici. Ce montant sera chargé à l’adhérent au moment du prêt (et renouvellement).
Important
Ne pas saisir de symboles dans ce champ mais uniquement des chiffres et un point pour la décimale. (ex. $5.00 doit être saisi simplement : 5 ou 5.00).
Coût du prêt par jour : pour les exemplaires pour lesquels des coûts de location seront facturés en fonction du nombre de jours de prêt, saisissez le coût journalier ici. Cela sera facturé à l’adhérent lors du prêt - selon le coût par jour et le nombre de jours pendant lequel cet exemplaire est emprunté.Par exemple, pour un exemplaire prêter pour 7 jours avec un coût du prêt par jour de 1$, l’adhérent sera chargé 7$ au moment du prêt. Ces coûts de prêt journaliers seront également appliqués si/quand un renouvellement a lieu.
Important
Ne pas saisir de symboles dans ce champ mais uniquement des chiffres et un point pour la décimale. (ex. $5.00 doit être saisi simplement : 5 ou 5.00).
Les locations quotidiennes utilisent le calendrier : cochez cette option pour exclure les jours de fermeture du calcul des coûts de location.
Note
Assurez-vous d’entrer les jours de fermeture dans le calendrier pour les exclure de la location quotidienne.
Frais de location horaires : pour les exemplaires en prêt horaire, saisissez le coût horaire ici. Là aussi, le total (coût horaire * nombre d’heures de prêt) sera facturé à l’adhérent lors du prêt et du renouvellement.
Important
Ne pas saisir de symboles dans ce champ mais uniquement des chiffres et un point pour la décimale. (ex. $5.00 doit être saisi simplement : 5 ou 5.00).
Les locations horaires utilisent le calendrier : cochez cette option, pour exclure les jours de fermeture du calcul des coûts de location.
Note
Assurez-vous d’entrer les jours de fermeture dans le calendrier pour les exclure de la location quotidienne.
Coût de remplacement par défaut : vous pouvez ajouter un coût de remplacement par défaut pour ce type de document. Il s’agit du montant qui sera facturé à l’adhérent en cas de perte ET que l’exemplaire n’a pas de coût de remplacement propre. Si l’exemplaire a un coût de remplacement propre, c’est ce montant qui sera facturé à l’adhérent.
Important
Ne pas saisir de symboles dans ce champ mais uniquement des chiffres et un point pour la décimale. (ex. $5.00 doit être saisi simplement : 5 ou 5.00).
Frais de traitement (si perdu) : vous pouvez également charger un frais d’administration qui sera ajouté au coût de remplacement en cas de perte d’un document.
Important
Ne pas saisir de symboles dans ce champ mais uniquement des chiffres et un point pour la décimale. (ex. $5.00 doit être saisi simplement : 5 ou 5.00).
Message de retour : si vous voulez faire apparaître un message ou une alerte lorsque les documents de ce type sont retournés, vous pouvez l’inscrire ici.
Type de message de retour : le message de retour peut être un “message” ou une “alerte”. La seule différence entre les deux est l’affichage. Par défaut, un message est affiché en bleu
et une alerte est affichée en jaune.
Type de support SIP : certains appareils SIP utilisent les types de support SIP au lieu des types de documents de Koha (habituellement, les casiers et les trieurs nécessitent les types de support SIP). Si vous utilisez un tel appareil, il vous faudra définir le type de support SIP.
Limite de site : si ce type de document est utilisé uniquement dans certaines bibliothèques, vous pouvez l’indiquer ici. Sélectionnez “Tous les sites” si ce type de document est utilisé partout.
Note
Si ce champ est laissé vide, “Tous les sites” sera appliqué par défaut.
Astuce
Pour sélectionner plusieurs bibliothèques, laissez la touche “Ctrl” appuyée lors de leur sélection.
Abrégé : cet abrégé sera utilisé dans les affichages sans XSLT uniquement.
Vérifier les prêts antérieurs : cette option apparait uniquement si la préférence système CheckPrevCheckout est configurée sur l’une des options “Sauf si outrepassé par la catégorie d’adhérent ou le type de prêt, ne pas” ou “Sauf si outrepassé par la catégorie d’adhérent ou le type de document, oui”. Cela permet de personnaliser, au niveau du type de document, si Koha doit alerter quand un adhérent ré-emprunte un même document.
En fonction des préférences système : le paramétrage de la préférence système CheckPrevCheckout sera suivi.
Oui et outrepasser les préférences système : Toujours vérifier l’historique de l’adhérent pour ce type de document, peu import le paramétrage de la préférence système CheckPrevCheckout.
Non et outrepasser les préférences système : ne jamais vérifier l’historique de circulation de l’adhérent, peu import le paramétrage de la préférence système CheckPrevCheckout.
Version
Cette option a été ajoutée à Koha dans sa version 25.11.
Quand vous avez fini, cliquez sur “Enregistrer les modifications”.
Note
Tous les champs, à l’exception de “Type de document”, seront modifiables à partir de la liste des types de documents.
Le nouveau type de document apparaîtra sur la liste.
Modifier des types de documents
Pour modifier un type document existant, cliquez sur le bouton “Modifier” sur sa ligne ou cliquez sur le code du type de document.
Voir la section Ajouter des types de documents pour la liste complète des champs.
Important
Vous ne pourrez pas modifier le code que vous avez assigné au type de document, mais vous pourrez modifier sa description.
Supprimer les types de document
Pour supprimer un type de document, cliquer sur le bouton “Supprimer” sur sa ligne.
Important
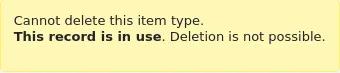
Vous ne pourrez pas supprimer des types de document qui sont utilisés dans votre système par au moins un exemplaire ou une notice bibliographique. Dans ce cas, un message vous alertera que ce type de document est utilisé.
Valeurs autorisées
Les valeurs autorisées sont utilisées un peu partout dans Koha. Ils constituent des listes contrôlées de termes, phrases ou codes.
Par exemple, une raison pour laquelle vous voudriez ajouter une valeur autorisée serait pour contrôler via une liste ce qui peut être entré dans un sous-champ d’une notice bibliographique par les catalogueurs.
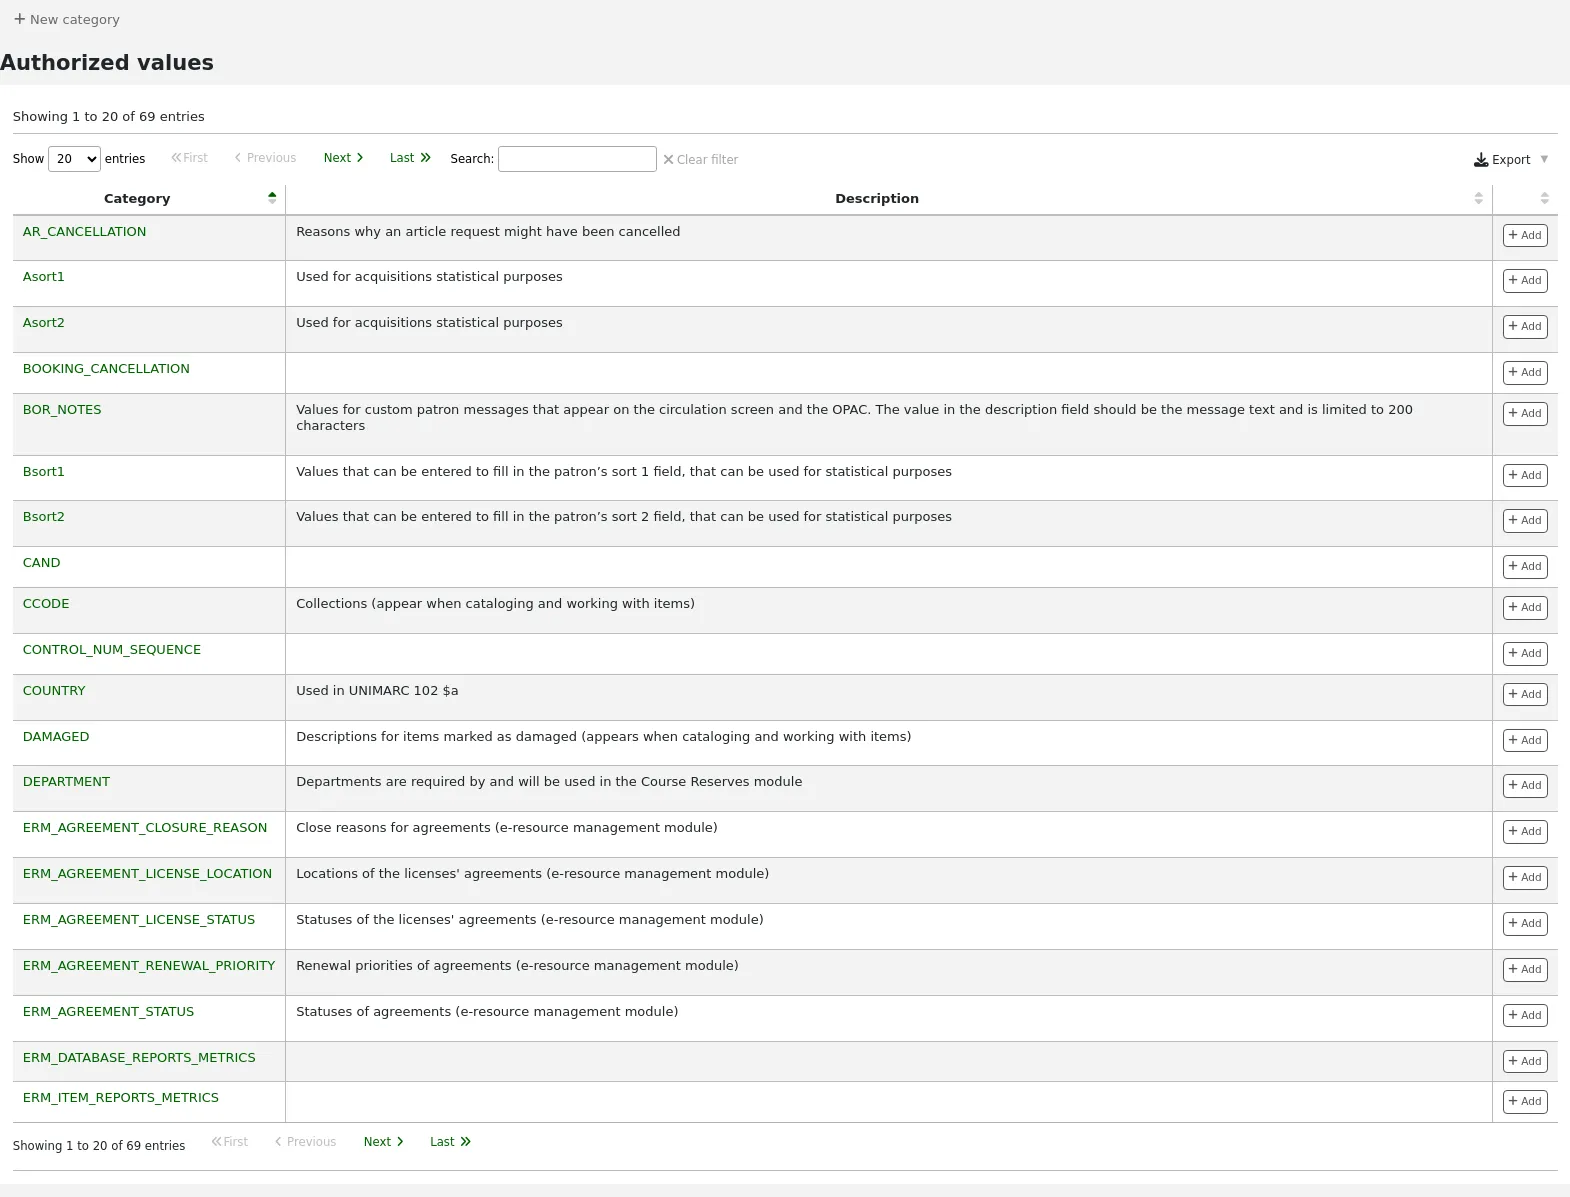
Aller à : Plus > Administration > Paramètres de base > Valeurs autorisées
Note
Seuls les bibliothécaires avec la permission manage_auth_values (ou la permission superlibrarian) auront accès à cette section.
Catégories de valeurs autorisées existantes
Koha installe par défaut plusieurs catégories de valeurs autorisées prédéfinies que votre bibliothèque utilisera certainement ou qui sont utilisées par le système.
AR_CANCELLATION
Cette catégorie regroupe les raisons pour lesquelles une demande d’article pourrait avoir été annulée.
Si vous choisissez d’installer les valeurs par défaut pour cette catégorie, vous aurez
Exemplaire introuvable (NOT_FOUND)
Exemplaire trop endommagé pour satisfaire la demande d’article (DAMAGED)
Supprimé de la page utilisateur de l’OPAC (OPAC)
Vous pouvez les changer pour les adapter aux besoins de votre organisation.
Asort1
Utilisé à des fins de statistiques sur les acquisitions. Vous pouvez utiliser ceci comme des catégories statistiques quand vous créez un fonds dans les acquisitions.
Asort2
Utilisé à des fins de statistiques sur les acquisitions. Vous pouvez utiliser ceci comme des catégories statistiques quand vous créez un fonds dans les acquisitions.
BOOKING_CANCELLATION
Version
Cette catégorie de valeurs autorisées a été introduite dans la version 24.11 de Koha.
Ces valeurs sont utilisées lors de l’anulation d’une réservation programmée, comme la raison d’annulation.
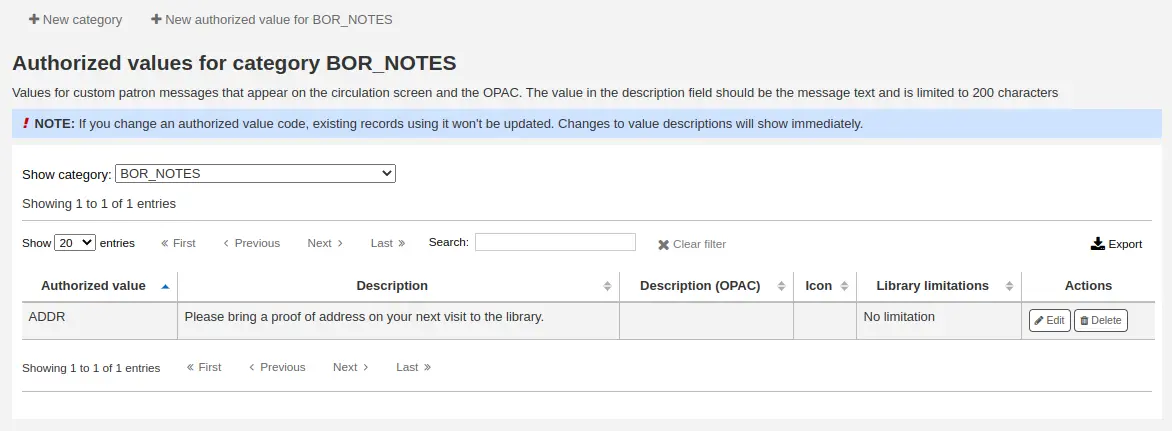
BOR_NOTES
Valeurs des messages pré-définis sur les comptes Adhérents et messages qui apparaissent à l’écran de circulation et dans l’OPAC.
Entrez le message que vous voulez voir apparaitre dans le champ “Description”.
Note
Ce champ est limité à 200 caractères mais le champ de messages dans la fiche adhérent peut en contenir plus que ça. Entrez les 200 premiers caractères dans la description et entrez le reste en ajoutant le message.
Bsort1
Ces valeurs peuvent être saisies pour renseigner le champ Tri 1 des adhérents.
Bsort2
Ces valeurs peuvent être saisies pour renseigner le champ Tri 2 des adhérents
CAND
Une liste utilisée en UNIMARC.
CCODE
Ces valeurs sont les codes de collection. Elles s’affichent en catalogage et modification d’exemplaires.
C’est normalement mappé avec le items.ccode de la base de données Koha.
Si vous choisissez d’installer les valeurs par défaut pour cette catégorie, vous aurez
Fiction (FIC)
Non-fiction (NFIC)
Référence (REF)
Vous pouvez les changer pour les adapter aux besoins de votre organisation.
Avertissement
Pour de meilleur résultat de recherche, évitez d’utiliser les traits d’union dans les codes de collection.
CONTROL_NUM_SEQUENCE
Cette catégorie est utilisée pour générer les numéros de contrôle dans l’éditeur de catalogage avancé
Saisissez une chaîne (se terminant par un nombre) comme valeur autorisée et utilisez Description pour présenter le type de nombre. Par exemple : “sprLib0001” “Springfield library”. Dans l’éditeur de notices avancé, cela va activer un nouveau widget qui vous permettra de choisir le type de nombre et de générer le prochain nombre dans la séquence.
COUNTRY
Une liste de nom de pays utilisés dans le champ UNIMARC 102 $a.
DAMAGED
Cette catégorie contient les descriptions des exemplaires signalés comme endommagés. Elles apparaissent lors de l’ajout ou la modification d’exemplaires).
C’est normalement mappé avec le items.damaged de la base de données Koha.
Si vous choisissez d’installer les valeurs par défaut pour cette catégorie, vous aurez
Endommagé (1)
Vous pouvez les changer pour les adapter aux besoins de votre organisation.
Avertissement
Les valeurs autorisées pour DAMAGED doivent être numériques.
Département
Cette catégorie regroupe les Départements, qui sont nécessaires pour et à l’utilisation du module Réserves de cours.
ERM_AGREEMENT_CLOSURE_REASON
Ces valeurs sont utilisée pour décrire la raison de clôture d’un contrat une fois qu’il a été marqué comme “Fermé” dans le module de gestion des ressources électroniques.
Elles sont aussi utilisées dans le module rapport.
Les valeurs par défaut sont
Expiré (expired)
Annulé (cancelled)
ERM_AGREEMENT_LICENSE_LOCATION
Ces valeurs sont utilisées pour décrire la localisation physique d’une licences dans le cas ou vous avez une copie papier de la licence (et non pas électronique).
Les valeurs par défaut sont
Classeur (filing cabinet)
Placard (cupboard)
ERM_AGREEMENT_LICENSE_STATUS
Ces valeurs sont utilisées pour décrire le statut d’une licence liée à un contrat dans le module gestion de ressources électroniques. Cela aide les bibliothécaires à suivre le cycle de vie des licences.
Elles sont aussi utilisées dans le module rapport.
Les valeurs par défaut sont
Examiner (controlling)
A venir (future)
Archivé (historic)
ERM_AGREEMENT_RENEWAL_PRIORITY
Ces valeurs sont utilisées pour décrire la priorité de renouvellement d’un contrat dans le module gestion de ressources électroniques, pour marquer l’importance du renouvellement des contrats.
Elles sont aussi utilisées dans le module rapport.
Les valeurs par défaut sont
Pour révision (for_review)
Renouveler (renew)
Annuler (cancel)
ERM_AGREEMENT_STATUS
Ces valeurs sont utilisées pour décrire le status d’un contrat dans le module de gestion de ressources électroniques.
Elles sont aussi utilisées dans le module rapport.
Les valeurs par défaut sont
Actif (active)
En cours de négociation (in_negotiation)
Fermé (closed)
Avertissement
Il ne faut pas changer la valeur autorisée pour “Closed” (la description peut être changée), elle est utilisée pour activer le menu déroulant de “Raison de fermeture”.
ERM_LICENSE_STATUS
Ces valeurs sont utilisées pour décrire le status d’une licence dans le module de gestion de ressources électroniques. Cela aide les bibliothécaires à suivre leur cycle de vie.
Elles sont aussi utilisées dans le module rapport.
Les valeurs par défaut sont
En cours de négociation (in_negotiation)
Pas encore activé (not_yet_active)
Actif (active)
Rejeté (rejected)
Expiré (expired)
ERM_LICENSE_TYPE
Ces valeurs sont utilisées pour décrire le type d’une licence dans le module de gestion de ressources électroniques.
Elles sont aussi utilisées dans le module rapport.
Les valeurs par défaut sont
Local (local)
Consortium (consortial)
National (national)
Alliance (alliance)
ERM_PACKAGE_CONTENT_TYPE
Ces valeurs sont utilisées pour décrire le type d’un contenu dans le bouquet local dans le module de gestion de ressources électroniques.
Cela est utilisé pour les bouquets locaux uniquement.
Les valeurs par défaut sont
Texte intégral (AggregatedFullText)
Résumé et indexation (AbstractAndIndex)
Livre numérique (EBook)
Revue électronique(EJournal)
Contenu mixte (MixedContent)
Ouvrage de référence en ligne (OnlineReference)
Imprimé (Print)
Ressources audiovisuelles en ligne (StreamingMedia)
Type inconnu (Unknown)
ERM_PACKAGE_TYPE
Ces valeurs sont utilisées pour décrire les types de bouquet dans le module gestion des ressources électroniques.
Cela est utilisé pour les bouquets locaux uniquement.
Les valeurs par défaut sont
Local (local)
Complet (complete)
ERM_TITLE_PUBLICATION_TYPE
Ces valeurs sont utilisées pour décrire le type de publicatoin d’un titre dans le module de gestion de ressources électroniques.
Elles sont utilisées pour les titres locaux uniquement
Les valeurs par défaut sont
Livre audio (audiobook)
Livre (book)
Publication en série (bookseries)
Base de données (database)
Livre électronique (ebook)
Revue (journal)
Bulletin (newsletter)
Journal / Presse(newspaper)
Actes de conférence / colloque (proceedings)
Rapports (report)
Média audio en continu (streamingaudio)
Média vidéo en continu (streamingvideo)
Thèse / Mémoire (thesisdissertation)
Non précisé (unspecified)
Site web (website)
ERM_USER_ROLES
Ces valeurs sont utilisées pour décrire le rôle d’un bibliothécaire lié à un contrat ou une licence record dans le module de gestion de ressources électroniques.
Les valeurs par défaut sont
Bibliothécaire ERM / gestion des ressources électroniques (librarian)
Spécialiste de domaine (subject_specialist)
ETAT
Ces valeurs sont utilisées dans les installations UNIMARC françaises (champ 995 $o) pour identifier le statut de l’exemplaire. Similaire à NOT_LOAN.
HINGS_AS
Ces valeurs sont utilisées comme indicateur du statut d’acquisition des collections.Cette donnée indique le statut d’acquisition de l’unité au moment du rapport.
HINGS_C
Ces valeurs sont utilisées comme indicateur général de l’exhaustivité des collections.
HINGS_PF
Ces valeurs sont utilisées comme indicateurs de support physique.
HINGS_RD
Ces valeurs sont utilisées comme indicateur général de conservation des collections. Cette donnée indique la politique générale de conservation de l’unité.
HINGS_UT
Ces valeurs sont utilisées comme indicateur de type d’unité.
HOLD_CANCELLATION
Ces valeurs sont utilisées lors de l’annuler des réservations comme les raisons d’annulation.
Si vous choisissez d’installer les valeurs par défaut pour cette catégorie, vous aurez
Exemplaire introuvable (NOT_FOUND)
Exemplaire trop endommagé pour être réservé (DAMAGED)
Vous pouvez les changer pour les adapter aux besoins de votre organisation.
HSBND_FREQ
Fréquences de livraison utilisées dans le module Public empêché. Elles sont affichées dans l’onglet Public empêché du compte de l’adhérent dans l’interface professionnelle.
Si vous choisissez d’installer les valeurs par défaut pour cette catégorie, vous aurez
Chaque semaine (EW)
Vous pouvez les changer pour les adapter aux besoins de votre organisation.
ILL_STATUS_ALIAS
Ces valeurs sont les statuts des demandes de prêt entre bibliothèques (PEB) utilisés dans le module PEB.
ITEMTYPECAT
Ces valeurs sont les catégories de recherche pour des types de documents. Ces valeurs permettent de rechercher plusieurs types de documents à la fois.
Pour combiner des types de documents dans des catégories, choisissez la catégorie dans les paramètres des types de documents.
Par exemple, une valeur ITEMTYPECAT pourrait être “NOUVEAUTÉS”. Cette catégorie de recherche pourrait être utilisée pour les types de documents “NOUVEAUX LIVRES” et “NOUVEAUX DVD”. Les types de documents NOUVEAUX LIVRES et NOUVEAUX DVDS seront alors remplacés dans le formulaire de recherche par “NOUVEAUTÉS”. Quand un adhérent choisit de rechercher à l’aide de la catégorie “NOUVEAUTÉS”, il recherchera dans plusieurs types de documents en une seule recherche.
Note
Les catégories de recherche sont utilisées à l’OPAC uniquement.
LANG
Cette catégorie est une liste des codes de langue standards ISO 639-2.
LOC
Ces valeurs sont les localisations. Elles apparaissent en général lors de la création ou modification d’un exemplaire.
C’est normalement mappé avec le items.location de la base de données Koha.
Si vous choisissez d’installer les valeurs par défaut pour cette catégorie, vous aurez
Audiovisuel (AV)
Panier de livres (CART)
CART est utilisé par UpdateItemLocationOnCheckin
Secteur enfant (ENFANT)
Fiction (FIC)
Piles générales (GEN)
Etagère des nouveautés (NEW)
A l’affichage (DISPLAY)
Centre de traitement (PROC)
PROC peut être utilisé avec NewItemsDefaultLocation et UpdateItemLocationOnCheckin.
Référence (REF)
Professionnel (STAFF)
Vous pouvez les changer pour les adapter aux besoins de votre organisation.
Avertissement
Pour de meilleurs résultats de recherche, évitez d’utiliser des apostrophes dans les codes de localisations.
LOST
Ces valeurs sont les descriptions des exemplaires marqués perdus. Elles apparaissent lors de la création ou modification d’un exemplaire.
C’est normalement mappé avec le items.itemlost de la base de données Koha.
Si vous choisissez d’installer les valeurs par défaut pour cette catégorie, vous aurez
Perdu (1)
Long retard (perdu) (2)
Perdu et remboursé (3)
Introuvable (4)
Manquant du paquet (5)
Vous pouvez les changer pour les adapter aux besoins de votre organisation.
Avertissement
Les valeurs autorisées pour LOST doivent être numériques.
NOT_LOAN
Ces valeurs sont les raisons qui font qu’un titre n’est pas empruntable. Elles apparaissent en ajout ou modification d’exemplaire.
C’est normalement mappé avec le items.notforloan de la base de données Koha.
Si vous choisissez d’installer les valeurs par défaut pour cette catégorie, vous aurez
En commande (-1)
Exclu du prêt (1)
Collecte du personnel (2)
Ajouté à un paquet (3)
Vous pouvez les changer pour les adapter aux besoins de votre organisation.
Avertissement
Les valeurs autorisées pour NOT_LOAN doivent être numériques.
Les valeurs en nombres négatifs autoriseront les réservations (utilisées par exemple pour le statut “en commande”).
Les valeurs positives ne permettront pas les réservations ni les prêts.
La valeur 0 signifie “empruntable”.
OPAC_SUG
Cette catégorie contient une liste de raisons qui s’affichent dans le formulaire de suggestion de l’OPAC.
Si vous choisissez d’installer les valeurs par défaut pour cette catégorie, vous aurez
L’exemplaire de la bibliothèque est endommagé (endommagé)
Nouveauté d’un auteur à succès (bestseller)
Vous pouvez les changer pour les adapter aux besoins de votre organisation.
ORDER_CANCELLATION_REASON
Ce sont les motifs pour lesquels une commande peut avoir été annulée. Ils sont utilisés dans le module Acquisitions.
Si vous choisissez d’installer les valeurs par défaut pour cette catégorie, vous aurez
Sans motif fourni (0)
Epuisé (1)
Réassort (2)
Vous pouvez les changer pour les adapter aux besoins de votre organisation.
PA_CLASS
Ces valeurs sont utilisées pour grouper les attributs adhérents ensemble dans le formulaire d’ajout et modification d’adhérent.
PAYMENT_TYPE
Cette catégorie génère un menu déroulant de méthodes personnalisées de paiement lors du paiement des pénalités.
Si vous choisissez d’installer les valeurs par défaut pour cette catégorie, vous aurez
Espèces via SIP2 (SIP00)
Visa via SIP2 (SIP01)
Carte de crédit via SIP2 (SIP02)
Vous pouvez les changer pour les adapter aux besoins de votre organisation.
qualif
Ces valeurs sont les codes de fonction (auteur, éditeur, collaborateur, etc.) utilisées dans les champs UNIMARC 7XX $4 (en français).
RELTERMS
Cette catégorie est une liste des codes et termes reliés.
Cette liste est basée sur la liste Library of Congress MARC21
Important
Cette liste n’est pas maintenue à jour pour les installations existante. Assurez-vous d’ajouter les nouvelles valeurs à votre liste quand elles sont publiées par le Library of Congress.
Cela peut être lié à un sous-champ dans une grille de catalogage MARC pour créer un menu déroulant dans lequel que les bibliothécaires peuvent choisir plutôt que de taper le code. En MARC21, les codes de liens sont habituellement dans le sous-champ $4.
REPORT_GROUP
Ces valeurs peuvent être utilisées comme un moyen de trier et filtrer vos rapports. Cela apparaitra comme onglet dans la page des rapports sauvegardés.
Si vous choisissez d’installer les valeurs par défaut pour cette catégorie, vous aurez
Comptabilité (ACC)
Acquisitions (ACQ)
Catalogue (CAT)
Règles de circulation (CIRC)
Adhérents (PAT)
Périodiques (SER)
Vous pouvez les changer pour les adapter aux besoins de votre organisation.
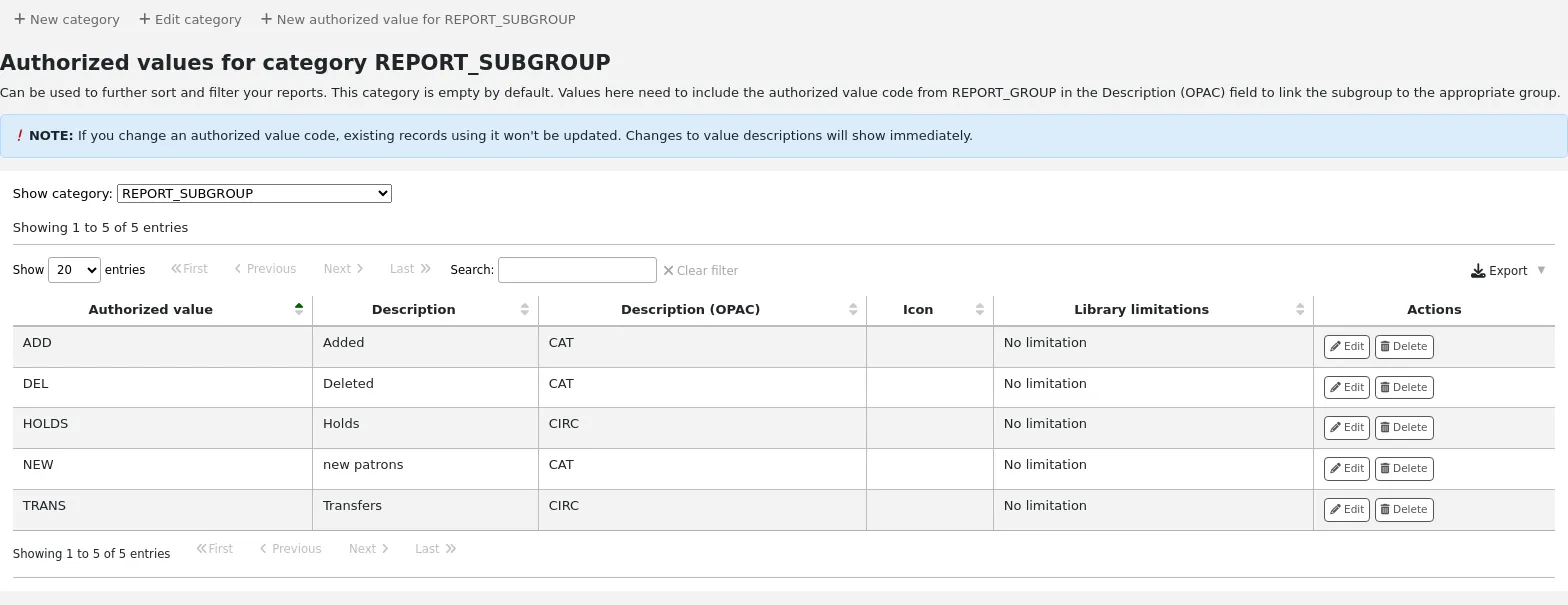
REPORT_SUBGROUP
Ces valeurs peuvent être aussi utilisées pour trier et filtrer vos rapports.
Les valeurs saisies doivent inclure les valeurs autorisées REPORT_GROUP dans le champ Description (OPAC) pour lier le sous-groupe au groupe approprié.
RESTRICTED
Ces valeurs sont utilisées pour les statuts Suspendu d’un exemplaire. Elles apparaissent en ajout ou modification d’exemplaire.
C’est normalement mappé avec le items.restricted de la base de données Koha.
Si vous choisissez d’installer les valeurs par défaut pour cette catégorie, vous aurez
Accès restreint (1)
Vous pouvez les changer pour les adapter aux besoins de votre organisation.
Avertissement
Les valeurs autorisées pour cette catégorie doivent être numériques.
RETURN_CLAIM_RESOLUTION
Ces valeurs sont les motifs pour lesquels une demande de retour a été résolue.
Si vous choisissez d’installer les valeurs par défaut pour cette catégorie, vous aurez
Retourné par l’adhérent (RET_BY_PATRON)
Trouvé à la bibliothèque (FOUND_IN_LIB)
Vous pouvez les changer pour les adapter aux besoins de votre organisation.
ROADTYPE
Ces valeurs sont les types de voies à utiliser dans les adresses des adhérents (champ “type de voie” dans dossier de l’adhérent)
SIP_MEDIA_TYPE
Ces valeurs sont utilisées lors de la création ou de l’édition d’un type de document pour lui assigner un type de média SIP pour les appareils tels les casiers ou les trieuses.
Si vous choisissez d’installer les valeurs par défaut pour cette catégorie, vous aurez
Autre (000)
Livre (001)
Magazine (002)
Revue reliée (003)
Cassette audio (004)
Cassette vidéo (005)
CD/CDROM (006)
Disquette (007)
Livre avec disquette (008)
Livre avec CD (009)
Livre avec cassette audio (010)
Avertissement
Les type de document SIP sont limitées à 3 caractères. Assurez-vous que vos valeurs autorisée pour SIP_MEDIA_TYPE n’ont pas plus de 3 caractères.
STACK
Ces valeurs sont les numéros de contrôle topographique (apparaît lors de la création ou modification d’un exemplaire).
C’est normalement mappé avec le items.stack de la base de données Koha.
Avertissement
Les valeurs autorisées pour cette catégorie doivent être numériques.
SUGGEST
Ces valeurs sont les motifs d’acceptation ou de rejet des suggestions d’acquisitions. Elles apparaissent au moment de gérer les suggestions.
Si vous choisissez d’installer les valeurs par défaut pour cette catégorie, vous aurez
Disponible via le PEB (AVILL)
Bestseller (BSELL)
Document ne correspondant pas à notre politique d’acquisition (Poldoc)
Document trop cher (Expensive)
Budget insuffisant (Budget)
Exemplaire de la bibliothèque perdu (LCL)
Exemplaire de consultation endommagé (SCD)
Vous pouvez les changer pour les adapter aux besoins de votre organisation.
SUGGEST_FORMAT
C’est la liste de types de documents qui s’affichent dans le formulaire de suggestion de l’OPAC.
Si vous choisissez d’installer les valeurs par défaut pour cette catégorie, vous aurez
Livre-audio (AUDIOBOOK)
Livre (BOOK)
EBook (EBOOK)
DVD (DVD)
Gros caractères (LP)
Vous pouvez les changer pour les adapter aux besoins de votre organisation.
Avertissement
Les type de document dans les suggestions sont limités à 30 caractères. Assurez-vous que vos valeurs dans cette catégorie ne dépassent pas 30 caractères.
SUGGEST_STATUS
Ces valeurs sont une liste de statuts additionnels pour les suggestions qui peuvent être utilisés en complément des valeurs par défaut.
Avertissement
Les status de suggestions sont limités à 10 caractères. Assurez-vous que ces valeurs autorisées n’ont pas plus de 10 caractères.
Avertissement
Les status de suggestions ne doivent contenir aucun espaces.
TERM
Ces valeurs sont les termes utilisés dans le module Réserves de cours. Par exemple : Printemps, Été, Automne, Hiver.
Ces termes apparaitrons dans le menu déroulant lors de l’ajout d’un nouveau cours.
TICKET_RESOLUTION
Version
Cette catégorie a été ajoutée à Koha dans sa version 24.05.
Ces valeurs sont les types de résolutions utilisables lorsqu’un problème de catalogage est marqué comme “Résolu”.
TICKET_STATUS
Version
Cette catégorie a été ajoutée à Koha dans sa version 24.05.
Ces valeurs sont les status utilisables lors de la mise à jour d’un problème de catalogage.
UPLOAD
Ces valeurs sont les catégories à assigner aux téléchargements de fichiers. Sans catégorie, un téléchargement est considéré comme temporaire et peut être supprimé lors de nettoyages automatiques.
VENDOR_INTERFACE_TYPE
Ces valeurs sont utilisées dans le type d’interface pour une interface d’un fournisseur dans le module acquisitions.
VENDOR_ISSUE_TYPE
Ces valeurs sont utilisées en tant que types de problèmes avec un fournisseur lors de l’ajout d’un problème fournisseur dans le module acquisition.
VENDOR_TYPE
Ces valeurs sont utilisées pour catégoriser les founisseurs dans le module acuisitions.
WITHDRAWN
Ces valeurs sont les descriptions d’un exemplaire désherbé. Elles apparaissent lors de l’ajout ou la modification d’exemplaire.
C’est normalement mappé avec la colonne items.withdrawn de la base de données Koha.
Si vous choisissez d’installer les valeurs par défaut pour cette catégorie, vous aurez
Retiré des collections (1)
Vous pouvez les changer pour les adapter aux besoins de votre organisation.
Avertissement
Les valeurs autorisées pour cette catégorie doivent être numériques.
YES_NO
Il s’agit d’une valeur autorisée générique qui peut être utilisé partout où vous avez besoin d’un simple menu déroulant oui/non.
Si vous choisissez d’installer les valeurs par défaut pour cette catégorie, vous aurez
Oui (1)
Non (0)
Avertissement
Généralement, les champs binaires nécessitent les valeurs 0 ou 1. Si vous changez ces valeurs, assurez-vous que les champs auxquels, vous allez l’attacher peut recevoir des valeurs autres que 0 et 1.
Ajouter une catégorie de valeur autorisée
En plus des catégories existantes qui sont définies par défaut dans Koha, les bibliothécaires peuvent ajouter leurs propres catégories de valeurs autorisées afin de contrôler la cohérence des informations entrées dans le catalogue.
Pour ajouter une nouvelle catégorie :
Cliquez sur « Ajouter catégorie »
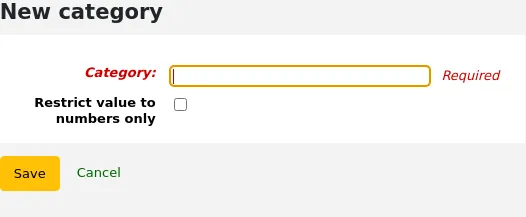
Remplir le formulaire
Catégorie : entrez le code de catégorie pour la nouvelle catégorie. Limiter votre catégorie à 10 caractères (quelque chose de court, pour rendre facile la compréhension de l’objet de cette catégorie).
Avertissement
Un code de catégorie ne peut contenir des espaces ou des caractères spéciaux autres que les tirets bas “_” ou trait d’union “-“.
Restreindre les valeurs à des chiffres seulement : cochez cette case si les valeurs de cette catégorie doivent être des nombres uniquement. Cela empêchera de créer des valeurs qui ne respectent pas cette règle.
Version
Cette option a été ajoutée à Koha dans la version 24.05.
Cliquez sur “Enregistrer”
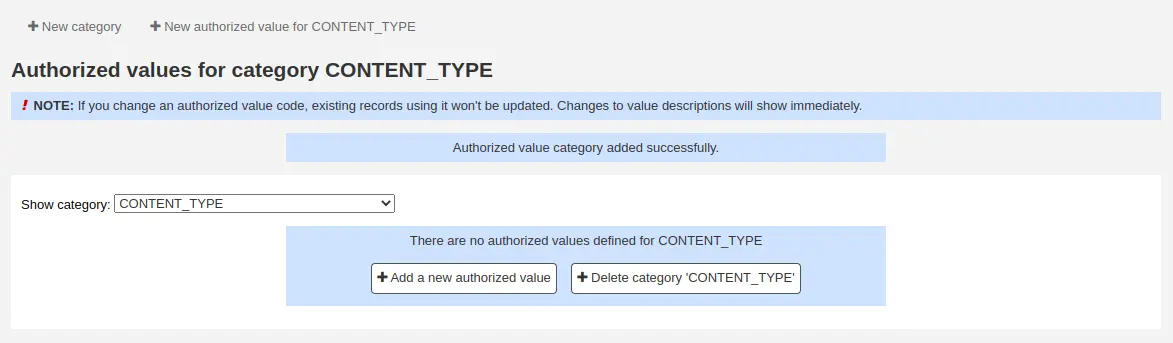
Vous pouvez ensuite ajouter de nouvelles valeurs pour cette catégorie.
Ajouter une nouvelle valeur autorisée
Des valeurs autorisées peuvent être ajoutées à toute catégorie existante ou à une nouvelle catégorie.
Pour ajouter une valeur :
Depuis la liste des catégories, cliquez sur le bouton « Ajouter » à droite de la catégorie appropriée
Alternativement, cliquez sur le nom de la catégorie, puis cliquez sur “Ajouter valeur autorisée pour …”
Si la catégorie n’a pas encore de valeur, cliquez sur le bouton “Ajouter une nouvelle valeur autorisée” en bas de la page
Remplir le formulaire
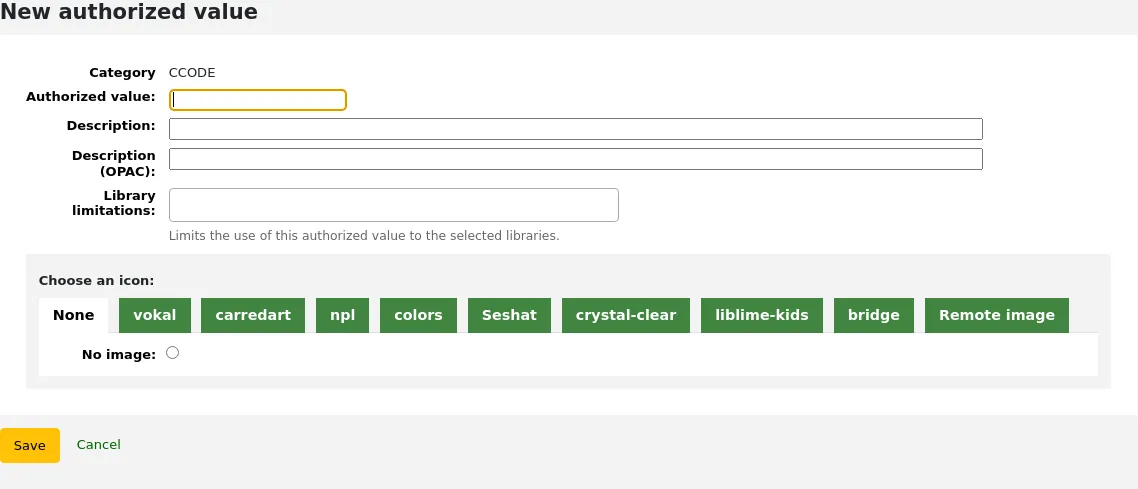
Valeur autorisée :entrez un code pour votre valeur autorisée
Note
La valeur autorisée est limitée à 80 caractères et ne peut contenir des espaces ou des caractères particuliers autres que des tirets bas “_” et trait d’union “-“.
Certaines catégories, comme SUGGEST_STATUS, peuvent avoir des limites plus strictes. Vérifier la section catégories de valeurs autorisées existantes ci-dessus pour les limites spécifiques.
Description : utilisez ce champ pour la valeur à afficher.
Description (OPAC) : si vous voulez une description différente à l’OPAC, entrez-la ici. Si ce champ est vide, le champ “Description” sera utilisé à la fois à l’interface professionnelle et à l’OPAC.
Limites de sites : si vous souhaitez limiter cette catégorie de valeur autorisée uniquement à des sites spécifiques, vous pouvez les choisir dans ce menu. Pour l’afficher pour tous les sites, choisissez simplement “Tous les sites” en haut de la liste.
Choisir une icône : vous pouvez choisir une image qui apparaitra près de la valeur dans l’interface professionnelle et dans l’OPAC.
Note
Cette fonctionnalité n’est pas disponible partout. C’est principalement pour les localisations d’exemplaire (LOC) et code de collection (CCODE) dans la recherche avancée.
Cliquez sur “Enregistrer”
La nouvelle valeur apparaîtra dans la liste avec les valeurs existantes
Supprimer des valeurs autorisées
Pour supprimer une valeur autorisée, cliquez sur le bouton “Supprimer” à droite de celle-ci.
Une fois qu’il n’y a plus de valeurs autorisées dans une catégorie de valeurs autorisées, vous pouvez supprimer la catégorie.
Adhérents et circulation
Paramètres de contrôle d’information de l’adhérent et de la circulation.
Catégories d’adhérents
Les catégories d’adhérent vous permettent d’organiser, de regrouper vos publics en fonction de différents critères, tels que l’âge, l’appartenance à un groupe, etc.
Aller à : Plus > Administration > Adhérents et Circulation > Catégories d’adhérents
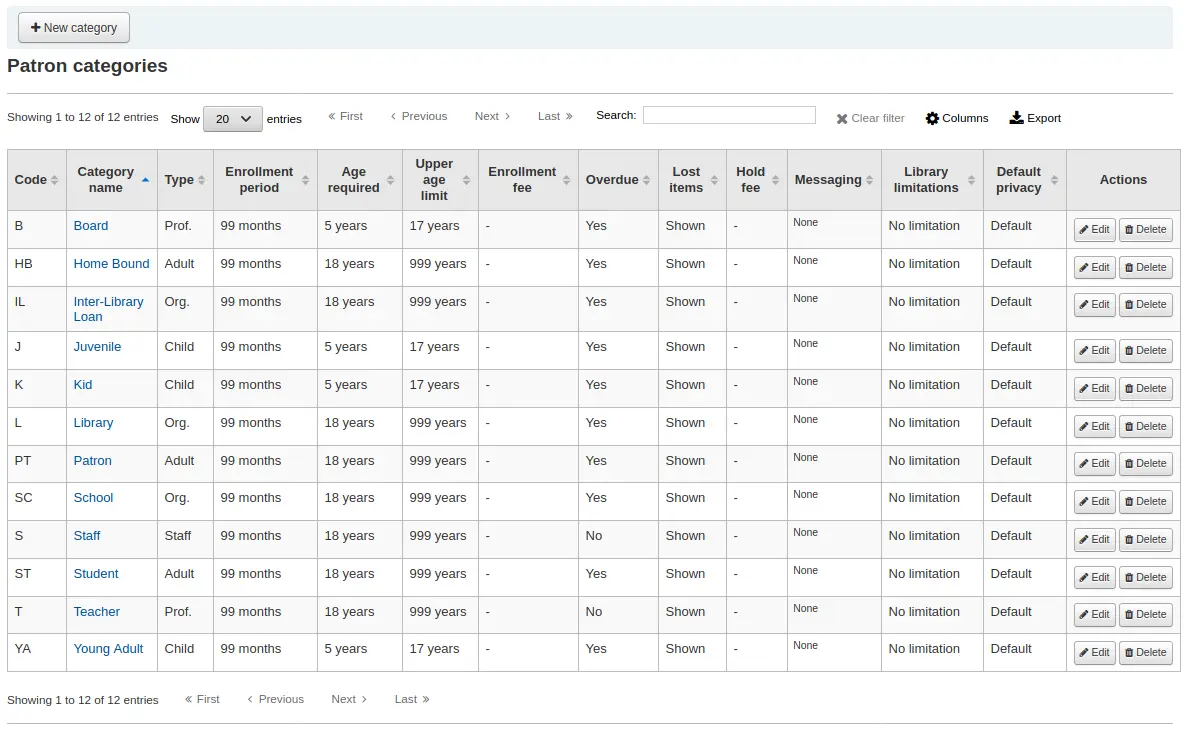
Note
Vous pouvez personnaliser les colonnes de ce tableau dans la section Configurer les colonnes du module Administration (référence du tableau : patron_categories).
Note
Seuls les bibliothécaires avec la permission manage_patron_categories (ou la permission superlibrarian) auront accès à cette section.
Ajout d’une Catégorie d’adhérent
Pour ajouter une nouvelle catégorie d’adhérent, cliquer sur “Ajouter une catégorie”, en haut de la page
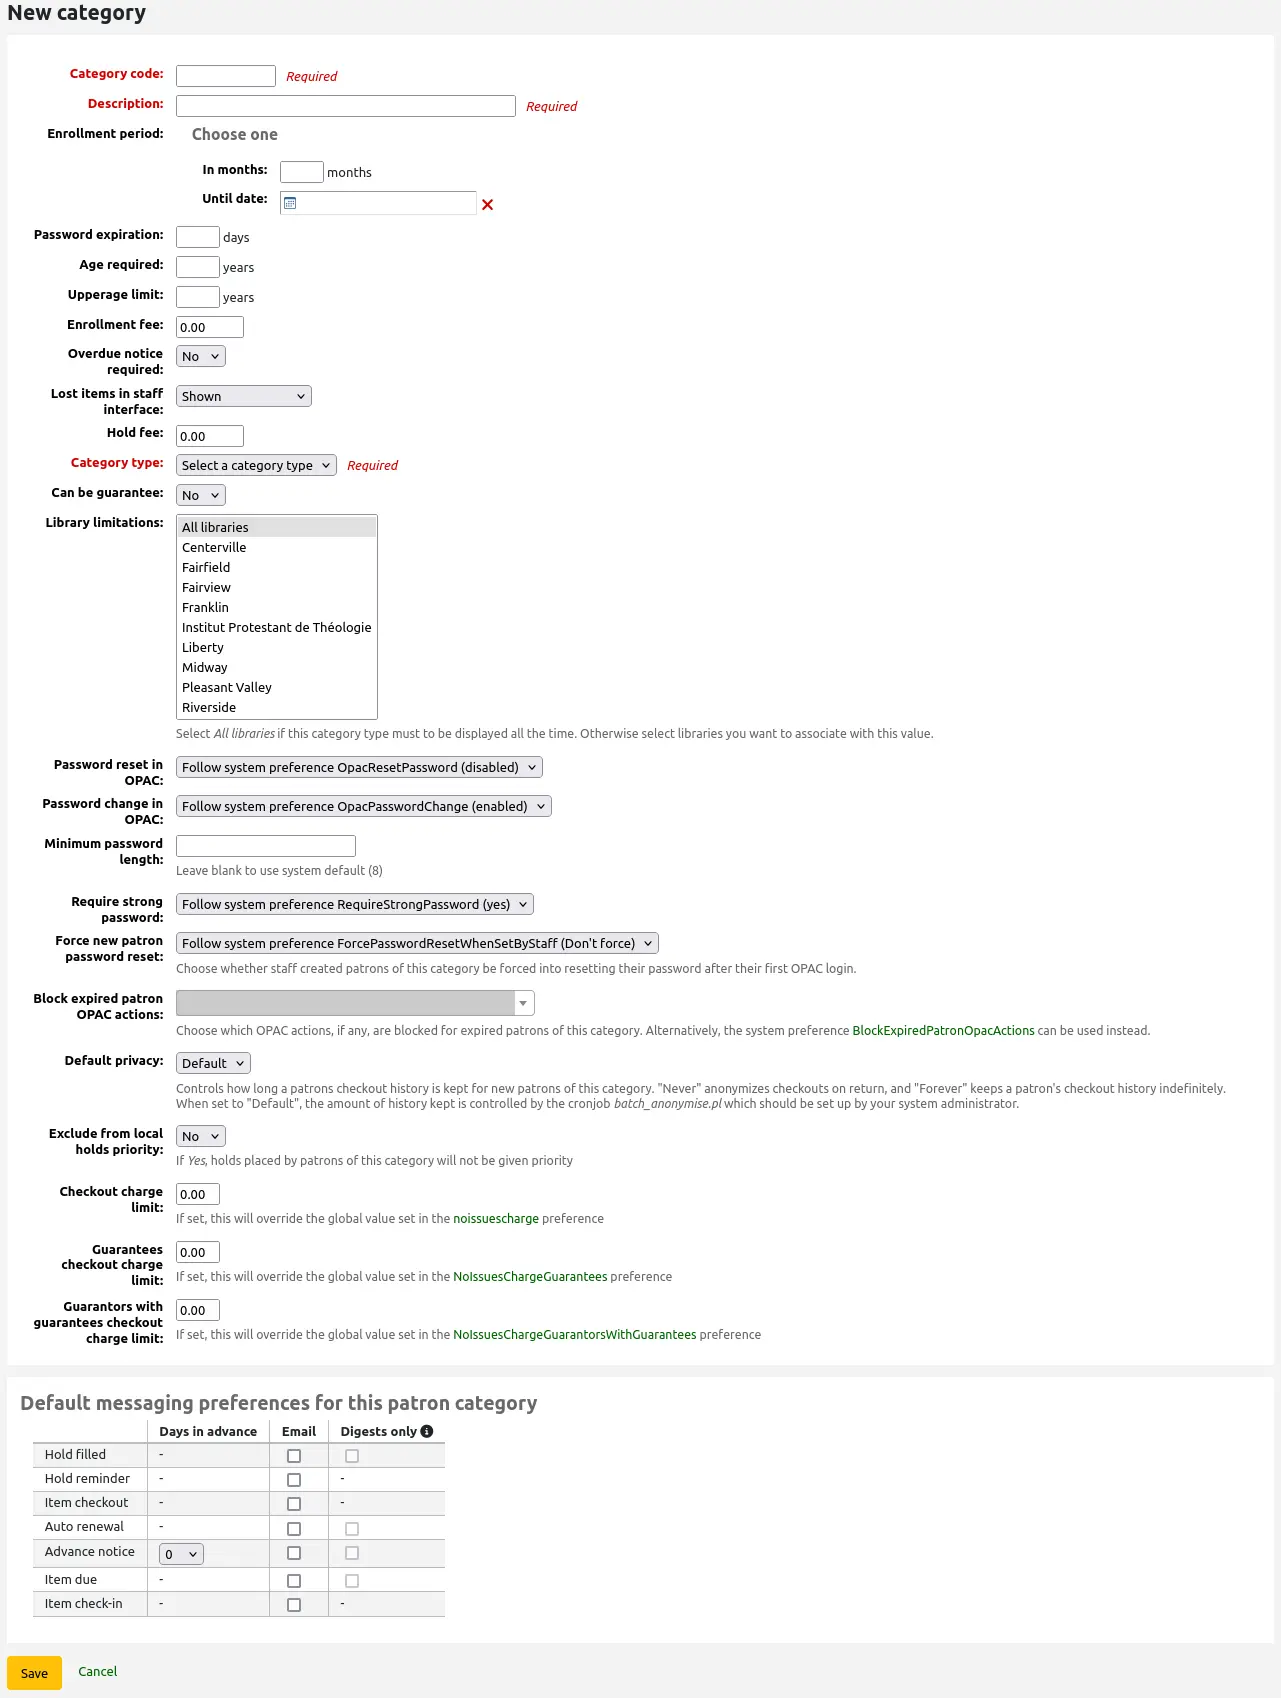
Code de catégorie : un identifiant pour votre nouvelle catégorie.
Le code de catégorie est limité à 10 caractères (chiffres et lettres) et doit être unique.
Ce champ est obligatoire pour enregistrer la catégorie adhérent. Vous rencontrerez une erreur s’il est laissé vide.
Description : une version texte clair de la catégorie.
La description sera visible partout dans Koha.
Ce champ est obligatoire pour enregistrer la catégorie adhérent. Vous rencontrerez une erreur s’il est laissé vide.
Durée d’inscription :
En mois : doit être renseignée si vous inscrivez vos lecteurs pour une durée limitée. Par exemple, des cartes d’étudiant qui expirent après neuf mois
Jusqu’à la date : vous pouvez choisir une date à laquelle les cartes expireront
Ce champ est obligatoire pour enregistrer la catégorie adhérent. Vous rencontrerez une erreur s’il est laissé vide.
Avertissement
Vous ne pouvez saisir une valeur à la fois en mois ou à une date fixe. Choisissez l’une ou l’autre.
Expiration du mot de passe : saisissez le nombre de jours après lequel un adhérent doit changer son mot de passe.
Age requis : l’âge minimum requis (en années) associé à la catégorie. Par exemple, un adhérent “adulte” aura au moins 18 ans; cela signifie que les adhérents doivent avoir au moins 18 ans pour être dans cette catégorie.
En création ou modification d’un adhérent, un avertissement apparaitra si l’adhérent est trop jeune pour cette catégorie.

Cette valeur est utilisée par le cron job update_patrons_category.pl pour changer la catégorie des adhérents qui sont trop jeunes.
Limite d’âge : l’âge maximum (en années) associé à la catégorie. Par exemple, un adhérent de la catégorie “Enfant” pourrait avoir une limite d’âge de 18, ce qui signifie que les adhérents ne peuvent avoir une carte enfant que jusqu’à leurs 18 ans.
En création ou modification d’un adhérent, un avertissement apparaitra si l’adhérent est trop âgé pour cette catégorie.
Cette valeur est utilisée par le cron job update_patrons_category.pl pour changer la catégorie des adhérents qui sont trop âgés.
Frais d’inscription : entrez le montant si vous faites payer des frais à vos adhérents (par exemple à ceux qui vivent dans une autre région).
Avertissement
Ne saisir dans ce champ que des nombres avec décimales.
Note
Selon le paramétrage de la valeur de la préférence système FeeOnChangePatronCategory, ce montant sera ajouté comme frais sur le compte de l’usager lors du renouvellement de son abonnement comme lors de sa première inscription.
Avis de retard: choisir “Oui” si vous désirez envoyer des avis de retard à cette catégorie d’utilisateurs. Cette option vous permettra de programmer vos avis de retard dans le déclencheur de notifications du module Outils.
Documents perdus dans l’interface professionnelle : vous pouvez décider pour chaque catégorie d’usager si les documents perdus sont visibles dans l’interface professionnelle.
Montré : les exemplaires perdus sont montrés dans l’interface professionnelle.
Caché par défaut : les exemplaires perdus sont cachés, mais les professionnels peuvent cliquer sur “Montrer tous les exemplaires” pour les voir.
Note
Ce n’est applicable que dans l’interface professionnelle, donc modifier cette valeur pour des catégories d’adhérents qui n’ont pas accès à l’interface professionnelle ne fait aucune différence.
Frais de réservation : saisissez le montant à payer pour les adhérents de cette catégorie lorsqu’ils effectuent des réservations.
Ne saisir dans ce champ que des nombres avec décimales.
Attention
As of version 26.05 of Koha, this feature was moved to the circulation and fine rules.
Type de catégorie : choisissez une des six catégories principales
Adulte : type d’adhérent le plus commun, le plus souvent utilisé pour une catégorie générale “Adhérent”.
Enfant : un autre type d’adhérent assez courant.
Personnel : personnel de la bibliothèque
Collectivité : organisations garantes des adhérents de type Professionnel.
Professionnel : les adhérents professionnels peuvent être liés à des adhérents de type Collectivité.
Statistique : ce type d’adhérent est utilisé uniquement à des fins statistiques, par exemple pour suivre les prêts sur place.
Ce champ est obligatoire pour enregistrer la catégorie adhérent. Vous rencontrerez une erreur s’il est laissé vide.
Peut être garanti : si l’adhérent de cette catégorie peut avoir des garants, choisir “Oui”. Cela fera apparaître les sections “Garant adhérent” et “Garant non-adhérent” dans le dossier adhérent.
Limites de site : si nécessaire, limitez cette catégorie d’adhérent à certaines bibliothèques de votre réseau. Sélectionnez “Tous les sites” si vous souhaitez que cette catégorie ait accès à tous les sites.
Astuce
Pour sélectionner plus d’un site, maintenez la touche “Ctrl” enfoncée en faisant votre sélection.
Mot de passe réinitialisé à l’OPAC : vous pouvez décider si les usagers de cette catégorie sont autorisés à réinitialiser leur mot de passe via la fonction “Mot de passe oublié” de l’OPAC. Par défaut, il suivra la règle définie dans la préférence système OpacResetPassword.
Suivre la préférence système OpacResetPassword.
Autorisé : les adhérents de cette catégorie pourront réinitialiser leur mot de passe via l’OPAC quel que soit le paramétrage de OpacResetPassword.
Non autorisé : les adhérents de cette catégorie ne pourront pas réinitialiser leur mot de passe via l’OPAC quel que soit le paramétrage de OpacResetPassword.
Changement de mot de passe à l’OPAC : vous pouvez décider si les usagers de cette catégorie sont autorisés à changer leur mot de passe via l’OPAC. Par défaut, il suivra la règle définie dans la préférence système OpacPasswordChange.
Suivre la préférence système OpacPasswordChange.
Autorisé : les adhérents de cette catégorie pourront changer leur mot de passe via l’OPAC quel que soit le paramétrage de OpacPasswordChange.
Non autorisé : les adhérents de cette catégorie ne pourront pas changer leur mot de passe via l’OPAC quel que soit le paramétrage de OpacPasswordChange.
Taille minimale du mot de passe : entrez la longueur minimale du mot de passe pour les adhérents de cette catégorie. Laissez vide pour utiliser la longueur par défaut fixée dans la préférence système minPasswordLength.
Nécessite un mot de passe fort : vous pouvez décider si un mot de passe robuste (doit contenir au moins une majuscule, une minuscule et un chiffre) est requis pour les adhérents de cette catégorie. Par défaut, c’est la règle fixée dans la préférence système RequireStrongPassword qui s’appliquera.
Suivre la préférence système RequireStrongPassword.
Oui : les adhérents de cette catégorie devront avoir un mot de passe robuste quels que soient les réglages de RequireStrongPassword.
Non : les adhérents de cette catégorie ne devront pas avoir un mot de passe robuste quels que soient les réglages de RequireStrongPassword.
Contraindre les nouveaux adhérents à réinitialiser leur mot de passe : permet de décider si les adhérents créés par des bibliothécaires sont contraints de modifier leur mot de passe lors de leur première connexion à l’OPAC.
Suivre la préférence système ForcePasswordResetWhenSetByStaff
Contraint : les adhérents de cette catégorie devront changer leur mot de passe lors de leur première connexion à l’OPAC, quel que soit le paramétrage de ForcePasswordResetWhenSetByStaff
Non contraint : les adhérents de cette catégorie ne devront pas changer leur mot de passe lors de leur première connexion à l’OPAC, quel que soit le paramétrage de ForcePasswordResetWhenSetByStaff.
Note
Ceci ne s’applique qu’aux adhérents dont le compte a été créé manuellement pas des bibliothécaires (par opposition aux adhérents auto-inscrits).
Version
Cette option a été ajoutée à Koha dans sa version 24.11.
Bloquer les actions à l’OPAC des adhérents expirés : vous pouvez décider si les adhérents de cette catégorie sont bloqués dans leur actions à l’OPAC si leur abonnement a expiré. Par défaut s’appliquera la règle fixée dans la préférence système BlockExpiredPatronOpacActions.
Suivre la préférence système BlockExpiredPatronOpacActions.
Bloquer ces actions spécifiques :
Note
Ce paramétrage outrepasse celui de la préférence système BlockExpiredPatronOpacActions .
Avertissement
Avant la version 24.11 de Koha, ce paramétrage n’était qu’un simple choix Oui/Non, et toutes les actions étaient bloquées lorsqu’il était sur Oui.
Vérifier les prêts antérieurs : si la préférence système CheckPrevCheckout est configurée sur l’une des options “Sauf si outrepassé par la catégorie d’adhérent”, vous pourrez paramétrer ici la valeur de cette catégorie d’adhérent.
Oui et tenter d’outrepasser les préférences système : Koha vérifiera si l’adhérent a déjà emprunté ce document, à moins que les paramétrages personnels de l’adhérent ne l’en empêchent.
Non et tenter d’outrepasser les préférences système : Koha ne vérifiera pas si l’adhérent a déjà emprunt ce document, à moins que les pramétrages personnels de l’adhérent ne le permettent.
En fonction des préférences système : le paramétrage de la préférence système CheckPrevCheckout sera suivi.
Peut faire des demandes de PEB à l’OPAC : si la préférence système ILLModule est activée, ce paramètre détermine si les adhérents de cette catégorie peuvent faire des demandes de PEB à partir de l’OPAC.
Version
Cette option a été ajoutée à Koha dans sa version 23.11. Dans les versions précédentes, tous les adhérents peuvent faire des demandes de PEB à partir de l’OPAC.
Confidentialité par défaut : choisissez les paramétrages de confidentialité par défaut pour les adhérents de cette catégorie.
Par défaut : l’historique de prêt sera conservé indéfiniment, jusqu’à ce que le script batch_anonymize.pl tourne ou bien qu’une anonymisation par lot manuelle soit lancée.
Jamais : l’historique de prêt est anonymisé dès le retour. Les statistiques sont conservées, mais le lien entre l’emprunt, l’exemplaire et l’adhérent est retiré.
Toujours : l’historique de prêt n’est jamais anonymisé pour les adhérents de cette catégorie, même s’il y a un cron job ou une anonymisation manuelle.
Ce paramétrage peut être modifié par l’adhérent via l’OPAC si vous le permettez avec la préférence système OPACPrivacy.
Exclure de la priorité des réservations locales : choisissez si les réservations pour les adhérents de cette catégorie ont une priorité.
Oui : les réservations pour les adhérents de cette catégorie n’ont pas de priorité spéciale, quel que soit le paramétrage de la préférence système LocalHoldsPriority.
Non : les réservations pour les adhérents de cette catégorie sont assujetties au paramétrage de la préférence système LocalHoldsPriority.
Montant des frais bloquant le prêt : empêche les adhérents de cette catégorie d’emprunter s’ils doivent plus que le montant spécifié.
Si ce champ est laissé vide, ou est à 0, la valeur de la préférence système noissuescharge sera utilisée pour les adhérents de cette catégorie.
Si ce champ a une valeur, elle outrepassera la valeur de la préférence système noissuescharge pour les adhérents de cette catégorie.
Version
Cette option a été ajoutée à Koha dans sa version 24.11.
Montant des frais des personnes à charges bloquant le prêt : empêche les adhérents de cette catégorie d’emprunter des documents si leurs garantis doivent, collectivement, plus que la valeur spécifiée.
Si ce champ est laissé vide, ou est à 0, la valeur de la préférence système NoIssuesChargeGuarantees sera utilisée pour les adhérents de cette catégorie.
Si ce champ a une valeur, elle outrepassera la valeur de la préférence système NoIssuesChargeGuarantees pour les adhérents de cette catégorie.
Version
Cette option a été ajoutée à Koha dans sa version 24.11.
Montant des frais des personnes à charges du garant bloquant le prêt : empêche les adhérents de cette catégorie d’emprunter des documents si l’adhérent a un garant et que les garantis de ce garant doivent, collectivement, plus que le montant précisé.
Si ce champ est laissé vide, ou est à 0, la valeur de la préférence système NoIssuesChargeGuarantorsWithGuarantees sera utilisée pour les adhérents de cette catégorie.
Si ce champ a une valeur, elle outrepassera la valeur de la préférence système NoIssuesChargeGuarantorsWithGuarantees pour les adhérents de cette catégorie.
Version
Cette option a été ajoutée à Koha dans sa version 24.11.
Préférences de notification par défaut pour cette catégorie d’adhérents : attribue des préférences de notification avancées par défaut à la catégorie d’adhérents
Ces préférences par défaut peuvent être changées individuellement par adhérent. Ce paramètre est une valeur par défaut qui vise à faciliter la saisie des messages à la création des nouveaux adhérents.
Note
Pour ce faire, la préférence système EnhancedMessagingPreferences system preference doit être positionnée sur “Autoriser”.
Avertissement
Ces paramètres par défaut s’appliqueront uniquement aux nouveaux adhérents ajoutés dans le système. Cela ne modifiera pas les préférences pour les adhérents existants.
Si vous avez besoin d’appliquer les préférences par défaut aux adhérents existants, vous pouvez répercuter ces changements en utilisant le script borrowers-force-messaging-defaults qui se trouve dans le répertoire misc/maintenance. Contactez votre administrateur système pour obtenir de l’aide pour utiliser ce script.
Règles de circulation et de pénalités
Ces règles régissent la façon dont vos exemplaires sont mis en circulation, comment et quand sont calculées les amendes et comment sont gérées les réservations.
Aller à : Plus > Administration > Adhérents et Circulation > Règles de circulation et de pénalités
Note
Seuls les bibliothécaires avec la permission manage_circ_rules (ou la permission superlibrarian) auront accès à cette section.
Les règles sont appliquées de la plus spécifique à la plus générale, utilisant la première règle trouvée dans l’ordre suivant :
même bibliothèque, même catégorie d’adhérent, même type de document
même bibliothèque, même catégorie d’adhérent, tous les types de document
même bibliothèque, toutes les catégories d’adhérent, même type de document
même bibliothèque, toutes les catégories d’adhérent, tous les types de document
par défaut (toutes les bibliothèques), même catégorie d’adhérent, même type de document
par défaut (toutes les bibliothèques), même catégorie d’adhérent, tous les types de document
par défaut (toutes les bibliothèques), toutes les catégories d’adhérent, même type de document
par défaut (toutes les bibliothèques), toutes les catégories d’adhérent, tous les types de document
Les préférences système CircControl et HomeOrHoldingBranch entrent aussi en jeu lors du calcul de la règle de circulation à suivre.
Si CircControl est réglée sur « la bibliothèque à laquelle vous êtes connecté », les règles de circulation seront choisies en se basant sur la bibliothèque à laquelle le professionnel qui fait le prêt est connecté
Si CircControl est réglé sur « le site d’inscription de l’adhérent », les règles de circulation seront choisies en se basant sur le site de l’adhérent
Si CircControl est définie sur “la bibliothèque d’où provient l’exemplaire”, les règles de circulation seront basées sur le site de l’exemplaire suivant le paramétrage défini dans HomeOrHoldingBranch (bibliothèque d’appartenance ou site dépositaire de l’exemplaire).
Si la préférence IndependentBranches est paramétrée sur “Oui” alors la valeur de la préférence HomeOrHoldingBranch est utilisée pour déterminer si l’exemplaire peut être emprunté ou pas. Si sa bibliothèque de rattachement ne correspond pas à la bibliothèque où le prêt est réalisé, il ne peut pas être prêté à moins que vous ne soyez un superbibliothécaire.
Important
Vous devez au minimum définir une règle de circulation par défaut, qui doit concerner tous les types de documents, tous les sites et toutes les catégories d’adhérents. Elle s’appliquera dans tous les cas où une règle plus spécifique n’aura pas été définie. Si vous ne définissez pas cette règle par défaut cela peut bloquer la finalisation d’une procédure de prêt ou empêcher une réservation.
Définir les règles de circulation
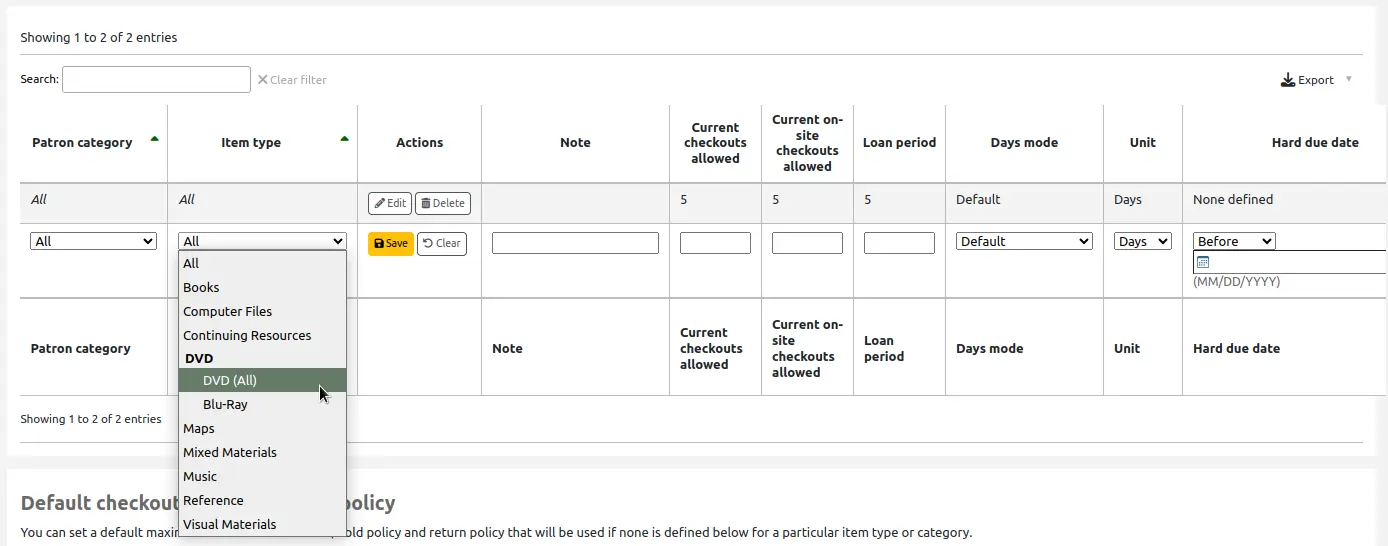
En utilisant la matrice des règles de circulation, vous pouvez définir des règles qui dépendent de combos catégorie d’adhérent/type de document.
Note
La matrice étant très large, vous pouvez exporter les règles existantes en format Microsoft Excel ou CSV, pour les regarder, en utilisant le bouton “Exporter” en haut du tableau.
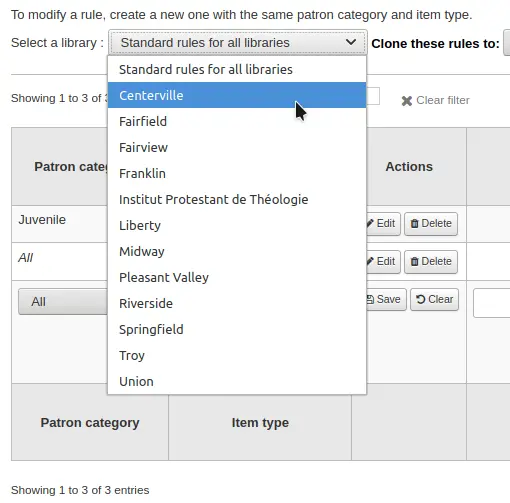
Par paramétrer vos règles, choisissez un site dans la liste déroulante (ou “Règles de base pour toutes les bibliothèques” pour appliquer ces règles à toutes les bibliothèques) :
Vous pouvez choisir dans la matrice toutes les combinaisons de catégories d’adhérent et de types d’exemplaire sur lesquelles appliquer les règles.

Choisissez d’abord la catégorie d’adhérent à laquelle appliquer la règle. Si vous laissez à Défaut, la règle s’appliquera à toutes les catégories d’adhérent.
Sélectionnez le Type d’exemplaire auquel vous voulez appliquer cette règles. Si vous laissez “Défaut”, elle s’appliquera à tous les types d’exemplaires pour cette catégorie d’adhérents
Si un type de document a un parent, la règle s’appliquera de Parent à Enfant. Le nombre de prêts simultanés autorisés sera limité soit au maximum du type de document parent (en comptant tous les types de documents associés) soit à la règle spécifique du type de document si cette dernière est moins élevée.
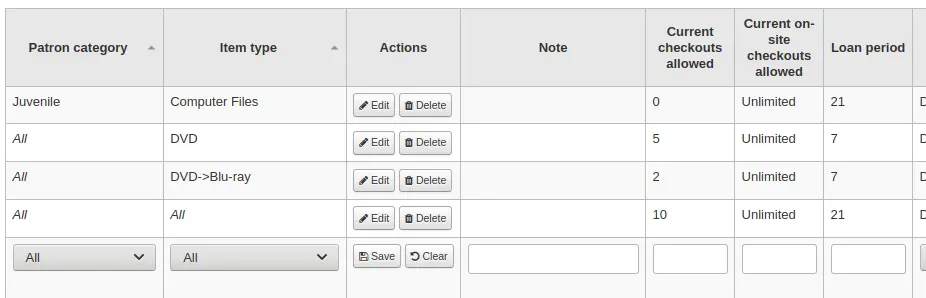
Dans l’exemple ci-dessus, il existe une règle pour le type de document DVD avec un maximum de 5 prêts et une règle pour Blu-ray, un enfant de DVD, avec un maximum de 2 prêts. Un adhérent de cette bibliothèque pourra emprunter un maximum de 2 Blu-ray sur un total de 5 documents de type DVD ou Blu-ray.
Pour résumer, un adhérent de cette bibliothèque pourrait prendre soit : - 0 Blu-ray et un maximum de 5 DVD - 1 Blu-ray et un maximum de 4 DVD - 2 Blu-ray et un maximum de 3 DVD
Ajoutez des notes sur votre règle de circulation dans le champ Notes. Cela peut être utile pour se rappeler pourquoi et quand quelque chose a été modifié pour la dernière fois.
Limitez le nombre de documents de ce type qu’un adhérent de cette catégorie peut emprunter en même temps en saisissant un nombre dans le champ “Prêts actuellement autorisés”.
Si vous autorisez les prêts sur place, alors vous souhaitez peut-être aussi limiter le nombre de documents de ce type que les adhérents de cette catégorie peuvent emprunter sur place.
Note
Ce paramétrage dépend aussi de la préférence ConsiderOnSiteCheckoutsAsNormalCheckouts
Définir la durée de prêt pour un document pour un adhérent de cette catégorie en saisissant le nombre d’unités (jours ou heures) dans la case “Période de prêt”.
Définir si la période de prêt doit inclure ou non les jours de fermeture dans la colonne “Mode jours”. L’option choisie ici remplacera la préférence système useDaysMode pour cette règle particulière.
L’option “Défaut” prendra l’option définie dans la préférence système useDaysMode
Choisissez l’option “Calendrier” si vous souhaitez utiliser le calendrier pour sauter les jours de fermeture de la bibliothèque
Choisissez l’option “Date de retour” si vous souhaitez repousser la date d’échéance au prochain jour d’ouverture
Choisissez l’option “Jours” si vous souhaitez ignorer le calendrier et calculer directement la date d’échéance
Choisir l’option “Jour de la semaine” si vous voulez utiliser le calendrier pour repousser la date d’échéance au même jour ouvert de la semaine suivante pour les prêts en durée hebdomadaire, ou sinon, au jour ouvert suivant
Choisissez à partir de quelle unité de temps, jours ou heure, la durée de prêt et les amendes seront calculées dans la colonne “Unité”
Note
Si vous choisissez “heures”, vous pouvez paramétrer les horaires d’ouverture de chaque bibliothèque et déterminer comment sera calculée l’heure de retour si elle tombe en dehors des horaires d’ouverture.
Vous pouvez également définir une date d’échéance forcée pour une catégorie de lecteur et un type de document spécifiques. La date d’échéance forcée offre trois options :
Exactement le : la date d’échéance de tout exemplaire emprunté avec cette règle sera définie par cette date d’échéance forcée.
Avant : Koha calculera la durée normale du prêt. Si la date d’échéance calculée est postérieure ou égale à la date d’échéance forcée, c’est cette dernière qui sera utilisée.
Après : Koha calculera la durée normale du prêt. Si la date d’échéance calculée est antérieure à la date d’échéance forcée, c’est cette dernière qui sera utilisée.
“Montant de l’amende” doit contenir le montant à appliquer pour des documents en retard.
Important
Saisissez uniquement des chiffres et le séparateur décimal (pas de mention de devise).
Entrez la “Périodicité de l’amende” dans l’unité que vous avez choisie (par exemple, facturer les amendes chaque 1 jour ou toutes les 2 heures). La préférence système finesCalendar contrôle si les jours de fermeture de la bibliothèque sont pris en compte ou non.
“Quand faire payer” est surtout utile dans les bibliothèques qui ont une périodicité pour les amendes supérieure à 1 jour.
Fin de l’intervalle : étant donnée une période de grâce de 2 jours et un intervalle pour la facturation des amendes de 7 jours, la première amende apparaîtra 7 jours après la date d’échéance, cela prendra toujours un intervalle de facturation (7 jours) avant que la première amende soit ajoutée sur le compte de l’adhérent.
Début de l’intervalle : étant donnée une période de grâce de 2 jours et une périodicité pour les amendes de 7 jours, la première amende apparaîtra 2 jours après la date d’échéance et la seconde amende, 7 jours après la date de retour prévue.
Le “délai de grâce pour les pénalités” est la période pendant laquelle un document peut être en retard avant que vous ne commenciez à appliquer des pénalités. La préférence système FinesIncludeGracePeriod définit si le délai de grâce sera inclus ou non lors du calcul des pénalités.
Important
Cela peut seulement être défini en “Jours”, pas en “Heures”
La “Pénalité maximale pour retards” est l’amende maximum par document pour la combinaison entre ce type d’adhérent et ce type de document.
Important
Si ce champ est laissé vide, Koha ne mettra pas de limite aux amendes générées. Un montant maximal d’amende pour tous les retards peut-être fixé avec la préférence système MaxFine.
Si vous voulez faire en sorte de ne pas surfacturer les adhérents pour les documents perdus, vous pouvez coher la case “Limiter l’amende au prix de remplacement”. Cela empêchera que le montant des amendes dépasse le prix de remplacement du document.
Note
Si “Limiter l’amende au prix de remplacement” est ainsi défini, l’amende sera le montant le moins élevé des deux si tous les deux peuvent s’appliquer pour un même prêt.
Si vous imputez une amande aux lecteurs quand ils ne viennent par récupérer les réservations en attente dans les temps (voir ci-dessous le nombre de jours dans “Période de retrait de réservations (jour)”, entrez le montant de l’amande dans “Frais de réservation expirée”.
Si ce champ est laissé vide, la valeur de la préférence système ExpireReservesMaxPickUpDelayCharge sera utilisée.
Version
Cette option a été ajoutée à Koha dans sa version 25.05.
Si vous pénalisez vos lecteurs en suspendant leur compte, vous pouvez indiquer le nombre de jours de suspension dans le champ “Suspension (en jours)”.
Important
Cela peut seulement être défini en “Jours”, pas en “Heures”
Vous pouvez aussi définir le nombre maximum de jours de suspension d’un adhérent avec le paramétre “Durée maximum de suspension (en jours)”
L’option “Suspension (périodicité)” fonctionne comme “Amende (périodicité)”. Par exemple, vous pouvez “sanctionner” un adhérent d’un jour de suspension tous les deux jours de retard.
Décidez ensuite si l’adhérent peut renouveler ce type d’exemplaire, et si oui, indiquez combien de fois l’adhérent a cette possibilité dans la zone “Prolongations autorisées”.
Si vous autorisez les renouvellements automatiques (voir UnseenRenewals), saisissez combien de renouvellements “automatiques” les adhérents peuvent effectuer. Ce n’est pas en plus des renouvellements classiques, mais plutôt combien de renouvellements “automatiques” peuvent être effectués parmi le nombre total de renouvellements.
Si vous autorisez les renouvellements, vous pouvez en définir la durée (dans l’unité de temps que vous aurez choisie) dans la case “Durée du renouvellement”.
Si vous autorisez les renouvellements, vous pouvez contrôler combien de temps avant la date d’échéance, les adhérents peuvent renouveler leurs documents, avec la case “Pas de renouvellement avant”.
Si ce champ est laissé vide, les exemplaires peuvent être renouvelés à tout moment. Sinon, les exemplaires ne sont renouvelés que si l’exemplaire doit être rendu après le nombre d’unités (jours/heures) saisi dans cette boîte de dialogue.
Pour contrôler cette valeur à un niveau plus fin, il faut configurer la préférence système NoRenewalBeforePrecision.
Si vous activez les renouvellements automatiques (voir ci dessous), saisissez combien de temps avant la date d’échéance ils s’opèrent.
Version
Cette option a été ajoutée à Koha dans sa version 23.11.
Dans les versions antérieures, les renouvellements automatiques utilisaient une valeur “Pas de renouvellement avant” qui s’apliquaient à la fois aux renouvellements manuels et aux renouvellements automatiques.
Vous pouvez permettre des renouvellements automatiques pour certains documents/adhérents. Cela permettra le renouvellement automatique d’après vos règles de circulation à moins qu’une réservation ne soit placée sur l’exemplaire.
Important
Vous devrez activer le cron job de renouvellement automatique pour que cela fonctionne.
Important
Cette fonctionnalité nécessite que la colonne “pas de renouvellement automatique avant” soit remplie ou bien un renouvellement automatique sera fait chaque jour après la date d’échéance.
Si vous utilisez les renouvellements automatiques, vous pouvez utiliser le paramètre “Pas de renouvellement automatique après” pour limiter la durée de l’emprunt. Par exemple : ne pas autoriser les renouvellements automatiques au-delà d’une période de prêt de 80 jours.
De la même manière que pour le paramètre de date d’échéance forcée, vous pouvez aussi stopper les renouvellements automatiques après une date spécifique en utilisant le paramètre “Pas de renouvellement automatique après (limite stricte)”.
Si les adhérents de cette catégorie peuvent faire des réservations sur ce type d’exemplaires, entrez le nombre total d’exemplaire (de ce type) qu’ils sont autorisés à réserver dans le champ “Réservation autorisées”.
Laisser vide pour avoir un nombre illimité de réservations.
Si vous préférez mettre une limite de réservations par catégorie d’adhérents, indépendamment du type de document, voir la section limite de prêt et réservation par défaut par catégorie d’adhérent ci-dessous.
Si vous souhaitez avoir une limite stricte de réservation, indépendamment de la catégorie d’adhérents et du type de document, voir la section Règles de prêt, réservation et retour par défaut ci-dessous.
Si vous voulez avoir une limite ferme du nombre de réservations, indépendamment de la catégorie d’adhérent, du type de prêt, et s’appliquant à tous les sites, rendez-vous à la préférence système maxreserves.
Vous pouvez aussi définir une limite par jour sur le nombre de réservations qu’un adhérent peut effectuer.
Tandis que les deux paramètres précédents limitent les réservations qui peuvent être placées sur différentes notices, le paramètre suivant est utilisé pour limiter le nombre de réservations qui peuvent être placées sur une seule notice à la fois. Par exemple, pour les livres de fiction vous pourriez vouloir autoriser la réservation d’un seul exemplaire à la fois par le même utilisateur. Mais pour les périodiques, où les exemplaires représentent différents fascicules, plus d’une seule réservation convient.
Note
Si ce paramétrage est strictement supérieur à 1 mais pas Illimité, les bibliothécaires pourront placer de multiples réservations en une fois en réservant le prochain exemplaire disponible dans l’interface professionnelle
Ensuite vous pouvez décider de quelle manière la disponibilité des exemplaires influe sur la possibilité de les réserver. L’option “Réservations sur étagère autorisées” a trois paramétrages :
Oui : cela permettra d’effectuer des réservations sur les exemplaires dans tous les cas. Peu importe qu’ils soient disponibles ou empruntés.
Si au moins un exemplaire est indisponible : cela permettra d’effectuer une réservation dès qu’un ou plusieurs exemplaires de la notice sont empruntés. Peu importe s’il y a encore un ou plusieurs exemplaires disponibles sur l’étagère.
Si tout est indisponible : cela permettra d’effectuer une réservation uniquement si tous les exemplaires de la notice qui peuvent satisfaire la réservation sont empruntés. Ceci est particulièrement utile pour les bibliothèques qui n’offrent pas de service de réservation de documents sur l’étagère par les adhérents.
Dans “Réservation au niveau exemplaire à l’OPAC” vous pouvez décider si les adhérents ont le droit de réserver un exemplaire spécifique dans le type de document en question. Les options sont :
Autoriser : cela permettra aux adhérents de choisir soit le prochain disponible soit un exemplaire spécifique.
Ne pas autoriser : cela permettra aux adhérents de ne choisir que le prochain exemplaire disponible.
Forcer : cela permettra seulement aux adhérents de choisir un exemplaire précis.
Vous pouvez définir le nombre de jours dont les adhérents disposent pour venir chercher leurs réservations avec la colonne “Durée de mise à de côté (en jours)”. Cette valeur permettr de calculer la dte de fin de mise de côté de la réservation. Après cette période, les réservations seront notées comme problématiques et figureront dans l’onglet “Réservations en attente au delà de leur date d’expiration” du rapport Réservations mises de côté.
La période par défaut est définie par la préférence système ReservesMaxPickUpDelay , mais cette colonne permet de définir des règles plus fines pour différentes combinaisons de bibliothèques, catégories d’adhérents et types de documents.
Version
Cette option de règles de circulation a été ajoutée à Koha dans sa version 23.11.
Hold fee: if you charge for placing holds, enter the amount the patron should be charged per hold matching this rule.
Version
This circulation rule option was first introduced in version 26.05 of Koha. In previous versions, hold fees are part of the patron categories settings.
Saisissez uniquement des chiffres et le séparateur décimal (pas de mention de devise).
At which point the fee is charged depends on the HoldFeeMode system preference.
Si vous voulez autoriser les adhérents de cette catégorie à placer des demandes d’article sur les exemplaires de ce type, choisissez une option dans la colonne “Demandes d’articles”
Non : les adhérents de cette catégorie ne pourront pas placer des demandes d’articles sur les exemplaires de ce type
Oui : les adhérents de cette catégorie pourront placer des demandes d’articles sur les exemplaires de ce type, soit sur un exemplaire spécifique (par exemple dans le cas de fascicules de périodiques) soit sur une notice entière (par exemple dans le case de monographies)
Notice uniquement : les adhérents de cette catégorie pourront placer des demandes d’articles sur les notices de ce type, mais pas sur des exemplaires spécifiques
Exemplaire seulement : les adhérents de cette catégorie pourront placer des demandes d’articles sur les exemplaires de ce type, mais pas sur des notices entières
Avertissement
Cette colonne ne sera visible que si la préférence système ArticleRequests est activée.
Si vous voulez utiliser la fonctionnalité de demandes d’articles vous devez l’activer avec la préférence système ArticleRequests et configurer le formulaire en utilisant les autres préférences liées.
Si vous avez paramétré un prêt payant pour le type de document et que vous souhaitez attribuer à une catégorie d’adhérent particulière une remise sur le coût, saisissez le pourcentage de remise (sans le symbole %) dans le champ “Remise”
Note
Saisissez le pourcentage de remise en utilisant le point comme séparateur décimal.
La remise doit obligatoirement être un nombre positif avec zéro ou deux chiffres après la virgule. Les nombres entiers sont aussi acceptés. Par exemple :
5,10,0.50,3.25,99.99.Les valeurs comme
0.5,25.123, ou-10ne sont pas acceptées.Si la préférence système UseRecalls est activée, vous aurez plusieurs options pour contrôler les rappels.
Rappels autorisés (total) : saisissez le nombre de rappels en cours qu’un adhérent de cette catégorie peut avoir sur les exemplaires ou les notices de ce type de document.
Rappels par notice (nombre) : saisissez le nombre de rappels en cours qu’un adhérent de cette catégorie peut avoir sur une quelconque notice de ce type de document.
Rappels sur étagère autorisés : choisissez si les adhérents peuvent rappeler des exemplaires sur des notices qui ont des exemplaires disponibles
Si au moins un exemplaire est indisponible : si une notice a plus d’un exemplaire et qu’au moins un est indisponible, l’adhérent pourra rappeler des exemplaires de cette notice
Si tout est indisponible : tous les exemplaires d’une notice doivent être indisponibles pour qu’un adhérent puisse rappeler un exemplaire de cette notice
Intervalle de date d’échéance pour les rappels (jour) : saisissez le nombre de jours qu’un adhérent a pour rendre un exemplaire qui a été rappelé
Montant de l’amende pour les rappels : saisissez le montant de l’amende qu’un adhérent devra payer s’il ne rend pas l’exemplaire rappelé avant la date d’échéance
Période de retrait du rappel : saisissez le nombre de jours qu’un adhérent a pour venir chercher l’exemplaire qu’il a rappelé, une fois qu’il a été marqué en attente de retrait.
Note
Cette valeur est prise en compte à la place de celle de la préférence système RecallsMaxPickUpDelay.
Quand vous avez terminé, cliquez sur “Enregistrer” pour enregistrer vos modifications. Pour modifier une règle, cliquez simplement sur le bouton “Modifier” soit au début soit à la fin de la ligne. La ligne de la règle en cours de modification sera surlignée en jaune et les valeurs apparaîtront remplies en bas du tableau. Modifiez les valeurs en bas de tableau et cliquez sur enregistrer.
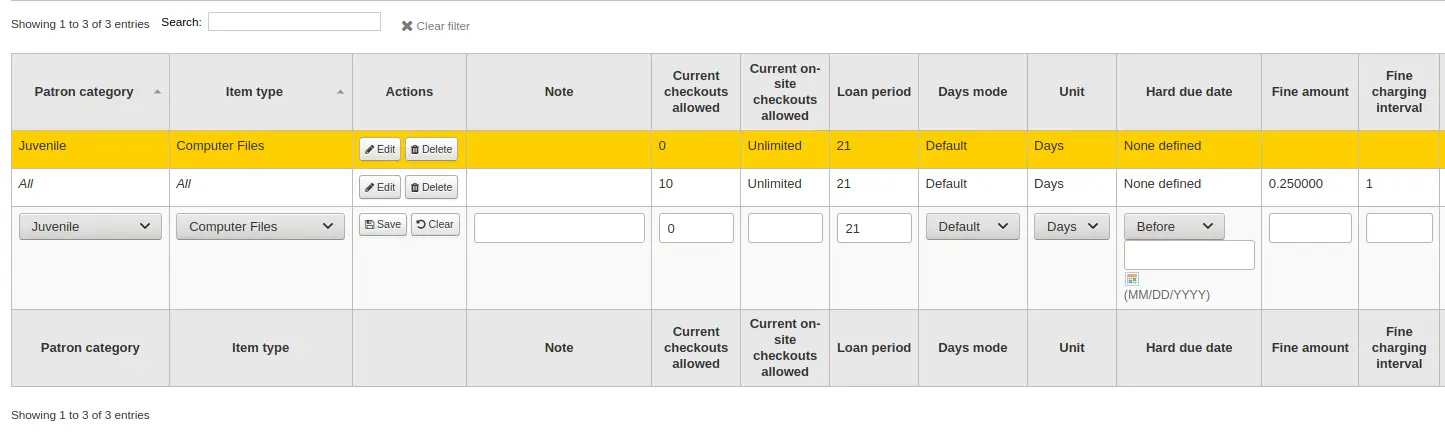
Note
Si, en modifiant une règle, vous changez soit la catégorie d’adhérent soit le type de document, cela créera une nouvelle règle. Vous pouvez faire ainsi pour dupliquer des règles plutôt que d’en créer de nouvelles si les valeurs sont similaires.
Sinon, vous pouvez créer une règle avec la même catégorie d’adhérent et le même type de document et cela modifiera la règle existante, car il ne peut y avoir qu’une seule règle par combinaison de site-catégorie d’adhérent-type de document.
Si vous souhaitez supprimer votre règle, cliquez sur le bouton “Supprimer” au début ou à la fin de la ligne.
Pour gagner du temps vous pouvez cloner les règles d’un site à un autre en choisissant l’option de clonage au-dessus du tableau de règles. Veuillez noter que cette opération remplacera toutes les règles déjà configurées pour ce site.

Après avoir choisi de cloner, un écran de confirmation s’affiche.
Règles de prêts, de réservations et de retours par défaut
Vous pouvez définir par défaut un nombre maximum de prêts, un nombre maximum de réservations et une politique de réservation qui seront utilisés si rien n’est défini en-dessous pour un type de document ou une catégorie d’adhérent particuliers. C’est la règle de base par défaut.

Vous sélectionnez dans ce menu une règle par défaut qui s’appliquera à tous les types d’exemplaire et toutes les catégories d’adhérent de la bibliothèque.
Nombre Total de prêts autorisés : entrez le maximum de documents qu’un adhérent peut emprunter à la fois
Nombre Total de prêts sur place autorisés : entrez le maximum de documents qu’un adhérent peut emprunter sur place à la fois (OnSiteCheckouts doit être activée)
Maximum de réservations autorisées (Nbre) : saisissez le nombre total de réservations en attente que les adhérents peuvent avoir en même temps.
Politique de réservation : contrôle d’où les adhérents peuvent placer des réservations
Tout site : Les adhérents de tous les sites peuvent réserver cet exemplaire. (valeur par défaut si aucune autre n’est sélectionnée)
Du groupe de réservation local : seuls les adhérents d’une bibliothèque du groupe de bibliothèques de l’exemplaire peuvent réserver ce livre
Depuis le site de rattachement : Seuls les adhérents du site de rattachement de l’exemplaire peuvent réserver ce document.
Réservation non autorisée : aucun adhérent ne pourra réserver ce document.
Correspondance avec le site de retrait de la réservation et de la réservation programmée : contrôle le site auquel un adhérent peut récupérer une réservation ou une réservation programmée
Tout site
groupe de réservation de l’exemplaire
groupe de réservation d’un adhérent
bibliothèque de rattachement de l’exemplaire
site dépositaire de l’exemplaire
Réservation pré-programmée (jours) : ajouter une période tampon avant une nouvelle réservation programmée, pour laisser le temps aux bibliothécaires de préparer l’exemplaire entre deux réservations programmées.
Version
Cette option a été ajoutée à Koha dans sa version 24.11.
Réservation post-programmée (jours) : ajouter une période tampon après une nouvelle réservation programmée, pour laisser le temps aux bibliothécaires de recevoir l’exemplaire entre deux réservations programmées.
Version
Cette option a été ajoutée à Koha dans sa version 24.11.
Politique de retour : contrôle où l’exemplaire doit être transféré une fois son retour enregistré
L’exemplaire retourne au site de rattachement
L’exemplaire retourne au site du prêt
Exemplaire flottant : Un exemplaire flottant reste au site où il a été retourné et ne retourne jamais à son site de rattachement
Exemplaire flottant par groupe de bibliothèque : le document ne sera pas tranféré et restera dans la bibliothèque où le retour a été effectué, si cette bibliothèque fait partie du même “groupe flottant” dans les groupes de bibliothèque que la bibliothèque de rattachement de l’exemplaire. Si la bibliothèque n’es pas dans le même groupe flottant, le document sera transféré à sa bibliothèque de rattachement.
Une fois votre politique de circulation configurée, vous pouvez la retirer en cliquant sur le lien “Supprimer” sur la droite de la règle.
Limite de prêt et réservation par défaut par catégorie d’adhérent
Pour ce site, vous pouvez spécifier le nombre maximum de prêts, de prêts sur place et de réservations qu’un adhérent peut faire en fonction de sa catégorie, quel que soit le type de document.

Note
Si la quantité totale de documents empruntables ou réservables pour une catégorie d’adhérent est laissée vide, il n’y aura pas de limites, sauf si vous en définissez une dans les règles de circulation au-dessus.
Par exemple, si vous dans la matrice une règle qui dit que les adhérents de Board peuvent emprunter 10 livres et 5 DVDs mais que vous voulez limiter le nombre maximal de documents empruntés simultanément à 12 pour les adhérents de Board : si vous saisissez 12 ici et que l’adhérent a déjà emprunté 10 livres, il ne pourra plus emprunter que 2 DVDs pour atteindre le total de 12 documents empruntables simultanément.
Politique d’annulation des réservations en attente par défaut
Pour cette bibliothèque, vous pouvez préciser si les adhérents peuvent annuler leurs réservations déjà en attente de retrait.

Pour chaque combinaison de catégorie d’adhérents et de type de document, vous pouvez choisir si les adhérents peuvent annuler leurs réservations qui sont déjà en attente de retrait.
Comme pour les règles de circulation, les règles plus spécifiques s’appliquent avant les règles plus générales (i.e. la règle “Toutes” les catégories d’adhérent / “Tous” les types de document s’appliquera si aucune autre règle n’existe pour cette combinaison).
Limite par défaut de demandes d’article
Si ArticleRequests est activée, vous pouvez paramétrer un nombre maximum de demandes d’article en cours qu’un adhérent d’une catégorie peut avoir à la fois.
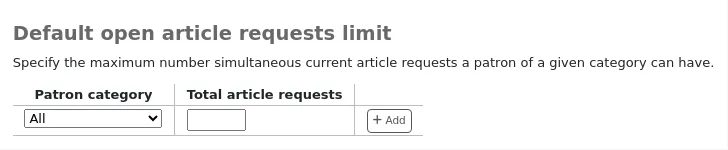
Note
Ceci apparaîtra uniquement si la préférence système ArticleRequests est activée.
Choisissez la catégorie d’adhérent que vous voulez limiter.
Saisissez le nombre de demandes d’articles ouvertes qu’un adhérent de cette catégorie peut avoir sur une période donnée
Cliquez sur “Ajouter”
Frais de demandes d’article par défaut
Si ArticleRequests est activée, vous pouvez paramétrer les frais qu’un adhérent d’une catégorie donnée (ou de n’importe quelle catégorie) doit payer pour demander l’article.

Note
Ceci apparaîtra uniquement si la préférence système ArticleRequests est activée.
Choisissez la catégorie d’adhérent pour laquelle vous voulez ajouter des frais, ou choisissez “Tous” pour paramétrer des frais globaux pour tous les adhérents
Note
Les frais spécifiques à une catégorie d’adhérents seront pris en compte à la place des frais communs à toutes les catégories.
Par exemple, si vous paramétrez des frais pour toutes les catégories de 2$ et des frais pour Université de 3$, les membres de Université devront payer 3$ et tous les autres adhérents devront payer 2$.
Saisissez le montant des frais (utilisez un point pour la décimale et ne saisissez aucun symbole, par exemple saisissez 5.00 pour 5$)
Cliquez sur “Ajouter”
Les frais sont imputés à l’adhérent lorsque la demande est placée.
Au moment de placer la demande, via l’interface professionnelle ou l’OPAC, un message apparaît pour informer le personnel ou l’adhérent que l’adhérent devra payer pour chaque demande, ainsi que le montant des frais.
Politique par défaut de remboursement des frais d’exemplaire perdu
Ici, vous pouvez spécifier quelle est votre poitique par défaut en matière de remboursement des exemplaires perdus.

Remboursement des frais de remplacement de document perdu : décider si oui ou non les frais de remplacement pour document perdu sont remboursés si le document est finalement rendu.
Remboursement des frais pour document perdu : le coût de remplacement est remboursé. Cela peut générer un crédit à régler à l’adhérent s’il a déjà payé l’amende.
Remboursement des frais pour document perdu (seulement si impayé) : le coût de remplacement est remboursé seulement s’il n’a pas encore été payé.
Remboursement des frais pour document perdu et nouveaux frais pour retard : le coût de remplacement est remboursé et les amendes pour retard sont calculées à partir d’aujourd’hui.
Remboursement des frais d’exemplaire perdu et rétablissement des amendes pour retard : le coût de remplacement est remboursé et les amendes sont rétablies à partir du jour de déclaration de perte du document.
Abandonner les frais d’un exemplaire perdu : le coût de replacement reste sur le compte de l’adhérent.
Rembourser les frais de traitement des exemplaires perdus : choisissez si les frais de traitement des exemplaires perdu sont remboursés lorsque l’exemplaire perdu est retourné.
Rembourser les frais de gestion d’exemplaire perdu : les frais de traitement sont remboursés. Cela peut créer à un crédit à payer à l’adhérent s’ils ont déjà payé les frais.
Rembourser les frais de gestion d’exemplaire perdu (seulement si non payés) : les frais de traitement sont remboursés uniquement s’ils n’ont pas encore été payés.
Abandonner les frais d’exemplaire perdu : les frais de traitement restent sur le compte adhérent.
Ici vous pouvez spécifier la politique d’amendes par défaut au retour des exemplaires perdus. Cette politique s’appliquera à ce site. Cette règle doit être utilisée avec la préférence système RefundLostOnReturnControl.
Note
Vous pouvez limiter les remboursements en se basant sur l’age :
Utilisez la préférence système NoRefundOnLostReturnedItemsAge pour limiter le nombre de jours durant lesquels un exemplaire perdu est remboursable en se basant sur la date ou l’exemplaire a été marqué perdu ;
Utilisez la préférence système NoRefundOnLostFinesPaidAge pour limiter le nombre de jours durant lesquels un exemplaire perdu est remboursable en se basant sur la date ou les frais ont été payés.
Règles de réservation et réservation programmée par défaut par type de document
Vous pouvez modifier les règles de réservation et de réservation programmée pour un type de document, indépendamment de la catégorie de l’adhérent.
Sélectionnez un type de document dans le menu déroulant.
Sélectionnez une politique de réservation selon les explications ci-dessous.
Cliquez sur “Ajouter” pour sauvegarder cette règle.
Ajoutez autant de règle que nécessaire.
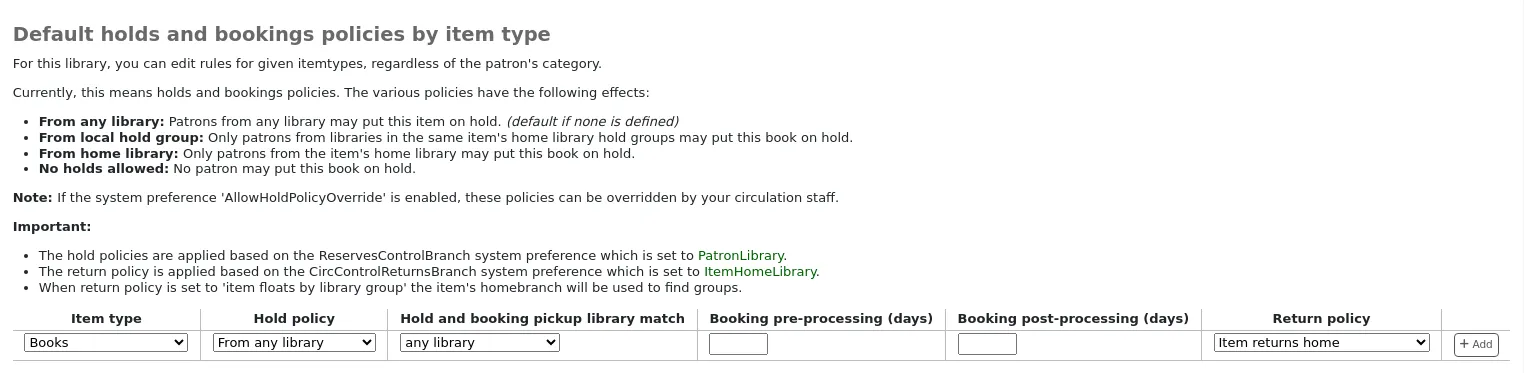
Politique de réservation : les diverses règles de réservations ont les effets suivants.
Tout site : Les adhérents de tous les sites peuvent réserver cet exemplaire. (valeur par défaut si aucune autre n’est sélectionnée)
Du groupe de réservation local : seuls les adhérents des bibliothèques du même groupe de réservation de l’exemplaire peuvent réserver ce document.
Site de rattachement : Seuls les adhérents du site de rattachement de l’exemplaire peuvent réserver ce document.
Réservation non autorisée : aucun adhérent ne pourra réserver ce document.
Si votre préférence système AllowHoldPolicyOverride est paramétrée sur “Permettre”, ces règles de prêt peuvent être outrepassées par les bibliothécaires.
Note
Les règles de réservation s’appliquent basées sur la préférence système ReservesControlBranch.
Correspondance avec le site de retrait de la réservation et de la réservation programmée : contrôle le site auquel un adhérent peut récupérer une réservation ou une réservation programmée sur un exemplaire du type de document spécifique.
Tout site
groupe de réservation de l’exemplaire
groupe de réservation d’un adhérent
bibliothèque de rattachement de l’exemplaire
site dépositaire de l’exemplaire
Réservation pré-programmée (jours) : ajouter une période tampon avant une nouvelle réservation programmée, pour laisser le temps aux bibliothécaires de préparer l’exemplaire entre deux réservations programmées.
Entrez un nombre de jours. Cela évitera qu’une nouvelle réservation programmée ne commence trop proche de la fin d’une réservation programmée existante.
Réservation post-programmée (jours) : ajouter une période tampon après une nouvelle réservation programmée, pour laisser le temps aux bibliothécaires de recevoir l’exemplaire entre deux réservations programmées.
Entrez un nombre de jours. Cela évitera qu’une nouvelle réservation programmée ne termine trop proche du début d’une réservation programmée existante.
Politique de retour : les diverses règles pour le retour ont les effets suivants.
Les exemplaires retournent à leur site de rattachement : au retour dans un autre site, un message s’affiche signalant le transfert de l’exemplaire vers son site de rattachement.
Les exemplaires retournent au site de prêt : au retour un message s’affiche signalant le transfert de l’exemplaire vers le site dans lequel il a été prêté.
Exemplaires flottants : l’exemplaire n’est pas transféré à partir de son site de retour, mais reste là jusqu’à ce qu’il soit transféré manuellement ou prêté à partir d’un autre site.
Exemplaire flottant par groupe de bibliothèque : le document ne sera pas transféré et restera dans la bibliothèque où le retour a été effectué, si cette bibliothèque fait partie du même “groupe flottant” dans les groupes de bibliothèque que la bibliothèque de rattachement de l’exemplaire. Si la bibliothèque n’est pas dans le même groupe flottant, le document sera transféré à sa bibliothèque de rattachement.
Quand la politique de retour est sur “Exemplaire flottant par groupe de bibliothèque”, le site de rattachement de l’exemplaire sera utilisé pour définir les groupes.
Note
La bibliothèque à utiliser pour sélectionner les règles de retour à utiliser est déterminée par la préférence système CircControlReturnsBranch.
Exemple
Vous pouvez autoriser les réservations dans votre réseau de bibliothèque, mais vous ne souhaitez pas que les nouveautés dans le type de document “Nouveauté” puissent être réservé par des adhérents d’autre site que celui de rattachement de l’exemplaire.
Pour le type de document “Nouveauté”, vous devez positionner la “Politique de réservation” sur “Depuis le site de rattachement” pour que ces documents ne puissent être réservés que si le site de rattachement de l’exemplaire et le site de l’adhérent sont identiques. Vous pouvez positionner la “Correspondance avec le site de retrait de la réservation et de la réservation programmée” sur “Bibliothèque de rattachement de l’exemplaire” pour vous assurer que ces exemplaires ne peuvent être récupérés que depuis leur site de rattachement. Vous pouvez aussi positionner la « Politique de retour” sur “L’exemplaire retour à son site de rattachement”.
Types d’attributs d’adhérent
Aller à : Plus > Administration > Adhérents & Circulation > Types d’attributs d’adhérent
Note
Seuls les bibliothécaires avec la permission manage_patron_attributes (ou la permission superlibrarian) auront accès à cette section.
Les attributs d’adhérents permettent de définir des champs personnalisés pour les fiches d’adhérents. Pour activer l’usage de ces champs personnalisés, utilisez la préférence système ExtendedPatronAttributes.
Une utilisation courante de ce champ serait un numéro d’identifiant pour un étudiant ou un numéro de permis de conduire.
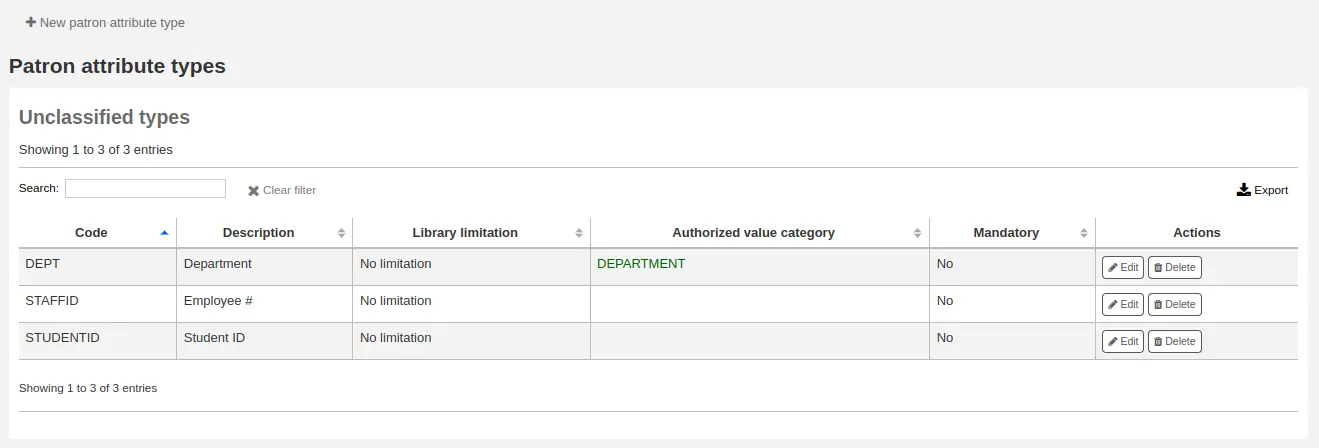
Ajouter un type d’attribut d’adhérent
Pour créer un nouveau type d’attribut d’adhérent, cliquez sur “Ajout d’un type d’attribut d’adhérent” en haut de la page
Code du type d’attribut d’adhérent : saisissez un code court qui servira à identifier ce champ
Avertissement
Ce paramètre ne pourra plus être modifié après qu’un premier attribut aura été utilisé.
Description : saisissez une description plus longue et plus complète de ce que ce champ contiendra
Répétable : cochez cette case afin qu’un adhérent puisse avoir plusieurs valeurs pour cet attribut.
Avertissement
Ce paramètre ne pourra plus être modifié après qu’un premier attribut aura été utilisé.
Identifiant unique : cochez cette case pour qu’une valeur saisie dans une notice d’adhérent ne puisse pas être donnée à une notice différente.
Des attributs uniques peuvent être employés comme points de correspondance de l’outil d’import des adhérents
Avertissement
Ce paramètre ne pourra plus être modifié après qu’un premier attribut aura été utilisé.
Est une date : cochez cette case si la valeur de l’attribut est une date. Un sélecteur de date sera disponible.
Important
Les types d’attribut Date ne peuvent être liés à des catégories de valeurs autorisées.
Version
L’option de date a été ajoutée à Koha dans sa version 24.05.
Afficher à l’OPAC : cochez cette case pour afficher cet attribut dans la page de détails de l’adhérent sur l’OPAC.
Modifiable à l’OPAC : cochez cette case pour permettre aux adhérents de modifier cette information dans l’OPAC.
Interrogeable : cochez cette case pour rendre cet attribut interrogeable dans la recherche d’adhérent de l’interface professionnelle.
Recherche par défaut : cochez cette case pour rendre cet attribut interrogeable dans la recherche d’adhérent “standard”, i.e., pas une recherche sur un champ particulier.
Cette option nécessite que le type d’attribut soit interrogeable (voir l’option précédente).
Version
Cette option a été ajoutée à Koha dans sa version 23.11.
Obligatoire : cochez cette case si l’attribut doit être renseigné pour chaque adhérent
Afficher dans les informations abrégées de l’adhérent : cochez cette case pour rendre cet attribut visible à l’affichage court de l’adhérent sur la page des prêts et sur les autres pages de l’adhérent
Catégorie de valeurs autorisées : si une catégorie est sélectionnée, la page de saisie d’un adhérent ne permettra la sélection d’une valeur qu’à partir de cette liste de valeurs autorisées.
Vous devez d’abord créer une liste de valeurs autorisées pour qu’elle apparaisse dans ce menu
Avertissement
Une liste de valeurs autorisées n’est pas vérifiée durant l’importation par lot des adhérents.
Limite de site : si vous souhaitez que cet attribut ne soit employé que par des sites spécifiques, vous pouvez les choisir dans cette liste. Choisissez “Tous les sites” pour l’afficher pour tous les sites.
Avertissement
Les adhérents ayant déjà des attributs renseignés ne seront pas modifiés. La limite de site ne limite le champ qu’en fonction de la bibliothèque à laquelle les bibliothécaires sont connectés.
Si un attribut est paramétré pour un adhérent, il sera affiché dans son dossier, visible par tous les bibliothécaires. Toutefois, seuls les bibliothécaires du site sélectionné pourront le modifier.
Catégorie : si vous souhaitez n’afficher cet attribut qu’aux adhérents d’une seule catégorie d’adhérent, choisissez la ici
Classe : si vous avez beaucoup d’attributs, il peut être pratique de les regrouper de façon à les retrouver facilement pour les modifier. Si vous créez une valeur autorisée pour PA_CLASS, elle apparaîtra dans le menu déroulant “Classe” et vous pourrez modifier la classe des attributs pour les regrouper en sections
Cliquez sur “Enregistrer” pour sauvegarder votre nouvel attribut.
Une fois créé, votre attribut apparaîtra dans la liste des attributs ainsi que dans le formulaire de saisie des adhérents
Modification / suppression de types d’attributs d’adhérent
Chaque attribut d’adhérent à des boutons Modifier et Supprimer sur sa ligne, dans la liste des attributs.
Certains champs de l’attribut ne seront pas modifiables une fois créés :
Code d’attribut adhérent
Répétable
Identifiant unique :
Vous ne pourrez pas supprimer un attribut s’il est utilisé dans une fichier adhérent.

Limites de transfert réseau
Limite les possibilités de transferts entre sites, sur la base du site émetteur, récepteur, ainsi que du code de collection (ccode).
Aller à : Plus > Administration > Adhérents & Circulation > Limites de transfert réseau
Note
Seuls les bibliothécaires avec la permission manage_transfers (ou la permission superlibrarian) auront accès à cette section.
Ces règles ne sont effectives que si la préférence système UseBranchTransferLimits est activée.
Avant de commencer, vous devez choisir à quel site ces paramètres vont s’appliquer.

Les limites de transferts sont basées sur les codes de collection définis dans les valeurs autorisées du module Administration.
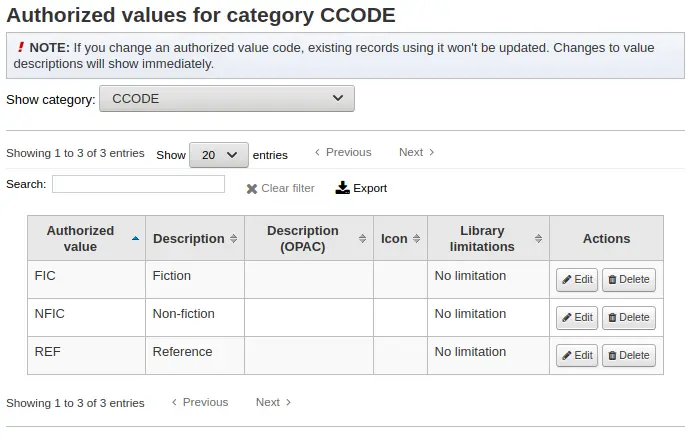
Les codes de collection apparaîtront comme onglets au-dessus des cases à cocher :
Cochez les cases des bibliothèques vers lesquelles vous autorisez le transfert de vos documents relevant du code de collection sélectionné plus haut (dans l’exemple ci-dessous - FIC)
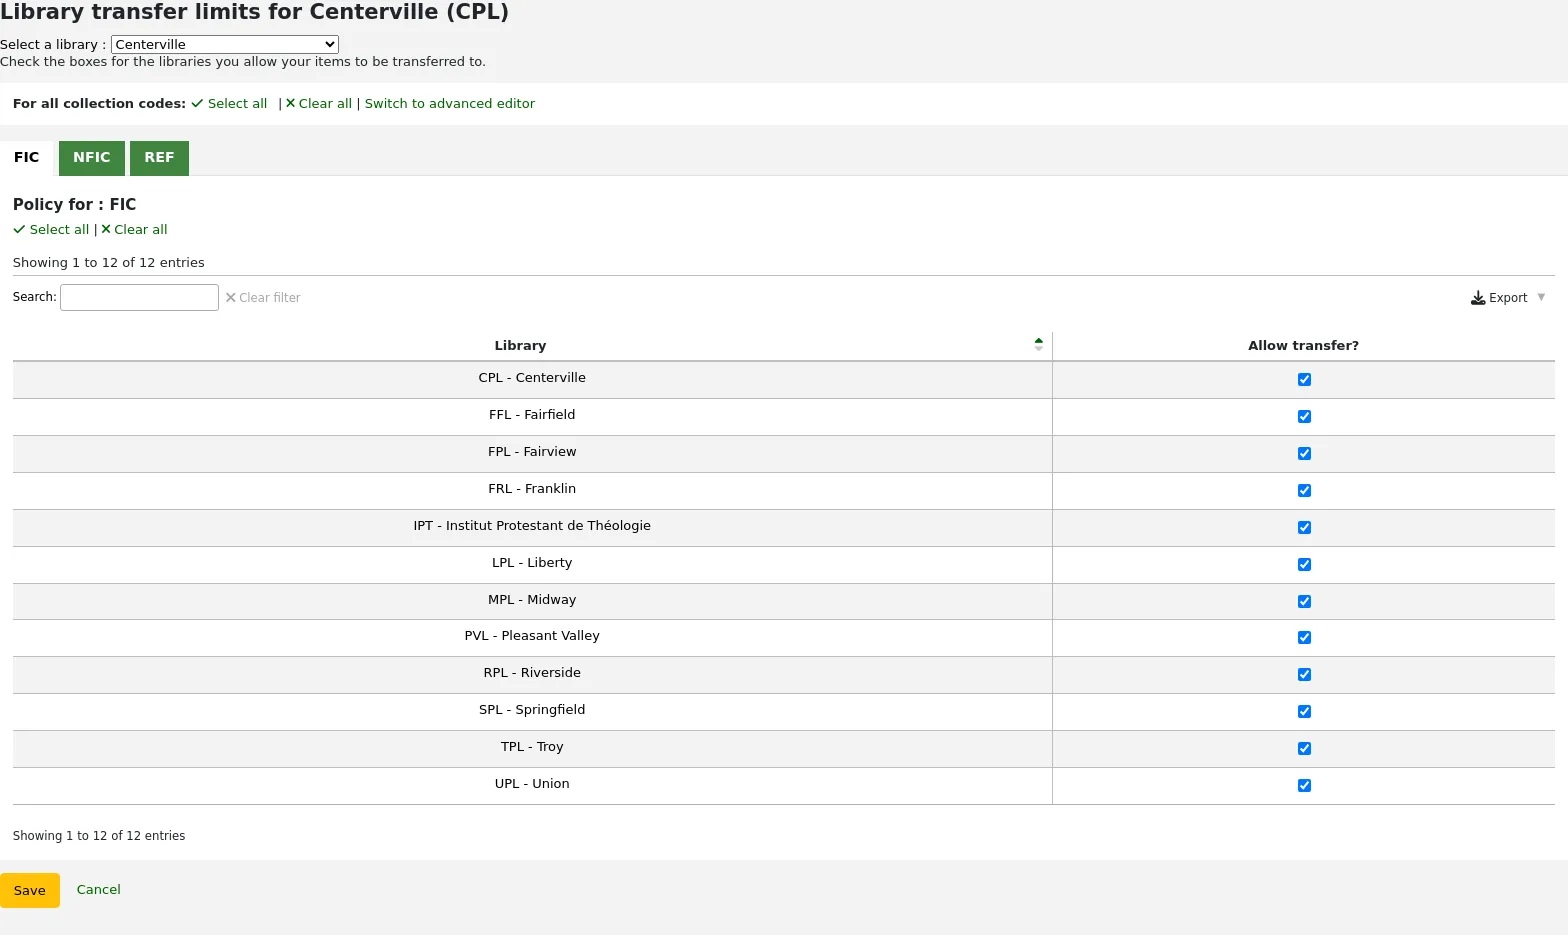
Dans l’exemple ci-dessous, la bibliothèque Centerville autorisera les adhérents de toutes les bibliothèques saut Liberty et Franklin, à demander des documents de leur bibliothèque.
Matrice des coûts de transport
La matrice des coûts de transport permet à un réseau de définir les coûts de transport de documents entre les sites.
Note
Seuls les bibliothécaires avec la permission manage_transfers (ou la permission superlibrarian) auront accès à cette section.
Pour permettre l’utilisation de cette matrice vous devez au préalable paramétrer la préférence système UseTransportCostMatrix sur “Utiliser”.
Important
La matrice de coûts de transport a la priorité sur la provenance des réservations; si la matrice n’est pas utilisée alors Koha vérifie la préférence système StaticHoldsQueueWeight.
Les coûts sont des valeurs décimales comprises entre 0 (prix nul) et une valeur maximale arbitraire (par ex. 1 ou 100). Par exemple, vous pourriez simplement utiliser la distance entre chaque site en km comme votre “coût”, si cela pouvait refléter de manière appropriée le coût de transfert. La prise en compte des bureaux de poste pourrait être une meilleure solution: les sites partageant un bureau de poste auraient un coût de 1, les bureaux de poste proches auraient un coût de 2, etc.
Pour entrer les coûts de transfert, il suffit de cliquer dans la cellule que vous souhaitez modifier, de décocher la case « Désactiver » et d’entrer votre « coût »
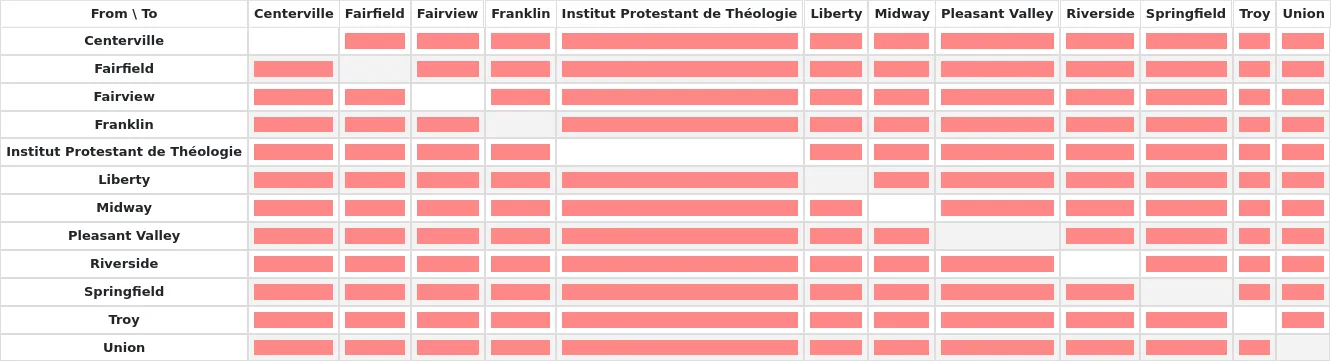
Après avoir saisi le prix, tapez sur “Entrée” ou cliquez sur le bouton “Enregistrer” pour prendre en compte vos modifications.
Note
Une valeur NULL ne fera pas de différence lorsque les bibliothèques De et Vers sont les mêmes. Cependant, il vaut mieux indiquer 0 dans ce cas. Pour toutes les autres combinaisons De / Vers, une valeur NULL signifiera que la relation entre les deux bibliothèques concernées sera considérée comme désactivée. Donc, en résumé, ne laissez aucune valeur vide. C’est toujours mieux de mettre une valeur (même si vous souhaitez désactiver une combinaison De / Vers).
Alertes de circulation
Vous pouvez décider si vous laisser vos adhérents recevoir automatiquement des alertes de circulations (prêts et retours)
Aller à : Plus > Administration > Adhérents & Circulation > Alertes de circulation
Note
Seuls les bibliothécaires avec la permission manage_item_circ_alerts (ou la permission superlibrarian) auront accès à cette section.
Ces préférences sont définies sur la base des types d’adhérent et des types de document.
Important
Ces préférences peuvent être outrepassées par des modifications dans les préférences de notification des adhérents.
Pour définir les alertes de circulation :
Sélectionnez votre bibliothèque dans le menu déroulant en haut de l’écran

Pour configurer les préférences pour tous les sites, laissez le menu à Défaut.
Par défaut tous les types d’exemplaire et tous les utilisateurs sont notifiés des prêts et retours. Pour changer cela, cliquez dans la liste exemplaire/utilisateur et choisir la combinaison pour laquelle vous voulez arrêter les notifications.
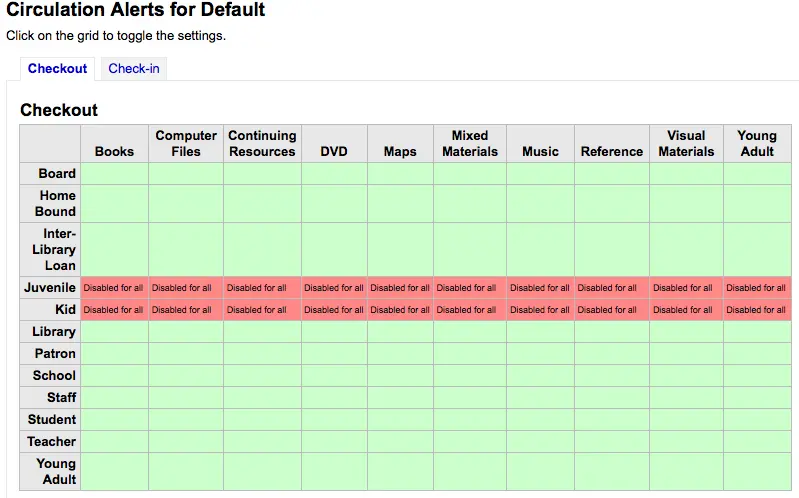
Dans l’exemple ci-dessus, les Jeunes et les Enfants ne recevront pas de notification de prêt.
Villes et villages
Vous uniformisez et vous simplifiez la saisie des utilisateurs en définissant les villes et les villages de votre région. Ainsi quand un utilisateur est entré dans le système, l’employé peut simplement choisir une valeur dans la liste et n’a pas à taper une ville et un code postal.
Comment y accéder : Plus > Administration > Utilisateurs et circulation > Villes et villages
Note
Seuls les bibliothécaires avec la permission manage_cities (ou la permission superlibrarian) auront accès à cette section.
Ajouter une ville
Pour ajouter une nouvelle ville, cliquez sur le bouton “Ajouter une ville” en haut de la page, puis saisissez le nom de la ville, la province, le code postal et le pays.
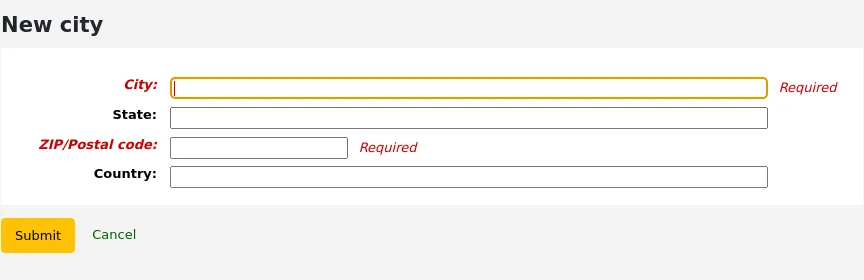
Une fois que vous avez cliqué sur Valider, la ville est enregistrée et elle apparaît dans la liste des villes et villages.
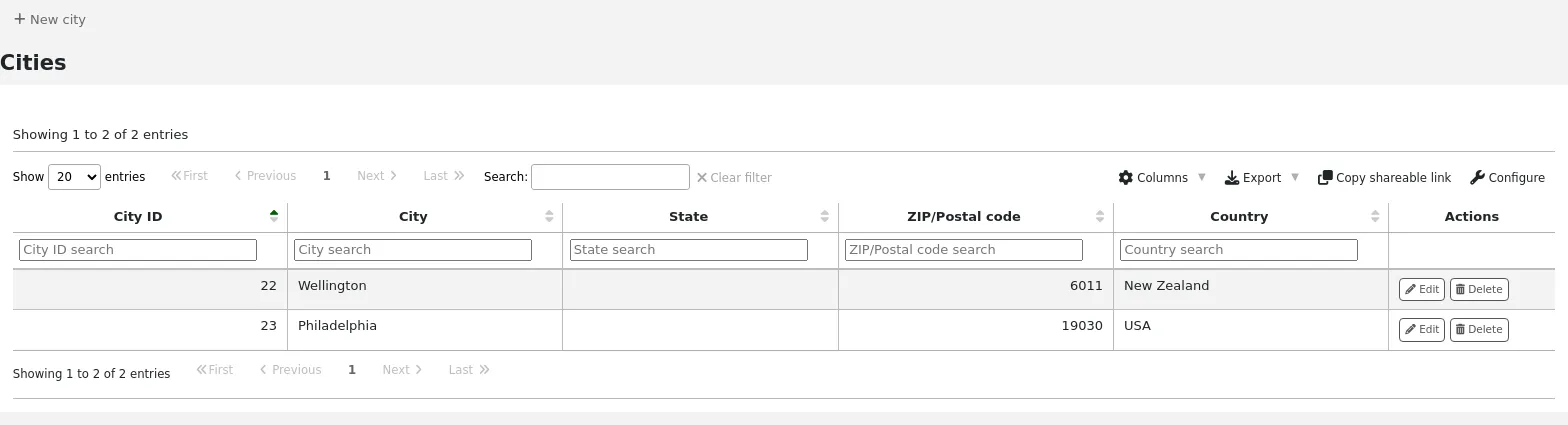
Les villes peuvent être modifiées ou supprimées à tout moment.
Voir les villes et villages dans le formulaire de saisie des utilisateurs
Si vous avez ajouté des villes et des villages, vous aurez un menu déroulant duquel vous pourrez choisir la ville dans les formulaires de création et de modification des utilisateurs.
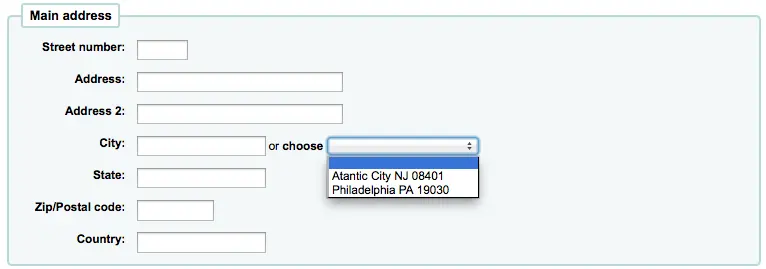
Cela permet d’entrer rapidement les villes de votre région et ce sans risque d’erreur de saisie, aussi bien sur l’orthographe des villes que leurs codes postales.
Collecte sur rendez-vous
La fonctionnalité Collecte sur rendez-vous est utilisée pour mettre en place des rendez-vous avec les adhérents afin qu’ils viennent récupérer leurs réservations
Aller à : Plus > Administration > Adhérents & Circulation > Collecte sur rendez-vous
Note
Afin de pouvoir utiliser ce module, vous devez activer la préférence système CurbsidePickup.
Note
Seuls les bibliothécaires avec la permission manage_curbside_pickups (ou la préférence superlibrarian) auront accès à cette section.
Configurer la collecte sur rendez-vous
Sur la page de configuration, cliquez sur l’onglet correspondant à la bibliothèque pour laquelle vous souhaitez paramétrer la collecte sur rendez-vous
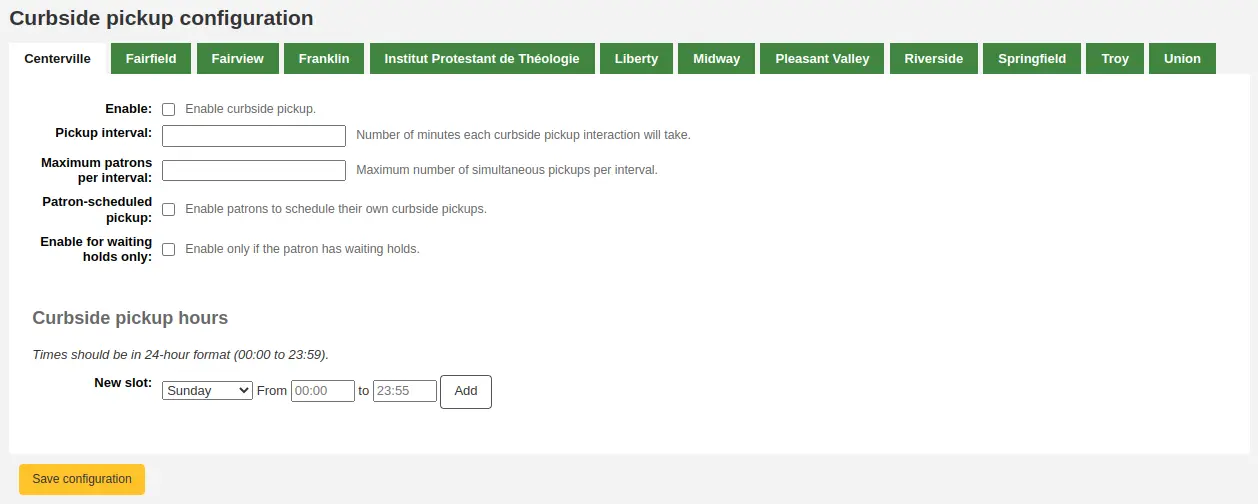
Remplir le formulaire
Activer : cochez cette case pour activer la collecte sur rendez-vous dans cette bibliothèque
Durée d’un retrait : saisissez le nombre de minutes que durera chaque collecte sur rendez-vous
Nombre maximum d’adhérents par intervalle : saisissez le nombre d’adhérents pouvant se présenter sur un même créneau
Retrait programmé par l’adhérent : cochez cette case si vous autorisez les adhérents à prendre eux-mêmes leur rendez-vous par l’OPAC
Activer uniquement pour les réservations en attente : cochez cette case si la collecte sur rendez-vous sera limitée aux adhérents ayant des réservations en attente
Créer des créneaux de collecte sur rendez-vous
Pour chaque créneau, saisissez le jour de la semaine, les heures de début et de fin du créneau sur lequel les adhérents peuvent venir
ce peut être vos horaires d’ouverture, si vous autorisez des collectes sur rendez-vous tout au long de la journée, ou des créneaux spécifiques sur lesquels vous autorisez vos adhérents à venir
Pour les heures, le format doit être XX:XX (nombres avec :) et doit être sous la forme 24 heures (par exemple, 1 heure de l’après-midi sera notée 13:00)
Cliquez sur “Ajouter”
Cliquez sur “Sauvegarder la configuration””
Répéter ces opérations pour chacune des bibliothèques proposant un service de collecte sur rendez-vous.
Types de suspension d’adhérent
Si vous utilisez les types de suspension d’adhérent, vous pouvez gérer ici les types de suspension utilisables.
Les types de suspension d’adhérent sont activés par la préférence système PatronRestrictionTypes.
Aller à : Plus > Administration > Adhérents et Circulation > Types de suspensions d’adhérent
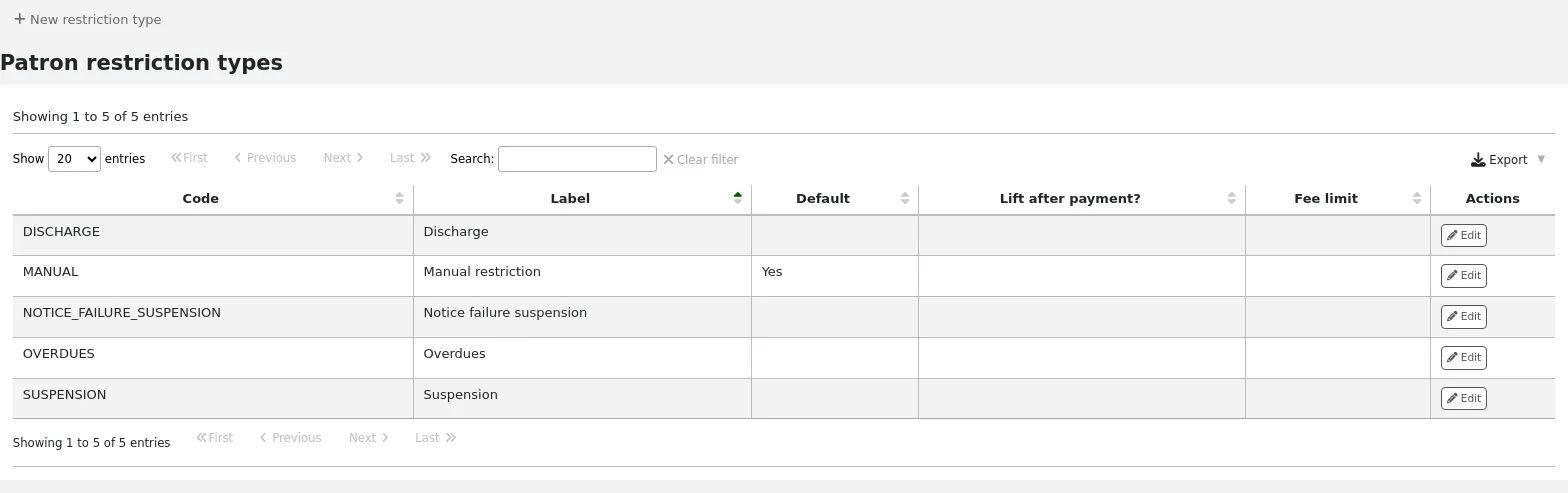
Note
Seuls les bibliothécaires avec la permission manage_patron_restrictions (ou la permission superlibrarian) auront accès à cette section.
Ajouter un type de suspension
Pour ajouter un nouveau type de suspension, cliquez sur le bouton “Nouveau type de suspension” en haut de la page.
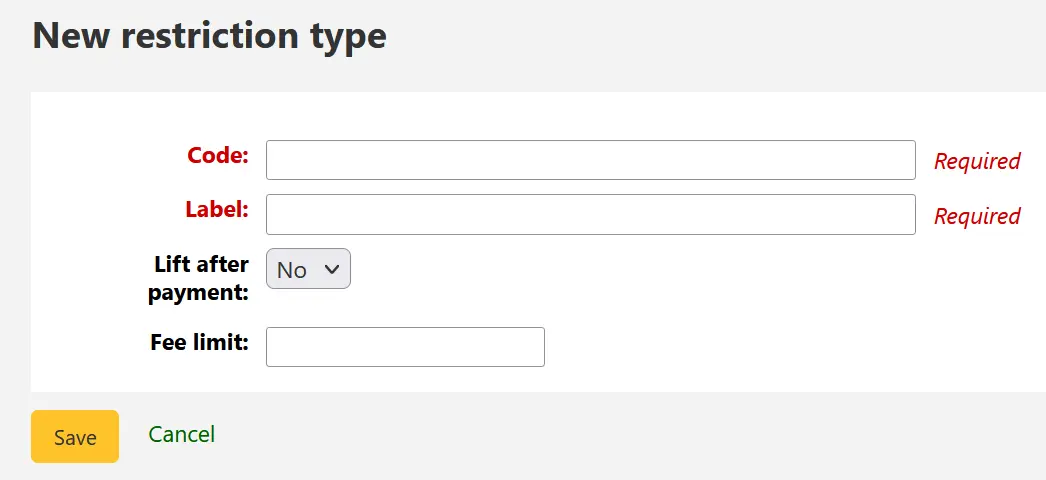
Code : saisissez un code pour la suspension. Les codes sont limités à 50 caractères et ne doivent pas contenir d’espace, accent ni caractère spécial.
Libellé : saisissez la description de la suspension. Le libellé sera affiché dans Koha.
Lever après le paiement : si paramétrées sur “Oui”, les suspensions de ce type seront automatiquement levées après un paiement au moins égal au montant défini par “Limite des frais”.
Limite des frais : saisissez le montant qui doit être réglé pour lever une suspension de ce type. Ce champ n’est utilisé qu si “Lever après le paiement” est paramétrée sur “Oui”.
Une fois que vous avez cliqué sur “Valider”, le type de suspension est sauvegardé et apparaîtra dans la liste des types de suspension.
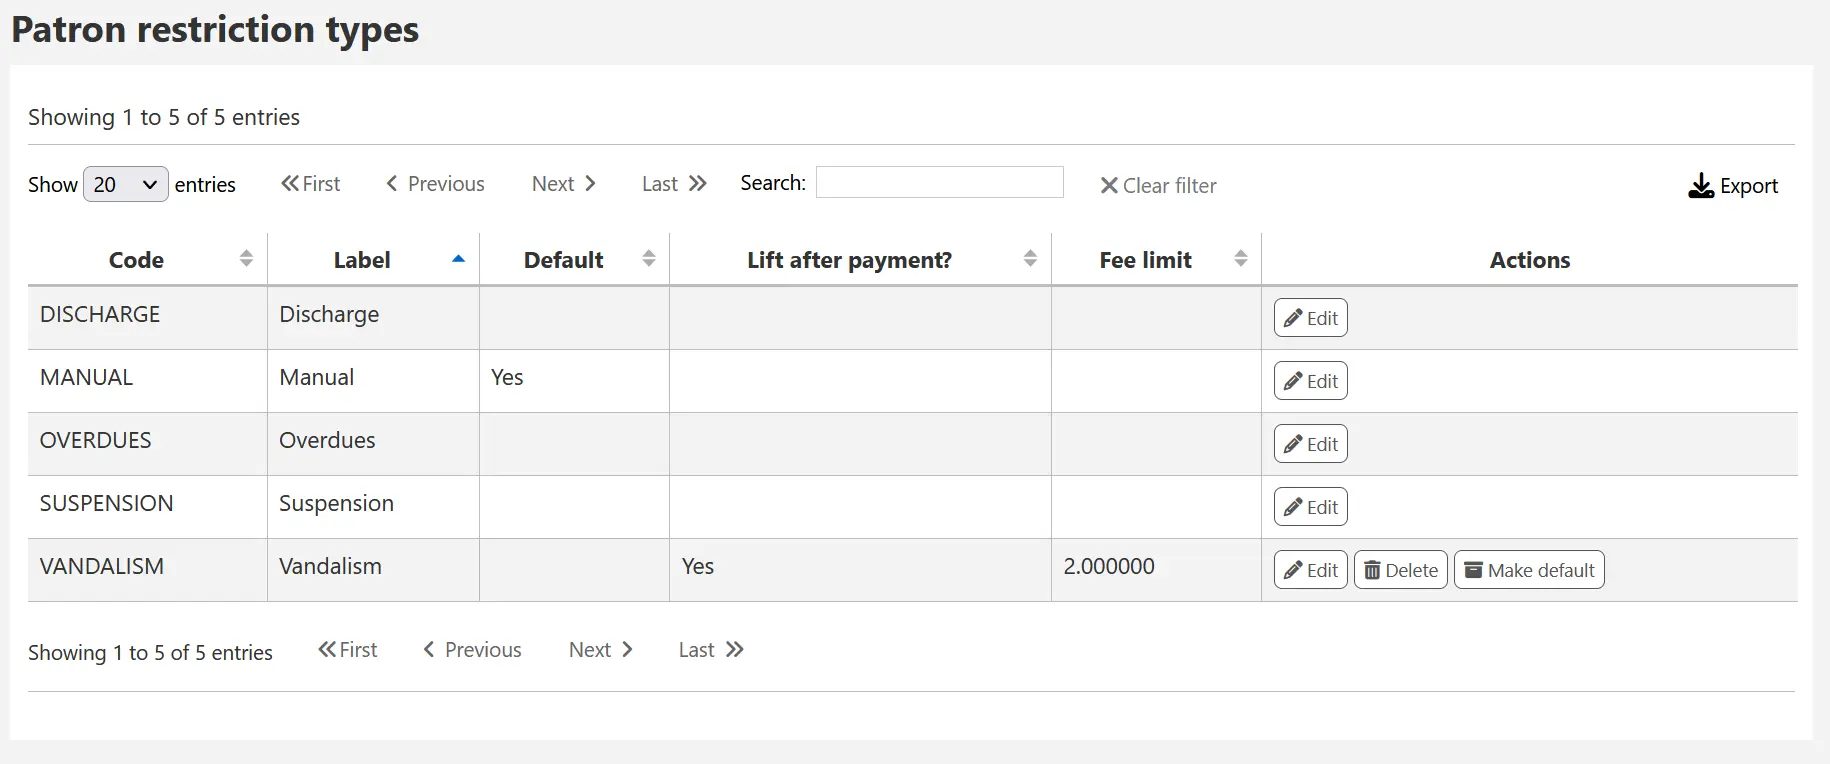
Des types de suspension créés localement peuvent être définis comme le type de suspension par défaut à utiliser lors de l’ajout manuel d’une suspension sur le compte d’un adhérent. Utilisez pour cela le bouton “Définir par défaut”.
Vous pouvez aussi supprimer tout type de suspension créer localement en utilisant “Supprimer” tant qu’ils ne sont pas paramétrés comme type de restriction par défaut.
Comptabilité
Aller à : Plus > Administration > Comptabilité
Cette section traite des paramètres utilisés pour gérer les comptes adhérents.
Types de débit
Allez à : Plus > Administration > Comptabilité > Types de débit
Note
Seuls les bibliothécaires avec la permission manage_accounts (ou la permission superlibrarian) auront accès à cette section.
C’est ici que vous définissez les amendes manuelles que vous pouvez imputer aux adhérents.

La première fois que vous vous rendez sur la page, vous verrez uniquement les amendes manuelles qui sont déjà définies dans votre système.
Vous pouvez visualiser les amendes définies par défaut en cliquant sur « Afficher tous les types de débit ».
Vous pouvez retourner voir uniquement les débits manuels en cliquant sur « Filtrer les types de débit système ».
Types de débit système
Plusieurs types de débit sont installés par défaut dans Koha. La plupart d’entre eux sont des amendes automatiques ajoutées en fonction des politiques que vous définissez par ailleurs.
ACCOUNT (Frais de création de compte) : ces frais sont imputés sur le compte de l’adhérent lors de l’inscription. Les frais peuvent être modifiés dans les paramètres de la catégorie d’adhérent dans “Frais d’inscription”.
ACCOUNT_RENEW (Frais de renouvellement de compte) : ces frais sont imputés sur le compte de l’adhérent lorsque son compte est renouvelé. Comme le type de débit ACCOUNT ci-dessus, ceci peut être modifié dans les paramètres de la catégorie d’adhérent dans “Frais d’inscription”.
LOST (Exemplaire perdu) : ces frais sont imputés sur le compte de l’adhérent quand un exemplaire dans leur dossier est déclaré perdu. Le montant dépend du champ “coût de remplacement” ou du coût de remplacement par défaut du type de document. Il peut aussi être ajouté manuellement dans l’onglet Factures manuelles.
MANUAL (Frais manuels) : il s’agit des frais manuels par défaut installés avec Koha. Ils ne sont pas imputés automatiquement par Koha, mais peuvent être ajoutés manuellement sur le compte d’un adhérent dans l’onglet Factures manuelles.
NEW_CARD (Frais pour une nouvelle carte) : il s’agit également de frais manuels par défaut installés avec Koha. Ils ne seront pas imputés automatiquement par Koha, mais peuvent être ajoutés manuellement sur le compte d’un adhérent dans l’onglet Factures manuelles.
OVERDUE (Amende de retard) : elle est imputée automatiquement sur le compte de l’adhérent quand il a des exemplaires en retard. Le montant des amendes de retard est paramétré dans les règles de circulation et d’amendes.
PAYOUT (Paiement de la bibliothèque à l’adhérent) : il est utilisé quand la bibliothèque rembourse l’adhérent (pour un trop-perçu par exemple).
PROCESSING (Frais de traitement des exemplaires perdus) : ceci est imputé automatiquement dans le compte de l’adhérent quand un exemplaire de son dossier est déclaré perdu. Le montant est paramétré par type de document dans “Frais de traitement (si perdu)”.
RENT (Frais d’emprunt) : ceci est imputé automatiquement sur le compte de l’adhérent lors de l’emprunt si le type de document a des frais de location.
RENT_DAILY (Frais de location journalière) : ceci est imputé automatiquement sur le compte de l’adhérent lors de l’emprunt si le type de document a des frais de location journalière.
RENT_DAILY_RENEW (Renouvellement d’exemplaire emprunté pour la journée) : ceci est imputé automatiquement sur le compte de l’adhérent lors du renouvellement si le type de document a des frais de location journalière.
RENT_RENEW (Renouvellement d’exemplaire emprunté) : ceci est imputé automatiquement sur le compte de l’adhérent lors du renouvellement si le type de document a des frais de location.
RESERVE (Frais de réservation) : ceci est imputé automatiquement sur le compte de l’adhérent lors d’une réservation. Le montant dépend du montant du “Coût de réservation” dans les paramètres de la catégorie d’adhérent.
RESERVE_EXPIRED (Réservation dépassée) : ceci est imputé automatiquement dans le compte de l’adhérent s’il n’a pas retiré sa réservation après le nombre de jours défini dans la préférence système ExpireReservesMaxPickUpDelay. Le montant est paramétré dans la préférence système ExpireReservesMaxPickUpDelayCharge.
Ajouter un nouveau type de débit
Pour ajouter un nouveau type de débit :
Cliquer sur “Nouveau type de débit”
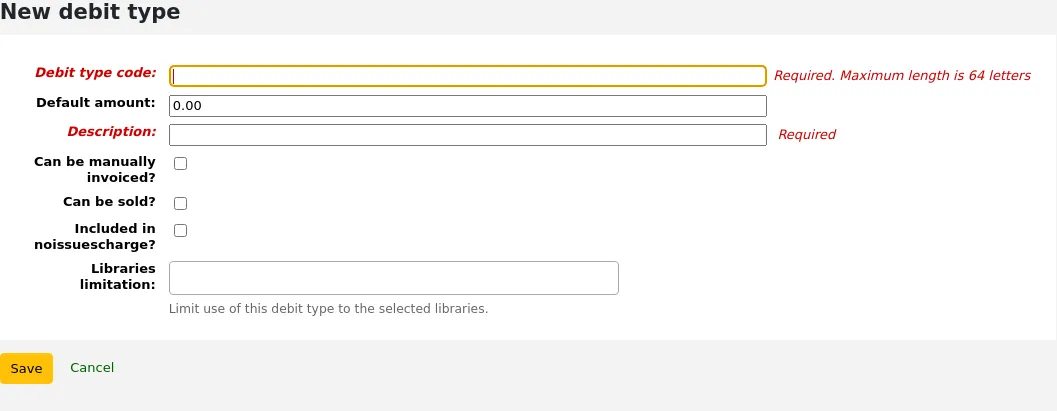
Code du type de débit : saisir un code (limité à 64 lettres).
Avertissement
Les codes devraient se limiter aux lettres, nombres et tirets de soulignements (_).
Eviter les espaces, signes diacritiques et caractères spéciaux.
Montant par défaut : saisir le montant par défaut.
Note
Les bibliothécaires pourront modifier ce montant au moment d’ajouter l’amende sur le compte de l’adhérent, si nécessaire.
Important
Ne saisissez pas de symboles de devises. Entrez seulement le montant avec un point de séparation (par exemple, 5 ou 5.00 au lieu de $5).
Description : saisir une description, qui sera utilisée dans le menu déroulant au moment d’ajouter une nouvelle dépense au compte de l’adhérent, ou lors d’une vente en point de vente ainsi que dans l’historique de transaction.
Peut être facturé manuellement : cocher cette case si ce type de débit peut être ajouté manuellement par les bibliothécaires sur le compte d’un adhérent via les factures manuelles.
Peut être vendu : cocher cette case si ce type de débit peut être utilisé en point de vente.
Inclus dans noissuescharge : cocher cette case si ce type de débit doit être inclus dans le calcul du montant dû par l’adhérent pour la préférence système noissuescharge. Cette préférence système est utilisée pour bloquer le droit au prêt quand un adhérent doit plus qu’un certain montant à la bibliothèque.
Limité à : si nécessaire, sélectionner les bibliothèques où ce type de débit peut être utilisé. Choisir “Toutes les bibliothèques” rendra ce type de débit disponible partout.
Note
Vous pouvez sélectionner plus d’un site en appuyant sur la touche “Ctrl” au moment de la sélection.
Si vous avez des champs supplémentaires pour les types de débit (account_debit_types), ils seront affichés ici.
Cliquez sur “Enregistrer”
Modifier un type de débit
Vous ne pouvez modifier que les types de débit que vous avez ajoutés, ainsi que les “Frais manuels”.
Pour modifier un type de débit :
Cliquez sur le bouton “Modifier” à droite du type de débit
Modifier n’importe quel champ
Cliquez sur “Enregistrer”
Archiver un type de débit
Si vous n’utilisez plus un type de débit, vous pouvez l’archiver.
Note
Il n’est pas possible de supprimer un type de débit encore utilisé dans l’onglet Comptabilité d’un adhérent.
Pour archiver un type de débit, cliquez sur le bouton “Archiver” à droite du type de débit.
Restaurer un type de débit archivé
Si vous souhaitez utiliser à nouveau un type de débit archivé, vous n’avez qu’à cliquer sur le bouton “Restaurer” à droite du type de débit.
Cela le rendra à nouveau disponible.
Types de crédit
Allez à : Plus > Administration > Comptabilité > Types de crédit
Note
Seuls les bibliothécaires avec la permission manage_accounts (ou la permission superlibrarian) auront accès à cette section.
C’est ici que vous définissez les crédits manuels que vous pouvez attribuer aux adhérents.
La première fois que vous vous rendez sur la page, vous verrez uniquement les crédits qui sont déjà définis dans votre système.
Vous pouvez visualiser les types de crédit définis par défaut en cliquant sur « Afficher tous les types de crédit ».

Vous pouvez retourner voir uniquement les crédits manuels en cliquant sur « Filtrer les types de crédit système ».
Types de crédit système
Plusieurs types de crédit sont installés par défaut dans Koha. La plupart d’entre eux sont des crédits automatiques ajoutés en fonction des politiques que vous définissez par ailleurs dans Koha. Ils ne peuvent pas être supprimés.
CANCELLATION (Frais annulés) : ceci est utilisé lorsqu’on annule des frais dans le compte d’un adhérent
CREDIT (Crédit) : ceci est utilisé pour donner des crédits manuels à vos adhérents.
DISCOUNT (Une remise a été appliquée sur les amendes d’un adhérent) : ceci est utilisé pour effectuer des remises sur les amendes et les frais.
FORGIVEN (Pardonné) : ceci est utilisé pour donner des crédits manuels à vos adhérents.
LOST_FOUND (Remboursement des frais d’exemplaire perdu) : ceci est utilisé quand un exemplaire précédemment perdu est rendu. Si vous remboursez les frais pour exemplaires perdus (voir Politique par défaut de remboursement des frais pour exemplaires perdus rendus), ce crédit sera appliqué pour rembourser les frais.
OVERPAYMENT (Remboursement de trop-perçu) : ceci est automatiquement appliqué dans le compte d’un adhérent quand il a trop payé. Ceci est principalement utilisé lorsqu’on antidate un retour pour lequel l’adhérent avait déjà payé la totalité de l’amende.
PAYMENT (Paiement) : comme son nom l’indique, ceci est utilisé pour indiquer les paiements de frais.
PURCHASE (Achat) : ceci est utilisé quand un paiement est fait via le module point de vente.
REFUND (Un remboursement appliqué à l’amende due par un adhérent) : ceci est utilisé lorsque l’on rembourse le paiement d’une amende ou de frais.
WRITEOFF (Annulation) : ceci est utilisé lorsque l’on annule une amende ou des frais.
Ajouter un nouveau type de crédit
Pour ajouter un nouveau type de crédit :
Cliquer sur “Nouveau type de crédit”
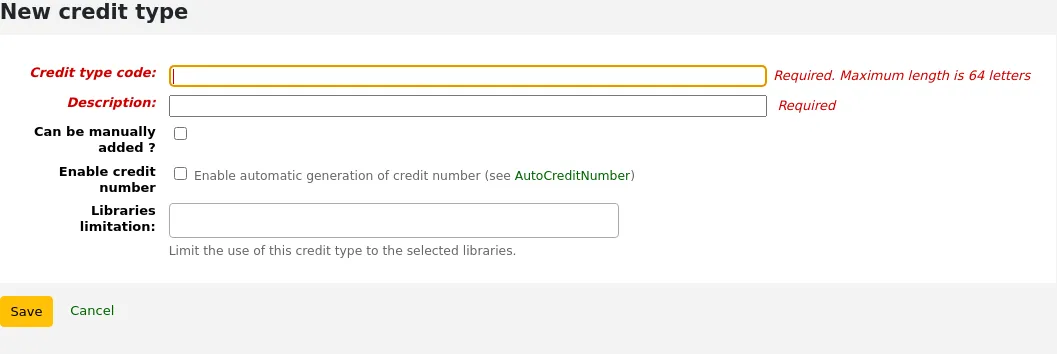
Saisir un code (limité à 64 lettres)
Avertissement
Les codes devraient se limiter aux lettres, nombres et tirets de soulignements (_).
Eviter les espaces, signes diacritiques et caractères spéciaux.
Entrer une description
Cette description sera utilisée dans le menu déroulant au moment d’ajouter un nouveau crédit au compte de l’adhérent, ainsi que dans l’historique des transactions
Si ce type de crédit peut être ajouté manuellement par le personnel sur le compte d’un adhérent via les crédits manuels, cochez la case “Peut être ajouté manuellement ?”
Si vous avez besoin que ce type de crédit soit numéroté de façon séquentielle, cochez le champ “Activer le numéro de crédit”. Le format du numéro est défini dans la préférence système AutoCreditNumber.
Si ce type de crédit n’est à utiliser que sur certains sites particuliers, vous pouvez sélectionner ces bibliothèques dans “Limité à”
Note
Vous pouvez sélectionner plus d’un site en appuyant sur la touche “Ctrl” au moment de la sélection.
Si vous avez des champs additionnels pour le type de crédit (account_credit_types), ils seront affichés ici.
Cliquez sur “Enregistrer”
Modifier un type de crédit existant
Vous ne pouvez modifier que les types de crédit que vous avez ajoutés.
Pour modifier un type de crédit :
Cliquer sur le bouton “Modifier” à droite du type de crédit
Modifier n’importe quel champ
Cliquez sur “Enregistrer”
Archiver un type de crédit
Si vous n’utilisez plus un type de crédit, vous pouvez l’archiver.
Note
Il n’est pas possible de supprimer un type de crédit encore utilisé dans l’onglet Comptabilité d’un adhérent.
Pour archiver un type de crédit, cliquez simplement sur le bouton “Archiver” à droite du type de crédit.
Restaurer un type de crédit archivé
Si vous souhaitez utiliser à nouveau un type de crédit archivé, vous n’avez qu’à cliquer sur le bouton “Restaurer” à droite du type de crédit.
Cela le rendra à nouveau disponible.
Caisses
Allez à : Plus > Administration > Comptabilité > Caisses
Cette fonctionnalité est activée par la préférence système UseCashRegisters.
Note
Seuls les bibliothécaires avec la permission manage_cash_registers (ou la permission superlibrarian) auront accès à cette section.
Si vous n’avez pas défini de caisse au préalable, vous serez invité à en créer une.
Sinon, vous verrez la liste de toutes vos caisses.
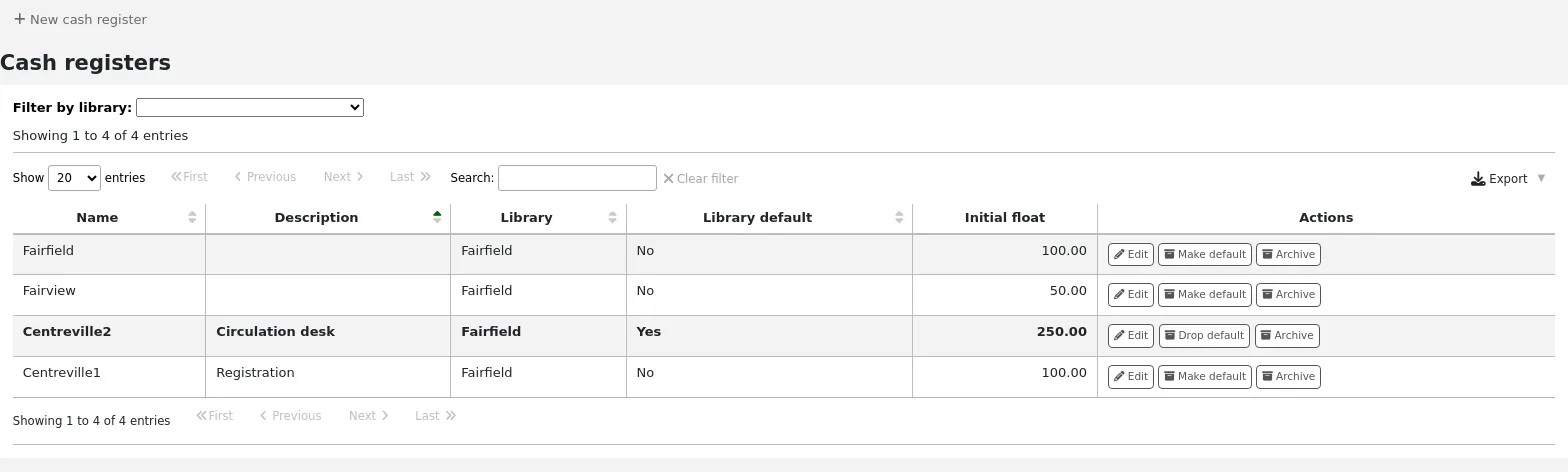
Dans la colonne “Actions”, vous pourrez choisir de modifier vos caisses, en définir une par défaut ou retirer ce statut, et archiver ou réactiver une caisse archivée.
Le statut par défaut n’est utile que dans les bibliothèques qui ont plus d’une caisse par site. La caisse par défaut sera présélectionnée au moment de saisir un paiement. S’il n’y a qu’une seule caisse par site, la caisse du site sera sélectionnée au moment du paiement.
Ajouter une nouvelle caisse
Cliquer sur “Nouvelle caisse”
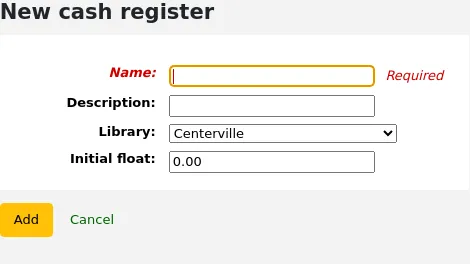
Donner un nom à votre caisse
Si besoin, vous pouvez aussi ajouter une description
Choisir dans quelle bibliothèque cette caisse se situe
Et finalement, saisir le fonds de caisse, c’est-à-dire le montant qui se trouve dans la caisse
Cliquez sur “Ajouter”
Plugins
Cette section a pour but de gérer tous les types de plugins.
Important
Avant d’utiliser des plugins, assurez-vous qu’ils sont activés dans le fichier de configuration.
Note
Seuls les bibliothécaires avec la permission manage, la permission configure, ou la permission admin (ou la permission superlibrarian) pourront voir cette section.
Voir aussi les sections outil plugins et plugins de rapport.
Aller à : Plus > Administration > Plugins
S’il y a un plugin d’administration installé, il apparaîtra sous cette section.
Note
Seuls les bibliothécaires avec la permission admin (ou la permission superlibrarian) pourront utiliser les plugins d’administration.
Gérer les plugins
Cette section permet de visualiser, gérer et configurer tous les types de plugins.
Note
Seuls les bibliothécaires avec la permission manage (ou la permission superlibrarian) pourront installer et désinstaller des plugins.
La page affichera tous les plugins actuellement installés.
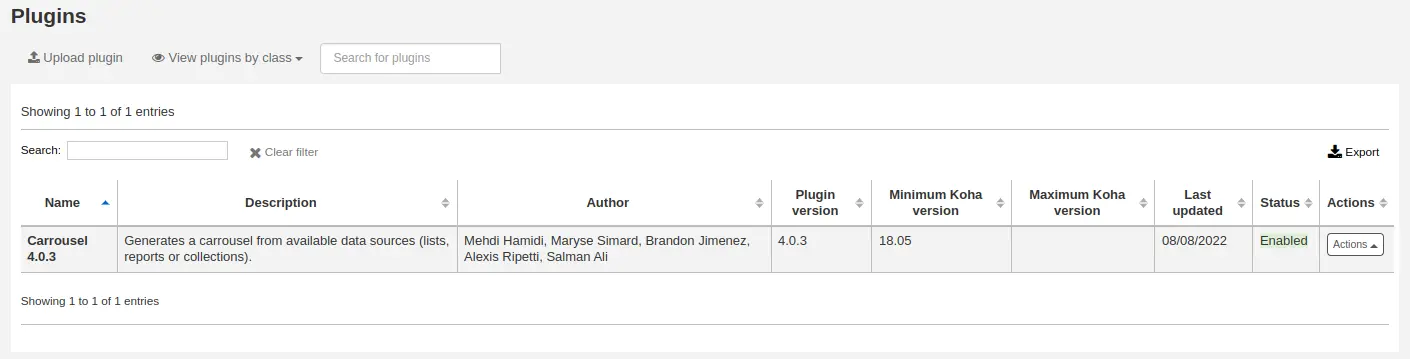
Si vous avez beaucoup de plugins, vous pouvez visualiser un sous-ensemble en cliquant sur “Voir les plugins par classe”.
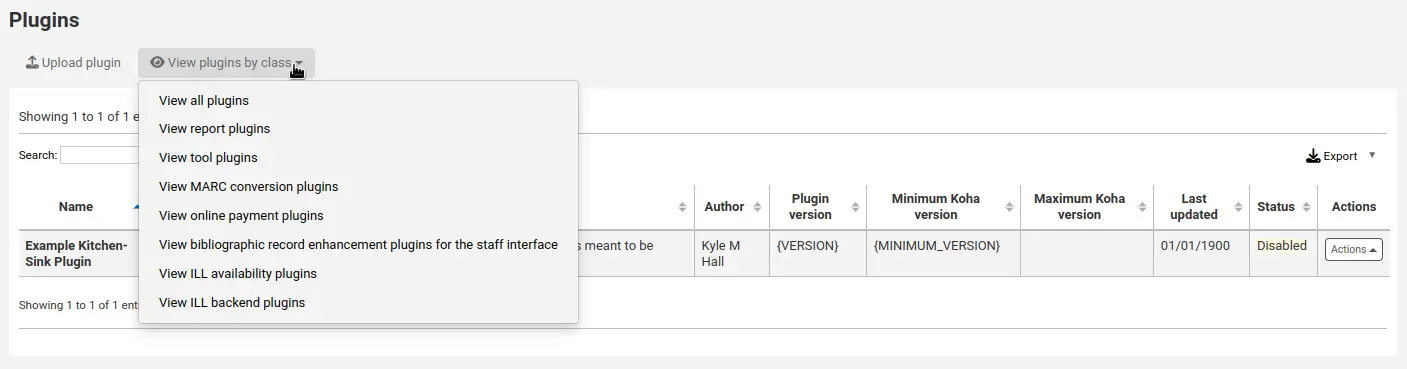
Installer un plugin
Pour installer un nouveau plugin manuellement,
Cliquez sur “Télécharger un plugin”.
Choisissez le fichier KPZ sur votre ordinateur et cliquez sur “Télécharger”.
Si vous avez configuré des dépôts externes de plugins, une boîte de recherche en haut de page vous permettra de chercher ces dépôts et d’installer directement sans avoir à télécharger puis téléverser le fichier KPZ. Pour installer un plugin à partir d’un dépôt,
Saisissez dans la boîte de recherche un mot à rechercher.
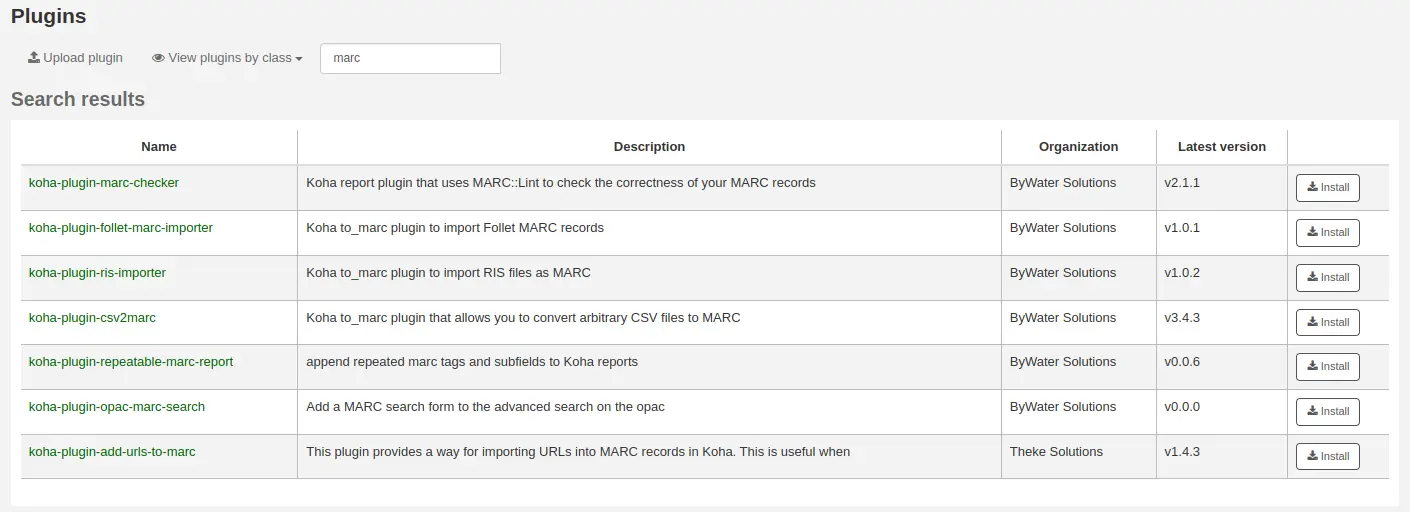
Cliquez sur le bouton “Installer” à droite du plugin.
Certains plugins nécessitent d’être activés avant utilisation.
Pour activer un plugin,
Cliquez sur le bouton “Actions” à droite du plugin et choisissez “Activez”
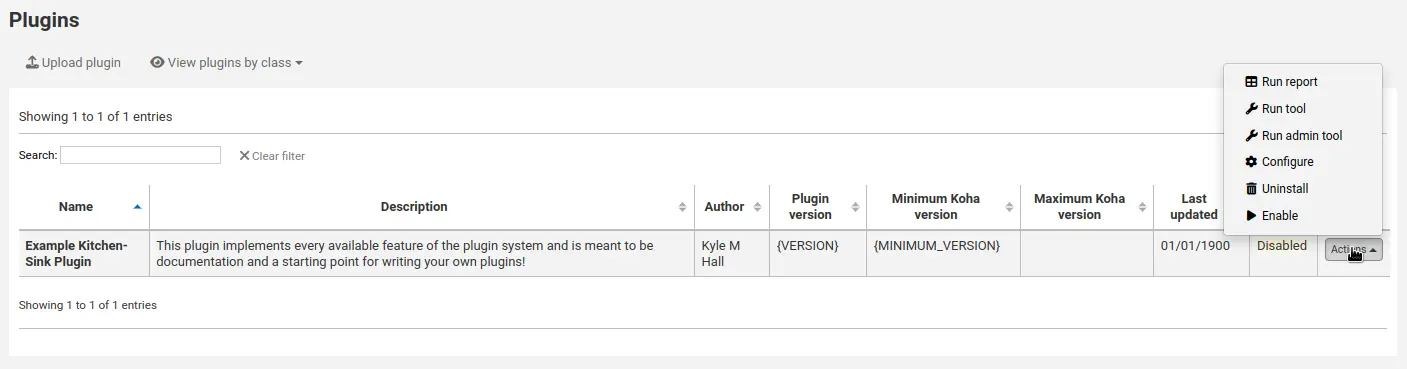
Utiliser un plugin
Tous les plugins sont différents. Certains nécessitent d’être configurés avant utilisation, d’autres sont simplement lancés.
Cliquez sur le bouton “Actions” et choisissez “Configurer” ou “Exécuter”.
Suivez les instructions provenant du créateur du plugin.
Note
Seuls les bibliothécaires avec la permission configure (ou la permission superlibrarian) auront accès à la configuration des plugins.
Désactiver un plugin
Si vous devez arrêter le plugin temporairement, vous pouvez le désactiver.
Cliquez sur le bouton “Actions” à droite du plugin et choisissez “Désactiver”
Ceci ne désinstallera pas le plugin. Il sera toujours installé, mais n’aura plus aucun effet sur votre installation Koha.
Supprimer un plugin
Pour supprimer ou désinstaller un plugin,
Cliquez sur le bouton “Actions” à droite du plugin et choisissez “Supprimer”
Ceci retirera le plugin de votre installation Koha. N’importe quelle action ou effet qu’il devait avoir stoppera. Si besoin, vous pourrez le ré-installer plus tard, sous condition qu’il soit toujours disponible.
Jobs
Cette section permet de gérer les tâches asynchrones. Les tâches sont des traitements mis en attente par le système, qui les traitera quand il aura les ressources pour le faire, comme une modification de notices par lot ou autres.
Aller à : Plus > Administration > Tâches
Note
Seuls les bibliothécaires avec la permission manage_background_jobs (ou la permission superlibrarian) auront accès à cette section.
Gérer les tâches
Par défaut, quand vous accédez à cette page, vous ne verrez que les traitements en cours et celles mises en file d’attente dans la dernière heure.
Pour visualiser toutes les tâches, décochez les cases en haut de la page.
Traitements en cours : décochez cette case pour inclure les traitements terminés
Inclut uniquement les tâches mises en file d’attente dans la dernière heure : décocher pour inclure les tâches mises en file d’attente plus tôt
Vous pouvez rechercher des tâches en utilisant les champs de recherche sous les en-têtes du tableau.
Sur la droite de chaque traitement, il y a des boutons Action.
Voir : cela affichera les détails de la tâche, ce qui comprend, ente autres :
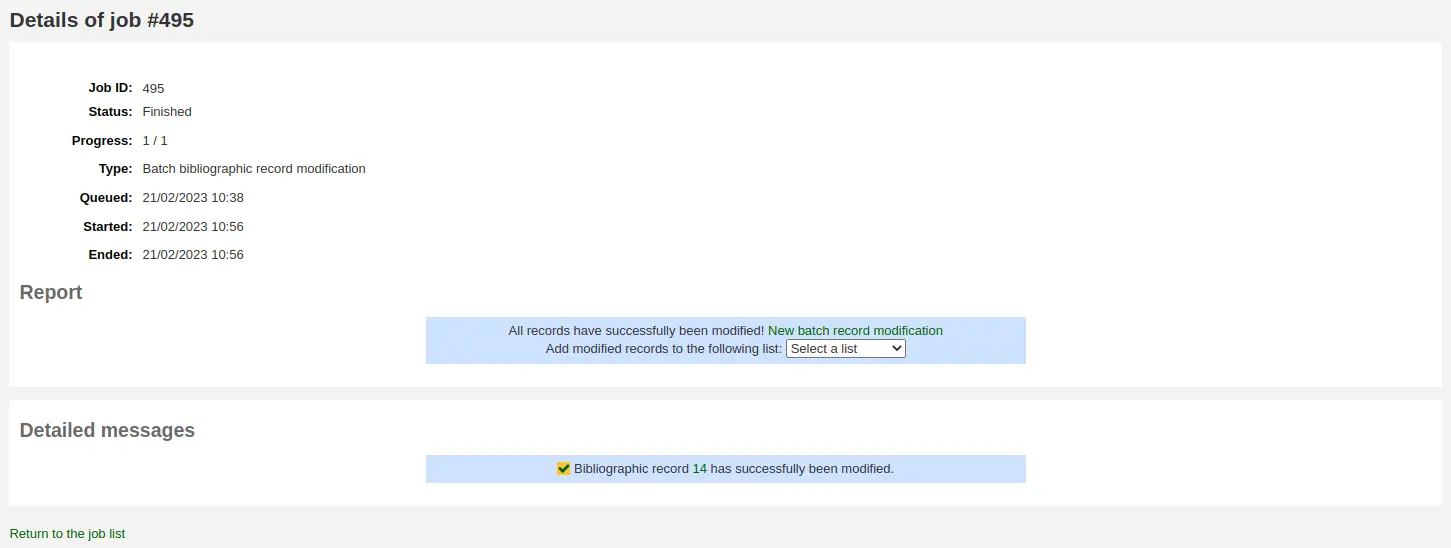
Identifiant de tâche : c’est l’identifiant du traitement dans la base de données Koha, un numéro incrémenté
Statut : le statut du traitement
Nouveau : le traitement a été mis en file d’attente
Annulé : le traitement a été annulé par un utilisateur
Terminé : le traitement a été mené à son terme avec succès
Démarré : le traitement a débuté mais n’est pas encore terminé
En cours : le traitement est en cours d’exécution
Echoué : le traitement a débuté, mais a échoué pour une raison quelconque
Avancement de la tâche : indique le degré d’avancement du traitement
Type : indique le type de traitement
modification de notices bibliographiques par lot : lot de notices bibliographiques devant être modifiées.
suppression de notices bibliographiques par lot : lot de notices bibliographiques devant être supprimées.
modification de notices autorités par lot : lot de notices autorités devant être modifiées.
suppression de notices autorités par lot : lot de notices autorités devant être supprimées.
modification de notices d’exemplaires par lot : lot de notices d’exemplaires devant être modifiées.
suppression de notices d’exemplaires par lot : lot de notices d’exemplaires devant être supprimées.
Annulation de réservations par lot : un lot de réservation devant être annulées (en utilisant le bouton “Annuler les réservations sélectionnées”).
Créer des titres de collections numériques : titres devant être créés à partir d’une liste dans le module de gestion des ressources électroniques.
Mise à jour de l’index Elasticsearch : les notices bibliographiques, autorités ou exemplaires devant être mises à jour dans l’index Elasticsearch. Toute modification apportée à une notice bibliographique, autorité ou exemplaire déclenche une mise à jour de l’index, incluant les changements dans le statut de circulation.
Mise à jour de la file d’attente es réservations : si la préférence système RealTimeHoldsQueue est activée, les modifications de réservations déclenchent une mise à jour de la file de réservations.
Notices MARC importées dans le réservoir: notices bibliographiques ou autorités devant être téléchargées dans le réservoir.
Importer des notices MARC: notices bibliographiques ou autorités du réservoir devant être importées dans le catalogue.
Annuler l’import de notices MARC : notices bibliographiques ou autorités importées dont il faut annuler l’import.
Mis en file d’attente : date et heure auxquelles le traitement a été mis en file d’attente
Démarré : date et heure auxquelles le traitement a commencé
Terminé : date et heure auxquelles le traitement s’est terminé
Rapport : cette partie contient les messages propres au type de traitement (par exemple, nombre de notices modifiées, dans le cas d’une modification de notices par lot)
Messages détaillés : cette section contient les messages propres au type de traitement (par exemple, quelles notices ont été modifiées, dans le cas d’une modification de notices par lot)
Annuler : pour des traitements encore nouveaux ou qui ont déjà commencé, il est possible de les annuler
Administration du catalogue
Définissez ces paramètres avant de commencer à cataloguer dans votre système.
Aller à : Plus > Administration > Catalogue
Grilles de catalogage MARC
Les grilles de catalogage sont des modèles utilisés pour la création de notices bibliographiques. Koha propose un certain nombre de grilles prédéfinies par défaut, que vous pouvez modifier ou supprimer. Vous pouvez aussi bien créer vos propres grilles adaptées à vos contenus spécifiques.
Aller à : Plus > Administration > Catalogue > Grilles de catalogage MARC
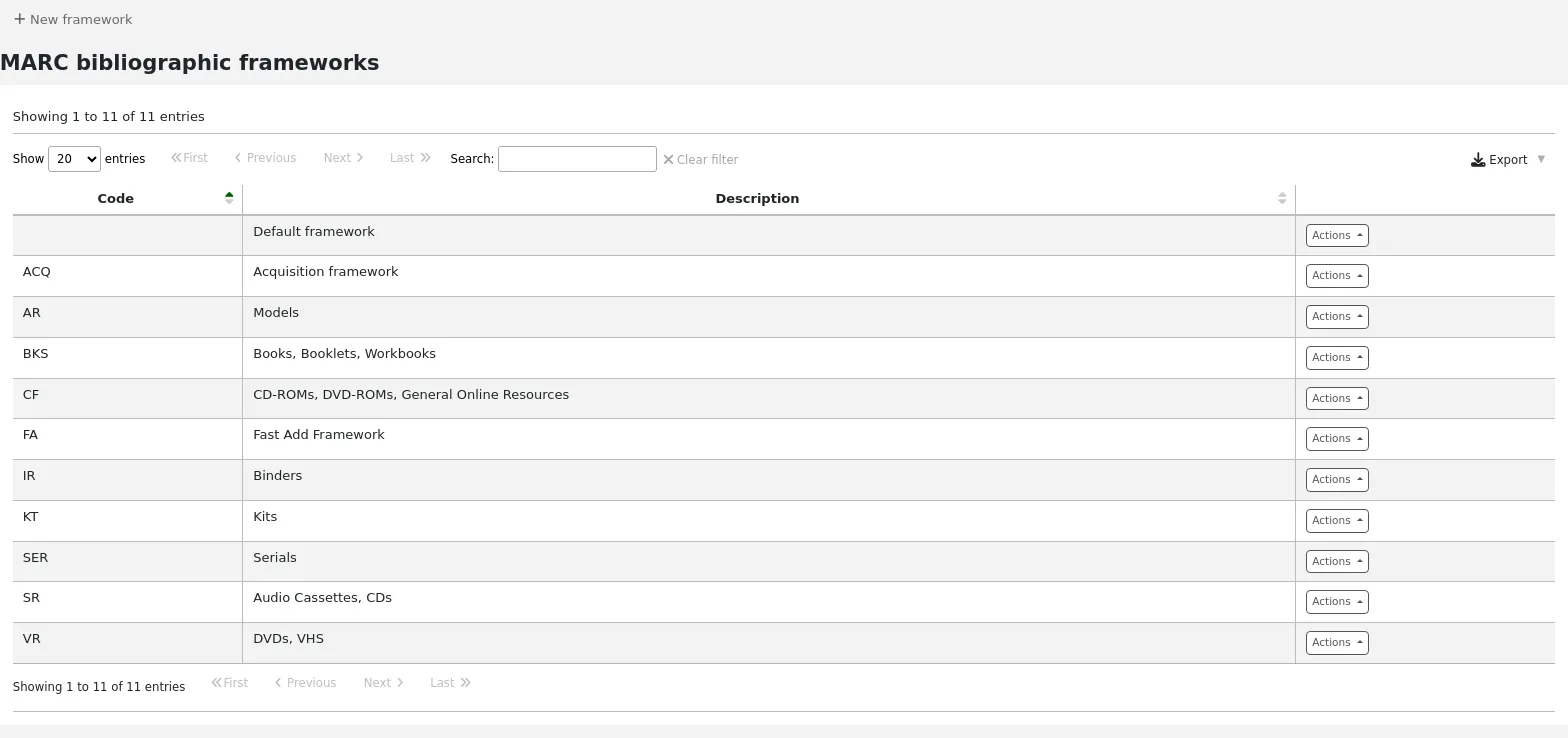
Note
Seuls les bibliothécaires avec la permission manage_marc_frameworks (ou la permission superlibrarian) auront accès à cette section.
Important
Ne supprimez pas ou ne modifiez pas la Grille par défaut : cela altérerait vos notices déjà existantes. Créez toujours une nouvelle grille sur la base de la Grille par défaut ou modifiez les autres grilles.
Ajouter une nouvelle grille de catalogage
Pour ajouter une nouvelle grille
Cliquer sur “Ajouter une grille de catalogage”
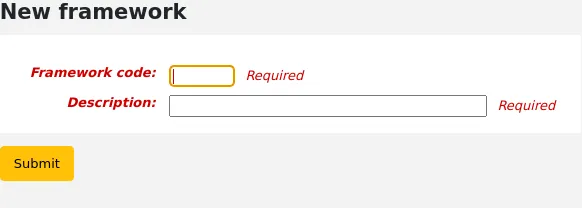
Code : entrer un code de 4 caractères ou moins, en évitant les espaces, accents ou autres caractères spéciaux.
Description : entrez une définition détaillée de votre grille, c’est ce qui sera affiché dans Koha.
Cliquez sur “Valider”
Une fois que votre grille a été ajoutée, cliquez sur “Actions” puis “Structure MARC” sur la droite dans la liste des grilles de catalogage
On vous demandera de choisir la grille sur laquelle baser la nouvelle grille, ce sera plus facile que de repartir de zéro

Une fois que votre grille apparaît à l’écran, vous pouvez modifier ou supprimer chaque champ en suivant les instructions de modification des champs et sous-champs
Modifier les grilles de catalogages existantes
En cliquant sur “Actions” puis sur “Modifier” à droite d’une grille, vous pourrez uniquement modifier la description de la grille.

Modifier les champs et sous-champs des grilles de catalogage
Les grilles de catalogage sont faites de champs MARC et de sous-champs. Pour modifier les champs et sous-champs associés à la grille, vous devez cliquer sur “Actions” puis sur “Structure MARC”.
Important
À chaque fois que vous faites des changements sur les champs ou sous-champs d’une grille de catalogage, assurez-vous de lancer la validation grilles de catalogage.
Modifier un champ MARC
Après avoir cliqué sur “Structure MARC”, vous obtiendrez un écran listant tous les champs disponibles pour cette grille et vous pouvez chercher le champ dont vous avez besoin. Pour faire des modifications à un champ MARC, cliquez sur “Actions” à droite du champ, puis sur “Modifier le champ”.
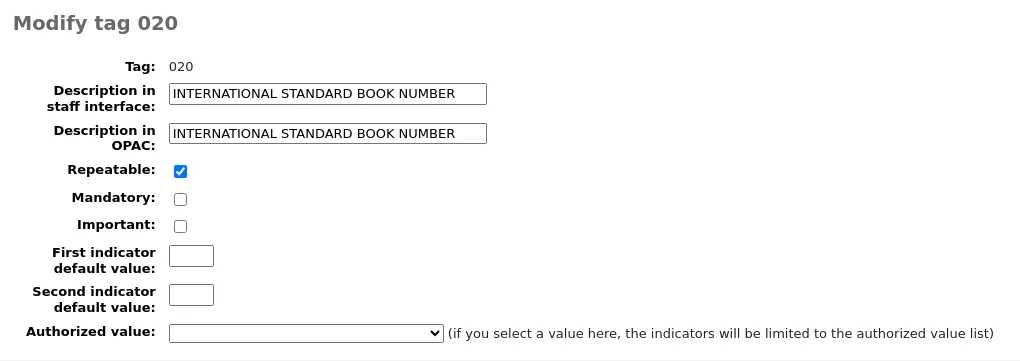
L’écran suivant affiche les détails du champ.
Étiquette : le numéro du champ MARC, non modifiable.
Libellé pour bibliothécaire : texte affiché dans la vue MARC de l’interface professionnelle, et dans l’éditeur de catalogage simple si la préférence système advancedMARCeditor est paramétrée pour afficher les libellés.
Note
Si vous utilisez des feuilles de style XSLT (voir la préférence système XSLTDetailsDisplay), les labels pour la vue “Normal” sont définis dans les feuilles XSLT.
Cela n’affectera pas la vue “Normal” sauf si vous n’utilisez pas de XSLT.
Description à l’OPAC : texte affiché à l’OPAC dans la vue MARC.
Note
Si vous utilisez du XSLT (voir la préférence système OPACXSLTDetailsDisplay), les labels pour la vue “Normal” sont définis dans la feuille de style XSLT.
Cela n’affectera pas la vue “Normal” sauf si vous n’utilisez pas de XSLT.
Répétable : si vous cochez cette case, une icône sera affichée à coté du champ dans l’éditeur simple et vous permettra de répéter ce champ.
Obligatoire : si vous cochez cette case la notice ne pourra pas être enregistrée si elle ne contient rien dans ce sous-champ. Dans l’éditeur simple un avertissement “Obligatoire” sera affiché.
Important : si vous cochez cette case, le champ générera une alerte s’il n’est pas rempli, mais à la différence d’un champ “Obligatoire”, vous pourrez malgré tout enregistrer la notice. Dans l’éditeur simple un avertissement “Important” sera affiché.
Valeur par défaut des indicateurs : ajoutez des valeurs par défaut pour les indicateurs ici, ceux-ci seront préremplis pour gagner du temps en cataloguant, mais pourront toujours être modifiés si besoin.
Valeurs autorisées : définie une liste déroulante de valeurs autorisées pour vos catalogueurs
Avertissement
L’option de valeur autorisée au niveau du champ ne fonctionne pas.
Cliquez sur “Enregistrer” pour sauvegarder les modifications.
Modifier un sous-champ MARC
Pour modifier les sous-champs associés au champ, cliquez sur “Actions” puis “Modifier les sous-champs” à droite de la ligne dans la liste des champs de la grille de catalogage. Chaque sous-champ a son propre onglet qui contient trois sections - Contraintes de base, Contraintes avancées et Autres options.
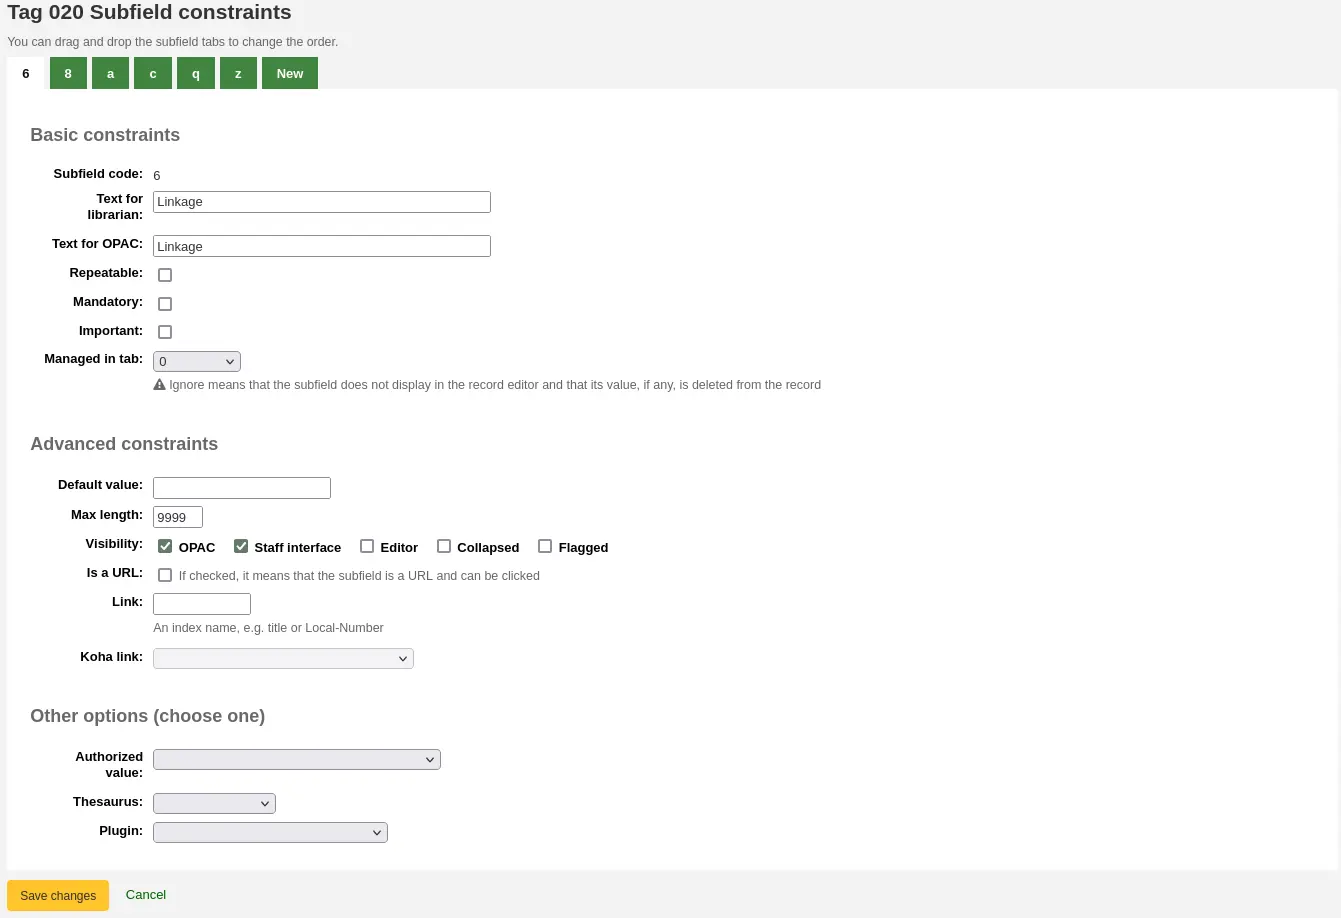
Pour chaque sous-champ vous pouvez choisir les contraintes de base suivantes
Code de sous-champ : c’est le code MARC du sous-champ, normalement il ne devrait pas y avoir besoin de le changer.
Texte pour bibliothécaire : texte affiché dans la vue MARC de l’interface professionnelle, et dans l’éditeur de catalogage simple si la préférence système advancedMARCeditor est paramétrée pour afficher les libellés.
Note
Si vous utilisez des feuilles de style XSLT (voir la préférence système XSLTDetailsDisplay), les labels pour la vue “Normal” sont définis dans les feuilles XSLT.
Cela n’affectera pas la vue “Normal” sauf si vous n’utilisez pas de XSLT.
Description à l’OPAC : texte qui s’affichera dans la vue MARC à l’OPAC.
Note
S’il est vide, c’est la description dans l’interface professionnelle qui est utilisée à la place
Note
Si vous utilisez du XSLT (voir la préférence système OPACXSLTDetailsDisplay), les labels pour la vue “Normal” sont définis dans la feuille de style XSLT.
Cela n’affectera pas la vue “Normal” sauf si vous n’utilisez pas de XSLT.
Répétable : si cette case est cochée, le champ sera suivi d’une icône plus dans l’interface de catalogage simple afin de vous permettre d’ajouter des répétitions de ce sous-champ.
Obligatoire : si cette case est cochée, la notice ne pourra pas être enregistrée si elle ne contient rien dans ce sous-champ. Dans l’éditeur de catalogage simple, Une mention “Obligatoire” sera affichée en guise d’avertissement.
Important : si vous cochez cette case, le champ générera une alerte s’il n’est pas rempli, mais à la différence d’un champ “Obligatoire”, vous pourrez malgré tout enregistrer la notice. Dans l’éditeur simple un avertissement “Important” sera affiché.
Géré dans l’onglet : définit l’onglet dans lequel est affiché le sous-champ.
Important
Tous les sous-champs d’un champ donné doivent être dans le même onglet ou ignorés. Ignorer signifie que le sous-champ n’est pas géré.
Avertissement
Au moment d”importer des notices, ou lors de la modification de notices existantes, les sous-champs qui sont gérés dans l’onglet “Ignorer” seront supprimés. Si vous souhaitez conserver les sous-champs, mais les cacher, utilisez les options de “Visibilité” ci-dessous.
Pour chaque sous-champ vous pouvez choisir les contraintes avancées suivantes
Valeur par défaut : définit ce que vous voulez faire apparaître par défaut dans le champ, ce sera modifiable, mais cela fait gagner du temps si vous utilisez souvent le même texte ou la même valeur dans un champ.
Note
Il y a plusieurs valeurs que vous pouvez utiliser ici et qui seront automatiquement remplacées quand une nouvelle notice est créée :
<<MM>> - le mois en cours, 2 chiffres
<<DD>> - le jour en cours du mois, 2 chiffres
<<YY>> - l’année en cours, 2 chiffres
<<YYYY>> - l’année en cours, 4 chiffres
<<USER>> - le nom de l’utilisateur actuellement connecté
Par exemple, une valeur par défaut de « <<MM>>/<<DD>>/<<YYYY>> » (sans guillemets) imprimera la date du jour au format « 01/21/2021 »
Note
Quand ces valeurs par défaut sont ajoutées dépend de la préférence système ApplyFrameworkDefaults.
Longueur max : entrez une valeur ici pour limiter le nombre de caractères pouvant être entré dans ce sous-champ.
Visibilité : vous permet de sélectionner où ce sous-champ est visible ou caché, cochez simplement les cases des endroits où vous voulez afficher le champ et décochez les cases des endroits où vous voulez le masquer.
OPAC : si cochée, cela rendra le sous-champ disponible pour l’affichage à l’OPAC. Pour les vues non-XSLT, le sous-champ sera affiché, pour les vues XSLT, cela dépendra de la feuille de style.
Interface professionnelle : si cochée, cela rendra le sous-champ disponible pour l’affichage dans l’interface professionnelle. Pour les vues non-XSLT, le sous-champ sera affiché, pour les vues XSLT, cela dépendra de la feuille de style.
Éditeur : si vous cochez cette case, le sous-champ sera modifiable dans l’éditeur simple.
Replié : si vous cochez cette case, le sous-champ sera masqué dans l’éditeur simple, mais s’affichera après qu’un clic sur le libellé du champ a affiché tous les sous-champs.
Marqué : si cette case est coché, ce sous-champ sera non-disponible et masqué dans toutes les vues (équivalent à toutes les cases décochées).
Est une URL : si coché, indique que le sous-champ est une URL valide et peut être cliqué.
Lien : si vous entrez ici un nom d’index ici, un lien apparaît après le sous-champ dans la page de Détail MARC dans l’interface professionnelle. Si le bibliothécaire clique sur ce lien, une recherche est lancée en utilisant l’index et le contenu du sous-champ.
Lien Koha : ce champ est utilisé pour créer un lien entre le sous-champ MARC et une colonne de la table items, biblioitems et biblio en base de données. Le lien peut être changé dans la page Liens Koha => MARC.
Pour chaque sous-champ vous pouvez choisir les Autres valeurs d’option suivantes
Valeur autorisée : signifie que la valeur ne peut pas être saisie par le bibliothécaire, mais qu’elle doit être choisie dans une liste déroulante de valeurs autorisées.
Dans l’exemple ci-dessous, la valeur autorisée LANG a été sélectionné pour le champ 041$a.

Cela créé le menu déroulant dans l’éditeur simple.
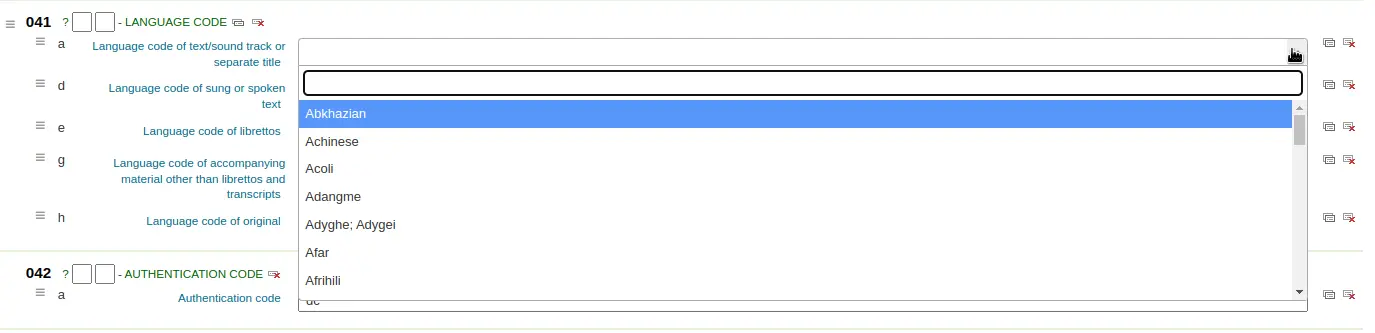
Thésaurus : signifie que la valeur est liée à une autoritée de la catégorie sélectionnée. Les types d’autorités sont gérés dans la section Type d’autorité.
Plugin : signifie que la valeur est calculée ou gérée par un plugin de catalogage Les extensions ou plugins de catalogage peuvent presque tout faire.
Exemples:
Pour la cote, il y a la possibilité d’ajouter un navigateur de cotes à côté du sous-champ de la cote pour que vous puissiez identifier les cotes utilisées et celles qui ne le sont pas. Vous devez choisir le plugin cn_browser.pl. Pour en savoir plus, allez dans la section catalogage du manuel.
Si vous souhaitez autoriser le téléchargement de fichiers via le catalogage, vous pouvez choisir le plug-in upload.pl, ce qui vous permettra de télécharger des fichiers dans Koha pour les liés à vos notices.
En UNIMARC il y a des plugins pour chaque champ 1xx qui sont des champs codés. Le plugin est une aide énorme pour le catalogueur ! Il y a aussi deux plugins (unimarc_plugin_210c et unimarc_plugin_225a) qui peuvent « magiquement » trouver l’éditeur à partir d’un ISBN, et la liste des collections pour l’éditeur
Si vous souhaitez activer une recherche par autocomplétion pour les éditeurs dans les champs 260b et 264b, vous pouvez utiliser le plugin marc21_field_260b.pl. Quand vous commencez à saisir le nom d’un éditeur, vous obtiendrez des résultats de recherche obtenus grâce aux noms d’éditeurs déjà dans le catalogue.
Pour enregistrer vos modifications, cliquez sur “Enregistrer les modifications”.
Astuce
Vous pouvez faire glisser les onglets des sous-champs pour modifier leur ordre d’affichage dans l’éditeur simple.
Par défaut, ils apparaissent dans l’ordre alphanumérique (0-9 puis a-z).
Ajouter des champs aux grilles de catalogage
Si une grille ne contient pas un champ qui vous est nécessaire, vous pourrez avoir besoin de l’ajouter. Pour ajouter un champ à une grille, cliquez sur le bouton “Ajouter champ” en haut de la page de définition de la grille de catalogage.
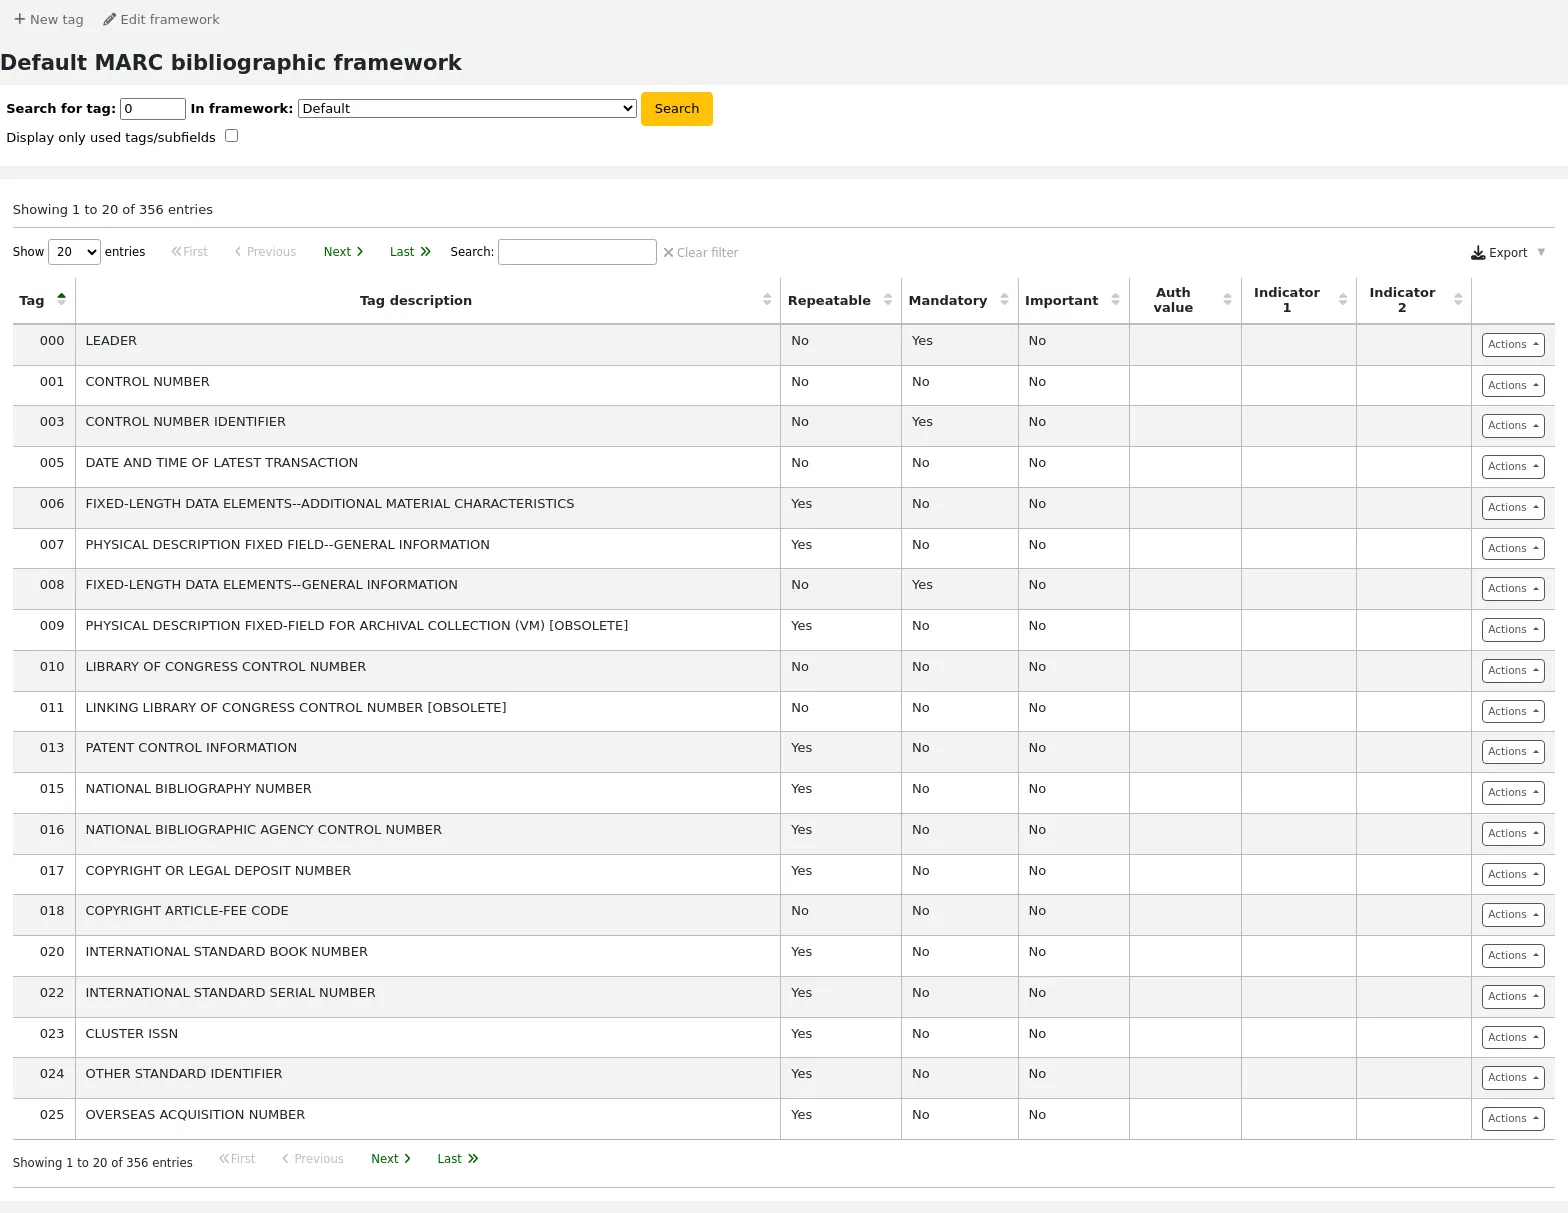
Un formulaire vide s’ouvre dans lequel vous pouvez entrer les informations relatives au champ MARC
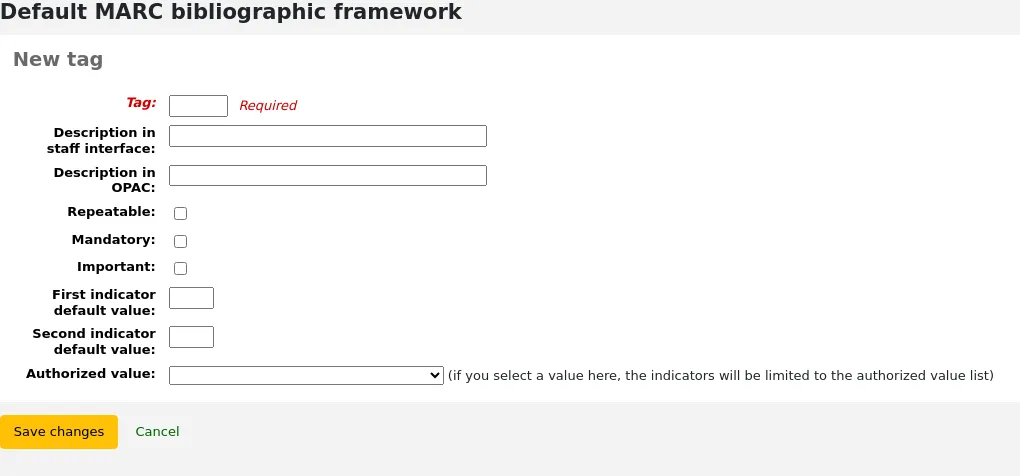
Saisissez le code du nouveau champ. La suite du processus de paramétrage pour le nouveau champ est le même que celui décrit dans la section Modification des champs et sous-champs des grilles de catalogage de ce manuel.
Lorsque vous aurez terminé, cliquez sur “Sauvegarder” et le nouveau champ s’affichera dans la liste des champs de la grille.
Vous devrez ajouter au moins un sous-champ à votre nouveau champ avant qu’il apparaisse dans votre grille quand vous cataloguez.
Cliquez sur le bouton “Actions” de votre nouveau champ, puis sur “Modifier les sous-champs”. Cliquez sur l’onglet “Nouveau” et saisissez votre code de sous-champ. Le processus de paramétrage pour le nouveau sous-champ est le même que celui décrit dans la section Modification des champs et sous-champs des grilles de catalogage de ce manuel.
Importer et exporter les grilles de catalogage
À côté de chaque grille il y a un lien pour l’importer ou l’exporter.
Exporter une grille de catalogage
Pour exporter une grille, cliquez simplement sur l’option “Exporter” dans le bouton “Actions” à droite du titre de la grille.
Lorsque vous cliquez sur “Export” vous serez amené à choisir le format d’export que vous préférez.
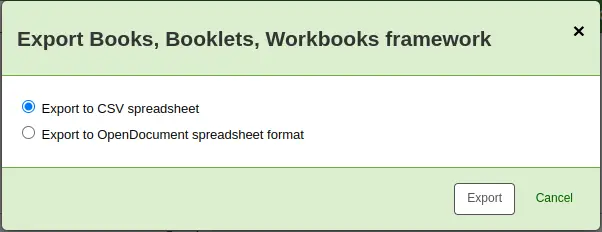
Une grille de catalogage exportée de cette façon peut être importée dans une autre installation de Koha en utilisant l’option d’import des grilles de catalogage.
Importer une grille de catalogage
Une façon facile de créer une nouvelle grille est d’en importer une créée pour votre installation Koha ou pour une autre. Cette grille devra être exportée de l’autre système en utilisant les instructions ci-dessus pour être disponible pour l’importation ici.
Pour importer une grille de catalogage, vous devez d’abord en créer une nouvelle. Une fois que vous avez cette grille, cliquez sur Actions puis “Importer” à droite de la nouvelle grille.
On vous demandera de chercher un fichier sur votre ordinateur pour l’importer dans la grille.
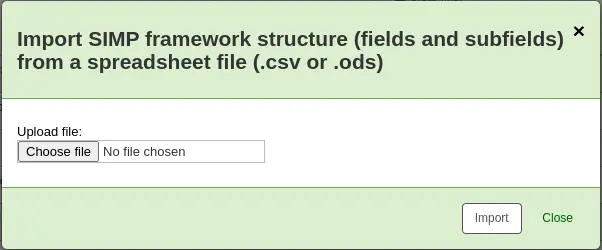
Il vous sera demandé de confirmer vos actions avant que le fichier soit importé.
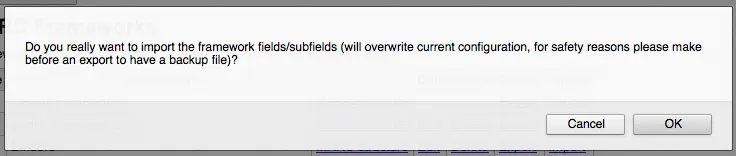
Pendant que le fichier est téléchargé, vous verrez une icône tournante qui vous confirmera que le système fonctionne.
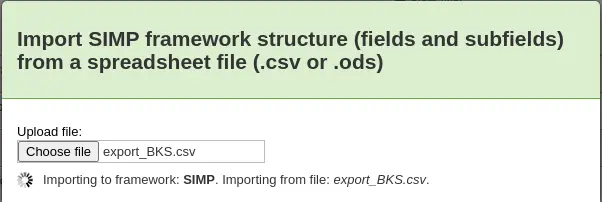
Une fois votre importation terminée vous serez dirigé vers l’outil d’édition des grilles où vous pourrez faire tous les changements dont vous avez besoin sur la grille que vous avez importée.
Liens Koha => MARC
Même si Koha stock l’intégralité de la notice MARC, il stocke aussi les champs les plus courants dans différentes tables de la base de données (principalement les tables items, biblioitems et biblio). Les liens Koha => MARC sont utilisés pour dire à Koha ou trouver ces informations dans la notice MARC. A chaque fois qu’une notice est ajoutée ou modifiée, ce mapping sera utilisé pour mettre à jour la colonne de la base de données liée. L’information des colonnes de la base de données est utilisée comme moyen de rechercher rapidement une information importante sans avoir à analyser l’ensemble de la notice MARC. Elle est utilisée pour afficher une information dans de nombreuses pages et peut aussi être utilisée dans des rapports.
Dans la plupart des cas, vous n’aurez pas besoin de changer les valeurs par défaut de l’installation, mais il est important de savoir que cet outil est là et peut être utilisé à n’importe quel moment.
Avertissement
Si vous avez besoin de changer les mappings après avoir ajouté des données dans votre catalogue, vous devrez demander à votre administrateur système d’exécuter misc/batchRebuildBiblioTables.pl. Ceci mettra à jour les valeurs dans les colonnes de la base de données pour toutes vos notices.
Aller à : Plus > Administration > Catalogue > Liens Koha => MARC
Note
Seuls les bibliothécaires avec la permission manage_marc_frameworks (ou la permission superlibrarian) auront accès à cette section.
Le tableau montre tous les champs de la base de données pouvant être mappés aux champs MARC.

Pour ajouter une nouvelle correspondance, cliquez sur le bouton « Ajouter » à droite du champ approprié.
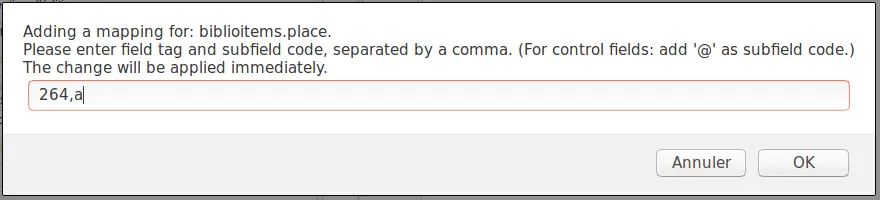
Écrivez dans le champ et sous-champ MARC que vous souhaitez mapper, séparés par une virgule, vers ce champ Koha (par exemple, « 264,a ») et cliquez sur le bouton “OK”.
Note
Il est possible de lier plusieurs champs MARC à un champ de la base. Par exemple, vous pouvez associer 260$a et 264$a au champ biblioitems.place.
Si vous souhaitez effacer la correspondance pour un champ de la base, cliquez sur le bouton “Supprimer”.
Note
Les changements sont immédiats. Les notices créées ou modifiées après le changement utiliseront immédiatement le nouveau mapping. Par contre, si vous souhaitez mettre à jour le mapping pour les notices déjà présentes dans votre catalogue, vous devrez demander à votre administrateur système d’exécuter misc/batchRebuildBiblioTables.pl. Ceci mettra à jour les valeurs dans les colonnes de la base de données pour toutes vos notices.
Validation grilles de catalogage
Cet outil test la structure des grilles de catalogage MARC pour les notices bibliographiques.
Aller à : Plus > Administration > Catalogue > Validation des grilles de catalogage
Note
Seuls les bibliothécaires avec la permission manage_marc_frameworks (ou la permission superlibrarian) auront accès à cette section.
Si vous avez modifié vos grilles de catalogage MARC, il est recommandé de lancer cet outil pour vérifier qu’il n’y a pas d’erreurs dans vos grilles.
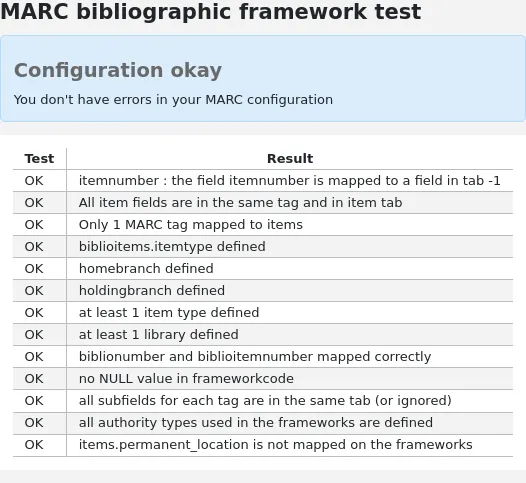
Sources de classification
Les sources de classification ou les règles de classement correspondent aux zones 952$2 et 942$2 (MARC21) dans les grilles de catalogage MARC de Koha et sont stockés dans les champs items.cn_source et biblioitems.cn_source de la base de données.
Aller à : Plus > Administration > Catalogue > Sources de classification
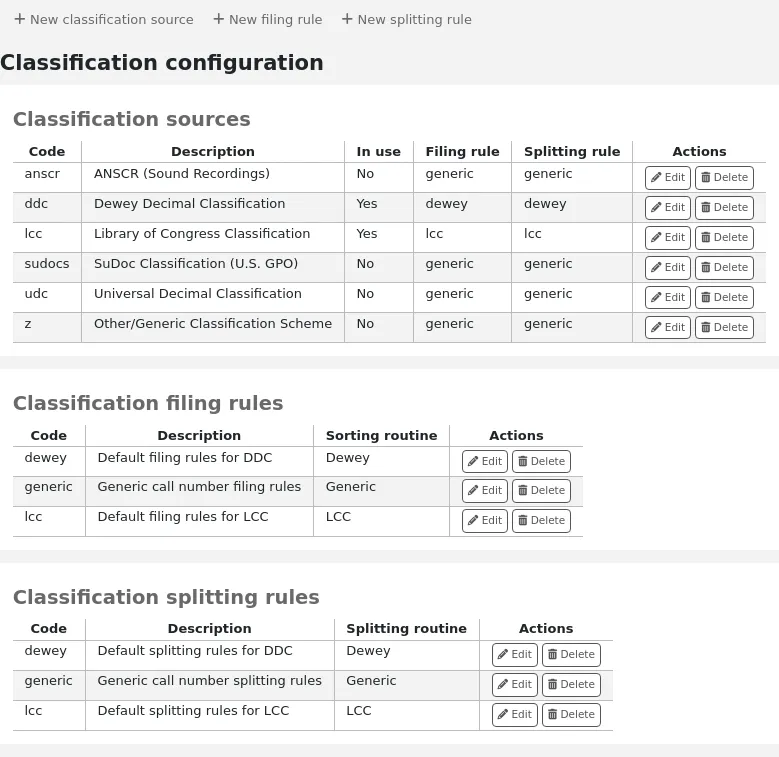
Note
Seuls les bibliothécaires avec la permission manage_classifications (ou la permission superlibrarian) auront accès à cette section.
Les sources de classification communément utilisées sont :
ddc - Classification décimale Dewey
lcc - Classification de la Bibliothèque du Congrès
Si, à l’installation de Koha, vous avez choisi d’installer des sources de classification, vous verrez également d’autres valeurs :
ANSCR (enregistrement sonore)
Classification SuDOC
CDU
Autre/Classification générique
Ajouter/modifier des sources de classification
Vous pouvez ajouter vos propres sources de classification en utilisant le bouton “Ajouter source de classification”. Pour modifier une source, utilisez le bouton” Modifier”.
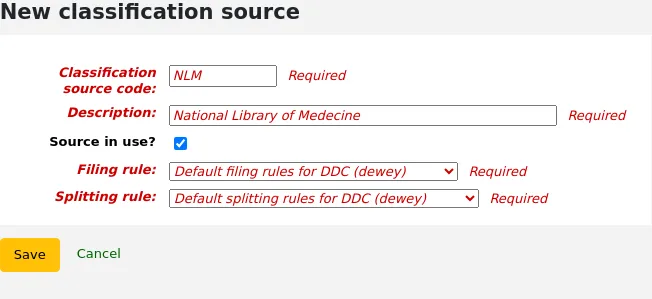
En saisie :
Saisissez un code. Le code est limité à 10 caractères et doit être unique.
Note
Le code n’est pas modifiable une fois qu’il a été créé.
Saisissez une description. La description est utilisée dans les listes déroulantes dans le module catalogage.
Cochez la case “Source utilisée ?” si vous voulez que la valeur apparaisse dans la liste déroulante pour cette catégorie.
Sélectionnez la règle de classement appropriée dans la liste déroulante.
Sélectionnez la règle de séparation appropriée dans la liste déroulante.
Règles de remplissage de la classification
Les règles de classement déterminent l’ordre dans lequel les exemplaires sont placés sur les étagères. Les règles de classement normalisent les cotes afin que Koha puisse les comparer et les trier dans le bon ordre.
Par exemple, une cote Dewey comme “636.8/07 SHAW” deviendra “636_800000000000000_07_SHAW” pour pouvoir être triée.
La cote triée est sauvegardée dans le champ items.cn_sort ou biblioitems.cn_sort de la base de données
Les valeurs prédéfinies dans Koha sont :
Dewey
LCC
Générique
Les règles de classement correspondent aux sources de classification. Vous pouvez définir de nouvelles règles de classement en utilisant le bouton “Ajouter règle de classement”. Pour les modifier, cliquez sur le bouton “Modifier”.
En saisie :
Saisissez un code. Le code est limité à 10 caractères et doit être unique.
Note
Le code n’est pas modifiable une fois qu’il a été créé.
Saisissez une description. La description est utilisée dans la liste déroulante lorsque vous créeez ou modifiez une source de classification.
Choisissez une routine de classement : dewey, générique, lcc.
La routine de classement Dewey génère une cote triée en suivant les règles suivantes :
Elle concatène la classification et les parties de l’exemplaire.
Elle convertit en majuscules.
Elle enlève tous les espaces vides en début ou fin de cote, et avant les slash (/)
Elle sépare les préfixes alphabétiques du reste de la cote
Elle divise sur les espaces et les points.
Elle laisse le premier groupe de chiffres tel qu’il est.
Elle convertit le deuxième groupe de chiffres en un long groupe de 15 chiffres, rempli à droite de zéros.
Elle convertit chaque espace en un underscore.
Elle enlève tous les caractères restants qui ne sont pas alphabétiques, numériques ou underscores.
La routine de classement générique génère une cote triée en suivant les règles suivantes :
Elle concatène la classification et les parties de l’exemplaire.
Elle enlève tous les espaces vides en début ou en fin de cote.
Elle convertit chaque espace en un underscore.
Elle convertit en majuscules.
Elle enlève les caractères qui ne sont pas alphabétiques, numériques ou underscores.
La routine de classement LCC génère une cote triée en suivant les règles suivantes :
Règles de découpage de la classification
Les règles de découpage déterminent comment les cotes sont découpées au moment de l’impression d’une étiquette de cote.
Note
Les règles de découpage sont utilisées uniquement si votre format d’étiquette précise que vous pouvez découper les cotes.
Par exemple, une cote Dewey comme “636.8/07 SHAW” deviendra :
636.807
SHAW
une fois imprimée sur une étiquette de cote.
Les valeurs prédéfinies dans Koha sont :
Dewey
LCC
Générique
Les règles de découpage sont paramétrées dans les sources de classification. Vous pouvez définir de nouvelles règles de découpage en utilisant le bouton “Ajouter règle de découpage”. Pour les modifier, cliquez sur le bouton “Modifier”.
En saisie :
Saisissez un code. Le code est limité à 10 caractères et doit être unique.
Note
Le code n’est pas modifiable une fois qu’il a été créé.
Saisissez une description. La description est utilisée dans la liste déroulante lorsque vous créeez ou modifiez une source de classification.
Choisissez une routine de découpage - Dewey, Générique, LCC ou RegEx
La routine de découpage Dewey recherche les trois chiffres et le point, les met sur une ligne avec les autres parties (Découpe, préfixe, etc.) chacun sur une ligne séparée (généralement divisé au niveau des espaces).
La routine de découpage Générique découpe au niveau des espaces.
La routine de découpage LCC met chaque composant sur une ligne séparée.
La routine de découpage RegEx vous permet de créer une routine de découpage personnalisée.
Quelques exemples de routines de découpage RegEx :
Découper au niveau des espaces :
s/\s/\n/g
Découper au niveau des signes égal (=) :
s/(\s?=)/\n=/g
Découper au niveau des slash (/) :
s/(\s?\/)/\n/g
Enlever le premier découpage si la cote commence par J ou K :
s/^(J|K)\n/$1 /
Couper après 9 caractères :
s/(^.{9})/$1\n/
Il est possible de mélanger et faire correspondre des routines de découpage RegEx en cliquant sur le lien “Nouveau” juste en dessous de la case de saisie de la RegEx.
Par exemple, si vous voulez couper après neuf caractères ET séparer au niveau des espaces, vous pouvez écrire les deux et la cote “971.42805092 C669r” sera découpée
971.42805
092
C669r
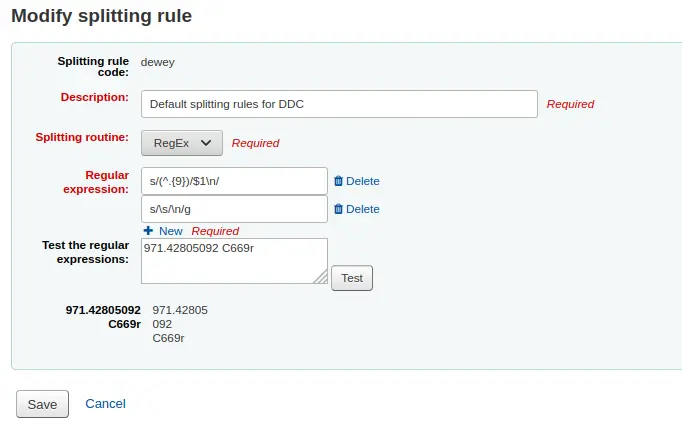
Règles de concordance
Les règles de concordance sont utilisées au moment de l’import de notices MARC dans Koha.
Aller à : Plus > Administration > Catalogue > Règles de concordance
Note
Seuls les bibliothécaires avec la permission manage_matching_rules (ou la permission superlibrarian) auront accès à cette section.
Les règles que vous définissez ici seront utilisées lors du téléchargement des notices dans le réservoir.
Il est important de comprendre la différence entre les «points de concordance» et les «contrôles de concordance» avant d’ajouter de nouvelles règles de concordance à Koha.
Les points de concordance sont les critères que vous entrez qui doivent être remplis pour qu’une notice corresponde à un enregistrement MARC existant dans votre catalogue (doublon). Vous pouvez avoir plusieurs points de concordance sur un import, chacun avec son propre score. Une notice importée sera comparé à vos notices existantes (« une notice à la fois ») et se verra attribuer un score pour chaque match. Lorsque le score total des points de concordance correspond ou dépasse le seuil indiqué pour la règle de concordance, Koha suppose un doublon correct et l’importe / le superpose en fonction de vos spécifications dans le processus d’importation. Un domaine à surveiller ici est la somme des points de concordance. Vérifiez à nouveau que les concordances que vous voulez donneront une concordance réussie (doublon).
Exemple :
Seuil de concordance : 1000
Point de concordance sur 020$a 1000
Point de concordance sur 022$a 1000
Point de concordance sur 245$a 500
Point de concordance sur 100$a 100
Dans l’exemple ci-dessus, une concordance sur le 020$a ou le 022$a aboutira à une concordance réussie. Une concordance sur 245$a par titre et 100$a par auteur (et non sur 020$a ou 022$a) n’ajoutera pas plus de 600 et ne sera pas une concordance. Un match sur 020$a et 245$a donnera 1500. Du fait que c’est soit une concordance réussie, les 500 points supplémentaires de la concordance pour le titre 245$a sont superflus. La notice importée a été appariée avec succès sur le 020$a sans nécessiter la concordance du 245$a. Cependant, si vous avez attribué un score de concordance de 500 sur 100$, une concordance sur 245$a par titre et sur 100$a par auteur sera considéré comme un match réussi (total de 1000) même si le 020$a n’est pas un match.
Les contrôles de concordance ne sont pas couramment utilisés dans les règles d’import. Cependant, ils peuvent servir à plusieurs fins dans la mise en concordance des notices. Premièrement, les contrôles de concordance peuvent être utilisés comme critères de concordance au lieu des points de concordance si vos index sont périmés et obsolètes. Les contrôles de concordance fonctionnent bien pour les données au lieu de compter sur les données dans les index. (Si vous craignez que vos index ne soient obsolètes, une reconstruction de vos index serait une excellente idée et permettrait de résoudre cette situation !) L’autre utilisation d’un contrôle de concordance est la « double vérification » ou le « veto » de votre règle de concordance. Par exemple, si vous avez une règle de concordance comme ci-dessous.
Seuil de concordance : 1000
Point de concordance sur 020$a 1000
Contrôle de concordance sur 245$a
Koha examinera d’abord le sous champ 020$ pour voir si la notice importée correspond à une notice existante. Si tel est le cas, il passera ensuite à la vérification de la correspondance et examinera directement la valeur de 245$a dans les données importées et la comparera à la valeur de 245$a de la notice « correspondante » existante dans votre catalogue. Si les 245$a correspondent, Koha continue comme si une correspondance avait réussi. Si les 245$a ne correspondent pas, Koha conclut que les deux notices ne correspondent pas et ne son pas des doublons. Les contrôles de concordance peuvent être un outil très utile pour confirmer les vrais doublons.
Lorsque vous cherchez à créer des règles de concordance pour vos autorités, les index suivants seront utiles :
Nom de l’index |
Champ Marc de correspondance |
|---|---|
ISBN |
010$a |
Nom de personne |
100$a |
Raison sociale |
110$a |
Publication en série |
111$a |
Titre-uniforme |
130$a |
Terme chronologique |
148$a |
Nom commun |
150$a |
Nom géographique |
151$a |
Terme de genre/forme |
155$a |
Table : Index d’autorités
Ajout de règles de concordance
Pour créer une nouvelle règle de concordance :
Cliquer sur “Ajouter une règle de concordance”
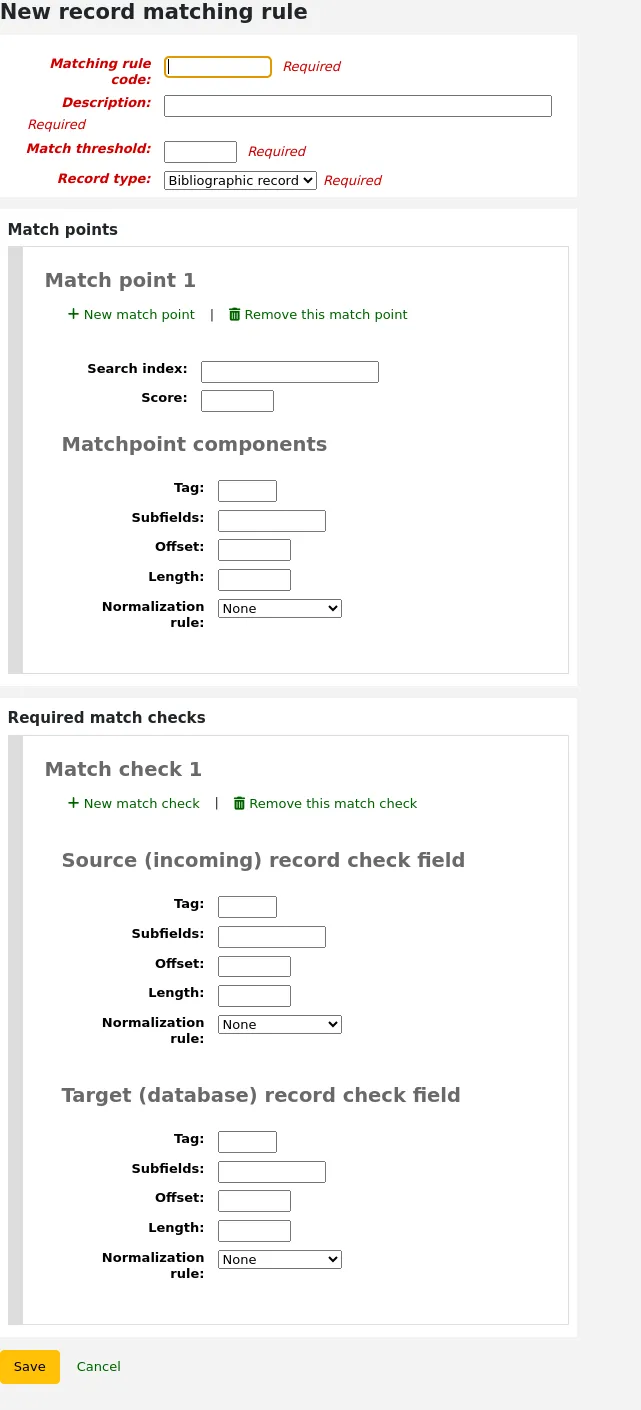
Choisissez un nom unique et saisissez-le dans le champ Code la règle de concordance.
la “Description” est une chaine expliquant ce qu’est la règle
“Seuil de correspondance” - Le nombre total de “points” que doit atteindre une notice pour être considérée comme un doublon
« Type de notice » est le type d’importation pour lequel cette règle sera utilisée -soit autorité soit bibliographique
Les Points de concordance sont définis pour choisir les champs sur lesquels effectuer l’opération de mise en concordance.
Vous pouvez trouver les “index de recherche” en regardant la configuration des index dans votre système. Pour Zebra vous pouvez trouver les bons noms d’index dans votre fichier ccl.properties. Vous pouvez aussi trouver des informations utiles dans le chapitre Index de recherche Koha de ce manuel.
“Score” - Le nombre de “points” que rapporte l’identification sur ce champ. Si la somme de tous les scores des champs est égale ou supérieure au seuil de concordance, la notice entrante est considérée comme étant en doublon avec une notice du catalogue.
Entrez le champ MARC que vous voulez mettre en correspondance dans la rubrique “Champ”.
Entrez le sous-champ MARC que vous voulez mettre en correspondance dans la rubrique “Sous-champs”. Pour réaliser une concordance sur des champs de contrôle comme 001, la rubrique sous-champs peut être laissée vide.
“Décalage” - A utiliser avec les champs de contrôle, 001-009
“Longueur” - A utiliser avec les champs de contrôle, 001-009
Il y a actuellement plusieurs options “Règles de normalisation” :
Aucun - aucune règle de normalisation ne sera appliquée
Supprimer les espaces
Majuscule
Minuscule
Par défaut - cette option a été ajoutée pour maintenir le comportement du formulaire avant que les autres règles de normalisation soient disponibles.
ISBN - utiliser cette option améliorera la concordance sur l’ISBN. Si les champs ISBN de vos notices entrantes contiennent du texte supplémentaire, comme “9780670026623 (alk. paper)”, ils correspondront quand même correctement.
“Contrôles de concordance requis” - Tandis que les points de concordance fonctionnent sur les index de recherche, les contrôles de concordance fonctionnent directement sur les données et peuvent être utilisés comme critère de concordance à la place des points de concordance ou en plus de ceux-ci pour confirmer les concordances.
Exemple de règle de concordance des notices bibliographiques : numéro de contrôle
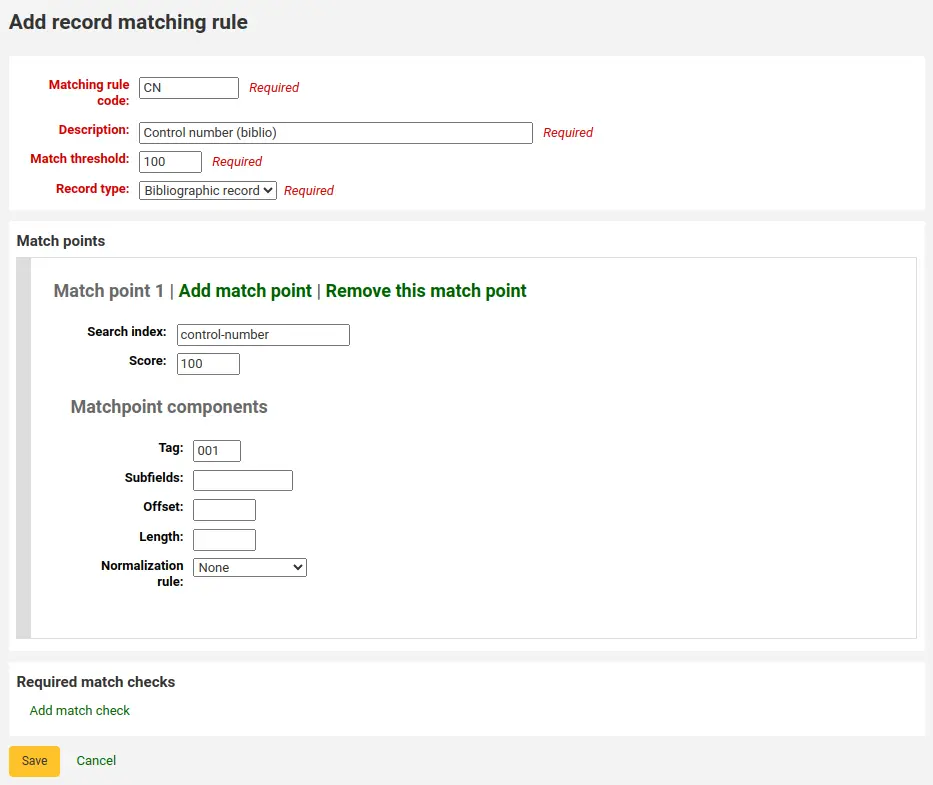
Seuil de concordance : 100
Type de notice : Bibliographies
Note
Si vous souhaitez qu’une règle soit posée sur 001 dans les notices d’autorité, vous devez répéter toutes ces valeurs et changer uniquement le type de notice en « Notice d’autorité ».
Points concordanca (unique) :
Recherche index : Control-number
Score : 100
Champ : 001
Note
En MARC21, ce champ est le numéro de contrôle assigné à la notice par l’établissement qui l’a créée, qui l’utilise ou la distribue.
Sous-champs : vides
Décalage : 0 ou vide
Longueur : 0 ou vide
Règle de normalisation : Aucune
Contrôles de correspondance requis : aucun (cliquer sur “supprimer ce contrôle de concordance”)
Sources notice
Version
Cette section a été ajoutée à Koha dans sa version 24.05.
Les sources de notices sont utilisées pour indiquer d’où les notices viennent et éventuellement éviter l’édition dans Koha des notices de ces sources.
Ceci est particulièrement utile avec des bases pour lesquelles les notices sont cataloguées dans un autre système puis exportées vers Koha. Quelques fois, dans ces cas, il est préférable de modifier les notices dans le système d’origine plutôt que dans Koha.
Note
Seuls les bibliothécaires avec la permission manage_record_sources (ou la permission superlibrarian) auront accès à cette section.
Ajout d’une source de notice
Pour ajouter une source de notice
Cliquer sur “Ajouter une source de notice”
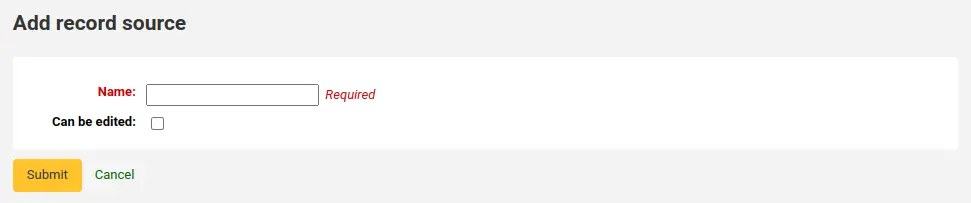
Remplir le formulaire
Nom : entrez le nom de la source
Peut être modifiée : Si cette case est cochée, les notices ajoutées depuis cette source seront éditables dans Koha. Sinon, seuls les bibliothécaires avec la permission edit_locked_records pourront éditer les notices.
Cliquez sur “Valider”
Modifier une source de notice
Pour modifier une source de notice existante, cliquez sur le bouton “Modifier” à droite de son nom.
Suppression d’une source de notice
Pour supprimer une source de notice, cliquez sur le bouton “Supprimer” à droite de celle-ci et confirmez.
Règles de fusion de notices
Les règles de fusion de notices permettent de définir des règles sur la façon dont les notices MARC entrantes et originales doivent être fusionnées sur la base d’un champ et d’un contexte quand une notice MARC est mise à jour.
Note
Seuls les bibliothécaires avec la permission manage_marc_overlay_rules (ou la permission superlibrarian) auront accès à cette section.
Contextes
Concentrons-nous d’abord sur la compréhension du concept de contextes.
Les contextes sont définis par « module » et par « filtre » en activant des ensembles de règles séparées pour différents contextes.
En paramétrant différentes valeurs de filtre pour ces modules, les règles sont appliquées uniquement quand la valeur du filtre concorde avec un module en particulier. Un joker ; « * », peut être utilisé pour concorder avec toutes les valeurs de filtre possibles.
Il y a trois modules contextuels différents :
- adhérent
Permet de définir des règles qui s’appliqueront si le numéro de l’adhérent actuellement connecté concorde avec la condition du filtre.
- categorycode
Permet de définir des règles qui s’appliqueront si le code de catégorie de l’adhérent actuellement connecté concorde avec la condition du filtre.
- source
Permet de définir des règles qui s’appliqueront si la notice est mise à jour dans une partie de Koha en particulier. Les méthodes de mise à jour suivantes sont supportées :
batchimport
z39.50
intranet
bulkmarcimport
import_lexile
batchmod
Un contexte n’est vraiment rien d’autre qu’une combinaison de module et de filtre. Chaque fois qu’une notice est mise à jour dans Koha, un contexte est paramétré et des valeurs de filtre sont remplies avec les valeur dépendant du contexte.
Des exemples de deux contextes différents sont l’enregistrement d’une notice dans l’interface professionnelle ou l’utilisateur actuellement connecté ayant un numéro particulier, par exemple « 12 ».
Ces deux contextes sont définis comme suivant :
Module: source, filter: intranet
Module: borrower, filter: 12
Les règles d’un seul contexte, une combinaison de module et filtre, sont appliqués. Si plusieurs contextes correspondent, ils ne sont pas fusionnés.
Si vous avez les règles suivantes :
Module: source, filter: *, tag: 650, preset: Protect
Module: source, filter: *, tag: 500, preset: Protect
Module: borrower, filter: 12, tag: *, preset: Overwrite
Et que le contexte de la modification où les règles sont appliquées sont :
source => "intranet" (wildcard match)
borrower => 1 (no match)
Seules les deux premières règles seront appliquées.
Si à la place le contexte de l’évaluation de la règle était :
source => "intranet" (wildcard match)
borrower => 12 (an exact match, which is considered more specific than a wildcard match)
Seule la troisième règle sera appliquée, même si les deux premières correspondent aussi elles seront ignorées puisque la correspondance du contexte est de plus basse spécificité à cause du joker.
La spécificité du contexte est dans l’ordre suivant :
En premier les règles sont regroupées dans des groupes de règles par combinaison unique de filter et module.
Si un ou plusieurs de ces contextes ont une condition n’utilisant pas un joker, le groupe de règles du contexte avec le module le plus spécifique est sélectionné. (les modules sont listés dans l’ordre de spécificités ce-dessus).
Si aucun contexte exact n’est trouvé, mais qu’il y a une ou plusieurs concordances avec des jokers, le groupe de règles du contexte avec le module le plus spécifique est sélectionné.
Si aucun contexte ne correspond, le comportement par défaut est d’écraser la notice originale avec la notice entrante.
Règle
Une règle est constituée de 3 parties différentes :
- Contexte
Un module et un filtre pour vérifier la correspondance.
- Champ
Une expression d’identification de champ pour déterminer sur quel(s) champ(s) la règle doit s’appliquer. Trois type d’expression sont supportés :
Un numéro de champ exact, par exemple « 650 ».
Une expression régulière, par exemple « 6.. » correspondra à tous les champs 6XX.
Un joker, « * », correspondant à tous les champs
Quand les règles pour un contexte spécifique sont évaluées, le contexte le plus spécifique est sélectionné. Les expressions de champ ci-dessus sont listées du plus spécifique au moins spécifique.
- Actions
Chaque règle définie un groupe d’action à prendre en fonction du type de modification. Il y a quatre types de modification : Ajouté (Added), Joindre (Appended), Enlevé (Removed) et Supprimé (Deleted). Une action est spécifiée pour chaque type de modification, soit faire la mise à jour soit la sauter.
En activant/désactivant l’application de ces différents types de mise à jour, 16 comportements différents peuvent être définie. Certain paramètre prédéfini sont disponibles pour les combinaisons les plus fréquentes/utiles :
Paramètre prédéfini |
Ajouté |
Joint |
Supprimé |
Enlevé |
|---|---|---|---|---|
Protéger |
Ignorer |
Ignorer |
Ignorer |
Ignorer |
Écraser |
Ajouter |
Joindre |
Enlever |
Supprimer |
Ajouter |
Ajouter |
Ignorer |
Ignorer |
Ignorer |
Ajouter et joindre |
Ajouter |
Joindre |
Ignorer |
Ignorer |
Protéger de la suppression |
Ajouter |
Joindre |
Enlever |
Supprimer |
Protéger
Added: Skip, Appended: Skip, Removed: Skip, Deleted: Skip
Le paramètre prédéfini « Protéger » évitera toutes les modifications des champs concernés, évitant qu’ils ne soient écrasés.
Si on considère la règle :
Module: source, filter: *, Tag: 650, Preset: Protect
Et les notices originale et entrante suivantes :
100 1#$aTerrace, Vincent,$d1948-
650 #0$aTelevision serials$zUnited States$vCatalogs.
100 1#$aTerrace, Vincent,$d1948-
500 ##$aIncludes index.
650 #0$aTelevision pilot programs$zUnited States$vCatalogs.
Le champ 650 de la notice originale conservera sa valeur originale après la mise à jour (mais comme le comportement par défaut si aucune règle ne correspond est d’écraser, le champ 500 sera ajouté) :
100 1#$aTerrace, Vincent,$d1948-
500 ##$aIncludes index.
650 #0$aTelevision serials$zUnited States$vCatalogs.
Écraser
Added: Add, Appended: Append, Removed: Remove, Deleted: Delete
The paramètre prédéfini « Écraser » autorisera toutes les modifications et suppression sur les champs concernés.
Vu que le comportement par défaut est d’écraser si aucune règle ne correspond, ajouter une règle avec le paramètre prédéfini « écraser » ne sert que s’il y a d’autre règle, moins spécifique, avec un comportement différent, par exemple une règle avec un joker.
Donc étant donné ces deux règles :
Module: source, filter: *, Tag: *, Preset: Protect
Module: source, filter: *, Tag: 650, Preset: Overwrite
Et les notices originale et entrante suivantes :
500 ##$aIncludes index.
650 #0$aTelevision serials$zUnited States$vCatalogs.
Notice entrante :
100 1#$aTerrace, Vincent,$d1948-
500 ##$aIncludes index.
650 #0$aTelevision pilot programs$zUnited States$vCatalogs.
Tous les champs sauf le 650 seront protégés dans la notice originale, la notice finale sera :
500 ##$aIncludes index.
650 #0$aTelevision pilot programs$zUnited States$vCatalogs.
Ajouter
Added: Add, Appended: Skip, Removed: Skip, Deleted: Skip
Le paramètre prédéfini « Ajouter » autoriser la mise à jour uniquement si le champ entrant est nouveau, qu’il n’existe aucun champ avec de tag dans la notice originelle.
Si on considère la règle :
Module: source, filter: *, Tag: 650, Preset: Add
Et les notices originale et entrante suivantes :
100 1#$aTerrace, Vincent,$d1948-
650 #0$aTelevision serials$zUnited States$vCatalogs.
100 1#$aTerrace, Vincent,$d1948-
500 ##$aIncludes index.
650 #0$aTelevision pilot programs$zUnited States$vCatalogs.
Le champ 650 de la notice entrante n’écrasera pas le 650 de la notice originale puisque la notice originale contient un ou plusieurs champs 650. Le champ 500 sera ajouté puisque la règle par défaut est d’écraser. La notice finale sera :
100 1#$aTerrace, Vincent,$d1948-
500 ##$aIncludes index.
650 #0$aTelevision serials$zUnited States$vCatalogs.
À l’inverse, si la notice originale est :
100 1#$aTerrace, Vincent,$d1948-
La notice finale sera :
100 1#$aTerrace, Vincent,$d1948-
500 ##$aIncludes index.
650 #0$aTelevision pilot programs$zUnited States$vCatalogs.
Puisqu’il n’y a aucun champ 650 dans la notice originale, en ajouter de nouveaux est possible.
Ajouter et joindre
Added: Add, Appended: Append, Removed: Skip, Deleted: Skip
Dans le paramètre prédéfini « Ajouter et joindre », joindre de nouveau champ (en plus de ceux existants) est permis mais pas les retirer ni les supprimer.
Donc si nous avons la règle suivante :
Module: source, filter: *, Tag: 650, Preset: Add and append
Et les notices originale et entrante suivantes :
100 1#$aTerrace, Vincent,$d1948-
650 #0$aTelevision serials$zUnited States$vCatalogs.
100 1#$aTerrace, Vincent,$d1948-
500 ##$aIncludes index.
650 #0$aTelevision pilot programs$zUnited States$vCatalogs.
La notice finale sera :
100 1#$aTerrace, Vincent,$d1948-
500 ##$aIncludes index.
650 #0$aTelevision serials$zUnited States$vCatalogs.
650 #0$aTelevision pilot programs$zUnited States$vCatalogs.
Notez que « l’ancien » champ 650 de la notice originale n’est pas supprimé puisque seul l’ajout de nouveau champ ou de joindre de nouveau champ en plus de ceux existant est autorisé.
En utilisant plutôt le paramètre prédéfini « Remplacer », l’enregistrement résultant est alors :
100 1#$aTerrace, Vincent,$d1948-
500 ##$aIncludes index.
650 #0$aTelevision pilot programs$zUnited States$vCatalogs.
avec le champ 650 de la notice originale retiré.
Protéger de la suppression
Added: Add, Appended: Append, Removed: Remove, Deleted: Skip
Le paramètre prédéfini « Protéger contre la suppression » permet toutes les mises à jour, sauf la suppression. La suppression se produit lorsqu’un champ présent dans l’enregistrement original n’existe plus dans l’enregistrement entrant. Dans ce cas, ce champ est supprimé si ce paramètre n’était pas activé.
Ainsi, selon la règle suivante :
Module: source, filter: *, Tag: 650, Preset: Protect from deletion
Et les notices originale et entrante suivantes :
100 1#$aTerrace, Vincent,$d1948-
650 #0$aTelevision serials$zUnited States$vCatalogs.
100 1#$aTerrace, Vincent,$d1948-
500 ##$aIncludes index.
650 #0$aTelevision pilot programs$zUnited States$vCatalogs.
La notice finale sera :
100 1#$aTerrace, Vincent,$d1948-
500 ##$aIncludes index.
650 #0$aTelevision pilot programs$zUnited States$vCatalogs.
D’un autre côté, si l’enregistrement entrant est :
100 1#$aTerrace, Vincent,$d1948-
500 ##$aIncludes index.
Dans ce cas, la suppression du champ 650 n’est pas autorisée et la valeur du champ dans l’enregistrement original est protégée. L’enregistrement résultant est alors :
100 1#$aTerrace, Vincent,$d1948-
500 ##$aIncludes index.
650 #0$aTelevision serials$zUnited States$vCatalogs.
Paramètres prédéfinis personnalisés (Custom presets)
Pour utiliser les paramètres prédéfinis personnalisés, il est nécessaire de bien comprendre les actions de mise à jour :
- Ajouté
Pour une règle de correspondance, l’action configurée pour l’ajout s’applique aux nouveaux champs de l’enregistrement entrant si l’enregistrement original ne contient aucun champ correspondant. Si l’action est « Ajouter », ces champs sont ajoutés à l’enregistrement original ; si l’action est « Ignorer », ils sont simplement ignorés.
- Joint
Si les deux enregistrements possèdent des champs communs, c’est-à-dire un ou plusieurs champs avec des sous-champs et identifiants identiques, l’action configurée pour l’ajout à la suite s’applique aux champs présents dans l’enregistrement entrant mais absents de l’enregistrement original. Si l’action est « Ajouter à la suite », ces champs sont ajoutés à l’enregistrement original ; si l’action est « Ignorer », ils sont simplement ignorés.
- Supprimé
Si les deux enregistrements possèdent des champs communs, l’action configurée pour la suppression s’applique aux champs présents dans l’enregistrement original mais absents de l’enregistrement entrant. Si l’action est « Supprimer », ces champs sont retirés de l’enregistrement original ; si l’action est « Ignorer », ils sont conservés.
- Enlevé
Si l’enregistrement original contient des champs correspondants, mais qu’aucun de ces champs n’est présent dans l’enregistrement entrant, l’action configurée pour la suppression s’applique aux champs de l’enregistrement original. Si l’action est « Supprimer », ces champs sont retirés de l’enregistrement original ; si l’action est « Ignorer », ils sont conservés.
Configuration des Sets OAI-PMH
Sur cette pages, vous créez, modifiez et supprimez des Sets OAI-PMH
Note
Seuls les bibliothécaires avec la permission manage_oai_sets (ou la permission superlibrarian) auront accès à cette section.
Ajouter un SET
Pour ajouter un set :
Cliquez sur le lien Ajouter un Set
Remplissez les champs obligatoire “setSpec” et “setName”
Vous pouvez ensuite ajouter des descriptions pour ce set. Pour ce faire, cliquez sur “Ajouter description” et remplissez la boîte qui apparaît. Vous pouvez ajouter autant de descriptions que vous le souhaitez.
Cliquez sur “Sauvegarder”
Modifier/Supprimer un set
Pour modifier un Set, cliquez sur le lien Modifier qui se trouve en face du Set. Un formulaire similaire à celui utilisé pour créer un Set sera affiché et vous pourrez modifier le nom, la description et les paramètres du Set.
Pour supprimet un set, cliquez sur le lien » Supprimer » qui se trouve sur la ligne du Set que vous voulez supprimer.
Définir les liens
Vous définissez ici la façon dont un set sera construit en spécifiant des critères (quelle notice appartient à ce set). Les critères sont des listes de conditions que les notices doivent remplir.
Remplissez les zones “Champ”, “Sous-champ” et “Valeur”. Par exemple si vous voulez inclure à ce Set toutes les notices qui ont la zone 999$a égale à XXX, mettez 999 dans “Champ”, 9 dans “Sous-champ” et XXX dans “Valeur”.
Si vous voulez ajouter un autre critère, cliquez sur le bouton “Ajouter” et répétez l’étape 1. Vous pouvez choisir entre les opérateurs booléens “et” ou “ou” pour lier vos critères.
Cliquez sur “Sauvegarder”
Pour supprimer une condition, laissez vide au moins une des zones «champ», «sous-champ» ou «Valeur» et cliquez sur « Enregistrer ».
Note
Note : Une condition n’est vraie si le sous-champ correspondant est strictement égal à ce qui est dans Valeur. Une notice ayant 999$9 = “XXX YYY” ne sera pas placée dans un jeu de données dont la condition est 999$9 = “XXX”.
Et c’est sensible à la casse : une notice ayant 999$9 = “xxx” n’appartiendra pas au jeu de donnée dont le critère est 999$9 = “XXX”.
Construire des sets
Une fois que vous avez configuré tous vos Sets, vous devez les construire. Ceci est effectué par le script misc/migration_tools/build_oai_sets.pl.
Champs de recherche des exemplaires
Aller à : Plus > Administration > Catalogue > Champs de recherche des exemplaires
D’ici vous pouvez ajouter des champs de recherche personnalisés à la recherche sur les exemplaires dans l’interface professionnelle.
Note
Seuls les bibliothécaires avec la permission manage_item_search_fields (ou la permission superlibrarian) auront accès à cette section.
Ajouter un champ de recherche sur les exemplaires
Pour ajouter un nouveau champ de recherche, cliquer sur le bouton « Nouveau champ de recherche ».
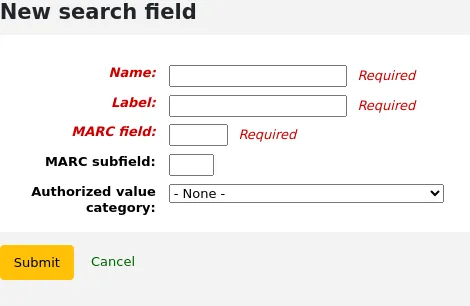
Nom : entrez le nom du champ de recherche
Label : Entrez le label du champ de recherche comme il apparaitra sur la recherche sur les exemplaires
Champ MARC : saisissez le numéro du champ MARC à rechercher ; ce champ MARC apparaît également sur la page de recherche d’articles item search page
Sous-champ MARC : entrez le sous-champ sur lequel vous souhaitez faire une recherche
Catégorie de valeur autorisée : Si besoin, choisissez une catégorie de valeurs autorisées pour ce champ de recherche ; cela le transformera en liste déroulante au lieu d’un champ de texte libre
Cliquez sur “Valider”.
Une fois que le nouveau champ aura été ajouté, il sera visible sur la page de recherche exemplaire dans le menu déroulant commençant par “Code à barres”.
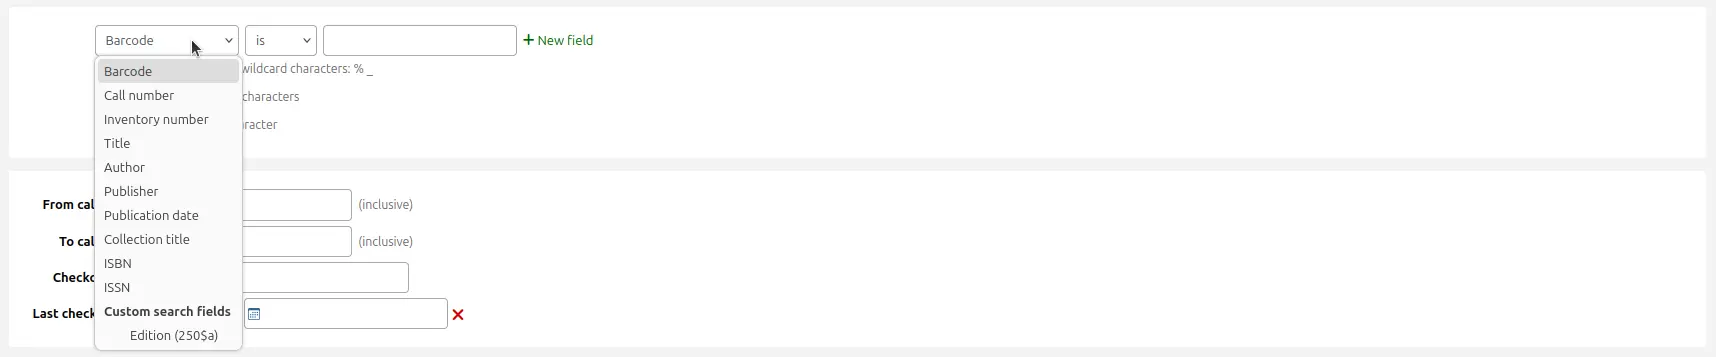
Modifier un champs de recherche sur les exemplaires
Pour modifier un champ de recherche exemplaire, cliquez sur le bouton “Modifier” à côté de son nom dans le tableau.
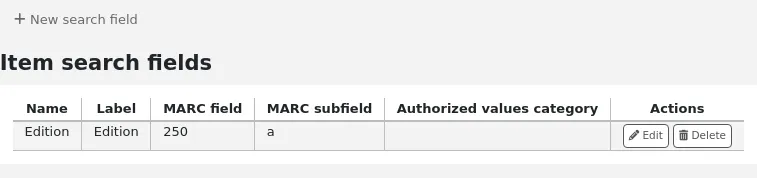
Modifiez puis cliquez sur « Soumettre ».
Supprimer un champ de recherche sur les exemplaires
Pour supprimer un champ de recherche exemplaire, cliquez sur le bouton “Supprimer” côté de son nom dans le tableau et confirmez la suppression.
Filtres de recherche
Les filtres de recherche sont des recherches personnalisées ou des filtres qui peuvent être appliqués aux résultats de recherche.
Cette fonctionnalité est activée en utilisant la préférence système SavedSearchFilters.
Note
Cette fonctionnalité est activée en utilisant la préférence système SavedSearchFilters.
Note
Seuls les bibliothécaires avec la permission manage_search_filters (ou la permission superlibrarian) auront accès à cette section.
Les filtres de recherche sont ajoutés par searching the catalog through the staff interface.
Cette page permet de gérer les filtres de recherche existants.

Vous pouvez modifier les filtres en cliquant sur les boutons d’action sur la droite.
Modifier le filtre : changer le nom du filtre et sa disponibilité dans le catalogue en ligne (OPAC) ou dans l’interface du personnel
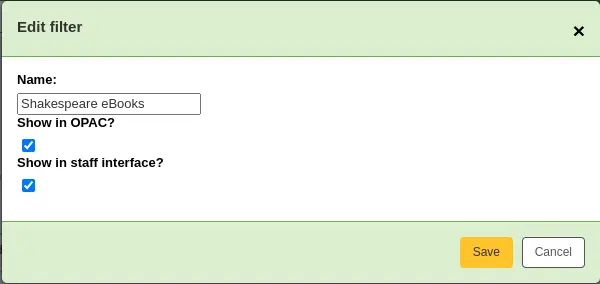
Modifier la recherche : cliquer sur ce bouton permet d’accéder à advanced search form, avec le filtre déjà appliqué. Vous pouvez modifier les paramètres de recherche, puis cliquer sur « Enregistrer le filtre » en haut de la page.
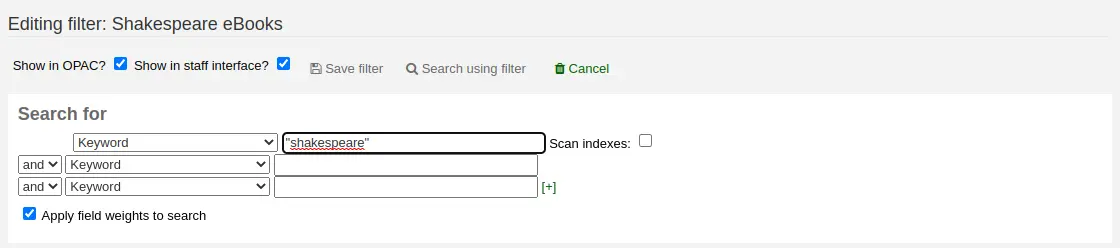
Supprimer : cliquer sur ce bouton supprime le filtre.
Avertissement
Aucune confirmation n’est demandée lors de la suppression d’un filtre de recherche. Dès que vous cliquez sur « Supprimer », le filtre est immédiatement supprimé.
Note
Les filtres de recherche peuvent être utilisés comme URL de recherche prédéfinies, que vous pouvez utiliser sur votre site web ou dans HTML customizations.
Les filtres de recherche sont accessibles via des liens relativement courts.
<OPACBaseURL>/cgi-bin/koha/opac-search.pl?limit=search_filter:<Id of filter>
Utilisez cette URL partout pour créer un lien direct vers la recherche.
Configuration du moteur de recherche
Une fois que vous aurez choisi Elasticsearch dans votre préférence système SearchEngine, vous verrez un nouveau lien pour la configuration du moteur de recherche, dans la section Catalogue du module Administration. Vous pourrez alors gérer les indexes, les facettes et leurs correspondances avec les champs et sous-champs MARC.
Note
Seuls les bibliothécaires avec la permission manage_search_engine_config (ou la permission superlibrarian) auront accès à cette section.
La page est organisée en trois onglets : champs de recherche, notices bibliographiques et notices d’autorité.
Important
Si vous modifiez quoi que ce soit sur cette page, vous devez réindexer complètement vos notices ; sinon, seuls les enregistrements ajoutés ou modifiés après le changement seront pris en compte.
Danger
Toute modification effectuée via l’interface sera perdue si vous cliquez sur “Reset mappings” ou si la commande de reconstruction est exécutée avec le paramètre --reset ou -r. Le bouton “Reset mappings” et le paramètre --reset réinitialisent les paramètres aux valeurs par défaut.
Champs de recherche
L’onglet des champs de recherche dans la page de configuration du moteur de recherche show , affiche tous les champs de recherche utilisés par Elasticsearch.
Les tables montrent :
Nom : c’est le nom du champ, tel que défini dans le fichier de correspondance.
Alias : certains champs ont des alias, par exemple « author » peut aussi être utilisé comme « au ». Ils sont codés en dur et ne peuvent être modifiés.
Label : certains champs ont des noms de champs différents de leur nom. Ils sont utilisés comme le nom de la facette lorsque que le champs utilise une facette.
Type : le type influence le stockage des données et comment elles sont recherchées.
Booléen : 0/1 (non/oui).
Call Number : il s’agit de la Cote déterminée par le système de classification.
Date : la date est enregistrée au format ISO.
Géopoint (Geo point) : valeur de latitude et longitude.
Version
Le type Geo point (Geo point) a été ajouté à Koha dans la version 24.05.
ISBN: ISBN standard number.
Number : un nombre.
Numéro standard : identifiant numérique.
Chaîne de caractères : une suite simple de caractères.
Somme : total de valeurs.
Année : une année exprimée sur quatre chiffres.
Poids : valeur numérique positive attribuée à ce champ de recherche afin de le rendre plus « important » dans une recherche simple. Plus la valeur est élevée, plus ce champ est pris en compte dans le classement par pertinence.
Note
La recherche pondérée fonctionne uniquement pour la recherche bibliographique, et non pour la recherche d’autorités. Elle ne s’applique également qu’à la recherche simple, sauf si l’option « Appliquer les pondérations des champs à la recherche » est sélectionnée dans la recherche avancée.
Interrogeable : si ce champ est utilisé à l’interface professionnelle ou à l’OPAC.
Ajouter des champs de recherche
Version
La possibilité d’ajouter des champs de recherche a été ajoutée à Koha dans sa version 24.05.
Il est possible d’ajouter des champs de recherche à partir de ce tableau. Ajoutez les informations du champ de recherche dans la dernière ligne du tableau, puis cliquez sur le bouton « Ajouter » à la fin de la ligne.
Supprimer des champs de recherche
Version
La possibilité de supprimer des champs de recherches ajoutés a été implantée dans Koha dans sa version 24.05.
Il est possible de supprimer les champs de recherche ajoutés manuellement. Les champs de recherche par défaut ne peuvent pas être supprimés, car ils sont nécessaires au bon fonctionnement de du sigb.
Pour supprimer un filtre de recherche, cliquez sur le bouton “Supprimer” à la fin de la ligne.
Notices bibliographies
L’onglet des notices bibliographiques de la page de configuration du moteur de recherche affiche les correspondances MARC pour chaque champ de recherche utilisé par Elasticsearch.
Note
Les correspondances par défaut sont décrites dans la section Elasticsearch indexes du chapitre Searching.
Les tables montrent :
Champ de recherche : le champ de recherche correspondant (tel que défini dans l’onglet search fields tab). Les champs de recherche peuvent être répétés afin d’inclure plusieurs champs MARC.
Triable : indique si ce mappage doit être utilisé pour le tri de ce champ de recherche. Par exemple, dans MARC21, l’index des titres comporte plusieurs champs de titre différents, mais seul le champ 245 est utilisé pour le tri.
Facetable : indique si ce mappage peut être utilisé dans les facettes.
Version
La configuration des facettes a été ajoutée à Koha dans sa version 24.05.
Suggestion : indique si ce mappage est utilisé dans browse search.
Interrogeable : indique si ce mappage est utilisé pour la recherche.
Filtre : influence la manière dont les valeurs sont indexées.
Ponctuation : supprime la ponctuation.
Aucun (Vide) : les valeurs sont indexées telles quelles.
Version
Les filtres ont été ajoutés à Koha dans la version 23.11.
Mapping : indique le champ MARC associé à ce champ de recherche.
Note
Les mappings peuvent inclure le champ entier ou bien certains sous-champs spécifiques. Dans le cas des sous-champs, ils peuvent être indexés individuellement ou comme une seule valeur.
Par exemple :
520indexera tout le contenu des champs 520. Chaque sous-champ sera indexé individuellement.100aindexera uniquement le contenu du 100$a.020azindexera le contenu des sous-champs $a et $z du champ 020. Ils seront indexés individuellement.245(abp)indexera uniquement le contenu des sous-champs $a, $b et $p du champ 245. Ils seront indexés en une seule entrée.
Pour les champs de longueur fixe, la syntaxe est la suivante :
leader_/6cela indexera la position 6 du leader (000).007_/0indexera la position 0 du champ 007.008_/39indexera la position 39 du champ 008.008_/15-17indexera les positions 15 à 17 du champ 008, comme une seule valeur.
Ajouter des mappings
Pour ajouter des mapping, ajouter les informations dans la dernière ligne du tableau et cliquer sur le bouton “Ajouter” à la fin de la ligne.
Important
N’oubliez pas que si vous changez quoi que ce soit sur cette page, vous devez réindexer complètement vos notices, sinon, seules les notices ajoutées ou modifiées après ce changement seront affectées.
Danger
Toute modification effectuée via l’interface sera perdue si vous cliquez sur “Reset mappings” ou si la commande de reconstruction est exécutée avec le paramètre --reset ou -r. Le bouton “Reset mappings” et le paramètre --reset réinitialisent les paramètres aux valeurs par défaut.
Supprimer des mappings
Pour supprimer un mapping, cliquez sur le bouton “Supprimer” à la fin de la ligne.
Certains mappings sont nécessaires pour le fonctionnement de Koha et ne peuvent pas être supprimés.
Important
N’oubliez pas que si vous changez quoi que ce soit sur cette page, vous devez réindexer complètement vos notices, sinon, seules les notices ajoutées ou modifiées après ce changement seront affectées.
Danger
Toute modification effectuée via l’interface sera perdue si vous cliquez sur “Reset mappings” ou si la commande de reconstruction est exécutée avec le paramètre --reset ou -r. Le bouton “Reset mappings” et le paramètre --reset réinitialisent les paramètres aux valeurs par défaut.
Ordre des facettes
Cette section (tout en bas de l’onglet Notice bibliographique) permet de personnaliser les <facettes, affichés dans les résultats de recherche dans l’OPAC et l’interface professionnelle.
Champ de recherche : le champ de recherche correspondant (comme défini dans l’onglet Champs de recherche).
Label : le label du champ de recherche (comme défini dans l’onglet Champs de recherche).
Version
Cette colonne a été ajoutée à Koha dans sa version 23.11.
Catégorie de valeur autorisée : pour certaines facettes, il est possible de définir une catégorie de valeur autorisée qui déterminera le texte affiché pour les éléments de la facette. Certaines facettes ont une catégorie de valeur autorisée imposée comme LOC pour la localisation et CCODE pour les collections.
Version
Cette option a été ajoutée à Koha dans sa version 23.11.
Pour réordonner les facettes, vous pouvez simplement les faire glisser et les déposer là où vous voulez qu’elles soient.
Pour renommer les facettes, vous devez changer le label dans l’onglet Champs de recherche.
Pour supprimer une facette, cliquez sur le bouton “Supprimer”.
Attention
Dans les versions 23.11 et inférieur, il n’est pas possible de supprimer des facettes. Il est cependant possible de décocher la case “Afficher” pour les cacher dans le résultat de recherche.
Pour ajouter une nouvelle facette,
d’abord, ajouter le champ de recherche,
puis ajouter un mapping, assurez-vous de définir “Interrogeable” sur “Oui”,
finalement, ajoutez la facette dans le tableau de l’ordre des facettes, utilisez la dernière ligne pour entrer les valeurs, et cliquer sur le bouton “Ajouter” à la fin de la ligne.
Version
L’option d’ajout de facettes a été ajoutée à Koha dans sa version 24.05.
Acquisitions
Le module Acquisitions dans Koha permet à la bibliothèque de garder une trace des des commandes passées auprès des fournisseurs et de gérer les budgets d’acquisition.
Avant d’utiliser le module Acquisitions, vous devez vérifier que vous avez rempli tous les paramètres nécessaires.
Aller à : Plus > Administration > Acquisitions
Devises et taux de change
Si vous effectuez des commandes dans plusieurs devises, il est souhaitable d’entrer les taux de change de façon à permettre au module Acquisitions de faire des totaux corrects.
Note
Seuls les bibliothécaires avec la permission currencies_manage (ou la permission superlibrarian) auront accès à cette section.
Aller à : Plus > Administration > Acquisitions > Devises et taux de change

Note
Vous pouvez personnaliser les colonnes de ce tableau dans la section Configurer les colonnes du module Administration (référence du tableau : currency).
Devise : ceci est le code de la devise. Pour les devises par défaut, le code ISO est utilisé comme code de la devise (par exemple “USD” pour le dollar américain). Le code ISO sera utilisé lors e l’import de fichier MARC via l’import de notice dans le réservoir. L’outil essayera de trouver et d’utiliser le prix de la devise actuellement active.
Taux : ceci est le taux utilisé pour calculer le prix dans la devise active.
Note
À savoir : Ces informations ne sont pas automatiquement mises à jour. Faites-le manuellement afin d’avoir des comptes justes.
Symbole : ceci est le symbole de la devise (par exemple, $ pour USD ou € pour EUR).
Dernière mise à jour : ceci est la date de dernière mise à jour de la devise dans Koha.
Active : La devise active est la devise principale que vous utilisez dans votre établissement. La devise active est marquée d’une coche dans la colonne Active. Si vous n’avez pas de devise active, un message d’erreur vous demande d’un définir une.
La devise active doit avoir un taux de 1. Il ne peut y avoir qu’une seule devise active.
Archivés : les devise archivés auront “Oui” dans cette colonne. Les devises archivées ne pourront pas être utilisées dans le module acquisition.
Note
Il n’est pour l’instant pas possible d’archiver manuellement des devises. Les devises seront archivées si Koha est mis à jour et qu’une devise précédemment utilisée dans le module acquisition est supprimée.
Actions : utilisez ces boutons pour modifier ou supprimer des devises.
Note
Si une devise a été utilisée au moins une fois, il n’est pas possible de la supprimer.
Ajouter une nouvelle devise
Si une devise que vous utilisez n’est pas déjà dans votre système, vous pouvez la créer.
Cliquer sur “Ajouter devise”.
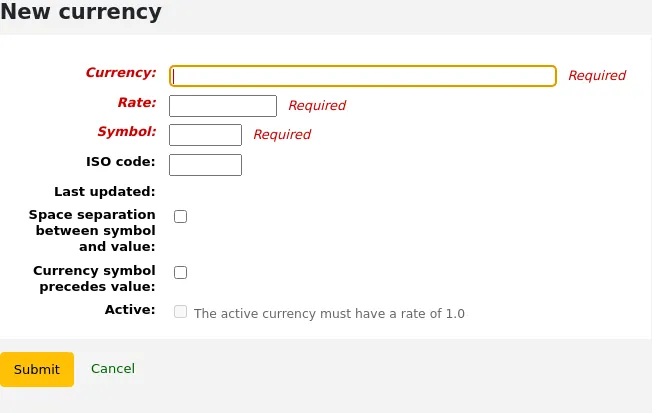
Remplissez le formulaire.
Devise : entrez un code pour cette devise, cela peut être le code ISO ou un autre code. C’est ce qui sera afficher dans le module acquisitions.
Note
Si vous décidez d’avoir un code personnalisé ici, vérifier que le code ISO est rempli avec le code correct pour cette devise. Cela assurera que les prix seront calculés en fonction du taux.
Note
Ce champ est limité à dix caractères (chiffres et lettres uniquement).
Taux : entrez le taux de cette devise par rapport à votre devise active.
Symbole : entrez le symbole de cette devise (par exemple, $ pour USD ou € pour EUR).
Code ISO : Entrez le code ISO de cette devise (par exemple “USD” pour le dollar américain). Ce champ est optionnel. Si ce champ est laissé vide, Koha utilisera le code de la devise (ci-dessus) en tant que code ISO pour le calcul de prix.
Date de dernière mise à jour : ce champ est mis à jour automatiquement avec la date du jour, il n’est pas possible de changer cette date manuellement.
Espace de séparation entre le symbole et la valeur : si cette case est cochée, Koha affichera le prix avec un espace avant le symbole de la devise (par exemple, 10.99 $ au lieu de 10.99$).
Le symbole monétaire précède la valeur : si elle est cochée, Koha affichera le symbole de la devise avant le prix (par exemple, $10.99 plutôt que 10.99$).
Version
Cette option a été ajoutée à Koha dans sa version 24.11.
Active : cochez cette case si cette devise est votre devise par défaut utilisé dans le module acquisitions. Notez qu’il ne peut y avoir qu’une seule devise active et que son taux doit impérativement être de 1.
Cliquez sur “Valider”.
Modifier une devise
Si vous commandez souvent depuis d’autres pays, il est nécessaire de mettre à jour régulièrement le taux de change pour calculer les prix précisément.
Pour modifier une devise existante,
Cliquez sur le bouton “Modifier” à droite de la devise dans le tableau des devises.
Changer le taux, ou une autre valeur.
Note
Notez que le code de la devise et la date de dernière mise à jour ne peuvent pas être modifiés.
Cliquez sur “Valider”.
Suppression une devise
S’il y a des devises que vous n’utilisez jamais, il est possible de les supprimer.
Depuis le tableau des devises, cliquez sur le bouton “Supprimer” à droite de la devise.
Avertissement
Les devises qui ont été utilisées au moins une fois dans le module acquisitions ne peuvent pas être supprimées.
Budgets
Budgets are used for tracking accounting values related to acquisitions. For example you could create a budget for the current year (ex. 2015) and then break that into funds for different areas of the library (ex. Books, Audio, etc).
Allez à : Plus > Administration > Acquisitions > Budgets
Note
Staff members must have the period_manage permission (or the superlibrarian permission) in order to access the budgets administration page.
It is recommended to minimally give the following permissions to staff members who need to manage budgets, since these are interdependent:
Dans l’interface principale d’administration des budgets vous verrez deux onglets, contenant respectivement les budgets actifs et inactifs.
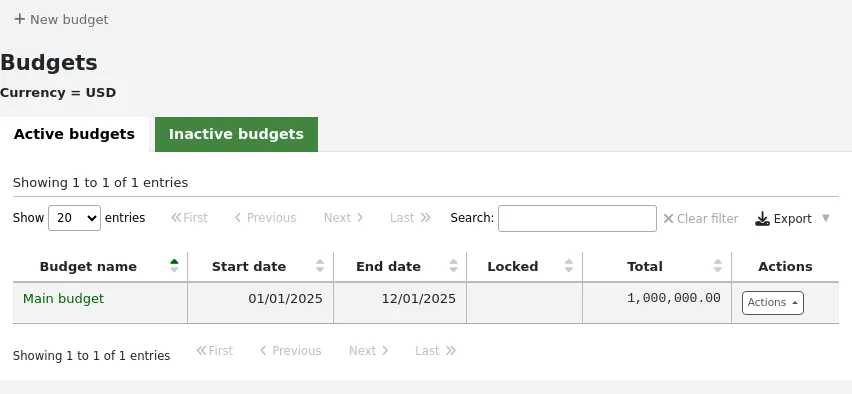
Ajouter un budget
Les budgets peuvent être créés ex nihilo ou en dupliquant le budget de l’année précédente.
Note
Staff members must have the period_manage permission (or the superlibrarian permission) in order to create new budgets or duplicate existing budgets.
Adding a new budget
If you haven’t used Koha before for acquisitions, you’ll need to start fresh with a new budget.
To add a new budget,
Click the “New budget” button.
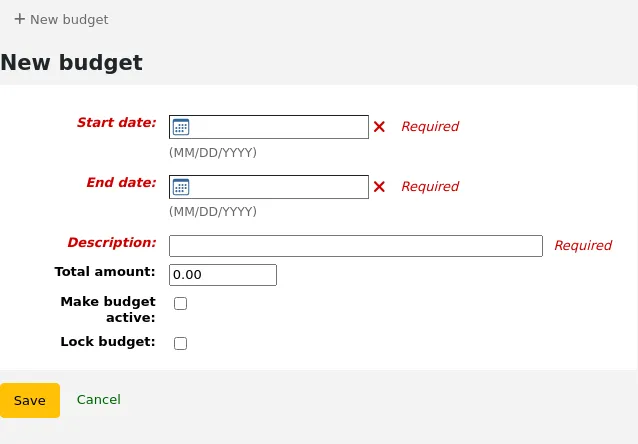
Remplissez le formulaire :
Start date (mandatory): choose the starting date for the time period this budget is for. This can be the start of the calendar year, fiscal year, academic year, quarter, etc.
End date (mandatory): choose the ending date for the time period this budget is for.
Description (mandatory): enter a description for this budget. The description should be something that will help you identify the budget when ordering.
Total amount: enter the amount for the budget. Do not use any symbols, simply enter the amount of the budget with numbers and decimals.
Make budget active: marking a budget as active makes it usable when placing orders in the acquisitions module, even if the order is placed after the budget end date. This will allow you to record orders that were placed in a previous budget period.
Verrouiller un budget : verrouiller un budget signifie que vous ne pourrez pas ajouter des postes budgétaires ou ajouter des postes enfants à ce budget, et vous ne pourrez pas planifier des dépenses. Verrouillez le budget une fois qu’il est organisé comme vous le souhaitez.
Cliquer sur “Enregistrer”.
You will be brought back to the list of existing budgets.
Proceed to add funds to the budget.
Duplicating a budget
At the end of the year, or the end of your budget period, you can duplicate the current budget. This will also duplicate all funds, so you don’t have to start from scratch each year or period.
To duplicate a budget,
From the list of budgets, click the “Actions” button on the right.
Choose “Duplicate”.
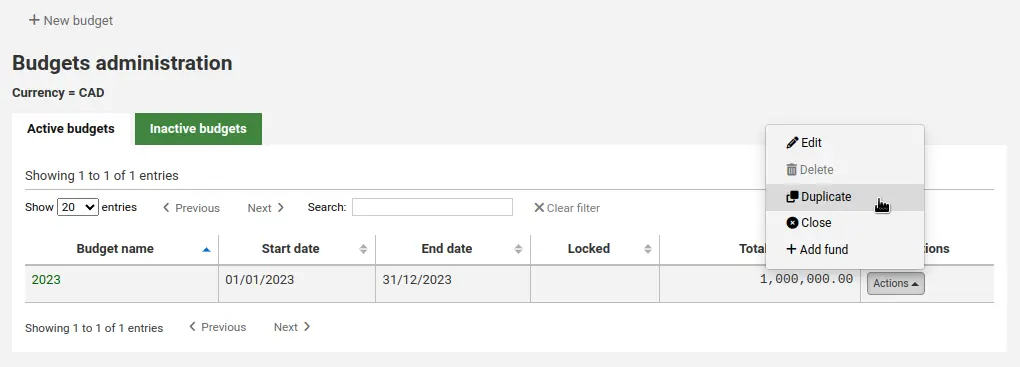
Alternatively,
From the list of budgets, click on the budget name.
On the screen listing the budget breakdown, click the “Edit” button at the top and choose to “Duplicate budget”.
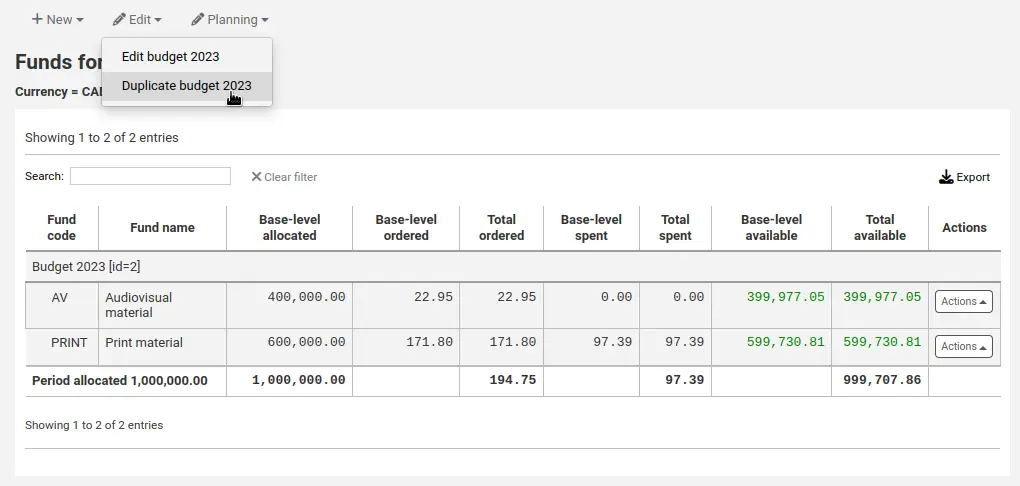
In both cases, you will be presented with a form to duplicate the budget.
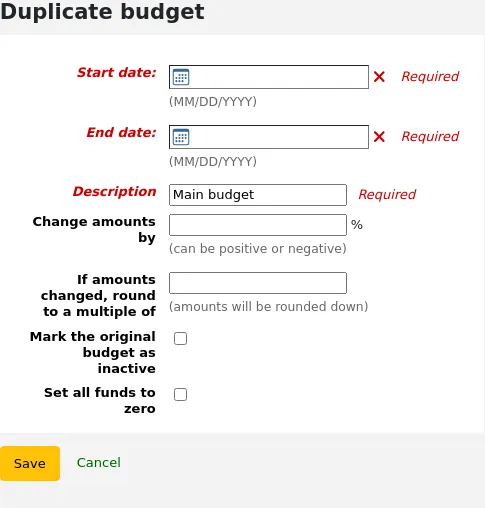
Start date (mandatory): choose the starting date for the time period this new budget is for.
End date (mandatory): choose the ending date for the time period this budget is for.
Description (mandatory): enter a description for this new budget.
Change amounts by: by default, the total amount from the duplicated budget and the original amounts for each fund will be used. However, if needed, you can indicate to change the amounts by a percentage, that can be positive or negative. For example, if your new budget was increased by 2%, enter 2. Inversely, if your new budget was decreased by 2%, enter -2.
If amounts changed, round to a multiple of: if you entered a value in “Change amounts by”, Koha will calculate the amounts automatically. You can force it to round down the amounts. For example, entering “100”, will round down the amounts to the hundreds (5542 will become 5500).
Mark the original budget as inactive: check this box if the original budget should no longer be used, effective immediately. You can always edit the budget later to make it inactive.
Set all funds to zero: check this box if you wish the new budget to contain all the same fund structures as the previous budget but no allocations until you manually enter an amount in the fund.
This will not only duplicate the budget, but all of the funds associated with that budget so that you can reuse budgets and funds from year to year.
When the time comes, you can close the previous budget to move unreceived orders, and, if desired, unspent funds to the new budget.
Modifier un budget
Note
Staff members must have the period_manage permission (or the superlibrarian permission) in order to edit existing budgets.
You can edit existing budgets to make them inactive or lock them to prevent fund changes, for example.
To edit a budget,
From the list of budgets, click the “Actions” button on the right.
Choose “Edit”.
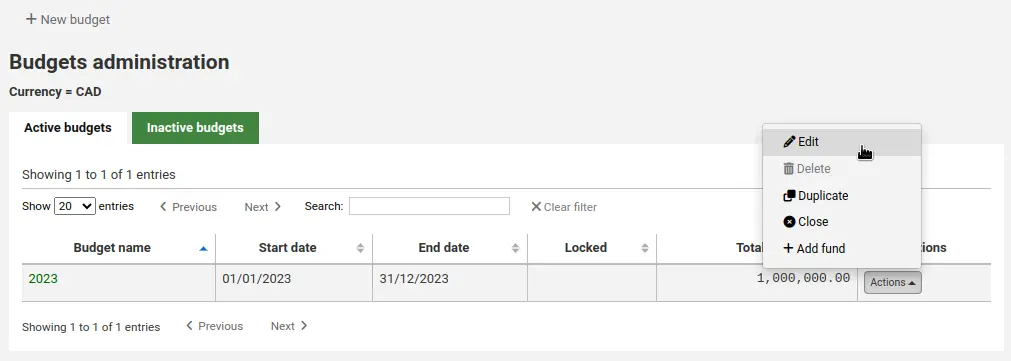
Alternatively,
From the list of budgets, click on the budget name.
On the screen listing the budget breakdown, click the “Edit” button at the top and choose to “Edit budget”
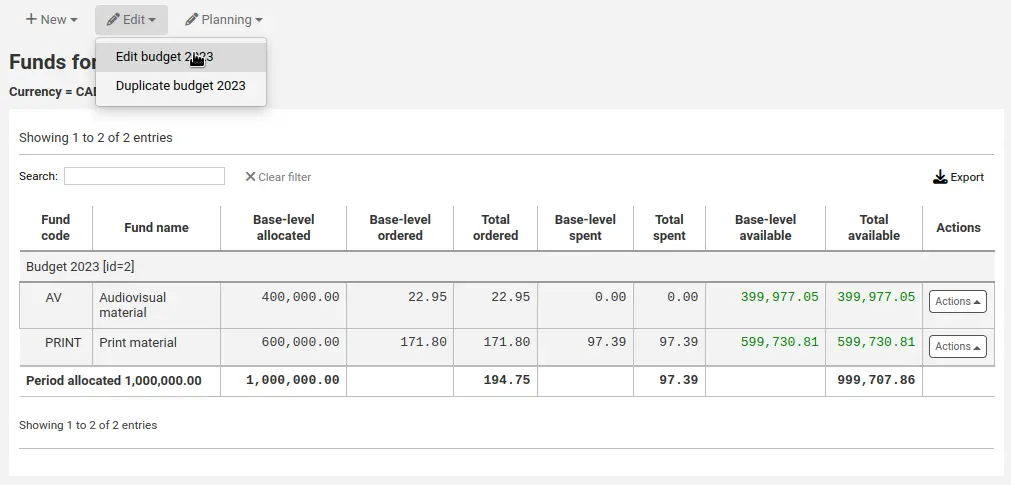
In both cases, you will be presented with a form to duplicate the budget.
Make your changes (see the field descriptions above).
Cliquer sur “Enregistrer”.
Closing a budget
Fermez un budget pour déplacer ou reconduire des commandes non reçues et, si vous le souhaité, les postes budgétaires non dépensés vers un nouveau budget. Avant de fermer votre budget, vous souhaitez peut-être dupliquer le budget de l’année précédente. De cette manière, vous aurez un budget pour déplacer les commandes non reçues.
Note
Staff members must have the period_manage permission (or the superlibrarian permission) in order to close existing budgets.
To close a budget,
From the list of budgets, click the “Actions” button on the right.
Choose “Close”
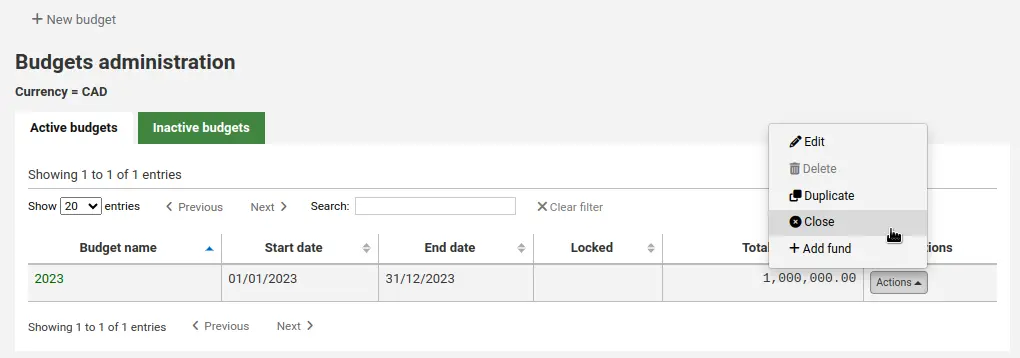
Note
Budgets without unreceived orders cannot be closed.
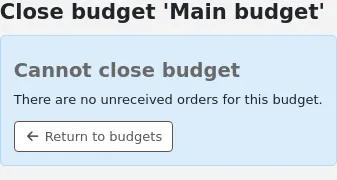
Remplissez le formulaire.
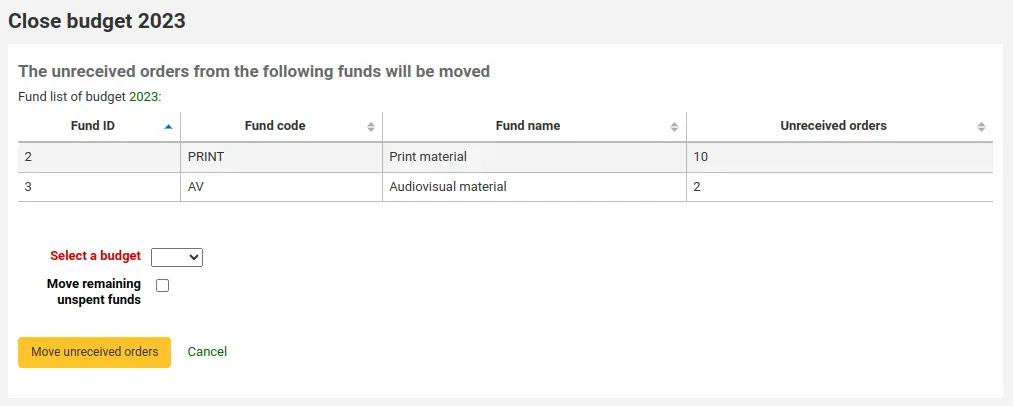
Select a budget: choose the new budget for the unreceived orders from the dropdown.
Note
In order for the unreceived orders to be automatically moved to the new budget, the fund structures in the previous budget must exist in the new budget.
Move remaining unspent funds: check this box to move the unspent amounts from the funds of the budget being closed to the selected budget.
Click the “Move unreceived orders” button.
You will be presented with a dialog box that says “You have chosen to move all unreceived orders from “Budget X” to “Budget Y”. This action cannot be reversed. Do you wish to continue?” Budget X is the budget to be closed and Budget Y is the selected budget.
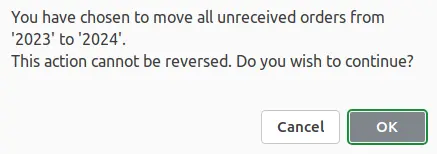
Si tout semble correct, cliquez sur “OK” et les commandes non reçues et, si sélectionnés, les postes budgétaires non dépensés seront déplacés.
Attendez jusqu’à l’affichage du « Rapport après le déplacement de commandes non reçues du budget X à Y » ). Ceci listera les numéros de commandes qui ont été impactés (groupés par poste budgétaire) et détaillera si la commande non reçue a été déplacée ou s’il y a eu un problème. Par exemple, si le nouveau budget ne contient pas de poste budgétaire avec le même nom que dans le budget précédent, la commande ne sera pas déplacée.
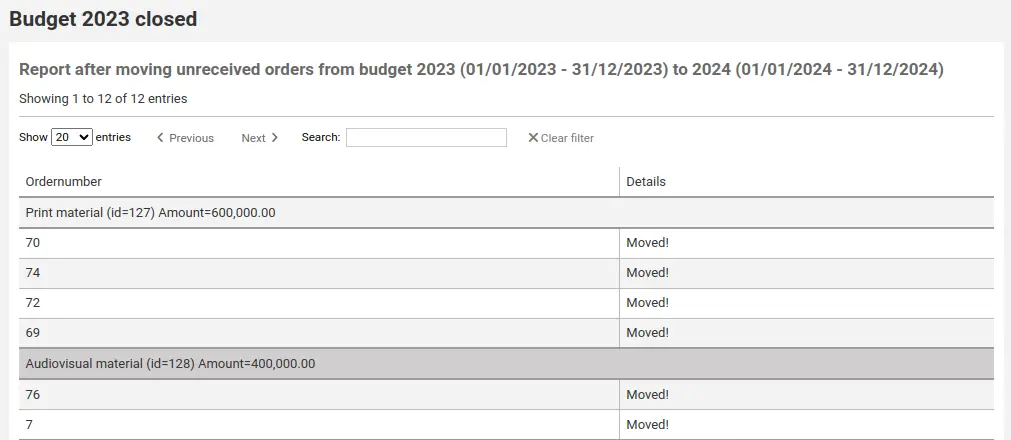
Deleting a budget
In order to delete a budget, it must not have funds. Start by deleting the funds.
Avertissement
This cannot be undone. Make sure you are certain this budget needs to be deleted. You can make it inactive or close it, instead.
To delete a budget,
From the list of budgets, click the “Actions” button on the right.
Choose “Delete”.
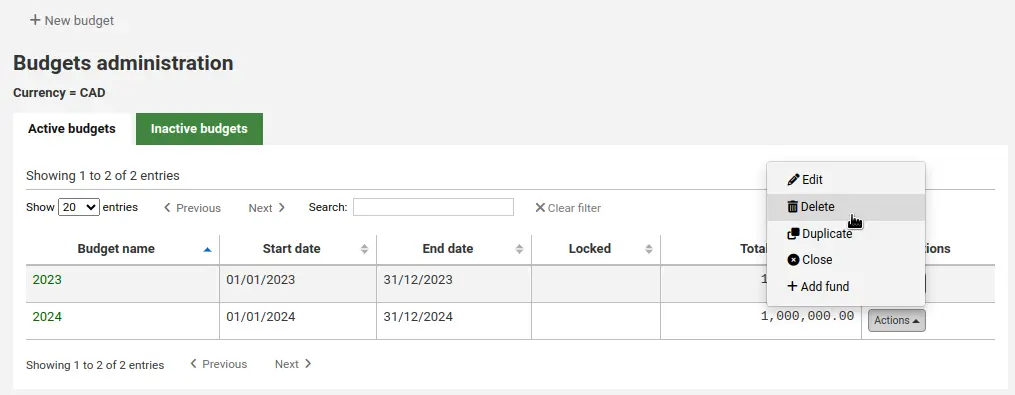
Click “Yes, delete”.

Postes budgétaires
Les postes budgétaires sont des divisions d’un budget. Par exemple, vous pouvez créer un budget pour l’année en cours (ex. 2015), puis le diviser en postes budgétaires correspondants aux différents fonds de la bibliothèque (Livres, Audio …).
Allez à : Plus > Administration > Acquisitions > Poste budgétaire
Adding a fund to a budget
A fund is added to a budget. Make sure to add a budget before adding funds.
Note
If a budget is locked, it will not be possible to add funds.
To add a new fund,
From the list of budgets, click the “Actions” button on the right.
Choose “Add fund”.
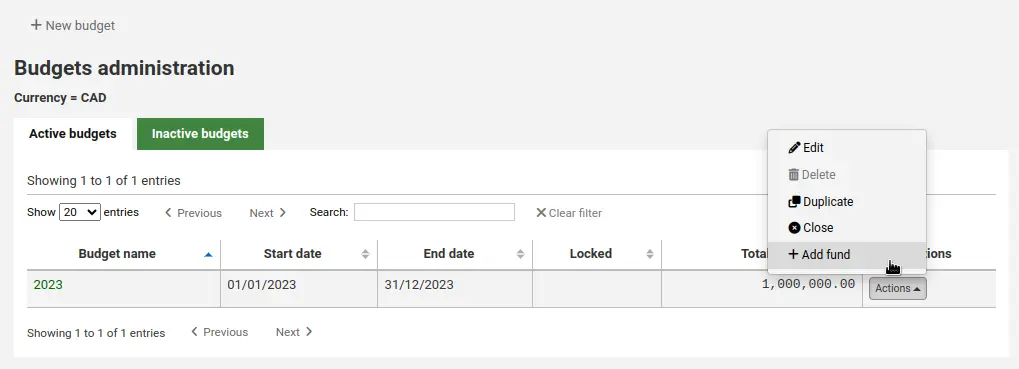
Alternatively,
From the list of budgets, click on the budget name.
On the screen listing the budget breakdown, click the “New” button at the top and choose the “New fund for…” option.
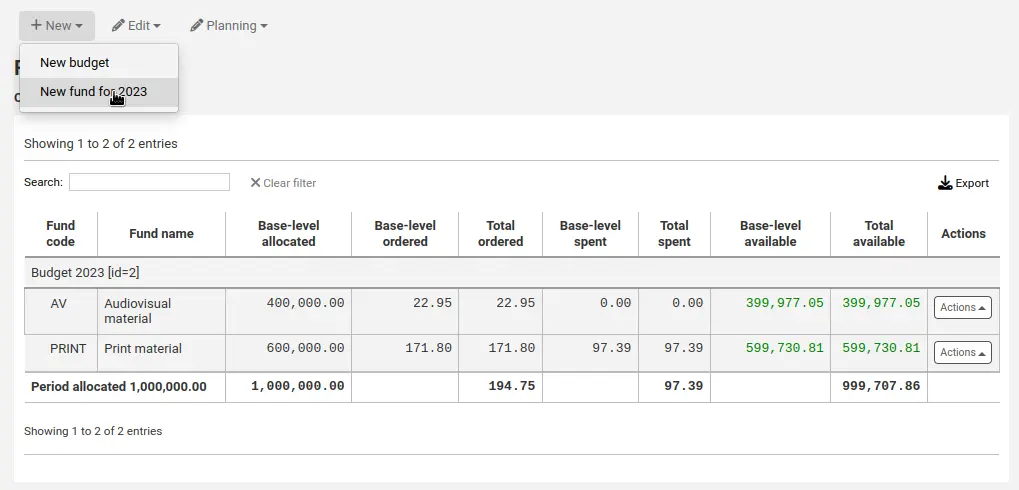
In both cases, you will be presented with a form to create the new fund.
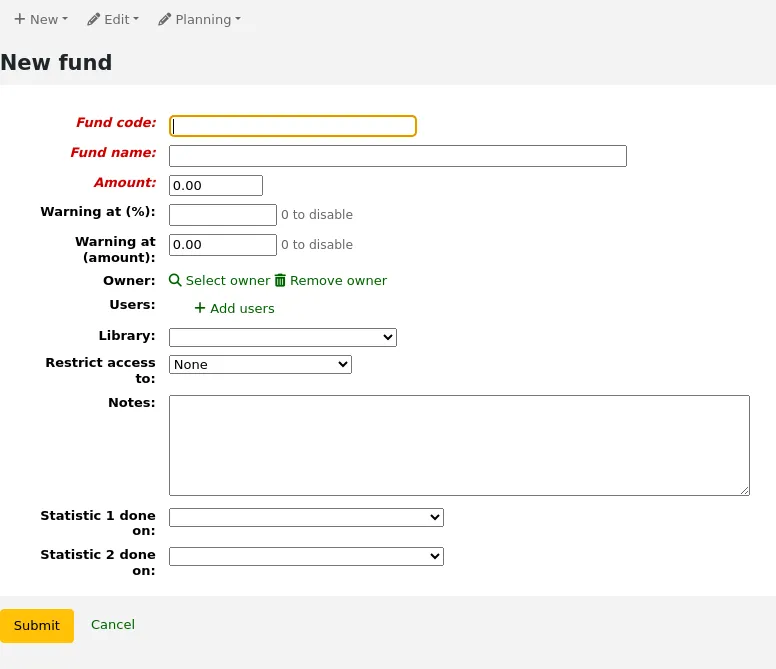
Fund code (mandatory): enter a unique identifier for your fund.
Fund name (mandatory): enter a name for the fund. This should be something that staff will understand, as this is what will be displayed when ordering.
Amount (mandatory): enter the amount with only numbers and decimals, no other characters.
Warning at (%): enter a percentage value to have Koha warn you when you have spent this percentage of the fund, to prevent overspending. For example, if you enter 90%, Koha will warn you for each order after 90% of the fund is spent.
Warning at (amount): same as above but for a specific amount of money spent. For example, if you enter 5000, Koha will warn you for each order after 5000 is spent in the fund.
Owner: you can choose to assign this fund to a staff member.
Click “Select owner”.
Search for the staff member in the patron search form.
Note
Only staff with the budget_modify permission (or the superlibrarian permission) are returned in the search results.
Click “Select” to the right of the staff member’s result.
Note
A fund can only have one owner.
Note
In order to limit the use of this fund to the owner, you must choose either “Owner”, “Owner and users” or “Owner, users and library” in the “Restrict access to” field below. Otherwise, adding users will not have any restricting effect.
Note
Staff members with the order_manage_all permission (or the superlibrarian permission) will be able to use funds regardless of restrictions.
Make sure your staff doesn’t have that permission if you want to restrict access to funds.
Users: you can also add users who will be able to spend in that fund.
Note
In order to limit the use of this fund to the users, you must choose either “Owner and users” or “Owner, users and library” in the “Restrict access to” field below. Otherwise, adding users will not have any restricting effect.
Note
Staff members with the order_manage_all permission (or the superlibrarian permission) will be able to use funds regardless of restrictions.
Make sure your staff doesn’t have that permission if you want to restrict access to funds.
Click “Add users”
Search for the staff member in the patron search form.
Note
Only staff with the budget_modify permission (or the superlibrarian permission) are returned in the search results.
Click “Add” to the right of the staff member’s result.
Note
You can add as many users as you need.
Click “Close” once all the users have been added.
Library: If this fund is for a specific library, choose it here.
Note
In order to limit the use of this fund to the library, you must choose “Owner, users and library” in the “Restrict access to” field below. Otherwise, choosing a library will not have any restricting effect.
Note
Staff members with the order_manage_all permission (or the superlibrarian permission) will be able to use funds regardless of restrictions.
Make sure your staff doesn’t have that permission if you want to restrict access to funds.
Restrict access to: you can restrict who can order from this fund by choosing either the “owner”, “owner and users” or “owner, users and library”.
Avertissement
Sans propriétaire, la restriction d’accès sera ignorée, assurez-vous de saisir un propriétaire ainsi qu’une restriction
Note
Staff members with the order_manage_all permission (or the superlibrarian permission) will be able to use funds regardless of restrictions.
Make sure your staff doesn’t have that permission if you want to restrict access to funds.
Notes: any descriptive notes about this fund.
Note
Notes will only appear on this screen (when editing the fund).
Statistic 1 done on: this is used for statistical purposes. Choose an authorized value category from which to choose values when placing orders using this fund. You will then be able to plan spending and report on spending according to those categories. The default authorized value category Asort1 is created specifically for this purpose, but you can use any authorized value category in this field (CCODE for example to plan spending according to collections).
Statistic 2 done on: same as above, for a second statistical category. The default authorized value category Asort2 is created specifically for this purpose, but you can use any authorized value category.
Note
Pour en apprendre plus au sujet des catégories de planification, consultez la FAQ.
Cliquez sur “Valider”.
You will be brought to a list of all of the funds for the budget.

Les colonnes monétaires du tableau des postes budgétaires se répartissent comme suit :
Le niveau de base alloué est la valeur du « montant » que vous avez définie lors de la création du poste budgétaire.
Le niveau de base commandé correspond au montant commandé pour ce poste budgétaire (sans les postes pour enfants).
Le total commandé est le niveau de base commandé pour ce poste budgétaire et tous ses postes pour enfants.
Le niveau de base dépensé est le montant dépensé pour ce poste budgétaire (sans les postes pour enfants)
Le total dépensé est le niveau de base dépensé pour ce poste budgétaire et tous ses postes pour enfants
Niveau de base disponible est 1 - 2
Total disponible est 1 - 3
To the right of each fund you will find the “Actions” button under which you will find the “Edit,” “Delete,” and “Add sub fund” options.
Ajout d’un poste enfant
Un poste budgétaire enfant est une subdivision d’un poste budgétaire. Par exemple un poste budgétaire « Fiction » pourrait avoir deux postes enfants : « Nouveautés » et « Science-fiction ». Cela peut permettre de mieux organiser vos dépenses.
Note
Si un budget est verrouillé, il ne sera pas possible d’ajouter des postes enfants.
Pour ajouter un poste enfant à un poste budgétaire,
From the list of all funds, or from the list of funds of a specific budget, click the “Actions” button on the right.
Choisissez “Ajouter un poste enfant”.
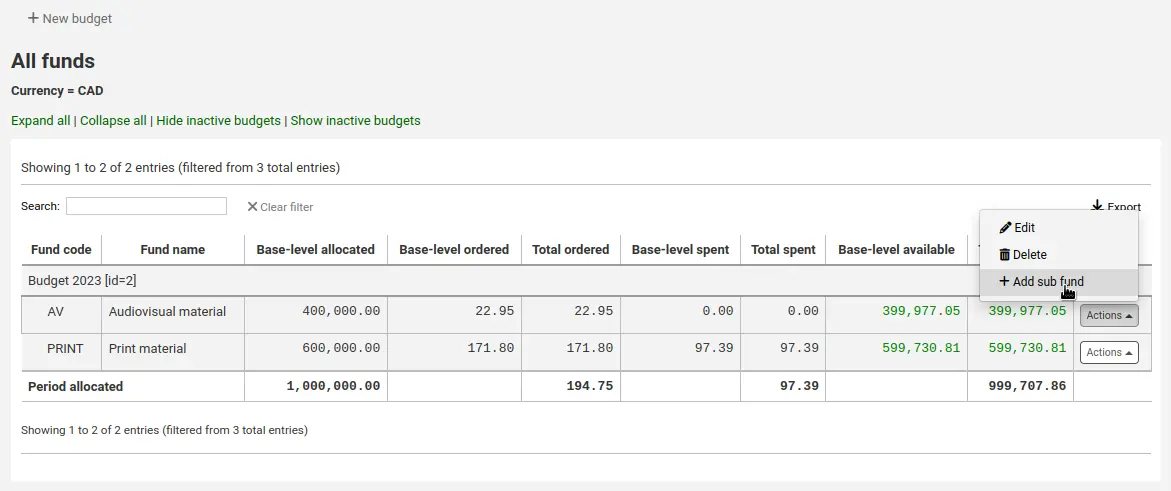
Remplissez le formulaire de création du poste enfant. Les champs sont les mêmes que pour l’ajout d’un nouveau poste budgétaire. La seule différence sera la mention du poste “parent”.
Cliquez sur “Valider”.
Les postes budgétaires ayant des postes enfants seront affichés avec une petite flèche sur la gauche. Cliquez dessus pour afficher les postes enfants.
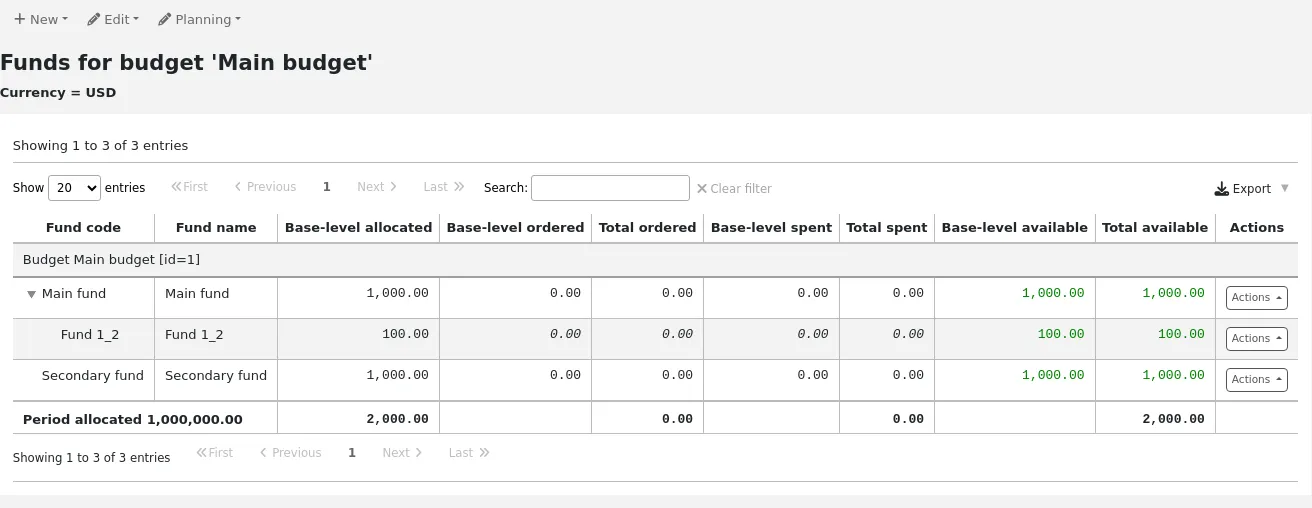
Deleting funds
It is possible to delete funds, if necessary.
Avertissement
Deleting a fund in which there are orders will delete those orders. Only delete funds if you are certain it needs to be deleted. It is not possible to undo this.
To delete a fund,
From the list of all funds, or from the list of funds of a specific budget, click the “Actions” button on the right.
Choose “Delete”.

Click “Yes, delete this fund” in the warning message.
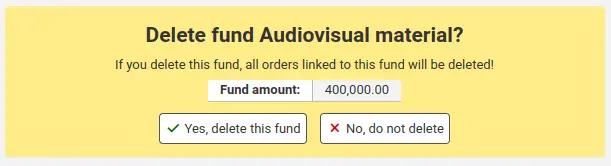
Planification du budget
Note
Staff members must have the planning_manage permission, the budget_manage permission, and the period_manage permission (or the superlibrarian permission) in order to access budget planning.
Sur la liste des périodes budgétaires, cliquez sur le bouton Planification et choisissez comment vous prévoyez de dépenser votre budget.
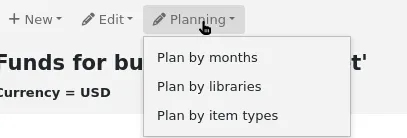
If you choose “Plan by months” you will see the budgeted amount broken down by months.
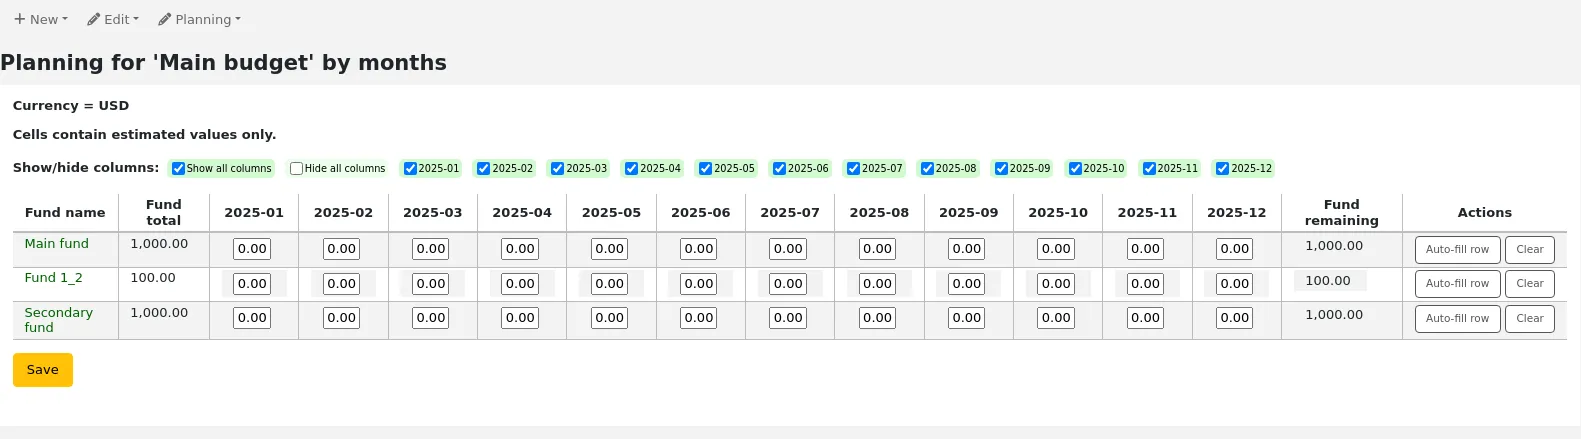
On the left are filters that can be used to limit what is shown in the table.
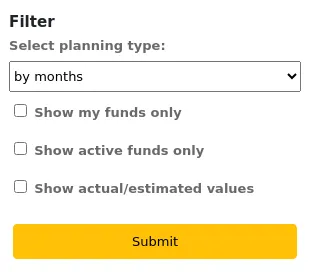
Select planning type: choose to plan by months, libraries, item types, or any authorized value category used as statistic 1 or 2 in the funds.
Show my funds only: this will filter out funds of which you are not the owner.
Show active funds only: this will filter out funds that have not been used (no ordered amount).
Show actual/estimated values: this will alter the table to show the ordered amounts as well.
To hide some of the columns, uncheck the boxes at the top of the table.
From here, you can plan your budget spending by manually entering values or by clicking the “Auto-fill row” button. If you choose to auto-fill the form the system will try to divide the amount accordingly, you may have to make some edits to split things more accurately.

Once your changes are made, click the “Save” button.
Note
If a budget is locked, it will not be possible to edit the values.
To export your data as a CSV file, enter a file name in the “Output to a file named” field, in the “Export” section on the left, and click the “Submit” button.
Comptes EDI
A partir de là vous pouvez entrer les informations nécessaires pour vous connecter à vos fournisseurs
Note
This section will only appear if the EDIFACT system preference is enabled.
Note
Seuls les bibliothécaires avec la permission edi_manage (ou la permission superlibrarian) auront accès à cette section.
Note
Before you begin you will need at least one vendor set up in acquisitions.
Pour ajouter un compte, cliquez sur le bouton « Nouveau compte ».
Enter your vendor’s information in the form.
See the EDI questions for vendors section of the acquisitions module chapter for a description of each field.
Chaque fournisseur aura un compte.
EANs de bibliothèque
Un code EAN pour bibliothèque est un identifiant donné à une bibliothèque par un fournisseur afin qu’elle puisse s’identifier et qu’il puisse savoir quel compte utiliser lors de la facturation. Un compte EDI peut avoir plusieurs EAN.
Note
This section will only appear if the EDIFACT system preference is enabled.
Note
Seuls les bibliothécaires avec la permission edi_manage (ou la permission superlibrarian) auront accès à cette section.
Pour ajouter un EAN, cliquez sur le bouton « Nouvel EAN ».
Dans le formulaire qui s’affiche, entrez les informations fournies par votre fournisseur.
See the EDI questions for vendors section of the acquisitions module chapter for a description of each field.
Paramètres divers
Aller à : Plus > Administration > Paramètres divers
Identity providers
This section is used to define and manage external identity providers for Koha users. This is used when your users come from an external source, such as student management system, active directory, or other similar databases.
Aller à : Plus > Administration > Paramètres divers > Fournisseurs d’identité
Note
Seuls les bibliothécaires avec la permission manage_identity_providers (ou la permission superlibrarian) auront accès à cette section.
Adding an identity provider
To add an identity provider, click the “New identity provider” button.
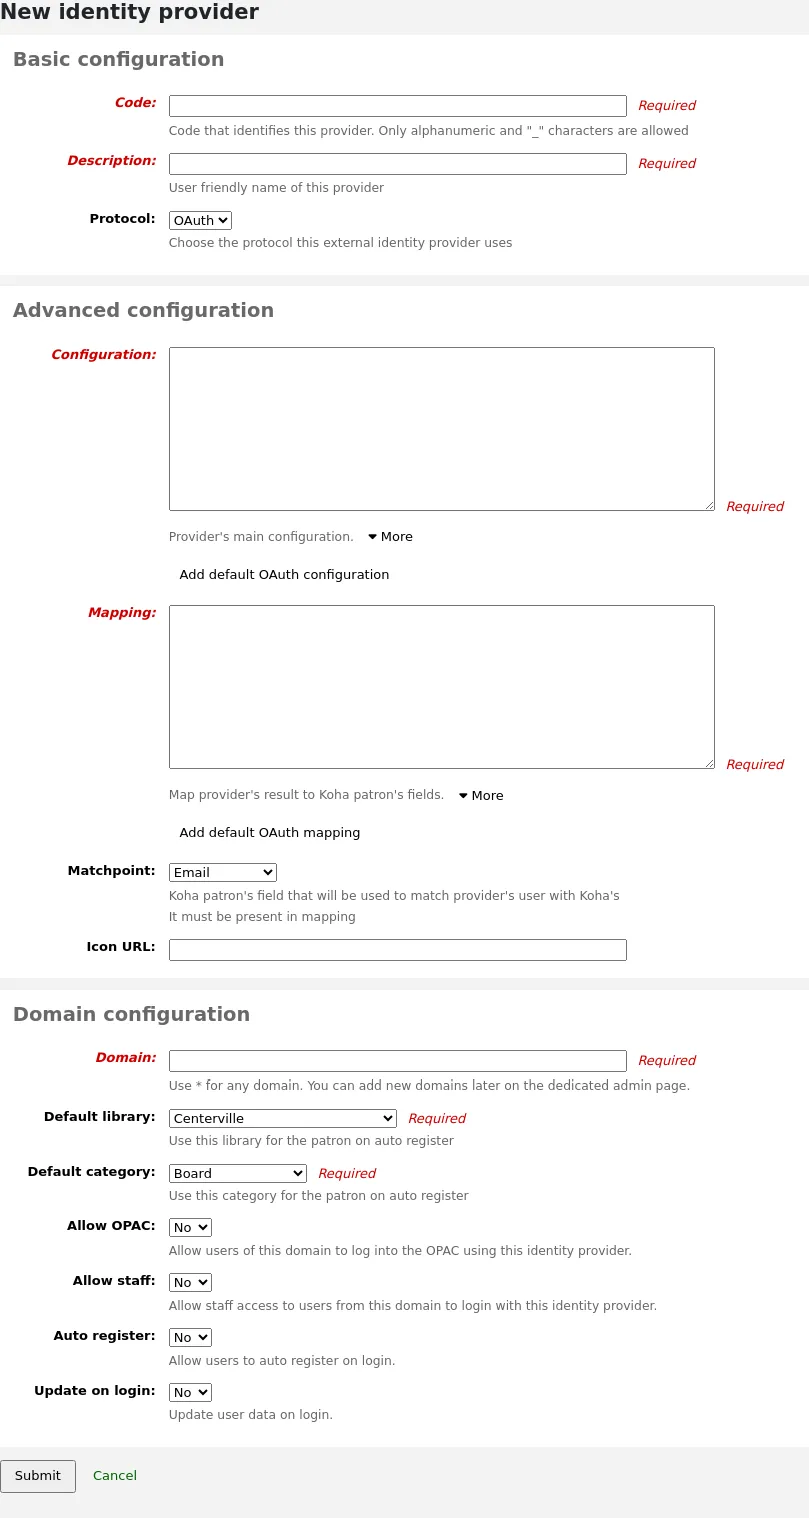
Basic configuration
Code: enter a code for this provider.
Note
The code for the identity provider is limited to 20 characters and can only be composed of letters, numbers, and underscore (_).
Description: enter a name for this provider. This is what you will see in the interface.
Protocol: choose which protocol this identity provider uses.
OAuth
OIDC
Configuration avancée
Configuration: Use this field to enter the configuration specific to the protocol chosen above.
You can click on the “Add default OAuth configuration” button or the “Add default OIDC configuration” button to prefill the field with some default values, which you can change for your own values.
The default OAuth configuration is:
{
 "key": "<enter client id>",
 "secret": "<enter client secret>",
 "authorize_url": "<enter authorization endpoint>",
 "token_url": "<enter token endpoint>",
 "userinfo_url": "<enter user info endpoint (optional)>",
 "scope": "email"
}
The default OIDC configuration is:
{
 "key": "<enter client id>",
 "secret": "<enter client secret>",
 "well_known_url": "<enter openid configuration endpoint>",
 "scope": "openid email"
}
Mapping: Use this field to define the field mappings from the external database to the Koha borrower fields.
The key is the Koha field from the borrowers table, and the value is the external field.
Note
You can find all fields for the borrowers table in the database structure.
You can click on the “Add default OAuth mapping” button or the “Add default OIDC mapping” button to prefill the field with some default values, which you can change for your own values.
Both the default OAuth mapping and default OIDC mapping are:
{
 "email": "email",
 "firstname": "given_name",
 "surname": "family_name"
}
If the external fields are nested, you can use periods to separate the levels.
For example, if the firstname is nested like so:
<user>
   <given_name>First name</given_name>
   <family_name>Family name</family_name>
   <email>Email address</email>
</user>
Use:
"firstname": "user.0.given_name"
This will fetch the « given_name » field in the first « user » field (0 = first).
Important
If you plan on using the auto register function (see below), make sure either « userid » or « cardnumber » are present in the mappings.
Important
Make sure the field for the matchpoint (see below) is included in the mappings.
Matchpoint: choose which field is used to match incoming users to existing users.
Note
The field chosen here must be included in the mappings (see above).
Icon URL: if you want an icon to show on the login screen for this provider, enter the URL to the image file here.
Domain configuration
Note
Enter at least one domain for this provider. Once it is saved, you will be able to add more domains to this provider.
Domain: enter the email domain for incoming users.
Note
Enter an asterisk (*) to include all domains.
Default library: if auto register is enabled, choose at which library new users will be registered.
Default category: if auto register is enabled, choose which patron category will be assigned to new users.
Allow OPAC: choose if patrons of this domain can log into the OPAC with their credentials from this identity provider.
Allow staff: chose if staff members of this domain can log into the staff interface with their credentials from this identity provider.
Auto register: choose whether or not a new patron account is created in Koha when a user from this domain logs in for the first time with their credentials from this identity provider.
Note
If auto register is enabled, make sure the « userid » or « cardnumber » fields are included in the mappings (see above).
Also make sure the default library and default category are set correctly for new patrons. These will be assigned to the new patrons.
Update on login: choose whether or not the patron account in Koha is updated with the external information when a user from this domain logs in with their credentials from this identity provider.
Avertissement
Information may be lost if you change it directly in Koha.
Once the form is completed, click “Submit” to save the new identity provider.
You will need to restart Koha once the identity provider is added.
Adding an email domain to an existing identity provider
You will need to add at least one email domain when creating a new identity provider. You can add more by clicking the “Manage domains” button to the right of the identity provider from the main identity providers page, and clicking “New email domain”.
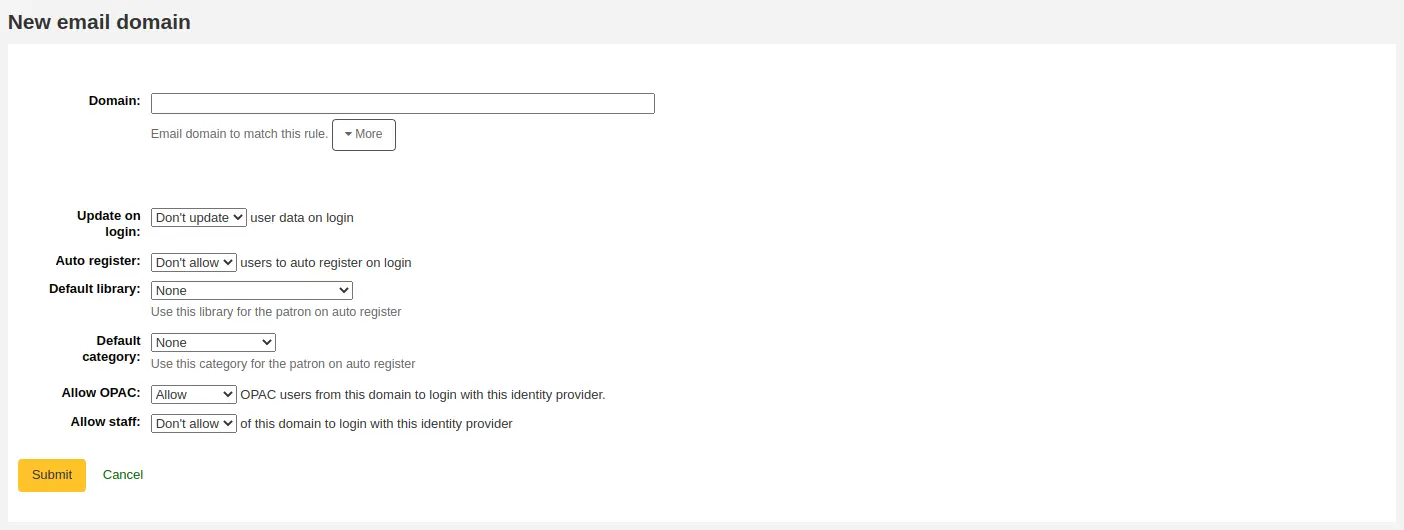
Domain: enter the email domain for incoming users.
Note
Enter an asterisk (*) to include all domains.
Update on login: choose whether or not the patron account in Koha is updated with the external information when a user from this domain logs in with their credentials from this identity provider.
Avertissement
Information may be lost if you change it directly in Koha.
Auto register: choose whether or not a new patron account is created in Koha when a user from this domain logs in for the first time with their credentials from this identity provider.
Note
If auto register is enabled, make sure the « userid » or « cardnumber » fields are included in the mappings of the identity provider.
Also make sure the default library and default category are set correctly for new patrons. These will be assigned to the new patrons.
Default library: if auto register is enabled, choose at which library new users will be registered.
Default category: if auto register is enabled, choose which patron category will be assigned to new users.
Allow OPAC: choose if patrons of this domain can log into the OPAC with their credentials from this identity provider.
Allow staff: chose if staff members of this domain can log into the staff interface with their credentials from this identity provider.
Once the form is completed, click “Submit” to save the new email domain.
Serveurs Z39.50/SRU
Z39.50 is a client/server protocol for searching and retrieving information from remote computer databases. In short, it’s a tool used for copy cataloging.
SRU (Search/Retrieve via URL) is a standard XML-based protocol for search queries, utilizing CQL (Contextual Query Language), a standard syntax for representing queries.
Using Koha you can connect to any Z39.50 or SRU target that is publicly available or that you have the log in information to and copy bibliographic or authority records from that source.
Aller à : Plus > Administration > Paramètres divers > Serveurs Z39.50/SRU
Note
Seuls les bibliothécaires avec la permission manage_search_targets (ou la permission superlibrarian) auront accès à cette section.
Koha comes with a default list of Z39.50/SRU targets set up that you can add to, edit or delete.
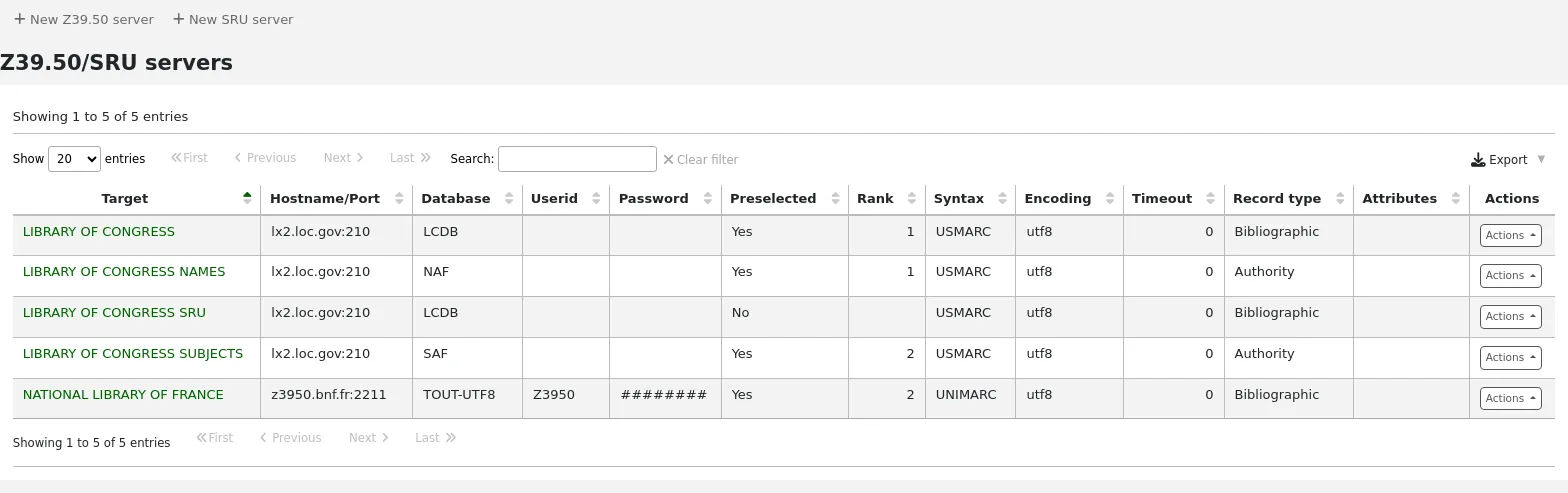
Adding a Z39.50 target
To find additional Z39.50 targets, you can use Index Data’s IRSpy https://irspy.indexdata.com or the Library of Congress’s list of targets https://www.loc.gov/z3950/. You can also contact individual libraries and ask for their Z39.50 information.
Dans la page principale Z39.50, cliquez sur “Ajouter un serveur Z39.50”.
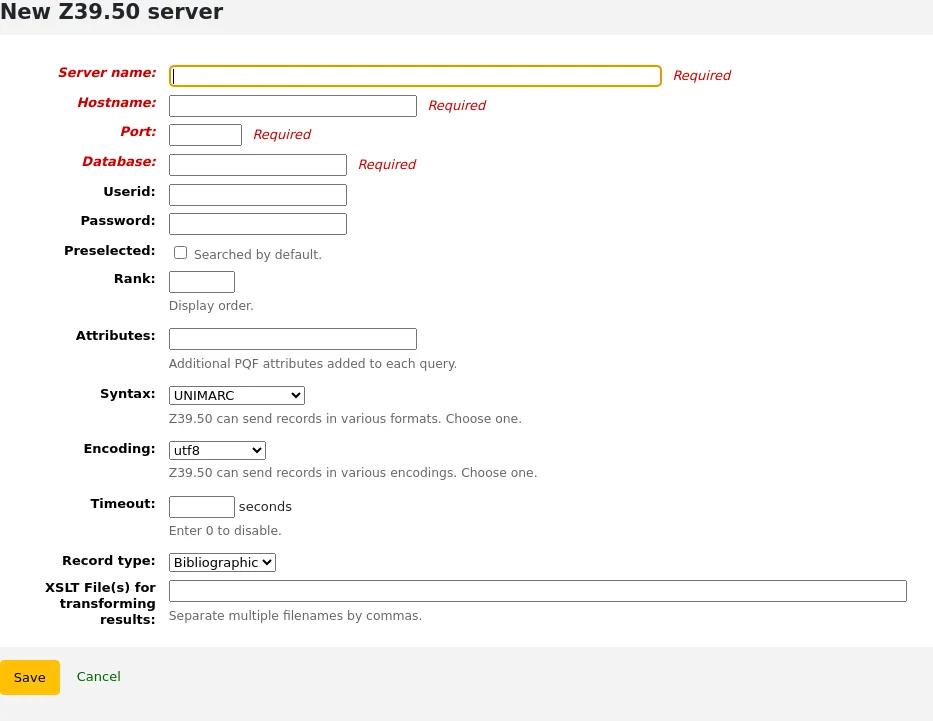
Server name: enter a name that will help you identify the source (such as the library name). It will be saved in capital letters.
Hostname: enter the address to the Z39.50 target.
Port: enter the port number to listen on to get results from this target.
Database: enter the name of the database.
Userid: some servers might be password protected. If that is the case for the server you are trying to add, enter your user ID for that source.
Password: if the server is password protected, enter your password for that source.
Preselected: check this box if you want this target to always be selected by default.
“Rang” précise l’emplacement de la cible dans la liste. 0 est la première position, ensuite 1, 2, etc.
Laissez vide pour que les cibles soient triés dans l’ordre alphabétique.
Attributes: enter PQF attributes to be added to all queries.
Syntax: choose the MARC flavor used by this target.
Encoding: choose the character encoding used by this target.
Note
If you notice special characters don’t appear correctly when you import records through Z39.50, it means the encoding is wrong. Change it to another and try importing again.
Timeout: enter a number of seconds after which to stop trying to search the target if results aren’t found in a reasonable amount of time. It is helpful for targets that take a long while.
Record type: choose if this is a bibliographic or an authority target.
XSLT file(s) for transforming results: enter one or more (comma-separated) XSLT file names that you want to apply on the search results.
Lors de la récupération de notices de serveurs externes, vous pouvez vouloir automatiser quelques changements à ces notices. Le XSLT vous permet de le faire. Koha est fourni avec quelques fichiers d’échantillon XSLT prêts à l’emploi, dans le répertoire /koha-tmpl/intranet-tmpl/prog/en/xslt/ :
Del952.xsl: Remove Koha items (field 952) (MARC21)
Del995.xsl: Remove Koha items (field 995) (UNIMARC)
Del9LinksExcept952.xsl: Remove links to authorities in bibliographic records ($9), except in the case of 952$9 (itemnumber) (MARC21)
Del9LinksExcept995.xsl: Remove links to authorities in bibliographic records ($9), except in the case of 995$9 (itemnumber) (UNIMARC)
Cliquer sur “Enregistrer”.
Serveurs Z39.50 bibliographiques suggérés
Koha libraries that have shared their Z39.50 targets are listed on the Koha wiki at https://wiki.koha-community.org/wiki/Koha_Open_Z39.50_Sources.
Known publicly available targets are listed on the Koha wiki at https://wiki.koha-community.org/wiki/Configure_Z39.50/SRU_targets.
You can also find open Z39.50 targets listed on the IRSpy website at https://irspy.indexdata.com/.
These targets are known to work:
LIBRARY OF CONGRESS
- Nom du serveur:
LIBRARY OF CONGRESS
- Adresse du serveur:
lx2.loc.gov
- Port:
210
- Base de données:
LCDB
- Présélectionné:
select to search by default
- Rang:
enter a value for the display order, for example 1
- Syntaxe:
MARC21/USMARC
- Encodage:
utf8
- Délais:
0
- Type de notice:
Bibliographic
OHIOLINK
- Nom du serveur:
OHIOLINK
- Adresse du serveur:
olc1.ohiolink.edu
- Port:
210
- Base de données:
INNOPAC
- Présélectionné:
select to search by default
- Rang:
enter a value for the display order, for example 1
- Syntaxe:
MARC21/USMARC
- Encodage:
utf8
- Délais:
0
- Type de notice:
Bibliographic
Adding an SRU target
Dans la page principale Z39.50/SRU, cliquez sur “Ajouter un serveur SRU”
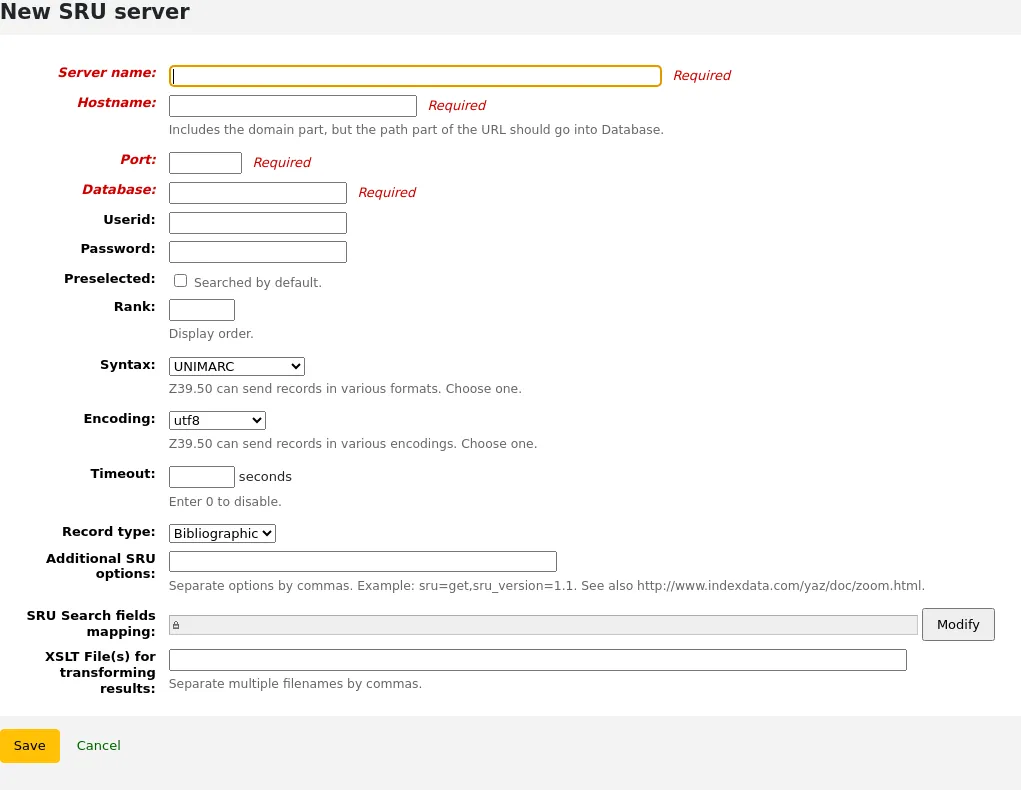
Server name: enter a name that will help you identify the source (such as the library name).
Hostname: enter the address (URL) to the SRU target.
Port: enter which port to listen on to get results from this target.
Database: enter the name of the database.
Userid: some servers might be password protected. If that is the case for the server you are trying to add, enter your user ID for that source.
Password: if the server is password protected, enter your password for that source.
Preselected: check this box if you want this target to always be selected by default.
“Rang” précise l’emplacement de la cible dans la liste. 0 est la première position, ensuite 1, 2, etc.
Laissez vide pour que les cibles soient triés dans l’ordre alphabétique.
Syntax: choose the MARC flavor used by this target.
Encoding: choose the character encoding used by this target.
Note
If you notice special characters don’t appear correctly when you import records through Z39.50, it means the encoding is wrong. Change it to another and try importing again.
Timeout: enter a number of seconds after which to stop trying to search the target if results aren’t found in a reasonable amount of time. It is helpful for targets that take a long while.
Record type: choose if this is a bibliographic or an authority target.
Additional SRU options: enter additional options of the external server here, like
sru_version=1.1orschema=marc21, etc. Note that these options are server dependent.SRU Search field mapping: click “Modify” to add or update the mapping from the available fields on the Koha search form to the specific server dependent index names.
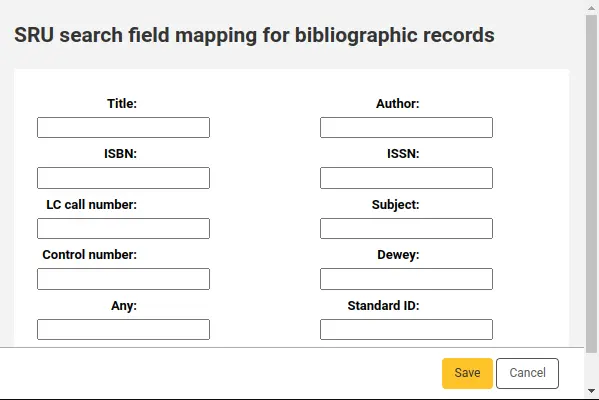
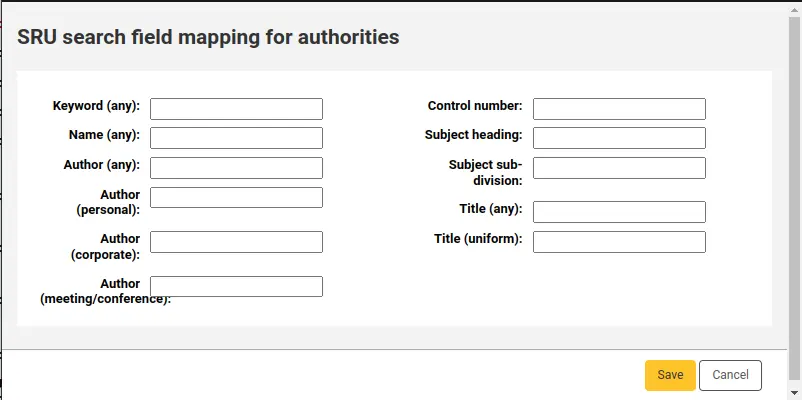
Pour affiner davantage vos recherches, vous pouvez ajouter les noms d’index suivants aux mappages des champs de recherche SRU. Pour faire ceci, afficher le serveur et cliquez sur le bouton « Modifier » à côté de ce champ.
Titre
title
ISBN
bath.isbn
Tous
cql.anywhere
Auteur
auteur
ISSN
bath.issn
Sujet
Sujet
Standard:
bath.standardIdentifier
Table : Mapping SRU
XSLT file(s) for transforming results: enter one or more (comma-separated) XSLT file names that you want to apply on the search results.
Lors de la récupération de notices de serveurs externes, vous pouvez vouloir automatiser quelques changements à ces notices. Le XSLT vous permet de le faire. Koha est fourni avec quelques fichiers d’échantillon XSLT prêts à l’emploi, dans le répertoire /koha-tmpl/intranet-tmpl/prog/en/xslt/ :
Del952.xsl: Remove Koha items (field 952) (MARC21)
Del995.xsl: Remove Koha items (field 995) (UNIMARC)
Del9LinksExcept952.xsl: Remove links to authorities in bibliographic records ($9), except in the case of 952$9 (itemnumber) (MARC21)
Del9LinksExcept995.xsl: Remove links to authorities in bibliographic records ($9), except in the case of 995$9 (itemnumber) (UNIMARC)
Cliquer sur “Enregistrer”.
OAI repositories
Version
This feature was first introduced in version 24.11 of Koha.
Get there: More > Administration > Additional parameters > OAI repositories
This section is used to define which OAI repositories to harvest metadata from in order to create records in Koha.
OAI-PMH harvesting is a protocol to retrieve records from an OAI-PMH repository. OAI-PMH repositories may be used by libraries for local history collections, thesis repositories… This functionality allows you to host and manage a collection outside of Koha but include the records in your Koha catalogue.
Once one or more OAI repositories are set up, use the harvest_oai.pl cronjob to harvest the records.
Adding an OAI repository to harvest
You will need to add a new OAI repository for each set you want to harvest. Click on the button “+ New OAI repository”.
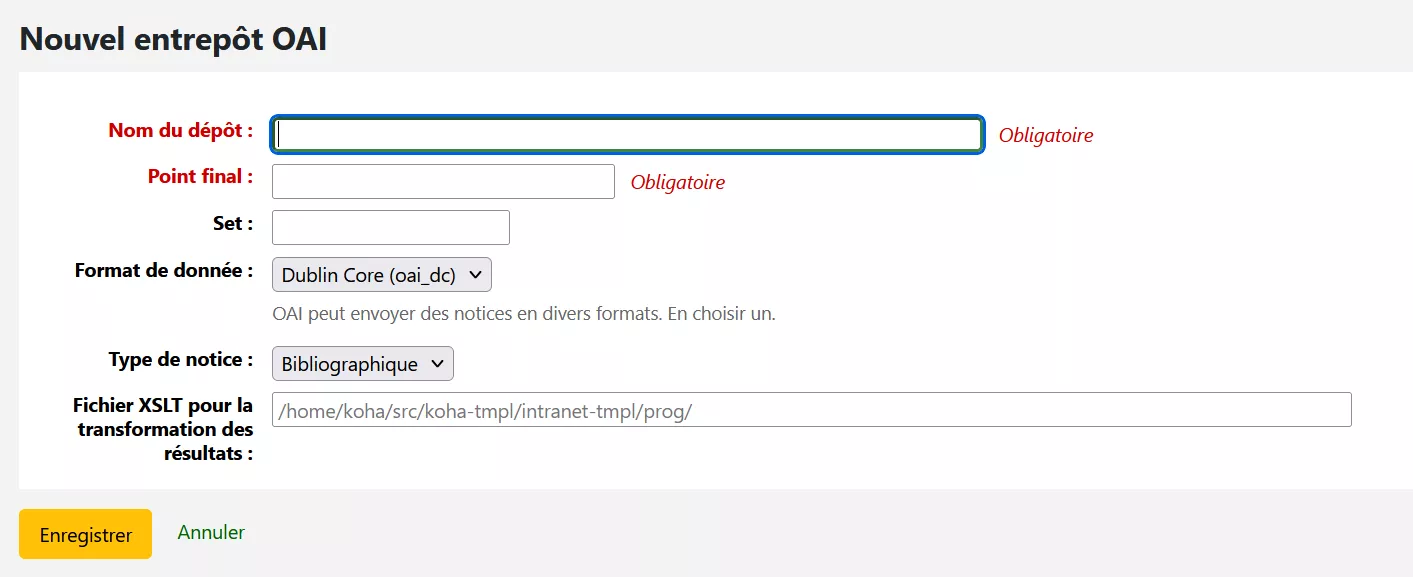
Repository name: enter a name that will help you identify the source
Point de terminaison : saisir l’URL.
The repository should provide you with its base endpoint; for example
https://doaj.org/oai?verb=Identifyfor the Directory of Open Access Journals. In the Koha endpoint field, simply enter the information before?verb, e.g.https://doaj.org/oai.
Set: the name of the set you want to harvest.
You can usually find all the sets available by adding
?verb=ListSetsto the endpoint you entered in the previous field.
Data format: choose the format to harvest in the list.
You can check the formats available for a repository by adding
?verb=ListMetadataFormatsto the endpoint you entered previously.
Record type: choose if you will harvest bibliographic or authority records in this set.
XSLT file for transforming results: type the path of the XSLT file you want to apply to transform Dublin Core XML to MARC. Several XSLT files are provided by default:
For bibliographic records:
<path_to_src>/koha-tmpl/intranet-tmpl/prog/en/xslt/OAIDCtoUNIMARCXML.xslor<path_to_src>/koha-tmpl/intranet-tmpl/prog/en/xslt/OAIDCtoMARC21XML.xslFor authority records:
<path_to_src>/koha-tmpl/intranet-tmpl/prog/en/xslt/AuthOAIDCtoUNIMARCXML.xslor<path_to_src>/koha-tmpl/intranet-tmpl/prog/en/xslt/AuthOAIDCtoMARC21XML.xsl
Click “Save” to save the new OAI repository.
Serveurs SMTP
Comment y accéder: Plus > Administration > Paramètres divers > Serveurs SMTP
Cette section permet de configurer les paramètres de serveur SMTP d’envoi de courriels par Koha.
Note
Seuls les membres du personnel ayant la permission manage_smtp_servers (ou la permission superlibrarian) pourront avoir accès à ces paramètres.
La configuration par défaut de STMP est définie dans le fichier koha-conf.xml. Cependant, cette section vous permet d’ajouter des serveurs supplémentaires.
Pour ajouter un nouveau serveur,
Cliquer sur “Nouveau serveur SMTP”
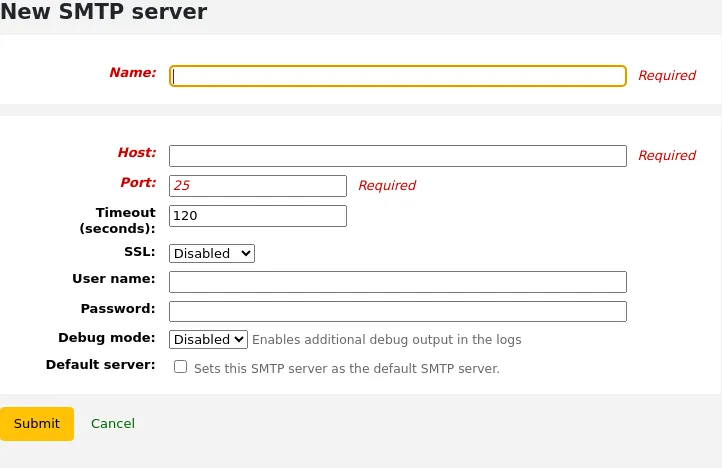
Nom (obligatoire) : donnez un nom significatif au serveur, ce nom sera affiché dans Koha
Hôte (obligatoire): inscrire le nom du serveur hôte ou l’adresse IP du serveur
Port (obligatoire): inscrire le numéro de port fourni par votre fournisseur.
Délai (en seconde): inscrire le nombre de secondes après lequel un courriel non envoyé entraînera une erreur
SSL: choisir le protocole de sécurité fourni par votre administrateur
Désactivé: non sécurisé (non recommandé)
SSL
STARTTLS
Identifiant: inscrire l’identifiant fourni par votre administrateur
Mot de passe: inscrire le mot de passe fourni par administrateur
Mode débogage: choisir d’activer ou non le mode débogage pour envoyer des données supplémentaires de débogage dans les registres
Serveur par défaut: choisir si ce serveur est le serveur par défaut utilisé par toutes les bibliothèques
Cliquez sur “Valider”
Once the server is added, you can select it in the library’s details.
Voulez-vous dire?
Aller à : Plus > Administration > Paramètres divers > Vouliez-vous dire ?
Note
Seuls les membres du personnel avec la permission manage_didyoumean (ou la permission superlibrarian) pourront consulter ces paramètres.
La fonction « Vouliez-vous dire? » permet de proposer des alternatives lors des recherches, en se basant sur les autorités.
Important
Note : “Vouliez-vous-dire ?” ne fonctionne pour le moment qu’à l’OPAC. La fonctionnalité en mode professionnel n’est indiquée qu’en tant que futur développement.
Avec cette page, vous pouvez contrôler quelles seront les options proposées aux utilisateurs dans leurs résultats de recherche.
Pour afficher la barre “Vouliez-vous dire?” dans vos résultats de rechercher, vous devez cocher les cases à côté de chaque plugin que vous souhaitez utiliser. Les deux plugins sont:
Le plugin ExplodedTerms suggère à l’usager de relancer sa recherche sur termes génériques/spécifiques/associés liés à sa recherche initiale. Par ex., un usager cherchant « New York (Etat) » pourrait cliquer sur le lien relançant la recherche sur les termes spécifiques s’il est aussi intéressé par « New York (Ville) ». Cela ne peut fonctionner que pour les bibliothèques disposant de données d’autorités hautement hiérarchisées.
Le plugin AuthorityFile recherche dans le fichier autorités et suggère à l’utilisateur des liens bibliographiques liés aux 5 premières autorités
Si vous voulez qu’un plugin soit prioritaire sur un autre, il vous suffit de le faire glisser au-dessus de l’autre.
Si vous choisissez les deux plugins, vous verrez plusieurs options en haut des résultats de votre recherche
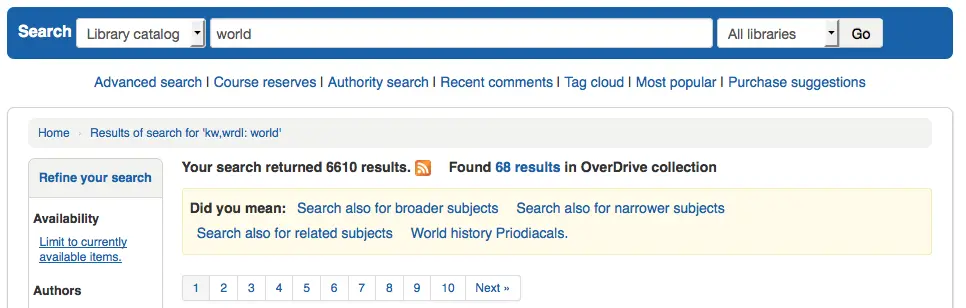
Si vous choisissez uniquement le fichier AuthorityFile, vous verrez uniquement les autorités.
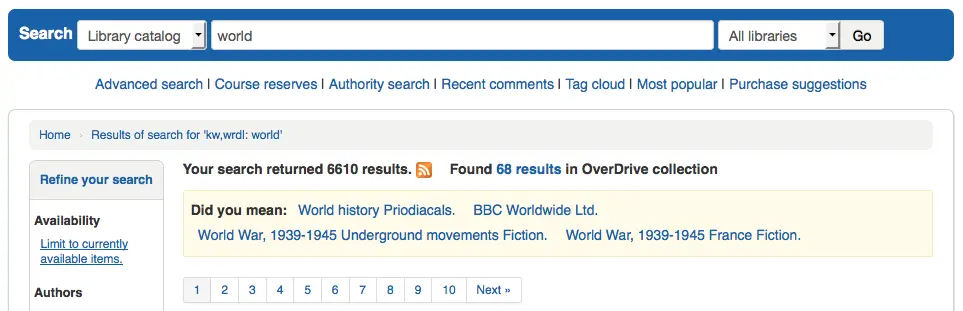
Configuration des tableaux
Cette zone d’administration vous aidera à cacher ou afficher des colonnes dans les tableaux de l’interface professionnelle et de l’OPAC.
Allez à : Plus > Administration > Paramètres divers > Configurer les colonnes
Note
Seuls les membres du personnel avec la permission manage_column_config (ou la permission superlibrarian) auront accès à ces paramètres.
Les options disponibles seront affichées en cliquant sur le module dans lequel vous souhaitez paramétrer les tableaux.
Cette zone vous permet de contrôler les colonnes qui s’affichent dans le tableau en question. Si rien n’est masqué, vous ne verrez aucune crochet dans la colonne “caché par défaut” du tableau.
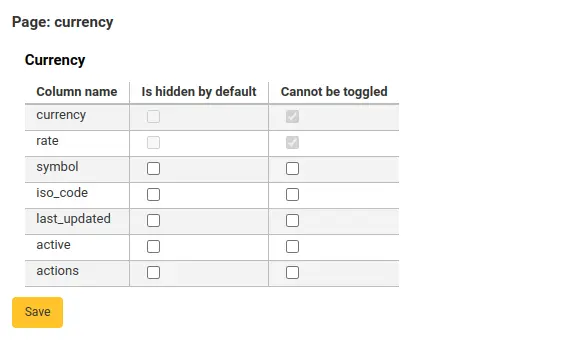
Et vous verrez toutes les colonnes lors de l’affichage du tableau sur sa page normale.

Si les colonnes sont cachées, elles seront cochées dans la colonne “est cachée par défaut”.
Et cachées lorsque vous consultez le tableau.
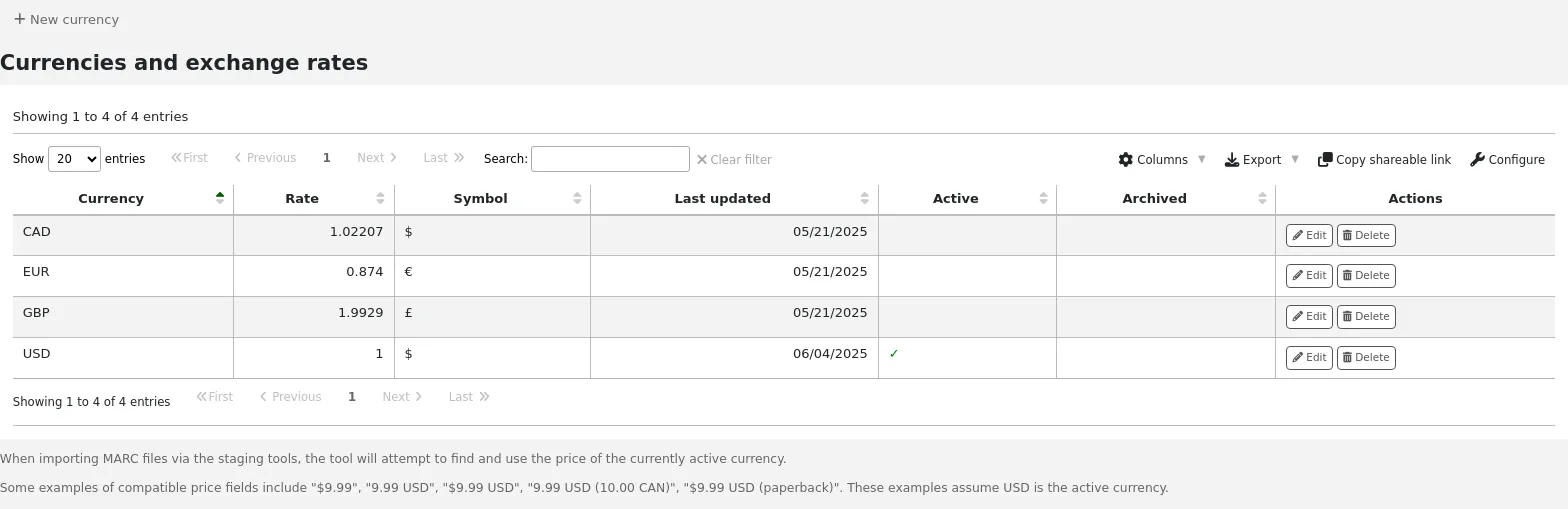
La colonne “Ne peut être basculé” est utilisée pour empêcher chaque utilisateur d’afficher ou de cacher cette colonne en consultant le tableau.
Les utilisateurs individuels peuvent basculer des colonnes en utilisant le bouton “Colonnes” en haut du tableau.
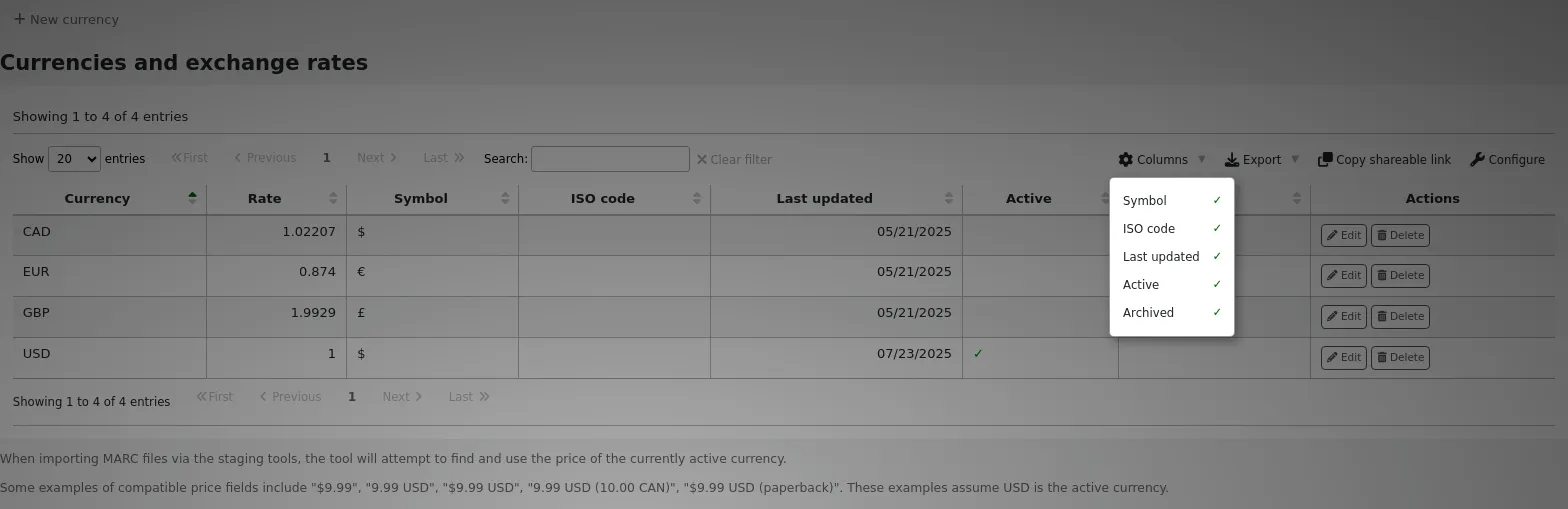
Par exemple, dans le tableau des Devises, les colonnes “Devise” et “Taux” ne peuvent pas être basculées. Lorsque l’utilisateur clique sur le bouton « Colonnes », il ne sera pas possible de choisir d’afficher ou de masquer l’une de ces deux colonnes.
Notez qu’utiliser le bouton “Colonnes” affiche ou masque des colonnes uniquement pour l’utilisateur et la session en cours. Une fois que l’utilisateur se déconnecte, les colonnes reviendront à leurs paramètres par défaut tels qu’ils sont définis dans la page d’administration. Ceci n’affectera aucun autre utilisateur.
Module |
Tableaux |
|---|---|
Acquisitions |
|
Administration |
|
Autorités |
Aucun tableau ne peut être configuré dans le module Autorités. |
Catalogue |
|
Catalogage |
|
Circulation |
|
Réserves de cours |
|
Gestion des ressources électroniques |
|
Prêts entre bibliothèques |
|
Adhérents |
|
Point de vente |
|
Outils |
|
OPAC |
|
Rapports |
|
Périodiques |
|
Note
Les adhérents à l’OPAC ne peuvent pas basculer la visibilité des colonnes. Pour les tableaux de l’OPAC cette fonctionnalité permet uniquement de contrôler la visibilité des colonnes.
Note
Tous les tableaux avec les colonnes répertoriées ici peuvent aussi être exportés vers Excel, au format CSV, être copiés ou imprimés au niveau de l’en-tête du tableau.
Alertes sonores
Si vous avez paramétré la préférence système AudioAlerts sur “Autoriser”, vous pourrez contrôler, d’ici, les différentes alertes sonores utilisées par Koha.
Aller à : Plus > Administration > Paramètres divers > Alertes sonores
Note
Seuls les bibliothécaires avec la permission manage_audio_alerts (ou la permission superlibrarian) auront accès à cette section.
Chaque boîte de dialogue de Koha a une classe CSS qui peut être utilisée comme sélecteur de son.
Pour modifier les valeurs, cliquez sur le bouton « Modifier » à droite du nom de chaque alerte.
Vous pouvez affecter des alertes à d’autres classes CSS dans Koha en entrant ces informations dans la zone de sélection. Par exemple si vous entrez
body:contains('Check in message')
Then when you visit the check-in page you will hear an alert.
Chaque page de Koha a un identifiant unique dans la balise body qui peut être utilisé pour limiter un son à une page spécifique.
N’importe ID de sélecteur (où HTML contient id= »name_of_id ») et peut également être un déclencheur tel que : #name_of_selector
Fournisseur de SMS
Important
- This option will only appear if the
Cette option n’apparaîtra que si vous avez défini la préférence système SMSSendDriver sur “Courriel”
Note
Seuls les bibliothécaires avec la permission manage_sms_providers (ou la permission superlibrarian) auront accès à cette section.
Note
Beaucoup de fournisseurs mobiles ont baissé la qualité de leur maintenance pour la fonctionnalité SMS::Send::Email. Il n’est pas recommandé de les utiliser à moins d’avoir une passerelle dédiée SMS vers Courriel.
À partir de là, vous pouvez entrer autant de fournisseurs de téléphonie mobile que nécessaire pour envoyer des notifications SMS à vos clients à l’aide du protocole de messagerie.
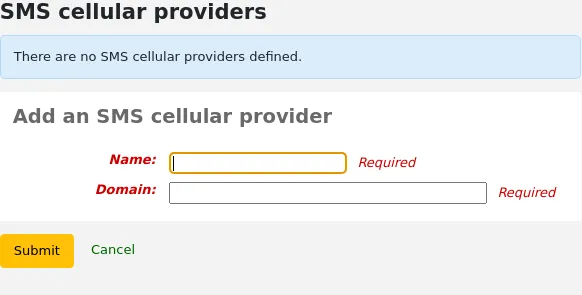
Quelques exemples aux Etats-Unis :
Mobile carrier |
SMS gateway domain |
|---|---|
Alltel |
sms.alltelwireless.com |
AT&T |
txt.att.net |
Boost Mobile |
sms.myboostmobile.com |
Project Fi |
msg.fi.google.com |
Republic Wireless |
text.republicwireless.com |
Sprint |
messaging.sprintpcs.com |
T-mobile |
tmomail.net |
U.S. Cellular |
email.uscc.net |
Verizon Wireless |
vtext.com |
Virgin Mobile |
vmobl.com |
Tableau : examples de fournisseurs de SMS
Pour ajouter de nouveaux fournisseurs, entrez les détails dans le formulaire et cliquez sur “Ajouter un nouveau” pour enregistrer.
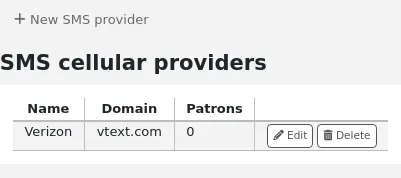
These options will appear in the OPAC for patrons to choose from on the Messaging tab if you have EnhancedMessagingPreferences enabled.
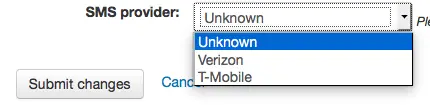
Partager vos statistiques d’utilisation
Vous pouvez partager vos statistiques d’utilisation de Koha avec la communauté Hea. Partager vos statistiques d’utilisation aide au développement de Koha car la communauté vérifie régulièrement ces statistiques pour prendre des décisions.
Note
Seuls les bibliothécaires avec la permission manage_usage_stats (ou la permission superlibrarian) auront accès à cette section.
Notez que les statistiques sont anonymisées et qu’aucune information d’adhérent n’est partagée.
Des statistiques du monde entier peuvent être consultées sur https://hea.koha-community.org/
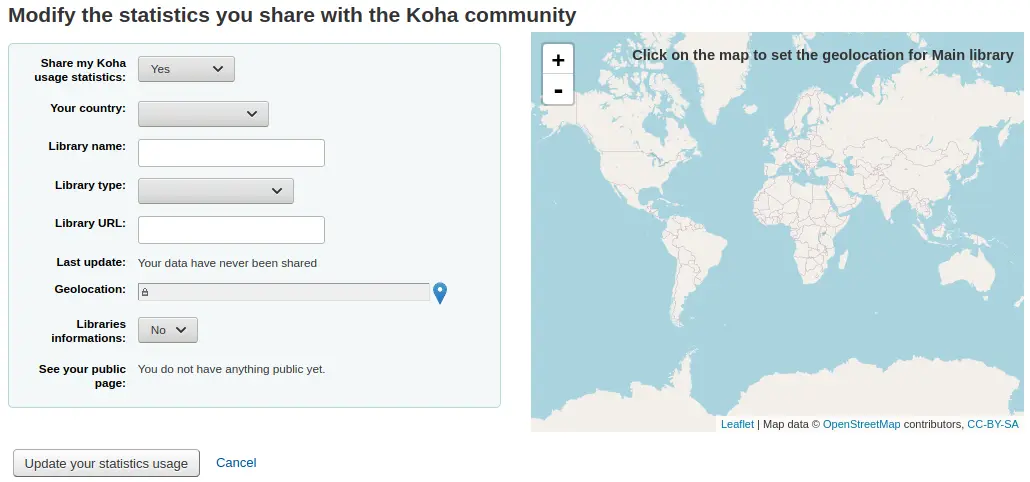
Partager mes statistiques d’utilisation de Koha :
Le choix par défait est “Indéfini”, ce qui fait apparaître le message sur la page d’accueil de l’administration.
Choisissez “oui” si vous voulez partager vos statistiques d’utilisation
Choisissez “non” si vous ne voulez pas partager vos statistiques et que vous ne voulez pas voir le message sur la page d’administration
Votre pays : choisissez le pays où est située votre bibliothèque
Nom de la bibliothèque : entrez le nom de votre bibliothèque
Type de bibliothèque : choisissez le type de votre bibliothèque
URL de la bibliothèque : saisissez l’URL du site de votre bibliothèque
Dernière mise à jour : ici vous verrez la dernière fois que vos données ont été téléversées sur le site de Hea
Géolocalisation : utilisez le plan sur la droite pour mettre le pointeur là où est située votre bibliothèque principale. Les coordonnées apparaîtront dans le champ Géolocalisation.
Informations des bibliothèques : si vous avez plus d’un site, vous pouvez choisir “oui” ici pour positionner tous vos sites sur le plan
Voir votre page publique : il s’agit de l’URL de vos informations sur le site de Hea.
Cliquez sur “Mettre à jour vos statistiques d’utilisation” pour sauvegarder les informations.
Partager du contenu avec Mana KB
Mana-KB est une base de connaissance mondiale pour les données concernant les bibliothèques. Koha est actuellement connecté à Mana-KB pour partager les modèles d’abonnements de périodiques et les rapports. Cette section est utilisée pour configurer votre connexion avec Mana-KB.
Aller à : Plus > Administration > Paramètres divers > Partager du contenu avec Mana KB

Note
Seuls les bibliothécaires avec la permission manage_mana (ou la permission superlibrarian) auront accès à cette section.
Dans le formulaire, choisissez si vous voulez utiliser Mana-KB pour partager du contenu ou pas. La sélection par défaut est « Non, laissez moi y réfléchir ». Si vous voulez utiliser Mana-KB, choisissez l’option « Oui ». Si vous ne voulez pas partager avec Mana-KB, choisissez « Non », ceci retirera le rectangle bleu de page d’accueil du module Administration.
Le reste de cette section suppose que vous ayez choisi « Oui ».
Choisissez si vous voulez partager vos modèles d’abonnements automatiquement. Ceci signifie que chaque fois que vous créerez un abonnement dans le module Périodiques, il sera automatiquement partagé avec Mana-KB et que les autres bibliothèques pourront le copier.
Pour configurer Mana-KB, vous devez obtenir un jeton Mana-KB pour authentifier votre installation Koha sur le serveur Mana-KB.
Entrez votre nom ou le nom de votre organisation dans le champ « Votre nom ».
Entrez votre courriel dans le champ « Courriel ». Assurez-vous que vous avez accès à cette boîte car vous recevrez plus tard des informations par courriel.
Une fois vos informations envoyées à Mana-KB, vous obtiendrez un jeton Mana-KB.
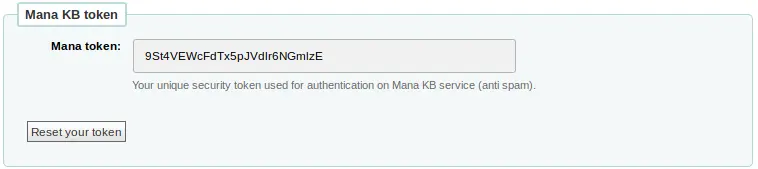
Dans le courriel que vous recevrez, cliquez sur le lien de confirmation et confirmez que vous n’êtes pas un robot pour terminer la configuration de Mana-KB.
Champs supplémentaires
This section is used to add custom fields to order baskets, invoice, serial subscriptions, and accountlines.
Note
Seuls les bibliothécaires avec la permission manage_additional_fields (ou la permission superlibrarian) auront accès à cette section.
Pour ajouter un nouveau champ, choisissez à quel type de contenu vous voulez l’ajouter.
Acquisitions
Invoices (aqinvoices): a field added to aqinvoices will appear when viewing an invoice in the acquisitions module.
Order baskets (aqbasket): a field added to aqbasket will appear upon the creation of a new order basket or the modification of an existing order basket in the acquisitions module.
Lignes de commande (aqorders) : un champ ajouté à aqorders apparaîtra lors de l’ajout de commandes à un panier ou de la modification d’une commande dans un panier ouvert.
Administration
Libraries (branches): a field added to branches will appear when editing libraries.
Version
Additional fields for libraries were added to Koha in version 25.05.
ERM
Agreements (erm_agreements): a field added to erm_agreements will appear when creating or editing agreements in the ERM module.
Version
Additional fields for ERM agreements were added to Koha in version 24.11.
Licenses (erm_licenses): a field added to erm_licenses will appear when creating or editing agreements in the ERM module.
Version
Additional fields for ERM licenses were added to Koha in version 24.11.
Packages (erm_packages): a field added to erm_packages will appear when creating or editing packages in the ERM module.
Version
Additional fields for ERM packages were added to Koha in version 24.11.
Patrons
Account lines (credit) (accountlines:credit): a field added to account line credits will appear when paying or writing off charges in a patron’s account or when creating manual credits.
Account lines (debit) (accountlines:debit): a field added to account line debit will appear when creating a manual invoice
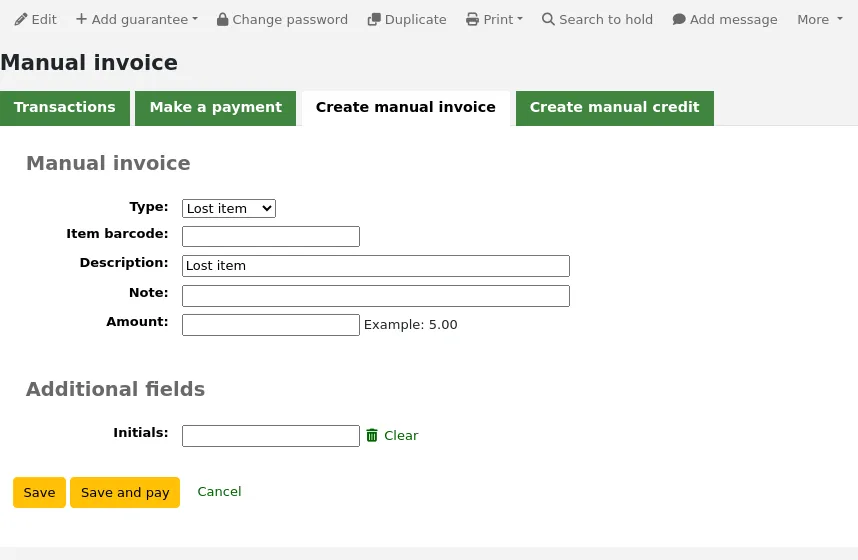
Account credit types (account_credit_types): a field added to account credit types will appear when adding or editing credit types.
Version
Additional fields for credit types were added to Koha in version 25.05.
Account debit types (account_debit_types): a field added to account debit types will appear when adding or editing debit types.
Version
Additional fields for debit types were added to Koha in version 25.05.
Serials
Abonnements (subscription) : un champ ajouté à l’abonnement s’affichera lors de la création d’un nouvel abonnement ou la modification d’un abonnement existant dans le module Périodiques.
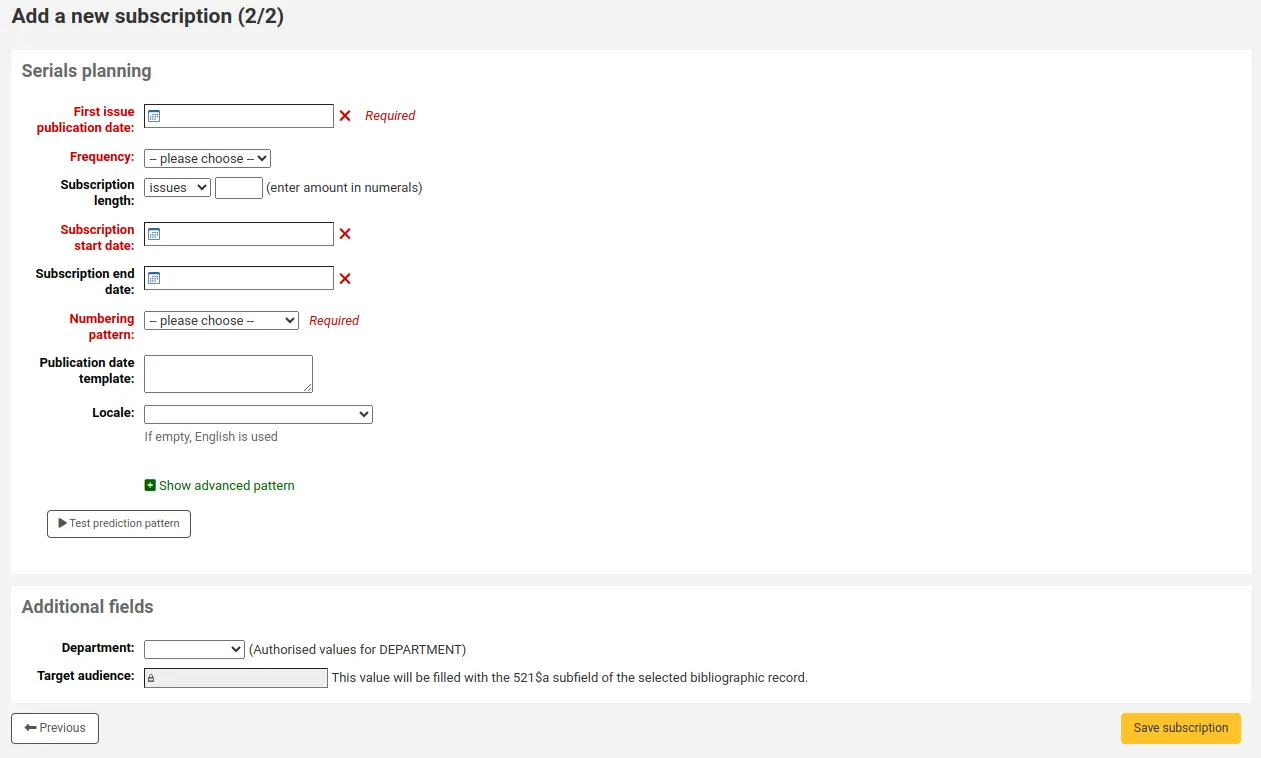
Click on “New field”.
Remplissez le formulaire.
Nom : c’est le nom du champ tel que vous voulez qu’il apparaisse.
Authorized value category: if you want to add a dropdown menu to the field choose an authorized value category here (you can also create a new authorized value category if you need to).
Repeatable: if you want the field to be repeatable, check this box. For free text fields, it will add a “New” button next to the field so that staff can repeat the field and add a new value. For fields with authorized value categories, it will create a list of checkboxes instead of a dropdown menu allowing staff to choose more than one option.
Version
Cette option a été ajoutée à Koha dans sa version 24.11.
Champs MARC : pour les champs supplémentaires d’abonnements, il est possible de lier le champ à un champ MARC. Le champ supplémentaire sera automatiquement complété avec la valeur correspondante pour ce champ MARC.
Note
Vous ne pouvez choisir qu’une seule des deux options (valeur autorisée ou champ MARC)
Avertissement
Si vous choisissez le champ MARC, assurez vous de le saisir sous cette forme : champ$sous-champ
Par exemple : 590$a
Interrogeable : cochez cette case si vous voulez pouvoir rechercher les paniers ou abonnements utilisant ce champ
Les champs supplémentaires de recherche sur les paniers de commande seront disponibles dans le formulaire de recherche avancée de commandes
Les champs supplémentaires de recherche sur les factures seront disponibles dans le formulaire de recherche de facture
Les champs supplémentaires de recherche d’abonnements de périodiques seront disponibles dans le formulaire recherche avancée d’abonnement
Exemples de champs supplémentaires
Exemple 1 : Ajout de champs supplémentaires aux abonnements en utilisant des valeurs autorisées
Vous pouvez vouloir savoir pour quel département vous commandez ce périodique
Dans le champ “Nom”, saisissez “Département”
Dans le champ “Catégorie de valeur autorisée”, choisissez DEPARTEMENT
Cochez la case “Interrogeable”
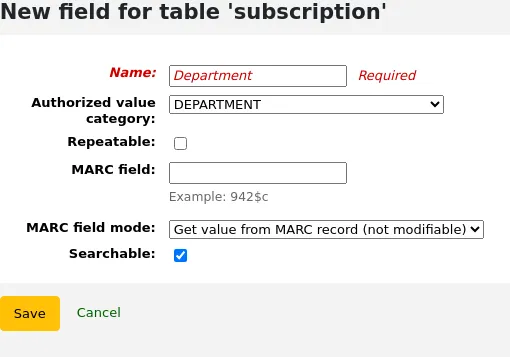
Quand vous ajoutez un abonnement, le champ sera dans la section “Champs supplémentaires” avec ses valeurs autorisées en menu déroulant.
Quand vous visualisez l’abonnement, le champ apparaîtra sous “Champs supplémentaires”.
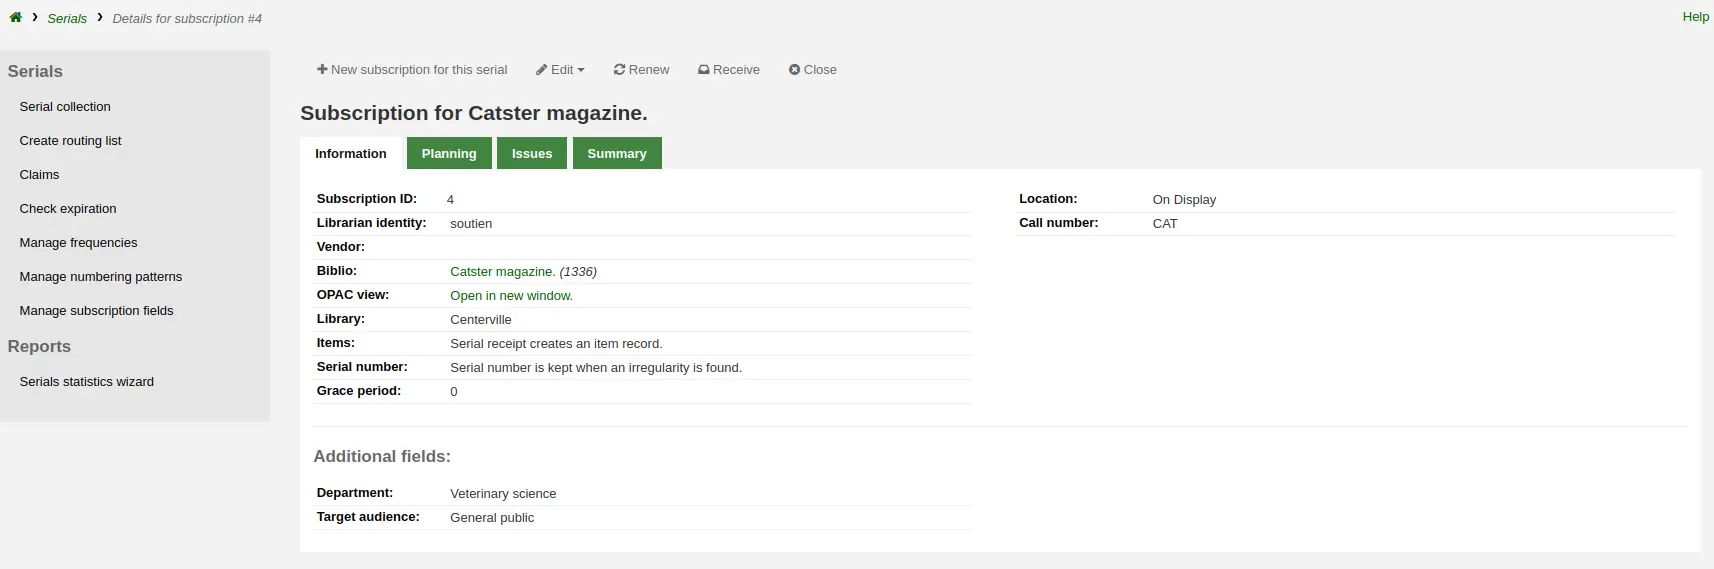
Comme nous avons rendu le champ interrogeable, il sera également présent dans la recherche sur les abonnements.
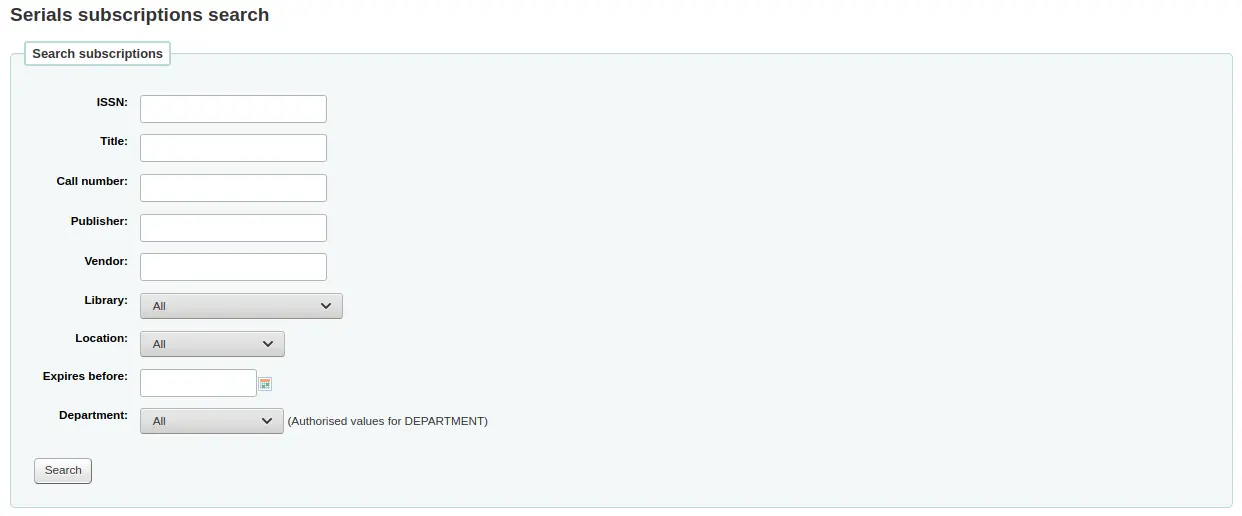
Example 2: Additional subscription field using MARC field
Ceci est particulièrement utile quand vous voulez voir des informations bibliographiques dans la page de détail de l’abonnement. Dans cet exemple, nous ajouterons le champ 521$a, qui est, en MARC21, la note sur le public cible.
Dans le champ “Nom”, entrez “Public cible”
Dans le champ “Champs MARC”, entrez “521$a”
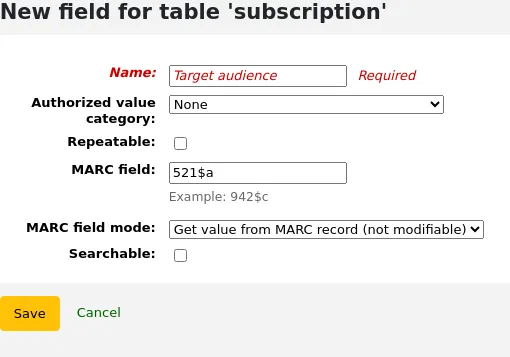
Note
Vous ne pourrez pas modifier ce champ depuis le formulaire d’abonnement. Si vous avez besoin d’ajouter ou de changer la valeur de ce champ, vous devrez le faire via le module catalogage.
Quand vous visualisez l’abonnement, le champ et l’information issus de la notice bibliographique s’afficheront sous “Champs supplémentaires”.
Example 3: Free text invoice additional field
If you need to enter additional information in invoices, such as the number of the check used to pay for the invoice, you can choose not to use an authorized value at all.
In the “Name” field, enter “Check #”
Cochez la case “Interrogeable”
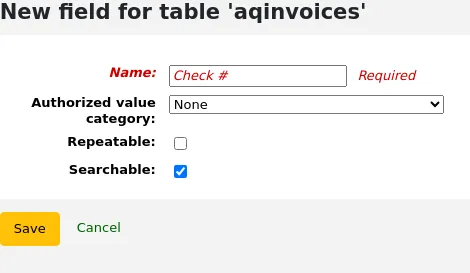
The new fields will be displayed when viewing the invoice in the acquisitions module.
Because we made the field searchable, it will also be in the invoice search.
Raccourcis clavier
This section is used to redefine the keyboard shortcuts used in the advanced cataloging editor.
Note
Cette section n’apparaîtra que si la préférence système EnableAdvancedCatalogingEditor est activée.
Note
Seuls les bibliothécaires avec la permission manage_keyboard_shortcuts (ou la permission superlibrarian) auront accès à cette section.
To change a shortcut, enter the combination of keys to use in the field in the “Shortcut keys” column, and click “Save shortcuts”.
Make sure to follow the key map rules when entering your key combinations:
Separate keys using a hyphen “-”
Control key is “Ctrl”
Alt key is “Alt”
Shift is “Shift”
If combining multiple keys they must be in specified order: Shift-Cmd-Ctrl-Alt