Périodiques
Le module de gestion des périodiques est accessible en choisissant Périodiques à partir du menu “Plus” en haut de l’écran. Il est également possible d’y accéder en cliquant sur le module Périodiques sur la page d’accueil de l’interface professionnelle de Koha. Le module Périodiques dans Koha est utilisé pour suivre la réception des magazines, journaux et tous autres documents arrivant de façon régulière.
Comme pour tous les modules, assurez-vous d’avoir consulté la liste de contrôle de mise en oeuvre et les préférences système liées avant d’utiliser le module Périodiques.
Aller à : Plus > Périodiques
Gestion des périodicités
Note
Seuls les bibliothécaires ayant la permission serials (ou la permission superlibrarian) pourront gérer les périodicités.
Koha conserve un enregistrement de la périodicité des publications pour faciliter leur gestion et leur duplication.
Aller à : Plus > Périodiques > Gestion des périodicités
Sur cette page, vous pouvez voir toutes les périodicités qui existent dans votre système.
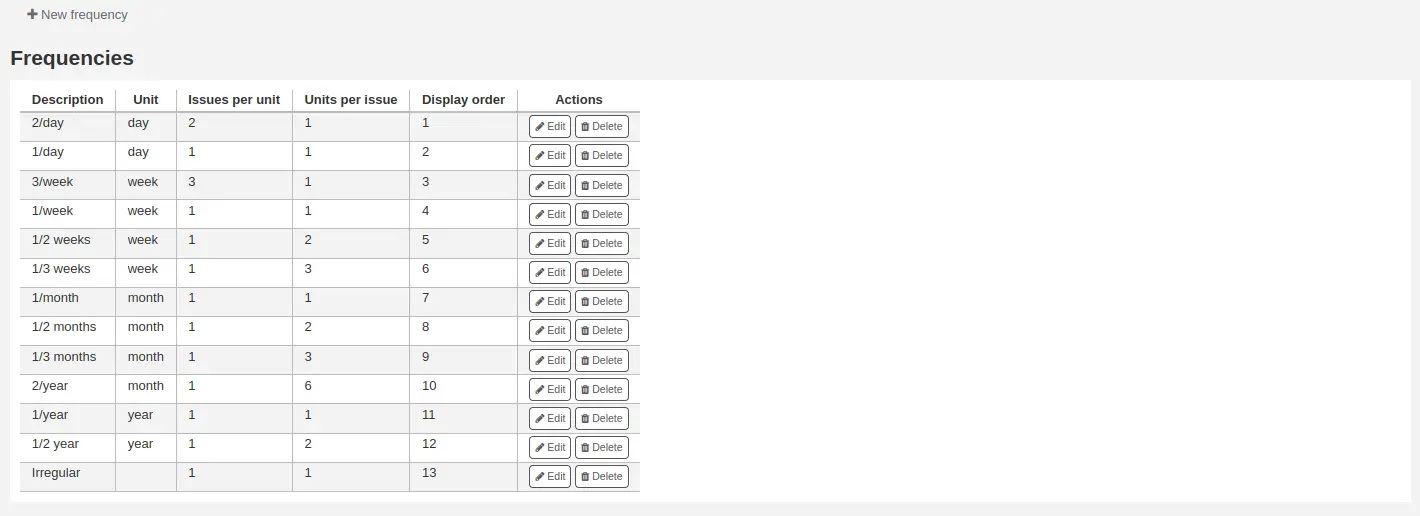
Vous pouvez les modifier, en supprimer ou en créer de nouvelles.
Ajouter une périodicité
Pour créer une nouvelle périodicité, cliquer sur le bouton “Nouvelle périodicité”.
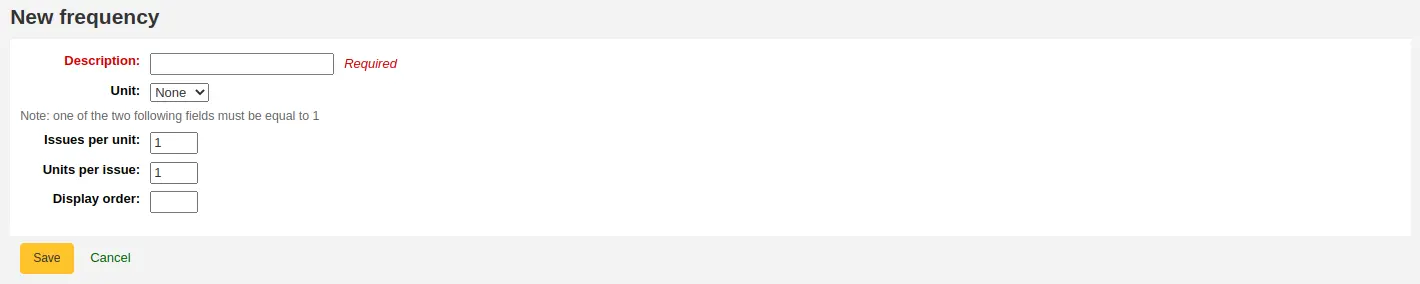
Description : c’est le nom qui apparaîtra dans le menu déroulant lors de la création d’un nouvel abonnement; assurez-vous de sa pertinence
Unité : c’est l’unité utilisée pour mesurer le cycle de publication. Choisissez entre aucune (périodicité irrégulière), jour, semaine, mois ou année.
Fascicules par unité : combien de fascicules seront publiés durant l’unité choisie au-dessus (en général, 1).
Unités par fascicule : combien d’unités doit-on attendre avant la publication du prochain fascicule.
Ordre d’affichage : c’est l’ordre dans lequel s’affichent les options du menu déroulant lors de la création d’un nouvel abonnement (vous souhaiterez peut-être placer la périodicité la plus courante en tête et la plus rare en fin de liste; la première position est 0). Plusieurs périodicités peuvent avoir le même rang. Si c’est le cas, elles apparaîtront dans l’ordre de leur création.
Astuce
Pour mieux saisir la différence entre “fascicules par unité” et “unités par fascicule”, vous pouvez lire comme cela : “<fascicules par unité> fascicule(s) par <unités par fascicule> <unité>”. Par exemple, une périodicité bimensuelle (toutes les 2 semaines) serait “1 fascicule chaque 2 semaines”. Donc, “fascicule par unité” serait 1 et “unités par fascicule” serait 2. Voir ci dessous pour plus d’exemples.
Exemples
Voici quelques exemples des périodicités les plus usitées.
Périodicité |
Unité |
Fascicules par unité |
Unités par fascicule |
|---|---|---|---|
Quotidien (« 1 fascicule tous les 1 jour ») |
Jour |
1 |
1 |
Trois fois par semaine (« 3 fascicules toutes les 1 semaine ») |
Semaine |
3 |
1 |
Bihebdomadaire (« 2 fascicules toutes les 1 semaine ») |
Semaine |
2 |
1 |
Hebdomadaire (« 1 fascicule toutes les 1 semaine ») |
Semaine |
1 |
1 |
Bimensuelle (« 1 fascicule toutes les 2 semaines ») |
Semaine |
1 |
2 |
Mensuel (« 1 fascicule tous les 1 mois ») |
Mois |
1 |
1 |
Bimestriel (« 1 fascicule tous les 2 mois ») |
Mois |
1 |
2 |
Trimestriel (« 1 fascicule tous les 3 mois ») |
Mois |
1 |
3 |
Semestriel (« 1 fascicule tous les 6 mois ») |
Mois |
1 |
6 |
Annuel (« 1 fascicule tous les 1 an ») |
Année |
1 |
1 |
Bisannuel (« 1 fascicule tous les 2 ans ») |
Année |
1 |
2 |
Gestion des modèles de numérotation des périodiques
Note
Seuls les bibliothécaires avec la permission serials ou n’importe laquelle de ses sous permissions (ou la permission superlibrarian) peuvent gérer les modèles de numérotation.
Chaque fois que vous créez un nouveau modèle de numérotation pour les périodiques vous pouvez le sauvegarder pour une utilisation ultérieure. Ces modèles sont accessibles sur la page “Gestion des modèles de numérotation”.
Aller à : Plus > Périodiques > Gestion des modèles de numérotation
Cette page vous affichera les modèles de numérotation que vous avez enregistrés dans le passé, ainsi que quelques modèles de base.
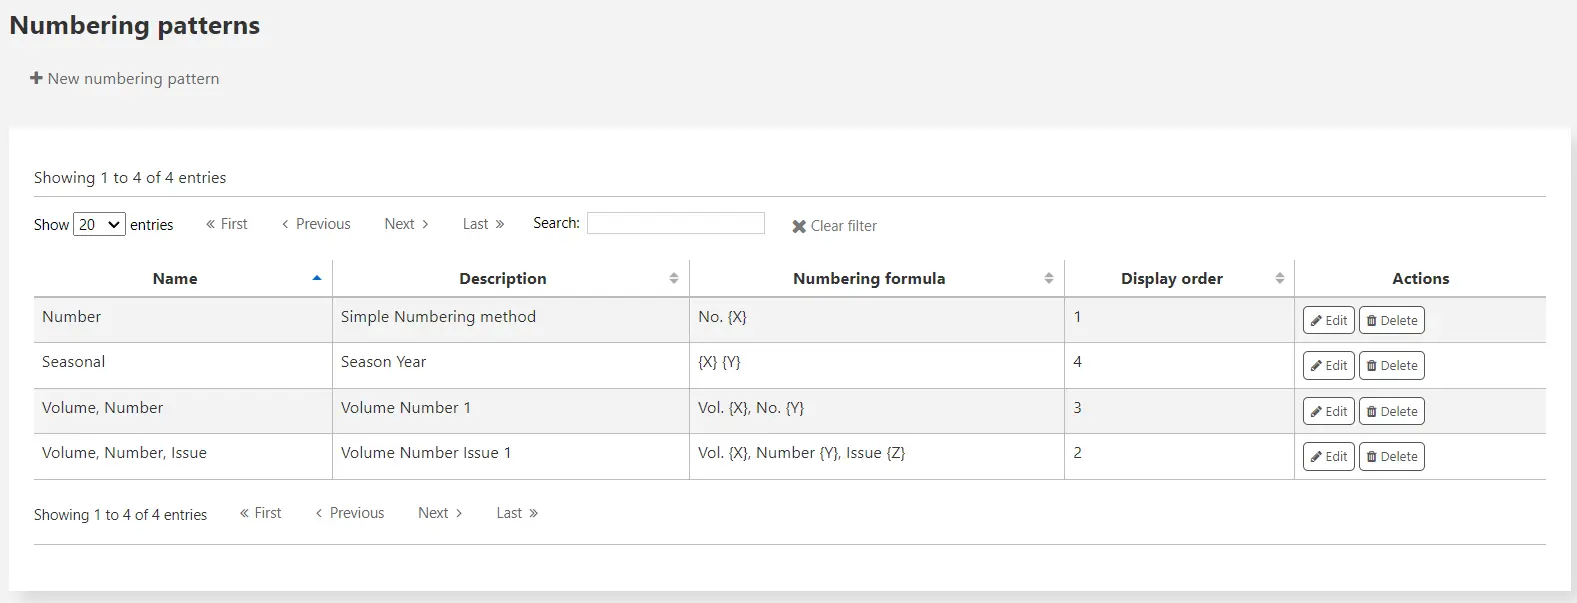
Note
Si vous avez effectué une migration à partir d’une ancienne version de Koha (avant 3.14), vous verrez des “Modèles sauvegardés” qui concernent les modèles. C’est comme ça que Koha a sauvegardé vos anciens modèles de numérotation. Vous pouvez les modifier ici en leur donnant des noms plus significatifs.
Ajouter un modèle de numérotation
Pour ajouter un nouveau modèle de numérotation, cliquer sur le bouton “Nouveau modèle de numérotation”.
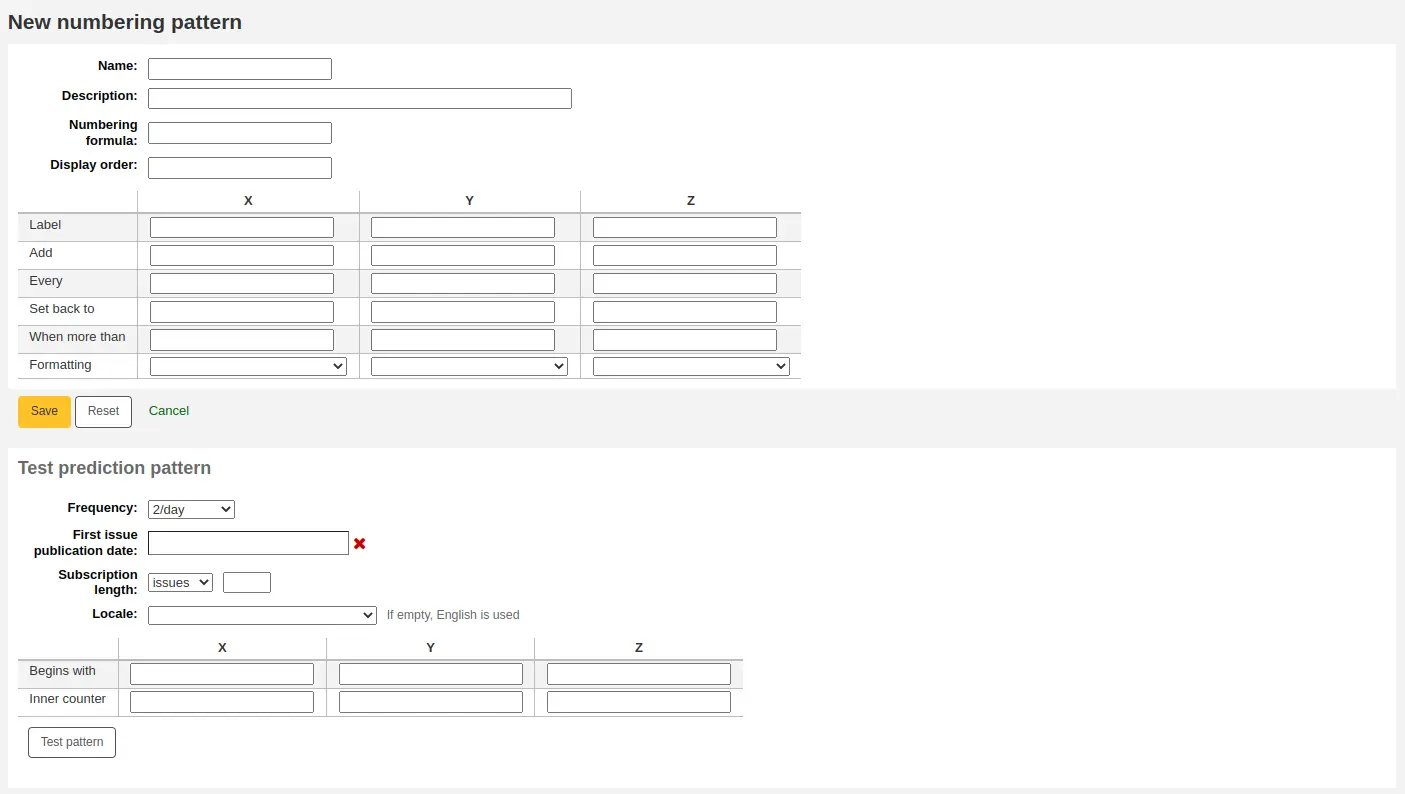
Nom : c’est le nom qui apparaîtra dans le menu déroulant lors de la création d’un nouvel abonnement; assurez-vous de sa pertinence.
Description : voila un complément de description du modèle de numérotation; ce dernier n’apparaît pas lors de la création d’un nouvel abonnement mais s’affiche dans la table des modèles de numérotation (voir ci-dessous).
Formule de numérotation : ceci est utilisé pour créer le numéro pour chaque fascicule. Vous pouvez utiliser des espaces réservés pour trois variables maximum {X}, {Y}, et {Z} (voir ci-dessous), comme variables prédéterminées :
{Day} sera remplacé par la date (deux chiffres)
{Month} sera remplacé par le numéro du mois (deux chiffres)
{Year} sera remplacé par l’année (4 chiffres)
{DayName} sera remplacé par le nom du jour de la semaine
Avertissement
Les paramètres régionaux sont ignorés dans la variable DayName. Elle sera toujours affichée en anglais. Utilisez une des variables X, Y ou Z dans la table avec le formatage “Nom du jour” pour afficher le nom du jour dans une autre langue que l’anglais.
{MonthName} sera remplacé par le nom du mois
Avertissement
Les paramètres régionaux sont ignorés dans la variable MonthName . Elle sera toujours affichée en anglais. Utilisez une des variables X, Y ou Z dans la table avec le formatage “Nom du mois” pour afficher le nom du jour dans une autre langue que l’anglais.
Version
Les espaces réservés {Day}, {Month}, {Year}, {DayName}, et {MonthName} ont été ajoutés à Koha dans sa version 24.05.
En plus des variables, vous pouvez saisir n’importe quel texte que vous souhaitez voit apparaître dans le numéro du fascicule. Vous pouvez aussi inclure les espaces que vous voulez dans ces numéros. Le texte sera le même pour chaque fascicule, les variables seules seront modifiées.
Avertissement
Les variables X, Y et Z doivent être en lettres capitales et entre accolades.
Exemples
Vol. {X} No {Y}
Fascicule {X} ({Year}-{Month}-{Day})
{X} {Y}
Ordre d’affichage : c’est l’ordre dans lequel s’affichent les options du menu déroulant lors de la création d’un nouvel abonnement (vous souhaiterez peut-être placer la périodicité la plus courante en tête et la plus rare en fin de liste; la première position est 0). Plusieurs périodicités peuvent avoir le même rang. Si c’est le cas, elles apparaîtront dans l’ordre de leur création.
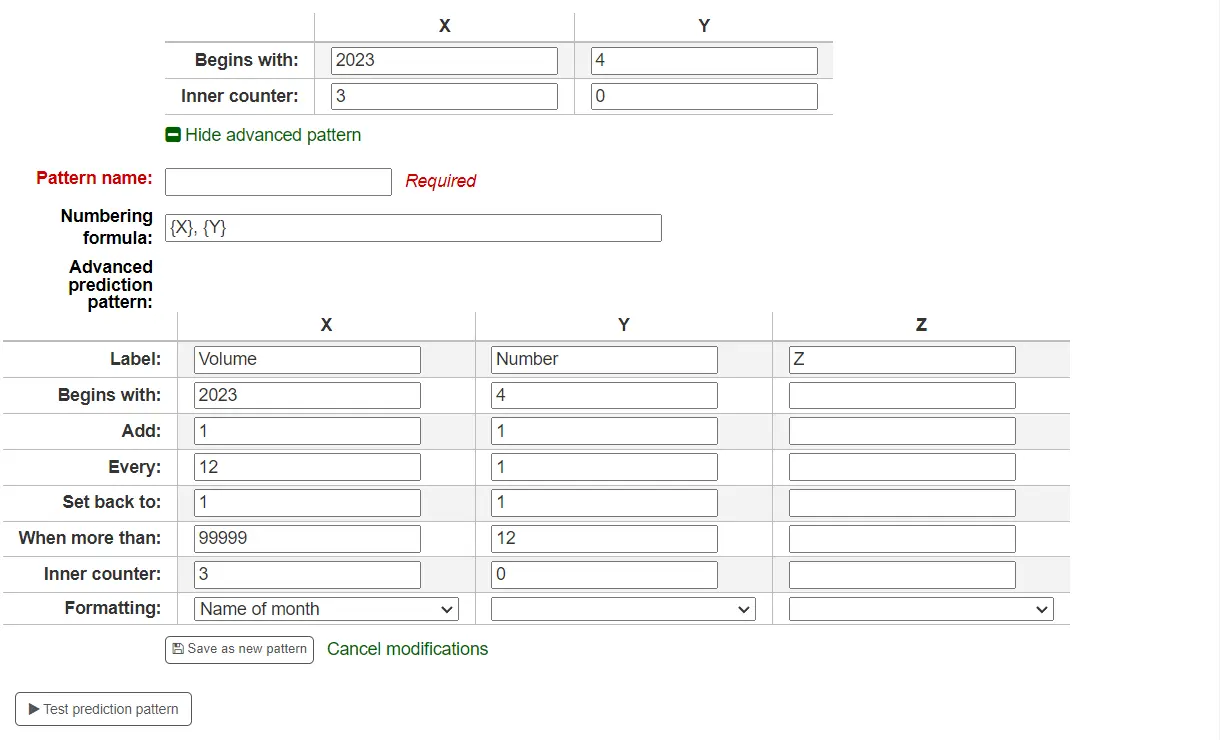
Dans le tableau, vous devez saisir les paramètres pour chaque variable.
Etiquette : c’est tout simplement un nom pour la variable, il ne sera pas utilisé ailleurs mais il facilite la compréhension de ce à quoi la variable correspond.
Ajouter : combien de numéros ou d’unités sont ajoutés à la variable.
Chaque : les nombres ou unités ajoutés à la variable sont ajoutés tous les combien de fascicules.
Retourner à : ceci est utilisé pour la numérotation cyclique; saisir le numéro de départ.
Quand supérieur à : ceci est utilisé pour la numérotation cyclique; saisir le dernier numéro.
Astuce
Lorsque vous renseignez ces quatre paramètres (“ajouter”, “chaque”, “retourner à”, “quand supérieur à”), faites-le colonne par colonne et lisez les comme une phrase : « ajouter 1 chaque 1 fascicule, revenir à 0 quand supérieur à 10 ».
Formatage : ceci est utilisé quand, à la place de nombres, vous souhaitez que des mots soient affichés dans votre numéro de fascicule. Vous pouvez choisir
Nom du jour (Lundi, Mardi, Mercredi, etc.)
Nom du jour (abrégé) (Lun, Mar, Mer, etc.)
Nom du mois (Janvier, Février, Mars, etc.)
Nom du mois (abrégé) (Jan, Fév, Mar, etc.)
Nom de la saison (Printemps, Été, Automne, Hiver)
Nom de la saison (abrégé) (Prtps, Été, Aut, Hiv)
Avertissement
Quand vous renseignez le tableau, vous devez utiliser des nombres, même pour représenter les noms des jours, mois et saisons. Voilà quel est l’équivalent de chacun
Jours |
Dimanche |
0 |
Lundi |
1 |
|
Mardi |
2 |
|
Mercredi |
3 |
|
Jeudi |
4 |
|
Vendredi |
5 |
|
Samedi |
6 |
|
Mois |
Janvier |
0 |
Février |
1 |
|
Mars |
2 |
|
Avril |
3 |
|
Mai |
4 |
|
Juin |
5 |
|
Juillet |
6 |
|
Août |
7 |
|
Septembre |
8 |
|
Octobre |
9 |
|
Novembre |
10 |
|
Décembre |
11 |
|
Saisons |
Printemps |
0 |
Été |
1 |
|
Automne |
2 |
|
Hiver |
3 |
Avant de sauvegarder votre modèle de numérotation, vous pouvez le tester afin de vous assurer qu’il produira ce que vous attendez.
Périodicité : choisir la périodicité qui correspond à votre modèle de numérotation.
Date de publication du premier fascicule : choisissez une date de départ pour votre test.
Durée de l’abonnement : saisissez le nombre de fascicules, semaines ou mois pour tester votre modèle de numérotation; si le modèle de numérotation suit un cycle, il est recommandé de tester au moins deux de ces cycles pour vérifier les changements et s’assurer que le modèle s’applique correctement.
Paramètres régionaux : pour l’utilisation de jours, mois ou saison, vous pouvez choisir la langue d’affichage de ces noms.
Note
Les paramètres régionaux ne gèrent pas très bien les noms des saisons.
Ensuite, saisissez les valeurs de vos variables.
Commencer par : saisissez la première valeur pour chaque variable, ce devrait être les valeurs du fascicule saisies dans “Date de parution du premier fascicule” au-dessus.
Compteur interne : saisissez combien de fascicules sont déjà sortis ce cycle, afin que Koha puisse calculer quand repartir sur un nouveau cycle.
Cliquez sur “Tester le modèle” pour voir les résultats. S’ils correspondent à votre attente, vous pouvez sauvegarder votre modèle de numérotation. Si les résultats ne correspondent pas aux attentes, revenez en arrière et modifiez vos paramètres avant d’essayer à nouveau.
Exemples
Mois et année pour les mensuels
Formule de numérotation : {X} {Y}
X
Y
Z
Etiquette
Mois
Année
Ajouter
1
1
Chaque
1
12
Retourner à
0
0
Quand supérieur à
11
99999
Formatage
Nom du mois
Volume et numéro pour les mensuels
Formule de numérotation : Vol.{X} No.{Y}
X
Y
Z
Etiquette
Volume
Numéro
Ajouter
1
1
Chaque
12
1
Retourner à
0
1
Quand supérieur à
99999
12
Formatage
Saison et année pour les trimestriels
Formule de numérotation : {X} {Y}
X
Y
Z
Etiquette
Saison
Année
Ajouter
1
1
Chaque
1
4
Retourner à
0
0
Quand supérieur à
3
99999
Formatage
Nom de la saison
Volume et numéro pour les hebdomadaires
Formule de numérotation : Vol.{X} No.{Y}
X
Y
Z
Etiquette
Volume
Numéro
Ajouter
1
1
Chaque
52
1
Retourner à
0
1
Quand supérieur à
99999
52
Formatage
Ajouter un abonnement
Note
Seuls les bibliothécaires avec la permission create_subscription (ou la permission superlibrarian) pourront créer des abonnements de périodiques.
Vous pouvez ajouter des abonnements en cliquant sur le bouton “Ajouter” depuis n’importe quelle notice bibliographique et choisissant “Nouvel abonnement”
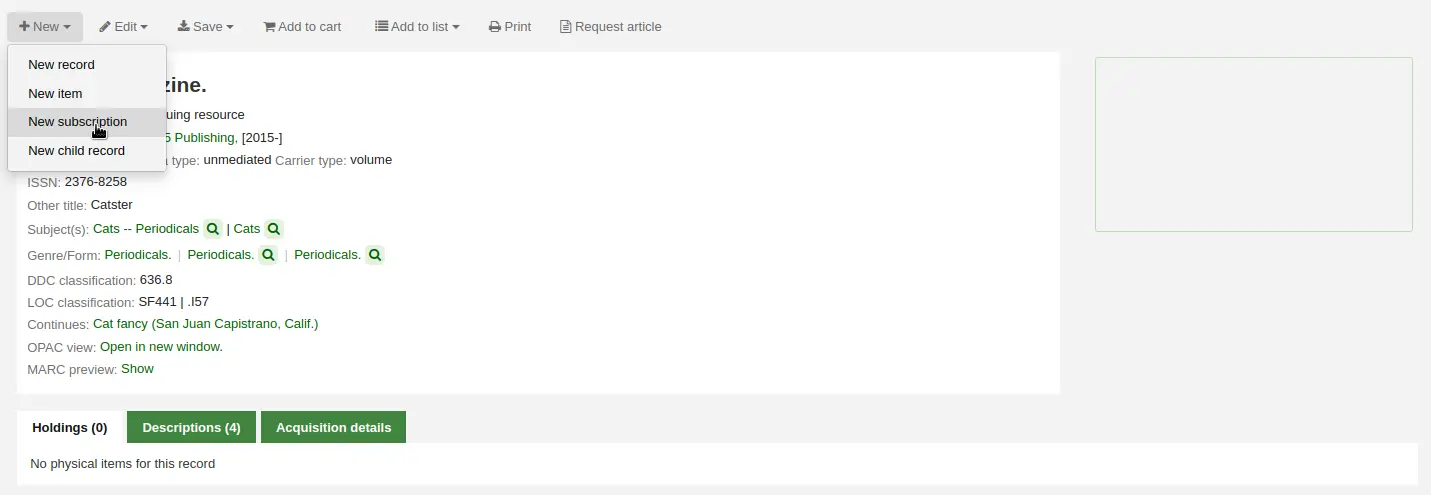
Ou cliquez sur le bouton “Nouvel abonnement” dans le module Périodiques
Si vous ajoutez un abonnement à partir du module Périodiques, vous arriverez sur un formulaire vide (en cas d’abonnement créé à partir d’une notice bibliographique existante, le formulaire contiendra déjà le numéro de la notice).
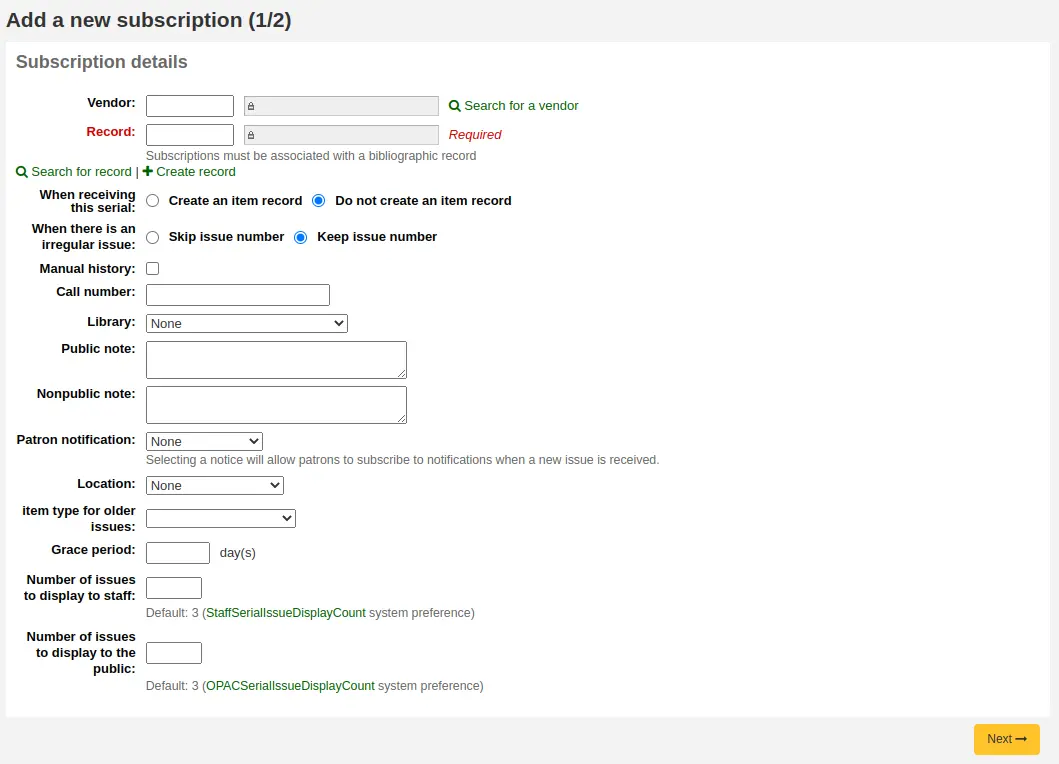
Fournisseur: on peut le retrouver soit en cherchant dans la liste des fournisseurs du module Acquisitions ou en entrant directement l’identifiant du fournisseur
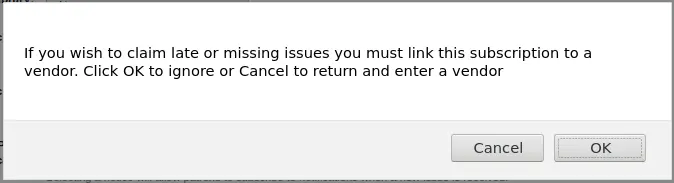
L’information sur le fournisseur n’est pas requise.
Pour réclamer les fascicules manquants ou en retard, vous devez entrer les informations sur le fournisseur.
Notice : le biblionumber de la notice MARC à laquelle vous souhaitez lier cet abonnement
Si vous avez créé un abonnement à partir d’une notice bibliographique, le biblionumber et le titre seront déjà renseignés
Vous pouvez rechercher une notice existante en cliquant sur le lien “Chercher une notice” sous les cases
S’il n’existe pas déjà de notice à laquelle relier cet abonnement, vous pouvez en créer une en cliquant sur le lien “Créer une notice” sous les cases
Vous pouvez aussi saisir manuellement, dans le premier champ, le biblionumber d’une notice
Vous pouvez ensuite choisir si un nouvel exemplaire est créé à réception d’un fascicule
Note
Si vous ajouter des codes à barres à vos fascicules ou si vous les prêtez, choisissez de créer un exemplaire à réception
En cas de fascicule hors-série : choisissez comment gérer ces exceptions à votre abonnement, soit en sautant le numéro du fascicule ou soit en le gardant
Note
Si les numéros suivent une séquence, choisissez “Conserver le numéro du fascicule”
Historique manuel : si cette case est cochée, vous pourrez saisir les périodiques ne se conformant pas au prévisionnel de bulletinage une fois l’abonnement enregistré. Par exemple, “La bibliothèque a les fascicules de Juin 1974 à Décembre 1996”. Pour ceci, rendez-vous dans l’onglet “Calendrier” sur la page détails de l’abonnement une fois cet abonnement enregistré et cliquez sur “Modifier l’historique”.
Cote : la cote de votre exemplaire ou le préfixe de cote, ça sera copié sur les exemplaires s’ils sont créés lors de la réception.
Bibliothèque : le site propriétaire de cet abonnement.
Si plus d’un site s’abonnent à ce périodique, il faut créer un abonnement par site
Cela peut être réalisé facilement en utilisant l’option “Dupliquer” sur la page d’information de l’abonnement, puis en ne changeant que le contenu du champ “Bibliothèque”
Note publique : toute note que vous souhaitez voir apparaître à l’OPAC pour les adhérents
Note privée : est utilisée pour les notes qui sont montrées uniquement aux bibliothécaires dans l’interface professionnelle
Notifications aux adhérents : vous pouvez sélectionner une notification à envoyer aux adhérents qui se sont abonnés aux mises à jour sur ce périodique, via l’OPAC.
Pour que cette option apparaisse, assurez-vous d’avoir défini une notification de type “Périodique (nouveau numéro)” dans l’outil “Notifications et tickets”
Localisation : la localisation, qui sera copiée sur les exemplaires s’ils sont créés à réception.
Type de document : si les exemplaires sont créés à réception, choisissez le type de document des exemplaires créés.
Type de document des anciens numéros : s’il y a création d’exemplaires à la réception, choisissez le type de document qui sera affecté aux numéros précédents lors de la réception de nouveaux numéros. Ceci ne s’affichera que si makePreviousSerialAvailable est activée.
Période de grâce : définit le nombre de jours au bout desquels le statut d’un fascicule passe automatiquement de “Attendu” à “En retard”. Ce fonctionnement suppose que le cron job SerialsUpdate.pl soit paramétré pour s’exécuter régulièrement.
Nombre de fascicules à afficher dans l’interface professionnelle : ceci permet de contrôler combien de fascicules apparaissent par défaut dans le catalogue de l’interface professionnelle, dans l’onglet “Abonnements” de la notice bibliographique.
S’il n’y a aucune valeur dans ce champ, la valeur définie dans la préférence système StaffSerialIssueDisplayCount sera utilisée.
Note
Cela n’affecte pas le nombre d’exemplaires affichés dans l’onglet “Exemplaires” si vous créez des exemplaires pour les numéros. Cela affecte uniquement le nombre de fascicules affichés dans l’onglet “Abonnements”.
Nombre de fascicules à afficher au public : ceci permet de contrôler combien de fascicules apparaissent par défaut à l’OPAC, dans l’onglet “Abonnements” des notices bibliographiques
S’il n’y a aucune valeur dans ce champ, la valeur définie dans la préférence système OPACSerialIssueDisplayCount sera utilisée.
Note
Cela n’affecte pas le nombre d’exemplaires affichés dans l’onglet “Exemplaires” si vous créez des exemplaires pour les numéros. Cela affecte uniquement le nombre de fascicules affichés dans l’onglet “Abonnements”.
Une fois les données remplies, vous pouvez cliquez sur “Suivant” pour saisir les informations du Prévisionnel de bulletinage
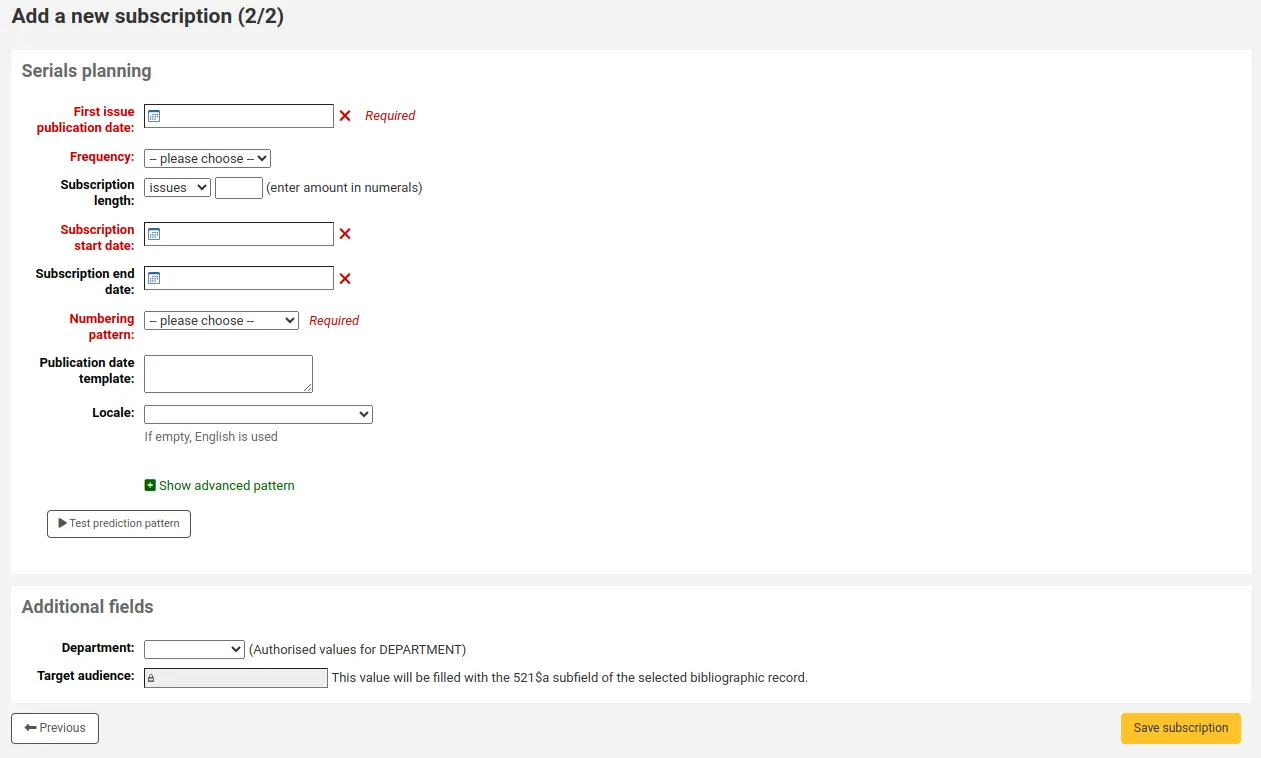
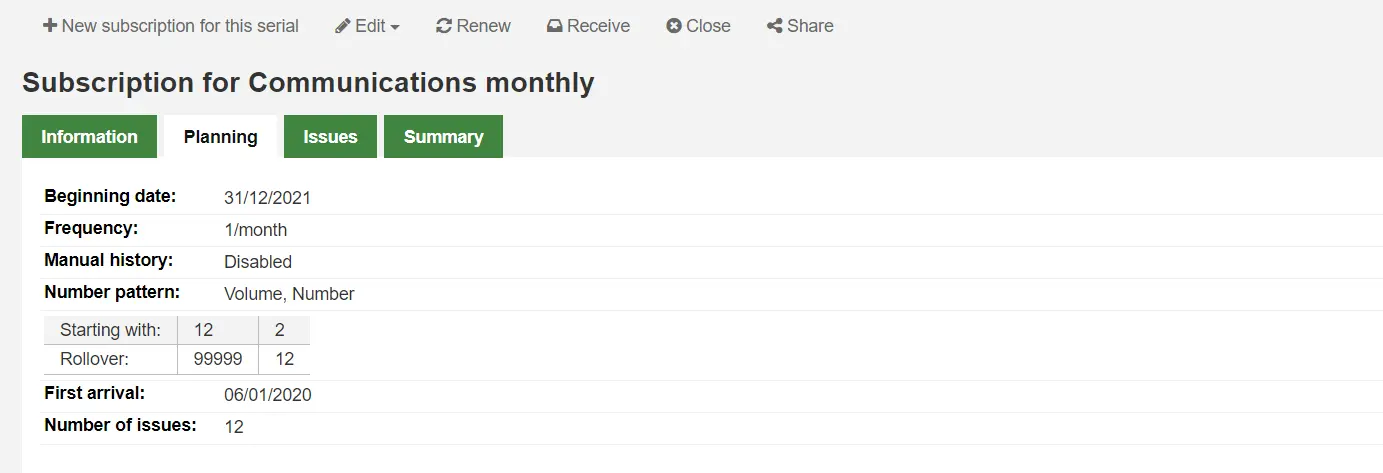
Date de parution du premier fascicule : entrez la date du fascicule que vous avez en main, qui servira de point de départ au prévisionnel de bulletinage
Périodicité : choisissez la périodicité de votre périodique. Il y a plusieurs options pré-définies et toutes sont visibles parmi vos propres périodicités si vous allez dans “Gestion des périodicités”. Si la périodicité que vous cherchez n’y est pas, vous pouvez ajouter une périodicité personnalisée.
Durée d’abonnement : saisir le nombre de fascicules, semaines ou mois de l’abonnement. On l’utilise également pour paramétrer les alertes de renouvellement.
Date de début de l’abonnement : c’est la date à laquelle l’abonnement commence. On l’utilise pour paramétrer les alertes de renouvellement.
Date de fin de l’abonnement : ceci ne doit être saisi que pour les abonnements qui sont terminés (si vous entrez rétrospectivement vos périodiques).
Modèle de numérotation : choisissez comment les fascicules sont numérotés. Les modèles saisis ici sont gérés dans la section “Gestion des modèles de numérotation”.
Si le modèle de numérotation dont vous avez besoin n’existe pas, vous pouvez créer votre propre modèle en cliquant sur “Afficher le modèle avancé” puis “Modifier le modèle”. C’est à l’image “d’ajouter un modèle de numérotation (voir la section ci-dessus).
Modèle de date de publication : c’est le modèle utilisé pour le champ “Publié le (texte)”. Vous pouvez utiliser le Template Toolkit pour créer votre modèle. Par exemple,
[% serialseq %] [% publisheddate %]renseignera le champ “Publié le (texte)” avec le numéro du périodique et sa date.Note
Vous pouvez utiliser le champs d’abonnement suivants dans votre modèle :
serialseq
serialseq_x
serialseq_y
serialseq_z
subscriptionid
biblionumber
status
planneddate
publisheddate
publisheddatetext
notes
routingnotes
Version
Ce champ a été ajouté à Koha dans sa version 23.11.
Paramètres régionaux : pour l’utilisation de jours, mois ou saison, vous pouvez choisir la langue d’affichage de ces noms.
Note
Les paramètres régionaux ne gèrent pas très bien les noms des saisons.
Une fois qu’un « Modèle de numérotation » est choisi, la formule de numérotation apparaîtra.
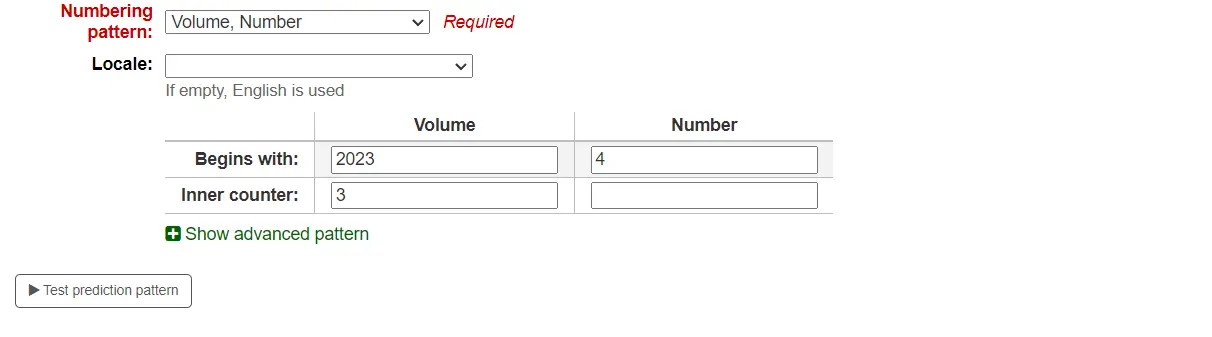
Commencer par : saisissez la première valeur pour chaque variable, ce devrait être les valeurs du fascicule saisies dans “Date de parution du premier fascicule” au-dessus.
Compteur interne : saisissez combien de fascicules sont déjà sortis ce cycle, afin que Koha puisse calculer quand repartir sur un nouveau cycle.
Par exemple : si le premier numéro à recevoir est « vol. 4, no. 1, fasc. 796 », vous devez paramétrer le compteur interne à « 0 ». Mais si c’est le « vol. 4, no. 2, fasc. 797 », le compteur interne doit être « 1 ».
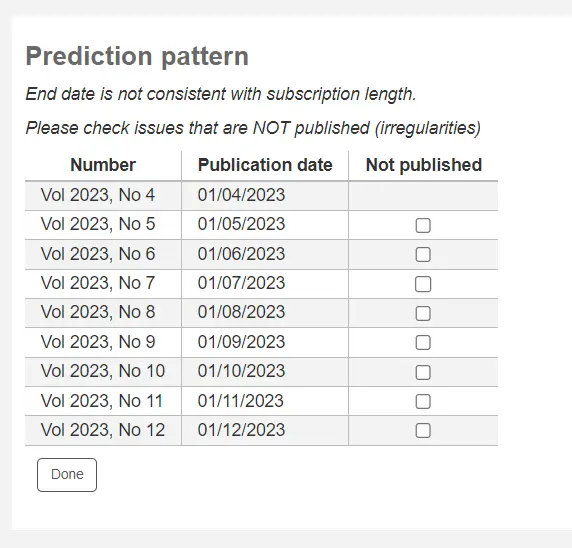
Après avoir saisi le formulaire, cliquer le bouton “Tester le modèle previsionnelle” pour voir quels numéros seront générés par le système. S’il y a des irrégularités, vous pourrez sélectionner quels numéros sont à retirer de la liste.
Si vous avez ajouté un champ personnalisé, il sera modifiable au-dessus des boutons au bas de l’écran
Cliquez sur “Enregistrer l’abonnement” pour sauvegarder les informations que vous venez de saisir.
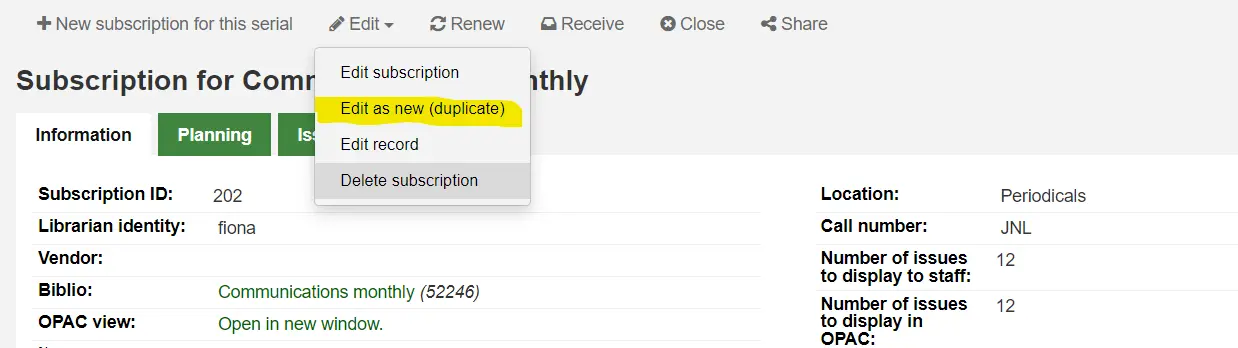
Modifier un abonnement
Note
Seuls les bibliothécaires ayant la permission edit_subscription (ou la permission the superlibrarian) pourront modifier les abonnements de périodiques existants.
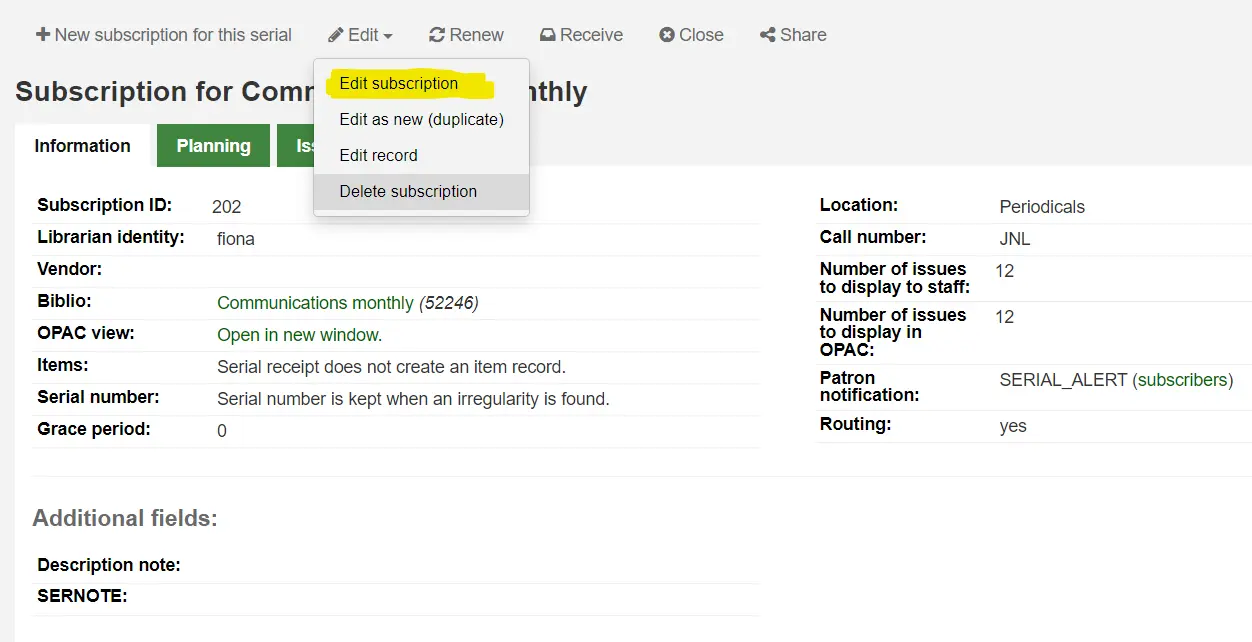
Pour modifier un abonnement, cliquez sur “Modifier” puis “Modifier un abonnement” à partir de la page Abonnement. Ceci vos amènera sur le même formulaire que celui utilisé lors de l’ajout d’un nouvel abonnement.
Vous pouvez aussi modifier des abonnements par lot. Pour ce faire, recherchez les abonnements que vous souhaitez modifier. Parmi les résultats, cochez les cases à côté des abonnements à modifier. Le lien “Modifier les périodiques sélectionnés” apparaîtra.

D’ici, vous pouvez modifier :
le fournisseur
la localisation
la bibliothèque
le type de document
la note publique
la note privée
si oui ou non créer un exemplaire à réception d’un fascicule
la date d’expiration
n’importe quels champs personnalisés
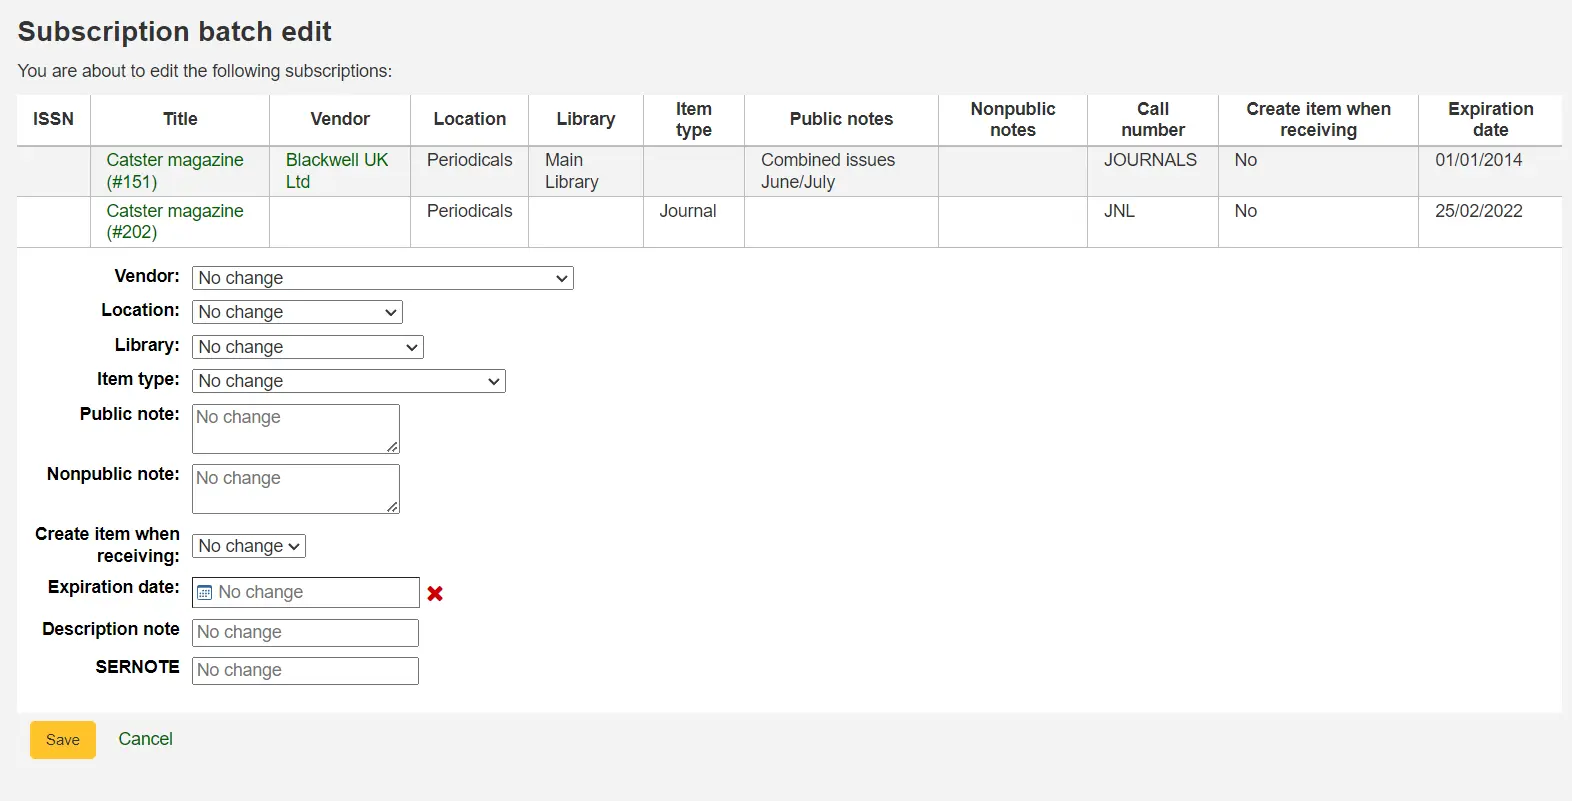
Note
Laissez le champ inchangé pour conserver les valeurs originales.
Bulletiner les fascicules
Note
Seuls les bibliothécaires avec la permission receive_serials (ou la permission superlibrarian).
Les fascicules peuvent être bulletinés depuis plusieurs endroits. Pour trouver un abonnement, utilisez la boîte de recherche située en haut de la page Périodiques pour rechercher le périodique que vous souhaitez bulletiner:
Dans la page de résultat, vous pouvez cliquer sur le bouton “Bulletiner” ou bien sur le titre du périodique puis sur le bouton “Bulletiner”.
La dernière possibilité pour réceptionner les fascicules est d’utiliser la page “État de collection”. Sur la gauche de la page avec les Informations d’abonnement vous trouvez un menu avec un lien vers “État de collection”
A partir de la page qui s’ouvre, cochez le(s) fascicule(s) que vous souhaitez bulletiner (ceux attendus devraient être cochés par défaut) puis cliquez sur “Bulletiner”.
Ces trois possibilités vont ouvrir le formulaire de réception d’un fascicule :
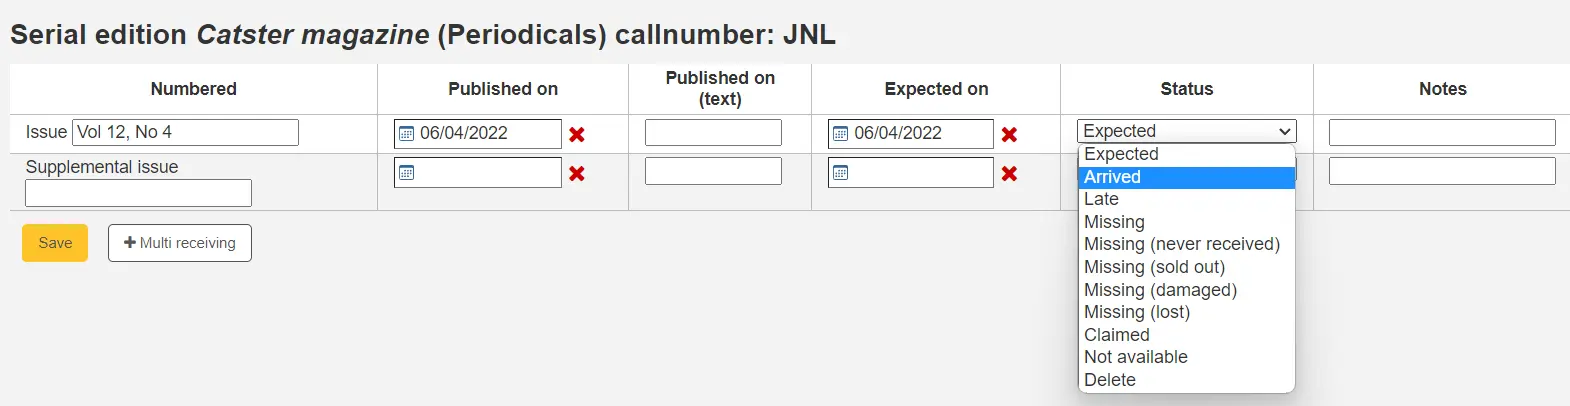
Choisissez “Arrivé” dans la liste Statut pour marquer le fascicule comme reçu.
Si vous avez décidé de créer un exemplaire pour chaque fascicule, un formulaire d’ajout d’exemplaire s’affichera après avoir sélectionné “Arrivé”. vous pouvez ajouter des exemplaires multiples en utilisant l’option “Nombre de copies de cet exemplaire à ajouter” en bas du formulaire.
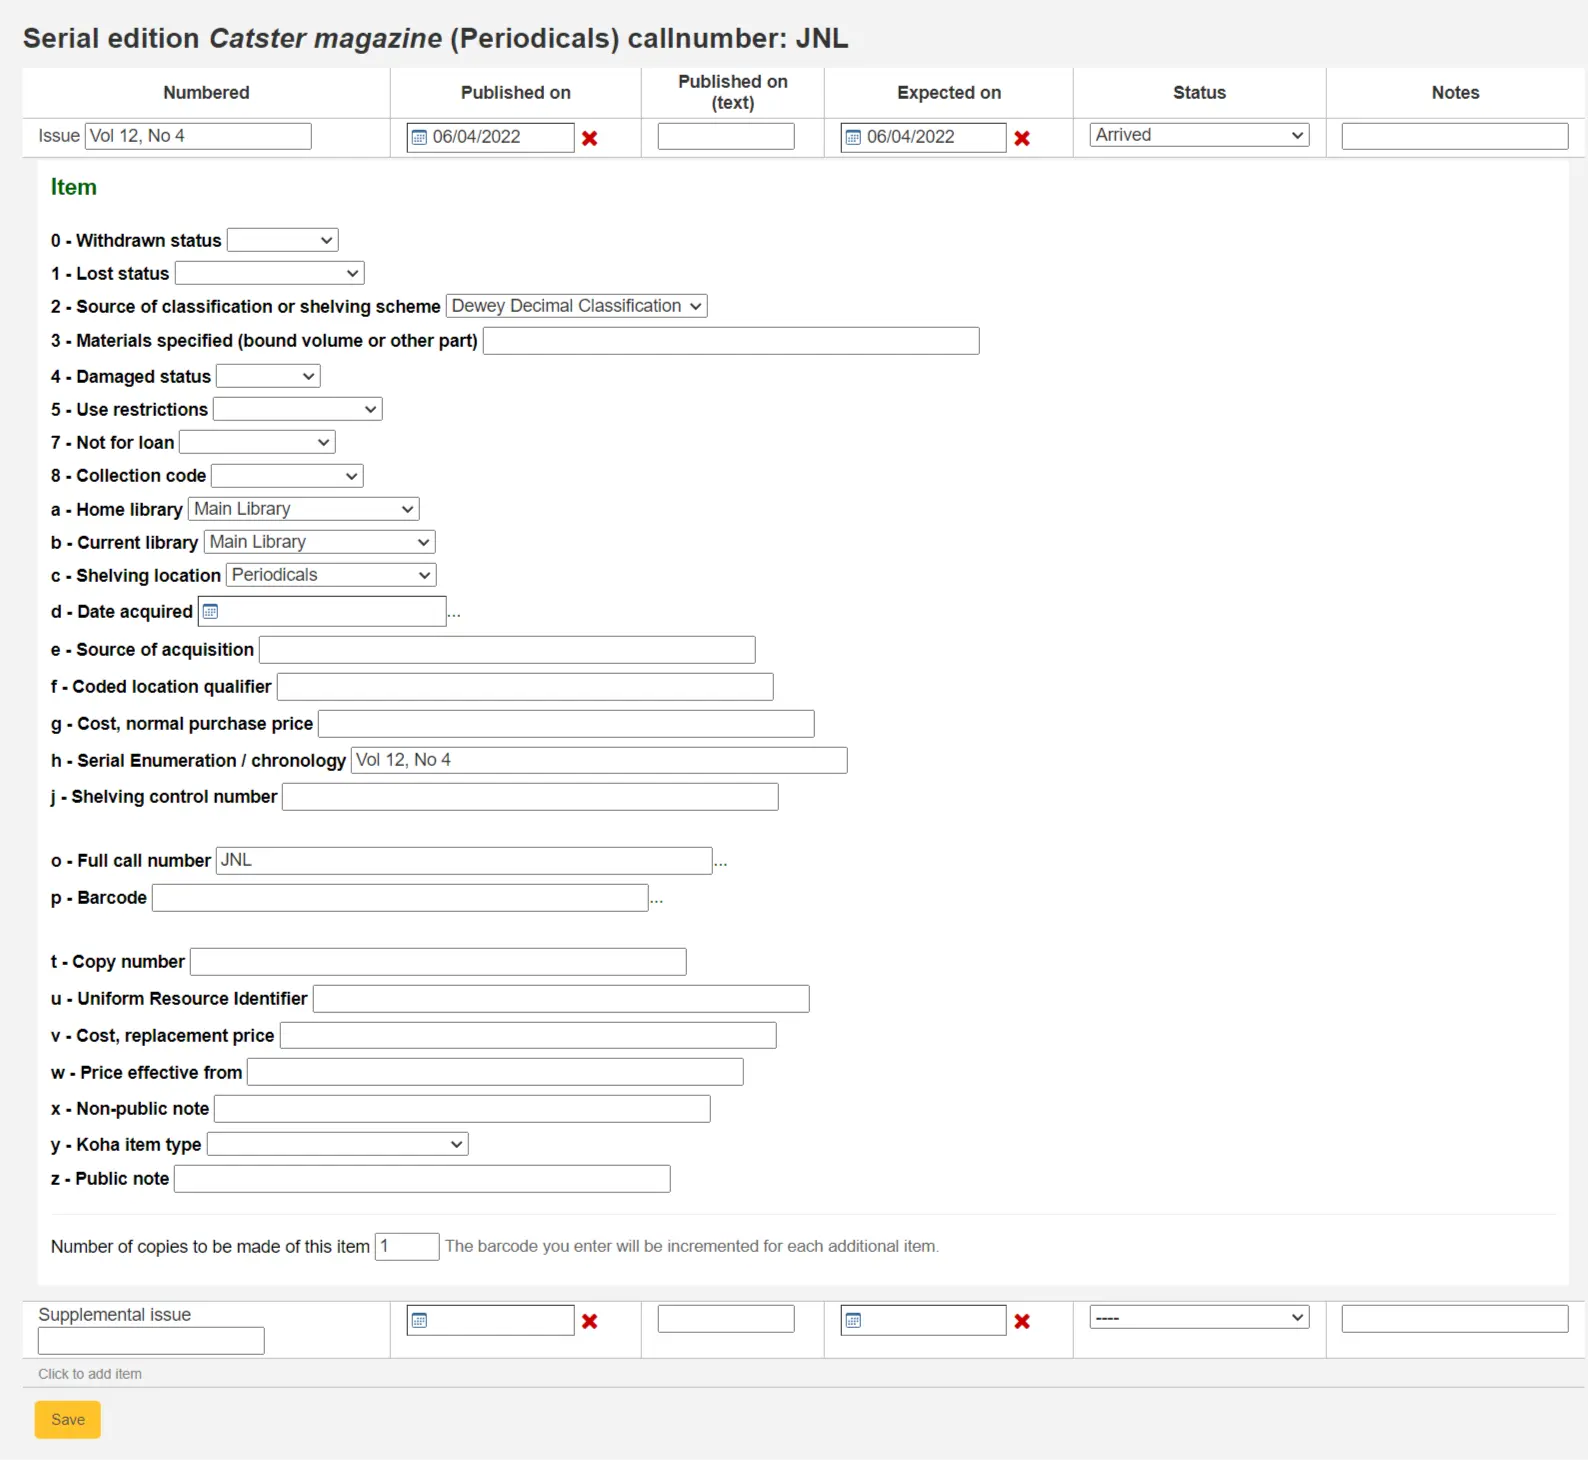
Si votre fascicule a un hors-série, remplissez la zone d’information Hors-série.
Saisissez la numérotation complète dans la barre après “Numéro supplémentaire”. Aucune numérotation ne sera pré-remplie, ce que vous saisirez s’inclura dans la chronologie/énumération du périodique de la notice d’exemplaire [MARC21 952$h] (si vous créez des notices d’exemplaire).
Par exemple, saisissez ceci dans son intégralité si c’est que vous souhaitez afficher: « v.69 no.3 (Mar. 2015) suppl. »
Si vous avez décidé de créer un exemplaire pour chaque fascicule, un formulaire d’ajout d’exemplaire s’affichera pour le hors-série et le fascicule lui-même
Quand vous avez saisi les données utiles, cliquez “Sauvegarder”
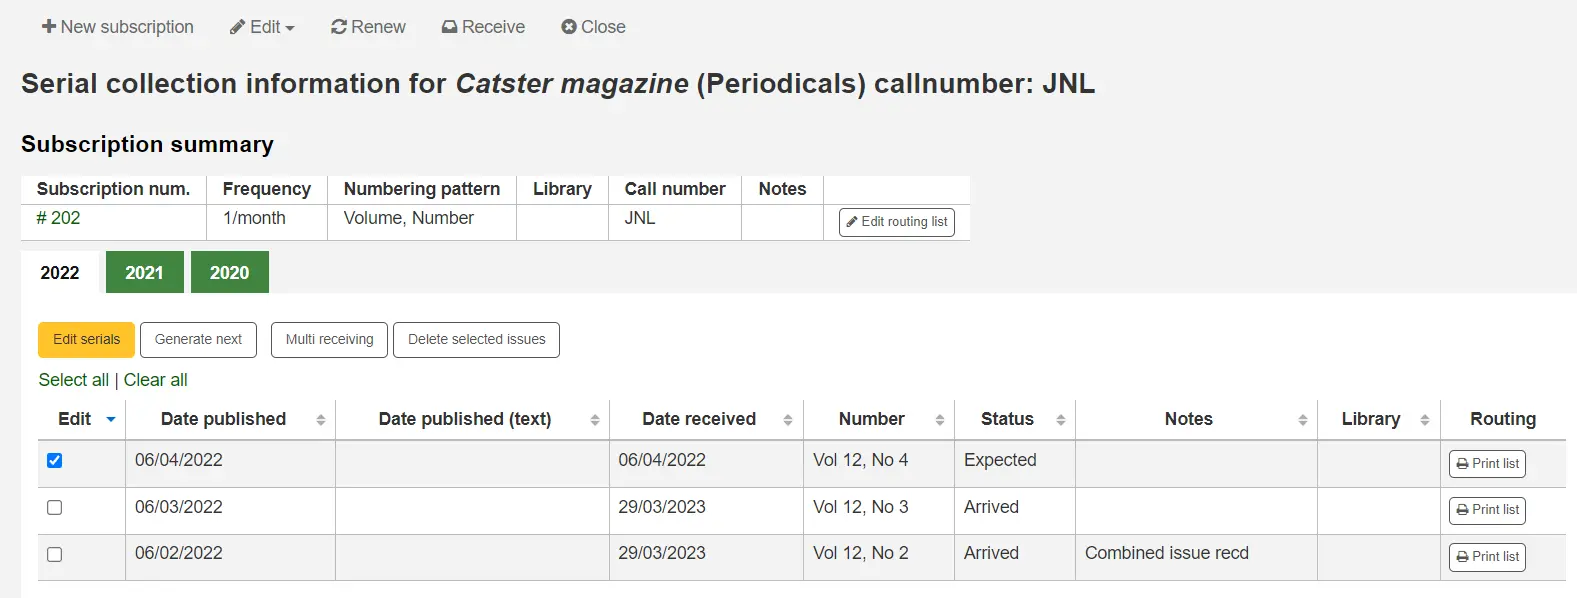
État de collection
Chaque abonnement a une page Etat de collection disponible à partir du menu Périodiques.
A partir de cette page, vous pouvez gérer des opérations supplémentaires liées aux abonnements comme le bulletinage de fascicules multiples et la modification.
En cliquant sur le bouton “Créer le suivant”, vous générez le prochain fascicule et vous marquez automatiquement comme En retard le fascicule précédent.
Cochez la case de la colonne Modifier de un ou plusieurs fascicules précédents et cliquez sur le bouton “Modifier les périodiques”. Vous serez alors dirigés vers le même écran que lorsque vous bulletinez des fascicules. A partir de là, vous pouvez modifier la numérotation, les dates et le statut et ajouter des notes.
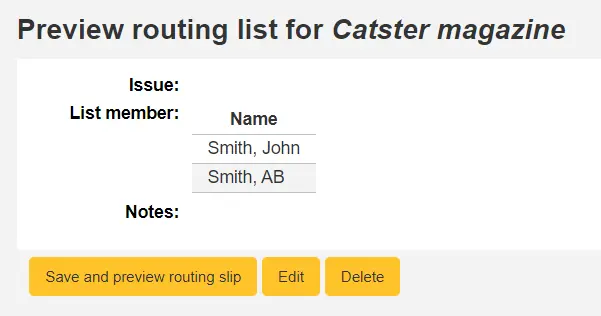
Créer une liste de routage
Note
Seuls les bibliothécaires ayant la permission routing (ou la permission superlibrarian) pourront gérer les listes de routage.
Une liste de routage contient la liste des personnes qui vont recevoir le périodique avant qu’il ne soit placé en rayon. Pour activer cette liste de routage, vous devez paramétrer votre préférence système RoutingSerials sur “Utiliser”.
Sur la page de l’abonnement, vous verrez un lien sur la gauche permettant de “Créer une liste de routage” ou “Modifier la liste de routage”
En cliquant sur ce lien, le formulaire pour ajouter une nouvelle liste de routage s’affiche.
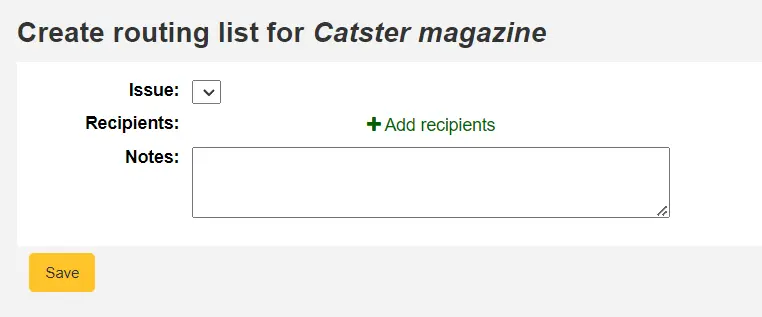
À partir de là, cliquez sur “Ajouter des destinataires “afin d’ajouter des adhérents à la liste de routage. Dans le menu qui s’affiche, vous pouvez filtrer les adhérents sur une partie de leur nom, leur bibliothèque ou leur catégorie d’adhérent.
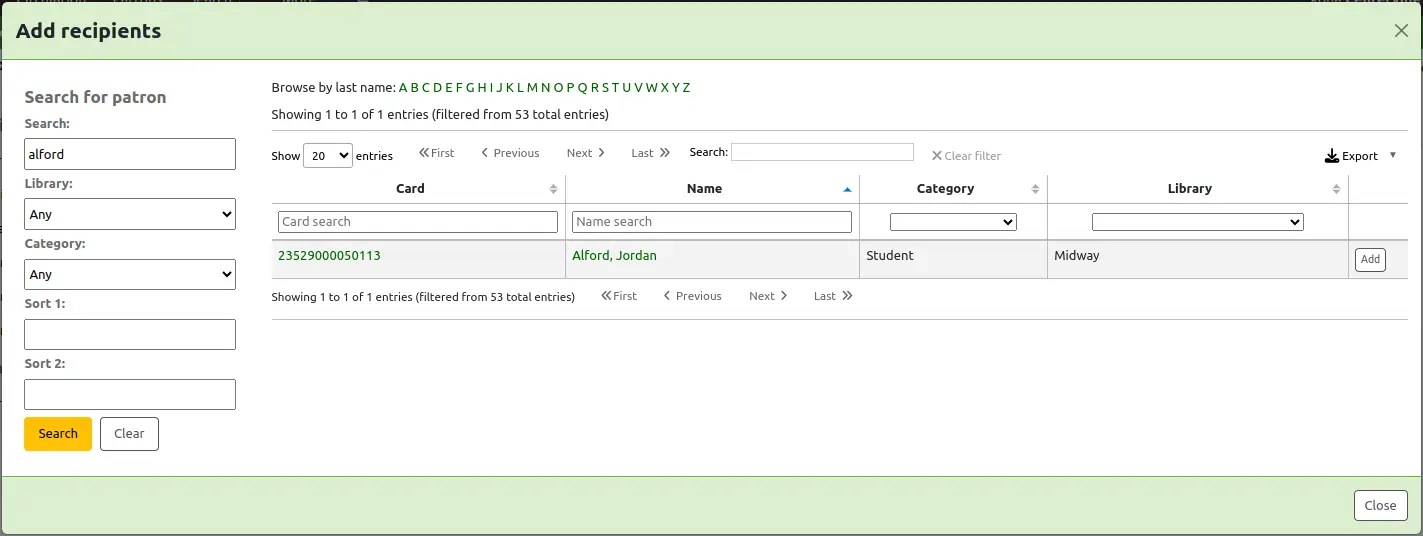
Cliquez sur “Ajouter” à droite du nom des personnes que vous souhaitez ajouter à la liste de routage. Quand vous avez choisi toutes les personnes que vous voulez, cliquez sur le bouton “Fermer” pour être redirigé sur la liste de routage.
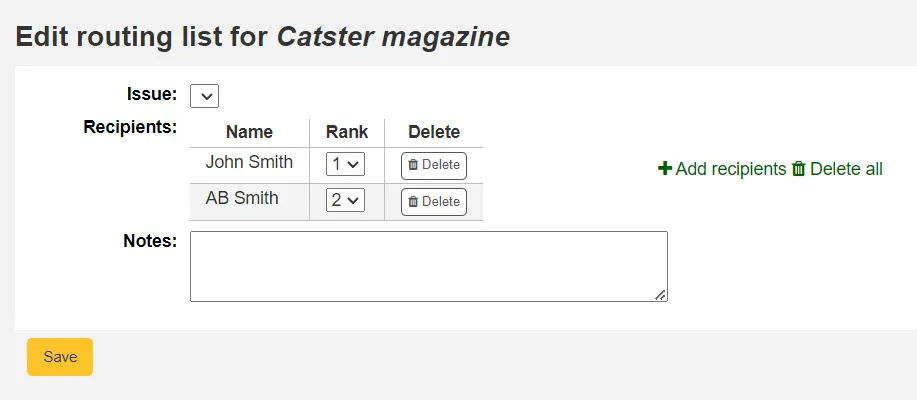
A partir de ce formulaire, vous pouvez modifier l’ordre des utilisateurs et ajouter des notes. Si vous ajoutez toujours la même note, vous pouvez créer une personnalisation HTML avec la localisation d’affichage “RoutingListNote”.
Si la liste ressemble à ce que vous attendez, cliquez sur “Enregistrer”.
Ensuite, vous êtes amené sur une page d’aperçu de la liste de routage. Pour imprimez la liste, cliquez “Enregistrer et prévisualiser la liste de routage”. Une version imprimable de la liste s’affichera.
Si la préférence système RoutingListAddReserves est activée, les membres de la liste de routage seront ajoutés automatiquement à la liste de réservation du fascicule.
Pour voir toutes les listes de routage d’un adhérent en particulier, cliquer sur l’onglet Listes de routage depuis sa fiche d’adhérent. Les adhérents peuvent voir leurs listes de routages, quand ils sont identifiés à l’OPAC, sur l’onglet Mes listes de routage.
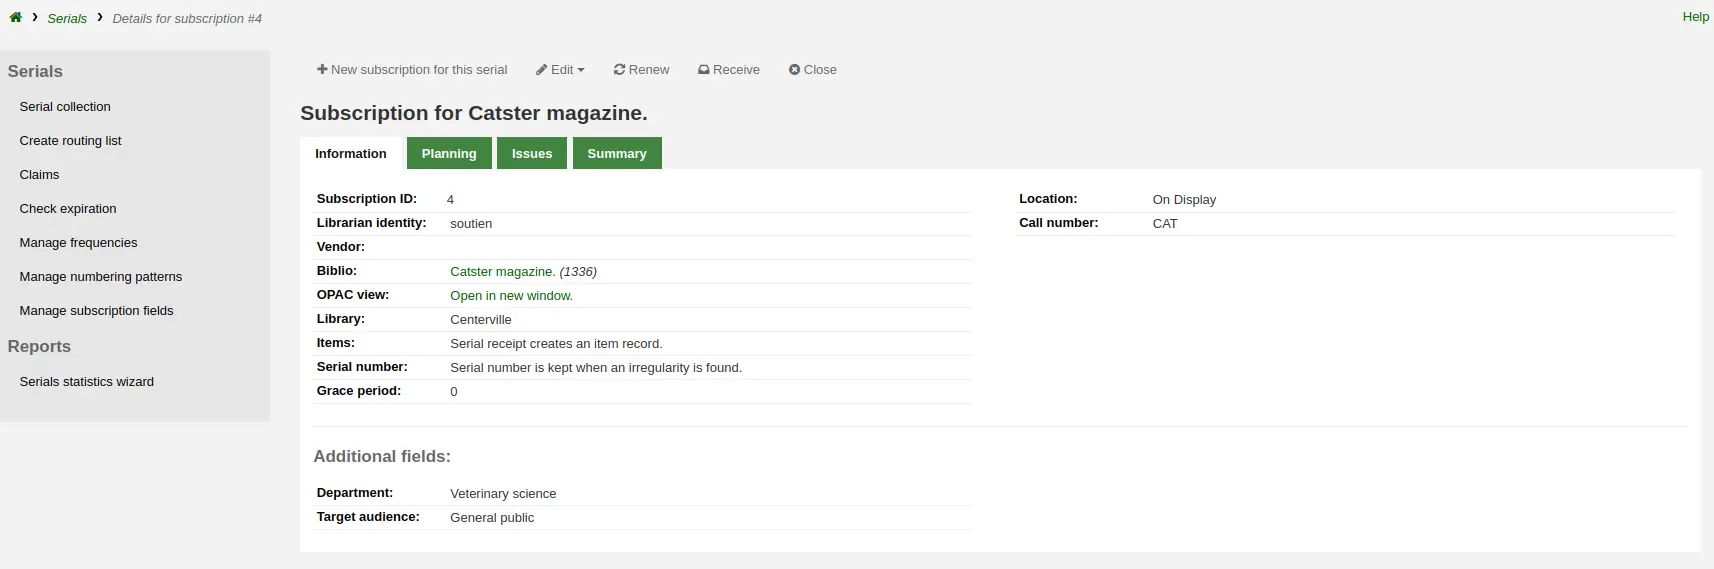
Les abonnements dans l’interface professionnelle
Toutes les informations de l’abonnement seront affichées dans les notices bibliographiques dans l’onglet “Abonnements”
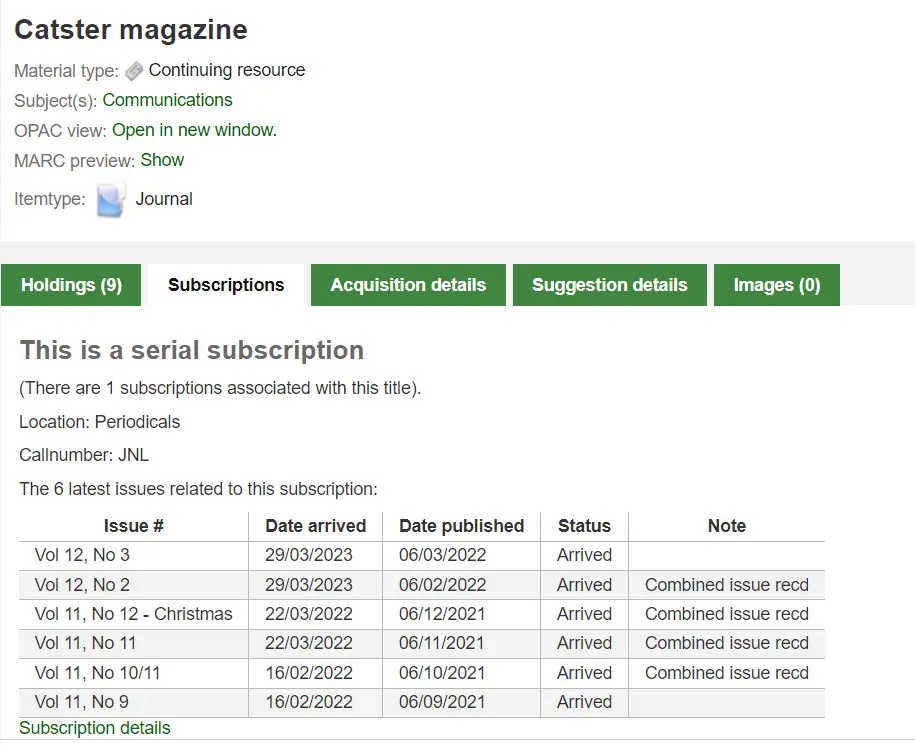
Si vous cliquez sur le lien “Détails de l’abonnement”, vous serez dirigé vers la page du résumé de l’abonnement dans l’interface professionnelle.
Si vous utilisez le module Acquisitions pour avoir un suivi des abonnements de périodiques vous verrez un onglet supplémentaire “Détails de l’acquisition” dans les détails de votre abonnement.
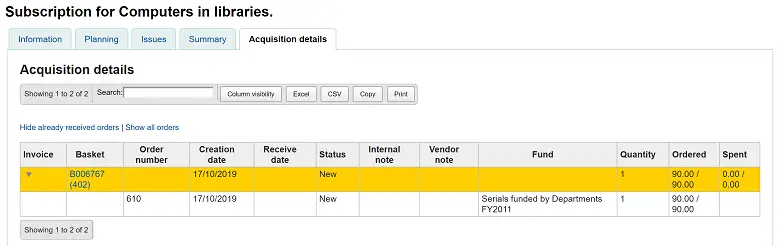
Note
Vous pouvez personnaliser les colonnes de ce tableau dans la section Configurer les colonnes du module Administration (référence du tableau : orders).
Les abonnements dans l’OPAC
Pour la consultation d’un abonnement à l’OPAC, il y a plusieurs options. Vous pouvez choisir quel onglet s’affiche par défaut avec la préférence système opacSerialDefaultTab.
Comme dans l’interface professionnelle, il y a un onglet Abonnement dans la notice bibliographique.
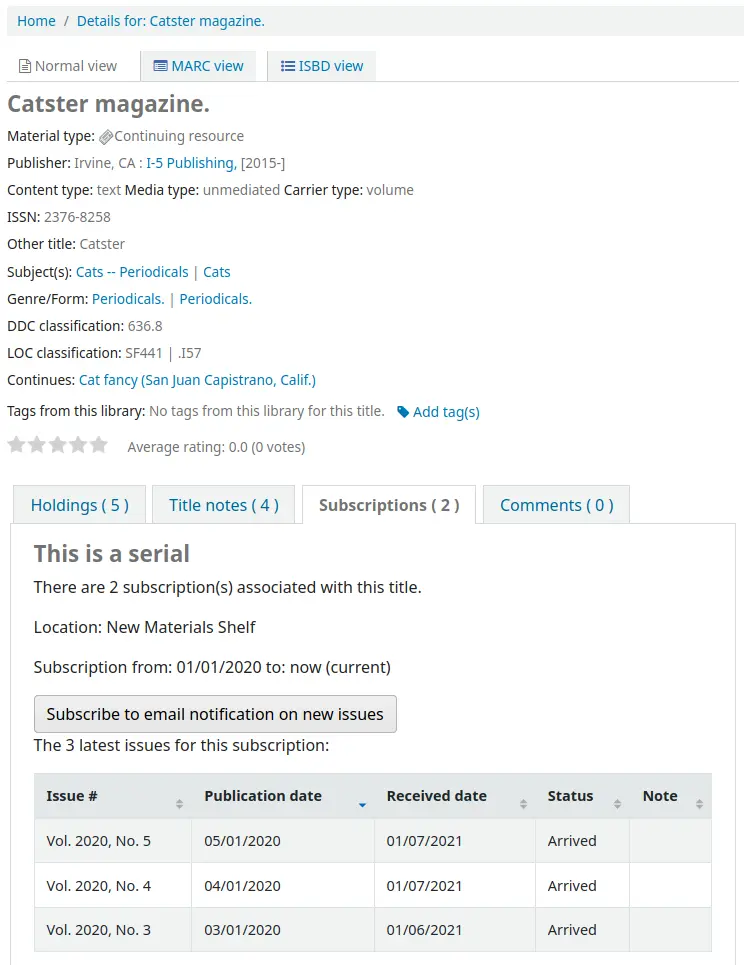
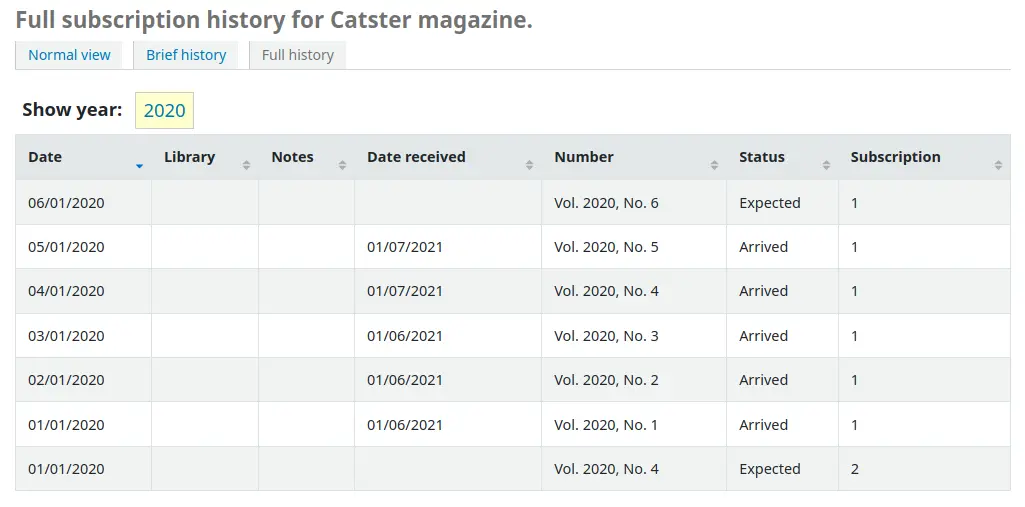
Dans cet onglet apparaîtront le nombre de fascicules choisi lors du paramétrage de l’abonnement ou dans la préférence système OPACSerialIssueDisplayCount. Si vous cliquez sur le lien “Plus de détails”, vous aurez des informations complémentaires concernant l’historique de l’abonnement. Vous pouvez définir l’affichage par défaut de l’historique d’un abonnement à l’OPAC avec la préférence système SubscriptionHistory.
Il y a deux modes de présentation : la présentation synthétique et la présentation complète. La présentation partielle de l’historique d’abonnement affiche les informations basiques de l’abonnement du périodique.

A partir de l’affichage synthétique, les adhérents peuvent s’abonner pour recevoir les notifications avertissant de la parution des nouveaux fascicules en cliquant sur le bouton “S’abonner à une alerte par courriel pour les nouveaux numéros”. Pour que ce lien apparaisse, il faut que vous ayez choisi de notifier les adhérents lors de la création de l’abonnement.
Vous pouvez voir les abonnés aux alertes de parution de nouveaux fascicules en vous rendant sur la page de l’abonnement dans l’interface professionnelle et en regardant dans la colonne de droite de l’onglet “Information”.
Alors que la présentation complète vous montre plus de détails sur l’abonnement, ventilés par année.
Réclamer des fascicules en retard
Note
Seuls les bibliothécaires avec la permission claim_serials (ou la permission superlibrarian) auront accès à cet outil de réclamation des fascicules en retard.
Koha peut envoyer des courriels à vos fournisseurs de périodiques quand vous avez des fascicules en retard. Sur la gauche de la page principale du module Périodiques, il y a un lien “Réclamations”.
Les liens pour les réclamations apparaissent sur la gauche de la page de détail de l’abonnement
Si vous n’avez pas encore défini de notification de réclamation, un message d’alerte vous informera que vous devez le faire dans l’outil Notifications et Tickets.

En cliquant sur Réclamation, vous serez amené sur un rapport vous demandant de choisir un fournisseur pour qui générer des réclamations.
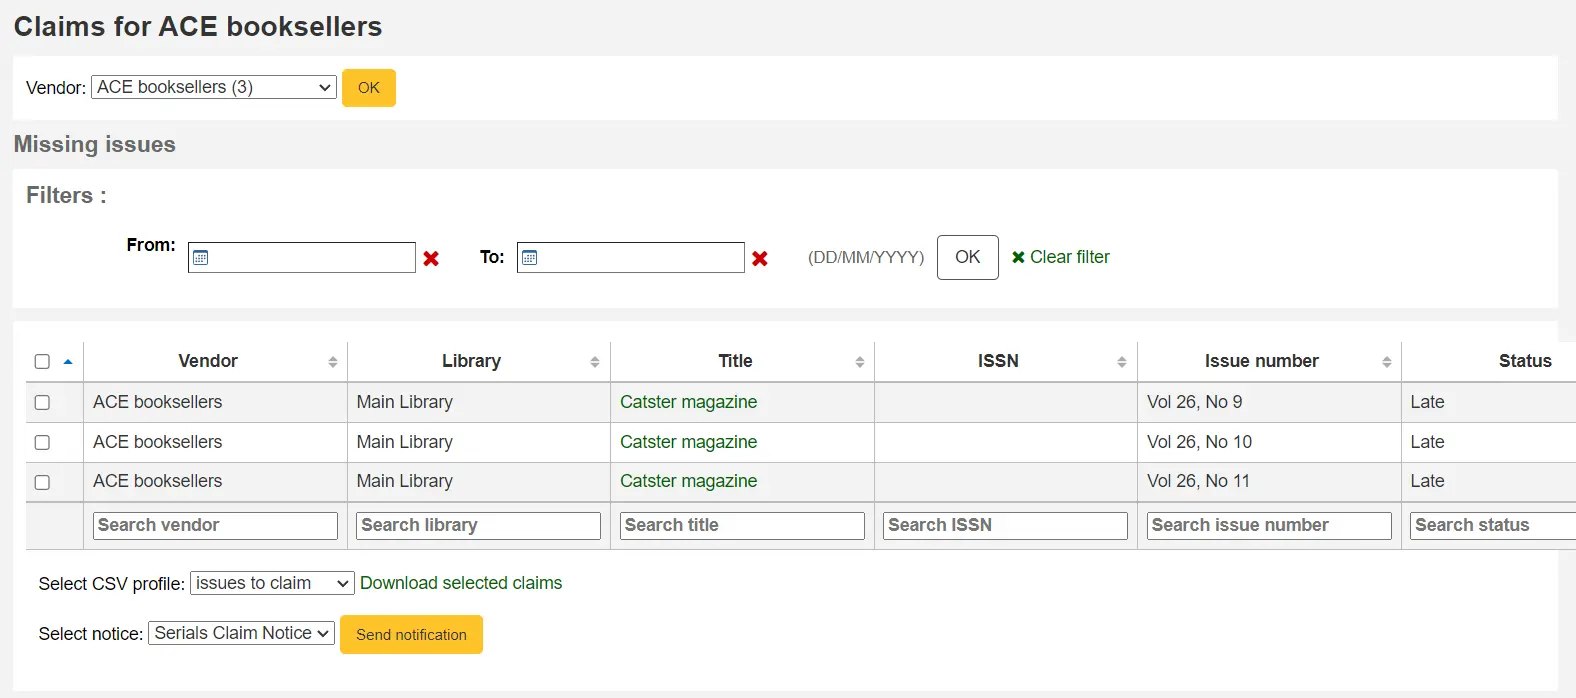
Dans la liste des fascicules en retard, vous sélectionnez en utilisant les cases à cocher les fascicules pour lesquels vous voulez émettre un courriel de réclamation. Vous choisissez le modèle de notification à utiliser. Puis vous cliquez sur le bouton Envoyer une notification.
Vous pouvez aussi exporter un fichier CSV en choisissant un profil CSV puis cliquant sur “Télécharger les réclamations sélectionnées”.
Vérifier l’expiration d’un périodique
Note
Seuls les bibliothécaires avec la permission check_expiration (ou la permission superlibrarian) auront accès à cet outil de vérification des dates d’expiration des abonnements de périodiques.
Lors de la création d’un périodique, vous définissez une durée d’abonnement. Avec l’outil de vérification d’expiration, vous pouvez voir quels abonnements sont sur le point d’expirer. Pour utiliser cet outil, cliquez sur le lien “Vérifier les dates d’expiration” dans le menu des Périodiques.
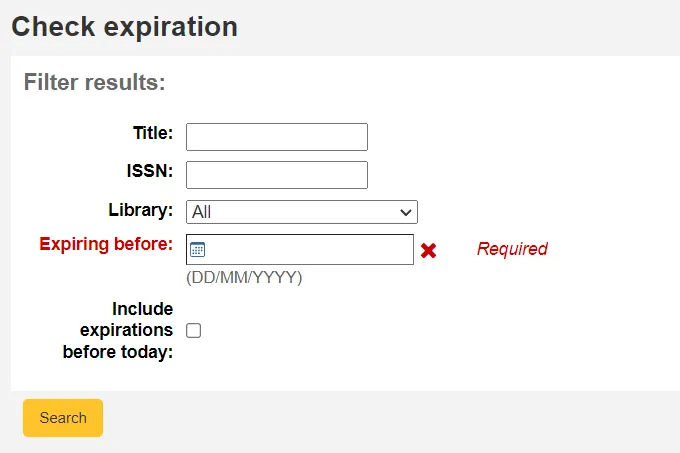
Dans le formulaire qui s’affiche, vous devez au moins saisir une date sur laquelle faire la recherche. Vous pouvez aussi faire une recherche par titre, ISBN ou bibliothèque.
Le résultat présente tous les abonnements qui expirent avant la date saisie. A partir de là, vous pouvez voir le détail d’un abonnement ou bien le renouveler en un clic.

S’il y a plus d’un abonnement, vous pouvez cocher les cases et cliquer sur “Renouveler les abonnements sélectionnés” pour renouveler tous les périodiques. Les périodiques seront renouvelés de la même durée que leur abonnement précédent (i.e si le dernier abonnement pour ce périodique était d’un an, il sera renouvelé d’une année; si le dernier abonnement s’étalait sur 16 fascicules, il sera renouvelé pour 16 autres fascicules).

Fermer un abonnement
Quand un abonnement a expiré, vous pouvez le fermer en utilisant le bouton Fermer. Une fois fermé, vous ne pouvez plus réceptionner ou renouveler un abonnement. Vous pouvez seulement le rouvrir.
Notez que vous pouvez aussi fermer un abonnement avant qu’il ait expiré.
Renouveler des abonnements de périodiques
Note
Seuls les bibliothécaires ayant la permission renew_subscription (ou la permission superlibrarian) pourront renouveler les abonnements de périodiques.
Une fois que vous aurez cliqué sur le bouton “Renouveler”, les options de renouvellement s’afficheront.
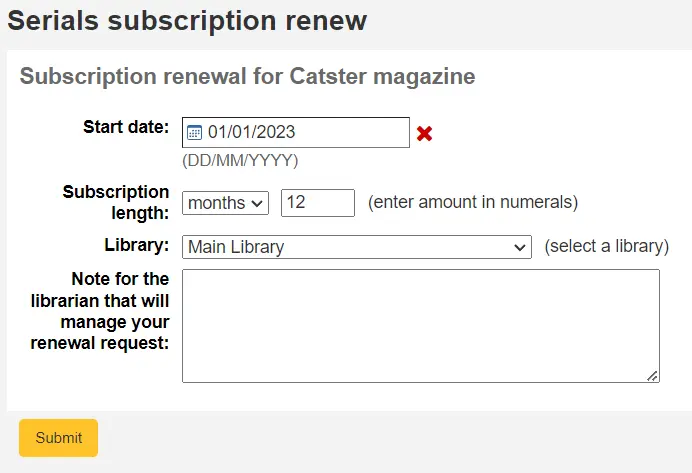
Date de début : saisissez la date à laquelle la période de votre abonnement commence.
Durée d’abonnement : saisissez le nombre de fascicules, de semaines ou de mois que durera votre abonnement
Bibliothèque : saisissez la bibliothèque pour laquelle est cet abonnement; ceci n’apparaîtra que si RenewSerialAddsSuggestion est paramétrée sur “Ajouter”
Note pour les bibliothécaires gérant la demande de renouvellement : saisissez toutes les notes que vous pouvez avoir à propos de ce renouvellement. Ceci n’apparaîtra que si RenewSerialAddsSuggestion est paramétrée sur “Ajouter”
Cliquez sur “Valider”.
Si votre abonnement de périodique a été fermé, vous ne pouvez pas renouveler un abonnement.
Si votre préférence système RenewSerialAddsSuggestion est activée, renouveler un abonnement créera une suggestion d’achat dans le module Acquisitions pour que les acquéreurs puissent la gérer.
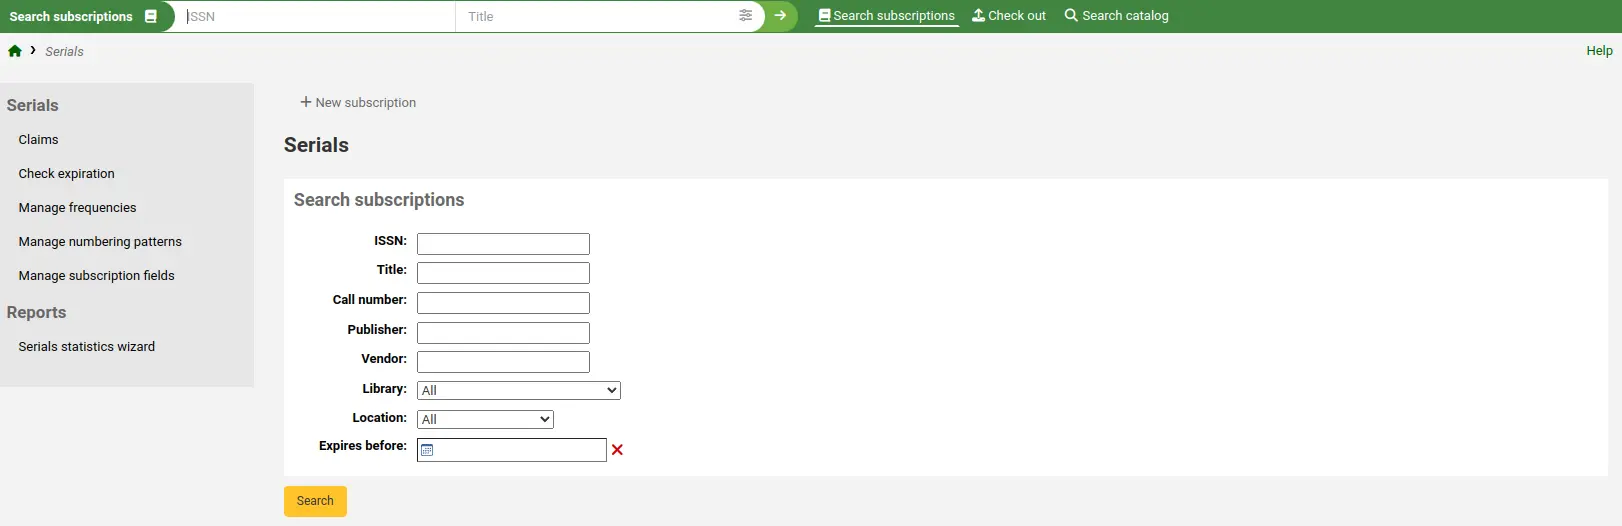
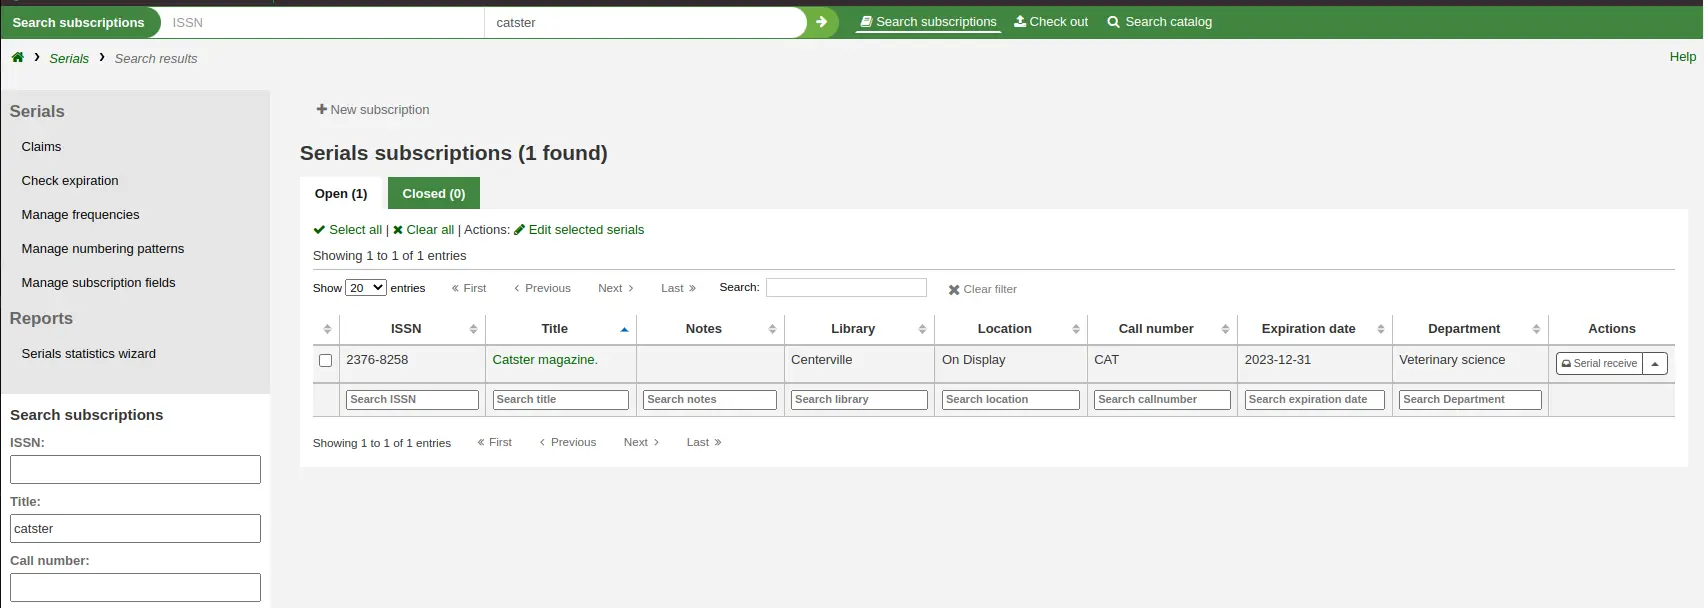
Recherche de périodiques
Dans le module Périodiques, en haut de l’écran, se trouve une barre de recherche que vous pouvez utiliser pour rechercher des abonnements en ciblant une partie de l’ISSN et/ou du titre, ainsi qu’un formulaire de recherche au milieu de la page.
Vous pouvez également cliquer sur l’icône “Plus d’option” dans le champ de recherche du haut de page puis cliquer sur le lien “Recherche avancée” pour effectuer une recherche plus approfondie sur vos périodiques.
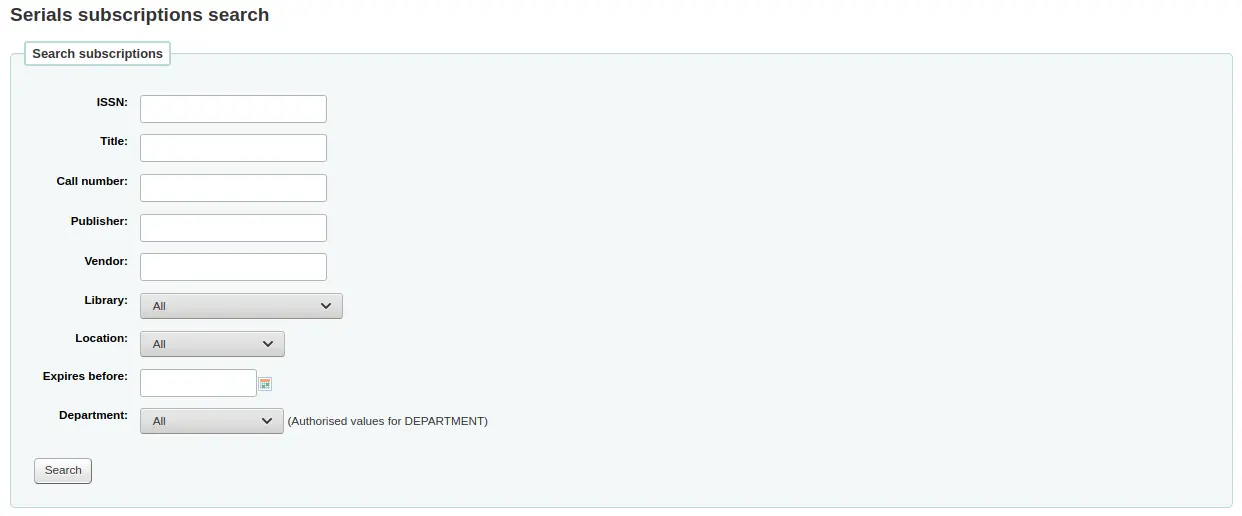
Note
Si vous avez des champs additionnels interrogeables, ils apparaîtront dans ce formulaire de Recherche avancée.
Vous pouvez filtrer ces résultats en utilisant les barres de recherche situées en bas de chaque colonne, et ajuster le nombre de résultats en utilisant la barre d’outil en haut des résultats.
Note
Si vous avez de nombreux abonnements et que le chargement des résultats prend du temps et consomme des ressources, vous pouvez utiliser la préférence système SerialsSearchResultsLimit pour limiter le nombre de résultats par page.
Statuts des périodiques
Lors du bulletinage d’un fascicule, vous modifiez le statut d’un fascicule en “Arrivé”. Il y a d’autres statuts pouvant être utilisés pour qualifier les fascicules.
Note
Voir aussi : Tableau des périodiques dans la section FAQ.
Attendu : c’est le statut assigné automatiquement à un nouveau fascicule lors de sa création. Il signifie que le fascicule n’est pas arrivé mais n’est pas encore en retard.
Arrivé : c’est le statut utilisé lors du bulletinage d’un fascicule. Il signifie que le fascicule a été reçu par la bibliothèque.
En circulation : ce statut signifie que le fascicule circule tout au long d’une liste de routage imprimée. Il n’est pas assigné automatiquement, mais vous pouvez l’utiliser pour indiquer aux adhérents que le document est actuellement indisponible.
Note
Ce statut n’est disponible que si le statut en cours n’est pas “Attendu”.
En reliure : utilisez ce statut quand vous envoyez des fascicules être reliés en volumes. Si vous créez des exemplaires pour chaque fascicule, vous pouvez aussi utiliser le module Conservation pour suivre les exemplaires envoyés à la reliure. Si vous ne créez pas d’exemplaire, vous pouvez utiliser ce statut pour suivre quel fascicule y a été envoyé.
Note
Ce statut n’est disponible que si le statut en cours n’est pas “Attendu”.
Relié : utilisez ce statut pour indiquer que ce fascicule est relié en volume.
Note
Ce statut n’est disponible que si le statut en cours n’est pas “Attendu”.
En retard : ce statut signifie que le fascicule n’est toujours pas arrivé bien que la date à laquelle il était attendue soit déjà passée. La date de retard dépend de la date de publication et de la période de grâce saisie dans l’abonnement. Ce statut est assigné automatiquement aux fascicules “Attendus” si un nouveau est créé en cliquant sur “Créer le suivant” dans la section Etat de collection. Il peut aussi être appliqué automatiquement en utilisant le cronjob SerialsUpdate.pl. Si vous allouez manuellement “En retard” à un fascicule, le suivant sera généré automatiquement.
Manquant : vous pouvez assigner ce statut aux fascicules manquants. Si vous ne créez pas d’exemplaire pour chaque fascicule, ce statut peut être utilisé pour indiquer quel fascicule est manquant (si un exemplaire est créé, vous pouvez utiliser le statut Perdu d’un exemplaire à la place ou en plus de ce statut du fascicule). Des statuts Manquants plus précis sont aussi disponibles.
Manquant (jamais reçu) : utilisez ce statut pour signaler que le fascicule n’a jamais été reçu du fournisseur.
Manquant (épuisé) : utilisez ce statut pour signaler que le fascicule n’est plus disponible à l’achat.
Manquant (endommagé) : utilisez ce statut pour signaler que le fascicule a été abîmé et n’est plus disponible.
Manquant (perdu) : utilisez ce statut pour signaler que le fascicule a été perdu.
Réclamé : ce statut signifie que le fascicule n’est toujours pas arrivé, mais qu’une réclamation a été envoyée au fournisseur. Il est automatiquement assigné par la procédure de réclamation mais peut être affecté manuellement si vous n’envoyez pas de réclamation avec Koha.
Non disponible : vous pouvez assigner ce statut aux fascicules qui ne sont pas disponibles, quelles qu’en soient les raisons.
Supprimer : si vous choisissez ce statut puis enregistrer, le fascicule sera supprimé, et le suivant sera créé.