OPAC
Résultats de la recherche
Pour lancer une recherche via l’OPAC, vous pouvez utiliser la barre de recherche rapide située en haut ou cliquer sur le lien “Recherche avancée” pour une recherche plus détaillée.

Si Elasticsearch est utilisé et que la préférence système OpacBrowseSearch est activée, vous verrez également l’option Feuilleter.
Note
Pour en savoir plus sur la recherche, consultez le chapitre Recherche de ce manuel.
Vue d’ensemble des résultats

Après avoir lancé la recherche, le nombre de résultats trouvés s’affiche au-dessus des résultats.
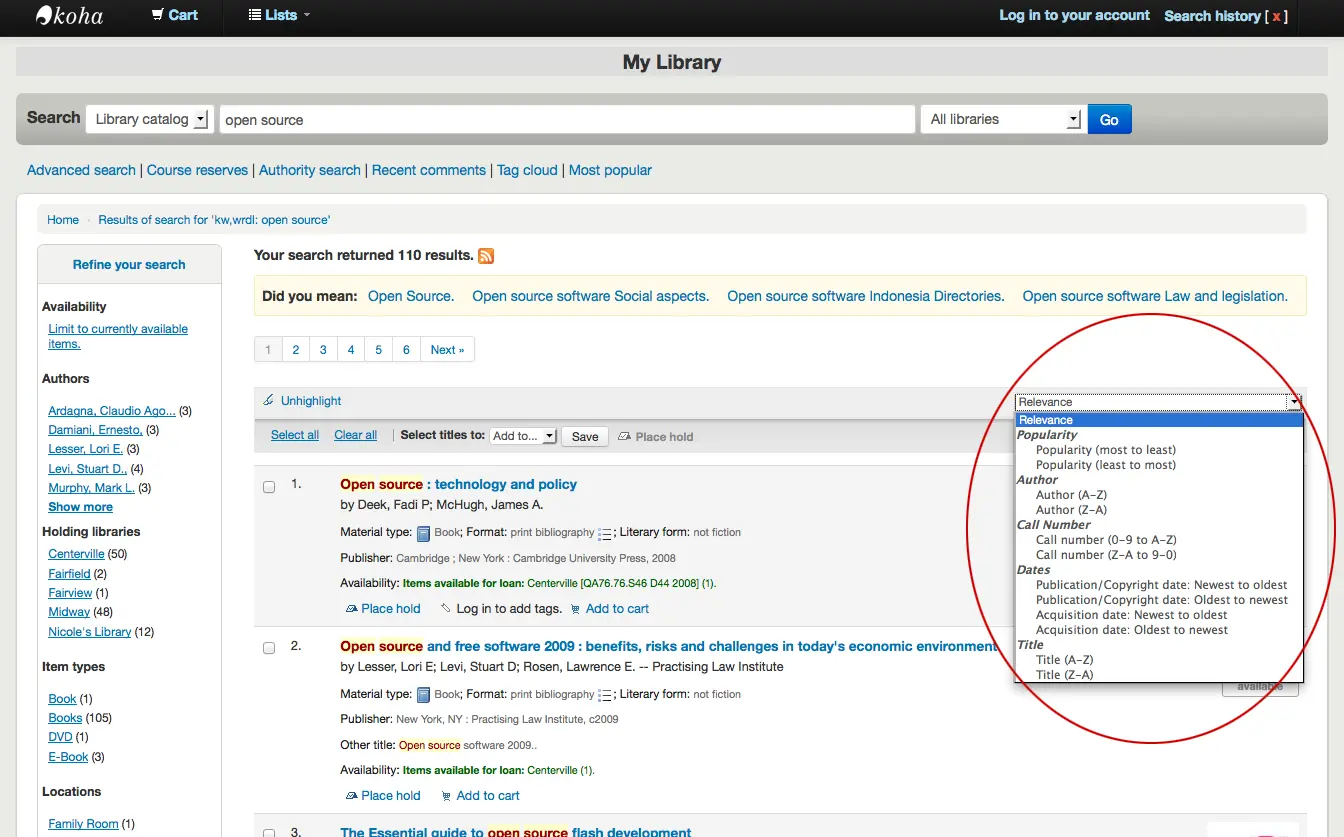
Par défaut vos résultats de recherche seront triés en fonction des valeurs des préférences système OPACdefaultSortField and OPACdefaultSortOrder. Pour modifier cela vous pouvez choisir un autre critère de tri dans le menu déroulant à droite.
Sous chaque titre de la liste des résultats, il y aura une série de valeurs issues du leader de la notice (champ 000).
Note
Ces valeurs n’ont rien à voir avec les types de documents ou les codes collection que vous avez appliqués à vos notices ou exemplaires. Ces données sont toutes tirées des champs de contrôle de la notice.
Ceci peut être activé ou désactivé avec la préférence système DisplayOPACiconsXSLT.
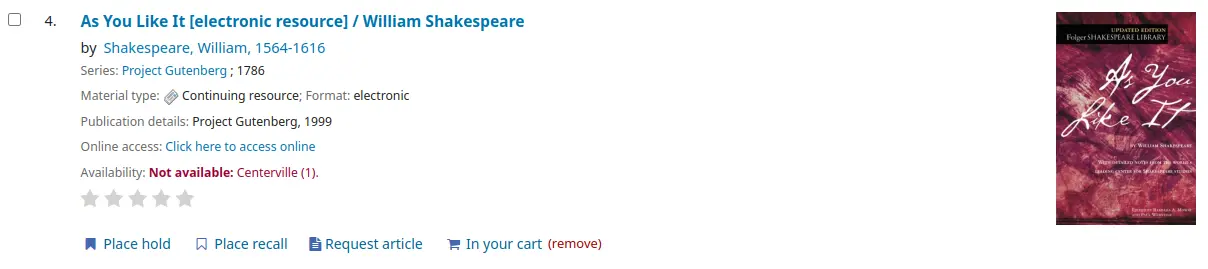
Sous chaque titre est précisée la disponibilité des exemplaires attachés à la notice.
Note
Même si vous avez limité vos recherches à une bibliothèque, tous les sites possédant le document recherché apparaîtront dans les résultats.
Avertissement
Le statut réservé d’un exemplaire ne modifie pas sa disponibilité jusqu’à qu’il ait le statut “en attente”. Les exemplaires en demande de réservation s’afficheront disponibles jusqu’à ce que le bibliothécaire retire l’exemplaire du rayon et l’enregistre comme “en attente de retrait”.
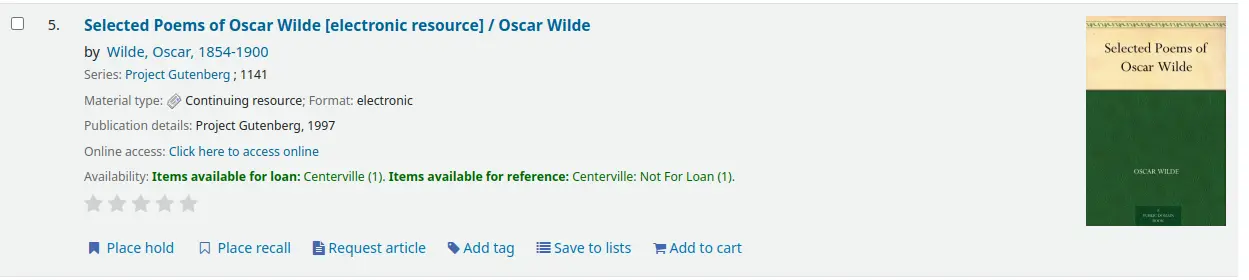
Si vous activé les préférences système Contenu enrichi, les pages de couverture s’affichent dans les résultats de recherche.
Si vous avez paramétré vos options Vouliez-vous dire ?, vous verrez une barre jaune en haut de vos résultats de recherche avec des propositions de recherches associées.
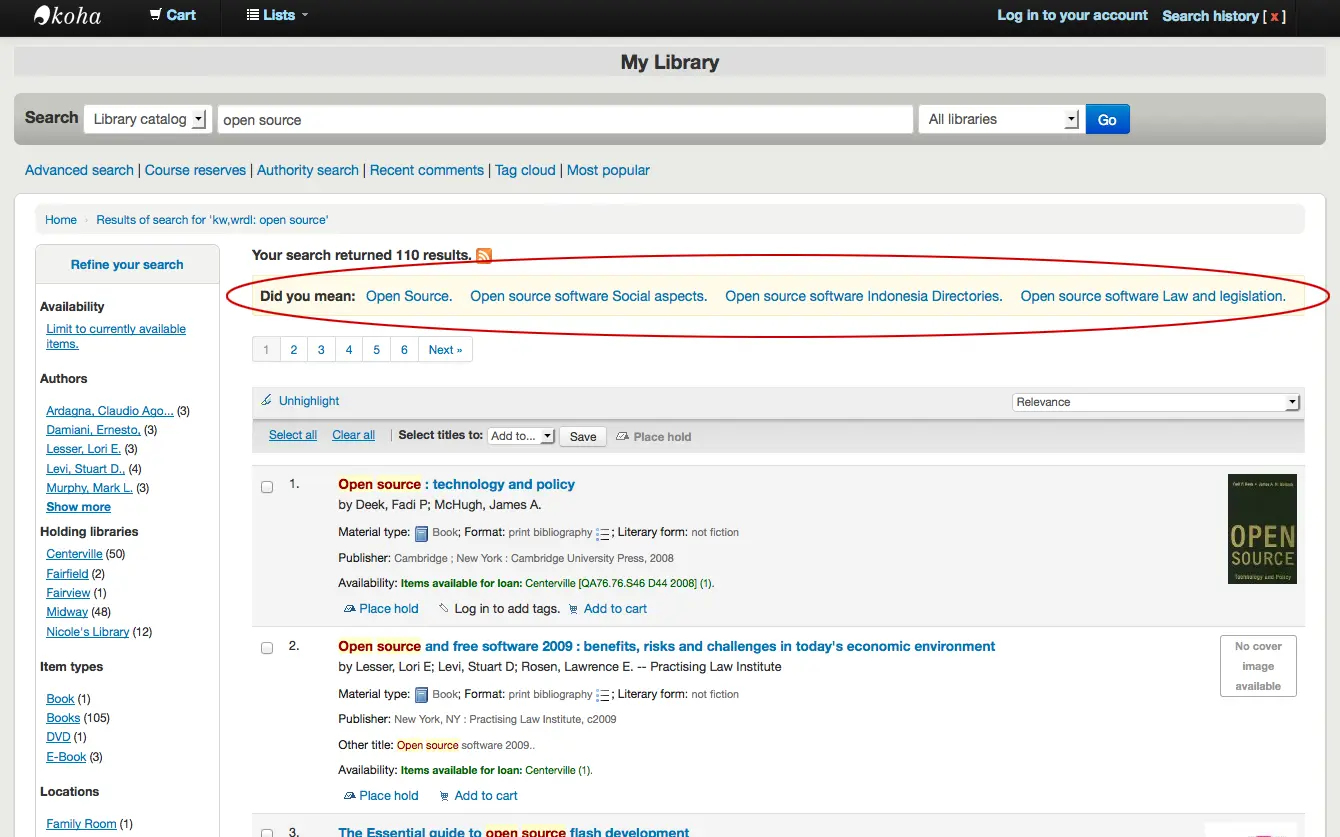
Si vous avez effectué une recherche avancée, une option vous permettant de revenir en arrière et de modifier votre recherche avancée apparaît dans la liste de résultats.
Filtres (facettes)
Pour filtrer vos résultats, cliquez sur les liens situés sous le menu “Affiner votre recherche” à gauche de votre écran.
Après avoir cliqué sur une facette, vous pouvez supprimer ce filtre en cliquant sur le petit “x” qui apparaît sur la droite de la facette.
![Vue rapprochée des facettes, dans les facettes Auteurs, "Shakespeare, William" n'est plus cliquable et il y a un [x] à côté](_images/removefilter.webp)
Voir la section sur les facettes des résultats de recherche pour plus de détails sur les facettes.
Vous pouvez ajouter du contenu personnalisé sous les facettes avec l’emplacement d’affichage OPACResultsSidebar dans l’outil de personnalisation HTML.
Recherche de flux RSS
Vous pourrez vous abonner à vos résultats de recherche via un flux RSS en cliquant sur l’icône RSS dans la barre d’adresse ou à côté du nombre de résultats.
L’intérêt de vous abonner à un flux RSS consiste à être informé des nouveaux documents qui s’ajoutent dans le catalogue dans le domaine de votre choix.
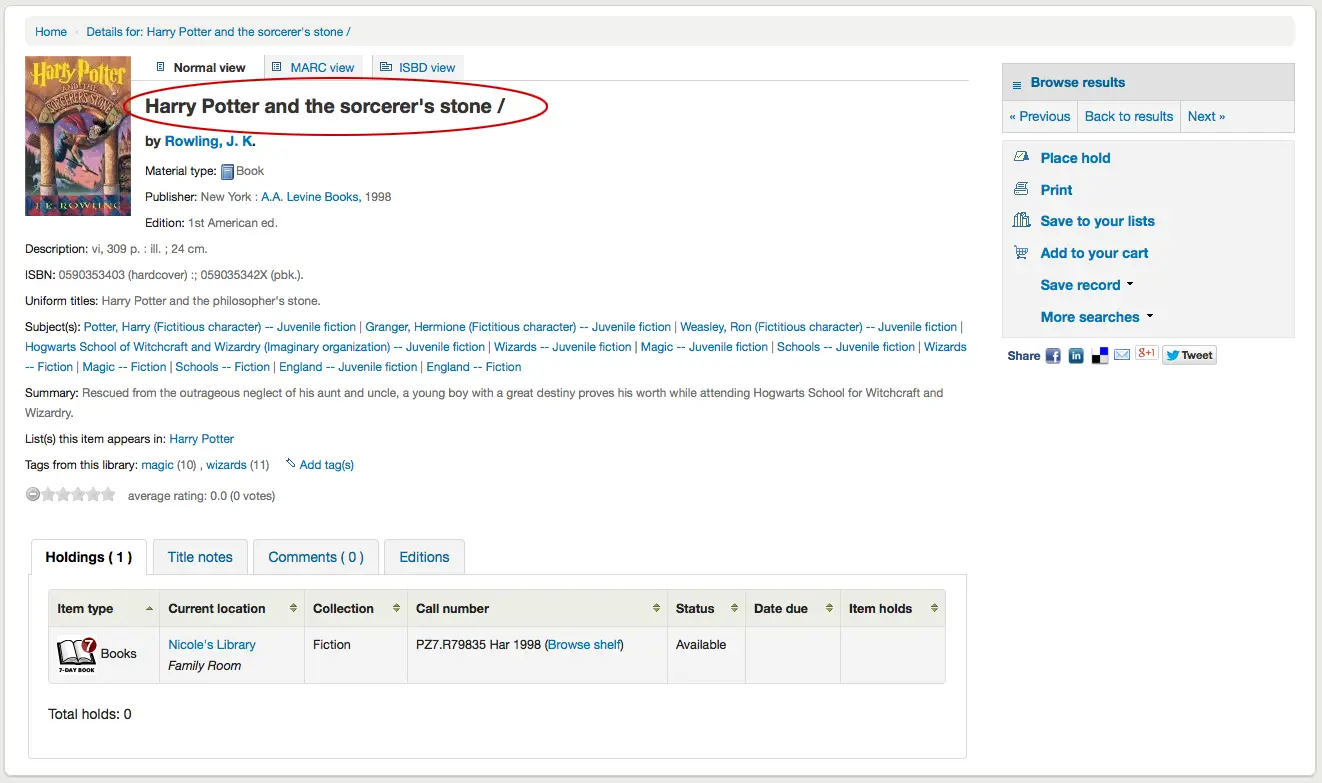
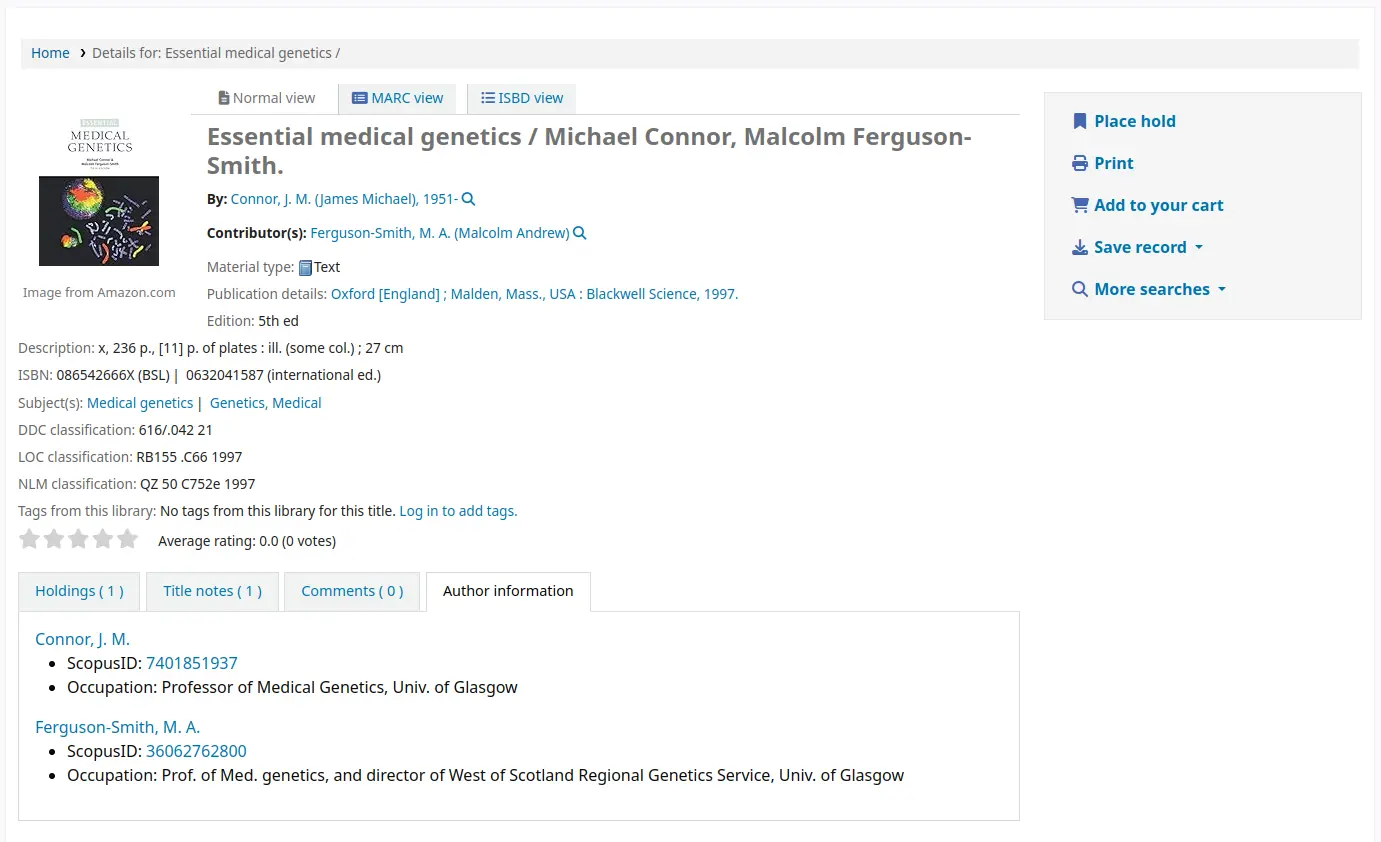
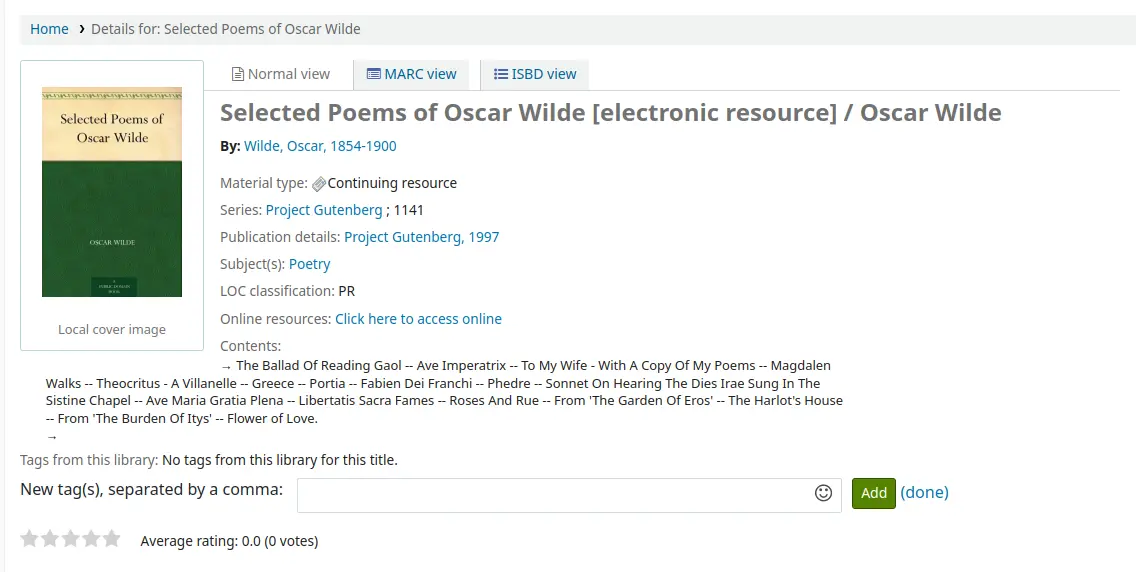
Notice bibliographique
Lorsque vous cliquez sur un titre des résultats de recherche, vous serez basculé sur la notice bibliographique détaillée. Cette page est organisée en plusieurs parties.
En haut de l’écran s’affiche le titre et le GMD:
Le nom des titres est affiché juste en dessous. Ils sont définis dans les champs 1xx et 7xx. Si vous cliquez sur l’auteur, ceci lancera une recherche de tous les documents de cet auteur.
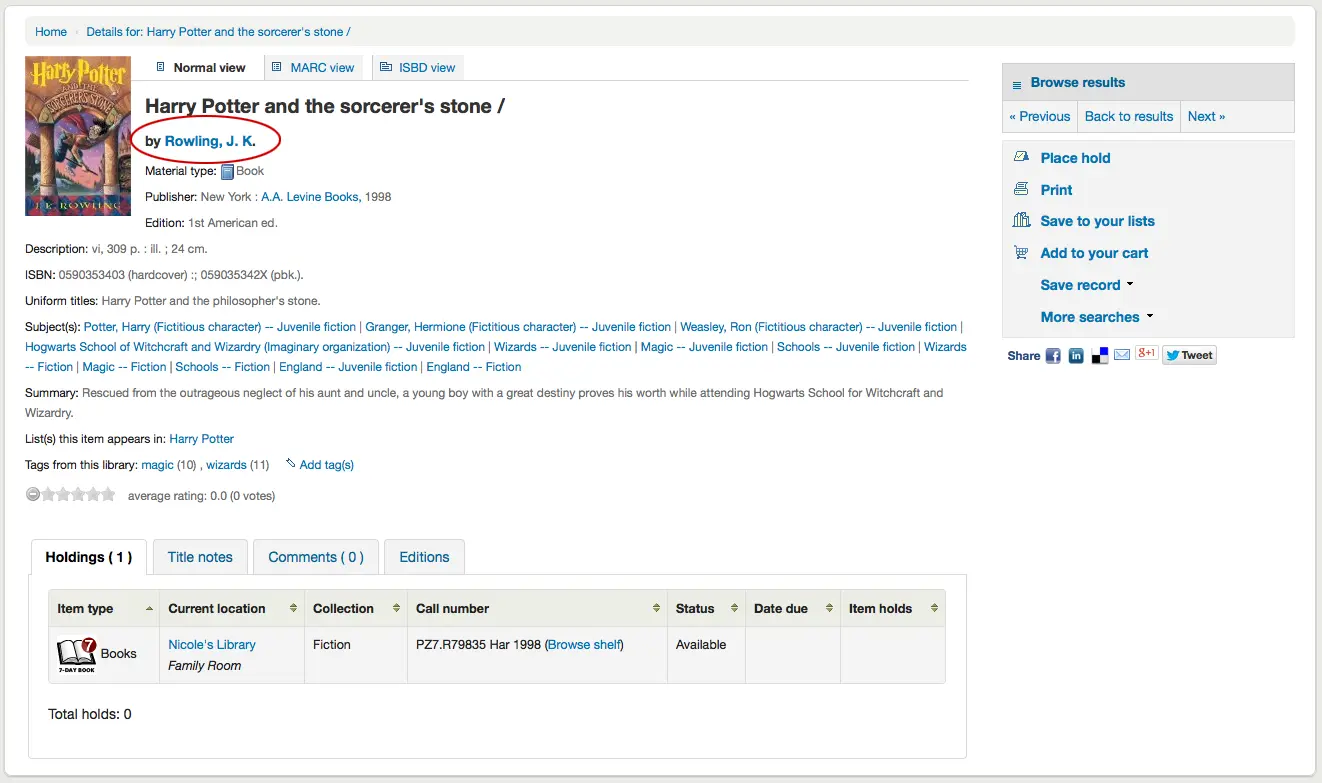
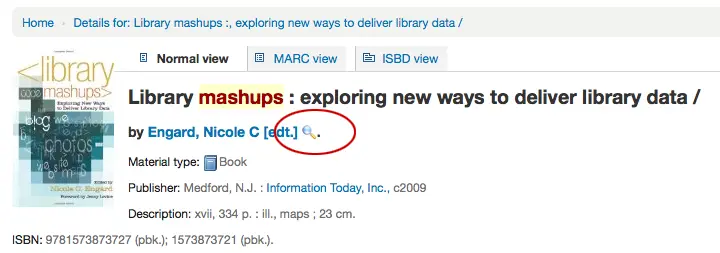
Si vous avez un fichier d’autorité, vous verrez une petite loupe à droite des autorités de l’auteur (ou des autres). Si vous cliquez sur cette loupe, cela vous basculera directement sur la notice d’autorité.
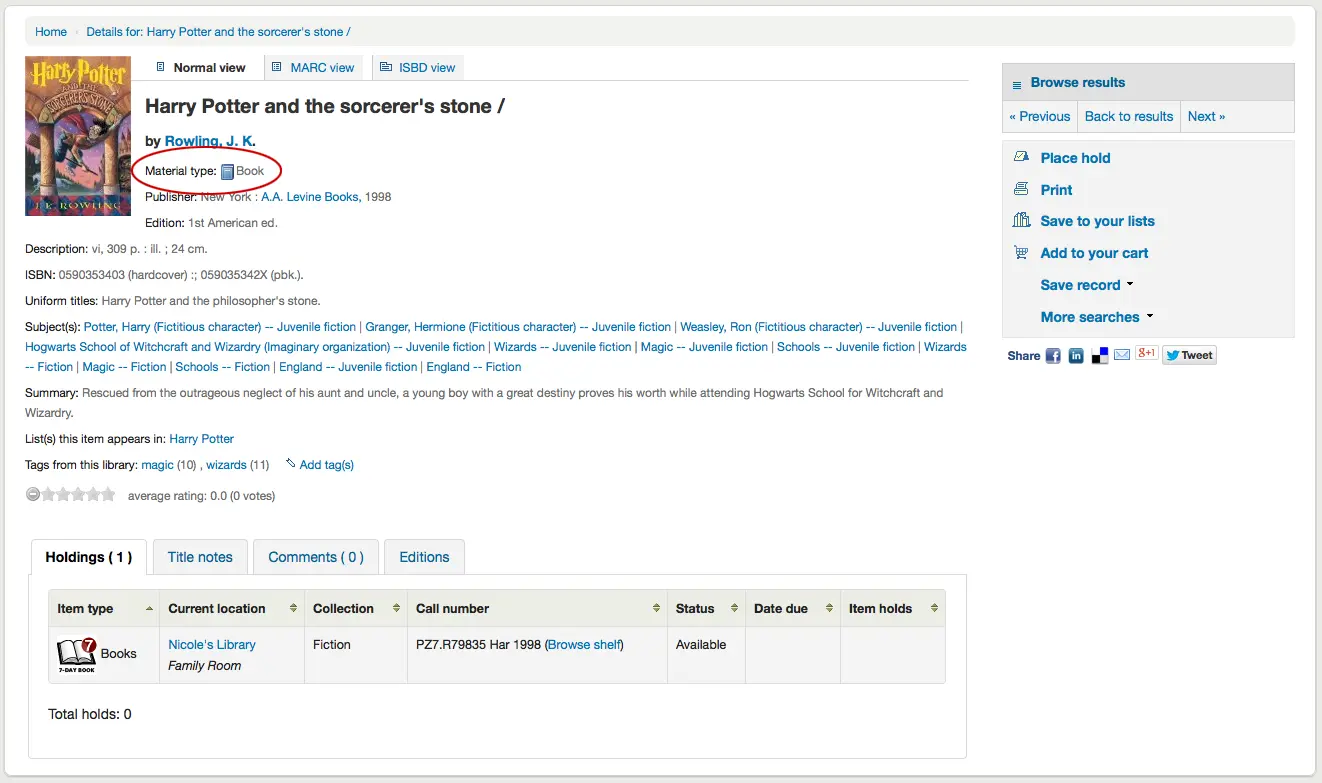
Si vous avez paramétré la préférence système DisplayOPACiconsXSLT sur “Afficher”, vous verrez un type de matériel qui est déterminé par les valeurs renseignées dans les champs fixes (apprenez en plus sur les icônes de type de matériel XSLT dans le guide de catalogage).
Vous verrez ensuite les zones de description de la notice:
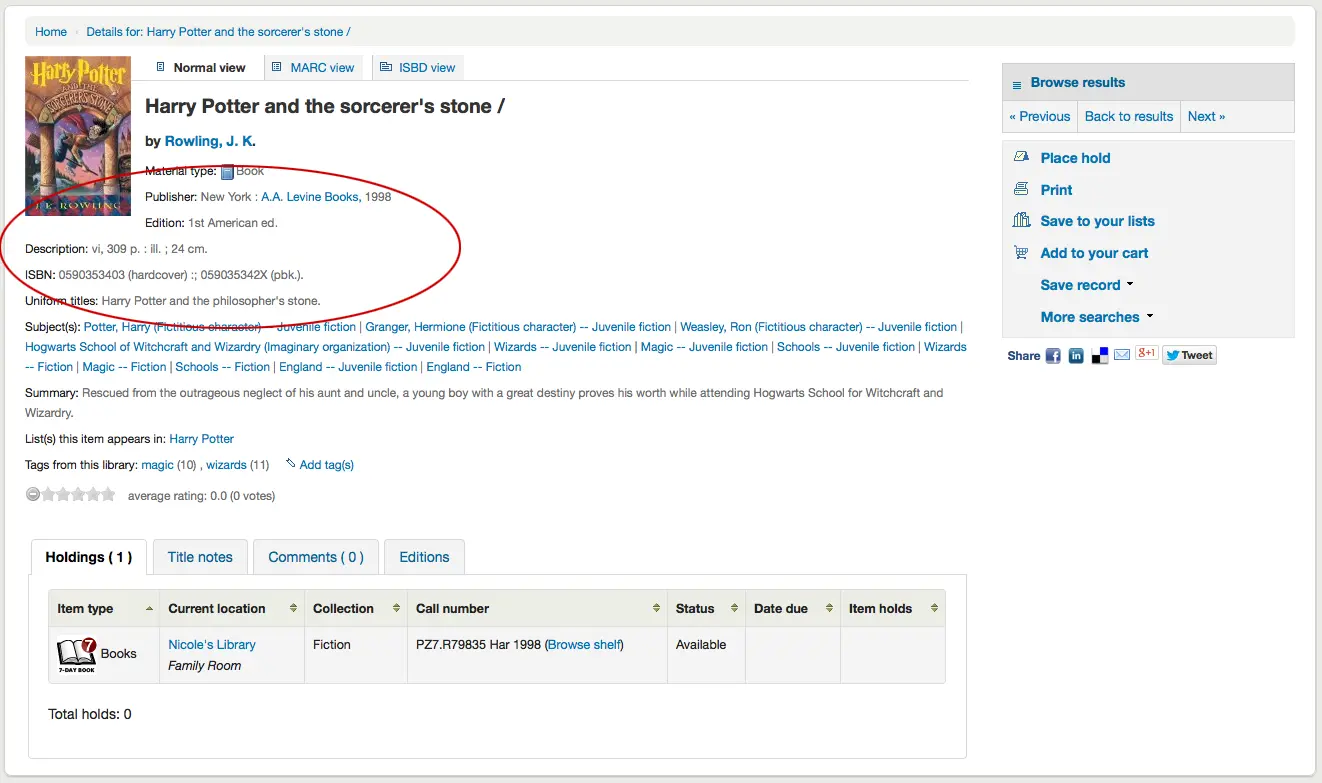
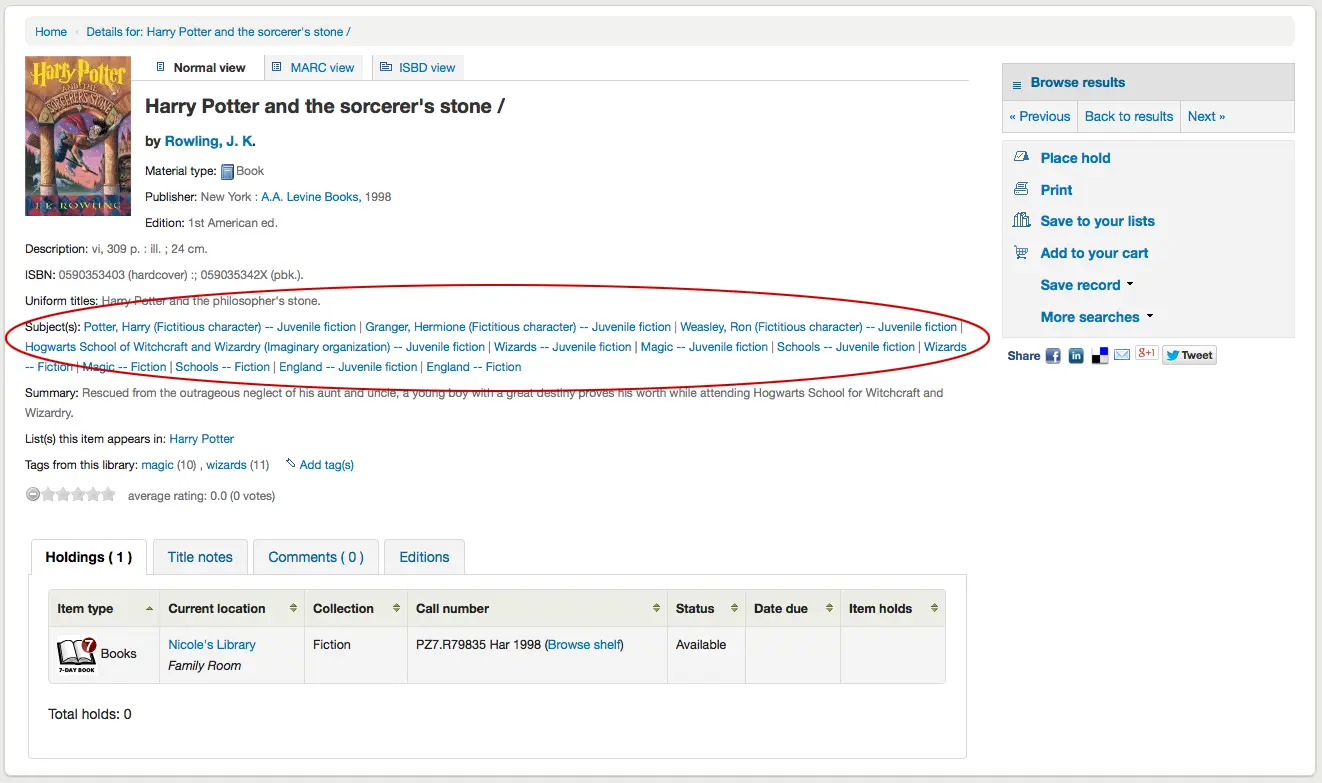
Parmi ces informations, vous trouverez les vedettes sujet sur lesquelles vous pouvez cliquer pour rechercher d’autres titres associés ou des sujets similaires
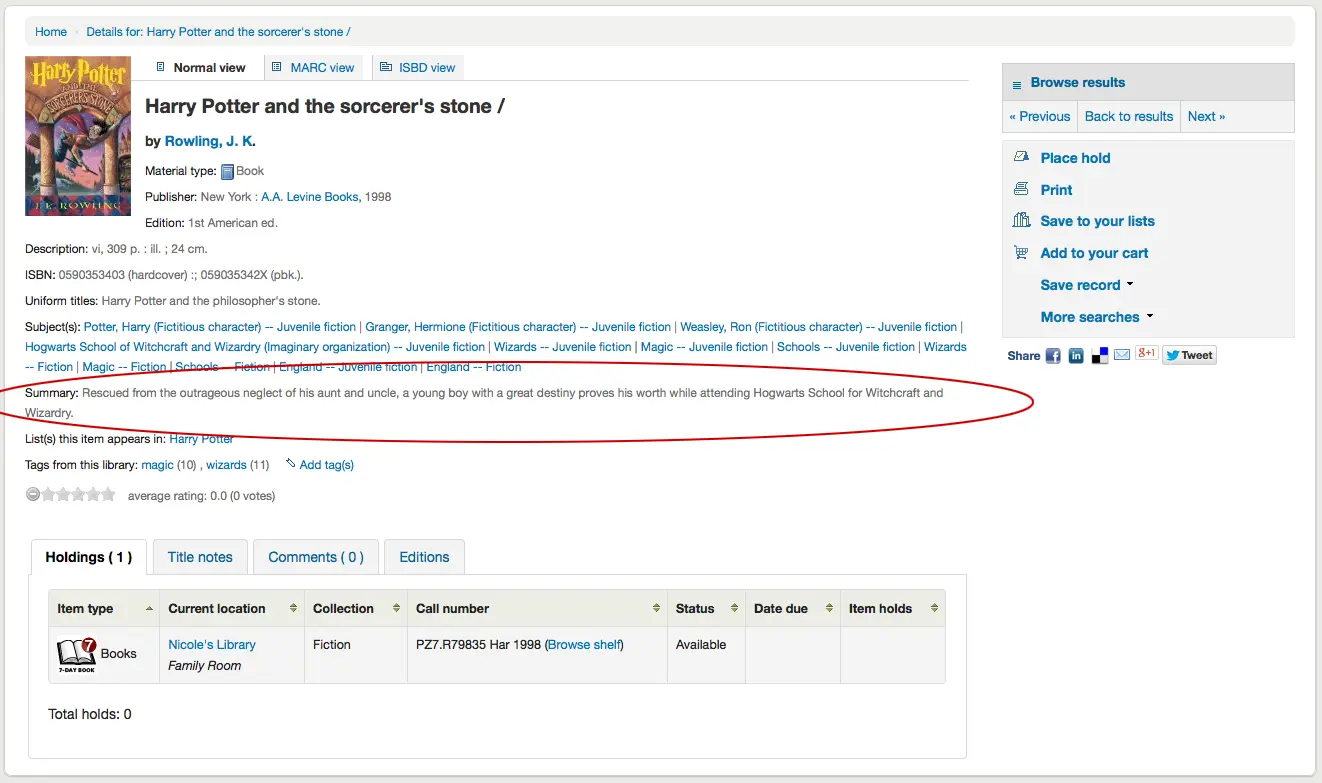
Si votre notice a une table des matières ou un résumé, cela s’affichera à côté des mentions “Résumé” ou “Tables des matières”
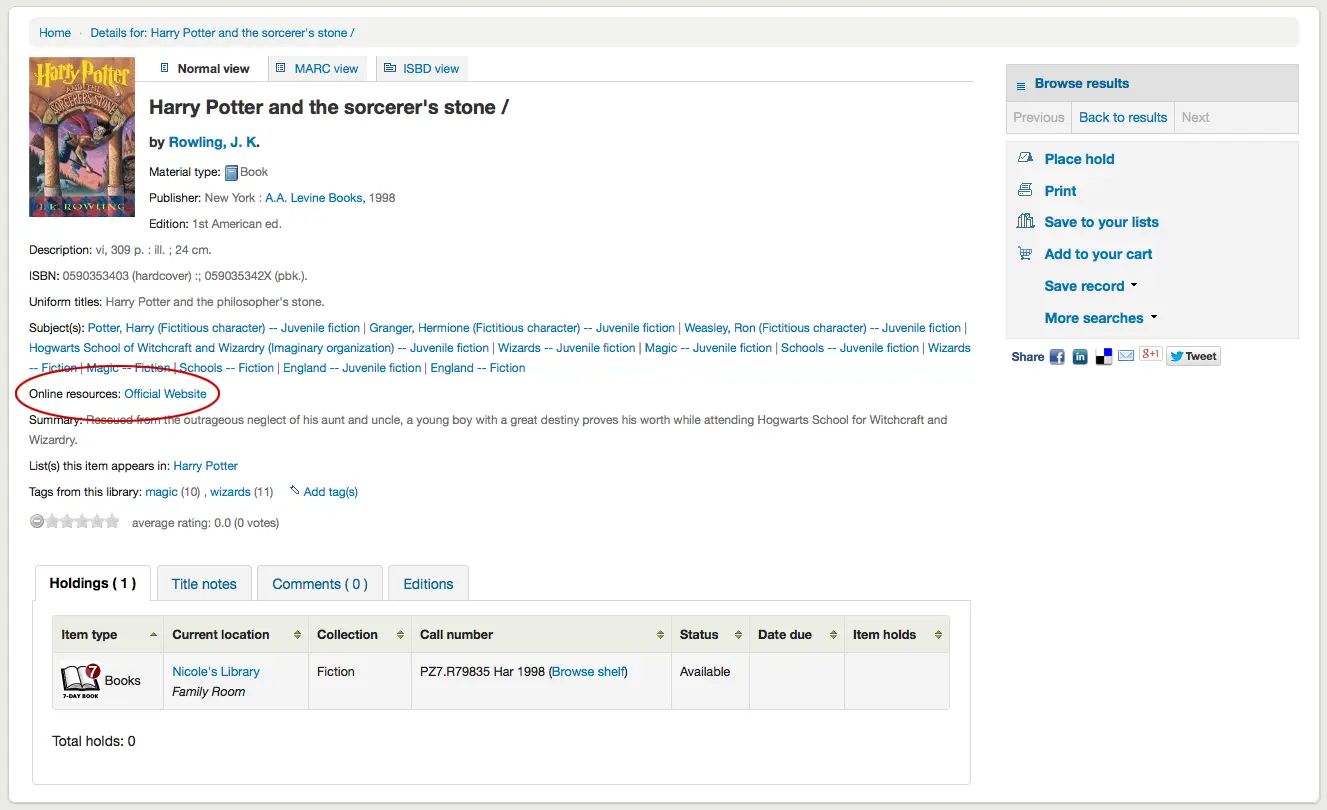
Si votre notice a des données dans les champs 856, vous verrez les liens à droite de la mention “Ressources en ligne”
Si le titre que vous êtes en train de consulter est sur une liste publique, vous verrez une liste à droite de la mention “Liste(s) où l’exemplaire apparaît”. Et si votre notice est associée à des tags (mots-clés), ils apparaîtront sous la mention “Tags de cette bibliothèque”

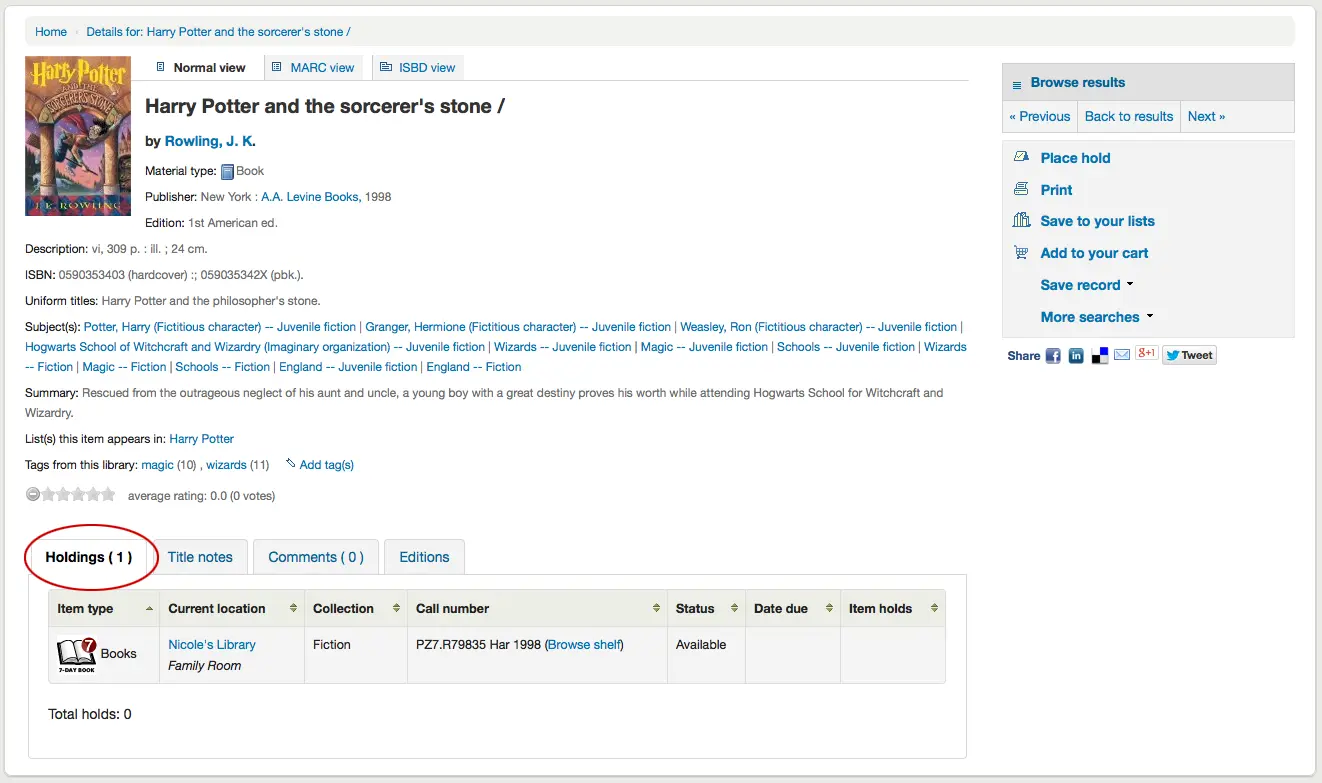
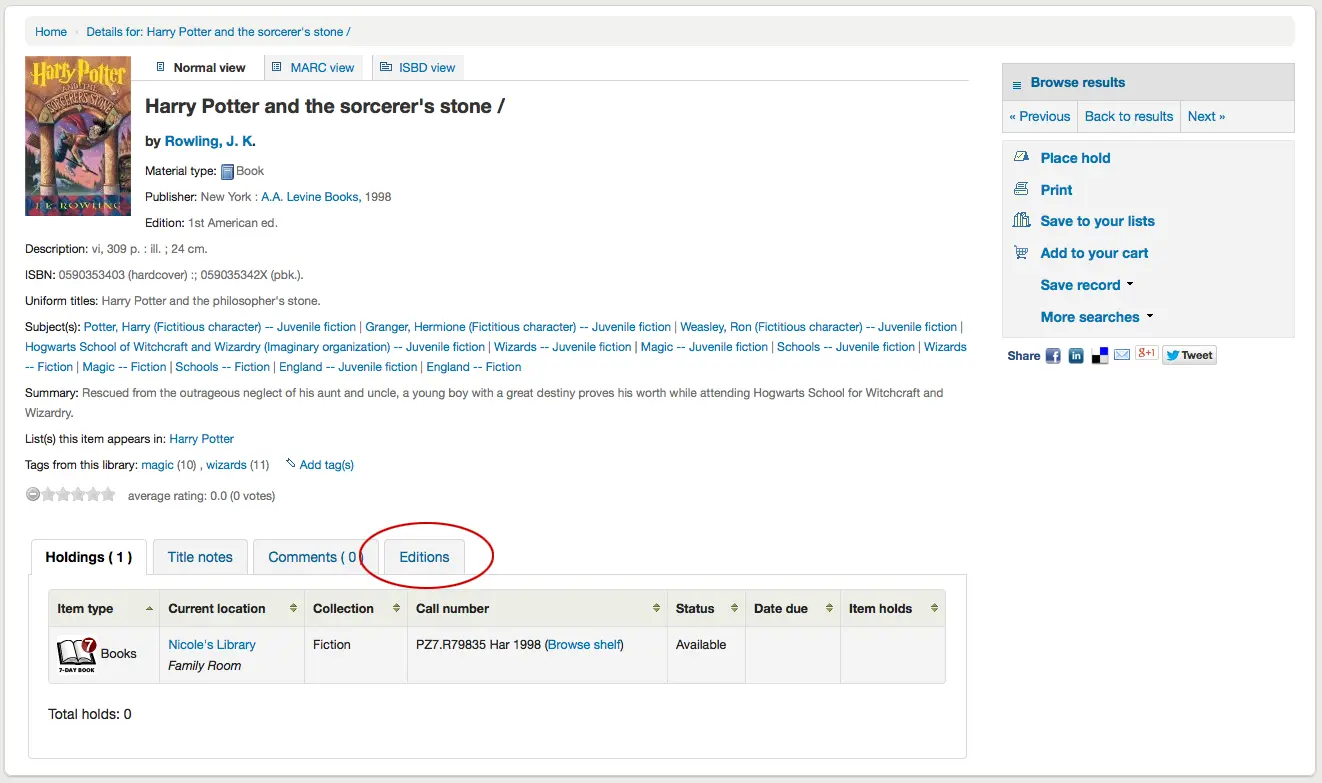
Dans les onglets situés sous les détails de la notice, vous trouverez toutes les informations de l’exemplaire
Note
Vous pouvez personnaliser les colonnes de ce tableau dans la section Configurer les colonnes du module Administration (id de la table : holdingst).
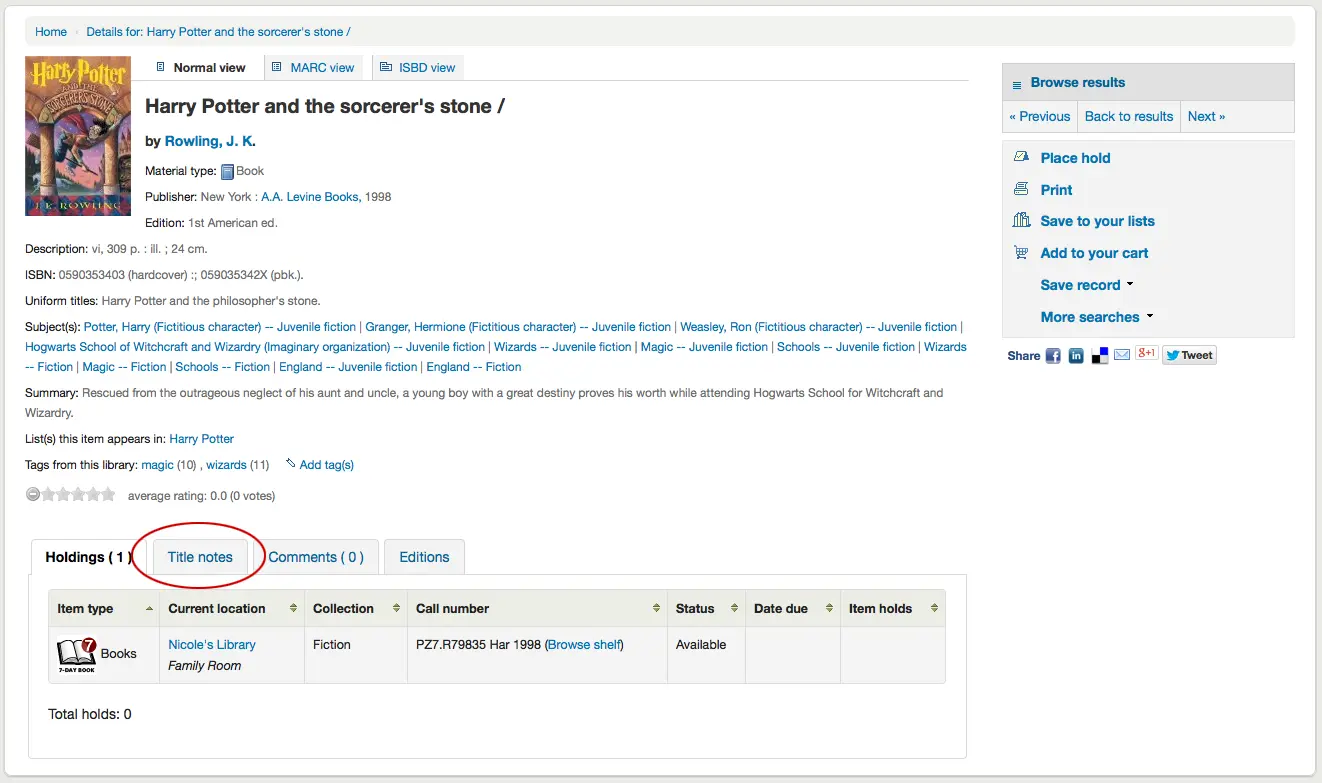
Toutes les notes cataloguées dans les champs 5xx s’afficheront sous “Notes sur le titre”
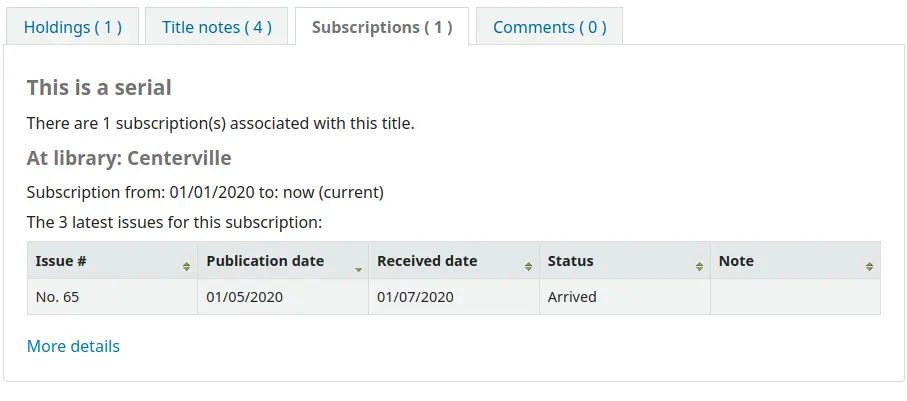
Si la notice bibliographique est liée à un abonnement dans le module Périodiques, il y aura un onglet “Abonnements” avec des informations sur l’abonnement et les fascicules.
Note
Vous pouvez personnaliser les colonnes de ce tableau dans la section Configurer les colonnes du module Administration (référence du tableau : subscriptionst).
Note
Si vous choisissez une notification dans le champ “Notifications aux adhérents” lors de l’ajout d’un abonnement, un bouton sera affiché et si les adhérents cliquent dessus, ils recevront un courriel notifiant la réception d’un nouveau fascicule.
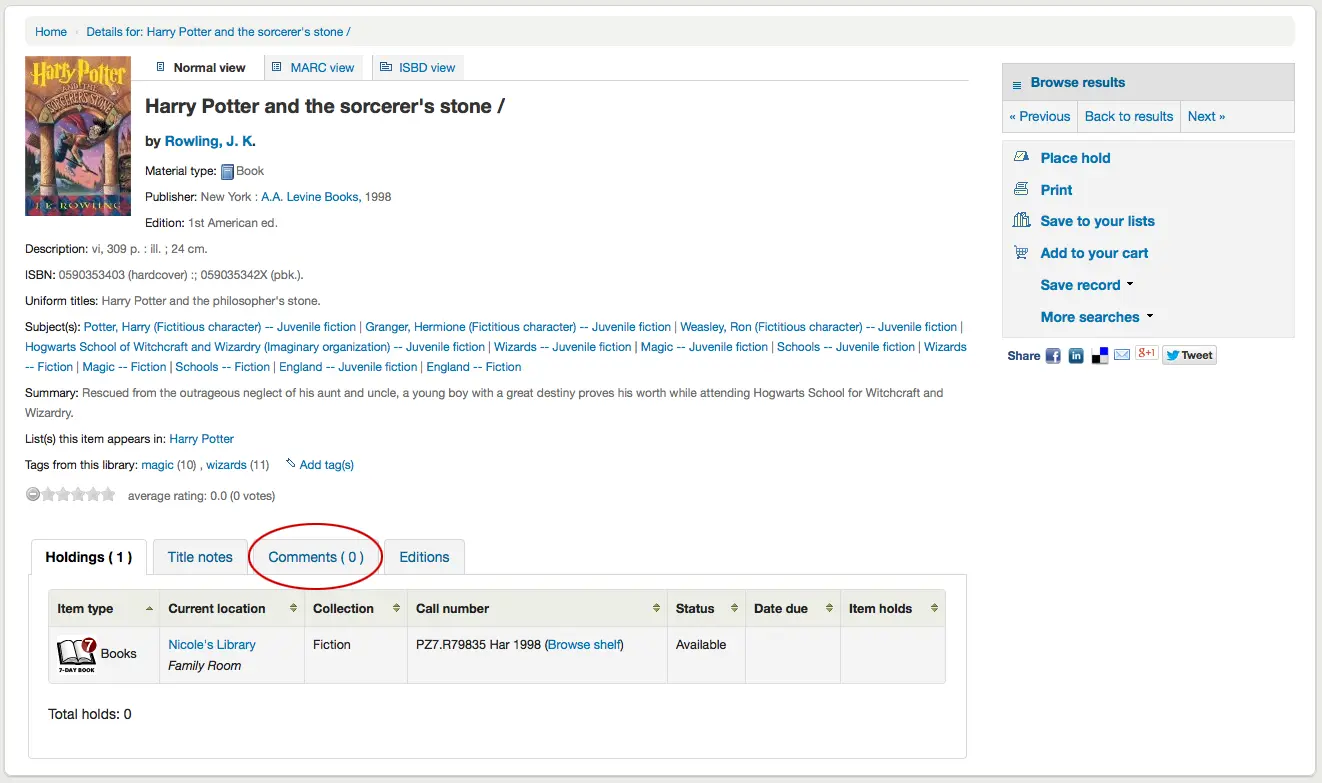
Si vous autorisez les commentaires, ils s’afficheront dans l’onglet suivant
Si la préférence système OPACAuthorIdentifiers est activée et que vos notices autorités Auteurs ont des identificateurs, un onglet “Identifiants d’auteur” affichera les identifiants ainsi que des liens vers la notice Auteur sur le site ressource.
Enfin, si vous avez activé FRBR et que vous avez d’autres éditions du titre dans votre collection, vous les verrez dans l’onglet “Editions”.
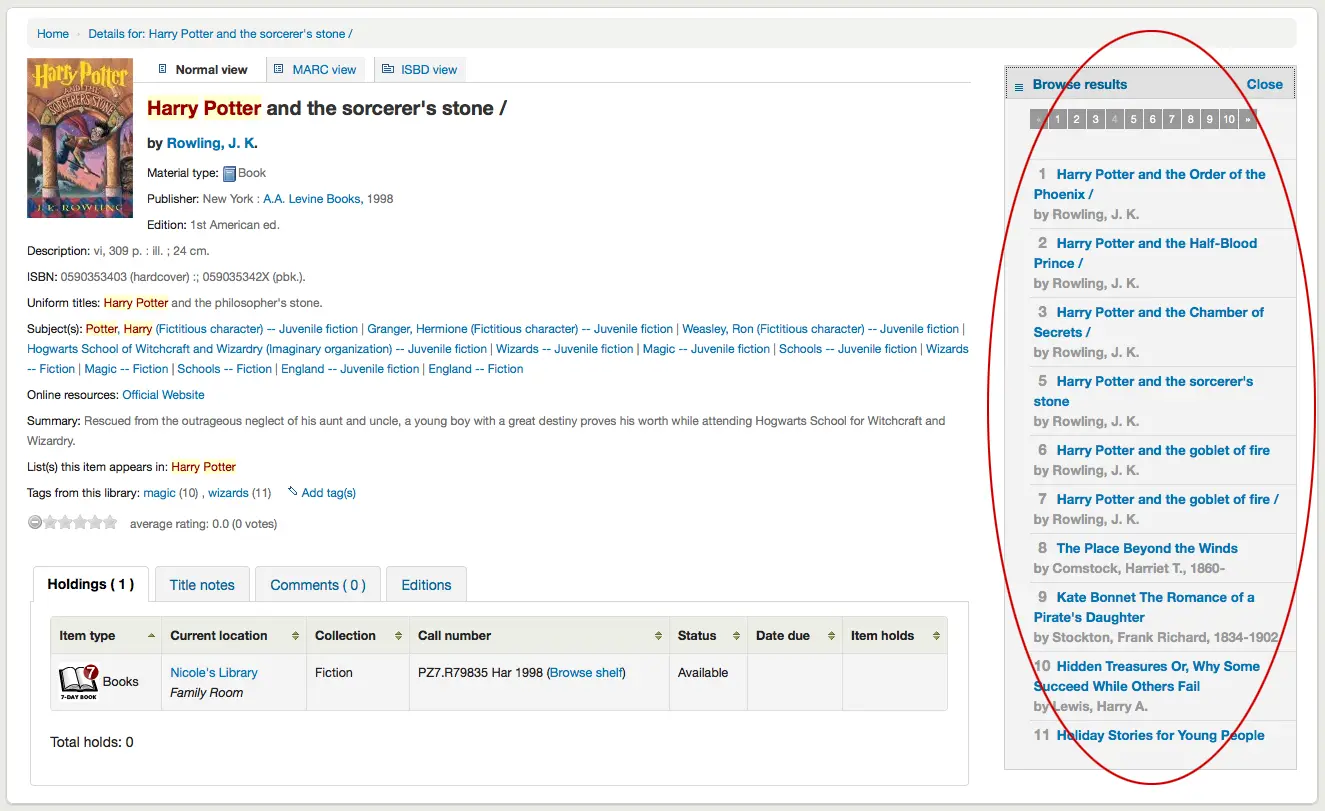
A droite des détails, vous trouverez une série de cases. La première case contient plusieurs boutons aidant à naviguer dans les résultats de recherche. Depuis ici, vous pouvez voir le prochain ou le précédent résultat de votre recherche ou revenir aux résultats.

Si vous cliquez sur “Parcourir les résultats” en haut de la colonne de droite, cela ouvrira vos résultats sur la page de détails
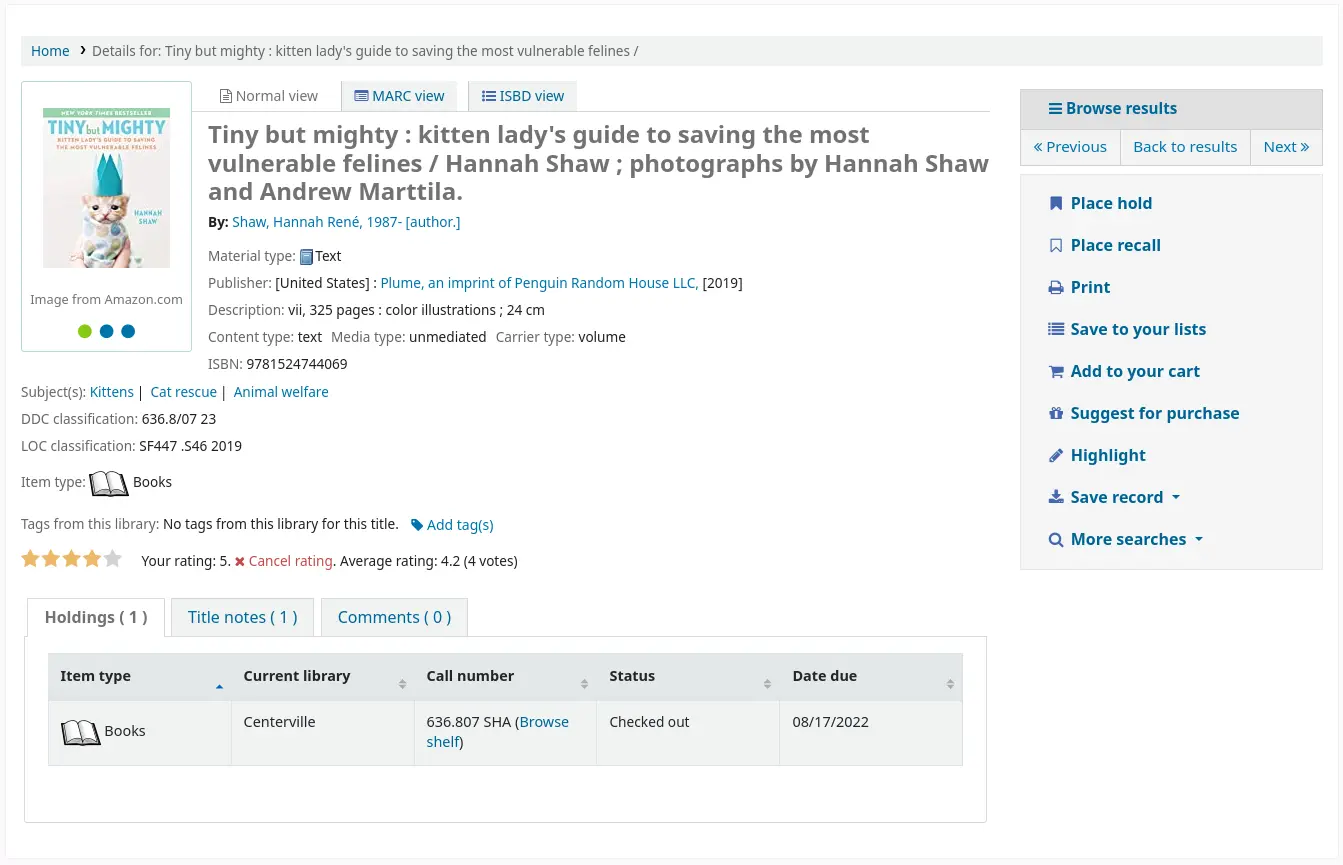
Sous ces boutons de recherche, vous trouverez des liens pour réserver, imprimer, enregistrer la notice dans vos listes, l’ajouter à votre panier ou l’envoyer à un périphérique (en utilisant un QR code).
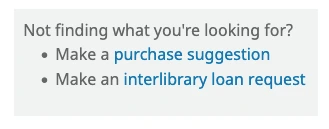
Une autre option, qui apparaîtra sur le bandeau de droite, si la bibliothèque autorise les suggestions d’achat (voir la préférence système suggestion), est la possibilité de “Suggérer un achat”. Cliquer sur ce lien dirigera l’usager sur le formulaire de suggestion à remplir.
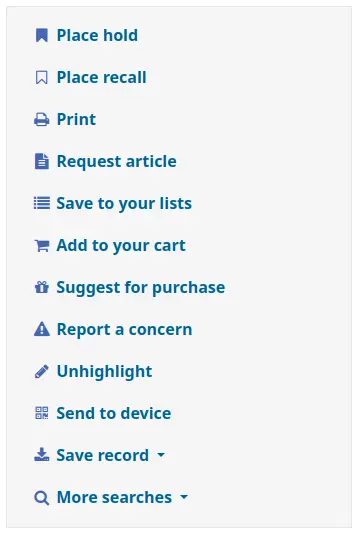
Cliquer sur “Plus de recherches” affichera la liste des bibliothèques que vous avez enregistrées dans la préférence système OPACSearchForTitleIn
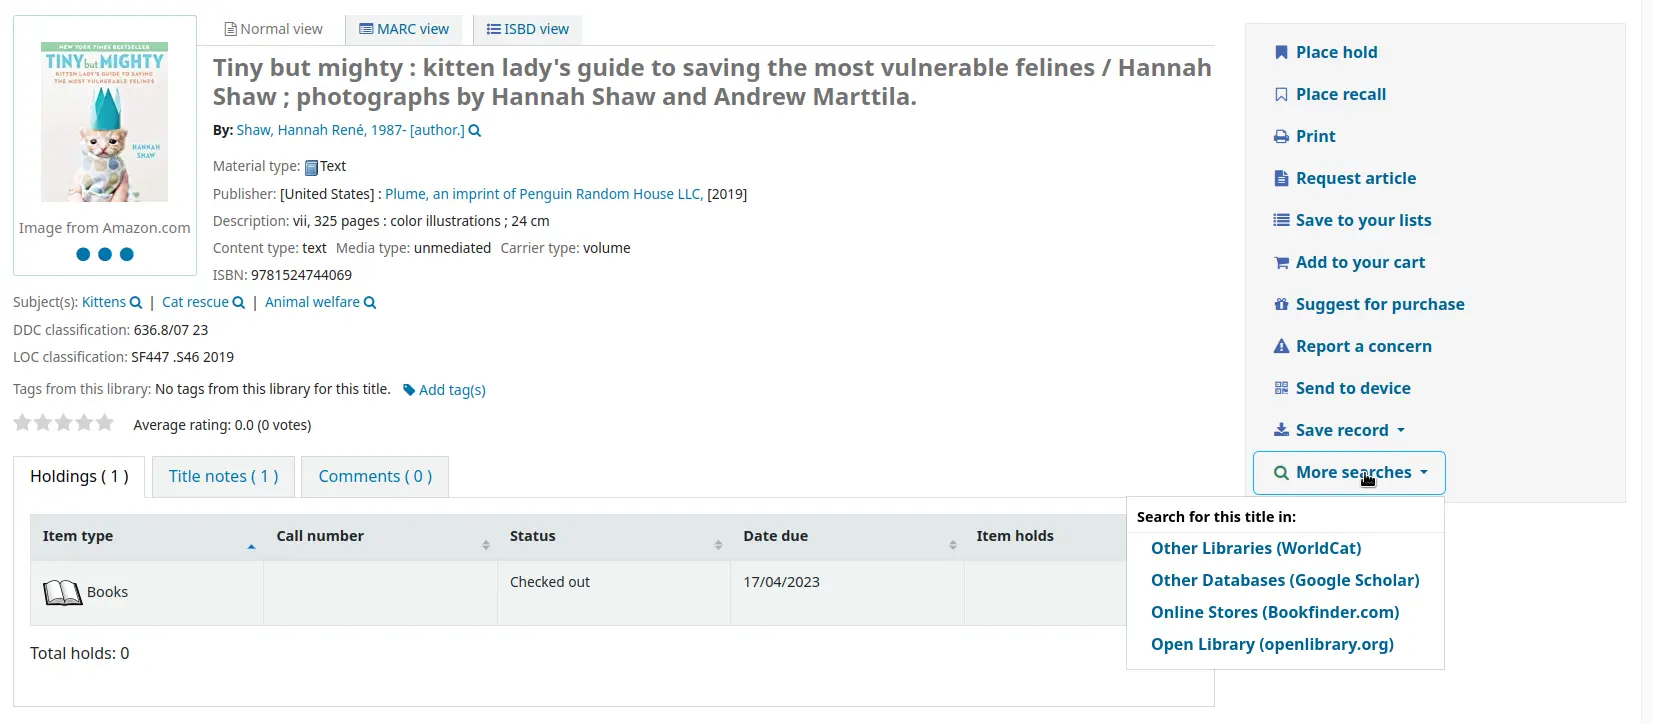
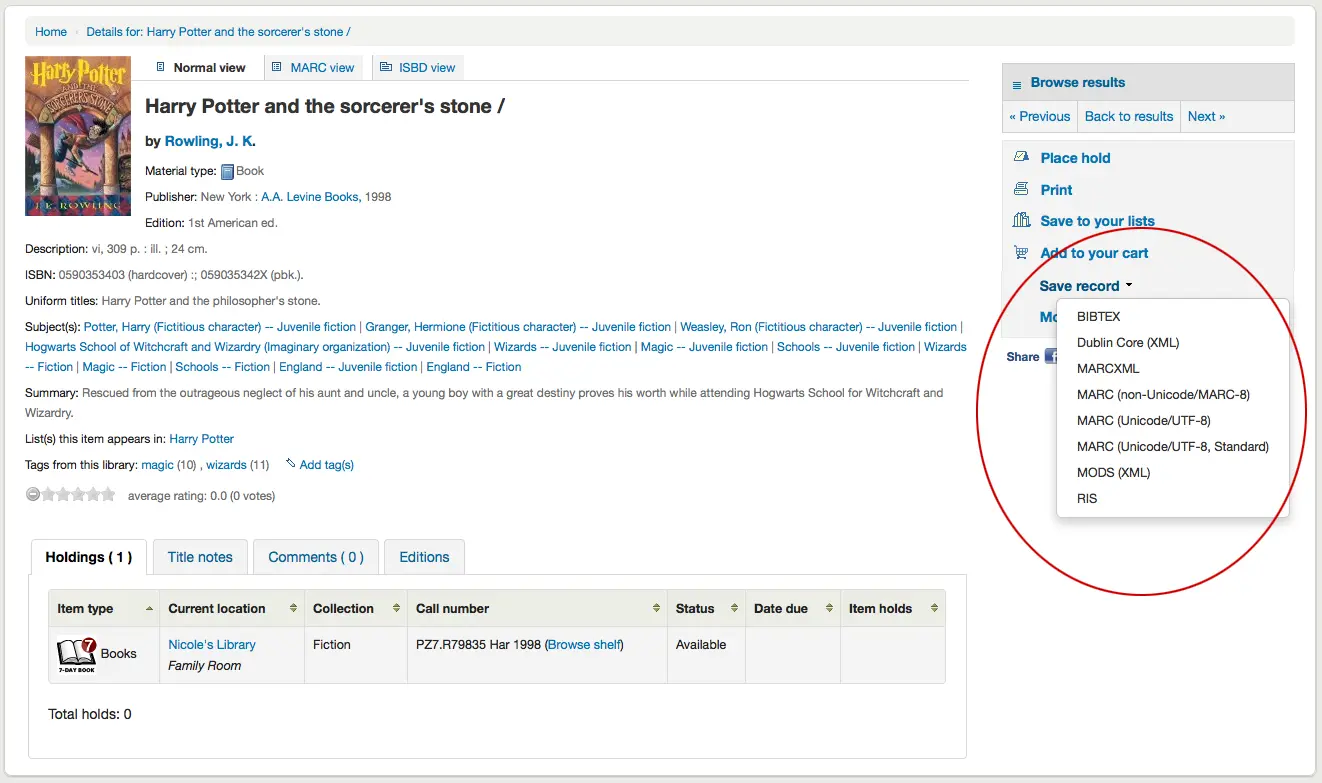
Sous le lien “Enregistrer la notice” vous trouverez une liste de formats de fichiers sous lesquels enregistrer la notice. Cette liste peut être personnalisée en modifiant la préférence système OpacExportOptions.
Il est possible d’activer jusqu’à trois modes d’affichage du détail bibliographique : “Normal”, MARC et ISBD. Pour cela, cliquez sur les onglets situés tout en haut de la notice

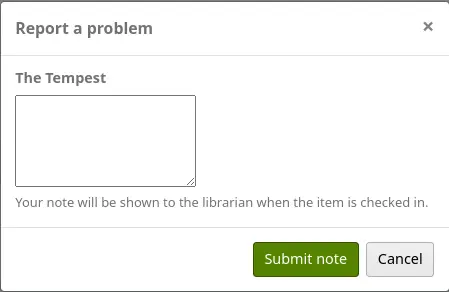
Rapporter des problèmes concernant des notices bibliographiques
Si la préférence système OpacCatalogConcerns est activée, les adhérents pourront rapporter des problèmes concernant des notices bibliographiques précises.
Ceci est similaire à la fonctionnalité Signaler une anomalie, mais est lié à une notice bibliographique spécifique, et il y a la possibilité d’avoir une résolution.
Pour signaler un nouveau problème,
Dans la page détaillée de la notice bibliographique, cliquez sur le lien “Rapporter un problème” dans les options à droite.
Note
Les adhérents doivent être connectés pour signaler un problème. S’ils ne sont pas connectés, le système leur demandera leurs informations de connexion.
Complétez le formulaire de signalement.
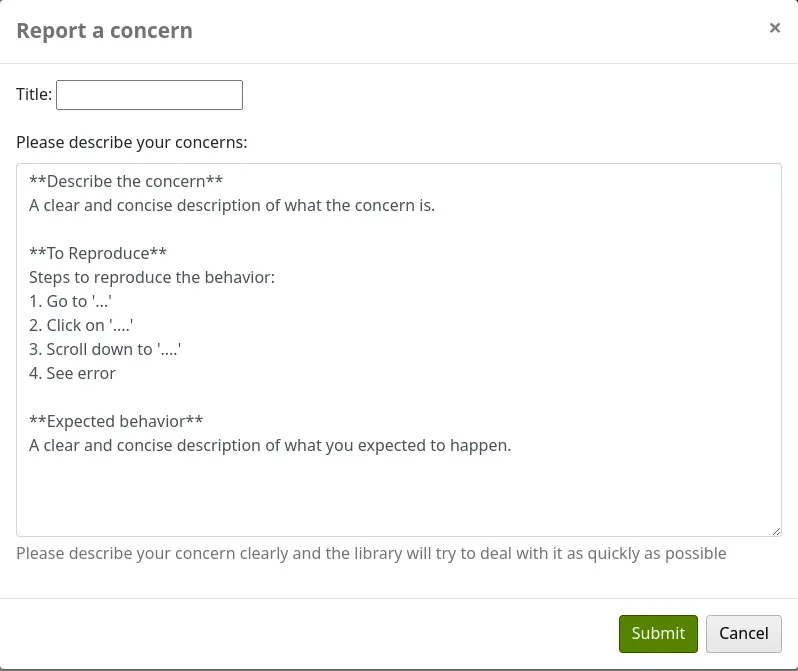
Titre : saisissez un titre décrivant succinctement le problème.
Merci de décrire vos problèmes : entrez des détails sur le problème, en étant le plus descriptif possible afin que la personne qui reçoit ce signalement puisse le reproduire et le constater.
Un exemple de ce qui est attendu dans la description est fourni dans le champ :
**Describe the concern**

A clear and concise description of what the concern is.

**To Reproduce**

Steps to reproduce the behavior:
1. Go to '...'
2. Click on '....'
3. Scroll down to '....'
4. See error

**Expected behavior**

A clear and concise description of what you expected to happen.
Note
Ce texte est personnalisable dans l’outil de personnalisation HTML, en modifiant l’entrée “CatalogConcernTemplate”.
Le texte en bas du formulaire (« Merci de décrire votre problème clairement… ») est également personnalisable dans l’outil personnalisations HTML, en modifiant l’entrée “CatalogConcernHelp”.
Cliquez sur “Valider”.
Ceci enverra un courriel à l’équipe de catalogage pour les informer qu’un nouveau problème a été créé. Le courriell sera envoyé à l’adresse de courriel dans la préférence système CatalogerEmails. Le courriel envoyé est la notification TICKET_NOTIFY, qui peut être personnalisée dans l’outil Notifications et tickets.
Un courriel sera également envoyé au rapporteur pour l’informer que le problème a été reçu. Le courriel envoyé est la notification TICKET_ACKNOWLEDGE, qui peut être personnalisé dans l’outil Notifications et tickets.
Les problèmes signalés au sujet de cette notice sont visibles dans l’onglet “Problèmes”.
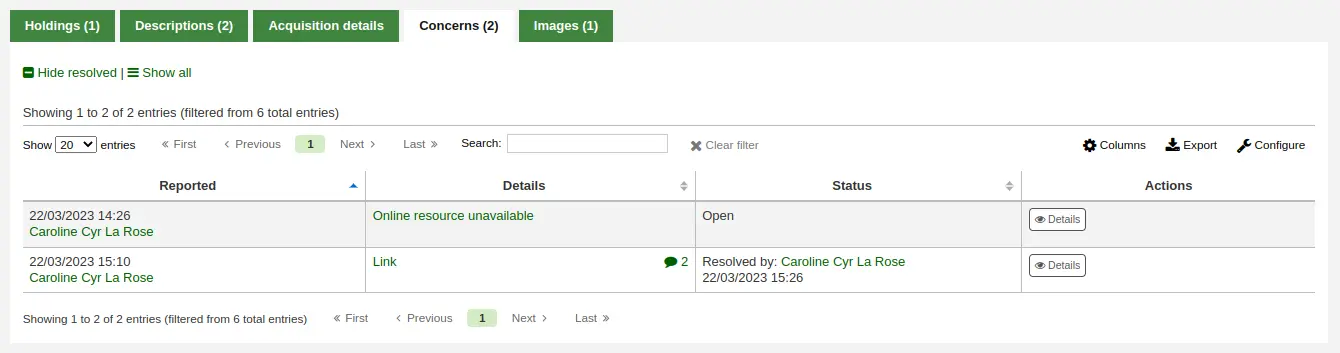
Tous les tickets de problème sont visibles dans le rapport Problèmes dans le catalogue.
Les rapports de problème nouvellement ouverts apparaîtront également dans la section notification au bas de la page principale de l’interface professionnelle.
Recherche d’autorités
Si la préférence système OpacAuthorities est paramétrée sur “Autoriser”, les adhérents pourront chercher parmi toutes les notices autorités à l’OPAC.
La recherche d’autorité est accessible par le lien “Recherche d’autorité” sous la barre de recherche en haut de la page.
Le formulaire de recherche permet aux adhérents de rechercher les autorités par type et termes.

Les résultats affichent les vedettes, le type de vedette, et le nombre de notices bibliographiques rattachées à cette notice autorité.
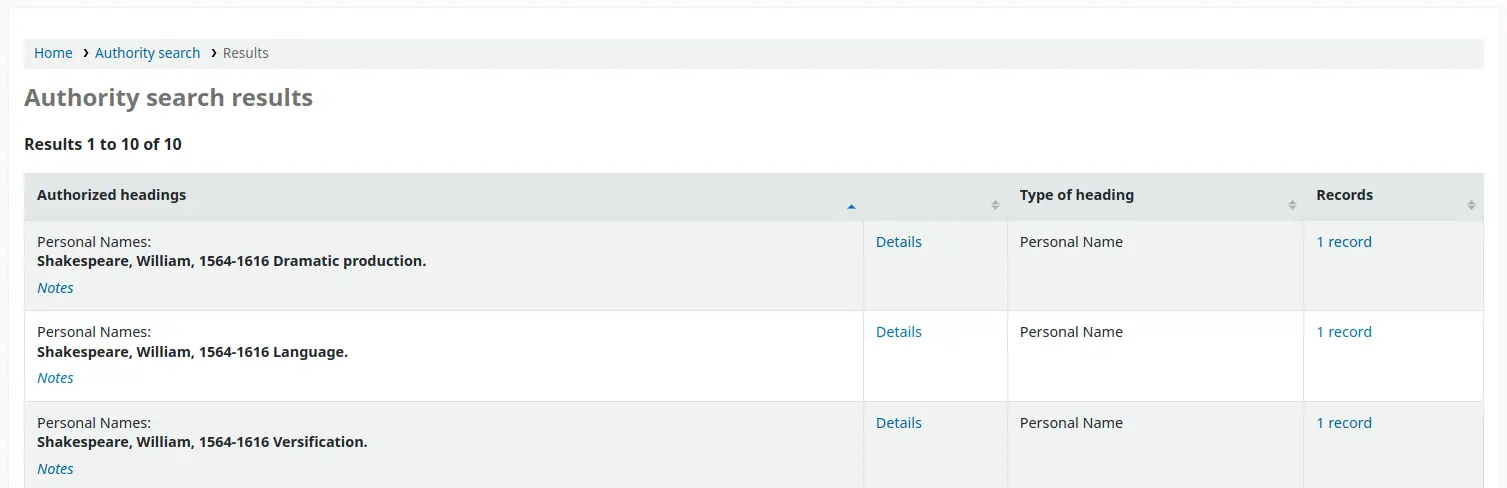
Si la notice d’autorité contient des notes, un lien « Notes » apparaîtra sous le titre.
Si vous cliquez sur “Détails”, cela affichera la notice complète.
En cliquant sur le nombre de notices, vous effectuerez une recherche dans le catalogue pour les notices bibliographiques liées à cette notice d’autorité.
Listes et panier
Un panier permet de regrouper temporairement des notices bibliographiques durant une session de connexion. Cela signifie que si vous vous déconnectez de l’OPAC ou si vous fermez le navigateur, vous perdez les documents du panier.
Une liste est un emplacement plus pérenne pour enregistrer des articles.
Pour en savoir plus sur les listes, consultez le chapitre Listes et panier de ce manuel, qui traite de ces fonctionnalités dans l’interface du personnel.
Listes
Les adhérents peuvent gérer leurs propres listes privées en consultant la section “mes listes” une fois connectés à leur compte.
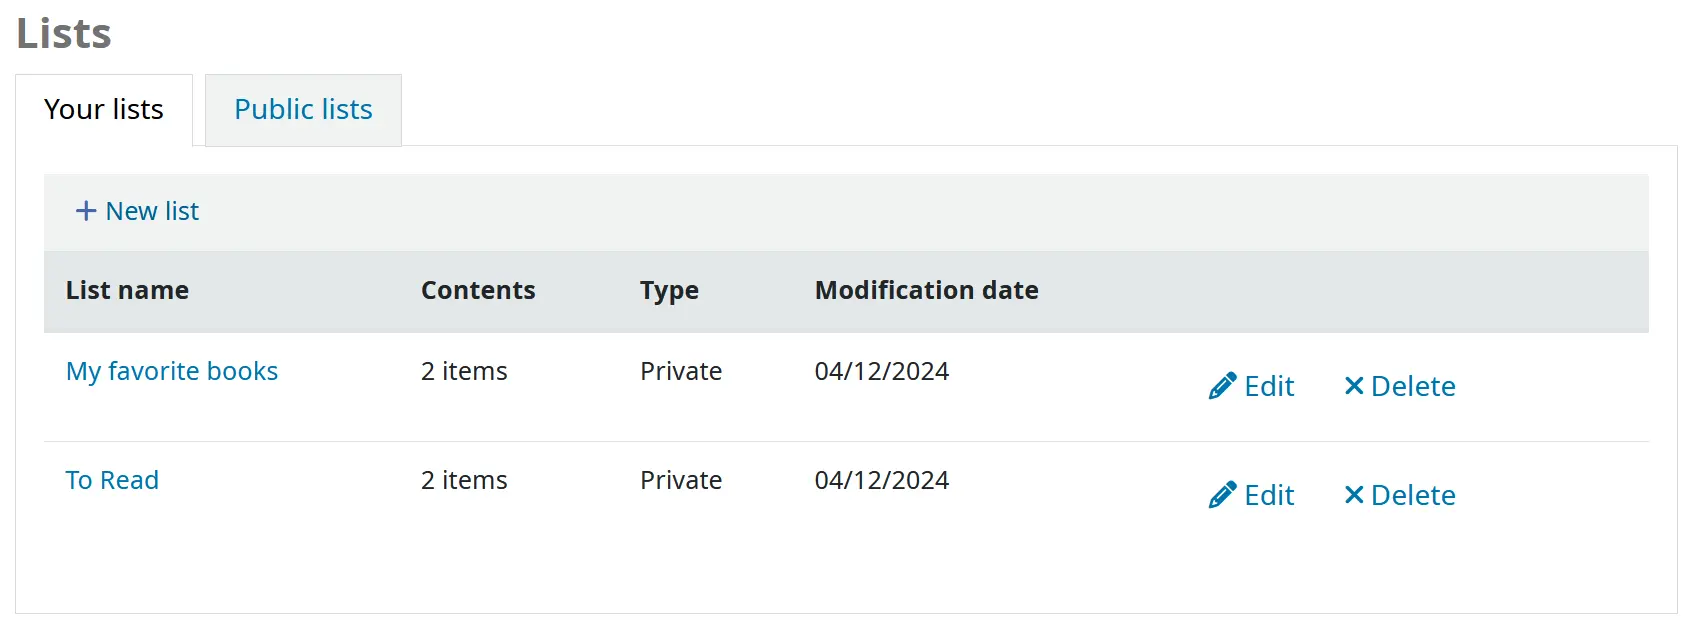
La colonne “Date de modification” indique quand la liste a été modifiée pour la dernière fois et est utile pour savoir rapidement si la liste est à jour.
Création de listes
Pour créer une liste, l’adhérent doit simplement cliquer sur le lien “Nouvelle liste” et remplir le formulaire qui apparaît.
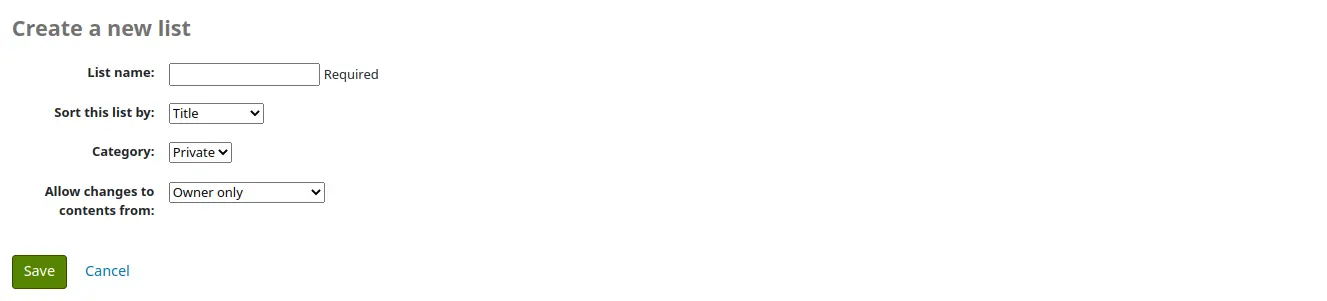
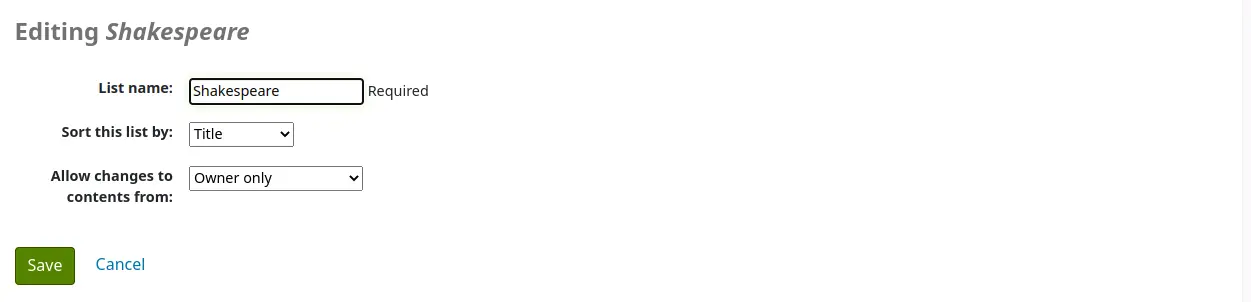
Nom de la liste : l’adhérent doit saisir un nom de liste, c’est le seul champ requis
Trier cette liste par : l’adhérent peut choisir comment il veut trier la liste (par titre, auteur, année de publication, cote ou date d’ajout à la liste).
Catégorie : l’adhérent peut choisir de garder cette liste privée ou de la rendre publique. Une liste publique sera visible par tous les utilisateurs de l’OPAC.
Note
Si vous n’autorisez pas les adhérents à créer des listes publiques avec la préférence système OpacAllowPublicListCreation , les adhérents auront seulement le droit de créer des listes privées.
Autoriser les modifications du contenu par : l’adhérent peut choisir qui pourra ajouter ou supprimer des titres de la liste.
Personne : personne, y compris l’adhérent lui-même, ne pourra ajouter ou supprimer des titres.
Propriétaire seulement : seul l’adhérent qui a créé la liste pourra ajouter ou supprimer des titres. Si la liste est publique ou partagée, les utilisateurs de l’OPAC ou les personnes avec qui la liste est partagée ne pourront pas modifier le contenu de la liste.
Quiconque visualisant cette liste : toute personne ayant accès à la liste pourra ajouter ou supprimer des éléments. Si la liste est publique, cela signifie toute personne. Si la liste est privée, seul le propriétaire pourra modifier le contenu. Si la liste est partagée, le propriétaire et les bénéficiaires du partage pourront le modifier.
Personnel uniquement : cette option n’apparaîtra qu’aux membres du personnel pour que la liste puisse être modifiée par tous les membres du personnel.
Vous pouvez créer des listes en cliquant sur “Nouvelle liste” dans le menu “Ajouter à” des résultats de recherche
Ajouter des titres dans une liste
Les titres peuvent être ajoutés à la liste à partir des résultats de recherche ou d’une notice bibliographique.
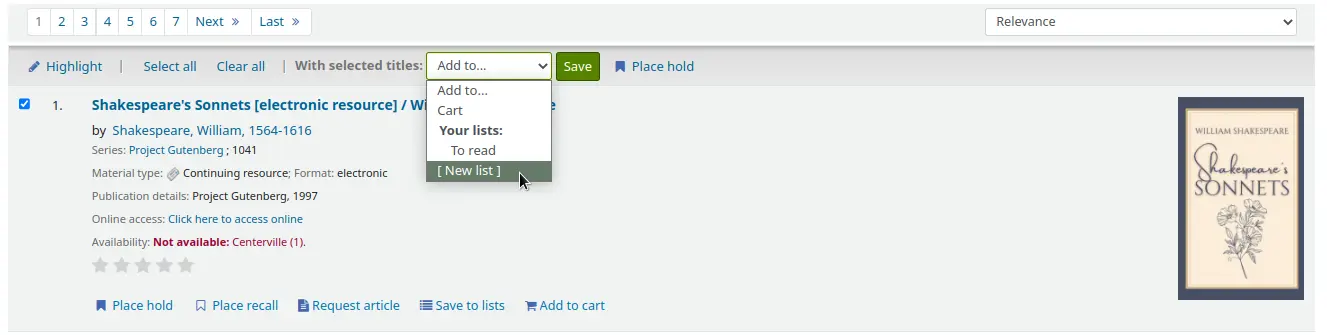
Dans les résultats de recherche, l’option d’ajout de documents à la liste apparaît sous chaque résultat (bouton “ Ajouter à la liste”)
et en haut de la page des résultats, à côté de “Sélectionner un titre pour : Ajouter à…”
Pour ajouter un seul titre à une liste, cliquez sur l’option “Enregistrer dans Listes”, puis choisissez la liste dans laquelle vous souhaitez ajouter le titre. Pour ajouter plusieurs titres à une liste, cochez les cases à gauche des titres que vous souhaitez ajouter et choisissez la liste dans laquelle vous souhaitez ajouter les titres, en cliquant sur le menu déroulant “Ajouter à” en haut de l’écran.
Dans l’affichage de la notice bibliographique, l’option d’enregistrement du titre dans une liste est dans le menu sur la droite.
Les titres peuvent aussi être ajoutés à une liste à partir du panier.
Consulter le contenu des listes
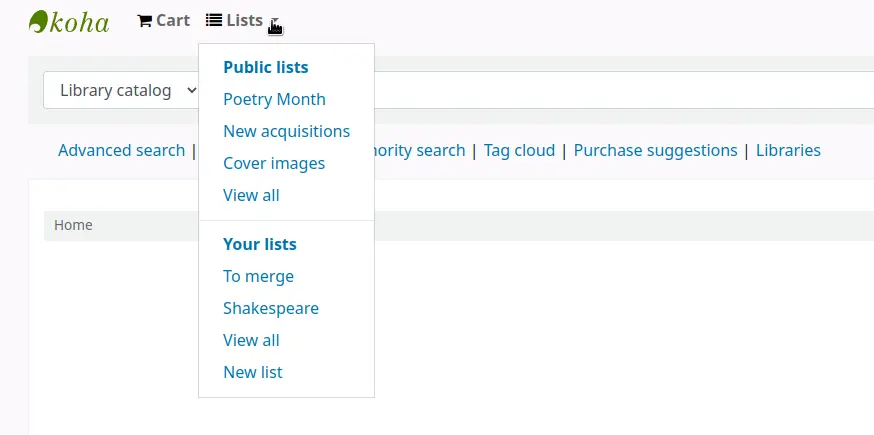
Pour visualiser le contenu d’une liste, cliquez sur le nom de la liste sur le menu déroulant “Listes”.
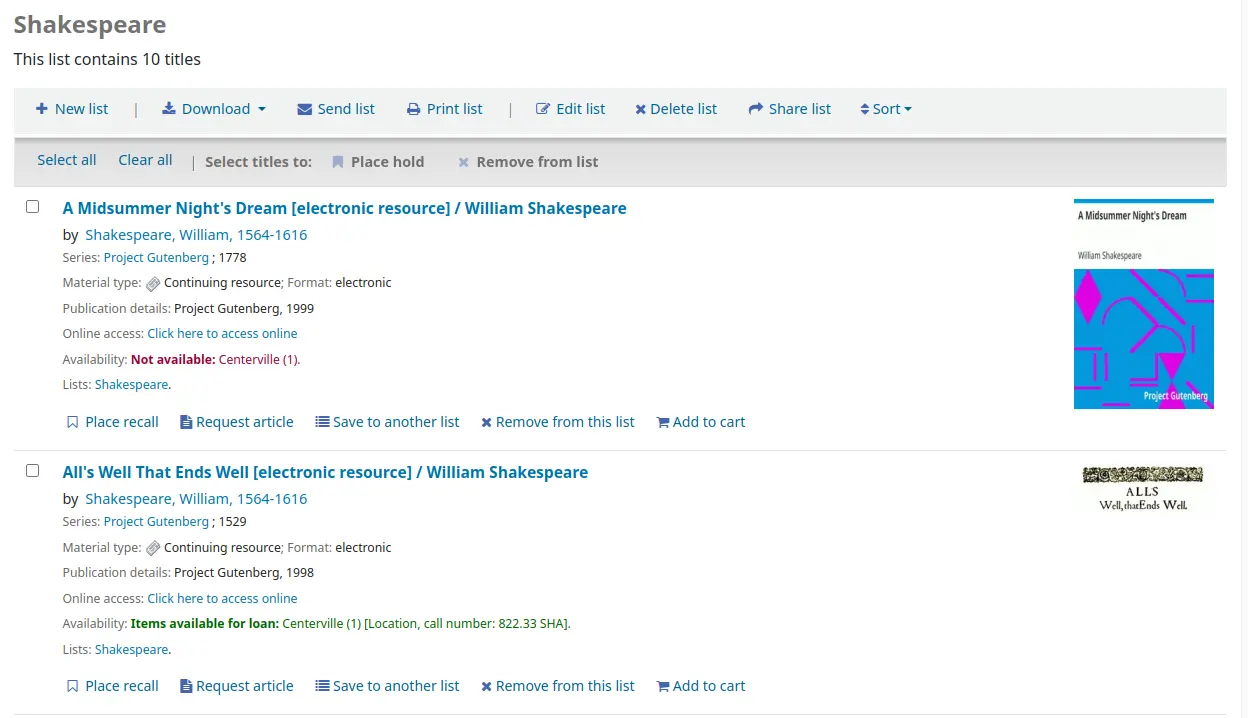
Le contenu de la liste sera similaire aux pages de résultats de recherche sauf qu’il y aura différentes options situées en haut de la liste.
À la droite du titre de la liste, il y a une icône de fil RSS qui vous permettra de vous abonner aux mises à jour de la liste.
Note
L’icône RSS n’apparaît que sur les listes publiques.
Si vous utilisez les options situées au-dessus de la liste, vous pouvez réserver plusieurs documents , télécharger le contenu de la liste, envoyer par e-mail la liste ou l’imprimer.
Pour réserver un ou plusieurs documents de la liste, cochez la case à gauche des titres et cliquez sur le lien “Réserver” situé en haut
Pour télécharger le contenu de la liste, cliquez sur “Télécharger liste” et choisissez le format dans lequel vous souhaitez la télécharger
Pour envoyer le contenu de la liste par courriel, cliquez sur le lien « Envoyer la liste » et saisissez votre courriel dans le formulaire qui s’affiche
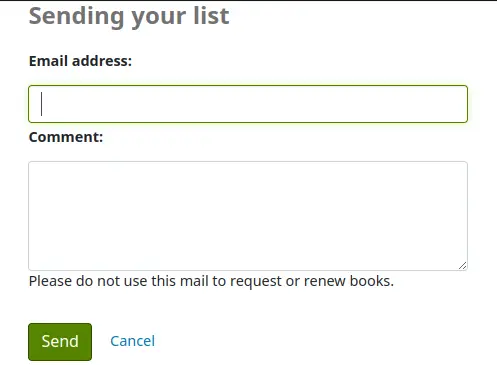
Note
Le message envoyé lors de l’envoi de la liste par courriel est LIST, et peut être configuré avec l’outil Notifications et tickets.
Note
L’option “Envoyer la liste” n’apparaîtra que si la préférence système OPACDisableSendList est paramétrée sur “Autoriser”.
Pour imprimer le contenu de vos listes, cliquez sur le lien “Imprimer liste”
Retirer des titres de listes
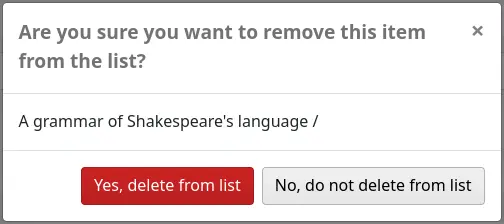
Pour retirer un titre d’une liste,
-
Cliquer sur “Enlever de la liste”, sous le titre à retirer.
Cliquer sur “Oui, retirer de la liste” pour confirmer la suppression du titre de la liste.
Gestion des listes
Une fois que la liste est enregistrée, les adhérents peuvent commencer à lui ajouter de documents. Depuis l’onglet Mes listes du compte adhérent, l’usager peut modifier et supprimer les listes qu’il a créées en cliquant sur le lien approprié situé à droite du nom de la liste.
Pour modifier le titre des listes ou le tri des adhérents, cliquez sur le bouton “Modifier” à droite de la description de la liste.
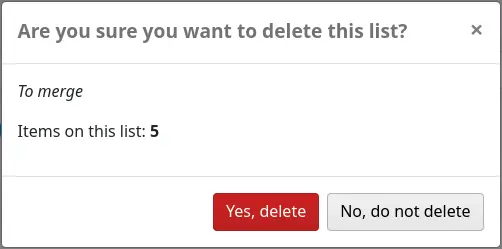
Lorsque vous cliquez sur “Supprimer” à côté d’une liste, il vous sera demandé de confirmer la suppression de la liste.
Si la préférence système OpacAllowSharingPrivateLists est paramétrée sur “Autoriser”, les adhérents verront le bouton “Partager” sur la liste des listes et le bouton “Partager la liste” en haut de chaque liste. En cliquant dessus, vous serez invité à entrer l’adresse de courriel d’un adhérent.

Une fois l’adresse e-mail saisie, un message de confirmation s’affichera

et un message sera envoyé à cet adhérent.
Une fois que l’adhérent a accepté la liste partagée, l’adhérent l’ayant partagée recevra une confirmation.
Note
Le message envoyé pour partager la liste est SHARE_INVITE et le message envoyé à l’adhérent l’ayant partagée pour confirmer l’acceptation du partage est SHARE_ACCEPT. Les deux messages sont personnalisables dans l’outil Notifications et tickets.
L’autre adhérent verra la liste partagée avec ses propres listes privées (le type sera “Partagée” au lieu de “Privée”). Il aura aussi l’option de supprimer le partage s’il ne veut plus avoir accès à la liste.
Le propriétaire d’une liste partagée aura l’option d’en transférer la propriété à un des adhérents avec qui la liste est partagée.
Si la préférence système TagsInputOnDetail est activée, les adhérents pourront ajouter des mots-clefs aux titres à partir de la visualisation d’une liste.
Panier
Ajouter un titre dans le panier
Des titres peuvent être ajoutés au panier à partir des résultats d’une recherche ou de la notice bibliographique.
Dans les résultats de recherche, l’option d’ajout de documents au panier apparaît sous chaque résultat (bouton “Ajouter au panier”)
et en haut de la page des résultats, à côté de “Sélectionner un titre pour : Ajouter à…”
Cliquer sur le bouton “Ajouter au panier” sous un résultat seul ajoutera ce titre au panier.
Pour ajouter plusieurs titres à la fois, cochez les cases situées à gauche de chaque résultat et sélectionnez “Panier” dans le menu déroulant “Ajouter à”. Une fois tous vos titres ajoutés au panier, un message de confirmation s’affichera en haut de la page.

A partir des résultats, vous verrez les exemplaires qui sont déjàdans votre panier et vous pourrez supprimer ces exemplaires de votre panier en cliquant sur “Supprimer” (remove).
En visualisation de la notice bibliographique, l’option d’ajout d’un titre au panier est dans le menu sur la droite.
Gestion du panier
Une fois tous les titres ajoutés dans votre panier, vous pouvez gérer le contenu en cliquant sur le bouton “Panier” situé généralement en haut de l’écran. Votre panier s’ouvrira dans une nouvelle fenêtre.
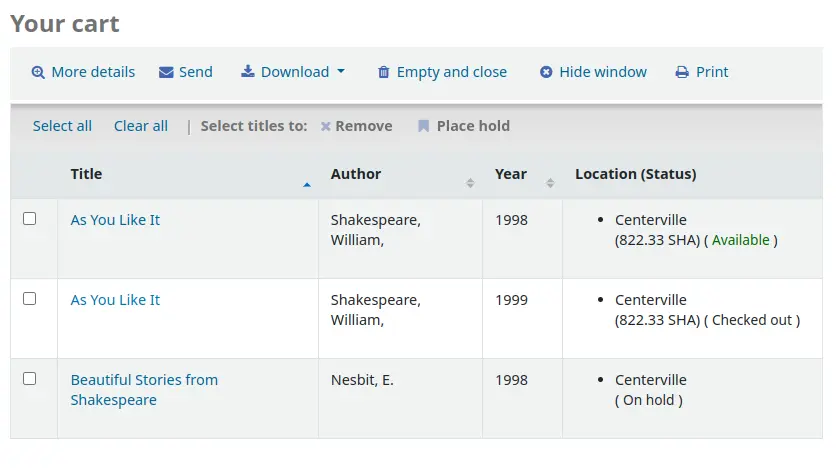
Il y a plusieurs boutons situés dans la partie supérieure du panier.
Plus de détails : cliquer dessus fra s’afficher des informations supplémentaires concernant les titres de votre panier (ISBN, sujets, éditeur, notes etc.).
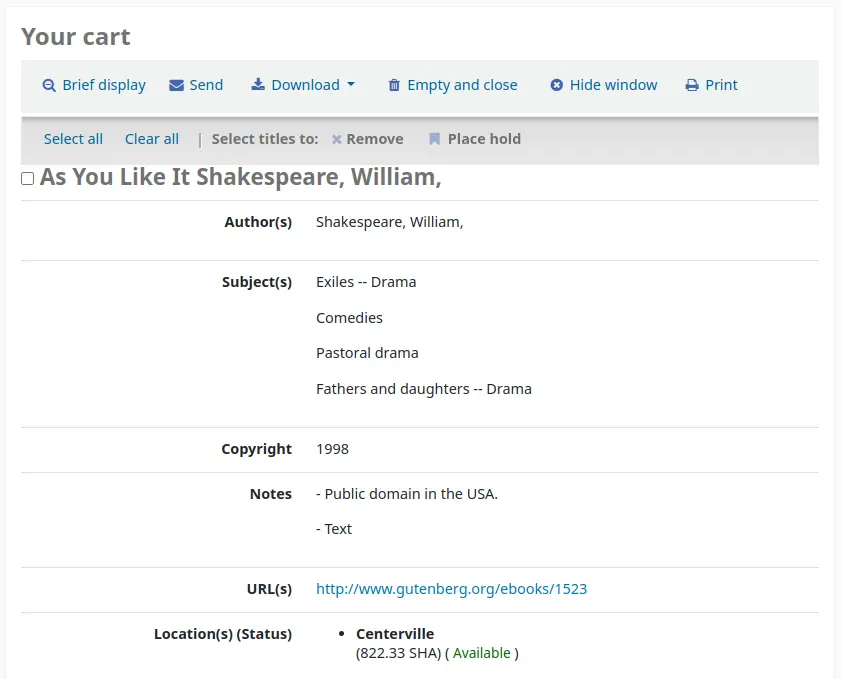
Quand on clique, le bouton “Plus de détails” deviendra “Affichage court”. Cela retournera à l’affichage par défaut du tableau avec le titre, l’auteur, la date de publication et la localisation et le statut.
Envoyer : l’option d’envoi du contenu de votre panier à une adresse de courriel. C’est pratique si vous souhaitez envoyer les références que vous avez trouvé à la bibliothèque sur votre adresse de courriel personnelle pour y revenir plus tard ou pour les envoyer à un adhérent qui fait des recherches sur un sujet spécifique. Cliquer sur le lien ouvrira une nouvelle fenêtre demandant de renseigner l’adresse de courriel et le message à envoyer.
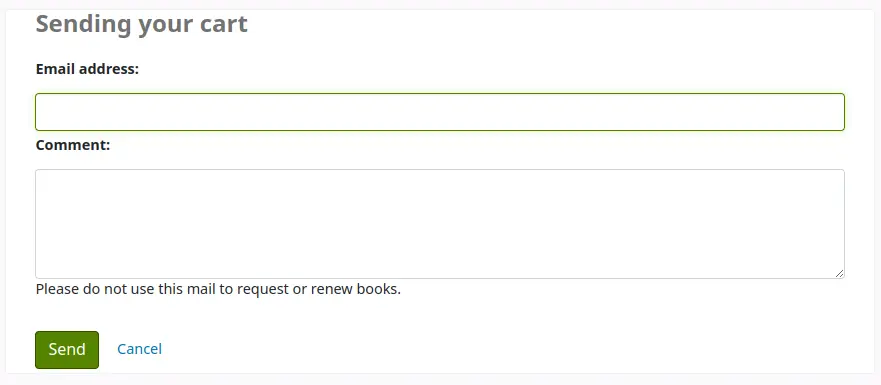
Avertissement
Le contenu du panier peut être envoyé par courriel uniquement par des utilisateurs connectés. Cela évite que la fonction courriel du panier soit utilisée pour spammer.
Note
Le message envoyé lors de l’envoi de la liste par courriel est CART, et peut être paramétré avec l’outil Notifications et tickets.
Télécharger : vous pouvez télécharger le contenu du panier dans plusieurs formats pré-définis ou en utilisant un profil CSV que vous avez défini dans le module Outils.
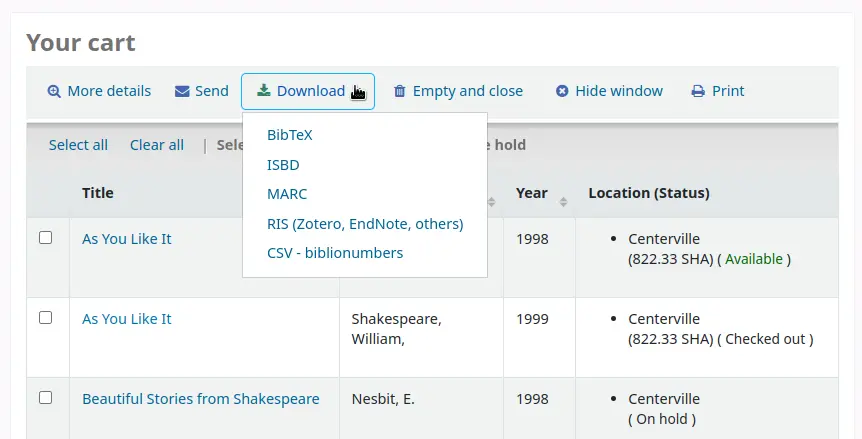
Vider et fermer : cela videra le panier et fermera la fenêtre.
Fermer la fenêtre : cela fermera la fenêtre mais la panier ne sera pas vidé.
Imprimer : cela imprimera le contenu du panier.
En plus des différentes manières d’enregistrer le contenu de votre panier, il y a de nombreuses façons d’enrichir sa valeur.
Sélectionnez un ou plusieurs titres du panier et choisissez une des options :
Retirer : ceci retirera les titres sélectionnés du panier.
Ajouter à la liste : cela ajoutera le.s titre.s sélectionné.s à une liste
Réserver : cela réservera le.s titre.s sélectionné.s
Tag : si la préférence système TagsInputOnDetail est activée, les adhérents pourront ajouter des tags aux titres sélectionnés.
Faire une réservation
Les adhérents peuvent réserver des exemplaires via l’OPAC s’ils sont authentifiés et si vous avez paramétré sur “Autoriser” la préférence système OPACHoldRequests. Si l’exemplaire peut être réservé, l’option pour le réserver apparaîtra à différents endroits.
Si la préférence système DisplayMultiPlaceHold est activée, lors de la visualisation d’une liste ou de la page de résultats d’une recherche, vous pourrez réserver plusieurs documents en cochant les cases situées à gauche des résultats et cliquant sur “Réserver” en haut.
En visualisation d’une liste ou de résultats de recherche, vous apercevrez l’option de réservation de documents en bas des informations du titre.
Si vous consultez un titre individuel, vous verrez l’option pour réserver située dans le cadre sur le côté droit de l’écran
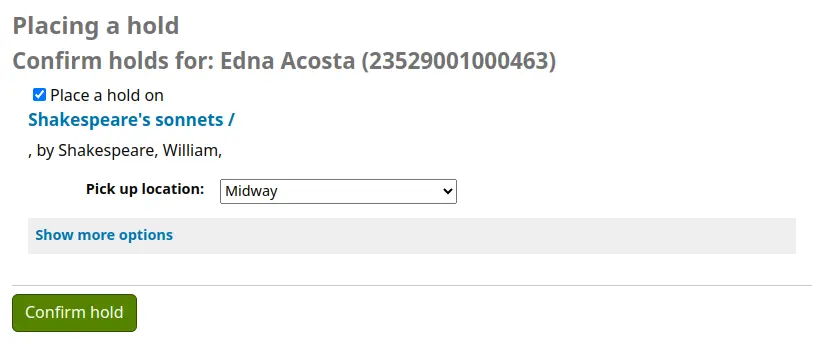
N’importe lequel des liens ci-dessus vous dirigera sur le même écran de réservation.
If your library has set hold fees in its circulation and fine rules and the patron will be charged for this hold, a note appears at the top of this screen specifying the amount. E.g. “You will be charged a hold fee of 0.50 for placing this hold”.
La case à gauche des documents que vous souhaitez réserver doit être cochée.
Le titre inclut un lien direct pour la page de détails de la notice.
Votre priorité : si la préférence système OPACShowHoldQueueDetails est paramétrée pour afficher le niveau de priorité, la priorité, le rang dans la file des réservations, s’affichera.
Si l’option est autorisée par votre préférence système OPACAllowUserToChooseBranch, l’adhérent peut choisir dans quel site retirer sa réservation. La liste des sites possibles inclura tous les sites ayant paramétré “Site de retrait” sur “Oui” dans la page de configuration de la bibliothèque.
Cliquez sur “Afficher plus d’options” pour afficher des paramètres supplémentaires pour cette réservation.
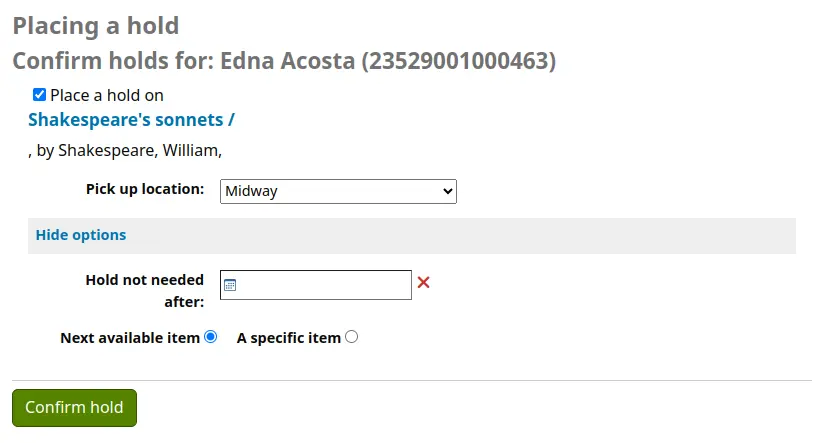
Début de réservation : si la préférence système OPACAllowHoldDateInFuture est activée, la barre de saisie “Début de réservation” s’affichera et permettra à l’adhérent de faire débuter sa réservation à une date future.
Réservation non souhaitée après : par défaut, les réservations restent dans le système jusqu’à qu’elles soient annulées, mais si l’adhérent renseigne ce champ, la réservation aura une date d’expiration.
Important
Les réservations arrivées à expiration sont retirées par le cron job cancel_expired_holds.pl. Ceci n’est pas un processus automatique et doit être planifié par votre administrateur système.
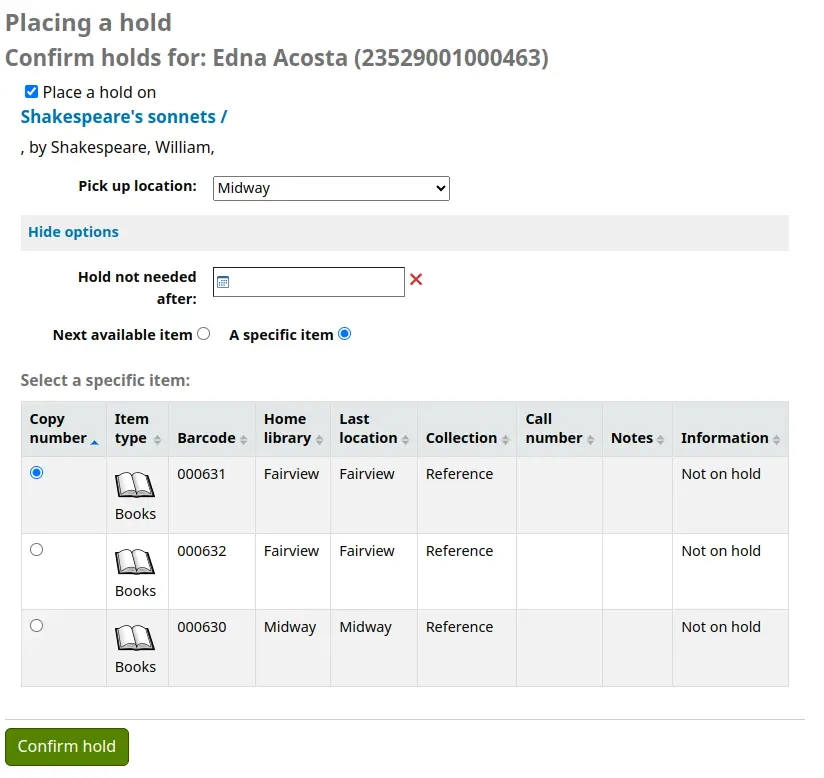
Réserver un type de document spécifique : si la préférence système AllowHoldItemTypeSelection est paramétrée sur “Permettre” cette option sera affichée et permettra à l’adhérent de choisir de limiter la réservation à un type de document spécifique.
Demander un groupe d’exemplaires spécifique : si la préférence système EnableItemGroupHolds est positionnée sur “Activer”, et si la notice a des groupes d’exemplaires, l’adhérent pourra choisir de réserver le prochain exemplaire disponible d’un groupe, plutôt que le prochain exemplaire disponible de la notice entière ou un exemplaire spécifique.
Notes sur la réservation : si la préférence système OpacHoldNotes est activée, les adhérents peuvent laisser des notes au sujet de leurs réservations à l’intention de la bibliothèque.
Selon les règles que vous avez définies à propos des réservations d’un exemplaire spécifique dans vos règles de circulation et d’amendes, l’adhérent sera autorisé à choisir s’il réserve le prochain exemplaire disponible ou un exemplaire spécifique.
Après avoir cliqué sur le bouton “Réserver”, l’adhérent bascule sur la page de son compte où il verra tous les documents qu’il a réservés.
Faire des demandes de prêt entre bibliothèques
Quand le module de demandes de PEB est activé et que des catégories d’adhérents “peuvent faire des demandes de PEB à l’OPAC”, les adhérents verront un lien sous les résultats de recherche pour effectuer des demandes de prêt entre bibliothèques.
Si la préférence système ILLOpacUnauthenticatedRequest est paramétrée sur “Ne pas autoriser”, les adhérents devront s’authentifier avant de faire une demande. Après l’authentification, ils seront redirigés vers le tableau des demandes de prêt entre bibliothèques sur leur compte pour créer une demande.
Si la préférence système ILLOpacUnauthenticatedRequest est paramétrée sur “Autoriser”, les adhérents peuvent faire des demandes sans être connecté ou sans avoir de compte. En cliquant sur “Faire une demande de prêt entre bibliothèques », ils pourront être invités à sélectionner d’abord un fournisseur (si la bibliothèque utilise plus d’un terminal) avant d’accéder au formulaire de demande.
Note
S’il y a un texte de copyright dans un emplacement d’affichage de la personnalisation HTML “ILLModuleCopyrightClearance” , il s’affiche ici et les adhérents devront cliquer sur “Oui” pour accepter avant de continuer.
Le formulaire inclut des champs pour les détails personnels de l’adhérent (nom, prénom, courriel).
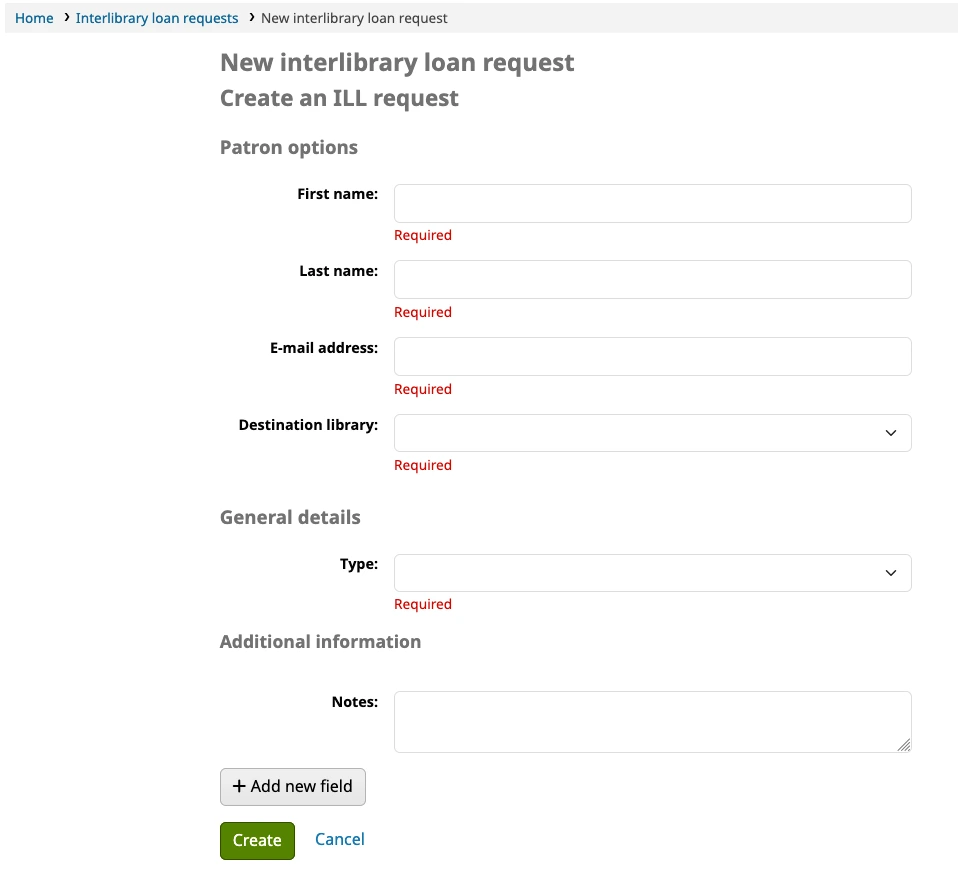
Bibliothèque de destination : la liste est composée des bibliothèques identifiées comme lieux de retrait dans les Paramètres des bibliothèques. Il s’agit de la bibliothèque qui gèrera la demande et sera le lieu de retrait pour les exemplaires physiques demandés.
Type : quand un type est sélectionné, les champs pertinents pour ce type de ressource particulière apparaissent. Les paramètres des champs pour chaque type de demande sont les mêmes que ceux affichés lorsqu’on crée une demande dans l’interface professionnelle.
Cliquer sur “Créer” soumettra la demande à la bibliothèque pour traitement.
Note
Si la préférence système ILLModuleDisclaimerByType est utilisée, les mentions légales apparaîtront à cette étape. Quelle que soit l’option choisie par l’adhérent, la demande sera créée et le type de valeur sera stocké tout au long de la demande.
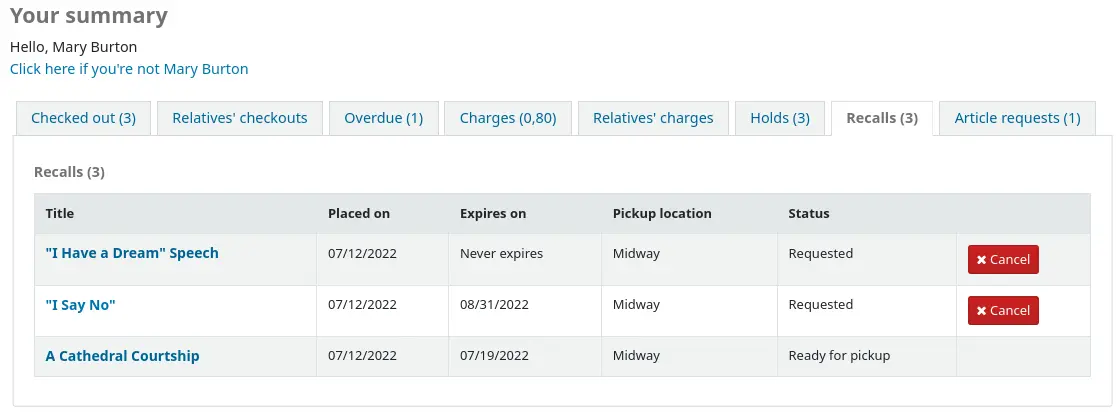
Rappels en attente
Si votre bibliothèque propose les rappels (voir paramétrage des rappels pour plus d’informations), les adhérents pourront placer des rappels sur des exemplaires.
L’option de rappel apparaît à plusieurs endroits sur l’OPAC:
Dans la liste des résultats suite à une recherche, l’option “Placer un rappel” apparaît en bas de chaque résultat sur lequel un rappel peut être placé.
Dans l’affichage des détails d’une notice, l’option “Placer un rappel” apparaît à droite de l’écran (ou en bas sur une version “mobile”) dans les options
Chacun de ces liens dirige vers le formulaire de rappel.
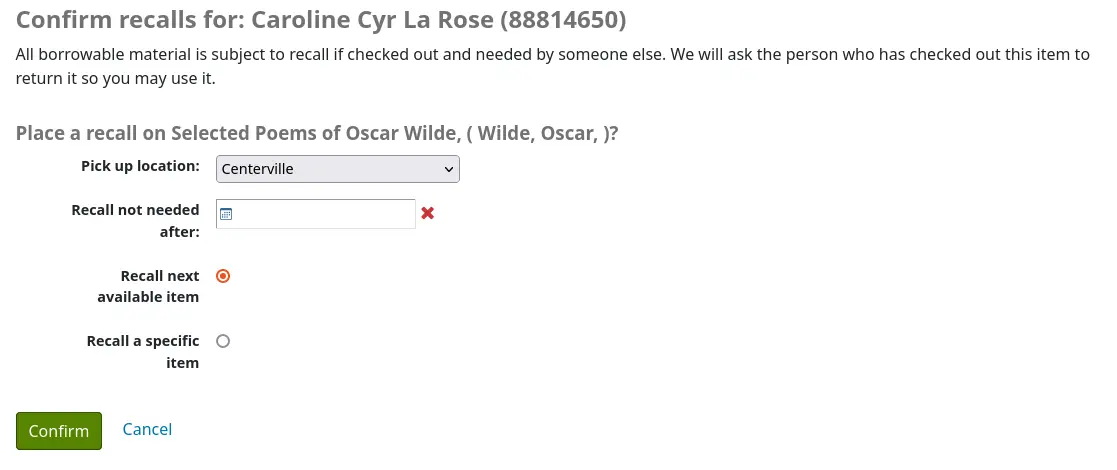
Site de retrait : l’adhérent peut choisir où il souhaite récupérer le document rappelé.
Rappel non nécessaire après : si l’adhérent n’a plus besoin de cet exemplaire après une certaine date, il peut la saisir ici. Le rappel expirera automatiquement (avec le cronjob expire_recalls.pl) après cette date.
Rappeler le prochain exemplaire disponible ou Rappeler un exemplaire spécifique : l’adhérent peut choisir de rappeler n’importe quel exemplaire ou un exemplaire spécifique. S’il choisit “Rappeler un exemplaire spécifique”, il devra choisir l’exemplaire dans la liste.
Une fois que l’adhérent a confirmé sa demande de rappel, il aura un message lui indiquant que l’adhérent qui a actuellement l’exemplaire sera notifié.
Note
La notification envoyée à l’adhérent qui a actuellement l’exemplaire est RETURN_RECALLED_ITEM. Elle peut être modifiée dans l”outil de Notifications et tickets.
La demande sera ajoutée au tableau des rappels dans le résumé de son compte, de même que dans la liste de son historique de rappel .
Contenu enrichi
OverDrive
Si les préférences système OverDrive sont utilisées, une recherche OPAC cherchera également dans la collection de la bibliothèque OverDrive.
Après avoir mené une recherche, vous verrez un hyperlien sous les résultats du catalogue de la bibliothèque : “X résultats trouvés dans la collection de la bibliothèque OverDrive”.
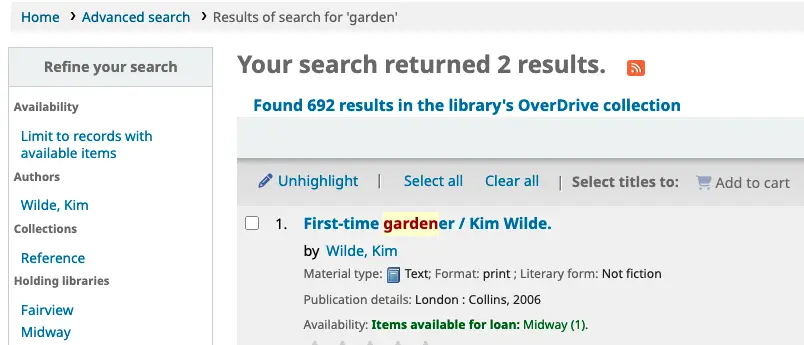
Quand vous cliquez sur ce lien, vous voyez tous les résultats OverDrive correspondants sans avoir à quitter l’interface de l’OPAC.
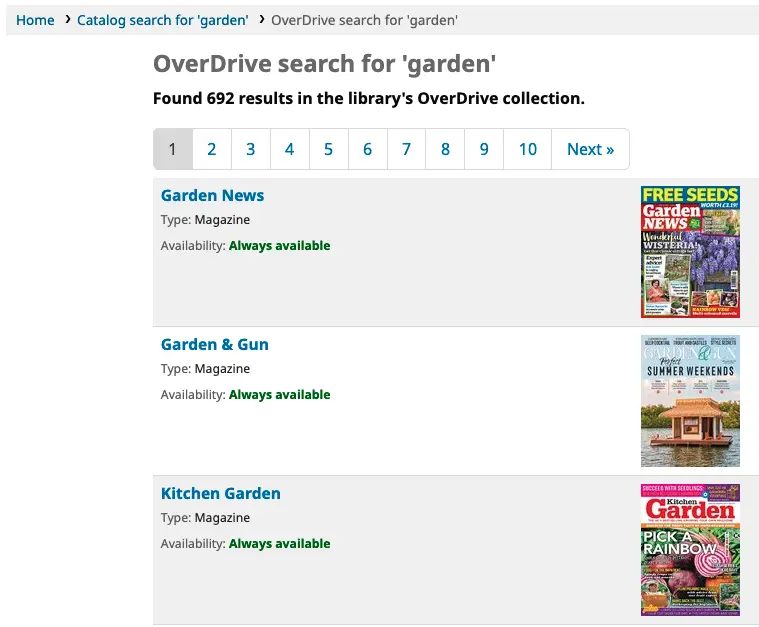
Cliquer sur un titre dans cette liste vous dirigera vers la notice sur le site OverDrive.
Mots-clefs
Suivant vos paramétrages des préférences système TagsEnabled, TagsInputOnList et TagsInputOnDetail, les adhérents pourront ajouter des mots-clefs aux notices bibliographiques à partir des résultats de recherche et/ou de la page de détails de la notice bibliographique.
Si vous autorisez les adhérents à ajouter des mots-clefs à partir de la page de résultats (voir TagsInputOnDetail), les adhérents pourront voir un bouton “Ajouter un mot-clef” sous chaque résultat et une option “Mot-clef” en haut de l’écran.
Pour ajouter un mot-clef à un titre, cliquez sur “Ajouter un mot-clef”, saisissez le ou les mots-clefs (séparés par des virgules) dans la barre de saisie “Nouveau mot-clef” puis cliquez sur “Ajouter”. Un message de confirmation d’ajout de votre mot-clef s’affichera.

A partir des résultats, il est possible de taguer des titres par groupe en cochant les cases sur la gauche et en cliquant sur le bouton “Tag”. Une barre de saisie apparaîtra pour que vous ajoutiez des tags à tous les titres que vous avez sélectionnés.

Si la préférence système TagsInputOnDetail est activée, les adhérents pourront aussi ajouter des mots-clefs à partir d’une liste et du panier.
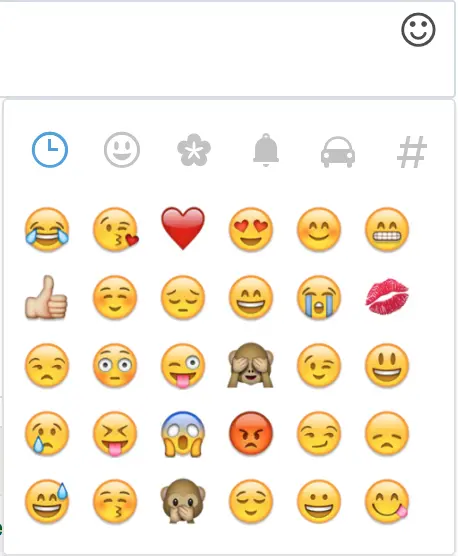
Si la préférence système TagsInputOnDetail est activée, les adhérents auront la possibilité d’ajouter des mots-clefs à partir de la page de détails d’unenotice en cliquant sur le lien “Ajouter un/des mot(s)-clef(s)”. Ce lien sera remplacé par une boîte de saisie.
Des émoticônes peuvent également être ajoutées en utilisant le sélecteur d’émoticônes au moment d’ajouter des tags à partir de la page de détails de la notice.
Zotero
Zotero est un module open source de gestion des références pour sauvegarder et gérer une bibliographie. Vous pouvez en savoir davantage et télécharger Zotero sur https://www.zotero.org.
A partir des résultats à l’OPAC, si Zotero est installé, vous verrez un icône sous forme de dossier dans la barre d’adresse à droite de l’URL. Cliquez sur le dossier afin de remonter la liste des titres de la recherche et de les ajouter à Zotero.
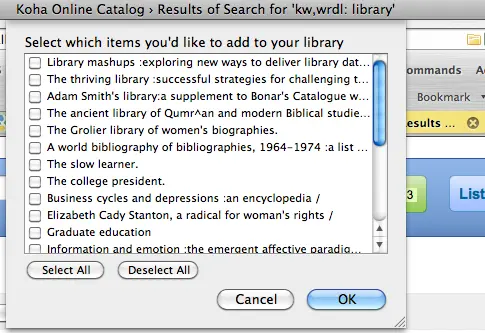
Sélectionnez les titres que voulez ajouter à Zotero et cliquez sur le bouton “OK”. Vous pourrez voir les titres ajoutés dans votre bibliothèque Zotero.
Personnaliser les flux RSS
En utilisant le script (cron job) flux RSS vous pouvez créer un flux RSS pour n’importe quelle requête SQL (par exemple un flux RSS pour les nouvelles acquisitions). Le script est exécuté en ligne de commande pour créer un document RSS XML.
Le résultat pourra être classé dans un répertoire accessible depuis OPAC (ou l’intranet) afin que les utilisateurs puissent télécharger le flux RSS.
Un exemple d’utilisation peut être trouvé à : misc/cronjobs/rss/lastAcquired.conf
Normalement le cron job (rss.pl) devrait être lancé périodiquement (ex : quotidien) afin de garder à jour le fil RSS.
Les listes du fichier de configuration (par exemple lastAcquired.conf) inclut:
nom du fichier modèle à utiliser
chemin du fichier exporté
Requête SQL
Le cron job rss.pl lance la requête SQL, puis envoie les résultats de la requête selon par le modèle pour produire le fichier de sortie.
Important
Pour utiliser les flux RSS personnalisés, vous devrez exécuter le script (cron job) de flux RSS.
Informations sur les cookies
Il est possible d’ajouter à l’OPAC des informations sur les cookies, avec un bandeau et une politique d’utilisation.

Depuis le bandeau de paramétrage des cookies, les usagers ont l’option d’accepter les cookies essentiels ou de voir plus d’informations. Quand ils cliquent « Plus d’informations », la politique de cookies apparaît.
Le bandeau de paramétrage des cookies est affiché sur toutes les pages jusqu’à ce que l’usager accepte les cookies.
Pour configurer les informations sur les cookies :
Vérifiez si vous utilisez des cookies non-essentiels sur votre site.
Regardez dans la préférence système OpacUserJS si vous avez du code pour des cookies de suivi.
Déplacez le code des cookies de suivi que vous utilisez vers la préférence système CookieConsentedJS.
Décidez quel texte vous souhaitez afficher sur le bandeau de paramétrage des cookies : ajoutez-le à la personnalisation HTML CookieConsentBar.
Décidez quel contenu vous souhaitez pour la politique de cookies : ajoutez-le à la personnalisation HTML CookieConsentPopup.
Paramétrez la préférence système CookieConsent sur “Oui” et vérifiez le résultat.
Auto-inscription à l’OPAC
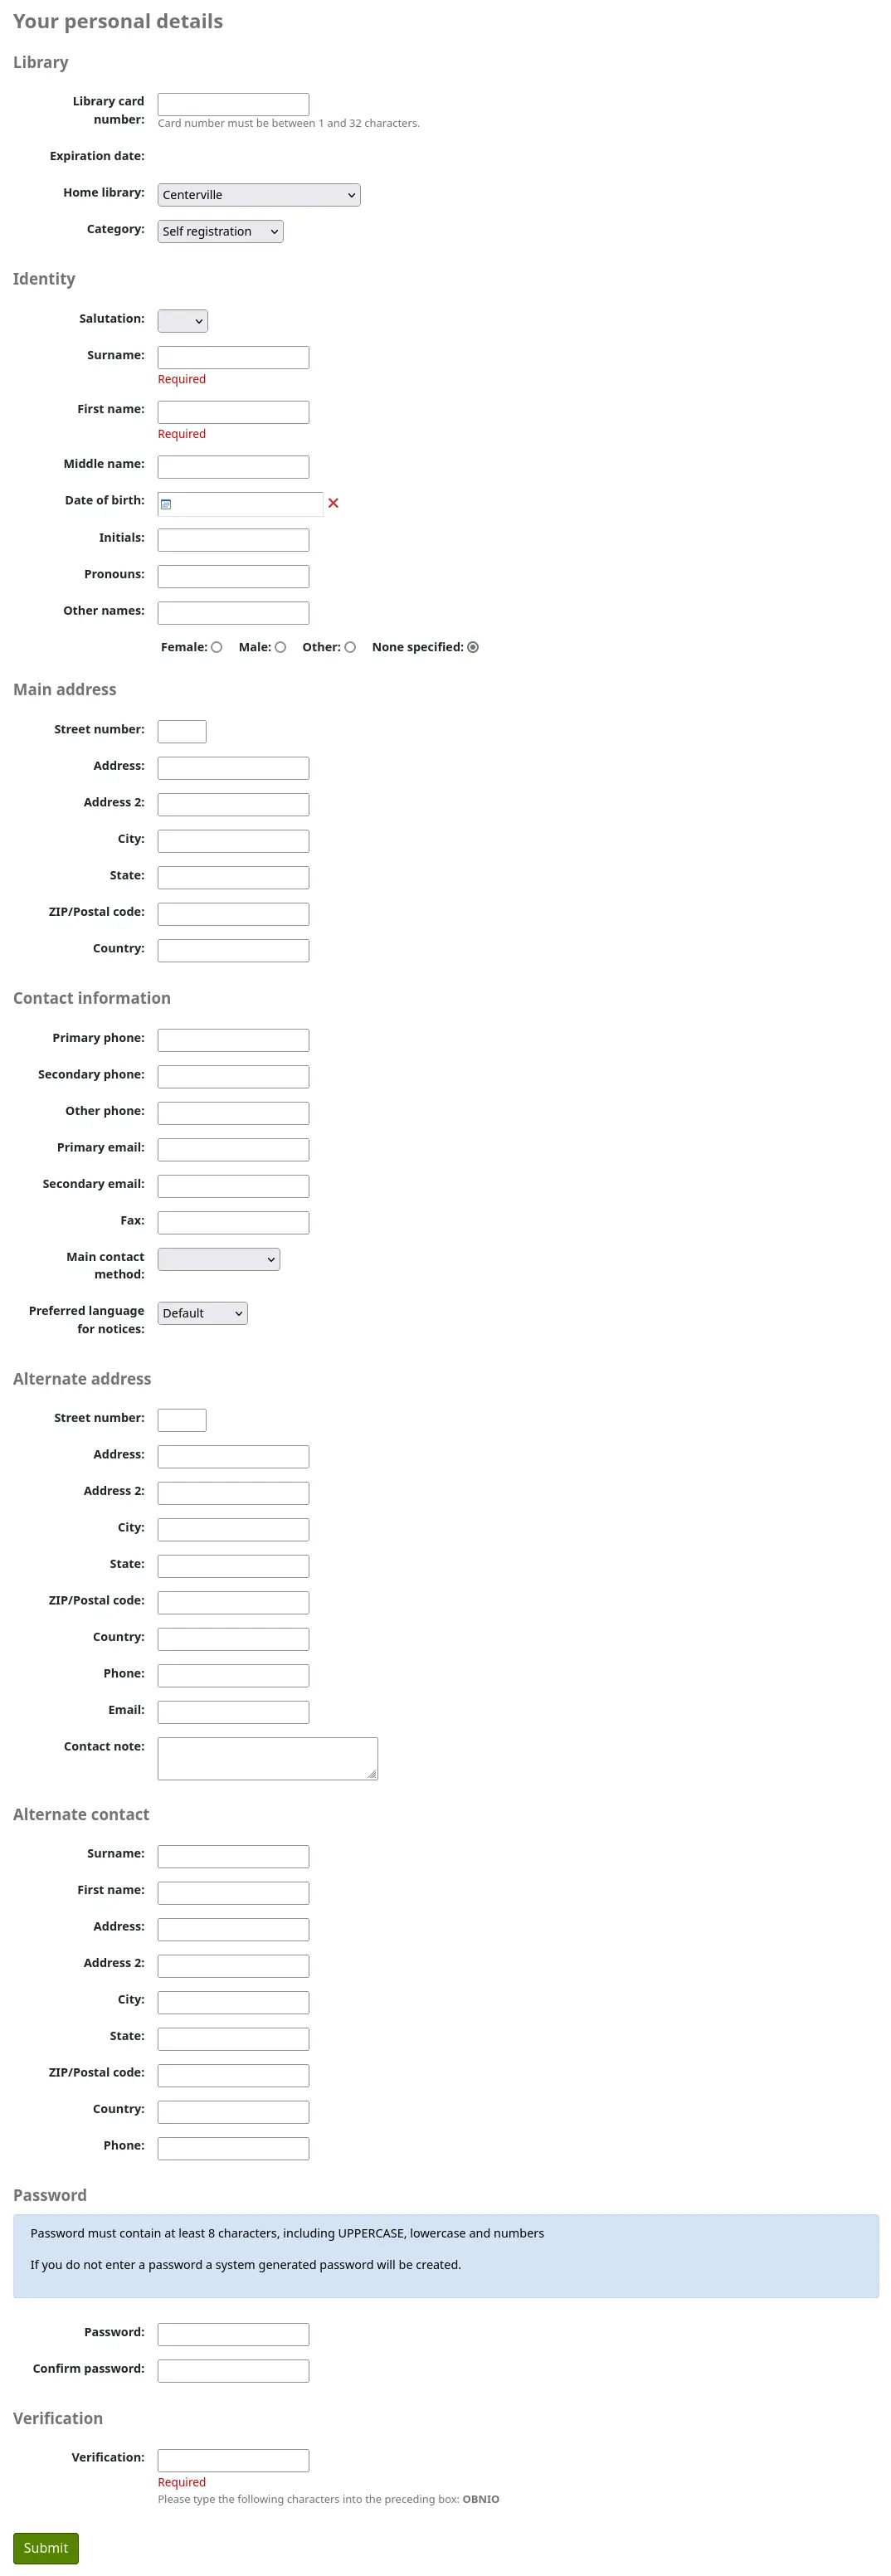
Si vous l’autorisez, les adhérents peuvent créer leur compte via l’OPAC. Si vous avez paramétré la préférence système PatronSelfRegistration sur “Autoriser” alors les adhérents verront un lien pour s’enregistrer sous l’encart de connexion.
Quand les adhérents cliquent sur le lien “Cliquez ici pour vous créer un compte”, ils sont dirigés sur la page d’inscription. Les options sur la page d’inscription sont définies par les préférences système PatronSelfRegistrationBorrowerMandatoryField et PatronSelfRegistrationBorrowerUnwantedField.
Note
Pour éviter des erreurs dans les années de naissance, vous pouvez activer la préférence système PatronSelfRegistrationAgeRestriction. Elle ajoute une vérification sur l’âge maximum lors de l’auto-inscription.
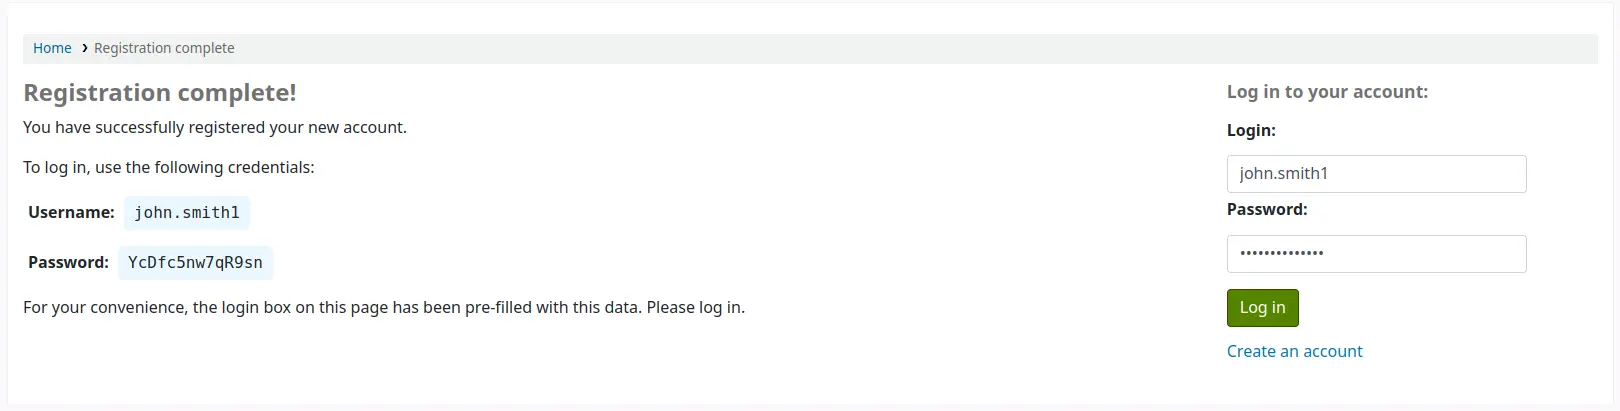
Une fois que les adhérents ont validé leur inscription, soit ils recevront un courriel pour confirmer leur compte (si vous avez paramétré la préférence système PatronSelfRegistrationVerifyByEmail pour que cela se fasse) soit ils verront s’afficher à l’écran leur identifiant et mot de passe. Si la préférence système :PatronSelfRegistrationPrefillForm est paramétrée sur “Afficher et préremplir”, le formulaire qui leur sera présenté sera pré-renseigné.
Vous pouvez ajouter des instructions supplémentaires sur cette page en créant une personnalisation HTML avec la localisation d’affichage “PatronSelfRegistrationAdditionalInstructions”.
Pour être averti qu’un adhérent s’est inscrit via l’OPAC, utilisez la préférence système EmailPatronRegistrations ou la préférence système PatronSelfRegistrationAlert.
Les adhérents qui s’inscrivent de cette façon n’auront pas de numéro de carte jusqu’à ce que la bibliothèque leur en assigne un, mais ils auront accès immédiatement à toutes les fonctionnalités de l’OPAC. Pour cette raison, il est conseillé de :
paramétrer une catégorie d’adhérents temporaire pour les adhérents auto-inscrits (comme “Auto-inscrit”) plutôt que d’utiliser une catégorie d’adhérents existante et de la paramétrer dans la préférence système PatronSelfRegistrationDefaultCategory
donner à cette catégorie d’adhérents des droits de prêts limités dans Circulation and fines rules (comme d’autoriser quelques réservations mais pas de prêt)
Les adhérents peuvent soit se présenter à la bibliothèque pour une vérification de leur identité avant de recevoir un numéro de carte qui leur permettra d’emprunter des documents, soit la bibliothèque génère des numéros de cartes à partir des règles internes, et les fournit aux adhérents auto-inscrits. La bibliothèque peut alors changer la catégorie d’adhérent en une plus appropriée (adulte, résident, non-résident, étudiant etc…) et ajouter un numéro de carte/code à barres.
Votre compte
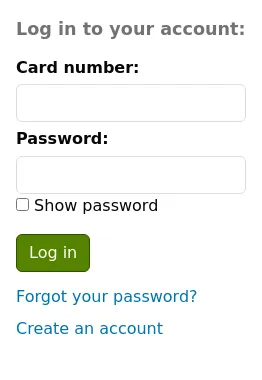
Si la préférence système opacuserlogin est paramétrée sur “Autoriser”, les adhérents peuvent se connecter et accéder à leur compte.
Une fois connectés, les adhérents sont dirigés vers le menu du compte.
Si les adhérents demandent l’affichage de la page d’accueil alors qu’ils sont connectés et que OPACUserSummary est paramétrée sur “Afficher”, ils auront un aperçu de leur compte au lieu des champs de connexion.
Si OPACShowSavings est paramétrée pour afficher les économies réalisées dans la boîte d’aperçu, cette section affichera aussi les économies réalisées par l’adhérent en fréquentant la bibliothèque plutôt qu’acheter les documents.

A partir de n’importe quelle page de l’OPAC, cliquer sur leur nom en haut à droite dirigera les adhérents sur leur compte.
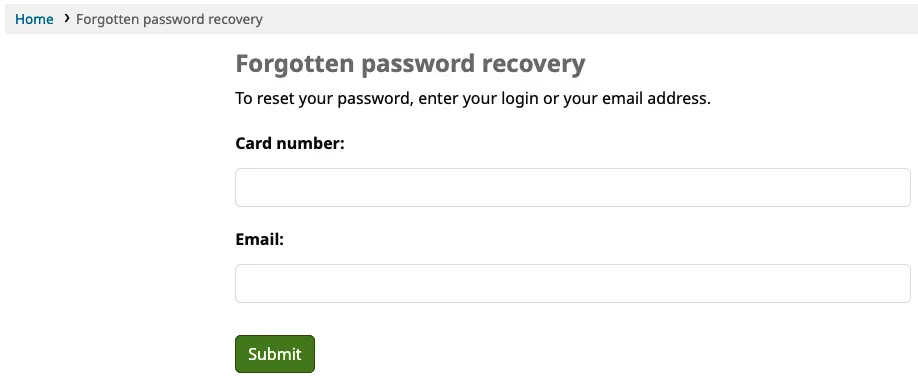
Modifier votre mot de passe
Si vous avez paramétré la préférence système OpacResetPassword sur “Autoriser”, les adhérents pourront réinitialiser leur mot de passe en cliquant sur le lien “Mot de passe oublié ?” sous l’encart de connexion.
Après avoir cliqué, ils devront renseigner un formulaire avec leur identifiant et leur adresse de courriel.
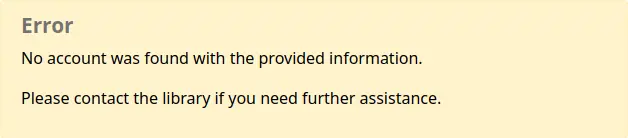
Avertissement
Les adhérents doivent avoir, pour réinitialiser leur mot de passe, une adresse de courriel. S’ils n’ont pas déjà d’adresse de courriel déjà renseignée dans leur compte, ils auront un message d’erreur
Le système enverra alors par courriel à l’adhérent les instructions pour réinitialiser son mot de passe.
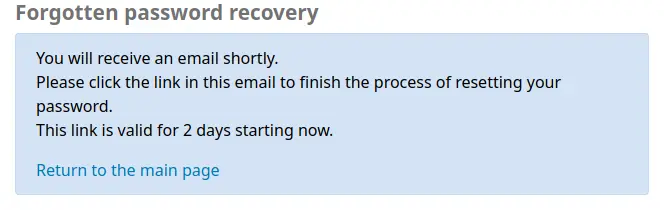
Le contenu de ce courriel peut être personnalisé avec l’outil Notifications et tickets. Le code du courrier est PASSWORD_RESET.
Si la préférence système NotifyPasswordChange est activée, l’adhérent recevra un message lui indiquant que son mot de passe a été modifié.
Le contenu de ce courriel peut être personnalisé avec l’outil Notifications et tickets. Le code du courrier est PASSWORD_CHANGE.
Mon compte
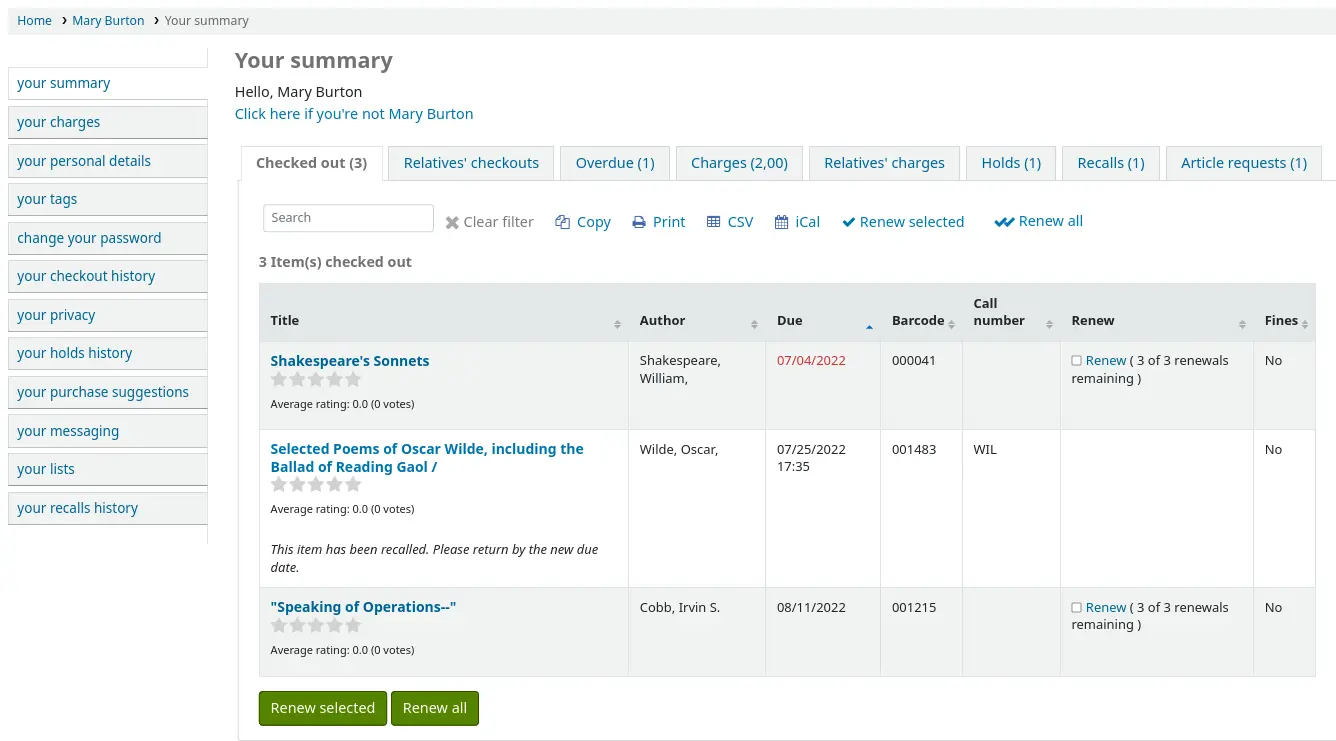
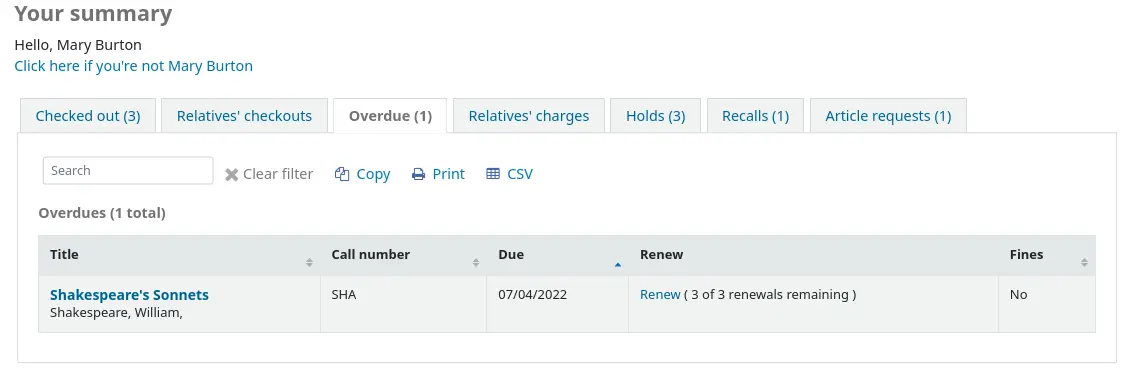
A partir de l’onglet “Mon compte”, les adhérents voient tous les documents qu’ils ont empruntés avec, surlignés en rouge, ceux en retard.
Les notifications OPAC et les notes OPAC seront affichées en haut de cette page. Pour les notifications OPAC, l’adhérent aura la possibilité de les ignorer. Cela masquera le message dans son compte à l’OPAC et le signalera comme Lu mais ne l’effacera pas.

Vous pouvez ajouter du contenu à cette page avec la localisation de personnalisation HTML OpacMySummaryNote. Le contenu ajouté ici apparaîtra au dessus de l’aperçu et sous le message de bienvenue.

Si OPACShowSavings est paramétrée pour afficher les économies réalisés dans la page “Mon compte”, cette section affichera aussi les économies réalisées en fréquentant la bibliothèque plutôt qu’acheter des documents.

Si OpacRenewalAllowed est paramétrée sur “Autoriser”, les adhérents pourront renouveler leurs prêts à partir de l’OPAC.
Si l’adhérent a des frais en attente supérieurs à la valeur définie dans OPACFineNoRenewals, une note s’affichera pour expliquer que les renouvellements ne peuvent être effectués.

Une note s’affichera si l’adhérent ne peut effectuer de réservation parce que ses frais sont supérieurs à la valeur définie dans la préférence système maxoutstanding.

Si AllowPatronToControlAutoRenewal est paramétrée sur “Autoriser les adhérents”, les adhérents pourront choisir s’ils veulent voir leurs prêts renouveler automatiquement ou non. S’ils choisissent “Oui”, les documents pour lesquels le renouvellement automatique est activé dans les règles de circulation seront renouvelés comme prévu. S’ils choisissent “Non”, les renouvellements automatiques qui se seraient appliqués sur les prêts de l’adhérent ne le seront pas.

Si vous avez ajouté du code HTML dans la préférence OPACMySummaryHTML vous le verrez alors à droite de la colonne “Amendes”.
Astuce
Par défaut, le codes à barres ne sont pas affichés dans le tableau des documents empruntés. Si vos adhérents souhaitent voir les codes à barres sur leurs propres listes de documents empruntés, vous pouvez paramétrer un attribut d’adhérent avec la valeur SHOW_BCODE et la valeur autorisée YES_NO.
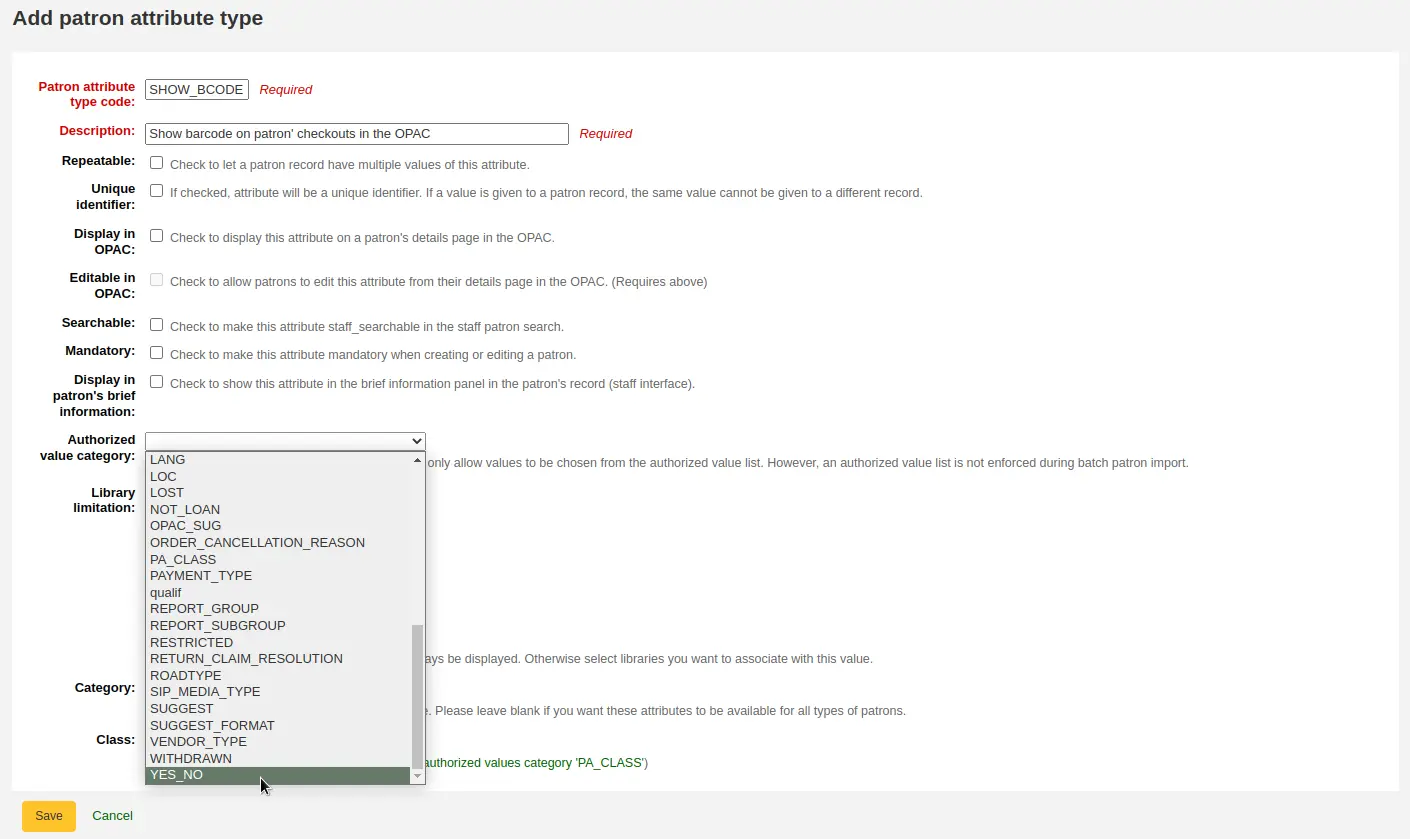
Puis, sur le compte de l’adhérent, définir la valeur pour SHOW_BCODE sur “Oui”.
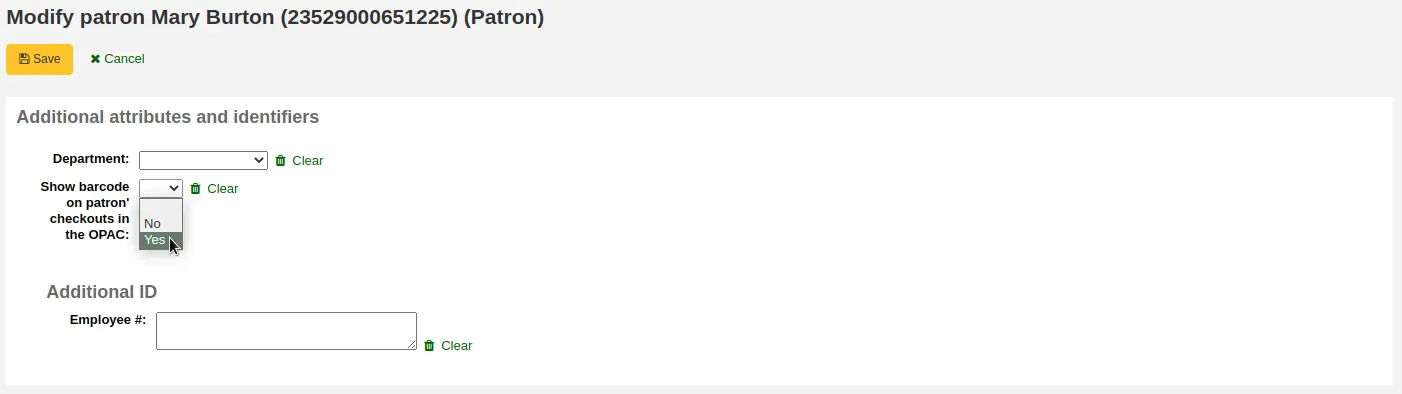
Cela ajoutera une colonne au tableau de résumé des prêts de l’OPAC qui affichera les codes à barres des documents empruntés.
Si vous souhaitez que vos adhérents puissent laisser une note sur les documents qu’ils ont empruntés, la préférence système allowcheckoutnotes doit être paramétrée sur “Autoriser”.
Dans le résumé des prêts de l’adhérent, il y aura une colonne supplémentaire pour autoriser l’adhérent à laisser une note (par exemple : première page manquante ou le DVD rayé).
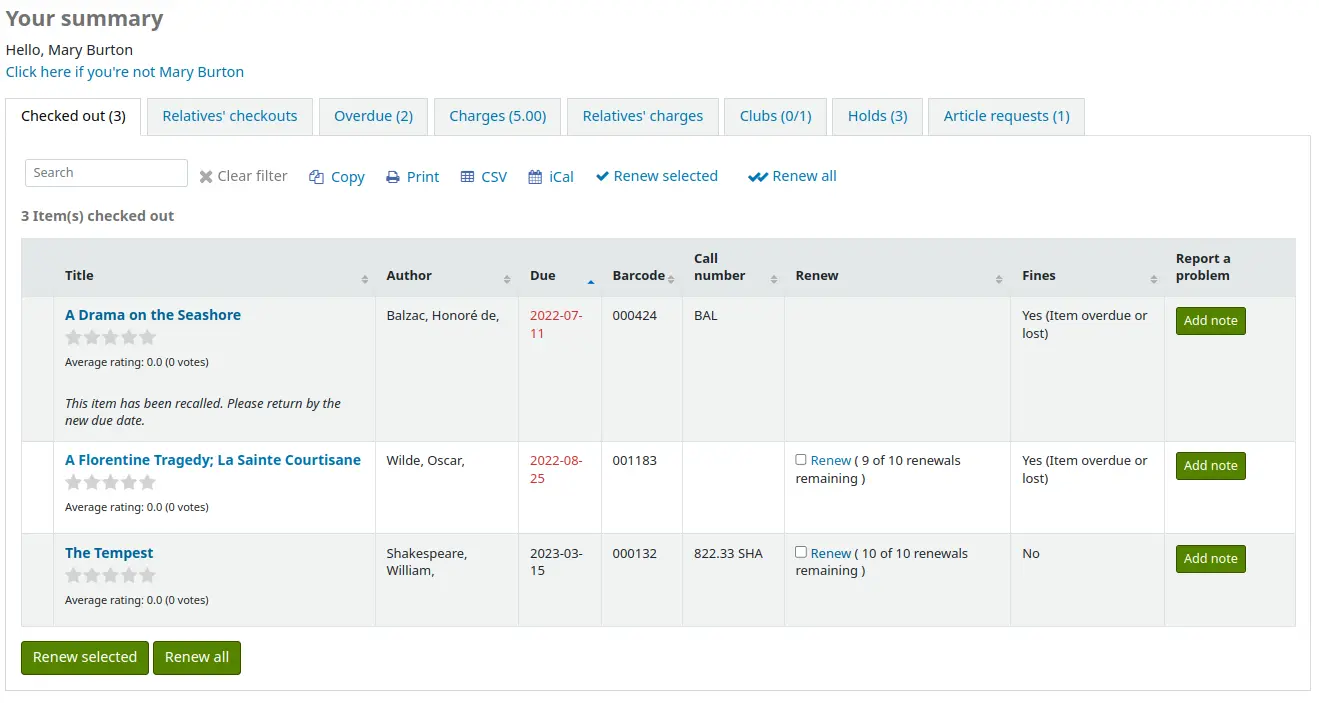
Si l’adhérent clique sur “Ajouter une note”, il peut ajouter un commentaire sur son prêt.
Les bibliothécaires pourront visualiser et gérer les notes sur les exemplaires à partir de l’interface professionnelle.
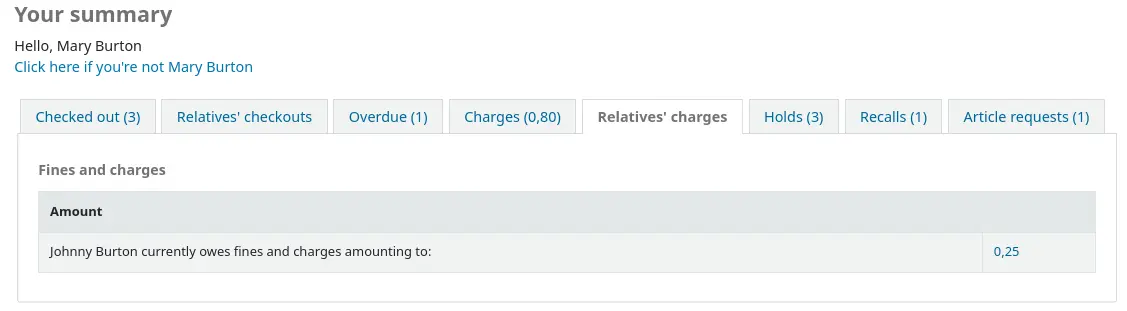
Si leurs personnes à charge l’ont autorisé via leurs options de vie privée, ou encore si les bibliothécaires sont autorisés à modifier ce paramètre de vie privée via la préférence système AllowStaffToSetCheckoutsVisibilityForGuarantor et qu’ils l’ont activée, les garants se connectant verront un onglet « Prêts de la famille » dans leur onglet résumé.

Si vous cliquez sur l’onglet “Retards”, cela affichera tous les documents en retard.
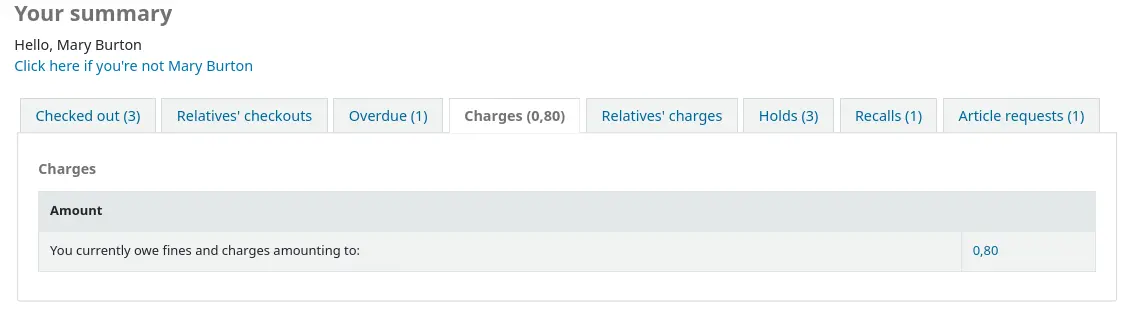
L’onglet “Amendes” présentera juste le total de ce que l’adhérent doit. En cliquant sur le total, ils basculeront sur l’onglet “Mes amendes” où ils verront une ventilation complète de leurs amendes et de leurs frais. Si vous n’utilisez pas les amendes dans votre bibliothèque, vous pouvez désactiver l’affichage de ces onglets en paramétrant la préférence système OPACFinesTab sur “Ne pas autoriser”.
Si leurs personnes à charge l’ont autorisé via leurs options de vie privée, ou encore si les bibliothécaires sont autorisés à modifier ce paramètre de vie privée via la préférence système AllowStaffToSetFinesVisibilityForGuarantor et qu’ils l’ont activée, les garants se connectant verront un onglet « Frais des personnes à charge » dans leur onglet résumé.
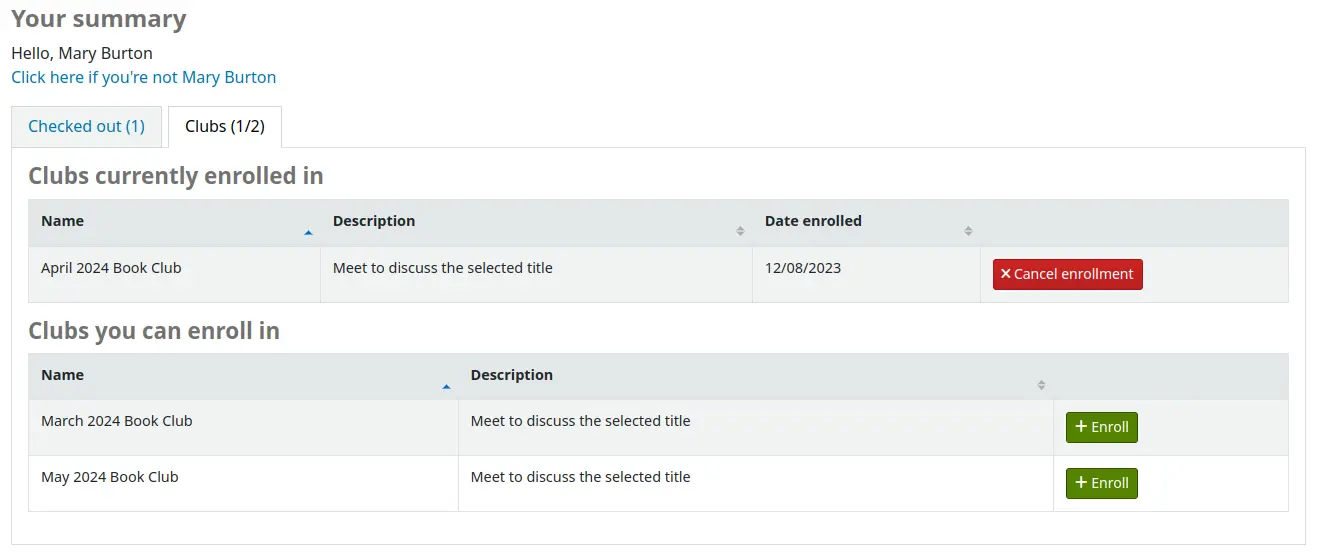
L’onglet “Club” affiche tous les clubs en cours qui permettent une inscription publique. Ici, les adhérents peuvent s’inscrire dans des clubs en cliquant sur le bouton “Inscription”.
L’onglet “Réservations” indique à l’adhérent le statut de chacun des exemplaires qui ont fait l’objet d’une réservation.
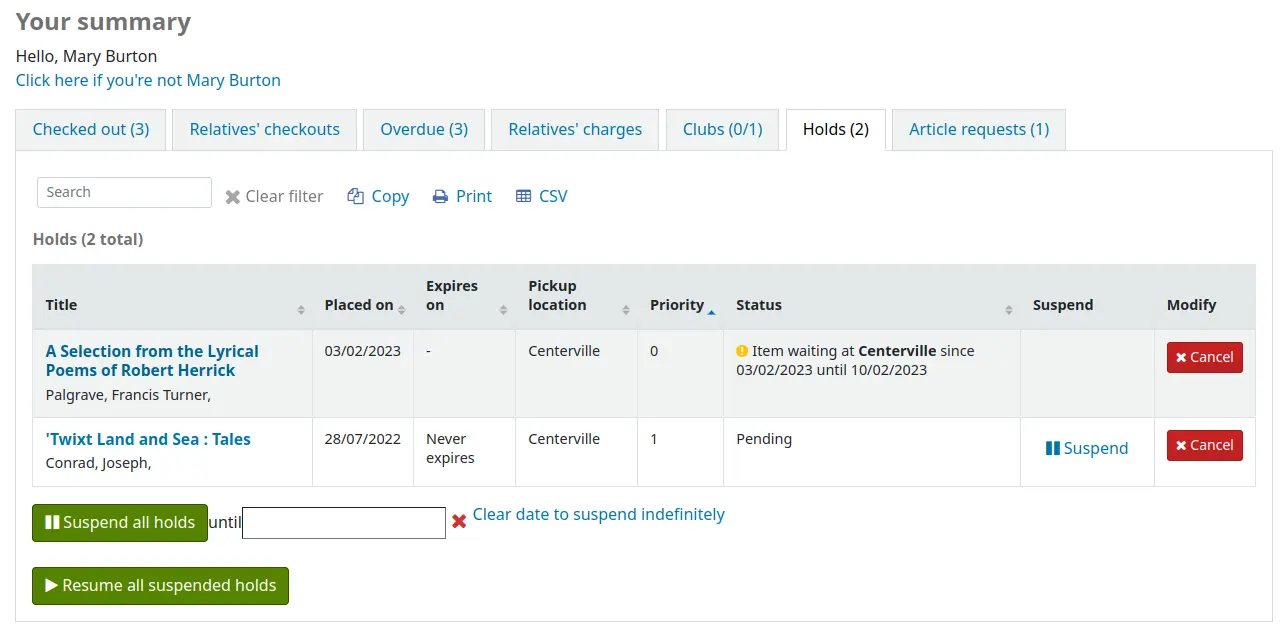
En fonction des valeurs de la préférence système SuspendHoldsOpac, les adhérents peuvent annuler ou suspendre leurs réservations si elles ne sont pas en transfert ou déjà en attente. Quand ils cliquent sur “Suspendre”, ils devront choisir une date de reprise de leur réservation.

Ils peuvent également suspendre toutes leurs réservations pour une période non définie ou jusqu’à une date précise, s’ils remplissent les options de suspension situées en bas de la page.
Note
Si vous avez paramétré la préférence système AutoResumeSuspendedHolds sur “Ne pas permettre”, vous n’aurez pas la possibilité de définir une date de fin pour la suspension des réservations.
Dans cet onglet, les adhérents peuvent aussi annuler leurs réservations. En fonction de la politique d’annulation des réservations en attente, ils pourraient aussi annuler des réservations mises de côté pour eux.
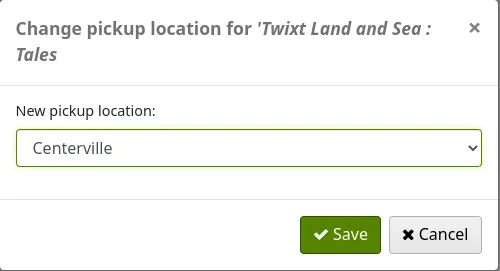
En fonction de la valeur de la préférence système OPACAllowUserToChangeBranch, les adhérents peuvent modifier la bibliothèque de retrait de leurs réservations. Si un ou plusieurs statuts sont sélectionnés dans la préférence système, un lien “Modifier” apparaîtra sous la biliothèque de retrait actuelle pour les réservations ayant ce statut.
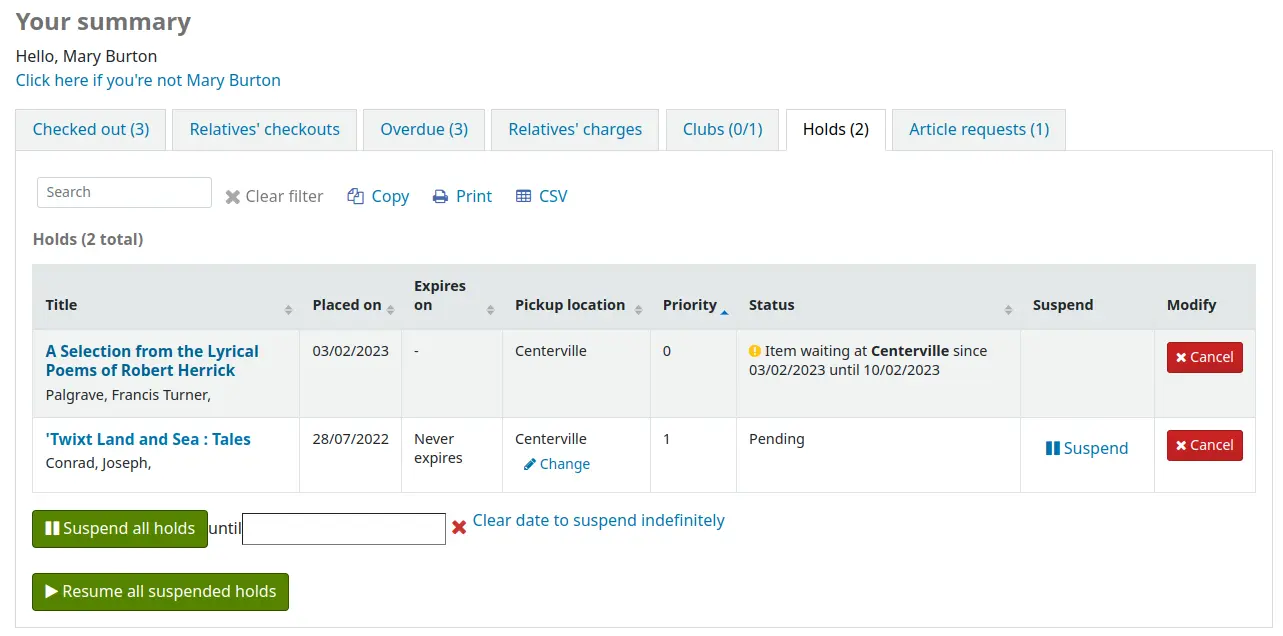
Quand l’adhérent clique sur le lien “Modifier”, un pop-up s’ouvre : il affiche une sélection de bibliothèques autorisant le retrait des réservations.
Si votre bibliothèque permet les rappels, l’adhérent peut voir ses rappels en attente et leurs différents statuts dans l’onglet “Rappels”.
L’adhérent peut annuler un rappel en cliquant sur le bouton “Annuler”, à la condition qu’il ne soit pas déjà en attente de retrait.
Pièges adhérent
Si vous avez activé une alerte sur le compte de l’adhérent, il pourra voir l’un des messages d’erreur suivants en haut de page de son compte.
Carte perdue

Changement d’adresse de l’adhérent
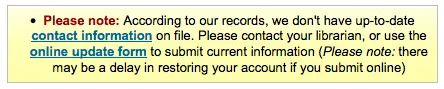
Note
le message d’erreur ne comportera pas de lien vers un formulaire de mise à jour si vous avez paramétré OPACPatronDetails sur « Ne pas autoriser »
Adhérent suspendu

Carte virtuelle
Version
Cette fonctionnalité a été ajoutée à Koha dans sa version 24.11.
Si la préférence système OPACVirtualCard est paramétrée sur “Autoriser”, les adhérents pourront voir un onglet “Ma carte virtuelle” où sera affiché le code à barres de leur carte de bibliothèque.
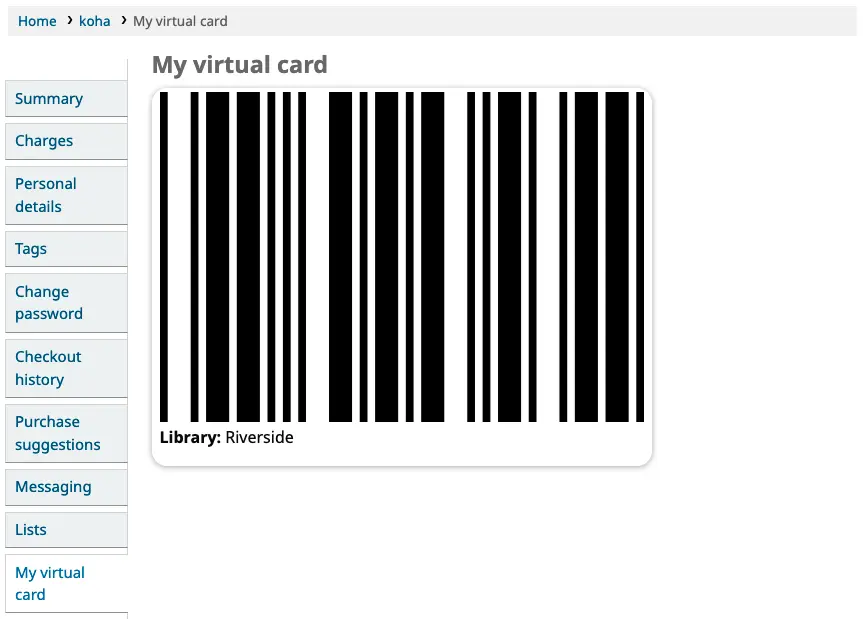
Quand l’adhérent est connecté à son compte à l’OPAC à partir d’un appareil mobile, le code à barres de sa carte peut être facilement lu par les automates de prêt de la bibliothèque et autres services.
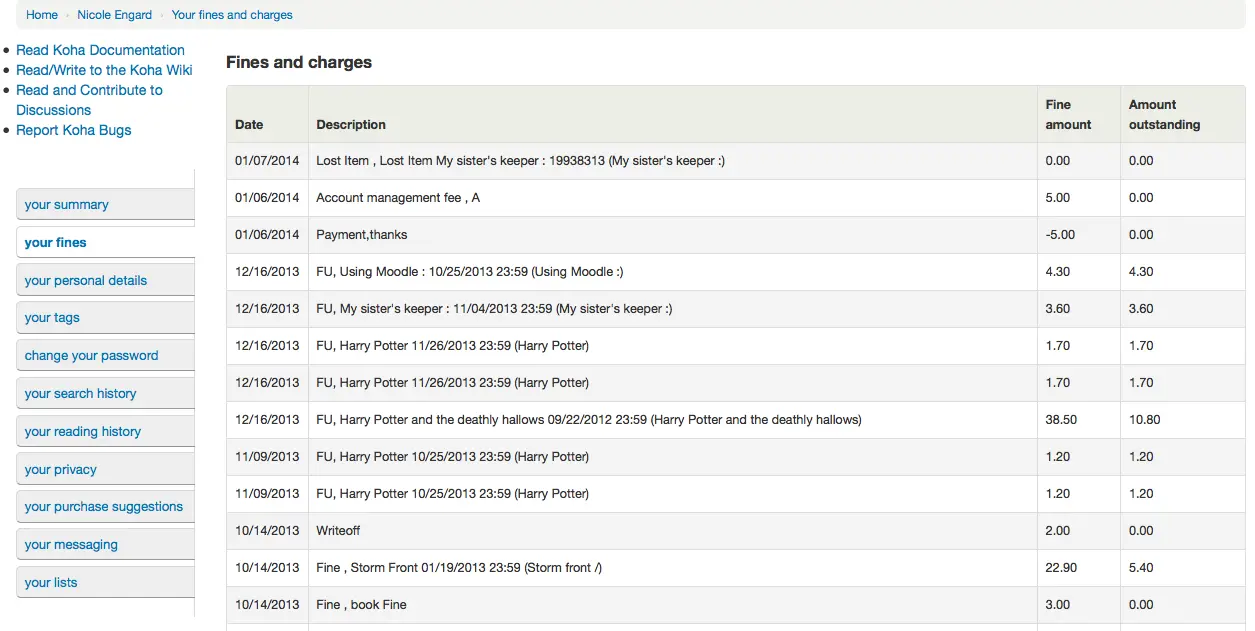
Mes amendes
Si la bibliothèque applique les amendes, l’onglet “mes amendes” situé à gauche affichera l’historique des amendes de l’adhérent.
Mes informations personnelles
Si vous avez paramétré la préférence OPACPatronDetails sur “Autoriser”, vos adhérents verront un formulaire renseigné avec leurs coordonnées en cliquant sur l’onglet “Mes informations personnelles”. Vous pouvez contrôler les champs que les adhérents peuvent voir et modifier à l’OPAC en configurant les préférences PatronSelfModificationBorrowerUnwantedField et PatronSelfModificationMandatoryField.
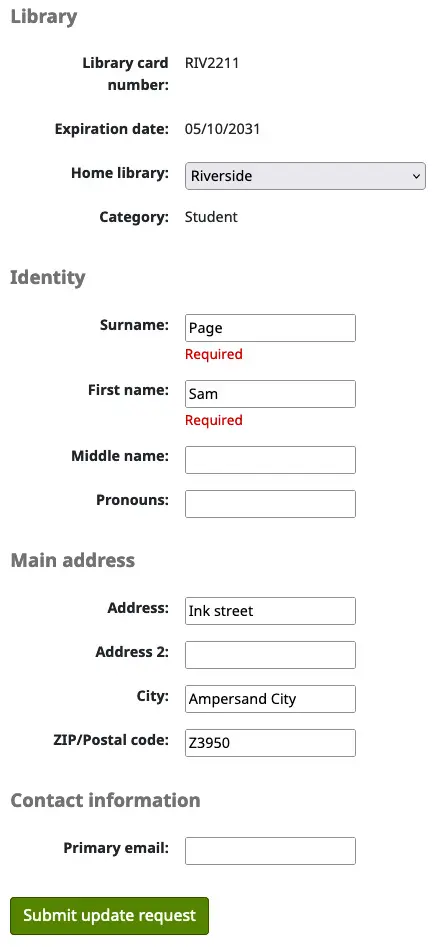
Les adhérents peuvent modifier leurs détails personnels sur le formulaire et cliquer sur “Soumettre les modifications”. Les modifications seront envoyées à la bibliothèque avant leur mise à jour. Le personnel verra toutes les demandes de modification listées.
Si la préférence système AutoApprovePatronProfileSettings est activée, les bibliothécaires n’auront pas à valider ces modifications.
Si la préférence OPACPatronDetails est paramétrée sur “Ne pas autoriser”, les adhérents verront alors simplement leurs coordonnées et un message indiquant qu’ils peuvent contacter la bibliothèque pour signaler des changements.
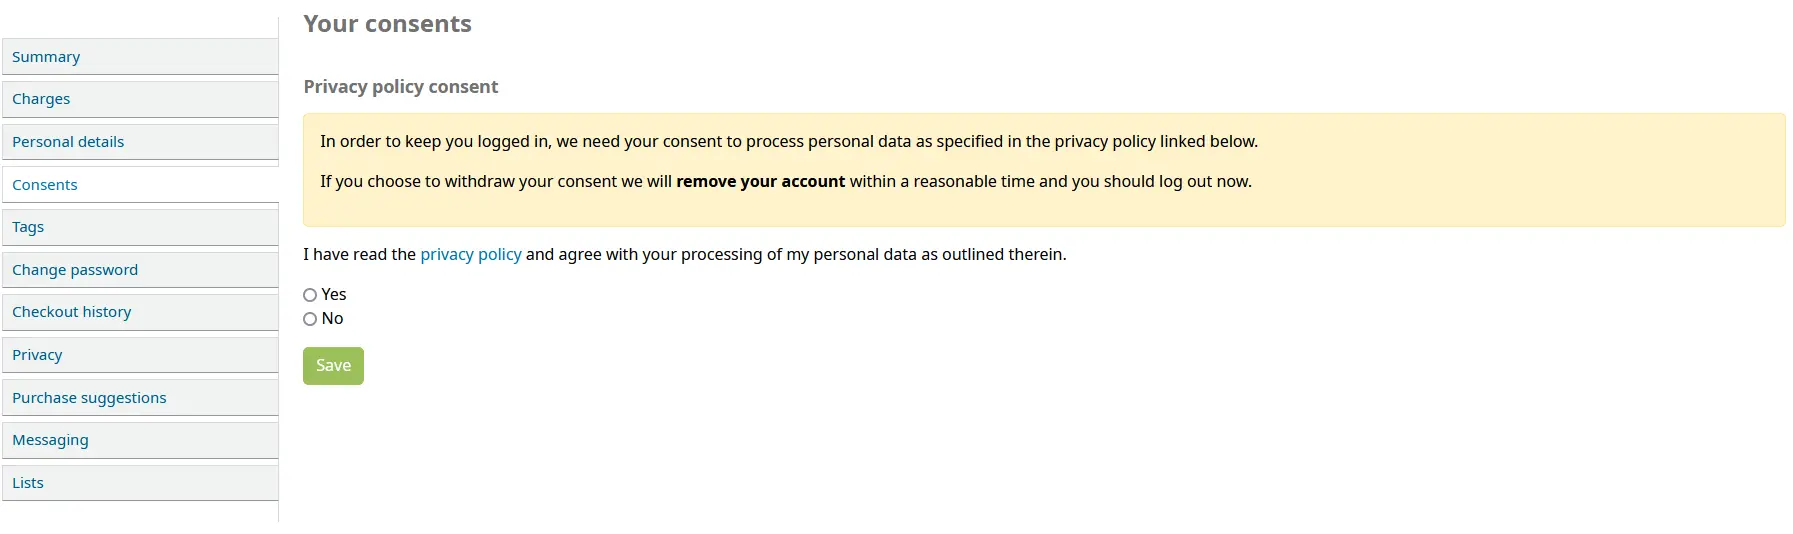
Consentement
Si vous avez paramétré la préférence système PrivacyPolicyConsent sur “permissive” ou “appliquée”, les adhérents connectés à l’OPAC verront un onglet “Consentements” où sont consignées leurs déclarations de consentement. Par défaut, la déclaration de consentement fait référence à la politique de confidentialité de la bibliothèque. Vous pouvez utiliser une URL pour diriger vers votre propre politique de confidentialité en utilisant la préférence système PrivacyPolicyURL.
Version
Un nouveau plugin pour “patron_consent_type” a été ajouté en version 23.11 de Koha pour permettre plus de types de consentement à l’OPAC. Voir la page Plugin Hooks dans le wiki pour plus d’informations.
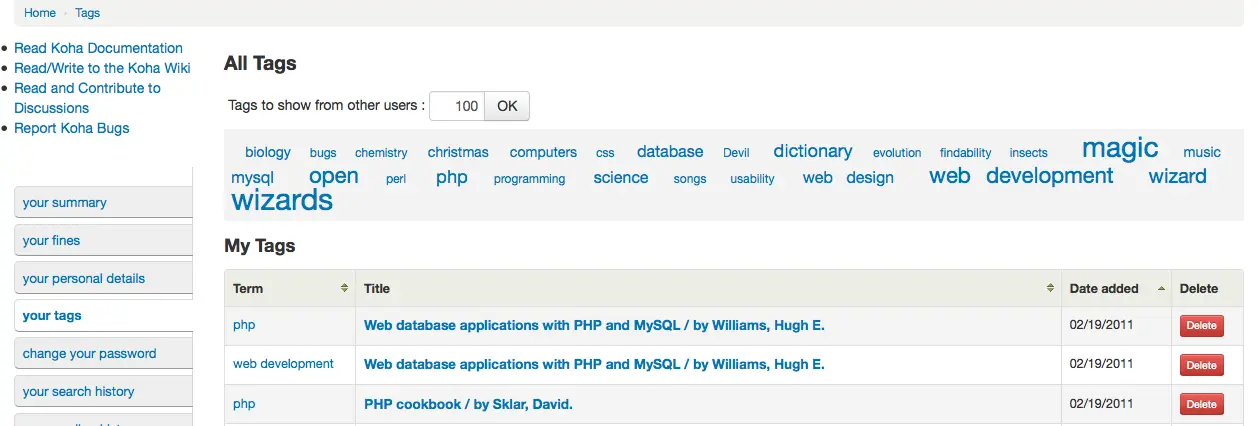
Mes mots-clés
Si votre bibliothèque a paramétré TagsEnabled sur “Autoriser”, l’onglet sur votre gauche sera “Mes mots-clefs”. Cet onglet montre aux adhérents tous les mots-clefs de la base dans un nuage et, en liste, tous les mots-clefs qu’ils ont retenus. Ici, les adhérents peuvent retirer, s’ils le souhaitent, les mots-clefs qu’ils avaient ajoutés.
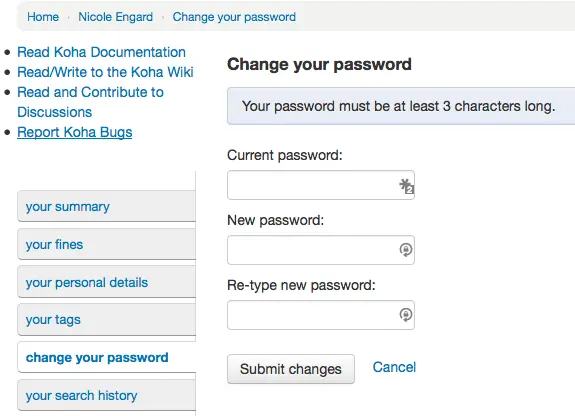
Modifier le mot de passe
Ensuite, si vous avez paramétré OpacPasswordChange sur “Autoriser”, l’onglet suivant sera “Changer mon mot de passe”, dans lequel les adhérents peuvent changer leur mot de passer pour se connecter à l’OPAC. Les adhérents verront un formulaire standard dans lequel ils devront renseigner leur ancien mot de passe et, à deux reprises, leur nouveau mot de passe.
Si la préférence système NotifyPasswordChange est activée, l’adhérent recevra un message lui indiquant que son mot de passe a été modifié.
Le contenu de ce courriel peut être personnalisé avec l’outil Notifications et tickets. Le code du courrier est PASSWORD_CHANGE.
Mon historique de recherche
Si vous avez paramétré votre préférence système EnableOPACSearchHistory sur “Conserver”, vos adhérents pourront alors accéder à leur historique de recherche via l’onglet “Mon historique de recherche”.
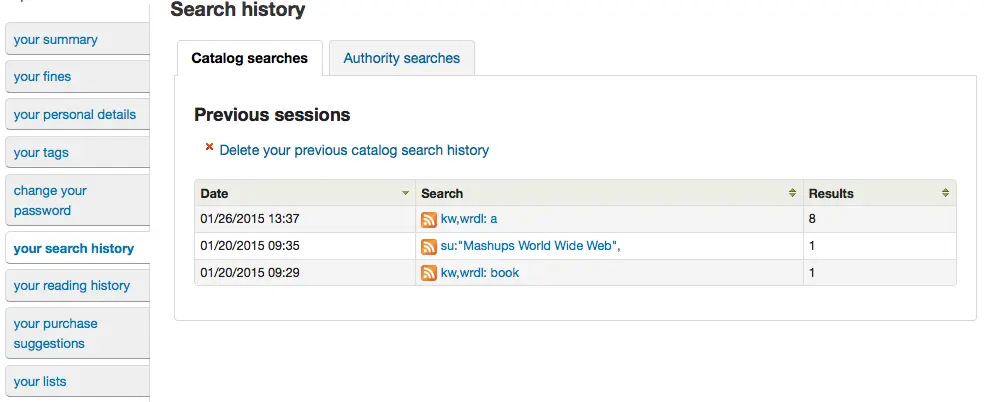
L’historique de recherche affiche tous les termes recherchés par l’adhérent. Si vous cliquez sur l’un des termes, vous relancerez une recherche sur ce terme. L’historique de recherche peut être supprimé par l’adhérent en cliquant sur le lien “Supprimer votre historique de recherche” situé en haut de l’historique ou en cliquant sur la petite “x” rouge située à côté du lien “Historique de recherche” en haut à droite de l’écran.

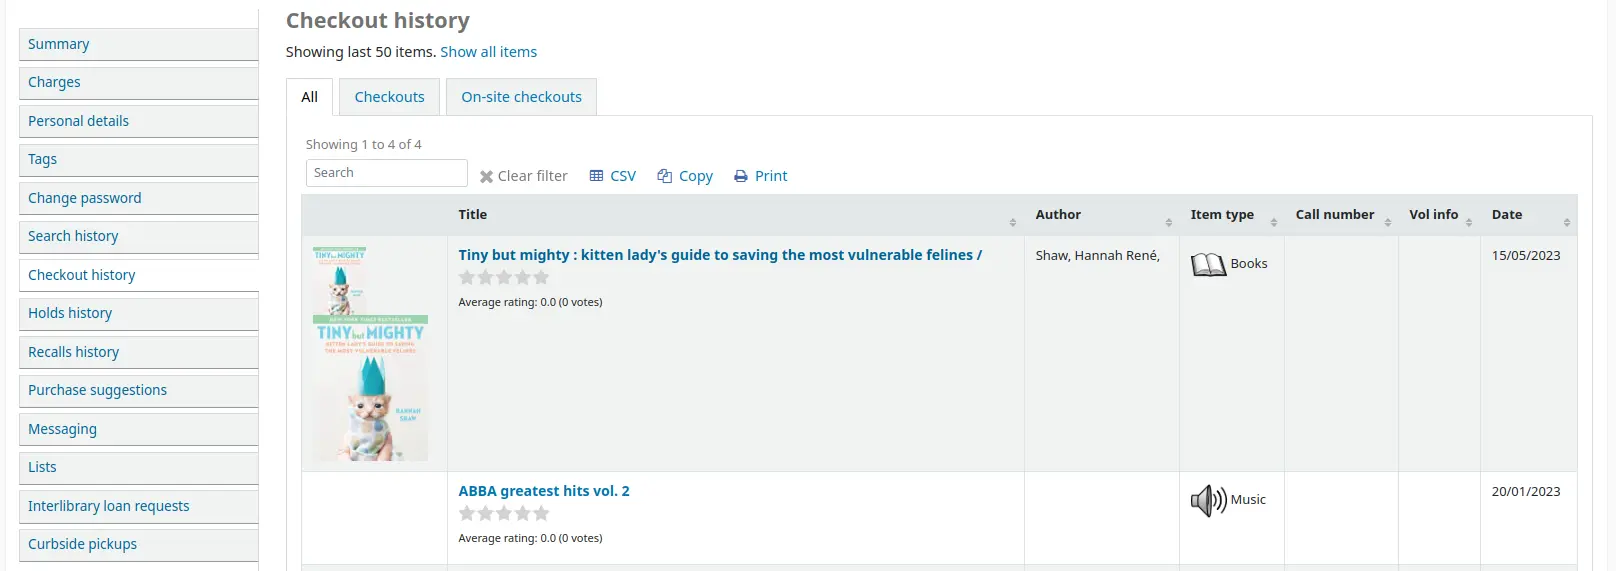
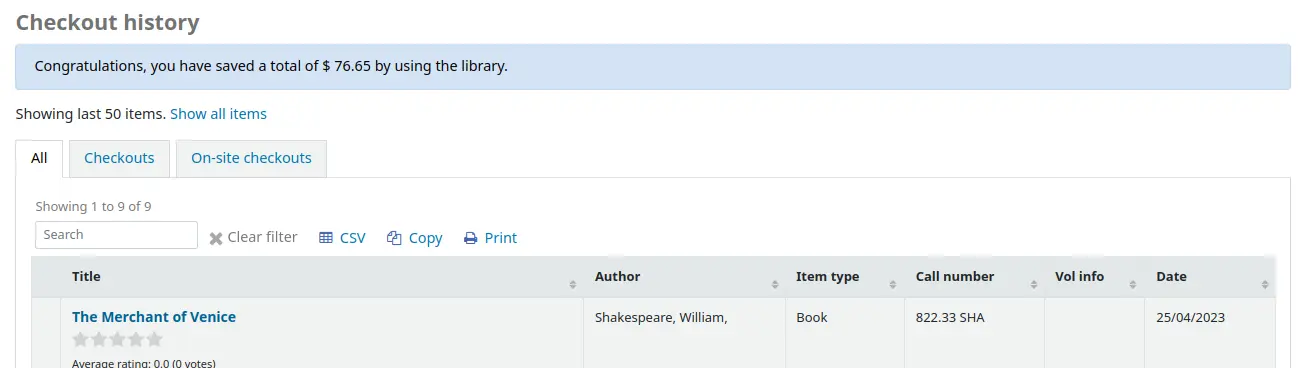
Mon historique de prêt
Si la préférence système opacreadinghistory est paramétrée sur “Autoriser”, les adhérents pourront accéder à l’onglet “Mon historique de prêt”. Ceci affichera l’intégralité de leur historique de prêt sauf s’ils ont demandé à la bibliothèque de ne pas conserver cette information via l’onglet “ Ma vie privée”.
Si OPACShowSavings est paramétrée pour afficher les économies réalisés dans la page “Mon compte”, cette section affichera aussi les économies réalisées en fréquentant la bibliothèque plutôt qu’acheter des documents.
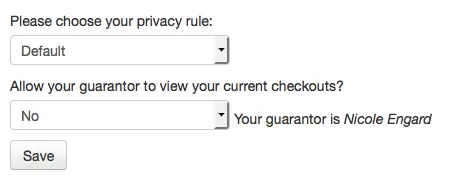
Ma vie privée
L’onglet “Ma vie privée” apparaîtra si vous avez à la fois paramétré sur “Autoriser” les préférences opacreadinghistory et OPACPrivacy. Cet onglet permettra aux adhérents de définir comment la bibliothèque doit conserver leurs données d’historique de circulation.
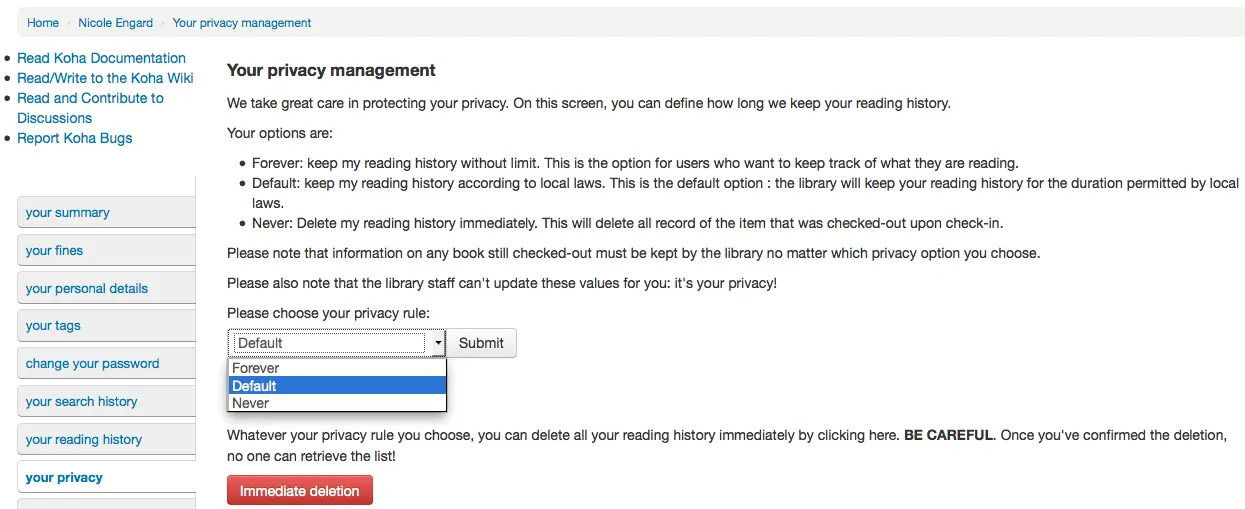
L’adhérent a le choix parmi ces trois options:
Pour toujours : Garde pour toujours ma liste de lecture.
Défaut : Conserve mon historique de lecture conformément aux lois en vigueur. C’est l’option par défaut. La bibliothèque se chargera de conserver votre historique de lecture pour la durée autorisée par la loi.
Jamais : Efface immédiatement mon historique de lecture. Cela effacera de votre historique tous vos documents empruntés au moment où vous les rendez.
En fonction des suggestions des adhérents, les contenus de l’onglet “mon historique de lecture à l’OPAC et de l’onglet “Historique de prêts” dans l’interface professionnelle peuvent être différents.
Quelque soit le choix de l’adhérent, celui-ci peut supprimer à tout moment son historique de lecture en cliquant sur le bouton “Suppression immédiate”.
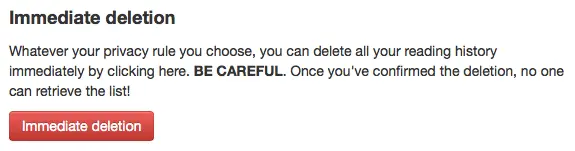
Cliquer sur ce bouton ne supprimera pas les prêts en cours mais effacera l’historique de lecture antérieur de l’adhérent.
Important
Pour que l’adhérent puisse supprimer son historique de prêt, vous devez avoir paramétré la préférence AnonymousPatron.
Si vous autorisez les personnes à charge à donner la permission à leur garant de voir leurs prêts en cours avec la préférence système AllowPatronToSetCheckoutsVisibilityForGuarantor, ils verront cette option sur cet écran.
Quand les garants se connectent, ils verront un onglet intitulé « Prêts liés » sur leur résumé.
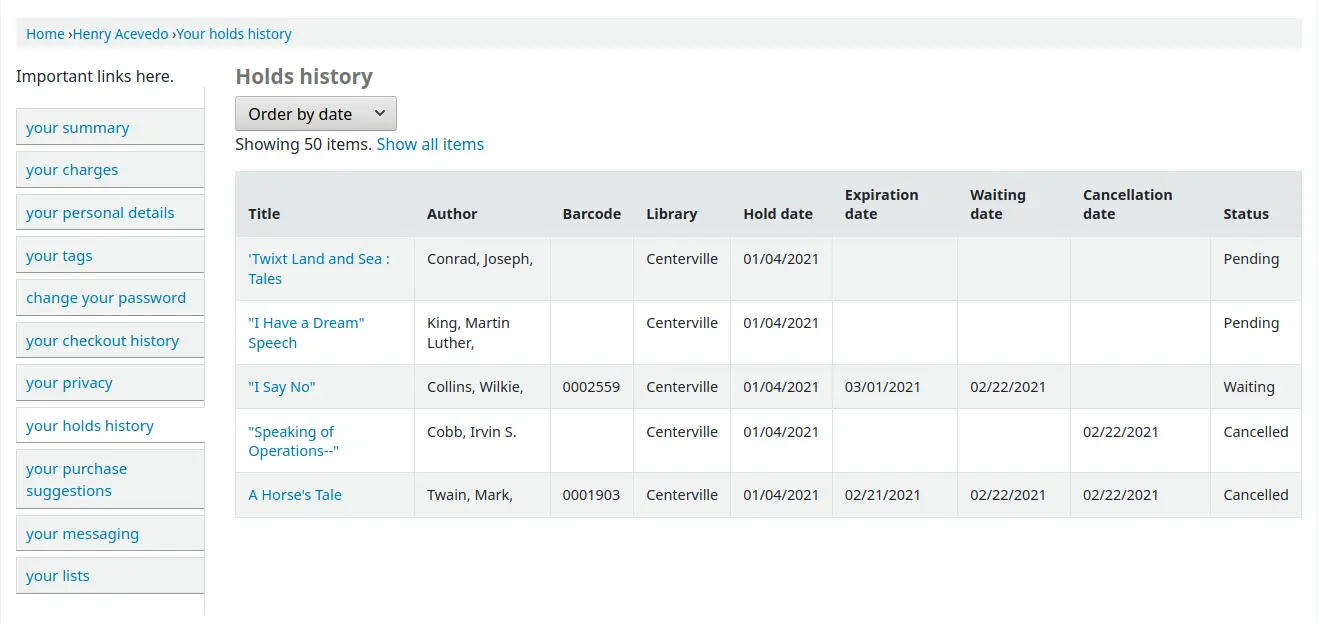
Mon historique de réservations
Si la préférence système OPACHoldsHistory est paramétrée sur “Autoriser”, les adhérents pourront voir toutes leurs réservations, en cours ou révolues.
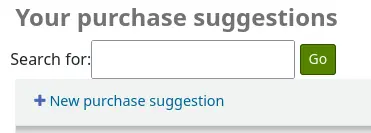
Mes suggestions d’achat
Si votre bibliothèque permet aux adhérents de proposer des suggestions d’achat, le prochain onglet présentera toutes les suggestions qu’un adhérent a proposées à sa bibliothèque et leur statut. Pour désactiver cet onglet et la fonctionnalité de suggestions, paramétrez la préférence système suggestion sur “Ne pas autoriser”.
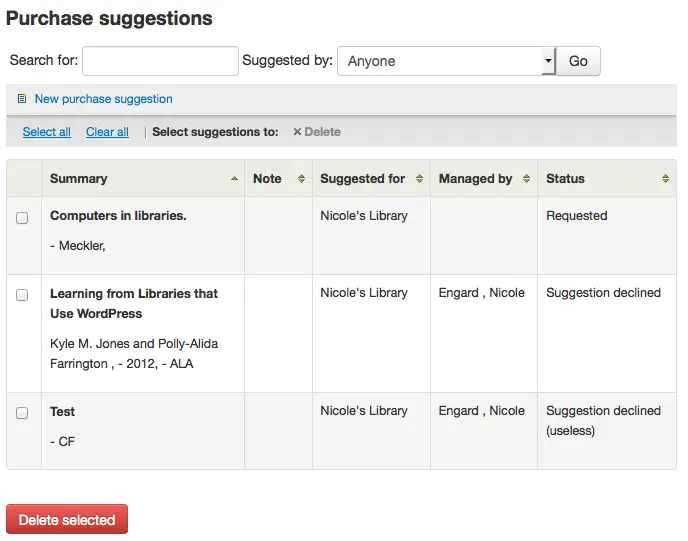
Si vous avez paramétré OPACViewOthersSuggestions sur “Montrer”, les adhérents pourront chercher des suggestions en haut de cette liste.
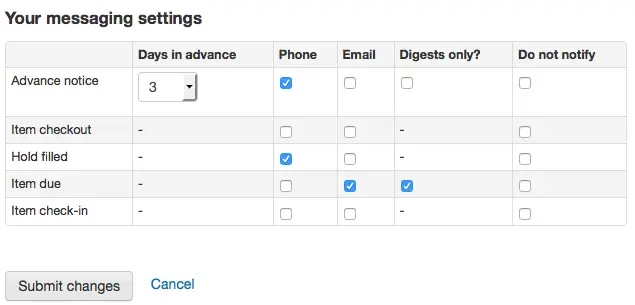
Mes messages
Si votre bibliothèque a paramétré la préférence EnhancedMessagingPreferences sur “Autoriser” et la préférence système EnhancedMessagingPreferencesOPAC sur “Afficher”, les adhérents pourront alors choisir quels messages ils souhaitent recevoir de la bibliothèque (à l’exception des relances de retard pour lesquelles la bibliothèque décide).
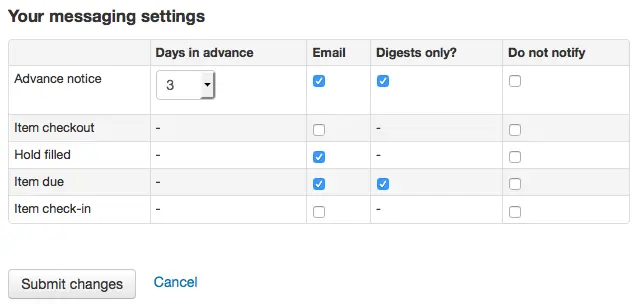
Si vous utilisez un pilote d’envoi SMS paramétré dans la préférence système SMSSendDriver , vous verrez s’afficher une colonne supplémentaire pour recevoir ces messages par SMS et un champ pour saisir un numéro de téléphone portable.
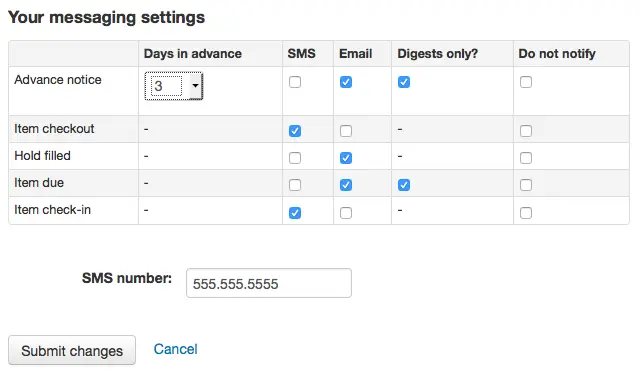
Si vous utilisez un protocole de courriel pour envoyer des SMS avec la préférence système SMSSendDriver, vous verrez s’afficher une colonne supplémentaire pour recevoir ces messages par SMS, un champ pour saisir un numéro de téléphone portable et une liste déroulante de fournisseurs de téléphone.
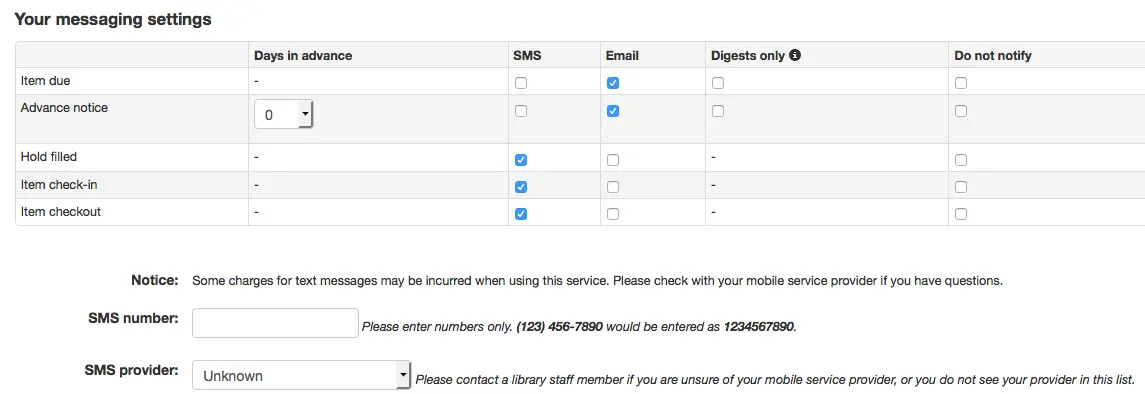
Si vous utilisez le service i-tiva de Talking Tech, vous verrez une colonne supplémentaire pour recevoir ces messages par téléphone.
Voir Notifications aux adhérents pour la liste des notifications disponibles.
Les adhérents peuvent choisir de recevoir leurs notifications en un seul résumé en cochant la case “Résumé uniquement” à côté du type d’envoi. Un résumé est une combinaison de tous les messages d’un type dans un même courriel (par exemple, pour avoir tous les exemplaires à rendre dans 3 jours) au lieu de nombreux courriels.
Si la préférence système TranslateNotices est paramétrée sur “Autoriser”, les adhérents auront une option “Langue favorite pour les messages” avec un menu déroulant listant les langues disponibles.
Important
Vous devez choisir votre mode d’envoi (SMS, courriel ou téléphone) ainsi que “Résumés uniquement” si vous souhaitez recevoir un résumé des notifications.
Listes
Si la préférence système virtualshelves est paramétrée sur “Autoriser”, les adhérents verront un onglet “Listes”.
Ici, les adhérents pourront visualiser les listes publiques et créer ou modifier leurs propres listes privées.
Alerte sur les abonnements (périodiques)
Version
Cette section a été ajoutée à Koha dans sa version 23.11.
Si la préférence système RoutingSerials est activée, les adhérents qui auront choisi de recevoir des alertes par courriel pour les nouveaux fascicules via l’onglet “Abonnements” de la notice bibliographique verront un onglet “Alerte sur les abonnements” dans leur compte.

Cet onglet liste toutes les alertes d’abonnement par courriel auxquelles l’adhérent est inscrit. Les adhérents peuvent annuler leurs alertes en cliquant sur le lien “Se désinscrire d’une alerte d’abonnement par courriel” s’ils le souhaitent.
Demander un reçu
Si vous avez activé la préférence système useDischarge, les adhérents pourront demander un quitus via l’OPAC. Un quitus est un certificat assurant que l’adhérent n’a plus de prêts en cours ni réservations.
Les adhérents peuvent demander un quitus à la bibliothèque en allant sur l’onglet “Demander un quitus” dans leur compte.
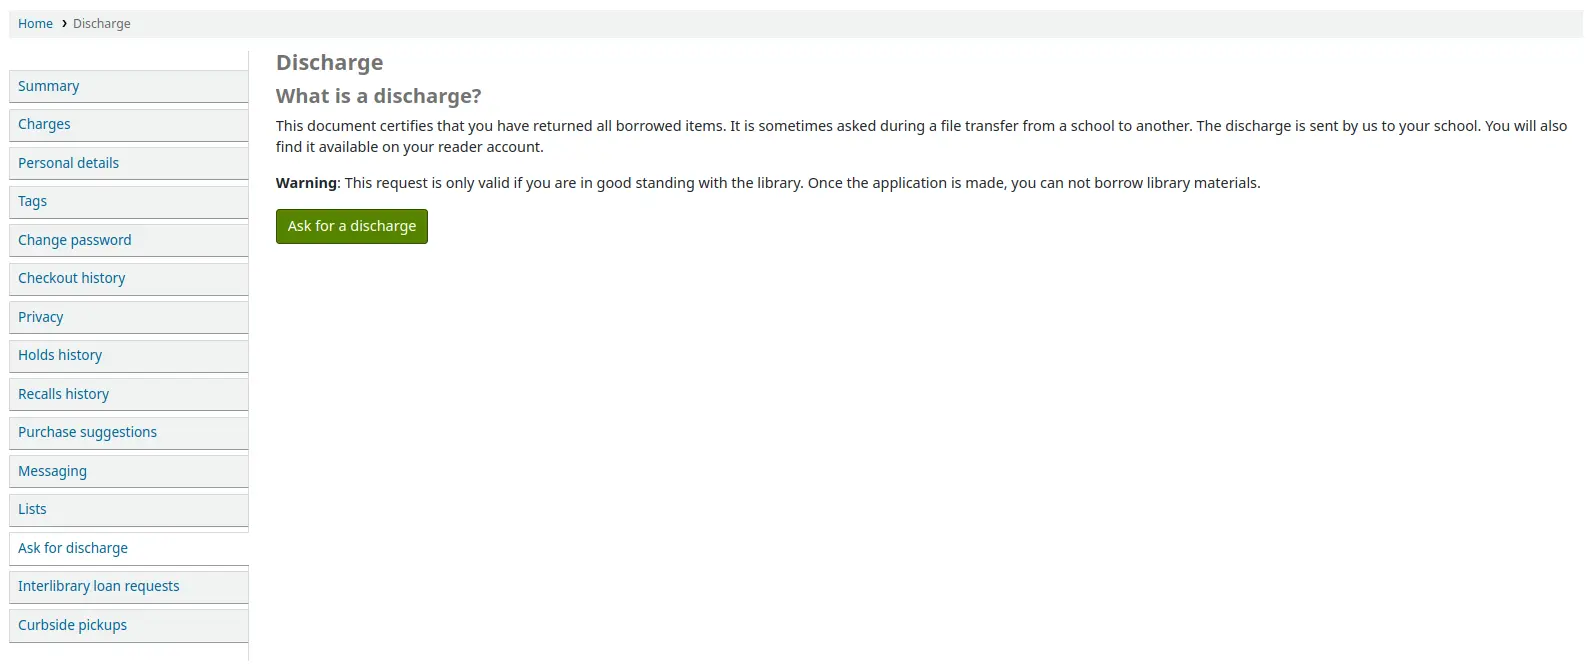
Ici, ils peuvent demander un quitus en cliquant sur le bouton “Demander un quitus”. Ils recevront une confirmation de leur demande.
Une fois le quitus approuvé par les bibliothécaires, l’adhérent verra un lien pour télécharger le PDF de son quitus.

Mes listes de routage
Si vous êtes nommés comme destinataires de listes de routage, vous les verrez listées ici. Le message suivant est affiché : « Vous êtes inscrit aux listes de routage pour les titres suivants. Si vous voulez apporter des changements, merci de contacter votre bibliothèque ».
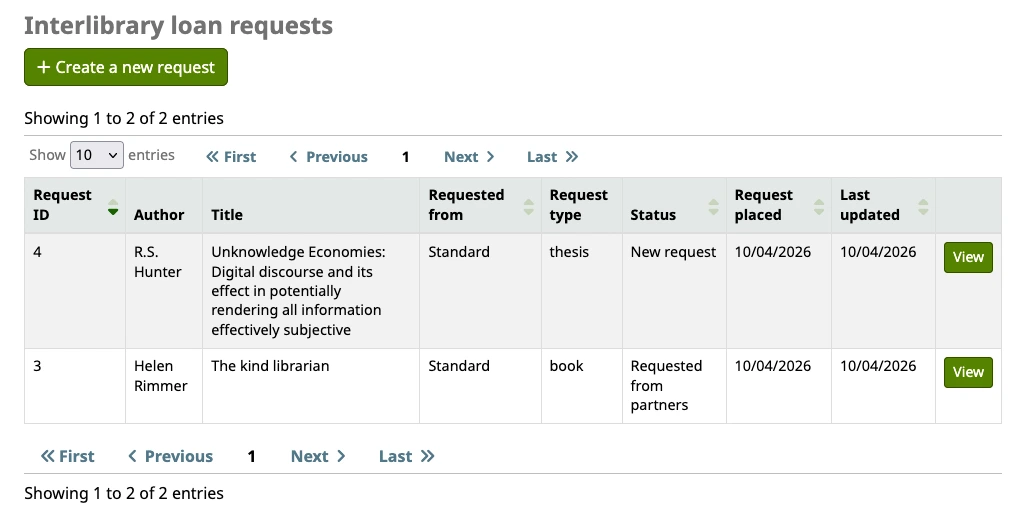
Demandes de prêt entre bibliothèques
Si le module de demandes de PEB est activé, les adhérents verront l’onglet “Demandes de prêt entre bibliothèques”. Leurs demandes existantes seront listées ici, avec les informations sur leur statut.
De plus, si leur catégorie d’adhérent est autorisée à faire des demandes de PEB à l’OPAC, ils verront un bouton “Créer une nouvelle demande”. En cliquant sur ce bouton, ils accéderont au formulaire pour faire une nouvelle demande de prêt entre bibliothèques. Si la bibliothèque utilise plus d’un serveur, ils devront d’abord choisir un fournisseur.
Note
S’il y a un texte de copyright dans un emplacement d’affichage de la personnalisation HTML “ILLModuleCopyrightClearance” , il s’affiche ici et les adhérents devront cliquer sur “Oui” pour accepter avant de continuer.
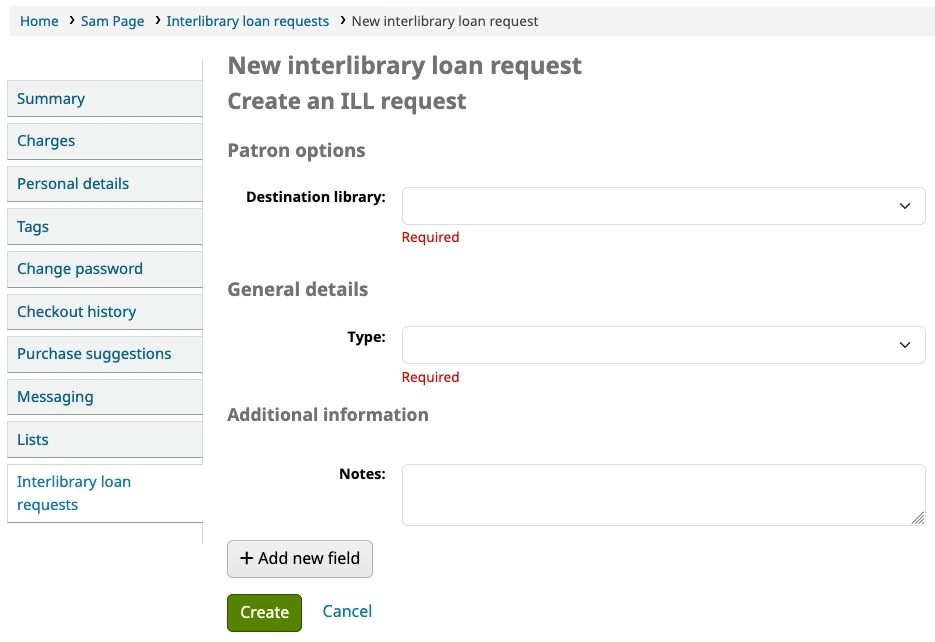
Bibliothèque de destination : la liste est composée des bibliothèques identifiées comme lieux de retrait dans les Paramètres des bibliothèques. Il s’agit de la bibliothèque qui gèrera la demande et sera le lieu de retrait pour les exemplaires physiques demandés.
Type : quand un type est sélectionné, les champs pertinents pour ce type de ressource particulière apparaissent. Les paramètres des champs pour chaque type de demande sont les mêmes que ceux affichés lorsqu’on crée une demande dans l’interface professionnelle.
Cliquer sur “Créer” soumettra la demande à la bibliothèque pour traitement.
Note
Si la préférence système ILLModuleDisclaimerByType est utilisée, les mentions légales apparaîtront à cette étape. Quelle que soit l’option choisie par l’adhérent, la demande sera créée et le type de valeur sera stocké tout au long de la demande.
Une fois créée, la demande sera d’abord listée avec le statut de “Nouvelle demande”. Le statut des demandes est mis à jour au fur et à mesure de leur traitement.
En cliquant sur “Voir” sur une demande, on accède à tous les détails.
Le seul changement que les adhérents peuvent faire est d’ajouter une note à la de mande, puis de cliquer sur “Soumettre les modifications”.
Pour les demandes avec le statut “Nouvelle demande”, les adhérents verront le bouton “Demander l’annulation”. S’ils l’utilisent, le statut de la demande sera mis à jour en “Annulation demandée”. Le personnel peut choisir de supprimer la demande pour l’enlever complètement.
Astuce
Si vous voulez être notifié par courriel quand les adhérents modifient ou annulent une demande, utilisez la préférence système ILLSendStaffNotices. Les courriels utilisent le modèle de notification ILL_REQUEST_MODIFIED and ILL_REQUEST_CANCEL. On peut les personnaliser dans Nl’outil Notifications et tickets.
Mon historique de rappels
Si votre bibliothèque autorise les rappels, l’adhérent peut voir ses rappels passés et actuels et leurs différents statuts dans l’onglet “Historique des rappels”.
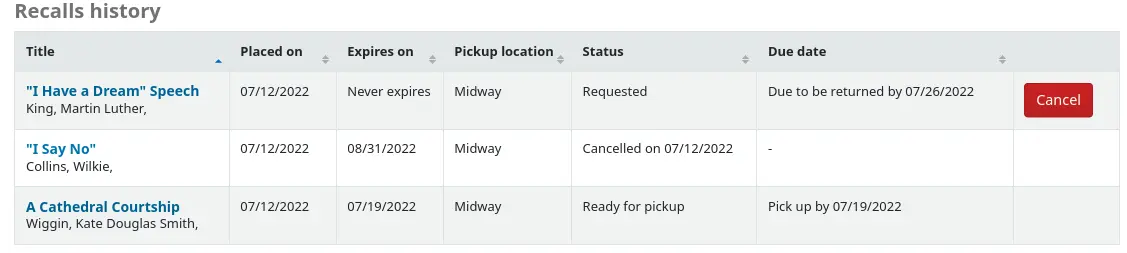
L’adhérent peut annuler un rappel en cliquant sur le bouton “Annuler”, à la condition qu’il ne soit pas déjà en attente de retrait.
Collectes sur rendez-vous
Si votre bibliothèque propose la collecte sur rendez-vous, l’adhérent pourra voir ses retraits programmés sous “Collectes sur rendez-vous”.
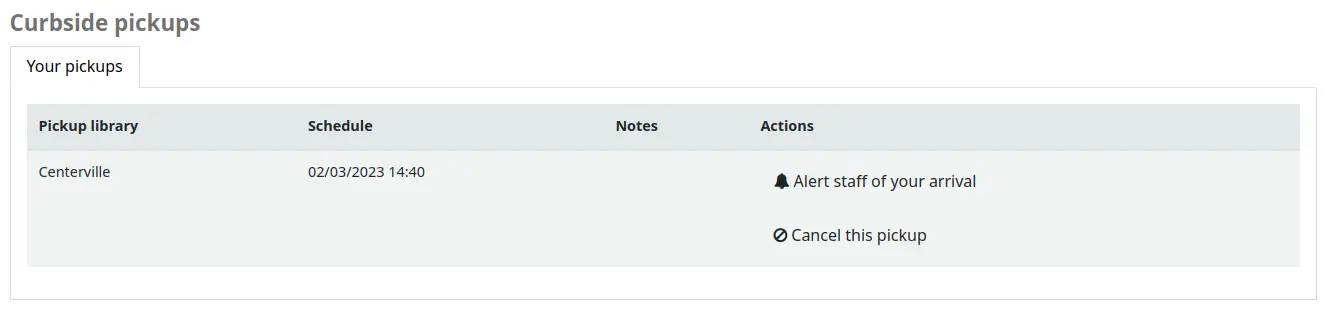
L’adhérent a la possibilité de signaler qu’il est à l’extérieur de la bibliothèque en cliquant sur “Avertir le personnel de votre arrivée “.
L’adhérent peut aussi annuler son retrait programmé avec le bouton “Annuler ce retrait”.
Si le paramètre “Retrait programmé par l’adhérent” est activé dans la configuration des collectes sur rendez-vous, l’adhérent pourra programmer son rendez-vous pour le retrait.

L’adhérent doit d’abord choisir une bibliothèque dans laquelle il souhaite retirer ses documents
Note
Seules les bibliothèques ayant activé la collecte sur rendez-vous seront affichées dans le menu déroulant.
De plus, si le paramétrage “Activer uniquement pour les réservations en attente” est activé, seules les bibliothèques dans lesquelles l’adhérent a des réservations en attente seront activées.
L’adhérent doit alors choisir une date
Note
Seules les dates pour lesquelles des créneaux horaires sont disponibles seront affichées.
Les horaires de retrait possible s’afficheront, en fonction du jour de la semaine
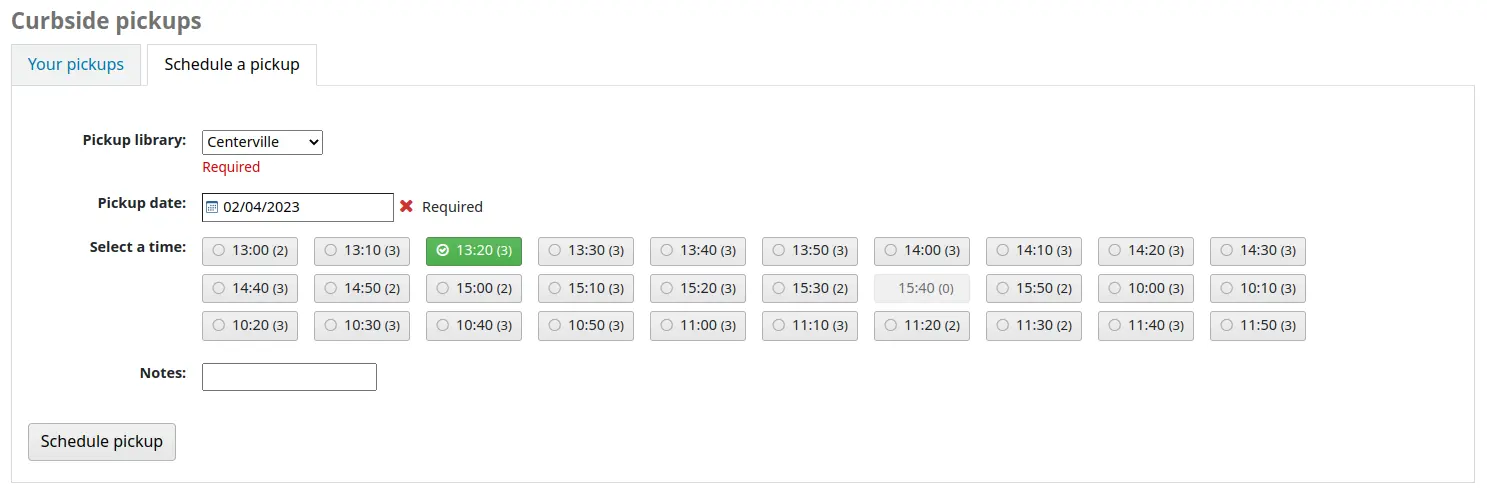
Note
Le nombre entre parenthèses sous chaque créneau horaire est le nombre de rendez-vous disponibles pour cette heure. Si le nombre maximum de rendez-vous a été atteint, en fonction du paramètre “Nombre maximum d’adhérents par intervalle” dans la configuration de la collecte sur rendez-vous, le créneau horaire sera grisé et l’adhérent ne pourra pas le sélectionner.
L’adhérent peut ajouter une note à propos de sa collecte
L’adhérent doit alors cliquer sur “Programmer un retrait” pour sauvegarder son rendez-vous
Suggestions d’achat
Si votre bibliothèque a paramétré la préférence suggestion sur “Autoriser”, les adhérents auront alors la possibilité de proposer des suggestions d’achat à plusieurs endroits à l’OPAC.
Si vous autorisez tout le monde à voir les suggestions d’achat faites par d’autres adhérents avec la préférence OPACViewOthersSuggestions, il y aura alors un lien en haut de l’OPAC sous la boîte de recherche.

Un lien s’affichera pour suggérer un achat si l’adhérent ne trouve rien pour sa recherche.

Il y aura une option “Suggestion d’achat” dans l’affichage détaillé de la notice bibliographique.
Et il y aura un lien sur l’onglet Mes Suggestions d’Achat dans le compte de l’adhérent.
Cliquez sur l’un de ces liens pour ouvrir le formulaire de la suggestion d’achat.
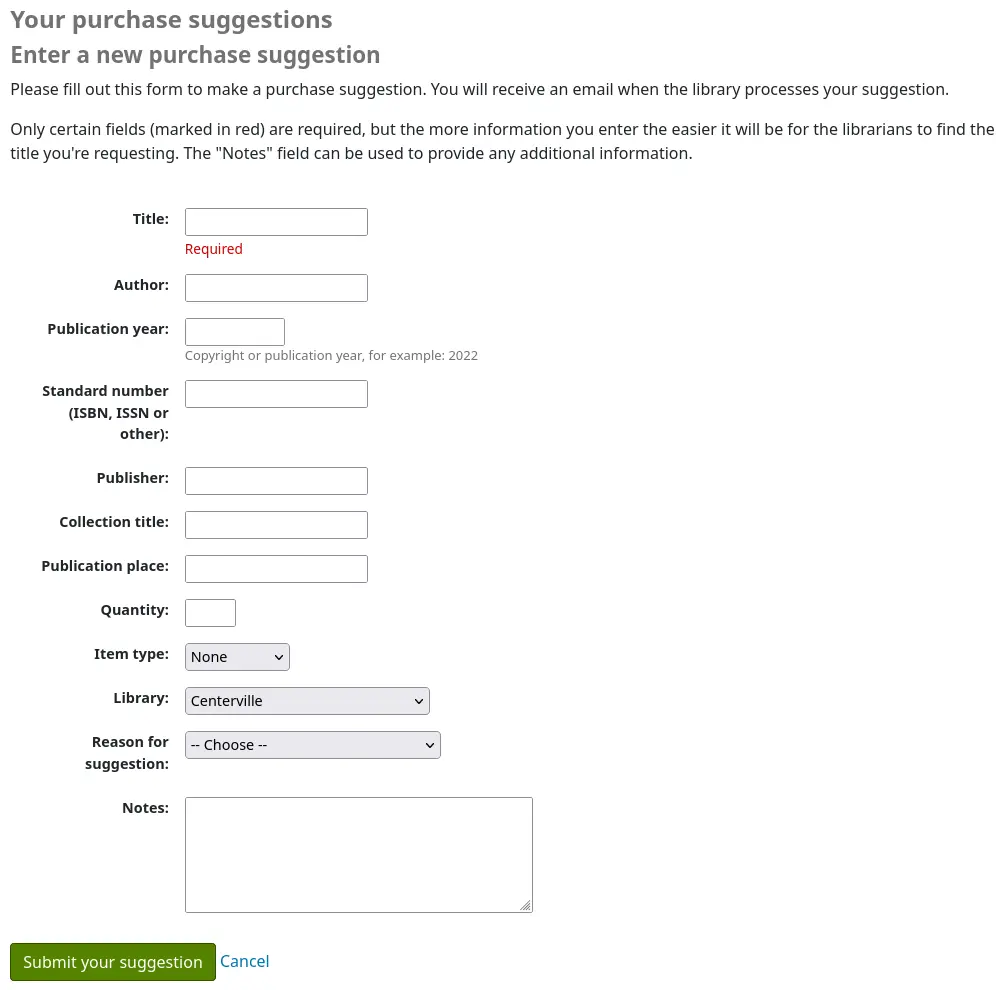
Le texte en haut du formulairepeut être remplacé en utilisant l’outil de personnalisation HTML, l’emplacement d’affichage OpacSuggestionInstructions.
Par défaut, seul le “Titre” est obligatoire dans le formulaire.
Les champs obligatoires peuvent être paramétrés en utilisant la préférence système OPACSuggestionMandatoryFields.
La préférence système OPACSuggestionUnwantedFields peut être utilisée pour masquer les champs inutiles.
La préférence système OPACSuggestionAutoFill peut être utilisée pour aider les adhérents à renseigner le formulaire en utilisant les données de Google Books.
La liste des types de documents peut être éditée dans la liste de valeurs autorisées SUGGEST_FORMAT.
La liste des “Motifs de suggestion” peut être modifiée en éditant la liste de valeurs autorisées OPAC_SUG.
Si le document existe déjà dans le catalogue, l’adhérent verra un message avec ce que Koha pense être le titre correspondant. Les correspondances sont établies sur le titre / auteur, ISBN ou ISSN. Si le titre n’est pas ce que l’adhérent suggérait, ce dernier peut cliquer sur “Soumettre votre suggestion” pour le suggérer.

Une fois le formulaire soumis, la suggestion d’achat apparaîtra dans le module Acquisitions pour que les bibliothécaires en assurent le suivi.
Si une suggestion d’achat a été commandée par le module Acquisitions, le titre de la suggestion d’achat de l’adhérent sera cliquable et renverra l’adhérent directement sur la notice commandée, à l’OPAC.
Bibliothèques / Contact
Si la préférence système OPACShowLibraries est paramétrée sur “Afficher” et que au moins une de vos bibliothèques est “Publique”, un lien vers la page Bibliothèques sera affiché sous la barre de recherche.
Attention
Depuis la version 25.05 de Koha, le lien est nommé “Contact” s’il n’y a qu’une bibliothèque paramétrée comme “publique”.
La page des bibliothèques affiche une liste de toutes les bibliothèques paramétrées comme “Publiques”, avec leurs données de contact (adresse, ville, code postal, pays, numéro de téléphone, numéro de fax, site internet).
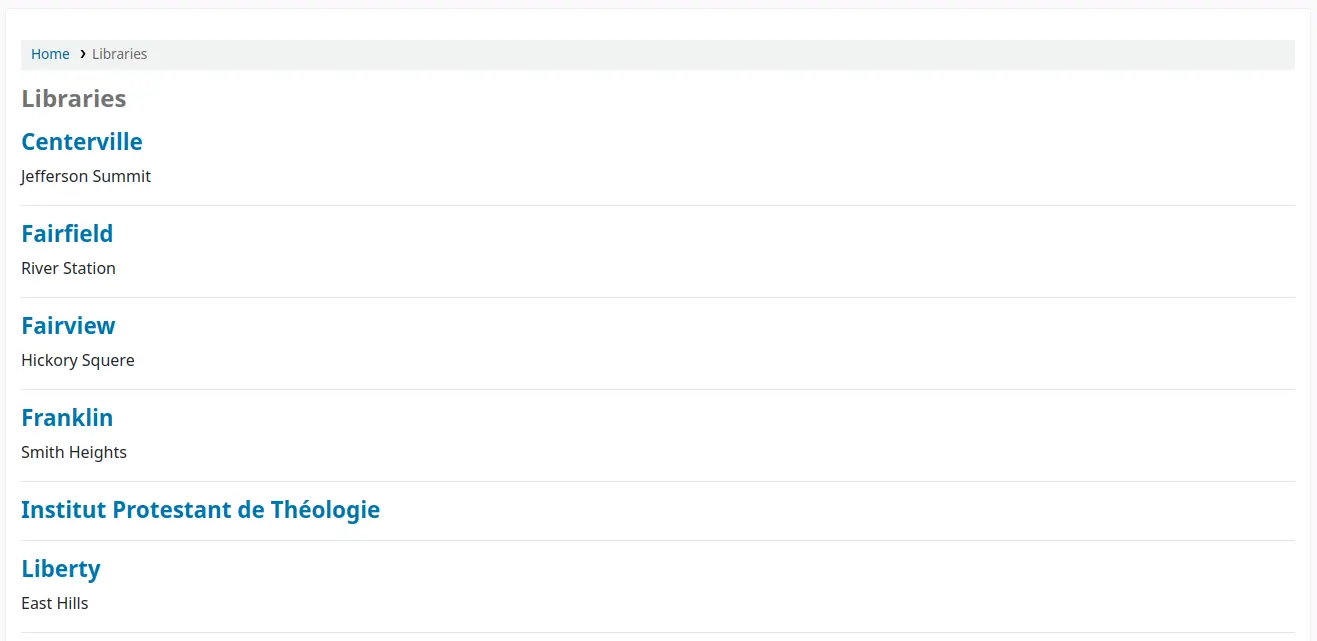
Le nom de la bibliothèque lui-même est un lien renvoyant vers la page spécifique à la bibliothèque. Cette seconde page inclut aussi les personnalisations HTML “OpacLibraryInfo” de cette bibliothèque.

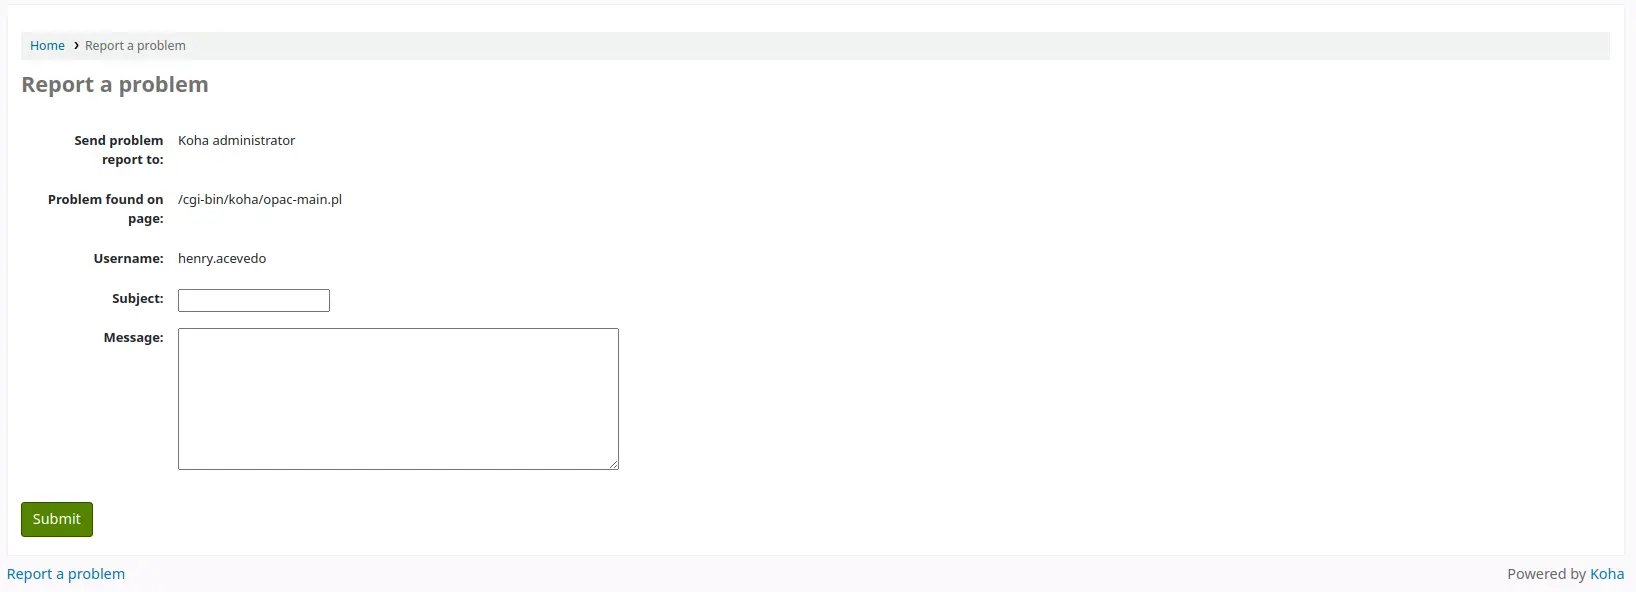
Signaler des problèmes
Si la préférence système OPACReportProblem est activée, les adhérents pourront signaler des problèmes sur l’OPAC (liens cassés ou informations erronée, par exemple).
En bas de chaque page, il y a un lien “signaler une anomalie”.
Quand les adhérents cliquent sur le lien, ils sont redirigés vers un formulaire sur lequel ils peuvent préciser en quoi consiste le problème.
Le rapport d’anomalie est envoyé à l’administrateur Koha par courriel (à l’adresse précisée dans KohaAdminEmailAddress) et apparaîtra dans l’outil Rapports d’anomalie à l’OPAC. Si la bibliothèque a une adresse de courriel, l’adhérents pourra choisir d’envoyer le rapport à la bibliothèque ou à l’adminitrateur.
Note
Le contenu de ce courriel peut être personnalisé avec l’outil Notifications et tickets. Le code du courrier est PROBLEM_REPORT.
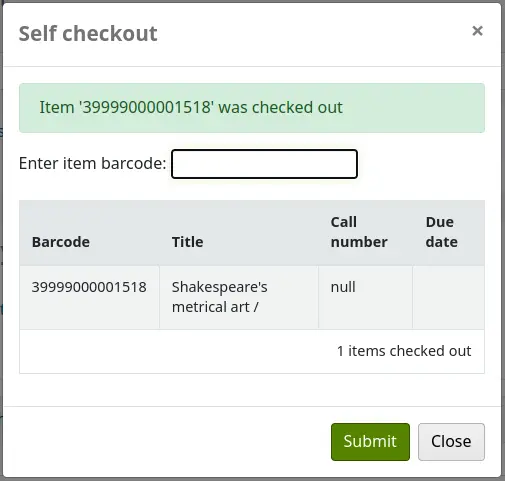
Prêt en self service à l’OPAC
Version
Cette fonctionnalité a été ajoutée à Koha dans la version 23.11.
En plus du module d’auto-prêt, il y a une option plus légère pour les bibliothèques de communautés plus petites et de confiance. Avec cette option, les adhérents sont autorisés à emprunter eux-mêmes des documents via leur compte à l’OPAC sans supervision de bibliothécaire. Cette fonctionnalité d’auto-prêt peut être utilisée sur n’importe quel ordinateur ou appareil avec un accès à l’OPAC, contrairement au module d’auto-prêt qui doit être utilisé sur des ordinateurs dédiés.
Une fois la préférence système OpacTrustedCheckout activée, les adhérents connectés verront une option “Auto-prêt” en haut de la page de l’OPAC.

Cliquer sur le lien “Auto-prêt” ouvrira une fenêtre pop-up dans laquelle l’adhérent pourra saisir le code à barres du document et cliquer sur “Valider” ou appuyer sur la touche Entrée.
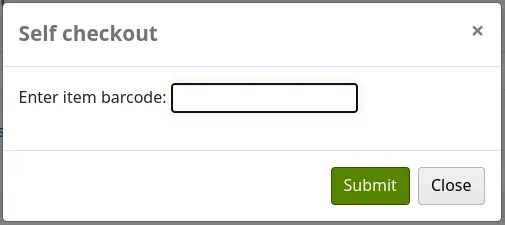
Une fois que le code à barres du document a été saisi, un message de confirmation apparaît en haut de la fenêtre pop-up et le code à barres, le titre, la cote du document et sa date d’échéance sont listés en bas. L’adhérent peut alors scanner ou saisir un autre code à barres.
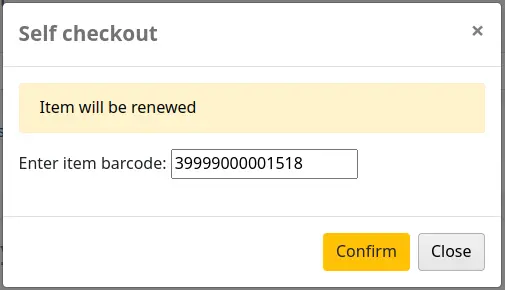
Pour renouveler le prêt, l’adhérent n’a qu’à l’emprunter à nouveau (ou le renouveler à partir de son menu du compte.
Si un document est déjà prêté à un autre adhérent, un message le signalera.
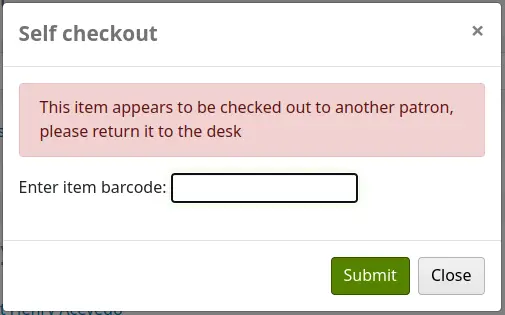
Le prêt sera aussi bloqué si :
le code à barres n’est pas trouvé;
le document est réservé pour un autre adhérent;
les amendes en attente de l’adhérent dépassent la limite;
l’adhérent a déjà réalisé le maximum de prêts autorisé;
l’adhérent n’a pas l’âge requis pour emprunter le document;
le document ne peut pas être emprunté à cause d’un statut “Non disponible” ou “Retiré”.
Commentaires
Les adhérents peuvent laisser des commentaires à l’OPAC si vous l’avez autorisé dans la préférence OPACComments. Chaque notice bibliographique a un onglet de commentaires sous le pavé bibliographique.
Si l’adhérent est connecté sur l’OPAC, il verra un lien pour ajouter un commentaire sur un document. En cliquant dessus cela ouvrira une fenêtre avec un cadre de saisie.
Une fois le commentaire rédigé, cliquez sur le bouton “Valider”. L’adhérent verra son commentaire en attente, et les autres adhérents verront qu’il n’y a aucun commentaire sur le document.
Une fois que le commentaire est approuvé, l’adhérent verra le nombre de commentaires sur l’onglet “Commentaires” ainsi que son propre commentaire parmi les autres. Si la préférence système ShowReviewerPhoto est paramétrée sur “Montrer”, la photo de l’adhérent extraite de la bibliothèque Libravatar sera affichée à côté du commentaire.
Les autres adhérents verront le commentaire ainsi que le nom de l’adhérent qui l’a laissé (à moins d’avoir paramétré la préférence système ShowReviewer pour ne pas montrer les noms des adhérents).
Si votre préférence système OpacShowRecentComments est paramétrée sur “Afficher”, vous verrez les commentaires approuvés sur cette page.
Depuis cette page, les adhérents peuvent s’abonner aux commentaires récents utilisant le RSS s’ils le souhaitent.