Autres API et protocoles
SIP2
SIP2 (Session Initiation Protocol) est un protocole de communication entre appareils.
Dans le contexte de Koha, SIP2 est utilisé pour la communication entre les bornes de prêt et le Système Automatisé de Circulation (ACS qui dans ce cas-ci est le serveur Koha).
Les communications SIP2 consistent en questions (requests) et réponses (responses).
Les bornes d’auto-prêt sont “stupides” en ce sens qu’elles envoient des requêtes au serveur Koha qui exécute une logique de traitement pour déterminer le résultat qui est renvoyé en tant que réponse à la borne d’auto-prêt, qui relaie ce message à l’utilisateur.
Avertissement
Note de sécurité concernant l’usage du service SIP2 : pour vous assurer que votre trafic SIP2 est sécurisé lorsqu’il passe par Internet, utilisez un VPN ou stunnel.
Mise en place de SIP2
Astuce
Des conseils peuvent être trouvés sur le wiki de Koha :
Si vous avez installé Koha avec les paquets Debian, la mise en place de SIP2 se fait aisément. Veuillez simplement suivre les étapes suivantes :
1. In your terminal (in the root Koha directory) write in: sudo koha-enable-sip <instancename>
2. Now you need to configure the SIP2 settings, to do this you need to edit the SIPconfig.xml file which exists in the /etc/koha/sites/<instancename>/ directory. You will need to edit this file as root because it contains passwords (to do so write ‘sudo’ at the start of your command).
par exemple sudo vi /etc/koha/sites/<instancename>/SIPconfig.xml
Note
Note importante : il y a trois zones dans le fichier SIPconfig.xml que vous devez modifier. Elles sont : service, account et institution.
Service
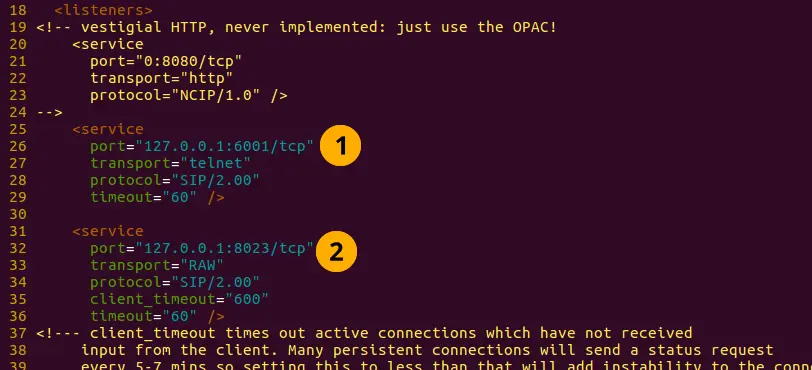
2.1 Changez la valeur du port vers le début du fichier SIPconfig.xml (identifié par le numéro 1 dans la capture d’écran ci-dessous), pour qu’il ait la même adresse IP que plus loin dans le fichier SIPconfig.xml, identifiée par le numéro 2.
Note
Assurez-vous que les deux valeurs n’ont pas le même numéro de port puisqu’un même port ne peut servir à deux services différents. Lorsque vous décidez du numéro de port à assigner, assurez-vous que ce soit un nombre élevé (c’est à dire plus élevé que 1000) parce que tous les ports sous 1000 requièrent les permissions root.
Account
Les comptes définis dans le fichier SIPconfig.xml sont simplement des comptes qui peuvent utiliser le service SIP2, c’est-à-dire que vous définissez qui peut envoyer et recevoir des commandes SIP2.
Avertissement
Les informations de compte que vous inscrivez ici doivent également exister dans la base de données de Koha, c’est-à-dire que vous devez créer un adhérent dans l’interface professionnelle de Koha avec le même identifiant et mot de passe (sans oublier de lui assigner les permissions de circulation) que le compte d’utilisateur que vous notez dans le fichier SIPconfig.xml.
Note
Il est fortement recommandé de n’inscrire que des utilisateurs Koha avec les seules permissions de circulation.
La raison pour laquelle nous souhaitons que les utilisateurs SIP2 n’aient que les permissions de circulation plutôt que la permission superlibrarian est de réduire l’accès des utilisateurs SIP2 aux informations confidentielles des adhérents, dans le cas où le système serait compromis.
Si le ACS ou la borne d’auto-prêt était compromis, le fait que les utilisateurs SIP2 n’aient que les permissions de circulation signifie que l’intrus ne pourrait accéder aux données des adhérents que par le terminal plutôt que par l’interface web (qui n’est accessible qu’avec la permission superlibrarian). Il s’agit simplement de protection de vos adhérents.
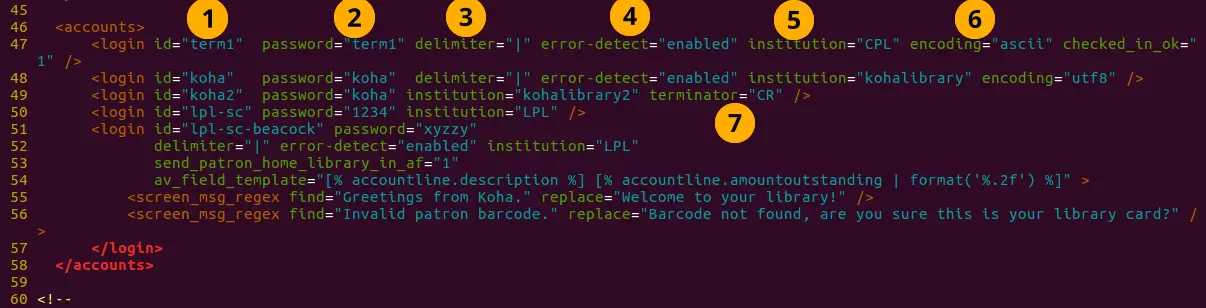
Définition des valeurs de Account :
Login id : c’est l’identifiant du compte. - Modifiez-le en conséquence
Password : le mot de passe du compte - Modifiez-le en conséquence
Delimiter : le type de délimiteur pour l’information du compte - Laissez tel quel
error-detect - Laissez tel quel
Institution : le branchcode de la bibliothèque d’appartenance de l’utilisateur. NOTE : cette institution doit être définie plus loin dans la section institution du fichier SIPconfig.xml et doit également exister dans la base de données de Koha. Vous devez donc créer un site avec le même branchcode dans l’interface professionnelle de Koha.
encoding : le standard utilisé pour encoder les données du compte
Terminator : doit correspondre au caractère d’arrêt du serveur SIP2. - Modifiez-le si vous connaissez le caractère d’arrêt du serveur SIP2.
Il est aussi possible d’ajouter des attributs adhérents personnalisés aux comptes SIP2 en utilisant le format suivant :
<patron_attribute field= »XX » code= »CODE1 » /> <patron_attribute field= »XY » code= »CODE2 » /> <patron_attribute field= »XZ » code= »CODE3 » />
Institution
Les informations Institution que vous définissez ici doivent correspondre à une bibliothèque créée dans l’interface professionnelle de Koha.
Avertissement
Vous devez vous assurer que toutes les Institutions auxquelles des comptes d’utilisateurs ont été assignés précédemment dans le fichier SIPconfig.xml sont aussi définies dans la section institution du même fichier.

Définitions des valeurs d’Institution :
- Institution id : le branchcode de la bibliothèque. - Modifiez-le en conséquence.
Doit être le même que celui créé dans Koha et dans la zone du compte.
Implementation : définit le code qui sera envoyé. - Laissez tel quel
Policy : les commandes SIP2 permises pour les bornes d’auto-prêt de cette institution. Par exemple : renewal= »true » signifie que les bornes d’auto-prêt de cette institution peuvent envoyer des commandes de renouvellement d’exemplaires.
Mise en place de SIP2
- Ecrivez simplement dans la commande :
sudo koha-start-sip <instancename>
Note
Vous avez maintenant un serveur SIP2 opérationnel.
Note
Optionnellement, vous pouvez configurer le comportement d’automates de tris en utilisant les préférences système UseLocationAsAQInSIP et SIP2SortBinMapping.
Utiliser SIP2
SIP2 est un protocole de communication. Les messages envoyés en SIP2 sont soit des requêtes ou des répondes. Les bornes d’auto-prêt envoient des messages de requête au système automatisé de circulation qui effectuera un traitement logique et renverra le résultat à la borne d’auto-prêt en tant que message de réponse.
Le message de requête contient des arguments qui sont des données utilisées par le système automatisé de circulation dans ses fonctions pour exécuter la tâche requise comme renouveler des exemplaires.
Commandes SIP2
Si vous souhaitez utiliser ou tester SIP2 manuellement, vous devrez écrire et recevoir des messages à travers le terminal de Linux.
Pour envoyer et recevoir des messages du serveur SIP2 vous devez utiliser telnet pour ouvrir une connexion SIP2. Vous devez spécifier le numéro de port que telnet doit utiliser.
Vous trouverez cette information au début du fichier SIPconfig.xml (cherchez le numéro de port, tel qu’indiqué par une flèche dans la capture d’écran ci-dessous).

Écrivez dans le terminal
telnet localhost <portnumber>
par exemple telnet localhost 8023
Écrivez l’identifiant et le mot de passe d’un des comptes du fichier SIPconfig.xml.
Vous êtes maintenant connecté au serveur SIP2 et vous pouvez commencer à écrire et envoyer des commandes de requête. La connexion au serveur SIP2 s’interrompt rapidement, donc si vous n’avez pas terminé d’écrire et de recevoir des commandes, écrivez : telnet localhost <portnumber> pour redémarrer la connexion SIP2.
Syntaxe de commande SIP2
Chaque commande SIP2 a un préfixe de 2 chiffres qui définit ce que la commande fait.
Par exemple, pour avoir de l’information à propos d’un adhérent, vous commencez votre commande par le préfixe 63. La réponse du serveur aura un préfixe numérique correspondant.
Vous trouverez ci-dessous un exemple de message de requête SIP2 pour avoir des information d’adhérent (dans cet exemple, une fiche d’adhérent a été créée dans l’interface professionnelle de Koha avec l’identifiant “« joe”, le mot de passe “joes” et le numéro de carte “y76t5r43”).
De plus, une bibliothèque avec le branchcode « WEL » a été créée dans l’interface professionnelle de Koha et est également définie dans la section institution du fichier SIPconfig.xml :

Le format de ce message de requête SIP2 est :

Note
La valeur summary est une valeur de 10 caractères. Si un Y est inscrit comme valeur summary vous pourrez obtenir un sommaire ainsi que des informations plus détaillées comme résultat.
La valeur dans <YYYYMMDD> <HHMMSS> correspond à la date et l’heure actuelles, en laissant 4 espaces entre YYYYMMDD et HHMMSS vous indiquez que vous désirez utiliser l’heure locale plutôt que UTC.
Note
Dans ce manuel, dans la mesure du possible, les codes alphabétiques pour les champs sont utilisés dans la description des champs des messages SIP2, par exemple AO<institutionid>.
Ces codes alphabétiques peuvent être écrits dans les commandes SIP2 dans le terminal Linux, mais lorsque vous substituez des valeurs (valeurs entre <>), assurez-vous de ne pas écrire les chevrons <>.
Messages SIP2 :
Bloquer un adhérent
Ceci utilise le préfixe 01 pour les messages de requêtes et 24 pour les messages de réponses.
Message de requête :

Note
Card retained est un champ d’un seul caractère, “Y” ou “N”, qui indique au système automatisé de circulation qu’une carte a été retenue par la borne d’auto-prêt.
Message de réponse :

Note
<patronstatus> est une valeur de 14 caractères. La valeur Y dans la chaîne veut dire vrai. Chaque position dans cette chaîne (commençant par 0) a une seule valeur correspondante (Y ou N) dans la chaîne.
par exemple, un Y à la position 1 (la deuxième valeur de la chaîne) signifie que les privilèges de renouvellement de l’adhérent sont refusés.
Retourner des documents
Ceci utilise le préfixe 09 pour le message de requête (message envoyé au système automatisé de circulation) et le préfixe 10 pour le message de réponse (message envoyé à la borne d’auto-prêt).
Message de requête :

Note
<no block (Offline)> est un champ d’un seul caractère, soit “Y” soit “N”, qui indique si la transaction est exécutée hors-ligne. Comme les transactions hors-ligne ne sont pas supportées, vous devez écrire “N” si vous testez ce message manuellement.
<transactiondate> est un champ de date de 18 caractères au format : AAAAMMJJZZZZHHMMSS.
ZZZZ indique le fuseau horaire; si vous souhaitez utiliser votre fuseau horaire local, vous devez laisser 4 espaces, mais si vous voulez utiliser UTC (Temps Universel Coordonné), vous devez alors laisser 3 espaces vides et un Z.
Message de réponse :

Note
Alert peut avoir une valeur parmi : 00 : inconnu
01 : réservation locale
02 : réservation à distance
03 : Transfert PEB
04 : transfert
99 : Autre
Si un exemplaire est resensibilisé, alors la valeur de <resensitize> devrait être Y et N sinon. La resensibilisation est faire pour assurer que si quelqu’un essaye de voler l’exemplaire il sera détecté.
Prêter des documents
Ceci utilise le préfixe 11 pour le message de requête et le préfixe 12 pour le message de réponse. La syntaxe est similaire à la commande de prêt, détailléé au dessus, à l’exception des préfixes.
Réservation - Peut ne pas être supporté par certains systèmes. Ceci utilise le préfixe 15 pour le message de requête et le préfixe 16 pour le message de réponse.
Message de requête :

Note
<holdmode> est une valeur d’un seul caractère. + veut dire ajouter une réservation, - veut dire supprimer une réservation * veut dire modifier une réservation.
Message de réponse :

Note
<ok> est une valeur d’un seul caractère qui est soit 0 (la réservation n’est pas autorisée ou n’a pas abouti) soit 1 (la réservation est autorisée et a abouti).
<available> est une valeur d’un seul caractère qui est soit Y soit N. Y signifie que le document est actuellement dans la bibliothèque, tandis que N signifie que le document est actuellement en prêt ou que quelqu’un d’autre a une réservation pour ce document.
Information sur un exemplaire : ceci utilise le préfixe 17 pour le message de requête et le préfixe 18 pour le message de réponse
Message de requête :

Note
Voir la commande de retour de document (décrite ci-dessus) pour des explications de la valeur <xact_date>.
La valeur “terminal password” est optionnelle.
Message de réponse :

Mise à jour du statut d’un exemplaire : ceci utilise le préfixe 19 pour le message de requête et le préfixe 20 pour le message de réponse
Message de requête :

Note
<itemproperties> n’a pas une longueur fixe, et vous pouvez optionnellement entrer des valeurs telles que la taille d’un exemplaire et ces valeurs seront stockées dans la base de données Koha pour l’exemplaire.
Message de réponse :

Note
<itempropertiesok> est une valeur d’un seul caractère qui est soit 0 soit 1. 1 indique que la valeur <itemproperties> définie dans la requête de modification du statut d’un exemplaire a été stockée dans la base de données Koha.
Statut adhérent
Ceci utilise les préfixes 23 pour les messages de requêtes et 24 pour les messages de réponses.
Message de requête :

Message de réponse :

Note
La valeur utilisée pour <patronvalidity> est Y (valide) et N (invalide). La valeur dans le champ <YYYYMMDD> < HHMMSS> est la date/heure actuelle.
La raison de l’espace entre les deux valeurs est pour définir que l’on souhaite utiliser l’heure locale à la place du temps UTC.
Autoriser un adhérent - Ceci n’est pas encore supporté. Ceci utilise le préfixe 25 pour le message de requête et le préfixe 26 pour le message de réponse
Note
Cette commande annule la commande “Bloquer un adhérent”.
Message de requête :

Message de réponse :

Renouvellement : Ceci utilise le préfixe 29 pour le message de requête et le préfixe 30 pour le message de réponse
Message de requête :

Note
<thirdpartyallowed> est une valeur d’un seul caractère qui est soit Y soit N. Si c’est Y alors des tiers peuvent renouveler les exemplaires.
<noblock> est une valeur d’un seul caractère qui est soit Y soit N. Y signifie que l’exemplaire a été prêté/retourné quand l’ACS était hors connexion.
<nbduedate> est la date de l’opération de prêt/retour quand l’ACS était hors connexion.
<feeacknowledged> est une valeur d’un seul caractère qui est soit Y soit N. Elle indique si l’utilisateur accepte les frais associés à l’exemplaire en cours de renouvellement.
Message de réponse :

Note
<ok> est une valeur d’un seul caractère qui est soit 0 soit 1. Une valeur de 1 signifie que l’exemplaire a été renouvelé avec succès, 0 signifie que l’exemplaire n’a pas été renouvelé.
<renewalok> est une valeur d’un seul caractère qui est soit Y, soit N. La logique de définition de la valeur de <renewalok> est la suivante : Y est défini lorsque l’exemplaire est déjà en prêt pour l’adhérent et doit donc être désensibilisé, ce qui le renouvelle, tandis que N est défini si le document n’est pas déjà en prêt chez l’adhérent et qu’il ne doit donc pas être renouvelé.
En d’autres termes, cela ne laisse pas les adhérents renouveler des exemplaires qu’ils n’ont pas déjà en prêt.
<magneticmedia> est une valeur d’un seul caractère qui est soit Y (pour oui), N (pour non) ou U (pour inconnu).
<mediatype> est une valeur de trois caractères numériques. Pour une liste des valeurs voir : https://web.archive.org/web/20190712041755/https://multimedia.3m.com/mws/media/355361O/sip2-protocol.pdf
Fin de session
Ceci utilise le préfixe 35 pour le message de requête et le préfixe 36 pour le message de réponse
Message de requête :

Message de réponse :

Note
<success_or_failure> est soit Y pour succès soit N pour échec.
Paiement des frais - Peut ne pas être implémenté pour le moment. Ceci utilise le préfixe 37 pour le message de requête et le préfixe 38 pour le message de réponse
Message de requête :

Note
<feetype> est une valeur de deux caractères numériques entre 01 et 99. Pour voir une liste des types de frais voir : https://web.archive.org/web/20190712041755/https://multimedia.3m.com/mws/media/355361O/sip2-protocol.pdf
<paymenttype> est une valeur à 2 chiffres comprise entre 00 et 99. 00 est Espèces, 01 est Visa, et 02 is Carte de crédit.
<currencytupe> est une valeur de trois caractères alphanumériques identifiant la devise dans laquelle le paiement a été effectué.
Message de réponse :

Note
<paymentaccepted> est une valeur d’un seul caractère qui est soit Y (paiement accepté) soit N (paiement non accepté).
Informations adhérent
Ceci utilise le préfixe 63 pour le message de requête et le préfixe 64 pour le message de réponse
Message de requête :

Message de réponse :

Note
<valid patron> est Y pour valide et N pour invalide.
Note
<hold itemcount><overdueitemcount><chargeditemscount><fienitemscount><recallitemscount><unavaliableholdscount> sont toutes des valeurs de 4 caractères numériques.
Tout renouveler
Ceci utilise le préfixe 65 pour le message de requête et le préfixe 66 pour le message de réponse.
Message de requête :

Message de réponse :

Note
<renewedcount> est une valeur de 4 caractères numériques indiquant le nombre d’exemplaires qui ont été renouvelés.
<unrenewedcount>, a le même format que <renewedcount> mais indique le nombre d’exemplaires non renouvelés.
Connexion
Ceci utilise le préfixe 93 pour le message de requête et le préfixe 94 pour le message de réponse.
Message de requête :

Note
<UIDalgorithm> et <PWDalgorithm> sont des valeurs d’un seul caractère indiquant le type d’algorithme utilisé pour crypter le loginuserid et le loginpassword respectivement.
Saisir la valeur 0 signifie que ces valeurs ne seront pas cryptées.
Message de réponse : 941 est une connexion réussie
940 est une connexion échouée
[connection closed by foreign host.] est une connexion échouée
Renvoyer
Ceci demande à l’appareil récepteur de renvoyer son dernier message.
Une demande de renvoi SC -> ACS est 97
Une demande de renvoi ACS->SC est 96
Statuts de l’ACS et du SC
Ceci utilise le préfixe 99 pour le message de requête et le préfixe 98 pour le message de réponse.
Message de requête :

Note
Le code de statut est une des 3 valeurs. - 0 : L’automate est ok
1 : L’automate n’a plus de papier
2 : L’automate s’éteint
la largeur maximum d’impression est une valeur à 3 caractères qui est le nombre entier de caractères que le client peut imprimer
La version du protocole est une valeur de 4 caractères au format x.xx
Message de réponse :

Note
Si vous recevez un message de réponse “96” cela signifie que le message de requête n’est pas valide/n’a pas été compris.
Problème avec SIP2
Impossible de se connecter à l’hôte distant avec la commande telnet localhost <portnumber>
Les 3 solutions pour résoudre ce problème sont :
Vérifiez que le numéro de port dans la commande ci-dessus est le numéro de port indiqué dans le fichier SIPconfig.xml au chemin indiqué par le numéro 1 (dans la section Mise en place de SIP2 - Service). Dans l’exemple, comme le numéro de port est 6001, la commande correcte est : telnet localhost 6001.
Vérifiez si certains userid sont utilisés plus d’une fois dans le fichier SIPconfig.xml. L’userid (qui est simplement l’identifiant (username) de l’utilisateur Koha) doit être unique dans le fichier SIPconfig.xml. Si vous avez plusieurs fois le même userid dans votre fichier, cela causera l’échec de la connexion à SIP2 avant même d’avoir une chance de s’identifier.
Vérifiez que le compte adhérent défini dans le fichier SIPconfig.xml existe également dans la base de données de Koha avec les mêmes identifiant et mot de passe et qu’il a la permission circulate. Si vous avez vidé et recréé la base de données de Koha après la création du compte adhérent depuis l’interface professionnelle de Koha et la création du fichier SIPconfig.xml, alors le compte adhérent n’existera plus dans la base de données et il faudra le recréer depuis l’interface professionnelle de Koha.
Pour accéder aux logs de SIP2 dans votre instance Koha, allez dans le dossier suivant : /var/log/koha/<instancename>
Puis, visualisez les fichiers sip-error.log et sip-output qui donnent des informations détaillées sur les erreurs de SIP2.
cat sip-error.log
cat sip-output.log
Liens utilse sur les commandes SIP2
LDAP
Configurer LDAP (Lightweight Directory Access Protocol) pour Koha vous permet de stocker toutes les informations des utilisateurs dans une base de données centrale, accessible à la fois à l’instance Koha de votre institution ainsi qu’aux adhérents, pour s’identifier sur d’autres systèmes existants.
LDAP est un protocole utilisé pour rechercher des fichiers sur les réseaux et s’authentifier.
Les configurations de LDAP sont puissantes, ce qui permet de personnaliser comment Koha et LDAP interagissent. LDAP peut être configuré de telle sorte que les nouveaux comptes créés dans LDAP peuvent être redescendus vers la base de données Koha, ainsi que les mises à jour des comptes sur LDAP.
Quoi qu’il en soit, Koha ne peut pas faire remonter ses mises à jour d’informations vers les serveurs LDAP, le traffic en utilisant LDAP est unidirectionnel.
Auth_By_Bind est positionné sur 1 quand un système Microsoft Windows Active Directory est utilisé dans la base de données LDAP.
Avant d’aller plus loin dans la configuration de LDAP, vous devez connaître les informations / mener les actions suivantes de l’organisation
L’organisation devra ouvrir un port pour donner accès à leur AD à partir du serveur.
Informations sur l’accès au serveur AD (adresse et nom d’hôte IP, port, infos SSL)
Informations sur la configuration du serveur AD (formats OU, DC, CNL pertinents par rapport aux noms d’utilisateurs)
Correspondances entre les champs AD et les champs Koha, dont ceux par défaut
Valeurs par défaut pour ce qui n’est pas fourni par AD (categorycode, branchcode par exemple)
Pour authentifier un utilisateur, devons-nous nous lier à lui (ce qui semble courant dans AD) ou utilisons-nous un compte pour la connexion et vérifions ensuite ? Dans ce dernier cas, nous avons besoin de détails sur comment se connecter
Est-ce que les identifiants existants dans Koha correspondent à ceux que nous utiliserons pour les rechercher dans AD ? Si oui, tant mieux. Sinon, comment gérer les doublons ?
Etapes pour configurer LDAP avec votre instance Koha
- 1 Dans un terminal Linux, naviguez jusqu’au répertoire contenant le fichier koha-conf.xml, qui sera soit dans :
/etc/koha/sites/<instancename>/
OR
/etc/koha/
2 Ouvrez le fichier koha-conf.xml avec les permissions root : sudo vi koha-conf.xml
3 Faites défiler jusqu’à la ligne contenant ‘<useldapserver>0</useldapserver>’et modifiez-la en <useldapserver>1</useldapserver>
4 Ensuite, dans la ligne en dessous, écrivez la configuration LDAP suivante :
      <ldapserver id="<ldapserverid>">

      <hostname><hostname></hostname>

      <base>dc=<domaincontroller>,dc=<domaincontroller></base>

      <user>cn=<nameofuser>, dc=<domaincontroller>,dc=<domaincontroller></user> <!--This is the username of user account with permissions to query the LDAP server -->

      <pass><password></pass> <!-- This is password of the user account with permissions to query the LDAP server-->

      <replicate><either0or1></replicate> <!-- add new users from LDAP to Koha database -->

<welcome><either0or1></welcome> <!-- send new users the welcome email when added via replicate -->

      <update><either0or1></update> <!-- update existing users in Koha database -->

      <auth_by_bind><either0or1></auth_by_bind> <!-- set to 1 to authenticate by binding instead of password comparison, e.g., to use Active Directory -->

      <principal_name><principalname></principal_name> <!-- optional, for     auth_by_bind: a printf format to make userPrincipalName from koha userid        -->

      <mapping> <!-- match koha SQL field names to your LDAP record field names-->

      <firstname is="givenname"></firstname>

      <surname is="sn"></surname>

      <address is="postaladdress"></address>

      <city is="l">Athens, OH</city>    <!-- Athens,OH is the default value for
      city of all users logging into Koha -->

      <zipcode is="postalcode"></zipcode>

      <branchcode is="branch">Central</branchcode>

      <userid is="uid"></userid>

      <password is="userpassword"></password>

      <email is="mail"></email>

      <categorycode is="employeetype">EM</categorycode>

      <phone is="telephonenumber"></phone>

      </mapping>

      </ldapserver>
5 Sauvegardez et quittez le fichier koha-conf.xml
6 Vérifiez que la connexion LDAP fonctionne en saisissant :
ldapsearch -H ldaps://host.name -s base -x -w « » -d 1
Note
Note à propos du nom d’hôte :
Le nom d’hôte peut être soit un nom alphanumérique soit l’adresse du serveur LDAP (il est optionnel d’écrire le numéro du port).
Par défaut le numéro de port Idaps par défaut, tandis que le numéro de port par défaut Idap est 389.
Note
Note à propos des champs dupliqués et mis à jour :
Le champ replicate de configuration de LDAP dans le fichier koha-conf.xml permet à la base de données de Koha de s’enrichir de nouveaux comptes d’adhérents chaque fois qu’un utilisateur se connecte à Koha (interface professionnelle ou OPAC) par le biais de ses identifiant et mot de passe LDAP (partant du fait que les même identifiant et mot de passe n’existent pas déjà dans la base de données de Koha).
Tandis que le champ de configuration de la mise à jour du LDAP (dans le même fichier allows) permet que les informations de l’utilisateur dans la base de données LDAP soient synchronisées à la base de données Koha.
par exemple, si quelqu’un se marie et change de nom de famille, alors le nouveau nom de famille n’a besoin d’être mis à jour que dans la base de données LDAP existante et sera synchronisé dans la base de données Koha automatiquement si la configuration de mise à jour est paramétrée sur 1.
A propos des champs de correspondance (les champs surlignés en vert) <city is= »l »>Athens, OH</city>
La colonne de gauche (surlignée en jaune) est le nom de la colonne dans la base de données LDAP.
Le nom de la colonne entre guillemets (surligné en rose) est le nom de la colonne dans la base de données de Koha. NOTE : ceci peut être renseigné avec n’importe quelle valeur s’il n’y a pas de nom de colonne équivalent dans la base de données de Koha et dans la base de données LDAP.
La valeur surlignée en cyan est la valeur par défaut pour les colonnes spécifiées de Koha et LDAP. Ainsi, dans l’exemple ci-dessus, toutes les notices d’adhérent des bases de données de Koha et LDAP seront renseignées, par défaut, avec la valeur “Athens, OH’.
Exemple de configurations LDAP :
<useldapserver>1</useldapserver><!-- see C4::Auth_with_ldap for extra configs you must add if you want to turn this on -->

<ldapserver id="ldapserver" listenref="ldapserver">

<hostname>ldaps://example.co.au</hostname>

<base>ou=employees,dc=companya,dc=com,dc=au</base>

<user></user> <!-- DN, if not anonymous -->

<pass></pass> <!-- password, if not anonymous -->

<auth_by_bind>1</auth_by_bind>

<replicate>1</replicate> <!-- add new users from LDAP to Koha database -->

<update>0</update> <!-- update existing users in Koha database -->

<principal_name>ou=employees,dc=companya,dc=com,dc=au</principal_name>

<mapping>

<userid       is="uid"            ></userid>

<cardnumber   is="uid"            ></cardnumber>

<email        is="mail"           ></email>

<surname      is="sn"             ></surname>

<firstname    is="givenname"      ></firstname>

<categorycode is="1">EM</categorycode>

<branchcode   is="1">SYD</branchcode>

</mapping>

</ldapserver>
Les valeurs dans la zone de correspondance ne sont pas toujours les mêmes, ça dépend de ce qui est dans la base de données LDAP de votre organisation. Par exemple, certaines organisations n’utilisent pas <userid> mais préfèrent plutôt identifier chaque adhérent par son champ <email>, ainsi, aucun champ <userid> n’est renseigné.
Problèmes avec LDAP
Le journal dans lequel les erreurs LDAP sont enregistrées dépend de plusieurs facteurs :
Si plack n’est pas désactivé, les erreurs LDAP sont affichées dans le fichier plack-error.log. Si plack est désactivé alors les erreurs LDAP sont consignées soit dans le fichier opac-error.log (si l’utilisateur se connecte à l’OPAC) soit dans le fichier intranet-error.log (si l’utilisateur se connecte à l’interface professionnelle). Ces trois fichiers se situent dans le répertoire suivant :
/var/log/koha/<instance>/