Adhérents
Avant d’importer ou d’ajouter des adhérents, n’oubliez pas de définir les catégories d’adhérents.
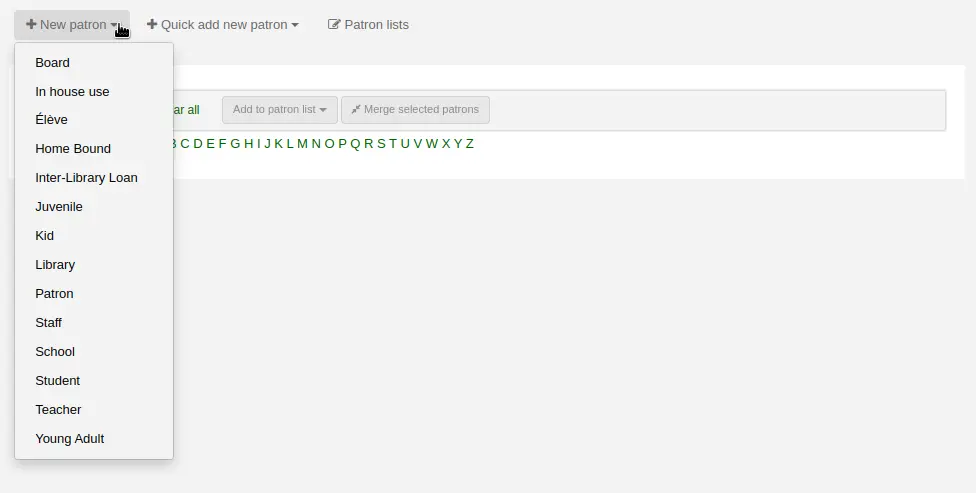
Ajouter un nouvel adhérent
Les adhérents sont ajoutés dans le module “Adhérents”.
Aller à : Adhérents
Note
Seuls les membres du personnel ayant la permission edit_borrowers (ou la permission superbibliothécaire) pourront ajouter des adhérents.
Une fois ici, vous pouvez inscrire un nouvel adhérent.
Cliquer sur “Nouvel Adhérent”
Note
Les champs apparaissant dans la fiche adhérent peuvent être définis dans la préférence système BorrowerUnwantedField.
Note
Les champs obligatoires sont définis dans la préférence système BorrowerMandatoryField
Tout d’abord, saisissez les informations d’identification de l’adhérent
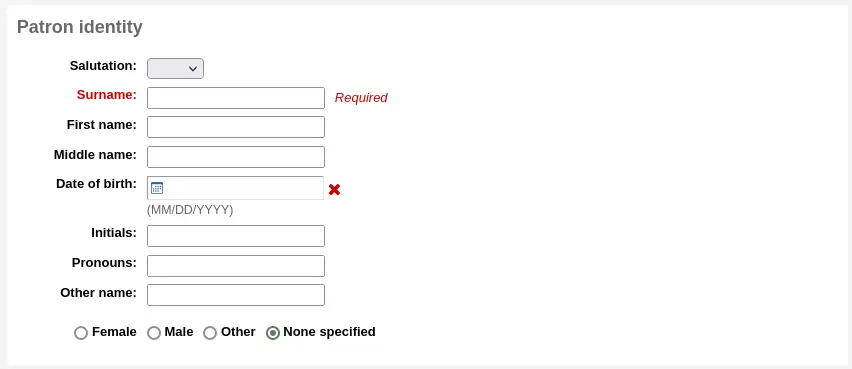
Les titres de civilité sont définis par la préférence système BorrowersTitles
Note
Si vous ne souhaitez pas afficher le nom complet d’un utilisateur lors de l’impression d’un ticket, vous pouvez utiliser les versions abrégées du nom contenu dans les champs Initiales ou Autre nom.
Par exemple :
Firstname: Nicole C.
Surname: Engard
Initials: NCE
Sur le ticket vous pouvez imprimer <<borrowers.initials>> à la place du nom complet (NCE).
Ou vous pourriez faire quelque chose comme ceci :
Firstname: Nicole
Surname: Engard
Initials: E
Sur le ticket, vous pouvez imprimer les champs <<borrowers.initials>>, <<borrowers.firstname>> à la place du nom complet (E, Nicole).
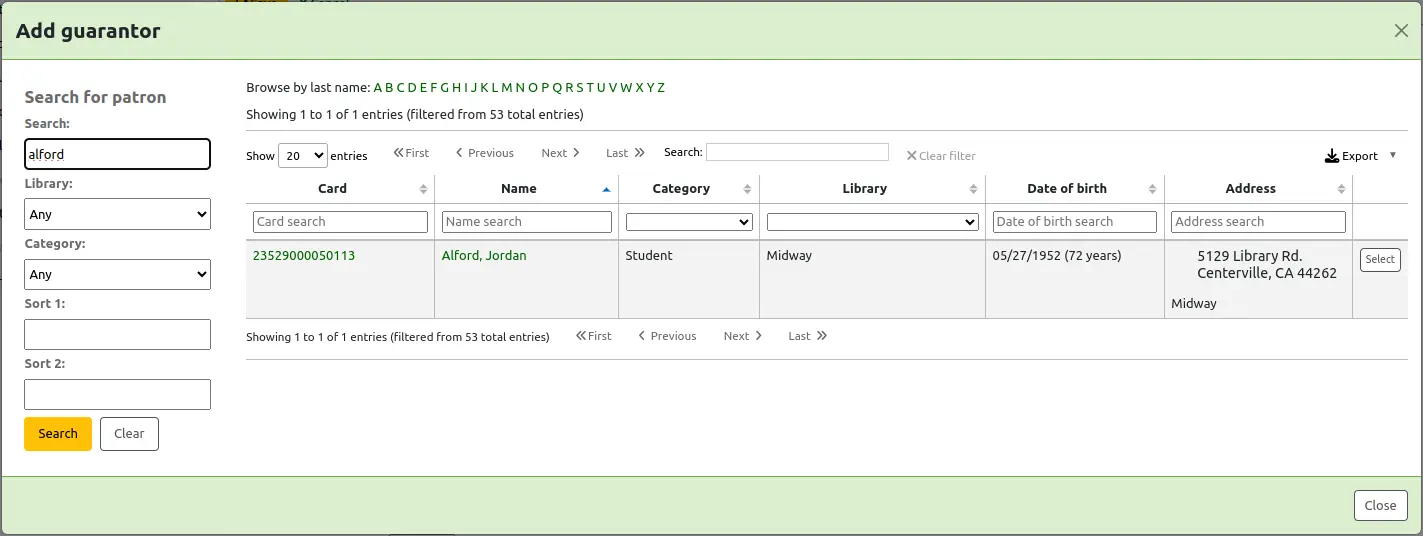
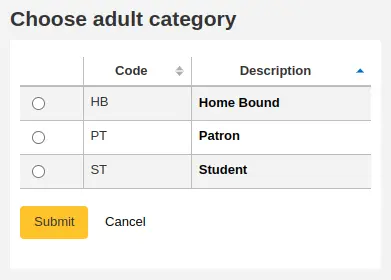
Si l’adhérent est un enfant, il faudra le rattacher à un adhérent adulte (garant)

Note
Les garants ne peuvent être liés qu’avec des adhérents dont la catégorie a le champ “Peut être une personne à charge” positionné sur “Oui”.
Note
Ce champ peut devenir obligatoire en activant la préférence système ChildNeedsGuarantor.
Si le garant est un adhérent de la bibliothèque, cliquez sur « Rechercher pour ajouter » pour chercher l’adhérent dans votre système
Cliquer sur “Sélectionner” pour choisir l’adhérent
Les relations entre adhérents sont à paramétrer dans la préférence système borrowerRelationship

Note
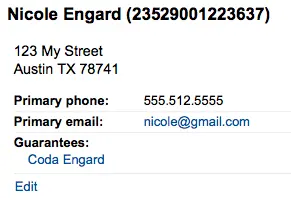
Il est possible d’ajouter plus d’un garant au compte d’un adhérent (les deux parents par exemple).
Avertissement
Un adhérent qui est une personne à charge ne peut pas être garant d’une autre personne et vice-versa.
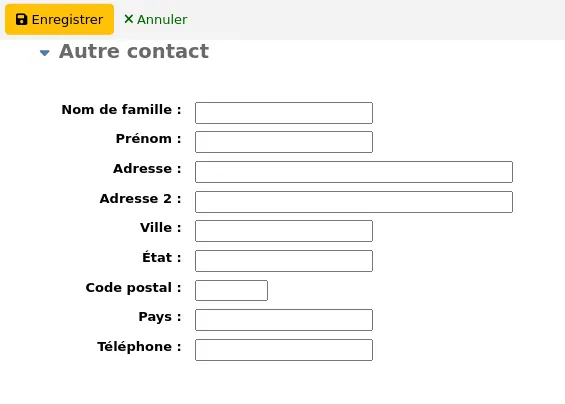
Si le garant n’est pas un adhérent, vous pouvez quand même ajouter ses informations dans la section « Garant non adhérent ».
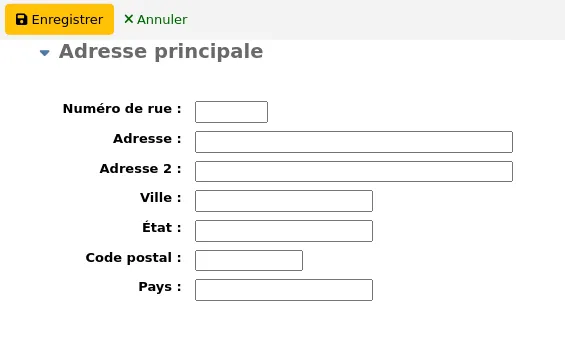
Saisissez ensuite l’adresse principale et les coordonnées
Note
Le menu déroulant du type de voie est rempli par la catégorie de valeur autorisée ROADTYPE.
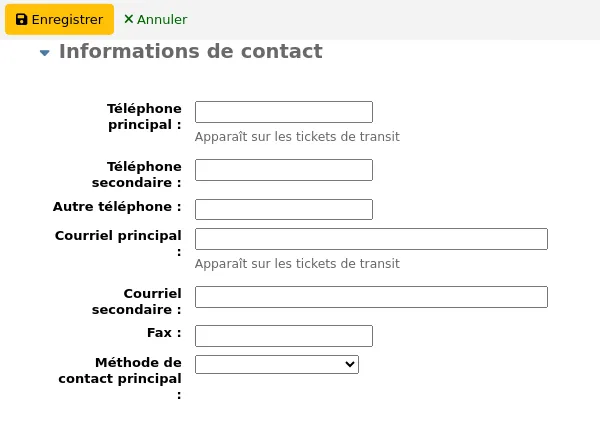
Pour les informations de contact, notez que les premiers téléphone et courriel de l’adhérent sont ceux qui apparaissent sur les notifications et tickets imprimés (reçus, transferts, réservations) pendant les transactions. La première adresse courriel est aussi celle utilisée pour les messages envoyés à l’adhérent.
La “Méthode de contact principal” peut être utilisée dans les rapports et pour l’équipe d’administration pour savoir quelle méthode utiliser en priorité pour contacter un adhérent.
Vous pouvez aussi enregistrer une adresse alternative pour chaque adhérent. Elle pourra par exemple être utilisée dans un cadre universitaire pour conserver l’adresse du domicile de l’adhérent.
Chaque adhérent peut avoir un contact alternatif. Un contact alternatif peut être un parent ou un tuteur, par exemple.

La section de la gestion de la bibliothèque inclut des valeurs propres à la bibliothèque
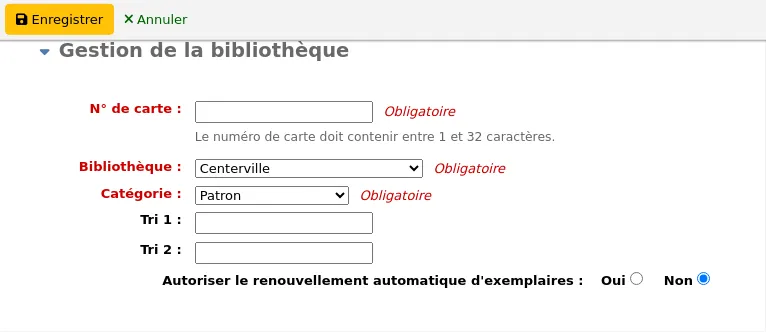
Un numéro de carte est automatiquement créé si vous avez paramétré la préférence système autoMemberNum sur ce mode
Note
Pour une nouvelle installation, cette préférence système va commencer avec le chiffre 1 et va incrémenter d’1 à chaque fois. Si vous souhaitez débuter la numérotation avec un numéro de code à barres de votre choix, saisissez ce dernier manuellement puis enregistrez l’adhérent. Après cela, l’augmentation automatique de 1 se fera à partir du numéro saisi.
Si vous avez choisi accidentellement la mauvaise catégorie d’adhérent au moment de sa création, vous pouvez la changer ici
Les tris 1 et 2 sont utilisés à des fins statistiques pour votre bibliothèque
Vous pouvez ajouter des menus déroulants pour ces champs en by ajoutant des valeurs autorisées dans la catégorie de valeur autorisée Bsort1 ou la catégorie de valeur autorisée Bsort2
“Autoriser le renouvellement automatique des exemplaires” est utilisé pour contrôler si les prêts de cet adhérent seront renouvelés selon les règles de circulation. Si la case Oui est cochée, les exemplaires pour lesquels le renouvellement automatique est activé dans les règles de circulation seront automatiquement renouvelés. Ceci nécessite que le cronjob automatic_renewal tourne tous les jours. Si la cas Non est cochée, les exemplaires pour lesquels le renouvellement automatique est activé dans les règles de circulation ne seront pas automatiquement renouvelés.
Protégé : les adhérents protégés ne peuvent pas être supprimés, que ce soit manuellement ou par un traitement par lot. Utilisez ce système pour des adhérents comme les adhérents statistiques, les adhérents SIP2, l” utilisateur d’auto-prêt, ou les superlibrarians.
Version
L’option “Protégé” a été ajoutée dans la version 23.11 de Koha.
“Vérifier les prêts précédents” permet de vérifier l’historique de prêt de l’adhérent, pour voir s’il a emprunté ce document précédemment. Cette fonction outrepasse le réglage dans les catégories d’adhérents et celui de la préférence système CheckPrevCheckout.
Langue préférée pour les notifications : si TranslateNotices est paramétrée sur autoriser, vous pourrez choisir parmi les langues installées la langue dans laquelle l’adhérent préfère recevoir ses notifications (comme les notifications de retard et les messages de courtoisie).
Ensuite, la section de configuration de la bibliothèque comprend des paramètres supplémentaires de la bibliothèque
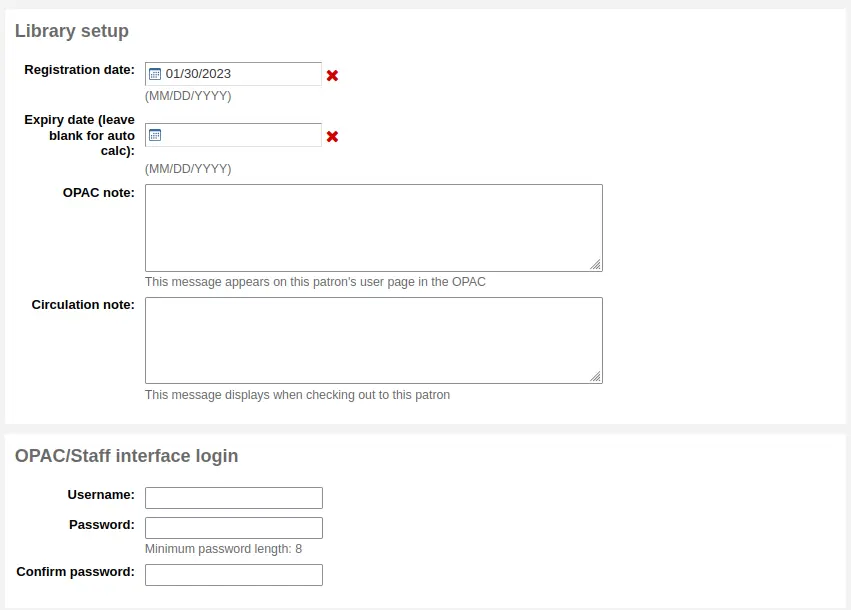
La date d’inscription est automatiquement renseignée à la date du jour
La date d’expiration sera automatiquement calculée en fonction des catégories d’adhérents
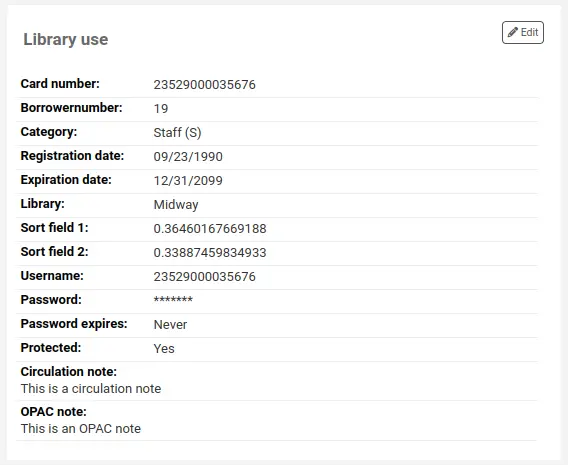
La note OPAC est une note à destination de l’adhérent, elle apparaîtra sur le compte de l’adhérent à l’OPAC

Note
Voir également les notifications à l’OPAC
La Note de circulation est destinée uniquement au personnel de la bibliothèque et apparaîtra lors du prêt d’un document à l’adhérent
Les identifiants et mots de passe sont utilisés par les adhérents pour se connecter à leur compte à l’OPAC. Ils sont également utilisés par les bibliothécaires pour se connecter à l’interface professionnelle de Koha.
Le personnel pourra seulement se connecter à l’interface professionnelle s’il a au moins la permission catalogue.
Si vous avez activé le module Public empêché (avec la préférence système HouseboundModule), vous pourrez choisir un rôle pour les services aux publics empêchés pour cet adhérent.

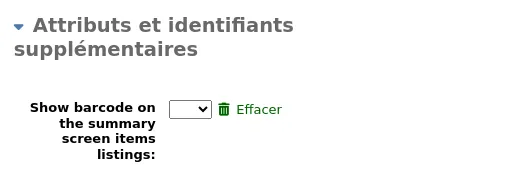
Si vous avez paramétré des attributs et identifiants supplémentaires dans l’administration, ils apparaîtront ensuite
Enfin, si vous avez paramétré la préférence système EnhancedMessagingPreferences sur “Autoriser”, vous pouvez choisir les préférences de notifications pour cet adhérent.

Voir la définition de chaque notification dans la section notifications avancées et notifications de réservation
Avertissement
Ces préférences systèmes outrepasseront ce que vous paramétrez via les catégories d’adhérents
Avertissement
Ces préférences peuvent être modifiée via l’OPAC par l’adhérent si la préférence système EnhancedMessagingPreferencesOPAC est paramétrée sur “Afficher”.
Quand vous avez fini, cliquez sur Enregistrer
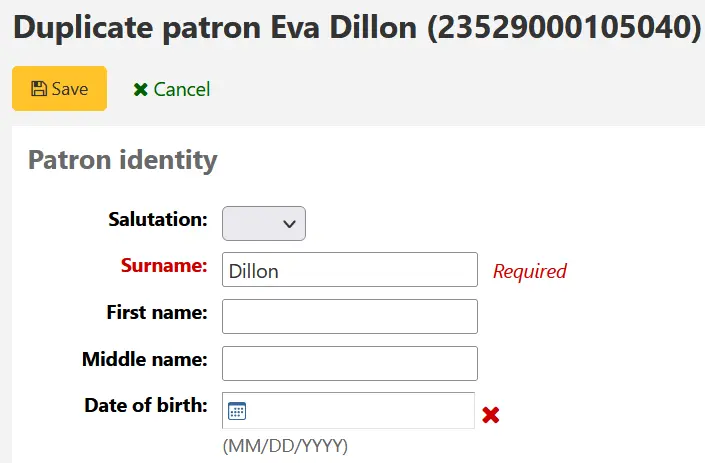
Si le système détecte un adhérent en double, il vous le signale.

Note
Consultez la préférence système PatronDuplicateMatchingAddFIelds pour consulter ou changer quels champs sont utilisés pour détecter des doublons d’adhérents. Par défaut, il y a le nom, le prénom et la date de naissance.
Si vous avez défini un âge minimum ou maximum dans la catégorie des adhérents où la date de naissance doit être saisie, Koha vous avertira que l’adhérent que vous êtes en train d’ajouter est trop vieux ou trop jeune pour la catégorie d’adhérents que vous avez sélectionnée :

Si la catégorie d’adhérent a des frais d’inscription, ces frais seront imputés sur le compte de l’adhérent au moment de la création du compte. Vous pouvez gérer les frais dans l’onglet comptabilité de l’adhérent.
Ajout rapide d’un nouvel adhérent
Si votre banque de prêt est en surcharge et que vous souhaitez inscrire rapidement un adhérent, vous pouvez utiliser la fonction « ajout rapide « . Il s’agit d’une version abrégée du formulaire d’ajout d’adhérent avec seulement quelques champs nécessaires à remplir.
Cette fonctionnalité utilise deux préférences système : BorrowerMandatoryField et PatronQuickAddFields. Ce sont les deux préférences système qui déterminent les champs du formulaire d’ajout rapide.
Pour ajouter rapidement un adhérent, aller dans le module Adhérents
Aller à : Adhérents
Cliquer sur le bouton “Ajout rapide d’un adhérent”.
Vous devrez choisir une catégorie d’adhérent.
Puis, un formulaire simplifié vous sera présenté.
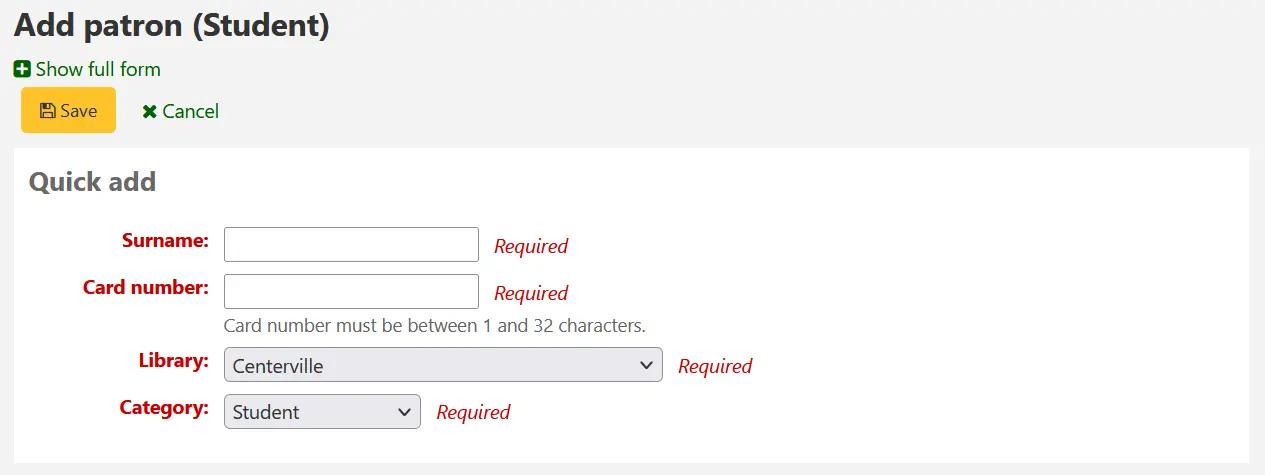
Quand vous avez fini, cliquez sur “Enregistrer”.
Si vous avez besoin d’accéder au formulaire complet, vous pouvez cliquer sur “Afficher le formulaire complet” au-dessus du bouton “Enregistrer”.
Ajout d’un adhérent Bibliothécaire
Tous les bibliothécaires doivent être enregistrés en tant qu’adhérents de type “Professionnel”. Suivre les étapes normales dans Ajouter un adhérent pour inscrire un professionnel. Pour donner aux professionnels les droits d’accès à l’interface professionnelle, suivre les étapes dans Permissions des adhérents.
Important
Pensez bien à donner aux professionnels un identifiant et un mot de passe sûrs.
Ajout d’un adhérent de type statistique
Une façon de garder une trace des documents consultés à la bibliothèque est de les passer en prêt sur la carte d’un adhérent de type Statistique. L’enregistrement des prêts n’enregistre alors aucun prêt, il enregistre juste l’utilisation des documents dans la bibliothèque. Pour utiliser cette méthode, il faudra d’abord paramétrer dans les catégories d’adhérents une catégorie Statistique.

Ensuite, vous devez créer un compte adhérent de type statistique.
Puis, suivez les étapes de la section “Ajouter un adhérent” de ce manuel. Puisque l’adhérent n’est pas une personne réelle, remplissez juste la bibliothèque correspondante dans le champ prévu à cet effet.
Pour en savoir plus sur les autres méthodes de suivi des consultations sur place, référez-vous à la section de ce manuel Suivi des consultation sur place.
Dupliquer un adhérent
Parfois, lorsque vous ajouter une nouvelle famille dans votre système, vous ne voulez pas taper encore et encore les informations de contact. Koha vous permet de dupliquer un adhérent et de changer seulement les parties que vous voulez (ou que vous avez besoin de) modifier.
Ouvrez la fiche de l’adhérent sur lequel vous voulez vous baser (l’adhérent dont vous voulez dupliquer les données)
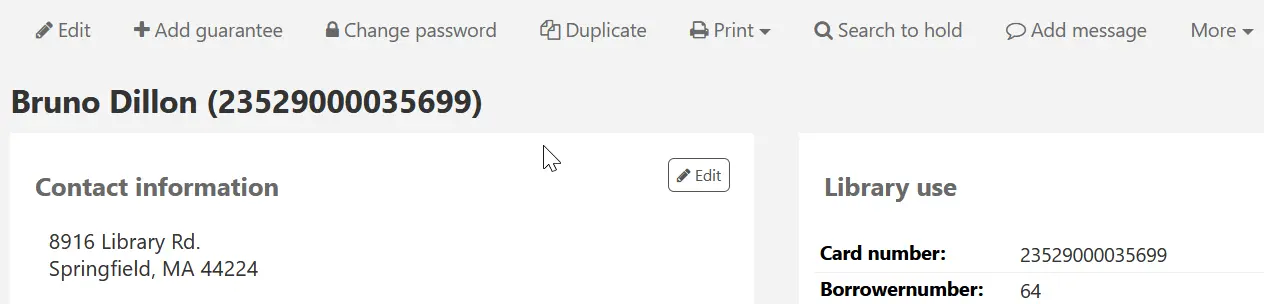
Cliquez sur le bouton “dupliquer” en haut de la fiche

Tous les champs ont été copiés sauf les prénom, numéro de carte, identifiant et mot de passe. Complétez les champs manquants et cliquez sur “Enregistrer”
Note
En cliquant sur un champ déjà rempli, la donnée s’efface (et vous permet de gagner du temps au niveau de la mise à jour)
Vous serez redirigé vers une page consacrée au nouvel adhérent
Ajouter des photos de l’adhérent
Vous pouvez ajouter des photos des adhérents pour vous aider à mieux les identifier. Pour cela, vous devez d’abord paramétrer la préférence système patronimages sur “Autoriser”.
Une fois la préférence système activée sur “Permettre”, vous verrez un espace réservé à l’image sous le nom de l’adhérent à gauche de l’écran.
Cliquez sur le bouton “Ajouter” sur l’emplacement de l’image.
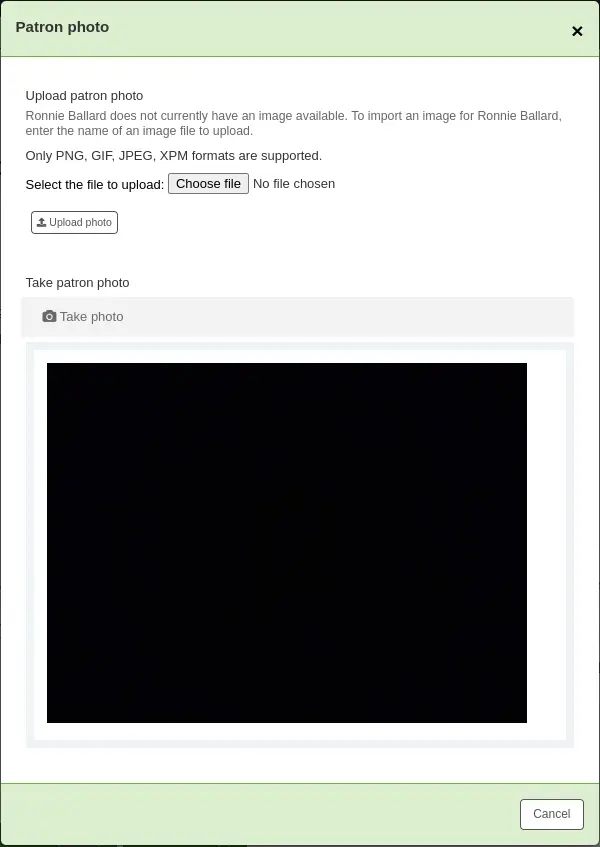
Vous avez la possibilité soit de téléverser une photo existante depuis l’ordinateur, soit de prendre une photo avec la webcam.
Pour télécharger une image existante, cliquez sur “Parcourir” ou “Choisir un fichier” pour trouver l’image sur votre ordinateur et cliquez sur “Téléverser” pour charger l’image dans la fiche adhérent.
Avertissement
Attention, il y a une limite de taille de l’image de 100 ko, nous vous conseillons une image de 200x300 pixels, mais les plus petites tailles fonctionnent également.
Pour prendre une photo avec la webcam, cliquez sur le bouton “Prendre une photo” une fois que la webcam est en face de l’adhérent. Le système prendra une photo et vous la présentera pour vérification. Si vous êtes satisfait, cliquez sur “Téléverser”. Sinon, cliquez sur “Reprendre une photo” pour prendre une nouvelle photo. Vous pouvez aussi télécharger la photo en cliquant sur “Télécharger la photo”.
Pour télécharger un lot de photos, utilisez l’outil Ajouter des photos de l’adhérent.
Modifier des adhérents
Il y a dans Koha de nombreuses façons de modifier la fiche d’un adhérent.
Note
Seuls les membres du personnel ayant la permission edit_borrowers (ou la permission superbibliothécaire) pourront modifier des adhérents.
Pour modifier l’intégralité de la fiche de l’adhérent, cliquez sur le bouton Modifier qui se trouve en haut de la fiche.
Pour modifier une section particulière de la fiche d’un adhérent (par exemple la section Utilisation de la bibliothèque), cliquez sur le lien “Modifier” en bas de la section.
Modifiez la fiche adhérent et cliquez sur “Enregistrer”.
Avertissement
Notez que changer votre propre identifiant vous déconnectera de Koha.
Modifier les mots de passe des adhérents
Les mots de passe des adhérents ne sont pas récupérables.
Les étoiles sur la page de détails de l’adhérent à côté du libellé mot de passe sont toujours présentes même s’il n’y a pas de mot de passe défini.
Si un adhérent oublie son mot de passe, ou si le compte d’un adhérent est “verrouillé” ou “administrativement verrouillé” (voir les préférences système FailedLoginAttempts et LockExpiredDelay, respectivement), la seule option est de réinitialiser son mot de passe.
Ceci peut être fait depuis l’interface professionnelle. Pour changer le mot de passe d’un adhérent, cliquez sur le bouton “Changer le mot de passe”.
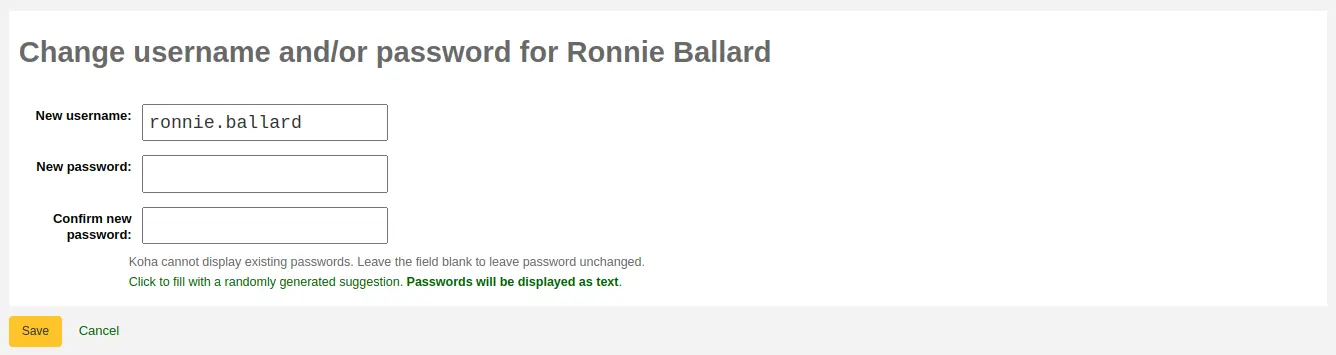
Koha ne peut pas afficher un mot de passe déjà défini car il est crypté dans la base de données. Laissez le champ vide pour ne pas changer le mot de passe.
Ce formulaire peut générer automatiquement un mot de passe de façon aléatoire si vous cliquez sur le lien « Cliquer pour compléter avec un mot de passe généré automatiquement. Le mot de passe sera affiché en mode texte »
Avertissement
Notez que changer votre propre identifiant vous déconnectera de Koha.
Modifier le mot de passe via ce formulaire mettra aussi à jour la date d’expiration du mot de passe, comme défini dans la catégorie d’adhérents.
Si la préférence système NotifyPasswordChange est activée, l’adhérent recevra un message lui indiquant que son mot de passe a été modifié.
Note
Le contenu de ce courriel peut être personnalisé avec l’outil Notifications et tickets. Le code du courrier est PASSWORD_CHANGE.
Si la préférence système OpacResetPassword est activée, ou si la catégorie d’adhérent le permet, vous pouvez aussi envoyer un courriel de réinitialisation du mot de passe en cliquant sur “Plus” et en choisissant “Envoyer un lien de réinitialisation du mot de passe”.
Ceci enverra un courriel de réinitialisation du mot de passe à l’adhérent, semblable à celui qui est envoyé quand il clique sur le lien “Mot de passe oublié ?” à l’OPAC. Cependant, le lien de réinitialisation est paramétré pour expirer après 5 jours plutôt que 2 jours quand il est envoyé de cette manière.
Note
Le contenu du courriel peut être personnalisé avec l’outil de Notifications et tickets. Le code de la lettre est STAFF_PASSWORD_RESET.
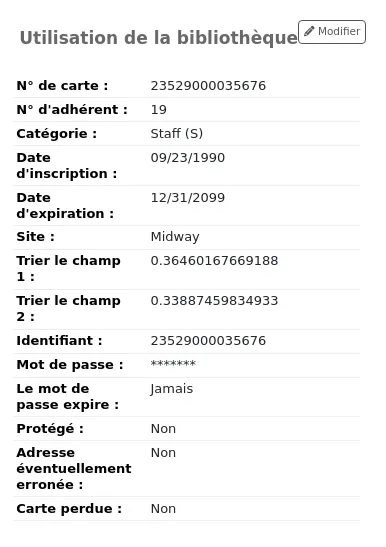
Seuls les membres du personnel ayant la permission superbibliothécaire peuvent voir et changer manuellement la date d’expiration du mot de passe. Elle peut être changée en cliquant sur le bouton “Modifier” en haut de la fiche de l’adhérent, ou sur le bouton “Modifier” à coté de la section “Utilisation de la bibliothèque”.
Ajouter des marqueurs à la fiche adhérent
Les Suspensions sont utilisés pour empêcher un adhérent d’emprunter.
Vous pouvez bloquer le prêt des adhérents en définissant des marqueurs.

Si vous voulez que le personnel chargé du prêt confirme l’adresse d’un adhérent avant de le laisser emprunter, vous pouvez cocher “Parti sans laisser d’adresse”, ce qui génère une alerte au moment du prêt.

Si un adhérent signale qu’il a perdu sa carte de bibliothèque, vous pouvez cocher “Carte perdue” pour empêcher toute utilisation frauduleuse de sa carte.

Si vous souhaitez suspendre un adhérent de la bibliothèque, vous pouvez ajouter une suspension manuelle.

Note
C’est la même chose que l’onglet suspension en bas de la fiche adhérent détaillée.
Note
La suspension peut être paramétrée automatiquement dans le paramétrage des relances
Si vous entrez une date ou une note relative aux suspensions, vous la retrouverez aussi dans le message associé.

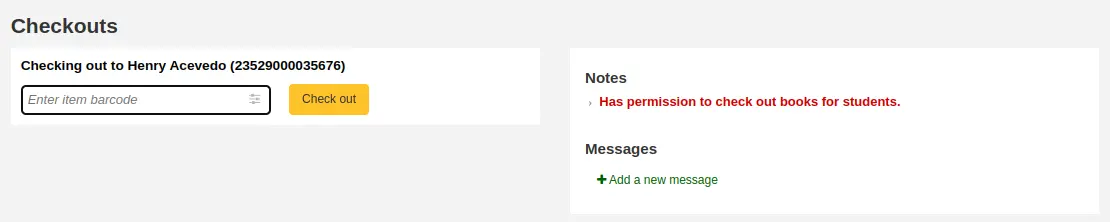
Ajouter des notes et des messages à une fiche adhérent
Vous pouvez laisser des notes sur une fiche adhérent. Il y a plusieurs manières de le faire : vous pouvez soit ajouter une note de circulation soit un message interne. Ils ne s’afficheront pas à l’OPAC pour que l’adhérent les voie. Si vous voulez que l’adhérent voie les notes et les messages, utilisez les notes OPAC et les messages OPAC.
Notes de circulation
Les notes de circulation sont ajoutées à la fiche adhérent via le formulaire d’ajout d’un adhérent ou le formulaire de modification d’un adhérent, dans la section “Paramètres de la bibliothèque”.
Dans l’interface professionnelle, les notes de circulation seront dans la section “Utilisation de la bibliothèque” de la fiche adhérent.
Messages de circulation
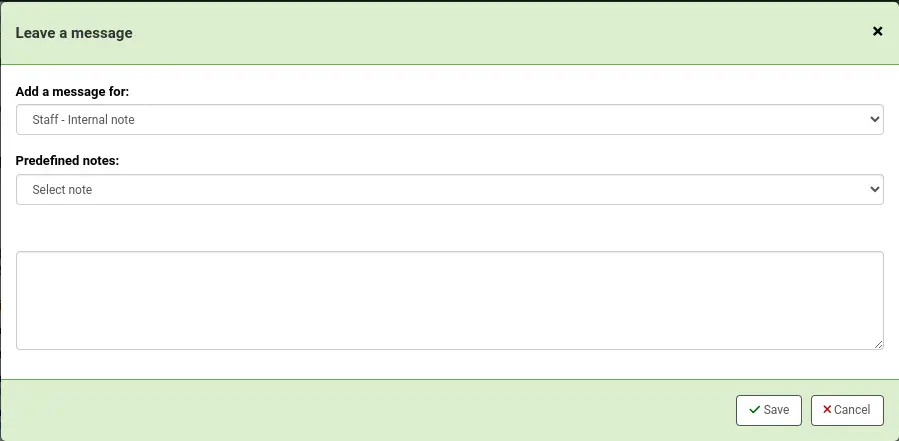
Les messages internes sont ajoutés à la fiche adhérent en utilisant le bouton “Ajouter un message”.
Pour laisser un message interne, choisissez « Professionnel - note interne » dans la partie “pour” de “Ajouter un message pour”. Saisissez votre message dans la zone, ou choisissez un message prédéfini dans le menu déroulant.
Note
Des messages prédéfinis sont ajoutés dans la catégorie de valeur autorisée BOR_NOTES.
Une fois enregistré, le message interne s’affiche en gras et rouge sur la page de détails de l’adhérent dans l’interface professionnelle, en haut de la page juste sous la ligne des boutons d’action.

Les messages apparaîtront également sur la page de prêt, à droite de la boîte de prêt.

Si vous devez modifier le message, cliquez sur le bouton “Modifier” près du message, modifiez le texte et cliquez sur “Enregistrer”.
Transformer des enfants en adultes
Les adhérents enfants ne deviennent pas automatiquement adultes dans Koha, sauf si le cron job “Mettre à jour les catégories des adhérents est exécuté.
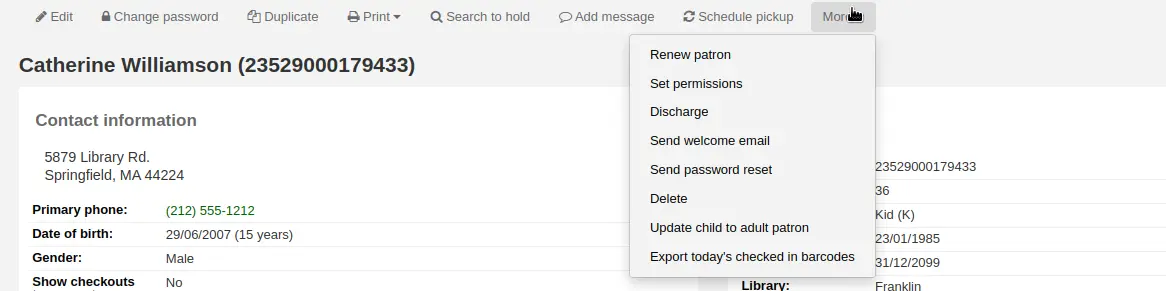
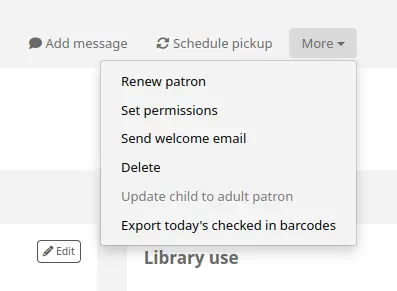
Pour transférer manuellement un adhérent Enfant à la catégorie Adulte, allez dans le menu “Plus” et sélectionnez “Transformer adhérent Enfant en Adulte”.
Une fenêtre pop-up s’affichera pour vous demander en quelle catégorie d’adhérent adulte devra être transformé cet adhérent enfant.
Note
La liste affiche les catégories d’adhérents qui ont le type de catégorie “adulte”.
Renouveler le compte d’un adhérent
Au moment de renouveler un adhérent, vous pouvez soit modifier la date d’expiration manuellement dans la fiche adhérent, soit utiliser l’option “Renouveler l’adhérent” du menu “Plus” dans la barre de menus en haut.
De cette manière, la nouvelle date d’expiration sera calculée en utilisant la période d’inscription configurée pour la catégorie d’adhérent de l’utilisateur. La préférence système BorrowerRenewalPeriodBase détermine si la nouvelle date d’expiration sera calculée à partir de la date actuelle ou de la date d’expiration de la carte.
Un avantage à utiliser l’option “Renouveler l’adhérent” est que ce sera enregistré comme un renouvellement d’inscription dans la table action_logs et sera visible comme tel en utilisant Log viewer ou Modification log depuis le compte de l’adhérent.
La date de renouvellement du compte adhérent sera visible dans l’onglet détails.
Si l’adhérent relève d’une catégorie d’adhérent ayant des frais d’adhésion, ces frais seront ajoutés aux frais de renouvellement. Vous pouvez gérer les frais dans l’onglet Comptabilité de l’adhérent.
Supprimer le compte d’un adhérent
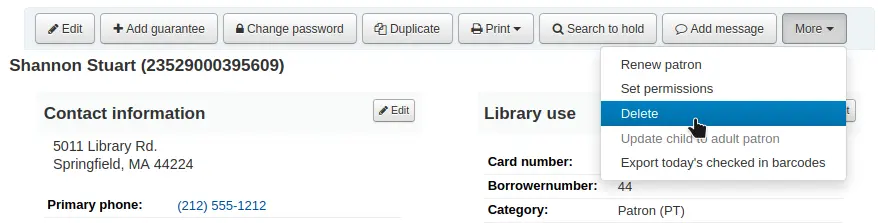
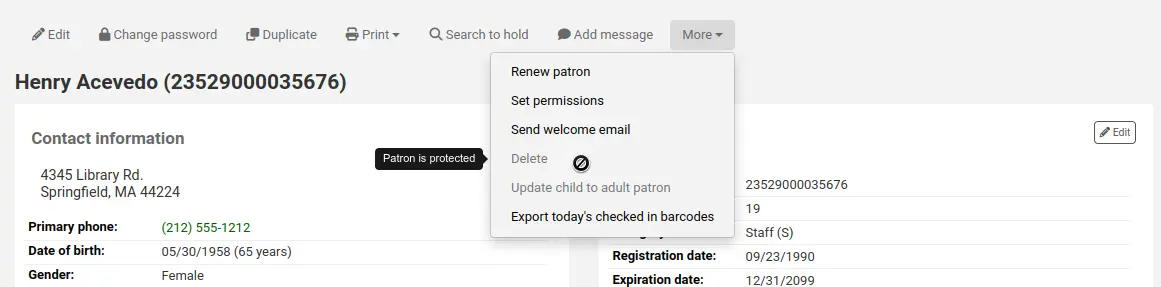
Depuis le menu déroulant “Plus”, le compte de l’adhérent peut être supprimé.
Note
Seuls les membres du personnel ayant la permission delete_borrowers (ou la permission superbibliothécaire) pourront supprimer des adhérents.
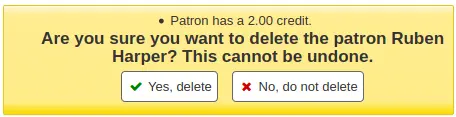
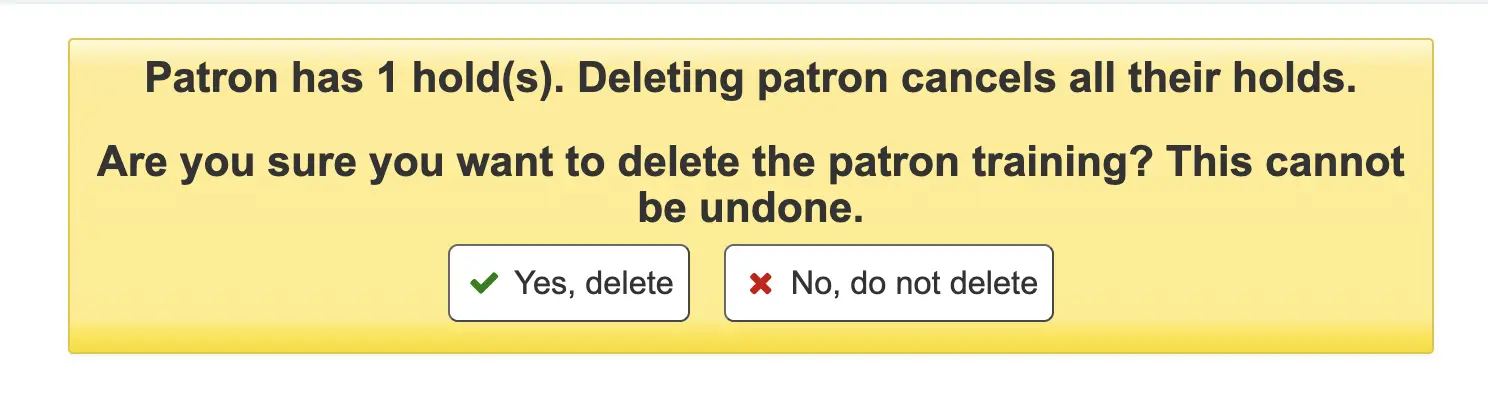
Il y aura une alerte si l’adhérent a des prêts, des réservations, des amendes ou des crédits.
Si un adhérent a des prêts en cours, la suppression ne sera pas possible.

Si un adhérent a des amendes en attente de paiement, la suppression ne sera pas possible.

Si un adhérent a des crédits inutilisés, l’option pour supprimer l’adhérent est possible mais il y aura une alerte.
Si un adhérent a des réservations en cours sur son compte, supprimer l’adhérent est possible. La réservation sera annulée et transférée dans la table old_reserves.
Si un adhérent a des listes publiques ou partagées, elles seront supprimées en même temps que l’adhérent, à moins que la préférence système ListOwnershipUponPatronDeletion ne soit positionnée sur “changer le propriétaire de ces listes”.
Si un adhérent est protégé, l’option “Supprimer” sera désactivée. Pour supprimer tout de même l’adhérent, modifiez l’adhérent et choisissez “Non” sous “Protégé” dans la partie “Gestion du site”, enregistrez et ensuite supprimez.
Gestion des comptes par les adhérents
Si vous autorisez des adhérents à modifier leur compte via l’OPAC avec la préférence OPACPatronDetails alors vous devrez approuver tous les changements dans l’interface professionnelle avant qu’ils soient appliqués. S’il y a des modifications d’adhérent en attente de validation, elles apparaîtront sur le tableau de bord de l’interface professionnelle en dessous de la liste des modules (avec d’autres éléments attendant une validation).
Note
Les administrateurs verront les modifications pour tous les sites, les autres membres du personnel ne verront que les modifications des lecteurs qui appartiennent au site auquel ils sont connectés.
En cliquant sur le lien “Adhérents demandant des modifications” vous accéderez à une liste d’adhérents avec les changements demandés.
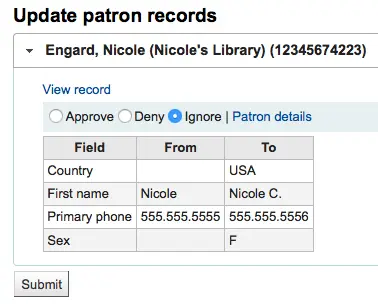
A partir de là, vous pouvez « Approuver » et appliquer les modifications de l’inscription de l’usager, « Supprimer » et remplacer les changements ou « Ignorer » et laisser les changements en attente pour les reprendre plus tard.
Si vous souhaitez voir la fiche de l’utilisateur en entier, vous pouvez cliquer sur le lien “Détails utilisateur” à la droite des boutons. Ceci ouvrira un nouvel onglet.
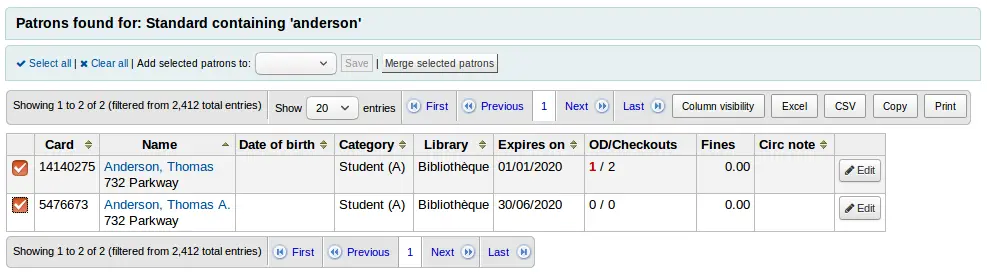
Fusionner des fiches adhérents
Si vous vous retrouvez accidentellement avec un adhérent avec deux cartes, il est possible de fusionner leurs fiches afin de ne pas perdre leur historique de prêt ou leurs réservations.
Note
Fusionner des adhérents nécessite la permission merge_borrowers.
Dans la liste des adhérents, cochez les fiches que vous voulez fusionner et cliquez sur « Fusionner les adhérents sélectionnés ».
Note
Il est possible de fusionner plus de deux fiches à la fois.
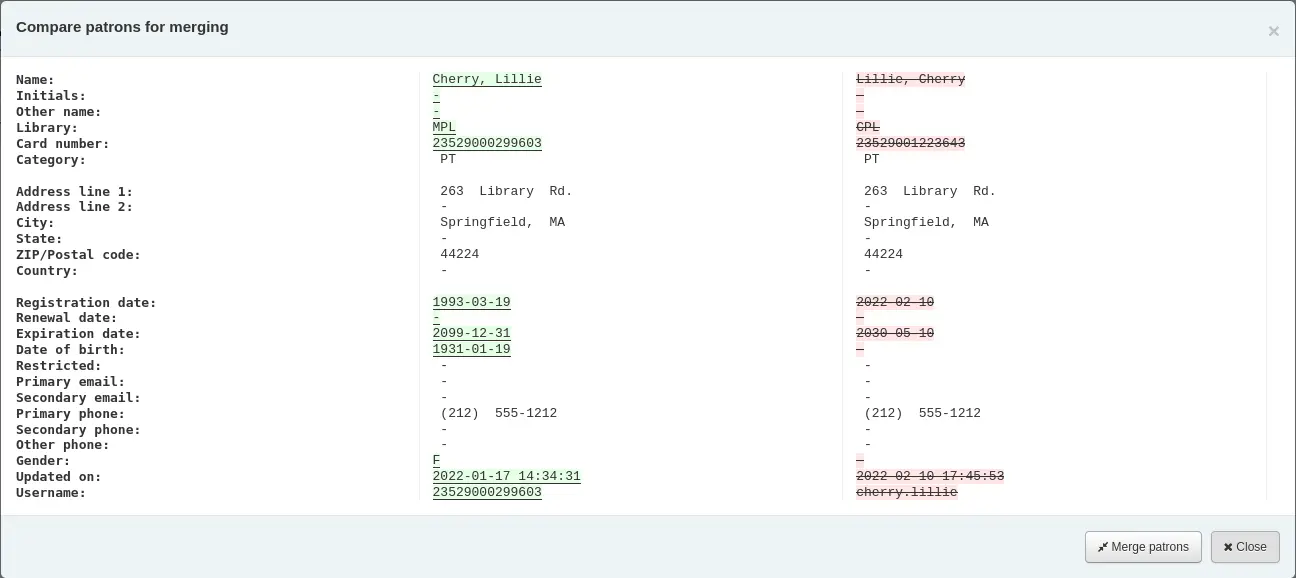
Sélectionnez la fiche adhérent que vous voulez conserver

Si nécessaire, cliquez sur le bouton “Comparer les adhérents” pour voir les différences entre les différents comptes.
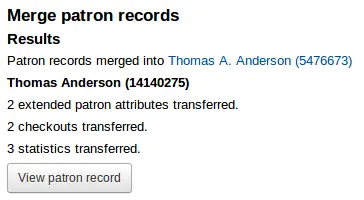
Cliquer sur le bouton “Fusionner des adhérents”.
Les prêts et les statistiques seront transférées à la bonne fiche et l’autre sera supprimée.
Permissions de l’adhérent
Les permissions de l’adhérent sont utilisées pour permettent aux bibliothécaires d’accéder à l’interface professionnelle.
Important
Pour qu’un bibliothécaire puisse se connecter à l’interface professionnelle, il doit avoir (au moins) la permission catalogue qui lui permet de visualiser l’interface professionnelle.
Définir les permissions des adhérents
Note
Seuls les membres du personnel ayant la permission permissions (ou la permission superbibliothécaire) pourront définir les permissions des autres membres du personnel.
En complément à la permission permissions, seuls les membres du personnel ayant la permission staffaccess pourront définir les permissions pour d’autres membres du personnel dont la catégorie category est du type “professionnel”.
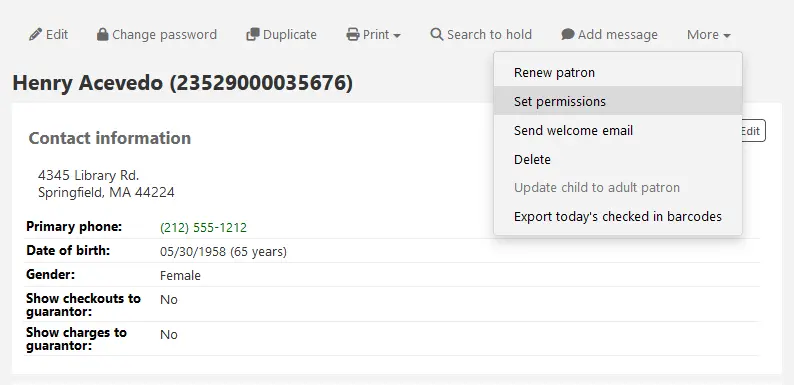
Sur la fiche de l’adhérent, cliquez sur le bouton « Plus » et choisissez « Définir les permissions » pour modifiez les autorisations de l’adhérent.
Une liste des permissions est affichées. Certaines d’entre elles peuvent être étendues en cliquant sur le lien “Afficher les détails” sur la droite.
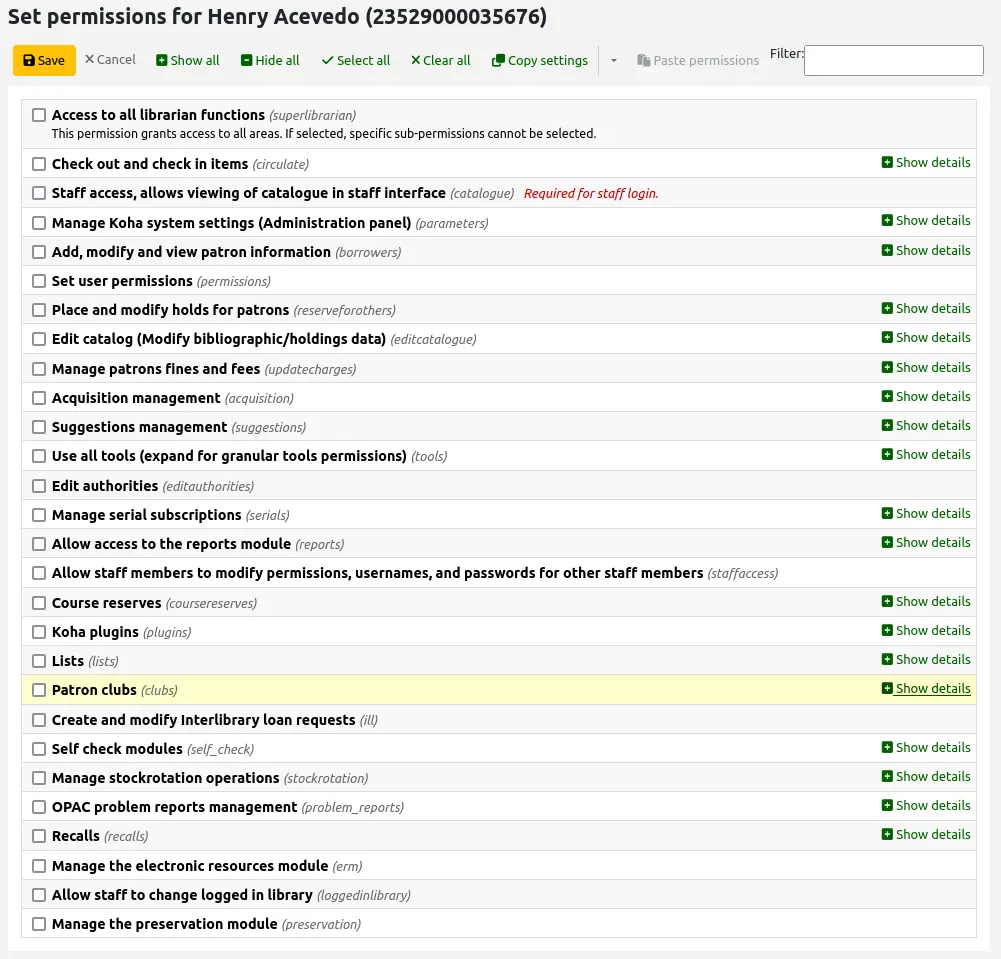
Dans tous les cas, si la permission parente est vérifiée, l’utilisateur a toutes les permissions enfants. Si vous voulez définir les permissions sur un niveau plus fin, étendez la section et cochez seulement les permissions nécessaire pour ce bibliothécaire.
Pour copier les permissions d’un adhérent vers un autre adhérent, cliquez sur le bouton “Paramètres de copie”, puis allez dans les paramètres des permissions de l’autre client et cliquez sur “Coller les permissions”.
Sur la fiche de l’adhérent, cliquez sur le bouton « Plus » et choisissez « Définir les permissions » pour modifiez les permissions de l’adhérent.
Version
La possibilité de copier des permissions a été ajoutée à Koha dans sa version 24.05.
Définition des permissions de l’adhérent
Cette section décrit les différentes permissions.
Accès à toutes les fonctions de bibliothécaire (superbibliothécaire)
Cette permission donne accès à tout ce qui se trouve dans l’interface du personnel de Koha.
La permission superbibliothécaire donne également accès à des actions qui pourraient par ailleurs être restreintes par les préférences système par exemple.
Note
Avec cette permission sélectionnée, il n’y a pas besoin d’en choisir d’autres.
Documents prêtés et retournés (circulate)
Les permissions suivantes sont utilisées pour donner accès aux fonctions du module circulation. Cocher de la permission “circulate” donnera accès à toutes les fonctionnalités. Cliquez sur « Afficher les détails » pour donner des permissions spécifiques.
Autres permissions de circulation (circulate_remaining_permissions)
Cette permission donne tous les droits de circulation sauf ceux traité par les permissions listées ci-dessous.
Forcer le prêt même si une limitation est fixée (force_checkout)
Avec cette permission le bibliothécaire sera autorisé à outrepasser les restrictions suivantes durant l’enregistrement des prêt :
restriction d’âge
le document est emprunté par un autre adhérent
le document n’est pas pour le prêt
l’adhérent a des documents en retard
l’adhérent est bloqué
le document est perdu
le document est très demandé
le document est réservé
Gérer les réservations programmées d’exemplaire (manage_bookings)
Cette permission autorise le personnel à gérer les réservations programmées d’exemplaire.
Marquer les notes de prêt comme Vue/Non vues (manage_checkout_notes)
Cette permission autorise le bibliothécaire à gérer les notes de prêt écrites par les utilisateurs via l’OPAC.
Gérer les collectes sur rendez-vous (manage_curbside_pickups)
Cette permission autorise le bibliothécaire à gérer les rendez-vous de collectes des adhérents.
Gérer les suspensions sur les comptes adhérent (manage_restrictions)
Cette permission autorise le bibliothécaire de lever les suspensions présentes sur le compte de l’adhérent ou à ajouter une suspension manuelle.
Note
Notez qu’un membre du personnel sans la permission manage_restrictions mais qui a la permission force_checkout sera en mesure de contourner temporairement la suspension d’un adhérent afin de lui prêter un document.
Générer le rapport des documents en retard (overdues_report)
Cette permission autorise le bibliothécaire à exécuter les rapports de retard du module Circulation ( Retards et Retards avec amendes ).
Outrepasser le blocage de renouvellement (override_renewals)
Cette permission autorise le bibliothécaire à outrepasser les restrictions de renouvellement.
Nécessite que le bibliothécaire dispose aussi de la permission circulate_remaining_permissions.
Accès professionnel, permet de voir le catalogue dans l’interface professionnelle (catalogue)
Important
Cette permission doit être donnée à tous les membres du personnel pour qu’ils puissent se connecter à l’interface professionnelle
Cette autorisation permet l’accès à l’interface professionnelle, avec la possibilité de
faire une recherche dans le catalogue (recherche simple, recherche avancée et recherche d’exemplaires)
faire une recherche d’autorité
voir l’historique de prêt d’un document (aucune information adhérent n’est affichée)
créer des listes privées ou publiques, ajouter des documents à des listes privées et à des listes publiques, si l’autorisation de la liste publique l’autorise, éditer et supprimer des listes privées
Utiliser le panier
voir les réserves de cours
Gestion des paramètres systèmes de Koka (Module administration) (parameters)
Les permissions suivantes sont utilisées pour donner accès à diverses pages du module administration. La sélection de la permission parameters donnera accès à toutes les pages. Cliquez sur « Afficher les détails » pour donner l’accès uniquement à des pages spécifiques.
Gérer les types de débit et de crédit (manage_accounts)
Cette permission donne accès aux sections types de débit et types de crédit.
Gérer les champs supplémentaires pour les paniers ou les abonnements (manage_additional_fields)
Cette permission donne accès à la section champs supplémentaires.
Important
Cette permission nécessite que le bibliothécaire ait également la permission correspondante pour les champs supplémentaires particuliers.
Champs supplémentaires |
Permission correspondante |
|---|---|
Paniers de commandes (aqbasket) |
Gérer les paniers et lignes de commande (order_manage) |
Lignes de commande (aqorders) |
Gérer les paniers et lignes de commande (order_manage) |
Factures (aqinvoices) |
Modifier les factures (edit_invoices) |
Abonnements (subscription) |
Modifier un abonnement existant (edit_subscription) |
Lignes de compte (credit) (accountlines:credit) |
Autres permissions permettant de gérer les amendes et frais (remaining_permissions) |
Lignes de compte (debit) (accountlines:debit) |
Autres permissions permettant de gérer les amendes et frais (remaining_permissions) |
Gérer les alertes sonores (manage_audio_alerts)
Cette permission permet d’accéder à la configuration des alertes sonores dans la partie administration.
Gérer les tâches de fond (manage_background_jobs)
Cette permission permet d’accéder à la section gestion des tâches dans la partie administration.
Ajouter, modifier ou archiver des caisses (manage_cash_registers)
Cette autorisation donne accès à la section caisses dans la partie administration.
Gérer les règles de circulation (manage_circ_rules)
Cette permission permet d’accéder à la configuration des Règles de Circulation et des pénalités dans la partie administration.
Gérer les règles de circulation de n’importe quelle bibliothèque (manage_circ_rules_from_any_libraries)
Cette permission permet de gérer les règles de circulation de n’importe quelle bibliothèque.
Si un bibliothécaire n’a pas cette permission, mais a la permission manage_circ_rules, ils peuvent uniquement modifier les règles de circulation de leur propre bibliothèque.
Gérer les villes et communes (manage_cities)
Cette permission permet d’accéder à la configuration des Villes et cités dans la partie administration.
Gérer les sources de classification et leurs règles de remplissage (manage_classifications)
Cette permission permet d’accéder à la configuration des Sources de classification dans la partie administration.
Gérer la configuration des colonnes (manage_column_config)
Cette permission permet d’accéder à la section configurer les colonnes.
Gérer les collectes sur rendez-vous (manage_curbside_pickups)
Cette permission permet d’accéder à la section collecte sur rendez-vous dans le module administration.
Cette section est utilisée pour gérer les horaires des collectes sur rendez-vous et d’autres paramètres des collectes sur rendez-vous. Le personnel de circulation qui effectue les collectes a besoin de la permission manage_curbside_pickups permission sous circulate.
Configurer le Vouliez-vous dire ? du moteur de recherche (manage_didyoumean)
Cette permission permet d’accéder à la section Voulez-vous dire ? dans le module Administration.
Gérer les fournisseurs d’identité (manage_identity_providers)
Cette permission permet d’accéder à la section fournisseurs d’identité dans la partie administration.
Gérer les alertes de circulation (manage_item_circ_alerts)
Cette permission permet d’accéder à la section Alertes de circulation dans la partie administration.
Gérer les champs de recherche sur les exemplaires (manage_item_search_fields)
Cette permission permet d’accéder à la section Champs de recherche exemplaire dans la partie administration.
Gérer les types de document (manage_itemtypes)
Cette permission permet d’accéder à la section item types dans la partie administration.
Gérer les raccourcis clavier pour l’éditeur avancé de catalogage (manage_keyboard_shortcuts)
Cette permission permet d’accéder à la section raccourcis clavier dans la partie administration.
Gérer les bibliothèques et les groupes de bibliothèque (manage_libraries)
Cette permission permet d’accéder aux sections bibliothèques and groupes de bibliothèques dans la partie administration.
Gérer le partage de contenu de Mana-KB (manage_mana)
Cette permission donne l’accès à la section partage de contenu avec Mana KB.
Gérer la configuration des règles de fusion MARC (manage_marc_overlay_rules)
Cette permission donne accès à la section Règles de fusion de notices dans la partie administration.
Gérer les règles de concordance (manage_matching_rules)
Cette permission donne accès à la section Règles de concordance dans la partie administration.
Gérer les sets OAI (manage_oai_sets)
Cette permission donne accès à la section Configuration des sets OAI dans la partie administration.
Gérer les attributs adhérents supplémentaires (manage_patron_attributes)
Cette permission donne accès à la section Types d’attributs adhérents dans la partie administration.
Gérer les catégories de lecteur (manage_patron_categories)
Cette permission donne accès à la section Catégories d’adhérents dans la partie administration.
Gestion des types de suspensions d’adhérent (manage_patron_restrictions)
Cette permission donne accès à la section types de suspension d’adhérent dans la partie administration.
Gérer les sources de notices (manage_record_sources)
Cette permission donne accès à la section de gestion des sources de notices.
Version
Cette permission et la fonctionnalité correspondante ont été ajoutées dans Koha dans la version 24.05.
Configurer le moteur de recherche (manage_search_engine_config)
Cette permission donne accès à la section configuration du moteur de recherche dans la partie administration.
Note
Cette section ne sera visible que si la préférence système SearchEngine est paramétrée sur “Elasticsearch”.
Gestion des filtres de recherche sauvegardés (manage_search_filters)
Cette permission donne accès à la section filtres de recherche dans la partie administration.
Gérer la configuration Z39.50 et des serveurs SRU (manage_search_targets)
Cette permission donne accès à la section serveurs Z39.50/SRU dans la partie administration.
Gérer les fournisseurs SMS (manage_sms_providers)
Cette permission donne accès à la section Fournisseurs de SMS dans la partie administration.
Note
Cette section n’apparaît que si la préférence système SMSSendDriver est positionnée sur “Email”.
Gérer les serveurs SMTP (manage_smtp_servers)
Cette permission donne accès à la section serveurs SMTP dans la partie administration.
Gérer les préférences système (manage_sysprefs)
Cette permission donne accès à la section Préférences systèmes dans la partie administration.
Gérer les limites de transfert entre bibliothèque et la matrice des coûts de transport (manage_transfers)
Cette permission donne accès aux sections limites de transfert réseau et matrice des coûts de transport dans le module administration.
Gérer les paramètres de statistiques d’usage (manage_usage_stats)
Cette permission donne accès à la section partager vos statistiques d’utilisation dans le module administration.
Autres permissions de paramétrage (parameters_remaining_permissions)
Cette permission donne accès à toutes les autres sections de l’administration qui ne sont pas mentionnées ci-dessus.
Ajouter, modifier et afficher les informations de l’adhérent (borrowers)
Les permissions suivantes sont utilisées pour donner accès aux fonctions du module adhérent. Cocher de la permission “borrowers” donnera accès à toutes les fonctionnalités. Cliquez sur « Afficher les détails » pour donner des permissions spécifiques.
Supprimer les adhérents (delete_borrowers)
Cette permission accorde la capacité de supprimer des adhérents.
Ajouter, modifier et afficher les informations de l’adhérent (edit_borrowers)
Cette permission donne accès au module adhérents pour afficher les fiches d’adhérents, autant pour ajouter de nouveaux adhérents que les modifier.
Avertissement
Les membres du personnel ayant cette permission, mais sans la permission list_borrowers pourront voir les fiches des adhérents (via un lien direct, par exemple), mais ne pourront pas faire de recherche.
Rechercher, lister et voir des adhérents (list_borrowers)
Cette permission donne accès au module adhérents pour faire une recherche et afficher des informations adhérents.
Avertissement
Les bibliothécaires ayant cette permission, mais sans la permission edit_borrowers pourront voir les adhérents, mais sans les modifier ni en ajouter.
Fusionner des adhérents (merge_borrowers)
Cette permission accorde la capacité de fusionner des adhérents.
Envoyer les messages aux adhérents (send_messages_to_patrons)
Version
Cette permission, et la fonctionnalité correspondante, ont été ajoutées à Koha dans sa version 24.05.
Cette permission donne le droit d’envoyer des emails personnalisés aux adhérents.
Note
Sans cette permission, mais avec la permission edit_borrowers permission, les bibliothécaires pourront ajouter et gérer les notes internes et les messages à l’OPAC.
Voir les informations adhérents de toutes les bibliothèques. (view_borrower_infos_from_any_libraries)
Cette permission donne le droit d’accéder aux informations des adhérents de toutes les bibliothèques.
Si un bibliothécaire n’a pas cette permission, mais a la permission edit_borrowers, il ne peut voir que les adhérents de sa propre bibliothèque ou groupe de bibliothèques.
Définir les permissions (permissions)
Cette permission donne la capacité de définir des permissions pour d’autres membres du personnel.
Important
Les membres du personnel ayant cette permission ne pourront pas définir des permissions pour les adhérents dont la catégorie n’est pas du type “professionnel”, sauf s’ils ont également la permission staffaccess.
Faire et modifier des réservations pour les adhérents (reserveforothers)
Les permissions suivantes sont utilisées pour donner accès aux options de réservations options. Sélectionner la permission reserveforothers donnera accès à toutes les fonctionnalités. Cliquez sur “Afficher les détails” pour donner des permissions spécifiques.
Modifier la priorité des réservations (modify_holds_priority)
Cette permission permet aux membres du personnel de modifier l’ordre des réservations (faire monter ou descendre des adhérents dans la file).
Réserver pour les adhérents (place_holds)
Cette permission permet aux bibliothécaires de réaliser des réservations dans l’interface professionnelle.
Editer le catalogue (Modifier les données bibliographiques/d’exemplaires) (editcatalogue)
Les permissions suivantes sont utilisées pour donner accès aux fonctions du module catalogage. Sélectionner la permission editcatalogue donnera accès à toutes les fonctionnalités. Cliquez sur “Afficher les détails” pour donner des permissions spécifiques.
Utiliser l’éditeur de catalogage avancé (advanced_editor)
Cette permission permet d’utiliser l’éditeur avancé de catalogage dans le module catalogage.
Important
Les membres du personnel ayant cette permission ont également besoin de la permission edit_catalogue.
Supprimer tous les exemplaires à la fois (delete_all_items)
Cette permission permet d’utiliser l’option “Supprimer tous les éléments” situé dans le menu “Modifier” dans le catalogue, pour supprimer tous les éléments d’un enregistrement.
Modifier n’importe quel exemplaire, y compris les exemplaires qui auraient été sinon restreints (edit_any_item)
Cette permission permet de modifier des éléments appartenant à des bibliothèques d’autres groupes de bibliothèques.
Important
Les membres du personnel ayant cette permission ont également besoin de la permission edit_items.
Editer le catalogue (Modifier les données bibliographiques / d’exemplaires) (edit_catalogue)
Cette permission permet d’ajouter des notices bibliographiques (y compris l’import des notices par z39.50/SRU, et la duplication de notice), de modifier des notices bibliographiques existantes, de fusionner des notices bibliographiques existantes, et de supprimer des notices bibliographiques.
Modifier les exemplaires (edit_items)
Cette permission permet d’ajouter de nouveaux exemplaires, de modifier des exemplaires, et de supprimer des exemplaires, mais pas des notices bibliographiques.
Cette permission permet également au bibliothécaire la création et l’utilisation de modèles d’exemplaires, mais la permission manage_item_editor_templates est nécessaire pour gérer les modèles d’exemplaires créés par d’autres membres du personnel.
Limiter la modification d’exemplaires aux sous-champs définis dans la préférence système SubfieldsToAllowForRestrictedEditing (edit_items_restricted)
Cette permission limite la capacité de modifier les exemplaires aux sous-champs spécifiés dans la préférence système SubfieldsToAllowForRestrictedEditing.
Important
Les membres du personnel ayant cette permission ont également besoin de la permission edit_items.
Modifier les notices verrouillées (edit_locked_records)
Cette permission permet d’éditer les notices provenant de sources verrouillées.
Version
Cette permission et la fonctionnalité correspondante ont été ajoutées dans Koha dans la version 24.05.
Catalogage rapide (fast_cataloging)
Cette permission permet de cataloguer en utilisant la grille de catalogage rapide depuis la page la page principale de circulation et la page principale de catalogage.
Créer, mettre à jour et supprimer les modèles de modification d’exemplaires possédés par d’autres (manage_item_editor_templates)
Cette permission permet de gérer les modèles d’exemplaire créés par d’autres utilisateurs.
Note
Quiconque ayant la permission edit_items peut créer et partager des modèles d’éléments, et supprimer leurs propres modèles.
Créer, mettre à jour et supprimer des groupes de types de documents, ajouter ou enlever des exemplaires d’un groupe de types de documents (manage_item_groups)
Cette autorisation permet de créer, modifier et supprimer des groupes d’exemplaires.
Gérer les amendes et les charges des adhérents (updatecharges)
Les permissions suivantes sont utilisées pour donner accès aux fonctions de l’onglet comptabilité dans les fiches adhérents. Sélectionner la permission updatecharges permettra d’accéder à toutes les fonctionnalités. Cliquez sur “Afficher les détails” pour donner des permissions spécifiques.
Faire une remise sur les débits pour les adhérents (discount)
Cette permission permet d’appliquer des remises sur les débits.
Important
Les membres du personnel ayant cette permission ont également besoin de la permission remaining_permissions.
Ajouter des crédits manuels à un compte d’adhérent (manual_credit)
Cette permission donne la capacité d’ajouter des crédits manuels au compte d’un adhérent.
Important
Les membres du personnel ayant cette permission ont également besoin de la permission remaining_permissions.
Ajouter des factures manuelles à un compte d’adhérent (manual_invoice)
Cette permission donne la capacité d’ajouter des factures manuelles au compte d’un adhérent.
Important
Les membres du personnel ayant cette permission ont également besoin de la permission remaining_permissions.
Montants crédités aux adhérents (payout)
Cette permission donne la capacité de rembourser les crédits aux adhérents.
Important
Les membres du personnel ayant cette permission ont également besoin de la permission remaining_permissions.
Rembourser des paiements aux adhérents (refund)
Cette permission donne la capacité de rembourser les paiements que les adhérents ont déjà faits à la bibliothèque.
Important
Les membres du personnel ayant cette permission ont également besoin de la permission remaining_permissions.
Autres permissions permettant de gérer les amendes et frais (remaining_permissions)
Cette permission donne la capacité de gérer les amendes et les frais autres que les actions décrites dans les autres sous-permissions (remises, crédits, remboursements et pertes et profits).
Cela comprend, sans s’y limiter :
la possibilité d’accéder à l’onglet comptabilité de la fiche adhérent;
la possibilité de payer les frais existants;
la possibilité d’annuler des frais;
la possibilité d’annuler des paiements; et
la possibilité de voir l’historique des transactions des adhérents.
Passer les amendes et frais en pertes et profits (writeoff)
Cette permission donne la capacité de gérer les pertes et profits adhérents.
Important
Les membres du personnel ayant cette permission ont également besoin de la permission remaining_permissions.
Gérer les acquisitions (acquisition)
Les permissions suivantes sont utilisées pour donner accès aux fonctions du module acquisitions. Sélectionner la permission acquisition donnera accès à toutes les fonctionnalités. Cliquez sur “Afficher les détails” pour donner des permissions spécifiques.
Avertissement
Toutes les sous-permissions d’acquisition donnent accès à la page d’accueil des acquisitions. Cela signifie que le personnel qui a une ou plusieurs des autorisations suivantes sera en mesure d’afficher les budgets, de rechercher et de consulter les renseignements sur les fournisseurs et de consulter les factures.
Ajouter et supprimer les budgets (sans possibilité de modification) (budget_add_del)
Cette autorisation donne la possibilité de ajouter des postes et supprimer des postes dans un budget.
Important
Les membres du personnel ayant cette permission ont également besoin de la permission budget_manage et la permission budget_modify.
Avertissement
Sans la permission period_manage, les membres du personnel pourront uniquement ajouter des sous-postes budgétaire, car ils ne pourront pas accéder à la page d’administration des budgets pour ajouter des postes budgétaires de premier niveau.
Gérer les postes budgétaires (budget_manage)
Cette permission permet d’accéder à la page d’administration des postes budgétaire.
Notez que cela donne uniquement accès à la page, vous devrez donner à votre personnel la permission budget_add_del et la permission budget_modify si vous voulez qu’ils puissent apporter des modifications aux postes budgétaires.
Gérer tous les postes budgétaires (budget_manage_all)
Cette permission accorde l’accès à tous les postes budgétaires, quelles que soient les restrictions qui leur sont imposées (restrictions concernant le propriétaire, l’utilisateur ou la bibliothèque).
Important
Les membres du personnel ayant cette permission ont également besoin de la permission budget_manage.
Modifier les budgets (modifier les lignes existantes, sans pouvoir en créer de nouvelles) (budget_modify)
Cette permission permet de modifier l’information et les montants des postes budgétaires.
Important
Les membres du personnel ayant cette permission ont également besoin de la permission budget_manage et la permission budget_add_del.
Gérer les contrats (contracts_manage)
Cette permission permet d’ajouter, de modifier et de supprimer des contrats avec les fournisseurs.
Gérer les devises et taux de change (currencies_manage)
Cette permission permet d’accéder à la page de configuration des devises et taux de change.
Supprimer les paniers (delete_baskets)
Cette permission permet de supprimer les paniers.
Important
Les membres du personnel ayant cette permission ont également besoin de la permission order_manage pour voir les paniers avant de les supprimer.
Supprimer les factures (delete_invoices)
Cette permission donne la possibilité de supprimer des factures.
Gérer les transmissions EDIFACT (edi_manage)
Cette permission permet d’accéder à la page d’administration du compte EDI, à la page d’administration des EAN de la bibliothèque et accéder aux messages EDI envoyés.
Modifier les factures (edit_invoices)
Cette permission permet de modifier les factures (modifier les informations sur les factures comme le numéro de facture, la date de facturation ou d’expédition, ajouter des ajustements, etc.).
Important
Les membres du personnel ayant cette permission ne pourront pas recevoir de commandes sur une facture à moins d’avoir également la permission order_receive.
Gérer les bordereaux de commande (group_manage)
Cette permission offre la possibilité de créer, modifier, clôturer et supprimer des groupes de paniers.
Gérer les problèmes fournisseur (issue_manage)
Cette permission permet de créer, modifier et supprimer les problèmes fournisseurs.
Version
Cette permission a été ajoutée dans la version 23.11 de Koha.
Fusionner des factures (merge_invoices)
Cette permission permet de fusionner des factures.
Gérer les paniers et lignes de commande (order_manage)
Cette permission accorde la capacité de placer les commandes, y compris créer des paniers, ajouter des articles au panier, éditer des paniers existants, fermer des paniers, etc.
Important
Les membres du personnel ayant cette permission ne pourront pas commander depuis un nouveau fichier à moins d’avoir également la permission stage_marc_import.
De même, les membres du personnel ne pourront pas commander à partir des titres ayant les plus forts taux de réservation à moins d’avoir également la permission circulate_remaining_permissions.
Gérer tous les paniers et lignes de commande, quelques soient les restrictions qui leur sont attribuées (order_manage_all)
Cette permission permet de gérer tous les paniers et commandes même si elles sont limitées au propriétaire, aux utilisateurs ou à la bibliothèque.
Important
Les membres du personnel ayant cette permission ont également besoin de la permission order_manage.
Réceptionner les commandes et gérer les colis (order_receive)
Cette permission permet de créer des factures, réceptionner des commandes, et réclamer des commandes en retard.
Gérer les budgets (period_manage)
Cette permission permet d’accéder à la page d’administration budgétaire et la possibilité de créer, reproduire, modifier et supprimer des budgets.
Avertissement
Sans la permission budget_manage, budget_add_del permission, et la permission budget_modify, le personnel ne pourra pas ajouter ou modifier des fonds budgétaires.
Gérer les prévisions budgétaires (planning_manage)
Cette permission permet d’accéder à la page planification budgétaire.
Important
Les membres du personnel ayant cette permission ont également besoin de la permission budget_manage, et la permission period_manage.
Réouvrir les factures fermées (reopen_closed_invoices)
Cette permission permet de rouvrir des factures fermées.
Gérer les fournisseurs (vendors_manage)
Cette permission donne la possibilité d’ajouter, de modifier et de supprimer des contrats avec les fournisseurs.
Notez que les fournisseurs sont utilisés dans le module acquisitions, le module périodiques, et le module gestion des ressources électroniques.
Gestion des suggestions (suggestions)
Les autorisations suivantes sont utilisées pour donner accès a la fonction de gestion des suggestions d’achats du module acquisitions. Il n’y a actuellement qu’une seule sous-permission. Cocher suggestions ou suggestion_manage aura le même effet.
Créer des suggestions d’achat (suggestions_create)
Cette permission donne le droit de gérer les suggestions d’achat, y compris la création de nouvelles suggestions et la modification des statuts des suggestions.
Version
Cette permission est ajoutée dans la version 24.11 de Koha. Dans les versions précédentes, la permission suggestions_manage donne la possibilité de créer de nouvelles suggestions d’achat et de voir et éditer les suggestions existantes.
Supprimer des suggestions d’achat (suggestions_delete)
Cette permission accorde la capacité de supprimer des suggestions d’achat.
Version
Cette permission est ajoutée dans la version 24.11 de Koha. Dans les versions précédentes, la permission suggestions_manage donne la possibilité de créer de nouvelles suggestions d’achat et de voir et éditer les suggestions existantes.
Gérer les suggestions d’achat (suggestions_manage)
Cette permission donne le droit de voir les suggestions d’achat, y compris la modification des statuts des suggestions.
Attention
Avant la version 24.11, cette permission donnait la possibilité de créer de nouvelles suggestions d’achats, de supprimer les suggestions existante et de les modifier. À partir de la version 24.11, les bibliothécaires avec cette permission pourront uniquement modifier des suggestions d’achat existantes.
Utiliser tout les outils (tools)
Les permission suivantes sont utilisées pour donner accès aux fonctions du module tools, y compris certains outils cataloguing. Cocher la permission tools donnera accès à tous les outils. Cliquez sur “Afficher les détails” pour donner accès à des outils spécifiques.
Accès aux fichiers stockés sur le serveur (access_files)
Cette permission donne accès à l’outil Accès aux fichiers pour accéder aux fichiers stockés sur le serveur.
Lancer la modifications par lot des dates d’échéance (batch_extend_due_dates)
Cette permission donne accès à l’outil Modification des dates d’échéance par lot.
Télécharger les photos des adhérents par lots ou une à une (batch_upload_patron_images)
Cette permission donne accès à l’outil Télécharger des photos d’adhérents.
Supprimer les anciens adhérents anciens et anonymiser l’historique de prêt (suppression de l’historique de lecture des adhérents) (delete_anonymize_patrons)
Cette permission donne accès à l’outil Suppression et anonymisation des adhérents par lot.
Rédiger des contenus supplémentaires pour l’OPAC et l’interface professionnelle (annonces et personnalisations HTML) (edit_additional_contents)
Cette permission donne accès à l’outil Annonces, l’outil Personnalisations HTML, et à l’outil Pages.
Définir les jours de fermeture de la bibliothèque (edit_calendar)
Cette permission donne accès à l’outil Calendrier.
Paramétrage des relances pour les documents en retard (edit_notice_status_triggers)
Cette permission donne accès à l’outil Paramétrage des relances.
Définir les notifications (edit_notices)
Cette permission donne accès à l’outil Notifications et tickets.
Lancer la modification par lot des adhérents (edit_patrons)
Cette permission donne accès a l’outil Modification d’adhérents par lots.
Modifier les citations pour la fonctionnalité citation-du-jour (edit_quotes)
Cette permission donne accès à l’outil Éditeur de citations pour la fonctionnalité “Citation”.
Exportation de notices bibliographiques avec leurs exemplaires (export_catalog)
Cette permission donne accès à l’outil Exporter les données du catalogue du module Catalogage
Important
Les membres du personnel ayant cette permission ont également besoin d’au moins une des sous-permission editcatalogue.
Import des données sur les adhérents (import_patrons)
Cette permission donne accès à l’outil Importer des adhérents.
Réaliser l’inventaire (récolement) de votre catalogue (inventory)
Cette permission donne accès a l’outil Inventaire/Récolement du module Catalogage.
Lancer la suppression par lot des exemplaires (items_batchdel)
Cette permission donne accès à l’outil Suppression d’exemplaires par lot du module Catalogage.
Lancer la modification par lot des exemplaires (items_batchmod)
Cette permission donne accès à l’outil Modification d’exemplaires par lots et à l’outil Modification d’exemplaires par ancienneté du module Catalogage.
Limiter la modification par lots des exemplaires aux sous-champs définis dans la préférence système SubfieldsToAllowForRestrictedBatchmod (items_batchmod_restricted)
Cette permission limite l’outil de modification d’exemplaires par lots aux sous-champs définis dans la préférence système SubfieldsToAllowForRestrictedBatchmod.
Important
Les bibliothécaires ayant cette permission ont également besoin de la permission items_batchmod.
Créer des étiquettes et des codes à barres imprimables à partir des données du catalogue et des adhérents (label_creator)
Cette permission donne accès a l’outil Créateur de cartes d’adhérent ainsi qu’aux outils Créateur d’étiquettes, Générateur d’images de codes à barres et Créateur d’étiquettes rapide du module Catalogage.
Gérer les profils d’export CSV (manage_csv_profiles)
Cette permission donne accès à l’outil Profils CSV.
Ajouter, modifier ou supprimer des listes d’adhérents et leur contenu (manage_patron_lists)
Cette permission donne accès à l’outil Listes d’adhérents.
Important
Les membres du personnel ayant cette permission ont également besoin de la permission list_borrowers (et de manière facultative de la permission view_borrower_infos_from_any_libraries), sans quoi ils ne pourront que créer des listes ou voir des listes existantes mais sans pouvoir leur ajouter des adhérents.
Gestion des notices MARC importées dans le réservoir, dont leur importation dans le catalogue ou annulation de l’importation (manage_staged_marc)
Cette permission donne accès à l’outil Gestion des notices importées dans le réservoir du module Catalogage.
Important
À moins d’avoir également la permission stage_marc_import, les bibliothécaires ayant cette permission ne pourront que gérer des notices déjà été téléchargées par un autre bibliothécaire. Cela dépend de vos flux de travail.
Gérer les modèles de transformation MARC (marc_modification_templates)
Cette permission donne accès à l’outil Modèles de transformation MARC du module Catalogage.
Modérer les commentaires des adhérents (moderate_comments)
Cette permission donne accès à l’outil Commentaires.
Gérer les collections tournantes (rotating_collections)
Cette permission donne accès à l’outil Collections tournantes.
Planification de tâches à exécuter (schedule_tasks)
Cette permission donne accès à l’outil Planificateur de tâches.
Télécharger des notices MARC dans le réservoir (stage_marc_import)
Cette permission donne accès à l’outil Télécharger des notices dans le réservoir du module Catalogage.
Important
A moins d’avoir également la permission manage_staged_marc, les membres du personnel ayant cette permission pourront uniquement télécharger des notices mais sans pouvoir les importer dans le catalogue. Cela dépend de vos flux de travail.
Télécharger n’importe quel fichier (upload_general_files)
Cette permission donne accès à l’outil Téléchargements pour télécharger des fichiers.
Télécharger des images de couverture locales (upload_local_cover_images)
Cette permission donne accès à l’outil Téléverser une image de couverture locale du module Catalogage pour télécharger un lot d’images de couverture locales, ainsi que la capacité d’ajouter une image de couverture locale depuis la page détail d’une notice et de supprimer une image de couverture locale.
Note
Afin d’ajouter des images de couverture aux exemplaires, les membres du personnel pourront également avoir besoin de la permission edit_items.
Gérer les fichiers téléversés (upload_manage)
Cette permission donne accès aux fichiers télécharger via l’outil Téléchargement.
Important
Les membres du personnel ayant cette permission ont également besoin de la permission upload_general_files pour accéder à l” outil chargement.
Consultation des logs du système (view_system_logs)
Cette permission donne accès à l’outil Visualiseur des logs, ainsi qu’à l’onglet “Log des modifications” (dans la fiche adhérent, par exemple, ou dans la vue détaillée d’une notice).
Gérer les abonnements aux périodiques (serials)
Les permissions suivantes sont utilisées pour donner accès aux fonctions du module Périodiques. Sélectionner la permission serials donnera accès à toutes les fonctionnalités. Cliquez sur “Afficher les détails” pour donner des permissions spécifiques.
Note
Les bibliothécaires avec au moins une des sous-permissions pourront faire une recherche et afficher les abonnements, ainsi que gérer les modèles de numérotation.
Important
La permission serials est nécessaire pour gérer les périodicités.
Note
Certains bibliothécaires pourraient aussi avoir besoin des permissions d’acquisition, par exemple vendors_manage permission puisque les vendeurs de périodiques sont gérés dans le module acquisitions.
Vérifier l’expiration d’un périodique (check_expiration)
Cette permission donne la capacité de vérifier l’expiration d’un périodique.
Réclamer un fascicule en retard (claim_serials)
Cette permission donne la capacité de réclamer les périodiques manquants.
Créer un nouvel abonnement (create_subscription)
Cette permission donne la capacité d’ajouter de nouveaux abonnements.
Supprimer un abonnement existant (delete_subscription)
Cette permission donne la capacité de supprimer des abonnements.
Modifier un abonnement existant (edit_subscription)
Cette permission donne la capacité de modifier un abonnement de périodique existant.
Réception des périodiques (receive_serials)
Cette permission donne la capacité de recevoir les fascicules d’abonnements existants.
Renouveler un abonnement (renew_subscription)
Cette permission donne la capacité de renouveler les abonnements de périodiques.
Routage (routing)
Cette permission donne la capacité de gérer les listes de routage.
Gérer les abonnements de tous les sites (superserials)
Cet permission n’est utile que si la préférence système IndependentBranches est utilisée.
Permet d’accéder au module Rapports (reports)
Les permissions suivantes sont utilisées pour donner accès aux fonctions du module rapports. Sélectionner la permission reports donnera accès à toutes les fonctionnalités. Cliquez sur “Afficher les détails” pour donner des permissions spécifiques.
Note
Les bibliothécaires avec au moins une des sous-permissions pourront lancer des rapport dans la section rapport statistique, ainsi que les autres rapport sur la page principale des rapports.
Important
Les rapports disponibles sur la page Circulation ne sont pas contrôlées par cette permission.
Créer des rapports SQL (create_reports)
Cette permission donne la capacité de créer des rapports guidés et des rapports SQL.
Important
Les bibliothécaires ayant besoin d’exécuter des rapports déjà créés ont besoin de la permission execute_reports.
Supprimer des rapports SQL (delete_reports)
Cette permission donne la capacité de supprimer des rapports SQL sauvegardés.
Important
Les bibliothécaires avec ces permissions ont aussi besoin de la permission execute_reports.
Exécuter des rapports SQL (execute_reports)
Cette permission donne la capacité d’exécuter des rapports SQL personnalisés, mais pas leur création ou modification.
Permet aux membres du personnel de modifier les permissions, les identifiants et les mots de passe du reste du personnel (staffaccess)
Cette permission donne la capacité de modifier les permissions, mots de passe, and identifiants des adhérents membres du personnel (adhérent dont la catégorie est de type “Bibliothécaires”).
Important
Les bibliothécaires avec cette permission ont aussi besoin des permissions edit_borrowers et permissions.
Réserves de cours (coursereserves)
Les permissions suivantes sont utilisées pour donner accès aux fonctions du module réserves de cours. Sélectionner la permission coursereserves donnera accès à toutes les fonctionnalités. Cliquez sur “Afficher les détails” pour donner des permissions spécifiques.
Note
Notez que si la préférence système UseCourseReserves n’est pas activée, ces permissions n’auront aucun effet.
Ajouter des réserves de cours (add_reserves)
Cette permission donne la capacité d’ajouter des documents à des cours existant.
Supprimer des réserves de cours (delete_reserves)
Cette permission donne la capacité de supprimer des documents des cours existants.
Ajouter, modifier ou supprimer des cours (manage_courses)
Cette permission donne la capacité de créer, éditer et supprimer des cours.
Les plugins Koha (plugins)
Les permissions suivantes sont utilisées pour donner accès aux plugins. Vérifier les permissions de plugins donnera accès à toutes les fonctionnalités. Cliquez sur “Afficher les détails” pour donner des permissions spécifiques.
Utiliser les plugins d’administration (admin)
Cette permission donne la possibilité d’utiliser plugins d’administration.
Configurer les plugins (configure)
Cette permission donne la possibilité de “configurer” une section d’un plugin, s’il en a une.
Note
Le personnel avec cette permission a aussi besoin soit de la permission rapport soit de la permission outil pour pouvoir accéder aux plugins.
Gérer les plugins (manage)
Cette permission donne la possibilité d”installer ou de désinstaller des plugins.
Note
Le personnel avec cette permission a aussi besoin soit de la permission rapport soit de la permission outil pour pouvoir accéder aux plugins.
Utiliser les plugins rapport (report)
Cette permission donne la possibilité d’utiliser les plugins de rapport.
Utiliser les plugins outils (tool)
Cette permission donne la possibilité d’utiliser les plugins outils.
Listes (lists)
Les permissions suivantes sont utilisées pour donner accès à la gestion des listes publiques. Cocher les permissions de listes donnera accès à toutes les fonctionnalités. Cliquer sur “Afficher les détails” permettra de donner des permissions spécifiques.
Important
Tout le personnel a la possibilité de créer et modifier ses propres listes. Cette permission n’est nécessaire que si vous souhaitez donner à un membre du personnel la permission de supprimer les listes publiques qu’il n’a pas créé.
Créer des listes publiques (create_public_lists)
Cette permission donne la capacité de créer de nouvelles listes publiques.
Version
Cette permission a été ajoutée à Koha dans sa version 24.11.
Dans les versions précédentes, un bibliothécaire avec la permission lists pouvait créer des listes publiques comme privées.
Supprimer les listes publiques (delete_public_lists)
Cette permission donne la possibilité de supprimer des listes publiques créées par quelqu’un d’autre.
Modifier les contenus des listes publiques (edit_public_list_contents)
Cette permission donne la possibilité de changer les contenus des listes publiques qui ont la permission « Personnel autorisé uniquement ».
Modifier les listes publiques (edit_public_lists)
Cette permission donne la possibilité de modifier le nom, les paramètres et les permissions d’une liste publique créée par quelqu’un d’autre.
Note
Ceci ne donne pas au membre du personnel la permission de changer les contenus de la liste, à moins qu’il ait également les permissions listes.
Utiliser les listes publiques (use_public_lists)
Cette permission donne la capacité de visualiser les listes publiques.
Version
Cette permission a été ajoutée à Koha dans sa version 24.11.
Dans les versions précédentes, un bibliothécaire avec la permission lists pouvait voir les listes publiques.
Clubs d’adhérents (clubs)
Les permissions suivantes sont utilisées pour donner accès aux fonctionnalités de clubs d’adhérents. Cocher la permission clubs donnera accès à toutes les fonctionnalités. Cliquez sur “Afficher les détails” pour donner des permissions spécifiques.
Créer et modifier des clubs (edit_clubs)
Cette permission donne la possibilité de créer et modifier des clubs d’adhérents en utilisant les modèles de clubs définis dans l’outil clubs d’adhérents.
Créer et modifier des modèles de clubs (edit_templates)
Cette permission donne la possibilité de créer et modifier des modèles de club en utilisant l” outil clubs d’adhérents.
Inscrire des adhérents dans des clubs (enroll)
Cette permission donne la possibilité d”inscrire des adhérents dans des clubs depuis la fiche adhérent dans l’interface professionnelle.
Note
Les membres du personnel ayant cette permission ont également besoin soit de la permission edit_borrowers ou plus largement de la permission borrowers pour pouvoir accéder aux fiches adhérents et les inscrire dans des clubs.
Créer et modifier des demandes de Prêt Entre Bibliothèques (PEB)
Cette permission donne accès au module PEB (ILL).
Modules d’auto-prêt (self_check)
Les permissions suivantes sont utilisées pour activer les modules d’auto-prêt et d’auto-retour. Cocher la permission self_check donnera accès à toutes les fonctionnalités. Cliquez sur “Afficher les détails” pour donner des permissions spécifiques.
Important
Ces permissions devront être données à un adhérent dédié à l’auto-prêt, pas a un membre du personnel normal.
Se connecter au module de retour en libre service (self_checkin_module)
Cette permission est utilisée pour activer le module d’auto-retour. Donnez-la uniquement à un adhérent dédié créé spécialement dans ce but.
Important
Cette permission empêche l’adhérent d’utiliser toutes les autres fonctionnalités de l’OPAC.
Effectuer un auto-prêt à l’OPAC (self_checkout_module)
Cette permission est utilisée pour activer le module d’auto-prêt. Donnez-la uniquement à un adhérent dédié créé spécialement dans ce but.
Note
Cette permission devra être utilisée pour l’adhérent saisi dans la préférence système AutoSelfCheckID.
Gérer les collections tournantes (stockrotation)
Les permissions suivantes sont utilisées pour donner accès à la gestion des collections tournantes. Cocher la permission collections tournantes donnera accès à toutes les fonctionnalités. Cliquez sur “Afficher les détails” pour donner des permissions spécifiques.
Ajouter et retirer des exemplaires des collections tournantes (manage_rota_items)
Cette permission donne la possibilité de gérer les exemplaires dans les collections tournantes.
Créer, modifier et supprimer des collections tournantes (manage_rotas)
Cette permission donne la possibilité de gérer les collections tournantes.
Gestion de la trésorerie (cash_management)
Les permissions suivantes sont utilisées pour donner accès au module points de vente et aux fonctionnalités de caisse enregistreuse. Cocher la permission cash_management donnera accès à toutes les fonctionnalités. Cliquez sur “Afficher les détails” pour donner des permissions spécifiques.
Effectuer des actions de remboursement anonymes (anonymous_refund)
Cette permission donne la possibilité de rembourser des paiements effectués via le point de vente depuis l’historique des transactions de la caisse enregistreuse.
Effectuer des actions d’encaissement de caisse enregistreuse (cashup)
Cette permission donne la possibilité d’enregistrer des encaissements de caisse enregistreuse.
Accéder à la page de point de vente et effectuer des paiements (takepayment)
Cette permission donne accès au module point de vente.
Rappels (recalls)
Les permissions suivantes sont utilisées pour donner accès aux fonctionnalités de rappels. Cocher la permission rappels donnera accès à toutes les fonctionnalités. Cliquez sur “Afficher les détails” pour donner des permissions spécifiques.
Gérer les rappels pour les adhérents (manage_recalls)
Cette permission donne accès à la page de gestion des rappels.
Gérer le module des ressources électroniques (erm)
Cette permission donne accès au module de gestion des ressources électroniques.
Important
Les membres du personnel doivent avoir cette permission pour être attachés comme utilisateur du contrat et de la licence dans les fiches de contrat et de licence.
Autorise le personnel à changer de site de connexion (loggedinlibrary)
Cette permission donne la possibilité de changer de site au moment de se connecter à l’interface professionnelle.
Cette permission donne aussi la possibilité de choisir le site dans l’interface professionnelle.
Note
Les membres du personnel qui n’ont pas cette permission ne pourront pas se connecter à leur bibliothèque de rattachement.
Gérer le module de conservation (preservation)
Cette permission donne accès au module de conservation.
Version
Cette permission a été ajoutée dans la version 23.11 de Koha.
Informations adhérent
Quand vous examinez la fiche d’un adhérent, vous choisissez parmi les onglets de gauche, le type d’information que vous souhaitez voir.
Aller à : Adhérents > Parcourir ou chercher un adhérent > Cliquer sur le nom de l’adhérent
Prêt
Pour des informations sur le prêt de documents, cliquez sur la section Prêt de ce manuel.
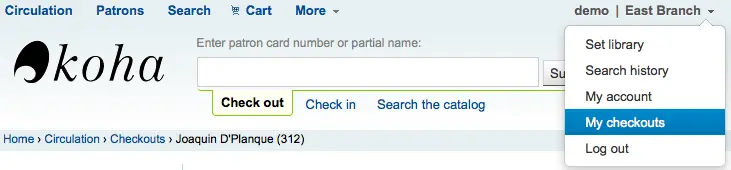
Les membres du personnel peuvent accéder à l’écran de leurs propres emprunts en cliquant sur leur nom d’utilisateur situé en haut à droite de l’interface professionnelle et en choisissant “Mes prêts”
Details
Note
Les membres du personnel peuvent accéder aux détails de leur compte en cliquant sur leur nom d’utilisateur situé en haut à droite de l’interface professionnelle et en choisissant “Mon compte”

Toutes les informations des adhérents apparaissent dans l’onglet Détails. Celui-ci inclut les coordonnées, des notes, attributs et identifiants de l’adhérent, préférences de messagerie, etc remplis lors de l’ajout de l’adhérent.
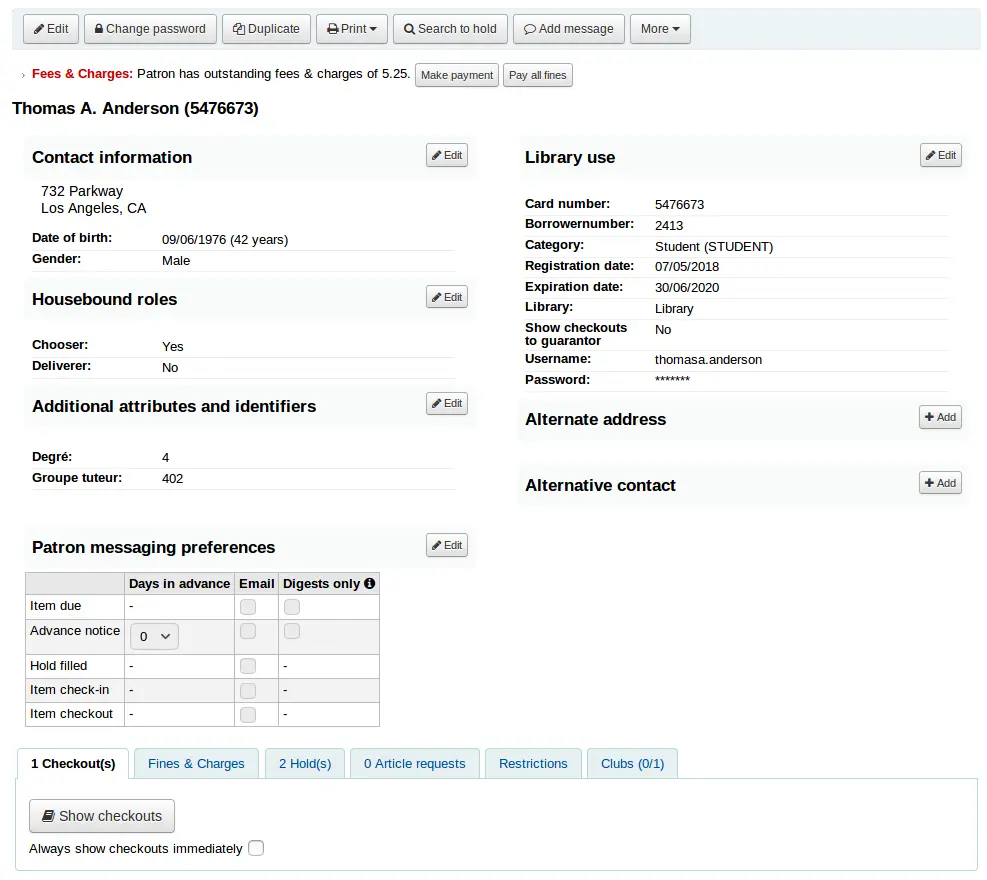
Dans le cas où les adhérents sont “Enfant” ou “Professionnel”, leurs garants associés apparaissent sur la fiche adhérent.
Un adhérent « enfant » sera rattaché à son garant
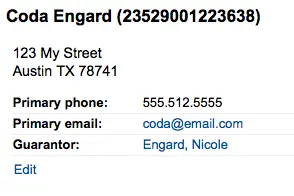
Sur la fiche d’un garant, tous ses enfants (ou toutes les personnes pour lesquels il se porte garant) sont affichés
Si l’âge de l’adhérent n’est pas dans la tranche d’âge définie pour sa catégorie, une alerte apparaîtra sur sa fiche.

Résumé de la circulation
Sur la page de détail d’un adhérent, sous la section contenant ses informations personnelles, il y a une section à onglets contenant ses exemplaires empruntés, en retard et réservés, entre autres.
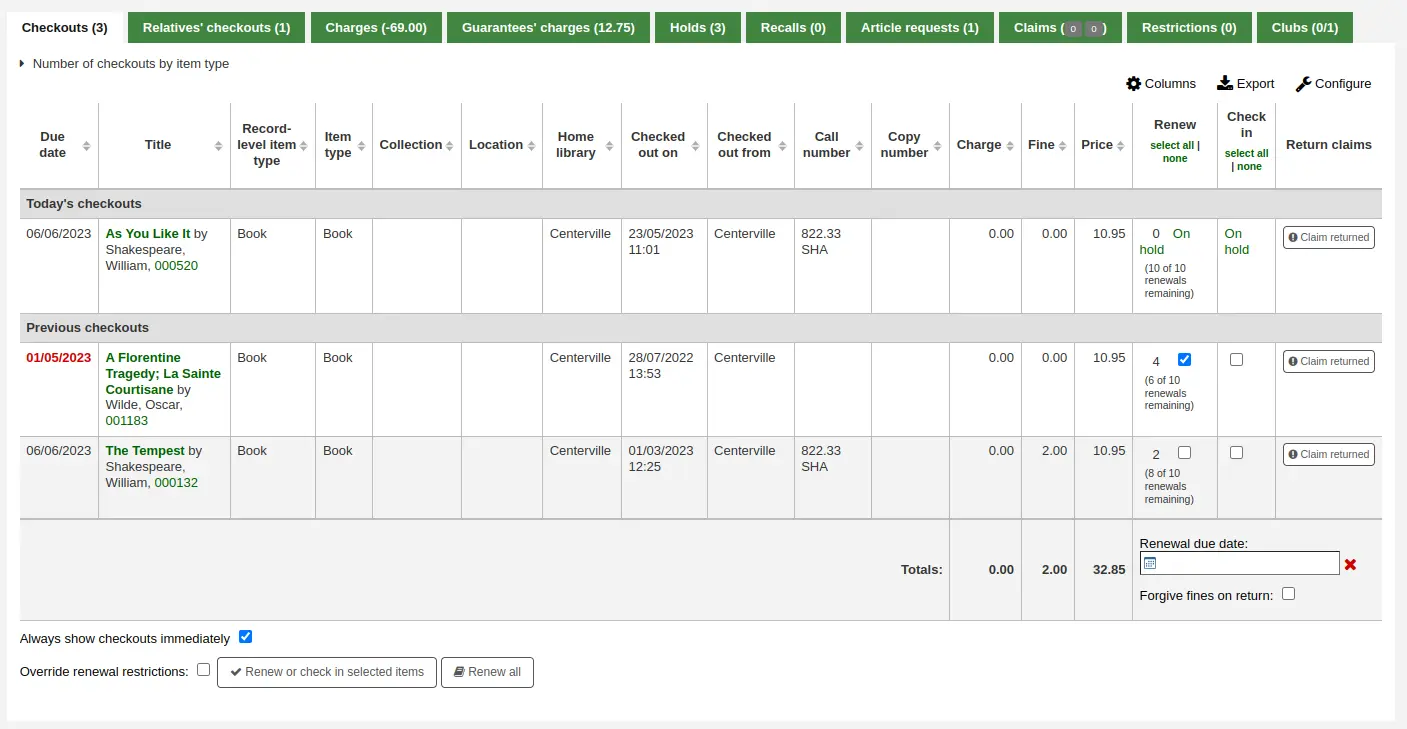
Prêts
Le premier tableau affiche les exemplaires que l’adhérent a actuellement en prêt. Le nombre des prêts en cours sera affiché dans le titre du tableau.
Note
Vous pouvez personnaliser les colonnes de ce tableau dans la section Configurer les colonnes du module Administration (référence du tableau : issues-table, sous la rubrique Adhérents).
Cliquez sur “Configurer” en haut à droite du tableau pour accéder directement au module d’administration.
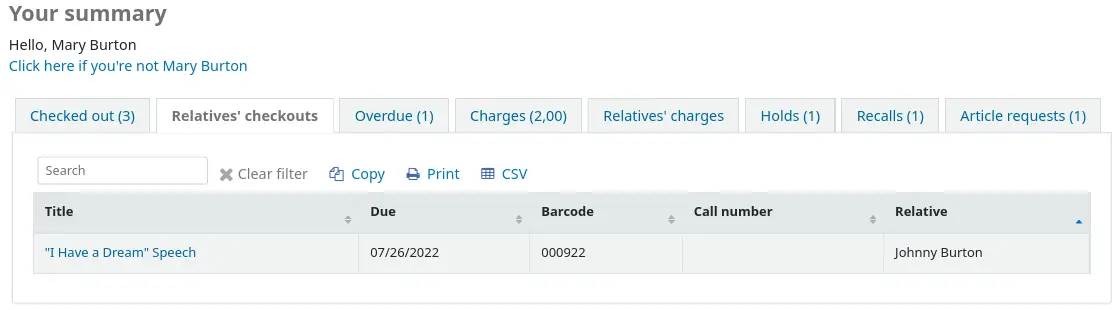
Prêts de la famille
S’ils ont de la famille inscrite à la bibliothèque, les bibliothécaires peuvent voir ce qu’ont emprunté les autres membre de la famille. Le nombre total des prêts de toute la famille s’affichera dans le titre de l’onglet.
Note
Vous pouvez personnaliser les colonnes de ce tableau dans la section Configurer les colonnes du module Administration (référence du tableau : relatives-issues-table, sous la rubrique Adhérents).
Cliquez sur “Configurer” en haut à droite du tableau pour accéder directement au module d’administration.
Frais
L’onglet Frais s’affichera uniquement sur les comptes des adhérents qui ont des montants dus ou des crédits inutilisés. Le montant total des charges dues ou des crédits inutilisés s’affichera dans le titre de l’onglet.
L’onglet affichera le montant total, sans aucun détail. Pour voir les détails, allez à l’onglet comptabilité.

Frais de la personne à charge
Cet onglet apparaîtra si l’adhérent a des personnes à charge et que ces personnes à charge ont des frais impayés sur leur compte. Le montant total dû par les personnes à charge s’affichera dans le titre de l’onglet.
L’onglet affichera le nom de la personne à charge et le montant total dû, sans aucun détail. Pour voir les détails, allez dans l’onglet comptabilité de la personne à charge.

Réservations
Si l’adhérent a des réservations, le nombre de réservations sera affiché dans le titre de l’onglet et le détail des réservations dans l’onglet lui-même.
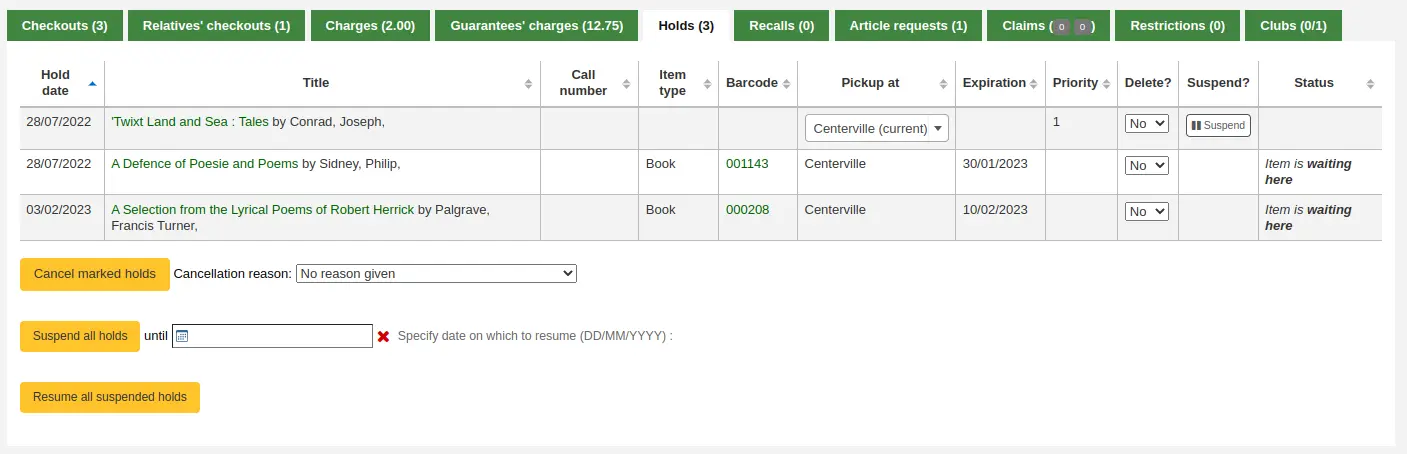
Note
Le code barre et la cote ne sont affichés que pour les réservations au niveau exemplaire, ou les réservations confirmées. Les réservations au niveau bibliographique qui ne sont pas encore mises de côté n’ont pas de code barres ni de cote renseignés.
À partir d’ici, vous pouvez gérer les réservations de l’utilisateur : changer la bibliothèque de retrait, annuler ou suspendre les réservations.
Note
Vous serez autorisés à suspendre les réservations seulement si la préférence système SuspendHoldsIntranet est paramétrée sur « Permettre ».
Note
Si, lors de la suspension d’une réservation, vous souhaitez pouvoir définir une date de ré-activation automatique de la réservation, paramétrez la préférence système AutoResumeSuspendedHolds sur « Permettre » et assurez-vous d’activer le cron job unsuspend_holds cron job.
Réservations programmées
Si l’adhérent a des réservations programmées, le nombre de réservations programmées sera affiché dans le titre de l’onglet et le détail des réservations dans l’onglet lui-même.
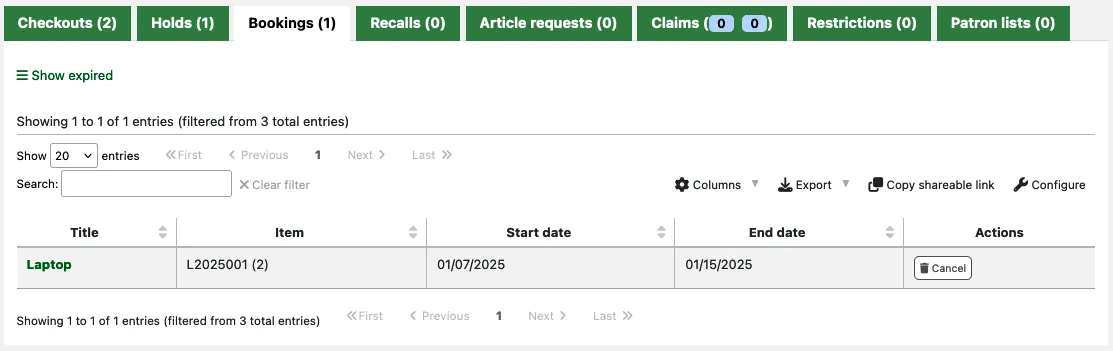
A partir d’ici vous pouvez annuler n’importe laquelle des réservations programmées de l’adhérent : utilisez le bouton “Annuler” dans la colonne Actions.
Rappels
Si les rappels sont activés, les rappels demandés par l’adhérent en cours apparaîtront dans cet onglet. Le nombre de rappels en cours s’affichera dans le titre de l’onglet.

Ici, les bibliothécaires peuvent voir le statut de chaque rappel et le gérer.
Demandes d’article
Si la préférence système ArticleRequests est activée, et que les règles de circulation le permettent, les adhérents pourront demander des articles, soit via l’OPAC soit dans l’interface professionnelle. Le nombre de demandes en cours s’affichera dans le titre de l’onglet.
Les détails de la demande de l’adhérent, et son statut, sont visibles dans cet onglet.

Réclamations
Si l’adhérent a des documents déclarés rendus, mais qu’ils n’ont pas été rendus, les réclamations s’afficheront dans cet onglet. Le nombre de réclamations résolues et non résolues s’affichera dans le titre de l’onglet. Le prêt nombre, en vert (ou en gris si c’est 0), représente le nombre de réclamations résolues et le deuxième nombre, en jaune (ou en gris si c’est 0), représente le nombre de réclamations non résolues.

Depuis cet onglet, le personnel peut modifier les notes sur les réclamations et résoudre des réclamations.
Suspensions
L’onglet Suspensions s’affichera sur toutes les fiches adhérents. Si l’adhérent n’est pas suspendu, cela sera aussi précisé.

Si l’adhérent est suspendu, les précisions s’afficheront dans l’onglet Suspensions.
- Il y a au moins quatre sortes de suspensions :
Manuel
Retards
Suspension
Quitus
En utilisant le bouton “Ajouter une suspension manuelle” vous pouvez directement suspendre l’adhérent. Cette fonction peut être utilisée pour tout type de suspension que vous devez ajouter manuellement à la fiche d’un adhérent.
Note
Seuls les membres du personnel ayant la permission manage_restrictions (ou la permission superbibliothécaire) pourront ajouter des suspensions manuelles ou supprimer les suspensions existantes.
Type : si la préférence système PatronRestrictionTypes est activée, vous aurez le choix entre différents types de suspension. Cette liste peut être gérée au moyen de la page d’administration Suspensions de l’adhérent
Commentaire : saisissez un commentaire pour expliquer la suspension
Expiration : vous pouvez saisir une date d’expiration (optionnelle) pour la suspension. Si la date d’expiration n’est pas précisée, la suspension reste active jusqu’à ce qu’elle soit supprimée. Avec une date d’expiration, la suspension expire automatiquement et s’affiche en grisé au-delà de cette date.
Version
Les suspensions expirées apparaissent comme telles à partir de la version 23.11 de Koha. Dans les versions antérieures, si une suspension est expirée, elle s’affiche comme une suspension en cours, mais ne bloque plus la circulation.
Note
Les suspensions expirées apparaissent toujours sur le compte de l’adhérent, mais ne bloquent pas la circulation.
Vous pouvez utiliser le cronjob cleanup_database.pl avec le paramètre –restrictions pour supprimer automatiquement les suspensions expirées.

Les suspensions pour retard peuvent être appliquées automatiquement lors de l’envoi des relances si vous l’avez spécifié dans le paramétrage des relances.
Cette suspension ne sera levée automatiquement au retour des documents en retard que si la préférence système AutoRemoveOverduesRestrictions est paramétrée sur “Permettre”.
Dans les règles de circulation, vous pouvez choisir d’infliger aux usagers une amende sous forme de temps de suspension à la place (ou en plus) d’une amende monétaire. Dans ce cas, le retour d’un ouvrage en retard déclenche une suspension.
Si vous utilisez la préférence système RestrictPatronsWithFailedNotices les adhérents seront suspendus si une notification mail ou un SMS échoue à leur être envoyé. Cette suspension à vocation à déclencher la vérification de leur adresse mail ou numéro SMS.
Les adhérents peuvent également être suspendus s’ils on fait la demande d’un quitus. Une fois le quitus validé, l’adhérent est automatiquement suspendu.
Les adhérents peuvent aussi être suspendus en ajoutant des marqueurs sur leur fiche.
Les suspensions sur le compte d’un adhérent empêchent le prêt. En fait, un message s’affiche en rouge sur la page de prêt.
Note
Seuls les membres du personnel ayant la permission force_checkout (ou la permission superbibliothécaire) pourront outrepasser temporairement une suspension pour réaliser un prêt.
Les suspensions peuvent aussi empêcher le renouvellement des documents si la préférence système RestrictionBlockRenewing est paramétrée sur “bloquer”.
A l’OPAC, les adhérents verrons un message indiquant que leur compte est suspendu. Ils ne pourront pas poser de réservation à l’OPAC.

Si des adhérents ont plusieurs suspensions, vous pouvez choisir de cumuler ou non les périodes de suspension à l’aide de la préférence système CumulativeRestrictionPeriods.
Note
Si vous voulez empêcher les adhérents dont le dossier n’est pas conforme de faire certaines actions, ajustez les préférences systèmes suivantes :
Positionnez la préférence système OverduesBlockCirc sur “Bloquer” pour empêcher les lecteurs qui ont des prêts en retard d’emprunter de nouveau.
Positionnez la préférence système OverduesBlockRenewing sur “bloquer le renouvellement pour tous les exemplaires de l’adhérent” ou sur “bloquer le renouvellement uniquement pour cet exemplaire” pour empêcher l’adhérent qui a des documents en retard de renouveler ses prêts.
Saisissez un montant dans les préférences systèmes noissuescharge et NoIssuesChargeGuarantees afin d’empêcher les prêts aux adhérents qui ont des amendes dépassant ce montant ou aux adhérents dont les personnes à charge doivent plus que ce montant.
Entrez un montant dans la préférence système maxoutstanding pour empêcher tout adhérent de poser une réservation à l’OPAC s’il doit plus que ce montant.
Entrez un montant dans la préférence système OPACFineNoRenewals pour empêcher tout adhérent qui doit plus que ce montant de renouveler ses prêts à l’OPAC.
Positionnez la préférence système BlockExpiredPatronOpacActions sur “Empêcher” si vous voulez empêcher les adhérents dont l’adhésion est expirée de poser une réservation ou renouveler leurs prêts à l’OPAC.
Version
Depuis la version 24.05 de Koha, les modifications des suspensions d’adhérents peuvent être journalisées avec la préférence système BorrowersLog.
Clubs
Si vous utilisez des clubs adhérents, les adhérents auront un onglet dans leur fiche indiquant à quels clubs ils sont inscrits, s’il y en a. Le premier nombre dans le titre de l’onglet est le nombre de clubs dans lesquels l’adhérent est inscrit, et le deuxième nombre est le nombre de clubs dans lesquels l’adhérent n’est pas inscrit.
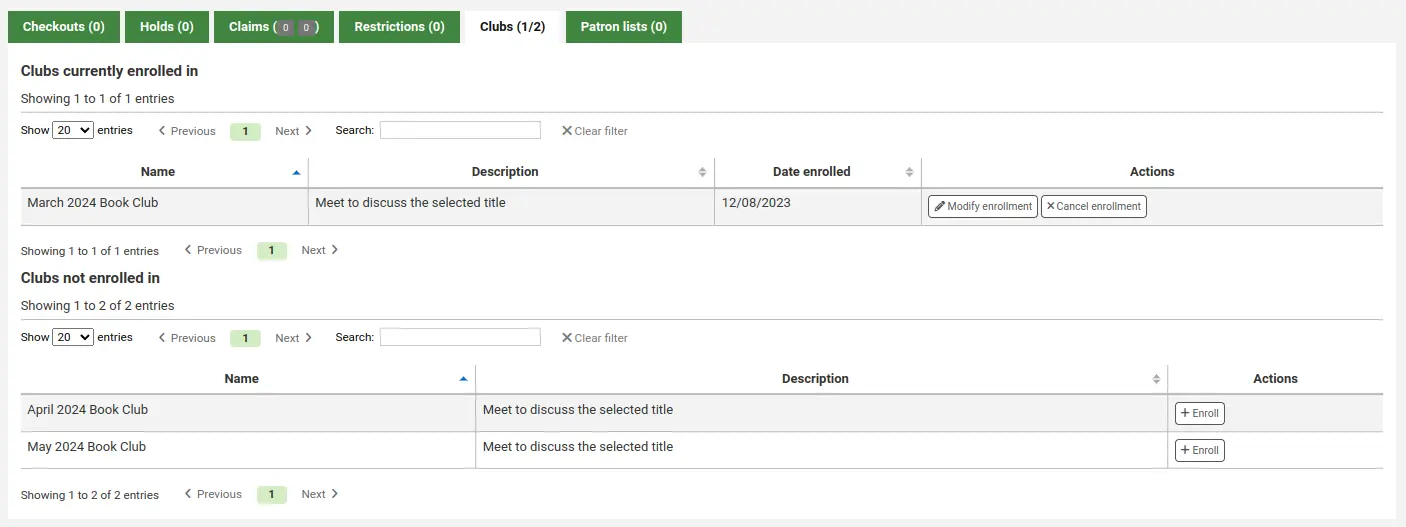
Listes d’adhérents
Version
Cet onglet a été ajouté à Koha dans sa version 23.11.
Si l’adhérent est dans une ou plusieurs listes d’adhérents, la ou les liste(s) apparaîtront dans cet onglet.
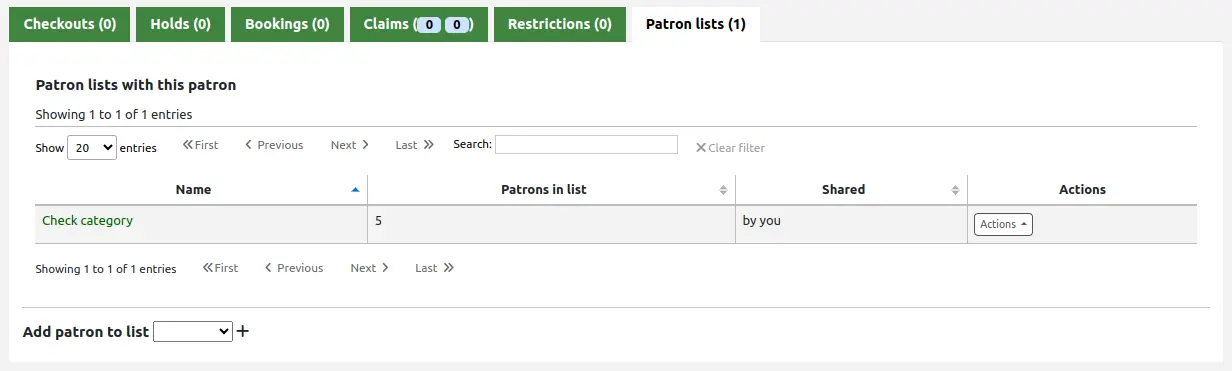
En bas de l’onglet, il y a un menu déroulant pour ajouter l’adhérent à une autre liste. Choisissez la liste dans le menu déroulant, et cliquez sur le bouton “+” pour l’ajouter à la liste.
Notez que ce menu déroulant n’affiche que les listes qui ne comprennent pas encore cet adhérent. Si l’adhérent est dans toutes les listes, cette option n’est pas visible.
Note
Seuls les membres du personnel ayant la permission manage_patron_lists (ou la permission super-administrateur) pourront ajouter un adhérent à une liste.
Comptabilité
Note
Les membres du personnel doivent avoir la permission updatecharges ou au moins la permission remaining_permissions sous updatecharges (ou la permission superbibliothécaire) pour accéder à cet onglet.
L’onglet Amendes affiche l’historique complet des opérations comptables de l’adhérent. Contrairement à son nom, l’onglet Amendes ne montre pas uniquement des amendes. Il montre également les frais d’inscription, les montants des emprunts, s’il y a lieu, les frais de réservations et toute opération monétaire.
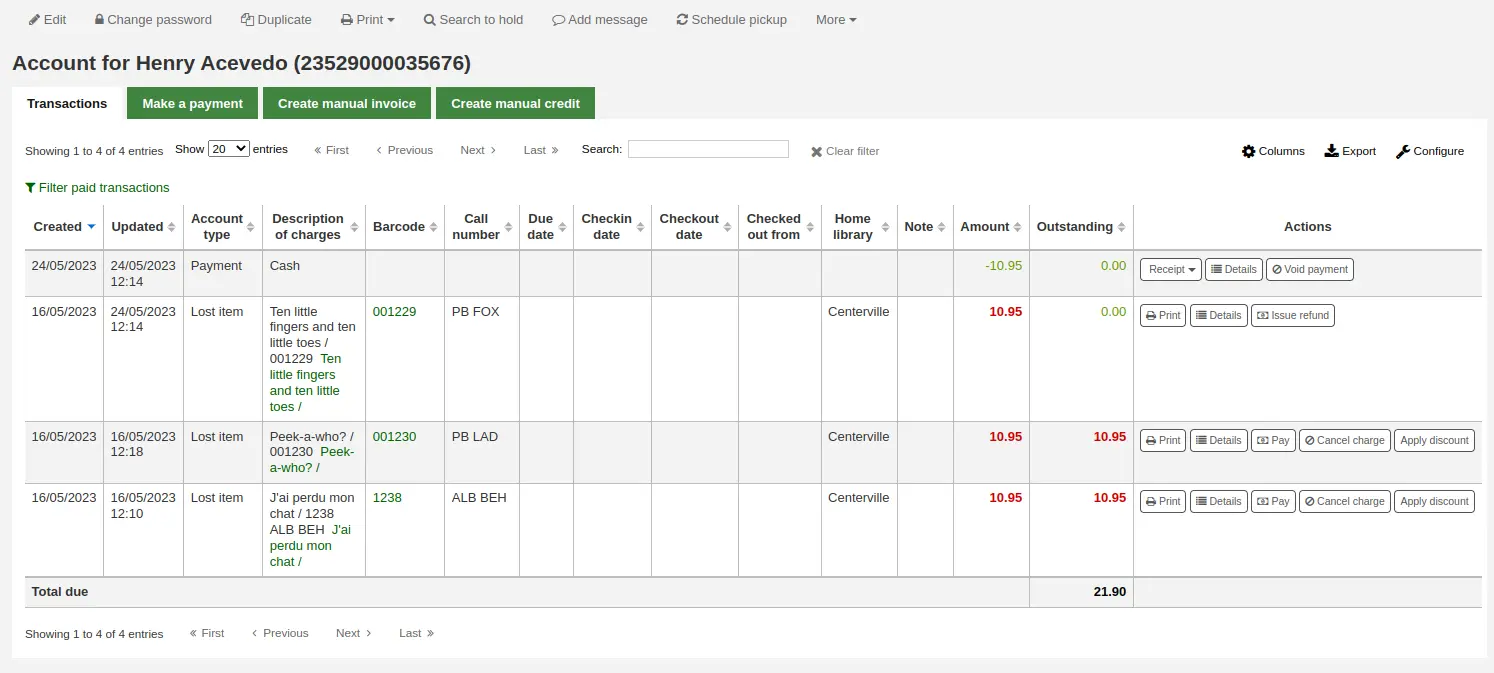
Note
Vous pouvez personnaliser les colonnes de ce tableau dans la section Configurer les colonnes du module Administration (référence du tableau : account-fines).
Note
Il est possible d’imprimer un résumé des frais impayés et crédits inutilisés du compte adhérent en cliquant “Imprimer” en haut de la page et en choisissant “Imprimer le solde du compte”.
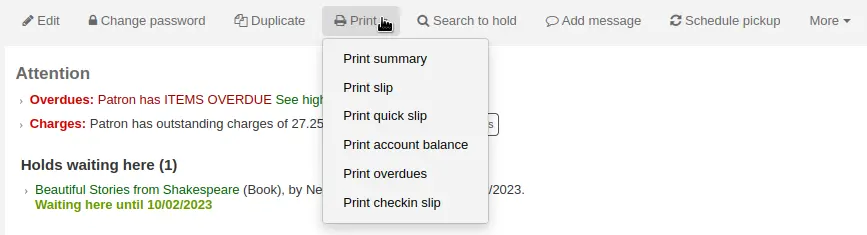
“Imprimer le résumé” va imprimer un résumé complet du compte adhérent, y compris les frais impayés.
L’onglet Transactions affichera les colonnes suivantes :
Date : la date à laquelle les frais, paiements ou crédits ont été enregistrés
Dans le cas des amendes, la date affichée sera le dernier jour où l’amende a été accumulée
Type de frais : de quel type de frais, paiement ou crédit il s’agit
Au cas où un type de frais a un “statut” l’accompagnant, il s’affichera à côté du type de frais entre parenthèses.
Description des frais : la description des frais comprend la date d’échéance pour les exemplaires en retard et un lien de la notice de l’exemplaire où celui-ci est disponible
Note
Pour les amendes de retard, la valeur par défaut est le titre et la date d’échéance. Vous pouvez le personnaliser en modifiant le modèle OVERDUE_FINE_DESC dans l’outil Notifications et tickets.
Code à barres : si les frais sont liés à un exemplaire en particulier, le code à barres est affiché
Cote : si les frais sont liés à un exemplaire en particulier, la cote de l’exemplaire est affichée
Date d’échéance : si les frais sont une amende de retard, la date d’échéance est affichée
Date de retour : si les frais sont une amende de retard, la date à laquelle le document a été rendu est affichée
Date de prêt : si les frais sont une amende de retard, la date de prêt est affichée
Site de rattachement : si les frais sont liés à un exemplaire en particulier, le site de rattachement est affiché
Note : toutes les notes à propos des frais/paiement
Montant : le montant total du paiement ou des frais
Montant à recouvrer : le montant restant dû
Actions :
Une sélection d’actions disponibles pour prendre en charge les lignes de comptabilité sont détaillées ci-dessous
En haut du tableau, vous pouvez cliquer sur “Filtrer les transactions payées” pour cacher toutes les transactions complétées et au-dessus de ce bouton, vous pouvez utiliser la boite de recherche pour trouver une amende ou un frais particulier.
Actions
Les boutons d’action seront disponibles pour les différentes lignes en fonction des permissions de l’utilisateur et du type de frais et de statut.
Un bouton pour imprimer ou envoyer par courriel un reçu ou une facture pour cette ligne
Note
Si la ligne est un crédit (paiement, annulation ou autre crédit), le reçu qui sera imprimé sera la notification ACCOUNT_CREDIT. Elle peut être personnalisée dans l’outil Notifications et tickets.
Si la ligne est un débit (des frais), le reçu qui sera imprimé sera la notification ACCOUNT_DEBIT. Elle peut être personnalisée dans l’outil Notifications et tickets.
Un bouton pour afficher plus de détails sur les frais et tous les paiements qui ont été effectués
Un bouton pour vider (inverser) un paiement/crédit
Ce bouton apparaîtra uniquement sur une ligne de paiement/crédit. En vidant la ligne, cela inversera le processus de paiement en restaurant dans le montant en attente les dettes/débits que le paiement/crédit avait précédemment utilisé. Cette action est généralement utilisée pour corriger les cas où un paiement a été enregistré mais jamais effectivement reçu. La ligne de crédit sera mise à zéro et mise à jour comme VOID.
Un bouton pour annuler (retirer) des frais/débits
Ce bouton apparaîtra uniquement sur une ligne de frais/débit qui n’a pas encore de paiement/crédit appliqué. En annulant la ligne elle sera marquée comme “Annulée” et une ligne ANNULATION sera ajoutée en décalé. Cette action est généralement utilisée pour corriger les cas où des frais ont été facturés par erreur.
Un bouton pour payer des frais/débits dont les montants sont impayés
Ce bouton apparaîtra pour tous les frais/débits avec des montants impayés. La page suivante peut être utilisée pour payer ou annuler la ligne partiellement ou totalement avec un PAIEMENT ou une ANNULATION.
Un bouton pour émettre un paiement de crédit
Ce bouton apparaîtra pour chaque ligne de crédit qui a un montant dû et pour laquelle vous avez la permission de paiement. Cela permet au bibliothécaire de rendre des crédits en attente à l’adhérent et d’enregistrer l’action avec un ligne PAYE.
Un bouton pour traiter un remboursement contre des frais/débits
Ce bouton apparaîtra pour toutes les lignes/débits qui ont été payés ou partiellement payés et vous avez la permission de rembourser. Le boîte de dialogue suivante vous autorisera à rembourser partiellement ou totalement la dette compensée, soit en CASH ou au moyen d’un crédit ajouté au compte.
Un bouton pour appliquer une remise à un frais/débit
Ce bouton apparaîtra pour tous les frais/débits qui n’ont pas encore été compensées par un crédit/paiement et vous avez la permission de remise. La boîte de dialogue suivante vous permettra d’ajouter une remise à un frais.
Facturation des frais et des amendes
La plupart des frais et des amendes seront facturés automatiquement si le cron job lié aux amendes est activé. Les amendes seront aussi facturées au retour d’un document en retard, si la préférence système CalculateFinesOnReturn est activée.
Les amendes seront facturés sur la base de vos règles de circulation et de pénalités
Les frais de réservation seront calculés en fonction des règles que vous avez définies dans l’administration des Types et Catégories adhérent
Le coût du prêt est facturé sur le base du paramétrage dans l’administration des Types de document
Marquer un exemplaire “perdu” dans la page de modification des exemplaires facturera automatiquement à l’adhérent le prix public du document
Créer un adhérent dans une catégorie avec frais d’inscription.
Renouveler l’adhésion d’un adhérent d’une catégorie avec des frais d’inscription.
Les charges de demandes d’article seront calculées sur la base de la section Frais de demandes d’article des règles de circulation.
Créer des factures manuelles
Pour les amendes qui ne sont pas facturées automatiquement, les bibliothécaires peuvent créer des factures manuelles.
Note
Les membres du personnel doivent avoir la permission manual_invoice (ou la permission superbibliothécaire) pour ajouter des factures manuelles au compte d’un adhérent.
Cliquez sur l’onglet “Créer facture manuelle”
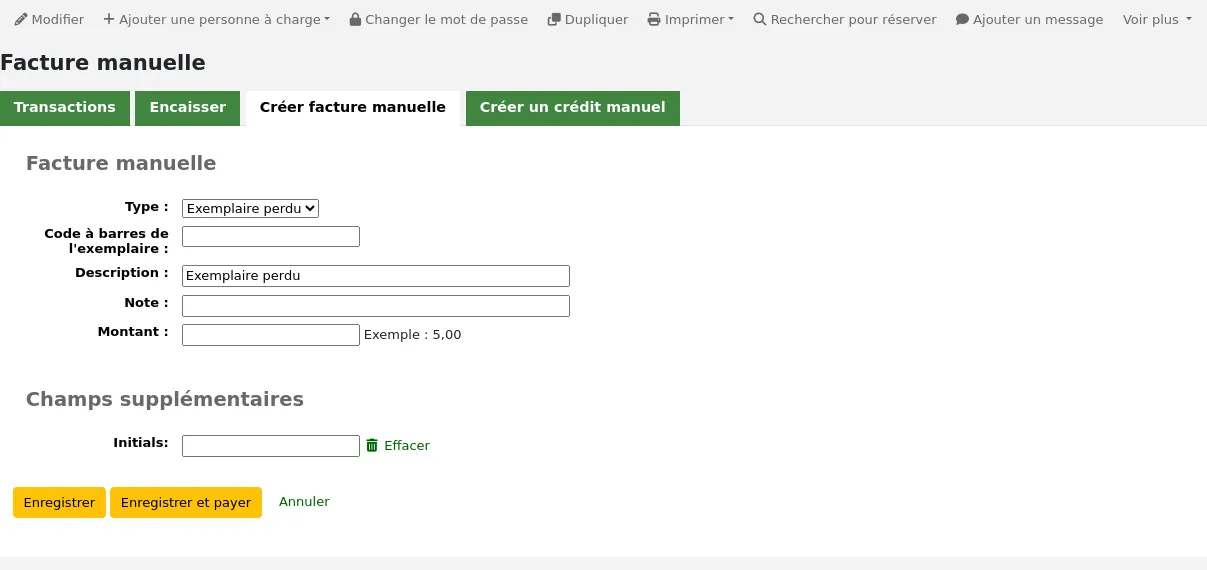
Type : choisissez le type de facture que vous souhaitez créer.
Note
Pour ajouter des valeurs à la liste déroulante des types de facture, ajoutez-les à aux types de débit dans le module Administration.
Code à barres : Si les frais sont associés à un exemplaire, vous pouvez entrer son code à barres afin que la ligne d’exemplaire montre un lien vers celui-ci.
Description : entrez une description du paiement.
Note : si nécessaire, ajoutez une note à propos du paiement.
Coût : si le type est un type de débit personnalisé, il y aura un champ “Coût” où vous pouvez entrer le coût de l’objet. Ceci est principalement pour les objets physiques vendus aux adhérents, comme les libres ou les sacs réutilisables, par exemple.
Version
Ce champ a été ajouté à Koha dans sa version 23.11.
Quantité : si le type est un type de débit personnalisé, il y aura un champ “Quantité” où vous pouvez entrer la quantité d’objet facturé. Ceci est principalement pour les objets physiques vendus aux adhérents, comme les libres ou les sacs réutilisables, par exemple.
Version
Ce champ a été ajouté à Koha dans sa version 23.11.
Montant : entez le montant du paiement, ne saisissez pas de symbole monétaire, juste des chiffres et le séparateur décimal.
Note
Si le type est un type de débit personnalisé, et que vous entrez un coût et une quantité, le montant sera automatiquement calculé.
Si des champs additionnels ont été créés pour les lignes de débits, ils apparaîtront ici.
Cliquez sur “Enregistrer” pour facturer le montant sur le compte de l’adhérent, ou
Cliquez sur “Enregistrer et payer” pour facturer le montant sur le compte de l’adhérent et aller directement à la page de palment.
Payer et passer en pertes et profits
Chaque ligne de compte peut être payée en entier ou passée en pertes et profits en utilisant l’onglet “Encaisser”.
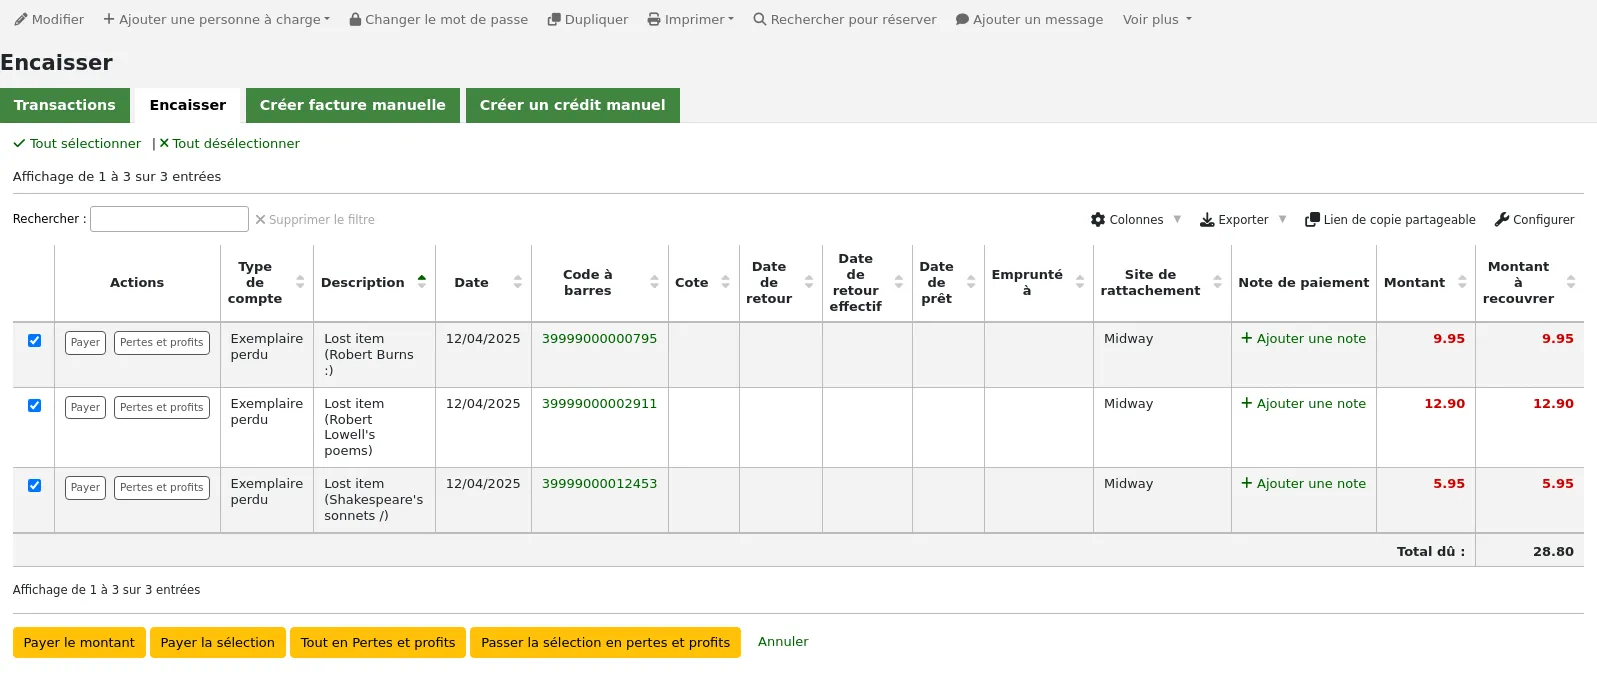
Note
Vous pouvez personnaliser les colonnes de ce tableau dans la section Configurer les colonnes du module Administration (référence du tableau : pay-fines-table).
Chaque ligne de compte peut être payée en entier, partiellement, ou passée en pertes et profits.
Payer une amende dans sa totalité
Pour payer une amende spécifique en intégralité :
Si vous avez une note sur le paiement, cliquez sur “Ajouter une note” et entrez votre note avant de passer à la suite.
Cliquez sur “Payer” à côté de l’amende que vous voulez payer entièrement.
Un tableau montrera les détails de l’amende en cours de paiement, le montant total de l’amendes sera saisie pour vous dans les champs “Montant à payer” et “Montant versé”.
Note
Si vous avez fait une erreur et que cette amende doit être passée en pertes et profits à la place, vous pouvez alterner entre les modes “Payer” et “Pertes et profits” en utilisant les boutons en haut de cet onglet. Voir Passer en pertes et profits une unique amende ci-dessous.
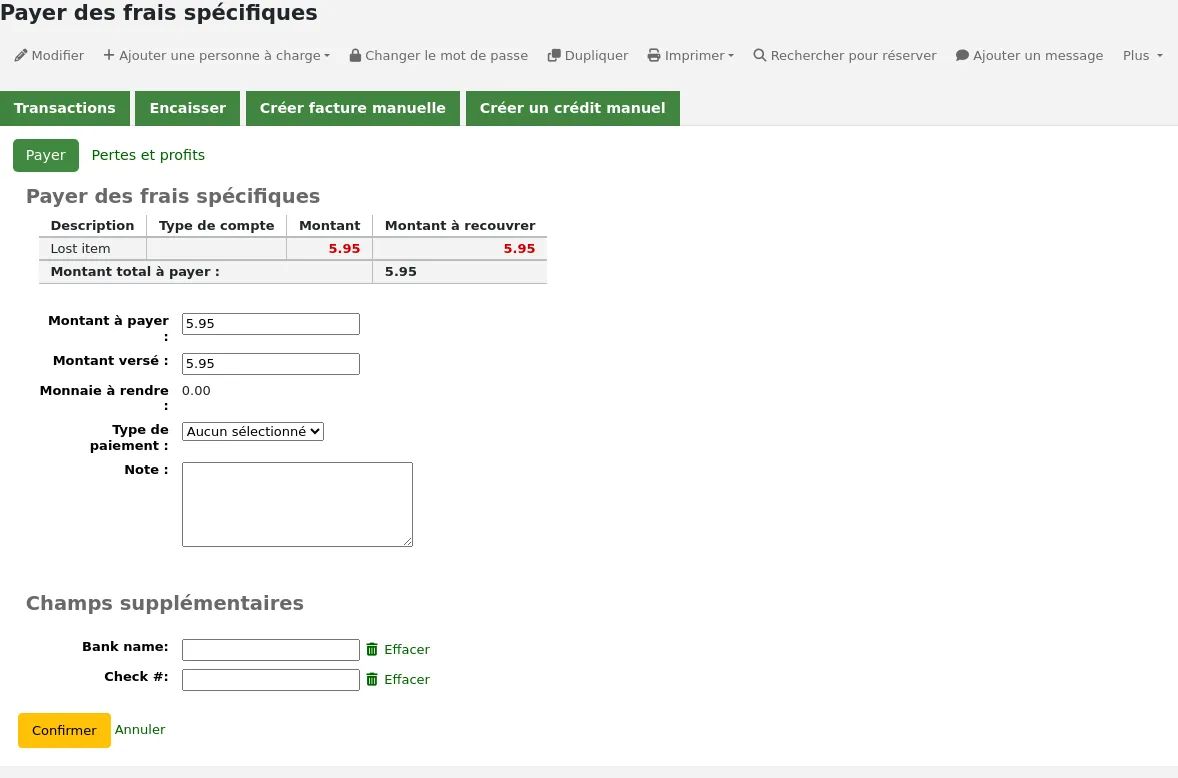
Montant à payer : montant qui sera débité de l’amende. Si l’amende est payée en intégralité, ceci doit être le montant total de l’amende.
Montant versé : montant réel donné par l’adhérent, cela sera utilisé pour calculer la monnaie à rendre. Par exemple, si un adhérent a une amende de 2,75$ à payer, et qu’il paye avec un billet de 5$, entrez 5 dans “Montant versé”.
Monnaie à rendre : Si le montant à payer et le montant versé sont différents (plus d’argent a été collecté), la monnaie à rendre sera calculée.
Type de paiement : choisir le type de paiement.
Note
Ce champ apparaît uniquement si une ou plusieurs valeurs sont définies dans la catégorie de valeurs autorisées PAYMENT_TYPE.
Note
Ce champ est obligatoire si l’une des préférences systèmes UseCashRegisters ou RequirePaymentType est activée.
Si la préférence système UseCashRegisters est activée, vous devrez choisir une caisse sur laquelle enregistrer la transaction.
Note
Si la préférence système UseCashRegisters est activée, et que le type de paiement CASH est choisi, vous devrez choisir une caisse sur laquelle enregistrer la transaction.
Pour les autres types de payements, la préférence système RequireCashRegister détermine si ce champ est obligatoire ou non.
Si des champs additionnels ont été créés pour les lignes de crédits, ils apparaîtront ici.
Cliquez sur “Confirmer”.
Si de la monnaie doit être rendue à l’adhérent, un pop-up apparaîtra pour vous le rappeler ; cliquer sur “Oui” pour confirmer que vous avez rendu le bon montant et confirmer le paiement.
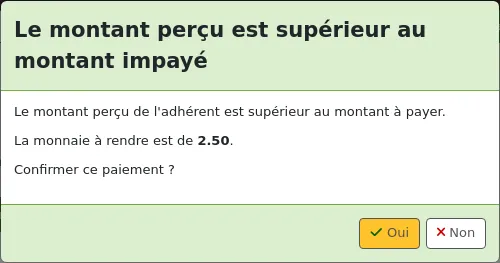
Le montant à recouvrer de l’amende sera mis à zéro (paiement en intégralité), et une ligne de paiement sera ajoutée dans les transactions de l’adhérent.
Note
Si la préférence système FinePaymentAutoPopup est activée, une fenêtre de dialogue pour imprimer sera affichée. L’impression du reçu suit le modèle ACCOUNT_CREDIT, qui peut être modifié dans l’outil Notifications et tickets. Si de la monnaie a été rendue pour cette transaction, les détails seront inclus à l’utilisation de cette préférence système.
En plus de leur impression, vous pouvez envoyer par courriel les reçus de paiement et d’abandon de créance avec la préférence système AutomaticEmailReceipts. Ce courriel utilise le modèle ACCOUNT_PAYMENT, qui peut être modifié dans l’outil Notifications et tickets.
Payer partiellement une amende
Pour payer partiellement une amende spécifique :
Cliquez sur “Payer” à côté de l’amende que vous voulez partiellement payer.
Un tableau montrera les détails de l’amende en cours de paiement, le montant total de l’amendes sera saisie pour vous dans les champs “Montant à payer” et “Montant versé”.
Note
Si vous avez fait une erreur et que cette amende doit être passée en pertes et profits à la place, vous pouvez alterner entre les modes “Payer” et “Pertes et profits” en utilisant les boutons en haut de cet onglet. Voir Passer partiellement en pertes et profits une unique amende ci dessous.

Montant à payer : montant qui sera débité de l’amende. Pour payer partiellement l’amende, entrer le montant à payer.
Montant versé : montant réel donné par l’adhérent, cela sera utilisé pour calculer la monnaie à rendre. Par exemple, si un adhérent a une amende de 2,75$ à payer, et qu’il paye avec un billet de 5$, entrez 5 dans “Montant versé”.
Monnaie à rendre : Si le montant à payer et le montant versé sont différents (plus d’argent a été collecté), la monnaie à rendre sera calculée.
Type de paiement : choisir le type de paiement.
Note
Ce champ apparaît uniquement si une ou plusieurs valeurs sont définies dans la catégorie de valeurs autorisées PAYMENT_TYPE.
Note
Ce champ est obligatoire si l’une des préférences systèmes UseCashRegisters ou RequirePaymentType est activée.
Si la préférence système UseCashRegisters est activée, vous devrez choisir une caisse sur laquelle enregistrer la transaction.
Note
Si la préférence système UseCashRegisters est activée, et que le type de paiement CASH est choisi, vous devrez choisir une caisse sur laquelle enregistrer la transaction.
Pour les autres types de payements, la préférence système RequireCashRegister détermine si ce champ est obligatoire ou non.
Si des champs additionnels ont été créés pour les lignes de crédits, ils apparaîtront ici.
Cliquez sur “Confirmer”.
Si de la monnaie doit être rendue à l’adhérent, un pop-up apparaîtra pour vous le rappeler ; cliquer sur “Oui” pour confirmer que vous avez rendu le bon montant et confirmer le paiement.
L’amende sera mise à jour pour afficher le montant d’origine, et le montant restant dû, et une ligne de paiement sera ajoutée aux transactions de l’adhérent.
Note
Si la préférence système FinePaymentAutoPopup est activée, une fenêtre de dialogue pour imprimer sera affichée. L’impression du reçu suit le modèle ACCOUNT_CREDIT, qui peut être modifié dans l’outil Notifications et tickets. Si de la monnaie a été rendue pour cette transaction, les détails seront inclus à l’utilisation de cette préférence système.
En plus de leur impression, vous pouvez envoyer par courriel les reçus de paiement et d’abandon de créance avec la préférence système AutomaticEmailReceipts. Ce courriel utilise le modèle ACCOUNT_PAYMENT, qui peut être modifié dans l’outil Notifications et tickets.
Payer le montant de toutes les amendes
Payer le montant de toutes les amendes :
Cliquez sur le bouton “Payer le montant”.
Le montant total à recouvrer dans le compte de l’adhérent sera affiché et remplie dans le champs “Montant à payer” et “Montant versé”.
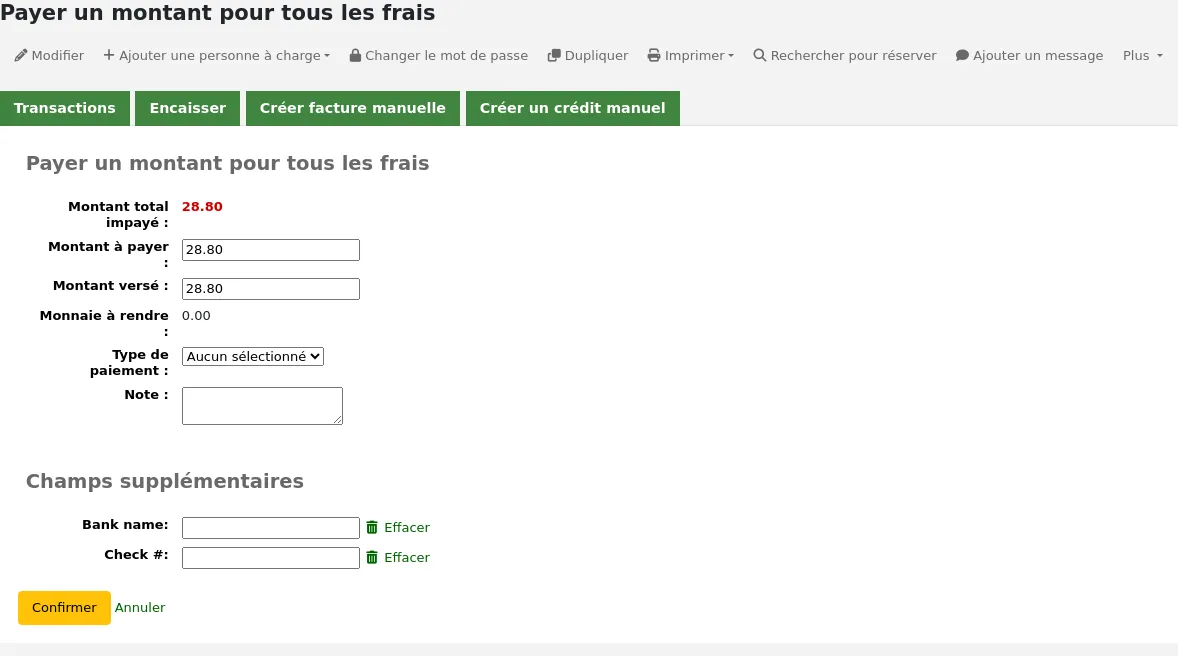
Montant total impayé : montant total impayé sur le compte de l’adhérent.
Montant à payer : montant qui sera débité du montant impayé. Entrez le montant qui sera payé.
Montant versé : montant réel donné par l’adhérent, cela sera utilisé pour calculer la monnaie à rendre. Par exemple, si un adhérent a une amende de 2,75$ à payer, et qu’il paye avec un billet de 5$, entrez 5 dans “Montant versé”.
Monnaie à rendre : Si le montant à payer et le montant versé sont différents (plus d’argent a été collecté), la monnaie à rendre sera calculée.
Type de paiement : choisir le type de paiement.
Note
Ce champ apparaît uniquement si une ou plusieurs valeurs sont définies dans la catégorie de valeurs autorisées PAYMENT_TYPE.
Note
Ce champ est obligatoire si l’une des préférences systèmes UseCashRegisters ou RequirePaymentType est activée.
Si la préférence système UseCashRegisters est activée, vous devrez choisir une caisse sur laquelle enregistrer la transaction.
Note
Si la préférence système UseCashRegisters est activée, et que le type de paiement CASH est choisi, vous devrez choisir une caisse sur laquelle enregistrer la transaction.
Pour les autres types de payements, la préférence système RequireCashRegister détermine si ce champ est obligatoire ou non.
Note : si nécessaire, ajoutez une note à propos de ce payement.
Si des champs additionnels ont été créés pour les lignes de crédits, ils apparaîtront ici.
Cliquez sur “Confirmer”.
Si de la monnaie doit être rendue à l’adhérent, un pop-up apparaîtra pour vous le rappeler ; cliquer sur “Oui” pour confirmer que vous avez rendu le bon montant et confirmer le paiement.
Le total des amendes sera mis à jour en appliquant le paiement appliqué aux plus anciennes amendes sélectionnées en premier et une ligne de payement sera ajoutée aux transactions de l’adhérent.
Note
Si la préférence système FinePaymentAutoPopup est activée, une fenêtre de dialogue pour imprimer sera affichée. L’impression du reçu suit le modèle ACCOUNT_CREDIT, qui peut être modifié dans l’outil Notifications et tickets. Si de la monnaie a été rendue pour cette transaction, les détails seront inclus à l’utilisation de cette préférence système.
En plus de leur impression, vous pouvez envoyer par courriel les reçus de paiement et d’abandon de créance avec la préférence système AutomaticEmailReceipts. Ce courriel utilise le modèle ACCOUNT_PAYMENT, qui peut être modifié dans l’outil Notifications et tickets.
Payer les amendes sélectionnées
Pour ne payer que certaines amendes :
Cochez les cases de sélection des amendes que vous voulez payer.
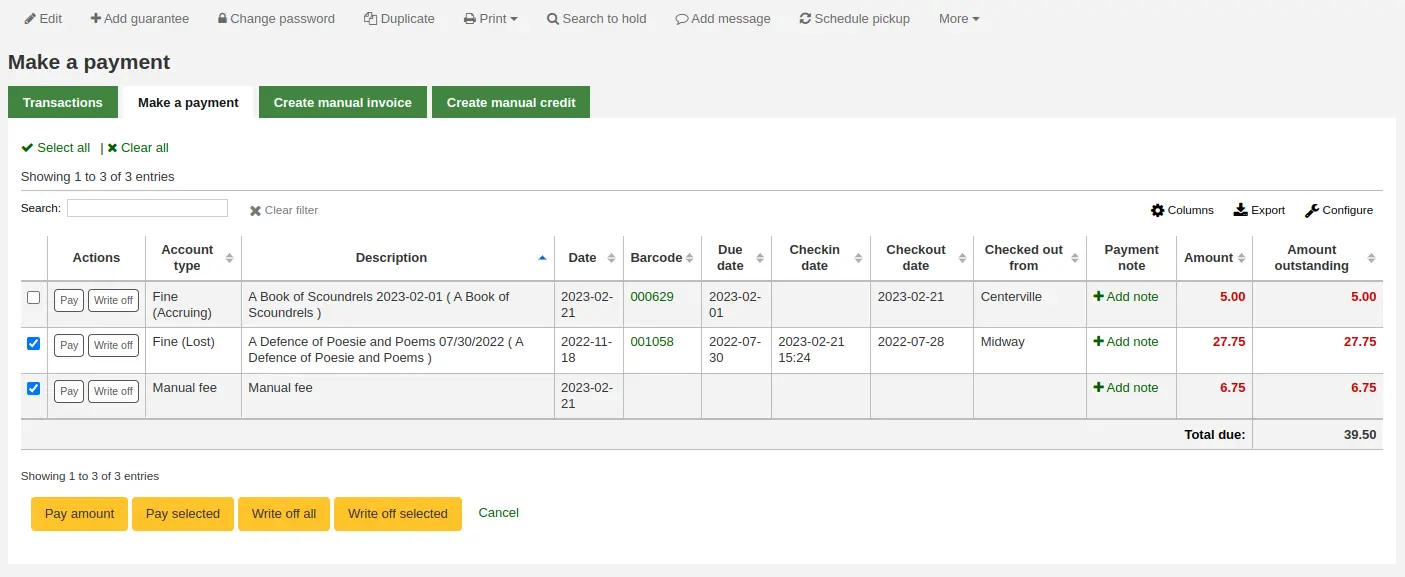
Cliquez sur le bouton “Payer la sélection”.
Le montant total impayé pour les amendes sélectionnées sera affiché et pré-rempli dans les champs “Montant à payer” et “Montant versé”.
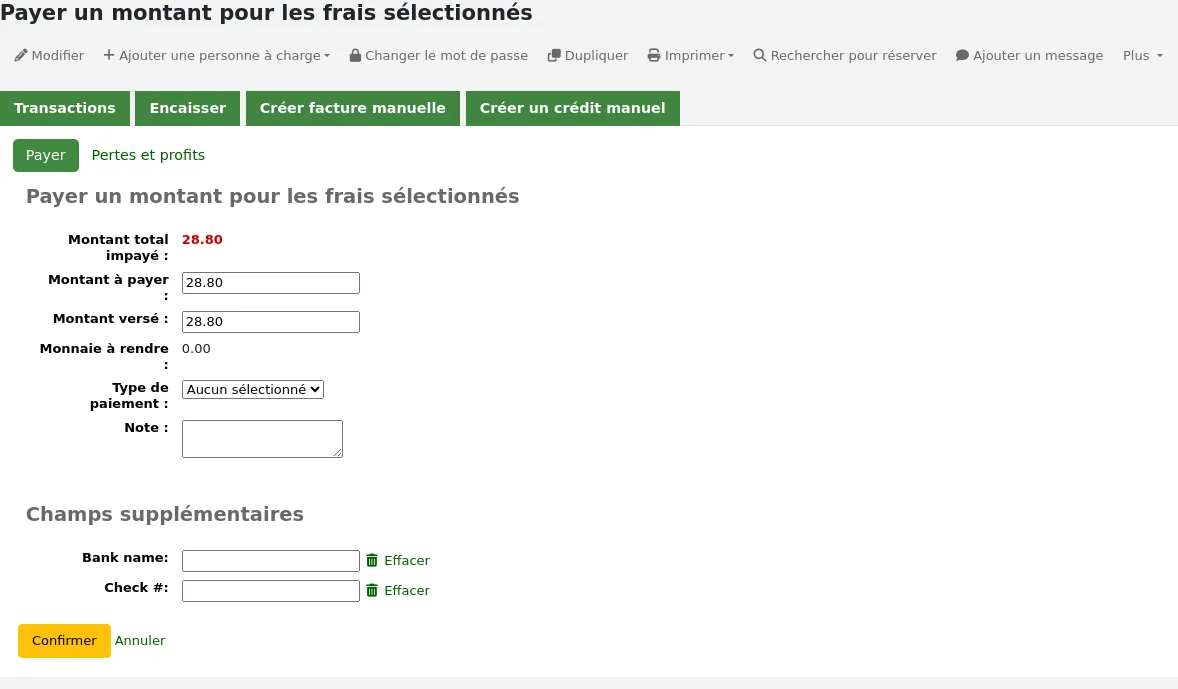
Montant total impayé : Montant total impayé pour les amendes sélectionnées.
Montant à payer : Montant qui sera débité du montant total impayé des amendes sélectionnées. Entrez le montant total qui sera payé.
Montant versé : montant réel donné par l’adhérent, cela sera utilisé pour calculer la monnaie à rendre. Par exemple, si un adhérent a une amende de 2,75$ à payer, et qu’il paye avec un billet de 5$, entrez 5 dans “Montant versé”.
Monnaie à rendre : Si le montant à payer et le montant versé sont différents (plus d’argent a été collecté), la monnaie à rendre sera calculée.
Type de paiement : choisir le type de paiement.
Note
Ce champ apparaît uniquement si une ou plusieurs valeurs sont définies dans la catégorie de valeurs autorisées PAYMENT_TYPE.
Note
Ce champ est obligatoire si l’une des préférences systèmes UseCashRegisters ou RequirePaymentType est activée.
Si la préférence système UseCashRegisters est activée, vous devrez choisir une caisse sur laquelle enregistrer la transaction.
Note
Si la préférence système UseCashRegisters est activée, et que le type de paiement CASH est choisi, vous devrez choisir une caisse sur laquelle enregistrer la transaction.
Pour les autres types de payements, la préférence système RequireCashRegister détermine si ce champ est obligatoire ou non.
Note : si nécessaire, ajoutez une note à propos de ce payement.
Si des champs additionnels ont été créés pour les lignes de crédits, ils apparaîtront ici.
Cliquez sur “Confirmer”.
Si de la monnaie doit être rendue à l’adhérent, un pop-up apparaîtra pour vous le rappeler ; cliquer sur “Oui” pour confirmer que vous avez rendu le bon montant et confirmer le paiement.
Les montant impayé des amendes sélectionné sera mis à jours, le payement sera appliqué aux plus ancienne amendes sélectionnées en premier et une ligne sera de payement sera ajoutée aux transactions de l’adhérent.
Note
Si la préférence système FinePaymentAutoPopup est activée, une fenêtre de dialogue pour imprimer sera affichée. L’impression du reçu suit le modèle ACCOUNT_CREDIT, qui peut être modifié dans l’outil Notifications et tickets. Si de la monnaie a été rendue pour cette transaction, les détails seront inclus à l’utilisation de cette préférence système.
En plus de leur impression, vous pouvez envoyer par courriel les reçus de paiement et d’abandon de créance avec la préférence système AutomaticEmailReceipts. Ce courriel utilise le modèle ACCOUNT_PAYMENT, qui peut être modifié dans l’outil Notifications et tickets.
Passer toutes les amendes en pertes et profits
Note
Les membres du personnel doivent avoir la permission writeoff (ou la permission superbibliothécaire) pour pouvoir passer des frais en Pertes et profits.
Pour passer en pertes en profits toutes les amendes d’un adhérents :
Cliquez sur le bouton “Tout en pertes et profits”
Confirmer le passage en pertes et profits
Tous les montants impayés des amendes seront mis à zéro (intégralement payés, passés en perte et profit), et une ligne de pertes et profits sera ajoutée aux transactions de l’adhérent.
Passer en pertes et profits une unique amende
Note
Les membres du personnel doivent avoir la permission writeoff (ou la permission superbibliothécaire) pour pouvoir passer des frais en Pertes et profits.
Passer une amende en pertes et profits :
Si vous avez besoin d’ajouter une notes à propos du passage en pertes et profis, cliquez que “Ajouter une notes” et écrivez dans la case avant de continuer
Cliquez sur “Pertes et profits” à côté de l’amende que vous voulez passer en pertes et profits
Un tableau affichera les détails de l’amende à passer en pertes et profits, le montant total de l’amende sera rempli pour vous dans le champ “Montant passé en perte et profits”.
Note
Si vous avez fait une erreur et que cette amende doit être payée à la place, vous pouvez alterner entre les modes “Payer” et “Pertes et profits” en utilisant les boutons en haut de cet onglet. Voir Payer une amende dans sa totalité ci-dessus.

Montant passé en pertes et profits : montant qui sera débité de l’amende. Quand l’amende est passée en perte et profits intégralement, cela doit être le montant total.
Si des champs additionnels ont été créés pour les lignes de crédits, ils apparaîtront ici.
Cliquez sur “Passer ce montant en perte et profits”
Le montant impayé de l’amende sera mis à zéro (payé/passé en pertes et profits intégralement), et une ligne de pertes et profits sera ajoutée aux transactions de l’adhérent.
Note
Si la préférence système FinePaymentAutoPopup est activée, une fenêtre de dialogue pour imprimer sera affichée. L’impression du reçu suit le modèle ACCOUNT_CREDIT, qui peut être modifié dans l’outil Notifications et tickets. Si de la monnaie a été rendue pour cette transaction, les détails seront inclus à l’utilisation de cette préférence système.
En plus de l’impression d’un reçu de paiement, vous pouvez permettre l’envoi par courriel des reçus de paiement et d’abandon de créance avec la préférence système AutomaticEmailReceipts. Le courriel envoyé utilise le modèle de lettre ACCOUNT_WRITEOFF, qui peut être modifié dans l’outil Notifications et tickets.
Passer partiellement en pertes et profits une unique amende
Note
Les membres du personnel doivent avoir la permission writeoff (ou la permission superbibliothécaire) pour pouvoir passer des frais en Pertes et profits.
Pour passer partiellement une amende en pertes et profits :
Si vous avez besoin d’ajouter une notes à propos du passage en pertes et profis, cliquez que “Ajouter une notes” et écrivez dans la case avant de continuer
Cliquez sur “Pertes et profits” à côté de l’amende que vous voulez passer en pertes et profits
Un tableau affichera les détails de l’amende à passer en pertes et profits, le montant total de l’amende sera rempli pour vous dans le champ “Montant passé en perte et profits”.
Note
Si vous avez fait une erreur et que cette amende doit être payée à la place, vous pouvez alterner entre les modes “Payer” et “Pertes et prodits” en utilisant les boutons en haut de cet onglet. Voir Payer partiellement une amende ci-dessus.
Montant passé en pertes et profits : montant qui sera débité de l’amende. Quand l’amende est payé partiellement, entrez le montant à passer en pertes et profits.
Si des champs additionnels ont été créés pour les lignes de crédits, ils apparaîtront ici.
Cliquez sur “Passer ce montant en perte et profits”
L’amende sera mise à jour pour afficher le montant d’origine, et le montant restant dû et une ligne de pertes et profits sera ajoutée aux transactions de l’adhérent.
Note
Si la préférence système FinePaymentAutoPopup est activée, une fenêtre de dialogue pour imprimer sera affichée. L’impression du reçu suit le modèle ACCOUNT_CREDIT, qui peut être modifié dans l’outil Notifications et tickets. Si de la monnaie a été rendue pour cette transaction, les détails seront inclus à l’utilisation de cette préférence système.
En plus de l’impression d’un reçu de paiement, vous pouvez permettre l’envoi par courriel des reçus de paiement et d’abandon de créance avec la préférence système AutomaticEmailReceipts. Le courriel envoyé utilise le modèle de lettre ACCOUNT_WRITEOFF, qui peut être modifié dans l’outil Notifications et tickets.
Passer les amendes sélectionnées en pertes et profits
Note
Les membres du personnel doivent avoir la permission writeoff (ou la permission superbibliothécaire) pour pouvoir passer des frais en Pertes et profits.
Pour passer en pertes et profits certaines amendes uniquement :
Si vous avez besoin d’ajouter une notes à propos du passage en pertes et profis, cliquez que “Ajouter une notes” et écrivez dans la case avant de continuer
Cochez les boîtes de sélection des amendes que vous voulez passer en pertes et profits
Cliquez sur le bouton “Passer la sélection en pertes et profits”
Le montant total impayé pour les amendes sélectionnées sera affiché et prérempli dans le champ “Montant passé en pertes et profits”.
Note
Si vous avez fait une erreur et que cette amende doit être payée à la place, vous pouvez alterner entre les modes “Payer” et “Pertes et profits” en utilisant les boutons en haut de cet onglet. Voir Payer les amendes sélectionnées ci-dessus.
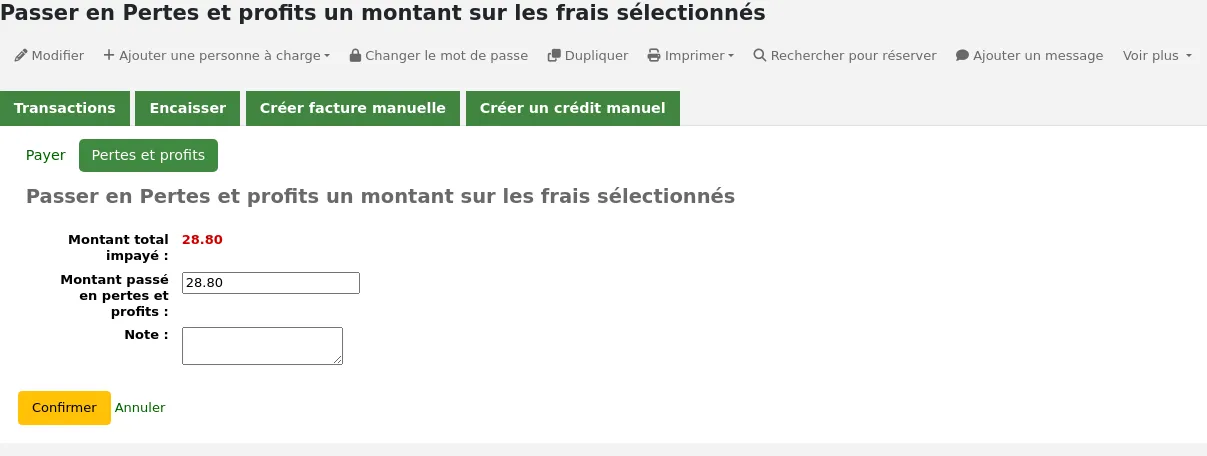
Montant passé en pertes et profits : montant qui sera débité de l’amende. Quand l’intégralité de l’amende est passée en pertes et profits, cela doit être le montant total.
Note : si nécessaire, entrer une note à propos du passage en pertes et profits.
Si des champs additionnels ont été créés pour les lignes de crédits, ils apparaîtront ici.
Cliquer sur “Confirmer”
Les montants impayés des charges sélectionnées seront mis à jour, avec le passage en perte et profits appliqué aux amendes les plus anciennes en priorité, et une ligne de pertes et profits sera ajoutée aux transactions de l’adhérent.
Note
Si la préférence système FinePaymentAutoPopup est activée, une fenêtre de dialogue pour imprimer sera affichée. L’impression du reçu suit le modèle ACCOUNT_CREDIT, qui peut être modifié dans l’outil Notifications et tickets. Si de la monnaie a été rendue pour cette transaction, les détails seront inclus à l’utilisation de cette préférence système.
En plus de l’impression d’un reçu de paiement, vous pouvez permettre l’envoi par courriel des reçus de paiement et d’abandon de créance avec la préférence système AutomaticEmailReceipts. Le courriel envoyé utilise le modèle de lettre ACCOUNT_WRITEOFF, qui peut être modifié dans l’outil Notifications et tickets.
Annulation des frais et des amendes
Si un adhérent a été chargé pour quelque chose et que c’est une erreur, vous pouvez annuler les frais en cliquant sur le bouton “Annuler les frais” dans la colonne Actions.

Un pop-up s’ouvrira pour pouvoir entrer un commentaire (optionnel), et confirmer l’annulation de l’amende.
Une fois validée, une nouvelle ligne sera ajoutée au compte pour “Frais annulés” du même montant que les frais annulés. Les frais ainsi annulés ont maintenant le statut “Annulé” et le montant à recouvrer est de 0.

Si vous avez annulé des frais par erreur, vous pouvez revenir sur l’annulation (voir Annuler un paiement ci-dessous).
Annuler un paiement
Si vous avez, par erreur, marqué des frais comme payés, vous pouvez annuler cette ligne en cliquant sur “Annuler le paiement” sur la droite de la ligne.

Un pop-up va s’ouvrir demandant d’entrer en commentaire (optionnel) et de confirmer l’annulation du payement.
Une fois confirmé, une nouvelle ligne sera ajoutée au compte “Le crédit a été annulé” et la ligne de payement aura le status « Annulé ».

La ligne de payement est ajoutée à nouveau dans l’onglet “Encaisser” comme une amende à payer.
Créer des crédits manuels
Les crédits manuels peuvent être utilisés pour payer partiellement des amendes ou pour annuler toute une amende.
Note
Les membres du personnel doivent avoir la permission manual_credit (ou la permission superbibliothécaire) pour pouvoir ajouter des frais manuels au compte d’un adhérent.
Cliquer sur “Créer un crédit manuel”.
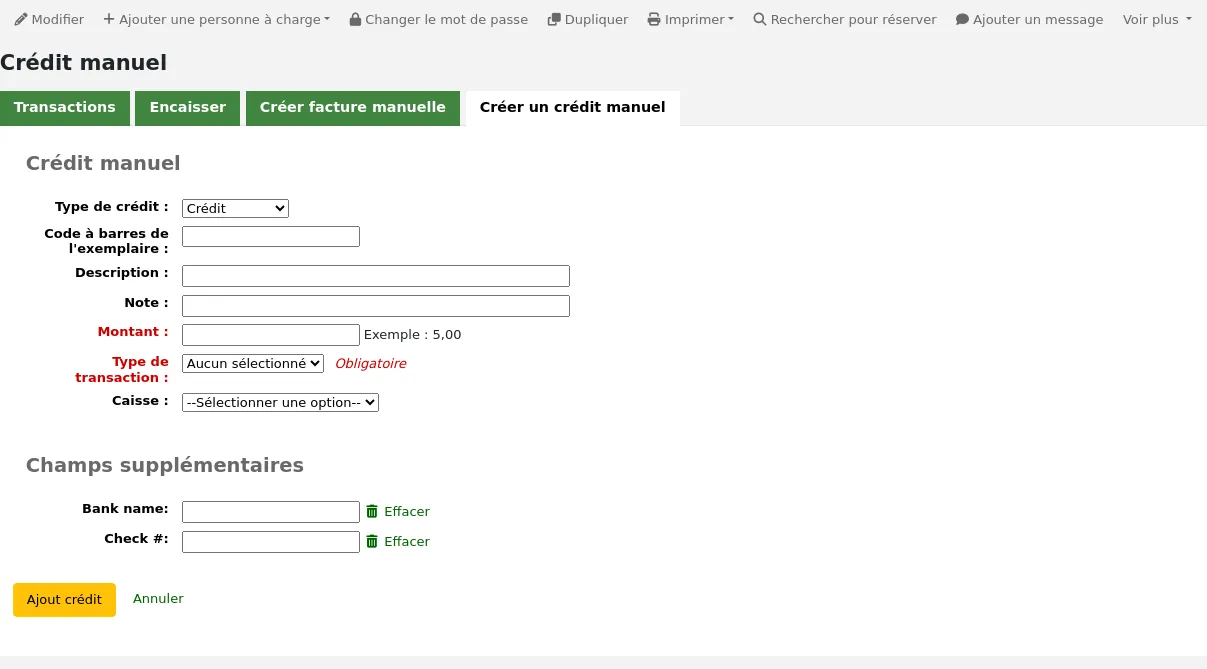
Type : Commencez par choisir le type de crédit à appliquer.
Note
Pour ajouter des valeurs à la liste déroulante des types de crédit, ajoutez-les à aux types de credit dans le module Administration.
Code à barres : si le crédit est associé à un exemplaire, entrez son code à barres afin que la ligne de compte montre un lien vers cet exemplaire.
Description : entrez la description du crédit.
Note : si nécessaire, ajoutez une note à propos de ce crédit.
Montant : entrez le montant du crédit, ne saisissez pas de symbole monétaire, uniquement des chiffres et le séparateur décimal.
Type de transaction : choisissez le type de transaction.
Note
Ce champ apparaît uniquement si une ou plusieurs valeurs sont définies dans la catégorie de valeurs autorisées PAYMENT_TYPE.
Note
Ce champ est obligatoire si l’une des préférences systèmes UseCashRegisters ou RequirePaymentType est activée.
Si la préférence système UseCashRegisters est activée, vous devrez choisir une caisse sur laquelle enregistrer la transaction.
Note
Si la préférence système UseCashRegisters est activée, et que le type de paiement CASH a été utilisé, vous devrez choisir une caisse sur laquelle enregistrer la transaction.
Le fait que ce champ soit obligatoire ou non lorsqu’un autre type de transaction est choisi est déterminé par la préférence système RequireCashRegister.
Si des champs additionnels ont été créés pour les lignes de crédits, ils apparaîtront ici.
Cliquez sur le bouton “Ajout crédit”.
Cela ajoutera une ligne de crédit sur le compte de l’adhérent.
Note
Si la préférence système AccountAutoReconcile est sur “Oui”, le crédit sera automatiquement utilisé pour réduire le montant à recouvrer des frais sur le compte de l’adhérent, en commençant par les frais les plus anciens.
Note
Si la préférence système AutoCreditNumber est activée, les crédits seront numérotés.
Impression des factures
Il y a un lien Imprimer sur la droite de chaque compte. Cliquez sur ce lien pour imprimer une facture qui contiendra la date et la description de l’opération, ainsi que le solde du compte.

Listes de routage
Toutes les listes de routages auxquelles un adhérent appartient sont consultables dans l’onglet “Listes de routage” de sa fiche.
Dans ce tableau, vous pouvez voir et modifier toutes les listes de routage de cet adhérent.

Historique de prêts
L’onglet d’historique des prêts est affiché si vous avez paramétré la préférence système intranetreadinghistory pour ce faire. Si vous avez paramétré la préférence système OPACPrivacy sur “Autoriser”, et si l’adhérent a décidé que la bibliothèque ne pouvait pas garder l’historique de ses prêts, cet onglet n’affichera que les exemplaires qui sont actuellement empruntés.
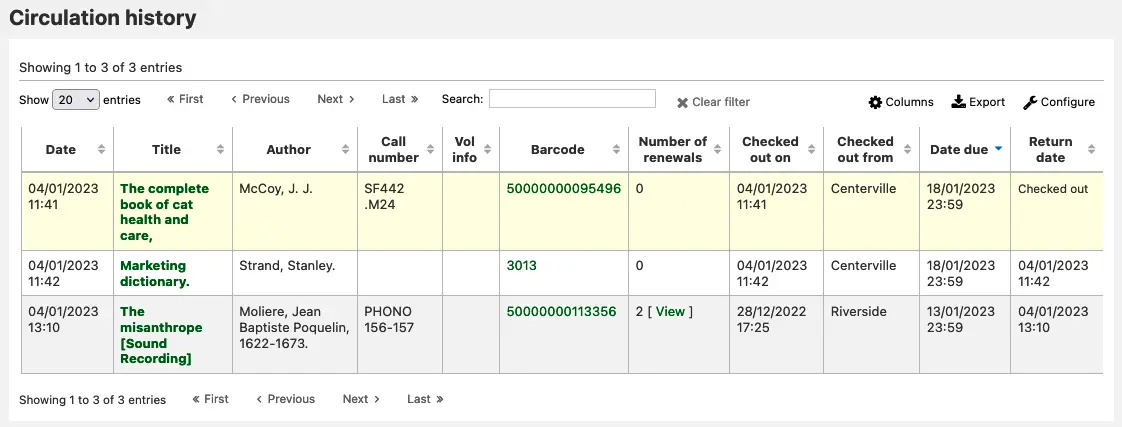
Note
Vous pouvez personnaliser les colonnes de ce tableau dans la section Configurer les colonnes du module Administration (référence du tableau : checkouthistory-table).
Pour voir quand un exemplaire a été renouvelé et par qui, cliquez sur “Voir” dans la colonne Nombre de nouvellement.
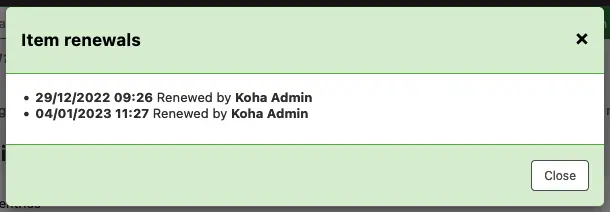
Si vous souhaitez exporter la liste de codes à barres de documents retournés aujourd’hui, vous trouvez cette option dans le menu “Plus” en haut à droite de la page.
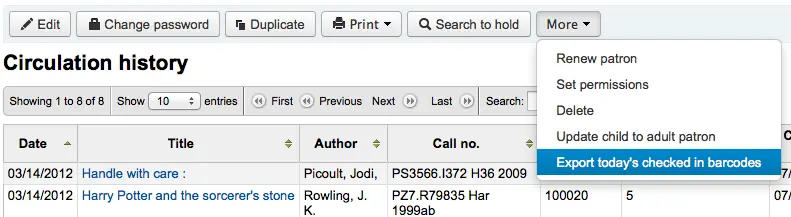
Ceci va générer un fichier texte avec un code à barres par ligne.
Note
Si la préférence système RecordStaffUserOnCheckout est activée, le compte du bibliothécaire qui a prêté l’exemplaire à l’adhérent sera aussi affiché ici.
Historique des réservations
L’onglet d’historique des réservations est visible si la préférence système IntranetReadingHistoryHolds est positionnée sur “Permettre”. Il affiche toutes les réservations que l’adhérent a réalisé, avec leur état.
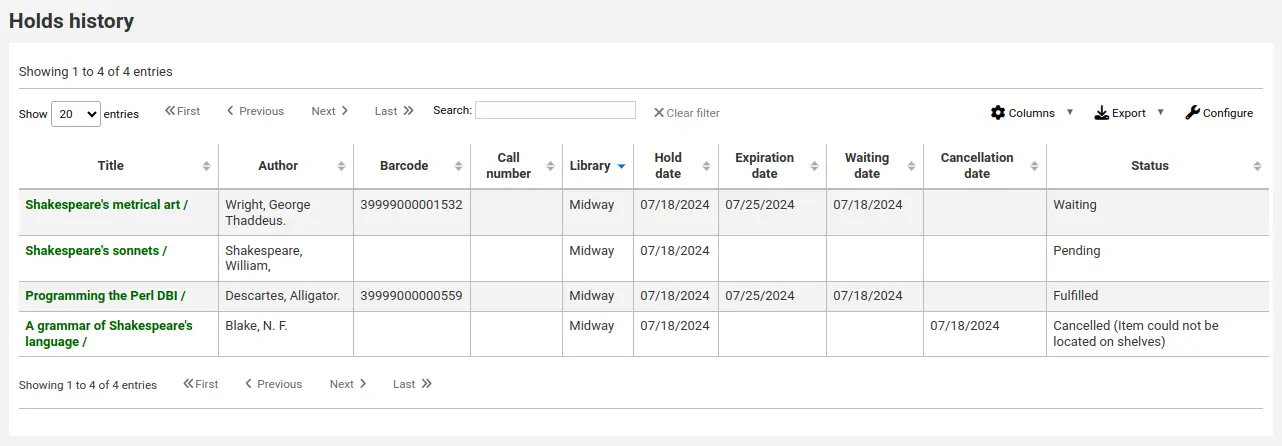
Note
Vous pouvez personnaliser les colonnes de ce tableau dans la section Configurer les colonnes du module Administration (référence du tableau : holdshistory-table).
Note
Si la préférence système OPACPrivacy est positionnée sur “Permettre” et que l’adhérent a décidé de ne jamais conserver d’historique, cet onglet n’affiche que les réservations courantes.
Log des modifications
Note
Seuls les membres du personnel ayant la permission view_system_logs (ou la permission superbibliothécaire) auront accès à cet outil.
Si vous avez configuré BorrowersLog pour suivre les changements apportés aux fiches des adhérents, l’onglet Log des modifications sera visible. Il indiquera quand ces changements auront été faits. Si vous avez aussi activé IssueLog et ReturnLog, vous verrez en plus les prêts et retours sur cet écran.
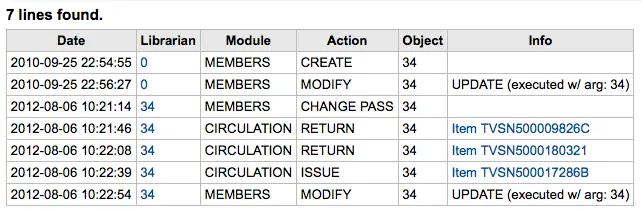
Le champ Bibliothécaire montre le numéro d’adhérent du bibliothécaire qui a effectué les changements
Le module des listes des “MEMBRES” pour le module adhérent
L’action vous informera quelle action a été enregistrée
Le champ Objet affiche le numéro d’adhérent qui est en train d’être modifié (dans l’exemple au-dessus, c’était la modification de sa propre fiche)
Notifications
L’onglet notification montre les messages qui ont été générés pour cet adhérent.
Note
Les préférences de notification des adhérents sont définies à la création ou lors de la modification d’un adhérent. Les notifications seront générées par les paramétrage de relance ou l’utilisation de fonctionnalité et préférences systèmes spécifiques.
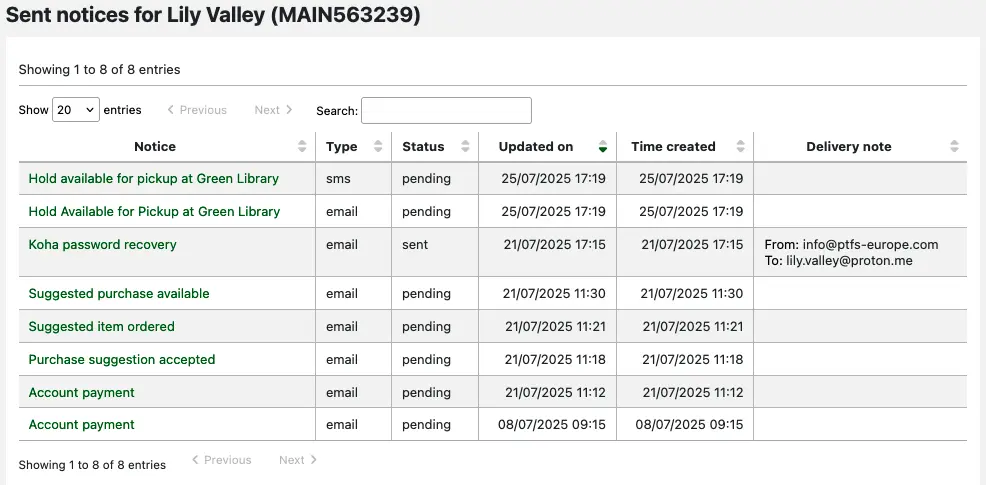
En cliquant sur le titre de la notification ouvrira le texte complet du message dans un pop-up.
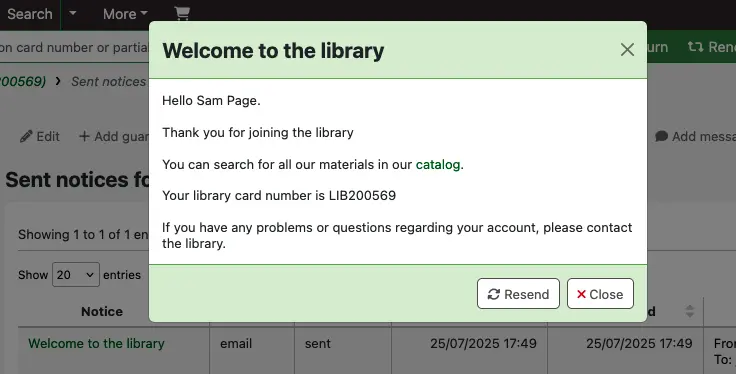
Si le message a le statut Envoyé ou Échec, vous aurez une option pour renvoyer le message à l’utilisateur en cliquant le bouton “Renvoyer” qui se situe sous le statut.
Si le message à échouer à s’envoyer et que vous utilisez la préférence système RestrictPatronsWithFailedNotices, une suspension sera ajoutée sur le compte de l’adhérent.
Statistiques
Selon la valeur de votre préférence système StatisticsFields, vous pouvez voir les statistiques de circulation par adhérent.
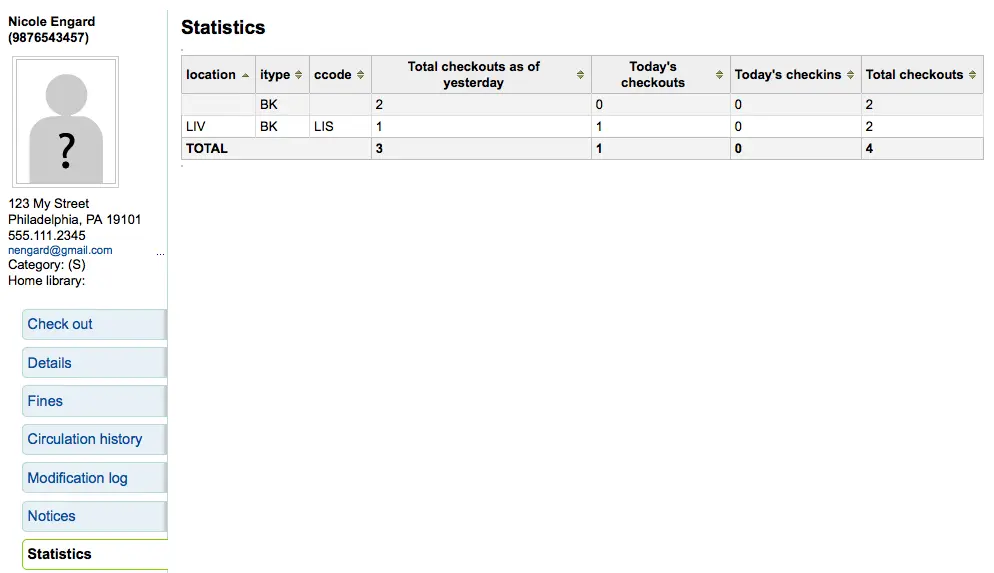
Fichiers
Si vous avez activé la préférence EnableBorrowerFiles, alors l’onglet “Fichiers” sera visible dans la page d’informations de l’adhérent.
Ici vous pouvez télécharger un fichier qui sera associé à la fiche de l’adhérent.

Tous les fichiers chargés vont apparaître au dessus du formulaire à partir duquel d’autres fichiers peuvent être chargés.
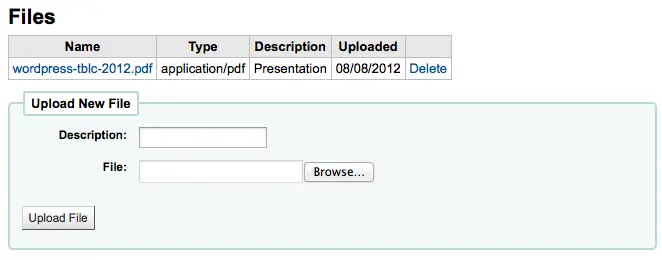
Suggestions d’achat
Si l’adhérent a déjà fait une suggestion d’achat, vous verrez un onglet Suggestions d’achat sur la fiche adhérent.
Note
Les bibliothécaires doivent avoir la permission suggestions_create (ou la permission superbibliothécaire) pour pouvoir créer des suggestions d’achat pour des adhérents et voir les suggestions existantes.
De là vous pouvez voir toutes les suggestions faites par l’adhérent et leurs statuts, vous pouvez aussi créer une suggestion d’achat au nom de l’adhérent en cliquant sur le bouton “Nouvelle suggestion d’achat” en haut de la page.
En savoir plus sur la gestion des suggestions d’achat dans le chapitre Acquisitions de ce manuel.
Quitus adhérent
Un quitus est un document certifiant que l’adhérent n’a plus de prêt en cours, ni de réservation. Pour activer cette option sur la fiche de l’adhérent vous devez régler la préférence système useDischarge sur “Permettre”.
Note
En France, un « quitus » (« quittance ») est nécessaire pour une inscription dans une bibliothèque ou une université.
Note
Les bibliothèques universitaires exigent souvent qu’un utilisateur ait un compte vierge avant de pouvoir obtenir son diplôme.
Émettre un quitus adhérent
Pour générer un quitus pour un adhérent, cliquez sur l’onglet “Quitus” à gauche de la fiche de l’adhérent.
Ou cliquez sur le bouton “Plus” et choisissez “Quitus”.
Si l’adhérent peut obtenir un quitus alors il y aura un bouton qui s’appellera « Générer un quitus »

Si l’adhérent a des prêts ou des réservations, vous verrez un message expliquant pourquoi vous ne pouvez pas attribuer un quitus à l’adhérent.

Une fois que cette lettre est générée vous devrez télécharger le PDF.
Note
Vous pouvez personnaliser ce message dans l’outil Notifications et tickets. Le code de la lettre est DISCHARGE.
Note
Vous pouvez styliser le PDF en utilisant la préférence système NoticeCSS, ou en ajoutant du CSS en ligne dans la lettre DISCHARGE dans l’outil Notifications et tickets.
Une suspension sera ajoutée au compte de l’adhérent.

Un historique des quitus sera ajouté à l’onglet “Quitus”.

Approuver des demandes de quitus
Les adhérents peuvent demander un quitus à l’OPAC. Les demandes en attente sont affichées sous les boutons de menu de la page principale de l’interface d’administration, avec les autres demandes en attente.
Cliquer sur le lien de demande de quitus en attente va ouvrir une page où vous pouvez approuver ce quitus en cliquant sur “Autoriser”.
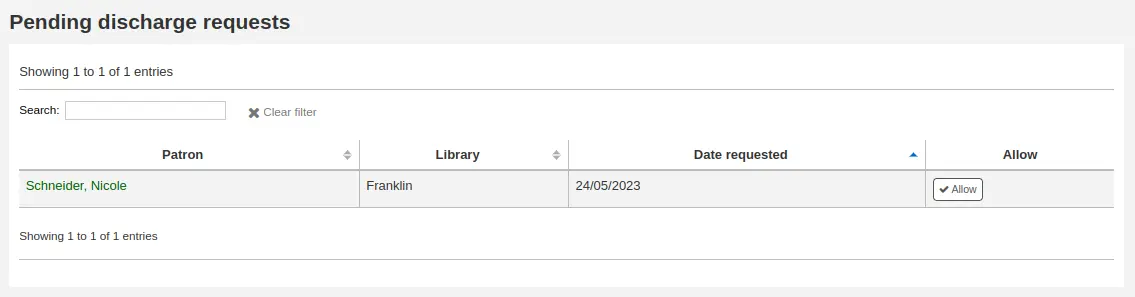
Adhérents empêchés
Il y a trois rôles qu’un adhérent peut endosser dans le module de prêt aux publics empêchés :
Important
Pour utiliser le module adhérents empêchés, les préférences systèmes HouseboundModule and ExtendedPatronAttributes doivent être activées.
Sélectionneur
Le sélectionneur a la charge de choisir les documents pour l’adhérent empêché.
Si vous avez activé le module Public empêché, avec la préférence système HouseboundModule, vous verrez que les adhérents ont maintenant une nouvelle section dans leur fiche, appelée “Rôles pour les services aux publics empêchés”.
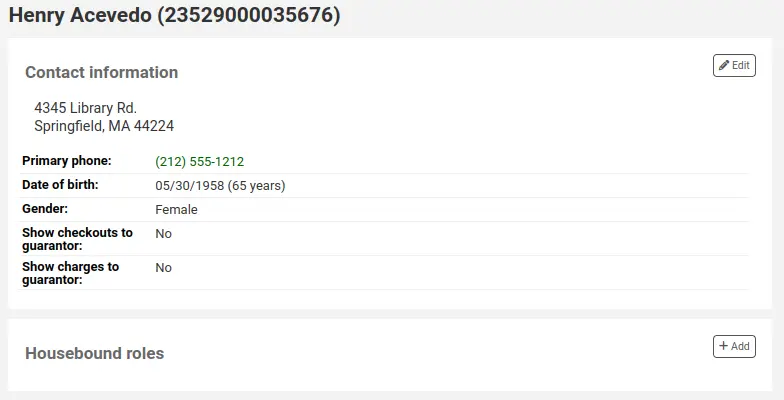
Cliquez sur le bouton “Ajouter” pour signaler cet adhérent comme “Sélectionneur”.

Livreur
Le livreur a la charge d’apporter les documents choisis à l’adhérent empêché, un jour et une heure précis.
Dans les “Rôles pour les services aux publics empêchés”, cliquez sur le bouton “Ajouter” pour signaler cet adhérent comme “Livreur”.

Publics empêchés
Pour créer un profil de public empêché pour un adhérent, cliquez sur l’onglet “public empêché” dans leur profil.
À partir de là vous pouvez éditer leur profil de public empêché.
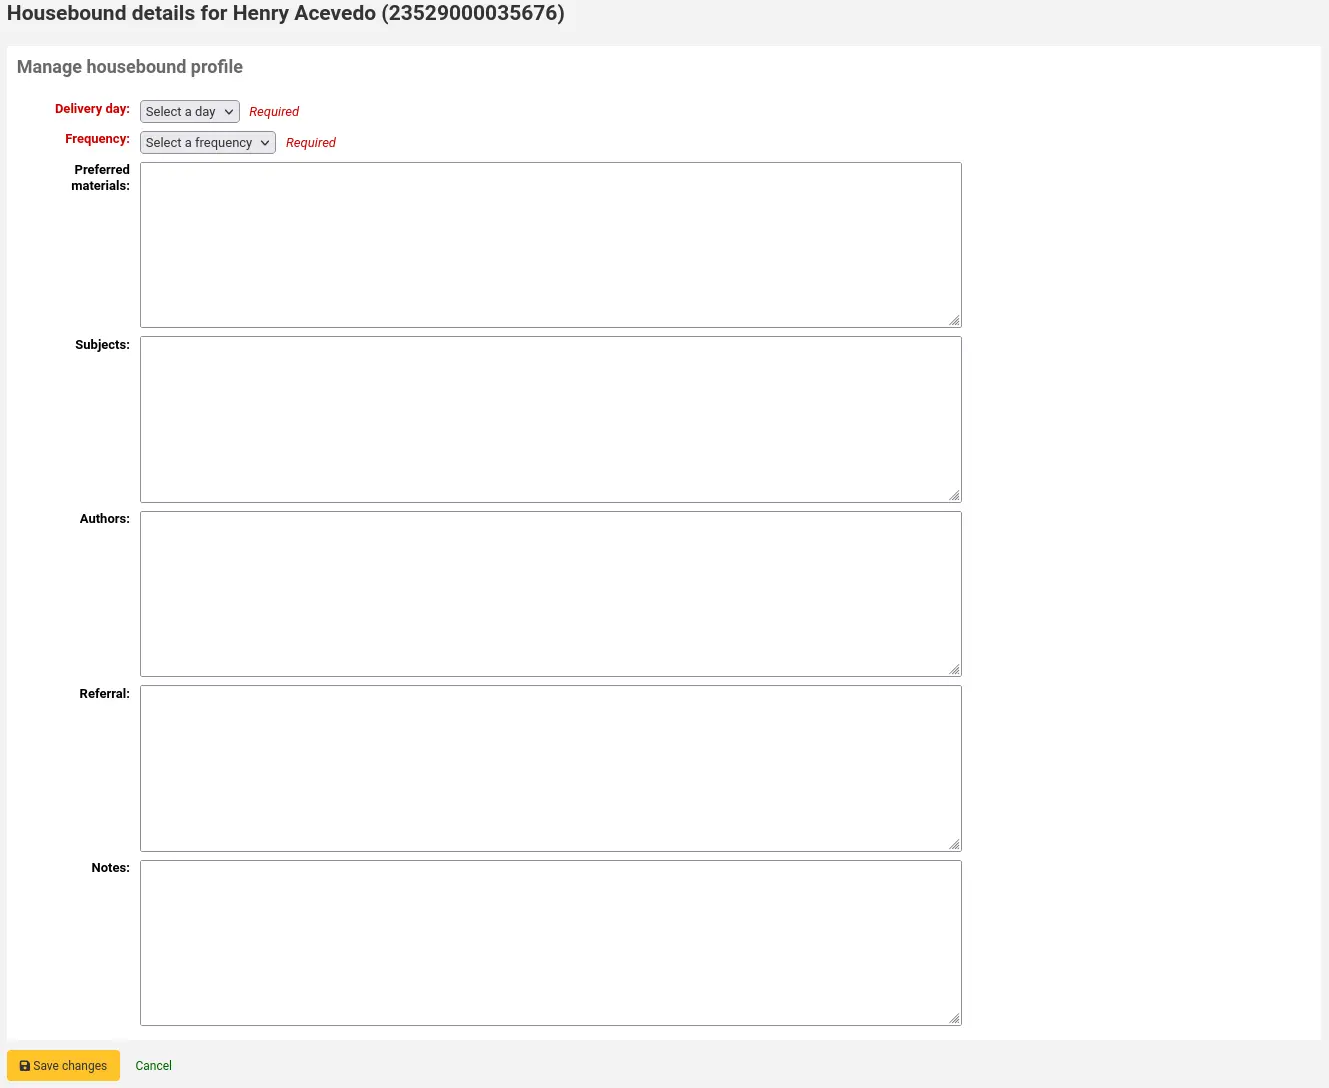
Jour de livraison : choisissez quel jour (ou “tous”) l’adhérent préfère recevoir ses livraisons.
Fréquence : choisir la fréquence à laquelle ils souhaitent recevoir leurs livraisons.
Note
Les fréquences sont gérées par la catégorie de valeurs autorisées HSBND_FREQ.
Documents préférés : saisissez des notes qui aideront le sélectionneur à choisir judicieusement les documents pour l’adhérent empêché.
Par exemple : livres, dvds, périodiques, etc.
Sujets : si l’adhérent empêché a des préférences pour des sujets particuliers, les noter ici. Cela aidera le sélectionneur à choisir des documents intéressants pour l’adhérent.
Par exemple : romances, livres de cuisine, thrillers, etc.
Auteurs : si l’adhérent empêché a des auteurs préférés, les noter ici.
Par exemple : Danielle Steel, James Patterson, etc.
Renvoi :si l’adhérent empêché a un renvoi, le noter ici.
Notes : saisissez n’importe quelles notes qui pourraient aider le sélectionneur ou le livreur.
Cliquez sur le bouton “Enregistrer les modifications” pour sauvegarder le profil de public empêché.
Coordonner des livraisons
Pour planifier des visites, aller sur le profil de l’adhérent empêché.
Dans l’onglet public empêché, vous pouvez créer des livraisons.
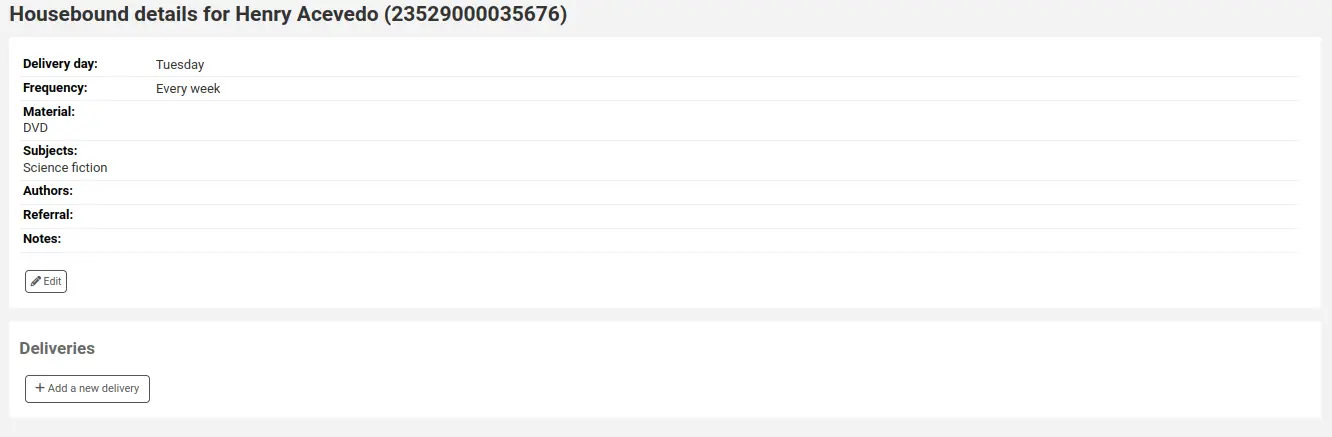
Cliquez sur “Ajouter une nouvelle livraison”.
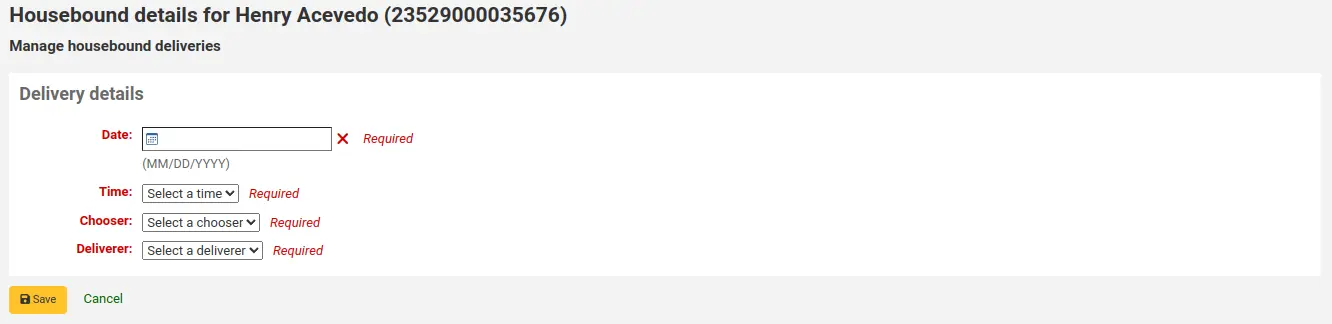
Saisissez ensuite les informations :
Date : entrez la date de la livraison.
Heure : sélectionnez un horaire pour la livraison. Les choix sont matin, après-midi ou soir.
Sélectionneur : choisissez un sélectionneur, qui aura la charge de choisir les documents pour l’adhérent empêché.
Note
Cette liste est remplie par les adhérents ayant le rôle sélectionneur.
Livreur : choisissez un livreur qui aura la charge de récupérer les documents et les apporter à l’adhérent empêché.
Note
Cette liste est remplie par les adhérents ayant le rôle livreur.
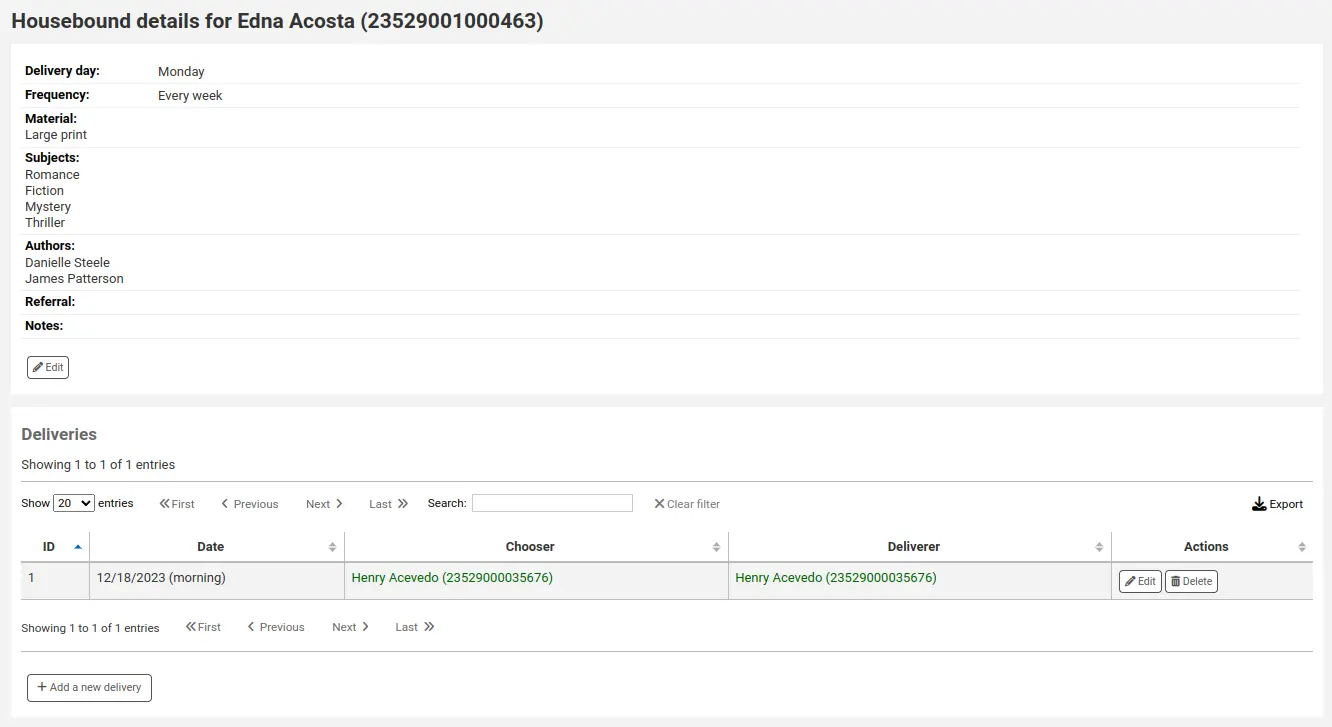
Note
Sélectionneurs et livreurs peuvent être notifiés des livraisons planifiées via des rapports.
Des exemples de rapports peuvent être trouvés dans la Bibliothèque de rapports SQL à l’adresse https://wiki.koha-community.org/wiki/SQL_Reports_Patrons#Patron_Characteristics.
Historique des rappels
Si les rappels sont activés , les rappels passés et en cours demandés par l’adhérent apparaîtront dans cet onglet.
Ici, les bibliothécaires peuvent voir le statut de chaque rappel et le gérer.
Alerte sur les abonnements (périodiques)
Version
Cette section a été ajoutée à Koha dans sa version 23.11.
Note
Seuls les membres du personnel ayant la permission serial (ou la permission superbibliothécaire) pourront voir les alertes sur les abonnements des adhérents.
Si la préférence système RoutingSerials est activée, les adhérents ayant choisi de recevoir des alertes par courriel pour les nouveaux fascicules de périodique via l’onglet “Abonnements” dans la notice bibliographique auront un onglet “Alerte sur les abonnements” dans leur compte.
Cet onglet liste toutes les alertes par courriel sur les abonnements auxquelles l’adhérent s’est inscrit. Les bibliothécaires peuvent annuler ces inscriptions pour l’adhérent en cliquant sur le lien “Se désinscrire d’une alerte d’abonnement par courriel”. Notez que l’adhérent peut aussi se désinscrire seul depuis l’onglet “Alerte sur les abonnements” dans leur compte à l’OPAC.
Authentification à 2 facteurs à l’interface professionnelle
Koha propose l’authentification à deux facteurs (2FA) pour la connexion à l’interface professionnelle.
Cette authentification à deux facteurs utilise un mot de passe temporaire et à usage unique (TOTP). Un TOTP est un mot de passe qui ne peut être utilisé une seule fois et est valide dans un temps limité.
Les utilisateurs qui veulent utiliser l’authentification à deux facteurs doivent avoir une application pour générer ces TOTP. N’importe quelle application, comme Google Authenticator, andOTP, FreeOTP et beaucoup d’autres peuvent être utilisées. Les applications qui autorisent le retour sur leur 2FA (basées sur le cloud ou automatique) sont recommandées.
Activer l’authentification à deux facteurs avec la préférence système TwoFactorAuthentication.
Une fois ceci fait, les membres du personnel peuvent accéder aux détails de leur compte en cliquant sur leur nom d’utilisateur situé en haut à droite de l’interface professionnelle et en choisissant “Mon compte”.
L’utilisateur doit alors se rendre sur Plus > Gérer l’authentification à deux facteurs.
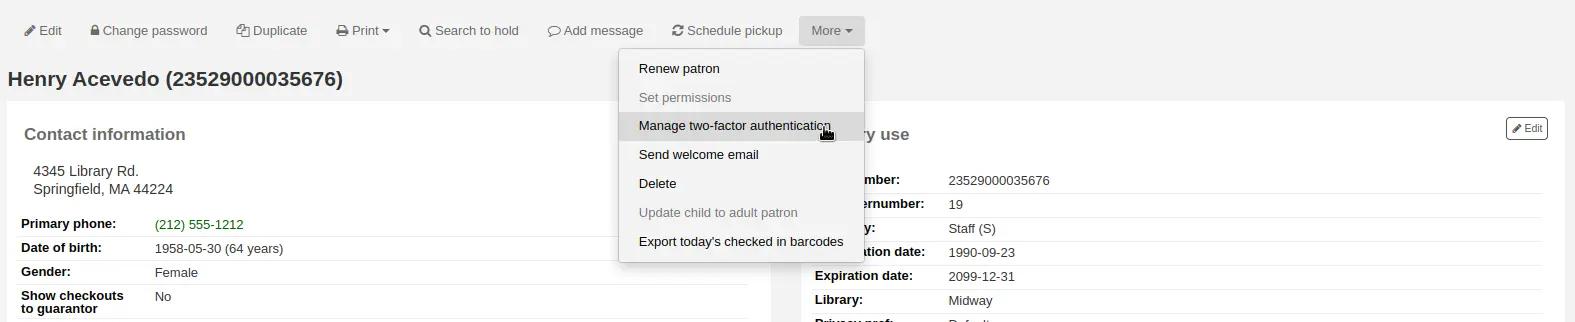
Le statut devrait être “Désactivé” la première fois que l’on va sur cette page.

Cliquez sur “Activer l’authentification à deux facteurs”.
Un QR code sera présenté. Ce code doit être scanné avec une application d’authentification (voir ci-dessus pour des suggestions).
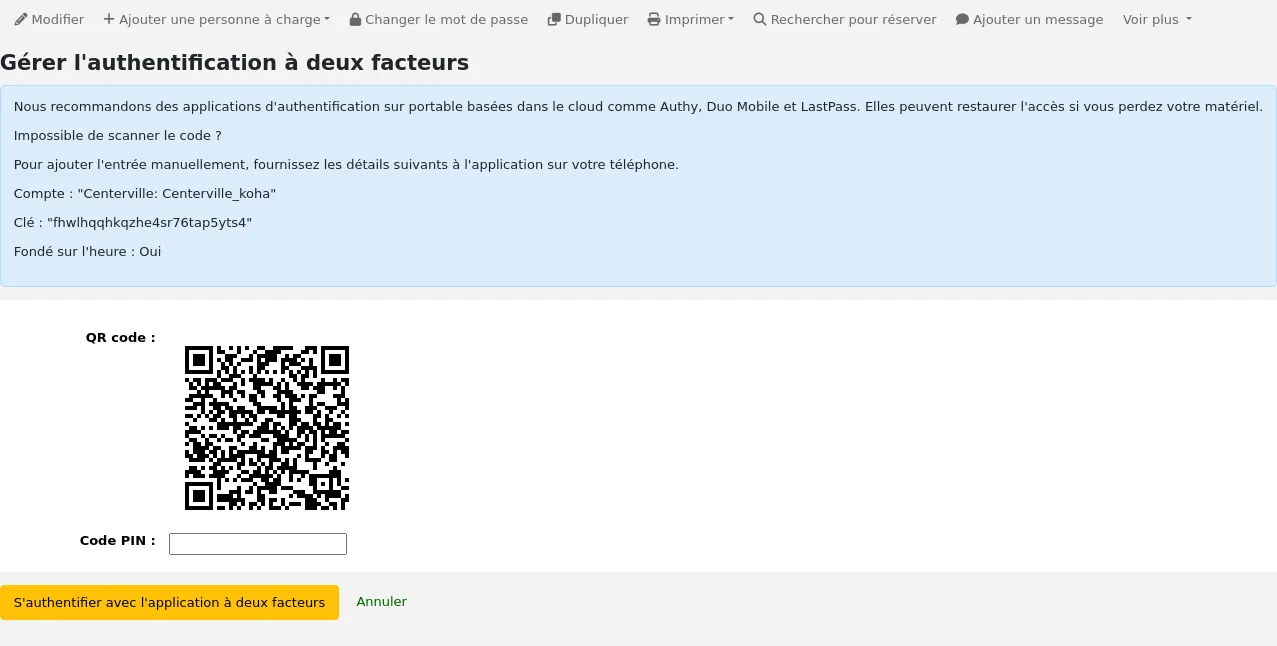
Note
Si l’application ne permet pas de scanner des QR codes, la page donne les habilitations qui peuvent être saisis manuellement (compte, clé, temporaire).
Une fois le QR code scanné, l’application enverra un code PIN temporaire. L’utilisateur doit saisir ce code PIN dans le champ code PIN et cliquez sur “S’enregistrer avec une application d’authentification à deux facteurs”.
Le statut de l’authentification à deux facteurs sera désormais activé.
Note
Un courriel sera envoyé à l’adresse de l’utilisateur pour l’alerter sur le fait que l’authentification à deux facteurs a été activée sur son compte.
Vous pouvez personnaliser ce message dans l” outil Notifications et tickets. Le code de la lettre est 2FA_ENABLE.
Quand l’utilisateur essaie de se connecter à l’interface professionnelle, il devra entrer son nom d’utilisateur et son mot de passe, comme d’habitude, mais aussi un code d’authentification à deux facteurs.
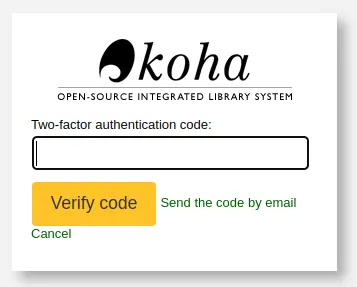
L’utilisateur doit alors ouvrir son application d’authentification, générer un mot de passe temporaire à usage unique et le saisir dans le champ pour se connecter.
Note
Sinon, si l’utilisateur n’a pas l’application, il peut cliquer sur “Envoyer le code par courriel”, ce qui lui enverra un courriel avec un mot de passe temporaire à usage unique pour qu’il puisse l’utiliser.
Ce courriel est basé sur le modèle de notification dans le 2FA_OTP_TOKEN, qui peut être personnalisé dans l” outil Notifications et tickets.
Si l’utilisateur souhaite désactiver l’authentification à deux facteurs, il peut aller sur son compte dans l’interface professionnelle, en cliquant sur Plus > Gérer l’authentification à deux facteurs puis sur “Désactiver l’authentification à deux facteurs”.

Note
Un courriel sera envoyé à l’adresse mail de l’adhérent pour l’alerter que l’authentification à double facteurs a été désactivée sur son compte.
Vous pouvez personnaliser ce message dans l” outil Notifications et tickets. Le code de la lettre est 2FA_DISABLE.
Recherche Adhérent
Cliquez sur le lien vers le module Adhérents pour accéder à la page de recherche des adhérents, à partir de laquelle vous pourrez chercher des adhérents par nom ou numéro de carte.

Note
Par défaut la recherche est de type “Commence par”, ce qui signifie que vous devez fournir le début du nom de l’adhérent ou le début de son numéro de carte. Vous pouvez utiliser la préférence système DefaultPatronSearchMethod pour changer la méthode de recherche en une recherche de type “Contient” pour pouvoir chercher n’importe où dans le nom ou le numéro de carte de l’adhérent.
Cliquez sur le symbole “Plus d’options” à droite de la boîte de recherche pour accéder à la recherche avancée d’adhérents, qui comprend des filtres supplémentaires et la possibilité de limiter la recherche à une catégorie ou une bibliothèque.
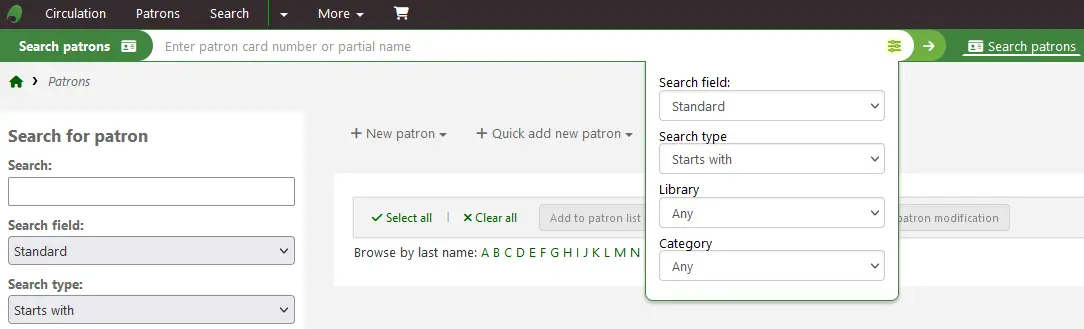
Vous pouvez filtrer les résultats des adhérents en utilisant les options de recherche situées sur le côté gauche de la page.
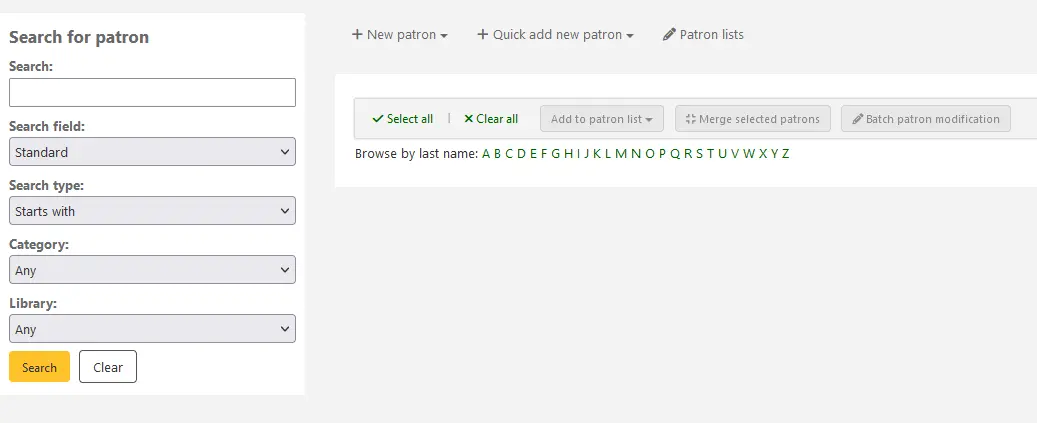
Vous pouvez rechercher des adhérents de plusieurs manières, en fonction des champs de recherche sélectionnés.
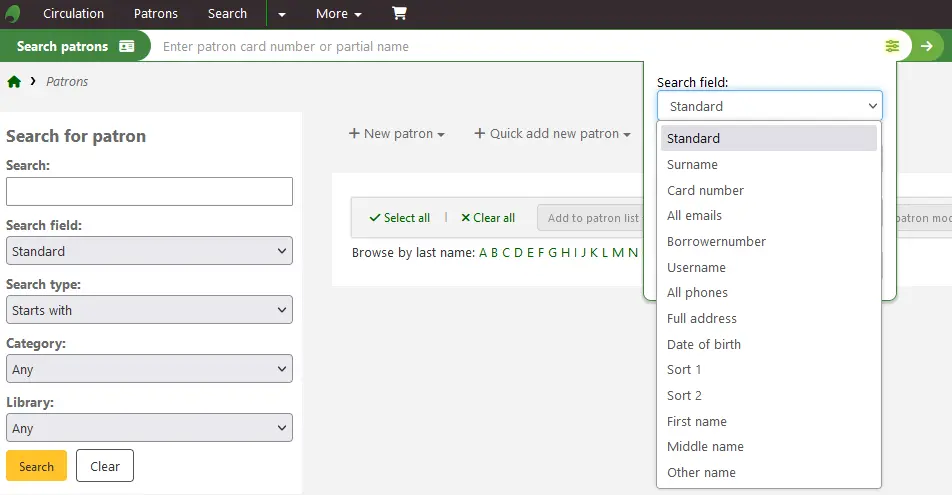
Standard :
Entrer une partie de leur nom, prénom, courriel ou code à barres
Note
Vous pouvez utiliser la préférence système DefaultPatronSearchFields pour définir d’autres champs à utiliser pour rechercher avec cette option.
Nom de famille :
Recherche le nom de famille de l’adhérent
Numéro de carte :
Recherche le numéro de carte de l’adhérent
Tous les courriels :
Recherche le courriel de l’adhérents dans tous les champs de courriel
Numéro d’adhérent :
Rechercher le numéro d’adhérent Koha
Nom d’utilisateur :
Recherche le nom d’utilisateur de l’adhérent
Tous les téléphones :
Recherchera tous les champs téléphone définis. Entrez le numéro de téléphone exactement comme il est dans le système ou en utilisant les espaces entre chaque groupe de numéros.
Exemple : Pour trouver (212) 555-1212 vous pouvez chercher exactement cette forme ou chercher sans parenthèse 212 555 1212
Adresse complète :
Recherche de l’adresse de l’adhérent dans tous les champs d’adresse
Date de naissance
Les dates de naissance devraient être entrées en utilisant le format choisi dans la préférence dateformat.
Champ de tri 1
C’est un champ basique que les bibliothèques peuvent utiliser pour tout type de données concernant l’adhérent.
Champ de tri 2
C’est un champ basique que les bibliothèques peuvent utiliser pour tout type de données concernant l’adhérent.
Prénom :
Recherche le prénom de l’adhérent
Deuxième prénom :
Recherche le deuxième prénom de l’adhérent
Autre nom :
Recherche dans les champs “Autre nom” des adhérents
Tous les types d’attributs adhérents marqués comme recherchables seront listés dans cette liste.
Vous pouvez également choisir de chercher les champs débutant ou contenant la chaîne que vous avez saisi. Choisir “Contient” équivaut à une recherche avec une troncature.
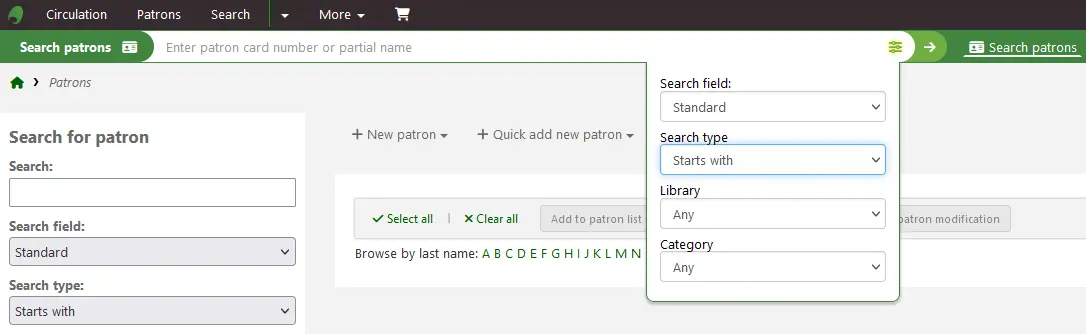
Vous pouvez aussi feuiller la liste des adhérents en cliquant sur une lettre de la barre de navigation qui se trouve en haut de la page.

Si votre recherche ne retourne qu’un résultat, vous serez redirigé automatiquement sur la fiche de l’adhérent. Si votre recherche retourne plusieurs résultats, ceux s’afficheront sous forme de liste dans laquelle vous pourrez choisir.
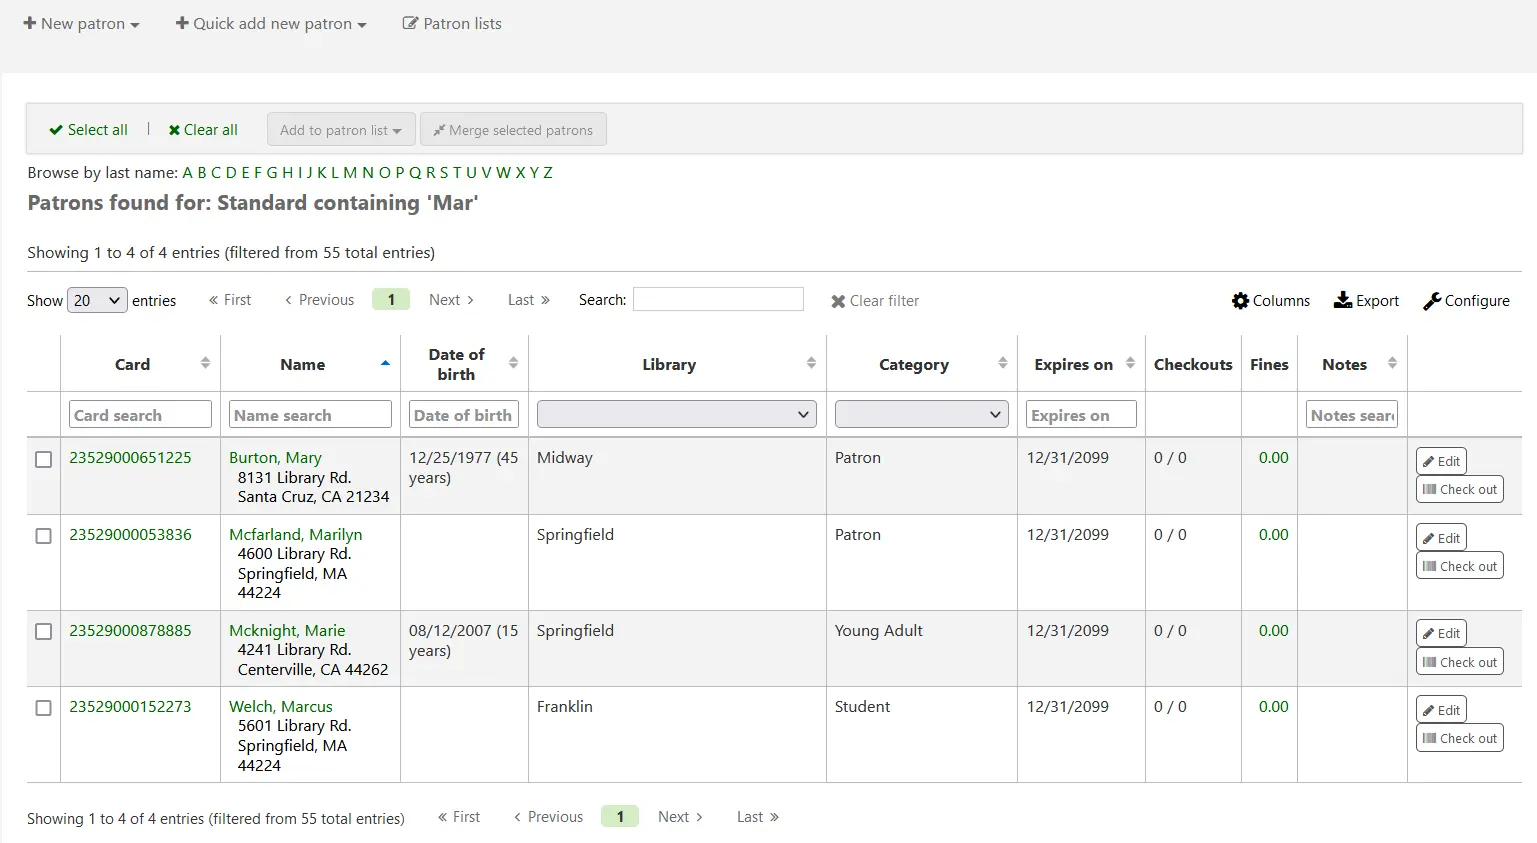
Note
Vous pouvez personnaliser les colonnes de ce tableau dans la section Configurer les colonnes du module Administration, dans l’onglet adhérents (référence du tableau : memberresultst).
Sélectionner un ou plusieurs adhérents dans la liste des résultats en cochant les cases dans la colonne de gauche affichera d’autres actions qui peuvent être exécutées pour les adhérents sélectionnés.
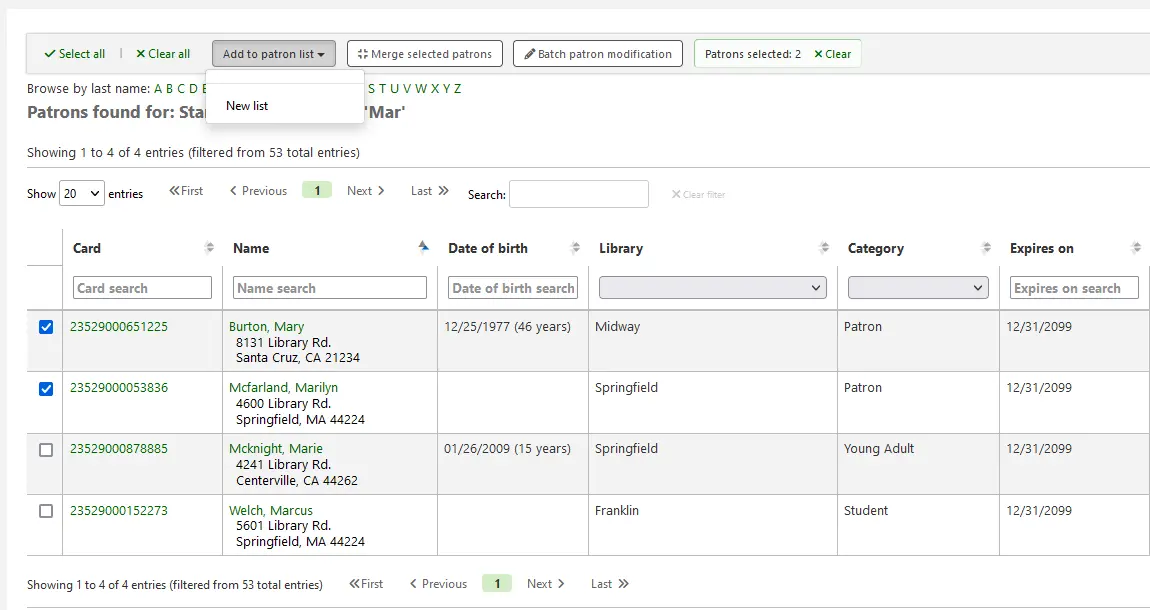
Ajouter à une liste d’adhérents :
Ajoute les adhérents sélectionnés à une liste d’adhérents existante ou crée une nouvelle liste
Fusionner les adhérents sélectionnés :
Permet de fusionner les adhérents sélectionnés
Modification d’adhérents par lot :
Envoie les adhérents sélectionnés à l’outil de modification par lot des adhérents
Communiquer avec les adhérents
Koha offre plusieurs possibilités de communication avec les adhérents, dont certaines ont déjà été traitées dans ce chapitre.
Notes OPAC
Les notes OPAC sont ajoutées à la fiche de l’adhérent au moyen du formulaire d’ajout d’adhérent ou du formulaire de modification d’adhérent, dans la section “Paramètres de la bibliothèque”.
Ils s’afficheront dans la section “Résumé” du compte adhérent à l’OPAC.
Dans l’interface professionnelle, les notes OPAC seront dans la section “Utilisation de la bibliothèque” de la fiche adhérent.
Messages OPAC
Les messages OPAC sont ajoutés à la fiche adhérent en utilisant le bouton “Ajouter un message”.
Pour ajouter un message que l’adhérent pourra voir à l’OPAC, choisissez « OPAC - Nom de l’adhérent » dans le champ “Ajouter un message pour”. Saisissez votre message dans le champ de saisie ou sélectionnez un message prédéfini.
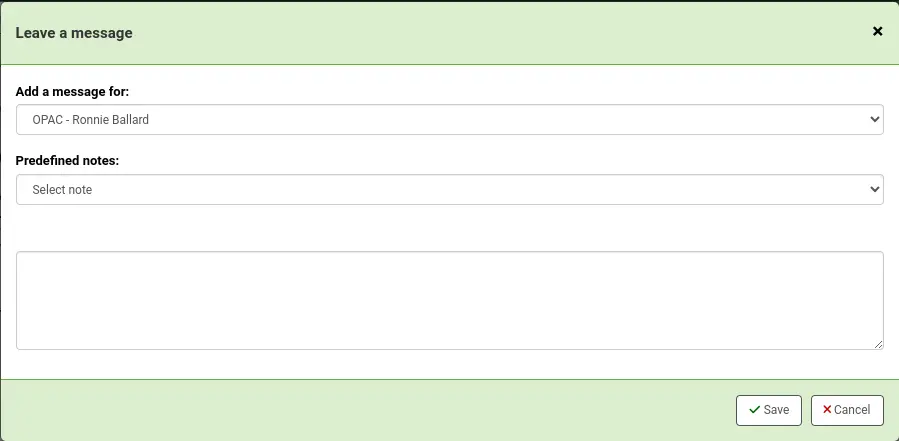
Note
Des messages prédéfinis sont ajoutés dans la catégorie de valeur autorisée BOR_NOTES.
Après l’enregistrement, l’adhérent pourra voir le message dans la section “Résumé” de son compte OPAC. Il verra également la date d’ajout du message ainsi que le nom de la bibliothèque. Il a la possibilité d’ignorer le message, ce qui le masque sur son compte OPAC et le marque comme “lu”, mais sans le supprimer.

Dans l’interface professionnelle, les messages OPAC sont affichés sur la fiche adhérent, en haut de la page, juste en dessous de la barre des boutons d’action.

Les messages apparaîtront également sur la page de prêt, à droite de la boîte de prêt.

Si vous devez modifier le message, cliquez sur le bouton “Modifier” près du message, modifiez le texte et cliquez sur “Enregistrer”.
Avertissement
Si vous modifiez un message qui a été ignoré par l’adhérent, il va conserver la mention « Lu » et l’adhérent de verra pas les modifications.
Si l’adhérent clique sur “Ignorer”, la mention “Lu” avec la date sera affichée près du message à l’interface professionnelle pour informer l’équipe de la bibliothèque que ce message à été lu par l’adhérent.

Notifications automatiques
Si vous avez paramétré la préférence système EnhancedMessagingPreferences sur “Autoriser”, les bibliothécaires peuvent paramétrer les préférences de notifications aux adhérents lors de l’ajout d’un nouveau compte adhérent ou la modification d’un compte adhérent.
Si vous avez paramétré la préférence système EnhancedMessagingPreferencesOPAC sur “Afficher”, les adhérents pourront modifier leurs préférences de notifications à partir de leur compte OPAC.
Les bibliothécaires et les adhérents peuvent paramétrer leurs préférences pour ces notifications :
Message de courtoisie (PREDUE, PREDUEDGST) : une notification envoyée avant la date de retour d’un document (le nombre de jours d’avance peut être choisi). Les messages de courtoisie sont générés par le cronjob advance_notices.pl.
Renouvellement automatique (AUTO_RENEWAL, AUTO_RENEWAL_DGST) : une notification envoyée à un adhérent dont les prêts seront renouvelés automatiquement, ou s’il y a eu un problème avec le renouvellement automatique. (Affichée si AutoRenewalNotices est paramétrée sur « selon les préférences de notification de l’adhérent ».)
Réservation satisfaite (HOLD, HOLDDGST, NEW_CURBSIDE_PICKUP) : une notification envoyée quand une réservation confirmée attend l’adhérent, et quand une collecte sur rendez-vous est planifiée.
Rappel de réservation en attente (HOLD_REMINDER) : une notification rappelant à l’adhérent qu’une réservation est en attente de récupération. Les notifications de rappel de réservation en attente sont générées un nombre de jours après satisfaction de la réservation par le cronjob holds_reminder.pl.
Prêt entre bibliothèques en attente de retrait (ILL_PICKUP_READY) : une notification prévenant qu’une demande de prêt entre bibliothèques est satisfaite et est prête à être collectée. (Affichée si les prêts entre bibliothèques sont activés.)
Prêt entre bibliothèques indisponible (ILL_REQUEST_UNAVAIL) : une notification prévenant qu’une demande de prêt entre bibliothèques a été annulée car le document n’était pas disponible. (Affichée si les prêts entre bibliothèques sont activés.)
Prêt entre bibliothèques mis à jour (ILL_REQUEST_UPDATE) : une notification envoyée quand un prêt entre bibliothèques est mis à jour. (Affichée si les prêts entre bibliothèques sont activés.)
Exemplaire rendu (CHECKIN) : une notification qui liste tous les exemplaires que l’adhérent vient de rendre.
Exemplaire prêté (CHECKOUT, RENEWAL) : une notification qui liste les exemplaires que l’adhérent vient d’emprunter ou renouveler. C’est un formulaire électronique du reçu de prêt. Si la préférence système RenewalSendNotice est positionnée sur “Envoyer”, cette notification sera nommée “Document emprunté et renouvelé”.
Document à rendre (DUE, DUEDGST) : une notification envoyée le jour même de la date de retour du document à la bibliothèque. Les notifications de documents dus sont générées par le cron job advance_notices.pl.
Rappels de retrait en attente (PICKUP_RECALLED_ITEM) : une notification précisant qu’un document rappelé est en attente de récupération. (Affichée si les rappels sont activés.)
Retour d’un exemplaire rappelé (RETURN_RECALLED_ITEM) : une ntification envoyée à un adhérent afin qu’il rende le document rappelé. (Affichée si les rappels sont activés.)
Utilisez l’outil Notifications et tickets pour personnaliser les notifications.
Les adhérents peuvent choisir de recevoir leurs notifications en un seul résumé en cochant la case “Résumé uniquement” à côté du type d’envoi. Un résumé est une combinaison de tous les messages d’un type dans un même courriel (par exemple, pour avoir tous les exemplaires à rendre dans 3 jours) au lieu de nombreux courriels.
Les modes de distributions actuellement supportés pour l’envoi de notifications sont :
Courriel
SMS (messages texte)
Système d’appel téléphonique automatique
Courrier papier
Les notifications électroniques sont envoyées par le cronjob process_message_queue.pl.
Les notifications imprimées sont générées par le cronjob gather_print_notices.pl. Il crée un fichier unique pour toutes les notifications imprimées, que vous pouvez imprimer puis envoyer avec le courrier habituel.
Notifications de retard
Les notifications de retard sont gérées dans Notifications et tickets et leurs conditions d” envoi sont gérées dans Paramétrage des relances.
Les adhérents ne peuvent pas choisir de ne pas recevoir les relances pour retard comme ils peuvent le faire pour d’autres notifications (telles que les notifications préalables ou les avis de réservation remplie)
Pour générer les relances pour retard, il faut exécuter le cronjob overdue_notices.pl. Alors, le cronjob process_message_queue.pl va envoyer les notifications ou le cronjob gather_print_notices.pl va les regrouper dans un fichier à imprimer ou envoyer par mail standard.
Emails personnalisés
Note
Seuls les membres du personnel ayant la permission edit_borrowers et la permission send_messages_to_patrons (ou la permission superbibliothécaire) pourront envoyer des courriels personnalisés aux adhérents.
Les emails personnalisés peuvent être envoyés à un adhérent particulier.
Version
Cette fonctionnalité a été ajoutée à Koha dans sa version 24.05.
Pour envoyer un courriel personnalisé à l’adhérent, cliquez sur le bouton “Ajouter un message”.
Choisissez “Courriel - adresses courriel de l’adhérent” dans le champ “Ajouter un message pour”. Si nécessaire, choisissez une notification prédéfinie dans “Notifications de l’adhérent”.
Note
Personnalisez les notifications de l’adhérent dans l” outil notifications et tickets dans le module “Adhérents (message personnalisé)”.
Sinon, saisissez manuellement le sujet du courriel dans le champ “Sujet” et le message dans le champ “Corps”.
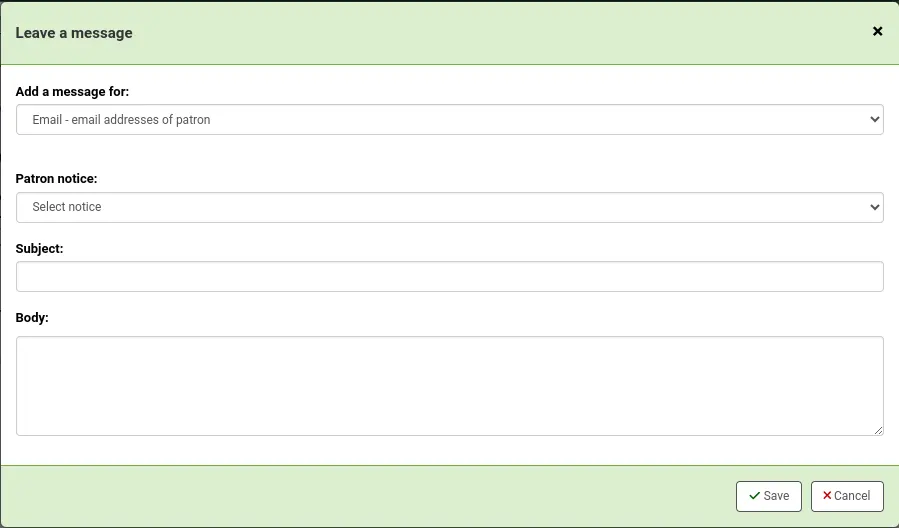
Quand vous cliquez sur “Enregistrer”, le message est mis en file d’attente pour être envoyé par le cronjob process_message_queue.pl. Il sera également visible dans l’onglet Notifications de la fiche adhérent.