Raporlar
Koha’da raporlar bir veri toplama yöntemidir. Raporlar istatistik, üye listeleri, raf listeleri oluşturmak veya veritabanınızdaki herhangi bir veri listesini oluşturmak için kullanılır.
Gidiş yolu: Daha fazla > Raporlar
Custom reports
Koha’s data is stored in a MySQL database which means that librarians can generate nearly any report they would like by either using the guided reports wizard or writing their own SQL query.
Add custom report
Guided report wizard
Kılavuzlu rapor sihirbazı sizi rapor oluşturmanız için 6 basamaklı bir işleme yönlendirecek.
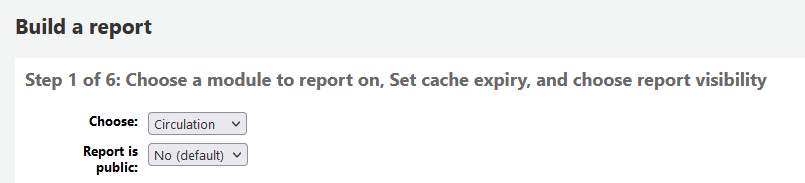
Adım 1: Raporlamak istediğiniz modülü seçin. Bu, sorgulamak için hangi tabloları ve alanları kullanabileceğinizi belirler.
‘Report is public’ should be left to the default of ‘No’ in most cases especially if the report contains patron or other sensitive information. A public report can be accessed using the JSON reports services by anyone and without authentication.
Not
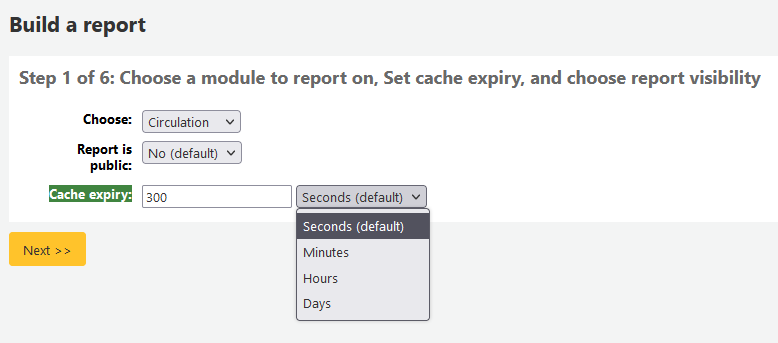
Sistem yöneticiniz sunucunuzda memcache ayarladıysa, Önbellek kullanım süresinin dolması için başka bir seçenek görebilirsiniz. Bu, herkese açık raporlarınızla ilgilidir. Raporu herkese açık hale getirirseniz, bu rapor sürekli olarak çalışır ve sisteminizde büyük bir yük oluşturur. Bu değeri ayarlamak bunu engeller.
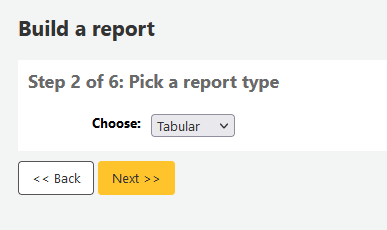
Adım 2: Bir rapor türü seçin. Şimdilik Sekmeli kullanılabilen tek seçenektir.
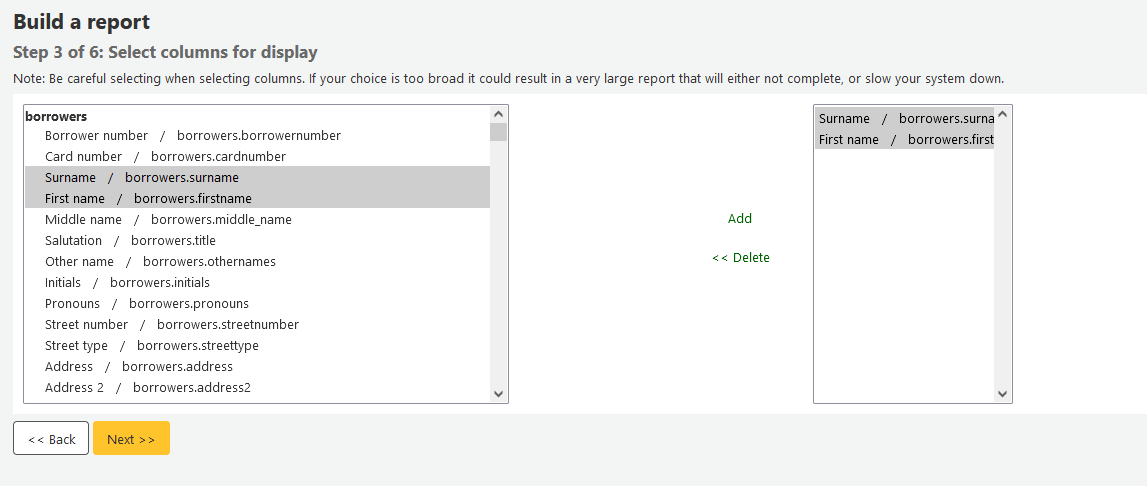
Step 3: Choose the fields you want in your report. You can select multiple fields and add them all at once by using CTRL+click on each item you want to add before clicking the Add button.
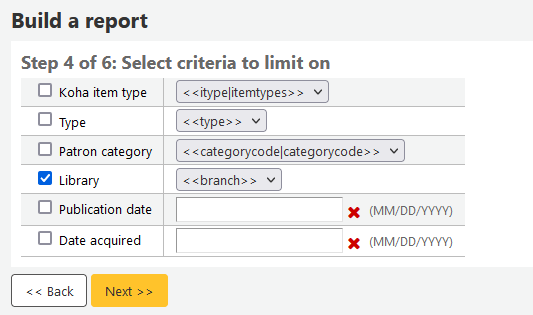
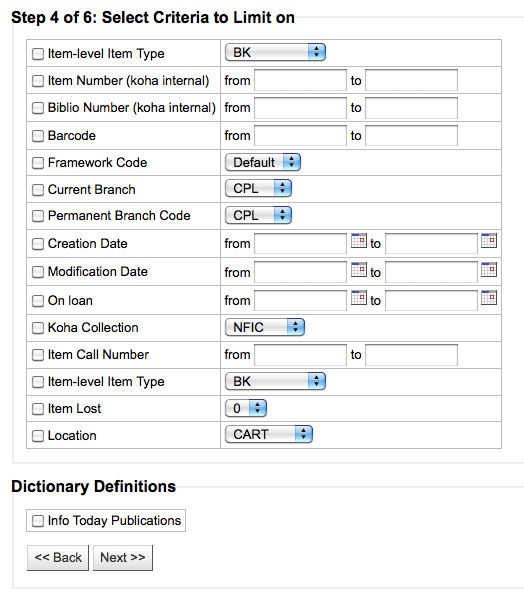
Step 4: Choose any limits you might want to apply to your report (such as item types or branches). If you don’t want to apply any limits, simply click ‘Next’ instead of choosing an option.
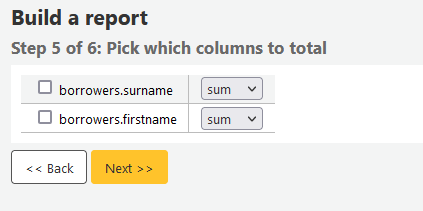
Step 5: Perform math functions. If you don’t want to do any calculations, simply click ‘Next’ instead of choosing an option.
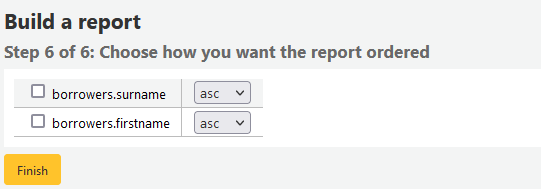
Step 6: Choose data order. If you want the data to print out in the order it’s found in the database, simply click ‘Finish’.
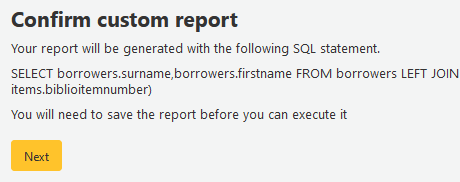
When you are finished you will be presented with the SQL generated by the report wizard. From here you can choose to save the report by clicking ‘Finish’ or copy the SQL and make edits to it by hand.
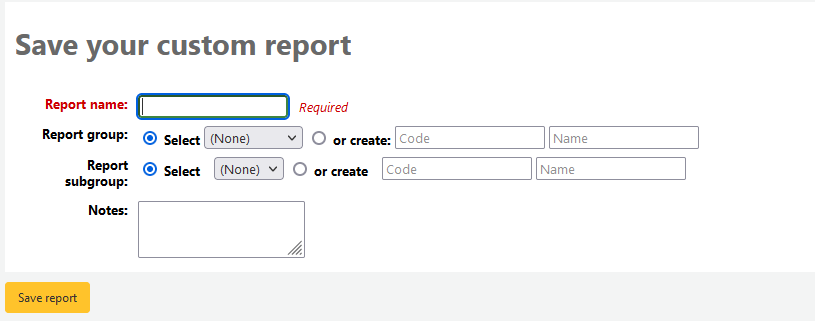
Raporu kaydetmeyi seçerseniz, raporu adlandırmanız, bu raporu gruplara ve alt gruplara göre sıralamanız ve bununla ilgili her hangi bir not girmeniz istenecektir.
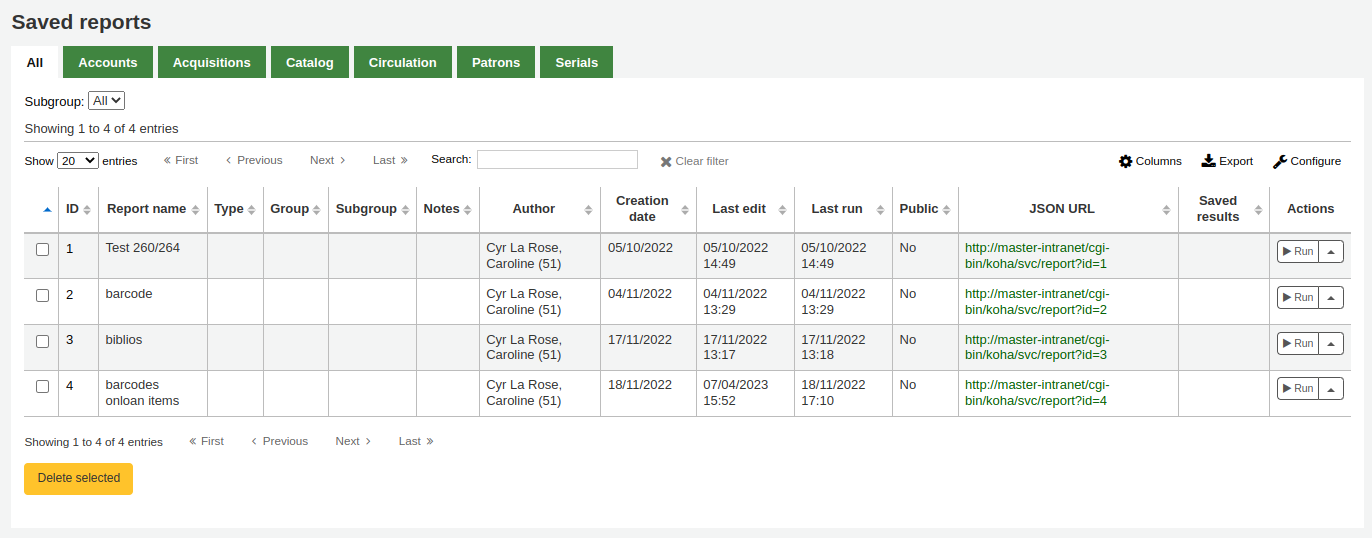
Once your report is saved it will appear on the ‘Use saved’ page with all other saved reports.
Not
You can customize the columns of this table in the ‘Table settings’ section of the Administration module (table id: table_reports).
Buradan, düzenlemeler yapabilir, raporu çalıştırabilir ya da raporun çalıştırılması için zamanı programlayabilirsiniz. Oluşturduğunuz raporu bulmak için, sütunların her hangi birinin başlığına tıklayarak raporları sıralayabilirsiniz(oluşturma tarihi henüz eklemiş olduğunuz raporu bulmak için en iyisidir). Sonuçlarınızı aynı zamanda soldaki filtre menüsünü kullanarak filtreleyebilirsiniz ya da özelleştirilmiş gruplara bağlı raporları bulmak için sekmeleri kullanabilirsiniz.
SQL’den rapor oluştur
In addition to the report wizard, you have the option to write your own queries using SQL. To find reports written by other Koha users, visit the Koha wiki: http://wiki.koha-community.org/wiki/SQL_Reports_Library. You can also find your database structure in /installer/data/mysql/kohastructure.sql or online at: http://schema.koha-community.org.
To add your query, click the link to ‘Create from SQL’ on the main reports module
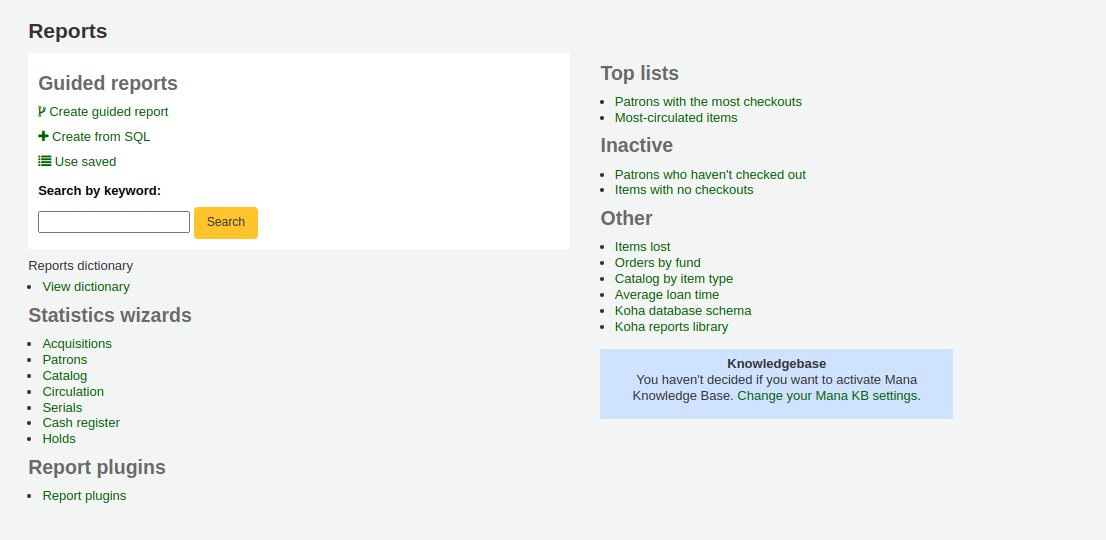
or the ‘New report’ button at the top of the ‘Saved reports’ page.

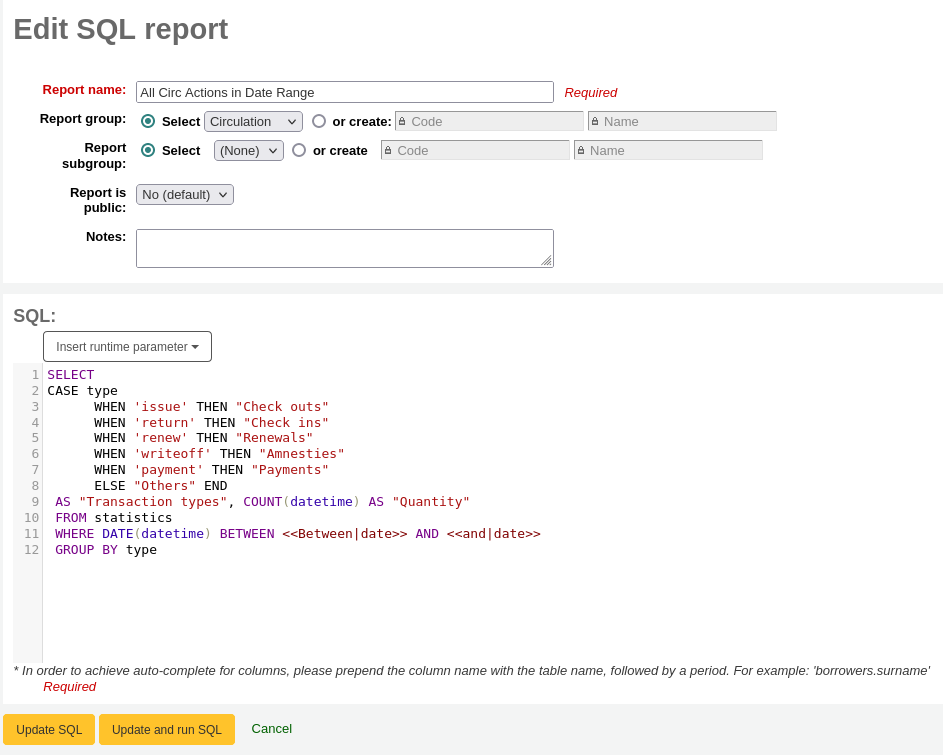
Sunulan formu doldurunuz
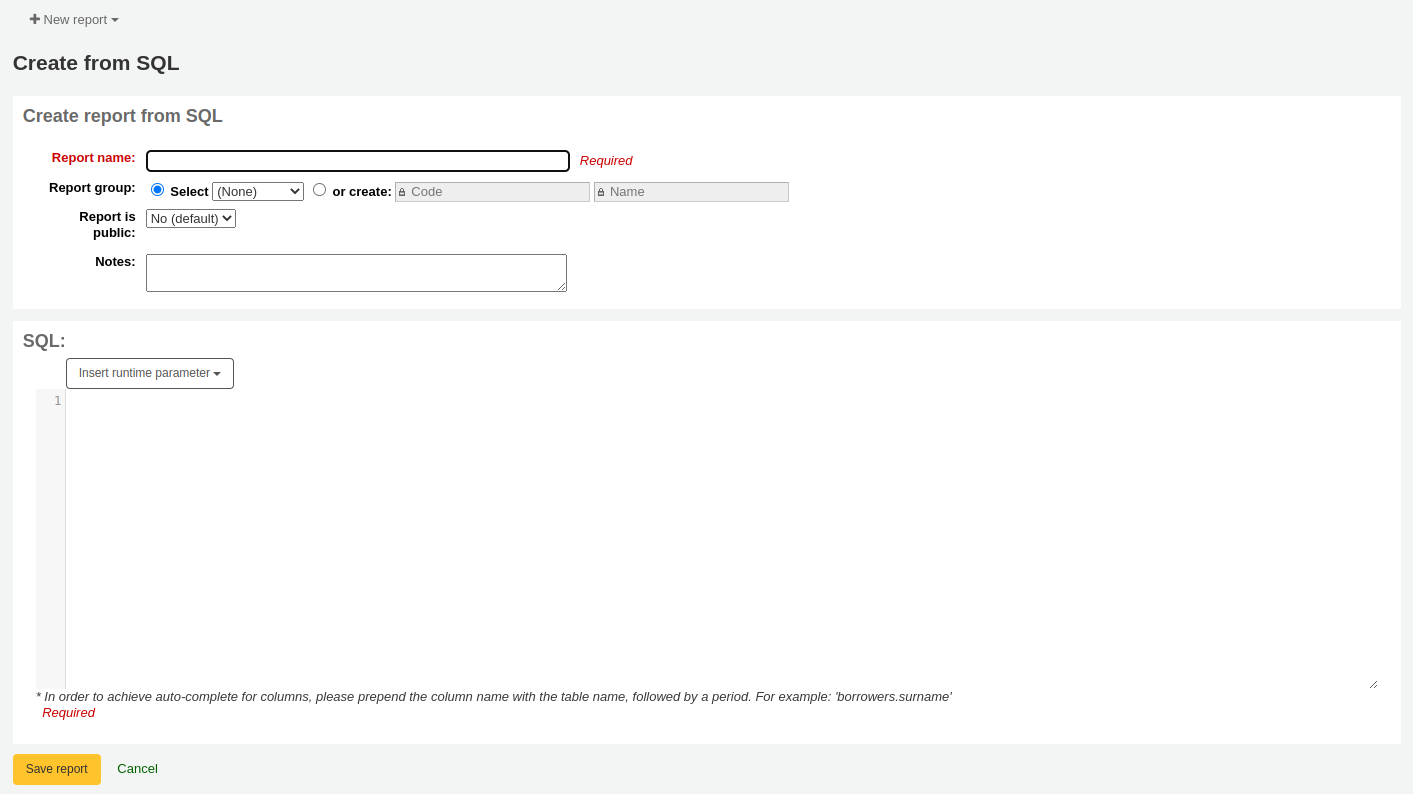
Report name: the name is what will appear on the ‘Saved reports’ page to help you identify the report later. It will also be searchable using the filters found on the left of the ‘Saved reports’ page.
Report group: you can use the ‘Report group’ to organize your reports in tabs on the ‘Saved reports’ page. You can choose from the list of existing groups, or create one on the fly by choosing the ‘or create’ radio button.

Report groups are set in the REPORT_GROUP authorized value category.
Uyarı
If you’re adding a report group on the fly, the code should not include special characters or spaces.
Report subgroup: if you chose a report group, this field will appear to further organize your reports. Choose a subgroup from the list, or create one on the fly by choosing the ‘or create’ radio button.
Report subgroups are set in the REPORT_SUBGROUP authorized value category.
Not
Report subgroups need to have unique values in ‘Authorized value’ and ‘Description’. The ‘Description (OPAC)’ field needs to contain the authorized value for the report group that the subgroup falls under.
Uyarı
If you’re adding a report subgroup on the fly, the code should not include special characters or spaces.
Report is public: this should be left to the default of ‘No’ in most cases, especially if the report contains patron or other sensitive information. A public report can be accessed using the JSON reports services by anyone and without authentication.
Cache expiry: this field will only appear if your system administrator has set up memcache on your server. This is related to public reports. If you make the report public, it’s constantly running and will cause a large load on your system. Setting this value prevents that.
Notes: notes will appear on the ‘Saved reports’ page, and can be used to provide more details about the report or tips on how to enter values when it runs.
SQL: type or paste the SQL for the report (see report writing tips below).
Once everything is entered click the ‘Save report’ button and you’ll be presented with options to run it. From here, you can also edit it, duplicate it, or schedule it to be run later.
Once a report is saved, you do not have to recreate it, it will appear on the ‘Saved reports’ page with all other saved reports.
Not
You can customize the columns of this table in the ‘Table settings’ section of the Administration module (table id: table_reports).
From the ‘Saved reports’ page, you can make edits, run the report, or schedule a time to run the report later. To find the report you created, you can sort by any of the columns by clicking on the column header (creation date is the best to find the report you just added). You can also filter your results using the filter menu on the left or use the tabs to find reports based on your custom groups.
Report writing tips
Autocomplete
When you start typing in the SQL field, autocomplete options will be displayed.
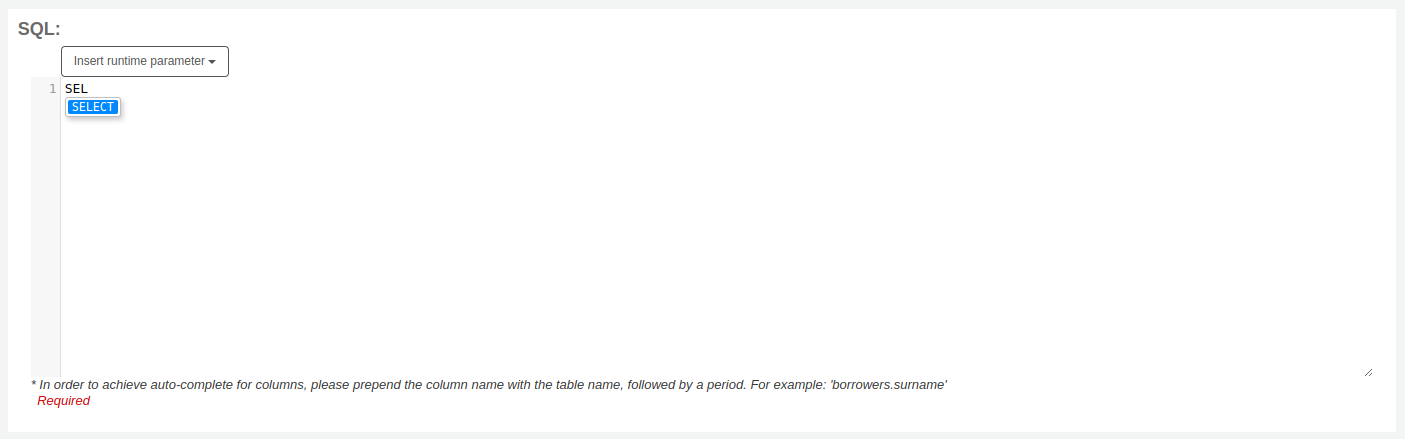
Use the arrows on your keyboard to choose the correct option and press ‘Enter’ or ‘Tab’ to insert it into your report, or simply click on the option to insert it.
Autocomplete options include:
SQL keywords such as SELECT, FROM, WHERE, etc.
table names
column names
Not
To have suggestions for column names, you must type the table name first, followed by a period, then start typing the column name.
For example, to have the suggestion for
cardnumber, you must typeborrowers.ca.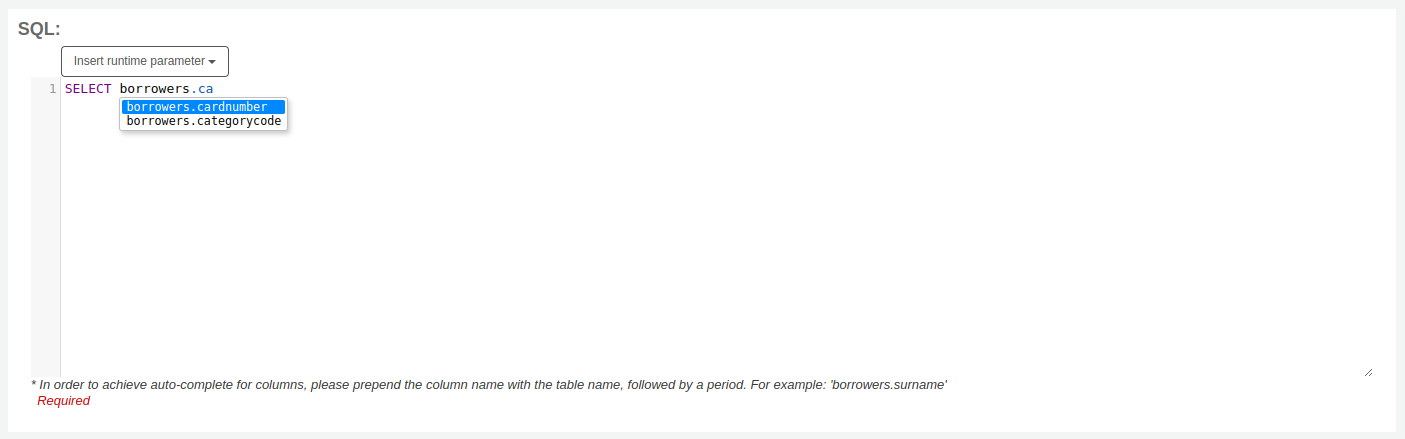
Runtime parameters
Raporunuzun sistem kaynaklarına çok fazla yüklendiğini düşünüyorsanız sorgulamalarınız için çalışma zamanı parametreleri kullanmayı düşünebilirsiniz. Çalışma zamanı parametreleri temelde rapor çalıştırılmadan önce sistem kaynaklarınızı korumak için bir filtrenin ekrana gelmesini sağlar.
Click the button ‘Insert runtime parameter’ and choose which parameter to add.
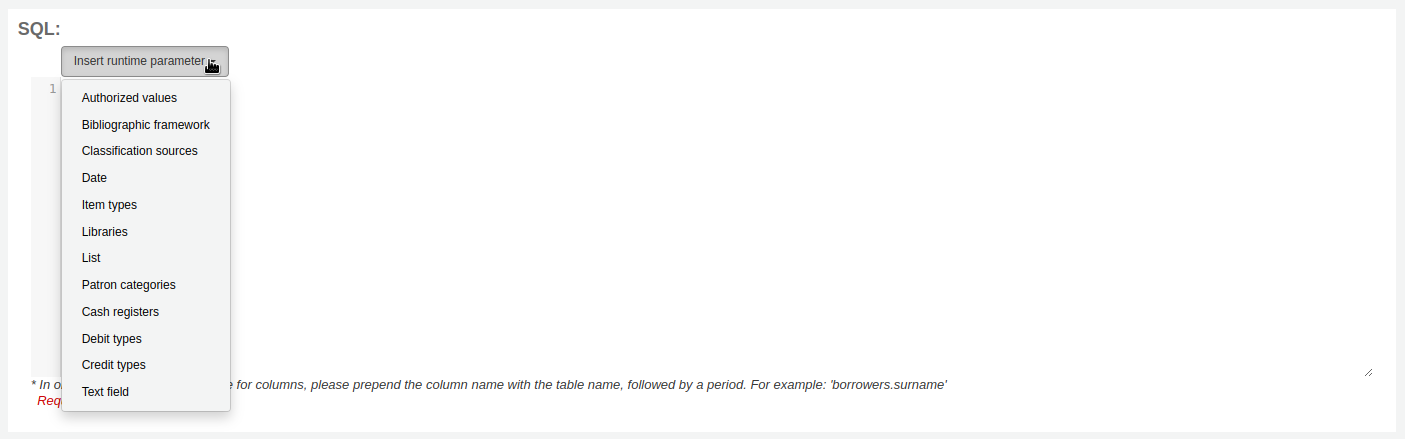
Authorized value: will display a drop down menu of the value descriptions from the chosen authorized value category. The authorized value code will be inserted in the report when it is run.
Bibliographic framework: will display a drop down menu of MARC bibliographic frameworks. The framework code will be inserted in the report when it is run.
Classification sources: will display a drop down menu of classification sources. The classification code will be inserted in the report when it is run.
Date: will display a calendar to pick a date. The date in YYYY-MM-DD format will be inserted in the report when it is run.
Item types: will display a drop down menu of item types. The item type code will be inserted in the report when it is run.
Libraries: will display a drop down menu of libraries. The library code (branchcode) will be inserted in the report when it is run.
List: will display a large text box in which the user can enter many values, one per line. Those values will be inserted in the report, separated by commas, when it is run.
Uyarı
In the case of the list parameter, users must write one value per line.
Patron categories: will display a drop down menu of patron categories. The category code will be inserted in the report when it is run.
Cash registers: will display a drop down menu of cash registers. The cash register’s internal id will be inserted in the report when it is run.
Debit types: will display a drop down menu of debit types. The debit type code will be inserted in the report when it is run.
Credit types: will display a drop down menu of credit types. The credit type code will be inserted in the report when it is run.
Text field: will display an empty text field in which the user can enter any text.
Not
Bir metin kutusuna ‘boş bırakmak için’ “%” yerleştirmelisiniz. Aksi halde alan değeri için gerçek anlamda “”(boş dizgi) arayacaktır.
For example entering nothing for: “title=<<Enter title>>” will display results with title=’’ (no title).
If you want to have to have something not mandatory, use “title like <<Enter title>>” and enter a % at run time instead of nothing.
After you choose the type of runtime parameter, it will ask you for the parameter label. This is what the user will see as the label for the choice they have to make or text they have to enter.
The syntax inserted into the report is <<Label|authorized_value>>.
The << and >> are just delimiters to indicate the start and end of the runtime parameter.
The label will be displayed on the left of the choice or value to enter.
The authorized_value can be omitted if not applicable. If it is absent, a free text field will be displayed. If it contains an authorized code (see table below), a drop down of the values will be displayed.
Not
You can write those in manually as well, you don’t have to go through the ‘Insert runtime parameter’ button. As long as the syntax is correct, Koha will interpret it as a runtime parameter.
List of parameters that can be used in runtime parameters
Parameter |
What the user sees |
What gets inserted in query |
|---|---|---|
date |
date picker |
validly formatted date |
branches |
drop down of branch names |
branch code |
itemtypes |
drop down of item type names |
item type |
categorycode |
drop down of patron category descriptions |
borrower category code |
biblio_framework |
drop down of MARC bibliographic frameworks |
framework code |
list |
large text box |
comma separated values |
(auth-value-category) |
drop down of auth-value descriptions in category |
authorized value |
(nothing) |
text box |
entered text |
Not
You can have more than one runtime parameter in a given SQL query.
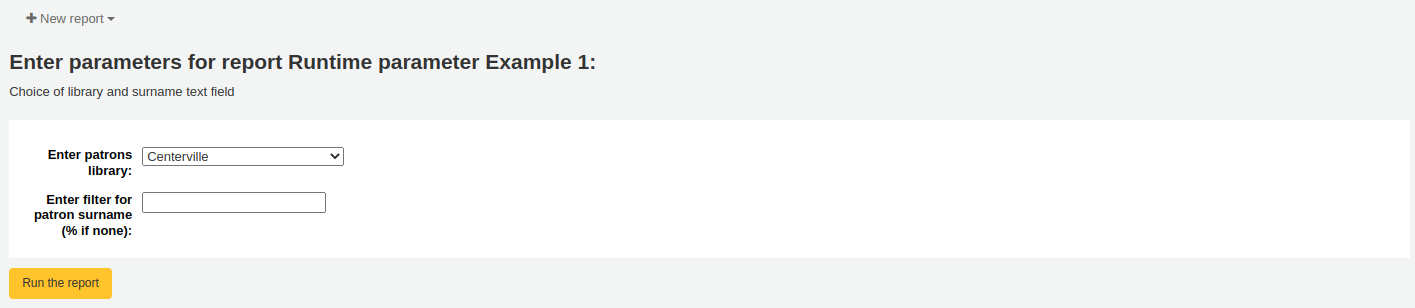
Example 1
SELECT surname,
       firstname
FROM borrowers
WHERE branchcode = <<Enter patrons library|branches>>
    AND surname LIKE <<Enter filter for patron surname (% if none)>>
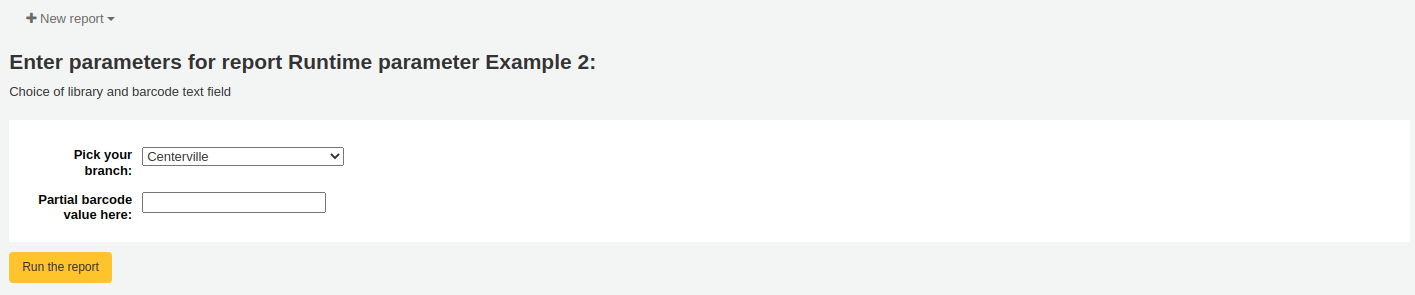
Example 2
SELECT *
FROM items
WHERE homebranch = <<Pick your branch|branches>>
    AND barcode LIKE <<Partial barcode value here>>
Example 3
SELECT title,
       author
FROM biblio
WHERE frameworkcode = <<Enter the frameworkcode|biblio_framework>>

Example 4
SELECT cardnumber,
       surname,
       firstname
FROM borrowers
WHERE dateexpiry <= <<Expiry date|date>>

Example 5
SELECT *
FROM items
WHERE itemnumber IN <<List of itemnumbers (one per line)|list>>
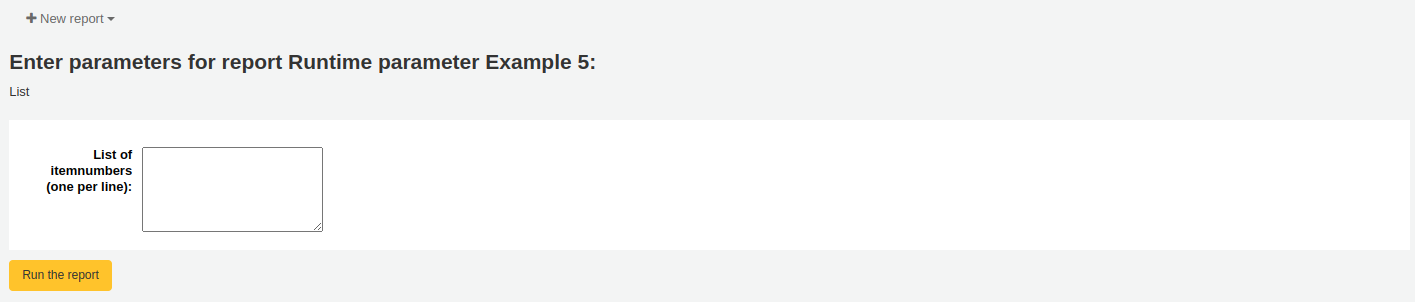
Uyarı
In the case of the list parameter, users must write one value per line.
SQL report from Mana
In the “Create report from SQL”, you can search Mana KB for pre-made reports by clicking on “New report” and choosing “New SQL from Mana”.
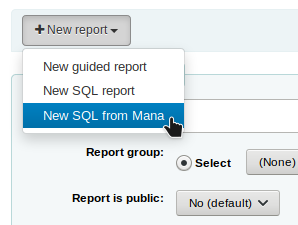
Not
This option will only appear if you’ve configured Mana KB in the administration module.
You will be prompted to enter keywords to search the knowledge base.
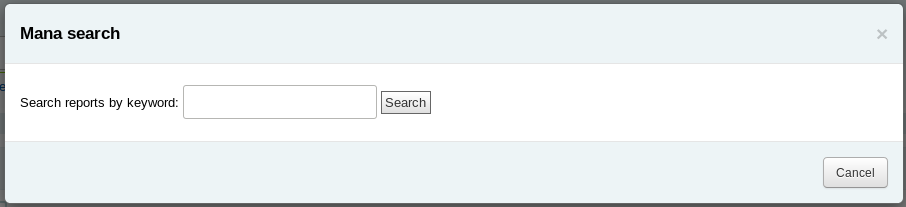
In the search results, you will see
the details of the report (name, notes and type)
how many people have used this entry (# of users)
when it was used for the last time (last import)
additional comments made by other Koha users (comments)
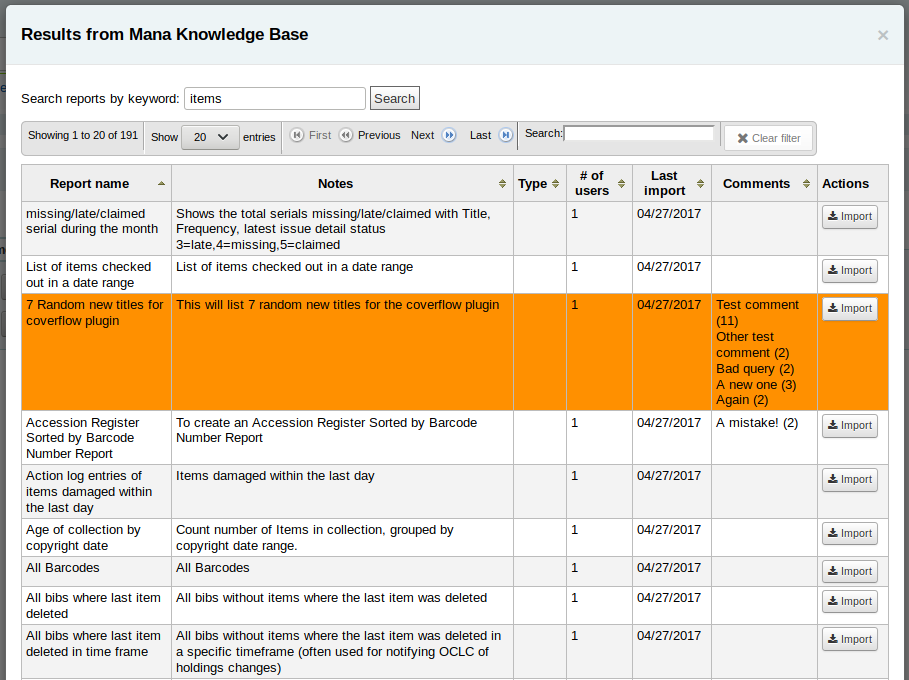
Click on “Import” to import a copy of the report in your own saved reports.
You can then edit it, duplicate it, delete it, run it as you would any of your own reports.
Duplicate report
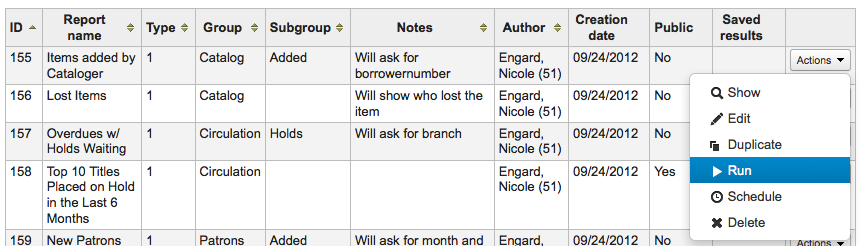
Raporlar aynı zamanda varolan bir rapor çoğaltılarak da eklenebilir. Sisteminizde hali hazırda listelenmiş tüm raporları görmek için ‘Kaydedilen Raporlar’ sayfasını ziyaret edin.
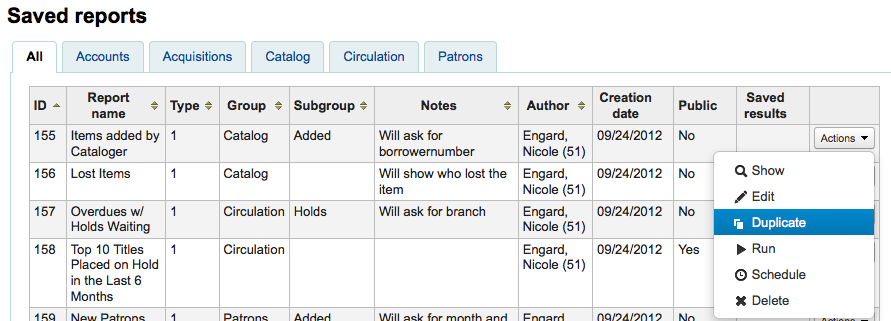
Her raporun sağında ‘Eylemler’ açılır menüsü mevcuttur. Yeni raporunuza temel olarak, mevcut bir raporu kullanmak için ‘Çoğalt’ bağlantısını seçip tıklayınız. Bu işlem, kolay düzenleme ve yeniden kayıt için yeni rapor biçimini mevcut SQL ile dolduracaktır.
Edit custom reports
Every report can be edited from the reports lists. To see the list of reports already stored in Koha, click ‘Use saved.’
Not
You can customize the columns of this table in the ‘Table settings’ section of the Administration module (table id: table_reports).
Düzenlemek istediğiniz raporu bulmak için, sütun başlığına tıklayarak sütunları sıralayabilirsiniz. Aynı zamanda soldaki filtre menüsünü kullanarak da sonuçlarınızı filtreleyebilir ya da özel gruplarınıza bağlı olarak, raporları bulmak için sekmeleri kullanabilirsiniz.
Bu listeden, raporun sağındaki ‘Eylemler’ üzerine tıklayarak ve açılan menüden ‘Düzenle’ opsiyonunu seçerek herhangi bir özel bir rapor düzenleyebilirsiniz.
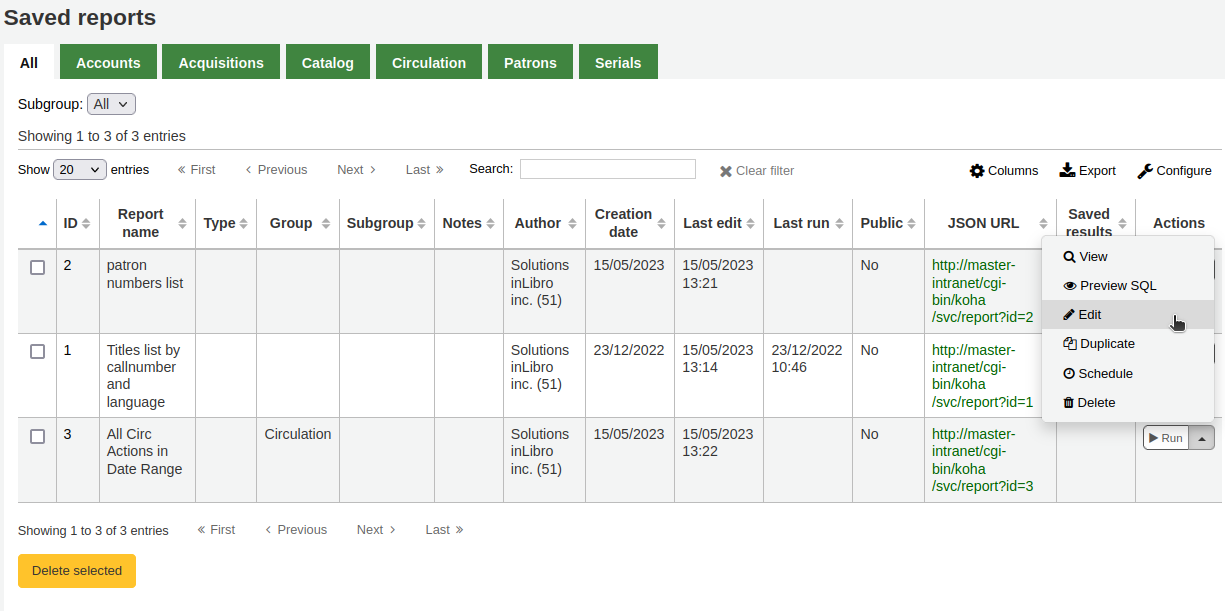
The form to edit the report will appear. Use the “update button” to save your modifications or click on “update and run SQL” to save and display the report results.
Running custom reports
Koha’ya özel raporlar kaydedildiğinde, bu raporları Kaydedilmiş Raporlar sayfasına giderek ve raporun sağındaki ‘Çalıştır’ bağlantısına tıklayarak ve ‘Çalıştır’ opsiyonunu seçerek çalıştırabilirsiniz.
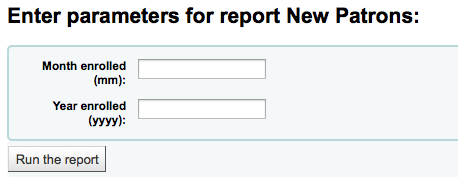
Raporu çalıştırdığınızda ya sizden bazı değerler girmeniz istenecektir
ya da hemen sonuçları göreceksiniz
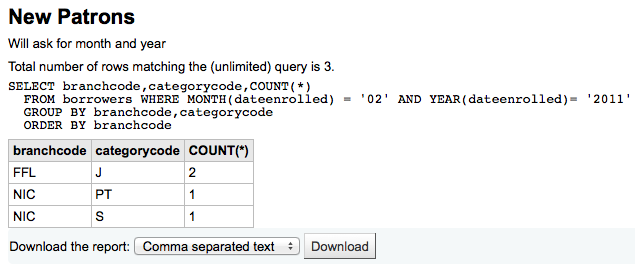
Sonuçlardan en üstteki ‘Raporu çalıştır’a tıklayarak raporu tekrar çalıştırmayı seçebilir, raporu ‘Düzenle’butonuna tıklayarak ya da ‘Yeni’ butonunu kullanarak yeni bir rapor oluşturup düzenleyebilirsiniz. Sonuçlarınızı aynı zamanda ‘Raporu yükle’ etiketinin yanındaki sonuçların altında olan dosya türünü seçerek ve ‘Yükle’ye tıklayarak yükleyebilirsiniz.
Not
A comma separated text file is a CSV file and it can be opened by any spreadsheet application.
Send report output to batch modification tools
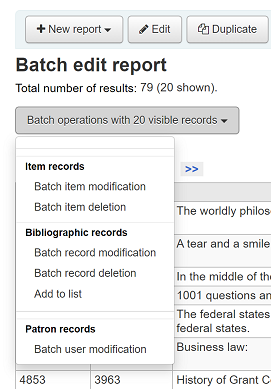
After running a report that contains itemnumbers, biblionumbers and/or patron cardnumbers the list of numbers can be imported directly into the relevant batch modification tool by clicking the ‘Batch operations with X visible records’ button in the report results. The X depends on the number of records you have chosen to display on screen (up to 1000).
Statistics reports
Statistic reports will show you counts and sums. These reports are all about numbers and statistics, for reports that return more detailed data, use the guided report wizard. These reports are limited in what data they can look at, so it’s often recommended to use custom reports for official end of the year statistics.
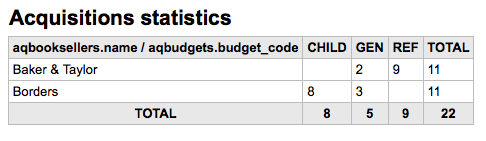
Acquisitions statistics
Not
Bu raporların içine baktığı veriler kısıtlıdır, bu nedenle resmi yıl sonu istatistikleri için custom reports özelliğinin kullanılması önerilir.
Using the form provided, choose which value you would like to appear in the column and which will appear in the row.
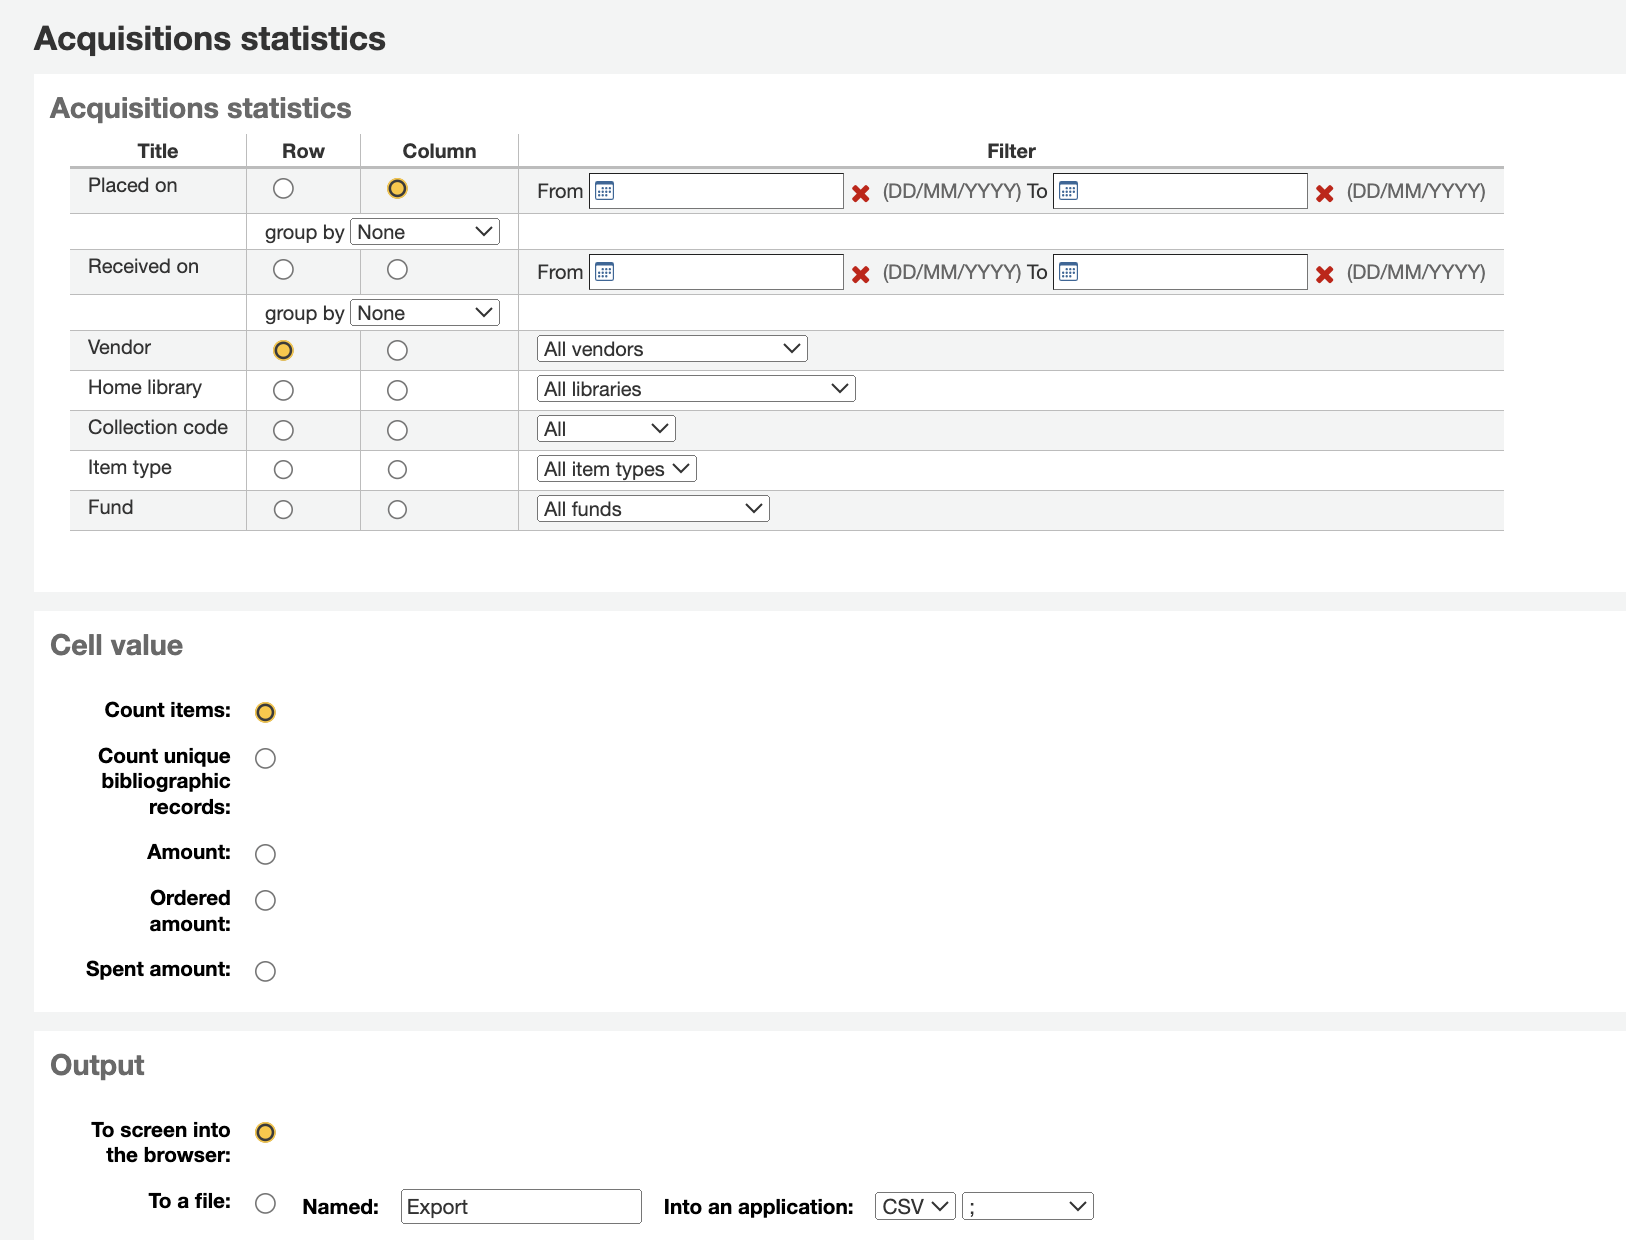
Tarayıcınızı çıktı olarak seçerseniz sonuçlarınız ekrana yazdırılacaktır.
Ayrıca ihtiyaçlarınızı işleyebileceğiniz bir dosyaya aktarmayı seçebilirsiniz.
Raporunuzu oluştururken, değerleri sayma ya da toplama şeklinde yapmanız gerektiğini unutmayınız.
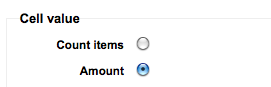
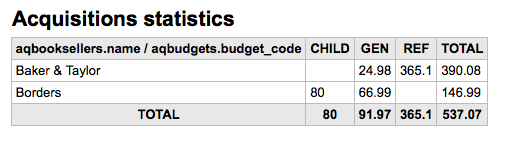
Tutarı seçmek, harcanan tutarın toplamı olarak sonuçlarınızı değiştirecektir.
Patron statistics
Not
Bu raporların içine baktığı veriler kısıtlıdır, bu nedenle resmi yıl sonu istatistikleri için custom reports özelliğinin kullanılması önerilir.
Using the form provided, choose which value you would like to appear in the column and which will appear in the row.

Tarayıcınızı çıktı olarak seçerseniz sonuçlarınız ekrana yazdırılacaktır.
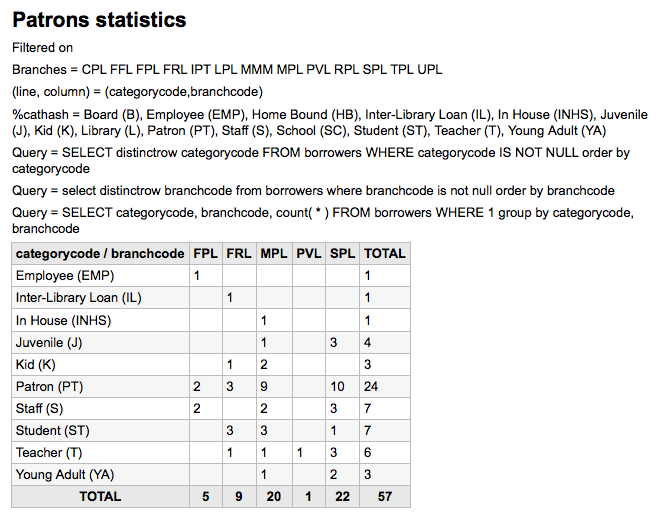
Seçimlerinize bağlı olarak, sonuç tablonuzun üzerinde sorgulama bilgilerini görebilirsiniz. İhtiyaçlarınızı karşılayabilecek bir dosyayı dışa aktarmayı da seçebilirsiniz.
Catalog statistics
Not
Bu raporların içine baktığı veriler kısıtlıdır, bu nedenle resmi yıl sonu istatistikleri için custom reports özelliğinin kullanılması önerilir.
Using the form provided, choose which value you would like to appear in the column and which will appear in the row.
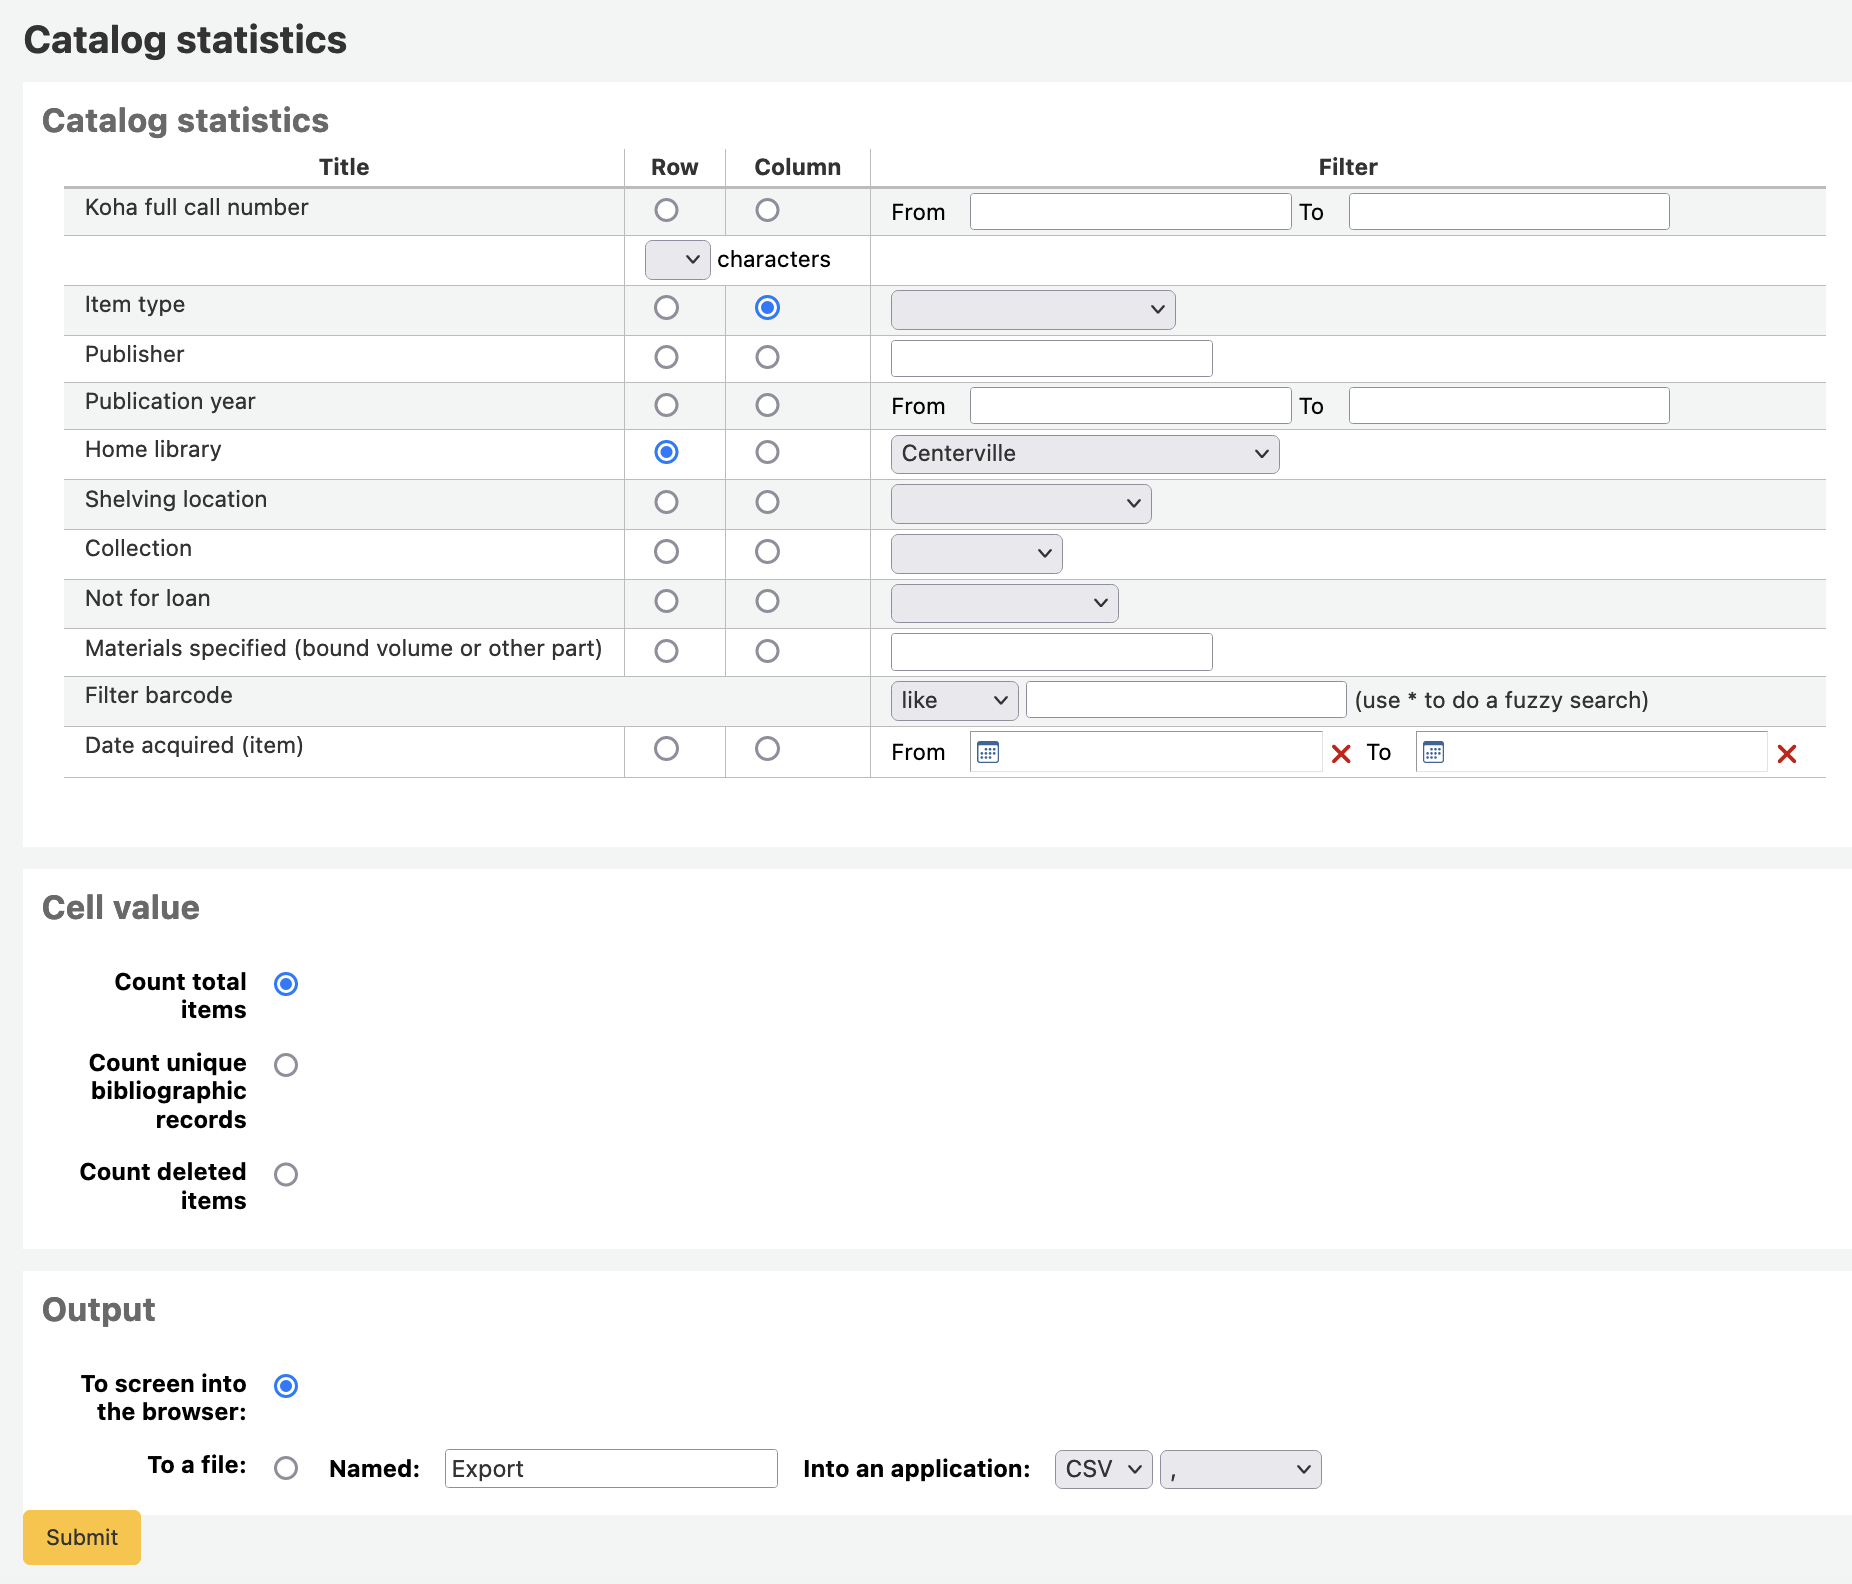
Tarayıcınızı çıktı olarak seçerseniz sonuçlarınız ekrana yazdırılacaktır.

Ayrıca ihtiyaçlarınızı işleyebileceğiniz bir dosyaya aktarmayı seçebilirsiniz.
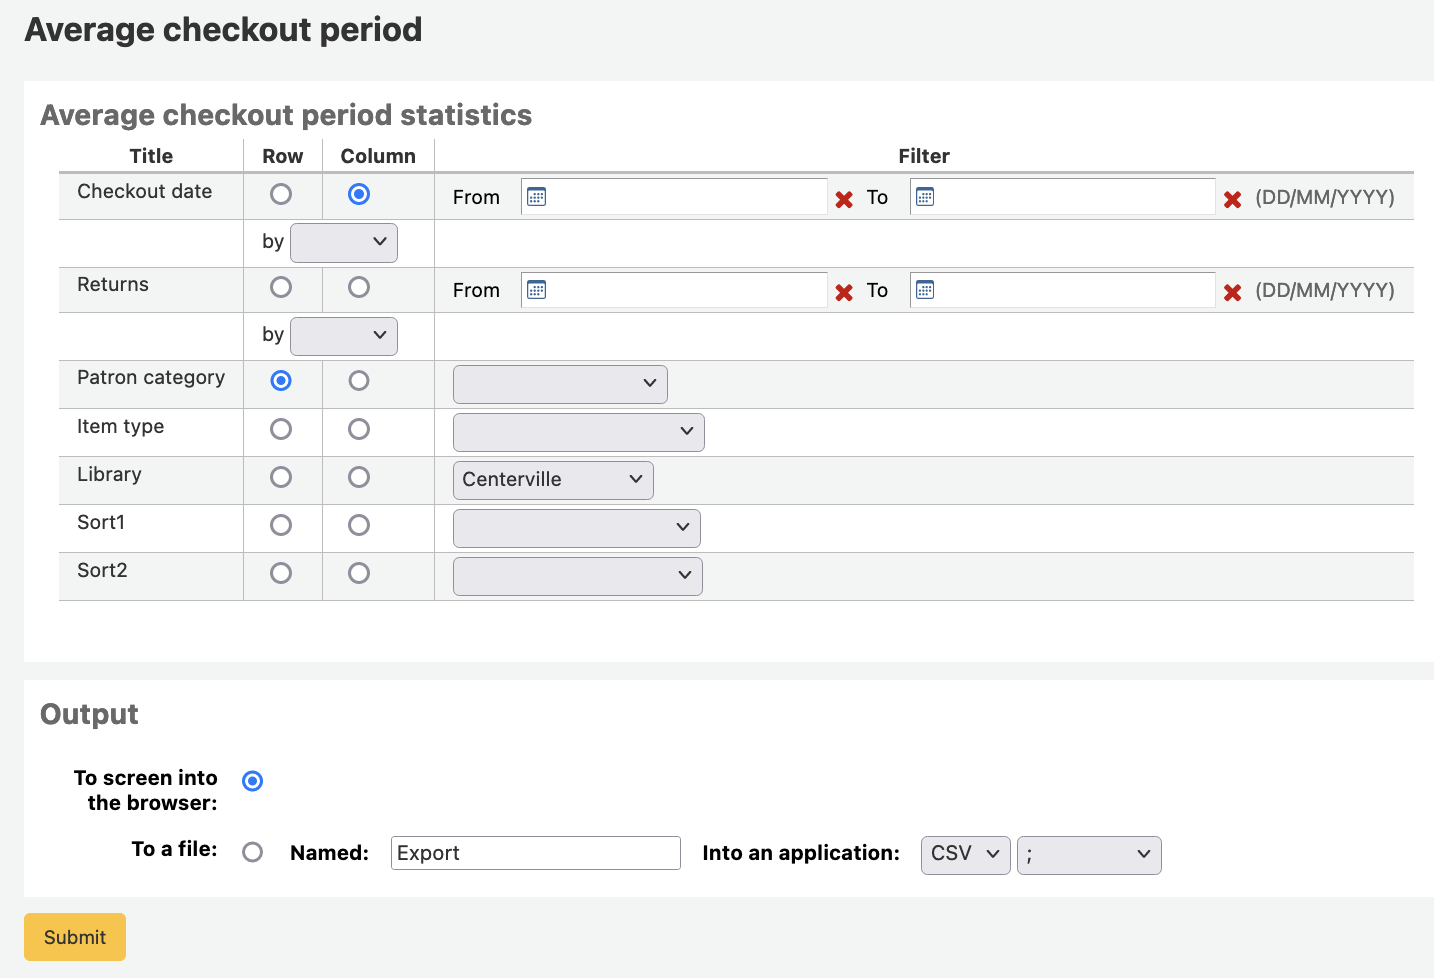
Circulation statistics
Not
Bu raporların içine baktığı veriler kısıtlıdır, bu nedenle resmi yıl sonu istatistikleri için custom reports özelliğinin kullanılması önerilir.
Using the form provided, choose which value you would like to appear in the column and which will appear in the row.
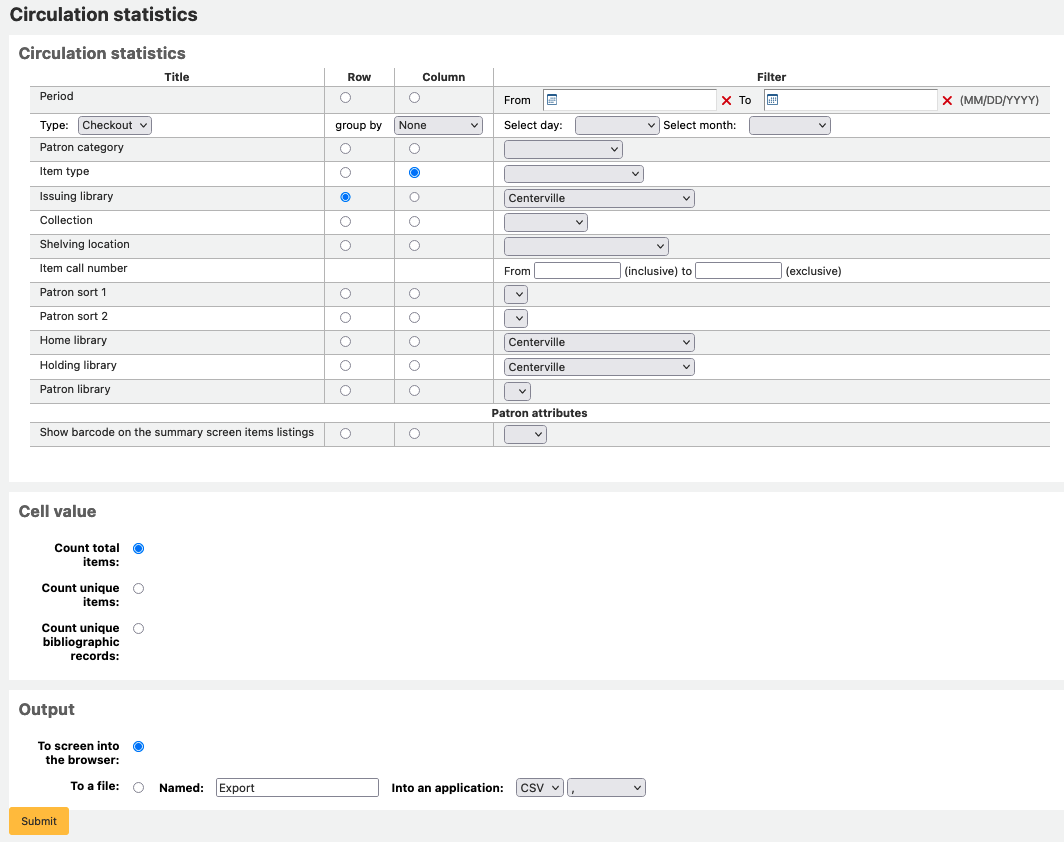
Tarayıcınızı çıktı olarak seçerseniz sonuçlarınız ekrana yazdırılacaktır.
Ayrıca ihtiyaçlarınızı işleyebileceğiniz bir dosyaya aktarmayı seçebilirsiniz.
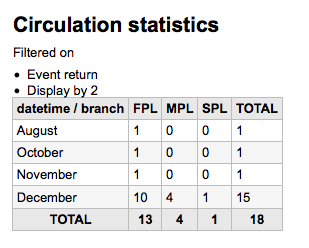
Not
Aylık ya da günlük dolaşımın tüm kopyasını alabilmek için raporu iki kez çalıştırabilirsiniz; ilk olarak ‘Ödünç Verme Türü’ ve ikinci kez de ‘Süre Uzatma’ için.
Bu rapor basitçe ilk ayın ilk gününü ve sonraki ayın ilk gününü seçerek bir ayla sınırlayabileceğiniz dönem ya da tarih filtresi kullanır. Örneğin, 1/10 dan 1/11 tarihine kadar Ekim ayı için istatistikleri bulmak için.
Günlük istatistiklerinizi bulmak için tarih aralığınızı ayarlayın. </br>Örnek: “XXX gününe kadar olan dolaşım bilgisini istiyorum fakat XXX tarihi dahil olmasın.”
Tüm aya örnek aralığı şu şekilde olabilir: 11.01.2009’dan 12.01.2009’e kadar
Tüm yıla örnek aralığı şu şekilde olabilir: 01.01.2009’dan 01.01.2010’e kadar
Tek güne örnek şu şekilde olabilir: 15.günde hangi dolaşımın olduğunu görmek için 11.15.2009’dan 11.16.2009’a kadar.
Ev kullanımını izlemek
Using the Circulation statistics reporting wizard you can run reports on in house usage of items simply by choosing ‘Local use’ from the ‘Type’ pull down:

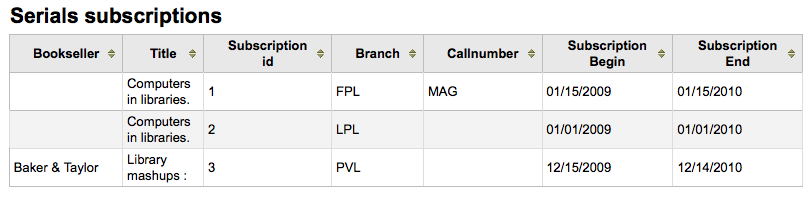
Serials statistics
Not
Bu raporların içine baktığı veriler kısıtlıdır, bu nedenle resmi yıl sonu istatistikleri için custom reports özelliğinin kullanılması önerilir.
Sağlanan formu kullanarak sisteminizdeki süreli yayınları nasıl listeleyeceğinizi seçin.

Tarayıcınızı çıktı olarak seçerseniz sonuçlarınız ekrana yazdırılacaktır.
Ayrıca ihtiyaçlarınızı işleyebileceğiniz bir dosyaya aktarmayı seçebilirsiniz.
Holds statistics
Not
Bu raporların içine baktığı veriler kısıtlıdır, bu nedenle resmi yıl sonu istatistikleri için custom reports özelliğinin kullanılması önerilir.
Sağlanan formu kullanarak, kütüphanenizdeki ayırmaların ayrıldığını, dolduğunu, iptal edildiğini ve daha fazlasını görebilirsiniz. Formdan, sütundaki hangi değeri görüntülemek istediğinizi ve satırdaki hangi değeri göstereceğinizi seçiniz. Formun en sağındaki filtrelerden de seçebilirsiniz.
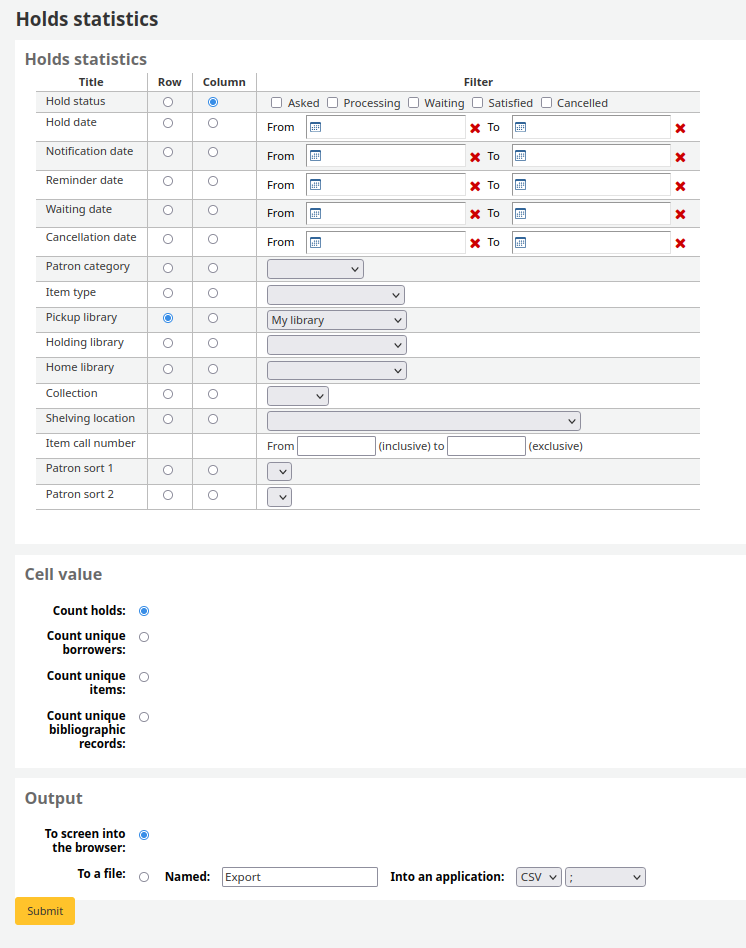
Tarayıcınızı çıktı olarak seçerseniz sonuçlarınız ekrana yazdırılacaktır.

Ayrıca ihtiyaçlarınızı işleyebileceğiniz bir dosyaya aktarmayı seçebilirsiniz.
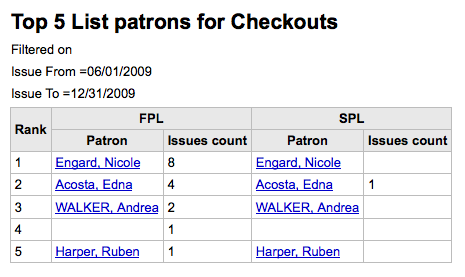
En çok ödünç materyal alan kullanıcılar
Bu rapor size basit bir şekilde en çok ödünç alan kullanıcıların listesini gösterecektir.
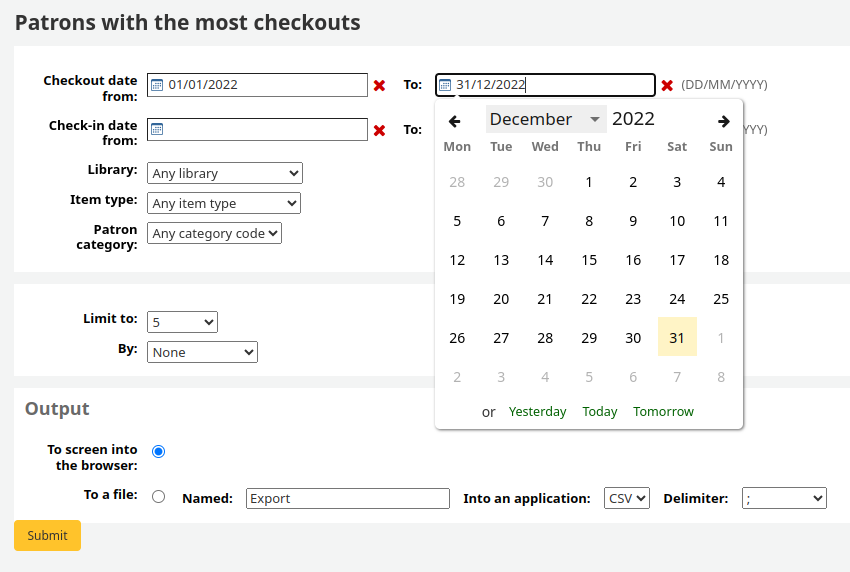
Tarayıcınızı çıktı olarak seçerseniz sonuçlarınız ekrana yazdırılacaktır.
Ayrıca ihtiyaçlarınızı işleyebileceğiniz bir dosyaya aktarmayı seçebilirsiniz.
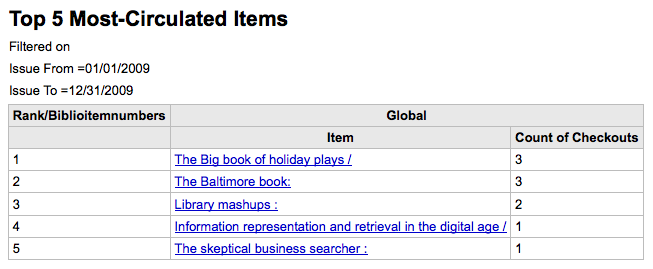
Most circulated items
Bu rapor basitçe en çok ödünç verilen materyalleri listeleyecektir.
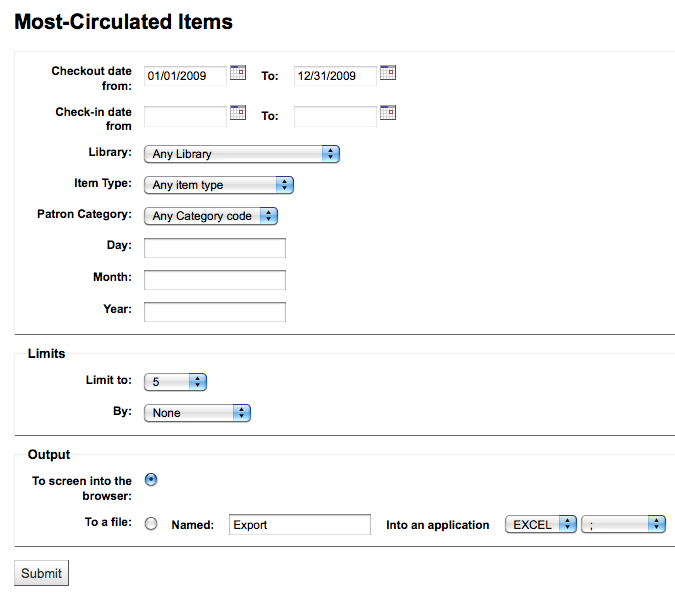
Tarayıcınızı çıktı olarak seçerseniz sonuçlarınız ekrana yazdırılacaktır.
Ayrıca ihtiyaçlarınızı işleyebileceğiniz bir dosyaya aktarmayı seçebilirsiniz.
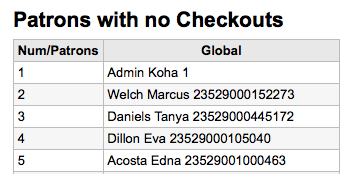
Ödünç materyal almayan kullanıcılar
Bu rapor sizin için sisteminizde herhangi bir materyal ödünç almayan kullanıcıları listeleyecektir.
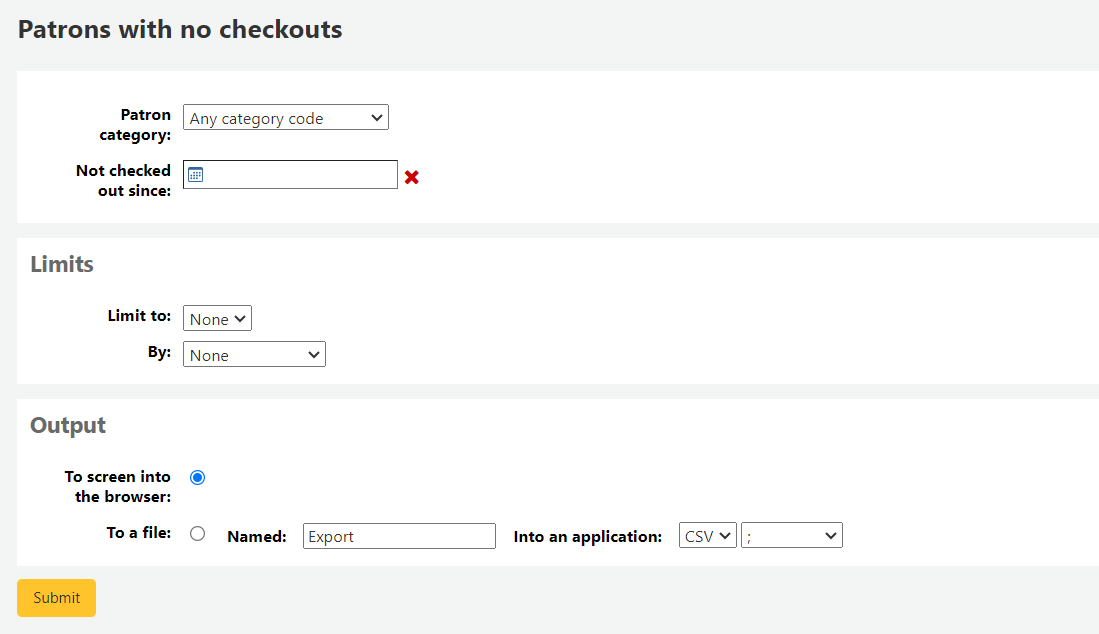
Tarayıcınızı çıktı olarak seçerseniz sonuçlarınız ekrana yazdırılacaktır.
Ayrıca ihtiyaçlarınızı işleyebileceğiniz bir dosyaya aktarmayı seçebilirsiniz.
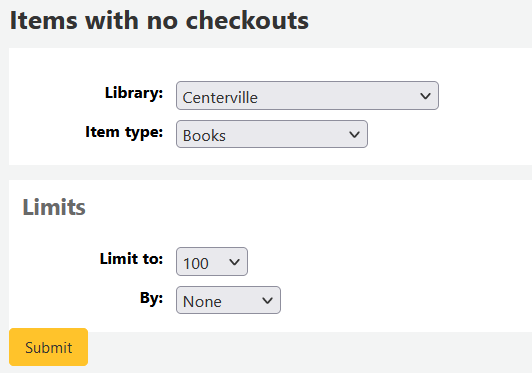
Hiç ödünç alınmamış materyaller
Bu rapor koleksiyonunuz içinde hiç ödünç verilmemiş materyalleri listeleyecektir.
Tarayıcınızı çıktı olarak seçerseniz sonuçlarınız ekrana yazdırılacaktır.
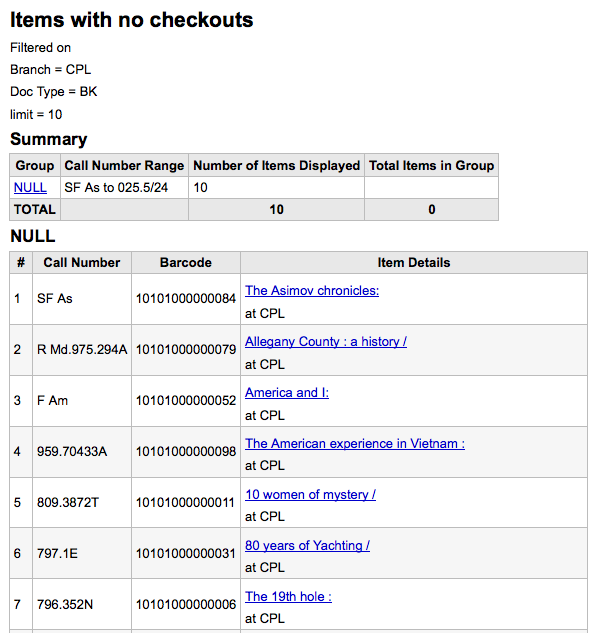
Ayrıca ihtiyaçlarınızı işleyebileceğiniz bir dosyaya aktarmayı seçebilirsiniz.
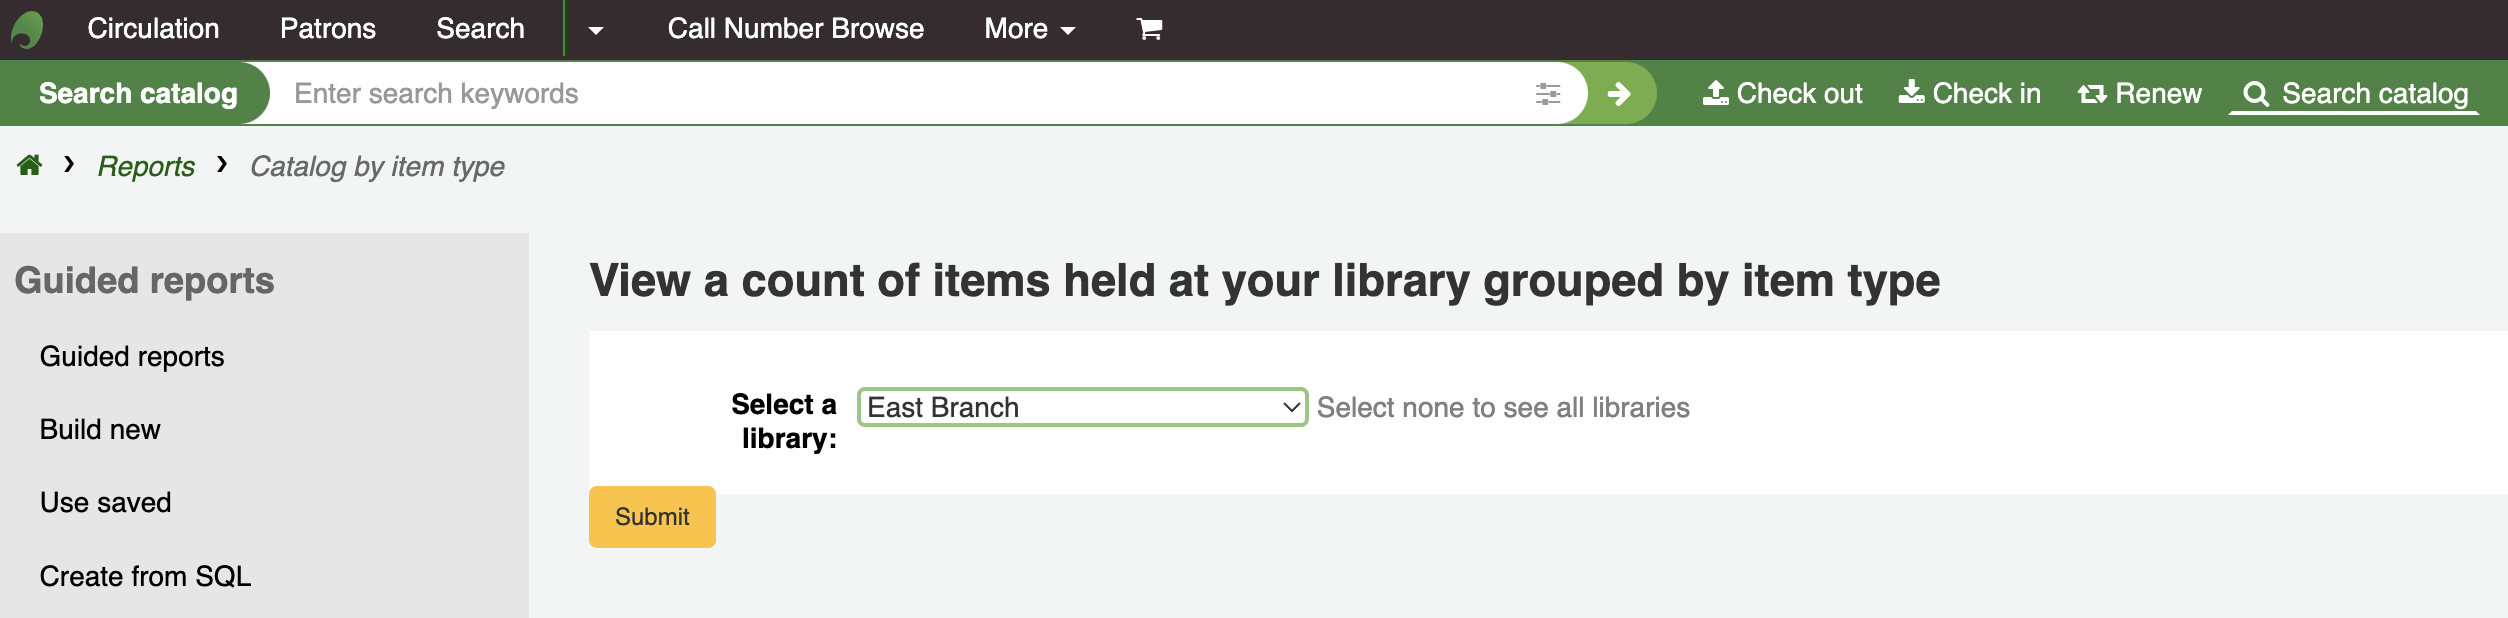
Catalog by item type
Bu rapor, birimlere göre her materyal türünün toplam materyal sayısını listeleyecektir.
Tarayıcınızı çıktı olarak seçerseniz sonuçlarınız ekrana yazdırılacaktır.
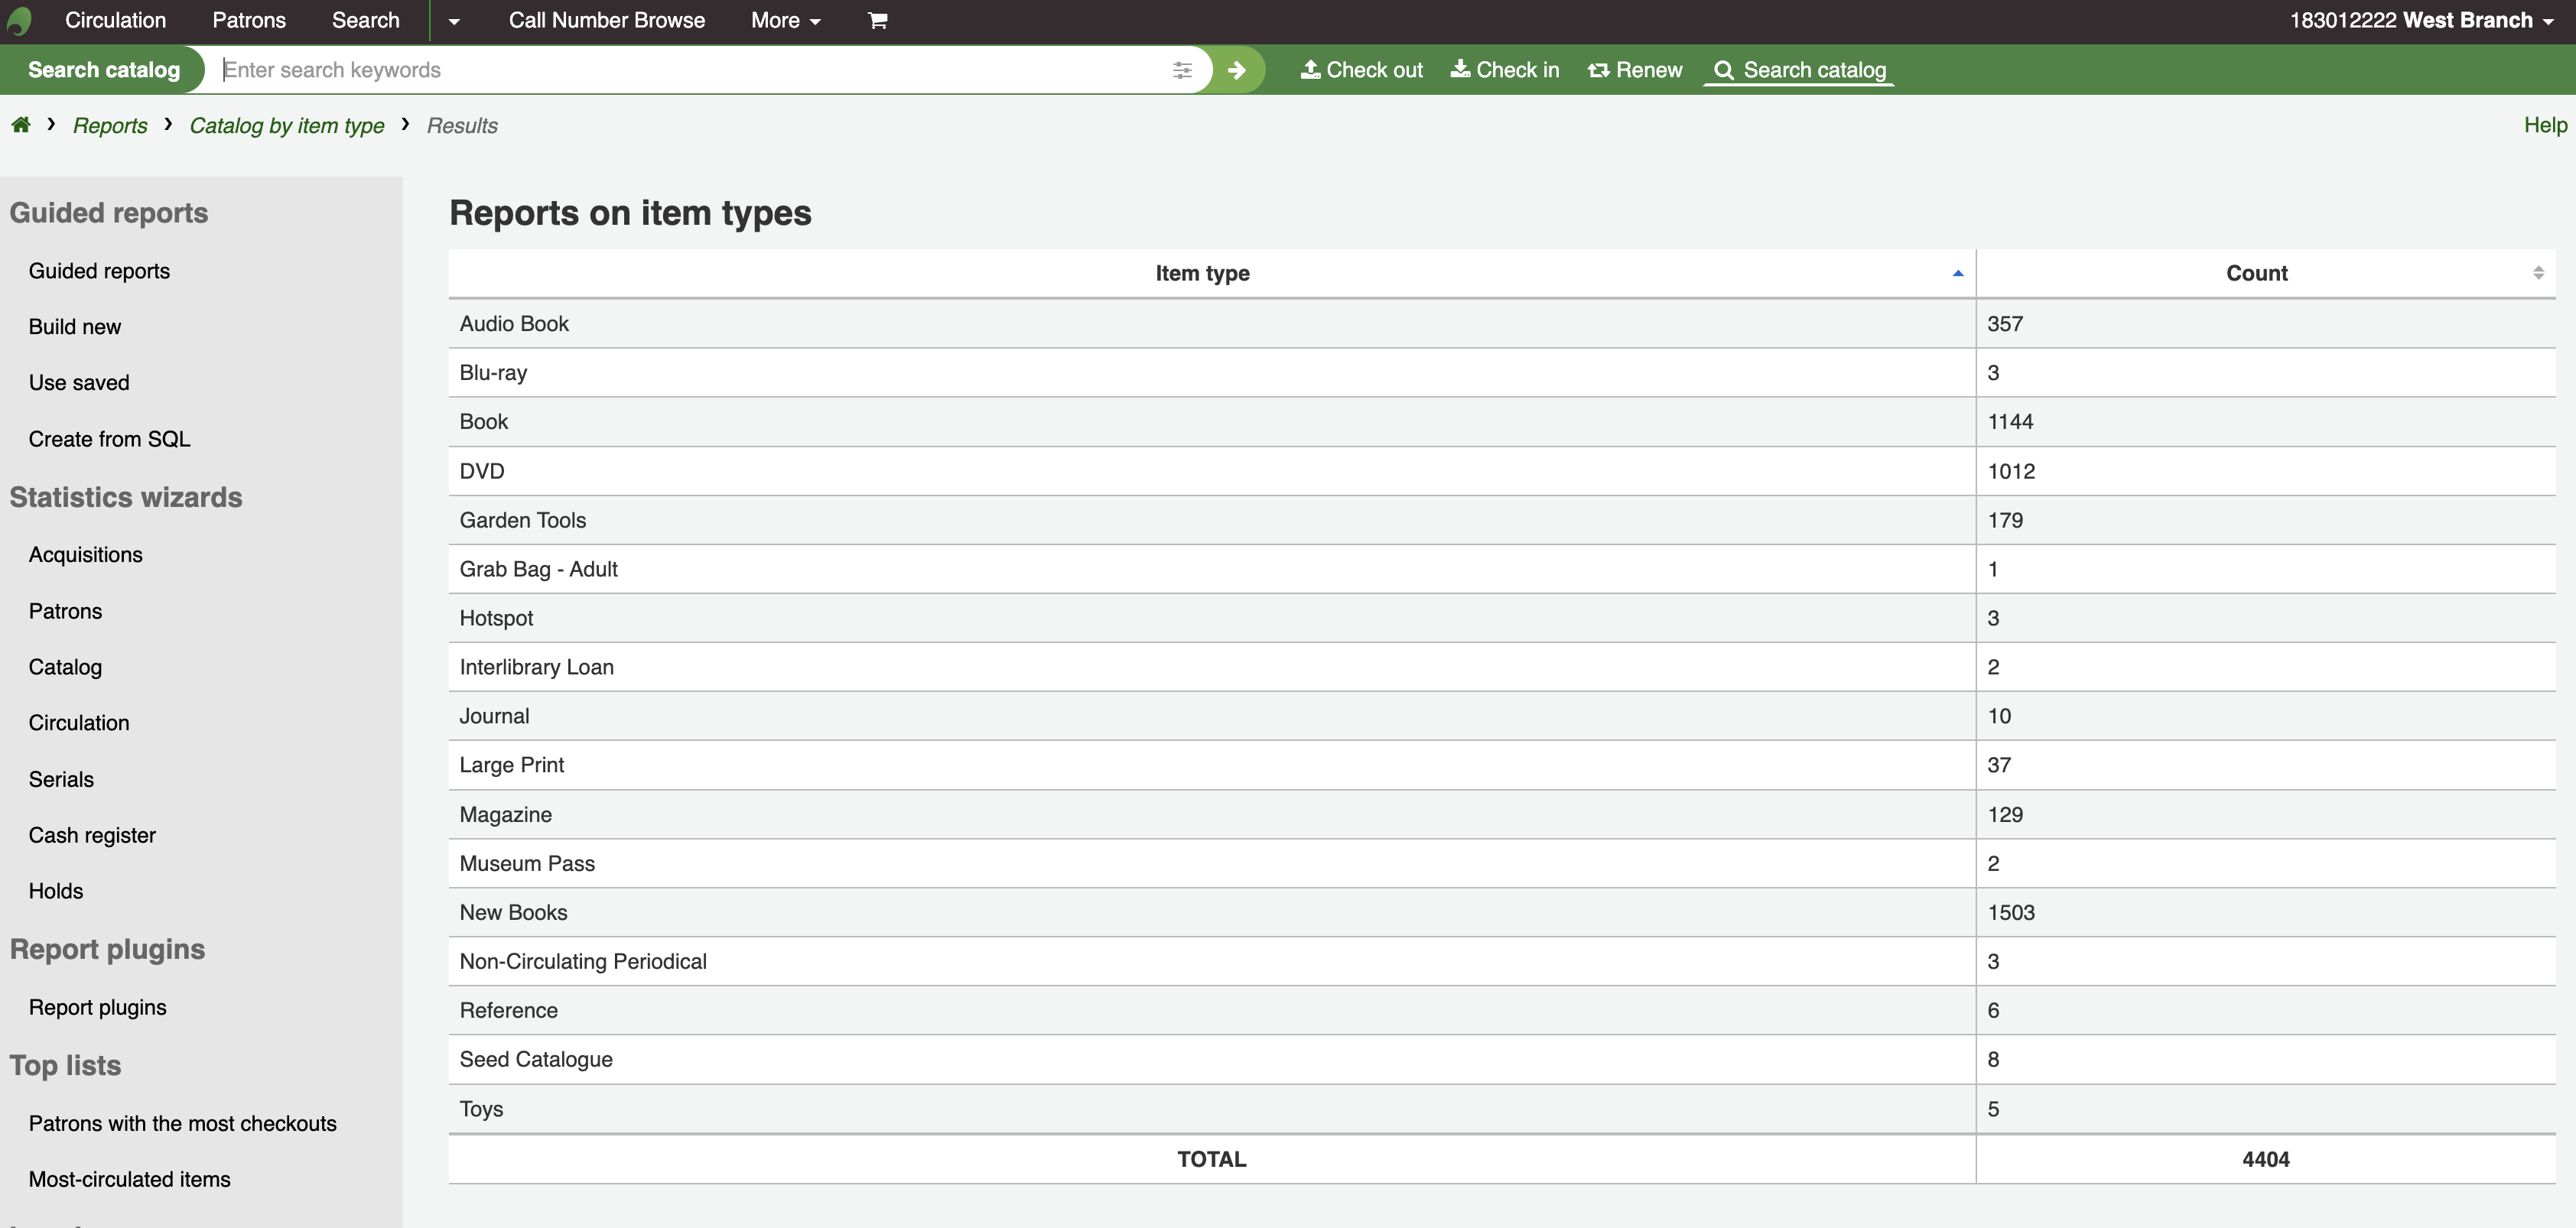
Ayrıca ihtiyaçlarınızı işleyebileceğiniz bir dosyaya aktarmayı seçebilirsiniz.
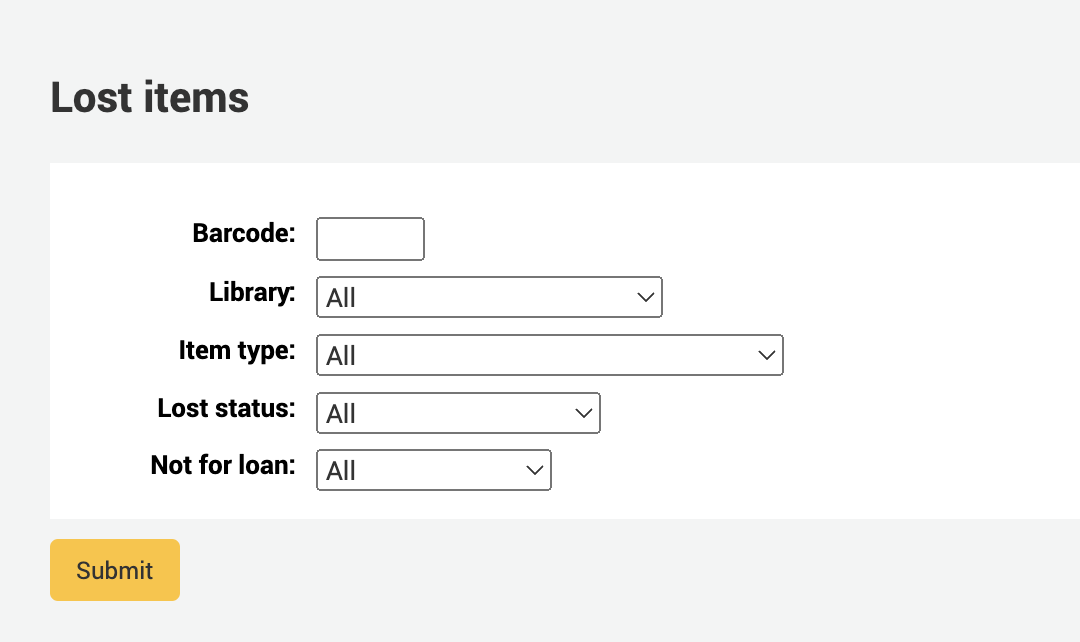
Lost items
Bu rapor, sistem içerisinde kayıp olarak işaretlenmiş materyallerin bir listesini oluşturmanızı sağlayacaktır
Once you have chosen parameters, you will see the corresponding list of items.
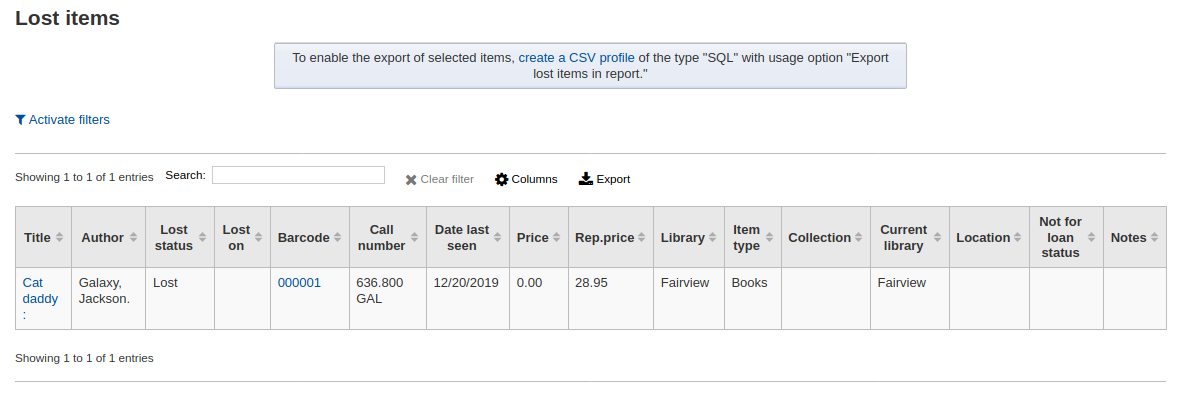
Not
You can customize the columns of this table in the ‘Table settings’ section of the Administration module (table id: lostitems-table).
Orders by fund
If you use the Acquisitions module, you will be able to see all the items that were ordered in each fund.
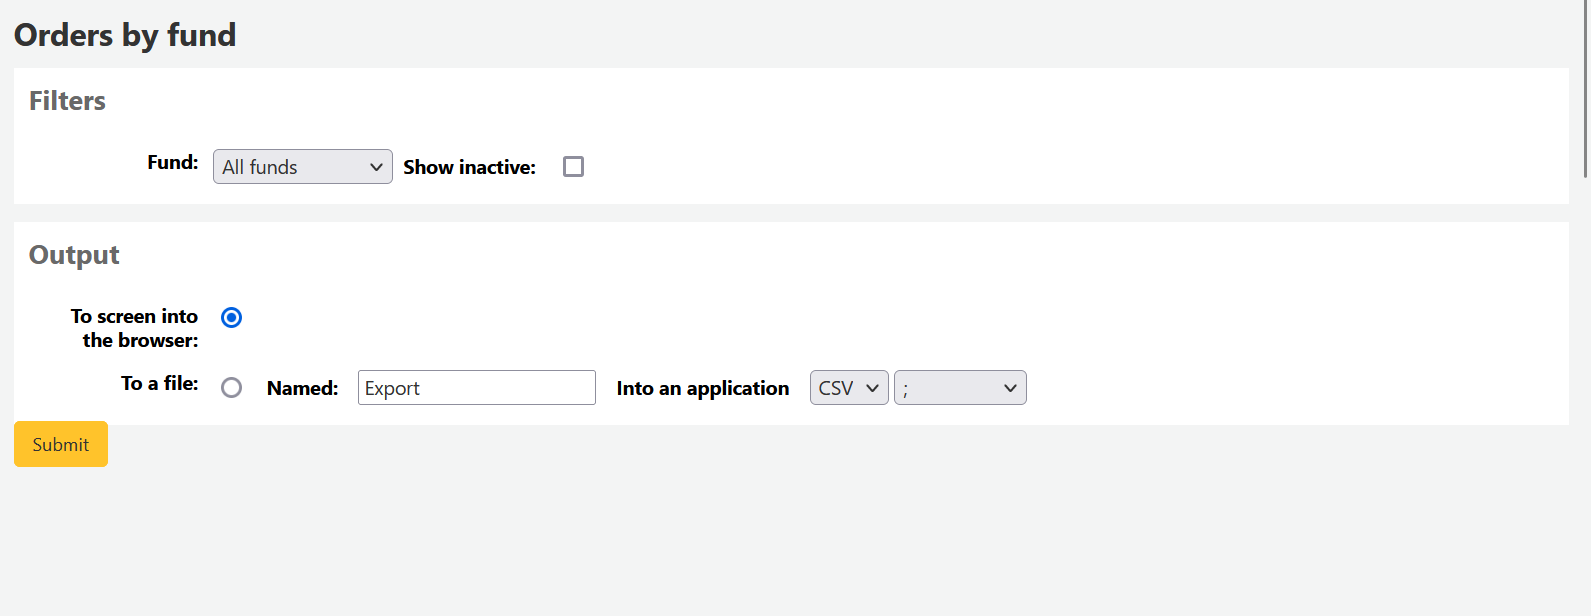
Once you choose the fund you wish to view, you can export the results or view them in the browser. If you choose to view them directly, you will be shown the list of orders.
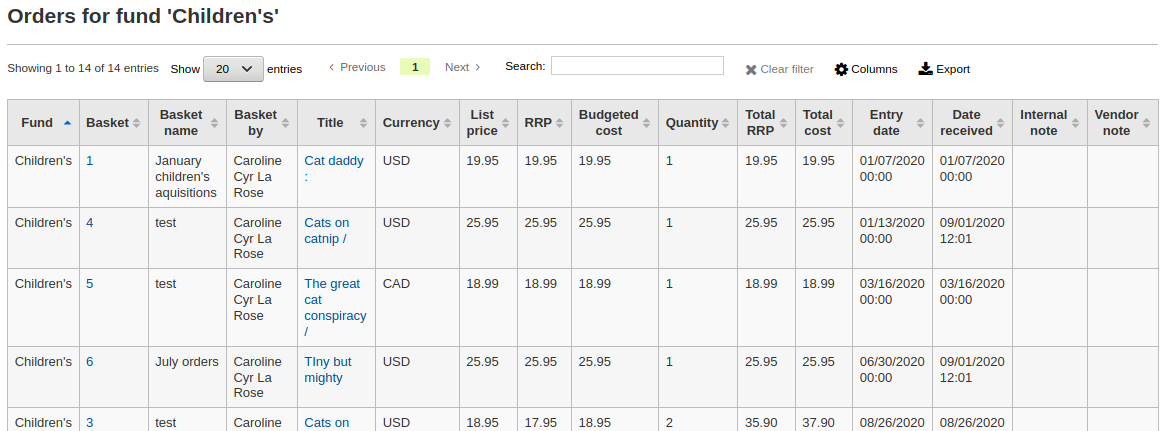
Not
You can customize the columns of this table in the ‘Table settings’ section of the Administration module (table id: funds-table).
Average loan time
Bu rapor, ödünç verilen materyallerin ödünçte kalma sürelerini girdiğiniz kritere dayalı olarak listeleyecektir:
Tarayıcınızı çıktı olarak seçerseniz sonuçlarınız ekrana yazdırılacaktır.
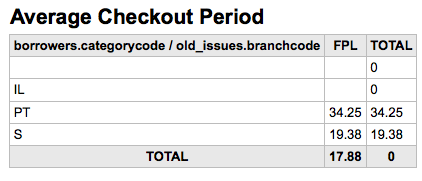
Ayrıca ihtiyaçlarınızı işleyebileceğiniz bir dosyaya aktarmayı seçebilirsiniz.
Report dictionary
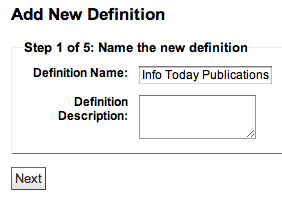
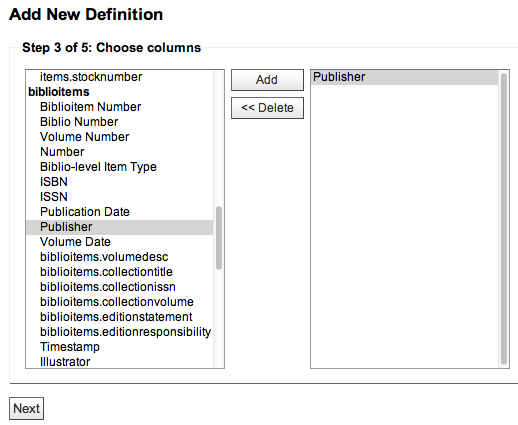
The report dictionary is a way to pre-define common filters you’d like to apply to your reports. This is a good way to add in filters that the report wizard doesn’t include by default. To add a new definition, or filter, click ‘New definition’ on the reports dictionary page and follow the 4 step process.
Adım 1: Yeni tanıma isim verin ve eğer gerekiyorsa bir açıklama getirin
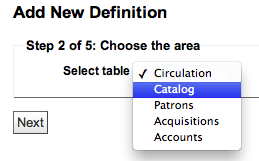
Adım 2: Sorgulanan modülü seçin.
Adım 3: Sunulan tablolardan sorgulamak için sütunları seçin.
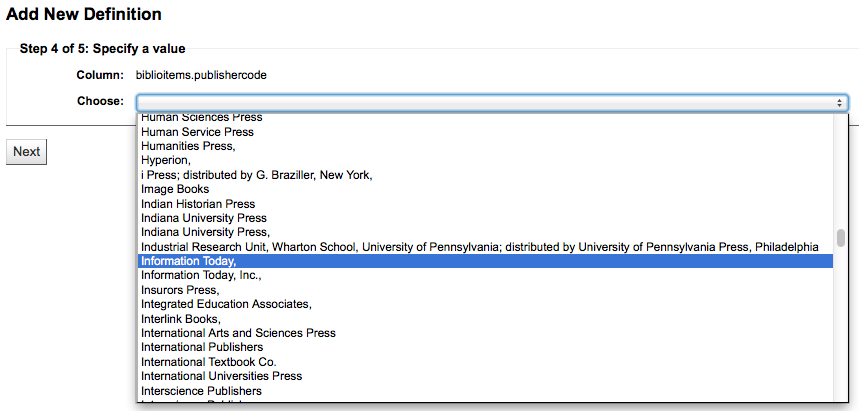
Basamak 4: Değer(leri) alan(lar)dan seçin. Bu değerler veri tabanınızda kullanılabilir olan seçeneklerle otomatik olarak doldurulacaktır.
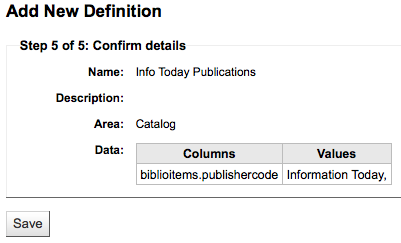
Tanımını kaydetmek için seçimlerinizi onaylayın
Tanımlamalarınızın tümü Raporlar Sözlüğü sayfası üzerinde görüntülenecektir
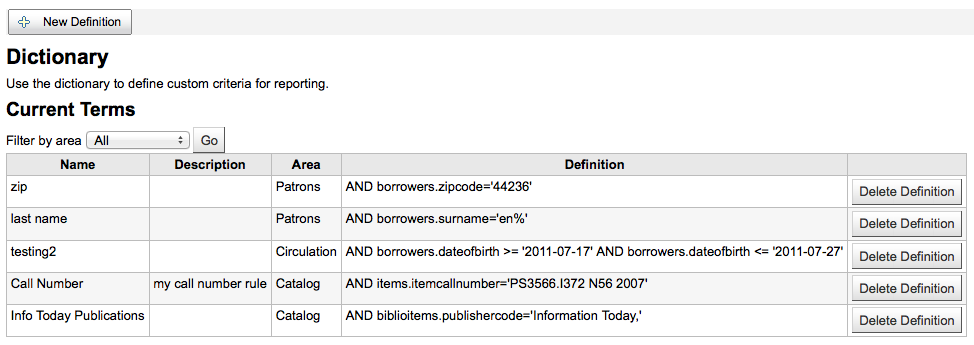
Modüldeki raporları oluştururken, oluşturduğunuz değer için mevcut filtrelerin altındaki tanımla sınırlandırmak üzere bir seçenek göreceksiniz.
Report plugins
Some plugins that are available can be used to make or enhance reports.
Get there: More > Reports > Report plugins > Report plugins
From this page, you will see only report-type plugins.
See the managing plugins section of this manual to learn how to manage your report-type plugins.