Dolaşım
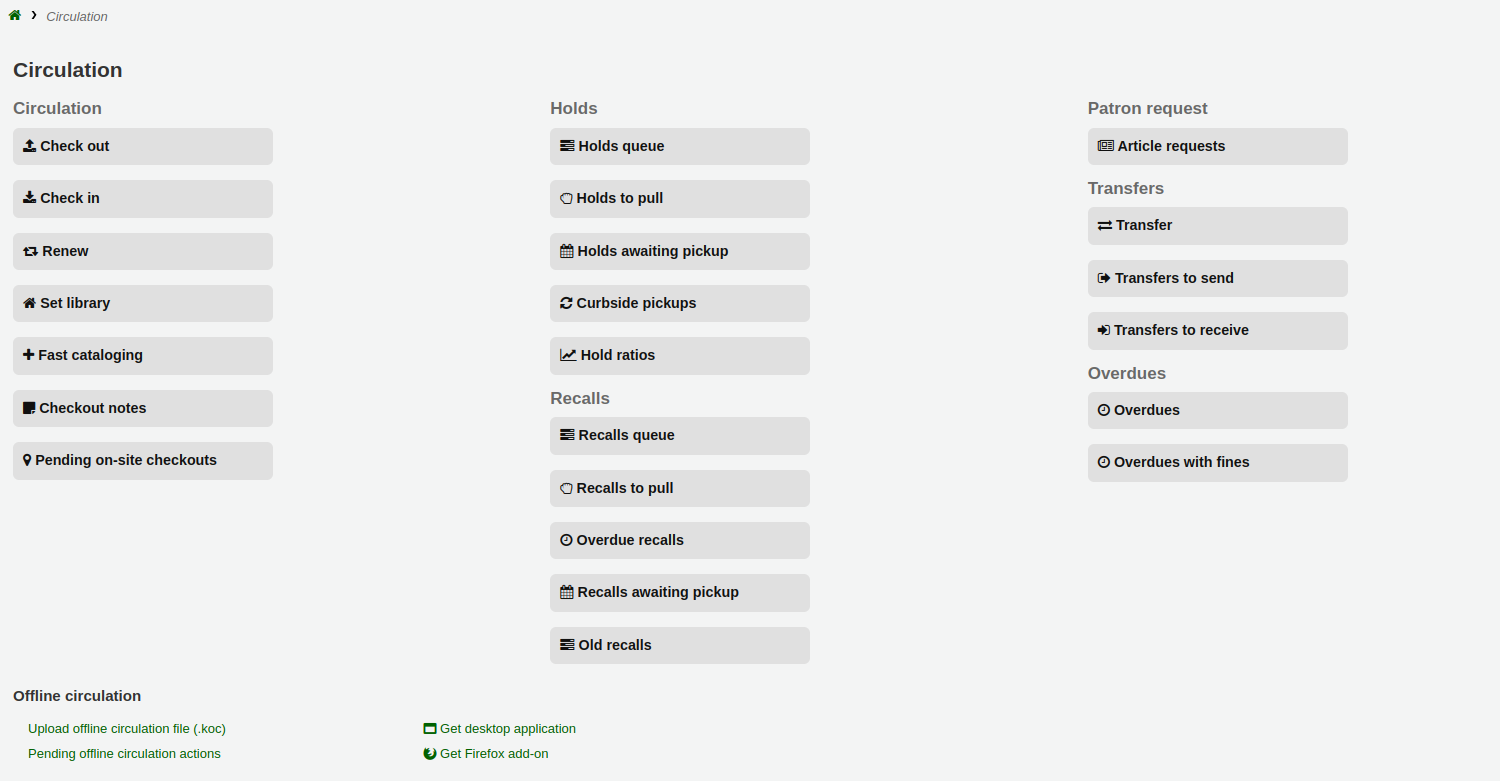
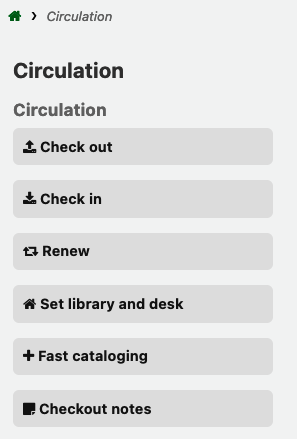
Dolaşım fonksiyonlarına birkaç farklı yoldan ulaşılabilir. Personel istemcinin ana sayfasında, materyal iadesi, girişi ya da aktarımı için sayfanın orta noktasında bazı hızlı bağlantılar mevcuttur. Dolaşım fonksiyonlarının tam listesi için, her sayfanın en üst solunda bulunan Dolaşım sayfasını ziyaret edebilir ya da ana sayfanın orta noktasından giriş yapabilirsiniz.
Before circulating your collection you will want to set your Global system preferences, Basic parameters and Patrons and circulation rules.
Dolaşımdayken ekranın üzerindeki hızlı arama kutusundaki sekmeler arasında şu kısa yol tuşlarını kullanarak atlayabilirsiniz:
Alt+Q ile katalog aramaya geçin
Alt+U ile ödünç vermeye geçin
bu, Mac kullanıcıları için işe yaramayacaktır
Alt+R ile iade bölümüne geçin
Not
Mac kullanıcıları ALT yerine OPTION düğmesini kullanın
Check out (issuing)
Ödünç verme işlemine başlamanız için kullanıcı barkod ya da adının bir kısmını girmelisiniz. Ödünç verme seçeneği üç ana yerde görünür:
Check out option in the search bar at the top of the staff interface’s main page

Check out option in the search bar at the top of the main circulation page

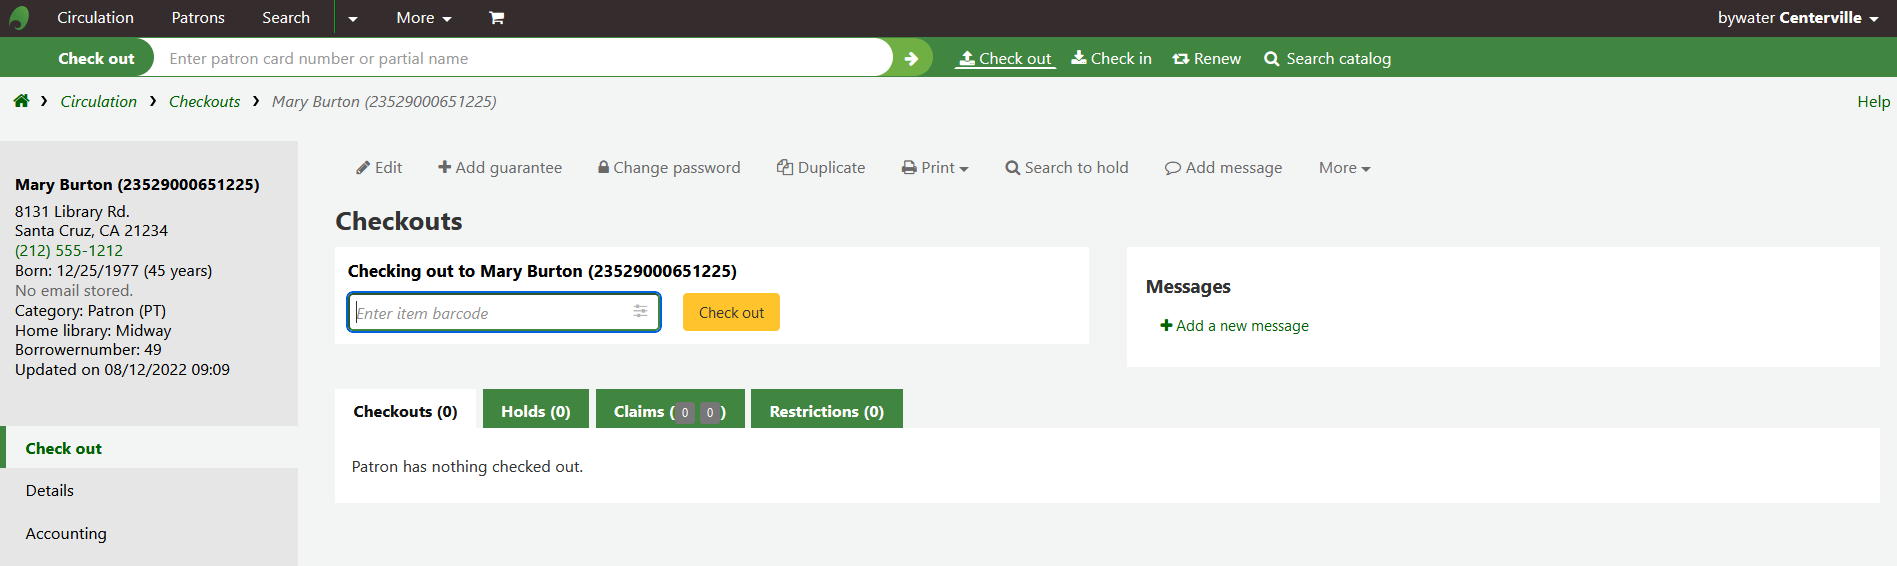
Those two options are essentially a patron search. If you only have one result, Koha will automatically go to the patron’s file, in the ‘Check out’ tab.
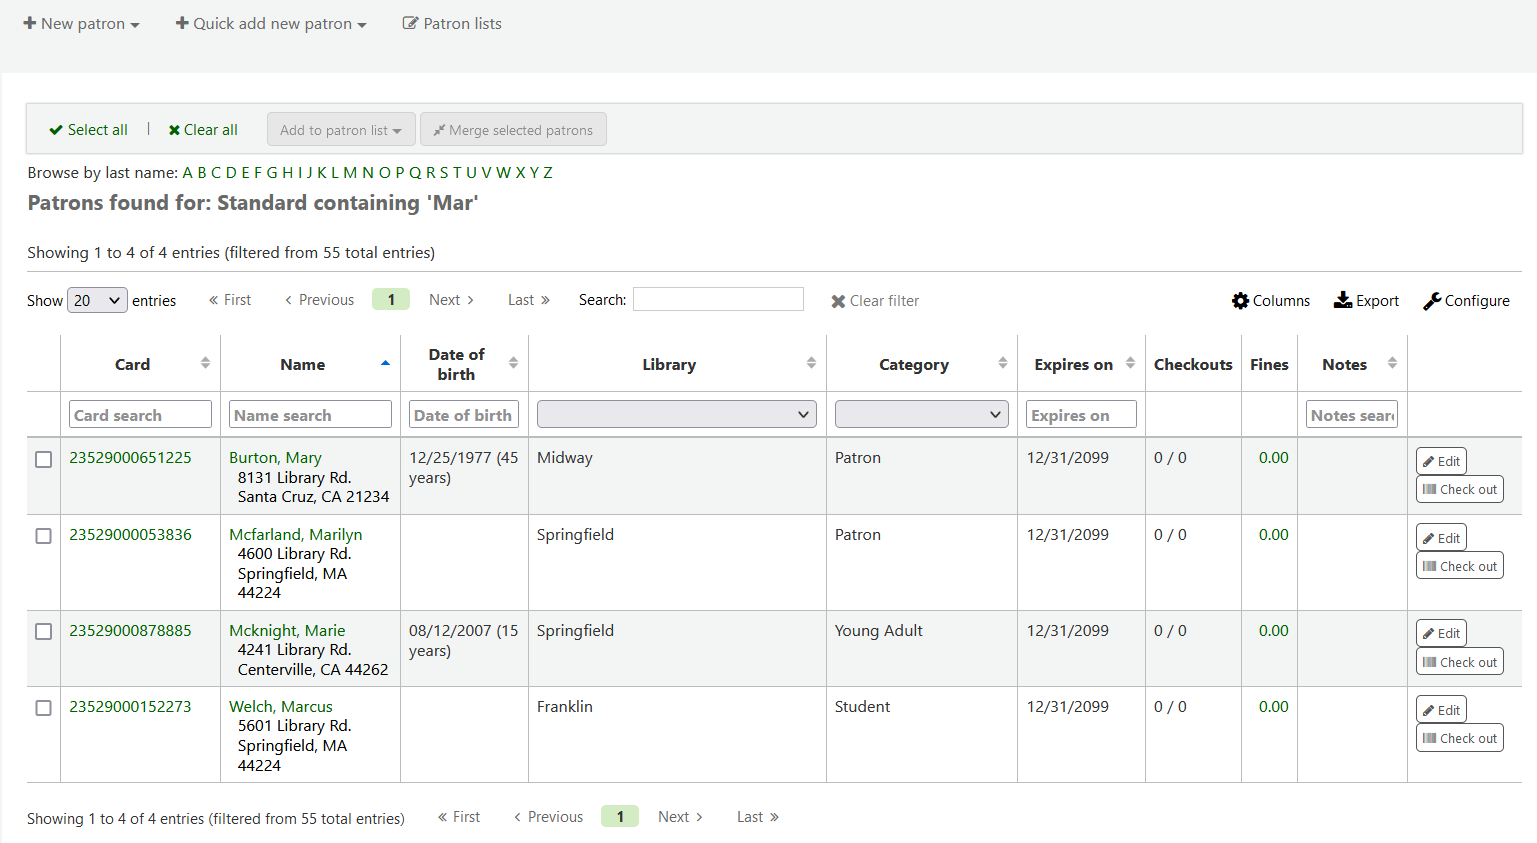
If your search gives you more than one result, it will ask you to choose which patron to check out to.
Not
You can customize the columns of this table in the ‘Table settings’ section of the Administration module, under the patrons tab (table id: memberresultst).
Clicking on a patron search result will bring you to the patron’s file, on the ‘Details’ tab. Click the ‘Check out’ tab to access the check out screen.
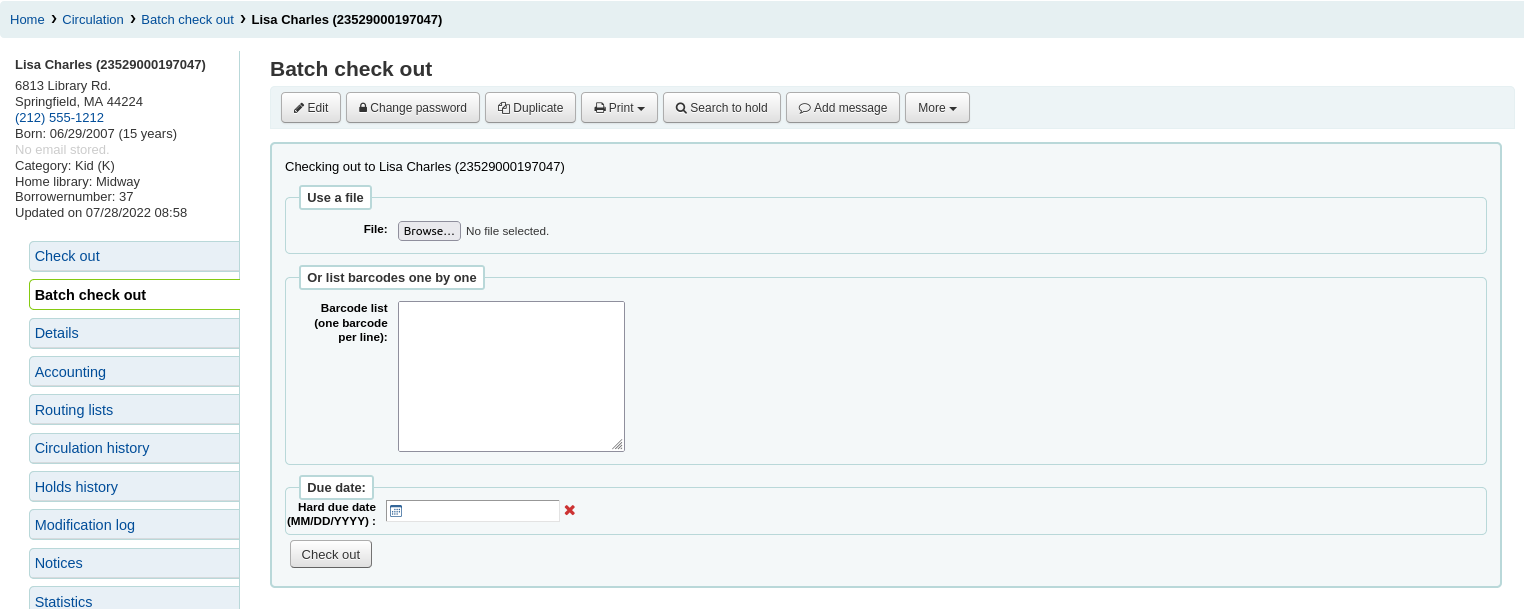
If you have enabled batch checkouts, click the batch check out tab on the patron record
Checking items out
Bir materyali kullanıcıya ödünç vermek için öncelikle yukarıda listelenen bir çok yöntemden bir tanesi ile kullanıcıyı arayın. Daha sonra ödünç verme ekranı karşınıza gelecektir.
If ‘Always show checkouts immediately’ is checked, you will see the list of current checkouts below the check out box.
Not
The previousIssuesDefaultSortOrder system preference controls in which order these previous checkouts appear (earliest to latest, or latest to earliest).
Not
You can customize the columns of this table in the ‘Table settings’ section of the Administration module, under the circulation tab (table id: issues-table).
At the top of the check out screen is a field to type or scan the item’s barcode into.
Not
Many modern barcode scanners will send a ‘return’ to the browser, making it so that the ‘Check out’ button is automatically clicked.
Barkod bulunamazsa materyali eklemek için hızlı kataloglama kullanmanız istenecektir. Bu kılavuzda daha sonra hızlı kataloglama hakkında daha fazla bilgi edinebilirsiniz.
If the itemBarcodeFallbackSearch system preference is set to ‘Enable’, you can enter a keyword search in this box instead of just a barcode (this will make it possible to check out using title and/or call number).
If the AutoSwitchPatron system preference is set to ‘Enable’, scanning a patron barcode here will take you to that patron’s file.
Daha fazla ödünç verme seçeneği görmek için ödünç verme alanını genişletmek için ‘Ödünç verme ayarları’ bağlantısını tıklayın.
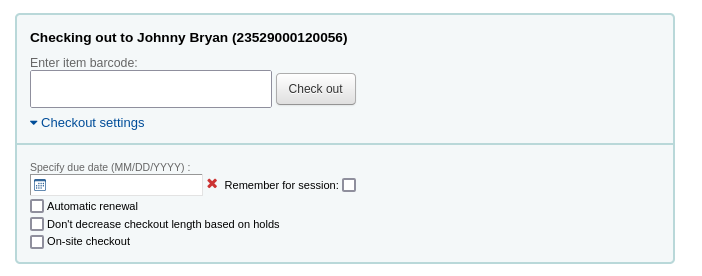
Specify due date: this option can be used to override the default due date for the item, as defined in the circulation and fines rules.
Not
This option will only appear if the SpecifyDueDate system preference is set to allow staff to override the due date.
The red ‘X’ is used to clear the date. If the ‘specify due date’ field is empty, the default due date, as defined in the circulation and fines rules is used.
Remember for this session: check this box to use the same date for all checkouts. This will not only keep the specified due date for this patron but for all patrons, until you log out of the staff interface.
Automatic renewal: this option will allow this item to automatically be renewed
To use automatic renewals,
the automatic_renewals cron job must be running
the circulation and fines rules regarding automatic renewals must be defined
Just like regular renewals, the checkouts will not be automatically renewed if there is a hold on the item.
Don’t decrease checkout length based on holds: this option overrides the decreaseLoanHighHolds system preference.
Not
This option will only appear if the decreaseLoanHighHolds system preference is enabled.
On-site checkout: this option indicates that this checkout is an on-site checkout.
Not
This option will only appear if the checkout of items on site to patrons is allowed. These are usually items that are not for loan that you would like to check out for in-library use.
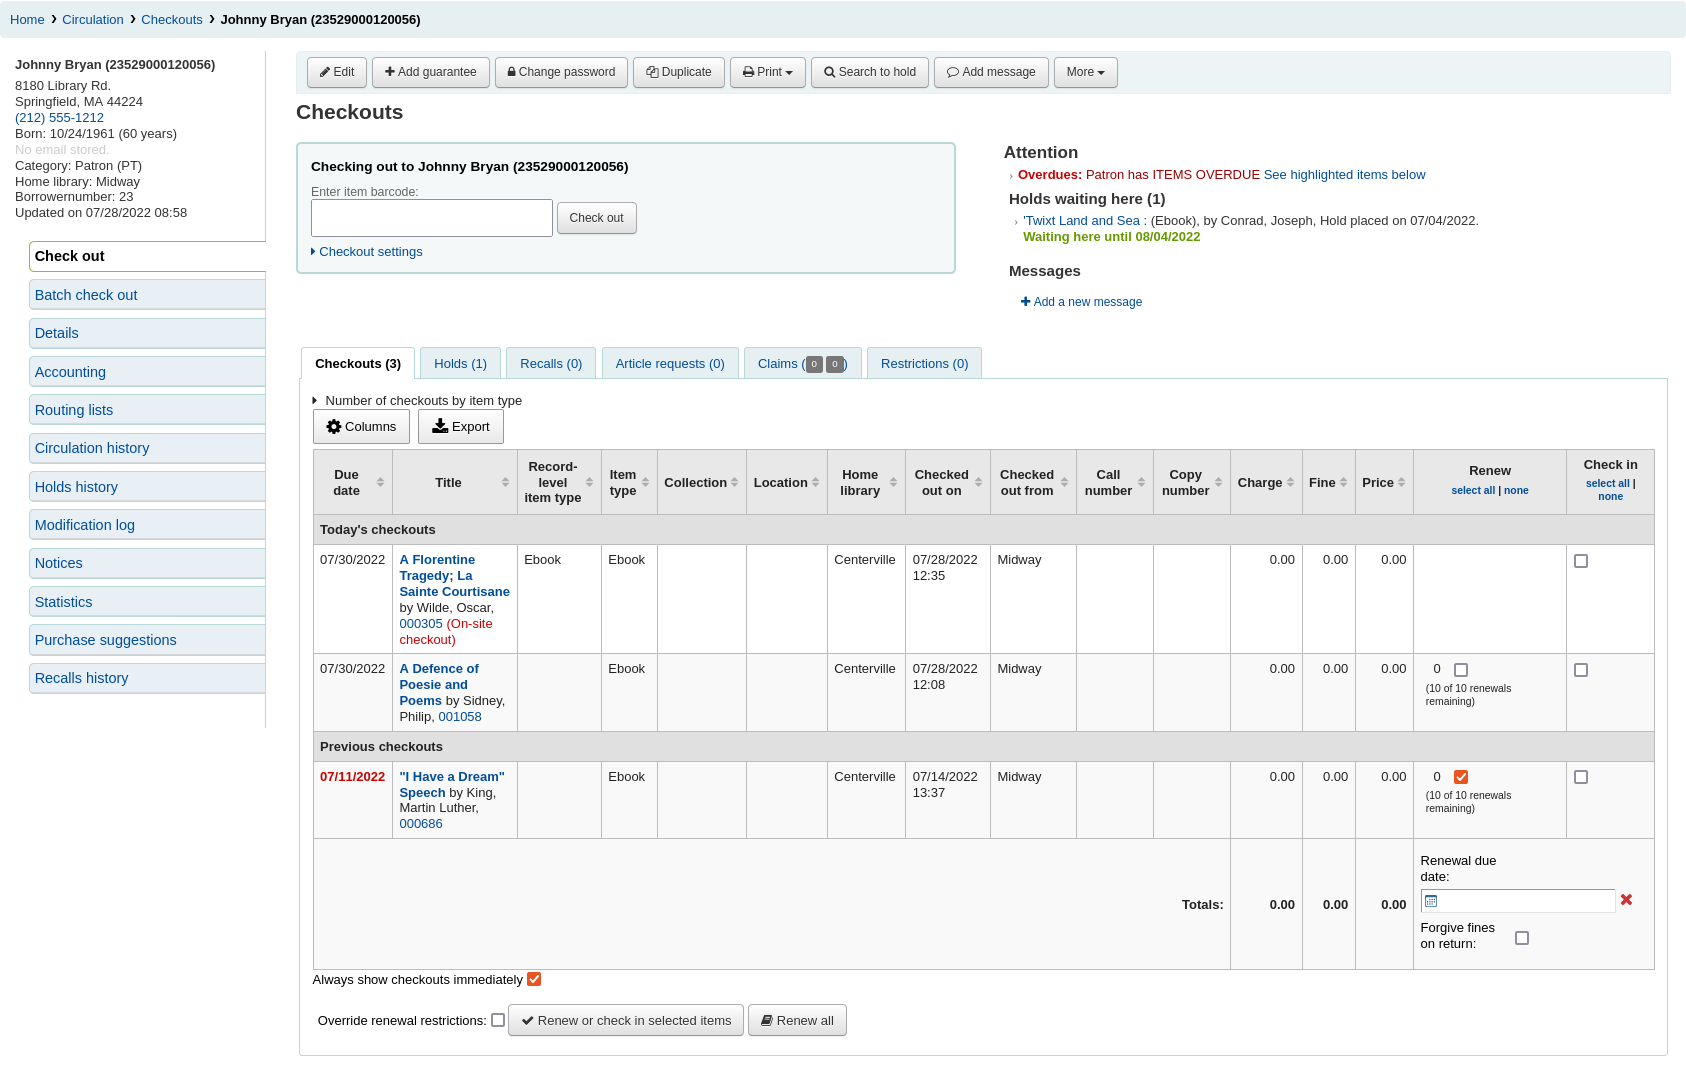
At the bottom of the page there is a summary of the patron’s current checked out items along with the due date (and time if the item is an hourly loan). Items checked out today will appear at the top, previously checked out items will be underneath.
Not
The todaysIssuesDefaultSortOrder system preference controls in which order these new checkouts appear (earliest to latest, or latest to earliest).
Not
Saatlik ödünç verilen materyaller iade tarihi ile birlikte iade zamanını da içerecektir.
If an item is checked out for on-site use, that information will be highlighted in red in the checkout summary.

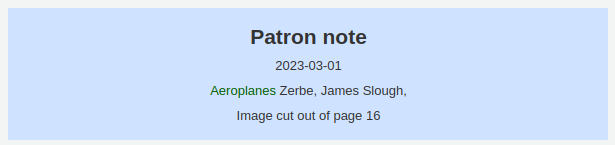
Kullanıcı kaydında notlar mevcutsa, bunlar ödünç verilenler kutusunun sağında belirecektir.
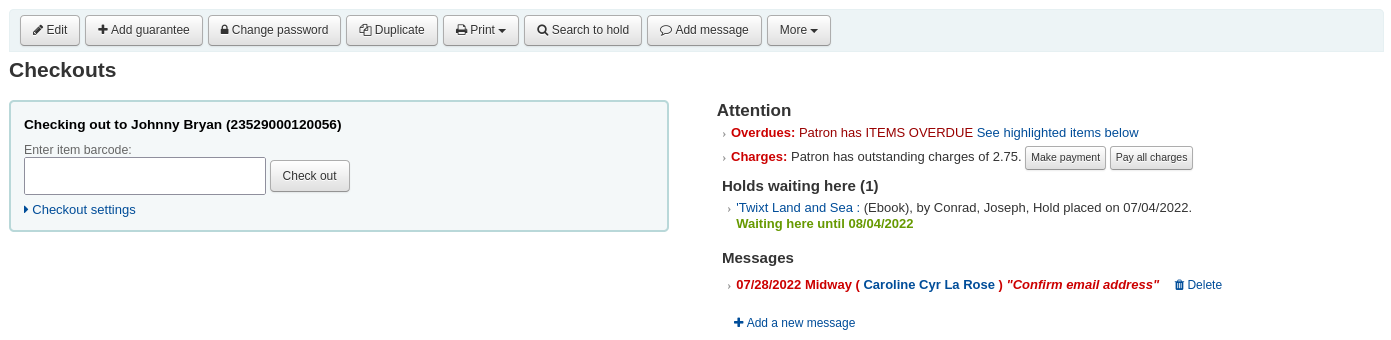
If the patron has a hold waiting at the library, that too will appear to the right of the check out box making it easy for the circulation staff to see that there is another item to give to the patron.
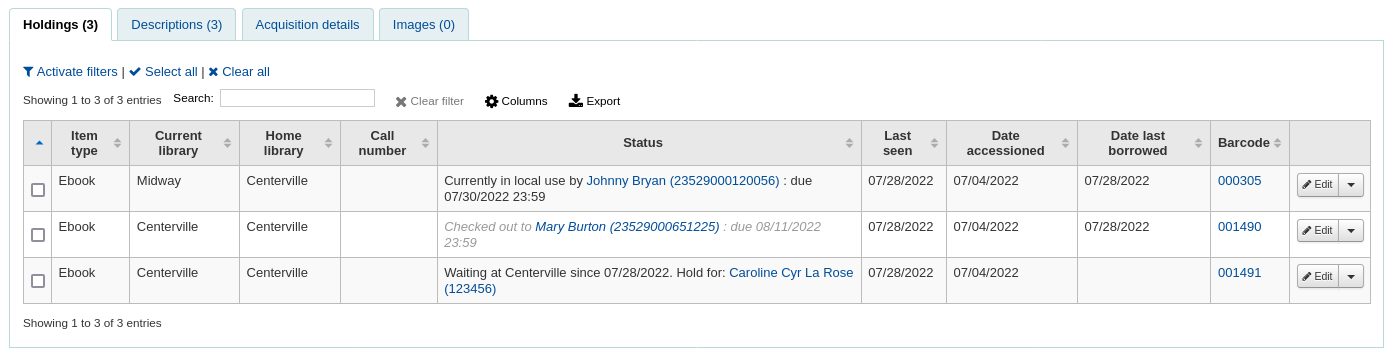
The details of the checkouts will appear on the record detail page in the staff interface as well.
Printing receipts
Kullanıcıya tüm materyalleri ödünç verdiğinizde, iki yöntemden birini seçerek materyallere alındı çıktısı alabilirsiniz.
If you have the CircAutoPrintQuickSlip preference set to ‘open a print quick slip window’ you can simply hit enter on your keyboard or scan a blank piece of paper with your barcode scanner. The idea being that you’re “checking out” a blank barcode which triggers Koha to print the ‘Quick slip.’
If you have the DisplayClearScreenButton system preference set to ‘Show print quick slip and clear buttons’ or ‘Show print slip and clear buttons’, there will be a small printer button in the top right of the checkout box, which can be used to print the slip or quick slip.

Aynı zamanda ekranın üstündeki Yazdır butonuna tıklayabilirsiniz ve ‘Slipi yazdır’ ya da ‘Hızlı slip yazdır’ seçeneklerini seçebilirsiniz.

If you choose ‘Print slip’ it will print all of the items the patron has checked out, including those they checked out at an earlier date.
Not
The slip uses the ISSUESLIP notice. You can customize the notice in the Notices and slips tool.
Choosing ‘Print quick slip’ will print only the items that were checked out today.
Not
The quick slip uses the ISSUEQSLIP notice. You can customize the notice in the Notices and slips tool.
‘Print summary’ will generate a full page summary for the patron’s circulation information.
Not
The summary cannot be customized.
‘Print account balance’ will generate a summary of outstanding charges and unused credits in the patron’s account.
Not
The quick slip uses the ACCOUNTS_SUMMARY notice. You can customize the notice in the Notices and slips tool.
Not
This option will only appear if the patron has charges in their Accounting tab.
‘Print overdues’ will print out a slip that lists all items that are overdue.
Not
The overdue slip uses the OVERDUE_SLIP notice. You can customize the notice in the Notices and slips tool.
‘Print checkin slip’ will print out a slip that lists items that were checked in today.
Not
The checkin slip uses the CHECKINSLIP notice. You can customize the notice in the Notices and slips tool.
Exporting checkouts
Other than printing a receipt, there are several ways to export a patron’s checkouts.
The ‘Export’ button at the top of the table allows you to export the patron’s current checkouts in either Microsoft Excel or CSV format, or even copy or print their checkouts.
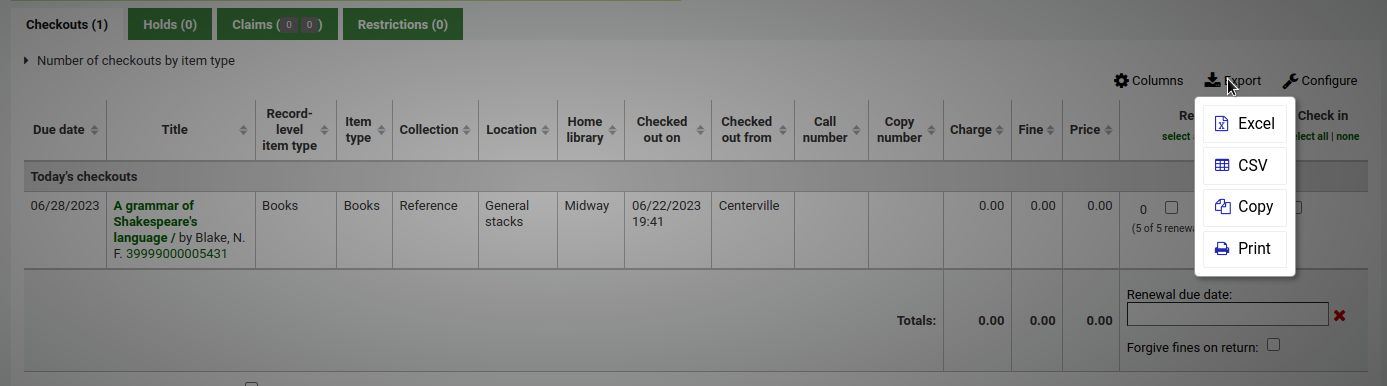
The CSV file exported this way will contain the columns of the table that are visible. You can click on the ‘Columns’ button and remove some columns first, if needed.
If the ExportCircHistory system preference is enabled, there will be an ‘Export’ column in the checkouts table. This is used to export the patron’s current checkouts in either MARC or CSV format.
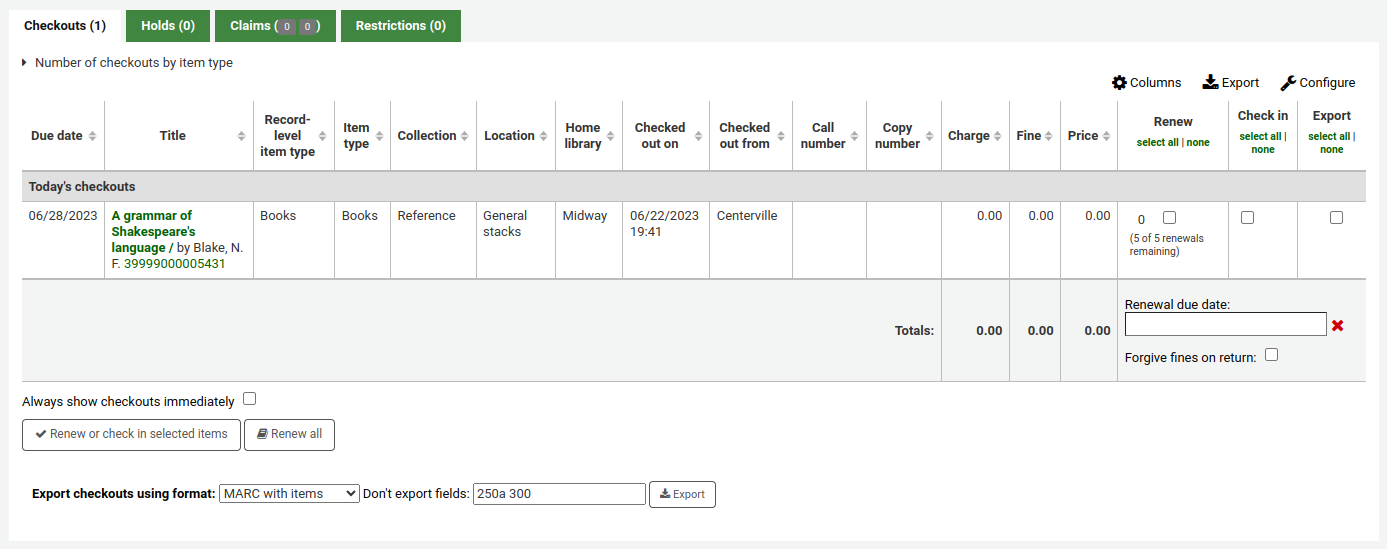
To export checkouts this way,
Select the checkouts to be exported using the checkboxes in the ‘Export’ column.
At the bottom of the table, choose the options for the export
Export checkouts using format
MARC with items: this will export the MARC records of the checked out titles, including the item information.
MARC without items: this will export the MARC records of the checked out titles.
CSV: this will export a CSV file of checked out titles. When this option is selected, a new dropdown menu will appear to choose a CSV profile.
Export bundle contents: if the patron checked out a bundle, this option will export the parent record as well as all the child records.
Don’t export fields: optionally, you can enter MARC fields that are not to be exported.
Not
The default values in the “Don’t export field” field are set in the ExportRemoveFields system preference.
Clear patron information
When you’re done checking an item out if you have the DisplayClearScreenButton preference set to ‘Show’ you can clear the current patron by clicking the X in the top right of the patron’s info to remove the current patron from the screen and start over.
If you have the CircAutoPrintQuickSlip preference set to ‘clear the screen’ then you simply need to hit enter or scan a blank barcode and the screen will be cleared of the current patron.
Batch checkouts
If you would like to perform a batch check out you can do so by turning on the BatchCheckouts system preference and assigning the proper patron categories via the BatchCheckoutsValidCategories system preference. This will allow you to use an RFID pad that reads multiple barcodes or perform a batch check out for training internal use.
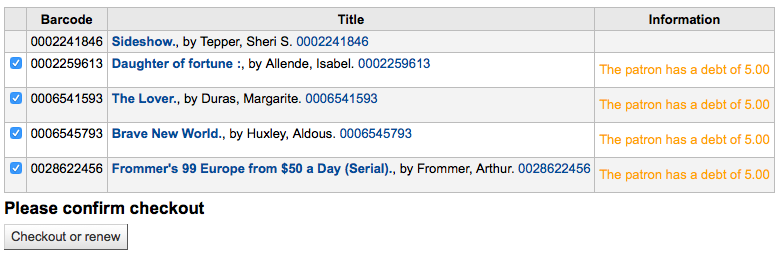
From this screen you can scan several barcodes or load a file of barcodes.
If you have the SpecifyDueDate system preference enabled you will have the option to set a due date for the checkouts.
If the items cannot be checked out, a warning will be provided on the following screen, with the option to uncheck the items that are not to be checked out.
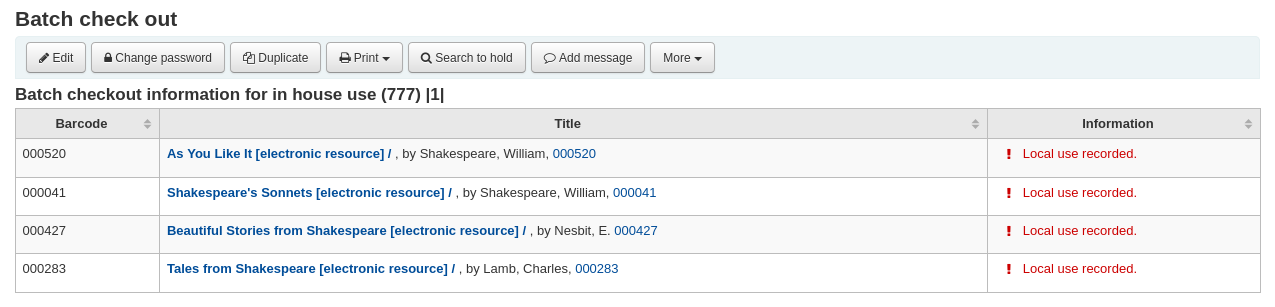
İstatistiksel bir kullanıcı türü kullanıyorsanız, yerel kullanımın taradığınız her bir materyal için kaydedildiğini göreceksiniz.
Check out messages
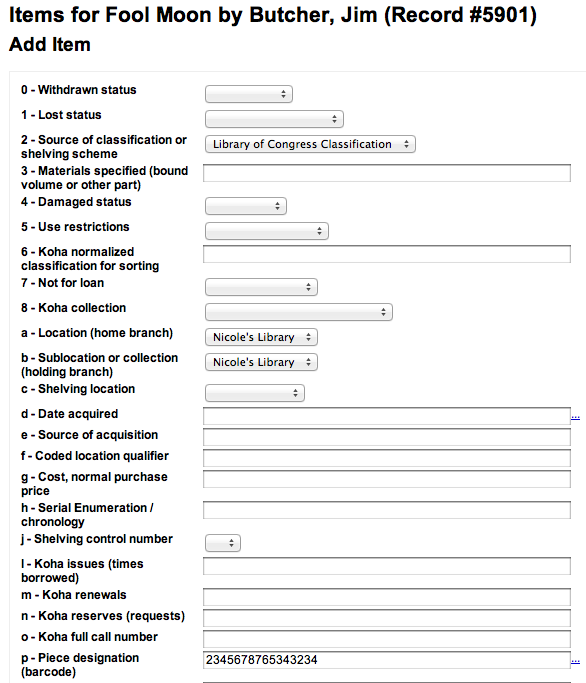
Birden fazla parçası olan bir materyali ödünç veriyorsanız, materyal kaydının (MARC21’deki) alt alan 3’teki bilgisini kataloglamış olursunuz. Materyali ödünç verdiğinizde o materyalin kaç parça olması gerektiğini belirten bir mesaj belirecektir.

Koha bazen kütüphanecinin kullanıcıya materyal ödünç verebilmesini engelleyecektir. Bu durumda, kullanıcının materyal alamamasının nedenini belirten bir uyarı belirecektir.
Kullanıcının çok fazla gecikme cezası borcu var
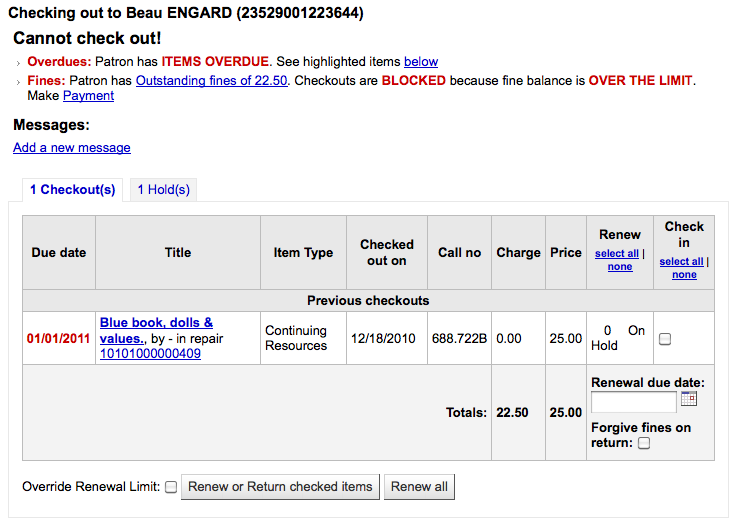
You can set the amount at which patron checkouts are blocked with the noissuescharge system preference
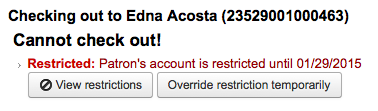
Kullanıcının hesabı üzerinde kısıtlama var

This can be set by the librarian editing a patron record and adding a restriction or by the Overdue/Notice Status Triggers
Personel doğru izne sahipse, kısıtlamayı geçici olarak geçersiz kılabilir
Kullanıcıların adreslerini onaylamaları gerekiyor

This can be set by the staff editing a patron record and adding a flag.
Kullanıcı kütüphane kartını kaybetmiş

This can be set by the staff editing a patron record and adding a flag.
Check out warnings
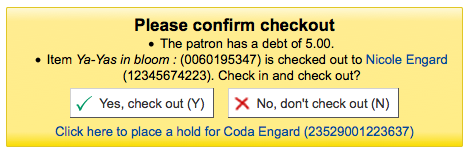
Bazen ödünç verme işlemleri, ödünç verme alanının üstünde gözüken sarı bir kutudan uyarı mesajları harekete geçirecektir. Materyalleri ödünç vermeye devam etmeye başlamadan önce bu uyarıların kabul edilmesi gerekir.
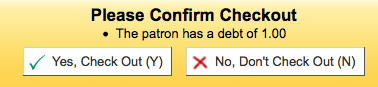
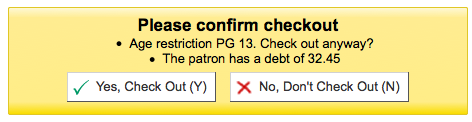
Kullanıcının ödenmemiş cezaları var
Materyal başka bir kullanıcı için ayrılmış
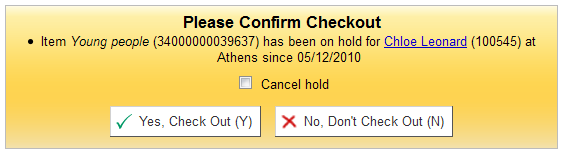
Her hangi biri için bekletilen materyalin ayırma rafında olması gerekir.
Materyal zaten bu kullanıcıya ödünç verilmiş

Materyal başka bir kullanıcıya ödünç verildi
Bu uyarı ödünç vermeye çalıştığınız kullanıcı için materyalin üzerinde ayırtma yapmanızı sağlar.
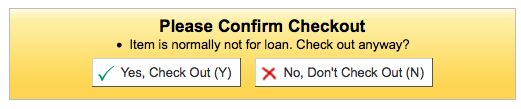
Materyal ödünç verilemez
Patron has too many things checked out and AllowTooManyOverride is set to ‘Allow’

Patron has too many things checked out and AllowTooManyOverride is set to “Don’t allow”

Materyalin süresi uzatılamaz

This can be overridden with the AllowRenewalLimitOverride system preference
Barkod bulunamadı

Bu kılavuzda daha sonra hızlı kataloglama hakkında daha fazla bilgi edinin.
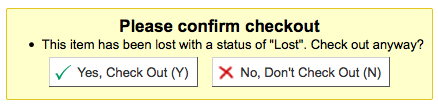
ödünç verilen materyal ‘kayıp’ olarak işaretli
Depending on the value in your IssueLostItem preference, you may just see a warning

ya da bir onay kutusu
Ödünç verilen materyal bu yaştaki kullanıcı için önerilmiyor
Item being checked out meets the decreaseLoanHighHolds system preference criteria

Item has accompanying material (field 952$3, ‘Materials specified’, is filled)

If CircConfirmItemParts is set to ‘Require’, the staff member will have to confirm the checkout

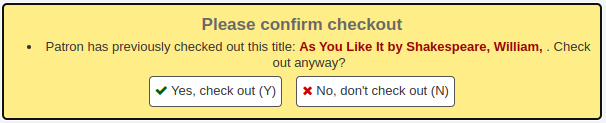
If the CheckPrevCheckout system preference says to check the patron’s circulation history, a warning will show to indicate that the patron has already checked out the item
Checkout notes
Checkout notes are notes that patrons can add from the OPAC about a particular item they have checked out (for example: missing first page, or DVD is scratched, etc.).
To enable checkout notes, set the AllowCheckoutNotes system preference to ‘Allow’.
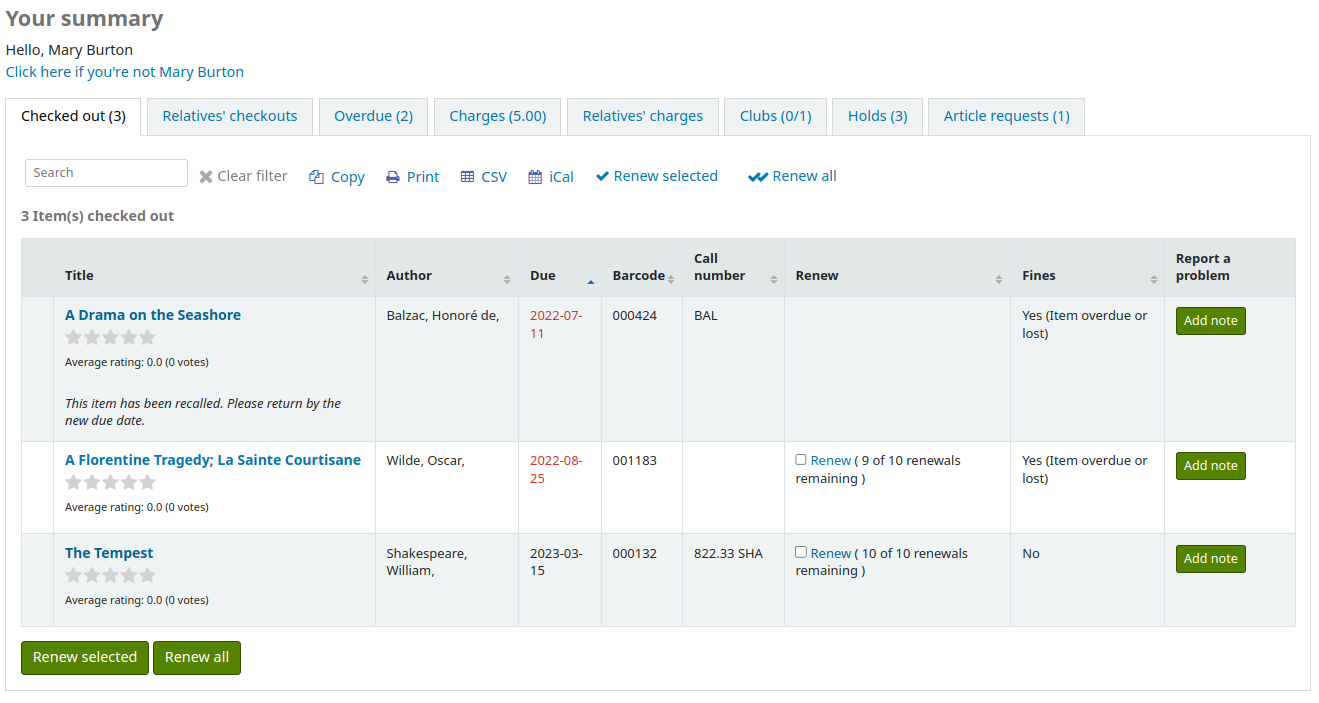
Once the system preference is activated, a new column titled ‘Report a problem’ will appear in the list of checkouts in the patron’s summary in the OPAC.
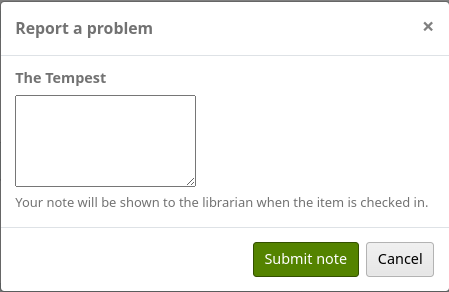
When the patron clicks on ‘Add note’, they will be able to write a note about this checkout.
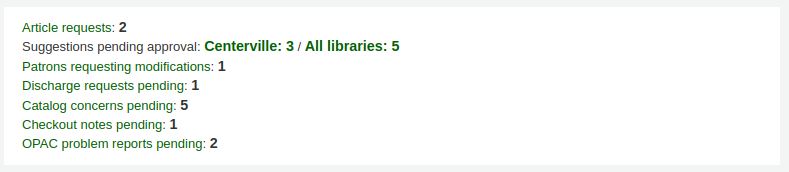
Staff will be alerted of new checkout notes in the section at the bottom of the staff interface’s home page, with other pending requests.
An email will also be sent to the email address in KohaAdminEmailAddress to alert the system administrator that a checkout note was added.
Not
You can customize this message in the Notices and slips tool. The letter code is CHECKOUT_NOTE.
Checkout notes can be managed from the circulation module home page, under Circulation > Checkout notes, or by clicking on the message in the pending requests section of the staff interface home page.

From this page, staff can mark notes as seen, either individually by clicking the ‘Mark seen’ button on the right, or in a batch by selecting the notes and clicking ‘Mark seen’ at the top of the page. Marking the notes as seen will remove them from the pending requests section of the staff interface homepage.
Seen notes can be filtered out with the ‘Hide seen’ link at the top of the table.
Checkout notes will also appear upon checkin.
Once the item is checked in, the note will be removed permanently from this page.
Süresi uzatılıyor
Checked out items can be renewed (checked out for another period of time) based on your circulation rules and renewal preferences.
Eğer you allow it olarak ayarlanırsa kullanıcılar kendi üzerlerindeki materyallerin sürelerini OPAC aracılığı ile yenileyebilirler, fakat bazen materyallerinin sürelerinin uzatılmasına personel istemci vasıtasıyla yardım etmek durumunda kalabilirsiniz.
Bir kullanıcıya ödünç verilen materyallerin süresini şu iki şeyden birini yaparak uzatabilirsiniz.
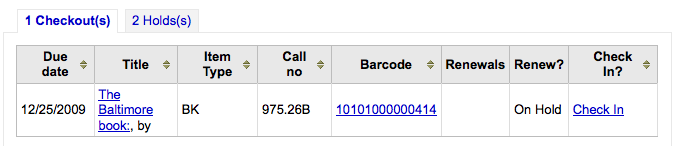
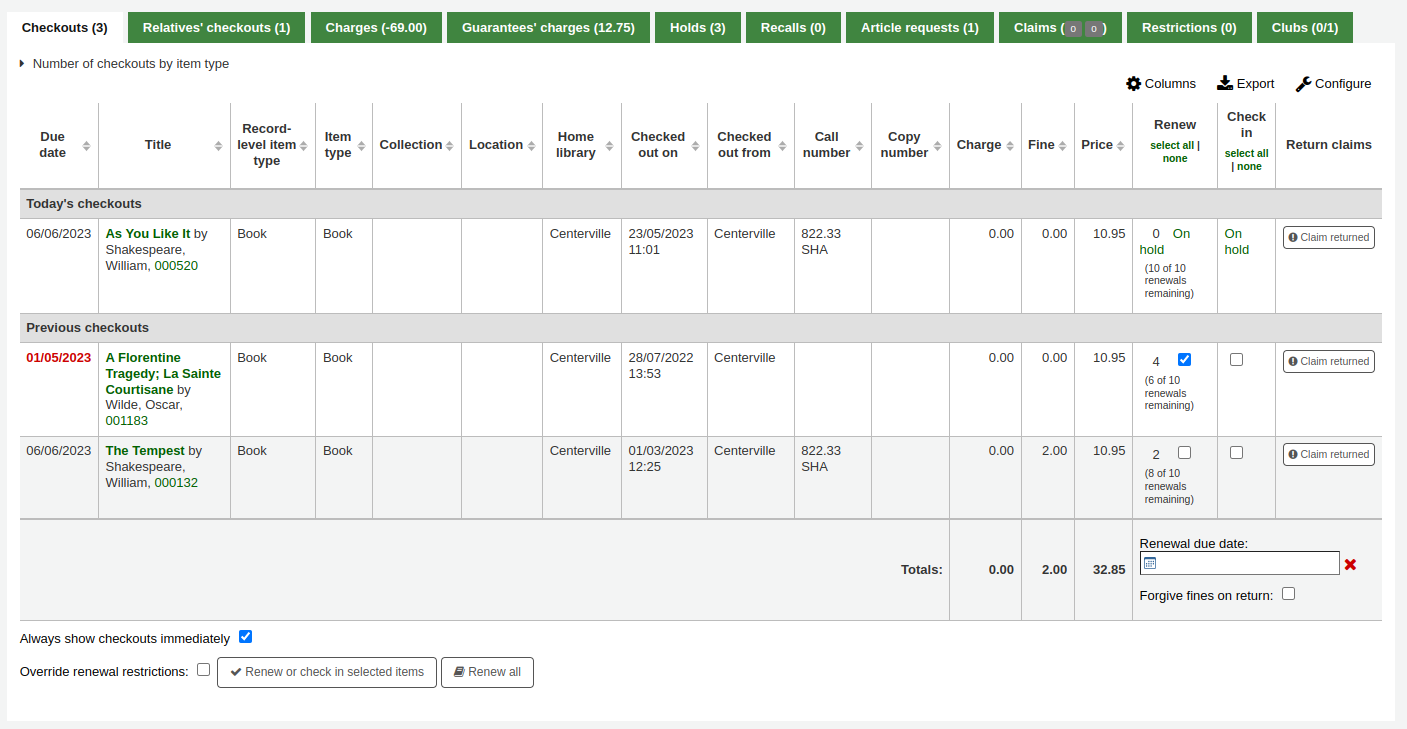
İlk olarak kullanıcının ayrıntılar sayfasına ya da ödünç verme sayfasına gidip alt tarafta bulunan ödünç alma geçmişine göz atabilirsiniz.
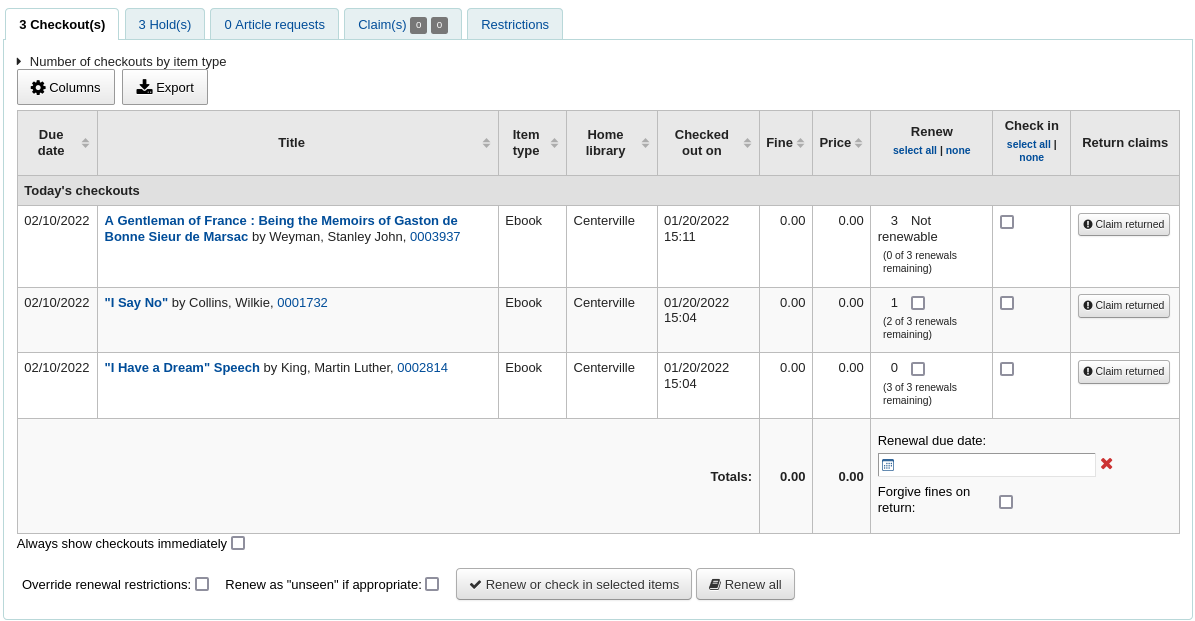
In the Renew column you will see how many times each item has been renewed and a checkbox to renew the item for the patron. Check the box of the items you would like to renew and click the ‘Renew or return checked items’ button, or to renew all items checked out to the patron simply click the ‘Renew all’ button.

Sometimes renewals will be blocked based on your circulation rules, to override this block you must have your AllowRenewalLimitOverride preference set to ‘Allow’. If you allow renewal limit overrides, you will see a checkbox at the bottom left of the circulation summary. Check that box and then choose the items you would like to renew.

Bu kutuyu işaretlemek daha önce materyalin süresinin uzatılmadığı yerde süre uzatmak için onay kutuları ekleyecektir.
You can also mark a renewal as ‘unseen’, to differentiate between renewals where staff has actually seen the item, versus renewals where they didn’t see it (over the phone, for example). To do this, you must first enable the UnseenRenewals system preference. Once enabled, a checkbox will appear at the bottom left of the circulation summary. Check that box to mark the renewals as ‘unseen’. Then click either ‘Renew or check in selected items’ or ‘Renew all’.

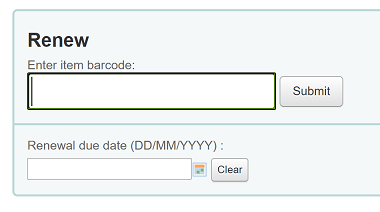
İkinci seçenek, dolaşım menüsünün altında bulunan ‘Süresini Uzat’ sayfasına gitmektir.
Ve süresini uzatmak istediğiniz materyallerin barkodlarını okutun.
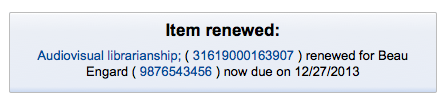
Eğer materyalin süresi uzatıldıysa bir onay iletisi alacaksınız.
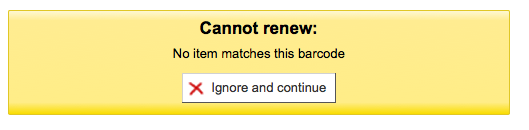
Barkod bulunamazsa bir hata mesajıyla karşılaşacaksınız.
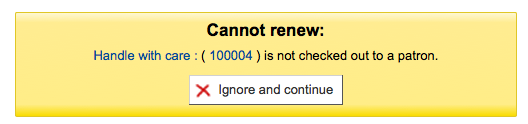
Eğer materyal aslında ödünç verilmemişse yine bir hata mesajıyla karşılaşacaksınız.
Check in (returning)
İade materyaller farklı konumlardan yapılabilir.
Ana personel istemcinin en üstündeki iade kutusu

Dolaşım sayfasındaki hızlı arama çubuğunda iade seçeneği

Kullanıcının ödünç verme özetindeki iade bağlantısı (ve ödünç verme özet sayfasında)
Dolaşım menüsünün altındaki İade Al sayfası

Koha also offers an automatic checkin feature, which can be set in item types.
Checking items in
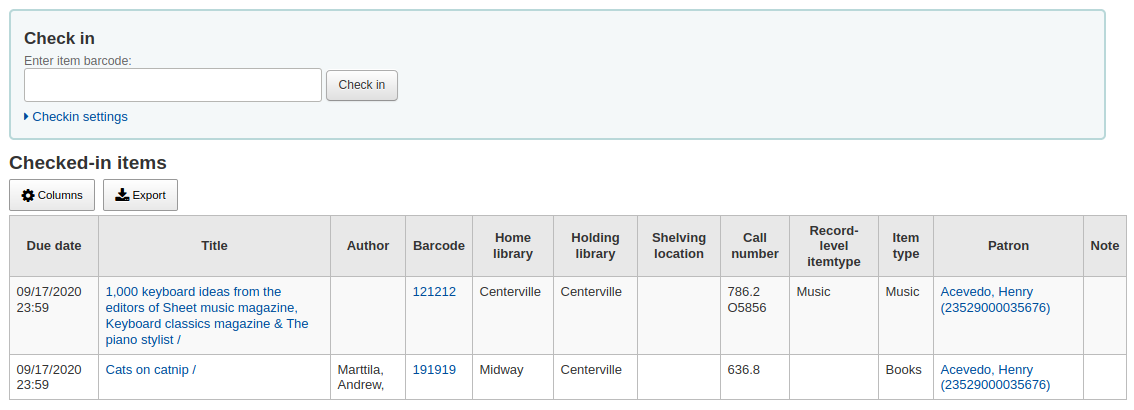
Bir materyali iade almak için barkodu tarayın. İade kutusunda iade alınan tüm materyallerin özeti çıkacak.
Not
You can customize the columns of this table in the ‘Table settings’ section of the Administration module (table id: checkedintable).
İade kutusuna bırakılan materyalleri kütüphane kapalıyken iade alıyorsanız, materyalleri taramadan önce ‘İade kutusu modu’nu etkinleştirebilirsiniz. Bu etkinleştirme, iade tarihinden kütüphanenin açık olduğu son güne kadar olan işlemleri etkili bir şekilde geri alacaktır.
This requires that you have your closings added to the calendar tool
Aynı zamanda materyalleri taramadan önce “gecikme cezalarını affet” kutusuna tıklayarak iade edilen materyallerin gecikme cezalarını affedebilirsiniz.
If you have the SpecifyReturnDate preference set to ‘Allow’ you will be able to arbitrarily set the return date from below the check in box.

Check in messages
Materyal iadesi yapılırken, birkaç mesaj gözükebilir:
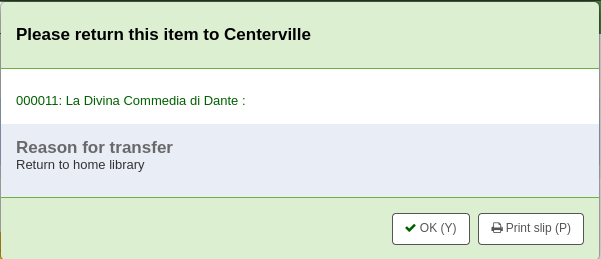
If the return policy dictates items need to be returned back to their home or holding library, a message will appear asking staff to transfer the item.
Not
When set to ‘Block’, the TransfersBlockCirc system preference will block all actions until the pop-up is confirmed.
When set to “Don’t block”, the AutomaticConfirmTransfer system preference determines what happens if the pop-up is dismissed without confirming the transfer.
After this item is checked in and the transfer is confirmed, the status of the item will be changed in the catalog to ‘in transit’.

To mark an item as back at the home or holding library, check the item in at that library.

A message will appear to tell you that the item is not checked out, but the status will now say available in the catalog. This step is necessary to mark items as received by the library.
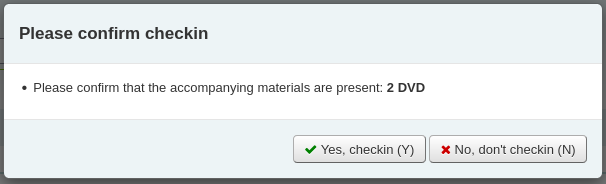
Çoklu bölümleri ya da parçaları olan gereken bir materyali iade alıyorsanız, o materyalin kaç parçadan oluştuğuna dair sizi uyaran bir mesaj gözükecektir.
If CircConfirmItemParts is set to ‘Require’, the staff member will have to confirm the checkin
Üzerine ayırma konmuş bir materyali iade alıyorsanız, ayırma işlemini onaylamanız istenecektir
Ayırma işlemini onayla butonunu tıklamak, materyali kütüphaneden alınmayı bekliyor olarak işaretler

Clicking the ‘Print slip and confirm’ button will mark the item as waiting for pickup at the library and present the library with a receipt to print and place on the book with the patron’s information
Bir ayırma işlemini yoksaymak, materyali ayrılmış olarak gösterecek ancak materyal durumu kullanılabilir olacaktır (ayırma işlemi iptal olmayacaktır)
Üzerinde başka bir birimden yapılmış bir ayırma olan bir materyali iade alırken, onaylamanız ve materyali transfer etmeniz istenecektir
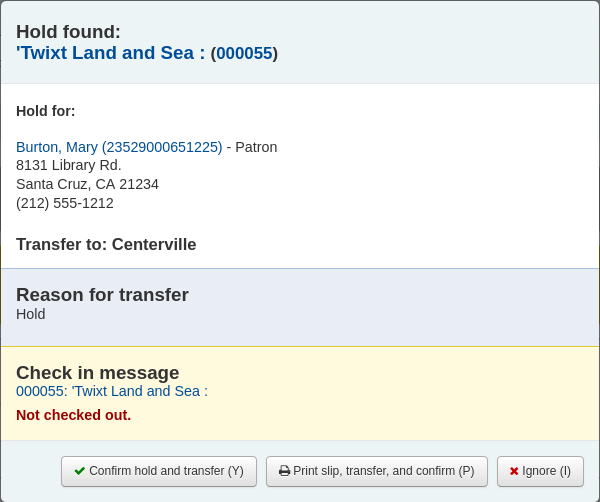
Clicking the ‘Confirm hold and transfer’ button will mark the item as in transit to the library where the hold was placed

Clicking the ‘Print slip, transfer and confirm’ button will mark the item as in transit to the library where the hold was placed and present the library with a receipt to print and place on the book with the patron’s information
Bir ayırma işlemini yoksaymak, materyali ayrılmış olarak gösterecek ancak materyal durumu kullanılabilir olacaktır (ayırma işlemi iptal olmayacaktır)
If you have the system showing you fines at the time of checkin (FineNotifyAtCheckin) you will see a message telling you about the fine and providing you a link to the payment page for that patron

Claiming an item as returned
If the patron claims they returned something, you can mark that item as ‘Claimed returned’ and track those claims.
In order to use this feature,
Add a new authorized value to the LOST category to represent items claimed as returned.
Enter the authorized value in the ClaimReturnedLostValue system preference (this enables the return claims feature).
Choose if a lost fee should be charged to the patron who claims an item as returned. Set a value in the ClaimReturnedChargeFee system preference (the default is to ask if a lost fee should be charged).
Optionally set a number of return claims a patron can make before a warning appears in their record in the ClaimReturnedWarningThreshold system preference.
Once the feature is enabled, a button to ‘Claim returned’ will appear in the patron’s checkouts tab.
To claim an item as returned,
Click the ‘Claim returned’ button next to the checkout.
In the pop-up, enter any notes about this claim.
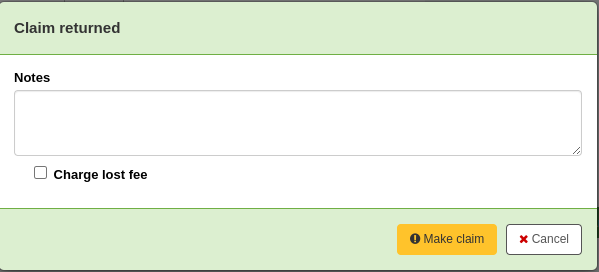
If the ClaimReturnedChargeFee system preference is set to ask whether or not the lost fee should be charged to the patron, there will be a checkbox to charge the fee.
Click ‘Make claim’.
The claimed returned item will stay in the patron’s checkouts, and its lost status will be updated. The claim will also appear in the ‘Claims’ tab.
Resolving a return claim
To resolve a claim,
Go to the patron’s record in the ‘Claims’ tab.

Click ‘Actions’ next to the item and choose ‘Resolve’.
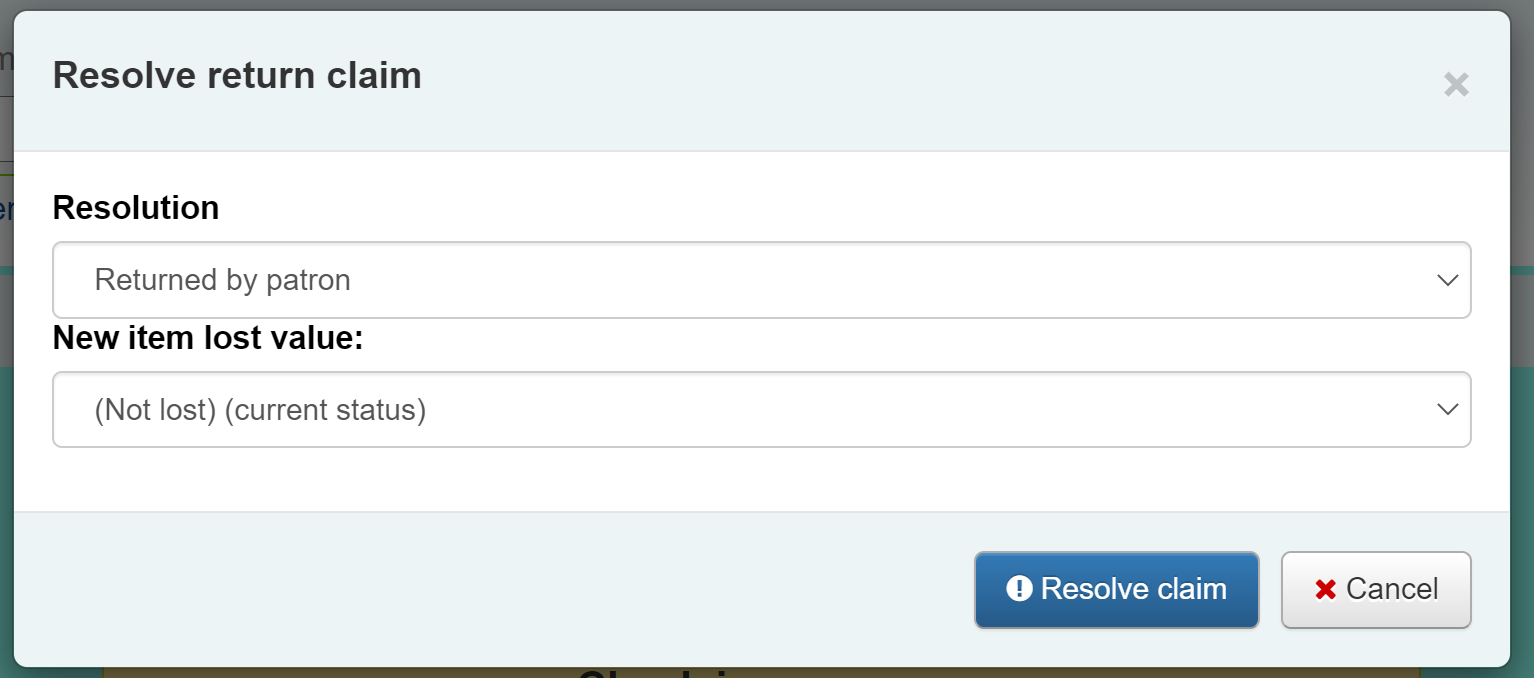
In the pop-up, choose a resolution and new lost status.
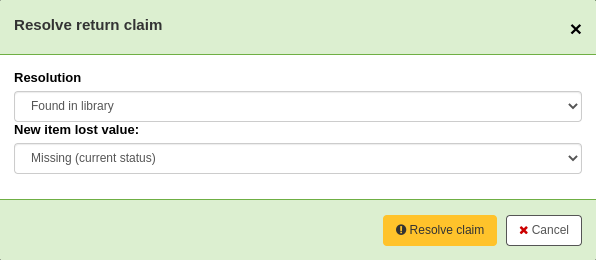
Resolution: the resolution is the reason this claim is being closed.
Not
The values are managed in the RETURN_CLAIM_RESOLUTION authorized value category.
New item lost value: this is the new lost status for this item.
Not
The values are managed in the LOST authorized value category.
Click ‘Resolve claim’.
The resolved claim will stay in the patron’s record, unless they are purged by the cleanup_database.pl cron job after the number of days specified in the CleanUpDatabaseReturnClaims system preference.
Circulating bundles
This feature adds the ability to create bundles of items that can be checked out as a single entity. A bundle could for example be a box of related items from your library or a collection of musical scores which need to be circulated together.
You create a collection level bibliographic record and add items to it in the usual way. Those items can then be converted to a bundle by adding existing item records to them using their barcodes. The items will remain attached to their original records and be marked as ‘not for loan’.
Configuration
First you need to make some configuration choices.
Item types - you may want to create a separate item type to identify your bundles.
Circulation rules - you can optionally create circulation rules for your bundle item type.
There are two system preferences which control the status values used with bundles:
Creating bundles
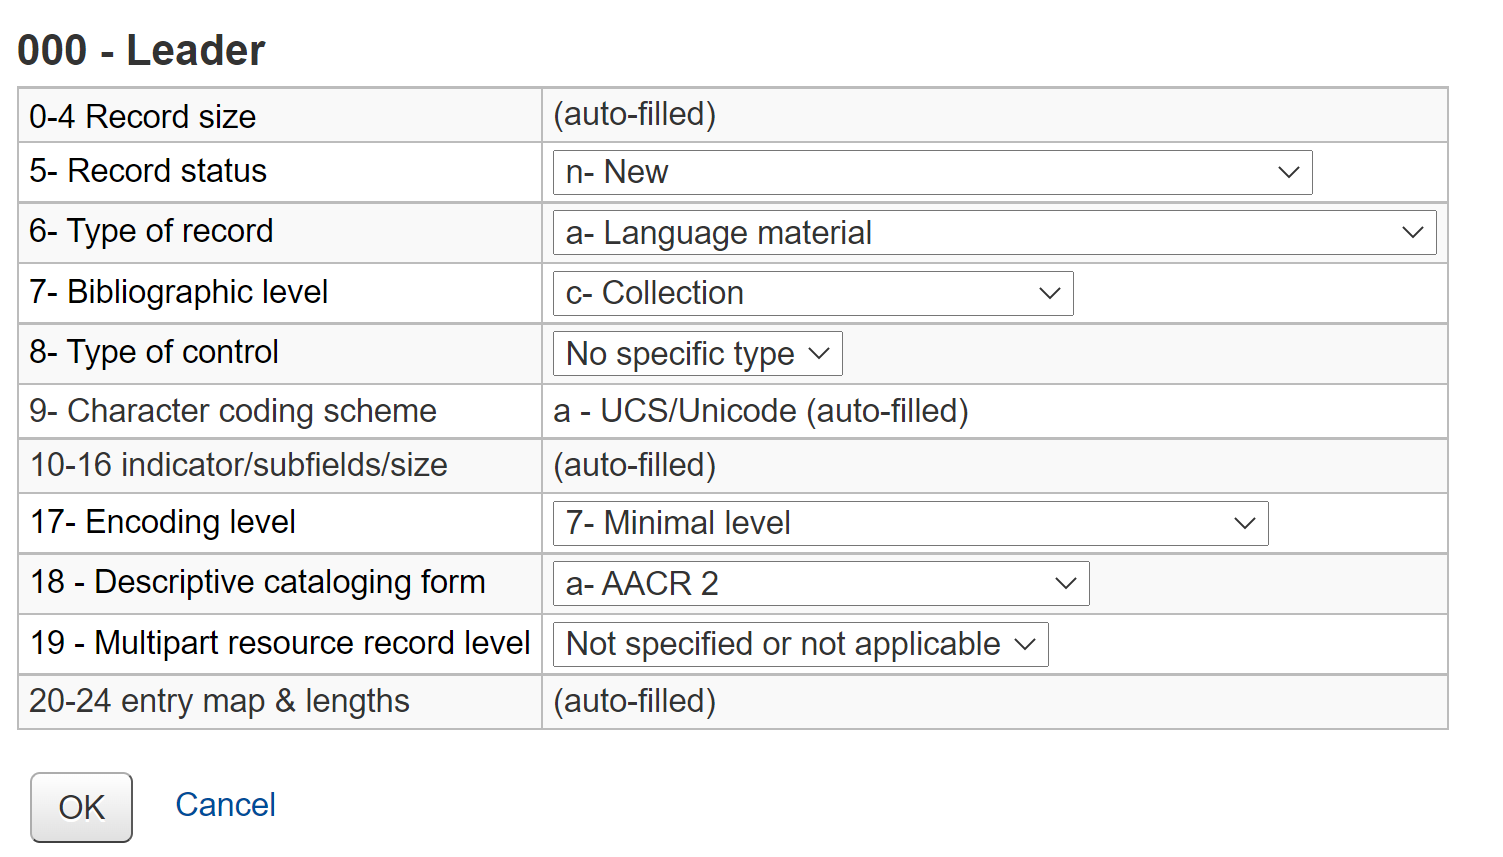
The bundle functionality will only be displayed if you create a catalogue record with the Leader, (000 MARC tag) position 7 set to ‘c’ for Collection.
Not
It might be useful to have a separate MARC bibliographic framework for bundles with the ‘c’ set as a default value if you will use bundles regularly. You can also add any custom fields to the template that might be unique to bundles such as size or weight.
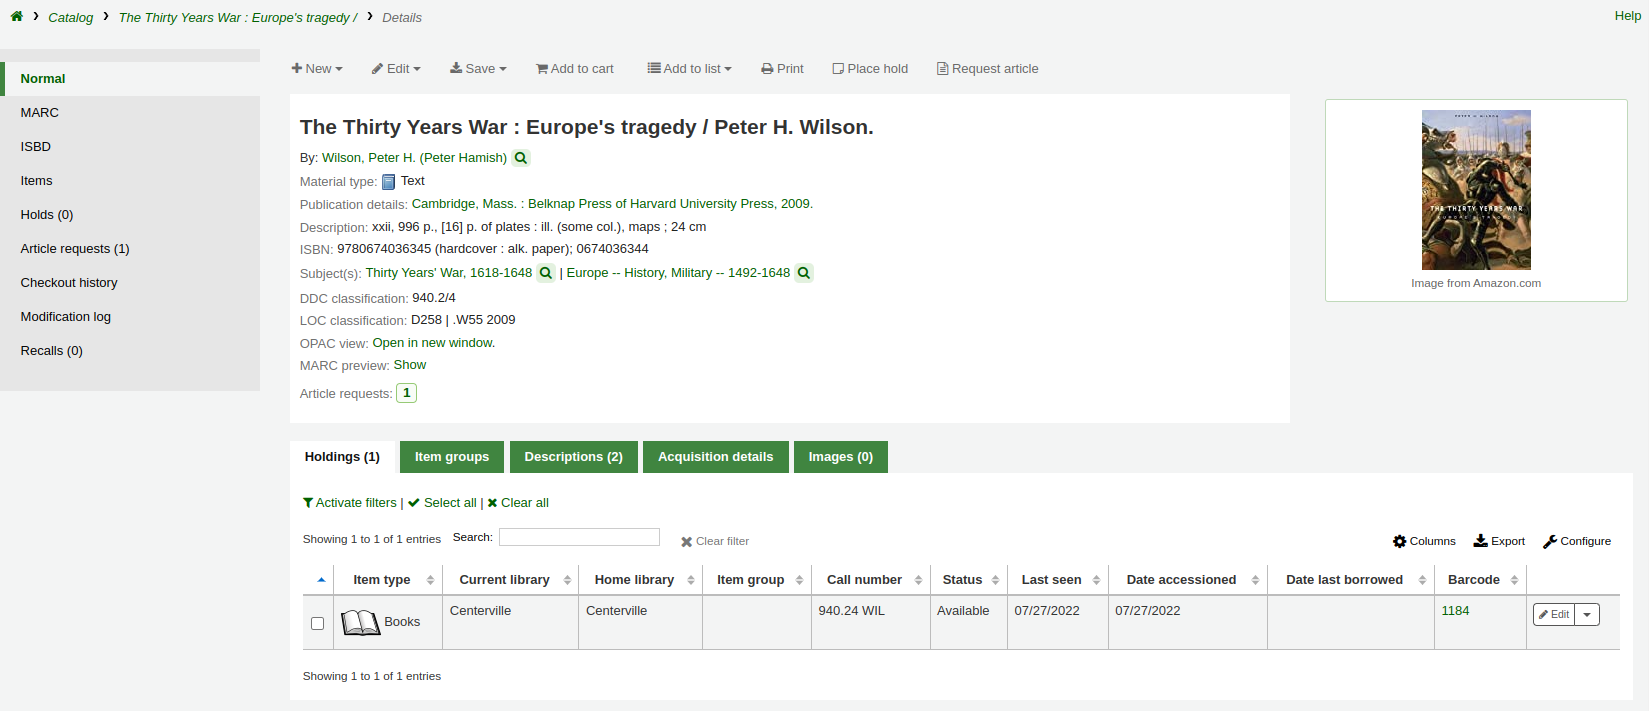
Your catalogue record will contain information to identify the content of the bundle.
For example, if the bundle is a box of resources for school children on the topic of oceans, the catalogue record might look something like the one shown below.
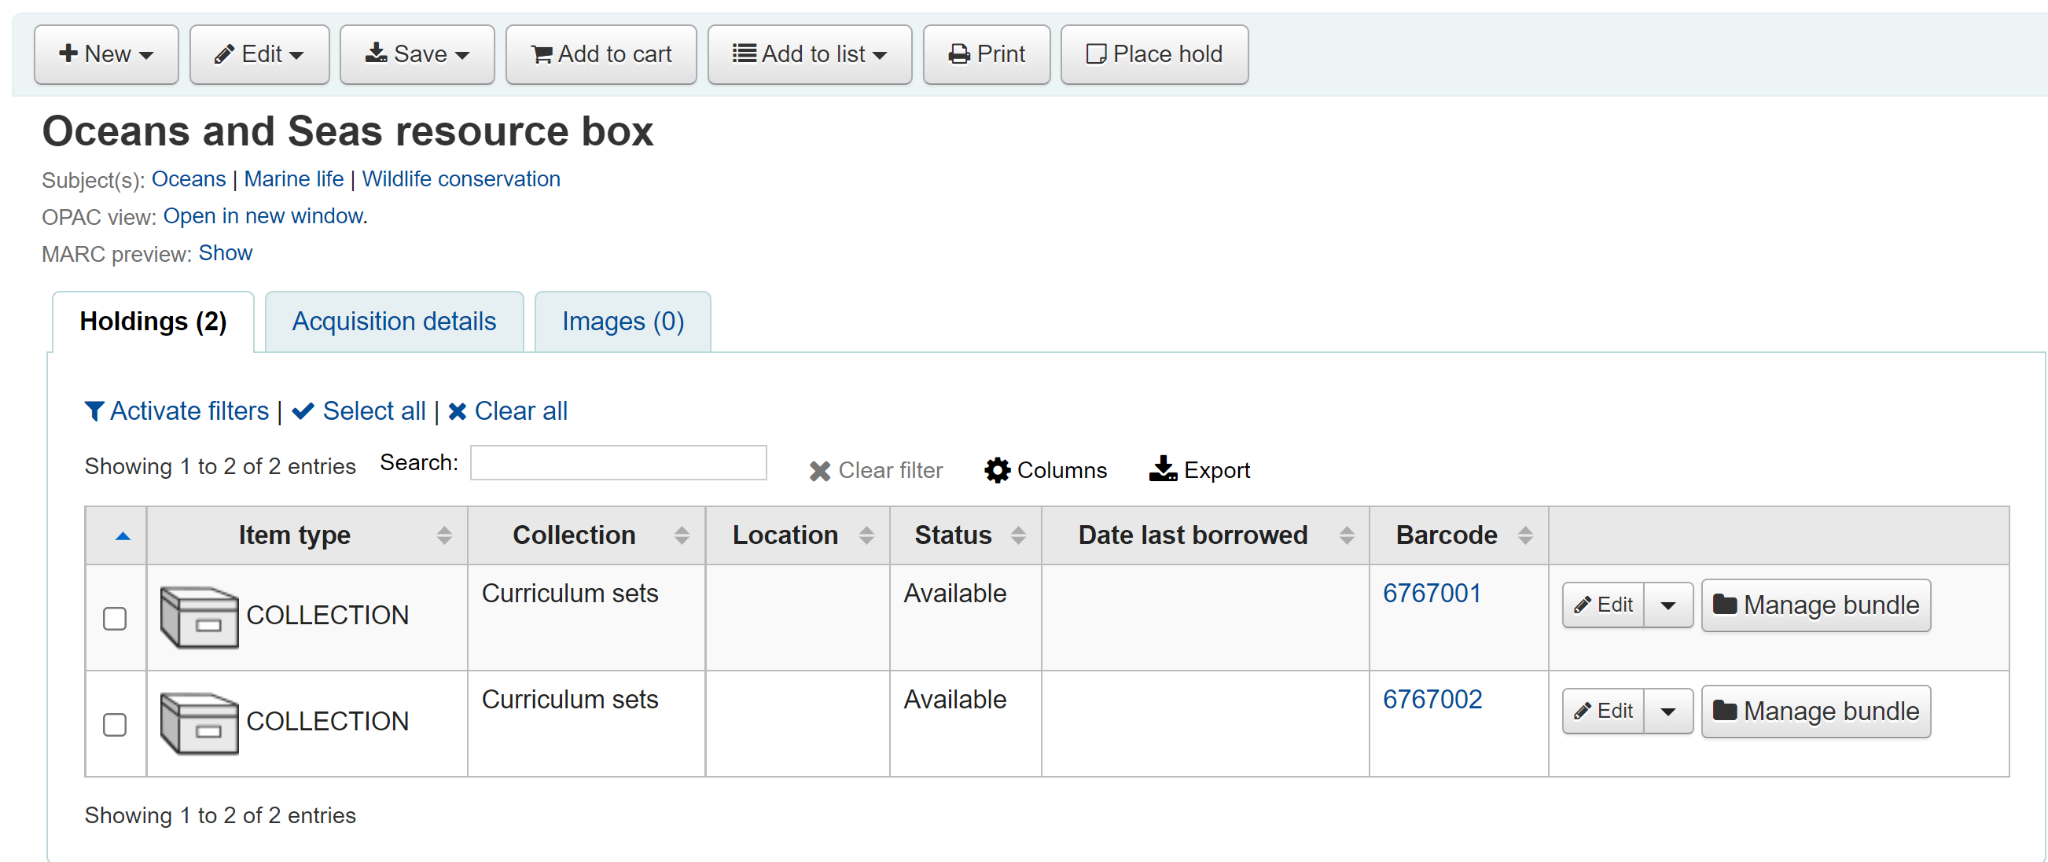
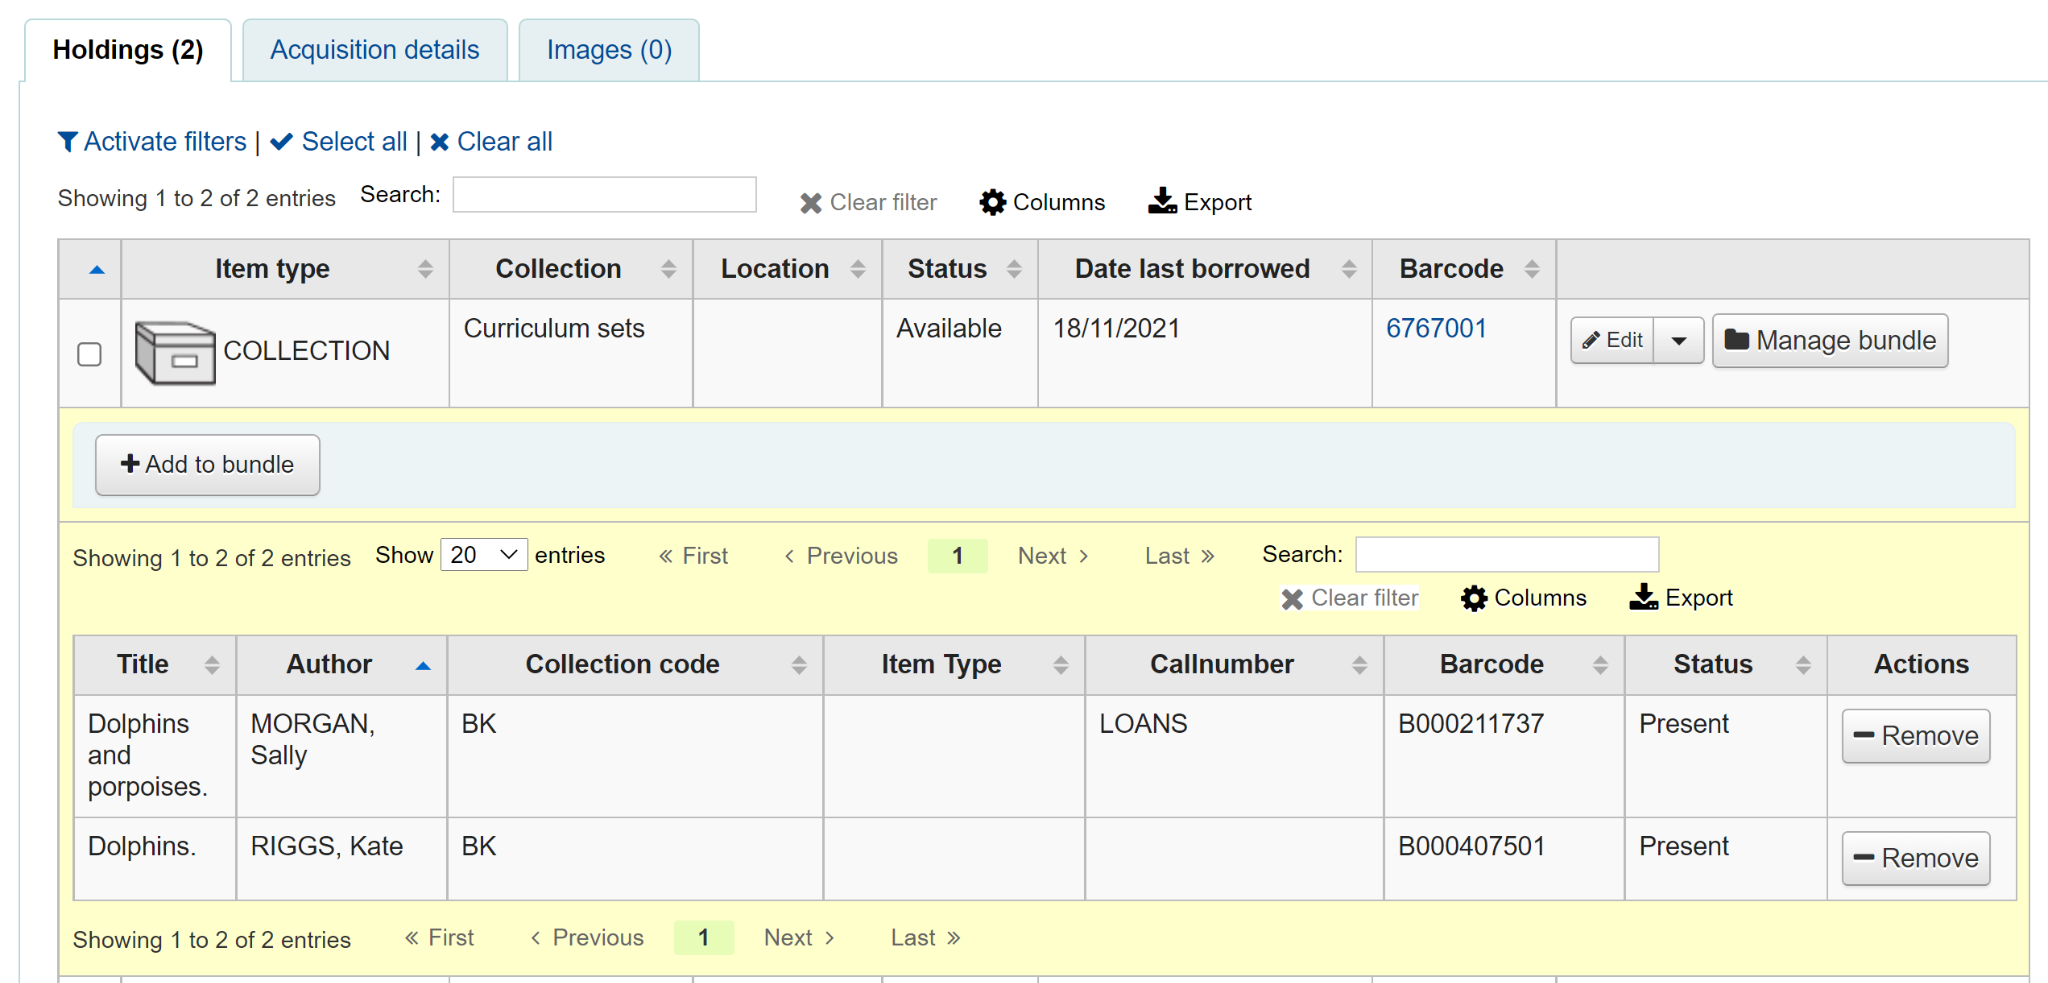
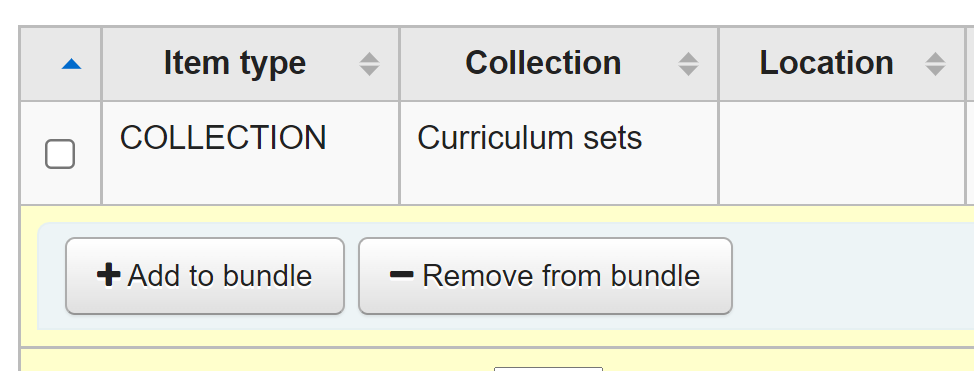
Add an item record for each physical bundle. It is likely that you will want a specific item type for bundles so that you can identify them easily and create circulation rules for them. In this case the bundle has the item type COLLECTION.
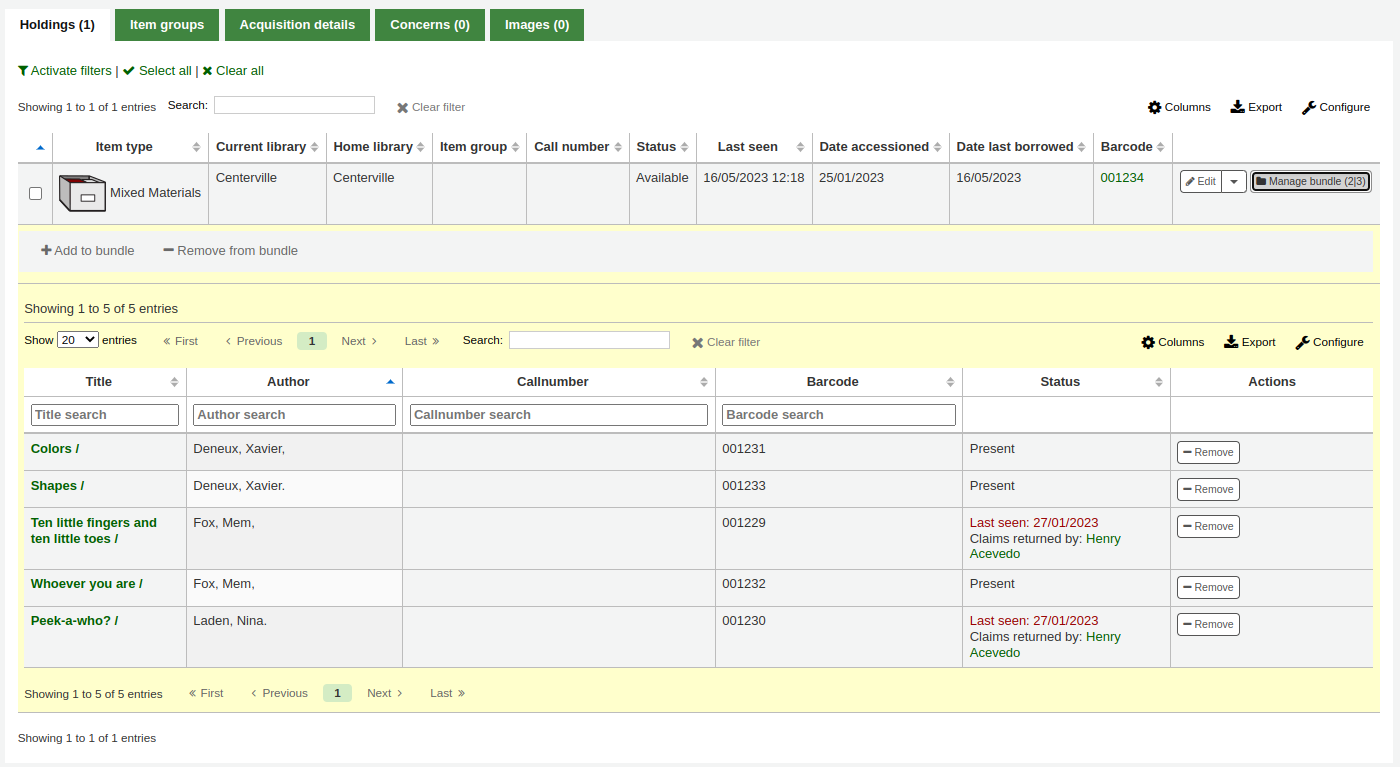
An item record attached to this type of catalogue record can be converted into a bundle via the Manage bundle button on the far right-hand side of the holdings table for each item as shown below.
Adding items to bundles
Click on Manage bundle and then the Add to bundle button to add items to the bundle using the barcode of the item.
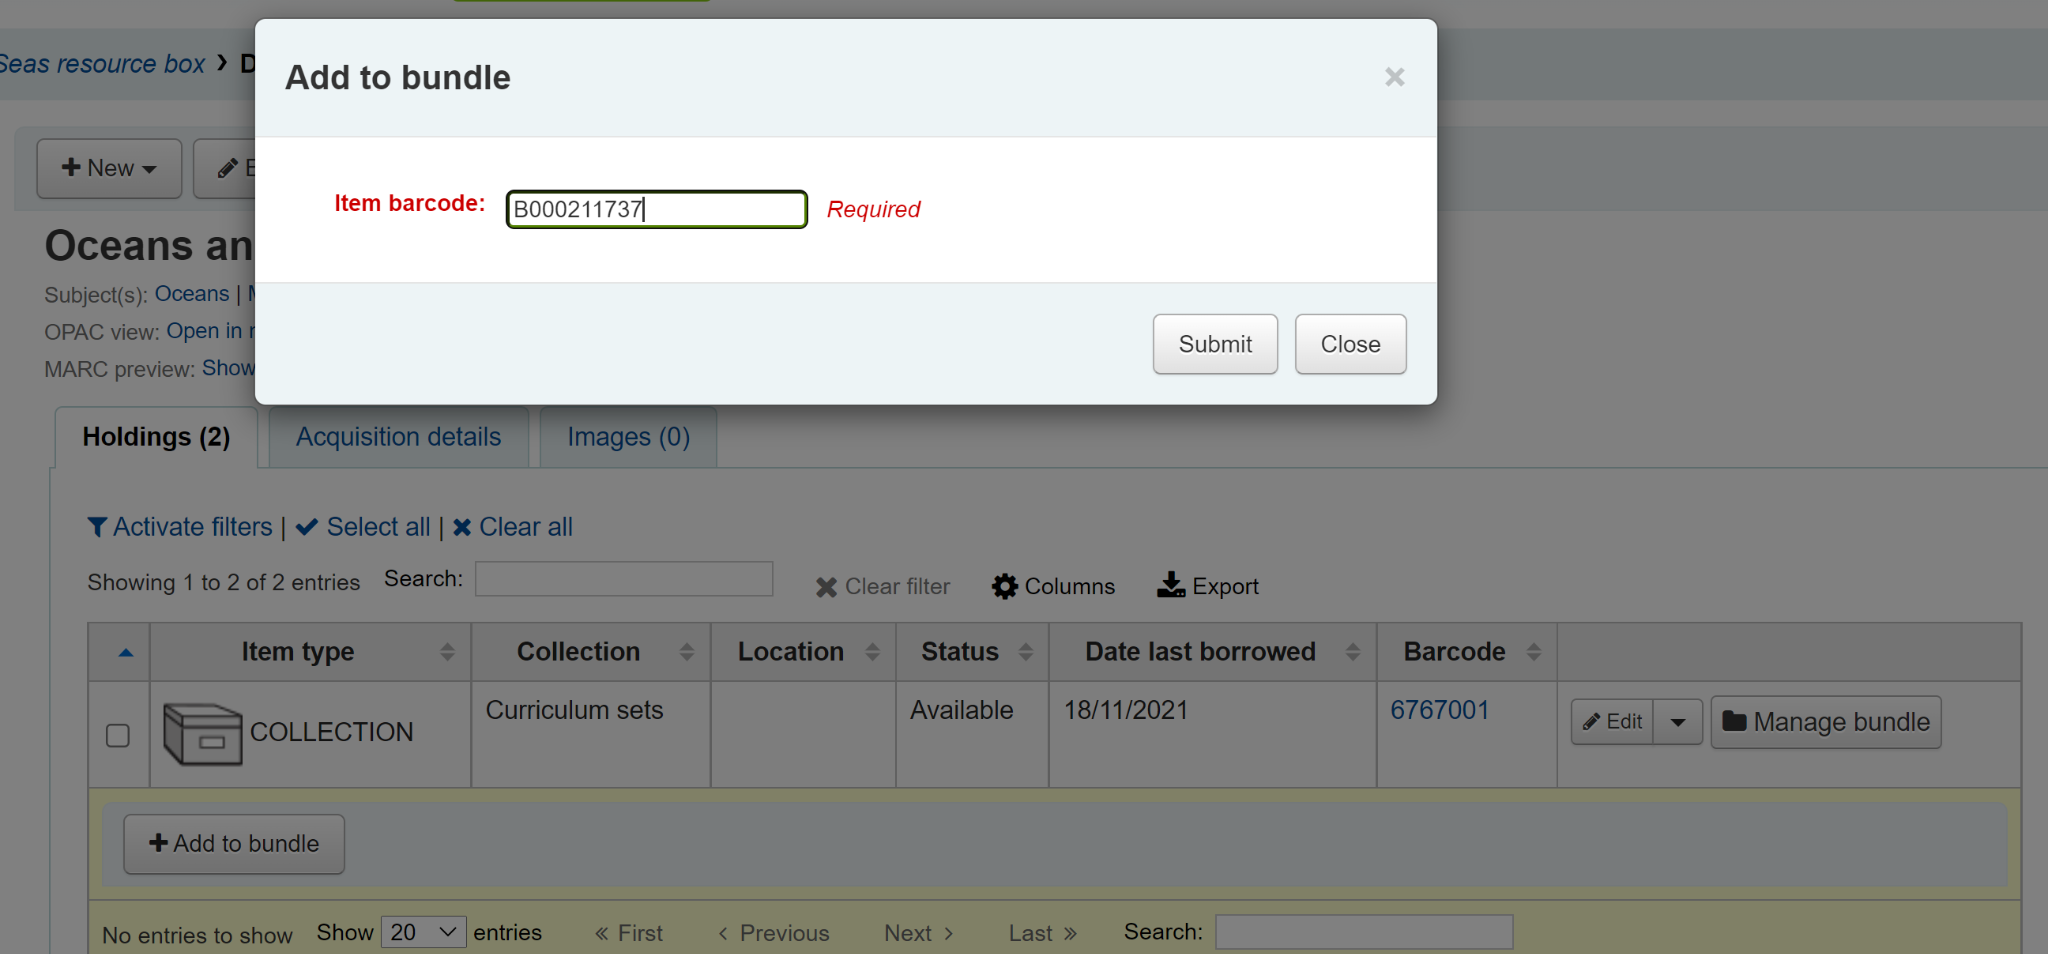
You will see a message telling you that the item has been added successfully.
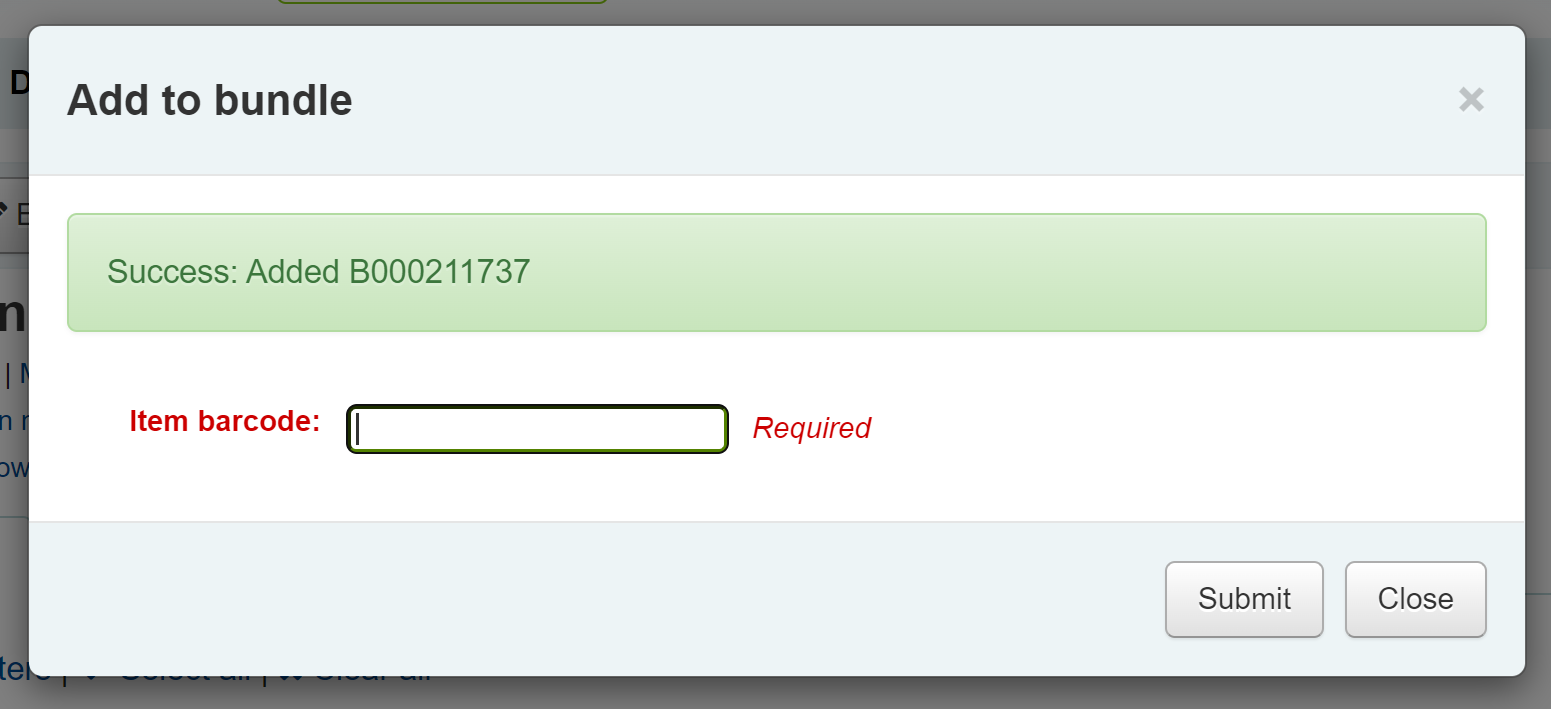
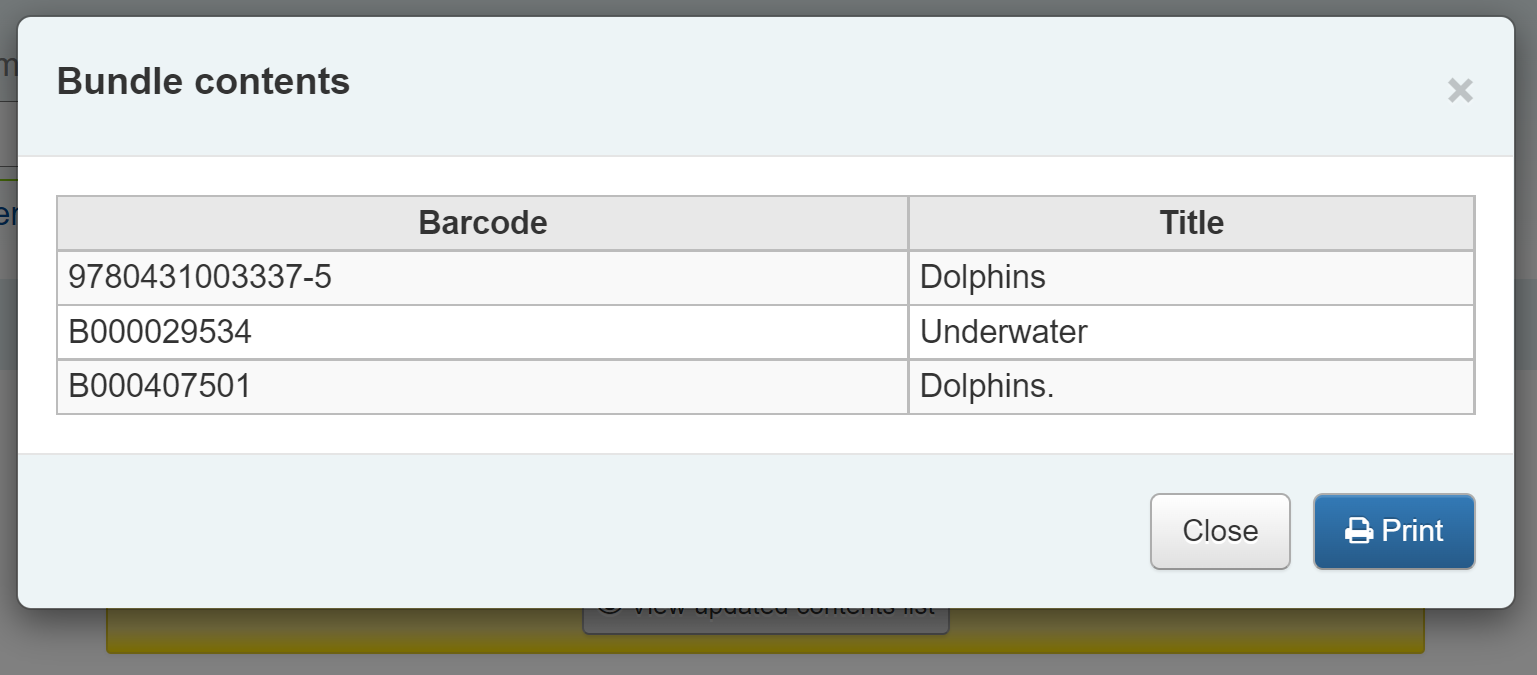
When you have finished scanning in items you can click on Close and view the bundle contents. The bundle contents list can be exported or printed if required.
Uyarı
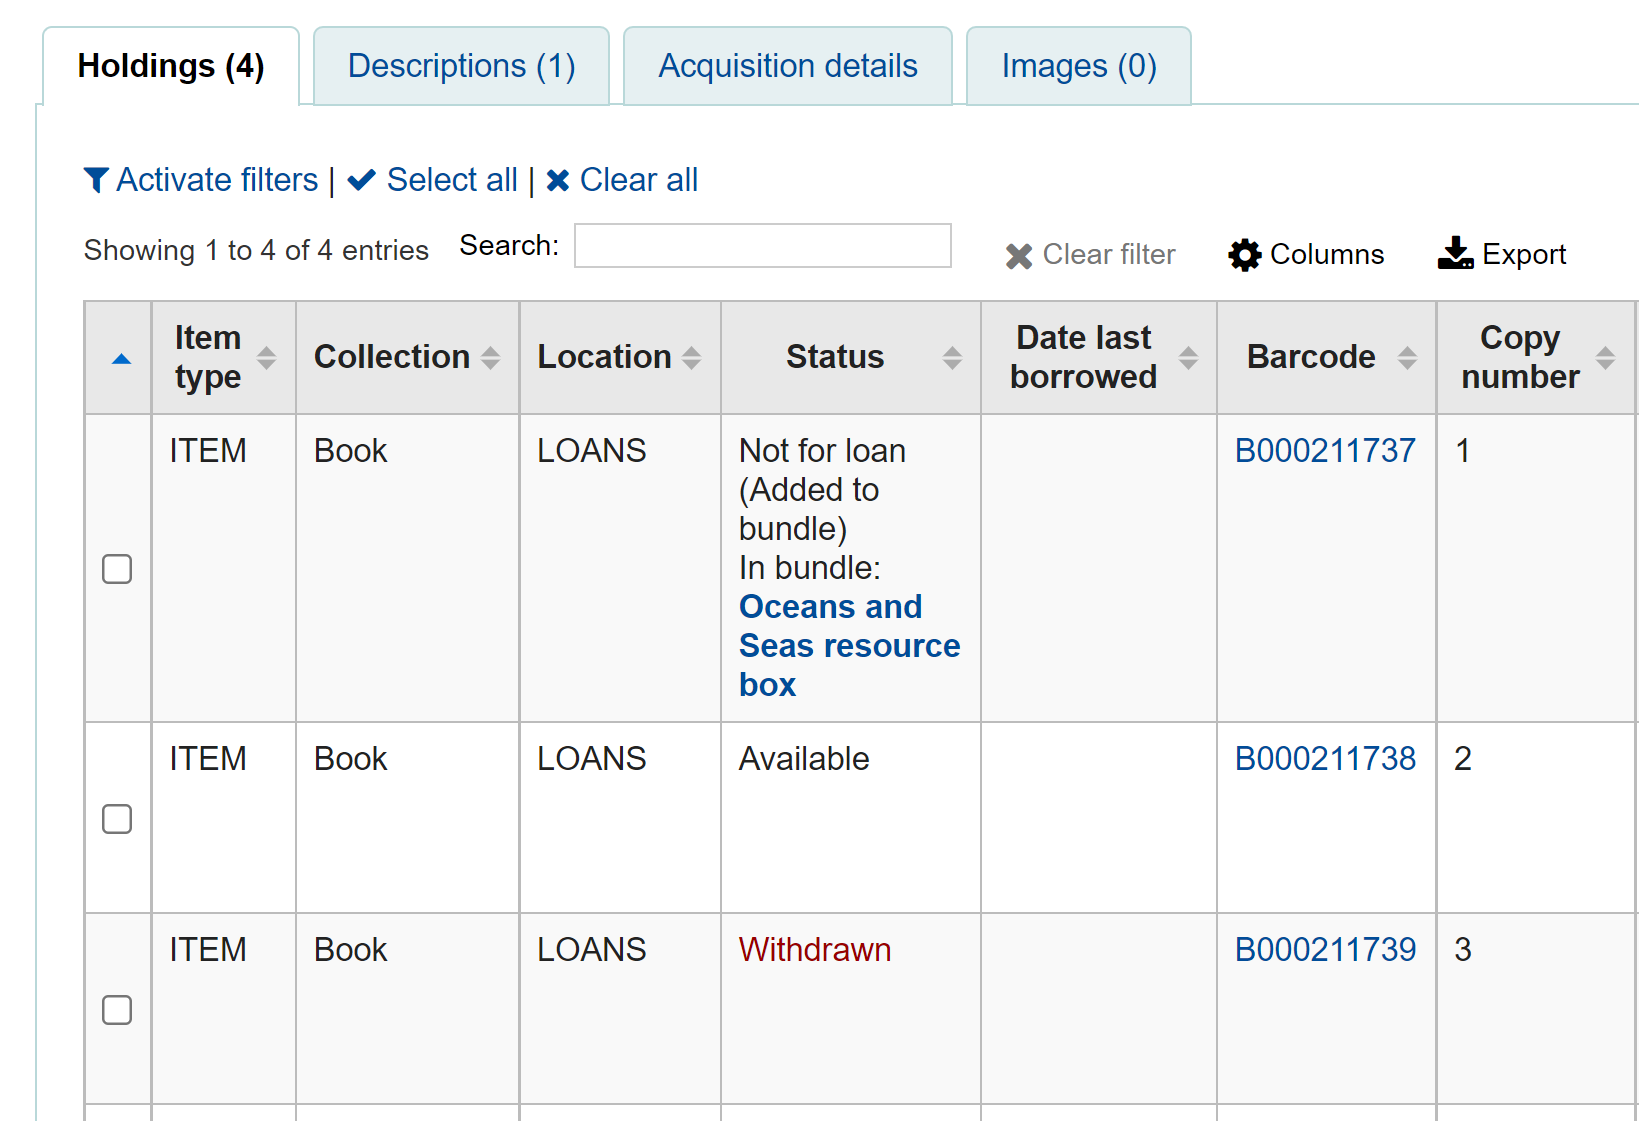
Items added to bundles are still attached to their permanent catalogue record, however, they cannot be checked out individually. When added to a bundle an item’s Not for Loan status is updated and can be viewed in the holdings table of the permanent record along with a link to the bundle. The Not for Loan status can be defined in the BundleNotLoanValue system preference.
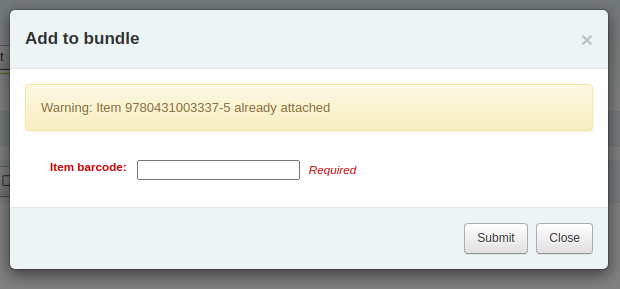
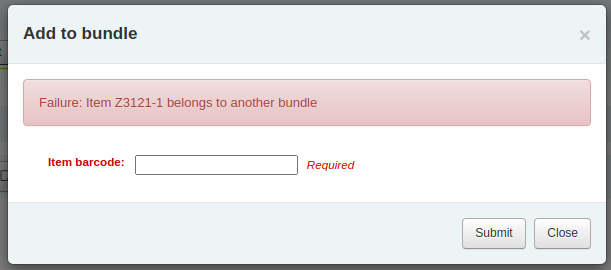
If an item is already found to be attached to the bundle, a warning message will be displayed.
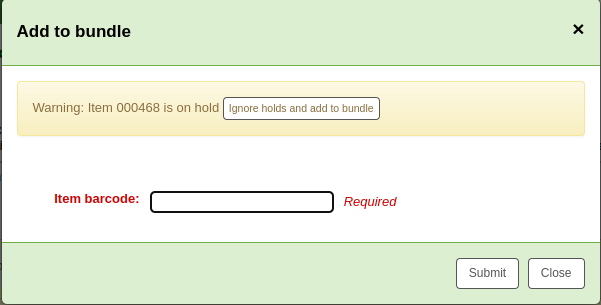
If an item has an item-level hold, a warning message will be displayed. To add the item to the bundle anyway, click ‘Ignore holds and add to bundle’. To cancel, click ‘Close’.
If an item cannot be added to the bundle for any other reason a failure message will display.
Removing items from bundles
To remove an individual item from a bundle you can click on the Remove button from the Actions column of the bundle contents list.
To remove multiple items from the bundle you have two options:
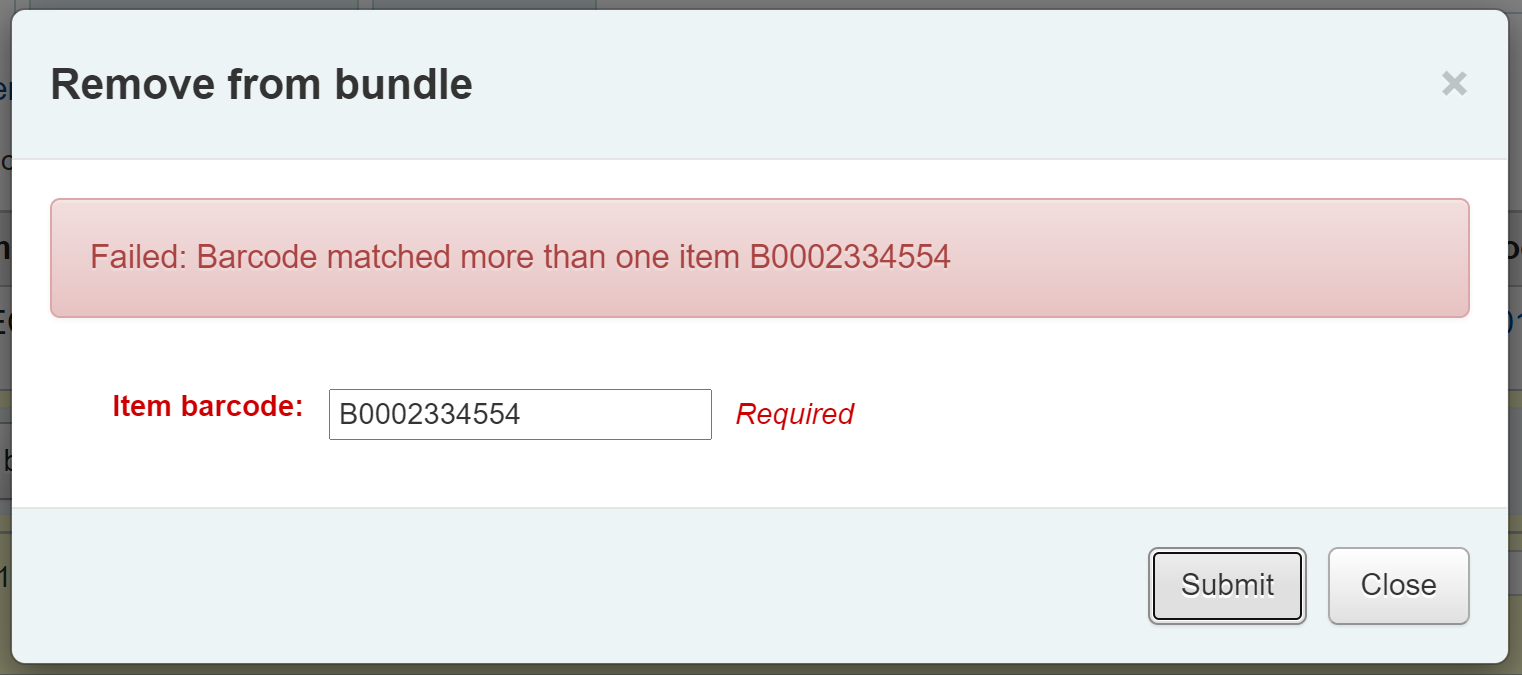
Use the ‘Remove from bundle’ button from within the Manage bundle display
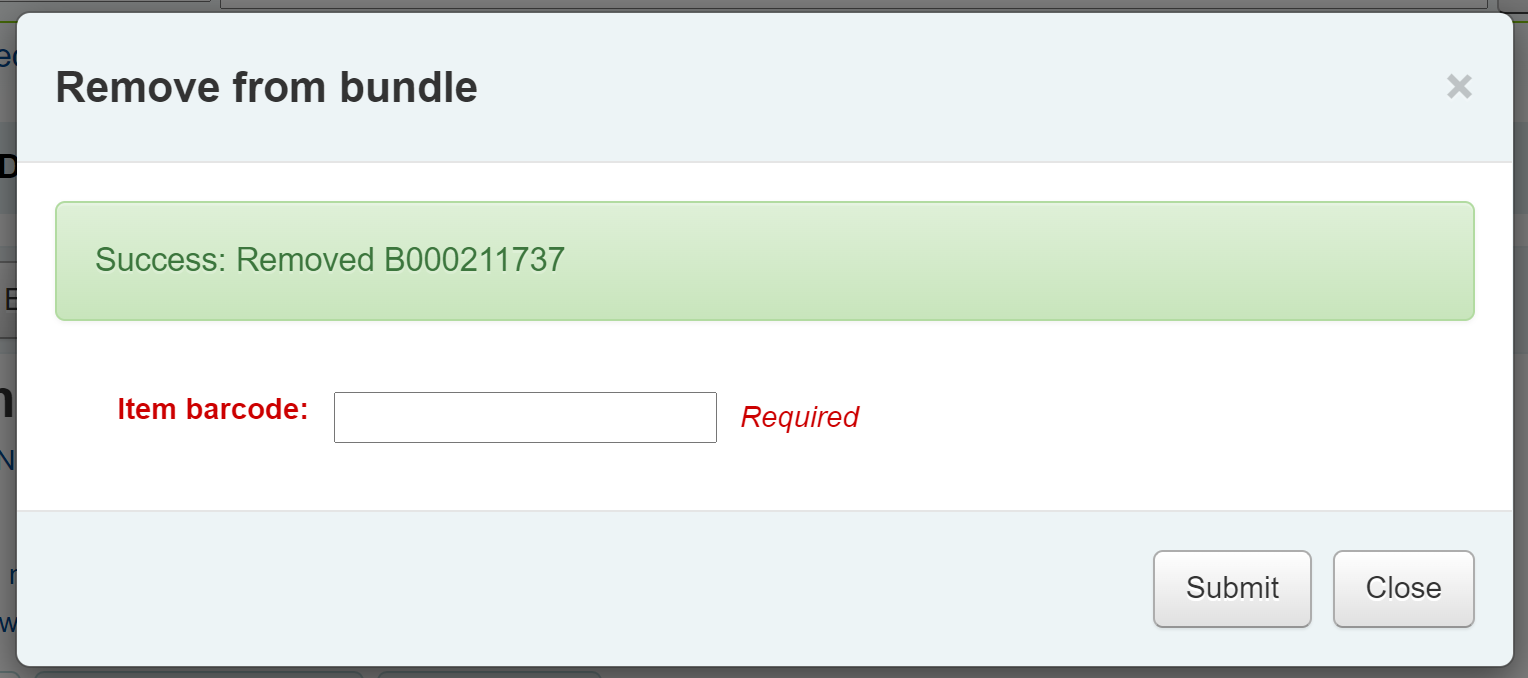
Scan in barcodes in the same way as you add items to bundles. You will see a confirmation dialogue to let you know the item has been removed.
If the item couldn’t be removed you will see a Failure message.
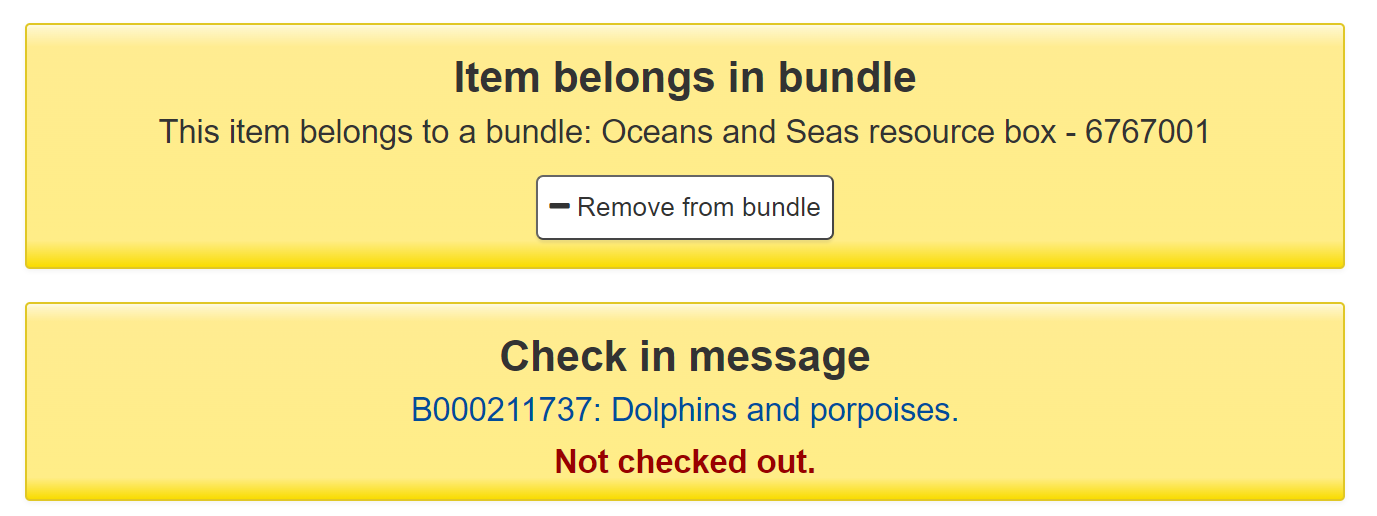
The second way to remove multiple items is to scan the barcode of the item into the checkin box and you will be given the option to remove the item from its bundle.
When you have finished working with a bundle you can close the contents list by clicking on the Manage bundle button again.
Circulating bundles
Checkout
You can checkout a bundle in the usual way from Circulation using the barcode of the bundle. If required you can create specific circulation rules for bundles based on their item type.
Remember, once an item is within a bundle it cannot be checked out individually. If you try to do this the following alert will be displayed.

You can see the checkout from the patron’s list of checkouts.
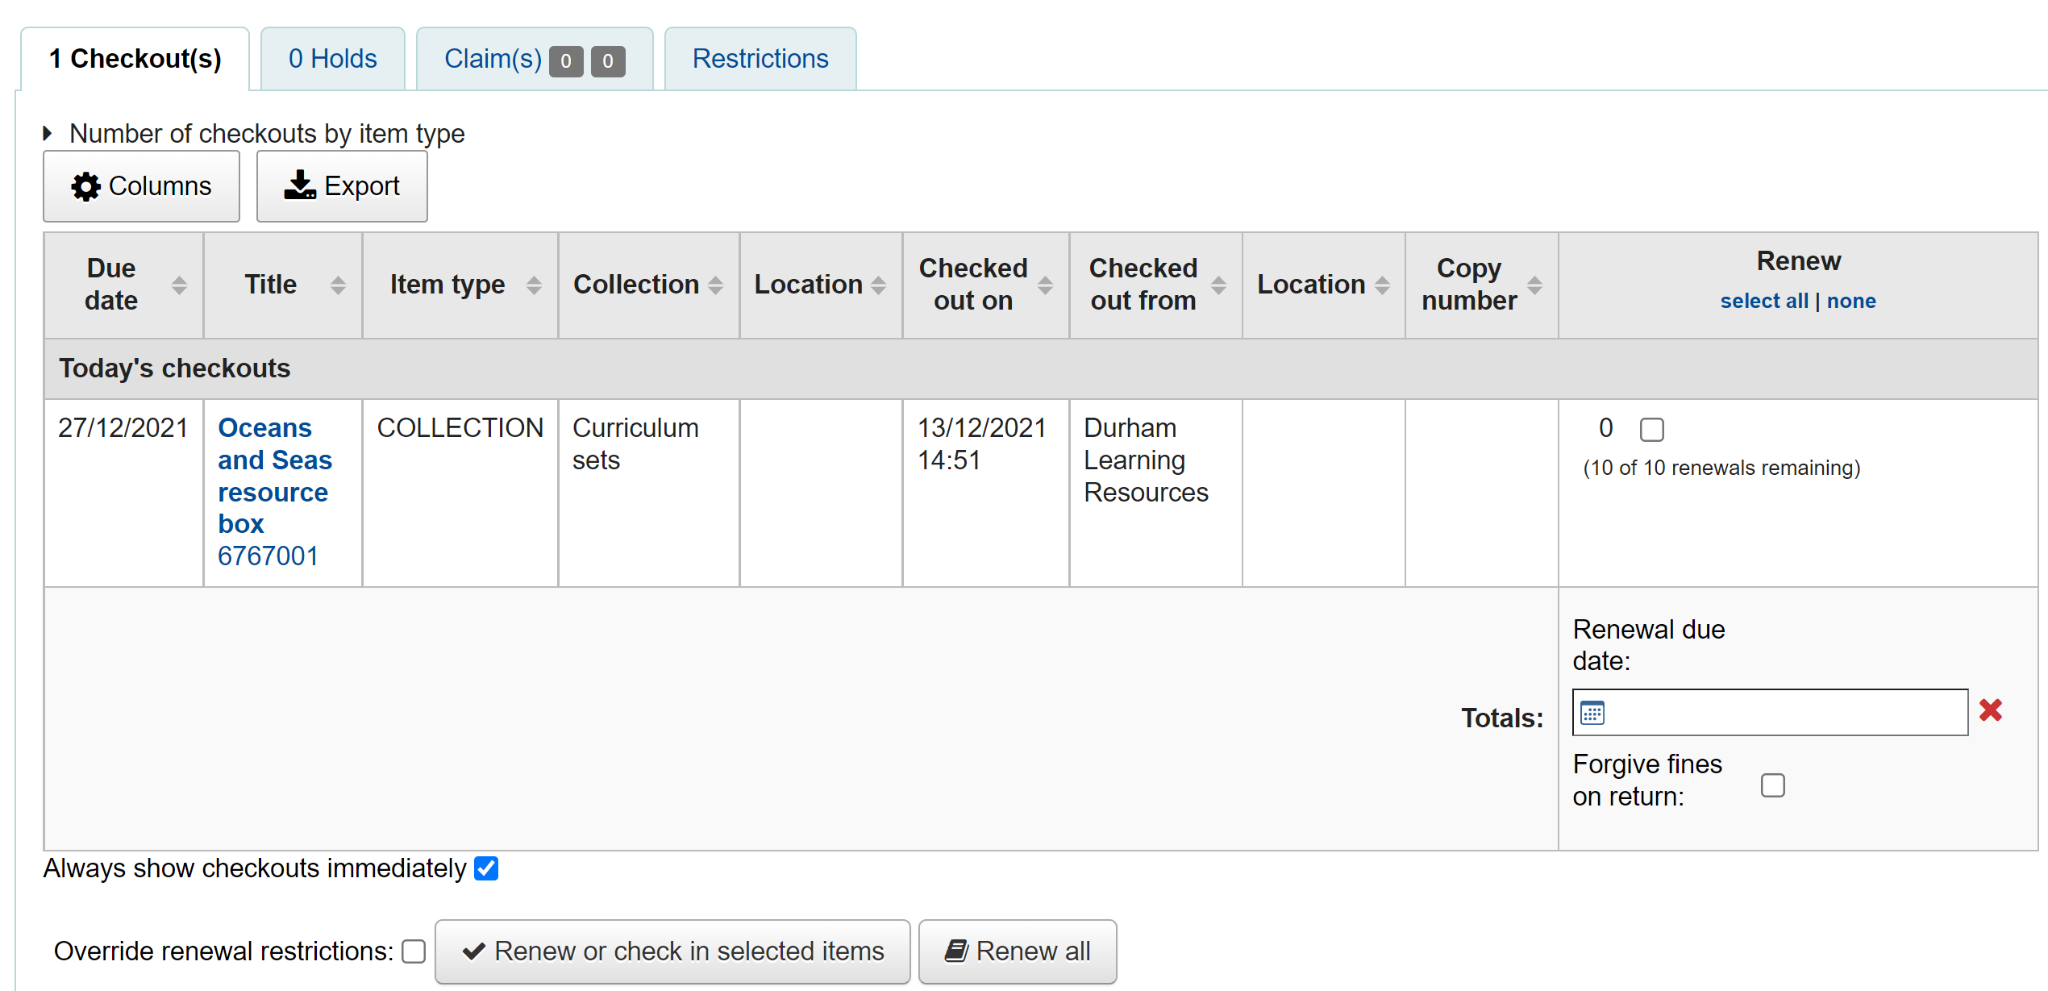
You can also see that the bundle is checked out from the status column of the Holdings table of the catalogue record.from the catalogue record display.

Checkin
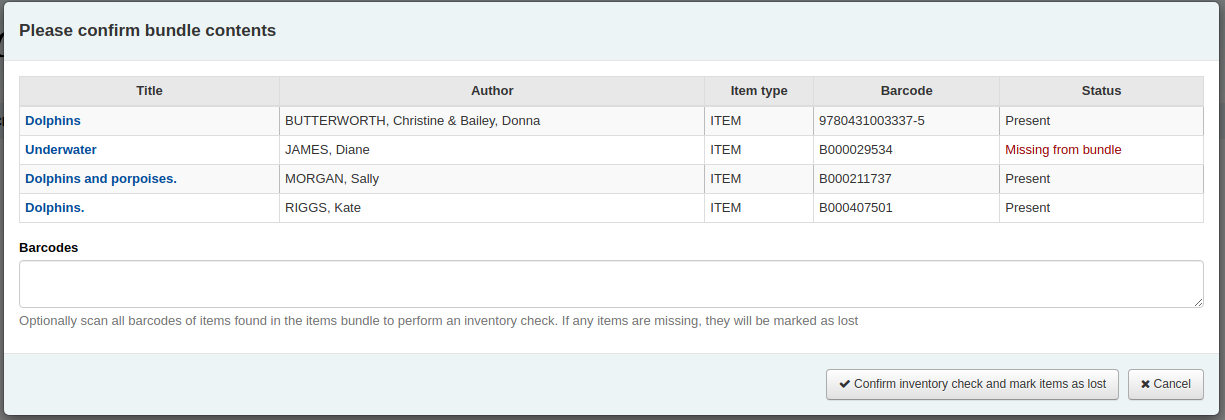
Check in bundles in the usual way from Circulation. You will then be prompted to verify the presence of each item that belongs in the bundle.
If you need to skip the verification process, click the ‘Confirm checkin without verifying bundle contents’ button. You will be able to verify the contents later.
A list of the items currently attached to the bundle, and expected to be returned, will display at the top of the dialogue. Beneath the list will be a ‘Barcodes’ box where you are expected to scan the barcodes of the returned items one by one.
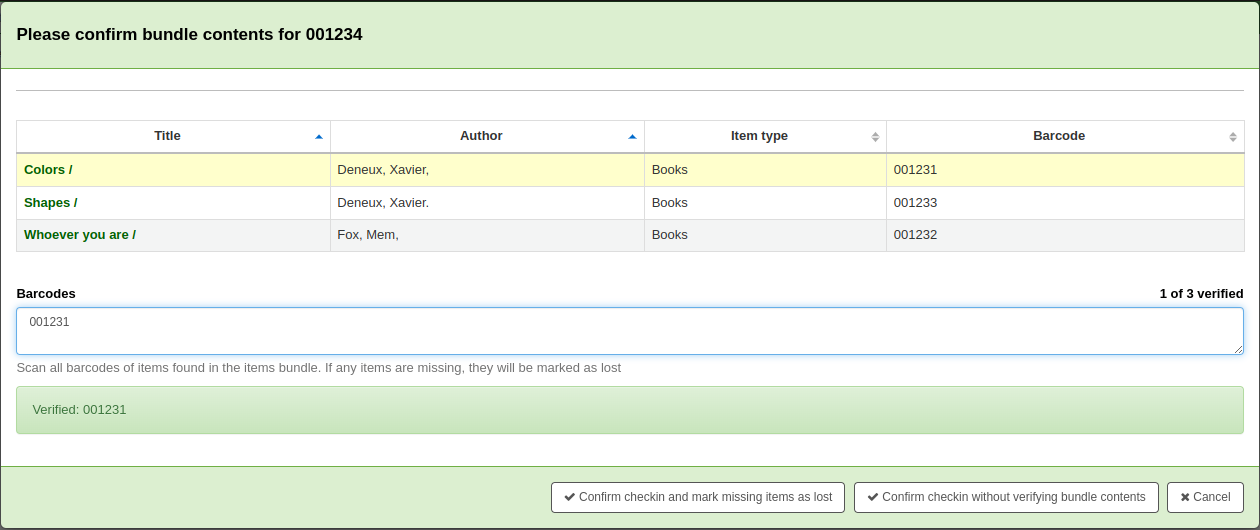
As you scan items, the matching row in the list will be highlighted to give some visual feedback. You also see a running total of items that have been checked in on the right hand side.
When you have finished scanning the returned items you can click on ‘Confirm checkin and mark missing items as lost’ or you can cancel the checkin.
If all the bundle items were marked as found you will be presented with a message to say the checkin is complete.

You can view and print a contents list.
Missing items
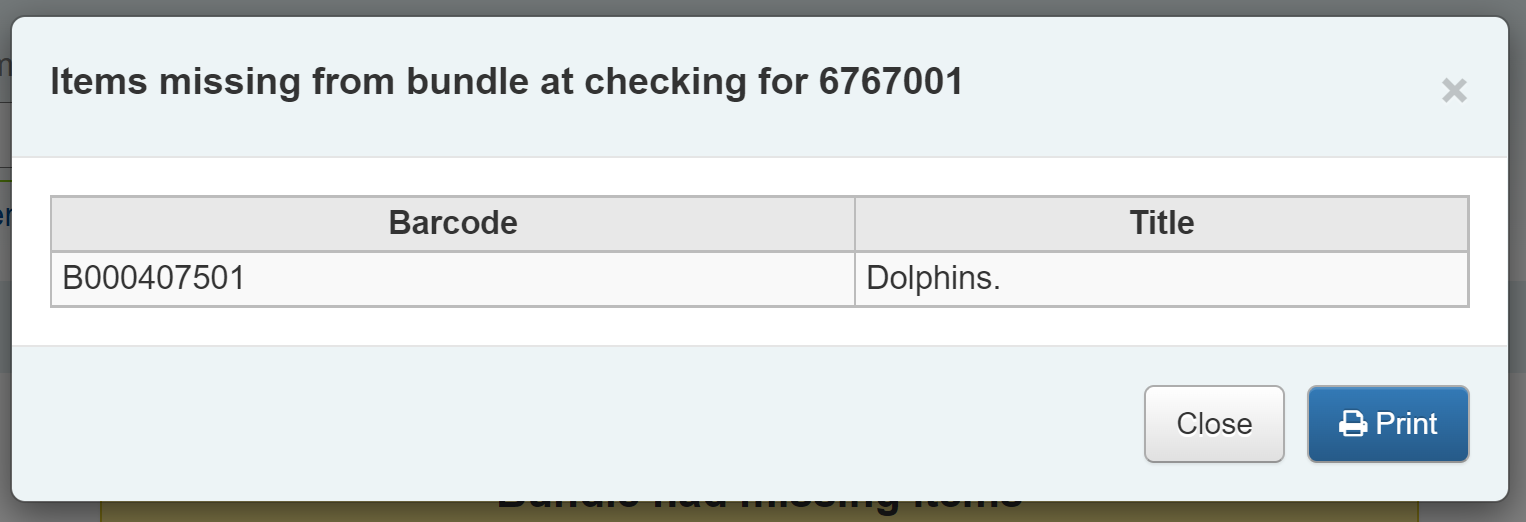
If some items were found to be missing during the verification stage the check in will proceed but you will be alerted to the fact that the bundle content has changed and you will be given the option to view and print an updated contents list.

You can also view a list of the missing items.
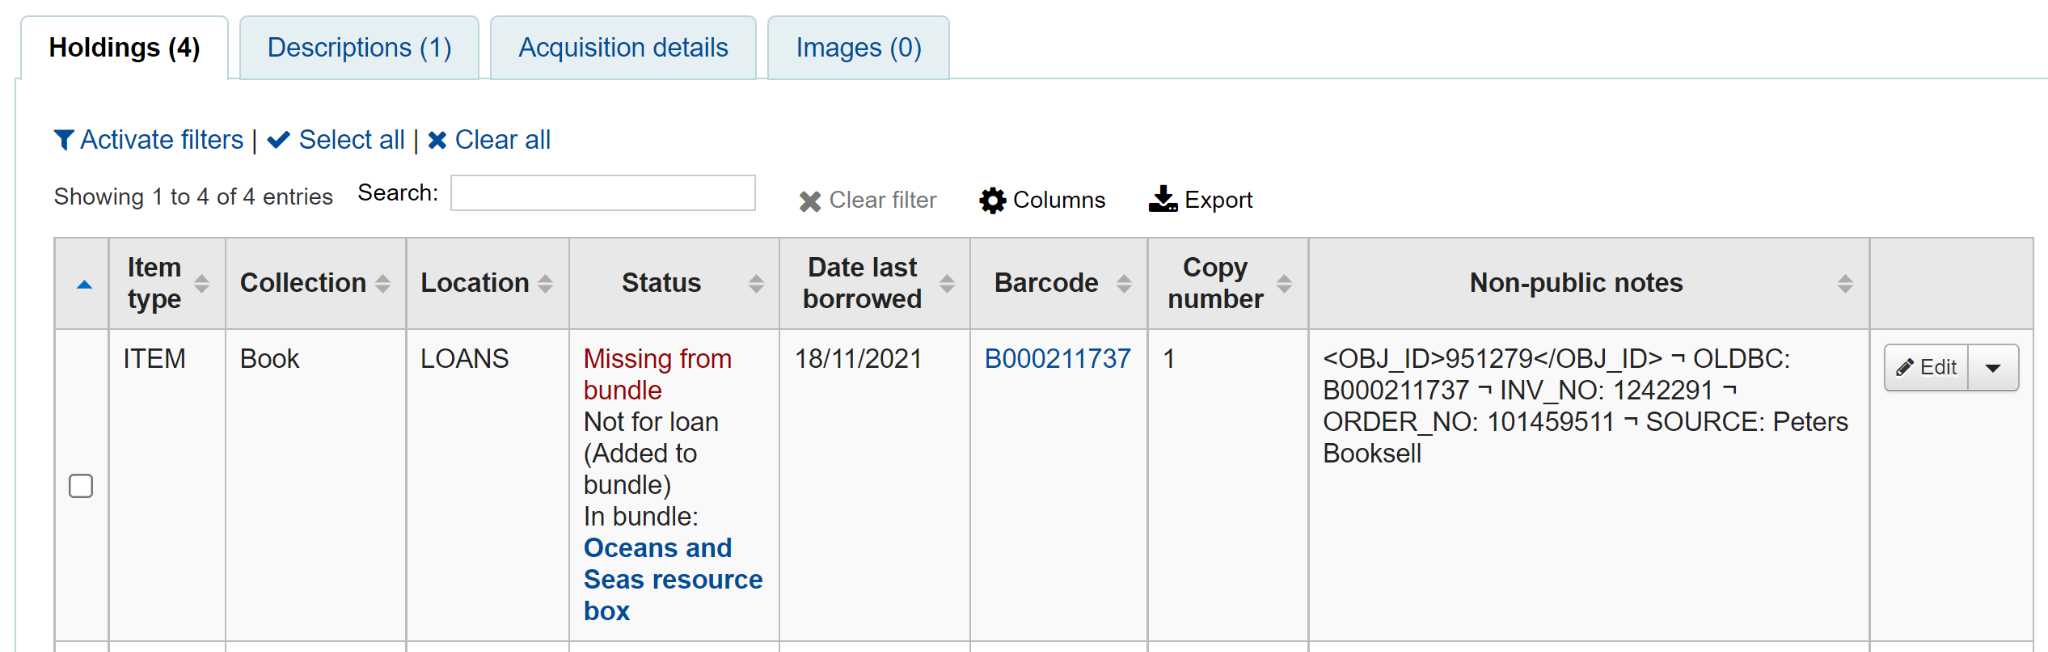
Any items that were missing during the verification stage will automatically be marked with an appropriate Lost status and a return claim added to track which checkout lost the contained item. You can add your own Lost statuses as authorized values and can control which lost status is used via the BundleLostValue system preference. For example a ‘Missing from bundle’ status as shown below.
In the Manage bundle contents view, the missing item displays with the date last seen.
Claims returned process
Within the patron record the missing items are listed as claims returned and can be viewed from the Claim(s) tab in the Checkouts table.
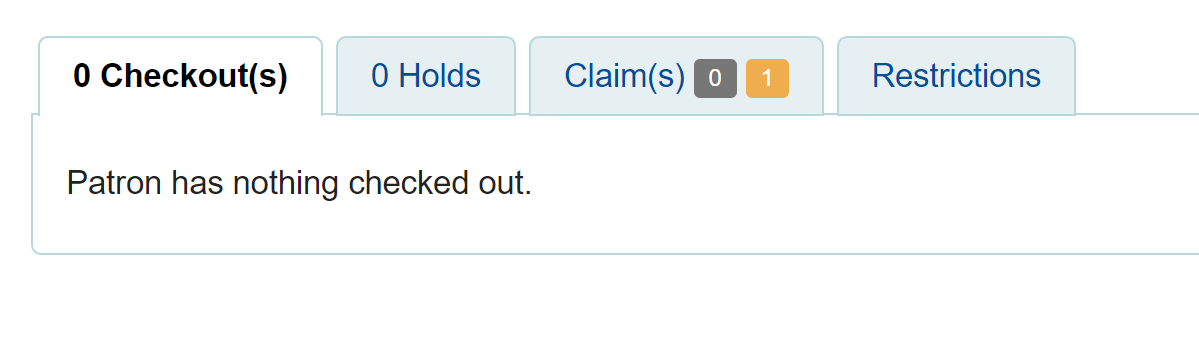
Click on the numbered square to view the missing items for the patron.
If an item is found it should be checked in. The checkin dialogue box will include a button to ‘Resolve’ the claim.

You are required to add a resolution reason and can optionally change the lost value of the item.
Inventory (checking bundle contents at any time)
A verification can be triggered at any time by checking the bundle in. If the system detects that the bundle was not checked out at this point, a modified confirmation dialogue is displayed which will include all items expected to be present in the bundle, even those currently marked as lost.
This allows for a quick view of what should be in the bundle and what’s currently marked as missing. You can optionally cancel the checkin or choose to rescan the items to perform the verification, marking items as found or subsequently missing. As this is a checkin that is not associated with a checkout, if new items are found to be missing, we will mark them as lost but cannot associate them with a checkout and returns claim.
Ayırmalar
Koha allows patrons to put things on hold. A ‘Hold’ is a way to reserve an item. Depending on your circulation and fines rules and hold system preference settings, patrons will be able to place items on hold for pickup at the library at a later date and time.
Placing holds in the staff interface
There are several ways to place holds from the staff interface. The most obvious is using the ‘Place hold’ button at the top of any bibliographic record.
You can also click the smaller ‘Place hold’ link found at the top of your catalog search results, or the ‘Holds’ link found below each result.

To place holds on multiple titles at the same time, check the boxes next to the titles in the search results, and click the ‘Place hold’ button at the top of the search results.
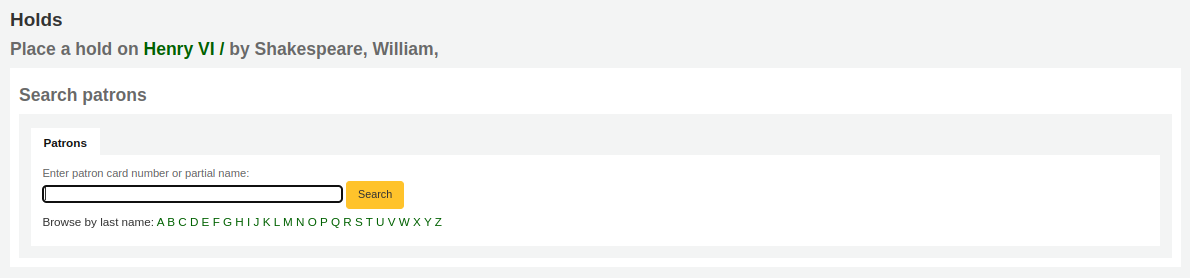
Ayırma işleminin başlaması için kullanıcıları barkodla ya da isimlerinin her hangi bir kısmıyla aramanız istenecektir.
If you’d like to search for the patron first and then the bibliographic record for the hold, you can open the patron record and click on the ‘Search to Hold’ button at the top of the patron record.

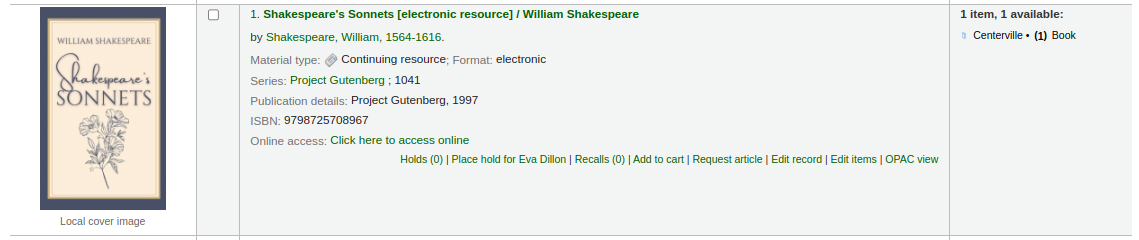
After clicking the button you will be brought to the catalog search page where you can find the title or titles you need to place a hold on. Under each title on the results you’ll see an option to ‘Place hold for (patron name).’
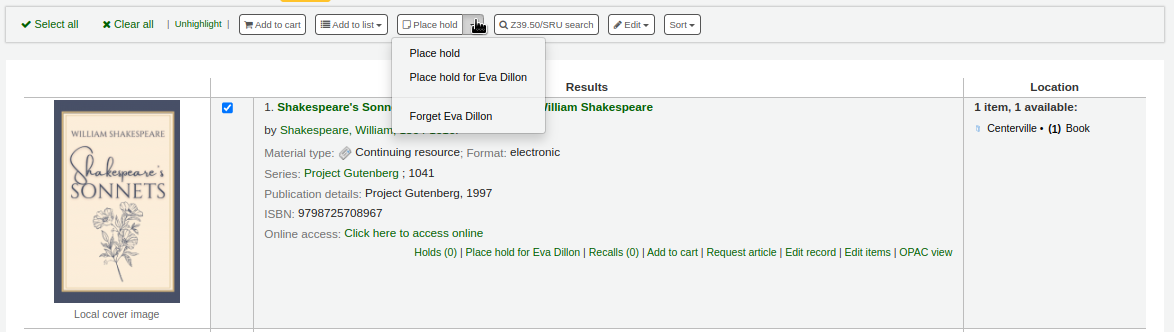
If you want to place a hold on multiple titles for this patron, check the boxes to the left of the titles, click the arrow to the right of the ‘Place Hold’ button and choose ‘Place hold for (patron name)’.
Not
Once the holds are placed, you can choose to have Koha ‘forget’ the patron’s name by clicking the arrow to the right of the ‘Place hold’ button on the search results and choosing the ‘Forget (patron name)’ option.
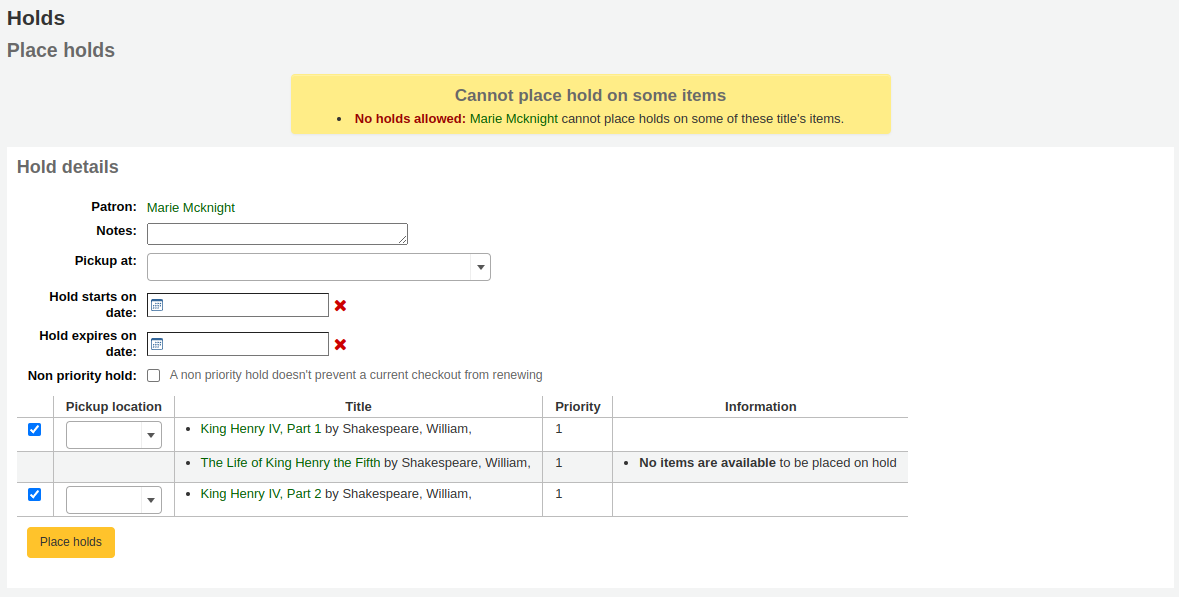
Bir seferde kaç tane materyal ayırtmayı seçtiğinize bağlı olarak, farklı bir ayırtma formu göreceksiniz. Bibliyografik bir kaydı ayırtıyorsanız, ayırtabileceğiniz tüm materyallerin bir listesini göreceksiniz.
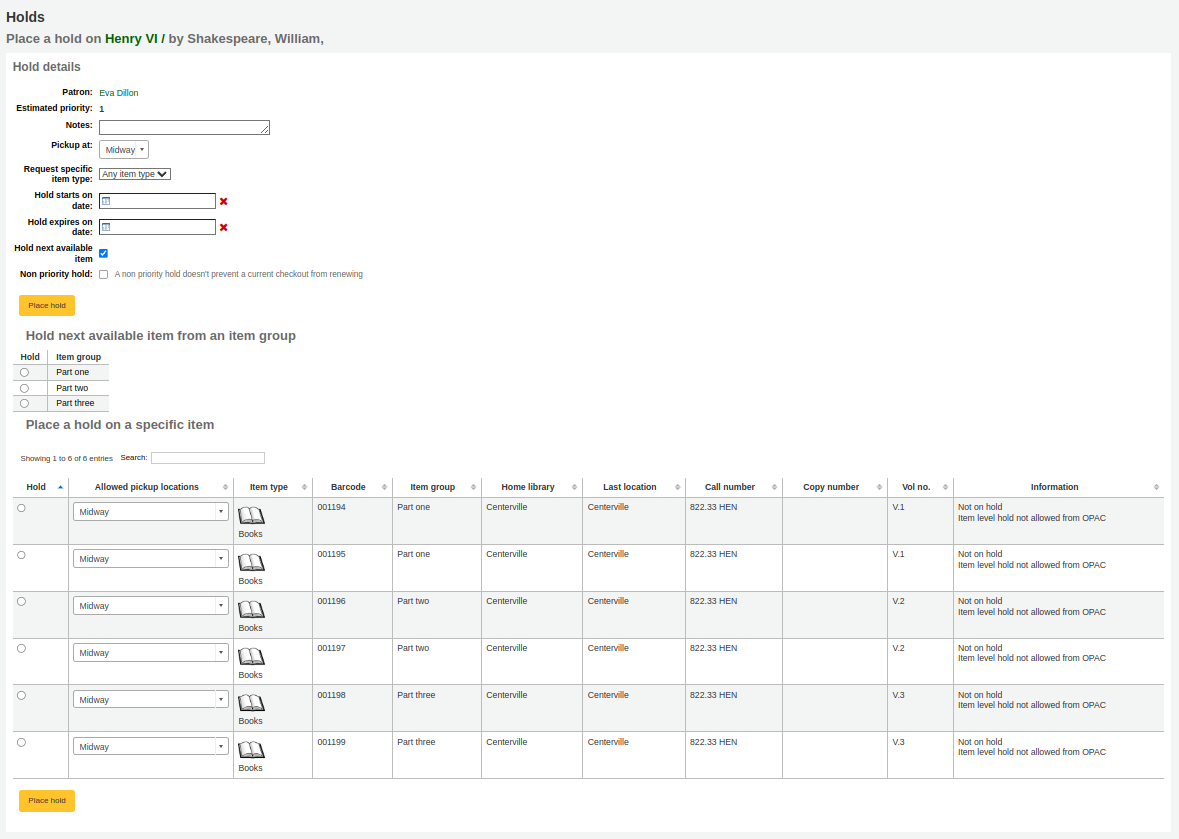
Patron: the patron’s name for whom this hold is
Estimated priority: this takes into account holds that are already placed on this title
Note: enter any notes that might apply to this hold
Pickup at: choose the library where the patron will pick up the item
Request specific item type: if the AllowHoldItemTypeSelection system preference is set to ‘Allow’ there will be an option to choose to limit the hold to a specific item type
Hold starts on date: if the AllowHoldDateInFuture system preference is set to ‘Allow’, and the patron wants the hold to start on a date other than today, enter the date here
Hold expires on: if the patron has specified that they don’t want the item after a certain date, or if you have limits on hold lengths, you can enter an expiration date for the hold in the ‘Hold expires on date’
Not
To cancel expired holds automatically you need to have the expired holds cron job set to run on a regular basis.
Hold next available item: check if the hold should be on the next available item, if not, choose an item group in the ‘Hold next available item from an item group’ section or a specific item in the ‘Place hold on a specific item’ section below
Holds to place (count): If ‘Hold next available item’ is checked and multiple holds per record are allowed, you can enter a number in the ‘Holds to place (count)’ text box to place that number of holds for the selected patron.
Not
The ‘Holds to place (count)’ text box will only appear if the Circulation and Fines rules are set to allow a ‘Holds per record’ limit that is greater than 1, but not Unlimited, for this combination of item type and patron category.
Non-priority hold: if you are placing a hold for internal purposes, such as checking for missing pages or needing to add a label, check the ‘Non-priority hold’ box. This type of hold will not prevent the patron who currently has the item to renew their checkout.
Hold next available item from an item group: if the EnableItemGroupHolds system preference is set to ‘Enable’ and the record has item groups, you can choose to place a hold on the next available item of a group, rather than the next available item on the whole record or a specific item.
Place hold on a specific item: if the hold should be on a specific item rather than the next available item of the record or the group, select the item that should be placed on hold
Not
The default pickup library for item-level holds is determined by the DefaultHoldPickupLocation system preference.
If you’re placing holds on multiple records you will be presented with the next available option for all titles. If no items are available for hold it will say so on the confirmation screen.
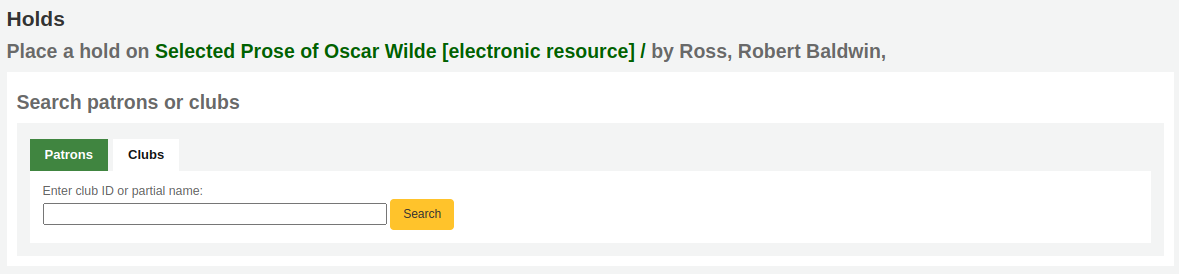
If your library uses the patron clubs feature, use the clubs tab to place a hold for a club.
To place a hold for a club, click the clubs tab, search for and select the club name, and click the ‘Place hold’ button.
Managing holds
Holds can be altered and cancelled from the holds tab found on the left of the bibliographic record.
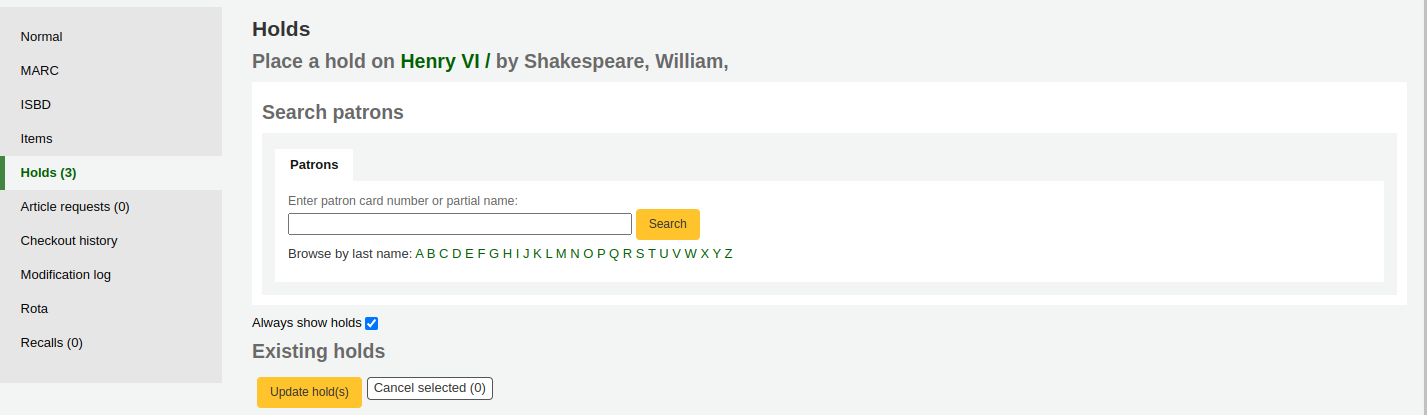
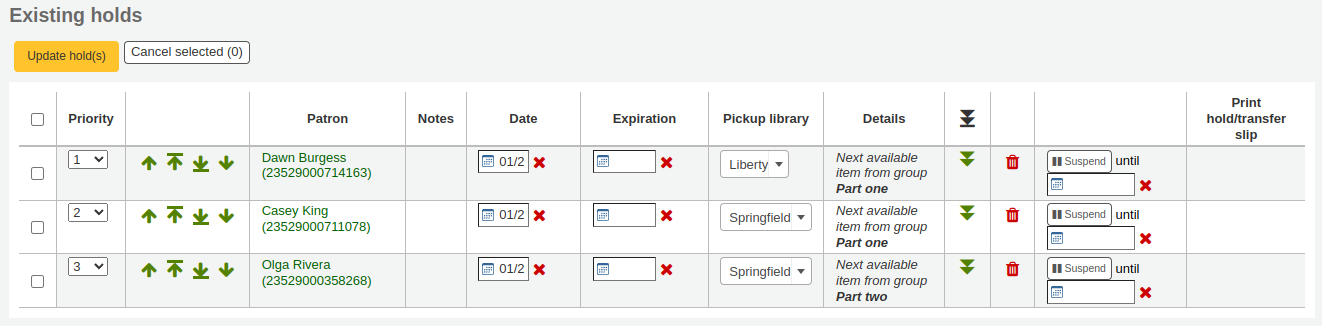
From the list of holds you can change the order of the holds, the pickup location, suspend, or cancel the hold.
Not
If the HoldsSplitQueue system preference is set, you will see the holds list split across different tables by either pickup library, item type or both.
Not
If the AllowHoldDateInFuture system preference is set to “Don’t allow”, you will not have the option to edit the date the hold was placed (the column labelled Date).
Not
Depending on how the HidePatronName system preference is set, the list may show card numbers instead of names in the patron column like in the image above.
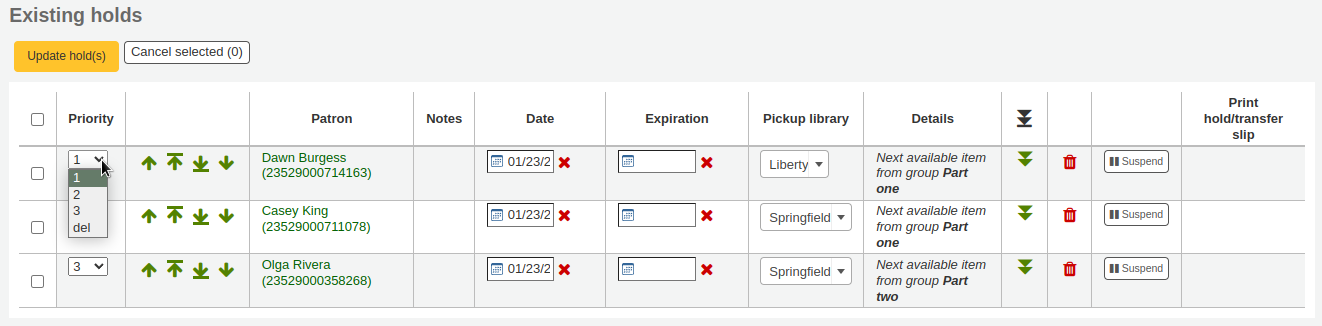
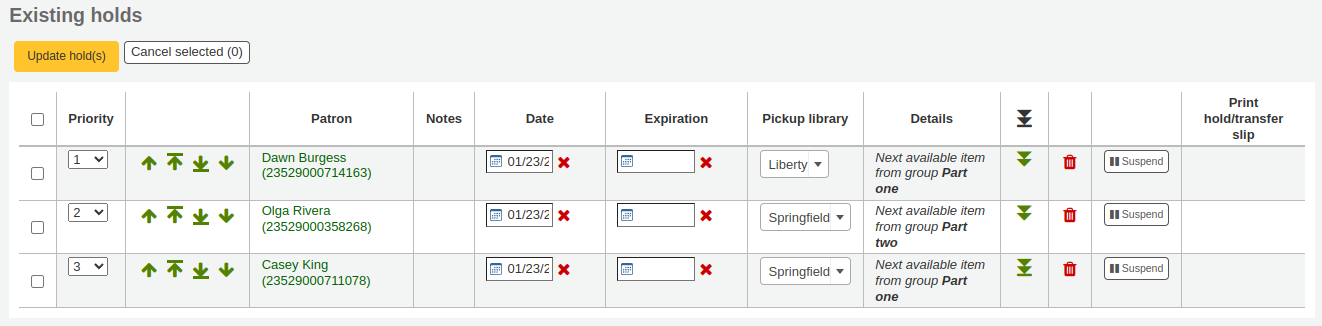
Changing the order of the holds
To rearrange holds, make a selection from the ‘Priority’ drop-down or click the arrows to the right of the priority pull down.
Uyarı
Clicking the double down arrow to the right of the hold will stick the hold at the bottom of the list even if more requests are made.
For example, if your library has home-bound patrons that are allowed to keep items out for months at a time, it would not be fair to other patrons if a home-bound patron were able to check out a brand new book and keep it for months. For this reason, the home-bound patron’s hold request would stay at the bottom of the queue until everyone else who wanted to read that book has already done so.
In the list of existing holds, lowest priority holds are indicated by the double down arrow with a line underneath.
Clicking the double arrow again will put the hold back in regular priority, in last place.
Suspending holds
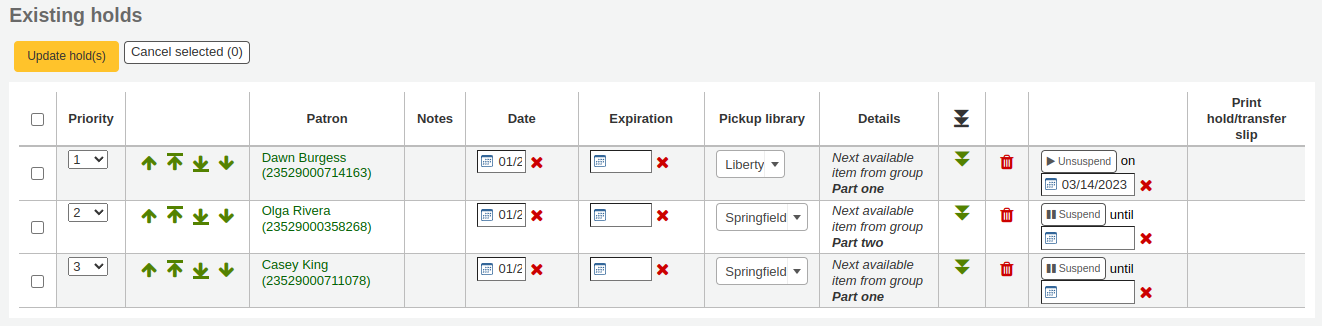
If a patron asks to have their hold suspended and the SuspendHoldsIntranet system preference is set to ‘Allow’, you can do so by clicking the ‘Suspend’ button at the far right.
If the patron gives you a date for the holds to resume, you can enter that in the date box and click the ‘Update hold(s)’ button to save your changes.
Not
If the AutoResumeSuspendedHolds system preference is set to “Don’t allow” there will not be the option to put an end date on the hold suspension.
Not
The auto_unsuspend_holds.pl cron job is required to automatically resume suspended holds.
You can also unsuspend holds manually by clicking the ‘Unsusped’ button.
If the SuspendHoldsOpac system preference is set to ‘Allow’, patrons will be able to suspend and unsuspend their own holds from their online account.
Deleting holds
To delete or cancel a hold, click the red trash can to the right of the hold line.
To delete/cancel a bunch of holds you can choose ‘del’ from the drop-down menu on the left of each line and then click ‘Update hold(s)’ at the bottom of the list.
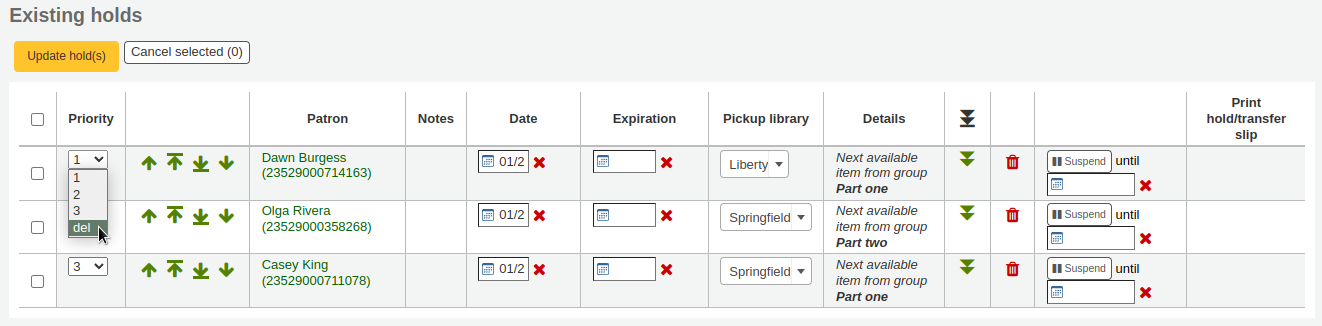
Alternatively, you can select the holds to be cancelled and click the ‘Cancel selected’ button.
Receiving holds
When items that are on hold are checked in or out the system will remind the circulation staff that the item is on hold and offer them options for managing the hold.
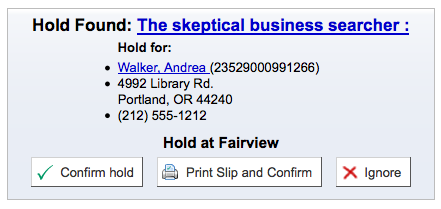
Ayırma yapılmış bir materyali iade aldığınızda sistem sizden ya onay verip materyali aktarmanızı isteyecek
ya da sadece ayırmaya onay vermenizi isteyecektir
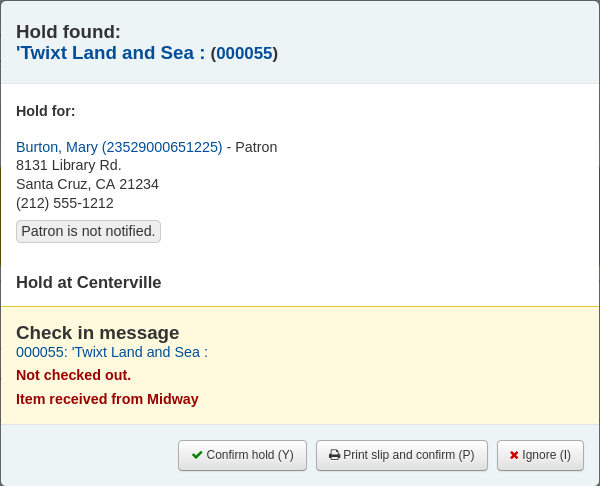
If the item needs to be transferred, clicking ‘Confirm and transfer’ or ‘Print slip, transfer, and confirm’ will mark the item as in transit to the proper library.
If the item is already at the pickup library, clicking the ‘Confirm’ or the ‘Print slip and confirm’ button will mark the item as ready for pickup by the patron.
Clicking ‘Ignore’ will retain the hold, but allow the item to be checked out to another patron or change the status of the item (if it was returned damaged, for example).
The ‘Print slip and confirm’ or ‘Print slip, transfer, and confirm’ options will open a printable page that you can attach to the item with the necessary hold or transfer information.
Not
The slip that is printed is the HOLD_SLIP notice. It can be modified with the Notices and slips tool.
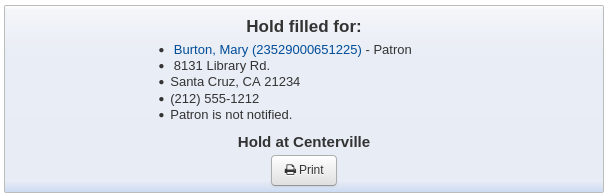
When the hold is confirmed, if the patron is notified, the ‘hold filled’ notice will be sent to them.
Not
The notice that is sent is the HOLD notice. It can be modified with the Notices and slips tool.
Not
If the HoldsAutoFill system preference is enabled, the circulation staff will not have to confirm the hold, but they will have the option to print the hold or transfer slip.
If the HoldsAutoFillPrintSlip system preference is enabled, the print window to print the hold or transfer slip will open automatically.
Once confirmed, the hold will show as ‘waiting’ on the patron record and on the checkout screen under the ‘Holds’ tab.
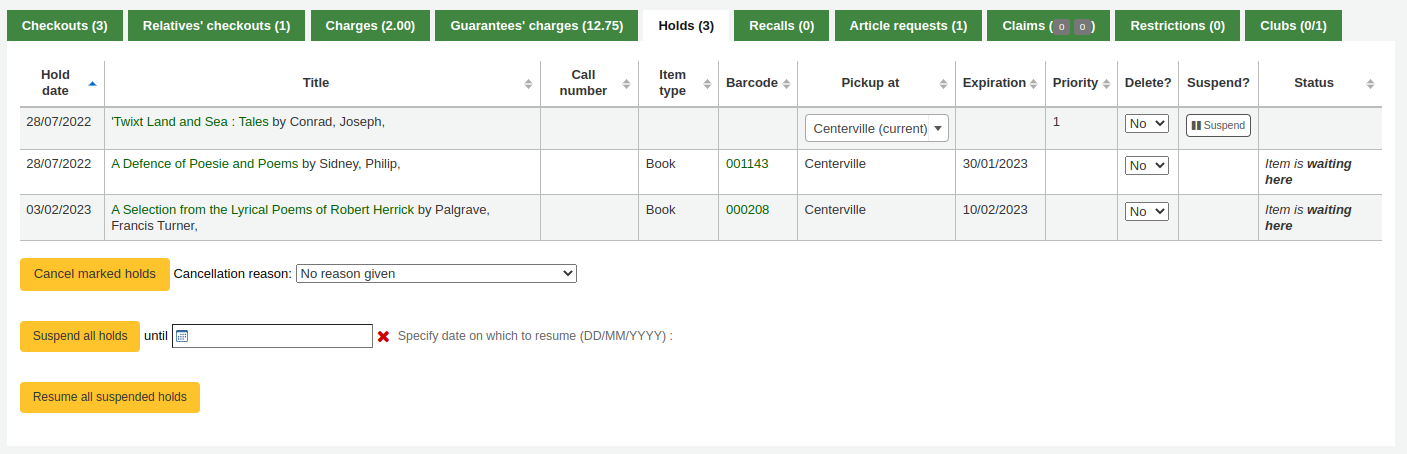
Materyal kaydı aynı zamanda materyalin ayrıldığını da gösterecektir.

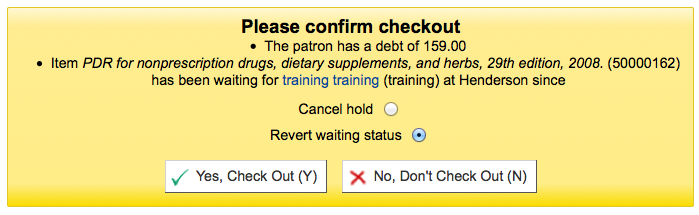
In some cases, a patron may come in to pick up a hold on behalf of someone else. In this case, make sure that the hold is cancelled when you check the item out to someone else. Alternatively, a check out might be attempted in error for an item that is already waiting for someone else. In this case you will be presented with a warning message.
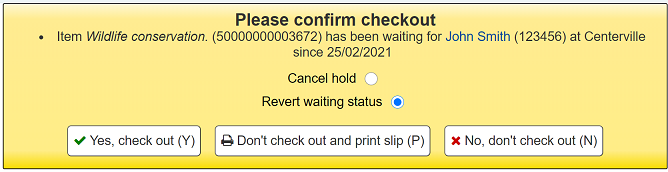
Cancel hold: in combination with ‘Yes, check out’, this option will cancel the current hold and check the item out to the new patron.
Revert waiting status: in combination with ‘Yes, check out’, this option will revert the waiting status of the hold (the patron who placed the hold will be back in first position in the queue) and check the item out to the new patron.
Yes, check out: this option will check the item out to the current patron.
Don’t check out and print slip: this option will open the print window to print the hold slip, the check out will be cancelled and the hold will remain.
No, don’t check out: this option will cancel the check out, the hold will remain.
If you try to check in an item that is already waiting to be picked up, a pop up indicating that a hold was found and the item is already waiting will appear.
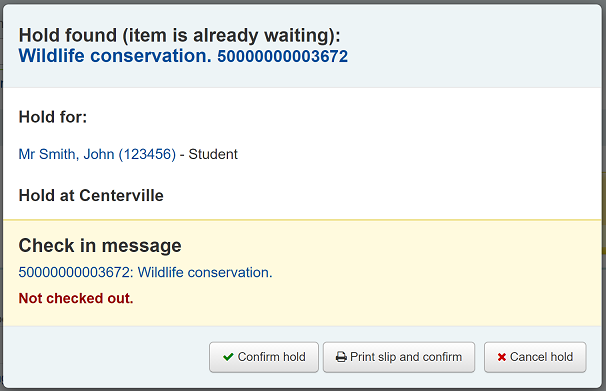
Confirm hold: this option will keep the existing hold.
Print slip and confirm: this option will open the print window to print the hold slip and keep the existing hold.
Cancel hold: this option will remove the hold.
If you cancel the hold and further holds exist for the item you will be presented with a new option to confirm the hold for the next patron.
Curbside pickups
Koha has an integrated curbside pickup module that can be used to schedule hold pickups by patrons.
Get there: Circulation > Curbside pickups
See the curbside pickup configuration section to learn how to set up curbside pickup.
Not
Staff needs the manage_curbside_pickups permission (under circulate) in order to schedule and manage pickups.
Scheduling a pickup
Get there: Circulation > Curbside pickups > Schedule pickup
To schedule a pickup,
Click the ‘Schedule pickup’ tab
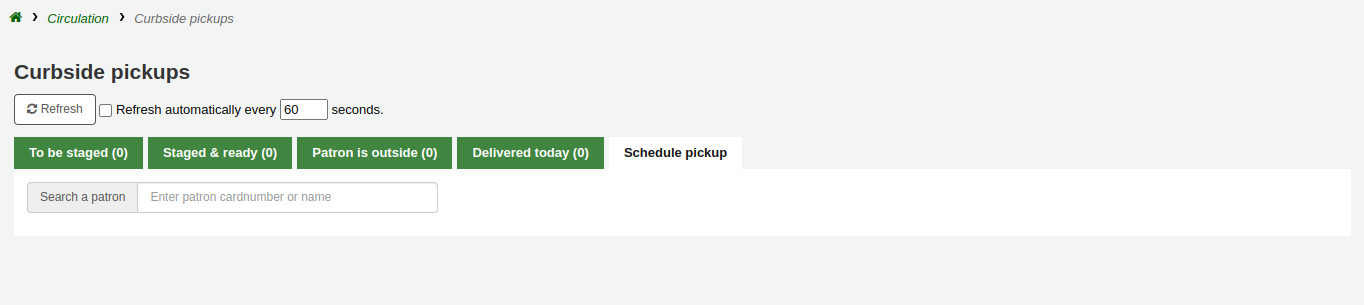
Search for the patron for whom to schedule a pickup, with either their name or their card number
Uyarı
If ‘Enable for waiting holds only’ is set in the curbside pickup configuration for your library, and the patron has no waiting holds, there will be an error message.
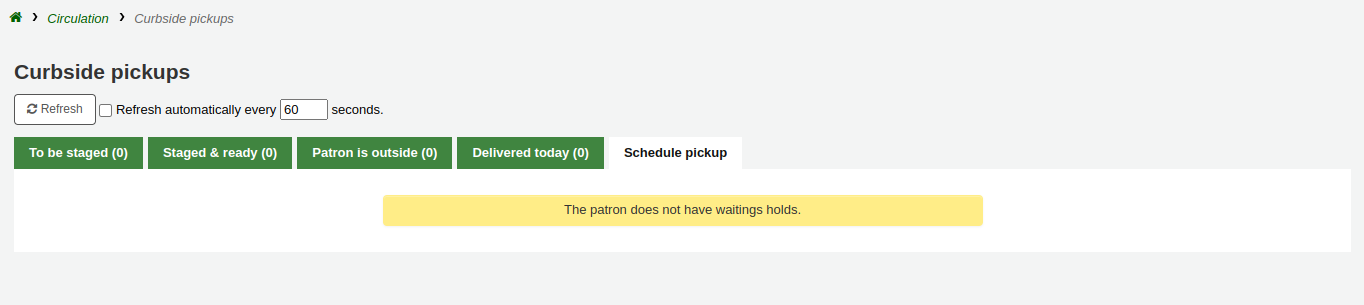
Enter a date for the pickup
Not
Only dates with available time slots will be displayed.
The possible pickup times will be displayed, depending on the day of the week
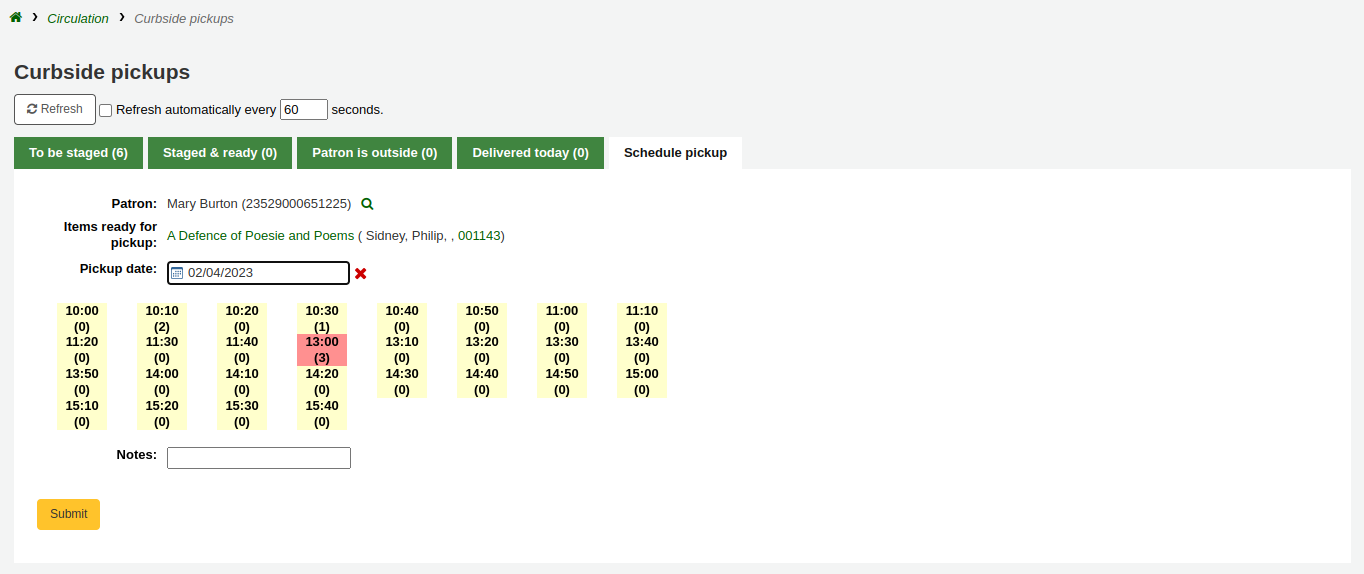
Not
The number in parentheses under each time slot is the number of patrons who are currently scheduled for a pickup at that time. If the maximum number of appointments has been reached, based on the ‘Maximum patrons per interval’ setting in the curbside pickup configuration, the time slot will be displayed in red and you will not be able to select it.
If needed, you can add a note concerning this pickup
‘Onayla’ya’ tıkla
Alternatively, you can schedule a pickup from the patron’s account.
Click ‘Schedule pickup’ at the top of the patron’s detail page
Not
If the patron has chosen to receive the ‘Hold filled’ notice by email, they will also get a notification when a curbside pickup is scheduled.
You can customize the notice by editing the NEW_CURBSIDE_PICKUP template in the Notices and slips tool.
Preparing for curbside pickups
Get there: Circulation > Curbside pickups > To be staged
The ‘To be staged’ tab contains all the curbside pickups still waiting to be prepared.
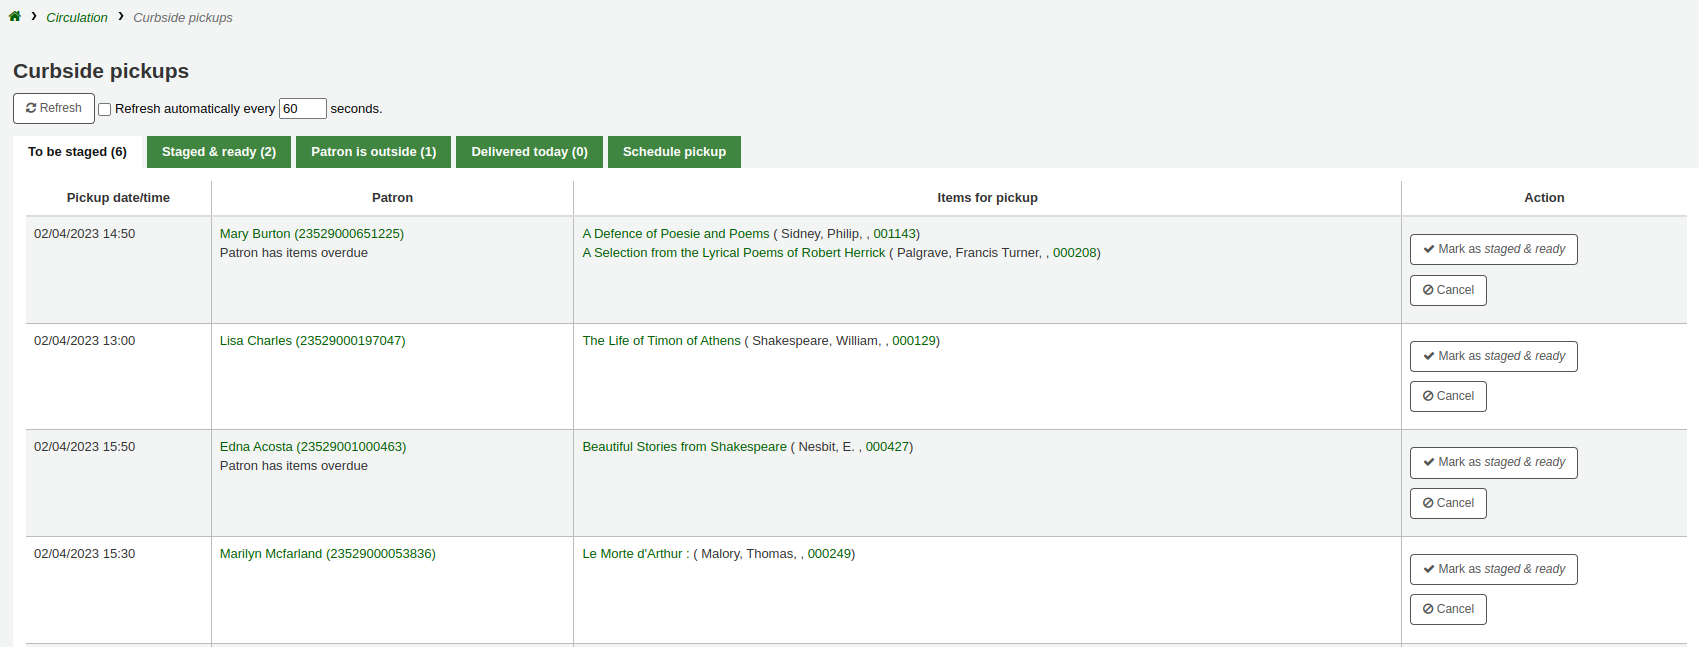
Not
If the patron has overdues or restrictions, it will be shown here, under their name.
Once the items are prepared and ready to be picked up, click ‘Mark as staged & ready’. This will transfer the scheduled pickup appointment in the ‘Staged & ready’ tab.
Not
There is no need to checkout the item or items to the patron at this point. When delivering curbside pickups, the module will automatically check the items out.
You have the option to refresh the list manually by clicking the ‘Refresh’ button. You can also set up your session to refresh every X seconds. Check the box next to ‘Refresh automatically every X seconds’ and enter the number of seconds.
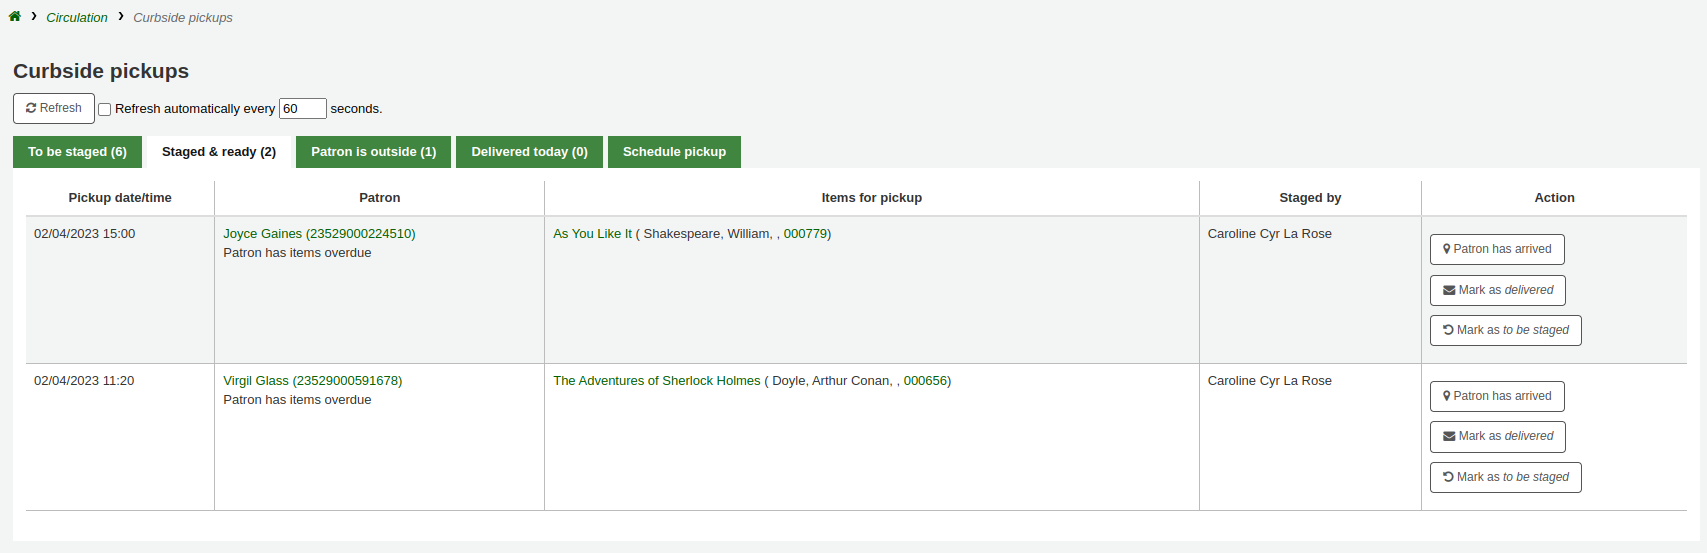
Delivering curbside pickups
Get there: Circulation > Curbside pickups > Patron is outside
From the OPAC, the patron can alert that they are outside. Staff can also indicate that the patron has arrived by clicking on the ‘Patron has arrived’ button from the ‘Staged & ready’ tab.
At the designated time, meet the patron to give them their items. Then, click ‘Mark as delivered’. This will check out the item or items to the patron and transfer the curbside pickup appointment to the ‘Delivered today’ tab.
Cancelling curbside pickups
Get there: Circulation > Curbside pickups > To be staged
If, for any reason, you need to cancel a curbside pickup appointment, click the ‘Cancel’ button from the ‘To be staged’ tab.
If the appointment has already progressed beyond the ‘To be staged’ status, click ‘Mark as To be staged’ to bring it back there in order to cancel it.
Recalls
The recalls feature allows users to recall items that are currently checked out. Once the recall is confirmed, the borrower who currently has the item checked out will be notified that their due date has been adjusted and they need to return their item. Once recalled items are returned, the recall requester will be notified that their item is awaiting pickup at their specified pickup location.
See the requesting recalls section to learn how to place a recall in the OPAC.
Setting up recalls in Koha
To use this feature:
Enable the UseRecalls system preference
Set the RecallsMaxPickUpDelay system preference
Optionally, enable the RecallsLog system preference
Modify the following sections in the relevant circulation rules
Recalls allowed (count)
Recalls per record (count)
On shelf recalls allowed
Recall due date interval (day)
Recall overdue fine amount
Recall pickup period
Make sure all the staff member who will be managing recalls have the superlibrarian or manage_recalls permission
Schedule the recalls cronjobs
Review the recalls notices and slips to make sure they have all the information needed
Managing recalls
The recalls feature is relatively automated. Staff do not have a lot of manipulations to do to manage recalls.
Recall statuses
The possible statuses for recalls are the following:
Requested
A new recall request has been made and the item must be returned by the patron who currently has it
Requested recalls appear in
the recalls queue
the recalls to pull list, if an available item can fulfill the recall
the ‘Recalls’ tab of the bibliographic record
the ‘Recalls’ tab of the patron’s file (and its equivalent in the OPAC)
the ‘Recalls history’ tab of a patron’s file (and its equivalent in the OPAC)
Waiting
A recalled item is awaiting pickup at the requester’s chosen branch
Waiting recalls appear in
In transit
An item has been assigned to a recall and is in transit to the requester’s chosen pickup branch
In transit recalls appear in
Overdue
A recalled item is overdue to be returned by the patron who currently has it
Overdue recalls appear in
Fulfilled
A recalled item has been checked out to the recall requester, and the recall is complete
Fulfilled recalls appear in
Expired
The recall was not completed before a defined expiration date or the recall requester failed to pick up their waiting recall within the pickup period defined in RecallsMaxPickUpDelay
Expired recalls appear in
Cancelled
The recall request was cancelled.
Cancelled recalls appear in
Receiving recalled items
Upon checkin in an item that has been recalled, a pop up will appear asking the staff member to confirm or ignore the recall.
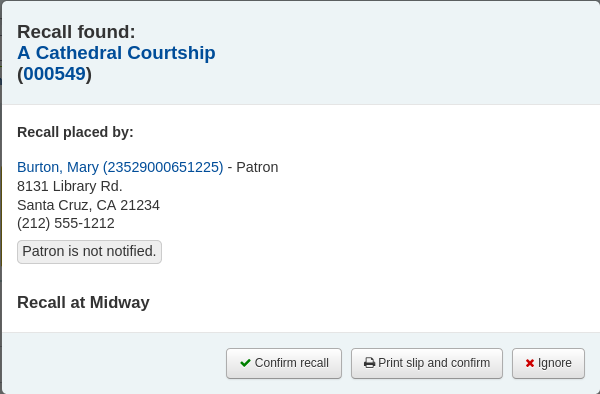
Confirm recall: this option will put the recall in ‘Waiting’ status and, if the patron has an email address in their file, will notify them that their recalled item is now ready for pickup.
Not
The notice sent is PICKUP_RECALLED_ITEM. You can modify it’s content in the notices and slips tool
Print slip and confirm: this option will print a slip you can attach to the item (similar to a hold slip) in addition to everything the ‘confirm recall’ does (change the status and send the notice).
Not
The slip is RECALL_REQUESTER_DET. You can modify it’s content in the notices and slips tool
Ignore: this option will check in the item, but the recall will not be set as awaiting pickup and the patron will not be notified.
If the patron asked to pick up their recalled item at a different library, a transfer will be triggered.
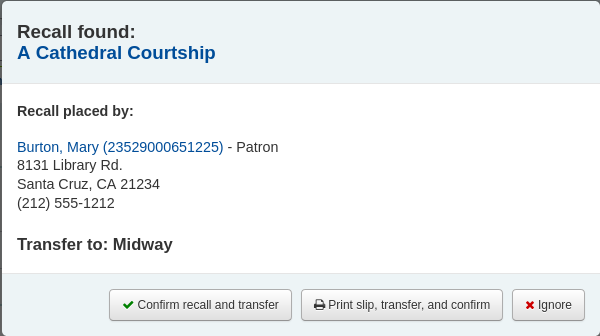
Confirm recall and transfer: this option will put the recall ‘In transit’.
Print slip, transfer, and confirm: this option will print a slip you can attach to the item (similar to a hold slip) in addition to setting the recall as ‘In transit’.
Ignore: this option will check in the item, but the recall will not be set as ‘In transit’
Not
The patron will not be notified that their recall is ready for them with any of the above options.
Cancelling recalls
Not
Only requested or overdue recalls can be cancelled.
It is not possible to cancel a recall that is currently awaiting pickup
Staff can cancel recalls from various screen in the staff interface.
Cancel from the recalls queue either individually by clicking the ‘Actions’ button and selecting the ‘Cancel’ option.
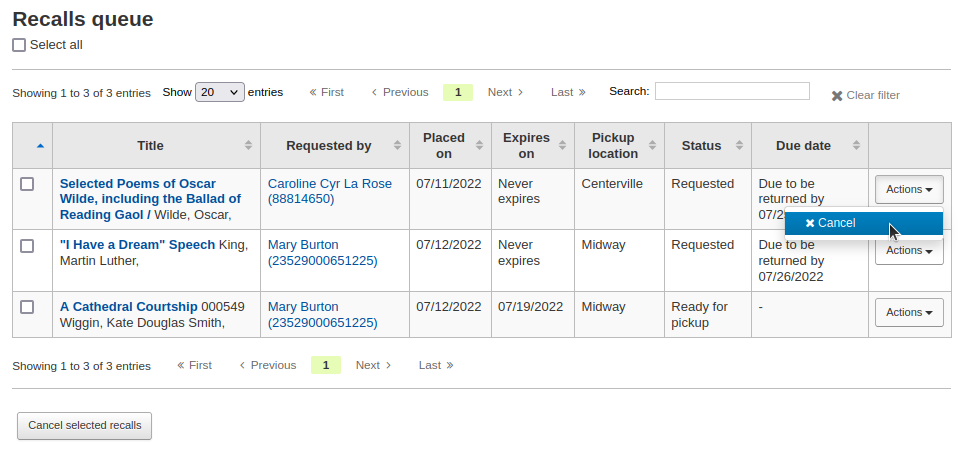
Or by selecting several recalls and clicking the ‘Cancel selected recalls’ button at the bottom of the screen.
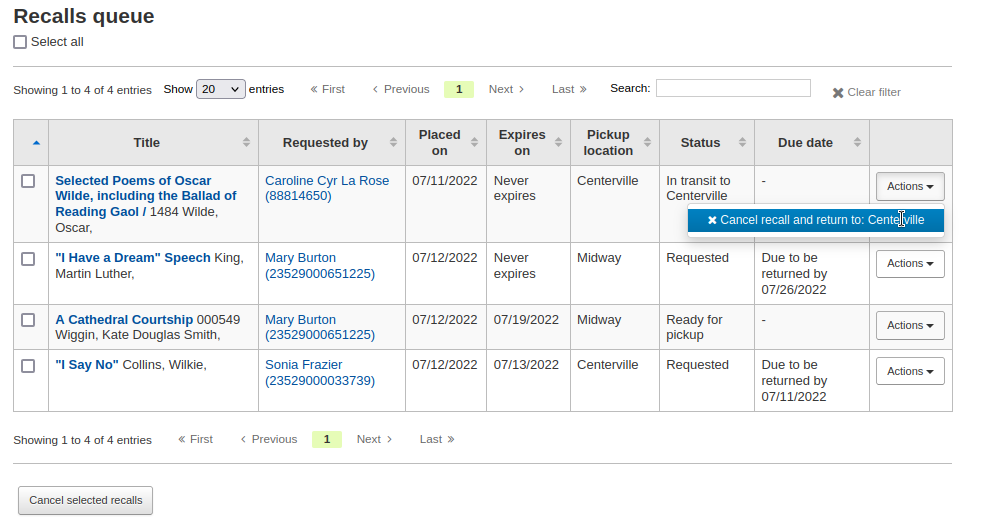
If the recalled item is currently in transit, the cancel option will also trigger a transfer back to the item’s home library.
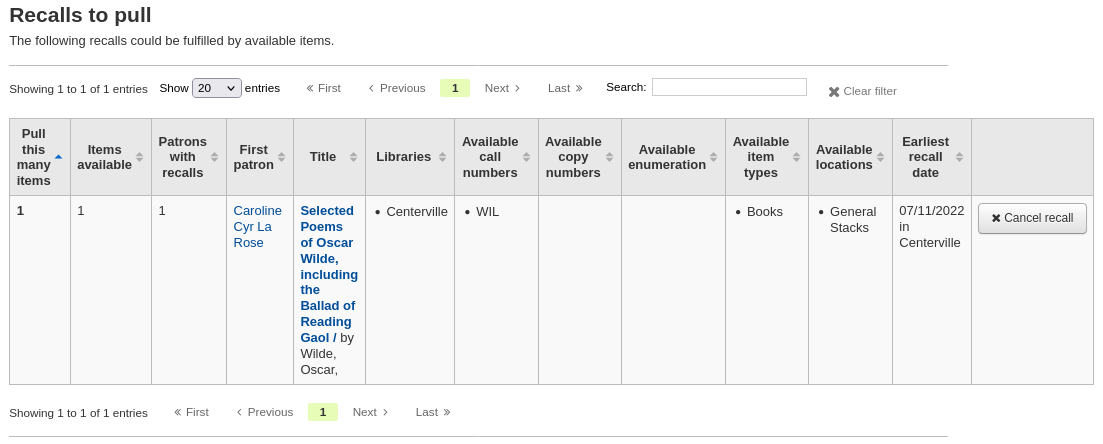
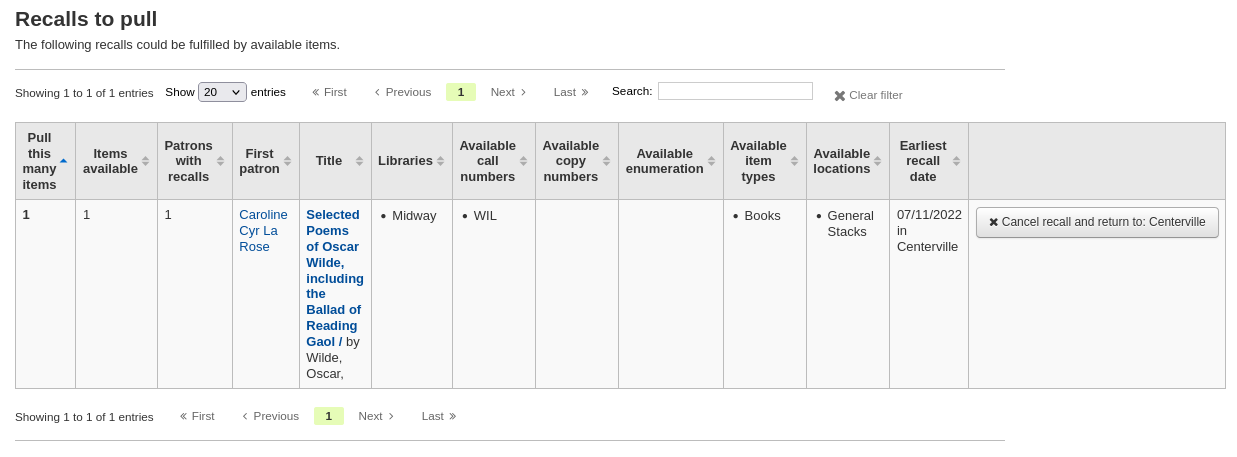
Cancel from the recalls to pull by clicking the ‘Cancel recall’ button on the right
If the recalled item is currently in transit, the cancel option will also trigger a transfer back to the item’s home library.
Cancel from the overdue recalls list either individually by clicking the ‘Actions’ button and selecting the ‘Cancel’ option.
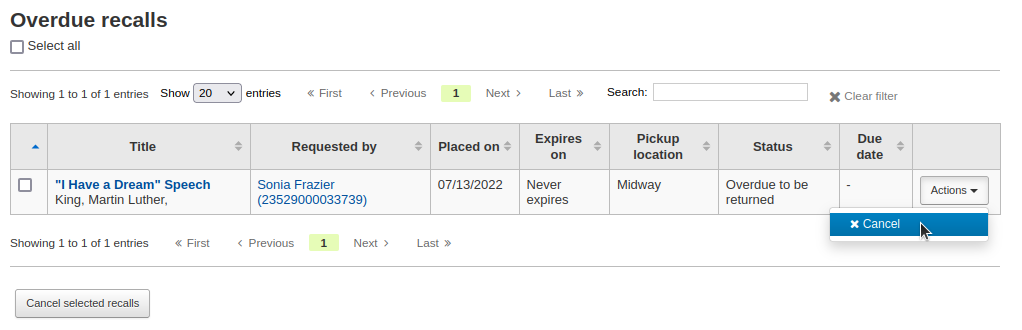
Or by selecting several recalls and clicking the ‘Cancel selected recalls’ button at the bottom of the screen.
Cancel from the ‘Recalls’ tab of a bibliographic record by clicking the ‘Actions’ button and selecting the ‘Cancel’ option.
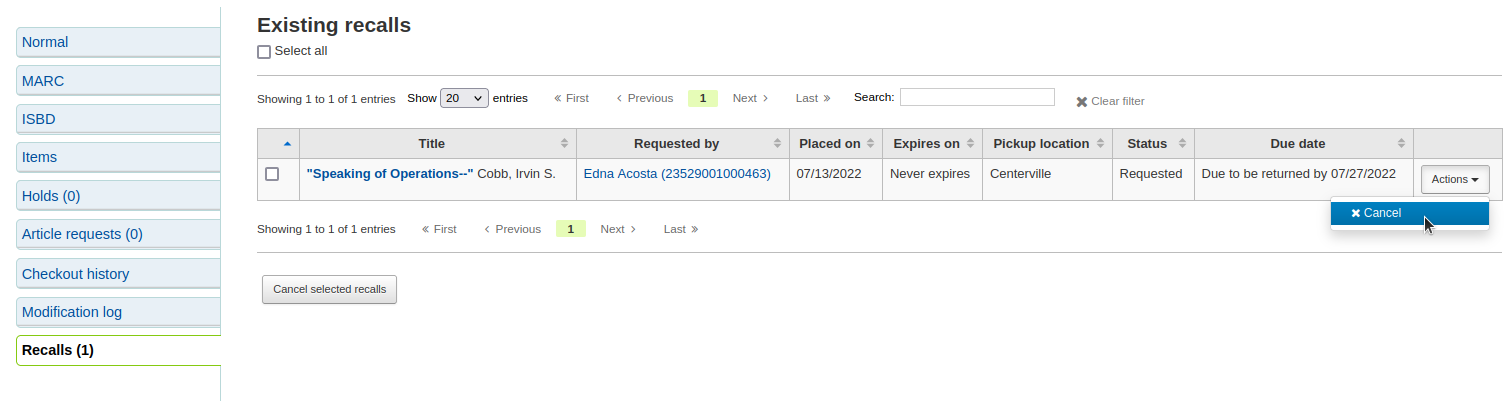
Or by selecting several recalls and clicking the ‘Cancel selected recalls’ button at the bottom of the screen.
Cancel from the ‘Recalls’ tab of a patron’s details page by clicking the ‘Actions’ button and selecting the ‘Cancel’ option.

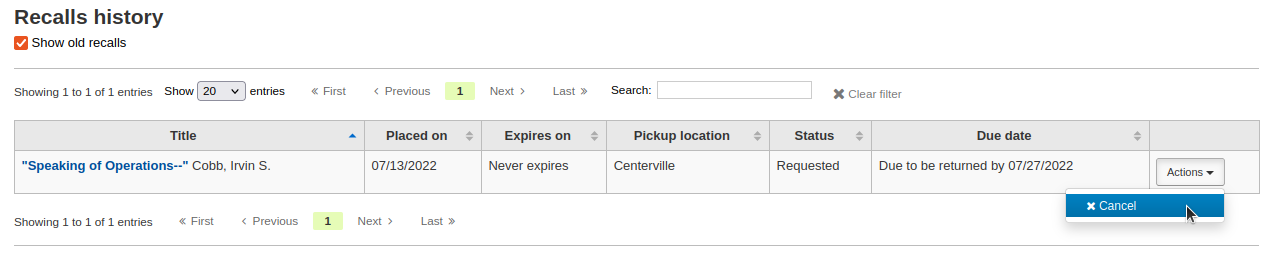
Cancel from the ‘Recalls history’ tab of a patron’s file by clicking the ‘Actions’ button and selecting the ‘Cancel’ option.
Changing waiting recalls’ status
If a recall is currently awaiting pickup and for some reason the staff needs to change this status (for example, the requesting patron called and they won’t be picking up the recall), it is possible to revert the waiting status.
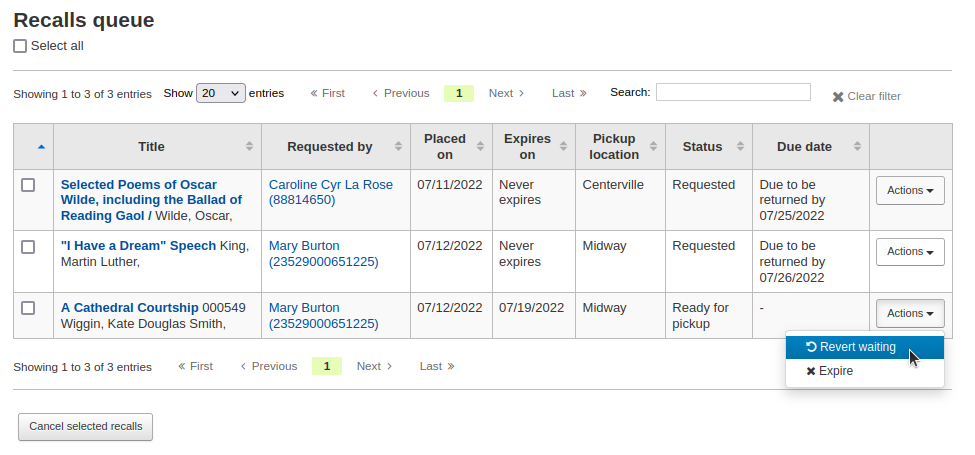
Revert the status from the recalls queue by clicking the ‘Actions’ button and selecting the ‘Revert waiting’ option.
Revert the status from the Recalls awaiting pickup list by clicking the ‘Revert waiting status’ button on the right.
Marking recalls as overdue
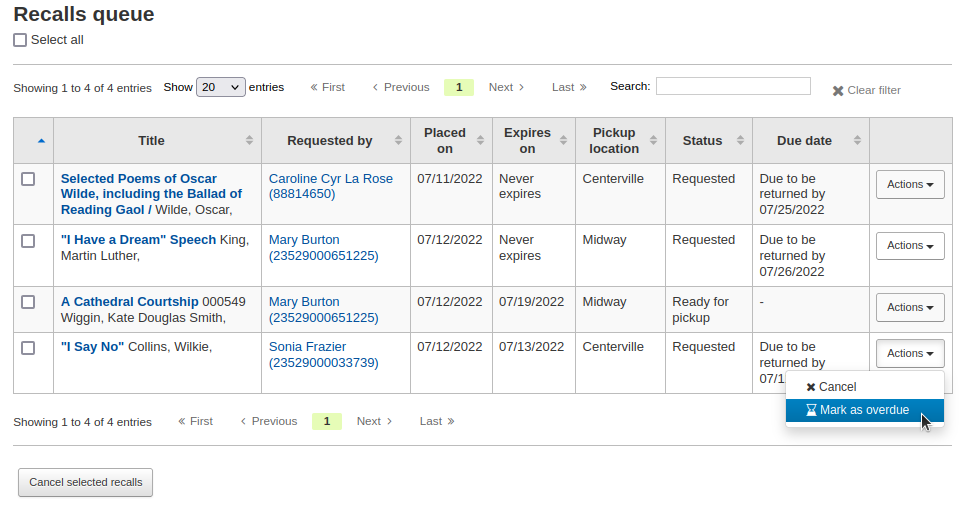
If a recall is not checked in by the new due date, it should be marked as overdue by the overdue_recalls cronjob. However, it is possible to mark recalls as overdue manually.
From the recalls queue, click the ‘Actions’ button and selecting the ‘Mark as overdue’ option.
Overdue recalls appear in the Overdue recalls list.
Expiring recalls
If a recall as been awaiting pickup for longer than the allowed period defined in RecallsMaxPickUpDelay, it should be expired automatically by the expire_recalls cronjob. However, it is possible to expire recalls manually.
From the recalls awaiting pickup list, click the ‘Expire recall’ button on the right.
Recalls reports
Once recalls are set up, new sections will appear in the circulation module.
Get there: Circulation > Recalls
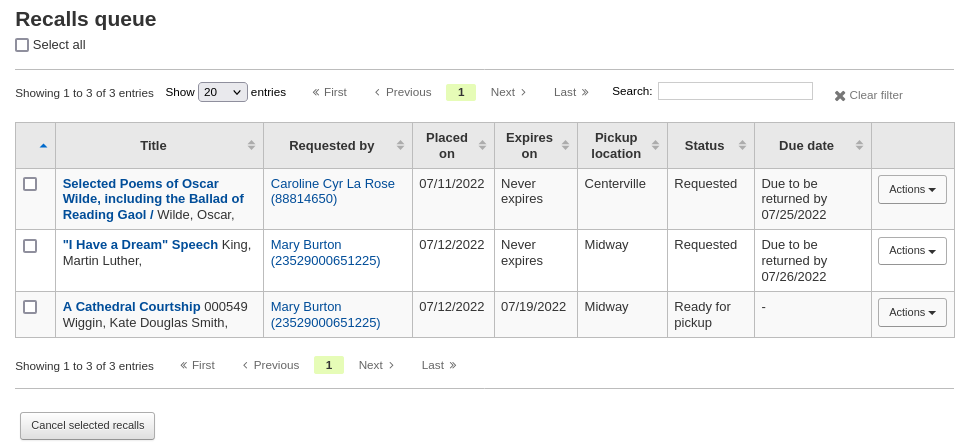
Recalls queue
The recalls queue shows all the current active recalls with their statuses.
From the recalls queue, staff can cancel active recalls either individually by clicking the ‘Actions’ button and selecting the ‘Cancel’ option.
Or by selecting several recalls and clicking the ‘Cancel selected recalls’ button at the bottom of the screen.
For recalls that are in transit, it is possible to cancel them and this will trigger a transfer back to their home library.
For recalls that are currently awaiting pickup, it is possible to revert the waiting status by clicking the ‘Actions’ button and selecting the ‘Revert waiting’ option.
For recalls that are overdue, it is possible to mark them as such from the recalls queue by clicking the ‘Actions’ button and selecting the ‘Mark as overdue’ option.
Recalls to pull
The recalls to pull list shows all the records that have been recalled but that have available items that could fulfill the request.
Staff can pick up these items from the shelves and check them in to fulfill the requests.
From the recalls to pull list, staff can cancel recalls if needed, by clicking the ‘Cancel recall’ button on the right.
If the item is currently in transit, cancelling the recall will also trigger a transfer back the the item’s home library.
Overdue recalls
This list shows the items that have been recalled but have not been returned by the new due date.
Recalls can be marked as overdue automatically through the overdue_recalls cronjob or manually.
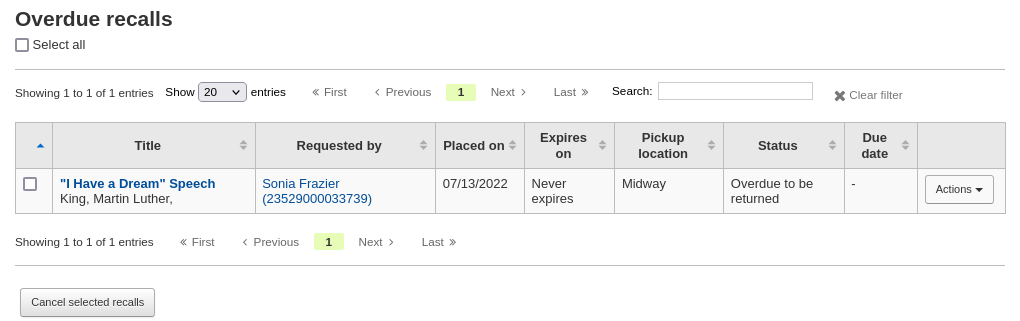
From this list, staff can cancel active recalls either individually by clicking the ‘Actions’ button and selecting the ‘Cancel’ option.
Or by selecting several recalls and clicking the ‘Cancel selected recalls’ button at the bottom of the screen.
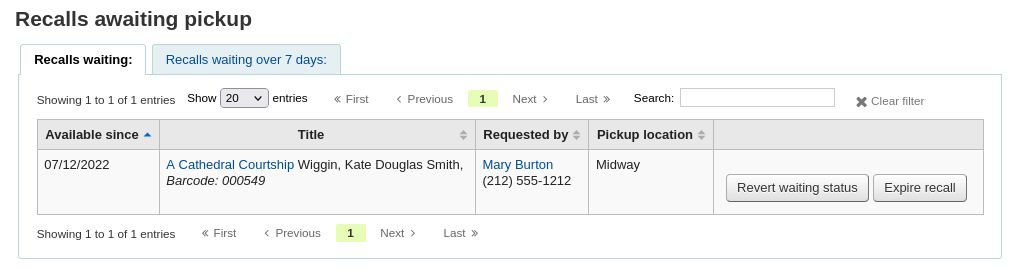
Recalls awaiting pickup
The recalls awaiting pickup list shows all the recalls that are currently waiting for the patron to come and get them.
This list is divided in two tabs:
Recalls waiting: shows all the recalls currently awaiting pickup.
Recalls waiting over x days: shows the recalls that have been waiting for more than the number of days specified in the RecallsMaxPickUpDelay system preference.
From this list, staff can revert waiting recalls by clicking on the ‘Revert waiting status’ button on the right.
Staff can also manually expire recalls by clicking on the ‘Expire recall’ button on the far right.
Old recalls
The old recalls list shows all the inactive recalls (completed, cancelled and expired).

Aktarımlar
Eğer birden çok şubeli bir kütüphane sisteminde çalışıyorsanız, materyalleri bir kütüphaneden diğerine transfer aracını kullanarak aktarabilirsiniz.
Gidiş yolu: Dolaşım > Aktarma
Bir materyali transfer etmek için
Dolaşım sayfasındaki ‘Transfer’ butonu üzerine tıklayın

Materyali transfer etmek istediğiniz kütüphaneyi girin
Aktarmak istediğiniz kitabın barkodunu tarayın ya da yazın
‘Onayla’ya’ tıkla

Materyal şu an transit halinde olduğunu söyleyecektir.

Materyal diğer birime ulaştığında kütüphaneci bu materyalin artık nakil halinde olmadığını bildirmek için giriş yapmalıdır
Materyal yeni kütüphaneye kalıcı olarak taşınmayacak
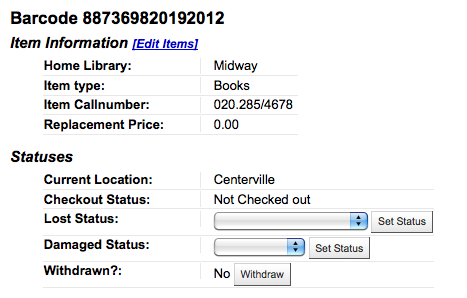
The item shows the same ‘Home library’ but has updated the ‘Current location’ to note where it resides at this time
Set library
By default, you will enter the staff interface as if you are at your home library. This library will appear in the top right of the staff interface.

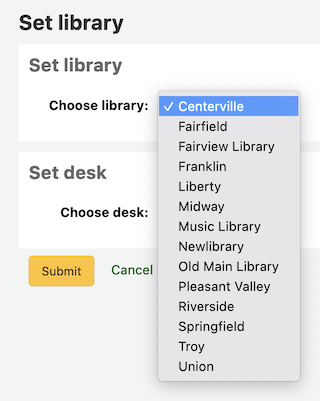
This is the library where all circulation transactions will take place. If you are at another library (or on a bookmobile) you will need to set the library before you start circulating items. To do this, click on your username and logged in library at the top right and choose ‘Set library’ or click ‘Set library’ on the main circulation page.
This will bring you to a page where you can choose at which library you are.
Once you save your changes, your new library will appear in the top right.
Not
Only staff with the loggedinlibrary (or superlibrarian) permission will be able to change the library where they are logged in.
Staff members who do not have this permission will only be able to log into their home library.
Fast add cataloging
Sometimes circulation librarians need to quickly add a record to the system for an item they are about to check out. This is called ‘Fast add’. To allow circulation librarians access to the Fast add cataloging tool, simply make sure they have the fast_cataloging permissions. There are two ways to add titles via fast add. If you know that you’re about to check out an item that isn’t in you catalog you can go to the Circulation module and click ‘Fast cataloging.’
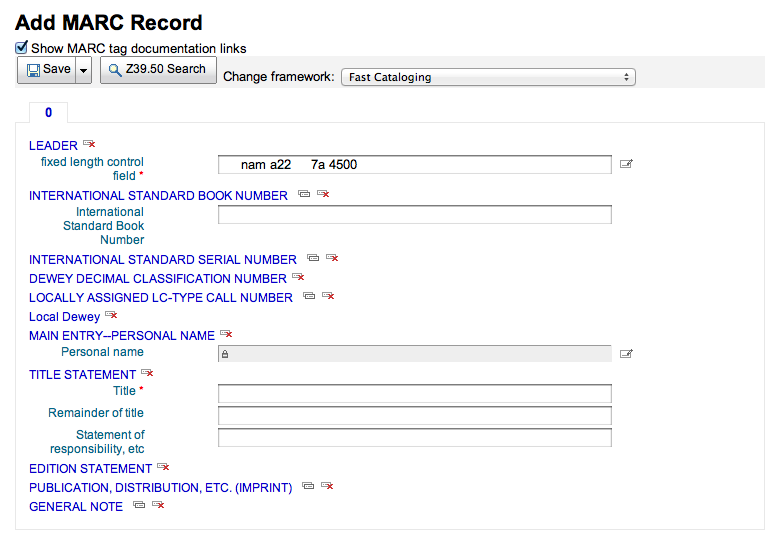
Kataloglama arayüzü kısa kataloglama kaydı ile açılacaktır:
Kataloglama verilerinizi ekledikten sonra materyal verisini girmek isteyip istemediğiniz sorulacaktır. Ödünç vermeden önce materyallerin barkodu, koleksiyon kodu vb. girişlerini yapınız ve materyali kaydediniz.
Hızlı kataloglamanın diğer yolu ödünç verme ekranından yapılır. Ödünç verme esnasında Koha’nın bulamadığı barkotu girdiğinizde, Koha size materyali hızlı kataloglamayı kullanarak ekleyeceğinizi ve bu materyali ödünç vereceğinizi hatırlatacaktır.
‘Hızlı Kataloglama’ya tıklamak, size başlık bilgilerini girebileceğiniz hızlı kataloglama formunu getirecektir.
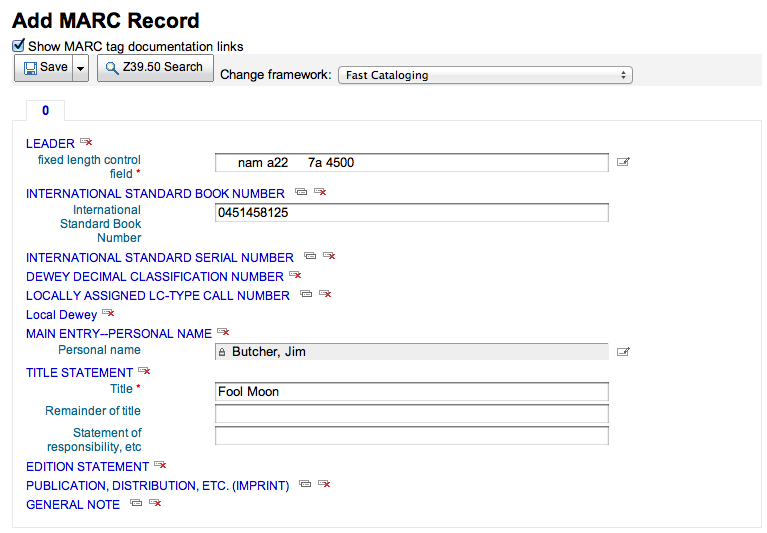
‘Kaydet’ üzerine tıkladıktan sonra, ödünç vermek istediğiniz barkodun basılmış olduğu materyal kaydına getirileceksiniz.
‘Materyal Ekle’ butonuna tıkladıktan sonra, materyal otomatik olarak, başlangıçta ödünç vermek istediğiniz kullanıcıya ödünç verilecektir.

Circulation reports
Çoğu rapor Raporlar modülünden bulunabilir, ancak daha yaygın dolaşım raporlarından bazıları Doğrudan Dolaşım modülünden edinilebilir.
Gidiş yolu: Dolaşım > Dolaşım raporları
Holds queue
This report will show you all holds waiting to be pulled off the shelf at your library.
First, choose some filters for the report.
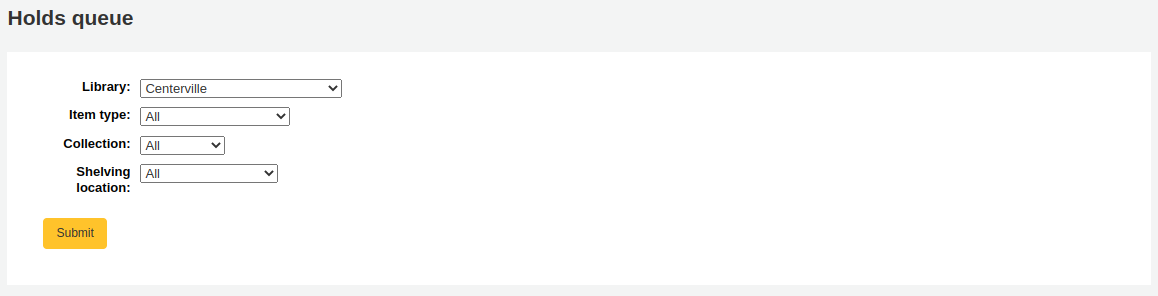
Then, the report will be displayed.
Not
You can customize the columns of this table in the ‘Table settings’ section of the Administration module (table id: holds-table).
To generate this report, you must either have the Build holds queue cron job running, or the RealTimeHoldsQueue system preference must be set to ‘Enable’. Either of these will run a script that decides which library should be responsible for fulfilling a given hold request. This should be enabled if your library system allows borrowers to place on-shelf holds.
The holds queue behavior is controlled by the system preferences StaticHoldsQueueWeight, RandomizeHoldsQueueWeight and UseTransportCostMatrix.
If you do not want all of your libraries to participate in the on-shelf holds fulfillment process, you should list the libraries that *do* participate in the process here by inputting all the participating library’s branchcodes, separated by commas (e.g. “MPL,CPL,SPL,BML” etc.).
By default, the holds queue will be generated such that the system will first attempt to hold fulfillment using items already at the pickup library if possible. If there are no items available at the pickup library to fill a hold, the system will then use the list of libraries defined in StaticHoldsQueueWeight. If RandomizeHoldsQueueWeight is disabled (which it is by default), the script will assign fulfillment requests in the order the libraries are placed in the StaticHoldsQueueWeight system preference.
For example, if your system has three libraries, of varying sizes (small, medium and large) and you want the burden of holds fulfillment to be on larger libraries before smaller libraries, you would want StaticHoldsQueueWeight to look something like “LRG,MED,SML”.
If you want the burden of holds fulfillment to be spread out equally throughout your library system, simply enable RandomizeHoldsQueueWeight. When this system preference is enabled, the order in which libraries will be requested to fulfill an on-shelf hold will be randomized each time the list is regenerated.
An alternative to static and randomized is using the Tansport cost matrix. It takes precedence in controlling where holds are filled from and allows you to define the ‘cost’ of transport between any two libraries. To use the Transport cost matrix simply set your UseTransportCostMatrix preference to ‘Use’.
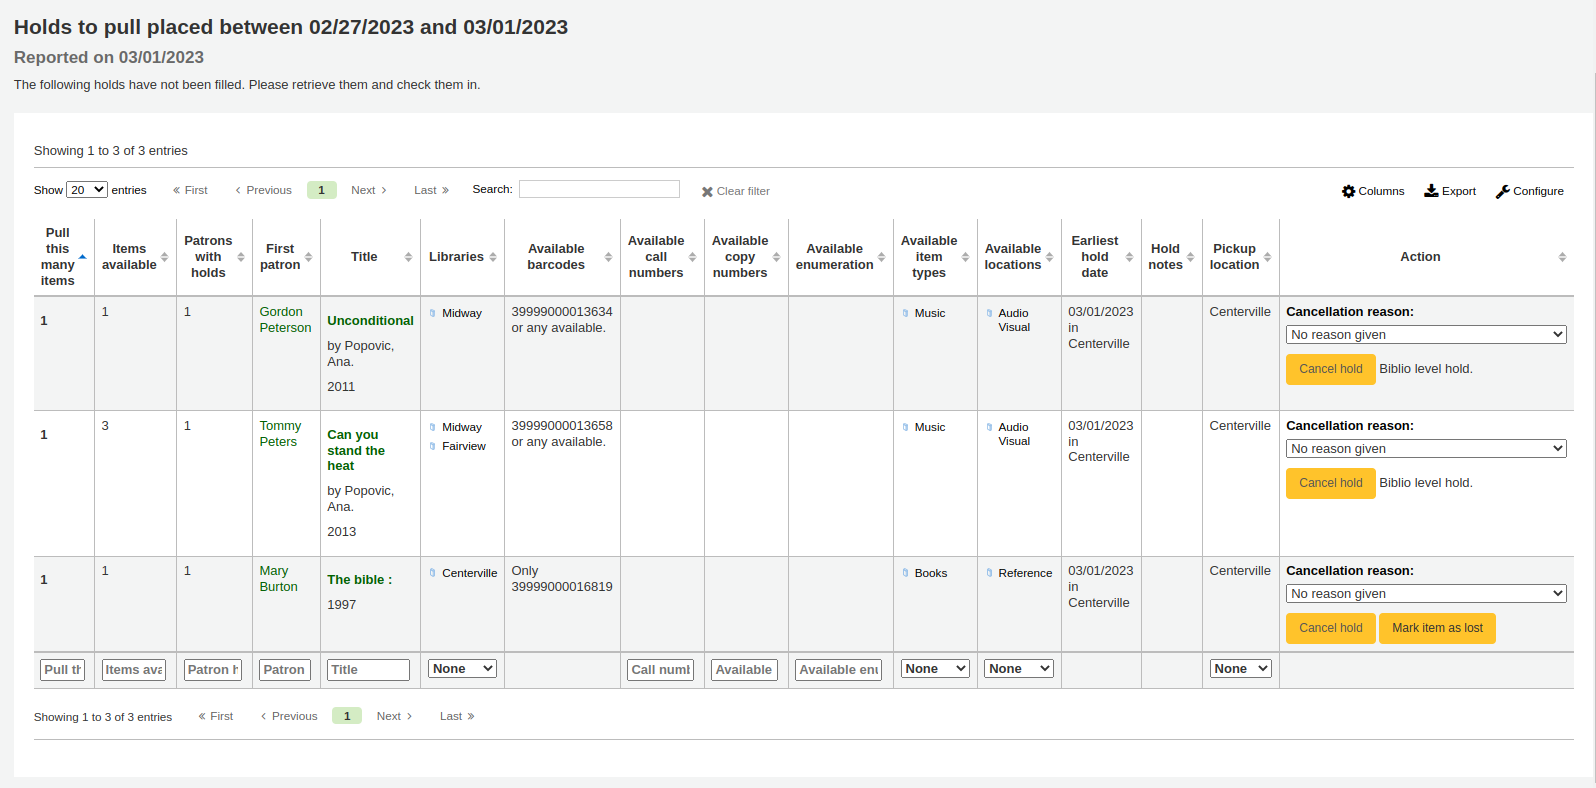
Ayırmadan çekilecekler
This report will show you all of the items that have holds on them that are available at the library for pulling. If the items are available at multiple libraries then all libraries with that item available will see the hold to pull until one library triggers the hold.
Not
You can customize the columns of this table in the ‘Table settings’ section of the Administration module (table id: holds-to-pull).
Depending on the value of the CanMarkHoldsToPullAsLost system preference, clicking the “Mark item as lost” button or “Mark item as lost and notify patron” button will mark item as lost and notify the requesting patron.
You can choose which LOST value to set the item to with the UpdateItemWhenLostFromHoldList system preference.
Uyarı
These buttons will only appear on item-level holds.
Not
The notification sent to the patron will use the CANCEL_HOLD_ON_LOST template. It can be customized in the Notices and slips tool.
You can limit the results you see by using the Refine box on the left side of the page.
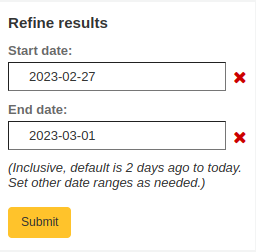
Not
The default dates in the filters are determined by the HoldsToPullStartDate and ConfirmFutureHolds system preferences.
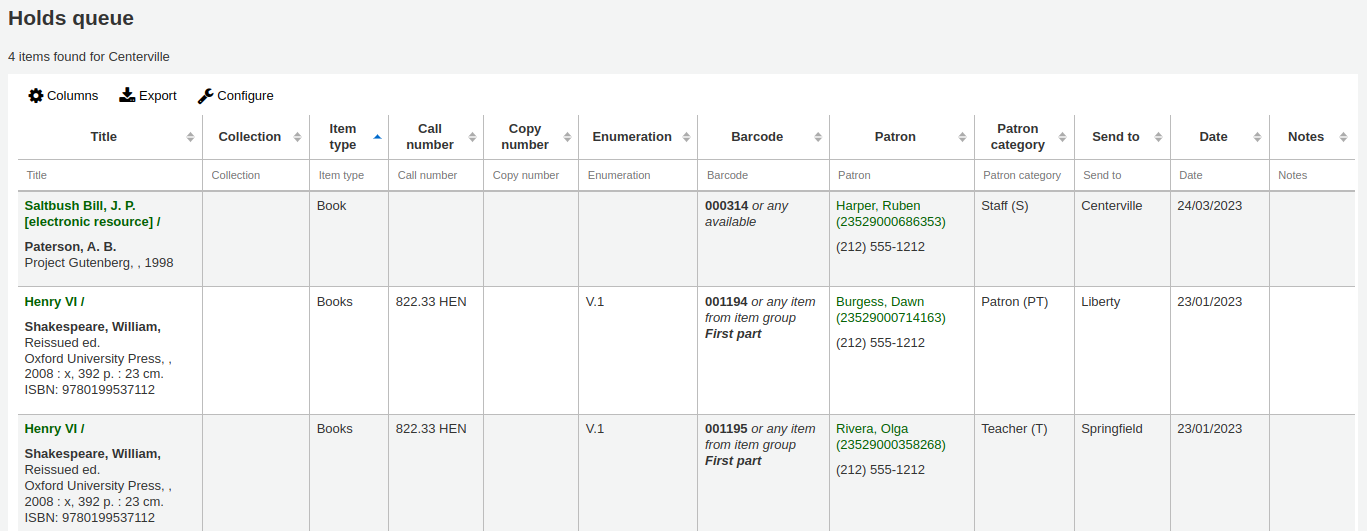
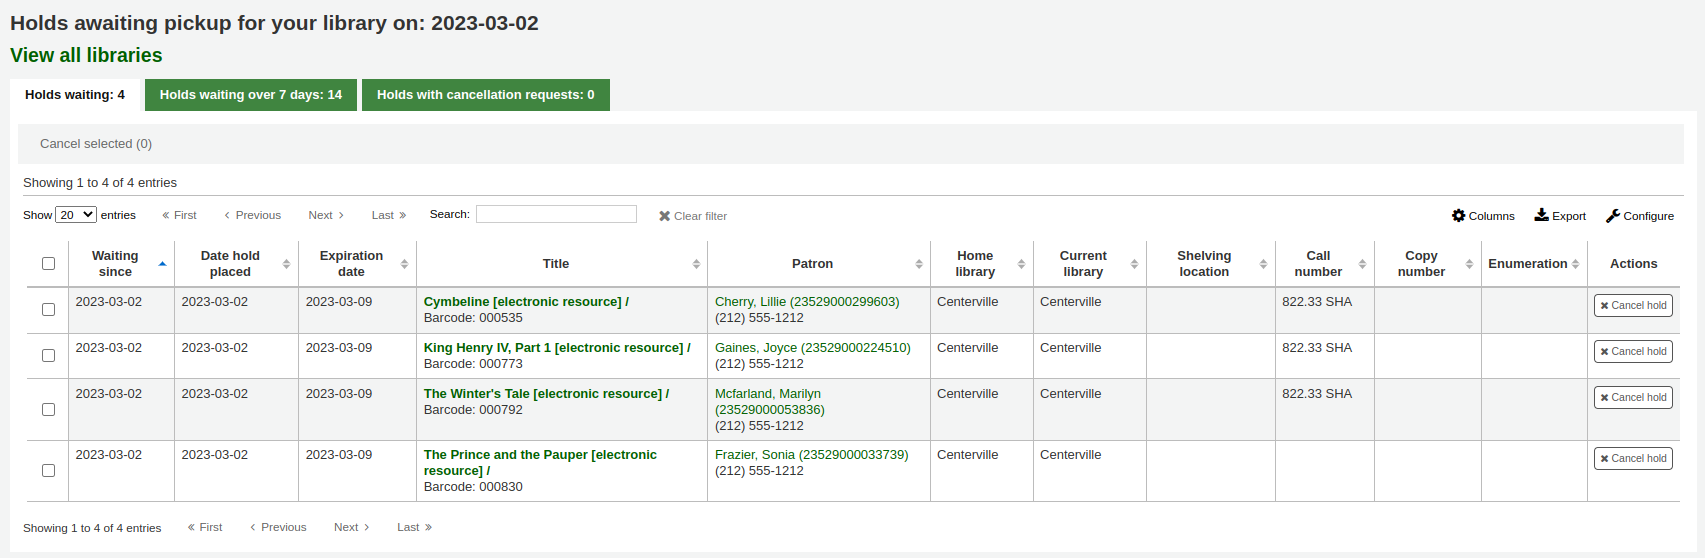
Ayırtanın alması için bekletilenler
Bu rapor kullanıcıların alması için bekleyen tüm ayrılan materyalleri gösterecektir.
Not
You can customize the columns of this table in the ‘Table settings’ section of the Administration module (table id: holdst).
You can cancel individual holds manually by clicking the ‘Cancel hold’ button to the right of each hold, or you can cancel selected holds using the button at the top of the list.
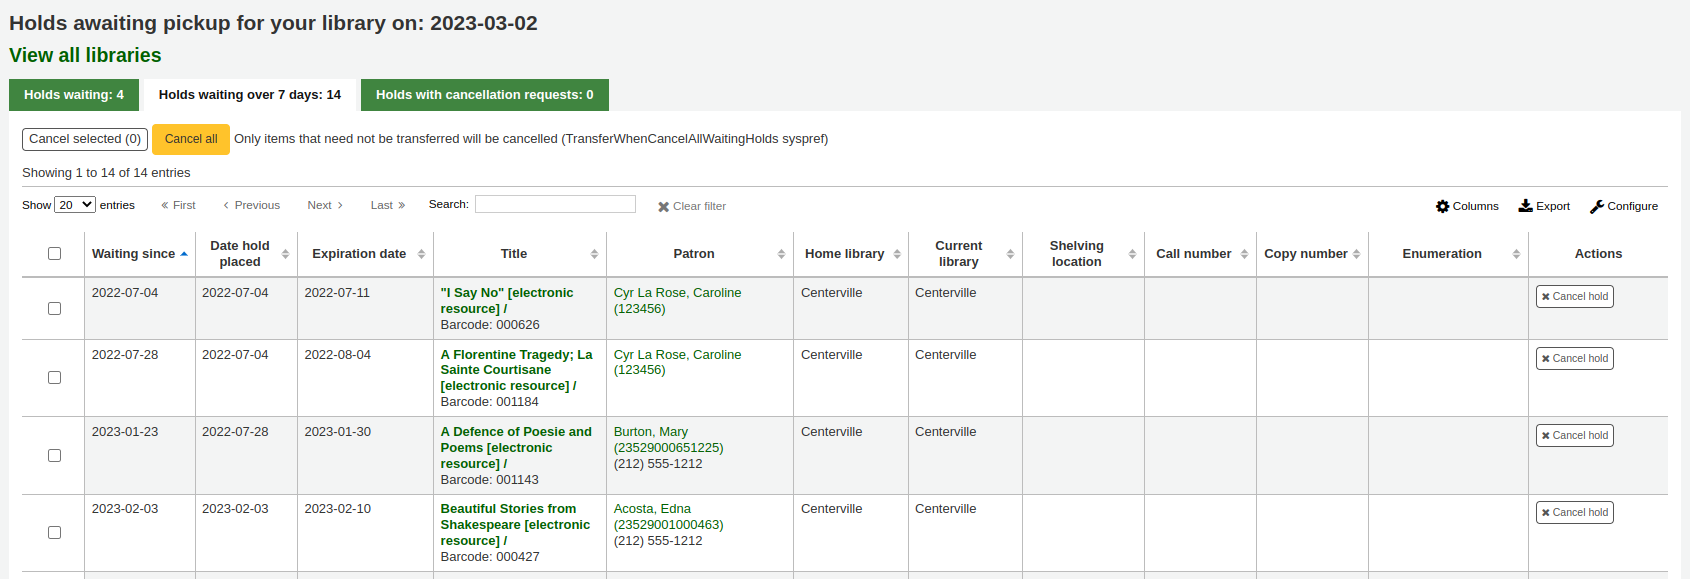
Items that have been on the hold shelf longer than you normally allow (based on the ReservesMaxPickUpDelay system preference value) will appear on the ‘Holds waiting over X days’ tab.
Not
You can customize the columns of this table in the ‘Table settings’ section of the Administration module (table id: holdso).
These holds will not automatically be canceled unless the ExpireReservesMaxPickUpDelay system preference is set to ‘Allow’ and the cancel_expired_holds.pl cron job is scheduled to run regularly.
You can cancel individual holds manually by clicking the ‘Cancel hold’ button to the right of each hold, or you can cancel selected holds using the button at the top of the list, or even cancel all holds.
The ‘Holds with cancellation requests’ tab contains waiting holds that have been canceled by patrons through their account on the OPAC, if that is allowed by the waiting hold cancellation policy.
From this tab, staff can cancel the holds, and transfer them back to their home library, if that is the case.
Not
Checking in the items will also cancel the holds with cancellation requests.
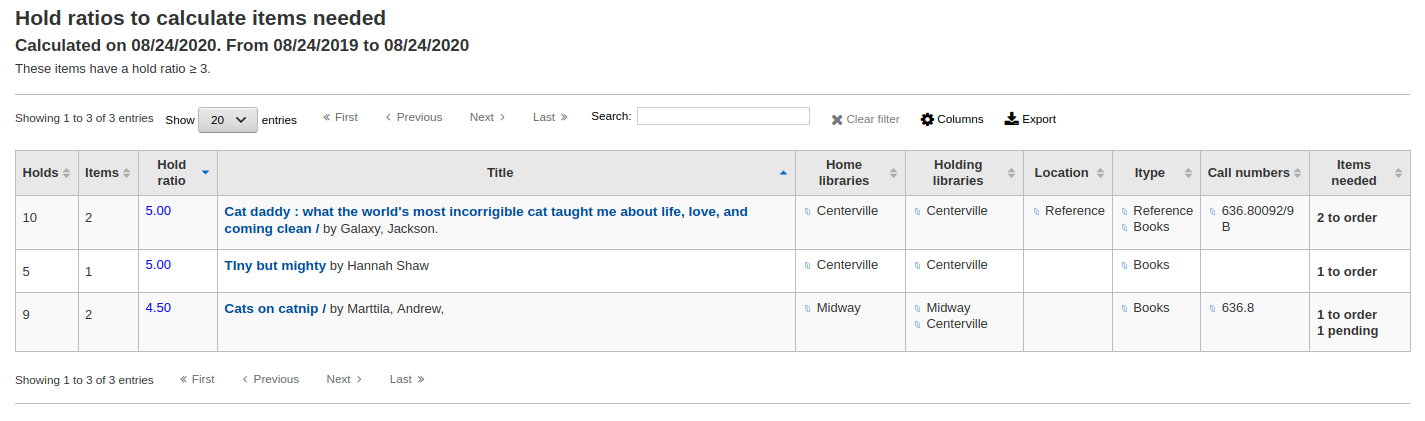
Ayırma oranları
Ayırma oranları koleksiyon gelişimine yardım eder. Bu raporu kullanarak kaç kullanıcının materyal ayırdığını ve daha fazla alıp almamanız gerektiğini görebileceksiniz. Varsayılanda ayırma başına 3 materyal verilecektir. Rapor bu kotayı karşılamak için kaç tane daha materyal satın alınması gerektiğini gösterecektir.
Not
You can customize the columns of this table in the ‘Table settings’ section of the Administration module (table id: holds-ratios).
Gelen aktarımlar
Bu rapor Koha’nın kütüphanenize transit olduğunu düşündüğü materyalleri listeleyecektir.
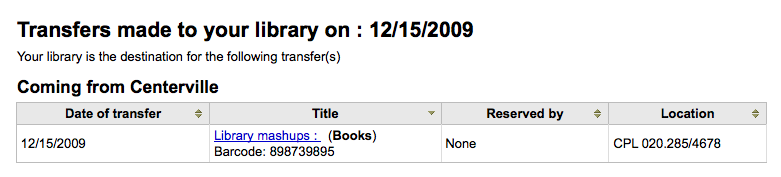
Aktarımlarınız kütüphanenize geç geliyorsa, materyallerinizin ne kadar geç geldiğini belirten bir mesaj göreceksiniz.
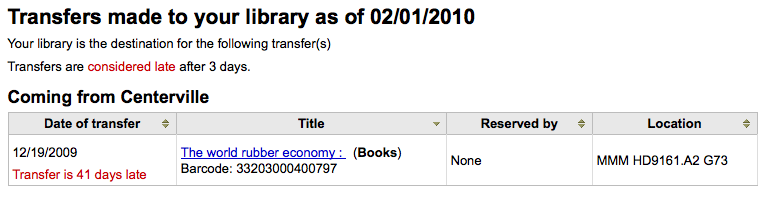
Önemli
An item is considered late based on the number of days you have entered in the TransfersMaxDaysWarning system preference.
Article requests
Article requests are somewhat similar to holds, but are not requests for an item to check out. Instead, article requests are requests for a photocopy of a particular section of a book or an article from a serial issue. This is very common in academic libraries where researchers may request a copy of a single article found in a journal.
Setting up article requests
First, enable your system preference for ArticleRequests.
Set to ‘Enable’ patrons to place article requests.
Ardından, kullanıcılarınızın yalnızca kayıt, yalnızca materyal veya hem kayıt hem de materyal düzeyinde istekte bulunmalarına karar vermeniz gerekecektir.
You can set 3 different system preferences for mandatory fields to be filled in depending on how your records are requested.
ArticleRequestsMandatoryFields: make the following fields mandatory for records that are record level or item level requestable
ArticleRequestsMandatoryFieldsItemsOnly make the following fields mandatory for records that are only item level requestable
ArticleRequestsMandatoryFieldsRecordOnly make the following fields mandatory for records that are only record level requestable
The ArticleRequestsOpacHostRedirection system preference is used if you create analytical records. If enabled, it will redirect the patron from the child record to the host record in the OPAC.
The ArticleRequestsSupportedFormats system preference determines the various formats patrons can request their articles in (either photocopy or scan).
Next you will want to go into your circulation and fines rules matrix and select each rule for which you want to allow requests.
You can allow requests to be made at the record level, item level, yes (which means both) and no (which means no article requests may be placed).
You can also limit the number of open article requests a patron can have at one time by patron category in the Default open article requests limit section of the circulation rules page.
You can set up a fee for each article request in the Default article request fees section of the circulation rules page.
Placing article requests
Artık hem personel istemcisinde hem de OPAC’da istekte bulunabilirsiniz.
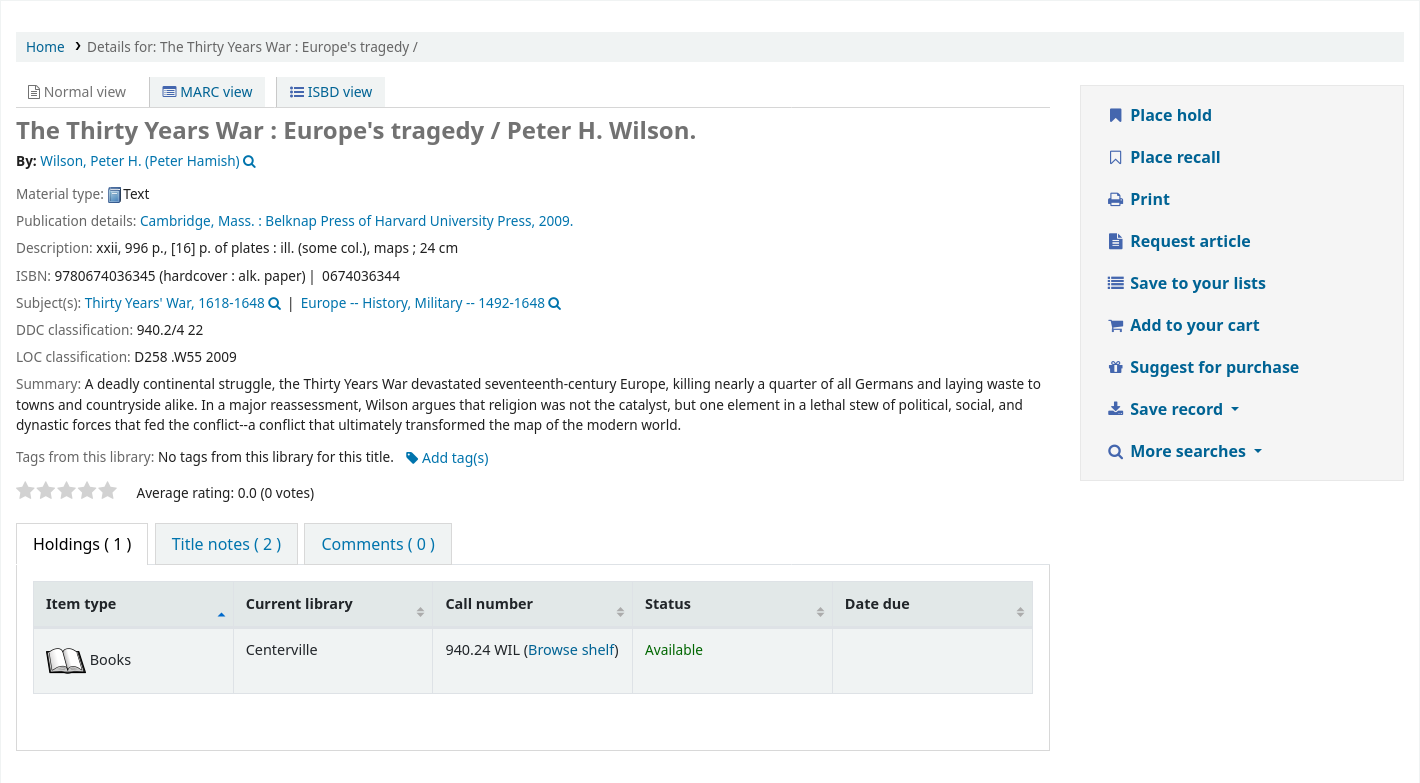
In the staff client, on the record details page, you will see a ‘Request article’ button at the top and an ‘Article requests’ tab to the left. The two options lead to the same page.
Just like a hold, you will be prompted to enter the patron’s card number or name.

If there is a fee, a message will appear to inform the staff member.

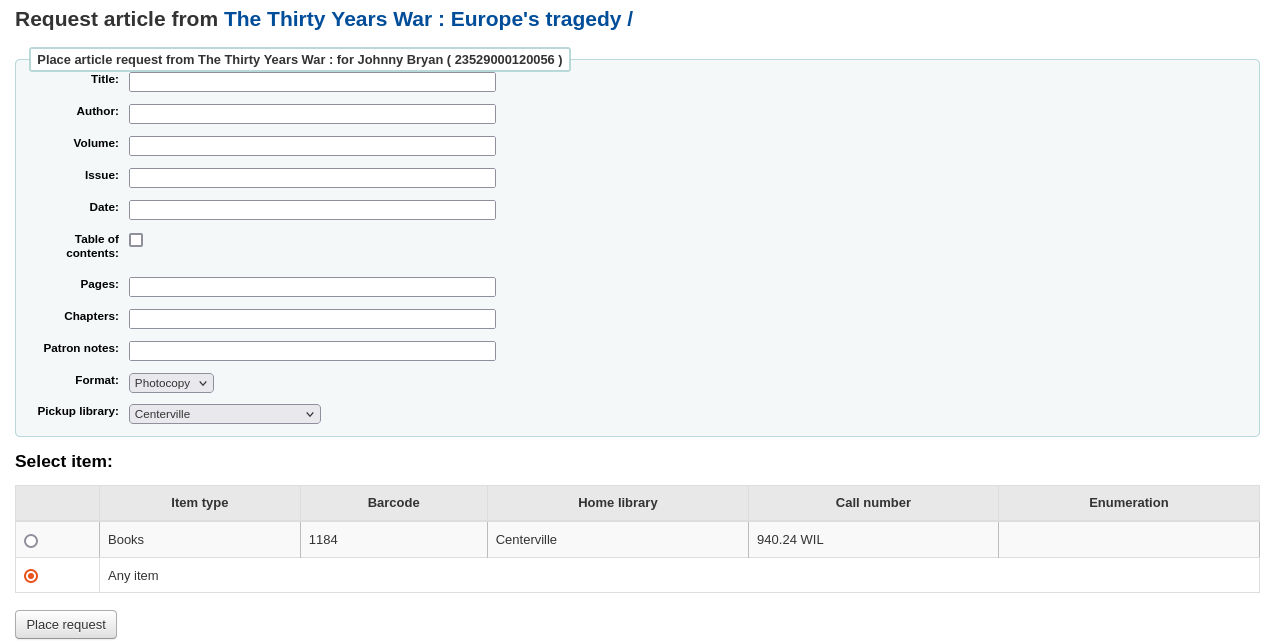
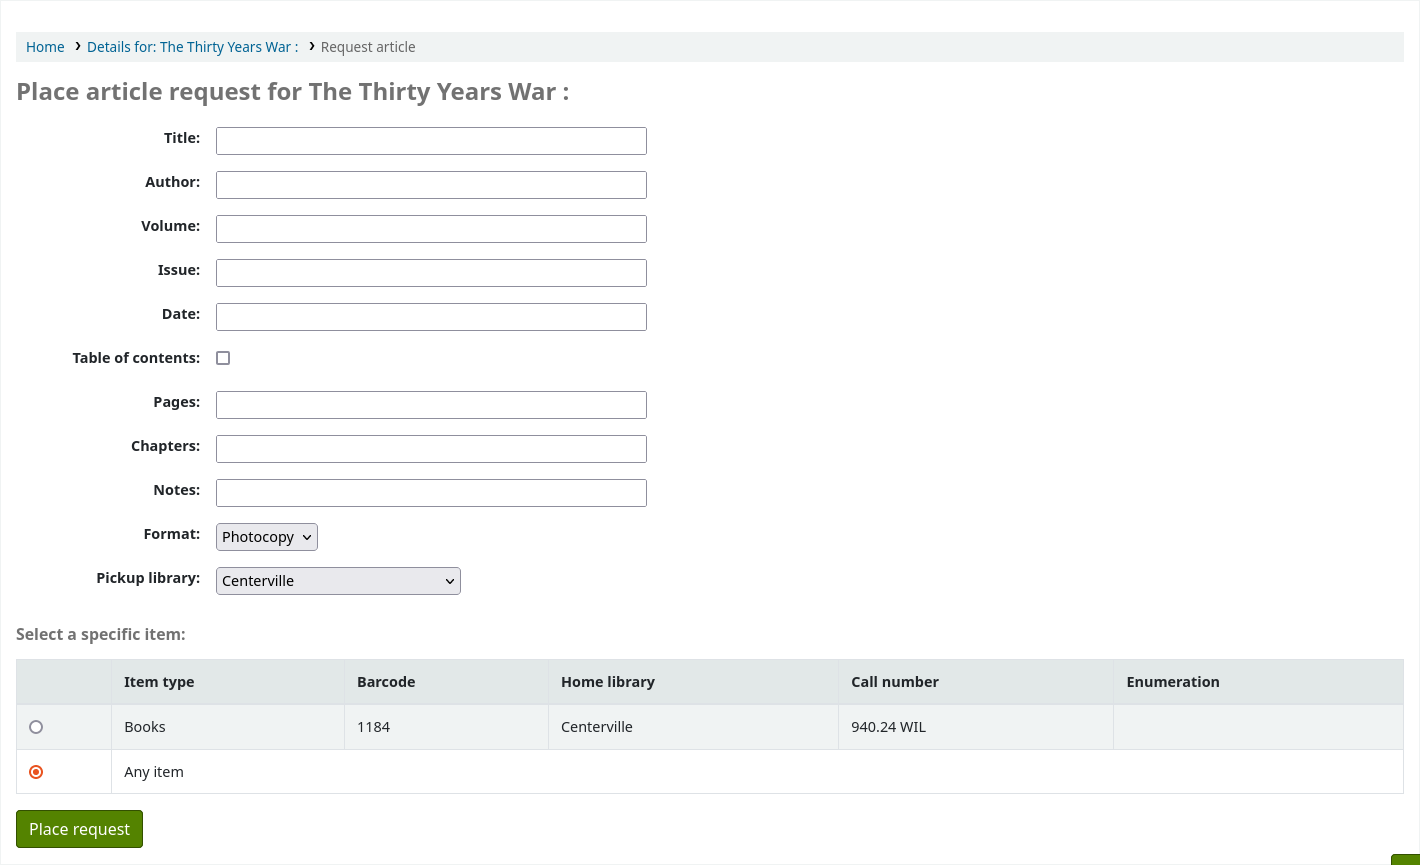
Fill in the form.
Not
The mandatory fields are set through the three system preferences ArticleRequestsMandatoryFields, ArticleRequestsMandatoryFieldsItemsOnly, and ArticleRequestsMandatoryFieldsRecordOnly.
Title: enter the title of the requested article or chapter
Author: enter the author of the requested article or chapter
Volume: enter the volume in which this article or chapter is found
Issue: enter the issue in which this article is found
Date: enter the date of the issue in which this article is found
Table of contents: check to indicate the patron wants a copy of the table of contents
Pages: enter the pages to photocopy or scan
Chapters: enter the chapters to photocopy or scan
Patron notes: enter any relevant notes
Format: choose the format in which the patron wishes to receive this article or chapter
Not
The possible formats are defined in the ArticleRequestsSupportedFormats system preference.
Pickup library: choose the library at which the patron wishes to pick up their photocopy
If allowed, choose the specific item to request.
Then, click on ‘Place request’.
From the OPAC, patrons can place requests themselves either from the results list
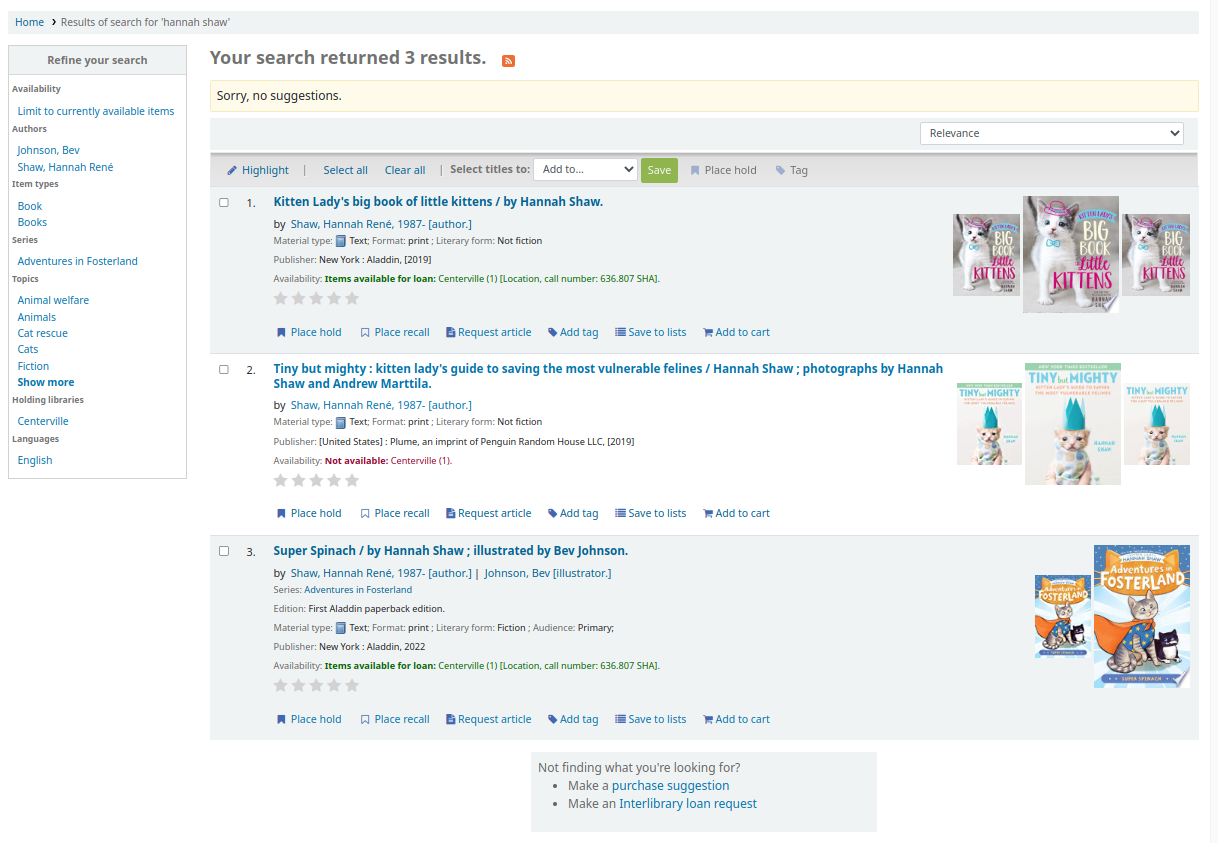
or by going to the detailed record.
As with a hold, if the patron is not logged in, they will be asked to do so.
The form is the same as the one in the staff interface.
If there is a fee, a message will appear to inform the patron.

If allowed, the patron can choose the specific item to request.
From their account, the patron will be able to follow the progress of their request from ‘new’

to ‘pending’, if necessary,

to ‘processing’.

The patron will receive an email notification after placing the request to confirm it as well as when the status of the request changes.
Not
When placing an article request, the patron will receive a notification. The notice sent is based on the AR_REQUESTED template.
Each status is also linked to a notification. See below, under Managing article requests for the letter code for each status.
The content of any notification can be customized in the Notices and slips tool.
Once the request is completed the patron will receive an email notification and the article request will no longer appear in their account.
Not
When staff marks the article request as ‘Completed’, the patron will receive a notification. The notice sent is based on the AR_COMPLETED template. The content of this notification can be customized in the Notices and slips tool.
Managing article requests
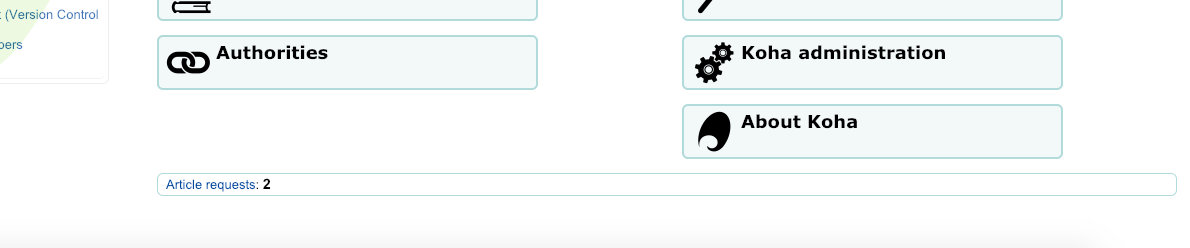
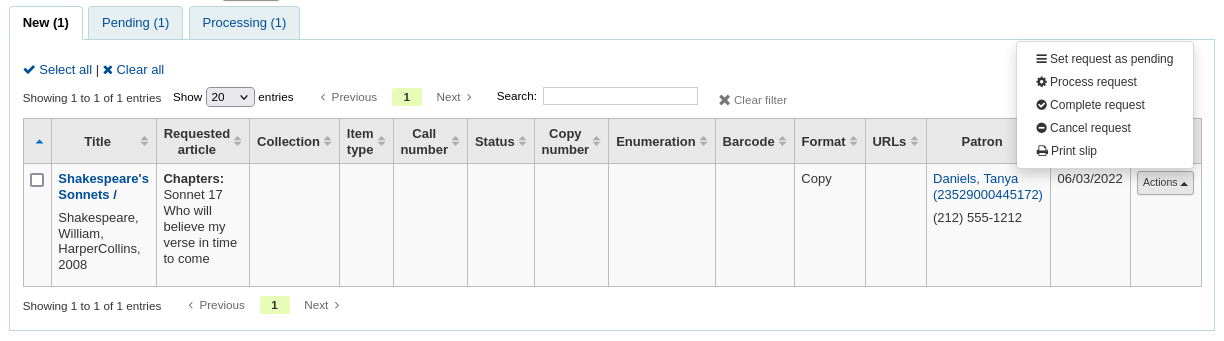
Makale talebi alındıktan sonra, personel, ana sayfanın alt kısmında, personel istemcisinde yeni istekler görecektir. (Etiketler, yorumlar ve modifikasyonlarla aynı yerde).
Oradan, personel işlemek için istekleri seçebilecektir.
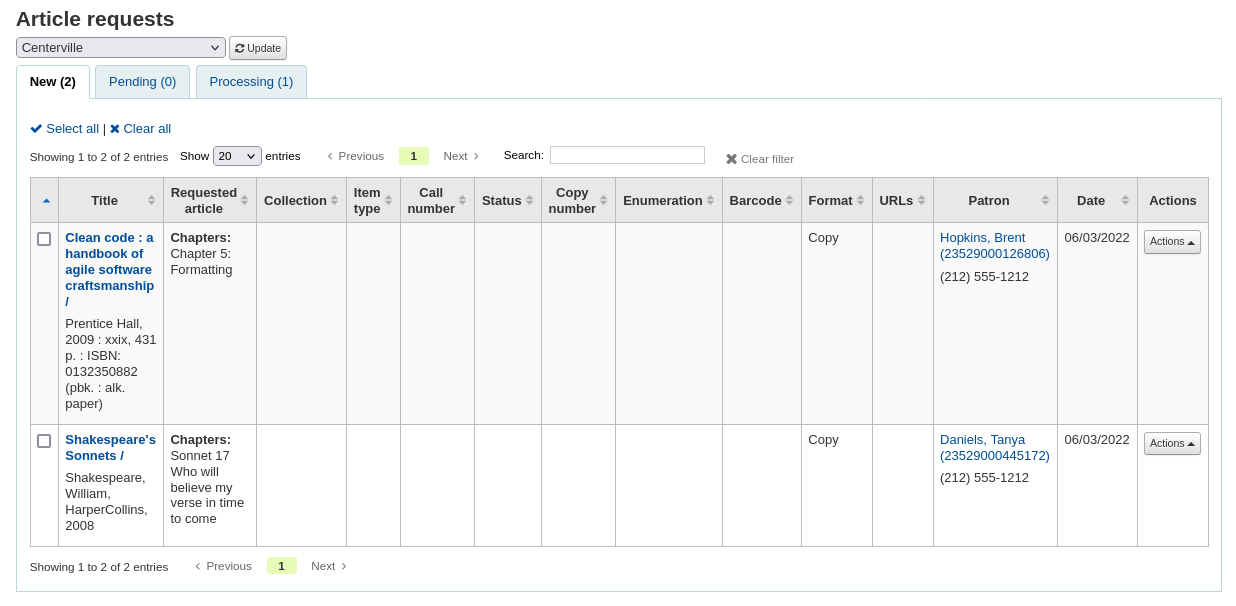
New requests are in the ‘New’ tab.
The first step would be for a staff member to process the request, that moves the request to the processing tab and alerts other staff members that the request is in process. In the actions column, click on the dropdown menu and select ‘Process request’. This will move the request to the processing tab.
Not
Setting an article request to ‘Processing’ will send a notification to the patron. The notice sent is based on the AR_PROCESSING template. The content of this notification can be customized in the Notices and slips tool.
If for any reason, a request cannot be processed right away (for example, if the title is currently checked out), the status can be changed to ‘Pending’. This will send a notice to the patron indicating the request has been received and seen, but has yet to be processed.
Not
Setting an article request to ‘Pending’ will send a notification to the patron. The notice sent is based on the AR_PENDING template. The content of this notification can be customized in the Notices and slips tool.
Ardından personel rafa gidip istenen makalenin bir kopyasını alacak.
Once that is complete, staff can print the article request slip and staple or paper clip it to the article. In the actions column, you can select the dropdown and select print slip.
Not
The slip used is based on the AR_SLIP template. The content of this slip can be customized in the Notices and slips tool.
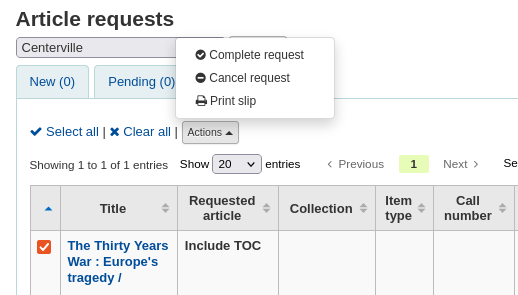
Son olarak, personel, isteğin gönderilmeye hazır olduğunu bildiren istekte bulunan kullanıcıya bildirimi gönderecek olan açılır menüden tam makale isteğini seçecektir.
Bu, işlem isteğini işlem sekmesinden kaldırır.
Not
Completing an article request will send a notification to the patron. The notice sent is based on the AR_COMPLETED template. The content of this notification can be customized in the Notices and slips tool.
If, for any reason, an article request must be cancelled, staff can choose the ‘Cancel request’ option from the ‘Actions’ button.
Not
Cancelling an article request will send a notification to the patron. The notice sent is based on the AR_CANCELED template. The content of this notification can be customized in the Notices and slips tool.
Not
Actions can also be made in bulk by checking the boxes next to the requests to process or by clicking ‘Select all’, and choosing the new status from the actions menu on top of the table.
Gecikmişler
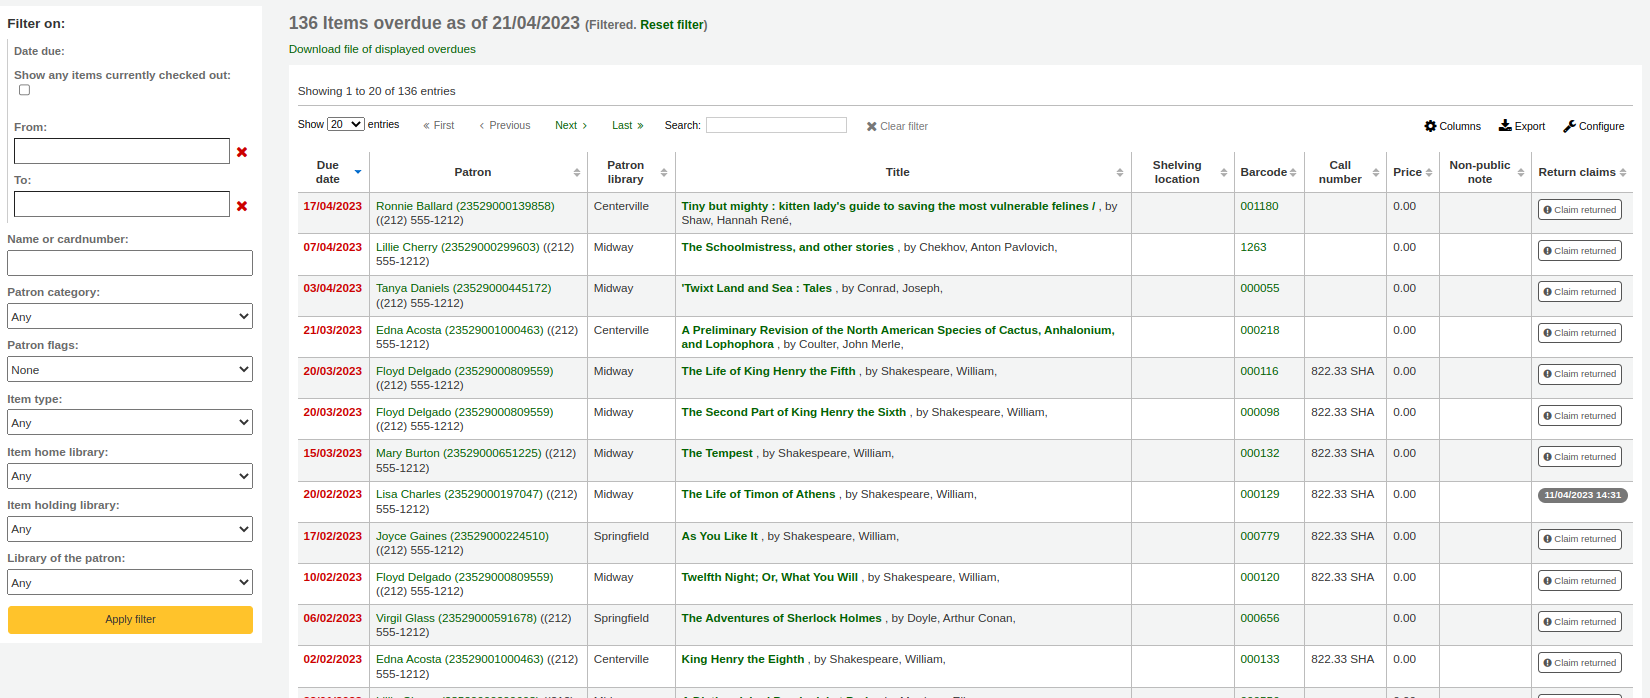
Bu rapor kütüphanenizdeki gecikmiş tüm materyalleri listeleyecektir.
Uyarı
Geniş kullanıcı tabanlı kütüphaneler için, bu raporun çalışması önemli miktarda zaman alabilir.
Large libraries can choose to filter the report before it runs by setting the FilterBeforeOverdueReport system preference to ‘Require’.
Not
You can customize the columns of this table in the ‘Table settings’ section of the Administration module (table id: circ-overdues).
Rapor, raporun solunda bulunan menu seçenekleri kullanılarak filtrelenebilir.
Not
‘Ödünç verilmiş tüm materyalleri göster’ onay kutusu temelde bunu bir gecikmeye kalanlar raporundan ödünç verilenler raporuna çevirir. İade tarihine bakılmaksızın ödünç verilmiş tüm başlıkları gösterecektir.
The report result can be downloaded via the ‘Download file of displayed overdues’ link or the ‘Export’ button at the top of the table.
Cezaya kalan gecikmiş materyaller
Bu rapor kütüphanenizde cezası birikmiş her hangi bir gecikmeyi gösterecektir.
Raporu sınırlandırmak istiyorsanız en üstte yer alan açılır menüyü kullanarak raporu biriminizde bulunan spesifik bir raf konumu ile sınırlandırabilirsiniz. Diğer birimlerdeki gecikme cezası işlemiş geciken materyalleri görebilmek için biriminizi değiştirin <set-library-label> ya da o birimin hesabından oturum açın.
Önemli
If you do not charge fines and/or don’t have the fines cron job running you will see no data on this report.
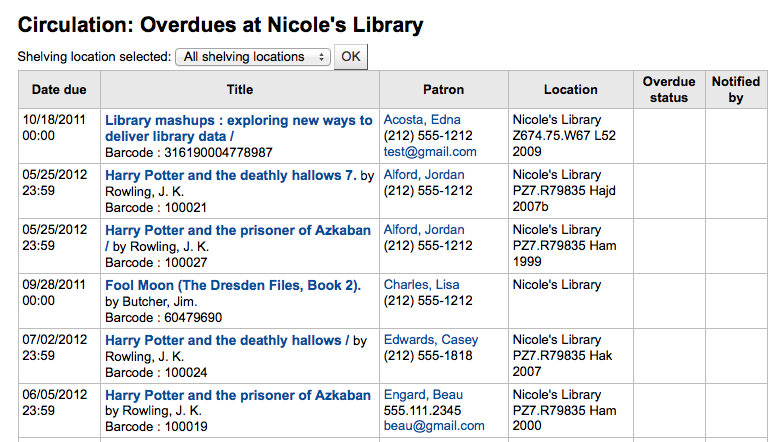
Beklemekte olan yerinde ödünç alımlar
If you are using the on site checkouts functionality (OnSiteCheckouts) then you’ll have a report to view all items that are currently checked out on site.
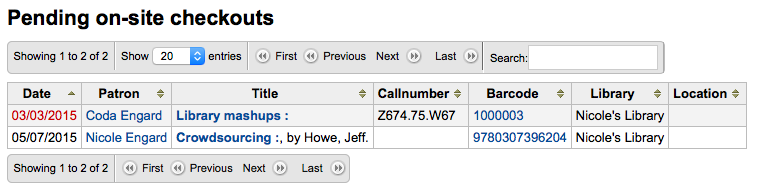
Bu, iade tarihlerini (iade tarihi geçenler kırmızı renkle gösterilecek), materyali kimin aldığını, materyal bilgilerini ve materyalin hangi kütüphanede olduğunu listeleyecektir.
Tracking in-house use
Bir çok kütüphane, materyallerinin bina için kullanımlarını izler.
Not
This is different from tracking on-site usage. In-house use is the use of items in the library by patrons without them having to check them out. On-site use is the use of items on site that must first be checked out. To learn more about on site usage please review the OnSiteCheckouts preference.
Ödünç alınmadan kütüphane içinde kullanılan materyallerin kullanımının izlenmesi Koha’da iki şekilde yapılabilir. Birincisi bir ya da daha fazla İstatistiksel Kullanıcı oluşturmaktır. Kütüphane içerisinde kullanılan materyalleri toplarken, bu materyalleri istatistiksel kullanıcınız üzerine ödünç vermek isteyeceksiniz:
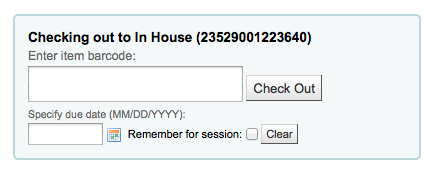
Sistem, materyali ‘ödünç verildi’ olarak işaretlemek yerine bina içinde kullanıldığını kayıt edecektir:

Materyal kullanımı hakkında doğru istatistikler tutmak için kütüphane içerisinde kullanılan tüm materyaller için bu adımları yineleyin.
The other way to record local use of items is to set your RecordLocalUseOnReturn preference to ‘Record.’ Then whenever you check an item in that is not checked out and not on hold a local use will be recorded.

Not
If you have RecordLocalUseOnReturn set to ‘Record’ you can still use your statistical patrons to record local use as well.
Self checkout
Koha comes with a very basic self checkout module. To enable this module you need to set the WebBasedSelfCheck system preference to ‘Enable.’ To use this module you have to log in as a staff member with self_check permissions.
Not
özellikle bu eylem için bir personel kullanıcı oluşturun, böylece gerçek bir kütüphanecinin gün boyu bilgisayarda oturum açmış olmasına gerek kalmaz
There is no link to the Self checkout module, but a simple addition to the OPACUserJS system preference can add one.
$(document).ready(function(){
    $("#login .btn").parent().after("<p><a href=\"http://YOUR_KOHA_OPAC_URL/cgi-bin/koha/sco/sco-main.pl\" target=\"_blank\">Self-Checkout</a></p>");
});

**Important**

The code above has line breaks added to make it more readable,
please be sure to enter the above as one line in when putting it in
the system preference.
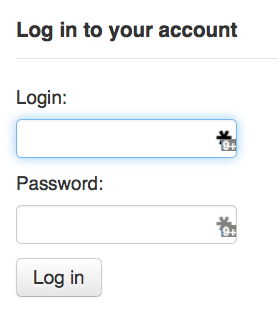
Bağlantı daha sonra oturum açma sayfasının en altında görünecektir:
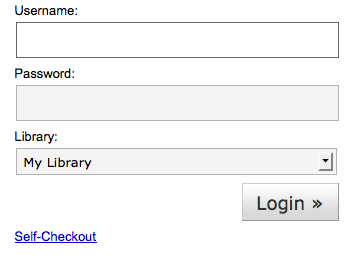
You can also access this module by going to: http://YOUR_KOHA_OPAC_URL/cgi-bin/koha/sco/sco-main.pl
When on the self checkout page, depending on the value in your SelfCheckoutByLogin system preference you will be asked to enter your cardnumber
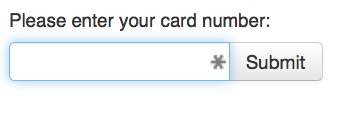
or your username and password
Otomatik ödünç alma modülüne bir kez bağlantı kurduğunuzda ödünç aldığınız materyalleri taramanız istenecektir
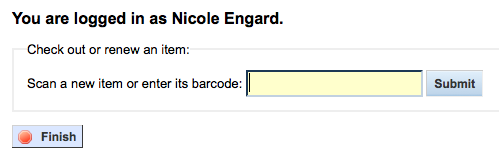
Taradığınız materyaller barkod kutusunun altında görünecektir

Materyalleri taramayı bitirdikten sonra ‘Sonlandır’ butonuna tıklamanız önemlidir. Böylelikle bir işlem fişi yazdırmanız ve otomatik ödünç alma modülünden çıkış yapmanız istenecektir.
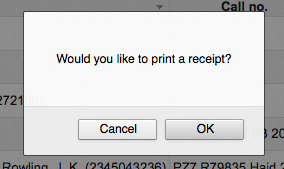
Materyalleri ödünç vermeye çalışırken ekrana hata mesajlarının geldiği ve kullanıcıyı bir kütüphaneciye yönlendirdiği bazı durumlar meydana gelecektir. Dolaşım fonksiyonlarını geçersiz kılmış olsanız bile bu durum gerçekleşecektir. Bir dolaşım bloğunu yalnızca bir kütüphaneci geçersiz kılabilir ve bu nedenle bu gibi durumlarda kullanıcıların yardım almak için bir kütüphaneci ile görüşmeleri gerekmektedir.
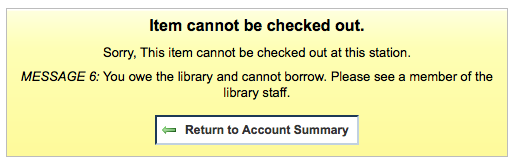
Self check-in
In order to use the self check-in module, you must first set the :ref: SelfCheckInModule <selfscheckinmodule-label> system preference to ‘Enable’.
Then, you will have to create a patron with the self_checkin_module permission.
Not
Create a staff patron specifically for this action so that you don’t leave a real staff client logged into a computer all day. You can give this patron only the aforementioned permission so it cannot be used for anything else.
Once this is done, you can head over to the self check-in page: http://YOUR_KOHA_OPAC_URL/cgi-bin/koha/sci/sci-main.pl
Log in with your staff patron with self check-in permissions
Once the computer or kiosk is set and the self check-in user logged in, patrons will be able to check-in their items themselves.
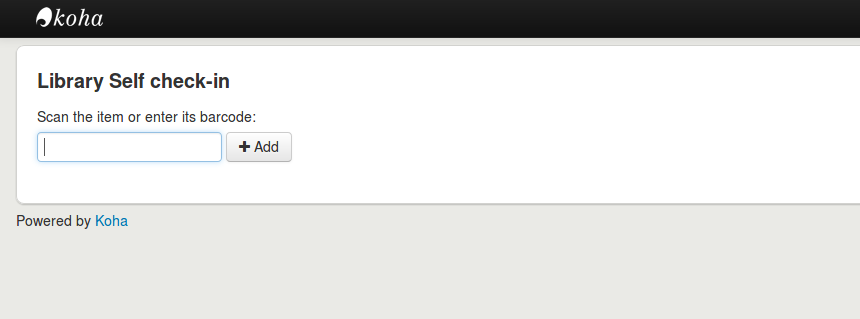
The patron will either scan the item’s barcode, if the computer is attached to a barcode scanner, or type in their item’s barcode in the box and click ‘Add’ or press enter.
Not
Most barcode scanners will automatically hit return after scanning.
Once they have scanned or entered all their items’ barcodes, they can click on the ‘Check-in’ button to return all the items at once.
Önemli
If the patron doesn’t click the ‘Check-in’ button, the items will not be returned and will stay in their account.
Önemli
The self check-in module will not warn user if the item is late, if they have fines, if the item is on hold for someone else, or if they have messages in their account.
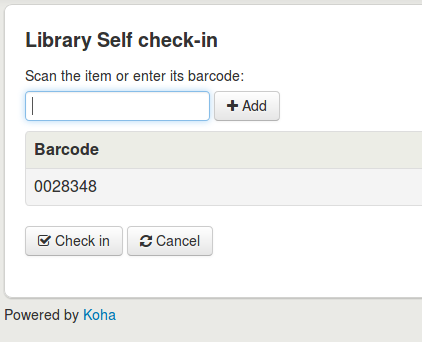
They can then click ‘Finish’ to return to the main self check-in page.
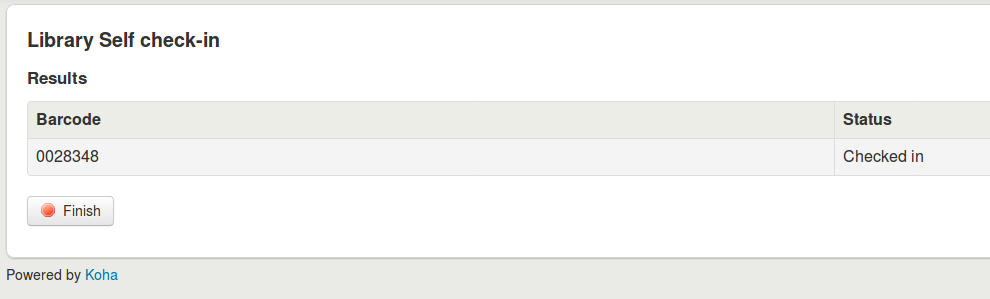
Not
If the patron doesn’t click ‘Finish’, the screen will refresh after the timeout period specified in the SelfCheckInTimeout system preference.
Not
Even if the patron doesn’t click ‘Finish’ the item will still be checked in from their account.
You can customize the look of your self check-in screens by using the SelfCheckInUserCSS system preference or the SelfCheckInUserJS system preference.
You can add content, like instructions on how to use the self check-in system for example, by using the SelfCheckInMainUserBlock system preference.
Statistics about the transactions made through the self check-in module are logged into the action_logs table in the Koha database. You can therefore build a custom report to get the statistics you need.
Offline circulation utilities
Koha, üç araçtan birini kullanarak çevrimdışı olarak dolaşım eylemlerine devam etmenizi sağlar.
Offline circulation in Koha
If the AllowOfflineCirculation preference is set to ‘Enable’ the library staff can continue to perform circulation actions within Koha when the system is offline. You will want to visit http://your-koha-staff-client-url/cgi-bin/koha/circ/offline.pl at least once while online and bookmark that page. That is the page you will go to when you are offline.
Önemli
Çevrimdışı arayüzü, tarayıcı ve kullanıcı ayarına bağlı olarak domain başına 2.5MB veya 5MB ile sınırlı HTML localStorage kullanır. Bu, daha büyük sistemlerin verilerini senkronize etmelerinin mümkün olmayacağı ve bu nedenle çevrimdışı dolaşım için ya Firefox ya da Windows uygulaması kullanmalarının önerileceği anlamına gelir.
Kurulum
Sistemin ilk defa çevrim dışı olmasından önce, Dolaşıma gidin ve buradan ‘Dahili çevrimdışı dolaşım arayüzü’ opsiyonunu seçin.
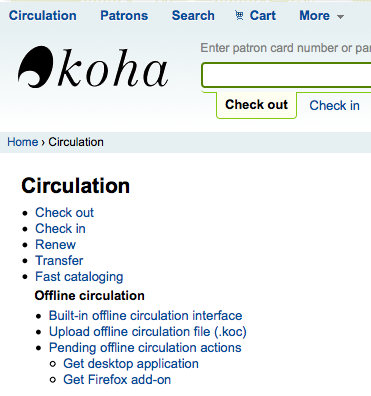
Ve ekranın sağında bulunan ‘Senkronize et’ bağlantısını tıklayarak her dolaşım bilgisayarında verilerinizi eşitleyebilirsiniz.
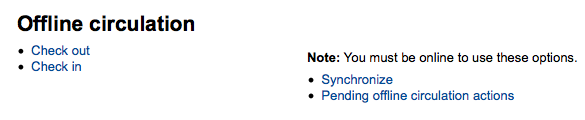
Önemli
Çevrimdışı arayüzü, tarayıcı ve kullanıcı ayarına bağlı olarak domain başına 2.5MB veya 5MB ile sınırlı HTML localStorage kullanır. Bu, daha büyük sistemlerin verilerini senkronize etmelerinin mümkün olmayacağı ve bu nedenle çevrimdışı dolaşım için ya Firefox ya da Windows uygulaması kullanmalarının önerileceği anlamına gelir.
Bu, kullanıcıların ve dolaşım verinizin yerel bir kopyasını indirmenize olanak sağlar. Verilerinizi eşitlemek için sayfanın en üstündeki ‘kayıtları indir’ bağlantısını tıklayın.
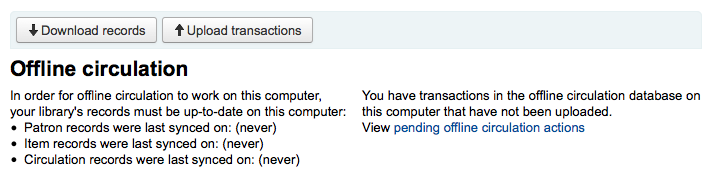
Veriniz indirildikten sonra her veri kümesinin sağ tarafında, verilerinizin en son senkronize edildiği tarihleri göreceksiniz.
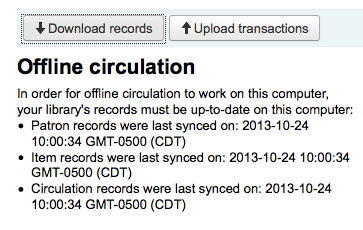
Bu işlemin, herhangi beklenmedik bağlantı kayıplarına hazırlanmak için düzenli olarak yapılması gerekir.
Dolaşımda yer alan
Sisteminiz çevrimdışı olduğunda Koha Çevrimdışı Dolaşım Sayfasını ziyaret edin (http://your-koha-staff-client-url/cgi-bin/koha/circ/offline.pl) ve çevrimdışı eylemleri gerçekleştirmek için ‘Ödünç ver’ ya da ‘İade al’ seçenekleri üzerine tıklayın.
Ödünç verme, ‘Ödünç verme’ ekranının üstündeki barkod veya isme göre kullanıcı araması ile yapılır. Bir kullanıcı seçtikten sonra, eş zamanlı olarak para cezası ve ödünç verme işlemleri de dahil olarak kullanıcı bilgisi karşınıza gelecektir.
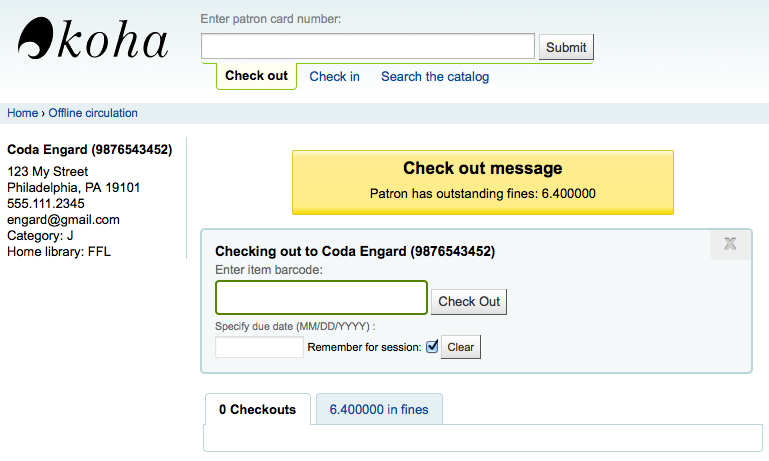
Ödünç vermek istediğiniz materyalin barkodunu tarayıcıya okutun ve bir iade tarihi girin. Bir iade tarihi girmezseniz Koha tarih girmeniz için sizi uyaracaktır.

Materyal ödünç verildiğinde, kullanıcı bilgisinin altında görülebilecektir.
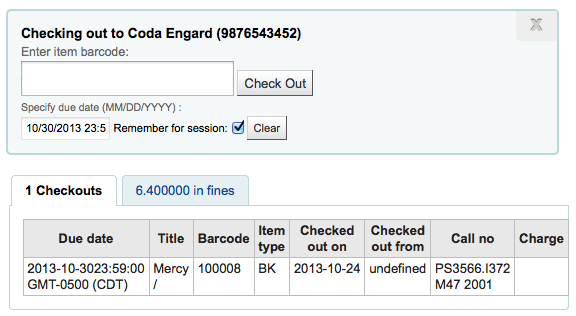
Koha offline uploading
Once the system is back online visit the ‘Synchronize’ page on the Offline circulation module and click ‘Upload transactions’
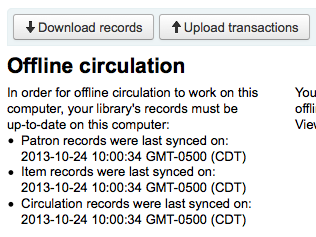
Dosyaların karşıya yüklenmesi tamamlandıktan sonra ‘Askıda olan çevrim dışı dolaşım eylemlerini gör’ üzerine tıklayabilirsiniz.
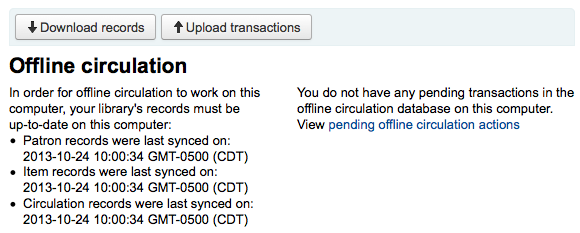
‘Bekleyen çevrimdışı dolaşım eylemleri görüntüle’ seçeneğine tıkladıktan sonra karşınıza *.koc dosyanızda Koha için yüklediğiniz tüm eylemlerin bir özeti gelecektir.
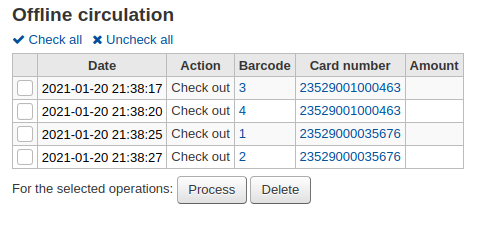
Tüm dolaşım bilgisayarlarından günlüklerin hepsi yüklendiğinde onların hepsini onaylayabilecek ya da sadece Koha’da yapmak istediğiniz işlemi seçebileceksiniz.
Click on the ‘Process’ button and Koha will record every stored transaction one by one. For each transaction, the status will change to:
“Başarılı” işlem doğru işlendi ise
“Kullanıcı bulunamadı.” kullanıcı kart numarası yanlış olduğunda
“Materyal bulunamadı.” Materyal barkodu yanlış ise
“Materyal ödünç alınmamış.” eğer kullanılabilir bir materyali iade ettiyseniz
Bittiğinde tüm işlemlerinizin özeti elinizde olacak
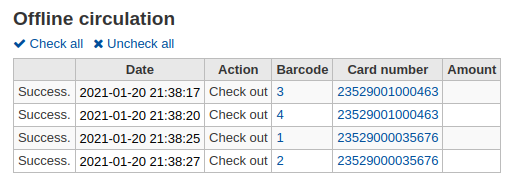
Firefox plugin
There is an offline circulation tool that you can add to your Firefox browser as an add-on. To do so, just go to https://addons.mozilla.org/en/firefox/addon/koct/ page and click on the “install now” button. You may have to confirm the installation, just click on “install now” and then restart Firefox to complete the installation.
Once you have installed the plugin and restarted Firefox, you will see the Koha logo in the download bar at the bottom right of Firefox.

Logo üzerine tıkladığınızda, araç kendi penceresi içinde açılacak.
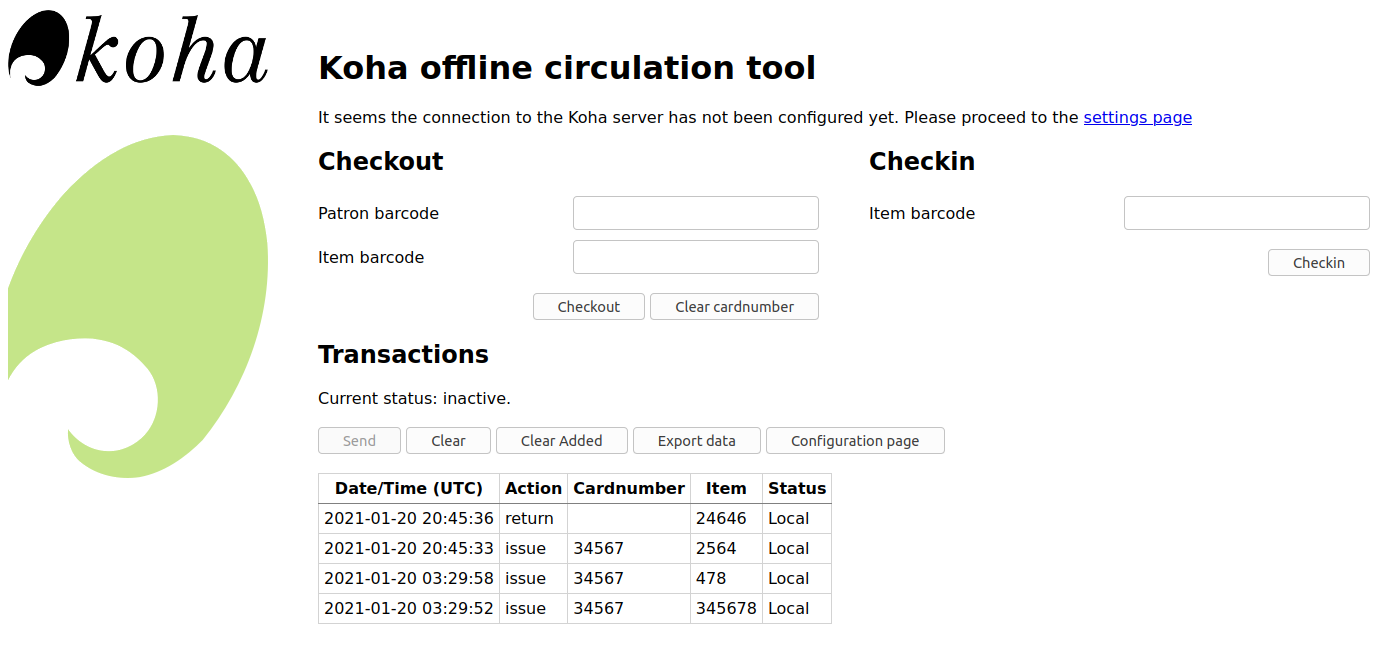
The plugin consists of three sections:
The ‘Check out’ section is where you check out items
The ‘Check in’ section is where you check in items
The ‘Transactions’ section is where you can track the transactions done while in offline mode
The transactions will keep information until you empty it.
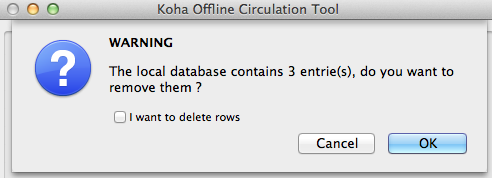
If you’d like to clear the transactions, click the ‘Clear’ box before hitting the ‘OK’ button.
The first thing you want to do then is to set up the plugin. Proceed to the settings page, linked in the top right of the page or under ‘Configuration page’ in the Transactions section.
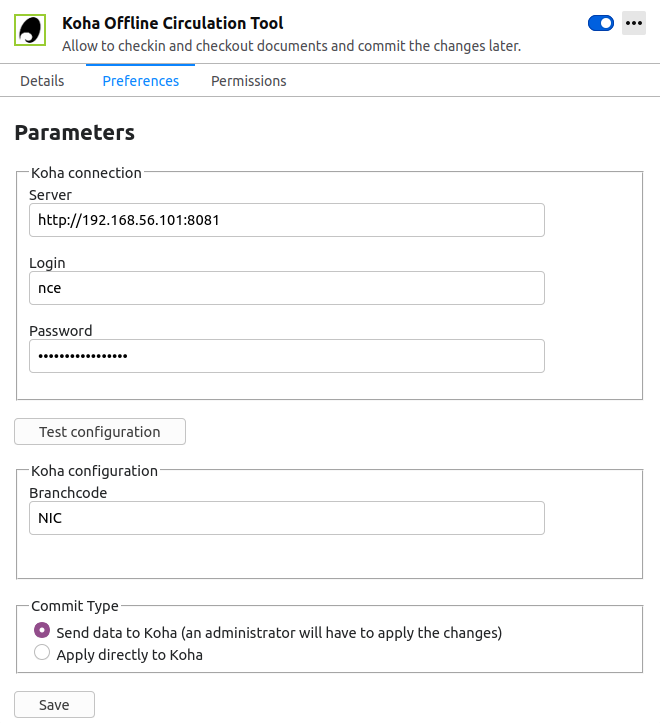
Answer the 5 questions presented:
Sunucu = kütüphaneci arayüzü URL’si
Kullanıcı adı = personel hesabınıza giriş
Parola = personel hesabınızın parolası
Branch code = the code for the branch where you are located
Commit Type = If you select ‘Send data to Koha’, your account will need to be approved by an administrator. If you select ‘Apply directly to Koha’, your account will not need to be approved.
Önemli
Ayarları kaydetmek için, eklenti penceresini kapatıp, eklenti çubuğundaki Koha logosuna tıklayarak yeniden açmalısınız.
Not
Çevrimdışı dolaşıma tahsis edilmiş bir personel hesabı oluşturabilirsiniz. Böylece dolaşım masasında hangi personel olursa olsun aynı hesaptan oturum açabilir. Bu doğrultuda, zaten dolaşımda yer alan bir grup oturumunu da kullanabilirsiniz.
Her şeyi kurduktan sonra materyallerin ödünç ve iade işlemlerine başlayabilirsiniz.
Ödünç veriliyor:
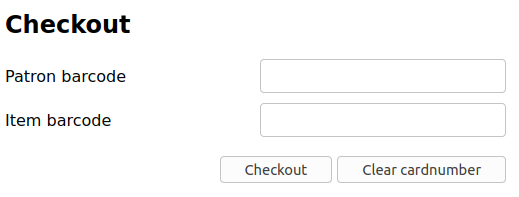
Under the ‘Checkout’ heading
Kullanıcı barkodunu okutun
Materyal barkodunu okutun
Click ‘Checkout’
İade alınıyor:
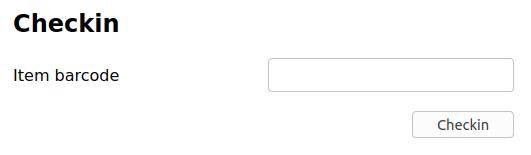
Under the ‘Checkin’ heading
Materyal barkodunu okutun
Click ‘Checkin’
Each time, you check out or check in an item, a new transaction is recorded in the local plugin database. This is recorded in the Transactions section bellow.
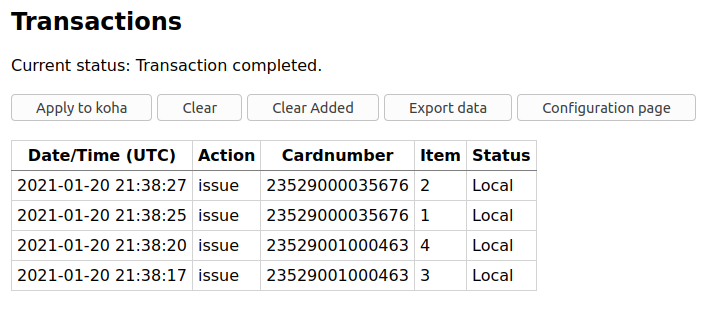
Not
Çevrimdışı olduğunuz ve işlem hareketlerini Koha’ya işlemediğiniz sürece durum “Yerel” olacaktır.
Internet bağlantınız geri geldiğinde bu işlem hareketlerini Koha’ya almak isteyeceksiniz. Bu işlem hareketlerini işlemeden önce bir kaç problemin bilincinde olmalısınız.
Because you are not connected to your Koha database when using this plugin holds will need additional processing. If an item you check in while offline has a hold, the hold is kept on the item. Since, you can’t confirm holds found during the processing of every check in, the holds stay on the item and will need to be managed later. If you only checked in a few items you can just keep a record of them all. If you checked in a lot of items you can use the Holds queue once it rebuilds to see what holds made it to the shelf erroneously.
Benzer şekilde, bir kullanıcı kartının süresi dolarsa, çevrim dışı dolaşım aracının bundan bilgisi olmayacaktır, böylece normalde engellenecek olan kullanıcı hesabına bakılmaksızın ödünç verme işlemi kaydedilecektir.
Bu veriyi Koha’ya eklemek için iki seçeneğiniz var
Apply to Koha
If you checked in/out on more than one computer at the same time, what you want is to process every transaction consistently. Let’s say for instance that one patron checked a book out on one computer and then checked the same book in on another computer. To be consistent, you need to record the check out first and then the check in. Not the opposite! To do so, you need to group every transaction in one place, sort them all and then, process everything. So, you need to use the “Apply to Koha” option from every plugin/computer you worked with. This way, the log will go to Koha and be accessible from the Offline Circulation page.
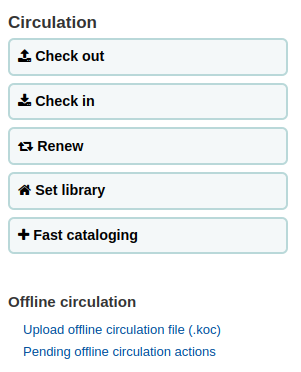
Gidiş yolu: Dolaşım > Askıya alınmış çevrimdışı dolaşım eylemleri
Tüm dolaşım bilgisayarlarından günlüklerin hepsi yüklendiğinde onların hepsini onaylayabilecek ya da sadece Koha’da yapmak istediğiniz işlemi seçebileceksiniz.
Süreç butonuna tıklayın ve Koha depolanan her işlemi tek tek kaydedecektir. Her bir işlem için, durum şu şekilde değişecektir:
“Başarılı” işlem doğru işlendi ise
“Kullanıcı bulunamadı.” kullanıcı kart numarası yanlış olduğunda
“Materyal bulunamadı.” Materyal barkodu yanlış ise
“Materyal ödünç alınmamış.” eğer kullanılabilir bir materyali iade ettiyseniz
Bittiğinde tüm işlemlerinizin özeti elinizde olacak
Doğrudan uygulayınız
Tüm dolaşım işlemleri eylemlerini tek bir bilgisayar üzerinden gerçekleştirdiyseniz zaten her şey sistematik olarak düzenlenmiş olacaktır, böylece “doğrudan Uygula” seçeneğini seçebilirsiniz
İşlemlerin uygulandığını size bildirmek için durum sütunları güncellenecektir
“Başarılı” işlem doğru işlendi ise
“Kullanıcı bulunamadı.” kullanıcı kart numarası yanlış olduğunda
“Materyal bulunamadı.” Materyal barkodu yanlış ise
“Materyal ödünç alınmamış.” eğer kullanılabilir bir materyali iade ettiyseniz
Offline circulation tool for Windows
The Offline circulation utility can be downloaded at: https://github.com/bywatersolutions/koha-offline-circulation/releases
To generate a borrowers.db file for loading in to the Windows tool you will need to run the file generator via a cron job.
Upload offline circulation file
Windows için çevrimdışı dolaşım aracı sisteminiz geri geldiğinde Koha’ya yükleyebileceğiniz bir KOC dosyası oluşturacaktır.
Dolaşım menüsündeki , ‘Çevrimdışı dolaşım dosyasına (.koc)’ tıklayınız
*.koc dosyası için bilgisayarınıza göz atın
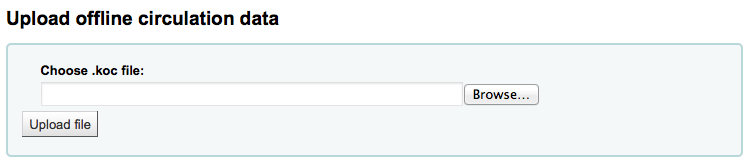
Dosya yüklendiğinde, dosyayı işleyin üzerine tıklayın
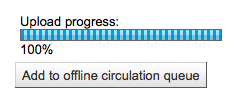
Bu tamamlandığında diğer bir dosyayı karşıya yükleyebilir ya da askıda olan çevrimdışı dolaşım eylemlerini uygulayabilirsiniz.
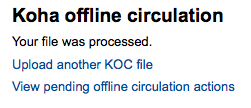
‘Bekleyen çevrimdışı dolaşım eylemleri görüntüle’ seçeneğine tıkladıktan sonra karşınıza *.koc dosyanızda Koha için yüklediğiniz tüm eylemlerin bir özeti gelecektir.
Tüm dolaşım bilgisayarlarından günlüklerin hepsi yüklendiğinde onların hepsini onaylayabilecek ya da sadece Koha’da yapmak istediğiniz işlemi seçebileceksiniz.
Süreç butonuna tıklayın ve Koha depolanan her işlemi tek tek kaydedecektir. Her bir işlem için, durum şu şekilde değişecektir:
“Başarılı” işlem doğru işlendi ise
“Kullanıcı bulunamadı.” kullanıcı kart numarası yanlış olduğunda
“Materyal bulunamadı.” Materyal barkodu yanlış ise
“Materyal ödünç alınmamış.” eğer kullanılabilir bir materyali iade ettiyseniz
Bittiğinde tüm işlemlerinizin özeti elinizde olacak