सूचीकरण
Before you start cataloging in Koha you're going to want to do some basic setup. Refer to the Implementation checklist for a full list of these things. Most importantly you're going to want to make sure that your MARC bibliographic frameworks are all defined the way you want. Once in the cataloging module you will not be able to add or remove fields and subfields so your frameworks must be ready before you start cataloging.
आप सीधे कोहा में रिकॉर्ड भेजने के लिए ओसीएलसी कनेक्शन का उपयोग भी कर सकते हैं। उस पर अधिक जानकारी के लिए कृपया समीक्षा करें: रेफर: ओसीएलसी कनेक्शन गेटवे सेटअप परिशिष्ट
Get there: More > Cataloging
Bibliographic records
In Koha the bibliographic record contains the main information related to the material. This includes things like the title, author, ISBN, etc. This information is stored in Koha in Marc (different flavors of Marc are supported in Koha). Once this information is saved, item records can be attached.
Adding records
रिकॉर्ड्स मूल या प्रतिलिपि कैटलॉग के माध्यम से कोहा करने के लिए जोड़ा जा सकता है। आप भी अपने काम के सभी के लिए बुनियादी या उन्नत कैटलॉग इंटरफ़ेस का उपयोग करने के लिए चुन सकते हैं।
यदि आप बुनियादी संपादक में एक खाली टेम्पलेट का उपयोग कर एक रिकार्ड सूची को चाहते हैं
Click 'New record'
Choose the framework you would like to base your record on
नोट
You can create or modify frameworks in the Administration module.
यदि आप उन्नत संपादक में एक खाली टेम्पलेट का उपयोग कर एक रिकार्ड सूची को चाहते हैं
सक्षम करें: रेफरी: EnableAdvancedCatalogingEditor वरीयता
क्लिक करें 'उन्नत संपादक' बटन
If you want to catalog a record based on an existing record at another library in the basic or advanced editor
क्लिक करें 'Z39.50/एसआरयू से नई'
Click on the arrow to pre-select a framework for your imported your catalog record (the Default framework is used if you do not make a selection).
आइटम के लिए खोज आप सूची को चाहते हैं
नोट
कोई परिणाम नहीं मिला रहे हैं, तो कम क्षेत्रों के लिए खोज करने की कोशिश करें, सभी Z39.50 लक्ष्यों उपरोक्त क्षेत्रों को नही खोज सकते हैं।
Search targets can be altered by using the Z39.50 admin area.
The display of extra MARC fields and subfields can be configured via the AdditionalFieldsInZ3950ResultSearch preference.
From the results' 'Actions' button you can view the MARC or Card view for the record or choose to import it into Koha.
नोट
You can customize the columns of this table in the 'Table settings' section of the Administration module (table id: resultst).
आप शीर्षक आप अपने Z39.50 खोज में जरूरत है आप अपने परिणामों की बाईं तल पर 'प्रयास एक और खोज' बटन पर क्लिक कर सकते हैं परिणाम नहीं मिल पा रहे हैं तो
Basic editor cataloging
मूल संपादक में एक बार आप एक खाली ढांचे खोला या Z39.50 के माध्यम से एक रिकार्ड आयात किया है आप फार्म सूचीकरण जारी रखने के लिए के साथ प्रस्तुत किया जाएगा
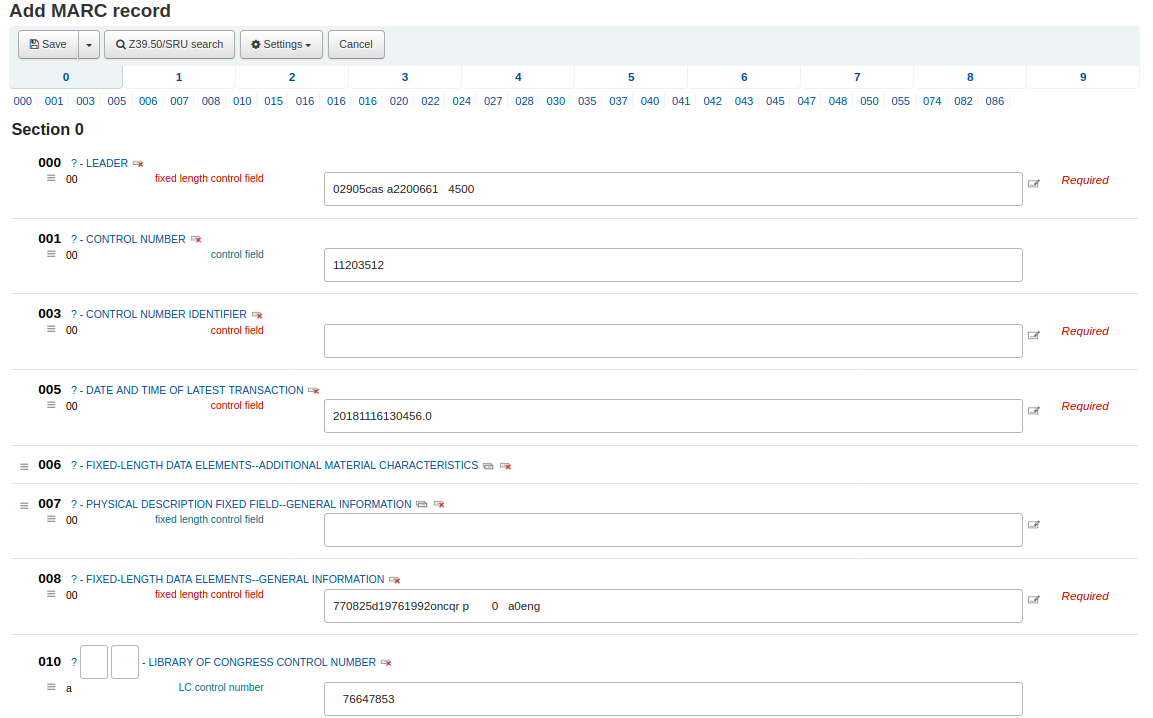
If you would rather not see the MARC tag numbers you can change the value in your hide_marc system preference or each user can check the box next to 'Show tags' found under 'Settings'.
टैग विवरण पर एक ढह टैग क्लिक करें विस्तार करने के लिए
To get help from the Library of Congress on a MARC tag click the question mark (?) to the right of each field number
It is possible to change the source of the MARC documentation using the MARCFieldDocURL system preference
यदि आपको लगता है कि स्क्रीन पर यह क्लैटर आप 'सेटिंग' के तहत पाया 'एमएआरसी टैग दस्तावेज़ीकरण लिंक दिखाएँ' नोट के बगल में दिए गए बॉक्स को अनचेक करके प्रश्न चिह्न छिपा सकते हैं
कभी-कभी फ़ील्ड आपके मूल्य में होने के कारण संपादन योग्य नहीं हो सकता है: रेफर: BiblioAddsAuthorities सिस्टम वरीयता। यदि आपके पास यह वरीयता निर्धारित है, तो अधिकारियों द्वारा नियंत्रित क्षेत्रों में कैटलरों को टाइप करने की अनुमति देने के लिए सेट नहीं है, तो आप फ़ील्ड के बाईं ओर एक लॉक प्रतीक देख सकते हैं।
टैग के अधिकार के लिए 'इस टैग को दोहराने के' आइकन पर एक क्षेत्र के नकल करने के लिए क्लिक करें
सही क्रम में उपक्षेत्रों को स्थानांतरित करने के लिए, ऊपर क्षेत्र के बाईं ओर तीर क्लिक करें
क्लोन आइकन पर एक उप क्षेत्र क्लिक नकल करने के लिए (एक नकल क्षेत्र को हटाने के लिए, हटाएं क्लोन आइकन पर क्लिक करें) क्षेत्र की सही करने के लिए
एक उप क्षेत्र निकालने के लिए (अगर कोई है ही प्रकार के एक से अधिक), क्लिक करें - क्षेत्र की सही करने के लिए (ऋण चिह्न) -
To use a plugin click on the icon to the right of the field
कुछ तय क्षेत्रों संपादकों कि सामग्री के प्रकार आप को सूचीबद्ध कर रहे हैं पर आधारित बदल जाएगा (उदाहरण के लिए 006 और 008 क्षेत्रों)
एक बार जब आप समाप्त कर दिया है, शीर्ष पर 'सहेजें' बटन पर क्लिक करें और चुनें कि क्या आप को बचाने और आपने बनाया है बिब रिकॉर्ड देखने या जारी रखने के लिए आइटम रिकॉर्ड से जुड़ी/संपादित जोड़ना चाहते हैं
चुनने 'सेव करें और देखें रिकॉर्ड' आप रिकार्ड तुम सिर्फ सूचीबद्ध करने के लिए सही लाएगा
चुनने 'बचाने के लिए और संपादित' आइटम बिब रिकॉर्ड बचत इतनी है कि आप जोत संलग्न कर सकते हैं के बाद जोड़ें/संपादित आइटम प्रपत्र पर ले जायेगा
'सहेजें और जारी रखें संपादन' का चयन करने से आप अपने काम को अब तक बचा सकते हैं और आपको काम जारी रखने के लिए संपादक में रख सकते हैं
आप के बारे में प्रणाली आप सेव करने से पहले चेतावनी दी जाएगी करने के लिए एक नकली रिकॉर्ड जोड़ने के लिए कर रहे हैं
टिप्पणी
To find possible duplicates, the system searches for the ISBN, and if there is not ISBN, it searches for the same combination of title and author.
Advanced editor cataloging
एडवांस्ड कैटलॉगिंग एडिटर का इस्तेमाल करने के लिए आपको सक्षम करने की आवश्यकता है :रेफर:EnableAdvancedCatalogingEditor वरीयता
नोट
This feature does not currently include any support for UNIMARC or NORMARC fixed fields.
उन्नत संपादक में एक बार आप एक खाली ढांचे खोला या Z39.50 के माध्यम से एक रिकार्ड आयात किया है आप फार्म सूचीकरण जारी रखने के लिए के साथ प्रस्तुत किया जाएगा
बाईं तरफ खोज बॉक्स का उपयोग कर आप Z39.50 खोजों प्रदर्शन कर सकते हैं
और Z39.50 उन से यह परिणाम है कि आप सही करने के लिए लिंक पर क्लिक करके मार्क रिकॉर्ड देख सकते हैं
क्लिक 'आयात' के संपादक को रिकॉर्ड में लाने जाएगा, जहां आप अपने संपादन प्रदर्शन कर सकते हैं
नोट
जब उन्नत संपादक में एक नए क्षेत्र को जोड़ने के लिए, आप एक खाली सूचक के लिए कुंजी रेखांकित करने की जरूरत है, और रिक्त स्थान के साथ संकेतक के चारों ओर।
नोट
तुम पहले उपक्षेत्र सीमांकक से पहले एक अंतरिक्ष कुंजी की जरूरत है, लेकिन इससे पहले कि या क्षेत्र में अन्य उपक्षेत्र सीमांकक के बाद नहीं।
At the bottom of the editor you will see help from the Library of Congress for the field you are on. In cases where your MARC is invalid you will see red highlighting. To edit the record using only keyboard functions the Keyboard shortcuts button will inform you of the necessary commands.
A clipboard is available to copy and paste text between fields. See the image and table below for the shortcuts used with the clipboard.
Advanced cataloging keyboard shortcuts
निम्नलिखित कीबोर्ड शॉर्टकट समय और क्लिक बचाने के लिए उन्नत सूचीकरण मॉड्यूल में इस्तेमाल किया जा सकता है।
लघु-पथ: |
व्यवहार |
|---|---|
Ctrl-C |
Copy current field |
Shift-Ctrl-C |
Copy current subfield |
Ctrl-X |
Delete current field and copy to 'clipboard' |
Shift-Ctrl-X |
Delete current subfield and copy to 'clipboard' |
Alt-C |
Insert copyright symbol (©) |
Alt-P |
Insert copyright symbol (℗) (sound recordings) |
Ctrl-D |
सीमांकक सम्मिलित (‡) |
Ctrl-I |
Copy current field on next line |
शिफ़्ट-एन्टर |
सम्मिलित लाइन ब्रेक |
Shift-Ctrl-L |
Link field to authorities |
एंटर |
अगली पंक्ति पर नए क्षेत्र |
टैब |
अगले स्थिति में ले जाएँ |
Ctrl-P |
Paste selection from 'clipboard' |
शिफ़्ट-टैब |
पिछली स्थिति में ले जाएँ |
Ctrl-H |
वर्तमान subfield पर मदद प्राप्त करें |
Shift-Ctrl-K |
Toggle Keyboard |
Ctrl-S |
Save record (cannot be remapped) |
Advanced cataloging virtual keyboard
A virtual keyboard is available for adding diacritics and symbols. Use the shortcut Shift-Ctrl-K to display the keyboard. A 'Keyboard layouts' button will display at the top of the advanced editor that allows you to set the virtual keyboard layout for different languages.
Macros in advanced cataloging
एक नया मैक्रो रिकॉर्ड करने के लिए:
Select the "Macros..." button
एक पॉप अप विंडो होगा। इस विंडो में, "नया मैक्रो ...," कुंजी नया मैक्रो का पॉप-अप बॉक्स में नाम का चयन करें और ठीक चुनें।
अब थोड़ा संख्या 1 के अधिकार के लिए क्लिक करें, और अपने मैक्रो की पहली पंक्ति कुंजी। एक बहु-लाइन है, यानी, बहु क्षेत्र मैक्रो के लिए, वापस कुंजी हिट किया इतना है कि एक छोटी संख्या 2 प्रतीत होता है, और कुंजी दूसरी पंक्ति/क्षेत्र, आदि
अपने मैक्रो स्वचालित रूप से सहेजा जाएगा। जब समाप्त हो तुम "एक्स" खिड़की बंद करने के लिए, या रिकॉर्ड है कि आप संपादन कर रहे हैं पर चलाने के लिए एक मैक्रो का चयन करें, या चलाने के लिए एक और मैक्रो का चयन चयन कर सकते हैं।
एक मौजूदा मैक्रो संपादित करने के लिए:
Select the "Macros..." button
एक विंडो पॉप अप होगी इस विंडो में, मैक्रो का चयन करें जिसे आप संपादित करना चाहते हैं और अपने परिवर्तनों को बनाते हैं।
आपका काम स्वचालित रूप से सहेजा जाएगा, और जब समाप्त हो तुम "एक्स" खिड़की बंद करने के लिए, या रिकॉर्ड है कि आप संपादन कर रहे हैं पर चलाने के लिए एक मैक्रो का चयन करें, या चलाने के लिए एक और मैक्रो का चयन चयन कर सकते हैं।
मैक्रो भाषा की बुनियादी सिंटेक्स:
नया 500=‡aविद्वेष के साथ संपादित
एक नया 500 a ‡a उप क्षेत्र के साथ बनाता है और यह सेट "विद्वेष के साथ संपादित करने के लिए"।
245c= द्वारा जे.के. रॉलिंग
"जे.के.राउलिंग द्वारा" के लिए रिकॉर्ड में पहले 245 टैग की पहली ‡c उपक्षेत्र सेट इसे बनाने के लिए यदि आवश्यक हो।
082a={084a}
पहले 082 टैग का ‡a उप क्षेत्र सेट (उपक्षेत्र यदि आवश्यक बनाने) पहले 084‡a की सामग्री के लिए.
संकेतक=_1
अंतिम उल्लेख टैग (इस मामले में, 082) से "_" और "1" के संकेतक सेट करता है
नया 090a=Z674.75.W67
पहले 090 पर एक नया ‡a उप क्षेत्र बनाता है (लेकिन उस क्षेत्र पहले से मौजूद है तभी)और यह Z674.75.W67 को निर्धारित करता है।
नया 090a पर बन्द=Z674.75.W67
ऊपर की तरह समान.
नया 245b बाद a= a पराक्रम की कहानी और जादू /
पहले एक उप क्षेत्र के बाद एक नया ‡b बनाएँ और पर इसे सेट करें " पराक्रम की कहानी और जादू /".
मिटाना 245b
पहले 245 पर पहले ‡b उपक्षेत्र ‡b को हटाता है
Adding analytic records
पुस्तकालय कभी कभी पत्रिका लेख और मोनोग्राफ और विश्लेषणों के माध्यम से सूचीबद्ध पुस्तकालय संरक्षक के लिए सुलभ धारावाहिकों के भीतर लेख बनाते हैं। एनालिटिक्स सूचीबद्ध ऐसी एक किताब, एक पत्रिका, अखबार या सीरियल के भीतर एक लेख के रूप में इन लेखों, अध्याय, वर्गों के लिए अलग ग्रंथ सूची रिकॉर्ड, आदि के लिए एक बड़ा संसाधन के भीतर पाया बनाता है। एनालिटिक्स सूचीबद्ध करने में, हालांकि एक अलग बिब रिकॉर्ड खिताब के लिए बनाई गई है, यह शारीरिक रूप से मेजबान आइटम से अलग नहीं है। AACR2 के अध्याय 13 में Analytics के बारे में अधिक जानें।
If you would like to catalog analytic records there are two options. One is to use the Easy analytics function; the other is the Analytics enhanced workflow.
Easy analytics
The easy analytics feature makes linking analytic records together easier. The first thing you need to do is set the EasyAnalyticalRecords preference to 'Display' and the UseControlNumber preference to 'Don't use.'
After cataloging your analytic record (see adding records for more on creating records) click 'Edit' from the normal view and choose to 'Link to host item'
इस मद में इस रिकॉर्ड से जोड़ा जाना चाहिए के लिए बारकोड दर्ज करने का संकेत होगा।
आइटम के बारकोड में प्रवेश करने और 'चुनें' क्लिक करने के बाद आप एक पुष्टिकरण संदेश प्राप्त होगा।
रिकॉर्ड अब ठीक से भरे लिंक पूरा करने के लिए 773 मैदान में होगा।
To view all of the items tied to the host record, do a search for the record, click the 'Analytics' tab on the left and the analytics tied to each barcode will be shown under the 'Used in' column.
नोट
It is also possible to create analytic records from this screen by clicking on 'Create analytics'
You can also see the analytics attached to this record by clicking the 'Show analytic' link towards the top of the record in the normal view.
विश्लेषणात्मक रिकॉर्ड को देखते हुए आपको 'एनालिटिक्स' टैब को देखते हुए होल्डिंग टेबल में 'होस्ट रिकॉर्ड' कॉलम के तहत मेजबान आइटम के लिए एक लिंक भी दिखाई देगा।
Analytics enhanced workflow
To use the enhanced workflow method of adding analytics, the first thing you need to do is set the EasyAnalyticalRecords preference to 'Don't display' and the UseControlNumber preference to 'Use.'
After cataloging your original record (see adding records for more on creating records) click 'New' from the normal view and choose to 'New child record.'
This will open a new blank record for cataloging. The blank record will have the 773 field filled in properly to complete the link once the record is saved.
The 'Show analytics' link from the host record will now use the hosts record control number (001) to search for all records on the system of the type 'monographic component part' or 'serial component part' (Leader position 7) with a 773 subfield w that contains the hosts record control number.
Editing analytics
If you have linked an analytic record incorrectly you can remove that link by editing the analytic record (not the host record).
To do this, go to the analytic record and click the 'Edit' button. For UseControlNumber simply edit or remove the corresponding 773.
If using EasyAnalytics choose to 'Edit items'; To the left of each item you will see two options.
Clicking 'Edit in host' will allow you to edit the item on the host record.
क्लिक 'से अलग' 773 क्षेत्र और विश्लेषणात्मक और मेजबान के बीच की कड़ी को हटा देगा।
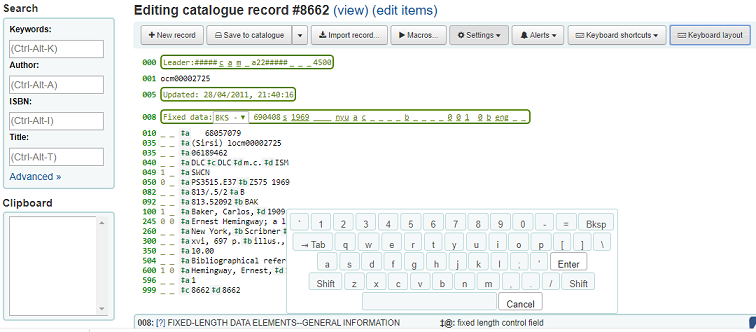
Editing records
To edit a record you can click the 'Actions' button and choose 'Edit biblio' from the search results on the cataloging search page
या ग्रंथ सूची रिकार्ड पर संपादित करें बटन क्लिक करके और चुनने 'रिकार्ड संपादित करें'
रिकॉर्ड मार्क संपादक में खुलेगा
The alternative is to search via Z39.50 to overlay your record with a fuller record found at another library. You can do this by choosing 'Replace record via Z39.50/SRU' from the 'Edit' menu.
Once you choose that, you will be brought to a Z39.50 search window to search other libraries for the record in question.
एक बार जब आप अपने संपादन (या तो विधि के माध्यम से) बना दिया है आप संपादक की बाईं शीर्ष पर 'सहेजें' क्लिक कर सकते हैं।
You can also use the edit menu to add your own custom cover image if you have either OPACLocalCoverImages and/or LocalCoverImages set to 'Display' by choosing 'Upload image' from the menu.
Choosing 'Upload image' will take you to the Upload Local Cover Image Tool.
Duplicating records
Sometimes a copy of the record you need to catalog can't be found via Z39.50. In these cases you can create a duplicate of similar record and edit the necessary pieces to create a new record. To duplicate an existing record click 'Edit as new (duplicate)' from the 'Edit' menu on the bibliographic record.
This will open a new MARC record with the fields filled in with the values from the original bibliographic record.
Attaching files to records
आप कोहा के लिए फाइल को अपलोड करने के लिए चाहते हैं, तो आपको कुछ सेटिंग्स के साथ ऐसा कर सकते हैं।
आपको अपने सिस्टम व्यवस्थापक से 'upload _path' config चर को सेट करने के लिए पूछना होगा कि फाइलें कहाँ संग्रहीत होंगी
You can see if your upload path is set correctly by visiting About Koha > System information. If there is an error you will see it there.
आप यह सुनिश्चित करना चाहते हैं कि आपका :रेफर: OPACBaseURL प्रणाली वरीयता उचित रूप से सेट की गई है
You will want to add the upload.pl plugin to the 856$u subfield in one (or multiple) of your frameworks
एक बार जब आप सभी की स्थापना कर रहे हैं आप नियमित रूप सूचीकरण के साथ जारी रख सकते हैं। आप एक प्लगइन आइकन 856$u कि अपलोड खोलने के लिए और/या खिड़की खोज करेंगे करने के लिए अगले देखेंगे
इस सूची से आप एक फ़ाइल को खोजने के लिए और इसे संलग्न करने के लिए ब्राउज़ क्लिक कर सकते हैं, या आप फ़ाइलों को आपने पहले खोज बॉक्स का उपयोग अपलोड कर दिया है खोज सकते हैं। खोज से परिणाम आप जो फ़ाइल संलग्न करने के लिए चुन सकते हैं।
एक बार फाइल चुना जाता है यह मार्क रिकॉर्ड में और विस्तार से प्रदर्शन पर एक कड़ी के रूप में दिखाई देगा।
नोट
If the file is a PDF, it will be opened directly in the user's browser whereas if the file is an image or another type of file, the user will be prompted to download it.
Merging records
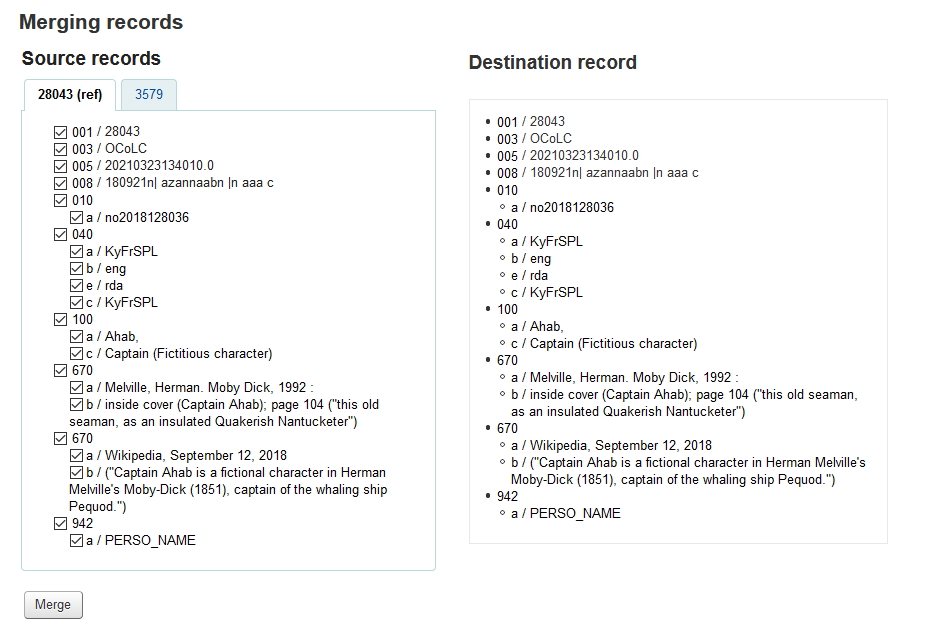
ग्रंथ सूची रिकॉर्ड मर्ज करने के लिए एक साथ आप सूचीबद्ध मॉड्यूल के लिए जाने के लिए और एक खोज प्रदर्शन करना चाहते हैं जाएगा।
आपको लगता है कि खोज परिणामों पर डुप्लिकेट देख अगर स्क्रीन आप डुप्लिकेट करने के लिए अगले बॉक्स चेक करें और परिणामों के शीर्ष पर 'मर्ज चयनित' बटन क्लिक कर सकते हैं।
एक बार जब आप रिकॉर्ड आप मर्ज करना चाहते हैं का चयन किया है, सूची के शीर्ष पर 'मर्ज चयनित' बटन पर क्लिक करें। आपसे पूछा जाएगा आप अपनी प्राथमिक रिकॉर्ड के रूप में रखना चाहते हैं और जो मर्ज के बाद हटा दिया जाएगा जो रिकॉर्ड की। अगर रिकॉर्ड विभिन्न फ्रेमवर्क का उपयोग कर बनाया गया था, कोहा भी आप से पूछना होगा कि क्या फ्रेमवर्क आप हाल में विलय कर रिकॉर्ड का उपयोग करना चाहते हैं।
आप के सारे रिकॉर्ड के लिए मार्क (उन रिकॉर्ड के लिए बिब नंबर के साथ लेबल टैब द्वारा प्रत्येक सुलभ) के साथ प्रस्तुत किया जाएगा। डिफ़ॉल्ट रूप से पूरे पहला रिकॉर्ड का चयन किया जाएगा, अंतिम (गंतव्य) रिकॉर्ड में क्षेत्रों आप नहीं चाहते अचयनित और उसके बाद का चयन करने के लिए जो क्षेत्रों अंतिम (गंतव्य) रिकॉर्ड में होना चाहिए दूसरे टैब पर चलते हैं।
क्या आप एक त्रुटि के साथ प्रस्तुत किया जाएगा (दोनों से # 1 रिकॉर्ड और # 245 क्षेत्र को चुनने 2) की तरह एक क्षेत्र है कि repeatable नहीं है दो बार जोड़ने के लिए प्रयास करना चाहिए
रिकॉर्ड आप विलय कर रहे हैं नीचे पर रिपोर्ट करने के लिए क्षेत्रों में प्रवेश के लिए एक विकल्प है। यह तुम क्या आप मर्ज पुष्टि पृष्ठ पर दिखाई देने वाली फ़ील्ड को नियंत्रित करने के लिए अनुमति देगा:
आप कुछ भी नहीं दर्ज करते हैं तो आप biblionumbers की पुष्टि के साथ ही प्रस्तुत किया जाएगा
यदि आप फ़ील्ड दर्ज करते हैं तो आप उन पुष्टिकरण पेज पर देखेंगे (आप डिफ़ॉल्ट के साथ सेट कर सकते हैं: ref: MergeReportFields वरीयता)
एक बार जब आप पूरा कर लिया है अपने चयन 'मर्ज' बटन पर क्लिक करें। प्राथमिक रिकॉर्ड अब आप डेटा के रूप में अच्छी तरह से दोनों बिब रिकॉर्ड से आइटम / जोत के सभी के रूप में इसके लिए चुना शामिल होंगे, और दूसरा रिकॉर्ड हटा दिया जाएगा।
नोट
If you would like you can also use the Lists tool for merging records together. Learn more here.
Deleting records
एक ग्रंथ सूची रिकॉर्ड को हटाने के लिए बस 'संपादन' बटन चुनें और 'रिकॉर्ड हटाएँ' का चयन करें
Bibliographic records can only be deleted once all items have been deleted. If you try to delete a bibliographic record with items still attached you will see that the delete option is grayed out.
Item records
कोहा में प्रत्येक ग्रंथ सूची रिकॉर्ड जुड़ी एक या एक से अधिक आइटम हो सकता है। इन आइटमों को कभी कभी होल्डिंगस के रूप में करने के लिए भेजा जाता है। प्रत्येक आइटम भौतिक प्रतिलिपि पुस्तकालय है करने के लिए जानकारी भी शामिल है।
Adding items
After saving a new bibliographic record, you will be redirected to a blank item record so that you can attach an item to the bibliographic record. You can also click 'Add/Edit items' from the cataloging search results
or you can add new item at any time by clicking 'New' on the bibliographic record and choosing 'New item'
आइटम संपादित रूप दिखाई देगा:
बहुत कम से कम, अगर आप आइटम घूम पर योजना, निम्नलिखित क्षेत्रों के लिए नए आइटम के लिए दर्ज किया जाना चाहिए:
2 - वर्गीकरण का प्रकार
a -- स्थाई लोकेशन
b - वर्तमान स्थान
o - पूर्ण कॉल नंबर
If you'd like you can use the cataloguing plugin 'call number browser' (cn_browser.pl) for this field. If it's enabled you'll see a ... to the right of the field. When clicked that will open a call number browser window if the row is highlighted in Red then the call number is in use, if there is a thin Green line instead then the call number can be used.
p - बारकोड
v - लागत, प्रतिस्थापन कीमत
यह मान संरक्षक के लिए शुल्क लिया जाएगा जब आप निशान और आइटम के रूप में वे 'खोया' चैक आउट की है
y - कोहा आइटम प्रकार
यह सुनिश्चित करने के लिए कि इन मूल्यों को आप में भर दिया गया है, आप इन्हें अनिवार्य रूप में चिह्नित कर सकते हैं: संदर्भ: `फ्रेमवर्क <marc-bibliographic-frameworks-label> 'आप उपयोग कर रहे हैं और फिर वे' आवश्यक 'लेबल के साथ लाल रंग में दिखाई देंगे । आइटम तब तक नहीं बचाएगा जब तक आवश्यक फ़ील्ड भर नहीं हो जाती।
नोट
एक ढांचे में आवश्यक वस्तु सबफ़ेल्ड बनाने के लिए आप 952 फ़ील्ड को संपादित करना चाहते हैं :रेफर: फ्रेमवर्क संपादक <marc-bibliographic-frameworks-label>
You can add a new authorized value directly from the add and edit item screen for any fields that are linked to authorized value categories such as Shelving location (subfield$c) or Collection code (subfield$8).
Start to type the authorized value description, if a match is not found you will see the option '(Select to create)'.
Click on this option to display a pop-up window where you can create you new authorized value.
The authorized value category will be pre-populated from the field you are using, for example LOC for Shelving location, CCODE for Collection code. Take care when choosing your authorized value code. Refer to the notes on adding new authorized values for the correct format of these codes. Use the Description field for the actual value that will be displayed

You can add authorized values in the same way from bibliographic and authority records.
टिप्पणी
You must have the manage_auth_values administration permission to add authorized values from cataloguing.
Below the add form there are 3 buttons for adding the item.
'Add item' will add just the one item
'Add & duplicate' will add the item and fill in a new form with the same values for you to alter
'Add multiple items' will ask how many items and will then add that number of items adding +1 to the barcode so each barcode is unique
आपका आइटम जोड़ा एक बार प्रस्तुत ऐड प्रपत्र के ऊपर दिखाई देगा
नोट
You can customize the columns of this table in the 'Table settings' section of the Administration module (table id: Items Editor).
आपका आइटम भी बिब रिकॉर्ड प्रदर्शन पर ग्रंथ सूची विवरण नीचे दिखाई देगा।
यदि आपके पास है SpineLabelShowPrintOnBibDetails को 'डिस्प्ले' पर सेट किया जाता है, फिर प्रत्येक आइटम के बगल में त्वरित रीढ़ के लेबल को प्रिंट करने के लिए एक लिंक भी होगा।
आप भी 'सक्रिय फिल्टर' लिंक पर क्लिक करके अपने होल्डिंगस तालिका की सामग्री को फिल्टर कर सकते हैं। इस शीर्ष जहां आप तालिका में परिणामों को फ़िल्टर करने के लिए कोई कॉलम में टाइप कर सकते हैं पर एक पंक्ति में दिखाई देंगे।
Editing items
आइटम कई मायनों में संपादित किया जा सकता है।
Clicking 'Edit' and 'Edit items' from the bibliographic record
कौन सा आइटम जहां आप विशिष्ट आइटम के बाईं आप संपादित करें और 'संपादन' चुनने के लिए चाहते हैं 'क्रिया' बटन क्लिक कर सकते हैं की एक सूची खुल जाएगा।
Clicking 'Edit items' beside the item on the 'Items' tab
कौन सा आइटम आप संपादित करना चाहते हैं पर संपादक खुल जाएगा
'संपादन' पर क्लिक करें और फिर 'बैच में संपादित आइटम'
यह खुल जाएगा : रेफर: बैच आइटम संशोधन उपकरण <batch-item-modification-label> जहां आप बैच के रूप में इस रिकॉर्ड पर सभी आइटम संपादित कर सकते हैं।
आप यह भी सक्षम कर सकते हैं :ref:`StaffDetailItemSelection`को डिटेक्शन डिस्प्ले पर प्रत्येक आइटम के बाईं ओर चेक बॉक्स दिखाई देते हैं। आप तब उन वस्तुओं की जांच कर सकते हैं जिन्हें आप संपादित करना चाहते हैं और सूची के शीर्ष पर 'चयनित आइटम संशोधित करें' पर क्लिक करें।
आप होल्डिंग्स टैब में प्रत्येक आइटम के अधिकार के लिए 'संपादन' क्लिक कर सकते हैं
वहाँ भी स्टाफ क्लाइंट के खोज परिणामों से आइटम संपादित करने के लिए एक कड़ी है
Finally you can use the batch item modification tool
Quick item status updates
अक्सर परिसंचरण स्टाफ या खो क्षतिग्रस्त करने के लिए एक आइटम की स्थिति बदलने के लिए की जरूरत है। इस पूरे आइटम रिकॉर्ड को संपादित करने की आवश्यकता नहीं है। इसके बजाय पर चेकआउट सारांश पर आइटम बारकोड क्लिक करने या इतिहास checkin एक आइटम सारांश पर ले जायेगा। तुम भी बिब विस्तार पृष्ठ के बाईं ओर आइटम टैब पर क्लिक करके आइटम सारांश को मिल सकती है।
From this view you can mark an item lost by choosing a lost status from the pull down and clicking the 'Set status' button.
You can also mark an item as damaged by choosing a damaged status from the pull down and clicking the 'Set status' button.
Duplicating items
You can easily duplicate each item by clicking the 'Actions' button the left of each item on the edit items screen
यहाँ से आप 'डुप्लीकेट' आइटम के लिए चुन सकते हैं और इस मद आप चुना से मूल्यों के साथ फार्म आप पॉप्युलेट हो जाएंगी।
Item information
हर ग्रंथ सूची रिकॉर्ड के बाईं ओर वहाँ आइटम देखने के लिए एक टैब है।
उस टैब पर क्लिक करके आप आइटम के बारे में बुनियादी जानकारी देंगे। यहाँ से आप ऐसे घर पुस्तकालय, आइटम प्रकार, संग्रह कोड, फोन नंबर और प्रतिस्थापन मूल्य के रूप में आइटम के बारे में बुनियादी जानकारी देख सकते हैं। आप भी देख सकते हैं और स्थिति की जानकारी संपादित कर सकते हैं। एक आइटम खो चिह्नित या वापस ले लिया है, तो आप भी तारीख है कि स्थिति लागू किया गया था देखेंगे।
In the 'History' section you will see information about the check out history of the item and if you ordered the item via the acquisitions module then this section will include information about the order.
आदेश या विलय की तारीख से जुड़ा हुआ है, तो इसे क्लिक कि आइटम के लिए अधिग्रहण की जानकारी के लिए आप लाएगा।
Adding cover images for items
If you have either OPACLocalCoverImages and/or LocalCoverImages set to ‘Display’ you can upload cover images for individual item records from the 'Upload image' option from the Edit button on the right of the Holdings table.
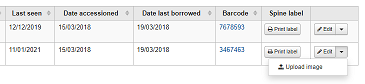
Click Choose file to find the image file on your computer and then Upload file.
On the next screen you are given the option to replace existing images. You can then click on Process images.
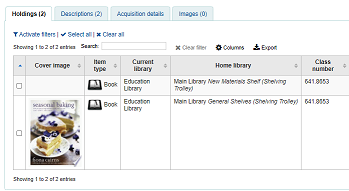
The image will display in a Cover image column in the holdings display.
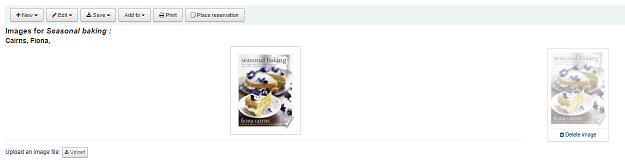
To delete an image, click on the image in the holdings display. You will see a greyed out copy of the image with the option to delete.
Moving items
Items can be moved from one bibliographic record to another using the 'Attach item' option
Visit the bibliographic record you want to attach the item to and choose 'Attach item' from the 'Edit' menu.
Simply enter the barcode for the item you want to move and click 'Submit'
If this is the last remaining item attached to a bibliographic record you will be presented with a button to delete the original host record.
If you want to move all items to a new record creating only one bibliographic record you can use the merge Records tool instead.
Deleting items
वहाँ आइटम रिकॉर्ड को नष्ट करने के लिए कई तरीके हैं। आप शीर्ष पर बिब रिकार्ड के लिए विस्तार पृष्ठ खोलने और 'संपादन' बटन क्लिक करके ऐसा कर सकते हैं तो आप केवल एक आइटम को नष्ट करने की जरूरत है। वहां से आप 'संपादन' आइटम करने के लिए चुन सकते हैं।
आप मदों की एक सूची है और हर एक के बगल के साथ प्रस्तुत किया जाएगा एक लिंक 'नष्ट' लेबल किया जाएगा। कि लिंक पर क्लिक करें और यदि आइटम चैक आउट नहीं कर रहा है यह है कि आइटम को हटाना होगा।
आप जानते हैं कि अपने रिकॉर्ड से जुड़ी वस्तुओं के सभी वर्तमान में बाहर की जाँच नहीं कर रहे हैं, तो आप का उपयोग करें 'संपादन' मेनू' के तहत विकल्प 'सभी आइटम हटाएं' कर सकते हैं और यह रिकॉर्ड से सभी आइटम को हटा देगा।
आप भी सक्षम कर सकते हैं StaffDetailItemSelection प्रत्येक आइटम के बगल में प्रदर्शित डिस्प्ले पर चेक बॉक्स दिखाई देते हैं। आप तब उन वस्तुओं की जांच कर सकते हैं जिन्हें आप हटाना चाहते हैं और सूची के शीर्ष पर 'चयनित आइटम हटाएं' पर क्लिक करें.
अंत में आप इन्हें इस्तेमाल कर सकते हैं :रेफर: `बैच डिलीट टूल <batch-item-deletion-label>आइटम के एक बैच को हटाने के लिए.
Item specific circulation history
प्रत्येक ग्रंथ सूची रिकॉर्ड के साथ (या अपनी सेटिंग्स के आधार पर संरक्षक जानकारी के बिना) एक परिसंचरण इतिहास रहता है, लेकिन प्रत्येक आइटम भी अपने स्वयं के संचलन के इतिहास पृष्ठ है। यह देखने के लिए, रिकॉर्ड आप देख रहे हैं के बाईं ओर 'आइटम' टैब पर क्लिक करें।
'इतिहास' शीर्षक के नीचे करने के लिए एक लिंक 'देखें आइटम की चेकआउट इतिहास' क्लिक कि आइटम का इतिहास है जो ग्रंथ सूची रिकॉर्ड के इतिहास पेज से थोड़ा अलग दिखेगा खुल जाएगा है।
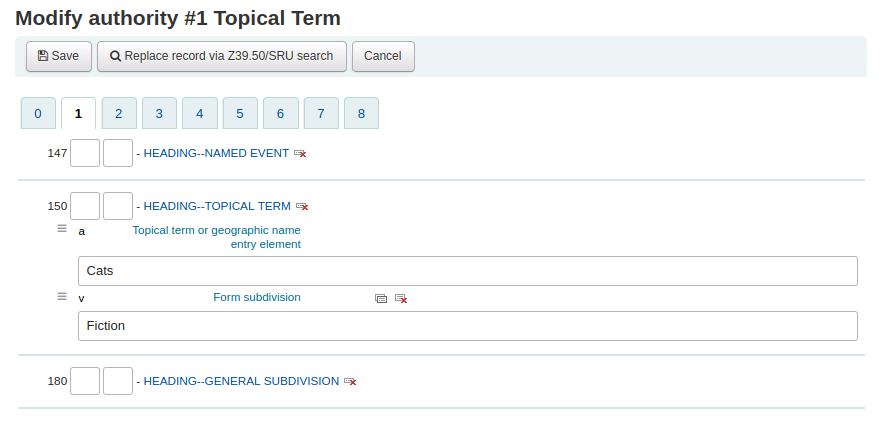
प्राधिकरण
प्राधिकरण रिकॉर्ड अपने मार्क रिकॉर्ड में खेतों को नियंत्रित करने का एक तरीका है। प्राधिकरण के रिकॉर्ड का उपयोग कर आप विषय शीर्षकों, व्यक्तिगत नाम और स्थानों पर नियंत्रण के साथ प्रदान करेगा।
Editing authorities
अधिकारियों खोज परिणामों से प्राधिकरण सारांश पर क्लिक करके और फिर रिकॉर्ड के ऊपर 'संपादन' बटन पर क्लिक करके संपादित किया जा सकता है। या 'संपादित करें खोज परिणामों पर अधिकार के बाईं ओर लिंक पर क्लिक करके।
Once you've made the necessary edits, simply click 'Save'.
Depending on the number of bibliographic records this authority record is linked to, the bibliographic records may be updated right away. This depends on the value in the AuthorityMergeLimit system preference (the default is 50). If the number of bibliographic records is under the value of AuthorityMergeLimit, the bibliographic records will be changed right away. If the number of bibliographic records exceeds the value of AuthorityMergeLimit, they will only be updated when the merge_authorities.pl script is run.
एक अधिकारी के रिकॉर्ड को हटाने के लिए आप पहली बार यकीन है कि यह किसी भी ग्रंथ सूची रिकॉर्ड से लिंक नहीं है सुनिश्चित करना चाहिए। यह किसी भी ग्रंथ सूची रिकॉर्ड द्वारा नहीं किया जाता है तो एक 'नष्ट' लिंक खोज परिणामों पर और एक बटन है कि प्राधिकरण रिकॉर्ड का सारांश पर क्लिक करने के बाद प्रकट होता है के रूप में रिकॉर्ड के अधिकार के लिए दिखाई देगा।
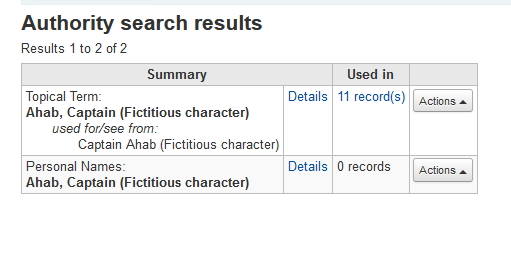
Merging authorities
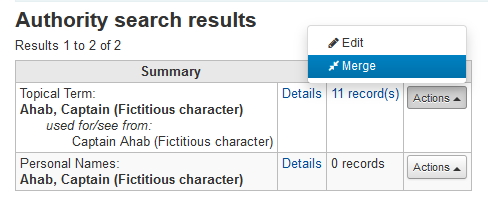
If you have duplicate authority records you can merge them together by clicking the 'Merge' link, found in the Actions menu, next to two results on an authority search.
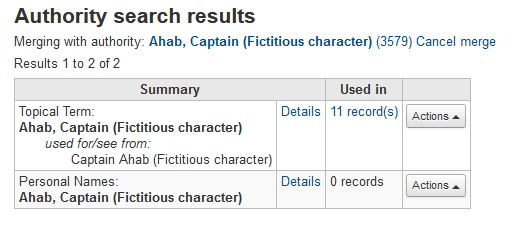
पहला परिणाम पर 'मर्ज' पर क्लिक करने के बाद आप परिणामों के शीर्ष पर सूचीकरण कि प्राधिकरण देखेंगे।
इसके बाद आप आप मर्ज करना चाहते हैं दूसरी परिणाम के लिए क्लिक करने के लिए 'मर्ज' अगले जरूरत है।
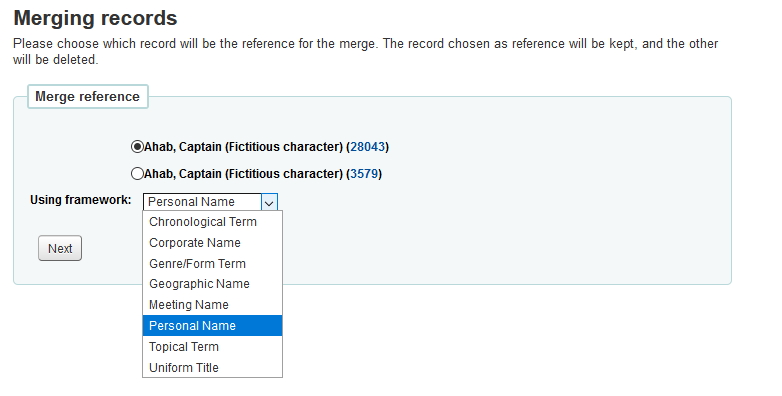
आपसे पूछा जाएगा आप अपनी प्राथमिक रिकॉर्ड के रूप में रखने के लिए करना चाहते हैं जो दो रिकॉर्ड की और जो मर्ज के बाद हटा दिया जाएगा।
आप रिकॉर्ड के दोनों के लिए मार्क (उन रिकॉर्ड के लिए प्राधिकरण संख्या के साथ लेबल टैब द्वारा प्रत्येक सुलभ) के साथ प्रस्तुत किया जाएगा। डिफ़ॉल्ट रूप से पूरे पहला रिकॉर्ड का चयन किया जाएगा, खेतों आप अंतिम (गंतव्य) रिकॉर्ड में नहीं करना चाहती अचयनित और फिर जो खेतों अंतिम (गंतव्य) रिकॉर्ड में होना चाहिए चुनने के लिए दूसरे टैब पर चलते हैं।
एक बार जब आप पूरा कर लिया है अपने चयन 'मर्ज' बटन पर क्लिक करें। प्राथमिक रिकॉर्ड अब डेटा आप इसके लिए चुना शामिल होंगे और दूसरा रिकॉर्ड हटा दिया जाएगा।
If you have two authority records for the same heading in different frameworks, you can merge them together by clicking the ‘Merge’ link, found in the actions menu, next to two results on an authority search. For example, these authority records using different frameworks can be merged.
If you select the 'Merge' link, found in the action menu of the top record.
You will see that authority record listed at the top of the results.
Next you need to select ‘Merge’ next to the second result you’d like to merge.
You will be asked which of the two records you would like to keep as your primary record and which will be deleted after the merge. You will also use the dropdown menu to pick which framework to use.
You will be presented with the MARC for both of the records (each accessible by tabs labeled with the authority numbers for those records). By default the entire first record will be selected, uncheck the fields you don’t want in the final (destination) record and then move on to the second tab to choose which fields should be in the final (destination) record.
The "ref" record (the primary record) will be in the framework that you chose:
Once you have completed your selections click the ‘Merge’ button. The primary record will now contain the data you chose for it and the second record will be deleted.
The MARC tag of the linked headings will have been updated accordingly.
Cataloging guides
Bibliographic record cataloging cheat sheet
टैग |
लेबल |
विवरण |
निर्देश |
|---|---|---|---|
000 |
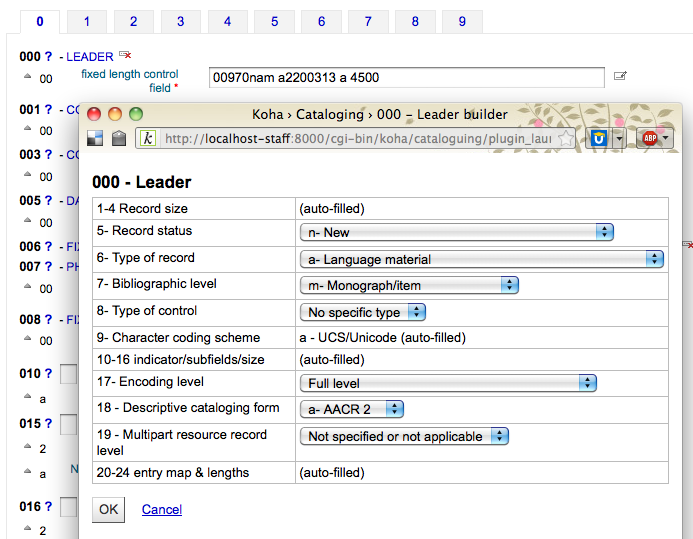
लीडर |
वर्णन रिकॉर्ड (यानी सरोगेट।) - यह एक मोनोग्राफ के लिए एक रिकॉर्ड है? एक सीरियल? |
इस क्षेत्र में क्लिक करें उस में भरने के लिए। 'ए' के लेख के लिए या धारावाहिकों के लिए 'एस' फिर "ग्रंथ सूची स्तर" की स्थापना की। अन्यथा, सब कुछ छोड़ के रूप में है। |
001 |
नियंत्रण संख्या |
परिग्रहण संख्या |
आइटम के अंदर यहाँ लिखा परिग्रहण संख्या दर्ज करें। लेख और आइटम जो परिग्रहण संख्या नहीं है के लिए, खाली छोड़ दें। |
003 |
नियंत्रण नंबर पहचानकर्ता |
Your MARC organizational code |
इसे भरने के लिए इस फ़ील्ड पर क्लिक करें MARCOrgCode वरीयता सेट). |
005 |
डी एंड टी नवीनतम लेनदेन |
वर्तमान दिनांक और समय. |
इस क्षेत्र में क्लिक करें उस में भरने के लिए |
008 |
फिक्स्ड-लम्बाई डेटा तत्वों |
फील्ड से युक्त कंप्यूटर-चीजों के एक नंबर की पठनीय अभ्यावेदन. |
आम तौर पर आप केवल 'एस' (एकल) या 'एम' (एकाधिक) की स्थिति के लिए विकल्प का उपयोग करेगा 06- पूर्व का उपयोग करें जब आइटम एक ही साल में प्रकाशित किया गया था, बाद में जब यह कई के पाठ्यक्रम पर प्रकाशित किया गया था। अगर वहाँ एक भी तारीख है, केवल पहली तारीख क्षेत्र (पदों 07-10) में एक तारीख दर्ज करें। पदों 15-17 में तीन अंकों की देश कोड दर्ज करें, अगर देश कोड से कम तीन अक्षर लंबा है रिक्त स्थान जोड़ने के लिए सुनिश्चित किया जा रहा है। अगर वहाँ एक सूचकांक है, ध्यान दें स्थिति 31 में तथ्य यह है कि पदों 35-37 में तीन अक्षर भाषा कोड दर्ज करें। |
010 |
LCCN |
लाइब्रेरी ऑफ कांग्रेस द्वारा आवंटित एक नंबर अनोखे काम की पहचान के लिए. |
किताब के पेज कॉपीराइट (अगर यह अमेरिका में प्रकाशित किया गया था) या इस नंबर के लिए नियंत्रण रेखा सूची पर जाँच करें। आप यह नहीं मिल सकता है, इसके बारे में चिंता मत करो. |
020 |
आईऍसबीऍन |
प्रकाशकों द्वारा प्रयुक्त किताबें पहचान करने के लिए अद्वितीय संख्या है. |
इस संख्या में किताब पर सूचीकरण नहीं है, शायद वहाँ एक नहीं है। |
022 |
ISSN |
प्रकाशकों द्वारा इस्तेमाल के सीरियलों की पहचान करने के लिए अनोखा संख्या है। |
इस संख्या में किताब पर सूचीकरण नहीं है, शायद वहाँ एक नहीं है। |
033 |
घटना के तिथि/समय |
नीलामी तिथियों के लिए प्रयुक्त। नीलामी सूची के लिए आवश्यक है। |
नीलामी है कि केवल एक ही दिन पर जगह ले ली के लिए, subfield 'ए' और एक प्रथम सूचक में '0' में प्रारूप YYYYMMDD में नीलामी की तारीख दर्ज करें। नीलामी है कि लगातार दो दिनों या गैर लगातार दिन के किसी भी नंबर पर जगह ले ली के लिए 'एक' प्रारूप YYYYMMDD में तारीख के साथ एक दिन, और के लिए डाल एक '1' पहले सूचक में एक उप क्षेत्र पैदा करते हैं। नीलामी है कि लगातार दो दिन से अधिक से अधिक जगह ले ली के लिए, पहले दिन के लिए एक उप क्षेत्र 'ए' (प्रारूप में YYYYMMDD) और पिछले दिन के लिए एक उप क्षेत्र 'ए' (यह भी प्रारूप में YYYYMMDD) बनाते हैं, और एक '2' रख दिया पहली सूचक है। |
040 |
कैटलॉग स्रोत |
पहचान करती जो पुस्तकालयों को बनाया है और रिकॉर्ड संशोधित किया. |
आयातित रिकॉर्ड के लिए, मान के रूप में अपने ओसीएलसी कोड के साथ एक उप क्षेत्र 'डी' में जोड़ें। नए रिकॉर्ड के लिए, यह सुनिश्चित कर लें कि मूल्य के रूप में अपने ओसीएलसी कोड के साथ उपक्षेत्र 'सी'। |
041 |
भाषा कोड |
सब एक आइटम में इस्तेमाल किया भाषाओं को दिखाता है, जब दो या दो से अधिक भाषाओं में मौजूद हैं। |
एक भी भाषा में एक पाठ का महत्वपूर्ण भाग के लिए, वहाँ एक उप क्षेत्र 'क' उस भाषा कोड के साथ होना चाहिए. वहाँ एक विशिष्ट भाषा में केवल सारांश या सार कर रहे हैं, उस भाषा कोड के साथ एक उप क्षेत्र 'ख' पैदा करते हैं. |
100 |
मुख्य प्रविष्टि--व्यक्तिगत |
मुख्य लेखक का नाम की अधिकृत रूप |
अधिकृत शीर्षकों शीट और AACR2 देखें। पहली सूचक आम तौर पर संकेत मिलता है कि प्रवेश उपनाम पहला है, एक '1' होना चाहिए। नाम केवल एक forename के होते हैं, हालांकि, पहले सूचक होना चाहिए '0'। |
110 |
मुख्य प्रविष्टि--कॉर्पोरेट |
मुख्य कॉर्पोरेट लेखक के नाम की अधिकृत रूप। नीलामी सूची के लिए आवश्यक है। |
नीलामी कैटलॉग बल्कि एक 100 क्षेत्र से एक 110 क्षेत्र का उपयोग करना चाहिए। अधिकृत शीर्षकों चादर और AACR2 देखें। '2' के लिए पहली सूचक सेट करें। |
111 |
मुख्य प्रविष्टि--बैठक |
एक बैठक में एक मुख्य प्रस्ताव के रूप में काम के नाम की अधिकृत रूप (जैसे सम्मेलन की कार्यवाही) |
अधिकृत शीर्षकों चादर और AACR2 देखें। '2' के लिए पहली सूचक सेट करें। |
245 |
शीर्षक वक्तव्य |
शीर्षक पेज से शीर्षक बयान का प्रतिलेखन (या जानकारी का मुख्य स्रोत) |
उपक्षेत्र में शीर्षक दर्ज करें 'ए', उपक्षेत्र 'बी' में उपशीर्षक, और उपक्षेत्र 'सी' में जिम्मेदारी का बयान। आप एक ही मात्रा या एक बहु हिस्सा आइटम के हिस्से के लिए एक रिकॉर्ड पैदा कर रहे हैं, तो आप उपक्षेत्र 'एन' और उपक्षेत्र में भाग शीर्षक में भाग संख्या रखना चाहिए 'पी।' नीलामी सूची के लिए, तारीख ( 'MM/DD/YYYY' प्रारूप में) उपक्षेत्र 'एफ' में वर्ग कोष्ठक में सूचीबद्ध किया जाना चाहिए। ISBD विराम शीट देखें। पहली सूचक '0' अगर कोई लेखक है, अन्यथा यह '1' के लिए सेट करने के लिए सेट। गैर-फाइलिंग वर्णों की संख्या के बाद दूसरे सेट सूचक (के लिए एक प्रारंभिक लेख के साथ साथ अंतरिक्ष में अर्थात पात्रों ... "" दूसरी सूचक सेट '4' के लिए)। |
246 |
शीर्षक के रूप बदलती |
खोज और दाखिल प्रयोजनों के लिए शीर्षक के वैकल्पिक प्रपत्र |
संरक्षक एक अलग शीर्षक के तहत काम करने के लिए लग सकता है, तो इसे यहाँ दर्ज करें। प्रारंभिक लेख शामिल न करें। पहला संकेत किया जाना चाहिए '3', जब तक कि शीर्षक महज एक संस्करण वर्तनी, जो मामले में पहले सूचक होना चाहिए '1' है। |
250 |
संस्करण वक्तव्य |
शीर्षक पेज से संस्करण बयान का प्रतिलेखन (या जानकारी का मुख्य स्रोत) |
संस्करण बयान बिल्कुल के रूप में यह शीर्षक-पेज पर दिखाई देता टाइप करना। आप संक्षिप्त संस्करण हो सकता है यदि बयान बहुत लंबा है। |
260 |
प्रकाशन (छाप) |
प्रकाशन जानकारी |
'ए', उपक्षेत्र 'सी' में उपक्षेत्र 'बी' में प्रकाशक, और वर्ष (या संभावित वर्ष) उपक्षेत्र में प्रकाशन के स्थान रखो। ISBD विराम शीट देखें। |
264 |
PRODUCTION, PUBLICATION ETC. |
Production, Publication, Distribution, Manufacture, and Copyright Notice. |
Put the location of publication in subfield 'a', the publisher in subfield 'b', and the year (or probable year) in subfield 'c'. See ISBD punctuation sheet. The label is set dynamically from the second indicator so generally this would be set to '1' for Publisher: . |
300 |
शारीरिक विवरण |
शारीरिक विवरण |
उपक्षेत्र 'ए', 'विशेष', इस तरह के चित्र या उपक्षेत्र 'बी' (AACR2 देखें) में नक्शे के रूप में सामग्री का एक संक्षिप्त विवरण और उपक्षेत्र 'सी' में आइटम के आकार में पृष्ठ पर अंक लगाना बयान दर्ज करें। ISBD विराम शीट देखें। |
490 |
श्रृंखला वक्तव्य |
श्रृंखला बयान बिल्कुल के रूप में यह आइटम पर प्रकट होता है दिखाता है। |
उपक्षेत्र 'ए' उपक्षेत्र 'वी' में मात्रा संख्या के साथ में श्रृंखला बयान टाइप करना। ISBD विराम शीट देखें। यदि आप एक सामान्य नियम के रूप में एक 830 का उपयोग कर रहे हैं '1' के लिए पहली सूचक सेट, आप ऐसा करना चाहिए। |
500 |
सामान्य नोट |
नोट्स कि कहीं और फिट नहीं है। |
प्रत्येक विशिष्ट विषय के लिए एक अलग से 500 क्षेत्र के साथ पूरा वाक्य के रूप में नोटों दर्ज करें। |
501 |
नोट के साथ |
नोट्स क्या कार्य अन्य रिकॉर्ड द्वारा वर्णित काम करता है के साथ ही है। |
उपक्षेत्र 'ए' में संबंध का विवरण रखो। |
504 |
ग्रंथ सूची, आदि ध्यान दें |
इंगित करता है कि काम एक ग्रंथ सूची में शामिल हैं। |
काम एक ग्रंथ सूची और सूचकांक में शामिल हैं, तो डाल पाठ "ग्रन्थसूची का संदर्भ (पी। XXX-XXX) और सूचकांक भी शामिल है।" उपक्षेत्र 'ए' में। काम एक सूचकांक शामिल नहीं है, वाक्य के उस हिस्से को हटा दें। संदर्भ के काम में फैले हुए हैं और एक अलग वाक्य में एकत्र हुए नहीं हैं, तो प्रारंभिक बयान को हटा दें। |
505 |
स्वरूपित सामग्री |
एक मानक प्रारूप में सामग्री की सूची। अस्वरूपित सामग्री को एक 500 (सामान्य नोट) क्षेत्र में सूचीबद्ध किया जा सकता है। |
ISBD विराम शीट देखें। '0' के लिए पहली सूचक सेट करें। आप अलग से लेखकों और खिताब कोडिंग कर रहे हैं, तो '0' के लिए दूसरा सूचक निर्धारित किया है। अन्यथा, दूसरी सूचक खाली छोड़ दें। |
518 |
घटना नोट के तिथि/समय |
नीलामी तिथियों के लिए प्रयुक्त. |
नीलामी सूची के लिए, प्रारूप में नीलामी की तारीख दर्ज करें 'जनवरी 2, 1984 'ए' उपक्षेत्र में |
520 |
सारांश, आदि |
एक संक्षिप्त सारांश या किताब या लेख का सार। |
सामान्य तौर पर आप एक सारांश लिखने की जरूरत नहीं है। एक सारांश के लिए बुलाया जा सकता है, तथापि, आइटम, इस तरह के उच्च अम्लीय कागज या सीडी-रोम के साथ पुस्तकों के रूप में है कि आसानी से एक संरक्षक द्वारा समीक्षा नहीं की जा सकती है। |
546 |
भाषा नोट |
नोट भाषाओं का वर्णन काम में इस्तेमाल किया |
केवल कई भाषाओं में काम करता है के लिए की जरूरत है। ISBD विराम शीट देखें। |
561 |
परिचय जानकारी |
आइटम के पिछले स्वामित्व का वर्णन करता है। |
केवल दुर्लभ पुस्तकों के लिए इस्तेमाल किया। |
563 |
बाइंडिंग जानकारी |
आइटम की बाइंडिंग वर्णन करता है. |
केवल दुर्लभ पुस्तकों के लिए इस्तेमाल किया। |
590 |
स्थानीय नोट |
स्थानीय नोटों। नीलामी सूची के लिए आवश्यक है। |
इंगित करने के लिए नीलामी सूची के लिए प्रयुक्त क्या सिक्के के प्रकार auction- रोमन, ग्रीक, आदि में बेच रहे हैं |
600 |
विषय जोड़--व्यक्तिगत |
काम में चर्चा लोगों के लिए व्यक्तिगत नाम की अधिकृत रूप |
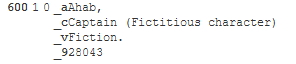
अधिकृत शीर्षकों चादर और AACR2 देखें। पहली सूचक आम तौर पर संकेत मिलता है कि प्रवेश उपनाम पहला है, एक '1' होना चाहिए। नाम केवल एक forename के होते हैं, हालांकि, पहले सूचक होना चाहिए '0'। आप नियंत्रण रेखा प्राधिकरण फ़ाइल में नाम पाया गया है, '0' के लिए दूसरा सूचक निर्धारित किया है। अन्यथा '4' के लिए दूसरा सूचक निर्धारित किया है। |
610 |
विषय जोड़--कॉर्पोरेट |
काम में चर्चा संगठनों के लिए कंपनियों के नामों की अधिकृत रूप |
अधिकृत शीर्षकों चादर और AACR2 देखें। '2' के लिए पहली सूचक सेट करें। आप नियंत्रण रेखा प्राधिकरण फ़ाइल में नाम पाया गया है, '0' के लिए दूसरा सूचक निर्धारित किया है। अन्यथा '4' के लिए दूसरा सूचक निर्धारित किया है। |
611 |
विषय जोड़--बैठक |
काम में चर्चा की बैठकों के लिए नामों की बैठक के अधिकृत प्रपत्र |
अधिकृत शीर्षकों चादर और AACR2 देखें। '2' के लिए पहली सूचक सेट करें। आप नियंत्रण रेखा प्राधिकरण फ़ाइल में नाम पाया गया है, '0' के लिए दूसरा सूचक निर्धारित किया है। अन्यथा '4' के लिए दूसरा सूचक निर्धारित किया है। |
630 |
विषय जोड़--सार्वभोमिक शीर्षक |
काम में चर्चा की अन्य कार्यों के लिए खिताब की अधिकृत रूप |
अधिकृत शीर्षकों चादर और AACR2 देखें। गैर-फाइलिंग वर्णों की संख्या को पहली सूचक सेट (के लिए एक प्रारंभिक लेख के साथ साथ अंतरिक्ष में अर्थात पात्रों ... "" पहले सूचक सेट '4' के लिए)। आप नियंत्रण रेखा प्राधिकरण फ़ाइल में नाम पाया गया है, '0' के लिए दूसरा सूचक निर्धारित किया है। अन्यथा '4' के लिए दूसरा सूचक निर्धारित किया है। |
650 |
विषय जोड़--सामयिक |
लाइब्रेरी ऑफ कांग्रेस शीर्षक विषय शर्तों काम के विषय का वर्णन करती हैं |
अधिकृत शीर्षकों चादर और AACR2 देखें। आप नियंत्रण रेखा प्राधिकरण फ़ाइल में नाम पाया गया है, '0' के लिए दूसरा सूचक निर्धारित किया है। अन्यथा '4' के लिए दूसरा सूचक निर्धारित किया है। |
651 |
विषय जोड़--भौगोलिक |
लाइब्रेरी ऑफ कांग्रेस विषय भौगोलिक दृष्टि से कार्य के विषय का वर्णन करती हैं |
अधिकृत शीर्षकों चादर और AACR2 देखें। आप नियंत्रण रेखा प्राधिकरण फ़ाइल में नाम पाया गया है, '0' के लिए दूसरा सूचक निर्धारित किया है। अन्यथा '4' के लिए दूसरा सूचक निर्धारित किया है। |
655 |
सूचकांक अवधि--शैली/फार्म |
वर्णन क्या एक आइटम है क्या आइटम के बारे में है के रूप में विरोध किया। |
आम तौर पर नीलामी के कैटलॉग, जो शैली की ओर बढ़ रहा है चाहिए के लिए ही इस्तेमाल किया "नीलामी कैटलॉग।" (अधिकृत शीर्षक खोजने के लिए सुनिश्चित करने के लिए!) आप नियंत्रण रेखा प्राधिकरण फ़ाइल में नाम पाया गया है, '0' के लिए दूसरा सूचक निर्धारित किया है। आप एक विशिष्ट कोश से एक शब्द का प्रयोग कर रहे हैं, तो दूसरी सूचक करने के लिए सेट '7' और उपक्षेत्र में कोश के लिए कोड डाल '2'। अन्यथा '4' के लिए दूसरा सूचक निर्धारित किया है। |
690 |
स्थानीय विषय जोड़--सामयिक |
किसी भी कस्टम विषय प्राधिकरण फ़ाइल से शीर्षकों के लिए इस्तेमाल किया। |
अगर कोई उचित LCSH शब्द है, आप विषय शीर्षकों आप सूची में अन्य मदों पर मिल के साथ एक 690 का उपयोग कर सकते हैं। |
691 |
स्थानीय विषय जोड़--भौगोलिक |
किसी भी कस्टम विषय प्राधिकरण फ़ाइल से शीर्षकों के लिए इस्तेमाल किया। |
अगर कोई उचित LCSH शब्द है, आप विषय शीर्षकों आप सूची में अन्य मदों पर मिल के साथ एक 691 का उपयोग कर सकते हैं। |
700 |
जोड़ा प्रविष्टि--व्यक्तिगत |
दूसरे लेखकों और अन्य काम के उत्पादन से संबंधित व्यक्तियों के लिए इस्तेमाल किया। |
अधिकृत शीर्षकों शीट और AACR2 देखें। पहली सूचक आम तौर पर संकेत मिलता है कि प्रवेश उपनाम पहला है, एक '1' होना चाहिए। नाम केवल एक forename के होते हैं, हालांकि, पहले सूचक होना चाहिए '0'। |
710 |
जोड़ा प्रविष्टि--कॉर्पोरेट |
काम के उत्पादन से संबंधित कॉरपोरेट निकायों के लिए प्रयुक्त (उदाहरण के लिए प्रकाशक)। |
अधिकृत शीर्षकों चादर और AACR2 देखें। '2' के लिए पहली सूचक सेट करें। |
711 |
जोड़ा प्रविष्टि--बैठक |
काम के उत्पादन से संबंधित बैठकों के लिए किया (उदाहरण के लिए संगोष्ठियों है कि काम करने के लिए योगदान)। |
अधिकृत शीर्षकों चादर और AACR2 देखें। '2' के लिए पहली सूचक सेट करें। |
730 |
जोड़ा प्रविष्टि--सार्वभौमिक शीर्षक |
काम के उत्पादन से संबंधित वर्दी शीर्षक के लिए प्रयुक्त (उदाहरण के लिए एक काम है कि वर्तमान कार्य प्रेरित) |
अधिकृत शीर्षकों चादर और AACR2 देखें। गैर-फाइलिंग वर्णों की संख्या को पहली सूचक सेट (के लिए एक प्रारंभिक लेख के साथ साथ अंतरिक्ष में अर्थात पात्रों ... "" पहले सूचक सेट '4' के लिए)। |
773 |
मेजबान आइटम प्रविष्टि |
बड़ा ग्रंथ सूची की इकाई है कि काम में शामिल है का वर्णन (उदाहरण के लिए पुस्तक या लेख युक्त पत्रिका मौजूदा रिकॉर्ड में वर्णित किया जा रहा) |
अगर मेजबान प्रकाशन लेखक मुख्य प्रविष्टि है, तो उपफील्ड 'ए' में लेखक के नाम का अधिकृत रूप दर्ज करें। उपक्षेत्र 'टी' में शीर्षक रखो अगर मेजबान प्रकाशन एक स्वतंत्र कार्य है, तो सबफील्ड 'डी' में प्रकाशन की जानकारी डालें। उपलब्ध होने पर, आईएसएसएन और आईएसबीएन का उपयोग क्रमशः सबफ़ेल्ड 'एक्स' और 'जेड' में किया जाना चाहिए। रिश्ते की जानकारी (जैसे वॉल्यूम संख्या, पेज नंबर आदि) सबफील्ड 'जी' में जाती है सबफ़ील्ड 'क्यू' में आइटम के स्थान का एक एन्कोडेड प्रतिनिधित्व होता है: मात्रा, समस्या, और अनुभाग संख्या कोलन द्वारा विभाजित किया जाता है, और प्रथम पृष्ठ सबफील्ड के अंत में '<' के बाद दर्ज किया गया है। आईएसबीडी विराम चिह्न देखें। '0' के लिए पहला सूचक सेट करें यदि आप "इन:" लेबल उत्पन्न करना चाहते हैं, तो दूसरे सूचक रिक्त छोड़ दें। यदि आप 773 पाठ से पहले कुछ और दिखना चाहते हैं, तो दूसरे सूचक को '8' पर सेट करें और फ़ील्ड की शुरुआत में लेबल के साथ एक सबफील्ड 'आई' जोड़ें (e.g. "$iOffprint from:"). |
830 |
श्रृंखला प्रवेश--सारभौमिक शीर्षक |
श्रृंखला का नाम 490 क्षेत्र में लिखित रूप से अधिकृत। अक्सर यह सिर्फ 490 के रूप में ही किया जाएगा। |
अधिकृत शीर्षकों चादर और AACR2 देखें। गैर-फाइलिंग वर्णों की संख्या के बाद दूसरे सेट सूचक (एक प्रारंभिक लेख के साथ साथ अंतरिक्ष में अर्थात पात्रों के लिए ... "" दूसरी सूचक स्थापित करने के लिए '4')। |
852 |
स्थिति/कॉल संख्या |
पूर्व बारकोड किताबें, पर्चे, और कुछ लेख और सीरियलों के लिए अनुभाग नाम प्रदान करता है। |
इस क्षेत्र में कुछ भी डाल अगर आप एक मात्रा है जो केवल एक रिकॉर्ड और एक बारकोड हो जाता सूचीबद्ध नहीं हैं। आइटम एक बारकोड नहीं मिलता है, या आप वर्तमान में एक मात्रा में एक लेख के लिए एक रिकॉर्ड बना रहे हैं, उपक्षेत्र में खंड 'ए' (देखें एएनएस सूचीबद्ध दस्तावेज), और कॉल 'मैं' उपक्षेत्र में नंबर डाल दिया। '8' के लिए पहली सूचक सेट करें। |
856 |
इलेक्ट्रॉनिक प्रवेश |
सामग्री ऑनलाइन उपलब्ध करने के लिए लिंक। |
'यू' उपक्षेत्र में किसी भी इलेक्ट्रॉनिक प्रतियां या सारांश, आदि के यूआरएल और उपक्षेत्र में एक लिंक शीर्षक 'Y' रख दिया। '4' के लिए पहली सूचक सेट करें। |
942 |
जोड़ा प्रविष्टि तत्वों (कोहा) |
कोहा-विशिष्ट डेटा के लिए इस्तेमाल किया। |
सेट उचित आइटम प्रकार के उपक्षेत्र 'सी'। |
तालिका: कैटलॉग गाइड
Koha-specific fields
Koha uses three fields to store information specific to it.
At the record level, 942 is used to store information such as record-level item type, record-level call number and classification scheme.
The item (holding) information is stored in 952 in MARC21 and 995 in UNIMARC.
System control numbers for Koha are stored in 999 in MARC21 and 090 in UNIMARC.
Added entry elements (942)
942$0 - Koha issues (borrowed), all copies
This field contains the total number of issues/checkouts of all items of this record. It is populated using the update_totalissues.pl cronjob.
Mapped to: biblioitems.totalissues
Indexed in: totalissues
चेतावनी
This field should not be editable nor edited manually.
942$2 - Source of classification or shelving scheme
This field contains the source of classification used by the record's call number (942$h and 942$i).
There is a choice of classification sources as they are defined in administration. If no classification scheme is entered, the system will use the value entered in the DefaultClassificationSource preference.
The source of classification will be used, along with the call number itself (942$h and 942$i) to create the normalized call number used when sorting by call number.
Mapped to: biblioitems.cn_source
Indexed in: cn-bib-source
942$6 - Koha normalized classification for sorting
This field contains the normalized call number used for sorting, based on the record-level call number (942$h and 942$i) and the classification source (942$2).
Mapped to: biblioitems.cn_sort
Indexed in: cn-bib-sort
चेतावनी
This field should not be editable nor edited manually.
942$c - Koha item type
This field contains the record-level item type.
The record-level item type is used in various places in Koha.
The value from 942$c is copied to 952$y as the default value when adding a new item to that record
The record-level item type can be used for the circulation rules if the item-level_itypes system preference allows it (this system preference lets you choose between using the record-level or item-level item type for the circulation rules, among other things)
The record-level item type is indexed and used in the search (see also the AdvancedSearchTypes system preference) as well as the facets (this is useful to find records that don't have items, like records for online resources, ebooks, pdf files, etc.)
The record-level item type is used for record-level/"next available" holds
The record-level item type is used for record-level article requests
The record-level item type is displayed in various tables in the staff interface, in the circulation module among other places (it is possible to hide unwanted columns in the 'Table settings' section of the Administration module)
Mapped to: biblioitems.itemtype
Indexed in: itemtype (mc-itemtype), itype (mc-itype)
942$e - Edition
This field contains the edition information.
942$h - Classification part
This field contains classification part of the call number. It is used, along with 942$2 and 942$i to create the normalized call number (942$6) used when sorting by call number.
Mapped to: biblioitems.cn_class
Indexed in: cn-class
942$i - Item part
This field contains item part of the call number. It is used, along with 942$2 and 942$h to create the normalized call number (942$6) used when sorting by call number.
Mapped to: biblioitems.cn_item
Indexed in: cn-item
942$k - Call number prefix
This field contains prefix to the call number.
Mapped to: biblioitems.cn_prefix
Indexed in: cn-prefix
942$m - Call number suffix
This field contains suffix to the call number.
Mapped to: biblioitems.cn_suffix
Indexed in: cn-suffix
942$n - Suppress in OPAC
If the OpacSuppression system preference is set to 'hide', this field indicates if the record should be hidden from the OPAC.
In this field, '1' means the record will be hidden in the OPAC, and '0' (or empty) means the record will be visible in the OPAC.
You can use the YES_NO authorized value list in this field if you don't want to remember the numerical values.
Indexed in: suppress
942$s - Serial record flag
This field is used by the serials module to indicate whether or not the record is associated with a serial subscription.
Mapped to: biblio.serial
चेतावनी
This field should not be editable nor edited manually.
Location and item information (952)
Koha uses field 952 to store item (holding) information.
952$0 - Withdrawn status
Uses
This field is used to set the withdrawn (weeded) status of the item.
You can use the withdrawn status to weed items without deleting the items.
In the search results, the withdrawn item will be marked as unavailable.
Effects on circulation
A withdrawn item will not be able to be checked out.
A withdrawn item will not be able to be checked in unless the BlockReturnOfWithdrawnItems system preference allows it.
Values
The withdrawn status is numerical, '0' (or empty) means 'not withdrawn' and any other number means 'withdrawn'.
By default, the field is associated with the WITHDRAWN authorized value category so you don't have to remember the numerical values. The default values in the WITHDRAWN authorized value category are:
1: Withdrawn
Display
Staff interface
Search results (withdrawn items will be marked as unavailable)
Holdings table in the record's detail page
'Items' tab of the bibliographic record, 'Withdrawn status' under 'Statuses'
OPAC
Search results (withdrawn items will be marked as unavailable)
Holdings table in the record's detail page
To hide withdrawn items from the OPAC, use the OpacHiddenItems system preference.
Mapped to: items.withdrawn
Indexed in: withdrawn
952$1 - Lost status
Uses
This field is used to set the lost status of the item.
You can use the lost status to mark items as lost or missing
In the search results, the lost item will be marked as unavailable.
Marking an item lost while it is checked out can charge the replacement cost (952$v) to the patron (see WhenLostChargeReplacementFee), as well as a processing fee (the processing fee is set at the item type level)
The lost status can be changed automatically after a number of days overdue with the longoverdue.pl cronjob
Effects on circulation
The ability to check out a lost item depends on the IssueLostItem system preference.
The ability to check in a lost item depends on the BlockReturnOfLostItems system preference.
Values
The lost status is numerical, '0' (or empty) means 'not lost' and any other number means 'lost'.
By default, the field is associated with the LOST authorized value category so you don't have to remember the numerical values. The default values in the LOST authorized value category are:
1: Lost
2: Long Overdue (Lost)
3: Lost and Paid For
4: Missing
Display
Staff interface
Search results (lost items will be marked as unavailable)
Holdings table in the record's detail page
'Items' tab of the bibliographic record, 'Lost status' under 'Statuses'
OPAC
Search results (lost items will be marked as unavailable)
Holdings table in the record's detail page
It's possible to configure Koha so that lost items don't display in the OPAC with the hidelostitems system preference.
Mapped to: items.itemlost
Indexed in: lost
952$2 - Source of classification or shelving scheme
Uses
This field contains the source of classification used by the record's call number (952$o).
The source of classification will be used, along with the call number itself (952$o) to create the normalized call number (952$6) used when sorting by call number.
Values
There is a choice of classification sources as they are defined in administration.
If no classification scheme is entered, the system will use the value entered in the DefaultClassificationSource preference.
Display
This is not displayed either in the OPAC or in the staff interface. The information is only available in the item's editing form.
Mapped to: items.cn_source
Indexed in: classification-source
952$3 - Materials specified
Uses
This field is used to add information about accompanying materials or to specify how many pieces the item has.
Effects on circulation
This information will be displayed when circulation the item so that the circulation staff knows to make sure all the accompanying material is there when checkout out and it's still there when checking the item back in.

Values
This is a free text field, but it is possible to associate it to an authorized value category in the MARC framework to make it into a drop-down menu.
Display
Staff interface
This information will appear when checking out or checking in an item
Holdings table in the record's detail page
टिप्पणी
Use 'Table settings' if you want to hide that column - Module: Catalogue - Table id: holdings_table and/or otherholdings_table - Column: holdings_materials or otherholdings_materials
'Items' tab of the bibliographic record, 'Materials specified' under 'Item information'
OPAC
Holdings table in the record's detail page (it is hidden by default)
टिप्पणी
Use 'Table settings' if you want to show that column - Module: OPAC - Table id: holdingst - Column: item_materials
Mapped to: items.materials
Indexed in: materials-specified
952$4 - Damaged status
Uses
This field is used to set the damaged status of the item.
In the search results, the damaged item will be marked as unavailable.
Effects on circulation
The damaged status does not affect the ability to check out or check in an item.
The AllowHoldsOnDamagedItems system preference indicates whether or not damaged items can be put on hold.
Values
The damaged status is numerical, '0' (or empty) means 'not damaged' and any other number means 'damaged'.
By default, the field is associated with the DAMAGED authorized value category so you don't have to remember the numerical values. The default values in the DAMAGED authorized value category are:
1: Damaged
Display
Staff interface
Search results (damaged items will be marked as unavailable)
Holdings table in the record's detail page
'Items' tab of the bibliographic record, 'Damaged status' under 'Statuses'
OPAC
Search results (damaged items will be marked as unavailable)
Holdings table in the record's detail page
To hide damaged items from the OPAC, use the OpacHiddenItems system preference.
Mapped to: items.damaged
Indexed in: damaged
952$5 - Use restrictions
Uses
This field is used to set the restricted status of the item.
In the search results, the restricted item will be marked as available.
Effects on circulation
A restricted item will not be able to be checked out.
Values
The restricted status is numerical, '1' means restricted and '0' (or empty) means unrestricted.
टिप्पणी
Unlike other statuses, the restricted status can only be 0 (not restricted) or 1 (restricted).
By default, the field is associated with the RESTRICTED authorized value category so you don't have to remember the numerical values. The default values in the RESTRICTED authorized value category are:
1: Access Restricted
Display
Staff interface
Search results (restricted items will be marked as available)
Holdings table in the record's detail page
OPAC
Search results (restricted items will be marked as available)
Holdings table in the record's detail page
Mapped to: items.restricted
Indexed in: restricted
952$6 - Koha normalized classification for sorting
चेतावनी
This field should not be editable nor edited manually.
Uses
This field contains the normalized call number used for sorting, based on the item-level call number (952$o) and the classification source (952$2).
Display
This information is not displayed anywhere in the OPAC or in the staff interface, it is for Koha's internal use only.
Mapped to: items.cn_sort
Indexed in: cn-sort
952$7 - Not for loan status
Uses
This field is used to set the not for loan status of the item.
In the search results, the not for loan item will be marked as unavailable or for reference use only (see Reference_NFL_Statuses)
Effects on circulation
Items with a not for loan status cannot be checked out (unless AllowNotForLoanOverride allows it)
Depending on the value, items may or may not be put on hold (see below)
Depending on TrapHoldsOnOrder and SkipHoldTrapOnNotForLoanValue not for loan items may be used to fill holds
The UpdateNotForLoanStatusOnCheckin system preference can be used to automatically change not for loan values upon checkin
Values
The not for loan status is numerical, '0' (or empty) means available.
Negative values (< 0) mean that the item cannot be checked out, but can be put on hold.
Positive values (> 0) mean that the item cannot be checked out nor be put on hold.
By default, the field is associated with the NOT_LOAN authorized value category so you don't have to remember the numerical values. The default values in the NOT_LOAN authorized value category are:
-1: Ordered
1: Not For Loan
2: Staff Collection
Display
Staff interface
Search results (not for loan item will be marked as unavailable or for reference use only (see Reference_NFL_Statuses))
Holdings table in the record's detail page
'Items' tab of the bibliographic record, 'Withdrawn status' under 'Statuses'
OPAC
Search results (not for loan item will be marked as unavailable or for reference use only (see Reference_NFL_Statuses))
Holdings table in the record's detail page
To hide not for loan items from the OPAC, use the OpacHiddenItems system preference.
Mapped to: items.notforloan
Indexed in: notforloan
952$8 - Collection
Uses
This field is used to set the collection of the item.
Collections in Koha are used to group items in ways other than physically (the physical location can be stored in 952$c). An example of a collection could be 'Local authors'.
Collections can also be used to limit transfers in multi-branch systems (see the Library transfer limits section of the administration) if BranchTransferLimitsType is set to 'collection code'
The collection of an item is used in the search (see the AdvancedSearchTypes system preference) as well as the facets.
Values
By default, the field is associated with the CCODE authorized value category. The default values in the CCODE authorized value category are:
FIC: Fiction
NFIC: Non-fiction
REF: Reference
Display
Staff interface
The collections will be part of the facets in the search results
Holdings table in the record's detail page
टिप्पणी
Use 'Table settings' if you want to hide that column - Module: Catalogue - Table id: holdings_table and/or otherholdings_table - Column: holdings_ccode or otherholdings_ccode
Checkouts table in the patron's file
टिप्पणी
Use 'Table settings' if you want to hide that column - Module: Circulation and Patrons - Table id: issues-table - Column: collection
Many other places all throughout Koha
OPAC
Search results, if OpacItemLocation allows it
The collections will be part of the facets in the search results
Holdings table in the record's detail page
टिप्पणी
Use 'Table settings' if you want to hide that column - Module: OPAC - Table id: holdingst - Column: item_ccode
Many other places throughout the OPAC
Mapped to: items.ccode
Indexed in: collection-code
952$9 - Itemnumber
चेतावनी
This field should not be editable nor edited manually.
Uses
The itemnumber is the internal number assigned to each item by Koha. It is unique and cannot be reattributed even when the item is deleted.
Display
This information is not displayed anywhere in the OPAC or in the staff interface, it is for Koha's internal use only.
Mapped to: items.itemnumber
Indexed in: itemnumber
952$a - Home library
Required
Uses
This field indicates the home library of the item.
The home library is important for many things in Koha, including, but not limited to
The home library of an item is used in the search as well as the facets (see the DisplayLibraryFacets system preference)
Effects on circulation
As previously stated, the circulation rules are based on the item's library (see the HomeOrHoldingBranch system preference)
Values
Libraries are defined in the libraries section of the administration page.
Display
Staff interface
Depending on the DisplayLibraryFacets system preference, the home library may be part of the facets in the search results
Holdings table in the record's detail page
टिप्पणी
Use 'Table settings' if you want to hide that column - Module: Catalogue - Table id: holdings_table and/or otherholdings_table - Column: holdings_homebranch or otherholdings_homebranch
This information is displayed in the staff interface, in the 'Items' tab of the bibliographic record, 'Home library' under 'Item information'
Checkouts table in the patron's file
टिप्पणी
Use 'Table settings' if you want to hide that column - Module: Circulation and Patrons - Table id: issues-table - Column: homebranch
Many other places all throughout Koha
OPAC
Search results (if OpacItemLocation allows it)
Depending on the DisplayLibraryFacets system preference, the home library may be part of the facets in the search results
Holdings table in the record's detail page, if OpacLocationBranchToDisplay allows it
टिप्पणी
Use 'Table settings' if you want to hide that column - Module: OPAC - Table id: holdingst - Column: item_home_location
Many other places throughout the OPAC
Mapped to: items.homebranch
Indexed in: homelibrary
952$b - Current library
Required
Uses
This field indicates the current library (holding library) of the item.
The current library is important for many things in Koha, including
The current library of an item is used in the search as well as the facets (see the DisplayLibraryFacets system preference)
Effects on circulation
As previously stated, the circulation rules are based on the item's library (see the HomeOrHoldingBranch system preference)
Values
Libraries are defined in the libraries section of the administration page.
Display
Staff interface
Depending on the DisplayLibraryFacets system preference, the holding library may be part of the facets in the search results
Holdings table in the record's detail page
टिप्पणी
Use 'Table settings' if you want to hide that column - Module: Catalogue - Table id: holdings_table and/or otherholdings_table - Column: holdings_holdingbranch or otherholdings_holdingbranch
This information is displayed in the staff interface, in the 'Items' tab of the bibliographic record, 'Current library' under 'Item information'
Many other places all throughout Koha
OPAC
Search results (if OpacItemLocation allows it)
Depending on the DisplayLibraryFacets system preference, the holding library may be part of the facets in the search results
Holdings table in the record's detail page, if OpacLocationBranchToDisplay allows it
टिप्पणी
Use 'Table settings' if you want to hide that column - Module: OPAC - Table id: holdingst - Column: item_current_location
Many other places throughout the OPAC
Mapped to: items.holdingbranch
Indexed in: holdinglibrary
952$c - Shelving location
Uses
This field indicates the location of the item (physical place in the library).
Shelving locations in Koha are used to group items physically. An example of a shelving location could be 'Children's section'.
The location of an item is used in the search (see the AdvancedSearchTypes system preference) as well as the facets.
The UpdateItemLocationOnCheckin system preference can be used to automatically change location values upon checkin
Values
By default, the field is associated with the LOC authorized value category. The default values in the LOC authorized value category are:
FIC: Fiction
CHLID: Children's Area
DISPLAY: On Display
NEW: New Materials Shelf
STAFF: Staff Office
GEN: General Stacks
AV: Audio Visual
REF: Reference
CART: Book Cart
PROC: Processing Center
The default value for new items can be set using the NewItemsDefaultLocation system preference
Display
Staff interface
The locations will be part of the facets in the search results
Holdings table in the record's detail page (under the home library)
This information is displayed in the staff interface, in the 'Items' tab of the bibliographic record, 'Home library' under 'Item information'
Checkouts table in the patron's file
टिप्पणी
Use 'Table settings' if you want to hide that column - Module: Circulation and Patrons - Table id: issues-table - Column: location
Many other places all throughout Koha
OPAC
Search results (if OpacItemLocation allows it)
The locations will be part of the facets in the search results
Holdings table in the record's detail page, the OpacLocationOnDetail system preference indicates in which column this information is located
टिप्पणी
Use 'Table settings' if you want to hide that column - Module: OPAC
Table id: holdingst
Column: item_shelving_location (if OpacLocationOnDetail is set to 'separate column')
Many other places throughout the OPAC
Mapped to: items.location
Indexed in: location
952$d - Date acquired
Uses
This field is used to enter the date of acquisition of the item.
The acquisition date can be used in the search and the sort function in the search results
When using the Acquisitions module, this should be filled automatically with the acquisition date
Values
This should be a date in the YYYY-MM-DD format (there is a handy date picker to ensure the date is in the correct format)
Display
Staff interface
Holdings table in the record's detail page
टिप्पणी
Use 'Table settings' if you want to hide that column - Module: Catalogue - Table id: holdings_table and/or otherholdings_table - Column: holdings_dateaccessioned or otherholdings_dateaccessioned
'Items' tab of the bibliographic record, 'Accession date' under 'History'
Mapped to: items.dateaccessioned
Indexed in: date-of-acquisition
952$e - Source of acquisition
Uses
This field is used to enter the vendor where the item was acquired
When using the Acquisitions module, this should be filled automatically with the vendor upon receiving
Values
This is a free text field
If using the Acquisitions field, the value in this field will be the vendor id rather than the vendor's name
Display
This is not displayed either in the OPAC or in the staff interface. The information is only available in the item's editing form.
Mapped to: items.booksellerid
Indexed in: acqsource
952$f - Coded location qualifier
Uses
This field is used to enter a three-character code that identifies the specific issues of the item that are located apart from the main holdings of the same item (same as MARC21 852$f).
Values
This is a free text field
The field in the database is limited to 10 characters
Display
This is not displayed either in the OPAC or in the staff interface. The information is only available in the item's editing form.
Mapped to: items.coded_location_qualifier
Indexed in: coded-location-qualifier
952$g - Cost, normal purchase price
Uses
This field is used to enter the purchase price of the item
When using the Acquisitions module, this should be filled automatically with the purchase price upon receiving
Values
This is a free text field
The price must be digits, with a period as the decimal, with no currency symbols (e.g. 24.95)
The field in the database limits to two decimal points (e.g. 24.95 is OK but 24.94875 is not)
Display
This is not displayed either in the OPAC or in the staff interface. The information is only available in the item's editing form.
Mapped to: items.price
Indexed in: price
952$h - Serial enumeration / chronology
Uses
This field is used to enter the issue number of serials or the volume number of series
When using the Serials module, this should be filled automatically with the issue number
Values
This is a free text field
Display
Staff interface
Holdings table in the record's detail page
टिप्पणी
Use 'Table settings' if you want to hide that column - Module: Catalogue - Table id: holdings_table and/or otherholdings_table - Column: holdings_enumchron or otherholdings_enumchron
'Items' tab of the bibliographic record, 'Serial enumeration' under 'History'
OPAC
Holdings table in the record's detail page
टिप्पणी
Use 'Table settings' if you want to hide that column - Module: OPAC - Table id: holdingst - Column: item_enumchron
Mapped to: items.enumchron
952$i - Inventory number
Uses
This field is used to enter an inventory number for the item
टिप्पणी
The inventory number is not Koha's internal itemnumber (which is stored in 952$9)
Values
This is a free text field
The field in the database is limited to 32 characters
Display
Staff interface
Holdings table in the record's detail page
टिप्पणी
Use 'Table settings' if you want to hide that column - Module: Catalogue - Table id: holdings_table and/or otherholdings_table - Column: holdings_stocknumber or otherholdings_stocknumber
Mapped to: items.stocknumber
Indexed in: number-local-acquisition
952$j - Shelving control number
Uses
This field is used to enter a shelf number where the item is located
Values
The stack number should be numerical
By default, the field is associated with the STACK authorized value category so you don't have to remember the numerical values. There are no default values.
Display
This is not displayed either in the OPAC or in the staff interface. The information is only available in the item's editing form.
Mapped to: items.stack
Indexed in: stack
952$l - Total checkouts
चेतावनी
This field should not be editable nor edited manually.
Uses
This field contains the total number of past and present issues/checkouts of this item
The number of issues is used to sort search results by popularity
The number of issues for each item is used to update the total number of issues for the record (942$0)
Display
Staff interface
'Items' tab of the bibliographic record, 'Total checkouts' under 'History'
Mapped to: items.issues
Indexed in: issues
952$m - Total renewals
चेतावनी
This field should not be editable nor edited manually.
Uses
This field contains the total number of past renewals of this item
Display
Staff interface
'Items' tab of the bibliographic record, 'Current renewals' under 'Statuses'
Mapped to: items.renewals
Indexed in: renewals
952$n - Total holds
चेतावनी
This field should not be editable nor edited manually.
Uses
This field contains the total number of past and present holds on this item
The number of holds is used to create a RSS feed for most reserved items
Display
This is not displayed either in the OPAC or in the staff interface.
Mapped to: items.renewals
Indexed in: renewals
952$o - Full call number
Uses
This field is used to store the item's call number
The call number of an item can used in the search
Values
The records call number can be copied into the item's call number, the itemcallnumber system preference indicates which record field to use as the source
Display
Staff interface
Holdings table in the record's detail page
टिप्पणी
Use 'Table settings' if you want to hide that column - Module: Catalogue - Table id: holdings_table and/or otherholdings_table - Column: holdings_itemcallnumber or otherholdings_itemcallnumber
'Items' tab of the bibliographic record, 'Item callnumber' under 'Item information'
Checkouts table in the patron's file
टिप्पणी
Use 'Table settings' if you want to hide that column - Module: Circulation and Patrons - Table id: issues-table - Column: callno
Many other places all throughout Koha
OPAC
Search results, if OpacItemLocation allows it
Holdings table in the record's detail page
टिप्पणी
Use 'Table settings' if you want to hide that column - Module: OPAC - Table id: holdingst - Column: item_callnumber
Checkouts table in the patron's online account
Many other places throughout the OPAC
Mapped to: items.itemcallnumber
Indexed in: local-classification
952$p - Barcode
Required for circulation
Uses
This field is used to store the item's barcode
The barcode of an item can used in the search
Effects on circulation
The barcode is essential for circulating items
Values
This should be a date in the YYYY-MM-DD format (there is a handy date picker to ensure the date is in the correct format)
This is a free text field
The field in the database is limited to 20 characters
Display
Staff interface
Holdings table in the record's detail page
टिप्पणी
Use 'Table settings' if you want to hide that column - Module: Catalogue - Table id: holdings_table and/or otherholdings_table - Column: holdings_barcode or otherholdings_barcode
'Items' tab of the bibliographic record
Checkouts table in the patron's file (in the title column)
Mapped to: items.barcode
Indexed in: barcode
952$q - Date due
चेतावनी
This field should not be editable nor edited manually.
Uses
When the item is checked out, the due date is stored in this field (YYYY-MM-DD)
This field is used in the 'Limit to currently available items' in the facets
Display
The due date appears in a lot of pages in the circulation module, but it is the due date that comes from the issues, not the item
Mapped to: items.onloan
Indexed in: onloan
952$r - Date last seen
चेतावनी
This field should not be editable nor edited manually.
Uses
When the item is checked out or in, edited, inventoried, or during any other transaction that affects the item, the date is stored in this field (YYYY-MM-DD)
Display
Staff interface
Holdings table in the record's detail page
टिप्पणी
Use 'Table settings' if you want to hide that column - Module: Catalogue - Table id: holdings_table and/or otherholdings_table - Column: holdings_lastseen or otherholdings_lastseen
'Items' tab of the bibliographic record, 'Last seen' under 'History'
Mapped to: items.datelastseen
Indexed in: datelastseen
952$s - Date last checked out
चेतावनी
This field should not be editable nor edited manually.
Uses
When the item is checked out, the date is stored in this field (YYYY-MM-DD)
Display
Staff interface
Holdings table in the record's detail page
टिप्पणी
Use 'Table settings' if you want to hide that column - Module: Catalogue - Table id: holdings_table and/or otherholdings_table - Column: holdings_datelastborrowed or otherholdings_datelastborrowed
'Items' tab of the bibliographic record, 'Last borrowed' under 'History'
Mapped to: items.datelastborrowed
Indexed in: datelastborrowed
952$t - Copy number
Uses
This field is used to enter the copy number of the item
Values
This is a free text field
The field in the database is limited to 32 characters
Display
Staff interface
Holdings table in the record's detail page
टिप्पणी
Use 'Table settings' if you want to hide that column - Module: Catalogue - Table id: holdings_table and/or otherholdings_table - Column: holdings_copynumber or otherholdings_copynumber
'Items' tab of the bibliographic record, 'Copy number' under 'History'
OPAC
Holdings table in the record's detail page
टिप्पणी
Use 'Table settings' if you want to hide that column - Module: OPAC - Table id: holdingst - Column: item_copy
Mapped to: items.copynumber
Indexed in: copynumber
952$u - URI
Uses
This field is used to enter a URL or URN specific to the item
It is not necessary to enter a URL here if there is already a URL in 856$u at the record-level, unless the URL for the specific item differs from the one in 856$u (for example, if you have an online periodical, you can put the URL to the periodical in 856$u and the URL to the specific issue in 952$u)
Values
Display
Staff interface
Holdings table in the record's detail page
टिप्पणी
Use 'Table settings' if you want to hide that column - Module: Catalogue - Table id: holdings_table and/or otherholdings_table - Column: holdings_uri or otherholdings_uri
OPAC
Holdings table in the record's detail page
टिप्पणी
Use 'Table settings' if you want to hide that column - Module: OPAC - Table id: holdingst - Column: item_url
Mapped to: items.uri
Indexed in: uri
952$v - Cost, replacement price
Uses
This field is used to enter the replacement cost that will be charged to the patron who loses the item
When using the Acquisitions module, this should be filled automatically with the replacement price upon receiving
Values
This is a free text field
The price must be digits, with a period as the decimal, with no currency symbols (e.g. 24.95)
The field in the database limits to two decimal points (e.g. 24.95 is OK but 24.94875 is not)
Display
Staff interface
Checkouts table in the patron's file (in the price column)
टिप्पणी
Use 'Table settings' if you want to hide that column - Module: Circulation and Patrons - Table id: issues-table - Column: price
'Items' tab of the bibliographic record, 'Replacement price' under 'Item information'
Mapped to: items.replacementprice
Indexed in: replacementprice
952$w - Price effective from
Uses
This field is used to enter the date of the replacement price of the item
When using the Acquisitions module, this should be filled automatically with the acquisition date upon receiving
If left empty, it will default to the acquisition date (952$d)
Values
This should be a date in the YYYY-MM-DD format
Display
This is not displayed either in the OPAC or in the staff interface. The information is only available in the item's editing form.
Mapped to: items.replacementpricedate
Indexed in: replacementpricedate
952$x - Non-public note
Uses
This field is used to enter internal notes about the item
Values
This is a free text field
Display
Staff interface
Holdings table in the record's detail page
टिप्पणी
Use 'Table settings' if you want to hide that column - Module: Catalogue
Table id: holdings_table and/or otherholdings_table
Column: holdings_itemnotes_nonpublic or otherholdings_itemnotes_nonpublic
'Items' tab of the bibliographic record, 'Non-public note' under 'History'
Mapped to: items.itemnotes_nonpublic
952$y - Koha item type
Required
Uses
This field contains the item-level item type.
The item-level item type is used in various places in Koha.
The item-level item type is generally used for the circulation rules unless the item-level_itypes system preference is set to use the record-level item type (this system preference lets you choose between using the record-level or item-level item type for the circulation rules, among other things)
The item-level item type is indexed and used in the search (see also the AdvancedSearchTypes system preference) as well as the facets
Effects on circulation
The item type is used as the basis for circulation rules, it will affect the number of items a patron can take out at the same time, number of holds, etc.)
Values
The values are managed in item types
Display
Staff interface
The itemtypes will be part of the facets in the search results
Holdings table in the record's detail page
टिप्पणी
Use 'Table settings' if you want to hide that column - Module: Catalogue - Table id: holdings_table and/or otherholdings_table - Column: holdings_itype or otherholdings_itype
'Items' tab of the bibliographic record, 'Item type' under 'Item information'
Checkouts table in the patron's file
टिप्पणी
Use 'Table settings' if you want to hide that column - Module: Circulation and Patrons - Table id: issues-table - Column: item_type
Many other places all throughout Koha
OPAC
The item types will be part of the facets in the search results
Holdings table in the record's detail page
टिप्पणी
Use 'Table settings' if you want to hide that column - Module: OPAC - Table id: holdingst - Column: item_itemtype
Many other places throughout the OPAC
Mapped to: items.itype
Indexed in: itemtype (mc-itemtype), itype (mc-itype)
952$z - Public note
Uses
This field is used to enter notes about the item
Values
This is a free text field
Display
Staff interface
Holdings table in the record's detail page
टिप्पणी
Use 'Table settings' if you want to hide that column - Module: Catalogue - Table id: holdings_table and/or otherholdings_table - Column: holdings_itemnotes or otherholdings_itemnotes
'Items' tab of the bibliographic record, 'Public note' under 'History'
OPAC
Holdings table in the record's detail page
टिप्पणी
Use 'Table settings' if you want to hide that column - Module: OPAC - Table id: holdingst - Column: item_notes
Mapped to: items.itemnotes
Indexed in: note
System control numbers (999)
Koha stores its system control numbers in the 999 field in MARC21 and in the 090 field in UNIMARC.
टिप्पणी
The itemnumber is stored in 952$9 (see above).
999$c - Biblionumber
The biblionumber is the internal number assigned to each record by Koha. It is unique and cannot be reattributed even when the record is deleted.
Mapped to: biblio.biblionumber
Indexed in: local-number (sn, biblionumber)
चेतावनी
This field should not be editable nor edited manually.
टिप्पणी
In UNIMARC, the biblionumber is stored in the 090$9 subfield.
999$d - Biblioitemnumber
The biblioitemnumber is the internal number assigned to each record by Koha. It is unique and cannot be reattributed even when the record is deleted.
Mapped to: biblioitems.biblioitemnumber
Indexed in: biblioitemnumber
चेतावनी
This field should not be editable nor edited manually.
टिप्पणी
In UNIMARC, the biblioitemnumber is stored in the 090$a subfield.
Koha XSLT material type icons
When you have any of the XSLT system preferences (OPACXSLTDetailsDisplay, OPACXSLTResultsDisplay, XSLTDetailsDisplay, and/or XSLTResultsDisplay) along with the DisplayOPACiconsXSLT and DisplayIconsXSLT preferences turned on you will see material type icons on the related screen.
महत्वपूर्ण
ये छवियां आपके नेता में पाए गए मानों से आ रही हैं, यदि आपके नेता को उचित रूप से सूचीबद्ध नहीं किया गया है तो यह बंद करना सबसे अच्छा हो सकता है: ref: DisplayOPACiconsXSLT वरीयता (जिसे अन्य एक्सएसएलटी वरीयताओं को चालू करते समय किया जा सकता है)।

पुस्तक [BK]
लीडर6 = a (और लीडर7 मूल्यों में से एक नीचे )
लीडर7 = a
लीडर7 = c
लीडर7 = d
लीडर7 = m
लीडर6 = t
कंप्यूटर फ़ाइल [CF]
लीडर6 = m

सतत संसाधन [CR]
लीडर7 = b
लीडर7 = i
लीडर7 = s

मानचित्र [MP]
लीडर6 = e
लीडर6 = f

मिश्रित [MX]
लीडर6 = p
ध्वनि [MU]
लीडर6 = c
लीडर6 = d
लीडर6 = i
लीडर6 = j
दृश्य सामग्री [VM]
लीडर6 = g
लीडर6 = k
लीडर6 = r

किट
लीडर6 = o
ऑर्डर आइटम और होल्डिंग पर हैंडलिंग
यदि आप अपने मार्क रिकॉर्ड को आयात करते हैं, तो जब आप पुस्तक का आदेश देते हैं (जैसा कि आप पुस्तकों को प्राप्त करते हैं), और उन पुस्तकों पर संरक्षक रखने की अनुमति दें, तो आपको *.mrc फ़ाइल से पहले आइटम रिकॉर्ड जोड़ना पड़ सकता है आयात।
अपने नवीनतम आदेश को आयात करने का सबसे आसान तरीका पहले अपने अभिलेखों को एमएआरसीईडएड <http://marcedit.reeset.net/> __ के माध्यम से चलाने के लिए है अपने एमएआरसी रिकॉर्ड डाउनलोड करें, उन्हें अपने डेस्कटॉप पर या किसी दूसरे स्थान पर सहेज कर रखें जो आप उपयोग करते हैं / याद रखेंगे। यदि आपके पास पहले से ही स्थापित MARCEdit है, तो आपको अपने मार्क रिकॉर्ड पर डबल क्लिक करना होगा, और वे स्वचालित रूप से MARCEdit में खुलेंगे
महत्वपूर्ण
इस ट्यूटोरियल Windows XP पर MARCEdit संस्करण 5.2.3769.41641 के साथ लिखा गया था, निर्देश अलग हो सकता है अपने संस्करण या ऑपरेटिंग सिस्टम अलग-अलग होता है।
आपका मूल फ़ाइल स्वचालित रूप से इनपुट में होगा; सुनिश्चित MarcBreaker चुना जाता है, और फिर क्लिक करें "चलाएँ"
आप स्क्रीन के तल पर कार्रवाई की रिकॉर्ड की एक सारांश के साथ प्रस्तुत किया जाएगा
आइटम रिकॉर्ड जोड़ने के लिए जारी रखने के लिए 'रिकॉर्ड संपादित करें' पर क्लिक करें
अपनी स्क्रीन एक बड़ी स्क्रीन मार्क रिकॉर्ड युक्त साथ प्रतिस्थापित किया जाएगा
टूल पर क्लिक करें > फ़ील्ड जोड़ें / संपादित करें
कोहा विशेष आइटम की जानकारी में दर्ज करें
फील्ड बॉक्स में, टाइप 942 करें
फ़ील्ड डेटा बॉक्स में, लिखें \\$c और आइटम प्रकार कोड (\\$cBOOK इस उदाहरण में)
'सम्मिलित आखिरी' विकल्प की जाँच करें
क्लिक करें 'जोड़ें फील्ड'
आइटम डेटा रिकॉर्ड में दर्ज
फील्ड बॉक्स में, टाइप 952 करें
फ़ील्ड डेटा बॉक्स में, टाइप करें $7ORDERED_STATUS$aPERM_LOC$bCURR_LOC$cSHELVING_LOCATION$eSOURCE_OF_ACQ$yITEM_TYPE
उदा. $7-1$aCPL$bCPL$cNEW$eBrodart$yBOOK
एक डिफ़ॉल्ट कोहा -1 के स्थापित में आदेश दिया की स्थिति के लिए मूल्य है
आप अन्य उपक्षेत्रों को देखने के लिए चाहते हो सकता है उदाहरण के लिए, -- आप में डेटा चाहते हैं संग्रह कोड बदलने ही संग्रह (8) में सभी आइटम डाल करने के लिए, स्वचालित रूप से अधिग्रहण की तारीख (घ) में भरने के लिए, या एक सार्वजनिक टिप्पणी (जेड) में डाल दिया।
आप अलग उपक्षेत्रों से $ का उपयोग सुनिश्चित करें; एक अलग लाइन पर प्रत्येक उपक्षेत्र कहा कि कई मदों के कारण होगा आपका मार्क रिकॉर्ड के साथ आयात करने के लिए (उपरोक्त उदाहरण में, चार वस्तुओं, उन उपक्षेत्रों में से एक के साथ प्रत्येक सही)
सुनिश्चित करें कि आप प्रशासन को देखें > क्षेत्र में सही कोड डाल करने के लिए कोहा में प्राधिकृत मूल्य
'सम्मिलित आखिरी' विकल्प की जाँच करें
क्लिक करें 'जोड़ें फील्ड'
क्षेत्र संपादक विंडो बंद करें
फ़ाइल पर क्लिक करें > मार्क में संकलित करें
चुनें जहां अपनी फ़ाइल को सहेजने के लिए
अब आप अपने कोहा प्रणाली में जाकर निर्देशों का पालन करना चाहते हैं: रेफरी: 'MARC रिकॉर्ड आयात करना<stage-marc-records-for-import-label>`.
एक बार जब आइटम में आ गया है, आप आइटम रिकॉर्ड करने के लिए जाने के लिए और व्यक्तिगत रूप से आइटम बदलने के लिए सही बारकोड की जरूरत होगी, और मैन्युअल स्थिति ऋण क्षेत्र के लिए नहीं में खाली लाइन के लिए आदेश दिया है से बदल जाते हैं।
नोट
यदि आप अपने सूचीबद्ध आइटम रिकॉर्ड खरीद, आप अपने विक्रेता की जानकारी आप के लिए मार्क रिकॉर्ड में जरूरत में डाल अनुरोध करने के लिए चाहते हो सकता है; उस तरफ, आप संपादित-से-विक्रेता फ़ाइल आयात कर सकता है, मौजूदा रिकॉर्ड को अधिलेखित, स्वचालित रूप से आप क्या जरूरत के साथ डाटा की जगह ले।