परिचालन
संचलन कार्यों कई अलग अलग तरीकों से पहुँचा जा सकता है। स्टाफ ग्राहक के मुख्य पृष्ठ पर पृष्ठ के केंद्र में कुछ त्वरित लिंक, आइटम बाहर की जाँच करने के लिए या उन्हें स्थानांतरित कर रहे हैं। संचलन कार्यों की एक पूरी सूची के लिए आप सर्कुलेशन पेज जो हर पृष्ठ के शीर्ष बाएं से या मुख्य पृष्ठ के केंद्र से जुड़ा हुआ है यात्रा कर सकते हैं।
Before circulating your collection you will want to set your Global system preferences, Basic parameters and Patrons and circulation rules.
सर्कुलेशन आप निम्नलिखित गर्म कुंजी का उपयोग करके स्क्रीन के शीर्ष पर त्वरित खोज बॉक्स पर नजर के बीच कूद सकते हैं:
Alt+Q के साथ सूची खोज करने के लिए कूद
Alt+U के साथ चेकआउट करने के लिए कूद
यह मैक उपयोगकर्ता के लिए काम नहीं करेगा
साथ Alt+R चेकइन करने के लिए कूद
नोट
मैक उपयोगकर्ताओं एएलटी के स्थान पर विकल्प बटन का उपयोग करें
Check out (issuing)
चेकआउट प्रक्रिया शुरू करने के लिए आप संरक्षक बारकोड या उनके नाम का हिस्सा दर्ज करना आवश्यक है। चेकआउट विकल्प तीन मुख्य स्थानों में प्रकट होता है:
Check out option in the search bar at the top of the staff interface's main page

Check out option in the search bar at the top of the main circulation page

Those two options are essentially a patron search. If you only have one result, Koha will automatically go to the patron's file, in the 'Check out' tab.
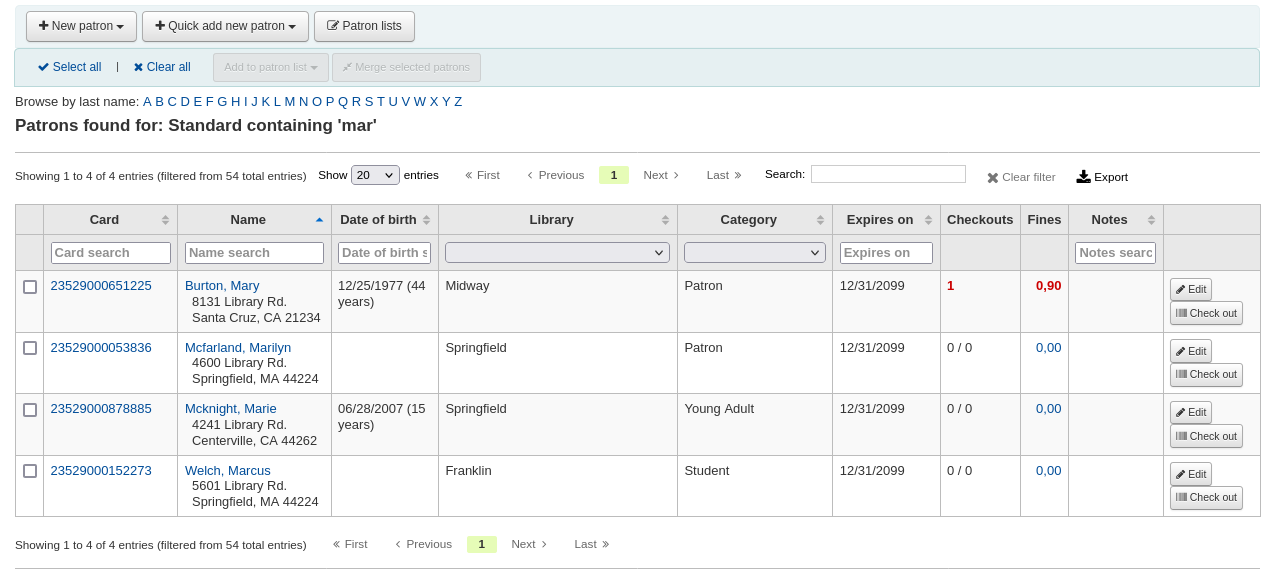
If your search gives you more than one result, it will ask you to choose which patron to check out to.
टिप्पणी
You can customize the columns of this table in the 'Table settings' section of the Administration module, under the patrons tab (table id: memberresultst).
Clicking on a patron search result will bring you to the patron's file, on the 'Details' tab. Click the 'Check out' tab to access the check out screen.
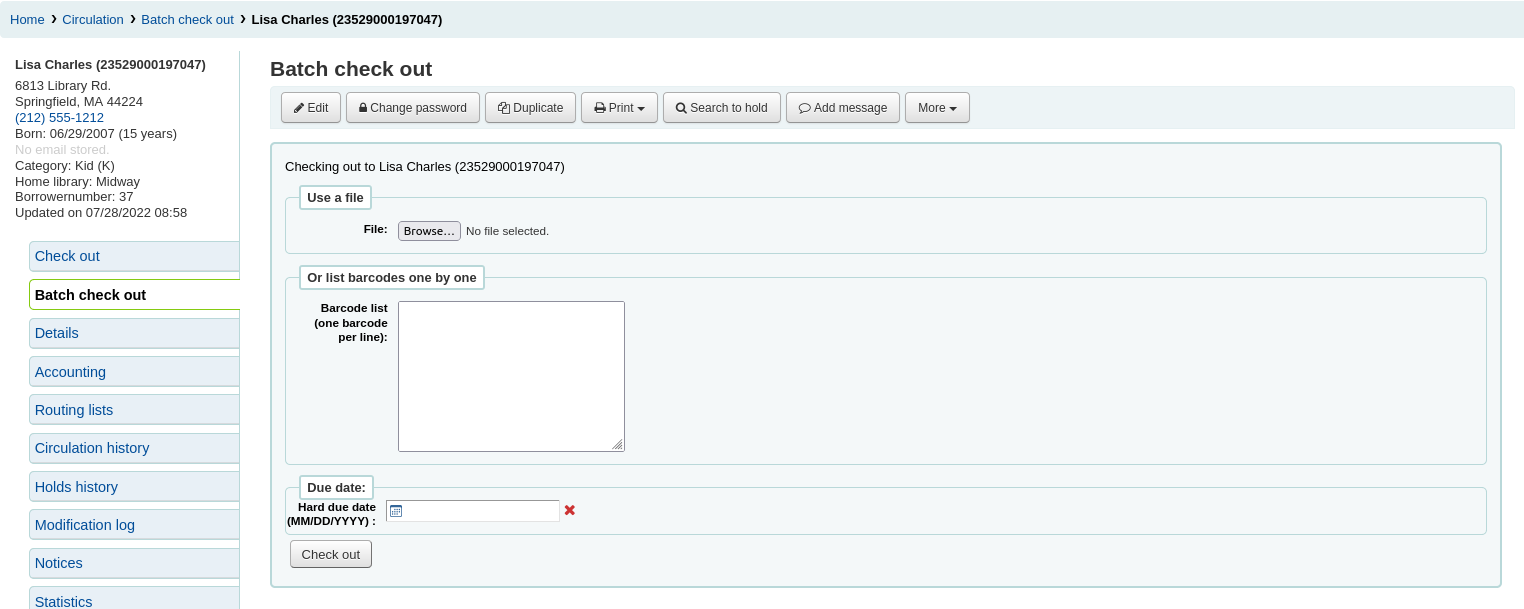
If you have enabled batch checkouts, click the batch check out tab on the patron record
Checking items out
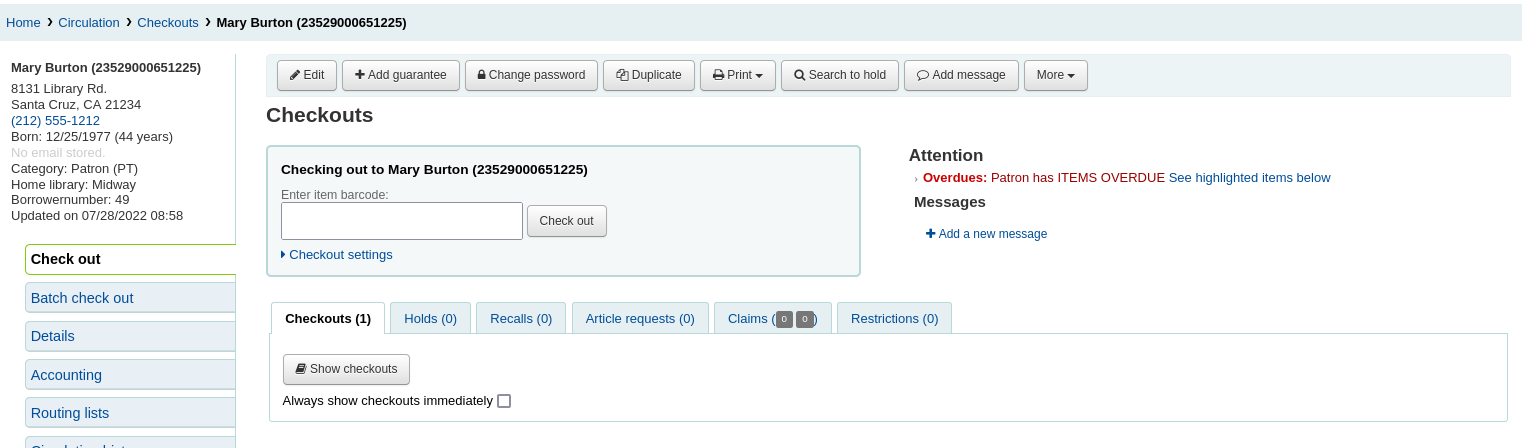
एक संरक्षक, कि संरक्षक ऊपर सूचीबद्ध कई विकल्पों में से एक का उपयोग कर के लिए पहले खोज के लिए बाहर एक आइटम की जांच करने के लिए। तुम तो चेकआउट स्क्रीन के साथ प्रस्तुत किया जाएगा।
If 'Always show checkouts immediately' is checked, you will see the list of current checkouts below the check out box.
टिप्पणी
The previousIssuesDefaultSortOrder system preference controls in which order these previous checkouts appear (earliest to latest, or latest to earliest).
टिप्पणी
You can customize the columns of this table in the 'Table settings' section of the Administration module, under the circulation tab (table id: issues-table).
At the top of the check out screen is a field to type or scan the item's barcode into.
टिप्पणी
Many modern barcode scanners will send a 'return' to the browser, making it so that the 'Check out' button is automatically clicked.
यदि बारकोड नहीं मिला है तो आपको आइटम जोड़ने के लिए तेज़ कैटलॉगिंग का उपयोग करने के लिए कहा जाएगा। के बारे में अधिक जानने फास्ट कैटलॉगिंग बाद में इस मैनुअल में।
If the itemBarcodeFallbackSearch system preference is set to 'Enable', you can enter a keyword search in this box instead of just a barcode (this will make it possible to check out using title and/or call number).
If the AutoSwitchPatron system preference is set to 'Enable', scanning a patron barcode here will take you to that patron's file.
अधिक चेकआउट विकल्प देखने के लिए चेकआउट क्षेत्र का विस्तार करने के लिए 'चेकआउट सेटिंग' लिंक पर क्लिक करें.
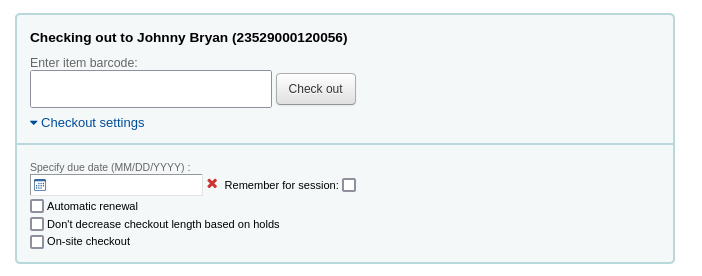
Specify due date: this option can be used to override the default due date for the item, as defined in the circulation and fines rules.
टिप्पणी
This option will only appear if the SpecifyDueDate system preference is set to allow staff to override the due date.
The red 'X' is used to clear the date. If the 'specify due date' field is empty, the default due date, as defined in the circulation and fines rules is used.
Remember for this session: check this box to use the same date for all checkouts. This will not only keep the specified due date for this patron but for all patrons, until you log out of the staff interface.
Automatic renewal: this option will allow this item to automatically be renewed
To use automatic renewals,
the automatic_renewals cron job must be running
the circulation and fines rules regarding automatic renewals must be defined
Just like regular renewals, the checkouts will not be automatically renewed if there is a hold on the item.
Don't decrease checkout length based on holds: this option overrides the decreaseLoanHighHolds system preference.
टिप्पणी
This option will only appear if the decreaseLoanHighHolds system preference is enabled.
On-site checkout: this option indicates that this checkout is an on-site checkout.
टिप्पणी
This option will only appear if the checkout of items on site to patrons is allowed. These are usually items that are not for loan that you would like to check out for in-library use.
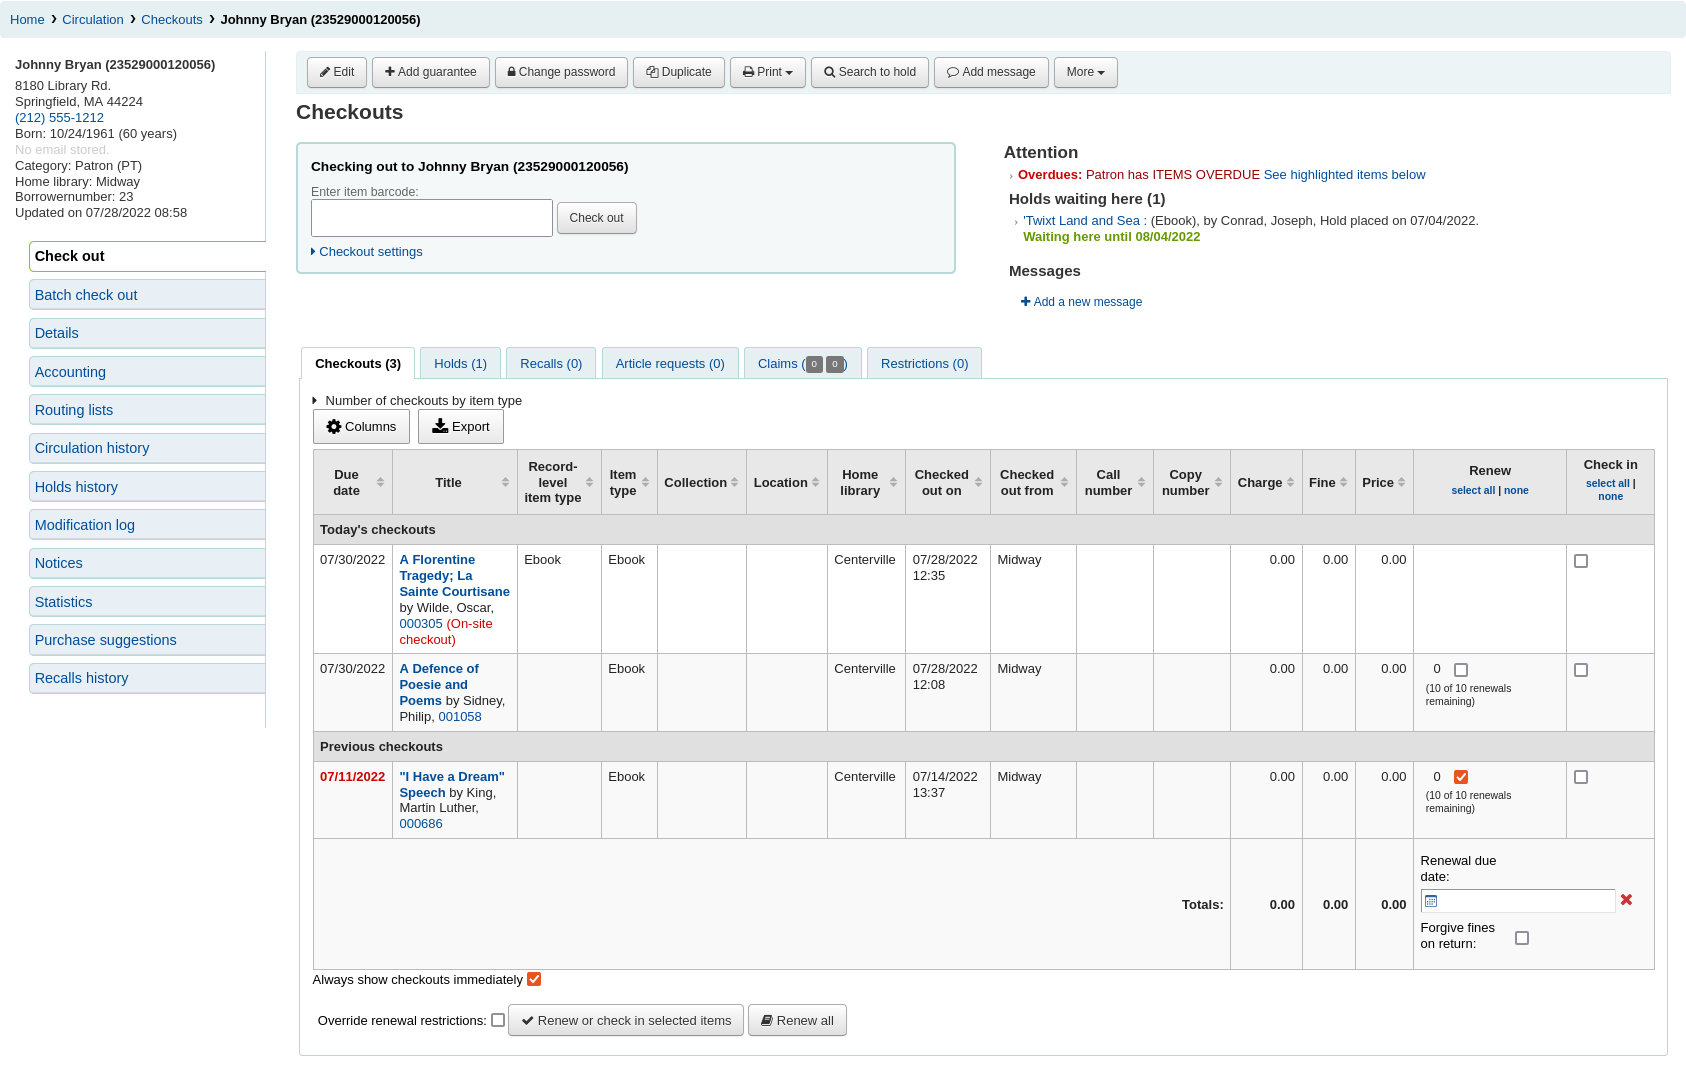
At the bottom of the page there is a summary of the patron's current checked out items along with the due date (and time if the item is an hourly loan). Items checked out today will appear at the top, previously checked out items will be underneath.
टिप्पणी
The todaysIssuesDefaultSortOrder system preference controls in which order these new checkouts appear (earliest to latest, or latest to earliest).
टिप्पणी
आइटम प्रति घंटा ऋण आइटम हैं देय तारीख के साथ समय शामिल होंगे।
If an item is checked out for on-site use, that information will be highlighted in red in the checkout summary.

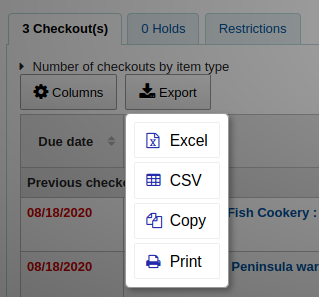
The 'Export' button at the top of the table allows you to export the patron's current checkouts in either Microsoft Excel or CSV format, or even copy or print their checkouts.
वहाँ संरक्षक रिकॉर्ड पर नोट कर रहे हैं इन चेकआउट बॉक्स के दाईं ओर दिखाई देंगे

If the patron has a hold waiting at the library, that too will appear to the right of the check out box making it easy for the circulation staff to see that there is another item to give to the patron.
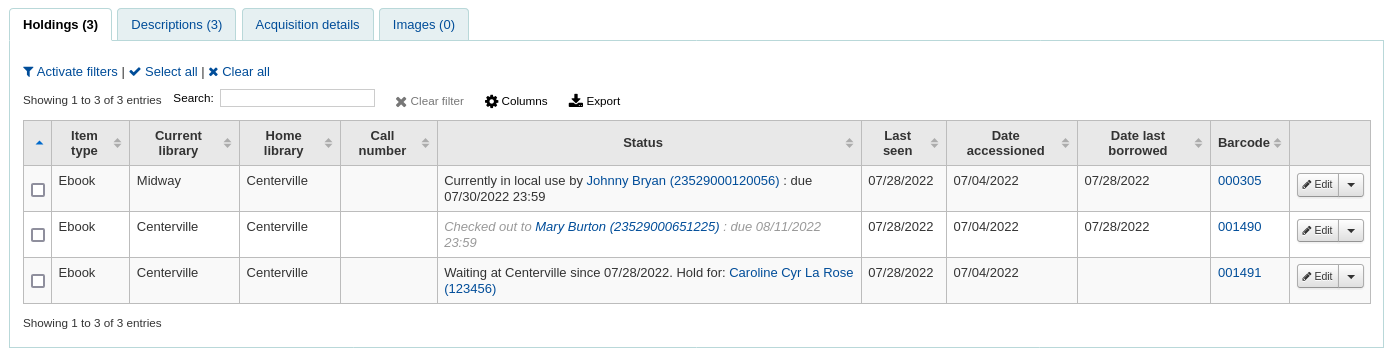
The details of the checkouts will appear on the record detail page in the staff interface as well.
Printing receipts
एक बार जब आप संरक्षक के लिए सभी वस्तुओं को बाहर की जाँच की है कि आप दो तरीकों में से एक का चयन करके उन्हें एक रसीद प्रिंट कर सकते हैं।
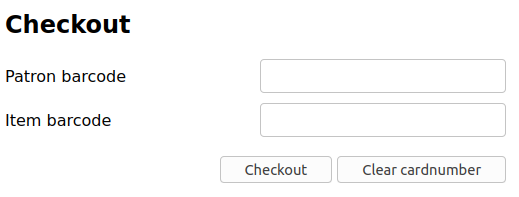
यदि आपके पास है : ref: CircAutoPrintQuickSlip वरीयता 'प्रिंट त्वरित पर्ची विंडो खोलने' पर सेट है, तो आप बस अपने कीबोर्ड पर एंटर दबा सकते हैं या अपने बारकोड स्कैनर के साथ कागज़ के रिक्त टुकड़े को स्कैन कर सकते हैं। यह विचार यह है कि आप एक खाली बारकोड "चेक आउट" कर रहे हैं जो कोहा को 'त्वरित पर्ची' प्रिंट करने के लिए ट्रिगर करता है।
तुम भी स्क्रीन के शीर्ष पर प्रिंट बटन क्लिक करें और चुनें 'प्रिंट पर्ची' या 'प्रिंट त्वरित पर्ची' कर सकते हैं।
यदि आप 'प्रिंट' पर्ची चुनते हैं यह आइटम संरक्षक बाहर की जाँच की है, वे उन लोगों की एक पहले की तारीख पर बाहर की जाँच सहित सभी प्रिंट होगा। 'प्रिंट त्वरित पर्ची' चुनने केवल आइटम है कि आज बाहर की जाँच कर रहे थे प्रिंट होगा।
'प्रिंट सारांश' संरक्षक के संचलन के बारे में जानकारी के लिए एक पूरे पृष्ठ का सारांश उत्पन्न होगा और 'प्रिंट अतिदेय' बाहर एक पर्ची कि सभी आइटम है कि अतिदेय सूचीबद्ध प्रिंट होगा।
'Print checkin slip' will print out a slip that lists items that were checked in today.
What prints on the slips can be customized by altering the slip templates under the Notices & slips tool.
Clear patron information
जब आप एक आइटम की जांच कर लेंगे यदि आपके पास है : ref: DisplayClearScreenButton वरीयता 'शो' पर सेट है, तो आप वर्तमान संरक्षक को हटाने के लिए संरक्षक की जानकारी के ऊपरी दाएं भाग में एक्स पर क्लिक करके वर्तमान संरक्षक को साफ़ कर सकते हैं स्क्रीन और शुरू करो।
यदि आपके पास है : ref: CircAutoPrintQuickSlip वरीयता 'स्क्रीन साफ़ करें' पर सेट है, तो आपको बस रिक्त बारकोड दर्ज करने या स्कैन करने की आवश्यकता है और स्क्रीन को वर्तमान संरक्षक से साफ़ कर दिया जाएगा।
Batch checkouts
If you would like to perform a batch check out you can do so by turning on the BatchCheckouts system preference and assigning the proper patron categories via the BatchCheckoutsValidCategories system preference. This will allow you to use an RFID pad that reads multiple barcodes or perform a batch check out for training internal use.
From this screen you can scan several barcodes or load a file of barcodes.
If you have the SpecifyDueDate system preference enabled you will have the option to set a due date for the checkouts.
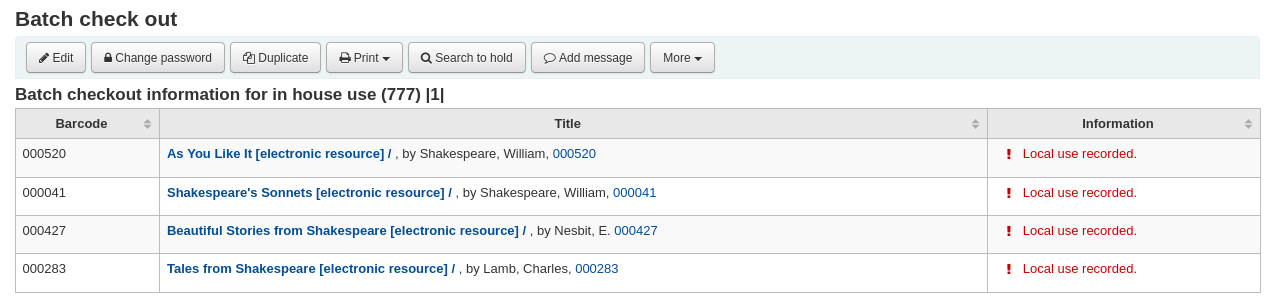
If the items cannot be checked out, a warning will be provided on the following screen, with the option to uncheck the items that are not to be checked out.
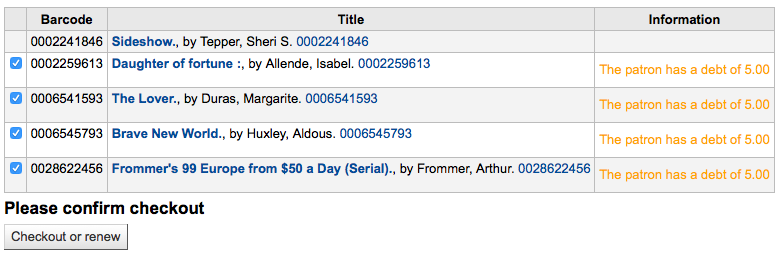
आप एक सांख्यिकीय संरक्षक टाइप उसके बाद का उपयोग कर रहे हैं, तो आप देख पाएंगे कि स्थानीय उपयोग के प्रत्येक आइटम आप स्कैन के लिए दर्ज किया गया था।
Check out messages
आप किसी वस्तु को कई टुकड़े है कि बाहर की जाँच करें और आप (MARC21 में) आइटम रिकॉर्ड की subfield 3 में है कि जानकारी के संदेश को पॉप जाएगा जब आप आप कह रही है कि कितने टुकड़े होना चाहिए कि आइटम बाहर की जाँच सूचीबद्ध किया है।

कई बार जब कोहा एक संरक्षक के लिए आइटम चैक आउट करने में सक्षम होने से रोकने जाएगा लाइब्रेरियन हैं। जब ऐसा होता है एक चेतावनी क्यों संरक्षक वस्तुओं की जांच बाहर नहीं कर सकते हैं की लाइब्रेरियन को अधिसूचित दिखाई देगा।
संरक्षक पर जुर्माने के रूप में ज्यादा बकाया
आप उस राशि को निर्धारित कर सकते हैं जिस पर संरक्षक चेकआउट को अवरुद्ध कर दिया गया है : ref: noissuescharge सिस्टम वरीयता
संरक्षक का अपने अकाउंट पर प्रतिबंध है
यह लाइब्रेरियन द्वारा एक संरक्षक रिकॉर्ड को संपादित करके और 'प्रतिबंध <#patronflags>`__ या द्वारा जोड़कर सेट किया जा सकता है अतिदेय / नोटिस स्थिति ट्रिगर्स
यदि स्टाफ के सदस्य के अधिकार अनुमति है तो वे प्रतिबंध अस्थायी रूप से ओवरराइड कर सकते हैं
संरक्षक के अपने पते की पुष्टि करने की जरूरत है
यह लाइब्रेरियन द्वारा एक संरक्षक रिकॉर्ड संपादित करके और 'ध्वज जोड़कर सेट किया जा सकता है <#patronflags>`__
संरक्षक अपने पुस्तकालय कार्ड खो दिए है
यह लाइब्रेरियन द्वारा एक संरक्षक रिकॉर्ड संपादित करके और 'ध्वज जोड़कर सेट किया जा सकता है <#patronflags>`__
Check out warnings
कभी कभी checkouts चेतावनी संदेश है कि क्षेत्र से बाहर की जांच के ऊपर एक पीले बॉक्स में दिखाई देगा ट्रिगर किया जाएगा। इन चेतावनियों से पहले आप आइटम की जाँच के बाहर जारी रखने के लिए सक्षम हो जाएगा स्वीकार किया जाना करने की जरूरत है।
संरक्षक बकाया जुर्माना किया गया है
किसी और के लिए ठंडे बस्ते में आइटम
आइटम किसी और के लिए इंतजार कर होल्ड शेल्फ पर होना चाहिए
आइटम पहले से ही इस संरक्षक करने के लिए बाहर की जाँच
अन्य संरक्षक को आइटम चैक आउट
यह चेतावनी आपको उस संरक्षक के लिए आइटम पर रोक लगाने की अनुमति देगी जिसे आप इसे जांचने की कोशिश कर रहे हैं।
आइटम ऋण के लिए नहीं
संरक्षक की बहुत सारी चीजें जांच चुकी हैं और: ref: AllowTooManyOverride को 'अनुमति दें' पर सेट किया गया है
संरक्षक की बहुत सारी चीजें जांच चुकी हैं और AllowTooManyOverride को "अनुमति न दें" पर सेट किया गया है
आइटम का नवीनीकरण नहीं किया जा सकता
इसे ओवरराइड किया जा सकता है के साथ : ref: AllowRenewalLimitOverride सिस्टम वरीयता दें
बारकोड नहीं मिलाः
इसके बारे में और जानें :ref:` फास्ट कैटलॉगिंग <fast-add-cataloging-label>'इस सूची में बाद में।
आइटम चैंक आउट की जा रही के रूप में 'खोई' चिह्नित है
आपके मूल्य में निर्भर करता है IssueLostItem वरीयता, आप केवल एक चेतावनी देख सकते हैं
या एक पुष्टिकरण बॉक्स
आइटम बाहर जाँच की जा रही इस उम्र के संरक्षक लिए अनुशंसित नहीं है
Item being checked out meets the decreaseLoanHighHolds system preference criteria
Item has accompanying material (field 952$3, 'Materials specified', is filled)

If CircConfirmItemParts is set to 'Require', the staff member will have to confirm the checkout

नवीनीकरण
Checked out items can be renewed (checked out for another period of time) based on your circulation rules and renewal preferences.
यदि :ref:`आप इसे <opacrenewalallowed-label>' की अनुमति देते हैं, तो संरक्षक OPAC के माध्यम से अपने स्वयं के आइटम नवीनीकृत कर सकते हैं, लेकिन कभी-कभी आपको कर्मचारियों के क्लाइंट के माध्यम से अपने आइटम को नवीनीकृत करके उनकी सहायता करने की आवश्यकता होगी.
आइटम एक संरक्षक के लिए बाहर की जाँच को नवीनीकृत करने के लिए, आप दो चीजों में से एक हो सकता है।
पहली बार अपने विवरण पृष्ठ या चेकआउट पृष्ठ पर जाएँ और नीचे में उनकी चेकआउट सारांश की समीक्षा करने के लिए है।
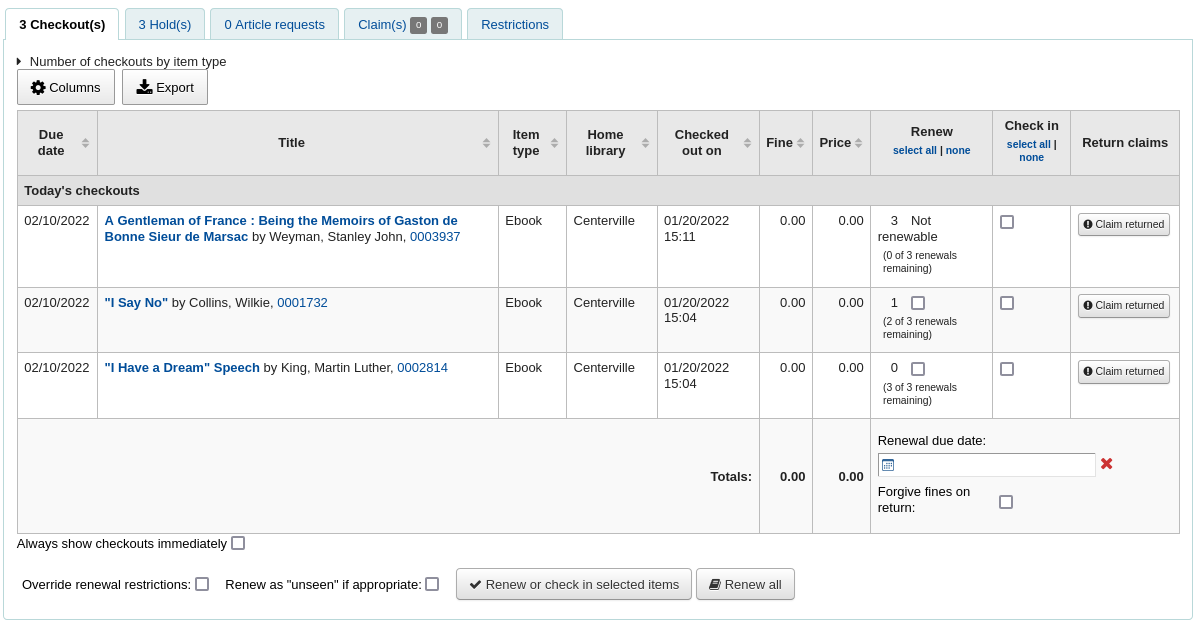
In the Renew column you will see how many times each item has been renewed and a checkbox to renew the item for the patron. Check the box of the items you would like to renew and click the 'Renew or return checked items' button, or to renew all items checked out to the patron simply click the 'Renew all' button.

कभी-कभी नवीनीकरण आपके परिसंचरण नियमों के आधार पर अवरुद्ध हो जाएगा, इस ब्लॉक को ओवरराइड करने के लिए आपके पास होना चाहिए :ref:`AllowRenewalLimitOverride`वरीयता को 'अनुमति दें' पर सेट करें। यदि आप नवीनीकरण सीमा ओवरराइड की अनुमति देते हैं, तो आप परिसंचरण सारांश के निचले बाएं हिस्से में एक चेकबॉक्स देखेंगे। उस बॉक्स को चेक करें और फिर उन वस्तुओं को चुनें जिन्हें आप नवीनीकृत करना चाहते हैं।

लगता है कि बॉक्स जाँच हो रही है ऊपर जहां पहले आइटम नहीं था अक्षय को नवीनीकृत स्तंभ में चेक बॉक्स जोड़ देगा।
You can also mark a renewal as 'unseen', to differentiate between renewals where staff has actually seen the item, versus renewals where they didn't see it (over the phone, for example). To do this, you must first enable the UnseenRenewals system preference. Once enabled, a checkbox will appear at the bottom left of the circulation summary. Check that box to mark the renewals as 'unseen'. Then click either 'Renew or check in selected items' or 'Renew all'.

दूसरा विकल्प मे जाएँ जो'नवीनीकृत' पेज सर्कुलेशन मेनू के नीचे पाया है।
और बारकोड को स्कैन करें जिस आइटम आप को नवीनीकृत करना चाहते हैं.
आइटम को नवीनीकृत किया गया, तो आप एक पुष्टिकरण संदेश प्राप्त होगा.
अगर बारकोड नहीं पाया जाता है तो आपको एक त्रुटि के साथ प्रस्तुत किया जाएगा।
आइटम वास्तव में चैकआउट नहीं की है, तो आप भी एक त्रुटि प्राप्त होगा।
Check in (returning)
मदों में जांच की जा रही विभिन्न विभिन्न स्थानों से किया जा सकता है
मुख्य स्टाफ ग्राहक के शीर्ष पर बॉक्स में जाँच
सर्कुलेशन पेज पर त्वरित खोज पट्टी पर विकल्प में चेक
संरक्षक के चेकआउट सारांश पर कड़ी में जांच (और जांच सारांश पेज पर)
सर्कुलेशन मेनू के तहत पेज में चेक
Koha also offers an automatic checkin feature, which can be set in item types.
Checking items in
दिए गए बॉक्स में आइटम के लिए बारकोड को स्कैन में एक आइटम की जाँच करें। में जाँच की सभी वस्तुओं का एक सारांश चेकइन बॉक्स के नीचे दिखाई देगा
नोट
You can customize the columns of this table in the 'Table settings' section of the Administration module (table id: checkedintable).
आप उस में आइटम की जाँच कर रहे हैं पुस्तक बूंद में डाल रहे थे, जबकि पुस्तकालय बंद हो गया आप आइटम स्कैनिंग से पहले 'पुस्तक ड्रोप मोड' बॉक्स की जांच कर सकते हैं। यह प्रभावी ढंग से करने की अंतिम तिथि पुस्तकालय खुला था लौटे तिथि वापस रोल करेंगे।
This requires that you have your closings added to the calendar tool
तुम भी आइटम आप की जाँच आइटम स्कैनिंग से पहले बॉक्स 'अतिदेय आरोपों माफ कर दो' द्वारा जाँच कर रहे हैं के लिए सभी अतिदेय आरोपों को माफ करने के लिए चुन सकते हैं।
यदि आपके पास है SpecifyReturnDate निर्दिष्ट करें 'वरीयता' को सेट करने के लिए सेट करें, आप मनमाने ढंग से चेक बॉक्स के नीचे से वापसी तिथि सेट कर पाएंगे।
Check in messages
कई संदेश है कि जब में आइटम की जाँच दिखाई दे सकती हैं:
आप घर शाखा के अलावा अन्य एक पुस्तकालय में एक आइटम की जाँच कर रहे हैं, संदेश घर पुस्तकालय के लिए पुस्तक स्थानांतरण करने के लिए आप आप पूछ दिखाई देगा
बाद में इस मद आइटम की स्थिति में जाँच की है 'पारगमन में' करने के लिए सूची में बदल जाएगा
एक आइटम घर शाखा में के रूप में वापस चिह्नित करने के लिए,घर शाखा में आइटम की जाँच करें
एक संदेश दिखाई आपको बता देगा कि आइटम बाहर की जाँच नहीं की है, लेकिन स्थिति अब सूची में उपलब्ध नहीं कहेगा। इस कदम के रूप में घर शाखा द्वारा प्राप्त वस्तुओं को चिह्नित करने के लिए आवश्यक है।
आप किसी वस्तु को कई भागों या टुकड़े संदेश टुकड़े की संख्या के बारे में चेतावनी दिखाई देगी होना चाहिए कि में जाँच कर रहे हैं, तो आप अपने हाथ में होनी चाहिए
If CircConfirmItemParts is set to 'Require', the staff member will have to confirm the checkin

आप किसी आइटम की जाँच कर रहे हैं कि यह पर एक होल्ड है, आप पकड़ पुष्टि करने के लिए प्रेरित किया जाएगा
पुष्टि होल्ड बटन पर क्लिक पुस्तकालय से पिक के लिए इंतजार कर के रूप में आइटम का प्रतीक होगा
Clicking the 'Print slip and confirm' button will mark the item as waiting for pickup at the library and present the library with a receipt to print and place on the book with the patron's information
होल्ड की उपेक्षा कर होल्ड पर आइटम छोड़ देंगे, लेकिन (यह होल्ड रद्द नहीं होगा) उपलब्ध रूप में अपनी स्थिति को छोड़
आप किसी वस्तु को एक और शाखा में उस पर एक होल्ड है कि में जाँच कर रहे हैं, तो आप इस बात की पुष्टि और आइटम हस्तांतरण करने के लिए प्रेरित किया जाएगा
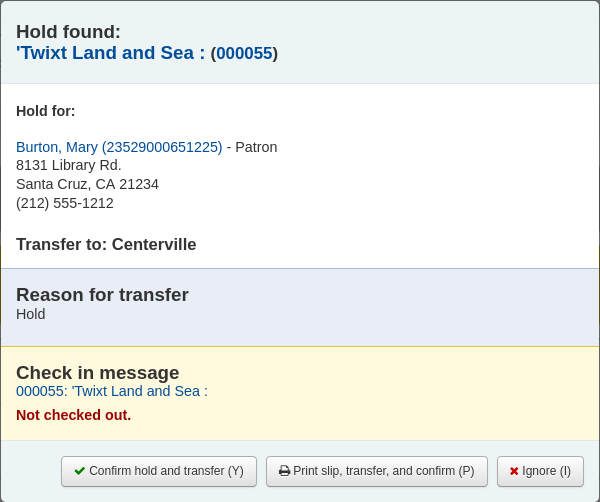
Clicking the 'Confirm hold and transfer' button will mark the item as in transit to the library where the hold was placed
Clicking the 'Print slip, transfer and confirm' button will mark the item as in transit to the library where the hold was placed and present the library with a receipt to print and place on the book with the patron's information
होल्ड की उपेक्षा कर होल्ड पर आइटम छोड़ देंगे, लेकिन (यह होल्ड रद्द नहीं होगा) उपलब्ध रूप में अपनी स्थिति को छोड़
यदि आपके पास सिस्टम चेकइन के समय आपको जुर्माना दिखा रहा है (FineNotifyAtCheckin) आपको एक जुर्माना के बारे में बताने वाला एक संदेश दिखाई देगा और आपको उस संरक्षक के लिए भुगतान पृष्ठ का लिंक प्रदान करेगा
Circulation messages
सर्कुलेशन संदेशों लघु संदेश है कि पुस्तकालय उनके संरक्षक या उनके सहयोगियों कि संचलन के समय में दिखाई देगा के लिए छोड़ सकते हैं।
Setting up messages
Circulation messages are set up as authorized values. To add or edit circulation messages you want to work with the BOR_NOTES value.
'विवरण' क्षेत्र एक डिब्बाबंद संदेश होल्ड कर सकते हैं जोकि आप संरक्षक के रिकॉर्ड पर प्रदर्शित करना चाहते हैं.
महत्वपूर्ण
'विवरण' फ़ील्ड 80 वर्णों तक सीमित है, लेकिन संरक्षक संदेश क्षेत्र कि अधिक से अधिक पकड़ कर सकते हैं। 'विवरण' क्षेत्र में 80 अक्षर दर्ज करें और फिर संरक्षक रिकार्ड पर बाकी टाइप करें।
Adding a message
जब संरक्षक के चेक आउट टैब पर आपको चेक आउट बॉक्स के दाईं ओर 'नया संदेश जोड़ें' और 'संदेश जोड़ें' के शीर्ष पर एक बटन दिखाई देगा।
जब आप इन विकल्पों में से किसी एक पर क्लिक करते हैं तो आपको यह चुनने के लिए कहा जाएगा कि संदेश लाइब्रेरियन या संरक्षक और संदेश जिसे आप छोड़ना चाहते हैं।
नोट
संरक्षक के लिए एक संदेश भी पुस्तकालय के कर्मचारियों को दिखाएगा।
Viewing messages
सर्कुलेशन संदेशों स्टाफ के लिए बने हैं और/या संरक्षक चेकआउट बॉक्स के दाईं ओर संरक्षक के चेकआउट स्क्रीन पर दिखाई देगा। बोल्ड और लाल रंग में संदेश, केवल पुस्तकालय के कर्मचारियों के लिए हैं, जबकि नियमित इटैलिक फ़ॉन्ट में संदेशों संरक्षक और लाइब्रेरियन के लिए हैं।
सर्कुलेशन संदेशों का मतलब संरक्षक के लिए भी दिखाई देगा जब वे ओपेक में प्रवेश करें।
होल्डस
Koha allows patrons to put things on hold. A 'Hold' is a way to reserve an item. Depending on your circulation and fines rules and hold preference settings patrons will be able to place items on hold for pickup at the library at a later date/time.
Placing holds in staff client
There are several ways to place holds from the staff client. The most obvious is using the 'Place hold' button at the top of any bibliographic record.
You can also click the smaller 'Place hold' link found at the top of your catalog search results, or the 'Holds' link found below each result.
आप बारकोड द्वारा एक संरक्षक या उनके नाम पर होल्ड की प्रक्रिया शुरू करने के किसी भी हिस्से के लिए खोज करने के लिए कहा जाएगा।
आप पकड़ के लिए पहली और फिर संरक्षक के लिए खोज करने के लिए बिब रिकॉर्ड करना चाहते हैं, तो आप संरक्षक रिकॉर्ड खोलने के लिए और संरक्षक रिकार्ड के शीर्ष पर 'पकड़ो खोज' बटन पर क्लिक कर सकते हैं।
बटन क्लिक करने के बाद आप सूची खोज पृष्ठ पर जहाँ आप किताब (s) आप पर एक पकड़ के लिए जगह चाहिए पा सकते हैं के लिए लाया जाएगा। परिणामों पर प्रत्येक शीर्षक के तहत आप करने के लिए एक विकल्प दिखाई देगा 'संरक्षक नाम के लिए रुक जाओ।'
आप कई वस्तुओं पर एक होल्ड के लिए जगह चाहते हैं, बस उन्हें के बाईं ओर बॉक्स चेक करें और 'स्थान बनाए रखें' बटन के दाईं ओर तीर क्लिक करें।
कितने आइटम आप एक बार में आप एक अलग जगह होल्ड प्रपत्र देखेंगे एक होल्ड पर जगह के लिए चुन पर निर्भर करता है। आप एक ग्रंथ सूची रिकॉर्ड पर एक होल्ड रखने रहे हैं, तो आप पर एक होल्ड जगह कर सकते हैं आइटम के सभी की एक सूची देखेंगे।
किसी भी नोट है कि यह होल्ड करने के लिए लागू हो सकता दर्ज
पुस्तकालय जहां संरक्षक आइटम लेने के लिए होगा चुनें
यदि आपके पास है : ref: AllowHoldItemTypeSelection वरीयता 'अनुमति दें' पर सेट करें और रिकॉर्ड में एक से अधिक आइटम प्रकार संलग्न हैं, तो आपको एक विशिष्ट आइटम प्रकार पर होल्ड को सीमित करने का विकल्प चुनने का विकल्प दिखाई देगा
यदि संरक्षक आज की तुलना में अन्य एक तारीख को शुरू करने के लिए होल्ड चाहता है, दर्ज करें कि 'होल्ड तारीख पर शुरू होता है' क्षेत्र
यह विकल्प केवल तभी दिखाई देगा यदि AllowHoldDateInFuture सिस्टम प्राथमिकता 'अनुमति दें' पर सेट है
संरक्षक निर्दिष्ट किया गया है कि वे नहीं आइटम के लिए एक निश्चित तारीख के बाद चाहते हैं, या अगर आप होल्ड लंबाई पर सीमा है, तो आप में होल्ड के लिए एक समय समाप्ति तिथि में प्रवेश कर सकते हैं 'होल्ड तारीख को समाप्त हो रहा है'
To have expired holds cancelled automatically you will need to have the Expired holds cron job set to run on a regular basis.
इसके बाद यदि आप रेडियो बटन एक व्यक्ति आइटम के बगल में क्लिक करके अगले उपलब्ध आइटम या एक विशेष आइटम पर एक पकड़ के लिए जगह चाहिए चुनें।
If you are placing a hold for internal purposes, such as checking for missing pages or needing to add a sticker, you can place a 'non-priority' hold. This type of hold will not prevent the patron who currently has the item to renew their checkout.
आप कई वस्तुओं पर एक होल्ड रखने रहे हैं आप सभी खिताब के लिए अगले उपलब्ध विकल्प के साथ प्रस्तुत किया जाएगा। कोई आइटम होल्ड के लिए उपलब्ध हैं, तो यह पुष्टि स्क्रीन पर इतना कहना होगा।
Once your hold is placed, if you'd like to have Koha forget that you used the 'Search to hold' function, you can choose to have Koha 'forget' the patron's name by clicking the arrow to the right of the 'Place hold' button on the search results and choosing the 'Forget' option.
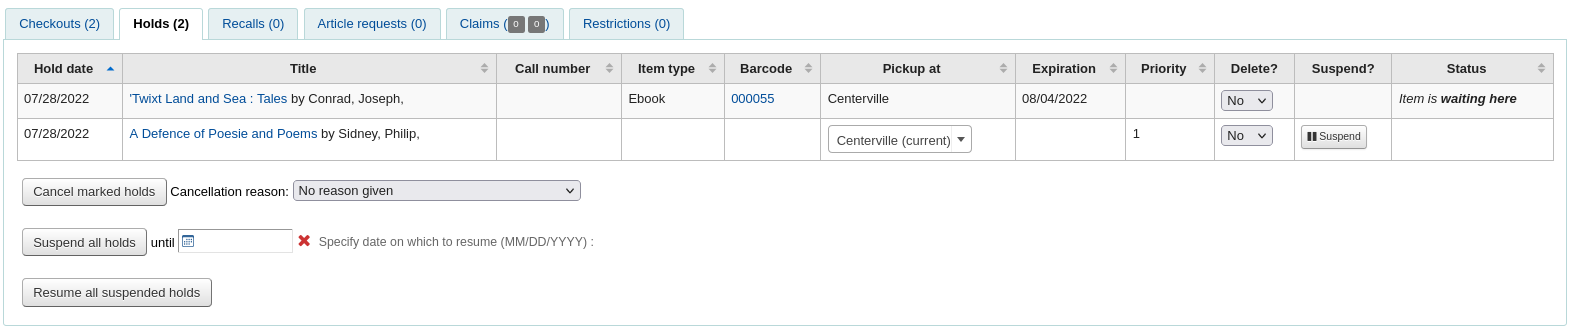
Managing holds
Holds can be altered and cancelled from the holds tab found on the left of the bibliographic record.
होल्ड की सूची से आप होल्ड का क्रम बदल सकते हैं, पिकअप स्थान, निलंबित और/या होल्ड रद्द कर दें।
नोट
If you have your AutoResumeSuspendedHolds preference set to "Don't allow" then you will not have the option to put an end date on the hold suspension.
नोट
If you have your AllowHoldDateInFuture preference set to "Don't allow" you will not have the option to edit the date the hold was placed (the column labelled Date).
नोट
If you have the HoldsSplitQueue system preference set you will see the holds list split across different tables by either pickup library, itemtype or both.
नोट
Depending on how you have your HidePatronName system preference set the list may show card numbers instead of names in the patron column like in the image above.
पुनर्व्यवस्थित करने या हटाने के लिए रखती है, बस 'प्राथमिकता' नीचे खींच या प्राथमिकता के अधिकार के लिए तीर क्लिक करें नीचे खींच से चयन करने के लिए।
आप को पुनर्व्यवस्थित या हटाने के लिए नीचे खींच प्राथमिकता का उपयोग रखती है, तो आप क्लिक करने के लिए 'अद्यतन होल्ड (s)' बटन अपने परिवर्तनों को सेव करने की जरूरत होगी।
होल्ड के सही करने के लिए नीचे तीर क्लिक करके सूची भले ही अधिक अनुरोध किया जाता है के तल पर होल्ड रहना होगा।
उदाहरण के लिए, अपने पुस्तकालय घर बाध्य संरक्षक है कि एक समय में महीनों के लिए किताबें बाहर रखने के लिए अनुमति दी जाती है। यह अन्य संरक्षक के लिए निष्पक्ष अगर एक घर बाध्य संरक्षक एक ब्रांड नई किताब बाहर की जाँच करें और यह महीनों के लिए रखने के लिए सक्षम थे नहीं होगा। इस कारण से, घर बाध्य संरक्षक की होल्ड अनुरोध कतार के तल पर रहेंगे जब तक बाकी सब जो उस किताब को पढ़ने के लिए चाहते थे कि पहले से ही ऐसा किया गया है जाएगा।
If a patron asks to have their hold suspended and you have the SuspendHoldsIntranet system preference set to 'allow' you can do so by clicking the 'Suspend' button to far right. If the patron gives you a date for the items to become unsuspended you can enter that in the date box and click the 'Update hold(s)' button to save your changes.
हटाने के लिए या रद्द करने के लिए एक होल्ड पकड़ लाइन के अधिकार के लिए क्लिक करें लाल 'एक्स'. हटाने के लिए/एक गुच्छा रद्द होल्ड की आप 'डेल' प्रत्येक पंक्ति के बाईं ओर नीचे खींचने के लिए और फिर सूची के तल पर क्लिक करें 'अपडेट होल्ड(s)' से चुन सकते हैं।
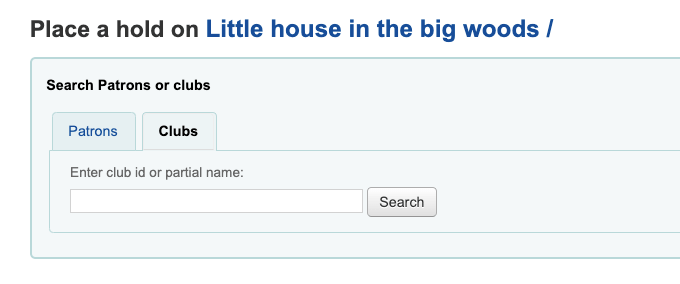
If your library uses the patron clubs feature, use the clubs tab to place a hold for a club. To place a hold for a club, click the clubs tab, search for and select the club name, and click the 'Place hold' button.
Receiving holds
When items that are on hold are checked in or out the system will remind the circulation staff that the item is on hold and offer them options for managing the hold.
जब आप किसी आइटम उस पर एक होल्ड है कि में जाँच प्रणाली या तो पुष्टि करने के लिए आप से पूछना और आइटम स्थानांतरण होगा
या होल्ड की पुष्टि करना चाहते हैं
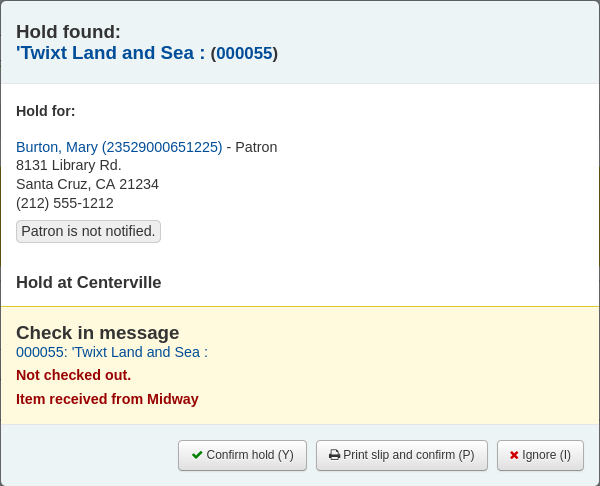
If the item needs to be transferred, clicking 'Confirm and transfer' or 'Print slip, transfer, and confirm' will mark the item as in transit to the proper library.
If the item is already at the pickup library, clicking the 'Confirm' or the 'Print slip and confirm' button will mark the item as ready for pickup by the patron.
Clicking 'Ignore' will retain the hold, but allow the item to be checked out to another patron or change the status of the item (if it was returned damaged, for example).
The 'Print slip and confirm' or 'Print slip, transfer, and confirm' options will open a printable page that you can attach to the item with the necessary hold or transfer information.
टिप्पणी
The slip that is printed is the HOLD_SLIP notice. It can be modified with the Notices & slips tool.
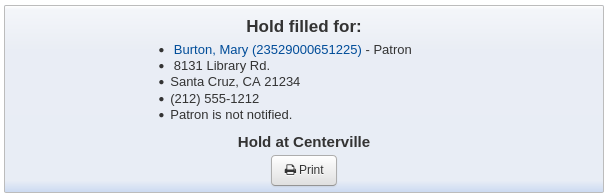
When the hold is confirmed, if the patron is notified, the 'hold filled' notice will be sent to them.
टिप्पणी
The notice that is sent is the HOLD notice. It can be modified with the
टिप्पणी
If the HoldsAutoFill system preference is enabled, the circulation staff will not have to confirm the hold, but they will have the option to print the hold or transfer slip.
If the HoldsAutoFillPrintSlip system preference is enabled, the print window to print the hold or transfer slip will open automatically.
Once confirmed, the hold will show as 'waiting' on the patron record and on the checkout screen under the 'Holds' tab.
आइटम रिकॉर्ड भी दिखा देंगे कि आइटम होल्ड पर है।

In some cases, a patron may come in to pick up a hold on behalf of someone else. In this case, make sure that the hold is cancelled when you check the item out to someone else. Alternatively, a check out might be attempted in error for an item that is already waiting for someone else. In this case you will be presented with a warning message.
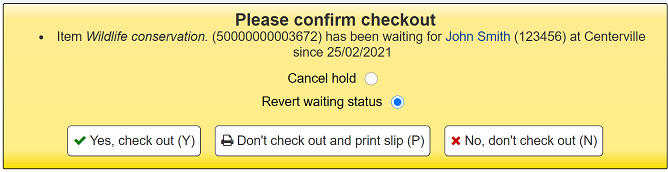
Cancel hold: in combination with 'Yes, check out', this option will cancel the current hold and check the item out to the new patron.
Revert waiting status: in combination with 'Yes, check out', this option will revert the waiting status of the hold (the patron who placed the hold will be back in first position in the queue) and check the item out to the new patron.
Yes, check out: this option will check the item out to the current patron.
Don't check out and print slip: this option will open the print window to print the hold slip, the check out will be cancelled and the hold will remain.
No, don't check out: this option will cancel the check out, the hold will remain.
If you try to check in an item that is already waiting to be picked up, a pop up indicating that a hold was found and the item is already waiting will appear.
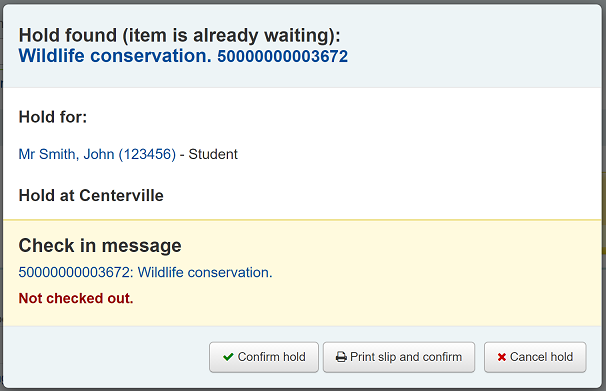
Confirm hold: this option will keep the existing hold.
Print slip and confirm: this option will open the print window to print the hold slip and keep the existing hold.
Cancel hold: this option will remove the hold.
If you cancel the hold and further holds exist for the item you will be presented with a new option to confirm the hold for the next patron.
Recalls
The recalls feature allows users to recall items that are currently checked out. Once the recall is confirmed, the borrower who currently has the item checked out will be notified that their due date has been adjusted and they need to return their item. Once recalled items are returned, the recall requester will be notified that their item is awaiting pickup at their specified pickup location.
See the requesting recalls section to learn how to place a recall in the OPAC.
Setting up recalls in Koha
To use this feature:
Enable the UseRecalls system preference
Set the RecallsMaxPickUpDelay system preference
Optionally, enable the RecallsLog system preference
Modify the following sections in the relevant circulation rules
Recalls allowed (count)
Recalls per record (count)
On shelf recalls allowed
Recall due date interval (day)
Recall overdue fine amount
Recall pickup period
Make sure all the staff member who will be managing recalls have the superlibrarian or manage_recalls permission
Schedule the recalls cronjobs
Review the recalls notices and slips to make sure they have all the information needed
Managing recalls
The recalls feature is relatively automated. Staff do not have a lot of manipulations to do to manage recalls.
Recall statuses
The possible statuses for recalls are the following:
Requested
A new recall request has been made and the item must be returned by the patron who currently has it
Requested recalls appear in
the recalls queue
the recalls to pull list, if an available item can fulfill the recall
the 'Recalls' tab of the bibliographic record
the 'Recalls' tab of the patron's file (and its equivalent in the OPAC)
the 'Recalls history' tab of a patron's file (and its equivalent in the OPAC)
Waiting
A recalled item is awaiting pickup at the requester's chosen branch
Waiting recalls appear in
In transit
An item has been assigned to a recall and is in transit to the requester's chosen pickup branch
In transit recalls appear in
Overdue
A recalled item is overdue to be returned by the patron who currently has it
Overdue recalls appear in
Fulfilled
A recalled item has been checked out to the recall requester, and the recall is complete
Fulfilled recalls appear in
Expired
The recall was not completed before a defined expiration date or the recall requester failed to pick up their waiting recall within the pickup period defined in RecallsMaxPickUpDelay
Expired recalls appear in
Cancelled
The recall request was cancelled.
Cancelled recalls appear in
Receiving recalled items
Upon checkin in an item that has been recalled, a pop up will appear asking the staff member to confirm or ignore the recall.
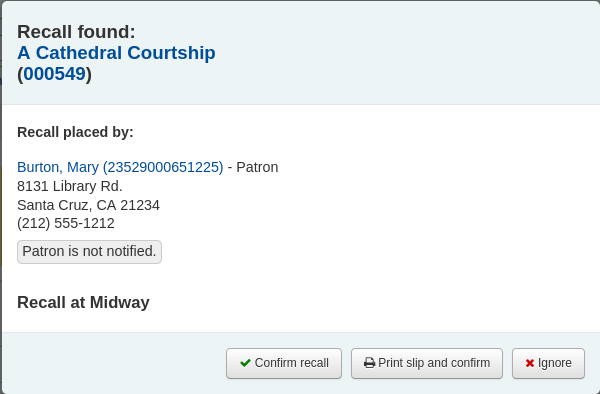
Confirm recall: this option will put the recall in 'Waiting' status and, if the patron has an email address in their file, will notify them that their recalled item is now ready for pickup.
टिप्पणी
The notice sent is PICKUP_RECALLED_ITEM. You can modify it's content in the notices and slips tool
Print slip and confirm: this option will print a slip you can attach to the item (similar to a hold slip) in addition to everything the 'confirm recall' does (change the status and send the notice).
टिप्पणी
The slip is RECALL_REQUESTER_DET. You can modify it's content in the notices and slips tool
Ignore: this option will check in the item, but the recall will not be set as awaiting pickup and the patron will not be notified.
If the patron asked to pick up their recalled item at a different library, a transfer will be triggered.
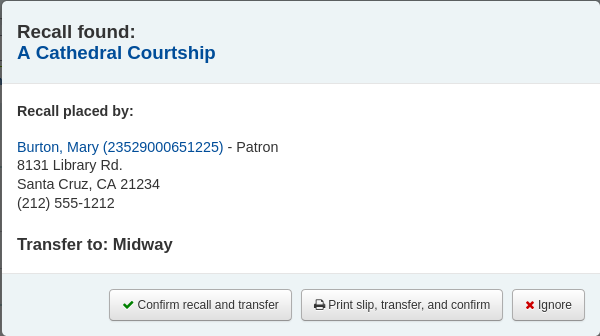
Confirm recall and transfer: this option will put the recall 'In transit'.
Print slip, transfer, and confirm: this option will print a slip you can attach to the item (similar to a hold slip) in addition to setting the recall as 'In transit'.
Ignore: this option will check in the item, but the recall will not be set as 'In transit'
टिप्पणी
The patron will not be notified that their recall is ready for them with any of the above options.
Cancelling recalls
टिप्पणी
Only requested or overdue recalls can be cancelled.
It is not possible to cancel a recall that is currently awaiting pickup
Staff can cancel recalls from various screen in the staff interface.
Cancel from the recalls queue either individually by clicking the 'Actions' button and selecting the 'Cancel' option.
Or by selecting several recalls and clicking the 'Cancel selected recalls' button at the bottom of the screen.
If the recalled item is currently in transit, the cancel option will also trigger a transfer back to the item's home library.
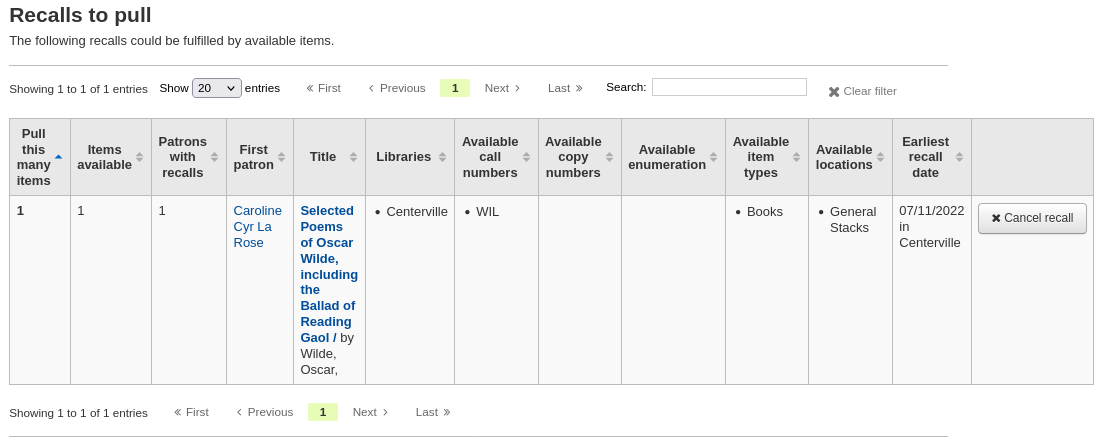
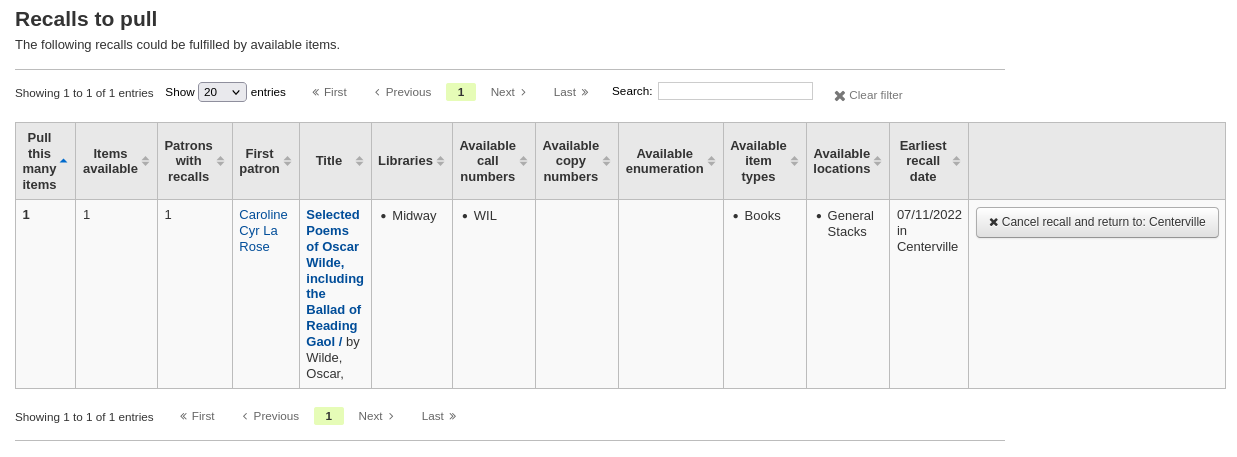
Cancel from the recalls to pull by clicking the 'Cancel recall' button on the right
If the recalled item is currently in transit, the cancel option will also trigger a transfer back to the item's home library.
Cancel from the overdue recalls list either individually by clicking the 'Actions' button and selecting the 'Cancel' option.
Or by selecting several recalls and clicking the 'Cancel selected recalls' button at the bottom of the screen.
Cancel from the 'Recalls' tab of a bibliographic record by clicking the 'Actions' button and selecting the 'Cancel' option.
Or by selecting several recalls and clicking the 'Cancel selected recalls' button at the bottom of the screen.
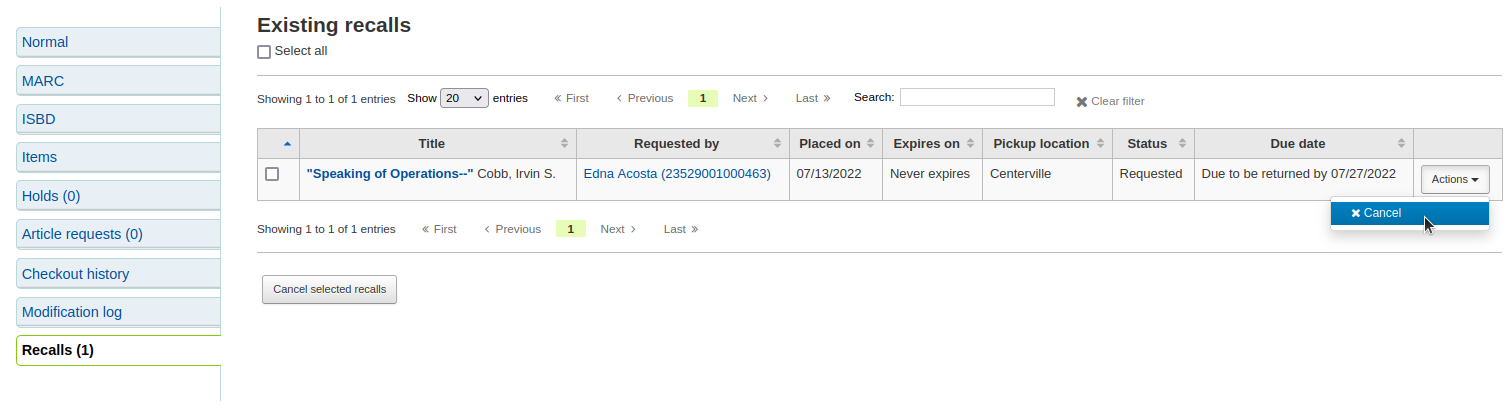
Cancel from the 'Recalls' tab of a patron's details page by clicking the 'Actions' button and selecting the 'Cancel' option.

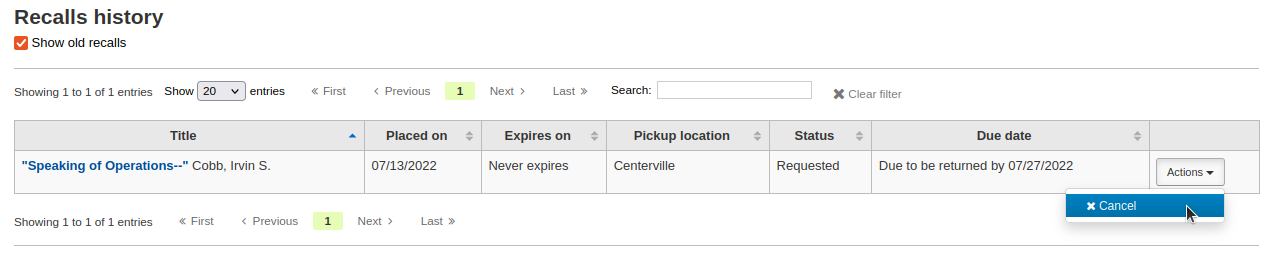
Cancel from the 'Recalls history' tab of a patron's file by clicking the 'Actions' button and selecting the 'Cancel' option.
Changing waiting recalls' status
If a recall is currently awaiting pickup and for some reason the staff needs to change this status (for example, the requesting patron called and they won't be picking up the recall), it is possible to revert the waiting status.
Revert the status from the recalls queue by clicking the 'Actions' button and selecting the 'Revert waiting' option.
Revert the status from the Recalls awaiting pickup list by clicking the 'Revert waiting status' button on the right.
Marking recalls as overdue
If a recall is not checked in by the new due date, it should be marked as overdue by the overdue_recalls cronjob. However, it is possible to mark recalls as overdue manually.
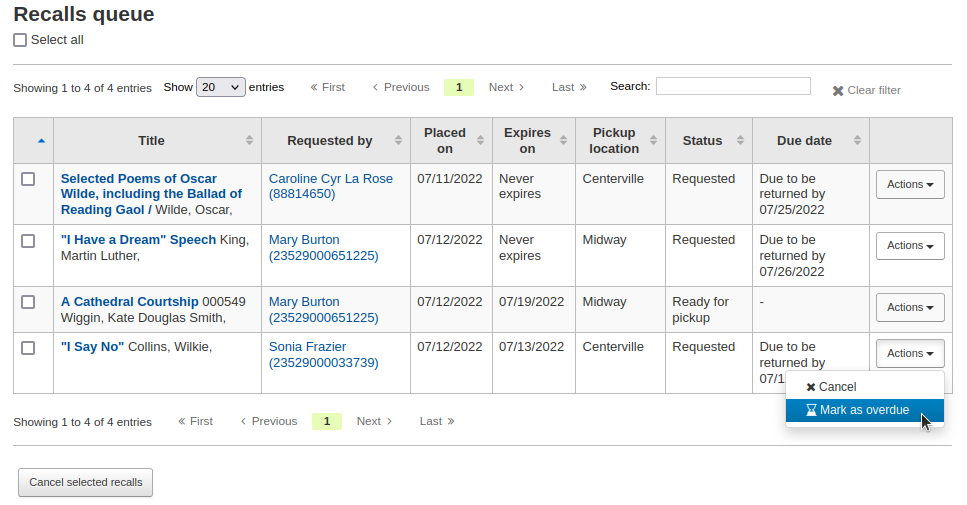
From the recalls queue, click the 'Actions' button and selecting the 'Mark as overdue' option.
Overdue recalls appear in the Overdue recalls list.
Expiring recalls
If a recall as been awaiting pickup for longer than the allowed period defined in RecallsMaxPickUpDelay, it should be expired automatically by the expire_recalls cronjob. However, it is possible to expire recalls manually.
From the recalls awaiting pickup list, click the 'Expire recall' button on the right.
Recalls reports
Once recalls are set up, new sections will appear in the circulation module.
Get there: Circulation > Recalls
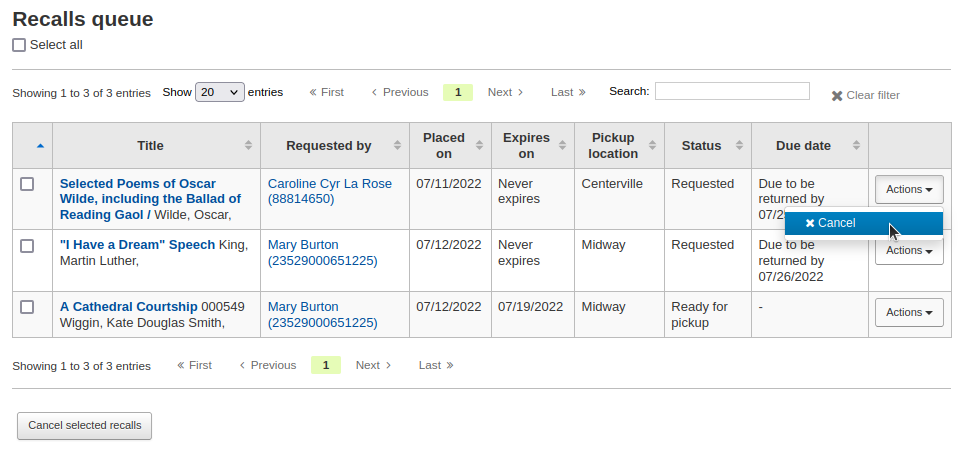
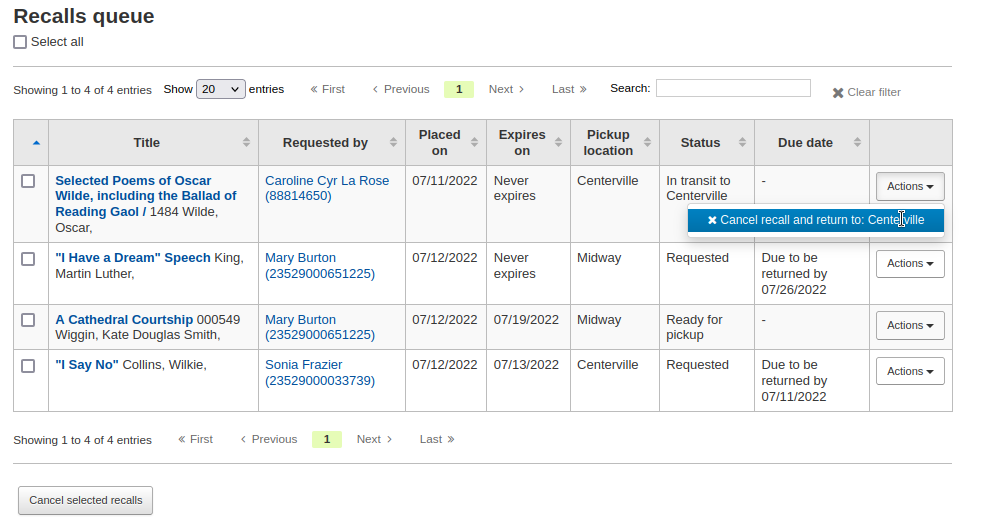
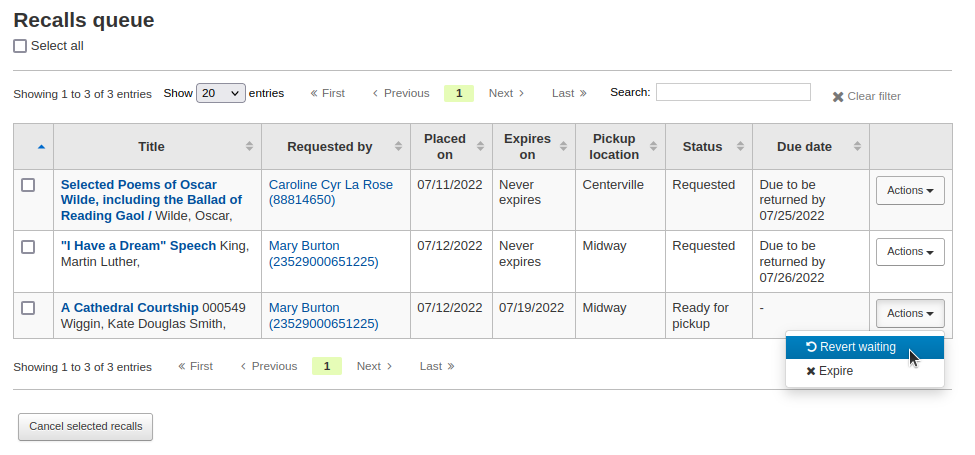
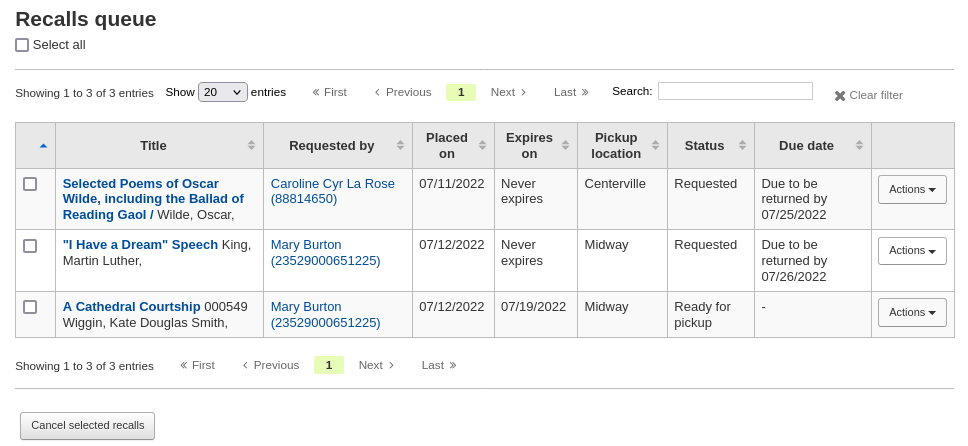
Recalls queue
The recalls queue shows all the current active recalls with their statuses.
From the recalls queue, staff can cancel active recalls either individually by clicking the 'Actions' button and selecting the 'Cancel' option.
Or by selecting several recalls and clicking the 'Cancel selected recalls' button at the bottom of the screen.
For recalls that are in transit, it is possible to cancel them and this will trigger a transfer back to their home library.
For recalls that are currently awaiting pickup, it is possible to revert the waiting status by clicking the 'Actions' button and selecting the 'Revert waiting' option.
For recalls that are overdue, it is possible to mark them as such from the recalls queue by clicking the 'Actions' button and selecting the 'Mark as overdue' option.
Recalls to pull
The recalls to pull list shows all the records that have been recalled but that have available items that could fulfill the request.
Staff can pick up these items from the shelves and check them in to fulfill the requests.
From the recalls to pull list, staff can cancel recalls if needed, by clicking the 'Cancel recall' button on the right.
If the item is currently in transit, cancelling the recall will also trigger a transfer back the the item's home library.
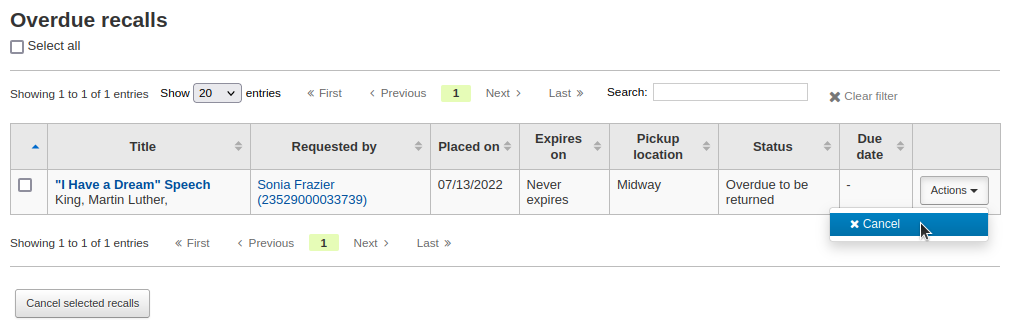
Overdue recalls
This list shows the items that have been recalled but have not been returned by the new due date.
Recalls can be marked as overdue automatically through the overdue_recalls cronjob or manually.
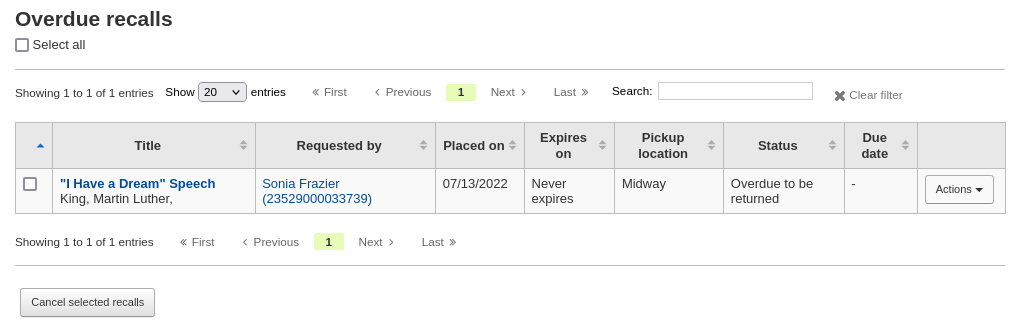
From this list, staff can cancel active recalls either individually by clicking the 'Actions' button and selecting the 'Cancel' option.
Or by selecting several recalls and clicking the 'Cancel selected recalls' button at the bottom of the screen.
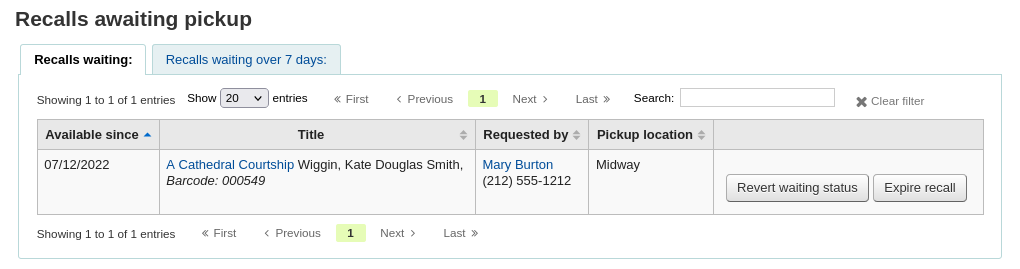
Recalls awaiting pickup
The recalls awaiting pickup list shows all the recalls that are currently waiting for the patron to come and get them.
This list is divided in two tabs:
Recalls waiting: shows all the recalls currently awaiting pickup.
Recalls waiting over x days: shows the recalls that have been waiting for more than the number of days specified in the RecallsMaxPickUpDelay system preference.
From this list, staff can revert waiting recalls by clicking on the 'Revert waiting status' button on the right.
Staff can also manually expire recalls by clicking on the 'Expire recall' button on the far right.
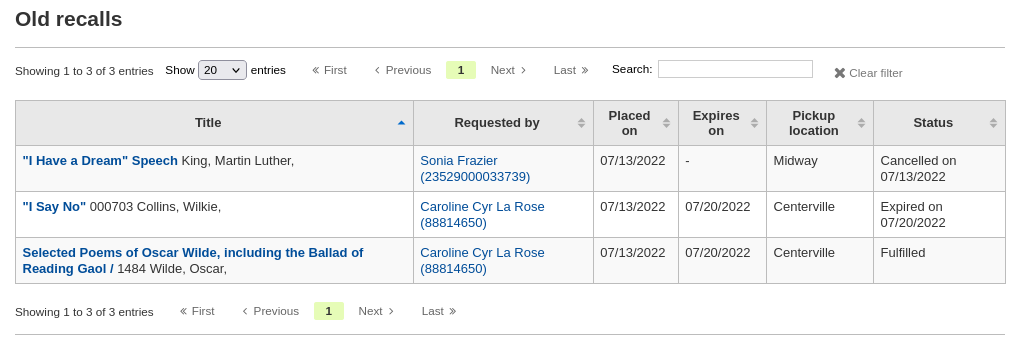
Old recalls
The old recalls list shows all the inactive recalls (completed, cancelled and expired).
स्थानांतरण
आप एक बहु शाखा प्रणाली में काम यदि स्थानांतरण उपकरण का उपयोग करके दूसरे के लिए एक पुस्तकालय से आइटम हस्तांतरण कर सकते हैं।
Get there: Circulation > Transfer
एक आइटम स्थानांतरित
सर्कुलेशन पृष्ठ पर 'ट्रांसफर' पर क्लिक करें
पुस्तकालय में प्रवेश करने के लिए आप आइटम हस्तांतरण करना चाहते हैं
स्कैन या आइटम आप स्थानांतरित करना चाहते हैं पर बारकोड टाइप
'सबमिट' पर क्लिक करें
आइटम अब कहेंगे कि यह पारगमन में है
जब आइटम को अन्य शाखा में आता है जो एक लाइब्रेरियन आइटम स्वीकार करते हैं कि यह अब पारगमन में नहीं है की जाँच करना चाहिए
आइटम स्थायी रूप से नए पुस्तकालय को स्थानांतरित नहीं किया जाएगा
The item shows the same 'Home library' but has updated the 'Current location' to note where it resides at this time
Set library
By default you will enter the staff client as if you are at your home library. This library will appear in the top right of the staff client.
इस पुस्तकालय है कि सभी संचलन के लेन-देन पर जगह ले जाएगा। यदि आप किसी अन्य पुस्तकालय में कर रहे हैं (या एक bookmobile पर) आप अपने पुस्तकालय स्थापित करने के लिए इससे पहले कि आप घूम आइटम शुरू करना चाहते हैं जाएगा। ऐसा करने के लिए आप क्लिक कर सकते हैं 'सेट' सही शीर्ष पर या संचलन पेज पर।
आप नए पुस्तकालय शीर्ष सही में दिखाई देगा एक बार जब आप अपने परिवर्तनों को बचाया है।
Fast add cataloging
Sometimes circulation librarians need to quickly add a record to the system for an item they are about to check out. This is called 'Fast add'. To allow circulation librarians access to the Fast add cataloging tool, simply make sure they have the fast_cataloging permissions. There are two ways to add titles via fast add. If you know that you're about to check out an item that isn't in you catalog you can go to the Circulation module and click 'Fast cataloging.'
सूचीबद्ध करने इंटरफेस लघु सूचीबद्ध रिकॉर्ड के साथ खुल जाएगा:
आपके सूचीबद्ध डेटा जोड़ने के बाद आप आइटम डेटा दर्ज करने के लिए कहा जाएगा। आइटम बारकोड, संग्रह कोड, आदि दर्ज करें और इसे बाहर की जाँच से पहले आइटम बचाने के लिए।
तेज सूची के लिए दूसरा रास्ता चेकआउट स्क्रीन से है। जब आप चेकआउट में एक बारकोड कि कोहा नहीं मिल सकता है में प्रवेश, यह आप कोहा के लिए आइटम जोड़ने के लिए और इसे बाहर की जाँच करने के लिए तेजी से सूचीबद्ध करने का उपयोग करने का संकेत होगा।
क्लिक करके 'फास्ट सूचीबद्ध' आप तेजी से सूचीबद्ध रूप में लाना होगा आप शीर्षक जानकारी दर्ज कर सकते हैं जहां
'सहेजें' क्लिक करने के बाद आप आइटम रिकॉर्ड जहां बारकोड पहले से ही बारकोड तुम बाहर की जाँच करने के लिए कोशिश कर रहे हैं साथ में भरा जाएगा करने के लिए लाया जाएगा।
'आइटम जोड़ें' बटन पर क्लिक करने के बाद आइटम स्वचालित रूप से संरक्षक आप मूल रूप से करने के लिए किताब की जांच करने के लिए कोशिश कर रहे थे बाहर की जाँच की जाएगी।
Circulation reports
ज्यादातर रिपोर्टों रिपोर्ट मॉड्यूल के माध्यम से पाया जा सकता है, लेकिन अधिक आम प्रचलन कुछ रिपोर्टों के सही वितरण मॉड्यूल से उपलब्ध हैं।
वहां जाओ: परिसंचरण> परिसंचरण रिपोर्ट
Holds queue
This report will show you all holds waiting to be pulled off the shelf at your library.
नोट
You can customize the columns of this table in the 'Table settings' section of the Administration module (table id: holds-table).
To generate this report, you must have the Build holds queue cron job running. This cron job is a script that should be run periodically if your library system allows borrowers to place on-shelf holds. This script decides which library should be responsible for fulfilling a given hold request.
It's behavior is controlled by the system preferences StaticHoldsQueueWeight, RandomizeHoldsQueueWeight and UseTransportCostMatrix.
यदि आप नहीं चाहते हैं कि आपके सभी पुस्तकालयों में ऑन-शेल्फ में भाग लेने की प्रक्रिया पूरी हो, तो आपको उन पुस्तकालयों को सूचीबद्ध करना चाहिए जो *do* सभी भाग लेने वाली लाइब्रेरी के शाखा कोडों को इनपुट करके अल्पविराम से अलग करते हुए प्रक्रिया में भाग लेते हैं। ( जैसे "MPL,CPL,SPL,BML" आदि. ).
By default, the holds queue will be generated such that the system will first attempt to hold fulfillment using items already at the pickup library if possible. If there are no items available at the pickup library to fill a hold, build_holds_queue.pl will then use the list of libraries defined in StaticHoldsQueueWeight. If RandomizeHoldsQueueWeight is disabled (which it is by default), the script will assign fulfillment requests in the order the branches are placed in the StaticHoldsQueueWeight system preference.
For example, if your system has three libraries, of varying sizes ( small, medium and large) and you want the burden of holds fulfillment to be on larger libraries before smaller libraries, you would want StaticHoldsQueueWeight to look something like "LRG,MED,SML".
आप अपने पुस्तकालय प्रणाली भर में समान रूप से बाहर फैल होने की बोझ चाहते हैं पूर्ति होल्ड की, बस RandomizeHoldsQueueWeight सक्षम करें। जब इस प्रणाली वरीयता सक्षम है, जिस क्रम में पुस्तकालयों पर एक शेल्फ होल्ड को पूरा करने का अनुरोध किया जाएगा हर बार सूची पुनर्जीवित है बेतरतीब दिया जाएगा।
An alternative to static and randomized is using the Tansport cost matrix. It takes precedence in controlling where holds are filled from and allows you to define the 'cost' of transport between any two libraries. To use the Transport cost matrix simply set your UseTransportCostMatrix preference to 'Use'.
खींचने के लिए होल्ड्स
This report will show you all of the items that have holds on them that are available at the library for pulling. If the items are available at multiple libraries then all libraries with that item available will see the hold to pull until one library triggers the hold.
If enabled, clicking the Mark item as lost button will mark item as lost and notify the requesting patron depending on the value of the CanMarkHoldsToPullAsLost system preference.
नोट
You can customize the columns of this table in the 'Table settings' section of the Administration module (table id: holds-to-pull).
You can choose which LOST value to set the item to with the UpdateItemWhenLostFromHoldList system preference.
आप पृष्ठ के बाईं ओर परिष्कृत बॉक्स का उपयोग करके परिणाम आप देख सीमित कर सकते हैं
Holds इंतज़ार कर पिकअप
यह रिपोर्ट है कि संरक्षक के लिए इंतजार कर रहे हैं रखती है की सब उन्हें लेने के लिए दिखाई देगा।
नोट
You can customize the columns of this table in the 'Table settings' section of the Administration module (table id: holdst).
Items that have been on the hold shelf longer than you normally allow (based on the ReservesMaxPickUpDelay preference value) will appear on the 'Holds over' tab, they will not automatically be cancelled unless you have set the cron job to do that for you, but you can cancel all holds using the button at the top of the list.
नोट
You can customize the columns of this table in the 'Table settings' section of the Administration module (table id: holdso).
अनुपात अनुपात
होल्डअनुपात के संग्रह के विकास के साथ मदद। इस रिपोर्ट का उपयोग कर आप देखने के लिए अपने संरक्षक के कितने लोगों की है वस्तुओं पर रखती है और आप और अधिक खरीद करना चाहिए कि क्या सकेंगे। डिफ़ॉल्ट रूप से यह पुस्तकालय होल्ड प्रति 3 आइटम है कि रखा गया है की आवश्यकता होगी करने के लिए सेट कर दिया जाएगा। रिपोर्ट आपको बता कितने अतिरिक्त आइटम इस कोटे को पूरा करने में खरीदा जा करने की आवश्यकता होगी।
नोट
You can customize the columns of this table in the 'Table settings' section of the Administration module (table id: holds-ratios).
स्थानांतरण प्राप्त करने के लिए
इस रिपोर्ट में आइटम है कि कोहा सोचता है कि सभी को अपने पुस्तकालय के लिए पारगमन में हैं सूची जाएगा।
अपने स्थानान्तरण अपने पुस्तकालय पर पहुंचने में देर हो गई है, तो आप एक संदेश बताते हुए कितनी देर अपने आइटम देखेंगे।
महत्वपूर्ण
आपके द्वारा दर्ज किए गए दिनों की संख्या के आधार पर एक आइटम देर से माना जाता है : ref: TransfersMaxDaysWarning सिस्टम वरीयता।
Article requests
Article requests are somewhat similar to holds, but are not requests for an item to check out. Instead, article requests are requests for a photocopy of a particular section of a book or an article from a serial issue. This is very common in academic libraries where researchers may request a copy of a single article found in a journal.
Setting up article requests
First, enable your system preference for ArticleRequests.
Set to 'Enable' patrons to place article requests.
इसके बाद आपको यह तय करने की आवश्यकता होगी कि आपके संरक्षक अनुरोध कैसे करेंगे, या तो केवल रिकॉर्ड करें, केवल आइटम, या रिकॉर्ड और आइटम स्तर दोनों ही रिकॉर्ड करें।
You can set 3 different system preferences for mandatory fields to be filled in depending on how your records are requested.
ArticleRequestsMandatoryFields: make the following fields mandatory for records that are record level or item level requestable
ArticleRequestsMandatoryFieldsItemsOnly make the following fields mandatory for records that are only item level requestable
ArticleRequestsMandatoryFieldsRecordOnly make the following fields mandatory for records that are only record level requestable
The ArticleRequestsOpacHostRedirection system preference is used if you create analytical records. If enabled, it will redirect the patron from the child record to the host record in the OPAC.
The ArticleRequestsSupportedFormats system preference determines the various formats patrons can request their articles in (either photocopy or scan).
Next you will want to go into your circulation and fines rules matrix and select each rule for which you want to allow requests.
You can allow requests to be made at the record level, item level, yes (which means both) and no (which means no article requests may be placed).
You can also limit the number of open article requests a patron can have at one time by patron category in the Default open article requests limit section of the circulation rules page.
You can set up a fee for each article request in the Default article request fees section of the circulation rules page.
Placing article requests
अब आप दोनों स्टाफ क्लाइंट और ओपेक पर अनुरोध कर सकते हैं।
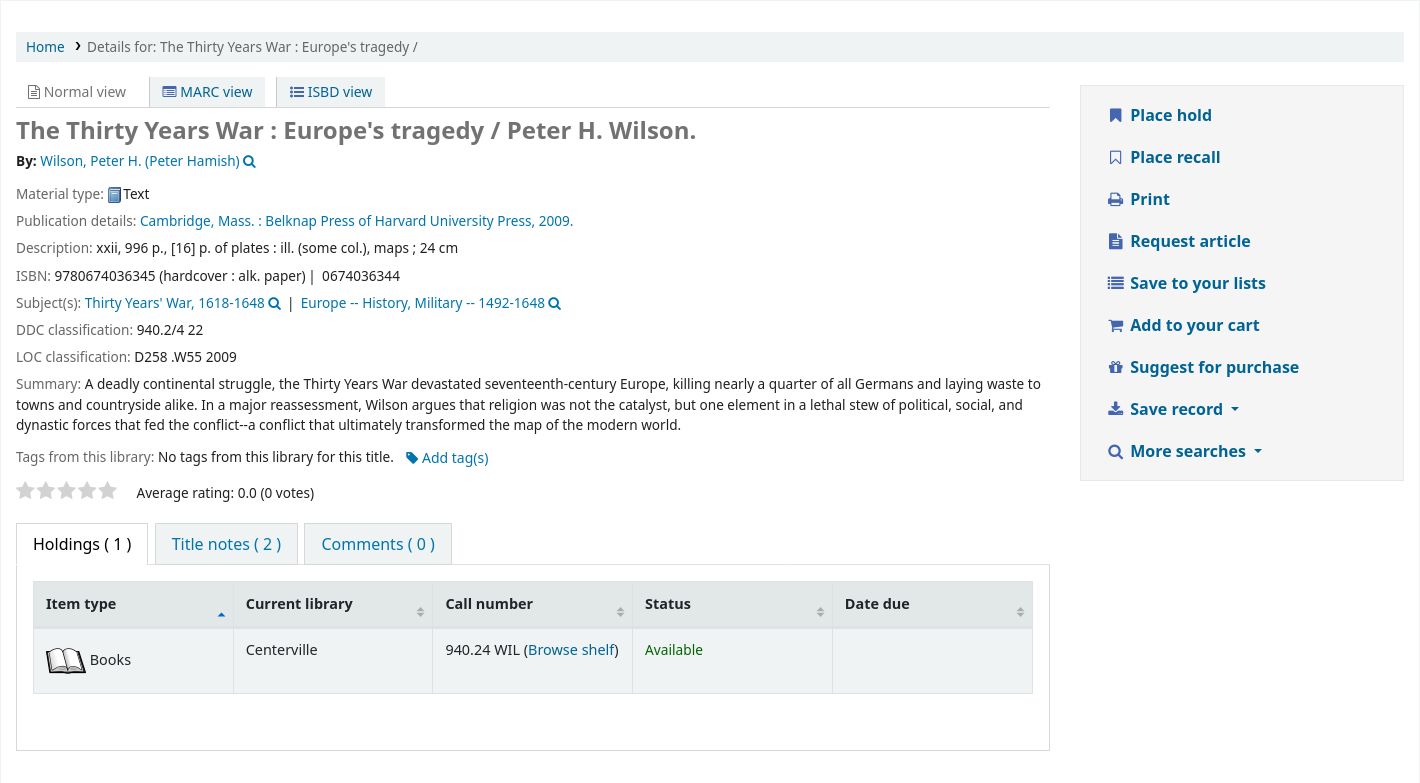
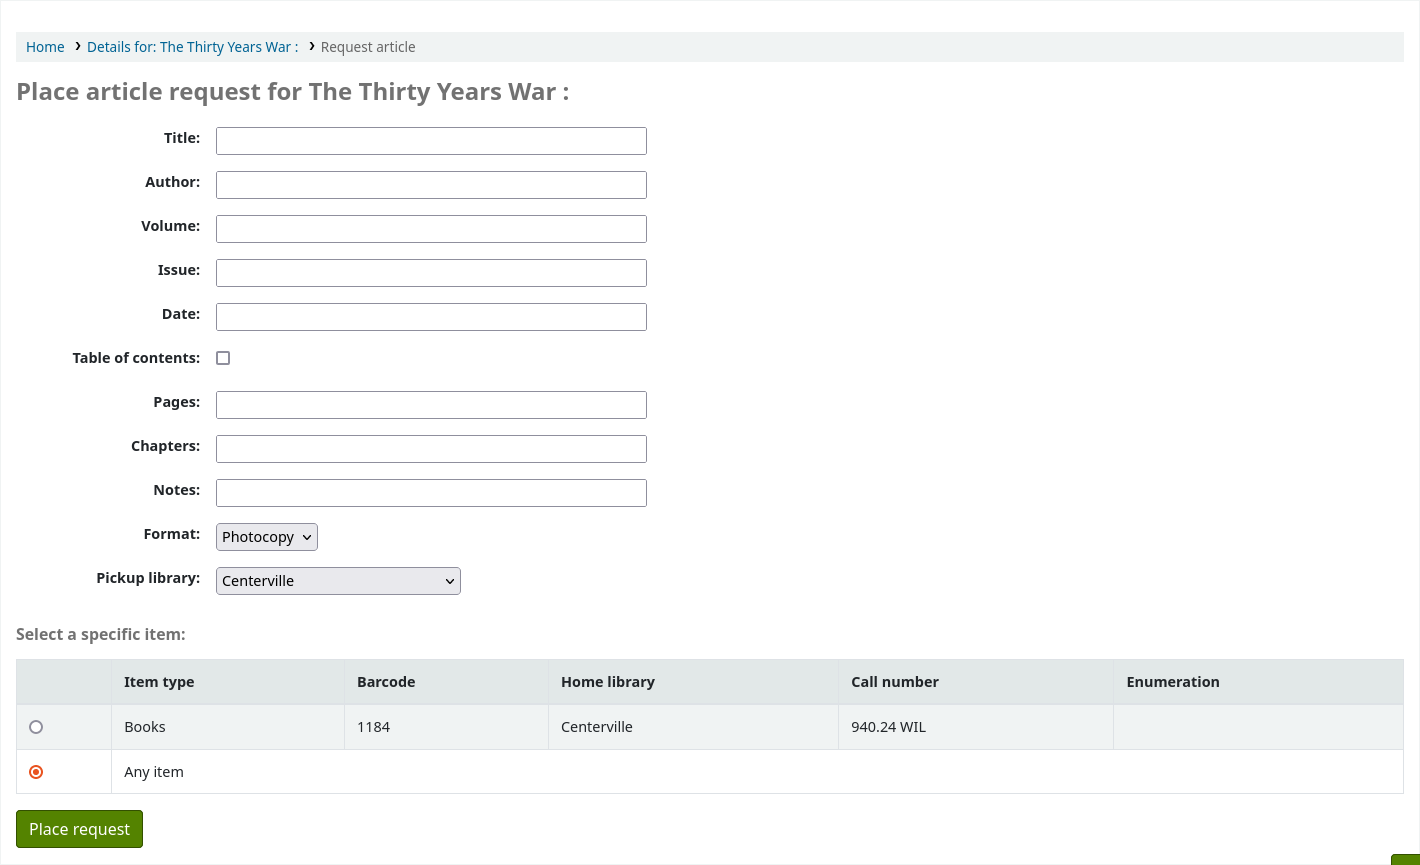
In the staff client, on the record details page, you will see a 'Request article' button at the top and an 'Article requests' tab to the left. The two options lead to the same page.
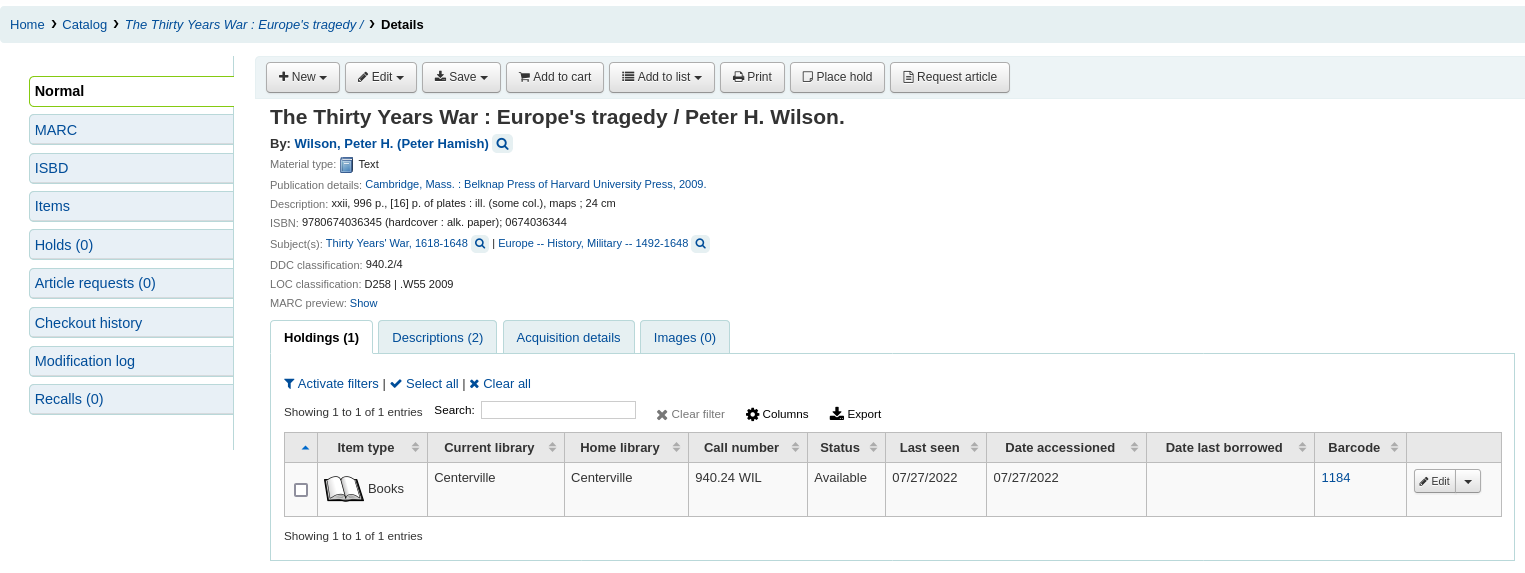
Just like a hold, you will be prompted to enter the patron's card number or name.

If there is a fee, a message will appear to inform the staff member.

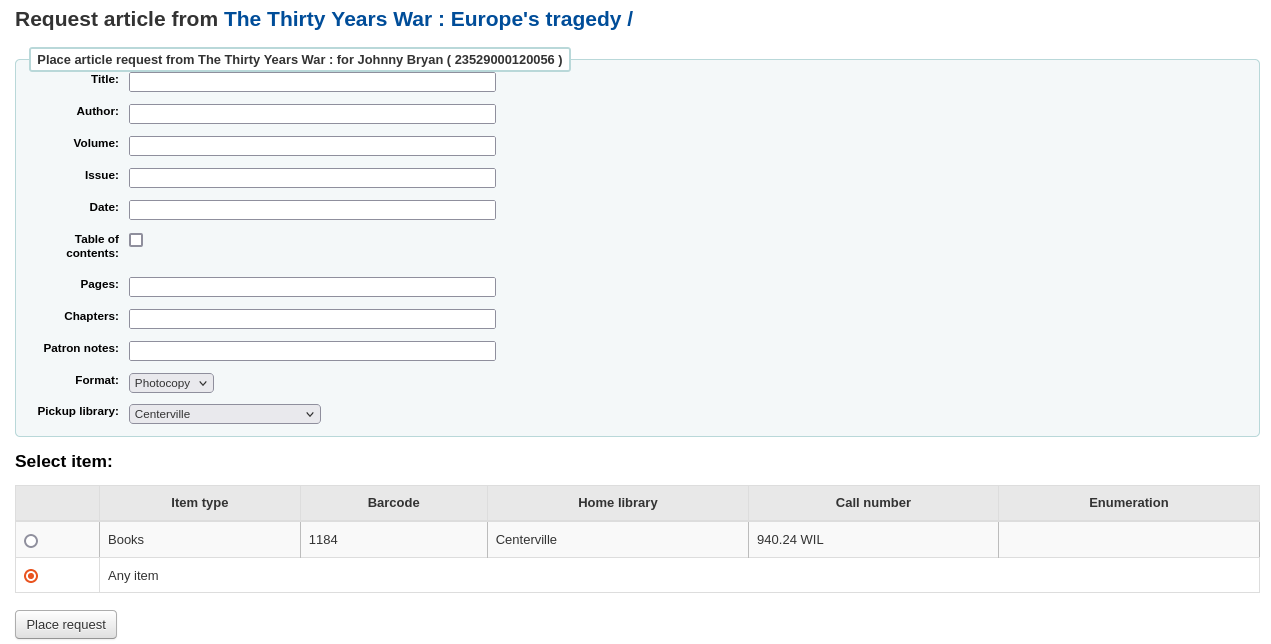
Fill in the form.
टिप्पणी
The mandatory fields are set through the three system preferences ArticleRequestsMandatoryFields, ArticleRequestsMandatoryFieldsItemsOnly, and ArticleRequestsMandatoryFieldsRecordOnly.
Title: enter the title of the requested article or chapter
Author: enter the author of the requested article or chapter
Volume: enter the volume in which this article or chapter is found
Issue: enter the issue in which this article is found
Date: enter the date of the issue in which this article is found
Table of contents: check to indicate the patron wants a copy of the table of contents
Pages: enter the pages to photocopy or scan
Chapters: enter the chapters to photocopy or scan
Patron notes: enter any relevant notes
Format: choose the format in which the patron wishes to receive this article or chapter
टिप्पणी
The possible formats are defined in the ArticleRequestsSupportedFormats system preference.
Pickup library: choose the library at which the patron wishes to pick up their photocopy
If allowed, choose the specific item to request.
Then, click on 'Place request'.
From the OPAC, patrons can place requests themselves either from the results list
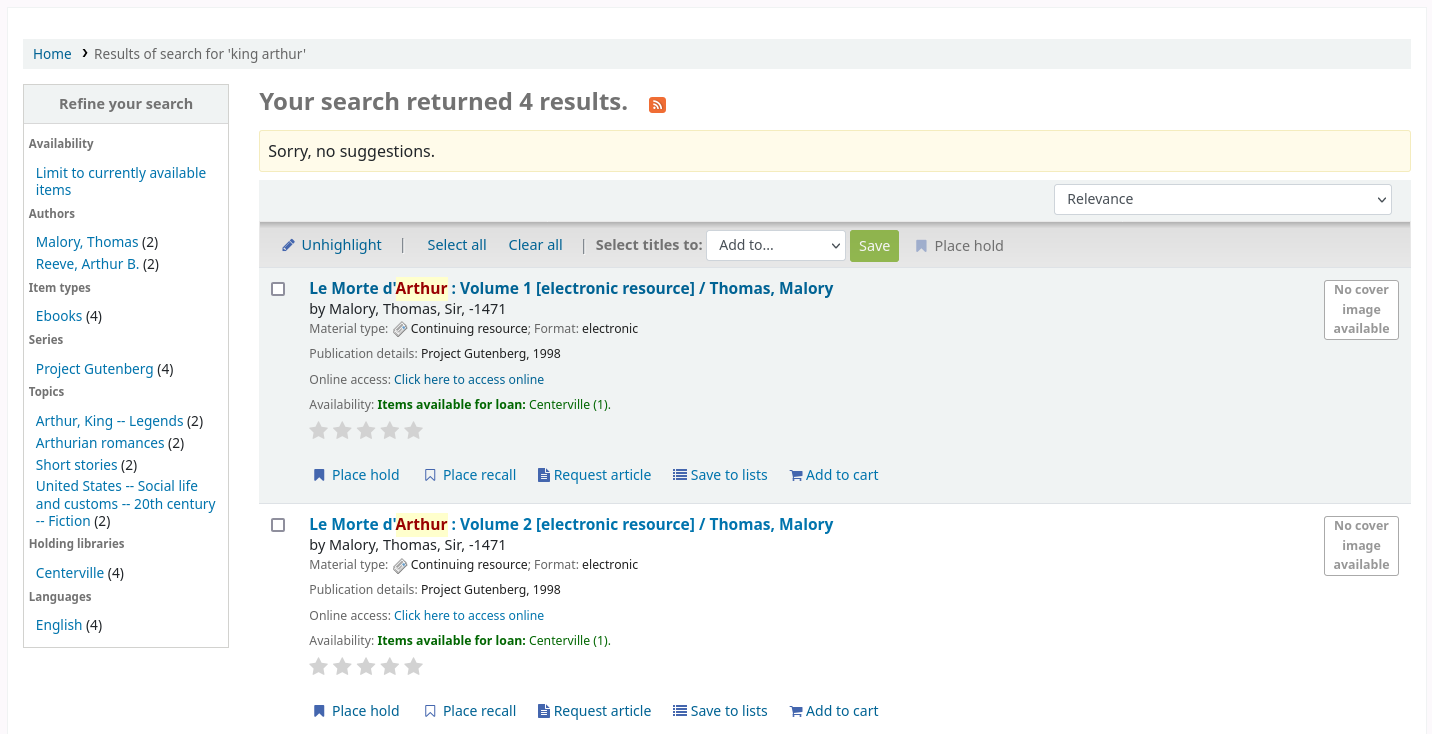
or by going to the detailed record.
As with a hold, if the patron is not logged in, they will be asked to do so.
The form is the same as the one in the staff interface.
If there is a fee, a message will appear to inform the patron.

If allowed, the patron can choose the specific item to request.
From their account, the patron will be able to follow the progress of their request from 'new'

to 'pending', if necessary,

to 'processing'.

The patron will also receive an email notification when the status of the request changes.
Once the request is completed the patron will receive an email notification and the article request will no longer appear in their account.
Email notifications can be customized in notices and slips.
Managing article requests
एक बार लेख अनुरोध रखा गया है, कर्मचारियों को स्टाफ क्लाइंट पर होम पेज के नीचे नए अनुरोध दिखाई देंगे। (टैग, टिप्पणियों और संशोधनों के समान स्थान पर)।
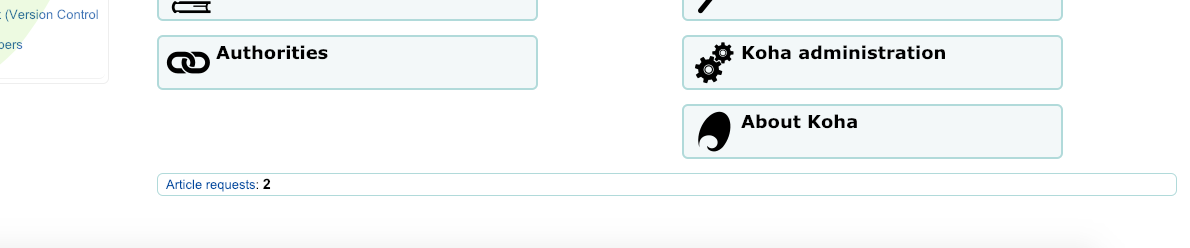
वहां से कर्मचारी प्रक्रिया के अनुरोधों का चयन करने में सक्षम होंगे।
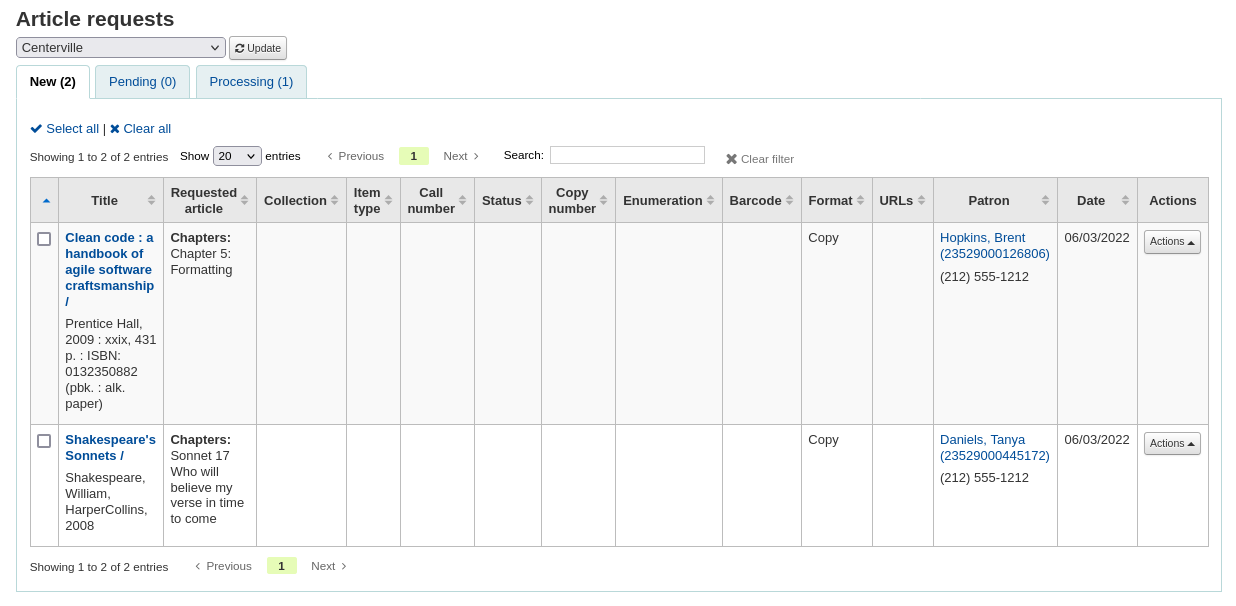
New requests are in the 'New' tab.
The first step would be for a staff member to process the request, that moves the request to the processing tab and alerts other staff members that the request is in process. In the actions column, click on the dropdown menu and select 'Process request'. This will move the request to the processing tab.
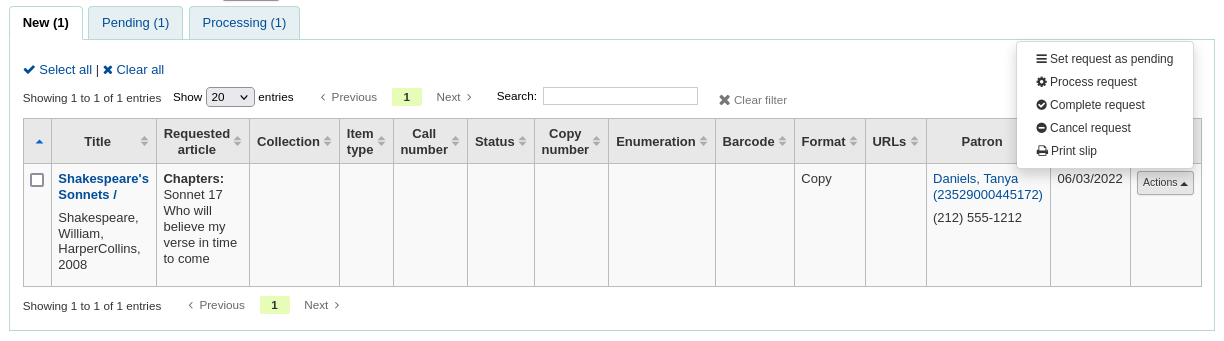
If for any reason, a request cannot be processed right away (for example, if the title is currently checked out), the status can be changed to 'Pending'. This will send a notice to the patron indicating the request has been received and seen, but has yet to be processed.
अगला कर्मचारी शेल्फ में जाएंगे और अनुरोधित लेख की एक प्रति बनायेंगे।
Once that is complete, staff can print the article request slip (this can be customized in notices and slips under AR_SLIP) and staple or paper clip it to the article. In the actions column, you can select the dropdown and select print slip.
अंत में, कर्मचारी कार्रवाई ड्रॉपडाउन मेनू से पूरा आलेख अनुरोध चुनेंगे जो संरक्षक को नोटिस भेजेगा, जिसने अनुरोध को यह बताने के लिए अनुरोध किया है कि वह पिकअप के लिए तैयार है।
यह प्रसंस्करण टैब से आलेख अनुरोध को हटा देता है।
टिप्पणी
Actions can also be made in bulk by checking the boxes next to the requests to process or by clicking 'Select all', and choosing the new status from the actions menu on top of the table.

अतिदेय राशि
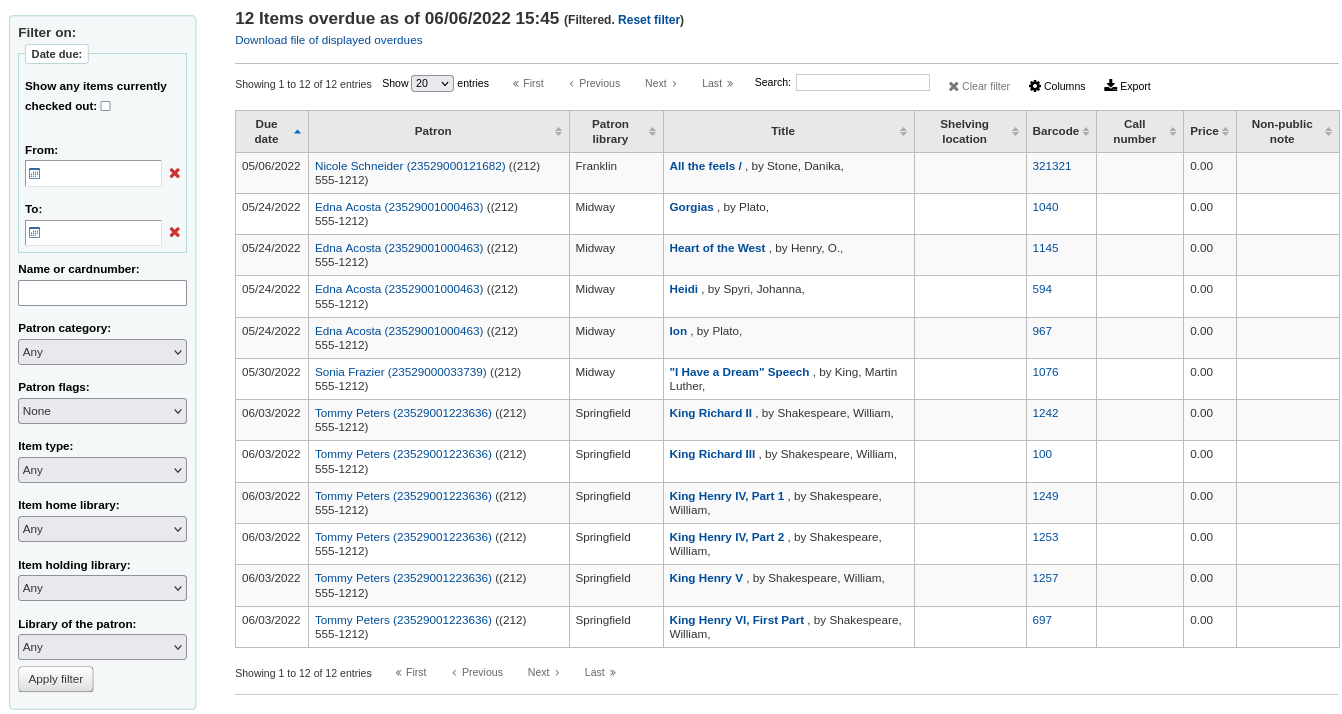
इस रिपोर्ट में सभी आइटम है कि अपने पुस्तकालय में अपेक्षित हैं सूची जाएगा।
चेतावनी
एक बड़े संरक्षक आधार के साथ पुस्तकालयों के लिए, इस रिपोर्ट के समय को चलाने के लिए एक महत्वपूर्ण राशि ले सकता है।
बड़े पुस्तकालय रिपोर्ट को फ़िल्टर करने से पहले फ़िल्टर को चुनने से पहले चुन सकते हैं : ref: FilterBeforeOverdueReport सिस्टम वरीयता 'आवश्यकता' के लिए।
टिप्पणी
You can customize the columns of this table in the 'Table settings' section of the Administration module (table id: circ-overdues).
रिपोर्ट मेनू विकल्पों की रिपोर्ट के बाईं पर पाया का उपयोग कर फ़िल्टर किया जा सकता है।
टिप्पणी
यह 'शो किसी भी आइटम वर्तमान में चैक आउट की' चेकबॉक्स मूल रूप से स्विच चैंक आउट की एक रिपोर्ट के अतिदेय की एक रिपोर्ट से यह। यह सब शीर्षक नियत तारीख की परवाह किए बिना चैंक आउट की दिखाएगा।
The report result can be downloaded via the 'Download file of displayed overdues' link or the 'Export' button at the top of the table.
जुर्माना के साथ अतिदेय
यह रिपोर्ट आपको अपने पुस्तकालय में किसी भी अतिदेय है कि उन पर जुर्माना उपार्जित है दिखाएगा।
यदि आप रिपोर्ट को सीमित करना चाहते हैं तो आप अपनी शाखा में एक विशिष्ट शेल्विंग स्थान तक सीमित होने के लिए शीर्ष पर पुल डाउन मेनू का उपयोग कर सकते हैं। अन्य शाखाओं में जुर्माना के साथ अतिदेय देखने के लिए आपको करना होगा अपनी शाखा बदलें या उस शाखा में लॉग इन करें।
महत्वपूर्ण
If you do not charge fines and/or don't have the fines cron job running you will see no data on this report.
ऑनसाइट चैक आउट देरी
यदि आप साइट चेकआउट कार्यक्षमता का उपयोग कर रहे हैं ( :ref: 'OnSiteCheckouts`) तो आपके पास साइट पर वर्तमान में चेक की गई सभी वस्तुओं को देखने के लिए एक रिपोर्ट होगी।
इस नियत तारीख (लाल रंग में अतिदेय), जो आइटम, आइटम के बारे में जानकारी है और क्या पुस्तकालय मद में है सूची जाएगा।
Tracking in-house use
कई पुस्तकालयों पुस्तकालय के भीतर वस्तुओं के उपयोग को ट्रैक करती हैं
नोट
This is different from tracking on-site usage. In-house use is the use of items in the library by patrons without them having to check them out. On-site use is the use of items on site that must first be checked out. To learn more about on site usage please review the OnSiteCheckouts preference.
बिना जांच किए लाइब्रेरी में वस्तुओं के उपयोग को ट्रैक करना कोहा में दो तरीकों से किया जा सकता है। पहला एक या अधिक बनाना है सांख्यिकीय संरक्षक। पुस्तकालय के भीतर उपयोग की जाने वाली वस्तुओं को इकट्ठा करते समय, आप उन्हें अपने सांख्यिकीय संरक्षक के लिए जांचना चाहेंगे:
इसके बजाय अंकन आइटम के रूप में 'चैंक आउट' प्रणाली रिकॉर्ड होगा कि आइटम घर में इस्तेमाल किया गया था:
सभी आइटम है कि पुस्तकालय के भीतर इस्तेमाल किया गया है आइटम का उपयोग के लिए सटीक आँकड़े रखने के लिए इन चरणों को दोहराएँ।
वस्तुओं के स्थानीय उपयोग को रिकॉर्ड करने का दूसरा तरीका यह है कि आप इसे सेट करें RecordLocalUseOnReturn वरीयता 'रिकॉर्ड' के लिए। फिर जब भी आप उसमें कोई आइटम चेक करते हैं तो चेक आउट नहीं किया जाता है और स्थानीय उपयोग को रिकॉर्ड नहीं किया जाएगा।
नोट
यदि आपके पास है RecordLocalUseOnReturn रिकॉर्ड 'पर सेट है, फिर भी आप स्थानीय उपयोग को रिकॉर्ड करने के लिए अपने सांख्यिकीय संरक्षक का भी उपयोग कर सकते हैं।
Self checkout
Koha comes with a very basic self checkout module. To enable this module you need to set the WebBasedSelfCheck system preference to 'Enable.' To use this module you have to log in as a staff member with self_check permissions.
नोट
एक बनाएं :ref:`कर्मचारी संरक्षक <add-a-staff-patron-label> 'विशेष रूप से इस क्रिया के लिए ताकि आप पूरे दिन कंप्यूटर में लॉग इन करने वाले वास्तविक कर्मचारी क्लाइंट को न छोड़ें
There is no link to the Self checkout module, but a simple addition to the OPACUserJS system preference can add one.
$(document).ready(function(){
    $("#login .btn").parent().after("<p><a href=\"http://YOUR_KOHA_OPAC_URL/cgi-bin/koha/sco/sco-main.pl\" target=\"_blank\">Self-Checkout</a></p>");
});

**Important**

The code above has line breaks added to make it more readable,
please be sure to enter the above as one line in when putting it in
the system preference.
लिंक तो लॉग इन पृष्ठ के तल पर दिखाई देगा:
You can also access this module by going to: http://YOUR_KOHA_OPAC_URL/cgi-bin/koha/sco/sco-main.pl
When on the self checkout page, depending on the value in your SelfCheckoutByLogin system preference you will be asked to enter your cardnumber
or your username and password
एक बार जब आप आत्म चेक मॉड्यूल करने में लॉग इन कर रहे हैं आप आइटम आप चैंक आउट कर रहे स्कैन करने के लिए कहा जाएगा
आप आइटम स्कैन के रूप में वे बारकोड बॉक्स के नीचे दिखाई देगा
आप स्कैनिंग आइटम खत्म हो रहे हैं उसे 'समाप्त' बटन पर क्लिक करने के लिए महत्वपूर्ण है। यह एक रसीद प्रिंट और आप स्वयं चेक मॉड्यूल से लॉग आउट करने का संकेत होगा।
जब वस्तुओं की जांच करने के लिए कुछ उदाहरणों देखते हैं बाहर का प्रयास त्रुटि संदेश प्रदर्शित होगा जहां और संरक्षक लाइब्रेरियन के लिए निर्देशित किया जाएगा। यह कुछ नहीं होगा, भले ही आप संचलन कार्यों पर ओवरराइड अनुमति दे रहे हैं। केवल एक लाइब्रेरियन एक परिसंचरण ब्लॉक ओवरराइड कर सकते हैं और इतने संरक्षक इन स्थितियों में मदद के लिए लाइब्रेरियन के पास जाना चाहिए।
Self check-in
In order to use the self check-in module, you must first set the :ref: SelfCheckInModule <selfscheckinmodule-label> system preference to 'Enable'.
Then, you will have to create a patron with the self_checkin_module permission.
नोट
Create a staff patron specifically for this action so that you don't leave a real staff client logged into a computer all day. You can give this patron only the aforementioned permission so it cannot be used for anything else.
Once this is done, you can head over to the self check-in page: http://YOUR_KOHA_OPAC_URL/cgi-bin/koha/sci/sci-main.pl
Log in with your staff patron with self check-in permissions
Once the computer or kiosk is set and the self check-in user logged in, patrons will be able to check-in their items themselves.
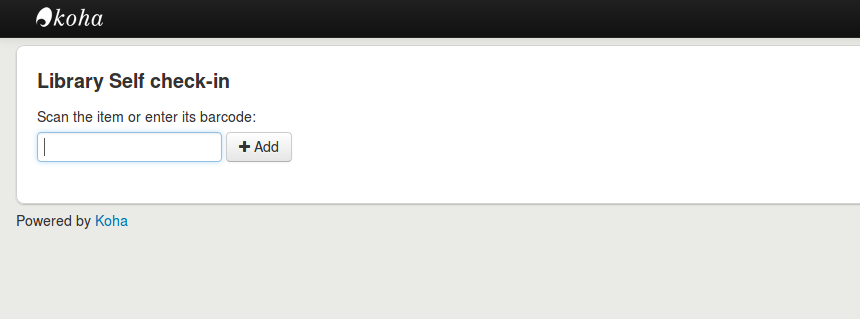
The patron will either scan the item's barcode, if the computer is attached to a barcode scanner, or type in their item's barcode in the box and click 'Add' or press enter.
नोट
Most barcode scanners will automatically hit return after scanning.
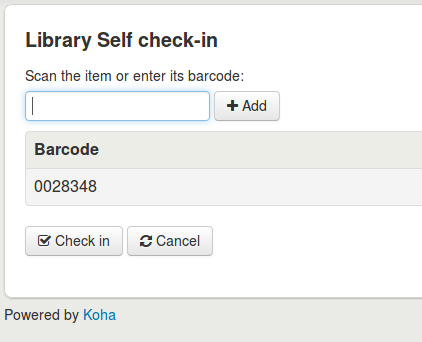
Once they have scanned or entered all their items' barcodes, they can click on the 'Check-in' button to return all the items at once.
महत्वपूर्ण
If the patron doesn't click the 'Check-in' button, the items will not be returned and will stay in their account.
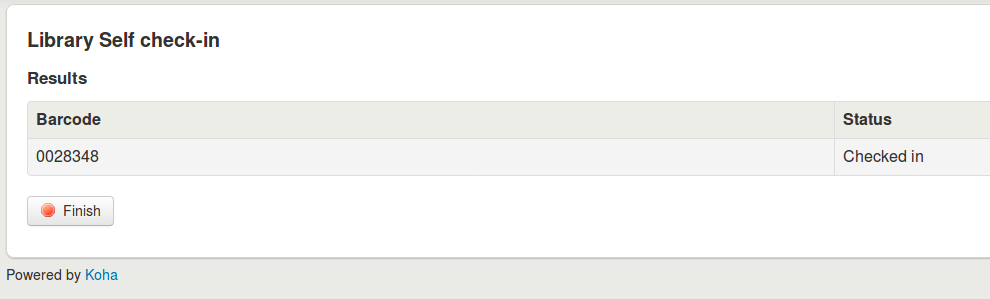
महत्वपूर्ण
The self check-in module will not warn user if the item is late, if they have fines, if the item is on hold for someone else, or if they have messages in their account.
They can then click 'Finish' to return to the main self check-in page.
नोट
If the patron doesn't click 'Finish', the screen will refresh after the timeout period specified in the SelfCheckInTimeout system preference.
नोट
Even if the patron doesn't click 'Finish' the item will still be checked in from their account.
You can customize the look of your self check-in screens by using the SelfCheckInUserCSS system preference or the SelfCheckInUserJS system preference.
You can add content, like instructions on how to use the self check-in system for example, by using the SelfCheckInMainUserBlock system preference.
Statistics about the transactions made through the self check-in module are logged into the action_logs table in the Koha database. You can therefore build a custom report to get the statistics you need.
Offline circulation utilities
कोहा आप संचलन कार्रवाई करते हुए तीन उपयोगिताओं में से किसी एक का उपयोग करके ऑफ़लाइन जारी रखने के लिए के लिए अनुमति देता है।
Offline circulation in Koha
यदि AllowOfflineCirculation वरीयता को 'सक्षम' करने के लिए सेट किया गया है, लाइब्रेरी कर्मचारी सिस्टम ऑफ़लाइन होने पर कोहा के भीतर परिसंचरण क्रियाएं जारी रख सकते हैं। आपhttp://your-koha-staff-client-url/cgi-bin/koha/circ/offline.pl पर कम से कम एक बार ऑनलाइन जाना चाहते हैं और उस पृष्ठ को बुकमार्क करना चाहते हैं। वह पृष्ठ है जिसे आप ऑफ़लाइन होने पर जाएंगे।
महत्वपूर्ण
ऑफ़लाइन इंटरफ़ेस HTML लोकल स्टोरेज का उपयोग करता है, जो ब्राउज़र और उपयोगकर्ता सेटिंग के आधार पर 2.5 डोमेन या 5MB तक सीमित है। इसका मतलब है कि बड़े सिस्टम अपने डेटा को सिंक्रनाइज़ करने में सक्षम नहीं होंगे और इनका उपयोग करने की अनुशंसा की जाती है Firefox या Windows ऑफलाइन परिसंचरण के लिए आवेदन.
सेटअप
पहली बार पहले सिस्टम परिसंचरण के लिए ऑफ़लाइन जाने से चला जाता है और चुनें 'में निर्मित ऑफ़लाइन परिसंचरण इंटरफेस'
और स्क्रीन के अधिकार पर 'सिंक्रनाइज़' लिंक पर क्लिक करके हर परिसंचरण कंप्यूटर पर अपने डेटा सिंक्रनाइज़।
महत्वपूर्ण
ऑफ़लाइन इंटरफ़ेस HTML लोकल स्टोरेज का उपयोग करता है, जो ब्राउज़र और उपयोगकर्ता सेटिंग के आधार पर 2.5 डोमेन या 5MB तक सीमित है। इसका मतलब है कि बड़े सिस्टम अपने डेटा को सिंक्रनाइज़ करने में सक्षम नहीं होंगे और इनका उपयोग करने की अनुशंसा की जाती है Firefox या Windows ऑफलाइन परिसंचरण के लिए आवेदन.
यह आप अपने संरक्षक और परिसंचरण डेटा की एक स्थानीय प्रतिलिपि डाउनलोड की अनुमति देगा। अपने डेटा को सिंक्रनाइज़ करने के लिए पेज के शीर्ष पर 'डाउनलोड रिकॉर्ड्स' लिंक पर क्लिक करें।
अपने डेटा डाउनलोड की है एक बार जब आप अपने डेटा तिथियों पिछले था प्रत्येक डेटा सेट के अधिकार के लिए समन्वयित देखेंगे।
यह किसी भी अप्रत्याशित कनेक्शन नुकसान के लिए तैयार करने में नियमित रूप से किया जाना चाहिए।
वितरण
अपने सिस्टम ऑफलाइन सर्कुलेशन पेज चला जाता है ऑफ़लाइन जाएँ: कोहा में (http://your-koha-staff-client-url/cgi-bin/koha/circ/offline.pl) और क्लिक करें 'बाहर की जाँच करें' या 'जाँचें' ऑफ़लाइन कार्रवाई करने के लिए।
बाहर की जाँच 'की जाँच करें' स्क्रीन के शीर्ष पर बारकोड या नाम से संरक्षक के लिए खोज द्वारा किया जाता है। एक संरक्षक चयन करने के बाद आप जुर्माना और चेक बहिष्कार सहित समन्वयित संरक्षक जानकारी, साथ प्रस्तुत किया जाएगा।
स्कैन आइटम आप बाहर की जाँच करें और एक नियत तारीख प्रवेश करना चाहते हैं के बारकोड। आप एक नियत तारीख दर्ज नहीं करते हैं Koha एक के लिए संकेत देगा।
एक बार आइटम बाहर की जाँच की है यह संरक्षक की जानकारी नीचे दिखाई देगा।
Koha offline uploading
Once the system is back online visit the 'Synchronize' page on the Offline circulation module and click 'Upload transactions'
फाइलों के बाद आप क्लिक कर सकते हैं अपलोड कर रहे हैं दाई तरफ पर 'देखें ऑफ़लाइन परिसंचरण कार्रवाई लंबित'।
क्लिक करने के बाद 'ऑफ़लाइन परिसंचरण क्रियाएं लंबित देखें' आपको सभी कार्यों के सारांश में लाया जाएगा आप अपने*.koc फ़ाइल में कोहा में लोड हो गए हैं।
एक बार जब संचलन कंप्यूटर के सभी से लॉग के सभी लोड कर रहे हैं आप उन सब की जाँच करें या सिर्फ उन आप Koha में प्रक्रिया चाहते का चयन करने में सक्षम हो जाएगा।
Click on the 'Process' button and Koha will record every stored transaction one by one. For each transaction, the status will change to:
"सफलता।" यदि लेनदेन को सही ढंग से संसाधित किया गया था
"उधारकर्ता नहीं मिला ।" अगर उधारकर्ता का कार्ड नंबर गलत है
"आइटम नहीं मिला।" यदि आइटम बारकोड गलत है
"आइटम जारी नहीं किया।" यदि आप ने एक उपलब्ध आइटम में जाँच की है
एक बार जब आप समाप्त हो अपने लेनदेन के सभी की एक सारांश होगा
Firefox plugin
There is an offline circulation tool that you can add to your Firefox browser as an add-on. To do so, just go to https://addons.mozilla.org/en/firefox/addon/koct/ page and click on the "install now" button. You may have to confirm the installation, just click on "install now" and then restart Firefox to complete the installation.
Once you have installed the plugin and restarted Firefox, you will see the Koha logo in the download bar at the bottom right of Firefox.
लोगो पर एक क्लिक के लिए अपने स्वयं के विंडो में उपकरण खुल जाएगा।
The plugin consists of three sections:
The 'Check out' section is where you check out items
The 'Check in' section is where you check in items
The ‘Transactions’ section is where you can track the transactions done while in offline mode
The transactions will keep information until you empty it.
If you'd like to clear the transactions, click the 'Clear' box before hitting the 'OK' button.
The first thing you want to do then is to set up the plugin. Proceed to the settings page, linked in the top right of the page or under ‘Configuration page’ in the Transactions section.
Answer the 5 questions presented:
सर्वर = लाइब्रेरियन इंटरफ़ेस का यूआरएल
उपयोगकर्ता नाम = अपने कर्मचारियों के खाता लॉगिन को
पासवर्ड = अपने कर्मचारियों खाता पासवर्ड
Branch code = the code for the branch where you are located
Commit Type = If you select ‘Send data to Koha’, your account will need to be approved by an administrator. If you select ‘Apply directly to Koha’, your account will not need to be approved.
महत्वपूर्ण
सेटिंग्स को बचाने के लिए, आप ऐड-ऑन पट्टी में कोहा लोगो पर प्लगइन विंडो बंद करें और फिर से खोलने के लिए उस पर क्लिक करने के लिए फिर होगा।
नोट
आप ऑफ़लाइन संचलन के लिए समर्पित एक कर्मचारी के खाते बना सकते हैं। ताकि, कोई फर्क नहीं पड़ता जो प्रचलन डेस्क पर है, वे सभी एक ही लॉगिन का उपयोग कर सकते हैं। उन पंक्तियों के साथ, आप एक समूह लॉगिन आप पहले से ही संचलन के लिए जगह में है कि के रूप में अच्छी तरह से उपयोग कर सकते हैं।
एक बार जब आप सब कुछ निर्धारित किया है आप में और बाहर आइटम की जाँच शुरू कर सकते हैं।
चैक आउट:
Under the 'Checkout' heading
संरक्षक बारकोड स्कैन करें
आइटम बारकोड स्कैन करें
Click 'Checkout'
चैकिंग इन:
Under the 'Checkin' heading
आइटम बारकोड स्कैन करें
Click 'Checkin'
Each time, you check out or check in an item, a new transaction is recorded in the local plugin database. This is recorded in the Transactions section bellow.
नोट
स्थिति "स्थानीय." हो जाएगा जब तक आप लंबे ऑफ़लाइन हैं और कोहा में लेनदेन की प्रक्रिया नहीं है।
आपके इंटरनेट कनेक्शन वापस आता है जब तक आप कोहा करने के लिए इन लेन-देन करना चाहते हो जाएगा। इन लेनदेन प्रसंस्करण इससे पहले कि आप कुछ मुद्दों के बारे में पता होना चाहिए।
Because you are not connected to your Koha database when using this plugin holds will need additional processing. If an item you check in while offline has a hold, the hold is kept on the item. Since, you can't confirm holds found during the processing of every check in, the holds stay on the item and will need to be managed later. If you only checked in a few items you can just keep a record of them all. If you checked in a lot of items you can use the Holds queue once it rebuilds to see what holds made it to the shelf erroneously.
इसी प्रकार, यदि एक संरक्षक कार्ड समाप्त हो गया था, ऑफ़लाइन संचलन उपकरण इसके बारे में पता नहीं है, तो चेकआउट संरक्षक के खाते की परवाह किए बिना दर्ज हो जाएगा सामान्य रूप से अवरुद्ध किया जा रहा।
आप कोहा के लिए इस डेटा को जोड़ने के लिए दो विकल्प हैं
Apply to Koha
If you checked in/out on more than one computer at the same time, what you want is to process every transaction consistently. Let's say for instance that one patron checked a book out on one computer and then checked the same book in on another computer. To be consistent, you need to record the check out first and then the check in. Not the opposite! To do so, you need to group every transaction in one place, sort them all and then, process everything. So, you need to use the "Apply to Koha" option from every plugin/computer you worked with. This way, the log will go to Koha and be accessible from the Offline Circulation page.
वहां जाएं: परिसंचरण> लंबित ऑफलाइन परिसंचरण क्रियाएं
एक बार जब संचलन कंप्यूटर के सभी से लॉग के सभी लोड कर रहे हैं आप उन सब की जाँच करें या सिर्फ उन आप Koha में प्रक्रिया चाहते का चयन करने में सक्षम हो जाएगा।
प्रक्रिया बटन पर क्लिक करें और कोहा हर संग्रहीत लेनदेन एक के बाद एक रिकार्ड होगा। प्रत्येक लेनदेन के लिए, स्थिति के लिए बदल जाएगा:
"सफलता।" यदि लेनदेन को सही ढंग से संसाधित किया गया था
"उधारकर्ता नहीं मिला ।" अगर उधारकर्ता का कार्ड नंबर गलत है
"आइटम नहीं मिला।" यदि आइटम बारकोड गलत है
"आइटम जारी नहीं किया।" यदि आप ने एक उपलब्ध आइटम में जाँच की है
एक बार जब आप समाप्त हो अपने लेनदेन के सभी की एक सारांश होगा
प्रत्यक्ष लागू करें
आप एक कंप्यूटर पर संचलन कार्यों के सभी प्रदर्शन किया तो सब कुछ पहले से ही हल किया है, तो आप "सीधे लागू करें" करने के लिए चुन सकते हैं
स्थिति कॉलम आपको यह बताने के लिए अद्यतन किया जाएगा यदि लेनदेन लागू किया गया
"सफलता।" यदि लेनदेन को सही ढंग से संसाधित किया गया था
"उधारकर्ता नहीं मिला ।" अगर उधारकर्ता का कार्ड नंबर गलत है
"आइटम नहीं मिला।" यदि आइटम बारकोड गलत है
"आइटम जारी नहीं किया।" यदि आप ने एक उपलब्ध आइटम में जाँच की है
Offline circulation tool for Windows
The Offline circulation utility can be downloaded at: https://github.com/bywatersolutions/koha-offline-circulation/releases
To generate a borrowers.db file for loading in to the Windows tool you will need to run the file generator via a cron job.
Upload offline circulation file
यह :ref:`विंडोज़ के लिए ऑफ़लाइन परिसंचरण उपकरण <offline-circ-tool-for-windows-label>'एक केओसी फ़ाइल उत्पन्न करेगा जिसे आप सिस्टम में वापस आने के बाद कोहा में अपलोड कर सकते हैं।
सर्कुलेशन मेनू पर क्लिक करें 'अपलोड ऑफ़लाइन परिसंचरण फ़ाइल (.koc)'
अपने कंप्यूटर को *.koc file फ़ाइल के लिए ब्राउज़ करें
एक बार फाइल अपलोड की गई है, इस प्रक्रिया फ़ाइल क्लिक करें
जब यह पूरा हो गया है यदि आप किसी अन्य फाइल अपलोड या ऑफलाइन परिसंचरण कार्रवाई लंबित करने के लिए करते हैं करने में सक्षम हो जाएगा।
क्लिक करने के बाद 'ऑफ़लाइन परिसंचरण क्रियाएं लंबित देखें' आपको सभी कार्यों के सारांश में लाया जाएगा आप अपने*.koc फ़ाइल में कोहा में लोड हो गए हैं।
एक बार जब संचलन कंप्यूटर के सभी से लॉग के सभी लोड कर रहे हैं आप उन सब की जाँच करें या सिर्फ उन आप Koha में प्रक्रिया चाहते का चयन करने में सक्षम हो जाएगा।
प्रक्रिया बटन पर क्लिक करें और कोहा हर संग्रहीत लेनदेन एक के बाद एक रिकार्ड होगा। प्रत्येक लेनदेन के लिए, स्थिति के लिए बदल जाएगा:
"सफलता।" यदि लेनदेन को सही ढंग से संसाधित किया गया था
"उधारकर्ता नहीं मिला ।" अगर उधारकर्ता का कार्ड नंबर गलत है
"आइटम नहीं मिला।" यदि आइटम बारकोड गलत है
"आइटम जारी नहीं किया।" यदि आप ने एक उपलब्ध आइटम में जाँच की है
एक बार जब आप समाप्त हो अपने लेनदेन के सभी की एक सारांश होगा