Catalogación
Before you start cataloging in Koha you’re going to want to do some basic setup. Refer to the Implementation checklist for a full list of these things. Most importantly you’re going to want to make sure that your MARC bibliographic frameworks are all defined the way you want. Once in the cataloging module you will not be able to add or remove fields and subfields so your frameworks must be ready before you start cataloging.
También puede utilizar la Conexión OCLC para enviar registros directamente a Koha. Para obtener más información al respecto puede consultar el anexo de configuración OCLC Connexion Gateway.
Ir a: Más > Catalogación
Bibliographic records
In Koha the bibliographic record contains the main information related to the material. This includes things like the title, author, ISBN, etc. This information is stored in Koha in Marc (different flavors of Marc are supported in Koha). Once this information is saved, item records can be attached.
Adding records
Los registros se pueden agregar catalogando el material original o copian la catalogación de un servidor remoto. Si usted desea catalogar directamente debe usar una hoja de trabajo en blanco
Si usted desea catalogar el material basándose en un registro existente en otra biblioteca
Click “New record”
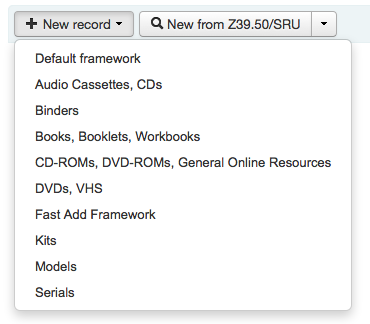
Choose the framework you would like to base your record on
Nota
You can create or modify frameworks in the Administration module.
Si usted desea catalogar el material basándose en un registro existente en otra biblioteca
Habilite la preferencia EnableAdvancedCatalogingEditor
Click the “Advanced editor” button

If you want to catalog a record based on an existing record at another library in the basic or advanced editor
Nuevo desde Z39.50/SRU
Click on the arrow to pre-select a framework for your imported your catalog record (the Default framework is used if you do not make a selection).
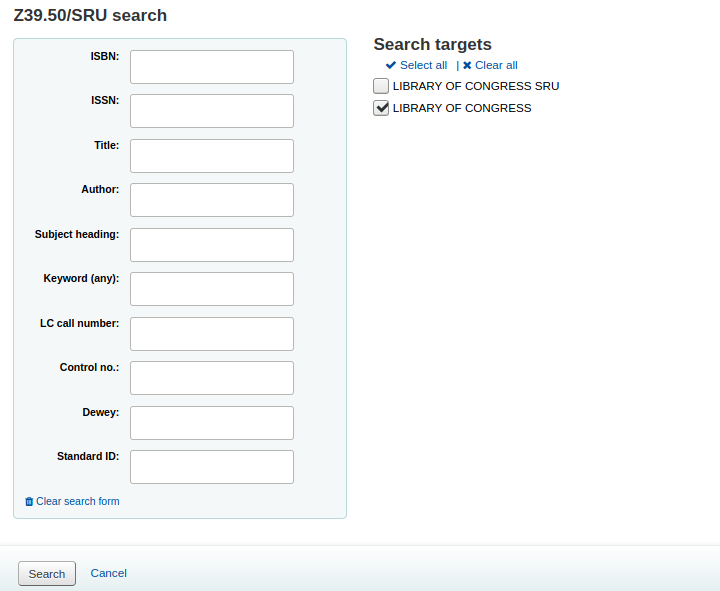
Busque el ejemplar que desea catalogar
Nota
Si no se encuentran resultados, trate de buscar menos campos, no todos los servidores Z39.50 pueden buscar en todos los campos del formulario.
Search targets can be altered by using the Z39.50 admin area.
The display of extra MARC fields and subfields can be configured via the AdditionalFieldsInZ3950ResultSearch preference.
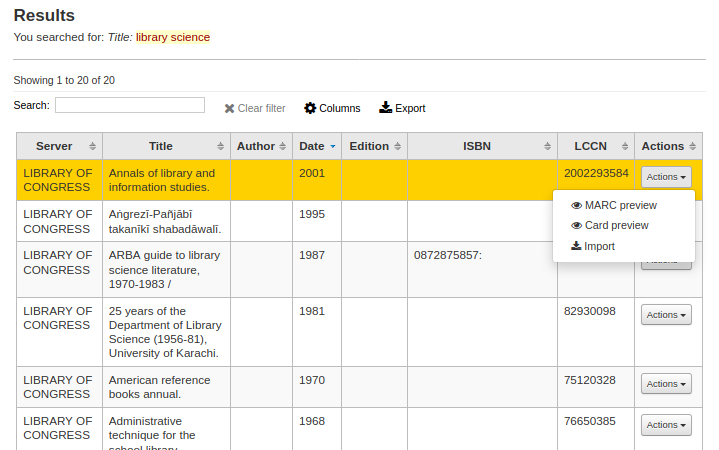
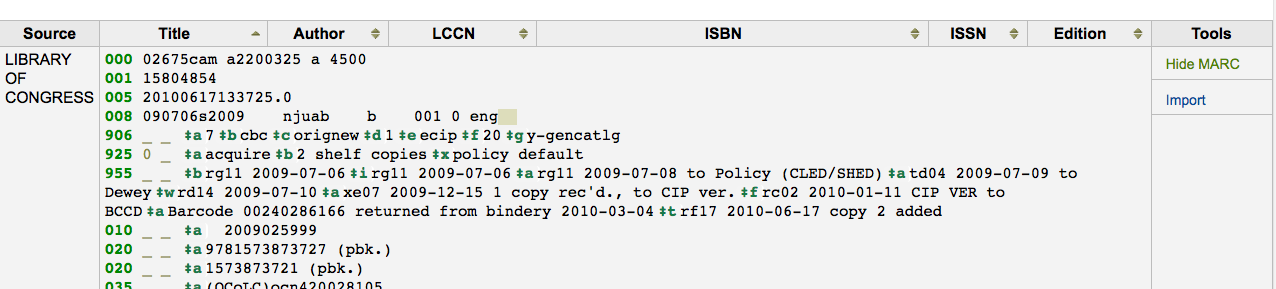
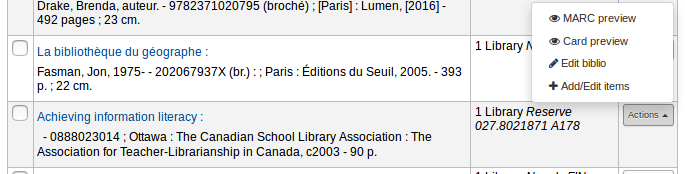
From the results” “Actions” button you can view the MARC or Card view for the record or choose to import it into Koha.
Nota
You can customize the columns of this table in the “Table settings” section of the Administration module (table id: resultst).
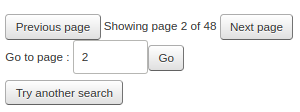
Si no encuentra el título que necesita en sus resultados de búsqueda Z39.50 puede hacer clic en el botón “Intentar otra búsqueda” abajo a la izquierda de sus resultados
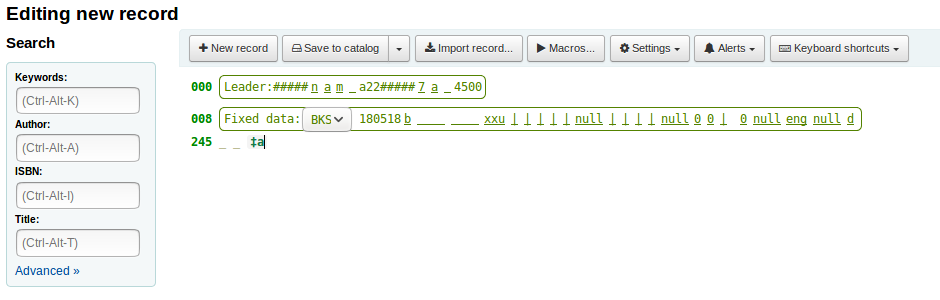
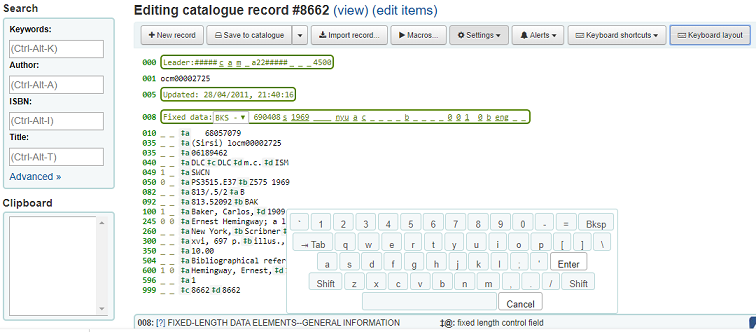
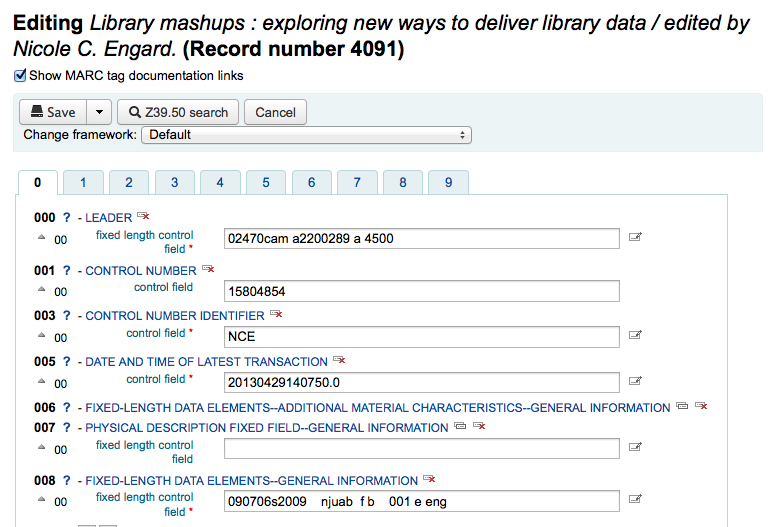
Basic editor cataloging
Una vez que haya abierto una hoja de trabajo en blanco o importado un registro a través de Z39.50 se le presentará un formulario para continuar la catalogación
If you would rather not see the MARC tag numbers you can change the value in your hide_marc system preference or each user can check the box next to “Show tags” found under “Settings”.

Para expandir una etiqueta colapsada haga clic en la descripción de la misma
To get help from the Library of Congress on a MARC tag click the question mark (?) to the right of each field number
It is possible to change the source of the MARC documentation using the MARCFieldDocURL system preference
Si usted siente que esto estorba su pantalla, puede ocultar los signos de interrogación desmarcando la casilla que aparece junto a la nota de los “Mostrar vínculos de documentación de etiquetas MARC” en la parte superior derecha del editor
A veces, los campos no pueden ser editables por el valor de su preferencia del sistema BiblioAddsAuthorities. Si usted tiene esta preferencia configurada para no permitir que los catalogadores escribir en los campos controlados por las autoridades es posible que aparezca un candado a la izquierda del campo.

Si aparece este icono debe hacer clic en el icono a la derecha del campo para buscar una autoridad existente.
Desde los resultados haga clic en “Elegir autoridad” para traerla dentro de su registro
Para duplicar un campo haga clic en el icono “repetir esta etiqueta” icono a la derecha de la etiqueta

Para mostrar los subcampos en el orden correcto, haga clic en la flecha hacia arriba a la izquierda del campo
Para duplicar un campo, haga clic en el signo + (más) a la derecha del el campo
Para borrar un subcampo (si hay mas de uno del mismo tipo), haga clic en el signo de menos (-) a la derecha del campo
To use a plugin click on the icon to the right of the field
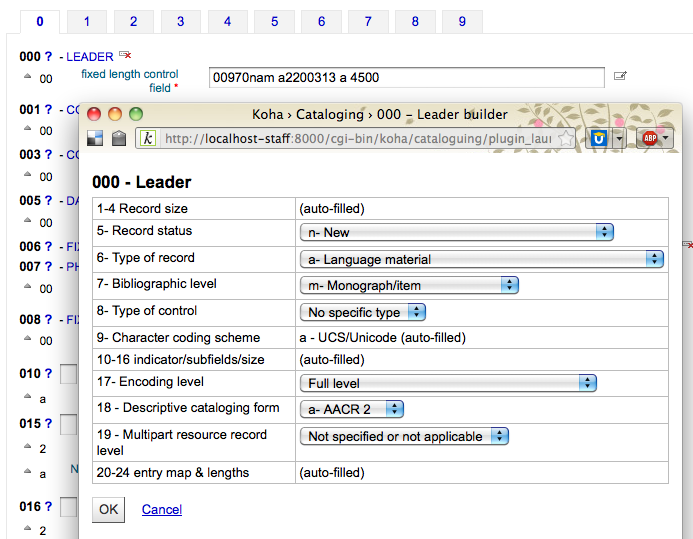
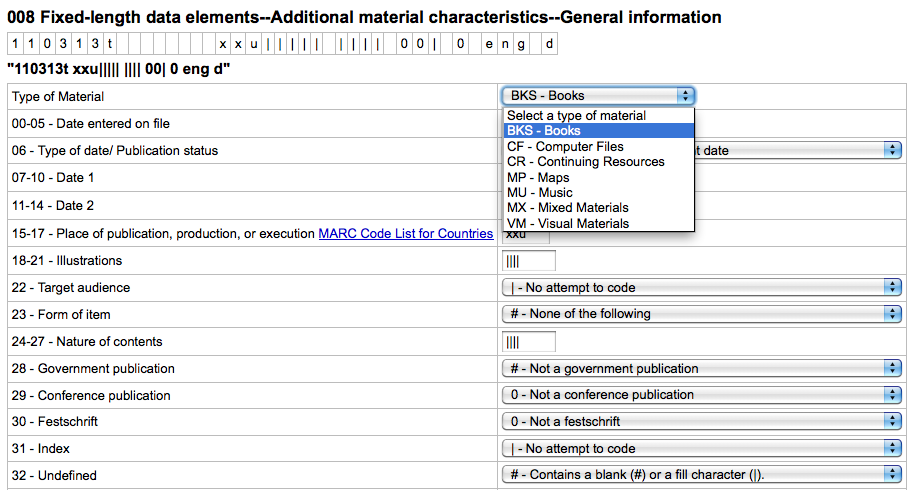
Algunos campos fijos tienen editores que cambiarán según el tipo de material que está catalogando (por ejemplo, los campos 006 y el 008)
Una vez que haya terminado, haga clic en el botón «Guardar» en la parte superior y seleccione si desea guardar y ver el registro bib que haya creado o continuar para añadir / editar los elementos agregados al registro
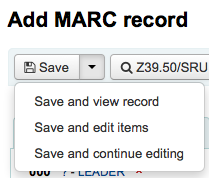
Eligiendo “Guardar y ver registro” lo llevará directamente al registro que usted acaba de catalogar
Eligiendo “Guardar y editar ítems” lo llevará al formulario de agregar/editar ítems después de haber guardo el registro bibliográfico, de ese modo, usted puede ajuntar las existencias
Choosing “Save and continue editing” will allow you to save your work so far and keep you in the editor to continue working
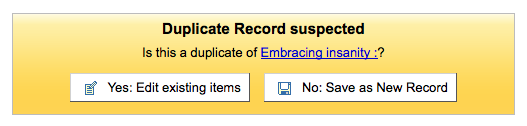
Si está por agregar un registro duplicado el sistema le avisará antes de guardar
Nota
To find possible duplicates, the system searches for the ISBN, and if there is not ISBN, it searches for the same combination of title and author.
Advanced editor cataloging
In order to use the Advanced cataloging editor you need to enable the EnableAdvancedCatalogingEditor preference.
Nota
This feature does not currently include any support for UNIMARC or NORMARC fixed fields.
In the advanced editor once you’ve opened a blank framework or imported a record via Z39.50 you will be presented with the form to continue cataloging
Utilizando el cuadro de búsqueda al lado izquierdo, puede realizar búsquedas Z39.50

Y desde los resultados de Z39.50 puede ver los registros marc haciendo clic en el enlace a la derecha
Haciendo clic en “Importar” lo llevará al registro editor donde puede realizar cambios
Nota
Cuando agrega un nuevo campo en el Editor avanzado, necesita presionar guiones bajos para un indicador en blanco, y rodear los indicadores con espacios.
Nota
Necesita dejar un espacio después del primer delimitador de subcampo, pero no después de otro delimitador de un subcampo en el mismo campo.
At the bottom of the editor you will see help from the Library of Congress for the field you are on. In cases where your MARC is invalid you will see red highlighting. To edit the record using only keyboard functions the Keyboard shortcuts button will inform you of the necessary commands.
A clipboard is available to copy and paste text between fields. See the image and table below for the shortcuts used with the clipboard.
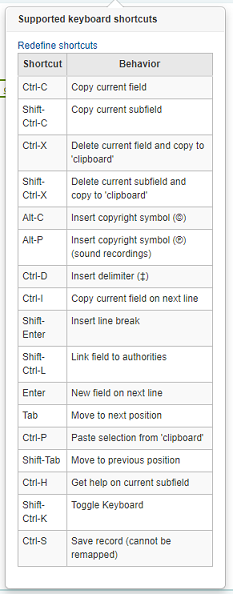
Advanced cataloging keyboard shortcuts
Los siguientes atajos de teclado pueden ser utilizados en el módulo de catalogación avanzada esto con el fin de ahorrase tiempo al hacer clic.
Atajo de teclado |
Comportamiento |
|---|---|
Ctrl-C |
Copy current field |
Shift-Ctrl-C |
Copy current subfield |
Ctrl-X |
Delete current field and copy to “clipboard” |
Shift-Ctrl-X |
Delete current subfield and copy to “clipboard” |
Alt-C |
Insert copyright symbol (©) |
Alt-P |
Insert copyright symbol (℗) (sound recordings) |
Ctrl+D |
Insertar delimitador (‡) |
Ctrl-I |
Copy current field on next line |
Mayús+Intro |
Insertar salto de línea |
Shift-Ctrl-L |
Link field to authorities |
Intro |
Nuevo campo en la siguiente línea |
Tabulador |
Mover a la siguiente posición |
Ctrl-P |
Paste selection from “clipboard” |
Mayús+Tab |
Mover a la posición anterior |
Ctrl+H |
Obtenga ayuda del subcampo actual |
Shift-Ctrl-K |
Toggle Keyboard |
Ctrl+S |
Save record (cannot be remapped) |
Advanced cataloging virtual keyboard
A virtual keyboard is available for adding diacritics and symbols. Use the shortcut Shift-Ctrl-K to display the keyboard. A “Keyboard layouts” button will display at the top of the advanced editor that allows you to set the virtual keyboard layout for different languages.
Macros in advanced cataloging
Para grabar una nueva macro:
Select the «Macros…» button
Una ventana aparecerá. En esta ventana, seleccione «Nuevo macro…,» ingrese el nuevo nombre de la macro en el cuadro emergente y seleccione OK.
Ahora haga clic a la derecha en número pequeño 1, e ingrese la primer línea de su macro. Para una línea múltiple, es decir, una macro con múltiples campos, presione la tecla Intro del modo que un número pequeño 2 aparezca, e introduzca la segunda línea/campo, etc.
Sus macros serán guardados automáticamente. Cuando finalice puede seleccionar cerrar la ventana en «x», o seleccionar un macro para ejecutarlo en el registro que se encuentra en edición, o seleccione otro macro para ejecutarlo.
Para editar un macro existente:
Select the «Macros…» button
A window will pop up. In this window, select the macro that you wish to edit & make your changes.
Su trabajó se guardará automáticamente y, cuando finalice, podrá seleccionar «x» para cerrar la ventana o seleccionar un macro para ejecutar en el registro que se está editando o seleccione otro macro par ejecutarse.
Sintaxis básica del lenguaje del macro:
new 500=‡aEditado con Rancor
Crea un campo 500 con un subcampo ‡a y lo establece a «Editado con Rancor.»
245c= by J.K. Rowling.
Establece el primer subcampo ‡c de la primer etiqueta 245 en el registro a «by J.k. Rowling, creándolo si es necesario.
082a={084a}
Establece el subcampo ‡a en la primer etiqueta 082 (creando el subcampo si es necesario) al contenido del primer 084‡a.
indicators=_1
Sets the indicators of the last mentioned tag (in this case, 082) to «_» and «1».
new 090a=Z674.75.W67
Crea un nuevo subcampo ‡a en el primer 090 (pero solamente si ese campo existe) y lo establece a Z674.75.W67.
new 090a at end=Z674.75.W67
Lo mismo que arriba.
new 245b after a= a tale of might and magic /
Crea un nuevo ‡b después del primer subcampo y lo establece a » a tale of might and magic /».
delete 245b
Elimina el primer subcampo ‡b en el primer 245 ‡b
Adding analytic records
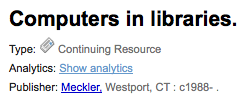
Las bibliotecas a veces hacen artículos de revistas y artículos dentro de monografías y publicaciones seriadas accesibles a los usuarios de la biblioteca a través de análisis de catalogación. La catalogación analítica crea registros bibliográficos separados para estos artículos, capítulos, secciones, etc encuentra dentro de un recurso más grande, como un libro, un artículo en una revista, un periódico o en serie. En catalogación analítica, aunque un registro bib separado se crea para el título, no está físicamente separado del elemento padre. Más información acerca de Analiticos esta en el Capítulo 13 de las AACR2.
If you would like to catalog analytic records there are two options. One is to use the Easy analytics function; the other is the Analytics enhanced workflow.
Easy analytics
The easy analytics feature makes linking analytic records together easier. The first thing you need to do is set the EasyAnalyticalRecords preference to “Display” and the UseControlNumber preference to “Don’t use.”
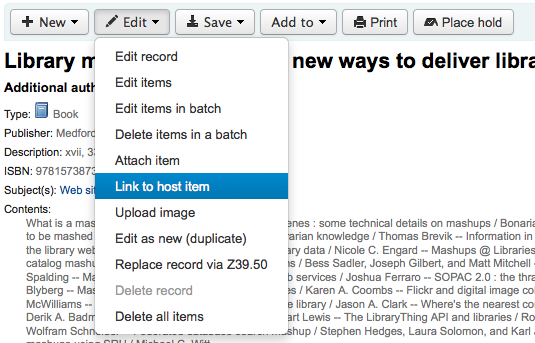
After cataloging your analytic record (see adding records for more on creating records) click “Edit” from the normal view and choose to “Link to host item”
Esto le pedirá ingresar el código de barras para el ejemplar al cual debe enlazarse este registro.
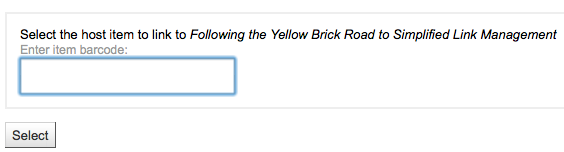
Luego de ingresar el código de barras del ejemplar y hacer clic en “Seleccionar” recibirá un mensaje de confirmación.

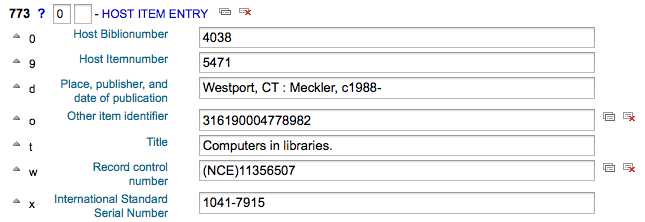
El registro tendrá ahora el campo 773 completado apropiadamente para completar el enlace.
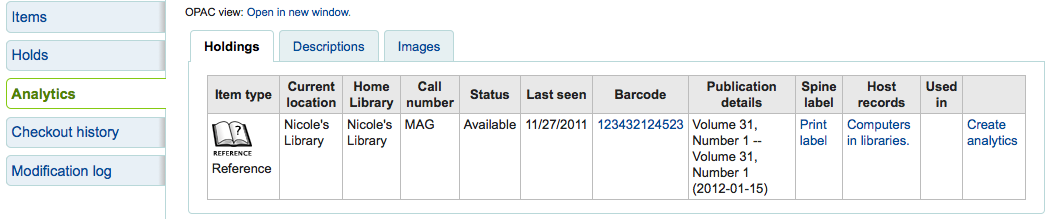
To view all of the items tied to the host record, do a search for the record, click the “Analytics” tab on the left and the analytics tied to each barcode will be shown under the “Used in” column.

Nota
It is also possible to create analytic records from this screen by clicking on “Create analytics”
You can also see the analytics attached to this record by clicking the “Show analytic” link towards the top of the record in the normal view.
When looking at the analytic record you will also see a link to the host item under the “Host records” column in the holdings table when viewing the “Analytics” tab.
Analytics enhanced workflow
To use the enhanced workflow method of adding analytics, the first thing you need to do is set the EasyAnalyticalRecords preference to “Don’t display” and the UseControlNumber preference to “Use.”
After cataloging your original record (see adding records for more on creating records) click “New” from the normal view and choose to “New child record.”
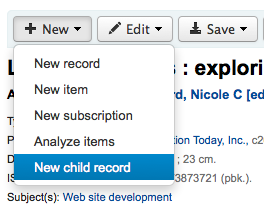
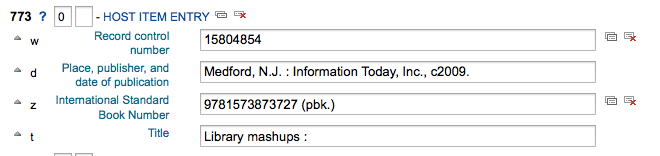
This will open a new blank record for cataloging. The blank record will have the 773 field filled in properly to complete the link once the record is saved.
The “Show analytics” link from the host record will now use the hosts record control number (001) to search for all records on the system of the type “monographic component part” or “serial component part” (Leader position 7) with a 773 subfield w that contains the hosts record control number.
Editing analytics
If you have linked an analytic record incorrectly you can remove that link by editing the analytic record (not the host record).
To do this, go to the analytic record and click the “Edit” button. For UseControlNumber simply edit or remove the corresponding 773.
If using EasyAnalytics choose to “Edit items”; To the left of each item you will see two options.

Clicking “Edit in host” will allow you to edit the item on the host record.
Al hacer clic en “Desconectar” se eliminará el campo 773 y el enlace entre la analítica y la fuente.
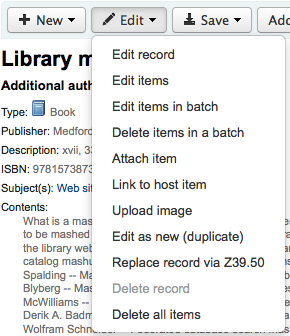
Editing records
To edit a record you can click the “Actions” button and choose “Edit biblio” from the search results on the cataloging search page
o haciendo clic en el botón “Editar” en el registro bibliográfico y eligiendo “Editar registro”
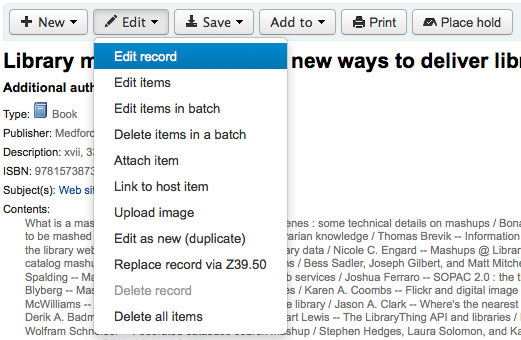
El registro se abrirá en editor de MARC
The alternative is to search via Z39.50 to overlay your record with a fuller record found at another library. You can do this by choosing “Replace record via Z39.50/SRU” from the “Edit” menu.
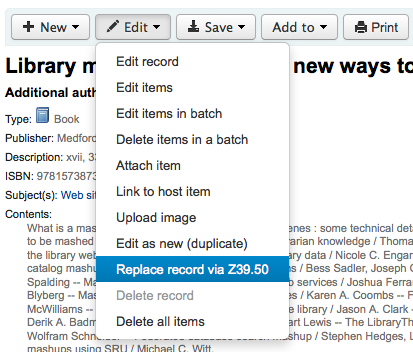
Once you choose that, you will be brought to a Z39.50 search window to search other libraries for the record in question.
Una vez haya editado (por cualquier método) puede hacer clic en “Guardar” arriba a la izquierda del editor.
You can also use the edit menu to add your own custom cover image if you have either OPACLocalCoverImages and/or LocalCoverImages set to “Display” by choosing “Upload image” from the menu.
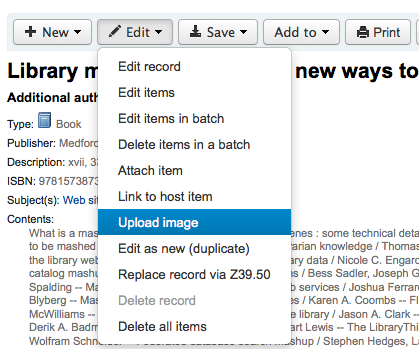
Choosing “Upload image” will take you to the Upload Local Cover Image Tool.
Duplicating records
Sometimes a copy of the record you need to catalog can’t be found via Z39.50. In these cases you can create a duplicate of similar record and edit the necessary pieces to create a new record. To duplicate an existing record click “Edit as new (duplicate)” from the “Edit” menu on the bibliographic record.
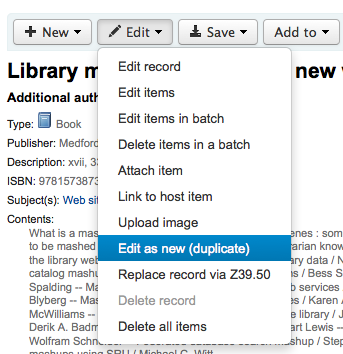
This will open a new MARC record with the fields filled in with the values from the original bibliographic record.
Attaching files to records
Si usted desea bloquear a un usuario de la biblioteca puede indicarlo con una restricción manual
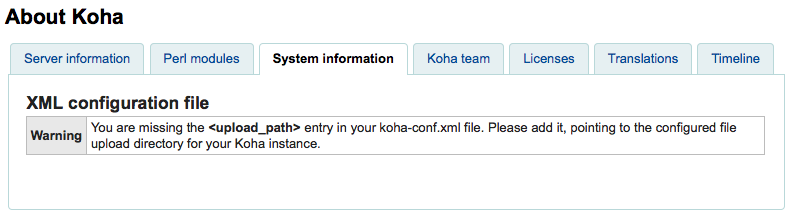
You will need to ask your system administrator to set the “upload_path” config variable to point to where the files will be stored
You can see if your upload path is set correctly by visiting About Koha > System information. If there is an error you will see it there.
You will want to be sure that your OPACBaseURL system preference is set appropriately
You will want to add the upload.pl plugin to the 856$u subfield in one (or multiple) of your frameworks
Once you are all set up you can continue with cataloging as regular. You will see a plugin icon next to the 856$u that will open up the upload and/or search window

From this menu you can click browse to find a file and attach it, or you can search files you have uploaded previously using the search box. From the search results you can choose which file to attach.
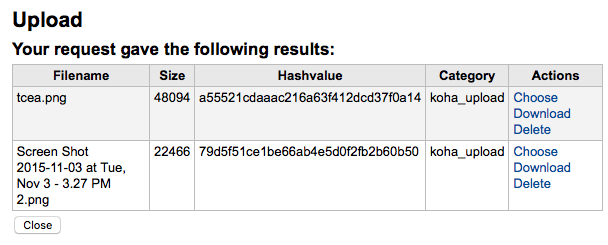
Un vez la fila ha sido escogida, aparecerá como un enlace en el registro MARC y en los destalles mostrados.
Nota
If the file is a PDF, it will be opened directly in the user’s browser whereas if the file is an image or another type of file, the user will be prompted to download it.
Merging records
Para combinar registros bibliográficos, querrá ir al módulo de Catalogación y realizar una búsqueda.
Si usted ve duplicados en esa pantalla de resultados de búsqueda, usted puede marcar las casillas junto a los duplicados y hacer clic en el botón “Combinar seleccionados” en la parte superior de los resultados.
Una vez que haya seleccionado los registros que desea combinar, haga clic en el botón “Combinar seleccionados” en la parte superior de la lista. Se le preguntará cuál de los dos registros desea mantener como su registro primario y cuál será eliminado después de la combinación. Si los registros fueron creados usando diferentes hojas de trabajo, Koha también le pedirá qué Hoja de trabajo le gustaría utilizar para el registro recién combinado.
Se mostrará el MARC para los dos registros (cada uno accesible por la etiqueta que tiene el número de registro de cada uno). Por defecto, todos los campos del registro principal estarán marcados y no habrá ningún campo marcado en el otro registro. Desactive los campos del primer registro que no desee en registro final (destino) y después en la segunda pestaña elija los campos que deben estar en el registro final (destino).
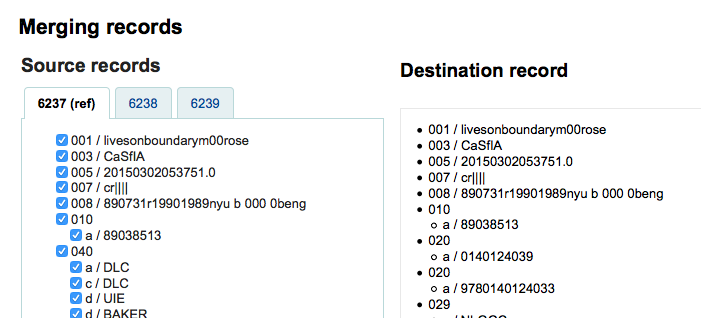
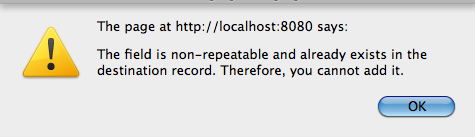
Si intenta agregar un campo que no es repetible dos veces (como la selección del campo 245 de ambos registros #1 y #2) se le presentará con un error
Por debajo de los registros que está combinando existe una opción para ingresar los campos que se mostrarán en el informe. Esto le permitirá controlar qué campos ver en la página de confirmación de la combinación:

Luego de elegir cargar, se le presentará un mensaje de confirmación

If you enter fields you will see those on the confirmation page (you can set defaults with the MergeReportFields preference)

Una vez ha cumplimentado su selección haga clic en el botón “combinar”. El registro primario contendrá ahora los datos que escogió para ello así como todos los ítems/existencias de ambos registros bibliográficos y, el segundo registro será eliminado.
Nota
If you would like you can also use the Lists tool for merging records together. Learn more here.
Deleting records
Para editar el registro completo del usuario simplemente haga clic en el botón «Editar» en la parte superior de dicho registro
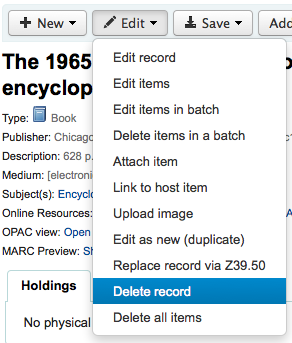
Bibliographic records can only be deleted once all items have been deleted. If you try to delete a bibliographic record with items still attached you will see that the delete option is grayed out.
Item records
En Koha cada registro bibliográfico puede tener uno o más elementos unidos. Estos items se refieren a veces como formatos. Cada item incluye información de la copia física que la biblioteca tiene.
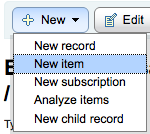
Adding items
After saving a new bibliographic record, you will be redirected to a blank item record so that you can attach an item to the bibliographic record. You can also click “Add/Edit items” from the cataloging search results
or you can add new item at any time by clicking “New” on the bibliographic record and choosing “New item”
El formulario de edición del ítem aparecerá:
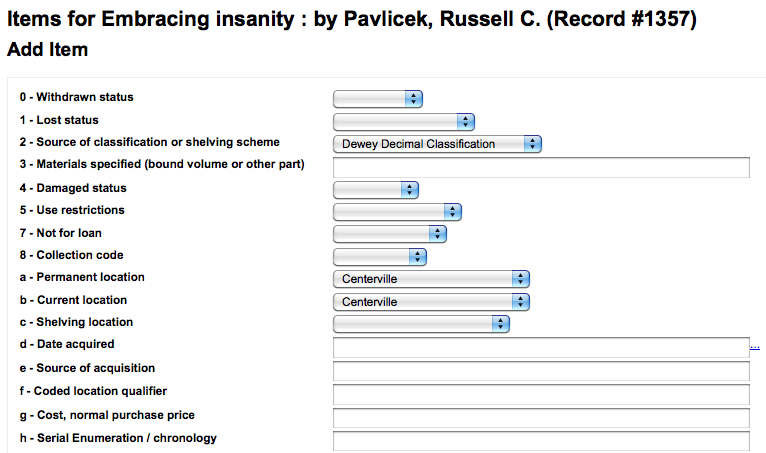
Como mínimo, si Usted planea prestar el ítem, los siguientes campos deben ser ingresados para nuevos ítems:
2- Fuente de la clasificación
a- Ubicación permanente
b - Lugar en las estanterías
o- Signatura topográfica completa
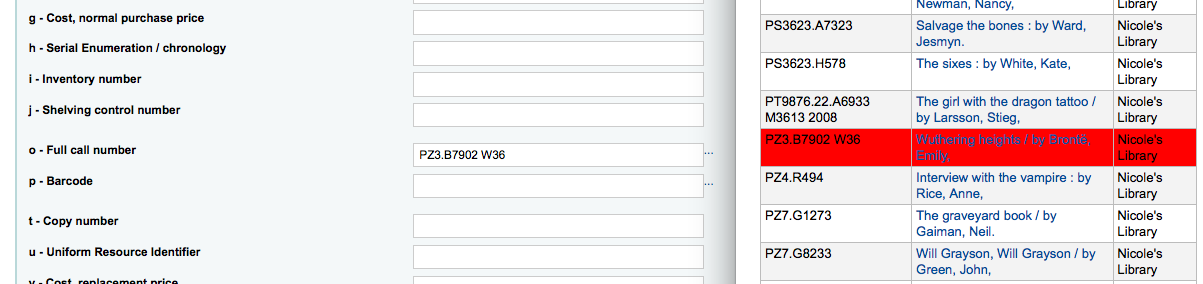
If you’d like you can use the cataloguing plugin “call number browser” (cn_browser.pl) for this field. If it’s enabled you’ll see a … to the right of the field. When clicked that will open a call number browser window if the row is highlighted in Red then the call number is in use, if there is a thin Green line instead then the call number can be used.
p- Código de barras
v - Costo, precio de reposición
Este valor será cargado a los clientes cuando marca unítem que ha sido prestado como “Perdido”
y- Tipo de ítem de Koha
To make sure that these values are filled in you can mark them as mandatory in the framework you’re using and then they will appear in red with a “required” label. The item will not save until the required fields are filled in.

Nota
To make item subfields required in a framework you’ll want to edit the 952 field in the framework editor.
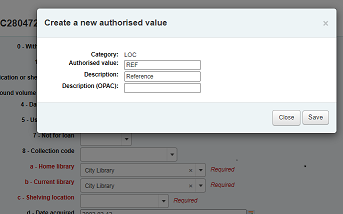
You can add a new authorized value directly from the add and edit item screen for any fields that are linked to authorized value categories such as Shelving location (subfield$c) or Collection code (subfield$8).
Start to type the authorized value description, if a match is not found you will see the option “(Select to create)”.
Click on this option to display a pop-up window where you can create you new authorized value.
The authorized value category will be pre-populated from the field you are using, for example LOC for Shelving location, CCODE for Collection code. Take care when choosing your authorized value code. Refer to the notes on adding new authorized values for the correct format of these codes. Use the Description field for the actual value that will be displayed
You can add authorized values in the same way from bibliographic and authority records.
Nota
You must have the manage_auth_values administration permission to add authorized values from cataloguing.
Below the add form there are 3 buttons for adding the item.

“Add item” will add just the one item
“Add & duplicate” will add the item and fill in a new form with the same values for you to alter
“Add multiple items” will ask how many items and will then add that number of items adding +1 to the barcode so each barcode is unique
Sus ítems agregados aparecerán encima del formulario una vez enviado el formulario

Nota
You can customize the columns of this table in the “Table settings” section of the Administration module (table id: Items Editor).
Sus ítems también aparecerán bajo los detalles bibliográficos en la pantalla de los registros bibliográficos.
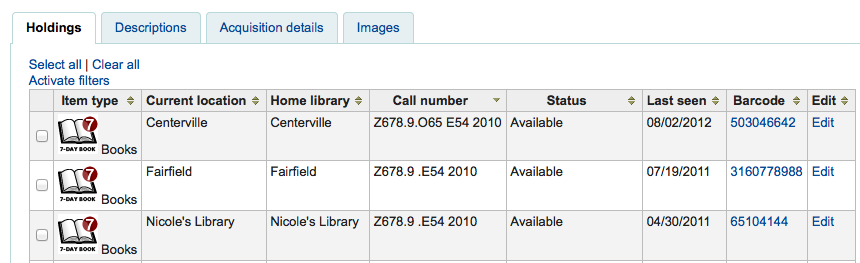
If you have SpineLabelShowPrintOnBibDetails set to “Display” then there will also be a link to print a quick spine label next to each item.
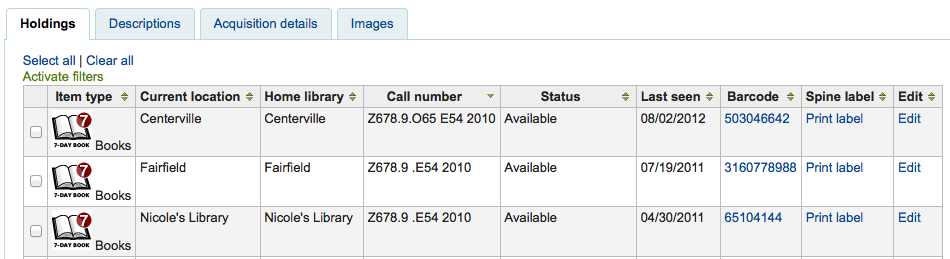
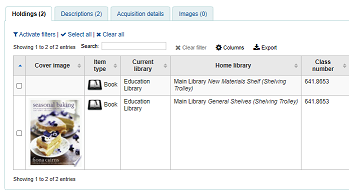
Usted también pude filtrar el contenido de su tabla de existencias haciendo clic en el enlace “Activar filtros.” Esto le mostrará una fila en la parte superior de donde puede ingresar datos en cualquier columna para filtrar los resultados en la tabla.

Editing items
Los ítems pueden ser editados de varias formas.
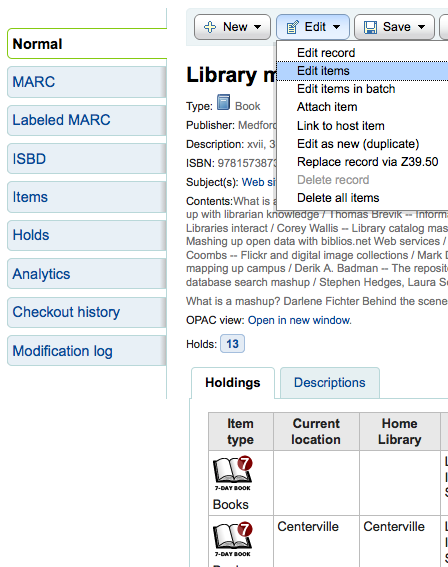
Clicking “Edit” and “Edit items” from the bibliographic record
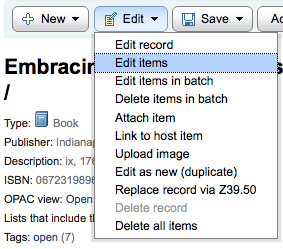
Que abrirá una lista de ítems que podrá hacer clic en “Editar” a la izquierda del ítem específico que desea editar.
Clicking “Edit items” beside the item on the “Items” tab
Marque la casilla a la izquierda de los ítems que desea reservar
Hacer clic en “Editar” y después en “Editar ítems en lotes”
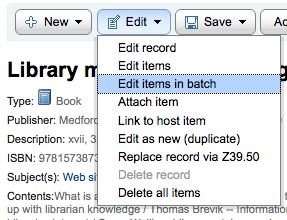
This will open up the batch item modification tool where you can edit all of the items on this record as a batch.
You can also enable StaffDetailItemSelection to have checkboxes appear to the left of each item on the detail display. You can then check off the items you would like to edit and click “Modify selected items” at the top of the list.
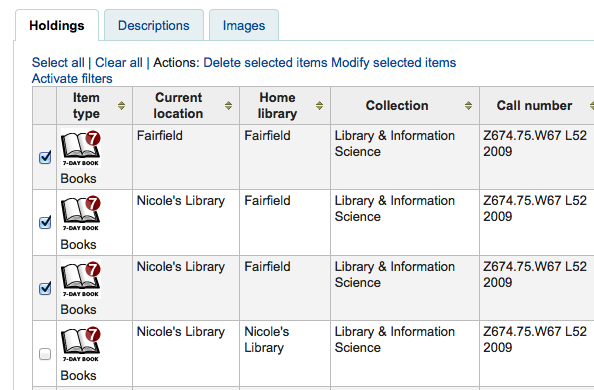
You can click “Edit” to the right of each item in the Holdings tab
There is also a link to Edit items from the search results in the staff client
Finally you can use the batch item modification tool
Quick item status updates
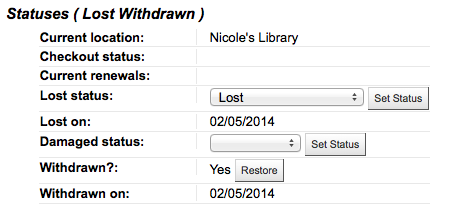
A menudo el personal de circulación necesita cambiar el estado de un ítem a Perdido o Dañado. Esto no requiere editar el registro completo. EN cambio haciendo clic en el código de barras del ítem en el resumen de préstamo o el historial de préstamo le llevará al un resumen del ítem. Puede llebar al resumen del ítem haciendo clic en la pestaña Ítems a la izquierda de la página de detalles del registro.
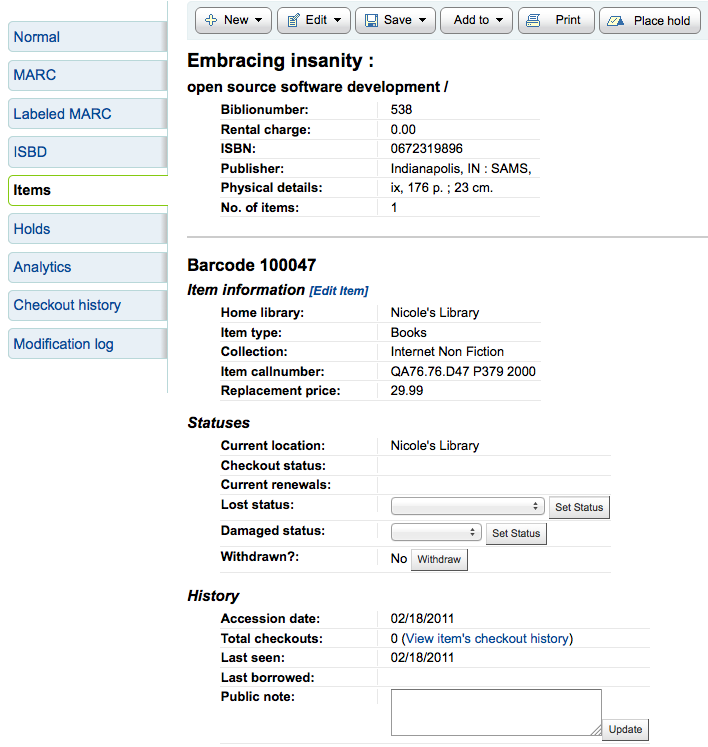
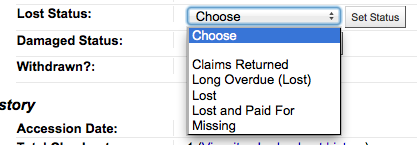
From this view you can mark an item lost by choosing a lost status from the pull down and clicking the “Set status” button.
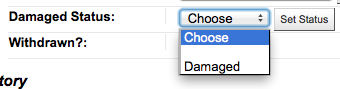
You can also mark an item as damaged by choosing a damaged status from the pull down and clicking the “Set status” button.
Duplicating items
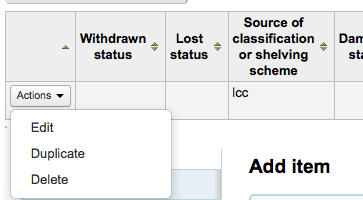
You can easily duplicate each item by clicking the “Actions” button the left of each item on the edit items screen
Desde aquí puede elegir “Duplicar” el ítem y esto rellenará el formulario con los valores del ítem que se eligió.
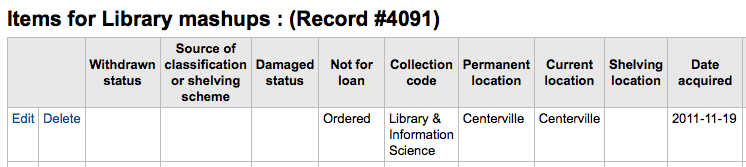
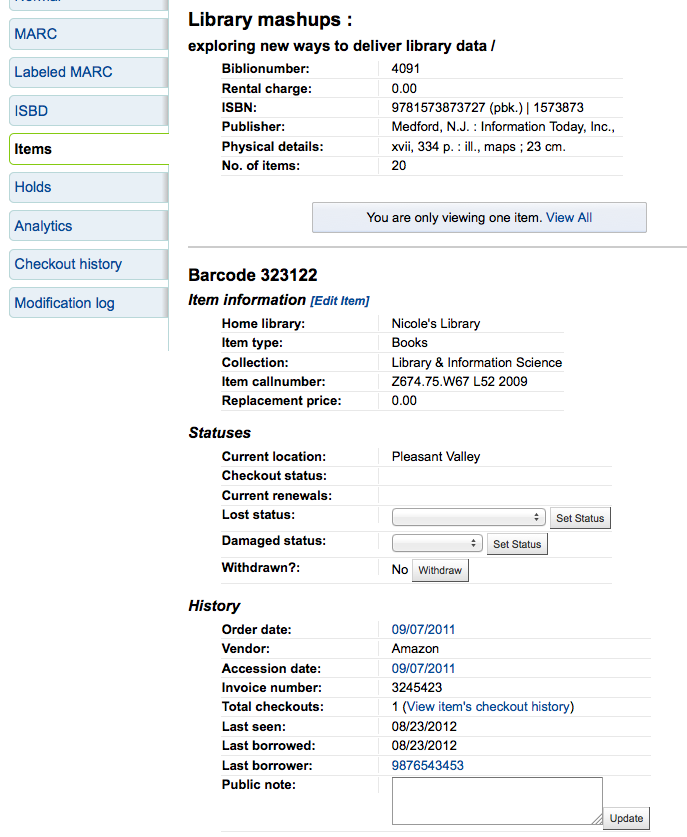
Item information
A la izquierda de cada registro bibliográfico hay una pestaña para ver los ítems.
Haciendo clic en esa pestaña le proporcionará información básica acerca de los ítems. Desde aquí puede observar información básica acerca del ítem, tal como, la biblioteca de origen, tipo de ítem, código de colección, signatura topográfica y precio de reemplazo. También puede ver y editar la información del estado. Si un ítem es marcado como perdido o retirado, también verá la fecha en que el estado fue aplicado.
In the “History” section you will see information about the check out history of the item and if you ordered the item via the acquisitions module then this section will include information about the order.
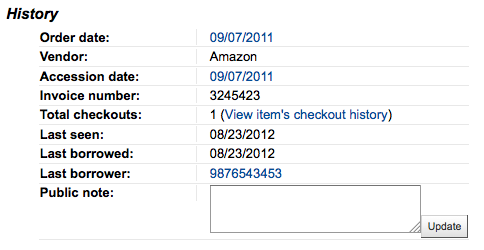
Si la fecha de pedido o de entrada están enlazadas, haciendo clic le llevará a la información de adquisición de ese ítem.
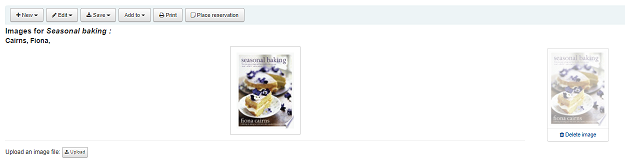
Adding cover images for items
If you have either OPACLocalCoverImages and/or LocalCoverImages set to ‘Display’ you can upload cover images for individual item records from the “Upload image” option from the Edit button on the right of the Holdings table.
Click Choose file to find the image file on your computer and then Upload file.
On the next screen you are given the option to replace existing images. You can then click on Process images.
The image will display in a Cover image column in the holdings display.
To delete an image, click on the image in the holdings display. You will see a greyed out copy of the image with the option to delete.
Moving items
Items can be moved from one bibliographic record to another using the “Attach item” option
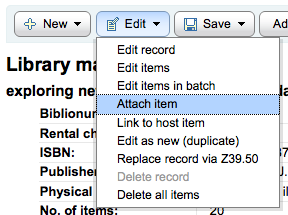
Visit the bibliographic record you want to attach the item to and choose “Attach item” from the “Edit” menu.
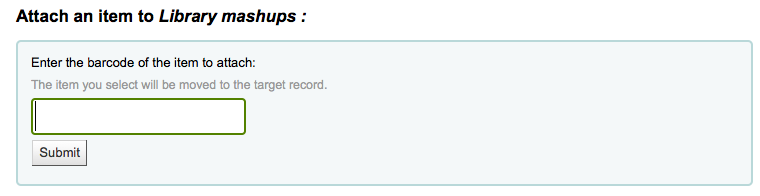
Simply enter the barcode for the item you want to move and click “Submit”
If this is the last remaining item attached to a bibliographic record you will be presented with a button to delete the original host record.
If you want to move all items to a new record creating only one bibliographic record you can use the merge Records tool instead.
Deleting items
Hay varias maneras de eliminar registros. Si solo necesita eliminar un ítem puede hacerlo abriendo la página de detalles del registro bibliográfico y haciendo clic en el botón “Editar” en el tope. Desde aquí puede elegir “Editar ítems”.
Se le presentará una lista de ítems y a lado de cada uno un enlace etiquetado “Eliminar”. Haga clic en ese enlace y si el ítem no está prestado se eliminará ese ítem.
Si sabe que todos los ítem del registro no están prestados puede utilizar la opción “Eliminar todos los ítems” en “Menú de edición” y removerá todos los ítems del registro.
You can also enable StaffDetailItemSelection to have checkboxes appear to the left of each item on the detail display. You can then check off the items you would like to delete and click “Delete selected items” at the top of the list.
Finally you can use the batch delete tool to delete a batch of items.
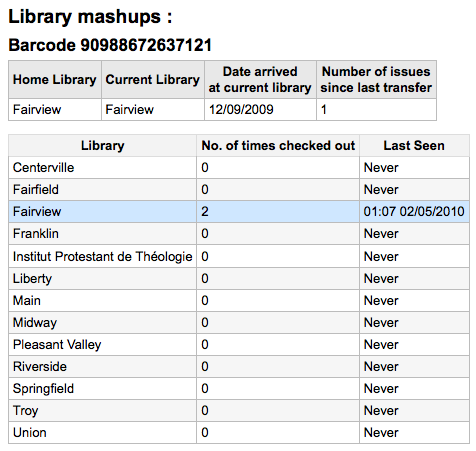
Item specific circulation history
Cada registro bibliográfico mantiene un historial de circulación (con o sin la información de los usuarios dependiendo de su configuración), pero cada ítem tiene también su página de historial propio. Para verla, haga clic en la pestaña “Ítems” a la izquierda del registro que está viendo.
Bajo el encabezado “Historia” hay un enlace a “Ver historial de préstamos del ítem”, haciendo clic le mostrará el historial del ítem el cual se ve levemente diferente de la página del historial de registros bibliográficos.
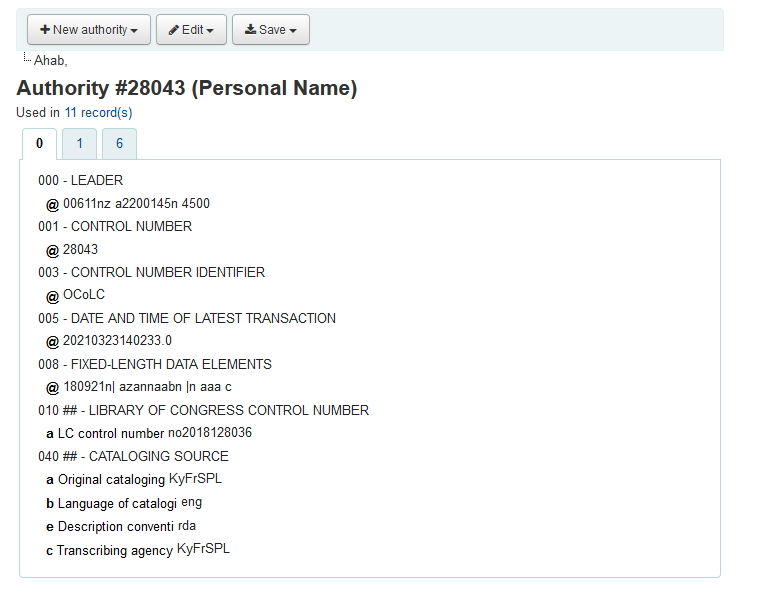
Autoridades
Los registros de autoridad son una manera de controlar campos en sus registros MARC. El utilizar registros de autoridad le provee control sobre temas, nombres personales y lugares.
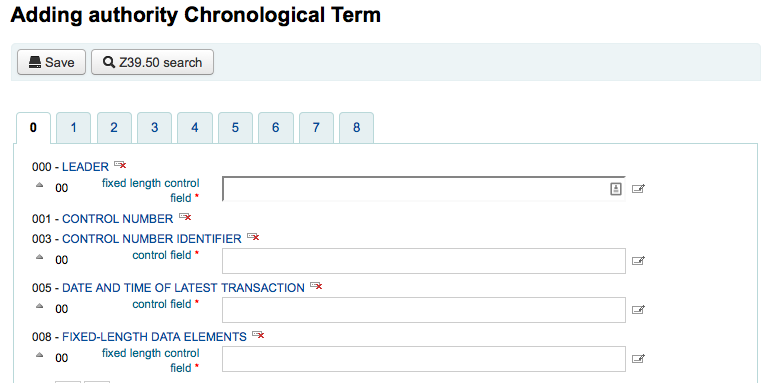
Adding authorities
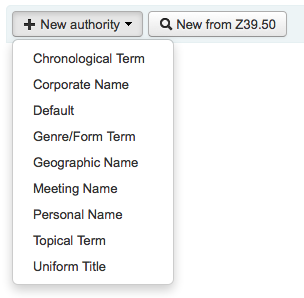
To add a new authority record you can either choose the authority type from the “New authority” button or search another library by clicking the “New from Z39.50” button.
Si elije ingresar una nueva autoridad desde cero, el formulario que aparece le permitirá introducir todos los datos necesarios de su registro de autoridad.
Para expandir valores colapsados simplemente haga clic en el título y los subcampos aparecerán. Para duplicar un campo o subcampo solo haga clic en el signo mas (+) a la derecha de la etiqueta. Para utilizar plugins de ayuda de campo haga clic en la elipsis (…) a la derecha del campo.
Cuando enlace autoridades a otros encabezados, puede utilizar el buscador de autoridades haciendo clic en las elipsis (…) a la derecha del campo.
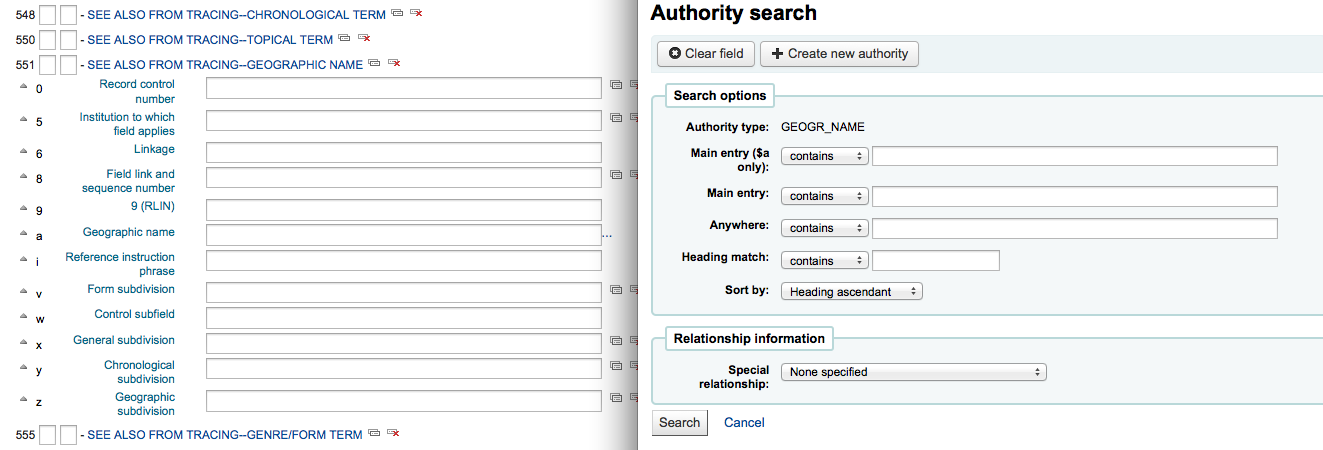
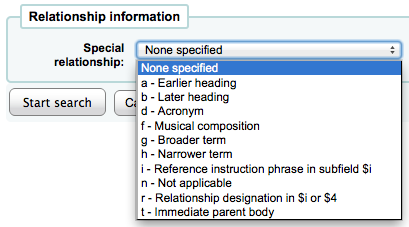
Desde allí podrá buscar el archivo de autoridad para enlazar con la autoridad. Si no puede encontrar la autoridad para enlazar, puede hacer clic en el botón “Crear nueva” y agregar la autoridad necesaria para el enlace. Este plugin también le permite seleccionar el enlace de relación entre las autoridades.
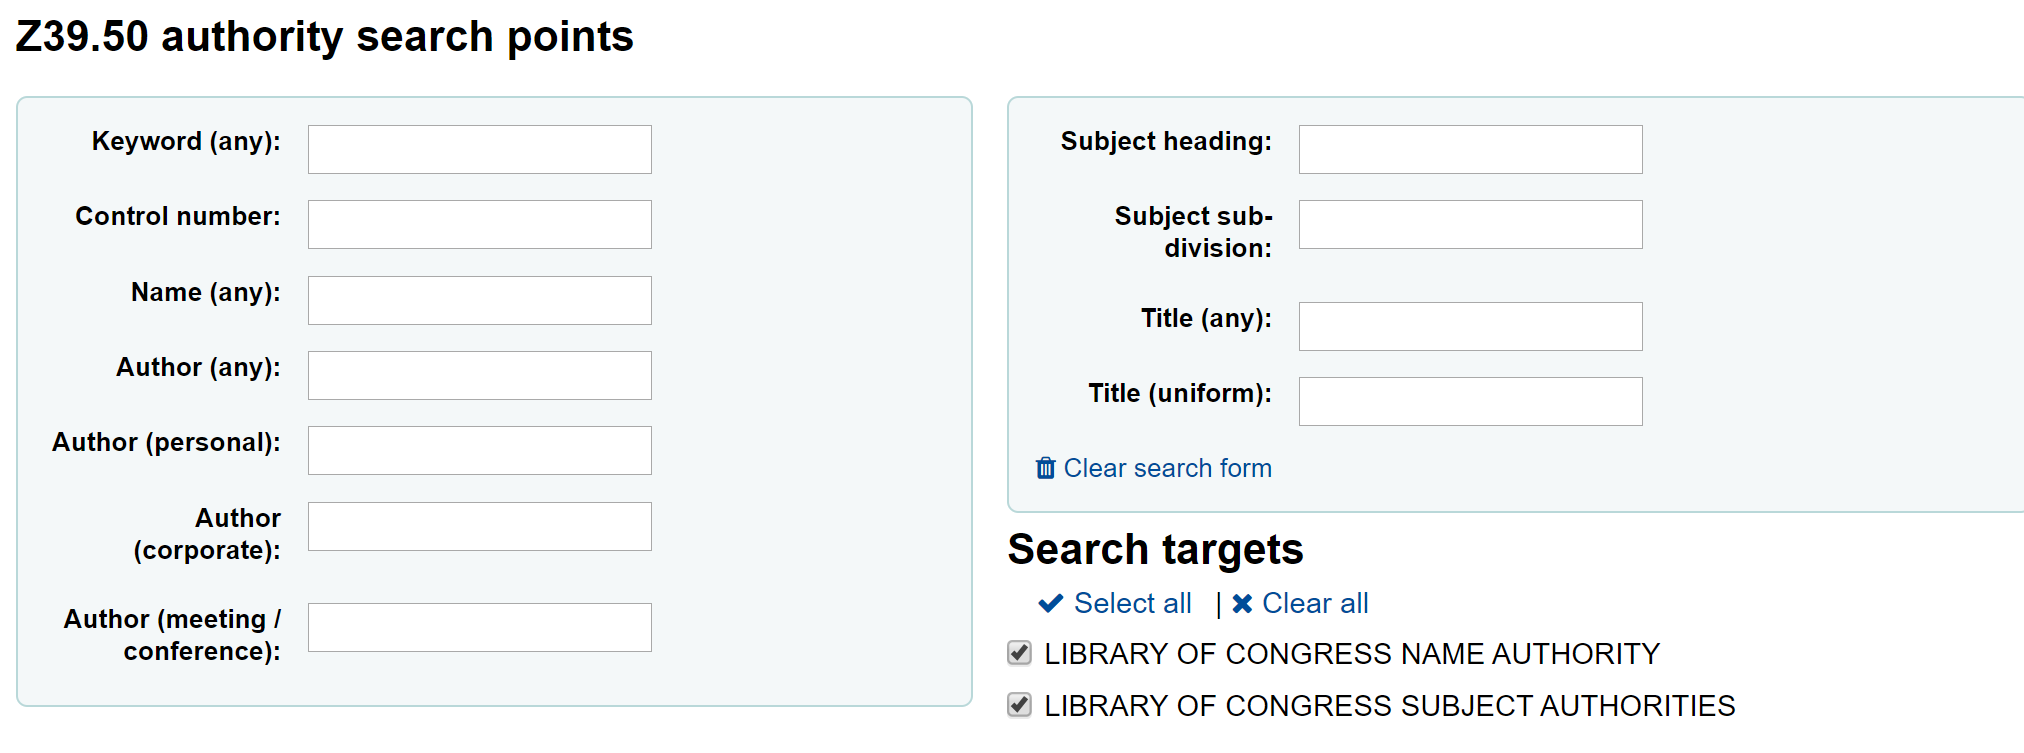
Si elije buscar en otra biblioteca a su registro de autoridad se le presentará una caja de búsqueda
De los resultados puede elegir el enlace “Importar” a la derecha del registro que desea agregar a Koha
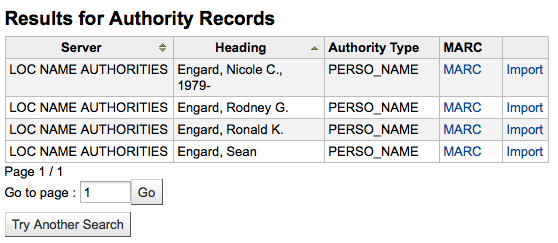
Se le presentará entonces el formulario para editar la autoridad antes de grabarla en su sistema

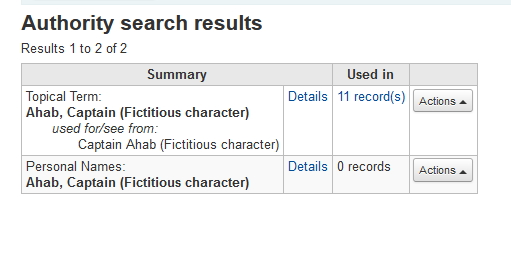
Searching authorities
Desde la página de autoridades puede buscar términos existentes y sus registros bibliográficos asociados.

From the results you will see the authority record, how many bibliographic records it is attached to, an “Actions” menu that includes the ability to edit, merge and delete (if there are no bibliographic records attached).
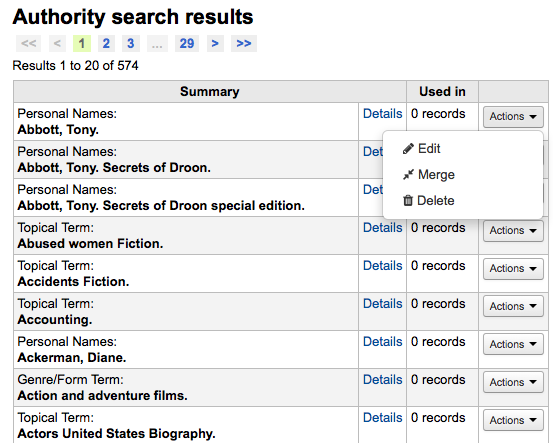
Clicking on the “Details” link to the right of the authority record summary will open the full record and the option to edit the record.
If the authority has “See also’s in it you will see those broken out on the search results, clicking the linked headings will run a search for that heading instead.
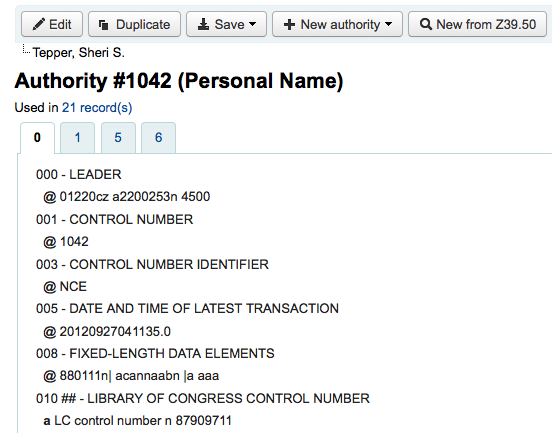
Editing authorities
Las autoridades pueden editarse haciendo clic en el resumen de la autoridad desde le resultado de búsqueda y haciendo clic en el botón “Editar” encima del registro.
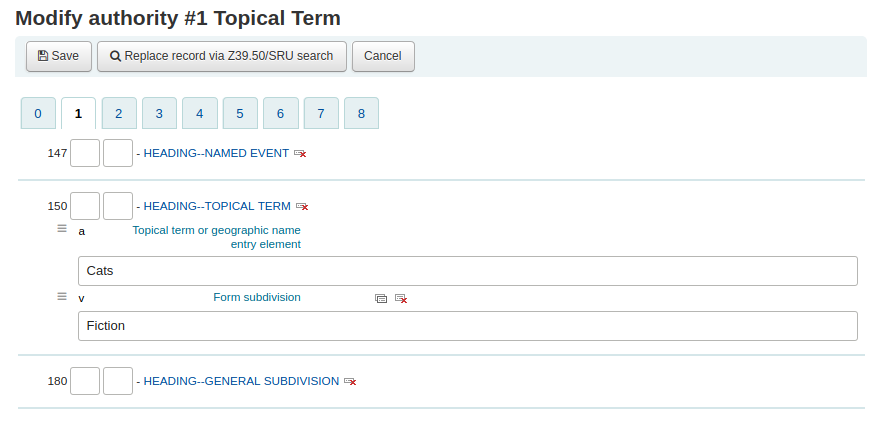
Once you’ve made the necessary edits, simply click “Save”.
Depending on the number of bibliographic records this authority record is linked to, the bibliographic records may be updated right away. This depends on the value in the AuthorityMergeLimit system preference (the default is 50). If the number of bibliographic records is under the value of AuthorityMergeLimit, the bibliographic records will be changed right away. If the number of bibliographic records exceeds the value of AuthorityMergeLimit, they will only be updated when the merge_authorities.pl script is run.
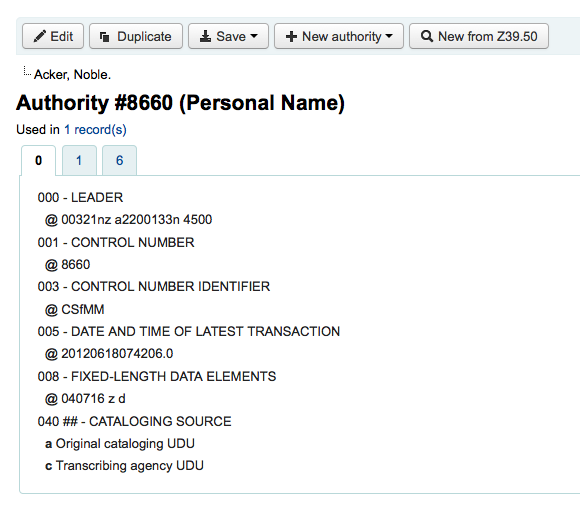
Para eliminar un registro de autoridad primero debe asegurarse de que no está vinculado con registros bibliográficos. Si no es utilizado por registros bibliográficos aparecerá el enlace “Eliminar» a la derecha del registro en los resultados de búsqueda y como un botón que aparece después de hacer clic en el resumen del registro de autoridad.
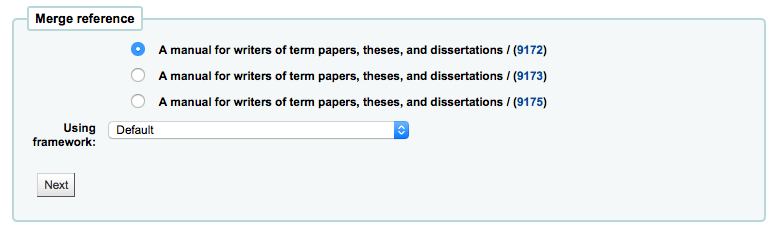
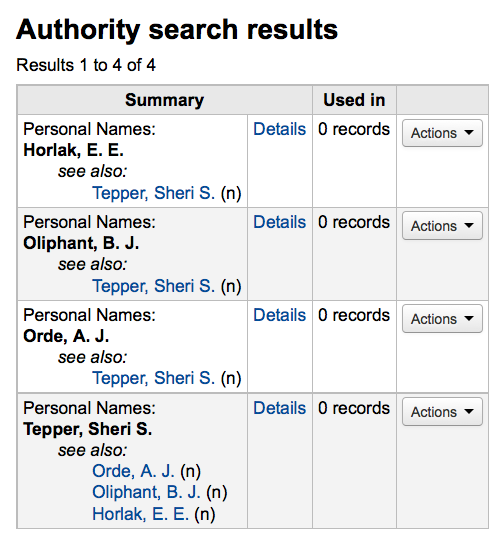
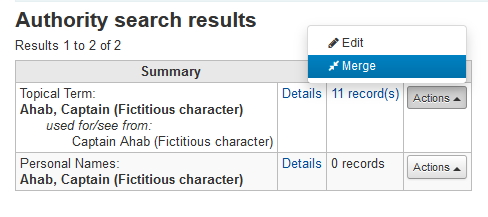
Merging authorities
If you have duplicate authority records you can merge them together by clicking the “Merge” link, found in the Actions menu, next to two results on an authority search.

Después de hacer clic en “Combinar” en el primer resultado, usted verá esa autoridad listada en la parte superior de los resultados.
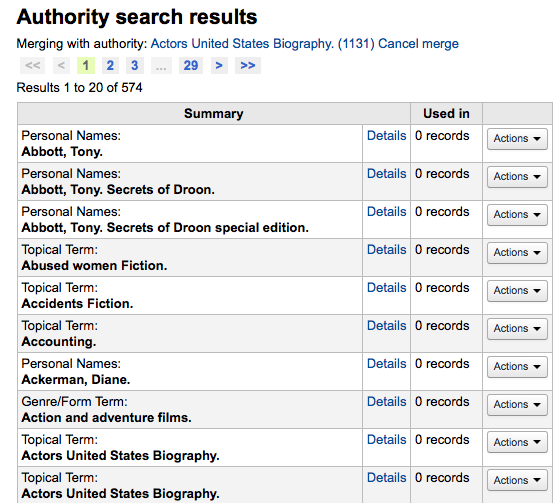
A continuación, necesitará de dar clic en “Combinar” a la par del segundo resultado el cual le gustaría combinar.
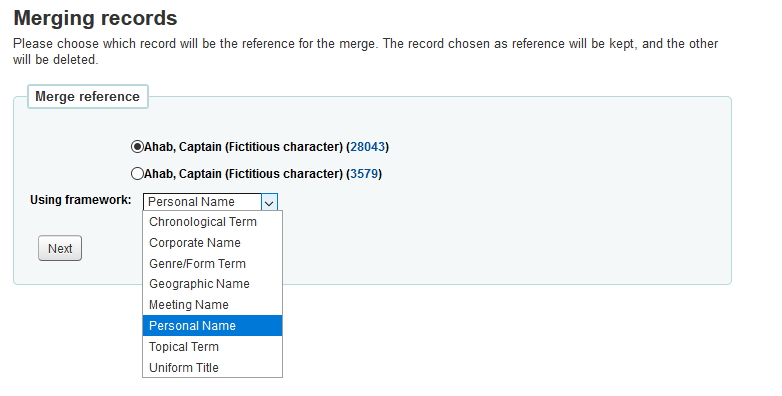
Primero se le preguntará cual de los dos registros desea conservar como primario y cual será eliminado luego de la combinación.

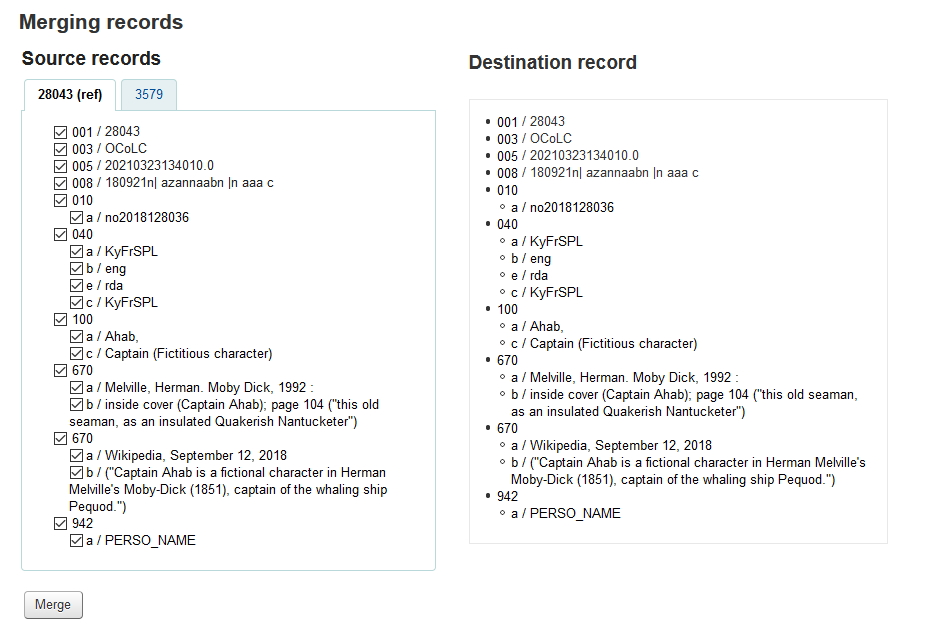
Se le presentará la vista MARC de ambos registros (cada uno accesible por pestañas identificadas con el número propio de esos registros). Por defecto el primer registro estará seleccionado, desmarque los campos que no desee en el registro final (destino) y luego muévase a la segunda pestaña y seleccione cuales campos deben ir en el registro final (destino).
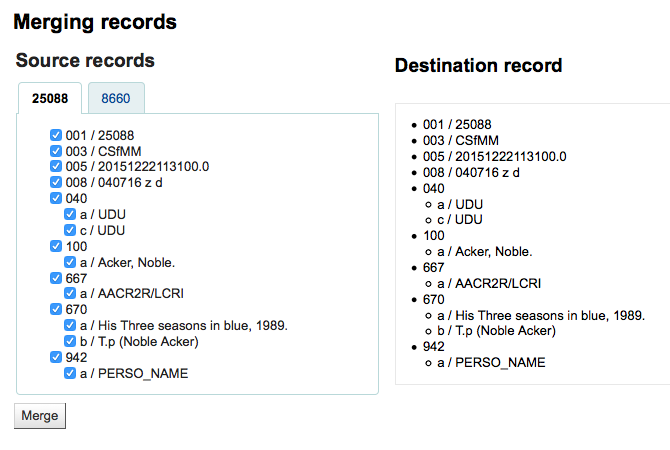
Una vez haya completado su selección haga clic en el botón “combinar”. El registro primario contendrá ahora los datos que eligió para el registro, así como, los ítems/existencias de ambos registros, y el segundo registro será eliminado.
If you have two authority records for the same heading in different frameworks, you can merge them together by clicking the ‘Merge’ link, found in the actions menu, next to two results on an authority search. For example, these authority records using different frameworks can be merged.
If you select the “Merge” link, found in the action menu of the top record.
You will see that authority record listed at the top of the results.

Next you need to select ‘Merge’ next to the second result you’d like to merge.
You will be asked which of the two records you would like to keep as your primary record and which will be deleted after the merge. You will also use the dropdown menu to pick which framework to use.
You will be presented with the MARC for both of the records (each accessible by tabs labeled with the authority numbers for those records). By default the entire first record will be selected, uncheck the fields you don’t want in the final (destination) record and then move on to the second tab to choose which fields should be in the final (destination) record.
The «ref» record (the primary record) will be in the framework that you chose:
Once you have completed your selections click the ‘Merge’ button. The primary record will now contain the data you chose for it and the second record will be deleted.
The MARC tag of the linked headings will have been updated accordingly.
Cataloging guides
Bibliographic record cataloging cheat sheet
Campo |
Etiqueta |
Descripción |
Instrucciones |
|---|---|---|---|
000 |
LEADER |
Describe el registro(i.e. surrogate) – es un registro para una monografía? Una serie? |
De clic en este campo para rellenarlo. Depués establezca el «Nivel Bibliográfico» a “a” para artículos o “s” para seriales. De otra manera, deje todo como esta. |
001 |
NÚMERO DE CONTROL |
Número de accesión. |
Introducir el número de accesión escrito dentro del item aquí. Para artículos y elementos que no tienen números de accesión, dejarlo en blanco. |
003 |
IDENTIFICADOR DE NÚMERO DE CONTROL |
Your MARC organizational code |
Click in this field to fill it in (will auto fill if you have your MARCOrgCode preference set). |
005 |
D & T LATEST TRANSACTION |
Tiempo y fecha actuales. |
De clic en este campo para rellenarlo. |
008 |
ELEMENTOS DE DATO DE LONGITUD-FIJA |
El campo que contiene ordenador-representaciones legibles de un número de cosas. |
En general, usted sólo utilizará opciones “s” (solo) o “m” (múltiple) para la posición 06 - usar el primero, cuando el item fue publicado en un solo año, este último cuando se publicó en el transcurso de varios. Si hay una sola fecha, sólo se escribe una fecha en el campo de fecha primero (posiciones 07 a 10). Ingrese el código de país de tres dígitos en las posiciones 15-17, asegurándose de añadir espacios si el código del país es de menos de tres caracteres. Si hay un índice, tenga en cuenta este hecho en la posición 31. Introduzca el código de idioma de tres letras en las posiciones 35-37. |
010 |
LCCN |
Un número asignado por la Biblioteca de Congreso singularmente identifica el trabajo. |
Verifique en la página de copyright del libro (si esta publicado en los EE.UU.) o las catalogaciones LC para este número. Si no lo puedes encontrar, no se preocupe. |
020 |
ISBN |
Número unico utilizada por editores para identificar libros. |
Si este número no está en la lista en el libro, probablemente no este. |
022 |
ISSN |
Número unico utilizado por editores para identificar seriales. |
Si este número no está en la lista en el libro, probablemente no este. |
033 |
TIEMPO/FECHA DE EVENTO |
Utilizado para fechas de presentación. Requerido para catalogos de presentación. |
Para las presentaciones que tienen lugar un único día, introducir la fecha de la presentación en el formato YYYYMMDD en el subcampo “a” y un “0” en el primer indicador. Para presentaciones que tienen lugar mas de dos días consecutivos o cualquier número de días no consecutivos, crear un subcampo “a” para cada día con la fecha en el formato YYYYMMDD, y poner un “1” en el primer indicador. Para presentaciones que tiene más de dos días consecutivos, crear un subcampo “a” (en formato YYYYMMDD) para el primer día y un subfield “a” (también en formato YYYYMMDD) para el último día, y poner un “2” en el primer indicador. |
040 |
FUENTE DE CATALOGACIÓN |
Identifica qué bibliotecas crean y modifican el registro. |
Para importar registros, añadir un subfield “d” con el código OCLC como valor. Para nuevos registros, asegurese que el subfield “c” con el código OCLC como valor. |
041 |
CÓDIGO DE IDIOMA |
Identifica todas los idiomas que utilizaron en un item, cuándo dos o más idiomas están presentes. |
Para porciones significativas de un texto en una lengua dada, tendría que haber un subfield “a” con esel código de idioma. Si hay resúmenes únicos o abstractos en una lengua específica, crear un subcampo “b” con ese código de idioma. |
100 |
ENTRADA PRINCIPAL–PERSONAL |
Forma autorizada del nombre del autor principal |
Ver hoja de encabezamientos Autorizados y AACR2. El primer indicador generalmente tendría que ser un “1”, para indicar que la entrada es apellido primero. Si el nombre consiste sólo de un nombre, aun así, el primer indicador tendría que ser “0”. |
110 |
ENTRADA PRINCIPAL–CORPORATIVO |
Forma autorizada del nombre del autor corporativo principal. Requerido para la presentación de la catalogación. |
La subastas en los catalogos tendría que utilizar un 110 campo más que un campo 100. Ir a hoja de encabezamientos Autorizado y AACR2. Poner el primer indicador a “2”. |
111 |
ENTRADA PRINCIPAL–CONOCIENDO |
Forma autorizada del nombre de una reunión qué esta como oferta principal (p. ej. procesos de conferencia) |
Vea hojas de encabezamientos Autorizado y AACR2. Pone el primer indicador a “2”. |
245 |
MENCIÓN DEL TÍTULO |
Transcripción de la mención de título de la página de título (o fuente principal de información) |
Introducir el título en subfield “a”, el subtitulo en subfield “b”, y la mención de responsabilidad en subfield “c”. Si estás creando un registro para un volumen solo o parte de un item, tendrías que poner el número de la parte en subfield “n” y el título de parte en subcampo “p.” Para la subasta de catalogos, la fecha (en “MM/DD/YYYY” formato) tendría que ser listado en paréntesis cuadrados en subfield “f”. Ver hoja ISBD de puntuación. Poner el primer indicador a “0” si no hay ningún autor, de otra forma poner a “1”. Poner el segundo indicador al número de caracteres vacios (i.e. caracteres en unos artículos iniciales más el espacio… Para «El » puesto el segundo indicador a “4”). |
246 |
FORMA VARIANTE DEL TITULO |
Forma alterna del título para buscar y propósitos de completado |
Si el usuario podría estar buscando para el trabajo bajo un título diferente, introducirlo aquí. No incluye artículos iniciales. El primer indicador tendría que ser “3”, a no ser que el título es meramente una variante en la ortografía, en tal caso el primer indicador tendría que ser “1”. |
250 |
MENCION DE EDICION |
Transcripción de la mención de la edición de la página de título (o fuente principal de información) |
Transcribir la mención de la edición exactamente como aparece en el título-página. Puedes abreviar si la declaración de edición es muy grande. |
260 |
PUBLICACIÓN (IMPRENTA) |
Información de publicación. |
Poner la ubicación de publicación en subcampo “a”, el editor en subcampo “b”, y el año (o año probable) en subcampo “c”. Ver hoja de puntuación de ISBD. |
264 |
PRODUCTION, PUBLICATION ETC. |
Production, Publication, Distribution, Manufacture, and Copyright Notice. |
Put the location of publication in subfield “a”, the publisher in subfield “b”, and the year (or probable year) in subfield “c”. See ISBD punctuation sheet. The label is set dynamically from the second indicator so generally this would be set to “1” for Publisher: . |
300 |
DESCRIPCIÓN FÍSICA |
Descripción física |
Introducir la mención de paginación en subfield “a”, una descripción breve de contenidos «especiales» como ilustraciones o mapas en subfield “b” (ver AACR2), y la medida del item en subcampo “c”. Ver ISBD hoja de puntuación. |
490 |
MENCIÓN DE SERIE |
Muestra la mención de serie exactamente como aparece en el item. |
Transcribir la mención de serie en el subcampo “a” con el número de volumen en subcampo “v”. Ver ISBD hoja de puntuación. Pone el primer indicador a “1” si estás utilizando 830. Como regla general, tendrías que hacer así. |
500 |
NOTA GENERAL |
Notas que no caben en ningun lugar más. |
Introducir notas como oraciones completas, con un separados de campo 500 para cada tema distinto. |
501 |
NOTA DE CON |
Notas si el trabajo está atado con los trabajos descritos por otros registros. |
Poner la descripción de relación en subfield “a”. |
504 |
NOTA DE BIBLIOGRAFÍA, ETC. |
Indica si el trabajo incluye una bibliografía. |
Si el trabajo incluye una bibliografía y índice, poner el texto «Incluye referencias bibliográficas (p. XXX-XXX) y índice.» En el subcampo “a”. Si el trabajo no incluye un índice, sacar esa parte de la frase. Si las referencias están esparcidas durante el trabajo y no reunido a una frase distinta, sacar la mención en parentesis. |
505 |
CONTENIDO CON FORMATO |
Lista de contenidos en un formato estándar. Los contenidos no formateados pueden ser listados en el campo 500 (Nota General). |
Ver ISBD hoja de puntuación. Pone el primer indicador a “0”. Si estan separado los autores de codificación y títulos, ponerlos en el segundo indicador a “0”. De otra manera, dejar el segundo indicador en blanco. |
518 |
NOTA DE FECHA/HORA DE UN EVENTO |
Utilizado para fechas de acontecimientos. |
Para los acontecimientos de los catalogos, introducir la fecha del acontecimiento en el formato “enero 2, 1984” en el subfield “a” |
520 |
RESUMEN, ETC. |
Un resumen breve o abstracto del libro o artículo. |
En general no necesitas escribir un resumen. Un resumen se podría llamar, aun así, con elementos que no puede ser fácilmente revisado por un usuario, como libros con altamente papel acídico o CD-ROMs. |
546 |
NOTA DE IDIOMA |
Nota describiendo los idiomas utilizados en el trabajo |
Sólo necesitado para trabajos en múltiples idiomas. Ver ISBD hoja de puntuación. |
561 |
INFORMACIÓN DE LA PROPIEDAD |
Describe la propiedad anterior del elemento. |
Utilizó sólo para libros raros. |
563 |
INFORMACIÓN DE ENCUADERNACIÓN |
Describe el enlace de el item. |
Utilizó sólo para libros raros. |
590 |
NOTA LOCAL |
Notas locales. Requerido para los acontecimientos en los catalogos. |
Utilizado para catalogos de subastas para indicar que tipos de monedas están vendidos en subasta- Romano, Griego, etc. |
600 |
ASIENTO SECUNDARIO–NOMBRE PERSONAL |
Forma autorizada de nombres personales para las personas discutidas en el trabajo |
Ver hojas de encabezamientos Autorizado y AACR2. El primer indicador generalmente tendría que ser un “1”, para indicar que la entrada es apellido primero. Si el nombre consiste sólo de un nombre, aun así, el primer indicador tendría que ser “0”. Si se encuentra el nombre en el LC archivo de autoridad, se pone el segundo indicador a “0”. De otra manera poner el segundo indicador a “4”. |
610 |
ASIENTO SECUNDARIO–NOMBRE CORPORATIVO |
Forma autorizada de nombres corporativos para las organizaciones discutidas en el trabajo |
Ver hoja de encabezamientos Autorizado y AACR2. Poner el primer indicador a “2”. Si se encontro el nombre en el LC archivo de autoridad, se pone el segundo indicador a “0”. De otra forma Poner el segundo indicador a “4”. |
611 |
ASIENTO SECUNDARIO–REUNION |
Forma autorizada de conocer nombres para las reuniones discutidas en el trabajo |
Ver hoja de encabezamientos Autorizado y AACR2. Poner el primer indicador a “2”. Si se encontro el nombre en el LC archivo de autoridad, se pone el segundo indicador a “0”. De otra forma Poner el segundo indicador a “4”. |
630 |
ASIENTO SECUNDARIO DE MATERIA–TITULO UNIFORME |
Forma autorizada de títulos para otros trabajos discutidos en el trabajo |
Ver hoja de encabezamientos Autorizado y AACR2. Poner el primer indicador al número de caracteres vaciosr (i.e. caracteres en unos artículos iniciales más el espacio… Para «El » poner el primer indicador a “4”). Si encontraste el nombre en LC archivo de autoridad, puesto el segundo indicador a “0”. De otra forma poner el segundo indicador a “4”. |
650 |
ASIENTO SECUNDARIO DE MATERIA–TERMINO TEMATICO |
Los terminos de los encabezamientos de materias de la Biblioteca de Congreso que describen el trabajo |
Ver hoja de encabezamientos Autorizado y AACR2. Si se encuentra el nombre en el archivo de autoridad LC, poner el segundo indicador a “0”. De otra forma Poner el segundo indicador a “4”. |
651 |
ASIENTO SECUNDARIO DE MATERIA–NOMBRE GEOGRAFICO |
Los terminos geográficos de los encabezamientos de materias de la Biblioteca de Congreso que describen el trabajo |
Ver hoja de encabezamientos Autorizado y AACR2. Si se encuentra el nombre en el archivo de autoridad LC, poner el segundo indicador a “0”. De otra forma Poner el segundo indicador a “4”. |
655 |
TERMINO DE INDIZACIÓN–GENERO/FORMA |
Describe lo que un item es contrario de lo que es acerca el item. |
Generalmente utilizado sólo para los catalogos de subasta, el cual tendría que tener el género que encabeza «subasta de catalogos» (Asegurarse de encontrar el encabezamiento autorizado) Si se encuentra el nombre del archivo de autoridad LC, poner el segundo indicador a “0”. Si se está utilizando un termino de un tesaurio específico, poner el segundo indicador a “7” y poner el código para el tesaurio en el subcampo “2”. De otra manera poner el segundo indicador a “4”. |
690 |
CAMPOS LOCALES SECUNDARIO–ACCESO TEMATICO |
Utilizado para encabezamientos de cualquier archivo de autoridad de materia personalizado. |
Si hay no un termino apropiado LCSH, puedes utilizar el campo 690 con el encabezamietno de materia que encuentras en otros items en el catalogo. |
691 |
CAMPOS LOCALES SECUNDARIO–ACCESO GEOGRÁFICO |
Utilizado para encabezamientos de cualquier archivo de autoridad de materia personalizado. |
Si hay no un termino apropiado LCSH, puedes utilizar el campo 691 para encuentrae en otros items en el catalogo. |
700 |
ASIENTO SECUNDARIO–NOMBRE PERSONAL |
Utilizado para segundos autores y otras personas relacionaron a la producción del trabajo. |
Ver hoja de encabezamientos Autorizados y AACR2. El primer indicador generalmente tendría que ser un “1”, para indicar que la entrada es apellido primero. Si el nombre consiste sólo de un nombre, aun así, el primer indicador tendría que ser “0”. |
710 |
ASIENTO SECUNDARIO–NOMBRE CORPORATIVO |
Utilizado para los cuerpos corporativos relacionaron a la producción del trabajo (p. ej. editores). |
Vea hojas de encabezamientos Autorizado y AACR2. Pone el primer indicador a “2”. |
711 |
ASIENTO SECUNDARIO–NOMBRE DE REUNION |
Utilizado para las reuniones relacionadas a la producción del trabajo (p. ej. symposio que contribuyó al trabajo). |
Vea hojas de encabezamientos Autorizado y AACR2. Pone el primer indicador a “2”. |
730 |
ASIENTO SECUNDARIO–TITULO UNIFORME |
Utilizado para los títulos uniformes relacionados a la producción del trabajo (p. ej. un trabajo que inspirado el trabajo presente) |
Ver hojas de encabezamiento Autorizado y AACR2. Poner el primer indicador al número de caracteres vacios (i.e. caracteres en artículos iniciales más el espacio… Para «El » poner el primer indicador a “4”). |
773 |
ASIENTO DE ITEM FUENTE |
Describe la unidad bibliográfica más grande que contiene el trabajo (p. ej. el libro o la revista que contienen el artículo que es descrito en el registro actual) |
If the host publication is author main entry, enter the authorized form of the author’s name in subfield “a”. Put the title in subfield “t”. If the host publication is an independent work, put publication information in subfield “d”. When available, ISSN and ISBN should always be used in, in subfields “x” and “z” respectively. Relationship information (e.g. volume number, page number, etc.) goes in subfield “g”. Subfield “q” contains an encoded representation of the location of the item: volume, issue, and section numbers are separated by colons, and the first page is entered following a “<” at the end of the subfield. See ISBD punctuation sheet. Set the first indicator to “0”. If you want the label «In:» to be generated, leave the second indicator blank. If you want something else displayed before the 773 text, set the second indicator to “8” and add a subfield “i” with the label you want at the beginning of the field (e.g. «$iOffprint from:»). |
830 |
ASIENTO SECUNDARIO DE SERIE–TITULO UNIFORME |
Forma autorizada del nombre de serie transcrito en el campo 490. A menudo esto será igual como el 490. |
Ver hoja de encabezamientos Autorizado y AACR2. Poner el segundo indicador al número de caracteres vacios (i.e. caracteres en unos artículos iniciales más el espacio… Para «El » poner el segundo indicador a “4”). |
852 |
UBICACIÓN/SIGNATURA TOPOGRÁFICA |
Proporciona el nombre de sección para código de barras de libros, panfletos, y algunos artículos y seriales establecidos. |
No poner cualquier cosa en este campo si estás catalogando un volumen qué tiene sólo un registro y un código de barras. Si el item no tiene un código de barras, o actualmente estás creando un registro para un artículo en un volumen, poner la sección en subcampo “a” (ver ANS documentación de catalogación), y la signatura topográfica en el subcampo “i”. Poner el primer indicador a “8”. |
856 |
ACCESO ELECTRONICOS |
Enlaces a materiales disponibles online. |
Poner el URL de cualesquier copias electrónicas o resúmenes, etc. en subcampos “u” y un título de enlace en el subcampo “y”. Poner el primer indicador a “4”. |
942 |
ELEMENTOS DE ENTRADA SECUNDARIOS (KOHA) |
Utilizado para datos específicos de Koha. |
Colocar el subcampo “c” al tipo de item apropiado. |
Table: Cataloging Guide
Koha-specific fields
Koha uses three fields to store information specific to it.
At the record level, 942 is used to store information such as record-level item type, record-level call number and classification scheme.
The item (holding) information is stored in 952 in MARC21 and 995 in UNIMARC.
System control numbers for Koha are stored in 999 in MARC21 and 090 in UNIMARC.
Added entry elements (942)
942$0 - Koha issues (borrowed), all copies
This field contains the total number of issues/checkouts of all items of this record. It is populated using the update_totalissues.pl cronjob.
Mapped to: biblioitems.totalissues
Indexed in: totalissues
Advertencia
This field should not be editable nor edited manually.
942$2 - Source of classification or shelving scheme
This field contains the source of classification used by the record’s call number (942$h and 942$i).
There is a choice of classification sources as they are defined in administration. If no classification scheme is entered, the system will use the value entered in the DefaultClassificationSource preference.
The source of classification will be used, along with the call number itself (942$h and 942$i) to create the normalized call number used when sorting by call number.
Mapped to: biblioitems.cn_source
Indexed in: cn-bib-source
942$6 - Koha normalized classification for sorting
This field contains the normalized call number used for sorting, based on the record-level call number (942$h and 942$i) and the classification source (942$2).
Mapped to: biblioitems.cn_sort
Indexed in: cn-bib-sort
Advertencia
This field should not be editable nor edited manually.
942$c - Koha item type
This field contains the record-level item type.
The record-level item type is used in various places in Koha.
The value from 942$c is copied to 952$y as the default value when adding a new item to that record
The record-level item type can be used for the circulation rules if the item-level_itypes system preference allows it (this system preference lets you choose between using the record-level or item-level item type for the circulation rules, among other things)
The record-level item type is indexed and used in the search (see also the AdvancedSearchTypes system preference) as well as the facets (this is useful to find records that don’t have items, like records for online resources, ebooks, pdf files, etc.)
The record-level item type is used for record-level/»next available» holds
The record-level item type is used for record-level article requests
The record-level item type is displayed in various tables in the staff interface, in the circulation module among other places (it is possible to hide unwanted columns in the “Table settings” section of the Administration module)
Mapped to: biblioitems.itemtype
Indexed in: itemtype (mc-itemtype), itype (mc-itype)
942$e - Edition
This field contains the edition information.
942$h - Classification part
This field contains classification part of the call number. It is used, along with 942$2 and 942$i to create the normalized call number (942$6) used when sorting by call number.
Mapped to: biblioitems.cn_class
Indexed in: cn-class
942$i - Item part
This field contains item part of the call number. It is used, along with 942$2 and 942$h to create the normalized call number (942$6) used when sorting by call number.
Mapped to: biblioitems.cn_item
Indexed in: cn-item
942$k - Call number prefix
This field contains prefix to the call number.
Mapped to: biblioitems.cn_prefix
Indexed in: cn-prefix
942$m - Call number suffix
This field contains suffix to the call number.
Mapped to: biblioitems.cn_suffix
Indexed in: cn-suffix
942$n - Suppress in OPAC
If the OpacSuppression system preference is set to “hide”, this field indicates if the record should be hidden from the OPAC.
In this field, “1” means the record will be hidden in the OPAC, and “0” (or empty) means the record will be visible in the OPAC.
You can use the YES_NO authorized value list in this field if you don’t want to remember the numerical values.
Indexed in: suppress
942$s - Serial record flag
This field is used by the serials module to indicate whether or not the record is associated with a serial subscription.
Mapped to: biblio.serial
Advertencia
This field should not be editable nor edited manually.
Location and item information (952)
Koha uses field 952 to store item (holding) information.
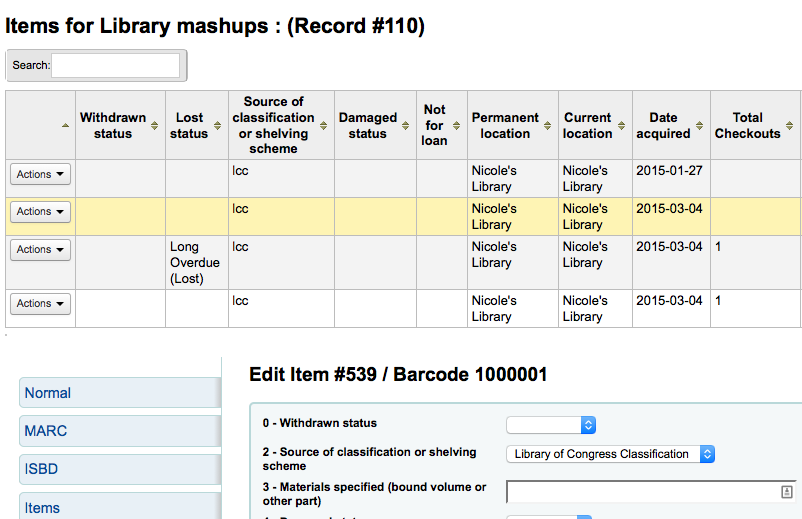
952$0 - Withdrawn status
Uses
This field is used to set the withdrawn (weeded) status of the item.
You can use the withdrawn status to weed items without deleting the items.
In the search results, the withdrawn item will be marked as unavailable.
Effects on circulation
A withdrawn item will not be able to be checked out.
A withdrawn item will not be able to be checked in unless the BlockReturnOfWithdrawnItems system preference allows it.
Values
The withdrawn status is numerical, “0” (or empty) means “not withdrawn” and any other number means “withdrawn”.
By default, the field is associated with the WITHDRAWN authorized value category so you don’t have to remember the numerical values. The default values in the WITHDRAWN authorized value category are:
1: Withdrawn
Display
Staff interface
Search results (withdrawn items will be marked as unavailable)
Holdings table in the record’s detail page
“Items” tab of the bibliographic record, “Withdrawn status” under “Statuses”
OPAC
Search results (withdrawn items will be marked as unavailable)
Holdings table in the record’s detail page
To hide withdrawn items from the OPAC, use the OpacHiddenItems system preference.
Mapped to: items.withdrawn
Indexed in: withdrawn
952$1 - Lost status
Uses
This field is used to set the lost status of the item.
You can use the lost status to mark items as lost or missing
In the search results, the lost item will be marked as unavailable.
Marking an item lost while it is checked out can charge the replacement cost (952$v) to the patron (see WhenLostChargeReplacementFee), as well as a processing fee (the processing fee is set at the item type level)
The lost status can be changed automatically after a number of days overdue with the longoverdue.pl cronjob
Effects on circulation
The ability to check out a lost item depends on the IssueLostItem system preference.
The ability to check in a lost item depends on the BlockReturnOfLostItems system preference.
Values
The lost status is numerical, “0” (or empty) means “not lost” and any other number means “lost”.
By default, the field is associated with the LOST authorized value category so you don’t have to remember the numerical values. The default values in the LOST authorized value category are:
1: Lost
2: Long Overdue (Lost)
3: Lost and Paid For
4: Missing
Display
Staff interface
Search results (lost items will be marked as unavailable)
Holdings table in the record’s detail page
“Items” tab of the bibliographic record, “Lost status” under “Statuses”
OPAC
Search results (lost items will be marked as unavailable)
Holdings table in the record’s detail page
It’s possible to configure Koha so that lost items don’t display in the OPAC with the hidelostitems system preference.
Mapped to: items.itemlost
Indexed in: lost
952$2 - Source of classification or shelving scheme
Uses
This field contains the source of classification used by the record’s call number (952$o).
The source of classification will be used, along with the call number itself (952$o) to create the normalized call number (952$6) used when sorting by call number.
Values
There is a choice of classification sources as they are defined in administration.
If no classification scheme is entered, the system will use the value entered in the DefaultClassificationSource preference.
Display
This is not displayed either in the OPAC or in the staff interface. The information is only available in the item’s editing form.
Mapped to: items.cn_source
Indexed in: classification-source
952$3 - Materials specified
Uses
This field is used to add information about accompanying materials or to specify how many pieces the item has.
Effects on circulation
This information will be displayed when circulation the item so that the circulation staff knows to make sure all the accompanying material is there when checkout out and it’s still there when checking the item back in.

Values
This is a free text field, but it is possible to associate it to an authorized value category in the MARC framework to make it into a drop-down menu.
Display
Staff interface
This information will appear when checking out or checking in an item
Holdings table in the record’s detail page
Nota
Use “Table settings” if you want to hide that column - Module: Catalogue - Table id: holdings_table and/or otherholdings_table - Column: holdings_materials or otherholdings_materials
“Items” tab of the bibliographic record, “Materials specified” under “Item information”
OPAC
Holdings table in the record’s detail page (it is hidden by default)
Nota
Use “Table settings” if you want to show that column - Module: OPAC - Table id: holdingst - Column: item_materials
Mapped to: items.materials
Indexed in: materials-specified
952$4 - Damaged status
Uses
This field is used to set the damaged status of the item.
In the search results, the damaged item will be marked as unavailable.
Effects on circulation
The damaged status does not affect the ability to check out or check in an item.
The AllowHoldsOnDamagedItems system preference indicates whether or not damaged items can be put on hold.
Values
The damaged status is numerical, “0” (or empty) means “not damaged” and any other number means “damaged”.
By default, the field is associated with the DAMAGED authorized value category so you don’t have to remember the numerical values. The default values in the DAMAGED authorized value category are:
1: Damaged
Display
Staff interface
Search results (damaged items will be marked as unavailable)
Holdings table in the record’s detail page
“Items” tab of the bibliographic record, “Damaged status” under “Statuses”
OPAC
Search results (damaged items will be marked as unavailable)
Holdings table in the record’s detail page
To hide damaged items from the OPAC, use the OpacHiddenItems system preference.
Mapped to: items.damaged
Indexed in: damaged
952$5 - Use restrictions
Uses
This field is used to set the restricted status of the item.
In the search results, the restricted item will be marked as available.
Effects on circulation
A restricted item will not be able to be checked out.
Values
The restricted status is numerical, “1” means restricted and “0” (or empty) means unrestricted.
Nota
Unlike other statuses, the restricted status can only be 0 (not restricted) or 1 (restricted).
By default, the field is associated with the RESTRICTED authorized value category so you don’t have to remember the numerical values. The default values in the RESTRICTED authorized value category are:
1: Access Restricted
Display
Staff interface
Search results (restricted items will be marked as available)
Holdings table in the record’s detail page
OPAC
Search results (restricted items will be marked as available)
Holdings table in the record’s detail page
Mapped to: items.restricted
Indexed in: restricted
952$6 - Koha normalized classification for sorting
Advertencia
This field should not be editable nor edited manually.
Uses
This field contains the normalized call number used for sorting, based on the item-level call number (952$o) and the classification source (952$2).
Display
This information is not displayed anywhere in the OPAC or in the staff interface, it is for Koha’s internal use only.
Mapped to: items.cn_sort
Indexed in: cn-sort
952$7 - Not for loan status
Uses
This field is used to set the not for loan status of the item.
In the search results, the not for loan item will be marked as unavailable or for reference use only (see Reference_NFL_Statuses)
Effects on circulation
Items with a not for loan status cannot be checked out (unless AllowNotForLoanOverride allows it)
Depending on the value, items may or may not be put on hold (see below)
Depending on TrapHoldsOnOrder and SkipHoldTrapOnNotForLoanValue not for loan items may be used to fill holds
The UpdateNotForLoanStatusOnCheckin system preference can be used to automatically change not for loan values upon checkin
Values
The not for loan status is numerical, “0” (or empty) means available.
Negative values (< 0) mean that the item cannot be checked out, but can be put on hold.
Positive values (> 0) mean that the item cannot be checked out nor be put on hold.
By default, the field is associated with the NOT_LOAN authorized value category so you don’t have to remember the numerical values. The default values in the NOT_LOAN authorized value category are:
-1: Ordered
1: Not For Loan
2: Staff Collection
Display
Staff interface
Search results (not for loan item will be marked as unavailable or for reference use only (see Reference_NFL_Statuses))
Holdings table in the record’s detail page
“Items” tab of the bibliographic record, “Withdrawn status” under “Statuses”
OPAC
Search results (not for loan item will be marked as unavailable or for reference use only (see Reference_NFL_Statuses))
Holdings table in the record’s detail page
To hide not for loan items from the OPAC, use the OpacHiddenItems system preference.
Mapped to: items.notforloan
Indexed in: notforloan
952$8 - Collection
Uses
This field is used to set the collection of the item.
Collections in Koha are used to group items in ways other than physically (the physical location can be stored in 952$c). An example of a collection could be “Local authors”.
Collections can also be used to limit transfers in multi-branch systems (see the Library transfer limits section of the administration) if BranchTransferLimitsType is set to “collection code”
The collection of an item is used in the search (see the AdvancedSearchTypes system preference) as well as the facets.
Values
By default, the field is associated with the CCODE authorized value category. The default values in the CCODE authorized value category are:
FIC: Fiction
NFIC: Non-fiction
REF: Reference
Display
Staff interface
The collections will be part of the facets in the search results
Holdings table in the record’s detail page
Nota
Use “Table settings” if you want to hide that column - Module: Catalogue - Table id: holdings_table and/or otherholdings_table - Column: holdings_ccode or otherholdings_ccode
Checkouts table in the patron’s file
Nota
Use “Table settings” if you want to hide that column - Module: Circulation and Patrons - Table id: issues-table - Column: collection
Many other places all throughout Koha
OPAC
Search results, if OpacItemLocation allows it
The collections will be part of the facets in the search results
Holdings table in the record’s detail page
Nota
Use “Table settings” if you want to hide that column - Module: OPAC - Table id: holdingst - Column: item_ccode
Many other places throughout the OPAC
Mapped to: items.ccode
Indexed in: collection-code
952$9 - Itemnumber
Advertencia
This field should not be editable nor edited manually.
Uses
The itemnumber is the internal number assigned to each item by Koha. It is unique and cannot be reattributed even when the item is deleted.
Display
This information is not displayed anywhere in the OPAC or in the staff interface, it is for Koha’s internal use only.
Mapped to: items.itemnumber
Indexed in: itemnumber
952$a - Home library
Required
Uses
This field indicates the home library of the item.
The home library is important for many things in Koha, including, but not limited to
The home library of an item is used in the search as well as the facets (see the DisplayLibraryFacets system preference)
Effects on circulation
As previously stated, the circulation rules are based on the item’s library (see the HomeOrHoldingBranch system preference)
Values
Libraries are defined in the libraries section of the administration page.
Display
Staff interface
Depending on the DisplayLibraryFacets system preference, the home library may be part of the facets in the search results
Holdings table in the record’s detail page
Nota
Use “Table settings” if you want to hide that column - Module: Catalogue - Table id: holdings_table and/or otherholdings_table - Column: holdings_homebranch or otherholdings_homebranch
This information is displayed in the staff interface, in the “Items” tab of the bibliographic record, “Home library” under “Item information”
Checkouts table in the patron’s file
Nota
Use “Table settings” if you want to hide that column - Module: Circulation and Patrons - Table id: issues-table - Column: homebranch
Many other places all throughout Koha
OPAC
Search results (if OpacItemLocation allows it)
Depending on the DisplayLibraryFacets system preference, the home library may be part of the facets in the search results
Holdings table in the record’s detail page, if OpacLocationBranchToDisplay allows it
Nota
Use “Table settings” if you want to hide that column - Module: OPAC - Table id: holdingst - Column: item_home_location
Many other places throughout the OPAC
Mapped to: items.homebranch
Indexed in: homelibrary
952$b - Current library
Required
Uses
This field indicates the current library (holding library) of the item.
The current library is important for many things in Koha, including
The current library of an item is used in the search as well as the facets (see the DisplayLibraryFacets system preference)
Effects on circulation
As previously stated, the circulation rules are based on the item’s library (see the HomeOrHoldingBranch system preference)
Values
Libraries are defined in the libraries section of the administration page.
Display
Staff interface
Depending on the DisplayLibraryFacets system preference, the holding library may be part of the facets in the search results
Holdings table in the record’s detail page
Nota
Use “Table settings” if you want to hide that column - Module: Catalogue - Table id: holdings_table and/or otherholdings_table - Column: holdings_holdingbranch or otherholdings_holdingbranch
This information is displayed in the staff interface, in the “Items” tab of the bibliographic record, “Current library” under “Item information”
Many other places all throughout Koha
OPAC
Search results (if OpacItemLocation allows it)
Depending on the DisplayLibraryFacets system preference, the holding library may be part of the facets in the search results
Holdings table in the record’s detail page, if OpacLocationBranchToDisplay allows it
Nota
Use “Table settings” if you want to hide that column - Module: OPAC - Table id: holdingst - Column: item_current_location
Many other places throughout the OPAC
Mapped to: items.holdingbranch
Indexed in: holdinglibrary
952$c - Shelving location
Uses
This field indicates the location of the item (physical place in the library).
Shelving locations in Koha are used to group items physically. An example of a shelving location could be “Children’s section”.
The location of an item is used in the search (see the AdvancedSearchTypes system preference) as well as the facets.
The UpdateItemLocationOnCheckin system preference can be used to automatically change location values upon checkin
Values
By default, the field is associated with the LOC authorized value category. The default values in the LOC authorized value category are:
FIC: Fiction
CHLID: Children’s Area
DISPLAY: On Display
NEW: New Materials Shelf
STAFF: Staff Office
GEN: General Stacks
AV: Audio Visual
REF: Reference
CART: Book Cart
PROC: Processing Center
The default value for new items can be set using the NewItemsDefaultLocation system preference
Display
Staff interface
The locations will be part of the facets in the search results
Holdings table in the record’s detail page (under the home library)
This information is displayed in the staff interface, in the “Items” tab of the bibliographic record, “Home library” under “Item information”
Checkouts table in the patron’s file
Nota
Use “Table settings” if you want to hide that column - Module: Circulation and Patrons - Table id: issues-table - Column: location
Many other places all throughout Koha
OPAC
Search results (if OpacItemLocation allows it)
The locations will be part of the facets in the search results
Holdings table in the record’s detail page, the OpacLocationOnDetail system preference indicates in which column this information is located
Nota
Use “Table settings” if you want to hide that column - Module: OPAC
Table id: holdingst
Column: item_shelving_location (if OpacLocationOnDetail is set to “separate column”)
Many other places throughout the OPAC
Mapped to: items.location
Indexed in: location
952$d - Date acquired
Uses
This field is used to enter the date of acquisition of the item.
The acquisition date can be used in the search and the sort function in the search results
When using the Acquisitions module, this should be filled automatically with the acquisition date
Values
This should be a date in the YYYY-MM-DD format (there is a handy date picker to ensure the date is in the correct format)
Display
Staff interface
Holdings table in the record’s detail page
Nota
Use “Table settings” if you want to hide that column - Module: Catalogue - Table id: holdings_table and/or otherholdings_table - Column: holdings_dateaccessioned or otherholdings_dateaccessioned
“Items” tab of the bibliographic record, “Accession date” under “History”
Mapped to: items.dateaccessioned
Indexed in: date-of-acquisition
952$e - Source of acquisition
Uses
This field is used to enter the vendor where the item was acquired
When using the Acquisitions module, this should be filled automatically with the vendor upon receiving
Values
This is a free text field
If using the Acquisitions field, the value in this field will be the vendor id rather than the vendor’s name
Display
This is not displayed either in the OPAC or in the staff interface. The information is only available in the item’s editing form.
Mapped to: items.booksellerid
Indexed in: acqsource
952$f - Coded location qualifier
Uses
This field is used to enter a three-character code that identifies the specific issues of the item that are located apart from the main holdings of the same item (same as MARC21 852$f).
Values
This is a free text field
The field in the database is limited to 10 characters
Display
This is not displayed either in the OPAC or in the staff interface. The information is only available in the item’s editing form.
Mapped to: items.coded_location_qualifier
Indexed in: coded-location-qualifier
952$g - Cost, normal purchase price
Uses
This field is used to enter the purchase price of the item
When using the Acquisitions module, this should be filled automatically with the purchase price upon receiving
Values
This is a free text field
The price must be digits, with a period as the decimal, with no currency symbols (e.g. 24.95)
The field in the database limits to two decimal points (e.g. 24.95 is OK but 24.94875 is not)
Display
This is not displayed either in the OPAC or in the staff interface. The information is only available in the item’s editing form.
Mapped to: items.price
Indexed in: price
952$h - Serial enumeration / chronology
Uses
This field is used to enter the issue number of serials or the volume number of series
When using the Serials module, this should be filled automatically with the issue number
Values
This is a free text field
Display
Staff interface
Holdings table in the record’s detail page
Nota
Use “Table settings” if you want to hide that column - Module: Catalogue - Table id: holdings_table and/or otherholdings_table - Column: holdings_enumchron or otherholdings_enumchron
“Items” tab of the bibliographic record, “Serial enumeration” under “History”
OPAC
Holdings table in the record’s detail page
Nota
Use “Table settings” if you want to hide that column - Module: OPAC - Table id: holdingst - Column: item_enumchron
Mapped to: items.enumchron
952$i - Inventory number
Uses
This field is used to enter an inventory number for the item
Nota
The inventory number is not Koha’s internal itemnumber (which is stored in 952$9)
Values
This is a free text field
The field in the database is limited to 32 characters
Display
Staff interface
Holdings table in the record’s detail page
Nota
Use “Table settings” if you want to hide that column - Module: Catalogue - Table id: holdings_table and/or otherholdings_table - Column: holdings_stocknumber or otherholdings_stocknumber
Mapped to: items.stocknumber
Indexed in: number-local-acquisition
952$j - Shelving control number
Uses
This field is used to enter a shelf number where the item is located
Values
The stack number should be numerical
By default, the field is associated with the STACK authorized value category so you don’t have to remember the numerical values. There are no default values.
Display
This is not displayed either in the OPAC or in the staff interface. The information is only available in the item’s editing form.
Mapped to: items.stack
Indexed in: stack
952$l - Total checkouts
Advertencia
This field should not be editable nor edited manually.
Uses
This field contains the total number of past and present issues/checkouts of this item
The number of issues is used to sort search results by popularity
The number of issues for each item is used to update the total number of issues for the record (942$0)
Display
Staff interface
“Items” tab of the bibliographic record, “Total checkouts” under “History”
Mapped to: items.issues
Indexed in: issues
952$m - Total renewals
Advertencia
This field should not be editable nor edited manually.
Uses
This field contains the total number of past renewals of this item
Display
Staff interface
“Items” tab of the bibliographic record, “Current renewals” under “Statuses”
Mapped to: items.renewals
Indexed in: renewals
952$n - Total holds
Advertencia
This field should not be editable nor edited manually.
Uses
This field contains the total number of past and present holds on this item
The number of holds is used to create a RSS feed for most reserved items
Display
This is not displayed either in the OPAC or in the staff interface.
Mapped to: items.renewals
Indexed in: renewals
952$o - Full call number
Uses
This field is used to store the item’s call number
The call number of an item can used in the search
Values
The records call number can be copied into the item’s call number, the itemcallnumber system preference indicates which record field to use as the source
Display
Staff interface
Holdings table in the record’s detail page
Nota
Use “Table settings” if you want to hide that column - Module: Catalogue - Table id: holdings_table and/or otherholdings_table - Column: holdings_itemcallnumber or otherholdings_itemcallnumber
“Items” tab of the bibliographic record, “Item callnumber” under “Item information”
Checkouts table in the patron’s file
Nota
Use “Table settings” if you want to hide that column - Module: Circulation and Patrons - Table id: issues-table - Column: callno
Many other places all throughout Koha
OPAC
Search results, if OpacItemLocation allows it
Holdings table in the record’s detail page
Nota
Use “Table settings” if you want to hide that column - Module: OPAC - Table id: holdingst - Column: item_callnumber
Checkouts table in the patron’s online account
Many other places throughout the OPAC
Mapped to: items.itemcallnumber
Indexed in: local-classification
952$p - Barcode
Required for circulation
Uses
This field is used to store the item’s barcode
The barcode of an item can used in the search
Effects on circulation
The barcode is essential for circulating items
Values
This should be a date in the YYYY-MM-DD format (there is a handy date picker to ensure the date is in the correct format)
This is a free text field
The field in the database is limited to 20 characters
Display
Staff interface
Holdings table in the record’s detail page
Nota
Use “Table settings” if you want to hide that column - Module: Catalogue - Table id: holdings_table and/or otherholdings_table - Column: holdings_barcode or otherholdings_barcode
“Items” tab of the bibliographic record
Checkouts table in the patron’s file (in the title column)
Mapped to: items.barcode
Indexed in: barcode
952$q - Date due
Advertencia
This field should not be editable nor edited manually.
Uses
When the item is checked out, the due date is stored in this field (YYYY-MM-DD)
This field is used in the “Limit to currently available items” in the facets
Display
The due date appears in a lot of pages in the circulation module, but it is the due date that comes from the issues, not the item
Mapped to: items.onloan
Indexed in: onloan
952$r - Date last seen
Advertencia
This field should not be editable nor edited manually.
Uses
When the item is checked out or in, edited, inventoried, or during any other transaction that affects the item, the date is stored in this field (YYYY-MM-DD)
Display
Staff interface
Holdings table in the record’s detail page
Nota
Use “Table settings” if you want to hide that column - Module: Catalogue - Table id: holdings_table and/or otherholdings_table - Column: holdings_lastseen or otherholdings_lastseen
“Items” tab of the bibliographic record, “Last seen” under “History”
Mapped to: items.datelastseen
Indexed in: datelastseen
952$s - Date last checked out
Advertencia
This field should not be editable nor edited manually.
Uses
When the item is checked out, the date is stored in this field (YYYY-MM-DD)
Display
Staff interface
Holdings table in the record’s detail page
Nota
Use “Table settings” if you want to hide that column - Module: Catalogue - Table id: holdings_table and/or otherholdings_table - Column: holdings_datelastborrowed or otherholdings_datelastborrowed
“Items” tab of the bibliographic record, “Last borrowed” under “History”
Mapped to: items.datelastborrowed
Indexed in: datelastborrowed
952$t - Copy number
Uses
This field is used to enter the copy number of the item
Values
This is a free text field
The field in the database is limited to 32 characters
Display
Staff interface
Holdings table in the record’s detail page
Nota
Use “Table settings” if you want to hide that column - Module: Catalogue - Table id: holdings_table and/or otherholdings_table - Column: holdings_copynumber or otherholdings_copynumber
“Items” tab of the bibliographic record, “Copy number” under “History”
OPAC
Holdings table in the record’s detail page
Nota
Use “Table settings” if you want to hide that column - Module: OPAC - Table id: holdingst - Column: item_copy
Mapped to: items.copynumber
Indexed in: copynumber
952$u - URI
Uses
This field is used to enter a URL or URN specific to the item
It is not necessary to enter a URL here if there is already a URL in 856$u at the record-level, unless the URL for the specific item differs from the one in 856$u (for example, if you have an online periodical, you can put the URL to the periodical in 856$u and the URL to the specific issue in 952$u)
Values
Display
Staff interface
Holdings table in the record’s detail page
Nota
Use “Table settings” if you want to hide that column - Module: Catalogue - Table id: holdings_table and/or otherholdings_table - Column: holdings_uri or otherholdings_uri
OPAC
Holdings table in the record’s detail page
Nota
Use “Table settings” if you want to hide that column - Module: OPAC - Table id: holdingst - Column: item_url
Mapped to: items.uri
Indexed in: uri
952$v - Cost, replacement price
Uses
This field is used to enter the replacement cost that will be charged to the patron who loses the item
When using the Acquisitions module, this should be filled automatically with the replacement price upon receiving
Values
This is a free text field
The price must be digits, with a period as the decimal, with no currency symbols (e.g. 24.95)
The field in the database limits to two decimal points (e.g. 24.95 is OK but 24.94875 is not)
Display
Staff interface
Checkouts table in the patron’s file (in the price column)
Nota
Use “Table settings” if you want to hide that column - Module: Circulation and Patrons - Table id: issues-table - Column: price
“Items” tab of the bibliographic record, “Replacement price” under “Item information”
Mapped to: items.replacementprice
Indexed in: replacementprice
952$w - Price effective from
Uses
This field is used to enter the date of the replacement price of the item
When using the Acquisitions module, this should be filled automatically with the acquisition date upon receiving
If left empty, it will default to the acquisition date (952$d)
Values
This should be a date in the YYYY-MM-DD format
Display
This is not displayed either in the OPAC or in the staff interface. The information is only available in the item’s editing form.
Mapped to: items.replacementpricedate
Indexed in: replacementpricedate
952$x - Non-public note
Uses
This field is used to enter internal notes about the item
Values
This is a free text field
Display
Staff interface
Holdings table in the record’s detail page
Nota
Use “Table settings” if you want to hide that column - Module: Catalogue
Table id: holdings_table and/or otherholdings_table
Column: holdings_itemnotes_nonpublic or otherholdings_itemnotes_nonpublic
“Items” tab of the bibliographic record, “Non-public note” under “History”
Mapped to: items.itemnotes_nonpublic
952$y - Koha item type
Required
Uses
This field contains the item-level item type.
The item-level item type is used in various places in Koha.
The item-level item type is generally used for the circulation rules unless the item-level_itypes system preference is set to use the record-level item type (this system preference lets you choose between using the record-level or item-level item type for the circulation rules, among other things)
The item-level item type is indexed and used in the search (see also the AdvancedSearchTypes system preference) as well as the facets
Effects on circulation
The item type is used as the basis for circulation rules, it will affect the number of items a patron can take out at the same time, number of holds, etc.)
Values
The values are managed in item types
Display
Staff interface
The itemtypes will be part of the facets in the search results
Holdings table in the record’s detail page
Nota
Use “Table settings” if you want to hide that column - Module: Catalogue - Table id: holdings_table and/or otherholdings_table - Column: holdings_itype or otherholdings_itype
“Items” tab of the bibliographic record, “Item type” under “Item information”
Checkouts table in the patron’s file
Nota
Use “Table settings” if you want to hide that column - Module: Circulation and Patrons - Table id: issues-table - Column: item_type
Many other places all throughout Koha
OPAC
The item types will be part of the facets in the search results
Holdings table in the record’s detail page
Nota
Use “Table settings” if you want to hide that column - Module: OPAC - Table id: holdingst - Column: item_itemtype
Many other places throughout the OPAC
Mapped to: items.itype
Indexed in: itemtype (mc-itemtype), itype (mc-itype)
952$z - Public note
Uses
This field is used to enter notes about the item
Values
This is a free text field
Display
Staff interface
Holdings table in the record’s detail page
Nota
Use “Table settings” if you want to hide that column - Module: Catalogue - Table id: holdings_table and/or otherholdings_table - Column: holdings_itemnotes or otherholdings_itemnotes
“Items” tab of the bibliographic record, “Public note” under “History”
OPAC
Holdings table in the record’s detail page
Nota
Use “Table settings” if you want to hide that column - Module: OPAC - Table id: holdingst - Column: item_notes
Mapped to: items.itemnotes
Indexed in: note
System control numbers (999)
Koha stores its system control numbers in the 999 field in MARC21 and in the 090 field in UNIMARC.
Nota
The itemnumber is stored in 952$9 (see above).
999$c - Biblionumber
The biblionumber is the internal number assigned to each record by Koha. It is unique and cannot be reattributed even when the record is deleted.
Mapped to: biblio.biblionumber
Indexed in: local-number (sn, biblionumber)
Advertencia
This field should not be editable nor edited manually.
Nota
In UNIMARC, the biblionumber is stored in the 090$9 subfield.
999$d - Biblioitemnumber
The biblioitemnumber is the internal number assigned to each record by Koha. It is unique and cannot be reattributed even when the record is deleted.
Mapped to: biblioitems.biblioitemnumber
Indexed in: biblioitemnumber
Advertencia
This field should not be editable nor edited manually.
Nota
In UNIMARC, the biblioitemnumber is stored in the 090$a subfield.
Koha XSLT material type icons
When you have any of the XSLT system preferences (OPACXSLTDetailsDisplay, OPACXSLTResultsDisplay, XSLTDetailsDisplay, and/or XSLTResultsDisplay) along with the DisplayOPACiconsXSLT and DisplayIconsXSLT preferences turned on you will see material type icons on the related screen.
Importante
These images are coming from values found in your leader, if your leader is not cataloged properly it might be best to turn off the DisplayOPACiconsXSLT preference (which can be done while leaving the other XSLT preferences turned on).

Libro [BK]
leader6 = a (y uno de los valores de leader7 más abajo)
leader7 = a
leader7 = c
leader7 = d
leader7 = m
leader6 = t
Fichero de ordenador[CF]
leader6 = m

Publicaciones periódicas [CR]
leader7 = b
leader7 = i
leader7 = s

Mapa [MP]
leader6 = e
leader6 = f

Mixtos [MX]
leader6 = p
Sonido [MU]
leader6 = c
leader6 = d
leader6 = i
leader6 = j
Material visual [VM]
leader6 = g
leader6 = k
leader6 = r

Equipo
leader6 = o
Administración de pedidos y reservas
If you tend to import your MARC records when you have ordered the book (as opposed to when you receive the books), and allow patrons to place holds on those books, you may need to add item records to the *.mrc file before importing.
La forma más fácil de importar su último pedido es, ejecutar primero sus registros a través de MARC Edit. Descargue sus registros MARC guardándolos en su escritorio o en alguna otra ubicación que use/recordará. Si ya tiene instalado MARCEdit, debe simplemente hacer doble clic en sus registros MARC, y se abrirán automáticamente en MARCEdit.
Importante
Este tutorial se escribió utilizando la versión 5.2.3769.41641 de MARCEdit en Windows XP, las instrucciones pueden ser diferentes si su versión o sistema operativo son diferentes.
El fichero original se mostrará automáticamente en la entrada; hay que asegurarse de que está marcado el MarcBreaker, después haremos clic en «Ejecutar»
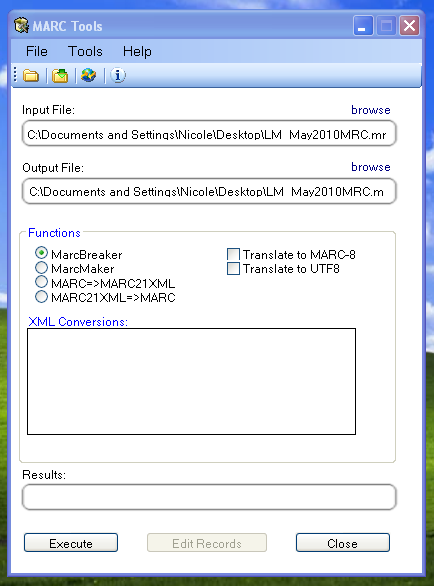
Se mostrará un resumen de los registros procesados en la parte inferior de la pantalla
Haga clic en “Editar registros” para continuar añadiendo ejemplares a los registros
La pantalla se reemplazará con otra pantalla que contiene los registros MARC
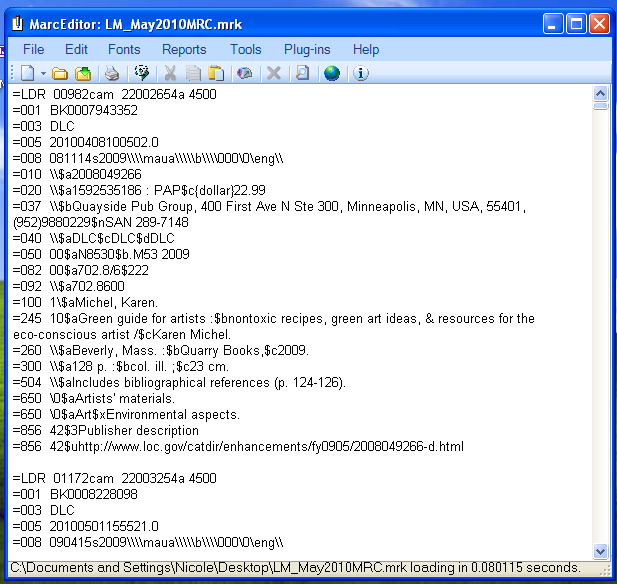
Haga clic en Herramientas > Añadir/Editar Campos
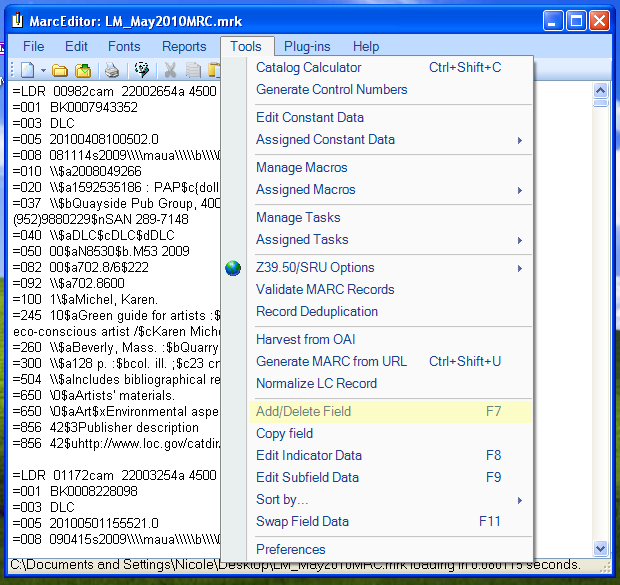
Introduzca la información específica de ítem de Koha
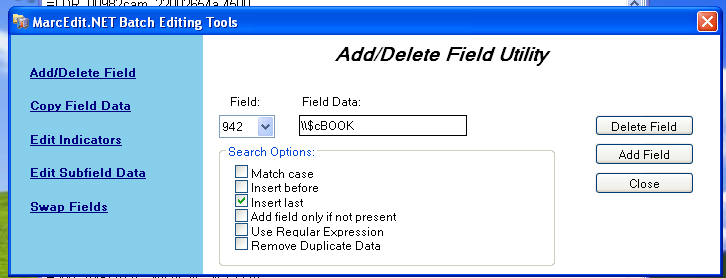
En el recuadro de campo, escriba 942
In the Field Data box, type \\$c and the item type code (\\$cBOOK in this example)
Marque la opción “insertar al final” (insert last)
Haga clic en “Añadir Campo” (Add Field)
Introduzca los datos de ejemplar del registro
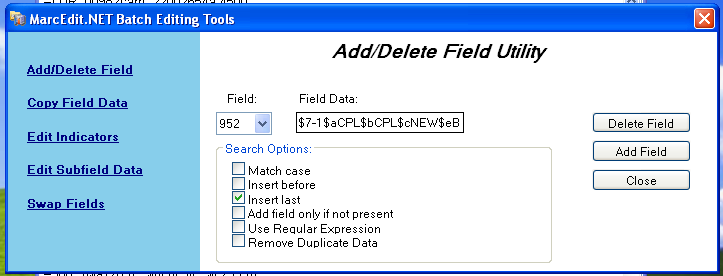
En el recuadro de Campo (Field), escriba 952
In the Field Data box, type $7ORDERED_STATUS$aPERM_LOC$bCURR_LOC$cSHELVING_LOCATION$eSOURCE_OF_ACQ$yITEM_TYPE
ej. $7-1$aCPL$bCPL$cNEW$eBrodart$yBOOK
En una instalación por defecto de Koha -1 es el valor para el estado Pedido
Puede querer consultar otros subcampos en los que desee datos – por ejemplo, cambiar el código de colección para incluir todos los registros en la misma colección (8), cumplimentar automáticamente la fecha de adquisición (d), o incluir una nota pública (z).
Asegúrese de usar los $ para separar subcampos; si agrega cada subcampo en una línea separada causará que se importen tantos ejemplares como líneas en su registro MARC( en el ejemplo de arriba, cuatro ejemplares, cada uno con uno de esos subcampos corregido)
Asegúrese de mirar Administración > Valores autorizados de Koha para poner el código correcto en el campo
Marque la opción “insertar al final” (insert last)
Haga clic en “Añadir Campo” (Add Field)
Cerrar la ventana de editor del campo
Haga clic en Archivo > Compilar a MARC
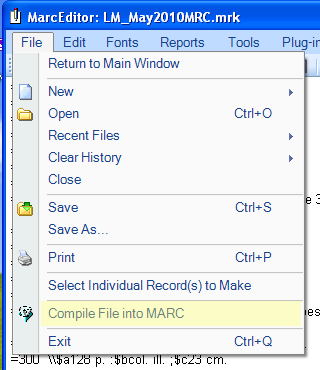
Elija dónde desea guardar el archivo
Now you want to go into your Koha system and follow the instructions for importing MARC records.
Una vez que el ítem se ha ingresado, tendrá que ir al registro del ítem y de forma individual cambiar el ítem para que tenga el código de barras correcto, y cambiar manualmente el estado de “Pedido” a “No para préstamo”.
Nota
Si usted compra sus registros ya catalogados, es posible que desee solicitar a su proveedor que ponga la información que necesita en los registros MARC, de esta manera, se puede importar el archivo editado por el vendedor, remplazando el registro actual, y de forma automática se hará una sustitución de los datos con lo que usted necesita.