ILL (Interlibrary loan) requests
The ILL (Interlibrary loan) requests module adds the ability to request and manage loans or copies of material from external sources. Patrons can submit a request via the OPAC from the Interlibrary loan requests tab of their account. Library staff can then review and process those requests. Alternatively, staff can place requests themselves from the staff interface.
Interlibrary loans module settings
Um das Fernleihmodul zu aktivieren, setzen Sie den Systemparameter ILLModule auf ‚Aktiviere‘.
Bemerkung
Nur Bibliothekspersonal mit der Berechtigung ill (oder der superlibrarian-Berechtigung) sind in der Lage, Fernleihaufträge zu erstellen und zu verwalten.
Initial configuration
Before using the Interlibrary loans module, you will want to make sure you have reviewed all ILL-related configuration.
Backends: the ILL requests module can be configured for different types of requests and workflows. Koha uses ‚backends‘ to process ILL requests depending on how the document should be supplied. Some backends are available as plugins. Others are documented on the Koha community wiki at https://wiki.koha-community.org/wiki/ILL_backends.
System preferences for interlibrary loans: the most important one is the ILLModule system preference, the master switch for the ILL module.
Staff permissions: library staff responsible for ILL requests need the ill permission (or the superlibrarian permission).
Patron categories settings: choose which patron categories can place ILL requests from the OPAC.
Custom request statuses: the ILL requests module uses system-defined statuses. In addition, you can create as ILL_STATUS_ALIAS authorized values custom statuses to match your ILL workflow.
Branch prefix: in the Interlibrary loans module, you can display ILL request IDs prefixed with a different code depending on the library the request is associated with. To configure this, update the
<branch>elements (within<interlibrary_loans>) in the koha-conf.xml file on your server.You can repeat
<branch>and everything within it to configure a prefix for each of your libraries.Example: to prefix the requests of the library whose code is CPL with ‚CPL‘, FFL library requests with ‚FFL‘ and LPL library requests with ‚LPL‘.
<branch>
   <!-- The code of this branch -->
   <code>CPL</code>
   <!-- An optional prefix for all ILL request IDs for this branch -->
   <prefix>CPL</prefix>
</branch>
<branch>
   <code>FFL</code>
   <prefix>FFL</prefix>
</branch>
<branch>
   <code>LPL</code>
   <prefix>LPL</prefix>
</branch>
Staff comments: by default, these are hidden in the OPAC. To display them, update the
<staff_request_comments>element (within<interlibrary_loans>) in the koha-conf.xml file on your server.Reply date: by default, this information is hidden in the staff interface. To display it with your preferred label, update the
<reply_date>element (within<interlibrary_loans>) in the koha-conf.xml file on your server.
E-Mail-Benachrichtigungen für die Fernleihe
Email notifications can be sent to library staff when a patron makes a request to modify (notice code: ILL_REQUEST_MODIFIED) or cancel (notice code: ILL_REQUEST_CANCEL) an existing request. Enable this feature using the ILLSendStaffNotices system preference.
The ILL staff email address can be configured per library in the Libraries settings. If there is no email for a library, the address in the ILLDefaultStaffEmail system preference will be used.
Notifications can be sent to patrons for updates on their requests:
ILL request update (notice code: ILL_REQUEST_UPDATE)
ILL request unavailable (notice code: ILL_REQUEST_UNAVAIL)
ILL request ready for pickup (notice code: ILL_PICKUP_READY)
The notifications are enabled from the patron categories default patron messaging preferences.
All notice templates can be customized in the Notices and slips tool.
Creating ILL requests
To create ILL requests in the staff interface, go to the ILL requests module.
Click the ‚New ILL request‘ button.
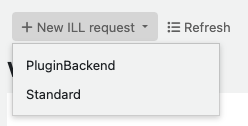
Bemerkung
You will not see the drop-down options to select a backend if:
you do not have additional backends installed;
you have additional backends installed and you have selected some in the AutoILLBackendPriority system preference.
In these cases, clicking the ‚New ILL request‘ button will take directly to step 3.
Select a backend.
Bemerkung
The images shown here are for the Standard backend only.
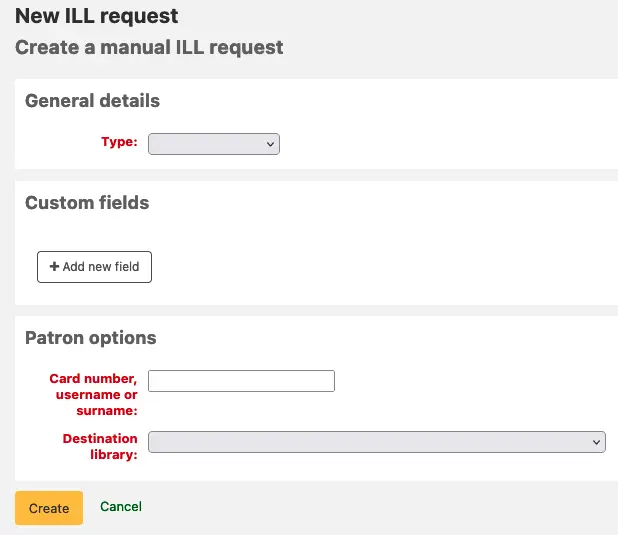
Select a Type: Book, Chapter, Journal, Journal article, Thesis, Conference, DVD, Other, Generic resource. A different set of metadata fields will display for each request type.
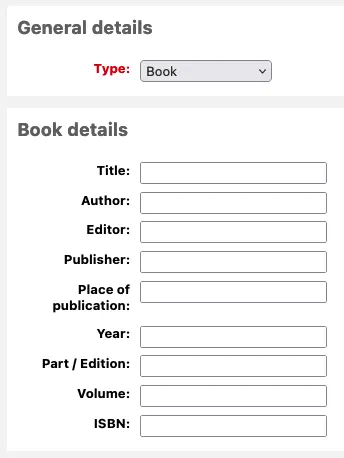
Geben Sie so viele Informationen ein, wie Sie möchten.
Custom fields: add a new custom field if needed; for example if you wish to add a note or if you are using the ‚Other‘ type of request.
Patron options:
Card number, username or surname: type in the patron details.
Destination library: select the library associated with the request.
Click ‚Create‘.
Bemerkung
If you have enabled the ILLCheckAvailability system preference and installed plugins for the staff interface, you will be presented with search results. If the title is found, follow the link to a relevant resource or proceed with the ILL request regardless. If no results are found, the ILL request is created.
Bemerkung
If you are using the AutoILLBackendPriority system preference, you will see the ‚Confirm request‘ screen. Select a backend and click ‚Confirm‘ to create the request.
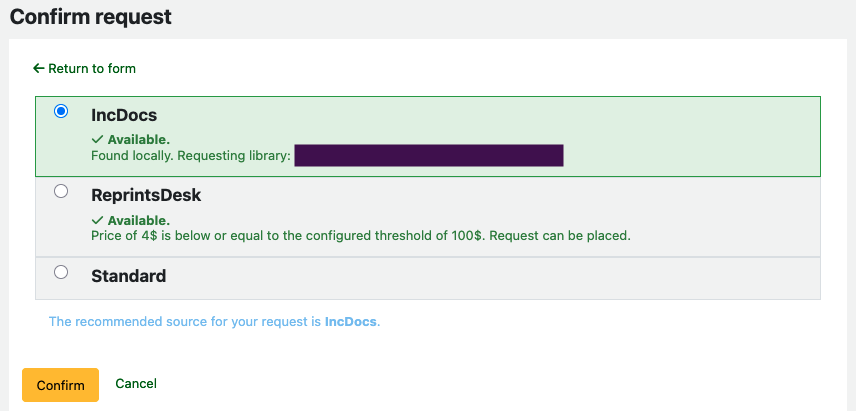
You can now manage your request or return to the list of all requests by clicking the ‚List requests‘ button.
Fernleihbestellungen anzeigen
From the main ILL requests screen you can view, filter and sort your ILL requests.
Click on the ‘List requests’ button from other pages in the ILL module to return to this list.
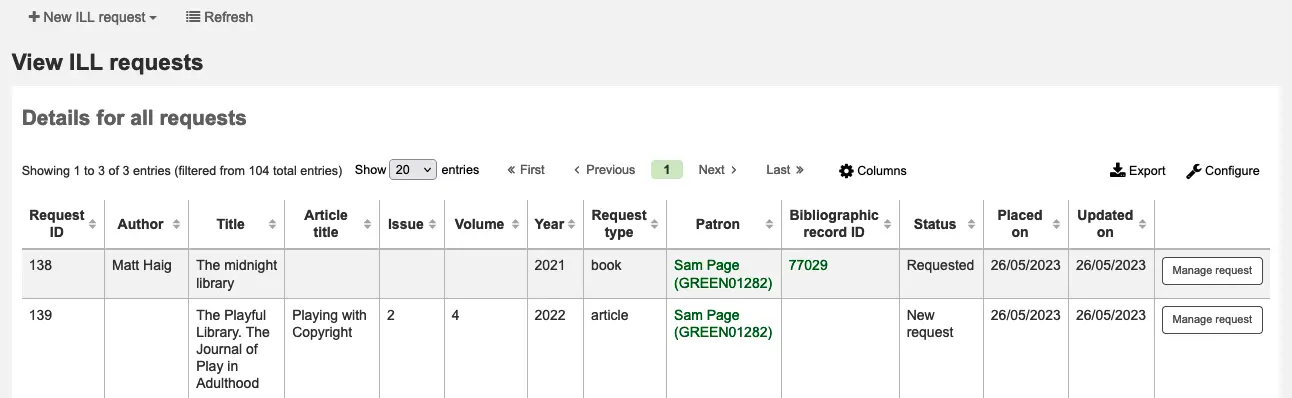
Tipp
You can customize this view.
Use the ILLRequestsTabs system preference to organise requests into custom tabs.
Use the ILLHiddenRequestStatuses system preference to hide requests with completed statuses by default.
There is a large amount of data available in the table; scroll right to see all the columns. You can define which columns are visible / hidden by default in the Table settings section of the Administration module (table id: ill-requests).
Use the filters on the left of the page to display a subset of requests based on your chosen criteria.
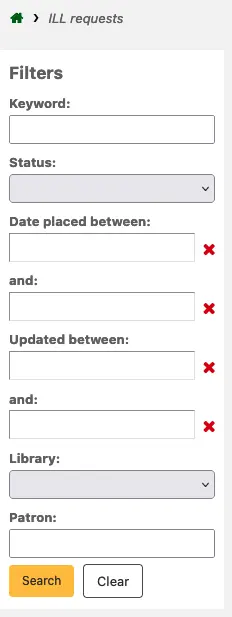
Fernleihbestellungen verwalten
From the main ILL requests view, click on a request ID in the first column or on the ‚Manage request‘ button in the final column. The request’s full details are displayed.
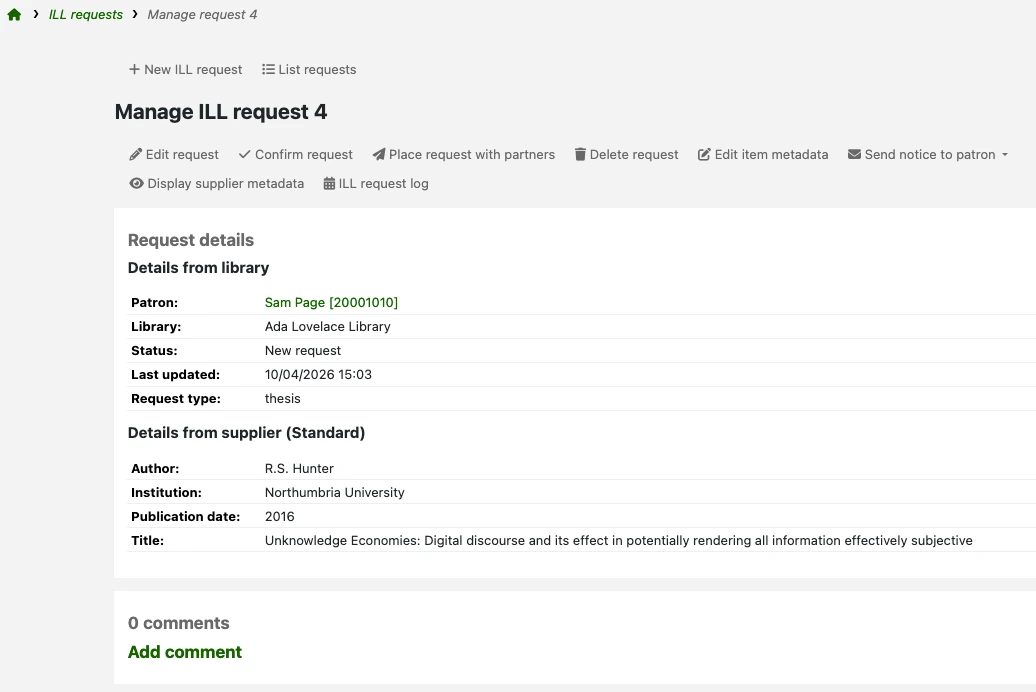
Depending on the current status of the request and the backend used, you may see some or all of the buttons described in the next section.
From this screen, you can add comments to the request. You may want to use comments to keep track of work undertaken. Comments are read-only (they cannot be edited or deleted). They are only visible in the staff interface. If any comments have been added to a request, a number will appear in the ‚Comments‘ column when viewing the full list of ILL requests.
Authenticated requests
Authenticated requests are requests linked to the Koha patron who requested the document. All requests placed in the staff interface or placed on the OPAC by patrons logged in to their account are authenticated requests.
New authenticated requests have the status ‚New request‘. Staff can progress the requests straightaway by using some of the following buttons.
Edit request: to update the patron the request is associated with, which staff member is managing the request, the destination library.
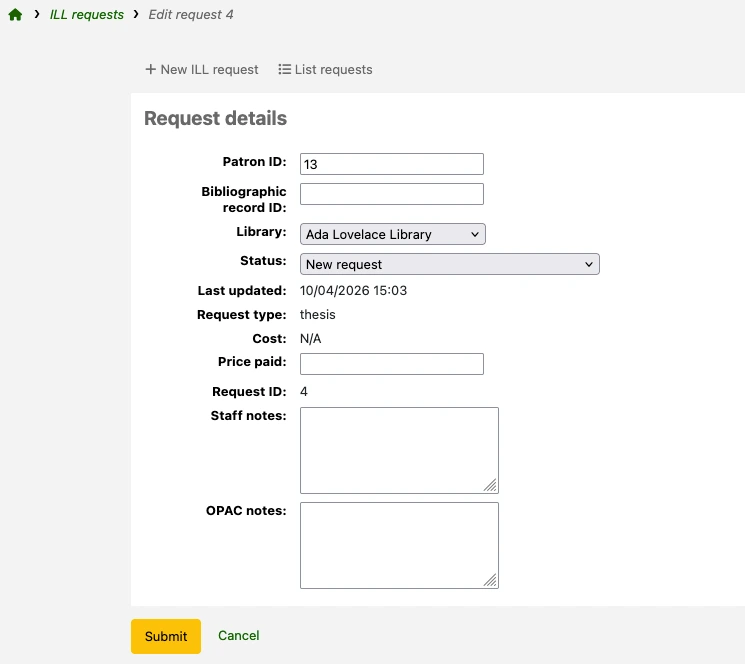
OPAC and staff-only notes can be added from the edit screen.
If you have custom ILL statuses (managed through the ILL_STATUS_ALIAS authorized values category) you can apply one by editing the Status field.
Confirm request: to manually mark the request as ‚Requested‘.
Place request with partners: for Koha to send a request to supply to a library. Using this option requires some prior configuration. The request status is then updated to ‚Requested from partners‘.
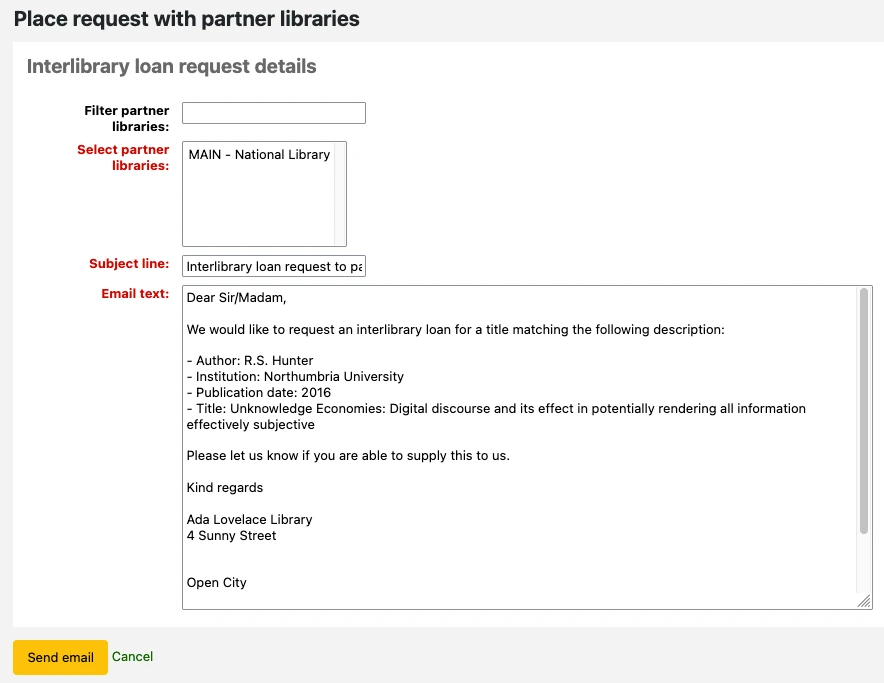
Filter partner libraries: type keywords to narrow down the list of accounts displayed in the next field.
Select partner libraries: choose a recipient from the list of your ILL partners. Each account’s library code is shown in capital letters before the account name.
Subject line: you can customize the subject line of the email Koha will send.
EMail-Text: Sie können den Text der eMail, die Koha versendet, individuell anpassen
Bemerkung
The default subject line and email text used here are defined in the ILL_PARTNER_REQ notice template in the Notices and slips tool.
Delete request: to fully delete the request. Details of deleted requests are not retained in the Koha database.
Edit item metadata: to update the metadata (title, author, etc.) for the title requested. This is useful when the information provided initially is incomplete or incorrect.
Bemerkung
Some backends may not allow updates to the metadata.
Send notice to patron: to send an update to the patron requesting the title.
ILL request ready for pickup: to alert the patron that their requested item is ready for collection. You can customize the notice text in the ILL_PICKUP_READY notice template in the Notices and slips tool.
ILL request unavailable: to inform the patron that your library will not be able to supply the requested title. You can customize the notice text in the ILL_REQUEST_UNAVAIL notice template in the Notices and slips tool.
Display supplier metadata: to view a text-only version of the details of the title requested. This may be useful in the cases where you need to quickly copy and paste this information outside of Koha.
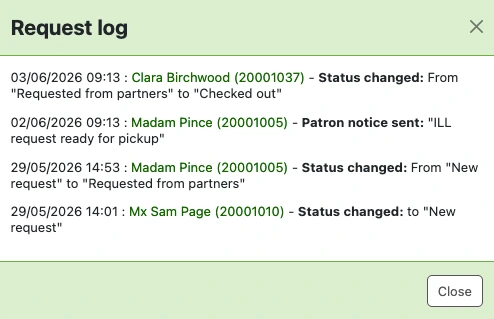
ILL request log: to view a history of the actions on this request. For any information to be displayed here, the IllLog system preference needs to be set to ‚Log‘.
Other buttons you may see as you progress the request:
Switch provider: to select a different backend and request the title from another provider. This is useful when the the wrong backend was initially selected or when the provider has indicated they are unable to supply.
Revert request: to cancel the request placed with an external source. This button is visible when the request has a status of ‚Requested‘ or ‚Requested from partners‘. The status is updated to ‚Request reverted‘.
Check out: to checkout the item supplied by a partner library directly to the patron who placed the request. The request status is updated to ‚Checked out‘.
This option is only available if you have enabled the CirculateILL system preference. It is used for circulating ILL materials.
Mark completed: to update the status to ‚Completed‘ when the request has been fulfilled and fully processed.
Unauthenticated requests
If the ILLOpacUnauthenticatedRequest system preference is set to ‚Allow‘, patrons can place requests without being logged in or without having an account.
Version
This feature was first introduced in version 25.05 of Koha.
Requests placed in this way have the status ‚Unauthenticated‘. Before they can be progressed, you need to link it to a patron record.
From the main ILL requests view, identify a request with the status ‚Unauthenticated‘.
Click on the request ID in the first column or on the ‚Manage request‘ button in the final column to view the request’s full details.
Click the ‚Edit request‘ button.
The Unauthenticated request details section shows the details entered by the patron who placed the request. Use this to search for an existing patron.
The ‚Patron ID‘ field at the top of the page can be used as a patron quick search. Start typing the patron name to see suggestions.
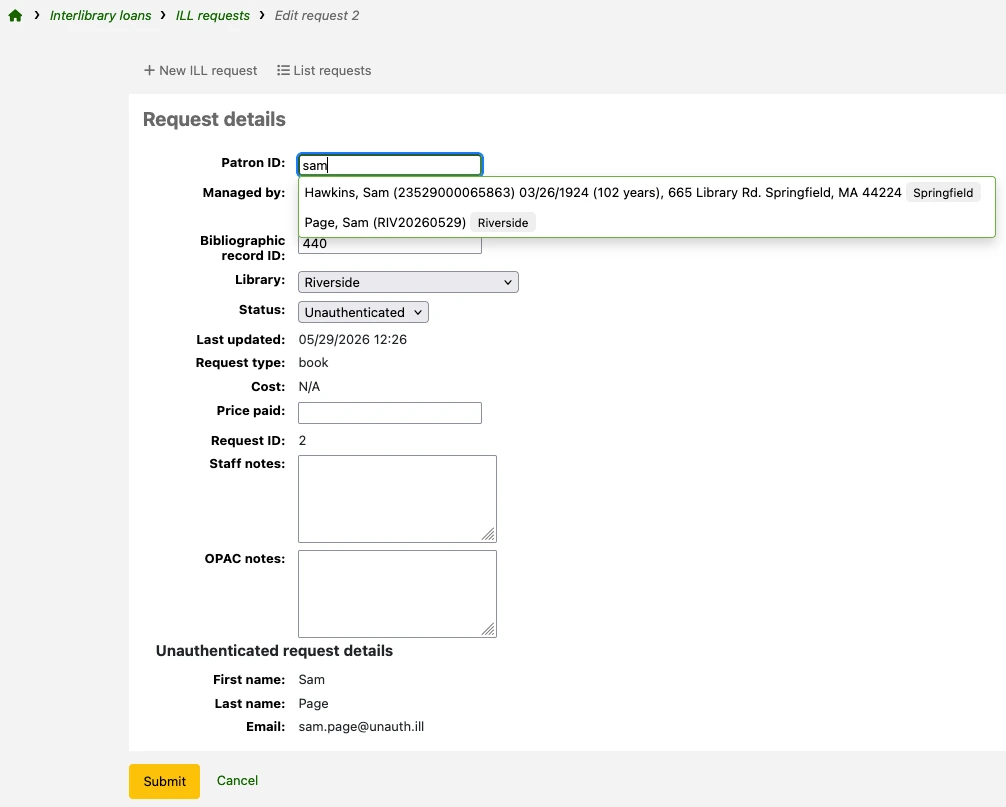
Alternatively, you can open the Patrons module in another browser tab and perform your search there.
Warnung
If the patron who placed the unauthenticated request is not yet a library member, you will need to add a new patron record for them before progressing the ILL request.
Whether you are searching a patron by name in the Patron ID field or pasting their card number in the field, you will need to select the correct patron from the suggestions. The field will then update to display the borrowernumber.
Click ‚Submit‘ to save your changes.
You can now manage the request in the same way as for other authenticated requests. The Unauthenticated request details section will stop displaying as it is not an unauthenticated request anymore.
Marking requests as completed
Some backends will automatically update the request status to ‚Complete‘.
For all other backends, you should complete the request manually by clicking the ‚Mark completed‘ button on the Manage ILL request page.
If you do not have any ILL_STATUS_ALIAS authorized values defined, the request status will update to ‚Completed‘.
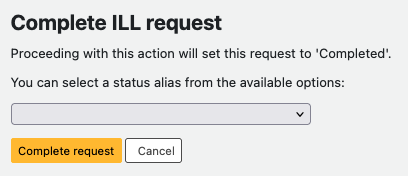
If you have defined some ILL_STATUS_ALIAS authorized values, you will be prompted to select one.
Version
The prompt for the status alias was first introduced in version 25.11 of Koha.
You can still complete the request without selecting a status alias. Click ‚Complete request‘ to confirm your choice. The request status will update to ‚Complete‘ and your chosen status alias will be assigned to the request.
Tipp
Consider using ILL_STATUS_ALIAS authorized values with either the ILLHiddenRequestStatuses system preference or the ILLRequestsTabs system preference to hide or separate some completed requests from the full list of ILL requests. This will be useful when you start having many completed requests.
Bestellung bei Fernleihpartnern
Wenn Sie über ein Netzwerk von Partnerbibliotheken verfügen, die Fernleihbestellungen zulassen, können Sie diese über Koha verwalten. Zunächst müssen Sie Konten Ihrer Partnerbibliotheken anlegen:
Benutzertyp anlegen, der den Partnerbibliotheken zugewiesen wird. Geben Sie dem Benutzertyp die Bezeichnung „Fernleihe“ oder „Bibliothek“ und den Kategorietyp „Organisation“. Geben Sie dann diese Kategorie im Systemparameter ILLPartnerCode ein.
Für jede Partnerbibliothek müssen Sie nun ein Benutzerkonto mit diesem Benutzertyp anlegen.
Für jede Bibliothek muss eine E-Mail-Adresse erfasst werden, damit die Fernleihbestellung verschickt werden kann.
Bemerkung
Das Template für die Benachrichtigung ist „ILL_PARTNER_REQ“ und der Text kann über Benachrichtigungen und Quittungen im Modul „Werkzeug“ angepasst werden.
Sie können dann die „Bestellung bei Fernleihpartnern“-Option verwenden, wenn Sie Bestellungen bearbeiten.
Bemerkung
Wenn Sie den Systemparameter ILLCheckAvailability aktiviert haben, können Sie Plugins verwenden, um vor der Bestätigung der Bestellung mit Z9.50 in den Katalogen Ihrer Fernleihpartner zu suchen.
Ausleihe von Fernleihen
Wenn Sie den Systemparameter CirculateILL aktiviert haben, können Sie Fernleihexemplare direkt aus der Fernleihbestellung heraus ausleihen.
Wenn Sie eine Fernleihbestellung für ein Buch anlegen, wird automatisch eine Schnellaufnahme basierend auf dem MARC-Framework für Schnellaufnahmen (FA) angelegt. Sobald die Bestellung den passenden Status erreicht, wird eine Schaltfläche „Ausleihe“ in der Werkzeugleiste für die Fernleihbestellung angezeigt. Über diese ist es möglich das Medium an den Besteller oder an einen statistischen Benutzer auszuleihen.
Um ein Exemplare auszuleihen:
Klicken Sie auf die Schaltfläche „Ausleihe“.
Wählen Sie einen Exemplartyp aus, wenn Sie dazu aufgefordert werden. Es wird automatisch ein Exemplar angelegt und an den biblio-Datensatz der Bestellung angehängt. Der Barcode des Exemplars hat das Format ILL-requestid.
Wählen Sie dann auf dem Ausleihbildschirm für den Benutzer ein Fälligkeitsdatum aus. Wenn Sie kein Fälligkeitsdatum auswählen, wird die entsprechende Ausleihregel zur Berechnung des Fälligkeitsdatums verwendet.
Sobald das Exemplare ausgeliehen wurde, ändert sich der Status der Bestellung auf „Ausgeliehen“, nach der Rückgabe dann automatisch auf „Zurückgegeben“.
Titeldatensätze die als Teil einer Fernleihbestellung angelegt wurden, haben einen zusätzlichen Reiter in der Exemplartabelle über den zurück auf die Fernleihbestellung im Fernleihmodul verlinkt wird.
Reporting for ILL
To query ILL-related information in the Reports module, the main database tables are:
illrequests
illrequestattributes
Generic information about ILL-related transactions in stored in:
statistics
The statistics.type ‚illreq_created‘ corresponds to the creation of an ILL request.
The statistics.type ‚illreq_comp‘ corresponds to an ILL request being marked completed.
pseudonymized_transactions (if the Pseudonymization system preferences are in use)
The pseudonymized_transactions.transaction_type ‚illreq_created‘ corresponds to the creation of an ILL request.
The pseudonymized_transactions.transaction_type ‚illreq_comp‘ corresponds to an ILL request being marked completed.
Version
The recording of ILL transactions in the statistics and pseudonymized_transactions tables is a feature first introduced in version 25.11 of Koha.
Bestellstatus
Koha has a set of core ILL statuses, listed below (with status codes as stored in the illrequests table). Installed backends may use additional statuses.
Neue Bestellung (NEW)
Unauthenticated (UNAUTH)
Angefragt (REQ)
Von Partnern angefordert (GENREQ)
Bestellung zurückgesetzt (REQREV)
Cancellation requested – a patron has requested cancellation from the OPAC (CANCREQ)
Abgeschlossen (COMP)
Ausgeliehen (CHK)
Zurückgegeben (RET)