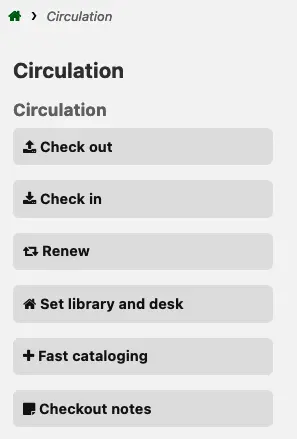
परिचालन
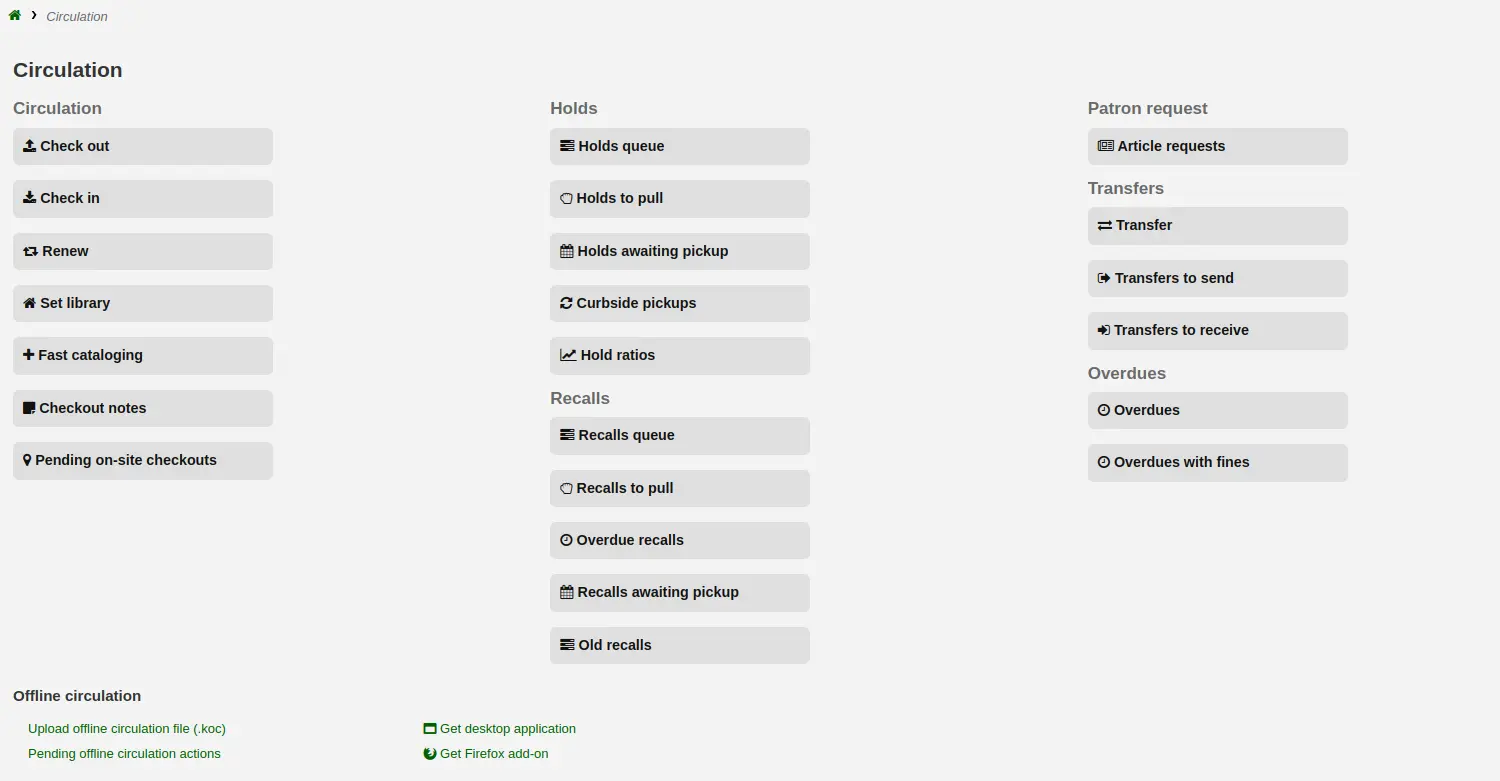
संचलन कार्यों कई अलग अलग तरीकों से पहुँचा जा सकता है। स्टाफ ग्राहक के मुख्य पृष्ठ पर पृष्ठ के केंद्र में कुछ त्वरित लिंक, आइटम बाहर की जाँच करने के लिए या उन्हें स्थानांतरित कर रहे हैं। संचलन कार्यों की एक पूरी सूची के लिए आप सर्कुलेशन पेज जो हर पृष्ठ के शीर्ष बाएं से या मुख्य पृष्ठ के केंद्र से जुड़ा हुआ है यात्रा कर सकते हैं।
Before circulating your collection you will want to set your Global system preferences, Basic parameters and Patrons and circulation rules.
सर्कुलेशन आप निम्नलिखित गर्म कुंजी का उपयोग करके स्क्रीन के शीर्ष पर त्वरित खोज बॉक्स पर नजर के बीच कूद सकते हैं:
Alt+Q: Search catalog
Alt+U: Check out
Alt+R: Check in
Alt+W: Renew
टिप्पणी
Staff members must have the circulate permission (or the superlibrarian permission) in order to be able to access circulation functions.
चेक आउट (जारी करना)
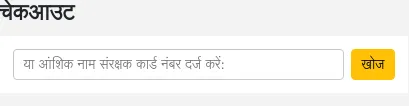
चेकआउट प्रक्रिया शुरू करने के लिए आप संरक्षक बारकोड या उनके नाम का हिस्सा दर्ज करना आवश्यक है। चेकआउट विकल्प तीन मुख्य स्थानों में प्रकट होता है:
स्टाफ इंटरफेस के मुख्य पृष्ठ के शीर्ष पर खोज बार में विकल्प देखें

मुख्य संचलन पृष्ठ के शीर्ष पर खोज बार में विकल्प देखें

Go to Circulation > Check out
संस्करण
This option was added to Koha in version 25.05.
Those options are essentially a patron search. If you only have one result, Koha will automatically go to the patron's file, in the 'Check out' tab.
यदि आपकी खोज आपको एक से अधिक परिणाम देती है, तो यह आपसे यह चुनने के लिए कहेगी कि किस संरक्षक को चेक आउट करना है।

टिप्पणी
You can customize the columns of this table in the Table settings section of the Administration module, under the patrons tab (table id: memberresultst).
संरक्षक खोज परिणाम पर क्लिक करने से आप 'विवरण' टैब पर संरक्षक की फ़ाइल पर पहुंच जाएंगे। चेक आउट स्क्रीन तक पहुँचने के लिए 'चेक आउट' टैब पर क्लिक करें।
अगर आपने सक्षम किया है बैच चेकआउट, संरक्षक रिकॉर्ड पर बैच चेकआउट टैब पर क्लिक करें
चेक आउट आइटम
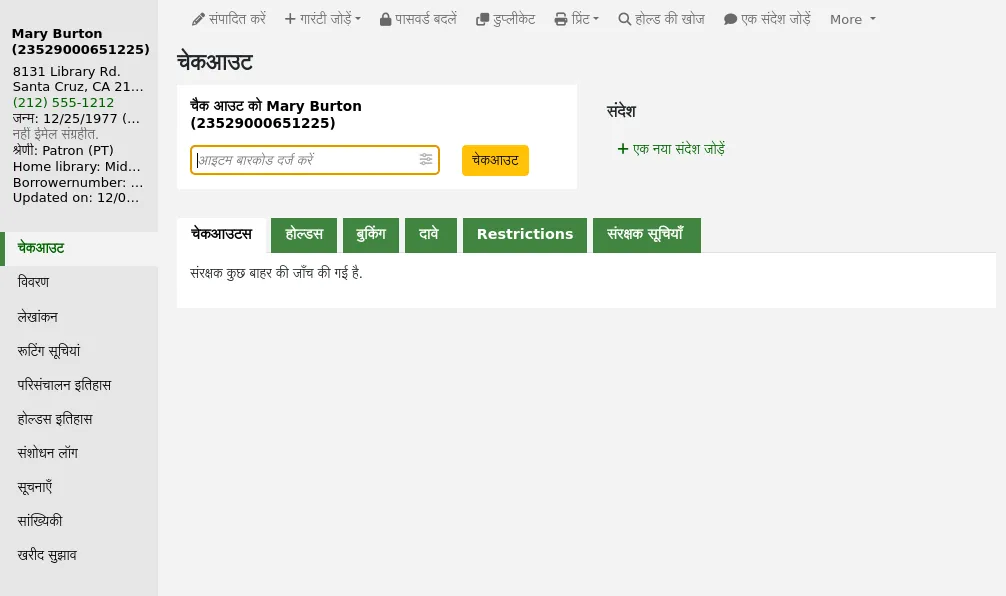
एक संरक्षक, कि संरक्षक ऊपर सूचीबद्ध कई विकल्पों में से एक का उपयोग कर के लिए पहले खोज के लिए बाहर एक आइटम की जांच करने के लिए। तुम तो चेकआउट स्क्रीन के साथ प्रस्तुत किया जाएगा।
यदि 'हमेशा चेकआउट दिखाते हैं' स्वचालित रूप से चेक किया जाता है, तो आपको चेक आउट बॉक्स के नीचे वर्तमान चेकआउट की सूची दिखाई देगी।
टिप्पणी
यह previousIssuesDefaultSortOrder सिस्टम वरीयता नियंत्रण जिसमें ये पिछले चेकआउट दिखाई देते हैं (जल्द से जल्द, या नवीनतम से जल्द से जल्द)।
टिप्पणी
You can customize the columns of this table in the Table settings section of the Administration module, under the circulation tab (table id: issues-table).
टिप्पणी
एक पंक्ति में कई आइटमों को चैक आइट करते समय बहुत अधिक सेवा प्रश्नों को रोकने के लिए, आप उपयोग कर सकते हैं LoadCheckoutsTableDelay टेबल के लोडिंग में देरी करने और संसाधनों पर लोड को हल्का करने के लिए सिस्टम वरीयता।
चेक आउट स्क्रीन के शीर्ष पर आइटम के बारकोड को टाइप करने या स्कैन करने के लिए एक फ़ील्ड है।
टिप्पणी
कई आधुनिक बारकोड स्कैनर ब्राउज़र को 'वापसी' भेजेंगे, जिससे 'चेक आउट' बटन स्वचालित रूप से क्लिक हो जाएगा।
यदि बारकोड नहीं मिला है तो आपको आइटम जोड़ने के लिए तेज़ कैटलॉगिंग का उपयोग करने के लिए कहा जाएगा। के बारे में अधिक जानने फास्ट कैटलॉगिंग बाद में इस मैनुअल में।
अगर itemBarcodeFallbackSearch सिस्टम वरीयता 'सक्षम' पर सेट है, तो आप केवल एक बारकोड के बजाय इस बॉक्स में एक कीवर्ड खोज दर्ज कर सकते हैं (यह शीर्षक और/या कॉल नंबर का उपयोग करके चेक आउट करना संभव बना देगा)।
यदि AutoSwitchPatron सिस्टम वरीयता को 'सक्षम' करने के लिए सेट किया गया है, तो यहां एक संरक्षक बारकोड को स्कैन करना आपको उस पैट्रन की फ़ाइल में ले जाएगा।
अधिक चेकआउट विकल्प देखने के लिए चेकआउट क्षेत्र का विस्तार करने के लिए 'चेकआउट सेटिंग' लिंक पर क्लिक करें.
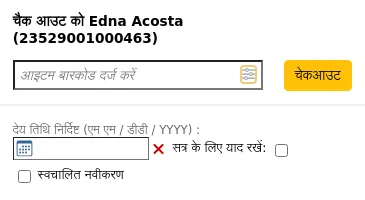
Specify due date: this option can be used to override the default due date for the item, as defined in the circulation and fines rules.
टिप्पणी
यह विकल्प केवल तभी दिखाई देगा यदि SpecifyDueDate सिस्टम वरीयताएँ कर्मचारियों को देय तिथि को ओवरराइड करने की अनुमति देने के लिए सेट की गई हैं।
The red 'X' is used to clear the date. If the 'specify due date' field is empty, the default due date, as defined in the circulation and fines rules is used.
इस सत्र के लिए याद रखें: सभी चेकआउट के लिए समान दिनांक का उपयोग करने के लिए इस बॉक्स को चेक करें। यह न केवल इस संरक्षक के लिए बल्कि सभी संरक्षकों के लिए निर्दिष्ट देय तिथि को तब तक बनाए रखेगा जब तक कि आप कर्मचारी इंटरफ़ेस से लॉग आउट नहीं हो जाते।
स्वत: नवीनीकरण: यह विकल्प इस आइटम को स्वचालित रूप से नवीनीकृत करने की अनुमति देगा
स्वचालित नवीनीकरण का उपयोग करने के लिए,
यह automatic_renewals cron job आवश्यक चलना चाहिए
the circulation and fines rules regarding automatic renewals must be defined
नियमित नवीनीकरण की तरह, आइटम पर होल्ड होने पर चेकआउट स्वचालित रूप से नवीनीकृत नहीं होंगे।
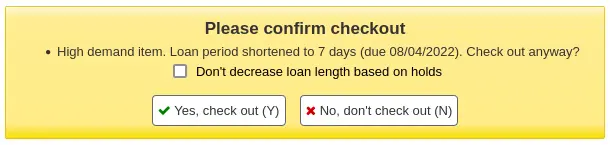
होल्ड के आधार पर चेकआउट की लंबाई कम न करें: यह विकल्प decreaseLoanHighHolds सिस्टम वरीयता को ओवरराइड करता है।
टिप्पणी
यह विकल्प केवल तभी दिखाई देगा यदि decreaseLoanHighHolds सिस्टम वरीयता सक्षम है।
ऑन-साइट चेकआउट: यह विकल्प इंगित करता है कि यह चेकआउट ऑन-साइट चेकआउट है।
टिप्पणी
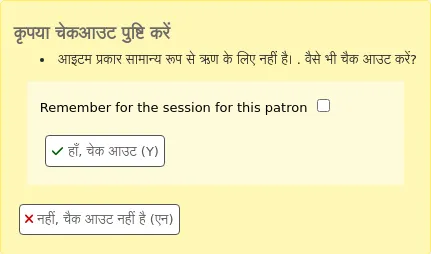
यह विकल्प तभी दिखाई देगा जब संरक्षकों को the साइट पर आइटमों का चेकआउट की अनुमति है। ये आम तौर पर वे आइटम होते हैं जो ऋण के लिए नहीं होते हैं जिन्हें आप पुस्तकालय में उपयोग के लिए जांचना चाहते हैं।
पृष्ठ के निचले भाग में देय तिथि (और समय यदि आइटम एक घंटे का ऋण है) के साथ संरक्षक की वर्तमान चेक आउट की गई वस्तुओं का सारांश है। आज चेक आउट किए गए आइटम सबसे ऊपर दिखाई देंगे, पहले चेक आउट किए गए आइटम नीचे होंगे.
टिप्पणी
todaysIssuesDefaultSortOrder सिस्टम वरीयता नियंत्रण जिसमें ये नए चेकआउट दिखाई देते हैं (जल्द से जल्द, या जल्द से जल्द नवीनतम)।
टिप्पणी
आइटम प्रति घंटा ऋण आइटम हैं देय तारीख के साथ समय शामिल होंगे।
यदि किसी आइटम को ऑन-साइट उपयोग के लिए चेक आउट किया जाता है, तो वह जानकारी चेकआउट सारांश में लाल रंग से हाइलाइट की जाएगी।

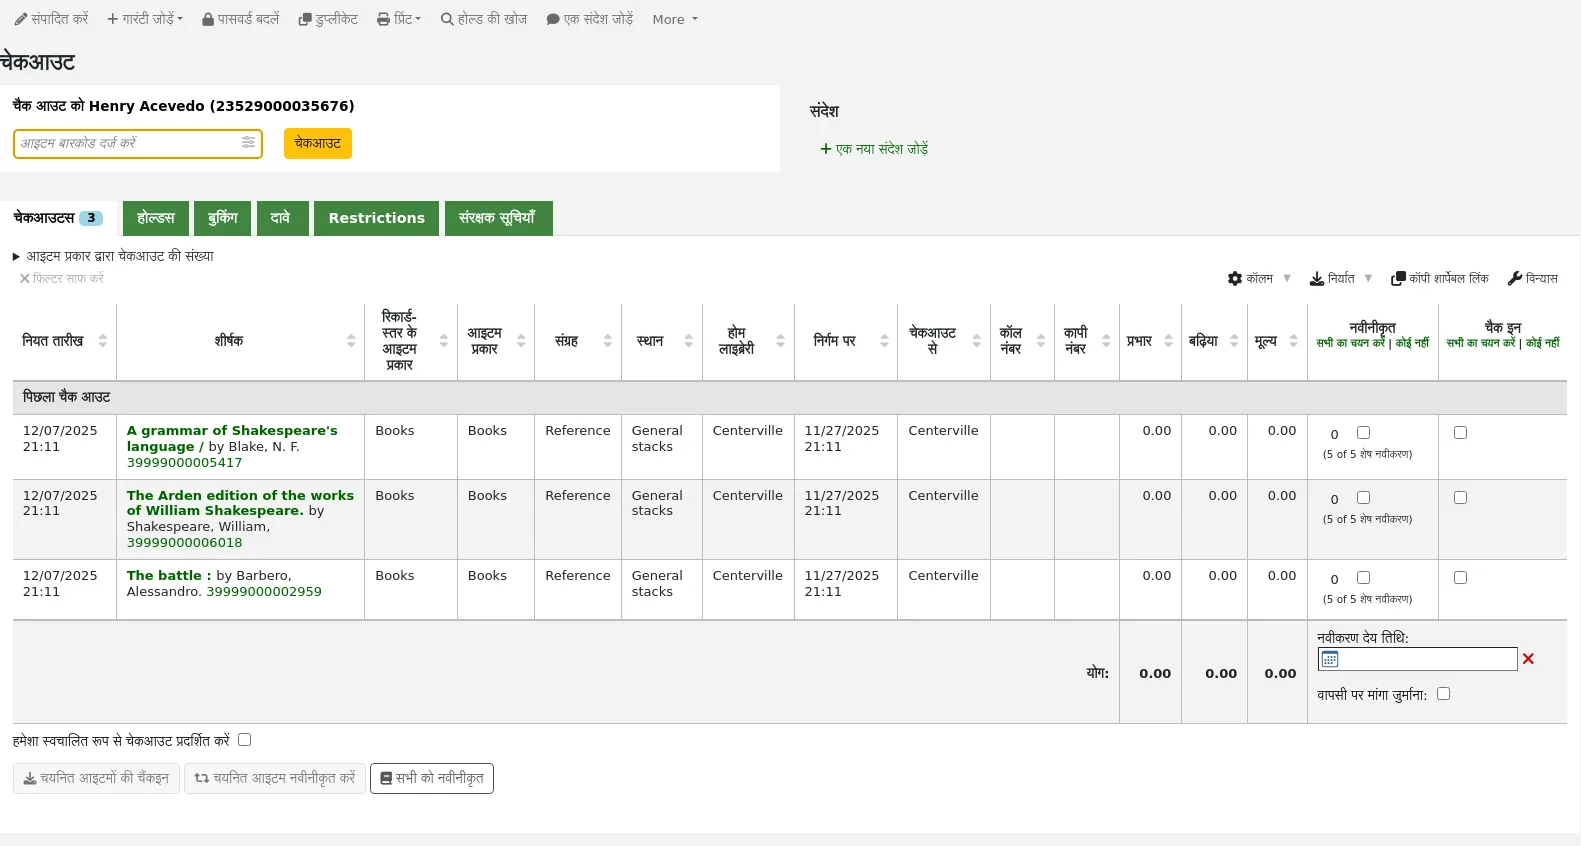
वहाँ संरक्षक रिकॉर्ड पर नोट कर रहे हैं इन चेकआउट बॉक्स के दाईं ओर दिखाई देंगे
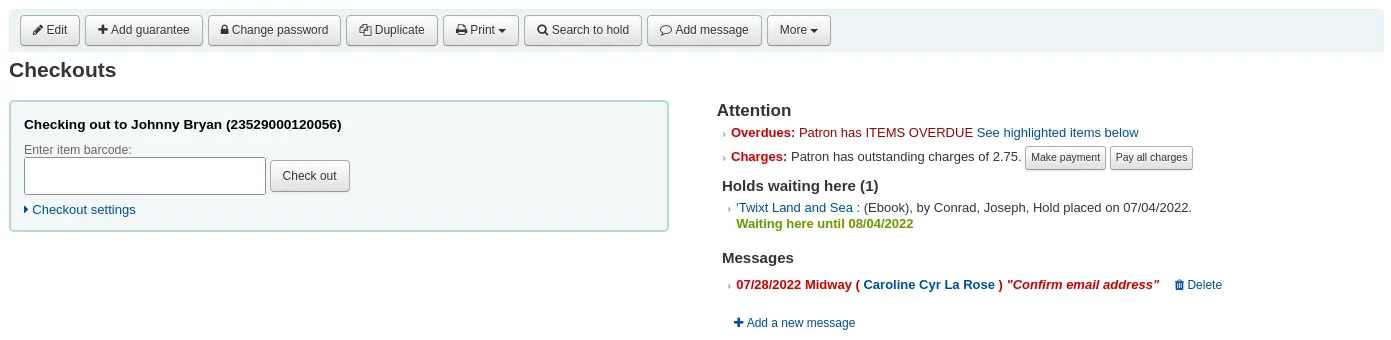
यदि संरक्षक की लाइब्रेरी में प्रतीक्षा हो रही है, तो वह चेक बॉक्स के दाईं ओर दिखाई देगा, जिससे सर्कुलेशन स्टाफ के लिए यह देखना आसान हो जाएगा कि संरक्षक को देने के लिए एक और वस्तु है।
यदि आप एक अधिक दावेदार पकड़ चेतावनी चाहते हैं, तो आप सक्षम कर सकते हैं WaitingNotifyAtCheckout सिस्टम वरीयता, जो प्रत्येक चेकआउट के बाद संरक्षक के लिए एक पॉप-अप उत्पन्न करेगा जो प्रतीक्षा रखती है।।
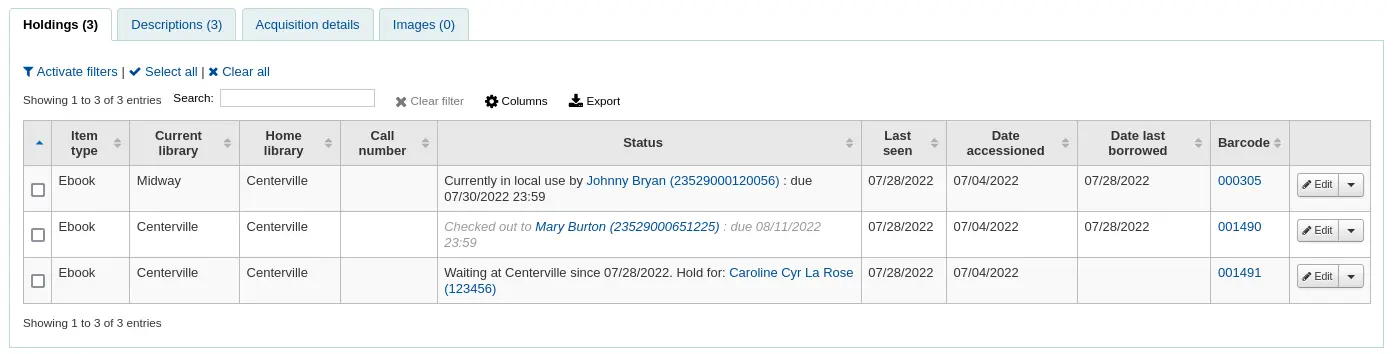
चेकआउट का विवरण कर्मचारी इंटरफ़ेस में रिकॉर्ड विवरण पृष्ठ पर भी दिखाई देगा।
मुद्रण प्राप्तियों
एक बार जब आप संरक्षक के लिए सभी वस्तुओं को बाहर की जाँच की है कि आप दो तरीकों में से एक का चयन करके उन्हें एक रसीद प्रिंट कर सकते हैं।
यदि आपके पास CircAutoPrintQuickSlip वरीयता सेट 'एक प्रिंट क्विक स्लिप विंडो' खोलने के लिए आप बस अपने कीबोर्ड पर प्रवेश कर सकते हैं या अपने बारकोड स्कैनर के साथ कागज का एक खाली टुकड़ा स्कैन कर सकते हैं। यह विचार यह है कि आप एक खाली बारकोड की "जाँच कर रहे हैं" जो कोहा को 'त्वरित पर्ची' प्रिंट करने के लिए ट्रिगर करता है।
यदि आपके पास DisplayClearScreenButton सिस्टम वरीयता सेट 'दिखाएँ प्रिंट क्विक स्लिप और क्लियर बटन' या 'शो प्रिंट स्लिप और क्लियर बटन', तो शीर्ष दाईं ओर एक छोटा प्रिंटर बटन होगा। चेकआउट बॉक्स का, जिसका उपयोग स्लिप या क्विक स्लिप को प्रिंट करने के लिए किया जा सकता है।

तुम भी स्क्रीन के शीर्ष पर प्रिंट बटन क्लिक करें और चुनें 'प्रिंट पर्ची' या 'प्रिंट त्वरित पर्ची' कर सकते हैं।
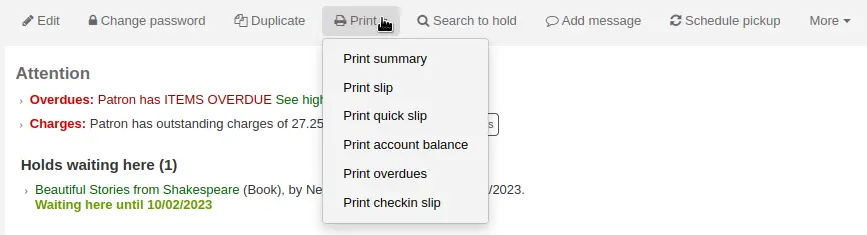
यदि आप 'प्रिंट स्लिप' चुनते हैं तो यह उन सभी वस्तुओं को प्रिंट करेगा जिनमें संरक्षक ने चेक आउट किया है, जिनमें वे पहले की तारीख में चेक आउट करते हैं।।
टिप्पणी
स्लिप आईएसएसयूएसआईएलपी नोटिस का उपयोग करती है। आप सूचना को Notices and slips tool में अनुकूलित कर सकते हैं।।
'मुद्रण त्वरित पर्ची' का चयन केवल उन वस्तुओं को प्रिंट करेगा जो आज की जाँच की गई थीं।।
टिप्पणी
त्वरित पर्ची ISSUEQSLIP नोटिस का उपयोग करता है। आप सूचना को Notices and slips tool में अनुकूलित कर सकते हैं।।
'प्रिंट सारांश' संरक्षक की परिसंचरण जानकारी के लिए एक पूर्ण पृष्ठ सारांश उत्पन्न करेगा।।
टिप्पणी
सारांश अनुकूलित नहीं किया जा सकता है।।
However, the tables for the checkouts, holds, and charges are customizable in the Table settings section of the Administration module (table id: print-summary-checkouts, print-summary-holds, and print-summary-fines).
'प्रिंट खाता शेष' संरक्षक के खाते में बकाया शुल्क और अप्रयुक्त क्रेडिट का सारांश उत्पन्न करेगा।।
टिप्पणी
त्वरित पर्ची ACCOUNTS_SUMMARY नोटिस का उपयोग करती है। आप सूचना को Notices and slips tool में अनुकूलित कर सकते हैं।।
टिप्पणी
यह विकल्प केवल तभी दिखाई देगा जब संरक्षक के पास उनके लेखन टैब में शुल्क है।।
'प्रिंट अतिदेय' एक पर्ची को प्रिंट करेगा जो उन सभी वस्तुओं को सूचीबद्ध करता है जो अतिदेय हैं।।
टिप्पणी
ओवरड्यू स्लिप OVERDUE _SLIP नोटिस का उपयोग करता है। आप सूचना को Notices and slips tool में अनुकूलित कर सकते हैं।।
'प्रिंट चेकइन स्लिप' एक स्लिप प्रिंट करेगा जो उन आइटम्स को सूचीबद्ध करता है जिन्हें आज चेक इन किया गया था।
टिप्पणी
चेकिन स्लिप CHECKINSLIP नोटिस का उपयोग करता है। आप सूचना को Notices and slips tool में अनुकूलित कर सकते हैं।।
सलाह
You can add custom slips in this menu by adding a new notice in the notices and slips tool in the 'Patrons (custom slip)' module.
उदाहरण के लिए, सभी संरक्षक के वर्तमान होल्डिंग्स के साथ स्लिप होना,
Click 'New notice', and choose 'Patrons (custom slip)'
कोड भरें और स्लिप के लिए नाम भरें। नाम 'प्रिंट' मेनू में क्या दिखाई देगा।।
In the 'Print' template section, paste the code:
Patron has [% borrower.holds.count %] holds

List of holds:
[% FOREACH hold IN borrower.holds %]
===============================
Reserve id: [% hold.reserve_id %]
Title [% hold.biblio.title %]
[% END %]
क्लिक करें 'सहेजें'
अब, एक संरक्षक खाते में, जब आप 'प्रिंट' पर क्लिक करते हैं तो नए कस्टम स्लिप उपलब्ध होना चाहिए।।
चेकआउट निर्यात करना
इसके अलावा एक रसीद को मुद्रित करना, संरक्षक के चेकआउट को निर्यात करने के कई तरीके हैं।।
तालिका के शीर्ष पर स्थित 'निर्यात' बटन आपको Microsoft Excel या CSV प्रारूप में संरक्षक के वर्तमान चेकआउट को निर्यात करने देता है, या उनके चेकआउट को कॉपी या प्रिंट भी कर सकता है।
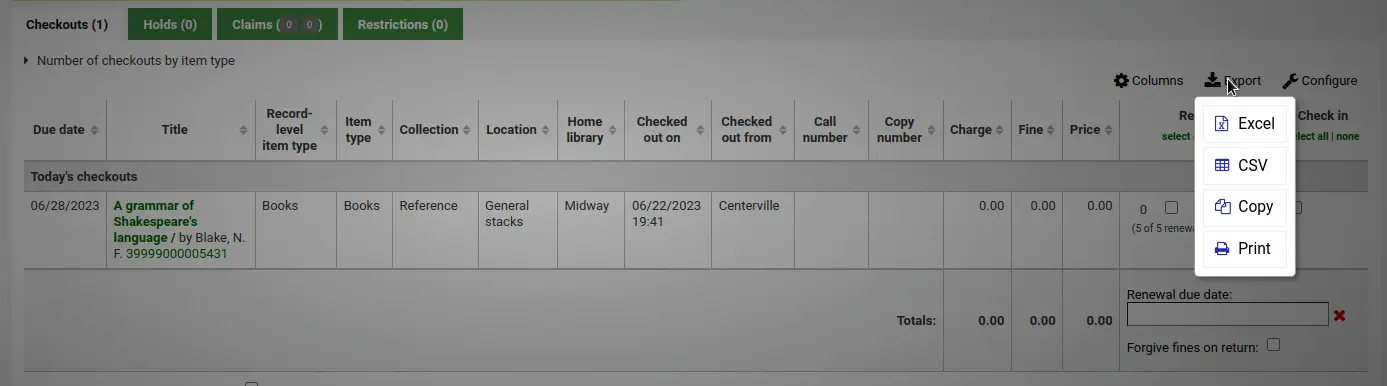
इस तरह से निर्यात CSV फ़ाइल में टेबल के स्तंभ होंगे जो दिखाई देते हैं। आप 'Columns' बटन पर क्लिक कर सकते हैं और यदि आवश्यक हो तो पहले कुछ स्तंभों को हटा सकते हैं।।
यदि ExportCircHistory सिस्टम वरीयता सक्षम है, तो चेकआउट तालिका में एक 'Export' कॉलम होगा। इसका उपयोग एमएआरसी या सीएसवी प्रारूप में संरक्षक के वर्तमान चेकआउट को निर्यात करने के लिए किया जाता है।।
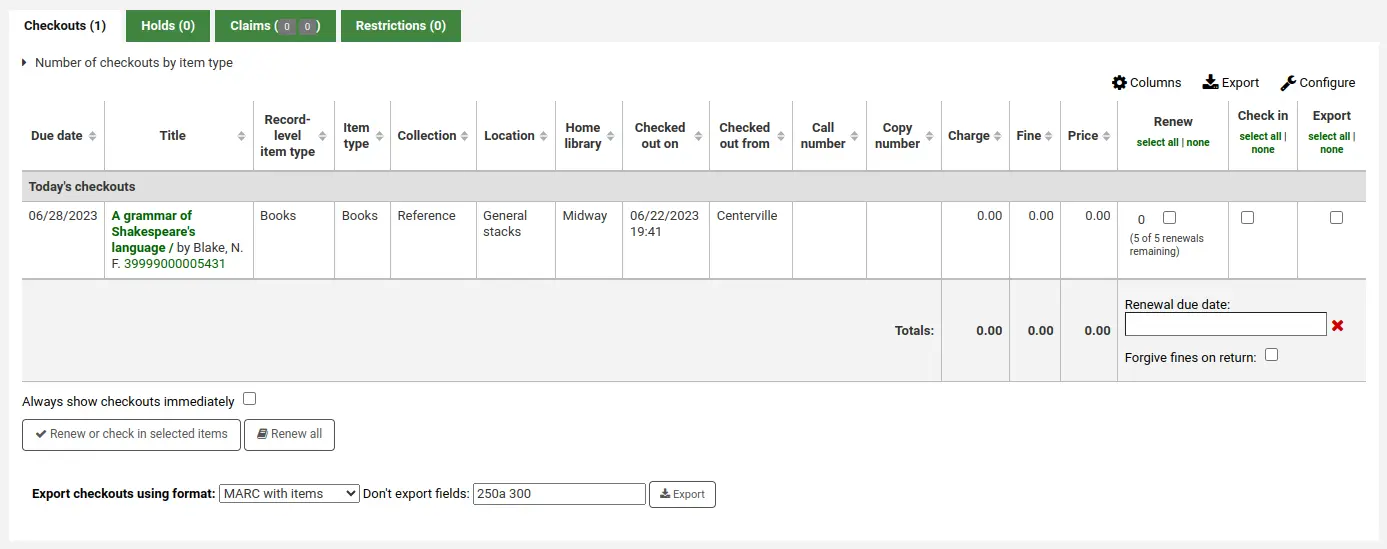
इस तरह से चेकआउट निर्यात करने के लिए,
'निर्यात' स्तंभ में चेकबॉक्स का उपयोग करके निर्यात किए जाने वाले चेकआउट का चयन करें।।
तालिका के नीचे, निर्यात के लिए विकल्प चुनें
प्रारूप का उपयोग करके चेकआउट निर्यात करें
आइटम के साथ मार्क: यह आइटम जानकारी सहित चेक आउट खिताब के मार्क रिकॉर्ड निर्यात करेगा।।
बिना आइटम के मार्क: यह चेक आउट खिताब के मार्क रिकॉर्ड निर्यात करेगा।
CSV: यह चेक आउट खिताब की एक CSV फ़ाइल निर्यात करेगा। जब इस विकल्प का चयन किया जाता है, तो एक नया ड्रॉपडाउन मेनू एक CSV प्रोफ़ाइल चुनने के लिए दिखाई देगा।।
एक्सपोर्ट बंडल सामग्री: यदि संरक्षक ने एक bundle की जांच की, तो यह विकल्प अभिभावक अभिलेख के साथ-साथ सभी बाल रिकॉर्ड निर्यात करेगा।।
फ़ील्ड निर्यात न करें: वैकल्पिक रूप से, आप एमएआरसी क्षेत्रों में प्रवेश कर सकते हैं जिन्हें निर्यात नहीं किया जाना है।।
टिप्पणी
"Don't export Field" क्षेत्र में डिफ़ॉल्ट मान ExportRemoveFields सिस्टम वरीयता में सेट किए गए हैं।।
संरक्षक जानकारी साफ करें
When you're done checking an item out if you have the DisplayClearScreenButton preference set to 'Show' you can clear the current patron by clicking the X in the top right of the patron's info to remove the current patron from the screen and start over.
यदि आपके पास CircAutoPrintQuickSlip वरीयता सेट 'स्क्रीन को साफ़ करने' के लिए सेट करें तो आपको बस एक खाली बारकोड को एंटर करने या स्कैन करने की आवश्यकता है और स्क्रीन को वर्तमान संरक्षक से साफ कर दिया जाएगा।
बैच चैकआउटस
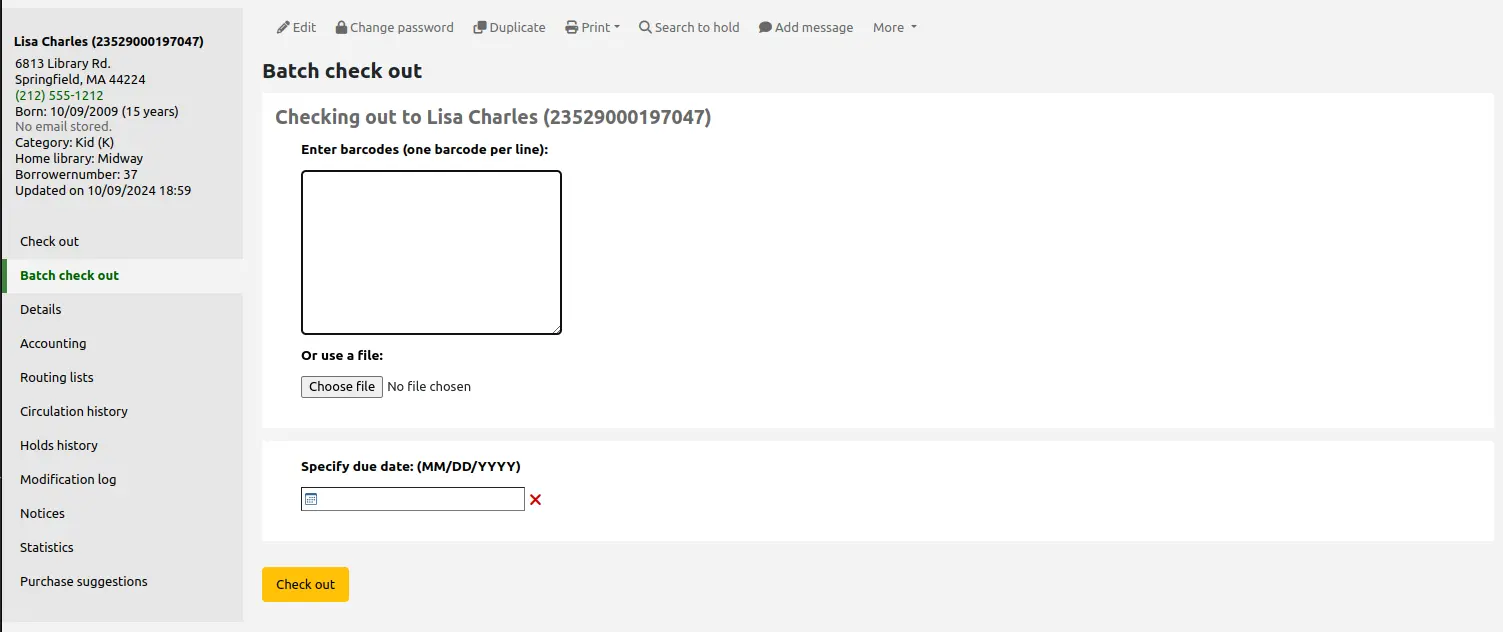
यदि आप एक बैच चेक आउट करना चाहते हैं, तो आप BatchCheckouts सिस्टम वरीयता चालू करके और BatchCheckoutsValidCategories सिस्टम वरीयता के माध्यम से उचित संरक्षक श्रेणियां निर्दिष्ट करके ऐसा कर सकते हैं। यह आपको एक आरएफआईडी पैड का उपयोग करने की अनुमति देगा जो कई बारकोड पढ़ता है या आंतरिक उपयोग के प्रशिक्षण के लिए बैच चेक आउट करता है।
Access the batch checkout screen by going to the patron record and clicking the 'Batch check out' tab on the left.
From this screen, you can scan several barcodes or load a file of barcodes.
If the SpecifyDueDate system preference is enabled, you will have the option to set a due date for the checkouts.
If the OnSiteCheckouts system preference is enabled, there will be an option to specify these are on-site checkouts.
संस्करण
The on-site checkout option in batch check out was added to Koha in version 23.11.
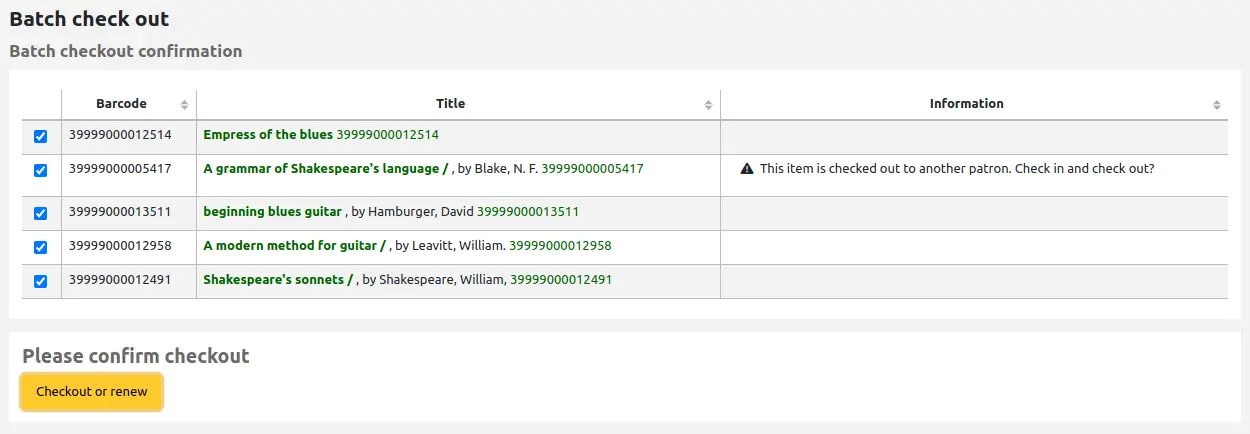
यदि आइटम चेक आउट नहीं किए जा सकते हैं, तो निम्न स्क्रीन पर एक चेतावनी प्रदान की जाएगी, जिसमें उन आइटम को अनचेक करने का विकल्प होगा जिन्हें चेक आउट नहीं किया जाना है।
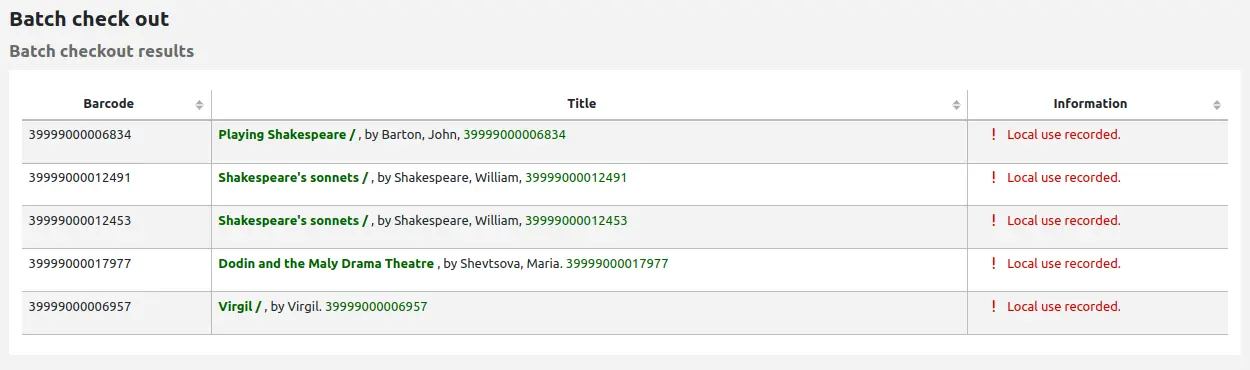
If you are using a statistical patron type to record in-house use, you'll see that local use was recorded for each scanned item.
चेकआउट संदेश
आप किसी वस्तु को कई टुकड़े है कि बाहर की जाँच करें और आप (MARC21 में) आइटम रिकॉर्ड की subfield 3 में है कि जानकारी के संदेश को पॉप जाएगा जब आप आप कह रही है कि कितने टुकड़े होना चाहिए कि आइटम बाहर की जाँच सूचीबद्ध किया है।

कई बार जब कोहा एक संरक्षक के लिए आइटम चैक आउट करने में सक्षम होने से रोकने जाएगा लाइब्रेरियन हैं। जब ऐसा होता है एक चेतावनी क्यों संरक्षक वस्तुओं की जांच बाहर नहीं कर सकते हैं की लाइब्रेरियन को अधिसूचित दिखाई देगा।
संरक्षक पर जुर्माने के रूप में ज्यादा बकाया
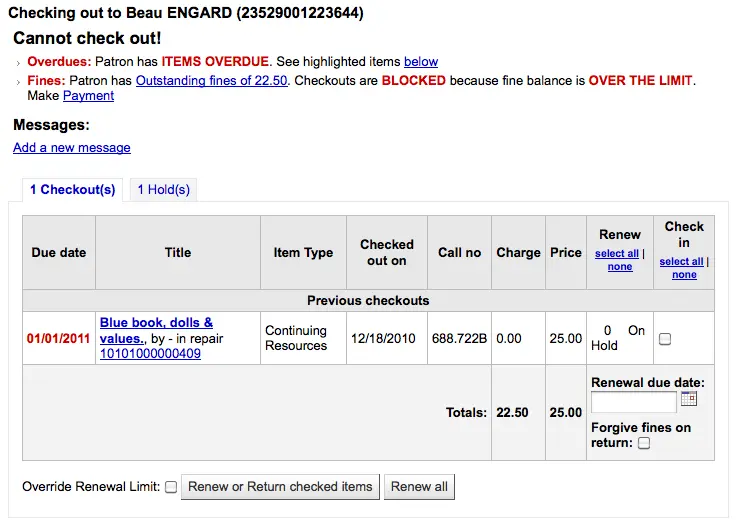
You can set the amount at which patron checkouts are blocked with the noissuescharge system preference
संरक्षक का अपने अकाउंट पर प्रतिबंध है

यह एक संरक्षक रिकॉर्ड और जोड़ने वाले लाइब्रेरियन द्वारा सेट किया जा सकता है a प्रतिबंध या द्वारा अतिदेय/नोटिस की स्थिति ट्रिगर
Staff with the force_checkout permission (or superlibrarian) will be able to temporarily override a restriction in order to check out anyway.

संरक्षक के अपने पते की पुष्टि करने की जरूरत है

यह एक संरक्षक रिकॉर्ड को संपादित करने वाले कर्मचारियों द्वारा निर्धारित किया जा सकता है और एक ध्वज जोड़ना।
संरक्षक अपने पुस्तकालय कार्ड खो दिए है

यह एक संरक्षक रिकॉर्ड को संपादित करने वाले कर्मचारियों द्वारा निर्धारित किया जा सकता है और एक ध्वज जोड़ना।
'This item has been lost with a status of "X".'

This message appears if the IssueLostItem is set to 'display a message' and the item being checked out has a lost status.
The item is checked out.
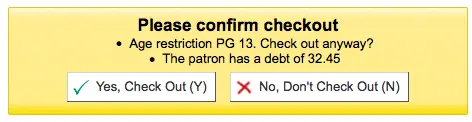
चेतावनी चेक आउट
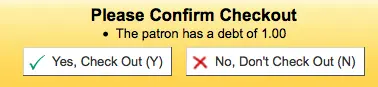
कभी कभी checkouts चेतावनी संदेश है कि क्षेत्र से बाहर की जांच के ऊपर एक पीले बॉक्स में दिखाई देगा ट्रिगर किया जाएगा। इन चेतावनियों से पहले आप आइटम की जाँच के बाहर जारी रखने के लिए सक्षम हो जाएगा स्वीकार किया जाना करने की जरूरत है।
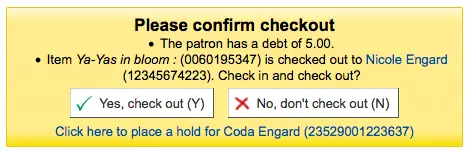
संरक्षक बकाया जुर्माना किया गया है
किसी और के लिए आइटम होल्ड
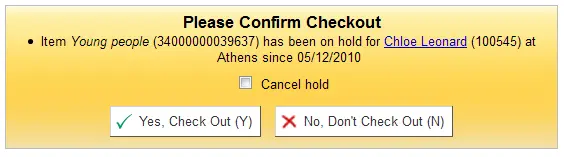
आइटम किसी और के लिए इंतजार कर होल्ड शेल्फ पर होना चाहिए
Item booked for someone else
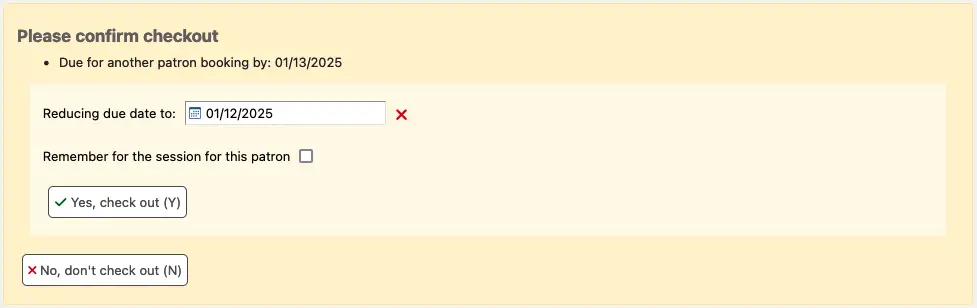
Bookable items can be issued without a prior booking, in accordance with the circulation rules. If a booking on the item being checked out is due to start before the end of the loan period, this warning will appear.
Koha will automatically suggest to reduce the item due date to a new date prior to the start of the booking. You can adjust this before checking out.
आइटम पहले से ही इस संरक्षक करने के लिए बाहर की जाँच

अन्य संरक्षक को आइटम चैक आउट
यह चेतावनी आपको उस संरक्षक के लिए आइटम पर रोक लगाने की अनुमति देगी जिसे आप इसे जांचने की कोशिश कर रहे हैं।
आइटम ऋण के लिए नहीं
सरंक्षक को बहुत सारी चीजें चैंक आउट हैं और AllowTooManyOverride अनुमति' के लिए सेट है

सरंक्षक को बहुत सारी चीजें चैंक आउट हैं और AllowTooManyOverride नही अनुमति' के लिए सेट है

आइटम का नवीनीकरण नहीं किया जा सकता

This can be overridden with the AllowRenewalLimitOverride system preference
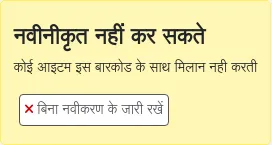
बारकोड नहीं मिलाः
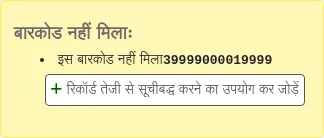
Learn more about fast cataloging later in this manual.
'This item has been lost with a status of "X". Check out anyway?'

This warning message appears if the IssueLostItem system preference is set to 'require confirmation' and the item being checked out has a lost status.
Staff must click 'Yes, check out' for the item to be checked out.
आइटम चैंक आउट की जा रही इस उम्र के संरक्षक लिए अनुशंसित नहीं है
Item being checked out meets the decreaseLoanHighHolds system preference criteria
आइटम के साथ सामग्री है (फ़ील्ड 952$3, 'निर्दिष्ट सामग्री', भरा हुआ है)

If CircConfirmItemParts is set to 'Require', the staff member will have to confirm the checkout

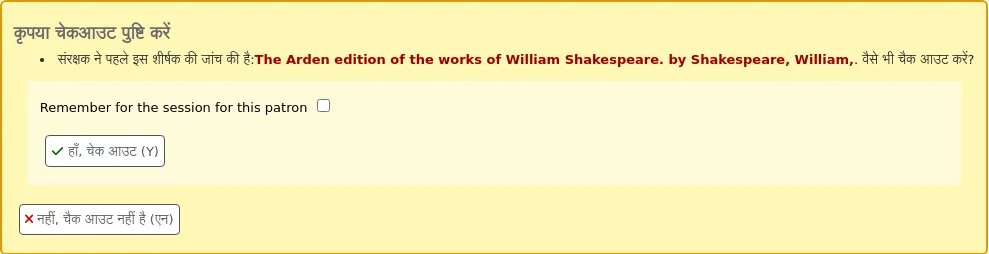
यदि CheckPrevCheckout सिस्टम वरीयता संरक्षक के परिसंचरण इतिहास की जांच करने के लिए कहता है, तो एक चेतावनी यह इंगित करेगी कि संरक्षक ने पहले से ही आइटम की जांच की है।
चेकआउट टिप्पणियाँ
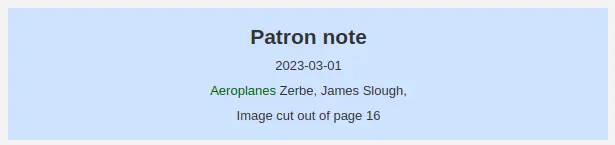
चेकआउट नोट्स नोट हैं कि संरक्षक किसी विशेष आइटम के बारे में OPAC से जोड़ सकते हैं जिसे उन्होंने चेक आउट किया है (उदाहरण के लिए: पहला पेज लापता, या डीवीडी खरोंच है, आदि)।।
चेकआउट नोट्स को सक्षम करने के लिए, सेट करें AllowCheckoutNotes सिस्टम वरीयता 'अनुमति'।
एक बार सिस्टम वरीयता सक्रिय हो जाने के बाद, 'रिपोर्ट ए प्रॉब्लम' शीर्षक वाला एक नया कॉलम चेकआउट की सूची में दिखाई देगा ओपेक में संरक्षक का सारांश।
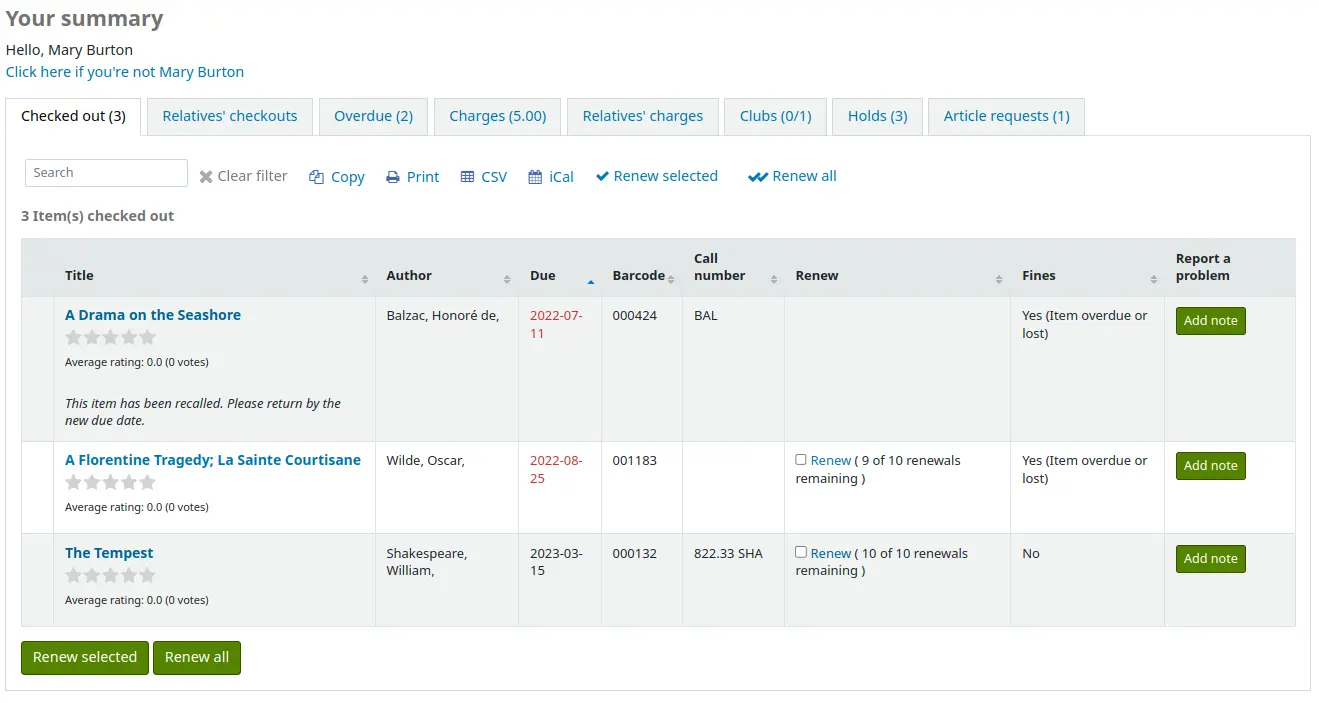
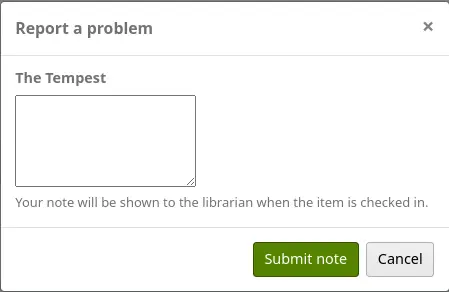
जब संरक्षक 'नोट जोड़ें' पर क्लिक करता है, तो वे इस चेकआउट के बारे में एक नोट लिखने में सक्षम होंगे।।
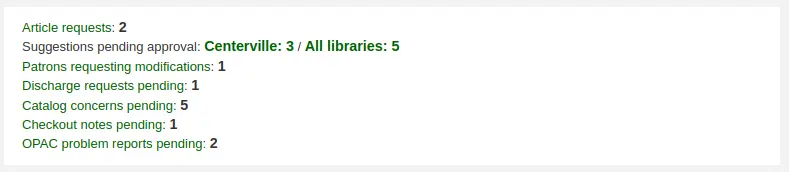
स्टाफ को अन्य लंबित अनुरोधों के साथ स्टाफ इंटरफेस के होम पेज के नीचे अनुभाग में नए चेकआउट नोटों से सतर्क किया जाएगा।।
टिप्पणी
Only staff with the manage_checkout_notes permission (or the superlibrarian permission) will see the new checkout notes and have access to the checkout notes management page.
एक ईमेल को ईमेल पते पर भी भेजा जाएगा KohaAdminEmailAddress सिस्टम प्रशासक को चेतावनी देने के लिए कि एक चेकआउट नोट जोड़ा गया था।।
टिप्पणी
You can customize this message in the Notices and slips tool. The letter code is CHECKOUT_NOTE.
चेकआउट नोट्स परिसंचरण मॉड्यूल होम पेज, परिसंचरण के तहत से प्रबंधित किया जा सकता है > चेकआउट नोट्स, या स्टाफ इंटरफेस होम पेज के लंबित अनुरोध अनुभाग में संदेश पर क्लिक करके।।
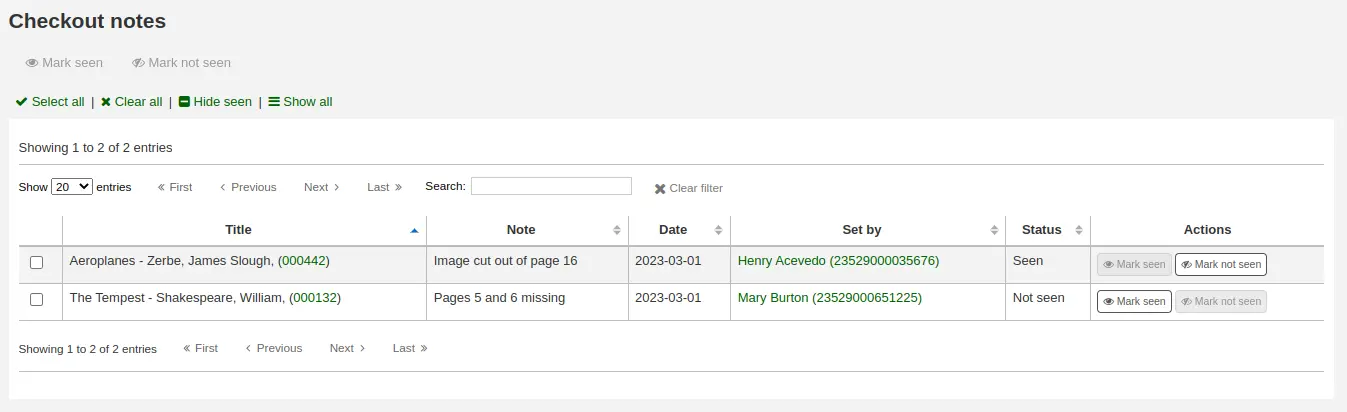
इस पृष्ठ से, कर्मचारी नोटों को देख सकते हैं, या तो व्यक्तिगत रूप से 'मार्क देखा' बटन को दाईं ओर क्लिक करके या एक बैच में नोट्स का चयन करके और पृष्ठ के शीर्ष पर 'मार्क देखा' पर क्लिक करके। जैसा कि देखा गया है, उन्हें स्टाफ इंटरफेस होमपेज के लंबित अनुरोध अनुभाग से हटा देगा।।
देखे गए नोटों को तालिका के शीर्ष पर 'छिपा हुआ देखा' लिंक के साथ फ़िल्टर किया जा सकता है।
चेकआउट नोट भी दिखाई देंगे चैकइन पर।
एक बार जब आइटम चैक़ड इन हो जाती है, तो नोट को इस पृष्ठ से स्थायी रूप से हटा दिया जाएगा।
नवीनीकरण चेकआउट
Checked out items can be renewed (checked out for another period of time) based on your circulation rules and renewal preferences.
If you allow it, patrons can renew their own items via the OPAC, but sometimes you'll need to help them by renewing their items via the staff interface.
आइटम को नवीनीकृत करने के लिए एक संरक्षक को जाँचा गया, आप तीन चीजों में से एक कर सकते हैं: संरक्षक के चेकआउट सारांश से नवीनीकृत करें, पृष्ठ के शीर्ष पर खोज बार से नवीनीकृत करें, या परिसंचरण मॉड्यूल के 'नया' अनुभाग से नवीनीकृत करें।।
संरक्षक के चेकआउट सारांश से नवीनीकरण
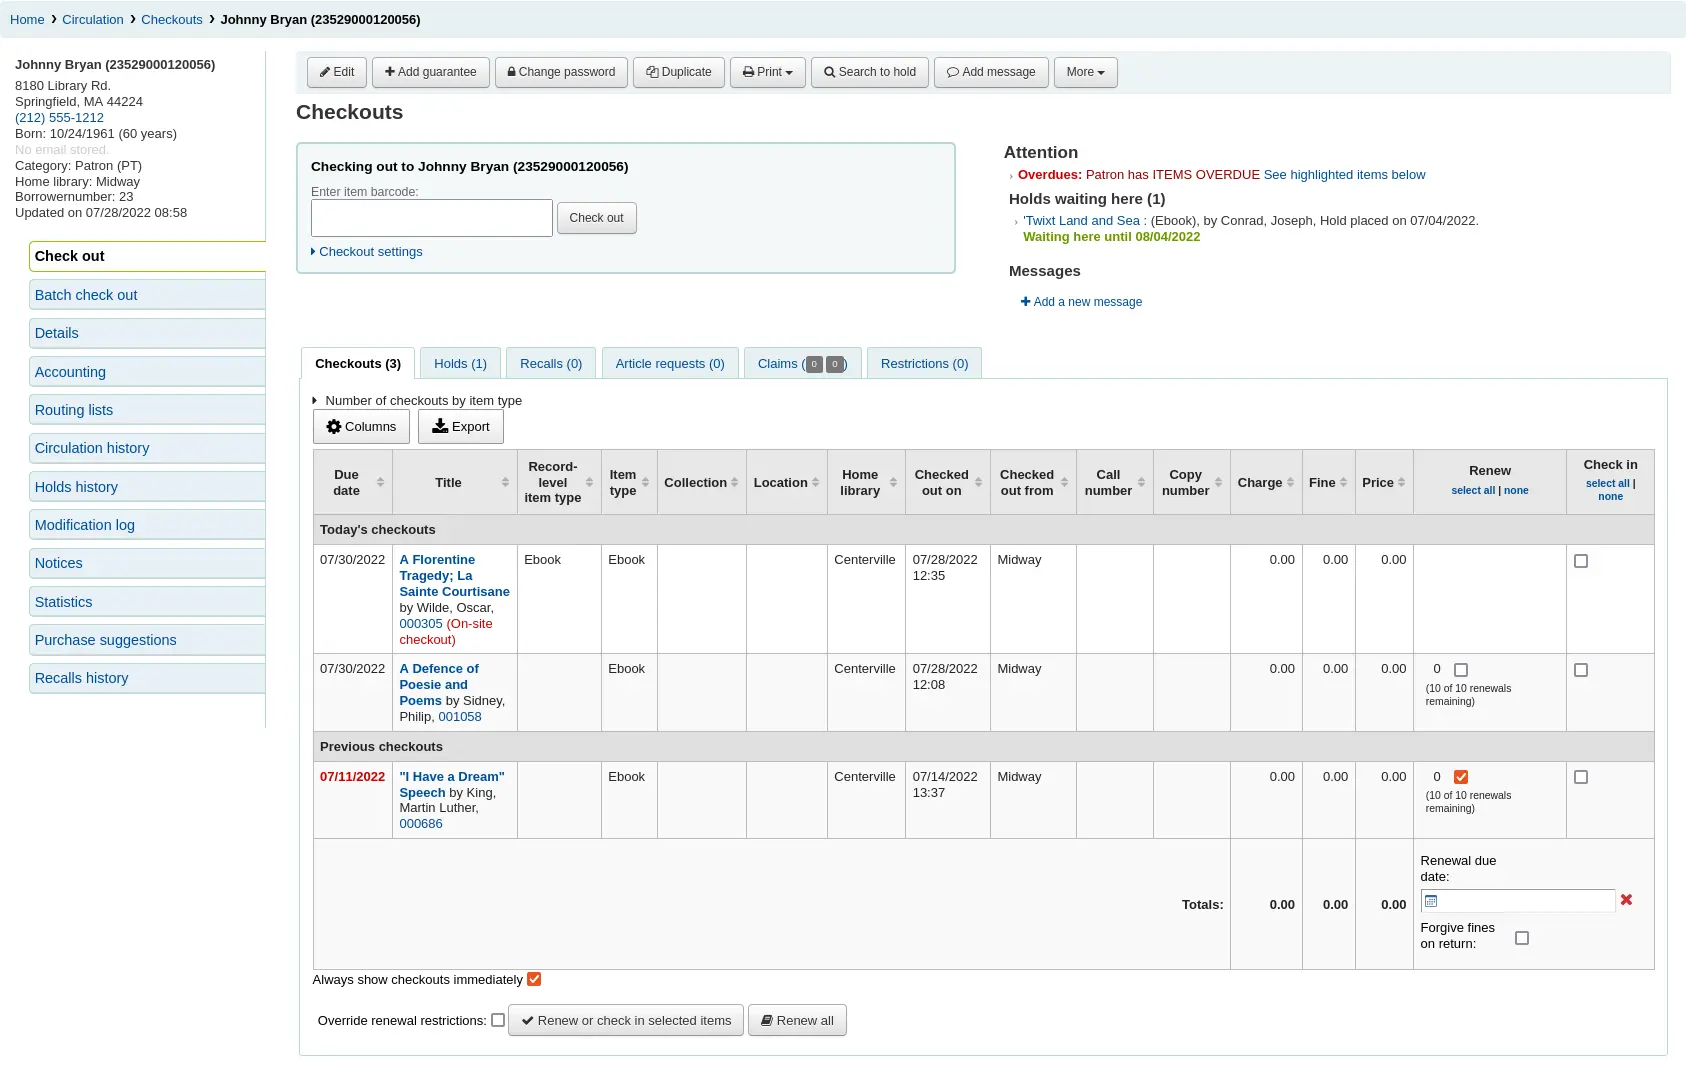
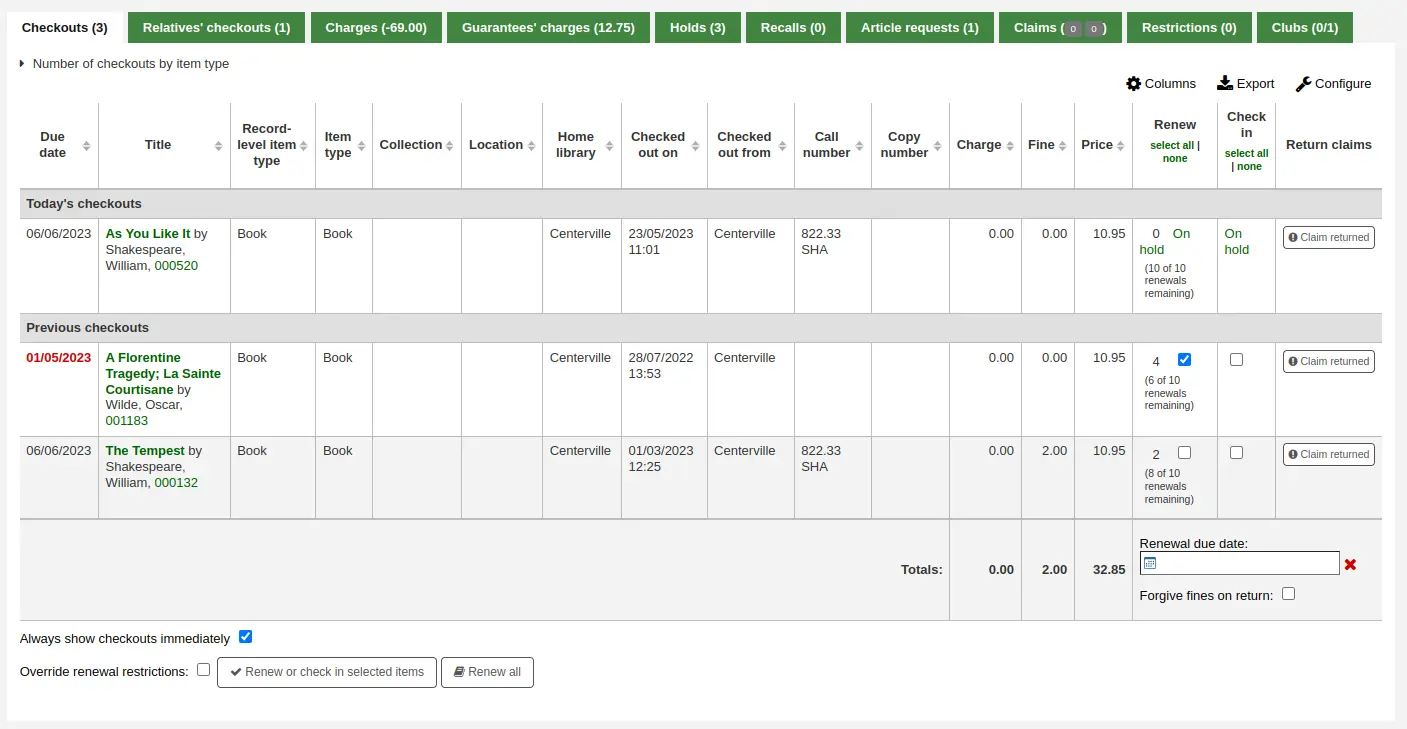
चेकआउट को नवीनीकृत करने का पहला तरीका यह है कि वह पैट्रन के विवरण पृष्ठ या चेकआउट पृष्ठ पर जाएँ और सबसे नीचे उनके चेकआउट सारांश को देखें।
'नवीनीकरण' कॉलम में, आप देखेंगे कि प्रत्येक आइटम को कितनी बार नवीनीकृत किया गया है और संरक्षक के लिए आइटम को नवीनीकृत करने के लिए एक चेकबॉक्स। उन वस्तुओं के बॉक्स की जाँच करें जिन्हें आप नवीनीकृत करना चाहते हैं और 'नवीनीकृत चयनित आइटम' बटन पर क्लिक करें। वैकल्पिक रूप से, संरक्षक को चेक किए गए सभी आइटमों को नवीनीकृत करने के लिए 'नवीनीकृत सभी' बटन पर क्लिक करें।

सावधानी
कोहा संस्करण 23.11 से पहले, बटन को 'चुने हुए वस्तुओं में नवीनीकृत या चेक करें' कहा गया था और दोनों को नवीनीकृत करने और उस पर निर्भर करता है जिस पर बॉक्स की जांच की गई थी।।
टिप्पणी
By default, items that are due today or already overdue are preselected.
सावधानी
Prior to Koha version 24.11, only overdue items were preselected.
कभी -कभी नवीनीकरण को आपके संचलन नियमों के आधार पर अवरुद्ध कर दिया जाएगा। इस ब्लॉक को ओवरराइड करने के लिए, AllowRenewalLimitOverride सिस्टम वरीयता को 'अनुमति' पर सेट किया जाना चाहिए। यदि आप नवीनीकरण सीमा ओवरराइड्स की अनुमति देते हैं, तो आपको परिसंचरण सारांश के नीचे बाईं ओर एक चेकबॉक्स दिखाई देगा। उस बॉक्स की जाँच करना ऊपर के नवीनीकरण कॉलम में चेकबॉक्स जोड़ देगा जहां आइटम अक्षय नहीं था।

उस बॉक्स को चेक करें, उन वस्तुओं को चुनें जिन्हें आप नवीनीकृत करना चाहते हैं, और फिर 'नए चयनित आइटम' पर क्लिक करें।
आप एक नवीकरण को 'अनदेखी' के रूप में भी चिह्नित कर सकते हैं, नवीनीकरण के बीच अंतर करने के लिए जहां कर्मचारियों ने वास्तव में आइटम, बनाम नवीकरण देखा है जहां उन्होंने इसे (फोन पर, उदाहरण के लिए) नहीं देखा था। ऐसा करने के लिए, आपको सबसे पहले सक्षम करना होगा UnseenRenewals सिस्टम वरीयता। एक बार सक्षम होने के बाद, एक चेकबॉक्स संचलन सारांश के नीचे बाईं ओर दिखाई देगा। नवीकरण को 'अनदेखी' के रूप में चिह्नित करने के लिए उस बॉक्स को देखें। फिर 'नवीनीकृत चयनित आइटम' या 'ऑल ऑल' पर क्लिक करें।

If you need to renew the checkout for a period different than the standard renewal period, you can pick a due date in the 'Renewal due date' box at the bottom of the 'Renewal' column. Make sure to enter the date before clicking the 'Renew selected items' button or the 'Renew all button'.
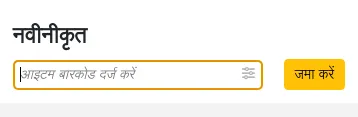
खोज बार से नवीनीकरण
यदि आपके पास हाथ में आइटम हैं, तो आप पृष्ठ के शीर्ष पर खोज बार में 'नया' विकल्प चुन सकते हैं (या प्रेस Alt + w, or Option + w ऑन Mac कंप्यूटर), और खोज क्षेत्र में बारकोड को स्कैन कर सकते हैं।।

यदि नवीनीकरण की अनुमति है, तो चेकआउट को निर्दिष्ट अवधि के लिए नवीनीकृत किया जाएगा संचलन नियम।
टिप्पणी
एक अलग नवीकरण अवधि निर्दिष्ट करने या यहां से नवीनीकरण सीमाओं को ओवरराइड करने का कोई तरीका नहीं है। आपको अन्य तरीकों में से एक का उपयोग करना होगा।।
'Renew' पेज से नवीनीकरण
हाँ जाओ: परिसंचरण> नवीकरण
चेकआउट को नवीनीकृत करने का अंतिम विकल्प परिसंचरण मेनू के तहत पाए गए 'नवीनीकरण' पृष्ठ पर जाना है।
उन आइटमों के बारकोड को स्कैन करें जिन्हें आप नवीनीकृत करना चाहते हैं।
If you need to renew the checkout for a period different than the standard renewal period, click the renewal settings icon in the field. This will open a 'Renewal due date' date picker under the barcode field where you can pick a due date.
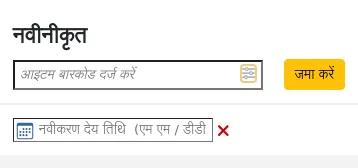
महत्त्वपूर्ण
Make sure to enter the date before scanning the barcode.
सावधानी
In versions of Koha prior to 25.05, the renewal date picker was always visible. The renewal settings icon was introduced in version 25.05 to make the interface consistent with other circulation pages in Koha.
आइटम को नवीनीकृत किया गया, तो आप एक पुष्टिकरण संदेश प्राप्त होगा।

अगर बारकोड नहीं पाया जाता है तो आपको एक त्रुटि के साथ प्रस्तुत किया जाएगा।
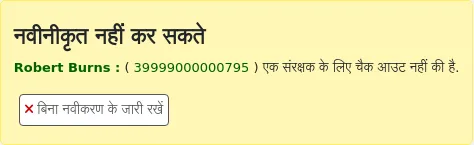
आइटम वास्तव में चैकआउट नहीं की है, तो आप भी एक त्रुटि प्राप्त होगा।
(returning) में आइटम की जांच करना
विभिन्न स्थानों से आइटम की जाँच की जा सकती है: स्टाफ इंटरफ़ेस के शीर्ष पर खोज बार, संरक्षक के चेकआउट सारांश में 'कॉलम इन' कॉलम, या सर्कुलेशन मॉड्यूल के 'पृष्ठ में समर्पित' चेक इन।
Koha also offers an automatic check-in feature, which can be set in item types and requires the automatic_checkin.pl cron job.
खोज बार से चैक इन करना
एक आइटम में जल्दी से जांच करने के लिए, आप पृष्ठ के शीर्ष पर खोज बार में 'चेक इन' विकल्प का चयन कर सकते हैं (या प्रेस Alt + r, or Option + r ऑन Mac कंप्यूटर), और खोज क्षेत्र में बारकोड को स्कैन कर सकते हैं।।

This will check in the item and bring you to the 'Check in' section of the Circulation module to check in more items.
टिप्पणी
There is no way to specify a return date, use the book drop mode, or forgive fines from the search bar. You need to go to Circulation > Check in to have access to those options.
संरक्षक के चेकआउट सारांश से जांच करना
Another way to check in items is to visit the patron's details page or checkout page and view their checkout summary at the bottom.
उन आइटमों के 'चेक इन' कॉलम में बॉक्स की जांच करें जिन्हें आप जांचना चाहते हैं और 'चेक इन चयनित आइटम' बटन पर क्लिक करें।।

सावधानी
कोहा संस्करण 23.11 से पहले, बटन को 'चुने हुए वस्तुओं में नवीनीकृत या चेक करें' कहा गया था और दोनों को नवीनीकृत करने और उस पर निर्भर करता है जिस पर बॉक्स की जांच की गई थी।।
चेतावनी
इस विधि को बारकोड को स्कैन करने के लिए स्टाफ की आवश्यकता नहीं होती है, जिससे आइटम को जांचने के लिए त्रुटियों का चयन किया जा सकता है। इस विधि का उपयोग करते समय सावधान रहें।।
Checking in from the 'Check in' page
Get there: Circulation > Check in
आप सर्कुलेशन मॉड्यूल में 'चेक इन' सेक्शन से भी आइटम की जांच कर सकते हैं।।
To check an item in, scan the barcode of the item into the box provided.
A summary of all items checked in will appear below the check-in box.
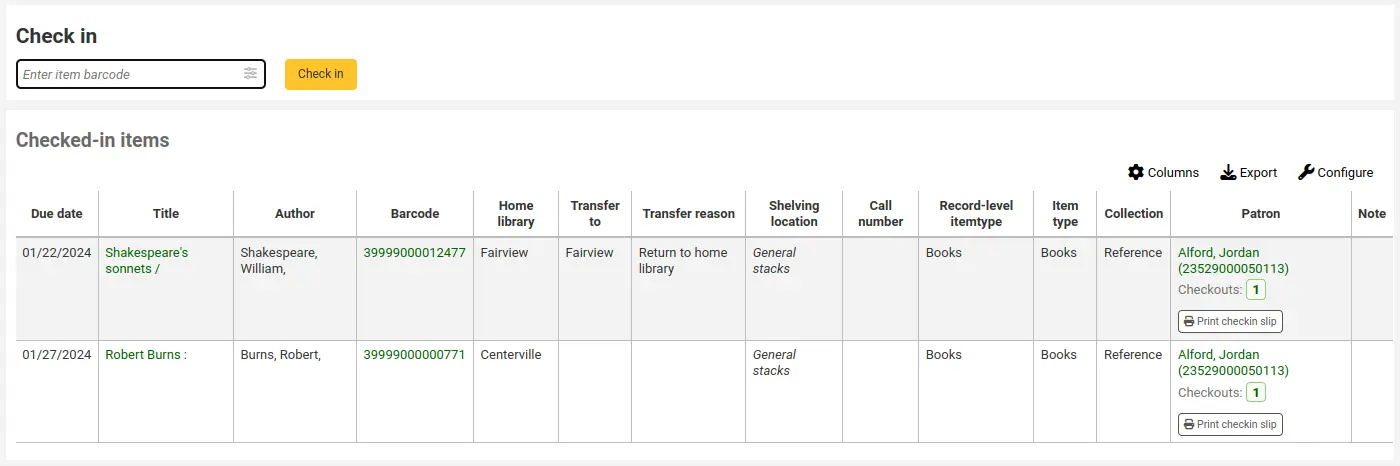
टिप्पणी
You can customize the columns of this table in the Table settings section of the Administration module (table id: checkedintable).
चेक-इन सेटिंग्स बारकोड क्षेत्र में सेटिंग्स आइकन पर क्लिक करके उपलब्ध हैं। इसका उपयोग गैर मानक चेक-इन के लिए किया जाता है, उदाहरण के लिए, यदि आपको एक अलग रिटर्न तिथि निर्दिष्ट करने की आवश्यकता है, या यदि आपको सभी जुर्मानाों को माफ करने की आवश्यकता है।।

If the SpecifyReturnDate system preference is set to 'Allow' you will be able to arbitrarily set the return date from below the check in box.
If you are checking items in that were put in the book drop while the library was closed, you can check the 'Book drop mode' box before scanning items. This will effectively roll back the return date to the last date the library was open.

टिप्पणी
This requires that the closed days are added to the calendar tool.
तुम भी आइटम आप की जाँच आइटम स्कैनिंग से पहले बॉक्स 'अतिदेय आरोपों माफ कर दो' द्वारा जाँच कर रहे हैं के लिए सभी अतिदेय आरोपों को माफ करने के लिए चुन सकते हैं।
टिप्पणी
This checkbox will only appear if you charge overdue fines, i.e., if the finesMode system preference is set to 'Calculate and charge'.
चैक इन संदेश
कई संदेश है कि जब में आइटम की जाँच दिखाई दे सकती हैं:
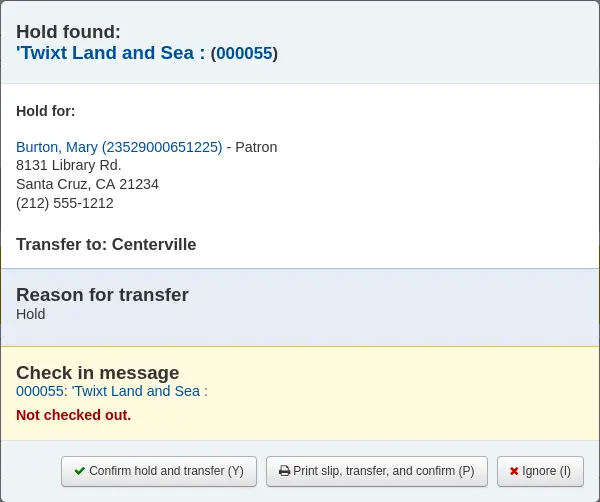
यदि वापिसी नीति डिक्टेट्स आइटम को अपने घर या होल्डिंग लाइब्रेरी में वापस लौटाने की आवश्यकता है, एक संदेश कर्मचारियों को आइटम को स्थानांतरित करने के लिए कहेगा।
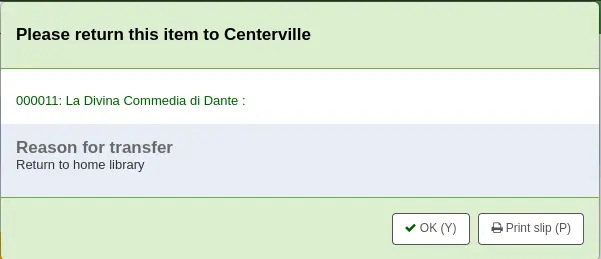
टिप्पणी
जब 'ब्लॉक' को सेट किया जाता है, तो transfersBlockCirc सिस्टम वरीयता सभी कार्यों को तब तक अवरुद्ध कर देगी जब तक पॉप-अप की पुष्टि नहीं की जाती है।।
जब "ब्लॉक न करें", तब AutomaticConfirmTransfer सिस्टम वरीयता निर्धारित करता है कि क्या होता है अगर पॉप-अप को हस्तांतरण की पुष्टि के बिना खारिज कर दिया जाता है।।
After this item is checked in and the transfer is confirmed, the status of the item will be changed in the catalog to 'in transit'.
To mark an item as back at the home or holding library, check the item in at that library.

A message will appear to tell you that the item is not checked out, but the status will now say available in the catalog. This step is necessary to mark items as received by the library.
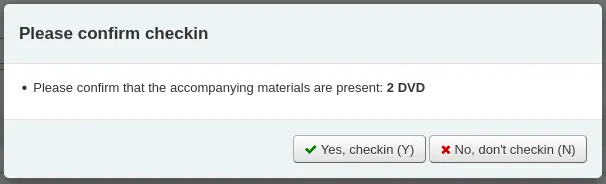
आप किसी वस्तु को कई भागों या टुकड़े संदेश टुकड़े की संख्या के बारे में चेतावनी दिखाई देगी होना चाहिए कि में जाँच कर रहे हैं, तो आप अपने हाथ में होनी चाहिए
अगर CircConfirmItemParts 'आवश्यकता' पर सेट है, स्टाफ सदस्य को चेकइन की पुष्टि करनी होगी
आप किसी आइटम की जाँच कर रहे हैं कि यह पर एक होल्ड है, आप पकड़ पुष्टि करने के लिए प्रेरित किया जाएगा
पुष्टि होल्ड बटन पर क्लिक पुस्तकालय से पिक के लिए इंतजार कर के रूप में आइटम का प्रतीक होगा

प्रिंट और संरक्षक की जानकारी के साथ पुस्तक पर जगह के लिए प्रिंट पर्ची क्लिक करके और पुस्तकालय में पिक के लिए इंतजार कर के रूप में आइटम के निशान और एक रसीद के साथ पुस्तकालय पेश करेंगे बटन की पुष्टि
होल्ड की उपेक्षा कर होल्ड पर आइटम छोड़ देंगे, लेकिन (यह होल्ड रद्द नहीं होगा) उपलब्ध रूप में अपनी स्थिति को छोड़
आप किसी वस्तु को एक और शाखा में उस पर एक होल्ड है कि में जाँच कर रहे हैं, तो आप इस बात की पुष्टि और आइटम हस्तांतरण करने के लिए प्रेरित किया जाएगा
पुष्टि होल्ड और हस्तांतरण बटन पर क्लिक पुस्तकालय के लिए पारगमन में के रूप में आइटम जहां होल्ड रखा गया था प्रतीक होगा

प्रिंट पर्ची क्लिक करने, स्थानांतरण और पुस्तकालय के लिए पारगमन में के रूप में आइटम का प्रतीक होगा बटन की पुष्टि करें जहां होल्ड रखा गया था और संरक्षक की जानकारी के साथ एक रसीद मुद्रित करने के लिए और किताब पर जगह के साथ पुस्तकालय पेश
होल्ड की उपेक्षा कर होल्ड पर आइटम छोड़ देंगे, लेकिन (यह होल्ड रद्द नहीं होगा) उपलब्ध रूप में अपनी स्थिति को छोड़
यदि आपके पास सिस्टम चेकइन के समय आपको जुर्माना दिखा रहा है (FineNotifyAtCheckin) आपको एक जुर्माना के बारे में बताने वाला एक संदेश दिखाई देगा और आपको उस संरक्षक के लिए भुगतान पृष्ठ का लिंक प्रदान करेगा

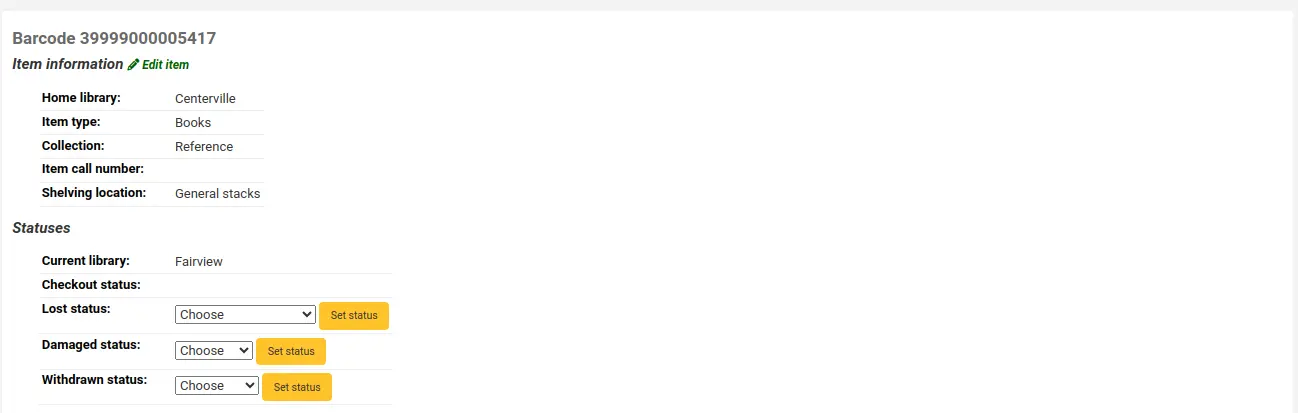
लौटाए गए आइटम का दावा करना
यदि संरक्षक दावा करता है कि वे कुछ वापस लौटते हैं, तो आप उस आइटम को 'क्लेक्ट लक्ष्य' के रूप में चिह्नित कर सकते हैं और उन दावों को ट्रैक कर सकते हैं।।
In order to use this feature,
Add a new authorized value to the LOST category to represent items claimed as returned.
Enter the authorized value in the ClaimReturnedLostValue system preference (this enables the return claims feature).
अगर एक खोया शुल्क संरक्षक जो वापस के रूप में एक आइटम का दावा करने के लिए शुल्क लिया जाना चाहिए चुनें। में एक मान सेट करें ClaimReturnedChargeFee सिस्टम वरीयता (डिफ़ॉल्ट यह पूछना है कि क्या एक खोया शुल्क लिया जाना चाहिए)।।
वैकल्पिक रूप से कई रिटर्न दावों को निर्धारित करते हैं कि एक संरक्षक अपने रिकॉर्ड में चेतावनी देने से पहले कर सकता है ClaimReturnedWarningThreshold सिस्टम वरीयता।
Once the feature is enabled, a button to 'Claim returned' will appear in the patron's checkouts tab.
To claim an item as returned,
चेकआउट के बगल में 'क्लेम रिटर्न' बटन पर क्लिक करें।
पॉप-अप में, इस दावे के बारे में कोई नोट्स दर्ज करें।।

यदि ClaimReturnedChargeFee सिस्टम वरीयता यह पूछने के लिए निर्धारित किया गया है कि खोए हुए शुल्क को संरक्षक को शुल्क लिया जाना चाहिए या नहीं।।
Click 'Make claim'.
दावा किया गया आइटम संरक्षक के चेकआउट में रहेगा, और इसकी खोई हुई स्थिति अपडेट की जाएगी। दावा भी 'दावा' टैब में दिखाई देगा।।
Resolving a return claim
To resolve a claim,
में संरक्षक के रिकॉर्ड पर जाएं 'दावा टैब।

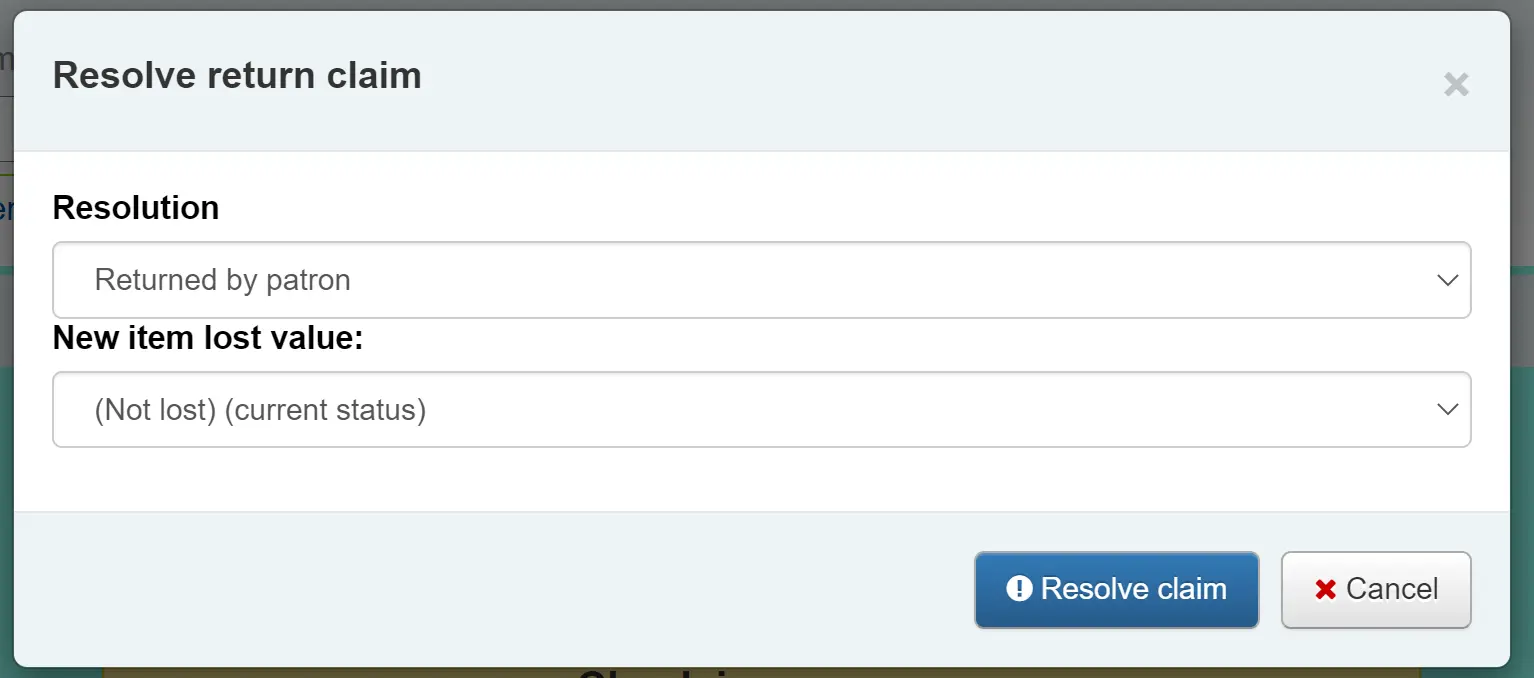
आइटम के बगल में 'क्रियाएं' पर क्लिक करें और 'संकल्प' चुनें।
पॉप-अप में, एक संकल्प और नई खोई हुई स्थिति चुनें।।
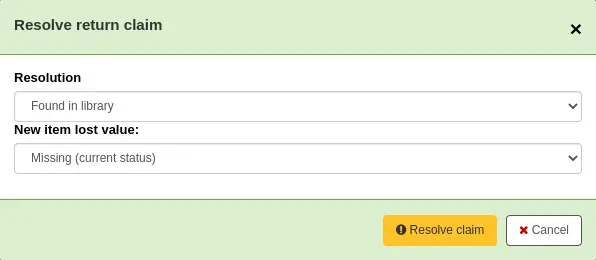
संकल्प: यह दावा बंद होने का कारण है।।
टिप्पणी
The values are managed in the RETURN_CLAIM_RESOLUTION authorized value category.
नया आइटम खो गया मूल्य: यह इस आइटम के लिए नई खोई हुई स्थिति है।
टिप्पणी
The values are managed in the LOST authorized value category.
'संकल्प दावा' पर क्लिक करें।
The resolved claim will stay in the patron's record, unless they are purged by the cleanup_database.pl cron job after the number of days specified in the CleanUpDatabaseReturnClaims system preference.
टिप्पणी
It is possible to set up return claims to be automatically resolved when the item is checked in or checked out with the system preferences AutoClaimReturnStatusOnCheckin and AutoClaimReturnStatusOnCheckout.
बंडलों को प्रसारित करना
यह सुविधा उन आइटमों के बंडलों को बनाने की क्षमता जोड़ती है जिन्हें एकल इकाई के रूप में चेक किया जा सकता है। एक बंडल उदाहरण के लिए आपकी लाइब्रेरी से संबंधित आइटमों का एक बॉक्स या संगीत स्कोर का एक संग्रह हो सकता है जिसे एक साथ प्रसारित करने की आवश्यकता है।
आप एक संग्रह स्तर ग्रंथ सूची रिकॉर्ड बनाते हैं और सामान्य तरीके से इसमें आइटम जोड़ते हैं। फिर उन वस्तुओं को अपने बारकोड का उपयोग करके मौजूदा आइटम रिकॉर्ड जोड़कर एक बंडल में परिवर्तित किया जा सकता है। आइटम उनके मूल रिकॉर्ड से जुड़े रहेंगे और उन्हें ‘ऋण के लिए नहीं’ के रूप में चिह्नित किया जाएगा।
कॉन्फ़िगरेशन
पहले आपको कुछ कॉन्फ़िगरेशन विकल्प बनाने की आवश्यकता है।
Item types - you may want to create a separate item type to identify your bundles.
Circulation rules - you can optionally create circulation rules for your bundle item type.
दो सिस्टम वरीयताएँ हैं जो बंडलों के साथ उपयोग की जाने वाली स्थिति मूल्यों को नियंत्रित करती हैं:
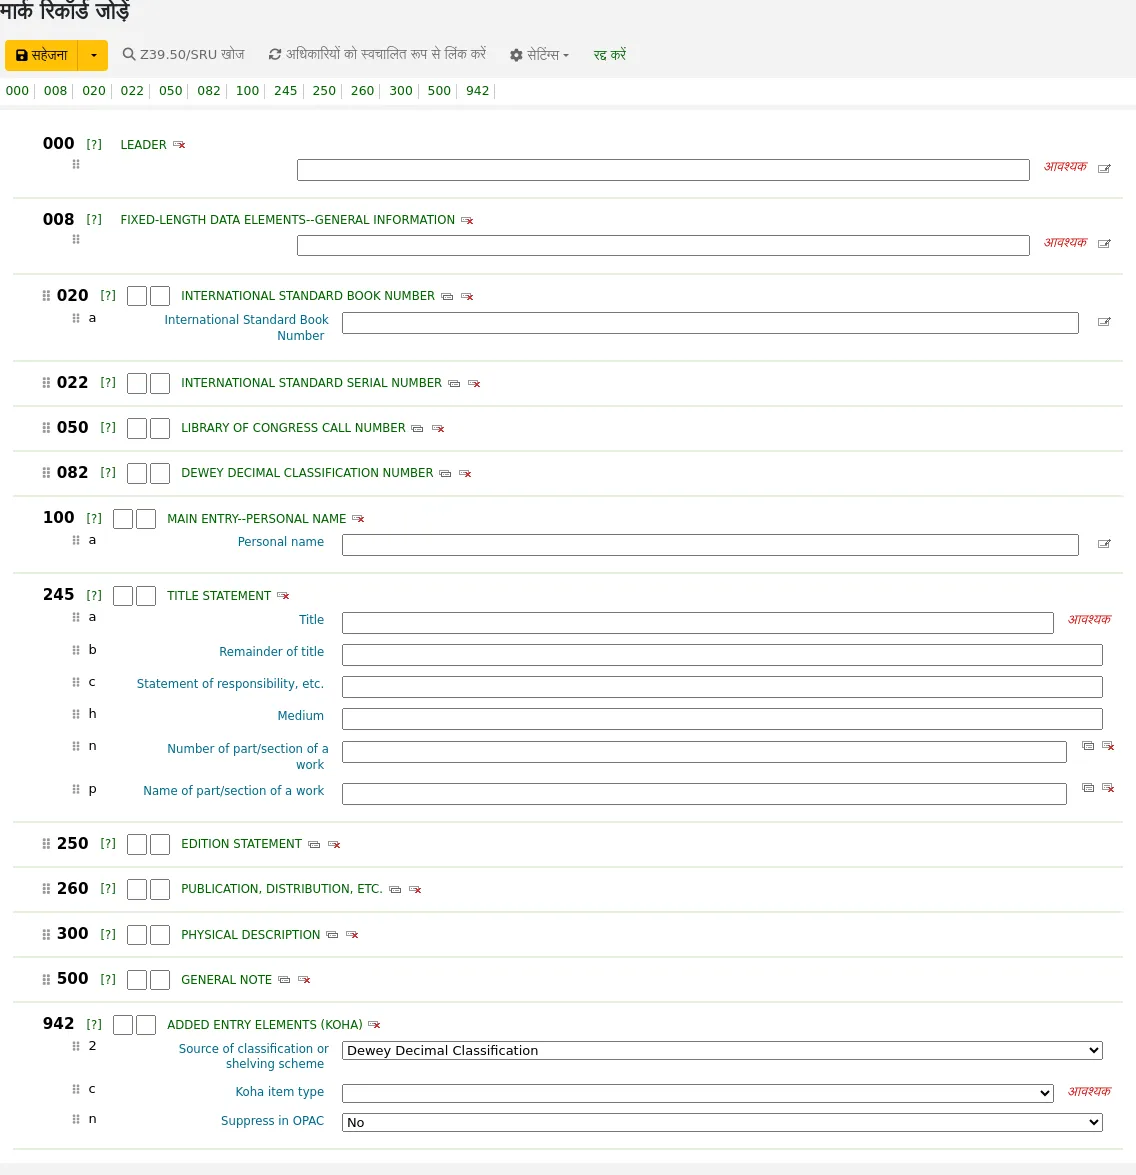
बंडलों का निर्माण
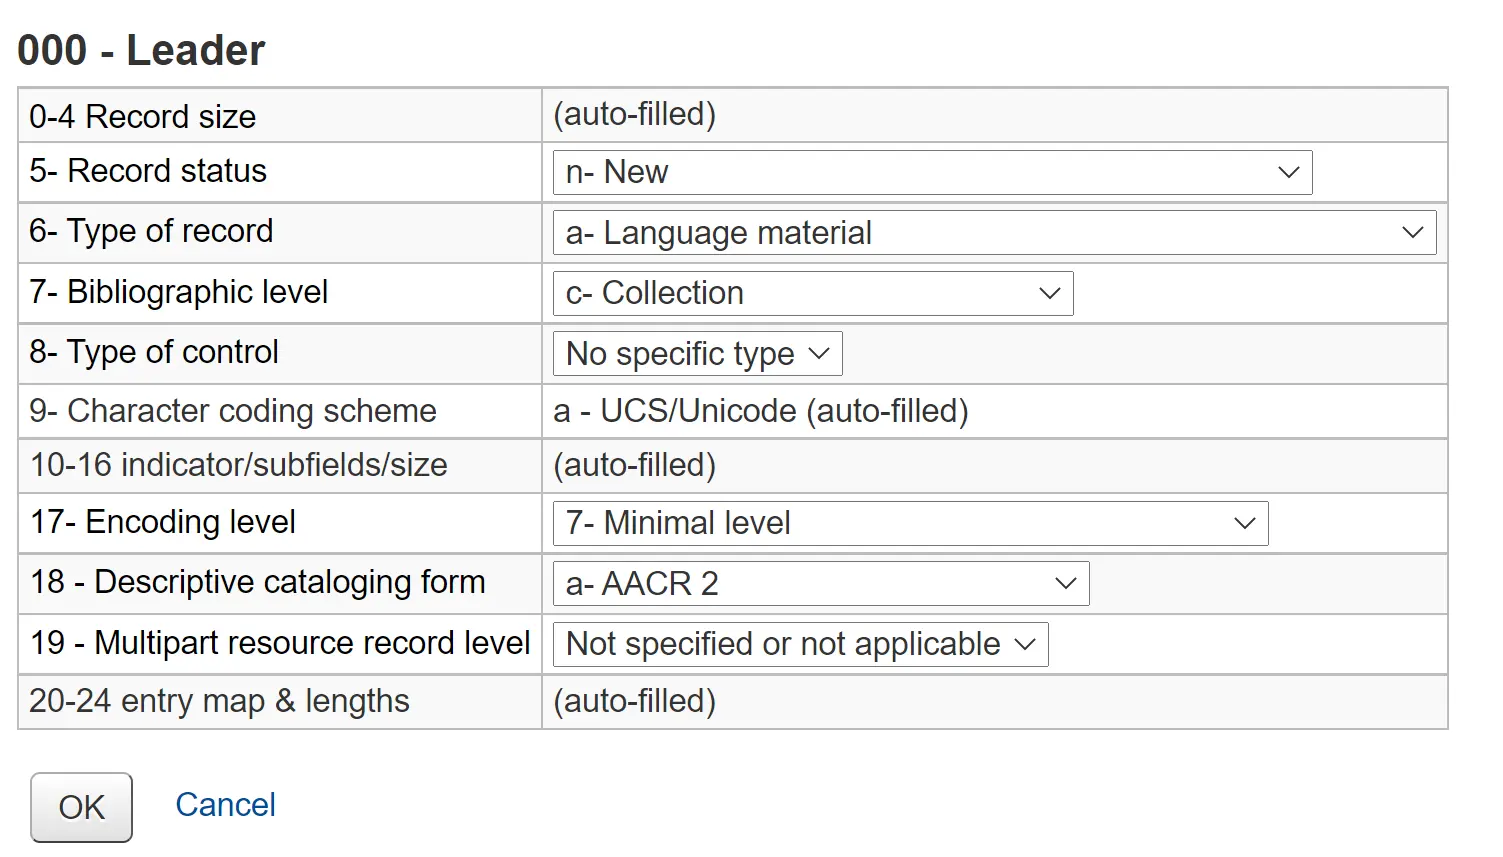
The bundle functionality will only be displayed if you create a catalog record with the Leader, (000 MARC tag) position 7 set to ‘c’ for Collection.
टिप्पणी
यदि आप नियमित रूप से बंडलों का उपयोग करेंगे, तो डिफ़ॉल्ट मान के रूप में ‘C' सेट के साथ बंडलों के लिए एक अलग मार्क ग्रंथ सूची ढांचा होना उपयोगी हो सकता है। आप किसी भी कस्टम फ़ील्ड को टेम्पलेट में भी जोड़ सकते हैं जो आकार या वजन जैसे बंडलों के लिए अद्वितीय हो सकता है।
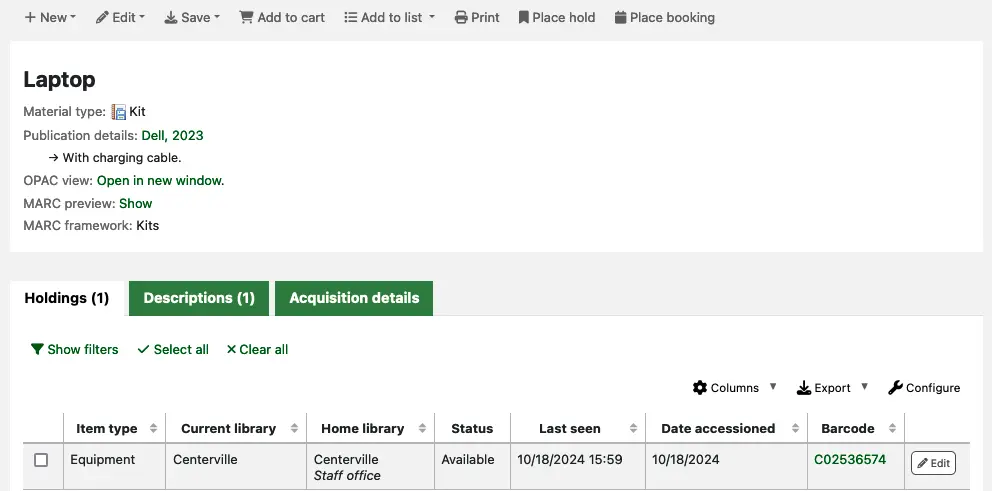
Your catalog record will contain information to identify the content of the bundle.
For example, if the bundle is a box of resources for school children on the topic of oceans, the catalog record might look something like the one shown below.
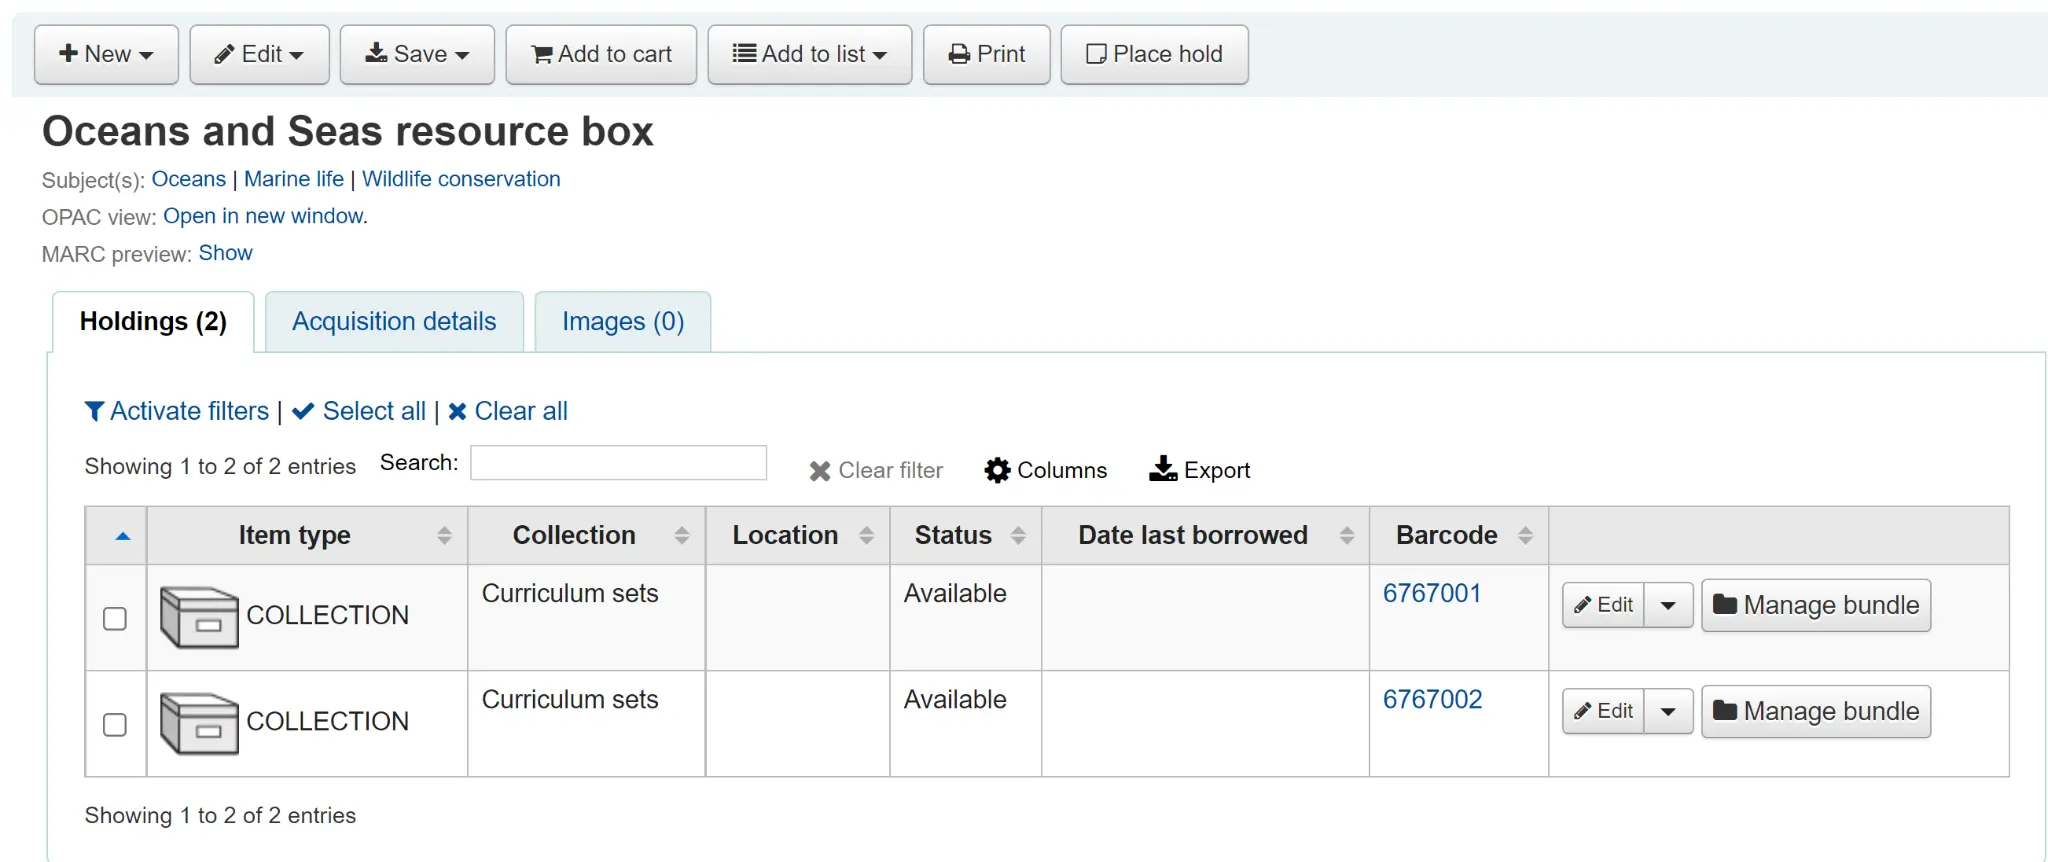
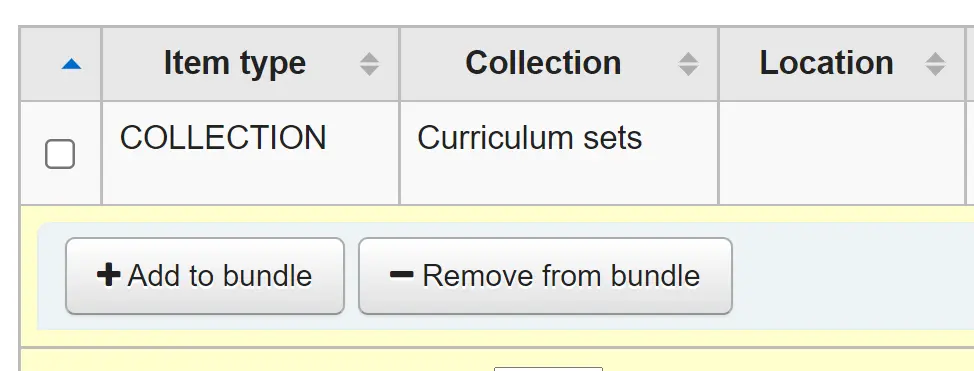
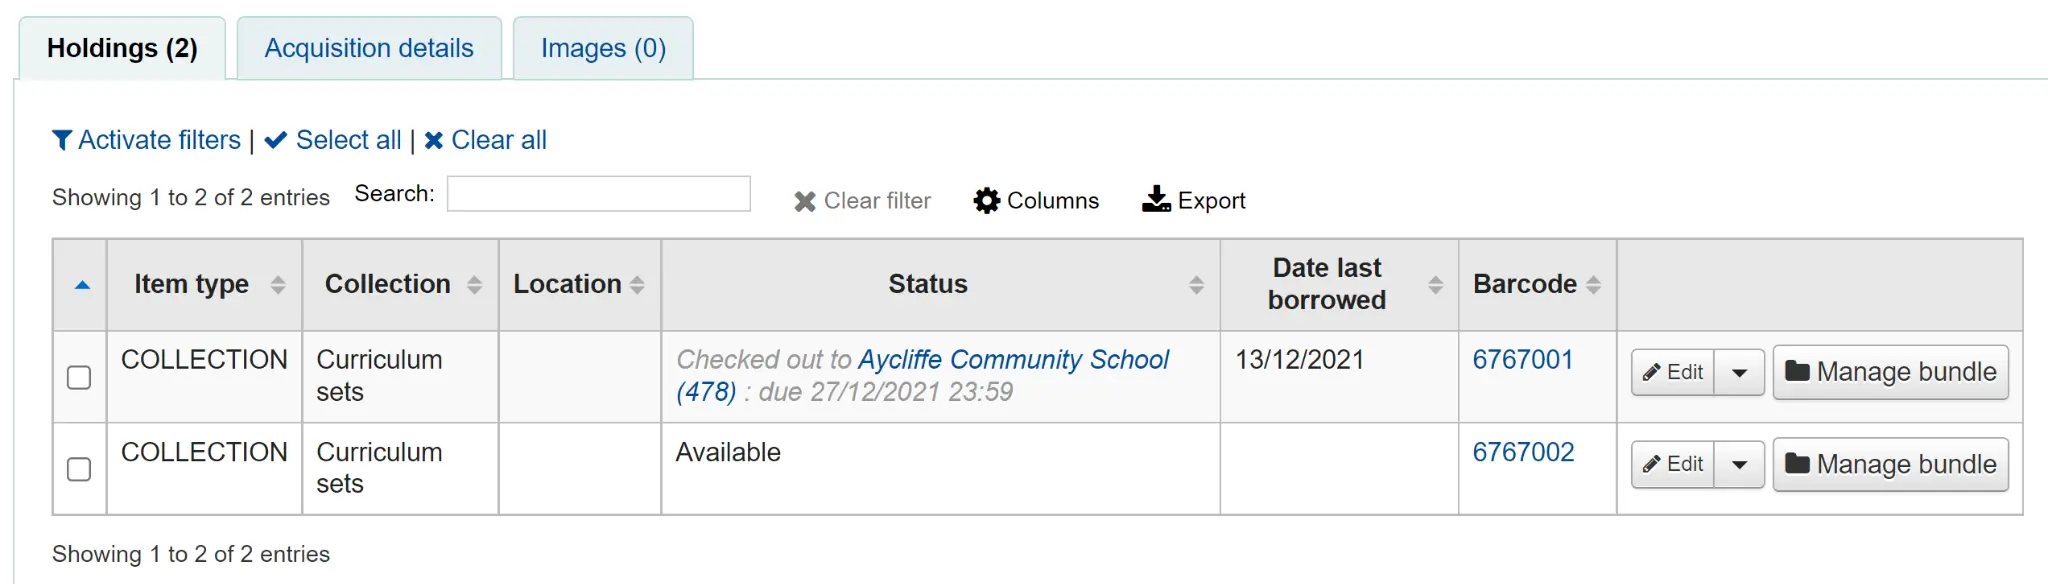
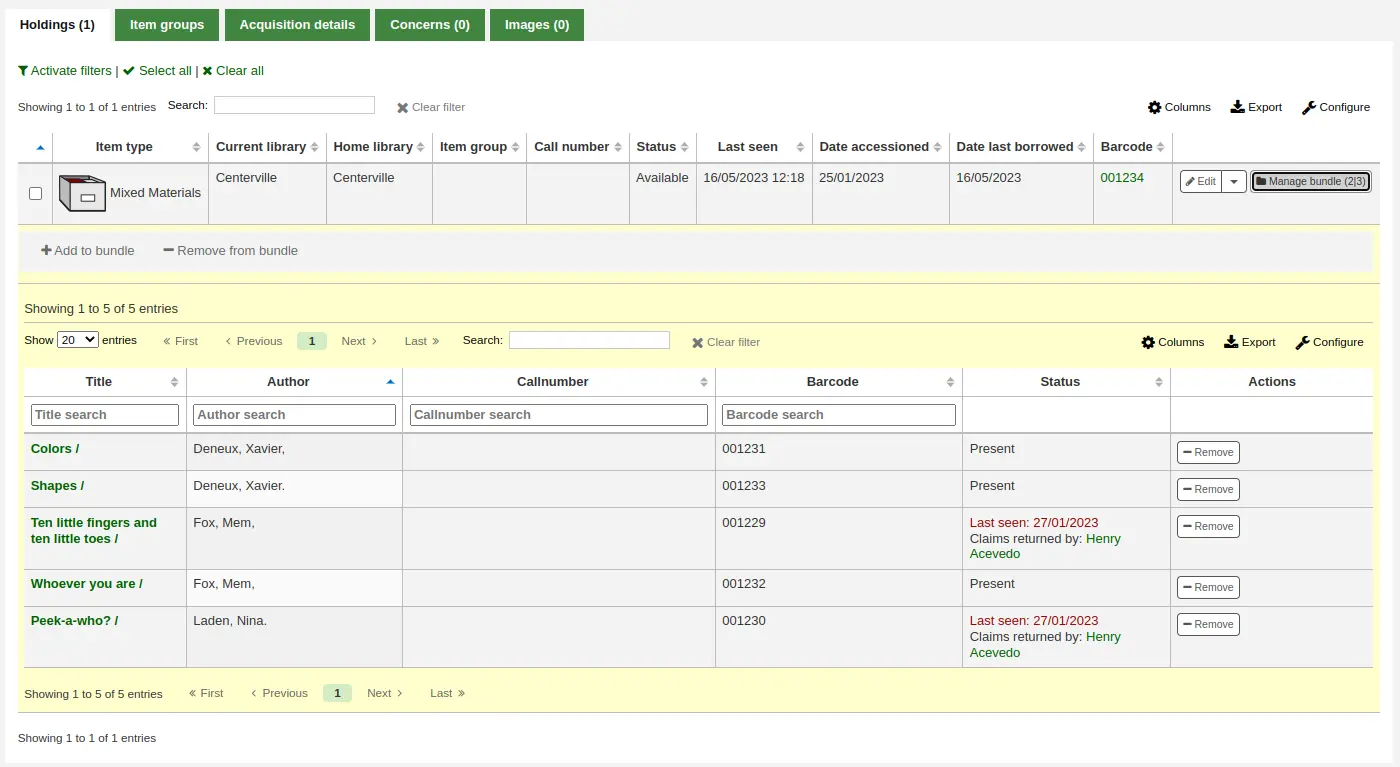
प्रत्येक भौतिक बंडल के लिए एक आइटम रिकॉर्ड जोड़ें। यह संभावना है कि आप बंडलों के लिए एक विशिष्ट आइटम प्रकार चाहते हैं ताकि आप उन्हें आसानी से पहचान सकें और उनके लिए संचलन नियम बना सकें। इस मामले में बंडल में आइटम प्रकार COLLECTION है।
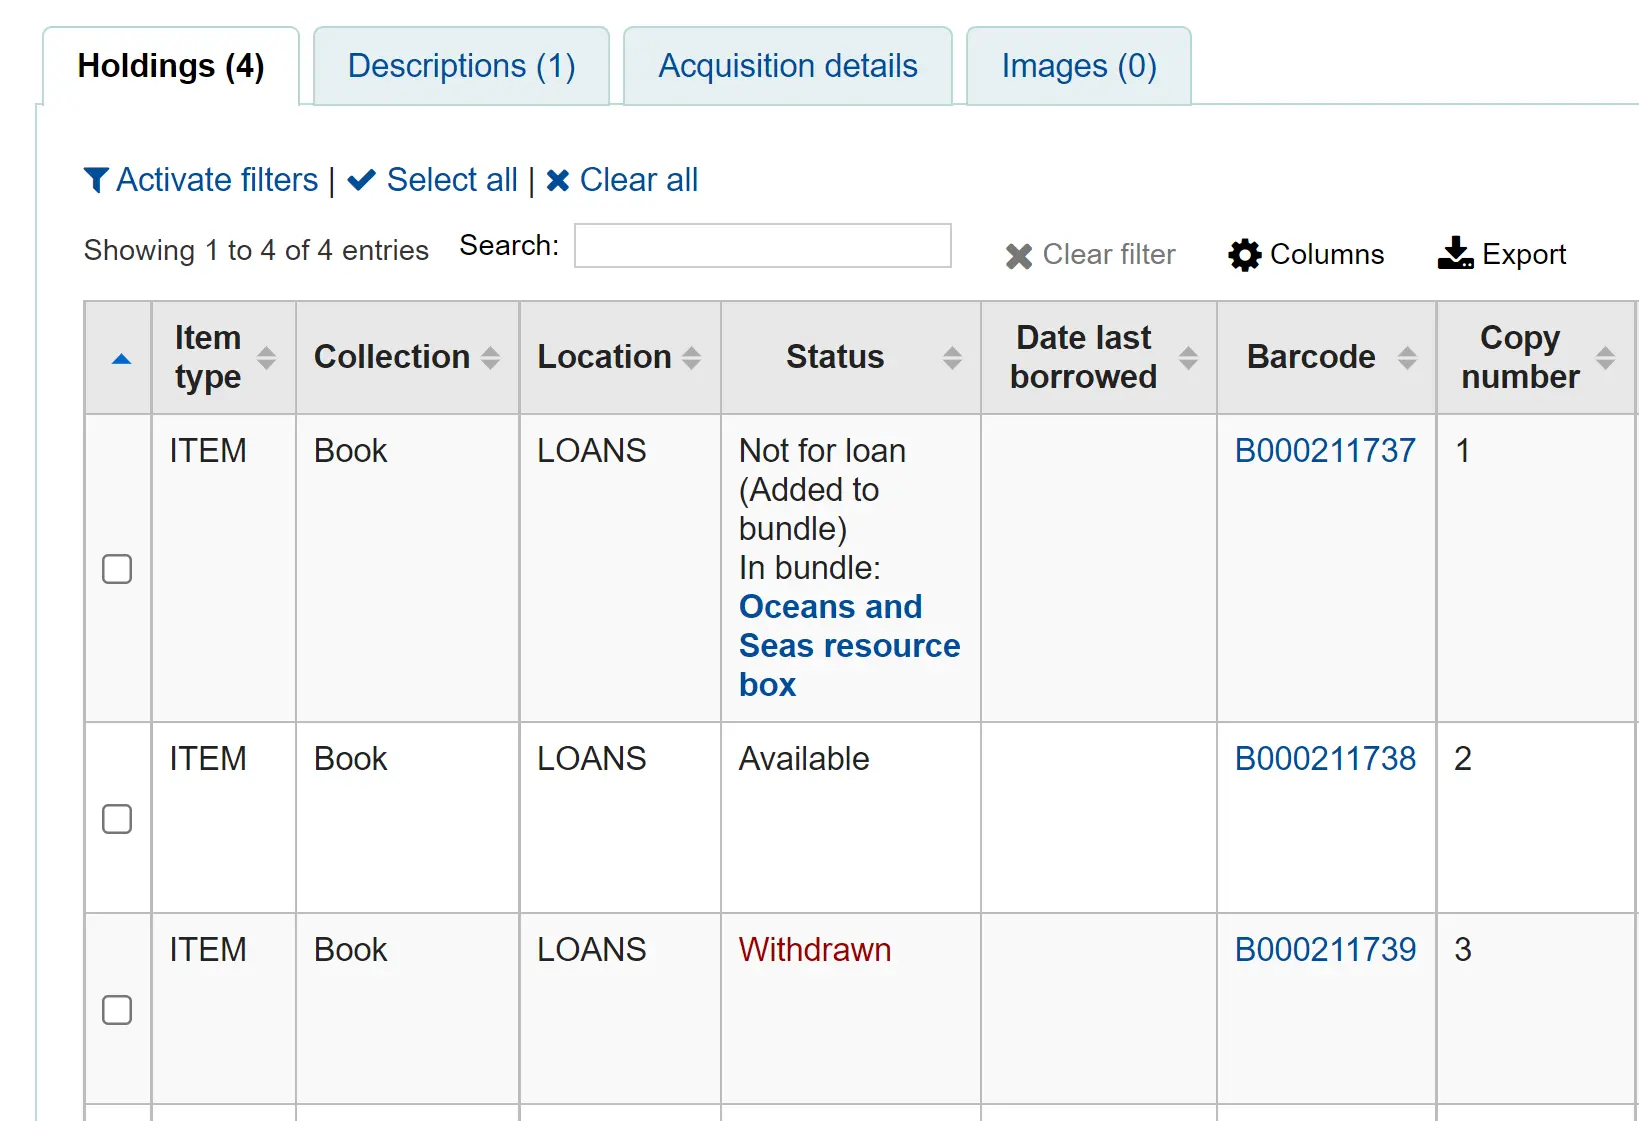
An item record attached to this type of catalog record can be converted into a bundle via the Manage bundle button on the far right-hand side of the holdings table for each item as shown below.
बंडलों में आइटम जोड़ना
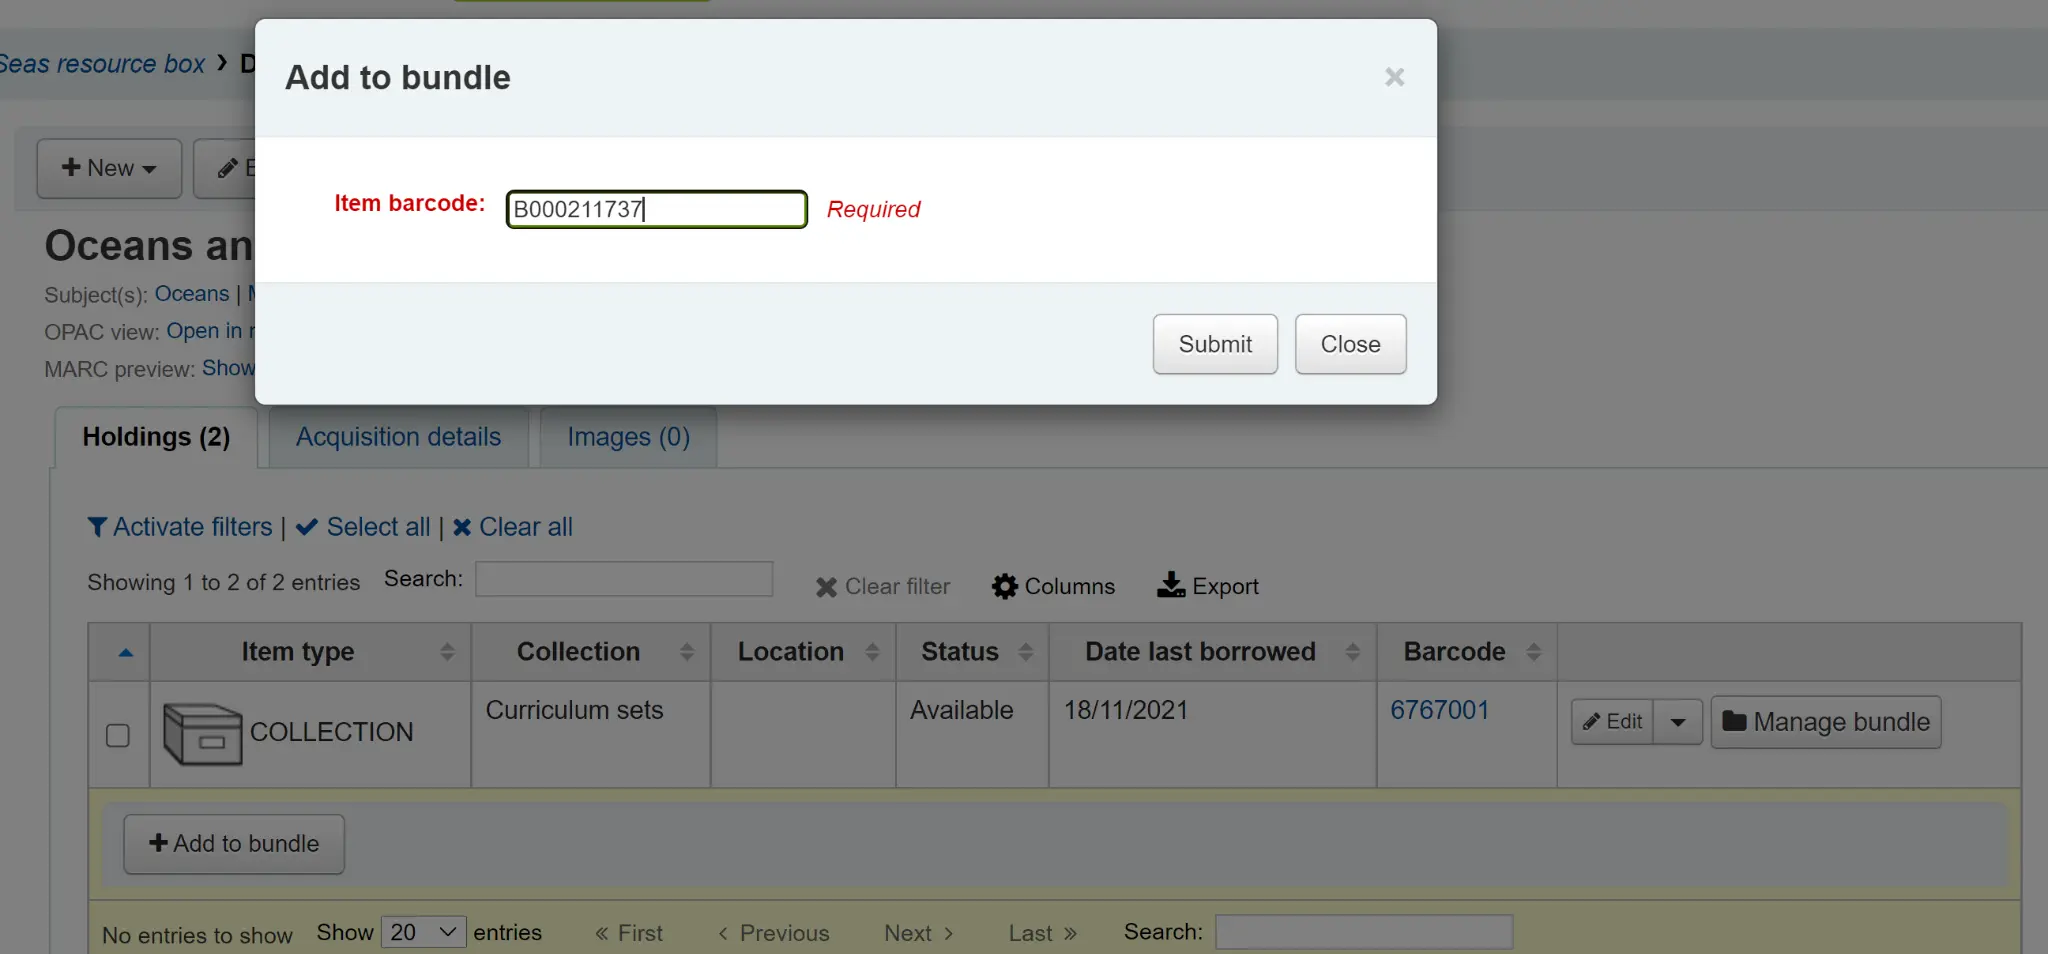
मैनेज बंडल पर क्लिक करें और फिर आइटम के बारकोड का उपयोग करके बंडल में आइटम जोड़ने के लिए बंडल बटन को जोड़ें।
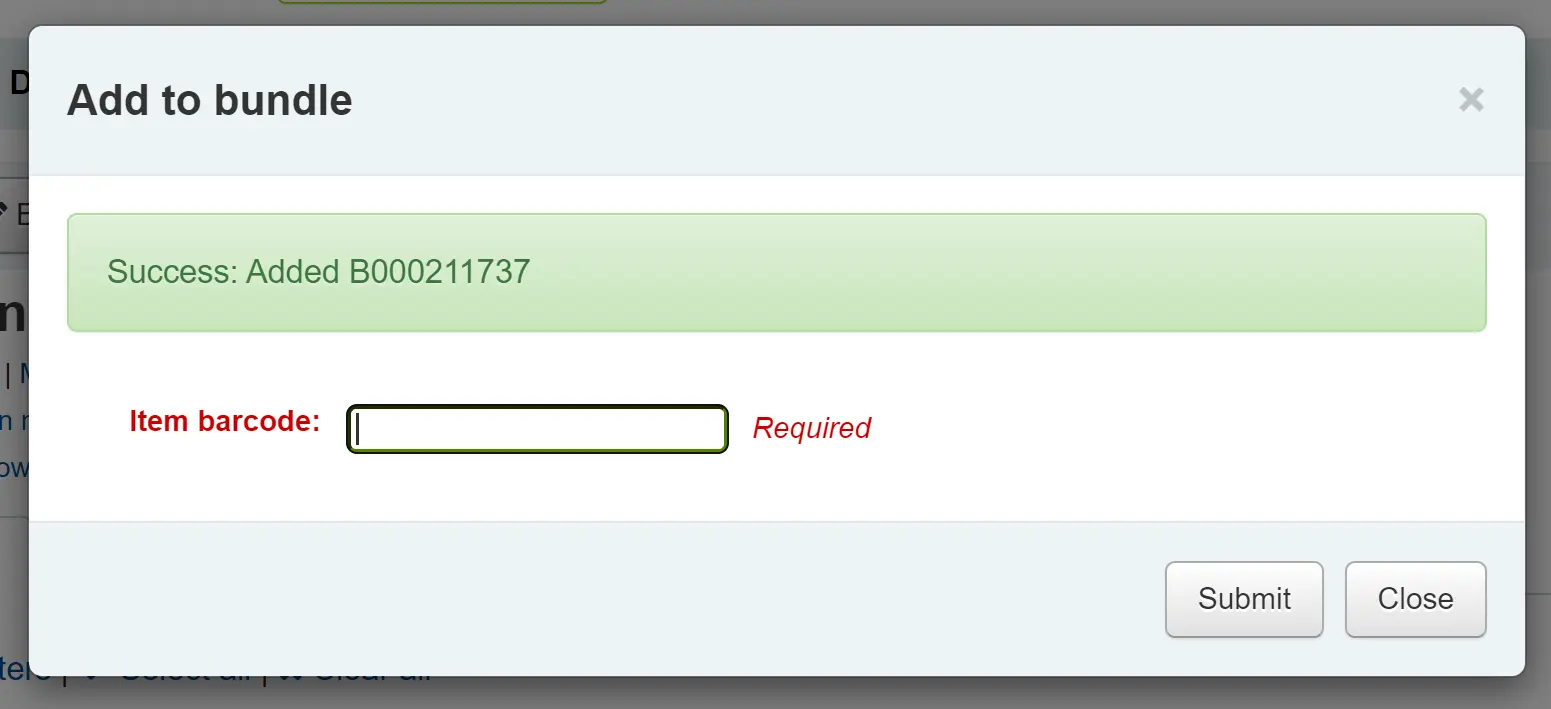
आपको यह बताते हुए एक संदेश दिखाई देगा कि आइटम को सफलतापूर्वक जोड़ा गया है।
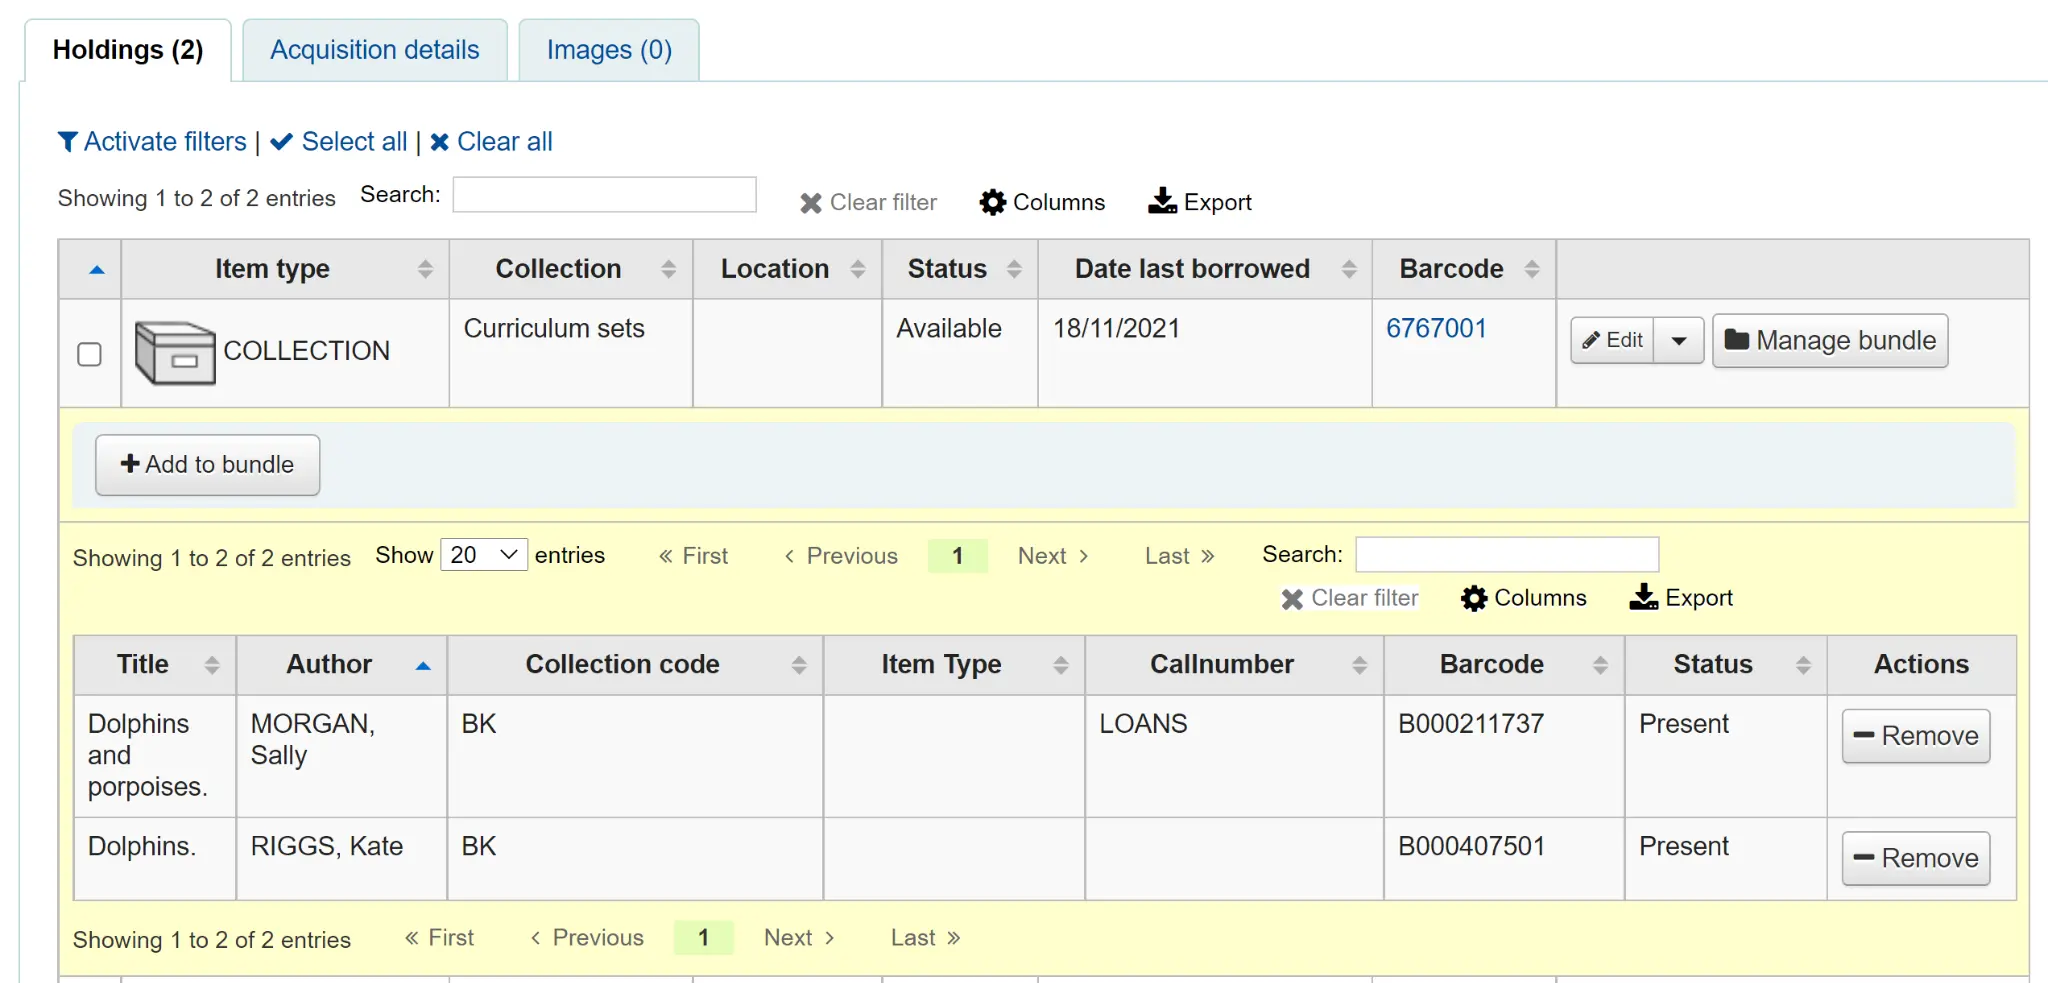
जब आपने आइटमों में स्कैनिंग समाप्त कर ली है, तो आप क्लोज़ पर क्लिक कर सकते हैं और बंडल सामग्री देख सकते हैं। यदि आवश्यक हो तो बंडल सामग्री सूची को निर्यात या मुद्रित किया जा सकता है।
चेतावनी
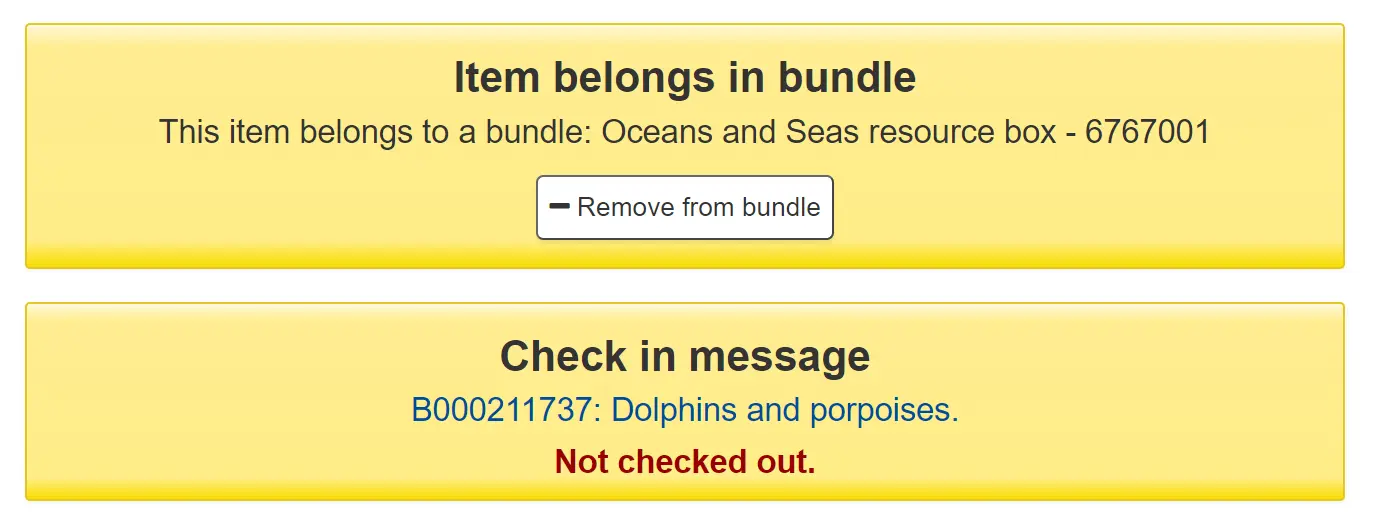
Items added to bundles are still attached to their permanent catalog record, however, they cannot be checked out individually. When added to a bundle an item’s Not for Loan status is updated and can be viewed in the holdings table of the permanent record along with a link to the bundle. The Not for Loan status can be defined in the BundleNotLoanValue system preference.
यदि कोई आइटम पहले से ही बंडल से जुड़ा हुआ पाया जाता है, तो एक चेतावनी संदेश प्रदर्शित किया जाएगा।

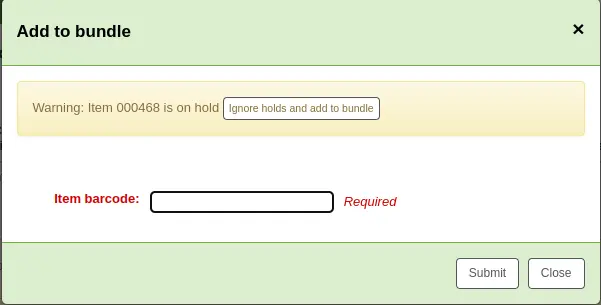
यदि किसी आइटम के पास एक आइटम लेवल होल्ड है, तो चेतावनी संदेश प्रदर्शित किया जाएगा। किसी भी तरह से बंडल में आइटम जोड़ने के लिए, क्लिक करें 'इग्नोर रखती है और बंडल में जोड़ें'। रद्द करने के लिए, 'Close' पर क्लिक करें।।
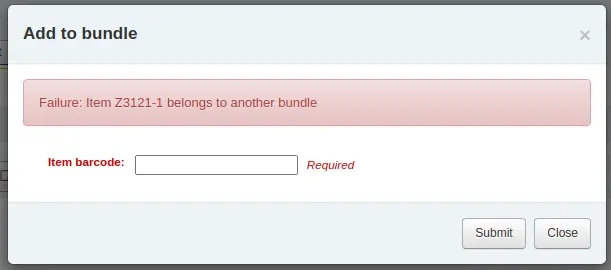
यदि किसी अन्य कारण से किसी आइटम को बंडल में नहीं जोड़ा जा सकता है, तो विफलता संदेश प्रदर्शित करेगा।
बंडलों से आइटम हटाना
एक बंडल से किसी व्यक्तिगत आइटम को हटाने के लिए आप बंडल सामग्री सूची के एक्शन कॉलम से निकालें बटन पर क्लिक कर सकते हैं।
बंडल से कई वस्तुओं को हटाने के लिए आपके पास दो विकल्प हैं:
मैनेज बंडल डिस्प्ले के भीतर से 'बंडल से निकालें' बटन का उपयोग करें
उसी तरह से बारकोड में स्कैन करें जैसे आप बंडलों में आइटम जोड़ते हैं। आपको यह बताने के लिए एक पुष्टिकरण संवाद दिखाई देगा कि आइटम हटा दिया गया है।
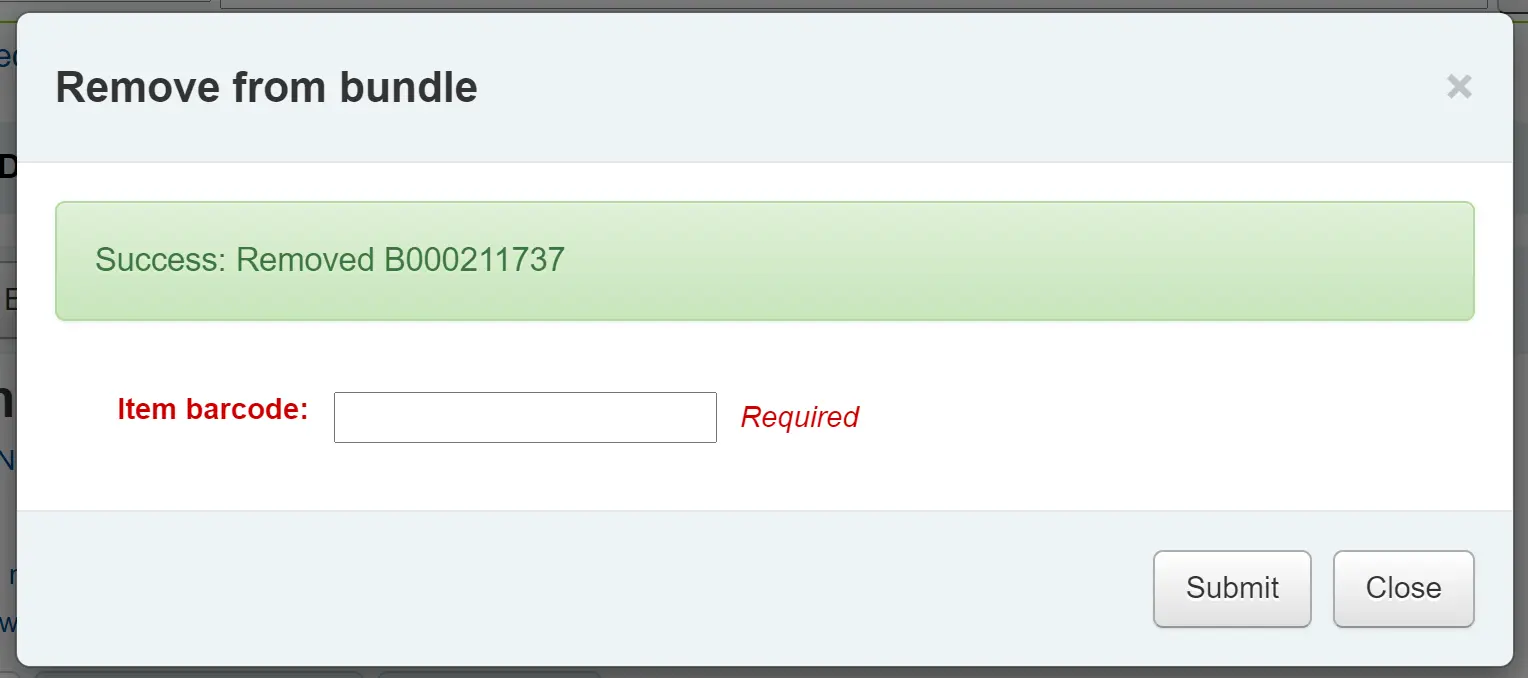
यदि आइटम को हटाया नहीं जा सकता है तो आपको एक विफलता संदेश दिखाई देगा।

कई आइटमों को हटाने का दूसरा तरीका आइटम के बारकोड को चेकइन बॉक्स में स्कैन करना है और आपको आइटम को उसके बंडल से हटाने का विकल्प दिया जाएगा।
जब आप एक बंडल के साथ काम करना समाप्त कर लेते हैं, तो आप फिर से प्रबंधित बंडल बटन पर क्लिक करके सामग्री सूची को बंद कर सकते हैं।
बंडलों को प्रसारित करना
चैकआउट:
आप बंडल के बारकोड का उपयोग करके परिसंचरण से सामान्य तरीके से एक बंडल की जांच कर सकते हैं। यदि आवश्यक हो तो आप उनके आइटम प्रकार के आधार पर बंडलों के लिए विशिष्ट परिसंचरण नियम बना सकते हैं।
याद रखें, एक बार जब कोई आइटम एक बंडल के भीतर होता है, तो उसे व्यक्तिगत रूप से चेक नहीं किया जा सकता है। यदि आप ऐसा करने का प्रयास करते हैं तो निम्न अलर्ट प्रदर्शित किया जाएगा।

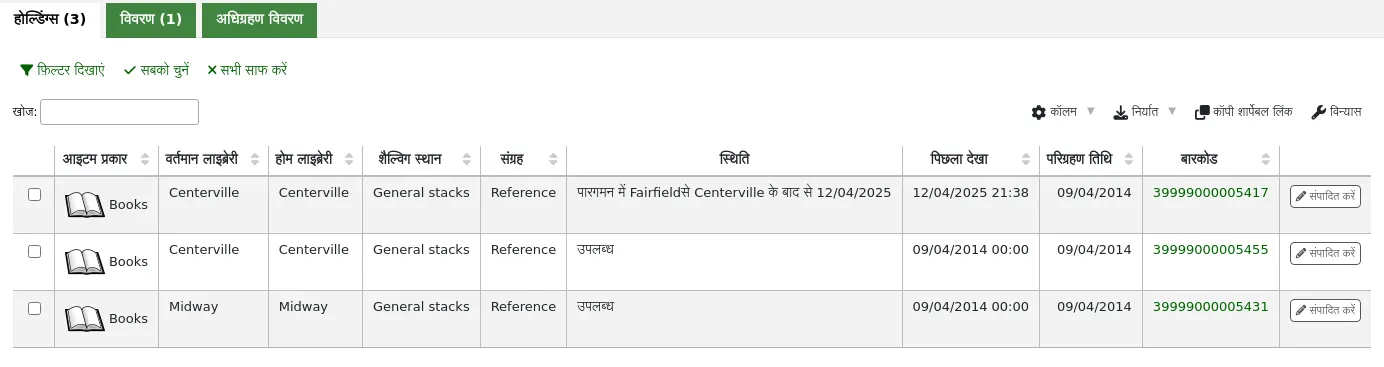
आप चेकआउट की पैट्रन की सूची से चेकआउट देख सकते हैं।
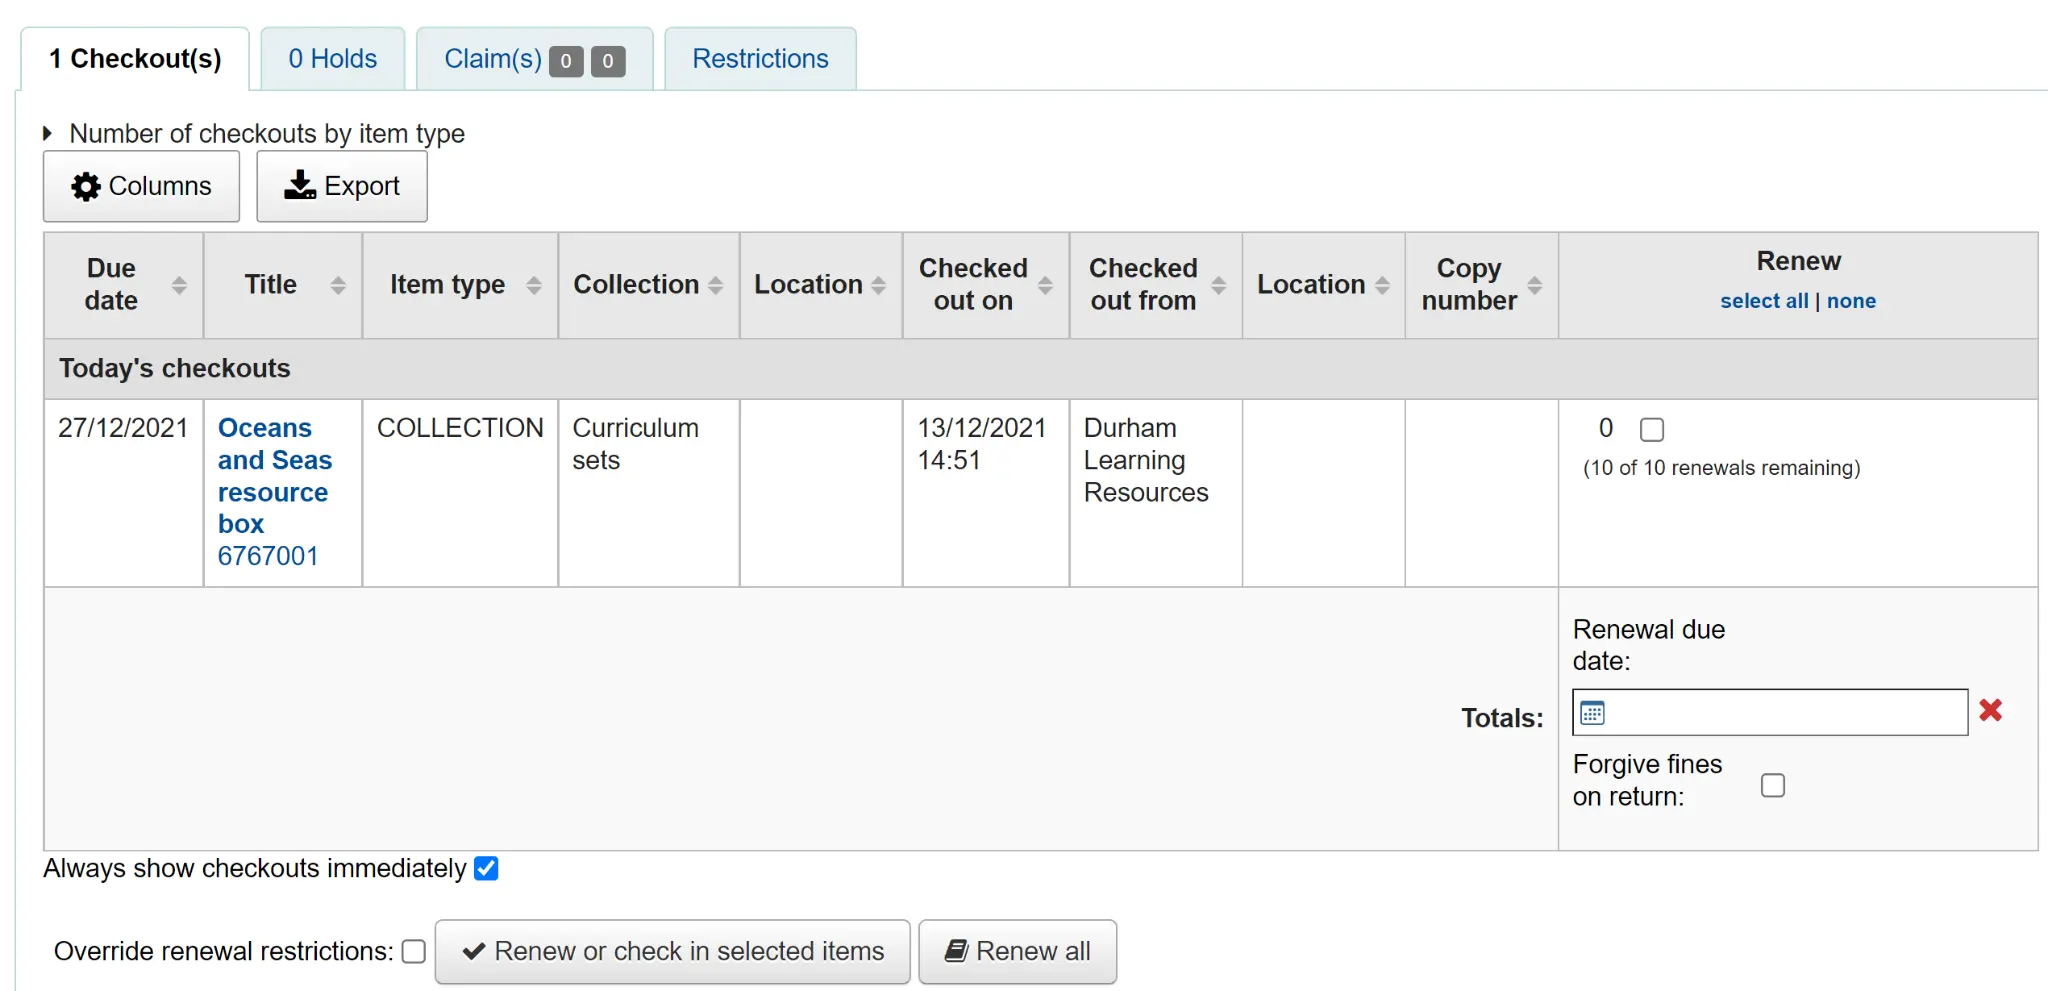
You can also see that the bundle is checked out from the status column of the Holdings table of the catalog record.
चैकइन
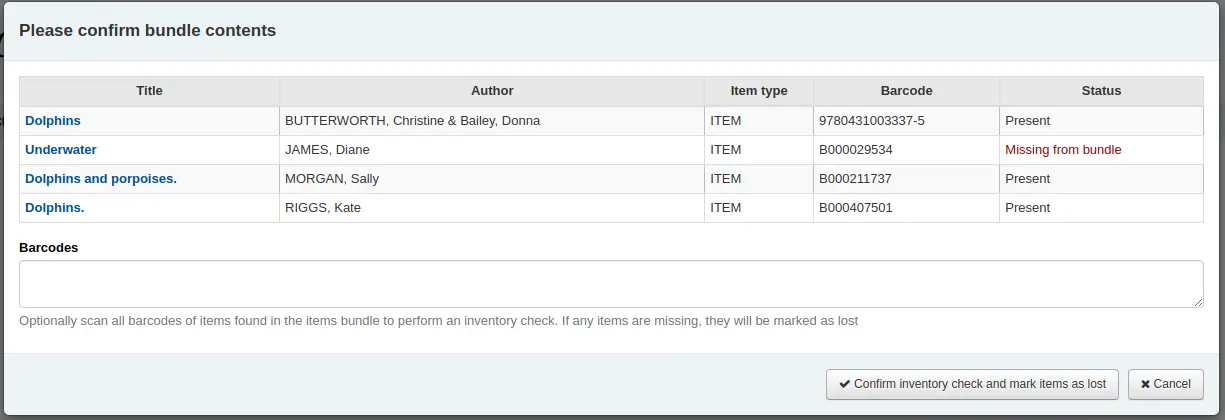
परिसंचरण से सामान्य तरीके से बंडलों में जाँच करें। फिर आपको प्रत्येक आइटम की उपस्थिति को सत्यापित करने के लिए प्रेरित किया जाएगा जो बंडल में है।
If you need to skip the verification process, click the 'Confirm checkin without verifying bundle contents' button. You will be able to verify the contents later.
वर्तमान में बंडल से जुड़ी वस्तुओं की एक सूची, और वापस लौटने की उम्मीद है, संवाद के शीर्ष पर प्रदर्शित होगी। सूची के नीचे एक 'बारकोड्स' बॉक्स होगा जहां आपको एक -एक करके लौटे आइटम के बारकोड को स्कैन करने की उम्मीद की जाती है।
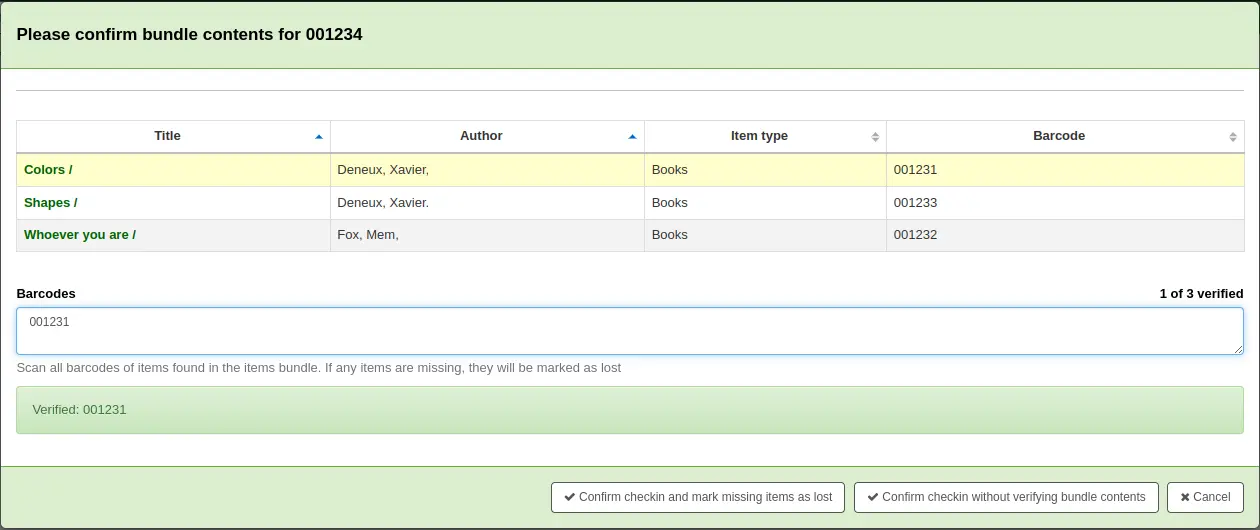
जैसा कि आप आइटम स्कैन करते हैं, सूची में मिलान पंक्ति को कुछ दृश्य प्रतिक्रिया देने के लिए हाइलाइट किया जाएगा। आप दाहिने हाथ की तरफ से चेक किए गए कुल आइटमों को भी देखते हैं।
जब आपने लौटे हुए आइटम को स्कैन करना समाप्त कर दिया है, तो आप ‘Confirm checkin और mark missing items पर क्लिक कर सकते हैं ’या आप चेकइन को रद्द कर सकते हैं।
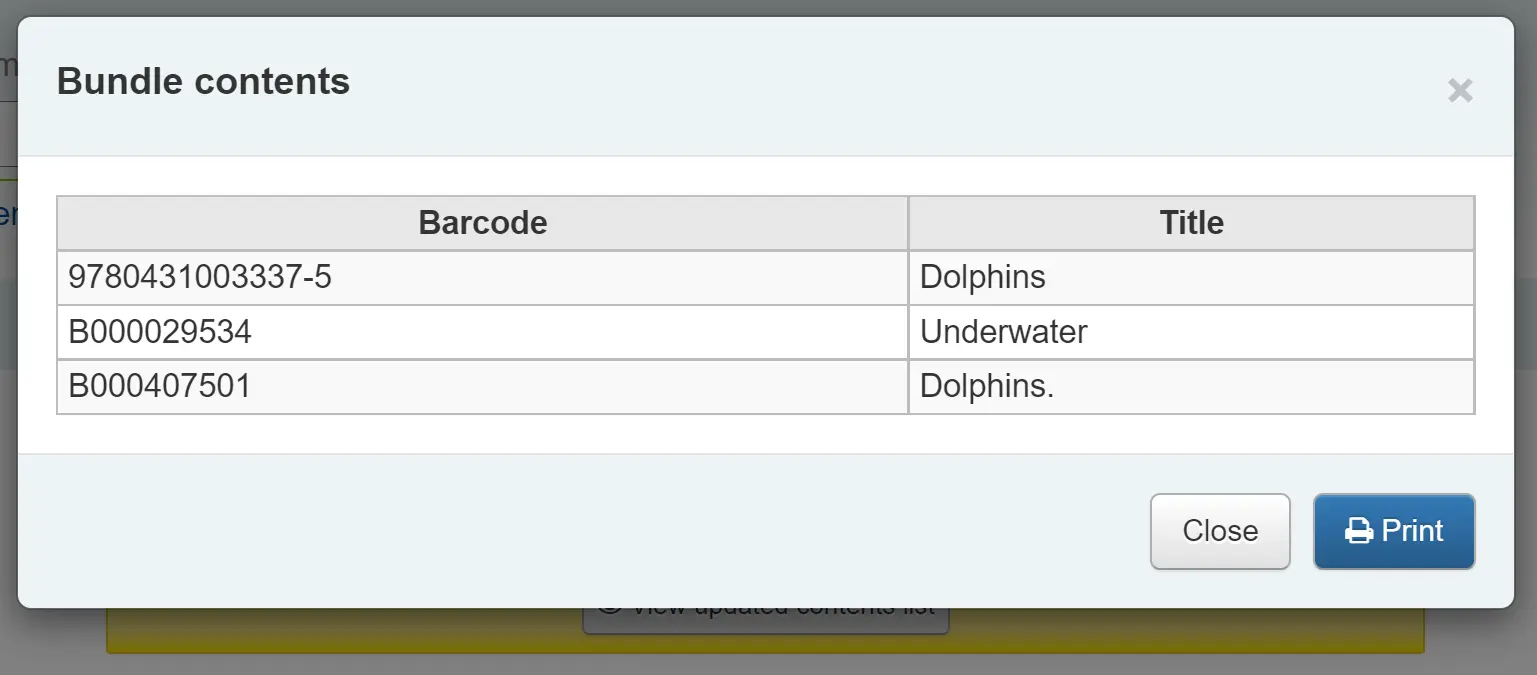
यदि सभी बंडल आइटमों को चिह्नित किया गया था, तो पाया गया कि आपको एक संदेश के साथ प्रस्तुत किया जाएगा, यह कहने के लिए कि चेकइन पूरा हो गया है।

आप सामग्री सूची देख सकते हैं और प्रिंट कर सकते हैं।
लापता आइटम
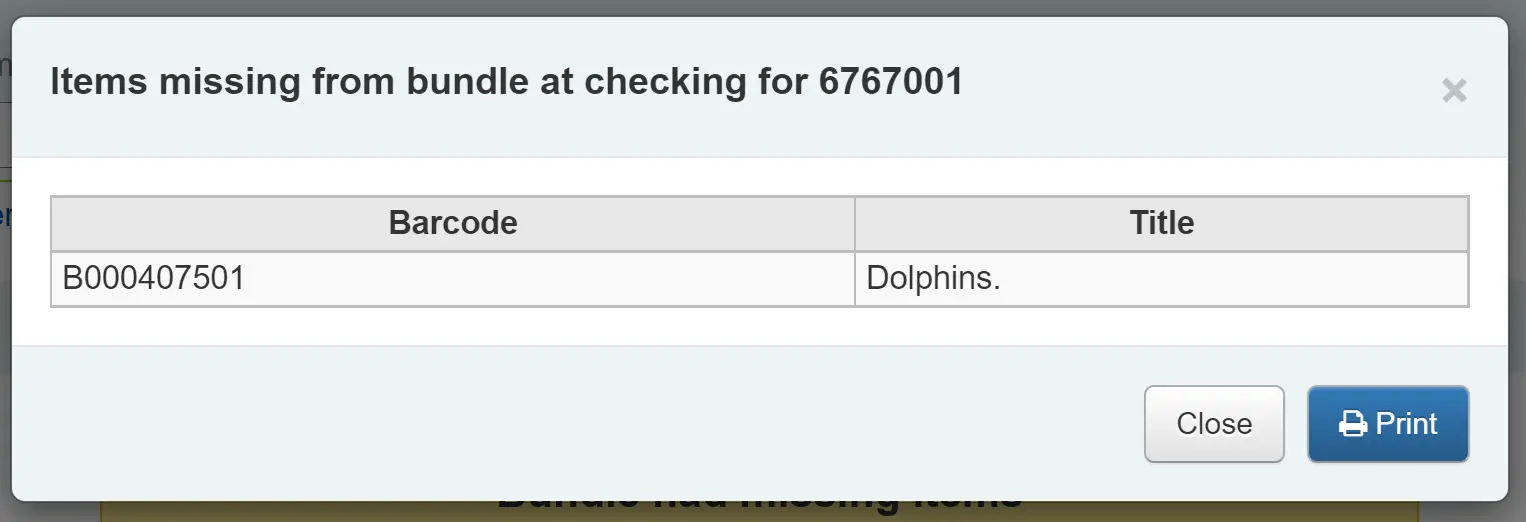
यदि कुछ आइटम सत्यापन चरण के दौरान गायब पाए गए थे, तो चेक आगे बढ़ेगा, लेकिन आपको इस तथ्य के लिए सतर्क किया जाएगा कि बंडल सामग्री बदल गई है और आपको अद्यतन सामग्री सूची को देखने और प्रिंट करने का विकल्प दिया जाएगा।

आप लापता आइटमों की सूची भी देख सकते हैं।
Any items that were missing during the verification stage will automatically be marked with an appropriate Lost status and a return claim added to track which checkout lost the contained item. You can add your own lost statuses in the LOST authorized value category and you can control which lost status is used via the BundleLostValue system preference. For example, a ‘Missing from bundle’ status as shown below.
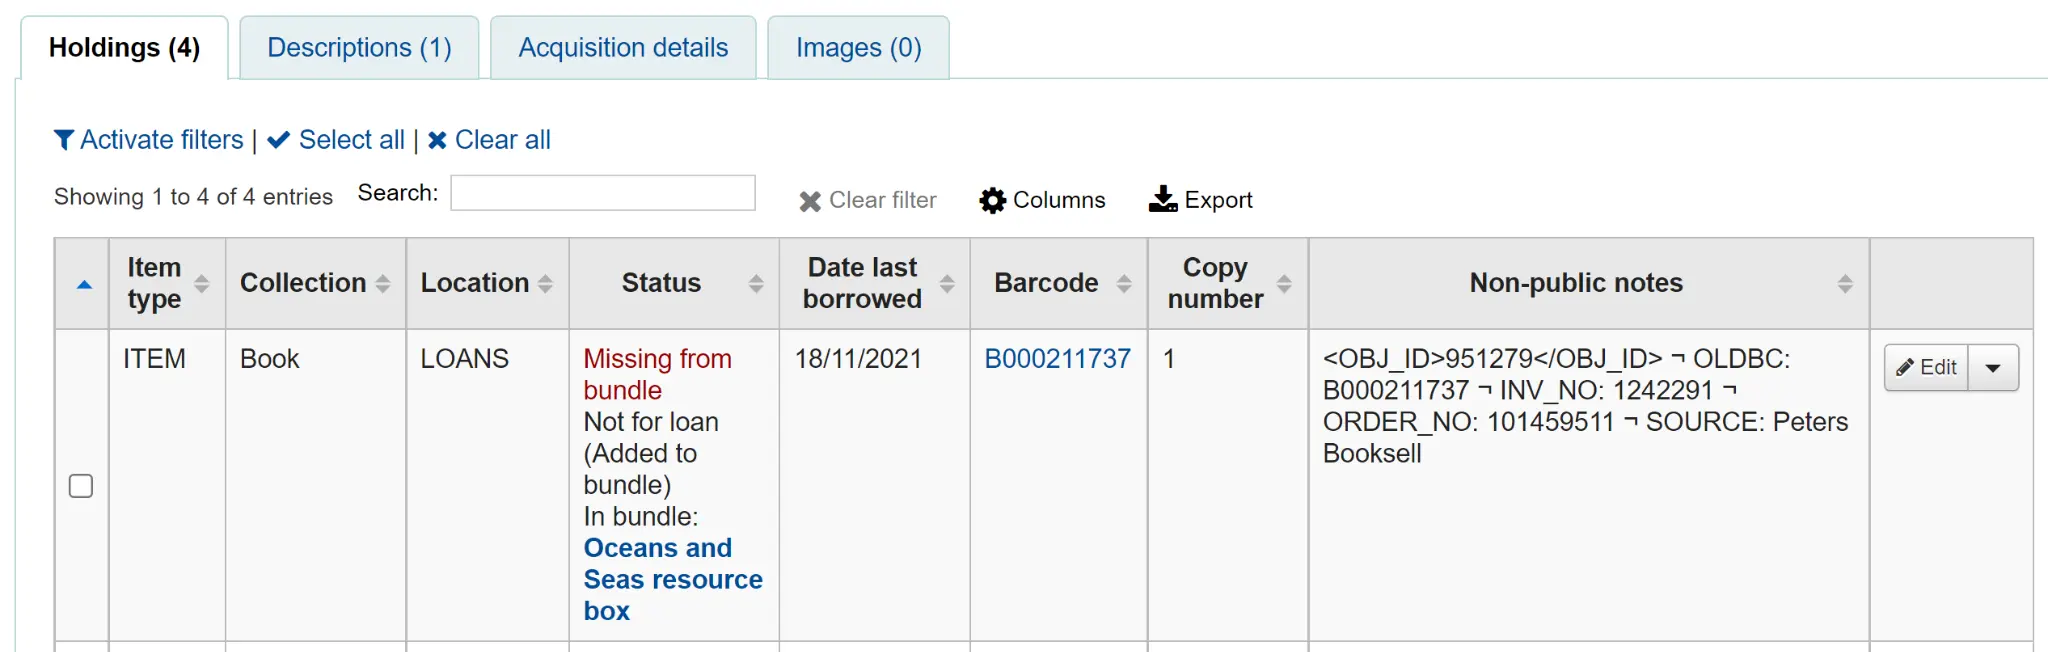
प्रबंधित बंडल सामग्री दृश्य में, लापता आइटम अंतिम बार देखी गई तारीख के साथ प्रदर्शित करता है।
दावों की प्रक्रिया
संरक्षक रिकॉर्ड के भीतर लापता वस्तुओं को दावों के रूप में सूचीबद्ध किया गया है और चेकआउट तालिका में दावे (एस) टैब से देखा जा सकता है।
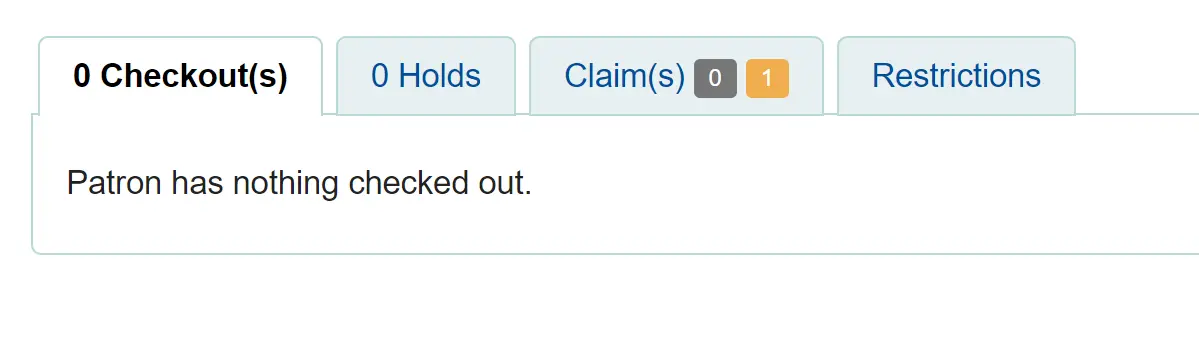
संरक्षक के लिए लापता आइटमों को देखने के लिए गिने हुए वर्ग पर क्लिक करें।
यदि कोई आइटम पाया जाता है, तो उसे चेक किया जाना चाहिए। चेकइन संवाद बॉक्स में दावे को 'हल' करने के लिए एक बटन शामिल होगा।

आपको एक रिज़ॉल्यूशन कारण जोड़ना आवश्यक है और वैकल्पिक रूप से आइटम के खोए हुए मूल्य को बदल सकता है।
इन्वेंटरी (किसी भी समय बंडल सामग्री की जाँच)
बंडल की जाँच करके किसी भी समय एक सत्यापन को ट्रिगर किया जा सकता है। यदि सिस्टम यह पता लगाता है कि इस बिंदु पर बंडल की जाँच नहीं की गई थी, तो एक संशोधित पुष्टि संवाद प्रदर्शित किया जाता है जिसमें बंडल में मौजूद सभी आइटमों को शामिल किया जाएगा, यहां तक कि वर्तमान में खोए हुए के रूप में चिह्नित है।
यह बंडल में क्या होना चाहिए, इस बारे में एक त्वरित दृश्य के लिए अनुमति देता है और वर्तमान में लापता के रूप में क्या चिह्नित है। आप वैकल्पिक रूप से चेकइन को रद्द कर सकते हैं या सत्यापन करने के लिए आइटम को फिर से शुरू करने के लिए चुन सकते हैं, आइटम को चिह्नित करते हुए या बाद में गायब कर रहे हैं। चूंकि यह एक चेकइन है जो एक चेकआउट के साथ जुड़ा नहीं है, अगर नए आइटम गायब पाए जाते हैं, तो हम उन्हें खोए हुए के रूप में चिह्नित करेंगे, लेकिन उन्हें चेकआउट और रिटर्न दावे के साथ संबद्ध नहीं कर सकते हैं।
होल्डस
Koha allows patrons to put things on hold. A 'Hold' is a way to reserve an item. Depending on your circulation and fines rules and hold system preference settings, patrons will be able to place items on hold for pickup at the library at a later date and time.
See the section placing holds in the OPAC chapter to learn how to place holds from the OPAC.
स्टाफ इंटरफेस में होल्ड रखना
टिप्पणी
Staff members must have the place_holds permission (or the superlibrarian permission) in order to be able to place holds.
स्टाफ इंटरफ़ेस से रखने के कई तरीके हैं। सबसे स्पष्ट किसी भी ग्रंथ सूची रिकॉर्ड के शीर्ष पर 'प्लेस होल्ड' बटन का उपयोग कर रहा है।
आप अपने कैटलॉग खोज परिणामों के शीर्ष पर पाए जाने वाले छोटे 'प्लेस होल्ड' लिंक पर भी क्लिक कर सकते हैं या प्रत्येक परिणाम के नीचे 'होल्ड्स' लिंक देख सकते हैं।

एक ही समय में कई खिताबों पर होल्ड रखने के लिए, खोज परिणामों में शीर्षक के बगल में बक्से की जांच करें, और खोज परिणामों के शीर्ष पर 'प्लेस होल्ड' बटन पर क्लिक करें।
टिप्पणी
This feature can be disabled with the DisplayMultiPlaceHold system preference.
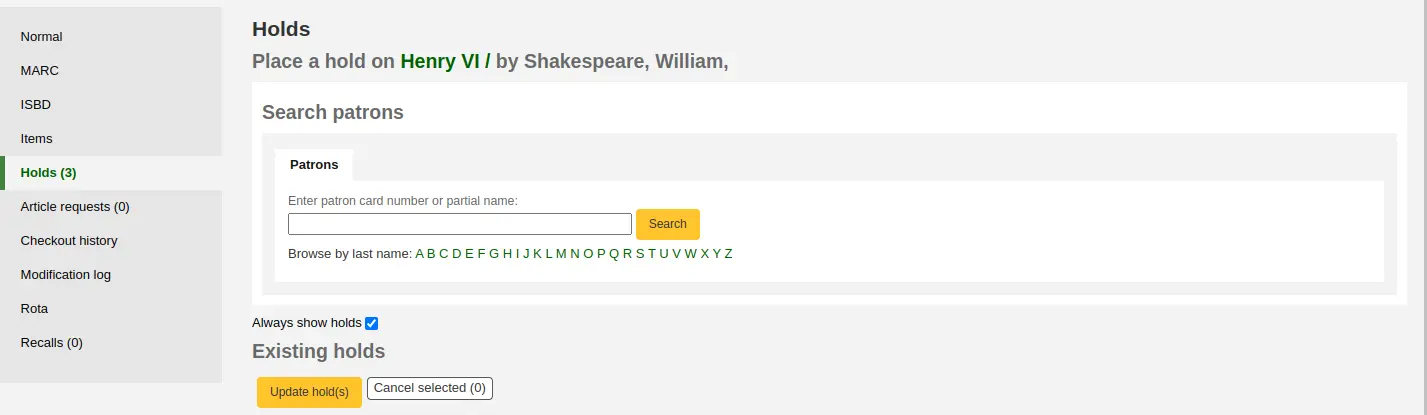
आप बारकोड द्वारा एक संरक्षक या उनके नाम पर होल्ड की प्रक्रिया शुरू करने के किसी भी हिस्से के लिए खोज करने के लिए कहा जाएगा।
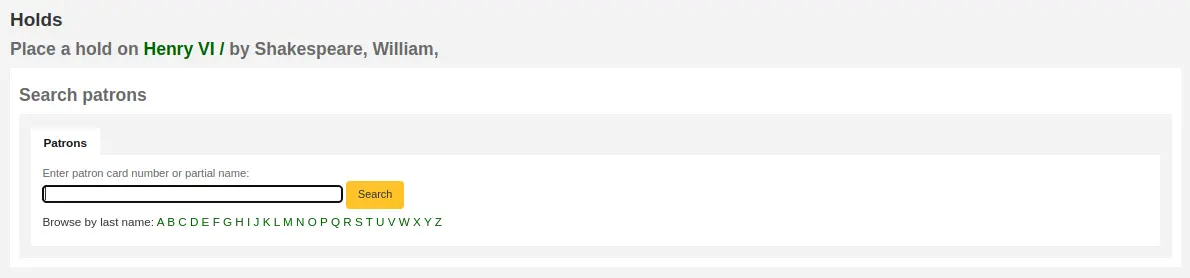
यदि आप पहले पैट्रन की खोज करना चाहते हैं और फिर होल्ड के लिए ग्रंथ सूची रिकॉर्ड, आप संरक्षक रिकॉर्ड खोल सकते हैं और संरक्षक रिकॉर्ड के शीर्ष पर 'सर्च टू होल्ड' बटन पर क्लिक कर सकते हैं।

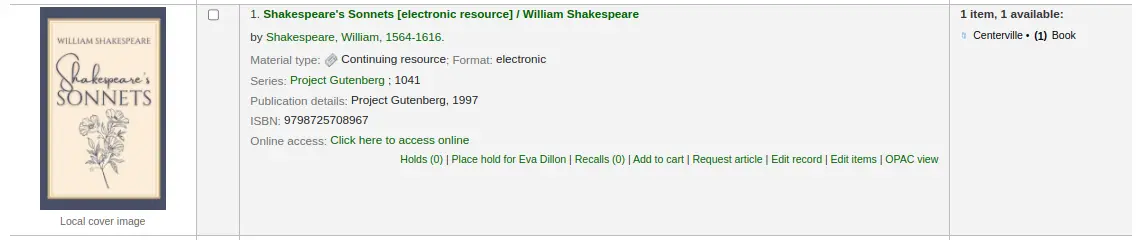
After clicking the button, you will be brought to the catalog search page where you can find the title or titles you need to place a hold on. Under each title in the result list, there will be an option to 'Place hold for (patron name).'
यदि आप इस संरक्षक के लिए कई खिताबों पर एक पकड़ रखना चाहते हैं, तो बक्से को शीर्षक के बाईं ओर देखें, 'प्लेस होल्ड' बटन के दाईं ओर तीर पर क्लिक करें और 'प्लेस होल्ड फॉर (पैट्रन नेम)' चुनें।
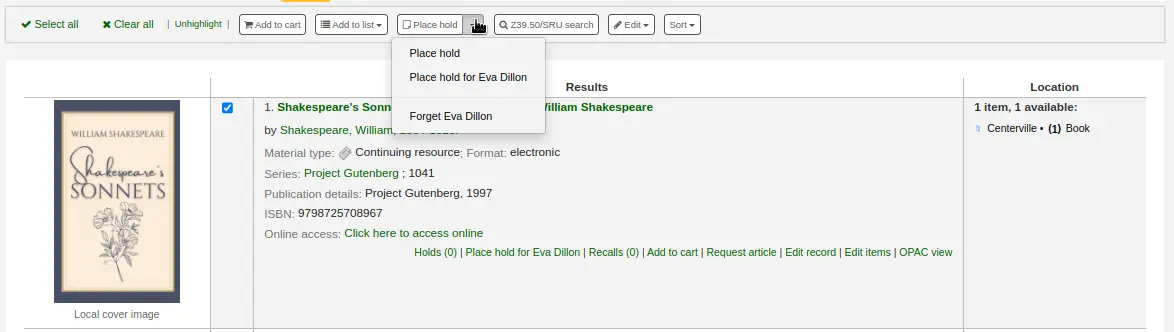
टिप्पणी
एक बार होल्ड रखने के बाद, आप खोज परिणामों पर 'प्लेस होल्ड' बटन के दाईं ओर तीर पर क्लिक करके और 'भूलने (संरक्षक नाम)' विकल्प चुनकर कोहा को 'भूल' के नाम को 'भूल' करने के लिए चुन सकते हैं।
Depending on how many items you choose to place a hold on at once, you will see a different place hold form. If you are placing a hold on one bibliographic record, you will see a list of all of the items you can place a hold on.
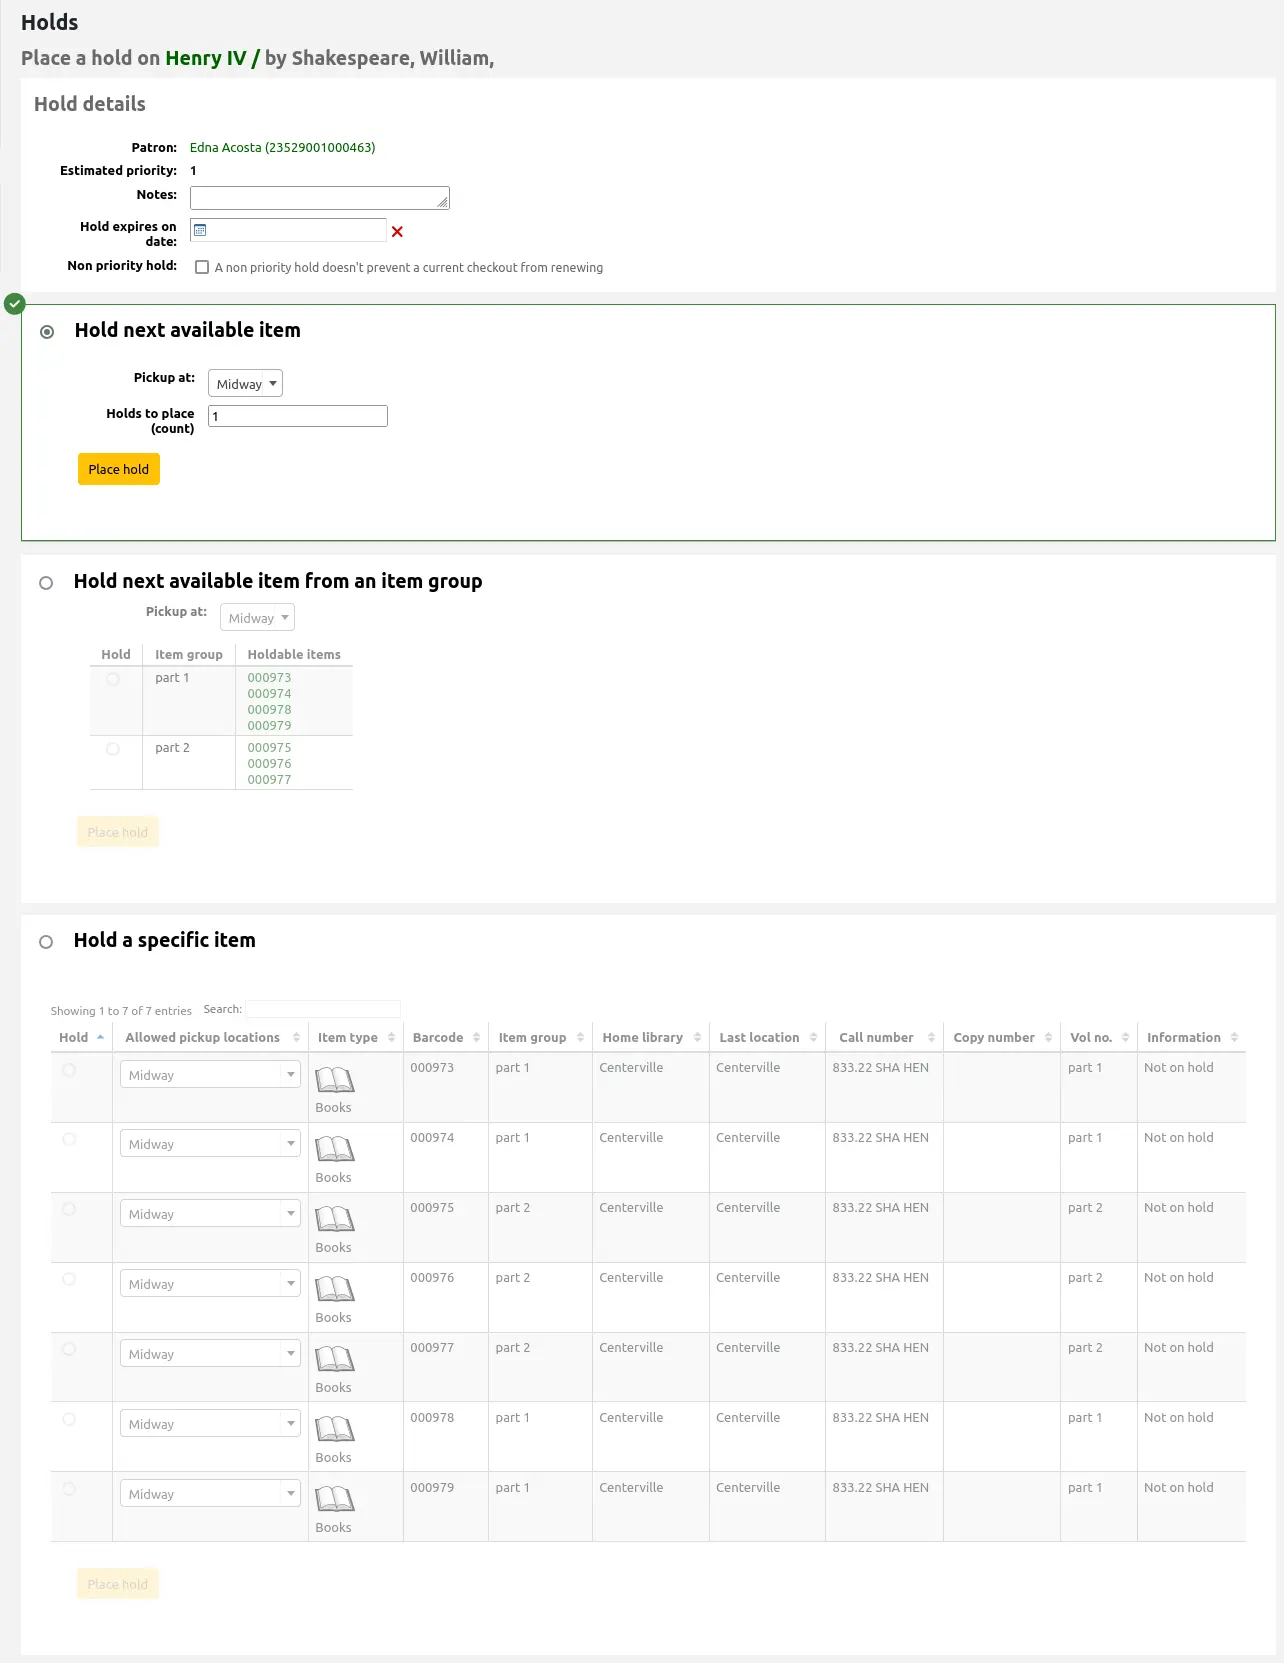
संरक्षक: संरक्षक का नाम जिसके लिए यह होल्ड है
अनुमानित प्राथमिकता: यह ध्यान में रखता है कि पहले से ही इस शीर्षक पर रखा गया है
Notes: enter any notes that might apply to this hold
Request specific item type: if the AllowHoldItemTypeSelection system preference is set to 'Allow' there will be an option to choose to limit the hold to a specific item type
होल्ड स्टार्ट ऑन डेट पर: यदि AllowHoldDateInFuture सिस्टम वरीयता 'अनुमति' पर सेट है, और संरक्षक चाहता है कि आज के अलावा अन्य तारीख पर होल्ड शुरू हो जाए, यहां दर्ज करें दिनांक यहां दर्ज करें
पर होल्ड समाप्त हो रहा है: यदि संरक्षक ने निर्दिष्ट किया है कि वे एक निश्चित तिथि के बाद आइटम नहीं चाहते हैं, या यदि आपके पास होल्ड लंबाई पर सीमाएं हैं,
टिप्पणी
To cancel expired holds automatically, your system administrator needs to set the cancel_expired_holds.pl cronjob to run on a regular basis.
Non-priority hold: if you are placing a hold for internal purposes, such as checking for missing pages or needing to add a label, check the 'Non-priority hold' box. This type of hold will not prevent the patron who currently has the item from renewing their checkout.
To place a hold on the next available item (default setting), fill the next part of the form. For more specific hold settings, choose an item group in the 'Hold next available item from an item group' section or a specific item in the 'Hold a specific item' section below.

पिकअप पर: उस लाइब्रेरी को चुनें जहां संरक्षक आइटम उठाएगा
टिप्पणी
The default pickup library is determined by the DefaultHoldPickupLocation system preference.
Request specific item type: if the AllowHoldItemTypeSelection system preference is set to 'Allow' there will be an option to choose to limit the hold to a specific item type
Holds to place (count): if multiple holds per record are allowed, you can enter a number in the 'Holds to place (count)' text box to place that number of holds for the selected patron.
टिप्पणी
The 'Holds to place (count)' text box will only appear if the Circulation and Fines rules are set to allow a 'Holds per record' limit that is greater than 1, but not Unlimited, for this combination of item type and patron category.
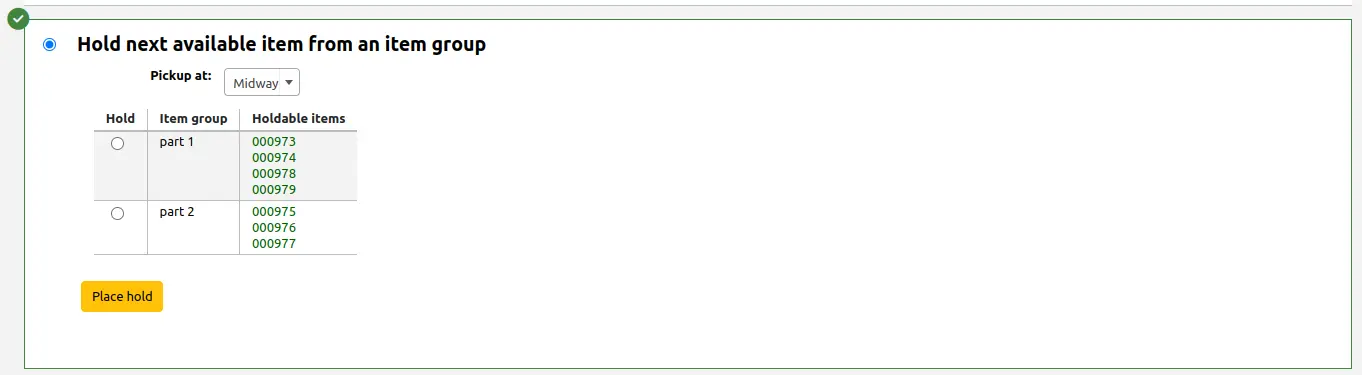
To place a hold on the next available item from an item group, rather than the next available item on the whole record or a specific item, select this section and fill it out.
टिप्पणी
This section will only appear if the EnableItemGroupHolds system preference is set to 'Enable' and the record has item groups. You can choose to place a hold on the next available item of a group.
पिकअप पर: उस लाइब्रेरी को चुनें जहां संरक्षक आइटम उठाएगा
टिप्पणी
The default pickup library is determined by the DefaultHoldPickupLocation system preference.
Select an item group on which to place the hold.
To place a hold on a specific item, rather than the next available item on the whole record or the next available item in an item group, select this section and fill it out.
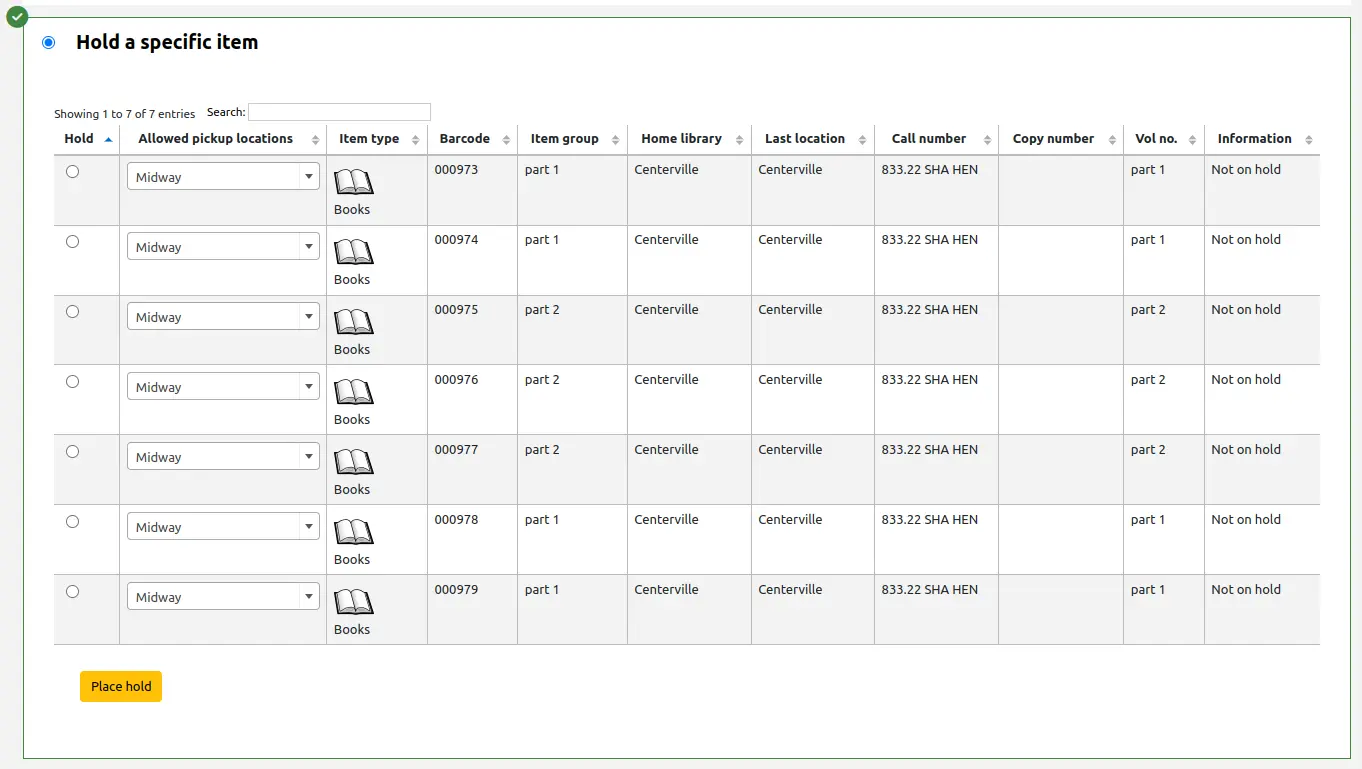
Select the item to place on hold.
टिप्पणी
Enabling the DisplayMultiItemHolds system preference will allow to select multiple individual items in this section to place multiple item-level holds at the same time for the same patron. If the system preference is enabled, the system will allow you to select more than one item.
If necessary, change the pickup location.
टिप्पणी
The default pickup library is determined by the DefaultHoldPickupLocation system preference.
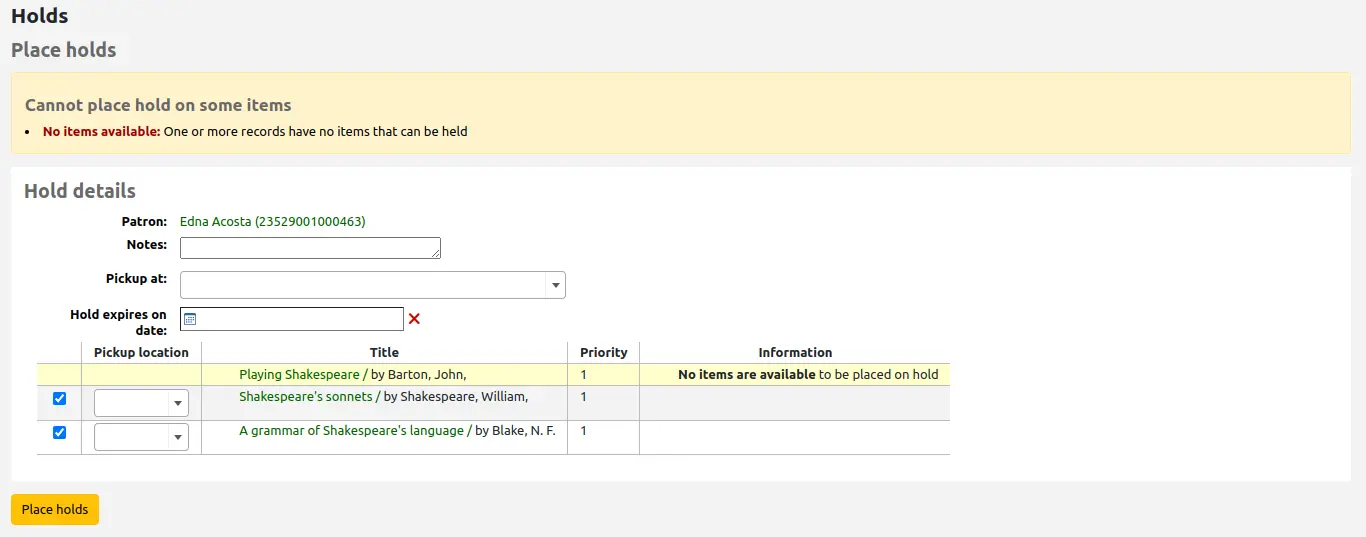
If you're placing holds on multiple records, you will be presented with the next available option for all titles. If no items are available for hold it will say so on the confirmation screen.
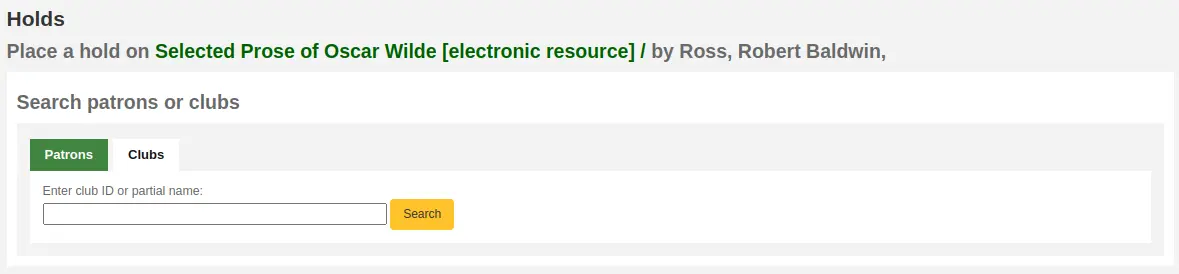
If your library uses the patron clubs feature, use the 'Clubs' tab to place a hold for a club.
To place a hold for a club, click the 'Clubs' tab, search for and select the club name, and click the 'Place hold' button.
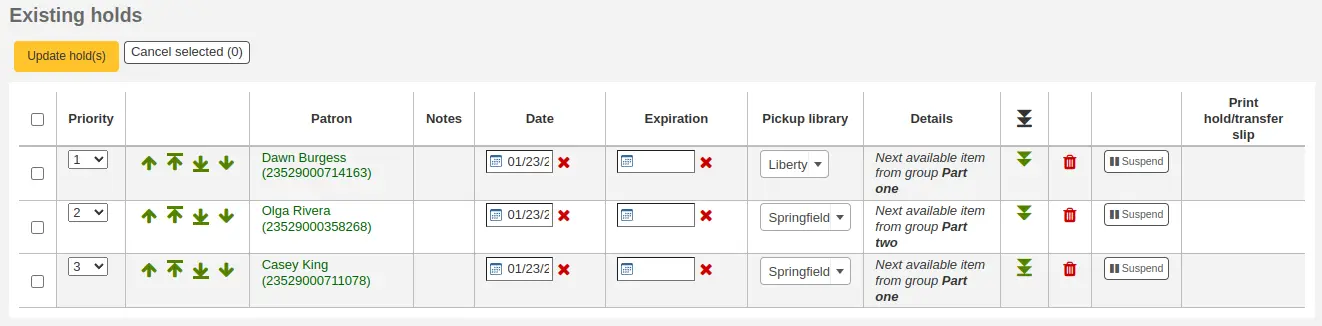
होल्ड्स प्रबंधन
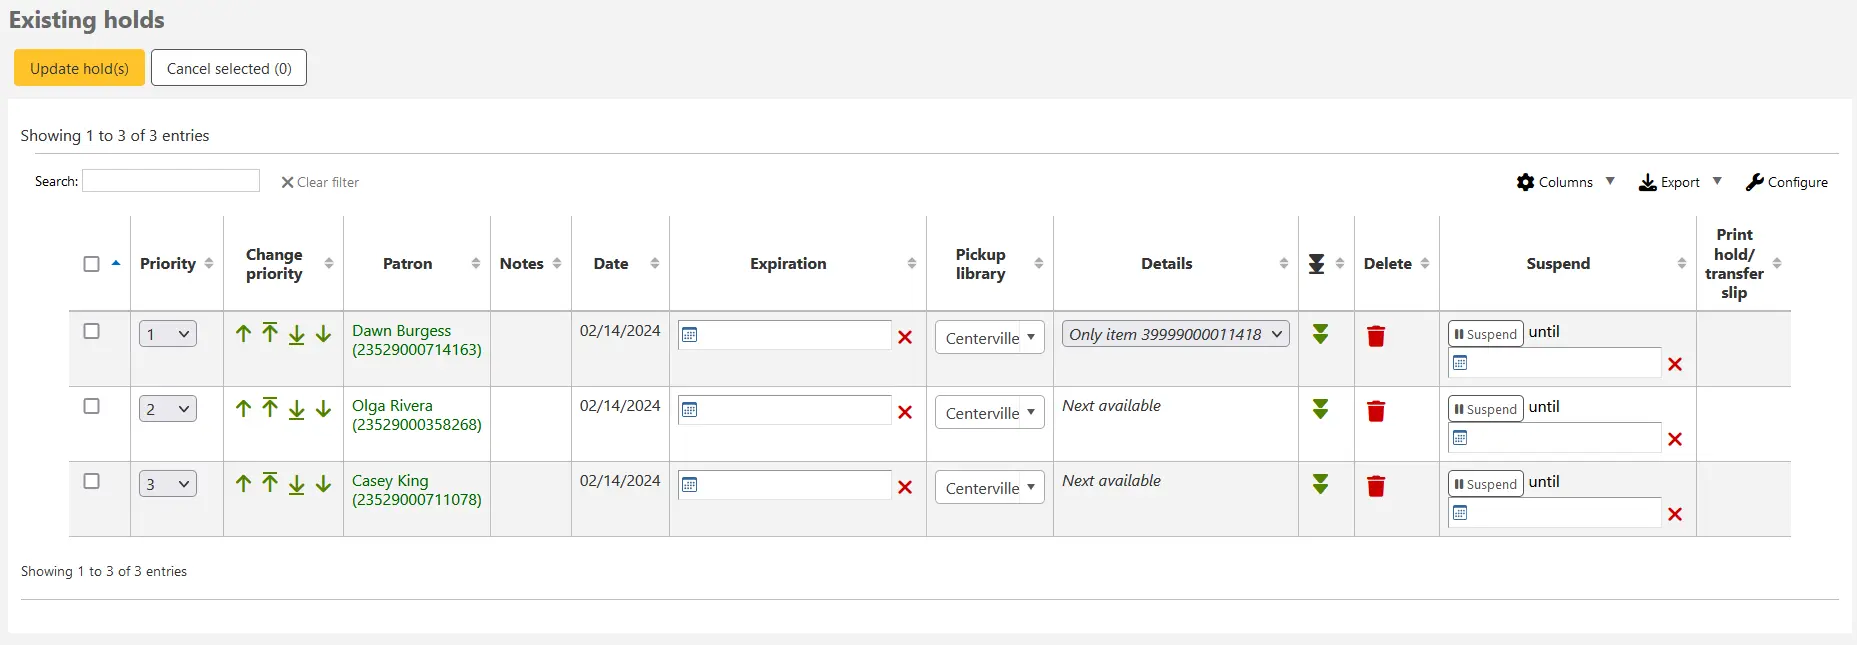
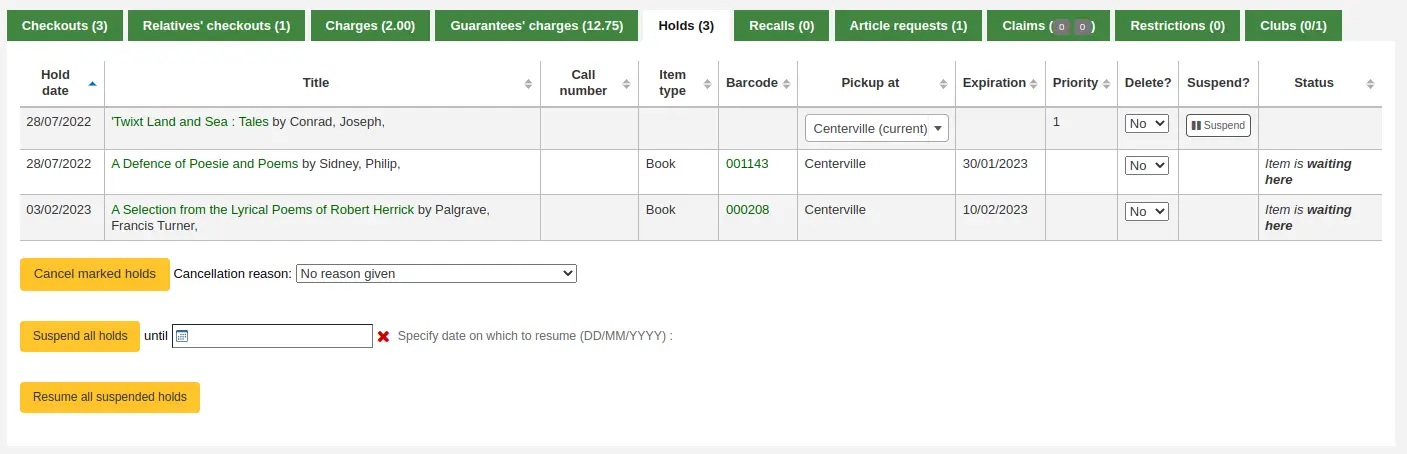
Holds can be altered and canceled from the holds tab found on the left of the bibliographic record.
From the list of holds you can change the order of the holds, the pickup location, whether the hold is on a specific item or for the next available item, suspend, or cancel the hold.
टिप्पणी
यदि आपके पास HoldsSplitQueue सिस्टम वरीयता सेट है, तो आप पिकअप लाइब्रेरी, आइटमटाइप या दोनों द्वारा अलग-अलग तालिकाओं में होल्ड सूची को विभाजित देखेंगे।
टिप्पणी
If the AllowHoldDateInFuture system preference is set to "Don't allow", you will not have the option to edit the date the hold was placed (the column labeled Date).
टिप्पणी
इस बात पर निर्भर करता है कि HidePatronName सिस्टम वरीयता सेट है, सूची ऊपर की छवि की तरह संरक्षक कॉलम में नामों के बजाय कार्ड नंबर दिखा सकती है।
होल्ड के क्रम को बदलना
टिप्पणी
Staff members must have the modify_holds_priority permission (or the superlibrarian permission) in order to be able to change holds' priorities.
होल्ड को फिर से व्यवस्थित करने के लिए, 'प्राथमिकता' ड्रॉप-डाउन से चयन करें या प्राथमिकता खींचने के दाईं ओर तीर पर क्लिक करें।
चेतावनी
होल्ड के दाईं ओर डबल डाउन तीर पर क्लिक करने से अधिक अनुरोध किए जाने पर भी होल्ड को सूची में सबसे नीचे चिपका दिया जाएगा।
उदाहरण के लिए, यदि आपकी लाइब्रेरी में होम-बाउंड संरक्षक हैं, जिन्हें एक समय में महीनों तक आइटम बाहर रखने की अनुमति है, तो यह अन्य संरक्षक के लिए उचित नहीं होगा यदि एक होम-बाउंड पैट्रन एक ब्रांड नई पुस्तक की जांच करने और इसे रखने में सक्षम थे कई महीनों तक। इस कारण से, होम-बाउंड पैट्रन का होल्ड अनुरोध कतार में सबसे नीचे रहेगा जब तक कि बाकी सभी लोग उस पुस्तक को पढ़ना नहीं चाहते थे।
मौजूदा होल्ड की सूची में, सबसे कम प्राथमिकता वाले होल्ड को डबल डाउन तीर द्वारा एक लाइन के नीचे के साथ इंगित किया जाता है।
डबल एरो पर फिर से क्लिक करने से अंतिम स्थान पर, नियमित प्राथमिकता में होल्ड वापस आ जाएगी।
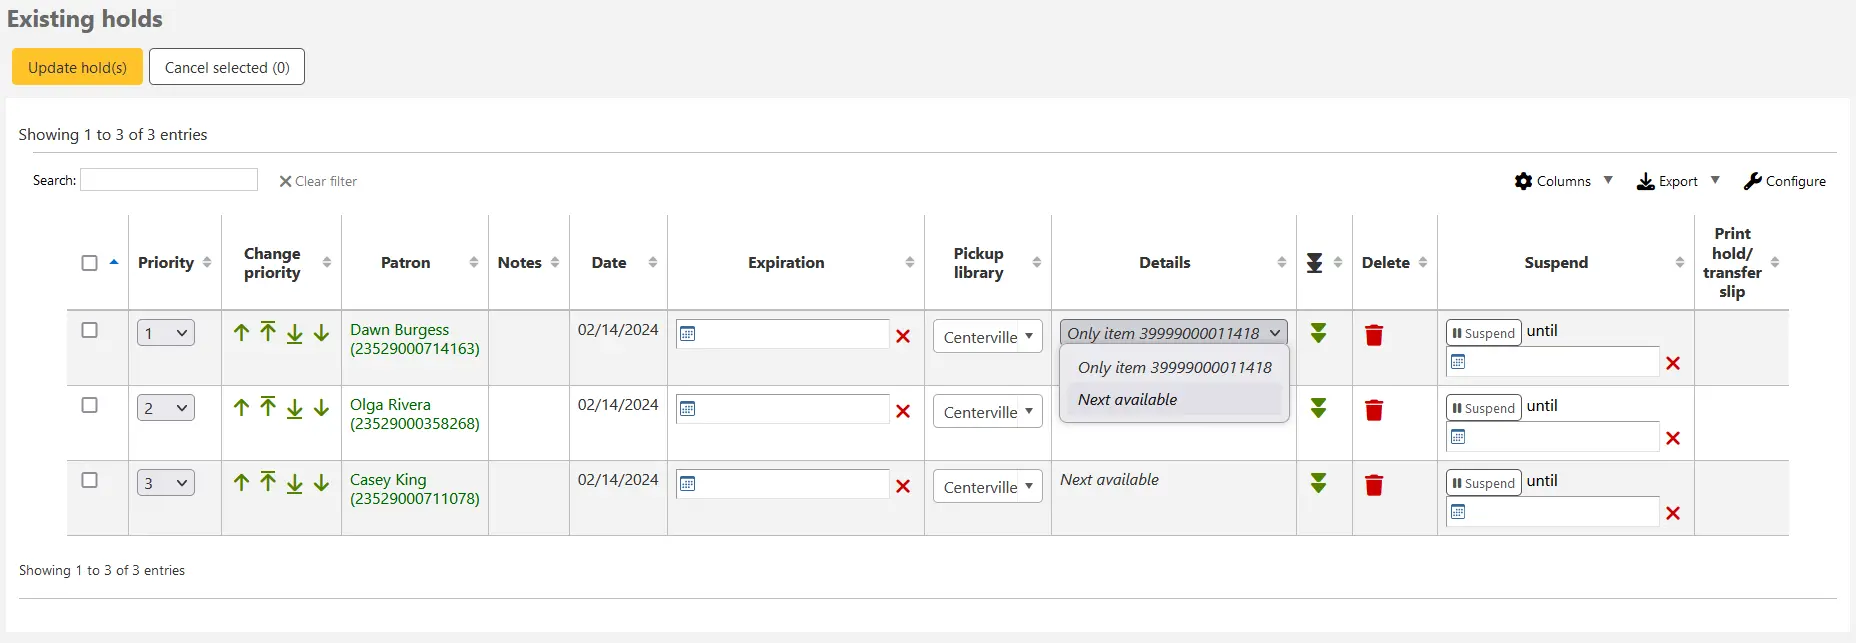
Changing the level of a hold
संस्करण
This feature was added in version 23.11 of Koha.
Sometimes it can be necessary to change a hold that has been made on a specific item (known as an item level hold) to a hold that is not specific to an item and will be filled as soon as the next item is returned (often referred to as a record level hold). To change the level of a hold, make a selection from the 'Details' dropdown and confirm the change by clicking the 'Update hold(s)' button above.
निलंबित होल्ड
यदि कोई संरक्षक अपनी पकड़ को निलंबित करने के लिए कहता है और SuspendHoldsIntranet सिस्टम वरीयता 'अनुमति' के लिए सेट है, तो आप 'सस्पेंड' बटन को सबसे दूर पर क्लिक करके ऐसा कर सकते हैं।
यदि संरक्षक आपको होल्ड के लिए फिर से शुरू करने के लिए एक तारीख देता है, तो आप उसे दिनांक बॉक्स में दर्ज कर सकते हैं और अपने परिवर्तनों को सहेजने के लिए 'अपडेट होल्ड (एस)' बटन पर क्लिक कर सकते हैं।
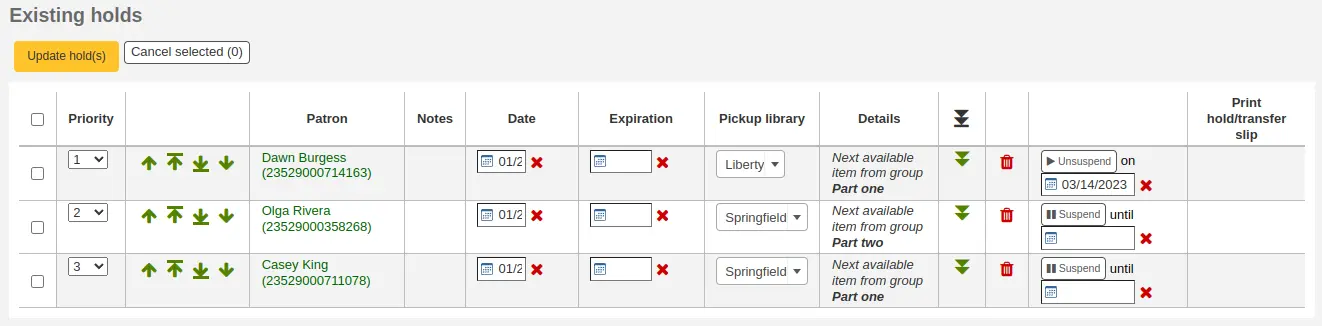
टिप्पणी
यदि AutoResumeSuspendedHolds सिस्टम वरीयता "अनुमति न दें" पर सेट है, तो होल्ड सस्पेंशन पर अंतिम तिथि डालने का विकल्प नहीं होगा।
टिप्पणी
The auto_unsuspend_holds.pl cron job is required to automatically resume suspended holds.
You can also unsuspend holds manually by clicking the 'Unsuspend' button.
यदिe SuspendHoldsOpac सिस्टम वरीयता 'अनुमति' पर सेट है, तो संरक्षक अपने स्वयं के होल्ड्स को निलंबित और अनसुना करने में सक्षम होंगे उनका ऑनलाइन खाता.
Deleting holds
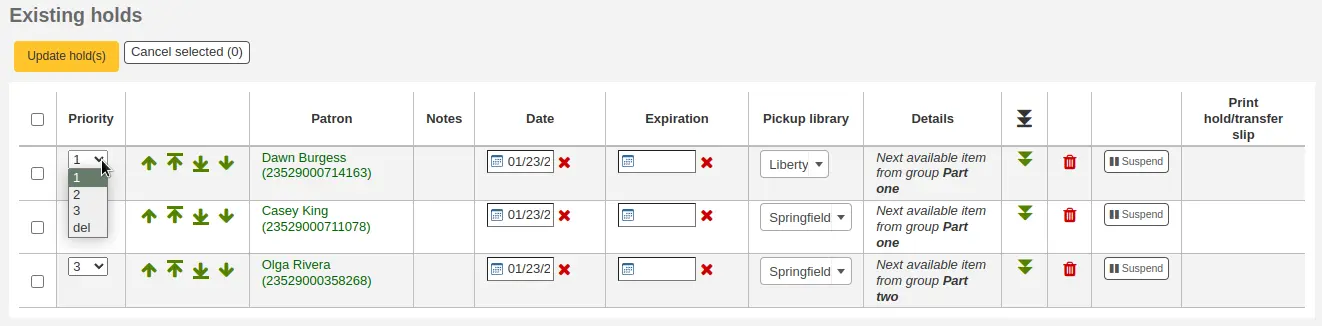
होल्ड को हटाने या रद्द करने के लिए, होल्ड लाइन के दाईं ओर लाल कचरा कैन पर क्लिक करें।
होल्ड का एक गुच्छा हटाने/रद्द करने के लिए आप प्रत्येक पंक्ति के बाईं ओर ड्रॉप-डाउन मेनू से 'डेल' चुन सकते हैं और फिर सूची के निचले भाग में 'अपडेट होल्ड (एस)' पर क्लिक करें।
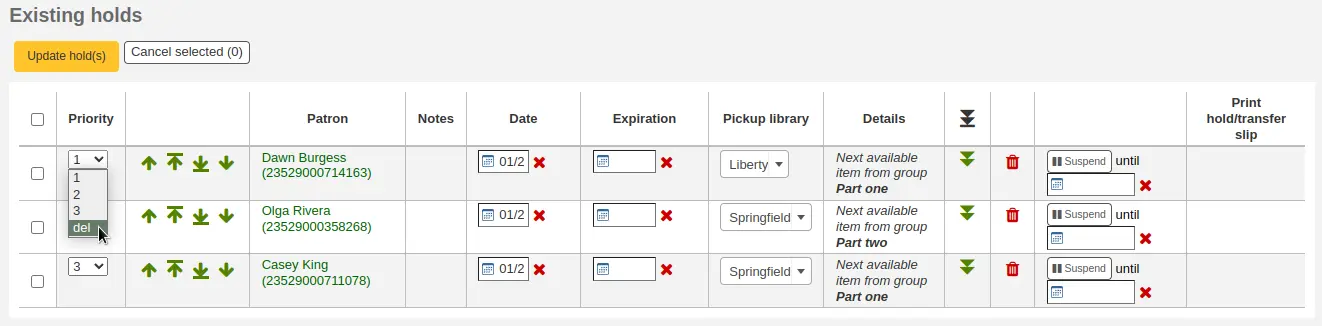
Alternatively, you can select the holds to be canceled and click the 'Cancel selected' button.
प्राप्त होल्ड्स
जब आइटम होल्ड पर हैं चेक इन या आउट सिस्टम आपको याद दिलाएगा सर्कुलेशन स्टाफ़ को पता चलता है कि आइटम होल्ड पर है और उन्हें होल्ड के प्रबंधन के लिए विकल्प प्रदान करें।
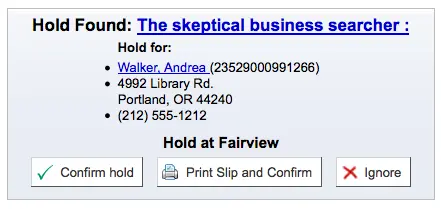
जब आप किसी आइटम उस पर एक होल्ड है कि में जाँच प्रणाली या तो पुष्टि करने के लिए आप से पूछना और आइटम स्थानांतरण होगा
या होल्ड की पुष्टि करना चाहते हैं
यदि आइटम को स्थानांतरित करने की आवश्यकता है, तो 'पुष्टि करें और स्थानांतरित करें' या 'प्रिंट स्लिप, स्थानांतरण, और पुष्टि करें' पर क्लिक करने से आइटम को उचित पुस्तकालय में पारगमन के रूप में चिह्नित किया जाएगा।
यदि आइटम पहले से ही पिकअप लाइब्रेरी में है, तो 'कन्फर्म' या 'प्रिंट स्लिप एंड कन्फर्म' बटन पर क्लिक करने से आइटम संरक्षक द्वारा पिकअप के लिए तैयार के रूप में चिह्नित हो जाएगा।
'इग्नोर' पर क्लिक करने से होल्ड बना रहेगा, लेकिन आइटम को किसी अन्य संरक्षक को चेक आउट करने की अनुमति दें या आइटम की स्थिति बदल दें (यदि यह क्षतिग्रस्त लौटाया गया था, उदाहरण के लिए)।
'प्रिंट स्लिप और कन्फर्म' या 'प्रिंट स्लिप, ट्रांसफर और कन्फर्म' विकल्प एक प्रिंट करने योग्य पेज खोलेगा जिसे आप आवश्यक होल्ड या ट्रांसफर जानकारी के साथ आइटम से जोड़ सकते हैं।
टिप्पणी
The slip that is printed is the HOLD_SLIP notice. It can be modified with the Notices and slips tool.
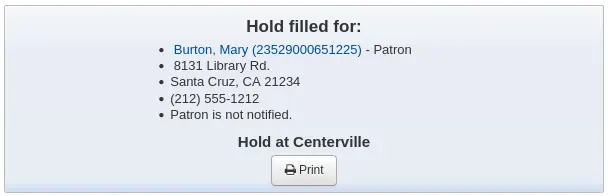
जब होल्ड की पुष्टि हो जाती है,यदि संरक्षक को सूचित किया जाता है, 'होल्ड फील' नोटिस उन्हें भेजा जाएगा।
टिप्पणी
जो नोटिस भेजा जाता है वह होल्ड नोटिस है। इसे नोटिस और स्लिप्स टूल के साथ संशोधित किया जा सकता है।
टिप्पणी
If the HoldsAutoFill system preference is enabled, the circulation staff will not have to confirm the hold, but they will have the option to print the hold or transfer slip.
यदि HoldsAutoFillPrintSlip सिस्टम वरीयता सक्षम है, तो होल्ड या ट्रांसफर स्लिप को प्रिंट करने के लिए प्रिंट विंडो स्वचालित रूप से खुल जाएगी।
Once confirmed, the hold will show as 'waiting' on the patron record and on the checkout screen under the 'Holds' tab.
आइटम रिकॉर्ड भी दिखा देंगे कि आइटम होल्ड पर है।

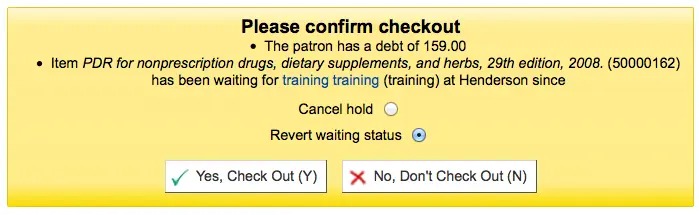
In some cases, a patron may come in to pick up a hold on behalf of someone else. In this case, make sure that the hold is canceled when you check the item out to someone else. Alternatively, a check out might be attempted in error for an item that is already waiting for someone else. In this case you will be presented with a warning message.
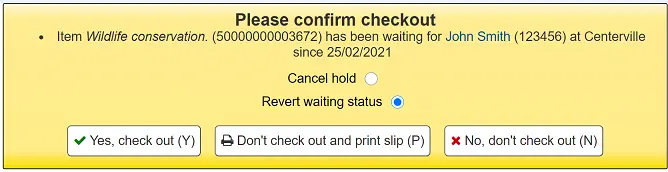
कैंसल होल्ड: 'हां, चेक आउट' के संयोजन में, यह विकल्प वर्तमान होल्ड को रद्द कर देगा और आइटम को नए संरक्षक के लिए चेक आउट कर देगा।
पूर्ववत प्रतीक्षा स्थिति: 'हां, चेक आउट' के संयोजन में, यह विकल्प होल्ड की प्रतीक्षा स्थिति को वापस कर देगा (जिस संरक्षक ने होल्ड रखा है वह कतार में पहले स्थान पर वापस आ जाएगा) और आइटम को नए संरक्षक के लिए चेक आउट करें .
हां, चेक आउट करें: यह विकल्प आइटम को वर्तमान संरक्षक को चेक आउट करेगा।
Don't check out and print slip: this option will open the print window to print the hold slip, the check out will be canceled and the hold will remain.
नहीं, चेक आउट न करें: यह विकल्प चेक आउट रद्द कर देगा, होल्ड बना रहेगा।
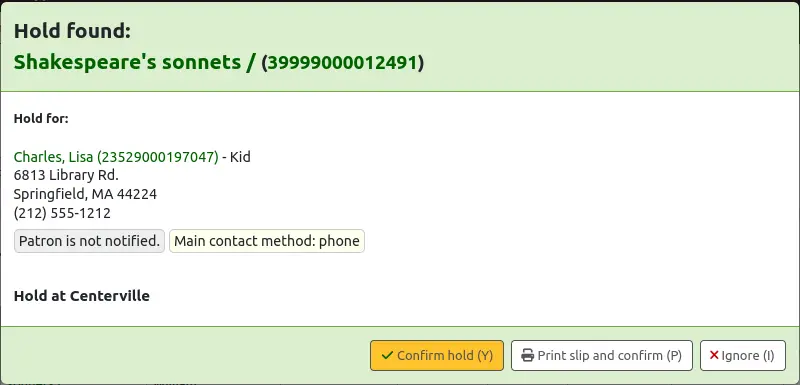
If you check in an item that is already waiting to be picked up, a pop up indicating that a hold was found and the item is already waiting will appear. In addition to this, there is an option to allow staff to cancel the hold and choose a hold cancellation reason.
टिप्पणी
Hold cancellation reasons are connected to the HOLD_CANCELLATION authorized value category.
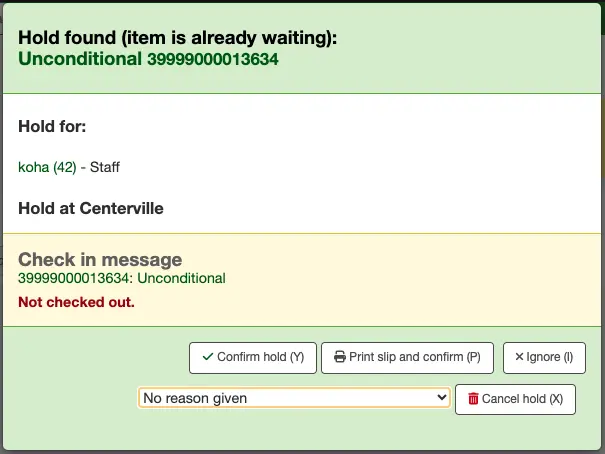
होल्ड की पुष्टि करें: यह विकल्प मौजूदा होल्ड को बनाए रखेगा।
प्रिंट स्लिप और पुष्टि करें: यह विकल्प होल्ड स्लिप को प्रिंट करने और मौजूदा होल्ड को बनाए रखने के लिए प्रिंट विंडो खोलेगा।
होल्ड रद्द करें: यह विकल्प होल्ड को हटा देगा।
यदि आप होल्ड को रद्द करते हैं और आइटम के लिए और होल्ड मौजूद हैं तो आपको अगले संरक्षक के लिए होल्ड की पुष्टि करने के लिए एक नया विकल्प प्रस्तुत किया जाएगा।
A reason can be allocated to the cancellation of the hold. A notice can be sent to the patron explaining why this hold was canceled.
चेतावनी
If you want to send a notice with the cancellation reason, you will need to add a new notice with code "HOLD_CANCELLATION" if you do not have one already.
Bookings
संस्करण
This feature was first introduced in version 23.11 of Koha.
A 'booking' in Koha is another way to reserve an item.
A hold is a reservation that joins a waiting list and is filled as soon as the item is available. The item is loaned for the period set in the circulation and fines rules for that library, patron category and item type.
A booking is an advance reservation filled for the dates specified. The booking period becomes the loan period.
Bookings may be especially useful for items such as models, story sacks, memory boxes, etc. that are used for events and programs at specific dates.
टिप्पणी
Enable the bookings feature using the EnableBookings system preference.
Staff members must have the manage_bookings permission (or the superlibrarian permission) in order to be able to place and manage bookings.
Make items bookable
Before items can be booked, they need to be set as 'bookable'.
Items can be made bookable individually:
From the bibliographic record, go to the Items tab and scroll down to the relevant item's Priority section.
Set 'Bookable' to 'Yes' to make the item bookable.

Alternatively, you can make all items in an item type bookable by using the Item types parameters.
संस्करण
The 'Bookable' option for item types was first introduced in version 24.11 of Koha.
To avoid clashing requests on popular items, it is advised to make the item type used for bookable items unholdable.
टिप्पणी
Bookable items can still be issued without a prior booking, according to the circulation rules for the library, patron category and item type.
Place a booking
Bookings can only be placed in the staff interface and only on items set as bookable.
If at least one of the items on a bibliographic record is bookable, the 'Place booking' button is displayed above the record view.
To place a booking, click the 'Place booking' button. This opens the booking modal.
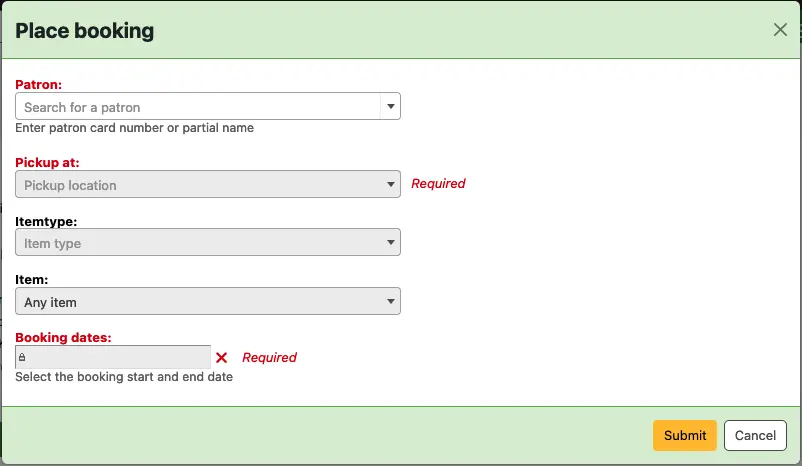
Patron: enter the card number or start typing the name of the patron this booking is for.
Pickup at: choose the library where the patron will pick up the item.
संस्करण
This option was first introduced in version 24.05 of Koha.
Itemtype: optionally, select which item type the booking will target. This is useful when you have items of different types on the same record, each with different circulation rules.
संस्करण
This option was first introduced in version 24.11 of Koha.
Item: optionally, choose whether the booking can be fulfilled by any item or only by the item whose barcode you select.
टिप्पणी
Despite these options being optional, either an itemtype or a specific item has to be selected in order to unlock the booking dates picker.
Booking dates: click on a date in the calendar to make it the booking's start date; click on another date for the booking end date. Use the cross button on the right of the input field to clear dates and start again.
Bookings on the same item cannot overlap.
Dates for which there are existing bookings are marked on the calendar by blue dots.
संस्करण
This feature was first introduced in version 24.05 of Koha.
You can set pre-processing and post-processing days in the Default holds and bookings policies by item type. These will appear on the calendar with a red background and an orange background respectively. They prevent bookings on the same item from being made too close to one another.
संस्करण
This feature was first introduced in version 24.11 of Koha.
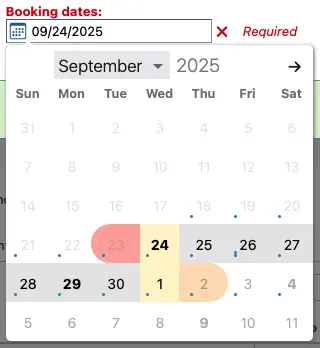
The booking cannot exceed the maximum loan period for that item type, patron category and library set out in the circulation rules. Once the booking start date is chosen, any dates beyond the maximum loan period are grayed out and cannot be selected.
टिप्पणी
The maximum loan period is calculated using: loan period + (renewal period * maximum number of renewals).
Dates that correspond to the end of the initial loan period and the renewal periods are highlighted in bold.

संस्करण
This feature was first introduced in version 24.11 of Koha.
Placing a booking triggers the BOOKING_CONFIRMATION notice. This notice is sent to the patron to inform them of their new booking's details. The notice can be edited in the Notices and slips tool.
संस्करण
The BOOKING_CONFIRMATION notice was first introduced in version 24.11 of Koha.
Manage bookings
A list of all upcoming bookings can be viewed using the Bookings to collect report in the Circulation module.
Individual bookings can be viewed, altered and canceled from the Bookings link in the left-hand menu of the bibliographic record.
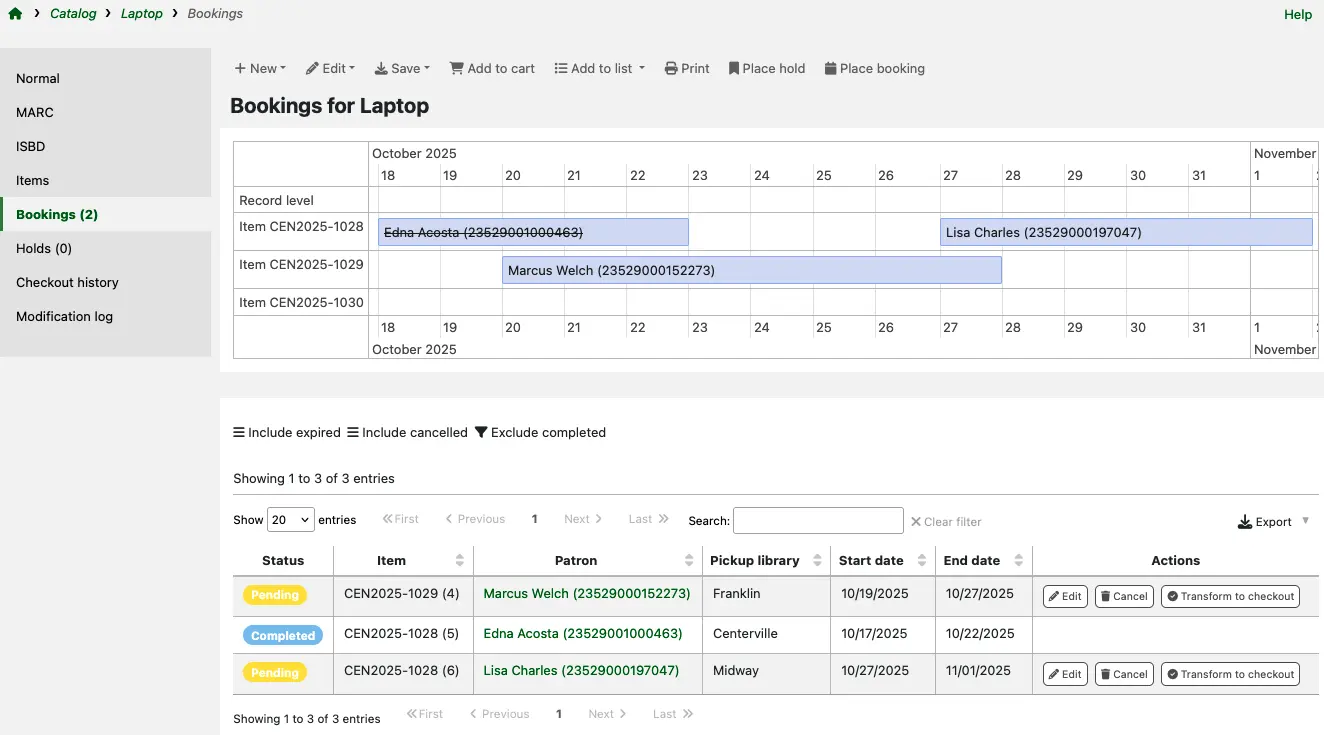
Use the buttons above the table to display expired, canceled and completed bookings.
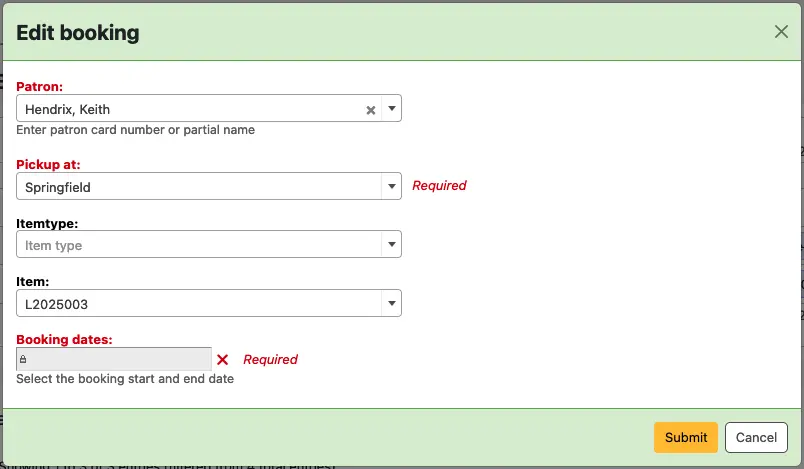
Edit a booking
From the list of bookings, use the 'Edit' button on the booking you want to alter. This opens a modal with the same options you have when placing a booking.
You can also edit a booking's dates from the calendar view above the list of bookings.
Click on a booking's placeholder; it turns yellow and the mouse cursor changes to four arrows.
Drag and drop the booking to match your new desired dates.

Amending a booking's pickup library, start date or end date triggers the BOOKING_MODIFICATION notice. This notice is sent to the patron to inform them of the booking's updated details. The notice can be edited in the Notices and slips tool.
संस्करण
The BOOKING_MODIFICATION notice was first introduced in version 24.11 of Koha.
Cancel a booking
From the calendar view , click on a booking's placeholder. When it turns yellow, use the red cross icon to its right.
From the list of bookings, use the 'Cancel' button on the booking you want to alter.
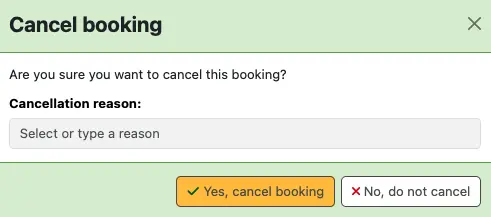
On the 'Cancel booking' modal, you can optionally type a cancellation reason or select one from the dropdown menu.
संस्करण
Cancellation reasons were first introduced in version 24.11 of Koha.
टिप्पणी
Values for the dropdown menu are managed in the BOOKING_CANCELLATION authorized value category.
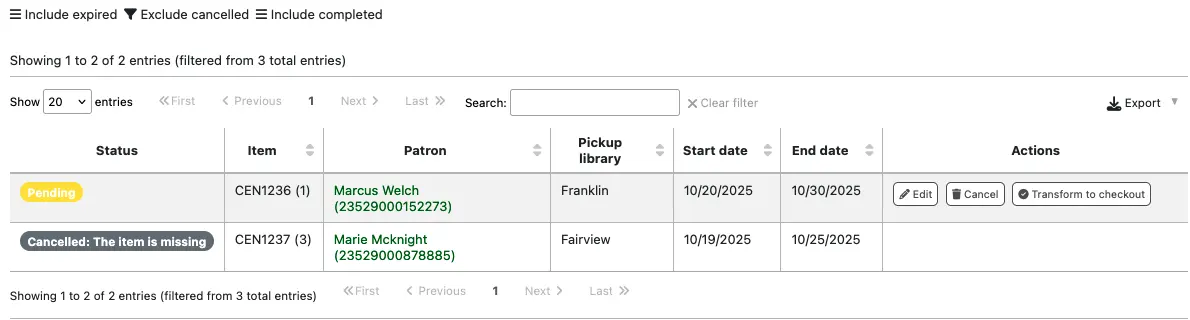
After confirmation, the canceled booking will be hidden from both the calendar and the list of bookings. Use the 'Include cancelled' filter above the table to see those bookings in the list.
Canceling a booking triggers the BOOKING_CANCELLATION notice. This notice is sent to the patron to inform them their booking has been canceled. The notice can be edited in the Notices and slips tool.
संस्करण
The BOOKING_CANCELLATION notice was first introduced in version 24.11 of Koha.
Check out booked items
When a patron comes to collect one of their booked items, issue it following the standard checking out workflow.
Switch to Check out and search for the patron.
Scan the item barcode or enter it manually and click 'Check out'.
टिप्पणी
The booked item's due date will be the booking end date.
If the patron tries to collect their item earlier than the booking start date, a check out warning will appear. You can decide whether to allow the early collection and check out the item or to decline the check out.

टिप्पणी
In case of an early collection, the due date will remain the original booking end date. The loan period will therefore be longer than the original booking.
कर्बसाइड पिकअप
कोहा में एक एकीकृत कर्बसाइड पिकअप मॉड्यूल है जिसका उपयोग संरक्षक द्वारा पिकअप को होल्ड करने के लिए किया जा सकता है।
Get there: Circulation > Curbside pickups
See the curbside pickup configuration section to learn how to set up curbside pickup.
टिप्पणी
Staff members must have the manage_curbside_pickups permission (or the superlibrarian permission) in order to schedule and manage pickups.
एक पिकअप शेड्यूल करना
वहां जाओ: परिसंचरण> परिसंचरण रिपोर्ट > शेड्यूल पिकअप
पिकअप शेड्यूल करने के लिए,
'शेड्यूल पिकअप' टैब पर क्लिक करें
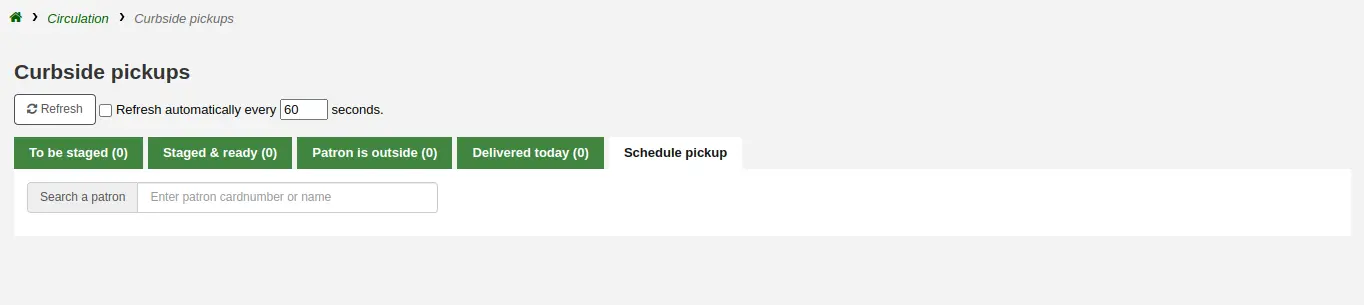
उस संरक्षक की खोज करें जिसके लिए पिकअप शेड्यूल करना है, या तो उनका नाम या उनके कार्ड नंबर के साथ
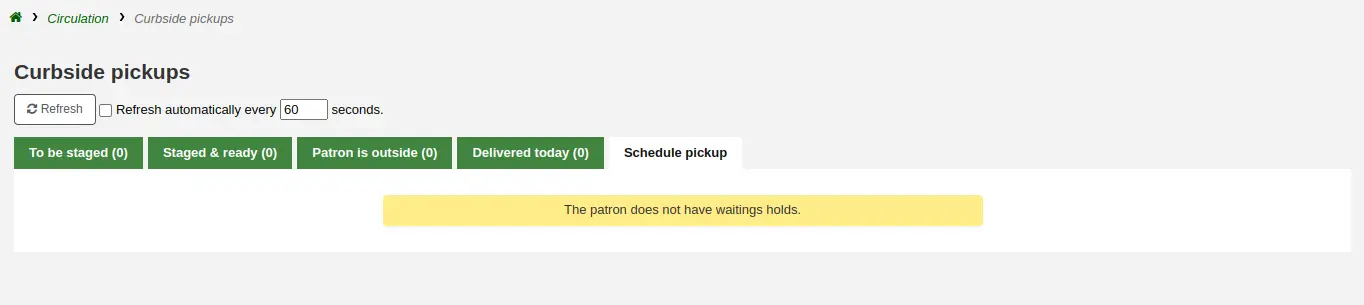
चेतावनी
If 'Enable for waiting holds only' is set in the curbside pickup configuration for your library, and the patron has no waiting holds, there will be an error message.
पिकअप के लिए एक तारीख दर्ज करें
टिप्पणी
उपलब्ध समय स्लॉट के साथ केवल तारीखें प्रदर्शित की जाएंगी।
सप्ताह के दिन के आधार पर संभावित पिकअप समय प्रदर्शित किया जाएगा
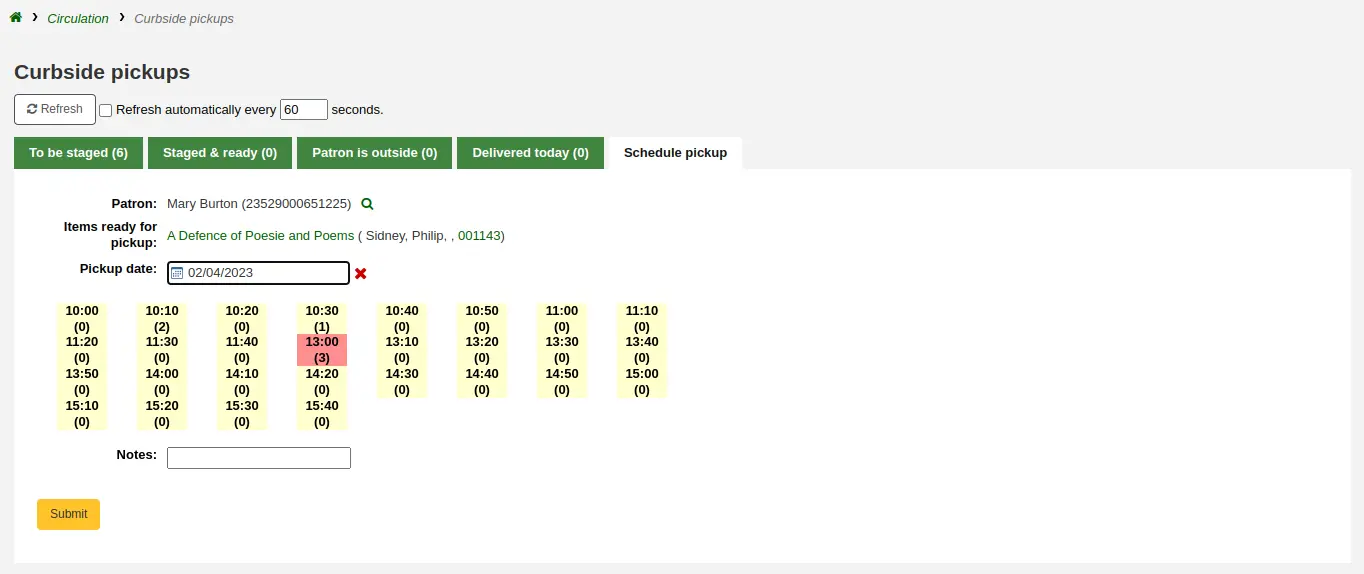
टिप्पणी
The number in parentheses under each time slot is the number of patrons who are currently scheduled for a pickup at that time. If the maximum number of appointments has been reached, based on the 'Maximum patrons per interval' setting in the curbside pickup configuration, the time slot will be displayed in red and you will not be able to select it.
यदि आवश्यक हो, तो आप इस पिकअप से संबंधित एक नोट जोड़ सकते हैं
'सबमिट' पर क्लिक करें
वैकल्पिक रूप से, आप संरक्षक के खाते से एक पिकअप शेड्यूल कर सकते हैं।
संरक्षक के विस्तार पृष्ठ के शीर्ष पर 'शेड्यूल पिकअप' पर क्लिक करें
टिप्पणी
If the patron has chosen to receive the 'Hold filled' notice by email, they will also get a notification when a curbside pickup is scheduled.
You can customize the notice by editing the NEW_CURBSIDE_PICKUP template in the Notices and slips tool.
कर्बसाइड पिकअप की तैयारी
वहां जाओ: परिसंचरण> कर्बसाइड पिकअप >मंचन करना
'टू बी स्टेज' टैब में सभी कर्बसाइड पिकअप होते हैं जो अभी भी तैयार होने की प्रतीक्षा कर रहे हैं।
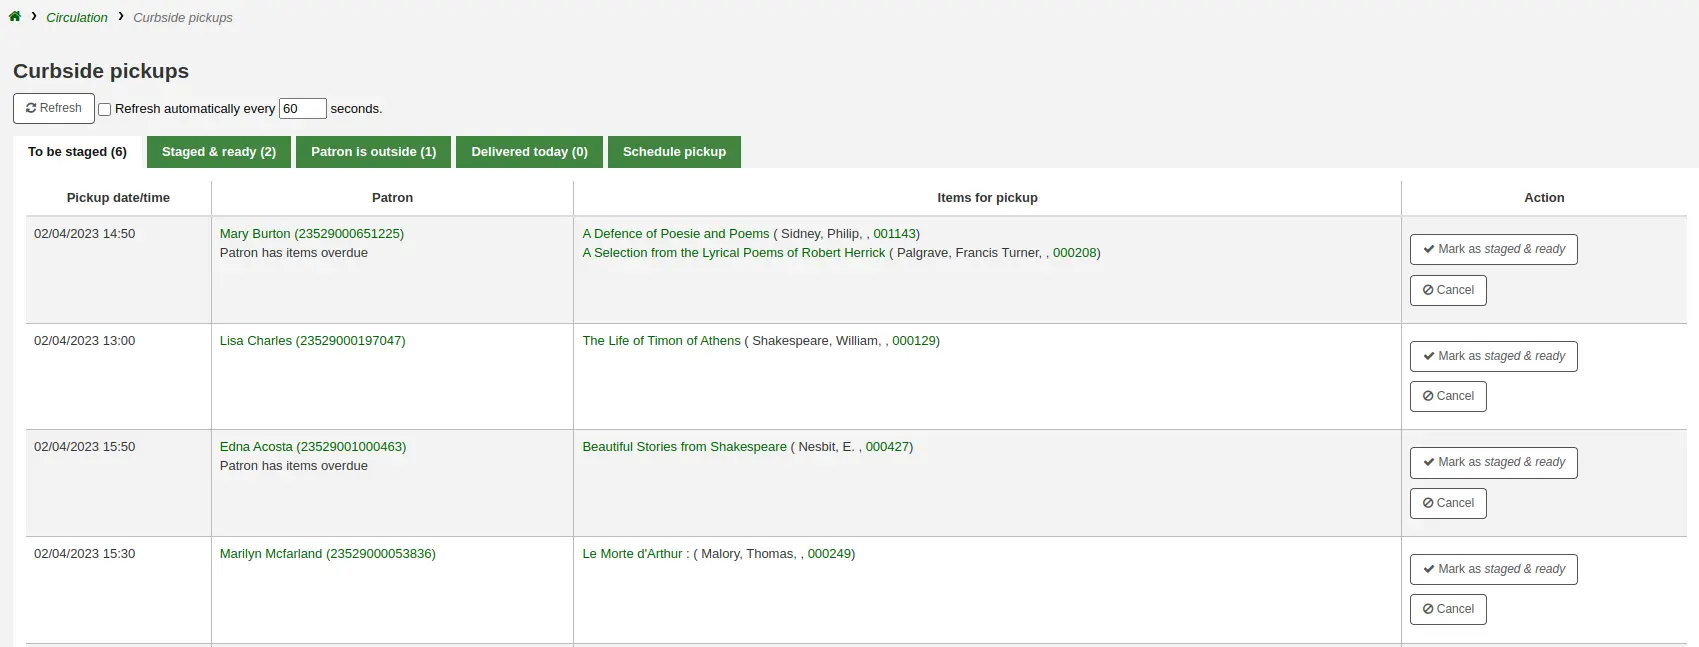
टिप्पणी
यदि संरक्षक के पास अतिव्यापी या प्रतिबंध हैं, तो यह उनके नाम के तहत यहां दिखाया जाएगा।
एक बार जब आइटम तैयार हो जाते हैं और उठाने के लिए तैयार हो जाते हैं, तो 'मार्क एज़ स्टेज एंड रेडी' पर क्लिक करें। यह 'स्टेज और रेडी' टैब में अनुसूचित पिकअप अपॉइंटमेंट को स्थानांतरित करेगा।
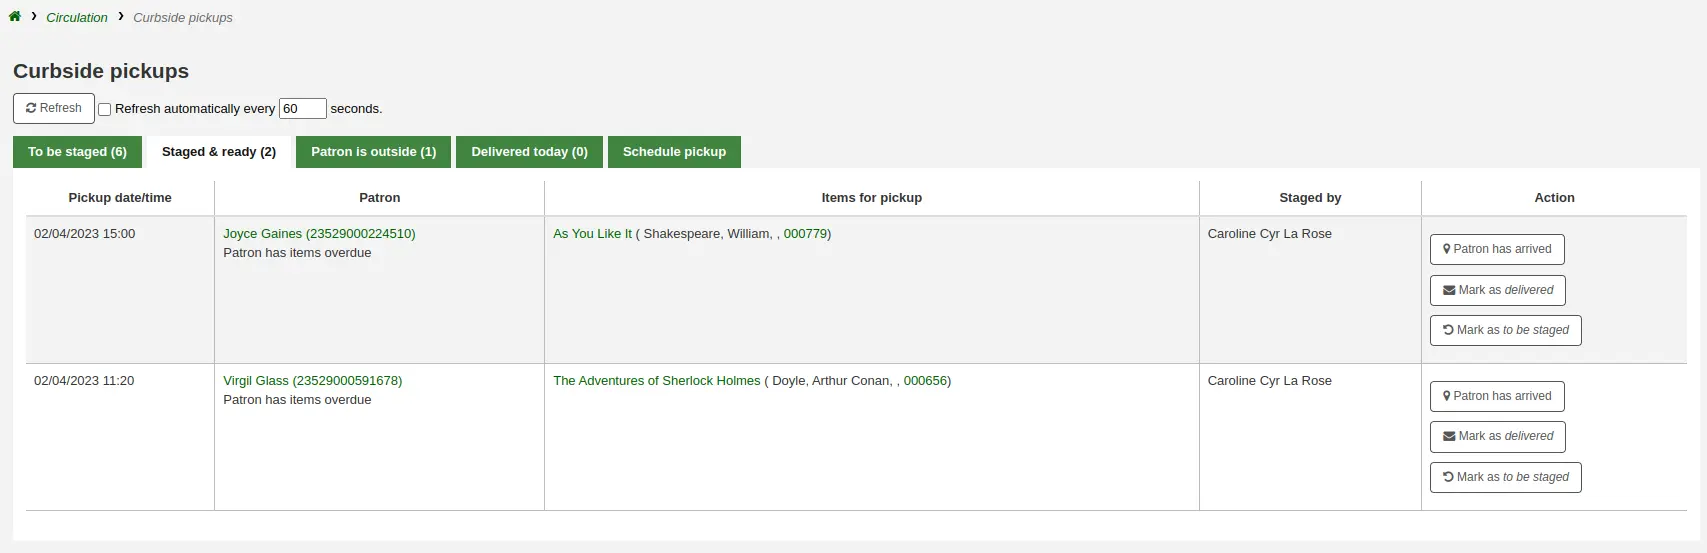
टिप्पणी
There is no need to checkout the item or items to the patron at this point. When delivering curbside pickups, the module will automatically check the items out.
You have the option to refresh the list manually by clicking the 'Refresh' button. You can also set up your session to refresh every X seconds. Check the box next to 'Refresh automatically every X seconds' and enter the number of seconds.
कर्बसाइड पिकअप वितरित करना
वहां जाओ: परिसंचरण> कर्बसाइड पिकअप> संरक्षक बाहर है
ओपेक से, संरक्षक सचेत कर सकता है कि वे बाहर हैं। कर्मचारी यह भी संकेत दे सकते हैं कि संरक्षक 'स्टेज्ड एंड रेडी' टैब से 'पैट्रन हैड्स आगमन' बटन पर क्लिक करके आ गया है।
निर्दिष्ट समय पर, उन्हें अपने आइटम देने के लिए संरक्षक से मिलें। फिर, 'मार्क एज़ डिलीवर' पर क्लिक करें। यह पैट्रन को आइटम या आइटम की जांच करेगा और कर्बसाइड पिकअप अपॉइंटमेंट को 'डिलीवर्ड टुडे' टैब में स्थानांतरित करेगा।
Canceling curbside pickups
वहां जाओ: परिसंचरण> कर्बसाइड पिकअप >मंचन करना
यदि, किसी भी कारण से, आपको एक कर्बसाइड पिकअप अपॉइंटमेंट रद्द करने की आवश्यकता है, तो 'रद्द' टैब से 'रद्द करें' बटन पर क्लिक करें।
यदि नियुक्ति पहले से ही 'मंचन' की स्थिति से परे प्रगति कर चुकी है, तो इसे रद्द करने के लिए इसे वापस लाने के लिए 'मार्क को मंचन' पर क्लिक करें।
रिकॉल
रिकॉल सुविधा उपयोगकर्ताओं को वर्तमान में चेक आउट की गई वस्तुओं को वापस बुलाने की अनुमति देती है। एक बार वापस बुलाने की पुष्टि हो जाने के बाद, उधारकर्ता जिसके पास वर्तमान में चेक आउट किया गया आइटम है, को सूचित किया जाएगा कि उनकी देय तिथि समायोजित कर दी गई है और उन्हें अपना आइटम वापस करने की आवश्यकता है। एक बार वापस बुलाए गए आइटम वापस कर दिए जाने के बाद, रिकॉल अनुरोधकर्ता को सूचित किया जाएगा कि उनका आइटम उनके निर्दिष्ट पिकअप स्थान पर पिकअप की प्रतीक्षा कर रहा है।
See the requesting recalls section to learn how to place a recall in the OPAC.
कोहा में रिकॉल की स्थापना
इस सुविधा का उपयोग करने के लिए:
Enable the UseRecalls system preference
सेट करे RecallsMaxPickUpDelay सिस्टम वरीयता
वैकल्पिक रूप से, सक्षम करें RecallsLog सिस्टम वरीयता
Modify the following sections in the relevant circulation rules
रिकॉल की अनुमति है (गिनती)
रिकॉल प्रति रिकॉर्ड (गिनती)
शेल्फ पर रिकॉल की अनुमति है
रिकॉल देय तिथि अंतराल (दिन)
अतिदेय अतिदेय जुर्माना राशि
रिकॉल पिकअप अवधि
Make sure all the staff members who will be managing recalls have the manage_recalls permission (or the superlibrarian permission).
Schedule the recalls cronjobs
Review the recalls notices and slips to make sure they have all the information needed
रिकॉल का प्रबंधन
रिकॉल सुविधा अपेक्षाकृत स्वचालित है। रिकॉल को प्रबंधित करने के लिए कर्मचारियों के पास बहुत अधिक हेरफेर नहीं है।
टिप्पणी
Only staff with the manage_recalls permission (or the superlibrarian permission) will be able to access recall management.
स्थितियों को याद करें
रिकॉल की संभावित स्थितियाँ निम्नलिखित हैं:
अनुरोध किया
एक नया रिकॉल अनुरोध किया गया है और आइटम को उस संरक्षक द्वारा वापस किया जाना चाहिए जिसके पास वर्तमान में यह है
अनुरोधित रिकॉल में दिखाई देते हैं
the recalls queue
यह खीचने वाली सूची का रिकॉल,अगर कोई उपलब्ध आइटम रिकॉल को पूरा कर सकता है
ग्रंथ सूची रिकॉर्ड का 'रिकॉल' टैब
the 'Recalls' tab of the patron's file (and its equivalent in the OPAC)
the 'Recalls history' tab of a patron's file (and its equivalent in the OPAC)
प्रतीक्षा कर रहा है
एक रिकॉल किया गया आइटम अनुरोधकर्ता की चुनी हुई शाखा में पिकअप के लिए प्रतीक्षारत है
वेटिंग रिकॉल में दिखाई देते हैं
पारगमन में
एक आइटम को वापस बुलाने के लिए असाइन किया गया है और यह अनुरोधकर्ता की चुनी हुई पिकअप शाखा में ट्रांज़िट में है
ट्रांजिट रिकॉल में दिखाई देते हैं
अतिदेय
एक वापस बुलाई गई वस्तु उस संरक्षक द्वारा लौटाई जाने के लिए अतिदेय है जिसके पास वर्तमान में यह है
ओवरड्यू रिकॉल में दिखाई देते हैं
पूरा करना
रिकॉल किए गए आइटम को रिकॉल अनुरोधकर्ता को चेक आउट कर दिया गया है, और रिकॉल पूरा हो गया है
पूर्ण किए गए रिकॉल में दिखाई देते हैं
एक्स्पायर्ड
The recall was not completed before a defined expiration date or the recall requester failed to pick up their waiting recall within the pickup period defined in RecallsMaxPickUpDelay
एक्सपायर्ड रिकॉल इसमें दिखाई देते हैं
रद्द किया
The recall request was canceled.
Canceled recalls appear in
वापस बुलाई गई आइटमों को प्राप्त करना
Upon checkin in an item that has been recalled, a pop up will appear asking the staff member to confirm or ignore the recall.
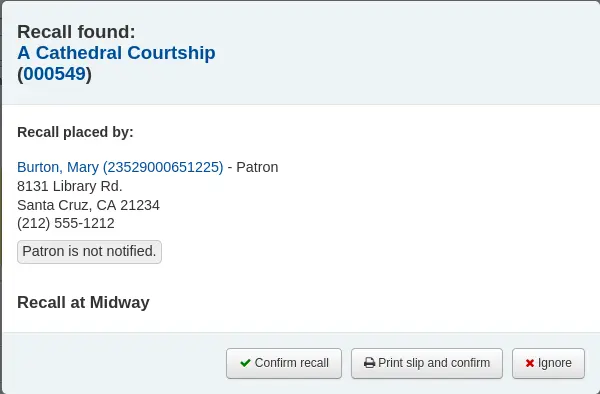
रिकॉल की पुष्टि करें: यह विकल्प रिकॉल को 'वेटिंग' स्थिति में डाल देगा और, यदि संरक्षक के पास उनकी फ़ाइल में एक ईमेल पता है, तो उन्हें सूचित करेगा कि उनका रिकॉल किया गया आइटम अब पिकअप के लिए तैयार है।
टिप्पणी
The notice sent is PICKUP_RECALLED_ITEM. You can modify it's content in the notices and slips tool
प्रिंट स्लिप और कन्फर्म: यह विकल्प एक स्लिप प्रिंट करेगा जिसे आप आइटम से अटैच कर सकते हैं (होल्ड स्लिप के समान) इसके अलावा 'पुष्टिकरण रिकॉल' करता है (स्थिति बदलें और नोटिस भेजें)।
टिप्पणी
The slip is RECALL_REQUESTER_DET. You can modify it's content in the notices and slips tool
इग्नोर करें: यह विकल्प आइटम में चेक इन करेगा, लेकिन रिकॉल को पिकअप की प्रतीक्षा के रूप में सेट नहीं किया जाएगा और संरक्षक को सूचित नहीं किया जाएगा।
If the patron asked to pick up their recalled item at a different library, a transfer will be triggered.
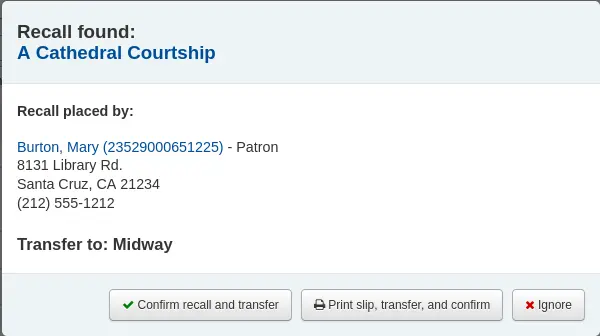
रिकॉल और ट्रांसफर की पुष्टि करें: यह विकल्प रिकॉल को 'ट्रांज़िट' में डाल देगा।
प्रिंट स्लिप, ट्रांसफर और कन्फर्म: यह विकल्प एक स्लिप को प्रिंट करेगा जिसे आप आइटम से अटैच कर सकते हैं (होल्ड स्लिप के समान) रिकॉल को 'ट्रांज़िट' के रूप में सेट करने के अलावा।
ध्यान न दें: यह विकल्प आइटम में चेक इन करेगा, लेकिन रिकॉल को 'ट्रांजिट' के रूप में सेट नहीं किया जाएगा
टिप्पणी
संरक्षक को सूचित नहीं किया जाएगा कि उनका रिकॉल उपरोक्त विकल्पों में से किसी के साथ उनके लिए तैयार है।
Canceling recalls
टिप्पणी
Only requested or overdue recalls can be canceled.
उस रिकॉल को रद्द करना संभव नहीं है जो वर्तमान में पिकअप की प्रतीक्षा कर रहा है
स्टाफ़ इंटरफ़ेस में स्टाफ विभिन्न स्क्रीन से रिकॉल को रद्द कर सकता है।
Cancel from the recalls queue either individually by clicking the 'Actions' button and selecting the 'Cancel' option.
या कई रिकॉल का चयन करके और स्क्रीन के नीचे 'चयनित रिकॉल रद्द करें' बटन पर क्लिक करके।
यदि वापस मंगाई गई आइटम वर्तमान में पारगमन में है, तो रद्द करने का विकल्प भी एक हस्तांतरण को आइटम की होम लाइब्रेरी में वापस ट्रिगर करेगा।
Cancel from the recalls to pull by clicking the 'Cancel recall' button on the right
यदि वापस मंगाई गई आइटम वर्तमान में पारगमन में है, तो रद्द करने का विकल्प भी एक हस्तांतरण को आइटम की होम लाइब्रेरी में वापस ट्रिगर करेगा।
Cancel from the overdue recalls list either individually by clicking the 'Actions' button and selecting the 'Cancel' option.
या कई रिकॉल का चयन करके और स्क्रीन के नीचे 'चयनित रिकॉल रद्द करें' बटन पर क्लिक करके।
'कार्रवाइयां' बटन पर क्लिक करके और 'रद्द करें' विकल्प का चयन करके ग्रंथ सूची रिकॉर्ड के 'रिकॉल' टैब से रद्द करें।
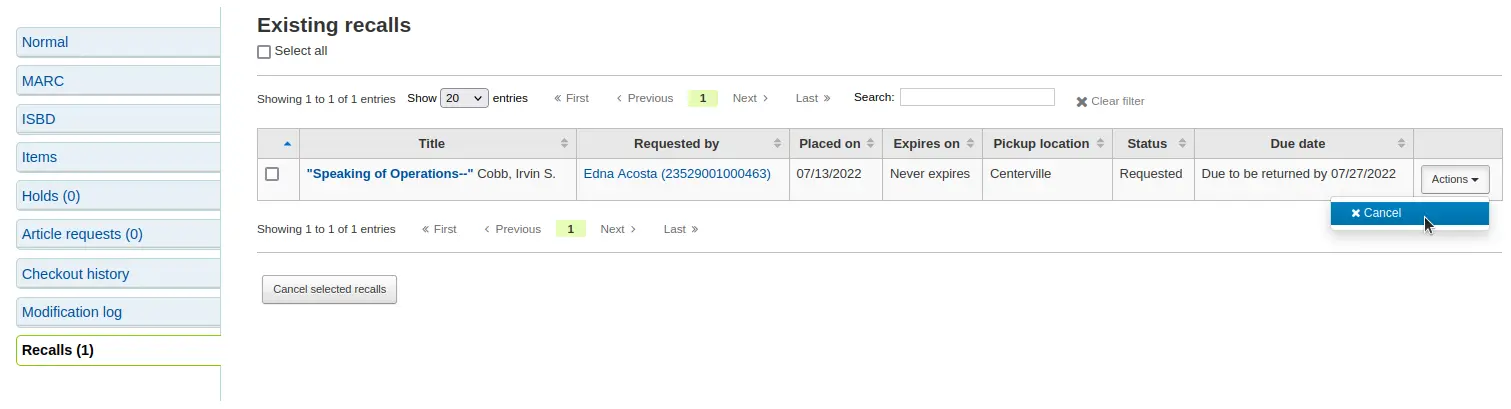
या कई रिकॉल का चयन करके और स्क्रीन के नीचे 'चयनित रिकॉल रद्द करें' बटन पर क्लिक करके।
'कार्रवाइयां' बटन पर क्लिक करके और 'रद्द करें' विकल्प का चयन करके संरक्षक के विवरण पृष्ठ के 'रिकॉल' टैब से रद्द करें।

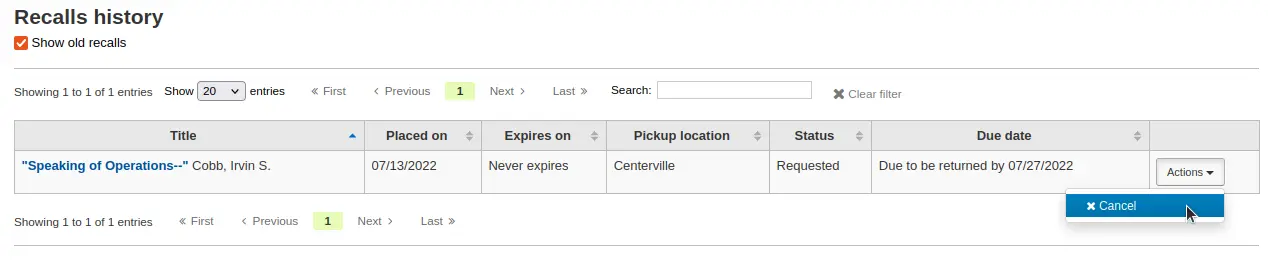
'कार्रवाइयां' बटन पर क्लिक करके और 'रद्द करें' विकल्प का चयन करके संरक्षक की फ़ाइल के 'रिकॉल इतिहास' टैब से रद्द करें।
वेटिंग रिकॉल की स्थिति बदल रही है
यदि कोई रिकॉल वर्तमान में पिकअप की प्रतीक्षा कर रहा है और किसी कारण से कर्मचारियों को इस स्थिति को बदलने की आवश्यकता है (उदाहरण के लिए, अनुरोध करने वाले संरक्षक ने कॉल किया और वे रिकॉल नहीं उठा रहे हैं), तो प्रतीक्षा स्थिति को वापस करना संभव है।
Revert the status from the recalls queue by clicking the 'Actions' button and selecting the 'Revert waiting' option.

Revert the status from the Recalls awaiting pickup list by clicking the 'Revert waiting status' button on the right.
रिकॉल को अतिदेय के रूप में चिह्नित करना
If a recall is not checked in by the new due date, it should be marked as overdue by the overdue_recalls cronjob. However, it is possible to mark recalls as overdue manually.
From the recalls queue, click the 'Actions' button and selecting the 'Mark as overdue' option.
Overdue recalls appear in the Overdue recalls list.
रिकॉल समाप्त हो रही है
If a recall as been awaiting pickup for longer than the allowed period defined in RecallsMaxPickUpDelay, it should be expired automatically by the expire_recalls cronjob. However, it is possible to expire recalls manually.
From the recalls awaiting pickup list, click the 'Expire recall' button on the right.
रिकॉल रिपोर्ट्स
Once recalls are set up, new sections will appear in the circulation module.
Get there: Circulation > Recalls
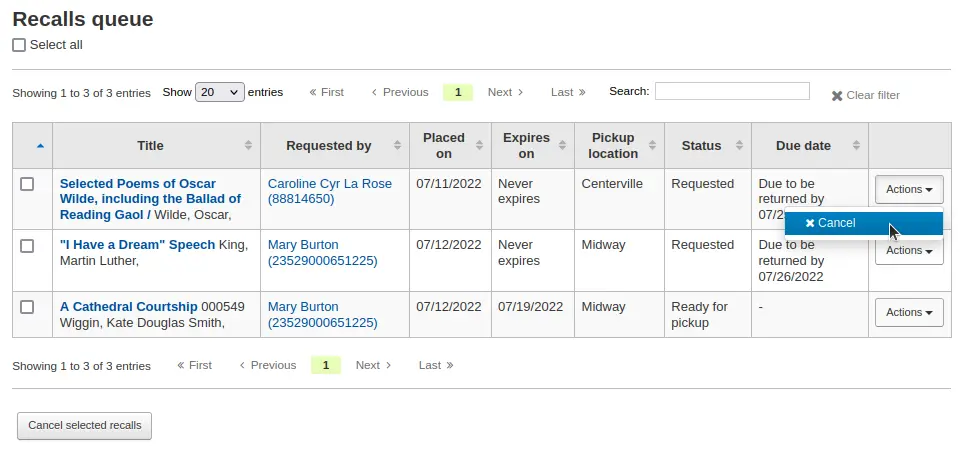
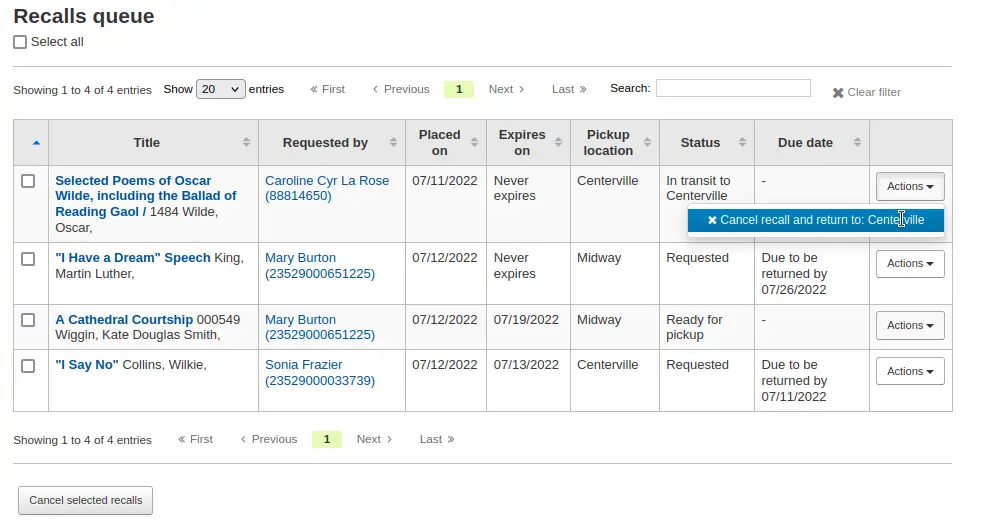
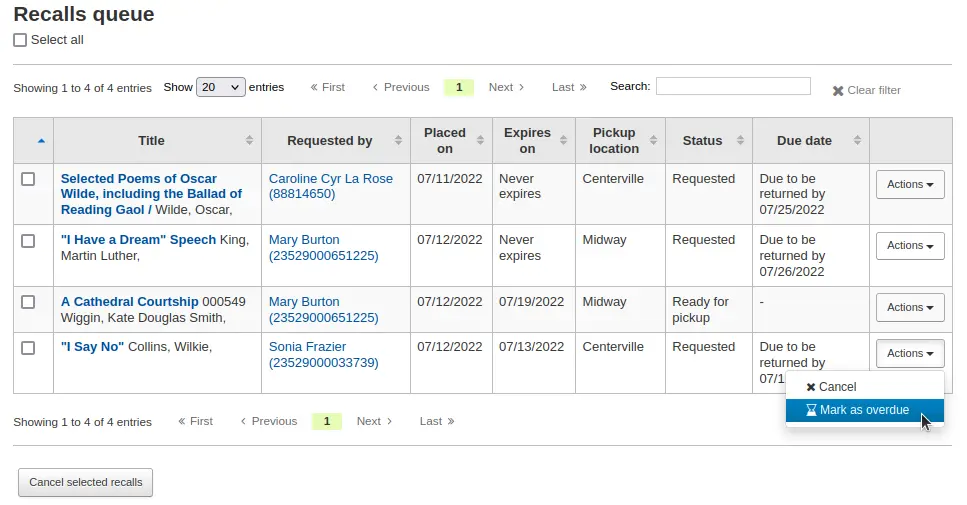
रिकॉल पंक्ति
रिकॉल कतार सभी मौजूदा सक्रिय रिकॉल को उनकी स्थिति के साथ दिखाती है।
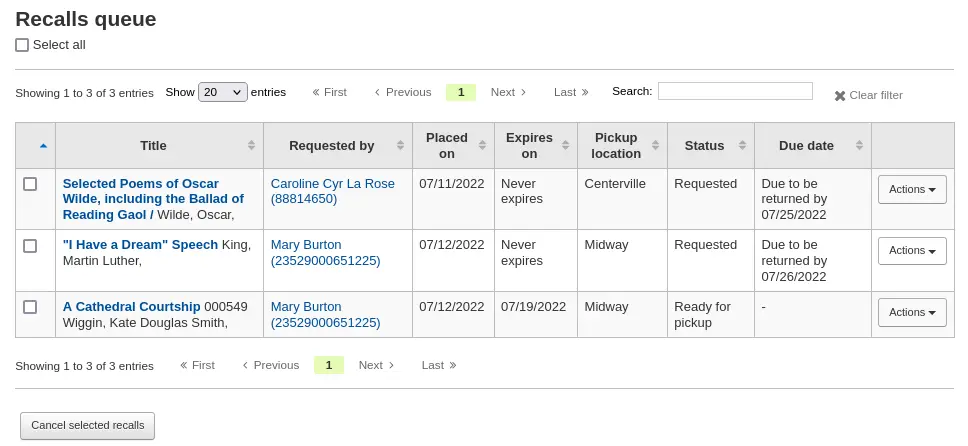
रिकॉल कतार से, कर्मचारी 'कार्रवाई' बटन पर क्लिक करके और 'रद्द करें' विकल्प का चयन करके या तो व्यक्तिगत रूप से सक्रिय रिकॉल को रद्द कर सकते हैं।
या कई रिकॉल का चयन करके और स्क्रीन के नीचे 'चयनित रिकॉल रद्द करें' बटन पर क्लिक करके।
रिकॉल के लिए जो पारगमन में हैं, उन्हें रद्द करना संभव है और यह उनके होम लाइब्रेरी में वापस स्थानांतरण को ट्रिगर करेगा।
रिकॉल के लिए जो वर्तमान में पिकअप की प्रतीक्षा कर रहे हैं, 'कार्रवाई' बटन पर क्लिक करके और 'प्रतीक्षा वापस करें' विकल्प का चयन करके प्रतीक्षा स्थिति को वापस लाना संभव है।
रिकॉल के लिए जो अतिदेय हैं, उन्हें 'कार्रवाई' बटन पर क्लिक करके और 'अतिदेय के रूप में चिह्नित करें' विकल्प का चयन करके रिकॉल क्यू से चिह्नित करना संभव है।
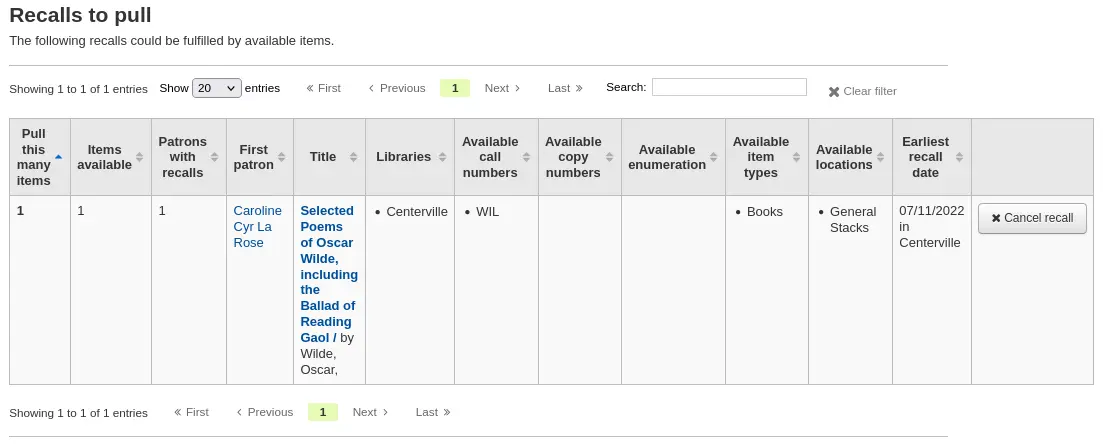
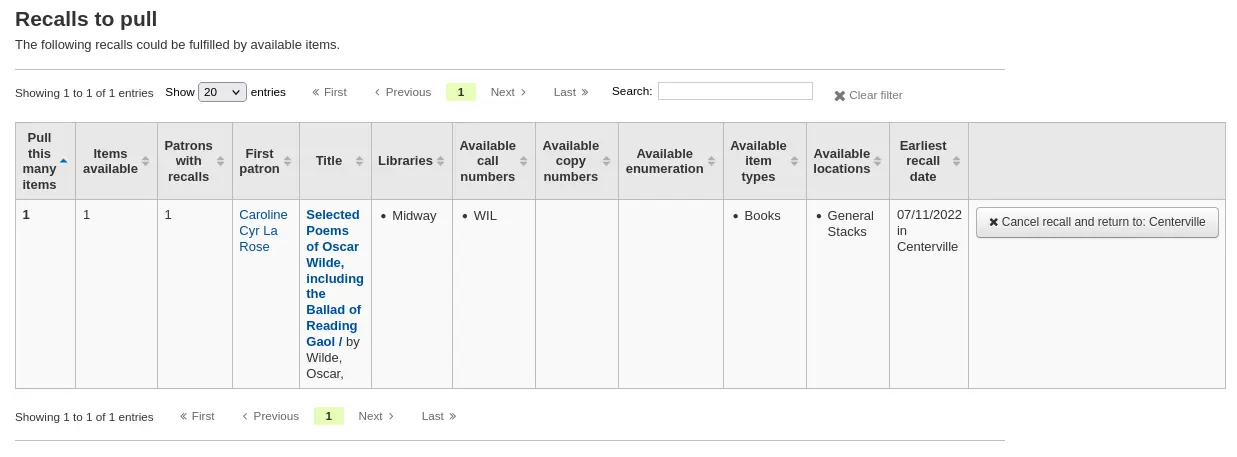
रिकॉल खींचना
रिकॉल टू पुल सूची उन सभी रिकॉर्ड्स को दिखाती है जिन्हें वापस मंगाया गया है लेकिन उनमें उपलब्ध आइटम हैं जो अनुरोध को पूरा कर सकते हैं।
Staff can pick up these items from the shelves and check them in to fulfill the requests.
रिकॉल से लेकर पुल सूची तक, कर्मचारी यदि आवश्यक हो तो दाईं ओर 'रिकॉल रद्द करें' बटन पर क्लिक करके रिकॉल को रद्द कर सकते हैं।
If the item is currently in transit, canceling the recall will also trigger a transfer back the the item's home library.
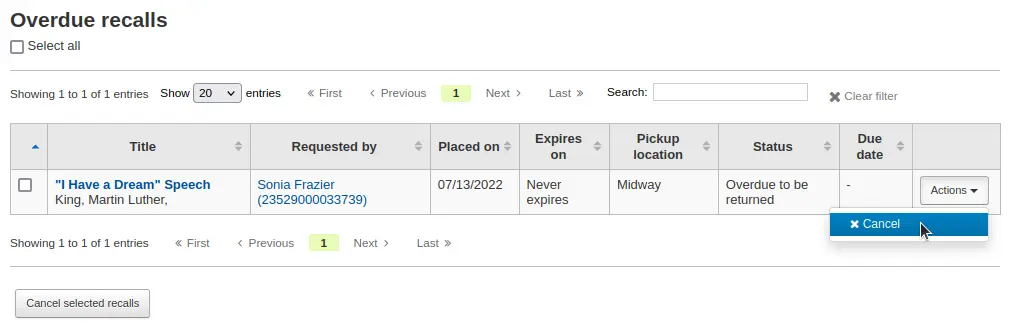
अतिदेय रिकॉल
यह सूची उन वस्तुओं को दिखाती है जिन्हें वापस मंगाया गया है लेकिन नई देय तिथि तक वापस नहीं किया गया है।
Recalls can be marked as overdue automatically through the overdue_recalls cronjob or manually.
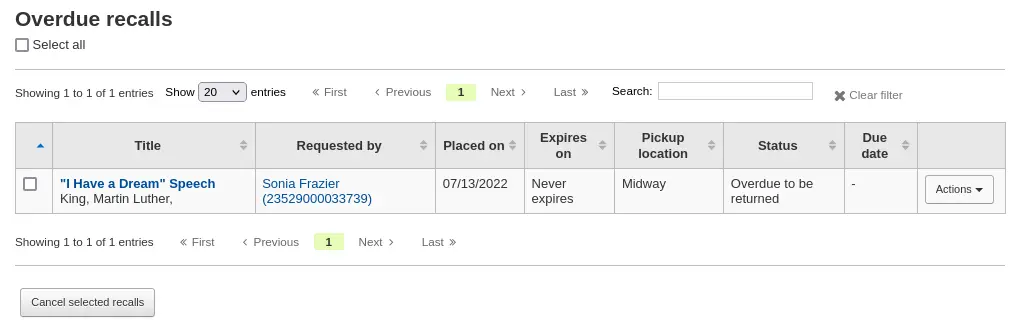
इस सूची से, कर्मचारी 'कार्रवाई' बटन पर क्लिक करके और 'रद्द करें' विकल्प का चयन करके या तो व्यक्तिगत रूप से सक्रिय रिकॉल को रद्द कर सकते हैं।
या कई रिकॉल का चयन करके और स्क्रीन के नीचे 'चयनित रिकॉल रद्द करें' बटन पर क्लिक करके।
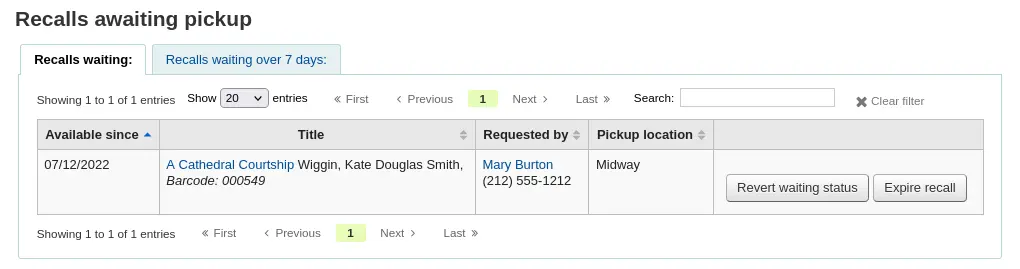
पिकअप की प्रतीक्षा में रिकॉल
पिकअप सूची का इंतजार कर रहे रिकॉल उन सभी रिकॉल को दिखाते हैं जो वर्तमान में संरक्षक के आने और उन्हें प्राप्त करने की प्रतीक्षा कर रहे हैं।
यह सूची दो टैब में विभाजित है:
रिकॉल वेटिंग: वर्तमान में पिकअप की प्रतीक्षा कर रहे सभी रिकॉल दिखाता है।
एक्स दिनों से प्रतीक्षा कर रहे रिकॉल: उन रिकॉल को दिखाता है जो RecallsMaxPickUpDelay सिस्टम वरीयता में निर्दिष्ट दिनों की संख्या से अधिक के लिए प्रतीक्षा कर रहे हैं।
From this list, staff can revert waiting recalls by clicking on the 'Revert waiting status' button on the right.
Staff can also manually expire recalls by clicking on the 'Expire recall' button on the far right.
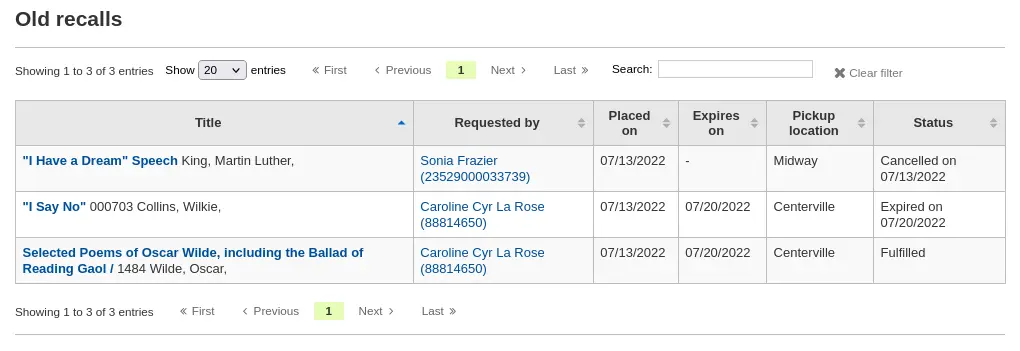
पुराना रिकॉल
The old recalls list shows all the inactive recalls (completed, canceled and expired).
स्थानांतरण
If you work in a multi-branch system, you can transfer items from one library to another by using the Transfer tool.
Get there: Circulation > Transfer
To transfer an item,
Click 'Transfer' on the Circulation page.
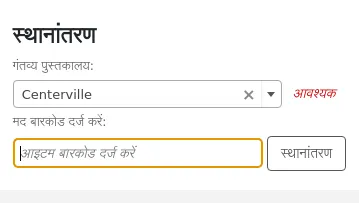
Select the library to transfer the item to.
Scan or type the barcode on the item to transfer.
'सबमिट' पर क्लिक करें
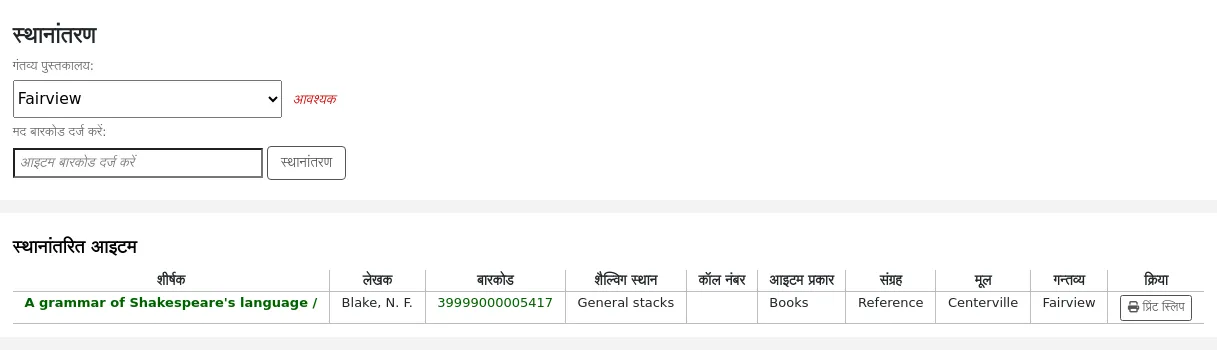
The item will now say that it is in transit in the 'Status' column of the holdings table in the staff interface and in the OPAC.
When the item arrives at the other library, the staff member must check the item in to acknowledge that it has arrived and is no longer in transit.
The item will not be permanently moved to the new library. The item will keep the same 'Home library' and the 'Current location' is updated to note where it resides at this time.
Staff can check the status of items in transit in the Transfers to receive report.
If you are using the stock rotation automation tool, you can check which items from your library are requested by the stock rotation tool for transfer to another library using the Transfers to send report.
सेट पुस्तकालय
By default, you will enter the staff interface as if you are at your home library. This library will appear in the top right of the staff interface.

This is the library where all circulation transactions will take place. If you are at another library (or on a bookmobile) you will need to set the library before you start circulating items. To do this, click on your username and logged in library at the top right and choose 'Set library' or click 'Set library' on the main circulation page.
टिप्पणी
Only staff with the loggedinlibrary permission (or the superlibrarian permission) will be able to change the library they are logged in at.
This will bring you to a page where you can choose which library you are logged in to.
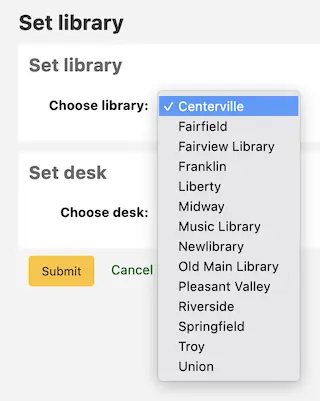
Once you save your changes, your new library will appear in the top right.
टिप्पणी
Only staff with the loggedinlibrary permission (or the superlibrarian permission) will be able to log into a library different from their home library.
Staff members who do not have this permission will only be able to log into their home library.
Fast cataloging
टिप्पणी
Staff members must have the fast_cataloging permission (or the superlibrarian permission) in order to be able to use the fast cataloging option.
Sometimes, circulation staff need to quickly add a record and item to the system for an item they are about to check out. This is called 'Fast cataloging'.
There are two ways to add records via fast cataloging: from the circulation home page or from checking out an item that is not currently in the system.
Fast cataloging from the circulation home page
Get there: Circulation > Fast cataloging
If you know that you're about to check out an item that isn't in your catalog, you can go to the Circulation module and click 'Fast cataloging'.
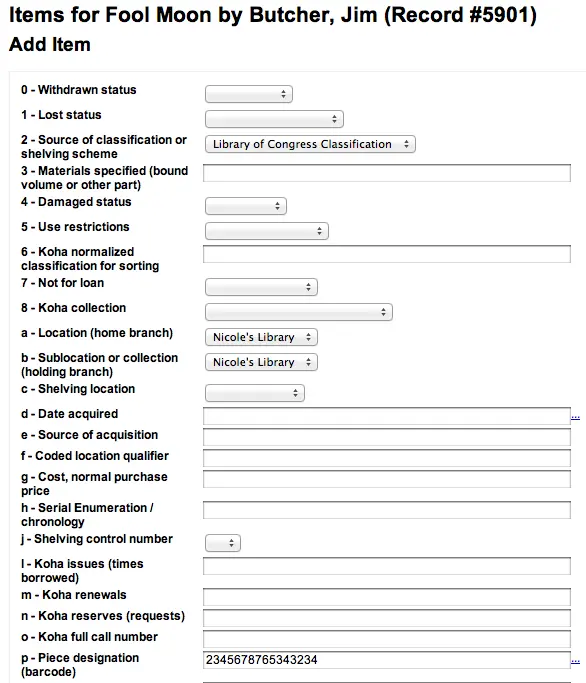
सूचीबद्ध करने इंटरफेस लघु सूचीबद्ध रिकॉर्ड के साथ खुल जाएगा:
After adding the record data and clicking 'Save', the item form will appear where you will be able to enter the item data.
Enter the item's information (at minimum, the barcode, home library, current library, and item type) and click 'Add item'.
You can then check out the item normally.
Fast cataloging by checking out
The other way to fast catalog is from the checkout screen. When you try to checkout a barcode that Koha can't find, it will prompt you to use fast cataloging to add the item to Koha and check it out.
Clicking 'Add record using fast cataloging' will bring you to the fast cataloging form where you can enter the record information.
After adding the record data and clicking 'Save', the item form will appear where you will be able to enter the item data. The barcode will already be filled in with the barcode you tried to check out.
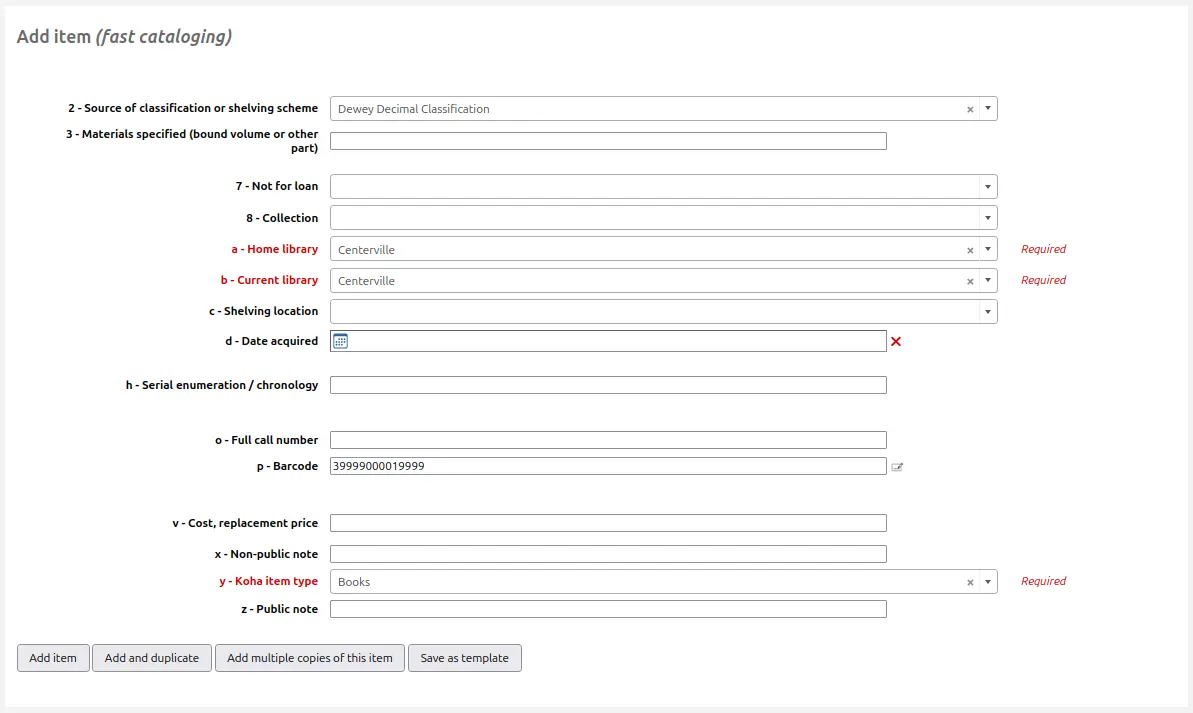
Enter the rest of the item's information (at minimum, home library, current library, and item type) and click 'Add item'.
The item will automatically be checked out the patron you were trying to check the item out to originally.
परिसंचालन रिपोर्टें
Most reports can be found via the Reports module, but the more common circulation reports are available right from the Circulation module's homepage.
होल्डस पंक्ति
यह रिपोर्ट आपको दिखाएगी कि आपके पुस्तकालय में शेल्फ से बाहर निकाले जाने की प्रतीक्षा कर रही है।
First, choose some filters for the report.
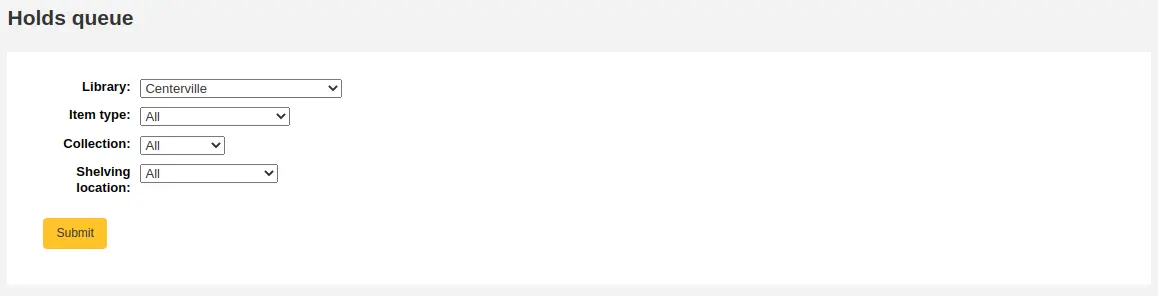
Then, the report will be displayed.

टिप्पणी
You can customize the columns of this table in the Table settings section of the Administration module (table id: holds-table).
To generate this report, you must either have the Build holds queue cron job running, or the RealTimeHoldsQueue system preference must be set to 'Enable'. Either of these will run a script that decides which library should be responsible for fulfilling a given hold request. This should be enabled if your library system allows borrowers to place on-shelf holds.
The holds queue behavior is controlled by the system preferences StaticHoldsQueueWeight, RandomizeHoldsQueueWeight and UseTransportCostMatrix.
If you do not want all of your libraries to participate in the on-shelf holds fulfillment process, you should list the libraries that *do* participate in the process here by inputting all the participating library's branchcodes, separated by commas (e.g. "MPL,CPL,SPL,BML" etc.).
By default, the holds queue will be generated such that the system will first attempt to hold fulfillment using items already at the pickup library if possible. If there are no items available at the pickup library to fill a hold, the system will then use the list of libraries defined in StaticHoldsQueueWeight. If RandomizeHoldsQueueWeight is disabled (which it is by default), the script will assign fulfillment requests in the order the libraries are placed in the StaticHoldsQueueWeight system preference.
For example, if your system has three libraries, of varying sizes (small, medium and large) and you want the burden of holds fulfillment to be on larger libraries before smaller libraries, you would want StaticHoldsQueueWeight to look something like "LRG,MED,SML".
If you want the burden of holds fulfillment to be spread out equally throughout your library system, simply enable RandomizeHoldsQueueWeight. When this system preference is enabled, the order in which libraries will be requested to fulfill an on-shelf hold will be randomized each time the list is regenerated.
An alternative to static and randomized is using the Transport cost matrix. It takes precedence in controlling where holds are filled from and allows you to define the 'cost' of transport between any two libraries. To use the Transport cost matrix simply set your UseTransportCostMatrix preference to 'Use'.
टिप्पणी
Other system preferences will have an impact on prioritization in the holds queue, namely: LocalHoldsPriority, LocalHoldsPriorityPatronControl, LocalHoldsPriorityItemControl and HoldsQueuePrioritizeBranch.
खींचने के लिए होल्ड्स
This report will show you all of the items that have holds on them that are available at the library for pulling. If the items are available at multiple libraries then all libraries with that item available will see the hold to pull until one library triggers the hold.
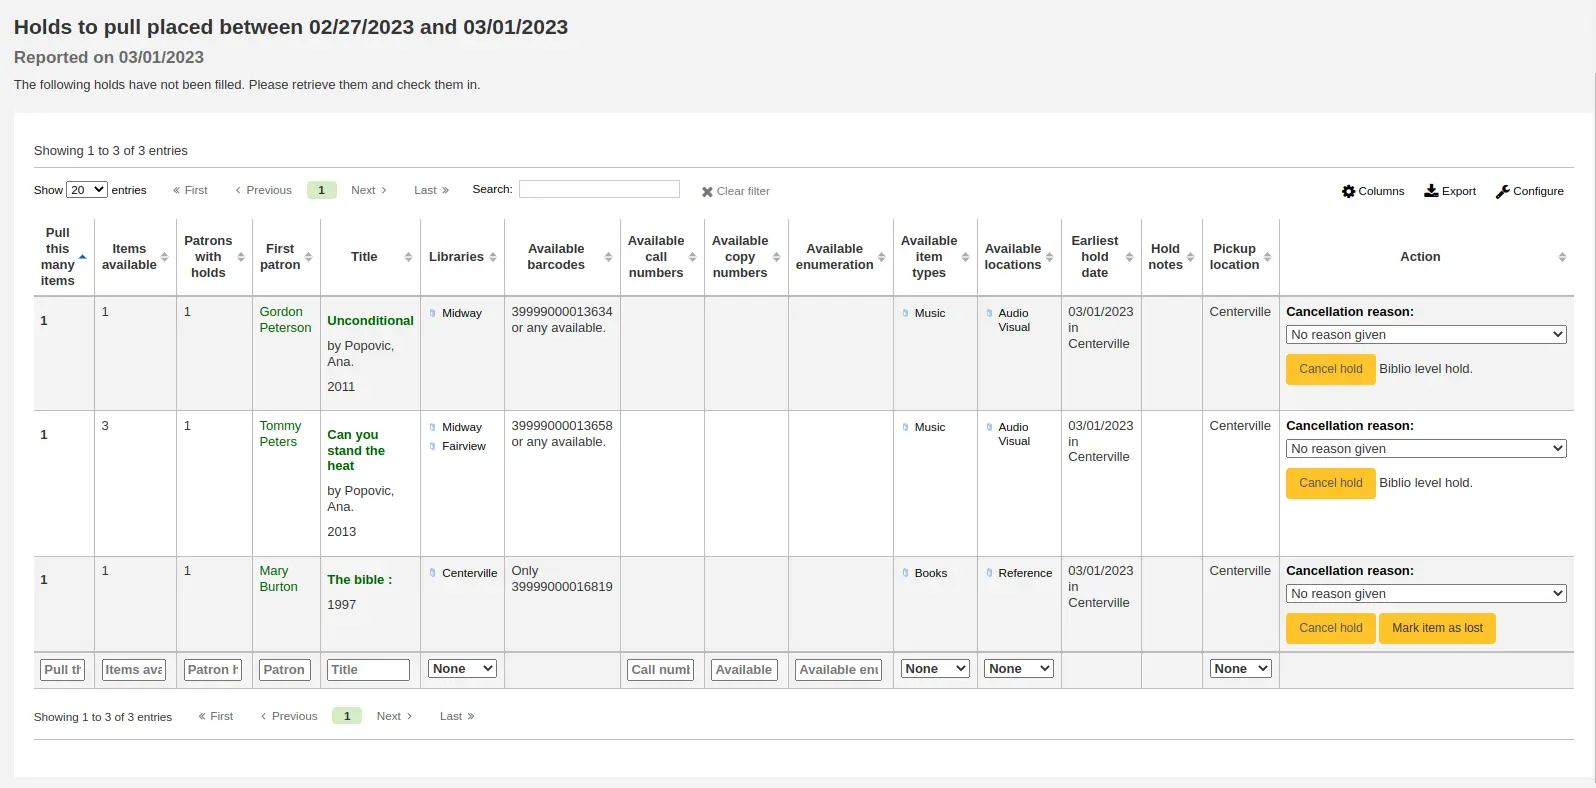
टिप्पणी
You can customize the columns of this table in the Table settings section of the Administration module (table id: holds-to-pull).
Depending on the value of the CanMarkHoldsToPullAsLost system preference, clicking the "Mark item as lost" button or "Mark item as lost and notify patron" button will mark item as lost and notify the requesting patron.
You can choose which LOST value to set the item to with the UpdateItemWhenLostFromHoldList system preference.
चेतावनी
These buttons will only appear on item-level holds.
टिप्पणी
The notification sent to the patron will use the CANCEL_HOLD_ON_LOST template. It can be customized in the Notices and slips tool.
You can limit the results you see by using the Refine box on the left side of the page.
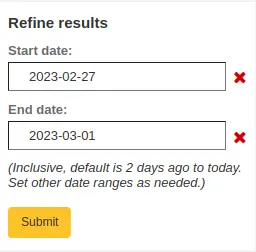
टिप्पणी
The default dates in the filters are determined by the HoldsToPullStartDate and ConfirmFutureHolds system preferences.
Holds इंतज़ार कर पिकअप
यह रिपोर्ट है कि संरक्षक के लिए इंतजार कर रहे हैं रखती है की सब उन्हें लेने के लिए दिखाई देगा।
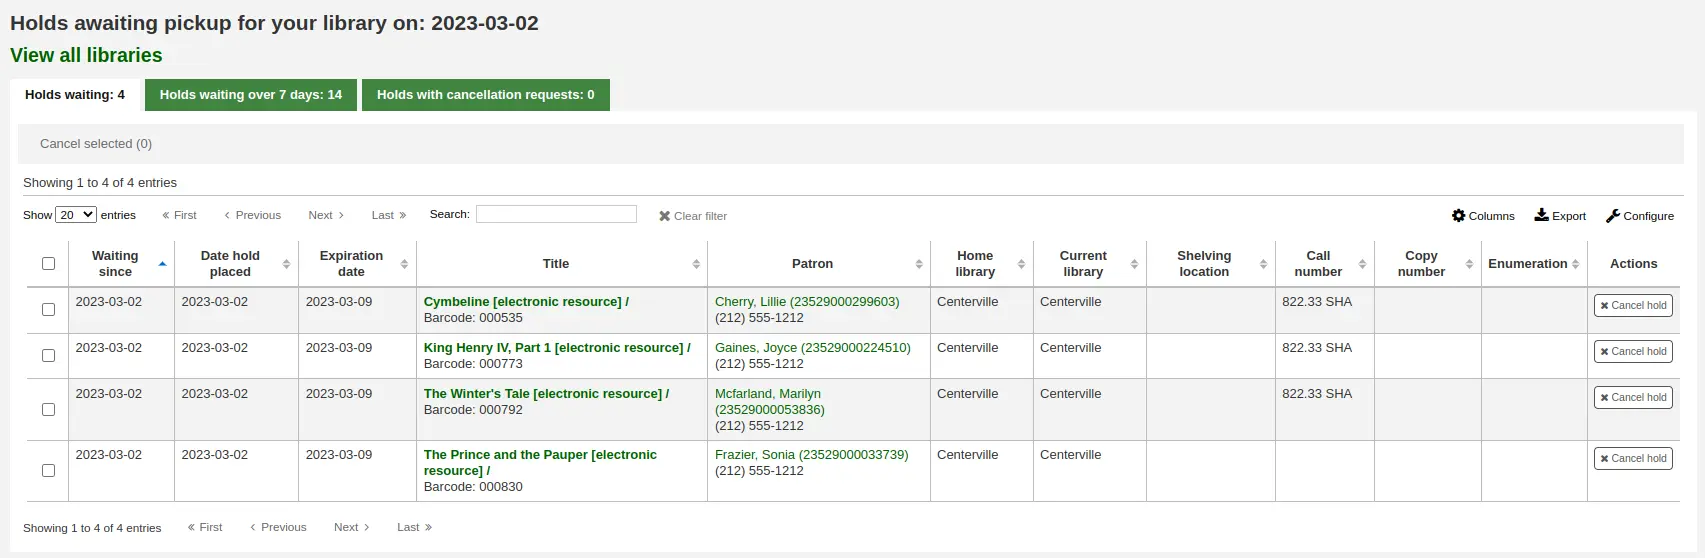
टिप्पणी
You can customize the columns of this table in the Table settings section of the Administration module (table id: holdst).
You can cancel individual holds manually by clicking the 'Cancel hold' button to the right of each hold, or you can cancel selected holds using the button at the top of the list.
Items that have been on the hold shelf longer than you normally allow (based on the ReservesMaxPickUpDelay system preference value or the 'Holds pickup delay' rule in the circulation and fine rules) will appear on the 'Holds waiting past their expiration date' tab.
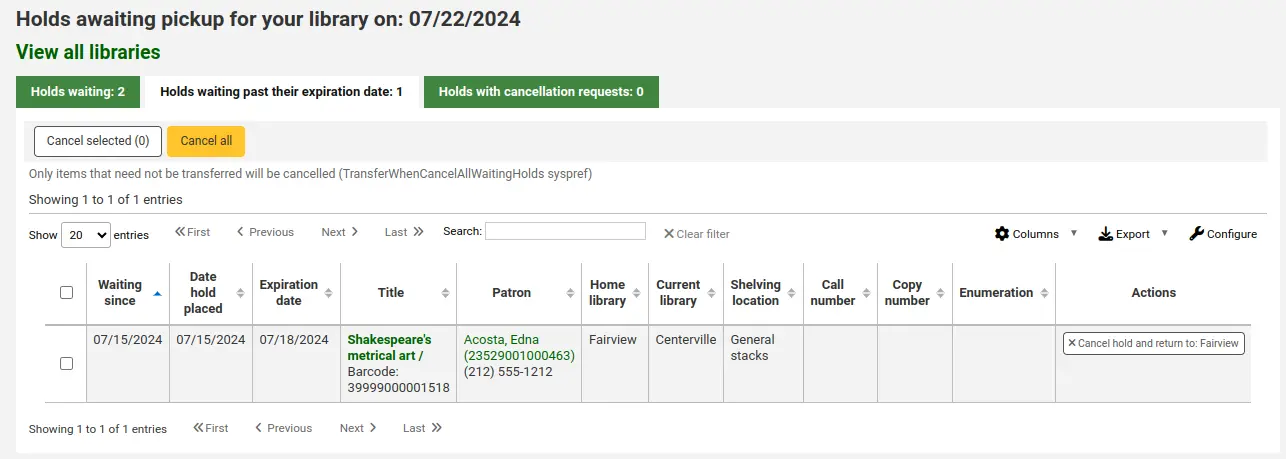
टिप्पणी
You can customize the columns of this table in the Table settings section of the Administration module (table id: holdso).
These holds will not automatically be canceled unless the ExpireReservesMaxPickUpDelay system preference is set to 'Allow' and the cancel_expired_holds.pl cron job is scheduled to run regularly.
You can cancel individual holds manually by clicking the 'Cancel hold' button to the right of each hold, or you can cancel selected holds using the button at the top of the list, or even cancel all holds.
The 'Holds with cancellation requests' tab contains waiting holds that have been canceled by patrons through their account on the OPAC, if that is allowed by the waiting hold cancellation policy.
From this tab, staff can cancel the holds, and transfer them back to their home library, if that is the case.
टिप्पणी
Checking in the items will also cancel the holds with cancellation requests.
अनुपात अनुपात
होल्डअनुपात के संग्रह के विकास के साथ मदद। इस रिपोर्ट का उपयोग कर आप देखने के लिए अपने संरक्षक के कितने लोगों की है वस्तुओं पर रखती है और आप और अधिक खरीद करना चाहिए कि क्या सकेंगे। डिफ़ॉल्ट रूप से यह पुस्तकालय होल्ड प्रति 3 आइटम है कि रखा गया है की आवश्यकता होगी करने के लिए सेट कर दिया जाएगा। रिपोर्ट आपको बता कितने अतिरिक्त आइटम इस कोटे को पूरा करने में खरीदा जा करने की आवश्यकता होगी।
टिप्पणी
You can change the default ratio with the HoldRatioDefault system preference.
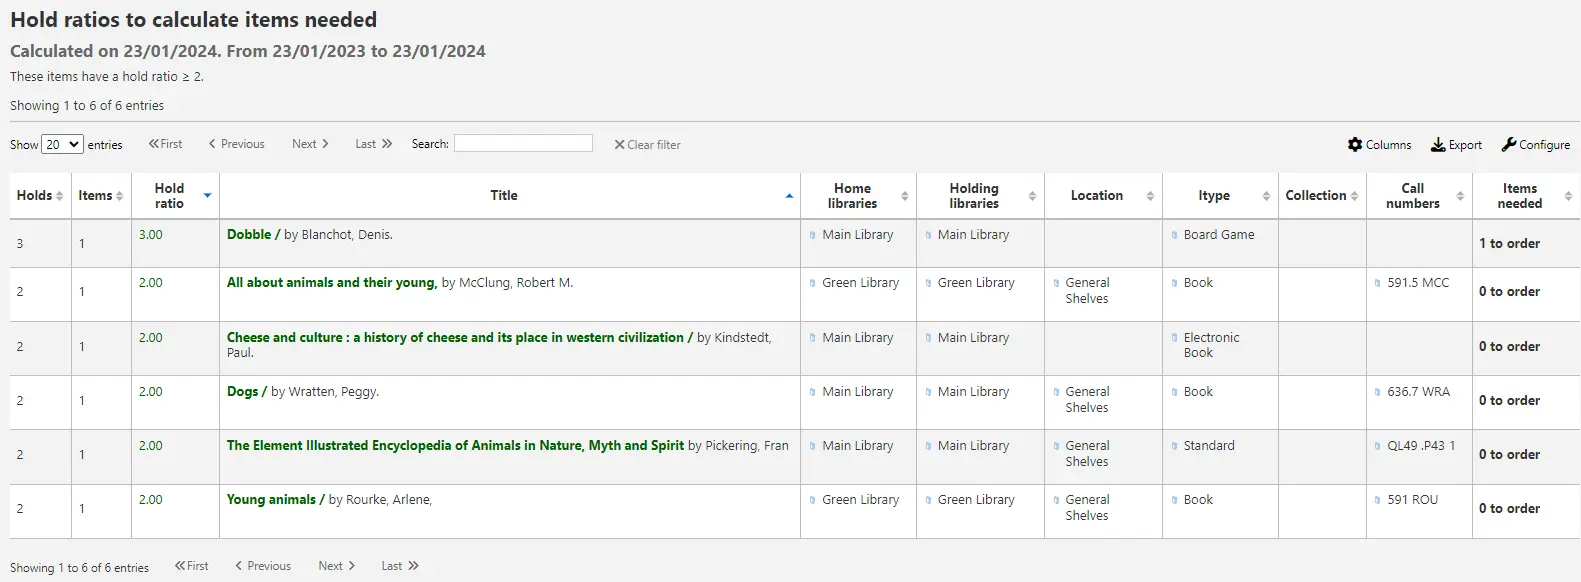
टिप्पणी
You can customize the columns of this table in the Table settings section of the Administration module (table id: holds-ratios).
Bookings to collect
संस्करण
This feature was first introduced in version 24.11 of Koha.
This report will show you all upcoming bookings to be collected at the selected library for the specified dates.
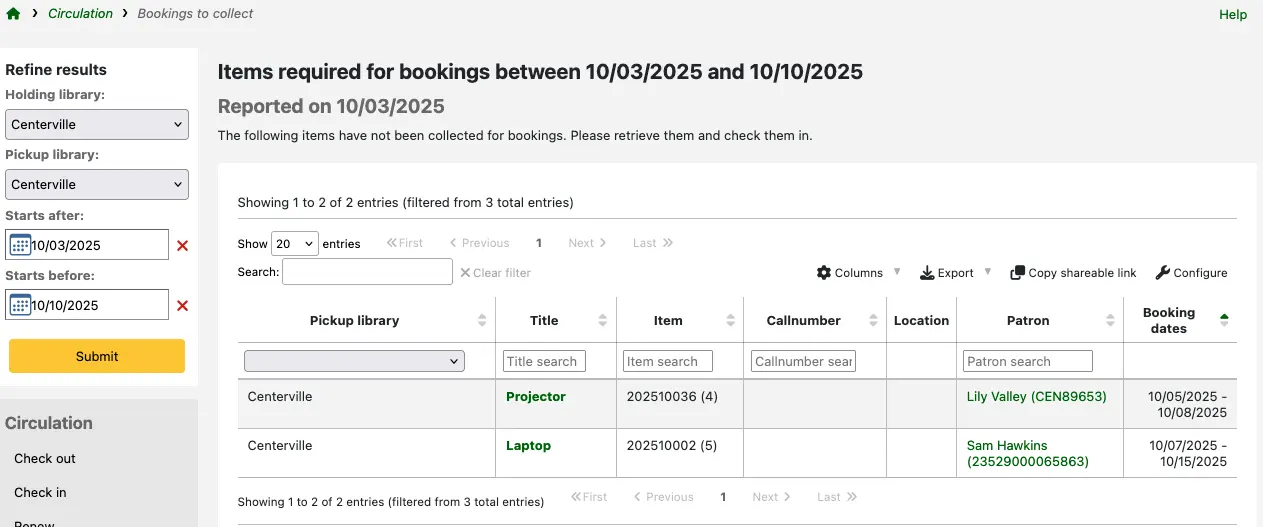
टिप्पणी
You can customize the columns of this table in the Table settings section of the Administration module (table id: bookings-to-collect).
By default:
the holding library and pickup library are set to the library you are logged in at;
the bookings displayed start after today and within the next 7 days.
You can update the selected libraries and dates using the filters to the left of the table.
स्थानांतरण प्राप्त करने के लिए
This report lists all the items that are in transit to your library.

If your transfers are late in arriving, you will see a message stating how late your items are.

टिप्पणी
A transfer is considered late based on the number of days entered in the TransfersMaxDaysWarning system preference.
Transfers to send
This report lists all the items that are requested from your library by the stock rotation tool.
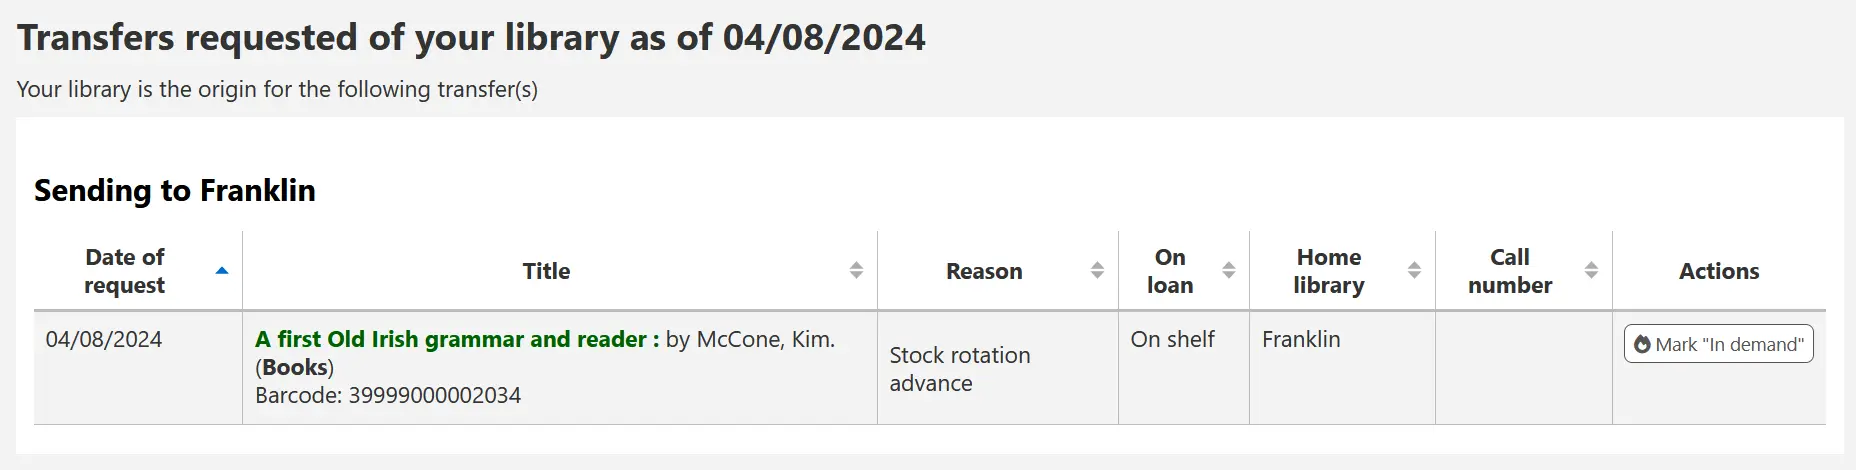
टिप्पणी
This report will only be shown and filled if you are using the stock rotation automation tool.
अनुच्छेद अनुरोधों
लेख अनुरोध कुछ हद तक समान हैं, लेकिन आइटम के लिए अनुरोध नहीं हैं। इसके बजाय, लेख अनुरोध एक पुस्तक के किसी विशेष खंड की फोटोकॉपी या धारावाहिक मुद्दे से एक लेख के लिए अनुरोध हैं। यह अकादमिक पुस्तकालयों में बहुत आम है जहां शोधकर्ता किसी पत्रिका में पाए जाने वाले एक लेख की एक प्रति का अनुरोध कर सकते हैं।
लेख अनुरोध सेट करना
सबसे पहले, के लिए अपने सिस्टम वरीयता को सक्षम करें ArticleRequests.
लेख अनुरोध रखने के लिए संरक्षक को 'सक्षम' पर सेट करें।
इसके बाद आपको यह तय करने की आवश्यकता होगी कि आपके संरक्षक अनुरोध कैसे करेंगे, या तो केवल रिकॉर्ड करें, केवल आइटम, या रिकॉर्ड और आइटम स्तर दोनों ही रिकॉर्ड करें।
आप अपने रिकॉर्ड के अनुरोध के आधार पर अनिवार्य फ़ील्ड के लिए 3 अलग-अलग सिस्टम प्राथमिकताएँ सेट कर सकते हैं।
ArticleRequestsMandatoryFields: रिकॉर्ड स्तर या आइटम स्तर अनुरोध योग्य रिकॉर्ड के लिए निम्नलिखित फ़ील्ड अनिवार्य करें
ArticleRequestsMandatoryFieldsItemsOnly रिकॉर्ड के लिए निम्नलिखित फ़ील्ड अनिवार्य करें जो केवल आइटम स्तर के अनुरोध योग्य हैं
ArticleRequestsMandatoryFieldsRecordOnly रिकॉर्ड के लिए निम्नलिखित फ़ील्ड अनिवार्य करें जो केवल रिकॉर्ड स्तर के अनुरोध योग्य हैं
यह ArticleRequestsOpacHostRedirection सिस्टम वरीयता का उपयोग तब किया जाता है जब आप विश्लेषणात्मक रिकॉर्ड बनाते हैं। यदि सक्षम किया गया है, तो यह ओपीएसी में चाइल्ड रिकॉर्ड से संरक्षक को होस्ट रिकॉर्ड में पुनर्निर्देशित करेगा।
The ArticleRequestsSupportedFormats system preference determines the various formats patrons can request their articles in (either photocopy or scan).
आगे आप अपने परिसंचरण और जुर्माना नियम मैट्रिक्स में जाना चाहेंगे और प्रत्येक नियम का चयन करेंगे जिसके लिए आप अनुरोध करना चाहते हैं।
आप रिकॉर्ड स्तर, आइटम स्तर, हां (जिसका अर्थ दोनों) और नहीं (जिसका अर्थ है कि कोई लेख अनुरोध नहीं रखा जा सकता है) पर अनुरोध करने की अनुमति दे सकते हैं।
आप संचलन के संरक्षक श्रेणी द्वारा एक बार में एक संरक्षक के पास खुले लेख अनुरोधों की संख्या को सीमित कर सकते हैं डिफॉल्ट ओपन आर्टिकल रिक्वेस्ट लिमिट सर्कुलेशन का सेक्शन नियम पृष्ठ।
You can set up a fee for each article request in the Default article request fees section of the circulation rules page.
लेख अनुरोध रख रहे हैं
अब आप दोनों स्टाफ क्लाइंट और ओपेक पर अनुरोध कर सकते हैं।
स्टाफ क्लाइंट में, रिकॉर्ड विवरण पृष्ठ पर, आपको शीर्ष पर एक 'अनुरोध लेख' बटन और बाईं ओर एक 'अनुच्छेद अनुरोध' टैब दिखाई देगा। दो विकल्प एक ही पृष्ठ पर ले जाते हैं।
एक होल्ड की तरह, आपको संरक्षक के कार्ड नंबर या नाम दर्ज करने के लिए प्रेरित किया जाएगा।

यदि कोई शुल्क है, तो स्टाफ सदस्य को सूचित करने के लिए एक संदेश दिखाई देगा।

प्रपत्र को भरें।
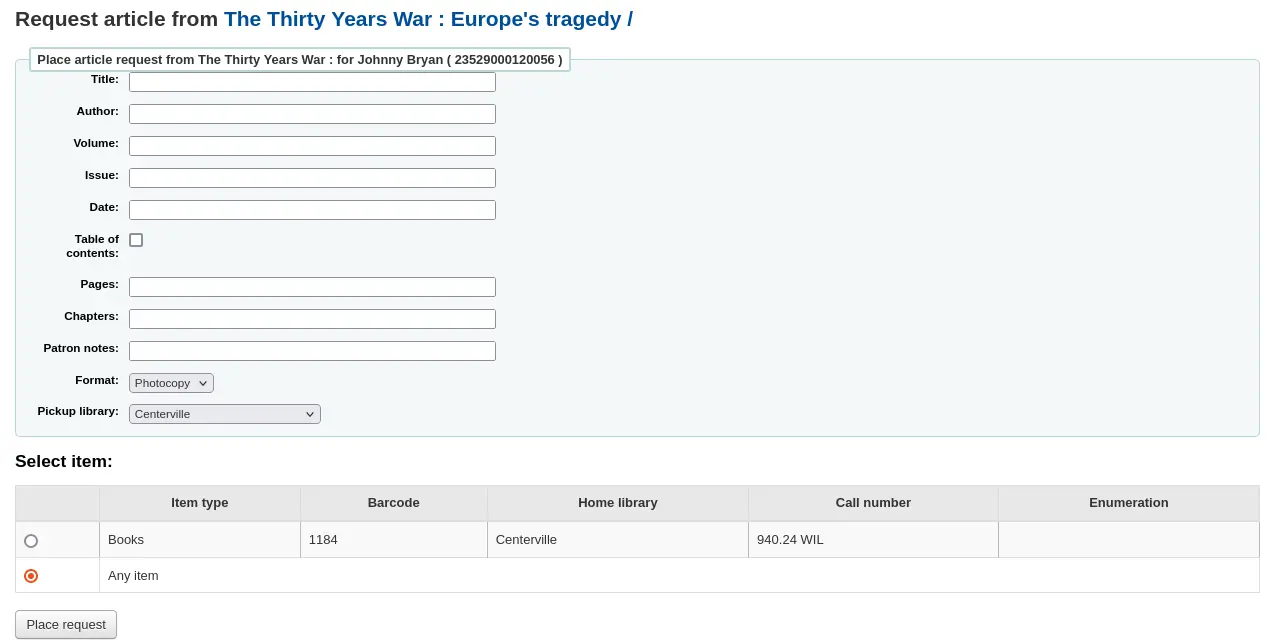
टिप्पणी
अनिवार्य फ़ील्ड्स को तीन सिस्टम प्राथमिकताओं के माध्यम से सेट किया जाता है ArticleRequestsMandatoryFields, ArticleRequestsMandatoryFieldsItemOnly, और ArticleRequestsMandatoryFieldsRecordOnly.
शीर्षक: अनुरोधित लेख या अध्याय का शीर्षक दर्ज करें
लेखक: अनुरोधित लेख या अध्याय के लेखक को दर्ज करें
आयतन: वह आयतन दर्ज करें जिसमें यह लेख या अध्याय पाया जाता है
अंक: वह अंक दर्ज करें जिसमें यह लेख पाया गया है
दिनांक: उस अंक की तिथि दर्ज करें जिसमें यह लेख पाया गया है
सामग्री की तालिका: यह इंगित करने के लिए जांचें कि संरक्षक सामग्री की तालिका की एक प्रति चाहता है
पन्ने: फोटोकॉपी या स्कैन करने के लिए पन्ने दर्ज करें
अध्याय: फोटोकॉपी या स्कैन करने के लिए अध्याय दर्ज करें
संरक्षक नोट: कोई भी प्रासंगिक नोट दर्ज करें
प्रारूप: वह प्रारूप चुनें जिसमें संरक्षक इस लेख या अध्याय को प्राप्त करना चाहता है
टिप्पणी
The possible formats are defined in the ArticleRequestsSupportedFormats system preference.
पिकअप लाइब्रेरी: वह लाइब्रेरी चुनें जहां से संरक्षक अपनी फोटोकॉपी लेना चाहता है
यदि अनुमति हो, तो अनुरोध करने के लिए विशिष्ट आइटम चुनें।
फिर, 'प्लेस रिक्वेस्ट' पर क्लिक करें।
ओपेक से, संरक्षक परिणाम सूची से या तो स्वयं अनुरोध कर सकते हैं
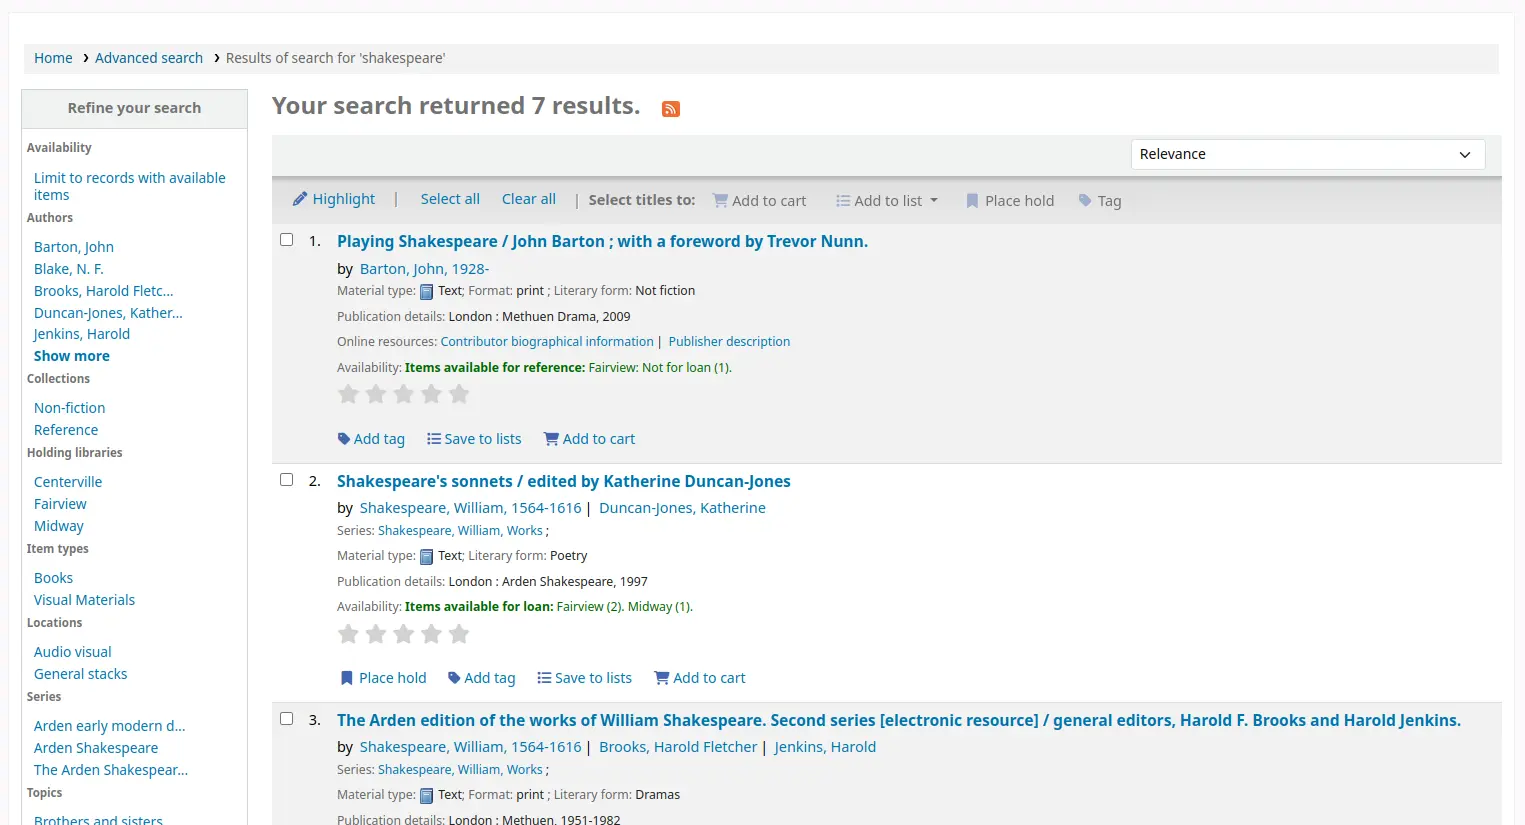
या विस्तृत रिकॉर्ड पर जाकर।
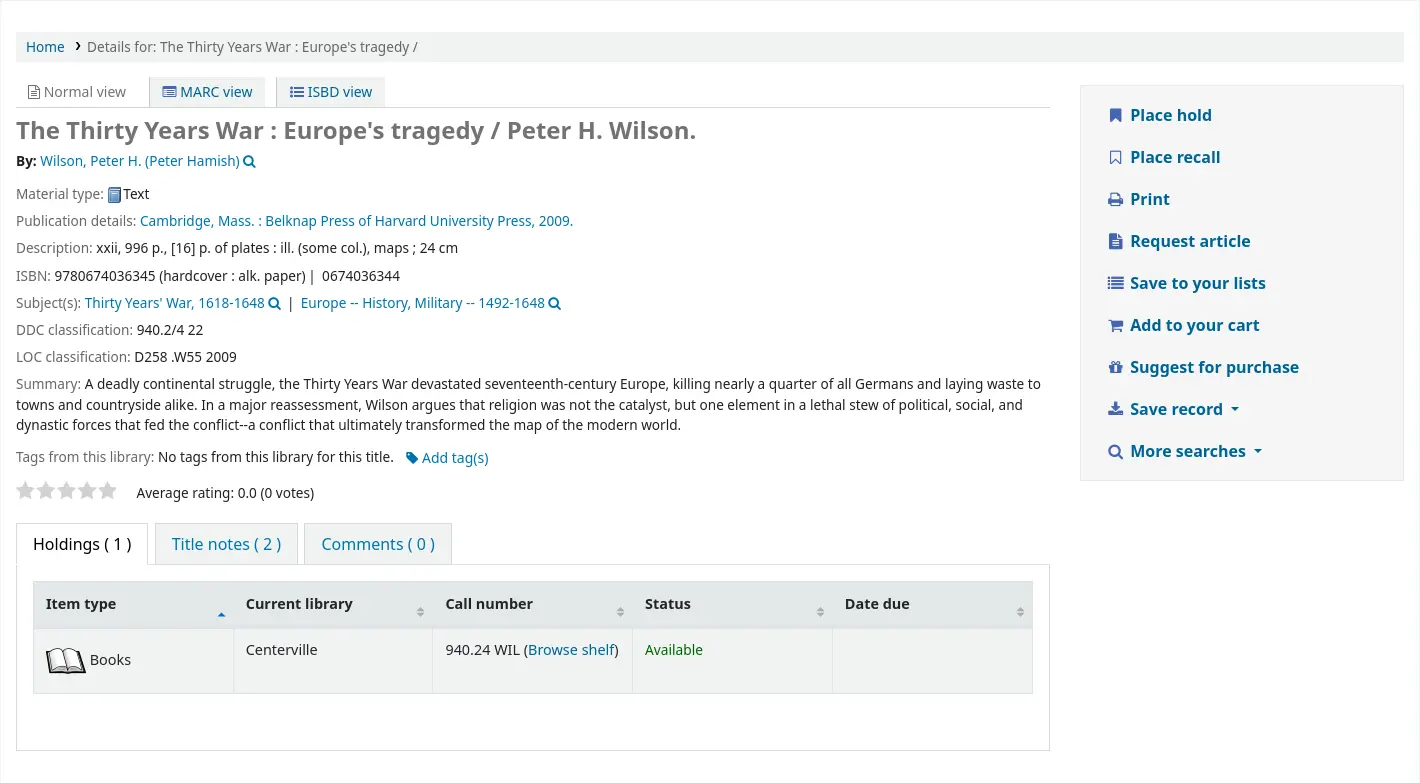
एक होल्ड के साथ, यदि संरक्षक लॉग इन नहीं है, तो उन्हें ऐसा करने के लिए कहा जाएगा।
फॉर्म स्टाफ इंटरफ़ेस में एक जैसा है।
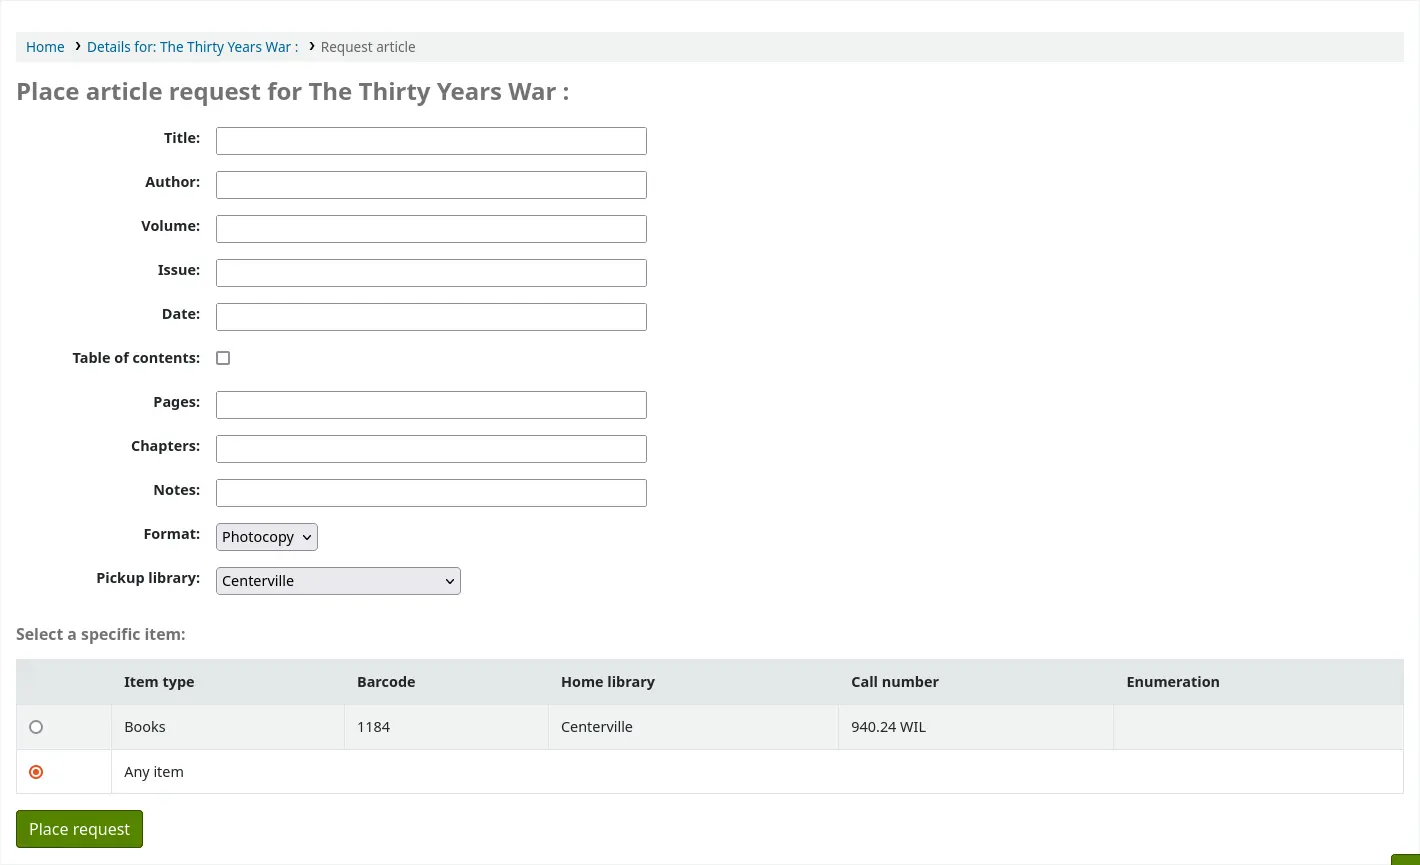
यदि कोई शुल्क है, तो संरक्षक को सूचित करने के लिए एक संदेश दिखाई देगा।

यदि अनुमति दी जाती है, तो संरक्षक अनुरोध करने के लिए विशिष्ट आइटम चुन सकता है।
अपने खाते से, संरक्षक 'नए' से अपने अनुरोध की प्रगति का अनुसरण कर सकेंगे

'लंबित' करने के लिए, यदि आवश्यक हो,

'प्रसंस्करण' के लिए।

The patron will receive an email notification after placing the request to confirm it as well as when the status of the request changes.
टिप्पणी
When placing an article request, the patron will receive a notification. The notice sent is based on the AR_REQUESTED template.
Each status is also linked to a notification. See below, under Managing article requests for the letter code for each status.
The content of any notification can be customized in the Notices and slips tool.
एक बार अनुरोध पूरा होने पर संरक्षक को एक ईमेल सूचना प्राप्त होगी और लेख अनुरोध अब उनके खाते में दिखाई नहीं देगा।
टिप्पणी
When staff marks the article request as 'Completed', the patron will receive a notification. The notice sent is based on the AR_COMPLETED template. The content of this notification can be customized in the Notices and slips tool.
लेख अनुरोधों का प्रबंधन
एक बार लेख अनुरोध रखा गया है, कर्मचारियों को स्टाफ क्लाइंट पर होम पेज के नीचे नए अनुरोध दिखाई देंगे। (टैग, टिप्पणियों और संशोधनों के समान स्थान पर)।
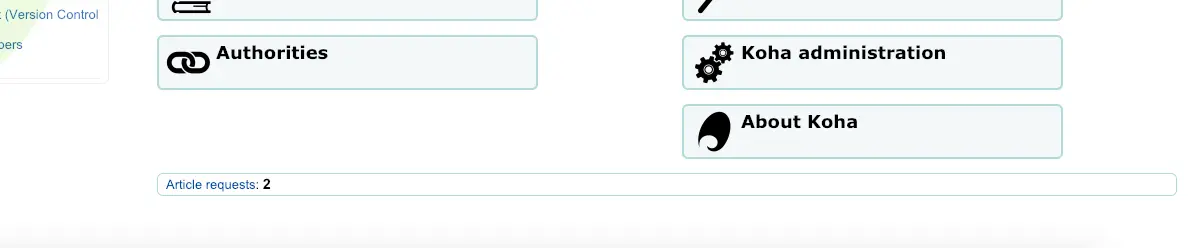
वहां से कर्मचारी प्रक्रिया के अनुरोधों का चयन करने में सक्षम होंगे।
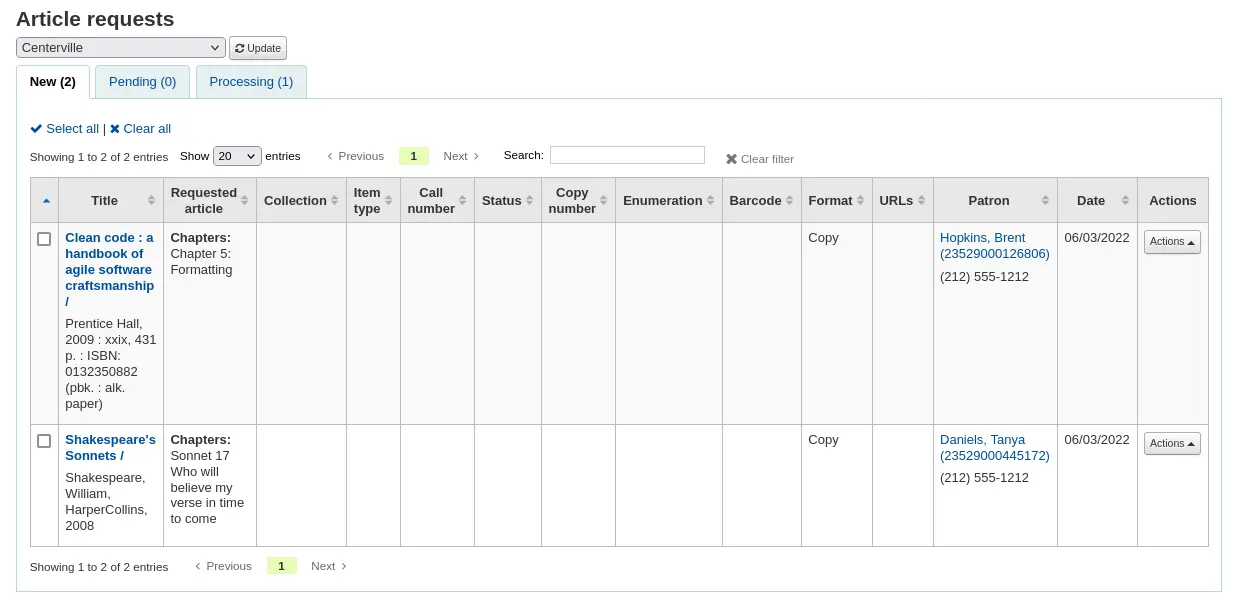
नए अनुरोध 'नए' टैब में हैं।
पहला कदम एक स्टाफ सदस्य के लिए अनुरोध को संसाधित करने के लिए होगा, जो अनुरोध को प्रोसेसिंग टैब पर ले जाता है और अन्य स्टाफ सदस्यों को सूचित करता है कि अनुरोध प्रक्रिया में है। क्रिया कॉलम में, ड्रॉपडाउन मेनू पर क्लिक करें और 'प्रक्रिया अनुरोध' चुनें। यह अनुरोध को प्रोसेसिंग टैब पर ले जाएगा।
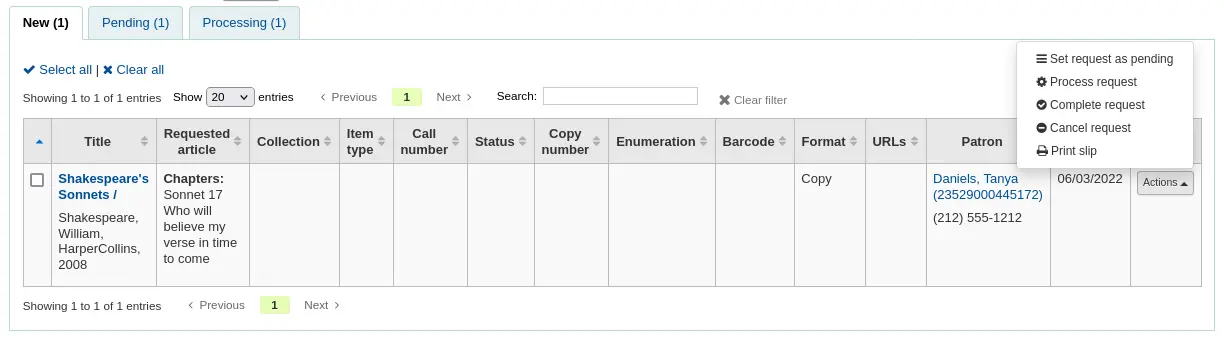
टिप्पणी
Setting an article request to 'Processing' will send a notification to the patron. The notice sent is based on the AR_PROCESSING template. The content of this notification can be customized in the Notices and slips tool.
यदि किसी कारण से, अनुरोध को तुरंत संसाधित नहीं किया जा सकता है (उदाहरण के लिए, यदि शीर्षक वर्तमान में चेक आउट हो गया है), तो स्थिति को 'लंबित' में बदला जा सकता है। यह संरक्षक को एक नोटिस भेजेगा जो दर्शाता है कि अनुरोध प्राप्त हो गया है और देखा जा चुका है, लेकिन अभी तक संसाधित नहीं किया गया है।
टिप्पणी
Setting an article request to 'Pending' will send a notification to the patron. The notice sent is based on the AR_PENDING template. The content of this notification can be customized in the Notices and slips tool.
अगला कर्मचारी शेल्फ में जाएंगे और अनुरोधित लेख की एक प्रति बनायेंगे।
Once that is complete, staff can print the article request slip and staple or paper clip it to the article. In the actions column, you can select the dropdown and select print slip.
टिप्पणी
The slip used is based on the AR_SLIP template. The content of this slip can be customized in the Notices and slips tool.
अंत में, कर्मचारी कार्रवाई ड्रॉपडाउन मेनू से पूरा आलेख अनुरोध चुनेंगे जो संरक्षक को नोटिस भेजेगा, जिसने अनुरोध को यह बताने के लिए अनुरोध किया है कि वह पिकअप के लिए तैयार है।
यह प्रसंस्करण टैब से आलेख अनुरोध को हटा देता है।
टिप्पणी
Completing an article request will send a notification to the patron. The notice sent is based on the AR_COMPLETED template. The content of this notification can be customized in the Notices and slips tool.
If, for any reason, an article request must be canceled, staff can choose the 'Cancel request' option from the 'Actions' button.
टिप्पणी
Canceling an article request will send a notification to the patron. The notice sent is based on the AR_CANCELED template. The content of this notification can be customized in the Notices and slips tool.
टिप्पणी
कार्रवाई करने के लिए या 'सभी का चयन करें' पर क्लिक करके, और तालिका के शीर्ष पर स्थित क्रिया मेनू से नई स्थिति का चयन करके बक्से को चेक करके भी बल्क में बनाया जा सकता है।
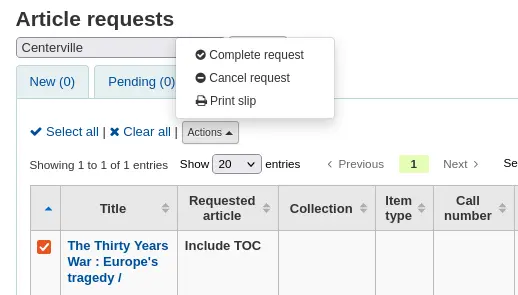
अतिदेय राशि
इस रिपोर्ट में सभी आइटम है कि अपने पुस्तकालय में अपेक्षित हैं सूची जाएगा।
टिप्पणी
Only staff with the overdues_report permission (or the superlibrarian permission) will be able to run this report.
चेतावनी
एक बड़े संरक्षक आधार के साथ पुस्तकालयों के लिए, इस रिपोर्ट के समय को चलाने के लिए एक महत्वपूर्ण राशि ले सकता है।
Large libraries can choose to filter the report before it runs by setting the FilterBeforeOverdueReport system preference to 'Require'.
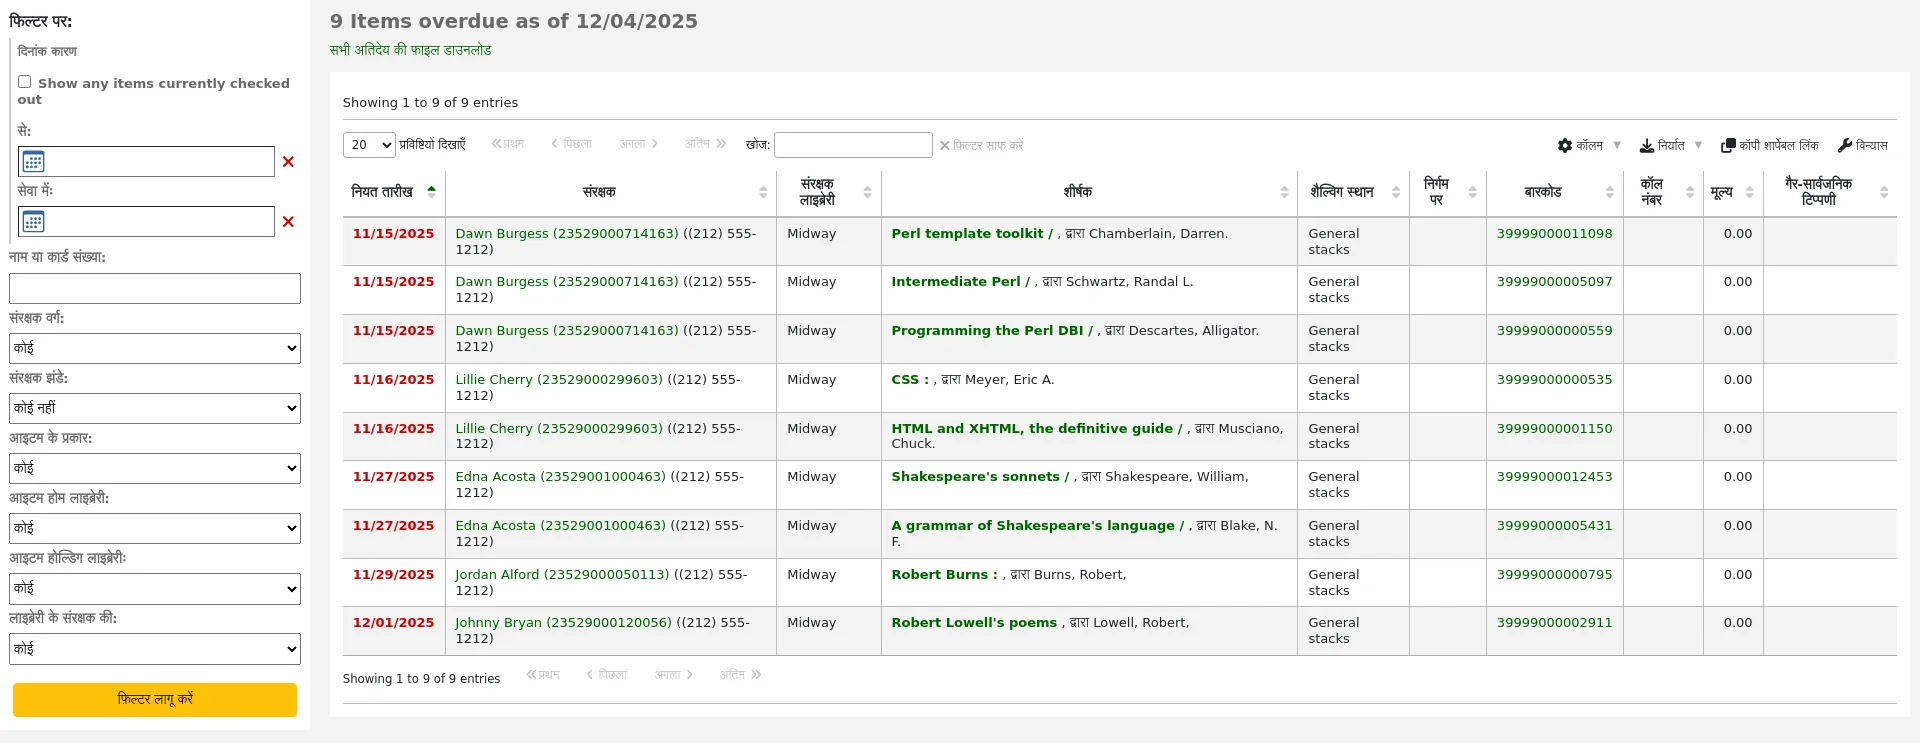
टिप्पणी
You can customize the columns of this table in the Table settings section of the Administration module (table id: circ-overdues).
रिपोर्ट मेनू विकल्पों की रिपोर्ट के बाईं पर पाया का उपयोग कर फ़िल्टर किया जा सकता है।
टिप्पणी
यह 'शो किसी भी आइटम वर्तमान में चैक आउट की' चेकबॉक्स मूल रूप से स्विच चैंक आउट की एक रिपोर्ट के अतिदेय की एक रिपोर्ट से यह। यह सब शीर्षक नियत तारीख की परवाह किए बिना चैंक आउट की दिखाएगा।
रिपोर्ट का परिणाम तालिका के शीर्ष पर 'प्रदर्शित अतिदेय की फ़ाइल डाउनलोड करें' लिंक या 'निर्यात' बटन के माध्यम से डाउनलोड किया जा सकता है।
जुर्माना के साथ अतिदेय
यह रिपोर्ट आपको अपने पुस्तकालय में किसी भी अतिदेय है कि उन पर जुर्माना उपार्जित है दिखाएगा।
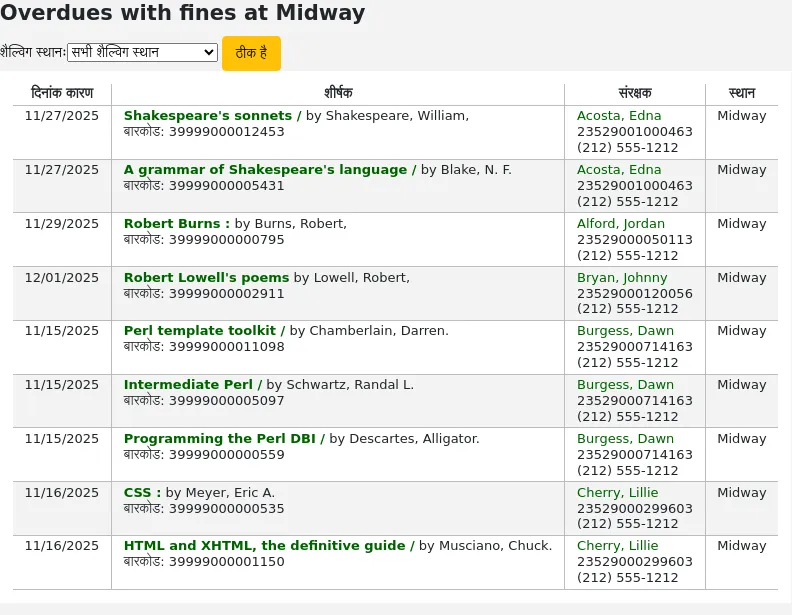
टिप्पणी
Only staff with the overdues_report permission (or the superlibrarian permission) will be able to run this report.
यदि आप रिपोर्ट को सीमित करना चाहते हैं तो आप अपनी शाखा में एक विशिष्ट शेल्विंग स्थान तक सीमित होने के लिए शीर्ष पर पुल डाउन मेनू का उपयोग कर सकते हैं। अन्य शाखाओं में जुर्माना के साथ अतिदेय देखने के लिए आपको करना होगा अपनी शाखा बदलें या उस शाखा में लॉग इन करें।
महत्वपूर्ण
यदि आप जुर्माना नहीं लेते हैं और / या आपके पास नहीं है जुर्माना कॉन जॉब चल रहा है आपको इस रिपोर्ट पर कोई डेटा नहीं दिखाई देगा।
ऑनसाइट चैक आउट देरी
If you are using the on site checkouts functionality (OnSiteCheckouts) then you'll have a report to view all items that are currently checked out on site.

इस नियत तारीख (लाल रंग में अतिदेय), जो आइटम, आइटम के बारे में जानकारी है और क्या पुस्तकालय मद में है सूची जाएगा।
गृह उपयोग में ट्रैकिंग
कई पुस्तकालयों पुस्तकालय के भीतर वस्तुओं के उपयोग को ट्रैक करती हैं
नोट
यह साइट के उपयोग पर ट्रैकिंग से अलग है। घर के उपयोग में पुस्तकालय में आइटमों का उपयोग संरक्षक द्वारा उन्हें जांचने के बिना किया जाता है। साइट पर उपयोग साइट पर वस्तुओं का उपयोग है जिसे पहले चेक आउट किया जाना चाहिए। साइट उपयोग के बारे में अधिक जानने के लिए कृपया समीक्षा करें OnSiteCheckouts वरीयता.
बिना जांच किए लाइब्रेरी में वस्तुओं के उपयोग को ट्रैक करना कोहा में दो तरीकों से किया जा सकता है। पहला एक या अधिक बनाना है सांख्यिकीय संरक्षक। पुस्तकालय के भीतर उपयोग की जाने वाली वस्तुओं को इकट्ठा करते समय, आप उन्हें अपने सांख्यिकीय संरक्षक के लिए जांचना चाहेंगे:
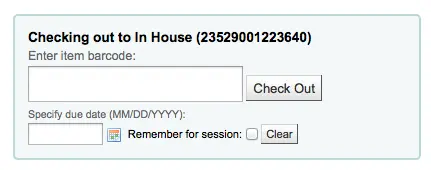
इसके बजाय अंकन आइटम के रूप में 'चैंक आउट' प्रणाली रिकॉर्ड होगा कि आइटम घर में इस्तेमाल किया गया था:

सभी आइटम है कि पुस्तकालय के भीतर इस्तेमाल किया गया है आइटम का उपयोग के लिए सटीक आँकड़े रखने के लिए इन चरणों को दोहराएँ।
आइटमों के स्थानीय उपयोग को रिकॉर्ड करने का दूसरा तरीका यह है कि आप इसे सेट करें RecordLocalUseOnReturn वरीयता 'रिकॉर्ड' के लिए। फिर जब भी आप उसमें कोई आइटम चेक करते हैं तो चेक आउट नहीं किया जाता है और स्थानीय उपयोग को रिकॉर्ड नहीं किया जाएगा।

नोट
यदि आपके पास है RecordLocalUseOnReturn रिकॉर्ड 'पर सेट है, फिर भी आप स्थानीय उपयोग को रिकॉर्ड करने के लिए अपने सांख्यिकीय संरक्षक का भी उपयोग कर सकते हैं।
स्व चेकआउट
Koha comes with a very basic Web-based self checkout module where patrons can check out items to themselves.
Setting up the self checkout module
To enable this module, set the WebBasedSelfCheck system preference to 'Enable'.
To use this module you have to log in as a staff member with the self_checkout_module permission.
टिप्पणी
Create a staff patron specifically for this action so that you don't leave a real staff user logged into a computer all day.
Furthermore, the self_checkout_module permission prevents the user from using the OPAC.
You can use the AutoSelfCheckAllowed, AutoSelfCheckID and AutoSelfCheckPass system preferences to log in automatically as this staff user.
You can add content, like instructions on how to use the self checkout system for example, by using the SCOMainUserBlock or the SelfCheckHelpMessage display locations in the HTML customizations tool.
Check the other self checkout module system preferences to make sure they work for your library.
Using the self checkout module
The module is available at: http://YOUR_KOHA_OPAC_URL/cgi-bin/koha/sco/sco-main.pl
सलाह
There is no link to the self checkout module from the OPAC. You can use HTML customizations to add the link on the OPAC.
When on the self checkout page, depending on the value in the SelfCheckoutByLogin system preference you will be asked to enter either your card number

or your username and password.

Once you're logged in to the self check module, you will be asked to scan the barcodes of the items to check out. A barcode scanner will usually do it automatically, but if you are entering the item barcode manually, hit 'Enter' or click the 'Submit' button after each barcode.
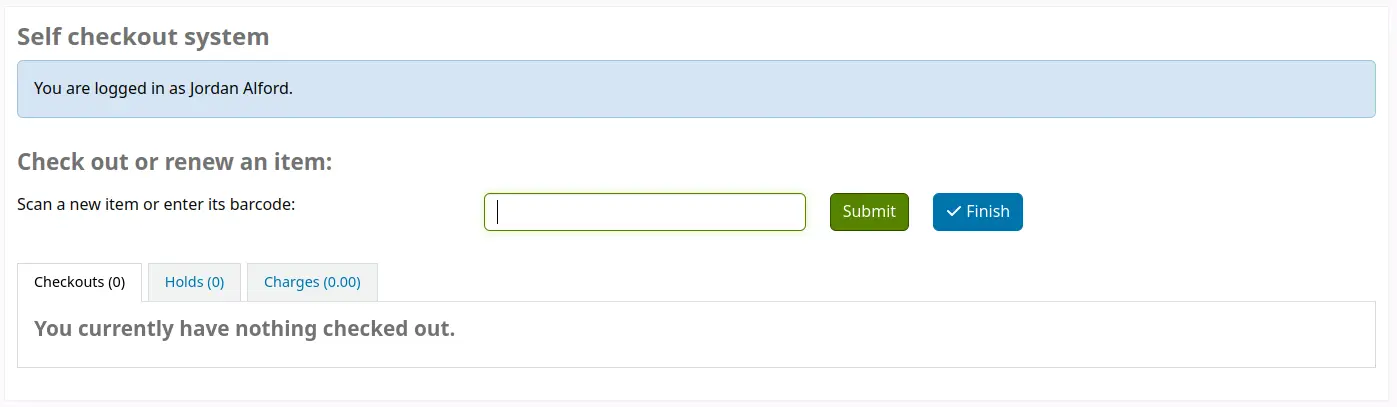
As you scan items they will appear in the 'Checkouts' tab at the bottom of the page.
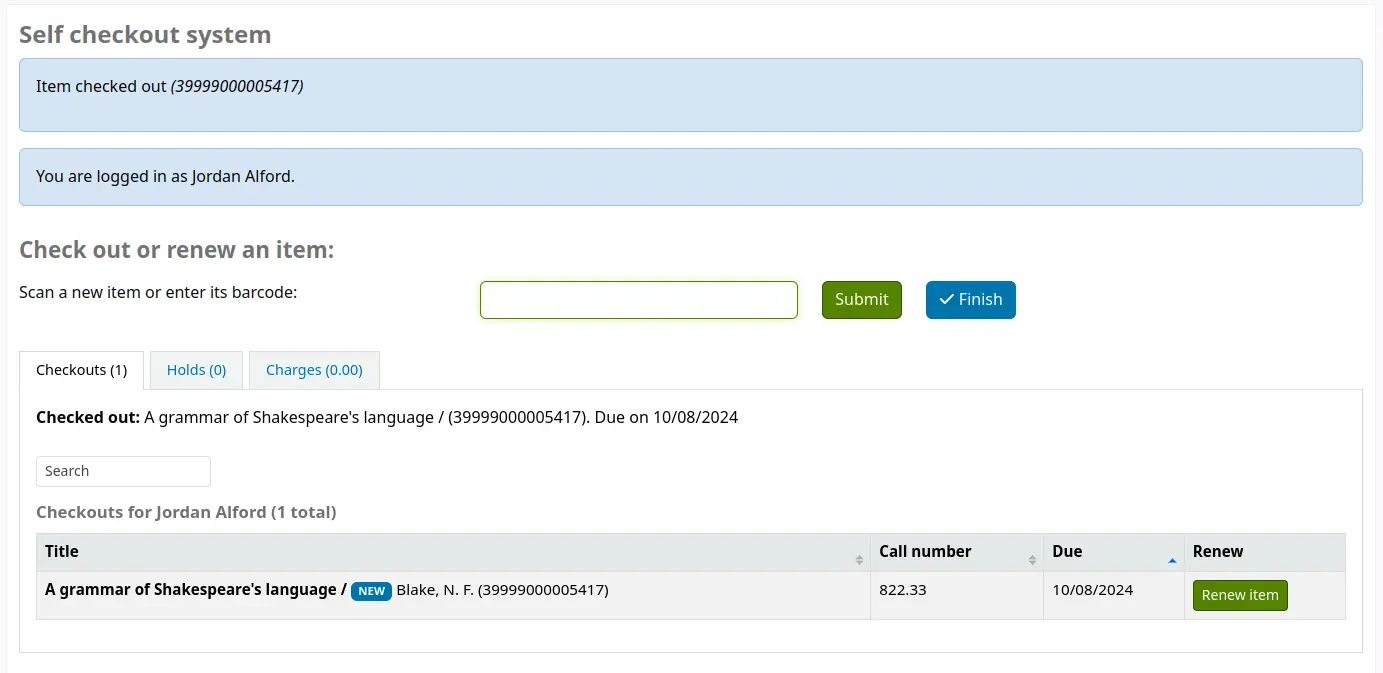
टिप्पणी
You can allow patrons from specific categories to check out several items at once with the SCOBatchCheckoutsValidCategories system preference.
When you are finished scanning items, click the 'Finish' button. This will prompt you to print a receipt and log you out of the self check module.
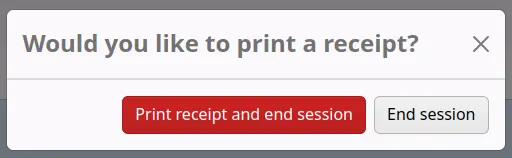
When attempting to check items out, there are some instances where error messages will appear and the patron will be directed to the library staff. This will happen even if you are allowing overrides on circulation functions. Only a staff member can override a circulation block and so patrons must go to the library staff for help in these situations.
टिप्पणी
The self checkout module can also be used to check in items, if the SCOAllowCheckin system preference is set to 'Allow'.
स्व चेक-इन
In order to use the self check-in module, you must first set the SelfCheckInModule system preference to 'Enable'.
Then, you will have to create a patron with the self_checkin_module permission.
नोट
Create a staff patron specifically for this action so that you don't leave a real staff client logged into a computer all day. You can give this patron only the aforementioned permission so it cannot be used for anything else.
एक बार ऐसा करने के बाद, आप स्वयं चेक-इन पेज पर जा सकते हैं: http://YOUR_KOHA_OPAC_URL/cgi-bin/koha/sci/sci-main.pl
स्वयं चेक-इन अनुमतियों के साथ अपने कर्मचारियों के संरक्षक के साथ लॉग इन करें
एक बार कंप्यूटर या कियोस्क सेट हो जाने पर और स्वयं चेक-इन उपयोगकर्ता लॉग इन हो जाने पर, संरक्षक अपने आइटम को स्वयं जांचने में सक्षम होंगे।
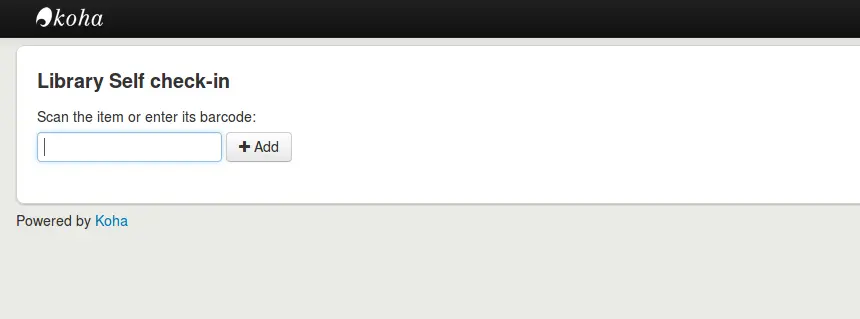
संरक्षक या तो आइटम के बारकोड को स्कैन करेगा, यदि कंप्यूटर बारकोड स्कैनर से जुड़ा हुआ है, या बॉक्स में अपने आइटम के बारकोड में टाइप करें और 'जोड़ें' पर क्लिक करें या एंटर दबाएं।
नोट
स्कैनिंग के बाद अधिकांश बारकोड स्कैनर स्वचालित रूप से वापसी पर आ जाएंगे।
एक बार जब वे स्कैन या अपने सभी आइटम बारकोड दर्ज कर लेते हैं, तो वे सभी आइटम एक बार में वापस करने के लिए 'चेक-इन' बटन पर क्लिक कर सकते हैं।
महत्वपूर्ण
यदि संरक्षक 'चेक-इन' बटन पर क्लिक नहीं करता है, तो आइटम वापस नहीं लौटाए जाएंगे और उनके खाते में रहेंगे।
महत्वपूर्ण
यदि आइटम में देर हो चुकी है, तो आइटम चेक-इन मॉड्यूल उपयोगकर्ता को चेतावनी नहीं देगा, अगर आइटम किसी और के लिए है, या यदि उनके खाते में संदेश हैं।
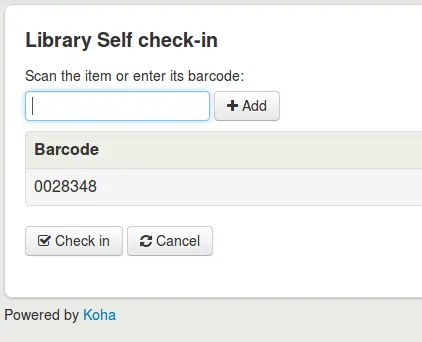
फिर वे मुख्य स्वयं चेक-इन पेज पर वापस जाने के लिए 'समाप्त करें' पर क्लिक कर सकते हैं।
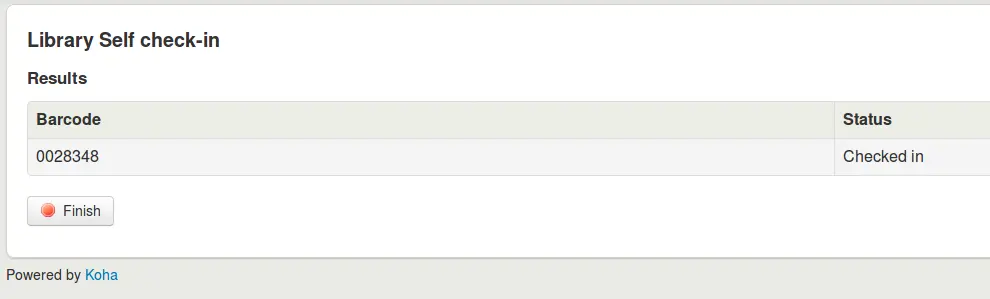
नोट
If the patron doesn't click 'Finish', the screen will refresh after the timeout period specified in the SelfCheckInTimeout system preference.
नोट
भले ही संरक्षक 'समाप्त' पर क्लिक न करें, फिर भी आइटम को उनके खाते से चेक किया जाएगा।
आप उपयोग करके अपने सेल्फ चेक-इन स्क्रीन के लुक को कस्टमाइज़ कर सकते हैं SelfCheckInUserCSS सिस्टम वरीयता या SelfCheckInUserJS सिस्टम वरीयता।
You can add content, like instructions on how to use the self check-in system for example, by using the SelfCheckInMainUserBlock display location in the HTML customizations tool.
Statistics about the transactions made through the self check-in module are logged into the action_logs table in the Koha database. You can therefore build a custom report to get the statistics you need.
ऑफ़लाइन परिसंचरण उपयोगिताएं
कोहा आप संचलन कार्रवाई करते हुए तीन उपयोगिताओं में से किसी एक का उपयोग करके ऑफ़लाइन जारी रखने के लिए के लिए अनुमति देता है।
कोहा में ऑफ़लाइन परिसंचरण
सावधानी
The offline circulation module was deprecated in Koha version 23.11. Only the Firefox plugin and Windows tool are now supported.
If the AllowOfflineCirculation preference is set to 'Enable' the library staff can continue to perform circulation actions within Koha when the system is offline. You will want to visit http://your-koha-staff-client-url/cgi-bin/koha/circ/offline.pl at least once while online and bookmark that page. That is the page you will go to when you are offline.
महत्वपूर्ण
ऑफ़लाइन इंटरफ़ेस HTML लोकल स्टोरेज का उपयोग करता है, जो ब्राउज़र और उपयोगकर्ता सेटिंग के आधार पर 2.5 डोमेन या 5MB तक सीमित है। इसका मतलब है कि बड़े सिस्टम अपने डेटा को सिंक्रनाइज़ करने में सक्षम नहीं होंगे और इनका उपयोग करने की अनुशंसा की जाती है Firefox या Windows ऑफलाइन परिसंचरण के लिए आवेदन.
सेटअप
पहली बार पहले सिस्टम परिसंचरण के लिए ऑफ़लाइन जाने से चला जाता है और चुनें 'में निर्मित ऑफ़लाइन परिसंचरण इंटरफेस'
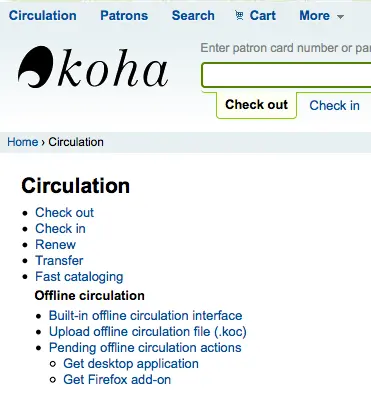
और स्क्रीन के अधिकार पर 'सिंक्रनाइज़' लिंक पर क्लिक करके हर परिसंचरण कंप्यूटर पर अपने डेटा सिंक्रनाइज़।
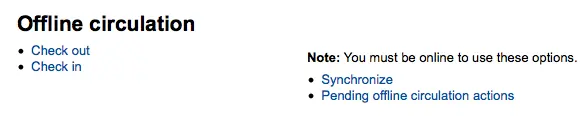
महत्वपूर्ण
ऑफ़लाइन इंटरफ़ेस HTML लोकल स्टोरेज का उपयोग करता है, जो ब्राउज़र और उपयोगकर्ता सेटिंग के आधार पर 2.5 डोमेन या 5MB तक सीमित है। इसका मतलब है कि बड़े सिस्टम अपने डेटा को सिंक्रनाइज़ करने में सक्षम नहीं होंगे और इनका उपयोग करने की अनुशंसा की जाती है Firefox या Windows ऑफलाइन परिसंचरण के लिए आवेदन.
यह आप अपने संरक्षक और परिसंचरण डेटा की एक स्थानीय प्रतिलिपि डाउनलोड की अनुमति देगा। अपने डेटा को सिंक्रनाइज़ करने के लिए पेज के शीर्ष पर 'डाउनलोड रिकॉर्ड्स' लिंक पर क्लिक करें।
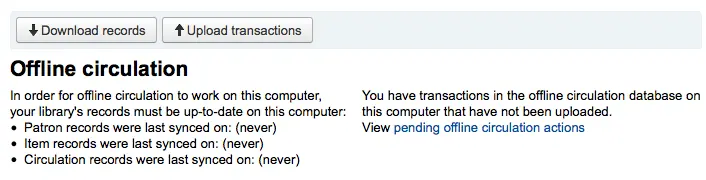
अपने डेटा डाउनलोड की है एक बार जब आप अपने डेटा तिथियों पिछले था प्रत्येक डेटा सेट के अधिकार के लिए समन्वयित देखेंगे।
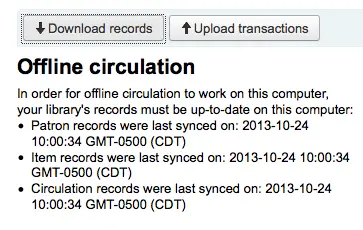
यह किसी भी अप्रत्याशित कनेक्शन नुकसान के लिए तैयार करने में नियमित रूप से किया जाना चाहिए।
परिसंचालन
अपने सिस्टम ऑफलाइन सर्कुलेशन पेज चला जाता है ऑफ़लाइन जाएँ: कोहा में (http://your-koha-staff-client-url/cgi-bin/koha/circ/offline.pl) और क्लिक करें 'बाहर की जाँच करें' या 'जाँचें' ऑफ़लाइन कार्रवाई करने के लिए।
बाहर की जाँच 'की जाँच करें' स्क्रीन के शीर्ष पर बारकोड या नाम से संरक्षक के लिए खोज द्वारा किया जाता है। एक संरक्षक चयन करने के बाद आप जुर्माना और चेक बहिष्कार सहित समन्वयित संरक्षक जानकारी, साथ प्रस्तुत किया जाएगा।
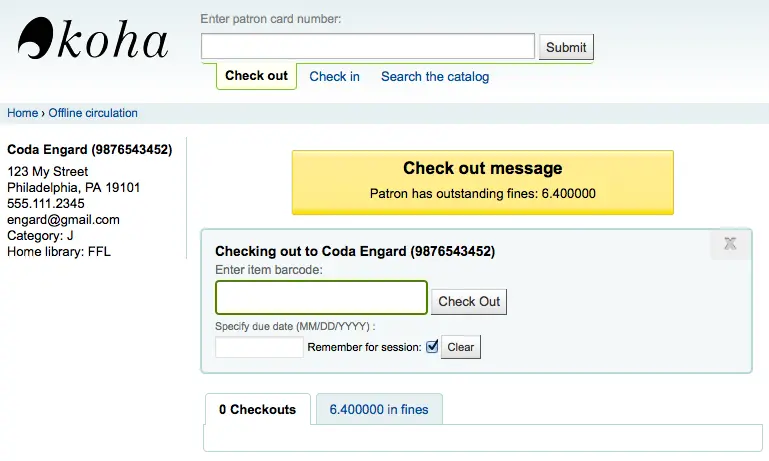
स्कैन आइटम आप बाहर की जाँच करें और एक नियत तारीख प्रवेश करना चाहते हैं के बारकोड। आप एक नियत तारीख दर्ज नहीं करते हैं Koha एक के लिए संकेत देगा।
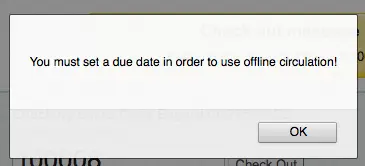
एक बार आइटम बाहर की जाँच की है यह संरक्षक की जानकारी नीचे दिखाई देगा।
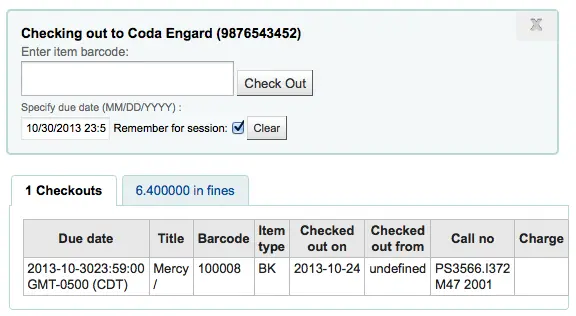
कोहा ऑफ़लाइन अपलोडिंग
एक बार इस प्रणाली वापस आ गया है ऑनलाइन ऑफलाइन सर्कुलेशन मॉड्यूल पर सिंक्रनाइज़ पेज पर जाएं और क्लिक करें 'अपलोड लेनदेन'
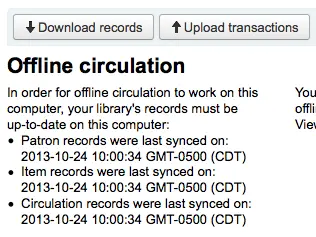
फाइलों के बाद आप क्लिक कर सकते हैं अपलोड कर रहे हैं दाई तरफ पर 'देखें ऑफ़लाइन परिसंचरण कार्रवाई लंबित'।
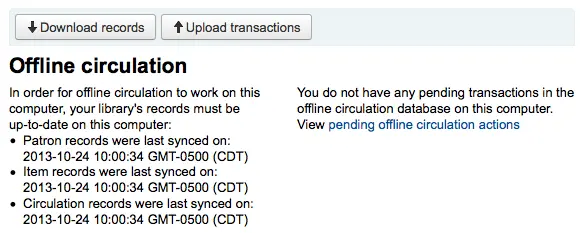
क्लिक करने के बाद 'ऑफ़लाइन परिसंचरण क्रियाएं लंबित देखें' आपको सभी कार्यों के सारांश में लाया जाएगा आप अपने*.koc फ़ाइल में कोहा में लोड हो गए हैं।
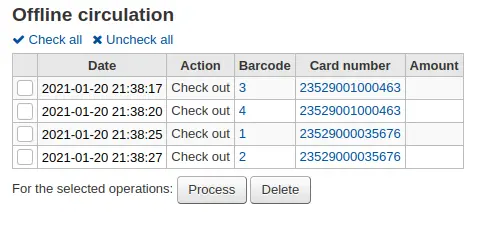
एक बार जब संचलन कंप्यूटर के सभी से लॉग के सभी लोड कर रहे हैं आप उन सब की जाँच करें या सिर्फ उन आप Koha में प्रक्रिया चाहते का चयन करने में सक्षम हो जाएगा।
प्रक्रिया बटन पर क्लिक करें और Koha हर संग्रहीत लेनदेन एक के बाद एक रिकार्ड होगा। प्रत्येक लेनदेन के लिए, स्थिति के लिए बदल जाएगा:
"सफलता।" यदि लेनदेन को सही ढंग से संसाधित किया गया था
"उधारकर्ता नहीं मिला ।" अगर उधारकर्ता का कार्ड नंबर गलत है
"आइटम नहीं मिला।" यदि आइटम बारकोड गलत है
"आइटम जारी नहीं किया।" यदि आप ने एक उपलब्ध आइटम में जाँच की है
एक बार जब आप समाप्त हो अपने लेनदेन के सभी की एक सारांश होगा
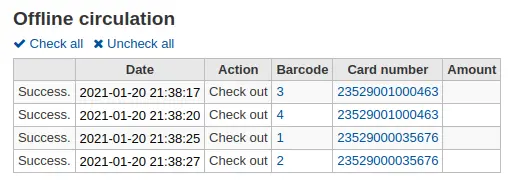
फ़ायरफ़ॉक्स प्लगइन
There is an offline circulation tool that you can add to your Firefox browser as an add-on. To do so, just go to https://addons.mozilla.org/en-US/firefox/addon/koct/ page and click on the "install now" button. You may have to confirm the installation, just click on "install now" and then restart Firefox to complete the installation.
एक बार जब आप प्लगइन स्थापित कर लेते हैं और फ़ायरफ़ॉक्स को पुनः आरंभ करते हैं, तो आपको फ़ायरफ़ॉक्स के नीचे दाईं ओर डाउनलोड बार में कोहा लोगो दिखाई देगा।

लोगो पर एक क्लिक के लिए अपने स्वयं के विंडो में उपकरण खुल जाएगा।
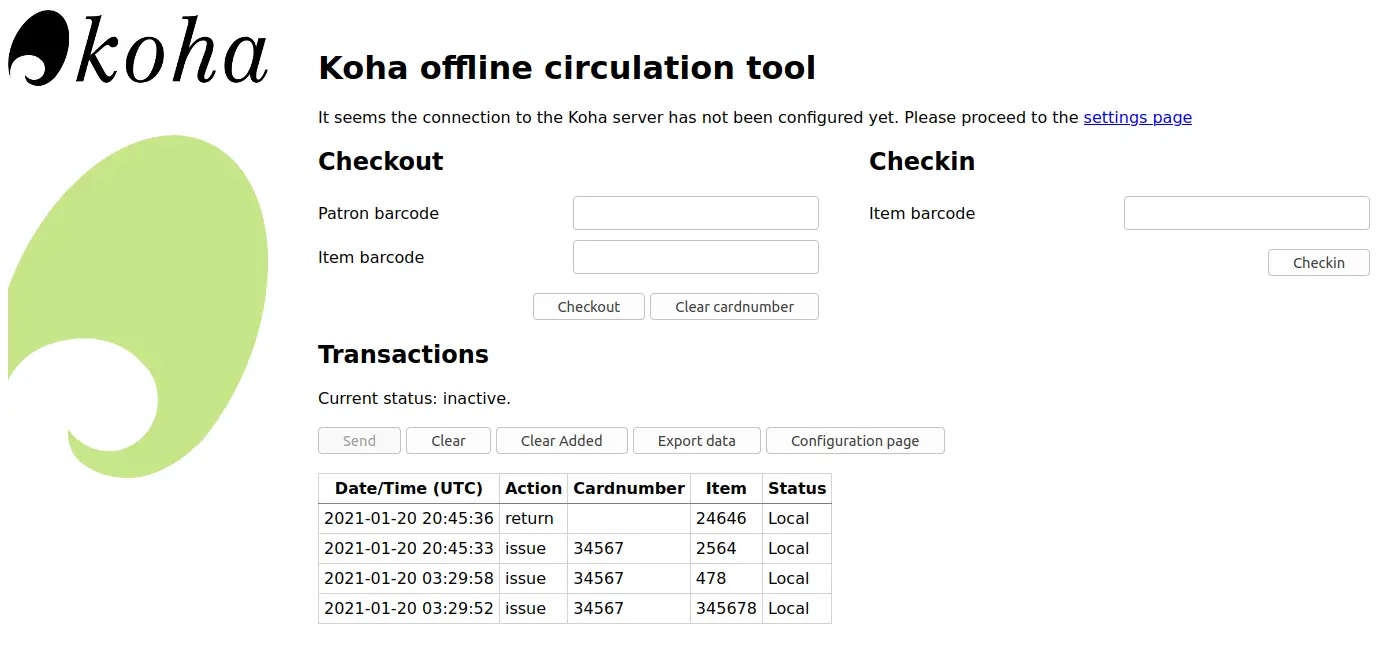
प्लगइन तीन वर्गों के होते हैं:
'चेक आउट' अनुभाग वह जगह है जहाँ आप आइटमों की जाँच करते हैं
'चेक इन टैब' है, जहां आप आइटम चेक इन कर सकते हैं
लेन-देन का अनुभाग वह है जहाँ आप ऑफ़लाइन मोड में रहते हुए किए गए लेनदेन को ट्रैक कर सकते हैं
लेन-देन जानकारी तब तक रखेगा जब तक आप इसे खाली नहीं करते।
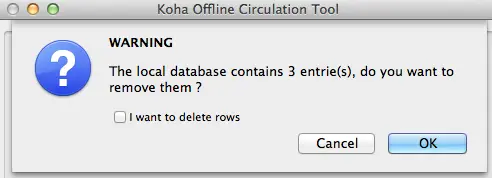
यदि आप लेन-देन साफ़ करना चाहते हैं, तो 'ओके' बटन पर क्लिक करने से पहले 'क्लियर' बॉक्स पर क्लिक करें।
इसके बाद सबसे पहले आपको प्लगइन सेट करना है। लेन-देन पृष्ठ पर आगे बढ़ें, पृष्ठ के शीर्ष दाईं ओर या लेन-देन अनुभाग में 'कॉन्फ़िगरेशन पृष्ठ' से जुड़ा हुआ है।
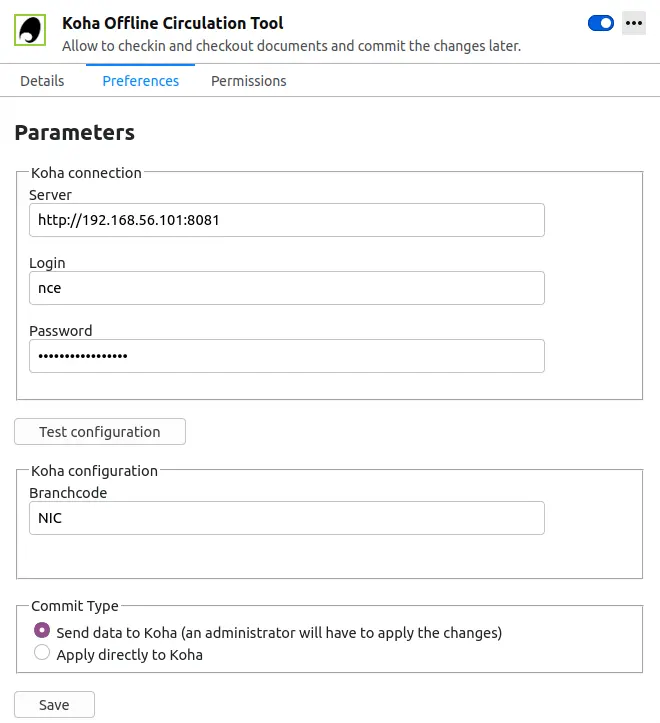
प्रस्तुत 5 सवालों के जवाब:
सर्वर = लाइब्रेरियन इंटरफ़ेस का यूआरएल
उपयोगकर्ता नाम = अपने कर्मचारियों के खाता लॉगिन को
पासवर्ड = अपने कर्मचारियों खाता पासवर्ड
शाखा कोड = शाखा के लिए कोड जहाँ आप स्थित हैं
कमिट प्रकार = यदि आप 'कोहा के लिए संदेश डेटा' का चयन करें, आपके खाते का व्यवस्थापक द्वारा स्वीकृत करने की आवश्यकता होगी। यदि आप कोहा से सीधे आवेदन करें ’का चयन करते हैं, तो आपके खाते को अनुमोदित करने की आवश्यकता नहीं होगी।
महत्वपूर्ण
सेटिंग्स को बचाने के लिए, आप ऐड-ऑन पट्टी में कोहा लोगो पर प्लगइन विंडो बंद करें और फिर से खोलने के लिए उस पर क्लिक करने के लिए फिर होगा।
नोट
आप ऑफ़लाइन संचलन के लिए समर्पित एक कर्मचारी के खाते बना सकते हैं। ताकि, कोई फर्क नहीं पड़ता जो प्रचलन डेस्क पर है, वे सभी एक ही लॉगिन का उपयोग कर सकते हैं। उन पंक्तियों के साथ, आप एक समूह लॉगिन आप पहले से ही संचलन के लिए जगह में है कि के रूप में अच्छी तरह से उपयोग कर सकते हैं।
एक बार जब आप सब कुछ निर्धारित किया है आप में और बाहर आइटम की जाँच शुरू कर सकते हैं।
चैक आउट:
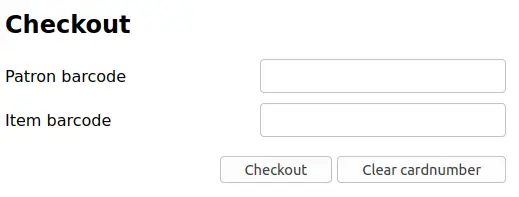
'चेकआउट' शीर्षक के तहत
संरक्षक बारकोड स्कैन करें
आइटम बारकोड स्कैन करें
'चेकआउट' पर क्लिक करें
चैकिंग इन:
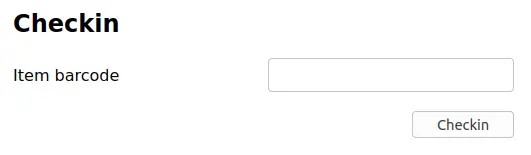
'चेकइन' शीर्षक के तहत
आइटम बारकोड स्कैन करें
'चेकइन' पर क्लिक करें
हर बार, आप किसी आइटम की जांच या जांच करते हैं, स्थानीय प्लगइन डेटाबेस में एक नया लेनदेन दर्ज किया जाता है। यह लेन-देन अनुभाग में नीचे दर्ज किया गया है।
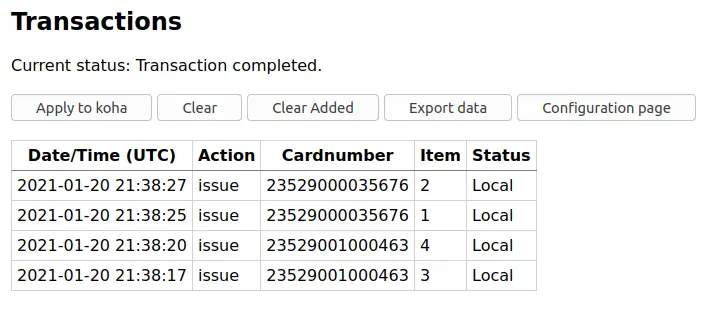
नोट
स्थिति "स्थानीय." हो जाएगा जब तक आप लंबे ऑफ़लाइन हैं और कोहा में लेनदेन की प्रक्रिया नहीं है।
आपके इंटरनेट कनेक्शन वापस आता है जब तक आप कोहा करने के लिए इन लेन-देन करना चाहते हो जाएगा। इन लेनदेन प्रसंस्करण इससे पहले कि आप कुछ मुद्दों के बारे में पता होना चाहिए।
क्योंकि आप अपने कोह डेटाबेस से कनेक्ट नहीं हैं जब इस प्लगइन का उपयोग करते हुए अतिरिक्त प्रसंस्करण की आवश्यकता होगी। यदि कोई आइटम जिसे आप ऑफ़लाइन रहते हुए चेक करते हैं, तो आइटम पर होल्ड रखा जाता है। चूंकि, आप प्रत्येक चेक के प्रसंस्करण के दौरान पाए गए होल्ड की पुष्टि नहीं कर सकते, होल्ड आइटम पर रहता है और बाद में प्रबंधित करने की आवश्यकता होगी। यदि आपने केवल कुछ वस्तुओं की जांच की है तो आप उन सभी का रिकॉर्ड रख सकते हैं। यदि आपने बहुत सी वस्तुओं की जाँच की है, तो आप होल्ड्स कतार का उपयोग कर सकते हैं एक बार यह देखने के लिए कि क्या यह गलत तरीके से शेल्फ पर रखता है।
इसी प्रकार, यदि एक संरक्षक कार्ड समाप्त हो गया था, ऑफ़लाइन संचलन उपकरण इसके बारे में पता नहीं है, तो चेकआउट संरक्षक के खाते की परवाह किए बिना दर्ज हो जाएगा सामान्य रूप से अवरुद्ध किया जा रहा।
आप कोहा के लिए इस डेटा को जोड़ने के लिए दो विकल्प हैं
कोहा पर लागू करें
यदि आपने एक ही समय में एक से अधिक कंप्यूटरों में / बाहर चेक-इन किया है, तो आप जो चाहते हैं वह प्रत्येक लेनदेन को लगातार संसाधित करना है। उदाहरण के लिए मान लें कि एक संरक्षक ने एक कंप्यूटर पर एक पुस्तक की जाँच की और फिर उसी पुस्तक की दूसरे कंप्यूटर पर जाँच की। सुसंगत होने के लिए, आपको पहले चेक आउट करने की आवश्यकता है और फिर चेक इन चेक करें। विपरीत नहीं! ऐसा करने के लिए, आपको प्रत्येक लेनदेन को एक स्थान पर समूहित करना होगा, उन सभी को क्रमबद्ध करना होगा और फिर, सब कुछ संसाधित करना होगा। इसलिए, आपको अपने द्वारा काम किए गए प्रत्येक प्लगइन / कंप्यूटर से "कोहा पर लागू करें" विकल्प का उपयोग करने की आवश्यकता है। इस तरह, लॉग कोहा पर जाएगा और ऑफलाइन सर्कुलेशन पेज से एक्सेस किया जा सकेगा।
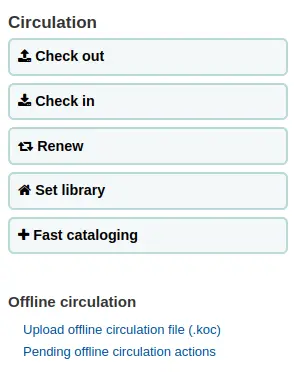
वहां जाएं: परिसंचरण> लंबित ऑफलाइन परिसंचरण क्रियाएं
एक बार जब संचलन कंप्यूटर के सभी से लॉग के सभी लोड कर रहे हैं आप उन सब की जाँच करें या सिर्फ उन आप Koha में प्रक्रिया चाहते का चयन करने में सक्षम हो जाएगा।
प्रक्रिया बटन पर क्लिक करें और कोहा हर संग्रहीत लेनदेन एक के बाद एक रिकार्ड होगा। प्रत्येक लेनदेन के लिए, स्थिति के लिए बदल जाएगा:
"सफलता।" यदि लेनदेन को सही ढंग से संसाधित किया गया था
"उधारकर्ता नहीं मिला ।" अगर उधारकर्ता का कार्ड नंबर गलत है
"आइटम नहीं मिला।" यदि आइटम बारकोड गलत है
"आइटम जारी नहीं किया।" यदि आप ने एक उपलब्ध आइटम में जाँच की है
एक बार जब आप समाप्त हो अपने लेनदेन के सभी की एक सारांश होगा
प्रत्यक्ष लागू करें
आप एक कंप्यूटर पर संचलन कार्यों के सभी प्रदर्शन किया तो सब कुछ पहले से ही हल किया है, तो आप "सीधे लागू करें" करने के लिए चुन सकते हैं
स्थिति कॉलम आपको यह बताने के लिए अद्यतन किया जाएगा यदि लेनदेन लागू किया गया
"सफलता।" यदि लेनदेन को सही ढंग से संसाधित किया गया था
"उधारकर्ता नहीं मिला ।" अगर उधारकर्ता का कार्ड नंबर गलत है
"आइटम नहीं मिला।" यदि आइटम बारकोड गलत है
"आइटम जारी नहीं किया।" यदि आप ने एक उपलब्ध आइटम में जाँच की है
विंडोज के लिए ऑफ़लाइन परिसंचालन उपकरण
ऑफ़लाइन परिसंचरण उपयोगिता को यहां डाउनलोड किया जा सकता है: https://github.com/bywatersolutions/koha-offline-circulation/releases
Windows उपकरण में लोड करने के लिए उधारकर्ता.db फ़ाइल जेनरेट करने के लिए आपको इसे चलाने की आवश्यकता होगी एक क्रॉन नौकरी के माध्यम से फ़ाइल जनरेटर.
ऑफलाइन परिसंचालन फाइल उपलोड करें
The offline circulation tool for Windows will generate a KOC file that you can upload into Koha once your system comes back up.
सर्कुलेशन मेनू पर क्लिक करें 'अपलोड ऑफ़लाइन परिसंचरण फ़ाइल (.koc)'
अपने कंप्यूटर को *.koc file फ़ाइल के लिए ब्राउज़ करें
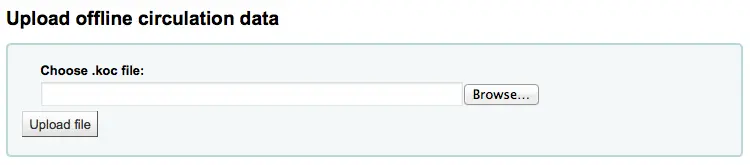
एक बार फाइल अपलोड की गई है, इस प्रक्रिया फ़ाइल क्लिक करें
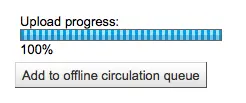
जब यह पूरा हो गया है यदि आप किसी अन्य फाइल अपलोड या ऑफलाइन परिसंचरण कार्रवाई लंबित करने के लिए करते हैं करने में सक्षम हो जाएगा।
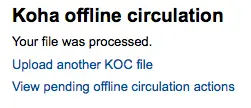
क्लिक करने के बाद 'ऑफ़लाइन परिसंचरण क्रियाएं लंबित देखें' आपको सभी कार्यों के सारांश में लाया जाएगा आप अपने*.koc फ़ाइल में कोहा में लोड हो गए हैं।
एक बार जब संचलन कंप्यूटर के सभी से लॉग के सभी लोड कर रहे हैं आप उन सब की जाँच करें या सिर्फ उन आप Koha में प्रक्रिया चाहते का चयन करने में सक्षम हो जाएगा।
प्रक्रिया बटन पर क्लिक करें और कोहा हर संग्रहीत लेनदेन एक के बाद एक रिकार्ड होगा। प्रत्येक लेनदेन के लिए, स्थिति के लिए बदल जाएगा:
"सफलता।" यदि लेनदेन को सही ढंग से संसाधित किया गया था
"उधारकर्ता नहीं मिला ।" अगर उधारकर्ता का कार्ड नंबर गलत है
"आइटम नहीं मिला।" यदि आइटम बारकोड गलत है
"आइटम जारी नहीं किया।" यदि आप ने एक उपलब्ध आइटम में जाँच की है
एक बार जब आप समाप्त हो अपने लेनदेन के सभी की एक सारांश होगा