Risorse in continuazione
Per accedere alle risorse in continuazione vai nel menu Più nella parte alta dello schermo e scegli Risorse in continuazione oppure scegli la voce Risorse in continuazione nella pagina principale dedicata allo staff Koha. Il modulo delle risorse in continuazione è utilizzato per tenere traccia dei periodici e riviste che arrivano su base regolare.
As with all modules, make sure you go through the related implementation checklist and system preferences before using the serials module.
Vai a: > Più > Risorse in continuazione
Managing serial frequencies
Nota
Only staff with the serials permission (or the superlibrarian permission) will be able manage frequencies.
Koha tiene traccia delle frequenze di pubblicazione per facilitare la gestione e prevenire la duplicazione.
Vai a : Più > Risorse in continuazione > Gestione delle frequenze
From this page you can view all of the existing frequencies in your system.
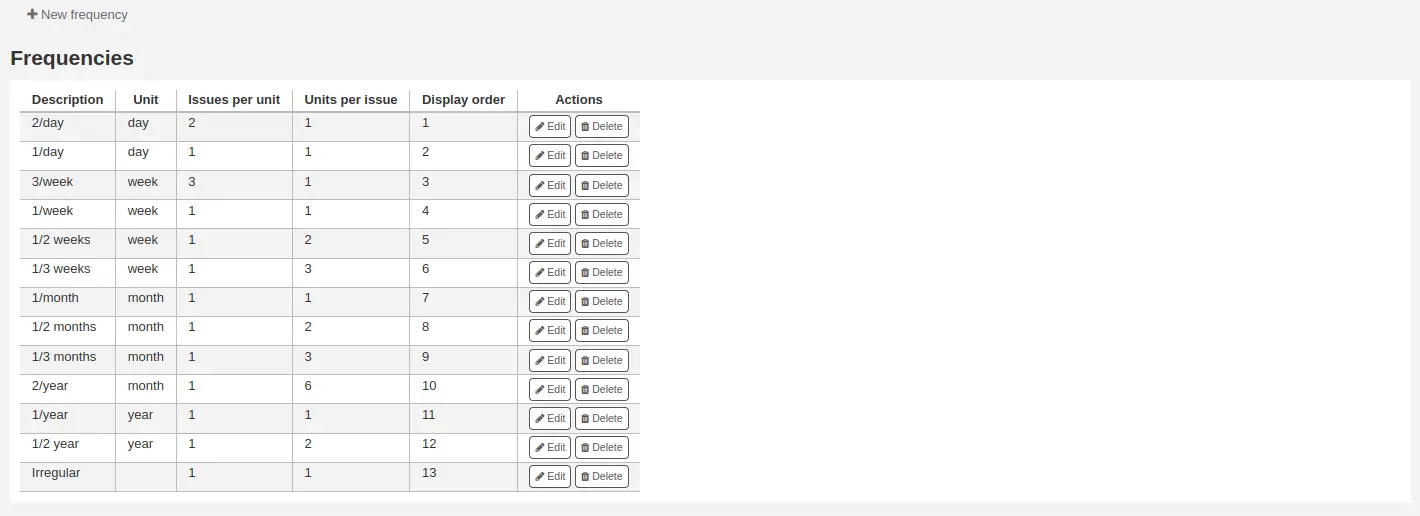
You can edit, delete and create new ones.
Adding a frequency
To add a new frequency, click on the “New frequency” button.

Description: this is the name that will appear in the drop-down menu when creating a new serial subscription; make sure it is descriptive
Unit: this is the unit used for counting the cycle of publication. Choose either none (for irregular frequencies), day, week, month, or year.
Issues per unit: this is how many issues are published during the unit chosen above (this will usually be 1).
Units per issue: this is how many units must we count until the next issue is published.
Display order: this is the display order in the drop-down menu when creating a new subscription (you may want to put the most used frequencies at the top and the less frequent at the bottom; the top-most position is 0). Several frequencies can have the same display order value. If this is the case, they will appear in the order they were created.
Suggerimento
To understand “issues per unit” versus “units per issue” you can read it as “<issues per unit> issue(s) every <units per issues> <unit>”. For example, a biweekly frequency (every two weeks) would be “1 issue every 2 weeks”. So “issues per unit” would be 1 and “units per issue” would be 2. See below for more examples.
Examples
Here are some examples for most common serial publication frequencies.
Frequency |
Unit |
Issues per unit |
Units per issue |
|---|---|---|---|
Daily («1 issue every 1 day») |
Day |
1 |
1 |
Three times per week («3 issues every 1 week») |
Week |
3 |
1 |
Semiweekly («2 issues every 1 week») |
Week |
2 |
1 |
Weekly («1 issue every 1 week») |
Week |
1 |
1 |
Biweekly («1 issue every 2 weeks») |
Week |
1 |
2 |
Monthly («1 issue every 1 month») |
Month |
1 |
1 |
Bimonthly («1 issue every 2 months») |
Month |
1 |
2 |
Quarterly («1 issue every 3 months») |
Month |
1 |
3 |
Semiannual («1 issue every 6 months») |
Month |
1 |
6 |
Annual («1 issue every 1 year») |
Year |
1 |
1 |
Biennal («1 issue every 2 years») |
Year |
1 |
2 |
Gestione degli schemi di numerazione delle Risorse in continuazione
Nota
Only staff with the serials permission or any of the serials sub-permissions (or the superlibrarian permission) will be able to manage numbering patterns.
Every time you create a new numbering pattern in serials you can save it for later use. These patterns are accessible via the “Manage numbering patterns” page.
Vai a: Più > Risorse in continuazione > Gestione degli schemi di numerazione
This page will list for you the numbering patterns you have saved in the past as well as a few basic patterns.
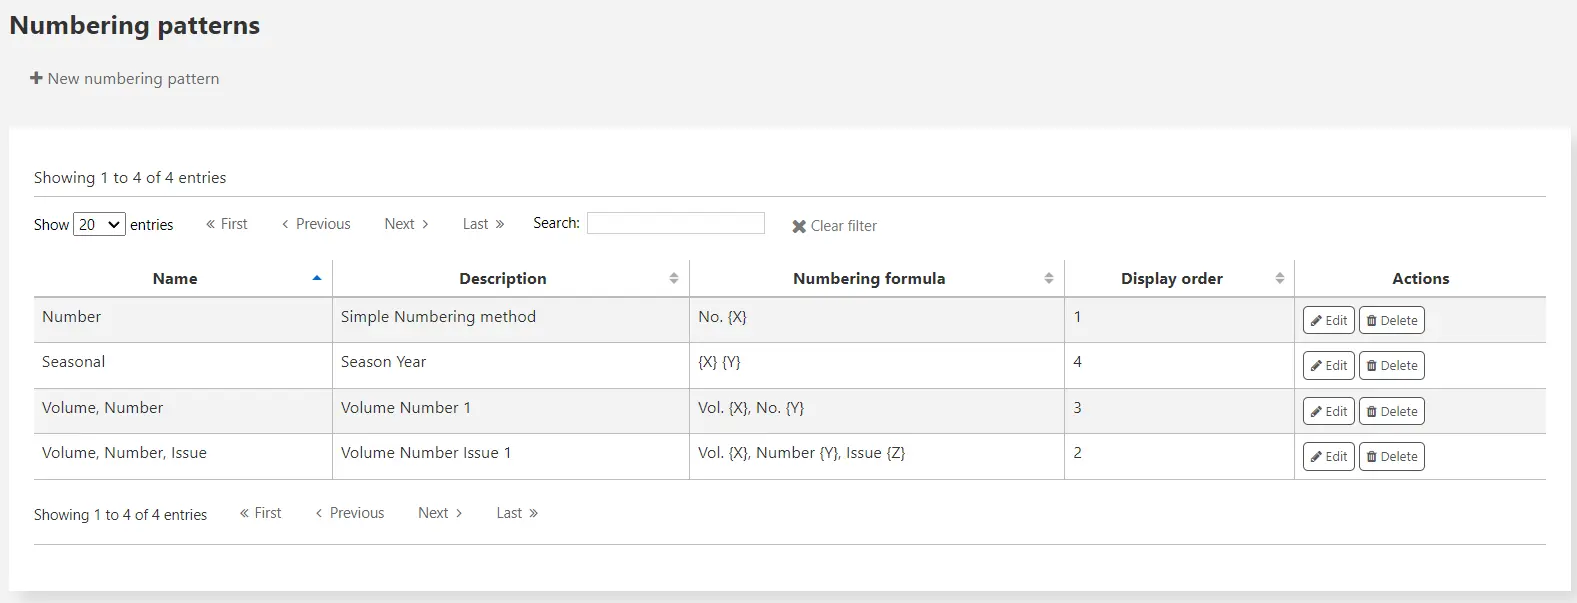
Nota
If you have upgraded from an old version of Koha (before 3.14) you will see “Backup patterns” listed for patterns. This is how Koha saved your old numbering patterns. You can edit these to give them more meaningful names from here.
Adding a numbering pattern
To add new new pattern click the “New numbering pattern” button.
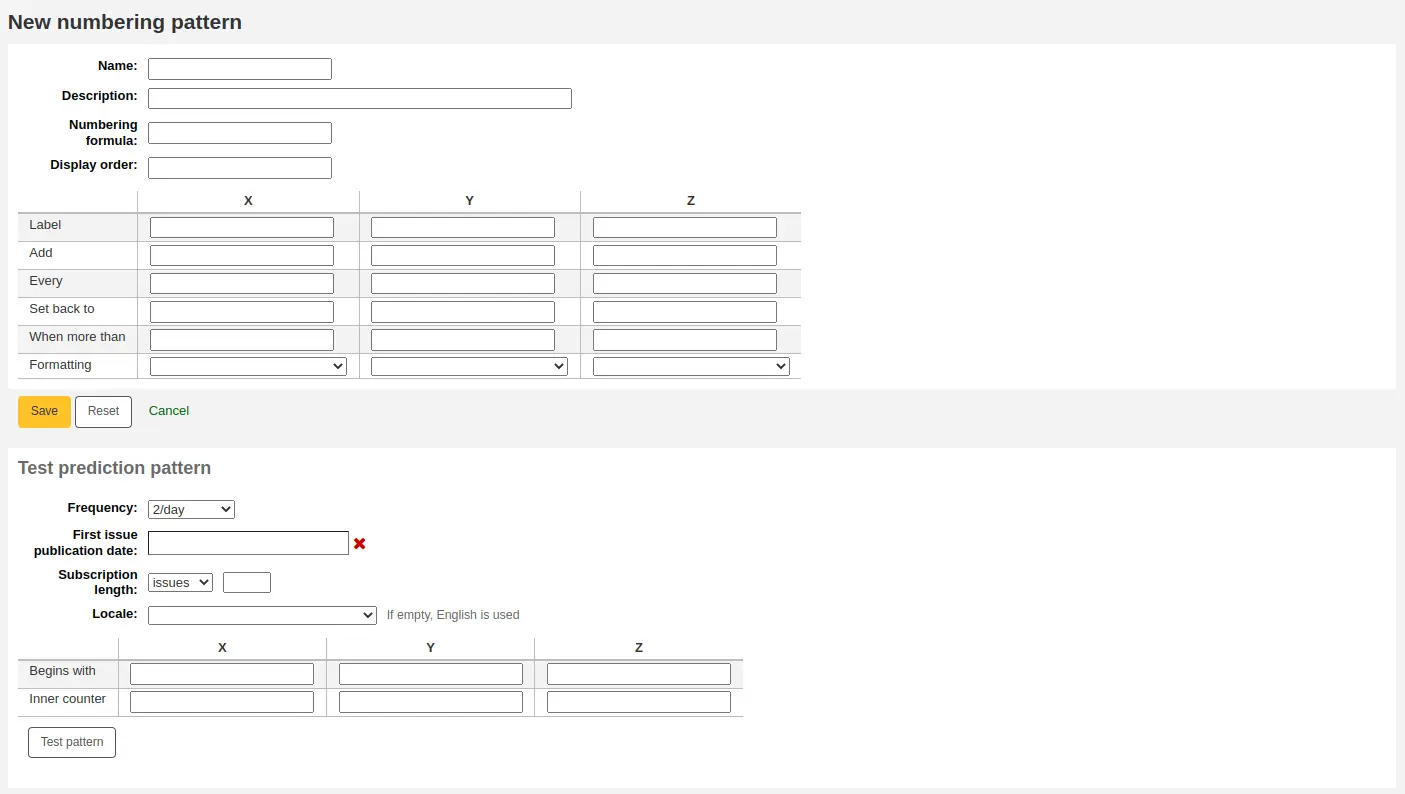
Name: this is the name that will appear in the drop-down menu when creating a new serial subscription; make sure it is descriptive.
Description: this is to further describe the numbering pattern; this does not appear when creating a new subscription, it only displays in the numbering patterns table (see above).
Numbering formula: this is what is used to create the number for each issue. You can use placeholders for up to three variables {X}, {Y}, and {Z} (which can be defined below), as well as predetermined variables:
{Day} will be replaced by the date (two digits)
{Month} will be replaced by the month number (two digits)
{Year} will be replaced by the year (four digits)
{DayName} will be replaced by the name of the day of the week
Avvertimento
Locale is ignored in the DayName variable. It will always be displayed in English. Use one of the X, Y, or Z variables in the table with the formatting “Name of day” to have the day name in a language other than English.
{MonthName} will be replaced by the name of the month
Avvertimento
Locale is ignored in the MonthName variable. It will always be displayed in English. Use one of the X, Y, or Z variables in the table with the formatting “Name of month” to have the month name in a language other than English.
Version
The placeholders {Day}, {Month}, {Year}, {DayName}, and {MonthName} were added to Koha in version 24.05.
Along with the variables, you can enter any text you want to have appear in the issue number. You must also include any spaces you want to see in the issue numbers. The text will stay the same for each issue and the variables will vary.
Avvertimento
The variables X, Y and Z must be in capital letters and between curly brackets.
Examples
Vol. {X} No {Y}
Issue {X} ({Year}-{Month}-{Day})
{X} {Y}
Display order: this is the display order in the drop-down menu when creating a new subscription (you may want to put the most used frequencies at the top and the less frequent at the bottom; the top-most position is 0). Several frequencies can have the same display order value. If this is the case, they will appear in the order they were created.
In the table, you need to enter the parameters for each variable.
Label: this is simply a name for the variable, it is not used anywhere else, but it helps identify what the variable is supposed to be.
Add: how many numbers or units are added to the variable.
Each: the numbers or units added to the variable are added each how many issues.
Set back to: this is used for cyclic numbering; enter the starting number.
When more than: this is used for cyclic numbering; enter the last number.
Suggerimento
When filling out these four parameter (“add”, “each”, “set back to” and “when more than”), work column by column and read it as a sentence: «Add 1 Every 1 issue, set back to 1 when greater than 10».
Formatting: this is used if, instead of numbers, you want words to appear in your issue number. You can choose
Name of day (Monday, Tuesday, Wednesday, etc.)
Name of day (abbreviated) (Mon, Tue, Wed, etc.)
Name of month (January, February, March, etc.)
Name of month (abbreviated) (Jan, Feb, Mar, etc.)
Name of season (Spring, Summer, Fall, Winter)
Name of season (abbreviated) (Spr, Sum, Fal, Win)
Avvertimento
When filling out the table, you must always use numbers, even to represent names of days, months or seasons. Here are the equivalent for each
Days |
Sunday |
0 |
Monday |
1 |
|
Tuesday |
2 |
|
Wednesday |
3 |
|
Thursday |
4 |
|
Friday |
5 |
|
Saturday |
6 |
|
Months |
January |
0 |
February |
1 |
|
March |
2 |
|
April |
3 |
|
May |
4 |
|
June |
5 |
|
July |
6 |
|
August |
7 |
|
September |
8 |
|
October |
9 |
|
November |
10 |
|
December |
11 |
|
Seasons |
Spring |
0 |
Summer |
1 |
|
Fall |
2 |
|
Winter |
3 |
Before you save your numbering pattern, you can test it to make sure it behaves as you intend.
Frequency: choose a frequency that fits with your numbering pattern.
First issue publication date: choose a date where your test will start.
Subscription length: enter a number of issues, weeks or months to test your numbering pattern; if the numbering pattern is cyclic, it is recommended to try at least two cycles to see the change in cycles and make sure it behaves correctly.
Locale: if using names of days, months or season, you can choose the language in which these names will be displayed.
Nota
Locale doesn’t currently work well with season names.
Next enter the parameters for your variables.
Begins with: enter the first value for each variable, these should be the values of the issue entered in “First issue publication date” above.
Inner counter: enter how many issues have already passed in the cycle, so that Koha can calculate when to cycle back.
Click “Test pattern” to see the results. If the result is what you expected, you can save your numbering pattern. If the results does not match your expectations, go back and tweak the parameters and test again.
Examples
Month and year for monthly serials
Numbering formula: {X} {Y}
X
Y
Z
Label
Month
Year
Add
1
1
Every
1
12
Set back to
0
0
When more than
11
99999
Formatting
Name of month
Volume and number for monthly serials
Numbering formula: Vol.{X} No.{Y}
X
Y
Z
Label
Volume
Number
Add
1
1
Every
12
1
Set back to
0
1
When more than
99999
12
Formatting
Season and year for quarterly serials
Numbering formula: {X} {Y}
X
Y
Z
Label
Season
Year
Add
1
1
Every
1
4
Set back to
0
0
When more than
3
99999
Formatting
Name of season
Volume and number for weekly serials
Numbering formula: Vol.{X} No.{Y}
X
Y
Z
Label
Volume
Number
Add
1
1
Every
52
1
Set back to
0
1
When more than
99999
52
Formatting
Adding a subscription
Nota
Only staff with the create_subscription permission (or the superlibrarian permission) will be able to add serial subscriptions.
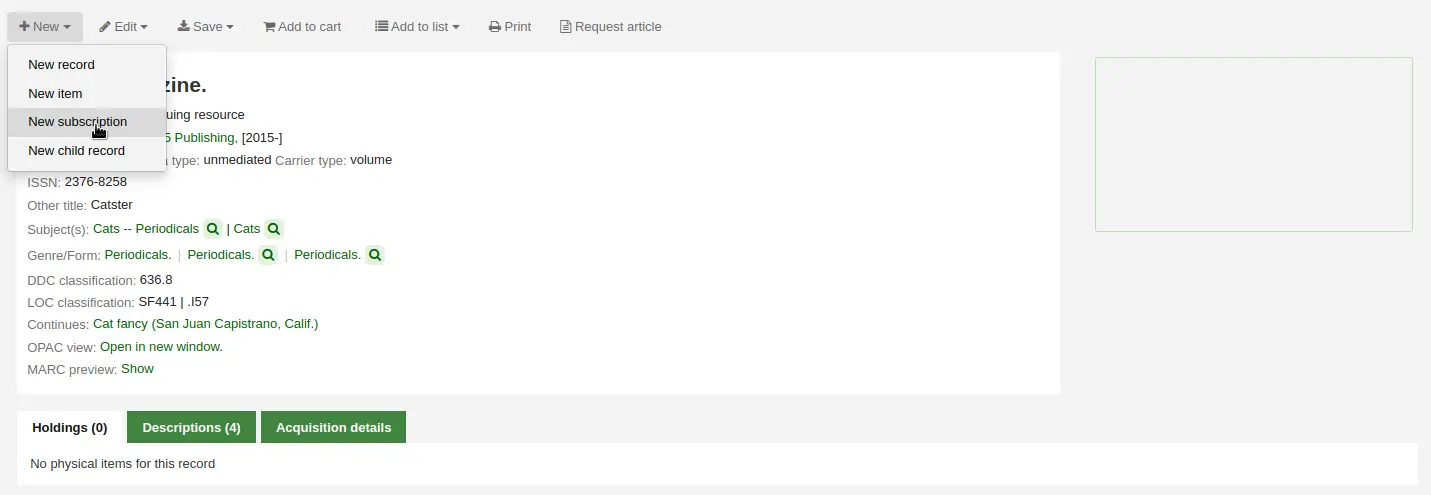
Subscriptions can be added by clicking the “New” button on any bibliographic record and choosing “New subscription”
Or click the “New subscription” button in the serials module

If you are entering a new subscription from the Serials module you will be presented with a blank form (if creating new from a bibliographic record the form will include the record number info).
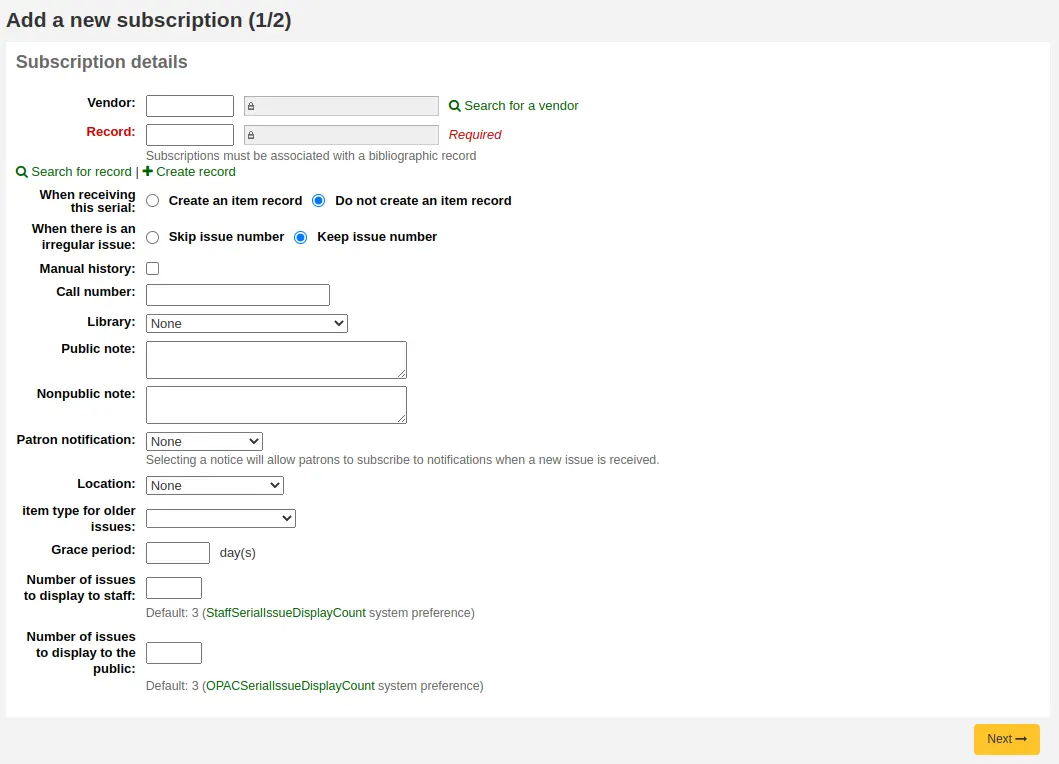
“Venditore” può essere cercato tra tutti i venditori inseriti nel Modulo di acquisizione o inserendo il numero identificativo del venditore
Informazione sul fornitore non richiesta
Per reclamare i fascicoli mancanti e in ritardo devi inserire informazioni sul fornitore

Record: the biblionumber of the MARC record you’d like to link this subscription to
If you created a new subscription from a bibliographic record, the biblionumber and the title will already be filled in
You can search for an existing record by clicking on the “Search for record” link below the boxes
If there is no existing bibliographic record for this subscription, you can create one by clicking on the “Create record” link below the boxes
You can also manually enter the biblionumber for a record in the first box
Next you can choose whether a new item is created when receiving an issue
Nota
If you add barcodes to issues or if your circulate them, choose to create an item upon reception
When there is an irregular issue: choose how to handle irregularities in your subscription, by either skipping the issue number or keeping the issue number
Nota
If the numbers are always sequential, choose “Keep issue number”
Manual history: if checked, you will be able to enter serials outside the prediction pattern once the subscription is saved. For example, “The library has issues from June 1974 to December 1996”. To do so, go to the “Planning” tab on the subscription detail page once the subscription is saved and click “Edit history”.
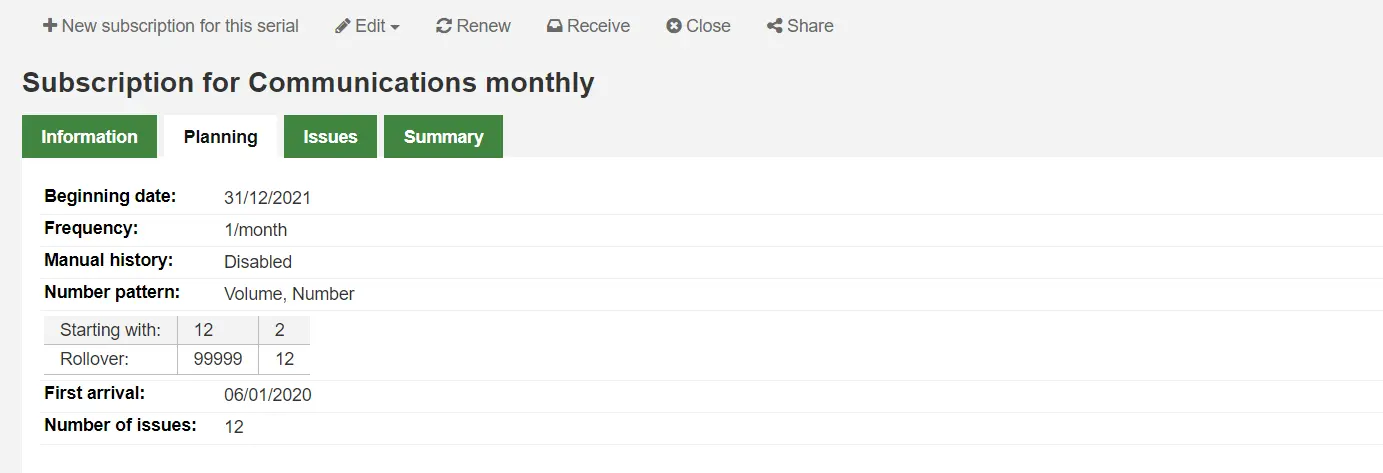
Call number: your item’s call number or call number prefix, this will be copied to items if they are created upon receiving.
Library: the branch that owns this subscription.
Se più di una biblioteca fa un abbomamento allo stesso periodico, dovrai creare un abbonamento per ogni biblioteca
Questo può essere fatto usando l’opzione “Modifica come nuovo (duplica)” che trovi nella pagina dinformazioni dell’abbonamento e cambiando solo il campo “Biblioteca”

Public note: any notes you would like to appear in the OPAC for the patrons
Nonpublic note: should be used for notes that are only visible to staff members via the staff interface
Patron notification: you can pick a notice to send to patrons who subscribe to updates on this serial via the OPAC.
For this option to appear you need to make sure that you have a “Serials (new issue)”-type notice set up in the “Notices and slips” tool
Location: the shelving location, this will be copied to items if they are created upon receiving.
Item type: if creating items upon reception, choose the item type of the items created.
Item type for older issues: if creating items upon reception, choose the item type that will be assigned to previous issues when receiving new issues. This will only appear only if the makePreviousSerialAvailable is enabled.
Grace period: the number of days before an issue is automatically moved from “Expected” status to “Late”. This mechanism requires that the SerialsUpdate.pl cron job is set up to run regularly.
Number of issues to display to staff: this allows you to control how many issues appear by default in the staff interface catalog, in the “Subscriptions” tab of the bibliographic record.
If this is left empty, the value of the StaffSerialIssueDisplayCount system preference will be used.
Nota
This does not affect the number of items shown in the “Holdings” tab if you create items for issues. It only affects the number of issues displayed in the “Subscriptions” tab.
Number of issues to display to the public: this allows you to control how many issues appear by default in the OPAC, in the “Subscriptions” tab in bibliographic records
If this is left empty, the value of the OPACSerialIssueDisplayCount system preference will be used.
Nota
This does not affect the number of items shown in the “Holdings” tab if you create items for issues. It only affects the number of issues displayed in the “Subscriptions” tab.
Dopo aver inserito i dati clicca su “Prossimo” per inserire le informazioni nello schema di previsione
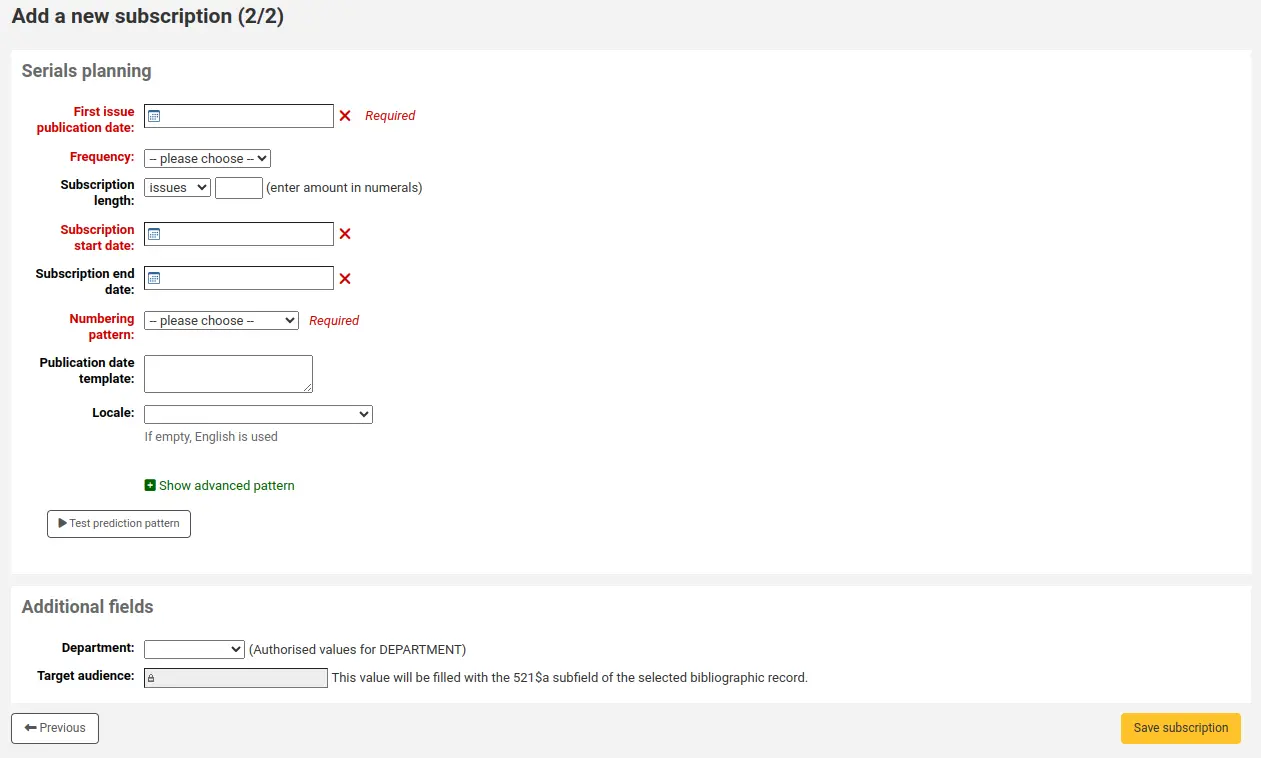
First issue publication date: enter the date of the issue you have in your hand, the date from which the prediction pattern will start
Frequency: choose the frequency of your serial. There are several predefined options all of which are visible alongside your own custom frequencies in “manage frequencies”. If the frequency you are looking for is not there, you can add a custom frequency.
“Subscription length” è il numero di fascicoli o mesi della sottoscrizione. E” usato anche per impostare gli alert per i rinnovi.
“Data di inizio della sottoscrizione” è la data in cui la sottoscrizione ha inizio. E” usata anche per impostare gli alert per i rinnovi.
“Data di fine di una sottoscrizione” deve essere inserito per le sottoscrizioni chiuse (se stai lavorando con arretrati).
“Schemi di numerazione” ti aiuterà a determinare la numerazione così come stampata su ogni fascicolo. Gli schemi inseriti qui sono salvati e modificabili in ogni momento visitando “Gestione degli schemi di numerazione”.
If the numbering pattern you need has not been created yet, you can create a new one by clicking on “Show advanced pattern” and then “Modify pattern”. This is be the same as adding a numbering pattern (see section above).
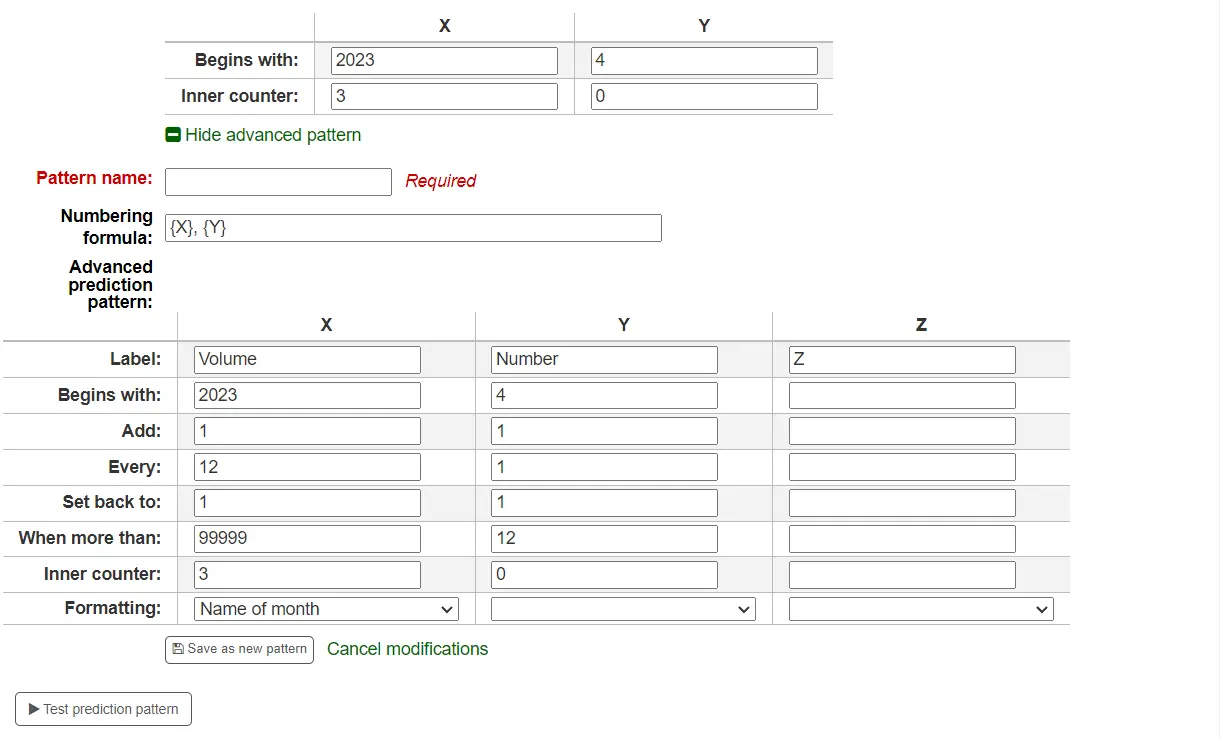
Publication date template: this is the template that will be used for the “Published on (text)” field. You can use Template Toolkit to create your template. For example,
[% serialseq %] [% publisheddate %]will fill the “Published on (text)” field with the serial number and date.Nota
You can use the following subscription fields in the template:
serialseq
serialseq_x
serialseq_y
serialseq_z
subscriptionid
biblionumber
status
planneddate
publisheddate
publisheddatetext
notes
routingnotes
Version
This field was added in Koha version 23.11.
Locale: if using names of days, months or season, you can choose the language in which these names will be displayed.
Nota
Locale doesn’t currently work well with season names.
Once a “Numbering pattern” is chosen the numbering table will appear.

Begins with: enter the first value for each variable, these should be the values of the issue entered in “First issue publication date” above.
Inner counter: enter how many issues have already passed in the cycle, so that Koha can calculate when to cycle back.
Per esempio: se il primo fascicolo da ricevere è «vol. 4, no. 1, iss. 796», tu devi settare «numero interno= 0» Ma se è «vol. 4, no. 2, iss. 797», il numero interno sarà «1».
Dopo aver riempito questi dati clicca sul bottone “Testa lo Schema di previsione” per vedere quali fascicoli il sistema genera, se ci sono irregolarità puoi scegliere quali fascicoli non ci sono nell’elenco presentato.
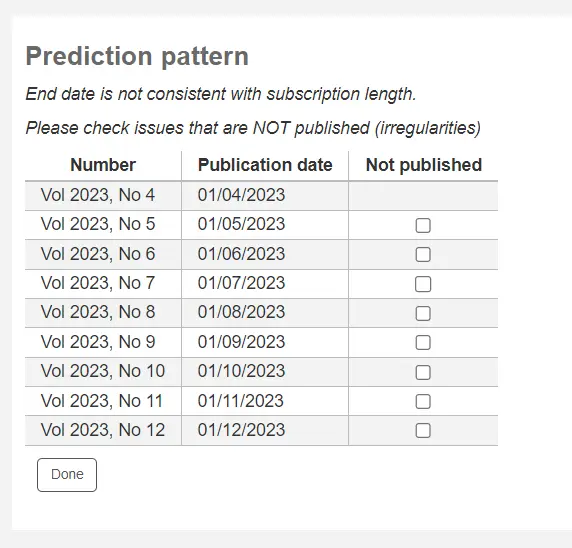
If you have added custom fields, they will be editable above the buttons at the bottom of the screen
Click “Save subscription” to save the information you have entered.
Editing a subscription
Nota
Only staff with the edit_subscription permission (or the superlibrarian permission) will be able to edit existing serial subscriptions.
Per modificare un’abbonamento clicca su “Modifica” e “Modifica abbonamento” dalla pagina realtiva. Questo ti porta alla stesso modulo usato quando si crea un nuovo abbonamento.
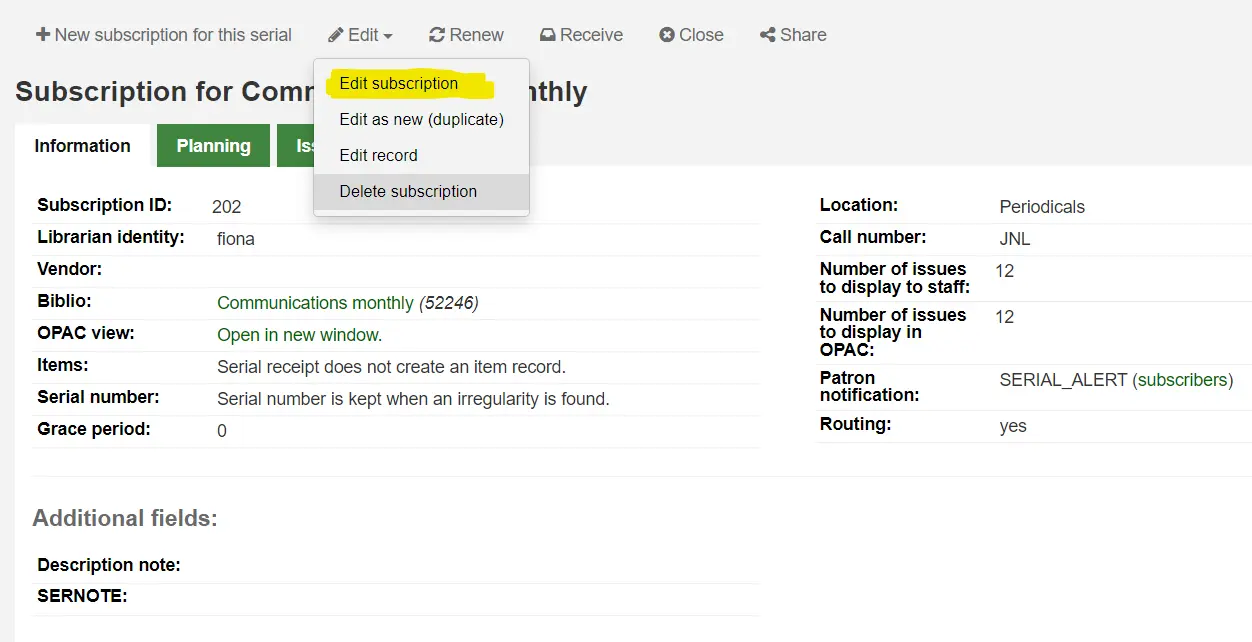
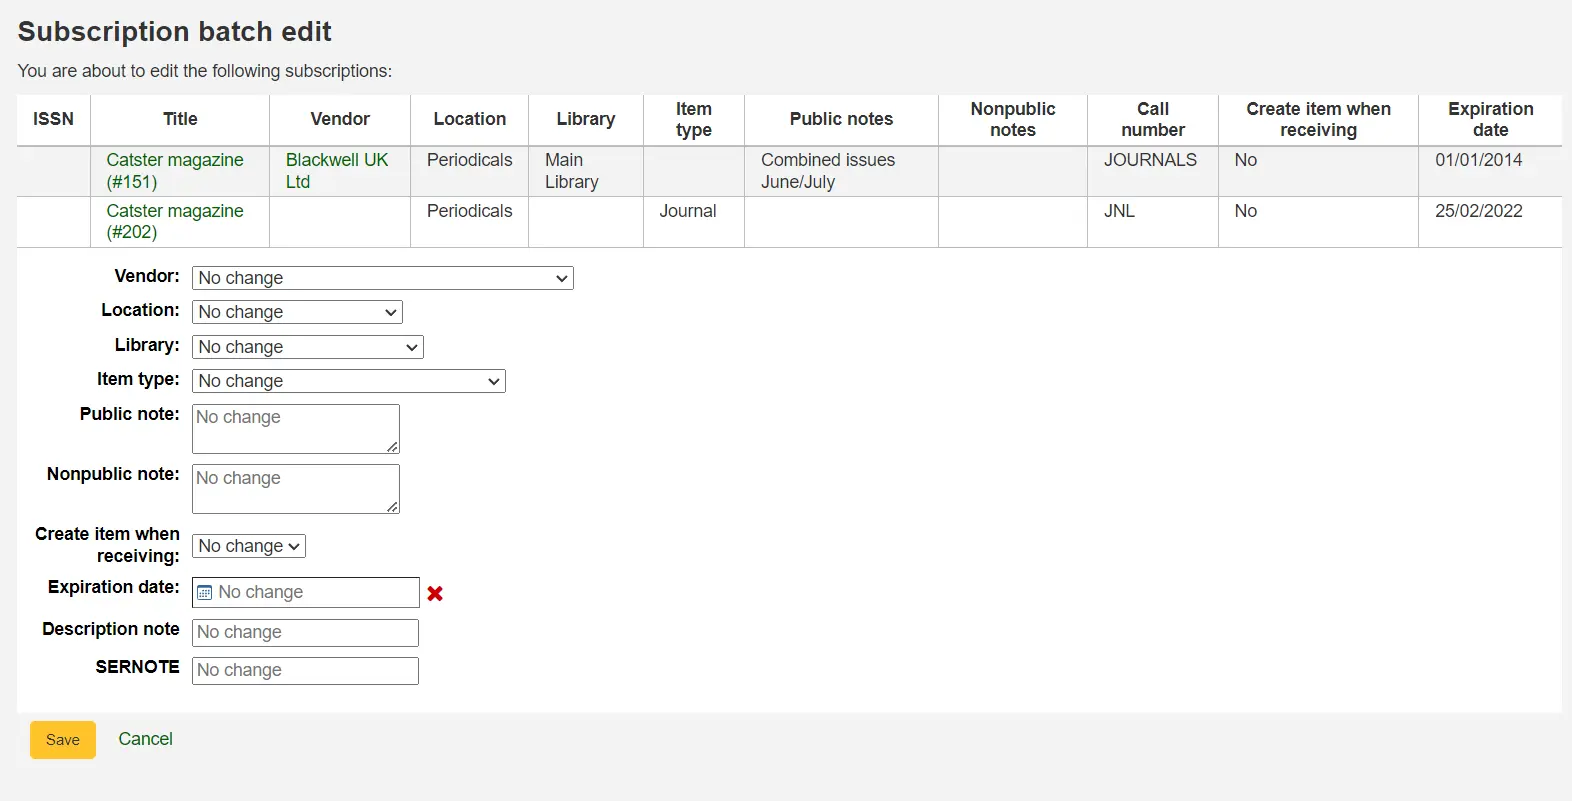
E” possibile anche fare modifiche massive agli abbonamenti. Per farlo cerca glo abbonamenti che vuoi cambiare. Sui risultati clicca le caselle vicine agli abbonamenti da modificare. Il link “Modifica i periodici selezionati” apparirà.

Da qui puoi cambiare:
Il fornitore
La collocazione a scaffale
la biblioteca
Il tipo di copia
La nota pubblica
la nota privata
se creare o non creare una copia quando si riceve un fascicolo
la data di scadenza
any custom fields
Nota
Lascia il campo senza cambiamente per mantenere i valori originali
Receiving issues
Nota
Only staff with the receive_serials permission (or the superlibrarian permission) will be able to receive issues of existing serial subscriptions.
Fascicoli possono essere identificati come ricevuti da diverse posizioni. Per trovare un abbonamento usa il box di ricerca in alto nella pagina dei periodici per cercare il periodico per il quale to vuoi ricevere il fascicolo:
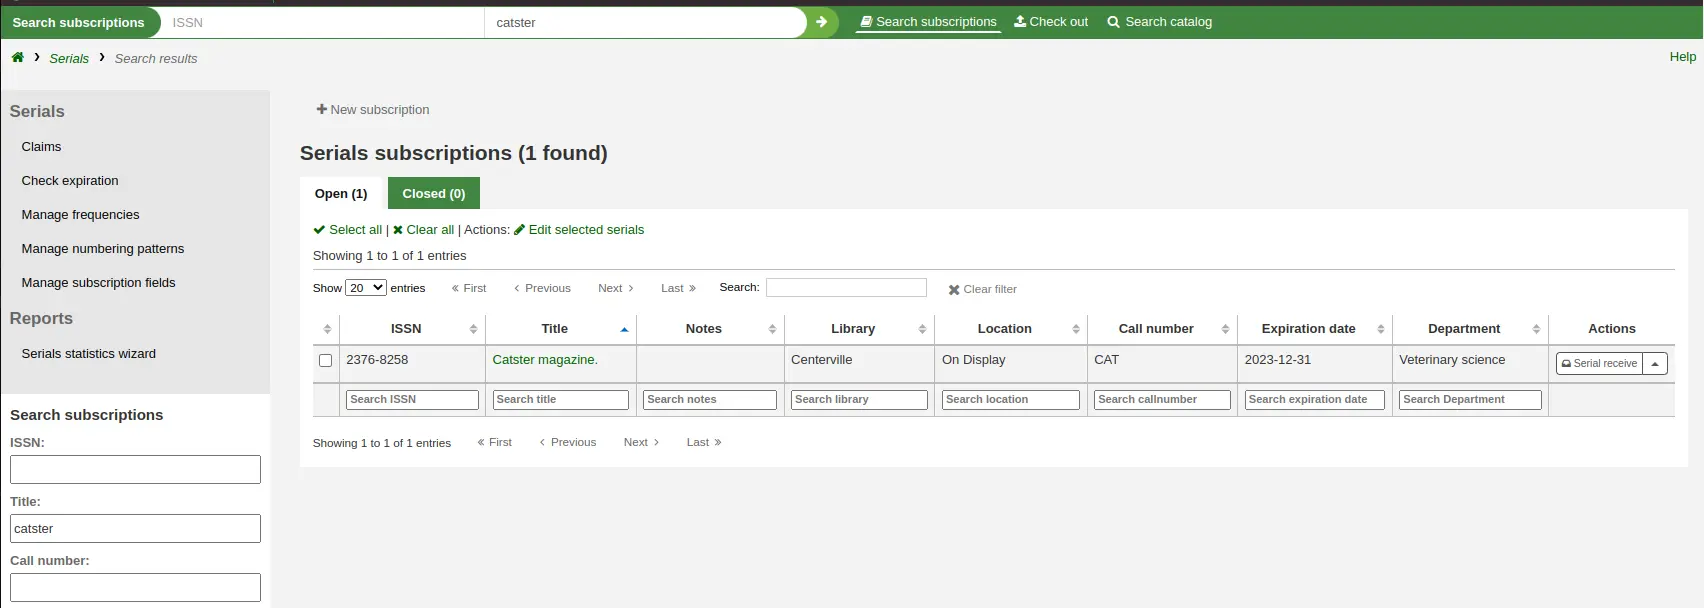
From the search results you can click the “Serial receive” button or you can click on the subscription title and then click the “Receive” button.

L’ultimo modo per ricevere dei periodici è dalla pagina “”Informazioni globali”. A sinistra della pagina riassuntiva degli abbonamenti c’è un menu con il link a “Informazioni globali”
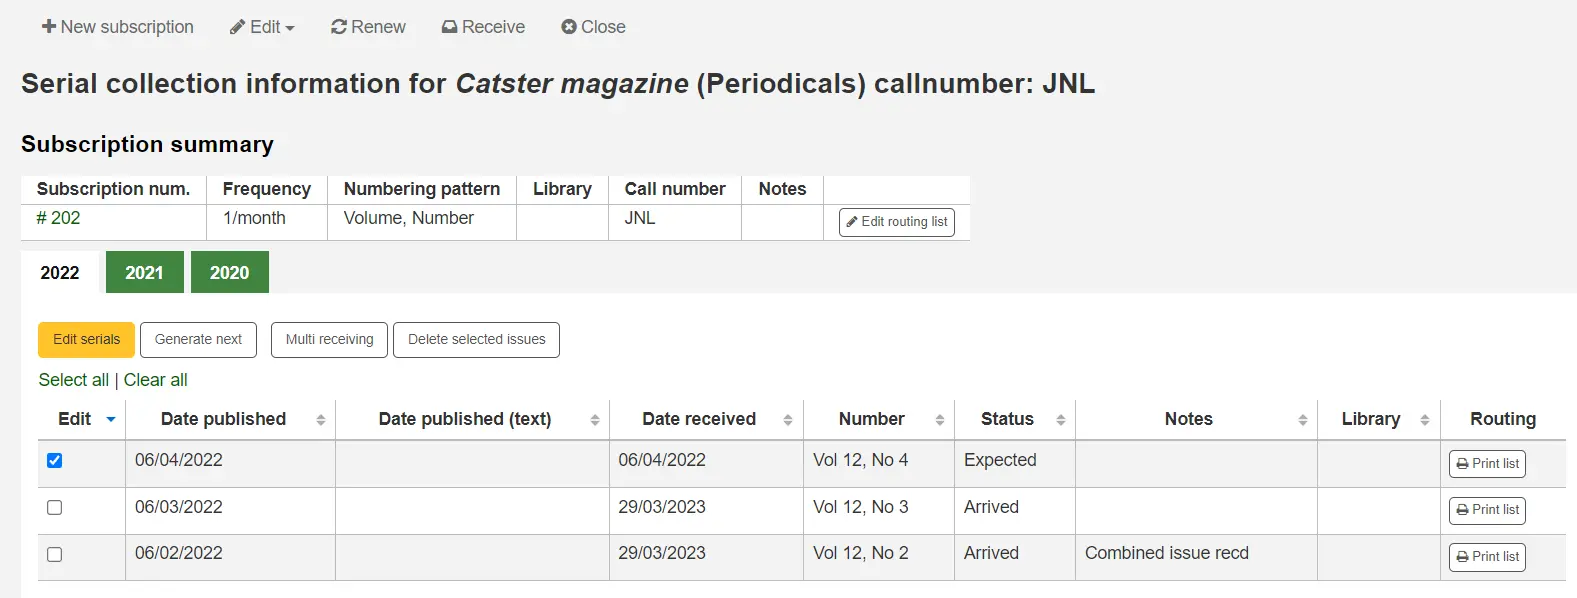
From the page that opens up, check the issue(s) you want to receive (the expected ones should be checked by default) and click “Edit serials”.
Tutte queste tre opzioni apriranno il form di ricezione del fascicolo:

Choose “Arrived” from the status drop-down menu to mark an issue as received.
Se hai deciso di avere un record creato per ogni singolo fascicolo, dopo aver scelto “Arrivato” ti comparirà un form di aggiungi record. Puoi aggingere più di una copia usando l’opzione “Numero di copie da fare” alla fine del form.
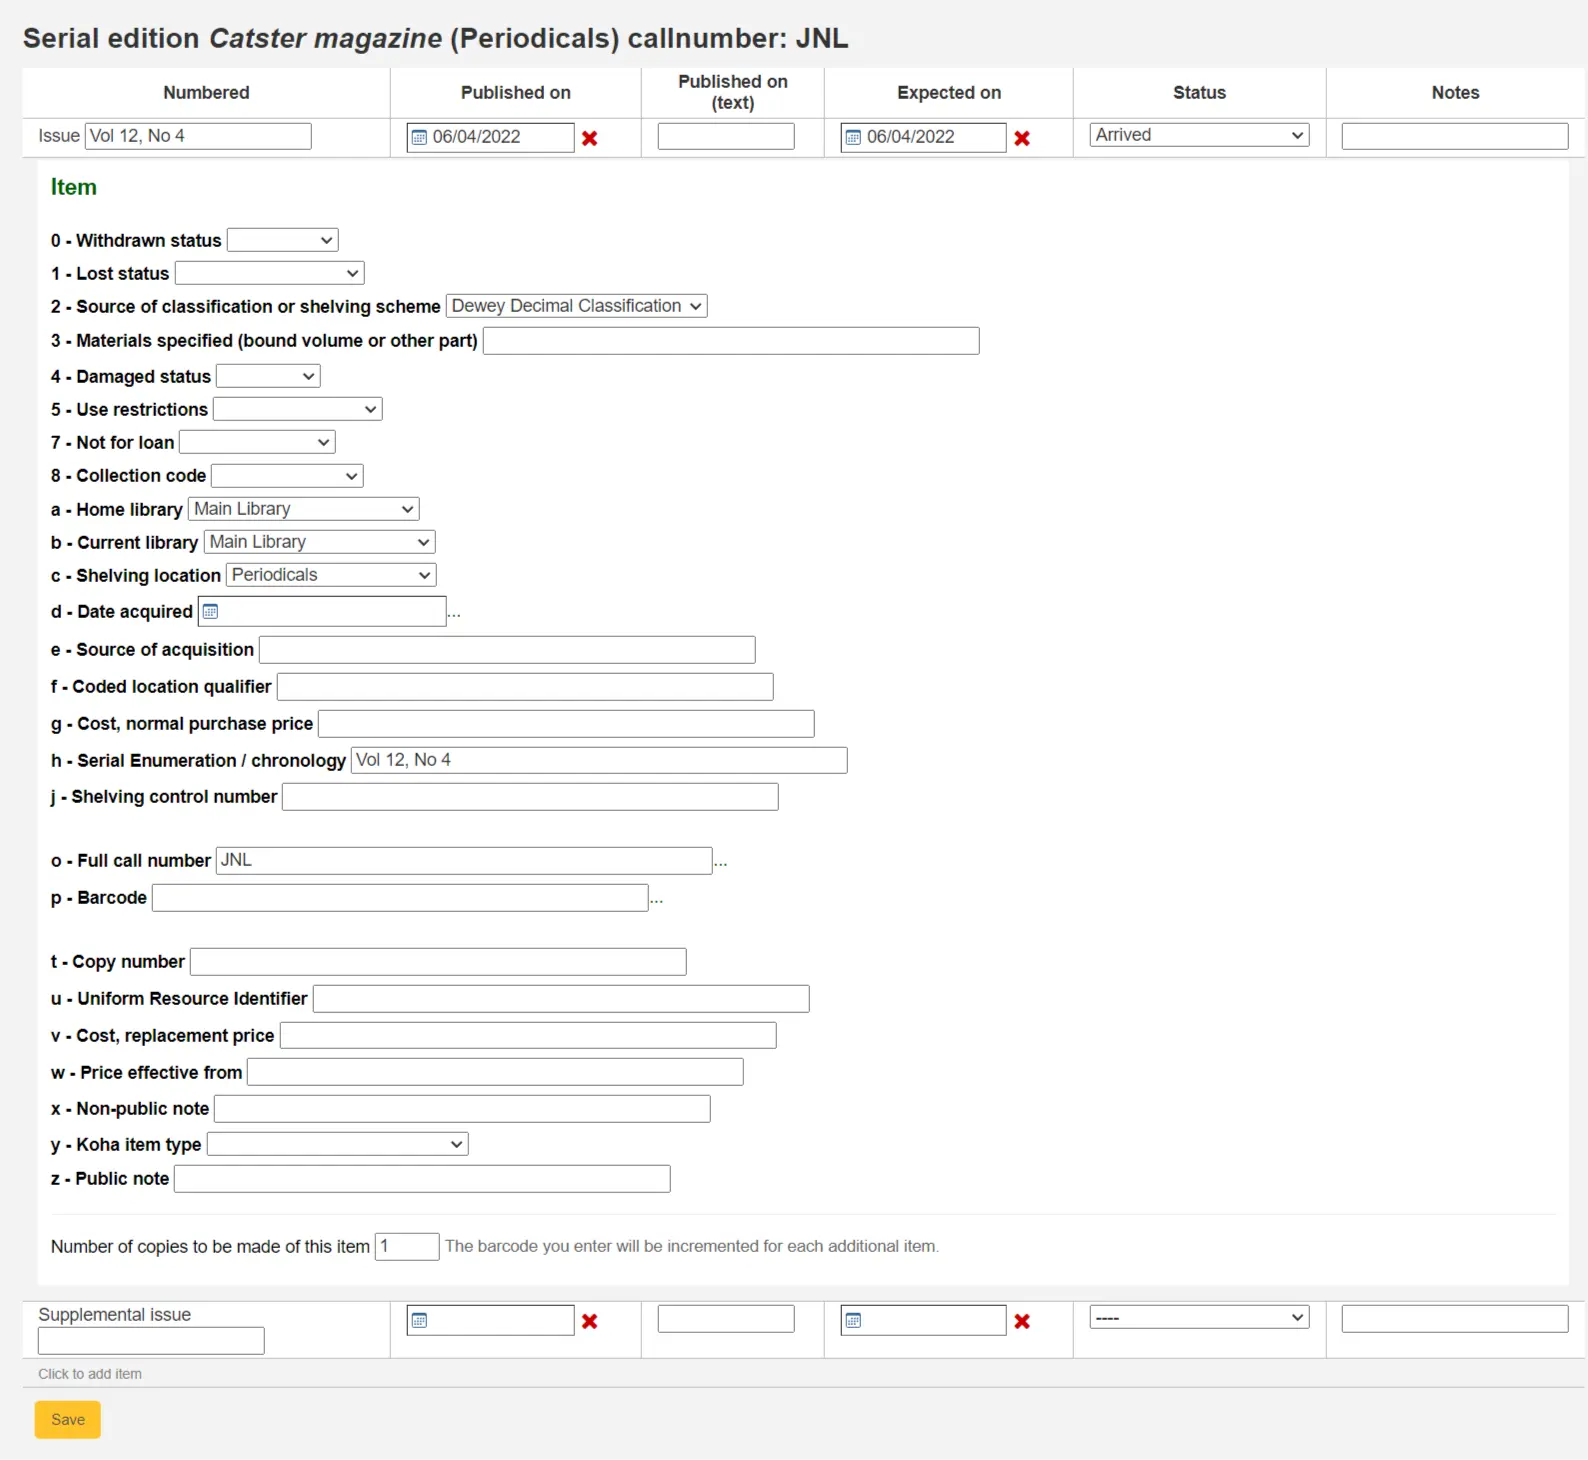
Se un fascicolo ha allegato un fascicolo supplementare, inseriscilo nel “Supplemento”
Inserisci tutta la numerazione nella casella dopo «Supplemento»; nessuna numerazione viene ereditata o autocompilata dalla serie principale. Ed esattamente quello che inserirai qui verrà inserito nel campo «Enumerazione seriale / cronologia» [MARC21 952$h] della copia collegata quando verrà creata. Questo se hai settato di crearla in automatico o la crei tu a mano.
Per esempio se inserici «v.69 no.3 (Mar. 2015) suppl.», apparira proprio questa dicitura.
Se hai deciso di avere un record creato per ogni singolo fascicolo ti comparirà un un form di aggiungi record per ogni supplemento e per il fascicolo stesso
Quando hai inserito il dato necessario clicca “Salva”
Informazioni globali
Ogni abbonamento ha un pagina “Informazioni globali” disponibile da manu principale dei periodici.
From this page you can manage additional tasks related to subscription issues such as receiving multiple issues and editing.
Cliccando questo bottone genererà il fascicolo successivo e marcherà il precedente come “In ritardo”.
Check the box in the Edit column for one or more previous issues and then click the Edit serials button. This will bring you to the same screen as when you are receiving issues. From there, you can edit the numbering, dates, status, and add notes.
Creating a routing list
Nota
Only staff with the routing permission (or the superlibrarian permission) will be able to manage routing lists.
A routing list is a list of people who receive the serial before it goes to the shelf. To enable routing lists, set your RoutingSerials preference to “Use”.
Quindi nella pagina dell’abbonamento vedrai un link a sinistra “Creare una Routing List” o “Modificare una Routing List”

Clicking that link will bring you to the form to add a new routing list.
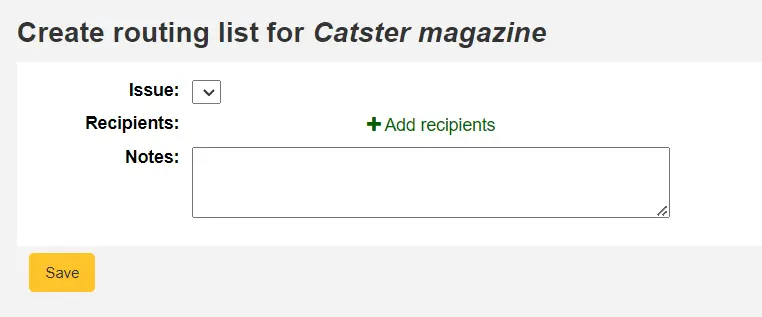
From here, click “Add recipients” to add users to the routing list. In the menu that appears you can filter patrons by part of their name, their library, or their patron category.
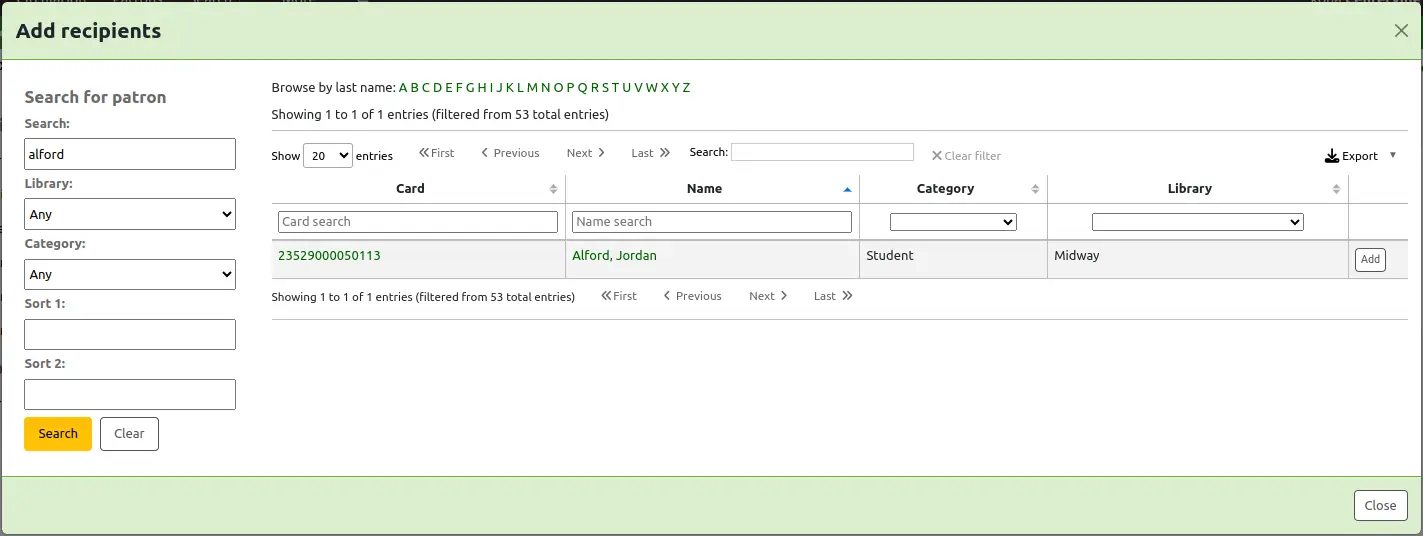
Click “Add” to the right of each name to add them to the routing list. When you have chosen all of the people for the list, click the “Close” button to be redirected to the routing list.
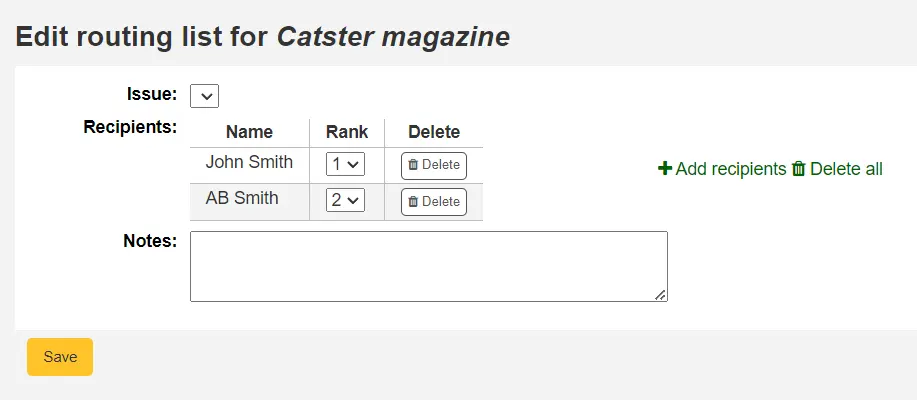
From this form, you can play with the order of the users and add notes. If you always add the same note, you can create an HTML customization with the display location “RoutingListNote”.
If the list looks the way you expect it to, click “Save”.
Next, you will be brought to a preview of the routing list. To print the list click “Save and preview routing slip.” This will open a printable version of the list.
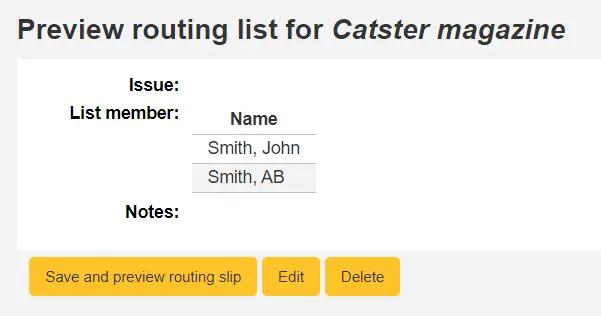
If RoutingListAddReserves is enabled, patrons listed in the routing list will automatically be added to the holds list for the issue.
To see a list of all of the routing lists for a specific patron is visit the routing lists tab on their patron record. Patrons are able to see a list of their own routing lists when logged into the OPAC in the your routing lists tab.
Subscriptions in the staff interface
Le informazioni sull’abbonamento appariranno nel record bibliografico sotto il tab “Abbonamento”
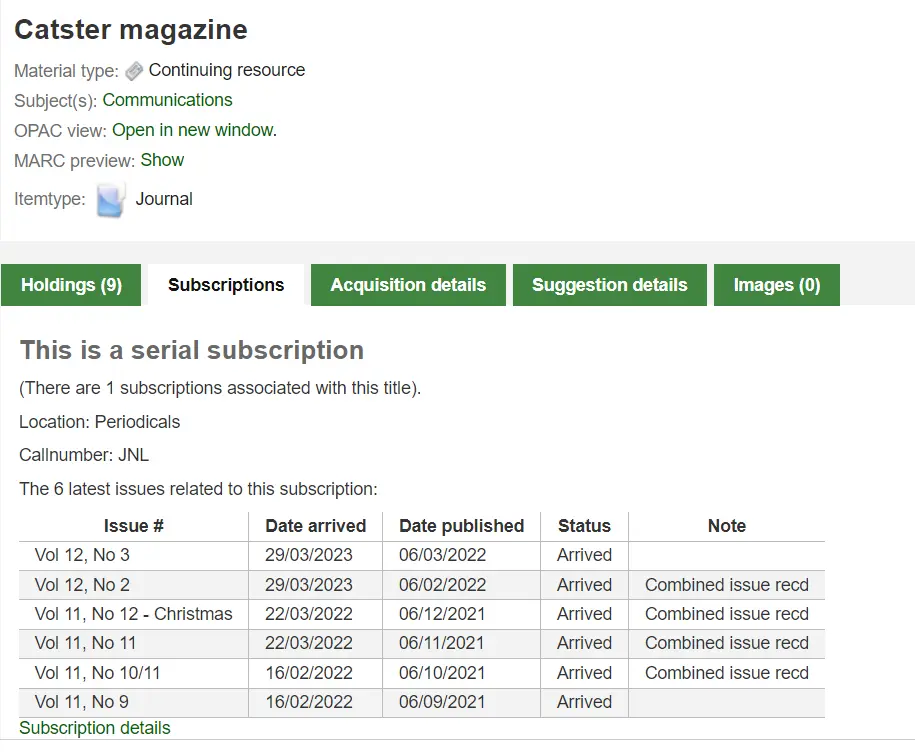
Clicking the “Subscription details” link will take you to the Subscription summary page in the staff interface.

Se stai usando il modulo Acquisitions per gestire gli abbonamenti dei periodici allora vedrai un tab extra “Dettagli acquisizione” tra le informazioni sull’abbonamento.

Nota
You can customize the columns of this table in the Table settings section of the Administration module (table id: orders).
Subscriptions in the OPAC
When viewing the subscription in the OPAC there will be several options. You can choose which tab appears by default with the opacSerialDefaultTab system preference.
Like in the staff interface, there will be a Subscriptions tab on the bibliographic record.
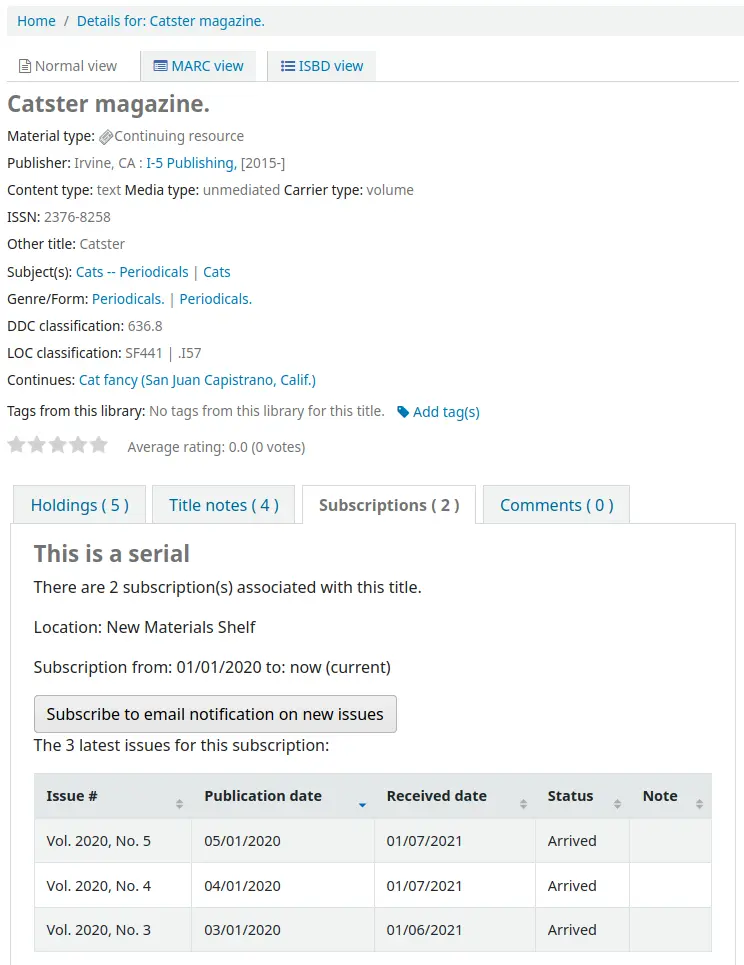
Under this tab will appear the number of issues you chose when setting up the subscription or in your OPACSerialIssueDisplayCount system preference. Clicking the “More details” link will provide you with additional information about the serial history. You can set the default view of the serial history in the OPAC with the SubscriptionHistory system preference.
There are two views, brief and full. The brief serial subscription history will show basic information regarding the subscription.

From this brief display patrons can subscribe to be notified of new issues as they are released by clicking the “Subscribe to email notifications of new issues” button. This link will only appear if you have chosen to notify patrons when creating the subscription.
Puoi vedere chi ha sottoscritto di essere avvisato all’arrivo di nuovi fascicoli andando alla pagina dell’abbonamento nello staff client e guardando nel tab «Informazioni».

Dettagli completi dell’abbonamento, divisi per anni
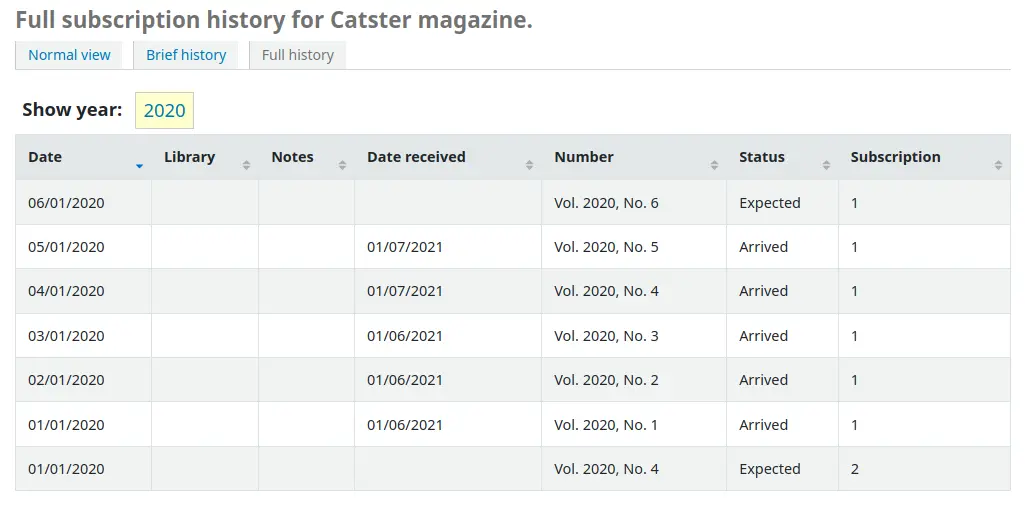
Claiming late issues
Nota
Only staff with the claim_serials permission (or the superlibrarian permission) will have access to this tool to claim late serial issues.
Koha can send email messages to your serial vendors if you have late issues. To the left of the main serials page there is a link to “Claims”.

Il link ai reclami appare anche a sinistra della pagina dei dettagli dell’abbonamento

If you don’t have a claim notice defined yet you will see a warning message that you need to first define a notice in the Notices and slips tool.

Premendo “Solleciti” si aprirà il report che ti chiederà di scegliere il nome del fornitore a cui segnalare i fascicoli in ritardo.
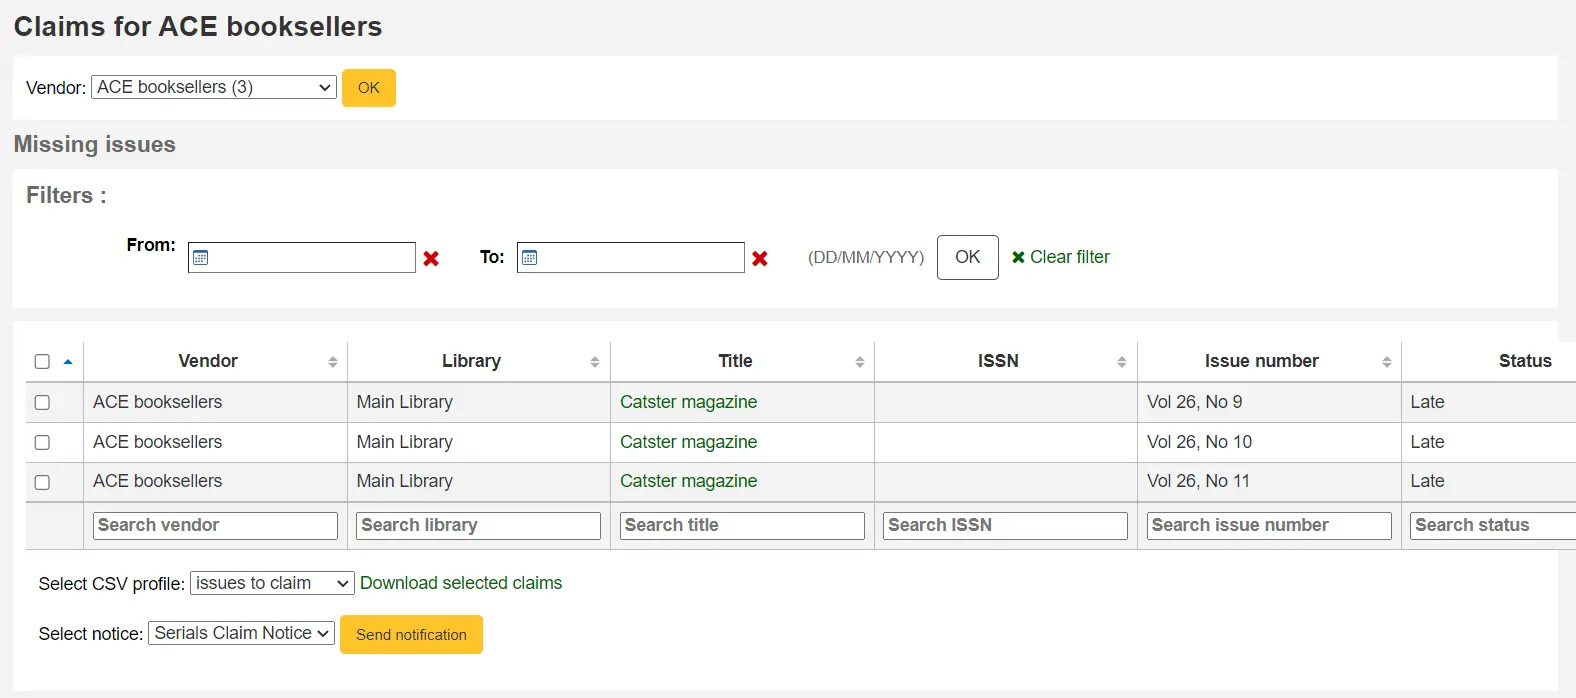
Dall’elenco dei fascicoli in ritardo, puoi scegliere quali sollecitare via email cliccando la casella a sinistra, scegliendo il modello del sollecito e premendo il bottone «Spedisci».
You can also export the results to a CSV file by choosing a CSV profile and clicking “Download selected claims”.
Checking serial expiration
Nota
Only staff with the check_expiration permission (or the superlibrarian permission) will have access to this tool to check serial subscription expiration dates.
When adding serials you enter a subscription length, using the check expiration tool you can see when your subscriptions are about to expire. To use the tool, click the link to “Check expiration” on the serials menu.
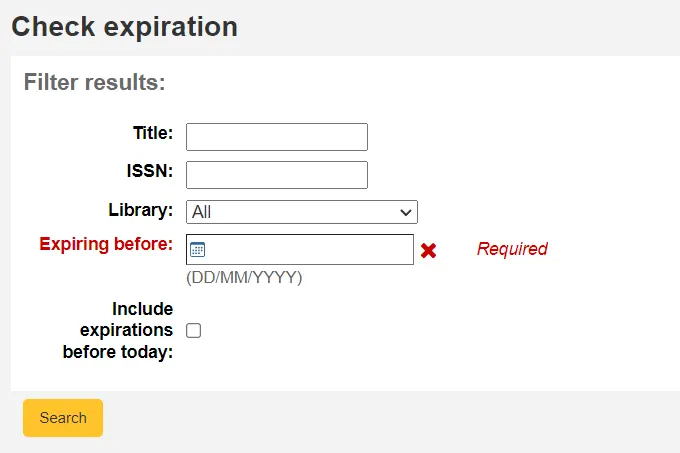
In the form that appears you need to enter at least a date to search by. You can also search by title, ISBN or library.
Nei risultati vedrai tutti gli abbonamenti che scadono prima della data che hai specificato. Potrai vedere l’abbonamento nei dettagli o rinnovarlo con un click.

Se c’è più di un abbonamento, puoi selezionare le caselle e cliccare su “Rinnova gli abbonamenti selezionati” per rinnovare tutti i periodici. I periodici verranno rinnovati con la stessa tempistica del precedente abbonamento (ad esempio se il precedente abbonamento era per un anno, l’abbonamento verrà rinnovato per un anno; se il precedente abbonamento valeva per 16 fascicoli, verrà rinnovato sempre per 16 fascicoli).

Closing a subscription
When a subscription has expired, you can close it using the Close button. Once closed, you can’t receive or renew a subscription anymore. You can only reopen it.
Note that you can also close a subscription before it has expired.
Renewing subscriptions
Nota
Only staff with the renew_subscription permission (or the superlibrarian permission) will be able to renew existing serial subscriptions.

Once you click the “Renew” button you will be presented with renewal options.
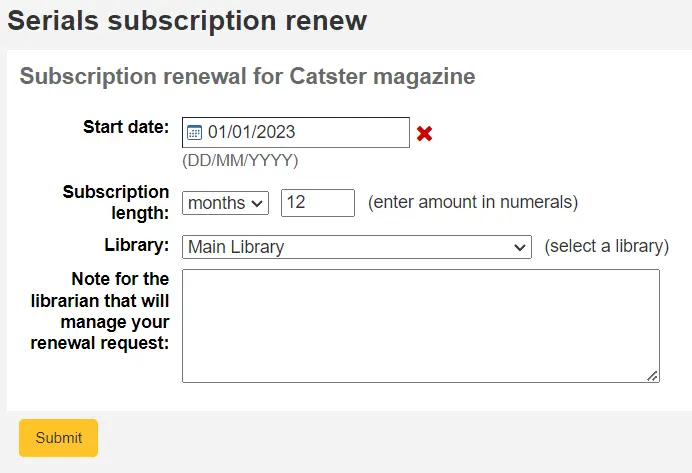
Start date: enter the date your subscription period starts.
Subscription length: enter the number of issues, weeks or months your subscription lasts
Library: enter the library for which this subscription is, this will only appear if RenewSerialAddsSuggestion is set to “Add”
Note for the librarian that will manage your renewal request: enter any notes you might have about this renewal. This will only appear if RenewSerialAddsSuggestion is set to “Add”
Click “Submit”.
If your serial subscription has been closed, you can’t renew a subscription.
If your RenewSerialAddsSuggestion system preference is enabled, renewing a subscription will create a purchase suggestion in the acquisitions module so that your acquisitions staff can manage it.
Ricerca di una risorsa in continuazione
Once in the Serials module there is basic search box at the top that you can use to find subscriptions using any part of the ISSN and/or title, as well as a search form in the middle of the page.


You can also click the “More options” icon in the search box at the top of the page and click the “Advanced search” link to do a more thorough search of your serials.
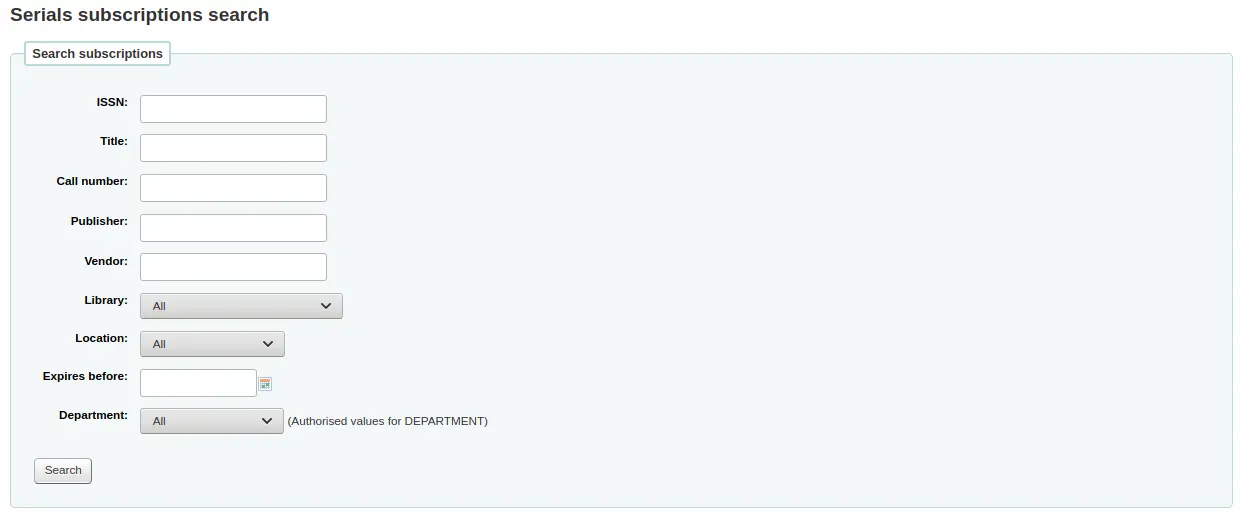
Nota
If you have additional fields that are searchable, they will appear in this advanced search form.
Dal risultato, puoi filtrare i dati usando i box posti in fondo a ogni colonna e sistemare il numero dei risultati usando la barra posta sopra ai risultati.

Nota
If you have a lot of subscriptions and loading results takes a lot of time or resources, you can use the SerialsSearchResultsLimit system preference to limit the number of results per page.
Serial statuses
When receiving an issue, you change the status of the issue to “Arrived”. There are more statuses that can be used to describe serial issues.
Nota
See also: Serials table in the FAQ section.
Expected: this is the status that is automatically assigned to a new issue when it is created. It means the issue hasn’t arrived, but it is not late yet.
Arrived: this is the status used when receiving an issue. It means the issue has been received by the library.
Circulating: this status means the issue is circulating through a printed routing list. It is not assigned automatically, but you can use it to indicate to patrons that it is not currently available.
Nota
This status is only available when the current status is not “Expected”.
Out for binding: use this status if you send issues to be bound in volumes. If you create items for each serial issue, you can also use the preservation module to track items sent out to be bound. If you don’t create items, you can use this status to track which issue was sent out.
Nota
This status is only available when the current status is not “Expected”.
Bound: use this status to indicate that this issue is bound in a volume.
Nota
This status is only available when the current status is not “Expected”.
Late: this status means the issue still has not arrived and the date you expected it to arrive has passed. The late date is determined by the publication date and the grace period entered in the subscription. This status is automatically assigned to “Expected” issues if a new one is created by clicking “Generate next” in the Serial collection section. It can also be applied automatically using the SerialsUpdate.pl cron job. If you manually set an issue to “Late”, the next one will automatically be generated.
Missing: you can assign this status to issues that are missing. If you don’t create an item for each serial issue, this can be used to indicate which issue is missing (if an item is created, you can use the item’s lost status instead of or in addition to the issue’s status). More specific missing statuses are also available.
Missing (never received): use this status to indicate that the issue was never received from the vendor.
Missing (sold out): use this status to indicate that the issue is no longer available to purchase.
Missing (damaged): use this status to indicate that the issue was damaged and is no longer available.
Missing (lost): use this status to indicate that the issue has been lost.
Claimed: this status means that the issue still has not arrived, but a claim was sent to the vendor. It is automatically assigned through the claim process, but can be assigned manually if you don’t send the claims through Koha.
Not available: you can assign this status to issues that are not available, for any reason.
Delete: if you choose this status and save, the issue will be deleted, and the next one will be created.