Web Services
OAI-PMH
Per il Protocollo OAI-PMH (Open Archives Initiative-Protocol for Metadata Harvesting) ci sono due gruppi di “partecipanti”: fornitori di dati e fornitori di servizi. I fornitori di dati (archivi aperti, repositori) danno libero accesso ai metadati, e possono offrire a loro discrezione accesso libero al full-text o ad altre risorse. OAI-PMH offre una soluzione semplice ai fornitori di dati. I fornitori di servizi usano le interfacce OAI dei fornitori di dati per raccogliere e conservare metadati. Questo implica che non saranno effettuate ricerche dall’utenza verso i fornitori di dati; se mai, i servizi sono basati sui dati raccolti via OAI-PMH.
Koha at present can only act as a Data Provider. It can not harvest from other repositories. The biggest stumbling block to having Koha harvest from other repositories is that MARC is the only metadata format that Koha indexes natively. Visit http://www.oaforum.org/tutorial/english/page3.htm for diagrams of how OAI-PMH works.
Learn more about OAI-PMH at: http://www.openarchives.org/pmh/
To enable OAI-PMH in Koha edit the OAI-PMH preference. Once enabled you can visit http://YOURKOHACATALOG/cgi-bin/koha/oai.pl to see your file.
Esempio di configurazione OAI
       format:
         vs:
           metadataPrefix: vs
           metadataNamespace: http://veryspecial.tamil.fr/vs/format-pivot/1.1/vs
           schema: http://veryspecial.tamil.fr/vs/format-pivot/1.1/vs.xsd
           xsl_file: /usr/local/koha/xslt/vs.xsl
         marcxml:
           metadataPrefix: marxml
           metadataNamespace: http://www.loc.gov/MARC21/slim
http://www.loc.gov/standards/marcxml/schema/MARC21slim
           schema: http://www.loc.gov/MARC21/slim
http://www.loc.gov/standards/marcxml/schema/MARC21slim.xsd
         oai_dc:
           metadataPrefix: oai_dc
           metadataNamespace: http://www.openarchives.org/OAI/2.0/oai_dc/
           schema: http://www.openarchives.org/OAI/2.0/oai_dc.xsd
           xsl_file:
/usr/local/koha/koha-tmpl/intranet-tmpl/xslt/UNIMARCslim2OAIDC.xsl
Servizi REST
Koha can now be requested by REST http requests. BibLibre wrotes an external module to adds more possibilities than ILS-DI can provide.There is no authentication process, but authorized ips are listed in the config file. Services have been tested in 3.10, 3.12 and 3.14 koha versions. You can find more information about it into README file and opac/rest.pl documentation on http://git.biblibre.com. If you want to add features, send us a patch at dev_patches AT biblibre DOT com.
I servizi forniti nella versione 1.4 del modulo sono:
GET branches
GET user/byid/:borrowernumber/holds
GET user/:user_name/holds
GET user/byid/:borrowernumber/issues
GET user/:user_name/issues
GET user/:user_name/issues_history
GET user/byid/:borrowernumber/issues_history
GET user/today
GET user/all
POST user
PUT user/:user_name
GET biblio/:biblionumber/items
GET biblio/:biblionumber/holdable
GET biblio/:biblionumber/items_holdable_status
GET item/:itemnumber/holdable
PUT auth/change_password
GET /suggestions
GET /suggestions/:suggestionid
POST /suggestions
PUT /suggestions/:suggestionid
DELETE /suggestions/:suggestionid
Utilizzare il server SRU
Utilizzare il server SRU
Koha implements the Search/Retrieve via URL (SRU) protocol. More information about the protocol itself can be found at http://www.loc.gov/standards/sru/. The version implemented is version 1.1.
Explain
If you want to have information about the implementation of SRU on a given server, you should have access to the Explain file using a request to the server without any parameter. Like <http://myserver.com:9999/biblios/>. The response from the server is an XML file that should look like the following and will give you information about the default settings of the SRU server.
       <zs:explainResponse>
            <zs:version>1.1</zs:version>
            <zs:record>
                 <zs:recordSchema>http://explain.z3950.org/dtd/2.0/</zs:recordSchema>
                 <zs:recordPacking>xml</zs:recordPacking>
                 <zs:recordData>
                 <explain xml:base="zebradb/explain-biblios.xml">
                 <!--
                 try stylesheet url: http://./?stylesheet=docpath/sru2.xsl
                 -->
            <serverInfo protocol="SRW/SRU/Z39.50">
                 <host>biblibre</host>
                 <port>9999</port>
                 <database>biblios</database>
            </serverInfo>
            <databaseInfo>
                 <title lang="en" primary="true">Koha 3 Bibliographic SRU/SRW/Z39.50 server</title>
                 <description lang="en" primary="true">Koha 3 Bibliographic Server</description>
                 <links>
                      <sru>http://biblibre:9999</sru>
                 </links>
            </databaseInfo>
            <indexInfo>
                 <set name="cql" identifier="info:srw/cql-context-set/1/cql-v1.1">
                      <title>CQL Standard Set</title>
                 </set>
                 <index search="true" scan="true" sort="false">
                 <title lang="en">CQL Server Choice</title>
                 <map>
                      <name set="cql">serverChoice</name>
                 </map>
            <map>
               <attr type="1" set="bib1">text</attr>
               </map>
          </index>
      <index search="true" scan="true" sort="false">
         <title lang="en">CQL All</title>
             <map>
<name set="cql">all</name>
</map>
<map>
<attr type="1" set="bib1">text</attr>
</map>
</index>
<!-- Record ID index -->
<index search="true" scan="true" sort="false">
<title lang="en">Record ID</title>
<map>
<name set="rec">id</name>
</map>
<map>
<attr type="1" set="bib1">rec:id</attr>
<attr type="4" set="bib1">3</attr>
</map>
</index>
Cerca
This url : http://myserver.com:9999/biblios?version=1.1&operation=searchRetrieve&query=reefs is composed of the following elements:
- base url del server SRU: http://myserver.com:9999/biblios?
- search part with the 3 required parameters : version, operation and query. The parameters within the search part should be of the key=value form, and can be combined with the & character.
One can add optional parameters to the query, for instance maximumRecords indicating the maximum number of records to be returned by the server. So http://myserver.com:9999/biblios?version=1.1&operation=searchRetrieve&query=reefs&maximumRecords=5 will only get the first 5 results results from the server.
http://www.loc.gov/standards/sru/sru1-1archive/search-retrieve-operation.html gives more details about the search operations and in particular the list of optional parameters for searching.
Altri dettagli relativi alla Ricerca
La chiave «operation» può avere due valori: scan o searchRetrieve.
If operation=searchRetrieve, then the search key should be query. As in : operation=searchRetrieve&query=reefs
If operation=scan, then the search key should be scanClause. As in : operation=scan&scanClause=reefs
etc/zebradb/biblios/etc/bib1.att definisce gli indici Zebra/3950 che esistono nel tuo sistema. Per esempio vedrai che ci sono gli indici per Soggetti e Titoli: att 21 Subject e att 4 Title rispettivamente.
In the pqf.properties file located under etc/zebradb/pqf.properties I see that an access point already uses my Subject index (index.dc.subject = 1=21) while another uses my Title index (index.dc.title = 1=4) I know this is my Subject index because as I’ve seen just before in my bib1.att file, it’s called with =1=21 in Z3950: so index.dc.subject = 1=21 correctly points to my Subject index. And Title was called with 1=4 so index.dc.title = 1=4 correctly points to my Title index. I can now construct my query just like I would in a search box, just preceding it with the «query» key: query=Subject=reefs and Title=coral searches «reefs» in the subject and «coral» in the title. The full url would be http://myserver.com:9999/biblios?version=1.1&operation=searchRetrieve&query=Subject=reefs and Title=coral If I want to limit the result set to just 5 records, I can do http://myserver.com:9999/biblios?version=1.1&operation=searchRetrieve&query=Subject=reefs and Title=coral&maximumRecords=5
Si possono fare prove con troncamenti, relazioni, ecc. Sono definiti anch’essi in pqf.properties. Per esempio le proprietà position sono definite come:
 position.first              = 3=1 6=1
# "first in field"
 position.any                = 3=3 6=1
   # "any position in field"
So as an example if I want «coral» to be at the beginning of the title, I can do this query : http://myserver.com:9999/biblios?version=1.1&operation=searchRetrieve&query=Title=coral first
Retrieve
My search for http://univ_lyon3.biblibre.com:9999/biblios?version=1.1&operation=searchRetrieve&query=coral reefs&maximumRecords=1 retrieves just on record. The response looks like this:
          <zs:searchRetrieveResponse>
<zs:version>1.1</zs:version>
<zs:numberOfRecords>1</zs:numberOfRecords>
<zs:records>
<zs:record>
<zs:recordPacking>xml</zs:recordPacking>
<zs:recordData>
<record xsi:schemaLocation="http://www.loc.gov/MARC21/slim http://www.loc.gov/ standards/marcxml/schema/MARC21slim.xsd">
<leader> cam a22 4500</leader>
<datafield tag="010" ind1=" " ind2=" ">
<subfield code="a">2-603-01193-6</subfield>
<subfield code="b">rel.</subfield>
<subfield code="d">159 F</subfield>
</datafield>
<datafield tag="020" ind1=" " ind2=" ">
<subfield code="a">FR</subfield>
<subfield code="b">00065351</subfield>
</datafield>
<datafield tag="101" ind1="1" ind2=" ">
<subfield code="c">ita</subfield>
</datafield>
<datafield tag="105" ind1=" " ind2=" ">
<subfield code="a">a z 00|y|</subfield>
</datafield>
<datafield tag="106" ind1=" " ind2=" ">
<subfield code="a">r</subfield>
</datafield>
<datafield tag="100" ind1=" " ind2=" ">
<subfield code="a">20091130 frey50 </subfield>
</datafield>
<datafield tag="200" ind1="1" ind2=" ">
<subfield code="a">Guide des récifs coralliens / A Guide to Coral Reefs</subfield>
<subfield code="b">Texte imprimé</subfield>
<subfield code="e">la faune sous-marine des coraux</subfield>
<subfield code="f">A. et A. Ferrari</subfield>
</datafield>
<datafield tag="210" ind1=" " ind2=" ">
<subfield code="a">Lausanne</subfield>
<subfield code="a">Paris</subfield>
<subfield code="c">Delachaux et Niestlé</subfield>
<subfield code="d">cop. 2000</subfield>
<subfield code="e">impr. en Espagne</subfield>
</datafield>
<datafield tag="215" ind1=" " ind2=" ">
<subfield code="a">287 p.</subfield>
<subfield code="c">ill. en coul., couv. ill. en coul.</subfield>
<subfield code="d">20 cm</subfield>
</datafield>
......
<idzebra>
<size>4725</size>
<localnumber>2</localnumber>
<filename>/tmp/nw10BJv9Pk/upd_biblio/exported_records</filename>
</idzebra>
</record>
</zs:recordData>
<zs:recordPosition>1</zs:recordPosition>
</zs:record>
</zs:records>
</zs:searchRetrieveResponse>
Novità bibliografiche come slider dell’Opac
Often times libraries will want to add a flowing widget with new materials at the library to their main public catalog page. To do this you can use a widget from any number of services (usually for a cost) or you can enable plugins in Koha and use the Cover Flow plugin which is based on the Flipster, a responsive jQuery coverflow plugin.
Dopo aver installato il plugin, le operazioni per far apparire il riquadro scorrevole sono le seguenti:
Dapprima bisogna creare uno o più report pubblici su cui collocare il o i «widget». Questo è il modo in cui il plugin sa quuali contenuti il widget dovrà mostrare. In ogni report sono necessarie solo tre colonne: title, biblionumber e isbn. E” importante avere dei numeri ISBN validi, poichè saranno usati per recuperare effettivamente le immagini delle copertine. Allo stato di sviluppo attuale, il plugin usa le immagini delle copertine fornite da Amazon, ma nella versione finale il sistema di recupero delle immagini di copertina sarà configurabile, in modo da una fonte dati qualsiasi per scaricare le copertine.
Poi, bisogna confiigurare il plugin. La configurazione del plugin è una singola area di testo che usa YAML (di fatto è JSON, che è un sottoinsieme di YAML) per memorizzare le opzioni di configurazione. Nell’esempio seguente si presenta così:
- id: 42
  selector: #coverflow
  options:
  style: coverflow
In questo esempio si dice al plugin di utilizzare il report con l’ID 42 e di usarlo per creare un widget di tipo coverflow che sostituisca l’elemento HTML avente ID «coverflow». La lista delle opzioni è passata direttamente a Flipster; in questo modo si può impostare nella configurazione del plugin qualsiasi opzione sia supportata da Flipster! Infatti, Flipster ha anche un modo «giostra», che è molto più compatto del tradizionale «album» per «sfogliare» le copertine. Si può anche decidere quale copertina il widget mostrerà per prima, ed altro ancora.
Nel momento in cui la configurazione viene salvata o aggiornata, il plugin genera del codice JavaScript «minificato» (una tecnica per ridurne le dimensioni, N.d.T.) che viene automaticamente salvato in Koha nella preferenza di sistema OpacUserJS. Ecco un esempio di ciò che viene prodotto:
/* JS for Koha CoverFlow Plugin
 This JS was added automatically by installing the CoverFlow plugin
 Please do not modify */$(document).ready(function(){$.getScript("/plugin/Koha/Plugin/Com/ByWaterSolutions/CoverFlow/jquery-flipster/src/js/jquery.flipster.min.js",function(data,textStatus,jqxhr){$("head").append("<link id='flipster-css' href='/plugin/Koha/Plugin/Com/ByWaterSolutions/CoverFlow/jquery-flipster/src/css/jquery.flipster.min.css' type='text/css' rel='stylesheet' />");$('#coverflow').load("/coverflow.pl?id=42",function(){var opt={'items':'.item','minfactor':15,'distribution':1.5,'scalethreshold':0,'staticbelowthreshold':false,'titleclass':'itemTitle','selectedclass':'selectedItem','scrollactive':true,'step':{'limit':4,'width':10,'scale':true}};$('#coverflow').flipster({style:'coverflow',});});});});
/* End of JS for Koha CoverFlow Plugin */
Perchè fare ciò? Per motivi di prestazioni! Piuttosto che rigenerare questo codice ogni volta che la pagina viene caricata, si può generare una volta sola e riutilizzarlo tutte le volte che serve.
Se si esamina il codice con attenzione, si nota il riferimento a «coverflow.pl», che è uno script fornito insieme al plugin. Poichè bisogna accedere a questo script dall’OPAC (e non vogliamo far scattare un allarme di attacco XSS), è necessario modificare la configurazione del web server per il catalogo pubblico e fare la seguente aggiunta:
ScriptAlias /coverflow.pl "/var/lib/koha/mykoha/plugins/Koha/Plugin/Com/ByWaterSolutions/CoverFlow/coverflow.pl"
Questa riga da accesso al file coverflow.pl dall’OPAC. Lo script legge i dati del report e li passa al catalogo pubblico per creare il widget. E” supprtata Koha::Cache, per potter caricare la pagina il più velocemente possibile!
L’ultimo passo è di collocare l’elemento selettore da qualche parte nel catalogo pubblico. Nell’esempio seguente è stato messo nella preferenzia di sistema OpacMainUserBlock:
<span id="coverflow">Loading...</span>
Once that is in place, you need only refresh your OPAC page, and there you have it, your very own catalog coverflow widget! Not only do these coverflows look great on a computer screen, but they look great on mobile platforms as well, and are even touch responsive!
Preferenze di sistema di default
ISBD Defaults
Default values for the ISBD preference.
MARC21 Default
#100||{ 100a }{ 100b }{ 100c }{ 100d }{ 110a }{ 110b }{ 110c }{ 110d }{ 110e }{ 110f }{ 110g }{ 130a }{ 130d }{ 130f }{ 130g }{ 130h }{ 130k }{ 130l }{ 130m }{ 130n }{ 130o }{ 130p }{ 130r }{ 130s }{ 130t }|<br/><br/>
#245||{ 245a }{ 245b }{245f }{ 245g }{ 245k }{ 245n }{ 245p }{ 245s }{ 245h }|
#246||{ : 246i }{ 246a }{ 246b }{ 246f }{ 246g }{ 246n }{ 246p }{ 246h }|
#242||{ = 242a }{ 242b }{ 242n }{ 242p }{ 242h }|
#245||{ 245c }|
#242||{ = 242c }|
#250| - |{ 250a }{ 250b }|
#254|, |{ 254a }|
#255|, |{ 255a }{ 255b }{ 255c }{ 255d }{ 255e }{ 255f }{ 255g }|
#256|, |{ 256a }|
#257|, |{ 257a }|
#258|, |{ 258a }{ 258b }|
#260| - |{ 260a }{ 260b }{ 260c }|
#300| - |{ 300a }{ 300b }{ 300c }{ 300d }{ 300e }{ 300f }{ 300g }|
#306| - |{ 306a }|
#307| - |{ 307a }{ 307b }|
#310| - |{ 310a }{ 310b }|
#321| - |{ 321a }{ 321b }|
#340| - |{ 3403 }{ 340a }{ 340b }{ 340c }{ 340d }{ 340e }{ 340f }{ 340h }{ 340i }|
#342| - |{ 342a }{ 342b }{ 342c }{ 342d }{ 342e }{ 342f }{ 342g }{ 342h }{ 342i }{ 342j }{ 342k }{ 342l }{ 342m }{ 342n }{ 342o }{ 342p }{ 342q }{ 342r }{ 342s }{ 342t }{ 342u }{ 342v }{ 342w }|
#343| - |{ 343a }{ 343b }{ 343c }{ 343d }{ 343e }{ 343f }{ 343g }{ 343h }{ 343i }|
#351| - |{ 3513 }{ 351a }{ 351b }{ 351c }|
#352| - |{ 352a }{ 352b }{ 352c }{ 352d }{ 352e }{ 352f }{ 352g }{ 352i }{ 352q }|
#362| - |{ 362a }{ 351z }|
#440| - |{ 440a }{ 440n }{ 440p }{ 440v }{ 440x }|.
#490| - |{ 490a }{ 490v }{ 490x }|.
#800| - |{ 800a }{ 800b }{ 800c }{ 800d }{ 800e }{ 800f }{ 800g }{ 800h }{ 800j }{ 800k }{ 800l }{ 800m }{ 800n }{ 800o }{ 800p }{ 800q }{ 800r }{ 800s }{ 800t }{ 800u }{ 800v }|.
#810| - |{ 810a }{ 810b }{ 810c }{ 810d }{ 810e }{ 810f }{ 810g }{ 810h }{ 810k }{ 810l }{ 810m }{ 810n }{ 810o }{ 810p }{ 810r }{ 810s }{ 810t }{ 810u }{ 810v }|.
#811| - |{ 811a }{ 811c }{ 811d }{ 811e }{ 811f }{ 811g }{ 811h }{ 811k }{ 811l }{ 811n }{ 811p }{ 811q }{ 811s }{ 811t }{ 811u }{ 811v }|.
#830| - |{ 830a }{ 830d }{ 830f }{ 830g }{ 830h }{ 830k }{ 830l }{ 830m }{ 830n }{ 830o }{ 830p }{ 830r }{ 830s }{ 830t }{ 830v }|.
#500|<br/><br/>|{ 5003 }{ 500a }|
#501|<br/><br/>|{ 501a }|
#502|<br/><br/>|{ 502a }|
#504|<br/><br/>|{ 504a }|
#505|<br/><br/>|{ 505a }{ 505t }{ 505r }{ 505g }{ 505u }|
#506|<br/><br/>|{ 5063 }{ 506a }{ 506b }{ 506c }{ 506d }{ 506u }|
#507|<br/><br/>|{ 507a }{ 507b }|
#508|<br/><br/>|{ 508a }{ 508a }|
#510|<br/><br/>|{ 5103 }{ 510a }{ 510x }{ 510c }{ 510b }|
#511|<br/><br/>|{ 511a }|
#513|<br/><br/>|{ 513a }{513b }|
#514|<br/><br/>|{ 514z }{ 514a }{ 514b }{ 514c }{ 514d }{ 514e }{ 514f }{ 514g }{ 514h }{ 514i }{ 514j }{ 514k }{ 514m }{ 514u }|
#515|<br/><br/>|{ 515a }|
#516|<br/><br/>|{ 516a }|
#518|<br/><br/>|{ 5183 }{ 518a }|
#520|<br/><br/>|{ 5203 }{ 520a }{ 520b }{ 520u }|
#521|<br/><br/>|{ 5213 }{ 521a }{ 521b }|
#522|<br/><br/>|{ 522a }|
#524|<br/><br/>|{ 524a }|
#525|<br/><br/>|{ 525a }|
#526|<br/><br/>|{\n510i }{\n510a }{ 510b }{ 510c }{ 510d }{\n510x }|
#530|<br/><br/>|{\n5063 }{\n506a }{ 506b }{ 506c }{ 506d }{\n506u }|
#533|<br/><br/>|{\n5333 }{\n533a }{\n533b }{\n533c }{\n533d }{\n533e }{\n533f }{\n533m }{\n533n }|
#534|<br/><br/>|{\n533p }{\n533a }{\n533b }{\n533c }{\n533d }{\n533e }{\n533f }{\n533m }{\n533n }{\n533t }{\n533x }{\n533z }|
#535|<br/><br/>|{\n5353 }{\n535a }{\n535b }{\n535c }{\n535d }|
#538|<br/><br/>|{\n5383 }{\n538a }{\n538i }{\n538u }|
#540|<br/><br/>|{\n5403 }{\n540a }{ 540b }{ 540c }{ 540d }{\n520u }|
#544|<br/><br/>|{\n5443 }{\n544a }{\n544b }{\n544c }{\n544d }{\n544e }{\n544n }|
#545|<br/><br/>|{\n545a }{ 545b }{\n545u }|
#546|<br/><br/>|{\n5463 }{\n546a }{ 546b }|
#547|<br/><br/>|{\n547a }|
#550|<br/><br/>|{ 550a }|
#552|<br/><br/>|{ 552z }{ 552a }{ 552b }{ 552c }{ 552d }{ 552e }{ 552f }{ 552g }{ 552h }{ 552i }{ 552j }{ 552k }{ 552l }{ 552m }{ 552n }{ 562o }{ 552p }{ 552u }|
#555|<br/><br/>|{ 5553 }{ 555a }{ 555b }{ 555c }{ 555d }{ 555u }|
#556|<br/><br/>|{ 556a }{ 506z }|
#563|<br/><br/>|{ 5633 }{ 563a }{ 563u }|
#565|<br/><br/>|{ 5653 }{ 565a }{ 565b }{ 565c }{ 565d }{ 565e }|
#567|<br/><br/>|{ 567a }|
#580|<br/><br/>|{ 580a }|
#581|<br/><br/>|{ 5633 }{ 581a }{ 581z }|
#584|<br/><br/>|{ 5843 }{ 584a }{ 584b }|
#585|<br/><br/>|{ 5853 }{ 585a }|
#586|<br/><br/>|{ 5863 }{ 586a }|
#020|<br/><br/><label>ISBN: </label>|{ 020a }{ 020c }|
#022|<br/><br/><label>ISSN: </label>|{ 022a }|
#222| = |{ 222a }{ 222b }|
#210| = |{ 210a }{ 210b }|
#024|<br/><br/><label>Standard No.: </label>|{ 024a }{ 024c }{ 024d }{ 0242 }|
#027|<br/><br/><label>Standard Tech. Report. No.: </label>|{ 027a }|
#028|<br/><br/><label>Publisher. No.: </label>|{ 028a }{ 028b }|
#013|<br/><br/><label>Patent No.: </label>|{ 013a }{ 013b }{ 013c }{ 013d }{ 013e }{ 013f }|
#030|<br/><br/><label>CODEN: </label>|{ 030a }|
#037|<br/><br/><label>Source: </label>|{ 037a }{ 037b }{ 037c }{ 037f }{ 037g }{ 037n }|
#010|<br/><br/><label>LCCN: </label>|{ 010a }|
#015|<br/><br/><label>Nat. Bib. No.: </label>|{ 015a }{ 0152 }|
#016|<br/><br/><label>Nat. Bib. Agency Control No.: </label>|{ 016a }{ 0162 }|
#600|<br/><br/><label>Subjects–Personal Names: </label>|{\n6003 }{\n600a}{ 600b }{ 600c }{ 600d }{ 600e }{ 600f }{ 600g }{ 600h }{–600k}{ 600l }{ 600m }{ 600n }{ 600o }{–600p}{ 600r }{ 600s }{ 600t }{ 600u }{–600x}{–600z}{–600y}{–600v}|
#610|<br/><br/><label>Subjects–Corporate Names: </label>|{\n6103 }{\n610a}{ 610b }{ 610c }{ 610d }{ 610e }{ 610f }{ 610g }{ 610h }{–610k}{ 610l }{ 610m }{ 610n }{ 610o }{–610p}{ 610r }{ 610s }{ 610t }{ 610u }{–610x}{–610z}{–610y}{–610v}|
#611|<br/><br/><label>Subjects–Meeting Names: </label>|{\n6113 }{\n611a}{ 611b }{ 611c }{ 611d }{ 611e }{ 611f }{ 611g }{ 611h }{–611k}{ 611l }{ 611m }{ 611n }{ 611o }{–611p}{ 611r }{ 611s }{ 611t }{ 611u }{–611x}{–611z}{–611y}{–611v}|
#630|<br/><br/><label>Subjects–Uniform Titles: </label>|{\n630a}{ 630b }{ 630c }{ 630d }{ 630e }{ 630f }{ 630g }{ 630h }{–630k }{ 630l }{ 630m }{ 630n }{ 630o }{–630p}{ 630r }{ 630s }{ 630t }{–630x}{–630z}{–630y}{–630v}|
#648|<br/><br/><label>Subjects–Chronological Terms: </label>|{\n6483 }{\n648a }{–648x}{–648z}{–648y}{–648v}|
#650|<br/><br/><label>Subjects–Topical Terms: </label>|{\n6503 }{\n650a}{ 650b }{ 650c }{ 650d }{ 650e }{–650x}{–650z}{–650y}{–650v}|
#651|<br/><br/><label>Subjects–Geographic Terms: </label>|{\n6513 }{\n651a}{ 651b }{ 651c }{ 651d }{ 651e }{–651x}{–651z}{–651y}{–651v}|
#653|<br/><br/><label>Subjects–Index Terms: </label>|{ 653a }|
#654|<br/><br/><label>Subjects–Facted Index Terms: </label>|{\n6543 }{\n654a}{–654b}{–654x}{–654z}{–654y}{–654v}|
#655|<br/><br/><label>Index Terms–Genre/Form: </label>|{\n6553 }{\n655a}{–655b}{–655x }{–655z}{–655y}{–655v}|
#656|<br/><br/><label>Index Terms–Occupation: </label>|{\n6563 }{\n656a}{–656k}{–656x}{–656z}{–656y}{–656v}|
#657|<br/><br/><label>Index Terms–Function: </label>|{\n6573 }{\n657a}{–657x}{–657z}{–657y}{–657v}|
#658|<br/><br/><label>Index Terms–Curriculum Objective: </label>|{\n658a}{–658b}{–658c}{–658d}{–658v}|
#050|<br/><br/><label>LC Class. No.: </label>|{ 050a }{ / 050b }|
#082|<br/><br/><label>Dewey Class. No.: </label>|{ 082a }{ / 082b }|
#080|<br/><br/><label>Universal Decimal Class. No.: </label>|{ 080a }{ 080x }{ / 080b }|
#070|<br/><br/><label>National Agricultural Library Call No.: </label>|{ 070a }{ / 070b }|
#060|<br/><br/><label>National Library of Medicine Call No.: </label>|{ 060a }{ / 060b }|
#074|<br/><br/><label>GPO Item No.: </label>|{ 074a }|
#086|<br/><br/><label>Gov. Doc. Class. No.: </label>|{ 086a }|
#088|<br/><br/><label>Report. No.: </label>|{ 088a }|
Deafault Unimarc
#200|<h2>Title : |{200a}{. 200c}{ : 200e}{200d}{. 200h}{. 200i}|</h2>
#461|<label class=»ipt»>A part of : </label>|<a href=»/cgi-bin/koha/catalogue/search.pl?op=do_search{&q=461t&idx=ti}»>{461t}</a>{N∞ 461h} {v. 461v}{(461d)}<br/>|
#200b|<label class=»ipt»>Material Designation : </label>| {200b }|<br/>
#101a|<label class=»ipt»>Language(s): </label>|<a href=»/cgi-bin/koha/catalogue/search.pl?op=do_search{&q=101a&idx=ln}»>{101a}</a>|<br/>
#200f|<label class=»ipt»>Authors : </label>|<a href=»/cgi-bin/koha/catalogue/search.pl?op=do_search{&q=200f&idx=au}»>{200f ; }</a>|<br/>
#200g|<label class=»ipt»>Co-authors : </label>|<a href=»/cgi-bin/koha/catalogue/search.pl?op=do_search{&q=200g&idx=au}»>{200g ; }</a>|<br/>
#210a|<br/><label class=»ipt»>Place of pubblication : </label>|<a href=»/cgi-bin/koha/catalogue/search.pl?op=do_search&idx=pl&q={210a}»>{210a}</a>|<br/>
#210c|<label class=»ipt»>Publisher : </label>|<a href=»/cgi-bin/koha/catalogue/search.pl?op=do_search&idx=pb&q={210c}»>{210c ; }</a>|<br/>
#210d|<label class=»ipt»>Date of pubblication : </label>|{ 210d}|<br/>
#215|<label class=»ipt»>Description : </label>|{215a}{ : 215c}{ ; 215d}{ + 215e}|<br/>
#225a|<label class=»ipt»>Series :</label>|<a href=»/cgi-bin/koha/catalogue/search.pl?op=do_search{&q=225a&idx=se}»>{225a ;}</a> |
#225||{ = 225d}{ : 225e}{. 225h}{. 225i}{ / 225f}{, 225x}{ ; 225v}|<br/>
#686|<label>Classification : </label>|{ 686a }|<br/>
#608|<label>Form, Genre : </label>|<a href=»/cgi-bin/koha/catalogue/search.pl?op=do_search&idx=su&q={608a}»><img border=»0» src=»/opac-tmpl/css/en/images/filefind.png» height=»15» title=»Search on {608a}»>{ 608a}</a>|<br/><br/>
#200||<label class=»ipt»>Subjects : </label><br/>|<ul>
#600|<label class=»ipt»>Person(s) </label><br/> |<li><a href=»/cgi-bin/koha/catalogue/search.pl?op=do_search&idx=su&q={600a}»><img border=»0» src=»/opac-tmpl/css/en/images/filefind.png» height=»15» title=»Search on {600a}»>{ 600a}</a></li>|<br/>
#601|<label class=»ipt»>Organisation(s) </label><br/>|<li><a href=»/cgi-bin/koha/catalogue/search.pl?op=do_search&idx=su&q={601a}»><img border=»0» src=»/opac-tmpl/css/en/images/filefind.png» height=»15» title=»Search on {601a}»>{ 601a}</a></li>|<br/>
#606|<label class=»ipt»>Term(s) </label><br/>|<li><a href=»/cgi-bin/koha/catalogue/search.pl?op=do_search&idx=su&q={606a}»><img border=»0» src=»/opac-tmpl/css/en/images/filefind.png» height=»15» title=»Search on {606a}»>{ 606a}</a></li>|<br/>
#607|<label class=»ipt»>Place(s) </label><br/>|<li><a href=»/cgi-bin/koha/catalogue/search.pl?op=do_search&idx=su&q={607a}»><img border=»0» src=»/opac-tmpl/css/en/images/filefind.png» height=»15» title=»Search on {607a}»>{ 607a}</a></li>|<br/>
#610|<label>Keywords</label><br/>|<li><a href=»/cgi-bin/koha/catalogue/search.pl?op=do_search&idx=su&q={610a}»><img border=»0» src=»/opac-tmpl/css/en/images/filefind.png» height=»15» title=»Search on {610a}»>{ 610a}</a></li>|
#200||</ul>|
#856|<label class=»ipt»>Electronic resource : </label>|<a href=»{856u}»>click here</a> to go to the external resource<br/>
#010|<label class=»ipt»>ISBN : </label>|{010a ;}|<br/>
#011|<label class=»ipt»>ISSN : </label>|{011a ;}|<br/>
#200||<label class=»ipt»>Notes : </label>|<br/><ul>
#300||<li>{300a}</li>|
#307||<li>{307a}</li>|
#310||<li>{310a}</li>|
#326||<li>{326a}</li>|
#327||<li>{327a}</li>|
#333|<li>Public : |{333a}</li>|
#200||</ul>|
#330||<label class=»ipt»>Abstract : </label>|<br/>
#330||{330a}|<br/>
#200||<br/><h2>Items</h2>|
#200|<table>|<th>Call number</th><th>Copy note</th><th>Fonds</th><th>Genre detail</th><th>Circulation type</th><th>Barcode</th>|
#995||<tr><td> {995k}</td><td> {995u}</td><td> {995y}</td><td>{995e} </td><td> {995o}</td><td>{995f}</td></tr>|</table>
OPACISBD Defaults
Default values for the OPACISBD preference.
MARC
#100||{ 100a }{ 100b }{ 100c }{ 100d }{ 110a }{ 110b }{ 110c }{ 110d }{ 110e }{ 110f }{ 110g }{ 130a }{ 130d }{ 130f }{ 130g }{ 130h }{ 130k }{ 130l }{ 130m }{ 130n }{ 130o }{ 130p }{ 130r }{ 130s }{ 130t }|<br/><br/>
#245||{ 245a }{ 245b }{245f }{ 245g }{ 245k }{ 245n }{ 245p }{ 245s }{ 245h }|
#246||{ : 246i }{ 246a }{ 246b }{ 246f }{ 246g }{ 246n }{ 246p }{ 246h }|
#242||{ = 242a }{ 242b }{ 242n }{ 242p }{ 242h }|
#245||{ 245c }|
#242||{ = 242c }|
#250| - |{ 250a }{ 250b }|
#254|, |{ 254a }| #255|, |{ 255a }{ 255b }{ 255c }{ 255d }{ 255e }{ 255f }{ 255g }| #256|, |{ 256a }|
#257|, |{ 257a }|
#258|, |{ 258a }{ 258b }|
#260| - |{ 260a }{ 260b }{ 260c }|
#300| - |{ 300a }{ 300b }{ 300c }{ 300d }{ 300e }{ 300f }{ 300g }|
#306| - |{ 306a }| #307| - |{ 307a }{ 307b }|
#310| - |{ 310a }{ 310b }|
#321| - |{ 321a }{ 321b }|
#340| - |{ 3403 }{ 340a }{ 340b }{ 340c }{ 340d }{ 340e }{ 340f }{ 340h }{ 340i }|
#342| - |{ 342a }{ 342b }{ 342c }{ 342d }{ 342e }{ 342f }{ 342g }{ 342h }{ 342i }{ 342j }{ 342k }{ 342l }{ 342m }{ 342n }{ 342o }{ 342p }{ 342q }{ 342r }{ 342s }{ 342t }{ 342u }{ 342v }{ 342w }|
#343| - |{ 343a }{ 343b }{ 343c }{ 343d }{ 343e }{ 343f }{ 343g }{ 343h }{ 343i }|
#351| - |{ 3513 }{ 351a }{ 351b }{ 351c }|
#352| - |{ 352a }{ 352b }{ 352c }{ 352d }{ 352e }{ 352f }{ 352g }{ 352i }{ 352q }|
#362| - |{ 362a }{ 351z }|
#440| - |{ 440a }{ 440n }{ 440p }{ 440v }{ 440x }|. #490| - |{ 490a }{ 490v }{ 490x }|.
#800| - |{ 800a }{ 800b }{ 800c }{ 800d }{ 800e }{ 800f }{ 800g }{ 800h }{ 800j }{ 800k }{ 800l }{ 800m }{ 800n }{ 800o }{ 800p }{ 800q }{ 800r }{ 800s }{ 800t }{ 800u }{ 800v }|.
#810| - |{ 810a }{ 810b }{ 810c }{ 810d }{ 810e }{ 810f }{ 810g }{ 810h }{ 810k }{ 810l }{ 810m }{ 810n }{ 810o }{ 810p }{ 810r }{ 810s }{ 810t }{ 810u }{ 810v }|.
#811| - |{ 811a }{ 811c }{ 811d }{ 811e }{ 811f }{ 811g }{ 811h }{ 811k }{ 811l }{ 811n }{ 811p }{ 811q }{ 811s }{ 811t }{ 811u }{ 811v }|.
#830| - |{ 830a }{ 830d }{ 830f }{ 830g }{ 830h }{ 830k }{ 830l }{ 830m }{ 830n }{ 830o }{ 830p }{ 830r }{ 830s }{ 830t }{ 830v }|.
#500|<br/><br/>|{ 5003 }{ 500a }|
#501|<br/><br/>|{ 501a }|
#502|<br/><br/>|{ 502a }|
#504|<br/><br/>|{ 504a }|
#505|<br/><br/>|{ 505a }{ 505t }{ 505r }{ 505g }{ 505u }|
#506|<br/><br/>|{ 5063 }{ 506a }{ 506b }{ 506c }{ 506d }{ 506u }|
#507|<br/><br/>|{ 507a }{ 507b }| #508|<br/><br/>|{ 508a }{ 508a }|
#510|<br/><br/>|{ 5103 }{ 510a }{ 510x }{ 510c }{ 510b }|
#511|<br/><br/>|{ 511a }|
#513|<br/><br/>|{ 513a }{513b }|
#514|<br/><br/>|{ 514z }{ 514a }{ 514b }{ 514c }{ 514d }{ 514e }{ 514f }{ 514g }{ 514h }{ 514i }{ 514j }{ 514k }{ 514m }{ 514u }|
#515|<br/><br/>|{ 515a }|
#516|<br/><br/>|{ 516a }|
#518|<br/><br/>|{ 5183 }{ 518a }|
#520|<br/><br/>|{ 5203 }{ 520a }{ 520b }{ 520u }|
#521|<br/><br/>|{ 5213 }{ 521a }{ 521b }|
#522|<br/><br/>|{ 522a }|
#524|<br/><br/>|{ 524a }|
#525|<br/><br/>|{ 525a }|
#526|<br/><br/>|{\n510i }{\n510a }{ 510b }{ 510c }{ 510d }{\n510x }|
#530|<br/><br/>|{\n5063 }{\n506a }{ 506b }{ 506c }{ 506d }{\n506u }|
#533|<br/><br/>|{\n5333 }{\n533a }{\n533b }{\n533c }{\n533d }{\n533e }{\n533f }{\n533m }{\n533n }|
#534|<br/><br/>|{\n533p }{\n533a }{\n533b }{\n533c }{\n533d }{\n533e }{\n533f }{\n533m }{\n533n }{\n533t }{\n533x }{\n533z }|
#535|<br/><br/>|{\n5353 }{\n535a }{\n535b }{\n535c }{\n535d }|
#538|<br/><br/>|{\n5383 }{\n538a }{\n538i }{\n538u }|
#540|<br/><br/>|{\n5403 }{\n540a }{ 540b }{ 540c }{ 540d }{\n520u }|
#544|<br/><br/>|{\n5443 }{\n544a }{\n544b }{\n544c }{\n544d }{\n544e }{\n544n }|
#545|<br/><br/>|{\n545a }{ 545b }{\n545u }| #546|<br/><br/>|{\n5463 }{\n546a }{ 546b }|
#547|<br/><br/>|{\n547a }| #550|<br/><br/>|{ 550a }|
#552|<br/><br/>|{ 552z }{ 552a }{ 552b }{ 552c }{ 552d }{ 552e }{ 552f }{ 552g }{ 552h }{ 552i }{ 552j }{ 552k }{ 552l }{ 552m }{ 552n }{ 562o }{ 552p }{ 552u }|
#555|<br/><br/>|{ 5553 }{ 555a }{ 555b }{ 555c }{ 555d }{ 555u }|
#556|<br/><br/>|{ 556a }{ 506z }| #563|<br/><br/>|{ 5633 }{ 563a }{ 563u }|
#565|<br/><br/>|{ 5653 }{ 565a }{ 565b }{ 565c }{ 565d }{ 565e }|
#567|<br/><br/>|{ 567a }|
#580|<br/><br/>|{ 580a }|
#581|<br/><br/>|{ 5633 }{ 581a }{ 581z }|
#584|<br/><br/>|{ 5843 }{ 584a }{ 584b }|
#585|<br/><br/>|{ 5853 }{ 585a }|
#586|<br/><br/>|{ 5863 }{ 586a }|
#020|<br/><br/><label>ISBN: </label>|{ 020a }{ 020c }|
#022|<br/><br/><label>ISSN: </label>|{ 022a }|
#222| = |{ 222a }{ 222b }|
#210| = |{ 210a }{ 210b }|
#024|<br/><br/><label>Standard No.: </label>|{ 024a }{ 024c }{ 024d }{ 0242 }|
#027|<br/><br/><label>Standard Tech. Report. No.: </label>|{ 027a }|
#028|<br/><br/><label>Publisher. No.: </label>|{ 028a }{ 028b }|
#013|<br/><br/><label>Patent No.: </label>|{ 013a }{ 013b }{ 013c }{ 013d }{ 013e }{ 013f }|
#030|<br/><br/><label>CODEN: </label>|{ 030a }|
#037|<br/><br/><label>Source: </label>|{ 037a }{ 037b }{ 037c }{ 037f }{ 037g }{ 037n }|
#010|<br/><br/><label>LCCN: </label>|{ 010a }|
#015|<br/><br/><label>Nat. Bib. No.: </label>|{ 015a }{ 0152 }|
#016|<br/><br/><label>Nat. Bib. Agency Control No.: </label>|{ 016a }{ 0162 }|
#600|<br/><br/><label>Subjects–Personal Names: </label>|{\n6003 }{\n600a}{ 600b }{ 600c }{ 600d }{ 600e }{ 600f }{ 600g }{ 600h }{–600k}{ 600l }{ 600m }{ 600n }{ 600o }{–600p}{ 600r }{ 600s }{ 600t }{ 600u }{–600x}{–600z}{–600y}{–600v}|
#610|<br/><br/><label>Subjects–Corporate Names: </label>|{\n6103 }{\n610a}{ 610b }{ 610c }{ 610d }{ 610e }{ 610f }{ 610g }{ 610h }{–610k}{ 610l }{ 610m }{ 610n }{ 610o }{–610p}{ 610r }{ 610s }{ 610t }{ 610u }{–610x}{–610z}{–610y}{–610v}|
#611|<br/><br/><label>Subjects–Meeting Names: </label>|{\n6113 }{\n611a}{ 611b }{ 611c }{ 611d }{ 611e }{ 611f }{ 611g }{ 611h }{–611k}{ 611l }{ 611m }{ 611n }{ 611o }{–611p}{ 611r }{ 611s }{ 611t }{ 611u }{–611x}{–611z}{–611y}{–611v}|
#630|<br/><br/><label>Subjects–Uniform Titles: </label>|{\n630a}{ 630b }{ 630c }{ 630d }{ 630e }{ 630f }{ 630g }{ 630h }{–630k }{ 630l }{ 630m }{ 630n }{ 630o }{–630p}{ 630r }{ 630s }{ 630t }{–630x}{–630z}{–630y}{–630v}|
#648|<br/><br/><label>Subjects–Chronological Terms: </label>|{\n6483 }{\n648a }{–648x}{–648z}{–648y}{–648v}| #650|<br/><br/><label>Subjects–Topical Terms: </label>|{\n6503 }{\n650a}{ 650b }{ 650c }{ 650d }{ 650e }{–650x}{–650z}{–650y}{–650v}|
#651|<br/><br/><label>Subjects–Geographic Terms: </label>|{\n6513 }{\n651a}{ 651b }{ 651c }{ 651d }{ 651e }{–651x}{–651z}{–651y}{–651v}|
#653|<br/><br/><label>Subjects–Index Terms: </label>|{ 653a }|
#654|<br/><br/><label>Subjects–Facted Index Terms: </label>|{\n6543 }{\n654a}{–654b}{–654x}{–654z}{–654y}{–654v}|
#655|<br/><br/><label>Index Terms–Genre/Form: </label>|{\n6553 }{\n655a}{–655b}{–655x }{–655z}{–655y}{–655v}|
#656|<br/><br/><label>Index Terms–Occupation: </label>|{\n6563 }{\n656a}{–656k}{–656x}{–656z}{–656y}{–656v}|
#657|<br/><br/><label>Index Terms–Function: </label>|{\n6573 }{\n657a}{–657x}{–657z}{–657y}{–657v}|
#658|<br/><br/><label>Index Terms–Curriculum Objective: </label>|{\n658a}{–658b}{–658c}{–658d}{–658v}|
#050|<br/><br/><label>LC Class. No.: </label>|{ 050a }{ / 050b }|
#082|<br/><br/><label>Dewey Class. No.: </label>|{ 082a }{ / 082b }|
#080|<br/><br/><label>Universal Decimal Class. No.: </label>|{ 080a }{ 080x }{ / 080b }|
#070|<br/><br/><label>National Agricultural Library Call No.: </label>|{ 070a }{ / 070b }|
#060|<br/><br/><label>National Library of Medicine Call No.: </label>|{ 060a }{ / 060b }|
#074|<br/><br/><label>GPO Item No.: </label>|{ 074a }|
#086|<br/><br/><label>Gov. Doc. Class. No.: </label>|{ 086a }|
#088|<br/><br/><label>Report. No.: </label>|{ 088a }|
Configurare le stampanti per scontrini
Le seguenti istruzioni sono specifiche per le stampanti per scontrini indicate di seguito, ma è probabile che possano essere d’aiuto per configurare anche altri modelli.
For Epson TM-T88III (3) & TM-T88IV (4) Printers
Nel driver della stampante
For these instructions, we are using version 5,0,3,0 of the Epson TM-T88III print driver; the EPSON TM-T88IV version is ReceiptE4. Register at the EpsonExpert Technical Resource Center website to gain access to the drivers; go to Technical Resources, then choose the printer model from the Printers drop-down list.
Click Start > Printers and Faxes > Right click the receipt printer > Properties:
- Linguetta Avanzate, fare clic sul pulsante Opzioni predefinite
- Linguetta Layout: formato carta: rotolo di carta 80 x 297mm
- TM-T88III: linguetta Layout: spuntare Riduci dimensioni di stampa e Adatta all’area stampabile.
- TM-T88IV: spuntare Riduci dimensioni di stampa; quando appare il mesaggio, fare clic su OK. Adatta all’ariea di stampa dovrebbe essere spuntato in automatico.
- Fare clic su OK per chiudere la finestra.
In Firefox
Under File > Page Setup:
- Shrink to fit page on Format & Options tab
- 0,0,0,0 for Margins on Margins & Header/Footer Tab. This makes the receipts use all available space on the paper roll.
- Impostare tutte le intestazioni /pie” di pagina su –vuoto–. Questo rimuove tutti i fronzoli che si trovano normalmente su una pagina stampata da Firefox, come l’URL, il numero di pagine, ecc.
- Fare clic su OK
Salvare le impostazioni predefinite di stampa in Firefox, in modo da non far apparire la finestra di dialogo Stampa:
Go to File > Print
Selezionare la stampante per scontrini
Fare clic sul pulsante Proprietà (o Avanzate)
Linguetta Layout: formato carta: rotolo di carta 80 x 297mm
TM-T88III: linguetta Layout: spuntare Riduci dimensioni di stampa e Adatta all’area stampabile.
TM-T88IV: spuntare Riduci dimensioni di stampa; quando appare il mesaggio, fare clic su OK. Adatta all’ariea di stampa dovrebbe essere spuntato in automatico.
Fare clic su OK per chiudere la finestra; proseguire e stampare una pagina qualsiasi - va bene quella su cui ci si trova
Digitare about:config nella barra dell’indirizzo; fare clic sul pulsante «Farò attenzione, prometto» sotto al messaggio di avvertimento.
Digirare print.always nella casella Cerca
Look for print.always_print_silent.
- Se la preferenza è disponibile, impostarne il valore a true.
Se la preferenza NON è disponibile (e non dovrebbe esserlo nella maggior parte dei casi), bisogna aggiungerla.
- Right click the preference area and select New > Boolean
- Type print.always_print_silent in the dialog box and set the value to True. This sets the print settings in Firefox to always use the same settings and print without showing a dialog box.
Warning
Setting the print.always_print_silent setting in about:config DISABLES the ability to choose a printer in Firefox.
Stampanti Epson TM-T88II (2)
Register at the EpsonExpert Technical Resource Center website to gain access to the drivers; go to Technical Resources, then choose the printer model from the Printers drop-down list.
In Firefox
Under File > Page Setup:
- Shrink to fit page on Format & Options tab
- 0,0,0,0 for Margins on Margins & Header/Footer Tab. This makes the receipts use all available space on the paper roll.
- Impostare tutte le intestazioni /pie” di pagina su –vuoto–. Questo rimuove tutti i fronzoli che si trovano normalmente su una pagina stampata da Firefox, come l’URL, il numero di pagine, ecc.
- Fare clic su OK
Salvare le impostazioni predefinite di stampa in Firefox, in modo da non far apparire la finestra di dialogo Stampa:
Go to File > Print
Selezionare la stampante per scontrini
Stampare una pagina qualsiasi - per esempio quella su cui ci si trova.
Digitare about:config nella barra dell’indirizzo; fare clic sul pulsante «Farò attenzione, prometto» sotto al messaggio di avvertimento.
Digirare print.always nella casella Cerca
Look for, print.always_print_silent.
- Se la preferenza è disponibile, impostarne il valore a true.
Se la preferenza NON è disponibile (e non dovrebbe esserlo nella maggior parte dei casi), bisogna aggiungerla.
- Right click the preference area and select New > Boolean
- Type, print.always_print_silent in the dialog box and set the value to True. This sets the print settings in Firefox to always use the same settings and print without showing a dialog box.
Warning
Setting the print.always_print_silent setting in about:config DISABLES the ability to choose a printer in Firefox.
Stampanti Star SP542
Installare la stampante
Sebbene le note seguenti siano incentrate sulla stampate Star SP542, probabilmente sono valide per tute le stampanti della serie SP5xx
The Star SP542 receipt printer works well with Koha and Firefox on Windows XP SP3. This printer, with either the parallel or USB interface, is fairly easy to install and configure. You will need the following executable file which is available from numerous places on the Internet:
linemode_2k-xp_20030205.exe
Questo programma di fatto esegue tutte le operazioni di installazione; non si deve usare la funzione «Aggiungi stampate» di Windows. Durante l’installazione, si raccomanda di non selezionare l’opzione per il software di monitoraggio: abbiamo rilevato pause e ritardi significativi, stampando quando è attivo. Invece, si scelga semplicemente di in installare la stampantge senza il monitor.
Additionally, the install program may not put the printer on the correct port, especially if using the USB interface. This is easily corrected by going to «Start -> Printers and Faxes -> Properties for the SP542 printer -> Ports», then check the appropriate port.
Potrebbe esere necessario riavviare il sistema, anche se non espressamente indicato dal programma di installazione o dal sistema operativo.
Windows 7 users should refer to this page: http://www.starmicronics.com/supports/win7.aspx.
Configurare Firefox per stampare gli scontrini
- Open File > Page Setup
- Impostare su –vuoto– tutte le intestazioni e pie” di pagina
- Impostare tutti i margini a 0 (zero)
- Nella barra dell’indirizzo di Firefox digitare about:config
- Search for print.always_print_silent and double click it
- Cambiarne il valore da false a true
- Questo permette di evitare che appaia la finestra di dialogo Stampa e di dover fare clic su OK, e quindi di stmpare automaticamente lo scontrino con le dimensioni corrette.
- If print.always_print_silent does not come up
- Fare clic destro in un’area vuota della finestra about:config
- Select new > Boolean
- Enter «print.always_print_silent» as the name (without quotes)
- Fare clic su OK
- Selezionare true quale valore
- You may also want to check what is listed for print.print_printer
- Potrebbe essere necessarrio selezionare Generica/Solo testo (o qualsiasi altra denominazione possa avere la stampante per scontrini).
Notice & Slips Guides
Field Guide for Notices & Slips
Questa guida dividerà l’avviso e la ricevuta in tre parti. La prima ti dirà quale file genera l’avviso, la seconda come presenterai l’informazione di copia nell’avviso e la terza se l’avviso sarà relativo a una biblioteca o no.
| Letter Code | Used In | Detail tag | Can be branch specific |
|---|---|---|---|
| DUE | advance_notices.pl | <<items.content>> | No |
| DUEDGST | advance_notices.pl | <<items.content>> | No |
| PREDUE | advance_notices.pl | <<items.content>> | No |
| PREDUEDGST | advance_notices.pl | <<items.content>> | No |
| ODUE* | overdue_notices.pl | <<items.content>> or <item> </item> | Si |
| CHECKOUT | C4/Circulation.pm | Non pertinente | Si |
| RENEWAL | C4/Circulation.pm | Non pertinente | Si |
| TRANSFERSLIP | C4/Circulation.pm | Non pertinente | Si |
| ISSUESLIP | C4/Members.pm | <checkedout> </checkedout> <overdue> </overdue> <news> </news> |
Si |
| ISSUEQSLIP | C4/Members.pm | <checkedout> </checkedout> | Si |
| HOLDPLACED | C4/Reserves.pm | Non pertinente | Si |
| HOLD_SLIP | C4/Reserves.pm | Non pertinente | Si |
| ASKED | C4/Suggestions.pm | Non pertinente | Si |
| CHECKED | C4/Suggestions.pm | Non pertinente | Si |
| ACCEPTED | C4/Suggestions.pm | Non pertinente | Si |
| REJECTED | C4/Suggestions.pm | Non pertinente | Si |
| OPAC_REG_VERIFY | opac/opac-memberentry.pl | Non pertinente | No |
Esempio di avviso
Nicole Engard
410 Library Rd.
Philadelphia, PA 19107
Cara Nicole Engard (23529000035726),
In base a i nostri record, al momento della notizia, hai dei documenti scaduti. Per favore, restituisci o rinnova i documenti prima possibile per evitare l’aumento della sanzione.
Se hai una password per l’Opac, puoi usarla con il codice della tua tessera per rinnovare online.
Se ritieni di aver restituito le copie elencate, chiama la biblioteca, i bibliotecari ti aiuteranno a risolvere il problema.
Le seguenti copie sono attualmente in ritardo:
07/08/2008 Creating drug-free schools and communities : 502326000054 Fox, C. Lynn.
06/27/2008 Eating fractions / 502326000022 McMillan, Bruce.
Cordialmente, lo staff della biblioteca
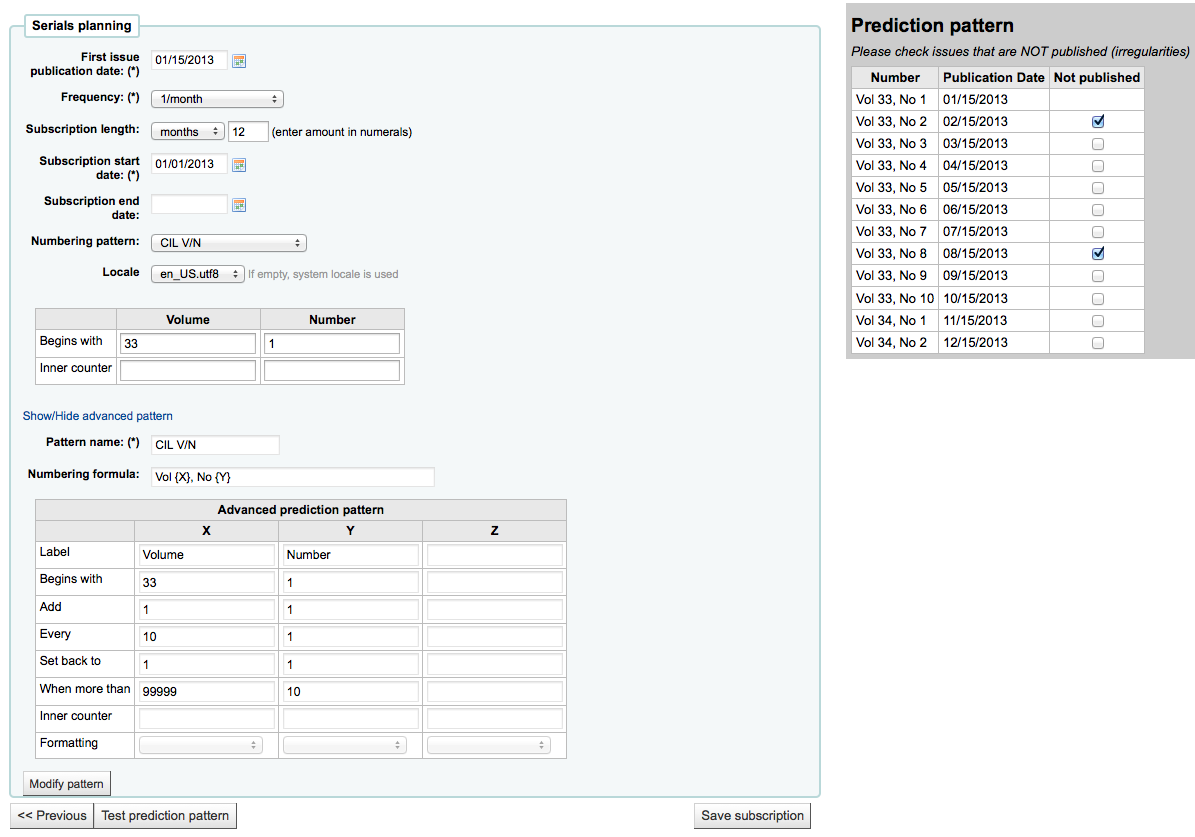
Esempi di abbonamenti a periodici
Reader’s Digest (0034-0375)
Esce 12 volte l’anno (una volta al mese)
Il numero del volume cambia ogni sei mesi ì, mentre i numeri delle uscite sono consecutivi (richiede uno schema di numerazione avanzato)
People Weekly (1076-0091)
- Pubblicazione settimanale
- Il sito web dice «esce il sabato, ecccetto la prima settimana di agosto, il Giorno del Ringraziamento, la prima e l’ultima settimana dell’anno», ma questo non corrisponde con il modello per il 2007 e il 2008
- Nel periodo luglio-dicembre ci sono 26 uscite
- Nel periodo gennaio-giugno ci sono 25 uscite (non esce la prima settimana di gennaio)
A causa dell’irregolarità sulla prima uscita, bisogna impostare l’abbonamento in modo che ricominci a contare dopo il 25° numero. La 26ª uscita nella seconda metà dell’anno dev’essere ricevuta come supplemento.
Il controllo sulle irregolarità segnala che sono attese 52 uscite, ma ne sono state immesse solo 25. Attualmente, il sistema di controllo può verificare soltanto che la prima posizione del modello di numerazione corrisponda con il numero di uscite attese secondo la periodicità. Ma bisogna far ricominciare il conteggio sul volume, quindi è necessario definire le ultime due settimane dell’anno come irregolarità.In questo modo si ricevono 50 uscite nelle prime 50 settimane, poi un supplemento nella settimana 51, per cui bisogna definire un’enumerazione apposta, dopodichè la successiva uscita prevista sarà quella della prima settimana dell’anno seguente.
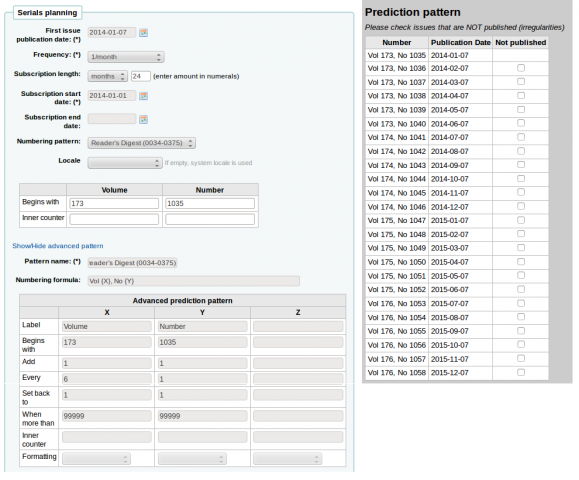
Et-Mol
Questa rivista è pubblicata con le seguenti regole:
- Sei numeri l’anno (ogni due mesi)
- L’anno cambia ogni 6 uscite
- Si comincia dal 2011
- I numeri delle uscite continuano all’infinito
- A partire dal numero 215
La pianificazione apparirà come segue:
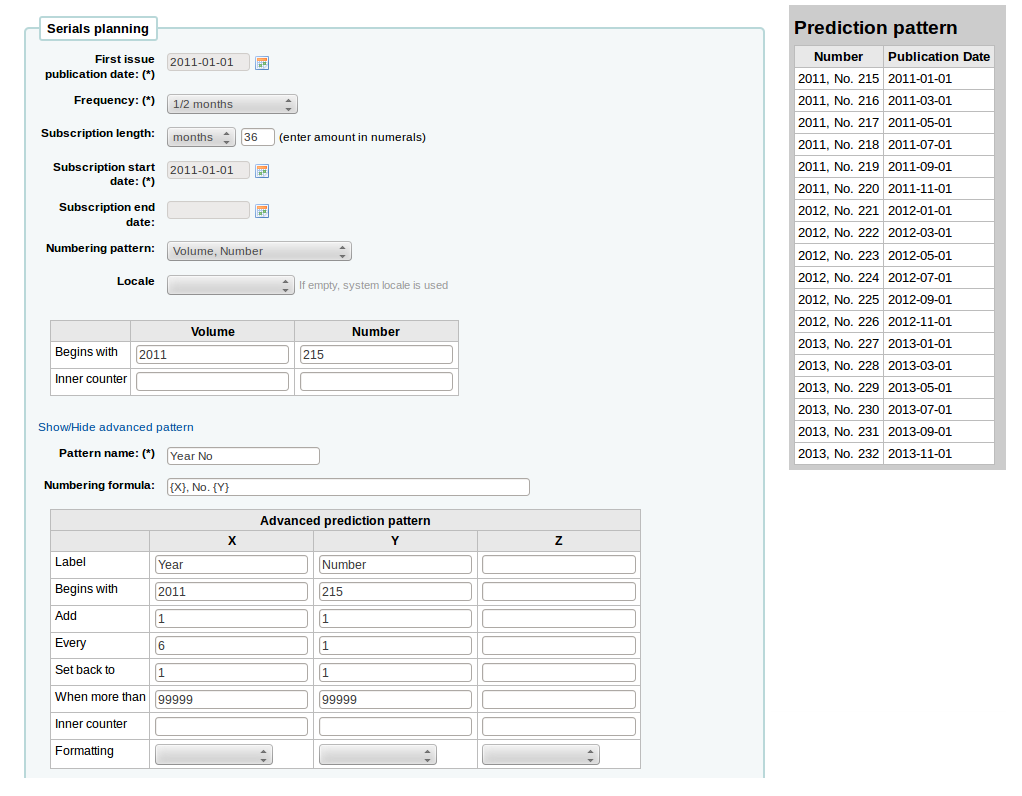
Backpacker (0277-867X)
Pubblicato 9 volte l’anno, ad intervalli irregolari. Il numero del volume e del fascicolo proseguono, mentre il numero dell’uscita ricomincia da 1 ogni nove. Avendo in mano il volume 41, numero 3, fascicolo 302, lo schema di numerazione previsto sarebbe:
E le copie ricevute sarebbero numerate come segue:
- 41, no. 3, iss. 302
- 41, no. 4, iss. 303
- 41, no. 5, iss. 304
- 41, no. 6, iss. 305
- 41, no. 7, iss. 306
- 41, no. 8, iss. 307
- 41, no. 9, iss. 308
- 42, no. 1, iss. 309
- 42, no. 2, iss. 310
- 42, no. 3, iss. 311
- 42, no. 4, iss. 312
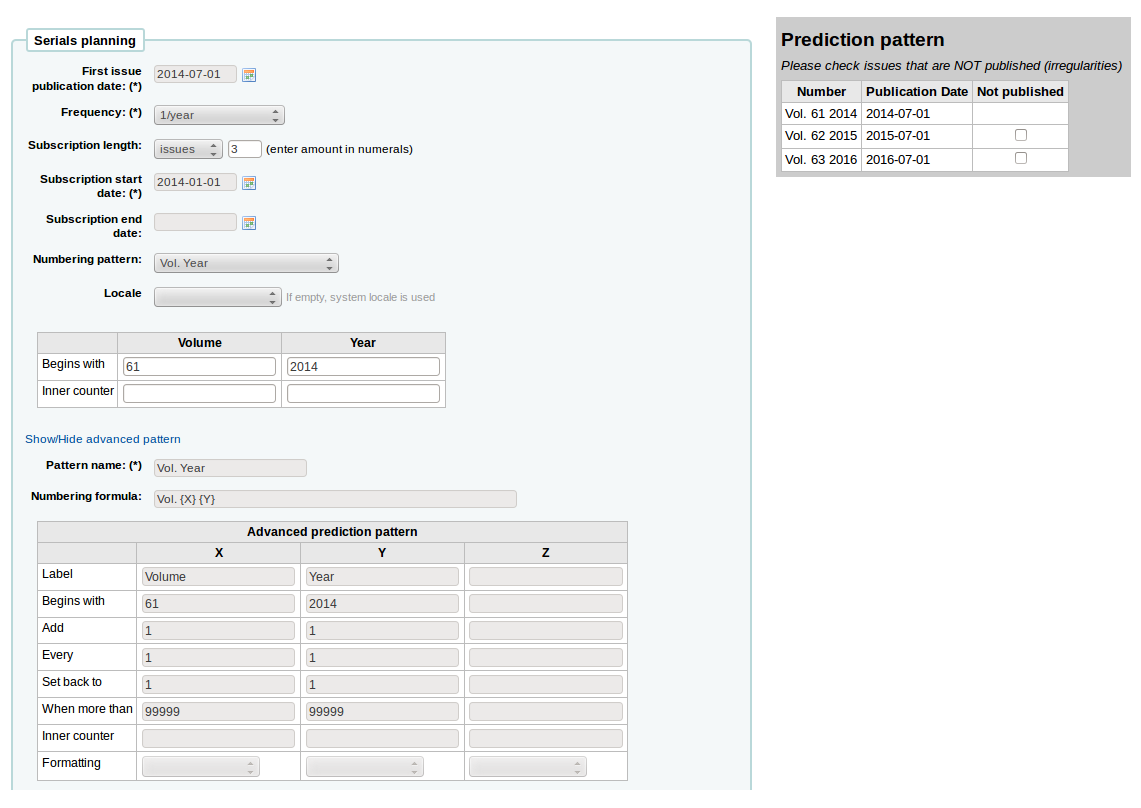
Keats-Shelley Journal (0453-4387)
This journal is published once per year in July. The numbering follows this pattern:
- Vol. 61 2013
- Vol. 62 2014
- Vol. 63 2015
L’impostazione dovrebbe essre simile alla seguente (se si comincia da luglio 2014)
Computers in Libraries (1041-7915)
«Computers in Libraries» comprende 10 uscite all’ano, con numeri doppi per gennaio/febbraio e luglio/agosto.
Sample List & Cart Emails
Esempio di email da una lista
Sotto c’è un esempio di e-mail da una lista
Hi,

Here is your list called If You Like Jodi Picoult, sent from our online catalog.

Please note that the attached file is a MARC bibliographic records file
which can be imported into a Personal Bibliographic Software like EndNote,
Reference Manager or ProCite.
---------------------------------------------

Home safe : a novel /

by Berg, Elizabeth.

Published by: Random House,, 260 p. ;, 25 cm.
Copyright year: 2009
LCCN:   2008049247
In the online catalog:
    http://MYCATALOG/cgi-bin/koha/opac-detail.pl?biblionumber=12113
Items :
    North Branch FIC (FIC Ber) TVSN500088894O
    Main Library FIC (FIC Boh) TVSN5000921548
    South Branch FIC (FIC Boh) TVSN500092156A
    West Branch FIC (FIC Boh) TVSN5000921559

---------------------------------------------

Half a heart /

by Brown, Rosellen.

Published by: Farrar, Straus, and Giroux,, 402 p. ;, 24 cm.
Copyright year: 2000
LCCN:    00022926
In the online catalog:
    http://MYCATALOG/cgi-bin/koha/opac-detail.pl?biblionumber=12501
Items :
    East Branch  (813/.54)
    South Branch FIC (FIC Bro) TVSN5000451333
Esempio di e-mail dal carrello
Sotto c’è un esempio di e-mail dal carrello
Hi,

   Joaquin D'Planque sent you a cart from our online catalog.

   Please note that the attached file is a MARC bibliographic records
   file which can be imported into personal bibliographic software like
   EndNote, Reference Manager or ProCite.

   ---------------------------------------------------------------------


     1.  Book /
       Author(s): Brookfield, Karen. ;
       Published by: Knopf : | Distributed by Random House, , 63 p. : ,
       29 cm.
       Copyright year: 1993
       Notes : Includes index.
       LCCN: 93018833 /AC

       In online catalog:
       http://MYCATALOG/cgi-bin/koha/opac-detail.pl?biblionumber=31644

       Items:

         *  East Branch (JNF 002 Bro) TVSN500017618A

       -----------------------------------------------------------------

     2.  The 1965 World book year book :

       Published by: Field Enterprises Educational Corp., , 628 p. : , 26
       cm.
       Copyright year: 1965
       Notes : Includes index. | Spine title: Year book, 1965. | Cover
       title: The World book year book, 1965.
       URL:
       http://www.archive.org/details/1965worldbookyea00chic%20%7C%20http://www.openlibrary.org/books/OL24199089M

       In online catalog:
       http://MYCATALOG/cgi-bin/koha/opac-detail.pl?biblionumber=88666

       -----------------------------------------------------------------
Usare Koha come un Content Management System (CMS)
Setup
Queste istruzioni spiegano come trasformare un’installazione predefinita di Koha in modo che funzioni come un piccolo sistema di gestione dei contenuti. Ciò permette alla biblioteca di pubblicare un numero arbitrario di pagine, basate su un modello. L’esempio seguente utilizza il modello su cui si basa la pagina principale dell’OPAC, ma si può utilizzare qualsiasi modello si voglia, con qualche modifica in più. Questo sistema può essere vantaggioso se si gestisce una biblioteca di piccole dimensioni, si vuole che i bibliotecari possano aggiungere agevolmente pagine al sito e non interessa adoperare un CMS completo.
Copiare /usr/share/koha/opac/cgi-bin/opac/opac-main.pl su /usr/share/koha/opac/cgi-bin/opac/pages.pl (nella stessa cartella)
Aprire pages.pl in un editor di testo
All’incirca alla riga 33 individuare la riga
template_name => "opac-main.tt",
e cambiarla in:
template_name => "pages.tt",
Approssimativamente a riga 62, dopo il seguente codice:
$template->param(
           koha_news       => $all_koha_news,
           koha_news_count => $koha_news_count,
           display_daily_quote => C4::Context->preference('QuoteOfTheDay'),
           daily_quote         => $quote,
           );
Aggiungere queste righe:
my $page = "page_" . $input->param('p');          # go for "p" value in URL and do the concatenation
my $preference = C4::Context->preference($page);  # Go for preference
$template->{VARS}->{'page_test'} = $preference;   # pass variable to template pages.tt
Note pages.pl file must have Webserver user execution permissions, you can use chmod command if you are actually logged in as such user:
$chmod 755 pages.pl
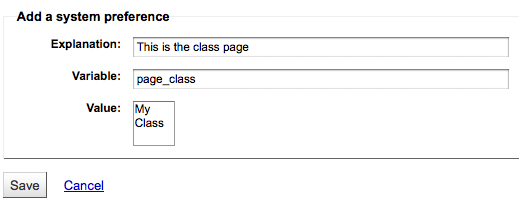
In the browser go to Home > Administration > System Preferences > Local Use and add a New Preference called «page_test»
Compilare la pagina Aggiungi una preferenza come segue:
- Spiegazione: pagina di prova per il mini-CMS integrato
- Variable: page_test
- Valore: Lorem ipsum
- Nella lista Tipi di variabile, fare clic sul link Textarea (oppure immettere «TextArea» nella casella di testo sottostante)
- variable options (last field): 80|50
Aprire un browser ed andare all’indirizzo http://indirizzo-di-koha/cgi-bin/koha/pages.pl?p=test; sostituire indirizzo-di-koha con l’indirizzo del server di Koha corrispondente alla vostra installazione.Deve apparire la pagina di prova, con le parole «Lorem ipsum» visualizzate nell’area del contenuto principale.
To add more pages simply create a system preference where the title begins with «page_» followed by any arbitrary letters. You can add any markup you want as the value of the field. Reference the new page by changing the value of the «p» parameter in the URL.
To learn more visit the Koha wiki page on this topic: http://wiki.koha-community.org/wiki/Koha_as_a_CMS
Modificare il modello delle pagine
The file to create / edit for the pages template will depend on your opacthemes system preference setting
Modificare il modello per il tema «bootstrap» (attuale)
Copiare /usr/share/koha/opac/htdocs/opac-tmpl/bootstrap/en/modules/opac-main.tt su /usr/share/koha/opac/htdocs/opac-tmpl/bootstrap/en/modules/pages.tt
Aprire in un editor di testo /usr/share/koha/opac/htdocs/opac-tmpl/bootstrap/en/modules/pages.tt
Approssimativamente a riga 61 sostituire il testo:
[% IF ( OpacMainUserBlock ) %]<div id="opacmainuserblock">[% OpacMainUserBlock %]</div>[% END %]
Con
[% IF ( page_test ) %]<div id="opacmainuserblock">[% page_test %]</div>[% END %]
Remark: You may wish to disable your News block of these CMS style pages e.g. when you do not want it displayed on the CMS style pages or where the News block is long enough that it actually makes the “page_test” include scroll outside the default viewport dimensions. In that case, remove the following code from your pages.tt template.
[% IF ( koha_news_count ) %]
    <div id="news">
    <table class="table table-bordered">
    [% FOREACH koha_new IN koha_news %]
      <thead><tr><th>[% koha_new.title %]</th></tr></thead>
      <tbody><tr><td><p>[% koha_new.new %]</p>
      <p class="newsfooter"><i>(published on [% koha_new.newdate %])</i></p></td></tr></tbody>
    [% END %]
    </table>
    </div>
   [% END %]
Risoluzione problemi
If you have problems check file permissions on pages.pl and pages.tt. They should have the same user and group as other Koha files like opac-main.pl.
Un punto in più
Invece di utilzzare indirizzi del tipo http://indirizzo-di-koha/cgi-bin/koha/pages.pl?p=test, si può abbreviare l’url in http://indirizzo-di-koha/pages.pl?p=test. Per far ciò, è sufficiente aprire /etc/koha/koha-httpd.con in un editor e - all’incirca a riga 13 - aggiungere la riga seguente:
ScriptAlias /pages.pl "/usr/share/koha/opac/cgi-bin/opac/pages.pl"
Dopo la modifica occorre riavviare Apache.
Uso del CMS
Dopo aver configurato Koha come un CMS, per creare nuove pagine seguire le istruzioni qui sotto:
Aggiungere pagine
Per aggiungere una pagina bisogna aggiungere una preferenza di sistema sotto Uso locale
Get there: More > Administration > Global System Preferences > Local Use
Fare clic su «Nuova preferenza»
Immettere una descrizione nella casella Spiegazione
Enter a value that starts with “page_” in the Variable field
Immettere l’HTML iniziale nel campo Valore
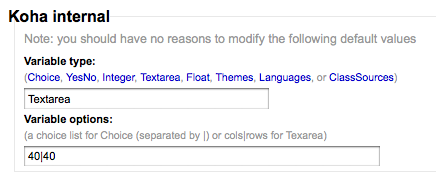
Impostare il tipo della variabile a Textarea
Set the Variable options to something like 20|20 for 20 rows and 20 columns
Visualizzare la nuova pagina
You can view your new page at http://YOUR-OPAC/cgi-bin/koha/pages.pl?p=PAGENAME where PAGENAME is the part you entered after “page_” in the Variable field.
Esempio:
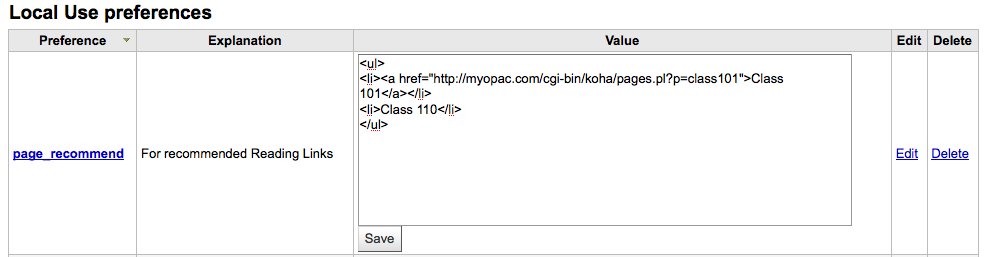
Questo procedimento si può utilizzare per creare in Koha un elenco di letture consigliate. Così, dopo aver apportato le modifiche specificate nelle sitruzioni su «Koha come un CMS», si prosegue con le istruzioni «Aggiungere una pagina», qui sopra, per realizzare una fantastica pagina «Letture consigliate».
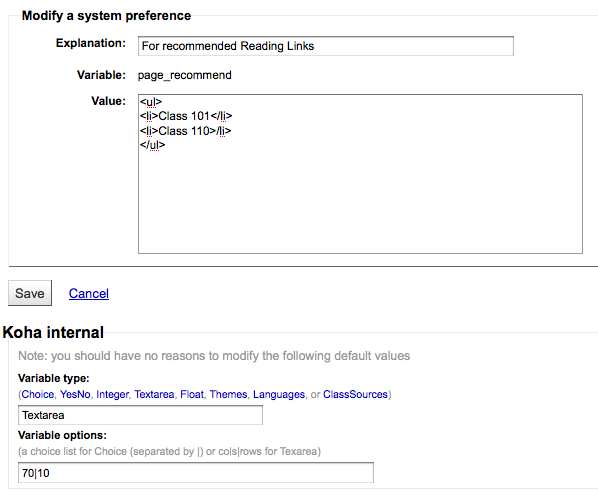
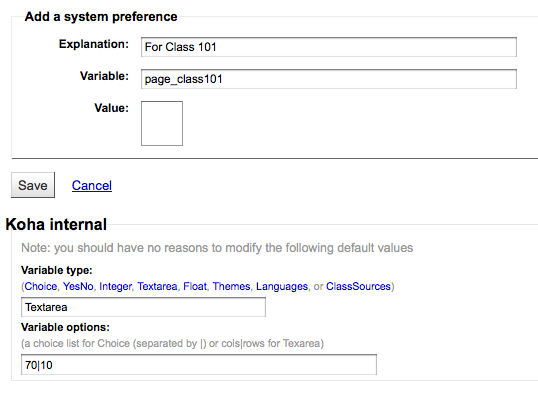
Fatto questo, bisogna creare creare altre pagine per le varie classi (o catigorie). Per fare ciò, tornare alla sezione «Aggiungere una pagina» e creare una preferenza per la prima classe
Next you’ll want to link your first page to your new second page, go to the page_recommend preference and click “Edit.” Now you want to edit the HTML to include a link to your newest page:
Esempi reali
- The Crawford Library at Dallas Christian College is using this method for their recommended reading lists: http://opac.dallas.edu/
Reset del database di Koha
These notes on how to reset the database for Koha were derived from the following email thread: http://lists.koha-community.org/pipermail/koha-devel/2009-January/008939.html and http://lists.katipo.co.nz/public/koha/2014-June/039701.html
Azzerare il database è utile se ha installato Koha con dati di esempio e vuoi iniziare a usare dati reali senza reinstallare il software.
Delete sample data from Tables
Use your preferred MySQL client to delete the following tables:
- bibio
- biblioitems
- copie
- auth_header
- sessions
- zebraqueue
You may need to disable foreign key checks to delete data from same tables. For instructions follow this thread: https://lists.katipo.co.nz/pipermail/koha/2013-July/036853.html.
Cancellare gli indici di Zebra
Esegui questo comando per il reset degli indici di autorità e bibliografici di Zebra.
$ zebraidx -c /etc/koha/zebradb/zebra-authorities-dom.cfg -g iso2709 -d authorities init
$ zebraidx -c /etc/koha/zebradb/zebra-biblios.cfg -g iso2709 -d biblios init
Se sta usando Koha installato con i package, lancia questi comandi per azzerare le authority e i dati bibliogafici negli indici di Zebra:
$ sudo zebraidx -c /etc/koha/sites/YOURLIBRARY/zebra-authorities-dom.cfg  -g iso2709 -d authorities init
$ sudo zebraidx -c /etc/koha/sites/YOURLIBRARY/zebra-biblios.cfg  -g iso2709 -d biblios init
Cambia YOURLIBRARY con il nome della tua installazione Koha.
Link importanti
Guide all’installazione
- Installing Koha 3 on Ubuntu - http://www.blazingmoon.org/guides/k3-on-u810-1.html
- Koha on Debian installation documentation - http://openlib.org/home/krichel/courses/lis508/doc/koha_installation_overview.html
- Koha 3.2 on Debian Squeeze - http://wiki.koha-community.org/wiki/Koha_3.2_on_Debian_Squeeze
Varie
- Zotero - http://zotero.org
- SOPAC - http://thesocialopac.net
Koha XSLT tipi copia
When you have any of the XSLT system preferences (OPACXSLTDetailsDisplay, OPACXSLTResultsDisplay, XSLTDetailsDisplay, and/or XSLTResultsDisplay) along with the DisplayOPACiconsXSLT and DisplayIconsXSLT preferences turned on you will see item type icons on the related screen.
Importante
These images are coming from values found in your leader, if your leader is not cataloged properly it might be best to turn off the DisplayOPACiconsXSLT preference (which can be done while leaving the other XSLT preferences turned on).

- Libro [BK}
- leader6 = a (e uno dei valori qui messi per leader7)
- leader7 = a
- leader7 = c
- leader7 = d
- leader7 = m
- leader6 = t
- leader6 = a (e uno dei valori qui messi per leader7)
- Computer File [CF]
- leader6 = m

- Seriale [CR}
- leader7 = b
- leader7 = i
- leader7 = s

- Materiale cartografico [MP}
- leader6 = e
- leader6 = f

- Materiale misto [MX]
- leader6 = p
- Musica [MU]
- leader6 = c
- leader6 = d
- leader6 = i
- leader6 = j
- Audiovisivi [VM}
- leader6 = g
- leader6 = k
- leader6 = r

- Kit
- leader6 = o
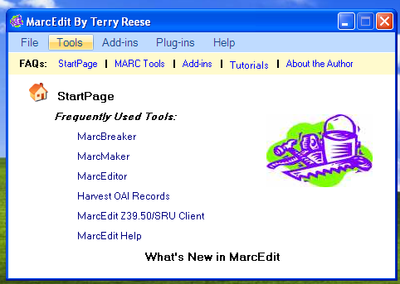
MarcEdit
Many libraries like to use MarcEdit for modifications or data cleanup. If you’d like to do this you will need to download it at: http://marcedit.reeset.net/
Importante
Many of the actions described in this chapter can be done in Koha using Marc Modification Templates, but this section is here for those who are used to MarcEdit.
Aggiungere un prefisso alle collocazioni
Quando si importano dati in Koha, innanzitutto può essere necessario bonificarli. Un’operazione comune tra gli utenti di Koha è di aggiungere un prefisso alla collocazione.
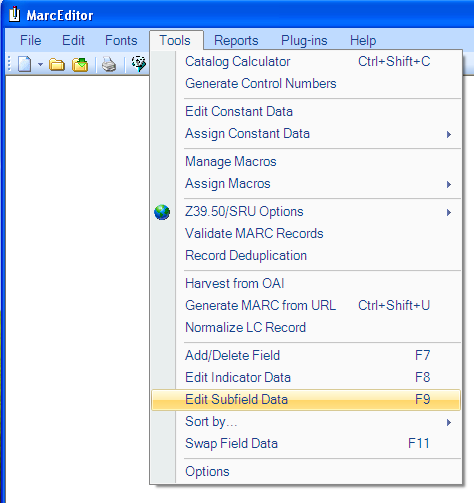
Apri MarcEdit
Click “MarcEditor”
Go to Tools > Edit Subfield Data
Per aggiungere un prefissio ai dati, il carattere speciale è ^b. Per aggiungere semplicemente dei dati all’inizio di un sottocampo, aggiungere ^b alla casella di testo Field Data, ed i dati da aggiungere in testa nella casella Replace

- Per aggiungere dati all’inizio di un sottocampo e contemporaneamente sostituire del testo, aggiungere ^b[stringa-da-sostituire] alla casella di testo Field Data ed i dati da aggiungere nella casella Replace With
Importare dati da Excel in Koha
Si supponga di avere il catalogo della biblioteca registrato sotto forma di fogli excel e di volerli importare in Koha. Come fare? Koha non permette di importare dati da excel direttamente.Bene, c’è una soluzione semplicissima, che permette di importare dati da excel in Koha facilmente. Prima si converte il file excel in un file Marc, poi si importa quest’ultimo in Koha.
Per importare dati da excel in Koha, seguire i passi di seguito descritti
Convertire un file dal formato Excel al formato .mrk
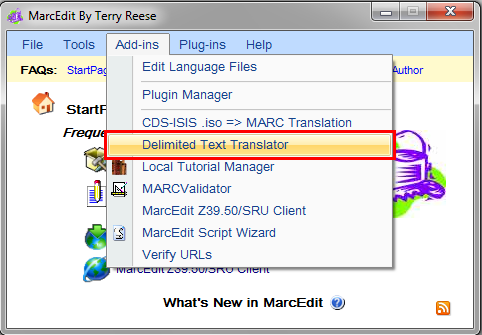
First, we will convert excel format into .mrk format. For this we will use MarcEdit. You can download it from http://marcedit.reeset.net/
Now open it and select Add-ins–>Delimited Text Translator.
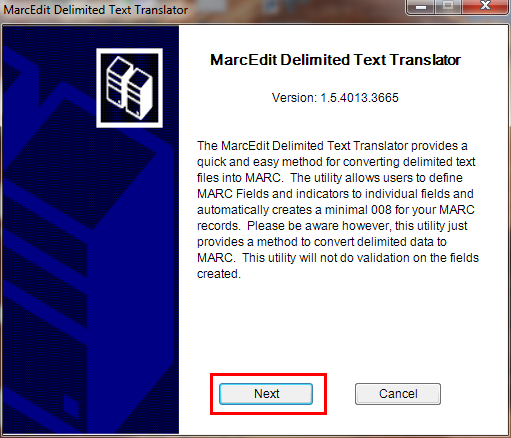
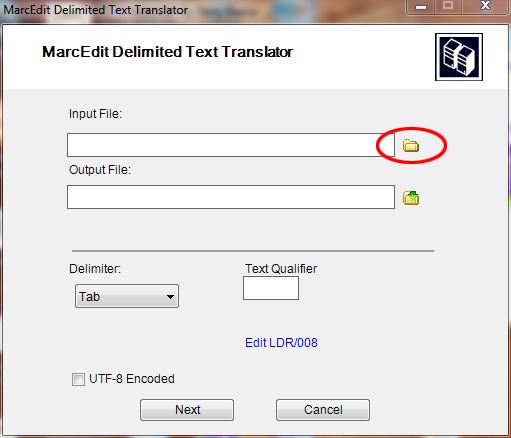
Quando appare la seguente finestra, fare clic su Next
Fare clic ssul pulsantino evidenziato nell’illustrazione per sfogliare le cartelle del disco ed individuare il file excel desiderato.
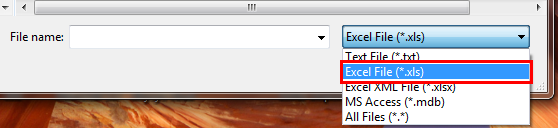
Locate your excel file by choosing the format Excel File(*.xls).
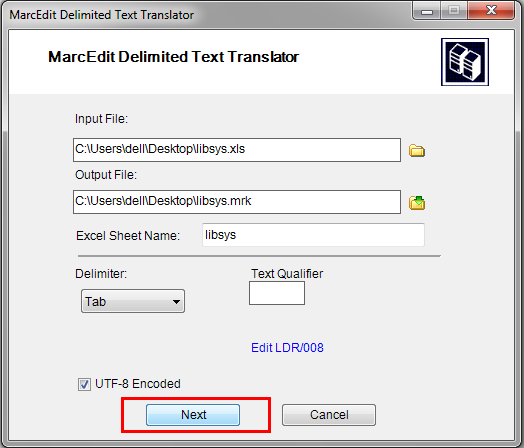
Analogamente, compilare le altre informazioni richieste: Output File ed Excel Sheet Name; spuntare la casella UTF-8 Encoded se necssario e fare clic su Next
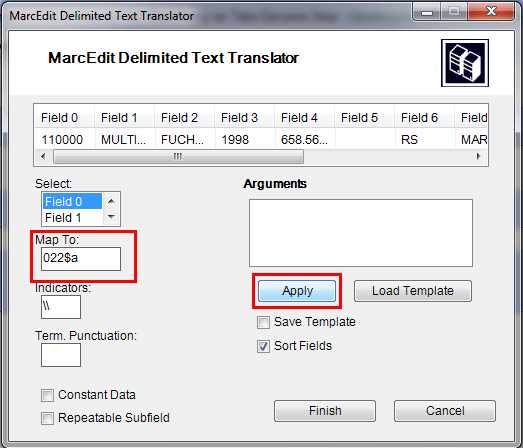
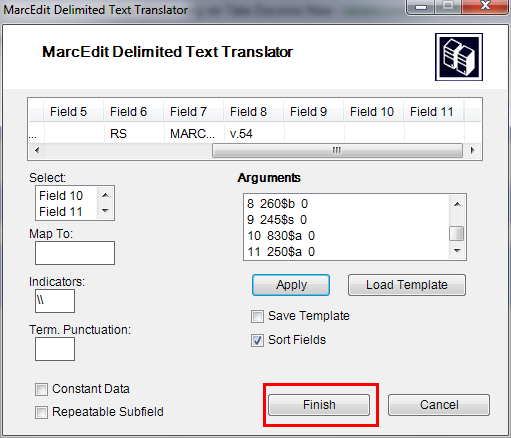
Ora il programma richiede di indicare la corrsipondenza tra le colonne del foglio excel ed i campi del formato standard marc.
Supponiamo di voler mappare la prima colonna al campo 022$a (ISSN valido per la risorsa in continuazione). Per far ciò, si seleziona Field 0 dall’elenco Select e si digita 022$a nella casella Map To; infine si fa clic su Apply.
Nota
You can customize Indicators and all other things, for more information on marc21 format visit the official library of congress site.
Seguire la stessa procedura per mappare gli altri campi e fare clic su Finish.
And then a window will appear indicating that your Marc Text File(*.mrk) has been created.
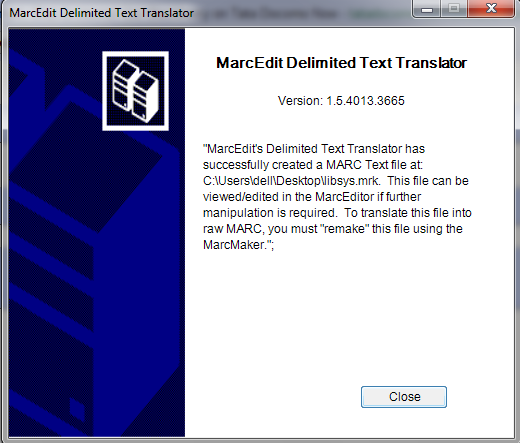
Fare clic su Close: è stato generato un file .mrk a partire da un file .xls. E” possibile vedere il file prodotto facendo doppio clic su di esso.
Convertire il file .mrk in .mrc
E” necessario convertire il file .mrk prodotto nella fase precedente in formato Marc «grezzo», che può essere importato direttamente in Koha.
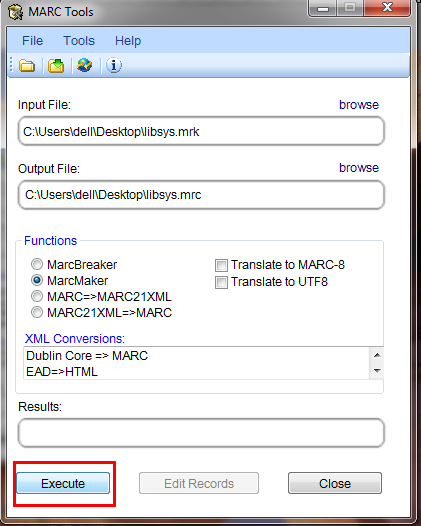
A questo scopo, aprire di nuovo MarcEdit e scegliere MARC Tools.
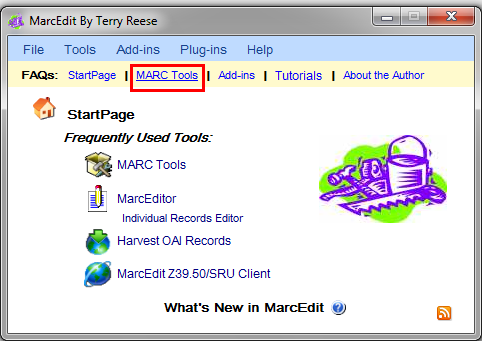
Quindi selezionare markMaker per convertire il file .mrk nel formato .mrc.
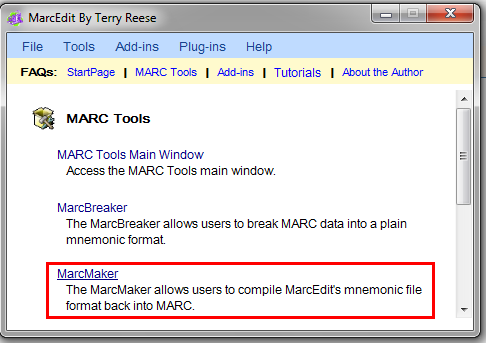
Individuare il file di ingresso ed assegnare un nome al file di uscita. Quindi fare clic su Execute.
Ed al termine dell’operazione appaiono i risultati:
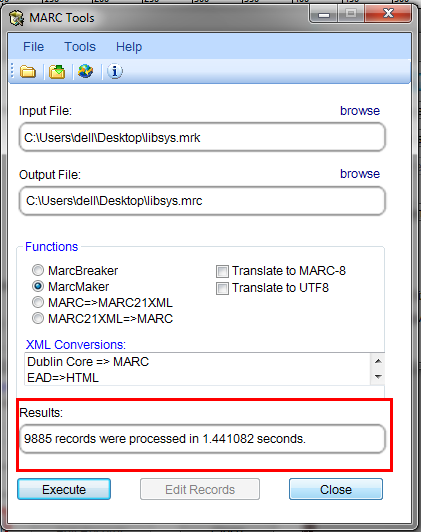
Fare clic su Close; adesso i dati sono convertiti in formato Marc grezzo (il file .mrc).
Importe il file .mrc in Koha
More information on importing records into Koha can be found in the “Stage MARC Records for Import” section of this manual.
Infine si importa in Koha il file .mrc creato sopra.
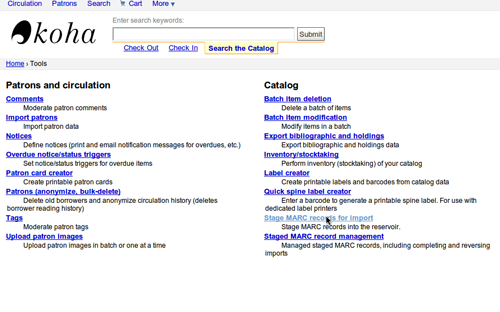
Fare clic su Strumenti nel client per lo staff di Koha.
Quindi fare clic su Deposito MARC records per l’importazione.
Dopodichè, selezionare il file .mrc creato primna e fare clic su Carica il file
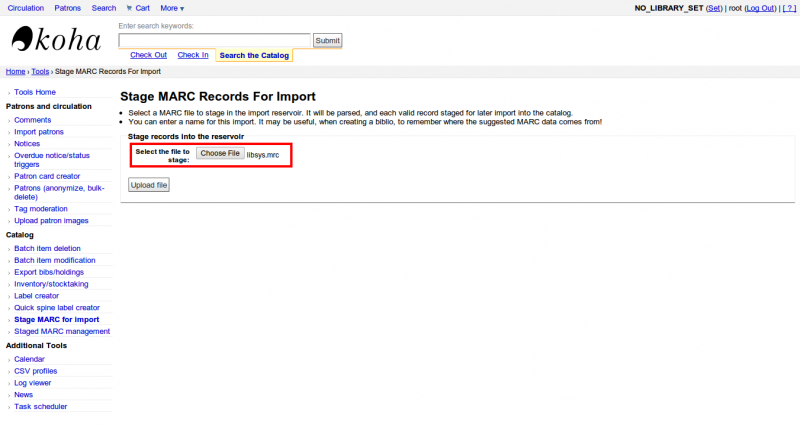
E” anche possibile aggiungere annotazioni sull file, ed infine fare clic su Prepara per l’importazione
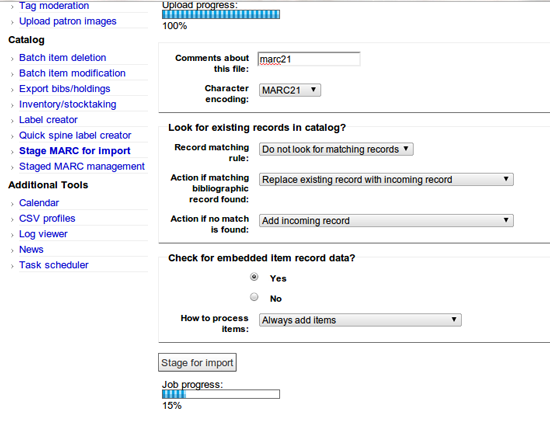
Quando l’importazione è terminata, si vedrà un risultato simile al seguente:
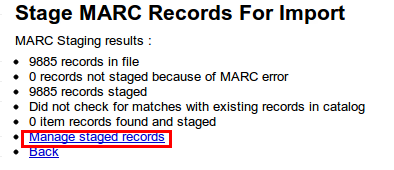
Quindi fare clic su Gestisci record preparati
Qui è anche possibile cambiare le regole di corrispondenza, se necessario.
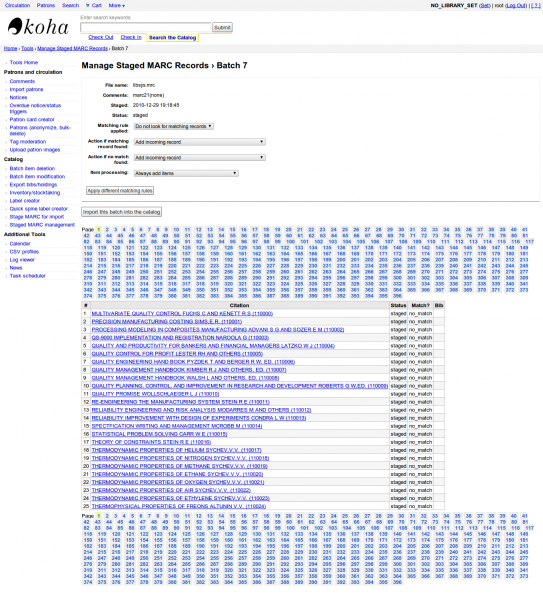
Una volta terminato, fare clic su Importa nel catalogo.
Fatto. Dopo che tutti i record sono stati importati, controllare la riga Status: dev’essere «Importato».

E” anche possibile annullare l’importazione.
E in pochi minuti abbiamo importato circa 10.000 record in Koha
Talking Tech
Talking Tech I-tiva is a third party, proprietary, product that libraries can subscribe to. Learn more here: http://www.talkingtech.com/solutions/library.
Installazione e messa a punto
Assicurarsi di aver eseguito installer/data/mysql/atomicupdate/Bug-4246-Talking-Tech-itiva-phone-notifications.pl per installare il pacchetto dati richiesto (nuova preferenza di sistema, preferenze sui segnaposto negli avvisi e sul protocollo di messaggistica)
To use, TalkingTechItivaPhoneNotification syspref must be turned on.
If you wish to process PREOVERDUE or RESERVES messages, you’ll need the EnhancedMessagingPreferences system preference turned on, and patrons to have filled in a preference for receiving these notices by phone.
For OVERDUE messages, overdue notice triggers must be configured under Koha -> Tools -> Overdue Notice Triggers. Either branch-specific triggers or the default level triggers may be used (script will select whichever is appropriate).
Inviare il file delle notifiche
- Add the TalkingTech_itiva_outbound.pl script to your crontab
- Aggiungere un’operazione FTP/SFTP, od altro protocollo di trasmissione, alle operazioni pianificate per inviare il file prodotto al server I-tiva
- Se desiderato, archivare i file di avviso in un’altra cartella dopo l’invio.
Run TalkingTech_itiva_outbound.pl –help for more information
Ricevere il file dei risultati
- Aggiungere un’operazione FTP/SFTP alla lista delle operazioni pianificate, per ricevere il file Results in una cartella stabilita sul server di Koha
- Add the TalkingTech_itiva_inbound.pl script to your crontab, aimed at that directory
- Se desiderato, archiviare i file di risultati in un’altra cartella, dopo l’elaborazione.
Run TalkingTech_itiva_inbound.pl –help for more information
Integrating SIP2 with Koha
SIP2 (Session Initiation Protocol) is a protocol for communication between devices.
In the context of Koha SIP2 is used for communication between Self Check (SC) machines i.e. self checkout machines, and the Automated Circulation System (also known as ACS which in this case is the server running Koha).
SIP2 communications consist of requests and responses.
The self checkout machines are ‘dumb’ and so they send requests to the Koha server which runs logic which determines a particular outcome which is sent as a response message back to the client self checkout machine, and this is then conveyed to the user.
Avvertimento
Security notice regarding using SIP2 service: To ensure that your SIP2 traffic is secure as it passes over the internet you need to make sure that you are using a VPN or stunnel.
Setting up SIP2
If you installed Koha using Debian packages then SIP2 setup is easy, simply follow these steps:
1. In your terminal (in the root Koha directory) write in: sudo koha-enable-sip <instancename>
2. Now you need to configure the SIP2 settings, to do this you need to edit the SIPconfig.xml file which exists in the /etc/koha/sites/<instancename>/ directory. You will need to edit this file as root because it contains passwords (to do so write ‘sudo’ at the start of your command).
e.g. sudo vi /etc/koha/sites/<instancename>/SIPconfig.xml
Nota
Important note: There are three areas of interest in the SIPconfig.xml file that you need to change. These are: service, account and institution.
Service
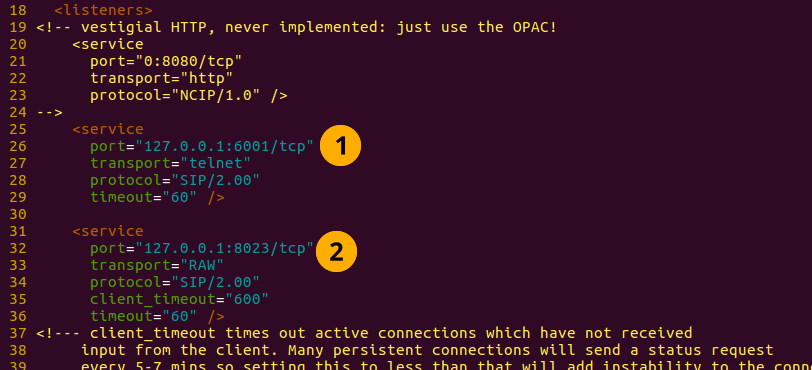
2.1 Change the port value near the top of the SIPconfig.xml file (identified by the number 1 in the below screen shot), so it has the same IP address as set further down the SIPconfig.xml file identified by 2.
Nota
Make sure the two port values don’t have the same port number as you cannot have the same port being listened to by two different services. When deciding upon the port number make sure it is a high number (i.e. above 1000) because all ports below 1000 require root permissions.
Account
The account(s) you define in the SIPconfig.xml file are simply account(s) permitted to use the SIP2 service i.e. your defining who can send and receive SIP2 commands.
Avvertimento
Account information that you write here must also exist in the Koha database i.e. you need to create a patron in the Koha staff interface with the same username, password (making sure to assign them circulate permissions) as the user account you write into the SIPconfig.xml file.
Nota
It is highly recommended that you only write in Koha user accounts with circulate permissions.
The reason we want SIP2 users to only have circulate permissions rather than superlibrarian permissions is to reduce the access SIP2 users have to confidential patron data in case the system was compromised.
If the ACS or the SC were compromised then having all SIP2 users only having circulation permissions means that an intruder would only be able to access patron data via the terminal rather than the web interface as well (which would be available with superlibrarian permissions). So it is simply a matter of protecting your users.
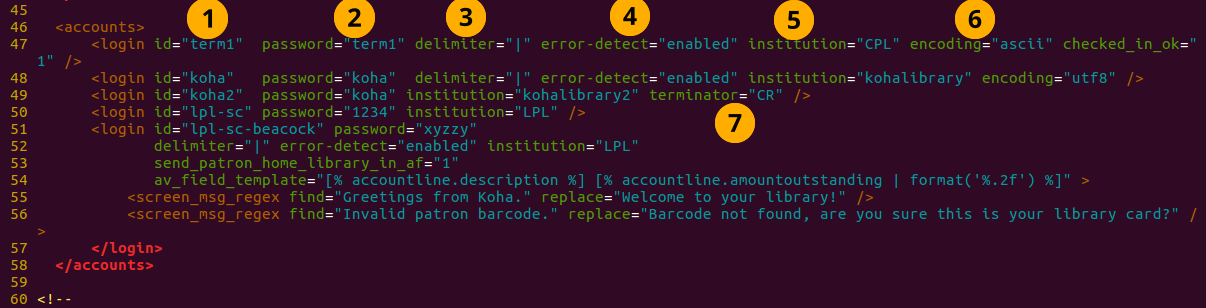
Account value definitions:
- Login id: This is the account username. - Modify this accordingly
- Password: Account password - Modify this accordingly
- Delimiter: The type of delimiter for account information - Leave as default
- error-detect - Leave as default
- Institution: This is the branchcode for the library that the user belongs to. NOTE: This institution needs to be defined further down in the institution area of the SIPconfig.xml file and it must also exist in the Koha database. i.e. you need to create a library with the same branchcode in Koha staff interface.
- encoding: This is the standard used to encode the account data
- Terminator: This needs to match the terminator value of the SIP2 server. - Modify this if you know the terminator value of the SIP2 server.
Institution
The institution information you define here must match a library created in the Koha staff interface.
Avvertimento
You need to make sure all the institutions that accounts are assigned to further up in the SIPconfig.xml file are also defined in the institution area of the same file.

Institution value definitions:
1. Institution id: The branchcode of the library. - Modify this accordingly. Must be the same as created in Koha and the account area.
- Implementation: Defines the code that will be run. - Leave as default
3. Policy: Policy defines the permitted SIP2 commands allowed from SC’s in this institution. For example: renewal=”true” means that SC’s at that institution have permission to send renewal item SIP2 commands.
4. Starting SIP2 Simply write in the command: sudo koha-start-sip <instancename>
Nota
Now you have a running SIP2 server.
Using SIP2
SIP2 is a communication protocol. The messages sent in SIP2 are either requests or responses. The SC’s send request messages to the ACS which will run some logic and send back the resulting value to the SC as a response message.
The request messages contain arguments, which are data values used by the ACS in its functions to perform the required task such as renewing items.
SIP2 commands
If you want to manually use/test SIP2 then you will be writing and receiving messages via the Linux terminal.
To be able to send and receive messages with the SIP2 server you need to use telnet to open a SIP2 connection. You need to specify the port number you want telnet to use.
To find this information look at the service area at the top of the SIPconfig.xml file (look for the port number as pointed out by the arrow in the below screenshot).

Write into the terminal
telnet localhost <portnumber>
e.g. telnet localhost 8023
Now write in the username and password set in one of the accounts in the SIPconfig.xml file.
Now you are connected to the SIP2 server you can start writing and sending request commands. The connection to the SIP2 server does time out fast so if haven’t finished writing and receiving commands simply write in:
telnet localhost <portnumber>
to restart the SIP2 connection.
SIP2 command syntax
Every SIP2 command has a 2 digit numerical prefix which defines what the command is doing.
e.g. To get information about a patron you start your command with the prefix: 63. The response from the server also has a corresponding numerical prefix.
Below is an example of a SIP2 request message to request patron information (in this example a Koha patron account with the user name ‘joe’, password ‘joes’, and card number ‘y76t5r43’ has been created in the Koha staff interface).
Additionally a library with the branchcode of ‘WEL’ has been created in the Koha staff interface and is also defined in the institution area of the SIPconfig.xml file):

So the format of this SIP2 request message is:

Nota
The summary value is a 10 character value. If a Y is written in for the summary value then you will be able to get both a summary and more detailed informational output.
The value in the <YYYYMMDD> <HHMMSS> is the current datetime, by leaving a 4 space gap between the YYYYMMDD and HHMMSS this indicates you want to use local time rather than UTC.
Nota
In this manual letter codes for the various fields are used where possible in describing the SIP2 message fields e.g. AO<institutionid>.
These letter codes can be written in the SIP2 commands into the Linux terminal, but make sure when substituting values in for the fields (values inside the <>) that you do not write in the <> brackets.
SIP2 messages:
Block patron
This uses the prefix 01 for request messages and 24 for response messages.
Request message:

Nota
Card retained is a single character field of either ‘Y’ or ‘N’ which tells the ACS that a card has been retained by the self checkout machine.
Response message:

Nota
<patronstatus> is a 14 character long value. The value Y in the string means true. Each position in this string (starting at 0) has a single corresponding value (Y or N) in the string.
e.g. a Y at position 1 (the second value in the string) means that the patrons renewal privileges are denied.
Check-in items
This uses the request message (messages sent to the ACS) prefix of 09 and the response prefix of 10 (sent to the SC).
Request message:

Nota
- <no block (Offline)> is a single character field of either ‘Y’ or ‘N’ which indicates if the transaction is being performed offline. As offline transactions are not supported you need to write ‘N’ if you are testing this message out manually.
- <transactiondate> this is a 18 character field with the date is the format: YYYYMMDDZZZZHHMMSS.
ZZZZ is the timezone, if you want to set it to local you need to leave 4 blank spaces, but if you want to set it to the UTC (Coordinated Universal Time) then you need to write in 3 blank spaces and a Z.
Response message:

Nota
Alert type could have one of several values: 00 : Unknown 01: local hold 02: remote hold 03: ILL Transfer 04: transfer 99: Other
If an item is resensitized then the value of <resentitize> should be Y otherwise it should be N. Rensensitizing items is done to ensure that if someone tries to steal the item they are detected.
Checkout items
This uses the request message prefix of 11 and the response message prefix of 12. It has similar syntax to the check-in command, outlined above except the prefixes are different.
Hold – May not yet be supported on some systems. This has a request message numerical prefix of 15 and a response message prefix of 16.
Request message:

Nota
<holdmode> is a single character value. + means add a hold, - means delete a hold and * means change a hold.
Response message:

Nota
- <ok> is a single length value which is either 0 (for hold is not permitted or was not successful) or 1 (for hold is permitted and was successful).
- <available> is a single length value which is either Y or N. Y means the item is currently in the library, whilst N means the item is currently on loan/someone else has created a hold on the item.
Item information: This uses the request command prefix of 17, and the response command prefix of 18
Request message:

Nota
See the check-in items command (described above) to find out what the <xact_date> value is.
The terminal password is optional.
Response message:

Item status update This uses the request message prefix of 19 and the response message prefix of 20
Request message:

Nota
<itemproperties> is not a fixed length value, and you can optionally write in values such as item size and these values will be stored in the Koha database for the item.
Response message:

Nota
<itempropertiesok> is a single length character value which is either 0 or 1. 1 identifies that the <itemproperties> value defined in the item status update request message was successfully stored in the Koha database.
Patron status
This uses the request message prefix 23 and the response message prefix of 24.
Request message:

Response message:

Nota
The value displayed for <patronvalidity> is Y (valid) and N (invalid) The value in the <YYYYMMDD> < HHMMSS> is the current date/time.
The reason for the gap between the two values is to define that you want to use localtime rather than UTC.
Patron enable - This is not yet supported. This uses the request message prefix of 25 and the response message prefix of 26
Nota
This command undoes the block patron command.
Request message:

Response message:

Renew This uses the request message prefix of 29 and the response message prefix of 30
Request message:

Nota
- <thirdpartyallowed> is a single character value which is either Y or N. If it is Y then third parties can renew items.
- <noblock> is a single character value which is either Y or N. If it is Y then this means that the item was checkin/out when the ACS was offline.
- <nbduedate> is the transaction date of checkin/checkout when the ACS was offline.
- <feeacknowledged> is a single character value which is either Y or N. This indicates if the user accepts the fee associated with the item they are renewing.
Response message:

Nota
- <ok> is a single character value which is either 0 or 1. A value of 1 means the item was successfully renewed, 0 means item was not successfully renewed.
- <renewalok> is a single character value which is either Y or N. The logic for the setting of the value of <renewalok> is Y is set when the item is already checkout by the user and so it should be desensitized thereby renewing it, whereas N is set if the item is not already checkout to the patron and so it should not be renewed.
In other words don’t let patrons renew books when they are not currently checked out to them.
- <magneticmedia> is a single character value which is either Y (for yes), N ( for no), or U (for unknown).
- <mediatype> is a three numerical character long value. For a list of the values go to: http://multimedia.3m.com/mws/media/355361O/sip2-protocol.pdf
End session
This uses the request message prefix of 35 and the response message prefix of 36
Request message:

Response message:

Nota
<success_or_failure> is either Y for success or N for failure.
Fee Paid – May not be implemented yet. This uses a request message prefix of 37 and a response message prefix of 38
Request message:

Nota
- <feetype> is a two numerical character value which is between 01 and 99. To see a list of fee type values go to http://multimedia.3m.com/mws/media/355361O/sip2-protocol.pdf
- <paymenttype> is a two character numerical value between 00 and 99. 00 is cash, 01 is Visa, and 02 is credit card.
- <currencytype> is a 3 alphanumeric character long value identifying the currency the fee paid was in.
Response message:

Nota
<paymentaccepted> is a single alphanumeric character long value which is either Y (payment has been accepted) or N (payment has not been accepted).
Patron information
This uses the request message prefix of 63 and the response message prefix of 64
Request message:

Response message:

Nota
<valid patron> is Y for valid and N for not valid.
Nota
<hold itemcount><overdueitemcount><chargeditemscount><fienitemscount><recallitemscount><unavaliableholdscount> are all 4 numerical character long values.
Renew all
This uses the request message prefix of 65 and the response message prefix of 66.
Request message:

Response message:

Nota
- <renewedcount> is a 4 numerical character long value denoting the number of items that were renewed.
- <unrenewedcount>, has the same format as the <renewedcount> but it denotes the number of items not renewed.
Login
This uses the request message prefix of 93, and the response message prefix of 94.
Request message:

Nota
<UIDalgorithm> and <PWDalgorithm> are one character long values indicating the type of algorithm to use to encrypt the loginuserid and loginpassword respectively.
Writing in the value of 0 means these values will not be encrypted.
Response message: 941 is a successful login. 940 is an unsuccessful login [connection closed by foreign host.] is a unsuccessful login
Resend
This requests the receiving device to resend its last message.
SC -> ACS resend request is 97
ACS -> SC resend request is 96
Status of the ACS and SC
This has the request message prefix of 99 and the response message prefix of 98.
Request message:

Nota
The status code is one of 3 values. * 0: SC is ok * 1: SC is out of paper * 2: SC is shutting down max print width is a 3 character long value which is the integer number of characters the client can print Protocol version is a 4 character value in the format x.xx
Response message:

Nota
If you get the response message ‘96’ this means that the request message is not valid/understood.
Troubleshooting SIP2
Can’t connect to remote host when writing in the command telnet localhost <portnumber>
3 solutions for this issue to try are:
1. Check the portnumber your writing in the above command is the port number written in the SIPconfig.xml file at the location indicated by the number 1. i.e. in the below example because the portnumber is 6001 the correct command would be: telnet localhost 6001
2. Check if any userid is written more than once in the SIPconfig.xml file. The userid (which is simply the username of the Koha user) needs to be unique within the SIPconfig.xml file. If you have the same userid multiple times in your SIPconfig.xml file this will cause the connection to SIP2 to fail before you get a chance to authenticate.
3. Check the account defined in the SIPconfig.xml file also exists in the Koha database with the same username, password and has circulate permissions. If you have dropped and recreated the Koha database after creating the patron account in the Koha staff interface and the SIPconfig.xml file then that patron account will not exist in the Koha database and so you will need to recreate them in the Koha staff interface.
Further troubleshooting
To access the SIP2 logs in your Koha home directory navigate to the following directory: /var/log/koha/<instancename>
Then view the output of the sip-error.log and the sip-output.log files which give more detailed information about the SIP2 error.
- cat sip-error.log
- cat sip-output.log
Useful links on SIP2 commands:
http://multimedia.3m.com/mws/media/355361O/sip2-protocol.pdf
Integrating LDAP with Koha
Setting up LDAP (Lightweight Directory Access Protocol) for Koha allows you to store all user information in a central database which is accessed both by your organisations Koha instance and for users to authenticate on other existing systems.
LDAP is a protocol used for file discovery over networks and network authentication.
LDAP configurations are powerful allowing you to customise how Koha and LDAP interact. LDAP can be configured so that new accounts created in LDAP can be synced down into the Koha database, additionally updates to the LDAP user account are synced down to the Koha database.
However Koha cannot sync data up to the LDAP server, thus the data traffic when using LDAP is only one directional.
Auth_By_Bind is set to 1 where a Microsoft Windows Active Directory system is in use in the LDAP database.
Before going through the steps to configure LDAP you will need the following information/actions from the organisation
- The organisation will need to open a port to allow access to their AD from the server.
- Information on the access to the AD server (IP address/hostname, port, SSL info)
- Information on the configuration of the AD server (relevant OUs, DCs, CN formats relative to usernames)
- Mapping between AD fields and Koha fields, including defaults
- Default values for things not provided by AD (categorycode, branchcode for example)
- To authenticate a user do we bind as them (seems to be common for AD) or do we use an account and login with that and then check? If the latter, we’ll need details of how to log in
- Do the existing usernames in Koha match the usernames that we’ll be using to look them up in AD? If so, good. If not, how will we deal with duplicate users?
Steps to set up LDAP with your Koha instance
1 In Linux terminal navigate to the directory containing the koha-conf.xml file which will either be in: * /etc/koha/sites/<instance-name>/ OR * /etc/koha/
2 Open the koha-conf.xml file with root permissions: sudo vi koha-conf.xml
3 Scroll down to the line containing ‘<useldapserver>0</useldapserver>’ and change it to: <useldapserver>1</useldapserver>
4 Then in the next line below write in the LDAP configurations below: Note all fields highlighted in yellow need to be replaced with the appropriate values for your organisations LDAP server.
<ldapserver id=»<ldapserverid>»>
<hostname><hostname></hostname>
<base>dc=<domaincontroller>,dc=<domaincontroller></base>
<user>cn=<nameofuser>, dc=<domaincontroller>,dc=<domaincontroller></user> <!–This is the username of user account with permissions to query the LDAP server –>
<pass><password></pass> <!– This is password of the user account with permissions to query the LDAP server–>
<replicate><either0or1></replicate> <!– add new users from LDAP to Koha database –>
<update><either0or1></update> <!– update existing users in Koha database –>
<auth_by_bind><either0or1></auth_by_bind> <!– set to 1 to authenticate by binding instead of password comparison, e.g., to use Active Directory –>
<principal_name><principalname></principal_name> <!– optional, for auth_by_bind: a printf format to make userPrincipalName from koha userid –>
<mapping> <!– match koha SQL field names to your LDAP record field names–>
<firstname is=»givenname»></firstname>
<surname is=»sn»></surname>
<address is=»postaladdress»></address>
<city is=»l»>Athens, OH</city> <!– Athens,OH is the default value for city of all users logging into Koha –>
<zipcode is=»postalcode»></zipcode>
<branchcode is=»branch»>Central</branchcode>
<userid is=»uid»></userid>
<password is=»userpassword»></password>
<email is=»mail»></email>
<categorycode is=»employeetype»>EM</categorycode>
<phone is=»telephonenumber»></phone>
</mapping>
</ldapserver>
5 Save and exit the koha-conf.xml file
6 Check the LDAP connection works by writing in:
ldapsearch -H ldaps://host.name -s base -x -w «» -d 1
Nota
Note about hostname Hostname can either be a alphanumerical name or it can be the LDAP server IP address (its optional to write port number). By default the ldaps default port number is 636, whilst ldap default port number is 389
Nota
Note about the replicate and update fields The replicate LDAP config field for LDAP in the koha-conf.xml file allow the Koha database to be added to with a new borrower account whenever a user logs into Koha (either the staff client or OPAC) with their LDAP username and password (assuming the same username and password does not already exist in the Koha database).
Whereas the update LDAP config field (in the same file allows) allows for user information in the LDAP database to be synced down to the Koha database. e.g. if someone gets married and their surname changes then the new surname only needs to be updated in the existing LDAP database and that will be synced down to the Koha database automatically if the update configuration is set to 1.
About the mapping fields (the fields highlighted green) <city is=»l»>Athens, OH</city>
The left hand column name (highlighted yellow) is the name of the column in the LDAP database.
The column name inside quote marks (highlighted pink) is the name of the column in the Koha database. NOTE: This can be filled with any value if there is no equivalent column name in the Koha database as exists in the LDAP database.
The value highlighted cyan is the default value for the specified Koha and LDAP columns. So in the above example all user records in the Koha and LDAP databases will by default have the city value of ‘Athens, OH’.
Example of the LDAP configurations:
<useldapserver>1</useldapserver><!– see C4::Auth_with_ldap for extra configs you must add if you want to turn this on –>
<ldapserver id=»ldapserver» listenref=»ldapserver»>
<hostname>ldaps://example.co.au</hostname>
<base>ou=employees,dc=companya,dc=com,dc=au</base>
<user></user> <!– DN, if not anonymous –>
<pass></pass> <!– password, if not anonymous –>
<auth_by_bind>1</auth_by_bind>
<replicate>1</replicate> <!– add new users from LDAP to Koha database –>
<update>0</update> <!– update existing users in Koha database –>
<principal_name>ou=employees,dc=companya,dc=com,dc=au</principal_name>
<mapping>
<userid is=»uid» ></userid>
<cardnumber is=»uid» ></cardnumber>
<email is=»mail» ></email>
<surname is=»sn» ></surname>
<firstname is=»givenname» ></firstname>
<categorycode is=»1»>EM</categorycode>
<branchcode is=»1»>SYD</branchcode>
</mapping>
</ldapserver>
The values in the mapping area are not always the same, and it depends on what is in your organisations LDAP database. For example some organisations do not use <userid> instead each user is only identified by the <email> field and so no <userid> is written.
Troubleshooting LDAP
The log that LDAP errors are printed to depends on several factors:
If plack is not disabled then LDAP errors are displayed in the plack-error.log file If plack is disabled then the location that LDAP errors are printed to is either the opac-error.log file (if the user is logging into the OPAC) or the intranet-error.log file (if the user is logging into the staff client) All of these three log files are accessible in the following directory:
/var/log/koha/<instance>/
OCLC Connexion Gateway
Koha può essere configurato per lavorare con l” OCLC Connextion Gateway. Questo permette alla biblioteche di usa l” OCLC Connextion come strumento di catalogazione e di inviare a Koha questi records con un click. Le seguenti istruzioni ti aiuteranno a configurare l” OCLC Connextion Gateway. Se ha un amministratore di sistema, consultalo durante il processo.
Configura l” OCLC service in Koha
Prima di tutto devi creare un file in un punto del server con le informazioni di configurazione. Puoi metterlo dovunque sia acessibile all’account che verrà usato dal servizion
Il file contiene 11 line. Le prime 6 riguardano il sistema di Koha
host: The IP address of your Koha server
port: The port you want to use for the Connexion service. This port must be different from your SIP port, or any other service
koha: The full URL of your staff client
log: The location (full file specification) of your log for the service
user: The default Koha username to use for importing
password: The password that goes with that username
Le altre linee indicano come caricare i dati:
match: The name of the matching rule from your system to use
overlay_action: "replace", "create_new", or "ignore"-- what to do if there is a match
nomatch_action: "create_new" or "ignore"-- what to do if there is no match
item_action: "always_add","add_only_for_matches","add_only_for_new", or "ignore" -- what to do with embedded 952 item data
import_mode: "direct" or "stage"
Un file di esempio sarebbe così:
host: 1.2.3.4
port: 8000
log: /home/koha/koha-dev/var/log/connexion.log
koha: http://kohastaff.myuniversity.edu
user: koha_generic_staff
password: password
match: 001
overlay_action: replace
nomatch_action: create_new
item_action: ignore
import_mode: direct
When choosing an “import_mode” if you use «direct» then the staged record will be immediately imported into Koha, and should be searchable after your indexes catch up. If you choose «stage», then the record will be placed in a staged batch for you to later go the Manage Staged MARC Records tool to finish the import.
Se importi più records, essi saranno nello stesso batch, fino a quanto il batch non sarà importato. Poi verrà creato un nuovo batch.
Nella modalità “direct” ogni record entrerà in Koha con un suo batch
Per far partire il servizio lancia lo script:
/location/of/connexion/import/daemon/connexion_import_daemon.pl -d -c /location/of/config/file.cnf
Configura il tuo OCLC desktop client
Nota
Gli screenshots provengono da OCLC Connexion Client v.2.50 e da Koha v.3.12
To set up the OCLC Connexion desktop client to connect to Koha, go to Tools > Options, then choose the Export tab.
Clicca il pulsante «Create…» per configurare una nuova destinazione, poi scegli il «OCLC Gateway Export» e clicca OK.
- Inserisci le seguenti informazioni:
- «Host Name:» Your catalog’s appropriate IP address (from your config file above)
- «Port:» Your catalog’s appropriate port number (from your config file above)
- «Login ID:» Il login del catalogatore in Koha
- «Password:»La password collegata
- «Notify Host Before Disconnect» = checked,
- «Timeout» = 100, «Retries» = 3, «Delay» = 0 (zero),
- «Send Local System Logon ID Password» = checked.

- Inserisci le seguenti informazioni:
Seleziona «OK» quando finito, e vedrai la nuova «Gateway Export» nella lista (L” IP address e la porta sono cancellati negli screenshot)
Gateway Export aggiunto
Clicca su «Record Characteristics» e controlla che i records bibliografici siano su MARC21, UTF-8 Unicode. Poi clicca OK per salvare.
Caratteristiche del record
Ora puoi partire! Per esportare da OCLC Connexion Client a Koha, basta premere F5 quando il record è sullo schermo. Verra mostrato il pop-up dell’export e vedrai Connexion che chiamerà Koha. Riceverai un messaggio se il record è stato aggiunto o sovrascritto in Koha, incluso il suo biblionumber, e un URL che puoi mettere nel web browser per andare al record in Koha.
Usare l’OCLC Connexion Gateway
I records posso essere esportato da Connexion sia in batch che uno alla volta.
Per esporare un record alla volta
To export bibliographic records one by one, be sure your «Batch» options are correct: from the «Tools» menu, select «Options», and select the «Batch» tab. In the «Perform local actions in batch» area, «Bibliographic Record Export» should be unchecked
When ready to export, from the «Action» menu, select «Export» or use the F5 key. You will see a screen similar to the following if the import is successful and if the record is new to the Catalog; you may copy & paste the resulting URL into your Koha catalog to see the new record.
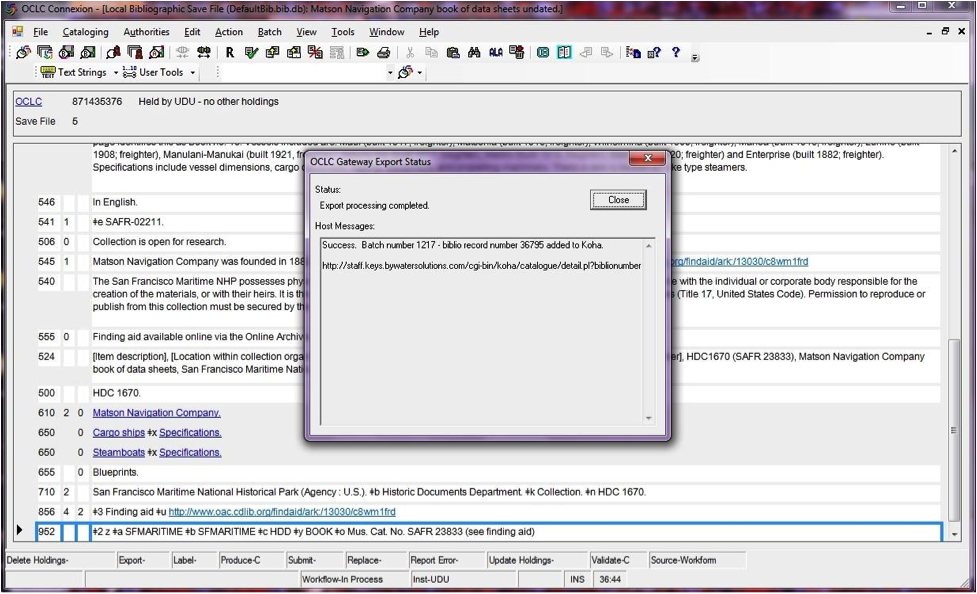
If the record was overlaid, you will see a message to that effect in the «OCLC Gateway Export Status» window
Esporta i records via batch
To export bibliographic records in a batch, be sure your «Batch» options are correct: from the «Tools» menu, select «Options», and select the «Batch» tab. In the «Perform local actions in batch» area, «Bibliographic Record Export» should be checkedOCLC

Quando un record è pronto per l’esportazione, dal menu «Action», seleziona «Export» o usa il tasto F5, e lo stato di esportazione diventerà «ready».
When ready to export the batch, from the «Batch» menu, select «Process batch» and check the appropriate «Path» and «Export» boxes
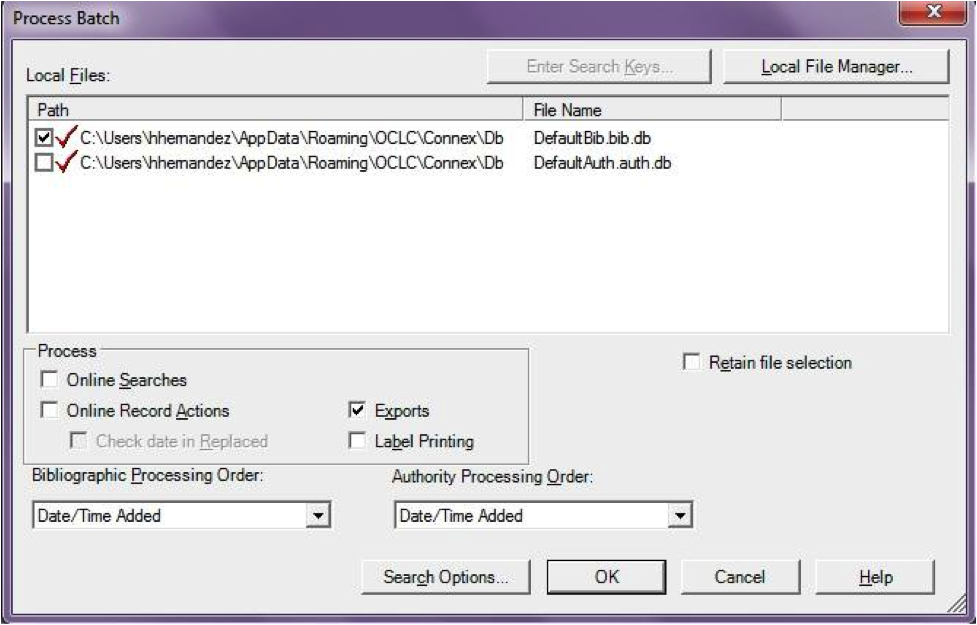
The export will begin, and the bib records will be exported & imported into Koha one by one; you will see «OCLC Gateway Export Status» windows, as above, showing you the results of each export. That window will stay there until you select «Close,» and then the next record’s export/import will begin. The process will continue until all records in the batch are completed. Then you may or may not see the Connexion Client export report (depending on your Client options for that).
Copie in OCLC
If you’d like to create your item records in OCLC you can do so by addding a 952 for each item to the bib record you’re cataloging. The Item/Holdings Cataloging Guide will break down what subfields you can use in the 952, but at the minimum you want to have subfield 2, a, b, and y on your items.
952 \$2CLASSIFICATION$aHOMEBRANCHCODE$bHOLDINGBRANCHCODE$yITEMTYPECODE
- The subfield 2 holds the classification code. This can be ddc for Dewey or lcc for Library of Congress or z for Custom. Other classification sources can be found in the Classification Sources area in administration
- Subfield a is your home library and needs to be the code for your home library, not the library name. You can find these codes in the Libraries & Groups administration area.
- Subfield b is your holding library and needs to be the code for your holding library, not the library name. You can find these codes in the Libraries & Groups administration area.
- Subfield y is your item type code. It needs to be the code, not the item type name. You can find these codes in the Item Types administration area.
952 \$2ddc$aMAIN$bMAIN$yBOOK
In addition to these required fields you can enter any other subfield you’d like. Most libraries will enter a call number in subfield o and a barcode in subfield p as well. Review the Item/Holdings Cataloging Guide for a full list of subfields and values.
Domande frequenti
Visualizza
Tipi di elemento personalizzati/Icone per i valori autorizzati
Question: Can I have my own set of item type images (or authorized value icons)?
Answer:Absolutely. To add additional icons to your system you simply add a new directory to koha-tmpl/intranet-tmpl/prog/img/itemtypeimg/ and to koha-tmpl/opac-tmpl/prog/itemtypeimg and put your icons in the new directory. Your icons will show up in a new tab as soon as they are in the folders.
Nota
Non dimenticare di mettere le icone sia nell’OPAC, sia nella intranet.
Personalizzare le immagini di Koha
Question: Can I customize the images in the OPAC?
Answer: Absolutely. Koha comes with a series of original images that you can alter to meet your needs. The originals can be found in the misc/interface_customization/ directory.
Visualizzazione dei campi nell’OPAC
Question: What MARC fields print to the different OPAC screens in Koha?
Answer: The XSLT preference must be set as follows for the following fields to show
- OPACXSLTResultsDisplay = using XSLT stylesheets
- OPACXSLTDetailsDisplay = using XSLT stylesheets
- DisplayOPACiconsXSLT = show
La pagna Risultati nell’OPAC visualizza i campi:
- 245
- 100, 110, 111
- 700, 710, 711
- 250
- 260
- 246
- 856
La pagina Dettagli dell’OPAC visualizza i campi:
- 245
- 100, 110, 111
- 700, 710, 711
- 440, 490
- 260
- 250
- 300
- 020
- 022
- 246
- 130, 240
- 6xx
- 856
- 505
- Campo 773
- 520
- 866
- 775
- 780
- 785
- oltre a tutti i campi 5xx nella scheda Note al fondo
Visualizzazione del sottotitolo nei record bibliografici
Question: How do I get the subtitle to display on the detail pages for my bib records?
Answer: Subtitle display now depends on there being a keyword mapping for the MARC field in question. Adding a mapping for «subtitle» -> «245b» for an item’s framework results in display of the subtitle in OPAC and staff client search and detail pages (although not in all instances where subtitles might be displayed, e.g. the Cart).
Mostrare agli utenti i codici a barre degli elementi che hanno chiesto in prestito
Question: Can patrons see the barcodes for the items they have checked out.
Answer: Not by default, but with a few edits to the patron record you can make a barcode column appear on the patron’s check out summary in the OPAC. You can set up a patron attribute with the value of SHOW_BCODE and authorized value of YES_NO to make this happen.
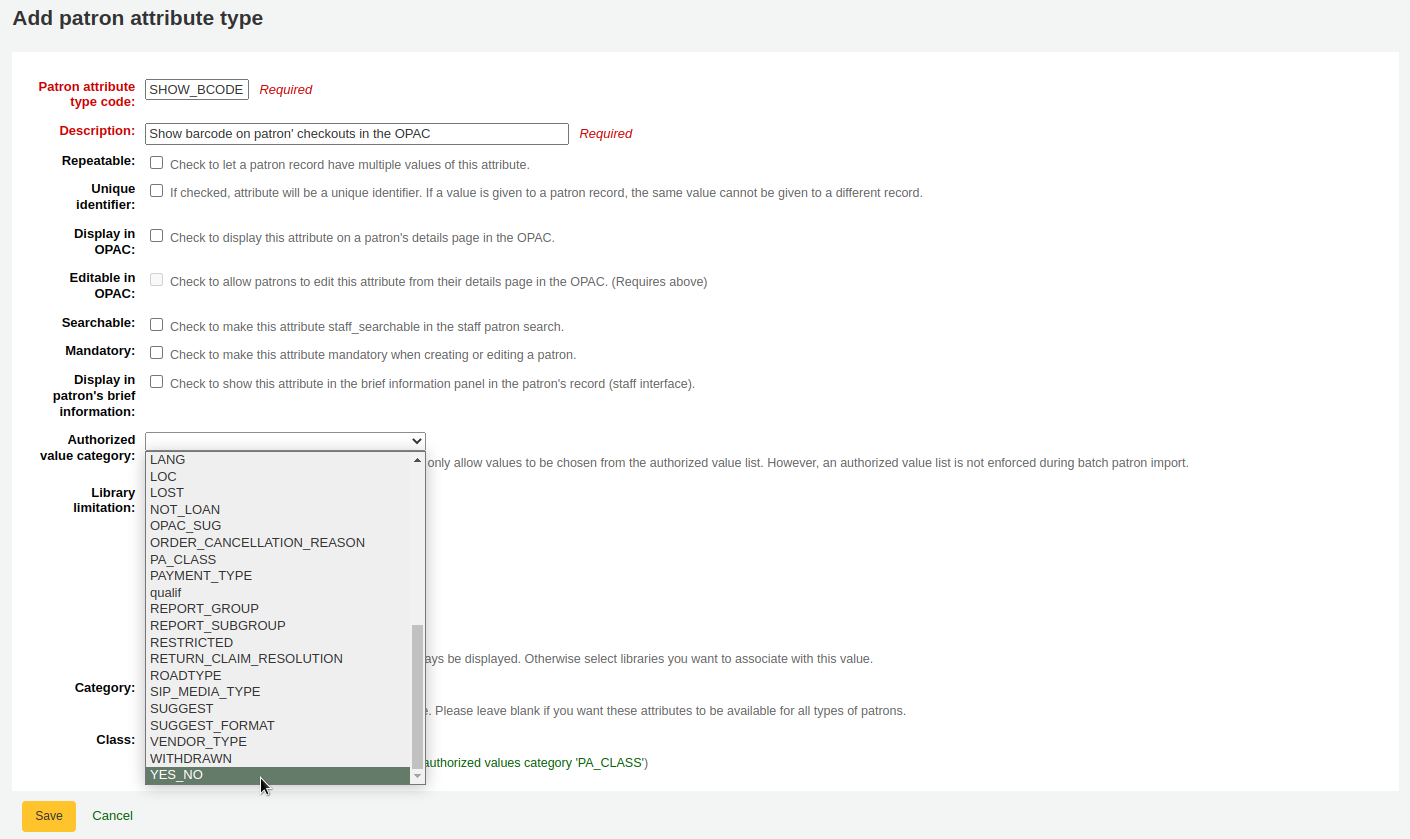
Then on the patron’s record set the value for SHOW_BCODE to yes.
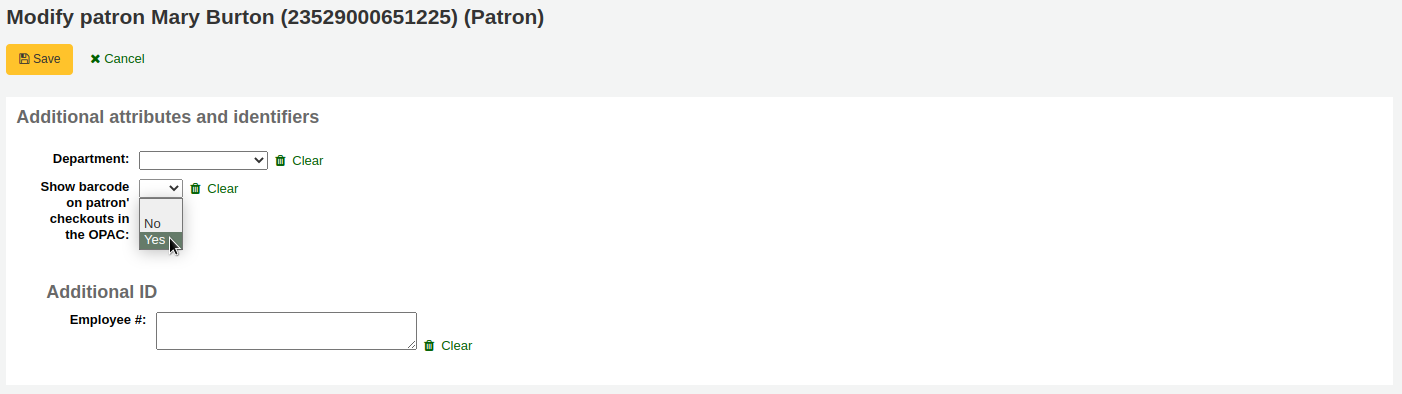
Verrà aggiunta una colonna nella sintesi dei prestiti nell’OPAC che mostra agli utenti il codici a barre delle copie in prestito.
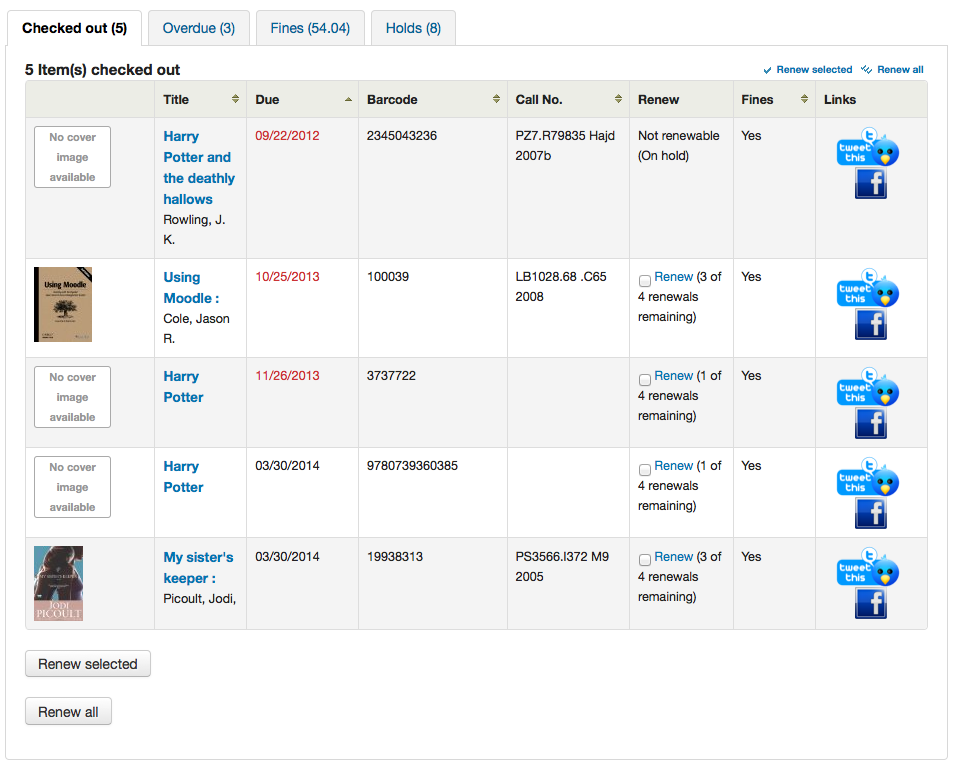
Facendo clic sulla scheda “in ritardo” verranno mostrate solo le copie prestate in ritardo di restituzione.
Circolazione/Avvisi
Data di riconsegna
Question: How is the book drop date is determined? Is it the last open date for the checkout branch? Is it today’s date minus one? Can the book drop checkin date be set?
Answer: If the library is closed for four days for renovations, for example, there would be more than one day needed for the book drop date. You will only have one book drop date and that will be the last day that the library open (determined by the holiday calendar) because there is no real way to know what day the books were dropped into the box during the 4 closed days. The only way to change the effective checkin date in book drop mode is to modify the calendar.
Prenotazioni da trattare e Prenotazioni in coda
Question: What is the difference between the Holds Queue and Holds to Pull?
Answer: The holds to pull report gives a simple list of what holds need to be filled with available items. It should only be used in Koha installations where there is only one library.
The holds queue tries to do the same thing, but in a “smarter” way. This allows it to split up the list by library, consult the transport cost matrix and refresh regularly to provide different pull lists to each library.
Avvisi di scadenza duplicati
Question: Why are patrons getting two overdue notices?
Answer: This tool takes all branches in the overdue rules and sent notifications to them. So, if you have a default rule & a branch rule, the notification will be generated twice. A quick fix is to discard «default rule» for instance.
Stampa degli avvisi di scadenza
Question: Can I print overdue notices for patrons without email addresses on file?
Answer: Yes. The overdue notice cron job has a setting to generate the overdue notices as HTML for printing. An example of this usage would be:
overdue_notices.pl -t -html /tmp/noticedir -itemscontent issuedate,date_due,title,barcode,author
Nell’esempio si sono voluti utilizzare, per produrre gli avvisi, solo alcuni campi della tabella Items, così sulla riga di comando è stata specificata l’opzione itemcontents, seguita dalla lista di campi; non si tratta però di un requisito per utilizzare la funzione.
The command line needs to specify a web-accessible directory where the print notices will go – they get a filename like notices-2009-11-24.html (or holdnotices-2009-11-24.html). The overdue notice itself can be formatted to fit a Z-mailer. Within the notice file, the text is spaced down or over to where it will print properly on the form. The script has code that wraps around the notice file to tell the HTML to obey the formatting, and to do a page break between notices. That’s so that when staff print it out, they get one per page. We had to add an extra syspref (PrintNoticesMaxLines) to specify page length because our client allows a _lot_ of checkouts which meant some notices were running onto multiple pages. That syspref says to truncate the print notice at that page length and put in a message about go check your OPAC account for the full list.
The print and email overdues use the same notice file. The print notices for holds are different – there’s a separate HOLD_PRINT notice file and the system uses it if there’s no email address. Then a nightly cron job runs to gather those up from the message queue and put them in an HTML file in the notice directory, as above.
The cron entry is gather_print_notices.pl /tmp/noticedir
Impossibile rinnovare i prestiti
Question: We’re trying to renew some items for our patron. One of the items is on hold and ineligible for renewal, but the other two items refuse to renew even though they should be eligible. When I try to use the override renewal limit, it just returns a little message that says «renewal failed». Any idea what’s going on here?
Answer: At the very least you will need to set an absolute default circulation rule. This rule should be set for the default itemtype, default branchcode and default patron category. That will catch anyone who doesn’t match a specific rule. Patrons who do not match a specific rule will get blocked from placing holds or renewing items, since there was no baseline number of holds or renewals to utilize.
Impossibile prenotare
Question: Why can’t I place holds when I have all of the preferences turned on.
Answer: You probably need to set a default circulation rule. At the very least you will need to set an default circulation rule. This rule should be set for all item types, all branches and all patron categories. That will catch all instances that do not match a specific rule. When checking out if you do not have a rule for the default branch, default item and default patron category then you may see patrons getting blocked from placing holds.
Scorciatoie da tastiera
Question: Do I have to use my mouse to access the checkout, checkin and cataloging tabs at the top of the circulation pages?
Answer: You can jump between the tabs on the quick search box at the top of the screen by using the following hot keys (if the tab is available):
vai alla ricerca con alt+Q
vai al prestito con Alt+U
- questo non funziona per utenti Mac
vai alla restituzione prestiti con alt+R
Nota
Gli utenti Mac possono usare il bottone OPTION al posto di ALT
Avvisi e messaggi via SMS
Question: I want Koha to send notices via SMS, what do I need to do?
Risposta: Prima di tutto bisogna scegliere un servizio di messaggistica SMS da utilizzare con Koha; un elenco è disponibile su http://search.cpan.org/search?query=sms%3A%3Asend&mode=all Non tutti i servizi di messaggistica SMS utilizzabili dalle biblioteche hanno driver Perl, perciò è bene verificare che il provider considerato sia elencato. Se non lo è, è consigliabile richiedere al proprio provider se ha un modulo Perl; se non lo ha, è necessario rivolgersi ad un altro fornitore. Alcuni fornitori molto diffusi negli Stati Uniti, che hanno driver Perl, sono:
- AQL (www.aql.com)
- Wadja (wadja.com)
- Ipipi (ipipi.com)
- T-mobile
- SMSDiscount (smsdiscount.com)
- Clickatell
Question: What about in India?
Answer: India does not yet have too many options here. This is partly due to the Telecom regulatory authority’s (TRAI) stipulations about transactional SMSes and limits on the number of SMSes that may be sent / received per users per day. India specific drivers include:
- Unicel Technologies Pvt Ltd (unicel.in)
Catalogazione
Campi Authority
Question:Why can’t I edit 1xx, 6xx, or 7xx fields in my catalog record?
Answer: These fields are authority controlled and you probably have the BiblioAddsAuthorities set to «Don’t allow». When it is set to «Don’t allow» these fields will be locked and require you to search for an existing authority record to populate the field with. To allow typing in these authority fields set BiblioAddsAuthorities to “Allow”.
Nota
I campi influenzati da questa impostazione mostrano all’interno l’icona di un lucchetto

Link tra Koha e MARC
Question: What’s the relationship between “Koha to MARC Mapping” and “MARC Bibliographic Frameworks”?
Answer: Mapping can be defined through “MARC Bibliographic Frameworks” OR “Koha to MARC Mapping”. “Koha to MARC Mapping” is just a shortcut to speed up linkage. If you change a mapping in one of these modules, the mapping will change in the other as well. (In other words, the two modules “overwrite” each other in order to prevent conflicts from existing in Koha).
Numero di copie per record bibliografico
Question: Is there a limit on the number of items I can attach to a bib record?
Answer: There is no explicit limit to the number of items you can attach to a bibliographic record, but if you attach enough of them, your MARC record will exceed the maximum file size limit for the ISO 2709 standard, which breaks indexing for that record. I’ve found this occurs somewhere between 600 and 1000 items on a “normal” bibliographic record.
Analitici
Question: I am using the EasyAnalyticalRecords feature, but my links in the OPAC and Staff Client to “Show Analytics” are not working.
Answer: If you plan on using EasyAnalyticalRecords you will want to make sure to set your UseControlNumber preference to «Don’t use,» this will prevent broken links.
Acquisizioni
Planning Categories
Question: What is a planning category?
Answer: When you plan in advance for the way your budget is going to be spent, you initially plan for how it’s going to be spent over time, that’s the most natural thing to do.
Così si stabilisce di spendere 1000€ a gennaio, 1000€ a febbraio, 3000€ a marzo, ecc. In pratica, si può fare la stessa cosa, utilizzando però una lista di valori al posto dei mesi.
Poniamo di avere di una lista come questa:
- < 1 month
- < 6 months
- < 1 year
- < 3 years
- < 10 years
- > 10 years
The list is meant to represent when the books acquired where published. Then you plan for it, saying: we went to spend at list 40% of our budgets on books published less than a year ago, 10% on books more than 10 years old, etc.
Al momento dell’acquisizione di nuovo materiale, sarà possibile, per un dato elemento, scegliere un valore dall’elenco a discesa. Dopodichè, quando il materiale sarà stato acquisito - alla fine dell’anno -, sarà possibile comparare gli obiettivi impostati con quelli che sono stati raggiunti.
Risorse in continuazione
Schemi avanzati
Question: What is the “inner counter” on the advanced serials pattern interface?
Answer: I think it is better to give an example to understand this :
Esempio per un abbonamento mensile:
- Data di pubblicazione della prima uscita: aprile 2010
- Numerazione: N. {X}, anno {Y}
- Pirma uscita: N. 4, anno 2010
Per l’anno Y si vuole che l’anno cambi a gennaio 2011
Il modello avanzato per Y sarà:
- Agiungi: 1
- ogni: 12
- Quando più di: 9999999
- Contatore interno: 3
- Torna a: 0
- Comincia con: 2010
L’anno cambierà dopo aver ricevuto dodici uscite a partire da aprile 2010, cioè ad aprile 2011, se non si imposta il contatore interno. Mettendo il contatore interno a 3, si dice a Koha: cambia l’anno dopo aver ricevuto 12-3 = 9 uscite.
Il contatore interno dice a Koha di tener conto delle prime uscite dell’anno, anche se non sono state ricevute con Koha. Se si inizia l’abbonamento con la prima uscita dell’anno, si lascia in bianco o si mette 0 (zero).
Reports
Definire codici memorizzati nel database
Tabella Fines
Question: What do the codes in the accounttype field in the accountlines table stand for?
Answer:
- A = Gestione della contabilità delle quote/tariffe
- C = Credito
- F= Ritardo con sanzione
- FOR = Cancellato
- FU = In ritardo, sta ancora crescendo
- L = Copia smarrita
- LR = copia persa rientrata/ripagata
- Assorito
- N = Nuova tessera
- PAY = Pagamento
- W = Stornato
Tabella Statistics
Question:What are the possible codes for the type field in the statistics table?
Answer:
- localuse
- Registra se una copia prestata a un utente con finalità statistiche (tipologia utente = “X”) e” rientrata.
- issue
- return
- renew
- writeoff
- payment
- CreditXXX
- XXX è un segnaposto per differenti tipi di tariffa, perciò una query che li includa tutti comprende una clausola LIKE, così: «type LIKE “Credit%”»
Tabella Reserves
Question: What are the possible codes for the found field in the reserves and old_reserves tables?
Answer:
- NULL: significa che l’utente ha richiesto la prima copia disponibile e non l’ha scelta
- T = Transito: la prenotazione è collegata a una copia che però e in transito nella biblioteca in cui si trova prima di tornare alla bibliotca che la possiede
- W = In attesa: la prenotazione è collegata a una copia che si trova nella biblioteca da cui deve essere ritirata. La copia sta aspettando sullo scaffale che l’utente la venga a ritirare
- F = Finito; la prenotazione è stata completata e finita
Tabella Reports Dictionary
Question: What are the possible codes for the area field in the reports_dictionary table?
Answer:
- 1 = Circolazione
- 2 = Catalogo
- 3 = Utenti
- 4 = Acquisizioni
- 5 = Accounts
Tabella Messages
Question: What are the possible codes for the message_type field in the messages table?
Answer:
- L = Per i bibliotecari
- B = per gli utenti
Tabella Serial
Question: What are the possible codes for the status field in the serial table?
Answer:
- 1 = Atteso
- 2 = Arrivato
- 3 = In ritardo
- 4 = Mancante
- 5 = Non disponibile
- 6 = Cancellato
- 7 = Sollecitato
- 8 = Fermato
- 41 = Mancante (non ricevuto)
- 42 = Mancante (esaurito)
- 43 = Mancante (danneggiato)
- 44 = Mancante (smarrito)
Tabella Borrowers
Question: What are the possible codes for the privacy field in the borrowers table?
Answer:
- 0 = Sempre
- 1 = Predefinito
- 2 = Mai
Tabella Messaging Preferences
Question: What are the possible codes in the message_attribute_id field in the borrower_message_preferences table?
Answer:
- 2 = notifica avanzata
- 6 = prestito
- 4 = prenotazione completa
- 1 = scadenza
- 5 =restituzione
Parametri di esecuzione
Question: Is there a way to filter my custom SQL reports before they run?
Answer: If you feel that your report might be too resource intensive you might want to consider using runtime parameters to your query. Runtime parameters basically make a filter appear before the report is run to save your system resources.
There is a specific syntax that Koha will understand as “ask for values when running the report”. The syntax is <<Question to ask|authorized_value>>.
- The << and >> are just delimiters. You must put << at the beginning and >> at the end of your parameter
- La “Questione da chiedere” verrà mostrata alla sinistra della stringa da inserire.
- The authorized_value can be omitted if not applicable. If it contains an authorized value category, or branches or itemtype or categorycode or biblio_framework, a list with the Koha authorized values will be displayed instead of a free field Note that you can have more than one parameter in a given SQL Note that entering nothing at run time won’t probably work as you expect. It will be considered as «value empty» not as «ignore this parameter». For example entering nothing for : «title=<<Enter title>>» will display results with title=”” (no title). If you want to have to have something not mandatory, use «title like <<Enter title>>» and enter a % at run time instead of nothing
Esempi per MARC 21:
SELECT surname,firstname FROM borrowers WHERE branchcode=<<Enter patrons library|branches>> AND surname like <<Enter filter for patron surname (% if none)>>
SELECT * FROM items WHERE homebranch = <<Pick your branch|branches>> and barcode like <<Partial barcode value here>>
SELECT title , author FROM biblio WHERE frameworkcode=<<Enter the frameworkcode|biblio_framework>>
Nota
To generate a date picker calendar to the right of the field when running a report you can use the “date” keyword like this: <<Enter Date|date>>
Nota
Devi mettere «%» in una casella di testo affinchè il sistema non la consideri nella query. Altrimenti il campo verrà considerato «» (stringa vuota o NULL), che è diverso da non considerare il filtro nella query SQL.
Importante
In addition to using any authorized value code to generate a dropdown, you can use the following values as well: Framework codes (biblio_framework), Branches (branches), Item Types (itemtypes) and Patron Categories (categorycode). For example a branch pull down would be generated like this <<Branch|branches>>

Limiti sui risultati
Question: When I download my report it’s limited to 10,000 results, how do I get all of the results to download?
Answer: There is a limit of 10,000 records put on SQL statements entered in Koha. To get around this you want to add “LIMIT 100000” to the end of your SQL statement (or any other number above 10,000.
Ricerca
Ricerca avanzata
Scorri indici
Question: What does “scan indexes” on the advanced search page mean?
Answer: When you choose an index, enter a term, click “scan indexes” and do the search, Koha displays the searched term and the following terms found in this index with the number of corresponding records That is search is not made directly in the catalog, but first in the indexes It works only for one index at once, and only with no limit in Location (All libraries needed)
Ricerca di termini che iniziano per un carattere specifico
Question: How do I search for all titles that start with the letter “C”?
Answer: You can choose to search for things that start with a character or series of characters by using the CCL “first-in-subfield”
- esempio: ti,first-in-subfield=C
Ricerca con caratteri jolly
Question:What is the difference between a keyword search using the “*” (asterisk) versus a keyword search using the “%” (percent)? Both work in the catalog, but return different sets. Why?
Answer: A wildcard is a character (*,?,%,.) that can be used to represent one or more characters in a word. Two of the wildcard characters that can be used in Koha searches are the asterisk (“*”) and the percent sign (“%”). However, these two characters act differently when used in searching.
The “*” is going to force a more exact search of the first few characters you enter prior to the “*”. The asterisk will allow for an infinite number of characters in the search as long as the first few characters designated by your search remain the same. For example, searching for authors using the term, Smi*, will return a list that may include Smith, Smithers, Smithfield, Smiley, etc depending on the authors in your database.
Il percento tratta le parole immesse dall’utente in termini di «somiglia a». Perciò una ricerca per «Smi%» troverà tutte le parole che «somigliano» a Smi, e questo conduce ad un elenco di risultati molto più vario. Per esempio, i risultati potrebbero comprendere Smothers, Smith, Smelley, Smithfield e molti altri, a seconda del contenuto del proprio database.
The bottom line in searching with wildcards: “*” is more exact while “%” searches for like terms.
Ricerca per titolo
Question: Why does my Zebra title search for “Help” not turn up “The help” in the first pages of results?
Answer: When doing a title search, you actually want to search for the title (i.e., “the help” rather than just “help”), and it will bubble right up to the top. If you’re just searching for “help” then the relevance ranking is going to affect the results you see.
When it comes to relevance in Zebra, here’s what’s happening. First, the search is done. If you search for the title «help», then any title that has «help» in it comes back. Then from those records, separately, it does relevance on the *whole* record. The more your word appears, the more relevant, and some MARC tags are worth more points than others. So a self-help book with 505 notes where «help» appears a *lot* will be at the top, regardless of keyword or title.
But when you add a *second word*, that helps it figure things out, as it’s weighing the relevance of both words and the phrase. Because of the way relevance works, if you search «the help», then «the help» or «the help I need» are more relevant than «the way to help», because they appear together in order. Likewise, «help the girl» would be lower relevance, because it’s out of order, and «help for the homeless» would be lower still, as they’re out of order, and apart.
In conclusione, i risultati di una ricerca per singola parola, particolarmente se comune, saranno sempre un po” in competizione tra loro: non si può valutare bene la rispettiva rilevanza, perchè non sono stati forniti elementi sufficienti.
Contenuti avanzati
Applicare FRBR (Functional Requirements for Bibliographic records - requisiti funzionali per record bibliografici) al contenuto
Question:At our public library we are running a Koha installation and we’ve tried to turn on all the nice functionalities in Koha such as the frbrising tool, but do not get the same result as Nelsonville public library.
Answer:In fact, this feature is quite tricky to make that right. First it looks at XISBN service. And then search in your database for that ISBN. So both XISBN and your internal ISBN (in biblio table) have to be normalized. You could therefore use the script misc/batchupdateISBNs.pl (it removes all the - in your local ISBNs)
Amazon
Contenuti Amazon
Question: I have all of the Amazon preferences turned on and have entered both of my keys, but none of the content appears in my system, why is that?
Answer: Amazon’s API checks your server time on all requests and if your server time is not set properly requests will be denied. To resolve this issue be sure to set your system time appropriately. Once that change in made Amazon content should appear immediately.
On Debian the the command is date -s «2010-06-30 17:21» (with the proper date and time for your timezone).
Amministrazione del sistema
Errori nelle esecuzioni pianificate di Zebra
Question: I am noticing some errors in the koha-zebradaemon-output.log file. When new records are added it takes a bit longer to index than we think they should. Running rebuild zebra is often faster. Zebra ends up indexing and search works, but I am concerned about the errors. Any ideas?
Answer: Rebuild_zebra.pl -r deletes all of the files in the Zebra db directories (such as reci-0.mf) and then recreates them. Thus, permissions will be lost, and the files will be owned by the user who ran rebuild_zebra.pl. If one rebuilds the zebra indexes as root, the daemons, which typically run under the user Koha, will not be able to update the indexes. Thus, it’s important then that the zebra rebuilds are put in the cronjob file of the user Koha, and not root. Also important is that other users, such as root, don’t manually execute rebuilds.
If one desires that another user be able to execute rebuild_zebra.pl, he should be given the permission to execute “sudo -u Koha …/rebuild_zebra.pl,” (if you want to do this, you also have to edit the sudoers file to pass the PERL5LIB variable with the env_keep option as by default sudo strips away almost all environment variables). Or, as root user, one can use a simple “su koha” and then the rebuild_zebra.pl command.
I’ve also tried to set the sticky bit on rebuild_zebra.pl, but for whatever reason it didn’t seem to work due to some problem with the PERL5LIB variable that I wasn’t able to figure. That seems to me the easiest thing to do, if anybody has any idea how to make it work. If it worked and were the default, I think it would help folks to avoid a great deal of the problems that come up with zebra.
Aprire al pubblico il servizio Z39.50
Question: Could someone tell me the exact steps I need to take to configure Zebra to expose my Koha 3 db as a public Z39.50 service?
Answer: Edit the KOHA_CONF file that your Koha is using. Uncomment the publicserver line like:
<!– <listen id=»publicserver» >tcp:@:9999</listen> –>
diventa:
<listen id=»publicserver» >tcp:@:9999</listen>
Then restart zebasrv and connect on the port specified (9999).
Valori autorizzati per le collocazioni a scaffale
Question: When editing an item, the new shelving location I created is not showing up by default in the items where I assigned it to.
Answer: This is because you created the new shelving location with a code value of 0 (zero) Just FYI the system interprets authorized values of 0 as equaling a null so when you edit a record in cataloging where the authorized value in a field was assigned where the code was 0, the value displays as null in the item editor (or MARC editor) instead of the value the library meant it to be.
Perchè mi servono i valori autorizzati?
Question: Why would I want to define authorized values for MARC tags?
Answer: Authorized Values create a “controlled vocabulary” for your staff. As an example, let us assume that your Koha installation is used by several libraries, and you use MARC 21. You might want to restrict the 850a MARC subfield to the institution codes for just those libraries. In that case, you could define an authorized values category (perhaps called «INST») and enter the institution codes as the authorized values for that category.
Nota
Koha crea automaticamente categorie di valori autorizzati per i tipidi elemento e per i codici filiate, e si possono collegare questi valori ai sottocampi MARC quando si definisce la propria struttura di tag MARC.
Come si pulisc la tabella delle sessioni?
Question: Is there a periodic job that can be run to cull old sessions from the table? We don’t want to backup all the useless session data every night.
Answer: You can run cleanup database cron job.
Or just before doing a backup command (mysqldump), you can truncate session table:
mysql -u<kohauser -p<password <koha-db-name -e 'TRUNCATE TABLE sessions'
Hardware
Lettori di codici a barre
Question: What barcode scanners have been known to work with Koha?
Answer: The simple rule of thumb is, does it act like a keyboard device?, if so, it will work. (i.e. can you take the scanner, scan a barcode and have it show up in a text editor, if so, it will work.)
I punti principali da controllare sono che il lettore si possa collegare opportunamente al computer (su una porta USB o sulla porta tastiera con un cavo ad Y - utile su computer vecchi) e che sia in grado di leggere il tipo di codice a barre in uso.
E” una buona idea provare a leggere alcuni codici «usati», se disponibili, in modo da controllare se il lettore è in grado di leggere correttamente codici sbiaditi, graffiati o stropicciati. Molti lettori sono in grado di leggere numerosi tipi di codice a barre: ce ne sono tanti, e l’elenco delle caratteristiche tecniche dovebbe specificare auali tipi il lettroe è in grado di comprendere. Potrebbe essere necessario regolare qualche impostazione, come i caratteri di prefisso e di suffisso, se si desidera che il lettore mandi un carattere di INVIO a fine lettura, oppure no.
Un ultimo consiglio: alcuni lettori si possono impostare in modalità «sempre accesso» e possono essere forniti con un supporto; altri hanno un grilletto sull’impugnatura, alcuni altri hanno un pulsante sulla parte superiore, altri ancora si tengono come una penna. Pensate al personale che dovrà lavorare con l’apparecchiatura, prima di sceglierne una, perchè un pulsante nella posizione sbagliata può essere veramente scomodo da usare.
Stampanti
Stampanti utilizzati da biblioteche Koha
- Stampante per scontrini POS-X
- Sampante Star Micronic (modello preciso ignoto) con driver generico/solo testo
- Star SP2000 (Nelsonville)
- Star TSP-100 futurePRINT (Geauga)
- «So che ci sono state moltissime domande sulle stampanti per scontrini, così ho pensato di riferire le mie scoperte. Stavamo provando la Star TSP-100 futurePRINT. Ho scoperto che questa stampante è MOLTO facile da configurare per Koha; sono perfino riuscito a personalizzare il job di stampa, aggiungendo il nostro logo (una gif) nella parte alta dello scontrino. Inoltre, con una bitmap disegnata con Paint, sono stato in grado di aggiungere un messaggio nella parte inferiore della ricevuta, che contie le informazioni di contatto, l’orario di apertura ed il sito della biblioteca presso cui il materiale è stato preso in prestito. «
- Stampante per scontrini su carta termica Epson TM 88 IIIP
- Epson TM-T88IV
- Stampare etichette 1x1 con la Dymolabelwriter
Compatibilità con il sistema Braille
Question: Are there any braille embosser or printer which has inbuilt braille converter and it is accessible with UNIX environment?
Answer: You may want to look into BRLTTY (http://www.emptech.info/product_details.php?ID=1232).
Aiuto supplementare
Estendere Koha
Script per la ricerca su Amazon ad uso delle biblioteche Koha
Noi ordiniamo la maggior parte dei nostri materiali su Amazon, quindi cercavo un metodo conveniente per sapere se un libro preso in considerazione fosse già nel nostro catalogo.
Greasemonkey & a custom user script fit the bill nicely:
Alcune avvertenze:
- Come molti scriptm questo è stato progettato per funzionare con Firefox; non ho provato a farlo funzionare con altri browser.
- Non sono una programmatrice JavaScript – questo script è stato adattato a partire dal laovro di altri. Dovrebbe bastare cambiare poche righe per far funzionare lo script con il vostro catalogo.
- Lo script si basa sull’esistenza del numero ISBN per l’elemento in questione; perciò non funziona con libri molto vecchi, film, ecc.
Others have added all sorts of bells & whistles: XISBN lookups to search for related titles, custom messages based on the status of items (on order, on hold, etc.), … just search the UserScripts site for Amazon + library. For a later date!
Nuvola di parole chiave
Oltre alòla tradizionale nuvola di tag, disponibilie in Koha, è possibile generare nuvole per gli argomenti più gettonati all’interno di Koha.
The Author/Subject Cloud cron job is used to help with this process. This cron job sends its output to files.
- /home/koha/mylibrary/koharoot/koha-tmpl/cloud-author.html
- /home/koha/yourlibrary/koharoot/koha-tmpl/cloud-subject.html
This means that you can produce clouds for authors, collective author, all kind of subjects, classifications, etc. And since it works on zebra indexes, it is quick, even on large DBs. Tags clouds are sent to files. It’s up to library webmaster to deal with those files in order to include them in OPACMainUserBlock, or include them into their library CMS.
Alcune biblioteche inviano i file ad una cartella condivisa mediante Samba, da dove il webmaster li preleva, eventualmente li pulisce un po”, e poi li integra in widget o pagine di navigazione.
Tendina delle novità.
Sovente si desidera dare agli utenti un sistema per cercare gli ultimi titoli arrivati. In questo esempio si vedrà come si può creare un elenco a discesa che contiene gli elementi più nuovi, per tipo di elemento. Questi suggerimenti funzionano anche (con un paio di modifiche) anche per i codici collezione o le collocazioni a scaffale.
Prima, è importante notare che ogni link in Koha è un link permanente. Ciò significa che se si cerca una cosa qualsiasi di un tipo specifico, ordinata per data di acquisizione, e poi si mette un segnalibro su quell’URL, ogniqualvolta si fa clic sul segnalibro si vedono gli elementi più recenti di quel tipo, sulle prime pagine dei risultati.
Sapendo questo, ho scritto un modulo che tiene conto di questa funzionalità. Sostanzialmente, esso esegue una ricerca del catalogo Koha per uno specifico tipo di elemento e dordina i risultati per data di acquisizione.
La prima cosa che ho fatto è stata di scrivere un’istruzione MySQL che generasse una lista dei tipi di elemento: perchè fare copia-incolla quando si può usare la potenza di MySQL?
select concat('<option value=\"mc-itype:', itemtype, '\">',description,'</option>') from itemtypes
La query soprastante cerca la tabella itemtypes e circonda ogni tipo di elemento con il necessario HTML. Poi ho esportato il risultato in formato CSV, l’ho aperto in un editor di testo ed ho aggiunto le altre parti del modulo.
<p><strong>New Items</strong></p>
<p><form name="searchform" method="get" action="/cgi-bin/koha/opac-search.pl">
<input name="idx" value="kw" type="hidden">
<input name="sort_by" value="acqdate_dsc" type="hidden">
<input name="do" value="OK" type="hidden">
<select name="limit" onchange="this.form.submit()">
<option>-- Please choose --</option>
<option value="mc-itype:BOOK">Book</option>
<option value="mc-itype:BOOKCD">Book on CD</option>
<option value="mc-itype:DVD">DVD</option>
<option value="mc-itype:LRG_PRINT">Large print book</option>
<option value="mc-itype:MAGAZINE">Magazine</option>
<option value="mc-itype:NEWSPAPER">Newspaper</option>
<option value="mc-itype:VIDEO">Videocassette</option>
</select>
</form>
</p>
Ora, che cosa significa tutto ciò?Le parti importanti sono queste:
Innanzitutto l’inizio del modulo.
<p><form name="searchform" method="get" action="/cgi-bin/koha/opac-search.pl">
Questo dice al browser di prendere ogni valore selezionato e di metterlo al fondo di http://VOSTROSITO/cgi-bin/koha/opac-search.pl. Se si desidera includere questo modulo sul sito web della biblioteca (e non sull’OPAC), occore immettere l’URL completo dell’OPAC.
Poi c’è un valore nascosto che dice alla ricerca di ordinare i risultati per data di acquisizione, in senso discendente (elementi più recenti in cima):
<input name="sort_by" value="acqdate_dsc" type="hidden">
E per finire c’è un’opzione per ciascuno dei tipi di elemento per cui si desidera che gli utenti ricerchino.
<option value="mc-itype:BOOK">Book</option>
Ciascuna di queste opzioni include la stringa «mc-itype:», che dice a Koha di eseguire una ricerca per tipo di elemento.
Once you have all of that in place you can copy and paste the form to somewhere on your OPAC. The Farmington Public Libraries OPAC has a few examples of this on the left.
Catalogazione e ricerca per colore
Uno dei gruppi di icone installati in Koha comprende una serie di colori. Questo set può essere utilizzato per catalogare e cercare per colore, se si vuole. Queste istruzioni guideranno nel cambiare i codici di collezione in colori.
Per aggiungere in blocco i colori alla categoria di valori autorizzati CCODE, si può usare la seguente istruzione SQL. Se si desiderasse usare questi colori per un’altra categoria di valori autorizzati, sarebbe necessario modificarla di conseguenza.
insert into authorised_values (category, authorised_value, lib,
 lib_opac, imageurl) values ('CCODE','000000','Black','','colors/000000.png');
insert into authorised_values (category, authorised_value, lib,
 lib_opac, imageurl) values ('CCODE','66cc66','Bright Green','','colors/66cc66.png');
insert into authorised_values (category, authorised_value, lib,
 lib_opac, imageurl) values ('CCODE','99cc33','Olive','','colors/99cc33.png');
insert into authorised_values (category, authorised_value, lib,
 lib_opac, imageurl) values ('CCODE','3333cc','Dark Blue','','colors/3333cc.png');
insert into authorised_values (category, authorised_value, lib,
 lib_opac, imageurl) values ('CCODE','006600' ,'Dark Green','','colors/006600.png');
insert into authorised_values (category, authorised_value, lib,
 lib_opac, imageurl) values ('CCODE','6600cc','Plum','','colors/6600cc.png');
insert into authorised_values (category, authorised_value, lib,
 lib_opac, imageurl) values ('CCODE','6666cc','Purple','','colors/6666cc.png');
insert into authorised_values (category, authorised_value, lib,
 lib_opac, imageurl) values ('CCODE','9999cc','Light Purple','','colors/9999cc.png');
insert into authorised_values (category, authorised_value, lib,
 lib_opac, imageurl) values ('CCODE','660000' ,'Burgundy','','colors/660000.png');
insert into authorised_values (category, authorised_value, lib,
 lib_opac, imageurl) values ('CCODE','663333' ,'Brown','','colors/663333.png');
insert into authorised_values (category, authorised_value, lib,
 lib_opac, imageurl) values ('CCODE','990000' ,'Red','','colors/990000.png');
insert into authorised_values (category, authorised_value, lib,
 lib_opac, imageurl) values ('CCODE','996633' ,'Tan','','colors/996633.png');
insert into authorised_values (category, authorised_value, lib,
 lib_opac, imageurl) values ('CCODE','999999' ,'Gray','','colors/999999.png');
insert into authorised_values (category, authorised_value, lib,
 lib_opac, imageurl) values ('CCODE','cc66cc','Pink','','colors/cc66cc.png');
insert into authorised_values (category, authorised_value, lib,
 lib_opac, imageurl) values ('CCODE','cc99cc','Bubble Gum','','colors/cc99cc.png');
insert into authorised_values (category, authorised_value, lib,
 lib_opac, imageurl) values ('CCODE','cc3333' ,'Orange','','colors/cc3333.png');
insert into authorised_values (category, authorised_value, lib,
 lib_opac, imageurl) values ('CCODE','cc6666' ,'Peach','','colors/cc6666.png');
insert into authorised_values (category, authorised_value, lib,
 lib_opac, imageurl) values ('CCODE','cc9999' ,'Rose','','colors/cc9999.png');
insert into authorised_values (category, authorised_value, lib,
 lib_opac, imageurl) values ('CCODE','cccc00' ,'Gold','','colors/cccc00.png');
insert into authorised_values (category, authorised_value, lib,
 lib_opac, imageurl) values ('CCODE','ffff33' ,'Yellow','','colors/ffff33.png');
insert into authorised_values (category, authorised_value, lib,
 lib_opac, imageurl) values ('CCODE','ffffcc','Cream','','colors/ffffcc.png');
insert into authorised_values (category, authorised_value, lib,
 lib_opac, imageurl) values ('CCODE','ffffff','White','','colors/ffffff.png');
If you would like to choose the colors manually you can do that via the Valori autorizzati administration area.
Next you’ll want to update the frameworks so that the 952$8 (if you’re using collection code) label to says Color.
Una volta che tutto ciò è a posto, si può inziare a catalogare gli elementi per colore.
Per finire, occorre aggiungere il seguente codice JQuery alle proprie prepreferenze, in modo che sostituisca la parola «Collezione» con «Colore»
$(document).ready(function(){
    $("#advsearch-tab-ccode a:contains('Collection')").text("Color");
    $("#holdings th:contains('Collection')").text("Color");
    });
$(document).ready(function(){
    $("#advsearch-tab-ccode a:contains('Collection')").text("Color");
    $('#item_ccode').text("Color");
    });
Koha e il tuo sito web
Questa appendice include suggerimenti su come integrare Koha e il tuo sito web.
La ricerca di Koha sul tuo sito
Spesso si vuole aggiungere il box di ricerda di Koha al sito della biblioteca. Per farlo copia e incolla il seguente codice HTML nel tuo sito sito. Aggiorna il link per parte YOURCATALOG e poi non c’è altro da fare.
<form name="searchform" method="get" action="http://YOURCATLOG/cgi-bin/koha/opac-search.pl" id="searchform">
<input id="transl1" name="q" type="text"><p>
<select name="idx" id="masthead_search">
<option value="kw">Keyword</option>
<option value="ti">Title</option>
<option value="au">Author</option>
<option value="su">Subject</option>
<option value="nb">ISBN</option>
<option value="se">Series</option>
<option value="callnum">Call Number</option>
</select>
<input value="Search" id="searchsubmit" type="submit">
</p></form>