التزويد
Koha's acquisitions module provides a way for the library to record orders placed with vendors and manage purchase budgets.
للوصول: المزيد > التزويد
Setting up the acquisitions module
Before using the acquisitions module, you need to make sure that you have completed all of the set up.
First, set your acquisitions system preferences and acquisitions administration to match your library's workflow. Before setting your EDI accounts and library EANs, you will need to have entered your vendors.
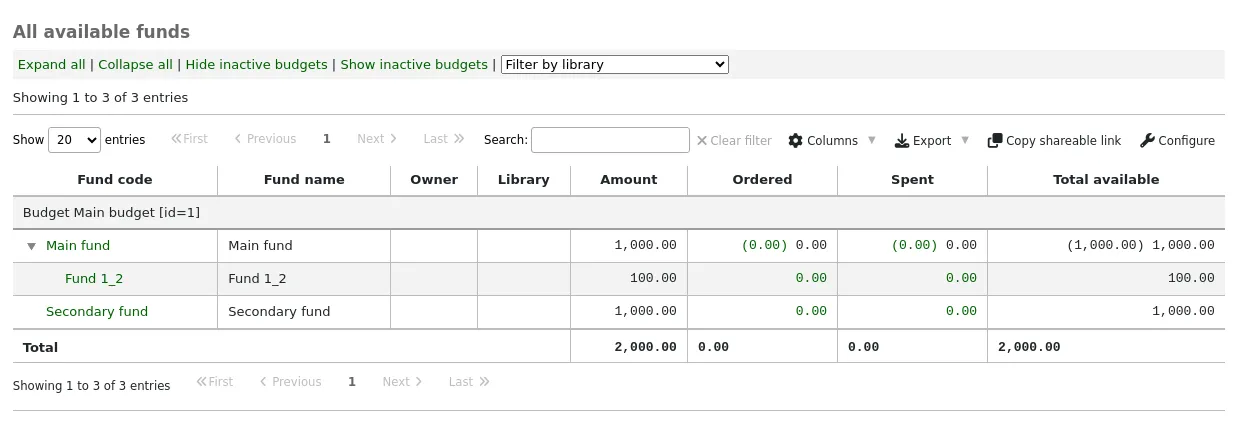
على الصفحة الرئيسية للتزويد سترى الصناديق المدرجة في مكتبتك.
Learn more in the budget/fund tracking section.
المزودون
قبل وضع أي طلبية، يجب عليك أولاً إدخال مزود واحد على الأقل.
Adding a vendor
ملاحظة
Staff members must have the vendors_manage permission (or the superlibrarian permission) in order to add vendors.
To add a vendor click the 'New vendor' button on the acquisitions module main page.

The new vendor form is broken into three sections: company information, contacts and ordering information.
Company information: basic information about the vendor
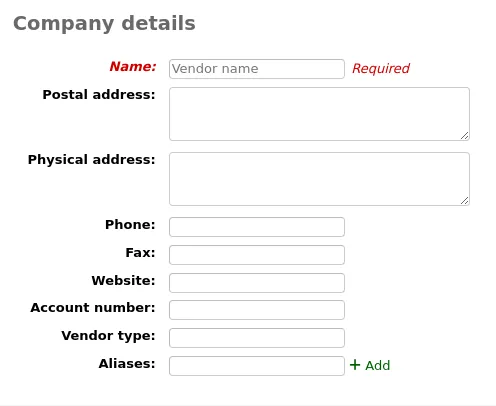
Name (required): this name is the name that will appear everywhere in Koha when referring to this vendor
Postal address, physical address, phone, fax, website, account number: these fields are optional and should be filled to help with generating claim letters and invoices
Vendor type: use this field as needed to categorize your vendors (for example, bookseller, donor, electronic resource provider)
ملاحظة
By default, this field is a free text field. If you'd rather have a drop-down menu, add values in the VENDOR_TYPE authorized value category.
Aliases: add one or more aliases to a vendor as additional keywords to search with in the vendor search. For example, the vendor 'American Library Association' could have the alias 'ALA'.
Contacts: information regarding your contact(s) at the vendor's office
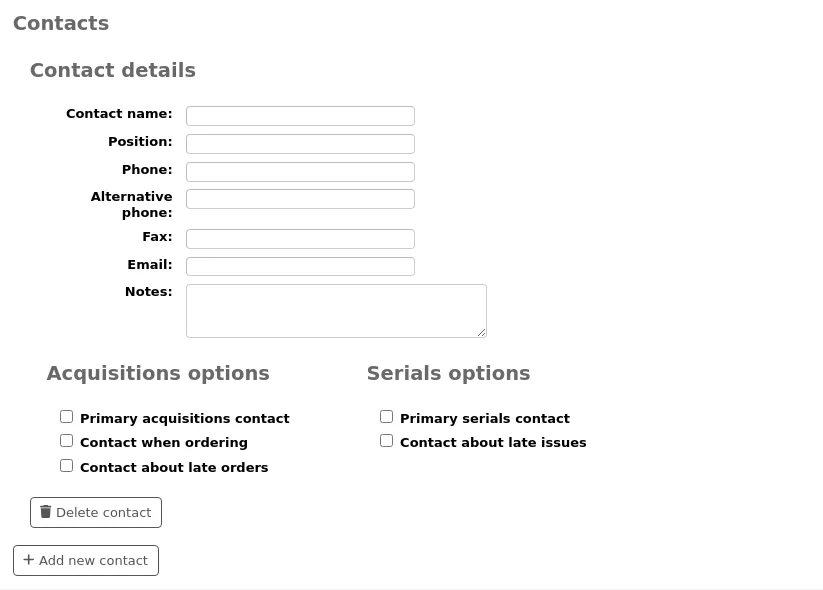
تلزم أيا من هذه الحقول، ينبغي إلا أن يكون قد دخل إذا كنت تريد أن تعقب معلومات الاتصال الخاصة بك داخل نظام كوها
جهة اتصال التزويد الرئيسية: قم بتحديد هذا المربع إذا كان هذا الشخص هو جهة اتصالك الرئيسية فيما يتعلق بالتزويد من هذا المزود
جهة اتصال الدوريات الرئيسية: قم بتحديد هذا المربع إذا كان هذا الشخص هو جهة اتصالك الرئيسية فيما يتعلق بتزويد الدوريات من هذا المزود
Contact when ordering? check this box if you want to be able to send your orders by email directly to this person (see the editing baskets section below)
Contact about late orders? check this box if you want to be able to send your acquisitions claims by email directly to this person
Contact about late issues? check this box if you want to be able to send your serials claims by email directly to this person
كما يمكنك إضافة أكثر من جهة اتصال واحدة لكل مزود عن طريق النقر على زر "أضف جهة اتصال أخرى"
Interfaces: information regarding the vendor's website, software, or portal that you use to manage orders or gather statistics from this vendor or organization. Entering an interface is not required, use this section only to keep track of the information within Koha. To add a vendor interface, click on 'Add another interface'.
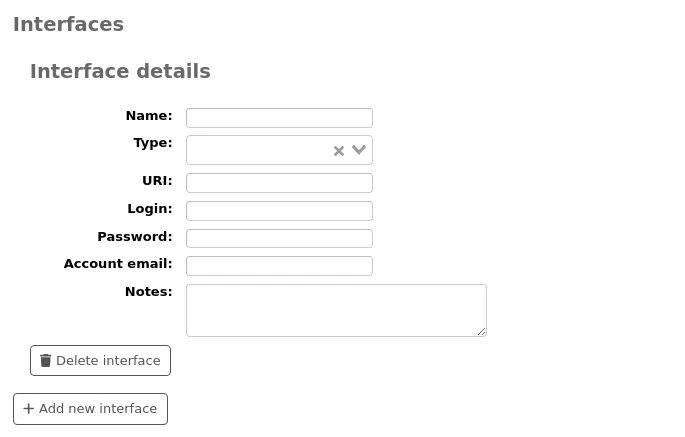
Fill out the form (all fields are optional):
Name: enter the name of the interface, this will be visible in Koha.
Type: choose the interface type.
ملاحظة
Values in this drop-down menu are managed in the VENDOR_INTERFACE_TYPE authorized value category.
URI: enter the interface's URL address.
Login: enter the username for the vendor interface.
Password: enter the password for the vendor interface.
ملاحظة
The password entered here will be encrypted in the database. It will not be shown by default in the vendor details page, there will be a 'Show' link in place of the password which can be clicked to display the password.
خطر
Please note that Koha is not a password manager. While the password is encrypted and access to it is permission-based, it is still a security risk to save it here. Using an actual password manager is recommended. Use this field at your own risk.
Account email: enter the email used for the account on this interface.
Notes: enter any notes regarding this interface.
Click 'Add another interface' if you need to add more than one interface for this vendor.
Ordering information: general billing information
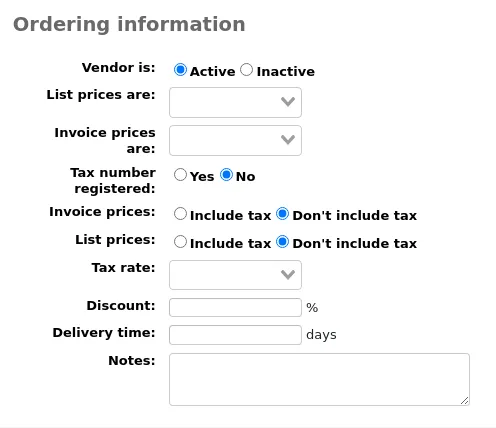
لتكون قادر على الطلب من الموّرد يجب جعلها 'نشطة.'
Choose the currency for list prices and invoice prices
ملاحظة
Currencies are set up in the Currencies and exchange rates administration section
If your library is charged tax, mark your tax number as registered
Note if your list prices and invoice prices include tax
أدخل معدل الضريبة الخاص بمكتبتك ، إذا كانت المكتبة تفرض ضرائب على الطلبات.
ملاحظة
Tax rates are set in the TaxRates system preferences
اذا وفرّ المورد خصم ثابت, ادخل ذلك في حقل 'الخصم'.
ملاحظة
You can enter item specific discounts when placing an order
ملاحظة
Enter the discount percentage using a decimal point.
Discounts can have up to two digits before the decimal and three digits after the decimal. For example:
9,99,-99,99.9,0.99,99.99,99.999.If you know how long it usually takes orders to arrive from this vendor you can enter a delivery time. This will allow Koha to estimate when orders will arrive at your library on the late orders report.
الملاحظات للإستخدام الداخلي.
Searching for vendors
Search for vendors either from the search bar at the top of the page

Or in the 'Manage orders' box on the main acquisitions page.

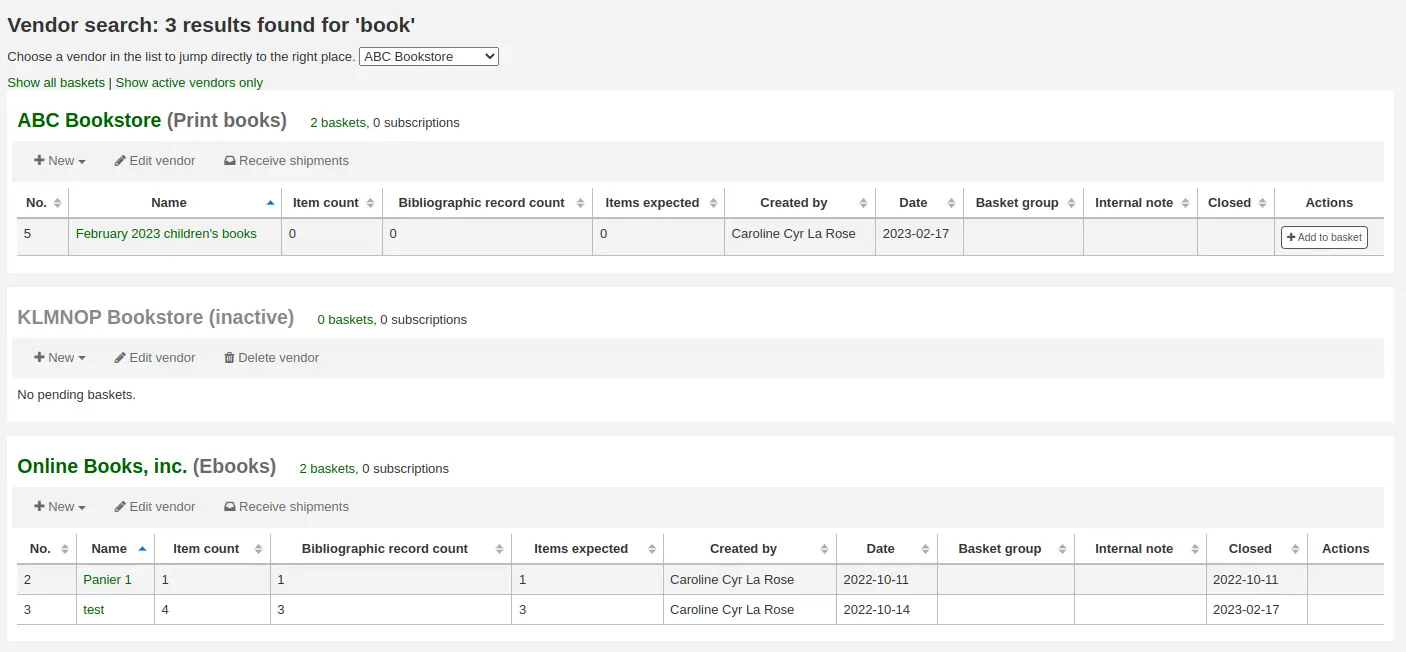
You can search for any part of the vendor's name, or their aliases.
ملاحظة
An empty search will return all vendors.
If you have a lot of vendors, you can use the dropdown menu to jump directly to a result.
By default, all vendors appear in the results, with inactive vendors in gray font and an '(inactive)' note next to their name. You can click on 'Show active vendors only' to hide inactive vendors.
In the results, you can see all the currently open baskets. You can click on 'Show all baskets' to show closed baskets as well.
There are action buttons under each vendor:
'New' can be used to create a new basket, or add a new contract to that vendor.
'Edit vendor' is used to edit the vendor information.
'Receive shipments' will appear when a vendor has baskets with orders.
'Delete vendor' will appear when a vendor has no baskets.
Viewing a vendor
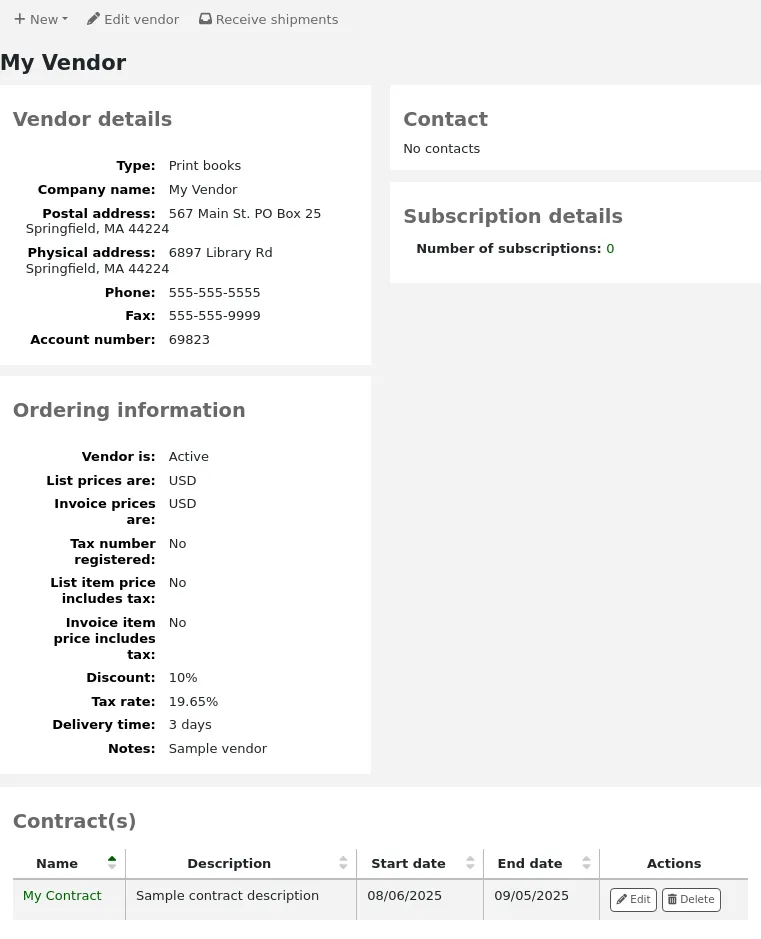
To view a vendor's information page, search for the vendor from the acquisitions home page.

From the results, click on the name of the vendor you want to view.
Editing vendor information
ملاحظة
Staff members must have the vendors_manage permission (or the superlibrarian permission) in order to edit existing vendors.
To make changes to a vendor search for the vendor from the acquisitions home page.
Click the 'Edit vendor' button on the results page

or on the vendor information page.

عقود المزود
يمكنك تعريف العقود (بتاريخ بدء وتاريخ انتهاء) وربطها بالمزود. يستخدم ذلك لتتمكن من رؤية كم أنفقت على عقد محدد بمزود بنهاية العام. في بعض الأماكن، يتم إنشاء العقود بحد أدنى وحد أقصى للمبلغ السنوي.
Adding a contract
ملاحظة
Staff members must have the contracts_manage permission (or the superlibrarian permission) in order to add contracts to vendors.
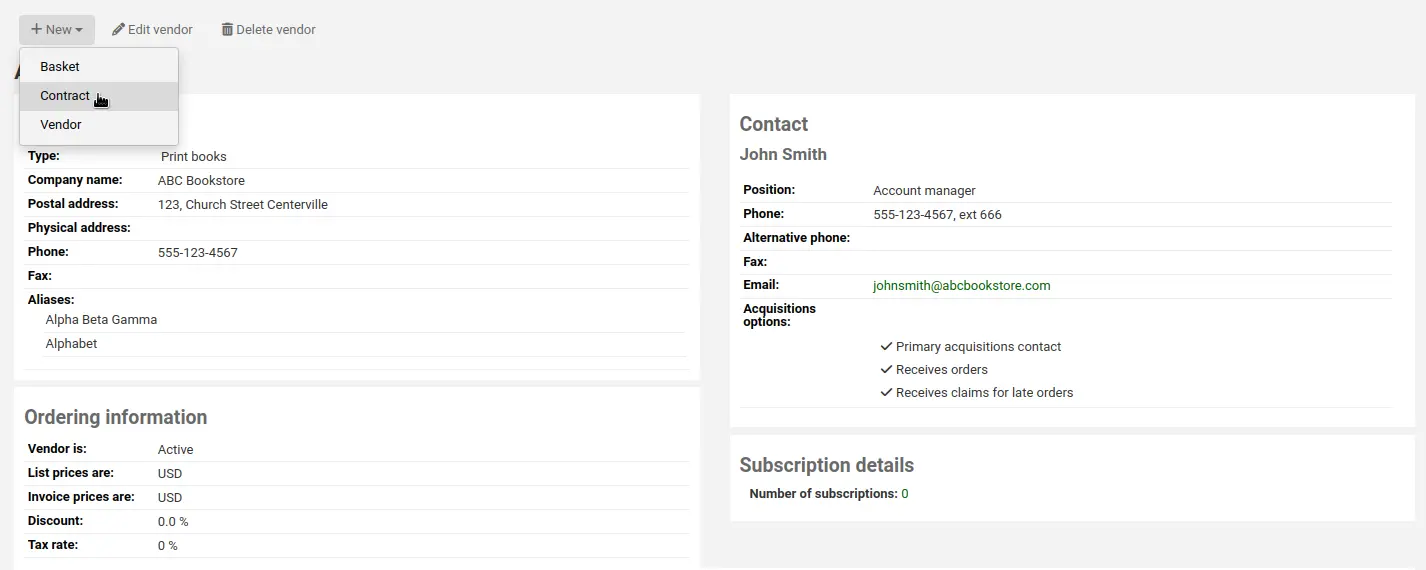
You can add a contract to a vendor by searching for the vendor, clicking the 'New' button and choosing the 'Contract' option.

Alternatively, you can access the vendor page and click 'New' and choose 'Contract' from there.
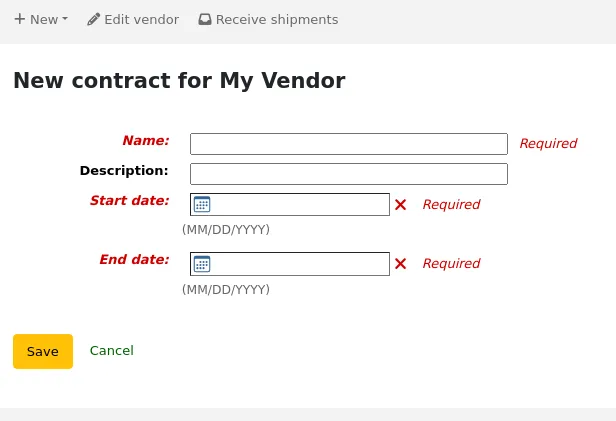
شكل العقد سوف يطلب بعض المعلومات الأساسية جدا عن العقد.
تحذير
هام: لا يمكنك ادخال عقد استعادي. تاريخ النهاية لا يجب أن يكون قبل تاريخ اليوم.
Once the contract is saved it will appear on the vendor page.

It will also be an option when creating a basket.
Recording issues with vendors
Version
This feature was introduced in version 23.11 of Koha.
ملاحظة
Staff members must have the issue_manage permission (or the superlibrarian permission) in order to view and manage vendor issues.
Vendor issues are a way to keep track of problems that might arise with vendors. This helps when comes the time to renegotiate contracts.
To access vendor issues, go to the vendor's page and click on 'Issues' from the menu on the left side.

This page will show all the issues that have been recorded for this vendor.

To record a new issue,
Click 'New issue'
Fill out the form with the issue information.

Type: choose the type of issue.
ملاحظة
Values in this drop-down menu are managed in the VENDOR_ISSUE_TYPE authorized value category.
Started on: choose the date on which the issue started.
Ended on: choose the date on which the issue ended, if that is the case.
Notes: enter details about the issue.
Click 'Submit'.
To edit an existing issue, click the 'Edit' button in the table.
If an issue is no longer relevant, you can delete it by clicking the 'Delete' button in the table.
إدارة مقترحات الشراء
You can create purchase suggestions via the staff interface either for the library or on the patron's behalf from their record. Depending on your settings in the suggestion system preference, patrons may also be able to make purchase suggestions via the OPAC.
ملاحظة
Staff members must have the suggestions_manage permission (or the superlibrarian permission) in order to view and manage purchase suggestions.
If staff members have the suggestions_manage permission but not any of the acquisitions permissions, they can access the suggestion management tool from 'Suggestions' under the 'More' menu in the header bar.
نصيحة
Changes to purchase suggestions can be logged: set the SuggestionsLog system preference to 'Log' for any subsequent updates to be recorded in the action_logs table.
When a suggestion is waiting for library review, it will appear on the Acquisitions home page next to the vendor search. The suggestions for the branch where you are logged in will be separated from the rest of the suggestions. Clicking the library name will take you to the suggestion management tool.

It will also appear on the main staff dashboard under the module labels.

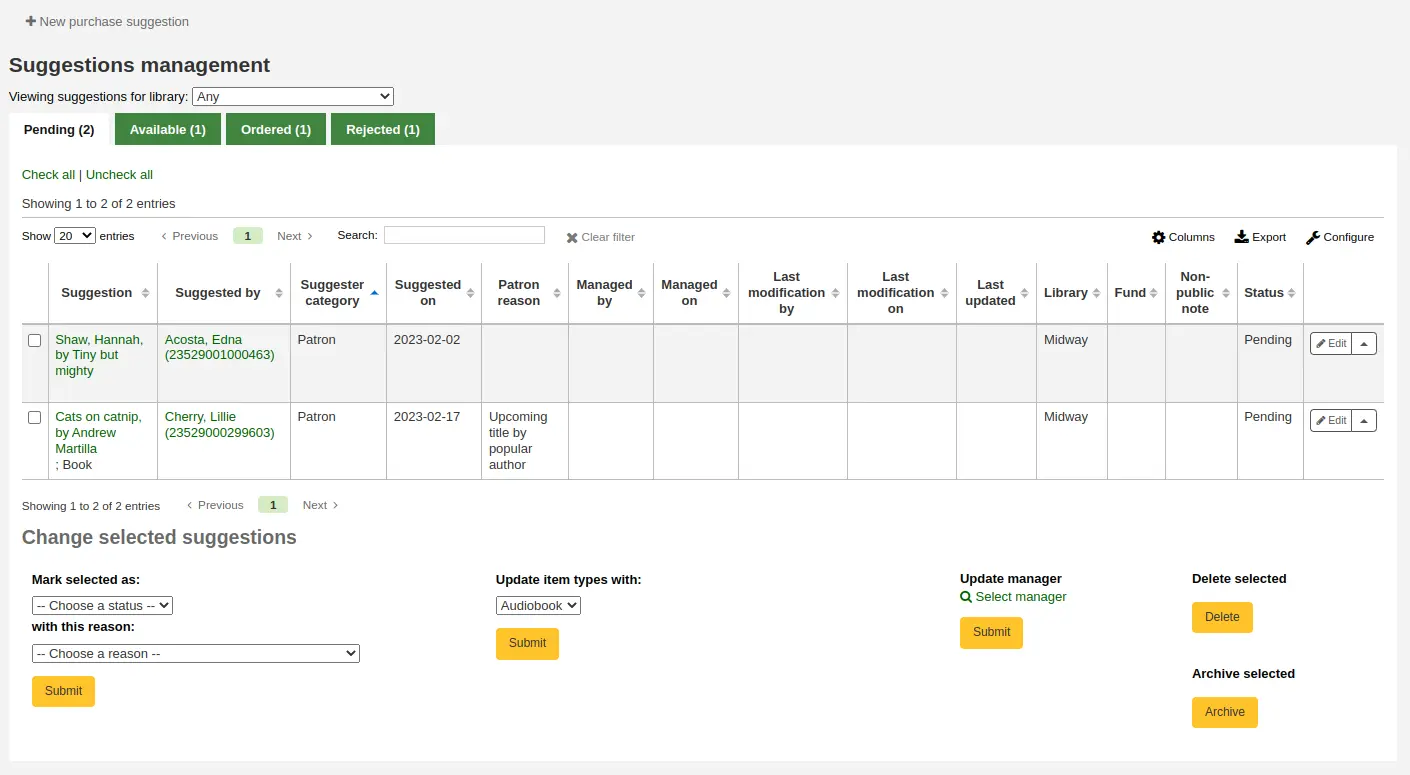
If there are no pending suggestions you can access the suggestion management tool by going to the 'More' menu and choosing 'Suggestions' or by clicking the 'Manage suggestions' link on the menu on the left of the Acquisitions module home page.
ملاحظة
You can customize the columns of this table in the Table settings section of the Administration module (table id: suggestions).
Your suggestions will be sorted into several tabs: Pending, Accepted, Checked, Ordered and Rejected.
Pending: A 'Pending' suggestion is one that is awaiting action from the library.
Accepted: An 'Accepted' suggestion is one that you have marked as 'Accepted' using the form below the suggestions.
Checked: A 'Checked' suggestion is one that has been marked as 'Checked' using the form below the suggestions.
Ordered: An 'Ordered' suggestion is one that has been ordered using the From a purchase suggestion link in an order basket.
Rejected: A 'Rejected' suggestion is one that you have marked as 'Rejected' using the form below the list of suggestions.
ملاحظة
If your workflow requires more statuses for suggestion management, you can add more using the SUGGEST_STATUS authorized values category.
Each suggestion will show the name of the staff member who managed the suggestion as well as the date when it was managed.
Accepted and rejected suggestions will show the reason for accepting or rejecting it under 'Status'.
For libraries with a lot of suggestions, there are filters on the left hand side of the Manage Suggestions page to assist in limiting the number of titles displayed on the screen.
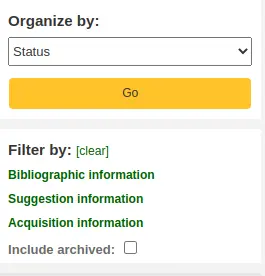
النقر على العناوين الزرقاء سيوسع خيارات التصفية وانقر على '[مسح]' سيمسح كل التصفيات ويعرض كل المقترحات.
ملاحظة
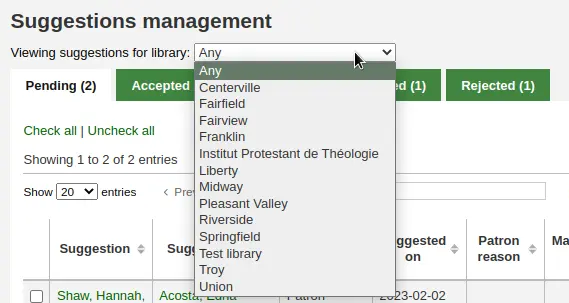
The suggestions page will automatically be limited to suggestions for your library. To see information for all (or any other) libraries change the library in the 'Viewing suggestions for library' dropdown menu.
Approving or rejecting purchase suggestions
When changing the status of a purchase suggestion (pending, accepted, rejected, checked, or ordered), the suggestion will be moved to the matching tab. The status will also be updated on the patron's account in the OPAC and an email notice will be sent to the patron using the template that matches the status you have chosen.
When reviewing 'Pending' suggestions check the boxes next to the purchase suggestions you want to approve or reject and then choose the status and reason for your selection in the 'Change selected suggestions' section below.
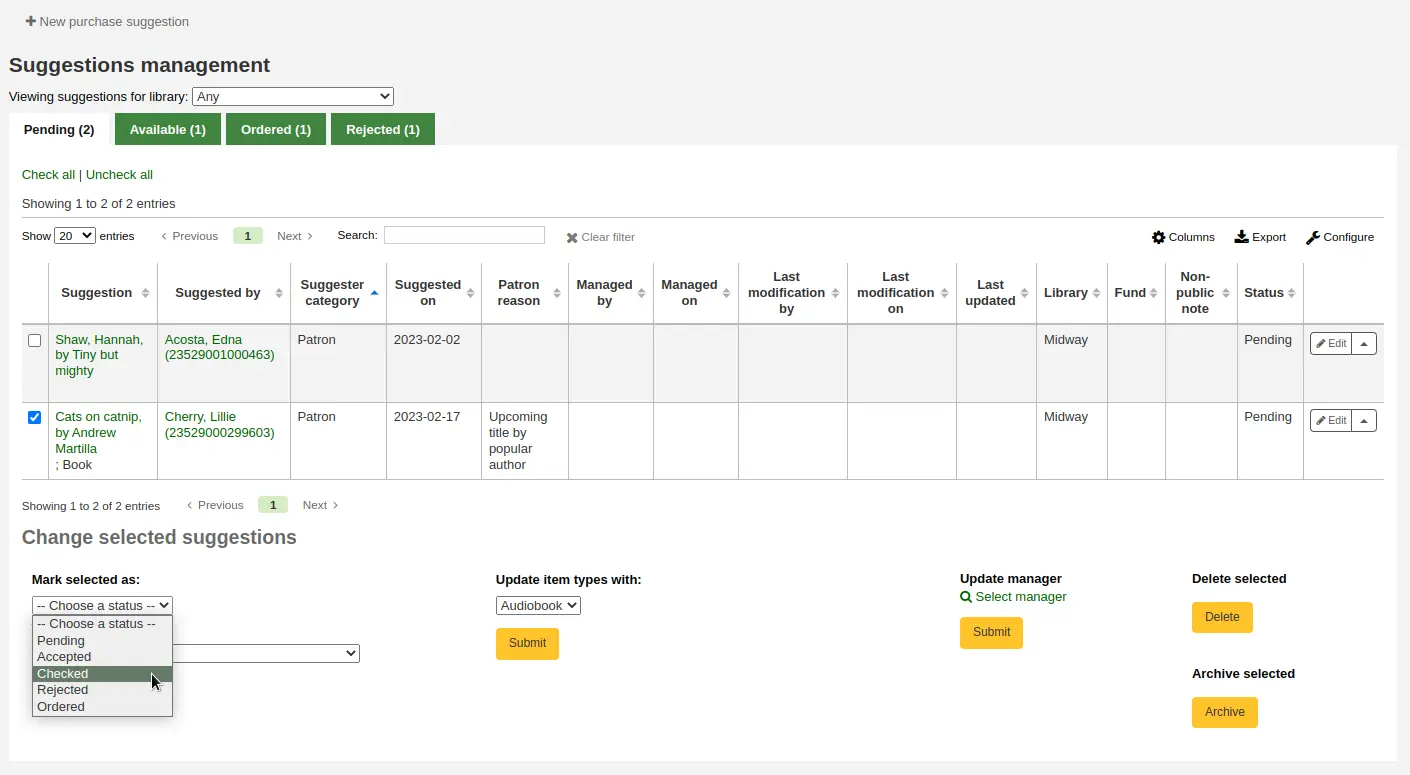
ملاحظة
If your workflow requires more statuses for suggestion management, you can add more using the SUGGEST_STATUS authorized values category.
Reasons for accepting and rejecting suggestions are defined by the SUGGEST authorized value category.
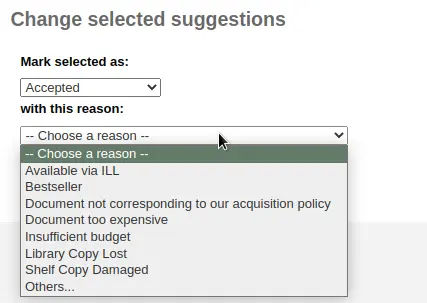
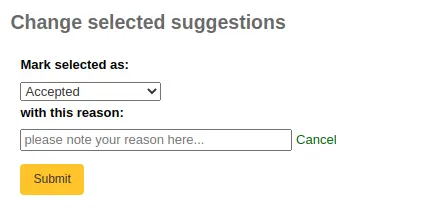
If you choose 'Others...' as your reason, you will be prompted to enter your reason in a text box. Clicking 'Cancel' to the right of the box will bring back the pull down menu with authorized reasons.
It is also possible to approve or reject suggestions one by one by clicking on the title of the suggestion to open a summary of the suggestion.
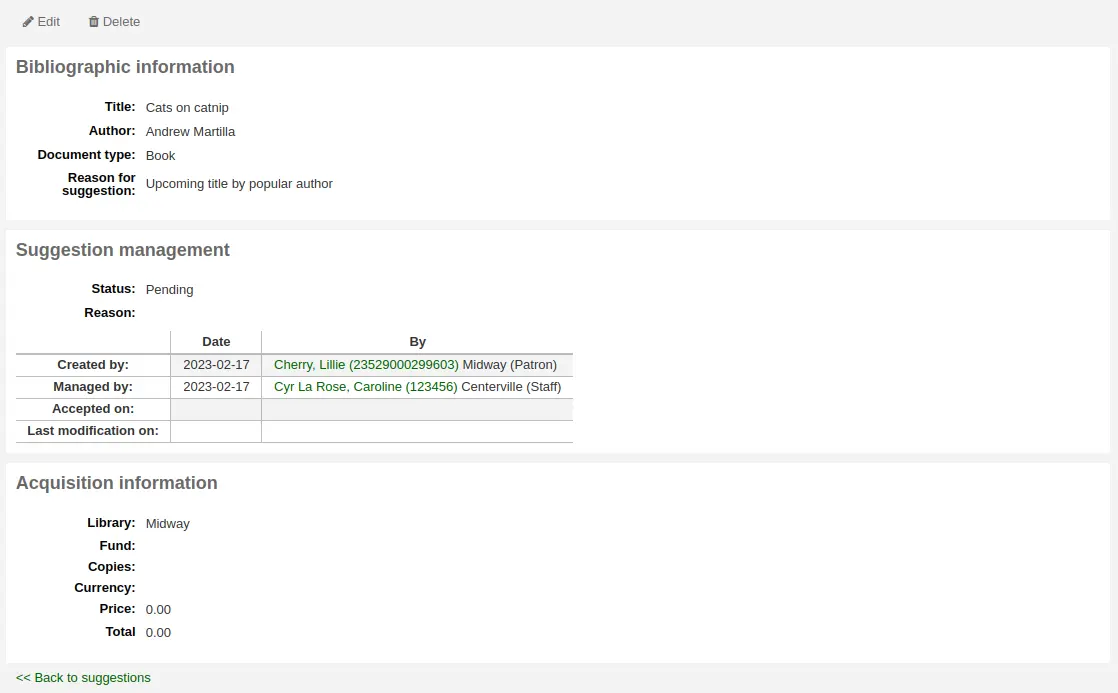
Click 'edit' at the top of the suggestion detail page to open the suggestion editing page.
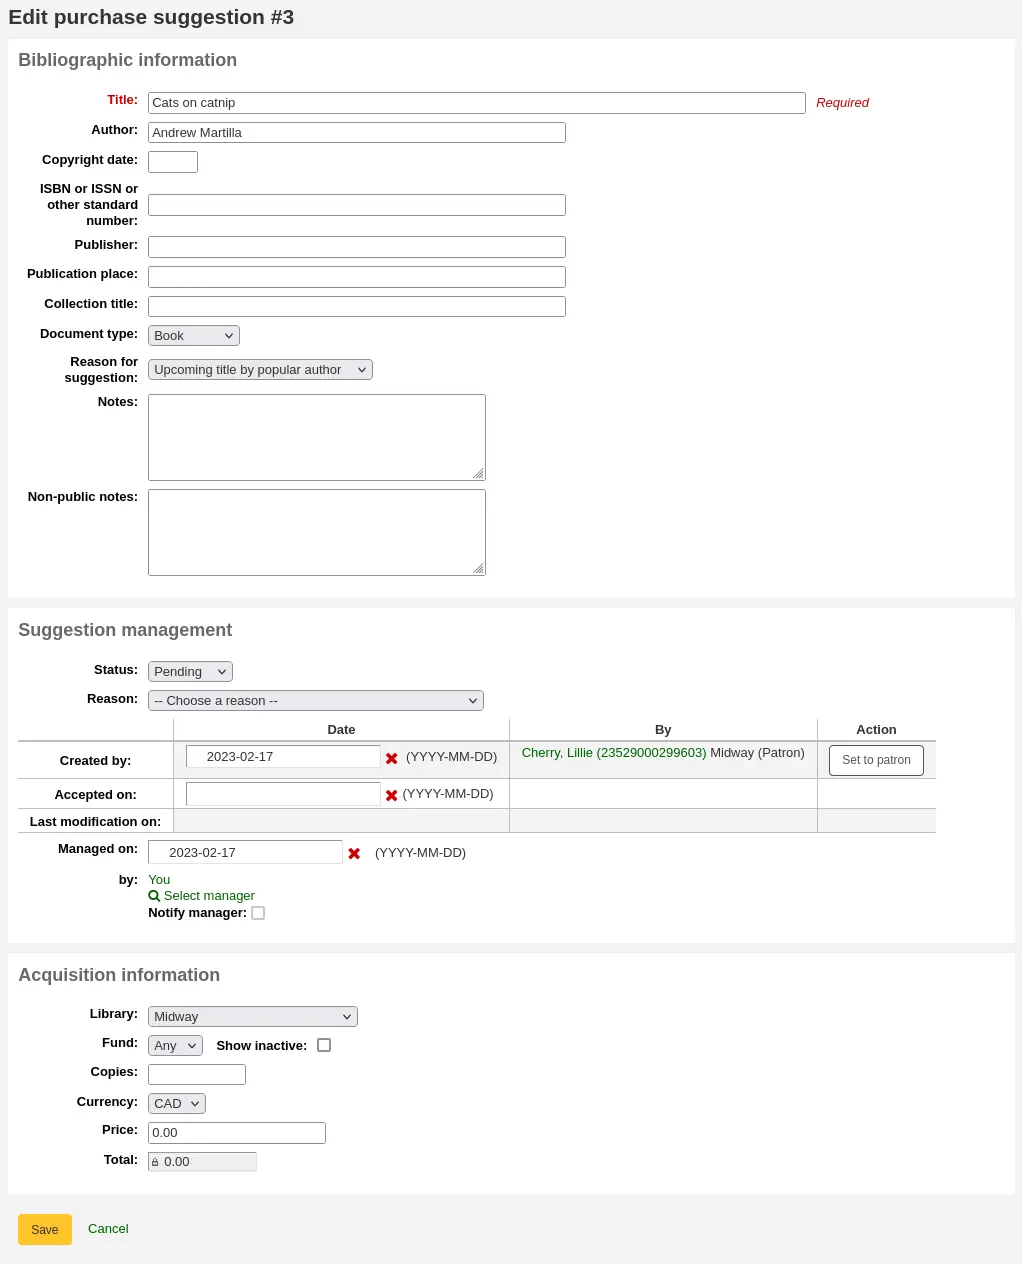
From there, change the status in the 'Suggestion management' section and click 'Save'.
A suggestion's status change will trigger a notice to be sent to the patron who made the suggestion. The notices can be edited in the Notices and slips tool.
The 'Accepted' status will trigger the ACCEPTED notice
The 'Rejected' status will trigger the REJECTED notice
The 'Ordered' status will trigger the ORDERED notice
ملاحظة
The 'Ordered' status will automatically be set when ordering from a suggestion and the corresponding notice will also be sent at that time.
Change to this status manually only if you don't use the acquisitions module to enter your orders.
ملاحظة
If you add custom statuses in the SUGGEST_STATUS authorized values, you can add corresponding notices with the same names, taking care to choose the 'Suggestions' module when creating the new notices.
Editing purchase suggestions
Other than changing the status to accept or reject the purchase suggestions, you can also change various attributes while managing the suggestions.
Edits can be done in a batch by selecting the suggestions and choosing the new values in the 'Change selected suggestions' section at the bottom of the page.
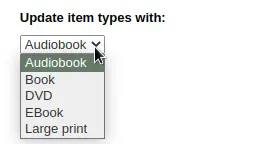
You can change the item type of the suggestions by selecting them and choosing the new item type in the 'Update item types with' drop down menu.
ملاحظة
The item types in this list are populated by the SUGGEST_FORMAT authorized value category.
You can also change the manager of the selected suggestions by clicking the 'Select manager' link and searching your user database. The new manager will receive the NOTIFY_MANAGER notice.
ملاحظة
Only users who have the suggestions_manage permission (or the superlibrarian permission) will show in the results.
It is also possible to edit suggestions one by one by clicking on the 'Edit' button to the right of the suggestion or by clicking on the title of the suggestion.

Clicking 'edit' at the top of the suggestion detail page will open a suggestion editing page.

من هذا النموذج تستطيع التعديل على المقترحات ( إضافة المزيد من التفاصيل ، أو تحديث بعض المعلومات الخاطئة التي قام بإدخالها المستفيد) . تستطيع أيضاً أن تختار بين قبول أو رفض هذه المقترحات إستناداً على أساسات فردية.
In the 'Bibliographic information' section, you can add missing information, such as the ISBN, publisher, etc. or correct wrong information provided by the patron.
This information will be used to create a bibliographic record should you order this title from the suggestion.
In the 'Suggestion management' section, you can edit the status, add a reason for accepting or rejecting the suggestion, or adjust the dates if needed.
Choosing to mark a suggestion as 'Pending' will move it back to the 'Pending' tab.
The 'Notify manager' checkbox can be used to send a notice to the staff member who previously managed the suggestion to inform them the suggestion was modified. The notice sent is NOTIFY_MANAGER notice.
In the 'Acquisitions information' section, you can edit the fund, price, currency, etc.
Assigning the suggestion to a fund will trigger a notice to be sent to the fund owner to inform them that there is a suggestion ready for them to manage.
The notice_unprocessed_suggestions.pl cronjob is necessary to generate these notices.
The notice used is TO_PROCESS, it can be edited in the Notices and slips tool.
Archiving purchase suggestions
Once the suggestion has completed the acquisitions process, it is possible to archive them. If you have a lot of suggestions, and the page takes a long time to load, archiving old suggestions will improve the performance.
Select the suggestions you want to archive and click the 'Archive' button in the 'Archive selected' box.
You can also archive the purchase suggestion by clicking the small arrow next to the 'Edit' button and choosing 'Archive'.

Archived suggestions will disappear from the list, but they can be viewed by checking the 'Include archived' checkbox in the filters.

Archived suggestions will have a the mention 'Archived' under the title information when they are viewed.

ملاحظة
Archived suggestions will disappear from the 'Your purchase suggestions' section of the patron's file on the OPAC.
Deleting purchase suggestions
ملاحظة
Staff members must have the suggestions_delete permission (or the superlibrarian permission) in order to delete purchase suggestions.
Once you no longer need the purchase suggestions, you can completely delete them from the system.
To delete purchase suggestions in batch, select the suggestions you want to delete completely and click the 'Delete' button in the the 'Delete selected' box.
You can also delete a purchase suggestion by clicking the small arrow next to the 'Edit' button and choosing 'Delete'.

It is also possible to delete purchase suggestions by clicking on the title of the suggestion to access the suggestion detail page and clicking the 'Delete' button from there.

Old purchase suggestions can be automatically deleted using the purge_suggestions.pl cronjob.
وضع الطلبيات
To place an order you must first search for the vendor or bookseller and create a basket.
تحذير
If you are planning on using EDIFACT to submit your order you will need to first set up your library's EDI accounts and EANs.
Creating a basket
ملاحظة
Staff members must have the order_manage permission (or the superlibrarian permission) in order to create baskets and add orders.
ملاحظة
إذا كنت تستخدم EDI للطلب يجب عليك تنزيل تسجيلة طلبيتك من مزودك قبل بدء العملية في كوها.
To create a basket you must first search for the vendor you're ordering from. From the vendor search results, click the 'New' button and choose 'Basket'.

Alternatively, you can click on the vendor's name to access the vendor page and click 'New' and choose 'Basket' from there.
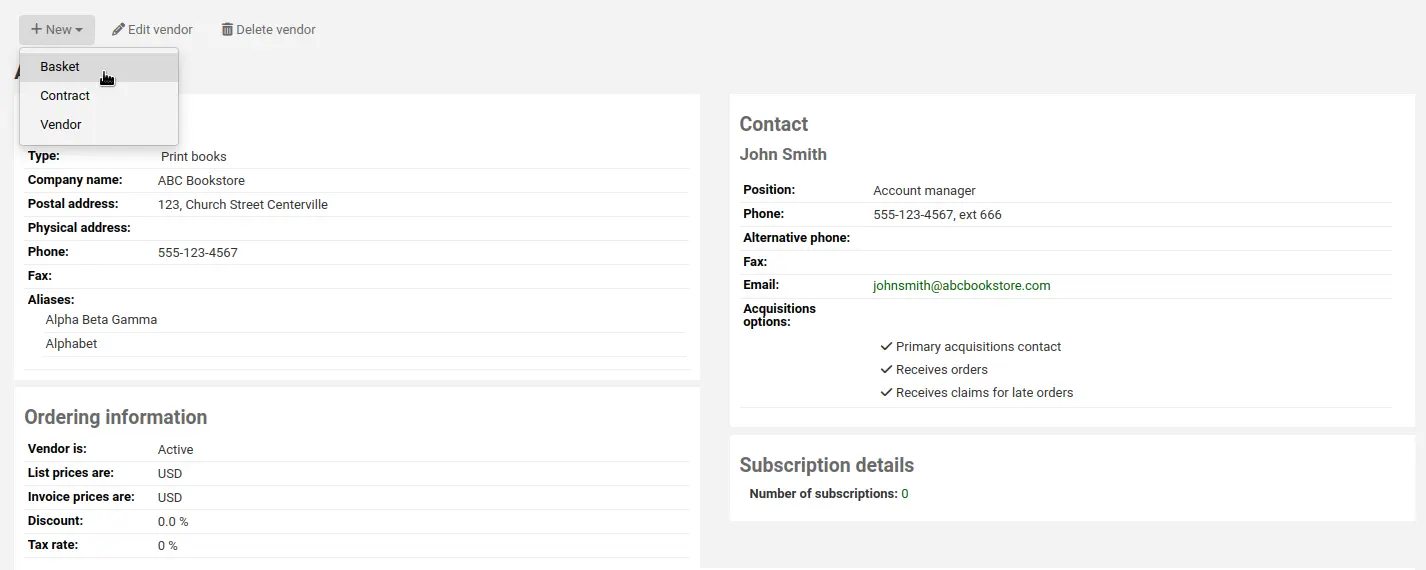
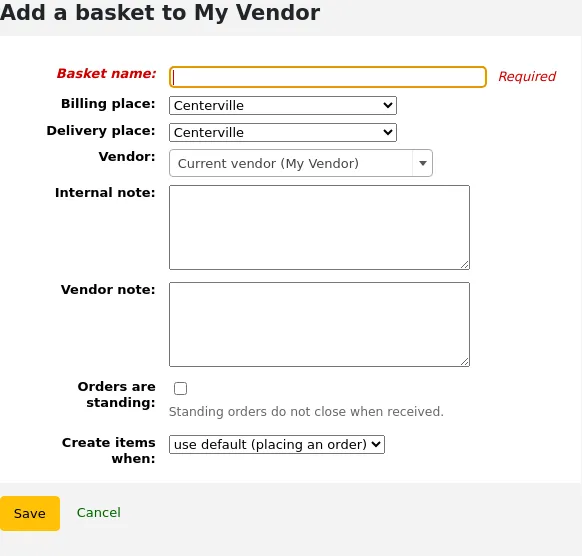
After clicking 'New' and 'Basket' you will be asked to enter some information about the order basket:

Give the basket a name that will help you identify it later
Enter in the billing place and delivery place (this will default the library you're logged in at)
إذا ما رغبتَ أن تغير المورِّد الذي تقوم بالطلب منه فبإمكانك إستخدام قائمة الموؤدين المنسدلة
حقول الملاحظات اختيارية ويمكن أن تحتوي على اي نوع من المعلومات
If you have added contracts to the vendor you're ordering from, you will have an option to choose which contract you're ordering these items under.
If you're ordering standing items (items which arrive regularly), check the 'Orders are standing' box for this basket.
Note that one basket cannot contain both firm and standing orders.
يمكنك اختيار إنشاء مواد إما عند وضع الطلبية، أو عند استلام الطلبية، أو عند فهرسة المادة. إذا قمت باختيار خيار مختلف عن الافتراضي، سيتم تطبيقه على هذه السلة فقط. يتم ضبط الافتراضي عن طريق التفضيل AcqCreateItem.
If you have additional fields for order baskets, they will appear here.
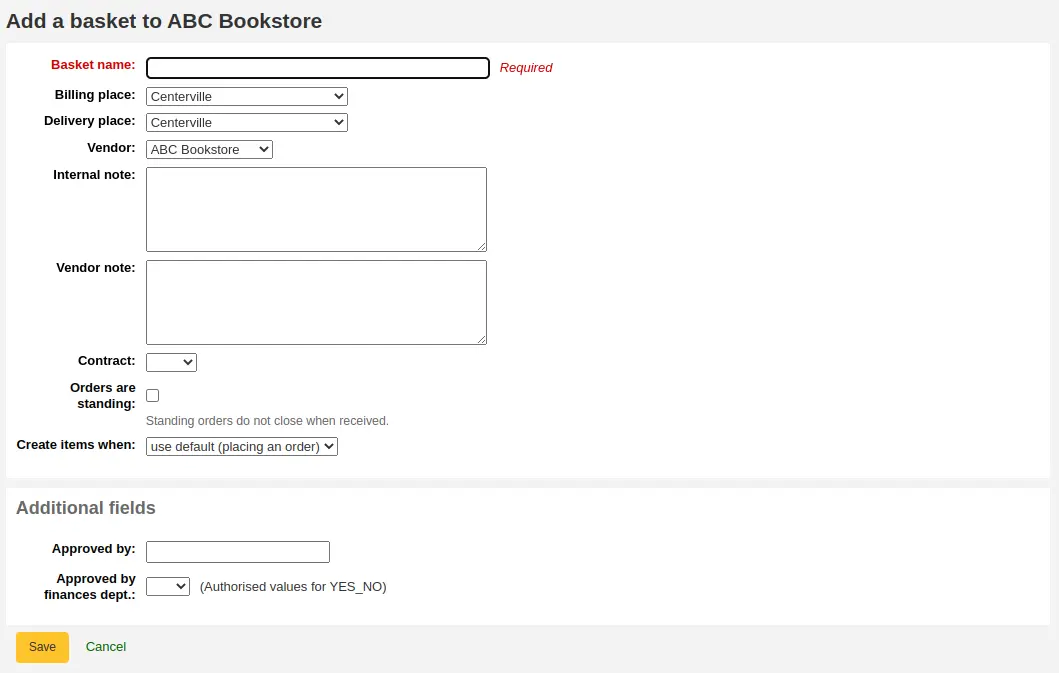
عند الانتهاء، قم بالنقر على 'حفظ'.
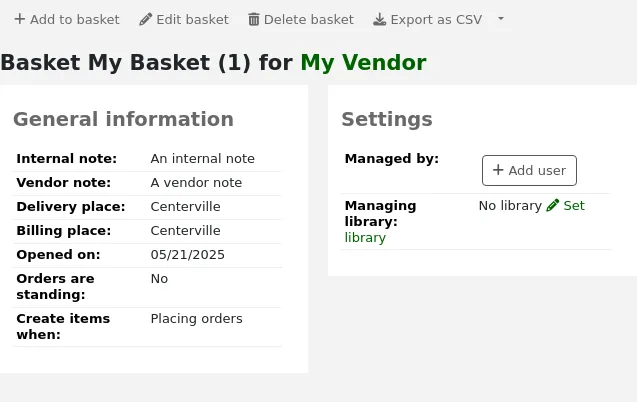
Adding materials to the basket
ملاحظة
Staff members must have the order_manage permission (or the superlibrarian permission) in order to add orders to baskets.
Once your basket is created, click on 'Add to basket' from the basket page.

To add to an existing basket click 'Add to basket' to the right of an existing basket.

Several options for adding items to the order will be presented.
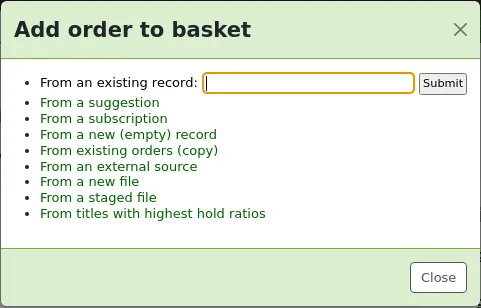
الطلب من تسجيلة حالية
اذا طلبت نسخة أخرى من مادة موجودة, يمكنك ببساطة البحث عن التسجيلة في نظامك.
من النتائج، يمكنك النقر على 'إضافة طلبية' لجلبها إلى نموذج الطلبية.

من عرض التسجيلة المفصل، يمكنك النقر على زر 'إضافة طلبية'.

سيتم نقلك إلى نموذج الطلبية
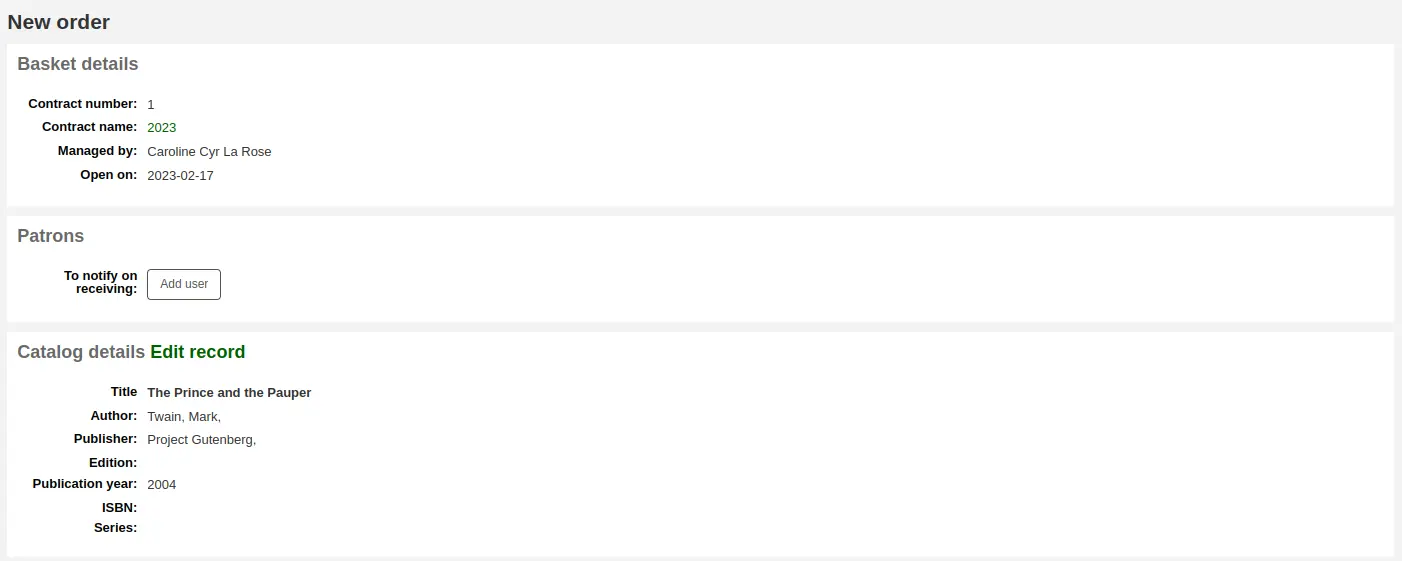
كل التفاصيل المرتبطة بالمادة ستكون مدرجة سلفاً في 'تفاصيل الفهرس'
Fill out the rest of the order form, including patron notifications, items, and accounting details.
الطلب من مقترح شراء
If you allow patrons to make purchase suggestions (learn more in the managing purchase suggestions section of this manual), you can place orders from those suggestions. In order to keep track of suggestions that have been ordered and received you must place the order using this link.
تحذير
يجب قبول المقترحات قبل أن تتمكن من طلبها.

From the results, click 'Order' next to the item you want to order and you will be presented with the order form including a link to the suggestion.
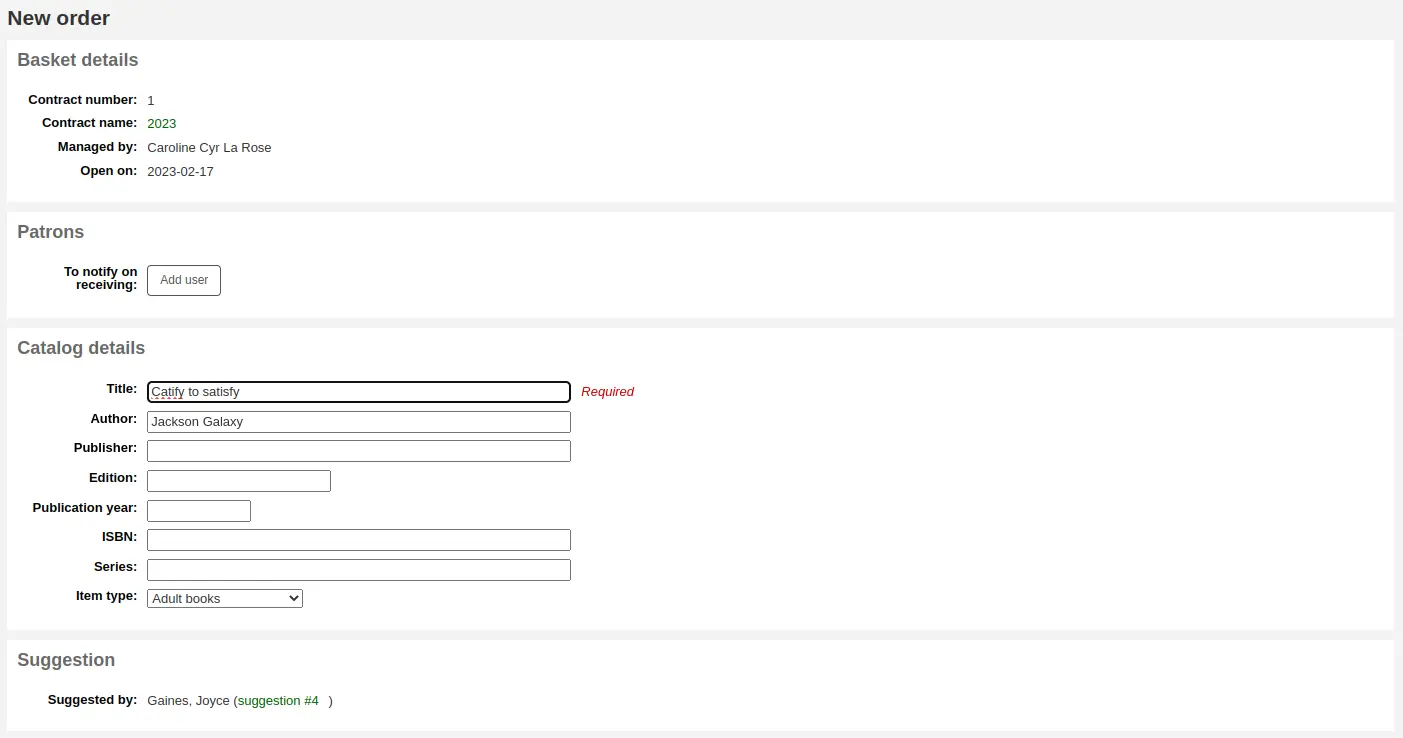
من هذا النموذج يمكنك إجراء التغييرات على تفاصيل الفهرس إذا لزم الأمر.
عند ظهور المادة في السلة الخاصة بك سيتم تضمين رابط للاقتراح.

When orders are added to a basket in this way, the suggestion status is updated to 'Ordered'. Patrons can see this on their account's purchase suggestions page in the OPAC. The suggestion's change of status also triggers the ORDERED notice; you can update its contents in Tools > Notices and slips.
ملاحظة
It is possible for a hold to be automatically created for the patron who made the suggestion, using the PlaceHoldsOnOrdersFromSuggestions system preference.
الطلب من اشتراك دورية
If you are using the Serials module you can link your subscription order information to acquisitions by choosing to order 'From a subscription'.
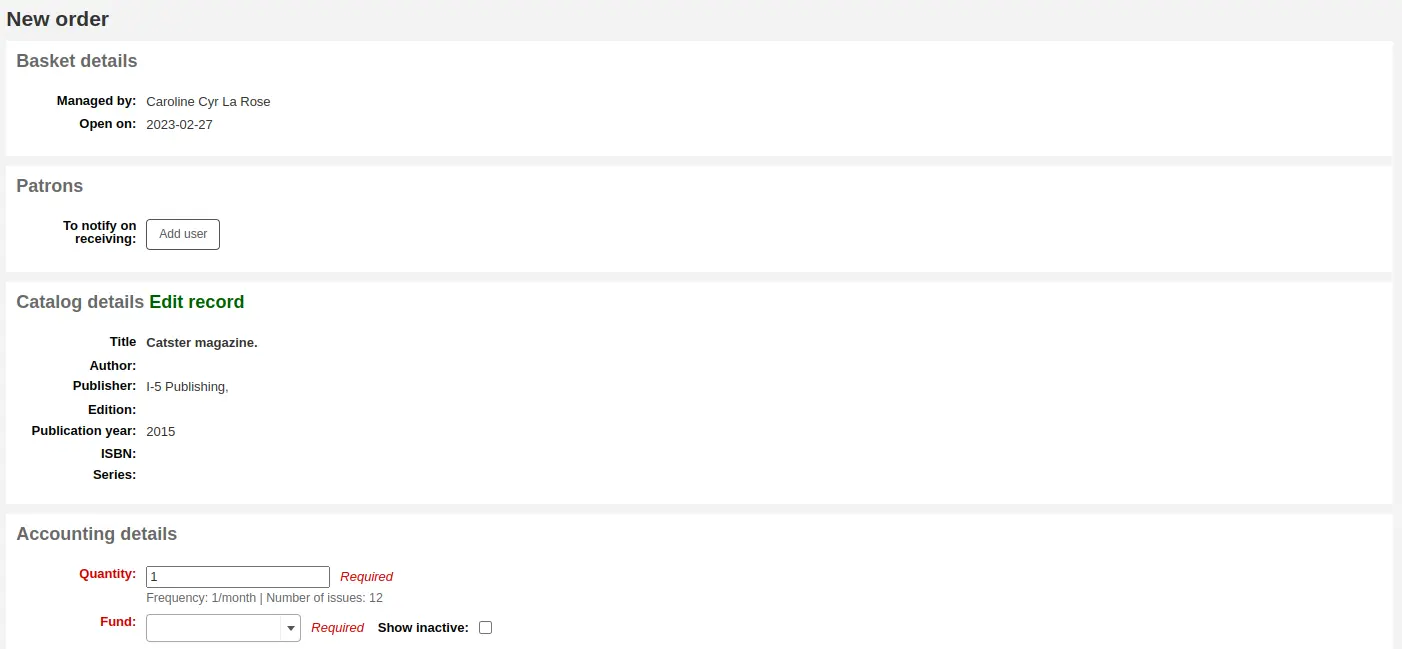
بعد النقر على رابط الطلبية ستنتقل إلى صفحة البحث التي ستساعدك في العثور على اشتراكك

ستظهر نتائجك على يسار النموذج وسيكون لكل اشتراك رابط "طلب" على يساره

Clicking 'Order' will bring the subscription info in to the order form without an 'Add item' section since you are just ordering a subscription and an item is not needed
الطلب من تسجيلة جديدة (فارغة)
To order from a record that can't be found anywhere else, choose the 'From a new (empty) record' option.
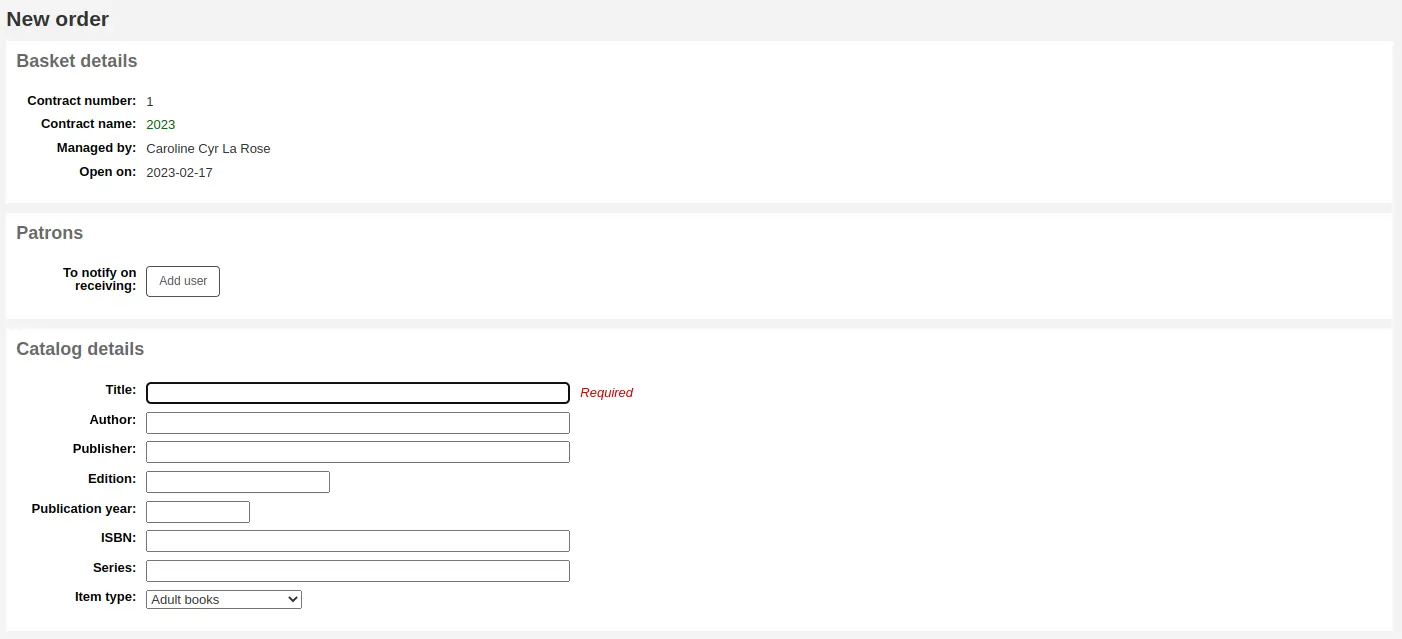
سوف يظهر لك نموذج فارغ لملء كافة التفاصيل الضرورية حول المادة التي تقوم بطلبها.
ملاحظة
If the default form does not have the necessary bibliographic fields to place an order, enable the UseACQFrameworkForBiblioRecords preference which will allow the ACQ MARC framework to customize the display of fields when ordering.
تكرار الطلبيات (الطلب من طلبيات حالية)
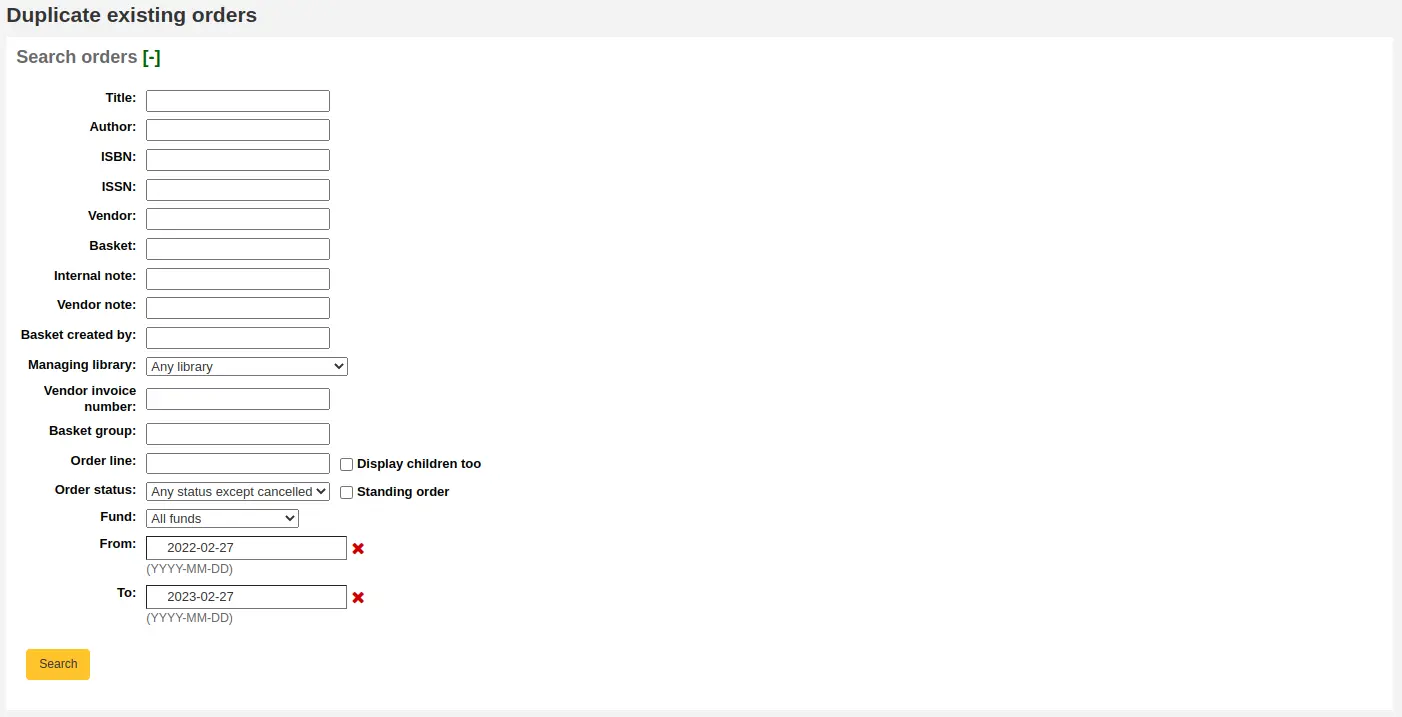
يمكنك تكرار طلبية حالية عن طريق اختيار خيار 'من طلبيات حالية (نسخ)'.
You will be presented with a search form to search your existing orders.
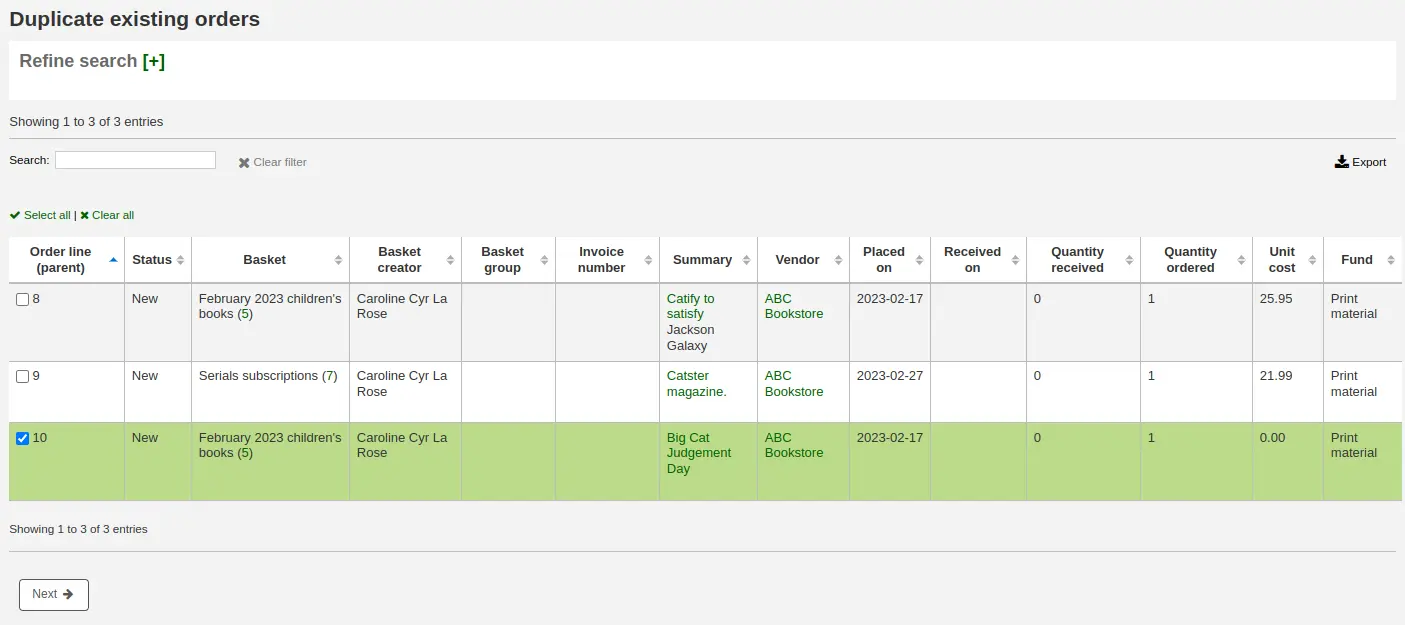
Check the boxes next to the order(s) you want to duplicate.
Click 'Next'
Check the boxes next to the values to copy from the original order or choose new values.
Click 'Duplicate orders'
Click 'Return to the basket'
Order from an external source
You can search other library catalogs for the record of an item to purchase using the 'From an external source' option. This will allow you to order from a MARC record found via a Z39.50 search.

From the results, click anywhere in the row of the title you want to add to your basket and choose the 'Order' option.

إذا ما كانت المادة التي تطلبها من مصدر خارجي وتبدو كأنها من الممكن أن تتكرر فإن كوها سينبهك ويعطيك خياراً لكيفية الاستمرار.

Use existing record: order another copy on the existing bibliographic record
Cancel and return to order: cancel the order
Create new record: create a new bibliographic record, while keeping the existing one also
Order from a new file
إذا قام المزود بإرسال ملف تسجيلة لك (ملف .mrc على سبيل المثال)، يمكنك إضافة طلبيات باستخدام التسجيلات الموجودة في الملف. قم باختيار 'من ملف جديد'.
ملاحظة
Staff members must have the stage_marc_import permission (or the superlibrarian permission) in addition to the order_manage permission in order to be able order from a new file.
You will be taken to the Stage MARC records for import tool. Stage your file as described in that section.
بمجرد تنظيم الملفات، يمكنك النقر على زر 'إضافة ملفات منظمة إلى السلة'.
Next to each title is a checkbox, check the items you would like to order, or choose 'Select all' at the top. Depending on your settings in the MarcFieldsToOrder system preference, Koha will populate the next screen with with the relevant quantity, price, fund, statistic 1, and statistic 2 found within the staged file.
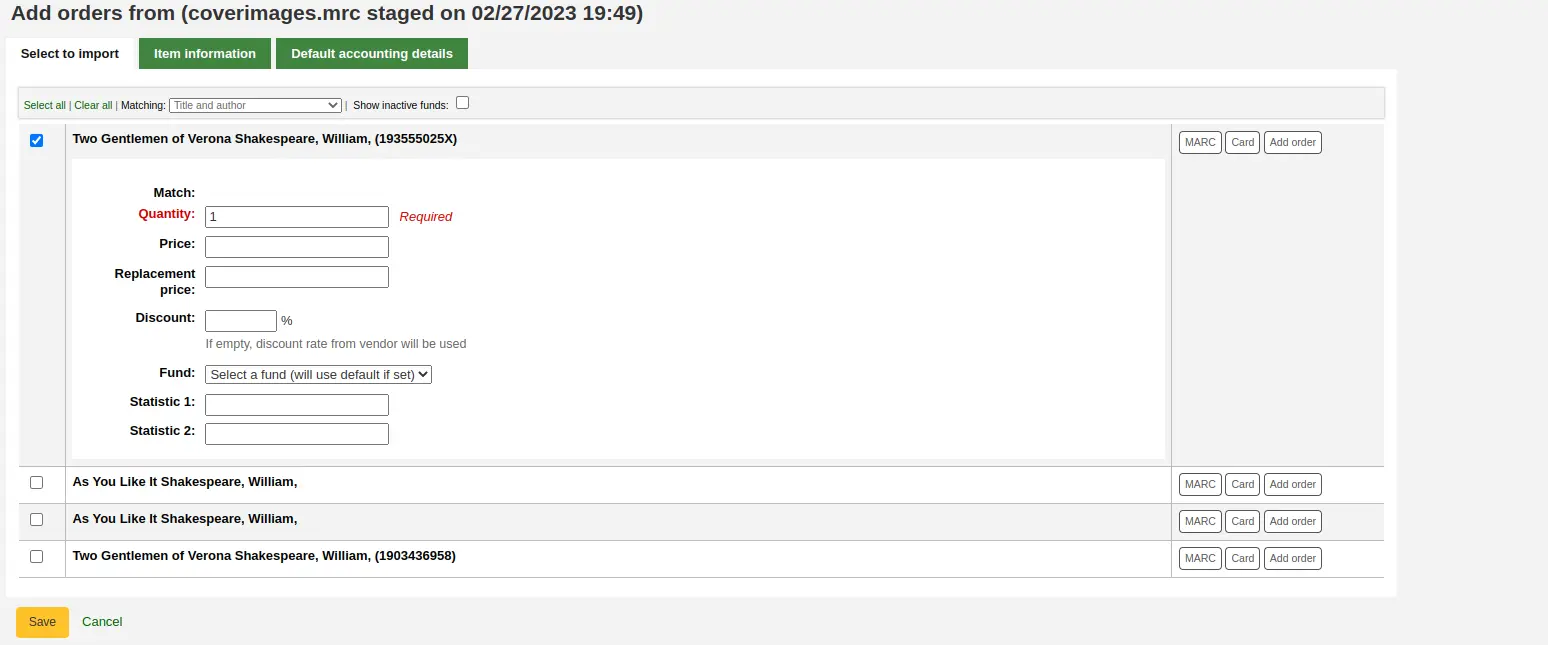
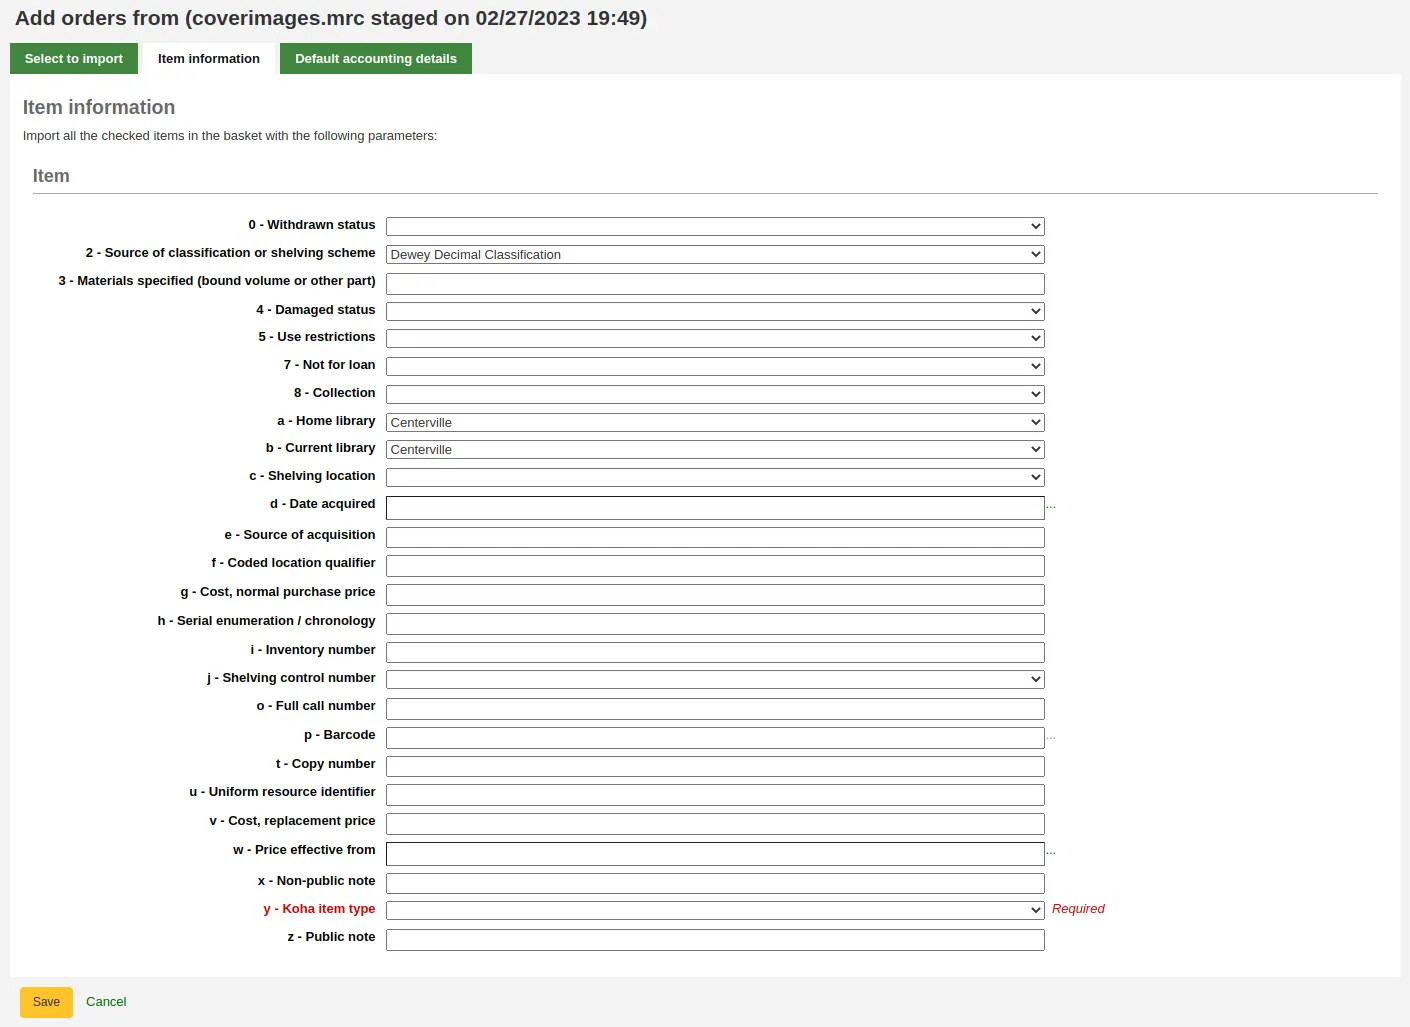
In the 'Item information' tab you can enter information that will be added to every ordered item such as item type, collection code and not for loan status.
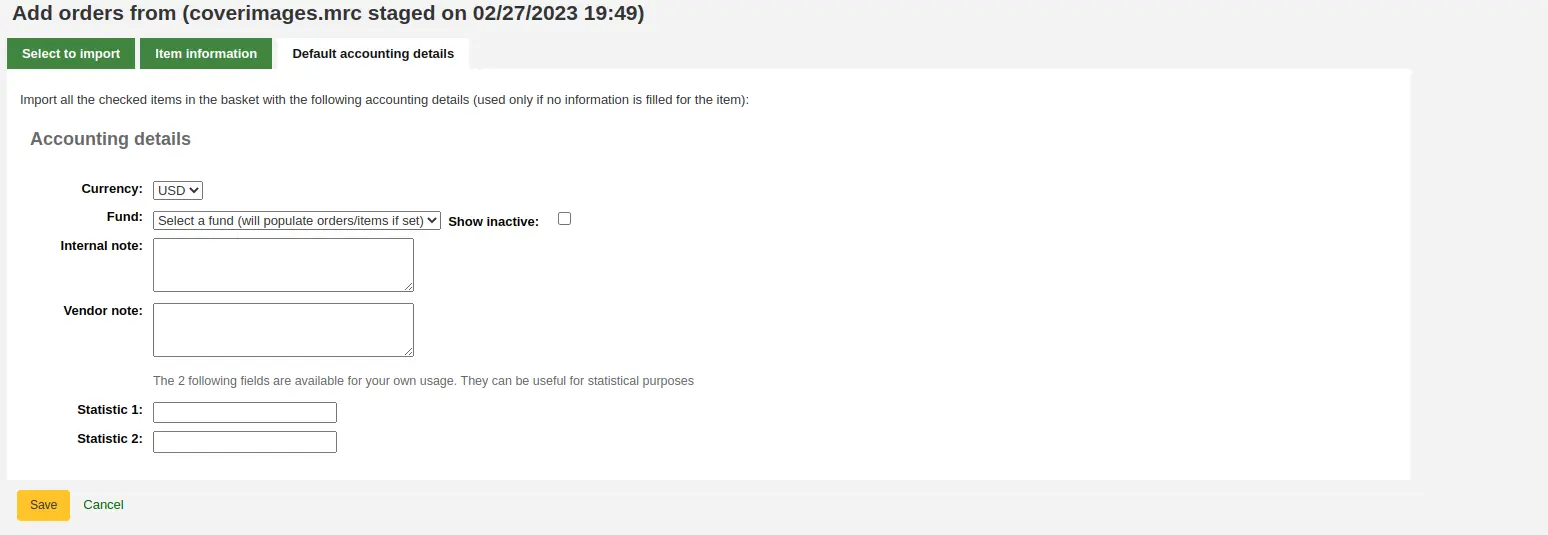
If no information is imported in the fund information from the MARC with the MarcFieldsToOrder system preference, the 'Default accounting details' tab can be used to apply values related to the accounting.
Click 'Save' to add to the basket
الطلب من ملف مخطط
يشبه هذا الخيار الخيار السابق، لكن في هذه الحالة، فقد تم بالفعل تنظيم ملفك. سواء قد قمت باختيار الطلب من ملف جديد أو الطلب من ملف منظم، فسيعتمد ذلك على سير عمل التزويد الخاص بك أو صلاحيات.
بمجرد النقر على 'من ملف منظم'، ستحصل على قائمة بكل الملفات المنظمة في نظامك.

From the list of files you are presented with, click on the 'Add orders' button to add the records in the staged file to your order.
Next to each title is a checkbox, check the items you would like to order, or choose 'Select all' at the top. Depending on your settings in the MarcFieldsToOrder system preference, Koha will populate the next screen with with the relevant quantity, price, fund, statistic 1, and statistic 2 found within the staged file.

In the 'Item information' tab you can enter information that will be added to every ordered item such as item type, collection code and not for loan status.

If no information is imported in the fund information from the MARC with the MarcFieldsToOrder system preference, the 'Default accounting details' tab can be used to apply values related to the accounting.

Click 'Save' to add to the basket
Order from titles with highest hold ratios
The final option for ordering is to order from a list of titles with the highest hold ratios.
ملاحظة
Staff members must have the circulate_remaining_permissions permission (or the superlibrarian permission) in addition to the order_manage permission in order to be able order from titles with high hold ratios.
This option will take you to the holds ratio report where you can find items with a high hold ratio and order additional copies. Next to each title will be a button with the number of items to order, click that and it will add the item to your basket.

Setting up patron notifications
With any of the above ordering options you're presented with an option to notify patrons of the new item when it's received. The contents of that notification can be edited in the Notices and slips tool and will have the code of ACQ_NOTIF_ON_RECEIV. In the 'Patrons' section you will see an option to 'Add user'. Click that button to add patrons who will be notified of the new issue.
بحث إشعار المستفيد
In the window that pops up search for the patrons you'd like to notify and click 'Add'
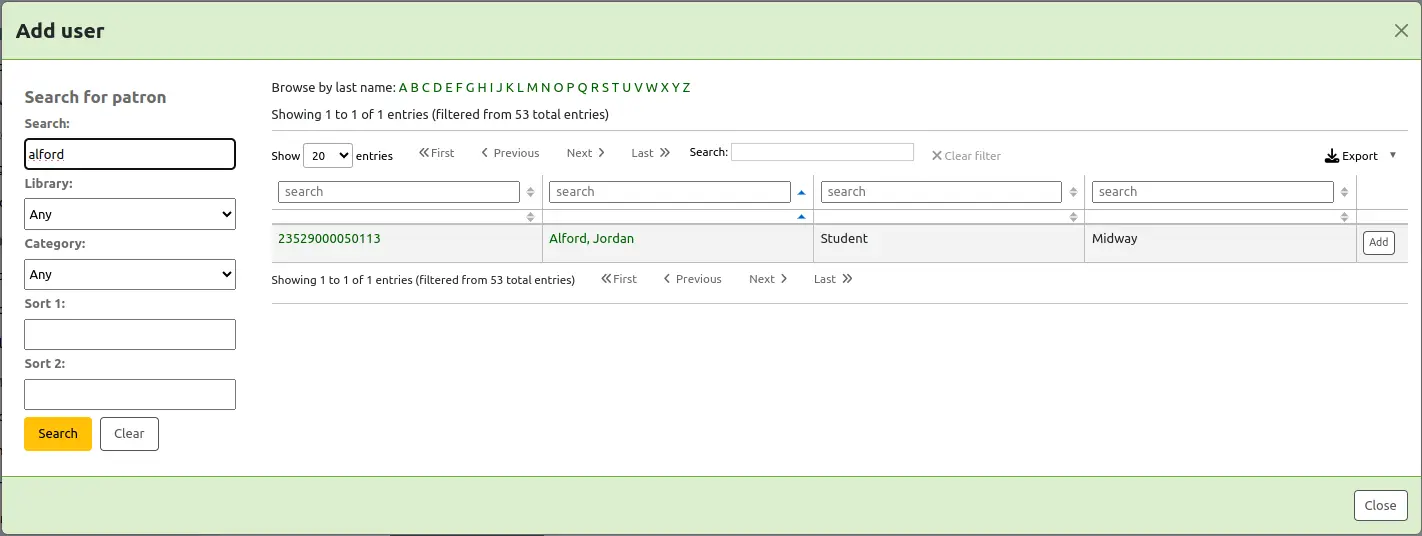
بمجرد انتهئك يمكنك إغلاق النافذة وسترى قائمة المستفيدين أدنى قسم "المستفيدين"

Adding items to orders
After bringing in the record information (for all order methods except for the staged files), if your AcqCreateItem system preference is set to add an item when ordering you will enter the item information next. You need to fill out at least one item record and then click the 'Add item' button at the bottom left of the item form.
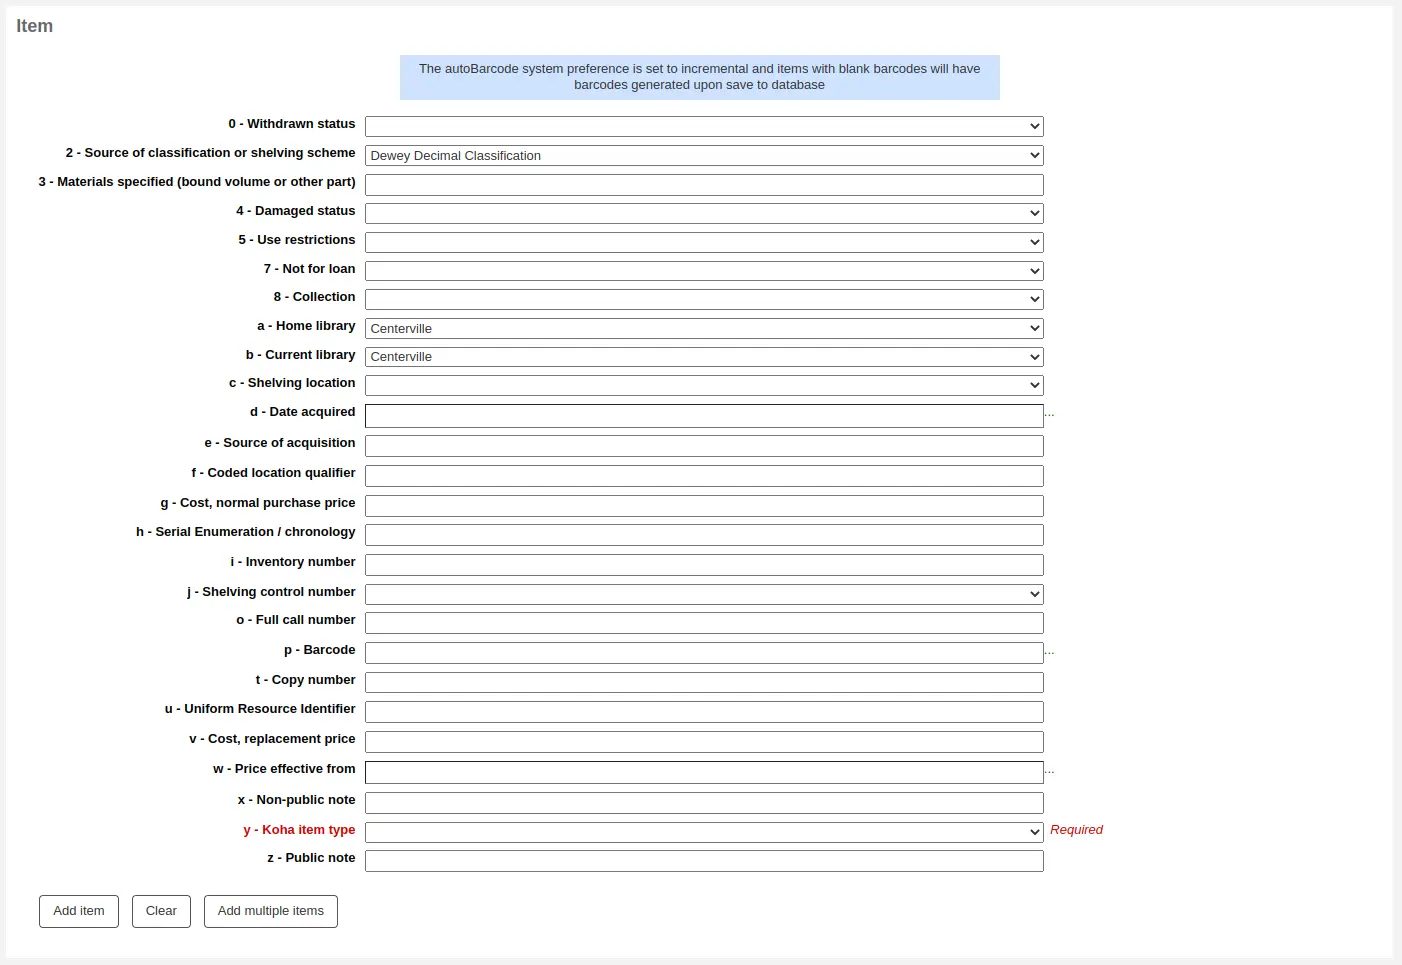
بعد النقر على إضافة ستظهر المادة أعلى النموذج وبعد ذلك سيمكنك إدخال مادتك الأخرى بنفس الطريقة (اذا كان الطلب لأكثر من مادة).

إذا كنت تقوم بطلب عدة مواد، يمكنك النقر على 'إضافة عدة مواد' بدلاً من إضافتها واحدة تلو الأخرى. سيتم سؤالم عن عدد المواد التي ترغب في إضافتها. قم ببساطة بإدخال ذلك العدد في المربع والنقر على'إضافة'.

Adding accounting details to orders
عند إنتهائك من إدخال المعلومات عن المادة ، ستحتاج أن تدخل البيانات المحاسبية.
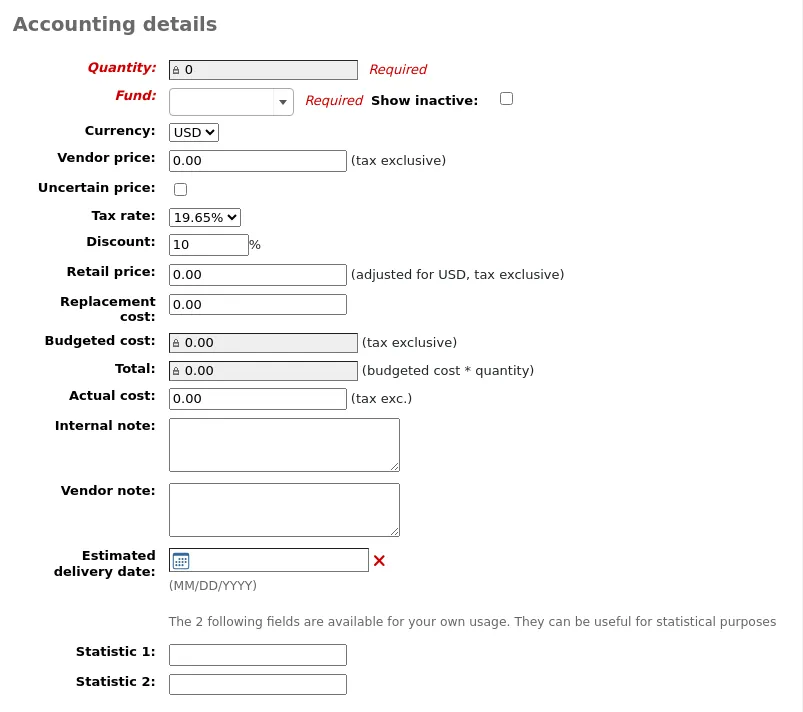
Quantity: enter the quantity of copies you want to order.
تحذير
If the item is created upon ordering, you will not be able to edit the quantity manually, you must add items to the order by clicking 'Add item' below the item form to add as many items as you're ordering.
Fund: choose the fund that will be used to buy this title.
The list of funds is populated by the funds you have created in the Acquisitions administration area.
If you have a lot of funds, you can start to type the fund name in the field and the list will be filtered for you.
By default, only funds for active budgets will be available in the drop-down menu. If you need to also see your inactive funds, check the 'Show inactive' box.
Currency: choose the currency of the price.
The currency pull down will have the currencies you set up in the Acquisitions administration area.
Vendor price: enter the price before any taxes or discounts are applied.
Uncertain price: if the price is uncertain, check the uncertain price box. You will be able to go back later to enter the right price.
ملاحظة
A basket with at least one uncertain price cannot be closed.
See the section Dealing with uncertain prices below to learn how to manage uncertain prices.
Tax rate: if you are charged sales tax, choose the rate.
This field is populated by the TaxRates system preference.
Discount: enter the percentage discount you're receiving on this order. Once you enter this, hit tab and Koha will populate the rest of the cost fields below.
Retail price: enter the recommended retail price (RRP), the price set by the publisher or the manufacturer as a recommendation to booksellers.
Replacement cost: enter the cost to replace the item. This is the price charged to the user when an item is declared lost (if the WhenLostChargeReplacementFee system preference is set to 'Charge').
Budgeted cost is the amount that will be removed from the 'spent' budget. Whether this number includes or excludes taxes will depend on the 'List price' setting for your vendor.
Total is the budgeted cost multiplied by the quantity of items ordered.
Actual cost: this field is usually left empty until receiving, when you can confirm the actual cost against the vendor's packing slip or invoice.
Internal note: this will only appear in the acquisitions module and in the staff interface catalog, under the 'Acquisitions details' tab in the detailed record.
Vendor note: this will appear in the acquisitions module as well as on the order when exported as CSV.
Estimated delivery date: you can specify an estimated delivery date for this specific order. If no date is entered here, the estimated delivery date will be calculated according to the 'Delivery time' in the vendor information. This date is used when managing late orders
If you added statistical categories when creating the fund, those values will appear in the two statistics fields.
If you have additional fields for order lines, they will appear here.
بمجرد قيامك بملء جميع الحقول قم بالنقر على "حفظ" لإضافة المادة إلى سلتك. إذا كان السعر يذهب إلى المبلغ المتاح في التمويل ستظهر لك رسالة تأكيد.

سيتيح لك تنبيه التأكيد الطلب بما يتخطى مبلغ تمويلك إذا اخترت ذلك.
Once your order is entered you can search for it through acquisitions or view the information on the bibliographic record detail page in the staff interface, if the AcquisitionDetails system preference is set to 'Display', or view the information on the bibliographic record detail page in the OPAC, if the OPACAcquisitionDetails system preference is set to 'Display'.

ملاحظة
You can customize the columns of this table in the Table settings section of the Administration module (table id: acquisitiondetails-table).
Editing the basket
ملاحظة
Staff members must have the order_manage permission (or the superlibrarian permission) in order to edit existing baskets.
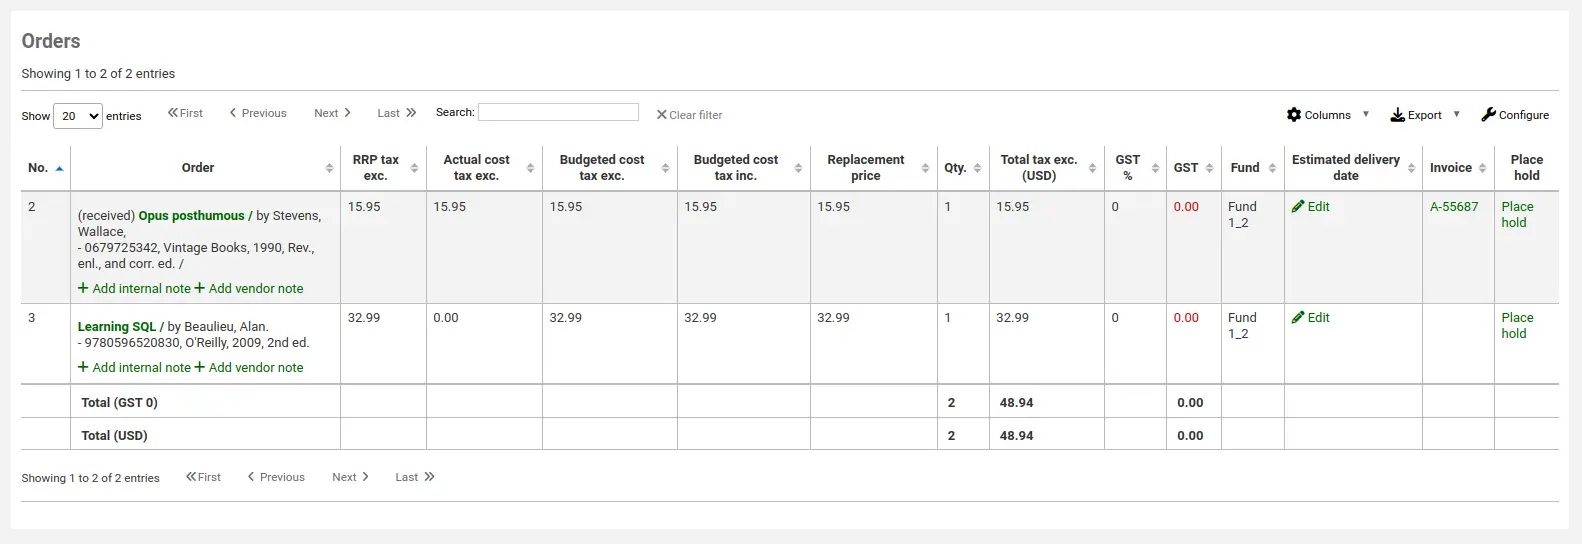
عندما تُضاف مادة إلى السلة سيُعرض لك ملخص السلة.
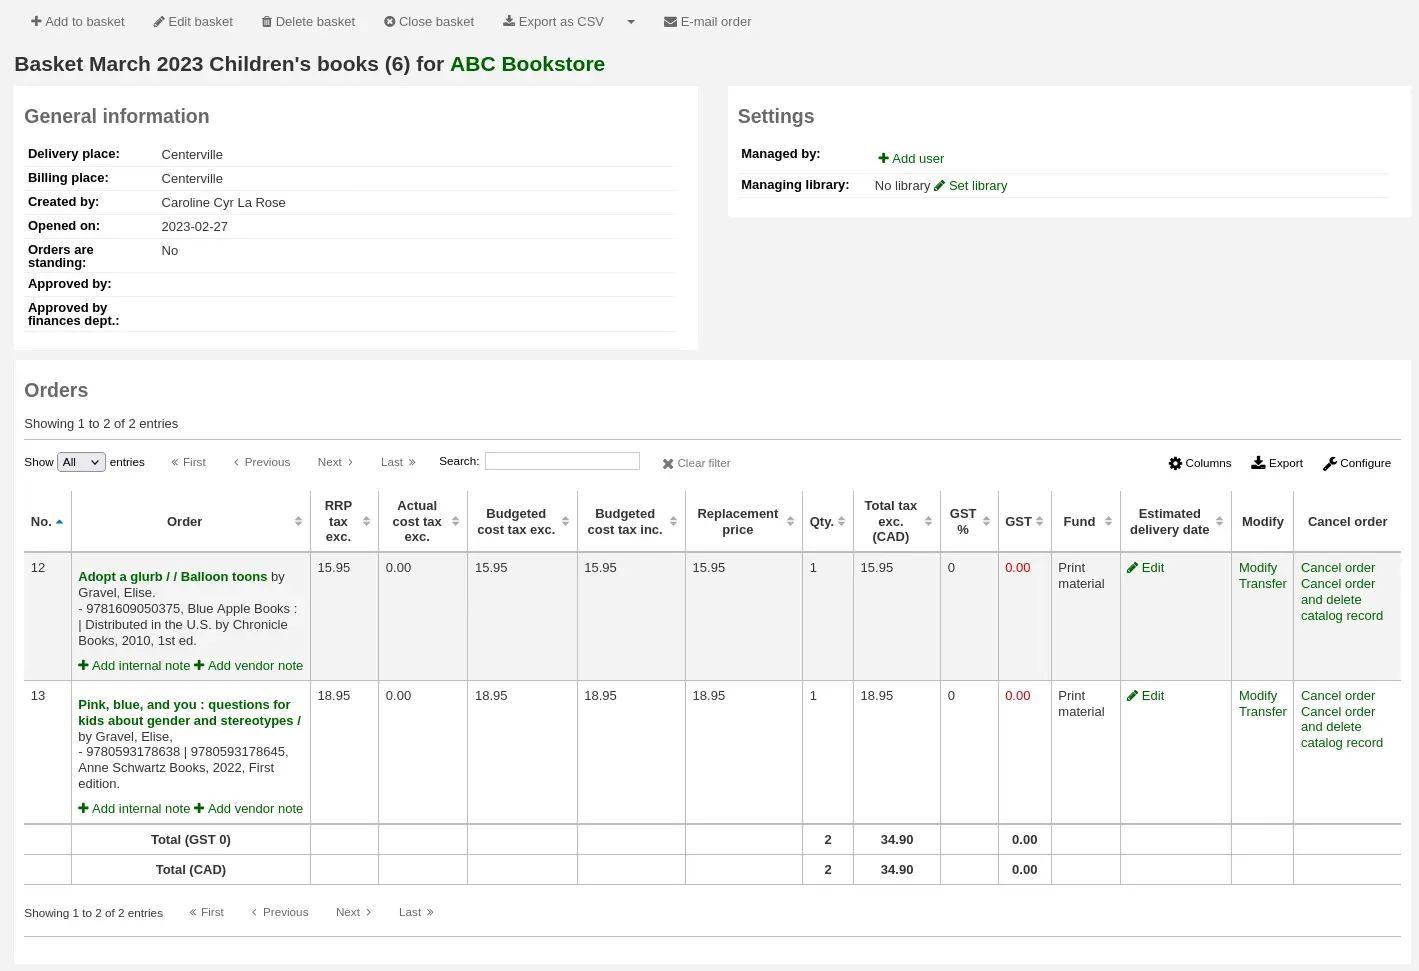
ملاحظة
You can customize the columns of this table in the Table settings section of the Administration module (table id: orders).
From the basket, you can edit or remove the items that you have added.
Choosing to 'Modify' the order will take you back into the order form in case you need to modify the accounting details or the items.
Choosing to 'Transfer' the order will allow you to move this order from this vendor's basket into a different vendor's basket.
ملاحظة
The new vendor must have at least one open basket for you to be able to transfer the order.
Choosing to 'Place Hold' will allow you to place a hold for a patron on this order.
Choosing to 'Cancel the order' will delete the order line but leave the record in the catalog.
Choosing to 'Cancel order and delete catalog record' removes both the order line and the record in the catalog.
تسجيلة الفهرسة لا يمكن دائماً حذفها. ربما عليك أن ترى الملاحظات التي تشرح السبب.
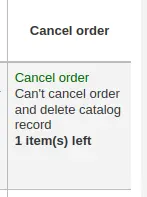
ملاحظة
If the order was created from a suggestion, the status of the suggestion will be reset from 'Ordered' back to 'Accepted' if the order is canceled.
On the summary page, you also have the several option through the buttons at the top of the basket header.

Add to basket: add orders to the basket
Edit basket: edit the basket information, such as the name or the billing place.
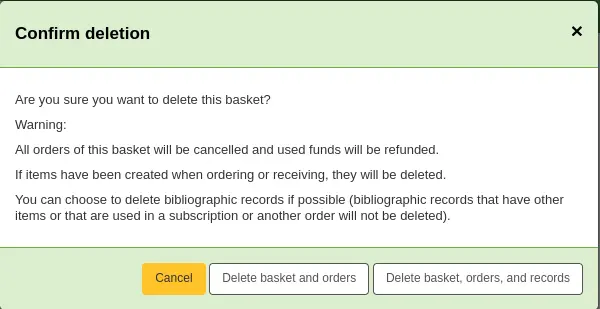
Delete basket: if the basket is empty, you will get a simple confirmation message before deleting the basket. If the basket contains orders, you will get a confirmation message with several options.
Delete basket and orders: this will delete the basket, cancel the orders, refund the used funds, and delete the items (ordered or received).
Delete basket, orders, and records: this will delete all of the above plus the bibliographic records associated with the orders (except the ones which can't be deleted because they have remaining items, orders or subscriptions attached).
Close basket: closing the basket will enable you to add it to a basket group (this is optional) and receive its items.
Export as CSV: this will create a CSV file with all your orders from this basket. You can add several CSV profiles options by going to the CSV profiles tool.
Create EDIFACT order: if you're using EDI for your order you can click the 'Create EDIFACT order' button when you're done to send the file to the vendor and close the basket.
E-mail order: this will send the order information to your contact for this vendor. Make sure your contact has a email address in the vendor profile.
ملاحظة
The email sent is based on the ACQORDER notice template. It can be customized in the Notices and slips tool.
Ordering (closing the basket)
ملاحظة
Staff members must have the order_manage permission (or the superlibrarian permission) in order to close existing baskets.
عندما تكون متأكداً من أن سلَّتك مكتملة، بإمكانك أن تنقر على زر'أغلق السلة' لتشير بذلك أن هذه السلة مكتملة وتم إرسالها للمورد.

تحذير
You must close the basket to be able to receive items when they arrive. Only items in closed baskets will show as ready to receive.
If you have your BasketConfirmations system preference set to show a confirmation, you will be asked if you are sure about closing the basket.

When closing the basket you can choose to add the basket to a group for easy printing and retrieval. If you check the box to 'Attach this basket to a new basket group with the same name' you will be brought to the group list where you can export a PDF of the order.

تحذير
A basket with at least one item marked as 'uncertain price' will not be allowed to be closed.
See the section Dealing with uncertain prices below to learn how to manage uncertain prices.
Dealing with uncertain prices
تحذير
A basket with at least one item marked as 'uncertain price' will not be allowed to be closed.
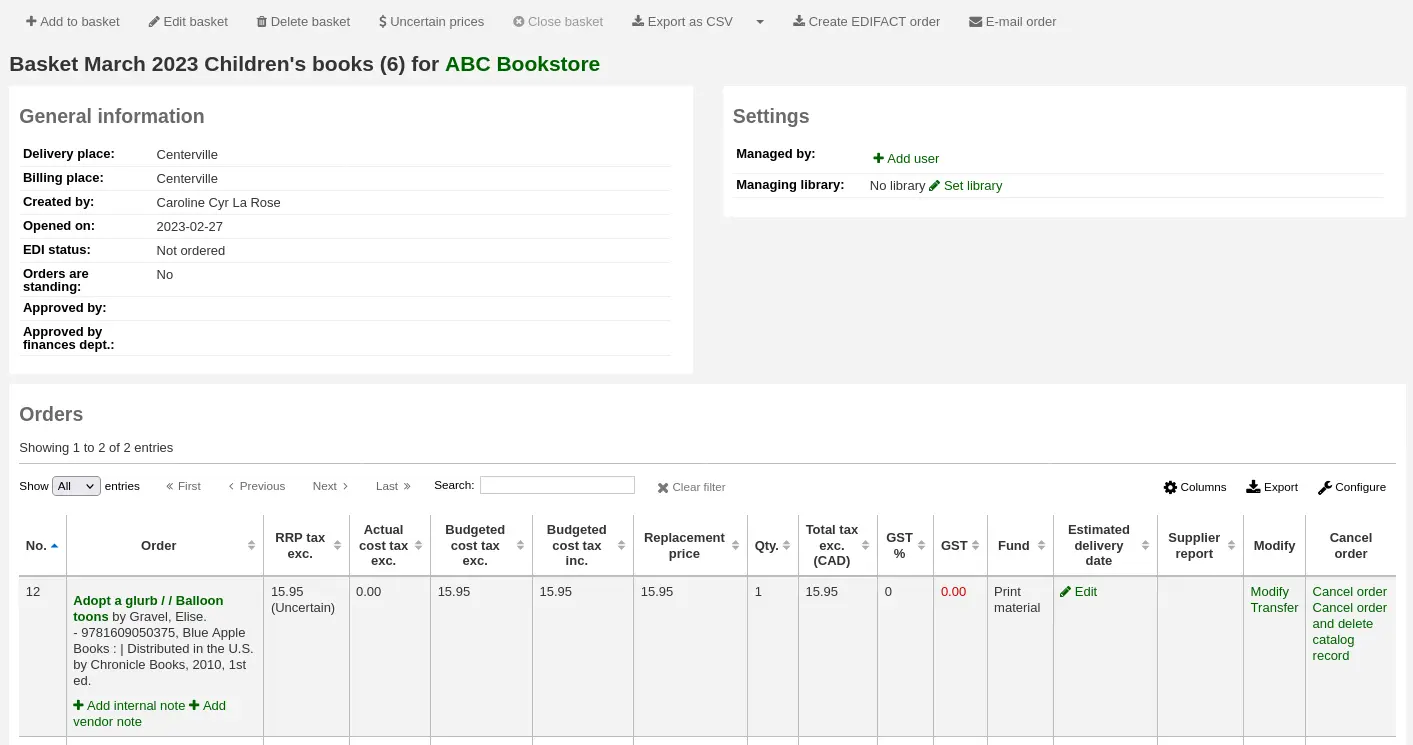
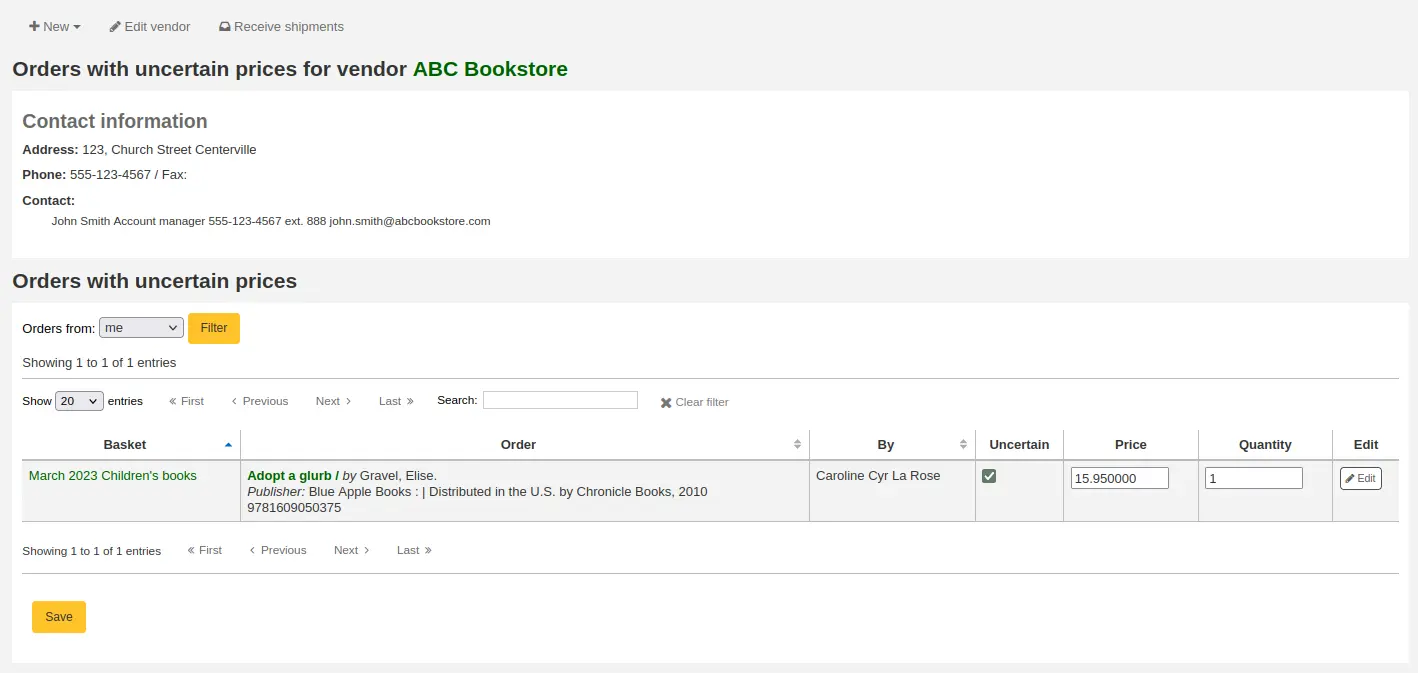
Clicking the 'Uncertain prices' button will call up a list of items with uncertain prices to quick editing. From that list, you can quickly edit the items by entering new prices and quantities.
ملاحظة
The Uncertain prices page is independent of the basket. It is linked to the vendor so you will see all items on order with uncertain prices for that vendor.
Creating a basket group
A basket group is simply a group of baskets. In some libraries, several staff members create baskets, and, at the end of a period of time, someone groups them together to send to the vendor in bulk. Note that it is possible to have one basket in a basket group, or no basket groups at all if that's the workflow used in your library.
ملاحظة
Staff members must have the group_manage permission (or the superlibrarian permission) in order to create, edit, close, and delete basket groups.
ملاحظة
You cannot re-open a basket that is attached to a basket group. The re-open basket button will be grayed out.
To create a basket group, go to the vendor detail page and click on the 'Basket groups' tab on the left side.

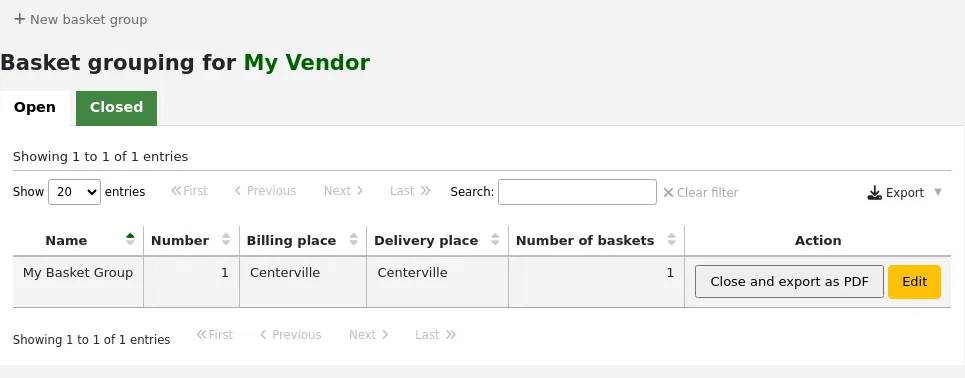
Click on the 'New basket group' button.
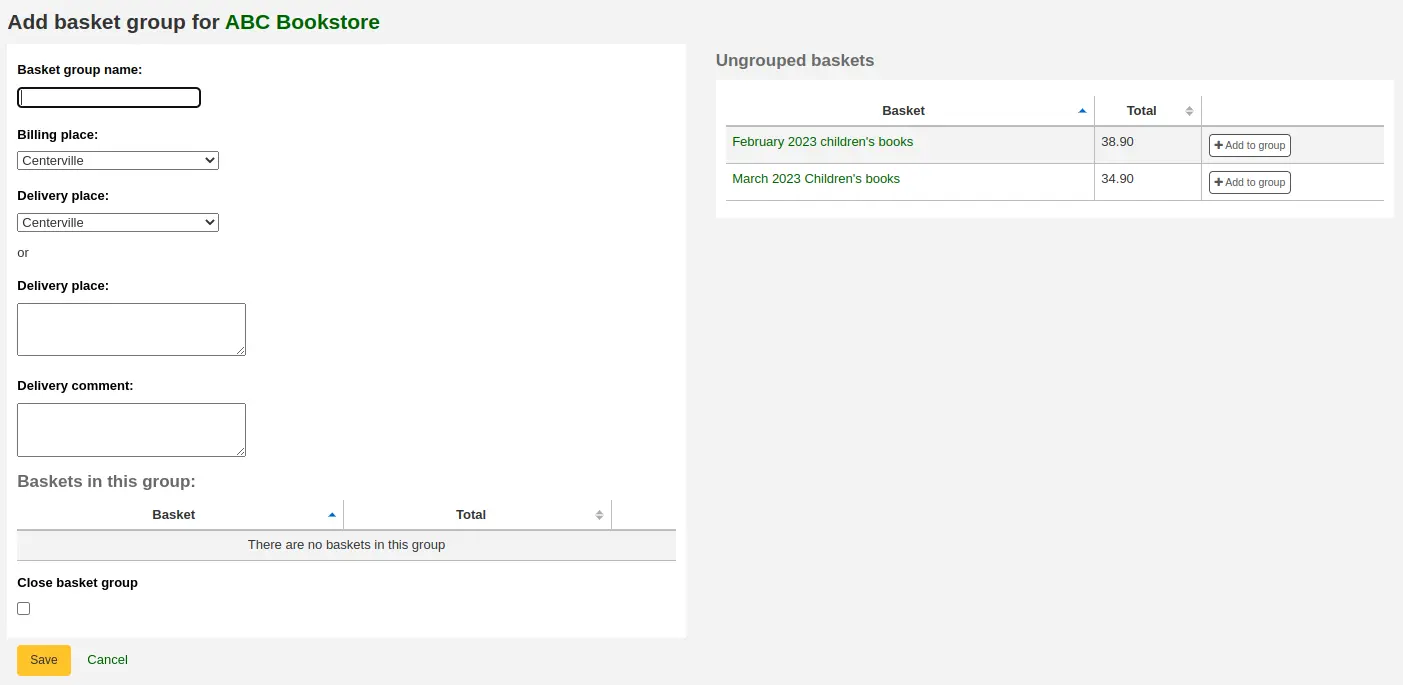
Basket group name: this is the name the basket group will go by in Koha
Billing place: this is the billing address that will appear on the basket group order
Delivery place: pick a library where these orders should be sent, this will appear on the basket group order under delivery address You can also enter a different address
Delivery comment: this comment will appear on the basket group order
Close basket group: if you know that once you're done with this basket group, you will not be modifying it anymore, you can check this box and the group will be closed upon saving
Add baskets to the group by clicking the 'Add to group' button on the right.
Click on 'Save' to finish creating your basket.
From there, you can export your order as a PDF file to send to your vendor.
ملاحظة
The content of the PDF file is not editable, but it is possible to change its language and formatting with the OrderPdfFormat system preference.
If using the 'English 1-Page' option, it is possible to customize the text written above the order table with the 1PageOrderPDFText system preference.
Searching for orders
At the top of the various Acquisition pages there is a quick search box where you can perform either a Vendor search or an Order search.

Using the Orders search you can search for items that have been ordered with the title or the vendor.

You can enter info in one or both fields and you can enter any part of the title or vendor name.
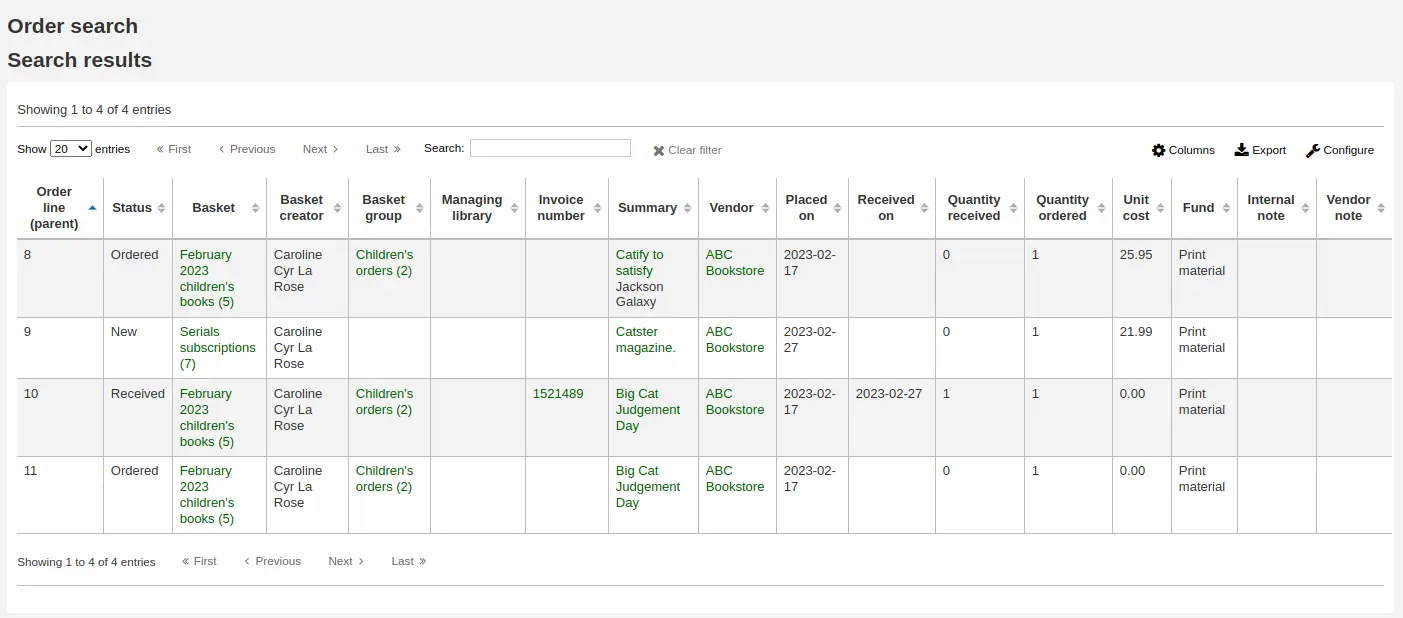
ملاحظة
You can customize the columns of this table in the Table settings section of the Administration module (table id: histsearcht).
Clicking the plus sign to the right of the vendor search box will expand the search and allow you to search for additional fields. In the basket search, you can enter any part of the basket name or its number. In the invoice number search, you can enter a part of the invoice number.

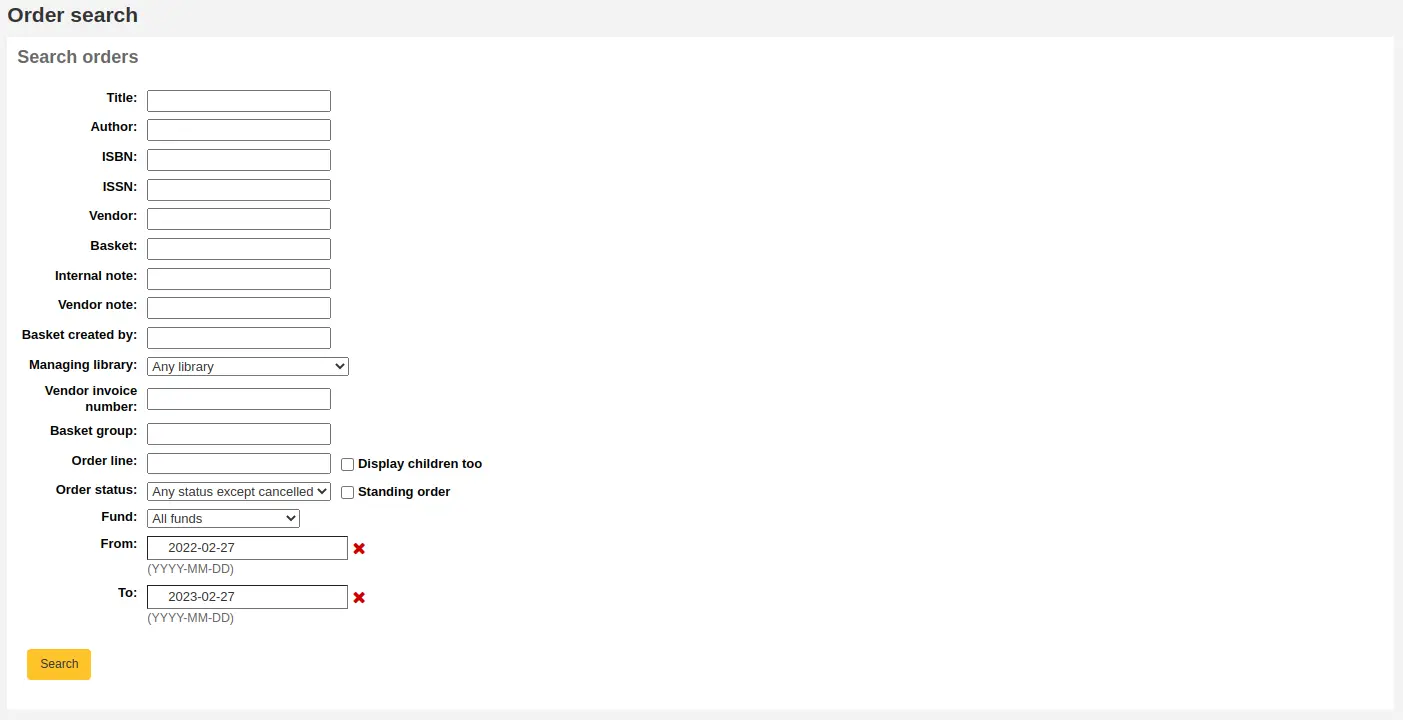
Clicking Advanced search to the right of the search button will give you all of the order search options available.
Receiving orders
تحذير
You must close the basket to be able to receive items when they arrive. Only items in closed baskets will show as ready to receive.
ملاحظة
Staff members must have the order_receive permission (or the superlibrarian permission) in order to receive orders.
الطلبات من الممكن أن تُستلم من صفحة معلومات المورد أو من صفحة نتائج بحث المورد.

او صفحة نتائج بحث المورد

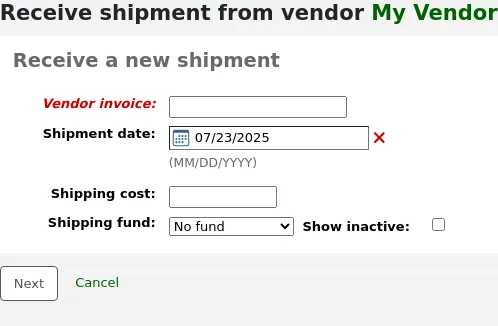
After clicking 'Receive shipments' you will be asked to enter a vendor invoice number, a shipment received date, a shipping cost and a fund to subtract that shipping amount from.
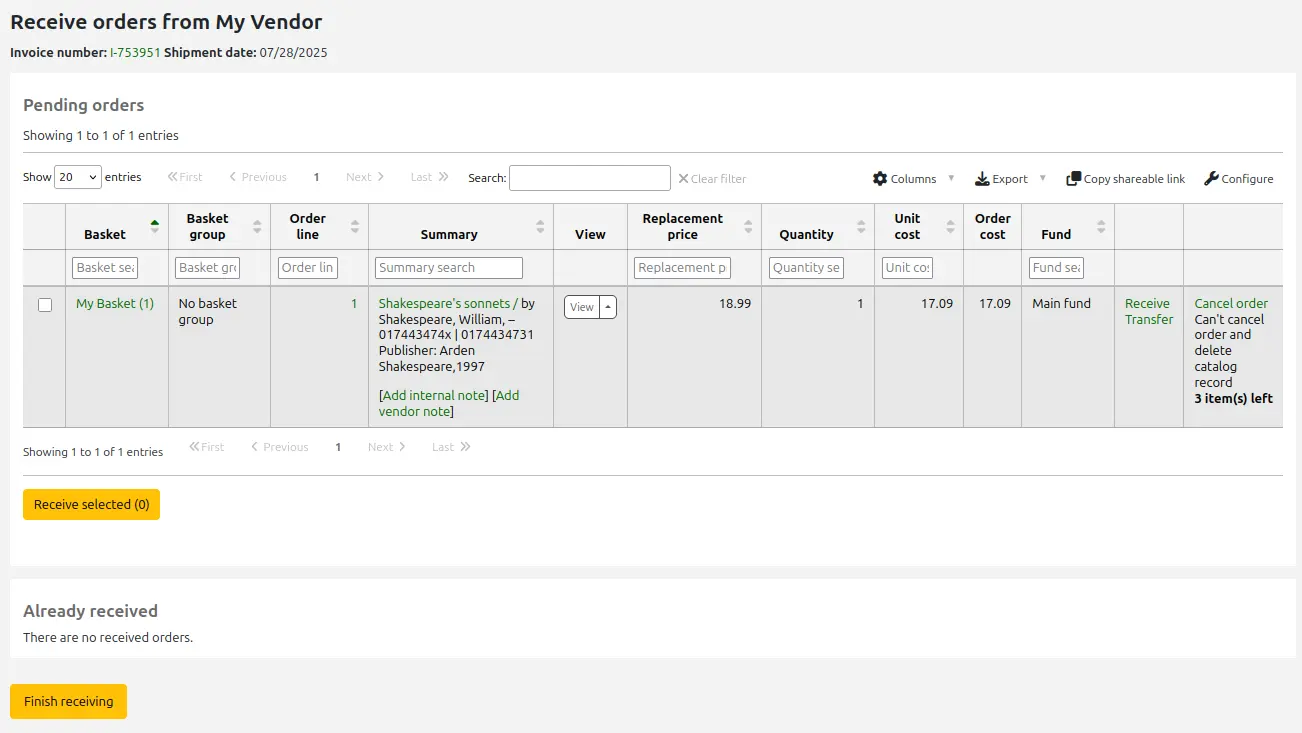
صفحة الإستلام ستدرج كل المواد التي لا تزال مطلوبة من المورد بغض النظر عن سلة المواد التي تتبع لها المادة.
تحذير
Only items from closed baskets will appear in the pending orders list.
ملاحظة
If you have a lot of orders, you can filter the orders using the 'Search' box just above the table, or the filter boxes at the top of each table column.

You could, for example, scan the ISBN of the book you are receiving in the filter box and the table will only show the corresponding orders.
Just make sure to clear the filter boxes when you're done, otherwise, the other items won't appear.
للحصول على مادة معينة، انقر فوق رابط 'استلام' من على يمين هذه المادة.
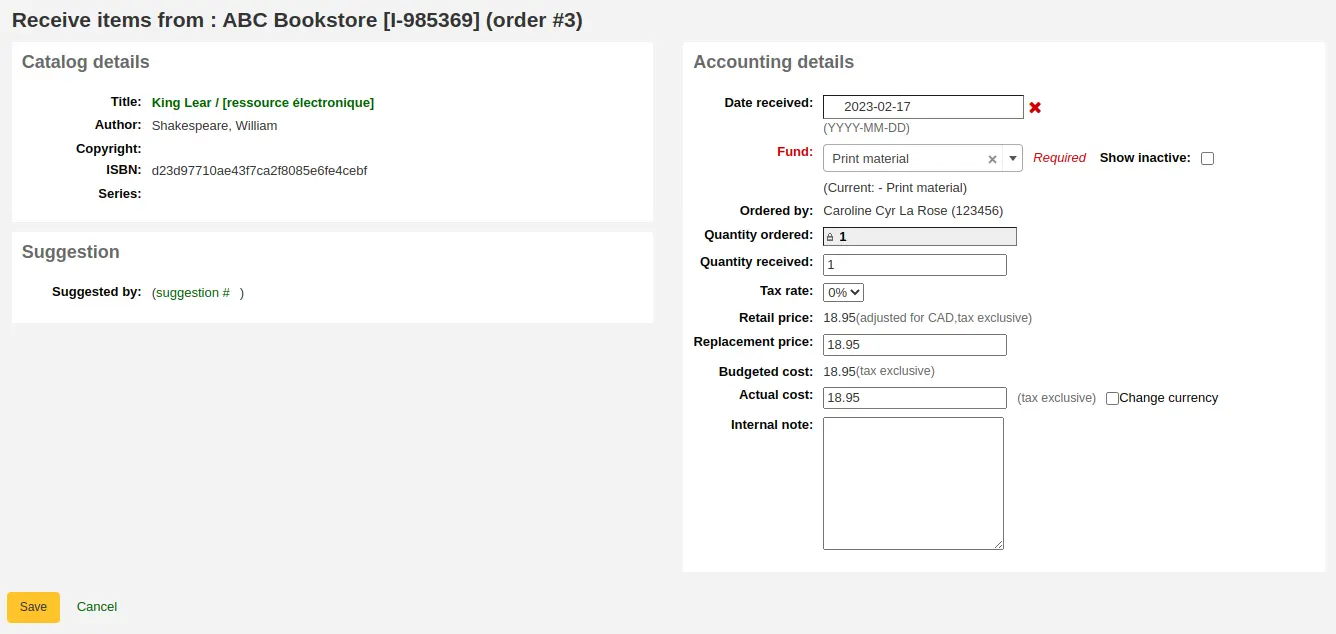
Depending on when you chose to create the item (either in the AcqCreateItem system preference, or upon creating your basket), the form will look slightly different.
If you chose to create your item when placing the order, you will have your item information on the left side and financial information on the right side.
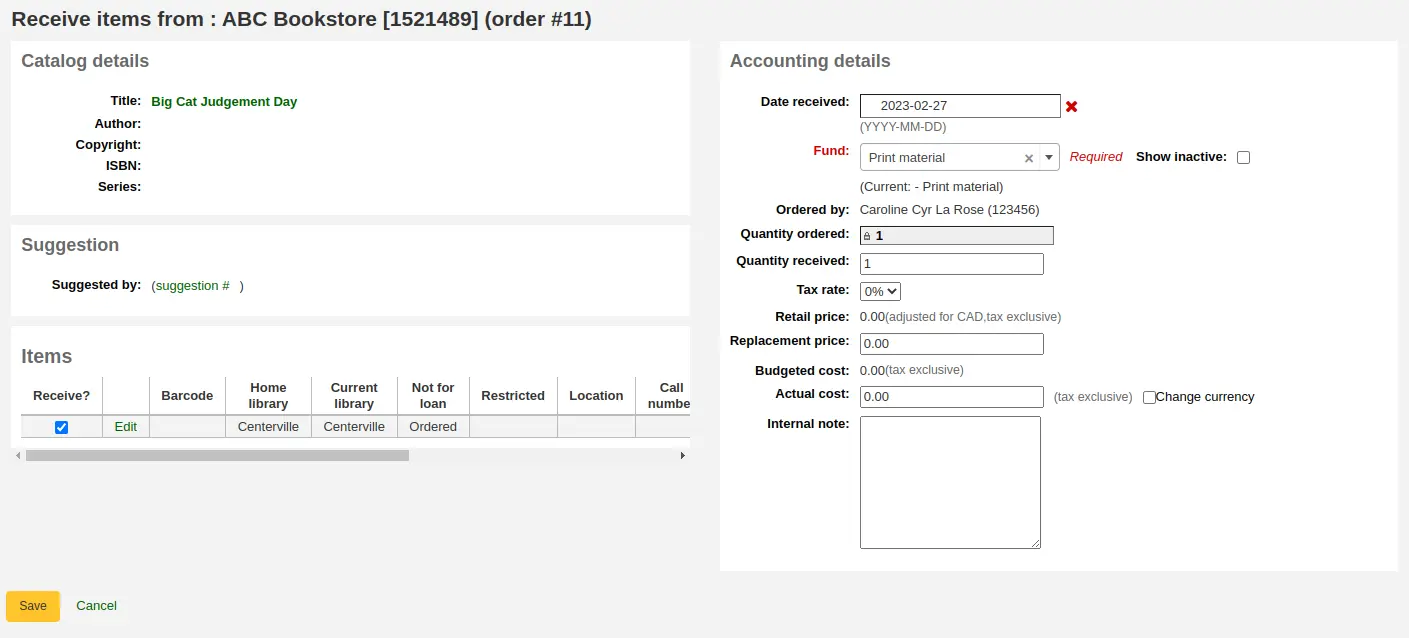
You can check the box next to the item to receive it, or fill out the 'Quantity received' field on the left side.
ملاحظة
You can choose to mark only part of the order as received if the vendor did not send your entire order by checking only the boxes next to the items on the left that you want to receive or by entering the right amount in the 'Quantity received' field.
You can edit the item if needed by clicking on the 'Edit' link. This will allow you to enter in accurate call numbers and barcodes if you'd like to do that at the point of receipt.
You can also alter the cost information (replacement cost, actual cost, and currency of the actual cost). The values you enter there will automatically populate the 'Cost, replacement price' subfield and the 'Cost, normal purchase price' subfield in the item record after saving.
If you chose to create your item when receiving the order, you will see the item creation form on the left side and the financial information on the right side.
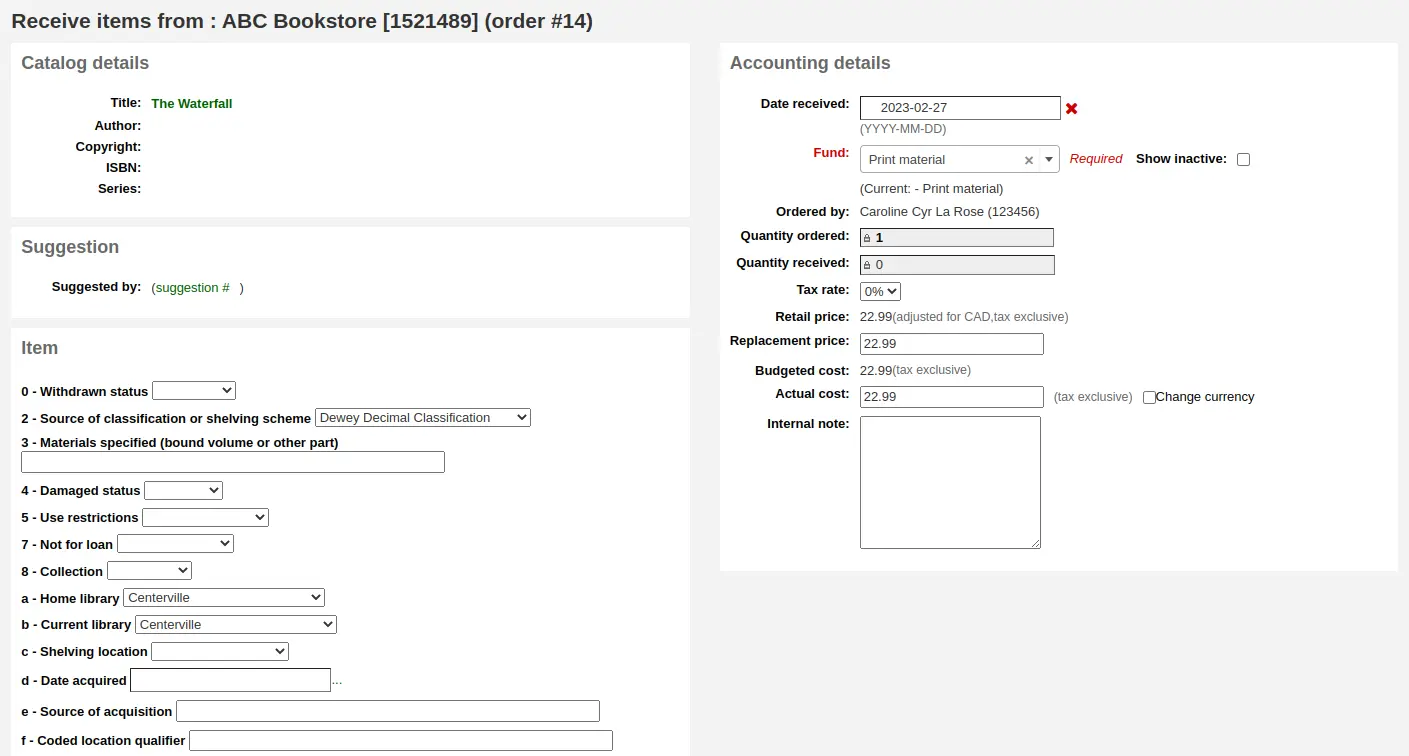
تحذير
You must fill out the item form and click on 'Add item' or 'Add multiple items' in order to receive the order. You will not be able to simply change the 'Quantity received' amount.
You can alter the cost information (replacement cost, actual cost, and currency of the actual cost). The values you enter there will automatically populate the 'Cost, replacement price' subfield and the 'Cost, normal purchase price' subfield in the item record after saving.
Finally, if you chose to create your item when cataloging the record, you will only see the financial information on the right.

You can alter the cost information (replacement cost, actual cost, and currency of the actual cost).
ملاحظة
The financial information will not be transferred to the item if the item is created when cataloging.
Once you have made any changes necessary (to the order and/or items, click 'Save' to mark the item(s) as received.
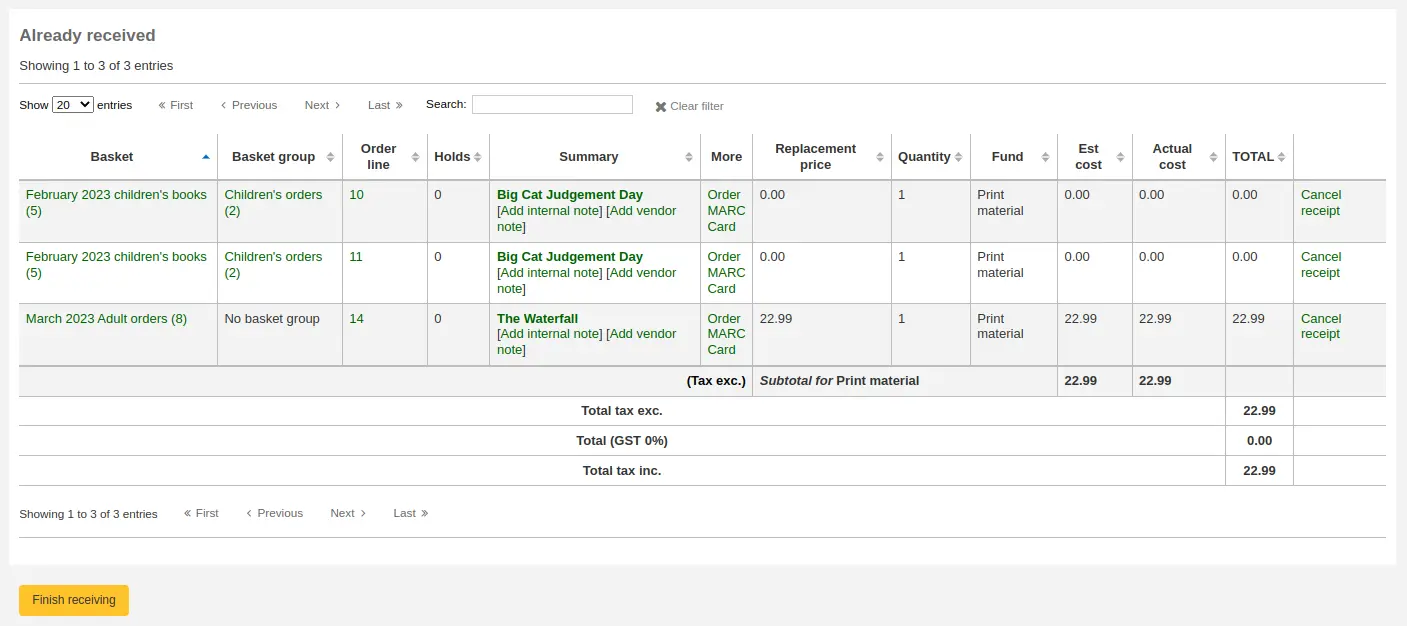
ملاحظة
If you have your AcqItemSetSubfieldsWhenReceived system preference set to add or change values on received items those changes will take place after you hit 'Save'.
عندما تنتهي من إستلام المواد ، بإمكانك أن تترك الصفحة أوتنقر زر 'إنهاء الإستلام' في أسفل الشاشة.
Received orders will have '(received)' before the title in the basket view.
ملاحظة
When all the orders in a basket have been received, the basket will be removed from the list of baskets for that vendor. You can click 'Show all baskets' to view the inactive baskets.


ملاحظة
If a patron was marked as needing to be notified when the order is received, they will receive the ACQ_NOTIF_ON_RECEIV notice.
If a patron suggested the purchase, they will receive the AVAILABLE notice.
Both of these notices can be customized in the Notices and slips tool.
Transferring orders
ملاحظة
Staff members must have the order_manage permission (or the superlibrarian permission) in order to transfer orders.
If the item is no longer available from this vendor you can transfer the order to another vendor's basket by clicking the 'Transfer' link to the right of the title on the basket page or the receiving page. This will pop up a vendor search box.
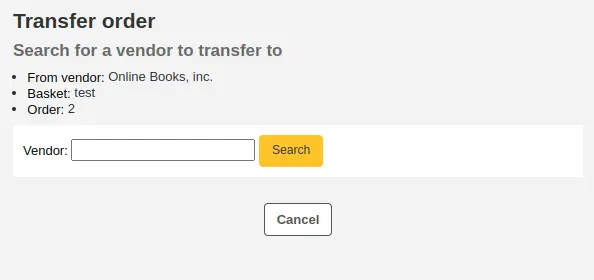
من النتائج يمكنك اختيار رابط "استيراد" على يسار التسجيلة التي ترغب في إضافتها إلى كوها
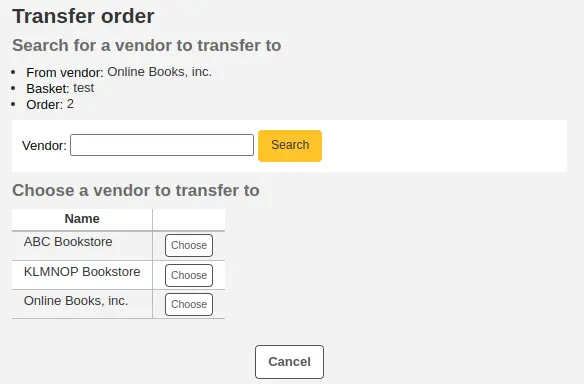
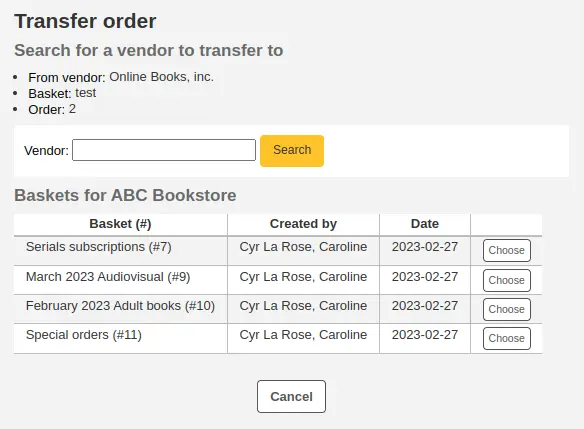
ستظهر لك السلات المفتوحة لهذا المزود للاختيار منها. لنقل المادة قم ببساطة بالنقر على "اختيار" على يسار السلة التي ترغب في إضافة المادة لها.
عندما يتم رفع الملف ، سيُعرض لك رسالة تأكيد.
You will see transferred orders with the canceled orders when viewing the basket.
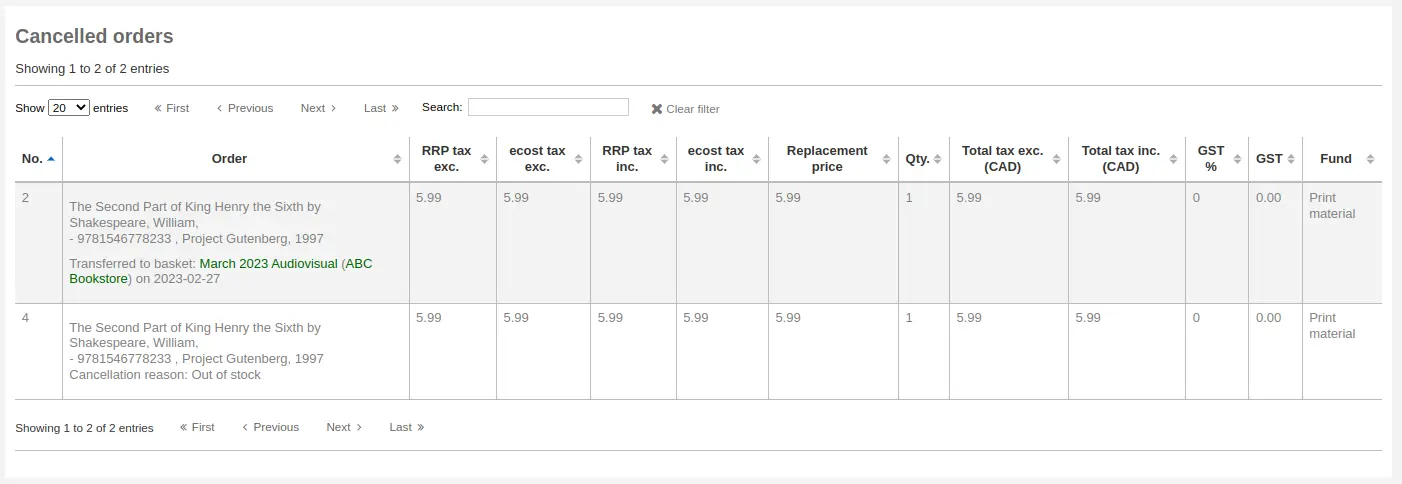
ملاحظة
Whilst it is possible to re-open your basket (unless it is part of a basket group, in which case the basket cannot be reopened), transfer one or more orders and re-close the basket, this is not recommended. This procedure will update the 'basket closed' date, which in turn will cause your 'late order' calculations to be incorrect.
It is preferable to transfer an order from the receiving page.
Canceling orders
ملاحظة
Staff members must have the order_manage permission (or the superlibrarian permission) in order to cancel orders.
If the item cannot be found anywhere you can cancel the order by clicking 'Cancel order' or 'Cancel order and delete catalog record' to the far right on the basket page or the receiving page.

This will prompt you to enter your reason and confirm cancellation.

ملاحظة
The cancellation reasons drop-down menu are populated by the ORDER_CANCELLATION_REASON authorized values category. If there aren't any authorized values in that category, it will be a free text field instead of a drop-down menu.
You will also see that the item is canceled if you view the basket.

Version
As of Koha version 23.11, you can cancel orders in closed baskets by enabling the CancelOrdersInClosedBaskets system preference.
In prior versions, it is not possible to cancel orders when the basket is closed. Whilst it is possible to re-open your basket (unless it is part of a basket group, in which case the basket cannot be reopened), cancel one or more orders and re-close the basket, this is not recommended. This procedure will update the 'basket closed' date, which in turn will cause your 'late order' calculations to be incorrect. In those cases, it is preferable to cancel an order from the receiving page.
فواتير
ملاحظة
Anyone with one of the acquisition permissions (or the superlibrarian permission) will have access to invoices. However, it is necessary to have specific invoice permissions to execute actions on invoices:
the order_receive permission to create invoices,
the edit_invoices permission to edit invoices,
the merge_invoices permission to merge invoices,
the reopen_closed_invoices permission to reopen closed invoices, or
the delete_invoices permission to delete invoices.
When orders are received invoices are generated. Invoices can be searched by clicking on 'Invoices' in the left of the Acquisitions page.
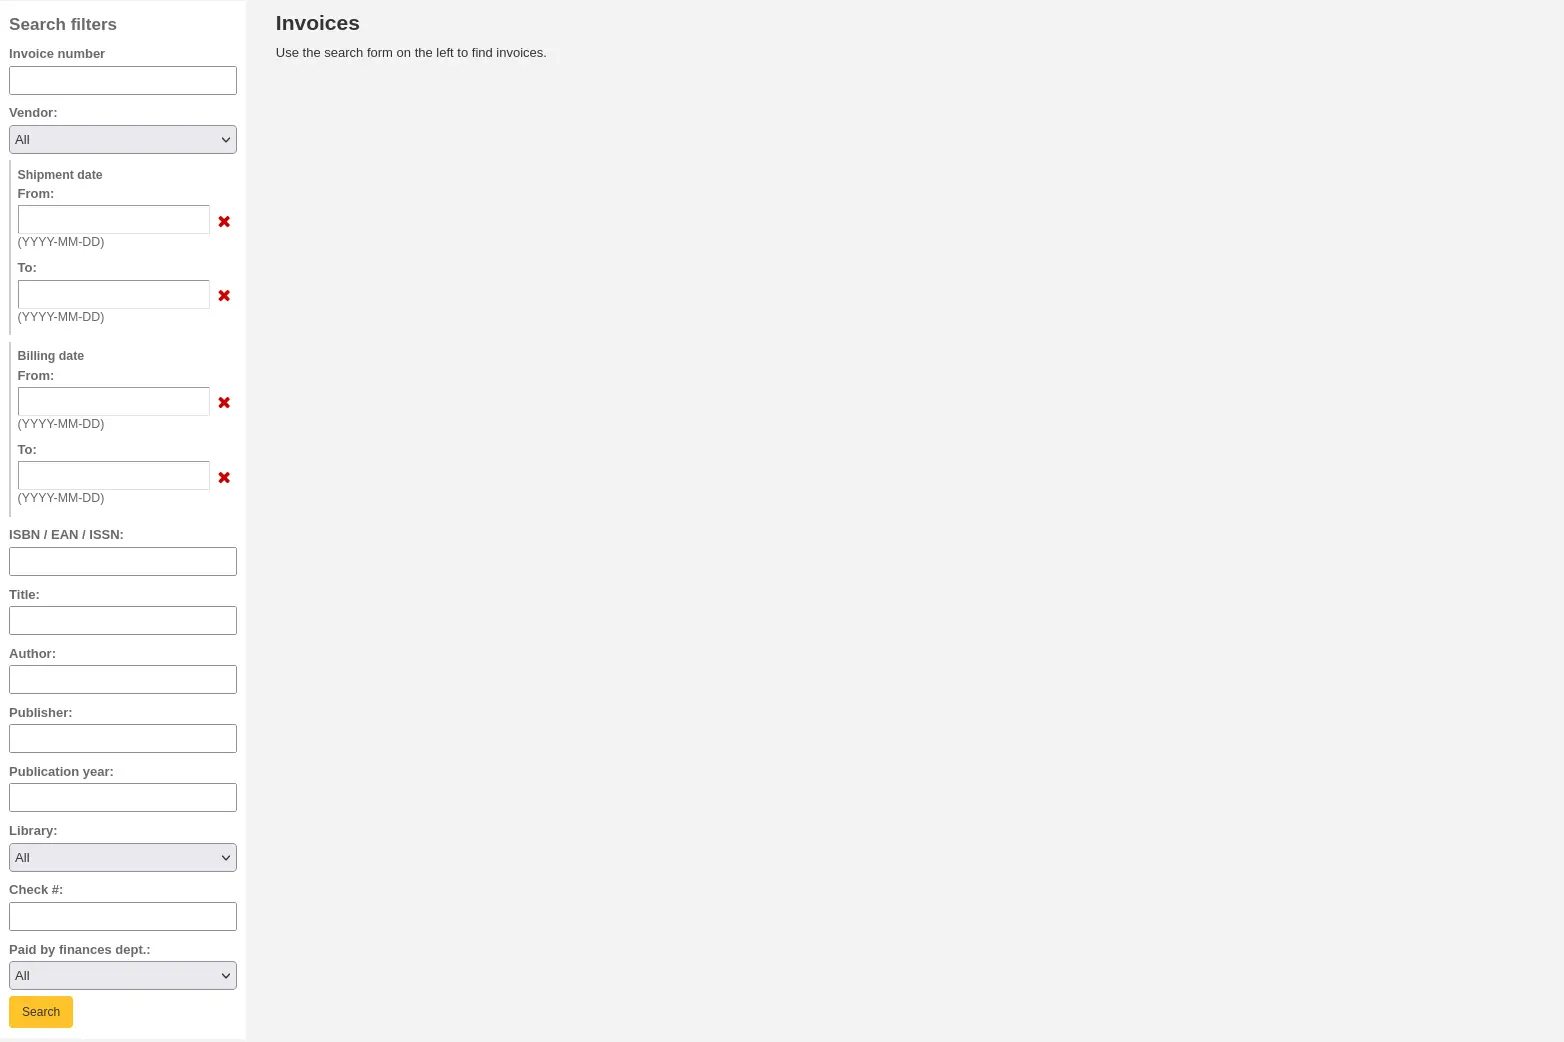
After a search, the results will appear to the right of the search options.

At the bottom of the table, there is a button to merge selected invoices and a button to close selected invoices.
The 'Actions' button on the right allows various actions on a single invoice:
Details: show the full invoice
Close: close the invoice to indicate that the invoice is paid for
Delete: delete the invoice; this option is only available for invoices that have no items received on them
The detailed invoice page presents all the information about the invoice.
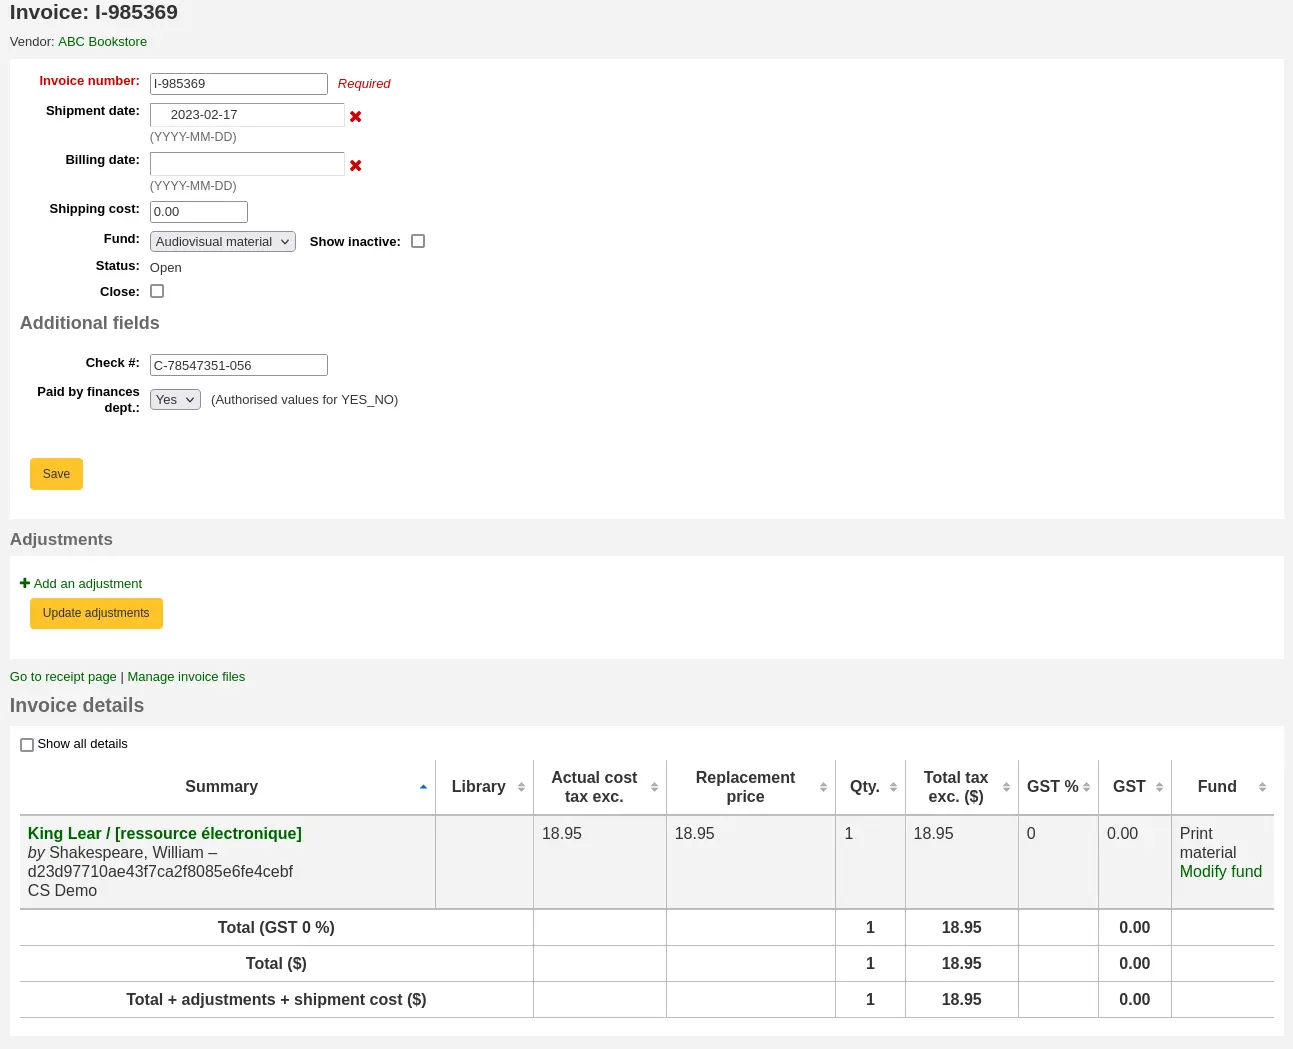
Invoice number: the invoice number entered upon receiving is editable here
Shipment date: date entered upon receiving is editable here
Billing date: enter the billing date of the invoice
Shipping cost: the shipping cost entered upon receiving is editable here
Shipping fund: the fund from which to subtract the shipping cost chosen upon receiving is editable here
Status: the status of the invoice, either open or closed; if closed, the closing date will also appear
Close: if the invoice is still open, it can be closed by checking this box
Reopen: if the invoice is closed, it can be reopened by checking this box
Additional fields: if there are additional fields for invoices, they will appear here.
In the Adjustments section, you can add adjustments to your invoices by clicking 'Add an adjustment'.
These adjustments can be for adjusting the price that is offset by rounding or adding a credit to the invoice, for example.

Amount: enter the amount of the adjustment (can be positive or negative)
Reason: choose a reason, if needed
ملاحظة
The reasons are populated by the ADJ_REASON authorized values category.
Note: enter a note, if needed
Fund: choose the fund from which the adjustment amount should be taken
Encumber while invoice open: if this is checked, the amount of the adjustment will be taken out of the fund immediately. If it is not checked, the amount will be subtracted only when the invoice is closed.
Click on 'Update adjustments' to save your adjustments.
If you need to change the adjustment afterwards, you can do so in the table and click on 'Update adjustments'.

In the 'Invoice details' section, you will see the details of each received title in this invoice.
If needed, you can change the fund used for each title by clicking 'Modify fund' in the 'Fund' column.
Attaching files to invoices
If you're allowing the uploading of acquisitions files with the AcqEnableFiles system preference you will see the option to manage invoice files next to the link to 'Go to receipt page'

لرؤية أو إرفاق ملفات جديدة انقر على رابط "أدر ملفات الفواتير"

From here you can find a file to upload and see the files you have already attached.

Merging invoices
ملاحظة
Staff members must have the merge_invoices permission (or the superlibrarian permission) in order to merge invoices.
From the invoice search results you can also merge together two invoices or more, should you need to.

Simply click the checkbox to the left of the invoices you would like to merge and click the 'Merge selected invoices' button at the bottom of the page. You will be presented with a form to confirm the merge:

Click on the row of the invoice number you would like to keep and it will be highlighted in yellow. Enter any different billing information in the fields provided and click 'Merge'. The invoices will become one.
Claims and late orders
ملاحظة
Staff members must have the order_receive permission (or the superlibrarian permission) in order to manage and claim late orders.
The 'Late orders' link on the acquisitions main page leads to a report where all orders can be filtered to find the late orders.
Upon clicking on the link to 'Late orders' from the Acquisitions page you will be presented with a series of filter options on the left hand side. These filters will be applied only closed baskets.
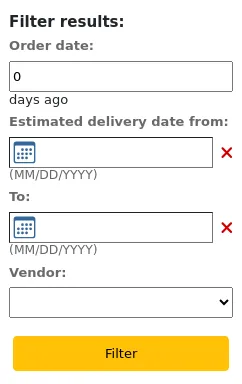
Order date: this filter limits the results to orders from baskets closed more than this number of days ago. This defaults to 0, meaning all orders from closed baskets are shown in the list.
ملاحظة
The order date is the date the basket was closed.
Estimated delivery date from ... to ...: this filter limits the results to orders estimated to be delivered between two dates. The estimated delivery date is either the date entered in the 'Estimated delivery date' field in the accounting details section of the order, or it is calculated as order date (date the basket was closed) + delivery time entered when creating the vendor.
ملاحظة
The estimated delivery date can be edited in the late orders table.
Vendor: this filter limits the results to orders to a specific vendor.
ملاحظة
The vendor drop-down menu only shows vendors with closed baskets.
عندما تصفي طلباتك لتعرض لك الطلبات التي تعتبرها متأخرة ، سيُعرض لك قائمة بتلك المواد.
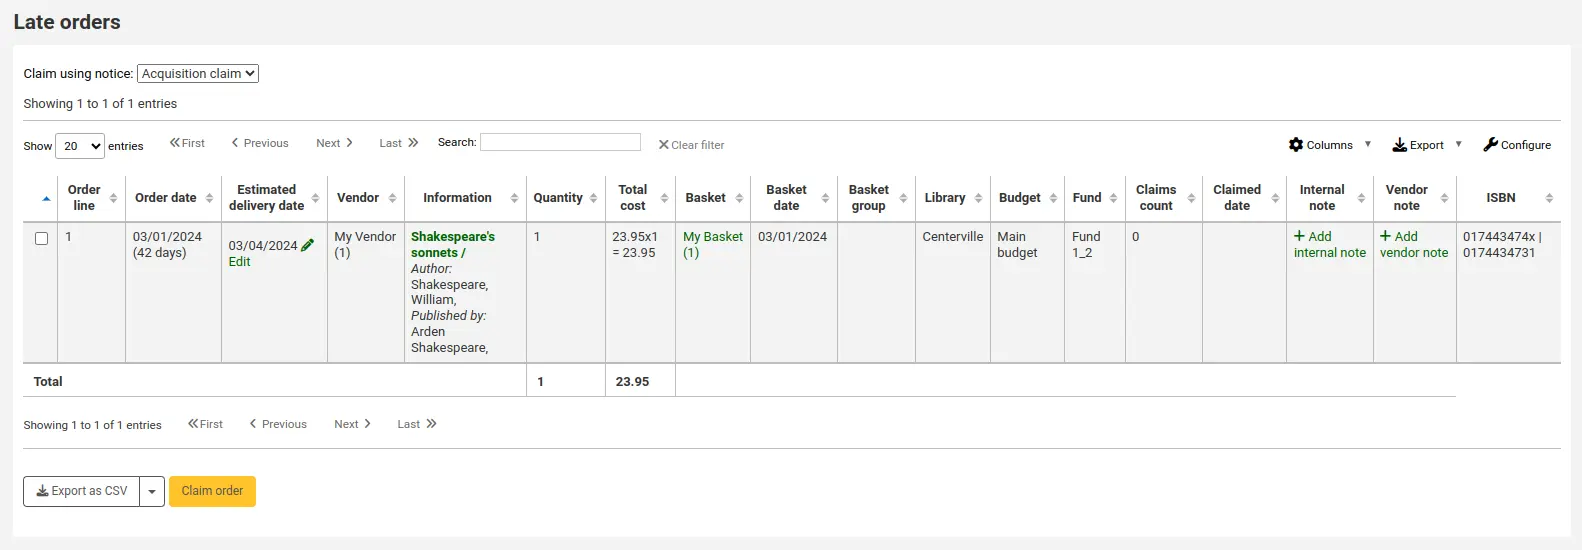
ملاحظة
You can customize the columns of this table in the Table settings section of the Administration module (table id: late_orders).
There are several options for claiming late orders.
If you have entered in an email address for a contact at the vendor's in your system you can send them claim emails when an order is late.
Choose the notice to be sent in the 'Claim using notice' drop down menu

ملاحظة
The default notice is 'Acquisition claim' (code ACQCLAIM). It can be modified in the Notices and slips tool.
You can add different notices. When creating a new notice, choose 'Claim acquisition'.
Check the box to the right of the late titles to claim
Click 'Claim order' at the bottom right of the list.
If the vendor does not have a contact with an email address, you can download the list of title to claim as a CSV file
Check the box to the right of the late titles to claim
Click 'Export as CSV' at the bottom right of the list
ملاحظة
The default CSV profile used is 'Late orders'. You can modify it or add new ones in the CSV profiles tool.
If adding a new one, choose profile type: SQL and usage: Export late orders.
Budget/fund tracking
On the Acquisitions homepage you will see a table of your active funds showing a breakdown of what has been ordered or spent against them.
Whether the amounts include tax or not is controlled by the CalculateFundValuesIncludingTax system preference.

ملاحظة
You can customize the columns of this table in the Table settings section of the Administration module (table id: accounts).
Use the 'Expand all' link to see all your funds and sub-funds.
'Collapse all' will show only first level funds.
'Hide inactive budgets' will hide budgets that are not currently active (such as previous years' budgets).
'Show inactive budgets' will show budgets that are not currently active (such as previous years' budgets).
'Filter by library': if you have several libraries in your system and have funds assigned to different ones, use this dropdown menu to filter the table to show only the funds for the selected library.
نصيحة
If the 'Total' line at the bottom of the table is confusing for the funds you have set up, you can hide it by adding this code to the IntranetUserCSS preference.
#funds_total {display:none;}
To see a history of all orders in a fund, click on the corresponding hyperlinked amount.
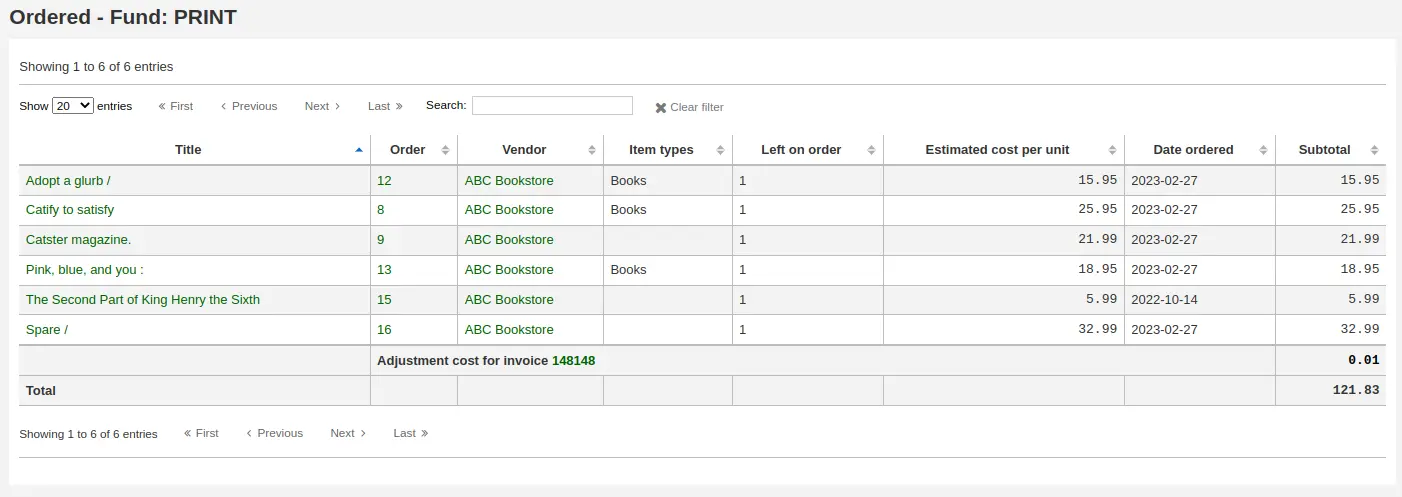
EDI process
Previous sections explain all ordering options, this section pulls out the parts related to EDI or EDIFACT ordering to help those who are using EDI for some or all of the ordering process.
EDI allows order files to be sent between vendors and Koha. When the files are processed the order information is loaded directly into Koha.
The full workflow is outlined below.
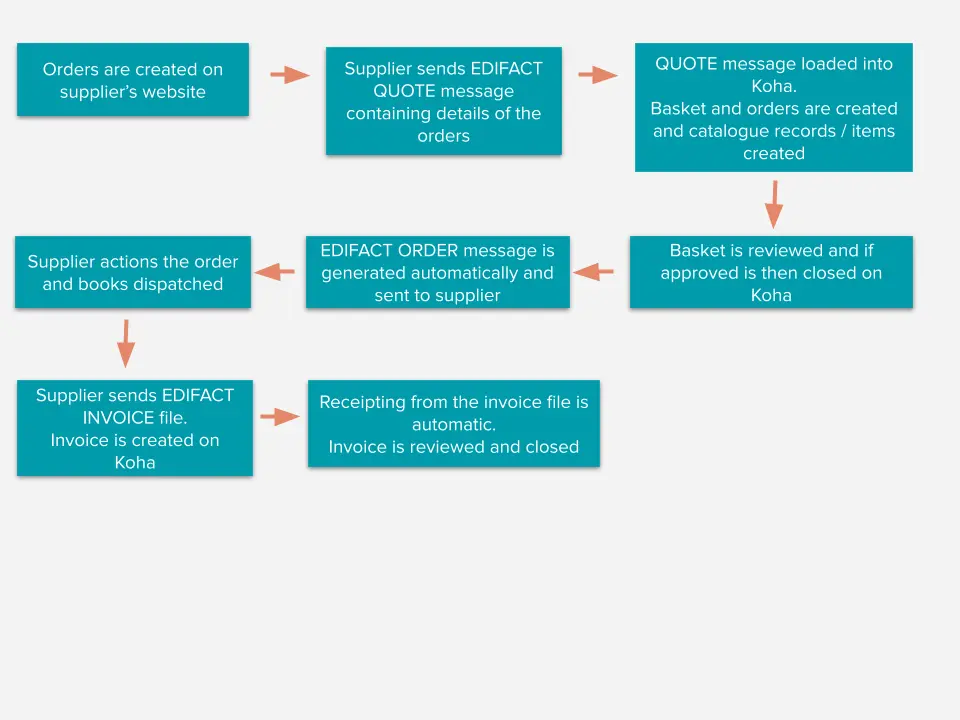
ملاحظة
Libraries do not have to automate the full process and not all vendors support all functions. For example a library might use QUOTE and ORDER files but carry out manual invoicing/receipting. Or a library may create the basket on Koha either manually or from a file of MARC records but send the order back to the vendor via an ORDER file. Speak to your vendors to establish which functions they support.
تحذير
Koha uses the EDIFACT standard (EDItEUR and BiC) not the X12 standard for electronic ordering.
Setting up EDI in Koha
- In order to use EDIFACT in Koha, the
EDIFACT system preference must be enabled.
Before you begin ordering using EDI you will need to take the following steps:
Ask your vendor/bookseller/jobber for their connection information. See EDI questions for vendors below.
من المفيد أيضًا طلب عينة ملفات EDIFACT من المزود
Share with your vendor/bookseller/jobber your library codes, item type codes, fund codes, and any other codes or authorized values they might need for creating your MARC order records
تواصل مع مجتمع أو موفر الدعم الخاص بك حول حاجتك لبرنامج مساعد بناءً على إجابات مزودك
على سبيل المثال: قامت باي وتر سلوشنز ByWater Solutions بنشر برامج مساعدة لمزودين محددين هنا https://github.com/bywatersolutions/koha-plugin-edifact-enhanced
Create a vendor/bookseller/jobber record in Acquisitions
Review your Acquisitions system preferences
Fill in the MarcFieldsToOrder system preference with values for order files (see the MARC order fields section below) if your vendor will be sending you files of MARC records for you to import manually. If the vendor will be sending automated EDI QUOTE files the MarcFieldsToOrder system preference does not need to be filled.
Enter your EDI Accounts
Enter your Library EANs
Turn on the EDI cron so that EDI files can be processed.
EDI questions for vendors
You will need to gather the following information from your vendors before beginning the set up process in Koha.
EDI accounts
EDI accounts: This is the basic connection information for your vendor. It will be used to fill in the EDI accounts section.
Vendor: The name of the vendor
Description: A short description if additional explanation is needed (especially if you have multiple accounts for one vendor).
Transport: Does the vendor transmit EDI files via FTP, SFTP, or something else that requires special processing?
Options:
FTP
SFTP
FILE
Remote host: The URL or IP address of the FTP/SFTP server
Username: The username for the above server
Password: The password for the above server
Download directory: The path on the server that contains files for Koha to download and process
Upload directory: The path on the server that Koha will upload files to for your vendor to process
Qualifier: Who assigned the SAN below?
Options:
EAN International (14)
US SAN Agency (31B)
Assigned by supplier (91)
Assigned by buyer (92)
SAN: The identifier for the vendor
Standard: Which standard is used by the vendor, this will change how the EDI messages are interpreted
Options:
BiC
EDItEUR
Quotes enabled: (yes or no) Does this vendor support sending and receiving quotes via EDIFACT and do you want to send and receive quotes via EDIFACT?
Orders enabled: (yes or no) Does this vendor support sending and receiving orders via EDIFACT and do you want to send and receive orders via EDIFACT?
Invoices enabled: (yes or no) Does this vendor support sending and receiving invoices via EDIFACT and do you want to send and receive invoices via EDIFACT?
Responses enabled: (yes or no) Does this vendor support sending and receiving responses via EDIFACT and do you want to send and receive invoices via EDIFACT?
Automatic ordering: (yes or no) Check this box if you want quotes to automatically generate orders.
EAN
Each library using EDIFACT needs to specify a buyer identifier know as a SAN or EAN. This will fill in the Library EANs setting.
Library: Choose the library this EAN represents
Description: Add a description to this EAN, if needed
EAN: Enter the EAN
Qualifier: Choose who assigned the EAN above
Options:
EAN International (14)
US SAN Agency (31B)
Assigned by supplier (91)
Assigned by buyer (92)
MARC order fields or grid ordering
ملاحظة
This is only necessary if your vendor will be sending you files of MARC records for you to import via Stage MARC records for import in the Cataloging module. If your vendor will be sending automated EDI QUOTE files the MarcFieldsToOrder system preference does not need to be filled.
These values will fill in the MarcFieldsToOrder system preference.
price: MARC21 field that contains the item price
quantity: MARC21 field that contains the number of items for the given record
budget_code: MARC21 field that contains the Koha budget code to be debited
discount: MARC21 field the contains the discount as a percentage the the price will be discounted by
sort1: MARC21 field that will populate custom field sort1
sort2: MARC21 field that will populate custom field sort2
Ordering via EDI
The first step in ordering using EDI happens on the book vendor's website. Each seller will use different language, but you will need to place your order on their site. Some language that you might see included "basket", "order", "cart", and/or "MARC order". The vendor will then either send you a file of MARC records to import into Koha OR the vendor will send a QUOTE file if you have this enabled in your EDI accounts settings.
Working with a MARC file
Once you have this MARC file downloaded to your computer you will want to log in to Koha and continue the process there.
In Acquisitions create a basket for the vendor you ordered from. Add your file to the basket by ordering from a new file.
From the confirmation screen you will see all of the data in the MARC file related to your order. If you are not seeing fields such as fund and quantity filled in then be sure to confirm that your MarcFieldsToOrder preference is set right.
بمجرد إضافة كل المواد إلى السلة يمكنك النقر على زر "إنشاء طلبية EDIFACT"
ملاحظة
The 'Create EDIFACT order' button only displays is you have enabled the EDIFACT system preference.
You will be asked if you wish to create the EDI order and close the basket.
Sending the EDIFACT order
This will generate an ORDER file with the status 'Pending' in the EDIFACT messages in Koha.
The pending files will be processed by the EDI cron job and sent to your vendor and the status in EDIFACT messages will be updated to 'Sent'.
Working with a QUOTE file
If you have QUOTE files enabled you can place the order on the bookseller's website and a QUOTE file will be automatically generated and made available to be collected and loaded to Koha. You will see the file listed in the EDIFACT messages in Koha with a status of 'Received'. The basket will have been created and records and items added to the basket.
Once you have checked that the basket is correct you can click the 'Create EDIFACT order' button. The process then completes as for Sending the EDIFACT order above.
فاتورة EDI
When the book vendor is done processing your files they can send an INVOICE file via EDI as well. The EDI cron job will grab invoice file, create an invoice on Koha and mark items found in the invoice as received and update your funds without any need for manual intervention. As a final check the invoice can be reviewed and closed if all items have been receipted correctly.
INVOICE files can be viewed in the EDIFACT messages. Processed files have the status 'Received'.
If you set the EdifactInvoiceImport preference to 'Don't' you can load invoice files manually.
رسائل EDIFACT
يمكن العثور على سجل بكافة الرسائل المرسلة والمستلمة عبر EDIFACT أدنى رسائل EDIFACT.
ملاحظة
Staff members must have the edi_manage permission (or the superlibrarian permission) in order to view sent EDIFACT messages.
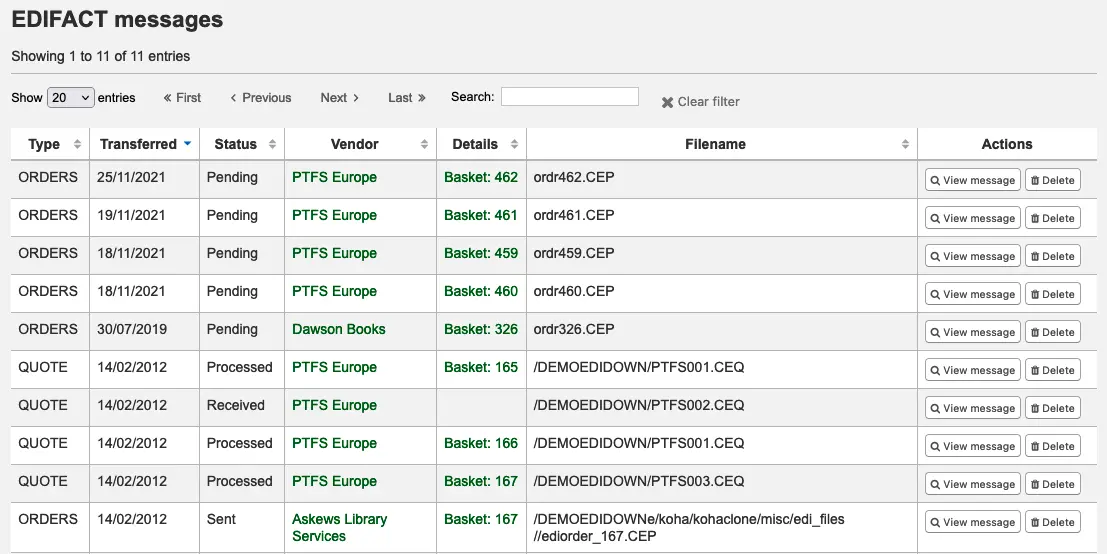
ملاحظة
Old EDIFACT messages can be deleted with the clean up database script
using the --edifact-messages parameter.
