ILL (Interlibrary loan) requests
The ILL (Interlibrary loan) requests module adds the ability to request and manage loans or copies of material from external sources. Patrons can submit a request via the OPAC from the Interlibrary loan requests tab of their account. Library staff can then review and process those requests. Alternatively, staff can place requests themselves from the staff interface.
Nota
Only staff with the ill permission (or the superlibrarian permission) will be able to create and manage ILL requests.
Configurar
Before using the ILL requests module, you will want to make sure that you have reviewed all ILL-related configuration.
The ILL requests module can be configured for different types of requests and workflows. Koha uses ‘backends’ to process ILL requests depending on how the document should be supplied. Currently available backends are documented on the Koha community wiki at https://wiki.koha-community.org/wiki/ILL_backends. Some backends are available as plugins. You will need to configure at least one backend.
Atenção
As of version 24.11, Koha has a default backend known as ‘Standard’, which replaces the FreeForm backend. The ILL module can be used solely with the Standard backend.
Next, set your system preferences for interlibrary loans. The most important one is the ILLModule system preference, the master switch for the ILL module.
In patron categories, choose which patron categories can place ILL requests from the OPAC.
Version
Prior to version 23.11, this is not necessary. All patron categories are allowed to place ILL requests from the OPAC.
As of version 23.11, you must define the option for each patron category.
The ILL requests module uses system defined statuses. You can add custom statuses to match your ILL workflow as ILL_STATUS_ALIAS authorized values.
Finally, library staff responsible for ILL requests need the ill permission (or the superlibrarian permission).
Notificações de e-mail para EEB
Email notifications can be sent to library staff when a patron makes a request to modify (notice code: ILL_REQUEST_MODIFIED) or cancel (notice code: ILL_REQUEST_CANCEL) an existing request. Enable this feature using the ILLSendStaffNotices system preference.
The ILL staff email address can be configured per library in the Libraries settings. If there is no email for a library, the address in the ILLDefaultStaffEmail system preference will be used.
Notifications can be sent to patrons for updates on their requests:
ILL request update (notice code: ILL_REQUEST_UPDATE)
ILL request unavailable (notice code: ILL_REQUEST_UNAVAIL)
ILL request ready for pickup (notice code: ILL_PICKUP_READY)
The notifications are enabled from the patron categories default patron messaging preferences.
All notice templates can be customized in the Notices and slips tool.
Criar solicitação de Empréstimo Interbibliotecas
Acesso: Mais > Empréstimo Interbibliotecas
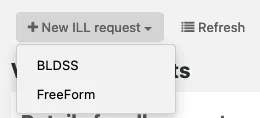
Escolha ‘Novo empréstimo Interbibliotecas’ e depois Freeform.
Nota
As imagens aqui mostradas são apenas para o backend FreeFrom.
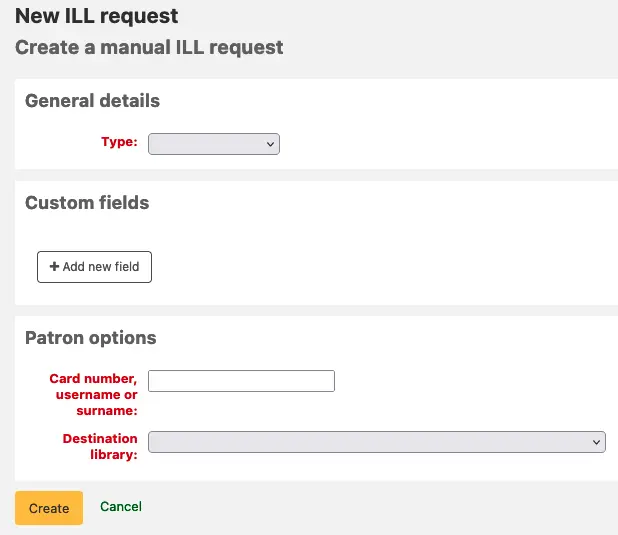
Escolha o tipo: Livro, Capítulo, Jornal, Artigo de jornal, Tese, Conferência, Outro, Recurso genérico.
Para cada tipo será mostrado um conjunto diferente de campos.
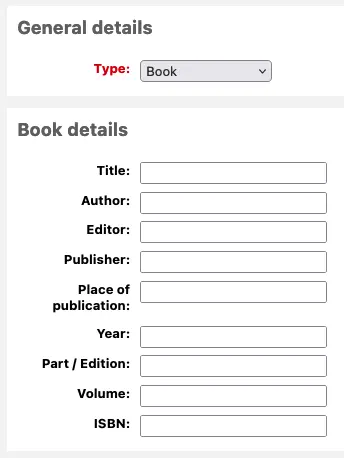
Insira as informações que desejar.
Adicione campos personalizados, se por exemplo desejar adicionar uma nota ou se estiver a usar o tipo de pedido “Outro”.
Nas opções do leitor, insira o número de cartão do leitor e a biblioteca associada ao pedido.
Clique em ‘Criar’ e será apresentado um breve resumo dos detalhes do pedido.
Nota
Se tiver a preferência de sistema ILLCheckAvailability ativa e plugins instalados no interface dos técnicos serão apresentados os resultados de pesquisa. O utilizador pode clicar num endereços de um recurso relevanta, caso seja encontrado, ou continuar com o pedido de empréstimo inter-bibliotecas. Se nenhum resultado for encontrado, o pedido de empréstimo é concluído da maneira usual.
Pode agora gerir o pedido ou voltar à lista de pedidos de empréstimos inter-bibliotecas clicando no endereço “Listar pedidos”.
Visualizando as solicitações de empréstimo interbibliotecas
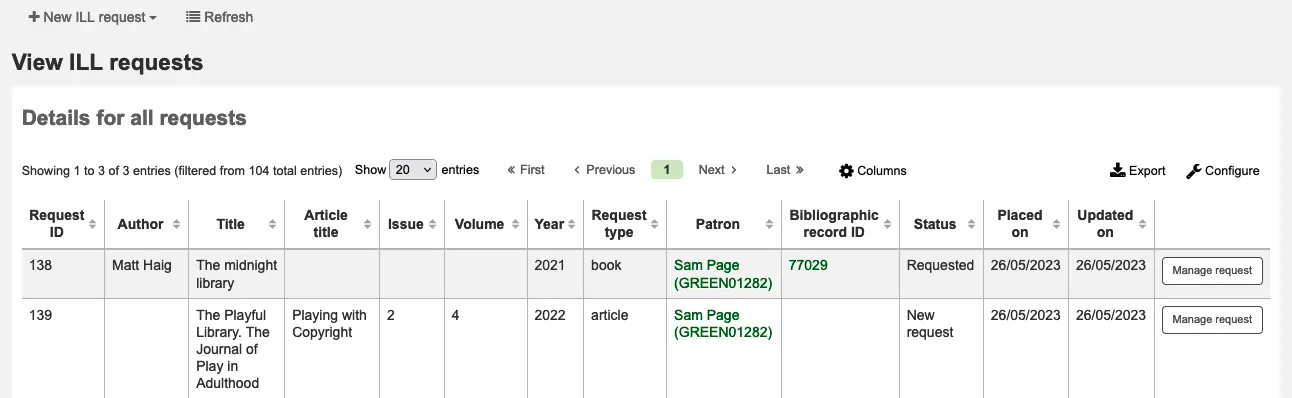
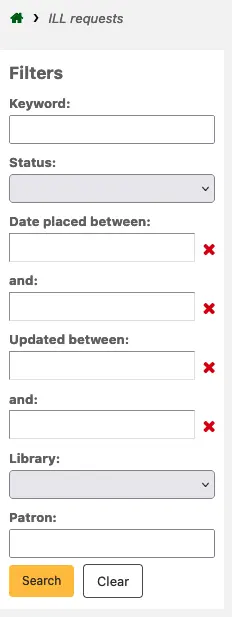
From the main ILL requests screen you can view, filter and sort your ILL requests.
Click on the ‘List requests’ button from other pages in the ILL module to return to this list.
Dica
You can customize this view.
Use the ILLRequestsTabs system preference to organise requests into custom tabs.
Use the ILLHiddenRequestStatuses system preference to hide requests with completed statuses by default.
There is a large amount of data available in the table; scroll right to see all the columns. You can define which columns are visible / hidden by default in the Table settings section of the Administration module (table id: ill-requests).
Use the filters on the left of the page to display a subset of requests based on your chosen criteria.
Gestão dos empréstimo interbibliotecas
From the main ILL requests view, click on a request ID in the first column or on the ‘Manage request’ button in the final column. The request’s full details are displayed.
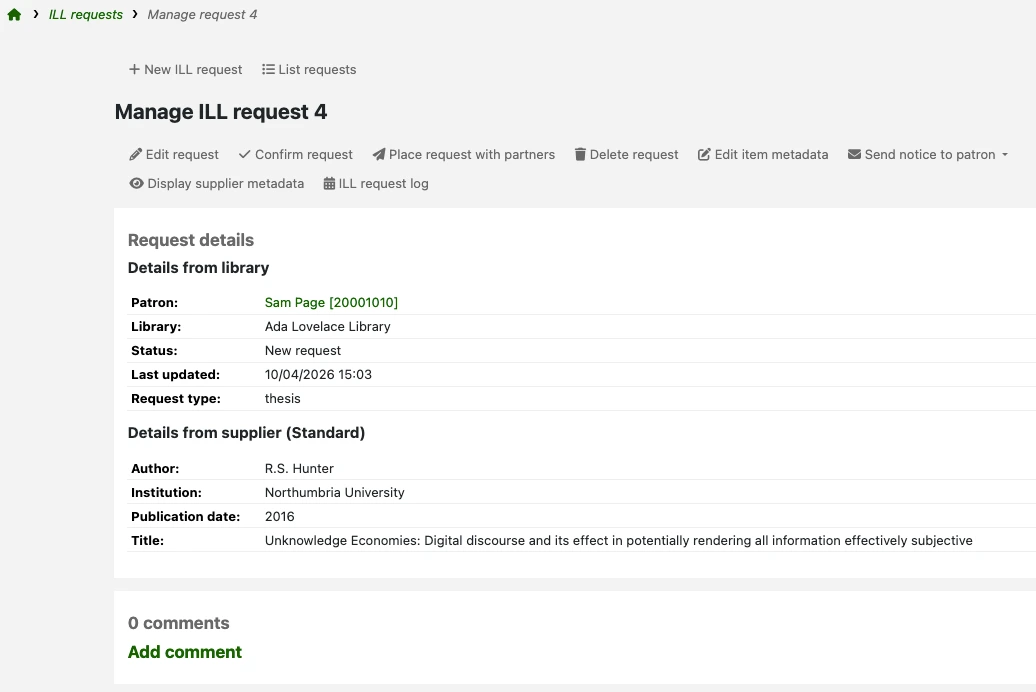
Depending on the current status of the request and the backend used, you may see some or all of the buttons described in the next section.
From this screen, you can add comments to the request. You may want to use comments to keep track of work undertaken. Comments are read-only (they cannot be edited or deleted). They are only visible in the staff interface. If any comments have been added to a request, a number will appear in the ‘Comments’ column when viewing the full list of ILL requests.
Authenticated requests
Authenticated requests are requests linked to the Koha patron who requested the document. All requests placed in the staff interface or placed on the OPAC by patrons logged in to their account are authenticated requests.
New authenticated requests have the status ‘New request’. Staff can progress the requests straightaway by using some of the following buttons.
Edit request: to update the patron the request is associated with, which staff member is managing the request, the destination library.
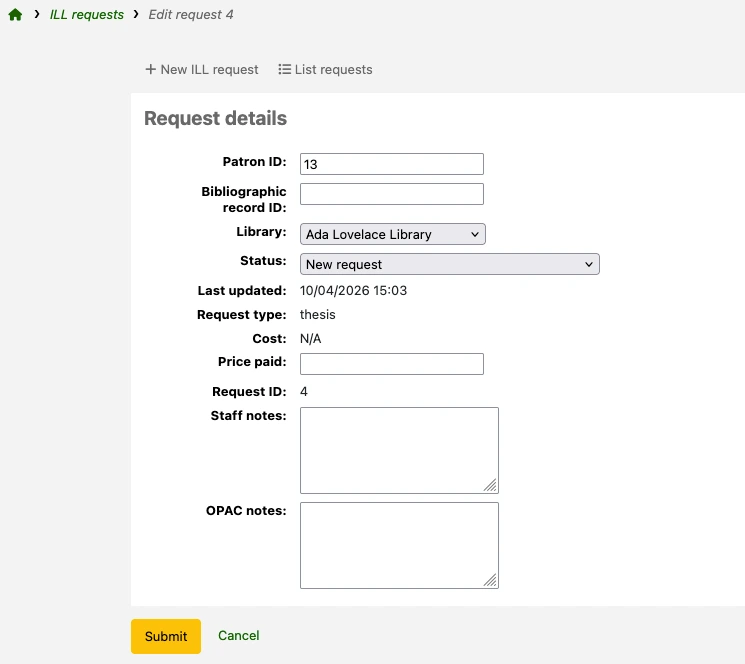
OPAC and staff-only notes can be added from the edit screen.
If you have custom ILL statuses (managed through the ILL_STATUS_ALIAS authorized values category) you can apply one by editing the Status field.
Confirm request: to manually mark the request as ‘Requested’.
Place request with partners: for Koha to send a request to supply to a library. Using this option requires some prior configuration. The request status is then updated to ‘Requested from partners’.

Filter partner libraries: type keywords to narrow down the list of accounts displayed in the next field.
Select partner libraries: choose a recipient from the list of your ILL partners. Each account’s library code is shown in capital letters before the account name.
Subject line: you can customize the subject line of the email Koha will send.
Email text: you can customize the text of the email Koha will send.
Nota
The default subject line and email text used here are defined in the ILL_PARTNER_REQ notice template in the Notices and slips tool.
Delete request: to fully delete the request. Details of deleted requests are not retained in the Koha database.
Edit item metadata: to update the metadata (title, author, etc.) for the title requested. This is useful when the information provided initially is incomplete or incorrect.
Nota
Some backends may not allow updates to the metadata.
Send notice to patron: to send an update to the patron requesting the title.
ILL request ready for pickup: to alert the patron that their requested item is ready for collection. You can customize the notice text in the ILL_PICKUP_READY notice template in the Notices and slips tool.
ILL request unavailable: to inform the patron that your library will not be able to supply the requested title. You can customize the notice text in the ILL_REQUEST_UNAVAIL notice template in the Notices and slips tool.
Display supplier metadata: to view a text-only version of the details of the title requested. This may be useful in the cases where you need to quickly copy and paste this information outside of Koha.
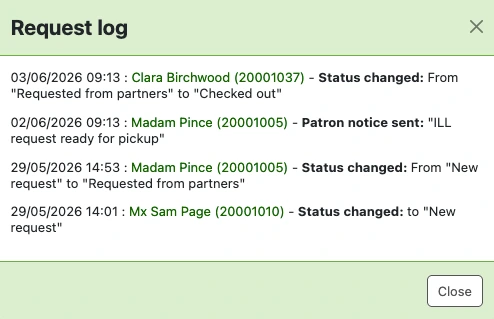
ILL request log: to view a history of the actions on this request. For any information to be displayed here, the IllLog system preference needs to be set to ‘Log’.
Other buttons you may see as you progress the request:
Switch provider: to select a different backend and request the title from another provider. This is useful when the the wrong backend was initially selected or when the provider has indicated they are unable to supply.
Revert request: to cancel the request placed with an external source. This button is visible when the request has a status of ‘Requested’ or ‘Requested from partners’. The status is updated to ‘Request reverted’.
Check out: to checkout the item supplied by a partner library directly to the patron who placed the request. The request status is updated to ‘Checked out’.
This option is only available if you have enabled the CirculateILL system preference. It is used for circulating ILL materials.
Mark completed: to update the status to ‘Completed’ when the request has been fulfilled and fully processed.
Unauthenticated requests
If the ILLOpacUnauthenticatedRequest system preference is set to ‘Allow’, patrons can place requests without being logged in or without having an account.
Version
This feature was first introduced in version 25.05 of Koha.
Requests placed in this way have the status ‘Unauthenticated’. Before they can be progressed, you need to link it to a patron record.
From the main ILL requests view, identify a request with the status ‘Unauthenticated’.
Click on the request ID in the first column or on the ‘Manage request’ button in the final column to view the request’s full details.
Click the ‘Edit request’ button.
The Unauthenticated request details section shows the details entered by the patron who placed the request. Use this to search for an existing patron.
The ‘Patron ID’ field at the top of the page can be used as a patron quick search. Start typing the patron name to see suggestions.
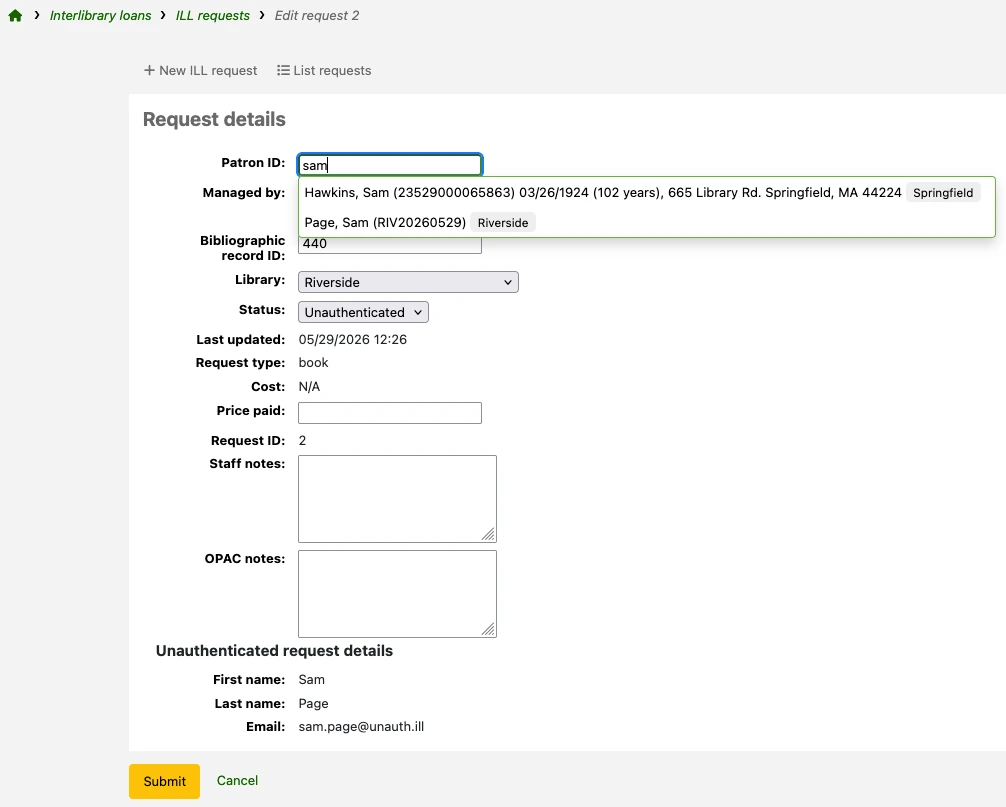
Alternatively, you can open the Patrons module in another browser tab and perform your search there.
Aviso
If the patron who placed the unauthenticated request is not yet a library member, you will need to add a new patron record for them before progressing the ILL request.
Whether you are searching a patron by name in the Patron ID field or pasting their card number in the field, you will need to select the correct patron from the suggestions. The field will then update to display the borrowernumber.
Click ‘Submit’ to save your changes.
You can now manage the request in the same way as for other authenticated requests. The Unauthenticated request details section will stop displaying as it is not an unauthenticated request anymore.
Status do pedido
Koha has a set of core ILL statuses, listed below (with status codes as stored in the illrequests table). Installed backends may use additional statuses.
New request (NEW)
Unauthenticated (UNAUTH)
Requested (REQ)
Requested from partners (GENREQ)
Request reverted (REQREV)
Cancellation requested – a patron has requested cancellation from the OPAC. (CANCREQ)
Completed (COMP)
Checked out (CHK)
Returned to library (RET)
Efetuar o pedido nas bibliotecas parceiras
Se tem uma rede de bibliotecas parceiras que permitem pedidos de empréstimo inter-bibliotecas pode fazer essa gestão no Koha. Primeiro necessita de criar as contas para as bibliotecas parceiras:
Create a patron category to be assigned to partner libraries. You may want to give it the description ‘Interlibrary loan’ or ‘Library’ and a category type of ‘Organization’. Then, enter this category in the ILLPartnerCode system preference.
Version
The ILLPartnerCode system preference was added to Koha in version 23.11. In previous versions, the partner code was defined in the koha-conf.xml file. The default code was ‘IL’.
Necessita de criar uma conta de leitor com essa categoria para cada biblioteca parceira.
Cada biblioteca deve ter um endereço de email válido, já que será esse o mecanismo para enviar os pedidos de empréstimos inter-bibliotecas.
Nota
Será usado o modelo ILL_PARTNER_REQ e o texto pode ser alterado na ferramenta Avisos e recibos.
A partir deste ponto você poderá usar a opção ‘Efetuar o pedido nas bibliotecas parceiras’ quando realizar os pedidos.
Nota
Se tiver a preferência de sistema ILLCheckAvailability ativo, pode usar os plugins para pesquisar os catálogos de bibliotecas parceiras usando o protocolo Z39.50 antes de confirmar o pedido a esse parceiro.
Circular materiais ILL
If you have enabled the CirculateILL preference you can checkout ILL items directly from the ILL request.
Quando cria um tipo de pedido Livro um registo abreviado é criado automaticamente de acordo com o modelo de Catalogação rápida. Assim que o pedido tiver um estado adequado, o botão de Emprestar é mostrado na barra de ferramentas. Ao clicar no botão vai permitir que o utilizador empreste o exemplar ao leitor que fez o pedido ou a um leitor estatístico.
Para emprestar um exemplar:
Clique no botão Emprestar.
Selecione o tipo de documento. Um exemplar é criado automaticamente e adicionado ao registo bibliográfico criado aquando do pedido. O código de barras para o exemplar ficará no formato ILL-requestid.
De seguida, no ecrã de empréstimo ao leitor escolha a data de fim do empréstimo. Se não escolher a data, será usada a regra de circulação para calcular automaticamente a data de fim.
Assim que o exemplar seja emprestado, o estado do pedido é alterado para ‘Emprestado’ e após a devolução é alterado para ‘Devolvido à biblioteca’.
Os registos bibliográficos criados a partir de um pedido de empréstimo inter-bibliotecas vai ter um separador extra que permite verificar a ligação para pedido no módulo de empréstimos inter-bibliotecas.