Extended Roman
This chapter shows how you can add various enhancements and customizations in and around Koha by using mostly the existing configuration options.
Keyword clouds
In addition to the traditional tag cloud available in Koha, there is a way to generate clouds for popular subjects within Koha.
The Author/Subject Cloud cron job is used to help with this process. This cron job sends its output to files.
/home/koha/mylibrary/koharoot/koha-tmpl/cloud-author.html
/home/koha/yourlibrary/koharoot/koha-tmpl/cloud-subject.html
This means that you can produce clouds for authors, collective author, all kind of subjects, classifications, etc. And since it works on zebra indexes, it is quick, even on large DBs. Tags clouds are sent to files. It’s up to library webmaster to deal with those files in order to include them in OPACMainUserBlock, or include them into their library CMS.
Some libraries even send the file into a Samba shared folder where webmaster take them, eventually clean them a little bit before integrating them into navigation widgets or pages.
Newest titles pulldown
Often we want to add a way for our patrons to do searches for the newest items. In this example I’ll show you how to create a pull down menu of the newest items by item type. These tips will work (with a couple changes) for collection codes or shelving locations as well.
First, it’s important to note that every link in Koha is a permanent link. This means if I do a search for everything of a specific item type sorted by the acquisitions date and bookmark that URL, whenever I click it I’ll see the newest items of that type on the first few pages of the results.
I took this knowledge and wrote a form takes this functionality in to consideration. It basically just does a search of your Koha catalog for a specific item type and sorts the results by acquisitions date.
The first thing I did was write a MySQL statement to generate a list of item types for me - why copy and paste when you can use the power of MySQL?
select concat('<option value=\"mc-itype:', itemtype, '\">',description,'</option>') from itemtypes
The above looks at the itemtypes table and slaps the necessary HTML around each item type for me. I then exported that to CSV and opened it in my text editor and added the other parts of the form.
<p><strong>New Items</strong></p>
<p><form name="searchform" method="get" action="/cgi-bin/koha/opac-search.pl">
<input name="idx" value="kw" type="hidden">
<input name="sort_by" value="acqdate_dsc" type="hidden">
<input name="do" value="OK" type="hidden">
<select name="limit" onchange="this.form.submit()">
<option>-- Please choose --</option>
<option value="mc-itype:BOOK">Book</option>
<option value="mc-itype:BOOKCD">Book on CD</option>
<option value="mc-itype:DVD">DVD</option>
<option value="mc-itype:LRG_PRINT">Large print book</option>
<option value="mc-itype:MAGAZINE">Magazine</option>
<option value="mc-itype:NEWSPAPER">Newspaper</option>
<option value="mc-itype:VIDEO">Videocassette</option>
</select>
</form>
</p>
Now, what does all of that mean? The important bits are these:
Popisuje údaje o vazbě jednotek (exempláře)
<p><form name="searchform" method="get" action="/cgi-bin/koha/opac-search.pl">
This tells the browser to take any value selected and put it at the end of this http://YOURSITE/cgi-bin/koha/opac-search.pl. If you want to embed this form on your library website (and not on your OPAC) you can put the full OPAC URL in there.
Next, there is a hidden value that is telling the search to sort by acquisitions date descending (newest items at the top):
<input name="sort_by" value="acqdate_dsc" type="hidden">
And finally you have an option for each item type you want people to search.
<option value="mc-itype:BOOK">Book</option>
These options each include the string „mc-itype:“ which tells Koha to do an item type search.
Once you have all of that in place you can copy and paste the form to somewhere on your OPAC.
New titles slider for OPAC
Often times libraries will want to add a flowing widget with new materials at the library on their main public catalog page. To do this you can use a widget from any number of services (usually for a cost) or you can enable plugins in Koha and use the Cover Flow plugin.
Once the plugin is installed, the steps to get your coverflow to show up are as follows:
First, you need to create one or more public reports for your coverflow widget or widgets to be based on. This is how the plugin knows what the content of your widget should contain. Each report needs only three columns; title, biblionumber, and isbn. It is important that you have a good and valid isbn, as that is the datum used to actually fetch the cover. In the iteration of the plugin, we are using Amazon cover images, but I believe in the end I will make the cover image fetcher configurable so we can use any data source for cover image fetching.
Second, we need to configure the plugin. The plugin configuration is a single text area that uses YAML ( actually, it’s JSON, which is a subset of YAML ) to store the configuration options. In this example it looks like this:
- id: 42
  selector: #coverflow
  options:
  style: coverflow
In this example, we are telling the plugin to use the report with id 42, and use it to create a coverflow widget to replace the HTML element with the id “coverflow”. The options list is passed directly to Flipster, so any options supported by Flipster can be set from the plugin configuration! In fact, in addition to the traditional coverflow, Flipster has a “carousel” mode which is a much more compact version of the coverflow. You can also configure which cover the widget will start on, among other options.
At the time the plugins options are saved or updated, the plugin will then generate some minified JavaScript code that is automatically stored in the Koha system preference OPACUserJS. Here is an example of the output:
/* JS for Koha coverflow plugin
 This JS was added automatically by installing the coverflow plugin
 Please do not modify */$(document).ready(function(){$.getScript("/plugin/Koha/Plugin/Com/ByWaterSolutions/CoverFlow/jquery-flipster/src/js/jquery.flipster.min.js",function(data,textStatus,jqxhr){$("head").append("<link id='flipster-css' href='/plugin/Koha/Plugin/Com/ByWaterSolutions/CoverFlow/jquery-flipster/src/css/jquery.flipster.min.css' type='text/css' rel='stylesheet' />");$('#coverflow').load("/coverflow.pl?id=42",function(){var opt={'items':'.item','minfactor':15,'distribution':1.5,'scalethreshold':0,'staticbelowthreshold':false,'titleclass':'itemTitle','selectedclass':'selectedItem','scrollactive':true,'step':{'limit':4,'width':10,'scale':true}};$('#coverflow').flipster({style:'coverflow',});});});});
/* End of JS for Koha coverflow plugin */
Why do this? For speed! Rather than regenerating this code each and every time the page loads, we can generate it once, and use it over and over again.
If you inspect the code closely, you’ll notice it references a script “coverflow.pl”. This is a script that is included with the coverflow plugin. Since we need to access this from the OPAC ( and we don’t want to set off any XSS attack alarms ), we need to modify the web server configuration for the public catalog and add the followup to it:
ScriptAlias /coverflow.pl "/var/lib/koha/mykoha/plugins/Koha/Plugin/Com/ByWaterSolutions/CoverFlow/coverflow.pl"
This line gives us access to the coverflow.pl script from the OPAC. This script retrieves the report data and passes it back to the public catalog for creating the coverflow widget. Koha::Cache is supported in order to make the widget load as quickly as possible!
The final step is to put your selector element somewhere in your public catalog. In this example, I put the following in the display location OpacMainUserBlock (see the news tool):
<span id="coverflow">Loading...</span>
Once that is in place, you need only refresh your OPAC page, and there you have it, your very own catalog coverflow widget! Not only do these coverflows look great on a computer screen, but they look great on mobile platforms as well, and are even touch responsive!

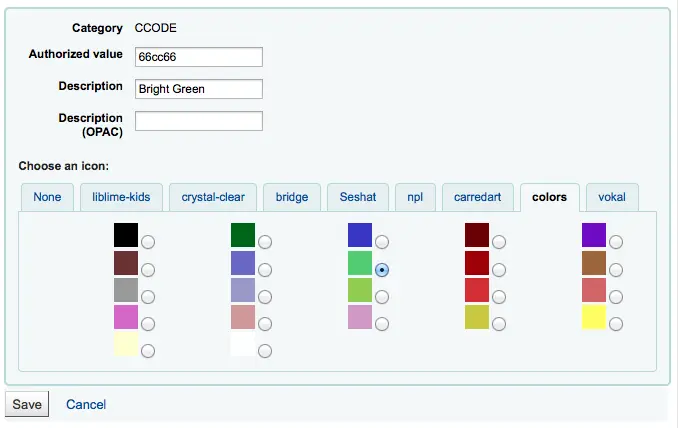
Cataloging and searching by color
One of the icon sets installed in Koha includes a series of colors. This set can be used to catalog and search by color if you’d like. This guide will walk you use changing collection code to color in Koha so that you can do this.
The following SQL could be used to add these colors to the CCODE authorized value category in a batch. If you wanted to use these colors for another authorized value you’d have to edit this to use that category:
insert into authorised_values (category, authorised_value, lib,
 lib_opac, imageurl) values ('CCODE','000000','Black','','colors/000000.png');
insert into authorised_values (category, authorised_value, lib,
 lib_opac, imageurl) values ('CCODE','66cc66','Bright Green','','colors/66cc66.png');
insert into authorised_values (category, authorised_value, lib,
 lib_opac, imageurl) values ('CCODE','99cc33','Olive','','colors/99cc33.png');
insert into authorised_values (category, authorised_value, lib,
 lib_opac, imageurl) values ('CCODE','3333cc','Dark Blue','','colors/3333cc.png');
insert into authorised_values (category, authorised_value, lib,
 lib_opac, imageurl) values ('CCODE','006600' ,'Dark Green','','colors/006600.png');
insert into authorised_values (category, authorised_value, lib,
 lib_opac, imageurl) values ('CCODE','6600cc','Plum','','colors/6600cc.png');
insert into authorised_values (category, authorised_value, lib,
 lib_opac, imageurl) values ('CCODE','6666cc','Purple','','colors/6666cc.png');
insert into authorised_values (category, authorised_value, lib,
 lib_opac, imageurl) values ('CCODE','9999cc','Light Purple','','colors/9999cc.png');
insert into authorised_values (category, authorised_value, lib,
 lib_opac, imageurl) values ('CCODE','660000' ,'Burgundy','','colors/660000.png');
insert into authorised_values (category, authorised_value, lib,
 lib_opac, imageurl) values ('CCODE','663333' ,'Brown','','colors/663333.png');
insert into authorised_values (category, authorised_value, lib,
 lib_opac, imageurl) values ('CCODE','990000' ,'Red','','colors/990000.png');
insert into authorised_values (category, authorised_value, lib,
 lib_opac, imageurl) values ('CCODE','996633' ,'Tan','','colors/996633.png');
insert into authorised_values (category, authorised_value, lib,
 lib_opac, imageurl) values ('CCODE','999999' ,'Gray','','colors/999999.png');
insert into authorised_values (category, authorised_value, lib,
 lib_opac, imageurl) values ('CCODE','cc66cc','Pink','','colors/cc66cc.png');
insert into authorised_values (category, authorised_value, lib,
 lib_opac, imageurl) values ('CCODE','cc99cc','Bubble Gum','','colors/cc99cc.png');
insert into authorised_values (category, authorised_value, lib,
 lib_opac, imageurl) values ('CCODE','cc3333' ,'Orange','','colors/cc3333.png');
insert into authorised_values (category, authorised_value, lib,
 lib_opac, imageurl) values ('CCODE','cc6666' ,'Peach','','colors/cc6666.png');
insert into authorised_values (category, authorised_value, lib,
 lib_opac, imageurl) values ('CCODE','cc9999' ,'Rose','','colors/cc9999.png');
insert into authorised_values (category, authorised_value, lib,
 lib_opac, imageurl) values ('CCODE','cccc00' ,'Gold','','colors/cccc00.png');
insert into authorised_values (category, authorised_value, lib,
 lib_opac, imageurl) values ('CCODE','ffff33' ,'Yellow','','colors/ffff33.png');
insert into authorised_values (category, authorised_value, lib,
 lib_opac, imageurl) values ('CCODE','ffffcc','Cream','','colors/ffffcc.png');
insert into authorised_values (category, authorised_value, lib,
 lib_opac, imageurl) values ('CCODE','ffffff','White','','colors/ffffff.png');
If you would like to choose the colors manually you can do that via the Authorized values administration area.
Next you’ll want to update the frameworks so that the 952$8 (if you’re using collection code) label says ‚Color‘.
Once you have that in place you can start to catalog items by color.
Finally you’ll want to add the following JQuery to your preferences so that it will relabel ‚Collection‘ to ‚Color‘
$(document).ready(function(){
    $("#advsearch-tab-ccode a:contains('Collection')").text("Color");
    $("#holdings th:contains('Collection')").text("Color");
    });
$(document).ready(function(){
    $("#advsearch-tab-ccode a:contains('Collection')").text("Color");
    $('#item_ccode').text("Color");
    });
Vyhledávání v katalogu Kohy z webových stránek knihovny
Častým požadavkem je umožnění hledání v katalogu přímo z webu knihovny. Pokud je to i vaše přání, zkopírujte následující kód do kódu Vašich webových stránek. Text YOURCATALOG nahraďte adresou Vašeho katalogu.
<form name="searchform" method="get" action="http://YOURCATLOG/cgi-bin/koha/opac-search.pl" id="searchform">
<input id="transl1" name="q" type="text"><p>
<select name="idx" id="masthead_search">
<option value="kw">Keyword</option>
<option value="ti">Title</option>
<option value="au">Author</option>
<option value="su">Subject</option>
<option value="nb">ISBN</option>
<option value="se">Series</option>
<option value="callnum">Call Number</option>
</select>
<input value="Search" id="searchsubmit" type="submit">
</p></form>