Cataloging
Get there: More > Cataloging
Before you start cataloging in Koha, you need to do some basic setup. Refer to the Implementation checklist for a full list of these things. Most importantly, you need to make sure that your MARC bibliographic frameworks are all defined the way you want. Once in the cataloging module you will not be able to add or remove fields and subfields, so your frameworks must be ready before you start cataloging.
You can also use OCLC cataloging services like WorldShare Record Manager and Connexion to send records directly in to Koha. For more information, see OCLC Cataloging Services.
Bibliographic records
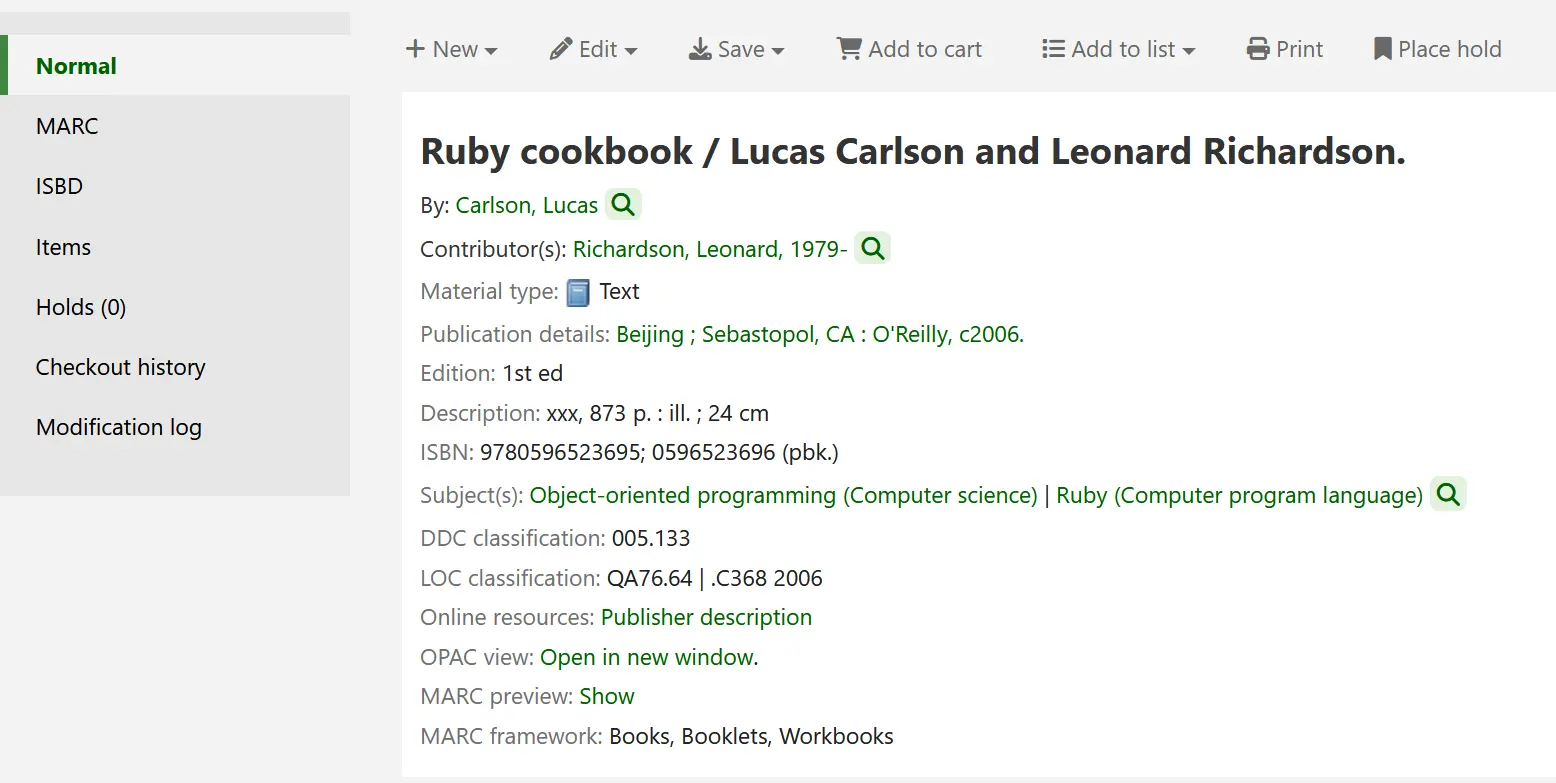
In Koha, the bibliographic record contains the main information related to the material. This includes things like the title, author, ISBN, etc. This information is stored in Koha in MARC. By default, the record details page displays in the ‘Normal’ tab and shows the most important details of the record.
Note
The ‘Normal’ tab of the record details page also shows which MARC bibliographic framework was used to add the record.

Note
Koha supports MARC21 and UNIMARC.
Once this information is saved, item records can be attached to the bibliographic record.
Adding records
Records can be added to Koha via original or copy cataloging. You can also choose to use the basic or advanced cataloging interface for all of your work.
Note
Staff members must have the edit_catalogue permission (or the superlibrarian permission) in order to be able to add bibliographic records.
To catalog a record using a blank template in the basic editor:
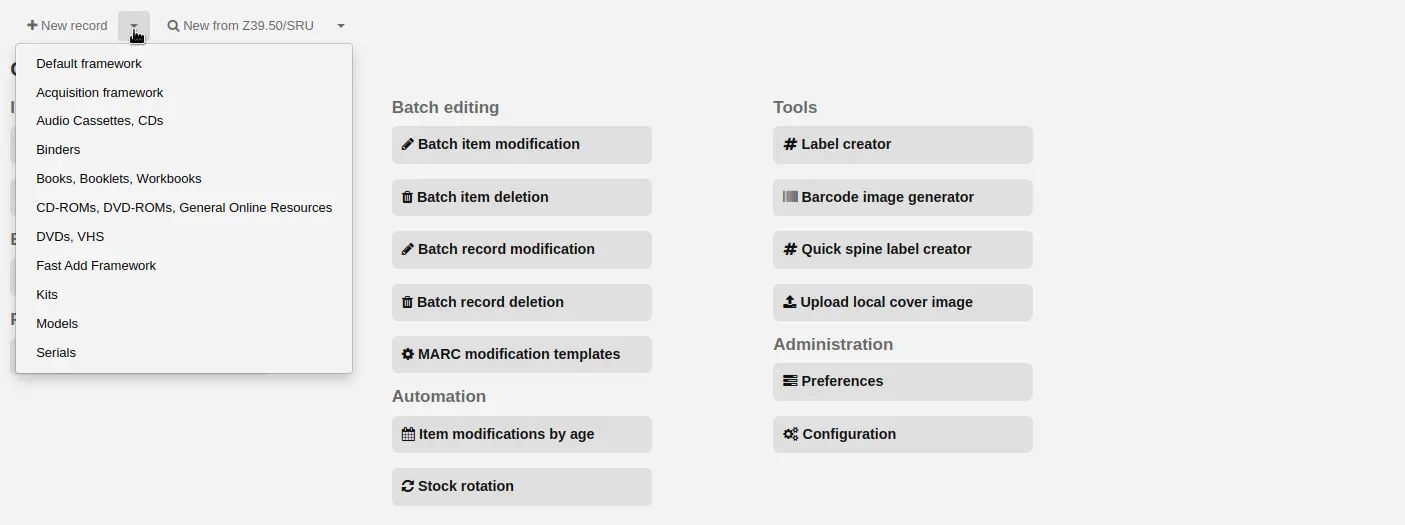
Click ‘New record’

Note
The ‘New record’ button will open the default bibliographic framework. If you want to use a different framework, click the small arrow to the right of the ‘New record’ button and choose the framework.
Note
You can create or modify frameworks in the Administration module.
To catalog a record using a blank template in the advanced editor:
Enable the EnableAdvancedCatalogingEditor system preference
Click the ‘Advanced editor’ button
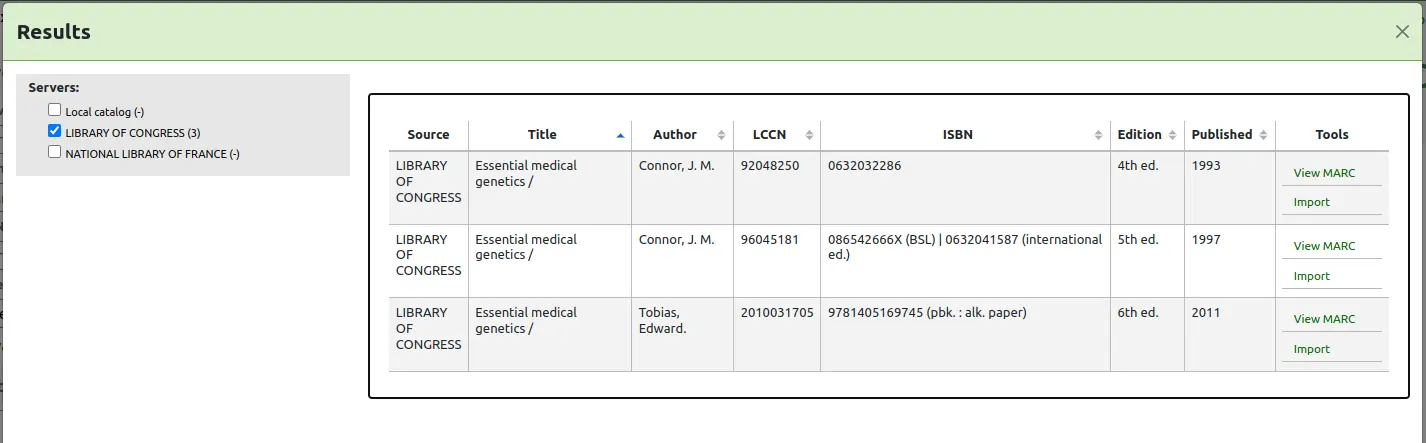
To catalog a record based on an existing record at another library in the basic or advanced editor:
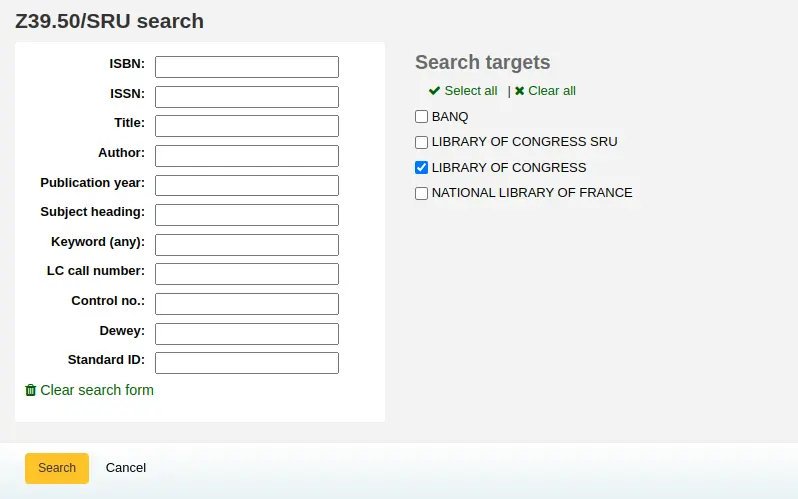
Click ‘New from Z39.50/SRU’
Note
The ‘New from Z39.50/SUR’ button will import the record into the default bibliographic framework. If you want to use a different framework, click the small arrow to the right of the ‘New from Z39.50/SRU’ button and choose the framework.
Search for the item you would like to catalog
Note
If no results are found, try searching for fewer fields, not all Z39.50 targets can search all of the fields above.
Note
Search targets can be edited by using the Z39.50/SRU servers section of the administration module.
Note
The display of extra MARC fields and subfields can be configured via the AdditionalFieldsInZ3950ResultSearch system preference.
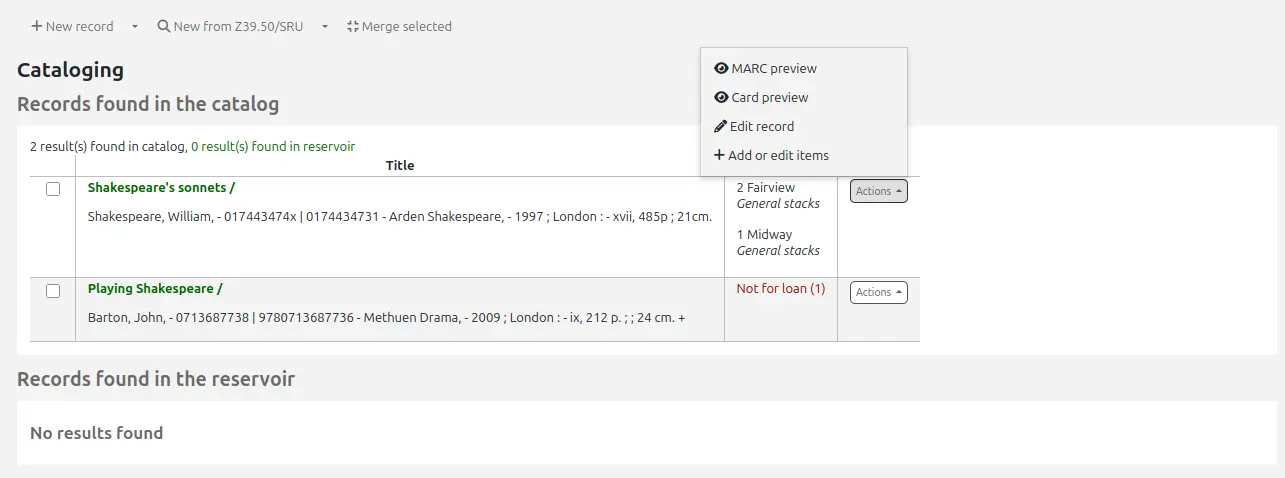
Clicking the arrow button next to a result (or clicking anywhere on the result line) will give you preview and import options.
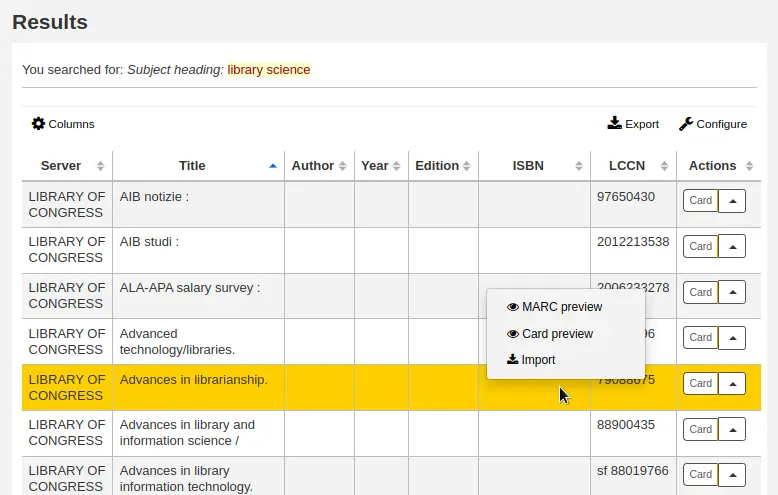
Note
The default option in the button next to a result is the last option used. In the above screenshot, the last option used was ‘Card preview’ so the button is set to open the card preview by default.
Note
You can customize the columns of this table in the Table settings section of the Administration module (table id: resultst).
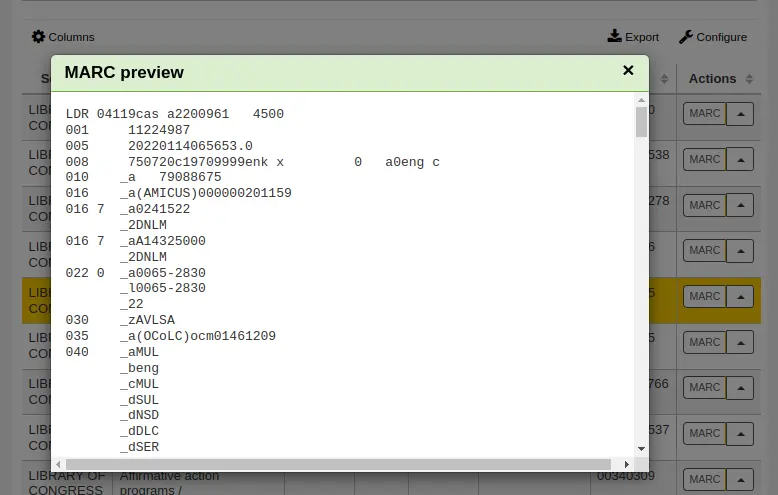
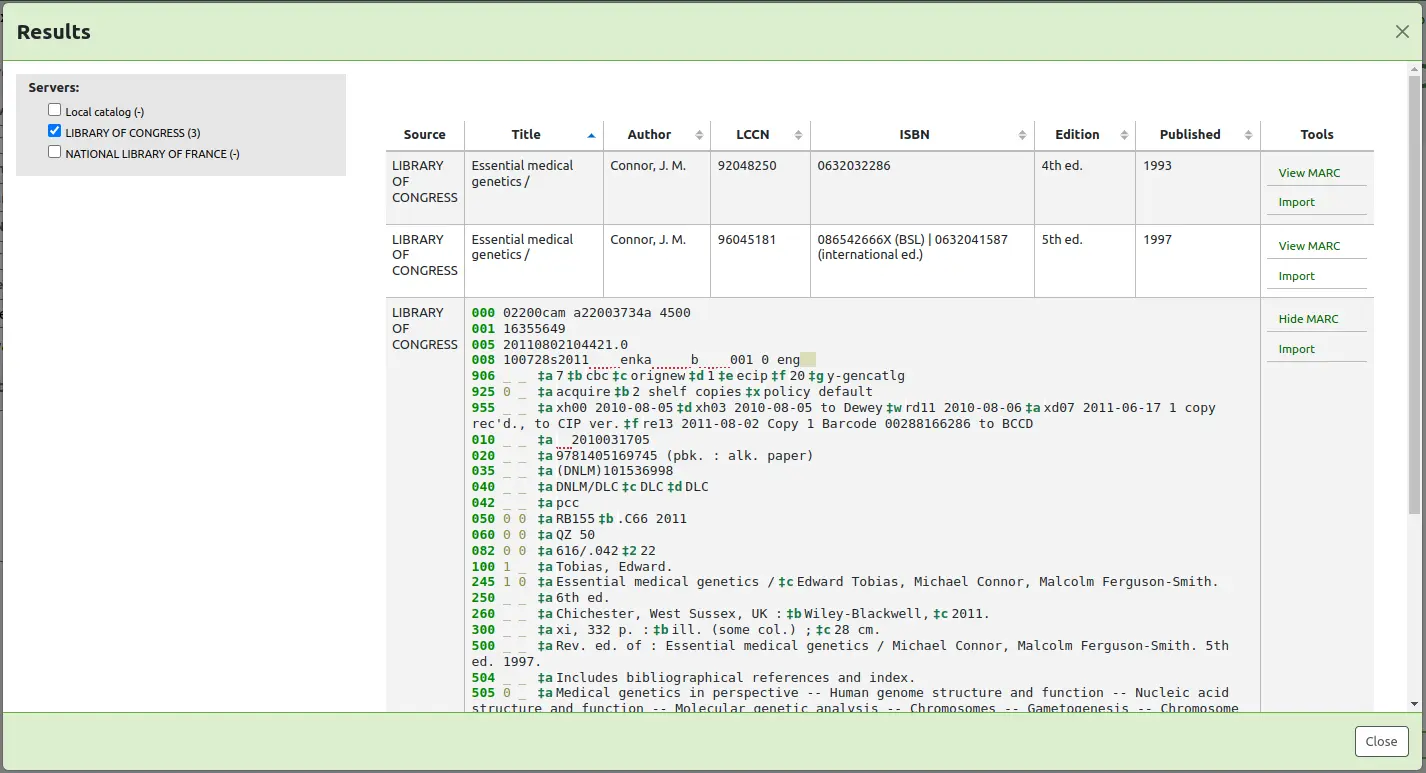
MARC preview: this option will open the record in plain MARC format.
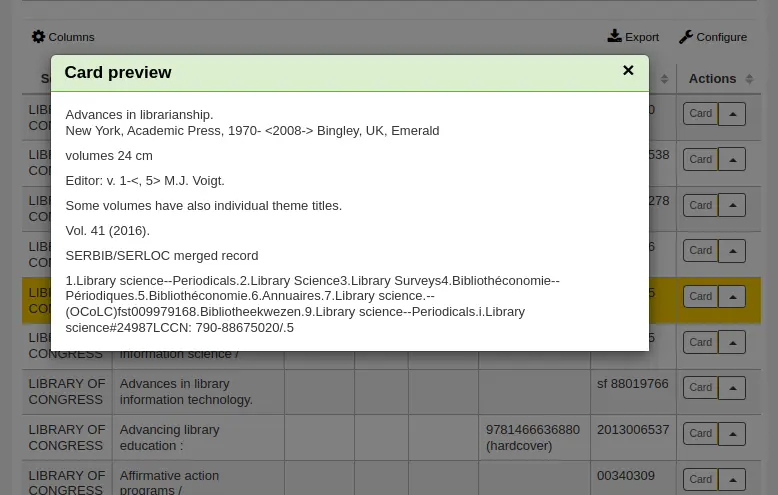
Card preview: this option will open the record formatted like a card catalog.
Import: this option will open the record in Koha’s cataloging editor so that you can modify and save the record in your own catalog.
If you don’t find the title you need in the Z39.50 search results, you can click the ‘Try another search’ button at the bottom left of your results
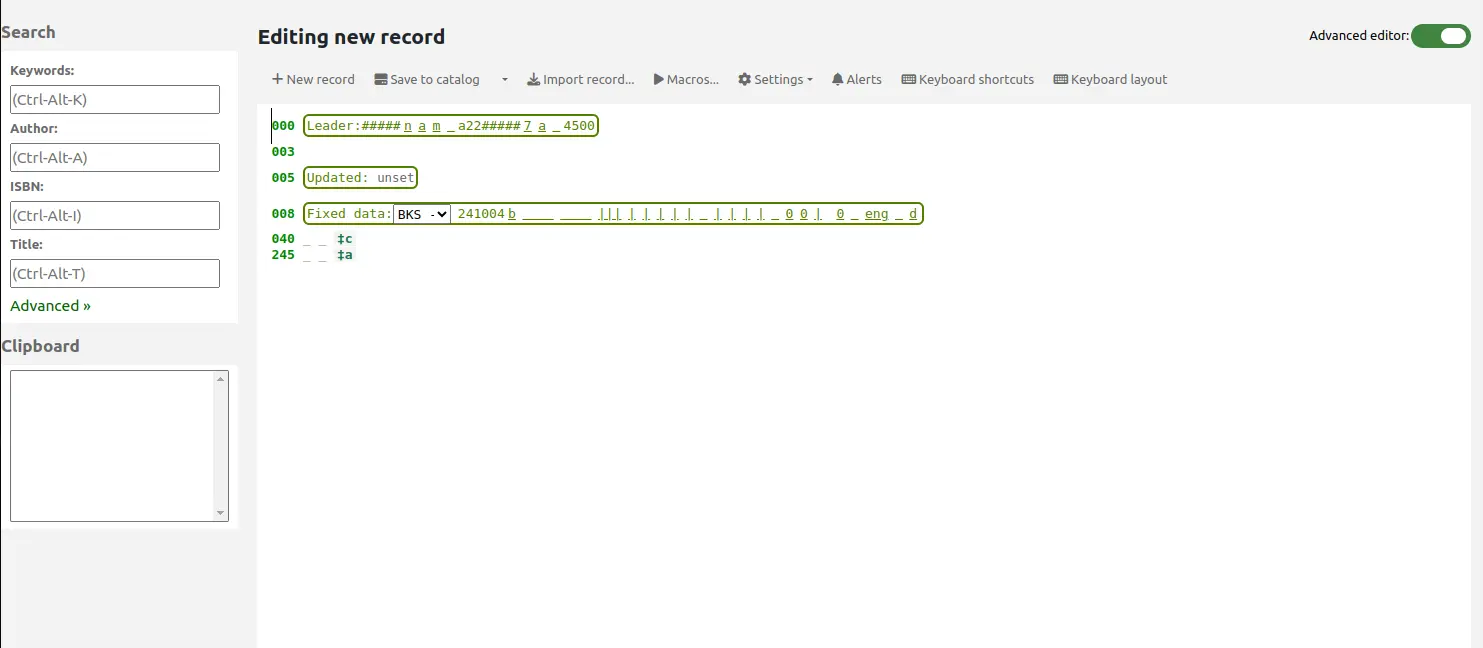
Basic editor cataloging
In the basic editor once you’ve opened a blank framework or imported a record via Z39.50 you will be presented with the form to continue cataloging
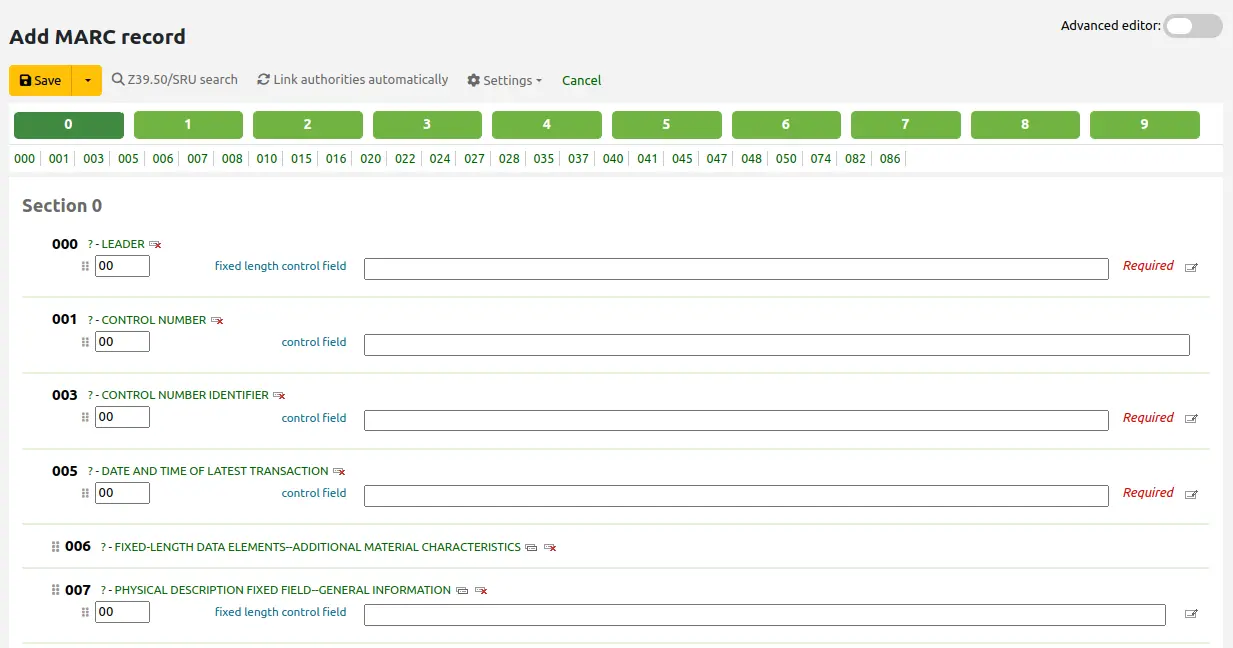
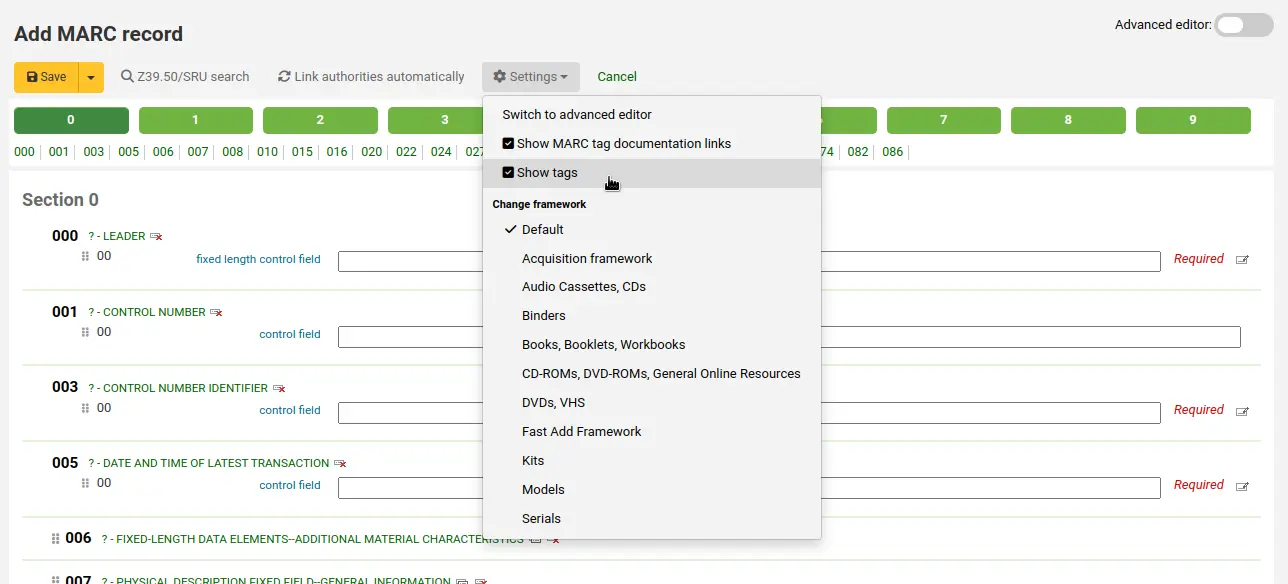
If you would rather not see the MARC tag numbers you can change the value in your hide_marc system preference or each user can check the box next to ‘Show tags’ found under ‘Settings’.
To expand a collapsed tag click on the tag description
To get help from the Library of Congress on a MARC tag click the question mark (?) to the right of each field number
It is possible to change the source of the MARC documentation using the MARCFieldDocURL system preference
If you feel that this clutters the screen you can hide the question marks by unchecking the box next to the ‘Show MARC tag documentation links’ note found under ‘Settings’
Sometimes fields may not be editable due to the value in your RequireChoosingExistingAuthority system preference. If this preference is set to “require”, you will see a lock symbol to the left of the field.

If this icon appears you must click the icon to the right of the field to search for an existing authority.
From the results list click ‘Choose authority’ to bring that into your catalog record

Note
In MARC21 systems, if the ShowHeadingUse system preference is enabled, there will be an additional column showing the appropriate use of the authority record in main or added entries, subject headings, or series titles.

To duplicate a field click on the ‘repeat this tag’ icon to the right of the tag

To move subfields in the right order, drag and drop the subfields using the handles on the right
Note
You can change the default order of the subfields in the bibliographic framework by dragging and dropping the subfield tabs when editing subfields.
To duplicate a subfield click on the clone icon (to remove a copied field, click the delete clone icon) to the right of the field
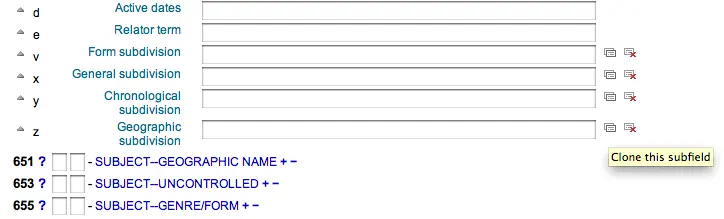
To remove a subfield (if there is more than one of the same type), click the - (minus sign) to the right of the field
To use a plugin click on the icon to the right of the field
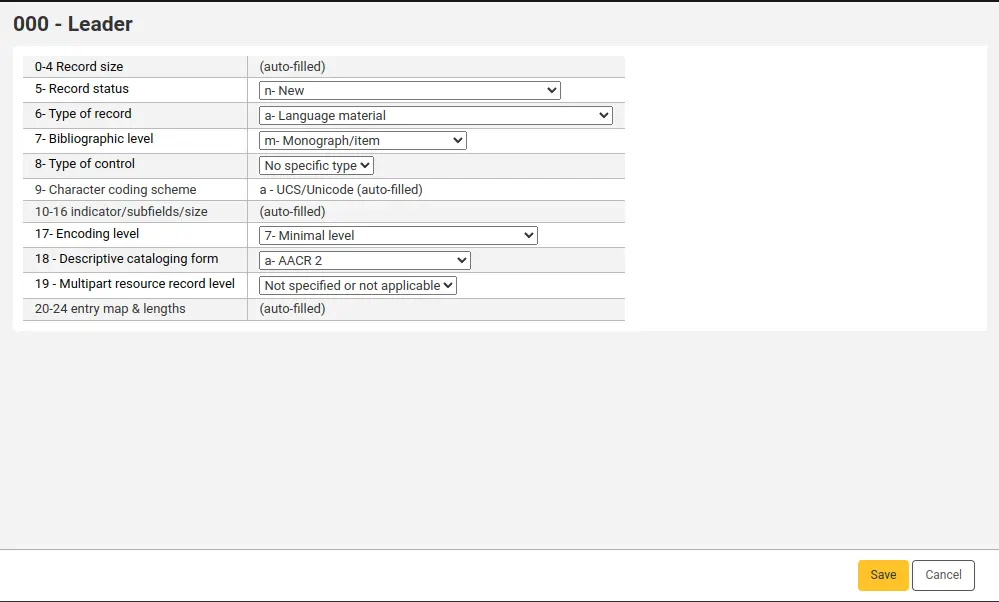
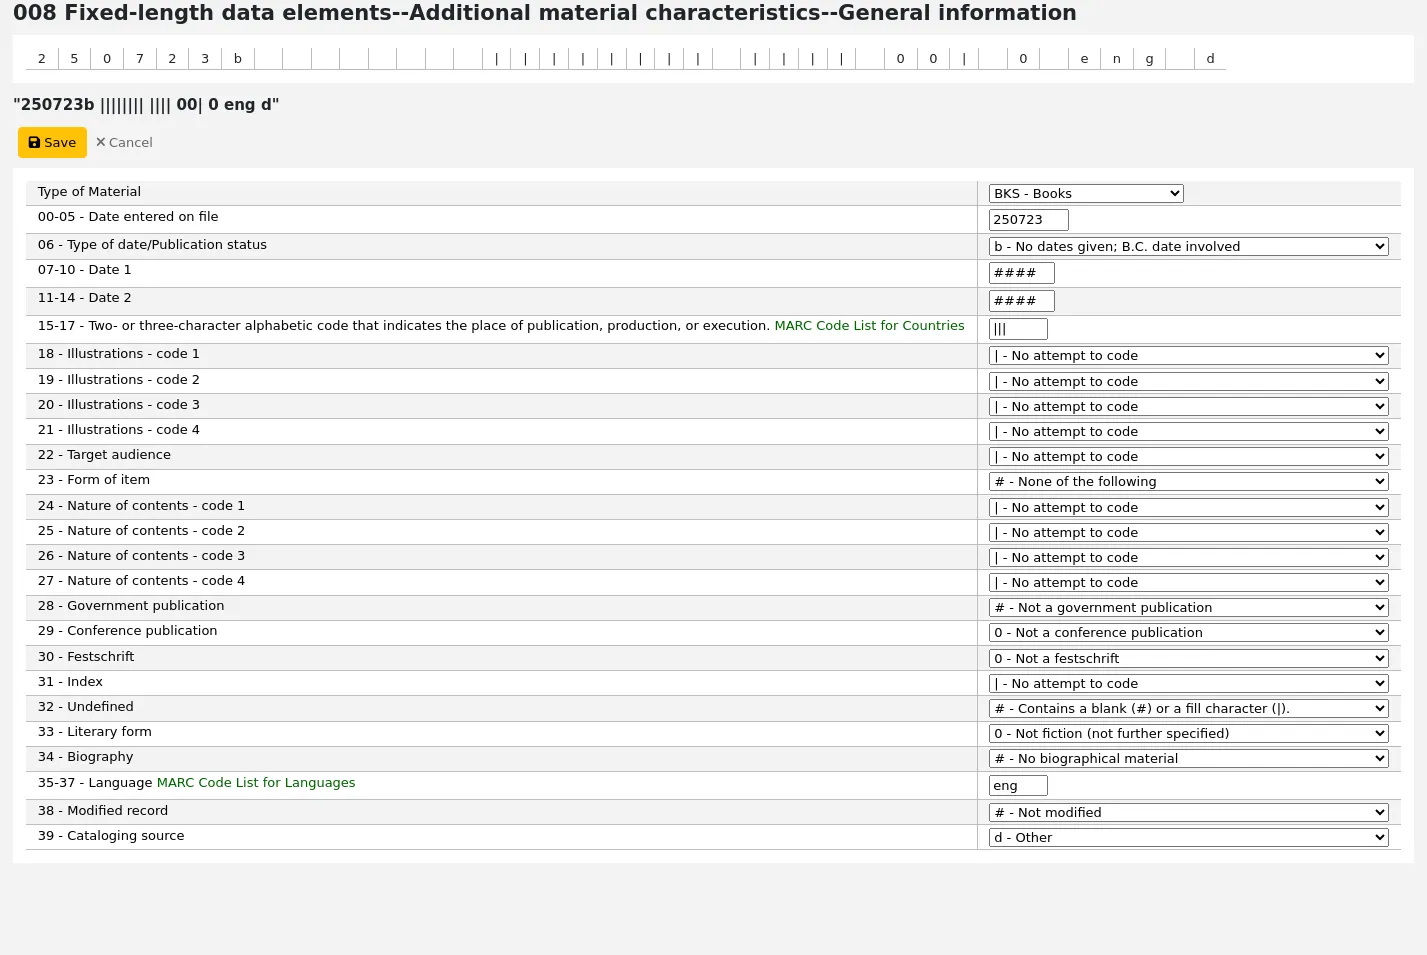
Some fixed fields have editors that will change based on the material type you’re cataloging (for example the 006 and the 008 fields)
Note
The ‘Type of material’ in 008 is determined by the value in leader/06.
Once you’ve finished, click the ‘Save’ button at the top and choose whether you want to save and view the bib record you have created or continue on to add/edit items attached to the record

Choosing ‘Save and view record’ will bring you right to the record you just cataloged
Choosing ‘Save and edit items’ will bring you to the add/edit item form after saving the bib record so that you can attach holdings
Choosing ‘Save and continue editing’ will allow you to save your work so far and keep you in the editor to continue working
If you are about to add a duplicate record to the system you will be warned before saving

Note
To find possible duplicates, the system searches for the ISBN, and if there is not ISBN, it searches for the same combination of title and author.
If mandatory or important fields or subfields are not filled, the system will give a warning. Click ‘Go to field’ to go to the problematic field and correct it.
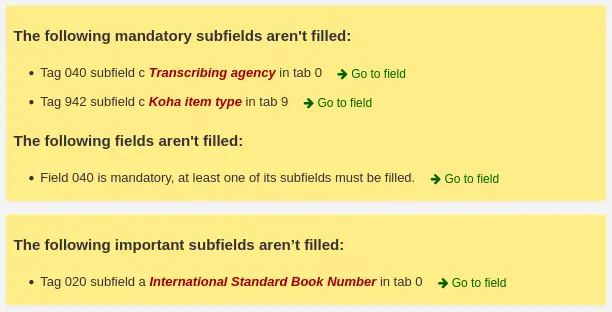
If you scrolled down and need to see the warning again, click the ‘Errors’ button at the right of the toolbar.

Note
Important fields or subfields will not prevent from saving the record.
Only mandatory fields or subfields will block saving.
Advanced editor cataloging
In order to use the advanced cataloging editor, you need to enable the EnableAdvancedCatalogingEditor system preference.
Note
Staff members must have the advanced_editor permission as well as the edit_catalogue permission (or the superlibrarian permission) in order to be able to use the advanced editor.
Note
This feature does not currently include any support for UNIMARC fixed fields.
To catalog with the advanced editor, click the ‘Advanced editor’ button from the main cataloging page, or use the switch in the upper right corner of the basic editor screen.
Once you’ve opened a blank framework or imported a record via Z39.50 in the advanced editor, you will be presented with the form to continue cataloging.
Using the search boxes on the left, you can perform Z39.50 searches.
From those Z39.50 results you can view the MARC record by clicking the link to the right
Clicking ‘Import’ will bring the record in to the editor where you can perform your edits.

Note
When adding a new field in the Advanced Editor, you need to key underscores for a blank indicator, and surround the indicators with spaces.
Note
You need to key a space before the first subfield delimiter, but not before or after other subfield delimiters in the field.
At the bottom of the editor you will see help from the Library of Congress (or the documentation from MarcFieldDocURL) for the field you are on.
In cases where your MARC is invalid, you will see red highlighting.
The ‘Keyboard shortcuts’ button will inform you of the necessary commands to edit the record using only keyboard functions.
A clipboard is available to copy and paste text between fields. See the table below for the shortcuts used with the clipboard.
Advanced cataloging keyboard shortcuts
The following keyboard shortcuts can be used in the advanced cataloging editor to save time and clicks.
Shortcut |
Behavior |
|---|---|
Ctrl-Alt-C |
Copy current field |
Shift-Ctrl-C |
Copy current subfield |
Ctrl-X |
Delete current field and copy to ‘clipboard’ |
Shift-Ctrl-X |
Delete current subfield and copy to ‘clipboard’ |
Alt-C |
Insert copyright symbol (©) |
Alt-P |
Insert copyright symbol (℗) (sound recordings) |
Ctrl-D |
Insert delimiter (‡) |
Ctrl-I |
Copy current field on next line |
Shift-Enter |
Insert line break |
Shift-Ctrl-L |
Link field to authorities |
Enter |
New field on next line |
Tab |
Move to next position |
Ctrl-P |
Paste selection from ‘clipboard’ |
Shift-Tab |
Move to previous position |
Ctrl-H |
Get help on current subfield |
Shift-Ctrl-K |
Toggle Keyboard |
Ctrl-S |
Save record (cannot be remapped) |
Attention
The default shortcut to copy the current field changed in Koha version 24.11. In prior versions, it was Ctrl-C.
It is possible to change the keyboard shortcuts if the default ones don’t suit your workflow by clicking ‘Redefine shortcuts’. This will bring you to the keyboard shortcuts administration page.
Advanced cataloging virtual keyboard
A virtual keyboard is available for adding diacritics and symbols. Use the shortcut Shift-Ctrl-K to display the keyboard.
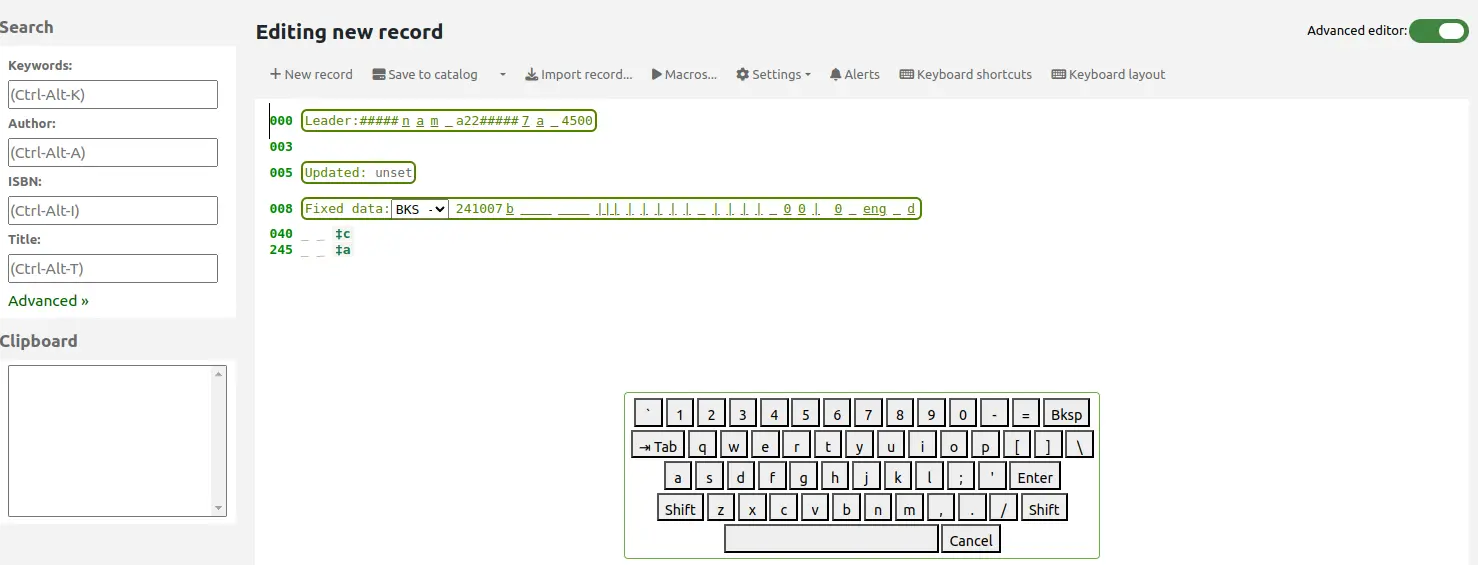
A ‘Keyboard layouts’ button will display at the top of the advanced editor that allows you to set the virtual keyboard layout for different languages.
Macros in advanced cataloging
Macros can be used to enter repetitive information in records.
Note
Staff members must have the create_shared_macros permission (or the superlibrarian permission) in order to be able to create macros for the advanced editor.
Staff members must have the delete_shared_macros permission (or the superlibrarian permission) in order to be able to delete existing macros from the advanced editor.
To record a new macro:
Click the ‘Macros…’ button.
In the pop-up window, click the ‘New macro…’ button.
Enter the new macro’s name in the pop-up box and click ‘OK’.
Now click to the right of the little number 1, and enter the first line of your macro (see macro syntax below). For a multi-line, or multi-field, macro, hit the return key so that a little number 2 appears, and enter the second line/field, etc.
Your macros will be automatically saved. When finished you can select the “x” to close the window, or select a macro to run on the record that you’re editing, or select another macro to run.
To edit an existing macro:
Click the ‘Macros…’ button.
In the pop-up window, select the macro that you wish to edit & make your changes.
Your work will automatically be saved, and when finished you can select the “x” to close the window, or select a macro to run on the record that you’re editing, or select another macro to run.
To run a macro:
Click the ‘Macros…’ button.
In the pop-up window, select the macro that you wish to run
Click ‘Run macro’
The basic syntax of the macro language:
new 500=‡aEdited with Rancor
Creates a new 500 with a ‡a subfield and sets it to “Edited with Rancor”.
245c= by J.K. Rowling.
Sets the first ‡c subfield of the first 245 tag in the record to ‘ by J.K. Rowling’, creating it if necessary.
082a={084a}
Sets the ‡a subfield of the first 082 tag (creating the subfield if necessary) to the contents of the first 084‡a.
indicators=_1
Sets the indicators of the last mentioned tag (in this case, 082) to “_” and “1”.
new 090a=Z674.75.W67
Creates a new ‡a subfield on the first 090 (but only if that field already exists) and sets it to “Z674.75.W67”.
new 090a at end=Z674.75.W67
Same as above.
new 245b after a= a tale of might and magic /`
Creates a new ‡b after the first a subfield and sets it to “ a tale of might and magic /”.
delete 245b
Deletes the first ‡b subfield on the first 245 to ‡b.
Importing records
It is possible to import both bibliographic and authority MARC record files in Koha. The files to import can be either in MARC or MARCXML format.
Importing records into Koha includes two steps.
The first is to stage records for import, which prepares the records, and imports them in the reservoir.
The second step is to import the prepared, or “staged”, files from the reservoir into the catalog.
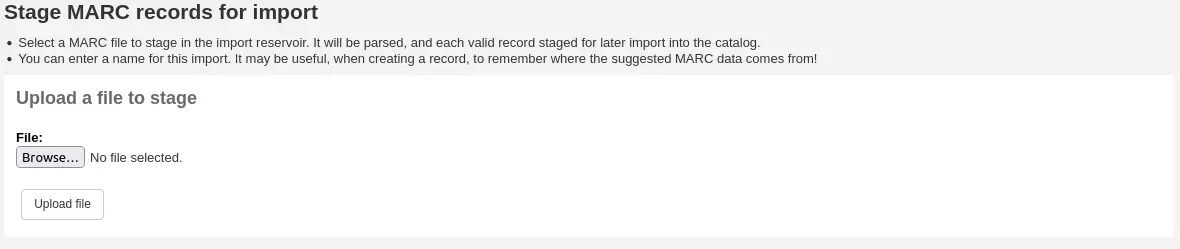
Staging records for import
Note
Only staff with the stage_marc_import permission (or the superlibrarian permission) will have access to this tool.
Get there: More > Cataloging > Import > Stage records for import
First, find the MARC file on your computer
- Next, you will be presented with options for record matching and item
imports
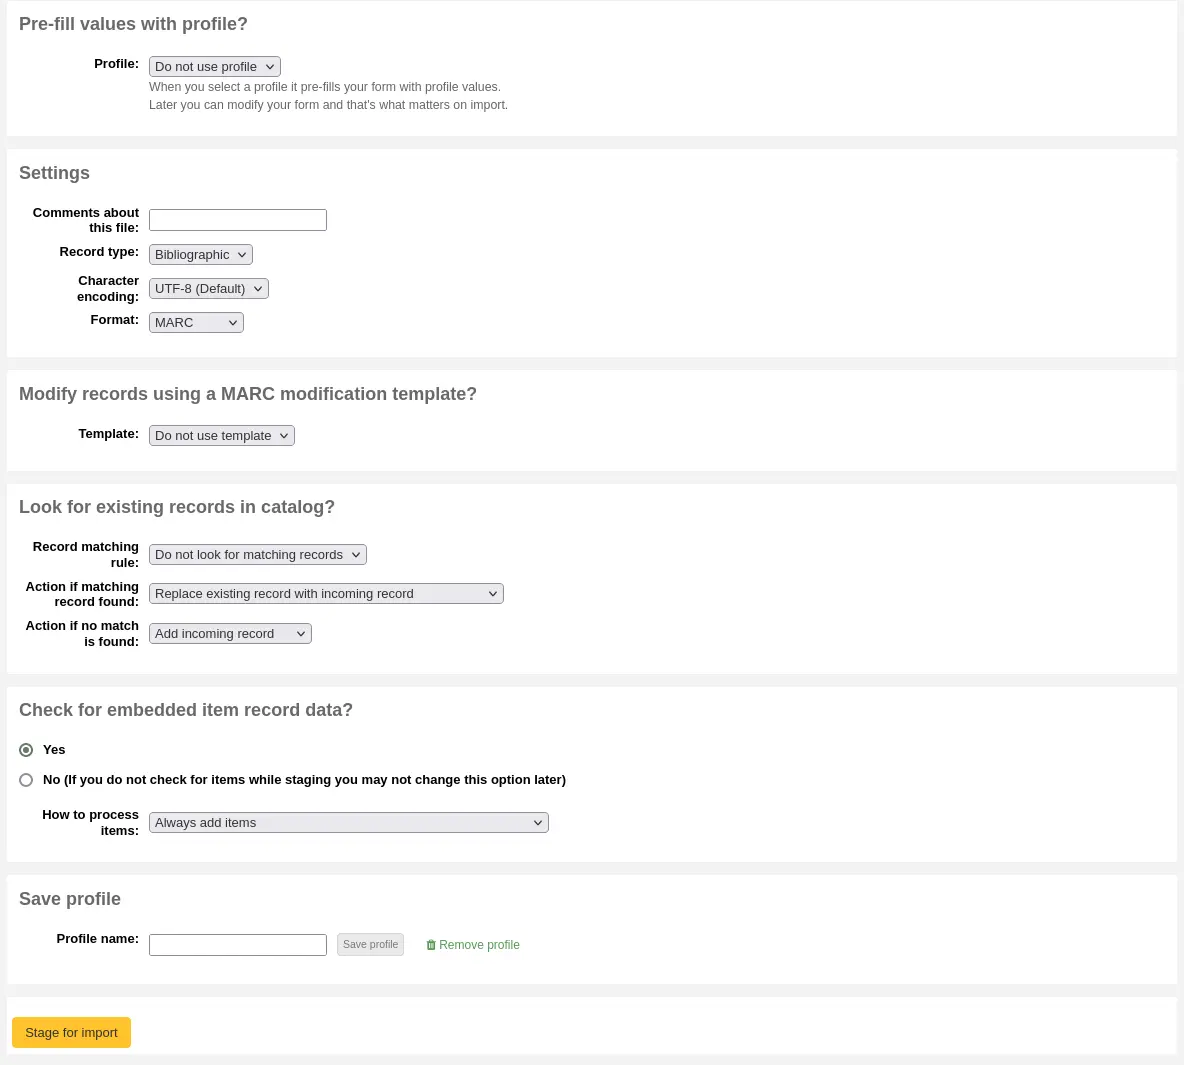
Prefill values with profile: if you already have staging profiles set up, you can choose the appropriate profile from the dropdown list
Profiles are used to prefill the rest of the staging settings form.
You can create a profile by choosing the various settings in the sections below and enter a profile name at the end of the form. Next time you stage records, the profile will be available.
Comments about this file: enter comments to identify your upload when going to the ‘Manage staged records’ tool
Record type: choose which type of records are in this file, bibliographic or authority

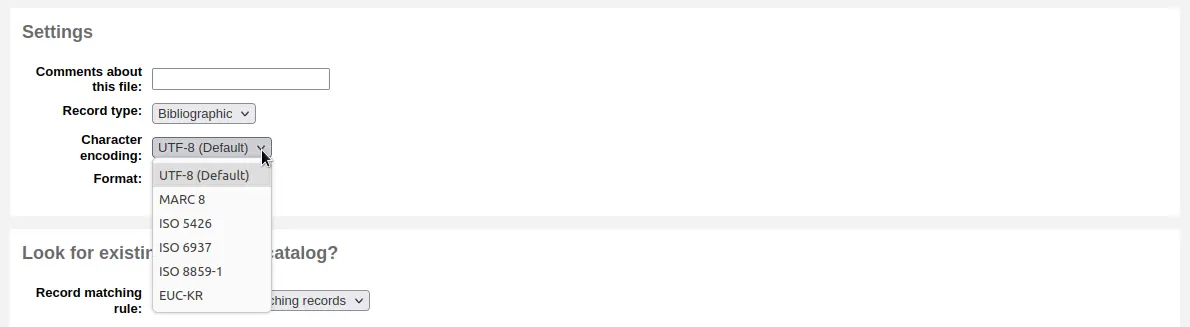
Character encoding: choose the character encoding of your file
Format: choose the MARC format of your file

Modify record using a MARC modification template: choose if you would like to use a MARC modification template to alter the data you’re about to import

Choose whether or not you want to look for matching records

Record matching rule: choose which rules to use to check your catalog if these records already exist.

Note
You can set up record matching rules in the administration area
Note
When using the ISBN matching rule Koha will find only exact matches. If you find that the ISBN match is not working to your satisfaction you can change the AggressiveMatchOnISBN preference to ‘Do’ and then run your import again.
Action if matching record found: choose what to do with matching records if they are found
Replace existing record with incoming record: choose this if you are importing more complete records than the ones you currently have, or if you made some changes using an external tool (MarcEdit for example)
Add incoming record: this will keep the existing record and add the incoming record, so you may end up with duplicates
Ignore incoming record (its items may still be processed): choose this if you do not want to replace existing records
Action if no match is found: choose what to do with records that are unique
Add incoming record: choose this if you wish to import records that are not already in your catalog (new titles for example)
Ignore incoming record: choose this if you don’t want to import records that are not already in your catalog (for example, if you’re only replacing existing records and don’t want to add anything)
Check for embedded item record data?: choose whether or not to import the item data (field 952) found in the MARC records (if the file you’re loading is a bibliographic file)
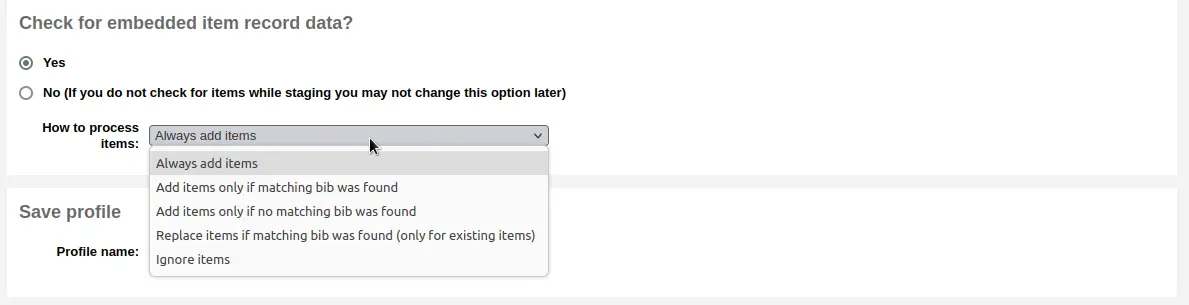
Always add items: always add items regardless of matching status
Add items only if matching bib was found: this will only add items to existing records in your catalog
Add items only if no matching bib was found: this will only add items to the new records you’re importing, not the ones that already exist
Replace items if a matching bib was found: the match will look at the itemnumbers and barcodes to match on for items and will only replace existing items.
Note
Itemnumbers take precedence over barcodes
Ignore items: this will not add any items
Save profile: you can choose to save the chosen settings under a profile to use again later

Click ‘Stage for import’
The record staging will be treated as a background job. A progress bar will let you know how the job is progressing.

Click ‘View detail of the enqueued job’ to see the summary of the staging
You will be presented with a confirmation of your MARC import
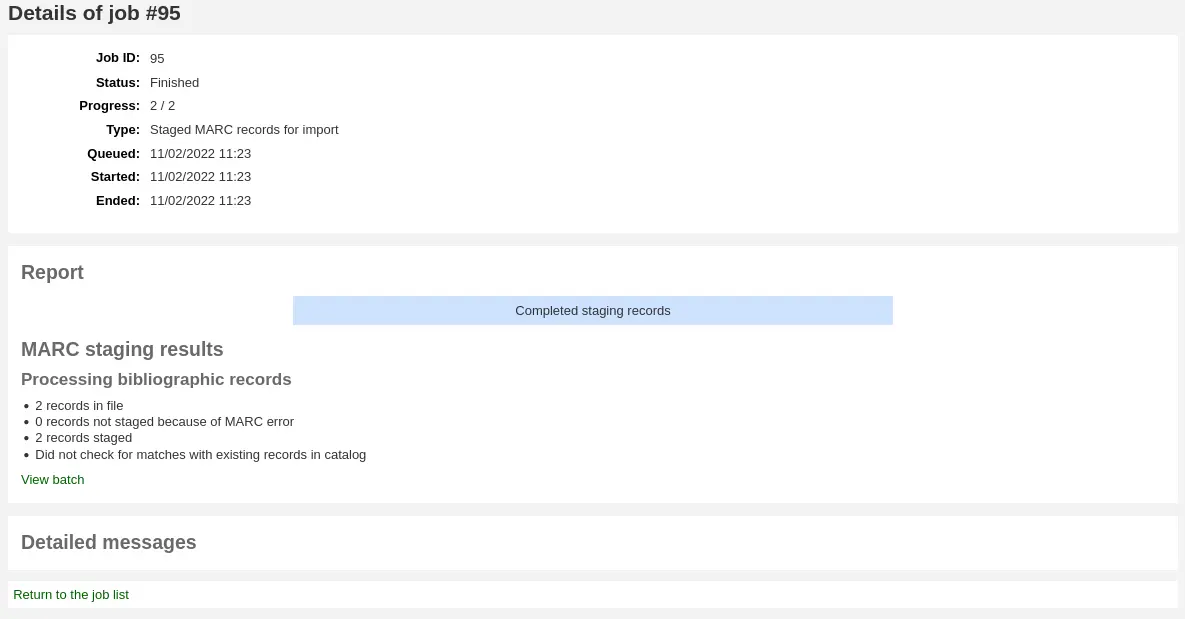
Number of records in file
Number of records with MARC errors
Number of records staged
Number of records matching existing records in the catalog
Number of items staged
To complete the process, continue to the Manage staged records tool by clicking on the ‘View batch’ link.
If these records are to be used in acquisitions, you can stop here and add these records to a basket by ordering from a staged file
Managing staged records
Note
Only staff with the manage_staged_marc permission (or the superlibrarian permission) will have access to this tool.
Get there: More > Cataloging > Import > Manage staged records
Once you have staged your records for import you can complete the import using this tool.
From the list of staged files, click on the file name that you want to finish importing
Note that records that have already been imported will say so under ‘Status’
Note
If you’re coming directly from the Stage records for import tool you will not see this list of staged files, you will be taken automatically to the right file summary
A summary of your staged file will appear along with the option to change your matching rules
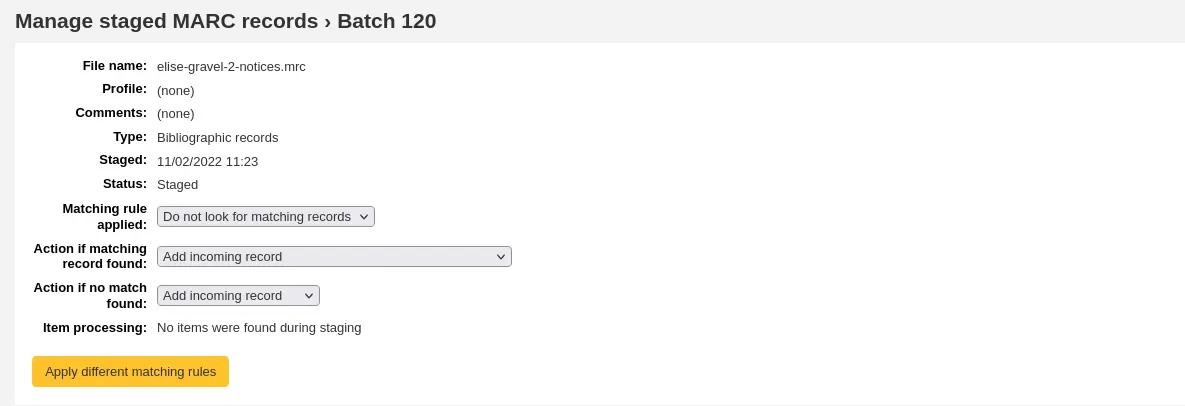
Below the summary is the option to import the batch of records using a specific framework
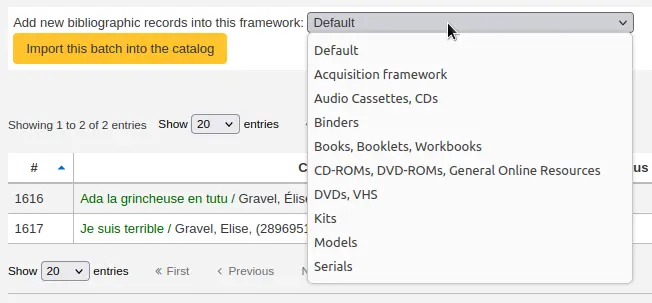
Choosing a framework other than ‘Default’ isn’t necessary, but it’s helpful for running reports.
Below the framework selection there will be a list of the records that will be imported
Review your summary before completing your import to make sure that your matching rule worked and that the records appear as you expect them to
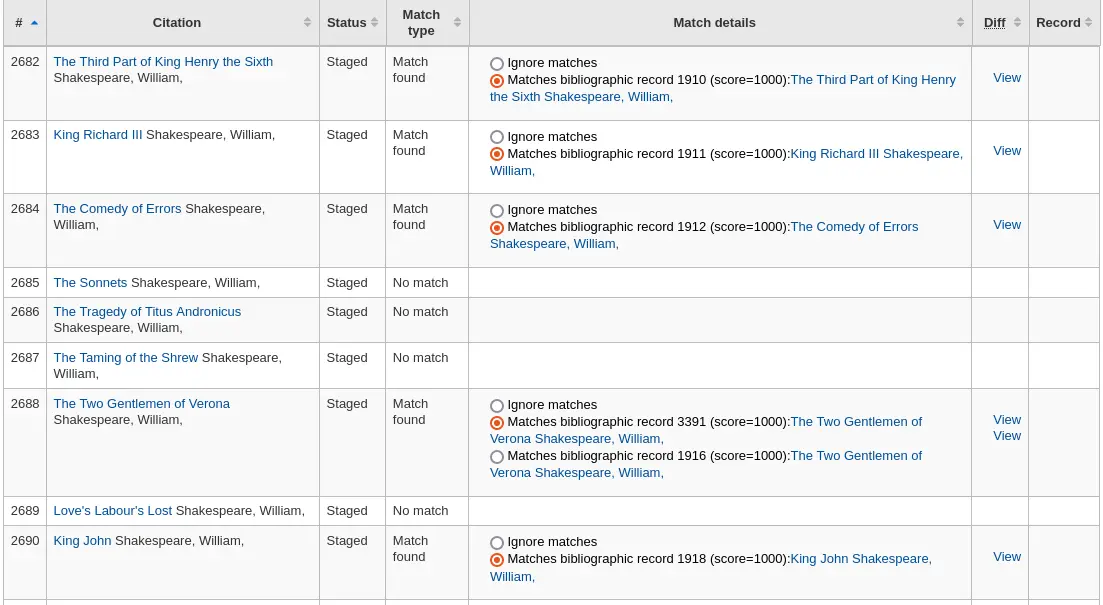
Matches will appear with info under the ‘Match details’ column

and when clicking the ‘View’ link under ‘Diff’ you can see the difference between versions.
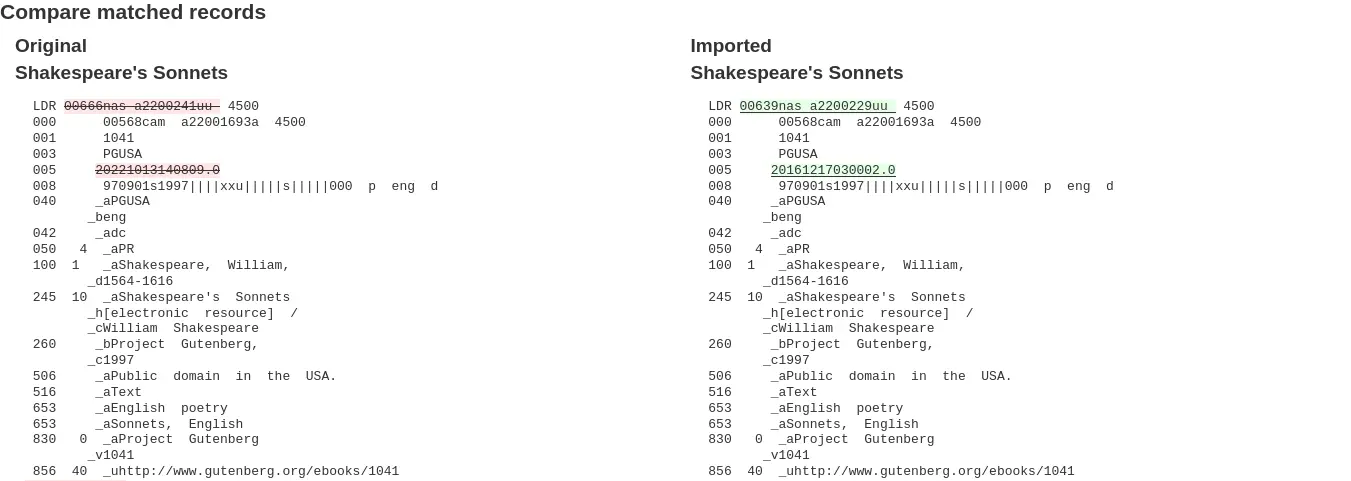
For each match, you can choose to ignore the match by selecting the ‘Ignore matches’ radio button. If more than one matching record was found, they will all be listed and you can choose with which to match your incoming record.

If ‘Ignore matches’ is selected, the action chosen in ‘Action if no match is found’ from the staging step will be applied.
Note
Here are the different behaviors depending on the ‘Action if matching record found’ choice from the staging step and if a match is selected or if ‘Ignore matches’ is selected.
Action if matching record found
Match selected
‘Ignore matches’ selected
Replace existing record with incoming record
Incoming record replaces selected matching record
‘Action if no match is found’ is applied
Add incoming record
Incoming record is added
Incoming record is added
Ignore incoming record
Incoming record is ignored
‘Action if no match is found’ is applied
Click ‘Import this batch into the catalog’ to complete the import
The record importation will be treated as a background job.

You will be presented with a confirmation of your MARC import
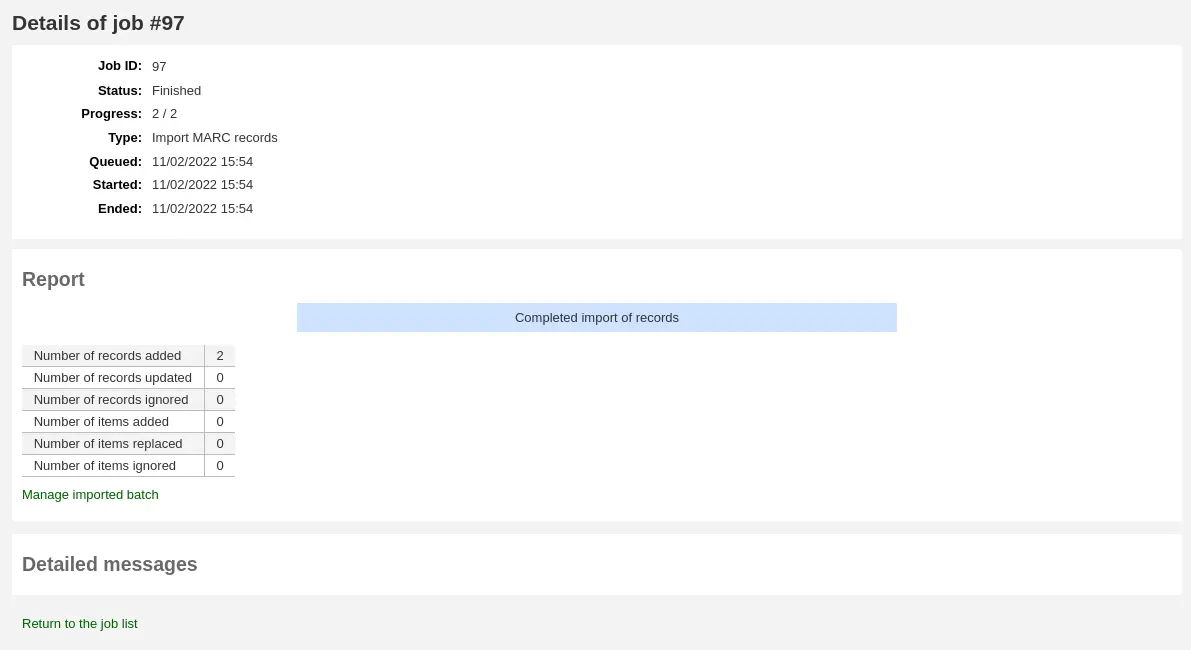
Number of records added: new records added
Number of records updated: existing records replaced with the incoming ones
Number of records ignored: records that were ignored due to the matching rule
Number of items added: new items added
Number of items replaced: existing items updated with the incoming ones
Number of items ignored because of duplicate barcode: items that were ignored because the barcode already exists in the database
Once your import is complete a link to the new records will appear to the right of each title that was imported
You can undo your import by clicking the ‘Undo import into catalog’ button
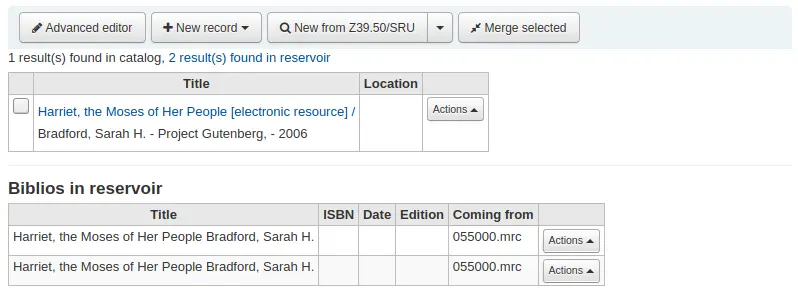
Records imported using this tool remain in the ‘reservoir’ until they are cleaned either through the ‘Clean’ button in the Staged MARC record management home page (see below) or through the cleanup_database cronjob. Reservoir records will appear when searching the catalog from the cataloging module
To manually clean items out of the ‘reservoir’:
Visit the main screen of the manage staged MARC records tool

To clean a batch, click the ‘Clean’ button to the right
You will be presented with a confirmation message
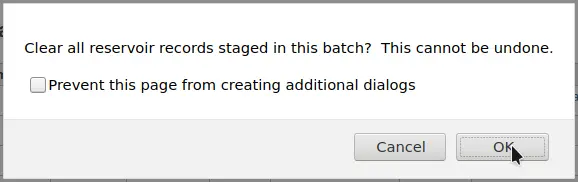
Accept the deletion and the records will be removed from the reservoir and the status will be changed to ‘cleaned’
Adding analytic records
Libraries sometimes make journal articles and articles within monographs and serials accessible to library patrons through analytics cataloging. Analytics cataloging creates separate bibliographic records for these articles, chapters, sections, etc. found within a larger resource such as a book, an article within a journal, newspaper or serial. In analytics cataloging, although a separate bib record is created for the title, it is not physically separated from the host item. Learn more about Analytics in Chapter 13 of AACR2.
If you would like to catalog analytic records there are two options. One is to use the Easy Analytics function; the other is the Analytics enhanced workflow.
Easy analytics
The easy analytics feature makes linking analytic records together easier. The first thing you need to do is set the EasyAnalyticalRecords preference to ‘Show’ and the UseControlNumber preference to ‘Don’t use.’
After cataloging your analytic record (see adding records for more on creating records) click ‘Edit’ from the normal view and choose to ‘Link to host item’

This will prompt you to enter the barcode for the item this record should be linked to.
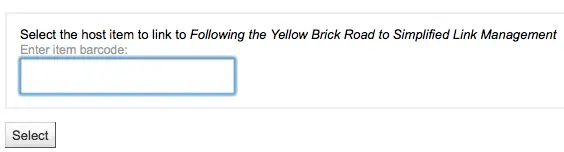
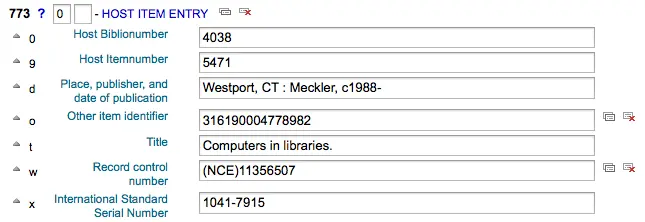
After entering the item’s barcode and clicking ‘Select’ you will receive a confirmation message.

The record will now have the 773 field filled in properly to complete the link.
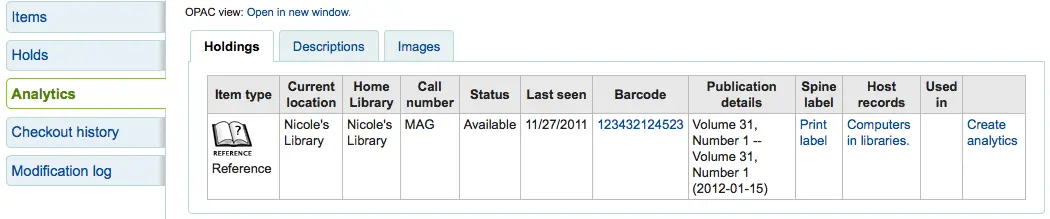
To view all of the items tied to the host record, do a search for the record, click the ‘Analytics’ tab on the left and the analytics tied to each barcode will be shown under the ‘Used in’ column.

Note
It is also possible to create analytic records from this screen by clicking on ‘Create analytics’
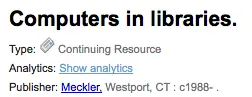
You can also see the analytics attached to this record by clicking the ‘Show analytic’ link towards the top of the record in the normal view.
When looking at the analytic record you will also see a link to the host item under the ‘Host records’ column in the holdings table when viewing the ‘Analytics’ tab.
Analytics enhanced workflow
To use the enhanced workflow method of adding analytics, the first thing you need to do is set the EasyAnalyticalRecords preference to ‘Don’t show’ and the UseControlNumber preference to ‘Use.’
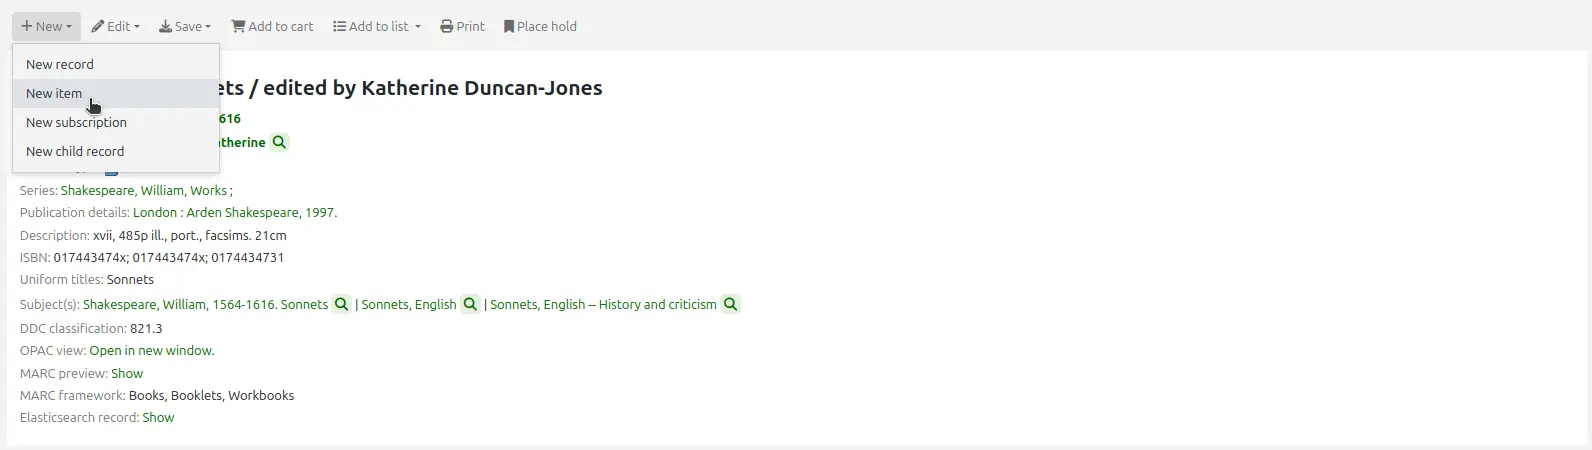
After cataloging your original record (see adding records for more on creating records) click ‘New’ from the normal view and choose to ‘New child record.’
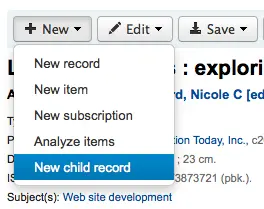
This will open a new blank record for cataloging. The blank record will have the 773 field filled in properly to complete the link once the record is saved.
The ‘Show analytics’ link from the host record will now use the hosts record control number (001) to search for all records on the system of the type ‘monographic component part’ or ‘serial component part’ (Leader position 7) with a 773 subfield w that contains the hosts record control number.
Editing analytics
If you have linked an analytic record incorrectly you can remove that link by editing the analytic record (not the host record).
To do this, go to the analytic record and click the ‘Edit’ button. For UseControlNumber simply edit or remove the corresponding 773.
If using EasyAnalytics choose to ‘Edit items’; To the left of each item you will see two options.

Clicking ‘Edit in host’ will allow you to edit the item on the host record.
Clicking ‘Delink’ will remove the 773 field and the link between the analytic and the host.
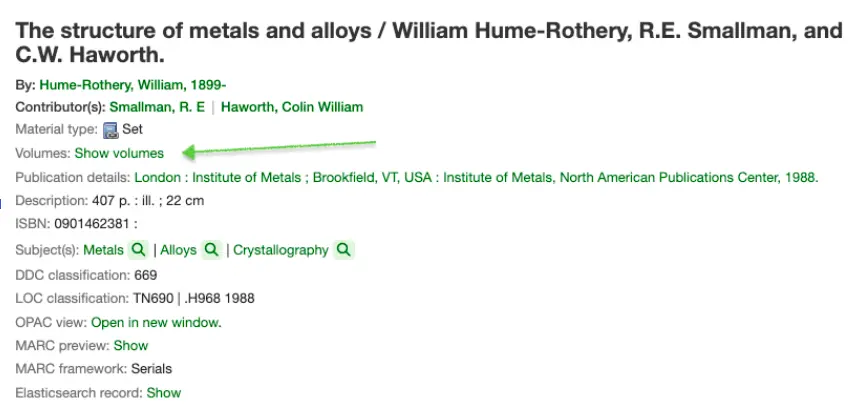
Showing volumes
When cataloging a set with volumes, Koha will display a ‘Volumes:’ label and a link to the items in the bibliographic detail view.
Setup:
When cataloging a set with volumes, the framework being used will need to have MARC field 773$w and 830$w available.
Set the system preference UseControlNumber preference to ‘Don’t use.’
Note
Set the system preference UseControlNumber to ‘Don’t use,’ so the ‘In’ label is replaced with the label and link ‘Volumes: Show volumes’ on the Parent record. Child records will not display the ‘Show volumes’ link. If ‘UseControlNumber’ is set to ‘Use’, the ‘In’ label and link will be displayed.
Catalog the parent record. Take note of the 001 control number.
Example:
000 LDR, pos. 19 = a - Set
001 xxx
773 _ _ $a  volume set title
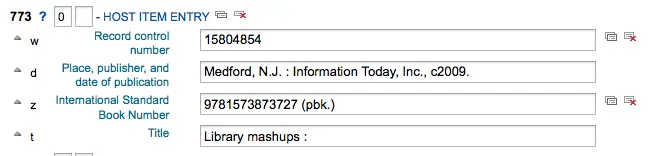
Catalog the child record. Enter the control number from the parent record into tag 773 subfield w.
000 LDR, pos. 7 = m - Monograph/Item
000 LDR, pos. 19 = c - Part with dependent title
773 _  _ $a  volume set title $w xxx
The Parent record will display the ‘Volumes:’ label with the ‘Show volumes’ link. Clicking on the link will take the user to the child record or a search result page of child records.
Editing records
Note
Staff members must have the edit_catalogue permission (or the superlibrarian permission) in order to be able to edit bibliographic records.
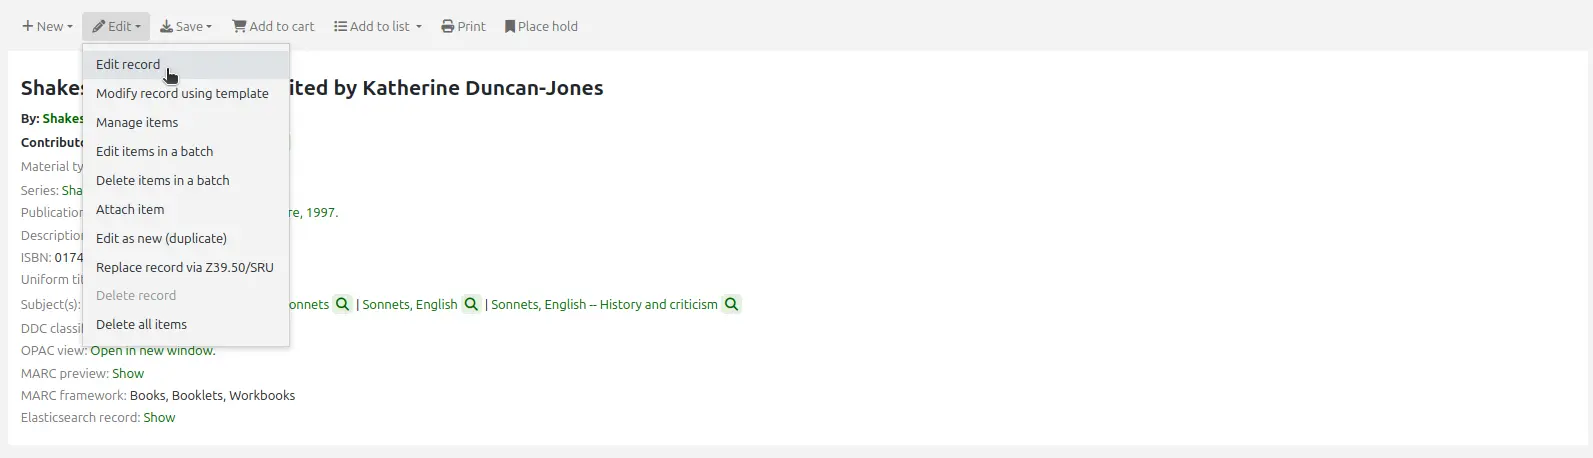
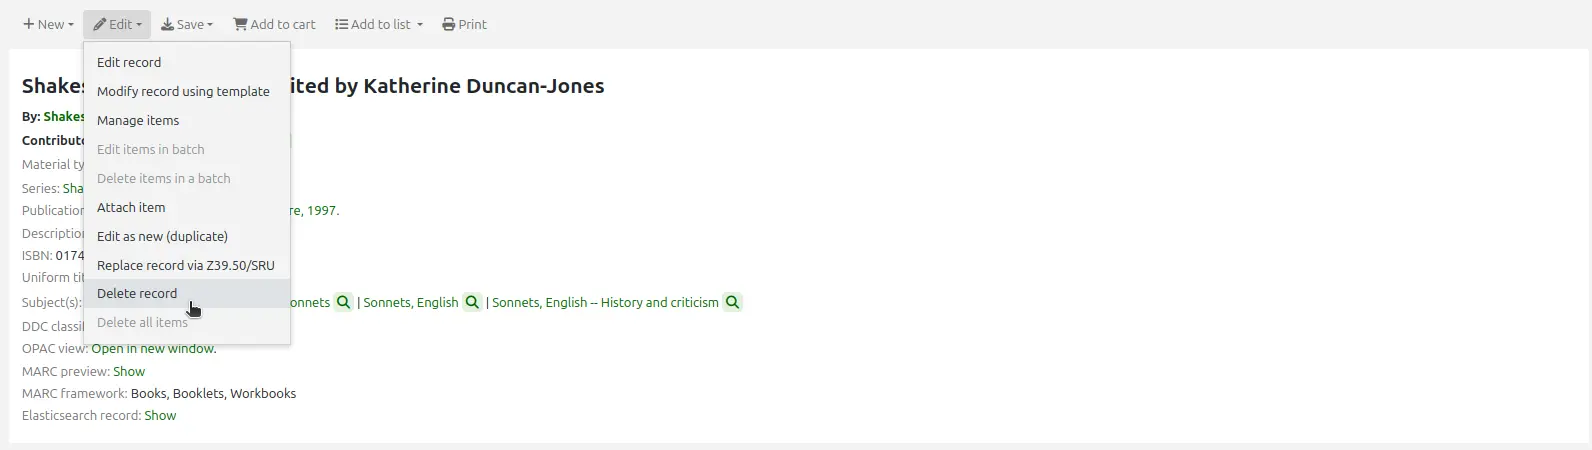
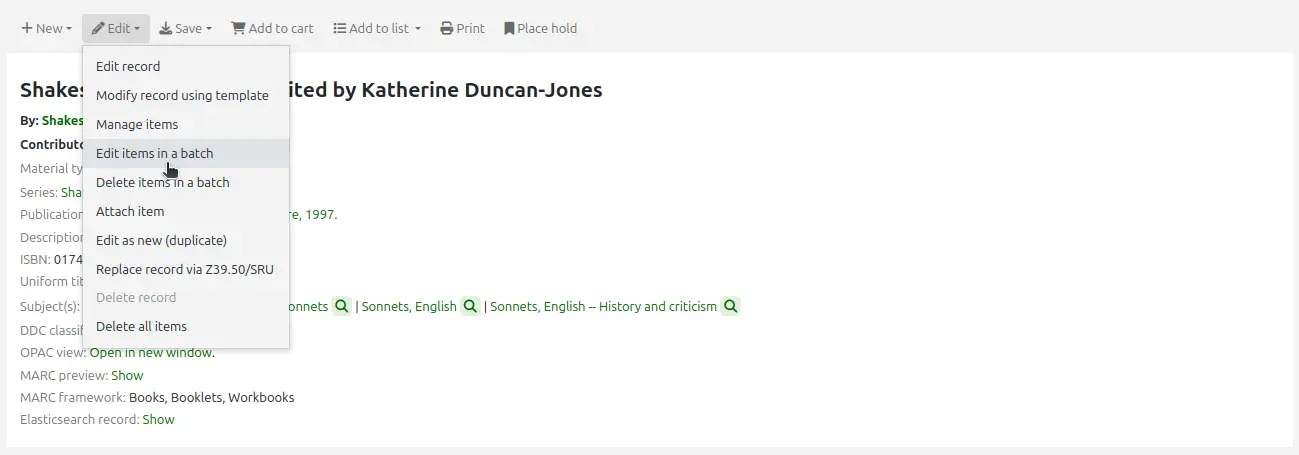
To edit a record, you can click the ‘Actions’ button and choose ‘Edit record’ from the search results on the cataloging search page.
Or, click the ‘Edit’ button on the record’s details page and choose ‘Edit record’.
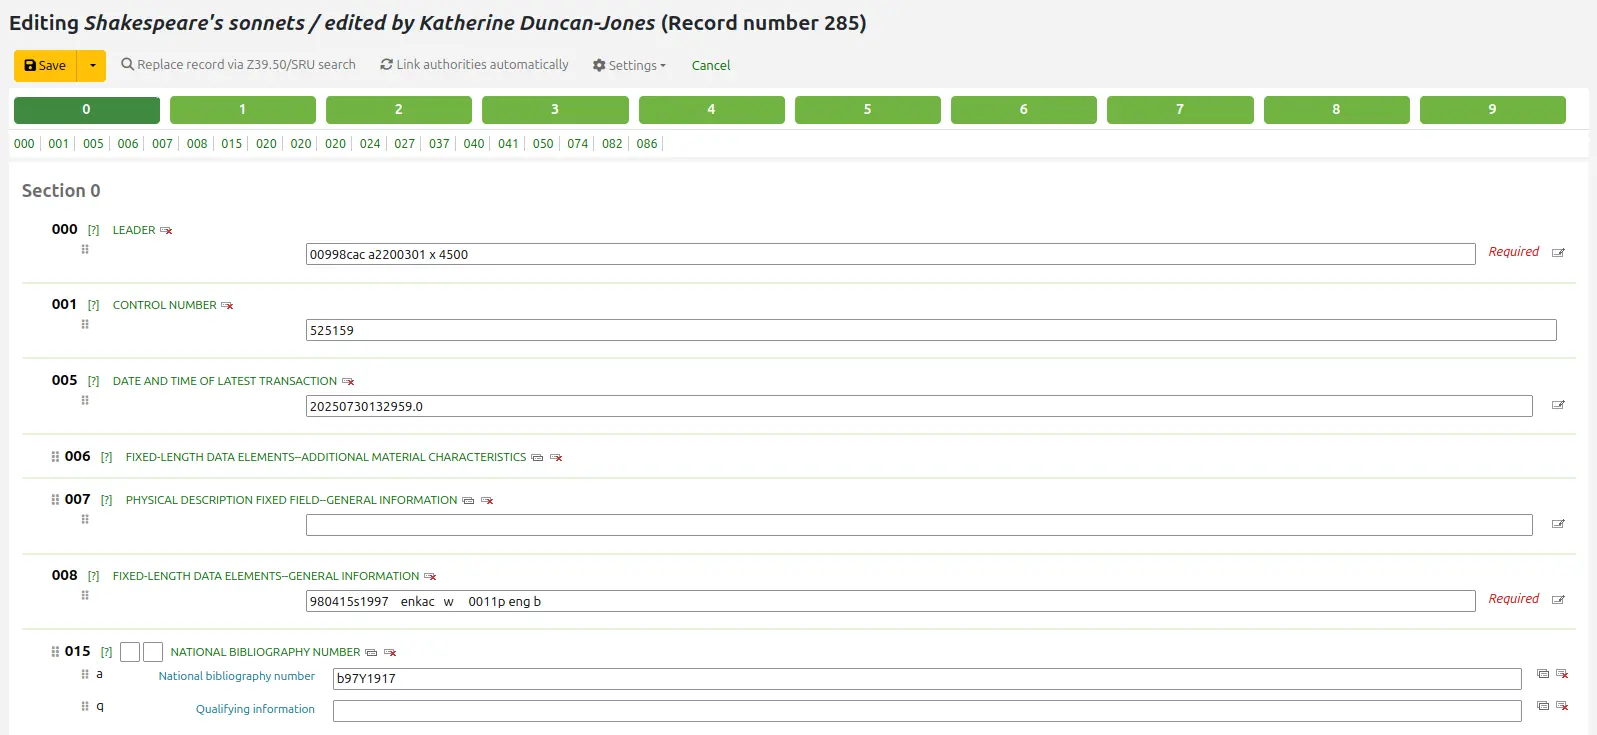
The record will open in the basic cataloging editor.
The alternative is to search via Z39.50 to overlay your record with a fuller record found at another library. You can do this by choosing ‘Replace record via Z39.50/SRU’ from the ‘Edit’ menu.

Once you choose that, you will be brought to a Z39.50 search window to search other libraries for the record in question.
Once you have made your edits (via either method) you can click ‘Save’ at the top left of the editor.
Batch record modification
Note
Only staff with the records_batchmod permission (or the superlibrarian permission) will have access to this tool.
Get there: More > Cataloging > Batch editing > Batch record modification
This tool is used to edit batches of bibliographic and authority records using MARC modification templates. Before visiting this tool you will need to set up at least one MARC modification template.
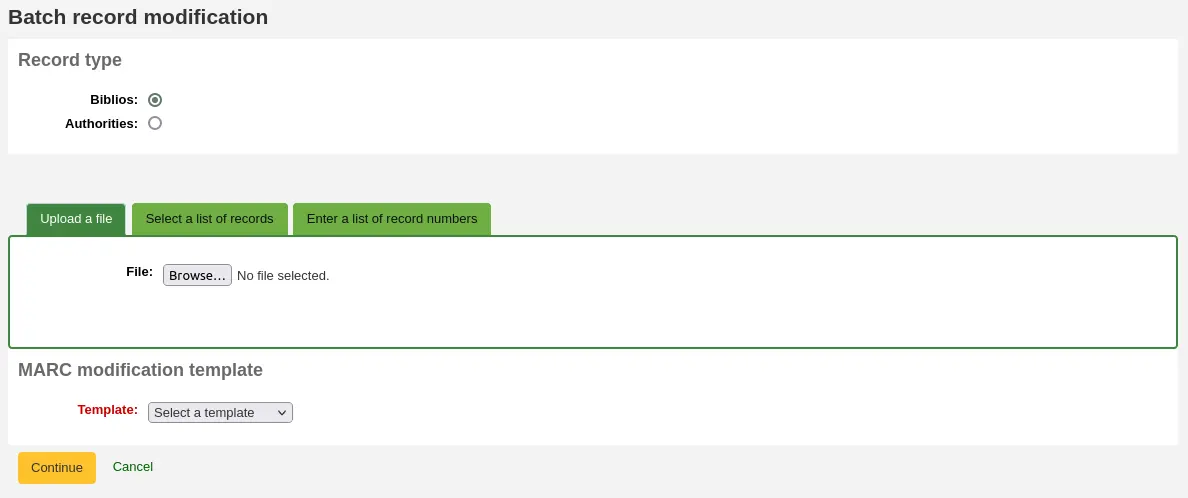
Record type: choose whether you’re editing bibliographic or authority records
Enter the biblionumbers or authids of records to be edited, in one of three ways
Upload a file of biblionumbers or authids
Use a list;
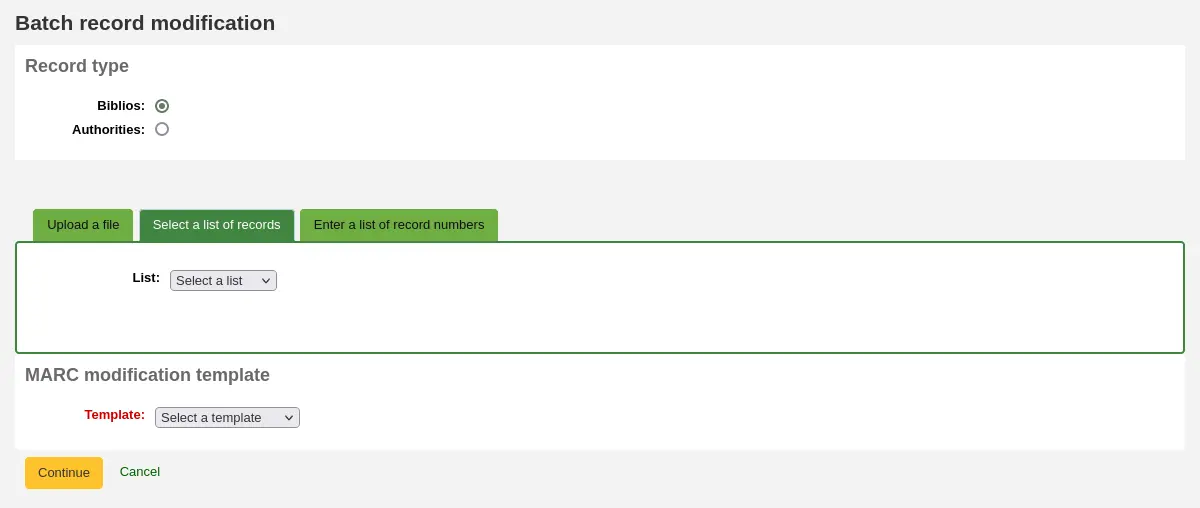
Or enter the numbers (one per line) in the box provided.
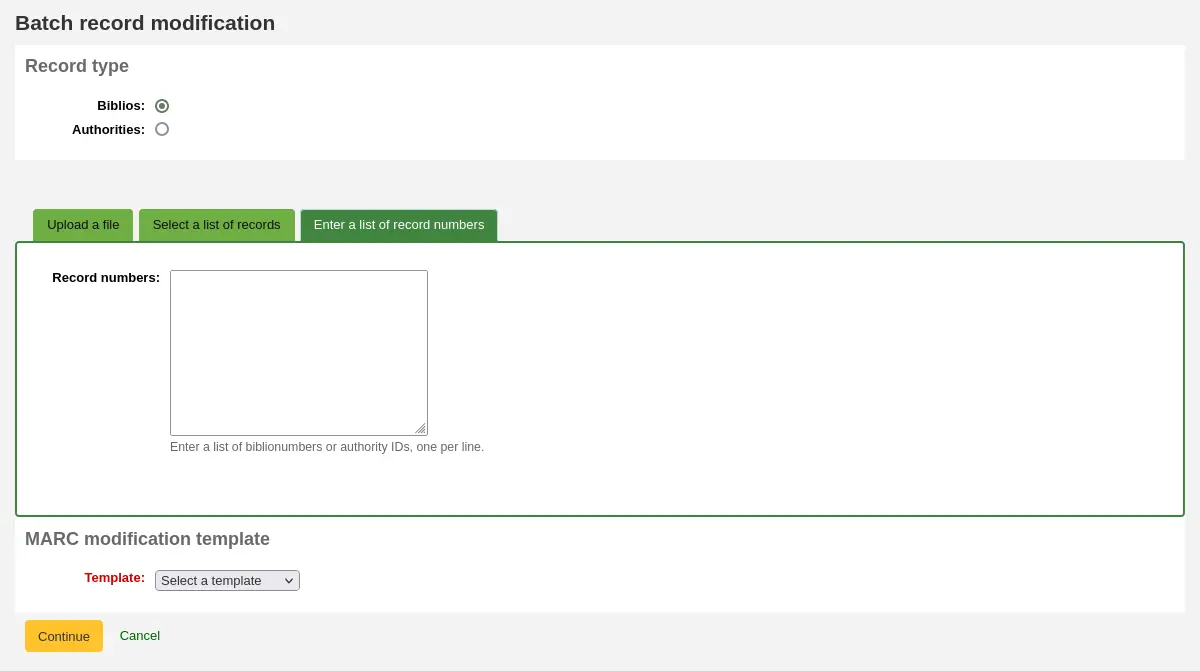
MARC modification template: finally choose the MARC modification template to use to edit these records.
Once you’ve entered your criteria click ‘Continue’
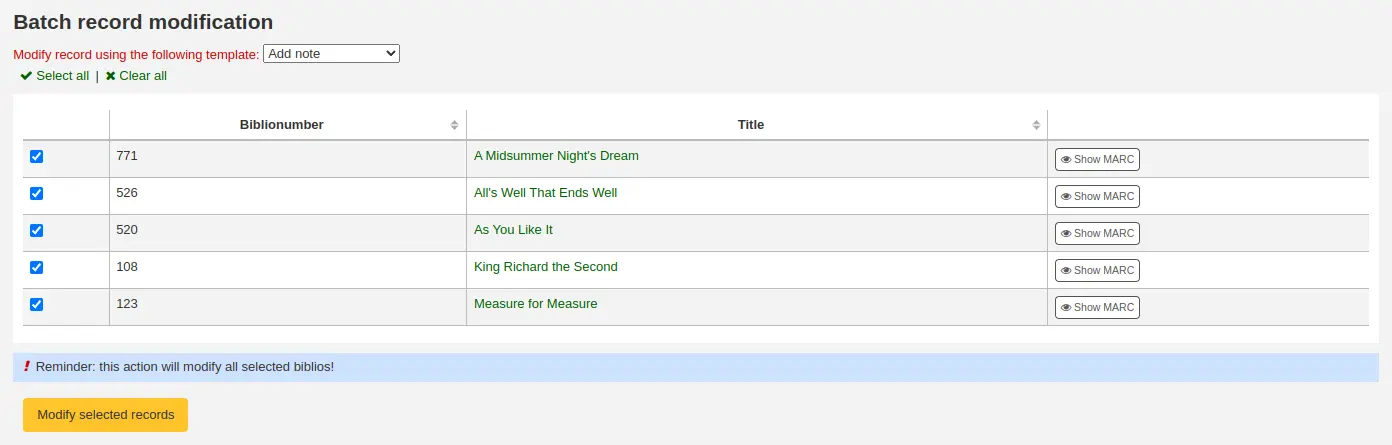
You will be presented with the list of records that will be edited. Next to each one is a checkbox so you can uncheck any records you would rather not edit at this time.
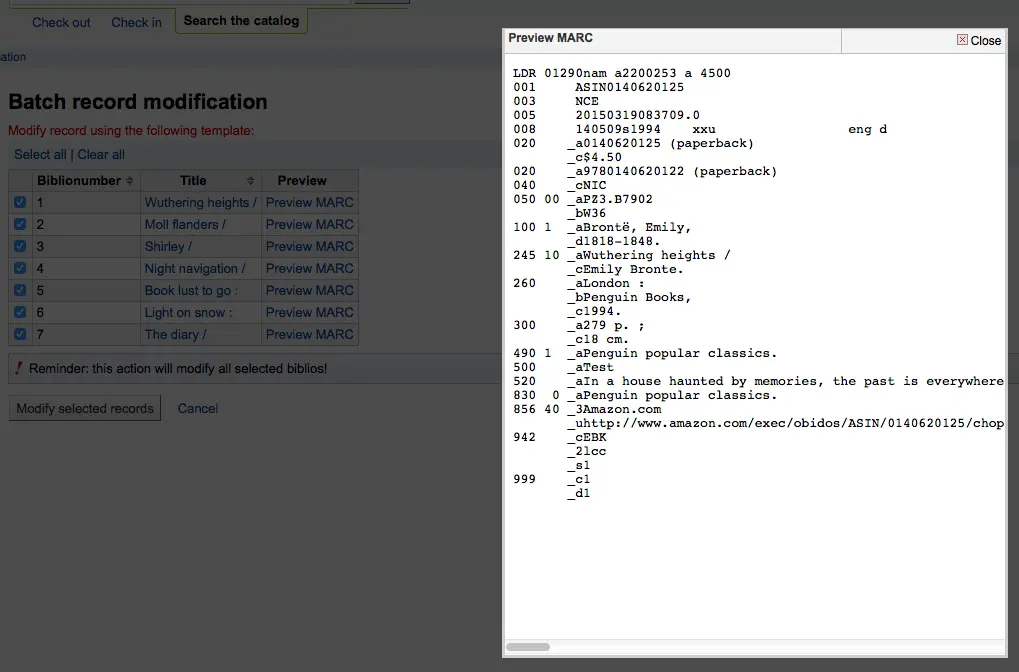
Clicking ‘Preview MARC’ will allow you to see what edits will be made when you finalize the edit.
Once you’re sure everything is the way you want you can click the ‘Modify selected records’ button and your records will be modified.
MARC modification templates
Note
Only staff with the marc_modification_templates permission (or the superlibrarian permission) will have access to this tool.
Get there: More > Cataloging > Batch editing > MARC modification templates
The MARC modification templates system gives Koha users the power to make alterations to MARC records automatically while staging MARC records for import or making batch record modifications.
This tool is useful for altering MARC records from various vendors or sources. The system essentially allows one to create a basic script using actions to copy, move, add, update and delete fields.
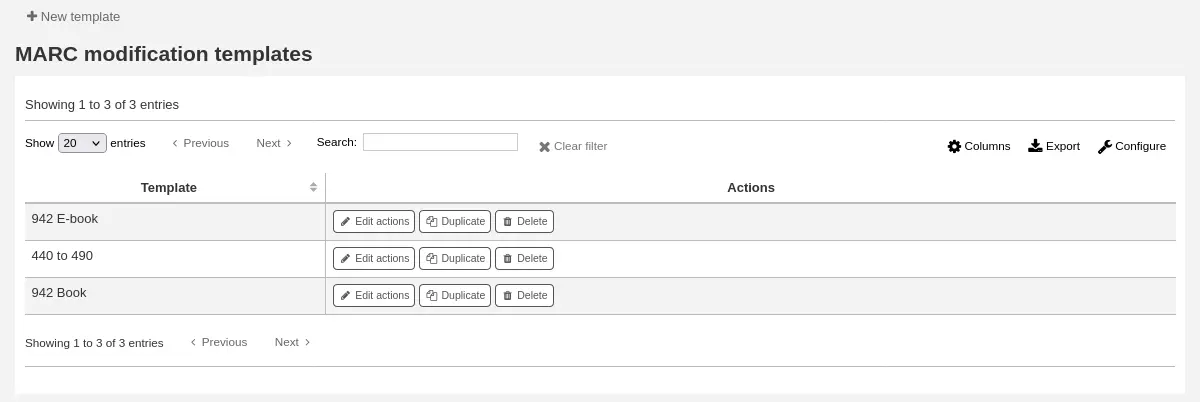
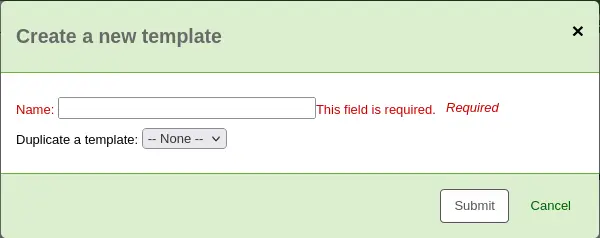
Click on ‘New template’ (a template can be made up of one or more actions), enter a name and click ‘Submit’.
Optionally, you can copy an existing template by choosing the template to copy in the ‘Duplicate a template’ drop-down menu.
Next, you can add actions to the template. Click on ‘New action’.
A ‘Add a new action’ box will appear that you can use to specify what exactly you want to do.
For example if you’re loading in a batch of files from your EBook vendor you might want to add the biblio item type of EBOOK to 942$c.
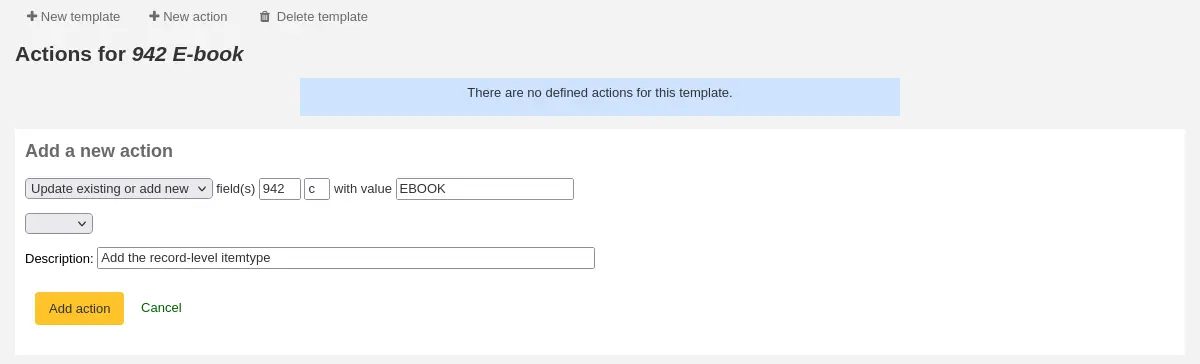
Choose ‘Add new’
Enter the field 942 and subfield c
Enter the value of ‘EBOOK’ (or whatever your ebook item type code is)
Provide a description so you can identify this action later
Click ‘Add action’
Note
If you wish to update the values in an existing field choose the option ‘Update existing or add new’. This will update existing values where found and add a new field if one doesn’t exist.
Each action can also have an optional condition to check the value or existence of another field. For example you might want to add the call number to the item record if it’s not already there.
Note
Editing item fields only works when using the template when staging records. Once records are in Koha, the item is ‘separated’ from the record and can only be edited using the batch item modification tool

Choose ‘Copy’
Decide if you want to copy the first occurrence or all occurrence of the field
Enter the field 090 (or other bibliographic call number field) and subfield a to copy
Enter the 952 field and o subfield to copy to
Choose ‘if’
Enter the 952 field and o subfield
Choose “doesn’t exist”
Provide a description so you can identify this action later
Click ‘Add action’
The move, copy, and copy and replace actions support regular expressions, which can be used to automatically modify field values during the copy or move. An example would be to strip out the ‘$’ character in field 020$c.

Choose ‘Copy and replace’
Decide if you want to copy the first occurrence or all occurrences of the field
Enter the field 020 and subfield c to copy
Enter the 020 field and c subfield to copy to
Check the ‘RegEx’ box and enter your regular expression (in this case s/\$// )
Choose ‘if’
Enter the 020 field and c subfield
Choose “matches”
Check the ‘RegEx’ box and enter your regular expression (in this case m/^\$/ )
Provide a description so you can identify this action later
Click ‘Add action’
Note
The value for an update can include variables that change each time the template is used. Currently, the system supports two variables, __BRANCHCODE__ which is replaced with the branchcode of the library currently using the template, and __CURRENTDATE__ which is replaced with the current date in ISO format ( YYYY-MM-DD ).
You could also use regular expressions to add your library’s proxy URL in front of links in your MARC record.

Choose ‘Copy and replace’
Decide if you want to copy the first occurrence or all occurrences of the field
Enter the field 856 and subfield u to copy
Enter the 856 field and u subfield to copy to
Check the ‘RegEx’ box and enter your regular expression (in this case s/^/PROXY_URL/ )
Provide a description so you can identify this action later
Click ‘Add action’
When choosing between ‘Copy’ and ‘Copy and replace’ keep the following example in mind:
245 _aThe art of computer programming _cDonald E. Knuth.
300 _aA_exists _bB_exists
If we apply action (a) Copy the whole field 245 to 300, we get:
245 _aThe art of computer programming _cDonald E. Knuth.
300 _aA_exists _bB_exists
300 _aThe art of computer programming _cDonald E. Knuth.
If we apply action (b) Copy the subfield 245$a to 300$a, we get:
245 _aThe art of computer programming _cDonald E. Knuth.
300 _aThe art of computer programming _bB_exists
Once your actions are saved you can view them at the top of the screen. Actions can be moved around using the arrows to the left of them.

Actions will be done in the order they appear. Depending on your actions the order may be very important. For example you don’t want to delete a field before you copy it to another field. You can use the arrows to move actions up or down the list
The up arrow will move the action up one position
The up arrow with a line at the top will move the action to the first position
The down arrow with a line at the bottom will move the action to the last position
The down arrow will move the action down one position
Once your template is saved you will be able to pick it when using the Stage MARC records for import tool or when using the batch record modification tool.
Duplicating records
Sometimes a copy of the record you need to catalog can’t be found via Z39.50. In these cases you can create a duplicate of similar record and edit the necessary pieces to create a new record. To duplicate an existing record click ‘Edit as new (duplicate)’ from the ‘Edit’ menu on the bibliographic record.
Note
Staff members must have the edit_catalogue permission (or the superlibrarian permission) in order to be able to duplicate bibliographic records.

This will open a new MARC record with the fields filled in with the values from the original bibliographic record.
Edit as needed and save.
Note
This will not change the original record.
Attaching files to records
If you would like to upload files to Koha you can do so with a few settings.
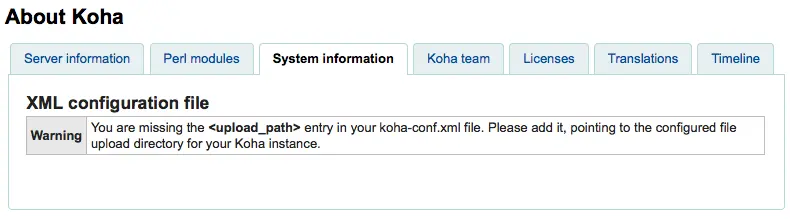
You will need to ask your system administrator to set the ‘upload_path’ config variable to point to where the files will be stored
You can see if your upload path is set correctly by visiting About Koha > System information. If there is an error you will see it there.
You will want to be sure that your OPACBaseURL system preference is set appropriately
You will want to add the upload.pl plugin to the 856$u subfield in one (or multiple) of your frameworks
Once you are all set up you can continue with cataloging as regular. You will see a plugin icon next to the 856$u that will open up the upload and/or search window
From this menu you can click browse to find a file and attach it, or you can search files you have uploaded previously using the search box. From the search results you can choose which file to attach.
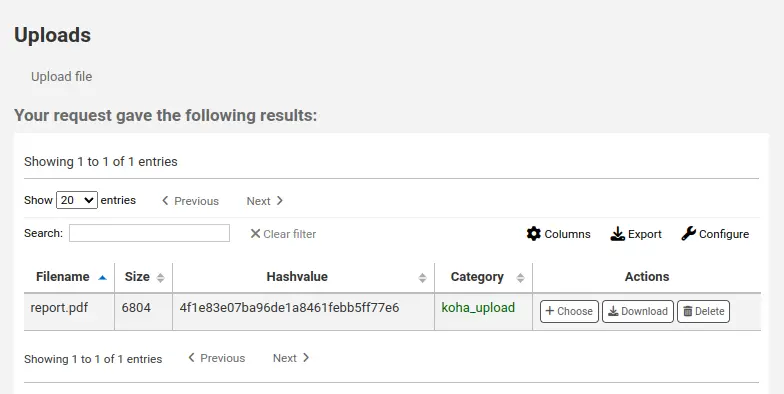
Once the file is chosen it will appear as a link in the MARC record and on the detail display.
Note
If the file is a PDF, it will be opened directly in the user’s browser whereas if the file is an image or another type of file, the user will be prompted to download it.
Adding cover images
Several free and paying services are integrated with Koha to provide cover images for your catalog, such as Amazon, Google books, NovelList Select, Open Library, and Syndetics. Check the corresponding system preferences to enable the service of your choice.
There are other options such as a Coce image cache server, or having remote cover images with custom URLs.
Warning
If you enable more than one service, you will have multiple cover images in your records.
Most of these services use the ISBN of the record to fetch the cover image from the provider.
Finally, you can upload your own images to your records with what is called Local cover images in Koha.
Warning
Make sure you are respecting copyright when using images.
Adding a single local cover image
Before adding local cover images, make sure either the OPACLocalCoverImages system preference and/or the LocalCoverImages system preference is set to ‘Show’.
Note
Only staff with the upload_local_cover_images permission (or the superlibrarian permission) will be able to manage local cover images.
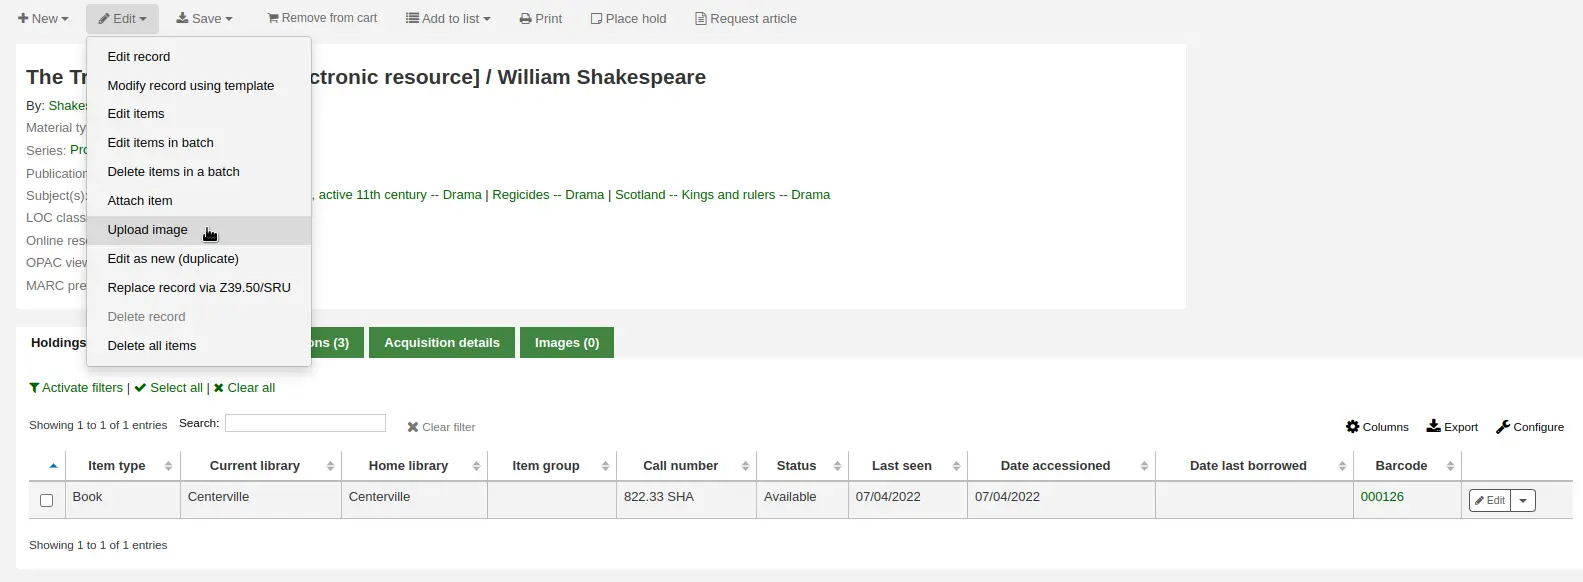
In a bibliographic record, choose ‘Upload image’ from the edit menu to add your cover image.
Drag and drop the image to the area, or click on ‘Drop files here or click to select a file’ a select the image file on your computer.

Warning
Koha does not have a maximum file size limit for this tool, but the web-server (such as Apache) may limit the maximum size of uploads (ask your system administrator).
If the AllowMultipleCovers system preference is set to ‘Allow’, you will have the choice to replace existing covers or not. If the system preference is set to “Don’t allow”, the image will replace existing cover images for this record.
Note
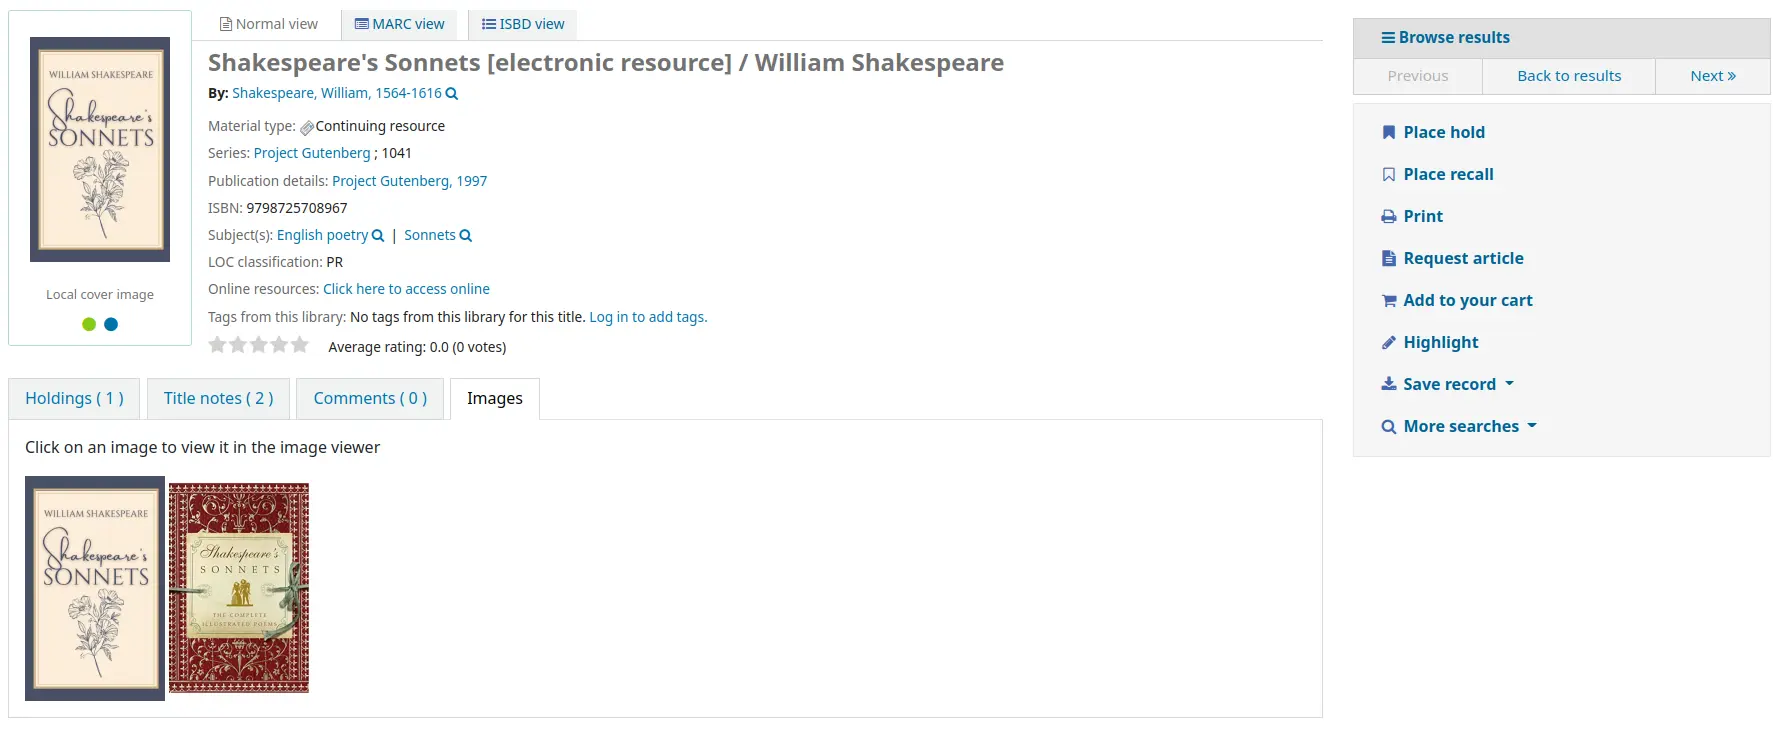
Where there are multiple images for a record they will display left to right (then top to bottom, depending on screen size) in the order they were uploaded. The image on the left (the first one uploaded) is used as a thumbnail cover in search results and on the details page. There is no way to reorder cover images uploaded in this way, so be sure to upload them in the order you’d like them to appear.
Click ‘Process images’
Alternatively, you can access the cover image upload tool itself in Cataloging > Tools > Upload local cover image. You will then need to specify the biblionumber of the record for which you are uploading the image.

Note
The biblionumber or bibliographic record number is not the same as the barcode, it is the system-generated number assigned by Koha to each bibliographic record. You can find the biblionumber in various place, namely:
At the end of the URL in the address bar of your browser when on the record details page. The URL will look something like
In the MARC tab of the record details page in the staff interface
Adding a batch of cover images
Note
Only staff with the upload_local_cover_images permission (or the superlibrarian permission) will be able to upload batches of local cover images.
The tool to upload cover images also allows batches of images to be uploaded in a ZIP file.
To upload a batch of images:
Create a folder with the images to upload in it
Create a text file (*.txt) named either datalink.txt or idlink.txt listing the biblionumber followed by the image name for each image, one per line. For example:
- ::
506,2gentlemen.jpeg 779,asyoulikeit.jpg 138,selected-poems-oscar-wilde.jpg 41,sonnets.jpg 499,3rdhenry6.jpg 787,macbeth.jpg 102,sonnets2.jpg
Warning
Make sure there are no extra lines or characters in the text file.
Create a ZIP file that includes all the images to upload and the text file
In Koha’s staff interface, go to the upload cover image tool in Cataloging > Tools > Upload local cover image, and drag and drop or select the ZIP file from your computer
The file type ‘ZIP file’ should be selected
If the AllowMultipleCovers system preference is set to ‘Allow’, you will have the choice to replace existing covers or not. If the system preference is set to “Don’t allow”, the image will replace existing cover images for this record.
Click ‘Process images’
You are presented with a summary of the upload

Note
The source image is used to generate a 140 x 200 px thumbnail image and a 600 x 800 px full-size image. The original sized image uploaded is not kept by Koha.
In the staff interface, the cover images appear in the search results, in the record details page on the right of the title, and in the ‘Images’ tab in the holdings table at the bottom.
In the OPAC, the cover images appear in the search results, in the record details page on the left of the title, and in the ‘Images’ tab in the holdings table at the bottom.
Deleting a local cover image
Note
Only staff with the upload_local_cover_images permission (or the superlibrarian permission) will be able to delete local cover images.
Click ‘Delete image’ below the image in the ‘Images’ tab in the staff interface.
Merging records
Note
Staff members must have the edit_catalogue permission (or the superlibrarian permission) in order to be able to merge bibliographic records.
To merge bibliographic records together,
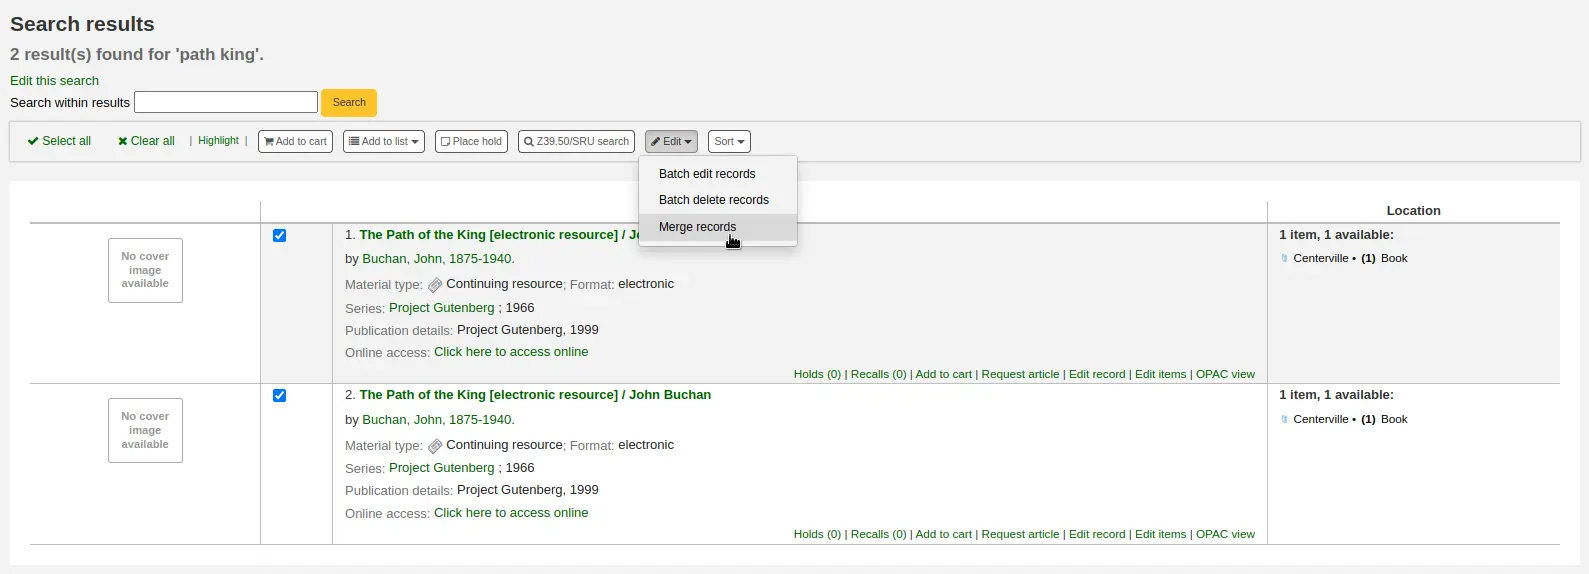
Perform a search in the catalog to find the records that need to be merged.
Check the boxes next to the duplicates to select them.
Click “Edit” and choose the “Merge records” option
Note
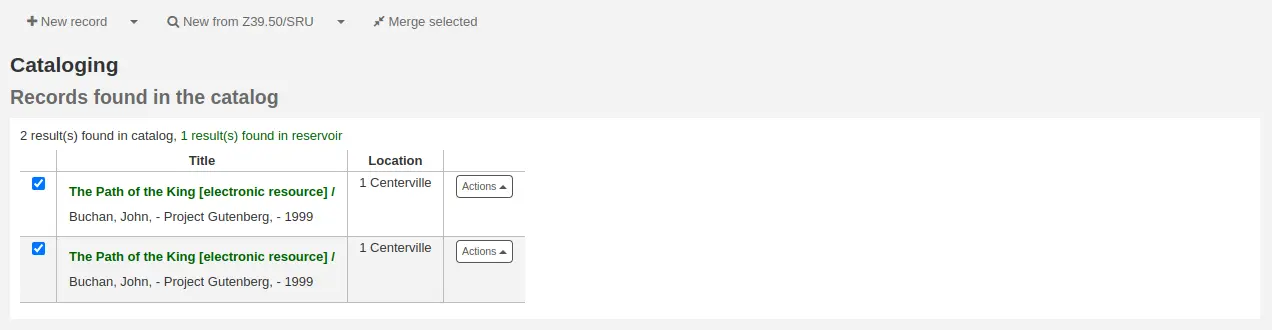
Alternatively, you can go through the cataloging module to merge bibliographic records.
After searching for the records in the cataloging search and selecting the records to be merged, click the ‘Merge selected’ button at the top of the list.
Choose which record to keep as the primary record, the other records will be deleted after the merge
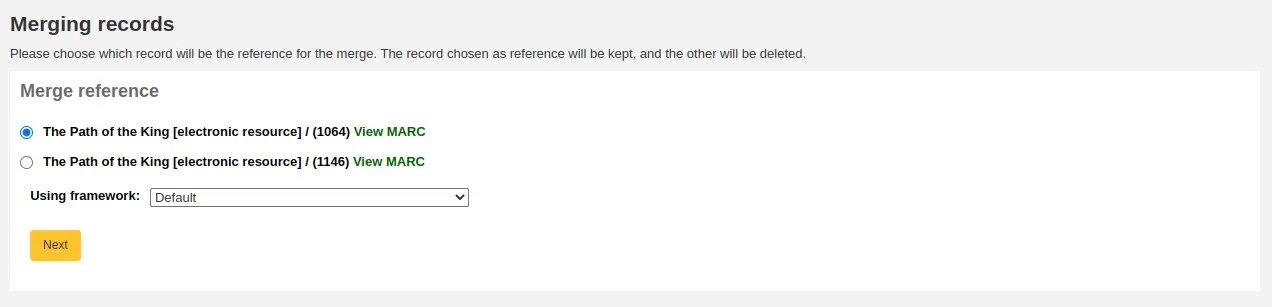
Choose which framework to use for the newly merged record
You will be presented with the MARC for all of the records, each accessible by a tab labeled with the biblionumber for this record. By default the entire first record will be selected.
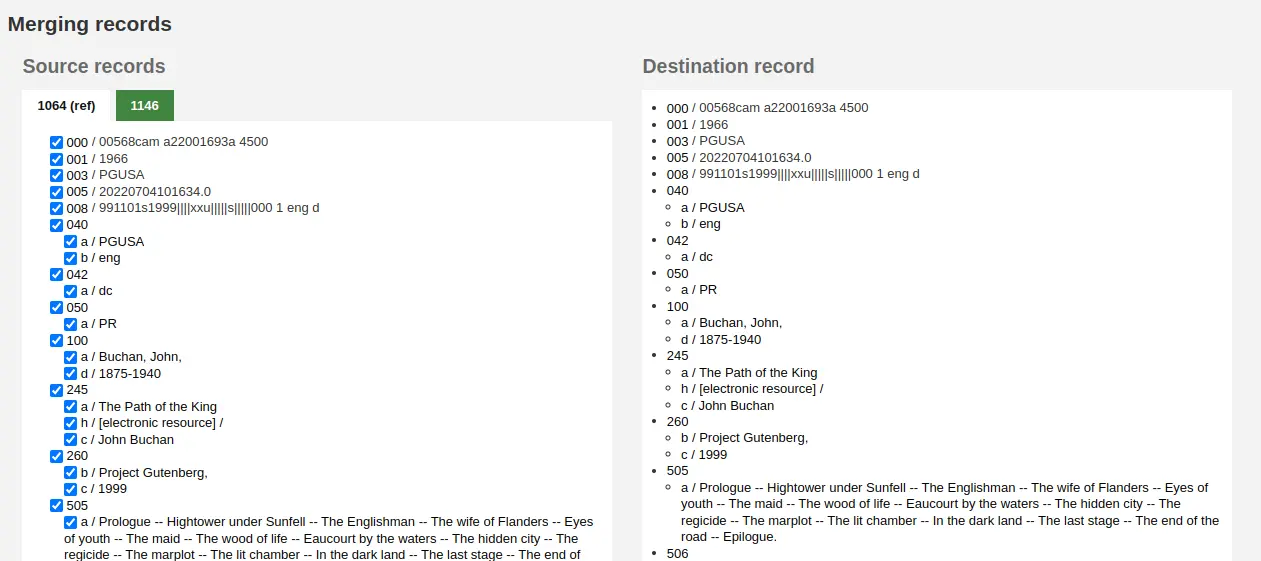
Uncheck the fields you don’t want in the final (destination) record from each source records
Check the fields you want to add in the final (destination) record
Note
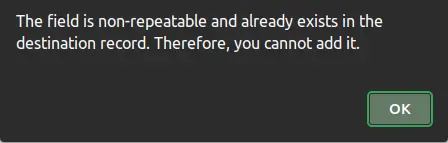
Should you try to add a field that is not repeatable two times (like choosing the 245 field from both records) you will be presented with an error
Note
If mandatory fields are missing in the destination record, Koha will not merge the records. You must select a value for mandatory fields.
If important fields are missing in the destination record, Koha will warn you, but will still merge the records.
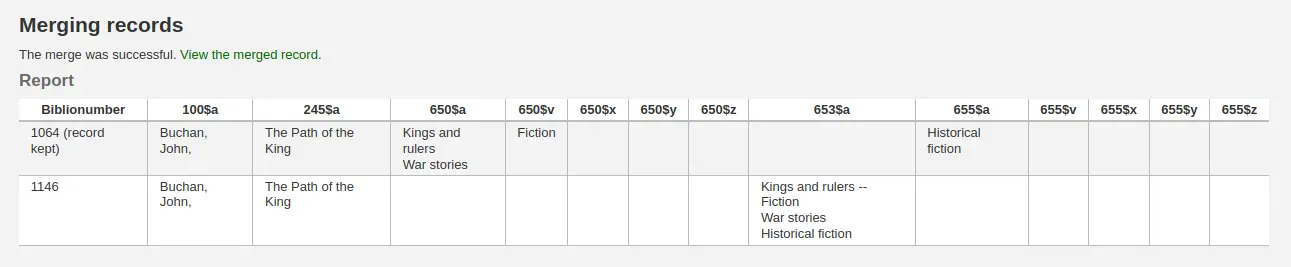
Below the records you are merging is an option to enter fields to report on. This will allow you to control what fields you see on the merge confirmation page:

If you enter nothing you will be presented with a confirmation of biblionumbers only

If you enter fields you will see those on the confirmation page.
Note
You can set defaults for this report with the MergeReportFields system preference.
Once you have completed your selections click the ‘merge’ button.
The primary record will now contain the data you chose for it, as well as all of the items and acquisition information from both bibliographic records, and the second record will be deleted.
Merging bibliographic records with lists
Another way to merge together duplicate bibliographic records is to add them to a list and use the merge tool from there.
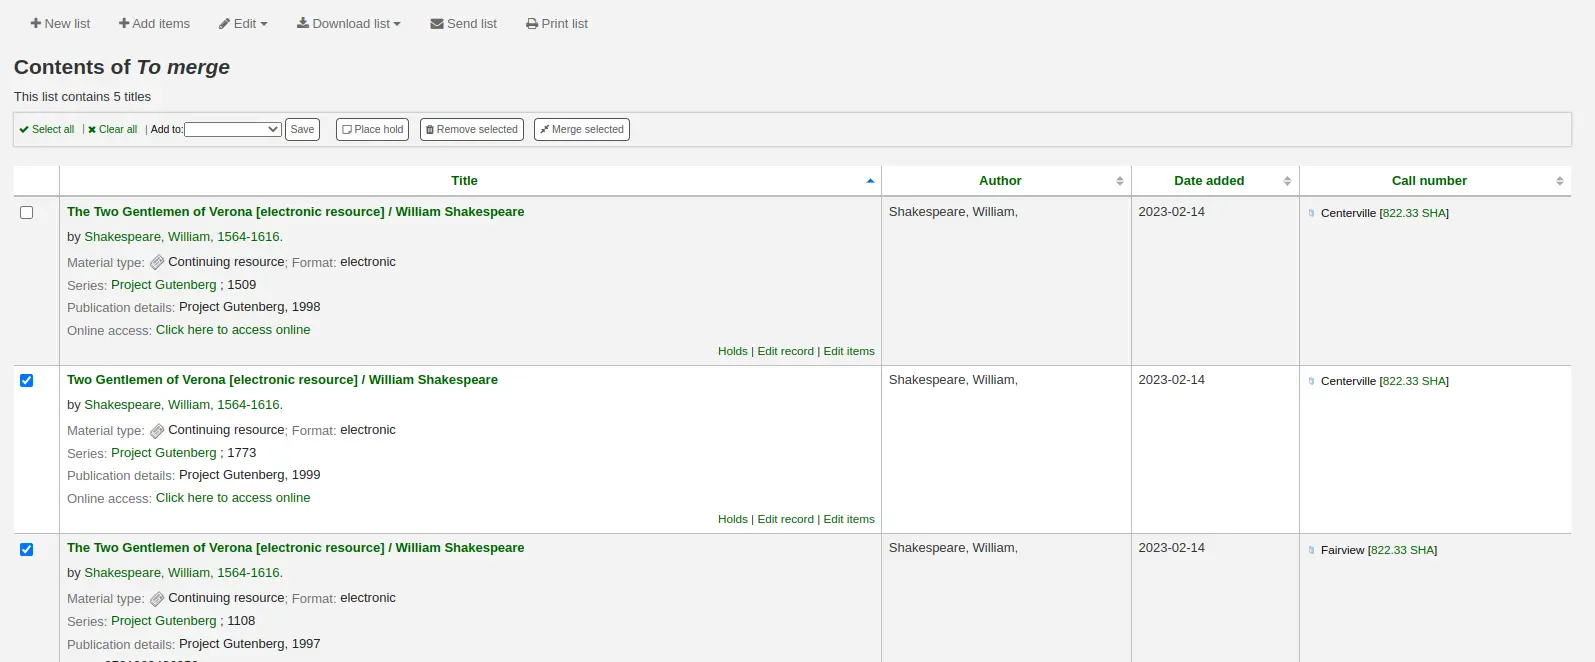
Go to Lists and click on the list title to view the list
Select the records to be merged
Click the ‘Merge selected’ button at the top of the list
Once you have selected the records to merge together the process is the same as merging via cataloging.
Deleting records
Note
Staff members must have the edit_catalogue permission (or the superlibrarian permission) in order to be able to delete bibliographic records.
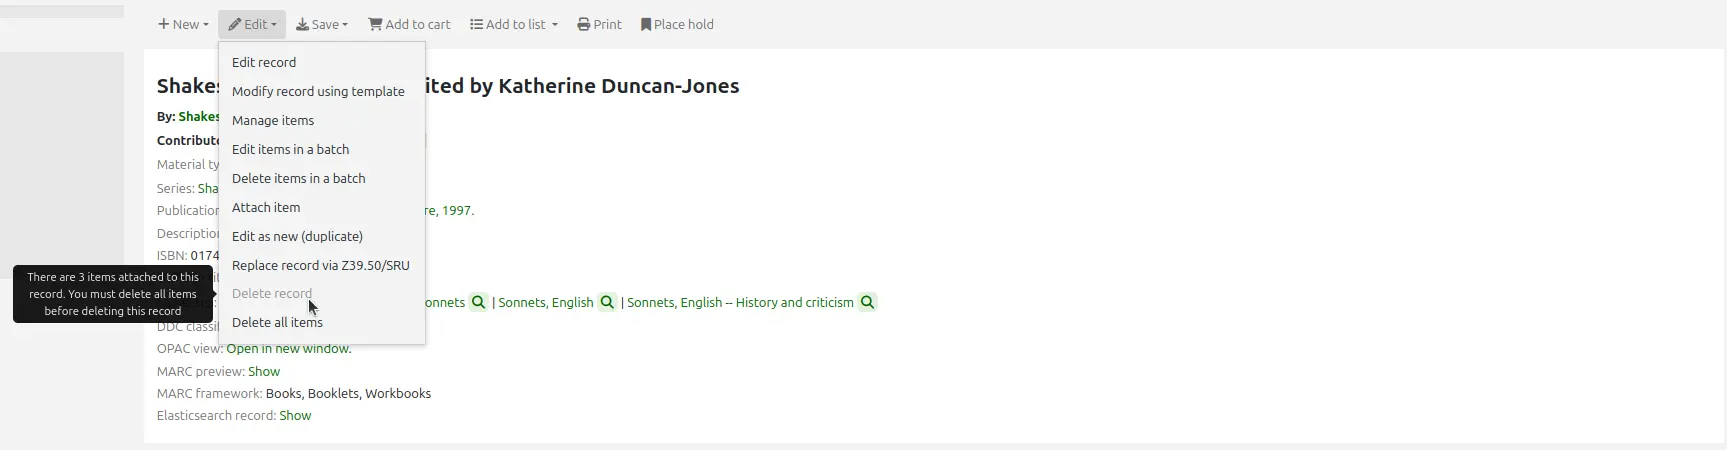
To delete a bibliographic record, click the ‘Edit’ button and choose ‘Delete record’.
Bibliographic records can only be deleted once all items have been deleted. If you try to delete a bibliographic record with items still attached you will see that the delete option is grayed out. (See the Deleting items section of this manual to learn how to delete items.)
Batch deleting records
Note
Only staff with the records_batchdel permission (or the superlibrarian permission) will have access to this tool.
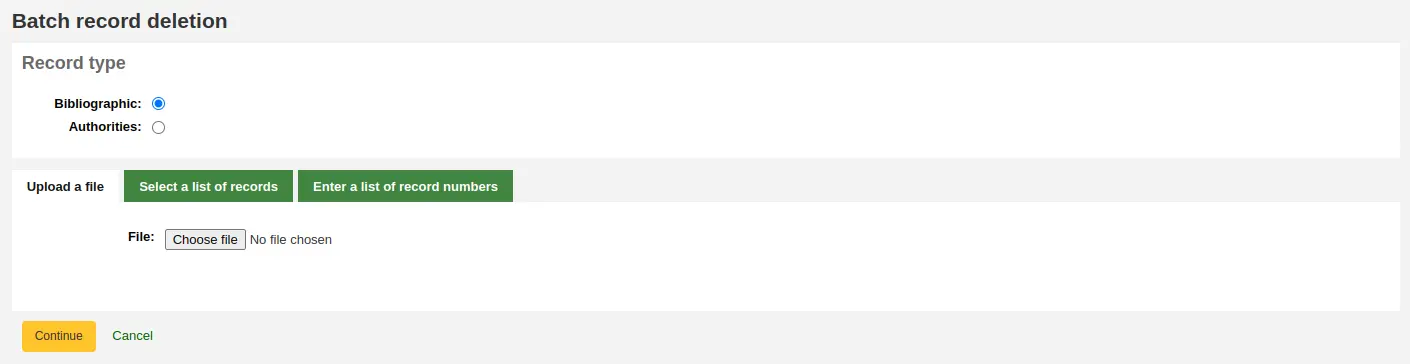
Get there: More > Cataloging > Batch editing > Batch record deletion
This tool will take a batch of record numbers for either bibliographic records or authority records and delete all those records and any items attached to them in a batch.
First, you need to tell the tool if you’re deleting bibliographic or authority records.
Next, you can:
load a file with biblionumbers or authids;
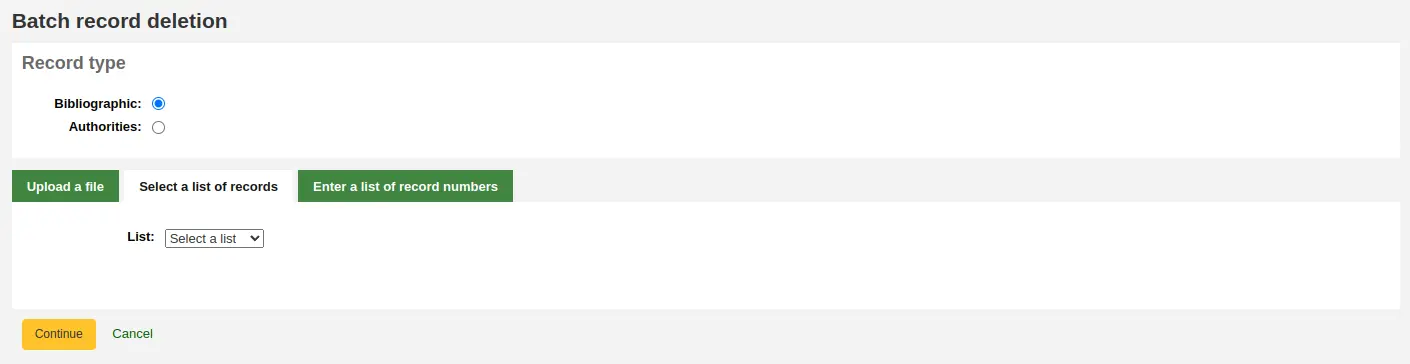
use a list;
or enter the list of numbers in the box provided.

Once you submit the form you will be presented with a summary of the records you are trying to delete.
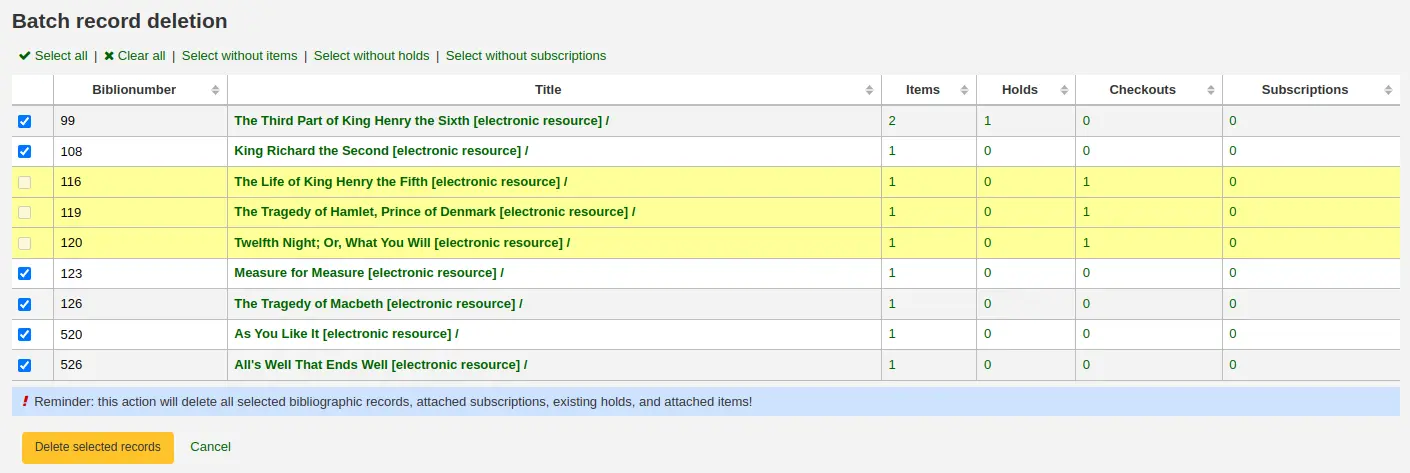
If a record you want to delete can’t be deleted, it will be highlighted.
Check the records you want to delete and click the ‘Delete selected records’ button to finish the process.
You can also use the links at the top of the table to select only the records without items, holds, or subscriptions.
Catalog concerns
Reporting concerns about bibliographic records
If the CatalogConcerns system preference is enabled, staff will be able to report concerns regarding specific bibliographic records.
To report a new concern,
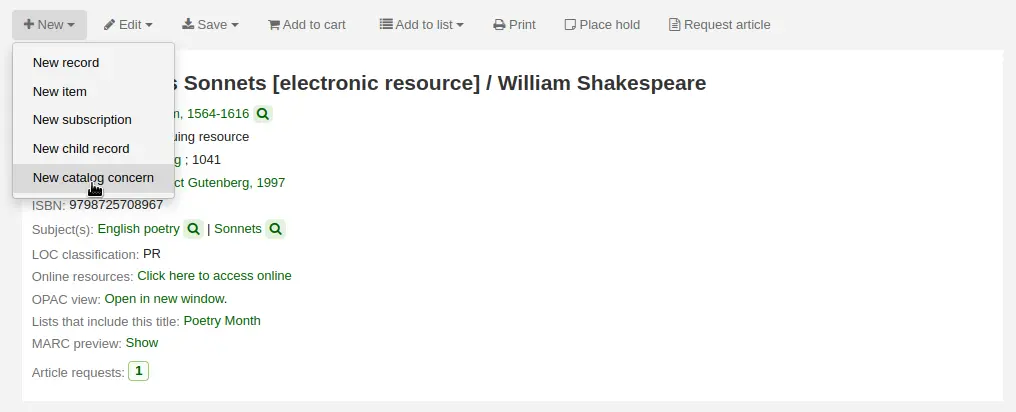
In the bibliographic record’s detail page, click the ‘New’ button and choose ‘New catalog concern’.
Fill in the concern form.
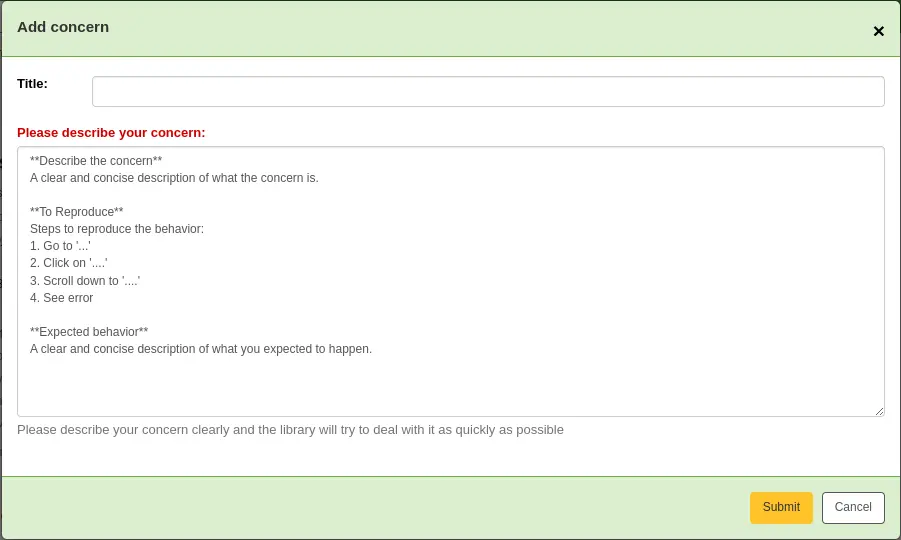
Title: enter a title describing succinctly the problem.
Please describe your concern: enter details about the problem, being the more descriptive possible so that the staff member who receives this is able to replicate and see the problem.
An example of what is expected in the description is provided in the field:
**Describe the concern**

A clear and concise description of what the concern is.

**To Reproduce**

Steps to reproduce the behavior:
1. Go to '...'
2. Click on '....'
3. Scroll down to '....'
4. See error

**Expected behavior**

A clear and concise description of what you expected to happen.
Note
This text is customizable in the HTML customizations tool, by changing the ‘CatalogConcernTemplate’ entry.
The text at the bottom of the form (“Please describe your concern clearly…”) is also customizable in the HTML customizations tool, by changing the ‘CatalogConcernHelp’ entry.
Click ‘Submit’.
This will send an email to the cataloging team to notify them that a new concern has been created. The email will be sent to the email address in the CatalogerEmails system preference. The email sent is the TICKET_NOTIFY notice, which can be customized in the Notices and slips tool.
An email will also be sent to the reporter to notify them that the concern has been received. The email sent is the TICKET_ACKNOWLEDGE notice, which can be customized in the Notices and slips tool.
Concerns reported about this record are visible in the ‘Concerns’ tab.

All concern tickets will be visible in the catalog concerns report.
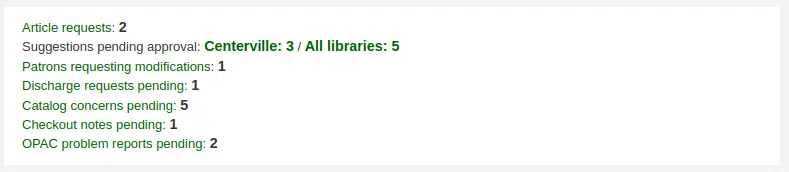
Newly opened concern reports will also appear in the notification section at the bottom of the staff interface main page.
Managing catalog concerns
When staff or patrons report concerns about bibliographic records, all concerns will be accessible through the catalog concerns report.
Get there: More > Cataloging > Reports > Catalog concerns
Note
This report will only be visible if either the CatalogConcerns system preference or the OpacCatalogConcerns system preference are enabled.
Note
Only staff with the edit_catalogue permission (or the superlibrarian permission) will have access to this page.
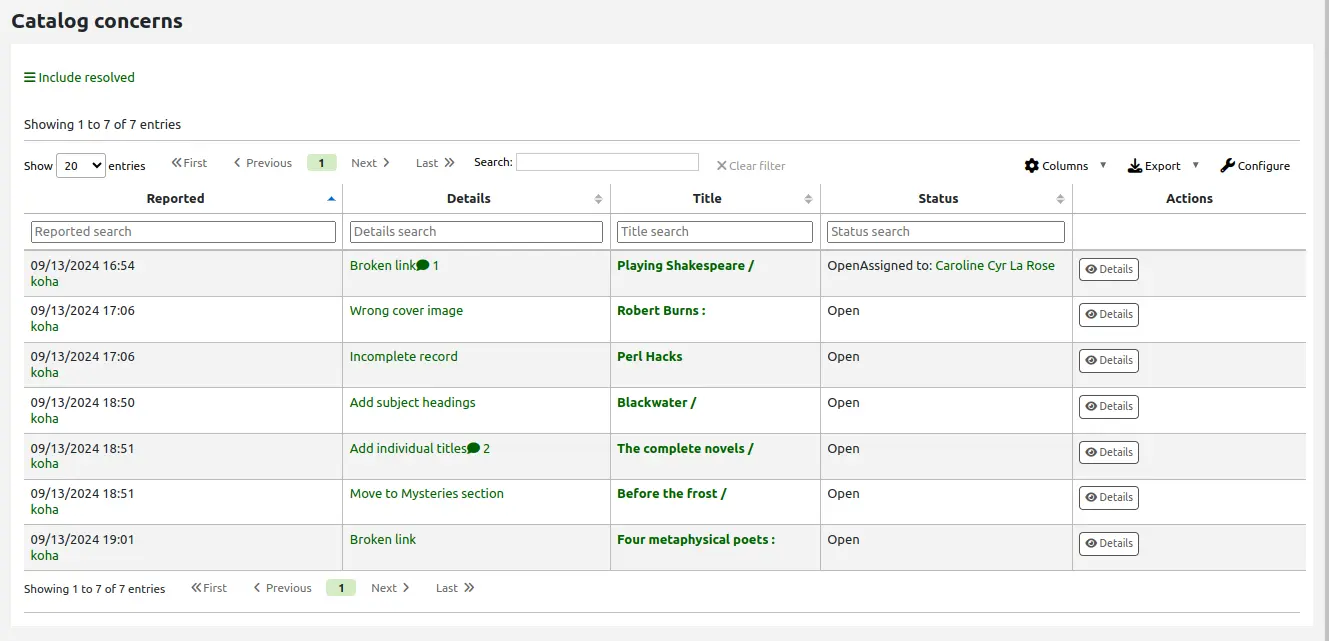
From this report, you can see all concerns, ordered by date, with the name of the reporter, the details of the concern, the title of the bibliographic record, the status, the assignee, if any, and if resolved, the date and name of the staff member who managed it.
Note
In version 24.05 and newer, only current concerns are shown by default. If needed, click on the ‘Include resolved’ button at the top of the page to show concerns that have already been resolved. Click ‘Filter resolved’ to hide the resolved concerns once again.
In version 23.11 and older, all concerns are shown by default. If needed, you can click on ‘Hide resolved’ at the top of the page to hide concerns that have already been resolved. Click ‘Show all’ to return to the full table.
To see the details of a concern, either click the text in the ‘Details’ column, or click the ‘Details’ button in the ‘Actions’ column.
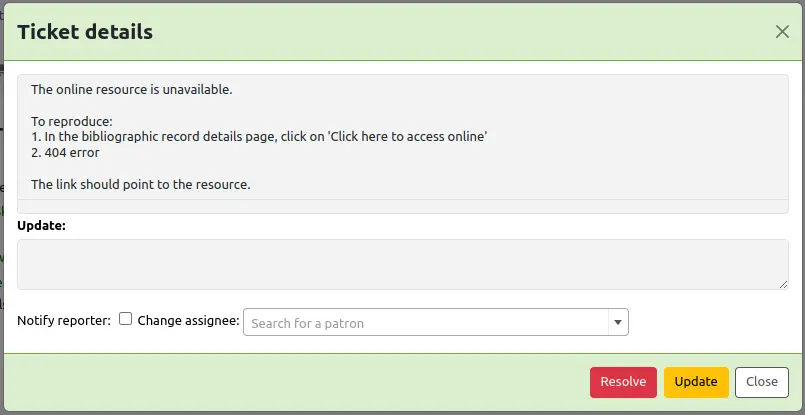
From this view, you can enter a comment in the ‘Update’ field.
To simply add the comment as an update, click the ‘Update’ button.
Note
If there are authorized values in the TICKET_STATUS authorized value category, the ‘Update’ button will offer status options with your custom statuses.
Version
This feature was added to Koha in version 24.05.
Attention
In Koha version 23.11 and older, the ‘Update’ button is labeled ‘Comment’.
To assign this concern to a staff member, search for the user’s name in the ‘Change assignee’ field, then click ‘Update’. They will receive an email based on the TICKET_ASSIGNED notice, which can be customized in the Notices and slips tool.
If this concern is resolved, click the ‘Resolve’ button.
Note
If there are authorized values in the TICKET_RESOLUTION authorized value category, the ‘Resolve’ button will offer resolution options with your custom resolution statuses.
Version
This feature was added to Koha in version 24.05.
If ‘Notify’ is checked, the reporter will receive an email indicating that the concern was updated. The email sent for an update is the TICKET_UPDATE notice, and the email sent when the concern is resolved is the TICKET_RESOLVE notice, both of which can be customized in the Notices and slips tool.
Item records
In Koha, each bibliographic record can have one or more items attached. These items are sometimes referred to as holdings. Each item includes information about the physical copy the library has.
Adding items
Note
Staff members must have the edit_items permission (or the superlibrarian permission) in order to be able to add items.
After saving a new bibliographic record, you will be redirected to a blank item record so that you can attach an item to the bibliographic record.
Other ways to add an item to a record :
From a record’s details page, click ‘New’, and choose ‘New item’.
From the cataloging search results, click ‘Actions’ and choose ‘Add or edit items’.
If you already have item templates, you can choose the template to apply and click ‘Apply template’. This will prefill the item form with the template values.
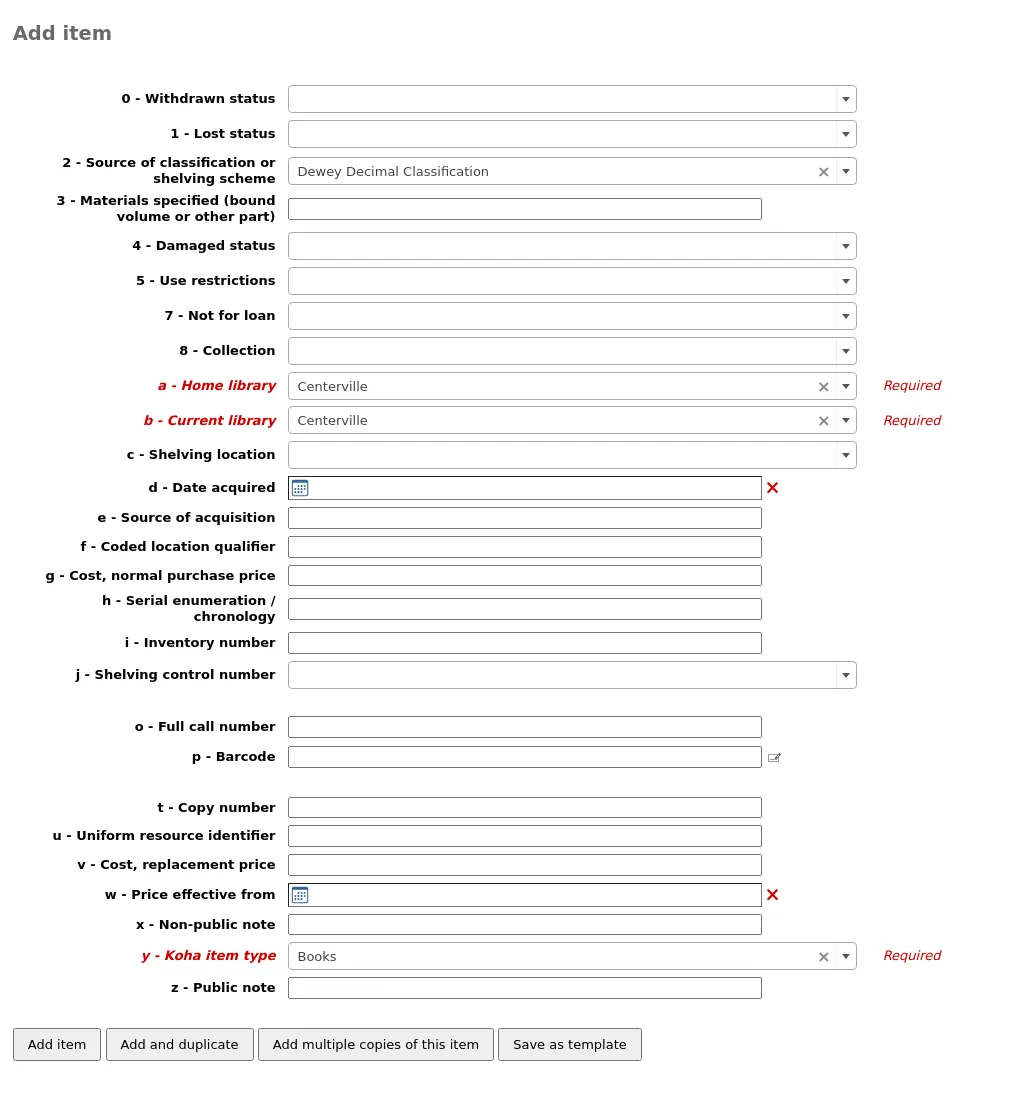
At the very least, if you plan on circulating the item, the following fields should be entered for new items:
-
If you’d like you can use the cataloging plugin ‘call number browser’ (cn_browser.pl) for this field. If it’s enabled you’ll see a … to the right of the field. When clicked that will open a call number browser window if the row is highlighted in Red then the call number is in use, if there is a thin Green line instead then the call number can be used.


-
This value will be charged to patrons when you mark an item they have checked out as ‘Lost’
To make sure that these values are filled in you can mark them as mandatory in the framework you’re using and then they will appear in red with a ‘required’ label. The item will not save until the required fields are filled in.

Note
To make item subfields required in a framework, edit the 952 field in the framework editor.
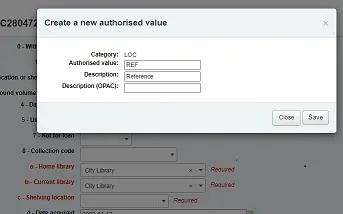
You can add a new authorized value directly from the add and edit item screen for any fields that are linked to authorized value categories such as Shelving location (subfield$c) or Collection code (subfield$8).
Start to type the authorized value description, if a match is not found you will see the option ‘(Select to create)’.
Click on this option to display a pop-up window where you can create you new authorized value.
The authorized value category will be pre-populated from the field you are using, for example LOC for Shelving location, CCODE for Collection code. Take care when choosing your authorized value code. Refer to the notes on adding new authorized values for the correct format of these codes. Use the Description field for the actual value that will be displayed
You can add authorized values in the same way from bibliographic and authority records.
Note
Only staff with the manage_auth_values permission (or the superlibrarian permission) will be able to add authorized values from cataloging.
Below the add form there are 3 buttons for adding the item.

‘Add item’ will add just the one item
‘Add & duplicate’ will add the item and fill in a new form with the same values for you to alter
‘Add multiple copies of this item’ will ask how many copies and will then add that number of items adding +1 to the barcode so each barcode is unique

‘Save as template’ will save this item as an item template to reuse later.
Warning
Saving as template will not save the item. It will only create the template.
Your added items will appear above the add form once submitted

Note
You can customize the columns of this table in the Table settings section of the Administration module (table id: Items Editor).
Your items will also appear below the bibliographic details on the record details page, in the ‘Holdings’ tab.
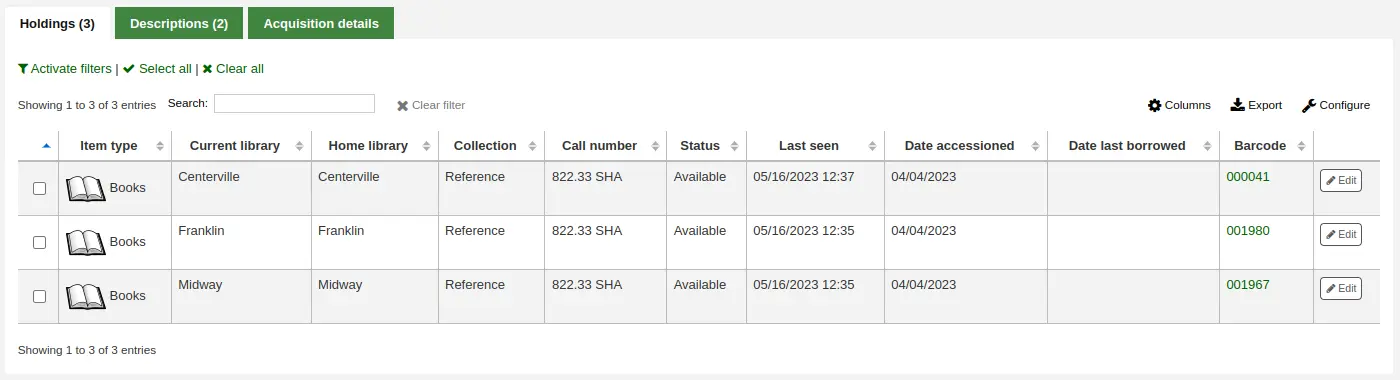
If the SpineLabelShowPrintOnBibDetails system preference is set to ‘Show’, there will be a button to print a quick spine label next to each item.
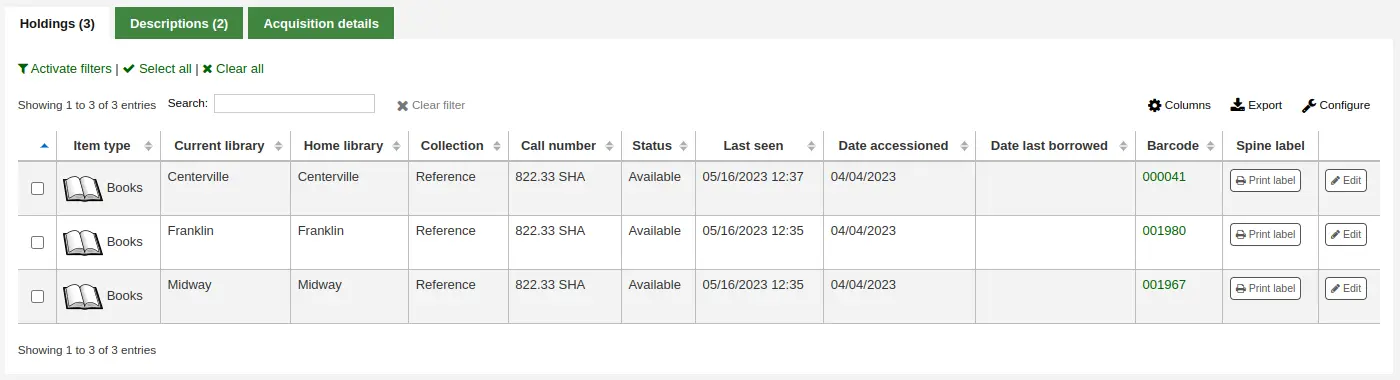
You can also filter the contents of your holdings table by clicking the ‘Activate filters’ links. This will show a row at the top where you can type in any column to filter the results in the table.
Adding and using item templates
You can create item templates to share and reuse in order to easily fill out the new item form.
Note
Anyone who has the edit_items permission can create and share item templates, and delete their own templates.
However, staff members must have the manage_item_editor_templates permission (or the superlibrarian permission) in order to manage item templates created by others.
Creating a new item template
To create an item template,
Go to add a new item
Fill out the item form with the values you want to add to the template
Instead of saving the item, click the ‘Save as template’ button

Choose ‘Save as new template’
Enter a template name
Choose if you want this template to be shared with all other catalogers
Click ‘Save’
Updating an existing template
To edit an existing template,
Go to add a new item
Choose the template to update at the top of the form

Click ‘Apply template’
Change the values as needed
Click the ‘Save as template’ button.
Choose the template to update
Choose if you want this template to be shared with all other catalogers
Click ‘Save’
Using a template
To use a template,
Go to add a new item
Choose the template to update at the top of the form
Click ‘Apply template’
If checking ‘For session’, all new items will be based on this template, unless otherwise specified
Change the values as needed
Save the item
Deleting a template
To delete a template,
Go to add a new item
Choose the template to delete at the top of the form
Click ‘Delete template’
Editing items
Note
Staff members must have the edit_items permission (or the superlibrarian permission) in order to be able to edit items.
Items can be edited in several ways.
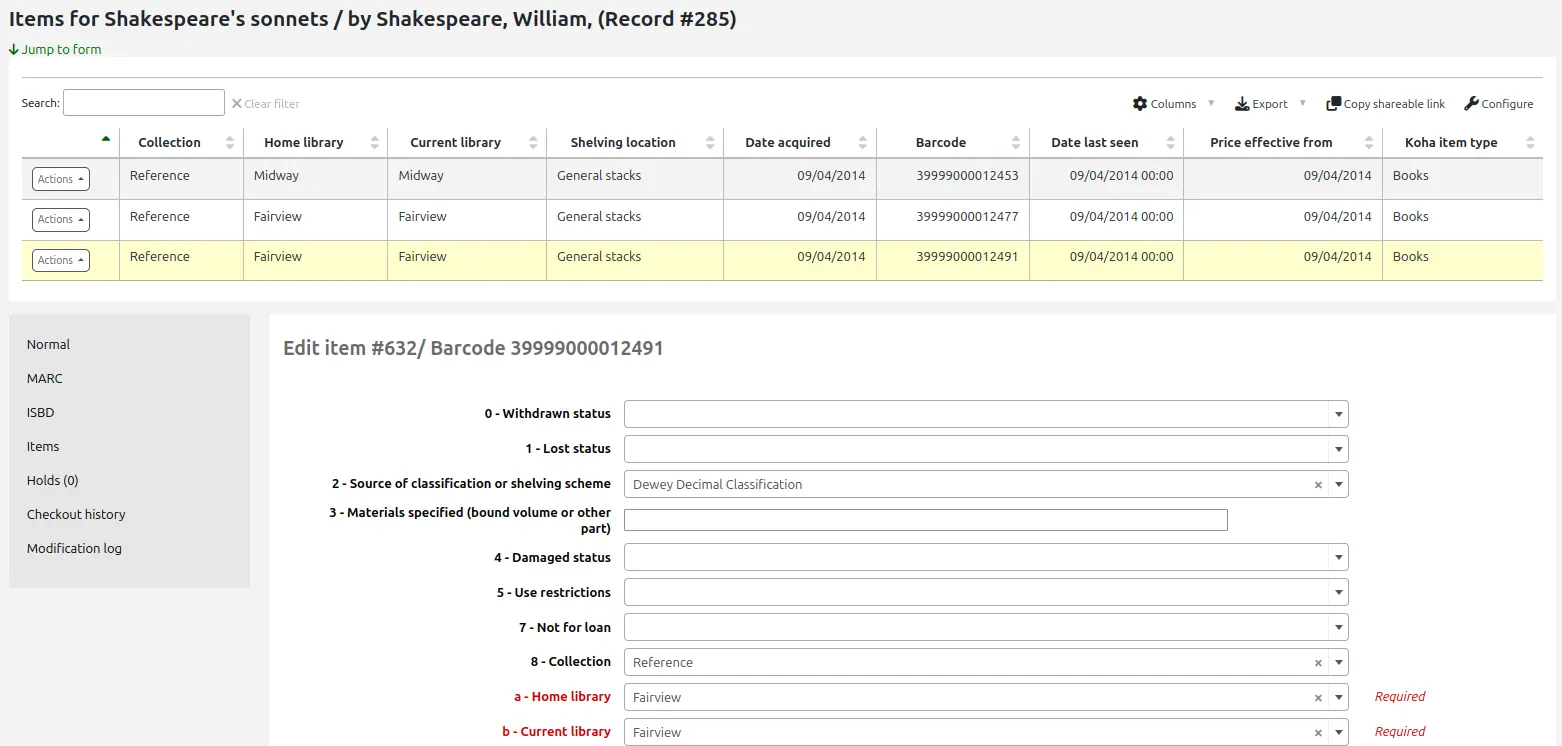
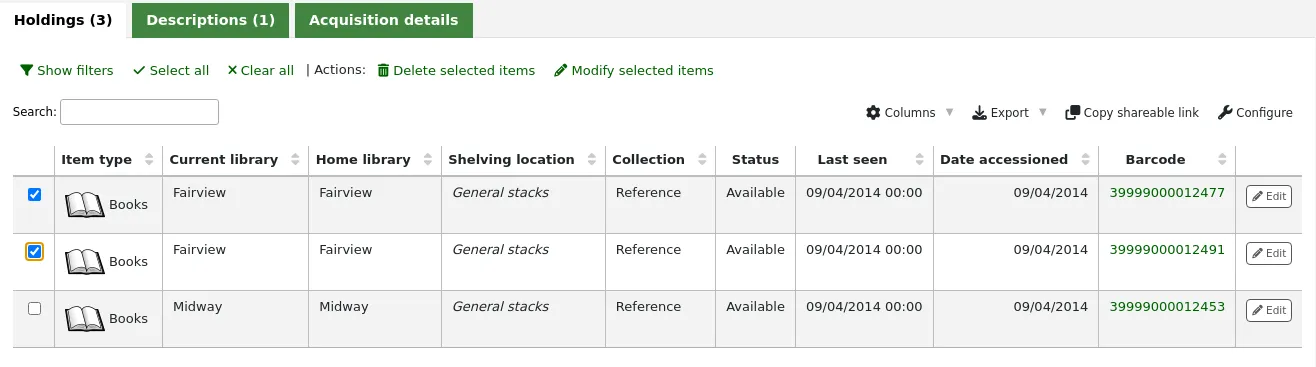
Clicking ‘Edit’ and ‘Manage items’ from the bibliographic record.

This will open up a list of items where you can click the ‘Actions’ button to the left of the specific item you would like to edit and choose ‘Edit’.
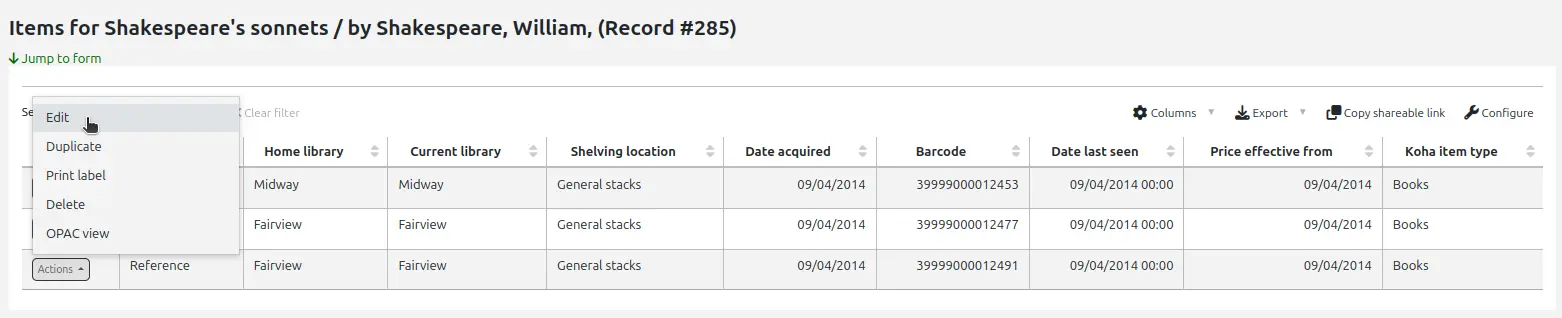
This will open the item in the form under the list of items where you will be able to edit the item information.
Clicking ‘Edit items’ beside the item on the ‘Items’ tab.
This will open up the editor on the item to edit.
Clicking ‘Edit’ and then ‘Edit items in a batch’.
This will open up the batch item modification tool where you can edit all of the items on this record as a batch.
You can check the items you would like to edit and click ‘Modify selected items’ at the top of the list.
This will open up the batch item modification tool where you will be able to edit all of the selected items as a batch.
You can click ‘Edit’ to the right of each item in the ‘Holdings’ tab.
There is also a link to ‘Edit items’ under each search result in the staff interface.

This will open up a list of items where you can click the ‘Actions’ button to the left of the specific item to edit and choose ‘Edit’.
Finally, you can use the batch item modification tool.
Quick item status updates
Circulation staff often need to change the status of an item to Lost or Damaged. This doesn’t require you to edit the entire item record. Instead, clicking on the item barcode on the checkout summary or checkin history will bring you to an item summary. You can also get to the item summary by clicking on the Items tab to the left of the bibliographic record’s detail page.
From this view, you can mark an item lost by choosing a lost status from the pull down and clicking the ‘Set status’ button. Same applies to the damaged and withdrawn statuses.

Note
If the PreventWithdrawingItemsStatus system preference is enabled, staff members will not be able to withdraw items that are either checked out or in transit.
Duplicating items
You can easily duplicate an item by clicking the ‘Actions’ button the left of each item on the manage items screen and choosing ‘Duplicate’.

This will populate the form with the values from the item you chose.
Batch editing items
Note
Only staff with the items_batchmod permission (or the superlibrarian permission) will have access to this tool.
Get there: More > Cataloging > Batch editing > Batch item modification
This tool will allow you to modify a batch of item records in Koha.
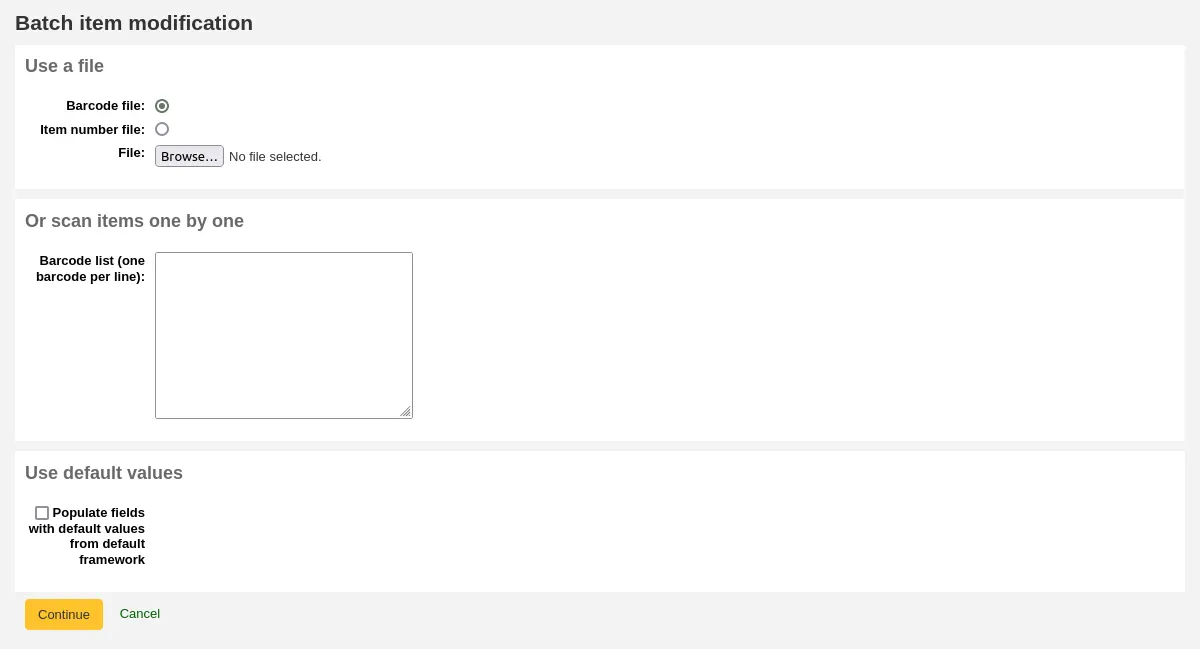
From the tool, choose to either upload a file of barcodes or itemnumbers, or scan item barcodes one by one into the box below the upload tool. You can also decide the items edited should be populated with the default values defined in the default framework.
Once the file is uploaded or the barcodes listed, click ‘Continue.’
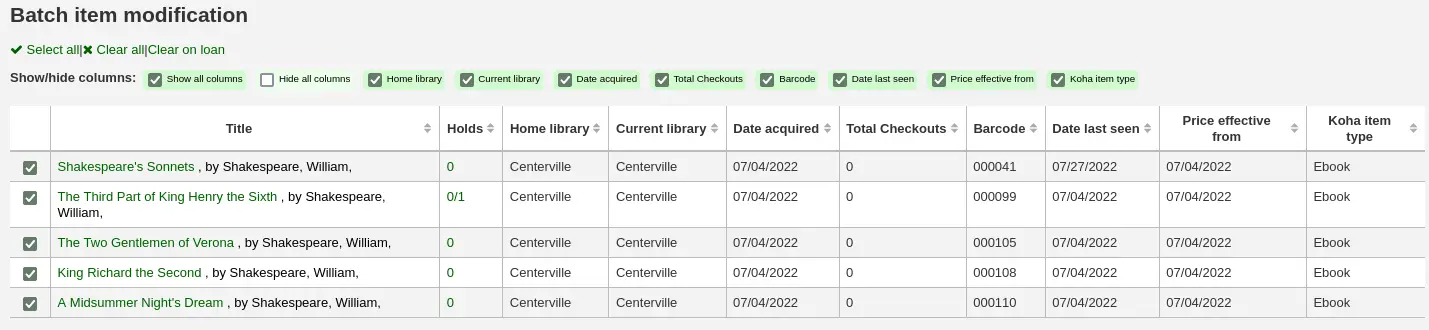
You will be presented with a summary of the items you want to modify. From here, you can uncheck the items you don’t want to modify before making changes in the form below. You can also hide columns you don’t need to see to prevent having to scroll from left to right to see the entire item table. The holds column displays a count of the current holds for the item.
Note
To uncheck all items that are currently checked out you can click the ‘Clear on loan’ link at the top of the form.
Using the edit form, choose which fields to make edits to. By checking the checkbox to the right of each field you can clear the values in that field for the items you are modifying.
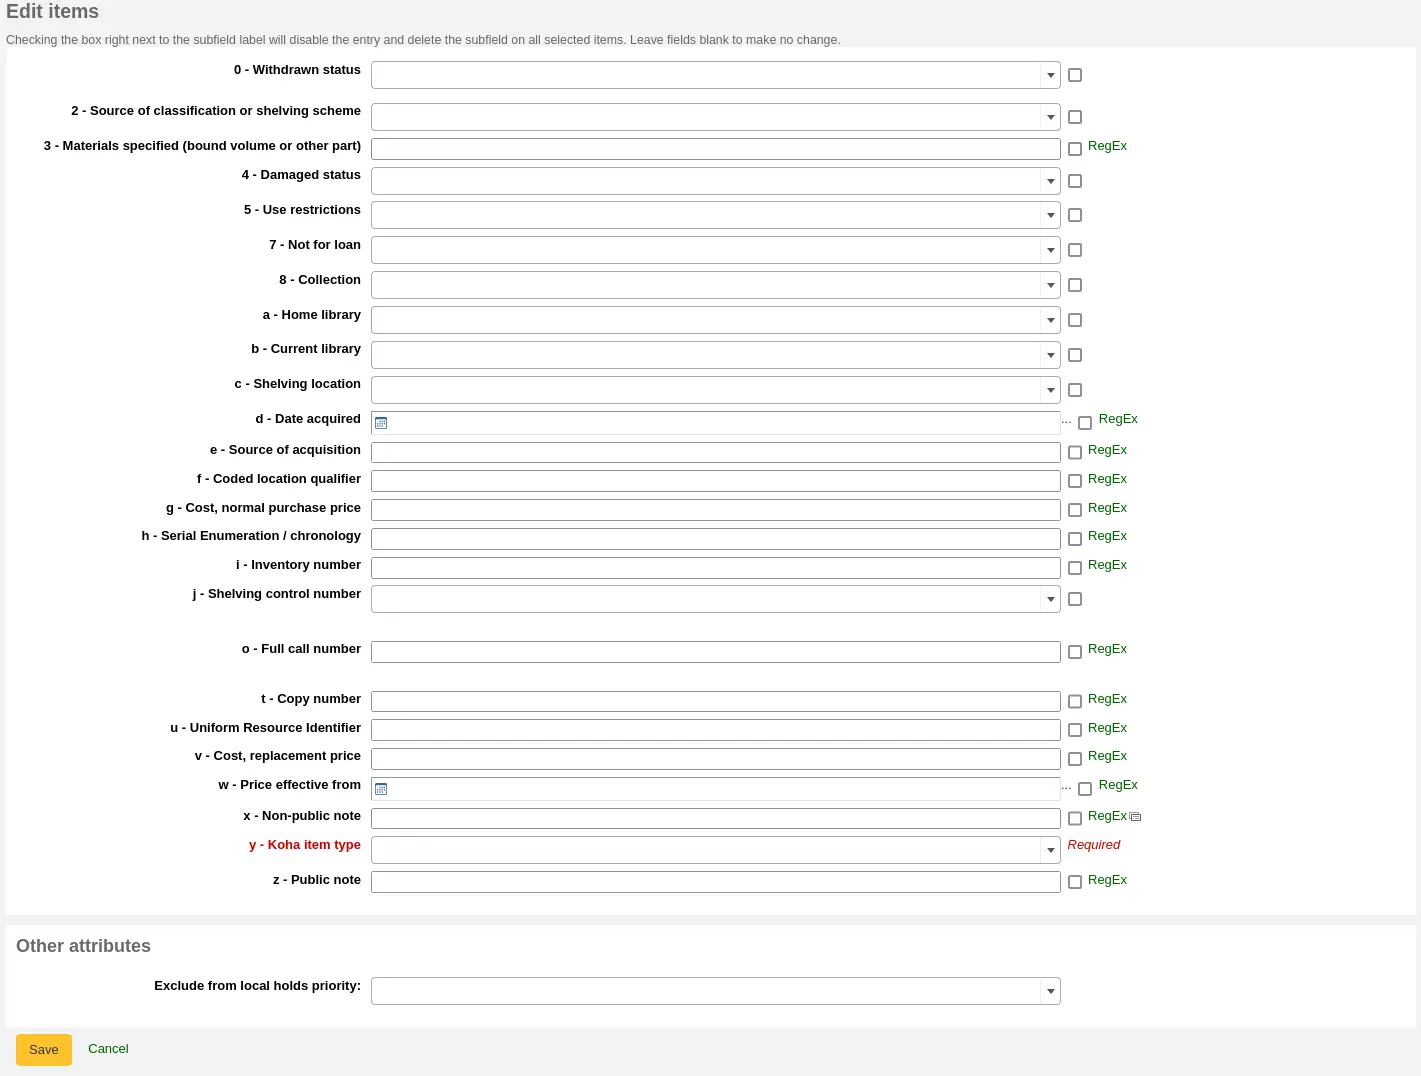
You can also click the ‘RegEx’ link to change the text field to a regular expression substitution. This is used to change only a part of a text string.

Note
If the PreventWithdrawingItemsStatus system preference is enabled, you will not be able to withdraw items that are either checked out or in transit using the batch item editor.
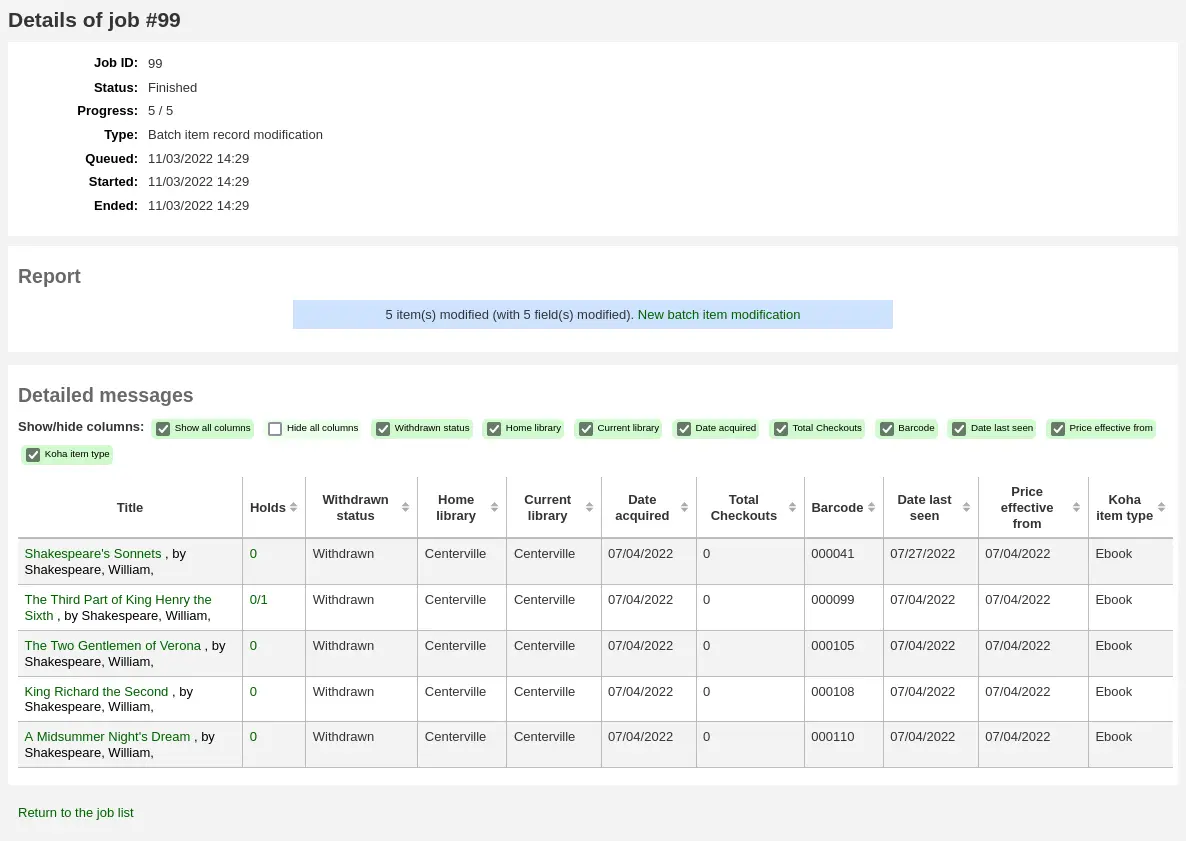
Once the changes are made, the job will be enqueued in the background jobs.

To see the edited items, click on ‘View detail of the enqueued job’.
Batch editing items from the bibliographic record
You can also edit items on one bibliographic record in a batch by going to the bibliographic record and clicking Edit > Edit items in batch.
This will bring you to the same batch item modification tool as above.
Batch editing items from a report
The batch item modification tool is also available from reports results when the results contain itemnumbers.
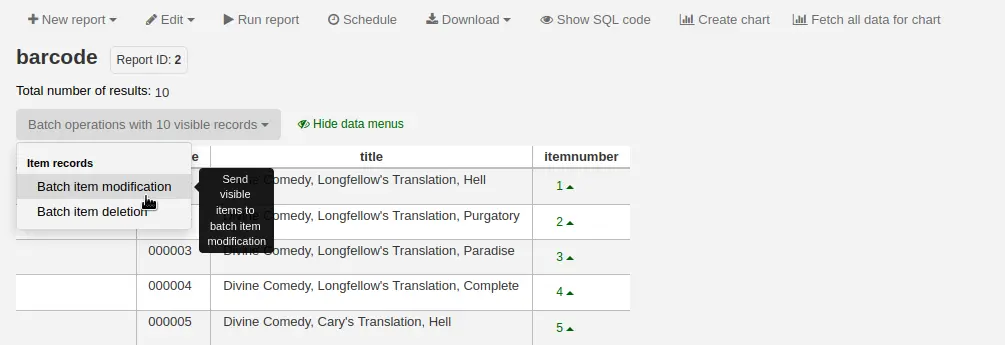
When the report contains the itemnumber, the option ‘Batch operations with X visible records’ will automatically appear. This option contains batch item modification and batch item deletion.
By default, only 20 results are shown when running reports, therefore, the batch modification will only be done on 20 results. If you have more results that you want to edit in a batch, make sure to change the number of results per page before choosing the batch operation.
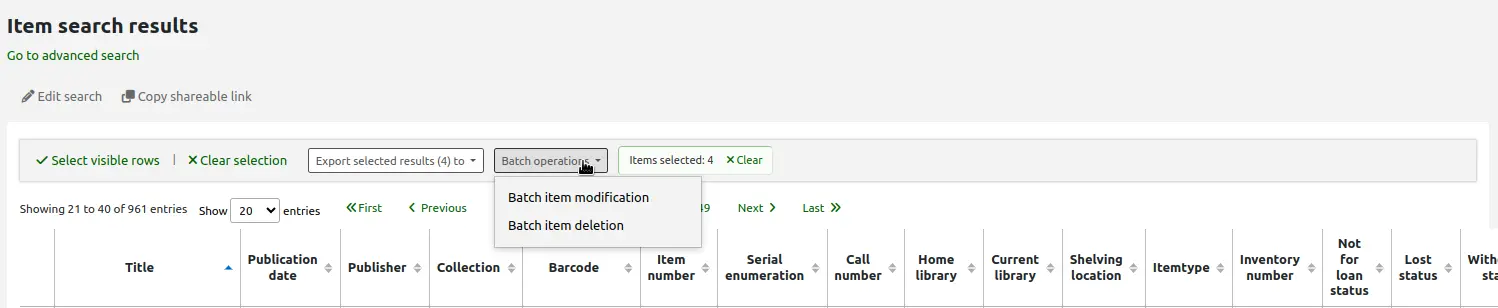
Batch editing items from the item search
Version
This option was added to Koha in version 23.11.
The batch item modification tool is also available from the item search results.
Simply select items to be edited from the results list, click ‘Batch operations’, and choose ‘Batch item modification’.
Grouping items
You can group items in order to place holds on a subset of items on a bibliographic record, rather than a specific item or the next available item. For example, if you have a bibliographic record for a series, and several items of each volume, you can group items by volumes and then place holds on the next available item of “Vol. 4”.
Note
Staff members must have the manage_item_groups permission (or the superlibrarian permission) in order to create, edit, and delete item groups.
You need to first enable the item groups feature with the EnableItemGroups system preference.
Once the system preference is enabled, a new ‘Item groups’ tab will appear in the detailed record in the staff interface.
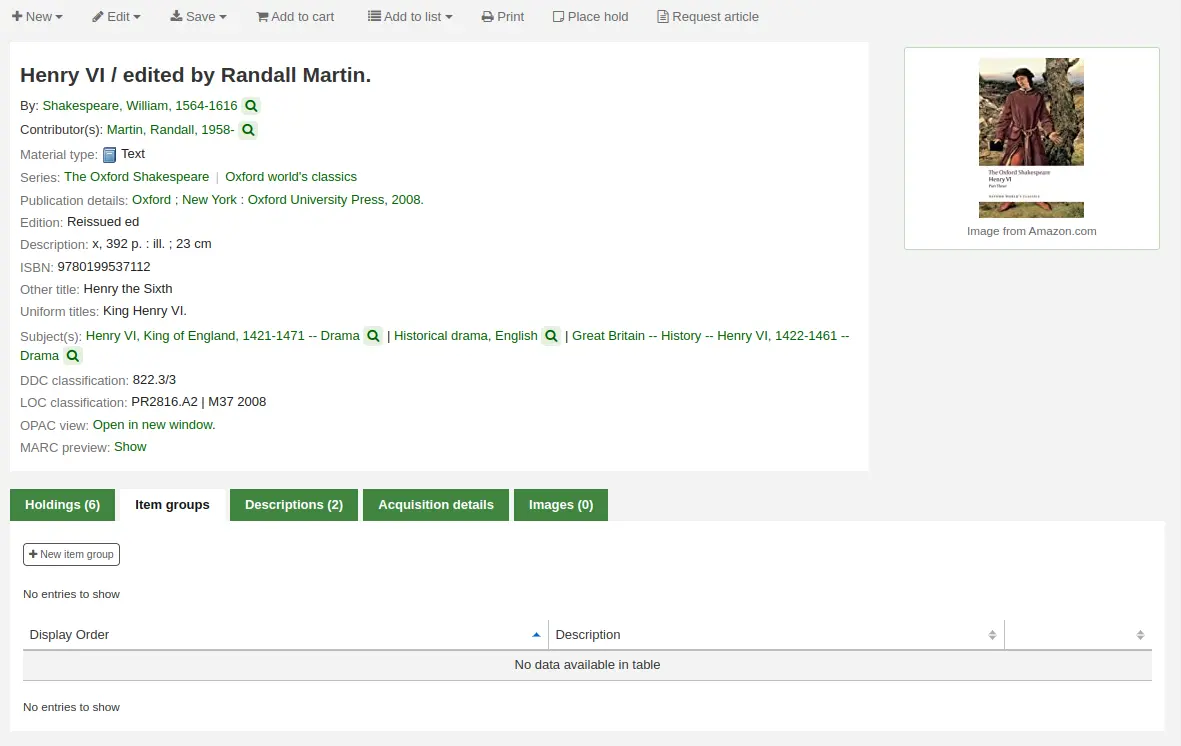
Click on the ‘New item group’ button
In the form that appears,
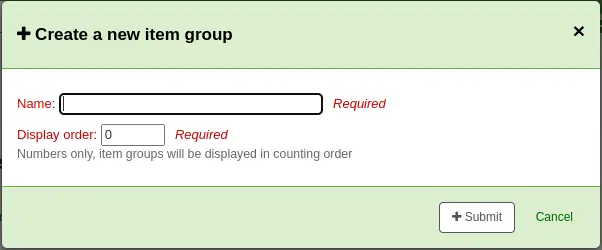
Name: enter a name for the group, this name will visible in the staff interface and the OPAC
Display order: enter a number for the position this group should be displayed compared to the other groups of the same record (for example, if you have groups with 0, 1 and 2 as display order, the 0 group will be displayed first, the 1 group will be displayed second and the 2 group will be displayed third. You can put any number in there, your groups can be 3, 11 and 27, in that case, 3 will be displayed first, then 11 and finally 27)
Click ‘Submit’ to create the group
Once it is created, you can add items to the group.
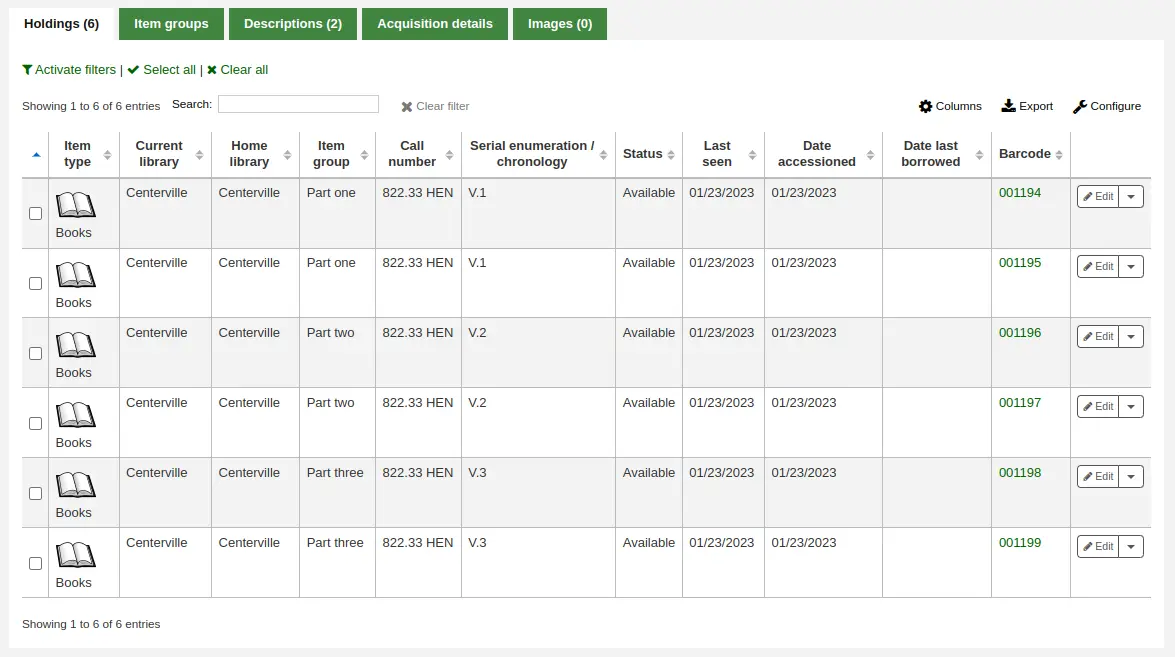
In the ‘Holdings’ tab, check the items that should be added to the group
At the top of the table, there will be batch actions, click on ‘Add/move to item group’
Choose which group the selected items should be added to

Click ‘Set item group’
The item group in which each item is will be shown in the ‘Holding’ table.
To delete an item group, go to the ‘Item groups’ tab, and click the ‘Delete’ button. This will only delete the group, the items will remain, but ungrouped.
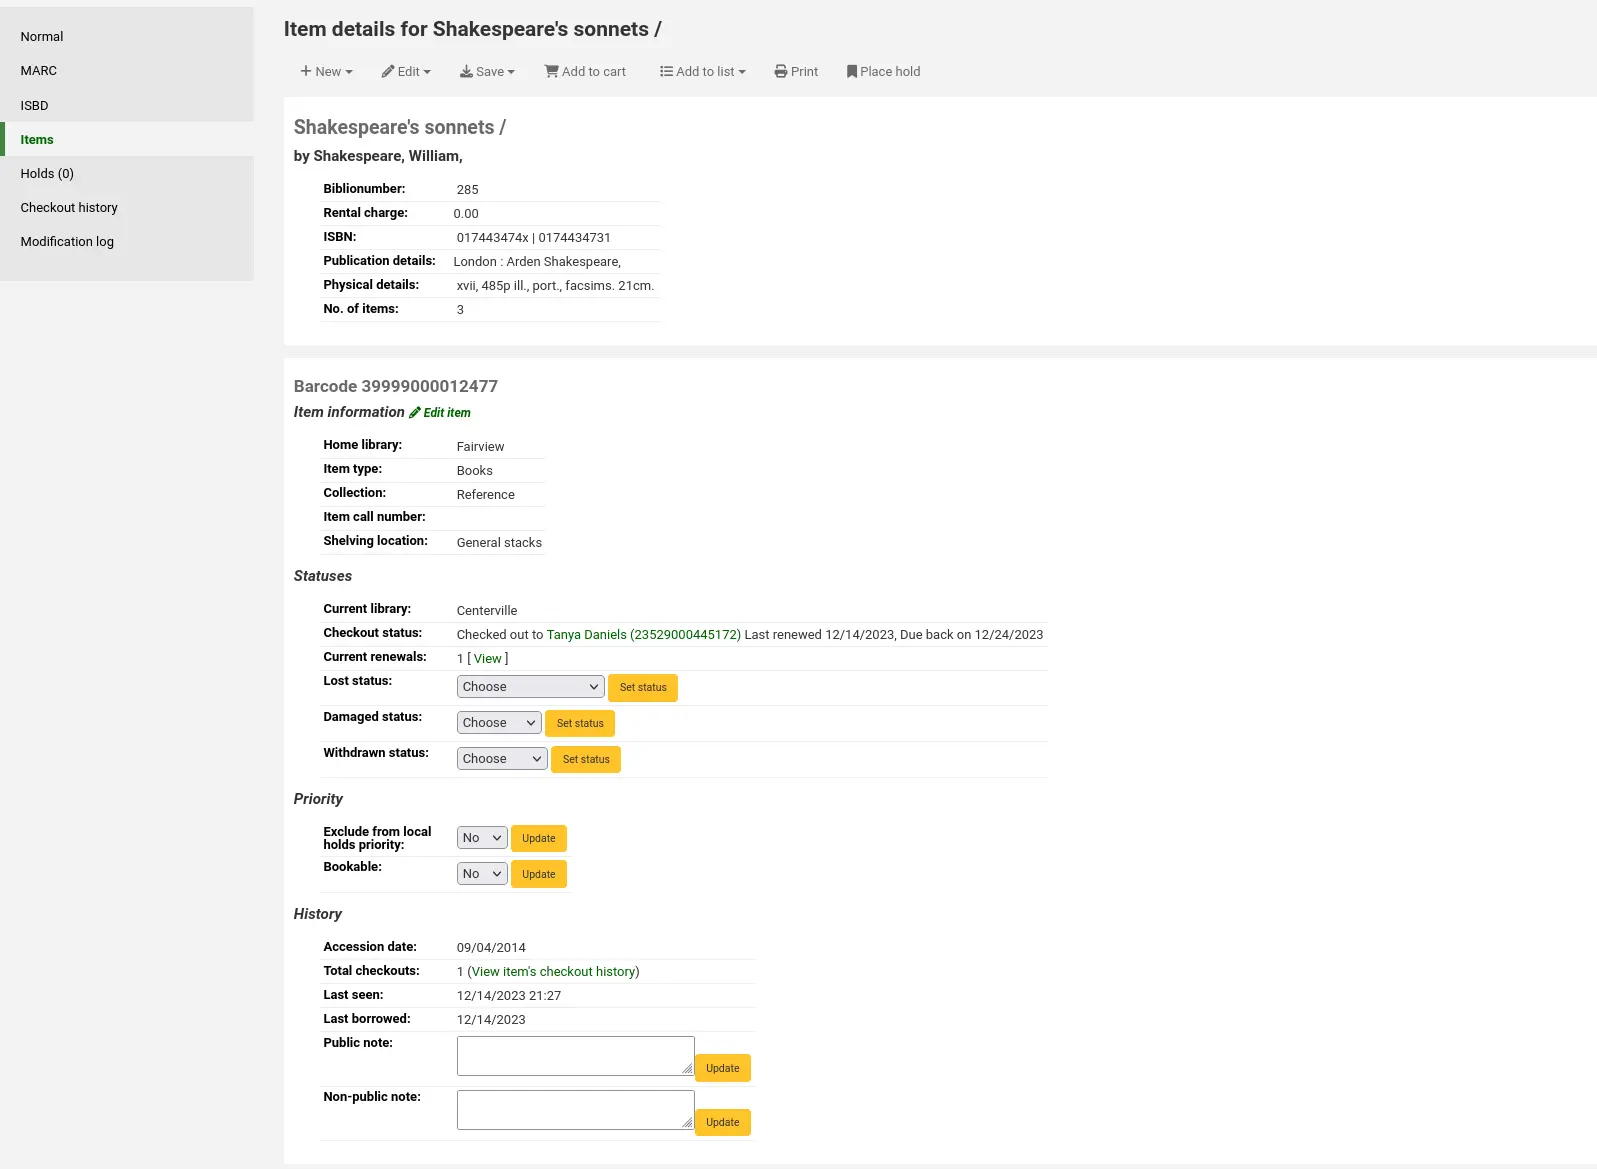
Item information
To the left of every bibliographic record there is a tab to view the items.
Clicking that tab will give you basic information about the items.
The ‘Item information’ section shows basic information about the item such as the home library, item type, collection, call number, copy number, shelving location, replacement price, and accompanying materials.

The ‘Statuses’ section shows the current status of the item. If the item is on loan, the loan details are displayed. If the item was renewed, you can click ‘View’ to see the details of any renewals, which include the date, the staff member who renewed the checkout, as well as if it was done manually or automatically (through the automatic_renewals.pl cronjob).
You can also view and edit the status information in this section. If an item is marked lost, damaged or withdrawn, you will see the date that status was applied.

The ‘Priority’ section shows whether the item is excluded from local holds priority and whether a booking can be placed on this item.

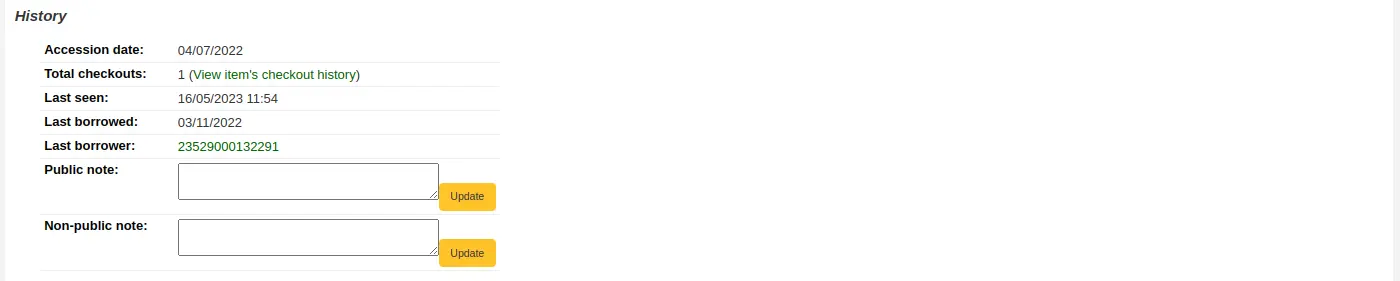
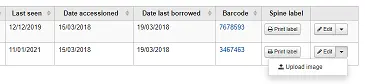
The ‘History’ section shows information about the acquisition and check out history of the item. If you ordered the item through the acquisitions module, this section will include the order date, vendor, accession (receiving) date and invoice number. Clicking the order or accession date will bring you to the acquisitions information for that item. This section also shows the number of total checkouts (with a link to see the checkout history), the date and time the item was last seen, the date it was last borrowed and the last patron to borrow this item (if the StoreLastBorrower system preference is enabled), if the item was paid for by the patron, the volume or serial number information, and public and non-public notes.
Adding cover images for items
Note
Only staff with the upload_local_cover_images) permission as well as the edit_items permission (or the superlibrarian permission) will be able to add cover images to items.
If you have either OPACLocalCoverImages or LocalCoverImages set to ‘Show’, you can upload cover images for individual item records from the ‘Upload image’ option from the Edit button on the right of the Holdings table.
Click Choose file to find the image file on your computer and then Upload file.
On the next screen you are given the option to replace existing images. You can then click on Process images.
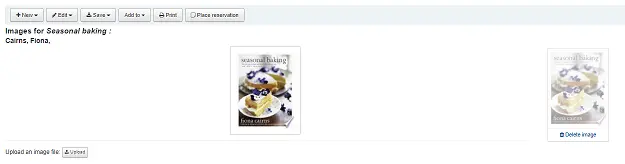
The image will display in a Cover image column in the holdings display.

To delete an image, click on the image in the holdings display. You will see a grayed out copy of the image with the option to delete.
Moving items
Note
Staff members must have the edit_items permission (or the superlibrarian permission) in order to be able to move items.
Items can be moved from one bibliographic record to another using the ‘Attach item’ option.
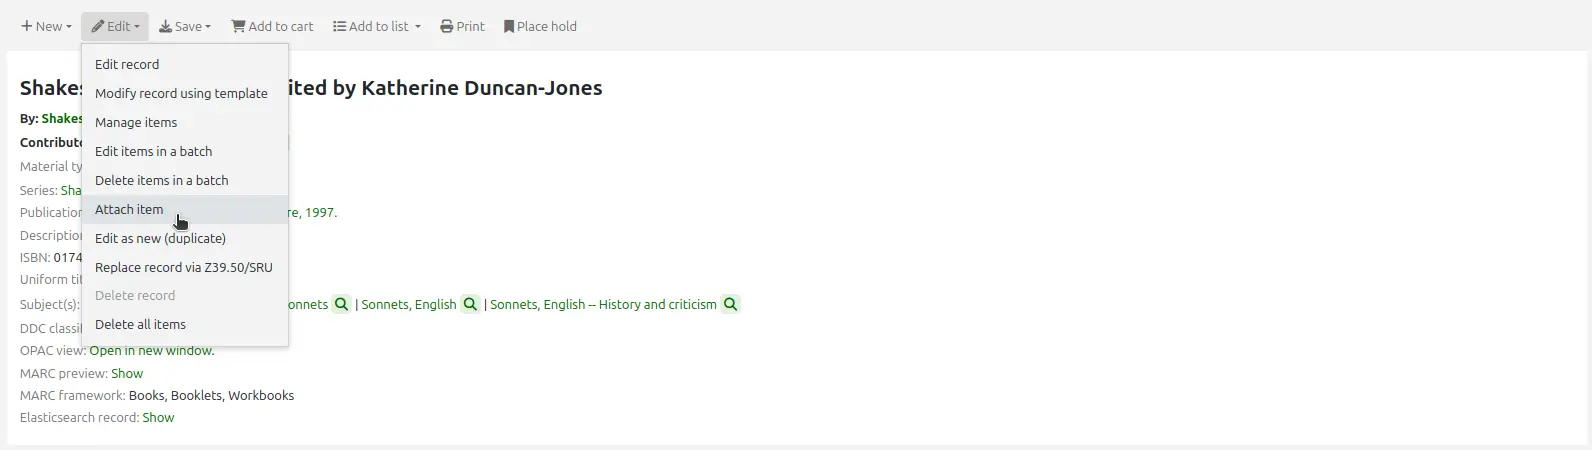
Visit the bibliographic record you want to attach the item to and choose ‘Attach item’ from the ‘Edit’ menu.
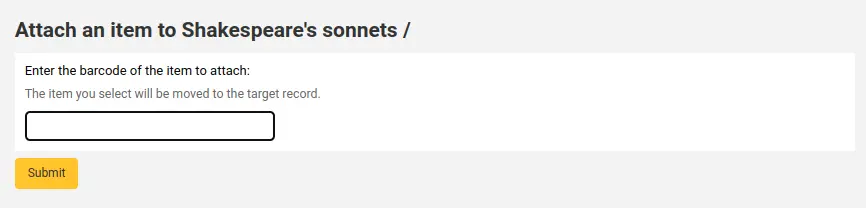
Simply enter the barcode for the item you want to move and click ‘Submit’.
If this is the last remaining item attached to a bibliographic record you will be presented with a button to delete the original host record.

If you want to move all items to a new record creating only one bibliographic record you can use the merge records tool instead.
Deleting items
Note
Staff members must have the edit_items permission (or the superlibrarian permission) in order to be able to delete items.
There are many ways to delete item records.
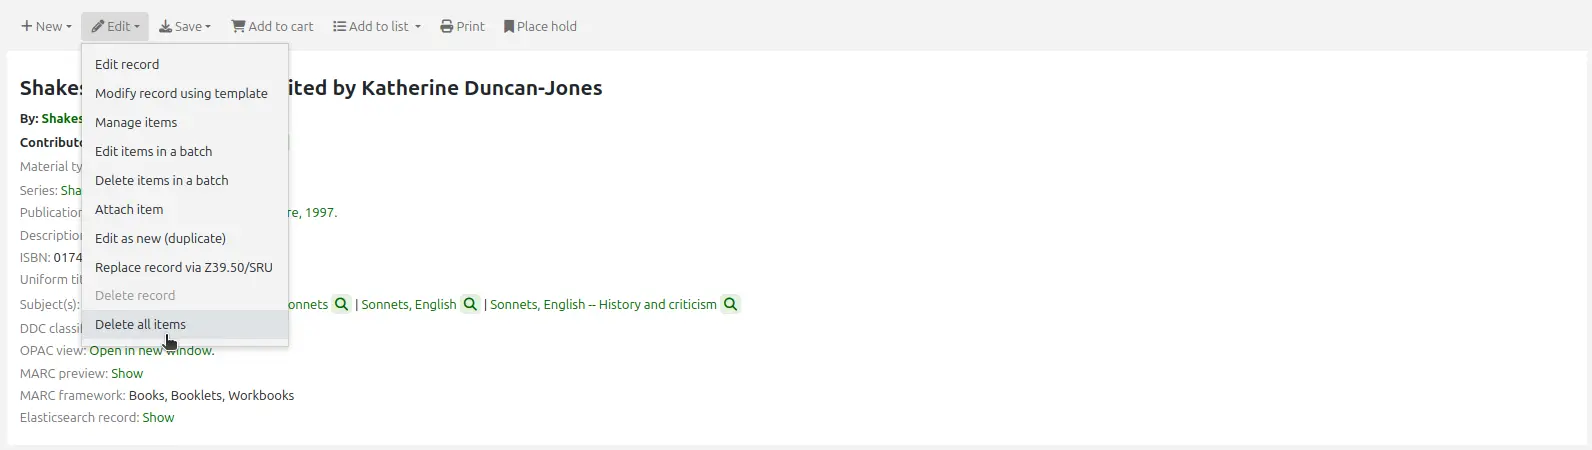
If you only need to delete one item, you can go to the record’s details page, click the ‘Edit’ button at the top and choose ‘Manage items’.
Click the ‘Actions’ button next to the item to delete, and choose the ‘Delete’ option. If the item is not checked out, it will be deleted.

If all the items attached to the record are not currently checked out, from the record’s details page, click the ‘Edit’ button at the top and choose ‘Delete all items’. This will delete all the items from the record.
Note
Staff members must have the delete_all_items permission (or the superlibrarian permission) in order to be able to delete all of a record’s items.
You can also choose the option ‘Delete items in a batch’, from the same ‘Edit’ button to delete all the items from the record.
This will open up the batch item deletion tool where you will be able to deleted all of the record’s items as a batch.
To delete several items from a record, but not necessarily all of them, you can check the items to delete and click ‘Delete selected items’ at the top of the list.
This will open up the batch item deletion tool where you will be able to deleted all of the selected items as a batch.
Finally, you can use the batch delete tool to delete a batch of items from different records.
Batch deleting items
Note
Only staff with the items_batchdel permission (or the superlibrarian permission) will have access to this tool.
Get there: More > Cataloging > Batch editing > Batch item deletion
This tool will allow you to delete a batch of item records from Koha.
From the tool, choose to either upload a file of barcodes or itemnumbers, or scan item barcodes one by one into the box below the upload tool.
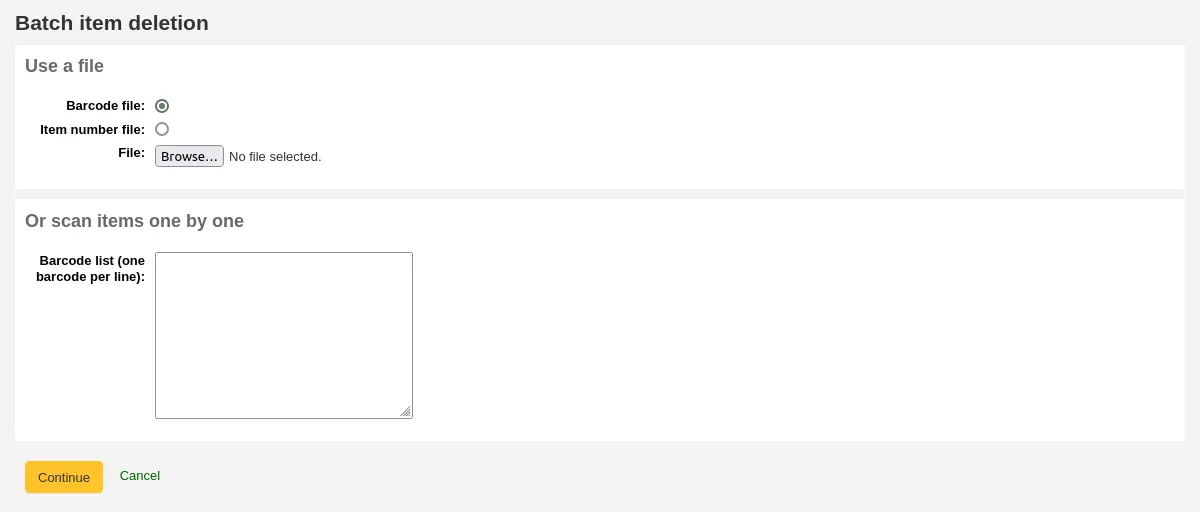
Once the file is uploaded or the barcodes listed, click ‘Continue.’
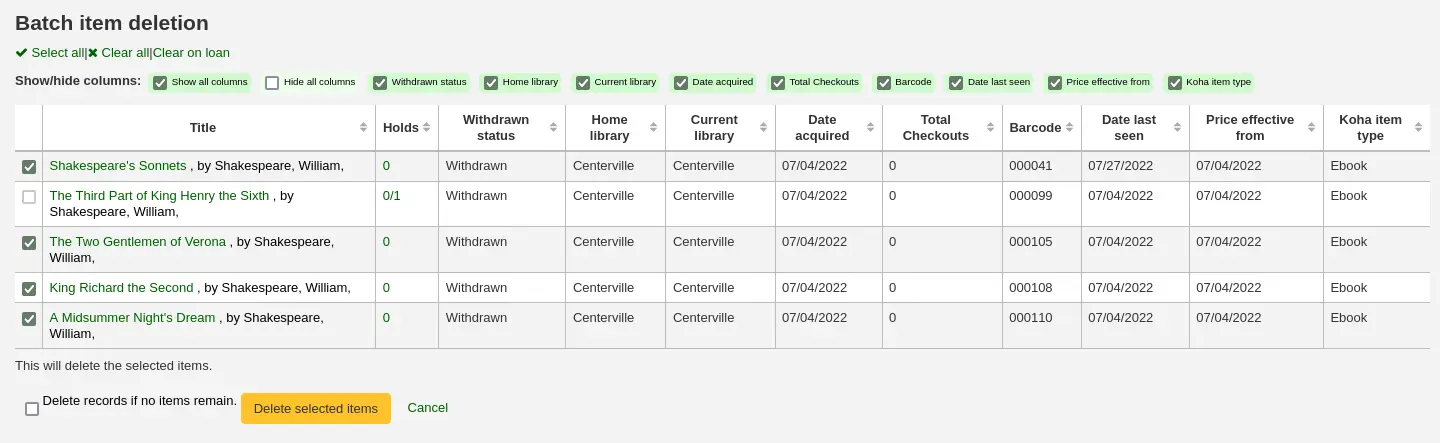
You will be presented with a confirmation screen. From here you can uncheck the items you don’t want to delete. You can check the ‘Delete records if no items remain’ box to delete the bibliographic record if the last item is being deleted.
Note
Items that are the last item attached to a bibliographic record with one or more record-level holds will be automatically unchecked. You will need to delete the hold before deleting the item.
Items that are checked out will also be automatically unchecked. They will need to be checked in before they can be deleted.
If your file (or list of scanned barcodes) has more than 1000 barcodes, Koha will be unable to present you with a list of the items. You will still be able to delete them, but not able to choose which items specifically to delete or delete the bibliographic records.

Click ‘Delete selected items.’
Note
If the items are checked out the items will not be deleted.
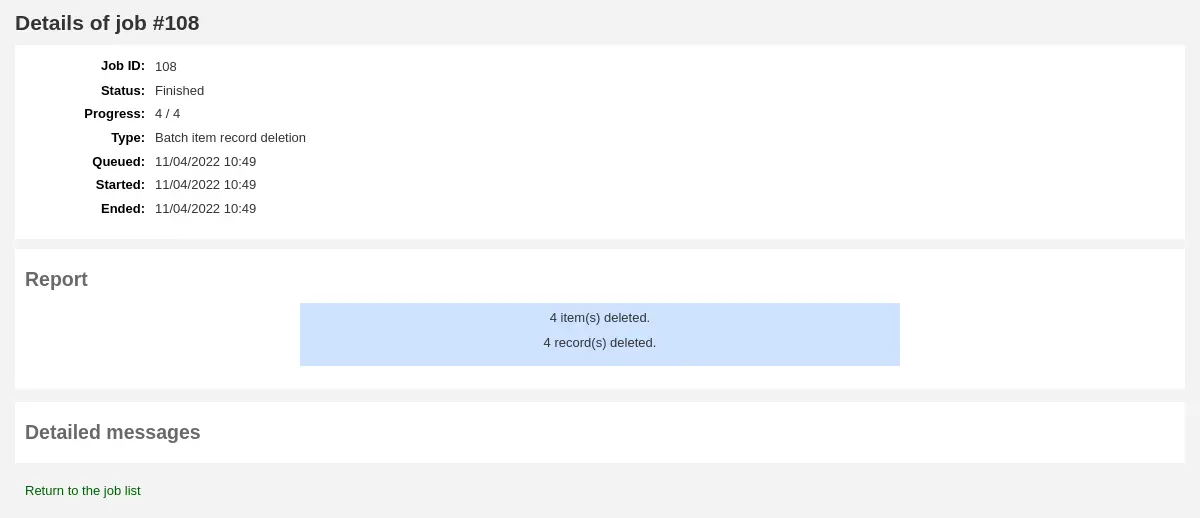
The deletion job will be enqueued in the background jobs.

To see the deletion details, click ‘View detail of the enqueued job’.
To delete a new batch of items, click ‘New batch item deletion’.
Batch deleting items from the bibliographic record
The batch item deletion tool is also available from the bibliographic record details page.
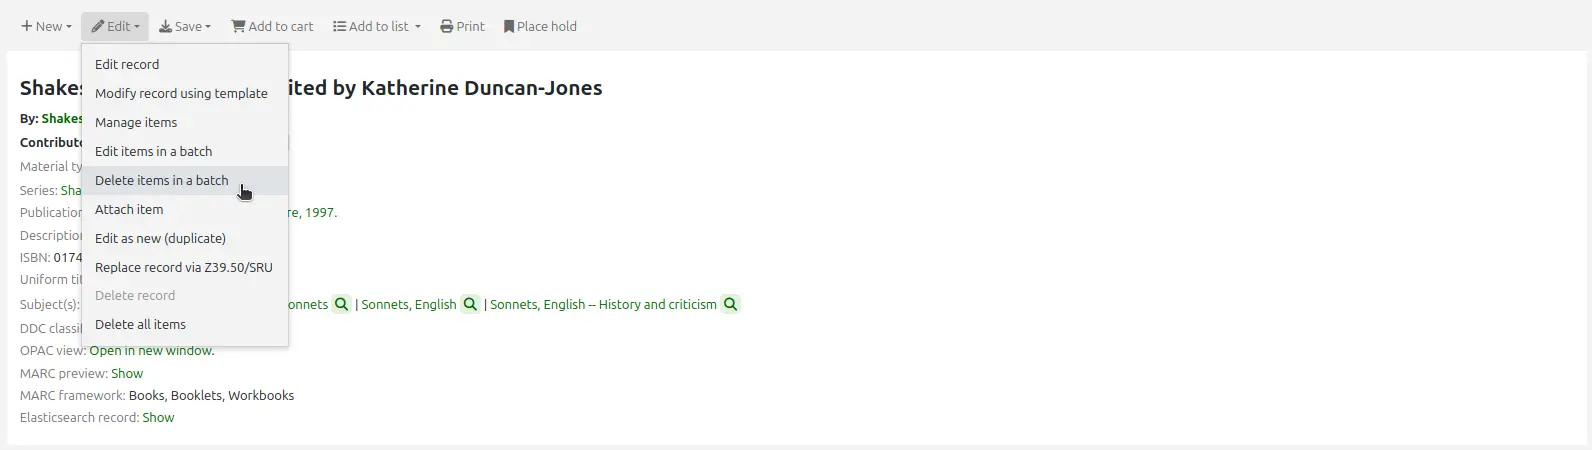
From the bibliographic record details page, click the ‘Edit’ button and choose the ‘Delete items in a batch’ option.
This will open the batch item deletion tool for the items of the specific record.
Batch deleting items from a report
The batch item deletion tool is also available from reports results when the results contain itemnumbers.
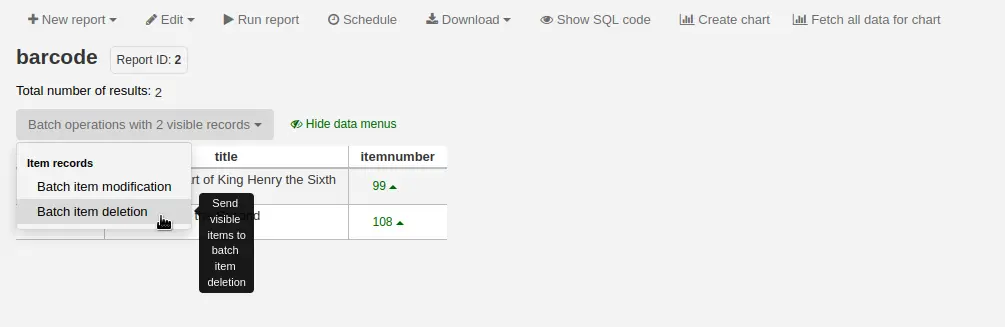
When the report contains the itemnumber, the option ‘Batch operations with X visible records’ will automatically appear. This option contains batch item modification and batch item deletion.
By default, only 20 results are shown when running reports, therefore, the batch deletion will only be done on 20 results. If you have more results that you want to delete in a batch, make sure to change the number of results per page before choosing the batch operation.
Batch deleting items from the item search
Version
This option was added to Koha in version 23.11.
The batch item deletion tool is also available from the item search results.
Simply select items to be deleted from the results list, click ‘Batch operations’, and choose ‘Batch item deletion’.
Item specific circulation history
Each bibliographic record keeps a circulation history (with or without the patron information depending on your settings), but each item also has its own circulation history page. To see this, click on the ‘Items’ tab to the left of the record you are viewing.
Below the ‘History’ heading is a link to ‘View item’s checkout history,’ clicking that will open up the item’s history which will look slightly different from the bibliographic record’s history page.
Item modifications by age
Get there: More > Cataloging > Automation > Automatic item modifications by age
This tool allows you to update item specific fields when an item reaches a certain age.
Note
Only staff with the items_batchmod permission (or the superlibrarian permission) will have access to this tool.
Note
The settings in this tool will be acted upon by the corresponding cron job.
If you haven’t created any rules, you will see the option to ‘Add rules’ on the page. Click this button to create rules.

If you have rules already there will be a button that reads ‘Edit rules’. To create a new rule click the ‘Edit rules’ button at the top of the page.

You will be brought to a page where you can edit existing rules or create a new rule.

Click ‘Add rule’.
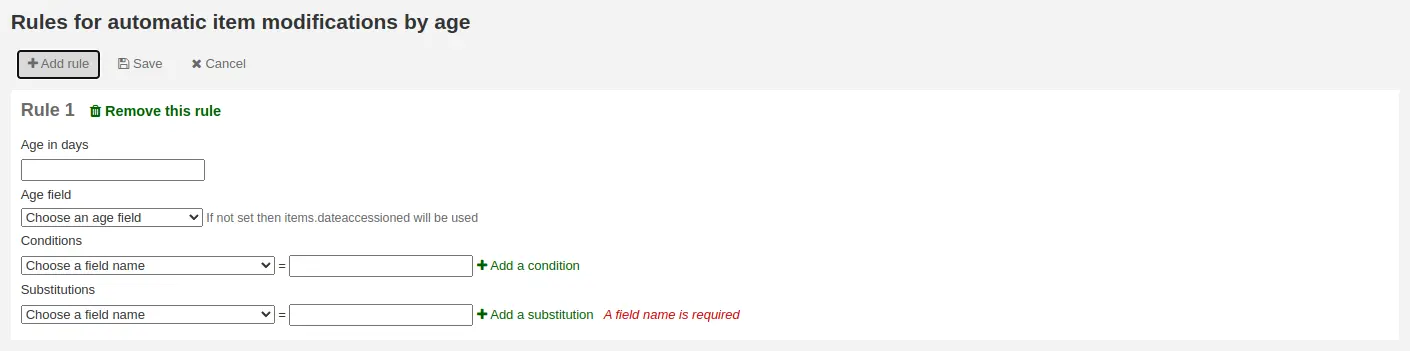
Fill out the form that appears to set the new rule:
Age in days: the age in days at which the item will update
Age field: the field on which the age is based
items.dateaccessioned (default): date of acquisition of the item; in MARC21, it is normally mapped to 952$d
items.replacementpricedate: date the replacement price is effective from; in MARC21, it is normally mapped to 952$w
items.datelastborrowed: date the item was last checked out; in MARC21, it is normally mapped to 952$s (not editable manually)
items.datelastseen: date of the last transaction made on the item; in MARC21, it is normally mapped to 952$r (not editable manually)
items.damaged_on: date on which the damaged status was set (not editable manually)
items.lost_on: date on which the lost status was set (not editable manually)
items.withdrawn_on: date on which the withdrawn status was set (not editable manually)
Conditions: what criteria is needed to trigger the update
Choose the field to check from the dropdown menu
Enter the value the field should have to trigger the update
If you need more than one condition, click ‘Add a condition’
Substitutions: what changes are made when the script runs
Choose the field to change from the dropdown menu
Enter the value the field should have after the update
If you need to do more than one change, click ‘Add a substitution’
Once you’re done, click the ‘Save’ button to save the rule and go back to the main page, or click ‘Add rule’ again to add another rule.
Stock rotation
Get there: More > Cataloging > Automation > Stock rotation
Note
This tool will only be available if the StockRotation system preference is enabled.
Note
Only staff with the stockrotation permission or subpermissions (or the superlibrarian permission) will have access to this tool.
Stock rotation helps to spread resources more fairly among library branches and allows patrons to see a wider range of titles.
Items are popular while they are new at a particular branch. However, their use often tails off over time. This tool empowers librarians to automate the movement of items on to another branch before usage declines and thereby extend the items’ useful life.
Library staff create rotation plans (rotas) and then assign items to them. A cronjob is then used to cycle these items round the specified libraries on the rotation plan, moving them to the next stage after the prescribed period of time has passed at the current stage.
Note
For this tool to work as intended, the stockrotation.pl cron job needs to be configured to run on a daily basis.
Email notices may be used to provide the libraries with a list of items on the shelf to be put in transit to the next library. If an item is on loan at the time it should be transferred, an alert will be displayed when it is next returned.
Note
The notice used is SR_SLIP. It can be customized with the Notices and slips tool.
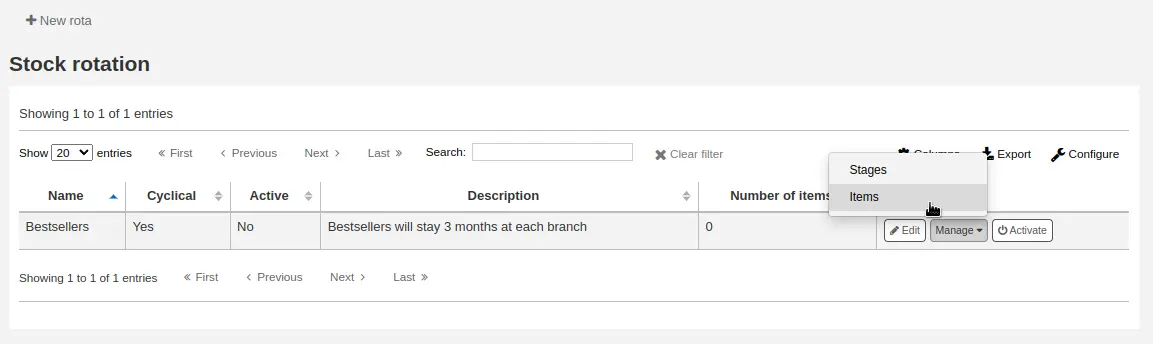
From the stock rotation page you can add new rotation plans (rotas) and see a summary of your currently configured rotas. For each existing rota, there are buttons to: edit, manage stages and items, activate or deactivate, delete.
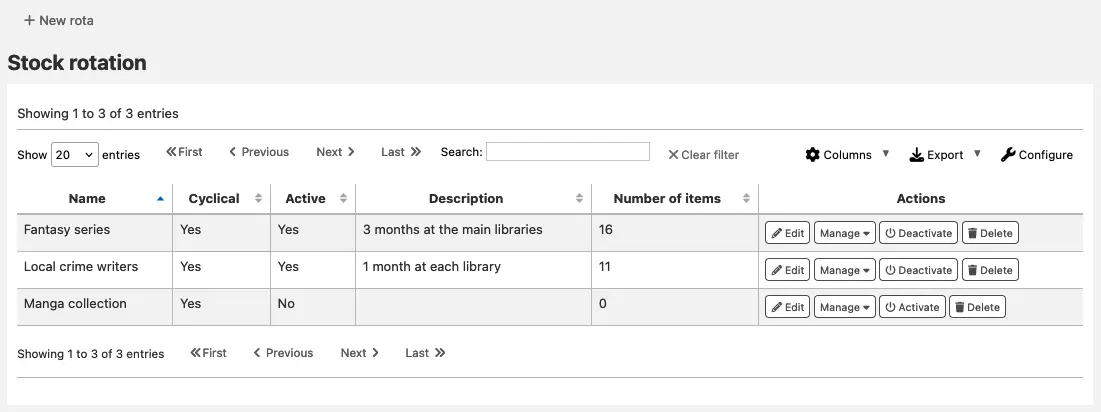
Note
You can customize the columns of this table in the Table settings section of the Administration module (table id: stock_rotation).
Creating a new rota
Note
Only staff with the manage_rotas permission (or the superlibrarian permission) will be able to create new rotas.
To create a new rota (rotation plan), click the ‘New rota’ button on the main stock rotation page.
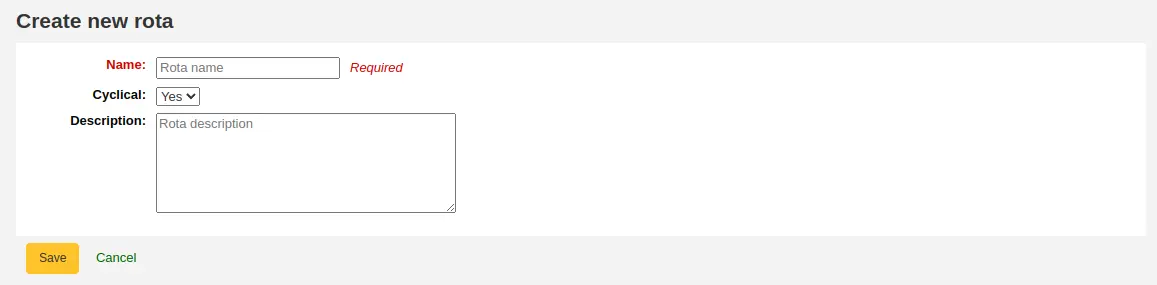
Name: enter a name or code to identify the rota
Cyclical:
No: items will remain at the last library on the rotation plan upon reaching the end of the rota
Yes: items will continue to rotate, returning back to the first library on the rotation plan once they have completed their allotted time at the last library, indefinitely until manually removed from the rota
Description: optionally add an expanded description of the rota for display in summary views
Once the rota is complete with stages and items, activate it to begin cycling the items through the rotation: on the stock rotation summary, click the ‘Activate’ button next to the rota.
Adding stages to a rota
Note
Only staff with the manage_rotas permission (or the superlibrarian permission) will be able to add stages to rotas.
Once the rota is created, you can add stages to it. Stages are a length of time that an item will stay at a particular library before moving on.
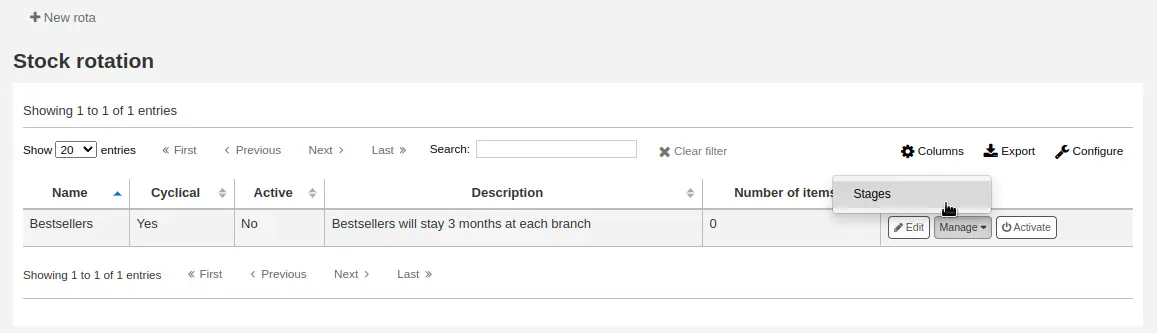
From the stock rotation summary page, click the ‘Manage’ button and choose the ‘Stages’ option.
Click the ‘Add stage’ button.
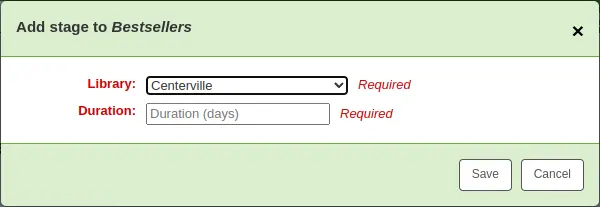
Library: choose the library this stage is for
Duration: enter the number of days the item should stay at this library before moving on
Click ‘Save’.
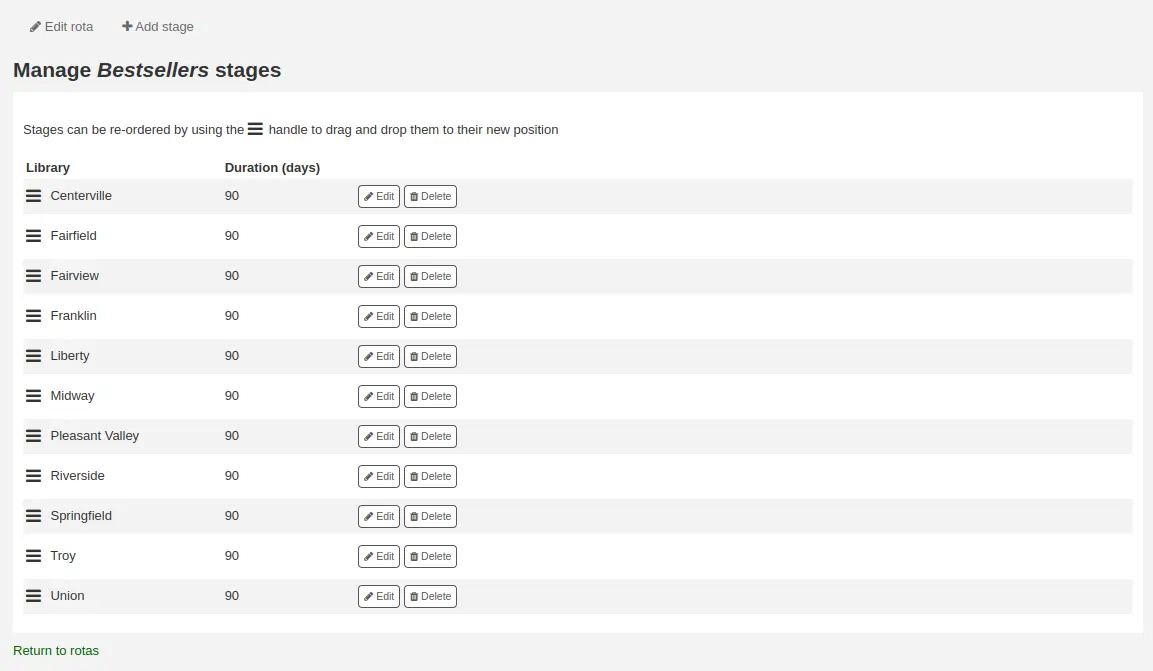
Once all the stages have been added, you can move them around using the handles on the left to change the order.
Adding items to a rota
Note
Only staff with the manage_rota_items permission (or the superlibrarian permission) will be able to add items to existing rotas.
Once a rota has stages, items can be added to it.
From the stock rotation summary page, click the ‘Manage’ button and choose the ‘Items’ option.
Click the ‘Add items’ button.
Items can be added to a rota individually (by barcode) or in bulk (via the upload of a line delimited barcode file).
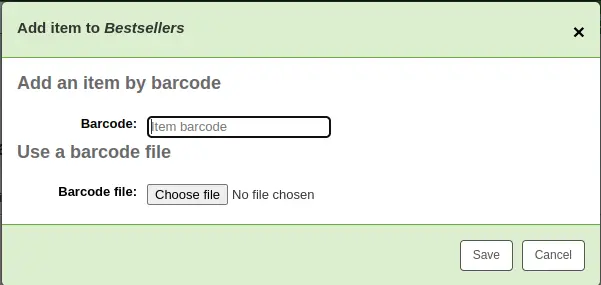
Items can also be added to a rota through the staff interface catalog, in the ‘Rota’ tab on the left when viewing a detailed record.
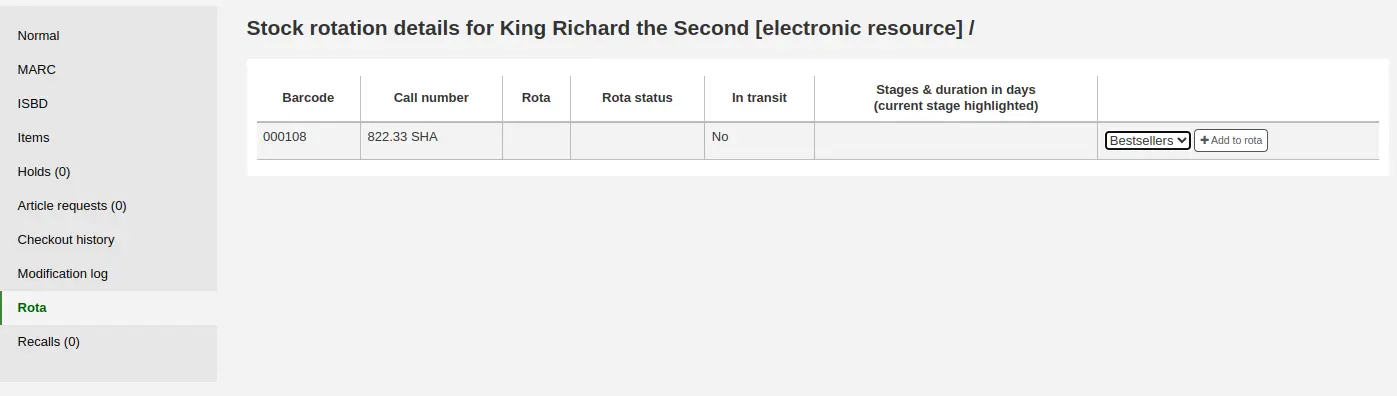
Choose the rota to add the item to and click ‘Add to rota’.
Items can also be automatically added to rotas at acquisition time by using the LRP (Library Rotation Plan) field in EDI.
On the Manage > Items page, there will be a summary of all items on the rota with their current location. You have options to immediately progress items, mark items as ‘in demand’ and remove an item from rotation.
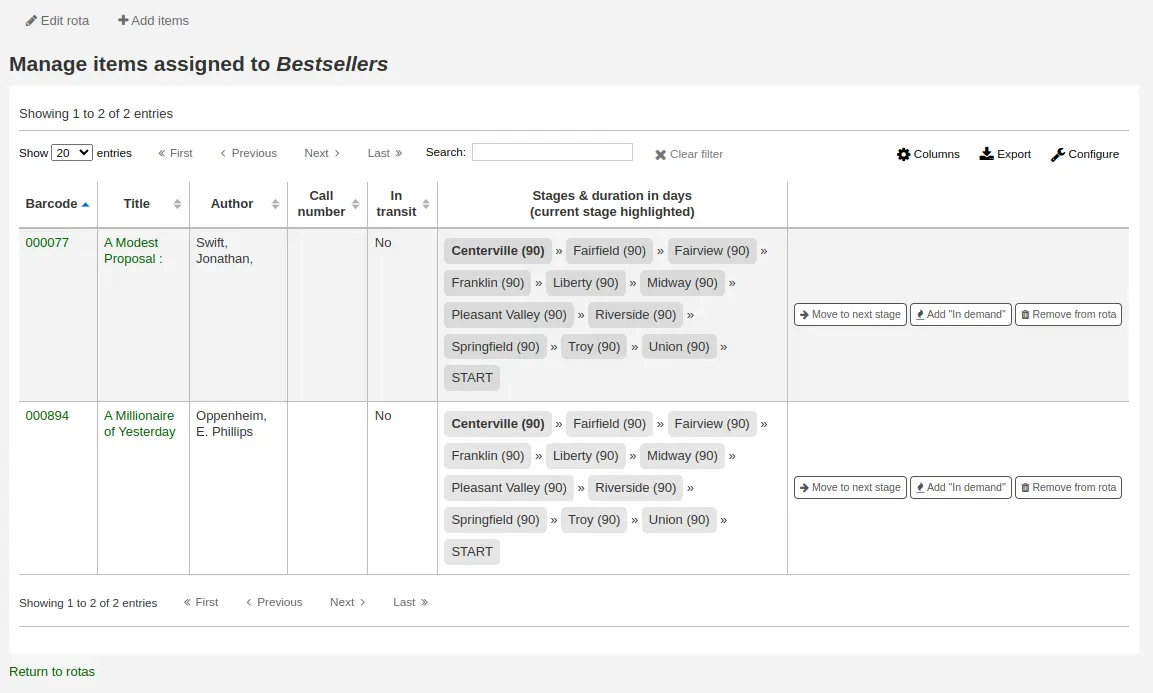
Note
You can customize the columns of this table in the Table settings section of the Administration module (table id: stock_rotation_manage_items).
Move to next stage: progress the item directly to the next stage even if the duration at the current stage is not complete.
Add “In demand”: double the duration the item will stay at it’s current stage compared to what is set in the rota. This is often used for items that are found to be unexpectedly popular at a particular library.
Remove from rota: remove the item from the rota.
Individual items can also be managed from the staff interface catalog, in the ‘Rota’ tab.
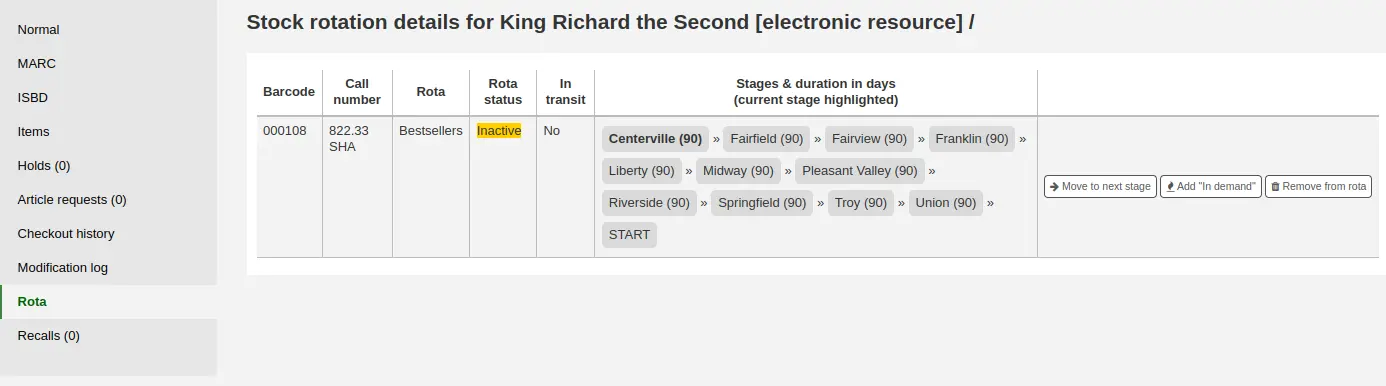
Creating labels
Note
Only staff with the label_creator permission (or the superlibrarian permission) will have access to this tool.
Get there: More > Cataloging > Tools > Label creator
The label creator tool allows you to use layouts and templates which you design to print a nearly unlimited variety of labels including barcodes. Here are some of the features of the label creator tool:
Customize label layouts
Design custom label templates for printed labels
Build and manage batches of labels
Export single or multiple batches
Export single or multiple labels from within a batch
Export label data in one of three formats:
PDF - Readable by any standard PDF reader, making labels printable directly on a printer
CSV - Export label data after your chosen layout is applied allowing labels to be imported in to a variety of applications
XML - Included as an alternate export format
Label layouts
Get there: More > Cataloging > Tools > Label creator > Manage > Layouts
A layout is used to define the fields you want to appear on your labels.
Adding a layout
To add a new layout, click on the ‘New’ button at the top of the label creator tool and choose ‘Layout’.
Using the form that appears, decide what appears on your labels.
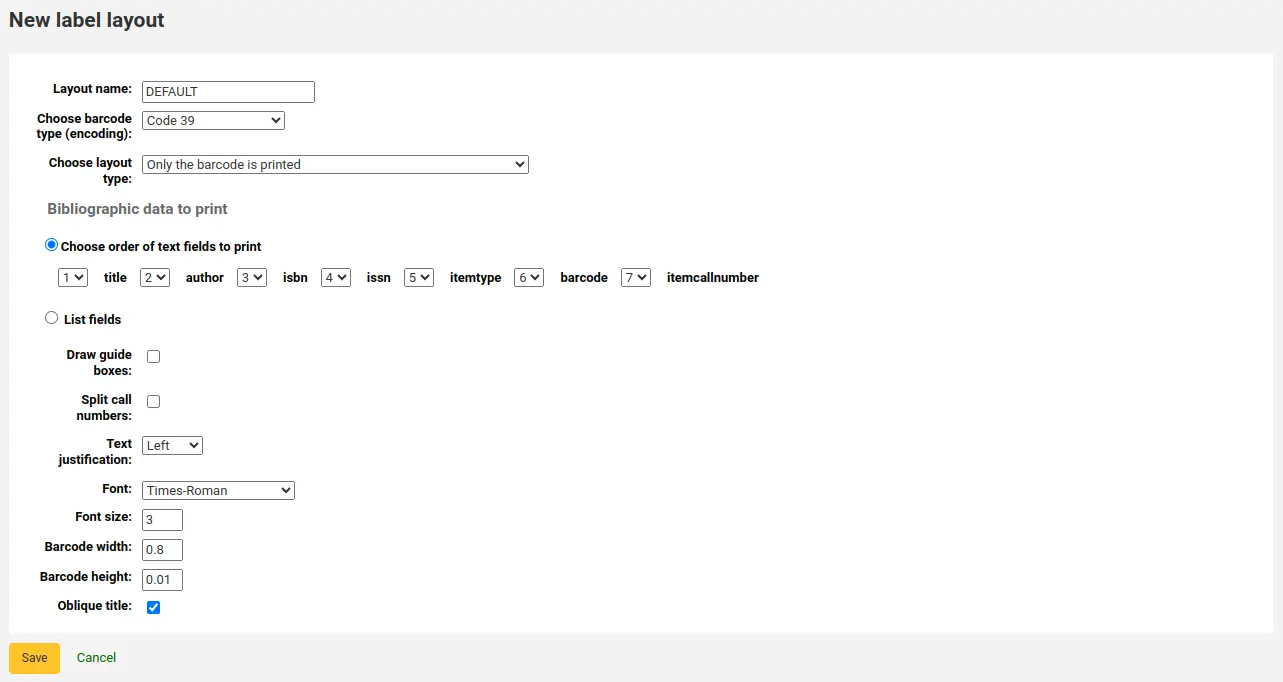
‘Layout name’: enter a name for the layout to help you identify it later.
‘Choose barcode type (encoding)’: if this is a barcode label, choose the encoding (Code 39 is the most common)
‘Choose layout type’: choose what type of information is printed on the label.
Only the bibliographic data is printed: only bibliographic information will appear on the label (this can be used for spine labels for example)
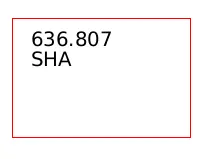
Note
Bibliographic data includes any of the data fields that may be mapped to your MARC frameworks.
Barcode precedes bibliographic data: the barcode will appear at the top of the label and the bibliographic information underneath
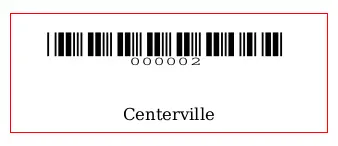
Bibliographic data precedes barcode: the bibliographic information will appear at the top of the label and the barcode underneath
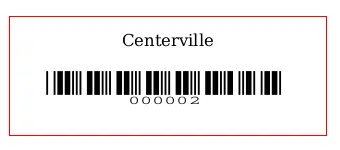
Barcode and bibliographic data are printed on alternating labels: the bibliographic information will appear on one label, and the barcode on the next label, alternating for each item
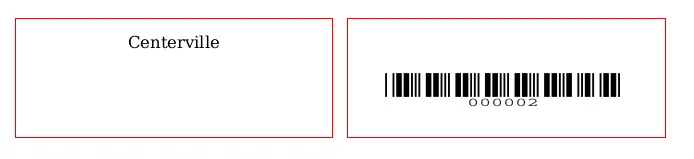
Only the barcode is printed: only the barcode will appear on the label
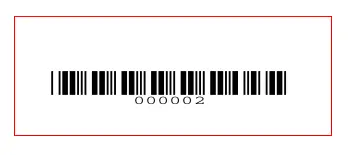
‘Bibliographic data to print’: if you chose to print bibliographic data on the label, choose from the preset list of fields which fields should appear on the label and in which order. Alternatively, you can click on ‘List fields’ and enter your own data.

Note
In ‘List fields’, you can specify any database field from the following tables (use the database structure at https://schema.koha-community.org to find the field names):
items
biblioitems
biblio
branches
You can also specify MARC subfields as a 4-character tag-subfield string, for example 254a for the title field in MARC21.
You can also enclose a whitespace-separated list of fields to concatenate on one line in double quotes, for example “099a 099b” or “itemcallnumber barcode”.
Finally you can add in static text strings in single-quote, for example ‘Some static text here.’
‘Draw guide boxes’: choose if guidelines are printed around each label (this is useful when first setting up the label creator to check alignment with your label sheets)
‘Split call numbers’: choose if call numbers should be split (usually used on spine labels)
Note
Call number splitting rules are managed under Administration > Classification sources.
‘Text justification’: choose the text alignment (left, center or right)
‘Font’: choose the font type
Font type choices are currently limited to:
Times-Roman (regular, bold, italic, or bold-italic): a serif font type
Courier (regular, bold, oblique (italic), or bold-oblique (bold-italic)): a monospace font type
Helvetica (regular, bold, oblique (italic), or bold-oblique (bold-italic)): a sans-serif font type
‘Font size’: enter the font size in points
‘Barcode width’: when printing barcodes, enter the width of the barcode as a fraction of the label width itself. For example, 0.8 means the barcode will take up 80% of the label length-wise.
- ‘Barcode height’: when printing barcodes, enter the height of the barcode as
a fraction of the label height.
‘Oblique title’: choose if the title should be italicized
Click ‘Save’ to save the new layout.
After saving, your layouts will appear under Manage > Layouts.

Editing a layout
To edit an existing layout, click on the ‘Manage’ button at the top of the label creator tool and choose ‘Layout’.
In the table of currently available layouts, click the ‘Edit’ button next to the layout you want to edit.
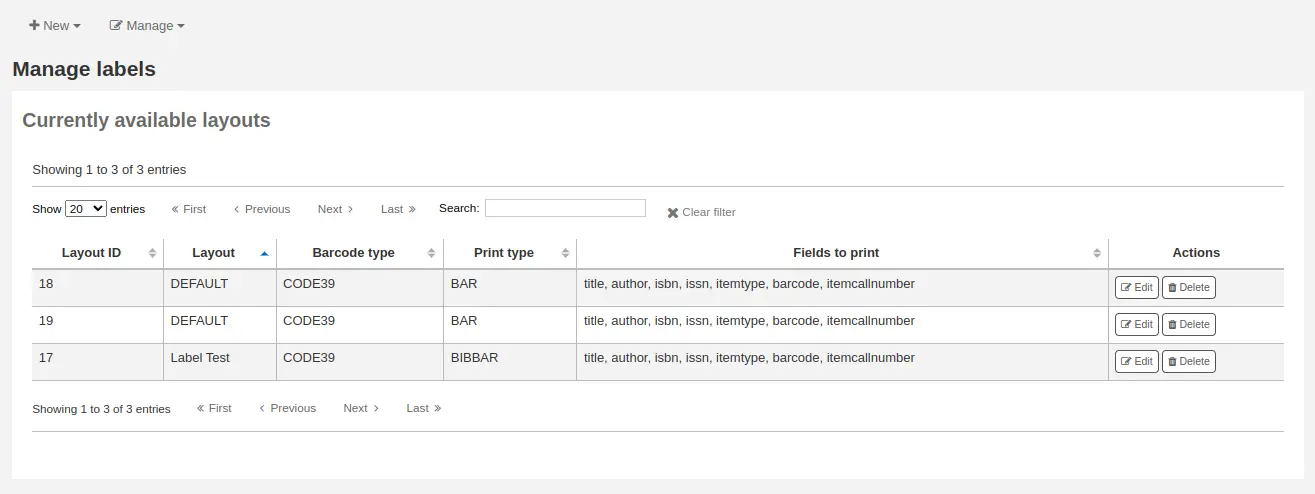
Change the necessary values and click ‘Save’.
Deleting a layout
To delete an existing layout, click on the ‘Manage’ button at the top of the label creator tool and choose ‘Layout’.
In the table of currently available layouts, click the ‘Delete’ button next to the layout you want to delete, and confirm the deletion.
Label templates
Get there: More > Cataloging > Tools > Label creator > Manage > Label templates
A template is based on the label/card stock you are using. This might be Avery 5160 for address labels, Gaylord 47-284 for spine labels or Avery 28371 for your patron cards, just to give a couple of examples. These labels will include all of the information you will need for setting up in Koha. This information may be on the packaging, on the vendor’s website or it can be measured manually.
Adding a template
To add a new template, click on the ‘New’ button at the top of the label creator page and choose ‘Label template’.
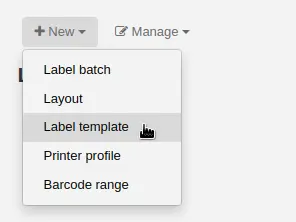
Using the form that appears you can define the template for your sheet of labels or cards.
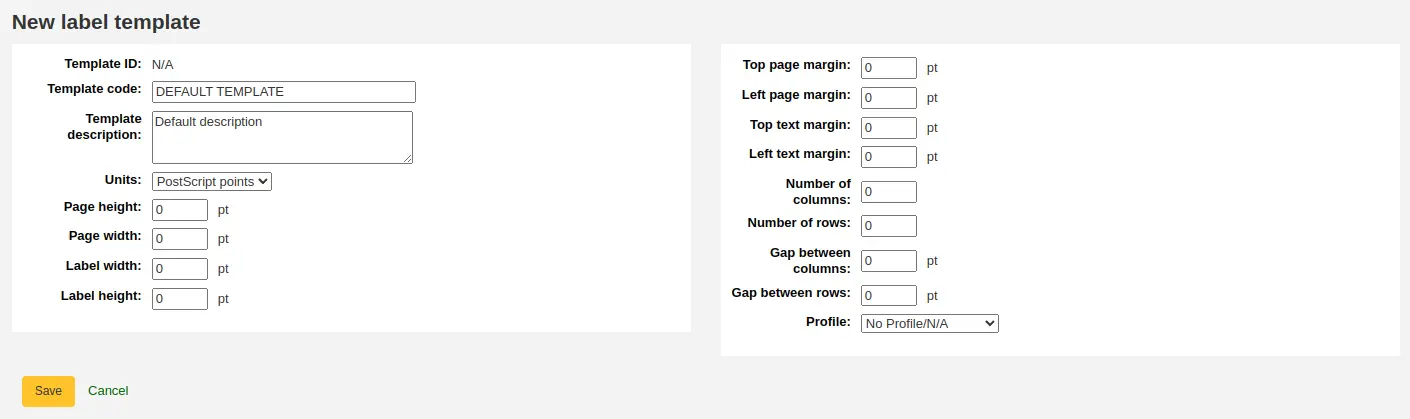
‘Template ID’: this will be automatically generated after saving your template, this is simply a system-generated unique id
‘Template code’: enter a code for the template, the code should be something you can use to identify your template on a list of templates
‘Template description’: use this field to add additional information about the template
‘Units’: choose which measurement scale you’re going to be using for the template. This should probably match the unit of measurement used on the template description provided by the product vendor.
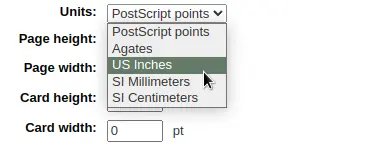
The measurements, number of columns and number of rows can be found on the packaging, on the vendor’s website or they can be measured manually.
Page height: height of the page
Page width: width of the page
Label width: width of the label
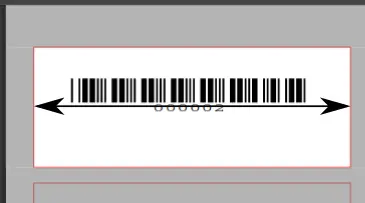
Label height: height of the label
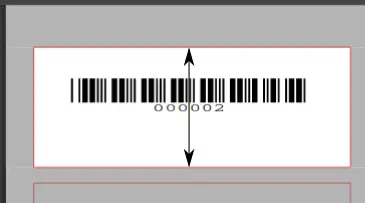
Top page margin: height between the top of the page and the top of the first row of labels
Left page margin: width between the left side of the page and the left side of the first column of labels
Top text margin: height between the top of the label and the top of the first line of text
Left text margin: width between the left side of the label and the start of the text
Note
If you do not supply a left text margin in the template, a 3/16” (13.5 point) left text margin will apply by default.
Number of columns: number of columns of labels in a page, or number of labels per row
Number of rows: number of rows of labels in a page, or number of labels per column
Gap between columns: width between two columns of labels
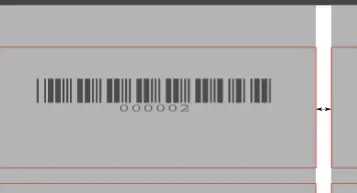
Gap between rows: height between two rows of labels
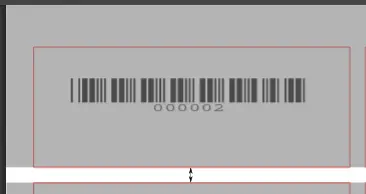
A profile is a set of “adjustments” applied to a given template just prior to printing which compensates for anomalies unique and peculiar to a given printer (to which the profile is assigned).
Before picking a profile try printing some sample labels so that you can easily define a profile that is right for your printer/template combination.
After finding any anomalies in the printed document, create a profile and assign it to the template.
Click ‘Save’ to save the new template.
After saving, your templates will appear under Manage > Label templates.
Editing a template
To edit an existing template, click on the ‘Manage’ button at the top of the label creator page and choose ‘Label template’.
In the table of currently available templates, click the ‘Edit’ button next to the template you want to edit.
Change the necessary values and click ‘Save’.
Deleting a template
To delete an existing template, click on the ‘Manage’ button at the top of the label creator page and choose ‘Label template’.
In the table of currently available layouts, click the ‘Delete’ button next to the layout you want to delete, and confirm the deletion.
Printer profiles
Get there: More > Cataloging > Tools > Label creator > Manage > Printer profiles
A profile is a set of “adjustments” applied to a given template just prior to printing which compensates for anomalies unique and peculiar to a given printer (to which the profile is assigned). This means if you set a template up and then print a sample set of data and find that the items are not all aligned the same on each label, you need to set up a profile for each printer to make up for the differences in printing styles, such as the shifting of text to the left, right, top or bottom.
If your labels are printing just the way you want, you will not need a profile.
Adding a printer profile
To add a new profile, click on the ‘New’ button at the top of the label creator tool and choose ‘Printer profile’.
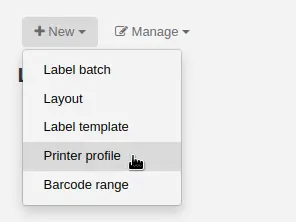
Using the form that appears you can create a profile to fix any problems with your template.
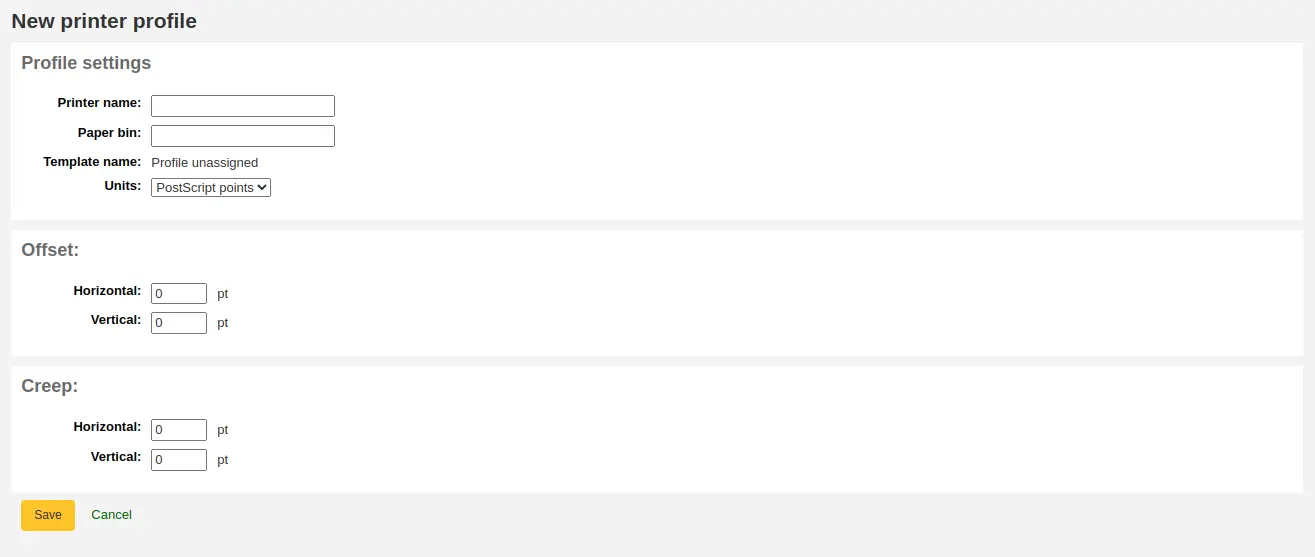
‘Printer name’: enter a name for the printer. It does not have to match your printer exactly, it is only used for reference within Koha, so you can use the printer model number or you can call it ‘the printer on my desk’.
‘Paper bin’: enter a name for the printer’s paper tray. Like the printer name, it is only used as a reference.
‘Template name’ will be filled in once you have chosen which template to apply the profile to in the template edit form
‘Units’: define what measurement scale you’re using for your profile.
The next sections are used to adjust the label printing.
Offset describes what happens when the entire image is off center either vertically or horizontally
Creep describes a condition where the distance between the labels changes across the page or up and down the page
Note
For these values, negative numbers move the error up and to the left and positive numbers move the error down and to the right
Example: the text is .25” from the left edge of the first label, .28” from the left edge of the second label and .31” from the left edge of the third label. This means the horizontal creep should be set to .03” to make up for this difference.
Click ‘Save’ to save the new profile.
After saving, your profiles will appear under Manage > Printer profiles.
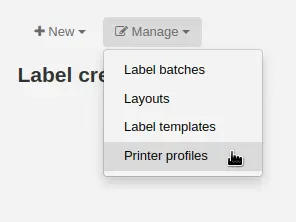
Once you have saved your new profile, you can return to the list of templates and edit the template that this profile is for.
Editing a printer profile
To edit an existing printer profile, click on the ‘Manage’ button at the top of the label creator page and choose ‘Printer profiles’.
In the table of currently available printer profiles, click the ‘Edit’ button next to the profile you want to edit.
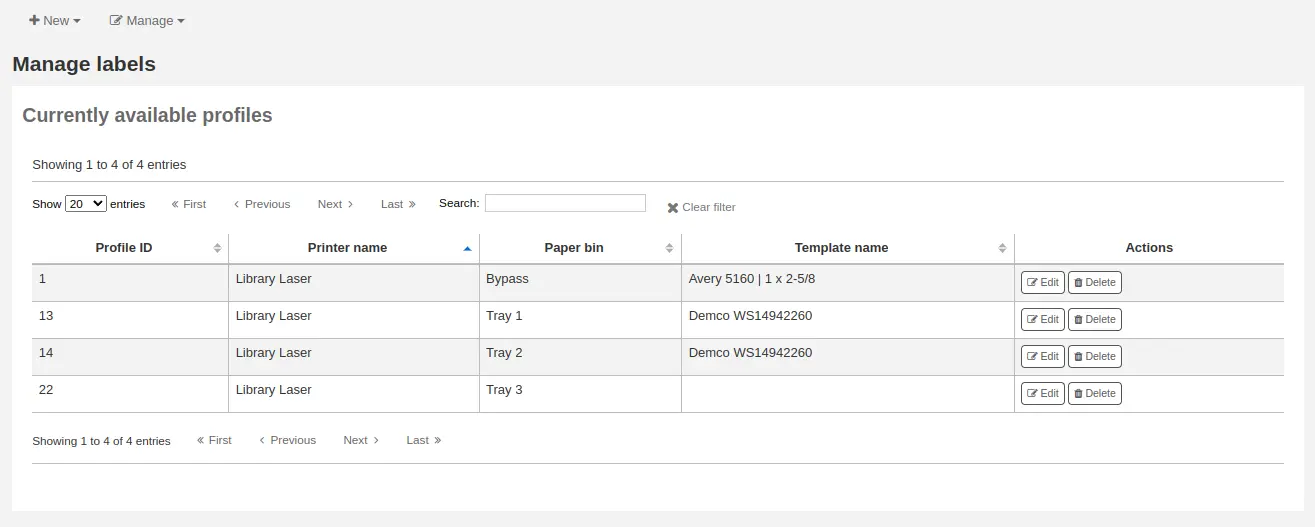
Change the necessary values and click ‘Save’.
Deleting a printer profile
To delete an existing printer profile, click on the ‘Manage’ button at the top of the label creator page and choose ‘Printer profiles’.
In the table of currently available profiles, click the ‘Delete’ button next to the profile you want to delete, and confirm the deletion.
Label batches
Get there: More > Cataloging > Tools > Label creator > Manage > Label batches
Batches are made up of the items for which you would like to print labels. Once in this tool you can search for the item records you would like to print out labels for.
Adding a label batch
Batches can be created in one of two ways. The first is to click the ‘Create label batch’ link on the Staged MARC management page.
The other is to choose to create a new batch from the label creator tool

You will be brought to an empty batch with a box to scan barcodes or itemnumbers in to and an ‘Add item(s)’ button at the bottom of the page.
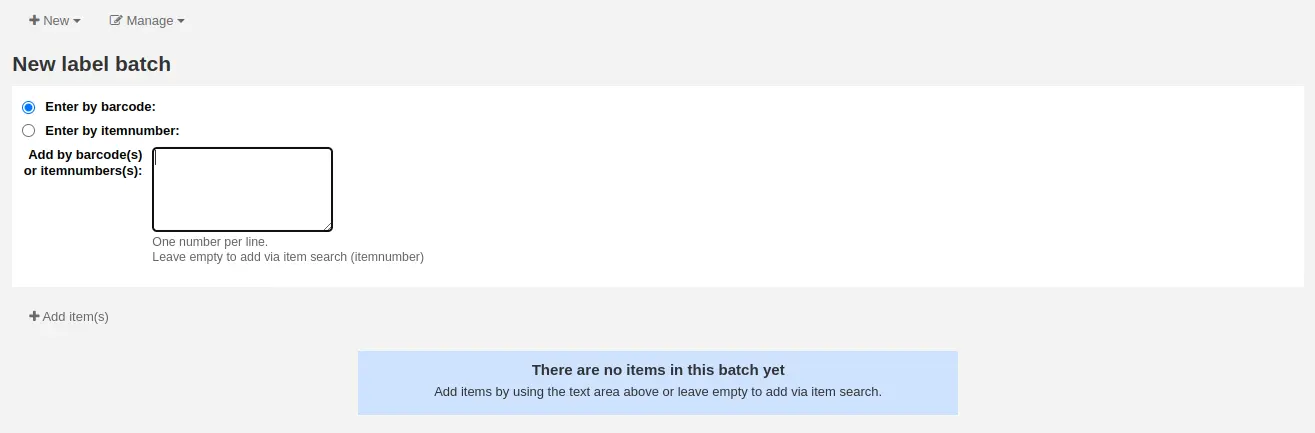
You can either scan barcodes in to the box provided and click the ‘Add item(s)’ button or you can click the ‘Add item(s)’ button with the barcodes box empty. Clicking ‘Add item(s)’ with nothing in the barcodes box will open a search window for you to find the items you want to add to the batch.
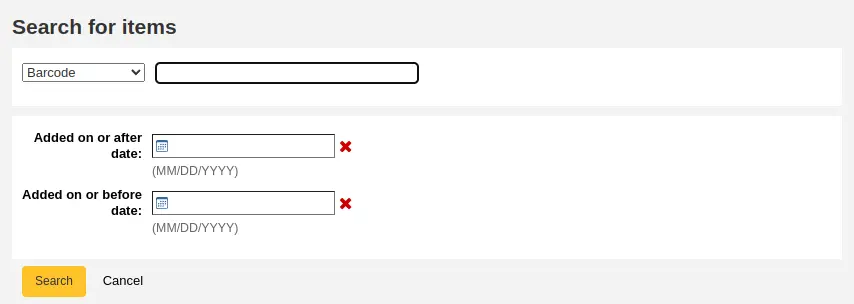
From the search results, click the check box next to the items you want to add to the batch and click the ‘Add checked’ button. You can also add items one by one by clicking the ‘Add’ link to the left of each item.
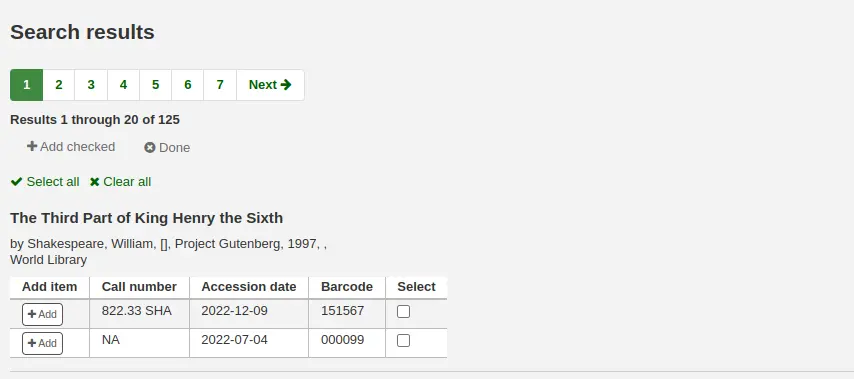
Once you have added all of the items click the ‘Done’ button. Click again on the ‘Add item(s)’ button to transfer the items from the barcode box to the batch. The resulting page will list the items you have selected.
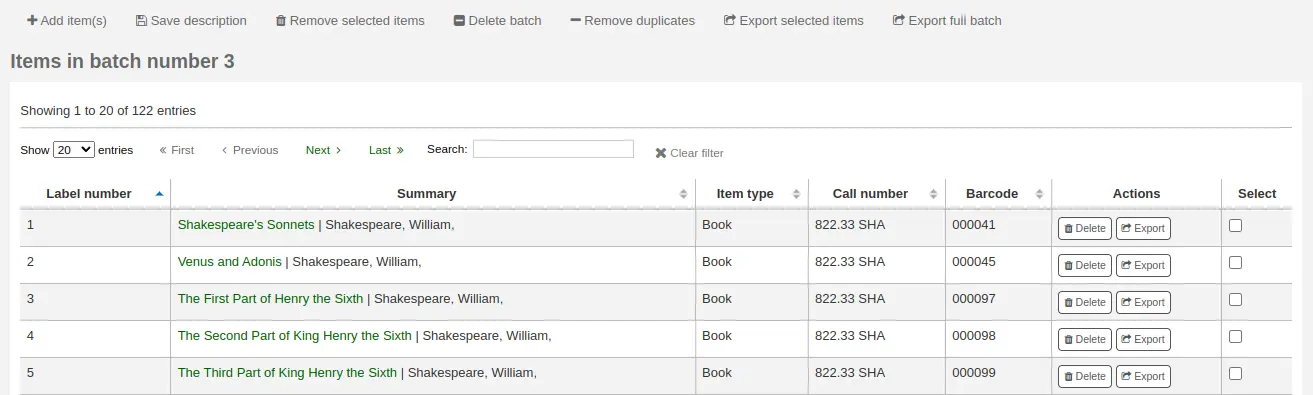
If some items were added more than once by accident, you can click the ‘Remove duplicates’ button. This will check barcodes and remove any duplicates from the batch.
If you need to remove some items from the batch, select them by checking the box on the right and click the ‘Remove selected items’ button.
Optionally, you can add a description to this batch, in case you need to find it later. Enter a description in the ‘Batch description’ field and click ‘Save description’. This description will appear in the ‘Currently available batches’ page.
To print your labels, click the ‘Export full batch’ button. To print only some of the labels, select the items and click the ‘Export selected item(s)’ button. To print only one label from the batch, click the ‘Export’ button to the right of that item. Either way you will be presented with a confirmation screen where you can choose your template and layout. If you’re using a sheet of labels that is not complete, you can enter the starting label (labels are counted horizontally).
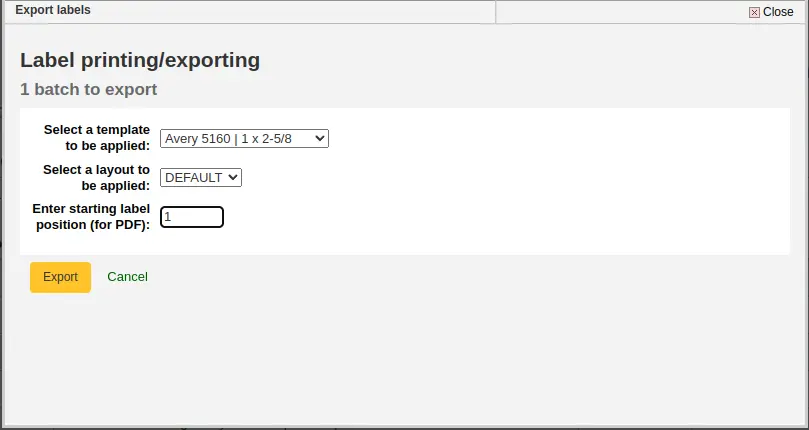
You will then be presented with three download options: PDF, CSV, or XML.
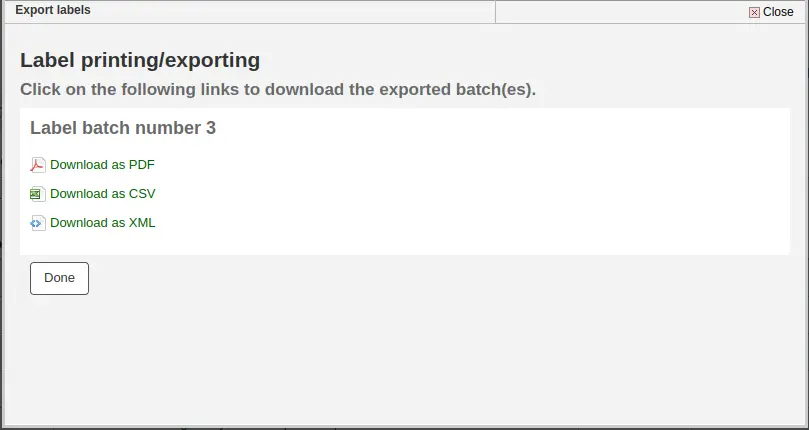
After saving your file, simply print on the blank labels you have in your library.
The batch is saved for later use, if needed, and is accessible under Manage > Label batches.
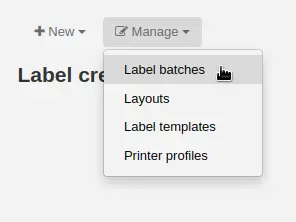
Editing a label batch
To edit an existing label batch, click on the ‘Manage’ button at the top of the label creator page and choose ‘Label batches’.
You will access currently available batches.
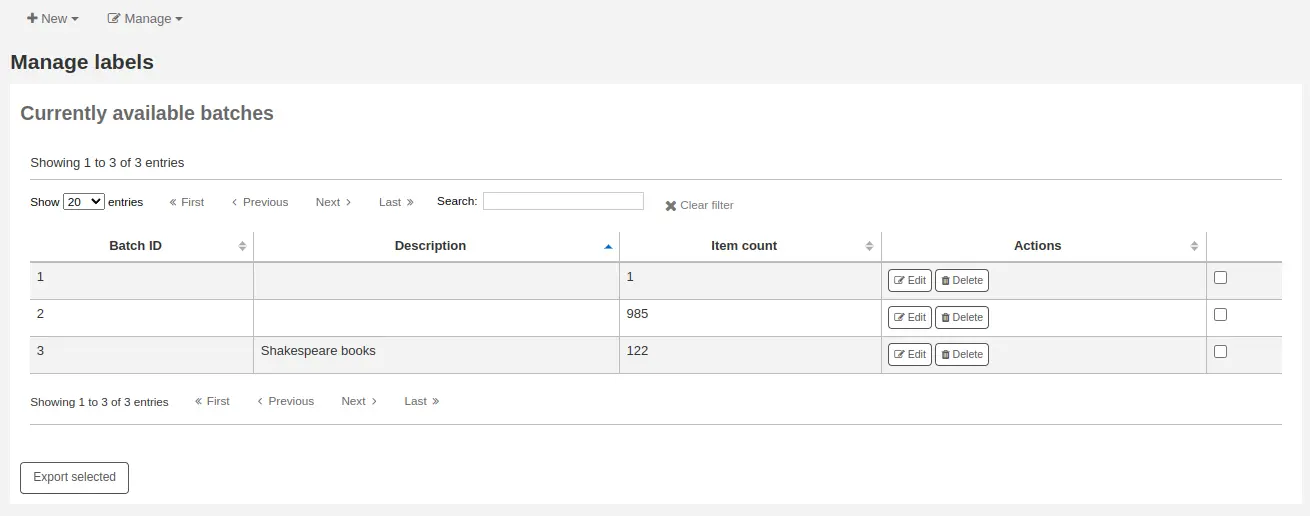
You can print one or more batches directly from this page by checking the box to the right of the batch or batches to print and clicking ‘Export selected’.
To edit a batch, click the ‘Edit’ button next to the batch you want to edit.
Deleting a label batch
To delete an existing label batch, click on the ‘Manage’ button at the top of the label creator page and choose ‘Label batches’.
You will access currently available batches.
Click the ‘Delete’ button next to the batch you want to delete, and confirm the deletion.
You can also delete a batch from the batch page itself, by clicking the ‘Delete batch’ button above the table of items in the batch.
Barcode range
Get there: More > Cataloging > Tools > Label creator > New > Barcode range
If you want to print your barcode labels in advance, before even cataloging the items, you can choose to add a batch of a range of barcodes.
Click ‘New’ and choose ‘Barcode range’ from the label creator tool.
Enter the starting and ending barcodes.

Warning
The barcode range tool does not accept leading zeroes. If you enter 0001234 the barcode that will be printed will be 1234.
Click ‘Print range’.
You will be presented with the confirmation screen where you can choose your template and layout and enter the starting label if using an incomplete sheet of labels.
Note
The only download option for barcode ranges is PDF.
Save the file and print it on a blank sheet of labels.
Barcode generator
Note
Only staff with the label_creator permission (or the superlibrarian permission) will have access to this tool.
Get there: More > Cataloging > Tools > Barcode generator
Koha offers a barcode generator tool that can be used to create images of barcodes for various uses (in notices for example).
This tool can be used for a number of types of barcodes, as well as QR codes.
It will create an image from the given barcode in the chosen barcode format and also generate a unique HTML tag which can be used anywhere.
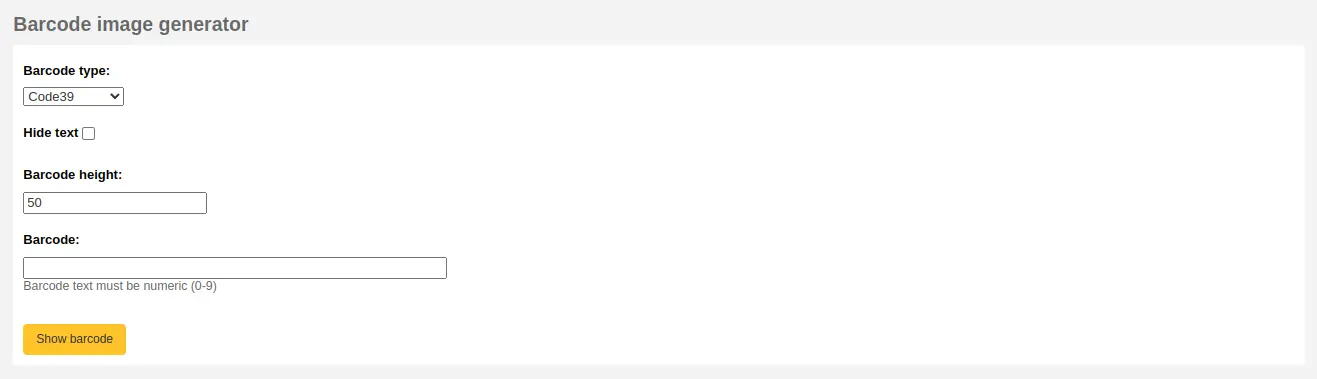
To generate a new image, fill out the form.
Barcode type: choose the barcode type to be used
Note
Most barcode types allow only numerical characters.
The following allow alphanumeric characters:
Code39
NW7
QRcode
Some barcode types (EAN13, EAN8, UPCA, and UPCE) expect specific patterns (which can be found here https://barcode.tec-it.com/en/ under EAN/UPC).
Hide text: check this box if you only want the actual barcode on the image. If unchecked, the number will be printed in human readable characters under the barcode.
Barcode height: enter the height in pixels the barcode image should have
Barcode: enter the barcode to be printed
Click ‘Show barcode’.
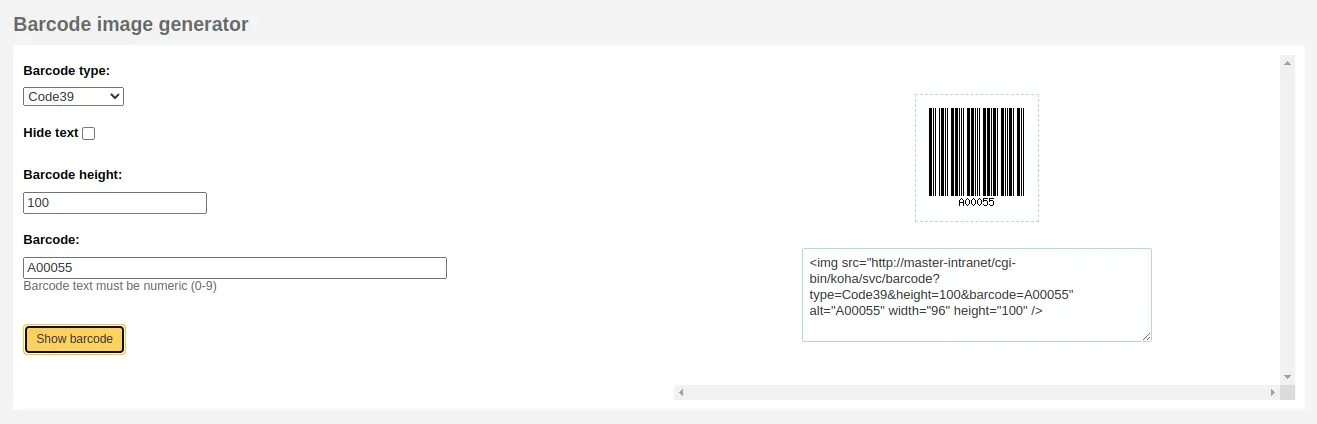
On the right of the screen is the barcode image, which can be downloaded or printed.
Under the image, there is an HTML ‘img’ tag. You can copy the tag and paste it anywhere you need the barcode to appear (however, note that it is only available in the staff interface).
For a QR Code, the options are slightly different. Instead of ‘Barcode height’, there is a ‘QR Code module size’ field that can be adjusted by slider. The number refers to the size in pixels of each black or white square in the code (modules). The larger the modules, the larger the image will be.
A QR Code can take not only alphanumeric characters, but any type of textual information, such as a URL or even a short text.
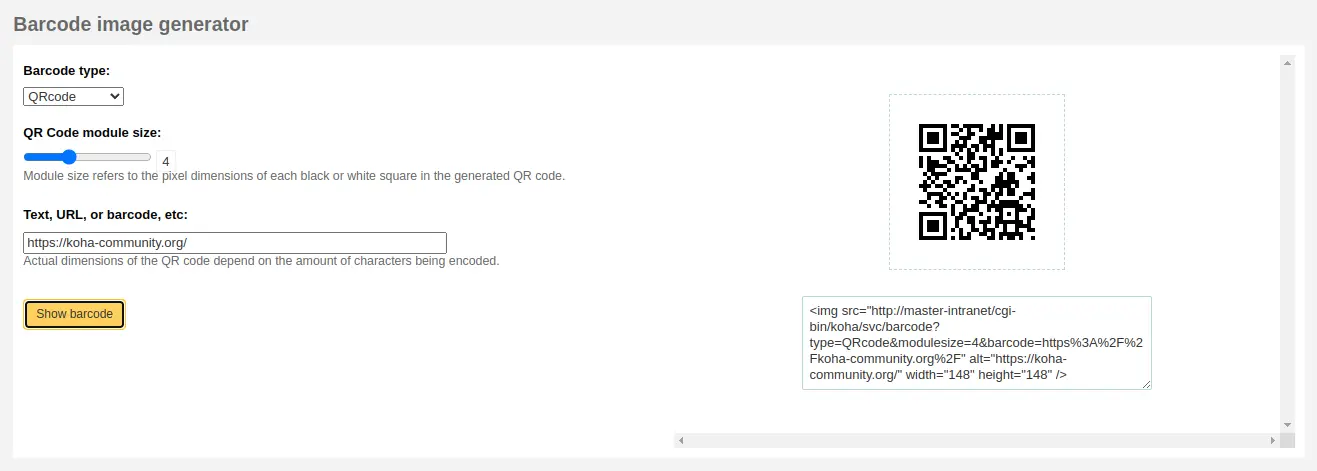
Quick spine label creator
Note
Only staff with the label_creator permission (or the superlibrarian permission) will have access to this tool.
Get there: More > Cataloging > Tools > Quick spine label creator
Note
This tool does not use the label layouts or templates, it simply prints a spine label in the first spot on the label sheet, or on a single label from a label printer.
Define the fields you want to print on the spine label in the SpineLabelFormat system preference.
Format your label printing by either editing the spinelabel.css file found in koha-tmpl/intranet-tmpl/prog/en/css/ or adding the CSS directly in the IntranetUserCSS system preference.
For example, adding the following CSS code in IntranetUserCSS will alter the label’s font.
/* Modify the Quick Spine Label Creator Font etc */
.tools.labels #spinelabel {
           font-size:11.5pt;
           font-family:courier new;
           font-weight:bold;
  }

To use this tool you simply need the barcode for the book you’d like to print the spine label for, and click ‘View spine label’.

From the page that appears, click ‘Print this label’.
If for some reason you need to change the callnumber, click ‘Edit this label’. The lock icon on the button will become unlocked, and you will be able to click on the callnumber to edit it.
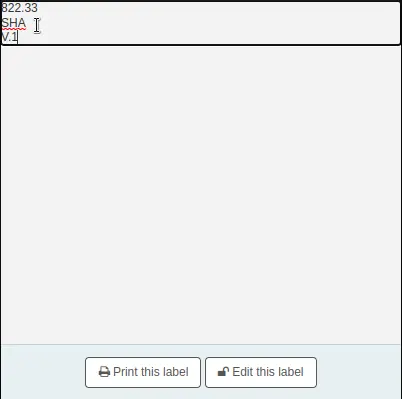
Authorities
Authority records are a way of controlling fields in your MARC records. Using authority records will provide you with control over subject headings, personal names and places.
Adding authorities
Note
Only staff with the editauthorities permission (or the superlibrarian permission) will be able to create authority records.
To add a new authority record you can either choose the authority type from the ‘New authority’ button or search another library by clicking the ‘New from Z39.50’ button.
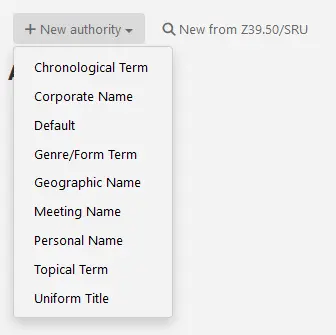
If you choose to enter a new authority from scratch, the form that appears will allow you to enter all of the necessary details regarding your authority record.
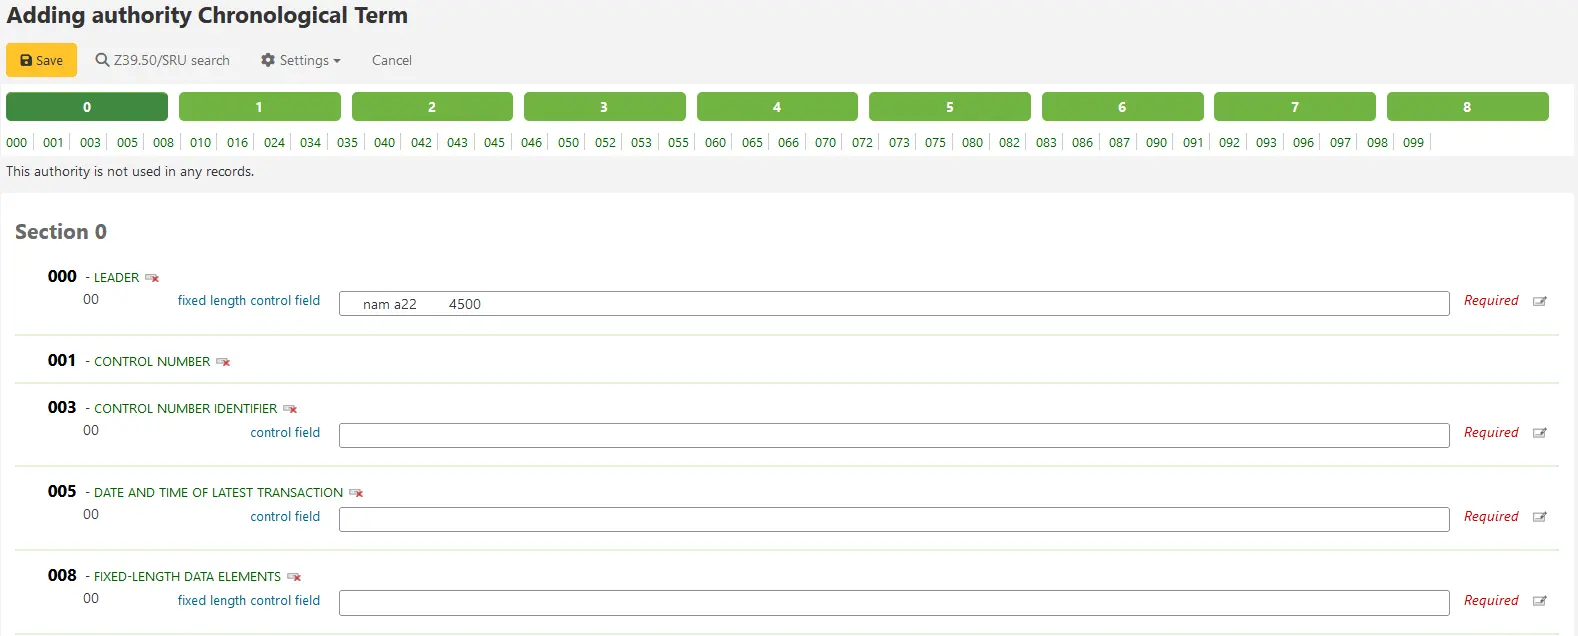
You can also change the authority type of the record in the ‘Settings’ menu above the cataloging form.
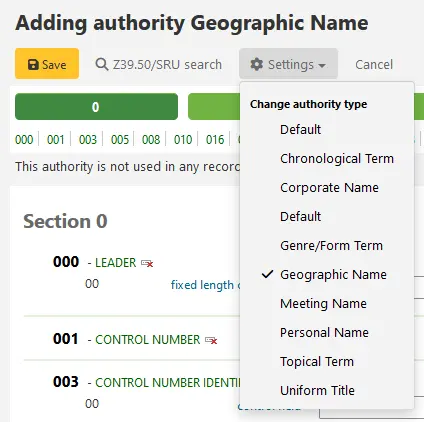
To expand collapsed values simply click on the title and the subfields will appear. To duplicate a field or subfield just click the plus sign (+) to the right of the label. To use field helper plugins simply click the ellipsis (…) to the right of the field.
When linking authorities to other headings, you can use the authority finder plugin by clicking the ‘Tag editor’ button to the right of the field.
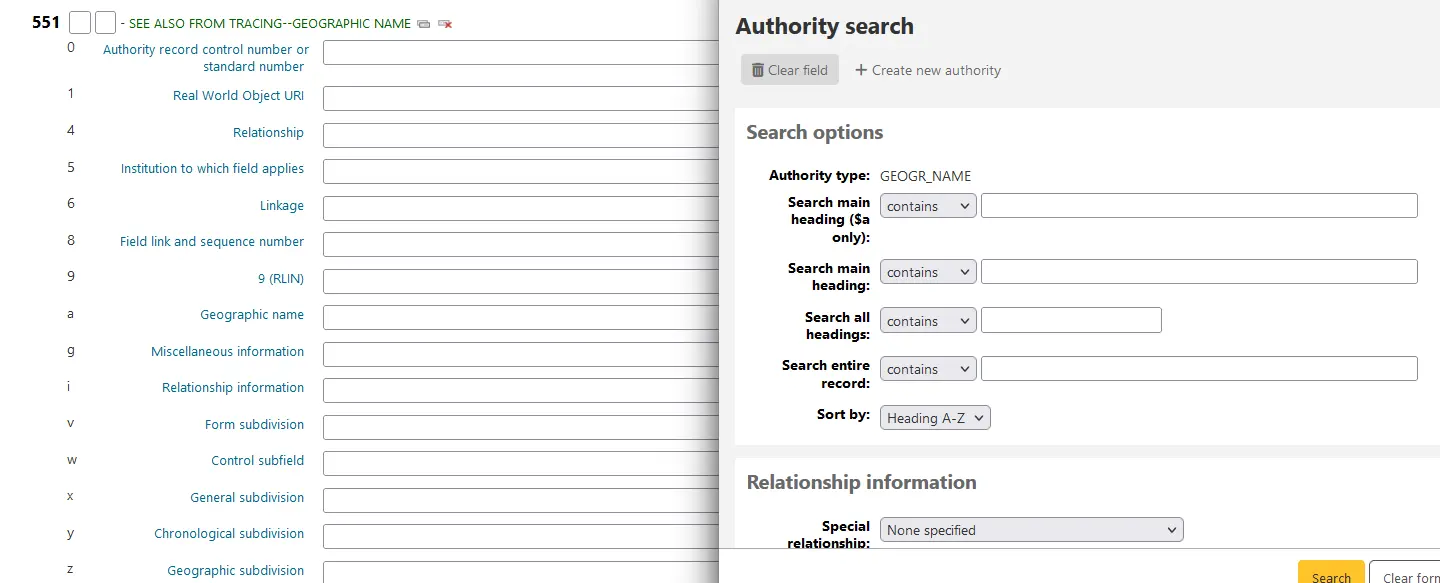
From there you can search your authority file for the authority to link. If you can’t find the authority to link, you can click the ‘Create new’ button and add the necessary authority for the link. This plugin also allows for you to choose the link relationship between the authorities.
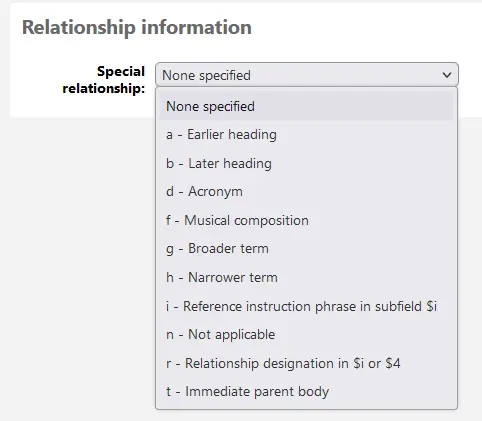
You can also import an authority record by clicking on ‘Z39.50/SRU search’ above the cataloging form. The Z39.50/SRU search form will open in a new window.
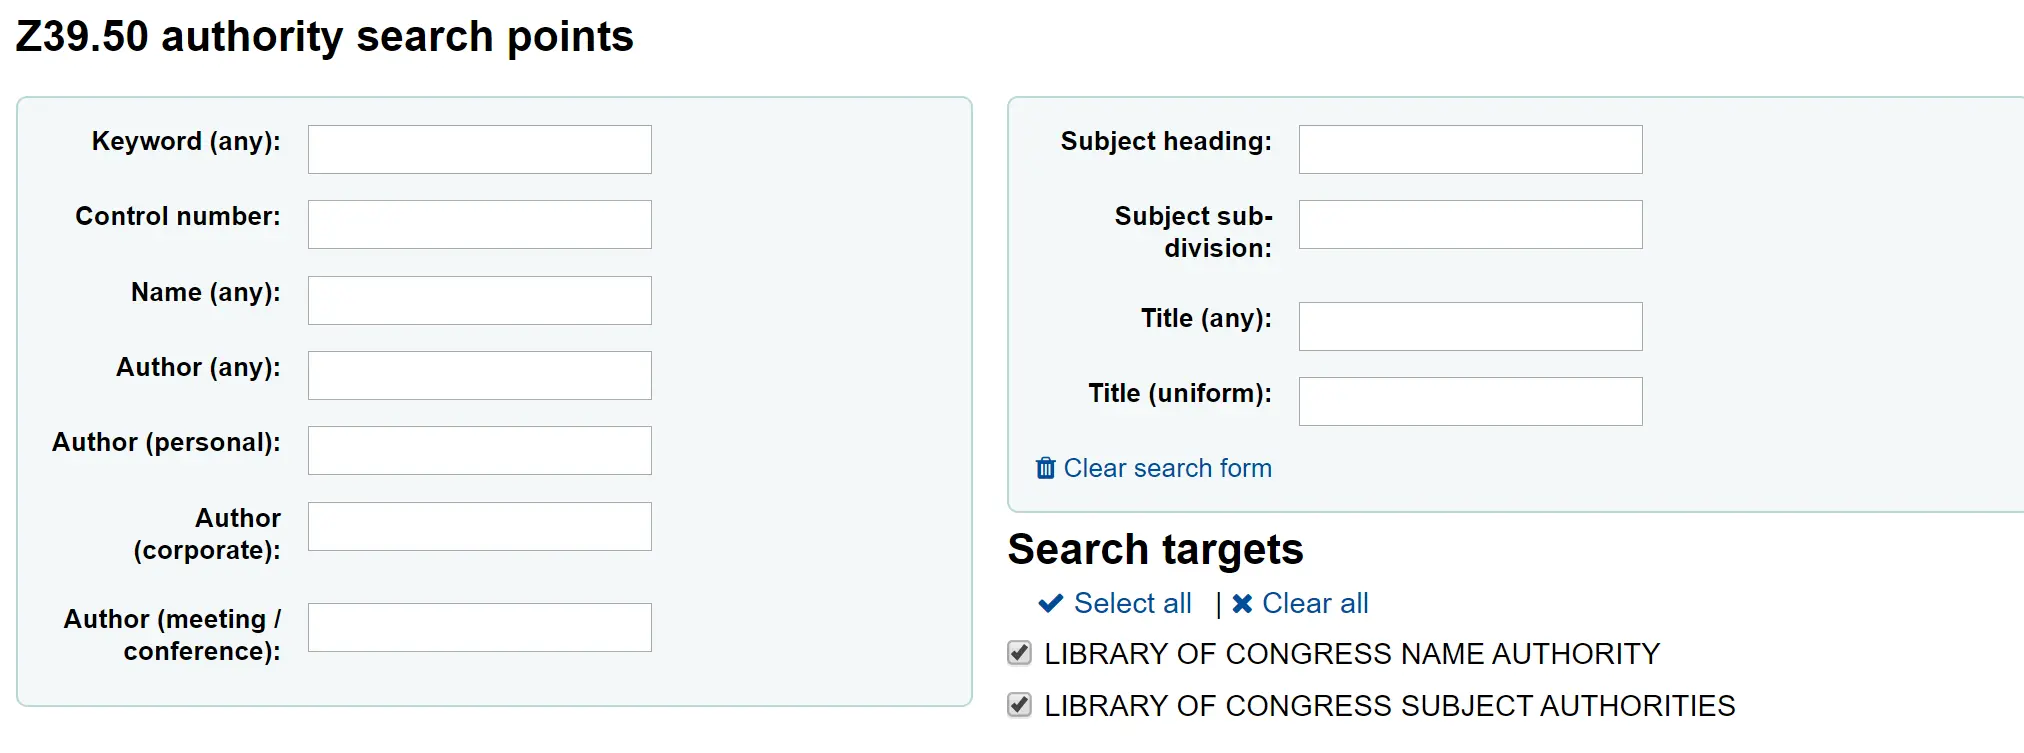
From the results you can use the ‘Actions’ menu to the right of the record you would like to add to Koha and select ‘Import’ to import it.
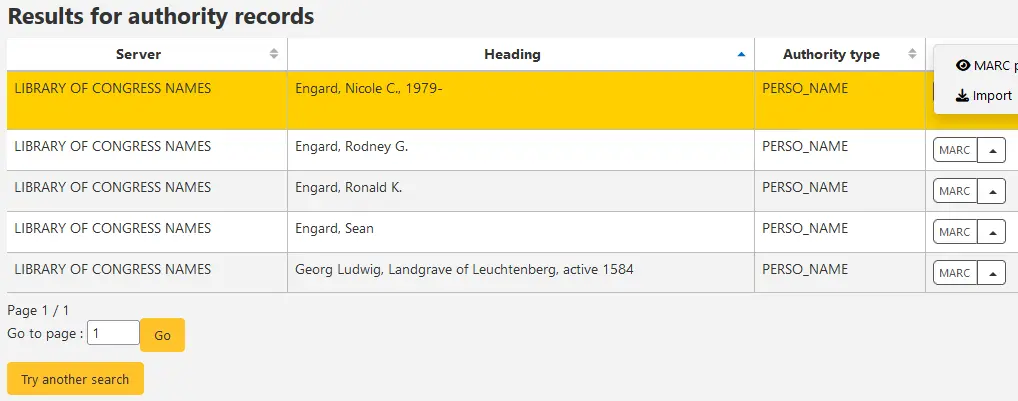
You will then be presented with the form to edit the authority before saving it to your system.
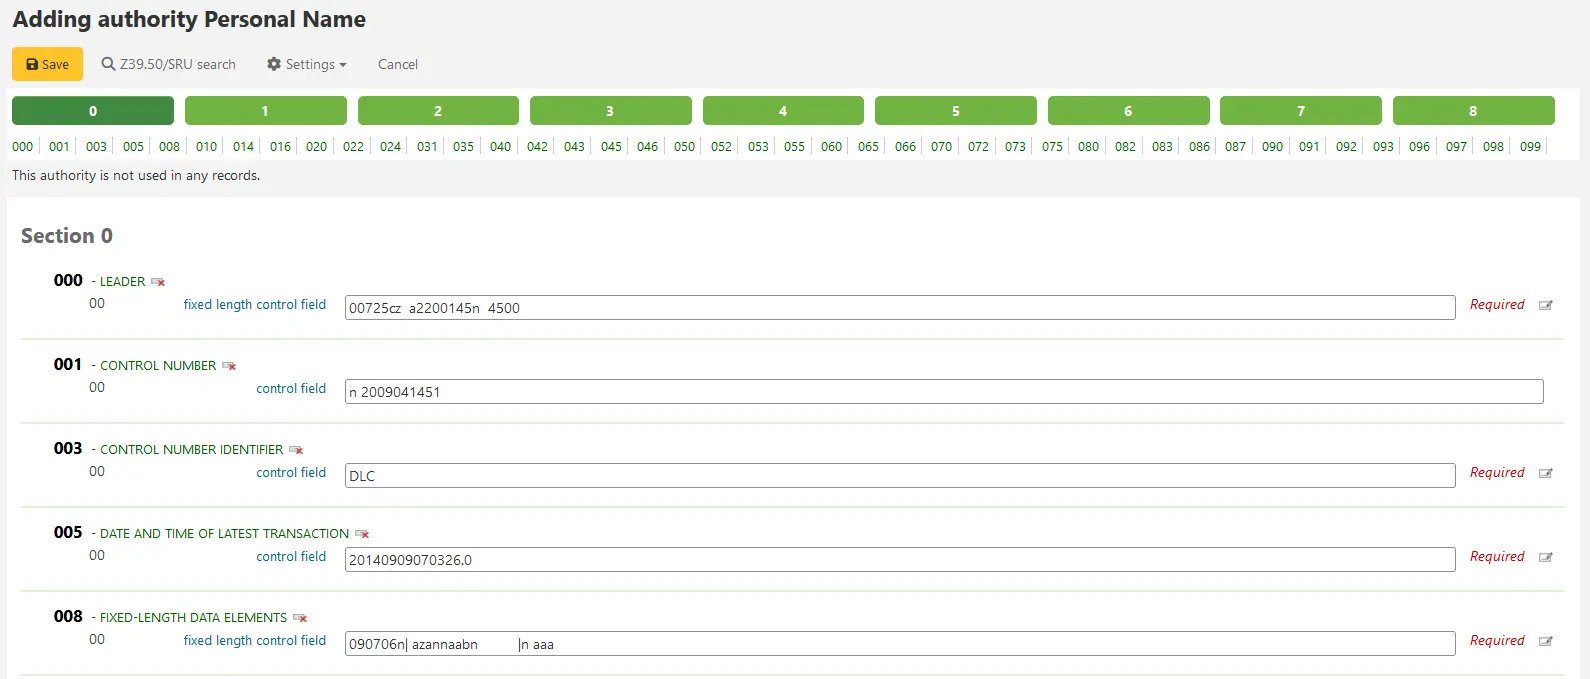
Searching authorities
From the authorities page you can search for existing terms and the bibliographic records they are attached to.

From the results you will see the authority record, how many bibliographic records it is attached to, an ‘Actions’ menu that includes the ability to edit, merge and delete (if there are no bibliographic records attached).
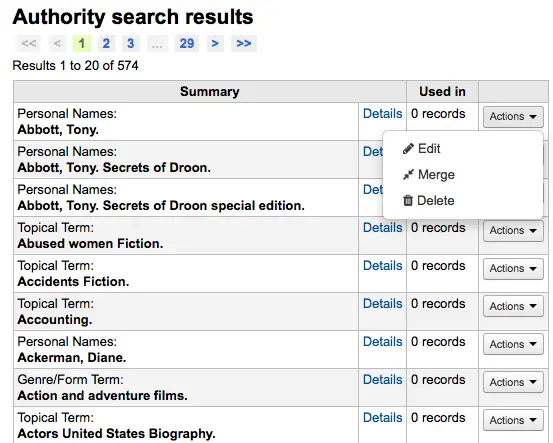
Note
In MARC21 systems, if the ShowHeadingUse system preference is enabled, there will be an additional column showing the appropriate use of the authority record in main or added entries, subject headings, or series titles.
Clicking on the ‘Details’ link to the right of the authority record summary will open the full record and the option to edit the record.
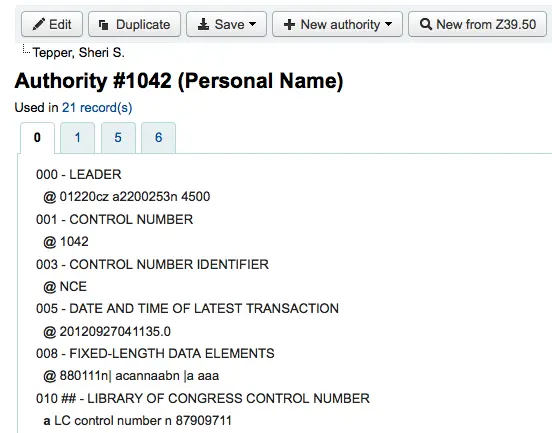
If the authority has ‘See also’s in it you will see those broken out on the search results, clicking the linked headings will run a search for that heading instead.
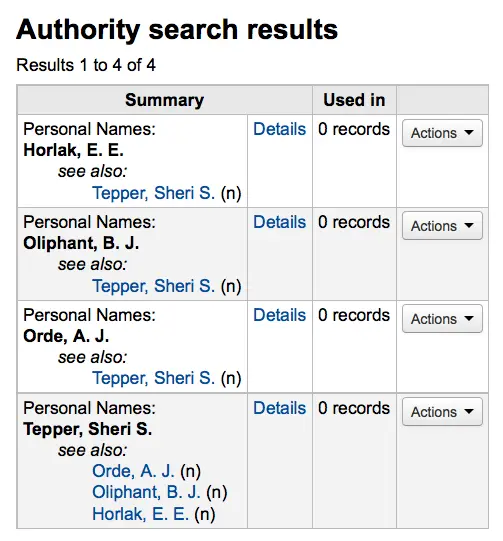
Editing authorities
Note
Only staff with the editauthorities permission (or the superlibrarian permission) will be able to edit or delete existing authority records.
Authorities can be edited by clicking on the authority summary from the search results and then clicking the ‘Edit’ button above the record. Or by clicking on the ‘Edit’ link to the left of the authority on the search results.
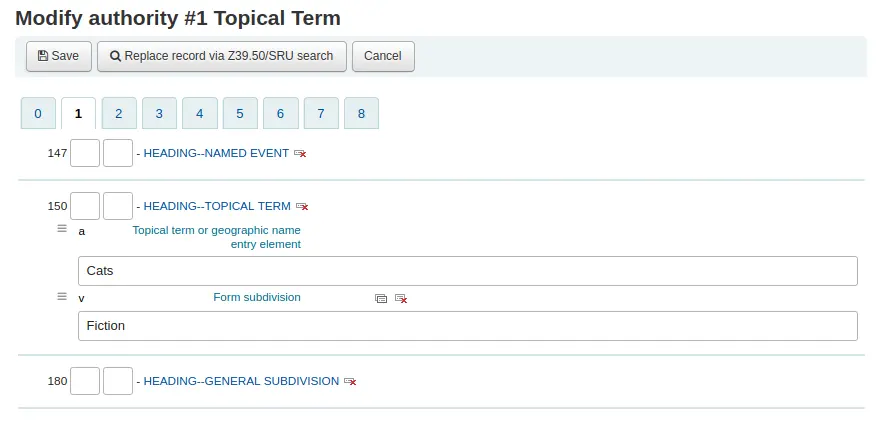
Once you’ve made the necessary edits, simply click ‘Save’.
Depending on the number of bibliographic records this authority record is linked to, the bibliographic records may be updated right away. This depends on the value in the AuthorityMergeLimit system preference (the default is 50). If the number of bibliographic records is under the value of AuthorityMergeLimit, the bibliographic records will be changed right away. If the number of bibliographic records exceeds the value of AuthorityMergeLimit, they will only be updated when the merge_authorities.pl script is run.
To delete an authority record you first must make sure it’s not linked to any bibliographic records. If it is not used by any bibliographic records a ‘Delete’ link will appear to the right of the record on the search results and as a button that appears after clicking on the summary of the authority record.
Merging authorities
Note
Only staff with the editauthorities permission (or the superlibrarian permission) will be able to merge authority records.
If you have duplicate authority records you can merge them together by clicking the ‘Merge’ link, found in the Actions menu, next to two results on an authority search.

After clicking ‘Merge’ on the first result you will see that authority listed at the top of the results.
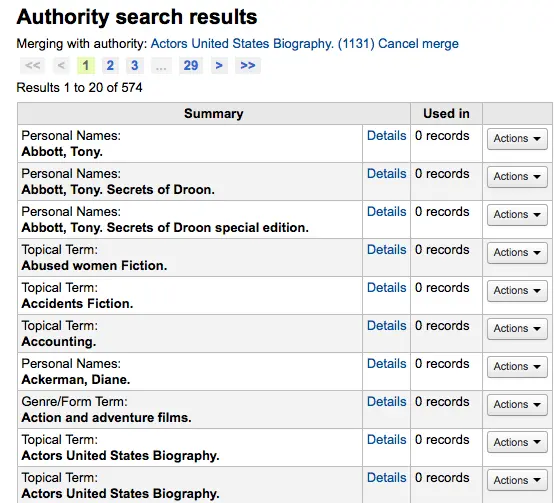
Next you need to click ‘Merge’ next to the second result you’d like to merge.
You will be asked which of the two records you would like to keep as your primary record and which will be deleted after the merge.
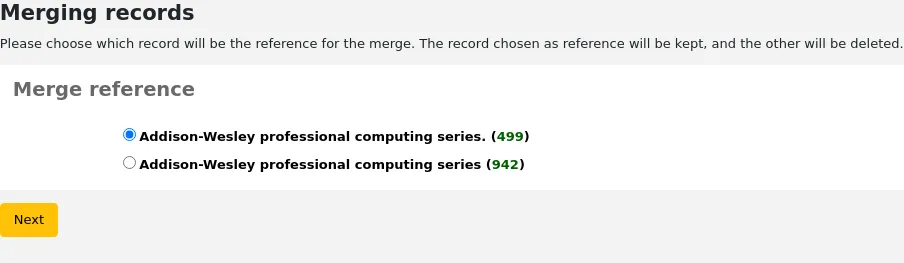
You will be presented with the MARC for both of the records (each accessible by tabs labeled with the authority numbers for those records). By default the entire first record will be selected, uncheck the fields you don’t want in the final (destination) record and then move on to the second tab to choose which fields should be in the final (destination) record.
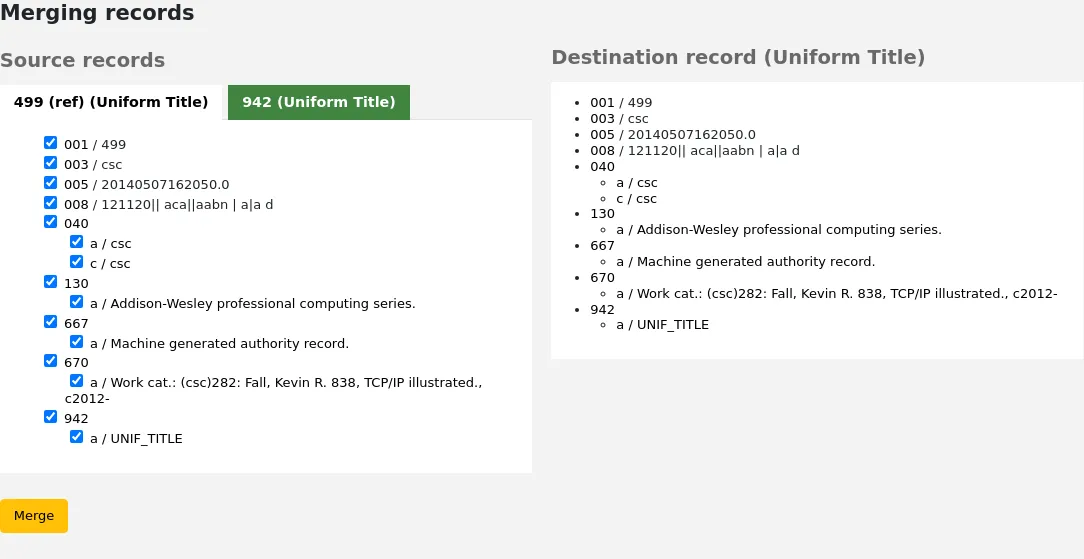
Once you have completed your selections click the ‘Merge’ button. The primary record will now contain the data you chose for it and the second record will be deleted.
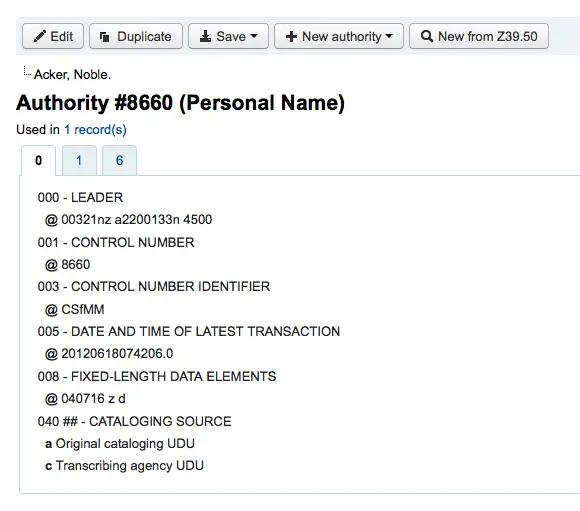
If you have two authority records for the same heading in different frameworks, you can merge them together by clicking the ‘Merge’ link, found in the actions menu, next to two results on an authority search. For example, these authority records using different frameworks can be merged.
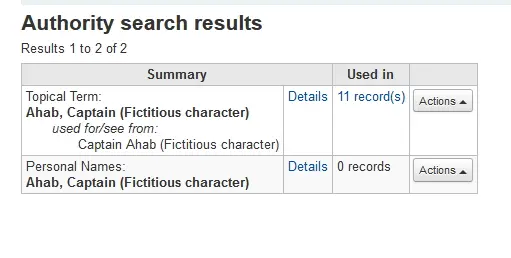
If you select the ‘Merge’ link, found in the action menu of the top record.
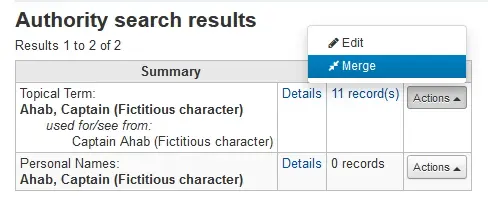
You will see that authority record listed at the top of the results.
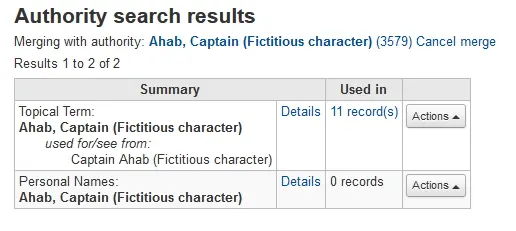
Next you need to select ‘Merge’ next to the second result you’d like to merge.
You will be asked which of the two records you would like to keep as your primary record and which will be deleted after the merge. You will also use the dropdown menu to pick which framework to use.
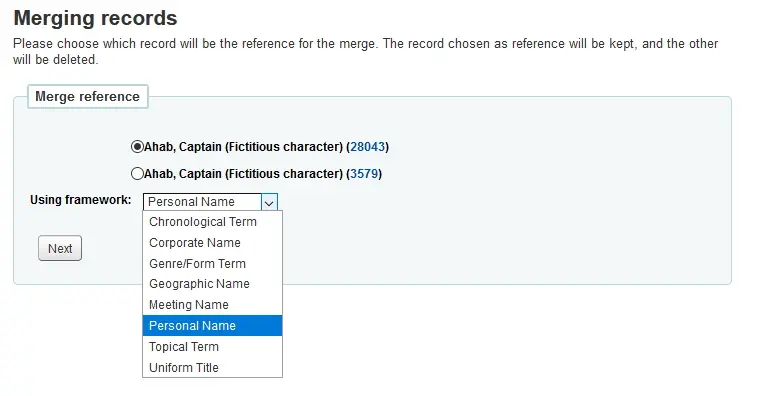
You will be presented with the MARC for both of the records (each accessible by tabs labeled with the authority numbers for those records). By default the entire first record will be selected, uncheck the fields you don’t want in the final (destination) record and then move on to the second tab to choose which fields should be in the final (destination) record.
The “ref” record (the primary record) will be in the framework that you chose:
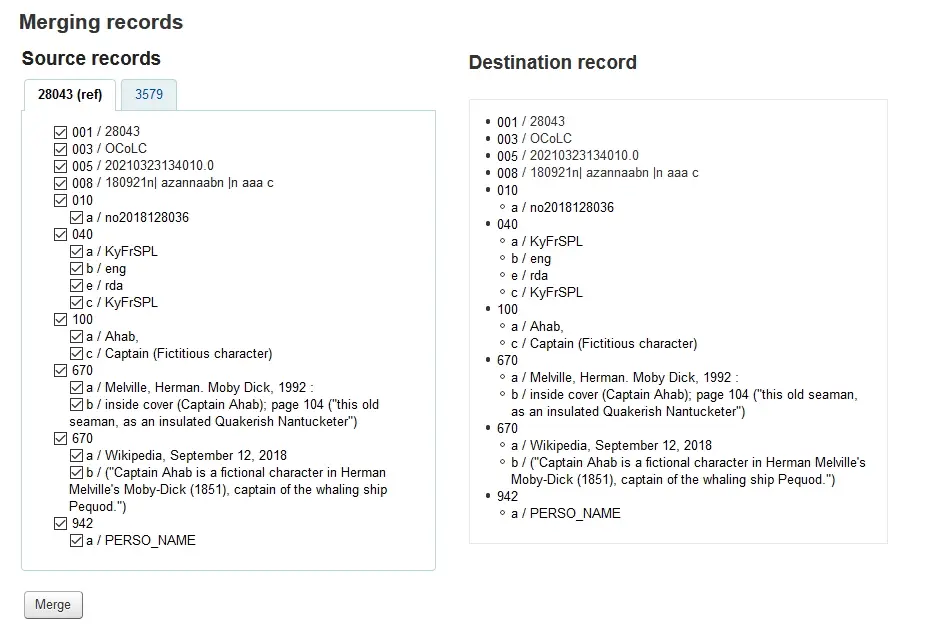
Once you have completed your selections click the ‘Merge’ button. The primary record will now contain the data you chose for it and the second record will be deleted.
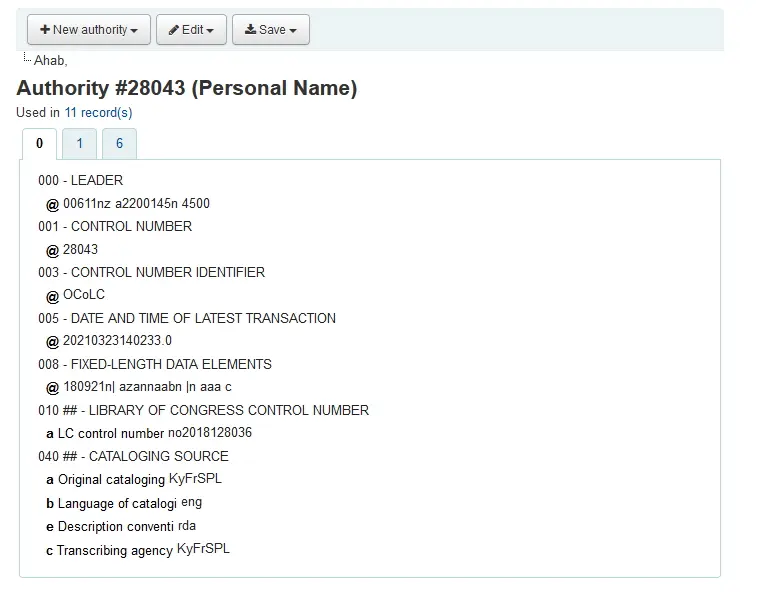
The MARC tag of the linked headings will have been updated accordingly.
Exporting data
Note
Only staff with the export_catalog permission as well as at least one of the editcatalogue sub-permissions (or the superlibrarian permission) will have access to this tool.
Get there: More > Cataloging > Export > Export catalog data
Koha comes with a tool that will allow you to export your bibliographic, items and authority records in bulk. This can be used to send your records to fellow libraries, organizations or services; or simply for backup purposes.
Exporting bibliographic records
At the top of the screen you need to pick what data you’re exporting. If you’re exporting bibliographic records with or without the item information, click the ‘Export bibliographic records’ tab.
Fill in the form in order to limit which records are exported (all fields are optional)
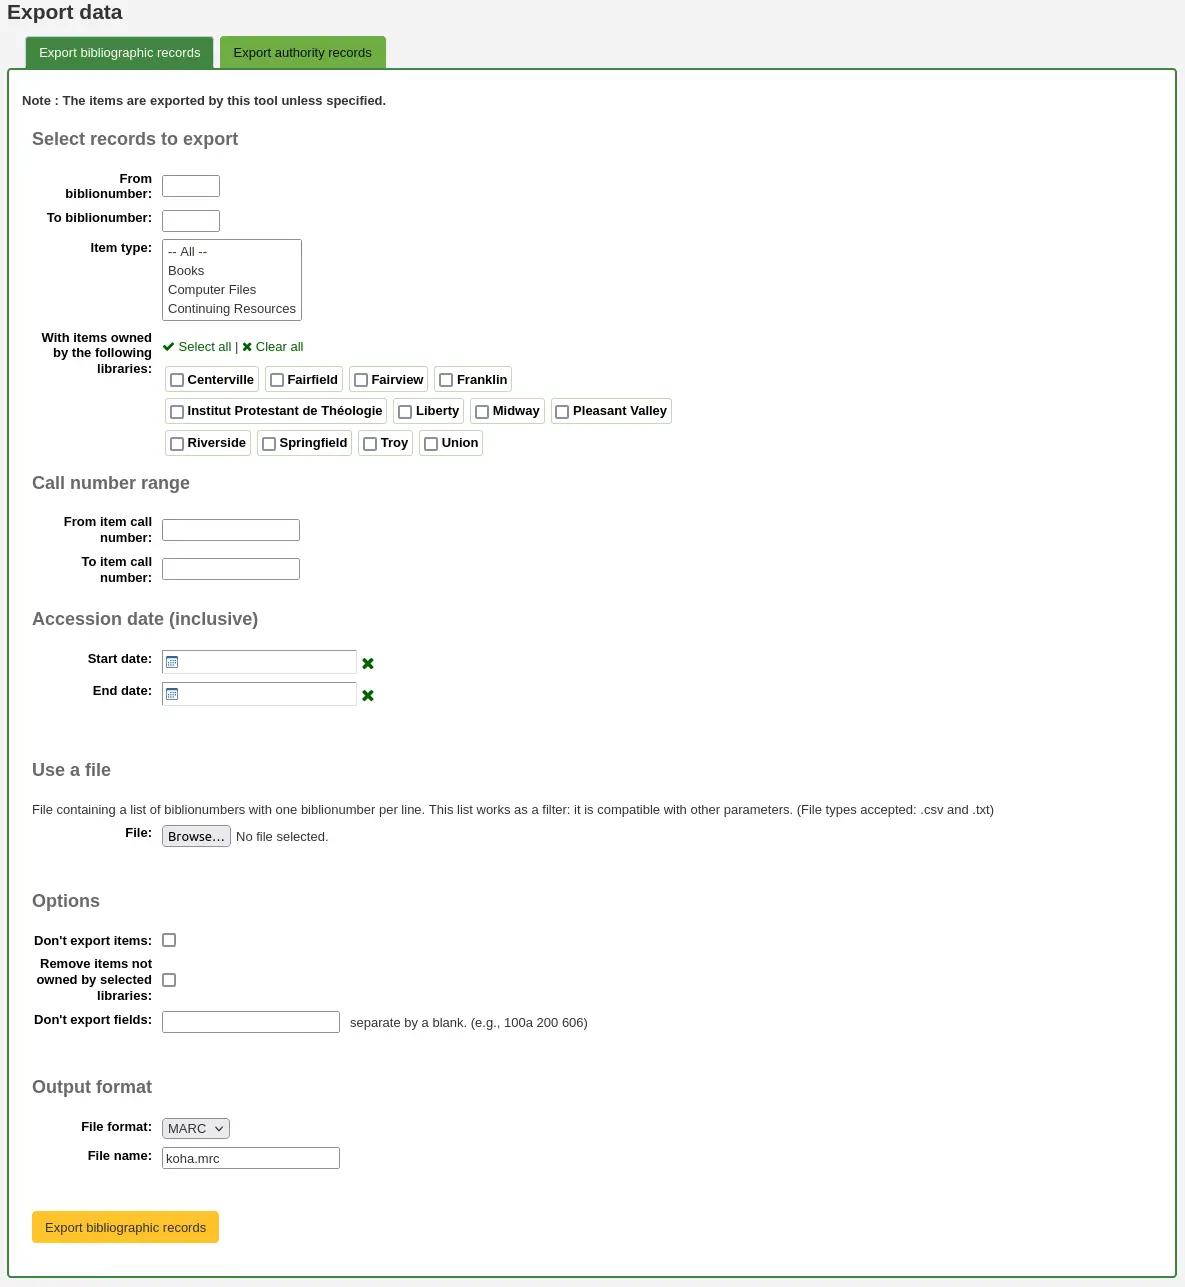
From biblionumber / To biblionumber: limit the exportation to a range of biblionumbers
Item type: limit to a specific item type, or several item types
Warning
This limit will use the item type defined in the item-level_itypes system preference.
If the item-level_itypes system preference is set to ‘specific item’ and there are no items attached to a bibliographic record, that record will not be exported.
To export all bibliographic records of a specific type, the item-level_itypes system preference needs to be set to ‘bibliographic record’.
With items owned by the following libraries: limit to a specific library or group of libraries
Warning
This is a filter; if this is set to the default value (all libraries selected), or select one or more libraries, bibliographic records with no items attached will not be exported.
To get bibliographic records with no items, ‘clear all’ selected libraries (that is, deselect all libraries).
Call number range: limit to a call number range
Accession date (inclusive): limit to an acquisition date range
Use a file: you can load a file of biblionumbers of the records to be exported. The file type needs to be .csv or .txt
Don’t export items: by default, items will be exported. Check this box to only export bibliographic records
Remove items not owned by selected libraries: check this box to limit the exported items to items from the library you’re logged in as (if the ‘With items owned by the following libraries’ field above is set to ‘All’) or to the library or libraries selected above
Don’t export fields: enter which fields that should not be exported, separated by spaces. This can be handy if you’re sharing your data, you can remove all local fields before sending your data to another library
File format: choose the file type, MARC or MARCXML
File name: if needed, enter a new file name for the export file
Click ‘Export bibliographic records’
Exporting authority records
At the top of the screen you need to pick what data you’re exporting. If you’re exporting authority records, click the ‘Export authority records’ tab.
Fill in the form in order to limit which records are exported (all fields are optional)
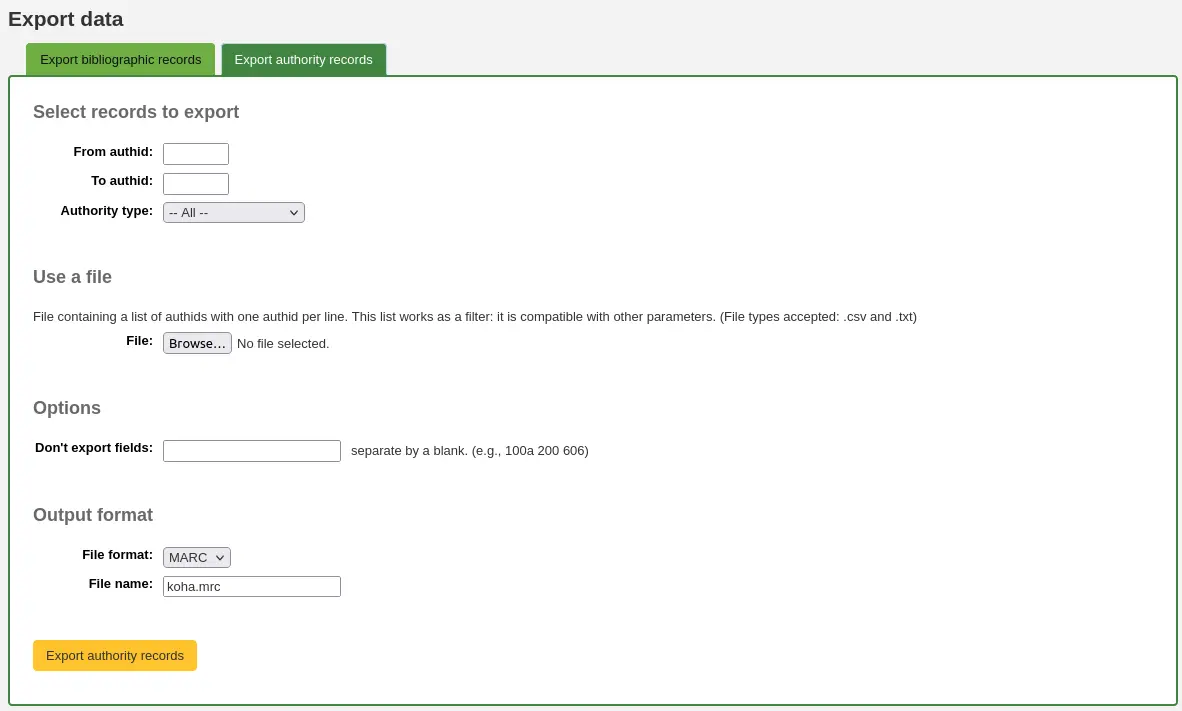
From authid / To authid: limit the exportation to a range of authids
Authority type: limit the exportation to records of a specific authority type
Use a file: you can load a file of authids of the records to be exported. The file type needs to be .csv or .txt
Next choose fields that you would like to exclude from the export separated by a space (no commas)
Don’t export fields: enter which fields that should not be exported, separated by spaces.
To exclude all subfields of the 200 field, for example, just enter 200
To exclude a specific subfield, enter it beside the field value. For example, 100a will exclude just the subfield ‘a’ of the 100 field
File format: choose the file type, MARC or MARCXML
File name: if needed, enter a new file name for the export file
Click ‘Export authority records’
Inventory
Note
Only staff with the inventory permission (or the superlibrarian permission) will have access to this tool.
Get there: More > Cataloging > Reports > Inventory
Koha’s inventory tool can be used in one of three ways:
By creating a shelf list that you can then mark items off on;
By uploading barcodes gathered by a portable scanner;
By comparing barcodes gathered by a portable scanner or scanned directly to a generated shelf list.
Creating a shelf list
If you do not have the ability to use your barcode scanner on the floor of the library, the option available to you is to generate a shelf list based on criteria you enter. You can then print it to use while walking around the library checking your collection or use it directly in Koha on a portable device.
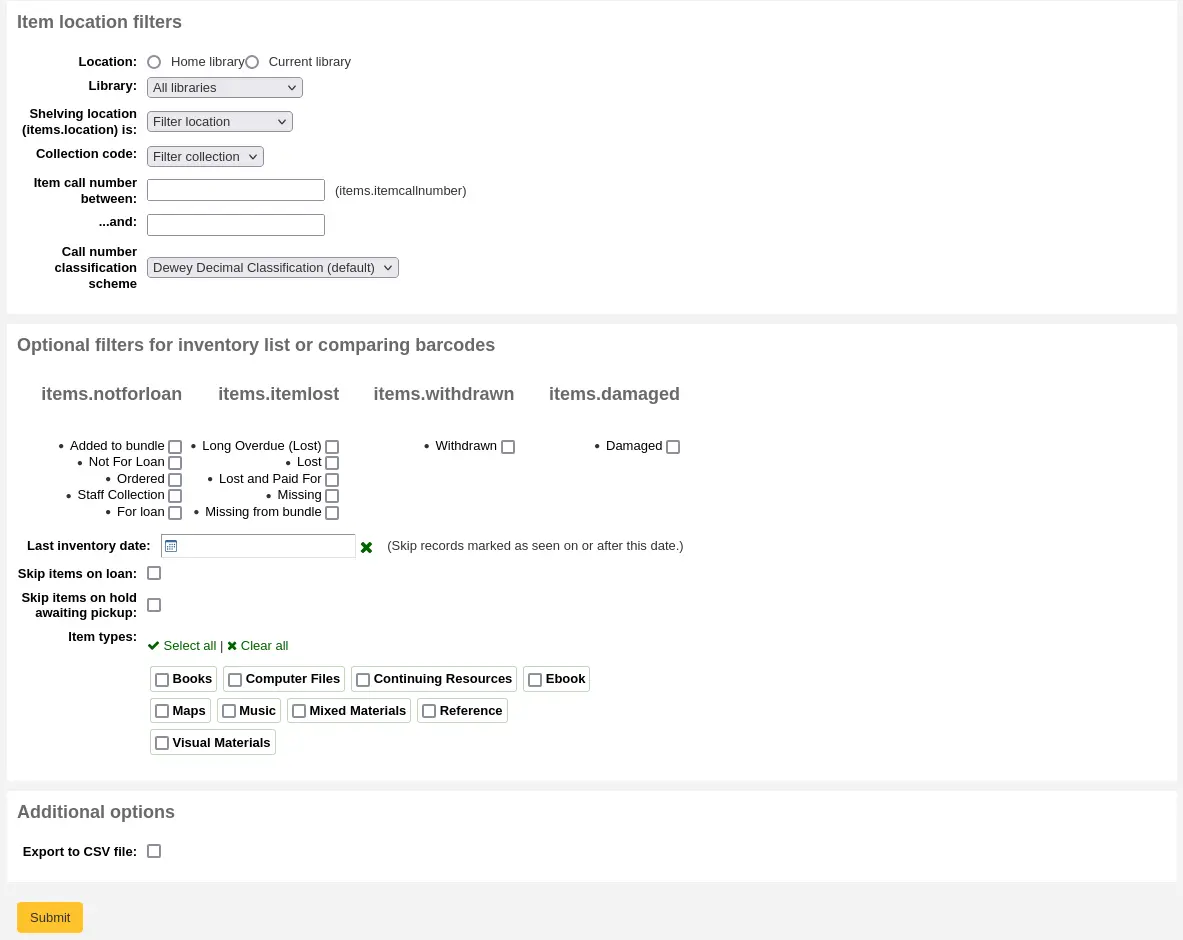
First, choose the criteria for the items you want to print out on a list. All parameters are optional, but if none are selected, the resulting list might be quite large.
Library: choose the branch you want to check, as well as if that branch is the home library or the current holding library of the items.
Shelving location (items.location) is: you can filter by location.
Item callnumber between … and …: you can also limit the list to a specific range of callnumbers.
Call number classification scheme: if filtering by call number, make sure to choose the correct classification scheme
You can filter even more with item statuses (not for loan status, lost status, withdrawn status or damaged status). Check the boxes next to the statuses you want to include. For example, if you are using the list to shelf read, check only the ‘for loan’ status as the other items probably won’t be on the shelves.
Last inventory date: enter a date here to skip items that have been marked as seen recently.
Skip items on loan: check this box to filter out loaned items from the list.
Skip items on hold awaiting pickup: check this box to filter out items that are awaiting pickup by patrons
Item types: check the boxes next to the item types you want to include in your shelf list
Export to CSV file: check this box to generate a CSV file for altering in an application on your desktop. If this box is unchecked, the list will be presented on the screen.
Click on ‘Submit’ to generate your shelf list.
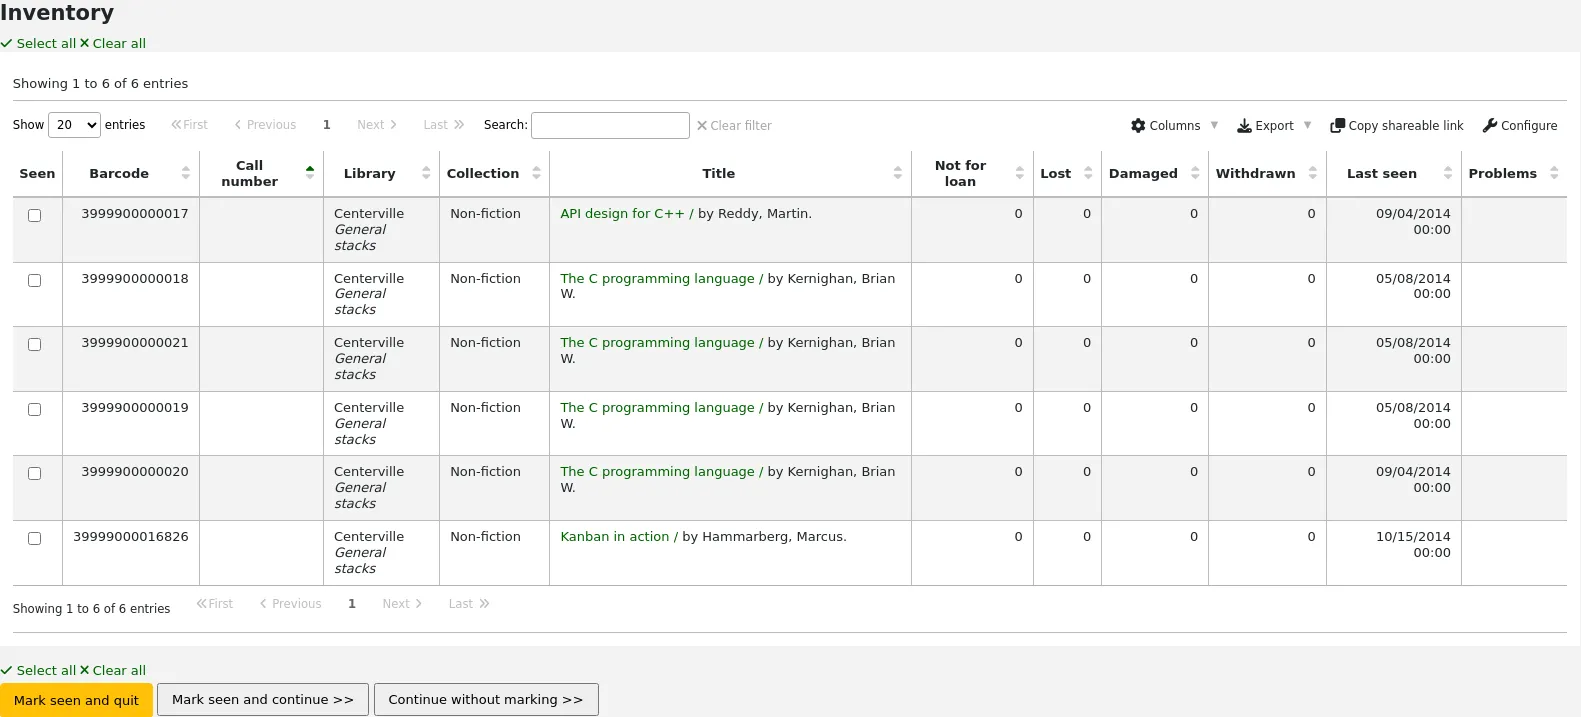
Once you have found the items on your shelves, return to this list and check the boxes next to the items you found. Next, click on one of the three buttons to continue:

Mark seen and quit: updates the ‘last seen’ date and time of the selected items to now and returns to the previous screen.
Mark seen and continue: updates the ‘last seen’ date and time of the selected items to now and shows the next page of the list.
Continue without marking: doesn’t update any of the items on this page and shows the next page of the list.
Uploading barcodes with a scanner
If you have a portable scanner (or a laptop and USB scanner) you can walk through the library with the scanner in hand and scan barcodes as you come across them (on a laptop, scan the barcodes into a text file or directly into the on screen text box). Once finished you can then upload the text file generated by the scanner to Koha.
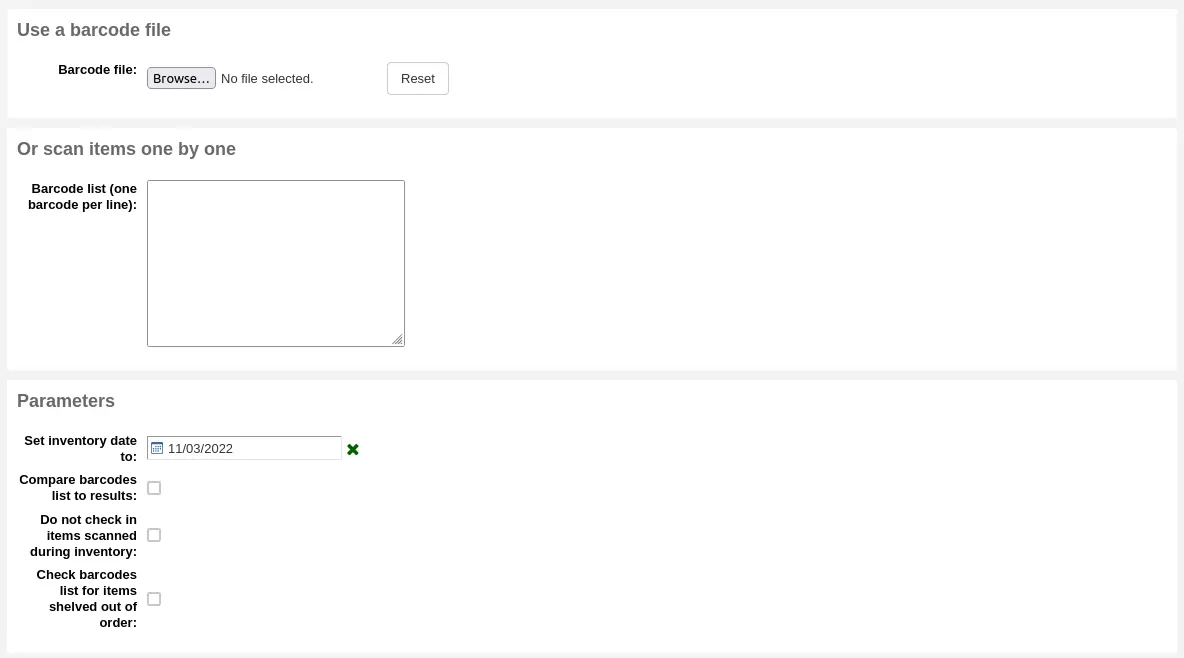
Set inventory date to: choose the date you want to mark all items as last seen.
Compare barcodes list to results: uncheck for this method.
Do not check in item scanned during inventory: unless this is checked, Koha will check in items scanned, as it is assumed that they are on the shelf and so not loaned out. If you do not want to check in scanned items, check this option.
Check barcodes list for items shelved out of order: if this option is checked, Koha will compare the call numbers and make sure they are in the correct order.
Click ‘Submit’. This will update all the items’ ‘last seen’ date to the chosen date (time last seen will be 00:00).
Once you have the updated the last seen date for all items scanned during the inventory it is possible to use reports to identify items that were not scanned and can therefore be assumed missing (you can use the batch item modification tool to change the LOST status of these items). There are sample reports you can use on the Koha SQL Reports Library.
Comparing scanned barcodes to a shelf list
Alternatively, you can combine the two methods to automatically compare a list of scanned barcodes with a generated list.
First, upload you barcode file or scan the barcodes in the box.
Set inventory date to: choose the date you want to appear in the items’ ‘last seen’ field (the time last seen will be set to 00:00).
Compare barcodes list to results: should automatically be checked.
Do not check in items scanned during inventory: make sure to check this option if you do not want the scanned items to be automatically checked-in if they are checked-out.
Choose the filters (library, shelving location, callnumbers, statuses or item types) to generate a list with which to compare your barcodes. Click on ‘Submit’.
Note
Depending on the number of barcodes you are comparing, this may take a few minutes. It is not recommended to compare lists of more than 1000 barcodes as this may cause a session timeout.
Once Koha has finished comparing the barcodes file to the generated list, it will return the number of items updated and a list of problematic items.
Note
Unlike when creating a shelf list, the list that will be presented here will only contain the items that Koha has determined are problematic.
Missing (not scanned): the item is in the generated list but not in the barcodes file.
Found in wrong place: the item is in the barcodes list, but not in the generated list.
Still checked out: the item is checked out, but is in the generated list. It was not automatically checked in.
No barcode: the barcode doesn’t exist.
Unknown not-for-loan status: the item has ‘not for loan’ status that is not in the NOT_LOAN authorized value category
Item may be shelved out of order: the callnumber is out of order
Cataloging guides
Bibliographic record cataloging cheat sheet
This section is for MARC21.
Tag |
Label |
Description |
Instructions |
|---|---|---|---|
000 |
LEADER |
Describes the record (i.e. surrogate) – is it a record for a monograph? A serial? |
Click in this field to fill it in. Then set “Bibliographic level” to ‘a’ for articles or ‘s’ for serials. Otherwise, leave everything as is. The value in position 6 influences the type of material in 008. |
001 |
CONTROL NUMBER |
Accession number. |
Enter the accession number written inside the item here. For articles and items which do not have accession numbers, leave blank. You can use the autoControlNumber system preference to automatically fill this field with the biblionumber of the record. |
003 |
CONTROL NUMBER IDENTIFIER |
Your MARC organizational code |
Click in this field to fill it in (will auto fill if you have your MARCOrgCode preference set). |
005 |
D & T LATEST TRANSACTION |
Current date and time. |
Click in this field to fill it in. |
008 |
FIXED-LENGTH DATA ELEMENTS |
Field containing computer-readable representations of a number of things. |
The type of material is automatically set according to the leader, position 06. Generally you will only use ‘s’ (single) or ‘m’ (multiple) options for position 06- use the former when the item was published in a single year, the latter when it was published over the course of several. If there is a single date, only enter a date in the first date field (positions 07-10). Enter the three-digit country code in positions 15-17, being sure to add spaces if the country code is fewer than three characters long. If there is an index, note that fact in position 31. Enter the three-letter language code in positions 35-37. |
010 |
LCCN |
A number assigned by the Library of Congress to uniquely identify the work. |
Check on the copyright page of the book (if it was published in the US) or the LC catalog for this number. If you can’t find it, don’t worry about it. |
020 |
ISBN |
Unique number used by publishers to identify books. |
If this number isn’t listed on the book, there probably isn’t one. |
022 |
ISSN |
Unique number used by publishers to identify serials. |
If this number isn’t listed on the book, there probably isn’t one. |
033 |
DATE/TIME OF EVENT |
Used for auction dates. Required for auction catalogs. |
For auctions that took place on only one day, enter the date of the auction in the format YYYYMMDD in the subfield ‘a’ and a ‘0’ in the first indicator. For auctions that took place over two consecutive days or any number of non-consecutive days, create a subfield ‘a’ for each day with the date in the format YYYYMMDD, and put a ‘1’ in the first indicator. For auctions that took place over more than two consecutive days, create a subfield ‘a’ (in format YYYYMMDD) for the first day and a subfield ‘a’ (also in format YYYYMMDD) for the last day, and put a ‘2’ in the first indicator. |
040 |
CATALOGING SOURCE |
Identifies which libraries created and modified the record. |
For imported records, add a subfield ‘d’ with your OCLC code as the value. For new records, make sure that the subfield ‘c’ with your OCLC code as the value. |
041 |
LANGUAGE CODE |
Identifies all the languages used in an item, when two or more languages are present. |
For significant portions of a text in a given language, there should be a subfield ‘a’ with that language code. If there are only summaries or abstracts in a specific language, create a subfield ‘b’ with that language code. For the language of sung or spoken text use subfield ‘d’. |
100 |
MAIN ENTRY–PERSONAL |
Authorized form of the main author’s name |
See Authorized headings sheet and AACR2. The first indicator should generally be a ‘1’, to indicate that the entry is surname first. If the name consists only of a forename, however, the first indicator should be ‘0’. |
110 |
MAIN ENTRY–CORPORATE |
Authorized form of the name of the main corporate author. Required for auction catalogs. |
Auction catalogs should use a 110 field rather than a 100 field. See Authorized headings sheet and AACR2. Set the first indicator to ‘2’. |
111 |
MAIN ENTRY–MEETING |
Authorized form of the name of a meeting which acted as a main offer (e.g. conference proceedings) |
See Authorized headings sheet and AACR2. Set the first indicator to ‘2’. |
245 |
TITLE STATEMENT |
Transcription of the title statement from the title page (or chief source of information) |
Enter the title in subfield ‘a’, the subtitle in subfield ‘b’, and the statement of responsibility in subfield ‘c’. If you are creating a record for a single volume or part of a multi-part item, you should put the part number in subfield ‘n’ and the part title in subfield ‘p.’ For auction catalogs, the date (in ‘MM/DD/YYYY’ format) should be listed in square brackets in subfield ‘f’. See ISBD punctuation sheet. Set the first indicator to ‘0’ if there is no author, otherwise set it to ‘1’. Set the second indicator to the number of non-filing characters (i.e. characters in an initial articles plus the space… for “The “ set the second indicator to ‘4’). |
246 |
VARYING FORM OF TITLE |
Alternate form of title for searching and filing purposes |
If the patron might look for the work under a different title, enter it here. Do not include initial articles. The first indicator should be ‘3’, unless the title is merely a variant spelling, in which case the first indicator should be ‘1’. |
250 |
EDITION STATEMENT |
Transcription of the edition statement from the title page (or chief source of information) |
Transcribe the edition statement exactly as it appears on the title-page. You may abbreviate if the edition statement is very long. |
260 |
PUBLICATION (IMPRINT) |
Publication information. |
Put the location of publication in subfield ‘a’, the publisher in subfield ‘b’, and the year (or probable year) in subfield ‘c’. See ISBD punctuation sheet. |
264 |
PRODUCTION, PUBLICATION ETC. |
Production, Publication, Distribution, Manufacture, and Copyright Notice. |
Put the location of publication in subfield ‘a’, the publisher in subfield ‘b’, and the year (or probable year) in subfield ‘c’. See ISBD punctuation sheet. The label is set dynamically from the second indicator so generally this would be set to ‘1’ for Publisher: . |
300 |
PHYSICAL DESCRIPTION |
Physical description |
Enter the pagination statement in subfield ‘a’, a brief description of “special” contents such as illustrations or maps in subfield ‘b’ (see AACR2), and the size of the item in subfield ‘c’. See ISBD punctuation sheet. |
490 |
SERIES STATEMENT |
Shows the series statement exactly as it appears on the item. |
Transcribe the series statement into subfield ‘a’ with the volume number in subfield ‘v’. See ISBD punctuation sheet. Set the first indicator to ‘1’ if you are using an 830. As a general rule, you should do so. |
500 |
GENERAL NOTE |
Notes that don’t fit anywhere else. |
Enter notes as full sentences, with a separate 500 field for each distinct topic. |
501 |
WITH NOTE |
Notes whether the work is bound with the works described by other records. |
Put description of relationship in subfield ‘a’. |
504 |
BIBLIOGRAPHY, ETC. NOTE |
Indicates whether the work includes a bibliography. |
If the work includes a bibliography and index, put the text “Includes bibliographical references (p. XXX-XXX) and index.” in subfield ‘a’. If the work does not include an index, remove that part of the sentence. If the references are scattered throughout the work and not gathered into a distinct sentence, remove the parenthetical statement. |
505 |
FORMATTED CONTENTS |
List of contents in a standard format. Unformatted contents can be listed in a 500 (General Note) field. |
See ISBD punctuation sheet. Set the first indicator to ‘0’. If you are separately coding authors and titles, set the second indicator to ‘0’. Otherwise, leave the second indicator blank. |
518 |
DATE/TIME OF EVENT NOTE |
Used for auction dates. |
For auction catalogs, enter the date of the auction in the format ‘January 2, 1984’ in the subfield ‘a’ |
520 |
SUMMARY, ETC. |
A brief summary or abstract of the book or article. |
In general you do not need to write a summary. A summary might be called for, however, with items that cannot be easily reviewed by a patron, such as books with highly acidic paper or CD-ROMs. |
546 |
LANGUAGE NOTE |
Note describing the languages used in the work |
Only needed for works in multiple languages. See ISBD punctuation sheet. |
561 |
PROVENANCE INFORMATION |
Describes the previous ownership of the item. |
Used only for rare books. |
563 |
BINDING INFORMATION |
Describes the binding of the item. |
Used only for rare books. |
590 |
LOCAL NOTE |
Local notes. Required for auction catalogs. |
Used for auction catalogs to indicate what types of coins are sold in the auction- Roman, Greek, etc. |
600 |
SUBJECT ADDED–PERSONAL |
Authorized form of personal names for people discussed in the work |
See Authorized headings sheet and AACR2. The first indicator should generally be a ‘1’, to indicate that the entry is surname first. If the name consists only of a forename, however, the first indicator should be ‘0’. If you found the name in the LC authority file, set the second indicator to ‘0’. Otherwise set the second indicator to ‘4’. |
610 |
SUBJECT ADDED–CORPORATE |
Authorized form of corporate names for organizations discussed in the work |
See Authorized headings sheet and AACR2. Set the first indicator to ‘2’. If you found the name in the LC authority file, set the second indicator to ‘0’. Otherwise set the second indicator to ‘4’. |
611 |
SUBJECT ADDED–MEETING |
Authorized form of meeting names for meetings discussed in the work |
See Authorized headings sheet and AACR2. Set the first indicator to ‘2’. If you found the name in the LC authority file, set the second indicator to ‘0’. Otherwise set the second indicator to ‘4’. |
630 |
SUBJECT ADDED–UNIFORM TITLE |
Authorized form of titles for other works discussed in the work |
See Authorized headings sheet and AACR2. Set the first indicator to the number of non-filing characters (i.e. characters in an initial articles plus the space… for “The “ set the first indicator to ‘4’). If you found the name in the LC authority file, set the second indicator to ‘0’. Otherwise set the second indicator to ‘4’. |
650 |
SUBJECT ADDED–TOPICAL |
Library of Congress Subject Heading terms describing the subject of the work |
See Authorized headings sheet and AACR2. If you found the name in the LC authority file, set the second indicator to ‘0’. Otherwise set the second indicator to ‘4’. |
651 |
SUBJECT ADDED–GEOGRAPHICAL |
Library of Congress Subject Heading geographical terms describing the subject of the work |
See Authorized headings sheet and AACR2. If you found the name in the LC authority file, set the second indicator to ‘0’. Otherwise set the second indicator to ‘4’. |
655 |
INDEX TERM–GENRE/FORM |
Describes what an item is as opposed to what the item is about. |
Generally used only for auction catalogs, which should have the genre heading “Auction catalogs.” (make sure to find the authorized heading!) If you found the name in the LC authority file, set the second indicator to ‘0’. If you are using a term from a specific thesaurus, set the second indicator to ‘7’ and put the code for the thesaurus in subfield ‘2’. Otherwise set the second indicator to ‘4’. |
690 |
LOCAL SUBJECT ADDED–TOPICAL |
Used for headings from any custom subject authority file. |
If there is no appropriate LCSH term, you can use a 690 with subject headings you find on other items in the catalog. |
691 |
LOCAL SUBJECT ADDED–GEOGRAPHICAL |
Used for headings from any custom subject authority file. |
If there is no appropriate LCSH term, you can use a 691 with subject headings you find on other items in the catalog. |
700 |
ADDED ENTRY–PERSONAL |
Used for second authors and other persons related to the production of the work. |
See Authorized headings sheet and AACR2. The first indicator should generally be a ‘1’, to indicate that the entry is surname first. If the name consists only of a forename, however, the first indicator should be ‘0’. |
710 |
ADDED ENTRY–CORPORATE |
Used for corporate bodies related to the production of the work (e.g. publishers). |
See Authorized headings sheet and AACR2. Set the first indicator to ‘2’. |
711 |
ADDED ENTRY–MEETING |
Used for meetings related to the production of the work (e.g. symposia that contributed to the work). |
See Authorized headings sheet and AACR2. Set the first indicator to ‘2’. |
730 |
ADDED ENTRY–UNIFORM TITLE |
Used for uniform titles related to the production of the work (e.g. a work that inspired the present work) |
See Authorized headings sheet and AACR2. Set the first indicator to the number of non-filing characters (i.e. characters in an initial articles plus the space… for “The “ set the first indicator to ‘4’). |
773 |
HOST ITEM ENTRY |
Describes the larger bibliographic unit that contains the work (e.g. book or journal containing the article being described in the current record) |
If the host publication is author main entry, enter the authorized form of the author’s name in subfield ‘a’. Put the title in subfield ‘t’. If the host publication is an independent work, put publication information in subfield ‘d’. When available, ISSN and ISBN should always be used in, in subfields ‘x’ and ‘z’ respectively. Relationship information (e.g. volume number, page number, etc.) goes in subfield ‘g’. Subfield ‘q’ contains an encoded representation of the location of the item: volume, issue, and section numbers are separated by colons, and the first page is entered following a ‘<’ at the end of the subfield. See ISBD punctuation sheet. Set the first indicator to ‘0’. If you want the label “In:” to be generated, leave the second indicator blank. If you want something else displayed before the 773 text, set the second indicator to ‘8’ and add a subfield ‘i’ with the label you want at the beginning of the field (e.g. “$iOffprint from:”). |
830 |
SERIES ENTRY–UNIFORM TITLE |
Authorized form of the series name transcribed in the 490 field. Often this will just be the same as the 490. |
See Authorized headings sheet and AACR2. Set the second indicator to the number of non-filing characters (i.e. characters in an initial articles plus the space… for “The “ set the second indicator to ‘4’). |
852 |
LOCATION/CALL NUMBER |
Provides the section name for pre-barcode books, pamphlets, and some articles and serials. |
Do not put anything in this field if you are cataloging a volume which gets only one record and a barcode. If the item does not get a barcode, or you are currently creating a record for an article in a volume, put the section in subfield ‘a’ (see ANS cataloging documentation), and the call number in subfield ‘i’. Set the first indicator to ‘8’. |
856 |
ELECTRONIC ACCESS |
Links to material available online. |
Put the URL of any electronic copies or summaries, etc. in subfield ‘u’ and a link title in subfield ‘y’. Set the first indicator to ‘4’. |
942 |
ADDED ENTRY ELEMENTS (KOHA) |
Used for Koha-specific data. |
Set the subfield ‘c’ to the appropriate item type. |
Table: Cataloging Guide
Koha-specific fields
Koha uses three fields to store information specific to it.
At the record level, 942 (MARC21) or 942 and 099 (UNIMARC) is used to store information such as record-level item type, record-level call number and classification scheme.
The item (holding) information is stored in 952 (MARC21) or 995 (UNIMARC).
System control numbers for Koha are stored in 999 (MARC21) or 001 and 090 (UNIMARC).
Added entry elements (942 / 099)
942$0 / 099$x - Koha issues (borrowed), all copies
MARC21: 942$0
UNIMARC: 099$x
This field contains the total number of issues/checkouts of all items of this record. It is populated using the update_totalissues.pl cronjob.
Mapped to: biblioitems.totalissues
Indexed in: totalissues
Warning
This field should not be editable nor edited manually.
942$2 - Source of classification or shelving scheme
MARC21: 942$2
UNIMARC: 942$2
This field contains the source of classification used by the record’s call number (942$h and 942$i (MARC21)).
There is a choice of classification sources as they are defined in administration. If no classification scheme is entered, the system will use the value entered in the DefaultClassificationSource preference.
The source of classification will be used, along with the call number itself (942$h and 942$i (MARC21)) to create the normalized call number used when sorting by call number.
Mapped to: biblioitems.cn_source
Indexed in: cn-bib-source
942$6 - Koha normalized classification for sorting
MARC21: 942$6
UNIMARC: 942$6
This field contains the normalized call number used for sorting, based on the record-level call number (942$h and 942$i (MARC21)) and the classification source (942$2).
Mapped to: biblioitems.cn_sort
Indexed in: cn-bib-sort
Warning
This field should not be editable nor edited manually.
942$c - Koha item type
MARC21: 942$c
UNIMARC: 942$c
This field contains the record-level item type.
The record-level item type is used in various places in Koha.
The value from 942$c is copied to 952$y (MARC21) or 995$r (UNIMARC) as the default value when adding a new item to that record
The record-level item type can be used for the circulation rules if the item-level_itypes system preference allows it (this system preference lets you choose between using the record-level or item-level item type for the circulation rules, among other things)
The record-level item type is indexed and used in the search (see also the AdvancedSearchTypes system preference) as well as the facets (this is useful to find records that don’t have items, like records for online resources, ebooks, pdf files, etc.)
The record-level item type is used for record-level/”next available” holds
The record-level item type is used for record-level article requests
The record-level item type is displayed in various tables in the staff interface, in the circulation module among other places (it is possible to hide unwanted columns in the Table settings section of the Administration module)
Mapped to: biblioitems.itemtype
Indexed in: itemtype (mc-itemtype), itype (mc-itype)
942$e - Edition
MARC21: 942$e
UNIMARC: N/A
This field contains the edition information.
942$h - Classification part
MARC21: 942$h
UNIMARC: N/A
This field contains classification part of the call number. It is used, along with 942$2 and 942$i (MARC21) to create the normalized call number (942$6) used when sorting by call number.
Mapped to: biblioitems.cn_class
Indexed in: cn-class
942$i - Item part
MARC21: 942$i
UNIMARC: N/A
This field contains item part of the call number. It is used, along with 942$2 and 942$h (MARC21) to create the normalized call number (942$6) used when sorting by call number.
Mapped to: biblioitems.cn_item
Indexed in: cn-item
942$k - Call number prefix
MARC21: 942$k
UNIMARC: N/A
This field contains prefix to the call number.
Mapped to: biblioitems.cn_prefix
Indexed in: cn-prefix
942$m - Call number suffix
MARC21: 942$m
UNIMARC: N/A
This field contains suffix to the call number.
Mapped to: biblioitems.cn_suffix
Indexed in: cn-suffix
942$n / 955$n - Suppress in OPAC
MARC21: 942$n
UNIMARC: 955$n
If the OpacSuppression system preference is set to ‘hide’, this field indicates if the record should be hidden from the OPAC.
In this field, ‘1’ means the record will be hidden in the OPAC, and ‘0’ (or empty) means the record will be visible in the OPAC.
You can use the YES_NO authorized value category in this field if you don’t want to remember the numerical values.
Indexed in: suppress
942$s / 099$s - Serial record flag
MARC21: 942$s
UNIMARC: 099$s
This field is used by the serials module to indicate whether or not the record is associated with a serial subscription.
Mapped to: biblio.serial
Warning
This field should not be editable nor edited manually.
Location and item information (952)
Koha uses field 952 to store item (holding) information in MARC21, and field 995 in UNIMARC.
952$0 / 995$0 - Withdrawn status
MARC21: 952$0
UNIMARC: 995$0
Uses
This field is used to set the withdrawn (weeded) status of the item.
You can use the withdrawn status to weed items without deleting the items.
In the search results, the withdrawn item will be marked as unavailable.
Effects on circulation
A withdrawn item will not be able to be checked out.
A withdrawn item will not be able to be checked in unless the BlockReturnOfWithdrawnItems system preference allows it.
Values
The withdrawn status is numerical, ‘0’ (or empty) means ‘not withdrawn’ and any other number means ‘withdrawn’.
By default, the field is associated with the WITHDRAWN authorized value category so you don’t have to remember the numerical values. The default values in the WITHDRAWN authorized value category are
1: Withdrawn
Display
Staff interface
Search results (withdrawn items will be marked as unavailable)
Holdings table in the record’s detail page
‘Items’ tab of the bibliographic record, ‘Withdrawn status’ under ‘Statuses’
OPAC
Search results (withdrawn items will be marked as unavailable)
Holdings table in the record’s detail page
To hide withdrawn items from the OPAC, use the OpacHiddenItems system preference.
Mapped to: items.withdrawn
Indexed in: withdrawn
952$1 / 995$2 - Lost status
MARC21: 952$1
UNIMARC: 995$2
Uses
This field is used to set the lost status of the item.
You can use the lost status to mark items as lost or missing
In the search results, the lost item will be marked as unavailable.
Marking an item lost while it is checked out can charge the replacement cost (952$v (MARC21) or 995$g (UNIMARC)) to the patron (see WhenLostChargeReplacementFee), as well as a processing fee (the processing fee is set at the item type level)
The lost status can be changed automatically after a number of days overdue with the longoverdue.pl cronjob
Effects on circulation
The ability to check out a lost item depends on the IssueLostItem system preference.
The ability to check in a lost item depends on the BlockReturnOfLostItems system preference.
Values
The lost status is numerical, ‘0’ (or empty) means ‘not lost’ and any other number means ‘lost’.
By default, the field is associated with the LOST authorized value category so you don’t have to remember the numerical values. The default values in the LOST authorized value category are
1: Lost
2: Long overdue (lost)
3: Lost and paid for
4: Missing
5: Missing from bundle
Display
Staff interface
Search results (lost items will be marked as unavailable)
Holdings table in the record’s detail page
‘Items’ tab of the bibliographic record, ‘Lost status’ under ‘Statuses’
OPAC
Search results (lost items will be marked as unavailable)
Holdings table in the record’s detail page
It’s possible to configure Koha so that lost items don’t display in the OPAC with the hidelostitems system preference.
Mapped to: items.itemlost
Indexed in: lost
952$2 / 995$4 - Source of classification or shelving scheme
MARC21: 952$2
UNIMARC: 995$4
Uses
This field contains the source of classification used by the record’s call number (952$o (MARC21) or 995$k (UNIMARC)).
The source of classification will be used, along with the call number itself (952$o (MARC21) or 995$k (UNIMARC)) to create the normalized call number (952$6 (MARC21) or 995$s (UNIMARC)) used when sorting by call number.
Values
There is a choice of classification sources as they are defined in administration.
If no classification scheme is entered, the system will use the value entered in the DefaultClassificationSource preference.
Display
This is not displayed either in the OPAC or in the staff interface. The information is only available in the item’s editing form.
Mapped to: items.cn_source
Indexed in: classification-source
952$3 / 995$l - Materials specified
MARC21: 952$3
UNIMARC: 995$l (L)
Uses
This field is used to add information about accompanying materials or to specify how many pieces the item has.
Effects on circulation
This information will be displayed when circulation the item so that the circulation staff knows to make sure all the accompanying material is there when checkout out and it’s still there when checking the item back in.

Values
This is a free text field, but it is possible to associate it to an authorized value category in the MARC framework to make it into a drop-down menu.
Display
Staff interface
This information will appear when checking out or checking in an item
Holdings table in the record’s detail page
Note
Use Table settings if you want to hide that column - Module: Catalog - Table id: holdings_table and/or otherholdings_table - Column: holdings_materials or otherholdings_materials
‘Items’ tab of the bibliographic record, ‘Materials specified’ under ‘Item information’
OPAC
Holdings table in the record’s detail page (it is hidden by default)
Note
Use Table settings if you want to show that column - Module: OPAC - Table id: holdingst - Column: item_materials
Mapped to: items.materials
Indexed in: materials-specified
952$4 / 995$1 - Damaged status
MARC21: 952$4
UNIMARC: 995$1
Uses
This field is used to set the damaged status of the item.
In the search results, the damaged item will be marked as unavailable.
Effects on circulation
The damaged status does not affect the ability to check out or check in an item.
The AllowHoldsOnDamagedItems system preference indicates whether or not damaged items can be put on hold.
Values
The damaged status is numerical, ‘0’ (or empty) means ‘not damaged’ and any other number means ‘damaged’.
By default, the field is associated with the DAMAGED authorized value category so you don’t have to remember the numerical values. The default values in the DAMAGED authorized value category are
1: Damaged
Display
Staff interface
Search results (damaged items will be marked as unavailable)
Holdings table in the record’s detail page
‘Items’ tab of the bibliographic record, ‘Damaged status’ under ‘Statuses’
OPAC
Search results (damaged items will be marked as unavailable)
Holdings table in the record’s detail page
To hide damaged items from the OPAC, use the OpacHiddenItems system preference.
Mapped to: items.damaged
Indexed in: damaged
952$5 / 995$3 - Use restrictions
MARC21: 952$5
UNIMARC: 995$3
Uses
This field is used to set the restricted status of the item.
In the search results, the restricted item will be marked as available.
Effects on circulation
A restricted item will not be able to be checked out.
Values
The restricted status is numerical, ‘1’ means restricted and ‘0’ (or empty) means unrestricted.
Note
Unlike other statuses, the restricted status can only be 0 (not restricted) or 1 (restricted).
By default, the field is associated with the RESTRICTED authorized value category so you don’t have to remember the numerical values. The default values in the RESTRICTED authorized value category are
1: Restricted access
Display
Staff interface
Search results (restricted items will be marked as available)
Holdings table in the record’s detail page
OPAC
Search results (restricted items will be marked as available)
Holdings table in the record’s detail page
Mapped to: items.restricted
Indexed in: restricted
952$6 / 995$s - Koha normalized classification for sorting
MARC21: 952$6
UNIMARC: 995$s
Warning
This field should not be editable nor edited manually.
Uses
This field contains the normalized call number used for sorting, based on the item-level call number (952$o (MARC21) or 995$k (UNIMARC)) and the classification source (952$2 (MARC21) or 995$4 (UNIMARC)).
Display
This information is not displayed anywhere in the OPAC or in the staff interface, it is for Koha’s internal use only.
Mapped to: items.cn_sort
Indexed in: cn-sort
952$7 / 995$o - Not for loan status
MARC21: 952$7
UNIMARC: 995$o
Uses
This field is used to set the not for loan status of the item.
In the search results, the not for loan item will be marked as unavailable or for reference use only (see Reference_NFL_Statuses)
Effects on circulation
Items with a not for loan status cannot be checked out (unless AllowNotForLoanOverride allows it)
Depending on the value, items may or may not be put on hold (see below)
Depending on TrapHoldsOnOrder and SkipHoldTrapOnNotForLoanValue not for loan items may be used to fill holds
The UpdateNotForLoanStatusOnCheckin system preference can be used to automatically change not for loan values upon checkin
The UpdateNotForLoanStatusOnCheckout system preference can be used to automatically change not for loan values when checking out the item
Values
The not for loan status is numerical, ‘0’ (or empty) means available.
Negative values (< 0) mean that the item cannot be checked out, but can be put on hold.
Positive values (> 0) mean that the item cannot be checked out nor be put on hold.
By default, the field is associated with the NOT_LOAN authorized value category so you don’t have to remember the numerical values. The default values in the NOT_LOAN authorized value category are
-1: On order
1: Not for loan
2: Staff collection
3: Added to bundle
Display
Staff interface
Search results (not for loan item will be marked as unavailable or for reference use only (see Reference_NFL_Statuses))
Holdings table in the record’s detail page
‘Items’ tab of the bibliographic record, ‘Withdrawn status’ under ‘Statuses’
OPAC
Search results (not for loan item will be marked as unavailable or for reference use only (see Reference_NFL_Statuses))
Holdings table in the record’s detail page
To hide not for loan items from the OPAC, use the OpacHiddenItems system preference.
Mapped to: items.notforloan
Indexed in: notforloan
952$8 / 995$h - Collection
MARC21: 952$8
UNIMARC: 995$h
Uses
This field is used to set the collection of the item.
Collections in Koha are used to group items in ways other than physically (the physical location can be stored in 952$c (MARC21) or 995$e (UNIMARC)). An example of a collection could be ‘Local authors’.
Collections can also be used to limit transfers in multi-branch systems (see the Library transfer limits section of the administration) if BranchTransferLimitsType is set to ‘collection code’
The collection of an item is used in the search (see the AdvancedSearchTypes system preference) as well as the facets.
Values
By default, the field is associated with the CCODE authorized value category. The default values in the CCODE authorized value category are
FIC: Fiction
NFIC: Non-fiction
REF: Reference
Display
Staff interface
The collections will be part of the facets in the search results
Holdings table in the record’s detail page
Note
Use Table settings if you want to hide that column - Module: Catalog - Table id: holdings_table and/or otherholdings_table - Column: holdings_ccode or otherholdings_ccode
Checkouts table in the patron’s file
Note
Use Table settings if you want to hide that column - Module: Circulation and Patrons - Table id: issues-table - Column: collection
Many other places all throughout Koha
OPAC
Search results, if OpacItemLocation allows it
The collections will be part of the facets in the search results
Holdings table in the record’s detail page
Note
Use Table settings if you want to hide that column - Module: OPAC - Table id: holdingst - Column: item_ccode
Many other places throughout the OPAC
Mapped to: items.ccode
Indexed in: collection-code
952$9 / 995$9 - Itemnumber
MARC21: 952$9
UNIMARC: 995$9
Warning
This field should not be editable nor edited manually.
Uses
The itemnumber is the internal number assigned to each item by Koha. It is unique and cannot be reattributed even when the item is deleted.
Display
This information is not displayed anywhere in the OPAC or in the staff interface, it is for Koha’s internal use only.
Mapped to: items.itemnumber
Indexed in: itemnumber
952$a / 995$b - Home library
MARC21: 952$a
UNIMARC: 995$b
Required
Uses
This field indicates the home library of the item.
The home library is important for many things in Koha, including, but not limited to
The home library of an item is used in the search as well as the facets (see the DisplayLibraryFacets system preference)
Effects on circulation
As previously stated, the circulation rules are based on the item’s library (see the HomeOrHoldingBranch system preference)
Values
Libraries are defined in the libraries section of the administration page.
Display
Staff interface
Depending on the DisplayLibraryFacets system preference, the home library may be part of the facets in the search results
Holdings table in the record’s detail page
Note
Use Table settings if you want to hide that column - Module: Catalog - Table id: holdings_table and/or otherholdings_table - Column: holdings_homebranch or otherholdings_homebranch
This information is displayed in the staff interface, in the ‘Items’ tab of the bibliographic record, ‘Home library’ under ‘Item information’
Checkouts table in the patron’s file
Note
Use Table settings if you want to hide that column - Module: Circulation and Patrons - Table id: issues-table - Column: homebranch
Many other places all throughout Koha
OPAC
Search results (if OpacItemLocation allows it)
Depending on the DisplayLibraryFacets system preference, the home library may be part of the facets in the search results
Holdings table in the record’s detail page, if OpacLocationBranchToDisplay allows it
Note
Use Table settings if you want to hide that column - Module: OPAC - Table id: holdingst - Column: item_home_location
Many other places throughout the OPAC
Mapped to: items.homebranch
Indexed in: homelibrary
952$b / 995$c - Current library
MARC21: 952$b
UNIMARC: 995$c
Required
Uses
This field indicates the current library (holding library) of the item.
The current library is important for many things in Koha, including
The current library of an item is used in the search as well as the facets (see the DisplayLibraryFacets system preference)
Effects on circulation
As previously stated, the circulation rules are based on the item’s library (see the HomeOrHoldingBranch system preference)
Values
Libraries are defined in the libraries section of the administration page.
Display
Staff interface
Depending on the DisplayLibraryFacets system preference, the holding library may be part of the facets in the search results
Holdings table in the record’s detail page
Note
Use Table settings if you want to hide that column - Module: Catalog - Table id: holdings_table and/or otherholdings_table - Column: holdings_holdingbranch or otherholdings_holdingbranch
This information is displayed in the staff interface, in the ‘Items’ tab of the bibliographic record, ‘Current library’ under ‘Item information’
Many other places all throughout Koha
OPAC
Search results (if OpacItemLocation allows it)
Depending on the DisplayLibraryFacets system preference, the holding library may be part of the facets in the search results
Holdings table in the record’s detail page, if OpacLocationBranchToDisplay allows it
Note
Use Table settings if you want to hide that column - Module: OPAC - Table id: holdingst - Column: item_current_location
Many other places throughout the OPAC
Mapped to: items.holdingbranch
Indexed in: holdinglibrary
952$c / 995$e - Shelving location
MARC21: 952$c
UNIMARC: 995$e
Uses
This field indicates the location of the item (physical place in the library).
Shelving locations in Koha are used to group items physically. An example of a shelving location could be ‘Children’s section’.
The location of an item is used in the search (see the AdvancedSearchTypes system preference) as well as the facets.
The UpdateItemLocationOnCheckin system preference can be used to automatically change location values upon checkin
The UpdateItemLocationOnCheckout system preference can be used to automatically change location values upon checkout.
Values
By default, the field is associated with the LOC authorized value category. The default values in the LOC authorized value category are
AV: Audio visual
CART: Book cart
CHILD: Children’s area
FIC: Fiction
GEN: General stacks
NEW: New materials shelf
DISPLAY: On display
PROC: Processing center
REF: Reference
STAFF: Staff office
The default value for new items can be set using the NewItemsDefaultLocation system preference
Display
Staff interface
The locations will be part of the facets in the search results
Holdings table in the record’s detail page (under the home library)
This information is displayed in the staff interface, in the ‘Items’ tab of the bibliographic record, ‘Home library’ under ‘Item information’
Checkouts table in the patron’s file
Note
Use Table settings if you want to hide that column - Module: Circulation and Patrons - Table id: issues-table - Column: location
Many other places all throughout Koha
OPAC
Search results (if OpacItemLocation allows it)
The locations will be part of the facets in the search results
Holdings table in the record’s detail page, the OpacLocationOnDetail system preference indicates in which column this information is located
Note
Use Table settings if you want to hide that column - Module: OPAC
Table id: holdingst
Column: item_shelving_location (if OpacLocationOnDetail is set to ‘separate column’)
Many other places throughout the OPAC
Mapped to: items.location
Indexed in: location
952$d / 995$5 - Date acquired
MARC21: 952$d
UNIMARC: 995$5
Uses
This field is used to enter the date of acquisition of the item.
The acquisition date can be used in the search and the sort function in the search results
When using the Acquisitions module, this should be filled automatically with the acquisition date
Values
This should be a date in the YYYY-MM-DD format (there is a handy date picker to ensure the date is in the correct format)
Display
Staff interface
Holdings table in the record’s detail page
Note
Use Table settings if you want to hide that column - Module: Catalog - Table id: holdings_table and/or otherholdings_table - Column: holdings_dateaccessioned or otherholdings_dateaccessioned
‘Items’ tab of the bibliographic record, ‘Accession date’ under ‘History’
Mapped to: items.dateaccessioned
Indexed in: date-of-acquisition
952$e / 995$a - Source of acquisition
MARC21: 952$e
UNIMARC: 995$a
Uses
This field is used to enter the vendor where the item was acquired
When using the Acquisitions module, this should be filled automatically with the vendor upon receiving
Values
This is a free text field
If using the Acquisitions field, the value in this field will be the vendor id rather than the vendor’s name
Display
This is not displayed either in the OPAC or in the staff interface. The information is only available in the item’s editing form.
Mapped to: items.booksellerid
Indexed in: acqsource
952$f / 995$8 - Coded location qualifier
MARC21: 952$f
UNIMARC: 995$8
Uses
This field is used to enter a three-character code that identifies the specific issues of the item that are located apart from the main holdings of the same item (same as MARC21 852$f).
Values
This is a free text field
The field in the database is limited to 10 characters
Display
This is not displayed either in the OPAC or in the staff interface. The information is only available in the item’s editing form.
Mapped to: items.coded_location_qualifier
Indexed in: coded-location-qualifier
952$g / 995$p - Cost, normal purchase price
MARC21: 952$g
UNIMARC: 995$p
Uses
This field is used to enter the purchase price of the item
When using the Acquisitions module, this should be filled automatically with the purchase price upon receiving
Values
This is a free text field
The price must be digits, with a period as the decimal, with no currency symbols (e.g. 24.95)
The field in the database limits to two decimal points (e.g. 24.95 is OK but 24.94875 is not)
Display
This is not displayed either in the OPAC or in the staff interface. The information is only available in the item’s editing form.
Mapped to: items.price
Indexed in: price
952$h / 995$v - Serial enumeration / chronology
MARC21: 952$h
UNIMARC: 995$v
Uses
This field is used to enter the issue number of serials or the volume number of series
When using the Serials module, this should be filled automatically with the issue number
Values
This is a free text field
Display
Staff interface
Holdings table in the record’s detail page
Note
Use Table settings if you want to hide that column - Module: Catalog - Table id: holdings_table and/or otherholdings_table - Column: holdings_enumchron or otherholdings_enumchron
‘Items’ tab of the bibliographic record, ‘Serial enumeration’ under ‘History’
OPAC
Holdings table in the record’s detail page
Note
Use Table settings if you want to hide that column - Module: OPAC - Table id: holdingst - Column: item_enumchron
Mapped to: items.enumchron
952$i / 995$j - Inventory number
MARC21: 952$i
UNIMARC: 995$j
Uses
This field is used to enter an inventory number for the item
Note
The inventory number is not Koha’s internal itemnumber (which is stored in 952$9 (MARC21) or 995$9 (UNIMARC))
Values
This is a free text field
The field in the database is limited to 32 characters
Display
Staff interface
Holdings table in the record’s detail page
Note
Use Table settings if you want to hide that column - Module: Catalog - Table id: holdings_table and/or otherholdings_table - Column: holdings_stocknumber or otherholdings_stocknumber
Mapped to: items.stocknumber
Indexed in: number-local-acquisition
952$j / 995$q - Shelving control number
MARC21: 952$j
UNIMARC: 995$q
Uses
This field is used to enter a shelf number where the item is located
Values
The stack number should be numerical
By default, the field is associated with the STACK authorized value category so you don’t have to remember the numerical values. There are no default values.
Display
This is not displayed either in the OPAC or in the staff interface. The information is only available in the item’s editing form.
Mapped to: items.stack
Indexed in: stack
952$l / 995$w - Total checkouts
MARC21: 952$l (L)
UNIMARC: 995$w
Warning
This field should not be editable nor edited manually.
Uses
This field contains the total number of past and present issues/checkouts of this item
The number of issues is used to sort search results by popularity
The number of issues for each item is used to update the total number of issues for the record (942$0 (MARC21) or 099$x (UNIMARC))
Display
Staff interface
‘Items’ tab of the bibliographic record, ‘Total checkouts’ under ‘History’
Mapped to: items.issues
Indexed in: issues
952$m / 995$x - Total renewals
MARC21: 952$m
UNIMARC: 995$x
Warning
This field should not be editable nor edited manually.
Uses
This field contains the total number of past renewals of this item
Display
Staff interface
‘Items’ tab of the bibliographic record, ‘Current renewals’ under ‘Statuses’
Mapped to: items.renewals
Indexed in: renewals
952$n / 995$t - Total holds
MARC21: 952$n
UNIMARC: 995$t
Warning
This field should not be editable nor edited manually.
Uses
This field contains the total number of past and present holds on this item
The number of holds is used to create a RSS feed for items with the most holds
Display
This is not displayed either in the OPAC or in the staff interface.
Mapped to: items.reserves
Indexed in: reserves
952$o / 995$k - Full call number
MARC21: 952$o
UNIMARC: 995$k
Uses
This field is used to store the item’s call number
The call number of an item can used in the search
Values
The records call number can be copied into the item’s call number, the itemcallnumber system preference indicates which record field to use as the source
Display
Staff interface
Holdings table in the record’s detail page
Note
Use Table settings if you want to hide that column - Module: Catalog - Table id: holdings_table and/or otherholdings_table - Column: holdings_itemcallnumber or otherholdings_itemcallnumber
‘Items’ tab of the bibliographic record, ‘Item callnumber’ under ‘Item information’
Checkouts table in the patron’s file
Note
Use Table settings if you want to hide that column - Module: Circulation and Patrons - Table id: issues-table - Column: callno
Many other places all throughout Koha
OPAC
Search results, if OpacItemLocation allows it
Holdings table in the record’s detail page
Note
Use Table settings if you want to hide that column - Module: OPAC - Table id: holdingst - Column: item_callnumber
Checkouts table in the patron’s online account
Many other places throughout the OPAC
Mapped to: items.itemcallnumber
Indexed in: local-classification
952$p / 995$f - Barcode
MARC21: 952$p
UNIMARC: 995$f
Required for circulation
Uses
This field is used to store the item’s barcode
The barcode of an item can used in the search
Effects on circulation
The barcode is essential for circulating items
Values
This is a free text field
Note
The barcodes in Koha are case insensitive, meaning that ABC123 and abc123 are considered to be the same barcode.
The field in the database is limited to 20 characters
Display
Staff interface
Holdings table in the record’s detail page
Note
Use Table settings if you want to hide that column - Module: Catalog - Table id: holdings_table and/or otherholdings_table - Column: holdings_barcode or otherholdings_barcode
‘Items’ tab of the bibliographic record
Checkouts table in the patron’s file (in the title column)
Mapped to: items.barcode
Indexed in: barcode
952$q / 995$n - Date due
MARC21: 952$q
UNIMARC: 995$n
Warning
This field should not be editable nor edited manually.
Uses
When the item is checked out, the due date is stored in this field (YYYY-MM-DD)
This field is used in the ‘Limit to currently available items’ in the facets
Display
The due date appears in a lot of pages in the circulation module, but it is the due date that comes from the issues, not the item
Mapped to: items.onloan
Indexed in: onloan
952$r / 995$y - Date last seen
MARC21: 952$r
UNIMARC: 995$y
Warning
This field should not be editable nor edited manually.
Uses
When the item is checked out or in, inventoried, or during any other transaction that affects the item, the date and time is stored in this field (YYYY-MM-DD HH:MM:SS)
Display
Staff interface
Holdings table in the record’s detail page
Note
Use Table settings if you want to hide that column - Module: Catalog - Table id: holdings_table and/or otherholdings_table - Column: holdings_lastseen or otherholdings_lastseen
‘Items’ tab of the bibliographic record, ‘Last seen’ under ‘History’
Mapped to: items.datelastseen
Indexed in: datelastseen
952$s / 995$m - Date last checked out
MARC21: 952$s
UNIMARC: 995$m
Warning
This field should not be editable nor edited manually.
Uses
When the item is checked out, the date is stored in this field (YYYY-MM-DD)
Display
Staff interface
Holdings table in the record’s detail page
Note
Use Table settings if you want to hide that column - Module: Catalog - Table id: holdings_table and/or otherholdings_table - Column: holdings_datelastborrowed or otherholdings_datelastborrowed
‘Items’ tab of the bibliographic record, ‘Last borrowed’ under ‘History’
Mapped to: items.datelastborrowed
Indexed in: datelastborrowed
952$t / 995$6 - Copy number
MARC21: 952$t
UNIMARC: 995$6
Uses
This field is used to enter the copy number of the item
Values
This is a free text field
The field in the database is limited to 32 characters
Display
Staff interface
Holdings table in the record’s detail page
Note
Use Table settings if you want to hide that column - Module: Catalog - Table id: holdings_table and/or otherholdings_table - Column: holdings_copynumber or otherholdings_copynumber
‘Items’ tab of the bibliographic record, ‘Copy number’ under ‘History’
OPAC
Holdings table in the record’s detail page
Note
Use Table settings if you want to hide that column - Module: OPAC - Table id: holdingst - Column: item_copy
Mapped to: items.copynumber
Indexed in: copynumber
952$u / 995$7 - URI
MARC21: 952$u
UNIMARC: 995$7
Uses
This field is used to enter a URL or URN specific to the item
It is not necessary to enter a URL here if there is already a URL in 856$u at the record-level, unless the URL for the specific item differs from the one in 856$u (for example, if you have an online periodical, you can put the URL to the periodical in 856$u and the URL to the specific issue in 952$u)
Values
Display
Staff interface
Holdings table in the record’s detail page
Note
Use Table settings if you want to hide that column - Module: Catalog - Table id: holdings_table and/or otherholdings_table - Column: holdings_uri or otherholdings_uri
OPAC
Holdings table in the record’s detail page
Note
Use Table settings if you want to hide that column - Module: OPAC - Table id: holdingst - Column: item_url
Mapped to: items.uri
Indexed in: uri
952$v / 995$g - Cost, replacement price
MARC21: 952$v
UNIMARC: 995$g
Uses
This field is used to enter the replacement cost that will be charged to the patron who loses the item
When using the Acquisitions module, this should be filled automatically with the replacement price upon receiving
Values
This is a free text field
The price must be digits, with a period as the decimal, with no currency symbols (e.g. 24.95)
The field in the database limits to two decimal points (e.g. 24.95 is OK but 24.94875 is not)
Display
Staff interface
Checkouts table in the patron’s file (in the price column)
Note
Use Table settings if you want to hide that column - Module: Circulation and Patrons - Table id: issues-table - Column: price
‘Items’ tab of the bibliographic record, ‘Replacement price’ under ‘Item information’
Mapped to: items.replacementprice
Indexed in: replacementprice
952$w / 995$i - Price effective from
MARC21: 952$w
UNIMARC: 995$i
Uses
This field is used to enter the date of the replacement price of the item
When using the Acquisitions module, this should be filled automatically with the acquisition date upon receiving
If left empty, it will default to the acquisition date (952$d (MARC21) or 995$5 (UNIMARC))
Values
This should be a date in the YYYY-MM-DD format
Display
This is not displayed either in the OPAC or in the staff interface. The information is only available in the item’s editing form.
Mapped to: items.replacementpricedate
Indexed in: replacementpricedate
952$x / 995$z - Non-public note
MARC21: 952$x
UNIMARC: 995$z
Uses
This field is used to enter internal notes about the item
Values
This is a free text field
Display
Staff interface
Holdings table in the record’s detail page
Note
Use Table settings if you want to hide that column - Module: Catalog
Table id: holdings_table and/or otherholdings_table
Column: holdings_itemnotes_nonpublic or otherholdings_itemnotes_nonpublic
‘Items’ tab of the bibliographic record, ‘Non-public note’ under ‘History’
Mapped to: items.itemnotes_nonpublic
952$y / 995$r - Koha item type
MARC21: 952$y
UNIMARC: 995$r
Required
Uses
This field contains the item-level item type.
The item-level item type is used in various places in Koha.
The item-level item type is generally used for the circulation rules unless the item-level_itypes system preference is set to use the record-level item type (this system preference lets you choose between using the record-level or item-level item type for the circulation rules, among other things)
The item-level item type is indexed and used in the search (see also the AdvancedSearchTypes system preference) as well as the facets
Effects on circulation
The item type is used as the basis for circulation rules, it will affect the number of items a patron can take out at the same time, number of holds, etc.)
Values
The values are managed in item types
Display
Staff interface
The itemtypes will be part of the facets in the search results
Holdings table in the record’s detail page
Note
Use Table settings if you want to hide that column - Module: Catalog - Table id: holdings_table and/or otherholdings_table - Column: holdings_itype or otherholdings_itype
‘Items’ tab of the bibliographic record, ‘Item type’ under ‘Item information’
Checkouts table in the patron’s file
Note
Use Table settings if you want to hide that column - Module: Circulation and Patrons - Table id: issues-table - Column: item_type
Many other places all throughout Koha
OPAC
The item types will be part of the facets in the search results
Holdings table in the record’s detail page
Note
Use Table settings if you want to hide that column - Module: OPAC - Table id: holdingst - Column: item_itemtype
Many other places throughout the OPAC
Mapped to: items.itype
Indexed in: itemtype (mc-itemtype), itype (mc-itype)
952$z / 995$u - Public note
MARC21: 952$z
UNIMARC: 995$u
Uses
This field is used to enter notes about the item
Values
This is a free text field
Display
Staff interface
Holdings table in the record’s detail page
Note
Use Table settings if you want to hide that column - Module: Catalog - Table id: holdings_table and/or otherholdings_table - Column: holdings_itemnotes or otherholdings_itemnotes
‘Items’ tab of the bibliographic record, ‘Public note’ under ‘History’
OPAC
Holdings table in the record’s detail page
Note
Use Table settings if you want to hide that column - Module: OPAC - Table id: holdingst - Column: item_notes
Mapped to: items.itemnotes
Indexed in: note
System control numbers (999)
Koha stores its system control numbers in the 999 field in MARC21 and in the 001 and 090 field in UNIMARC.
Note
The itemnumber is stored in 952$9 (MARC21) or 995$9 (UNIMARC) (see above).
999$c / 001 - Biblionumber
The biblionumber is the internal number assigned to each record by Koha. It is unique and cannot be reattributed even when the record is deleted.
MARC21: 999$c
UNIMARC: 001
Mapped to: biblio.biblionumber
Indexed in: local-number (sn, biblionumber)
Warning
This field should not be editable nor edited manually.
999$d / 090$a - Biblioitemnumber
The biblioitemnumber is the internal number assigned to each record by Koha. It is unique and cannot be reattributed even when the record is deleted.
MARC21: 999$d
UNIMARC: 090$a
Mapped to: biblioitems.biblioitemnumber
Indexed in: biblioitemnumber
Warning
This field should not be editable nor edited manually.
Koha XSLT material type icons
When you have any of the XSLT system preferences (OPACXSLTDetailsDisplay, OPACXSLTResultsDisplay, XSLTDetailsDisplay, and/or XSLTResultsDisplay) along with the DisplayOPACiconsXSLT and DisplayIconsXSLT preferences turned on you will see material type icons on the related screen.
Important
These images are coming from values found in your leader, if your leader is not cataloged properly it might be best to turn off the DisplayOPACiconsXSLT preference (which can be done while leaving the other XSLT preferences turned on).

Book [BK]
leader6 = a (and one of the leader7 values below)
leader7 = a
leader7 = c
leader7 = d
leader7 = m
leader6 = t
Computer File [CF]
leader6 = m

Continuing Resource [CR]
leader7 = b
leader7 = i
leader7 = s

Map [MP]
leader6 = e
leader6 = f

Mixed [MX]
leader6 = p
Sound [MU]
leader6 = c
leader6 = d
leader6 = i
leader6 = j
Visual Material [VM]
leader6 = g
leader6 = k
leader6 = r

Kit
leader6 = o
Handling On Order Items and Holds
If you tend to import your MARC records when you have ordered the book (as opposed to when you receive the books), and allow patrons to place holds on those books, you may need to add item records to the *.mrc file before importing.
The easiest way to import your latest order is to first run your records through MARCEdit. Download your MARC records, saving them to your desktop or some other location you use/will remember. If you have MARCEdit already installed you should simply have to double click on your MARC records, and they will automatically open in MARCEdit.
Important
This tutorial was written with MARCEdit version 5.2.3769.41641 on Windows XP, instructions may be different if your version or operating system is different.
Your original file will automatically be in the input; ensure MarcBreaker is chosen, and then click “Execute”
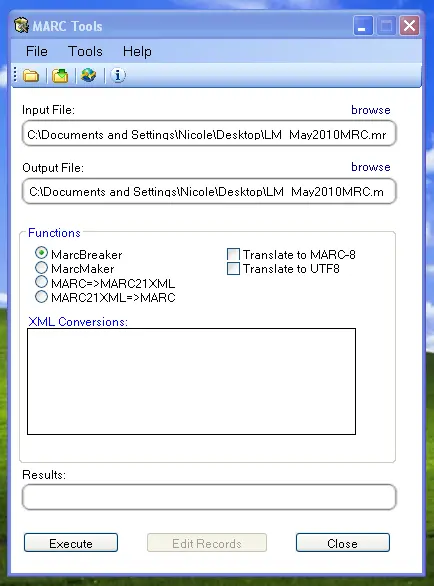
You will be presented with a summary of the records processed at the bottom of the screen
Click ‘Edit Records’ to continue on to adding item records
Your screen will be replaced with a larger screen containing the MARC records
Click on Tools > Add/Edit Field
Enter in the Koha specific item info

In the Field box, type 942
In the Field Data box, type \\$c and the item type code (\\$cBOOK in this example)
Check the ‘Insert last’ option
Click ‘Add Field’
Enter in the item record data
In the Field box, type 952
In the Field Data box, type $7ORDERED_STATUS$aPERM_LOC$bCURR_LOC$cSHELVING_LOCATION$eSOURCE_OF_ACQ$yITEM_TYPE
ex. $7-1$aCPL$bCPL$cNEW$eBrodart$yBOOK
In a default install of Koha -1 is the value for the Ordered status
You may want to look at other subfields you would like data in – for example, changing the collection code to put all the items in the same collection (8), automatically fill in the acquisition date (d), or put in a public note (z).
Be sure you use the $ to separate subfields; adding each subfield on a separate line will cause that many items to be imported with your MARC record (in the example above, four items, each with one of those subfields corrected)
Make sure you look at the Administration > Authorized Values in Koha to put the correct code into the field
Check the ‘Insert last’ option
Click ‘Add Field’
Close the field editor window
Click on File > Compile into MARC

Choose where to save your file
Now you want to go into your Koha system and follow the instructions for importing MARC records.
Once the item has come in, you will need to go to the item record and individually change the item to have the correct barcode, and manually change the status from Ordered to the blank line in the Not for Loan field.
Note
If you purchase your cataloged item records, you may want to request your vendor put in the information you need into the MARC records for you; that way, you could import the edited-by-the-vendor file, overwriting the current record, automatically replacing the data with what you need.