9. MARC21 and UNIMARC setup
Note
In the previous screen you either choose MARC21 or UNIMARC as your MARC flavour. This page outlines both.
9.1. MARC21 setup
9.1.1. MARC21 Basic setup
Basic setup gets your Koha set up with the most commonly used default settings. This setup should be used by most users.
All data values that are required for using Koha are selected by default.
The values in the Optional area are either sample data for Koha evaluation purposes, or values that highlight specific features of Koha (For example: Sample news items, or populating the calendar with known holidays).

MARC21 basic setup
- Select all options button will select all optional values. Selecting all sample data is probably what you want to do if you are evaluating Koha for your library or if you are setting up a developer instance.
- Default: All the data values in this area are mandatory and selected by default, and cannot be unselected. The Advanced installer allows changes to these values.
- Other data Default: Again all the data values are mandatory.
- Coded values conforming to the Z39.71-2006 holdings statements for bibliographic items: Not required to use Koha. A holding statement tells the user if the library has a specific item and where it is located. Selecting will install sample code values for items in the holding statements.
- MARC code list for relators: Not required to use Koha. A relator is a person who was invloved in the development of the item (e.g. author). Selecting this will insert sample relator records into the database.
- Useful patron attribute types: Not required to use Koha. Patrons have a barcode which identifies them. By clicking this checkbox your making sure that this patron barcode is displayed on the patron summary screen.
- Sample patron types and categories: Not required to use Koha. Selecting this will install sample patron categories into the database. This will mean the Create patron category step in the onboarding tool is skipped.
- Sample label and patron card data: Not required to use Koha, but recommended for most new installs. Selecting this will install sample data for labels and patron cards and will make it easier to create a labels and patron cards in the future.
- Sample holidays: Sunday, Christmas, New Year’s Not required to use Koha. Selecting this will insert sample repeatable public holidays (e.g. Christmas) into the database.
- A set of default item types: Not required for Koha. Selecting this will insert sample item type data into the database, meaning Create Item type step in the onboarding tool will be skipped.
- Sample Libraries: Not required for Koha. Selecting this will insert sample libraries into the database. Developers will often want this for demo or development purposes. Selecting this means the Create library step in the onboarding tool will be skipped.
- Sample news items: Not required for Koha. Selecting this will insert sample news items that are displayed on the OPAC (Online Public Access Catalog) and staff client into the database.
- Sample patrons: Not required for Koha. Patrons are the people who use the Koha Library Management System, for example: library users and staff. Selecting this will insert a number of sample patrons into the database. Developers will often want this for demo or development purposes. Selecting this means the Create patron step in the onboarding tool will be skipped.
- Sample quotes: Not required for Koha. Quotes of the day can be displayed to library users on the OPAC (Online Public Access Catalog) interface. Selecting this will install a few library related sample quotes.
- Allow access to the following servers to search and download record information: Not required to use Koha, but recommended for most new installs. Selecting this configures Koha to allow access to a selection of Z39.50 targets, which allow searching the target servers for MARC21 records to import them into your Koha instance. This can avoid the need to manually input all record information manually, or greatly speed up the process.
- Click the Import>> button to install the default and selected data values.
9.1.2. MARC21 Advanced setup
The advanced setup gives far greater control over the data values that are inserted into the database. All data values are unselected by default.
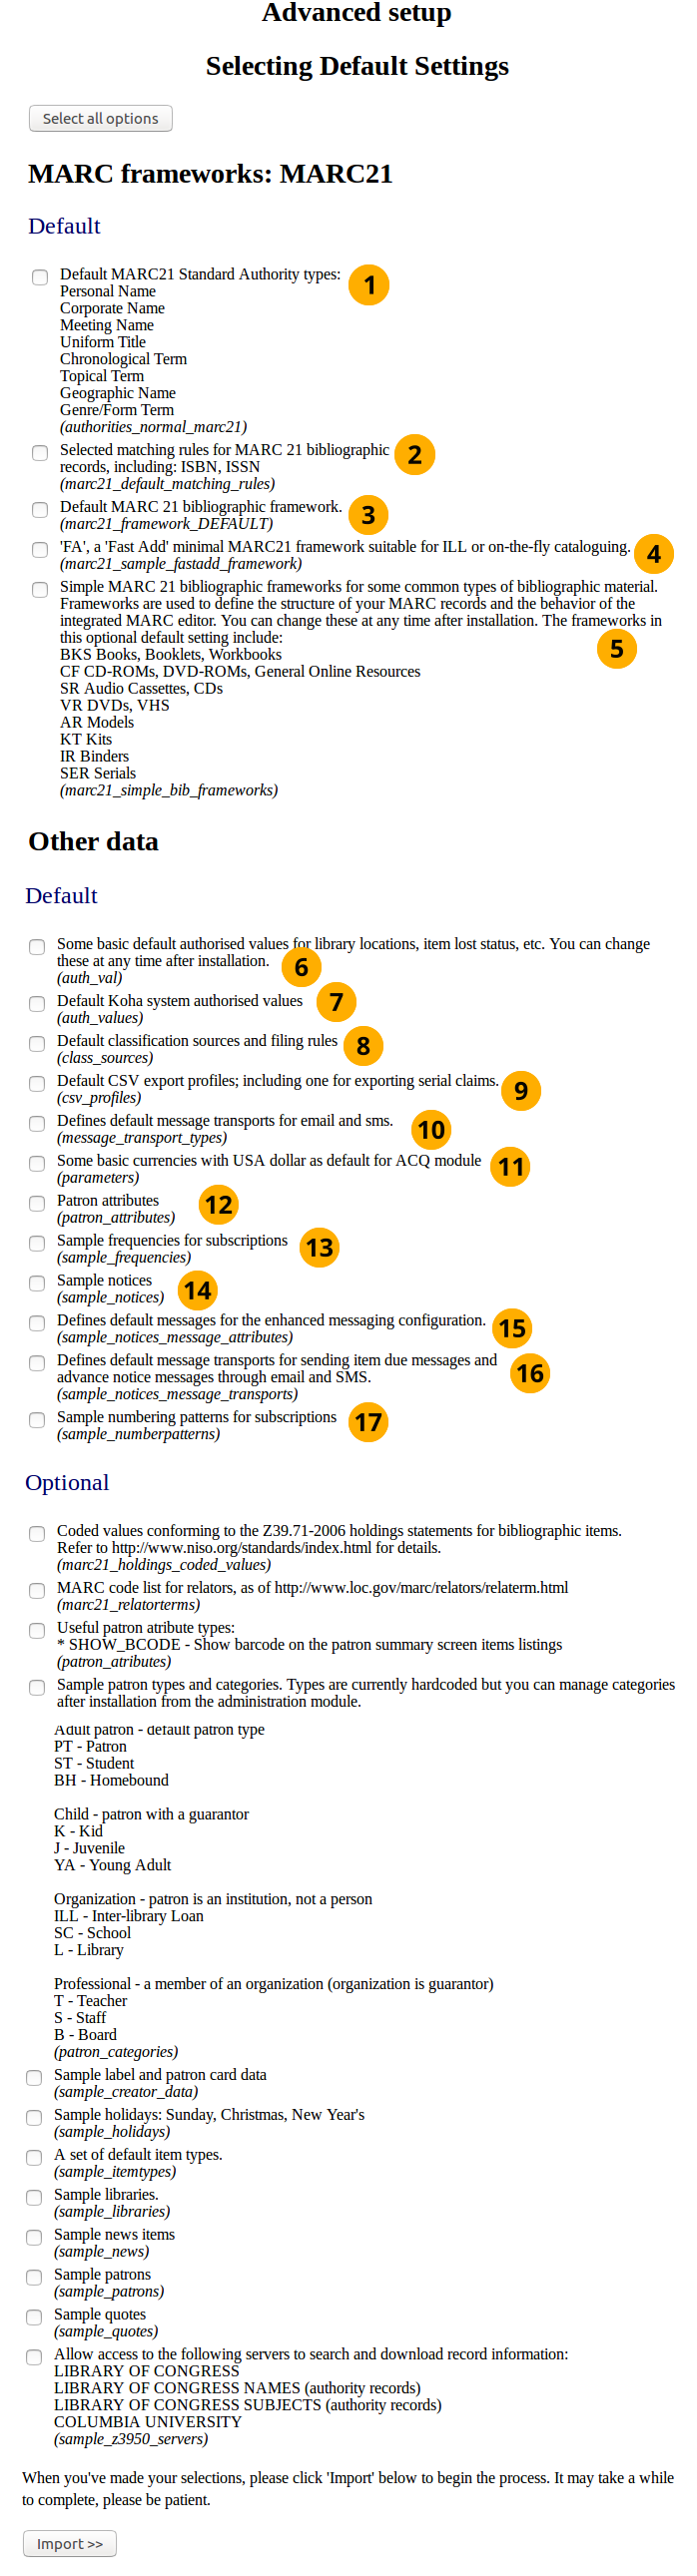
MARC21 advanced setup
Note
This installation option will most commonly be used by Koha support providers, or libraries who have a database they are planning to import into this Koha instance.
Most of these mandatory values should be selected, unless there are reasons not to. Not installing mandatory values will leave your Koha in a working but very minimal state!
- Default MARC21 Standard Authority Types: An authority type is a template of an authority record (stores the search fields used to search an institutions catalog for an item). This option will install sample authority types.
- Selected matching rules for MARC21 bibliographic records: The MARC21 matching rules are used to find all the information about specific bibliographic records using the authority type search values.
- Default MACR21 bibliographic framework: Following on from the MARC21 selection in the previous screen selecting this checkbox (and the Import>> button) will actually setup the MARC21 bibliographic framework as the desired MARC flavour.
- ‘FA’, a ‘Fast Add’ minimal MARC21 framework suitable for ILL, or on the fly cataloging: The FA MARC framework displays fewer fields, and allows for faster cataloguing on the fly. Select this checkbox to install this minimal framework.
- Sample MARC21 bibliographic frameworks for some common types of bibliographic material: This installs the template you will use to create items.
- Some basic default authorised values for library locations: This installs authorised values, which filter user inputs, to make sure they match specified criteria before the library or other object is created.
- Default Koha system authorised values: This installs mandatory authorised values that every Koha installation needs.
- Default classification sources and filling rules: This will insert several common library classification sources such as dewey decimal.
- Default CSV export profiles: Using Koha you can export items. The CSV profile defines how you want to export the item(s). CSV/Tab exports will not work without these.
- Defines default message transports for email and sms: This provides the option to the user of being able to change how the library contacts them. They can choose from the following: email address, printed message, sms, or phone call. Notices will not work without these.
- Some basic currencies with USA dollar as default for ACQ module: Install US dollar, Great British Pound, Canadian Dollar and Euro currencies. Set the US dollar as the default acquisition currency. Not installing these will mean that a currency will need to be defined before Acquisitions can be used.
- Patron attributes: This does not install any data, and it needs to be removed.
- Sample frequencies for subscriptions: For items that arrive on a regular and predictable basis (e.g. monthly magazines), installing sample frequencies is useful because you can simply select a pre-installed sample frequency when you create the item.
- Sample notices: This inserts sample notices into the database, meaning all you have to do is customize these sample notices before you use them. Creating these by hand can be very time consuming and error prone.
- Defines default messages for the enhanced messaging configuration: The enhanced messaging configuration lets the user choose what messages they receive from the institution. Selecting this will insert sample message types for the Due, Predue, and Advance notice message types.
- Defines default message transports for sending item due messages: This inserts the SMS and email transport types. Mandatory if you want to send notices by email or SMS.
- Sample numbering patterns for subscriptions: This option will install sample numbering patterns, saving you having to manually insert them for magazines and other periodicals.
Note
All the data values in the Optional area are the same as for the Basic setup and so have been defined above.
9.2. Unimarc setup
9.2.1. Unimarc Basic setup
The basic setup of unimarc is the same as that of MARC21:
- You are only able to select/unselect the optional data values.
- Optional values are the same for both unimarc and MARC21, therefore their definition will not be repeated, please go to web_installer_marc21_setup to read the definitions.
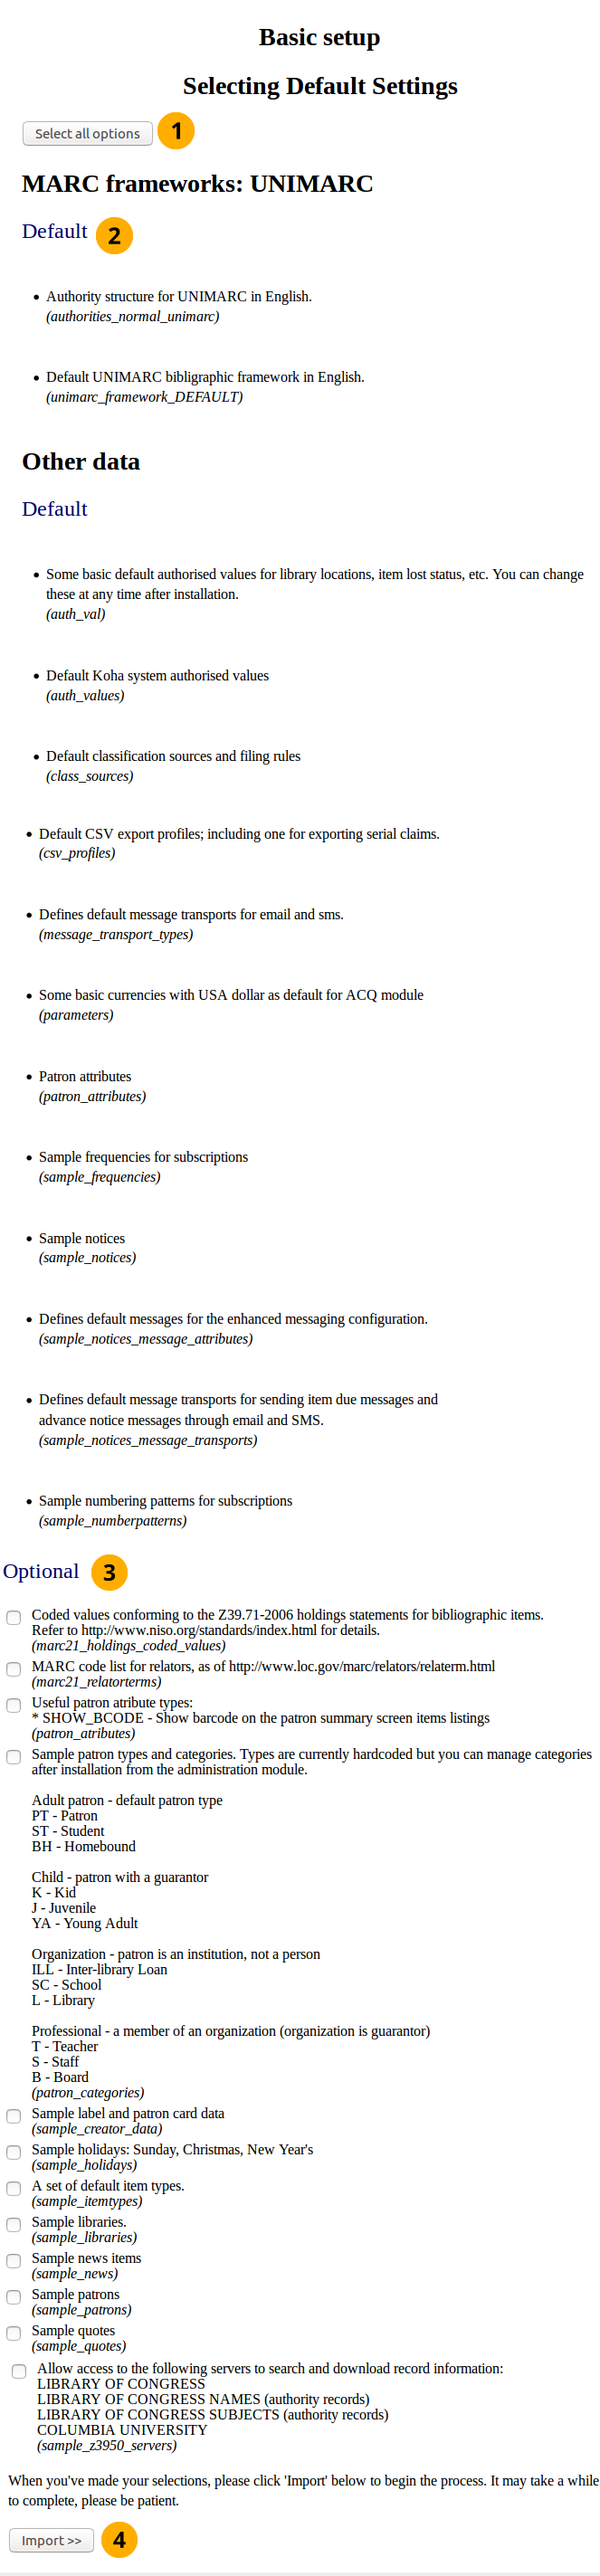
Unimarc basic setup
- Click the Select all options button to select all optional data values to be installed.
- Default: As with the Basic setup for MARC21 the data values in this area are mandatory and selected by default.
- Optional: As previously stated these are the same data values as defined in the Basic setup of MARC21.
- Click the Import>> button to install the sample data.
9.2.2. Unimarc Advanced setup
There are only 2 data values in the Unimarc advanced setup which are unique:
- Authority Structure for UNIMARC in English
- Default UNIMARC bibliographic framework in English
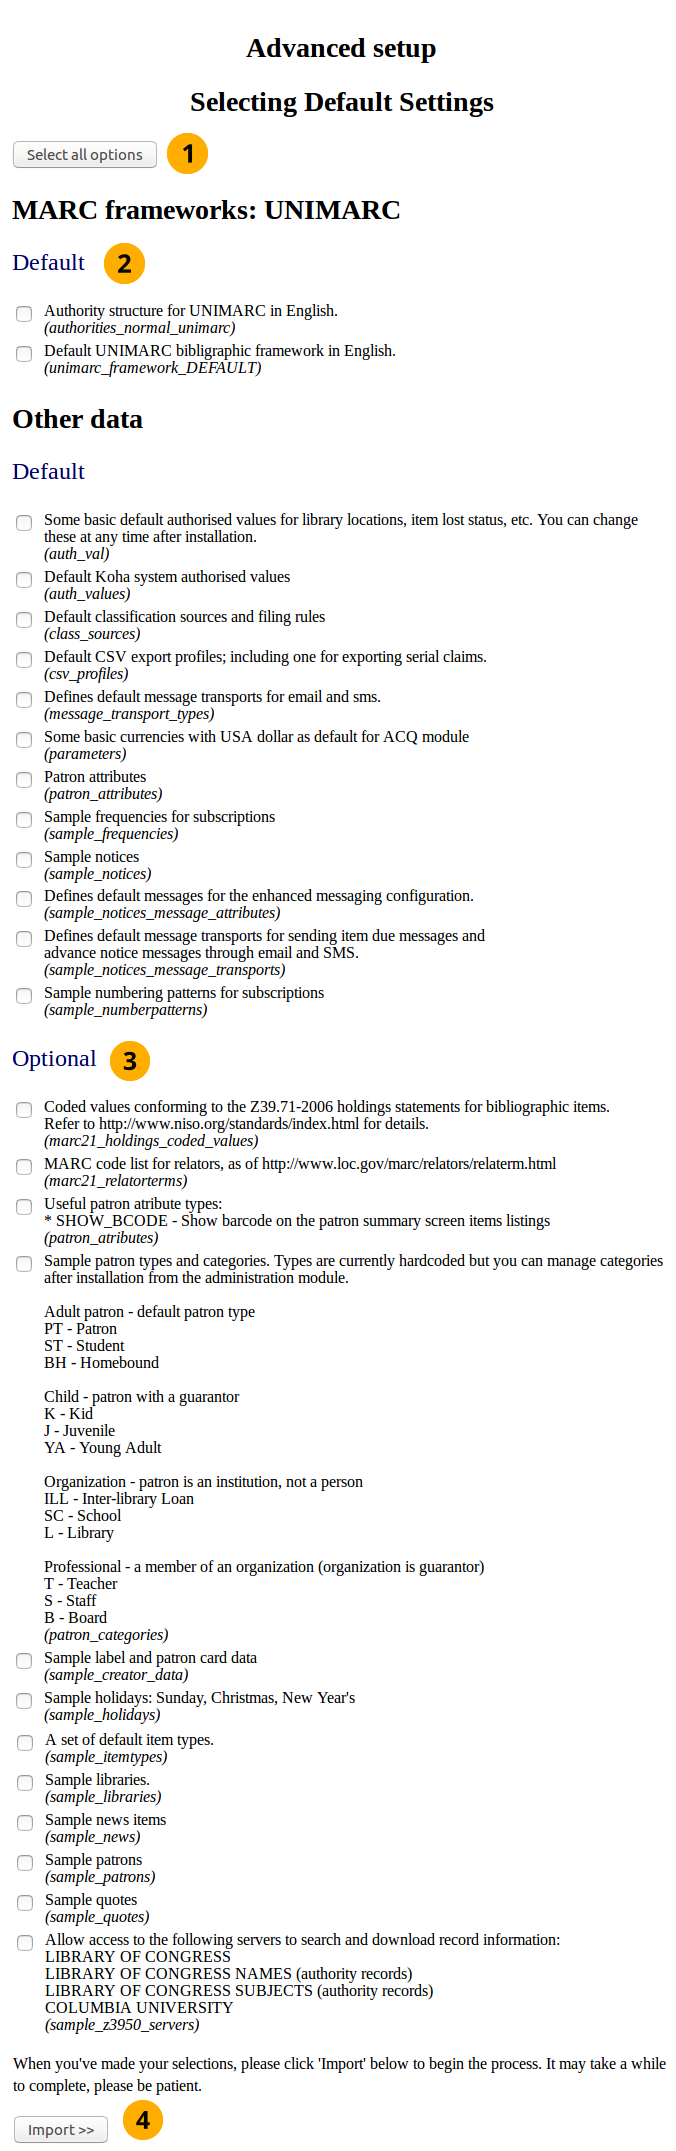
Unimarc advanced setup
- Click the Select all options button to select all default and optional data values to be installed.
- Authority structure for UNIMARC in English: Authority records store the search terms used to find items in the database. Unlike marc21, when using unimarc the authority structure needs to be compatible with unimarc. Selecting this option makes it compatible.
- Default UNIMARC bibliographic framework in English: In the previous screen you clicked to use the unimarc flavour, now by selecting this option you are confirming you want to use that framework.
- Click the Import>> button to install the sample data