Get there: More > Administration
Important
Configure all 'parameters' in the order they appear.
When setting up your Koha system you will want to add information for every library that will be sharing your system. This data is used in several areas of Koha.
-
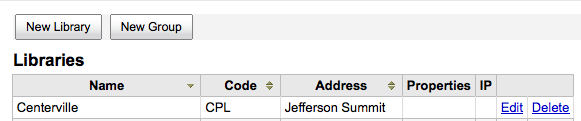
Get there: More > Administration > Basic Parameters > Libraries and Groups
When visiting this page you are presented with a list of the libraries and groups that have already been added to the system.

To add a new library:
-
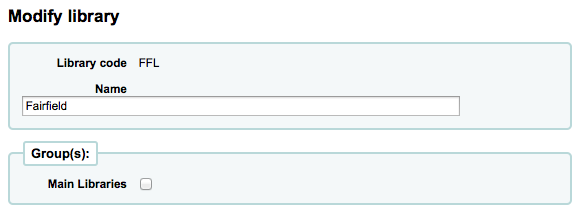
Click 'New Library'
-
The top of the form asks for some basics about the library

-
The library code should not contain any spaces and be 10 or fewer characters. This code will be used as a unique identifier in the database.
-
The name will be displayed on the OPAC wherever the library name displays to the public and should be a name that makes sense to your patrons.
-
If you have groups set up you can choose what group this library belongs to after entering in the code and name
-
-
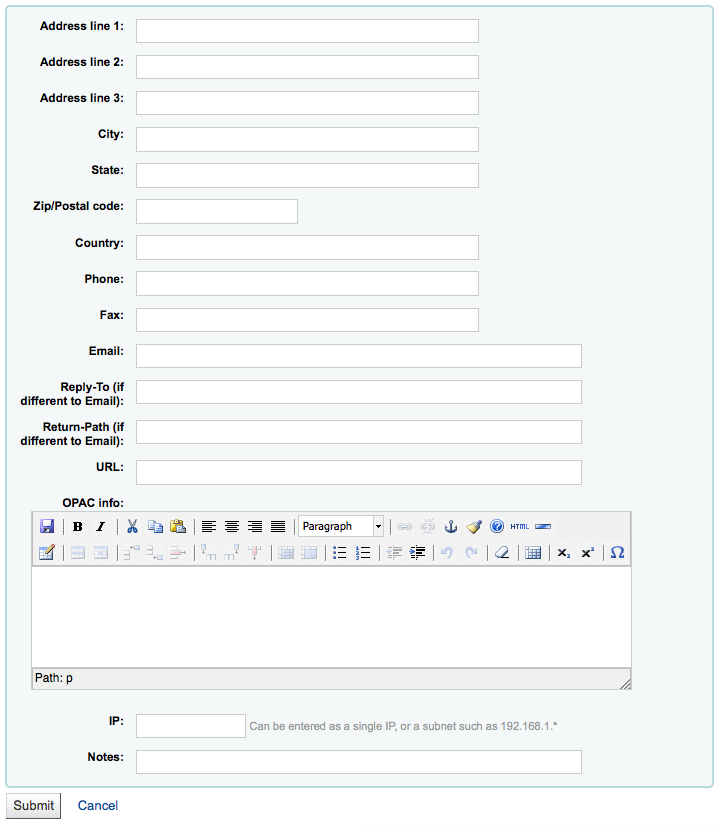
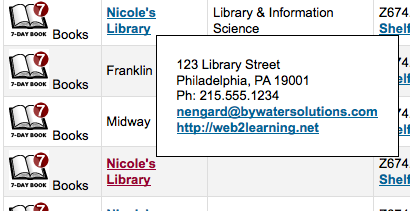
Next you can enter basic contact info about the branch
-
The address and contact fields can be used to make notices custom for each library
-
The email address field is not required, but it should be filled for every library in your system
-
Important
Be sure to enter a library email address to make sure that notices are sent to and from the right address
-
-
If you'd like you can enter a different 'Reply-To' email address. This is the email address that all replies will go to.
-
Note
If you do not fill in this value Koha will use the address in the ReplytoDefault preference
-
-
If you'd like you can also enter a different 'Return-Path' email address. This is the email address that all bounced messages will go to.
-
Note
If you do not fill in this value Koha will use the address in the ReturnpathDefault preference
-
-
If the URL field is populated then the library name will be linked in the holdings table on the OPAC
-
The OPAC Info box is for you to put information about the library that will appear in the OPAC when the branch name is moused over in the holdings table
-
IP Address does not have be filled in unless you plan on limiting access to your staff client to a specific IP Address
-
Important
An IP address is required if you have enabled AutoLocation
-
-
Finally, if you have any notes you can put them here. These will not show in the OPAC
-
Note
Of the fields listed, only 'Library code' and 'Name' are required
You will be unable to delete any library that has patrons or items attached to it.

Each library will have an 'Edit' link to the right of it. Click this link to edit/alter details associated with the library in question.
Important
You will be unable to edit the 'Library code'
To add a Search Domain or Library Property Group click the 'New Group' button at the top of the screen
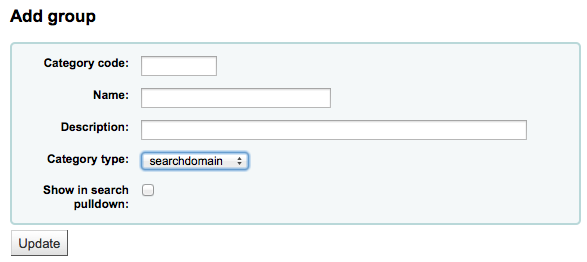
Give the group a 'Category type; of 'searchdomain' and if you would like the group to show up in the library pull down at the top of the OPAC (with OpacAddMastheadLibraryPulldown set to 'Add') and on the advanced search page you can check the 'Show in search pulldown' box.
Of the fields on the group form, 'Category code', 'Name', and 'Category type' are the only required fields
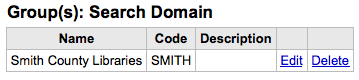
Search Domain Groups allow you to search a group of libraries at the same time instead of searching just one library or all libraries.
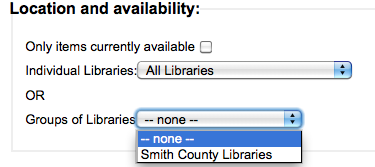
To see Search Domain Groups in action visit the staff client advanced search page in your Koha system:
You can assign specific categories to your libraries by adding groups for them

Properties are then applied to libraries via the add or edit library form
Koha allows you to organize your collection by item types and collection codes.
-
Get there: More > Administration > Basic Parameters > Item Types
Item types typically refer to the material type (book, cd, dvd, etc), but can be used in any way that works for your library.
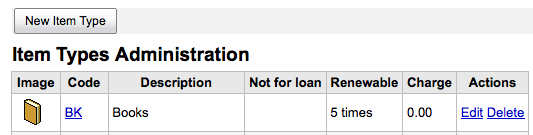
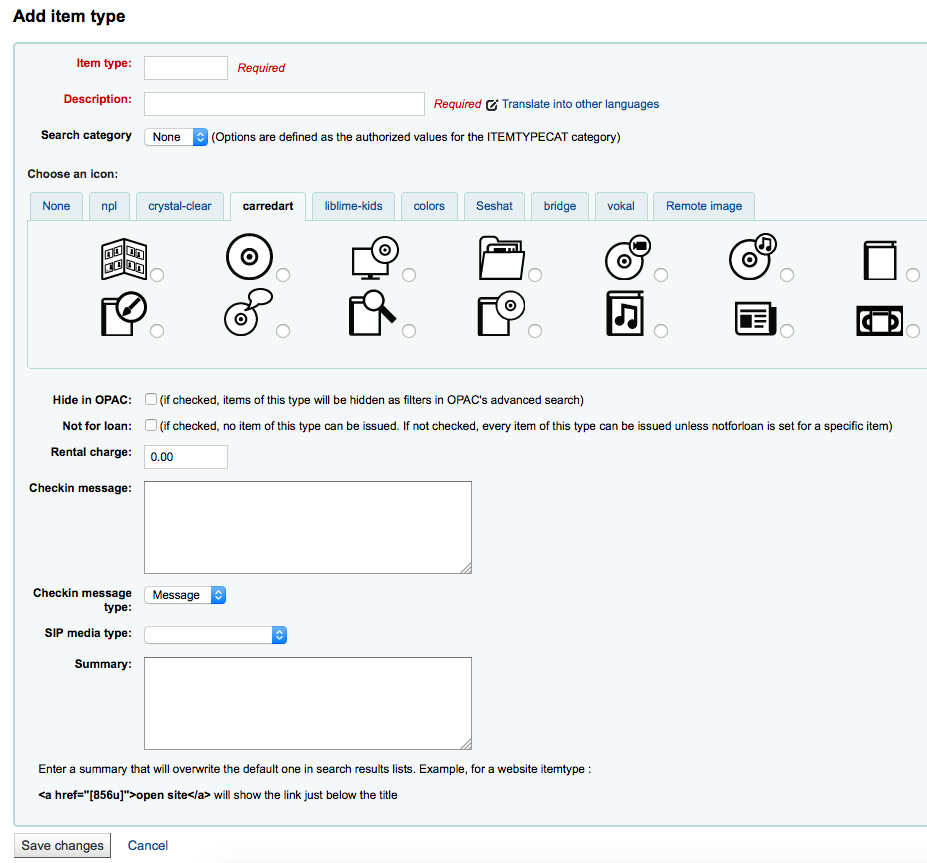
To add a new item type, simply click the 'New Item Type' button at the top of the Item Types page.
-
In the 'Item Type' field, enter a short code for your item type
-
The description is the plain text definition of the item type (for those with multiple languages installed you can translate the item type description in to all of those languages using the 'Translate in to other languages' link)
-
Item types and can grouped together for searching at the same time. For example you can put DVDs and Bluray in to a group called Movie and then they can be searched together. These groups are defined in the ITEMTYPECAT authorized value.
-
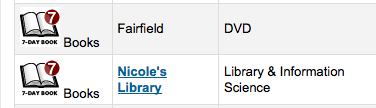
You can choose to have an image associated with your item type
-
You can choose from a series of image collections
-
You can link to a remote image
-
Or you can just have no image associated with the item type
-
Important
To have your item type images appear in the OPAC you need to set noItemTypeImages to 'Show'
-
Get there: More > Administration > Global System Preferences > Admin
-
-
-
For items that you are suppressing from the OPAC you can hide their item type from being searched in the OPAC
-
For items that do not circulate, check the 'Not for loan' options
-
Items marked 'Not for loan' will appear in the catalog, but cannot be checked out to patrons
-
-
For items that you charge a rental fee for, enter the total fee you charge in the 'Rental charge' field
-
Important
Do not enter symbols in this field, only numbers and decimal points (ex. $5.00 should be entered as 5 or 5.00)
-
This will charge the patron on checkout
-
-
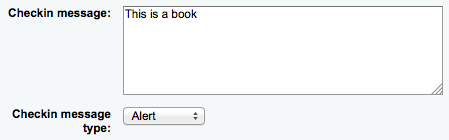
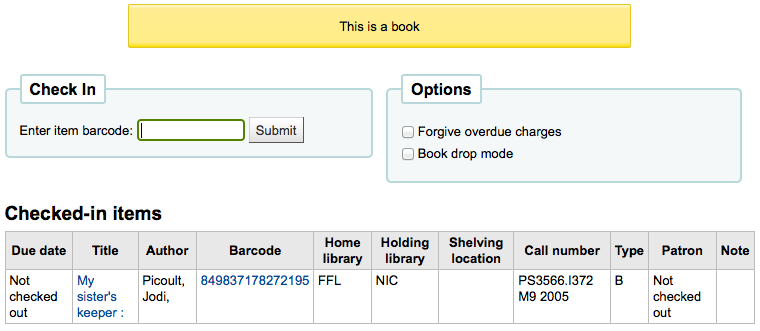
If you would like a message or alert to appear when items of this type are checked in you can enter that in the 'Checkin message' box
-
The Checkin message type can be a Message or an Alert. The only difference between these two is the styling. By default a Message is blue
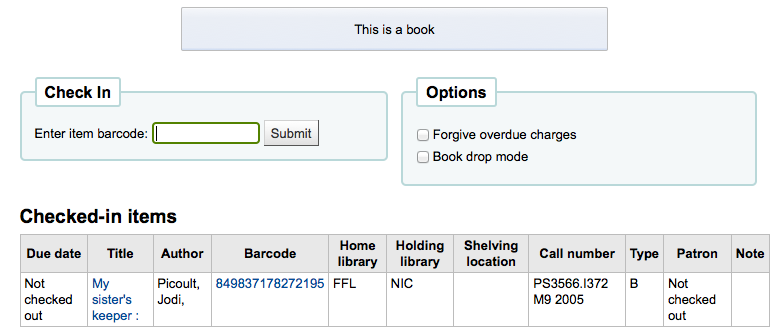
and an Alert is yellow.
-
-
Some SIP devices need you to use a SIP-specific media type instead of Koha's item type (usually lockers and sorters need this media type), if you use a device like this you'll want to enter the SIP media type.
-
When finished, click 'Save Changes'
-
Note
All fields, with the exception of the 'Item Type' will be editable from the Item Types list
-
-
Your new item type will now appear on the list

Each item type has an Edit button beside it. To edit an item simply click the 'Edit' link.
Important
You will not be able to edit the code you assigned as the 'Item Type' but you will be able to edit the description for the item.
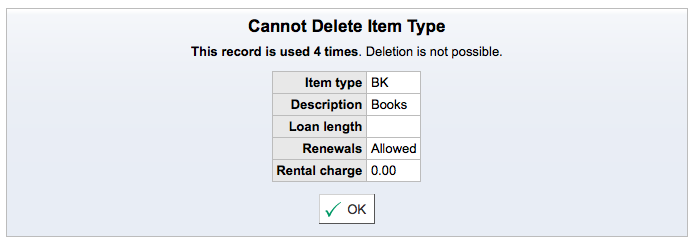
Each item has a Delete button beside it. To delete an item, simply click the 'Delete' link.
Important
You will not be able to delete item types that are being used by items within your system.
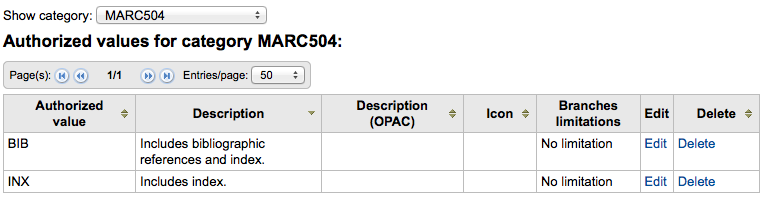
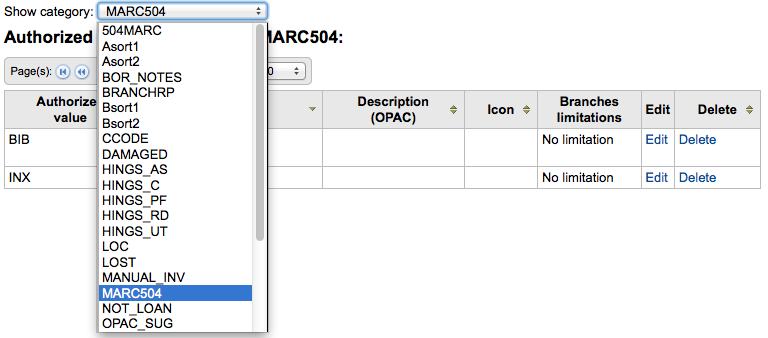
Authorized values can be used in several areas of Koha. One reason you would add an authorized value category would be to control the values that can be entered into MARC fields by catalogers.
-
Get there: More > Administration > Basic Parameters > Authorized Values
Koha installs with pre-defined values that your library is likely to use, for instance 'Lost'.
-
Asort1
-
Used for acquisitions statistical purposes
-
-
Asort2
-
Used for acquisitions statistical purposes
-
-
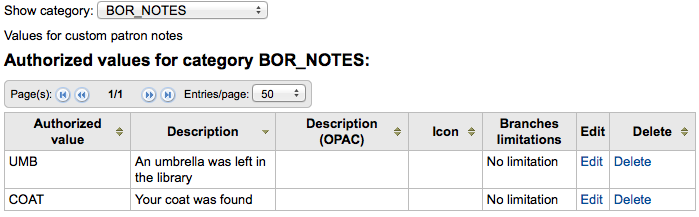
BOR_NOTES
-
Values for custom patron messages that appear on the circulation screen and the OPAC. The value in the Description field should be the message text and is limited to 200 characters.
-
-
Bsort1
-
Values that can be entered to fill in the patron's sort 1 field
-
-
Bsort2
-
Values that can be entered to fill in the patron's sort 2 field
-
-
CART
-
Is the shelving cart location, used by InProcessingToShelvingCart and ReturnToShelvingCart
-
-
CCODE
-
Collection codes (appears when cataloging and working with items)
-
-
DAMAGED
-
Descriptions for items marked as damaged (appears when cataloging and working with items)
-
-
DEPARTMENT
-
Departments are required by and will be used in the Course Reserves module
-
-
HINGS_AS
-
General Holdings: Acquisition Status Designator :: This data element specifies acquisition status for the unit at the time of the holdings report.
-
-
HINGS_C
-
General Holdings: Completeness Designator
-
-
HINGS_PF
-
Physical Form Designators
-
-
HINGS_RD
-
General Holdings: Retention Designator :: This data element specifies the retention policy for the unit at the time of the holdings report.
-
-
HINGS_UT
-
General Holdings: Type of Unit Designator
-
-
LOC
-
Shelving location (usually appears when adding or editing an item)
-
-
LOST
-
Descriptions for the items marked as lost (appears when adding or editing an item)
-
Important
Values given to lost statuses should be numeric and not alphabetical in order for statuses to appear properly
-
-
MANUAL_INV
-
Values for manual invoicing types
-
Important
The value set as the Authorized Value for the MANUAL_INV authorized value category will appear as the Description and the Authorized Value Description will be used as the amount. Enter monetary amounts in the description without currency symbols.
-
-
NOT_LOAN
-
Reasons why a title is not for loan
-
Important
Values given to lost statuses should be numeric and not alphabetical in order for statuses to appear properly
-
Note
Negative number values will still allow holds (use for on order statuses for example) where as positive numbers will not allow holds or checkouts
-
-
ORDER_CANCELLATION_REASON
-
Reasons why an order might have been cancelled
-
-
PROC
-
The location to be used for NewItemsDefaultLocation (change description as desired), also the location expected by InProcessingToShelvingCart.
-
-
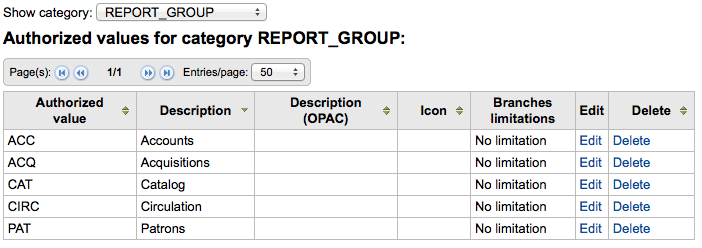
REPORT_GROUP
-
A way to sort and filter your reports, the default values in this category include the Koha modules (Accounts, Acquitisions, Catalog, Circulation, Patrons)
-
-
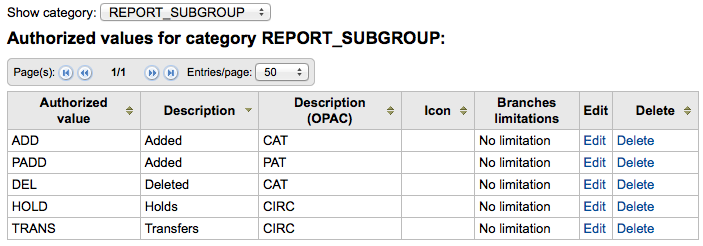
REPORT_SUBGROUP
-
Can be used to further sort and filter your reports. This category is empty by default. Values here need to include the authorized value code from REPORT_GROUP in the Description (OPAC) field to link the subgroup to the appropriate group.
-
-
RESTRICTED
-
Restricted status of an item
-
-
ROADTYPE
-
Road types to be used in patron addresses
-
-
SIP_MEDIA_TYPE
-
SUGGEST
-
List of patron suggestion reject or accept reasons (appears when managing suggestions)
-
-
WITHDRAWN
-
Description of a withdrawn item (appears when adding or editing an item)
-
-
YES_NO
-
A generic authorized value field that can be used anywhere you need a simple yes/no pull down menu.
-
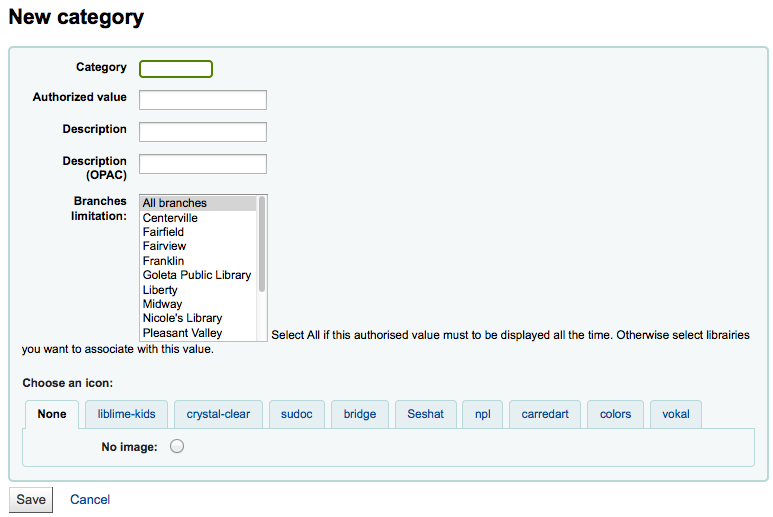
In addition to the existing categories that come by default with Koha, librarians can add their own authorized value categories to control data that is entered into the system. To add a new category:
-
Click 'New Category'
-
Limit your Category to 10 characters (something short to make it clear what the category is for)
-
Important
Category cannot have spaces or special characters other than underscores and hyphens in it.
-
-
When adding a new category you're asked to create at least one authorized value
-
Enter a code for your Authorized Value into the 'Authorized value' field
-
Important
Authorized value is limited to 80 characters and cannot have spaces or special characters other than underscores and hyphens in it.
-
-
Use the Description field for the actual value that will be displayed. If you want something different to show in the OPAC, enter a 'Description (OPAC)'
-
If you would like to limit this authorized value category to only specific libraries you can choose them from the 'Branches limitation' menu. To have it show for all libraries just choose 'All branches' at the top of the list.
-
If you have StaffAuthorisedValueImages and/or AuthorisedValueImages set to show images for authorized values you can choose the image under 'Choose an icon'
-
-
Click 'Save'
-
Your new category and value will appear on the list of Authorized Values
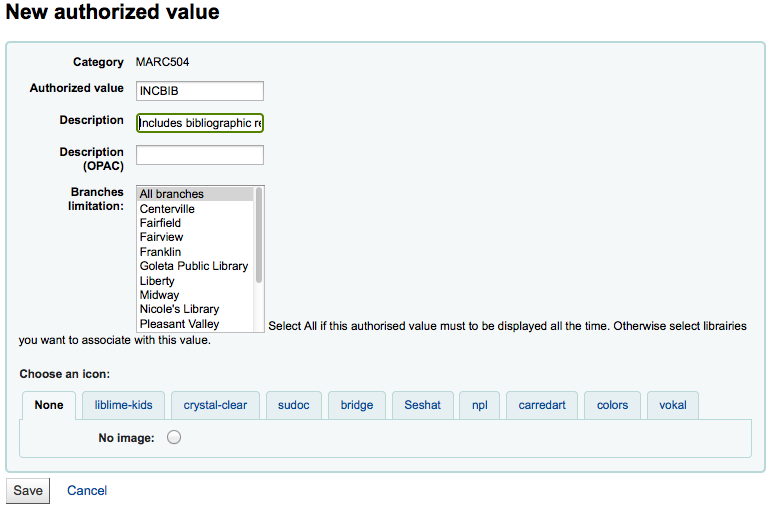
New authorized values can be added to any existing or new category. To add a value:
-
Click 'New authorized value for ...'
-
Enter a code for your Authorized Value into the 'Authorized value' field
-
Important
Authorized value is limited to 80 characters and cannot have spaces or special characters other than underscores and hyphens in it.
-
-
Use the Description field for the actual value that will be displayed. If you want something different to show in the OPAC, enter a 'Description (OPAC)'
-
If you would like to limit this authorized value category to only specific libraries you can choose them from the 'Branches limitation' menu. To have it show for all libraries just choose 'All branches' at the top of the list.
-
If you have StaffAuthorisedValueImages and/or AuthorisedValueImages set to show images for authorized values you can choose the image under 'Choose an icon'
-
Click 'Save'
-
The new value will appear in the list along with existing values