Settings for controlling circulation and patron information.
Patron categories allow you to organize your patrons into different roles, age groups, and patron types.
-
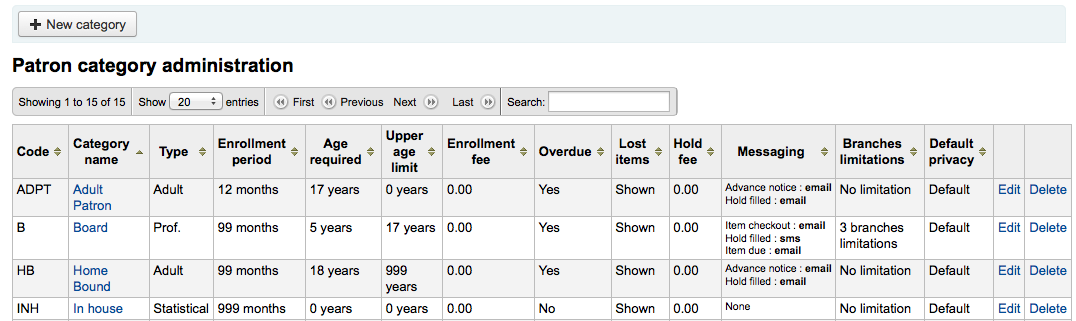
Get there: More > Administration > Patrons & Circulation > Patron Categories
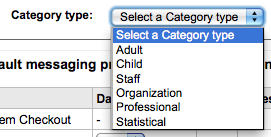
Patrons are assigned to one of six main categories:
-
Adult
-
Most common patron type, usually used for a general 'Patron' category.
-
-
Child
-
Children patrons can have a guardian to be attached to them.
-
-
Staff
-
Librarians (and library workers) should be assigned the staff category so that you can set their permissions and give them access to the staff client.
-
-
Organizational
-
Organizational patrons are organizations. Organizations can be used as guarantors for Professional patrons.
-
-
Professional
-
Professional patrons can be linked to Organizational patrons
-
-
Statistical
-
This patron type is used strictly for statistical purposes, such as in house use of items.
-
To add a new patron category click 'New Category' at the top of the page
-
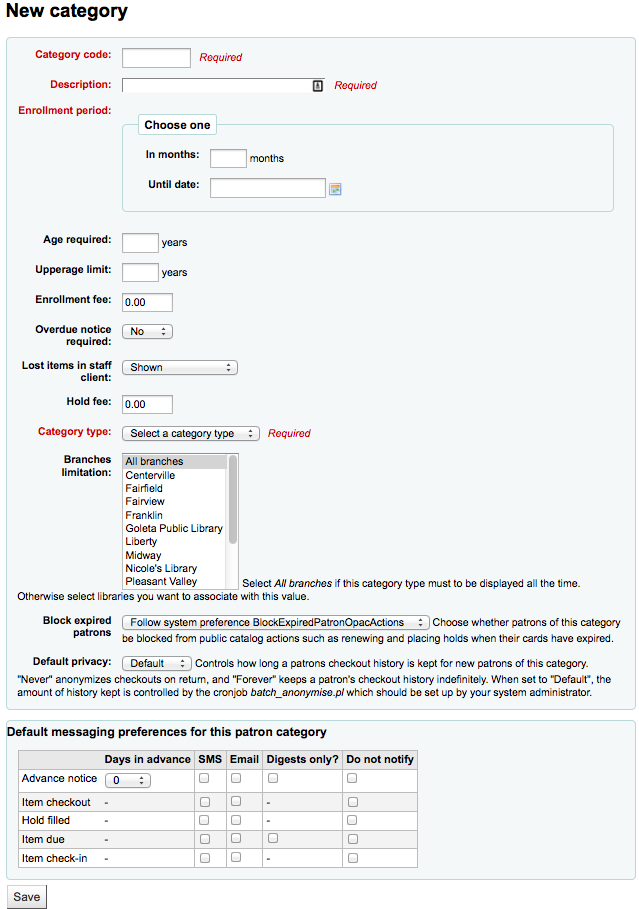
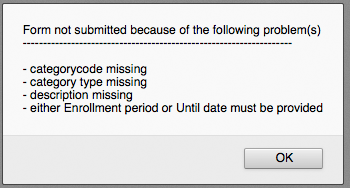
The 'Category Code' is an identifier for your new code.
-
Important
The category code is limited to 10 characters (numbers and letters)
-
Important
This field is required in order to save your patron category. If left blank you will be presented with an error.
-
-
Enter a plain text version of the category in the 'Description' field.
-
Important
This field is required in order to save your patron category. If left blank you will be presented with an error.
-
-
Enrollment period (in months) should be filled in if you have a limited enrollment period for your patrons (eg. Student cards expire after 9 months or until a specific date)
-
Important
You cannot enter both a month limit and a date until. Choose to enter either one or the other.
-
Important
This field is required in order to save your patron category. If left blank you will be presented with an error.
-
-
Some patron categories can have a minimum age (in years) requirement associated with them, enter this age in the 'Age required'
-
Important
This value will only be checked if BorrowerMandatoryField defines the dateofbirth as a required field on the patron record
-
-
Patron categories can also have a maximum age (in years) associated with them (such as children), enter this age in the 'Upperage limit'
-
Important
This value will only be checked if BorrowerMandatoryField defines the dateofbirth as a required field on the patron record
-
-
If you charge a membership fee for your patrons (such as those who live in another region) you can enter that in the 'Enrollment fee' field.
-
Important
Only enter numbers and decimals in this field
-
Note
Depending on your value for the FeeOnChangePatronCategory preference this fee will be charged on patron renewal as well as when they are first enrolled.
-
-
If you want your patron to receive overdue notices, set the 'Overdue notice required' to 'Yes'
-
You can decide on a patron category basis if lost items are shown in the staff client by making a choice from the 'Lost items in staff client' pull down

-
Important
Note that this is only applicable in the staff client, so changing this value on patron categories who do not have access to the staff client won't make any difference
-
-
If you charge patrons for placing holds on items, enter the fee amount in the 'Hold fee' field.
-
Important
Only enter numbers and decimals in this field
-
-
In the 'Category type' field choose one of the six main parent categories
-
Important
This field is required in order to save your patron category. If left blank you will be presented with an error.
-
-
The Branch Limitations let you limit this patron category to only some branches in your library system. Select 'All branches' if you would like any library to be able to use this category.
-
You can decide if this patron category is blocked from performing actions in the OPAC if their card is expired using the next option. By default it will follow the rule set in the BlockExpiredPatronOpacActions preference

-
Next you can choose the default privacy settings for this patron category. This setting can be edited by the patron via the OPAC if you allow it with the OPACPrivacy system preference.

-
Finally you can assign advanced messaging preferences by default to a patron category
-
Important
Requires that you have EnhancedMessagingPreferences enabled
-
These defaults will be applied to new patrons that are added to the system. They will not edit the preferences of the existing patrons. Also, these can be changed for individual patrons, this setting is just a default to make it easier to set up messages for an entire category.
-
Note
After setting the default for the patron category you can force those changes to all existing patrons by running the borrowers-force-messaging-defaults script found in the misc/maintenance folder. Ask your system administrator for assistance with this script.
-
-
These rules define how your items are circulated, how/when fines are calculated and how holds are handled.
-
Get there: More > Administration > Patrons & Circulation > Circulation and fines rules
The rules are applied from most specific to less specific, using the first found in this order:
-
same library, same patron type, same item type
-
same library, same patron type, all item type
-
same library, all patron types, same item type
-
same library, all patron types, all item types
-
default (all libraries), same patron type, same item type
-
default (all libraries), same patron type, all item types
-
default (all libraries), all patron types, same item type
-
default (all libraries), all patron types, all item types
The CircControl and HomeOrHoldingBranch also come in to play when figuring out which circulation rule to follow.
-
If CircControl is set to "the library you are logged in at" circ rules will be selected based on the library you are logged in at
-
If CircControl is set to "the library the patron is from" circ rules will be selected based on the patron's library
-
If CircControl is set to "the library the item is from" circ rules will be selected based on the item's library where HomeOrHoldingBranch chooses if item's home library is used or holding library is used.
-
If IndependentBranches is set to 'Prevent' then the value of HomeOrHoldingBranch is used in figuring out if the item can be checked out. If the item's home library does not match the logged in library, the item cannot be checked out unless you are a superlibrarian.
Note
If you are a single library system choose your branch name before creating rules (sometimes having only rules for the 'all libraries' option can cause issues with holds)
Important
At the very least you will need to set a default circulation rule. This rule should be set for all item types, all libraries and all patron categories. That will catch all instances that do not match a specific rule. When checking out if you do not have a rule for all libraries, all item types and all patron types then you may see patrons getting blocked from placing holds. You will also want a rule for your specific library set for all item types and all patron types to avoid this holds issue. Koha needs to know what rule to fall back on.
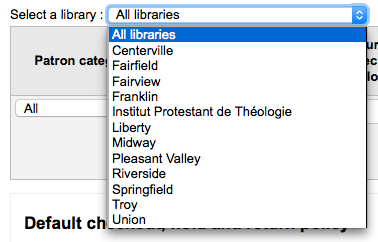
Using the issuing rules matrix you can define rules that depend on patron/item type combos. To set your rules, choose a library from the pull down (or 'all libraries' if you want to apply these rules to all branches):
From the matrix you can choose any combination of patron categories and item types to apply the rules to

-
First choose which patron category you'd like the rule to be applied to. If you leave this to 'All' it will apply to all patron categories
-
Choose the 'Item type' you would like this rule to apply to. If you leave this to 'All' it will apply to all item types
-
Limit the number of items a patron can have checked out at the same time by entering a number in the 'Current checkouts allowed' field
-
If you're allowing OnSiteCheckouts then you may also want to set a limit on the number of items patron's can have onsite.
-
Note
This setting also depends on the ConsiderOnSiteCheckoutsAsNormalCheckouts preference
-
-
Define the period of time an item can be checked out to a patron by entering the number of units (days or hours) in the 'Loan period' box.
-
Choose which unit of time, Days or Hours, that the loan period and fines will be calculated in in the 'Unit' column
-
You can also define a hard due date for a specific patron category and item type. A hard due date ignores your usual circulation rules and makes it so that all items of the type defined are due on, before or after the date you specify.
-
'Fine amount' should have the amount you would like to charge for overdue items
-
Important
Enter only numbers and decimal points (no currency symbols).
-
-
Enter the 'Fine charging interval' in the unit you set (ex. charge fines every 1 day, or every 2 hours)
-
'When to charge' is most handy in libraries that have a fine charging interval of more than 1 day.
-
End of interval
-
Given a grace period of 2 days and a fine interval of 7 days, the first fine will appear 7 days after the due date, it will always take one fine interval (7 days), before the first fine is charged
-
-
Start of interval
-
Given a grace period of 2 days and a fine interval of 7 days, the first fine will appear 2 days after the due date and the second fine 7 days after the due date.
-
-
-
The 'Fine grace period' is the period of time an item can be overdue before you start charging fines.
-
Important
This can only be set for the Day unit, not in Hours
-
-
The 'Overdue fines cap' is the maximum fine for this patron and item combination
-
Important
If this field is left blank then Koha will not put a limit on the fines this item will accrue. A maximum fine amount can be set using the MaxFine system preference.
-
-
If you would like to prevent overcharging patrons for a lost items, you can check the box under 'Cap fine at replacement price.' This will prevent the patron's fines from going above the replacement price on the item.
-
Note
If the 'Overdue fines cap' is also set, the fine will be the lesser of the two, if both apply to the given overdue checkout.
-
-
If your library 'fines' patrons by suspending their account you can enter the number of days their fine should be suspended in the 'Suspension in days' field
-
Important
This can only be set for the Day unit, not in Hours
-
-
You can also define the maximum number of days a patron will be suspended in the 'Max suspension duration' setting
-
Next decide if the patron can renew this item type and if so, enter how many times they can renew it in the 'Renewals allowed' box
-
If you're allowing renewals you can control how long the renewal loan period will be (in the units you have chosen) in the 'Renewal period' box
-
If you're allowing renewals you can control how soon before the due date patrons can renew their materials with the 'No renewals before' box.
-
Items can be renewed at any time if this value is left blank. Otherwise items can only be renewed if the item is due after the number in units (days/hours) entered in this box.
-
To control this value on a more granular level please set the NoRenewalBeforePrecision preference.
-
-
You can enable automatic renewals for certain items/patrons if you'd like. This will renew automatically following your circulation rules unless there is a hold on the item
-
Important
You will need to enable the automatic renewal cron job for this to work.
-
Important
This feature needs to have the "no renewal before" column filled in or it will auto renew everyday after the due date
-
-
If the patron can place holds on this item type, enter the total numbers of items (of this type) that can be put on hold in the 'Holds allowed' field
-
Next you can decide if this patron/item combo are allowed to place holds on items that are on the shelf (or available in the library) or not. If you choose 'no' then items can only be placed on hold if checked out
-
You can also decide if patrons are allowed to place item specific holds on the item type in question. The options are:
-
Allow: Will allow patrons the option to choose next available or item specific
-
Don't allow: Will only allow patrons to choose next available
-
Force: Will only allow patrons to choose an specific item
-
-
Finally, if you charge a rental fee for the item type and want to give a specific patron type a discount on that fee, enter the percentage discount (without the % symbol) in the 'Rental Discount' field
When finished, click 'Add' to save your changes. To modify a rule, simply click the 'Edit' link to the right of the fule and edit the values that appear filled in at the bottom of the form.

If you would like to delete your rule, click the 'Delete' link to the right of the rule.
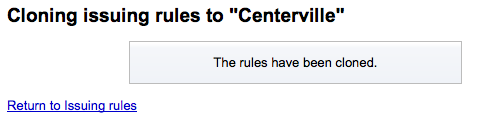
To save time you can clone rules from one library to another by choosing the clone option above the rules matrix.

After choosing to clone you will be presented with a confirmation message.
You can set a default maximum number of checkouts and hold policy that will be used if none is defined below for a particular item type or category. This is the fall back rule for defaults.

From this menu you can set a default to apply to all item types and patrons in the library if no other option is set in the forms below.
-
In 'Total current checkouts allowed' enter the total number of items patrons can have checked out at one time
-
In 'Total current on-site checkouts allowed' enter the total number of items patrons can have checked out on site at a time (OnSiteCheckouts needs to be set to 'Enable')
-
Control where patrons can place holds from using the 'Hold Policy' menu
-
From Any Library: Patrons from any library may put this item on hold. (default if none is defined)
-
From Home Library: Only patrons from the item's home library may put this book on hold.
-
No Holds Allowed: No patron may put this book on hold.
-
-
Control if there is a limit to filling a hold based on the item's library
-
any library
-
item's home library
-
item's holding library
-
Note
The patron's home library should not affect whether a patron can place the hold, instead the hold will only be fillable when an item matching the pickup location becomes available.
-
-
Control where the item returns to once it is checked in
-
Item returns home
-
Item returns to issuing branch
-
Item floats
-
When an item floats it stays where it was checked in and does not ever return 'home'
-
-
-
Once your policy is set, you can unset it by clicking the 'Unset' link to the right of the rule
For this library, you can specify the maximum number of loans that a patron of a given category can make, regardless of the item type.

Note
If the total amount loanable for a given patron category is left blank, no limit applies, except possibly for a limit you define for a specific item type.
For example, if you have a rule in the matrix that says Board patrons are allowed 10 books and 5 DVDs but you want to make it so that Board patrons only have a total of 12 things checked out at once. If you enter 12 here and the patron has 10 books out already they will only be allowed 2 DVDs to equal the 12 total they're allowed.
For this library, you can edit hold and return policies for a given item type, regardless of the patron's category.
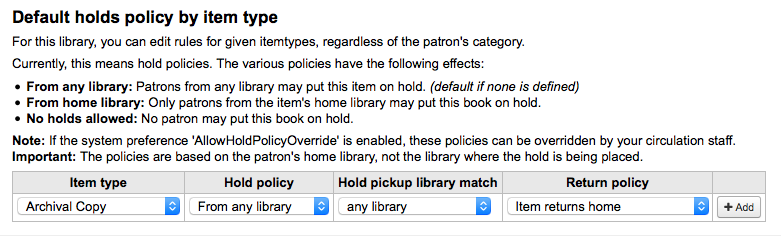
The various Hold Policies have the following effects:
-
From Any Library: Patrons from any library may put this item on hold. (default if none is defined)
-
From Home Library: Only patrons from the item's home library may put this book on hold.
-
No Holds Allowed: No patron may put this book on hold.
Important
Note that if the system preference AllowHoldPolicyOverride set to 'allow', these policies can be overridden by your circulation staff.
Important
These policies are based on the patron's home branch, not the branch that the reserving staff member is from.
Control if there is a limit to filling a hold based on the item's library
-
any library
-
item's home library
-
item's holding library
-
Note
The patron's home library should not affect whether a patron can place the hold, instead the hold will only be fillable when an item matching the pickup location becomes available.
The various Return Policies have the following effects:
-
Item returns home: The item will prompt the librarian to transfer the item to its home library
-
Important
If the AutomaticItemReturn preference is set to automatically transfer the items home, then a prompt will not appear
-
-
Item returns to issuing branch: The item will prompt the librarian to transfer the item back to the library where it was checked out
-
Important
If the AutomaticItemReturn preference is set to automatically transfer the items home, then a prompt will not appear
-
-
Item floats: The item will not be transferred from the branch it was checked in at, instead it will remain there until transferred manually or checked in at another branch
For example you might allow holds at your libraries but not what New items or DVDs to be placed on hold by other branches so you can set the 'Hold policy' to 'From home library' so that those items can only be placed on hold if the items' owning library and the patron's home library are the same. You can also block holds completely on specific item types from this form. This is also how you can set up floating item types and types that remain with their home library.
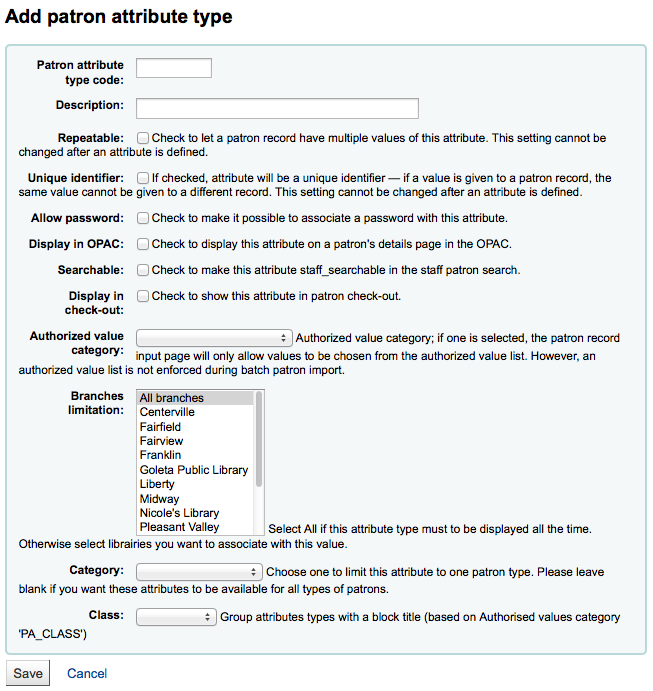
Patron attributes can be used to define custom fields to associate with your patron records. In order to enable the use of custom fields you need to set the ExtendedPatronAttributes system preference.
-
Get there: More > Administration > Patrons & Circulation > Patron attribute types
A common use for this field would be for a student ID number or a Driver's license number.
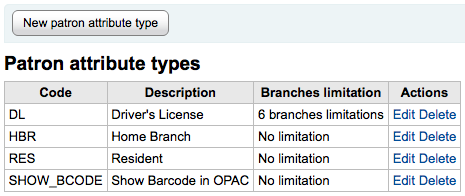
To add a new Patron Attribute Type, click the 'New Patron Attribute Type' button at the top of the page
-
In the 'Patron attribute type code', enter a short code to identify this field
-
Important
This field is limited to 10 characters (numbers and letters only)
-
Important
This setting cannot be changed after an attribute is defined
-
-
In the 'Description' field, enter a longer (plain text) explanation of what this field will contain
-
Check the box next to 'Repeatable' to let a patron record have multiple values of this attribute.
-
Important
This setting cannot be changed after an attribute is defined
-
-
If 'Unique identifier' is checked, the attribute will be a unique identifier which means, if a value is given to a patron record, the same value cannot be given to a different record.
-
Unique attributes can be used as match points on the patron import tool
-
Important
This setting cannot be changed after an attribute is defined
-
-
Check 'Allow password' to make it possible to associate a password with this attribute.
-
Check 'Display in OPAC' to display this attribute on a patron's details page in the OPAC.
-
Check 'Searchable' to make this attribute searchable in the staff patron search.
-
Check 'Display in check-out' to make this attribute visible in the patron's short detail display on the left of the checkout screen and other patron pages

-
Authorized value category; if one is selected, the patron record input page will only allow values to be chosen from the authorized value list.
-
You will first need to add an authorized value list for it to appear in this menu
-
Get there: More > Administration > Basic Parameters > Authorized Values
-
-
Important
an authorized value list is not enforced during batch patron import.
-
-
If you would like this attribute to only be used by specific branches you can choose those branches from the 'Branches limitation' list. Choose 'All branches' to show it for all libraries.
-
Important
Note that items with locations already set on them will not be altered. The branch limitation only limits the choosing of an authorized value based on the home branch of the current staff login. All authorized values for item records (LOC, LOST, CCODE, etc) will show in the OPAC for all patrons.
-
-
If you'd like to only show this attribute on patrons of one type choose that patron type from the 'Category' pull down
-
If you have a lot of attributes it might be handy to group them so that you can easily find them for editing. If you create an Authorized Value for PA_CLASS it will show in the 'Class' pull down and you can then change your attributes page to have sections of attributes
-
Click Save to save your new attribute
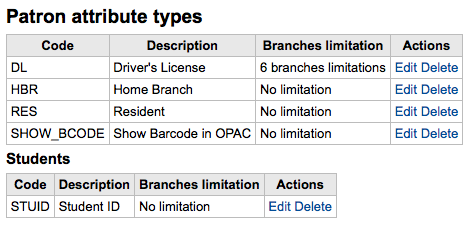
Once added your attribute will appear on the list of attributes and also on the patron record add/edit form
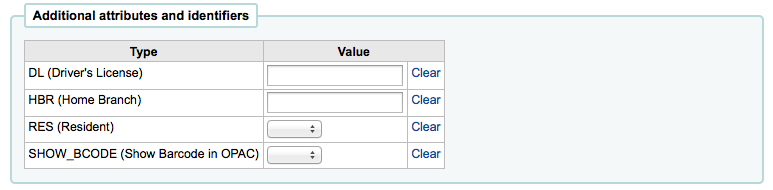
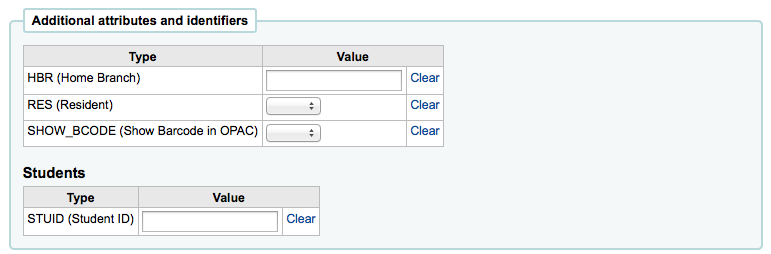
If you have set up classes for organizing attributes they will appear that way on the add/edit patron form
Each patron attribute has an edit and a delete link beside it on the list of attributes.
Some fields in the attribute will not be editable once created:
-
Patron attribute type code
-
Repeatable
-
Unique identifier
You will be unable to delete an attribute if it's in use.

Limit the ability to transfer items between libraries based on the library sending, the library receiving, and the collection code involved.
-
Get there: More > Administration > Patrons & Circulation > Library Transfer Limits
These rules only go into effect if the preference UseBranchTransferLimits is set to 'enforce'.
Before you begin you will want to choose which library you are setting these limits for.
Transfer limits are set based on the collections codes you have applied via the Authorized Value administration area.
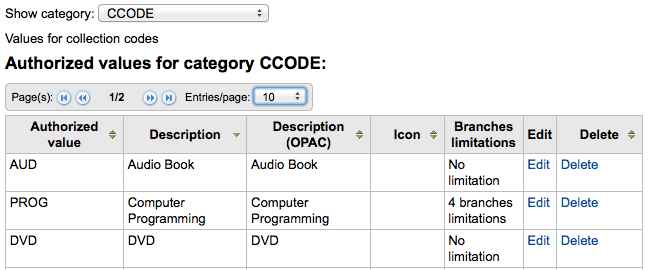
Collection codes will appear as tabs above the checkboxes:
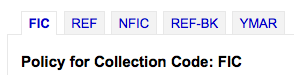
Check the boxes for the libraries that you accept checkins from for the item type you have selected at the top (in the example below - FIC)
In the above example, Centerville library will allow patrons to return items from all libraries except Liberty and Franklin to their branch.
The Transport cost matrix lets a library system define relative costs to transport books to one another. In order for the system to use this matrix you must first set the UseTransportCostMatrix preference to 'Use'.
Important
The Transport cost matrix takes precedence in controlling where holds are filled from, if the matrix is not used then Koha checks the StaticHoldsQueueWeight.
Costs are decimal values between some arbitrary maximum value (e.g. 1 or 100) and 0 which is the minimum (no) cost. For example, you could just use the distance between each library in miles as your 'cost', if that would accurately reflect the cost of transferring them. Perhaps post offices would be a better measure. Libraries sharing a post office would have a cost of 1, adjacent post offices would have a cost of 2, etc.
To enter transport costs simply click in the cell you would like to alter, uncheck the 'Disable' box and enter your 'cost'
After entering in your cost, hit 'Enter' on your keyboard or click the 'Save' button at the bottom of the matrix to save your changes.
Note
A NULL value will make no difference where the From and To libraries are the same library. However, as a best practice, you should put a 0 in there. For all other To/From combinations, a NULL value will cause that relationship to act as if it has been disabled. So, in summary, don't leave any of the values empty. It's best to always put a number in there ( even if you choose to disable that given To/From option ).
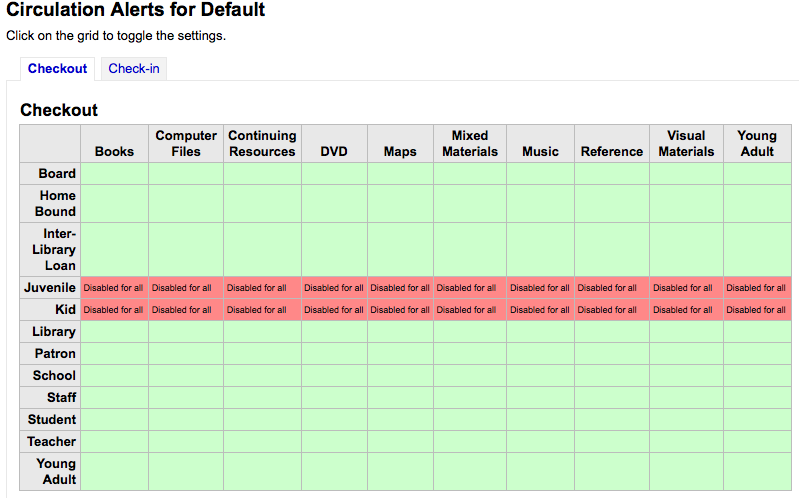
Libraries can decide if they want to have patrons automatically notified of circulation events (check ins and check outs).
-
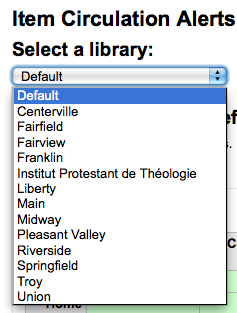
Get there: More > Administration > Patrons & Circulation > Item Circulation Alerts
These preferences are set based on patron types and item types.
Important
These preference can be overridden by changes in the individual patron's messaging preferences.
To set up circulation alerts:
-
Choose your library from the pull down at the top of the screen
-
To set preferences for all libraries, keep the menu set to 'Default'
-
-
By default all item types and all patrons are notified of check ins and check outs. To change this, click on the item/patron type combo that you would like to stop notices for.
-
In the above example, Juveniles and Kids will not receive check out notices.
-
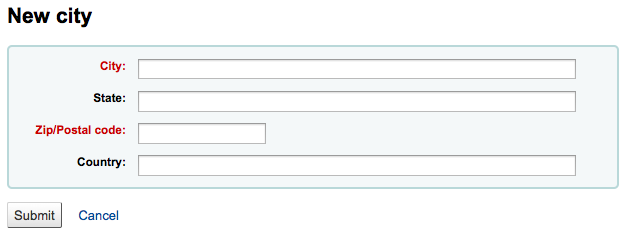
To standardize patron input you can define cities or towns within your region so that when new patrons are added librarians simply have to select the town from a list instead of having to type the town and zip (or postal) code information.
-
Get there: More > Administration > Patrons & Circulation > Cities and Towns
To add a new city, click the 'New City' button at the top of the page and enter the city name, state, zip/postal code and country.
One you click Submit, your city will be saved and will be listed on the Cities and Towns page
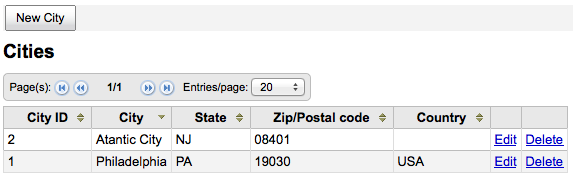
Cities can be edited or deleted at any time.
If you have defined local cities using the New city form, then when adding or editing a patron record you will see those cities in a pull down menu to make city selection easy.
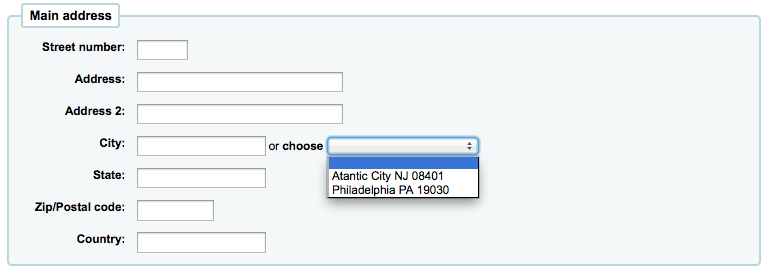
This will allow for easy entry of local cities into the patron record without risking the potential for typos or mistaken zip/postal codes.