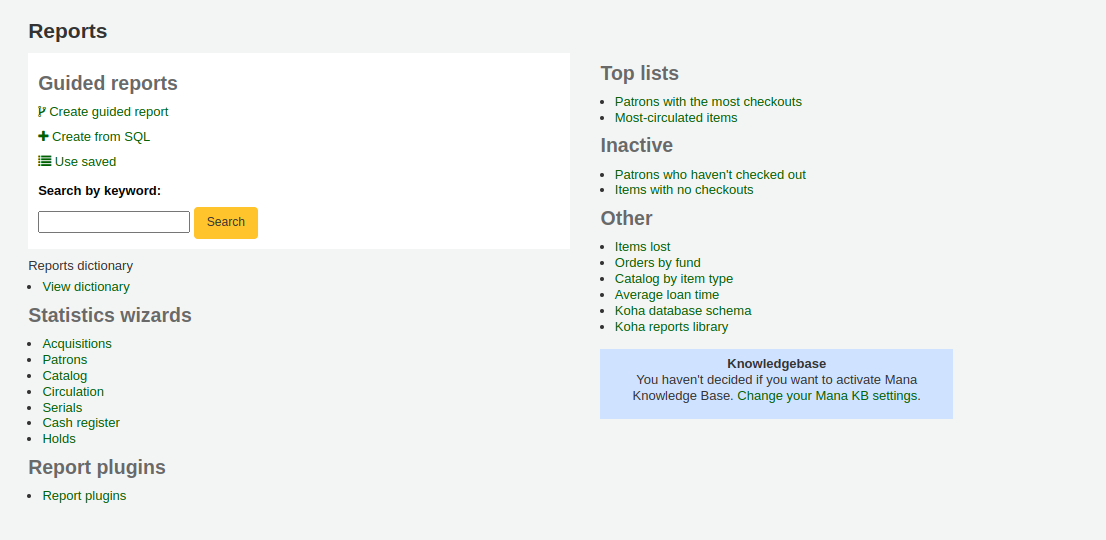
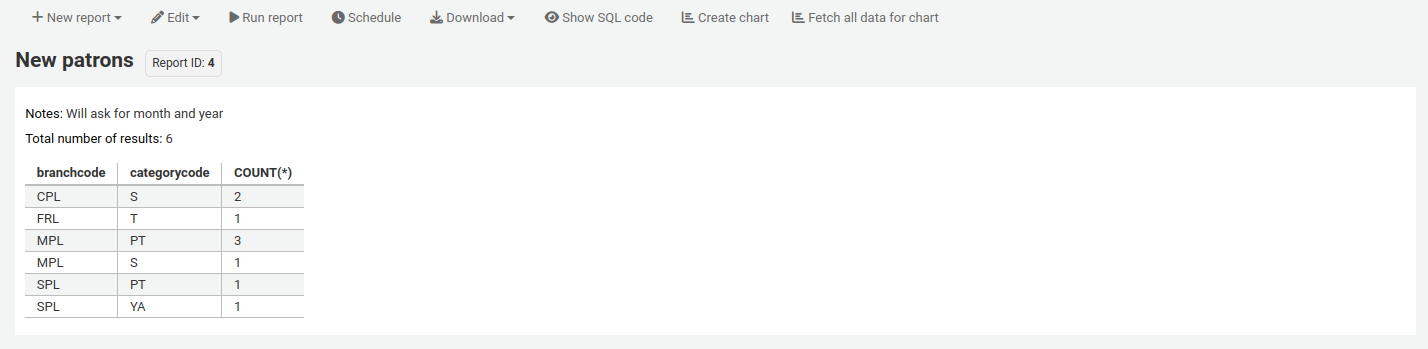
Reports
I reports in Koha sono un modo per raccogliere i dati. Essi sono usati per generare statistiche, liste di utenti, liste di collocazioni sugli scaffali o ogni tipo di lista dei dati presenti nel database.
Vai a: Più > Reports
Report personalizzati
I dati di Koha sono memorizzati in un database MySQL che significa che i bibliotecari possono generare quasi qualsiasi report che desiderano sia usando il Wizard per creare i reports o scrivere le proprie :ref:query SQL <report-from-sql-label>.
Aggiungi un report personalizzato
Wizard guidato per report
Il wizard ti guida in 6 passi per creare un report.
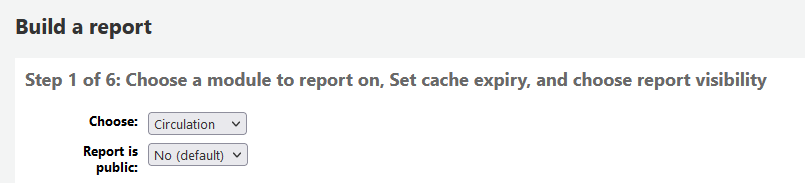
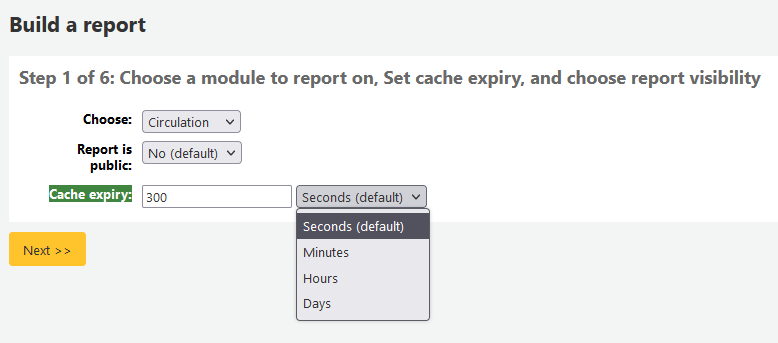
Passo 1: Scegli il modulo a cui si riferisce il report. Verranno determinate le tabelle e i campi disponibili per la query.
“Report is public” should be left to the default of “No” in most cases especially if the report contains patron or other sensitive information. A public report can be accessed using the JSON reports services by anyone and without authentication.
Nota
Se il tuo amministratore di sistema ha impostato la memcache per il tuo server, vedrai un’opzione in più relativa alla durata della Cache. Si riferisce ai report pubblici. Se definisci un report come pubblico, verrà fatto girare costantemente, e sovraccaricherà il sistema. Impostare questo valore eviterà il sovraccarico.
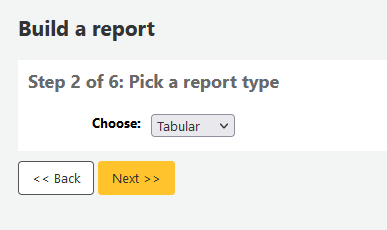
Passo 2: Scegli il tipo di report. Per adesso, l’unica scelta possibile è tabulare.
Passo 3: Scegli i campi che vuoi nel report. Puoi selezionare più campi e aggiungerli tutti insieme usando ctrl-click (cmd-click per Mac) su ciascuno prima di premere il bottone Aggiungi.

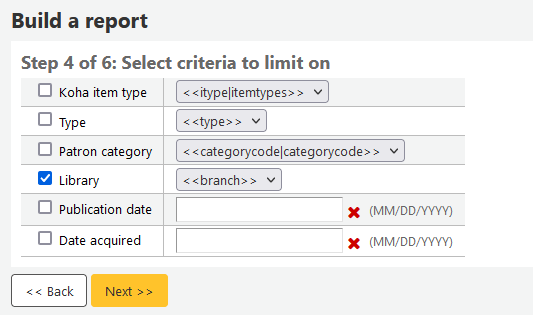
Passo 4: Scegli eventuali limiti per il report (per esempio tipi di copie o biblioteche). Se non ti servono limiti, premi direttamente su Successivo.
Passo 5: Eseguire funzioni matematiche. Se non vuoi fare calcoli, semplicemente fai clic su Avanti invece selezionare un’opzione.

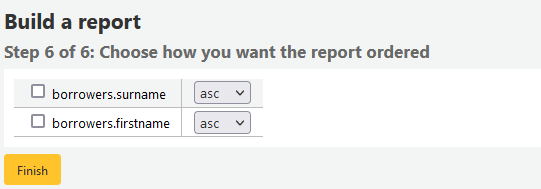
Passo 6: Scegli l’ordine dei dati. Se vuoi estrarre i dati nello stesso ordine presente sul db, semplicemente clicca su “Fine”
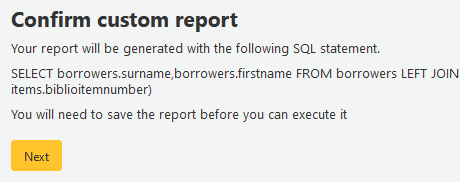
Quando hai finito, ti verrà mostrato l’SQL generato. Da qui puoi scegliere di salvare il report cliccando “Finito” o copiare l’SQL per modificarlo a mano.
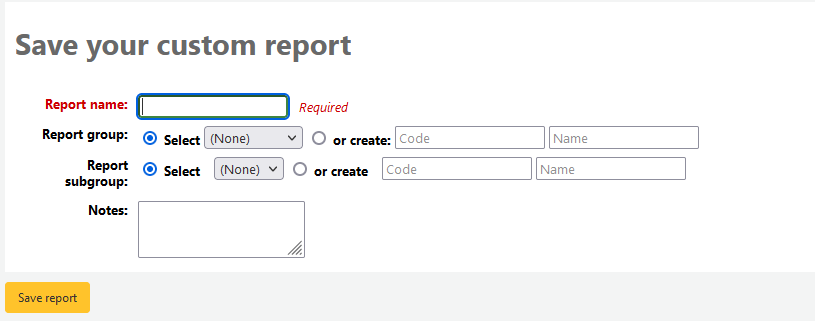
Se scegli di salvare il report, ti sarà chiesto di dargli un nome, di eventualmento di assegnarlo a un gruppo e a un sottogruppo, di eventualmente inserire delle note
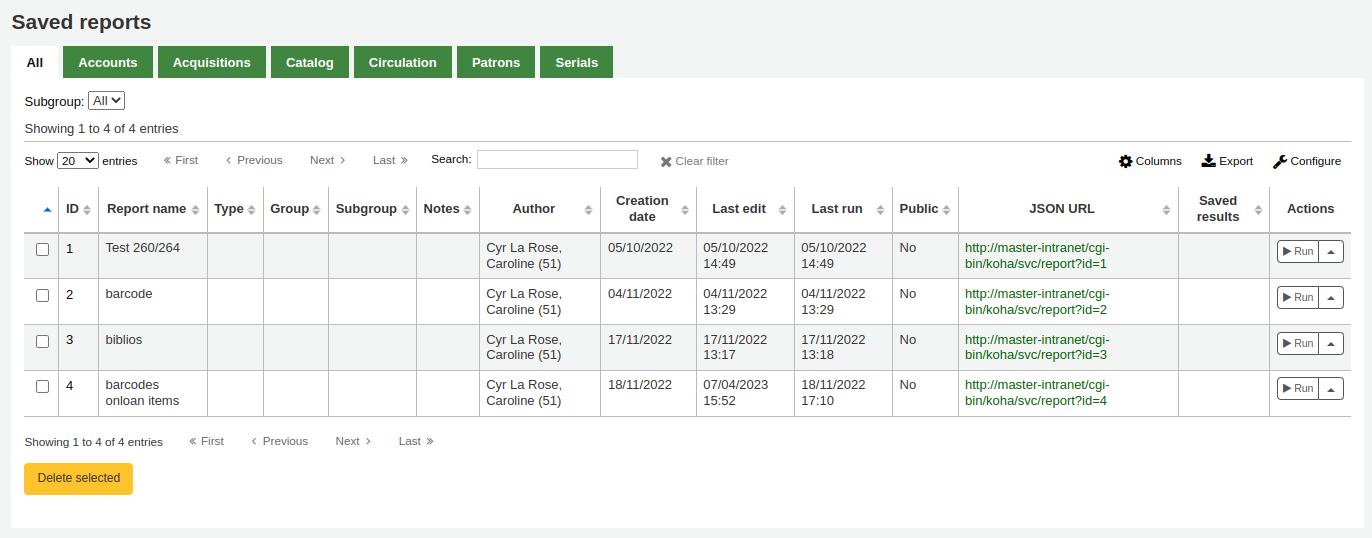
Una volta salvato, il report apparirà nella pagina “Report salvati”.
Nota
You can customize the columns of this table in the “Table settings” section of the Administration module (table id: table_reports).
Da qui puoi fare modifiche, far eseguire un report o pianificare l’elaborazione di un report. Per trovare il report che hai creato puoi ordinare la tabella per il valore di ogni colonna cliccando sulla testata. Uno degli ordinamenti migliore è quello per data di creazione. Puoi anche filtrare i risultati usando il menu sulla sinistra o usare le tabulazioni per vedere i tuoi raggruppamenti.
Crea un report da SQL
In aggiunta al wizard, hai l’opzione di scrivere le tue query direttamente con SQL. Per trovare reports scritti da altri utenti Koha, visita il wiki di Koha: http://wiki.koha-community.org/wiki/SQL_Reports_Library. Puoi trovare la struttura del tuo db in /installer/data/mysql/kohastructure.sql oppure online al sito http://schema.koha-community.org.
To add your query, click the link to “Create from SQL” on the main reports module
or the “New report” button at the top of the “Saved reports” page.

Compila nel form presentato
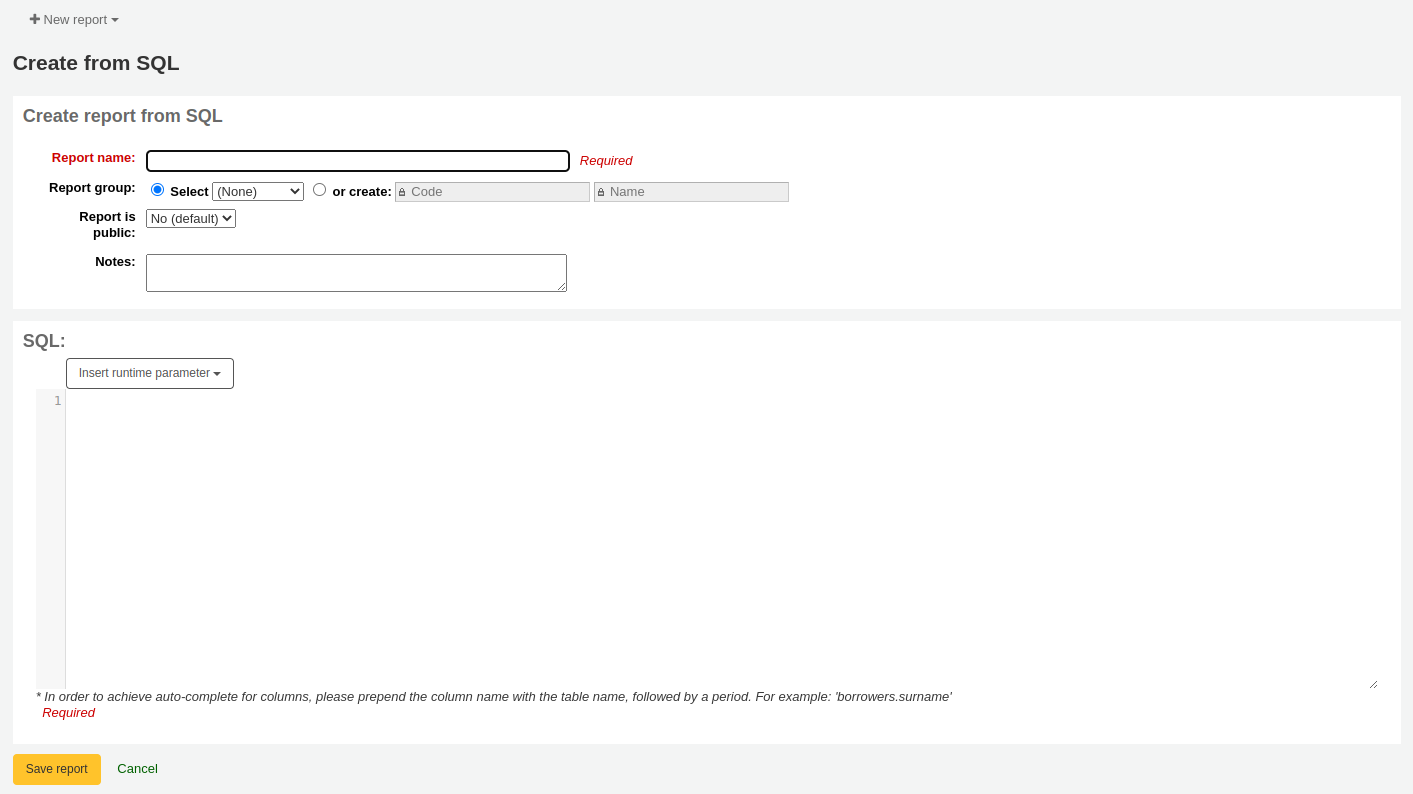
Report name: the name is what will appear on the “Saved reports” page to help you identify the report later. It will also be searchable using the filters found on the left of the “Saved reports” page.
Report group: you can use the “Report group” to organize your reports in tabs on the “Saved reports” page. You can choose from the list of existing groups, or create one on the fly by choosing the “or create” radio button.

Report groups are set in the REPORT_GROUP authorized value category.
Avvertimento
If you’re adding a report group on the fly, the code should not include special characters or spaces.
Report subgroup: if you chose a report group, this field will appear to further organize your reports. Choose a subgroup from the list, or create one on the fly by choosing the “or create” radio button.
Report subgroups are set in the REPORT_SUBGROUP authorized value category.
Nota
Report subgroups need to have unique values in “Authorized value” and “Description”. The “Description (OPAC)” field needs to contain the authorized value for the report group that the subgroup falls under.
Avvertimento
If you’re adding a report subgroup on the fly, the code should not include special characters or spaces.
Report is public: this should be left to the default of “No” in most cases, especially if the report contains patron or other sensitive information. A public report can be accessed using the JSON reports services by anyone and without authentication.
Cache expiry: this field will only appear if your system administrator has set up memcache on your server. This is related to public reports. If you make the report public, it’s constantly running and will cause a large load on your system. Setting this value prevents that.
Notes: notes will appear on the “Saved reports” page, and can be used to provide more details about the report or tips on how to enter values when it runs.
SQL: type or paste the SQL for the report (see report writing tips below).
Once everything is entered click the “Save report” button and you’ll be presented with options to run it. From here, you can also edit it, duplicate it, or schedule it to be run later.
Once a report is saved, you do not have to recreate it, it will appear on the “Saved reports” page with all other saved reports.
Nota
You can customize the columns of this table in the “Table settings” section of the Administration module (table id: table_reports).
From the “Saved reports” page, you can make edits, run the report, or schedule a time to run the report later. To find the report you created, you can sort by any of the columns by clicking on the column header (creation date is the best to find the report you just added). You can also filter your results using the filter menu on the left or use the tabs to find reports based on your custom groups.
SQL Report writing tips
Autocomplete
When you start typing in the SQL field, autocomplete options will be displayed.
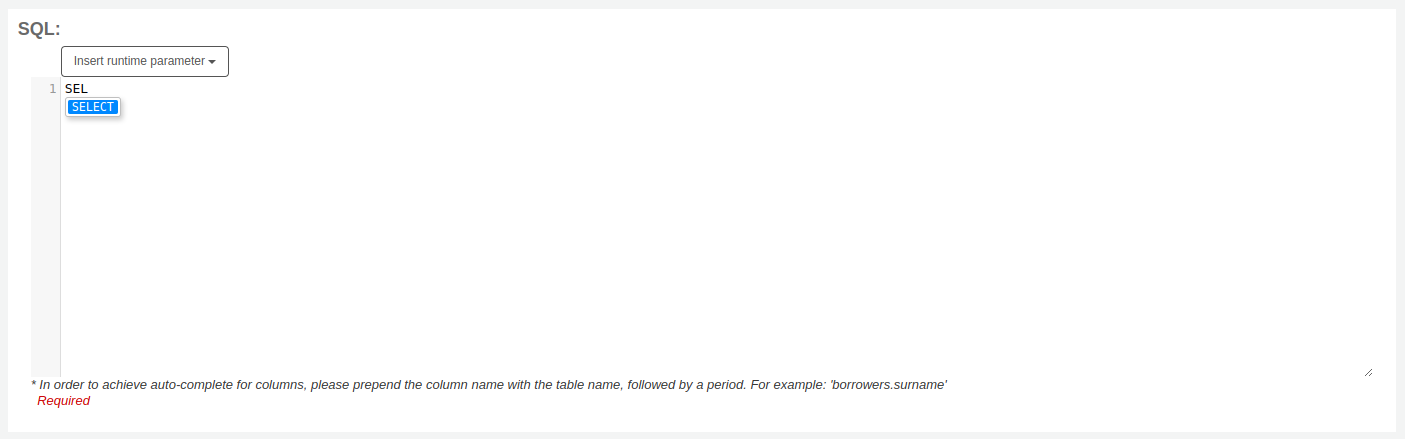
Use the arrows on your keyboard to choose the correct option and press “Enter” or “Tab” to insert it into your report, or simply click on the option to insert it.
Autocomplete options include:
SQL keywords such as SELECT, FROM, WHERE, etc.
table names
column names
Nota
To have suggestions for column names, you must type the table name first, followed by a period, then start typing the column name.
For example, to have the suggestion for
cardnumber, you must typeborrowers.ca.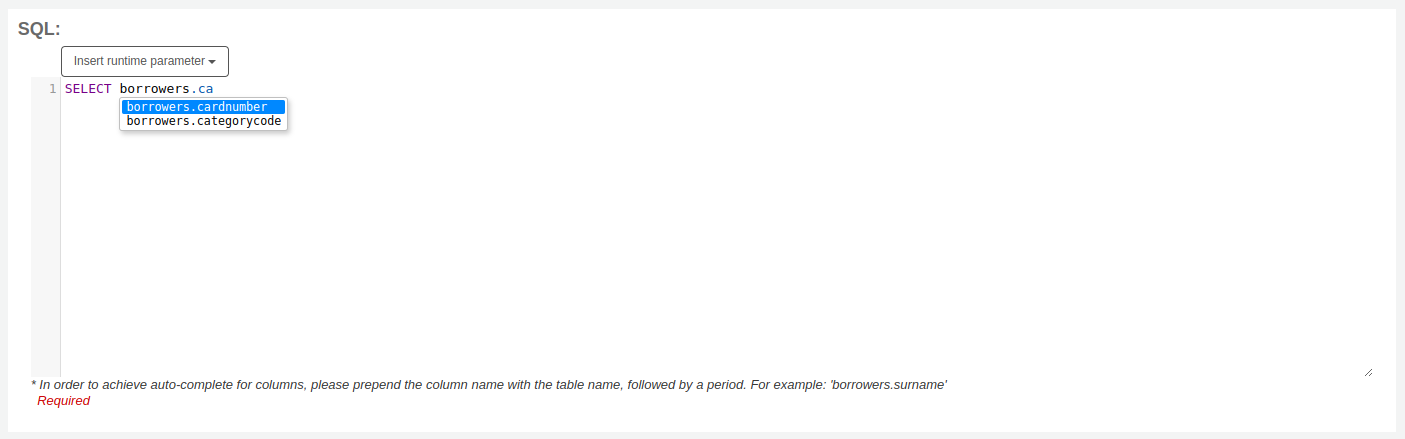
Runtime parameters
Se pensi che il tuo report pesi troppo sull macchina oppure tu voi mettere dei filtri, Koha ti permette di definire dei valori parametrici da inserire prima dell’esecuzione. In pratica questi valori funzionano da filtro e definiscono meglio i risultati che ottieni.
Click the button “Insert runtime parameter” and choose which parameter to add.
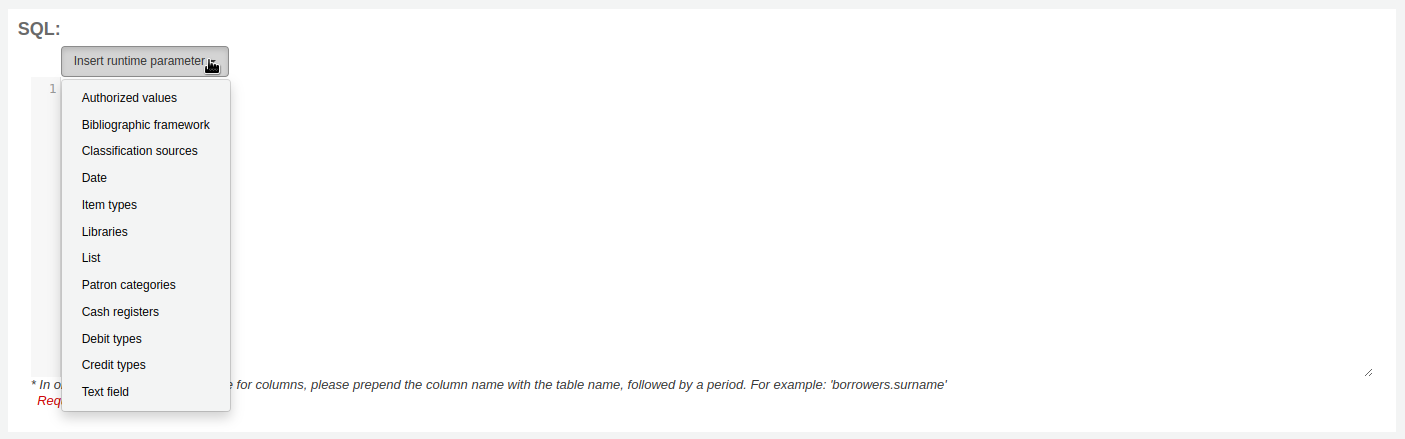
Authorized value: will display a drop down menu of the value descriptions from the chosen authorized value category. The authorized value code will be inserted in the report when it is run.
Bibliographic framework: will display a drop down menu of MARC bibliographic frameworks. The framework code will be inserted in the report when it is run.
Classification sources: will display a drop down menu of classification sources. The classification code will be inserted in the report when it is run.
Date: will display a calendar to pick a date. The date in YYYY-MM-DD format will be inserted in the report when it is run.
Item types: will display a drop down menu of item types. The item type code will be inserted in the report when it is run.
Libraries: will display a drop down menu of libraries. The library code (branchcode) will be inserted in the report when it is run.
List: will display a large text box in which the user can enter many values, one per line. Those values will be inserted in the report, separated by commas, when it is run.
Avvertimento
In the case of the list parameter, users must write one value per line.
Patron categories: will display a drop down menu of patron categories. The category code will be inserted in the report when it is run.
Cash registers: will display a drop down menu of cash registers. The cash register’s internal id will be inserted in the report when it is run.
Debit types: will display a drop down menu of debit types. The debit type code will be inserted in the report when it is run.
Credit types: will display a drop down menu of credit types. The credit type code will be inserted in the report when it is run.
Text field: will display an empty text field in which the user can enter any text.
Nota
Devi mettere «%» in una casella di testo affinchè il sistema non la consideri nella query. Altrimenti il campo verrà considerato «» (stringa vuota o NULL), che è diverso da non considerare il filtro nella query SQL.
For example entering nothing for: «title=<<Enter title>>» will display results with title=”” (no title).
If you want to have to have something not mandatory, use «title like <<Enter title>>» and enter a % at run time instead of nothing.
After you choose the type of runtime parameter, it will ask you for the parameter label. This is what the user will see as the label for the choice they have to make or text they have to enter.
The syntax inserted into the report is <<Label|authorized_value>>.
The << and >> are just delimiters to indicate the start and end of the runtime parameter.
The label will be displayed on the left of the choice or value to enter.
The authorized_value can be omitted if not applicable. If it is absent, a free text field will be displayed. If it contains an authorized code (see table below), a drop down of the values will be displayed.
Nota
You can write those in manually as well, you don’t have to go through the “Insert runtime parameter” button. As long as the syntax is correct, Koha will interpret it as a runtime parameter.
List of parameters that can be used in runtime parameters
Parametri |
What the user sees |
What gets inserted in query |
|---|---|---|
date |
date picker |
validly formatted date |
branches |
drop down of branch names |
branch code |
itemtypes |
drop down of item type names |
item type |
categorycode |
drop down of patron category descriptions |
borrower category code |
biblio_framework |
drop down of MARC bibliographic frameworks |
framework code |
list |
large text box |
comma separated values |
(auth-value-category) |
drop down of auth-value descriptions in category |
authorized value |
(nothing) |
text box |
entered text |
Nota
You can have more than one runtime parameter in a given SQL query.
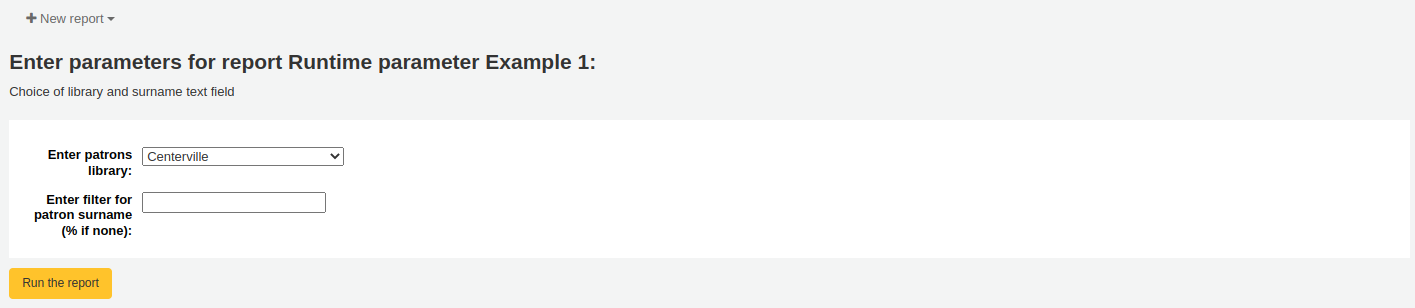
Example 1
SELECT surname,
       firstname
FROM borrowers
WHERE branchcode = <<Enter patrons library|branches>>
    AND surname LIKE <<Enter filter for patron surname (% if none)>>
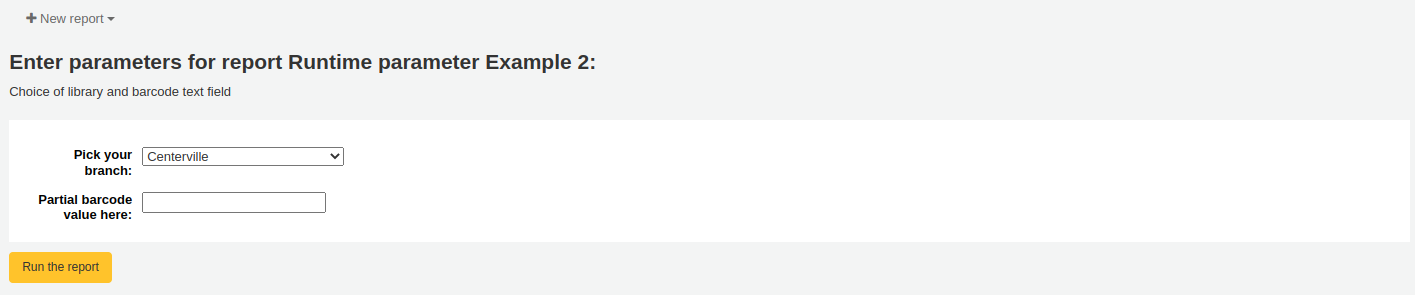
Example 2
SELECT *
FROM items
WHERE homebranch = <<Pick your branch|branches>>
    AND barcode LIKE <<Partial barcode value here>>
Example 3
SELECT title,
       author
FROM biblio
WHERE frameworkcode = <<Enter the frameworkcode|biblio_framework>>

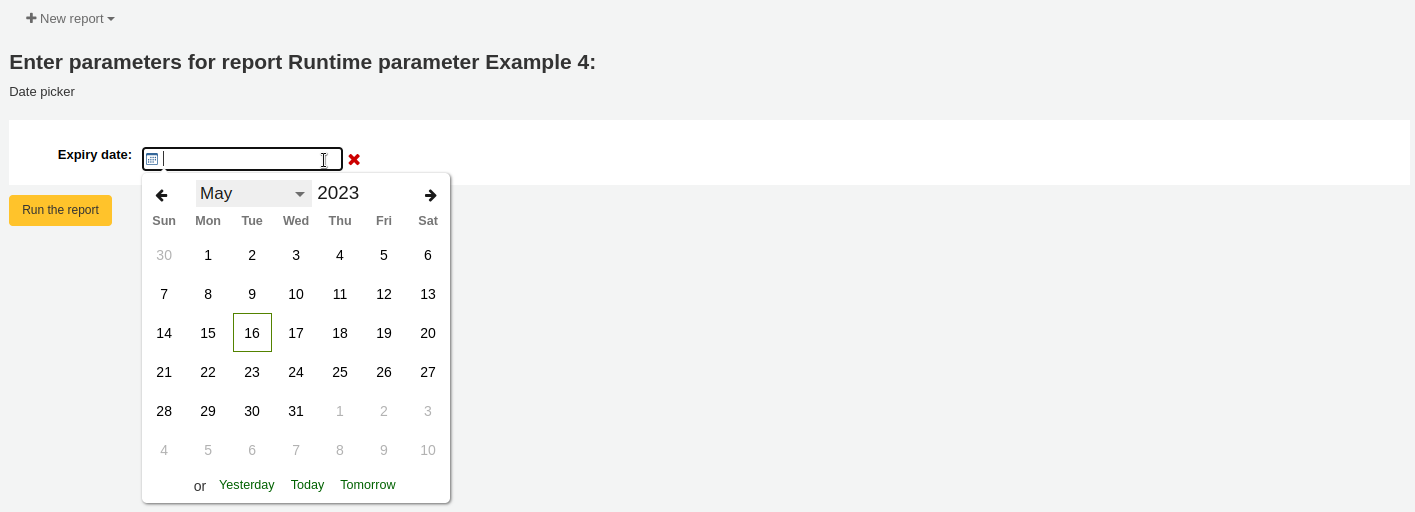
Example 4
SELECT cardnumber,
       surname,
       firstname
FROM borrowers
WHERE dateexpiry <= <<Expiry date|date>>
Example 5
SELECT *
FROM items
WHERE itemnumber IN <<List of itemnumbers (one per line)|list>>
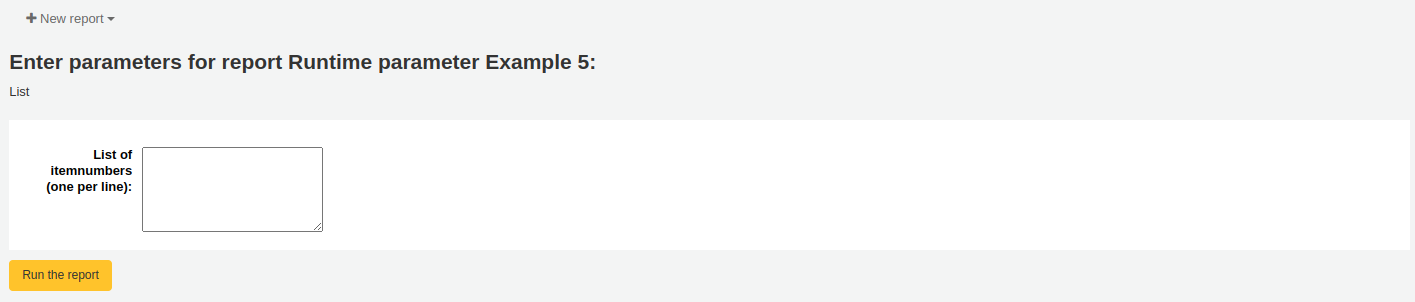
Avvertimento
In the case of the list parameter, users must write one value per line.
Column names
You can use an SQL alias to rename columns.
Example
SELECT surname AS "Last Name"
FROM borrowers
For reports whose results you wish to send to batch modification tools or generate automatic hyperlinks to use [[batch field|Column Name]] to rename the itemnumber, biblionumber or borrowernumber columns. For example, [[itemnumber|Item Number]] will format the itemnumber column as «Item Number», while allowing those results to be sent to the batch item modification tool.
Example
SELECT [[borrowernumber|Borrower Number]], firstname AS "First Name", surname AS "Last Name"
FROM borrowers
Hyperlinks
It can be useful to add clickable links to reports to make it easier for staff to navigate directly to specific results.
Koha will automatically generate hyperlinks for any report that contains a borrowernumber, cardnumber, itemnumber or biblionumber.
Nota
The column name must match the type of data your are inserting. Please see Column names for more details on naming columns for automatic hyperlinks.
When a user clicks on the number, the menu will prompt the user to click which Koha page they wish to visit.
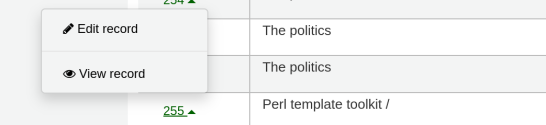
Available actions for each automatic link are:
borrowernumber: View, edit, check out
cardnumber: Check out
itemnumber: View, edit
biblionumber: View, edit
You may wish to make this a single click by directly linking to a specific page, or you may wish to make other data into clickable links; to make a book’s title a clickable link that brings the user to the bibliographic record, for example. Koha will insert HTML links added to the SELECT statement and by using CONCAT, data from the report results can be added to create a clickable link.
Example 1
This example uses the string /cgi-bin/koha/members/boraccount.pl?borrowernumber=XXXX to insert a direct link to a borrower. The end user will see the borrower’s library barcode number.
SELECT CONCAT('<a href=\"/cgi-bin/koha/members/boraccount.pl?borrowernumber=',borrowernumber,'\">', cardnumber, '</a>'), surname, firstname
FROM borrowers
Nota
Koha will automatically insert your library’s top level domain when a user clicks the link, so only «cgi-bin» and onward is required.
Nota
The example uses single quotation marks to separate the CONCAT segments, which are joined by commas. Below is a detailed explanation of the sections, each of which is separated by a comma:
CONCAT- This SQL command combines separate queries and strings into a single column. Parentheses will enclose the next entries.'<a href="/cgi-bin/koha/members/boraccount.pl?borrowernumber='- The beginning of an HTML link tag and Koha URL that points to a specific borrower. The single quotation marks ensure the string is printed literally. You must escape the double quotation marks with a backslash to ensure Koha interprets it literally rather than as part of the SQL.borrowernumber- The borrower number from the database. This is not enclosed by single quotation marks because we wish to query Koha.'">'- The end of an opening HTML tag for a link. Again wrapped in single quotation marks.cardnumber- The borrower’s barcode number queried from Koha. This is what will be visible to the user and comprise the clickable link.'</a>'- A closing tag of an HTML link. Wrapped in single quotation marks.
Example 2
This example will link directly to an item, displaying the item’s barcode to the user.
SELECT CONCAT('<a href=\"/cgi-bin/koha/catalogue/moredetail.pl?itemnumber=',itemnumber,'\">', barcode , '</a>')
FROM items
Example 3
This example will link to a bibliographic record and display the item’s title.
SELECT CONCAT('<a href=\"/cgi-bin/koha/catalogue/detail.pl?biblionumber=',biblionumber,'\">', title , '</a>')
FROM biblio
Report SQL da Mana
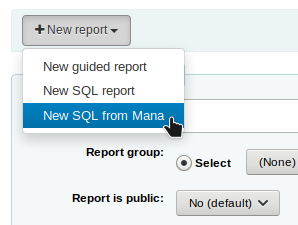
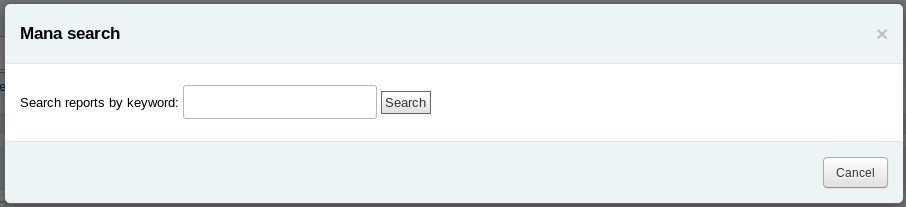
In the «Create report from SQL», you can search Mana KB for pre-made reports by clicking on «New report» and choosing «New SQL from Mana».
Nota
This option will only appear if you’ve configured Mana KB in the administration module.
You will be prompted to enter keywords to search the knowledge base.
In the search results, you will see
the details of the report (name, notes and type)
how many people have used this entry (# of users)
when it was used for the last time (last import)
additional comments made by other Koha users (comments)
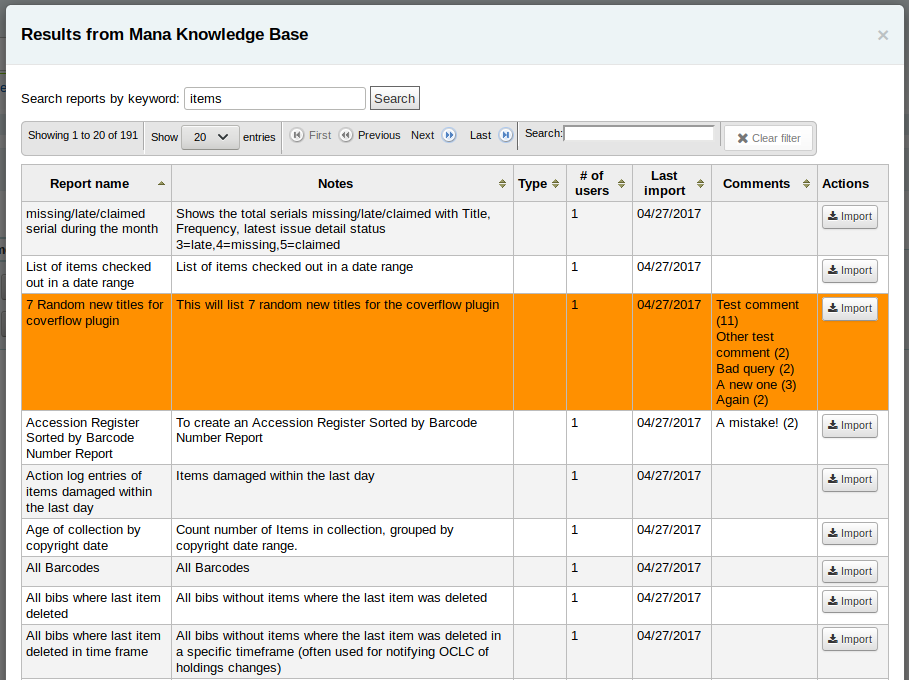
Click on «Import» to import a copy of the report in your own saved reports.
You can then edit it, duplicate it, delete it, run it as you would any of your own reports.
Duplica il report
I reports possono essere aggiunti duplicando un report esistente. Visita la pagina “Reports salvati” per vedere tutti i reports che il tuo sistema ha già.
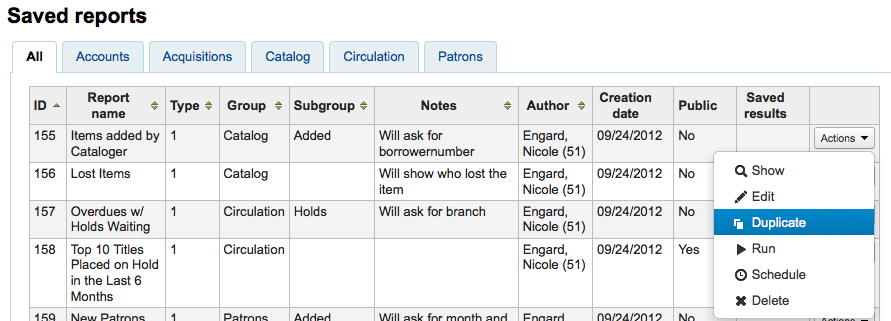
Alla destra di ogn report c’è un menu “Azioni”.. Cliccaci sopra e scegli “Duplica” per usare un report esistente come base del il nuovo report. Il codice SQL del nuovo report sarà copiato da quello vecchio e ti sarà facile cambiarlo secodo le tue esigenze.
Modifica report personalizzati
Ogni report può essere modficato usando la lista dei reports, Per vedere la lista, clicca su “Vedi salvati”.
Nota
You can customize the columns of this table in the “Table settings” section of the Administration module (table id: table_reports).
Per trovare il report che hai vuoi moodificare puoi ordinare la tabella per il valore di ogni colonna cliccando sulla testata. Puoi anche filtrare i risultati usando il menu sulla sinistra o usare le tabulazioni per vedere i tuoi raggruppamenti.
Da questa lista puoi modificare ogni report personalizzato cliccando “Azioni” a destra del report e successivamente “Modifica” nel menu che appare.
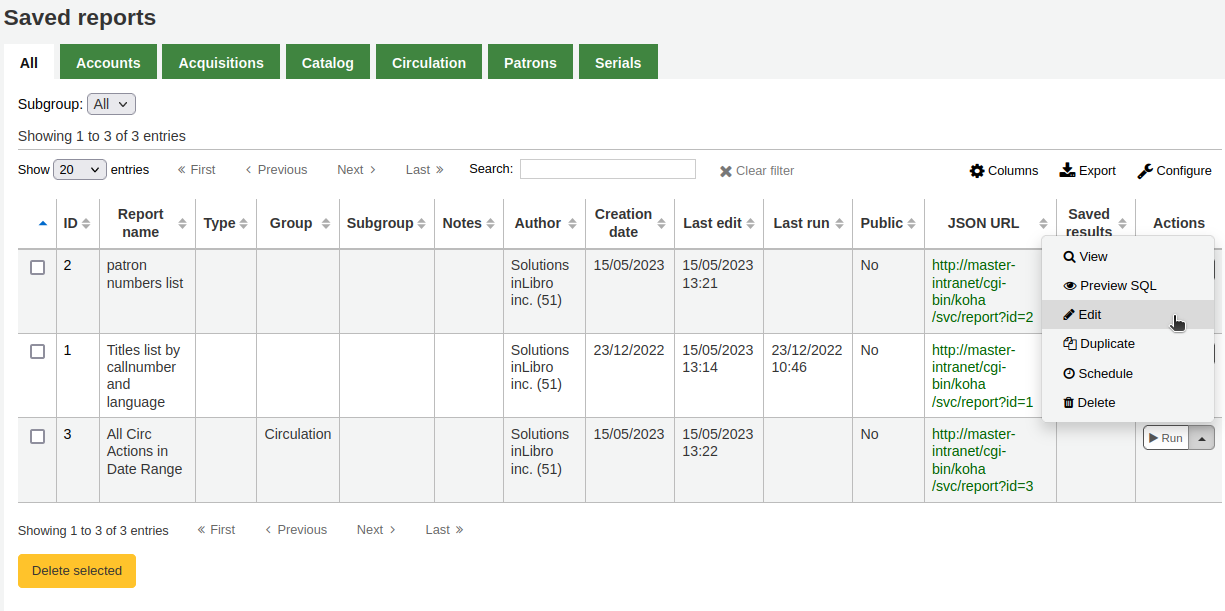
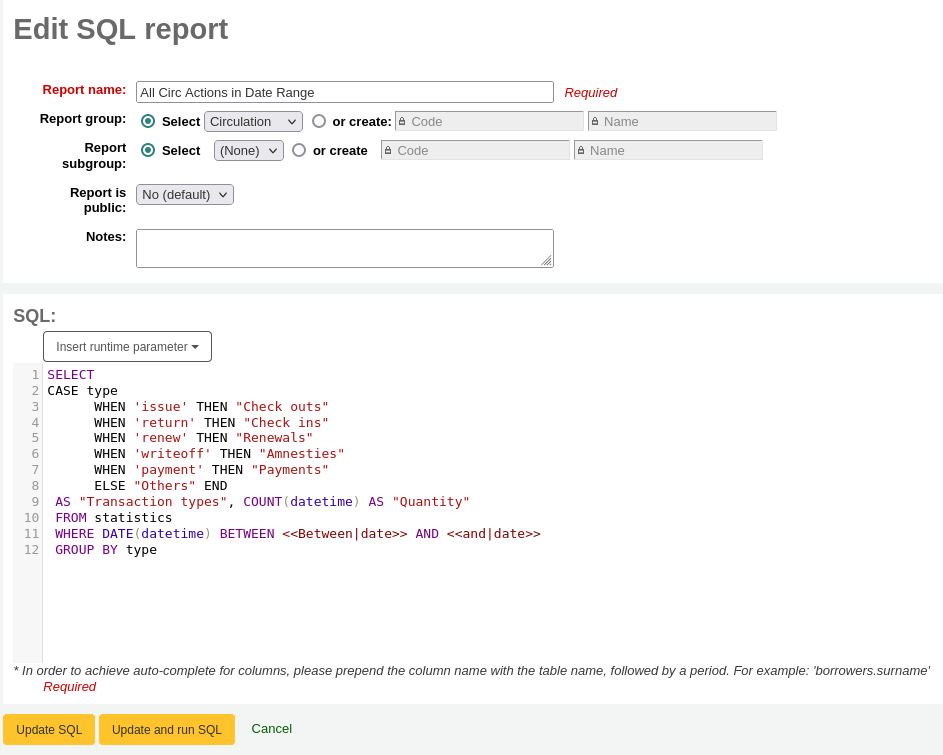
The form to edit the report will appear. Use the «update button» to save your modifications or click on «update and run SQL» to save and display the report results.
Esegui i report personalizzati
Once custom reports are saved to Koha, you can run them by going to the Saved Reports page and clicking the “Run” button to the right of the report.
When your report runs, you will either be asked for some values,
or you will see the results right away.
From the results you can do various actions with the button bar at the top of the page.
New report: create a brand new report.
New guided report: goes to the guided report wizard
New SQL report: goes to the create from SQL section
New SQL from Mana: this option only appears if Mana is set up, to search Mana for an existing SQL report.
Edit:
Edit: edit the current report
Duplicate: create a new report from the existing one
Delete: delete the current report
Run report: rerun the report
Run with template: this button only appears if you have notice templates in the notices and slips tool that are for reports.
Suggerimento
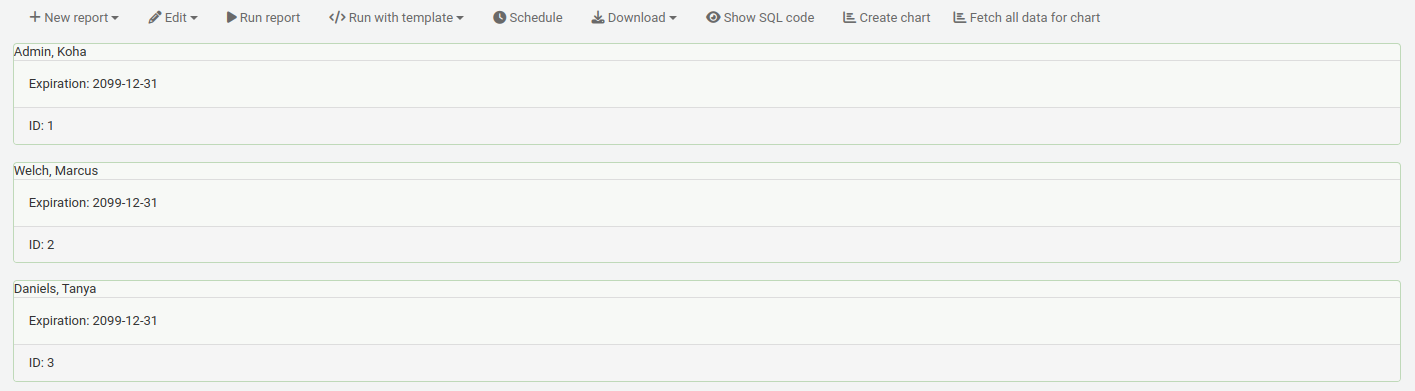
To view the results in a format other than the traditional table, you can create a template in the notices and slips tool.
For example, to view patron information in “card” form,
Go to Tools > Notices and slips.
Click “New notice”, and choose “Reports”.
Fill out the code and name for the slip. The name will be what appears in the “Run with template” menu.
In the “Print” template section, paste the code:
[% FOREACH b IN data %]
<div class="panel panel-default">
  <div class="panel-heading">[% b.surname %], [% b.firstname %]</div>
  <div class="panel-body">Expiration: [% b.dateexpiry %]</div>
  <div class="panel-footer">ID: [% b.borrowernumber %]</div>
</div>
[% END %]
Click “Save”.
In a report with patron information, for example,
SELECT * FROM borrowers LIMIT 50
Click “Run with template” and choose the template.
Instead of a table, the results will appear in “card” form.
Schedule: schedule the report to be run at a later time with the task scheduler tool
Download: download the results
Comma separated text (.csv): a comma separated text file is a CSV file and it can be opened by any spreadsheet application or a text editor
Tab separated text: a tab separated text can also be opened by any spreadsheet or a text editor
Open Document Spreadsheet: ODS is an open-source spreadsheet file that can be opened in most spreadsheet applications
Show SQL code: show the SQL query used to get those results
Create chart: create a pie chart or a line/bar chart with the visible results
Fetch all data for chart: make all the data visible to make a chart with all the data
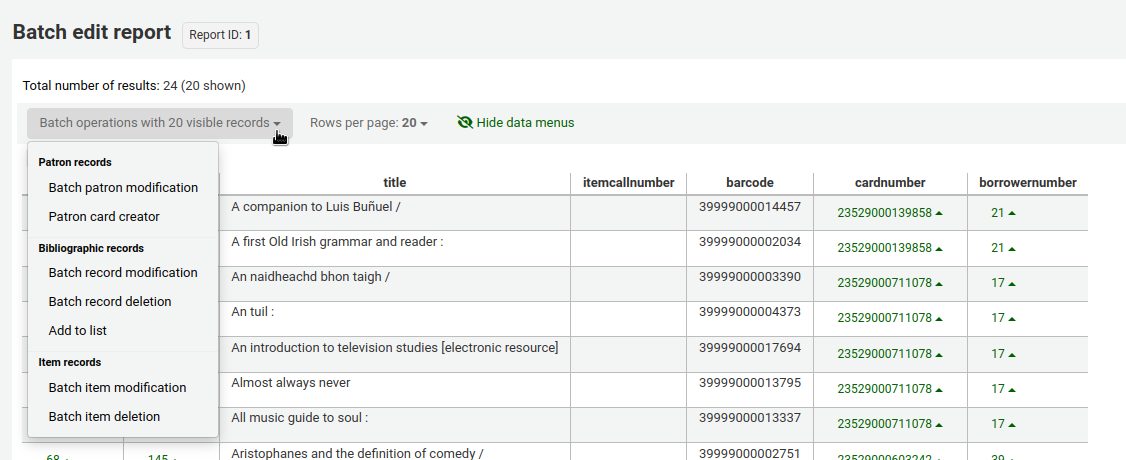
Send report output to batch modification tools
After running a report that contains itemnumbers, biblionumbers and/or patron cardnumbers the list of numbers can be imported directly into the relevant batch modification tool by clicking the “Batch operations with X visible records” button in the report results. The X depends on the number of records you have chosen to display on screen (up to 1000).
Rapporti statistici
Statistic reports will show you counts and sums. These reports are all about numbers and statistics, for reports that return more detailed data, use the guided report wizard. These reports are limited in what data they can look at, so it’s often recommended to use custom reports for official end of the year statistics.
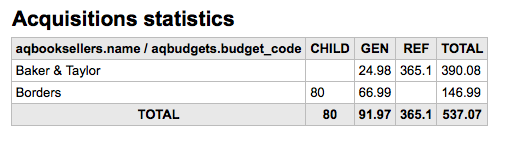
Statistiche delle Acquisizioni
Nota
Questi report sono limitati per quanto riguarda i dati disponibili, così spesso si consiglia di utilizzare i report personalizzati <custom-reports-label> le statistiche ufficiali di fine anno.
Usando la maschera fornita, scegli quale valore dovrà apparire nella Colonna e quale nella Riga.
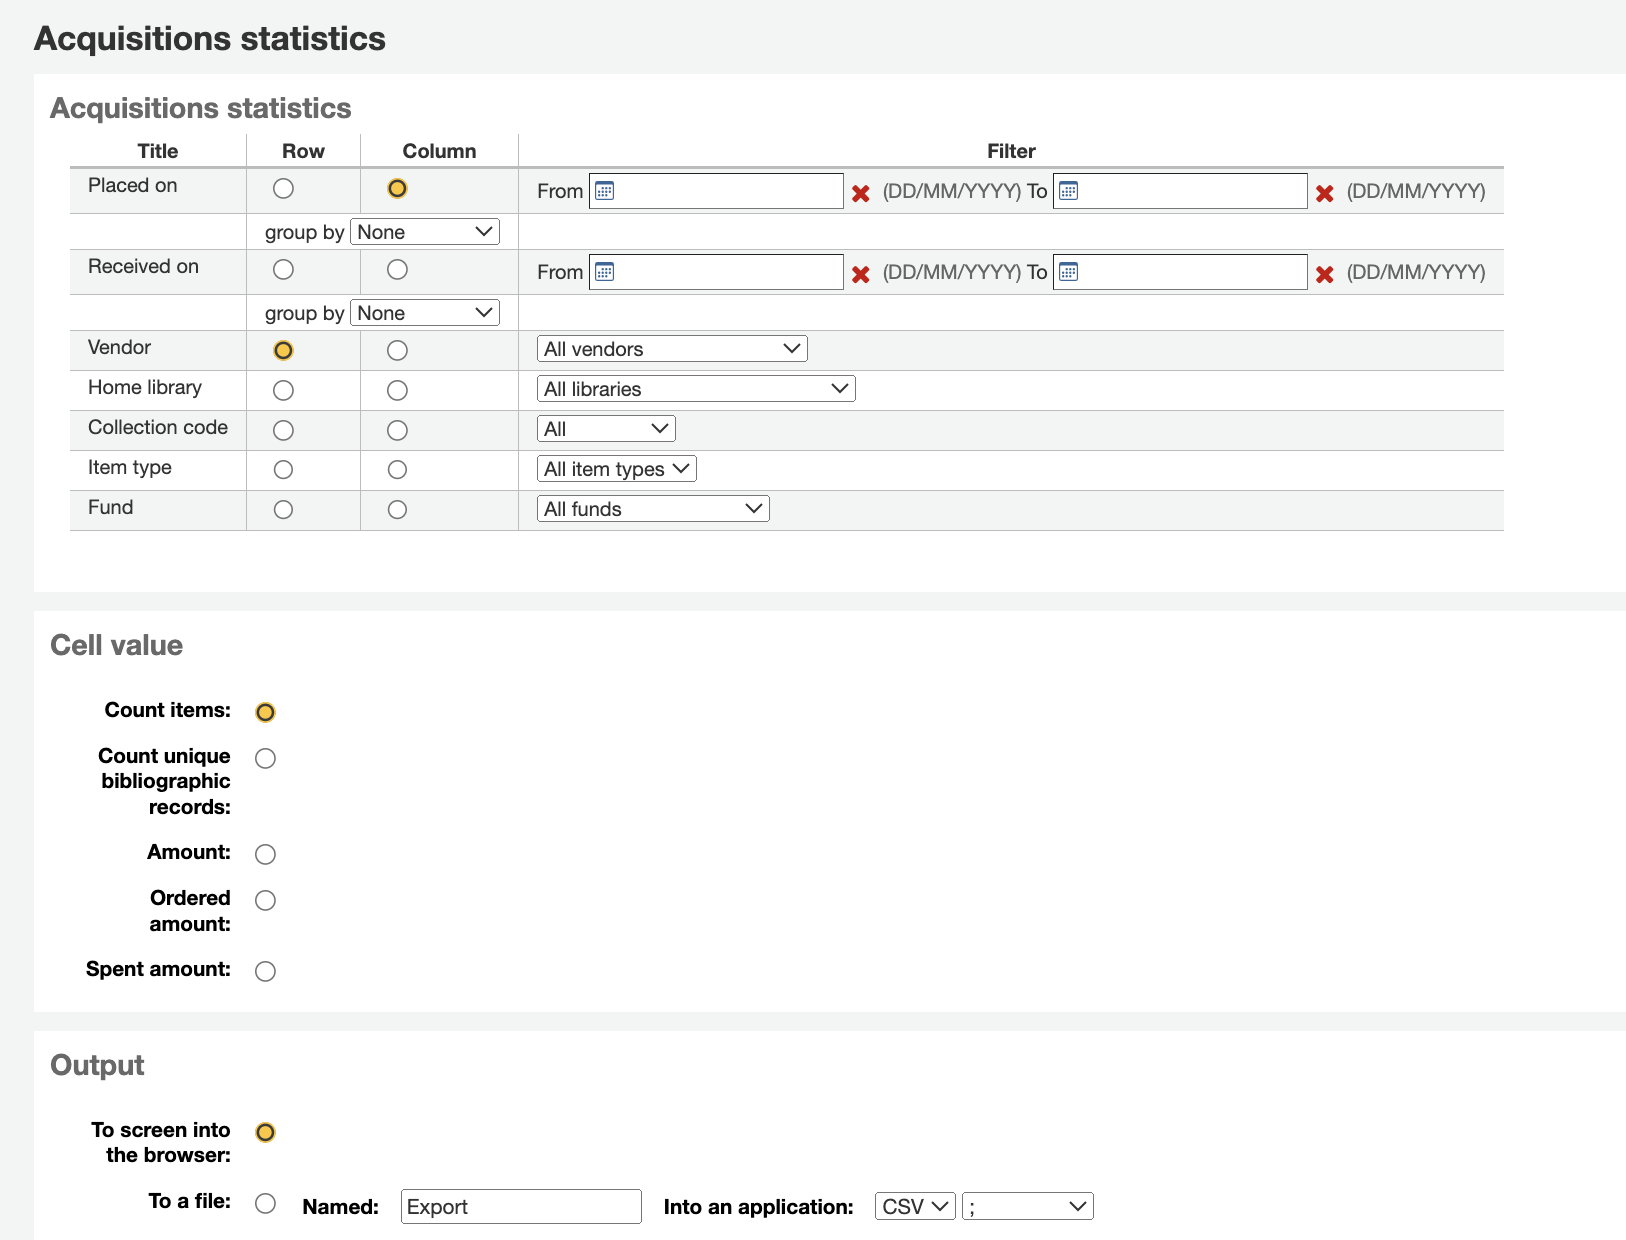
Se scegli l’output sul browser, i risultati verranno presentati sullo schermo.
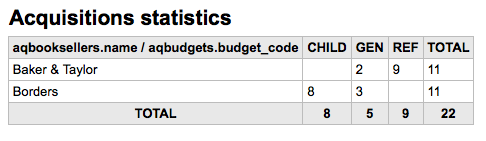
Puoi anche scegliere di esportare in un fai che puoi manipolare secondo le tue esigenze.
Quando generi il report, puoi scegliere tra contare o sommare i valori.
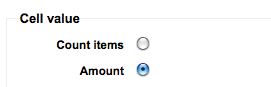
Scegliendo ammontare mostrerà i risultati come somma degli ammontare spesi.
Statistiche degli utenti
Nota
Questi report sono limitati per quanto riguarda i dati disponibili, così spesso si consiglia di utilizzare i report personalizzati <custom-reports-label> le statistiche ufficiali di fine anno.
Usando la maschera fornita, scegli quale valore dovrà apparire nella Colonna e quale nella Riga.
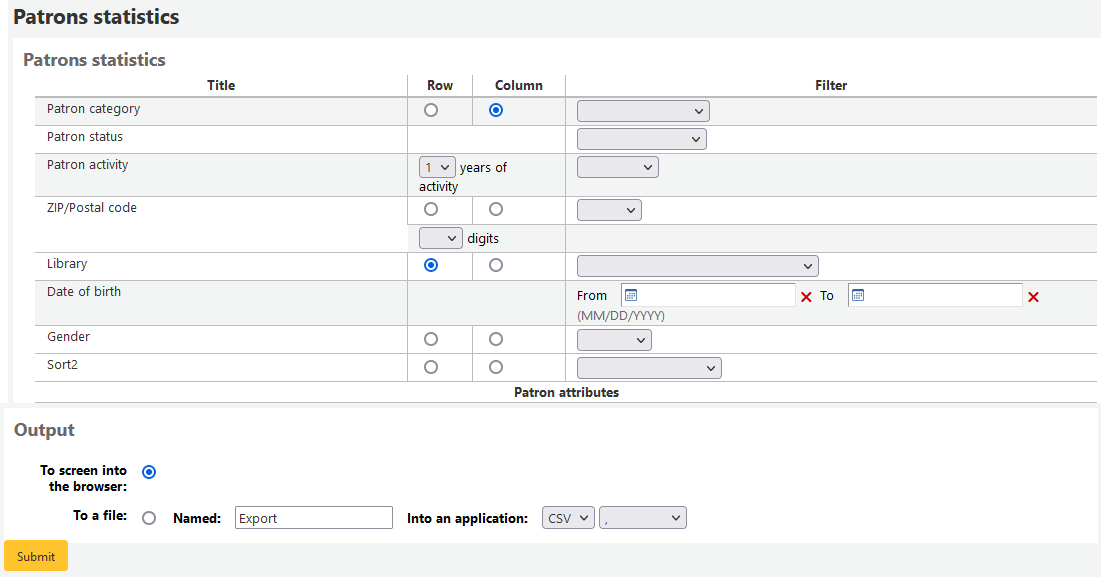
Se scegli l’output sul browser, i risultati verranno presentati sullo schermo.

A seconda della tua selezione, potresti vedere qualche richiesta di informazioni sopra la tabella dei risultati. Potresti anche scegliere di esportare in un file da manipolare per le tue necessità
Statistiche del catalogo
Nota
Questi report sono limitati per quanto riguarda i dati disponibili, così spesso si consiglia di utilizzare i report personalizzati <custom-reports-label> le statistiche ufficiali di fine anno.
Usando la maschera fornita, scegli quale valore dovrà apparire nella Colonna e quale nella Riga.
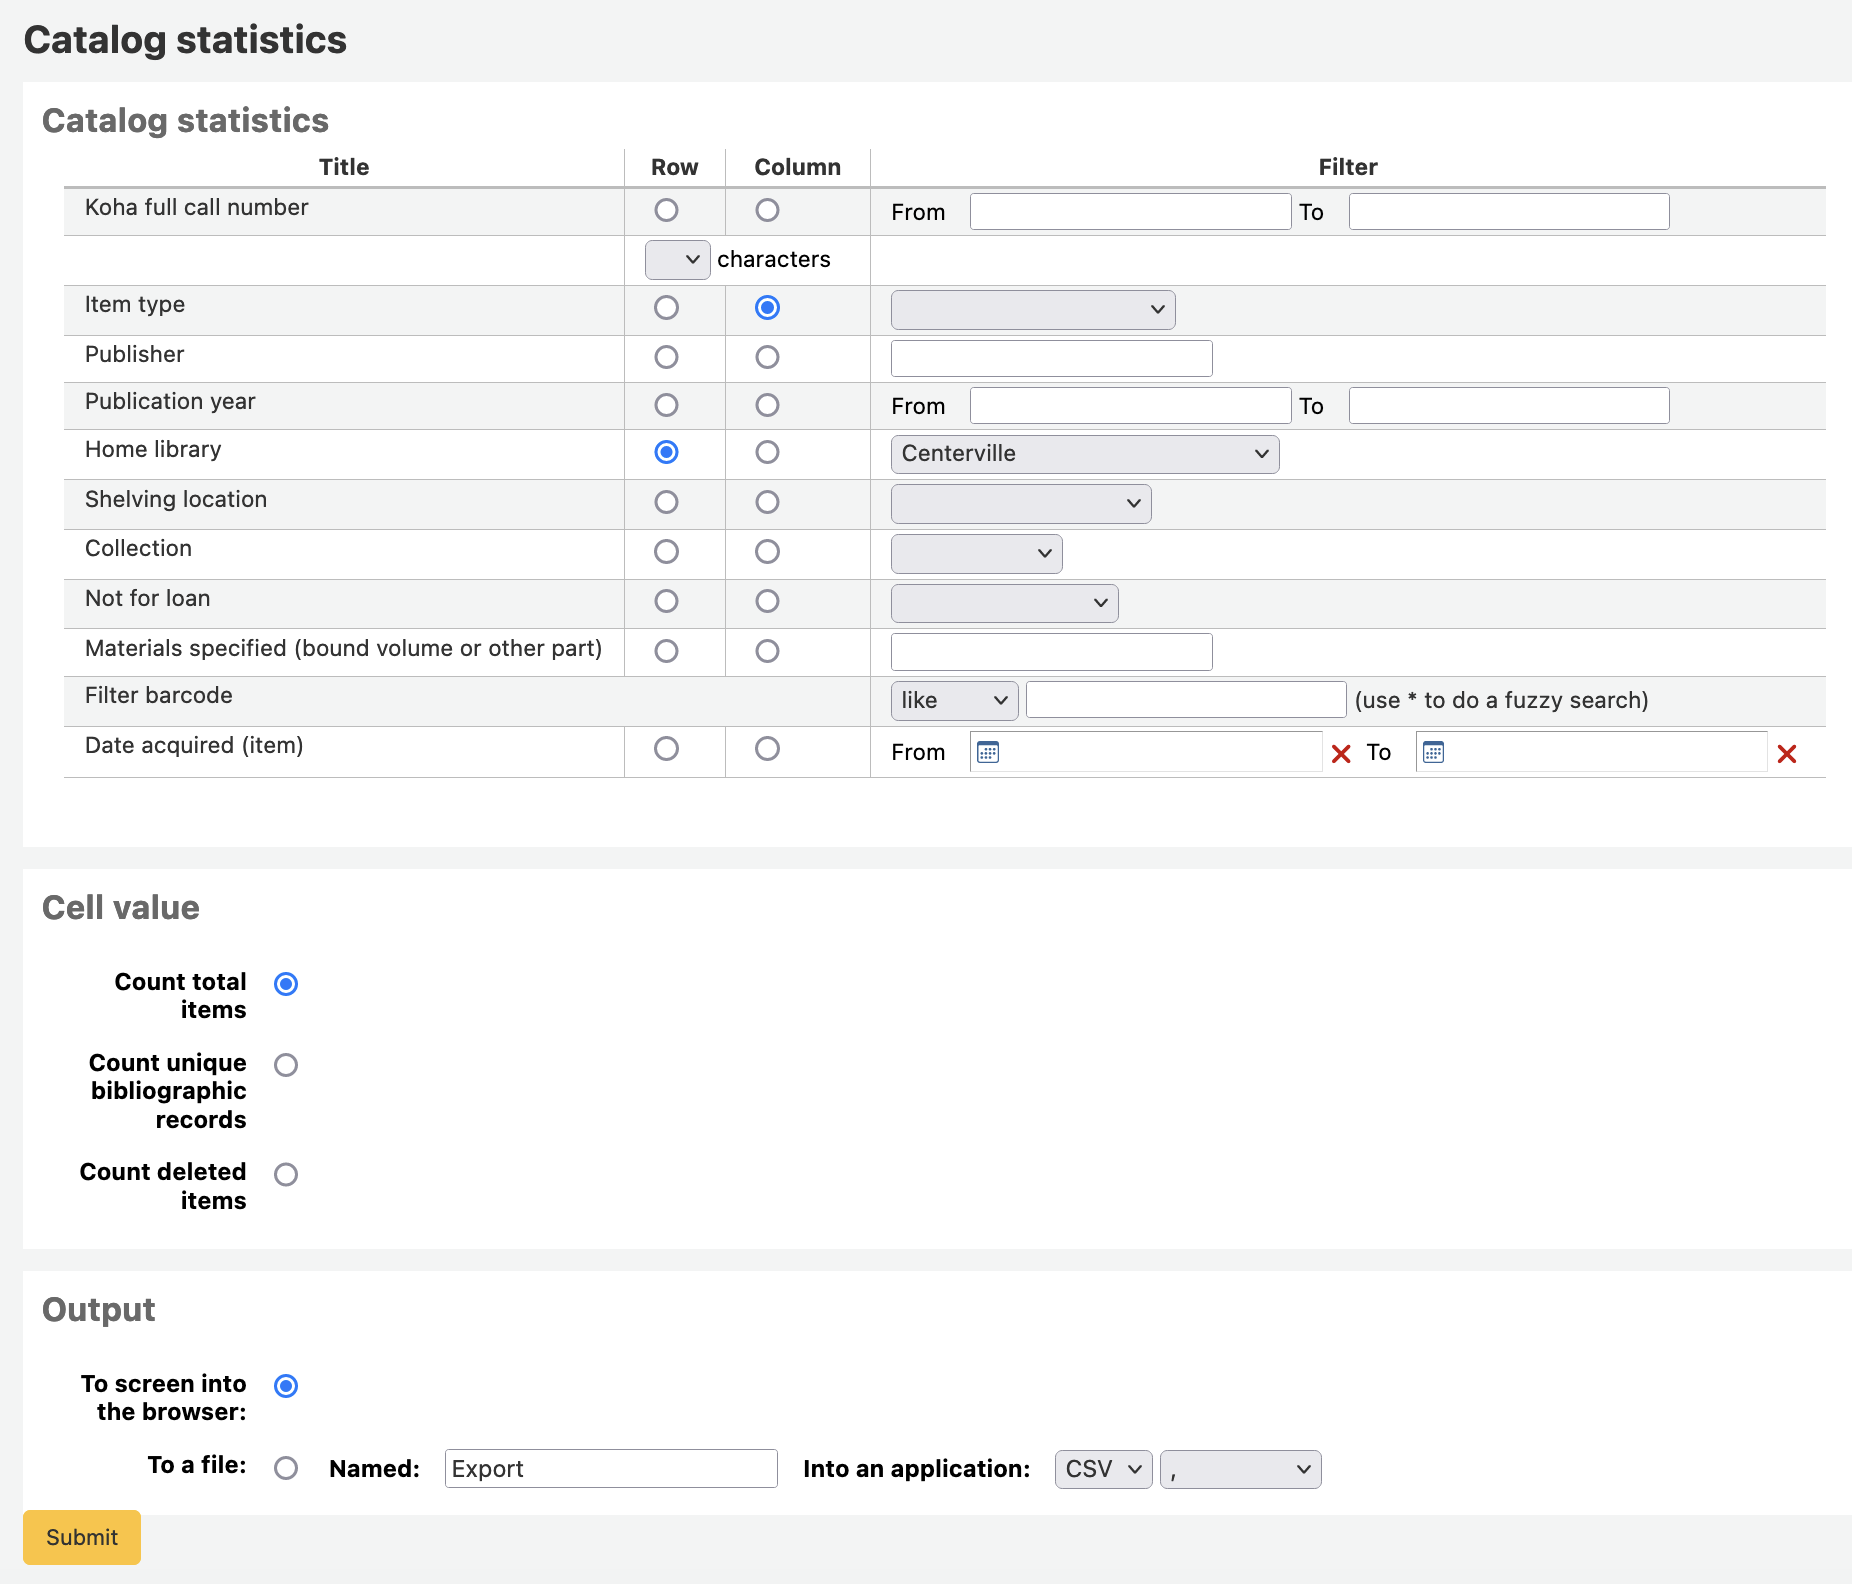
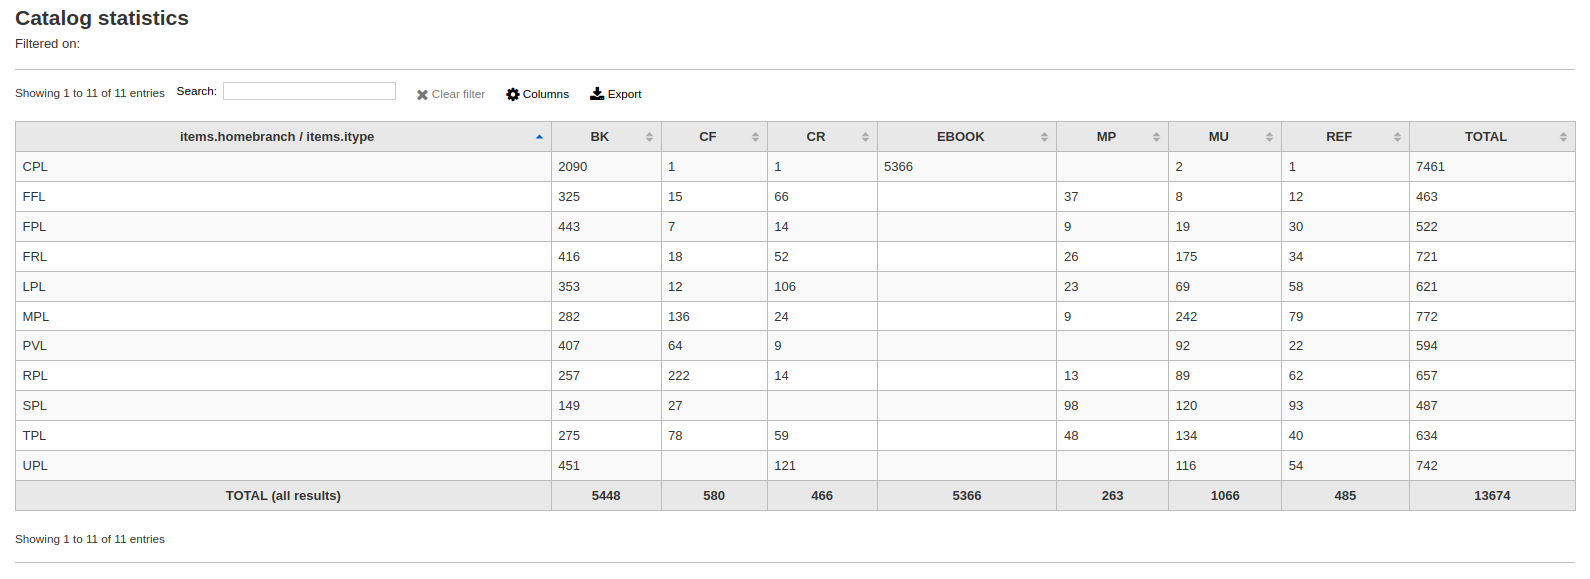
Se scegli l’output sul browser, i risultati verranno presentati sullo schermo.
Puoi anche scegliere di esportare in un fai che puoi manipolare secondo le tue esigenze.
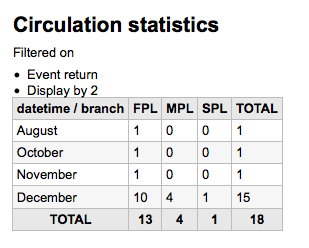
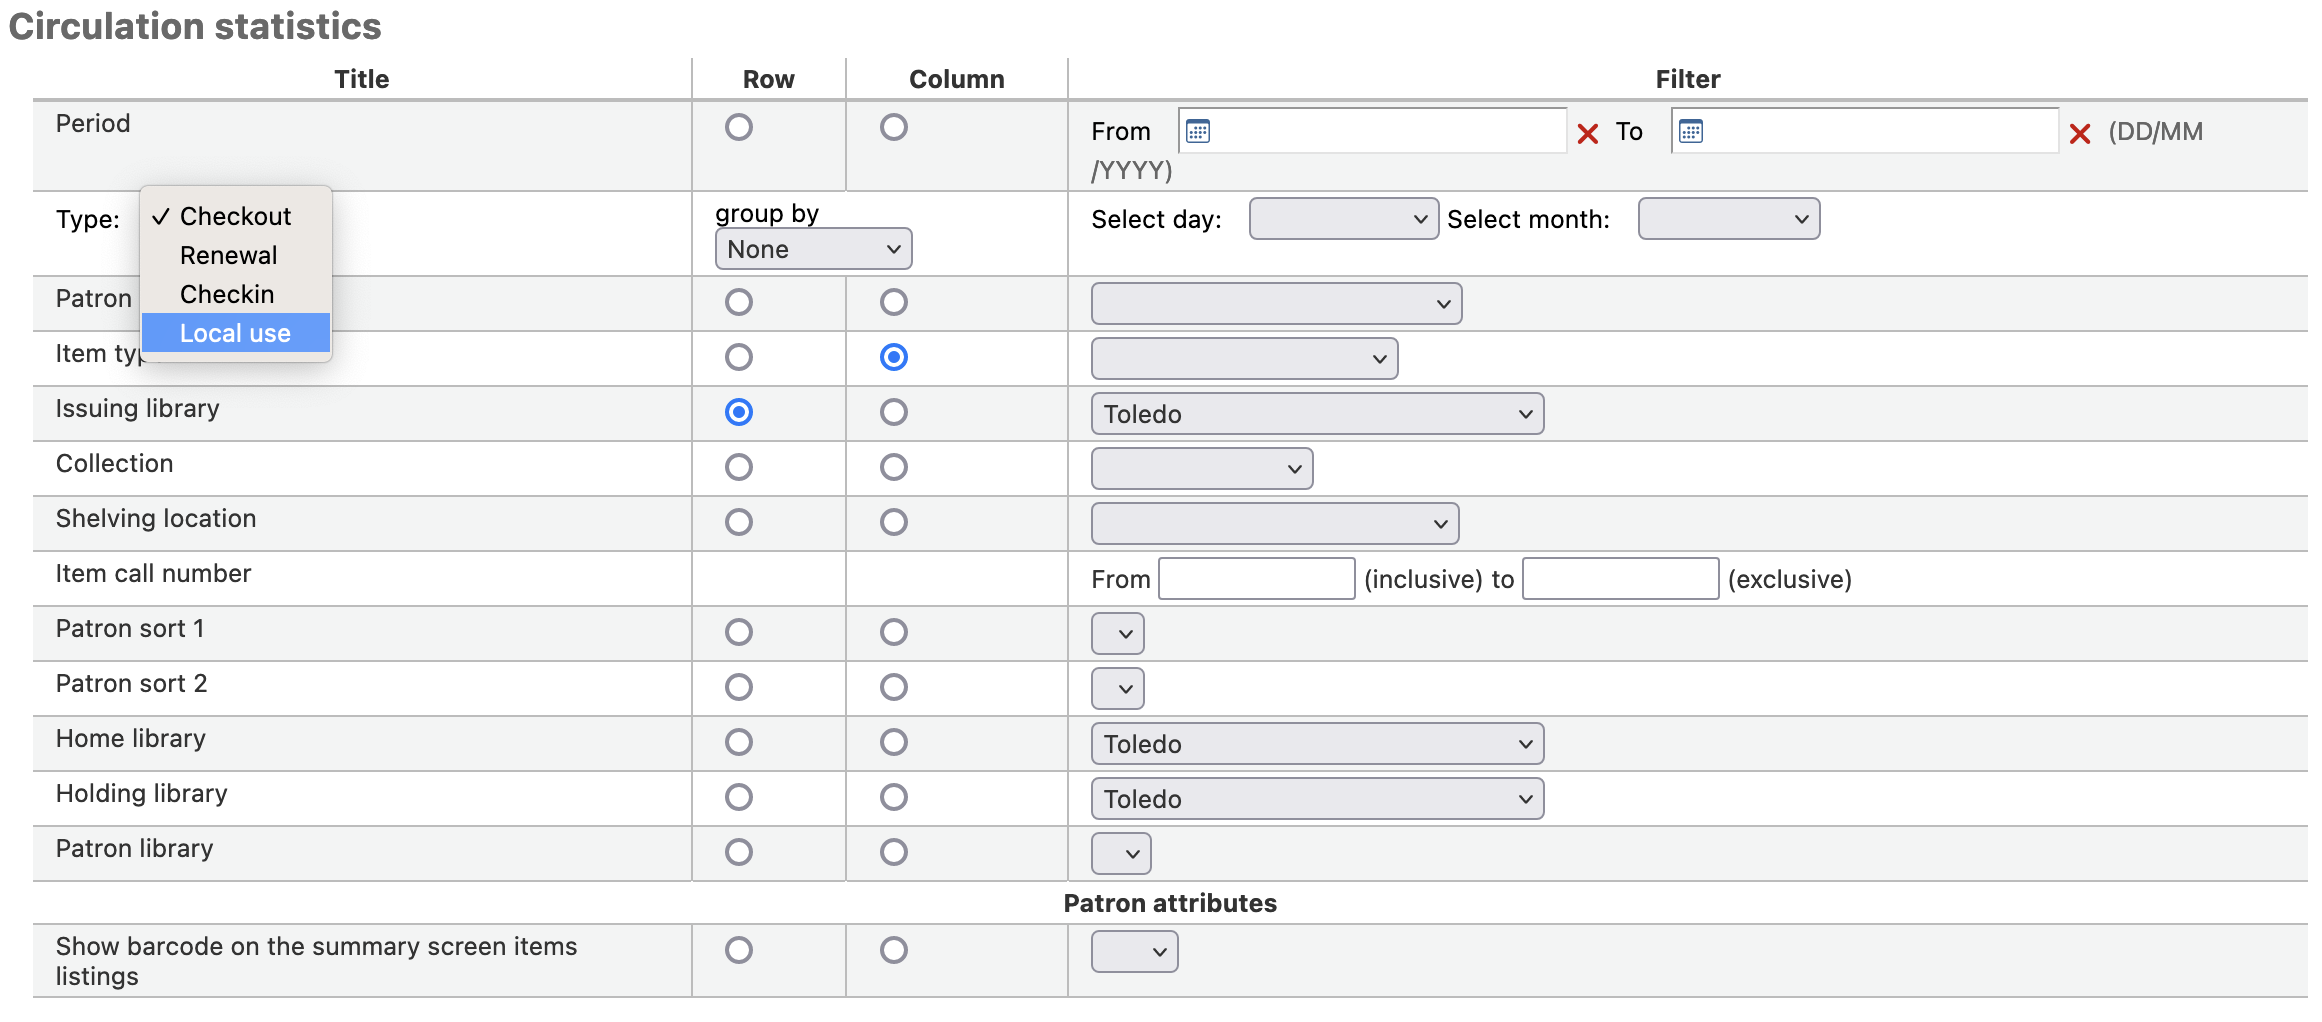
Statistiche delle Circolazione
Nota
Questi report sono limitati per quanto riguarda i dati disponibili, così spesso si consiglia di utilizzare i report personalizzati <custom-reports-label> le statistiche ufficiali di fine anno.
Usando la maschera fornita, scegli quale valore dovrà apparire nella Colonna e quale nella Riga.
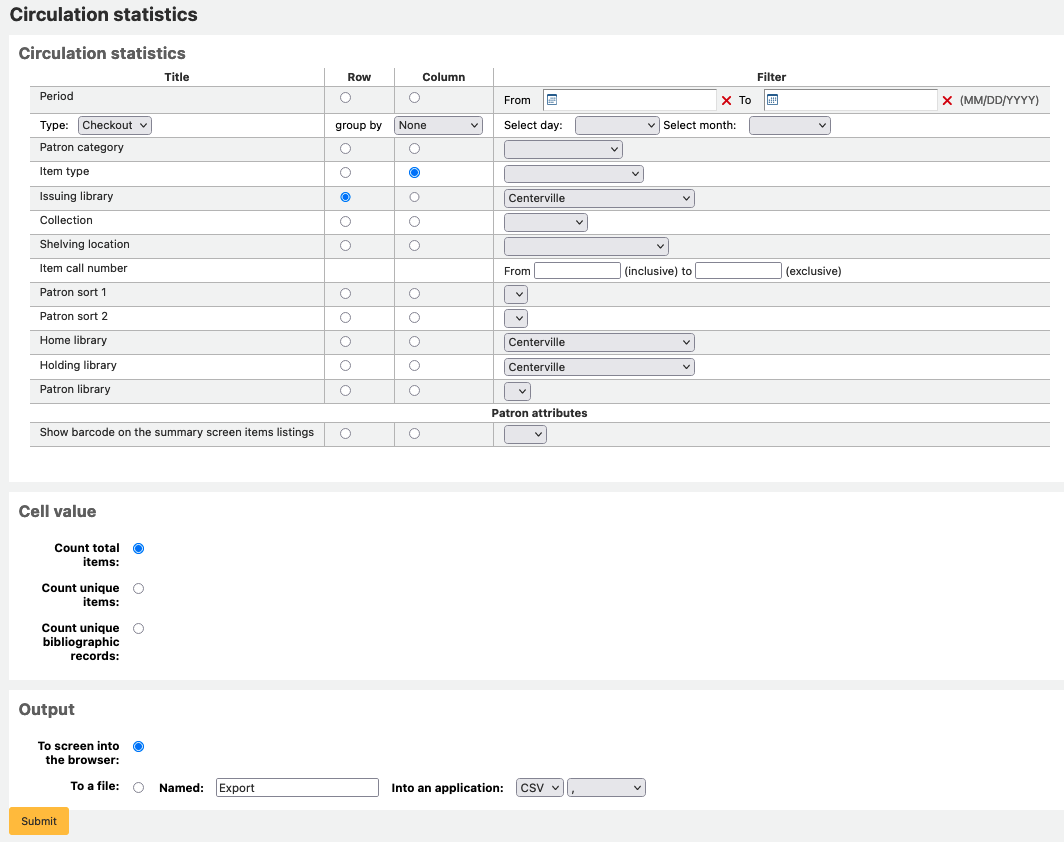
Se scegli l’output sul browser, i risultati verranno presentati sullo schermo.
Puoi anche scegliere di esportare in un fai che puoi manipolare secondo le tue esigenze.
Nota
Per ottenere un quadro completo della vostra circolazione mensile o giornaliera, è possibile eseguire il report due volte, una volta per “Tipo” di “Prestito” e un’altra per “Rinnovo”.
Questo report utilizza “Periodo”, o data, filtro che consente di limitare a un mese semplicemente selezionando dal primo giorno del primo mese fino al primo giorno del mese successivo. Ad esempio, 10/1 a 11/1 a trovare le statistiche per il mese di ottobre.
Per trovare le statistiche giornaliere, seleziona l’intervallo di date. </br> Per esempio: «Voglio i dati di circolazione dalla data XXX fino a, ma non includendo, la data XXX.»
Per estrarre tutto un mese puoi indicare: 01/11/2009 a 01/12/2009
Per estrarre un anno intero puoi mettere ad esempio: 01/01/2009 a 01/01/2010
Per un giorno solo puoi inserire così: 15/11/2009 a 16/11/2009. Con questo avrai la circolazione del giorno 15.
Tracciare la consultazione in loco
Utilizzando il motore di report statistiche circolazione è possibile eseguire reports sulla consultazione semplicemente scegliendo “Consultazione” dal menu a discesab “Tipo”:
Statistiche dei periodici
Nota
Questi report sono limitati per quanto riguarda i dati disponibili, così spesso si consiglia di utilizzare i report personalizzati <custom-reports-label> le statistiche ufficiali di fine anno.
Usando la maschera fornita, scegli come elencare le risorse in continuazione nel tuo sistema.
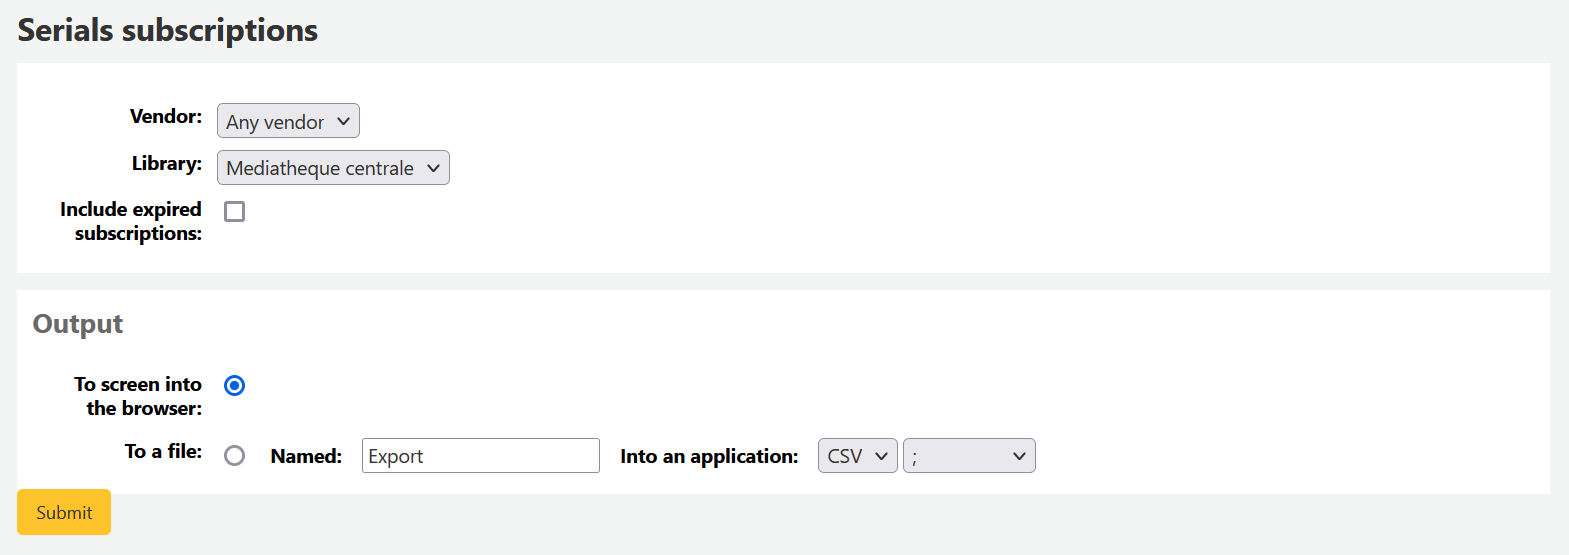
Se scegli l’output sul browser, i risultati verranno presentati sullo schermo.
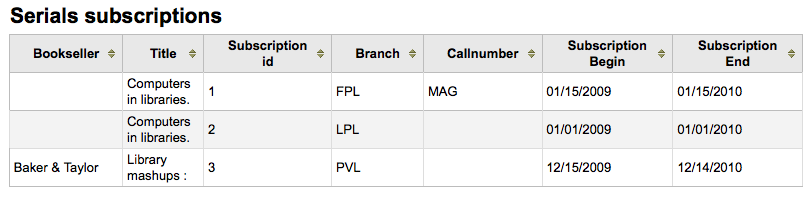
Puoi anche scegliere di esportare in un fai che puoi manipolare secondo le tue esigenze.
Statistiche prenotazioni
Nota
Questi report sono limitati per quanto riguarda i dati disponibili, così spesso si consiglia di utilizzare i report personalizzati <custom-reports-label> le statistiche ufficiali di fine anno.
Usando la form puoi vedere le statistiche delle prenotazioni, fatte, riempite, cancellate ecc. della tua biblioteca. Dalla form scegli che cosa vuoi mostrare nella colonna, e quali valori avere nella riga. Puoi anche usare i filtri a destra della form.
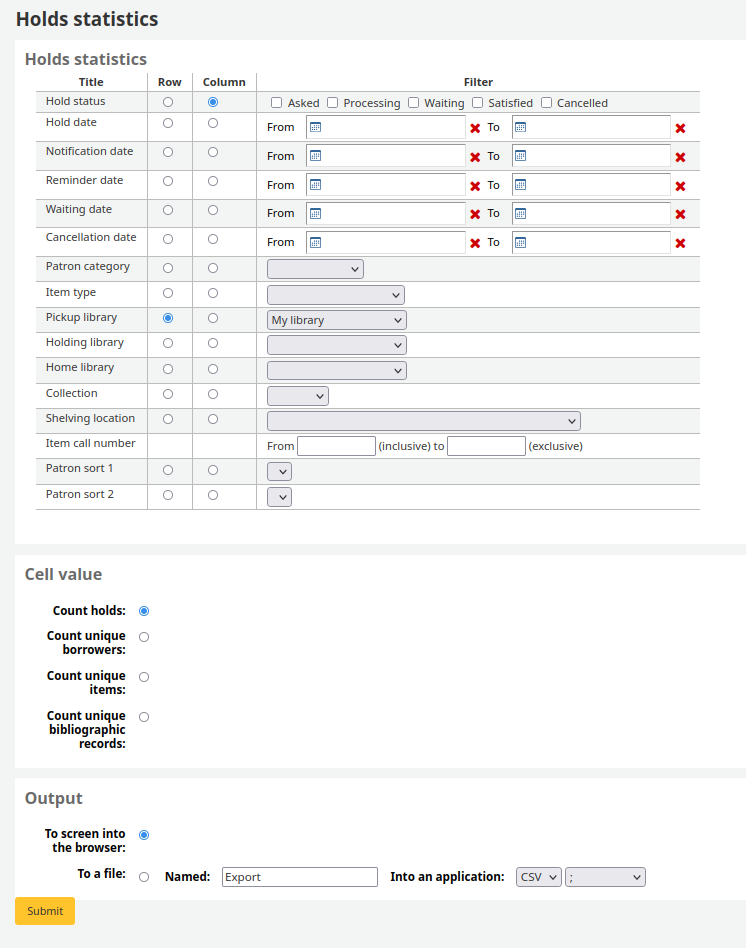
Se scegli l’output sul browser, i risultati verranno presentati sullo schermo.

Puoi anche scegliere di esportare in un fai che puoi manipolare secondo le tue esigenze.
Utenti con più prestiti
Il report guidato ti mostrerà gli utenti con più prestiti.

Se scegli l’output sul browser, i risultati verranno presentati sullo schermo.
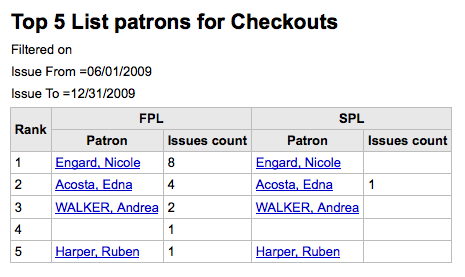
Puoi anche scegliere di esportare in un fai che puoi manipolare secondo le tue esigenze.
Copie con maggiore circolazione
Il report guidato ti mostrerà le copie che sono state prestate maggiormente.
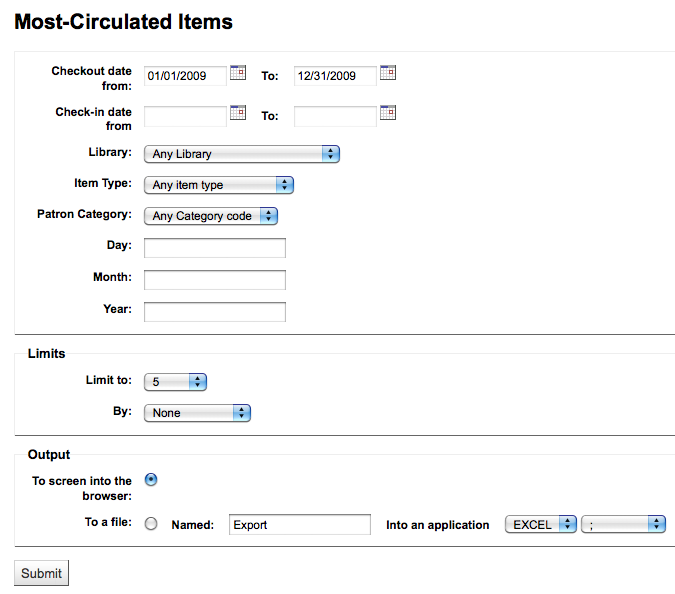
Se scegli l’output sul browser, i risultati verranno presentati sullo schermo.
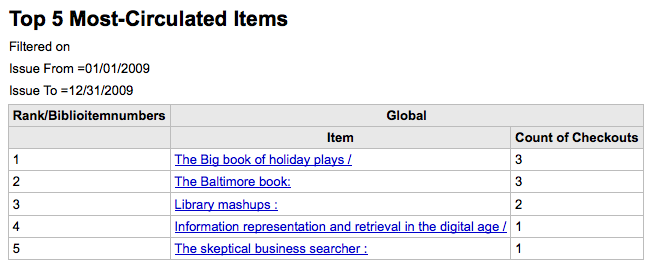
Puoi anche scegliere di esportare in un fai che puoi manipolare secondo le tue esigenze.
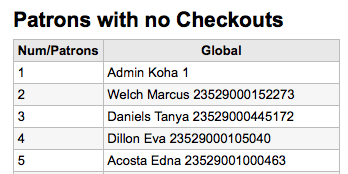
Utenti senza prestiti
Il report guidato ti mostrerà quali utenti non hanno preso prestiti.
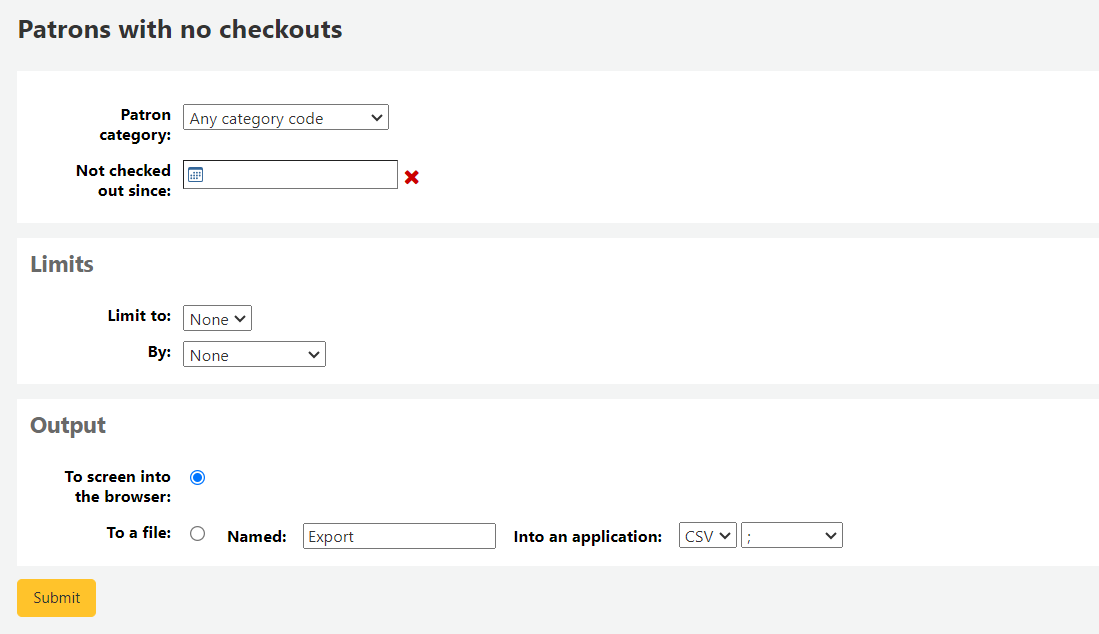
Se scegli l’output sul browser, i risultati verranno presentati sullo schermo.
Puoi anche scegliere di esportare in un fai che puoi manipolare secondo le tue esigenze.
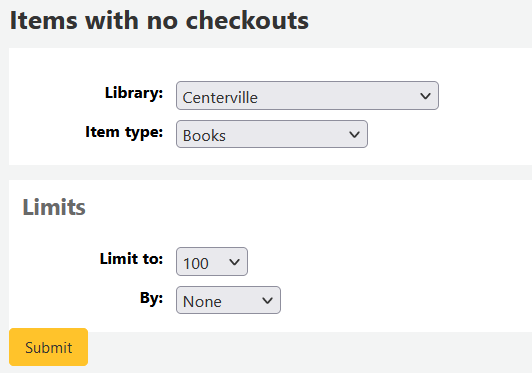
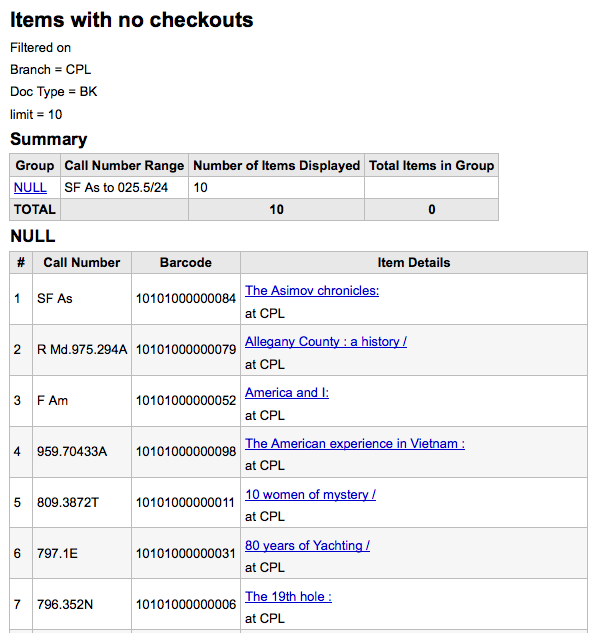
Copie mai prestate
Questo report ti mostrerà le copie mai andate in prestito.
Se scegli l’output sul browser, i risultati verranno presentati sullo schermo.
Puoi anche scegliere di esportare in un fai che puoi manipolare secondo le tue esigenze.
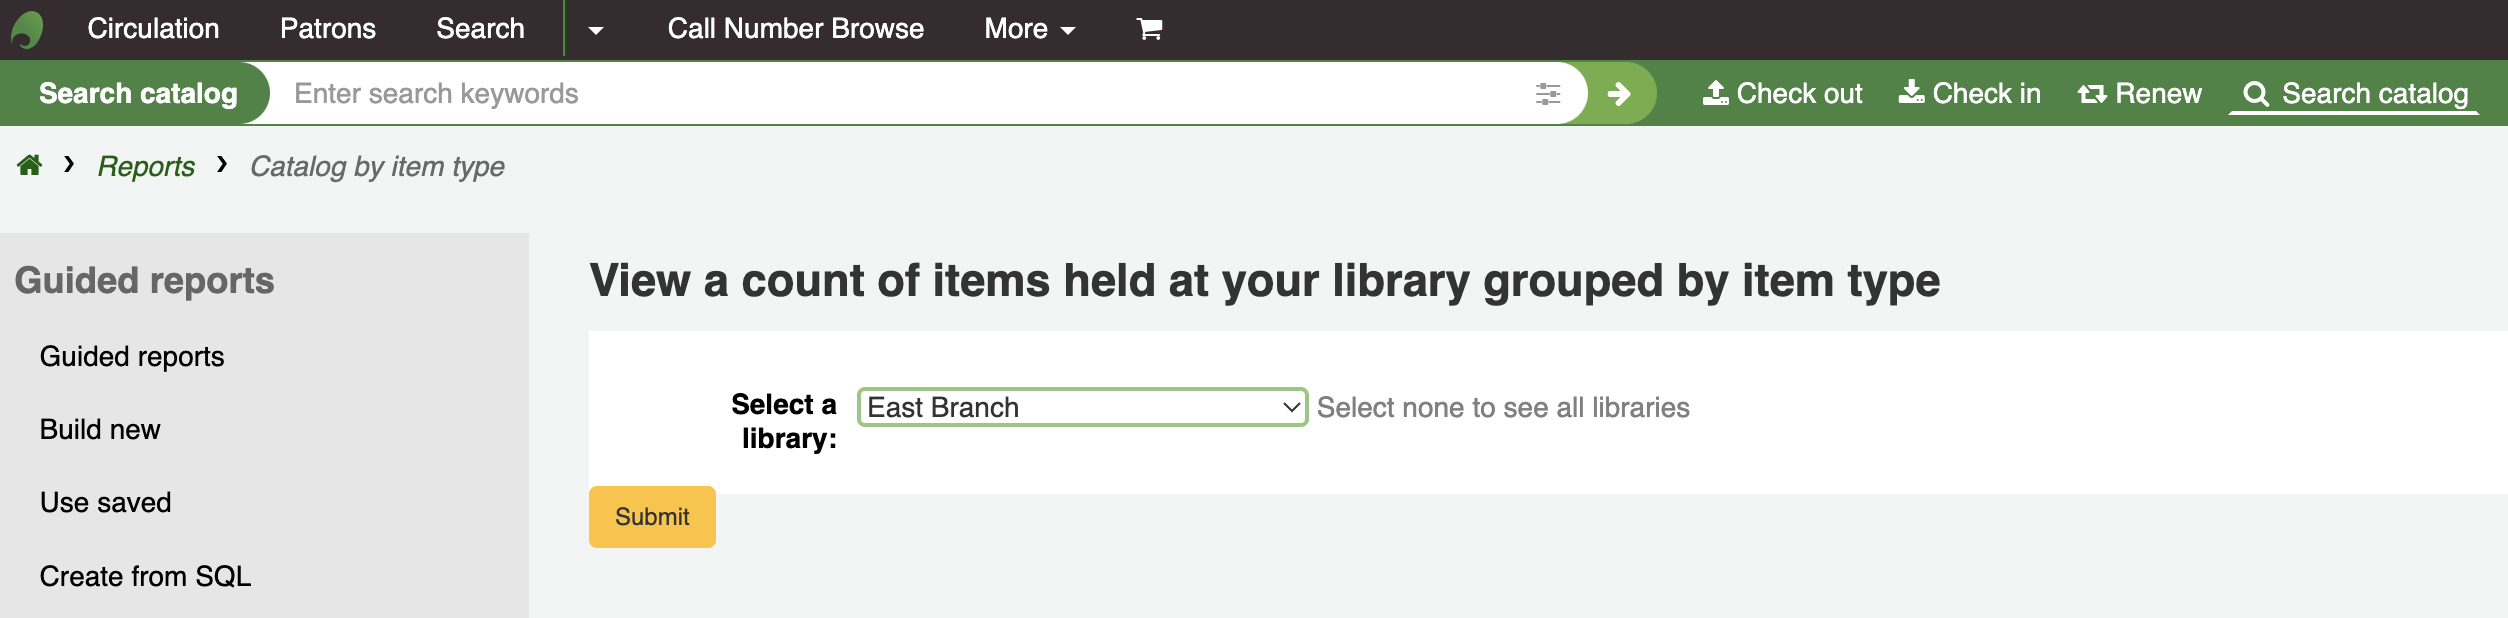
Catalogo per tipo di copia
Questo report ti mostrerà i totali di copie per tipologia in una biblioteca.
Se scegli l’output sul browser, i risultati verranno presentati sullo schermo.
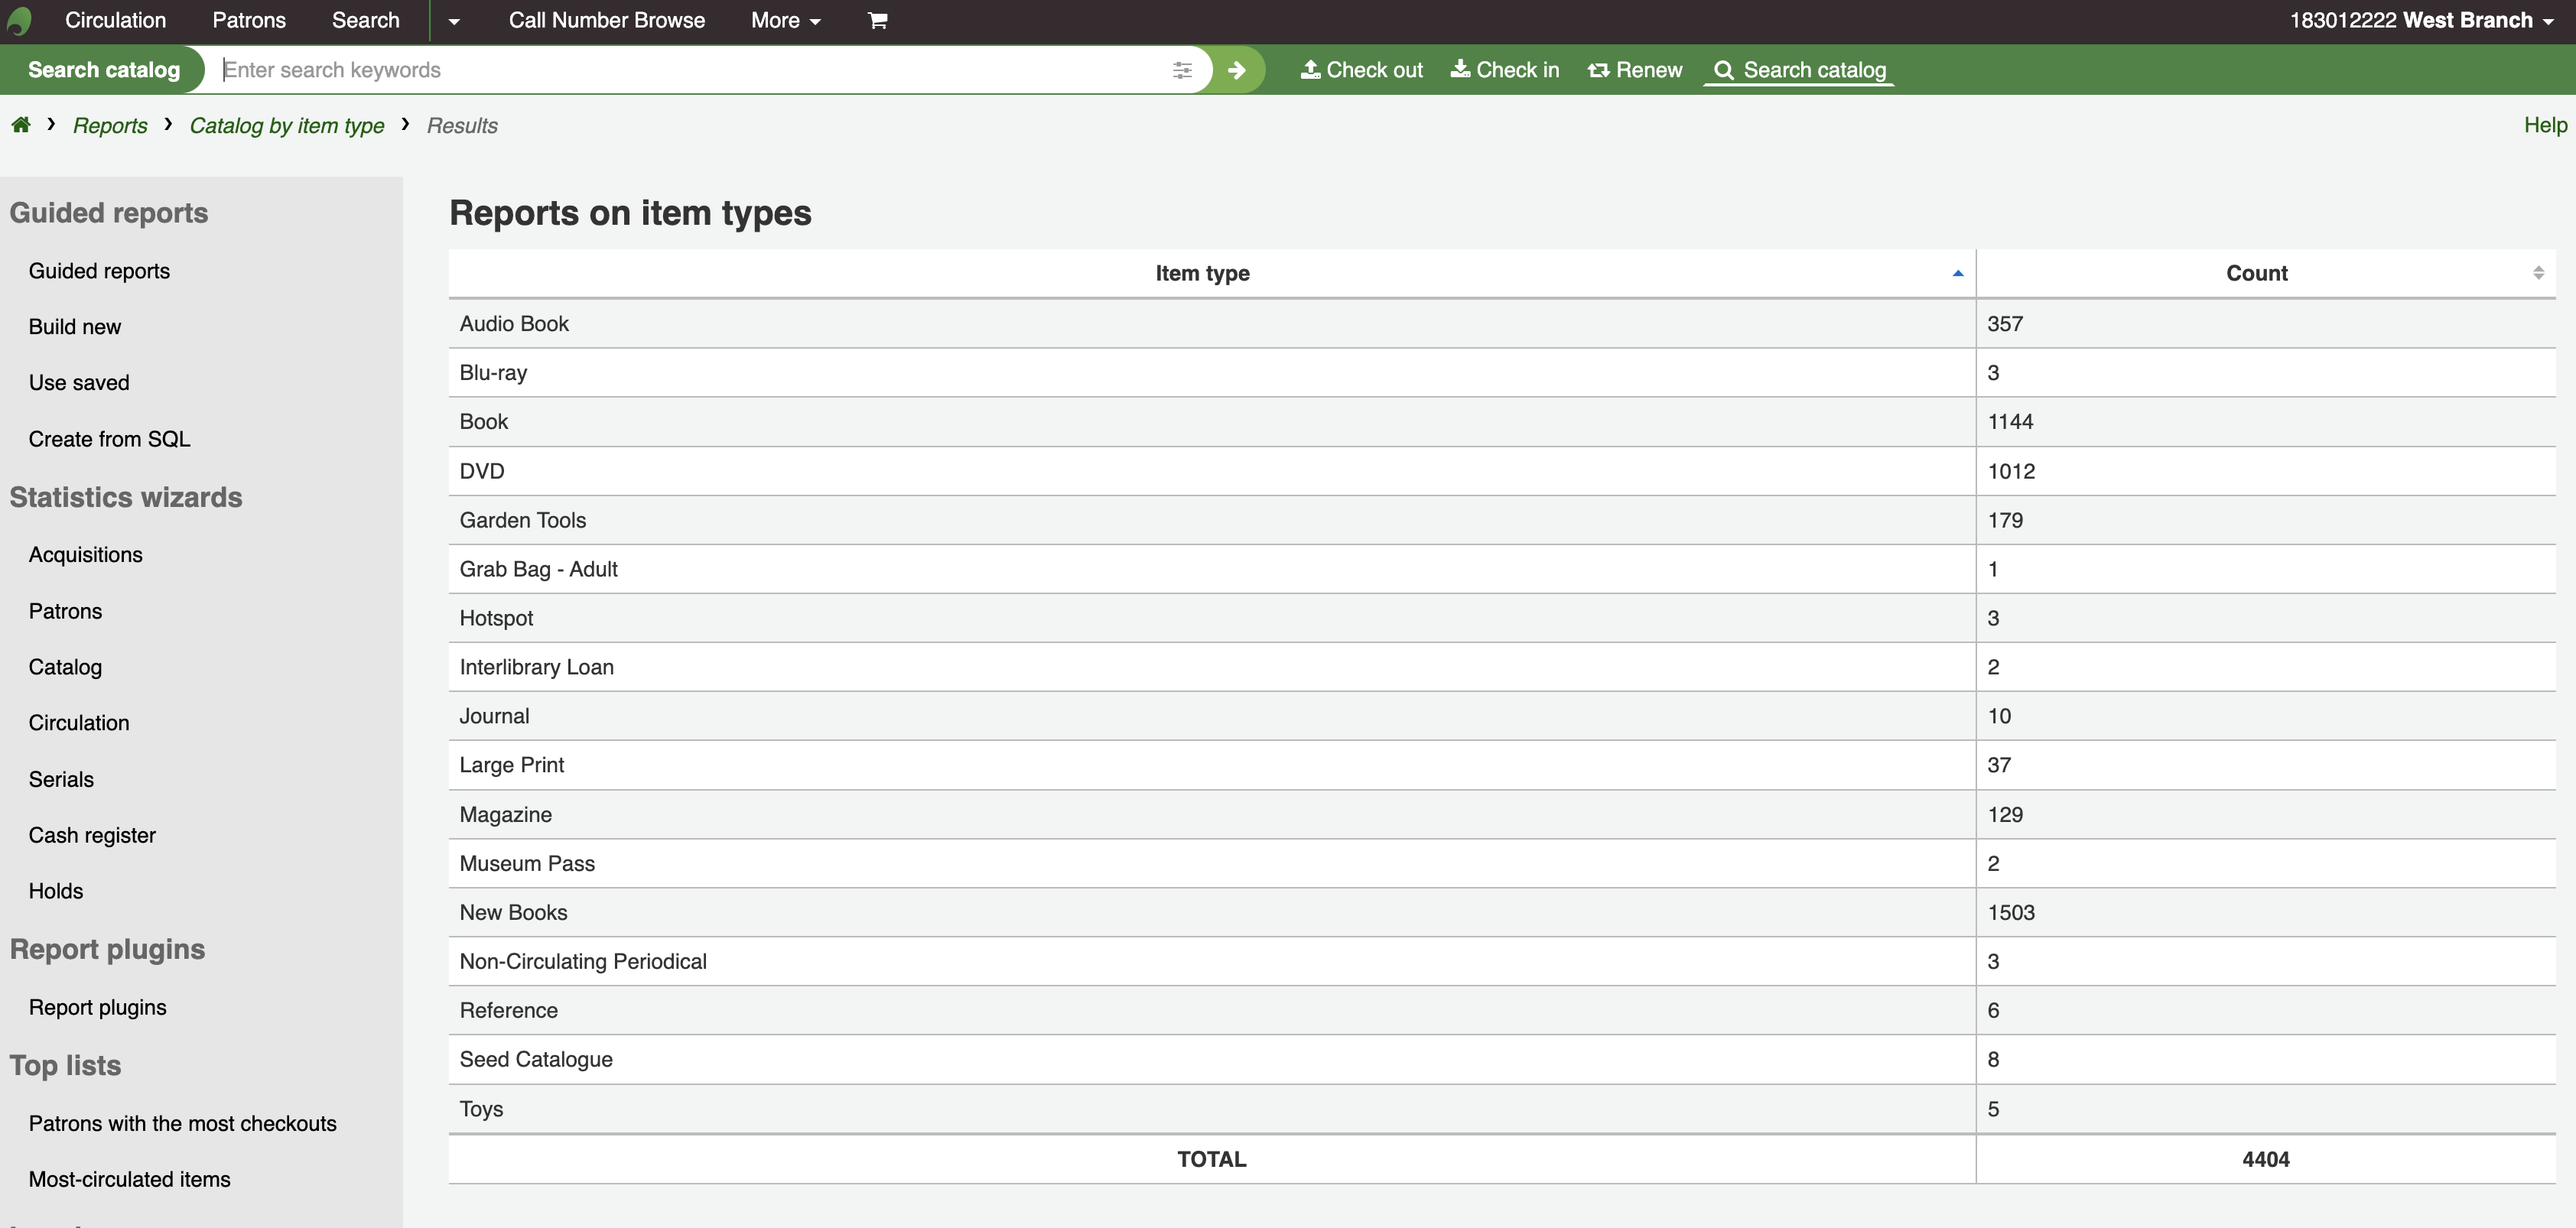
Puoi anche scegliere di esportare in un fai che puoi manipolare secondo le tue esigenze.
Copie smarrite
Questo rapporto vi permetterà di generare un elenco di copie che sono stati contrassegnate con la tipologia “Lost” (smarrite) all’interno del sistema
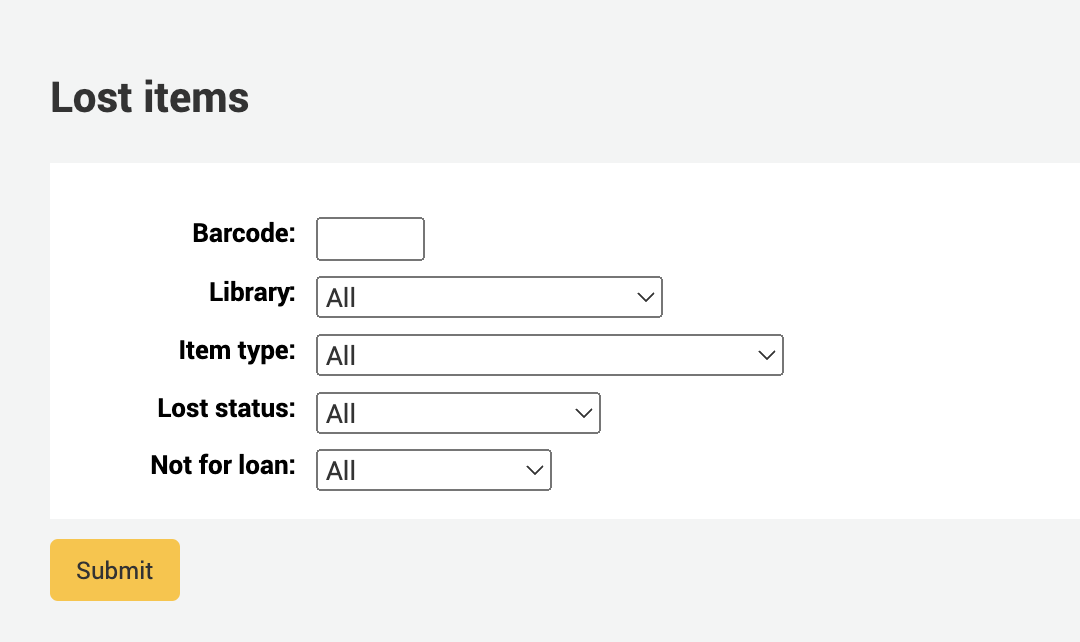
Once you have chosen parameters, you will see the corresponding list of items.
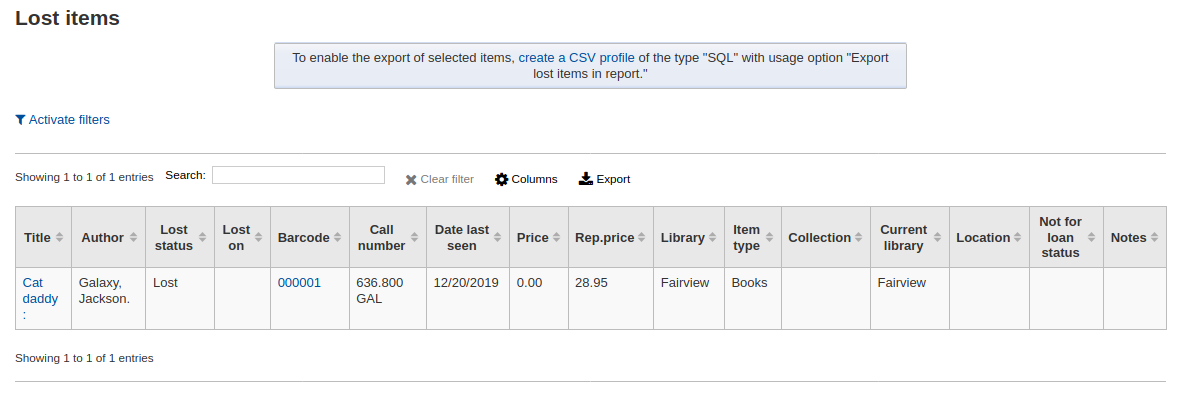
Nota
You can customize the columns of this table in the “Table settings” section of the Administration module (table id: lostitems-table).
Orders by fund
If you use the Acquisitions module, you will be able to see all the items that were ordered in each fund.
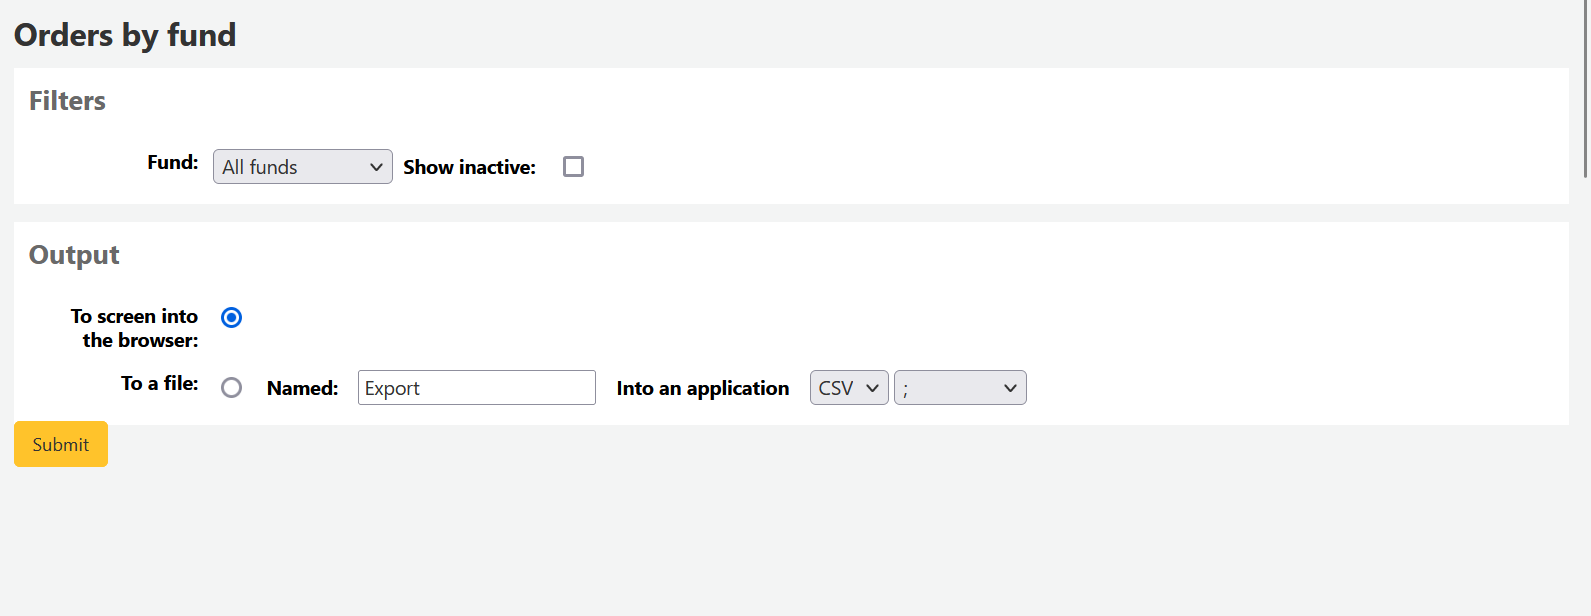
Once you choose the fund you wish to view, you can export the results or view them in the browser. If you choose to view them directly, you will be shown the list of orders.
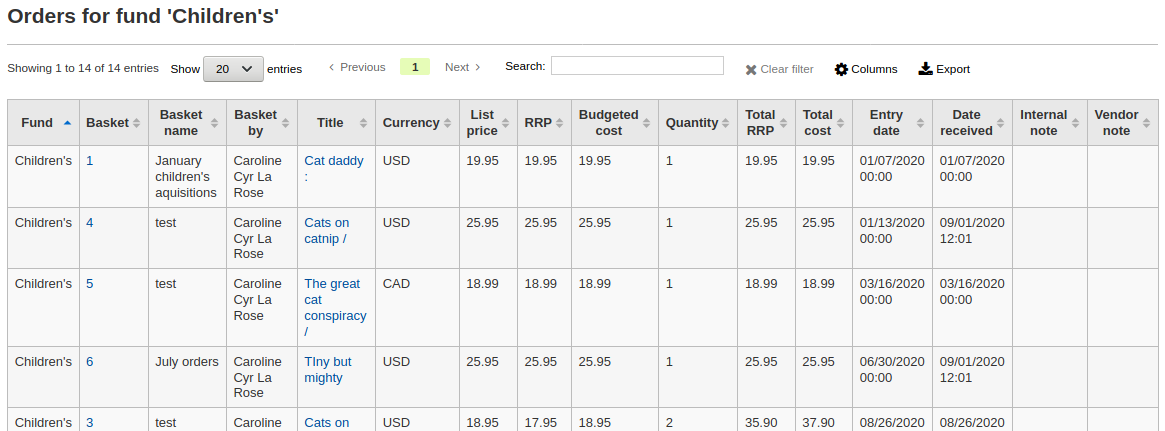
Nota
You can customize the columns of this table in the “Table settings” section of the Administration module (table id: funds-table).
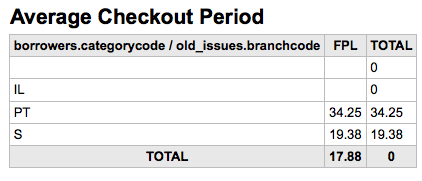
Durata media del prestito
Questo report ti dirà quanto stammo in media in prestito le copie secondo i criteri che inserirai nella maschera:
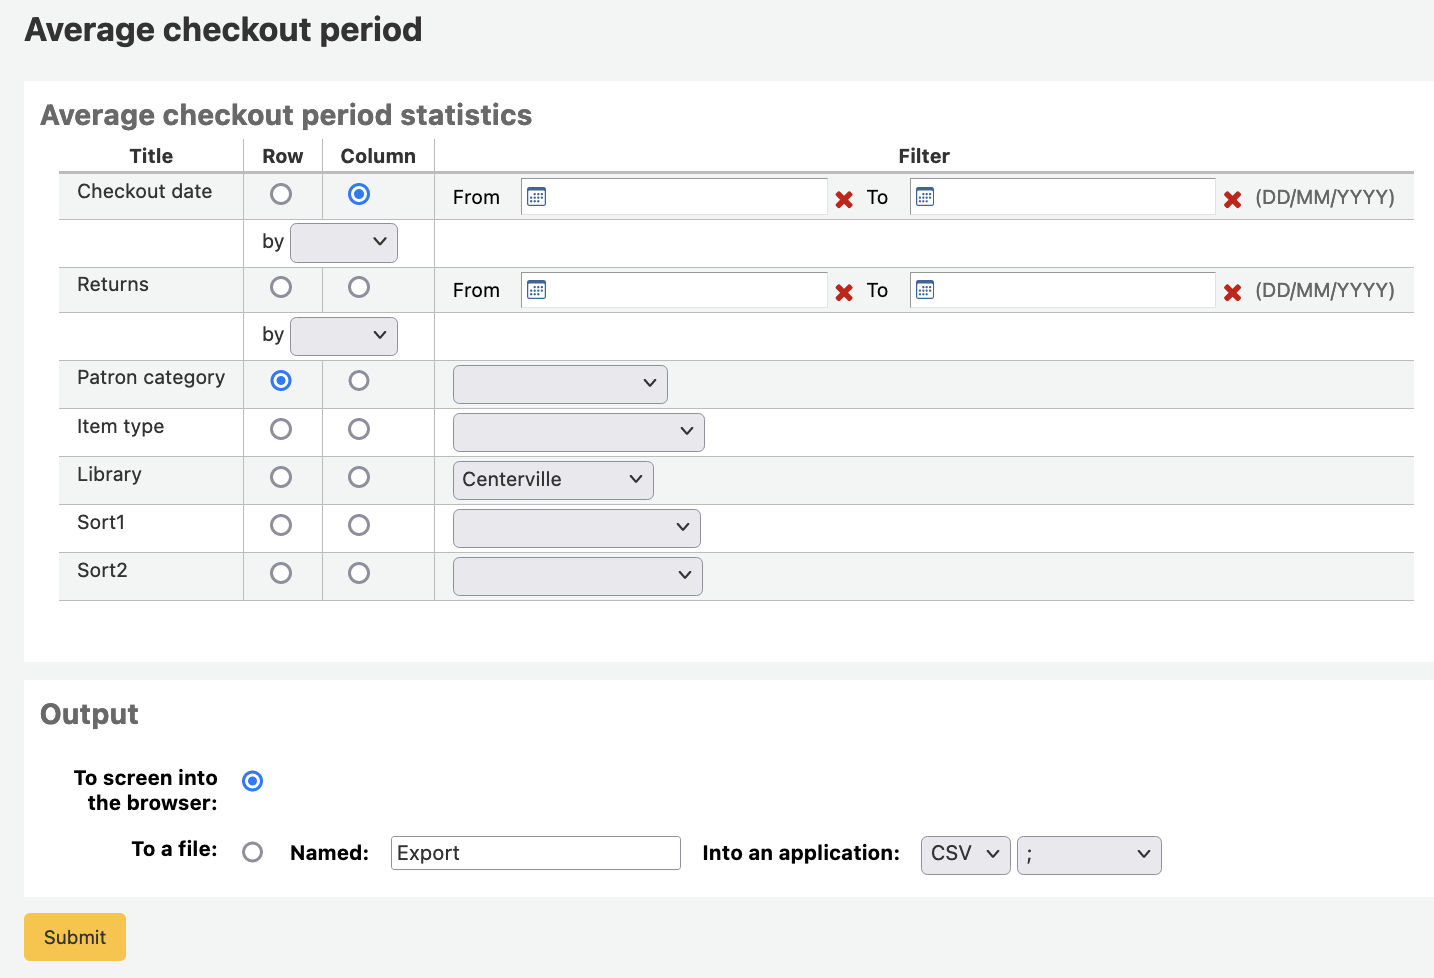
Se scegli l’output sul browser, i risultati verranno presentati sullo schermo.
Puoi anche scegliere di esportare in un fai che puoi manipolare secondo le tue esigenze.
Dizionario dei report
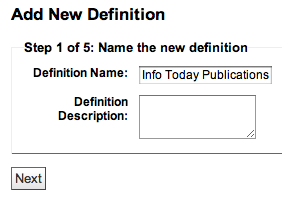
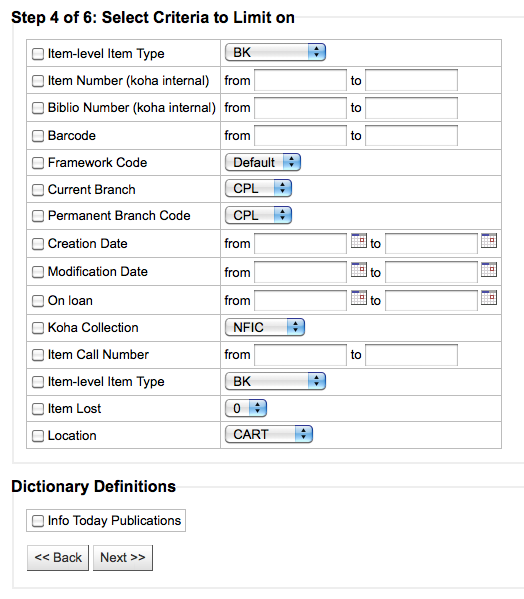
Il Dizionario dei report è un modo per preparare filtri da applicare a più di un report. E” un modo comodo per definire filtri che il sistema di creazione report non prevede per default. Per aggiungere una nuova definizione di filtro, clicca “Nuova definizione” nella pagina del Dizionario dei report e segui i quattro passi.
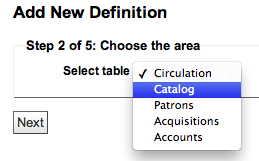
Passo 1: dai un nome alla definizione e fornisci una descrizione, se occorre
Passo 2: Scegli il modulo che vuoi interrogare.
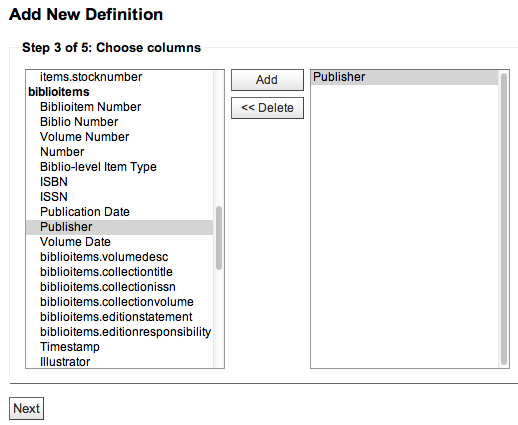
Passo 3: scegli le colonne da estrarre dall’elenco delle tabelle.
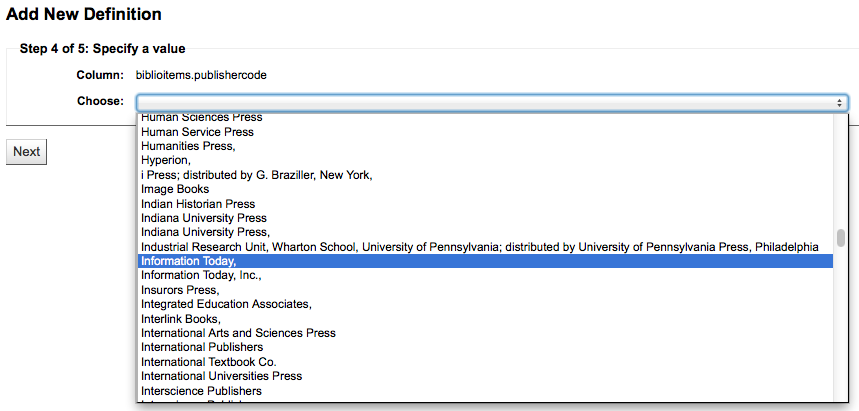
Passo 4: scegli il valore(i) dal campo(i). Saranno automaticamente popolati con le opzioni disponibili nel database.
Conferma le scelte per salvare la definizione.
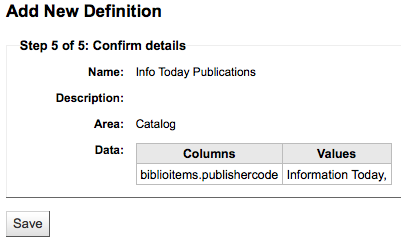
Le tue definizioni compariranno nella pagina del Dizionario dei report
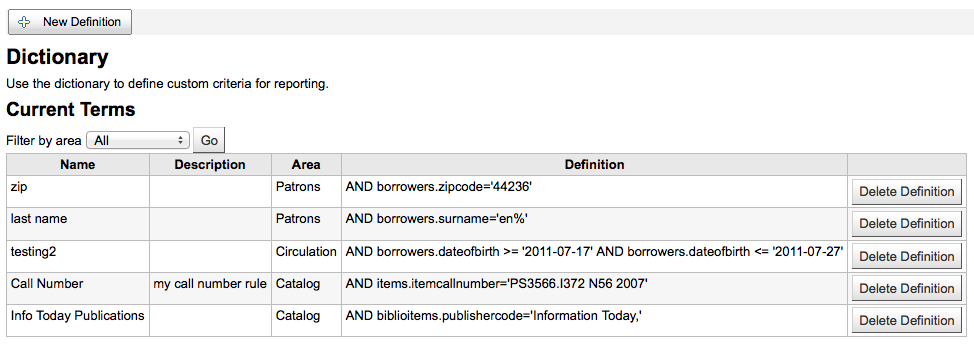
Cosi, quando genererai dei reports con il modulo a cui hai collegato il dizionario, vedrai una nuova opzione per filtrare i risultati dopo i filtri usuali.
Report plugins
Some plugins that are available can be used to make or enhance reports.
Get there: More > Reports > Report plugins > Report plugins
From this page, you will see only report-type plugins.
See the managing plugins section of this manual to learn how to manage your report-type plugins.