Výstupy
Výstupy (sestavy) jsou způsobem jak shromáždit data. Užívají se pro generování statistik, seznamy členů, seznamy podle regálů, nebo jakékoliv data z vaší databáze.
Get there: More > Reports
Custom reports
Koha’s data is stored in a MySQL database which means that librarians can generate nearly any report they would like by either using the guided reports wizard or writing their own SQL query.
Add custom report
Poznámka
Only staff with the create_reports permission (or the superlibrarian permission) will be able to create custom reports, either with the guided report wizard or directly with SQL.
Průvodce vlastními výstupy
Naváděný tvůrce výkazů vás provede v šesti krocích ke generování sestavy.
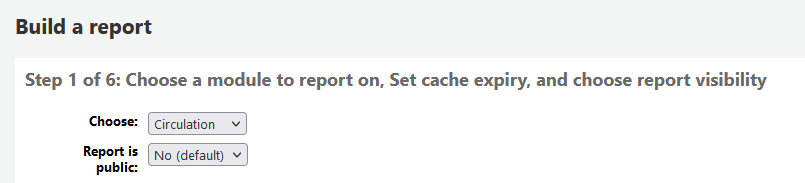
Krok 1: Vyberte modul, o kterém chcete informovat. To bude určovat, jaké tabulky a pole Vám budou k dispozici na dotaz.
‚Report is public‘ should be left to the default of ‚No‘ in most cases especially if the report contains patron or other sensitive information. A public report can be accessed using the JSON reports services by anyone and without authentication.
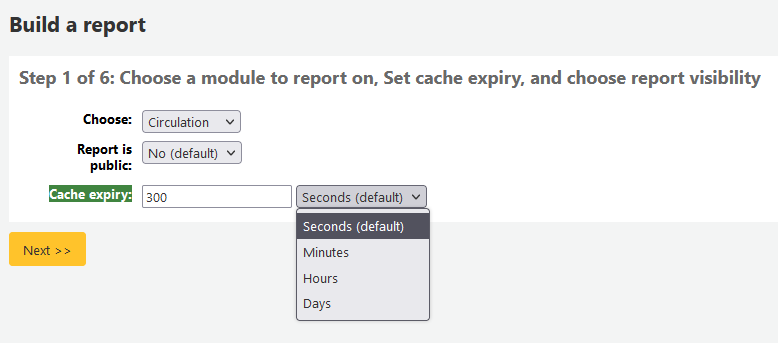
Poznámka
If your system administrator has set up memcache on your server you might see one more option for the Cache expiry. This is related to your public reports. If you make the report public then it’s constantly running and will cause a large load on your system. Setting this value prevents that.
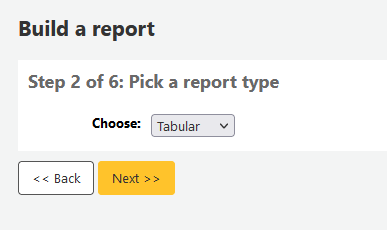
Krok 2: Vyberte typ zprávy. Prozatím je k dispozici pouze volba tabelární.
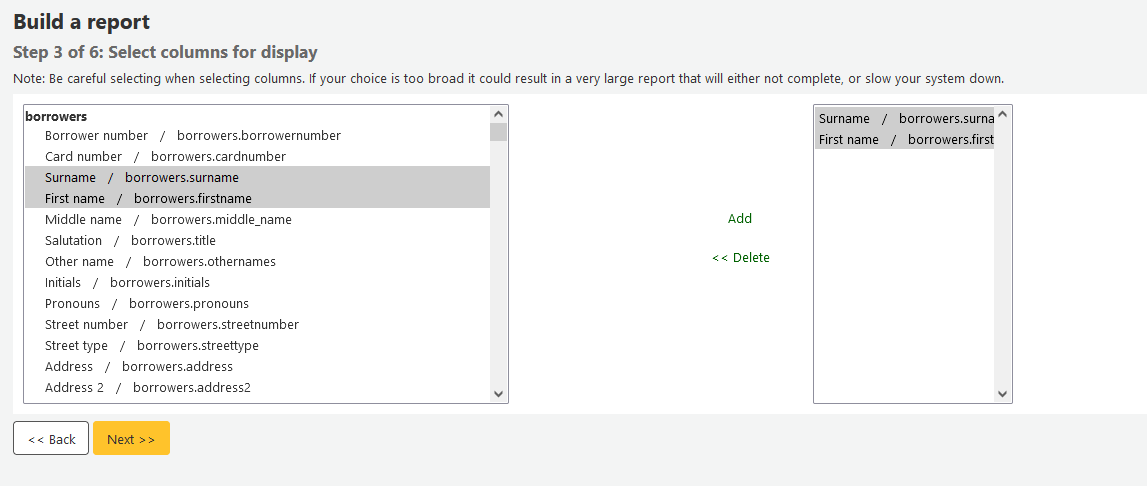
Step 3: Choose the fields you want in your report. You can select multiple fields and add them all at once by using CTRL+click on each item you want to add before clicking the Add button.
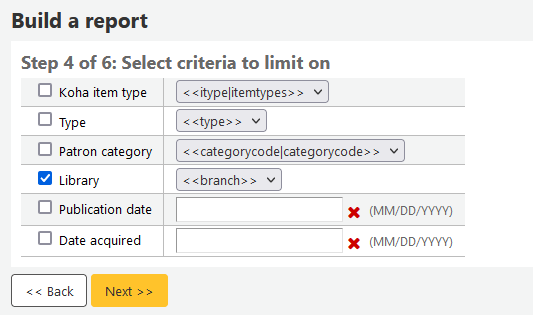
Step 4: Choose any limits you might want to apply to your report (such as item types or branches). If you don’t want to apply any limits, simply click ‚Next‘ instead of choosing an option.
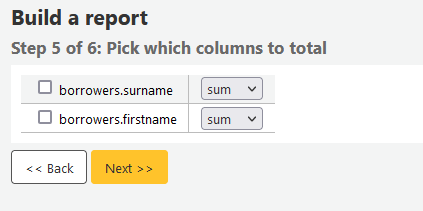
Step 5: Perform math functions. If you don’t want to do any calculations, simply click ‚Next‘ instead of choosing an option.
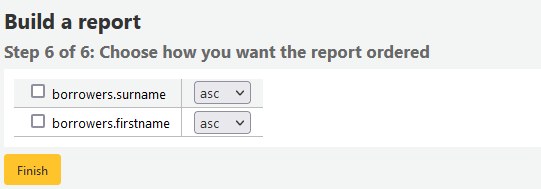
Step 6: Choose data order. If you want the data to print out in the order it’s found in the database, simply click ‚Finish‘.
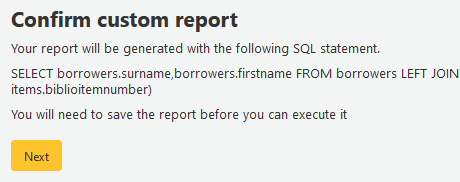
When you are finished you will be presented with the SQL generated by the report wizard. From here you can choose to save the report by clicking ‚Finish‘ or copy the SQL and make edits to it by hand.
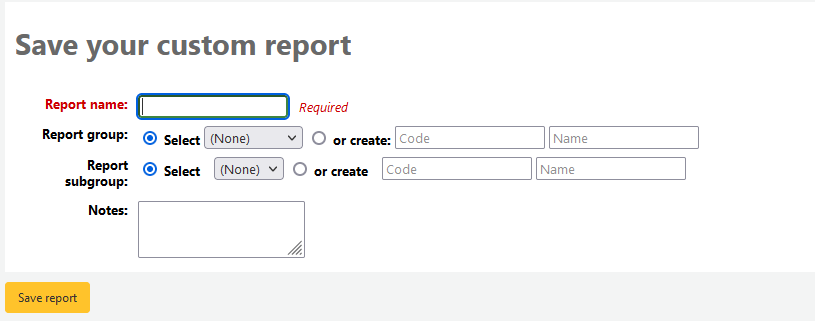
Pokud se rozhodnete uložit sestavu, budete požádáni o zadání názvu sestavy, o setřídění do skupin a podskupin, a zadejte případné poznámky týkající se sestavy.
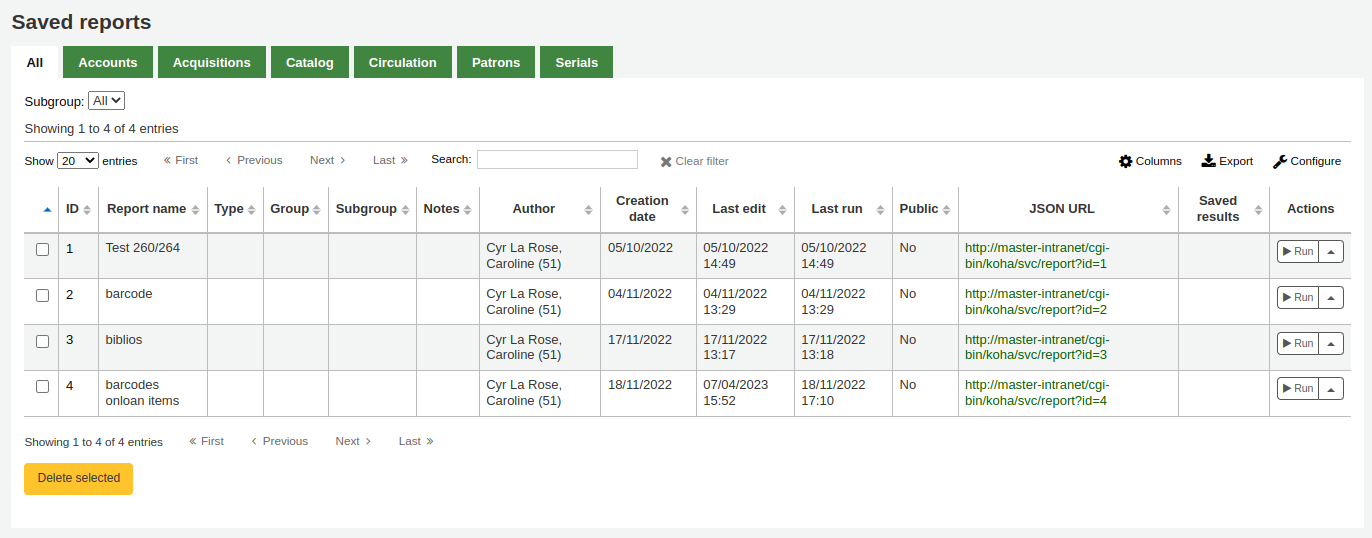
Once your report is saved it will appear on the ‚Use saved‘ page with all other saved reports.
Poznámka
You can customize the columns of this table in the ‚Table settings‘ section of the Administration module (table id: table_reports).
Odtud můžete provádět úpravy, spouštět výstupy a také plánovat časované spouštění výstupů. Chcete-li vyhledat výstup, který jste vytvořili, můžete řadit podle kteréhokoli sloupce kliknutím na záhlaví sloupce (datum vytvoření je nejlepší volba pro nalezení výstupu, který jste právě přidali). Můžete také zúžit výsledky pomocí filtrů na levé straně, nebo pomocí záložek, pod kterými se nacházejí jednotlivé skupiny výstupů.
Výstup pomocí SQL
In addition to the report wizard, you have the option to write your own queries using SQL. To find reports written by other Koha users, visit the Koha wiki: http://wiki.koha-community.org/wiki/SQL_Reports_Library. You can also find your database structure in /installer/data/mysql/kohastructure.sql or online at: http://schema.koha-community.org.
To add your query, click the link to ‚Create from SQL‘ on the main reports module
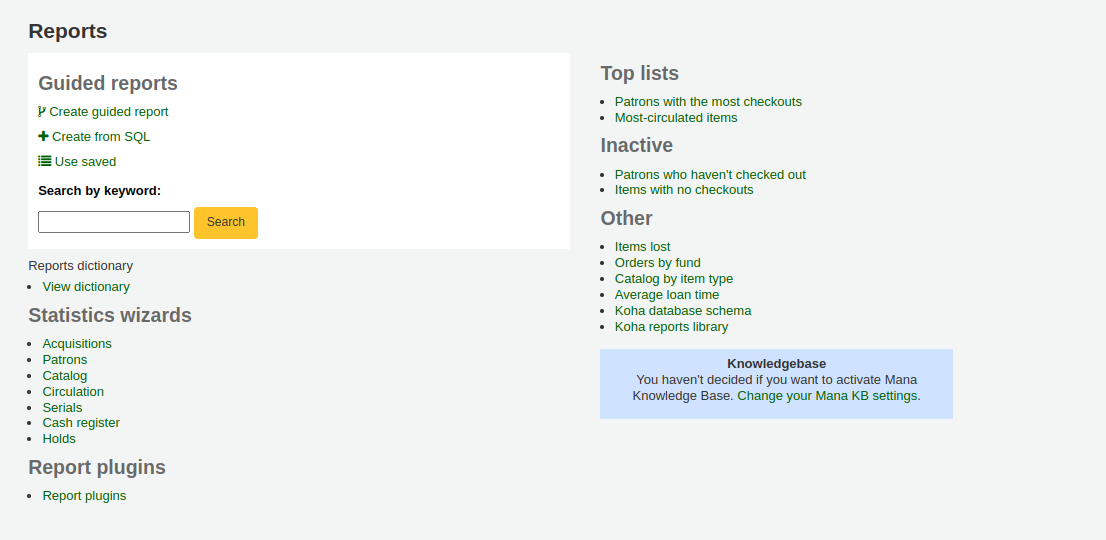
or the ‚New report‘ button at the top of the ‚Saved reports‘ page.

Vyplňte tento formulář
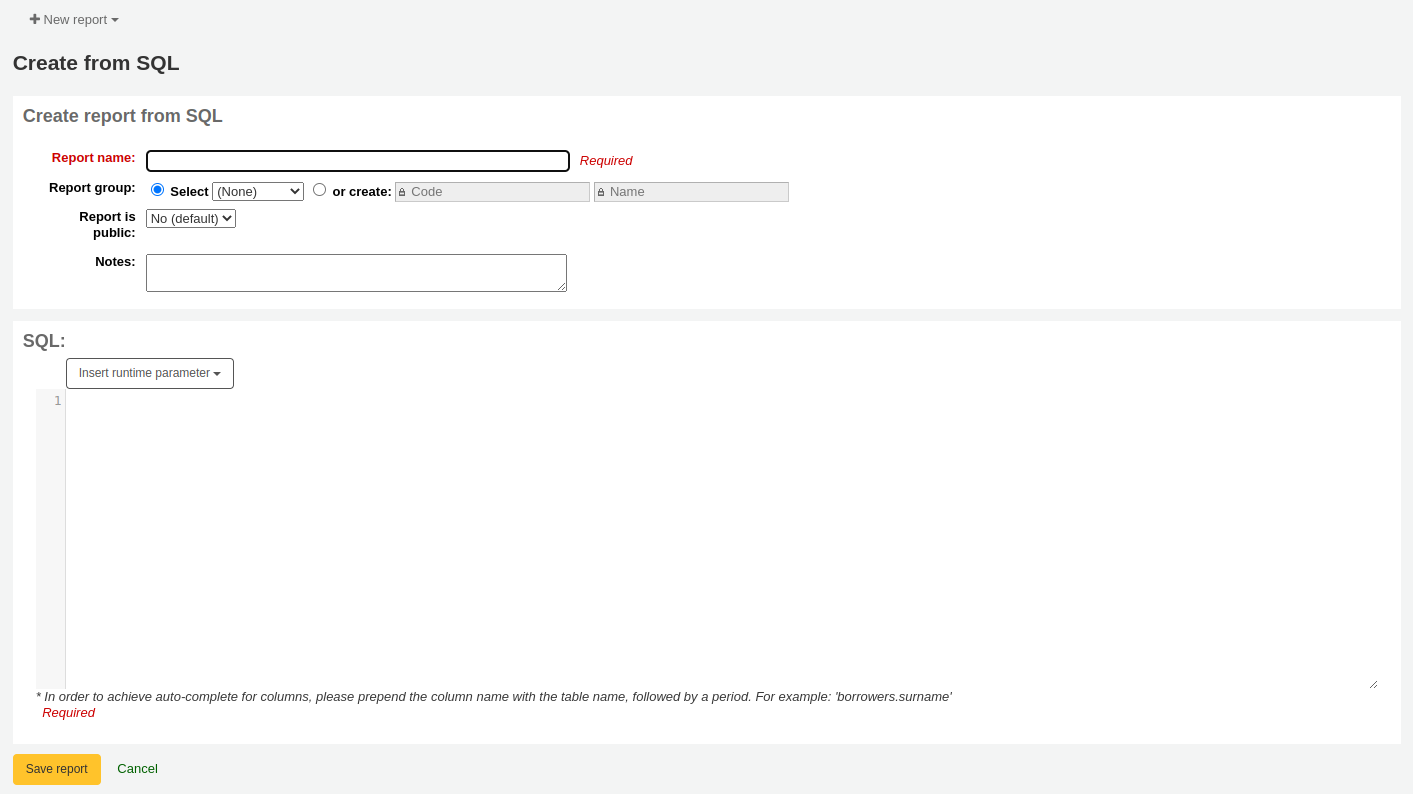
Report name: the name is what will appear on the ‚Saved reports‘ page to help you identify the report later. It will also be searchable using the filters found on the left of the ‚Saved reports‘ page.
Report group: you can use the ‚Report group‘ to organize your reports in tabs on the ‚Saved reports‘ page. You can choose from the list of existing groups, or create one on the fly by choosing the ‚or create‘ radio button.

Report groups are set in the REPORT_GROUP authorized value category.
Varování
If you’re adding a report group on the fly, the code should not include special characters or spaces.
Report subgroup: if you chose a report group, this field will appear to further organize your reports. Choose a subgroup from the list, or create one on the fly by choosing the ‚or create‘ radio button.
Report subgroups are set in the REPORT_SUBGROUP authorized value category.
Poznámka
Report subgroups need to have unique values in ‚Authorized value‘ and ‚Description‘. The ‚Description (OPAC)‘ field needs to contain the authorized value for the report group that the subgroup falls under.
Varování
If you’re adding a report subgroup on the fly, the code should not include special characters or spaces.
Report is public: this should be left to the default of ‚No‘ in most cases, especially if the report contains patron or other sensitive information. A public report can be accessed using the JSON reports services by anyone and without authentication.
Cache expiry: this field will only appear if your system administrator has set up memcache on your server. This is related to public reports. If you make the report public, it’s constantly running and will cause a large load on your system. Setting this value prevents that.
Notes: notes will appear on the ‚Saved reports‘ page, and can be used to provide more details about the report or tips on how to enter values when it runs.
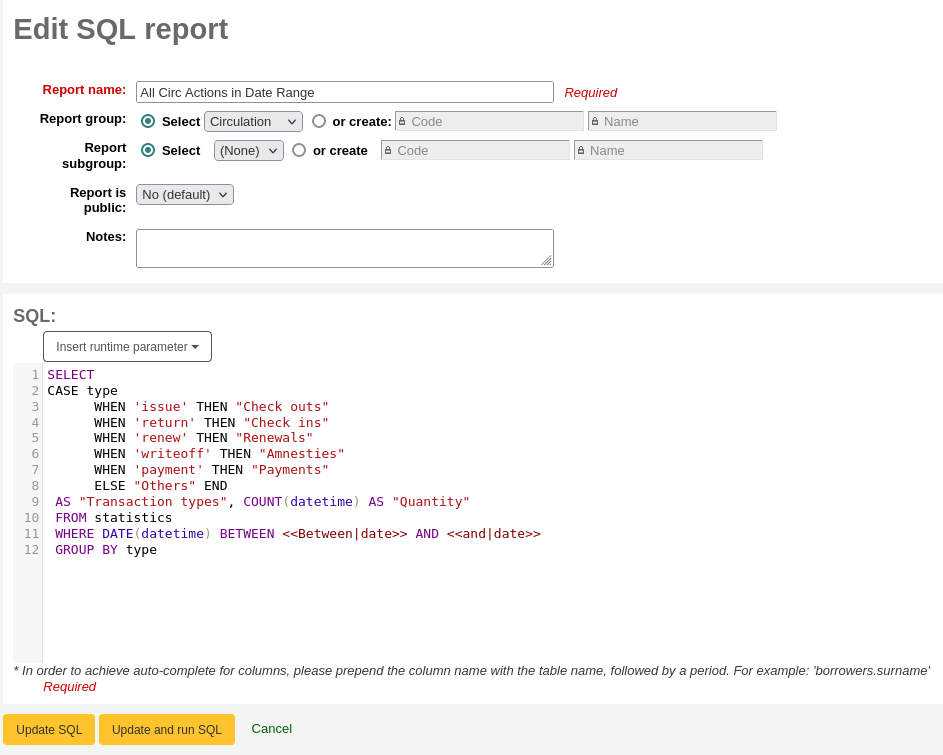
SQL: type or paste the SQL for the report (see report writing tips below).
Once everything is entered click the ‚Save report‘ button and you’ll be presented with options to run it. From here, you can also edit it, duplicate it, or schedule it to be run later.
Once a report is saved, you do not have to recreate it, it will appear on the ‚Saved reports‘ page with all other saved reports.
Poznámka
You can customize the columns of this table in the ‚Table settings‘ section of the Administration module (table id: table_reports).
From the ‚Saved reports‘ page, you can make edits, run the report, or schedule a time to run the report later. To find the report you created, you can sort by any of the columns by clicking on the column header (creation date is the best to find the report you just added). You can also filter your results using the filter menu on the left or use the tabs to find reports based on your custom groups.
SQL Report writing tips
Autocomplete
When you start typing in the SQL field, autocomplete options will be displayed.
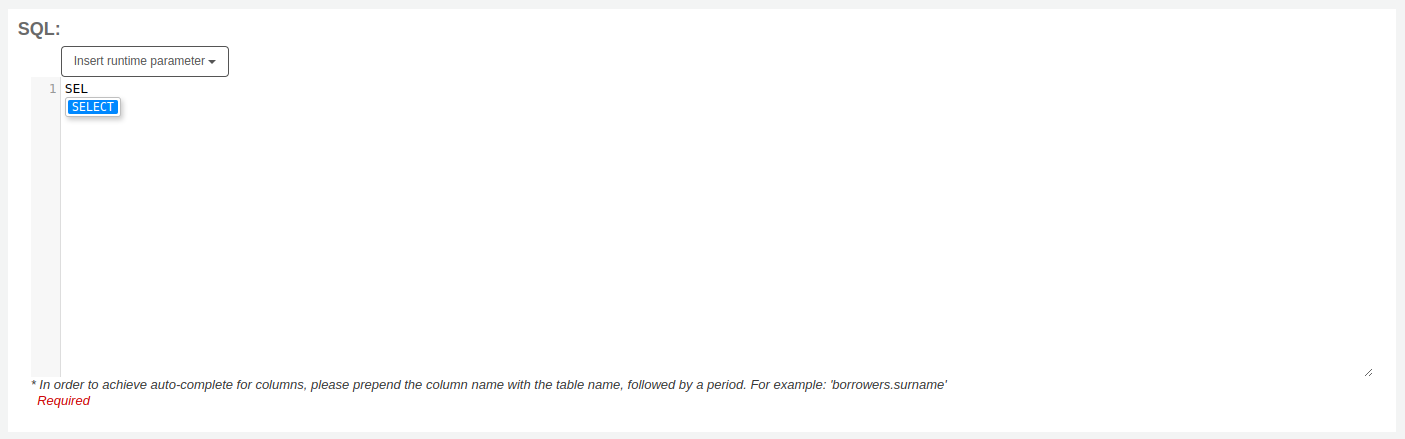
Use the arrows on your keyboard to choose the correct option and press ‚Enter‘ or ‚Tab‘ to insert it into your report, or simply click on the option to insert it.
Autocomplete options include:
SQL keywords such as SELECT, FROM, WHERE, etc.
table names
column names
Poznámka
To have suggestions for column names, you must type the table name first, followed by a period, then start typing the column name.
For example, to have the suggestion for
cardnumber, you must typeborrowers.ca.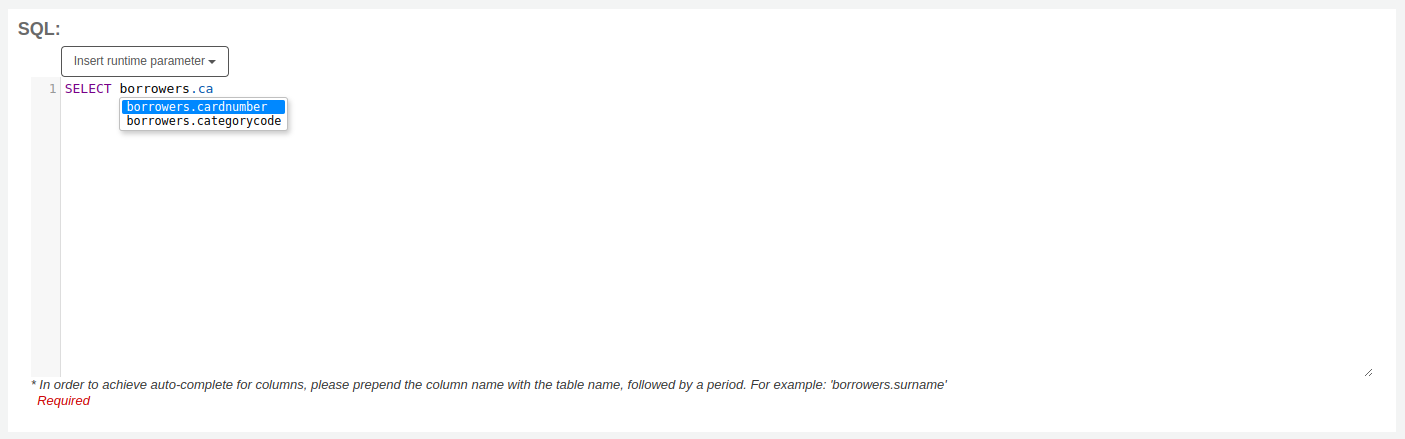
Runtime parameters
Pokud máte pocit, že vaše zpráva může být příliš náročná na zdroje, zvažte použití runtime parametrů vašeho dotazu. Runtime parametry v podstatě dělají filtr před spuštění sestavy a tak šetříte systémové prostředky.
Click the button ‚Insert runtime parameter‘ and choose which parameter to add.
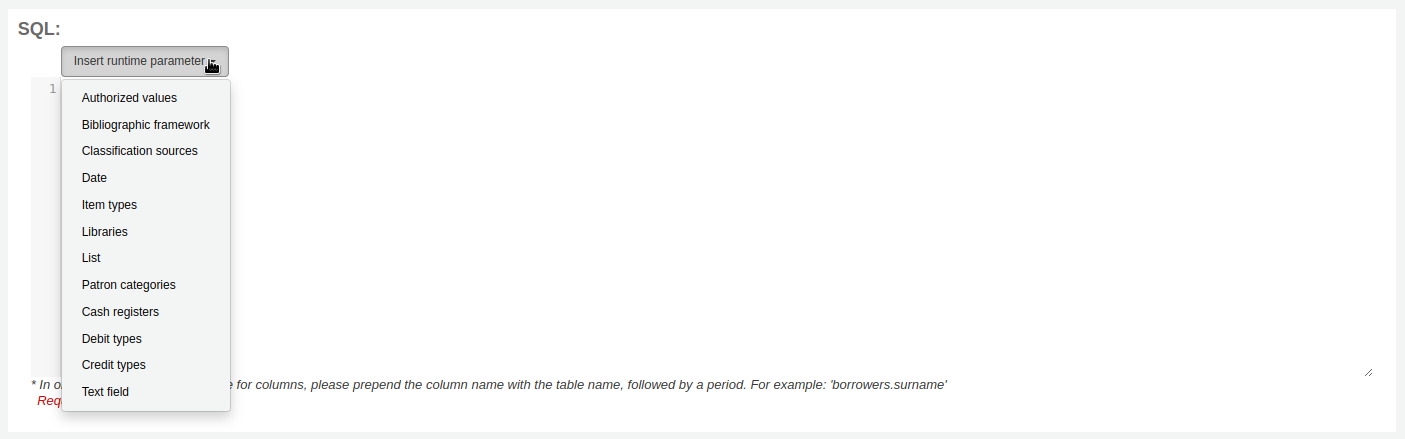
Authorized value: will display a drop down menu of the value descriptions from the chosen authorized value category. The authorized value code will be inserted in the report when it is run.
Bibliographic framework: will display a drop down menu of MARC bibliographic frameworks. The framework code will be inserted in the report when it is run.
Classification sources: will display a drop down menu of classification sources. The classification code will be inserted in the report when it is run.
Date: will display a calendar to pick a date. The date in YYYY-MM-DD format will be inserted in the report when it is run.
Item types: will display a drop down menu of item types. The item type code will be inserted in the report when it is run.
Libraries: will display a drop down menu of libraries. The library code (branchcode) will be inserted in the report when it is run.
List: will display a large text box in which the user can enter many values, one per line. Those values will be inserted in the report, separated by commas, when it is run.
Varování
In the case of the list parameter, users must write one value per line.
Patron categories: will display a drop down menu of patron categories. The category code will be inserted in the report when it is run.
Cash registers: will display a drop down menu of cash registers. The cash register’s internal id will be inserted in the report when it is run.
Debit types: will display a drop down menu of debit types. The debit type code will be inserted in the report when it is run.
Credit types: will display a drop down menu of credit types. The credit type code will be inserted in the report when it is run.
Text field: will display an empty text field in which the user can enter any text.
Poznámka
Musíte dát „%“ do textového pole, když to chcete ignorovat. V opačném případě (nezadání „%“) doslova hledá „“ (prázdný řetězec) jako hodnotu pro pole.
For example entering nothing for: „title=<<Enter title>>“ will display results with title=‘‘ (no title).
If you want to have to have something not mandatory, use „title like <<Enter title>>“ and enter a % at run time instead of nothing.
After you choose the type of runtime parameter, it will ask you for the parameter label. This is what the user will see as the label for the choice they have to make or text they have to enter.
The syntax inserted into the report is <<Label|authorized_value>>.
The << and >> are just delimiters to indicate the start and end of the runtime parameter.
The label will be displayed on the left of the choice or value to enter.
The authorized_value can be omitted if not applicable. If it is absent, a free text field will be displayed. If it contains an authorized code (see table below), a drop down of the values will be displayed.
Poznámka
You can write those in manually as well, you don’t have to go through the ‚Insert runtime parameter‘ button. As long as the syntax is correct, Koha will interpret it as a runtime parameter.
List of parameters that can be used in runtime parameters
Parameter |
What the user sees |
What gets inserted in query |
|---|---|---|
date |
date picker |
validly formatted date |
branches |
drop down of branch names |
branch code |
itemtypes |
drop down of item type names |
typ jednotky (exempláře) |
categorycode |
drop down of patron category descriptions |
borrower category code |
biblio_framework |
drop down of MARC bibliographic frameworks |
framework code |
list |
large text box |
comma separated values |
(auth-value-category) |
drop down of auth-value descriptions in category |
authorized value |
(nothing) |
text box |
entered text |
Poznámka
You can have more than one runtime parameter in a given SQL query.
Poznámka
When using runtime parameters that create drop down menus you can optionally specify whether to include an option for ‚All‘ or to allow multiple selections.
To include an option for all the syntax is
LIKE <<Label|branches:all>>.To allow multiple selections the syntax is
IN <<Label|itemtypes:in>>.
SELECT *
FROM
items i
WHERE
i.homebranch LIKE <<Library|branches:all>>
AND
i.itype IN <<Item type|itemtypes:in>>
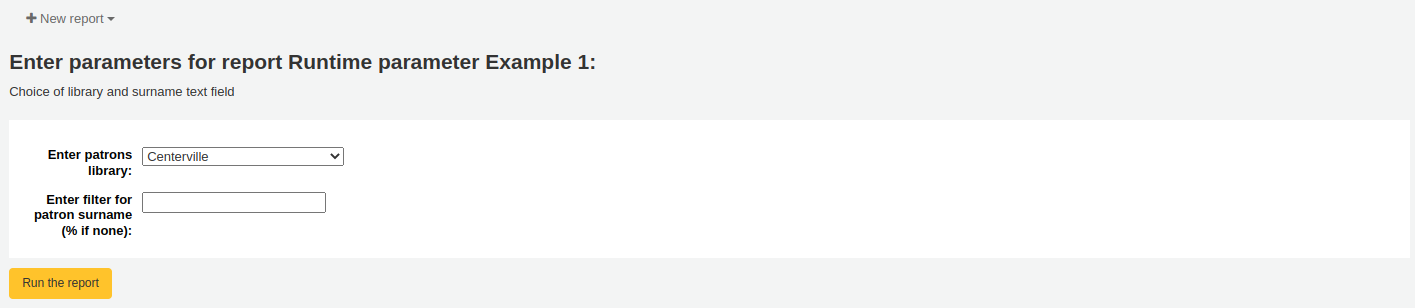
Example 1
SELECT surname,
       firstname
FROM borrowers
WHERE branchcode = <<Enter patrons library|branches>>
    AND surname LIKE <<Enter filter for patron surname (% if none)>>
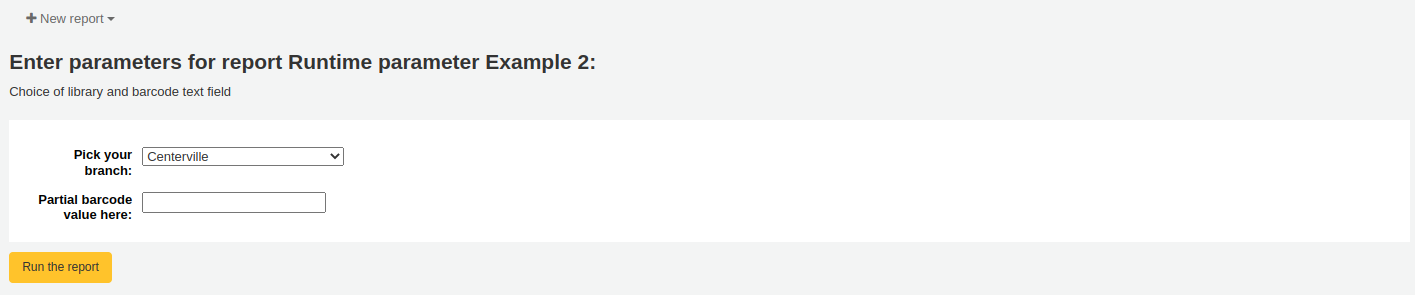
Example 2
SELECT *
FROM items
WHERE homebranch = <<Pick your branch|branches>>
    AND barcode LIKE <<Partial barcode value here>>
Example 3
SELECT title,
       author
FROM biblio
WHERE frameworkcode = <<Enter the frameworkcode|biblio_framework>>

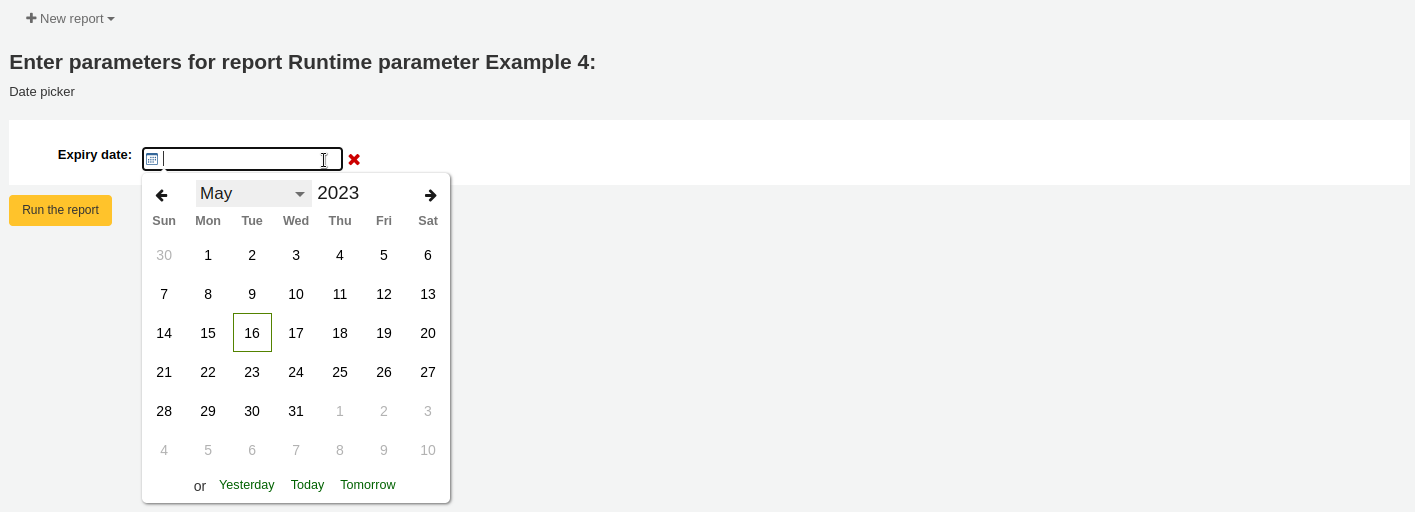
Example 4
SELECT cardnumber,
       surname,
       firstname
FROM borrowers
WHERE dateexpiry <= <<Expiry date|date>>
Example 5
SELECT *
FROM items
WHERE itemnumber IN <<List of itemnumbers (one per line)|list>>
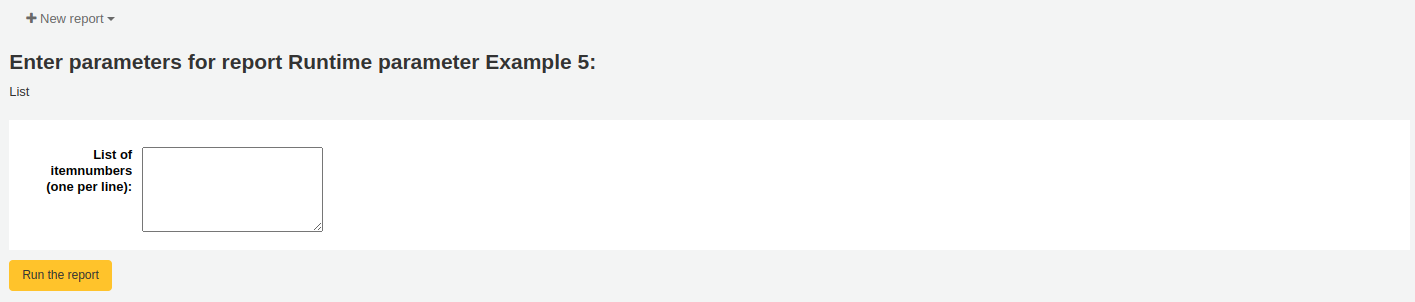
Varování
In the case of the list parameter, users must write one value per line.
Column names
You can use an SQL alias to rename columns.
Example
SELECT surname AS "Last Name"
FROM borrowers
For reports whose results you wish to send to batch modification tools or generate automatic hyperlinks to use [[batch field|Column Name]] to rename the itemnumber, biblionumber or borrowernumber columns. For example, [[itemnumber|Item Number]] will format the itemnumber column as „Item Number“, while allowing those results to be sent to the batch item modification tool.
Example
SELECT [[borrowernumber|Borrower Number]], firstname AS "First Name", surname AS "Last Name"
FROM borrowers
Hyperlinks
It can be useful to add clickable links to reports to make it easier for staff to navigate directly to specific results.
Koha will automatically generate hyperlinks for any report that contains a borrowernumber, cardnumber, itemnumber or biblionumber.
Poznámka
The column name must match the type of data your are inserting. Please see Column names for more details on naming columns for automatic hyperlinks.
When a user clicks on the number, the menu will prompt the user to click which Koha page they wish to visit.
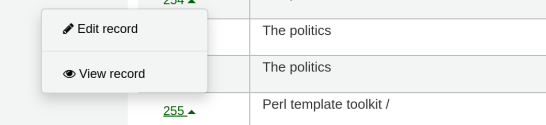
Available actions for each automatic link are:
borrowernumber: View, edit, check out
cardnumber: Check out
itemnumber: View, edit
biblionumber: View, edit
You may wish to make this a single click by directly linking to a specific page, or you may wish to make other data into clickable links; to make a book’s title a clickable link that brings the user to the bibliographic record, for example. Koha will insert HTML links added to the SELECT statement and by using CONCAT, data from the report results can be added to create a clickable link.
Example 1
This example uses the string /cgi-bin/koha/members/boraccount.pl?borrowernumber=XXXX to insert a direct link to a borrower. The end user will see the borrower’s library barcode number.
SELECT CONCAT('<a href=\"/cgi-bin/koha/members/boraccount.pl?borrowernumber=',borrowernumber,'\">', cardnumber, '</a>'), surname, firstname
FROM borrowers
Poznámka
Koha will automatically insert your library’s top level domain when a user clicks the link, so only „cgi-bin“ and onward is required.
Poznámka
The example uses single quotation marks to separate the CONCAT segments, which are joined by commas. Below is a detailed explanation of the sections, each of which is separated by a comma:
CONCAT- This SQL command combines separate queries and strings into a single column. Parentheses will enclose the next entries.'<a href="/cgi-bin/koha/members/boraccount.pl?borrowernumber='- The beginning of an HTML link tag and Koha URL that points to a specific borrower. The single quotation marks ensure the string is printed literally. You must escape the double quotation marks with a backslash to ensure Koha interprets it literally rather than as part of the SQL.borrowernumber- The borrower number from the database. This is not enclosed by single quotation marks because we wish to query Koha.'">'- The end of an opening HTML tag for a link. Again wrapped in single quotation marks.cardnumber- The borrower’s barcode number queried from Koha. This is what will be visible to the user and comprise the clickable link.'</a>'- A closing tag of an HTML link. Wrapped in single quotation marks.
Example 2
This example will link directly to an item, displaying the item’s barcode to the user.
SELECT CONCAT('<a href=\"/cgi-bin/koha/catalogue/moredetail.pl?itemnumber=',itemnumber,'\">', barcode , '</a>')
FROM items
Example 3
This example will link to a bibliographic record and display the item’s title.
SELECT CONCAT('<a href=\"/cgi-bin/koha/catalogue/detail.pl?biblionumber=',biblionumber,'\">', title , '</a>')
FROM biblio
SQL report from Mana
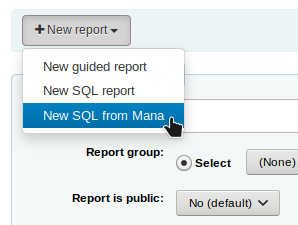
In the „Create report from SQL“, you can search Mana KB for pre-made reports by clicking on „New report“ and choosing „New SQL from Mana“.
Poznámka
This option will only appear if you’ve configured Mana KB in the administration module.
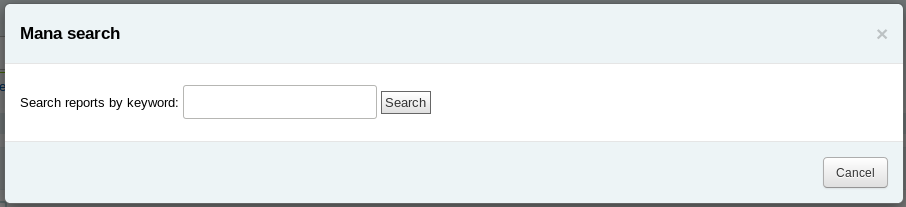
Budete vyzváni k zadání klíčových slov pro vyhledávání ve znalostní bázi.
In the search results, you will see
the details of the report (name, notes and type)
how many people have used this entry (# of users)
when it was used for the last time (last import)
additional comments made by other Koha users (comments)
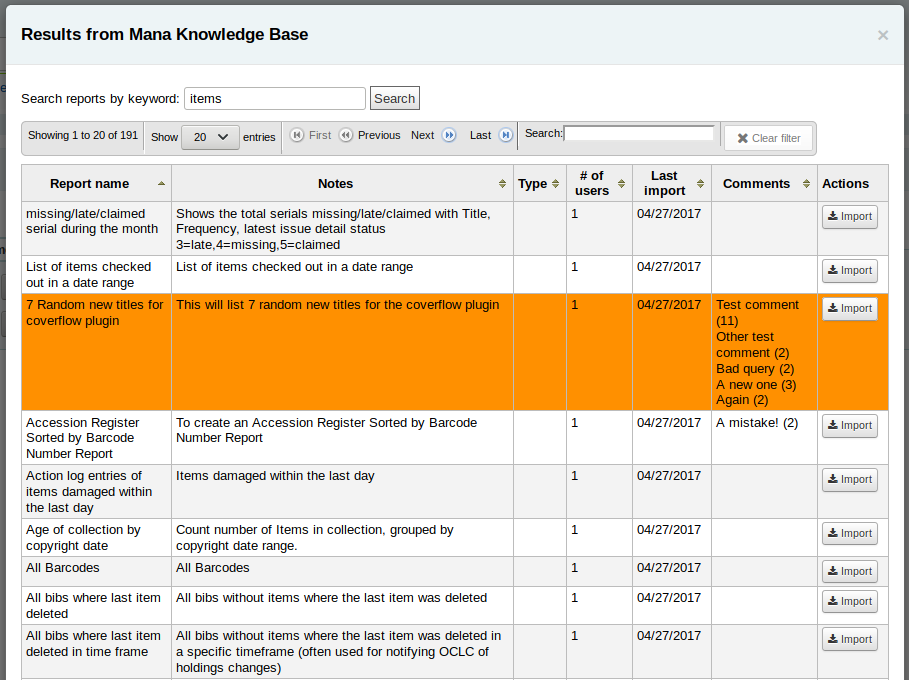
Click on „Import“ to import a copy of the report in your own saved reports.
You can then edit it, duplicate it, delete it, run it as you would any of your own reports.
Duplicate report
Sestavy také mohou být přidány tím, že kopírují existující sestavy. Navštivte stránku „Uložené sestavy“ abyste viděli všechny sestavy již uložené ve vašem systému.
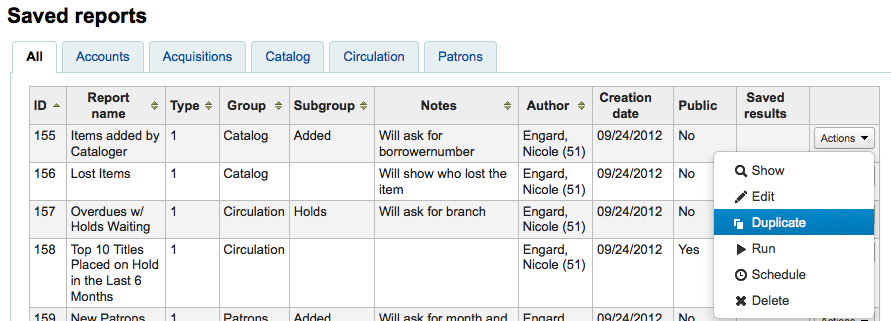
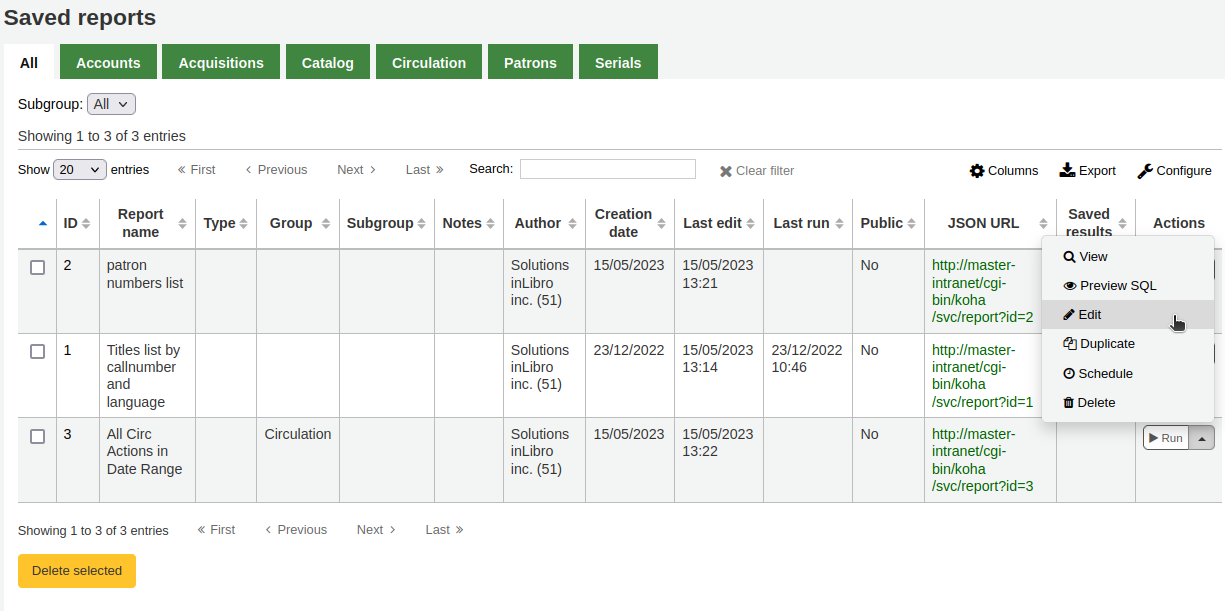
Na pravé straně každého výstupu je odkaz je rozbalovací menu „Akce“, pod kterým se nachází i možnost „Duplikovat“, tak je možné vytvořit nový výstup na základě již existujícího.
Edit custom reports
Every report can be edited from the reports lists. To see the list of reports already stored in Koha, click ‚Use saved.‘
Poznámka
You can customize the columns of this table in the ‚Table settings‘ section of the Administration module (table id: table_reports).
Chcete-li vyhledat výstup, který chcete upravit, můžete řadit podle kteréhokoli sloupce kliknutím na záhlaví sloupce. Můžete také filtrovat výsledky pomocí menu filtrů na levé straně, nebo pomocí záložek s jednotlivými skupinami výstupů.
Z tohoto seznamu můžete upravit jakoukoliv vlastní sestavu kliknutím na tlačítko „Akce“ napravo a vybráním možnosti „Upravit“.
The form to edit the report will appear. Use the „update button“ to save your modifications or click on „update and run SQL“ to save and display the report results.
Running custom reports
Poznámka
Only staff with the execute_reports permission (or the superlibrarian permission) will be able to run existing reports.
Once custom reports are saved to Koha, you can run them by going to the Saved Reports page and clicking the ‚Run‘ button to the right of the report.
When your report runs, you will either be asked for some values,
or you will see the results right away.
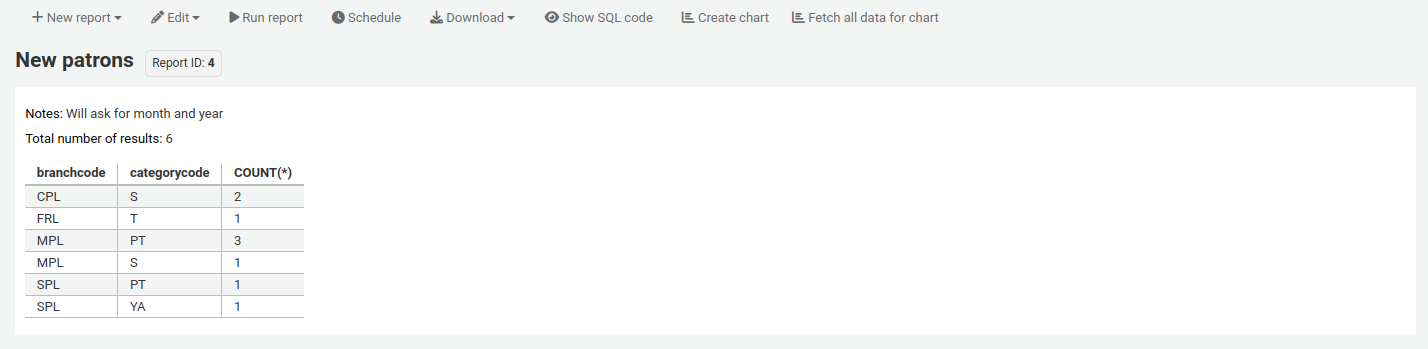
From the results you can do various actions with the button bar at the top of the page.
New report: create a brand new report.
New guided report: goes to the guided report wizard
New SQL report: goes to the create from SQL section
New SQL from Mana: this option only appears if Mana is set up, to search Mana for an existing SQL report.
Edit:
Edit: edit the current report
Duplicate: create a new report from the existing one
Delete: delete the current report
Run report: rerun the report
Run with template: this button only appears if you have notice templates in the notices and slips tool that are for reports.
Version
This option was added to Koha in version 23.11.
Tip
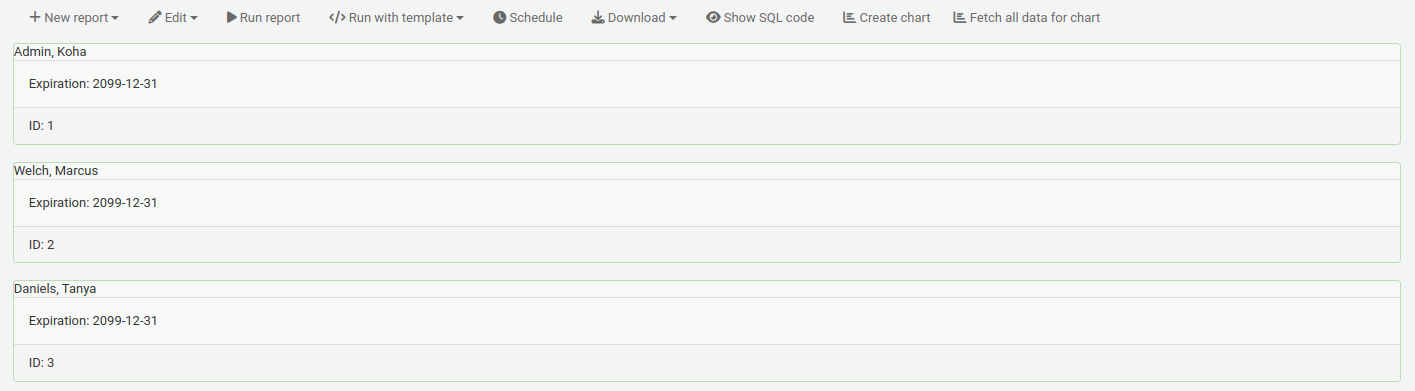
To view the results in a format other than the traditional table, you can create a template in the notices and slips tool.
For example, to view patron information in ‚card‘ form,
Go to Tools > Notices and slips.
Click ‚New notice‘, and choose ‚Reports‘.
Fill out the code and name for the slip. The name will be what appears in the ‚Run with template‘ menu.
In the ‚Print‘ template section, paste the code:
[% FOREACH b IN data %]
<div class="panel panel-default">
  <div class="panel-heading">[% b.surname %], [% b.firstname %]</div>
  <div class="panel-body">Expiration: [% b.dateexpiry %]</div>
  <div class="panel-footer">ID: [% b.borrowernumber %]</div>
</div>
[% END %]
Click ‚Save‘.
In a report with patron information, for example,
SELECT * FROM borrowers LIMIT 50
Click ‚Run with template‘ and choose the template.
Instead of a table, the results will appear in ‚card‘ form.
Schedule: schedule the report to be run at a later time with the task scheduler tool
Download: download the results
Comma separated text (.csv): a comma separated text file is a CSV file and it can be opened by any spreadsheet application or a text editor
Tab separated text: a tab separated text can also be opened by any spreadsheet or a text editor
Open Document Spreadsheet: ODS is an open-source spreadsheet file that can be opened in most spreadsheet applications
Rendered template: this option only appears if there are notice templates in the notices and slips tool that are for reports, and the report was „run with template“ (see above). It allows you to download the report results with the template applied.
Version
This option was added to Koha in version 23.11.
Show SQL code: show the SQL query used to get those results
Create chart: create a pie chart or a line/bar chart with the visible results
Fetch all data for chart: make all the data visible to make a chart with all the data
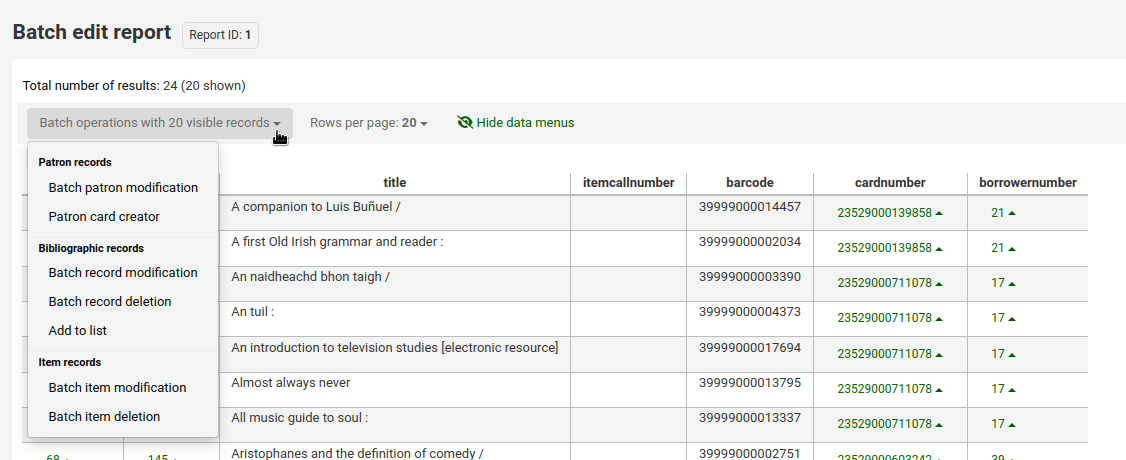
Send report output to batch modification tools
After running a report that contains itemnumbers, biblionumbers and/or patron cardnumbers the list of numbers can be imported directly into the relevant batch modification tool by clicking the ‚Batch operations with X visible records‘ button in the report results. The X depends on the number of records you have chosen to display on screen (up to 1000).
Statistics reports
Statistic reports will show you counts and sums. These reports are all about numbers and statistics, for reports that return more detailed data, use the guided report wizard. These reports are limited in what data they can look at, so it’s often recommended to use custom reports for official end of the year statistics.
Poznámka
Only staff with at least one of the reports permissions (or the superlibrarian permission) will be able to use the statistics wizards.
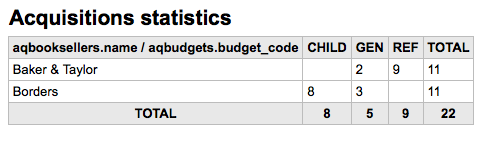
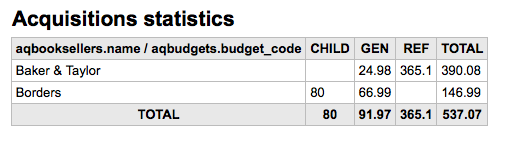
Statistika akvizic
Poznámka
These reports are limited in what data they can look at, so it’s often recommended to use custom reports for official end of the year statistics.
Using the form provided, choose which value you would like to appear in the column and which will appear in the row.
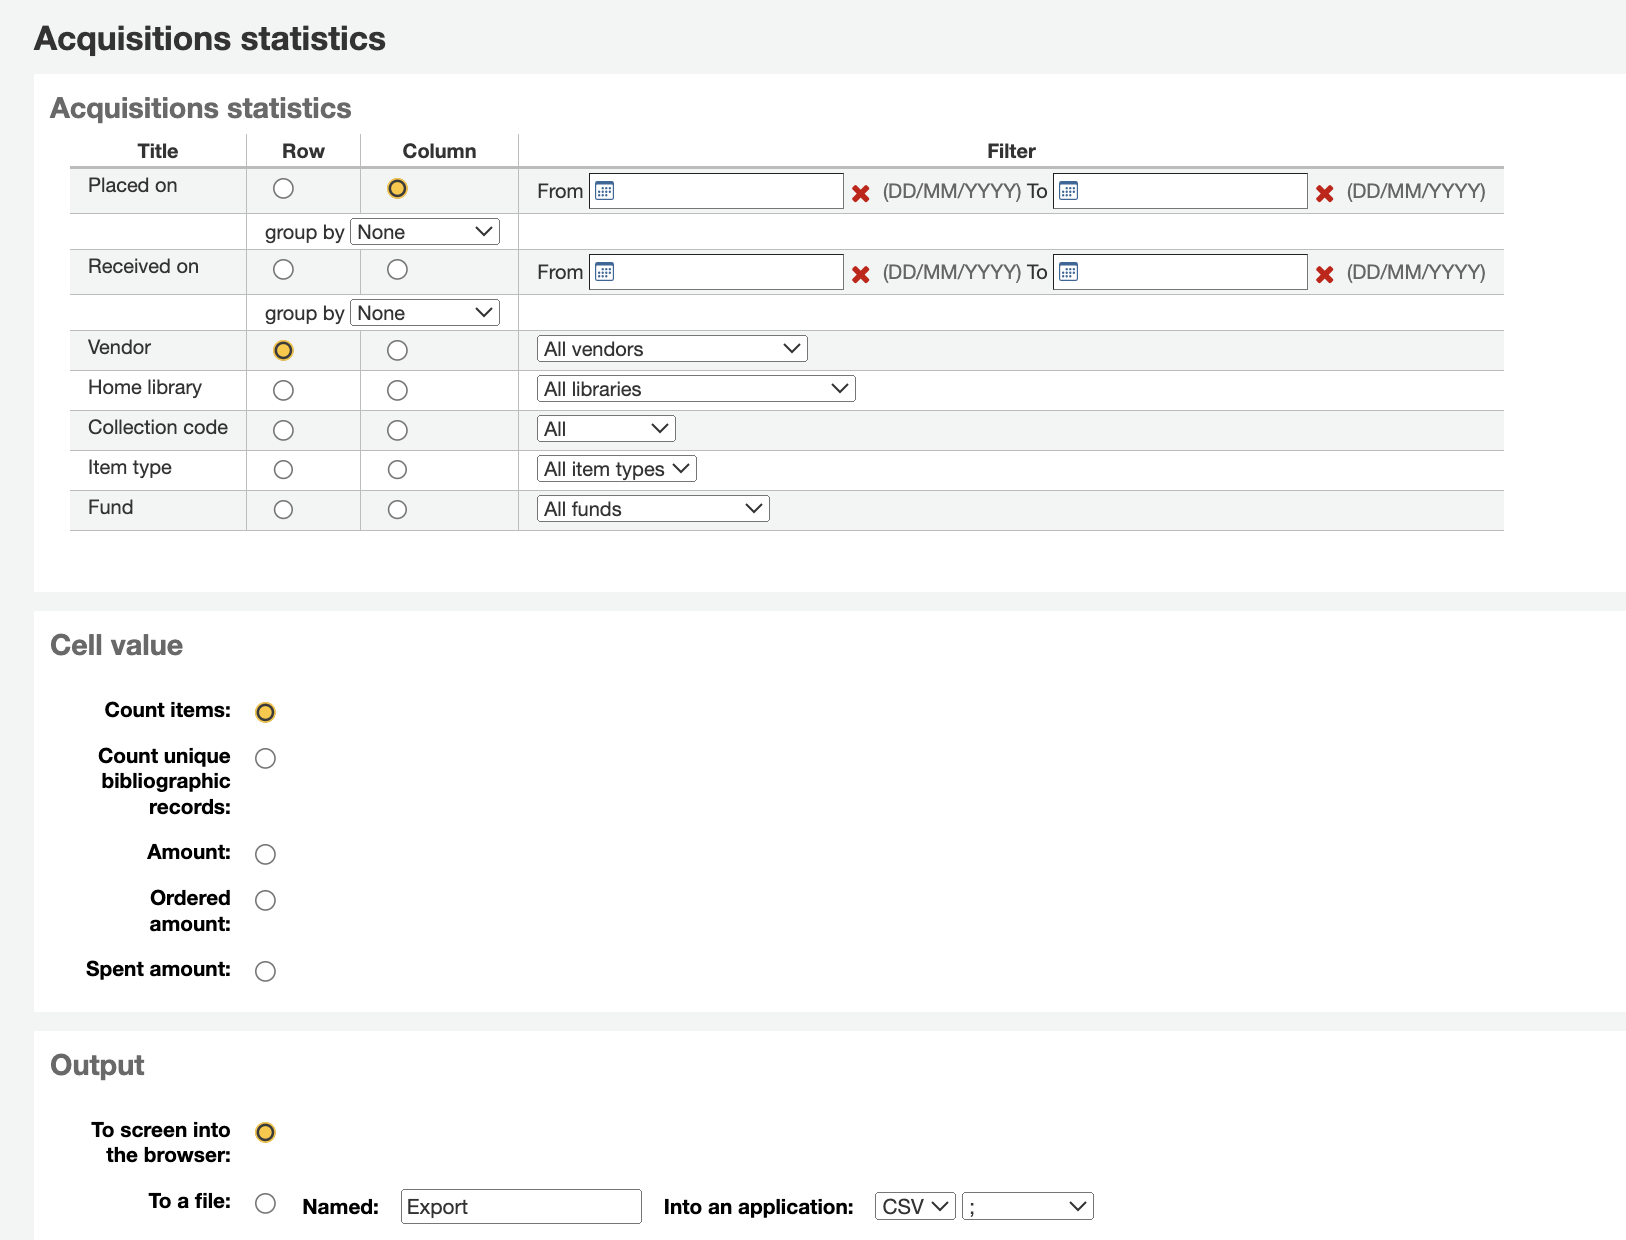
Pokud se rozhodnete pro výstup do prohlížeče, vaše výsledky se budou tisknout na obrazovku.
Můžete si také zvolit export do souboru, s kterým můžete manipulovat podle vašich potřeb.
Při generování sestavy, uvedomte si, že dostanete na výběr mezi vypočítáním nebo sečtením hodnot.
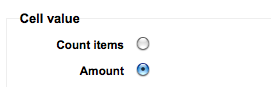
Volba částky změní vaše výsledky, které se zobrazí jako součet vynaložených částek.
Statistika čtenáře
Poznámka
These reports are limited in what data they can look at, so it’s often recommended to use custom reports for official end of the year statistics.
Using the form provided, choose which value you would like to appear in the column and which will appear in the row.
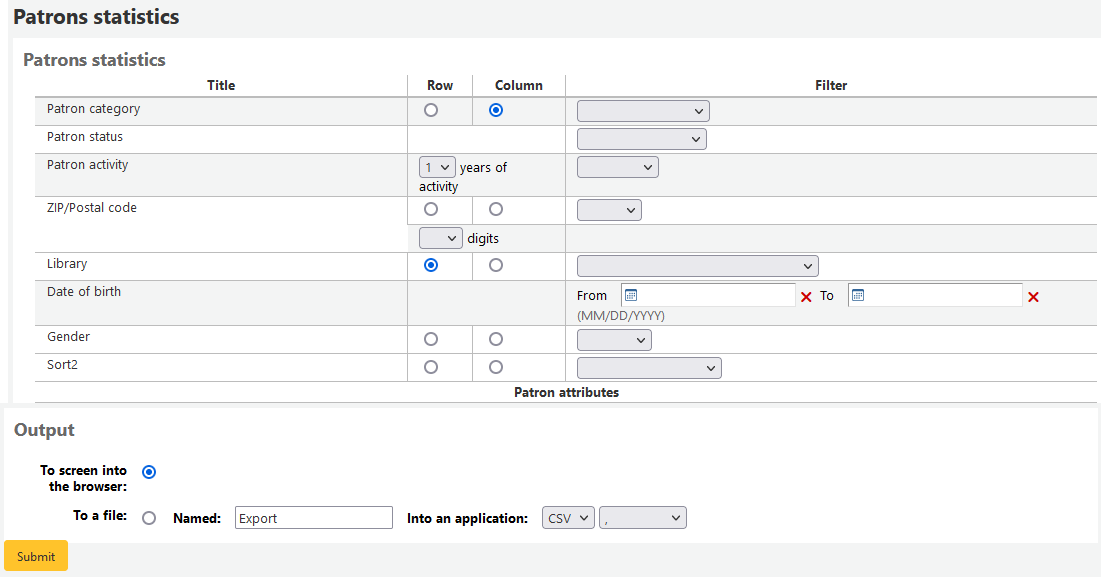
Pokud se rozhodnete pro výstup do prohlížeče, vaše výsledky se budou tisknout na obrazovku.
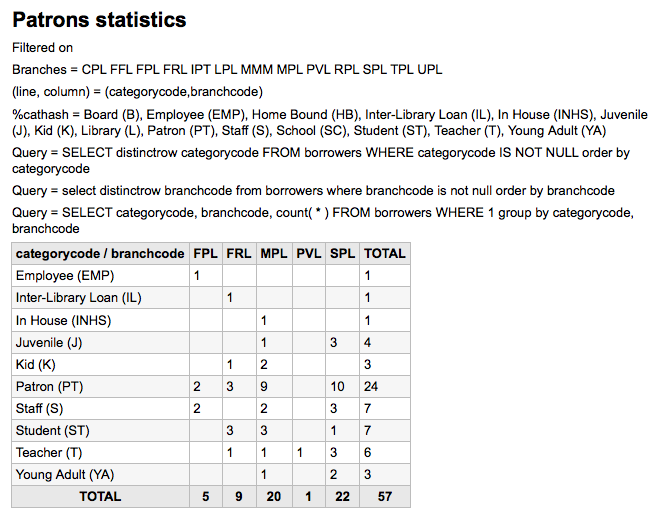
Na základě Vašeho výběru je možné, že uvidíte některé informace o dotazu nad tabulkou s výsledky. Můžete také vybrat, zda-li chcete výsledky exportovat do souboru, např. z důvodu dalšího zpracování.
Statistiky katalogu
Poznámka
These reports are limited in what data they can look at, so it’s often recommended to use custom reports for official end of the year statistics.
Using the form provided, choose which value you would like to appear in the column and which will appear in the row.

Pokud se rozhodnete pro výstup do prohlížeče, vaše výsledky se budou tisknout na obrazovku.

Můžete si také zvolit export do souboru, s kterým můžete manipulovat podle vašich potřeb.
Statistika výpůjček
Poznámka
These reports are limited in what data they can look at, so it’s often recommended to use custom reports for official end of the year statistics.
Using the form provided, choose which value you would like to appear in the column and which will appear in the row.
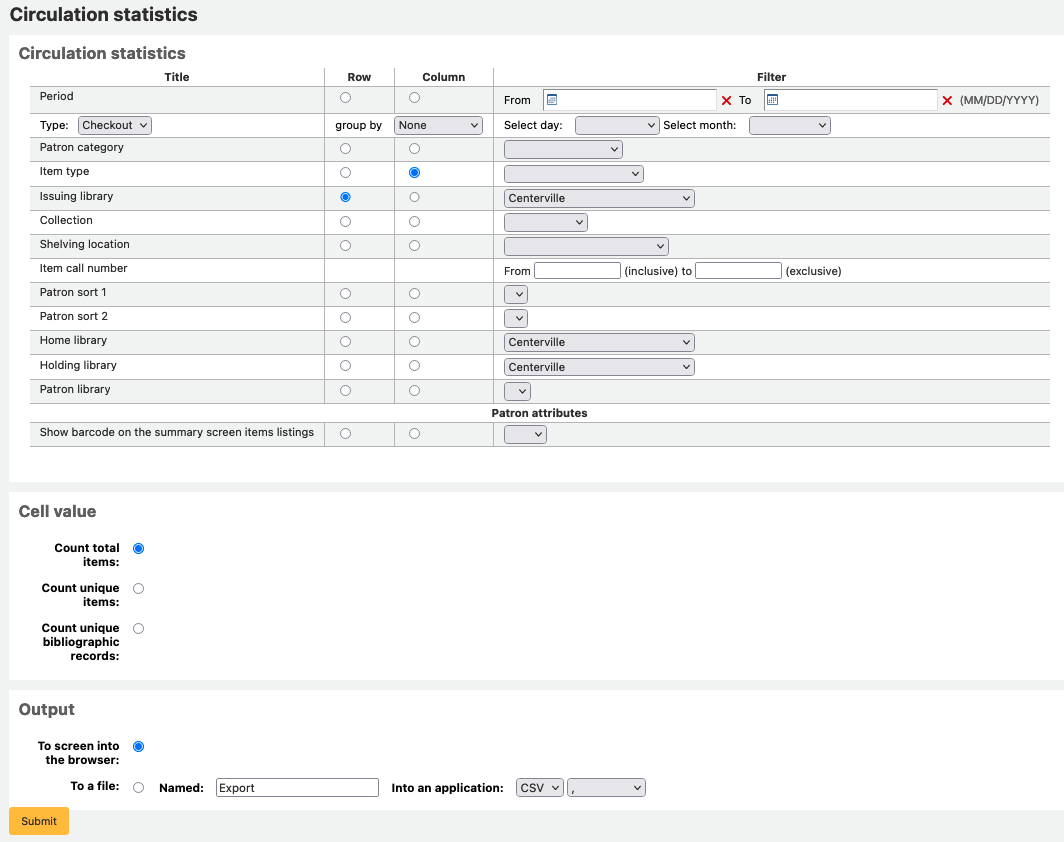
Pokud se rozhodnete pro výstup do prohlížeče, vaše výsledky se budou tisknout na obrazovku.
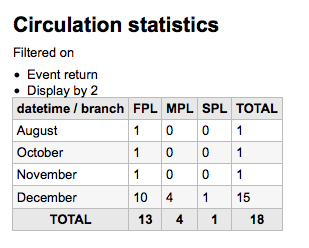
Můžete si také zvolit export do souboru, s kterým můžete manipulovat podle vašich potřeb.
Poznámka
Chcete-li získat úplný obraz o vašem měsíčním nebo denním provozu, můžete sestavu spustit dvakrát, jednou pro „Typ“ „Výpůjčky“ a znovu pro „Prodloužení“.
Tato zpráva používá „Období“ nebo datum, tj. filtrování, které umožňuje omezit měsíc pouhým výběrem první prvního dne měsíce a prvním dnem následujícího měsíce. Například 10/1 11/1 najde statistiky pro měsíc říjen.
To find daily statistics, set your date range.</br> Example: „I want circulation data starting with date XXX up to, but not including, date XXX.“
Příklad rozsahu pro celý měsíc: od 11/01/2009 do 12/01/2009
Příklad rozsahu pro celý rok: od 01/01/2009 do 01/01/2010
Příklad pro jeden den: od 11/15/2009 do 11/16/2009 pro nalezení výpůjček z patnáctého listopadu
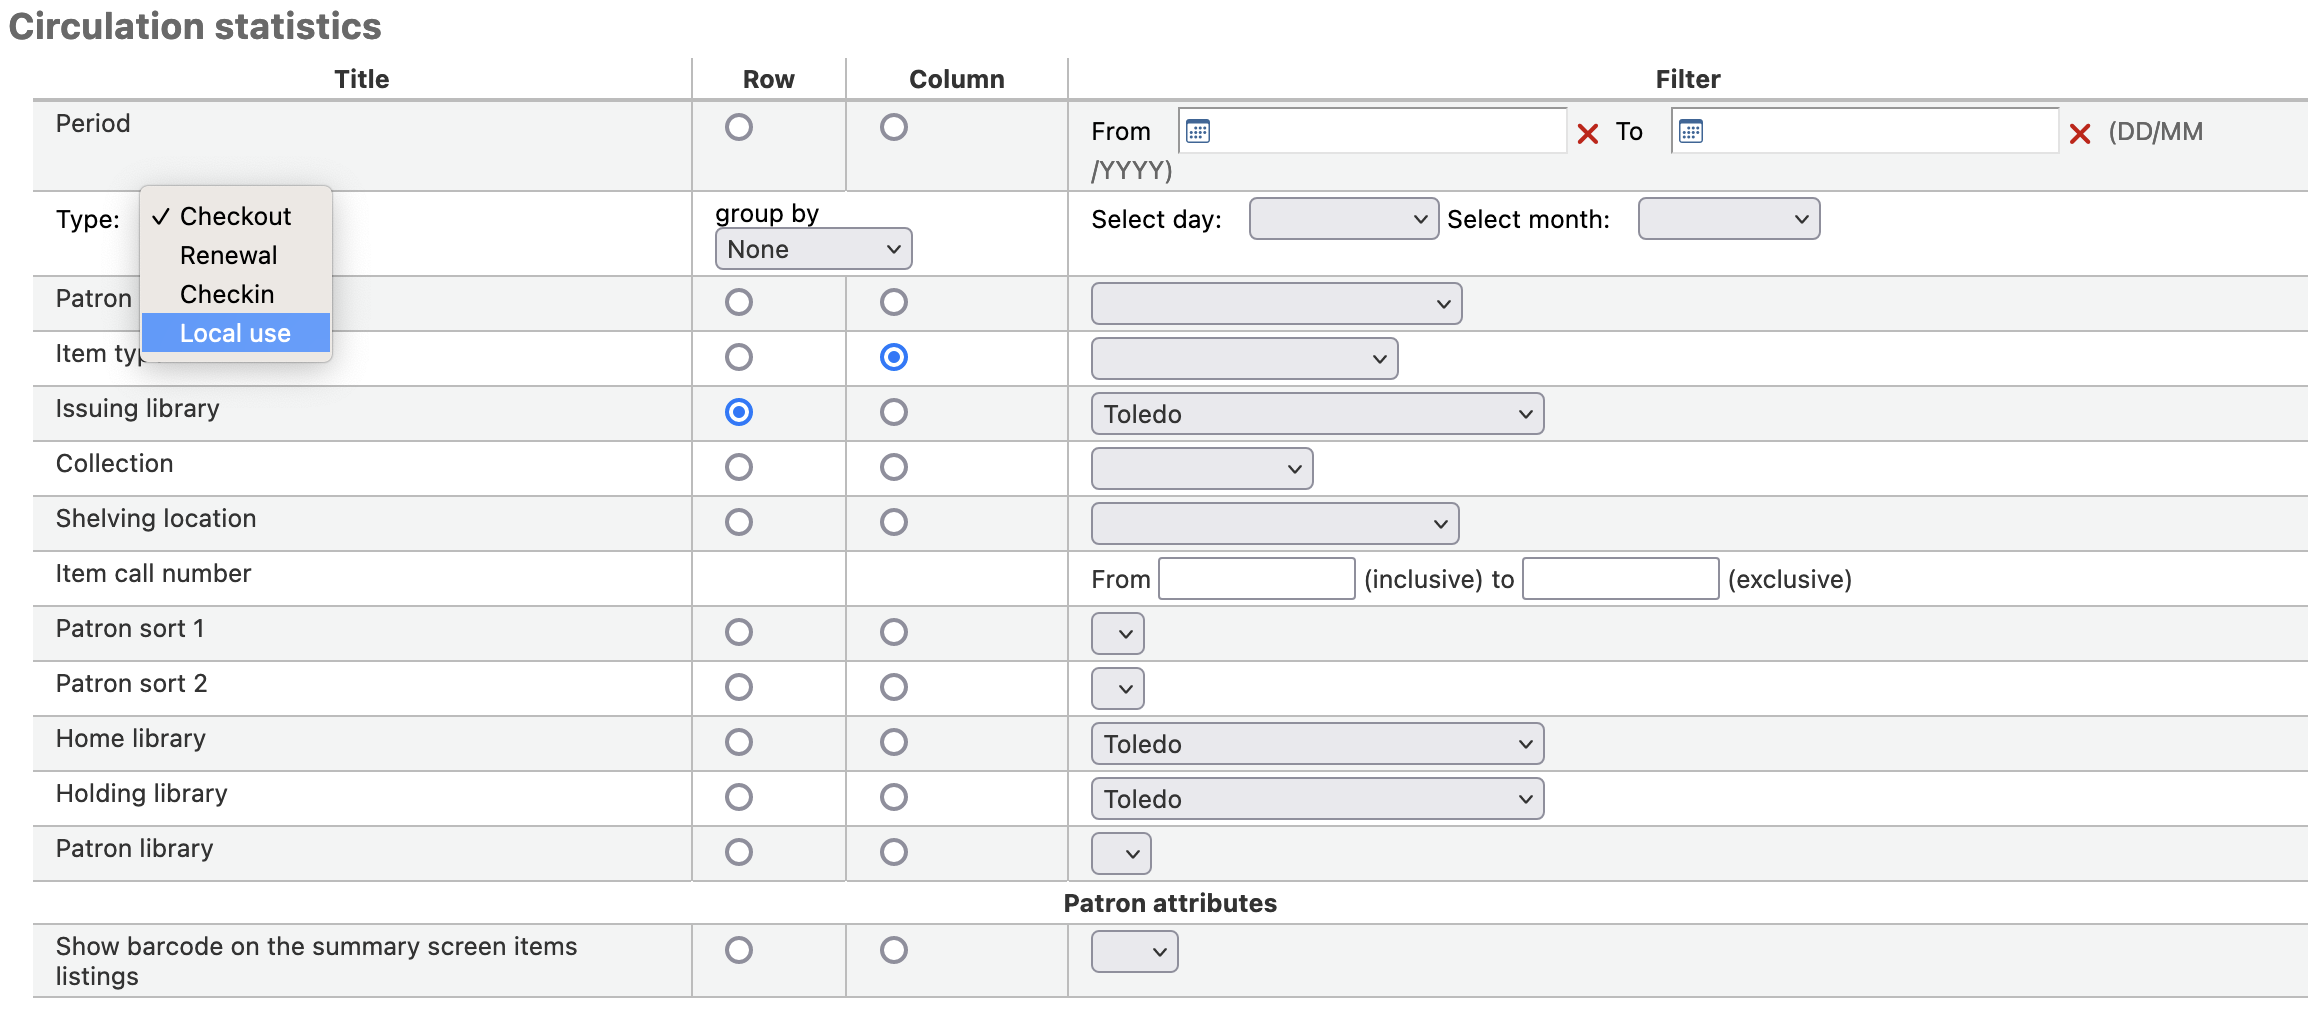
Sledování vnitřního užívání
Using the Circulation statistics reporting wizard you can run reports on in house usage of items simply by choosing ‚Local use‘ from the ‚Type‘ pull down:
Statistika seriálů
Poznámka
These reports are limited in what data they can look at, so it’s often recommended to use custom reports for official end of the year statistics.
Na předloženém formuláři zvolte, jaký chcete seznam periodik ve vašem systému.
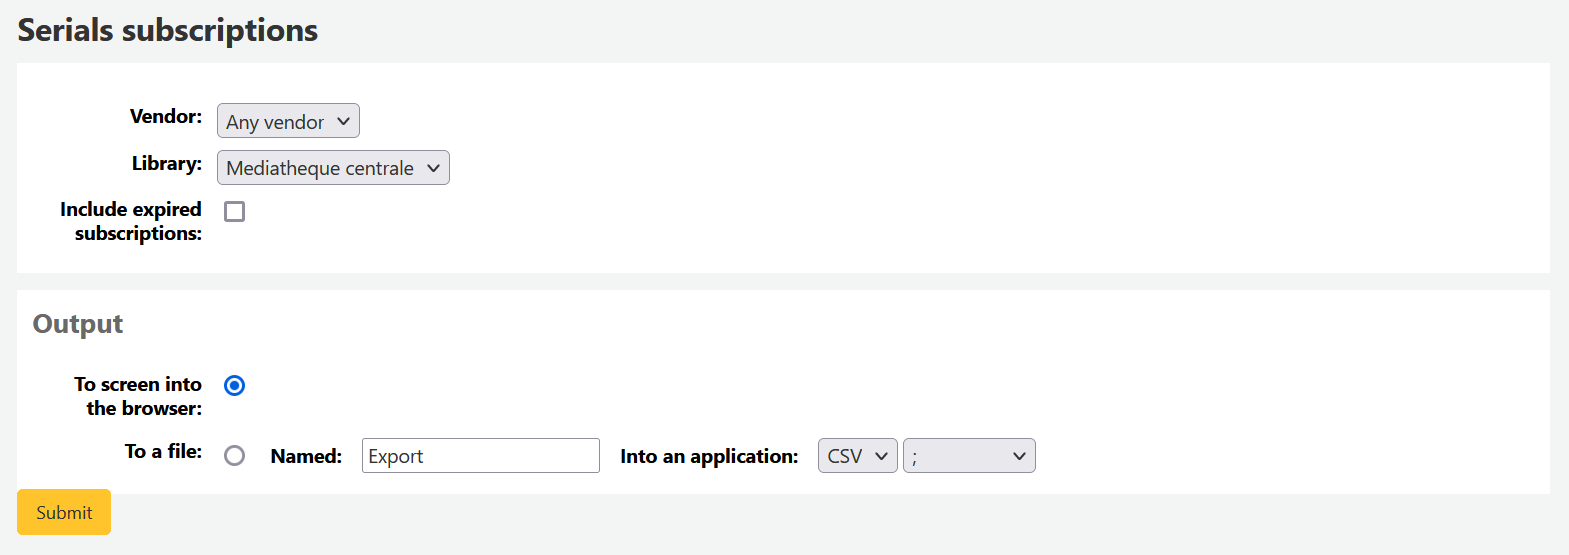
Pokud se rozhodnete pro výstup do prohlížeče, vaše výsledky se budou tisknout na obrazovku.
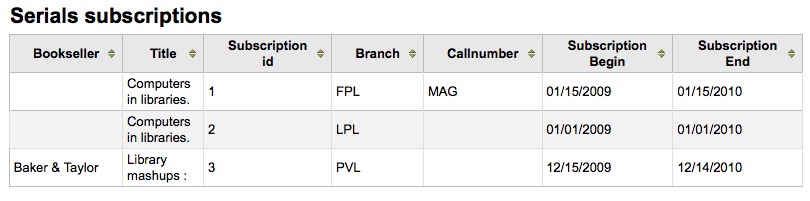
Můžete si také zvolit export do souboru, s kterým můžete manipulovat podle vašich potřeb.
Statistiky rezervací
Poznámka
These reports are limited in what data they can look at, so it’s often recommended to use custom reports for official end of the year statistics.
Pomocí předloženého formuláře, si můžete prohlédnout statistiky pro rezervace, splněné, zrušené i další ve vaší knihovně. Z formuláře si vyberte, jakou hodnotu chcete zobrazit ve sloupci a jaké hodnoty v řádku. Můžete si také vybrat z filtrů na pravé straně formuláře.
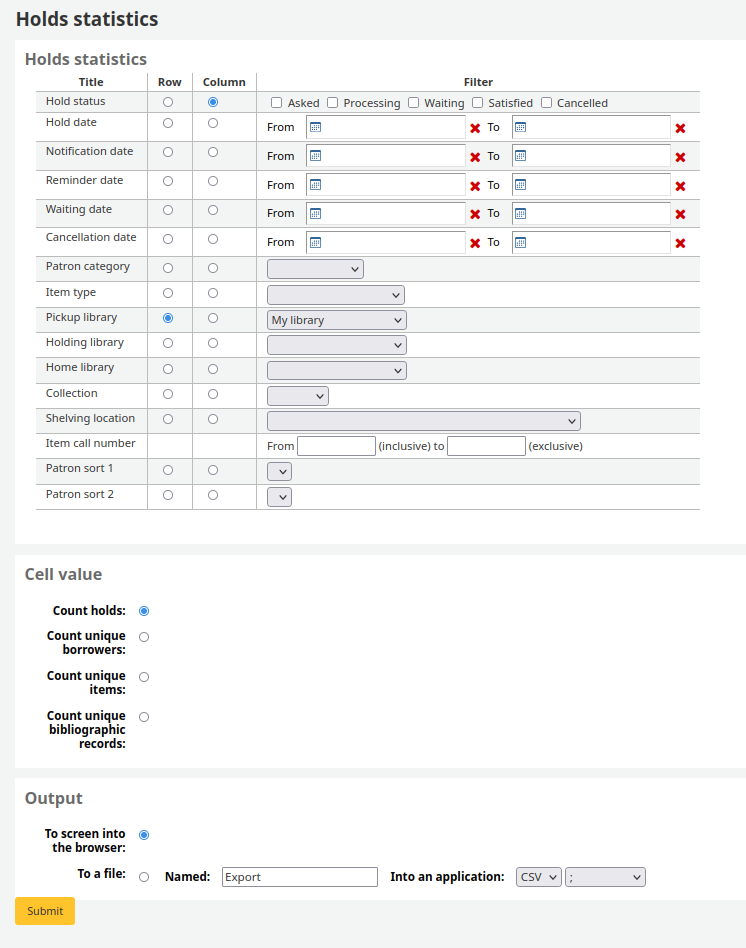
Pokud se rozhodnete pro výstup do prohlížeče, vaše výsledky se budou tisknout na obrazovku.

Můžete si také zvolit export do souboru, s kterým můžete manipulovat podle vašich potřeb.
Čtenáři s nejvíce výpůjčkami
Tato zpráva zobrazí seznam čtenářů s nejvíce výpůjčkami.
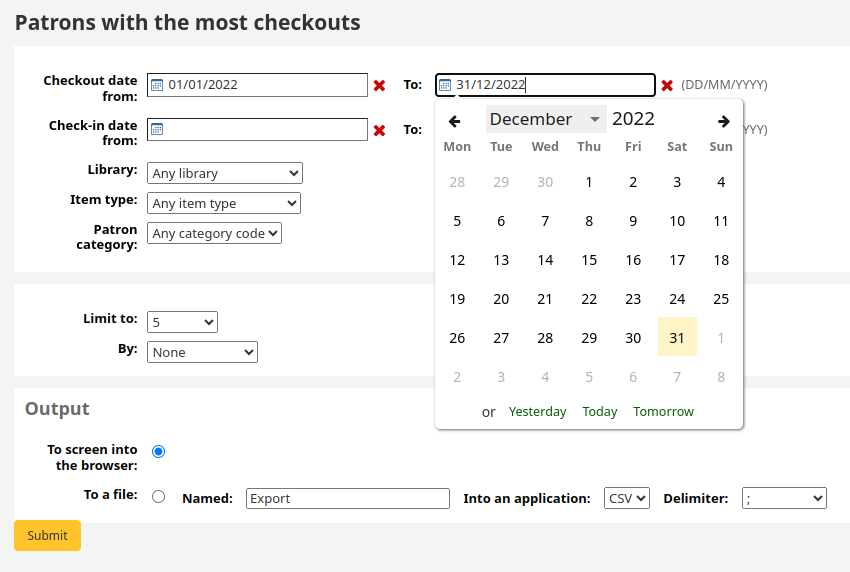
Pokud se rozhodnete pro výstup do prohlížeče, vaše výsledky se budou tisknout na obrazovku.
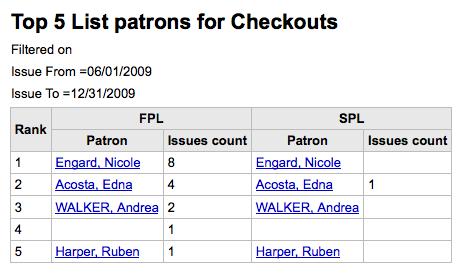
Můžete si také zvolit export do souboru, s kterým můžete manipulovat podle vašich potřeb.
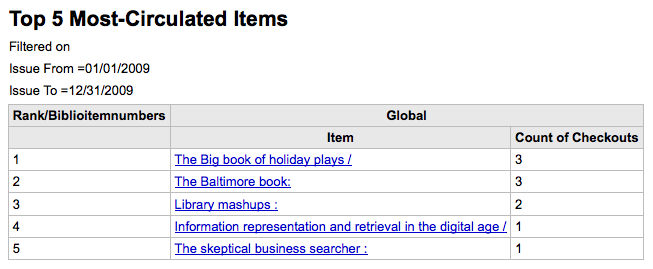
Nejčastěji půjčované jednotky
Tato zpráva zobrazí seznam nejpůjčovanějších výtisků.
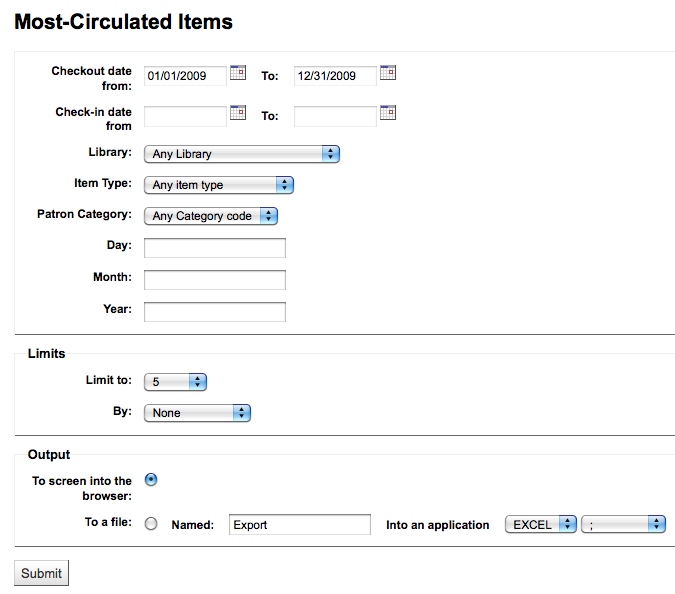
Pokud se rozhodnete pro výstup do prohlížeče, vaše výsledky se budou tisknout na obrazovku.
Můžete si také zvolit export do souboru, s kterým můžete manipulovat podle vašich potřeb.
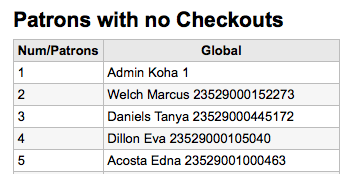
Čtenáři bez výpůjček
Tato zpráva zobrazí seznam čtenářů, kteří nemají žádné výpujčky.
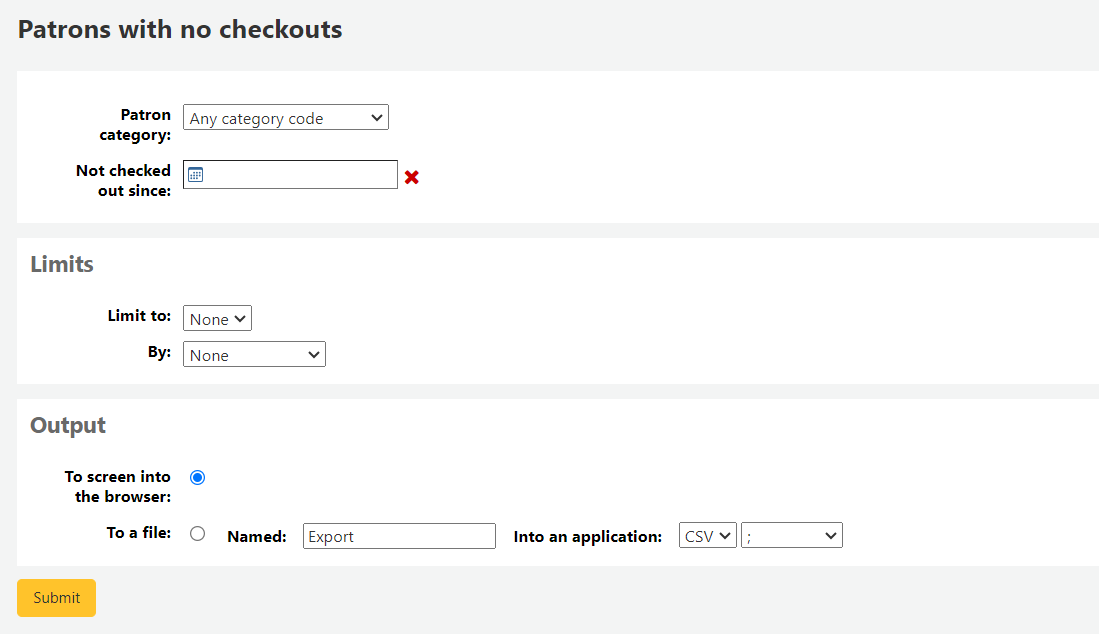
Pokud se rozhodnete pro výstup do prohlížeče, vaše výsledky se budou tisknout na obrazovku.
Můžete si také zvolit export do souboru, s kterým můžete manipulovat podle vašich potřeb.
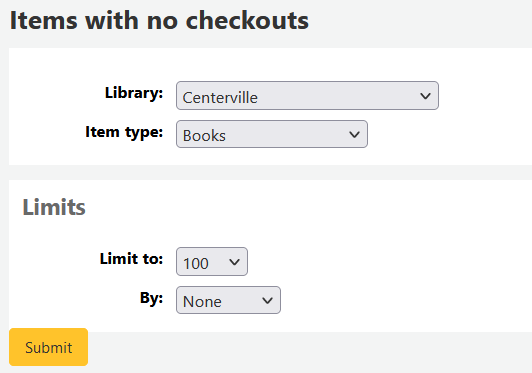
Nepůjčované jednotky
Tato zpráva zobrazí seznam výtisků ve vašem fondu, které nikdy nebyly vypůjčeny.
Pokud se rozhodnete pro výstup do prohlížeče, vaše výsledky se budou tisknout na obrazovku.
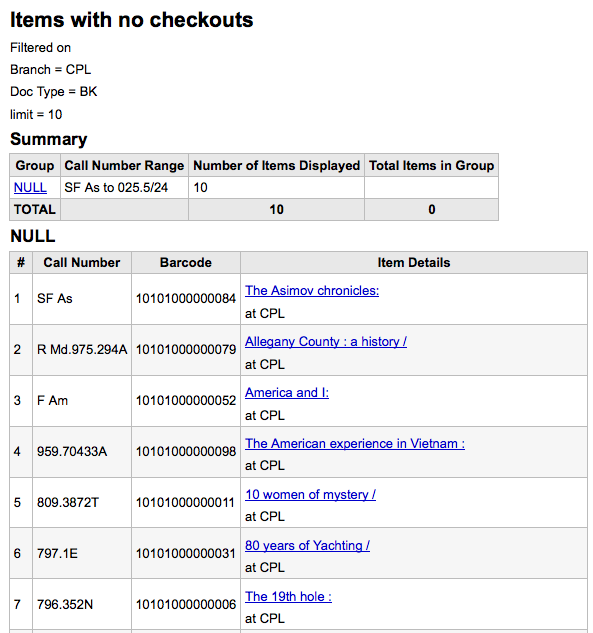
Můžete si také zvolit export do souboru, s kterým můžete manipulovat podle vašich potřeb.
Katalog podle typu jednotky
Tato zpráva vypíše celkový počet kusů každého typu jednotky na pobočku.
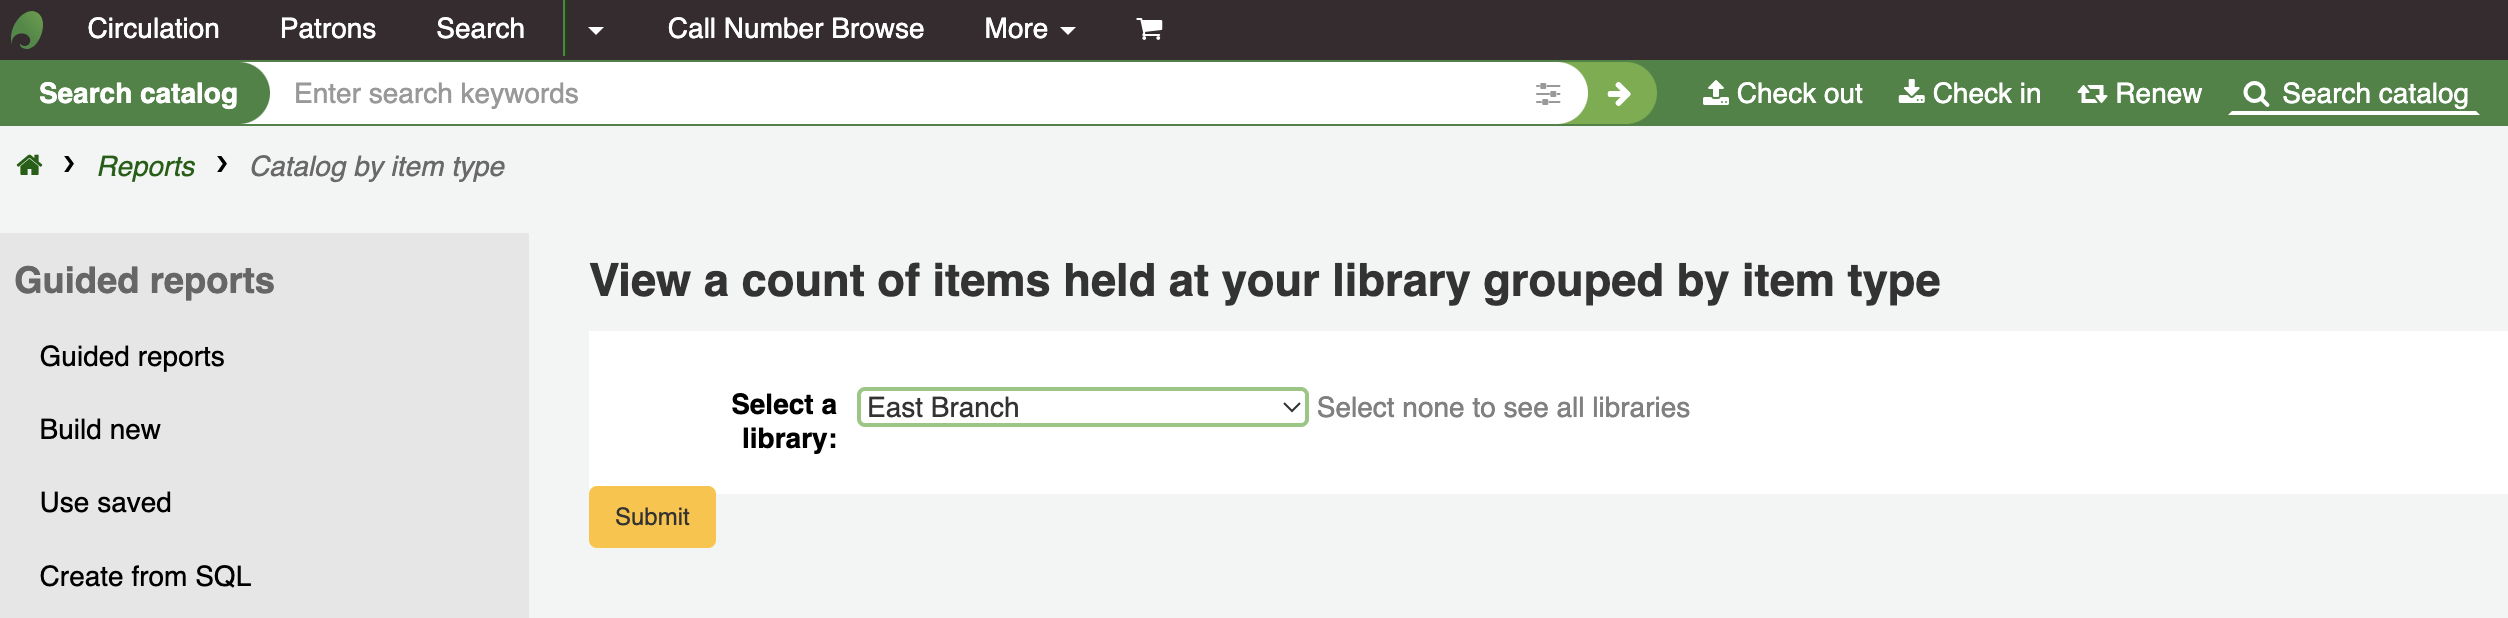
Pokud se rozhodnete pro výstup do prohlížeče, vaše výsledky se budou tisknout na obrazovku.
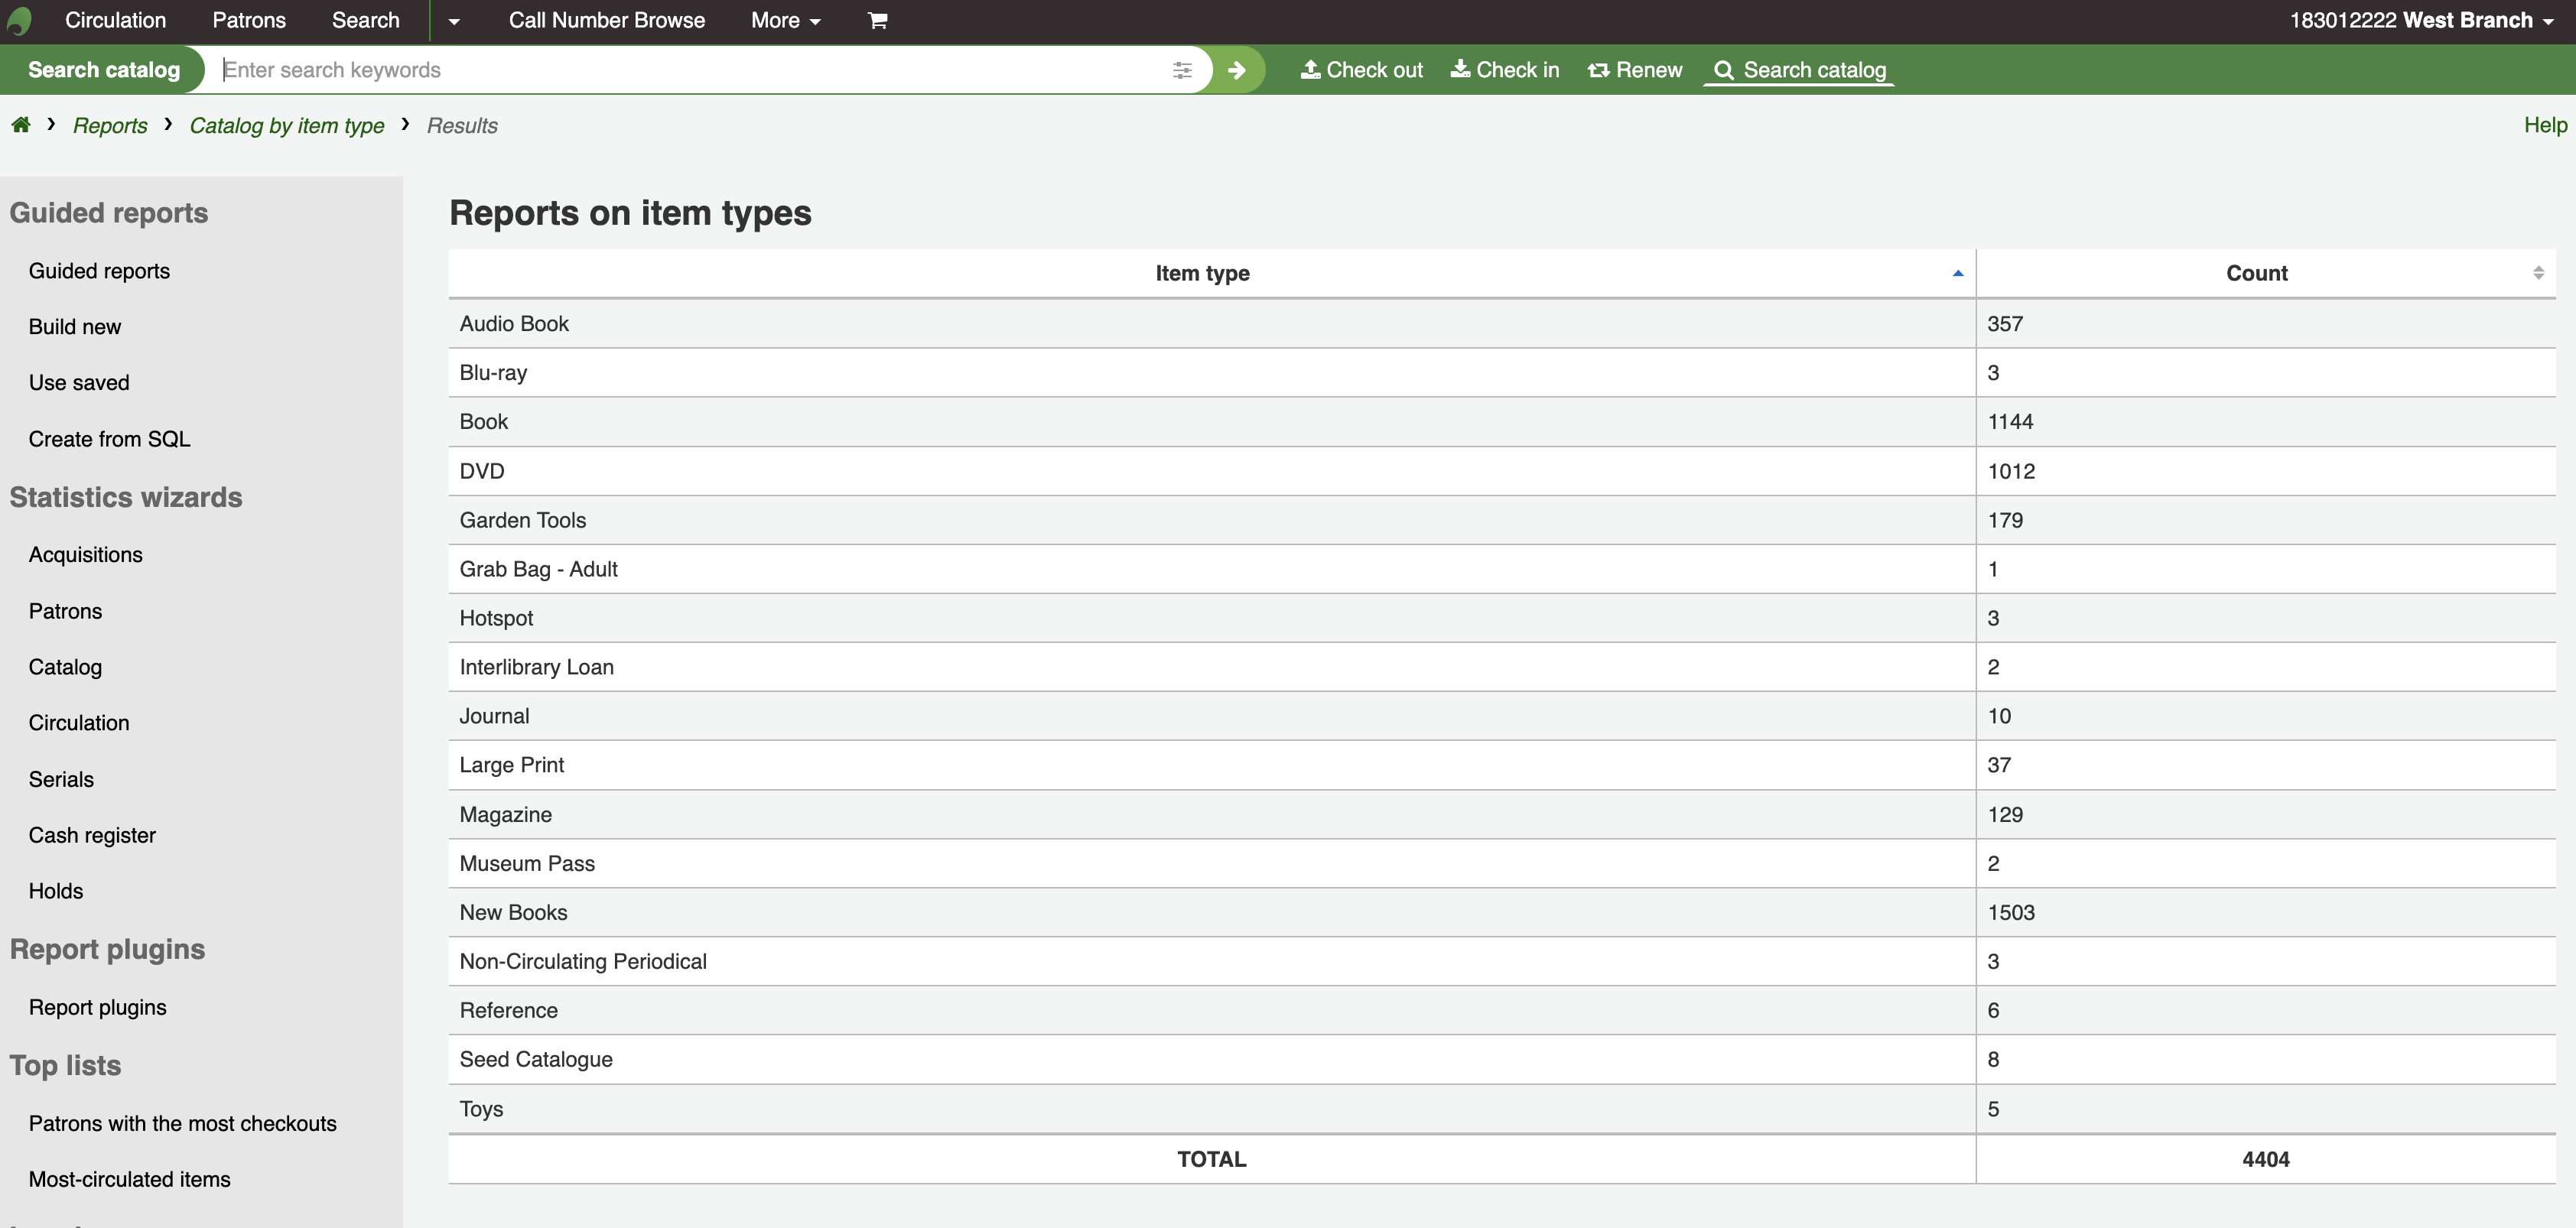
Můžete si také zvolit export do souboru, s kterým můžete manipulovat podle vašich potřeb.
Ztracené jednotky
Tato sestava vám umožní vytvořit seznam jednotek, které byly označeny jako ztracené
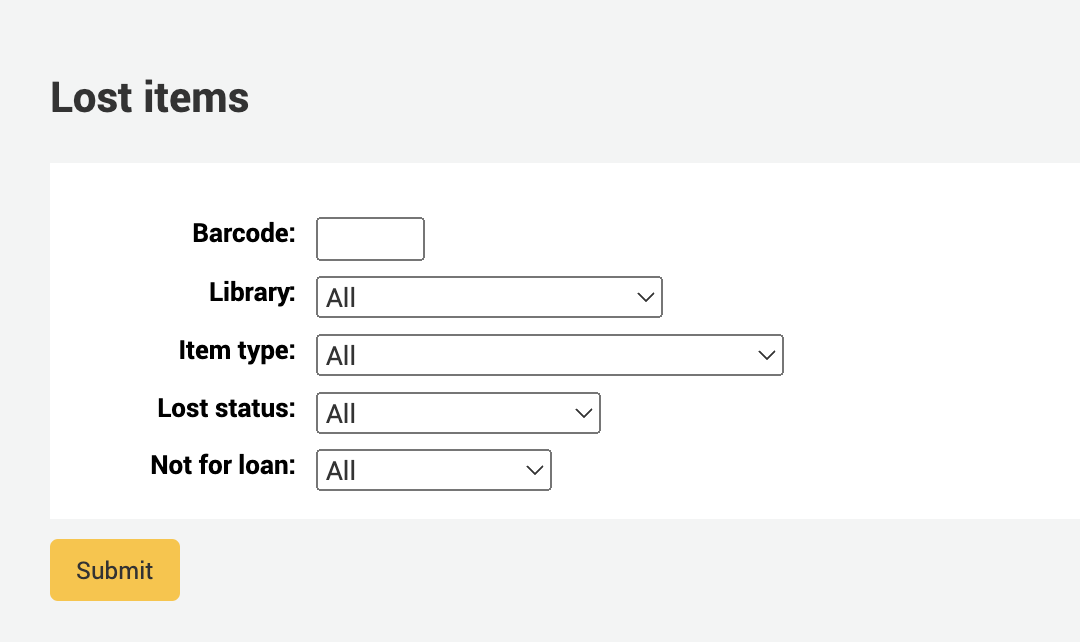
Once you have chosen parameters, you will see the corresponding list of items.
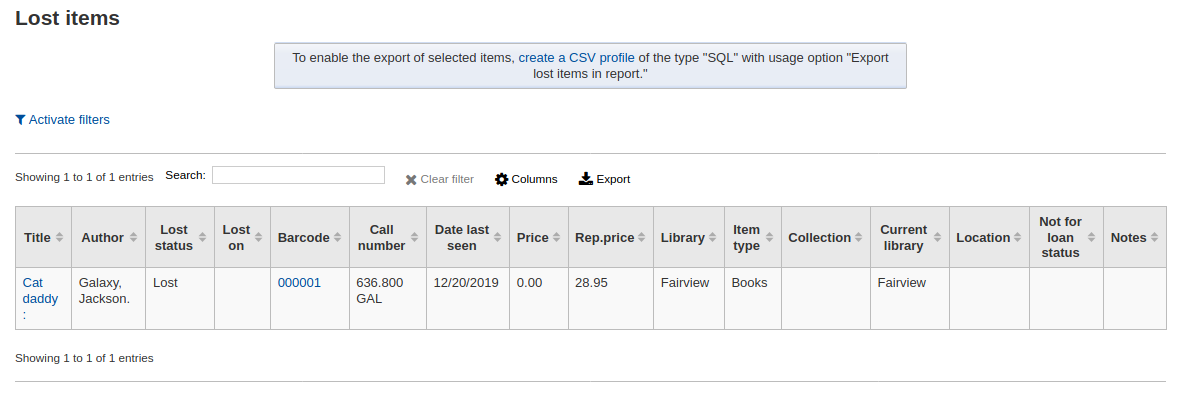
Poznámka
You can customize the columns of this table in the ‚Table settings‘ section of the Administration module (table id: lostitems-table).
Objednávky podle fondu
If you use the Acquisitions module, you will be able to see all the items that were ordered in each fund.
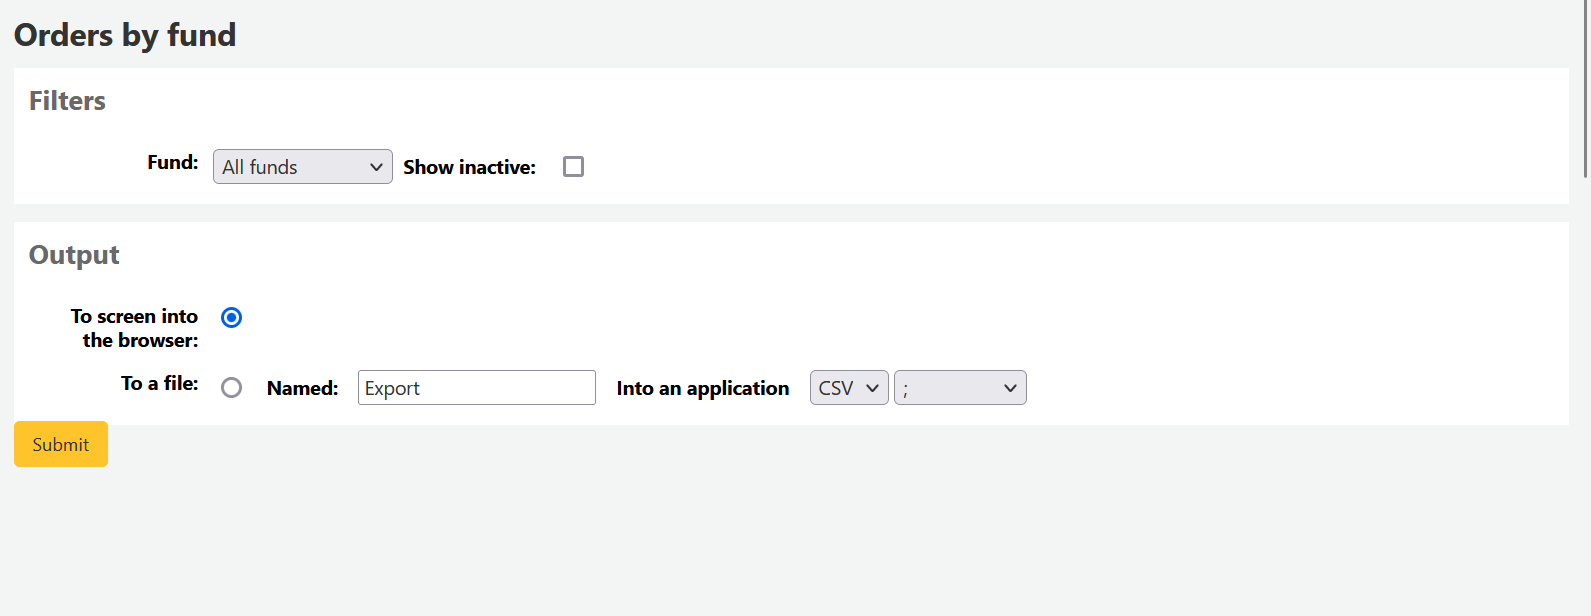
Once you choose the fund you wish to view, you can export the results or view them in the browser. If you choose to view them directly, you will be shown the list of orders.
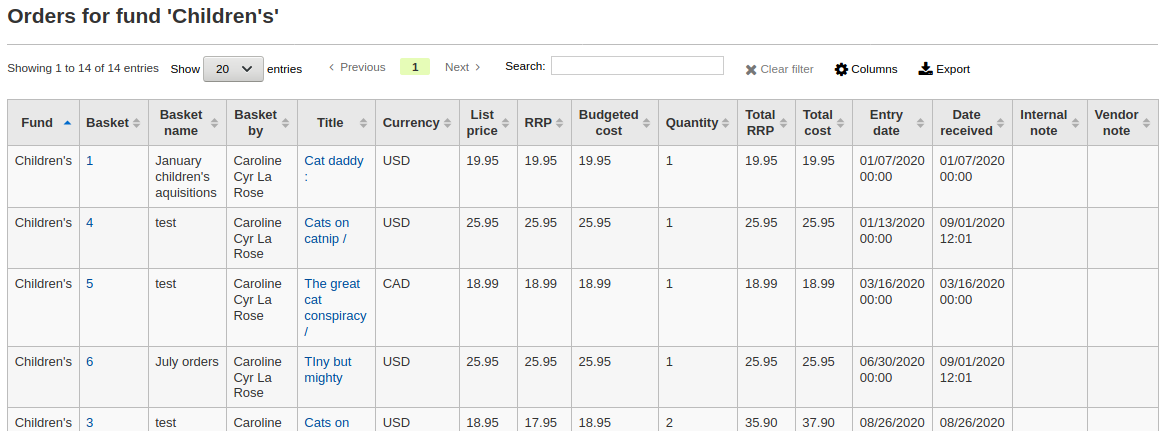
Poznámka
You can customize the columns of this table in the ‚Table settings‘ section of the Administration module (table id: funds-table).
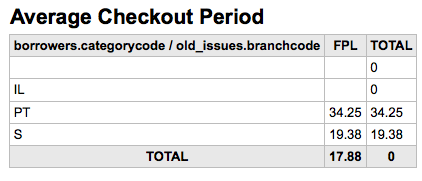
Průměrná délka výpůjček
Tato sestava vypíše průměrnou dobu výpůjček na základě kritérií, které zadáte:
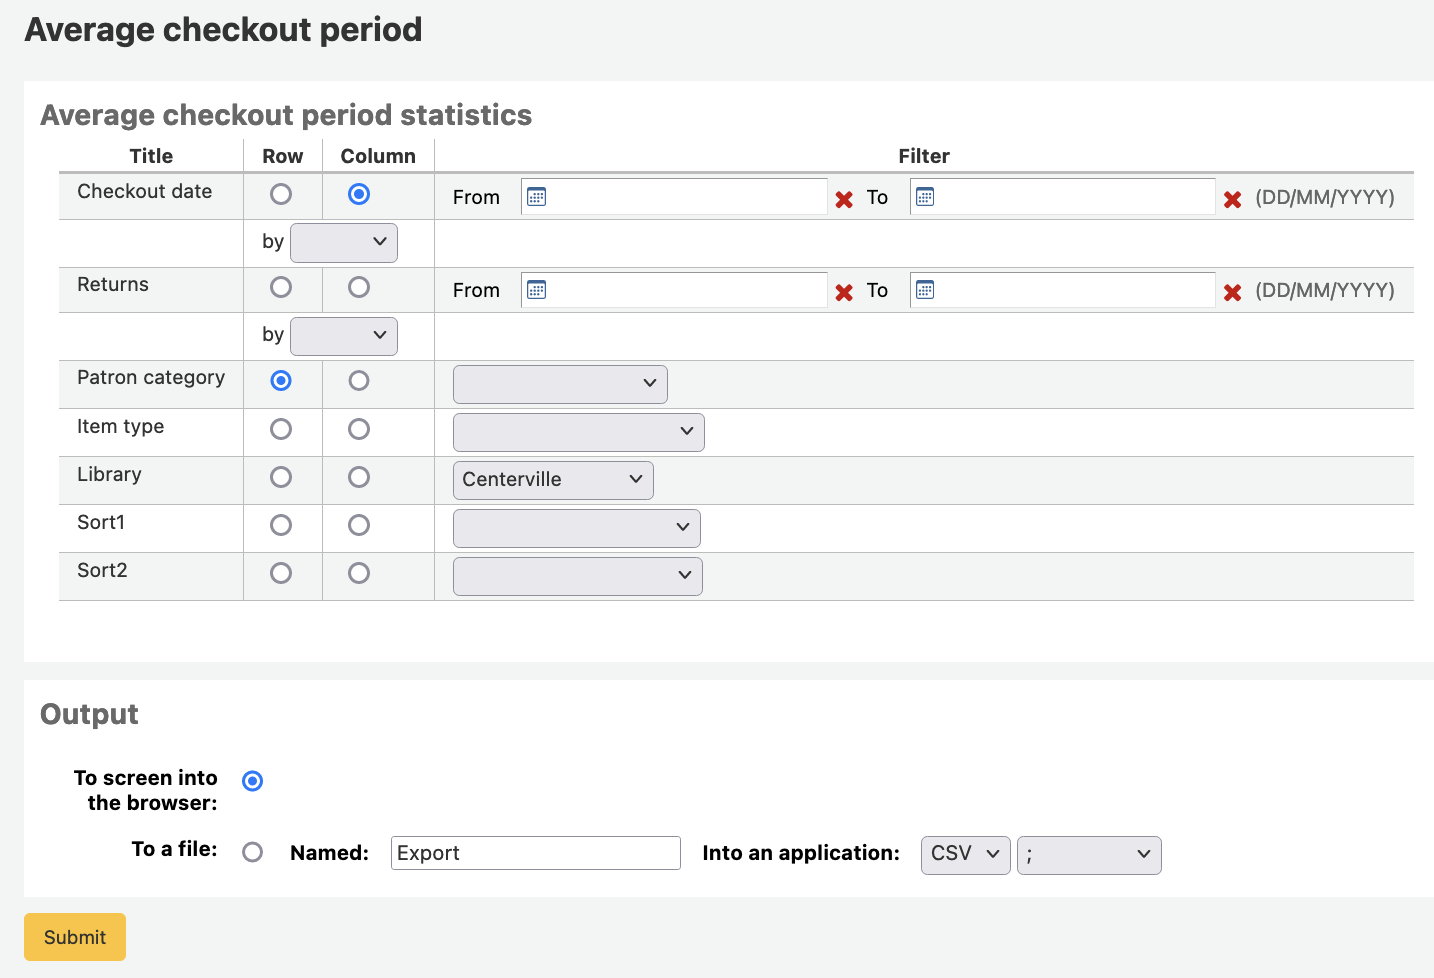
Pokud se rozhodnete pro výstup do prohlížeče, vaše výsledky se budou tisknout na obrazovku.
Můžete si také zvolit export do souboru, s kterým můžete manipulovat podle vašich potřeb.
Report dictionary
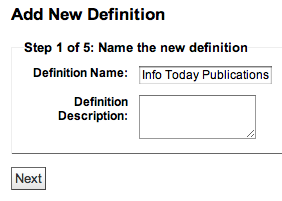
The report dictionary is a way to pre-define common filters you’d like to apply to your reports. This is a good way to add in filters that the report wizard doesn’t include by default. To add a new definition, or filter, click ‚New definition‘ on the reports dictionary page and follow the 4 step process.
Krok 1: Zadejte název definice a udělejte popis (v případě potřeby)
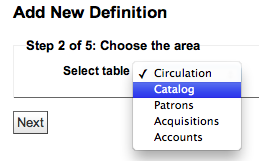
Krok 2: Vyberte modul, který bude dotazován.
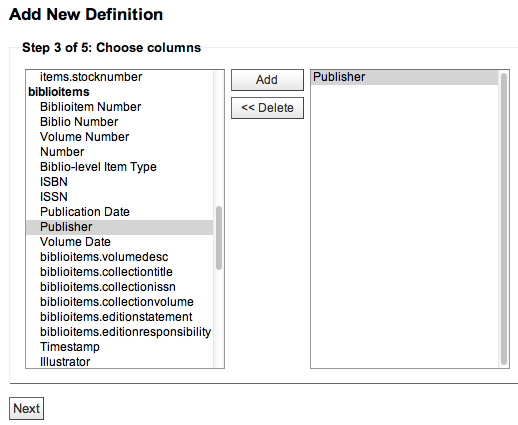
Krok 3:: Vybrat sloupce k dotazu ze zobrazených tabulek.
Krok 4: Vyberte hodnotu(y) z pole(lí). Tyto budou automaticky dosazeny s možnostmi dostupnými ve vaší databázi.
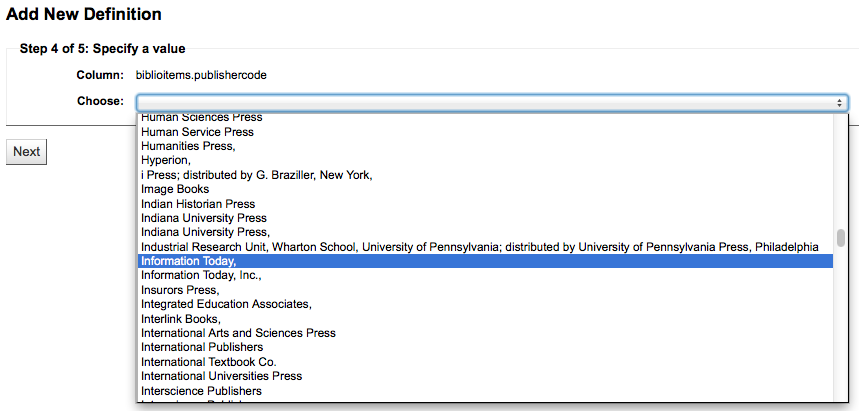
Potvrďte váš výběr pro uložení tohoto vymezení.
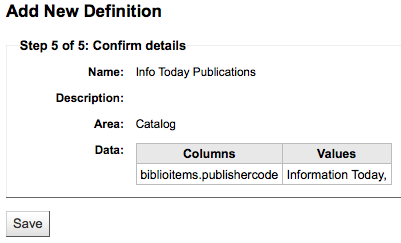
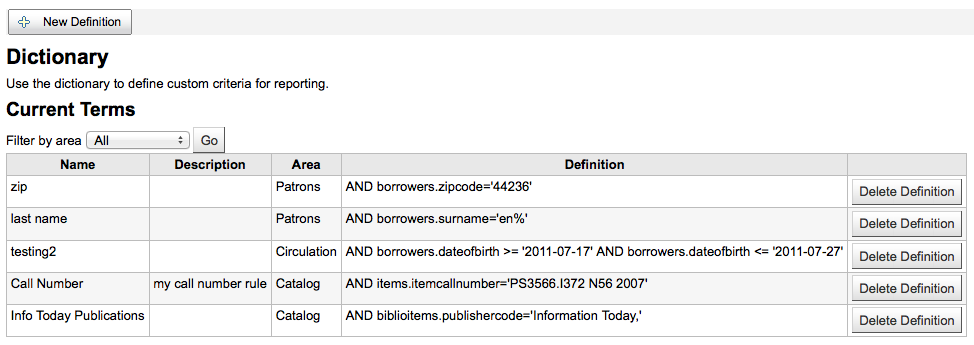
Vaše definice se všechny objeví na stránce „Slovník výstupů“
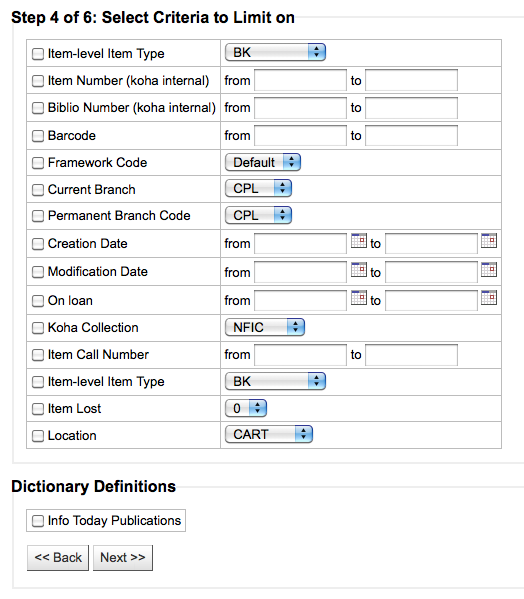
Potom při generování výstupu v modulu, ve kterém jste vytvořili hodnoty, uvidíte volbu „Omezit podle definice“ v dolní části běžných filtrů.
Report plugins
Some plugins that are available can be used to make or enhance reports.
Get there: More > Reports > Report plugins > Report plugins
Poznámka
Only staff with the report permission (or the superlibrarian permission) will be able to access report plugins.
From this page, you will see only report-type plugins.
See the managing plugins section of this manual to learn how to manage your report-type plugins.