OPAC
Search results
To search the OPAC you can either choose to enter your search words in the box at the top of the OPAC or click on the “Advanced search” link to perform a more detailed search.

Nota
For more on searching check the Searching chapter in this manual.
Results overview
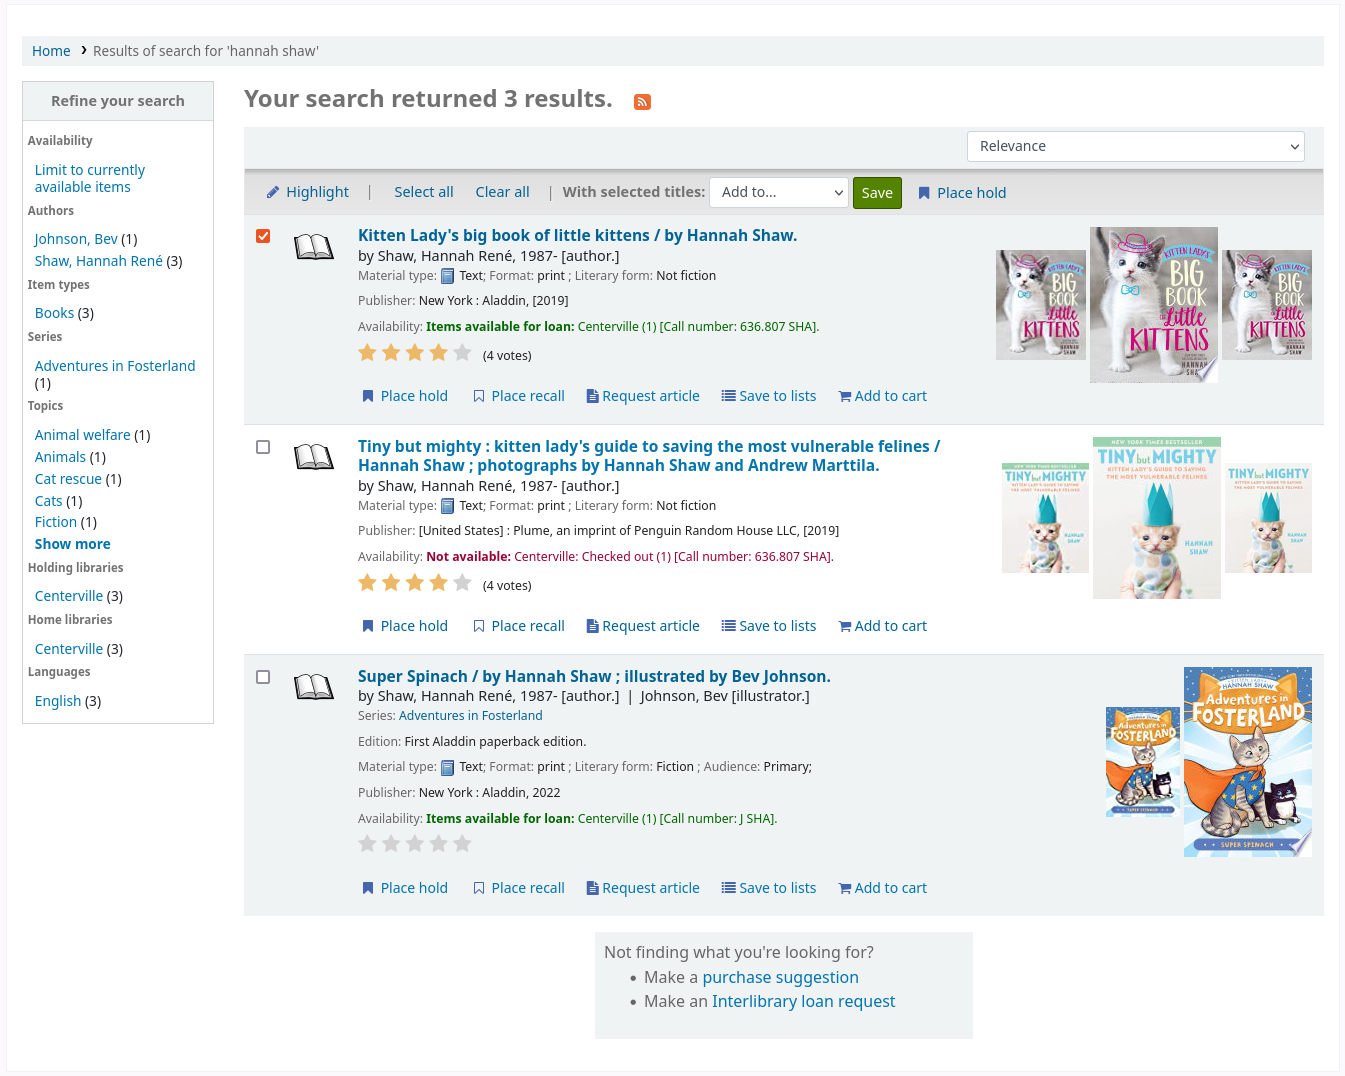
After performing a search, the number of results found for the search will appear above the results.
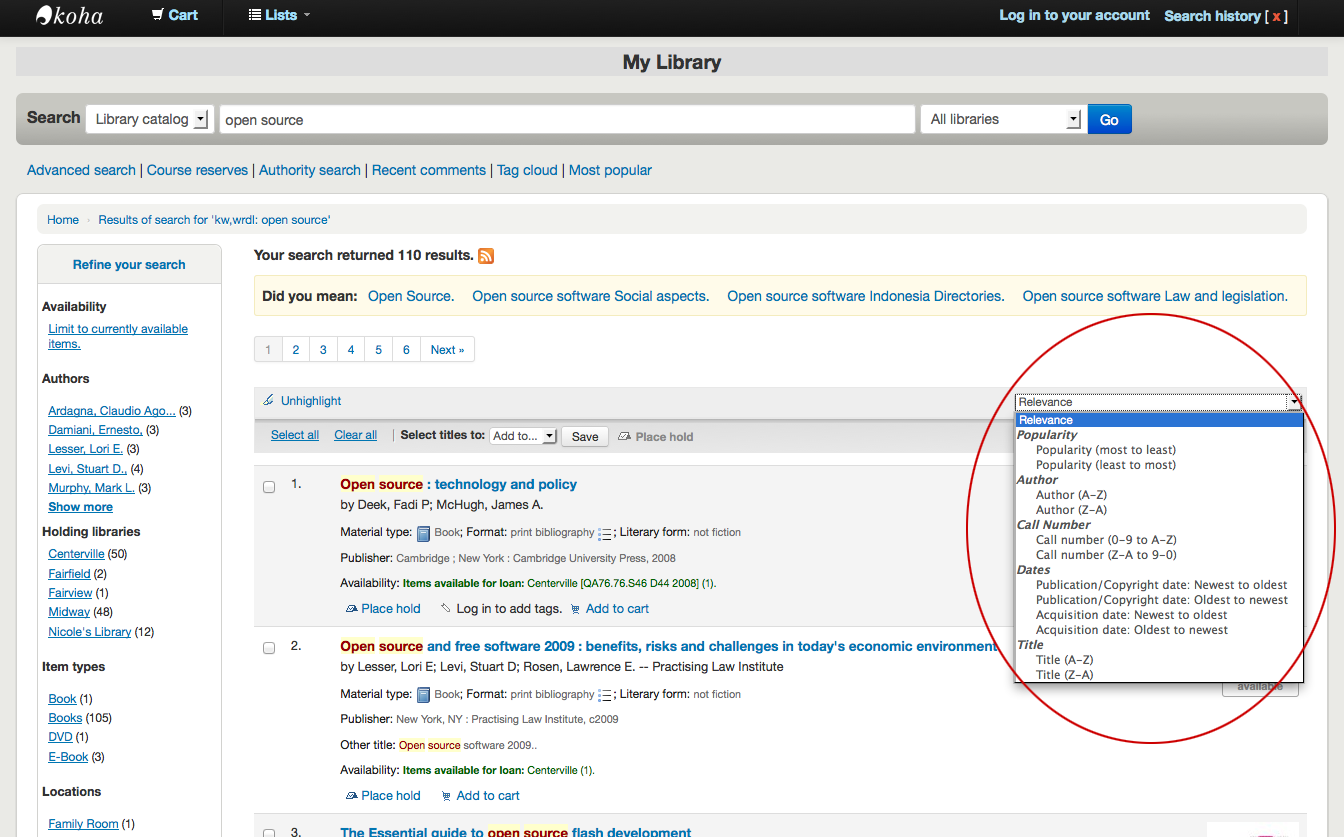
By default, the search results are sorted based on the OPACdefaultSortField and OPACdefaultSortOrder system preference values. To change the sort order of these results, you can choose another sorting method from the drop-down menu on the right.
Under each title in the results list, there will be a series of values from the record’s leader (field 000).
Nota
These values have nothing to do with the item types or collection codes you have applied to your records or items. This data is all pulled from the record’s control fields.
This can be turned on or off with the DisplayOPACiconsXSLT system preference.
Below each title, there will be the availability for the items attached to the record.
Nota
Even if you filtered on one library location, all locations that hold the item will appear on the search results.
Avvertimento
An item’s hold status does not affect whether or not the item is “available” until the item is in “waiting” status. Items with on-shelf holds will show as available until a staff member has pulled them from the shelf and checked the item in make it show “waiting”.
If any enhanced content system preferences are turned on, there may be cover images next to the search results.
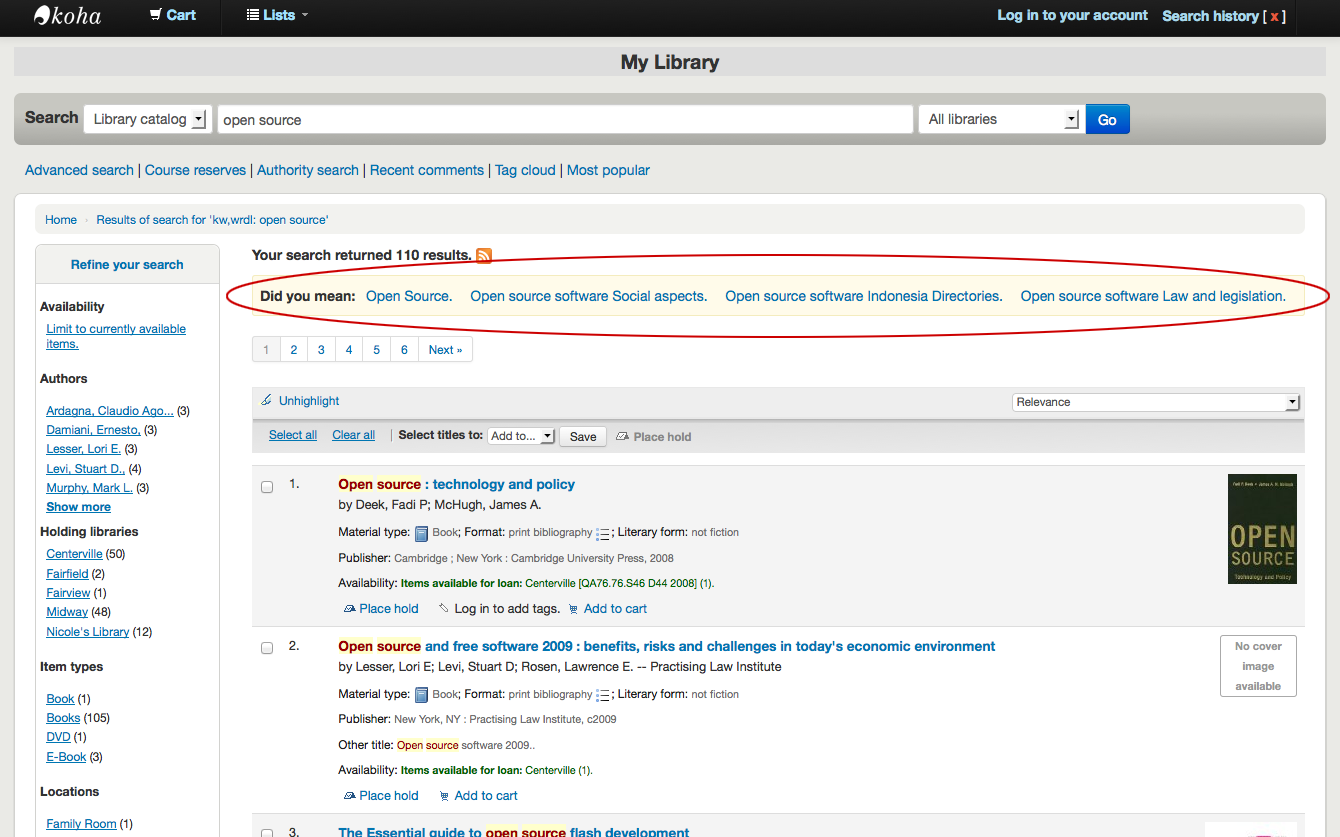
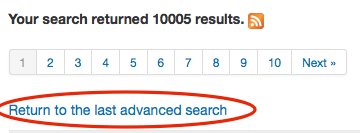
If Did you mean? options are set, there will be a yellow bar across the top of your results will other related searches.
Se hai fatto una ricerca avanzata vedrai un’opzione per ritornare indietro a modificare la ricerca avanzata che hai fatto. Essa si trova sotto la lista della pagine dei risultati della ricerca.
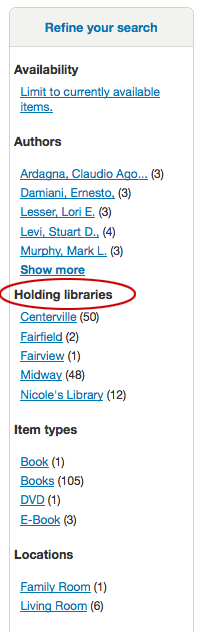
Filtri
To filter your results click on the links below the “Refine your search” menu on the left of your screen

Depending on your setting for the DisplayLibraryFacets system preference you will see filters for your home, holding or both libraries.
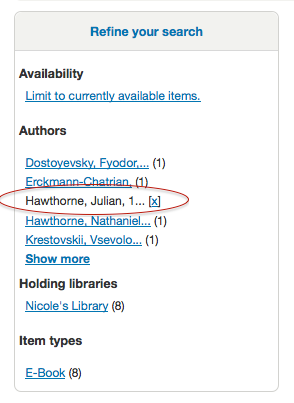
Dopo aver cliccato su una faccetta, è possibile rimuovere il filtro dai risultati facendo clic sulla piccola “x” che appare a destra della faccetta stessa.
Search RSS feeds
Sarete in grado di iscriversi ai risultati della ricerca come un feed RSS facendo clic sull’icona RSS nella barra degli indirizzi o accanto al numero di risultati. Per saperne di più sui feed RSS si veda questo video tutorial.
Iscrivendosi ai risultati della ricerca come feed RSS, permetterà di vedere quando un nuovo record in una propria area di interesse si aggiunge al catalogo.
Bibliographic record
Quando si fa clic su un titolo dai risultati della ricerca, si apre il dettaglio bibliografico della registrazione. Questa pagina è suddivisa in aree.
Nella parte superiore della pagina ci sarà il titolo e la natura dell’opera [se DVD, raccolta, etc]:
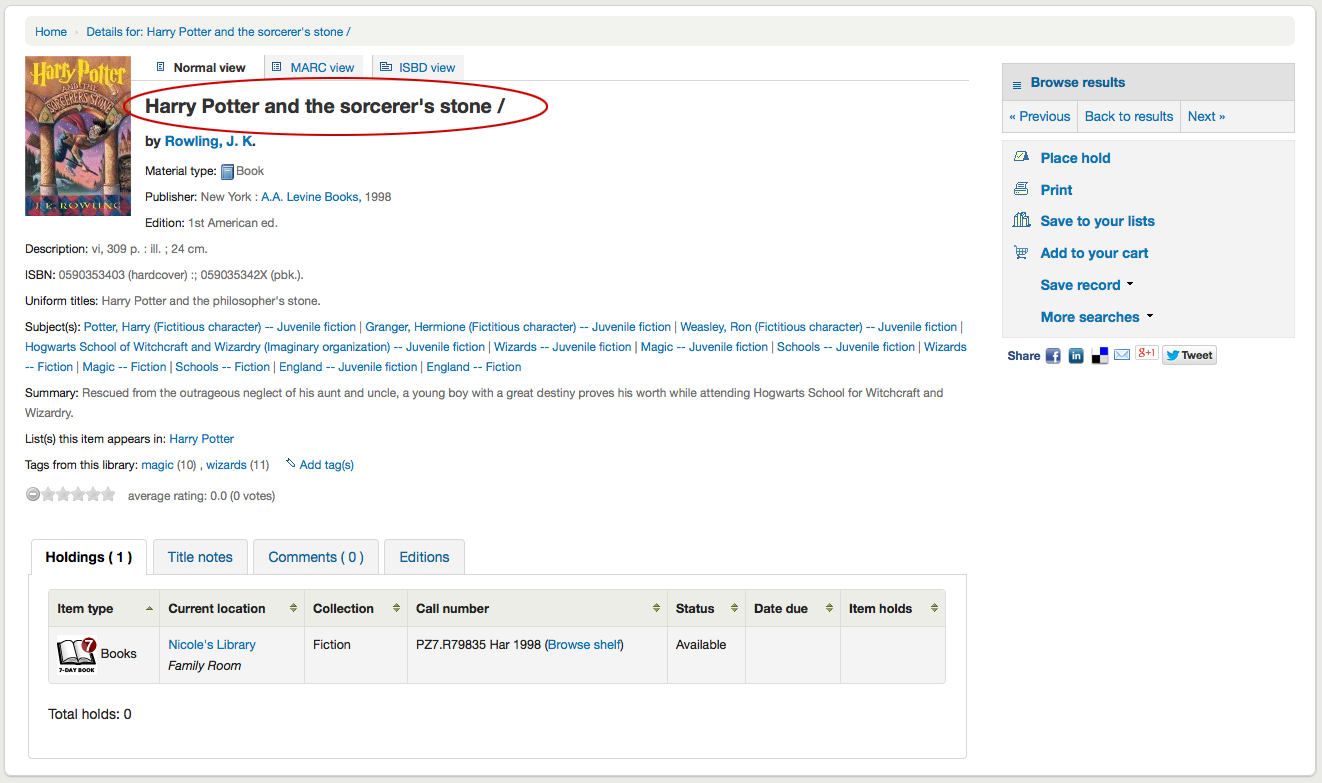
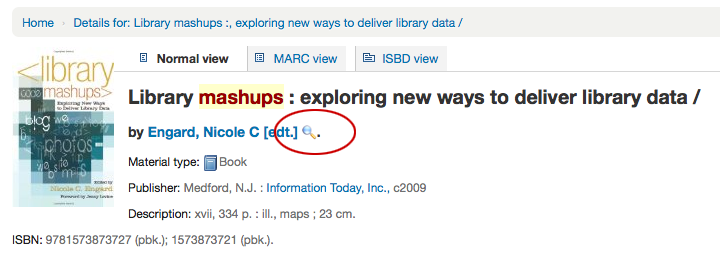
Sotto il titolo saranno elencati gli autori. Questi provengono dalle vostre 1xx e 7xx campi. Cliccando l’autore, parte una ricerca di altri titoli di quell’autore.
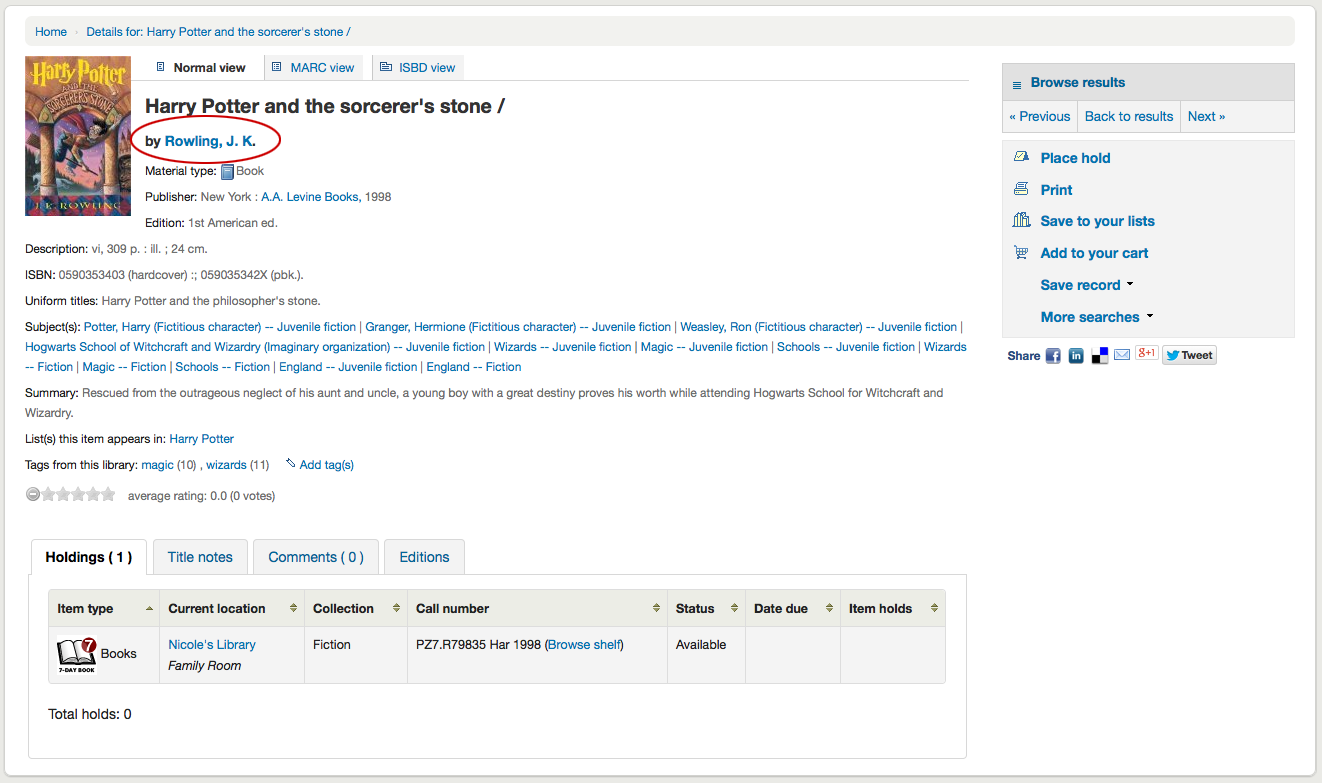
Se si dispone di un file di autorità verrà visualizzata una lente di ingrandimento a destra dell’autore e di altre intestazioni. Cliccando la lente d’ingrandimento si apre direttamente il record di autorità.
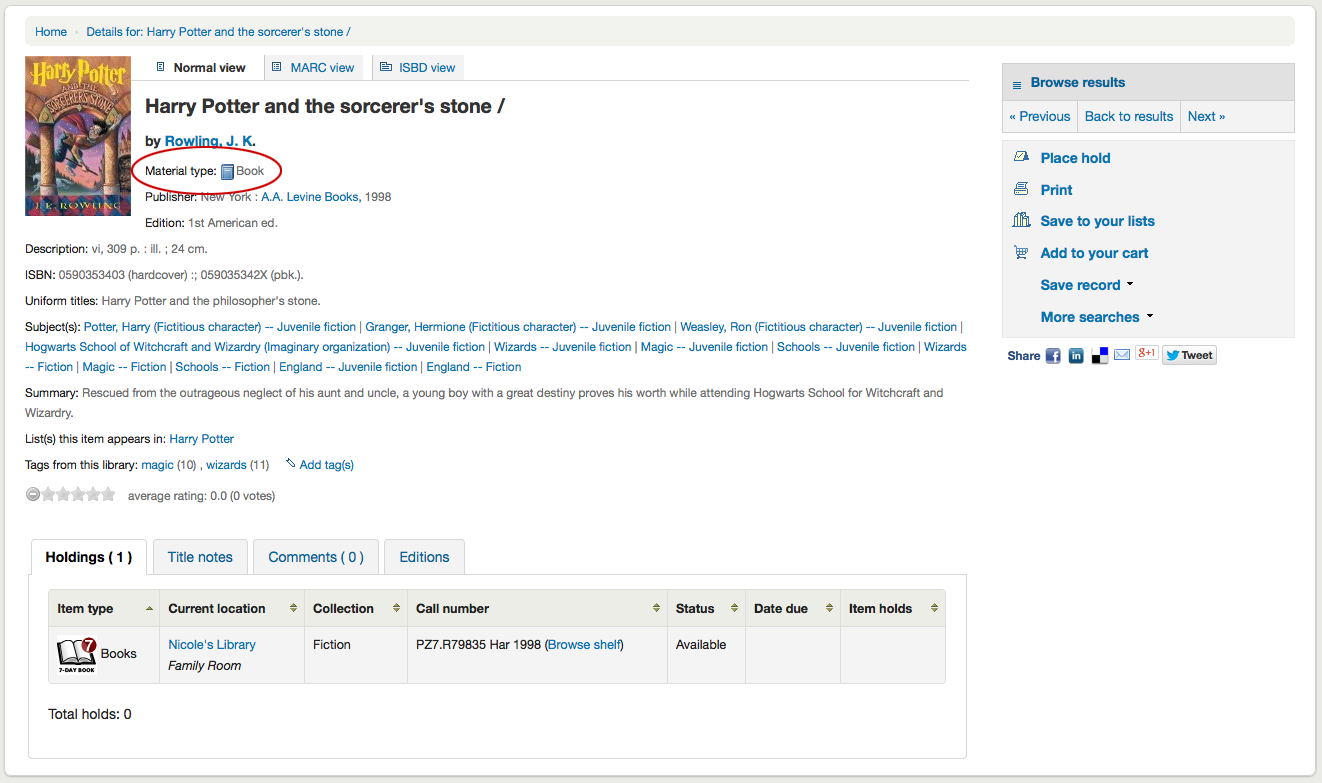
If you have your DisplayOPACiconsXSLT preference set to “show” you will see a material type that is determined by values in your fixed fields (learn more in the XSLT material type icons cataloging guide.
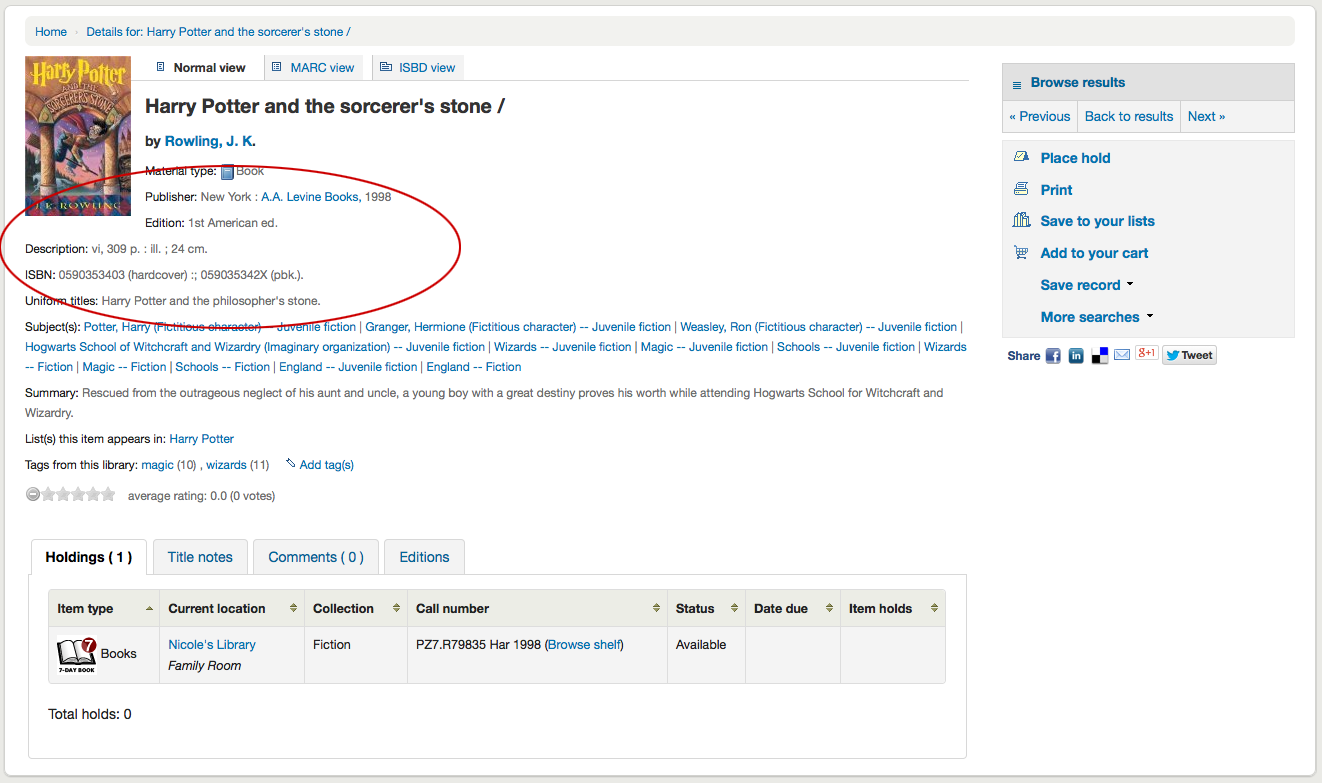
A continuazione vedrai la descrizione del record che stai visualizzando:
Dopo queste informazioni si trovano le intestazioni per soggetto, che può essere cliccato per la ricerca di altri titoli su argomenti simili
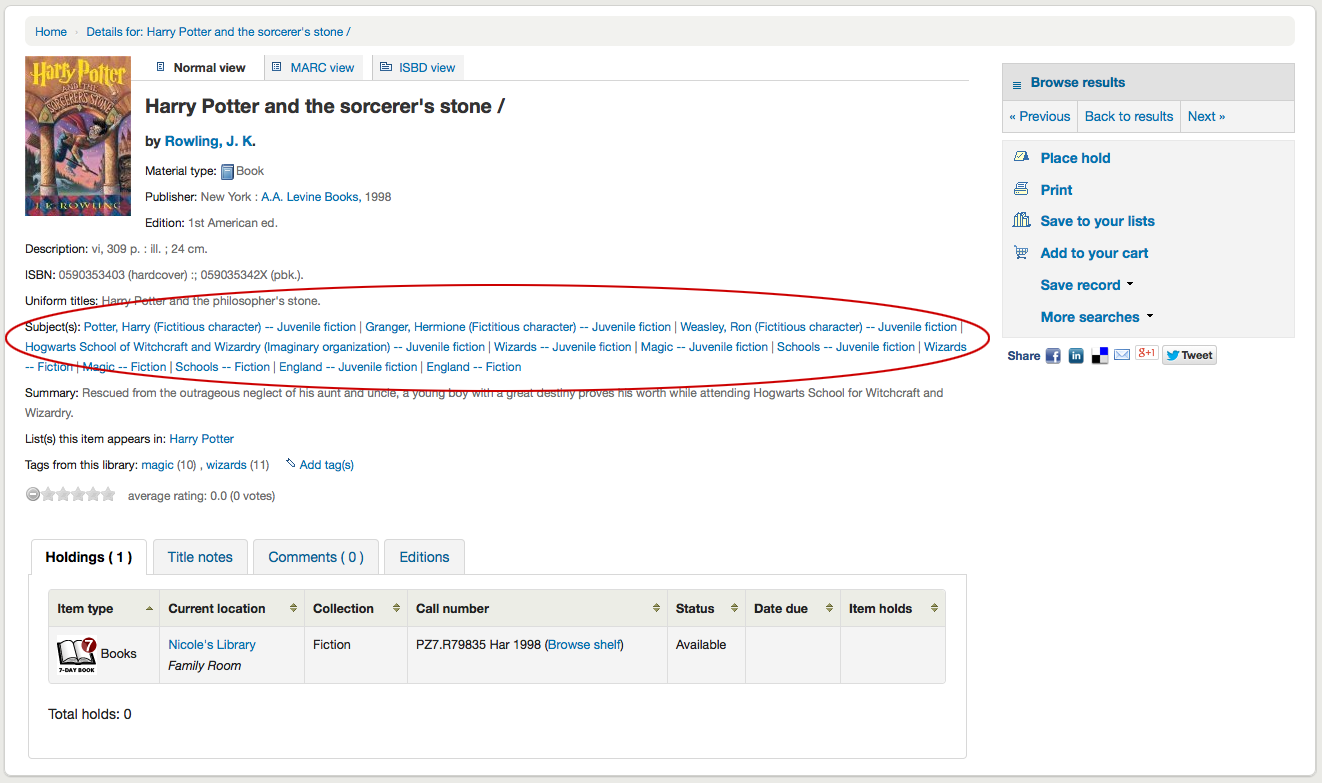
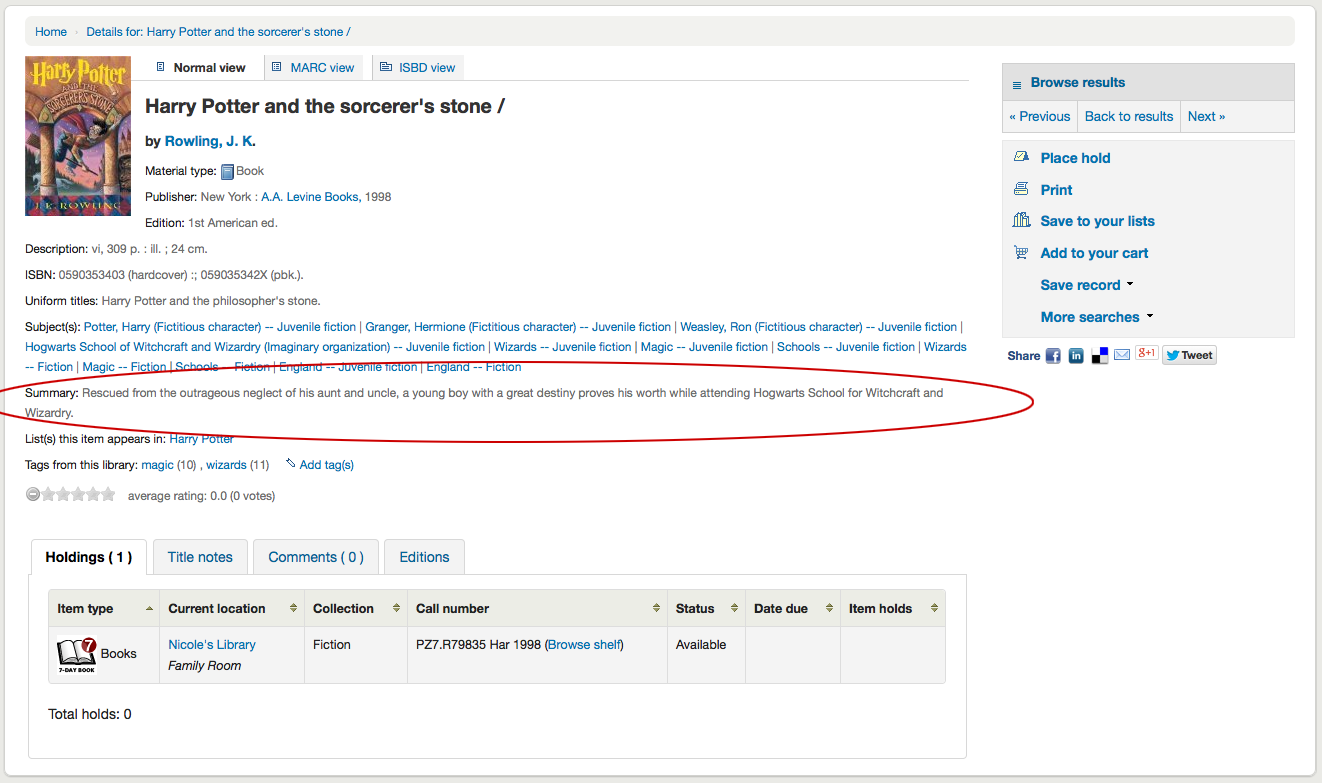
If your record has a table of contents or summary it will appear next to the “Summary” or “Table of contents” label
If your record has data in the 856 fields you’ll see the links to the right of the “Online resources” label

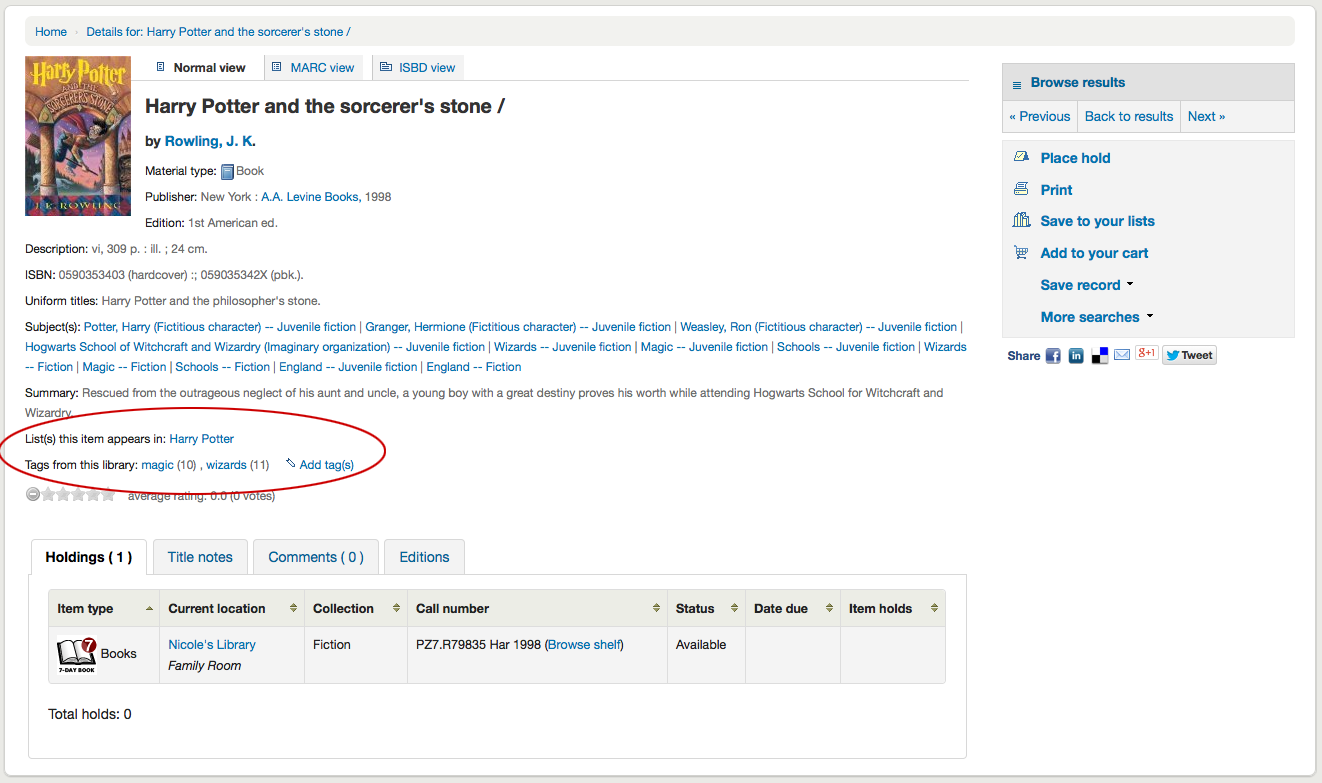
Se il titolo si sta visualizzando è in una lista pubblica, vedrai un elenco di quelli a destra della etichetta “Lista(e) in cui questo record appare” e se è stato taggato appariranno sotto l’etichetta «Tag da questa biblioteca”
Nelle schede sotto i dettagli troverai i dati sul posseduto
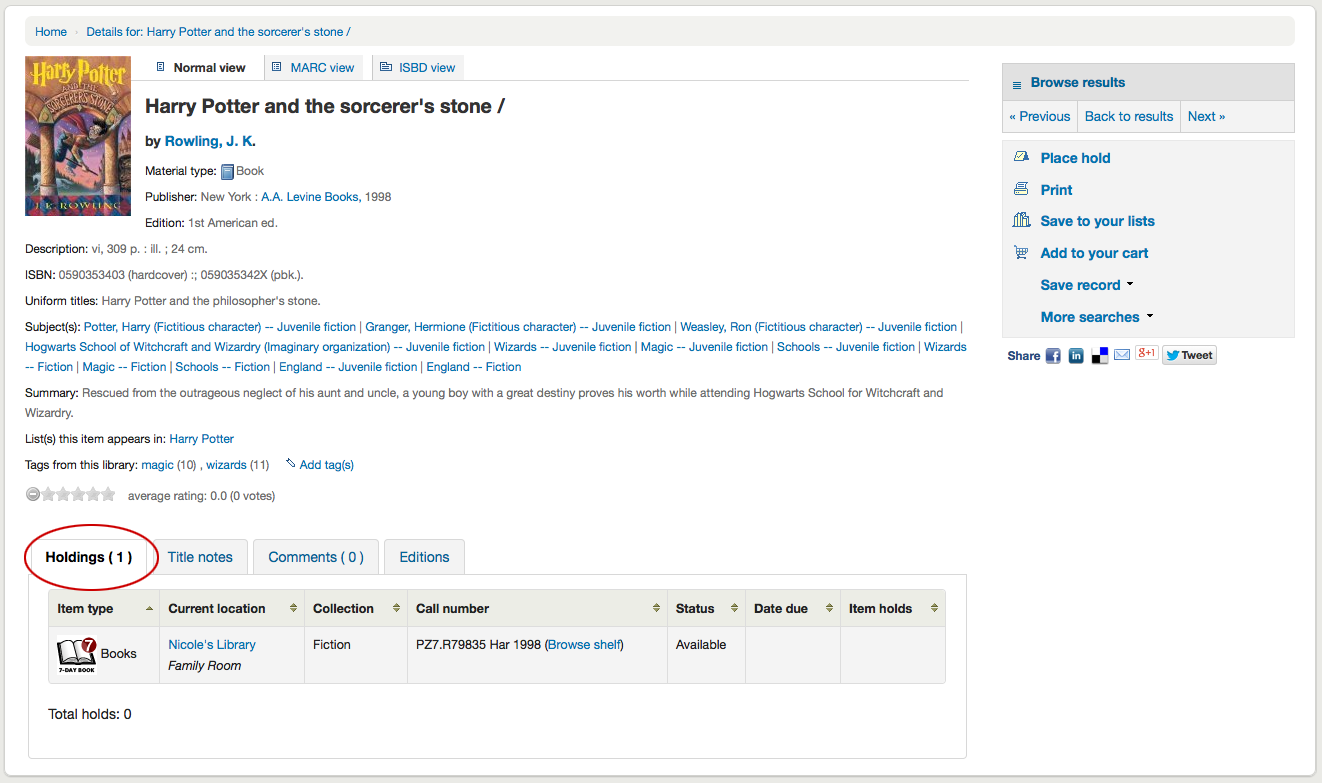
Nota
You can customize the columns of this table in the “Table settings” section of the Administration module (table id: holdingst).
Any notes (5xx fields) that have been cataloged will appear under “Title notes”
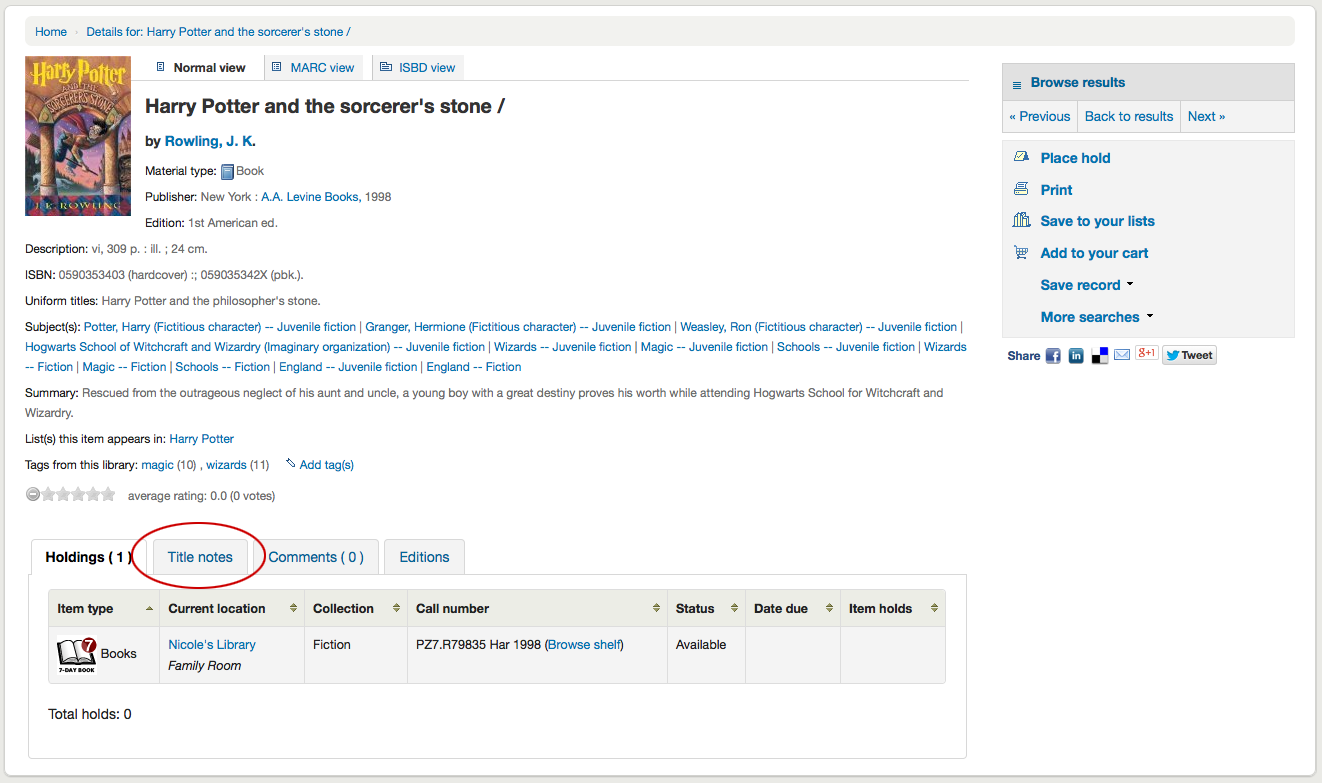
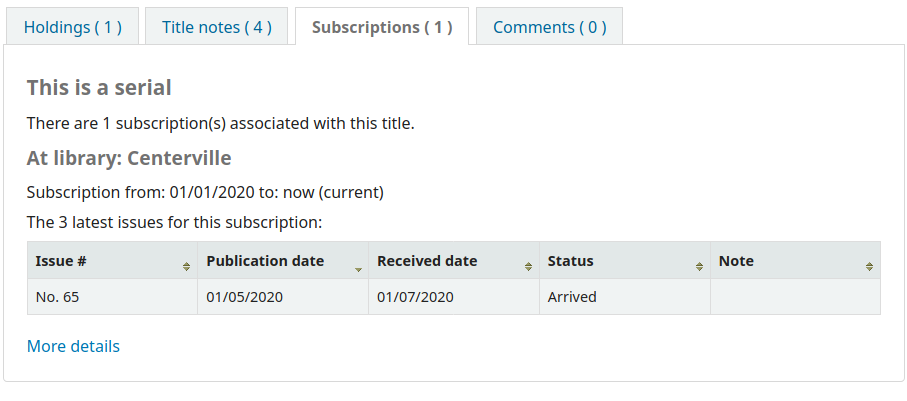
If the bibliographic record is linked to a subscription in the Serials module, there will be a “Subscriptions” tab with the subscription and issues information.
Nota
You can customize the columns of this table in the “Table settings” section of the Administration module (table id: subscriptionst).
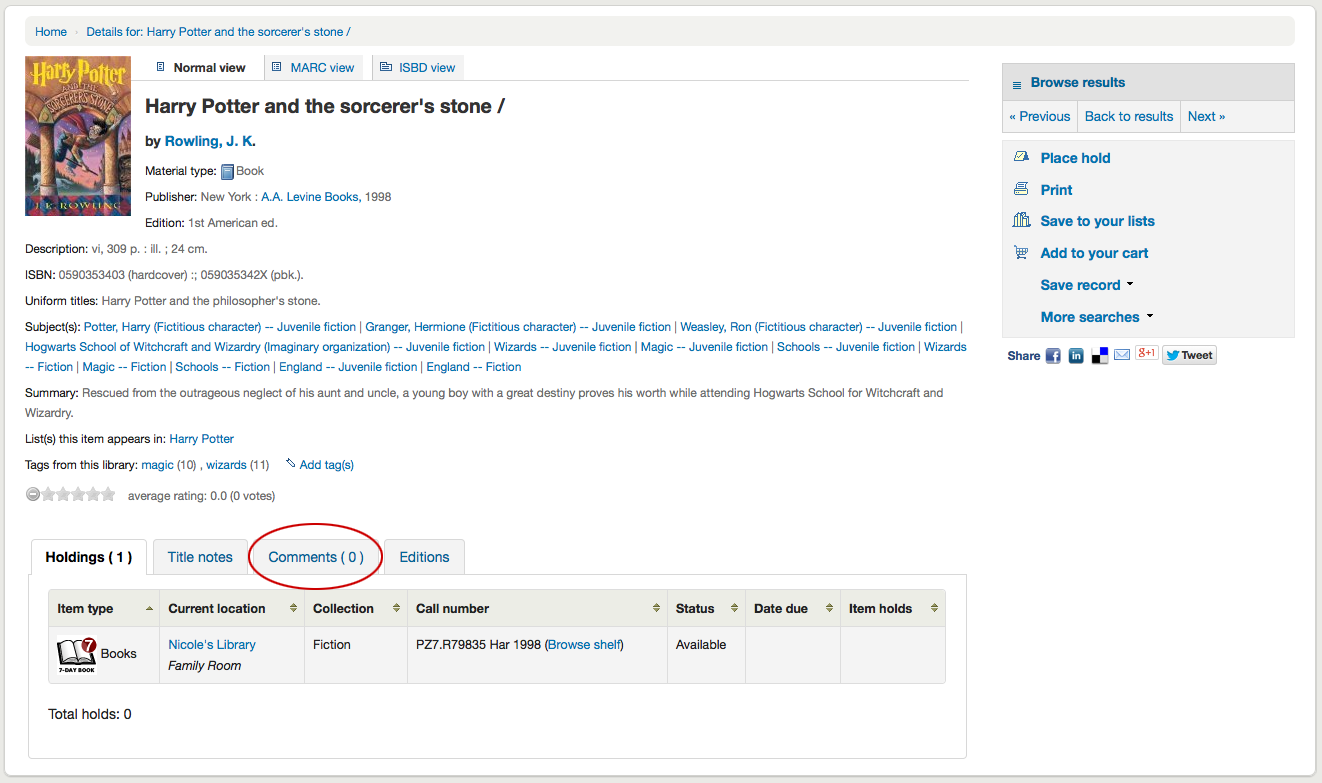
Se i commenti sono attivi, appariranno nella scheda successiva
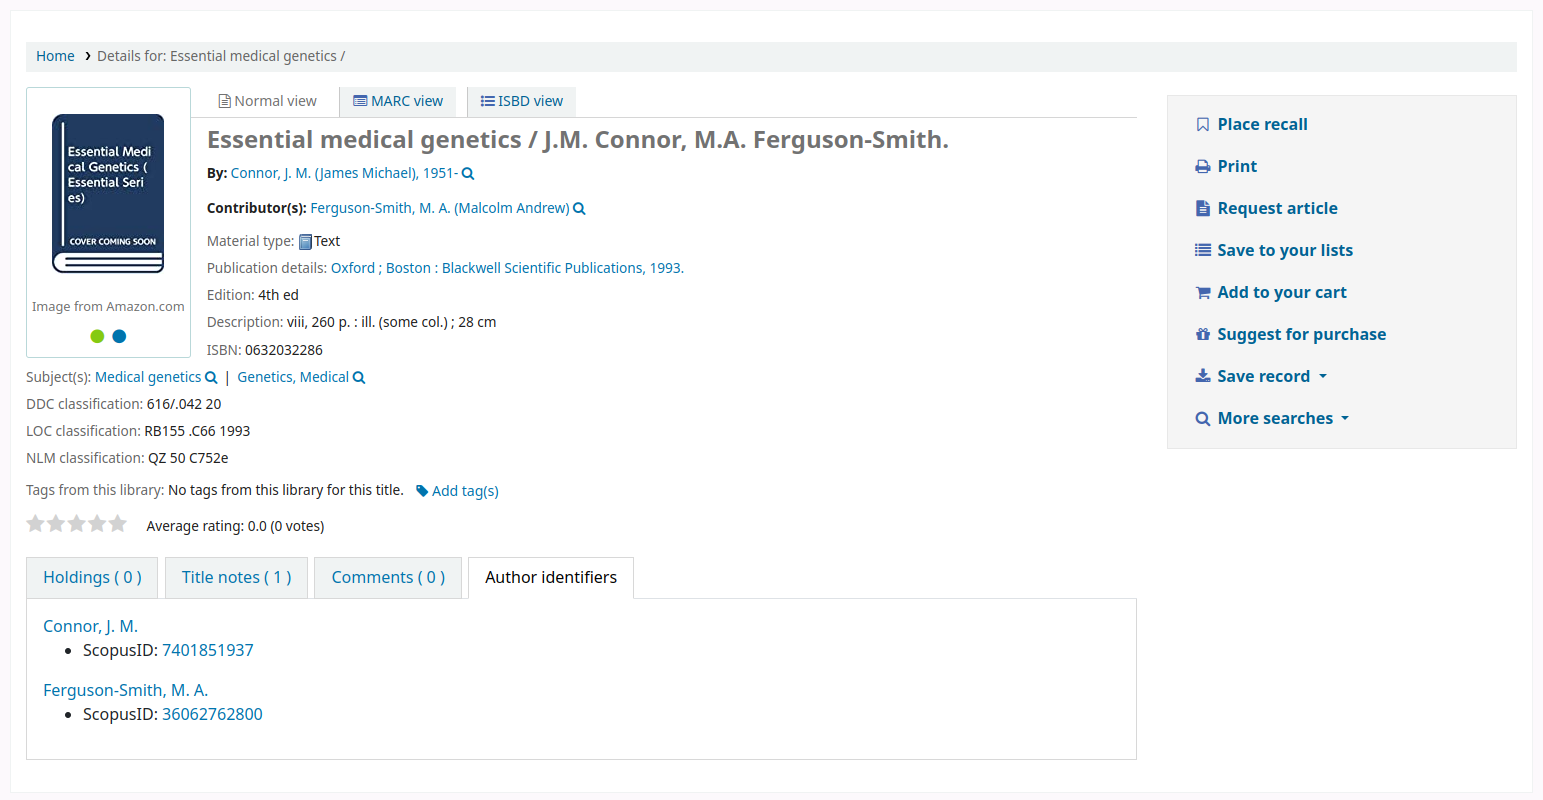
If the OPACAuthorIdentifiers system preference is turned on, and that your author authority records have standard identifiers, there will be an “Author identifiers” tab showing the identifiers with links to the author record on the source website.
Infine, se FRBR è attivo e se in catalogo ci sono altre edizioni dello stesso titolo, vedrai la scheda “Edizioni”.
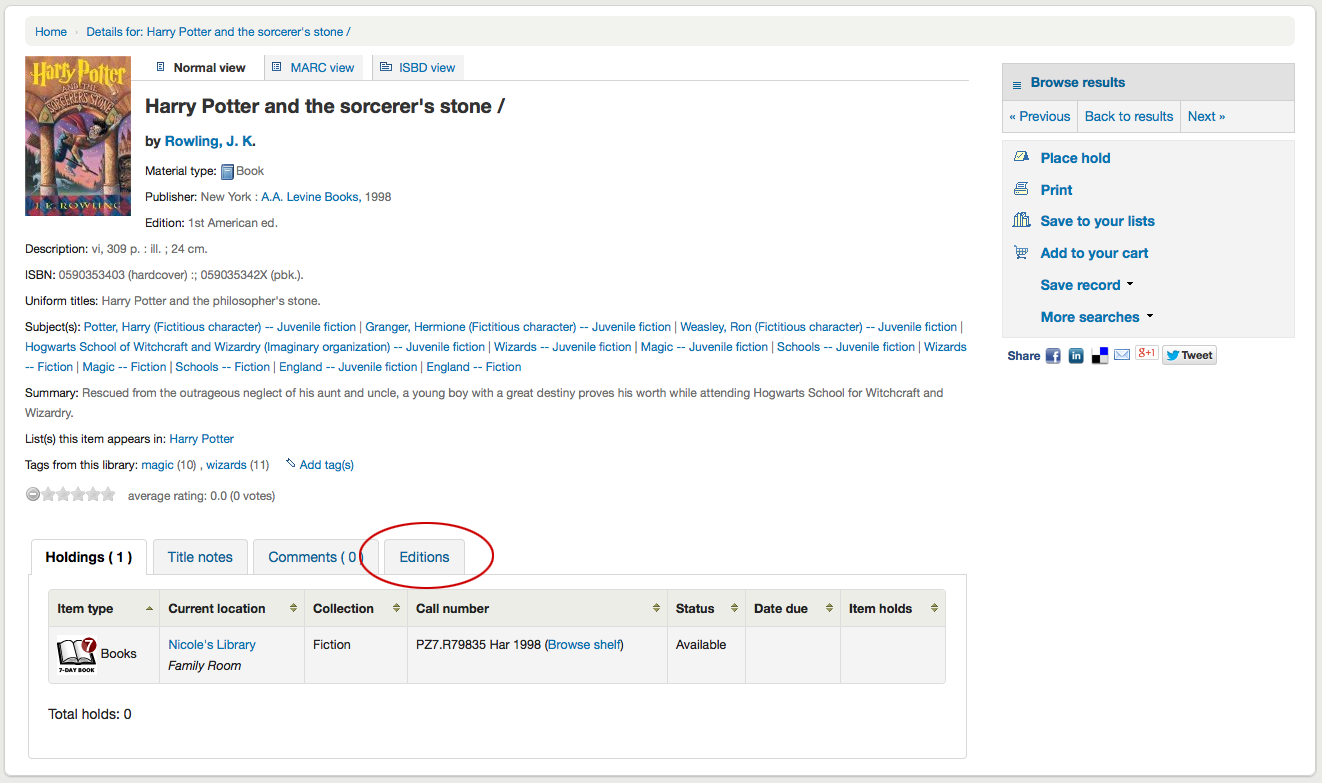
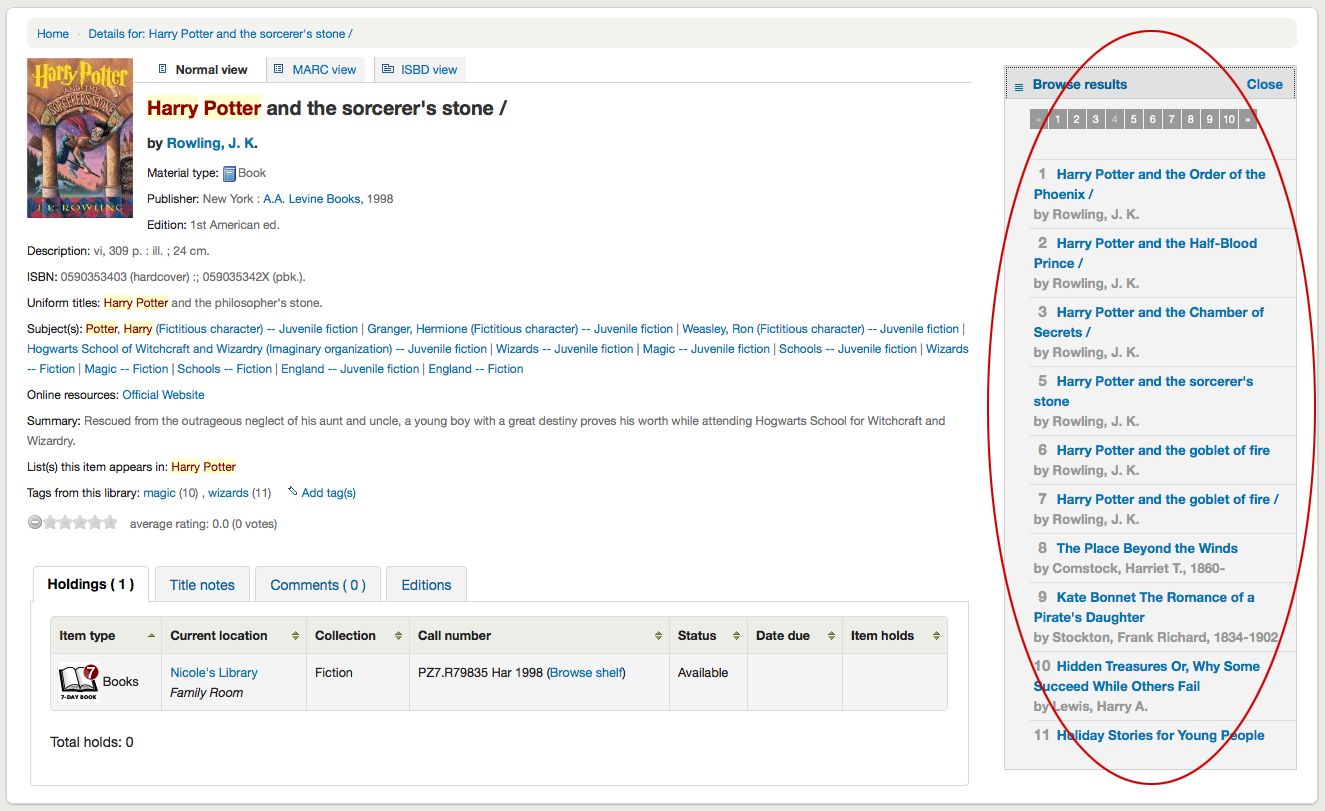
A destra dei dettagli troverete una serie di caselle. La prima casella è una lista di pulsanti per navigare i risultati di ricerca. Da lì si può vedere il risultato successivo o precedente dalla ricerca o tornare ai risultati.
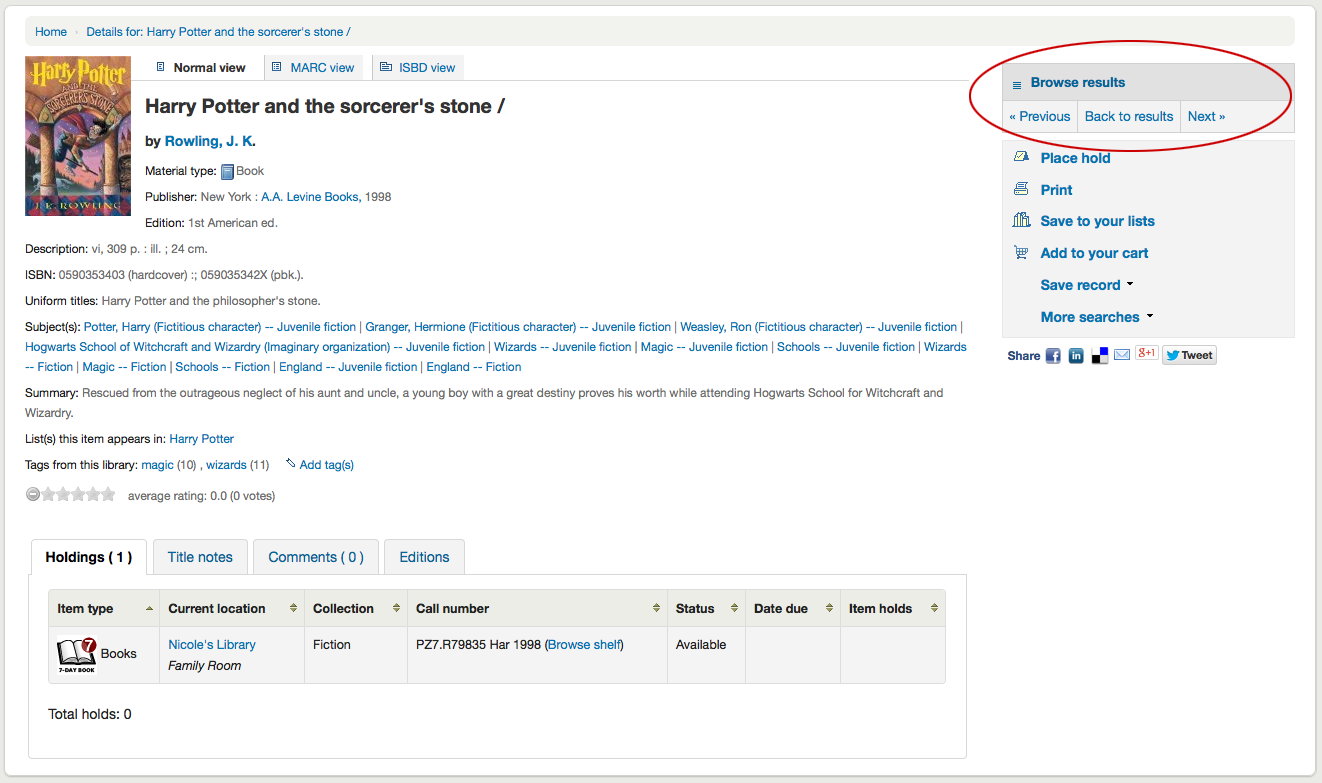
Clicking “Browse results” at the top of the right column will open up your search results on the detail page
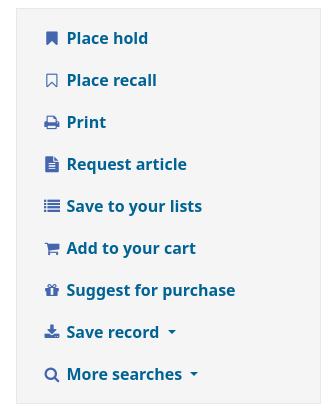
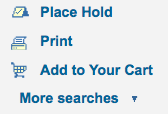
Below the search buttons you’ll find the links to place a hold, print the record, save the record to your lists, add it to your cart or send to a device (using a QR code).
Another option that will appear on this right hand side bar, if a library is allowing purchase suggestions (see the suggestion system preference), is the ability to “Suggest for Purchase”. Clicking this link will bring the user to the purchase suggestion form to fill out.
Clicking “More searches” will show the list of libraries you entered in your OPACSearchForTitleIn preference
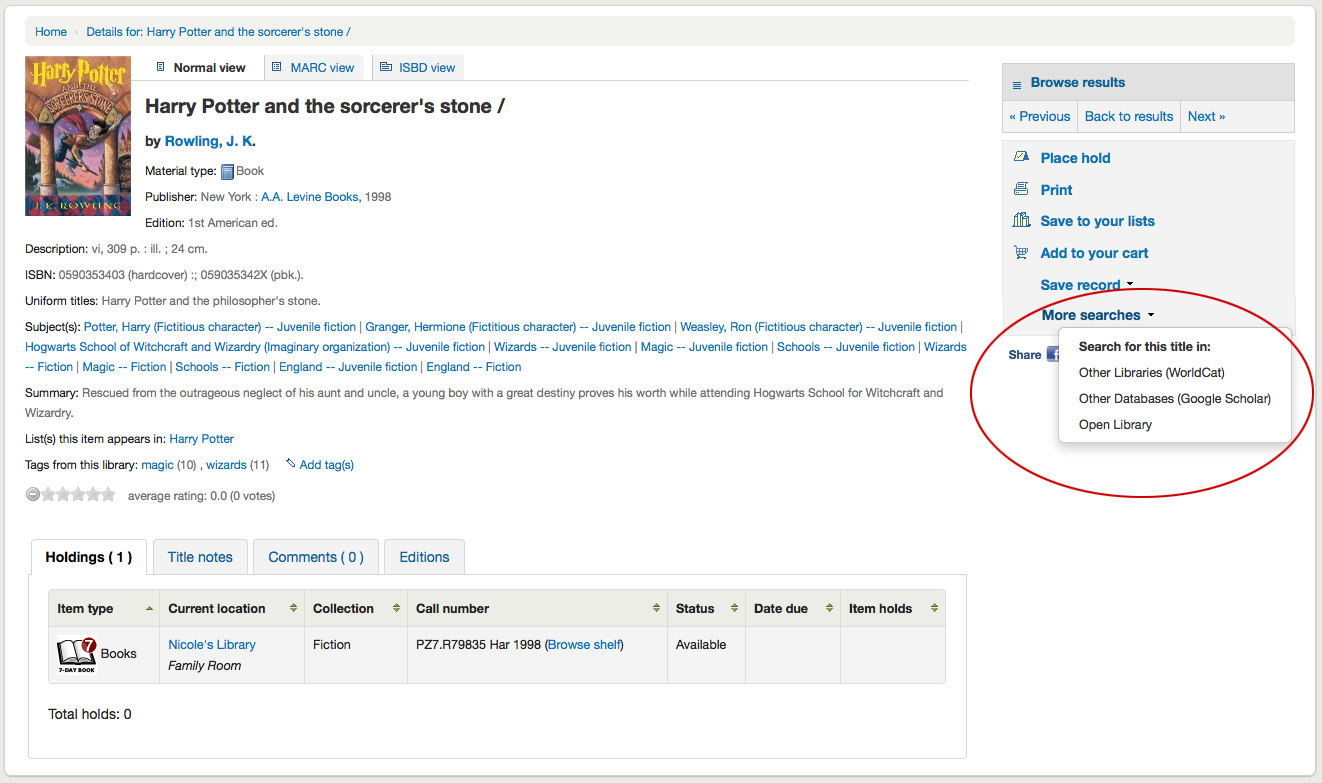
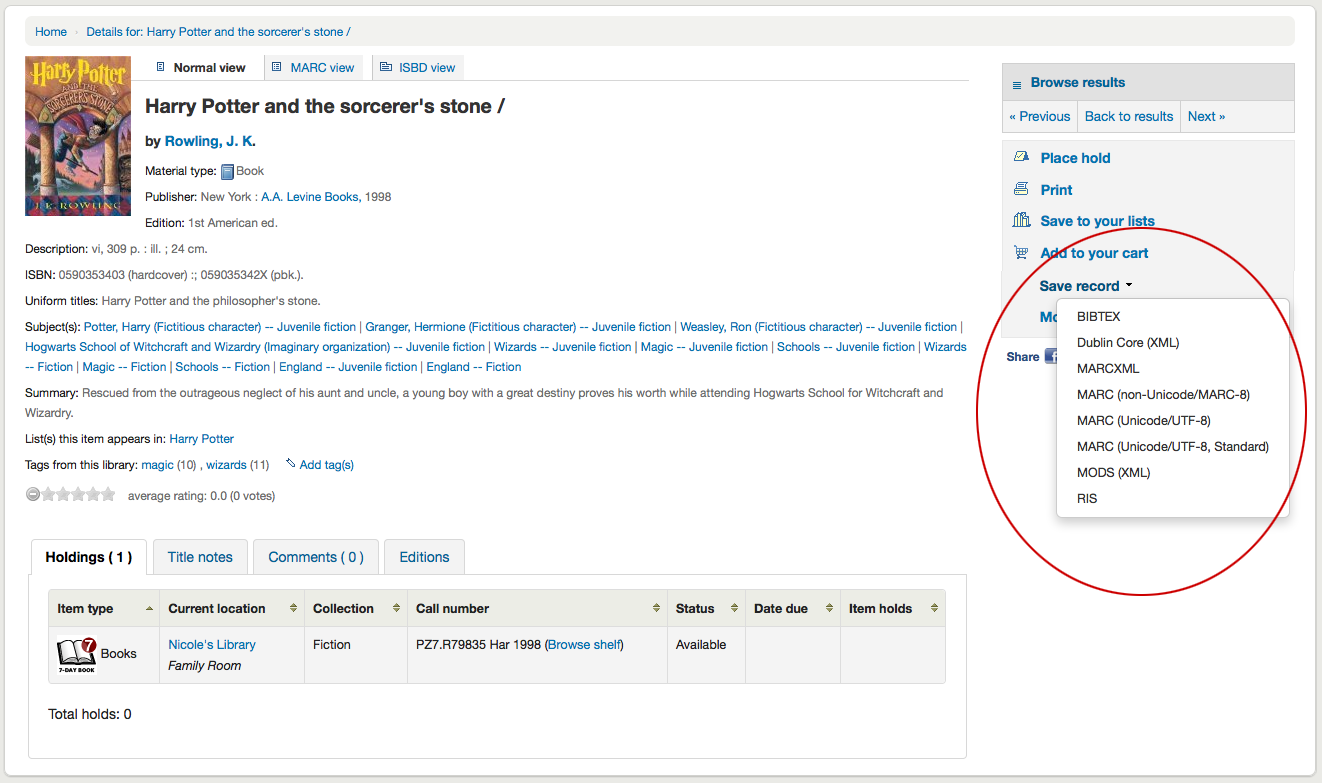
Under the “Save record” label you will find a series of file formats you can save the record as. This list can be customized by altering the OpacExportOptions system preference.
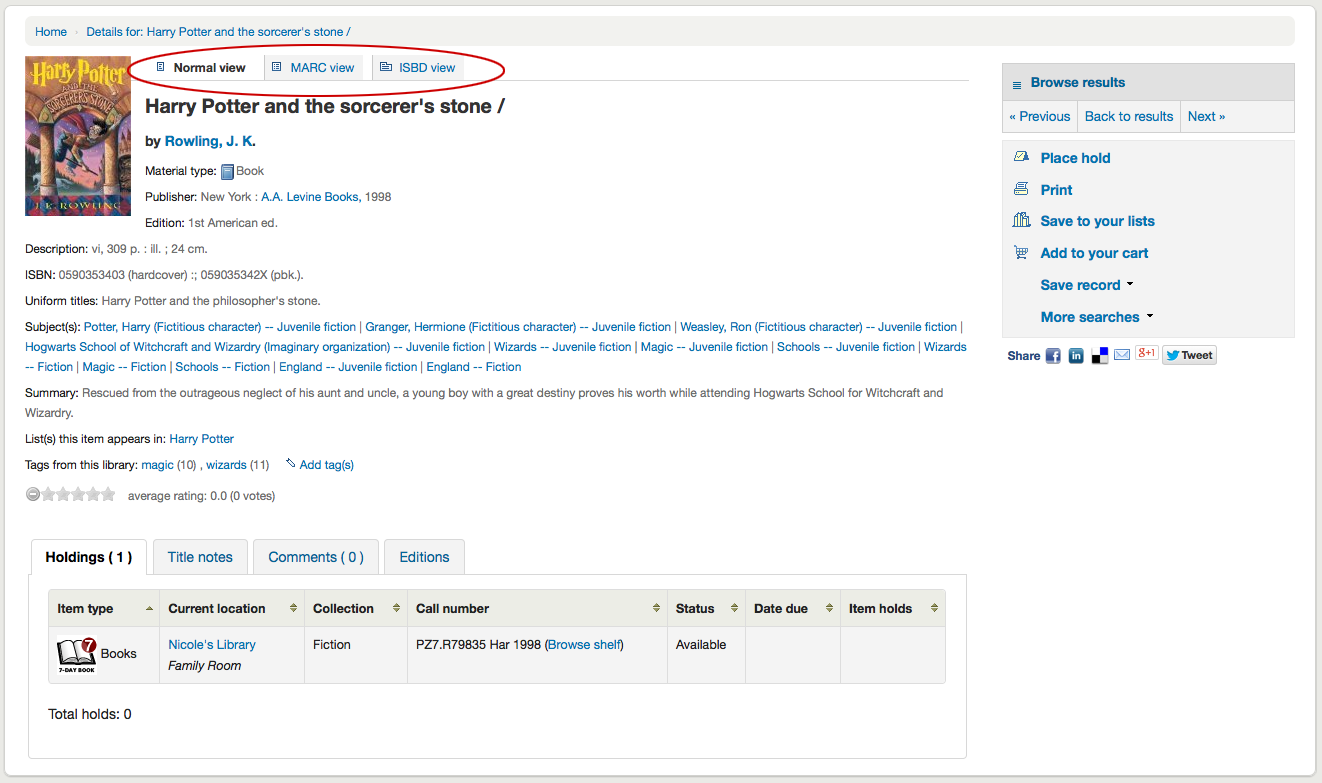
Se in qualsiasi momento si desidera modificare la vista da “Normale” e passare alle viste Marc o ISBD, è possibile fare clic sulle schede nella parte superiore del record
Lists and the cart
A cart is a temporary holding place for records you’re interested in finding during this session. That means that once you log out of the OPAC or close the browser you lose the items in your cart. A list is a more permanent location for saving items. To learn more about lists, check the Lists in the staff client chapter of this manual.
Liste
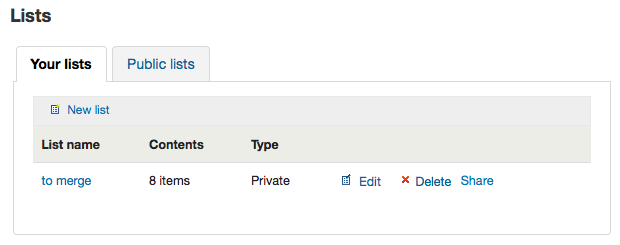
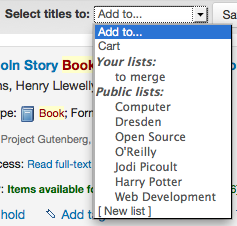
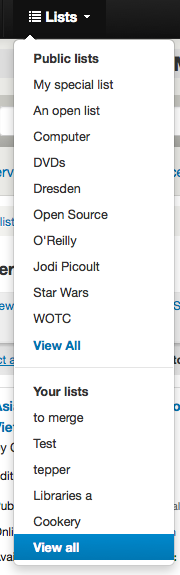
Patrons can manage their own private lists by visiting the “your lists” section of their account.
Creating lists
Lists can also be created by choosing the “New list” option in the “Add to” menu on the search results
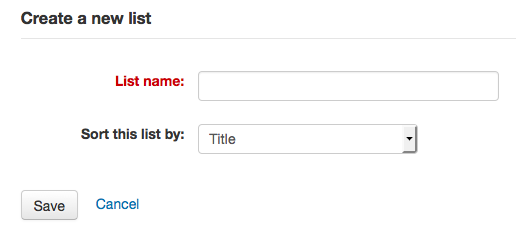
To create a list the patron simply needs to click the “New list” link and populate the form that appears
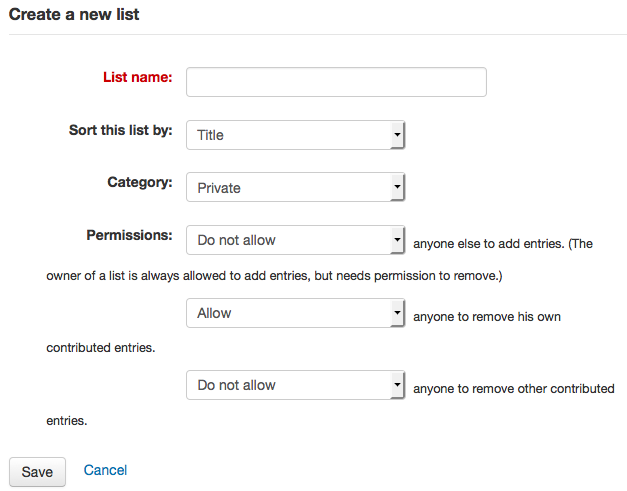
The only field required is the “List name,” but the patron can also choose how they want the list sorted and if the list is public or private.
A private list is managed by you and can be seen only by you (depending on your permissions settings below)
A public list can be seen by everybody, but managed only by you (depending on your permissions settings below)
Importante
If you aren’t allowing patrons to create public lists with the OpacAllowPublicListCreation preference then patrons will only be able to create private lists.
Al termine decidi quali permessi dare alla lista. Puoi permettere o non permettere:
a chiunque altro di aggiungere elementi
a chiunque altro di rimuovere i propri elementi
Nota
Il padrone di una lista può sempre aggiungere voci, ma ha bisogno del permesso per cancellarle.
chiunque a rimuovere contributi di altri
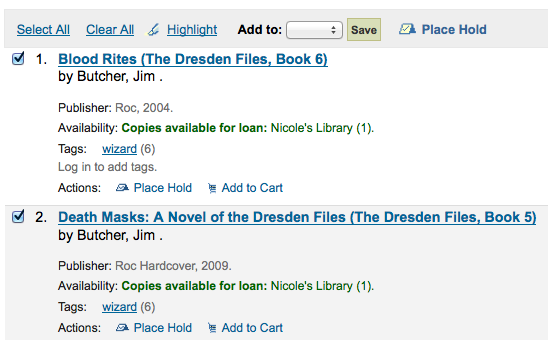
Adding titles to lists
I titoli possono essere aggiunti alle listeo dalla pagina dei risultati e/o dal record bibliografico. Nella pagina dei risultati appaiono delle caselle di spunta sotto ogni record e in alto
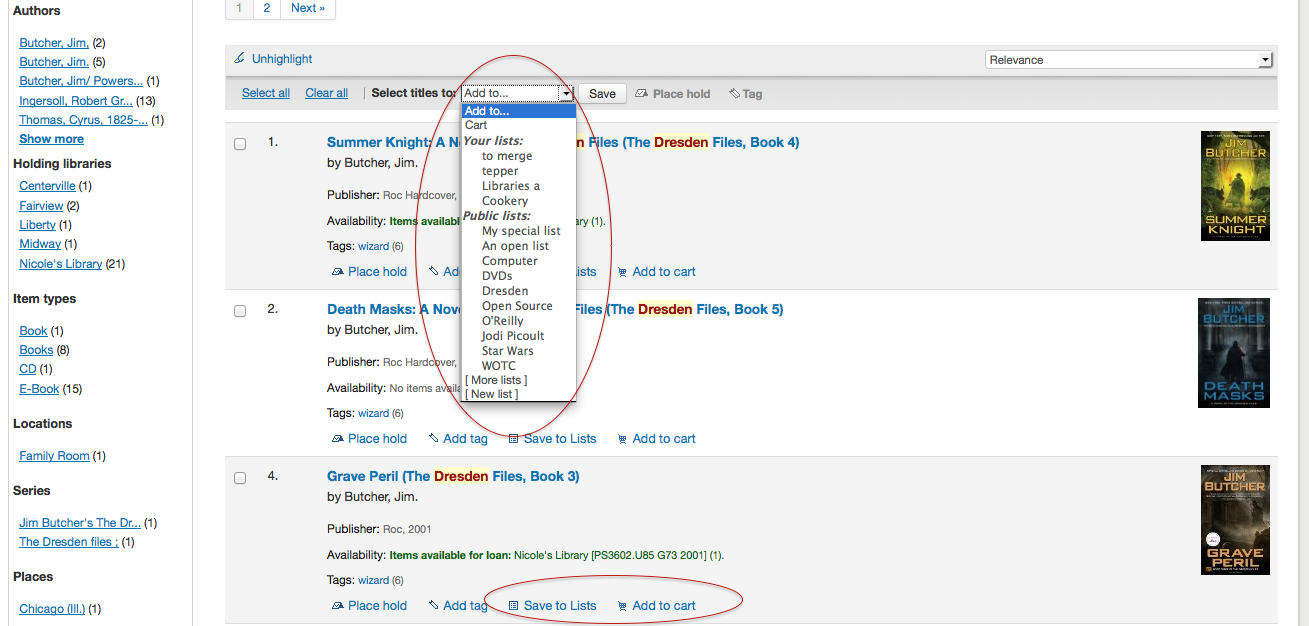
To add a single title to a list, click the “Save to lists” option and then choose the list you’d like to add the title to. To add multiple titles to a list check the boxes on the left of the titles you want to add and then choose the list you want to add the titles to from the “Add too” pull down at the top of the screen.
Viewing lists contents
To view the contents of a list, click on the list name under the “Lists” button.
Il contenuto della lista sarà simile alle pagine dei risultati di ricerca, tranne che ci saranno diverse opzioni di menu nella parte superiore della lista.

Sulla destra della lista titolo c’è una icona RSS che ti abilita a sottoscrivere gli aggiornamenti alla lista.
Utilizzando le opzioni del menu sopra l’elenco è possibile prenotare più copie, scaricare il contenuto della lista, inviarla per e-mail o stamparla.
To place a hold on one or more list items check the box to the left of the item and click the “Place hold” link at the top
To download the list contents click the “Download list” link and choose the format you’d like to download the list in
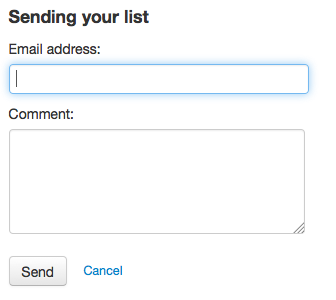
To email the list contents to someone, click the “Send list” link and enter in your email details in the form that pops up
To print the contents of your list out click the “Print list” link
Managing lists
Once the list is saved patrons can begin adding items to it. From the “your lists” tab on the patron record the patron can edit and delete the lists they have created by clicking the appropriate link to the right of the list name.
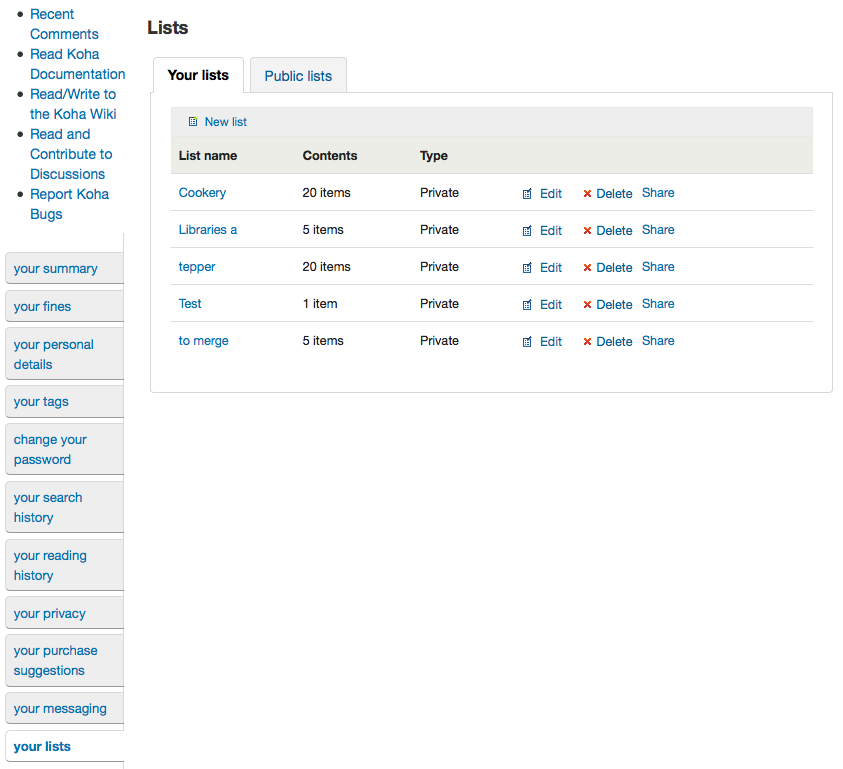
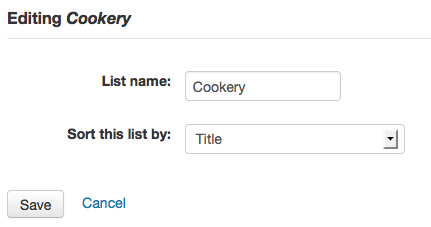
Per modificare il titolo della lista o l’ordinamento, gli utenti devono cliccare sul link “Modifica” alla destra della descrizione della lista.
Quando si clicca “Elimina” accanto a una lista vi verrà chiesto di confermare che si desidera eliminarla.
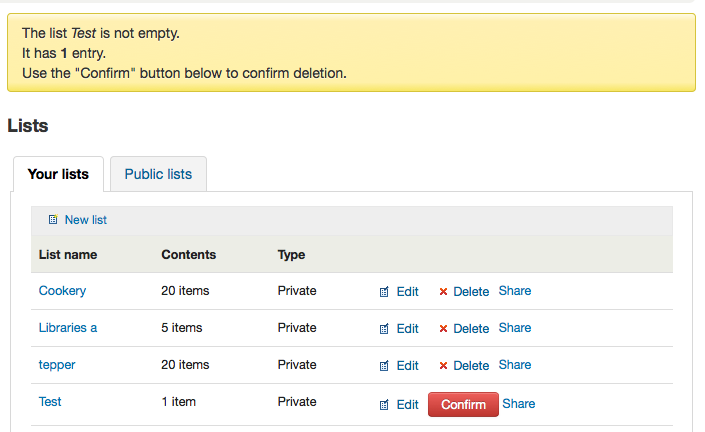
La lista non sarà cancellata fino a quando il pulsante “Conferma” viene premuto; si trova sulla destra della lista che si desidera eliminare.
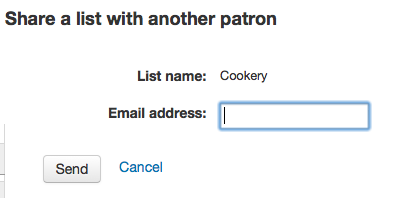
If the library is allowing you to share private lists with the OpacAllowSharingPrivateLists preference then you will see the “Share” link on your list of lists and the “Share list” link at the top of each individual list. Clicking this will ask you to enter the email address of a patron.
Una volta inserito l’indirizzo email, Koha presenterà un messaggio di conferma
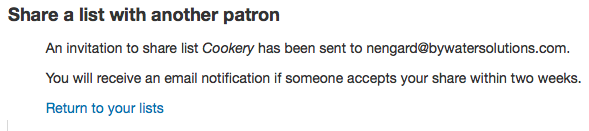
e invierà un messaggio a quell’utente.
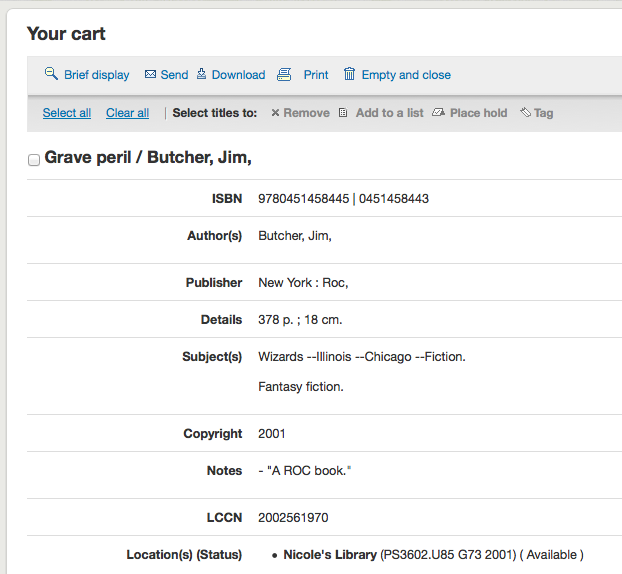
Carrello
Adding titles to the cart
I titoli possono essere aggiunti al carrello dalla pagina dei risultati e/o dal record bibliografico. Nella pagina dei risultati appaiono delle caselle di spunta sotto ogni record e in alto
Clicking the “Add to cart” button will add the one title to your cart. To add multiple titles at once, check the box to the left of each result and then choose “Cart” from the “Add to” pull down at the top of the screen. Once titles are added to the cart you will be presented with a confirmation

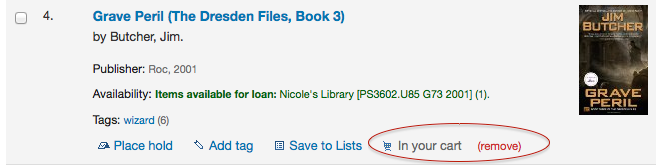
Dai risultati si vedrà quali copie sono presenti nel carrello e si potranno rimuovere facendo clic su “(rimuovi)”.
Managing the cart
Una volta che hai dei titoli nel carrello è possibile gestirne i contenuti facendo clic sul pulsante “Carrello” che di solito si trova nella parte superiore dello schermo. Il carrello si apre in una nuova finestra.

Da questa finestra vengono presentate diverse opzioni. Nella parte superiore del carrello ci sono alcuni pulsanti.
First is the “More details” button. Clicking this will show you additional information about the titles in your cart (ISBNs, subjects, publisher info, notes and more).
Next is the option to send the contents of your cart to an email address. This is handy if you want to send the resources you found at the library to your home email account to refer to later or to send to a patron researching a specific topic. Clicking this link will open up a new window that asks for the email address and message to send.
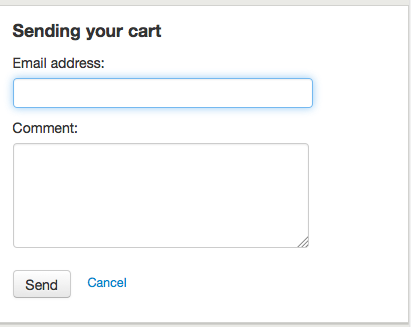
Importante
Il carrello può essere inviato solo da utenti registrati. Questo consentirà di evitare che la funzione venga utilizzata per lo spamming.
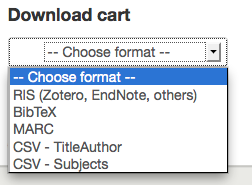
In addition to sending your cart you can download the contents of your cart in several pre-defined formats or using a CSV profile that you defined in the tools module.
Infine è possibile stampare il contenuto del tuo carrello scegliendo il link “Stampa”.
In addition to the various different ways to save the contents of your cart, there are ways to add value to the data in your cart. By selecting one or more titles from the cart you can add them to a list (click “Add to a list”), place hold(s) (click “Place hold”), or tag them (click “Tag”). All of these operations follow the same procedure as they do when performing them in the OPAC.
Placing holds
Patrons can place holds on items via the OPAC if they’re logged in and you have the OPACHoldRequests preference set to “Allow”. If the item can be placed on hold the option to place it on hold will appear in several different places.
When viewing a list or search results page you’ll see the option to place hold on multiple items by checking the boxes to the left of the results and clicking “Place hold” at the top
Quando si visualizza una lista o una pagina risultati di ricerca, si vedrà l’opzione per prenotare la copia sotto le informazioni di base sul titolo
Durante la visualizzazione di un singolo titolo c’è la possibilità di inserire una prenotazione nella casella sul lato destro dello schermo
Indipendentemente da quale link posti in alto si sceglie per fare una prenotazione, si sarà portati alla stessa schermata delle prenotazioni.
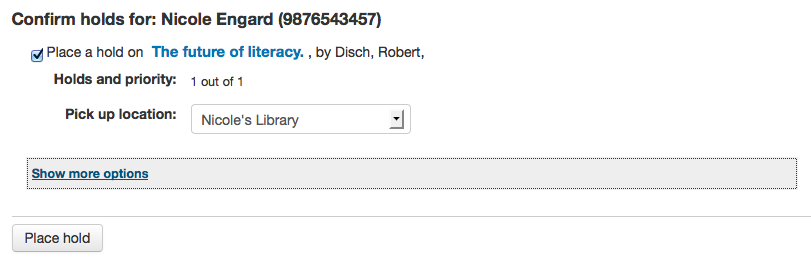
Cliccare la casella a sinistra delle copie che si desidera prenotare
Il titolo include un link alla pagina di dettaglio per il record
La priorità mostra la posizione nella coda assunta da una prenotazione
If allowed by your OPACAllowUserToChooseBranch preference the patron can choose where they’d like to pick up their hold. The list of available pickup locations will include all libraries that have “Pickup location” set to “Yes” on the library configuration page.
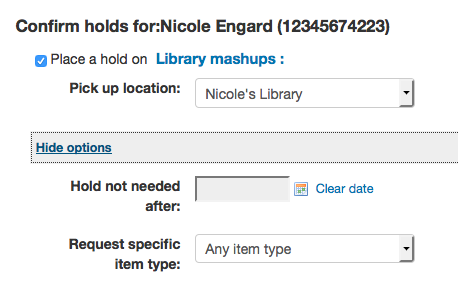
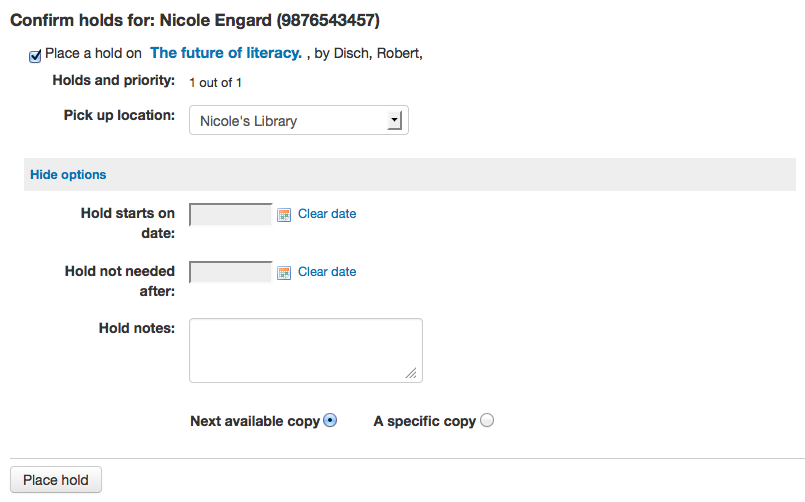
Se volete vedere altre opzioni è possibile fare clic su “Mostra altre opzioni”
Place hold form with more options
If you have the AllowHoldItemTypeSelection preference set to “Allow” and the record had more than one item type attached you will see an option to choose to limit the hold to a specific item type
If allowed by your OPACAllowHoldDateInFuture preference, the “Hold starts on date” column will show. This field allows the patron to have their hold start on a future date.
By default holds placed in the system remain until canceled, but if the patron fills in a “Hold not needed after” date then the hold has an expiration date.
Importante
Expired holds are removed by the expired holds cron job, this is not an automatic process and must be set up by your system administrator
If allowed by the OpacHoldNotes preference then patrons can leave notes about their holds for the library by clicking the “Edit notes” button
If the EnableItemGroupHolds system preference is set to “Enable” and the record has item groups, the patron can choose to place a hold on the next available item of a group, rather than the next available item on the whole record or a specific item.
Depending on the rules you set regarding item specific holds in your circulation and fines rules the patron will be allowed to choose whether to place the hold on the next available copy and/or a specific copy.
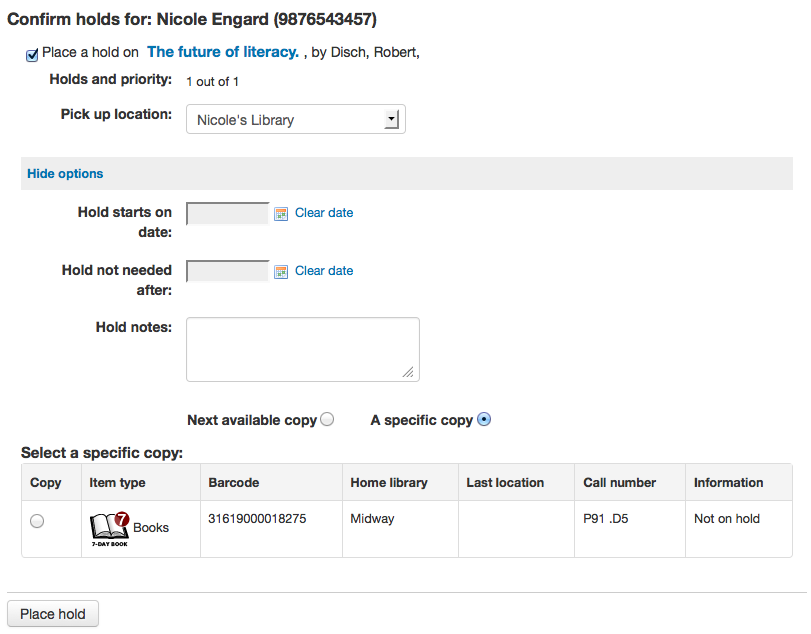
After clicking the “Place hold” button the patron will be brought to their account page where they’ll see all of the items they have on hold.
Requesting recalls
If your library accepts recalls (see setting up recalls for more information), patrons will be able to place recalls on items.
The option to request a recall appears in various places in the OPAC:
In the results list after a search, the “Place recall” option appears at the bottom of each recallable result.
In the detailed record. the “Place recall” option appears on the right side of the screen (or bottom in mobile view) in the options
Either of those links will lead to the recall form.
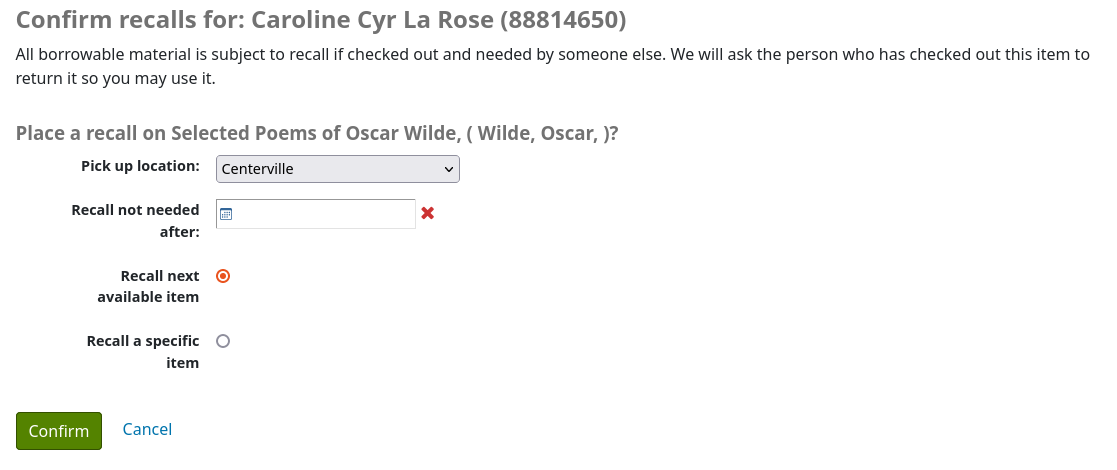
Pick up location: the patron can choose where they’d like to pick up their recalled item.
Recall not needed after: if the patron not need this item after a certain date, they can enter it here. The recall will be automatically expired (with the expire_recalls.pl cronjob) after that date.
Recall next available item or Recall a specific item: the patron can choose to recall any item or a specific one. If they choose “Recall a specific item”, they will be asked to select the item in the list.
Once the patron confirms their recall request, they will have get a message saying the the patron who currently has the item will be notified. The request will be added to the recalls tab in their account summary, as well as in their recall history list.
Enhanced content
Marcatura
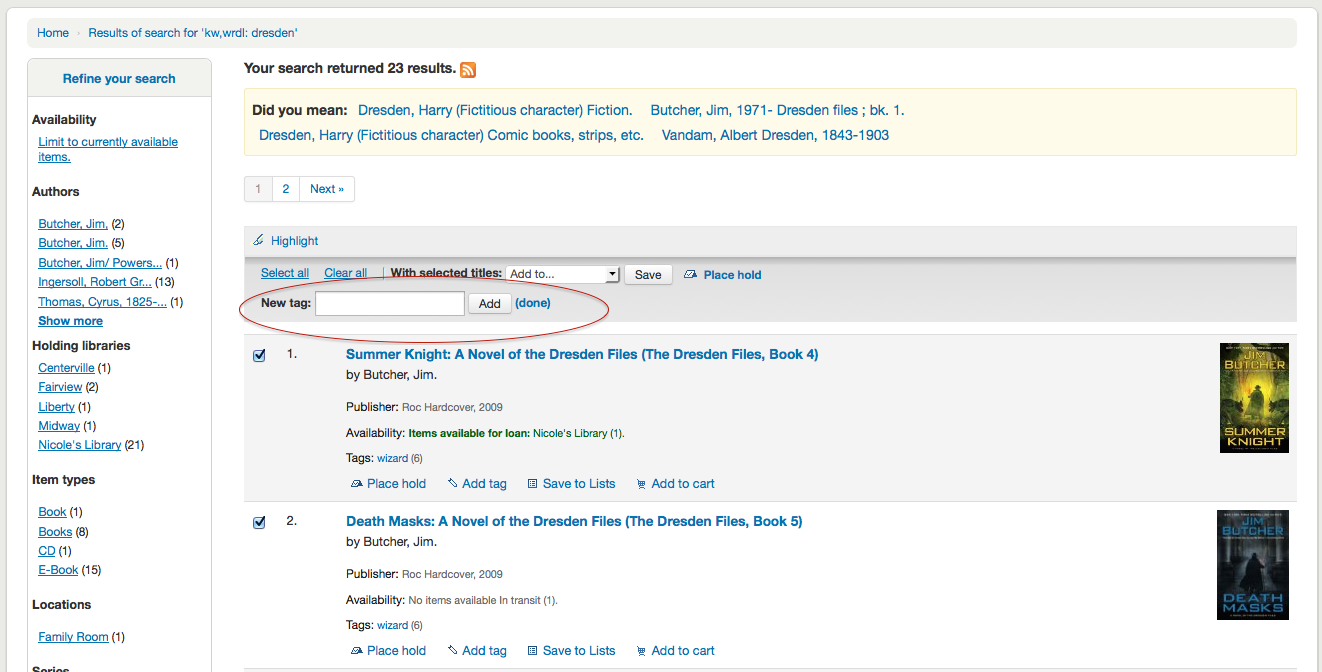
Depending on your settings for the TagsEnabled, TagsInputOnList and TagsInputOnDetail preferences you may be able to add tags to bibliographic records from the search results and/or bibliographic records. If you are allowing patrons to add tags from the search results screen you will see an input box below each result and a “Tag” option at the top of the screen.
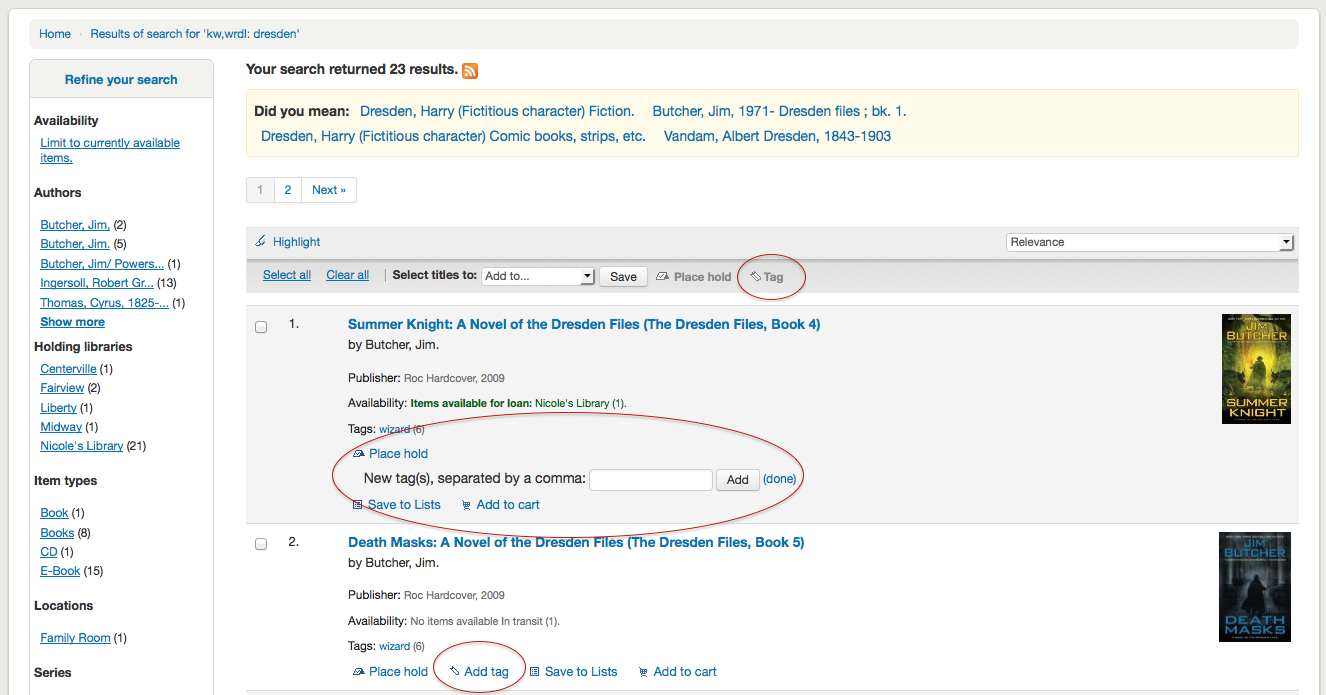
Per aggiungere un tag a una copia, scrivi i tag (separati da virgole) nella casella “Nuovi tag” e fai clic su “Aggiungi”. Verrà chiesta conferma per l’aggiunta dei tag.
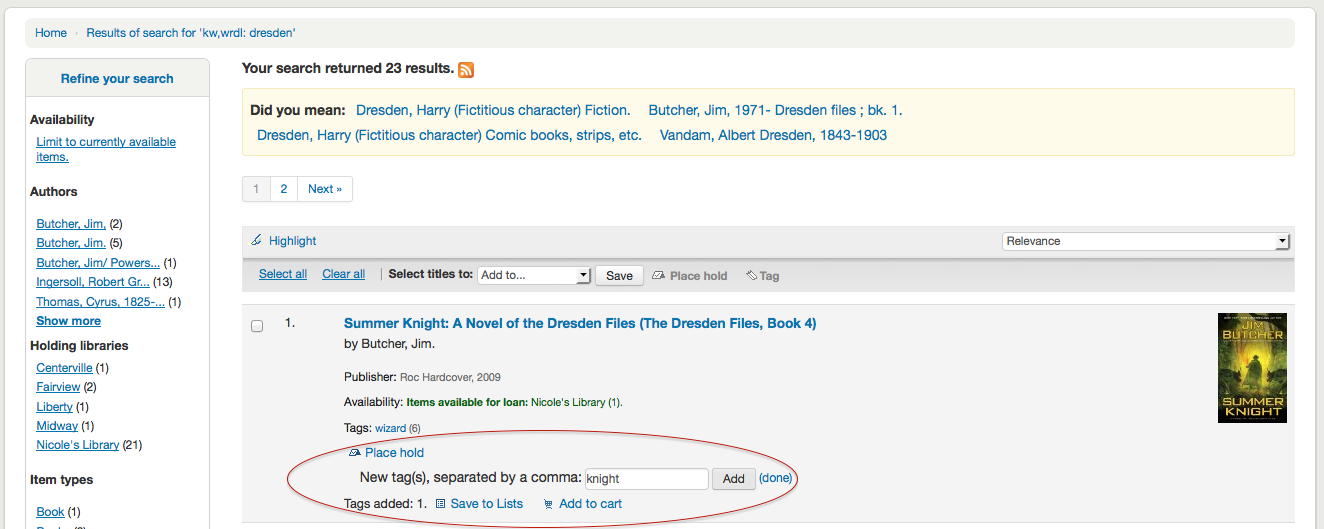
Dai risultati puoi anche assegnare tag a oggetti in blocco cliccando le caselle di controllo a sinistra e facendo clic sul pulsante “Tag” nella parte superiore. Dopo averlo cliccato, il pulsante cambierà in una casella di testo per aggiungere tag a tutte le copie selezionate.
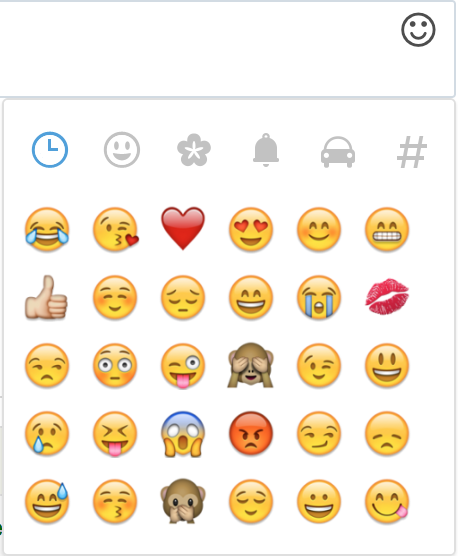
Emojis can also be included using the emoji picker when adding tags
Zotero
Zotero è un add on di Firefox che consente di salvare e generare una bibliografia. Ulteriori informazioni e per scaricare Zotero vedere http://zotero.org.
Quando su risultati della ricerca in OPAC Koha, se avete installato Zotero, vedrete un’icona di cartella nella barra degli indirizzi a destra dell’URL. Facendo clic su tale cartella si aprirà un elenco di titoli nella pagina da scegliere per aggiungerli a Zotero.
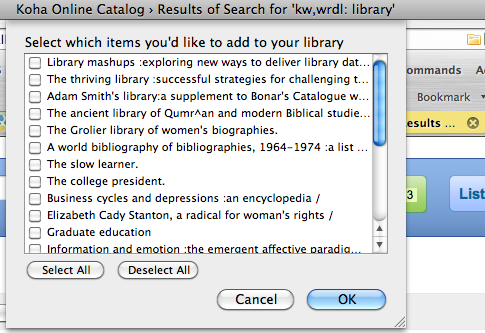
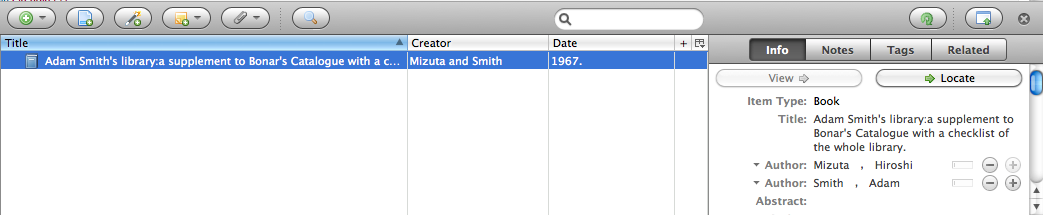
Selezionare i titoli che si desidera aggiungere a Zotero e fare clic sul pulsante “OK”. Questo aggiungerà i titoli a Zotero. È possibile visualizzare il titolo aprendo poi la biblioteca di Zotero.
Custom RSS feeds
Using the RSS feeds cron job you can generate an RSS feed for any SQL query (for example a new acquisitions RSS feed). The cron job is run on the command line to produce an RSS XML document.
L’output va sistemato in una directory accessibile all’interfaccia dell’OPAC (o dello staff) affinché gli utenti possano scaricare il feed RSS.
Un esempio di utilizzo può essere trovato presso: misc/cronjobs/rss.pl lastAcquired.conf
Normally the RSS cron job should be run periodically (e.g., daily) to keep the feed up-to-date.
Elenca i file di configurazione (ad esempio, lastAcquired.conf)
nome del file da utilizzare come modello
percorso del file di output
Interrogazione SQL
The RSS cron job runs the SQL query, then feeds the output of the query through the template to produce the output file.
Importante
To use custom RSS feeds you need to turn on the RSS cron job.
OPAC self registration
If you allow it, patrons can register for their own accounts via the OPAC. If you have the PatronSelfRegistration preference set to “Allow” then patrons will see a link to register below the log in box on the right of the main OPAC page.
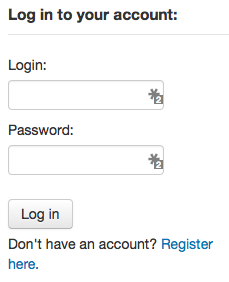
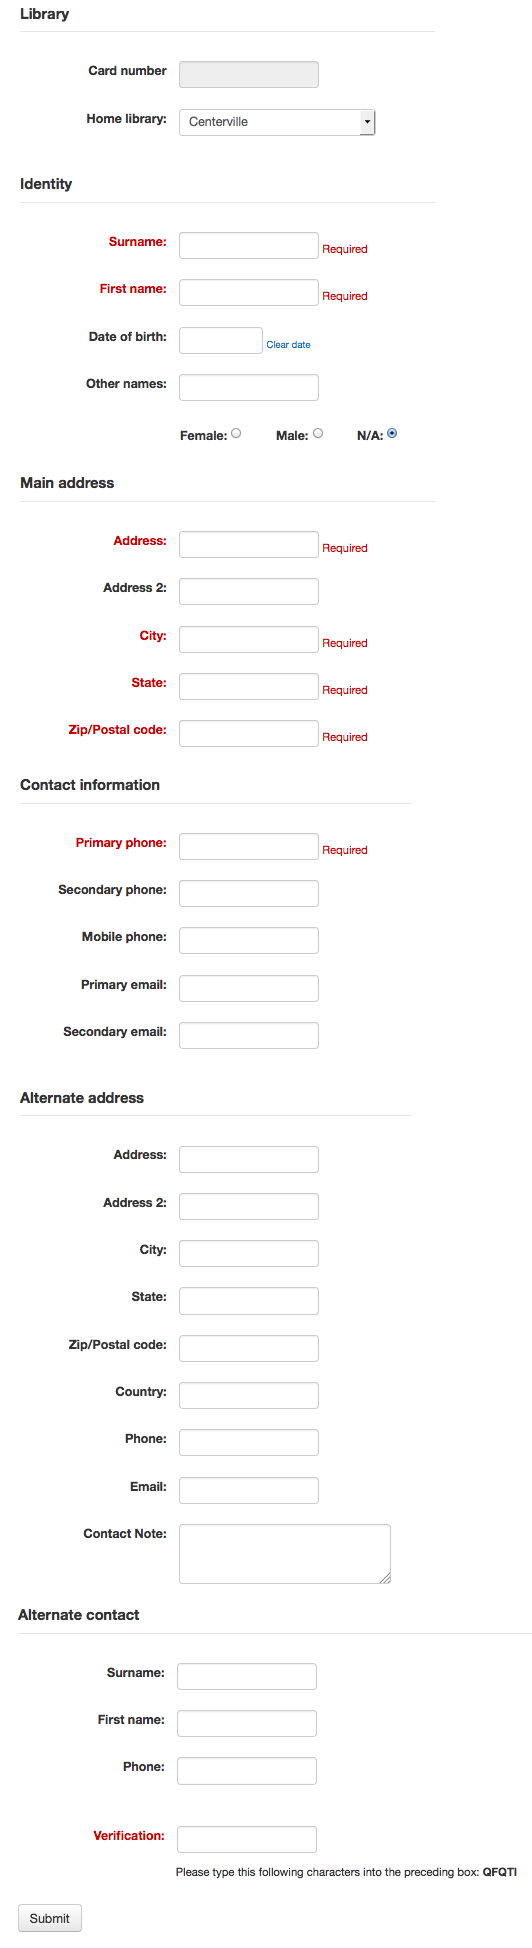
When the patron clicks the “Register here” link they will be brought to a registration page. The options on the registration page can be controlled by editing the PatronSelfRegistrationBorrowerMandatoryField and the PatronSelfRegistrationBorrowerUnwantedField preferences.
Once the patron has confirmed submitted their registration they will either be sent an email to confirm their account (if you have the PatronSelfRegistrationVerifyByEmail preference to require this) or presented with their new username and password. If the PatronSelfRegistrationPrefillForm system preference is set to “Show and prefill”, they will be presented with the prefilled login form.

Gli utenti registrati in questo modo non avranno un numero di tessera fino a quando la biblioteca non ne assegnerà uno; ma avranno immediatamente accesso a tutte le funzionalità dell’OPAC. Per questo motivo si raccomanda di:
set up a provisional patron category for self registered patrons (such as “Self Registered) instead of using an existing patron category and set that value in the PatronSelfRegistrationDefaultCategory preference
give this patron category minimal circulation privileges in the circulation and fines rules (such as allowing a couple holds, but no check outs)
In questo modo gli utenti, o dovranno venire in biblioteca per verificare la loro identità prima di avere un numero di tessera e la possibilità di avere prestiti o la biblioteca dovrà definire una procedura interna per la generazione di numeri di tessera prima di fornirne una all’utente autoregistrato. Una volta fatto questo la biblioteca può modificare la categoria a una più appropriato (sia esso un adulto, residente, non residente, studente, ecc) e aggiungere un numero di tessera / codice a barre.
Your account
If the opacuserlogin system preference is set to “Allow”, patrons can log in and access their account.
Once logged in patrons are brought to their account summary.
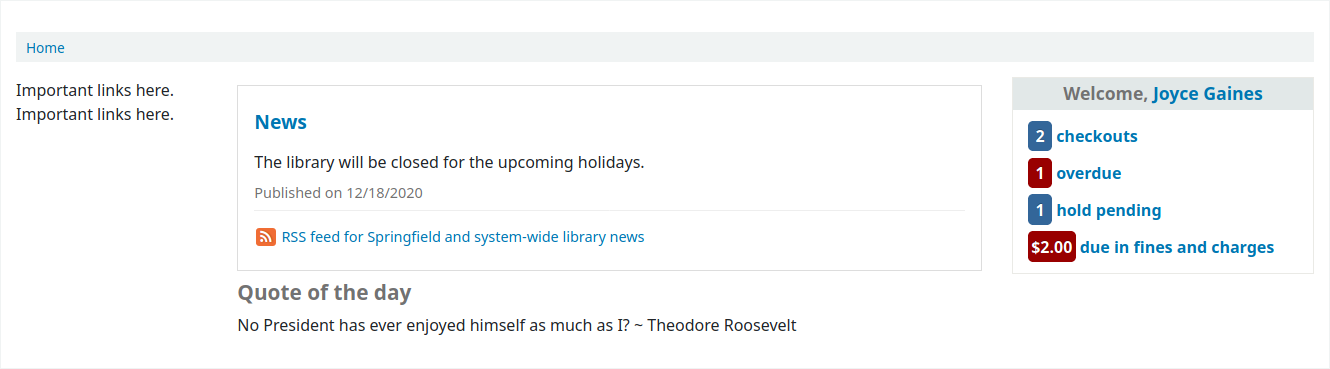
If patrons access the home page while logged in, and OPACUserSummary is set to “Show”, they will see a small summary of their account instead of the login fields.
From any page on the OPAC, clicking on their name at the top right of the page will bring a patron back to their account.
Reimpostazione della password
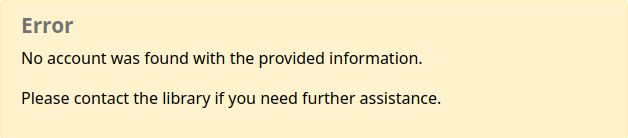
If you have the OpacResetPassword system preference set to “Allow”, patrons can reset their password by clicking the “Forgot your password?” link found under the login box.
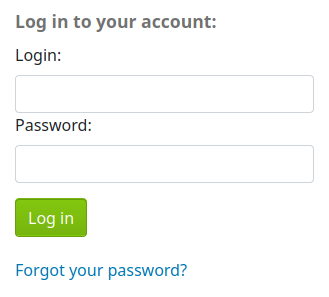
Once clicked, they will be presented with a form asking for their username and their email address.
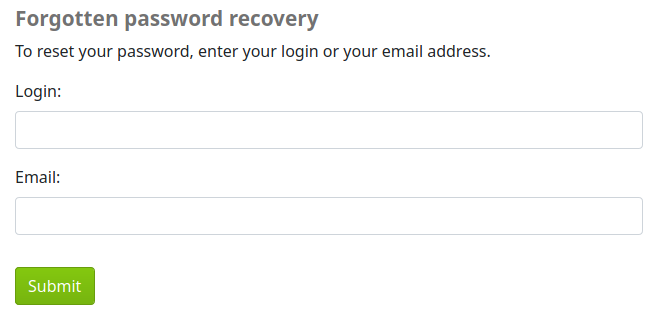
Avvertimento
Patrons must have an email address on file to reset their password. If they don’t have an email address already in their file, they will get an error message
Il sistema invierà all’utente le istruzioni per reimpostare la password.
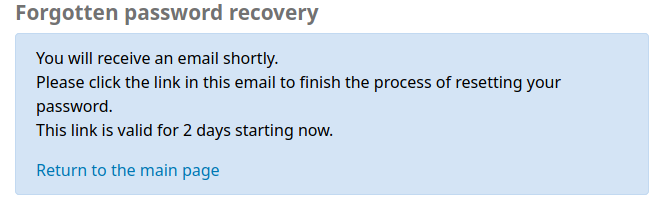
The content of the email can be customized with the Notices and slips tool. The code of the letter is PASSWORD_RESET.
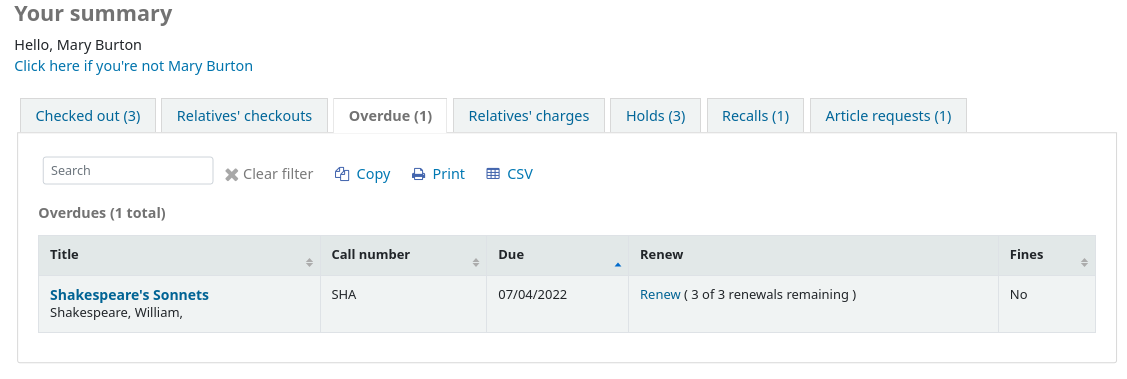
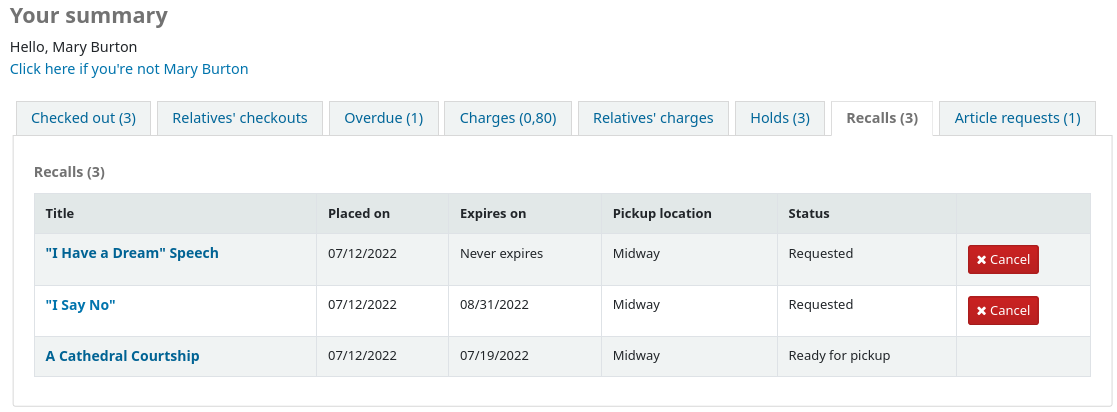
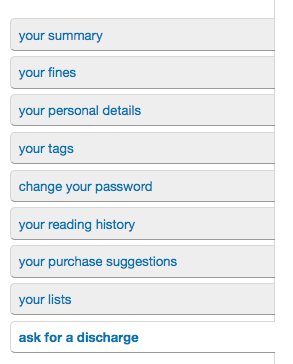
Your summary
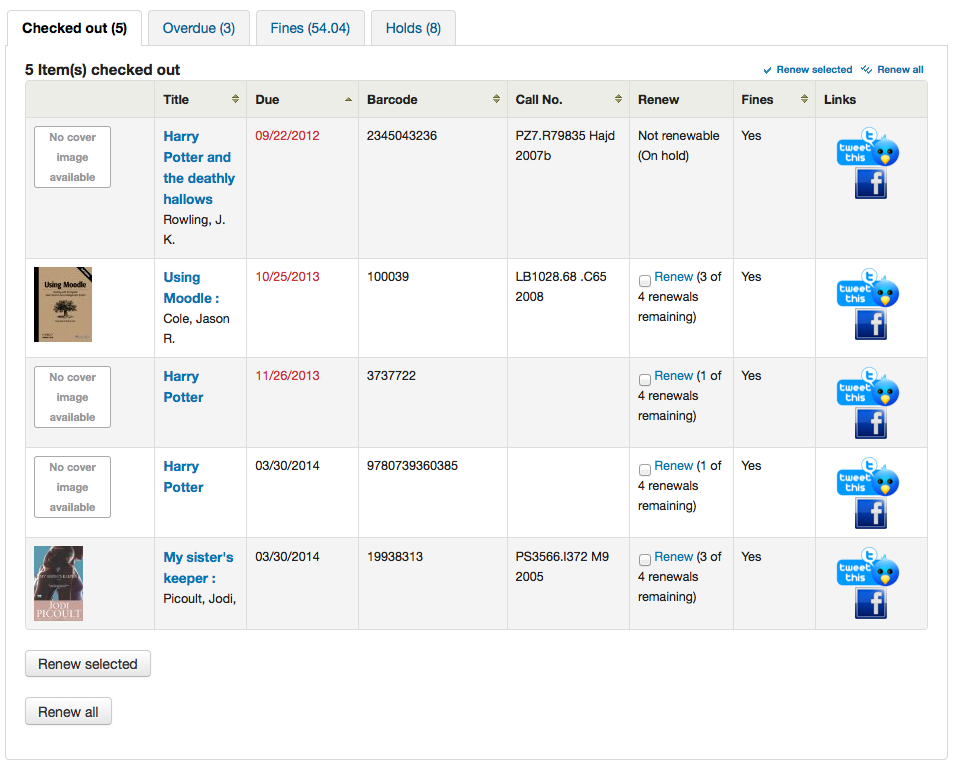
From the “your summary” tab, patrons will see all of the items they have checked out with the overdue items highlighted in red.
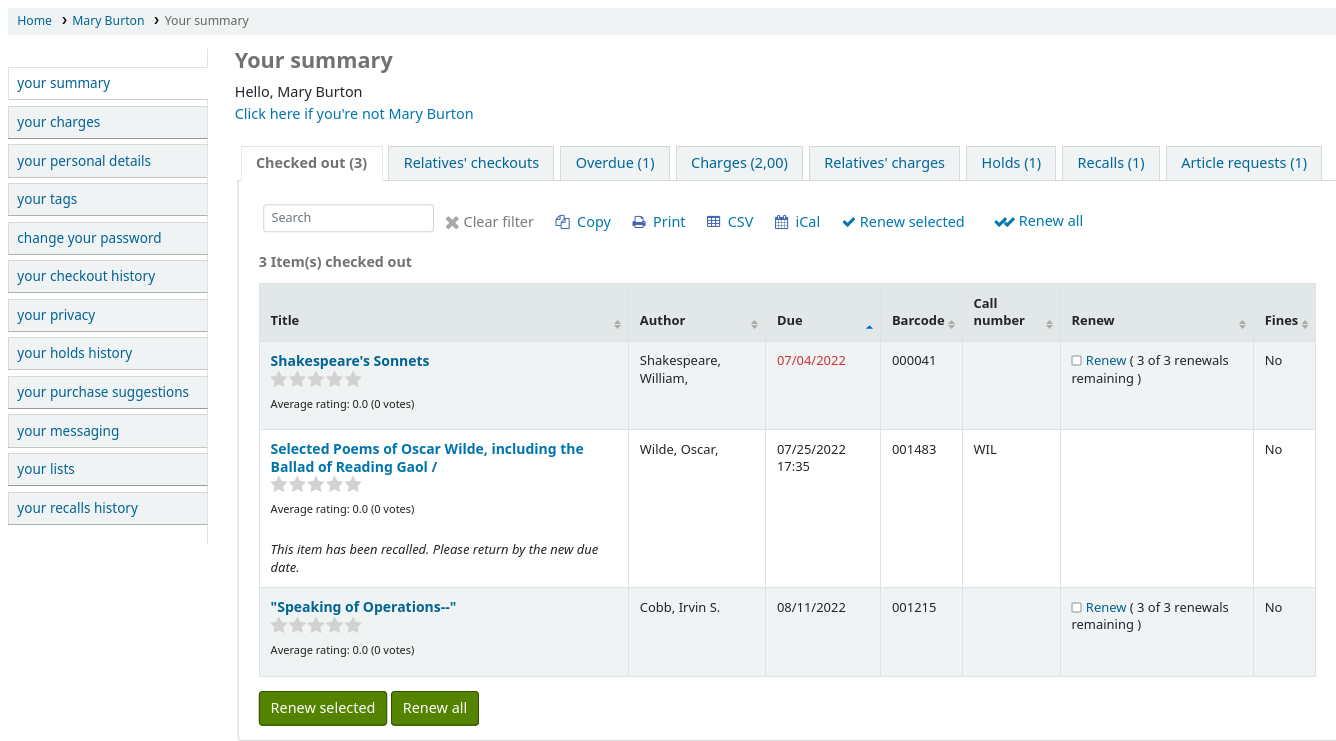
If OpacRenewalAllowed set to “Allow”, patrons will be able to renew their checkouts from the OPAC.
If the patron has pending charges exceeding the value set in OPACFineNoRenewals, a note will display explaining that renewals cannot be made.

A note will display if the patron cannot place holds due to their charges exceeding the value set in the maxoutstanding system preference.

If AllowPatronToControlAutoRenewal is set to “Allow patrons”, patrons will be able to choose whether or not they want their checkouts to be renewed automatically. If they choose ‘Yes’, items for which automatic renewal is enabled in the circulation rules will renew as expected. If they choose ‘No’, the automatic renewals that would have applied to this patron’s checkouts will not take place.

If you have HTML entered in the OPACMySummaryHTML preference then you will see that to the right of the “Fines” column.
Se i tuoi utenti vogliono vedere i codici a barre sulla loro lista di copie in prestito si può impostare un attributo utente con il valore di SHOW_BCODE e un valore autorizzato tipo YES_NO.
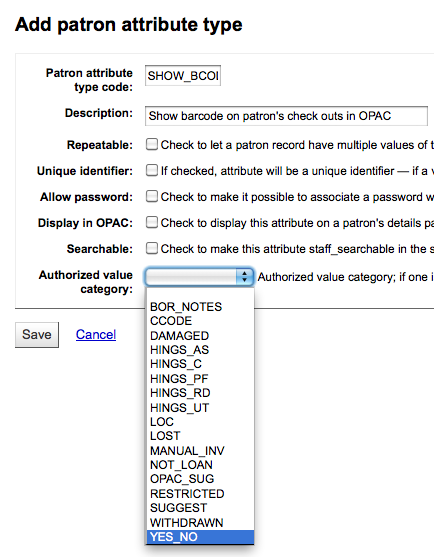
Poi modifica l’utente e poni il campo SHOW_BCODE a “yes”.

Verrà aggiunta una colonna nella sintesi dei prestiti nell’OPAC che mostra agli utenti il codici a barre delle copie in prestito.
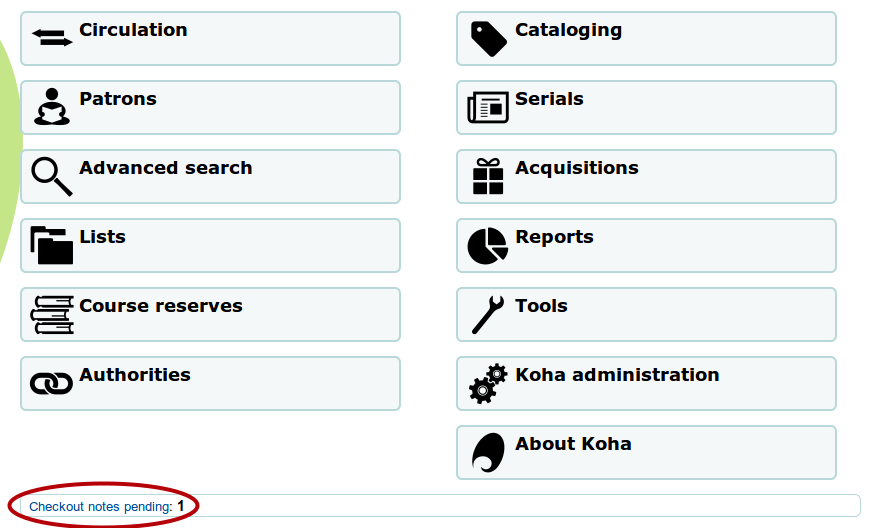
If you would like your patrons to leave a note on an item they have checked out allowcheckoutnotes preference must be set to allow.
In the patron’s summary of checkouts, there will be an added column to allow the patron to leave a note (for example: missing first page, or DVD is scratched). This note once confirmed by the patron will appear to the staff at the bottom of the staff interface’s home page, and also when the item is checked in.
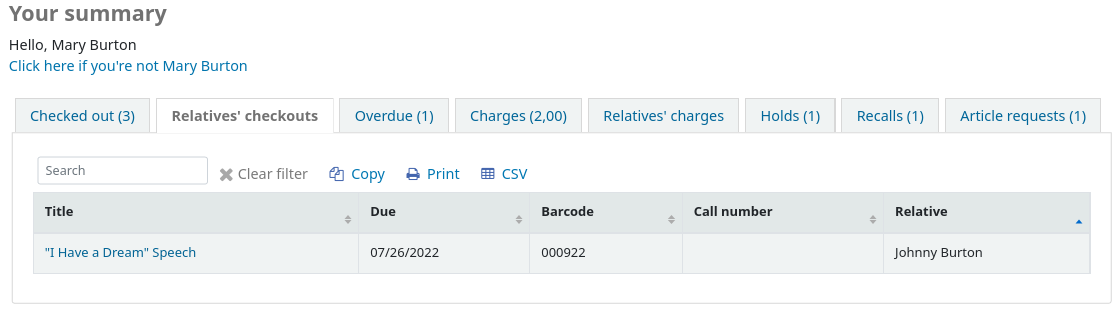
If their guarantee has allowed it via their privacy, or alternatively, if the staff is allowed to change this privacy setting in the staff interface with the AllowStaffToSetCheckoutsVisibilityForGuarantor system preference and this setting is turned on, when the guarantor logs in they will see a tab labeled «Relatives” checkouts» on their summary tab.
Facendo clic sulla scheda “in ritardo” verranno mostrate solo le copie prestate in ritardo di restituzione.
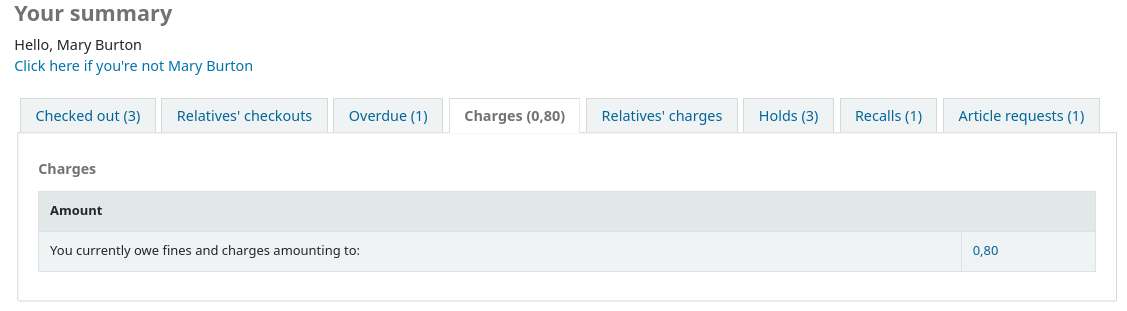
The “Fines” tab will show just a total of what the patron owes. Clicking on the total will take them to the “your fines” tab where they will see a complete breakdown of their fines and bills. If you don’t charge fines at your library you can turn the display of these tabs off by setting the OPACFinesTab preference to “Don’t allow.”
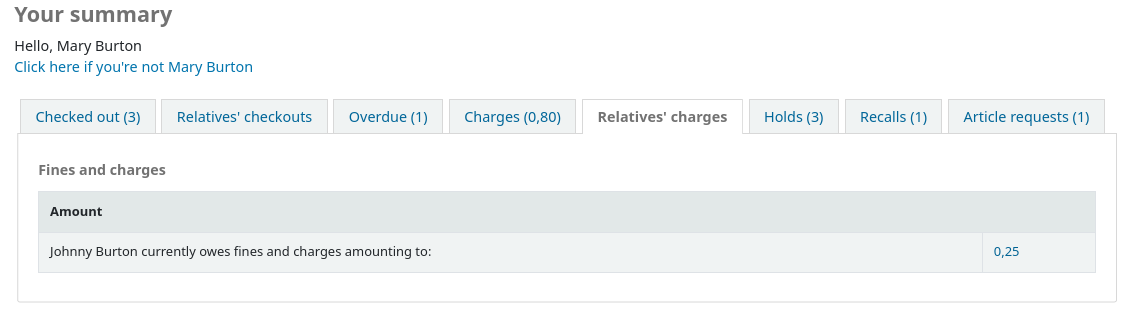
If their guarantee has allowed it via their privacy, or alternatively, if the staff is allowed to change this privacy setting in the staff interface with the AllowStaffToSetFinesVisibilityForGuarantor system preference and this setting is turned on, when the guarantor logs in they will see a tab labeled «Relatives” charges» on their summary tab.
The “Holds” tab shows the patron the status of all of the items they have on hold.
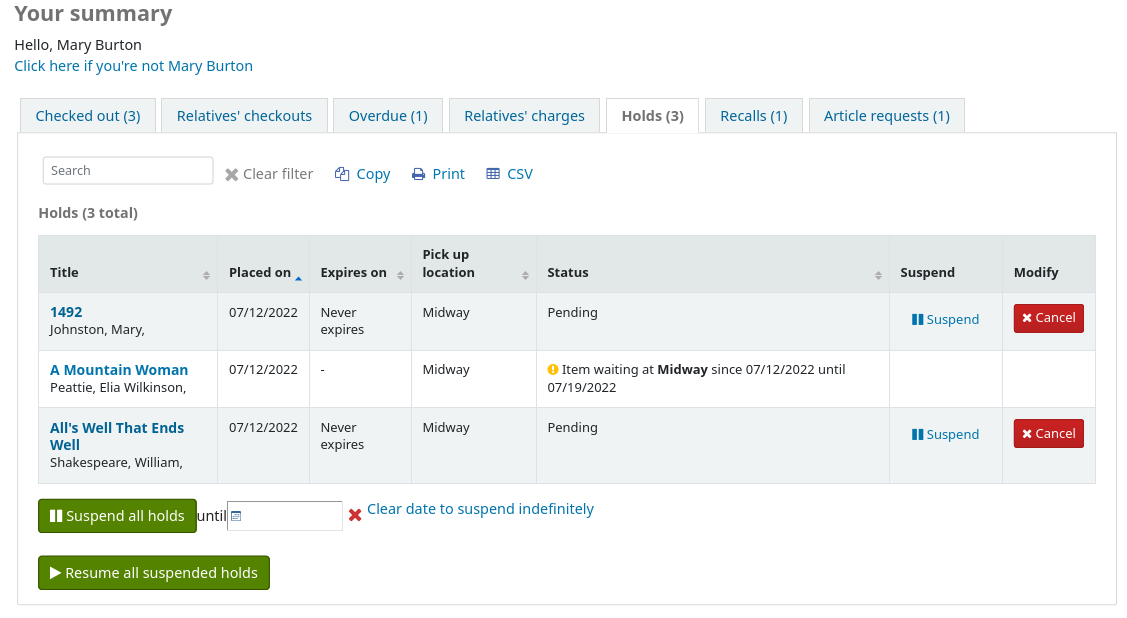
Patrons can cancel or suspend (depending on the value of your SuspendHoldsOpac system preference) their own holds if they are not in transit or already waiting for them. When they click “Suspend” they will be presented with the option to choose a date for their hold to resume.
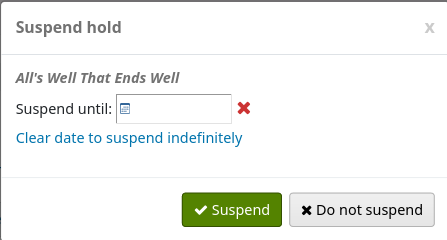
Essi possono anche sospendere tutte le prenotazioni indefinitamente o fino a una data specifica che scelgono compilando le opzioni per la sospensione in fondo alla pagina.
Nota
If you have your AutoResumeSuspendedHolds preference set to «Don’t allow» then you will not have the option to put an end date on the hold suspension
If your library allows recalls, the patron can see the recalls they have requested and their various statuses in the “Recalls” tab.
The patron can cancel a recall by clicking the “Cancel” button, provided that it is not already awaiting pickup.
Patron flags
Se hai bloccato degli utenti essi vedreanno uno dei seguenti messaggi di errore in alto nei loro account.
Tessera contrassegnata come smarrita

Indirizzo da modificare
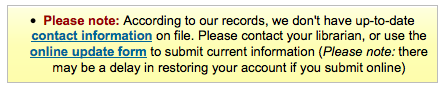
Nota
this error message will not include a link to the update form if you have OPACPatronDetails set to “Don’t allow”
Utente contrassegnato come limitato

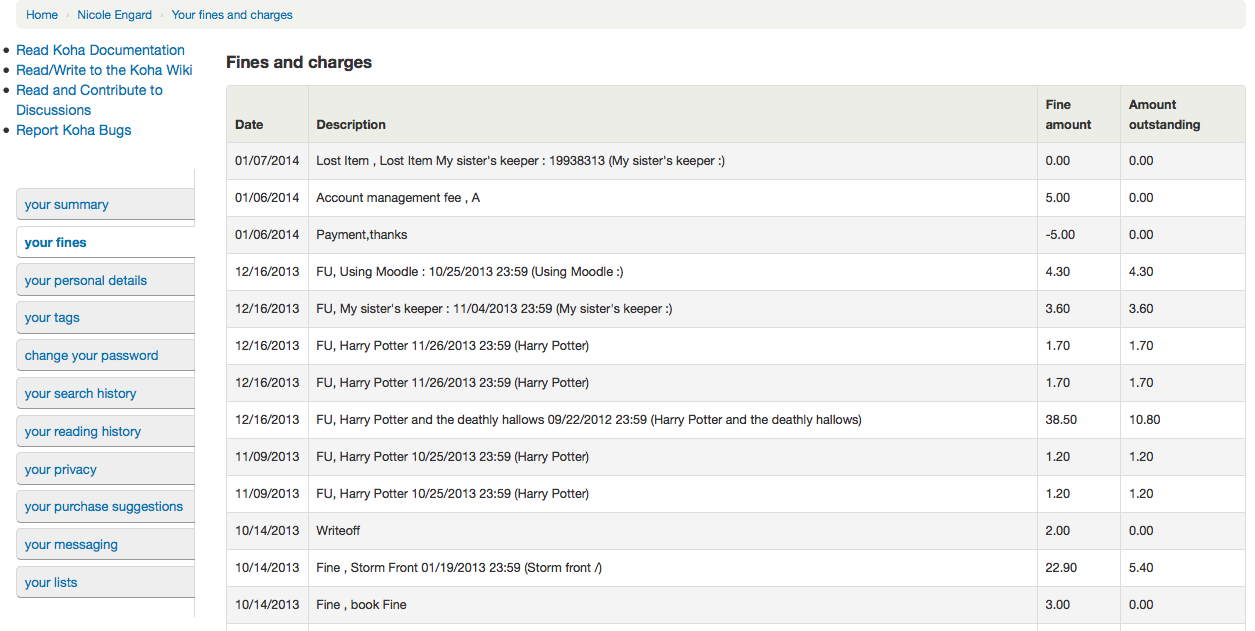
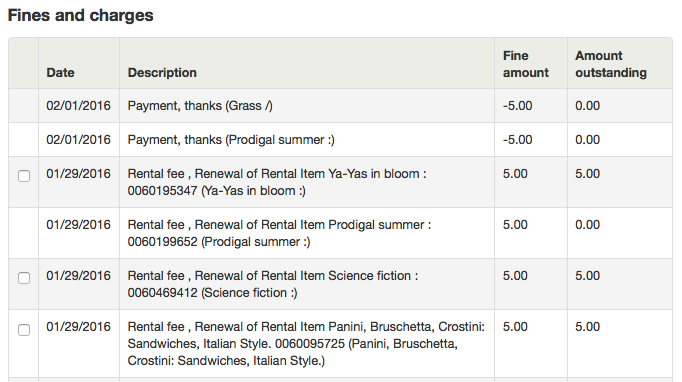
Your fines
If your library charges fines the next tab on the left is “your fines”. Opening this tab will show the patron an entire history of their accounting at the library.
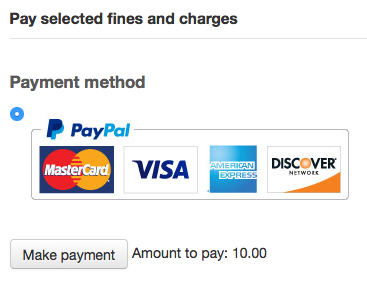
If you are allowing patrons to pay their fines using PayPal with the EnablePayPalOpacPayments preference there will be checkboxes to the left of each fine with an outstanding amount.
Nella parte inferiore l’utente vedrà la possibilità di pagare con PayPal per quanto ha selezionato.
Dopo aver pagato, ti verrà presentato un messaggio di conferma
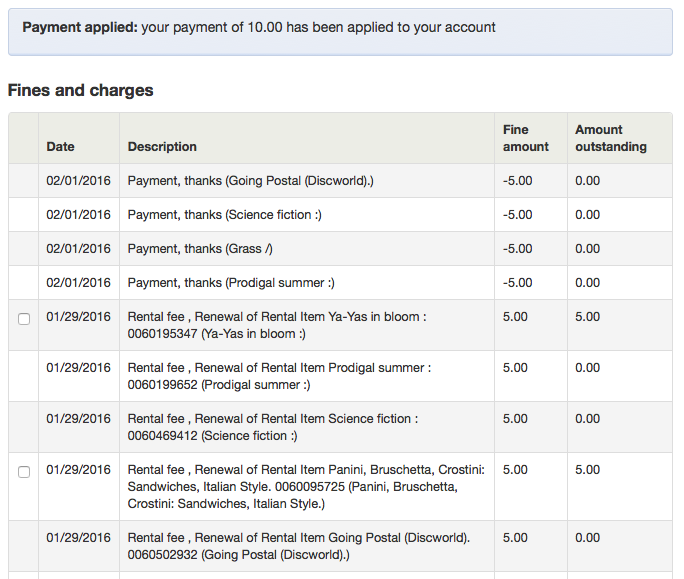
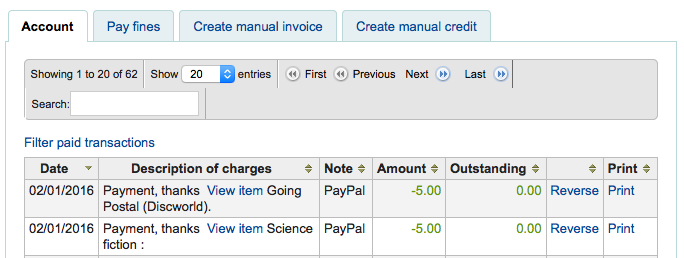
E vedrai che la multa è stata pagata tramite PayPal dentro l’interfaccia del bibliotecario.
Your personal details
If you have your OPACPatronDetails preference set to “Allow”, your patrons will see a form filled in with their contacting information by clicking on the “Your personal details” tab. You can control what fields patrons see and can modify via the OPAC by setting the PatronSelfModificationBorrowerUnwantedField and PatronSelfModificationMandatoryField preferences.
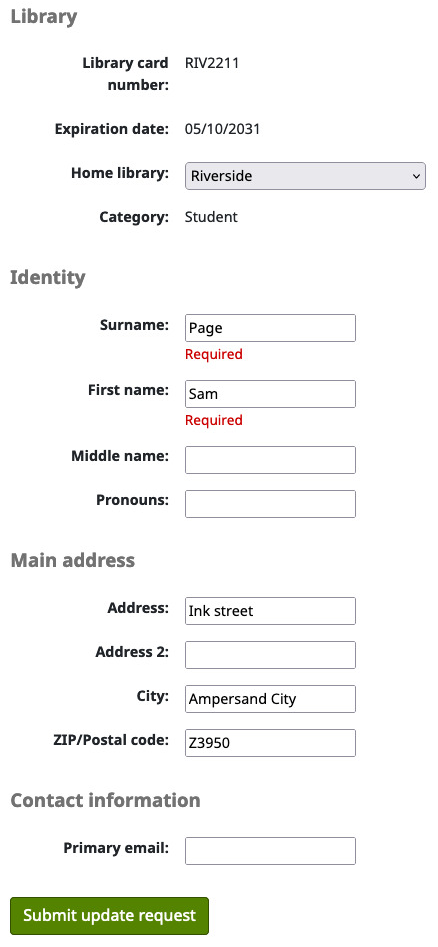
Patrons can edit their details in this form and click “Submit changes” to have their edits sent to the library for review before their record is updated. Staff will see all patrons requesting modification to their record listed below the modules on the main dashboard along with anything else awaiting library attention.

If the OPACPatronDetails preference is set to “Don’t allow” then patrons will simply see their details and a message stating that they should contact the library for changes.
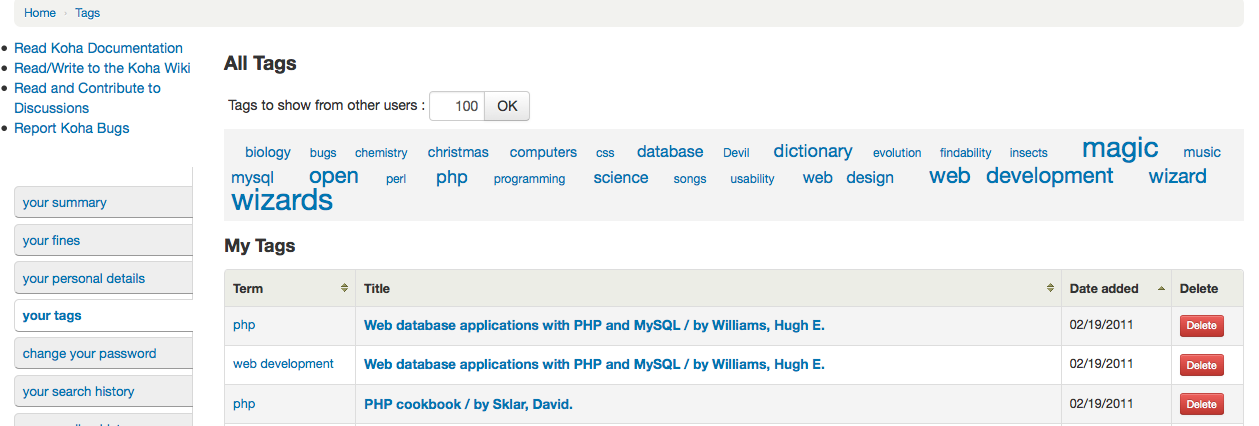
Your tags
If your library has TagsEnabled set to “Allowed” then the next tab on the left will be “your tags”. This tab will show patrons all of the tags in the system as a cloud and then all of the tags they have applied in a list format. From here patrons have the ability to remove tags that they have added if they want.
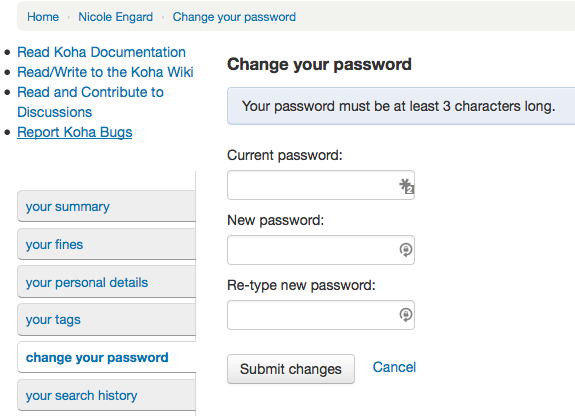
Change your password
Next, if you have OpacPasswordChange set to “Allow” the next tab will be “change your password,” where patrons can change their password for logging into the OPAC. Patrons will be presented with a standard form asking them to enter their old password and then their new password twice.
Your search history
If you have your EnableOpacSearchHistory preference set to “Allow” then your patrons can access their search history via the “your search history” tab.
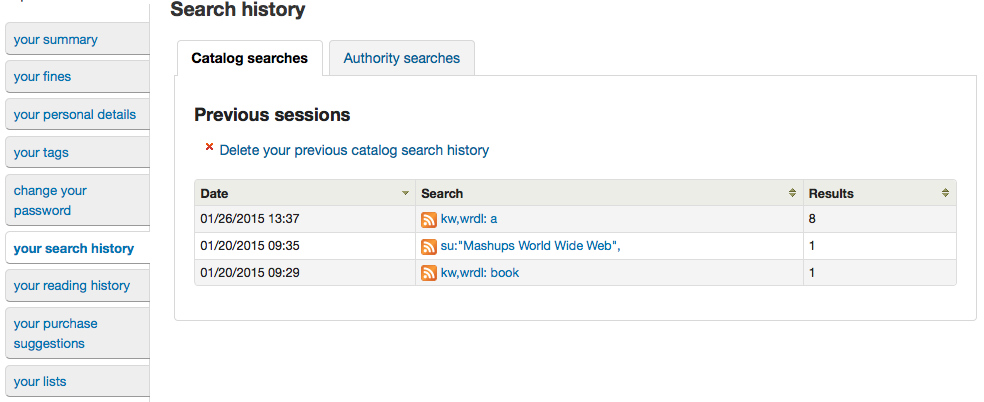
La cronologia delle ricerche è una registrazione di tutte le ricerche gestiti dal patron. Cliccando su una qualsiasi delle frasi di ricerca si riesegue la ricerca. La cronologia di ricerca può essere eliminato dall’utente in qualsiasi momento cliccando sul pulsante “Elimina la cronologia di ricerca” posto nella parte superiore di questa scheda o facendo clic sul piccolo rosso “x” accanto al link “Ricerche effettuate” in alto a destra dell’OPAC.

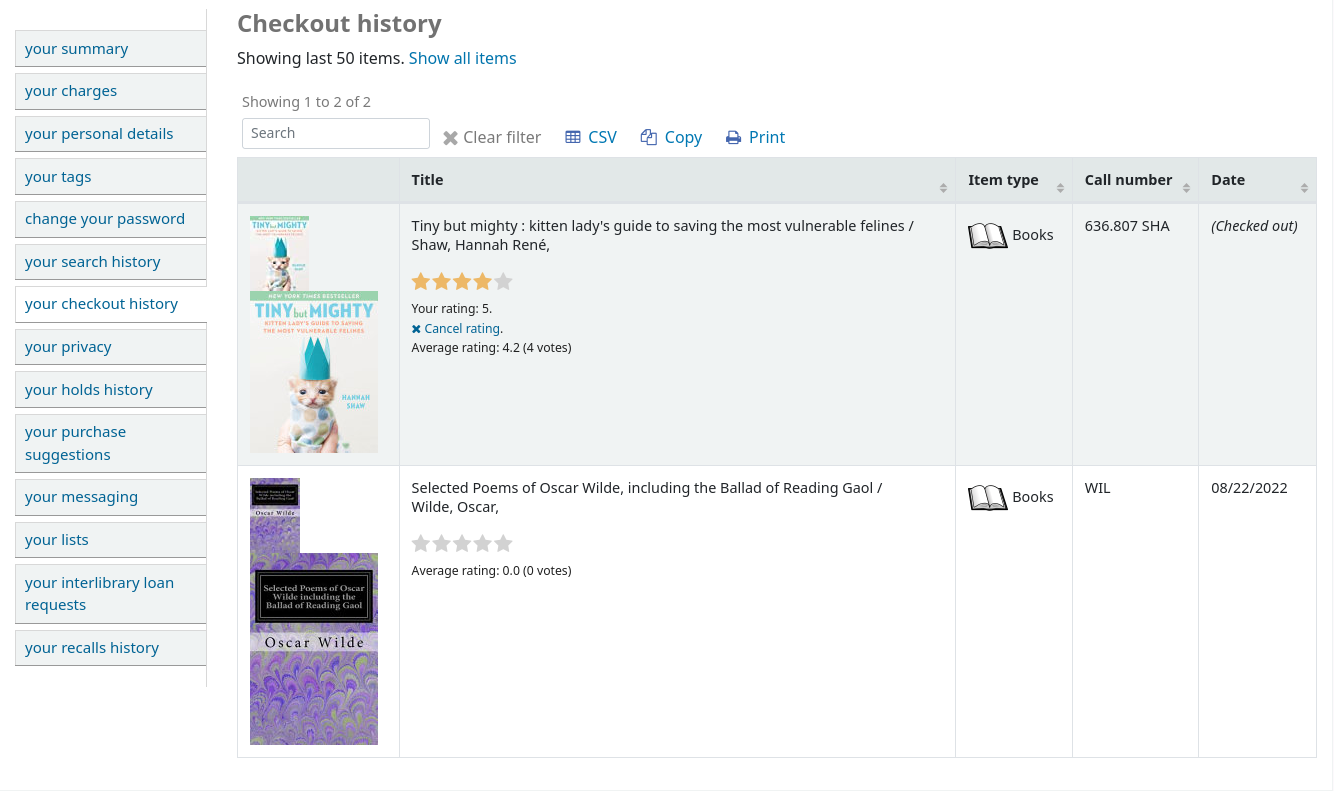
Your checkout history
Depending on your library’s setting for opacreadinghistory your patrons may see the “your checkout history” tab next. This will show the patron their entire borrowing history unless they have asked the library to not keep that information via the “your privacy” tab which will appear if you have the OPACPrivacy preference set to “Allow.”
Your privacy
The “your privacy” tab will appear if you have both the opacreadinghistory and the OPACPrivacy preferences set to “Allow.” This tab will allow the patrons to decide how the library keeps their circulation history data.
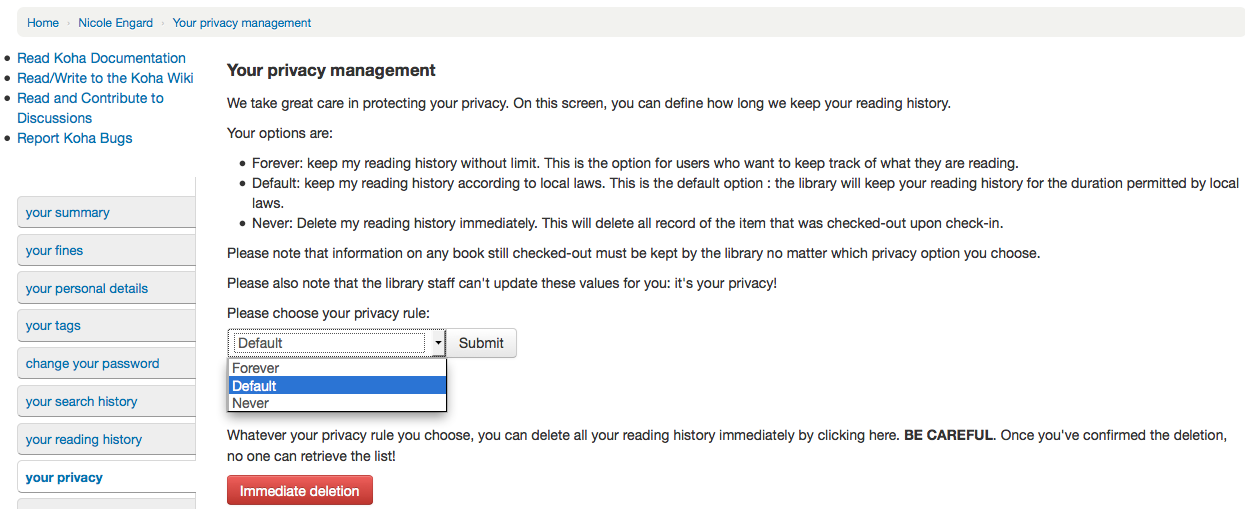
L’utente può scegliere tra tre opzioni:
Sempre: mantieni traccia dei mie prestiti per sempre. Questa opzione è per quegli utenti che voglio ricordarsi di tutto quello che hanno letto.
Predefinito: conserva il mio storico prestiti secondo le leggi locali. Questa è l’opzione predefinita: la biblioteca conserverà il tuo storico prestiti per la durata ammessa dalle leggi locali.
Mai: cancella subito i miei prestiti. La registrazione del prestito verrà cancellata al momento della restituzione.
Depending on the patron’s suggestions the contents of the “Your reading history” tab and the “Circulation History” tab in the staff client may change.
Indipendentemente dalla sua scelta, l’utente può cancellare la sua storia di lettura in blocco in qualsiasi momento facendo clic sul pulsante “eliminazione immediata”.
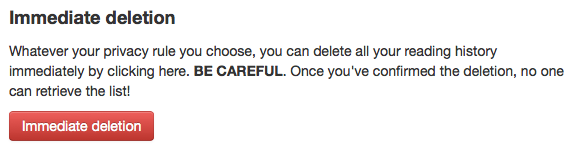
Facendo clic su questo pulsante non eliminerà le copie attualmente in prestito, ma cancellerà la precedente cronologia di lettura dell’utente.
Importante
In order for the patron to be able to delete their reading history you must have the AnonymousPatron preference set.
If you’re allowing guarantees to grand permission to their guarantors to view their current checkouts with the AllowPatronToSetCheckoutsVisibilityForGuarantor preference they will see that option on this screen.
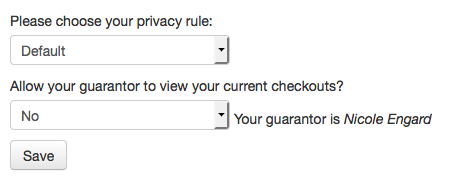
Quando il garante si collegherà egli avrà a disposizione una scheda con «Prestiti dei parenti» dentro la sua scheda di riepilogo.
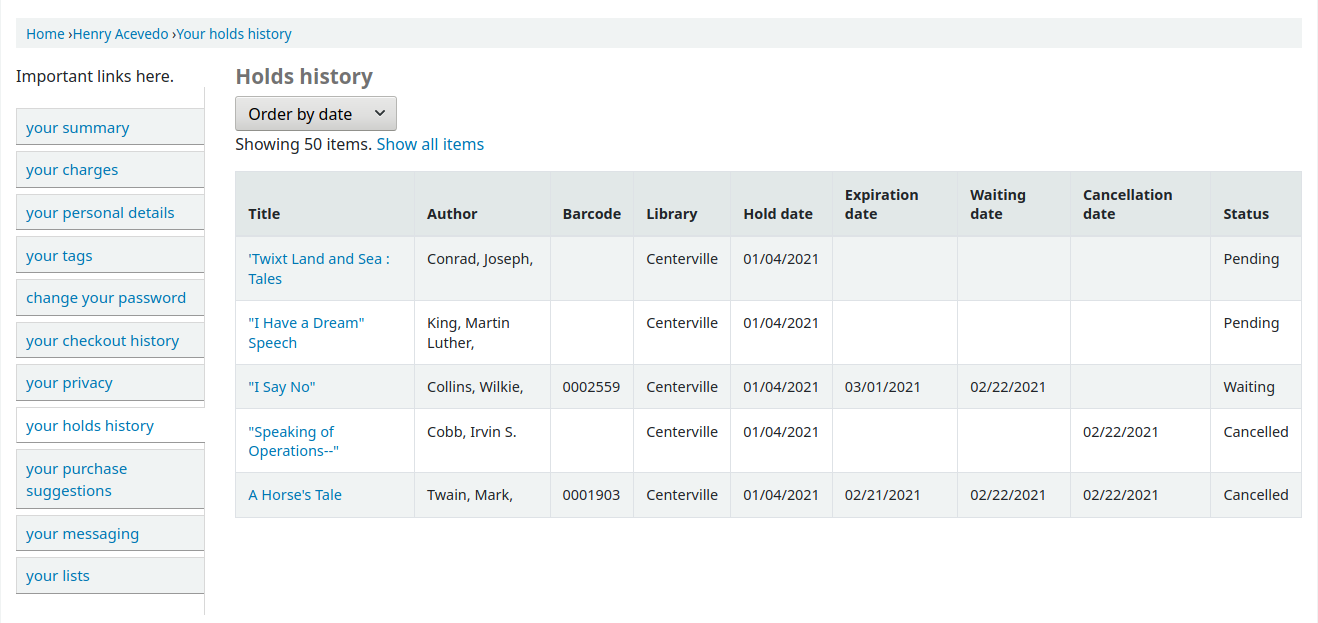
Your holds history
If the OPACHoldsHistory system preference is set to “Allow”, patrons will be able to see all their current and past holds.
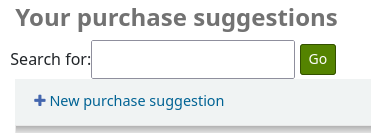
Your purchase suggestions
If your library allows patrons to make purchase suggestions the next tab will show all suggestions that the patron made to the library and their statuses. To disable this tab and the suggestion functionality set the suggestion preference to “Don’t allow.”
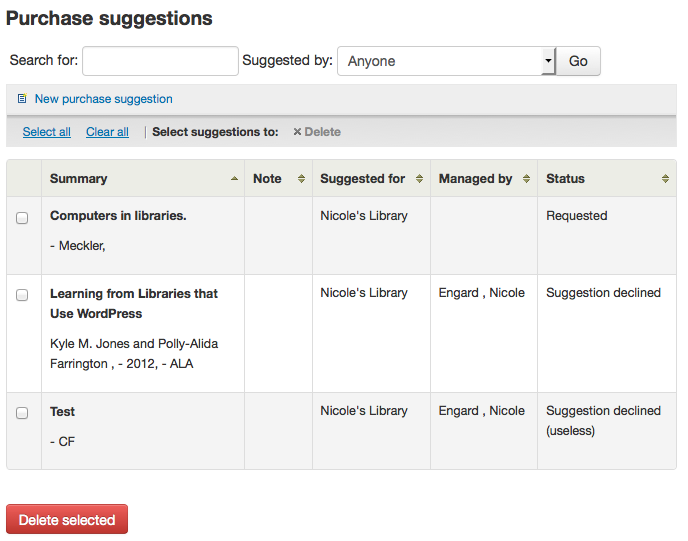
If you have OPACViewOthersSuggestions set to “Show” then patrons will be able to search suggestions from the top of this list.
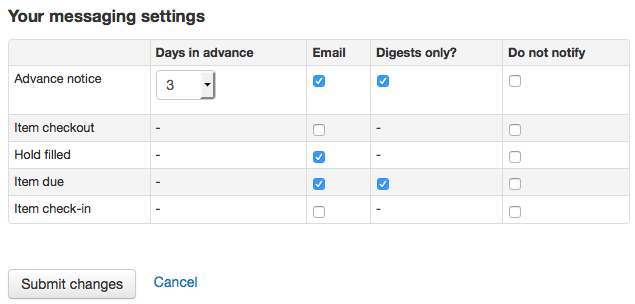
Your messaging
If your library has the EnhancedMessagingPreferences and the EnhancedMessagingPreferencesOPAC preferences set to “Allow” then your patrons will be able to choose which messages they receive from the library (with the exception of overdue notices which the library controls).
If you use an outside driver for sending text messages set with the SMSSendDriver preference, you will see an additional column to receive these messages as SMS (or text messages) and a field for a cell (or SMS) number.
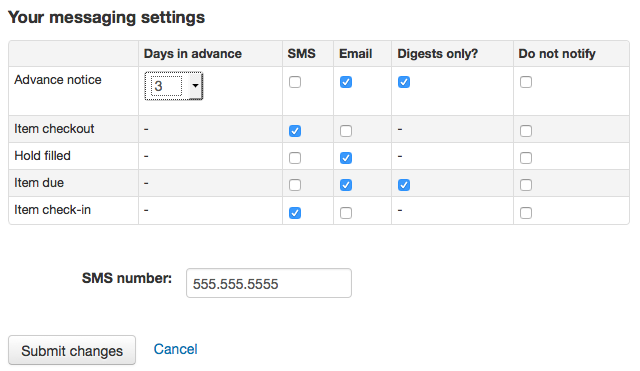
If you are using the Email protocol for sending text messages set with the SMSSendDriver preference, you will see an additional column to receive these messages as SMS (or text messages), a field for a cell (or SMS) number, and a pull down listing cellular providers entered in administration.
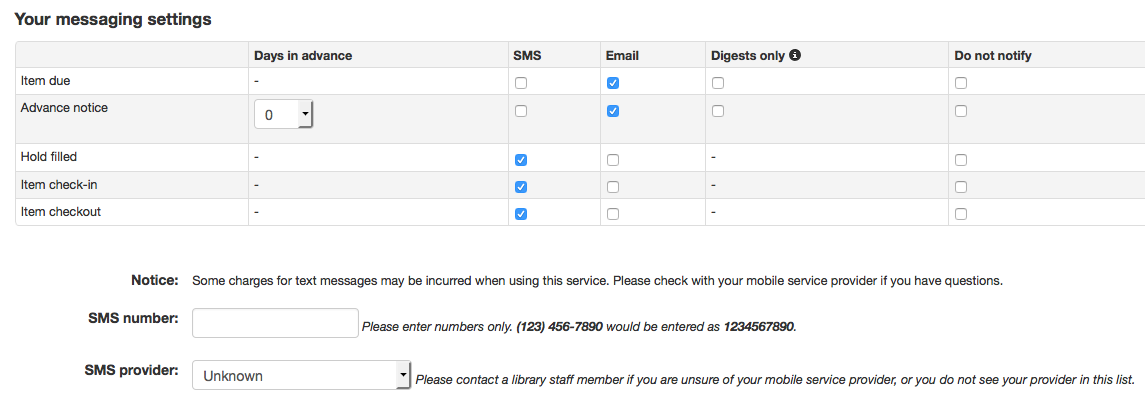
Se si utilizza il servizio Itiva Talking Tech si vedrà una colonna aggiuntiva per ricevere questi messaggi via telefono.
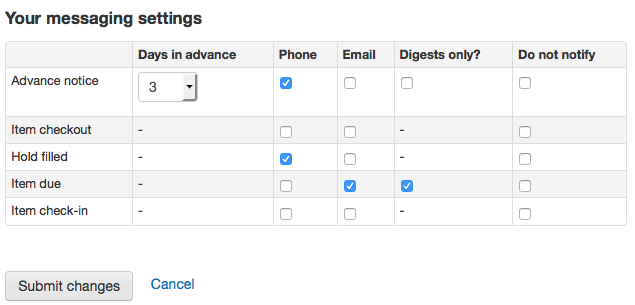
Questi avvisi sono:
Advanced notice: A notice in advance of the patron’s items being due (The patron can choose the number of days in advance)
Item checkout: A notice that lists all the of the items the patron has just checked out and/or renewed, this is an electronic form of the checkout receipt
Hold filled: A notice when you have confirmed the hold is waiting for the patron
Item due: A notice on the day and item is due back at the library
Item check-in: A notice that lists all the of the items the patron has just checked in
Gli utenti possono scegliere se ricevere gli avvisi come digest spuntando la casella “solo digest” e il metodo di spedizione. Il digest è un raggruppamento di tutti i messaggi di un certo tipo (p.es. tutte le copie da restituire nei prossimi 3 giorni in un solo messaggio) invece di un messaggio per avviso.
If the TranslateNotices preference is set to Allow the patron will also see an option to choose “Preferred language for notices” with a dropdown list of available languages.
Importante
You must choose a delivery method (SMS or email or phone) along with “Digest only?” if you would like to receive a digest of the messages.
Your lists
If your library has the virtualshelves set to “Allow” they will see the “your lists” tab. From here your patrons can review public lists and create or edit their own private lists.
Ask for a discharge
If you have enabled the useDischarge preference then patrons will be able to request a discharge via the OPAC.
Da qui gli utenti posso chiedere una liberatoria
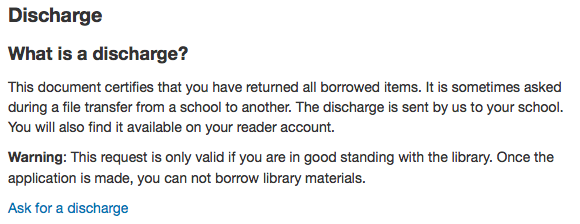
E riceveranno conferma della loro richiesta.

Your routing lists
If you are named as a recipient on any serial routing lists you will see them listed here. The following note is displayed «You are subscribed to the routing lists for following serial titles. If you wish to make changes, please contact the library».
Your interlibrary loan requests
If your library has the ILLModule preference set to ‘Enable’ patrons will have the option to make ILL requests when logged in to their OPAC account. From here they can view their existing requests and place new ones.
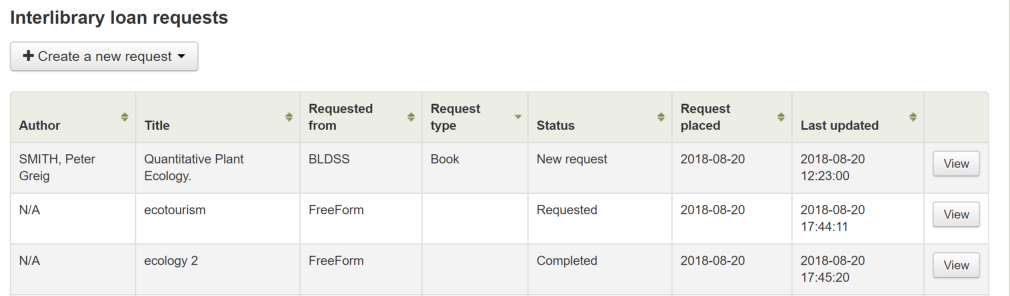
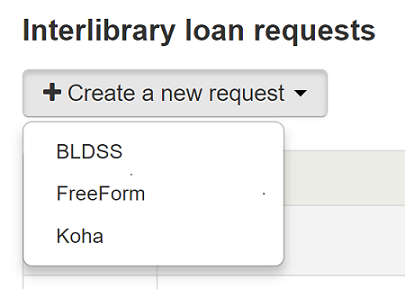
To place a new interlibrary loan request click on ‘Create a new request’ and choose a request form.
Nota
The options displayed are dependent on your ILL configuration. See the ILL backends wiki page at https://wiki.koha-community.org/wiki/ILL_backends further explanation.
Nota
If you have entered copyright text in the ILLModuleCopyrightClearance preference the text displays here and you need to click ‘Yes’ to accept before continuing.
Complete the publication details as fully as possible. Depending on the form in use you may see the option to add Custom fields for additional information such as notes. Destination branch is a required field, this is the branch you would like the request to be sent to.
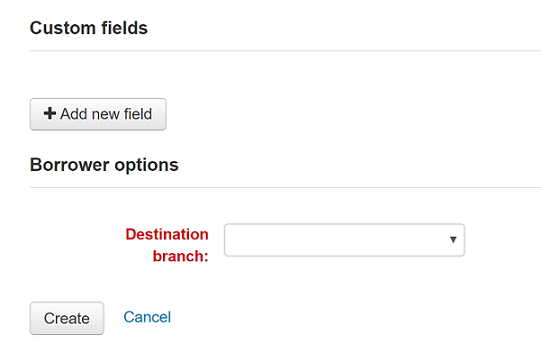
Click on “Create” to submit your request to the library for processing.
Your submitted request will be listed with a status of ‘New request’. Once processed the status will be updated to ‘Requested’.
Click on ‘View’ to make changes or cancel your request.
You cannot edit the form details but you can add a note to request a modification and then click on ‘Submit modifications’ at the bottom of the screen. Your modification will be sent to the library for processing.
For new requests you will also have the option to ‘Request cancellation’. Your request will be updated with the status ‘Cancellation requested’ and can then be removed by library staff.
Your recalls history
If your library allows recalls, the patron can see all their past and current recalls they have requested and their various statuses in the “your recalls history” tab.
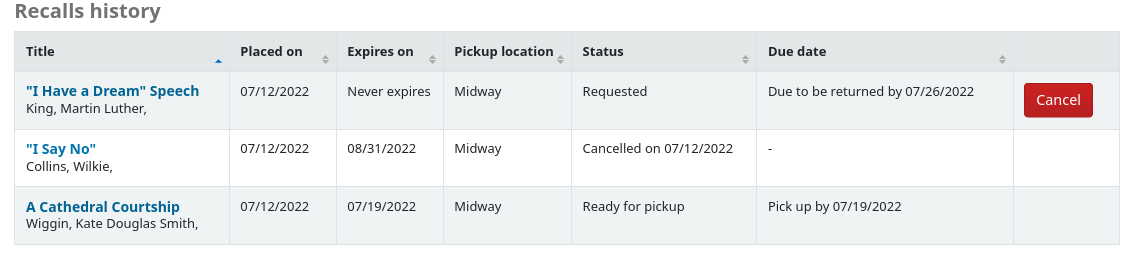
The patron can cancel a recall by clicking the “Cancel” button, provided that it is not already awaiting pickup.
Curbside pickups
If your library offers curbside pickup, the patron will be able to see their scheduled pickups under “Curbside pickups”.

The patron has the option to indicate that they are outside the library by clicking “Alert staff of your arrival”.
The patron also has the option to cancel their scheduled pickup with the “Cancel this pickup” button.
If the “Patron-scheduled pickup” setting is turned on in the curbside pickup configuration, the patron will be able to schedule their own curbside pickup appointment.

The patron must first choose a library at which they want to pick up their items
Nota
Only libraries with curbside pickup enabled will be displayed in the drop-down menu.
Furthermore, if the “Enable for waiting holds only” setting is turned on, only the libraries at which the patron has waiting holds will be enabled.
The patron must then choose a date
Nota
Only dates with available time slots will be displayed.
The possible pickup times will be displayed, depending on the day of the week
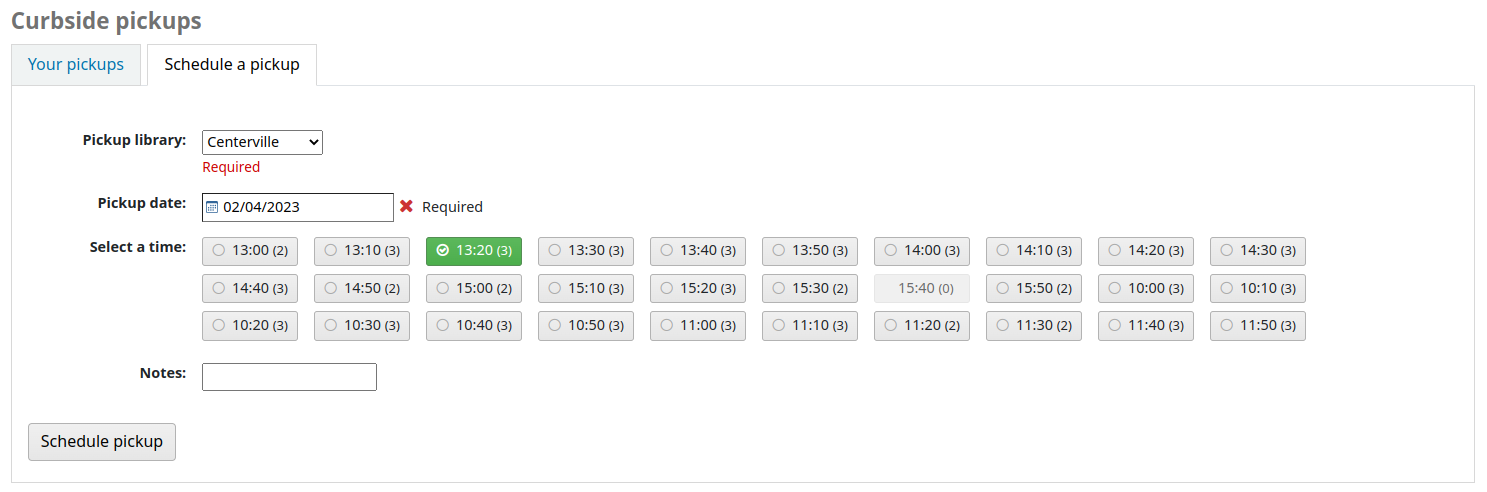
Nota
The number in parentheses under each time slot is the number of available appointments for that time. If the maximum number of appointments has been reached, based on the “Maximum patrons per interval” setting in the curbside pickup configuration, the time slot will be greyed out and the patron will not be able to select it.
The patron can optionally add a note about their pickup
The patron must then click “Schedule pickup” to save their appointment
Purchase suggestions
If your library has the suggestion preference set to “Allow”, patrons will have the option to make purchase suggestions in several areas in the OPAC.
If you are allowing everyone to see the purchase suggestions made by others with the OPACViewOthersSuggestions preference, there will be a link at the top of your OPAC under the search box.

Ci sarà un collegamento quando l’utente non trova nulla con la ricerca.

There will be a “Suggest for purchase” option in the detailed view of a bibliographic record.
And there will be a link in the Your purchase suggestions tab in the patron’s account.
Facendo clic su uno qualsiasi di questi link si aprirà il modulo dei suggerimenti di acquisto.
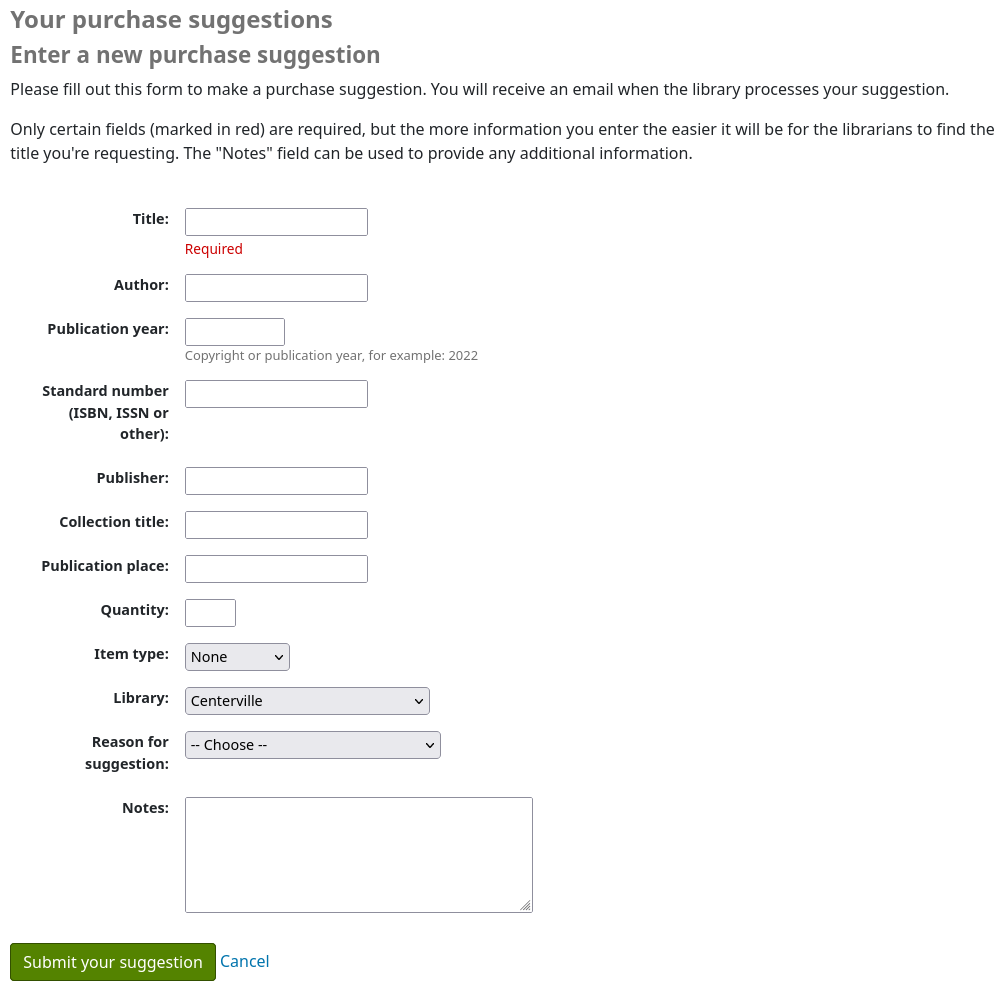
The informational text at the top of the form can be replaced using the HTML customizations tool, display location OpacSuggestionInstructions.
From the form only the “Title” is required by default.
Mandatory fields can be set using the OPACSuggestionMandatoryFields system preference.
The OPACSuggestionUnwantedFields system preference can be used to hide unnecessary fields.
The item type list can be edited by editing the SUGGEST_FORMAT authorized value list.
The “Reason for suggestion” list can be edited by editing the OPAC_SUG authorized value list.
You can change the text at the top of the form using the HTML customizations tool
Once the form is submitted the purchase suggestion will appear in the acquisitions module for the librarians to manage.
If a purchase suggestion has been ordered through the acquisitions module, the patron’s purchase suggestion title will be clickable and bring the patron directly to the ordered record in the OPAC.
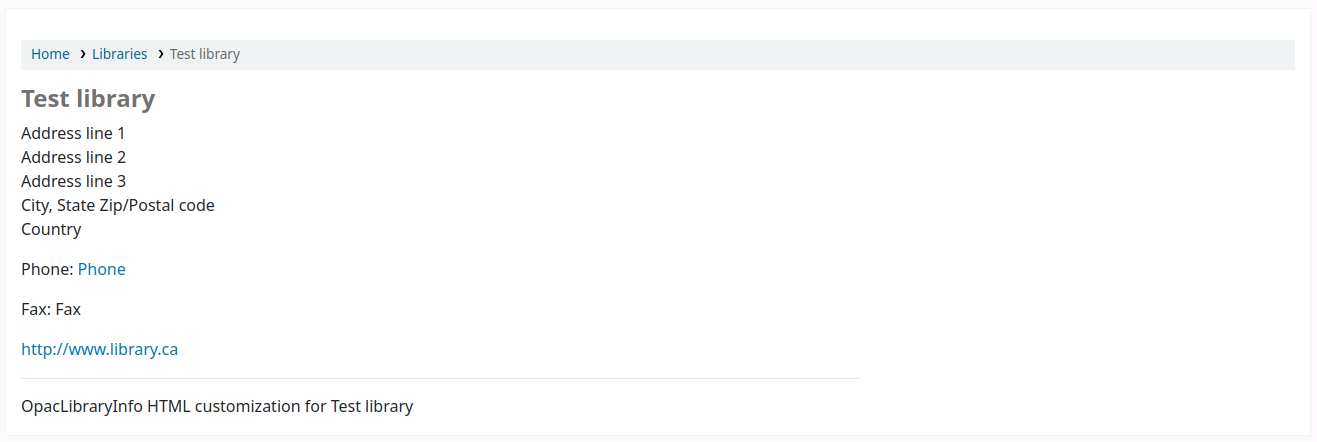
Libraries
The “Libraries” page shows the contact information (address lines, city, state, zip/postal code, country, phone number, fax number, website) for libraries in the system that are set as “Public”.
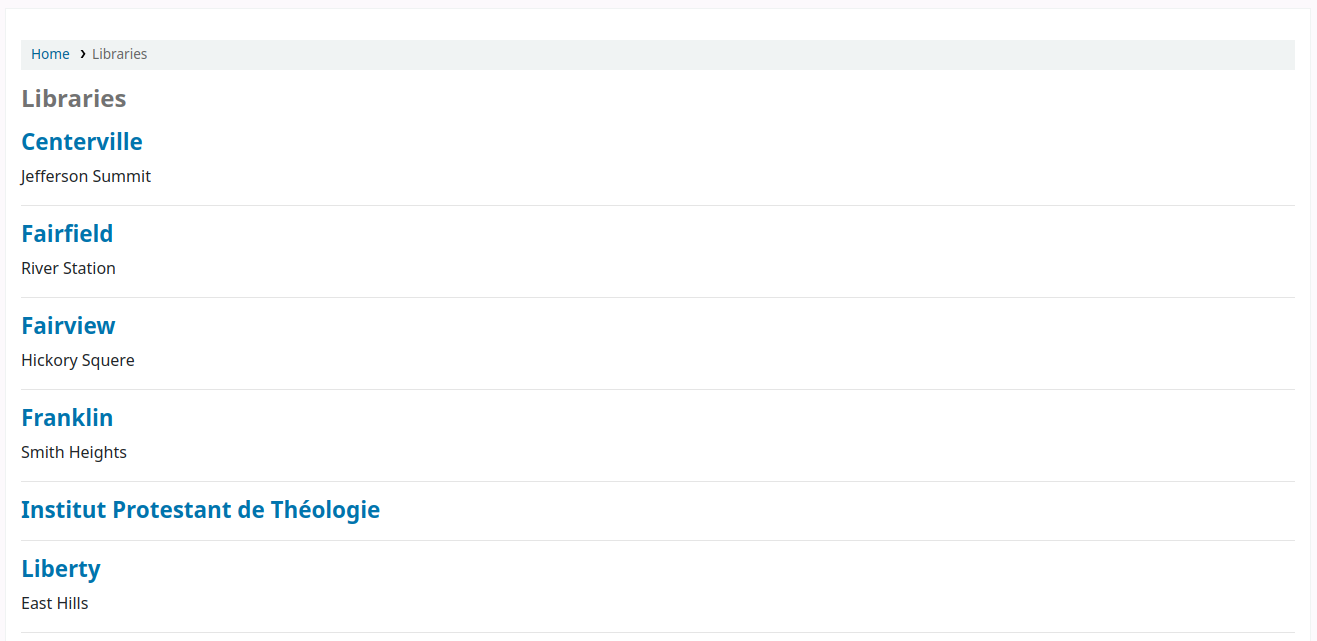
The library name is a link to a specific page for this library. This second page also includes “OpacLibraryInfo” HTML customizations for this library.
Commenti
Patrons can leave comments in the OPAC if you have the OPACComments preference set to allow this. Each bibliographic record has a comments tab below the bibliographic information.
Se l’utente è collegato vedrà un link per aggiungere un commento alla copia. Cliccando su questo link si apre una finestra pop-up con una casella di testo per i commenti.
Una volta che il commento è stato digitato e il inviato tramite il bottone “Invia”, l’utente vedrà il commento come in sospeso e altri utenti non vedranno il commento.
Once the comment is approved the patron will see the number of comments on the “Comments” tab and their comment labeled amongst the other comments. If the ShowReviewerPhoto system preference is set to “Show”, the patron’s photo pulled from the Libravatar library will be displayed next to their comment.
Other patrons will see the comment with the name of the patron who left the comment (unless you have set the ShowReviewer preference to not show patron names).
If you have your OpacShowRecentComments set to show then you’ll see the approved comments on that page.
Da questa pagina gli utenti possono ricevere i commenti recenti utilizzando il feed RSS.