Circolazione
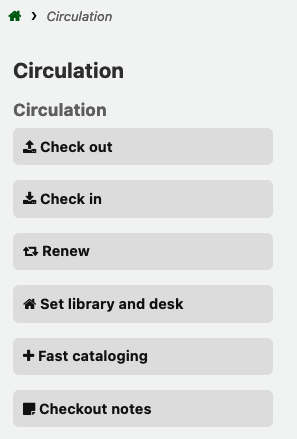
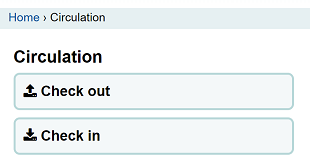
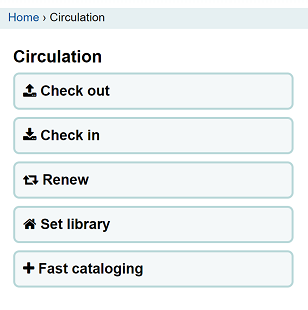
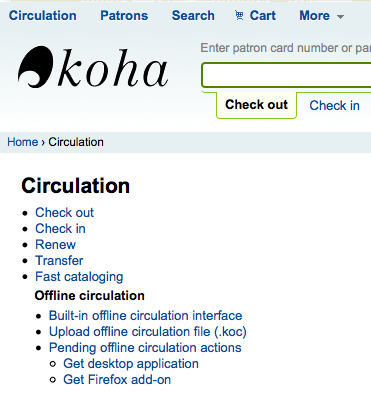
Le funzioni di circolazione possono essere raggiunte in diversi modi. Dalla pagina principale dello staff ci sono link veloci per i prestiti in uscita, o per i trasferimenti. Per una lista completa delle funzioni di circolazione puoi vedere la pagina della Circolazione che ha un link in alto a sinistra in ogni pagina, o al centro della pagina principale dello staff.
Before circulating your collection you will want to set your Global system preferences, Basic parameters and Patrons and circulation rules.
Mentre sei nel modulo della circolazione, puoi passare da un tab all’altro della casella di ricerca usando i seguenti tasti rapidi:
vai alla ricerca con alt+Q
vai al prestito con Alt+U
questo non funziona per gli utenti Mac
vai alla restituzione prestiti con alt+R
Nota
Gli utenti Mac possono usare il bottone OPTION al posto di ALT
Check out (issuing)
Per iniziare un prestito devi per prima cosa inserire il barcode dell’utente o parte del nome. Le opzioni per il prestito compaiono principalmente in tre punti:
Check out option in the search bar at the top of the staff interface’s main page

Check out option in the search bar at the top of the main circulation page

Those two options are essentially a patron search. If you only have one result, Koha will automatically go to the patron’s file, in the “Check out” tab.
If your search gives you more than one result, it will ask you to choose which patron to check out to.
Nota
You can customize the columns of this table in the “Table settings” section of the Administration module, under the patrons tab (table id: memberresultst).
Clicking on a patron search result will bring you to the patron’s file, on the “Details” tab. Click the “Check out” tab to access the check out screen.
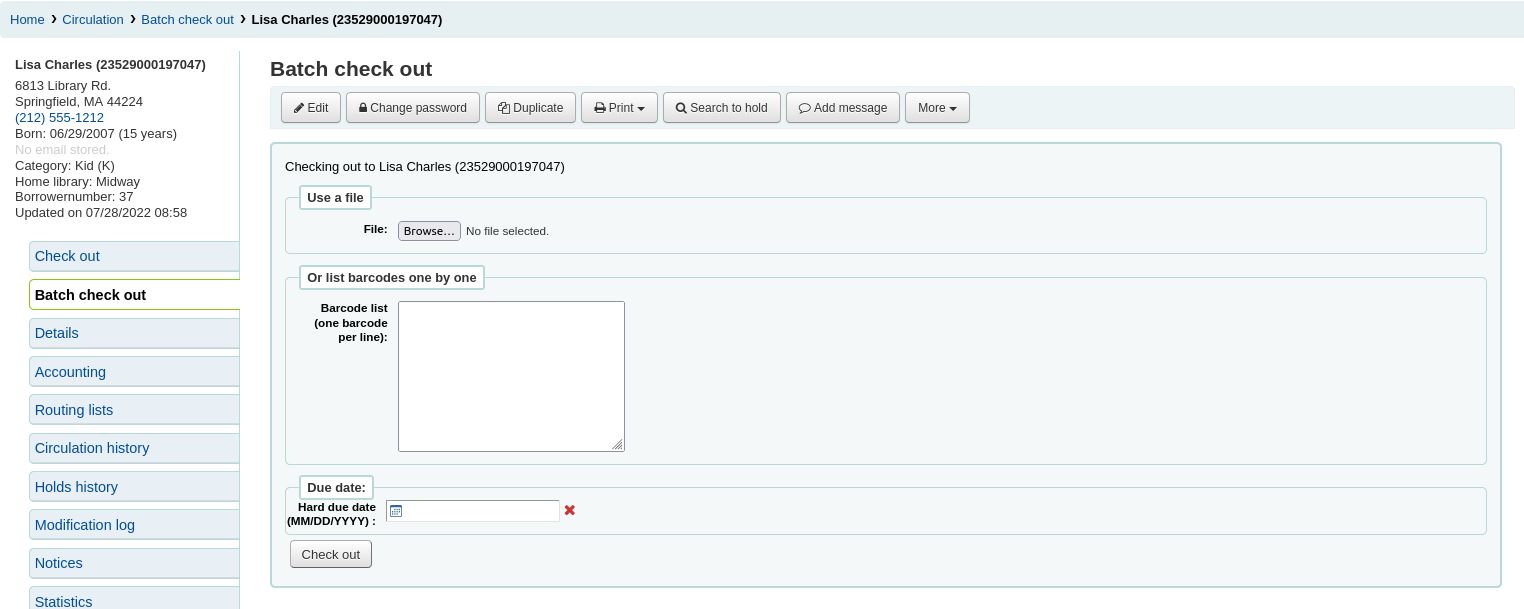
If you have enabled batch checkouts, click the batch check out tab on the patron record
Checking items out
Per prestare una copia ad un utente, per prima cosa cerca l’utente usando una delle molteplici funzioni a disposizione. Poi ti si presenterà la schermata del prestito.

If “Always show checkouts immediately” is checked, you will see the list of current checkouts below the check out box.
Nota
The previousIssuesDefaultSortOrder system preference controls in which order these previous checkouts appear (earliest to latest, or latest to earliest).
Nota
You can customize the columns of this table in the “Table settings” section of the Administration module, under the circulation tab (table id: issues-table).
At the top of the check out screen is a field to type or scan the item’s barcode into.
Nota
Many modern barcode scanners will send a “return” to the browser, making it so that the “Check out” button is automatically clicked.
Se il barcode non viene trovato, puoi decidere di inserire immediatamente la copia utilizzando la griglia di catalogazione veloce. Vedi di più sulla catalogazione veloce più avanti in questo manuale.
If the itemBarcodeFallbackSearch system preference is set to “Enable”, you can enter a keyword search in this box instead of just a barcode (this will make it possible to check out using title and/or call number).
If the AutoSwitchPatron system preference is set to “Enable”, scanning a patron barcode here will take you to that patron’s file.
Per vedere più opzioni nei prestiti clicca su “Impostazione prestiti” per espandere l’area dei prestiti.
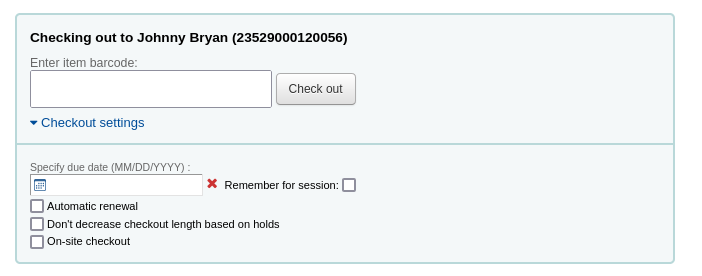
Specify due date: this option can be used to override the default due date for the item, as defined in the circulation and fines rules.
Nota
This option will only appear if the SpecifyDueDate system preference is set to allow staff to override the due date.
The red “X” is used to clear the date. If the “specify due date” field is empty, the default due date, as defined in the circulation and fines rules is used.
Remember for this session: check this box to use the same date for all checkouts. This will not only keep the specified due date for this patron but for all patrons, until you log out of the staff interface.
Automatic renewal: this option will allow this item to automatically be renewed
To use automatic renewals,
the automatic_renewals cron job must be running
the circulation and fines rules regarding automatic renewals must be defined
Just like regular renewals, the checkouts will not be automatically renewed if there is a hold on the item.
Don’t decrease checkout length based on holds: this option overrides the decreaseLoanHighHolds system preference.
Nota
This option will only appear if the decreaseLoanHighHolds system preference is enabled.
On-site checkout: this option indicates that this checkout is an on-site checkout.
Nota
This option will only appear if the checkout of items on site to patrons is allowed. These are usually items that are not for loan that you would like to check out for in-library use.
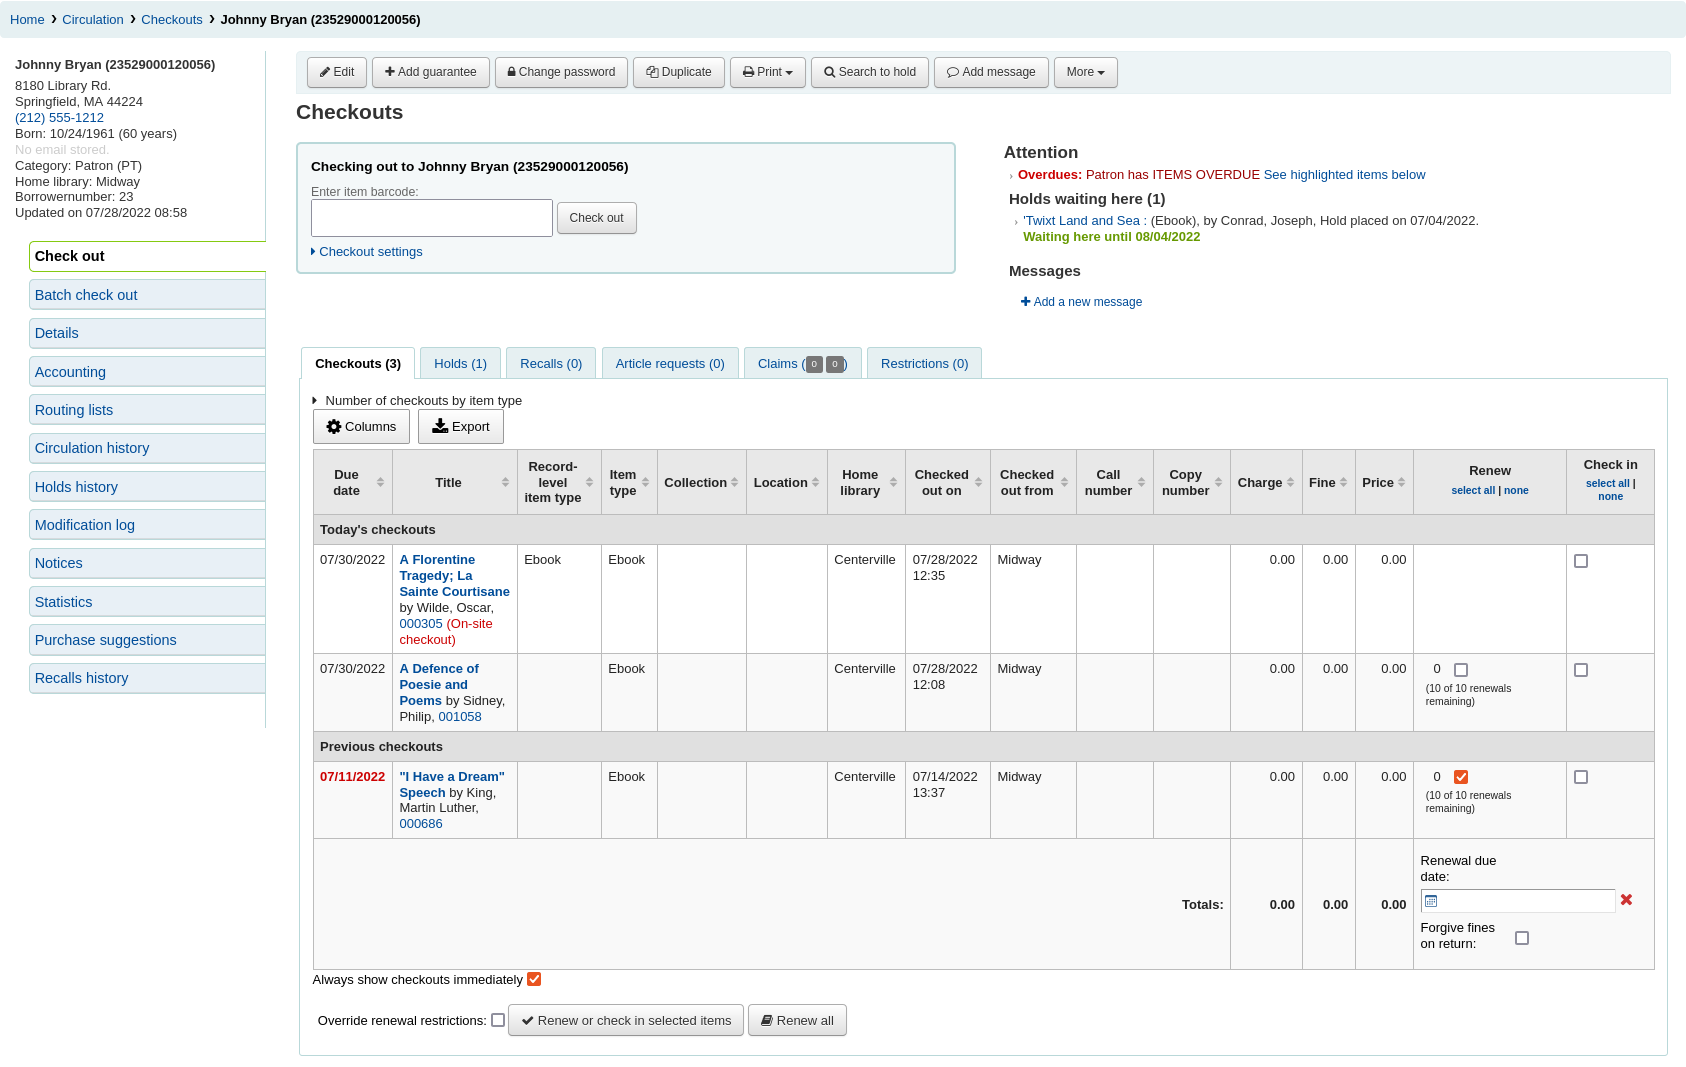
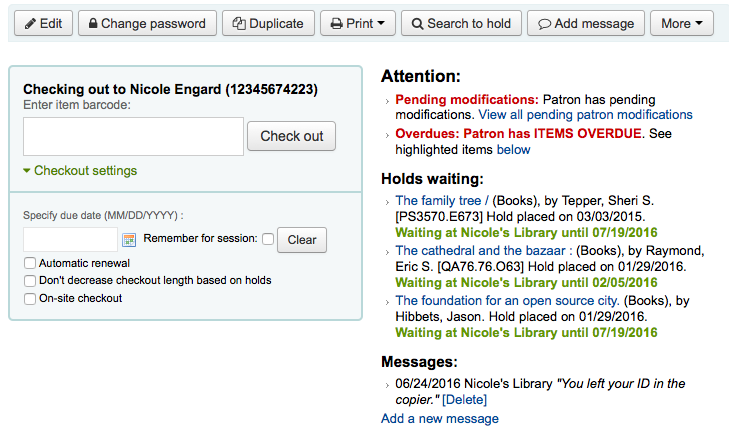
At the bottom of the page there is a summary of the patron’s current checked out items along with the due date (and time if the item is an hourly loan). Items checked out today will appear at the top, previously checked out items will be underneath.
Nota
The todaysIssuesDefaultSortOrder system preference controls in which order these new checkouts appear (earliest to latest, or latest to earliest).
Nota
Per le copie che sono in prestito orario sarà incluso l’ora con la data di rientro
If an item is checked out for on-site use, that information will be highlighted in red in the checkout summary.

The “Export” button at the top of the table allows you to export the patron’s current checkouts in either Microsoft Excel or CSV format, or even copy or print their checkouts.

Se ci sono note nel record dell’utente, appariranno sulla destra del box per i prestiti
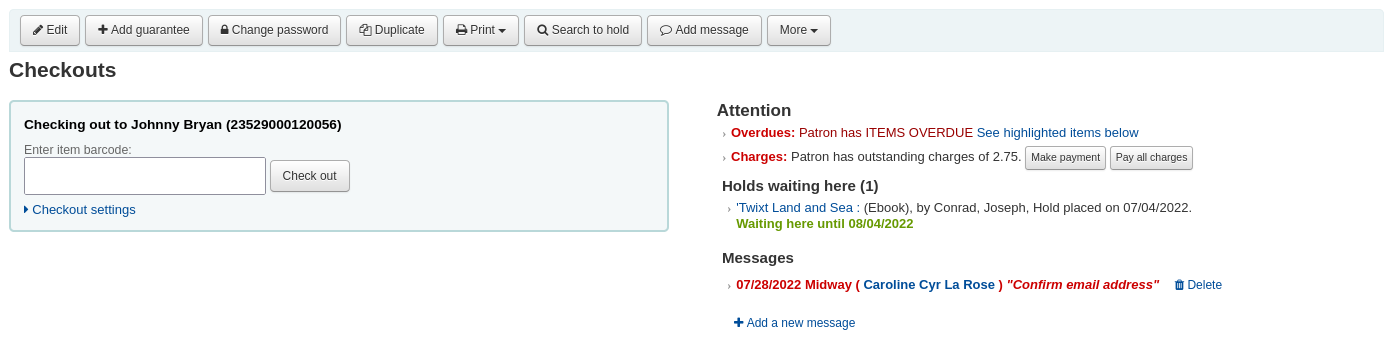
If the patron has a hold waiting at the library, that too will appear to the right of the check out box making it easy for the circulation staff to see that there is another item to give to the patron.
The details of the checkouts will appear on the record detail page in the staff interface as well.
Printing receipts
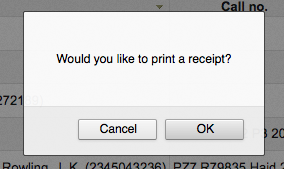
Una volta che hai prestato tutte le copie ad un utente, puoi stampare una ricevuta scegliendo tra due metodi.
If you have the CircAutoPrintQuickSlip preference set to “open a print quick slip window” you can simply hit enter on your keyboard or scan a blank piece of paper with your barcode scanner. The idea being that you’re «checking out» a blank barcode which triggers Koha to print the “Quick slip.”
If you have the DisplayClearScreenButton system preference set to “Show print quick slip and clear buttons” or “Show print slip and clear buttons”, there will be a small printer button in the top right of the checkout box, which can be used to print the slip or quick slip.

Puoi cliccare il bottone “Stampa” all’inizio della pagina e scegliere “Stampa ricevuta” o “Stampa ricevuta veloce”.
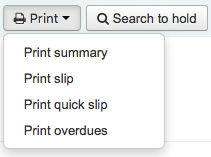
Se scegli “Stampa ricevuta”, verrà stampata una ricevuta con tutte le copie prese in prestito dall’utente, comprese quelle prese in prestito in precedenza. scegliendo “Ricevuta veloce” verranno stampate solo le copie prese in prestito oggi.
“Stampa Riepilogo” genererà una pagina Riepilogo informativo circolazione dell’utente e “Stampa ritardi” stamperà una lista delle copie che sono in ritardo.
“Print checkin slip” will print out a slip that lists items that were checked in today.
What prints on the slips can be customized by altering the slip templates under the Notices and slips tool.
Clear patron information
When you’re done checking an item out if you have the DisplayClearScreenButton preference set to “Show” you can clear the current patron by clicking the X in the top right of the patron’s info to remove the current patron from the screen and start over.
If you have the CircAutoPrintQuickSlip preference set to “clear the screen” then you simply need to hit enter or scan a blank barcode and the screen will be cleared of the current patron.
Batch checkouts
If you would like to perform a batch check out you can do so by turning on the BatchCheckouts system preference and assigning the proper patron categories via the BatchCheckoutsValidCategories system preference. This will allow you to use an RFID pad that reads multiple barcodes or perform a batch check out for training internal use.
From this screen you can scan several barcodes or load a file of barcodes.
If you have the SpecifyDueDate system preference enabled you will have the option to set a due date for the checkouts.
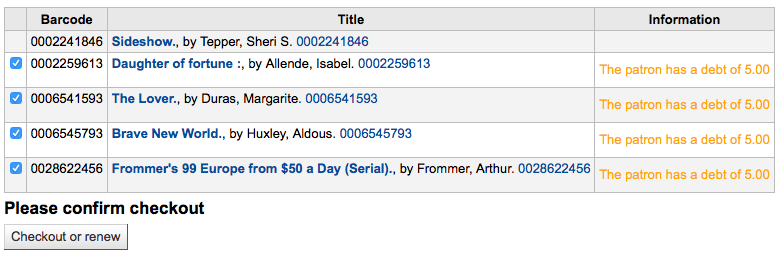
If the items cannot be checked out, a warning will be provided on the following screen, with the option to uncheck the items that are not to be checked out.
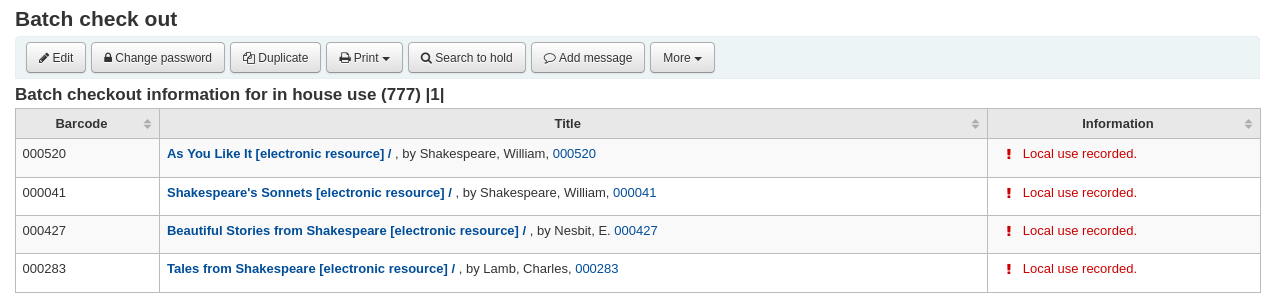
Se si utilizza un utente per le statistiche, ogni uso locale verrà registrato per ogni copia scansionata.
Check out messages
Se stai prestando una copia con pezzi multipli e hai inserito questa informazione nel sottocampo 3 del record di copia (in MARC21) un messaggio apparirà quando farai il prestito della copia che ti dirà quanti pezzi ci devono essere.

In alcuni casi Koha impedisce al bibliotecario di fare prestiti ad un utente. Quando questo succede, apparirà un avviso che notificherà al bibliotecario perché l’utente non può prendere in prestito delle opere.
Utente che ha troppe multe
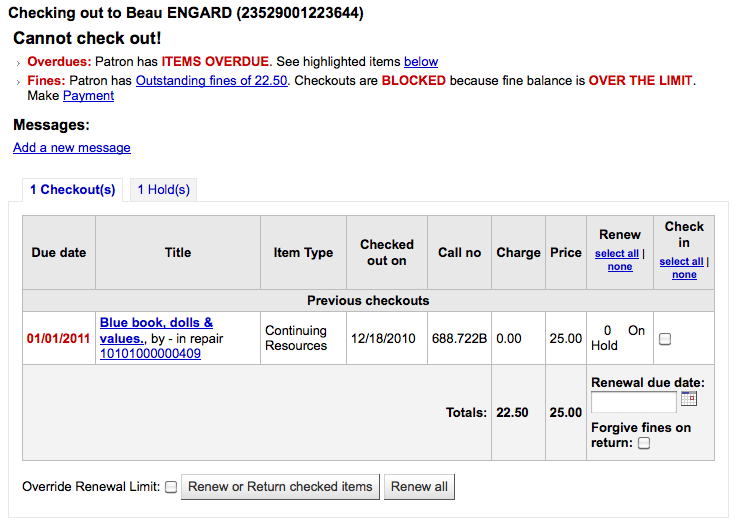
You can set the amount at which patron checkouts are blocked with the noissuescharge system preference
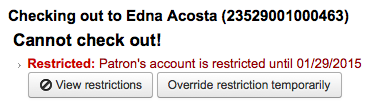
L’utente ha delle restrizioni sul suo account

Questo può essere modificato dal bibliotecario modificando la scheda dell’utente aggiungendo una restrizione <#patronflags> o con i triggers degli avvisi/messaggi sullo status utente
Se lo staff ha le autorizzazioni può temporaneamente superare le restrizioni
L’utente deve confermare i suoi indirizzi
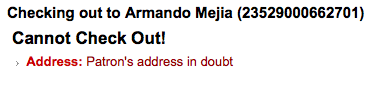
Questo può essere impostato dal bibliotecario modificando la scheda dell’utente e aggiungendo un flag <#patronflags>
L’utente ha perso la sua tessera
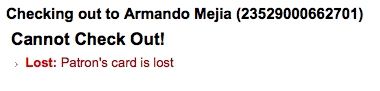
Questo può essere impostato dal bibliotecario modificando la scheda dell’utente e aggiungendo un flag <#patronflags>
Check out warnings
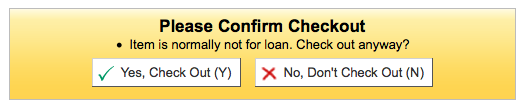
A volte durante l’operazione di prestito compaiono avvisi un un’area gialla. Accetta gli avvisi per poter continuare a prestare.
L’utente ha multe in sospeso
La copia è prenotata da un altro utente
La copia potrebbe essere sullo scaffale delle prenotazioni in attesa di altri
La copia è già in prestito a questo utente.

La copia è in prestito ad altro utente
Questo avviso ti permetterà di inserire una prenotazione sulla copia per l’utente a cui hai tentato di prestarla.
Copia non destinata al prestito
Patron has too many things checked out and AllowTooManyOverride is set to “Allow”

Patron has too many things checked out and AllowTooManyOverride is set to «Don’t allow»

La copia non può essere rinnovata

This can be overridden with the AllowRenewalLimitOverride system preference
Il barcode non è stato trovato

Vedi di più sulla catalogazione veloce più avanti in questo manuale.
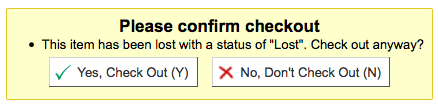
La copia che sta per essere prestata è segnalata come “persa”
Depending on the value in your IssueLostItem preference, you may just see a warning

o una richiesta di conferma
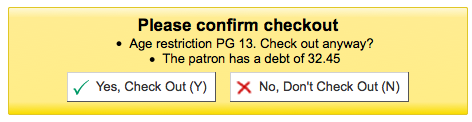
La copia sta per essere prestata ad un utente non ritenuto adatto per l’età
Item being checked out meets the decreaseLoanHighHolds system preference criteria

Item has accompanying material (field 952$3, “Materials specified”, is filled)

If CircConfirmItemParts is set to “Require”, the staff member will have to confirm the checkout

Rinnovi
Checked out items can be renewed (checked out for another period of time) based on your circulation rules and renewal preferences.
Se lo permetti, gli utenti potranno richiedere un rinnovo dei propri prestiti direttamente dall’Opac, ma a volte potrà essere necessario intervenire rinnovando le copie dallo staff client.
Per rinnovare copie in prestito a un utente, puoi fare una di queste due cose.
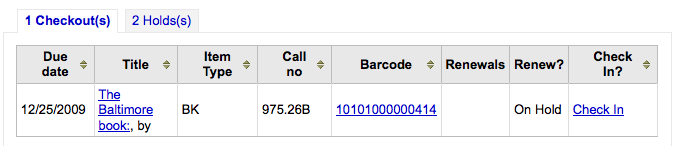
La prima è entrare nella pagina con i suoi dettagli o nella pagina dei prestiti e verificare l’elenco dei suoi prestiti attivi sul fondo.
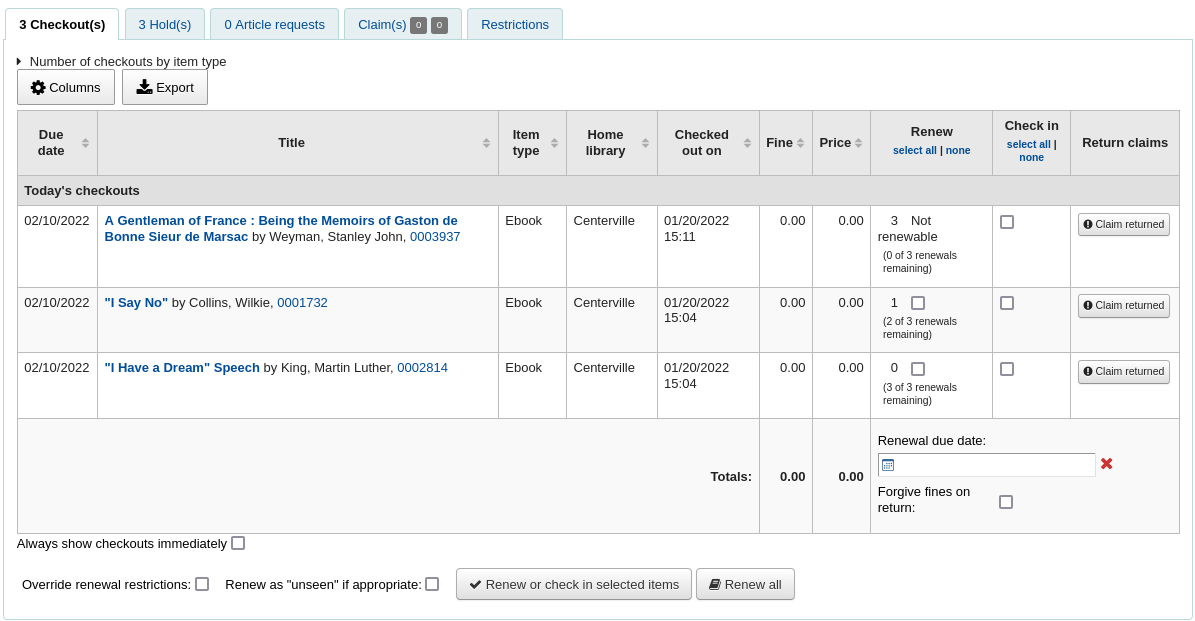
In the Renew column you will see how many times each item has been renewed and a checkbox to renew the item for the patron. Check the box of the items you would like to renew and click the “Renew or return checked items” button, or to renew all items checked out to the patron simply click the “Renew all” button.

Sometimes renewals will be blocked based on your circulation rules, to override this block you must have your AllowRenewalLimitOverride preference set to “Allow”. If you allow renewal limit overrides, you will see a checkbox at the bottom left of the circulation summary. Check that box and then choose the items you would like to renew.

Flaggando questa casella sarà aggiunto un flag in tutte le caselle presenti nella colonna dei rinnoci anche laddove prime la copia era non rinnovabile.
You can also mark a renewal as “unseen”, to differentiate between renewals where staff has actually seen the item, versus renewals where they didn’t see it (over the phone, for example). To do this, you must first enable the UnseenRenewals system preference. Once enabled, a checkbox will appear at the bottom left of the circulation summary. Check that box to mark the renewals as “unseen”. Then click either “Renew or check in selected items” or “Renew all”.

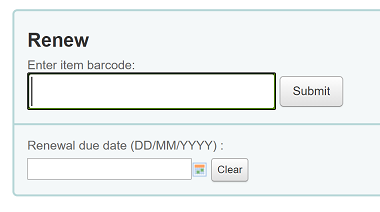
La seconda opzione è di andare alla pagina “Rinnovi” posta sotto il menu della Circolazione.
Poi leggi con lo scanner i barcode delle copie che vorresti rinnovare.
Se una copia è stata rinnovata, riceverai un messaggio di conferma.

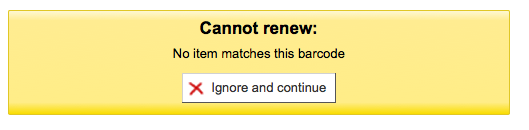
Se il barcode non è stato trovato, verrà visualizzato un messaggio di errore.
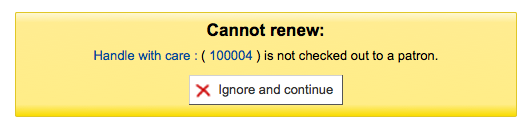
Se la copia non può al momento andare in prestito, anche in questo caso ti comparirà un messaggio di errore.
Check in (returning)
La restituzione prestiti può essere effettuata da diversi punti
Il box per la restituzione posto nella home dell’intranet

L’opzione di restituzione prestiti sulla barra della pagina della circolazione

Il link per la restituzione nel riassunto dei prestiti dell’utente (e la pagina di riassunto dei prestiti)
L’opzione di restituzione prestiti sulla barra della pagina della circolazione
Koha also offers an automatic checkin feature, which can be set in item types.
Checking items in
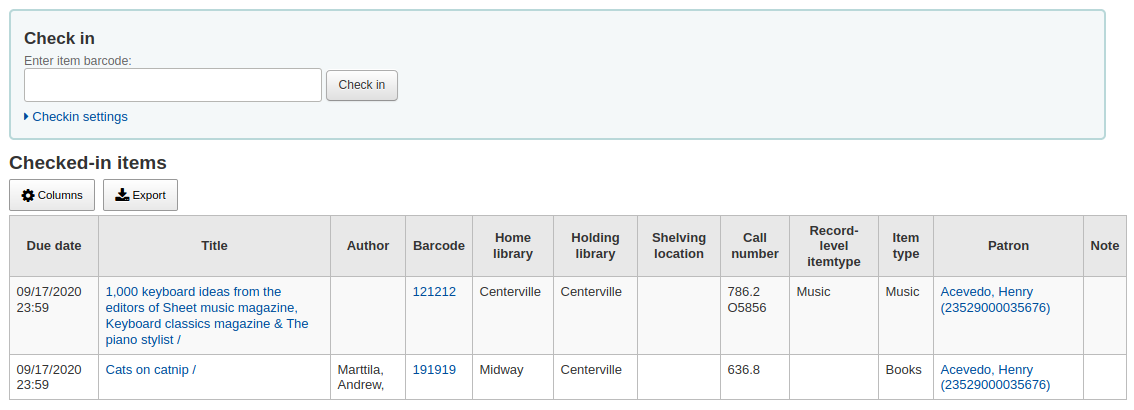
Per far rientrare la copia leggi con la pistola il barcode per inserirlo nel form apposito. Un elenco di tutte le copie rientrate apparira sotto il campo per la restituzione.
Nota
You can customize the columns of this table in the “Table settings” section of the Administration module (table id: checkedintable).
Se fai rientrare dei prestiti su copie che sono state lasciate nella “dropbox” quando la biblioteca era chiusa, allora puoi selezionare la casella “Modalità dropbox” prima di passarli al lettore di barcode. Questo farà in modo che verrà registrata come data di restituzione l’ultima data in cui la biblioteca era aperta.
This requires that you have your closings added to the calendar tool
Puoi scegliere di dimenticare tutte le multe dovute ai ritardi per le copie che stai facendo rientrare selezionando la casella “Cancella le multe per i ritardi “ prima di passare le copie con il lettore di barcode.
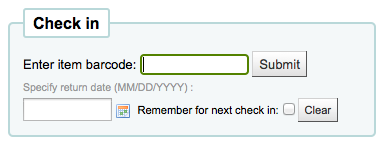
If you have the SpecifyReturnDate preference set to “Allow” you will be able to arbitrarily set the return date from below the check in box.
Check in messages
Ci sono numerosi messaggi che possono apparire quando fai rientrare le copie:
Se fai rientrare dal prestito una copia in una biblioteca diversa da quella che la possiede, apparirà un messaggio che ti chiederà di trasferire la copia nella biblioteca proprietaria.

Dopo che questa copia è rientrata (check in) il suo status viene cambiato in “in transito” nel catalogo

Per segnare una copia come rientrata alla biblioteca proprietaria, registra il rientro nella biblioteca che la possiede.
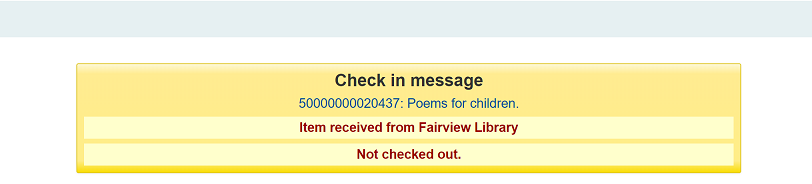
Un messaggio ti informerà che la copia non è in prestito, ma disponibile in catalogo. Questo passaggio è necessario per segnare le copie come ricevute dalla biblioteca.
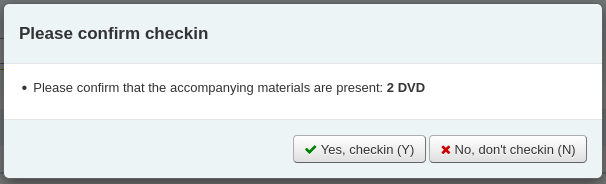
Se fai rientrare il prestito di una copia ceh deve avere più parti, apparirà un messaggio che ti avviserà del numero di pezzi che dovrati avere in mano
If CircConfirmItemParts is set to “Require”, the staff member will have to confirm the checkin
Se stai facendo rientrare una copia che ha una prenotazione sopra, ti verrà chiesto di confermare la prenotazione.
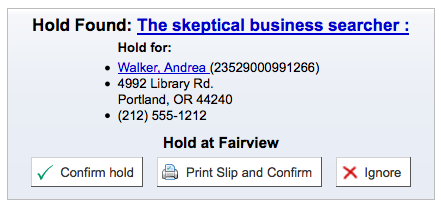
Cliccando il bottone “Conferma prenotazione” marcherai la copia come in attesa di essere presa dalla biblioteca

Clicking the “Print slip and confirm” button will mark the item as waiting for pickup at the library and present the library with a receipt to print and place on the book with the patron’s information
Se ignori la prenotazione, la prenotazione rimarrà sulla copia, ma il suo status sarà “Disponibile”, status che non cancella la prenotazione
Se stai facendo rientrare una copia che ha una prenotazione in un’altra biblioteca, ti sarà chiesto di confermare la prenotazione e trasferire la copia.
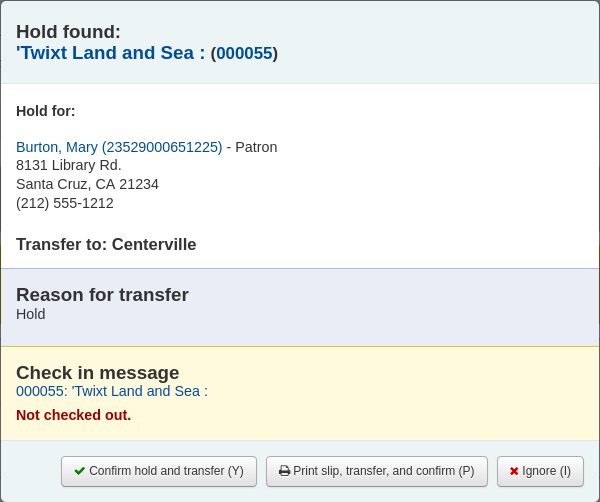
Clicking the “Confirm hold and transfer” button will mark the item as in transit to the library where the hold was placed

Clicking the “Print slip, transfer and confirm” button will mark the item as in transit to the library where the hold was placed and present the library with a receipt to print and place on the book with the patron’s information
Se ignori la prenotazione, la prenotazione rimarrà sulla copia, ma il suo status sarà “Disponibile”, status che non cancella la prenotazione
If you have the system showing you fines at the time of checkin (FineNotifyAtCheckin) you will see a message telling you about the fine and providing you a link to the payment page for that patron

Circulation messages
I messaggi di circolazioni sono brevi frasi che i bibliotecari possono mettere per gli utenti e i colleghi. Essi appariranno durante le operazioni di circolazione.
Setting up messages
Circulation messages are set up as authorized values. To add or edit circulation messages you want to work with the BOR_NOTES value.
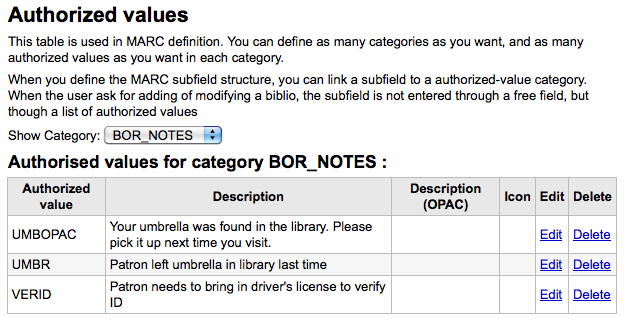
Il campo “Descrizione” può contenere un messaggio preconfezionato che potrebbe essere utile far comparire sul record dell’utente.
Importante
Il campo “Descrizione” è limitato a 80 caratteri, ma il campo del messaggio utente può contenerne di più. Inserire 80 caratteri nel campo “Descrizione” e quindi digitare il resto sul record utente.
Adding a message
Quando vai sul tab “prestiti” dell’utente, vedrai un link “Aggiungi un nuovo messaggio” alla destra del box di prestito e un pulsante in alto per “Aggiungi messaggio”.
Quando premi una delle due opzioni, ti verrà chiesto di scegliere se vuoi destinare il messaggio agli utenti o allo staff, e quale messaggio vuoi inviare.
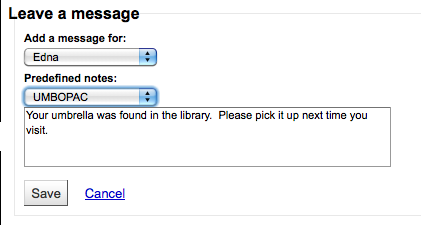
Nota
Un messaggio per l’utente può essere anche visualizzato dallo staff della biblioteca.
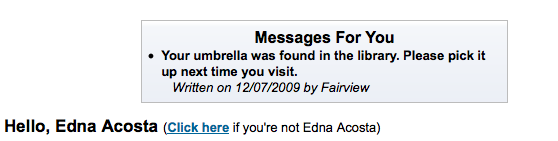
Viewing messages
I messaggi per lo staff e/o per l’utente appariranno a destra del box con i prestiti nella schermata dei prestiti dell’utente . I messaggi in rosso e grassetto sono solo per lo staff della biblioteca mentre quelli in caratteri normali sono sia per l’utente che per il bibliotecario.
Le note per l’utente appariranno quando questi si autenticherà nell’opac.
Circulating bundles
This feature adds the ability to create bundles of items that can be checked out as a single entity. A bundle could for example be a box of related items from your library or a collection of musical scores which need to be circulated together.
You create a collection level bibliographic record and add items to it in the usual way. Those items can then be converted to a bundle by adding existing item records to them using their barcodes. The items will remain attached to their original records and be marked as ‘not for loan’.
Configuration
First you need to make some configuration choices.
Item types - you may want to create a separate item type to identify your bundles.
Circulation rules - you can optionally create circulation rules for your bundle item type.
There are two system preferences which control the status values used with bundles:
Creating bundles
The bundle functionality will only be displayed if you create a catalogue record with the Leader, (000 MARC tag) position 7 set to ‘c’ for Collection.
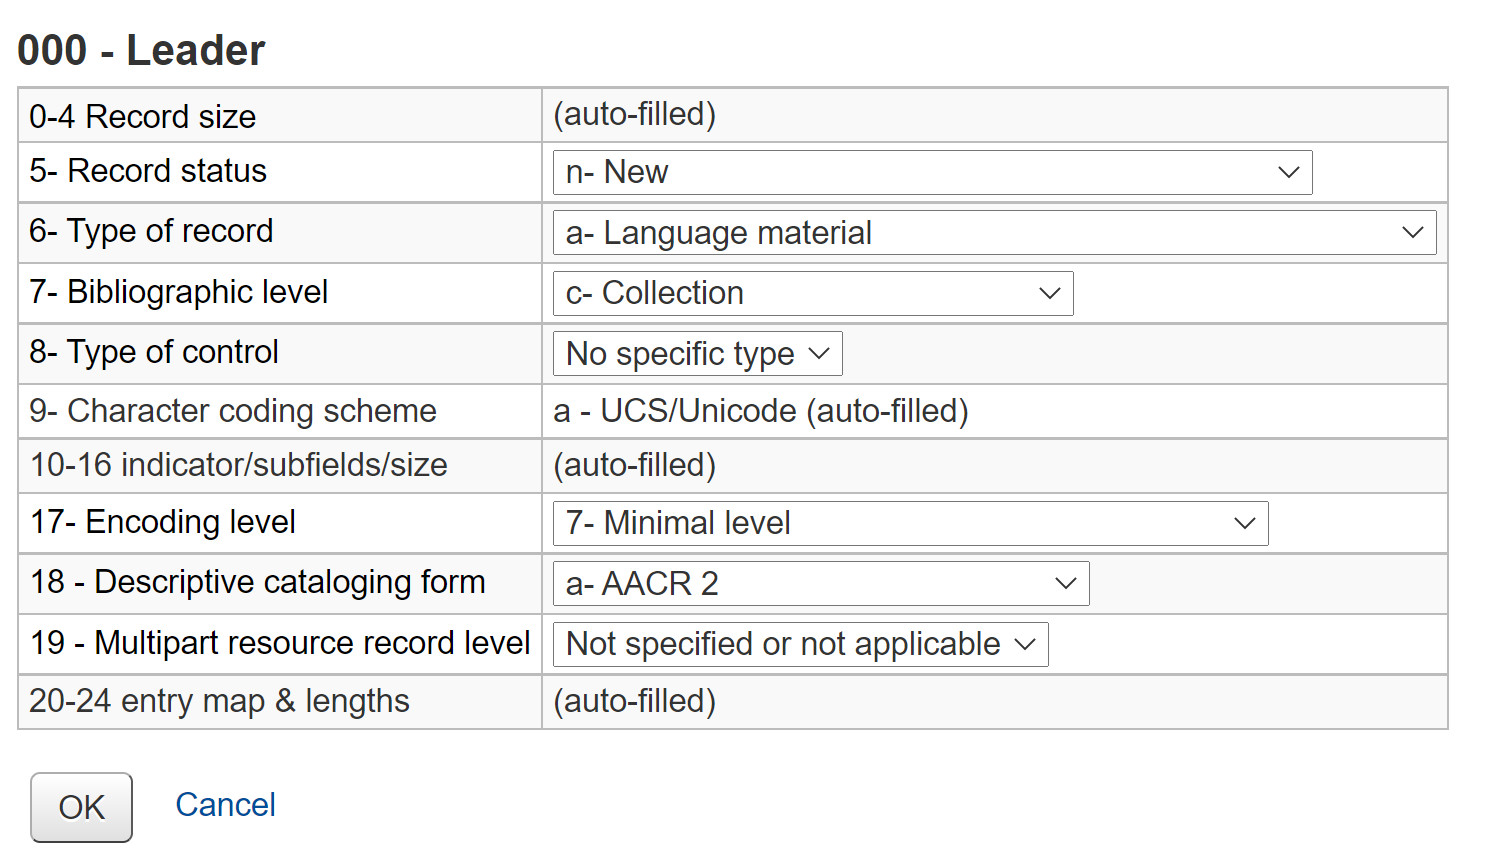
Nota
It might be useful to have a separate MARC bibliographic framework for bundles with the ‘c’ set as a default value if you will use bundles regularly. You can also add any custom fields to the template that might be unique to bundles such as size or weight.
Your catalogue record will contain information to identify the content of the bundle.
For example, if the bundle is a box of resources for school children on the topic of oceans, the catalogue record might look something like the one shown below.
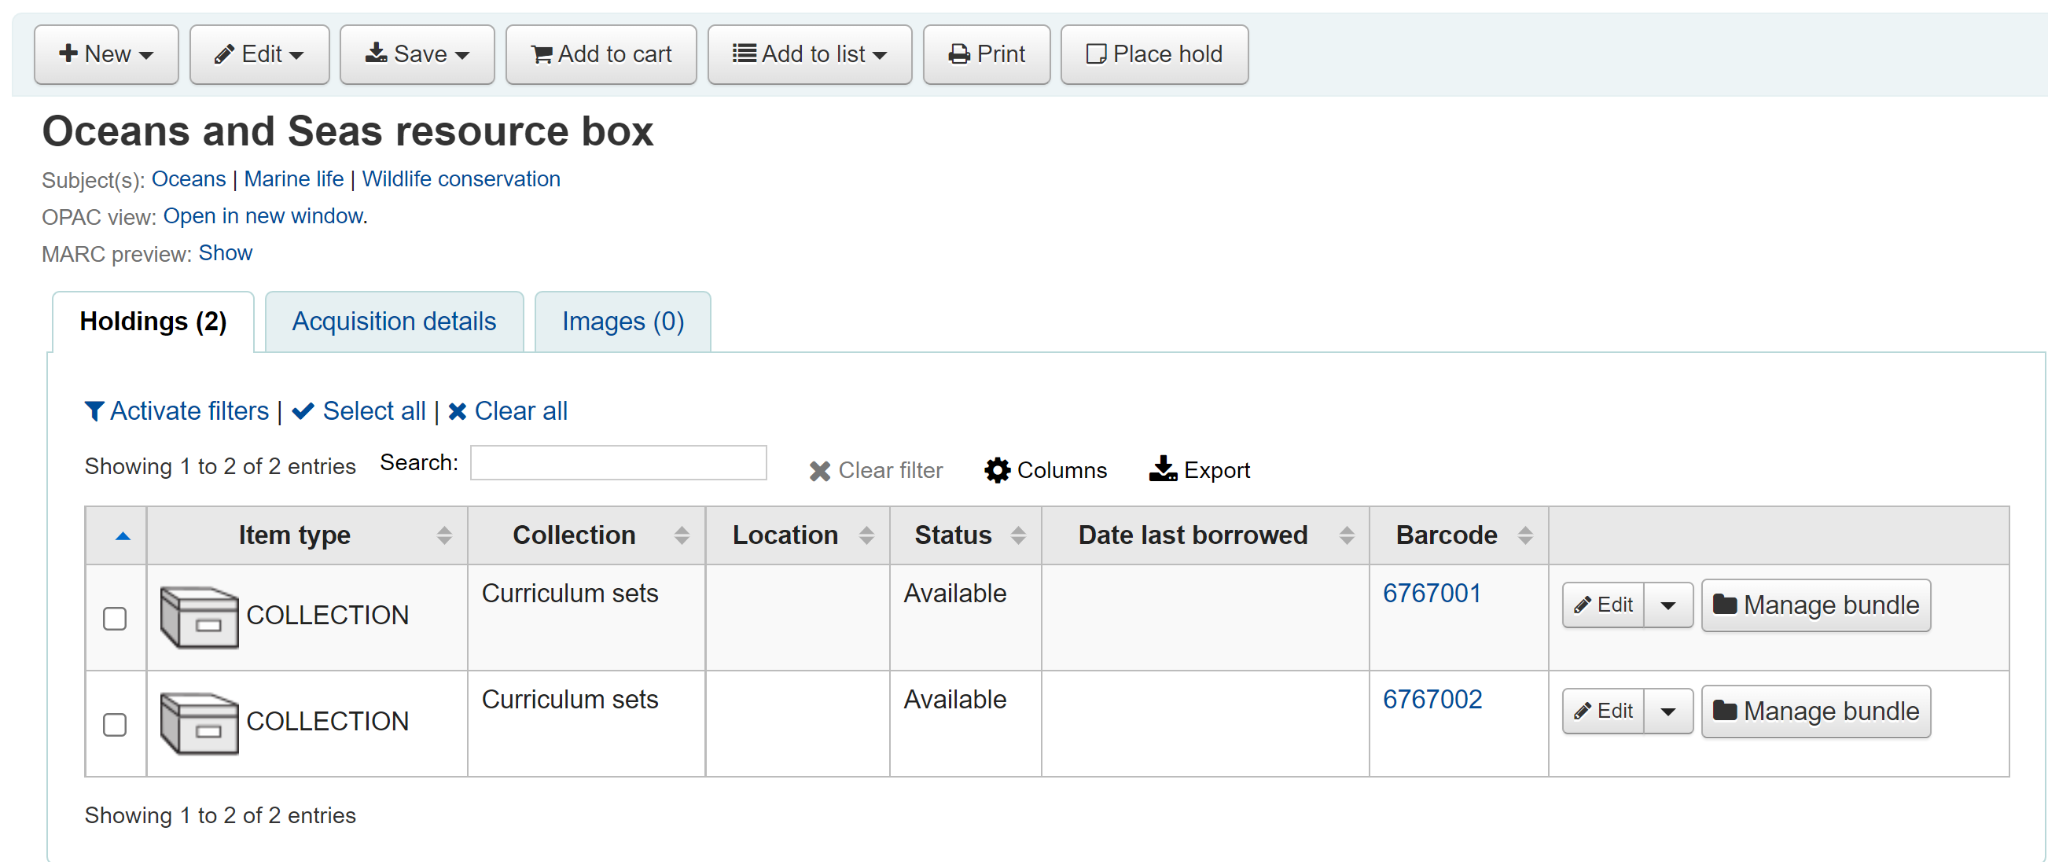
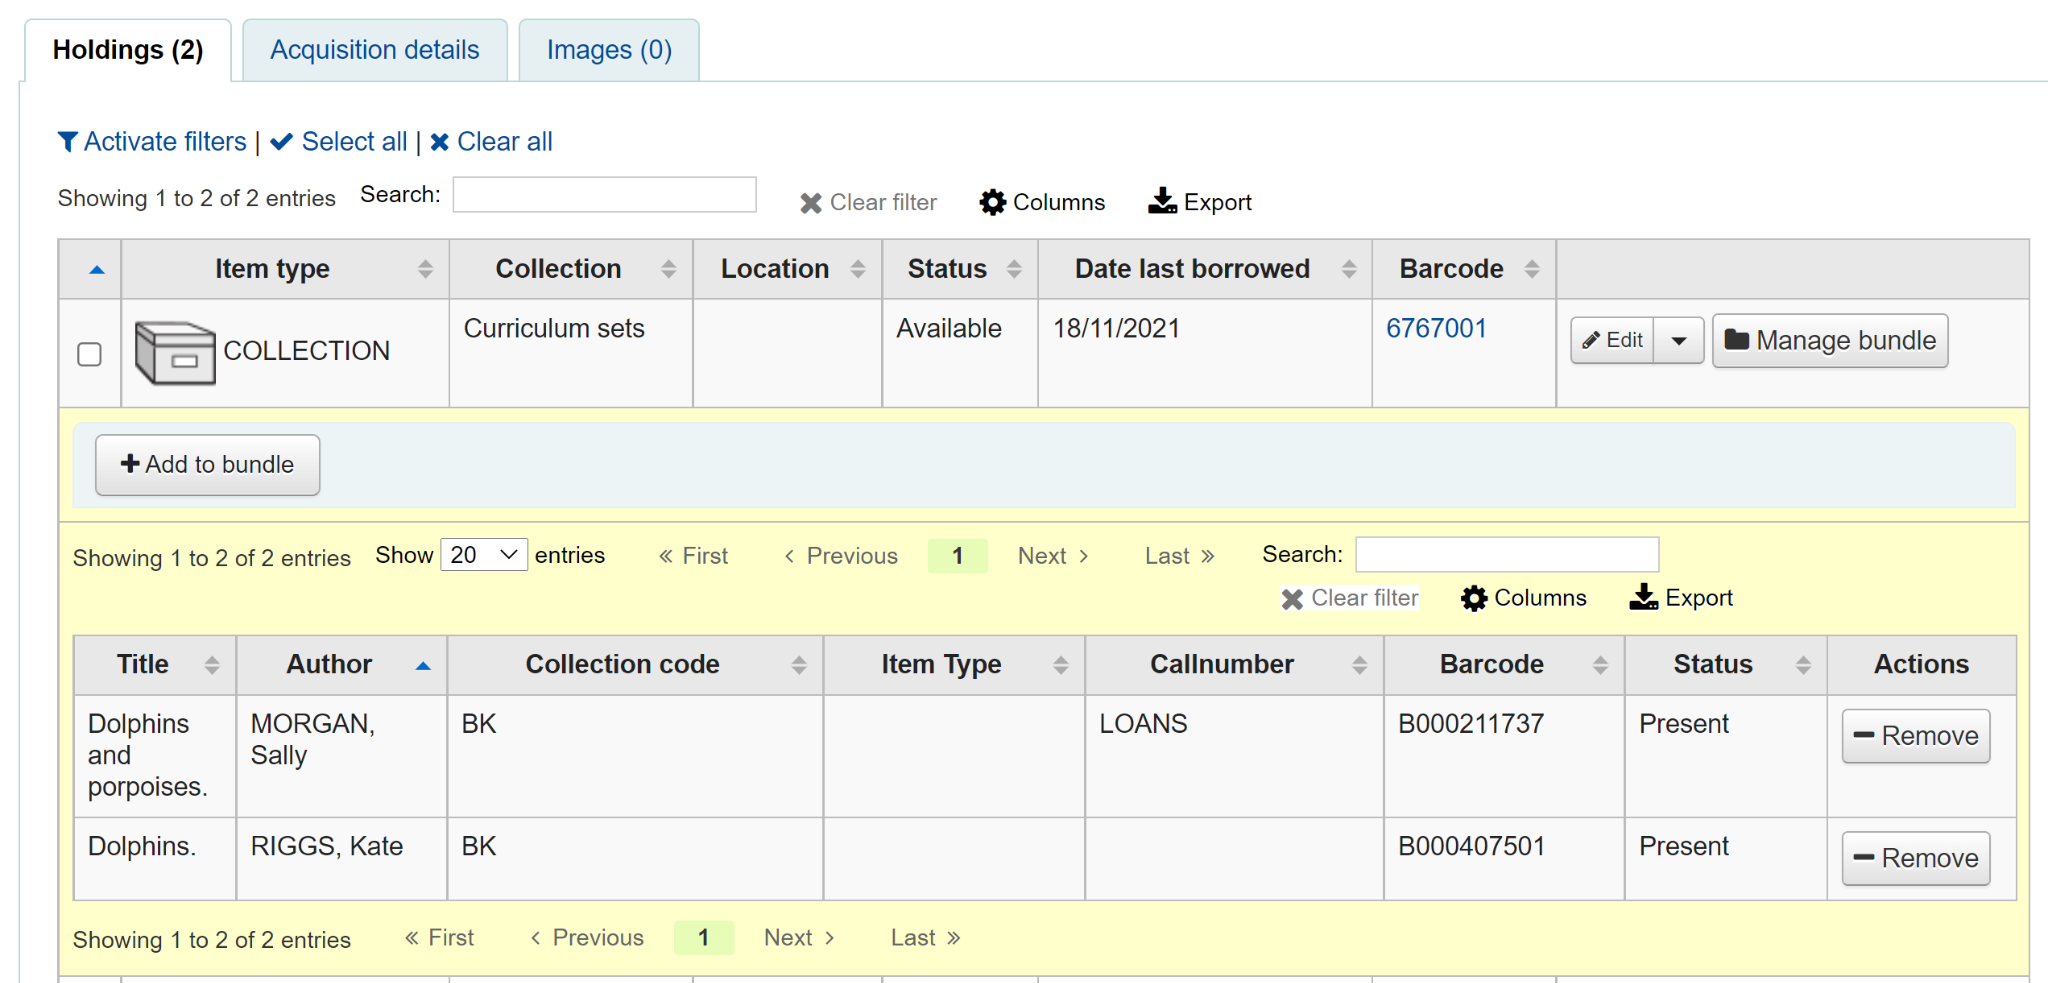
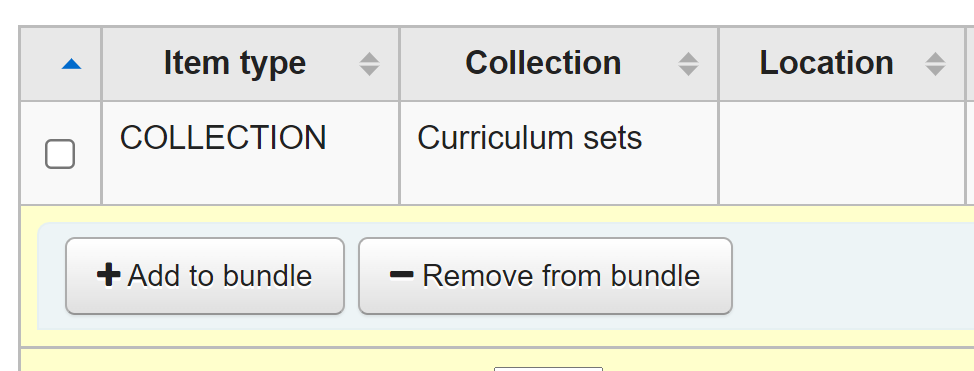
Add an item record for each physical bundle. It is likely that you will want a specific item type for bundles so that you can identify them easily and create circulation rules for them. In this case the bundle has the item type COLLECTION.
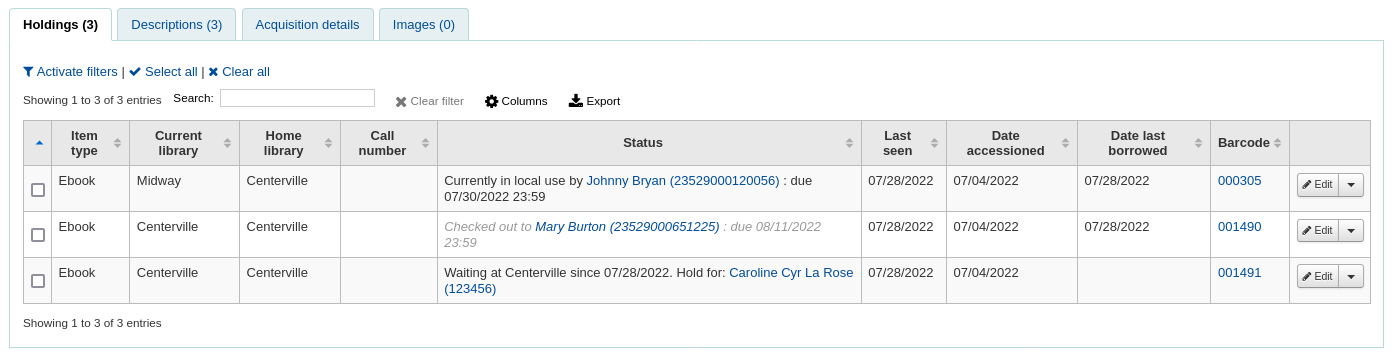
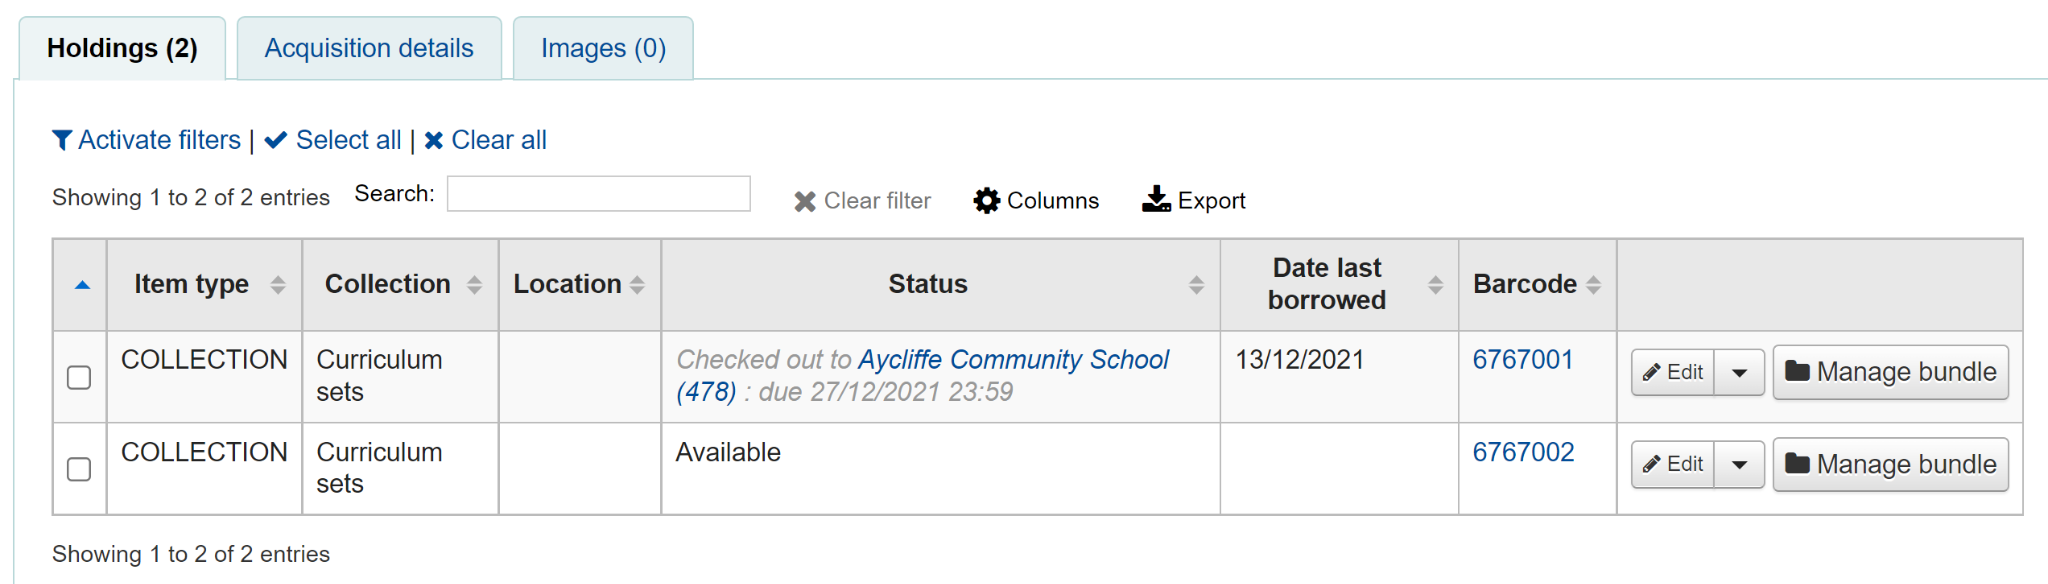
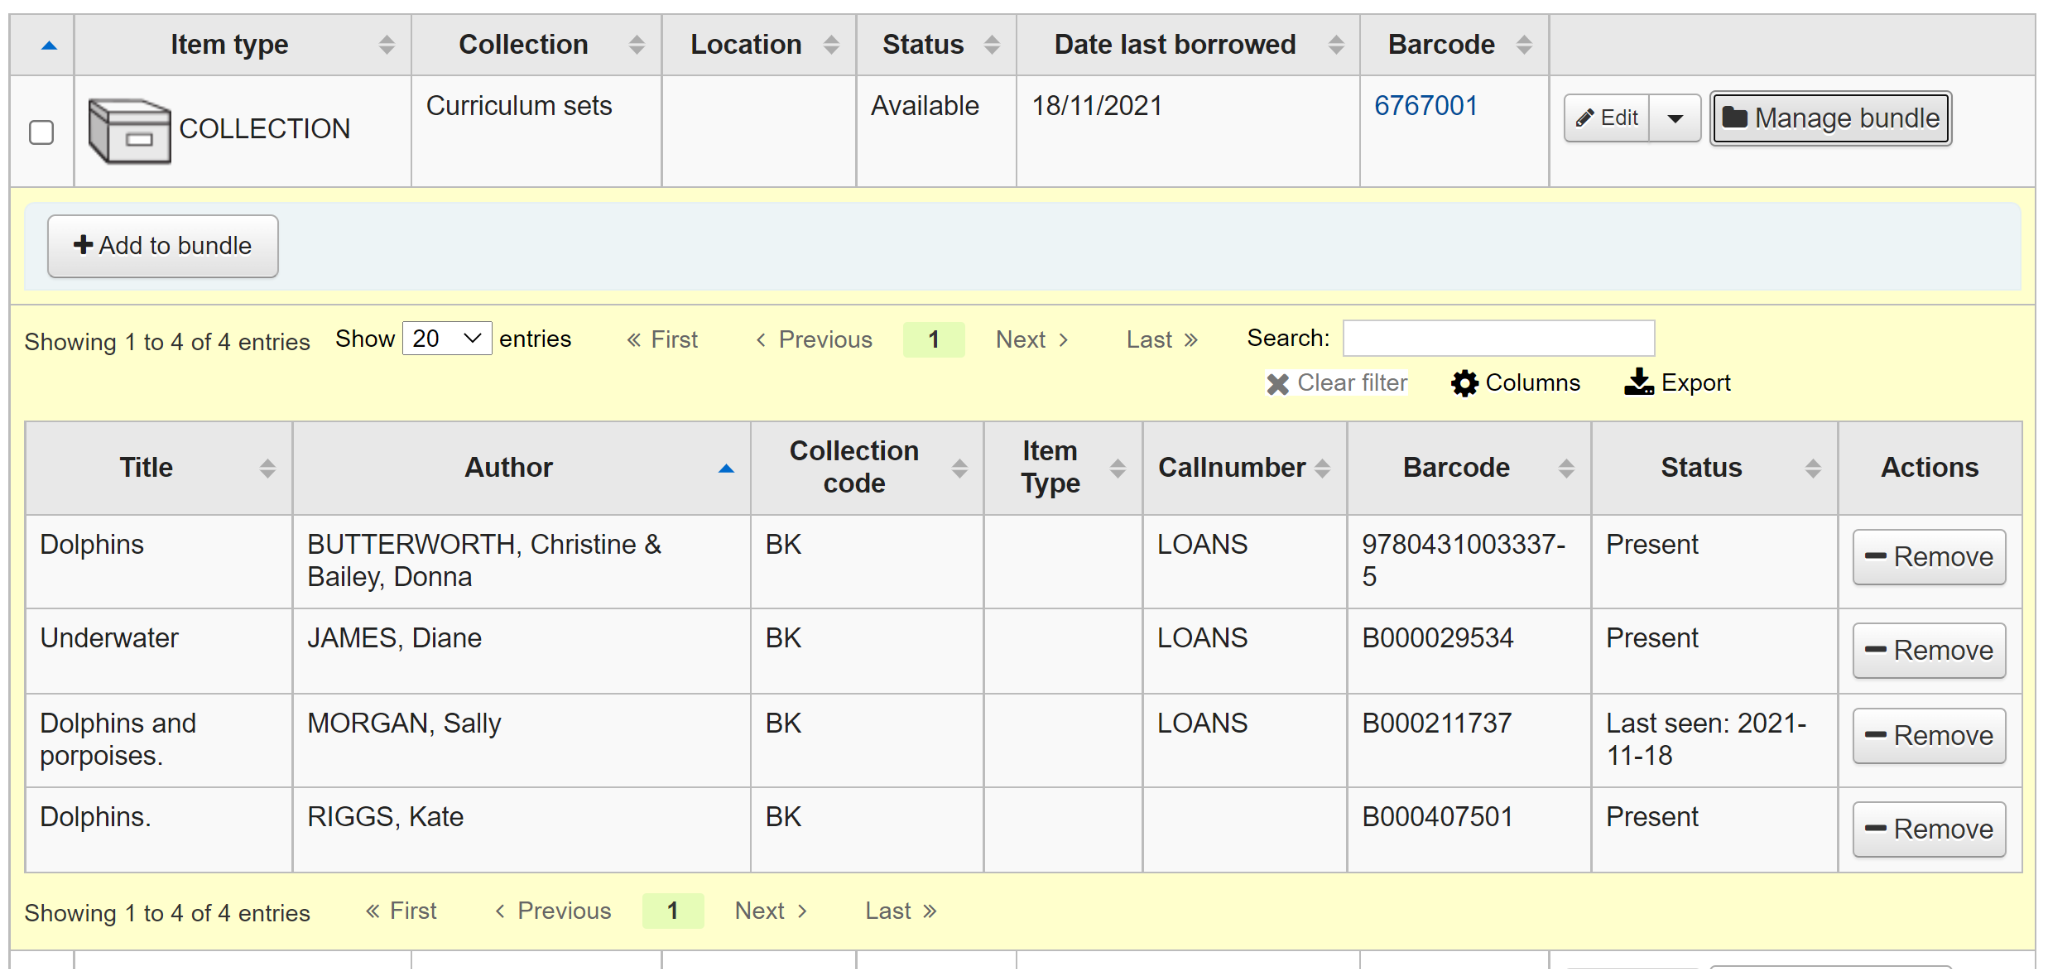
An item record attached to this type of catalogue record can be converted into a bundle via the Manage bundle button on the far right-hand side of the holdings table for each item as shown below.
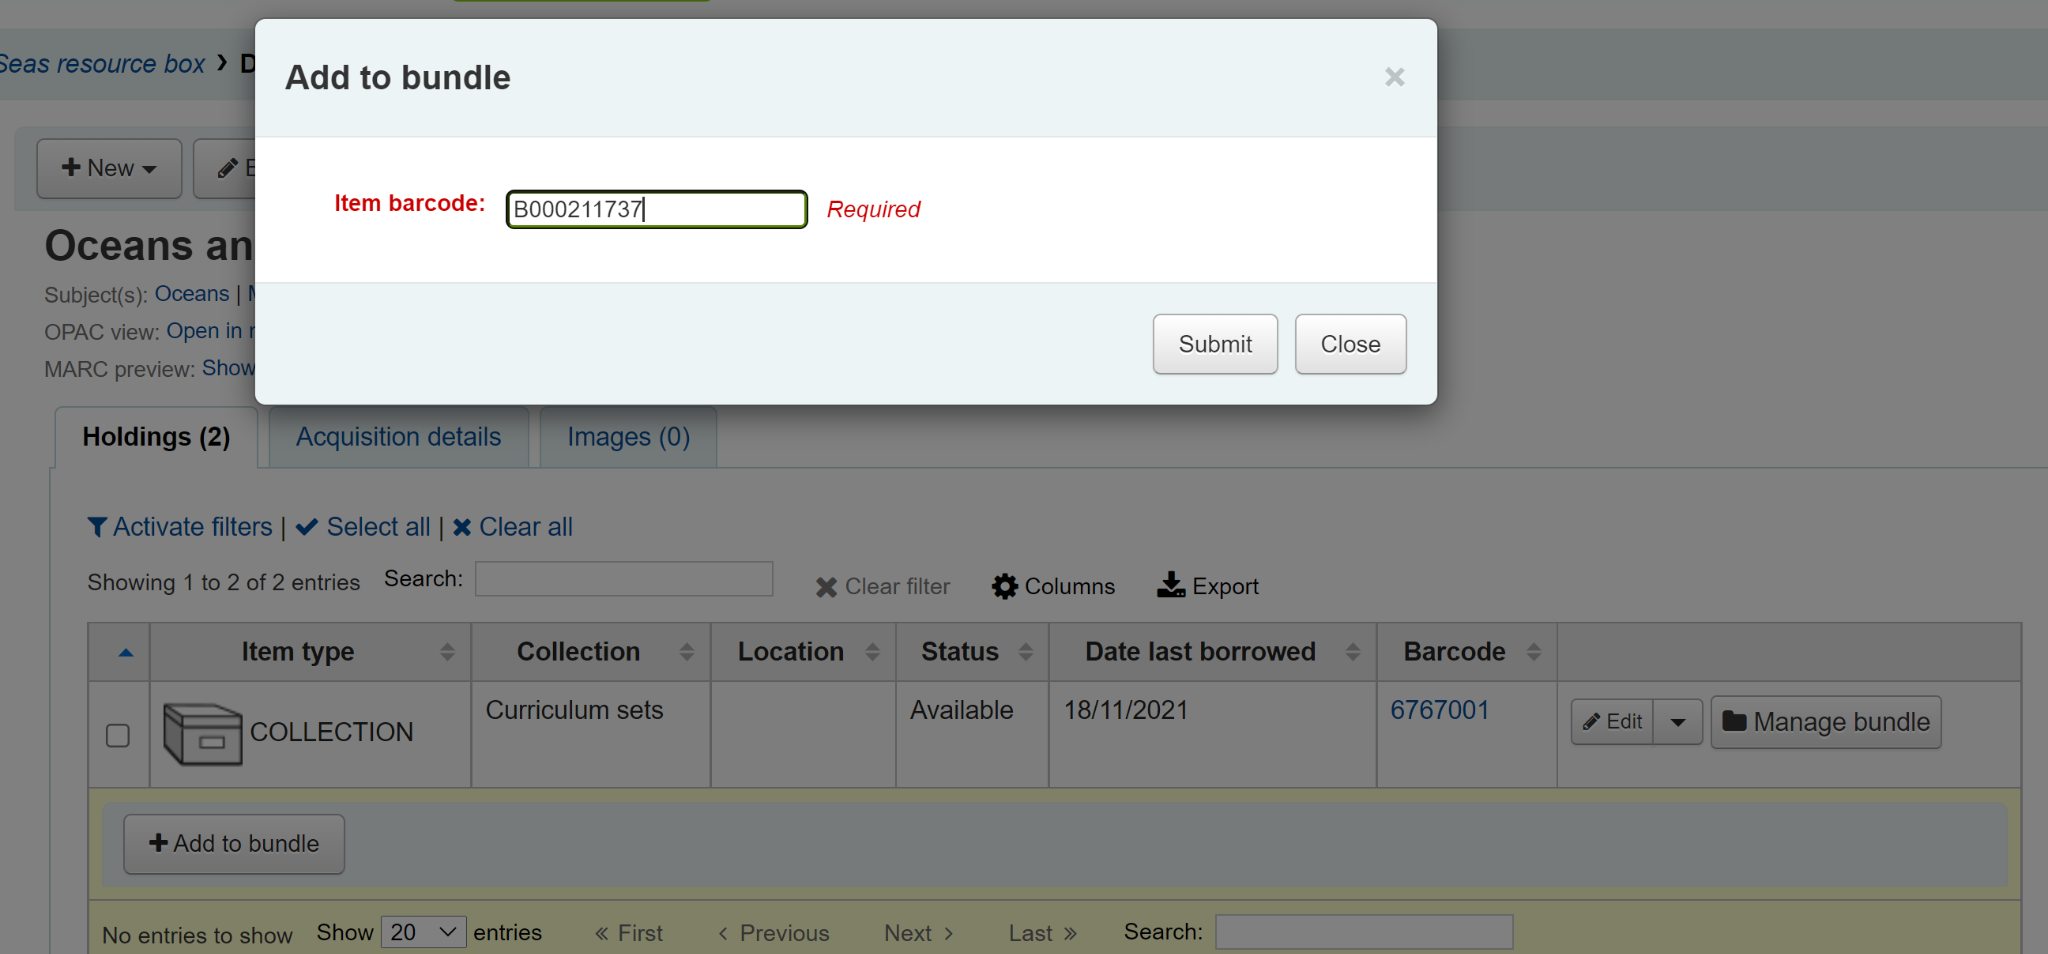
Adding items to bundles
Click on Manage bundle and then the Add to bundle button to add items to the bundle using the barcode of the item.
You will see a message telling you that the item has been added successfully.
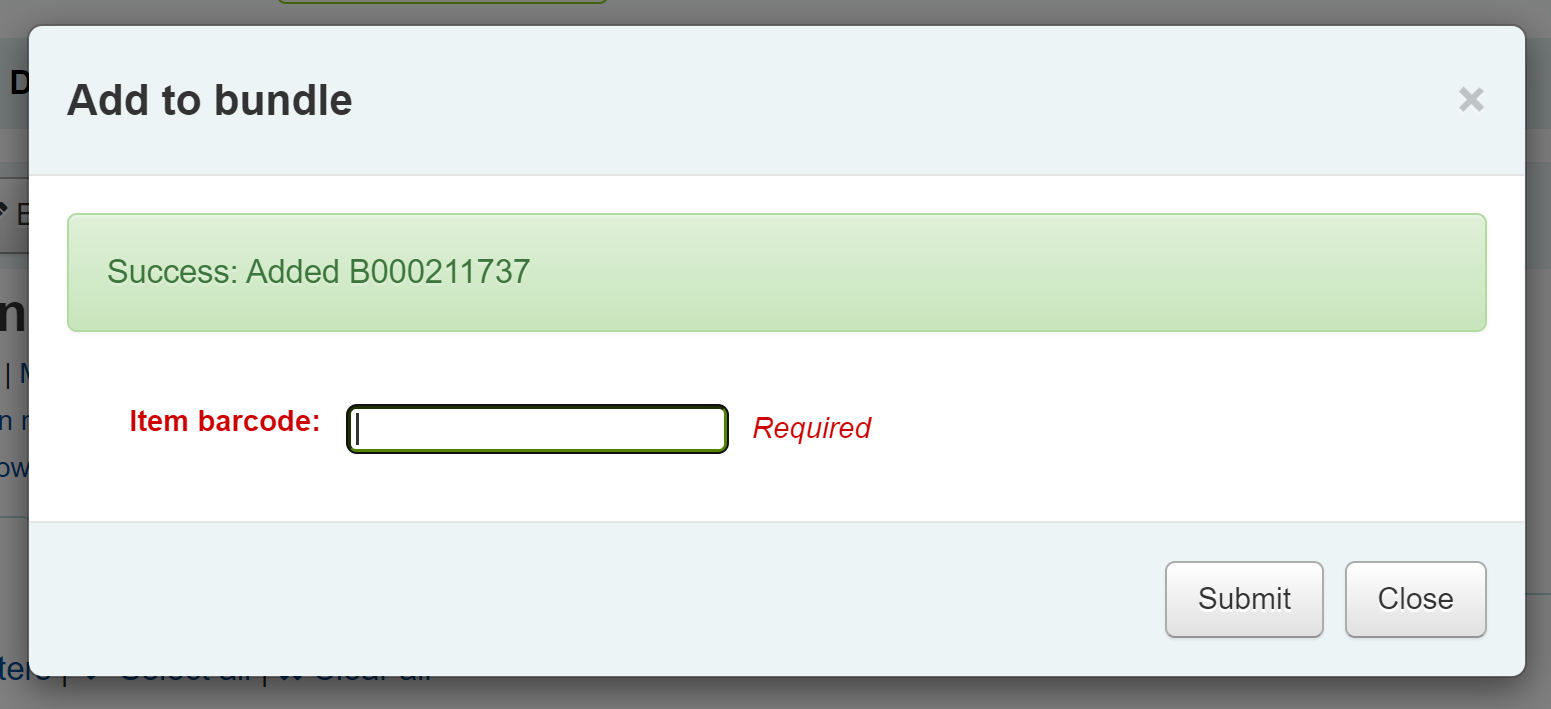
When you have finished scanning in items you can click on Close and view the bundle contents. The bundle contents list can be exported or printed if required.
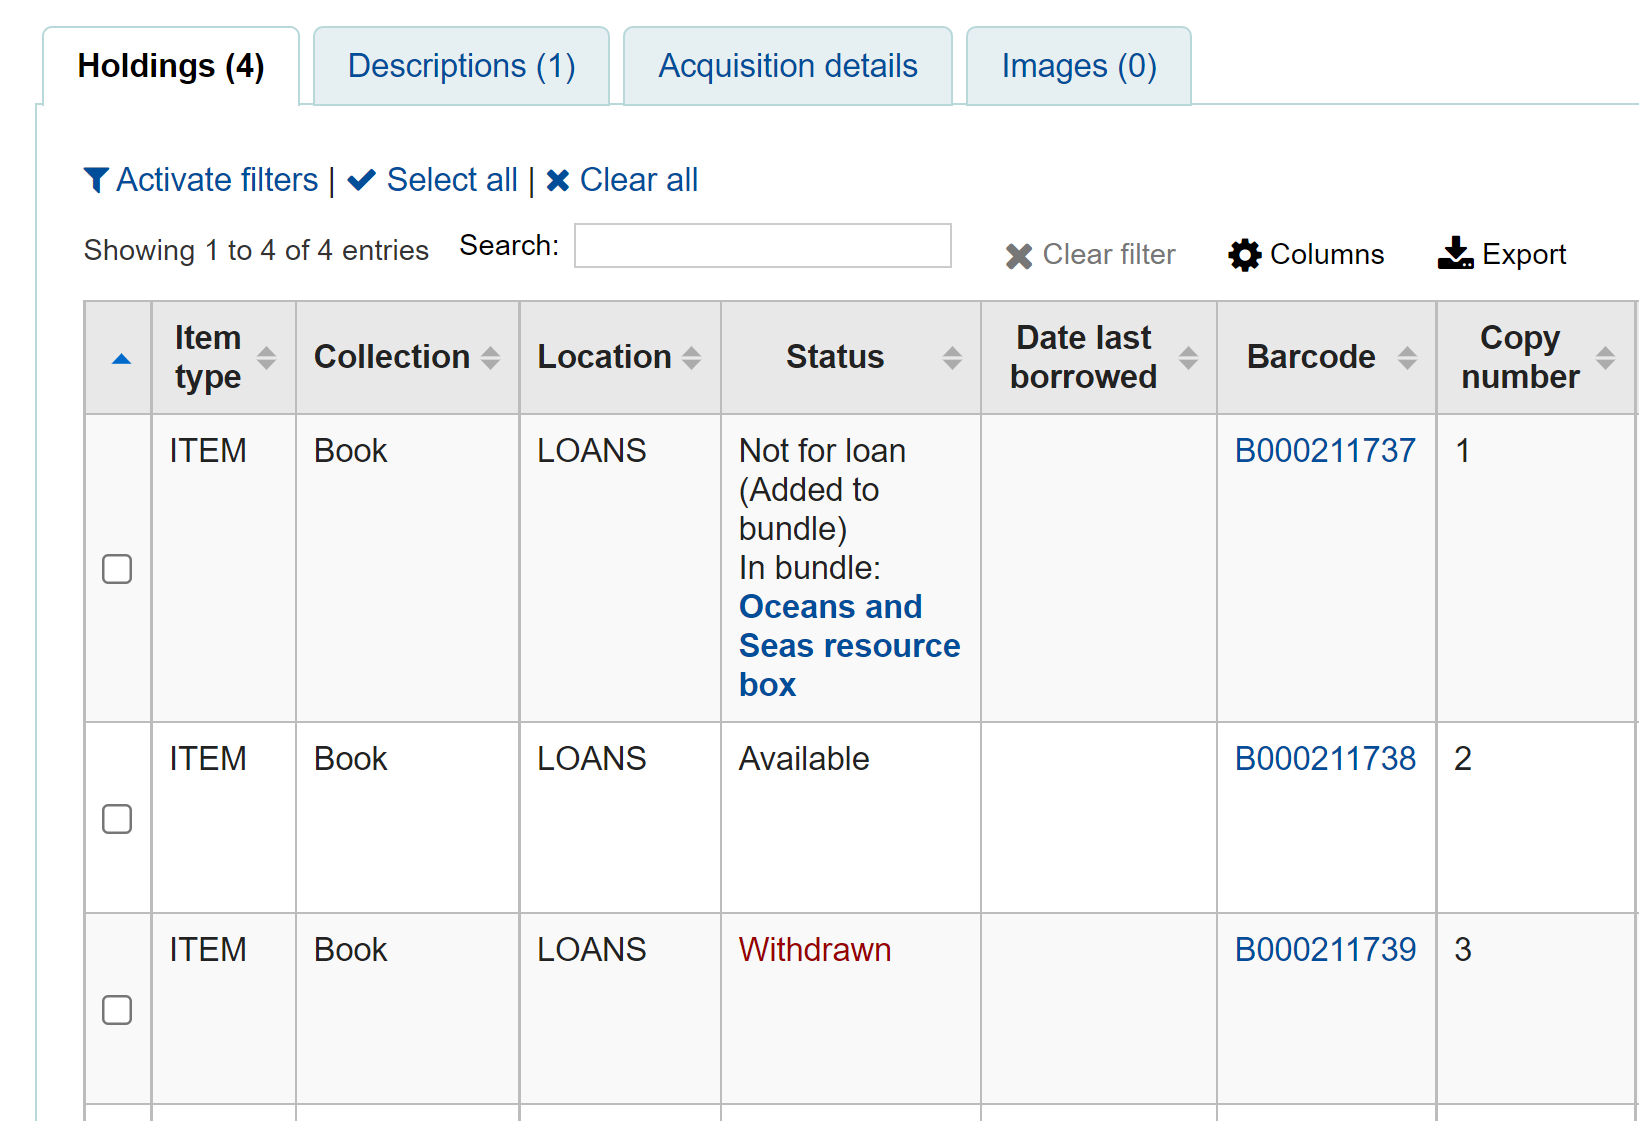
Avvertimento
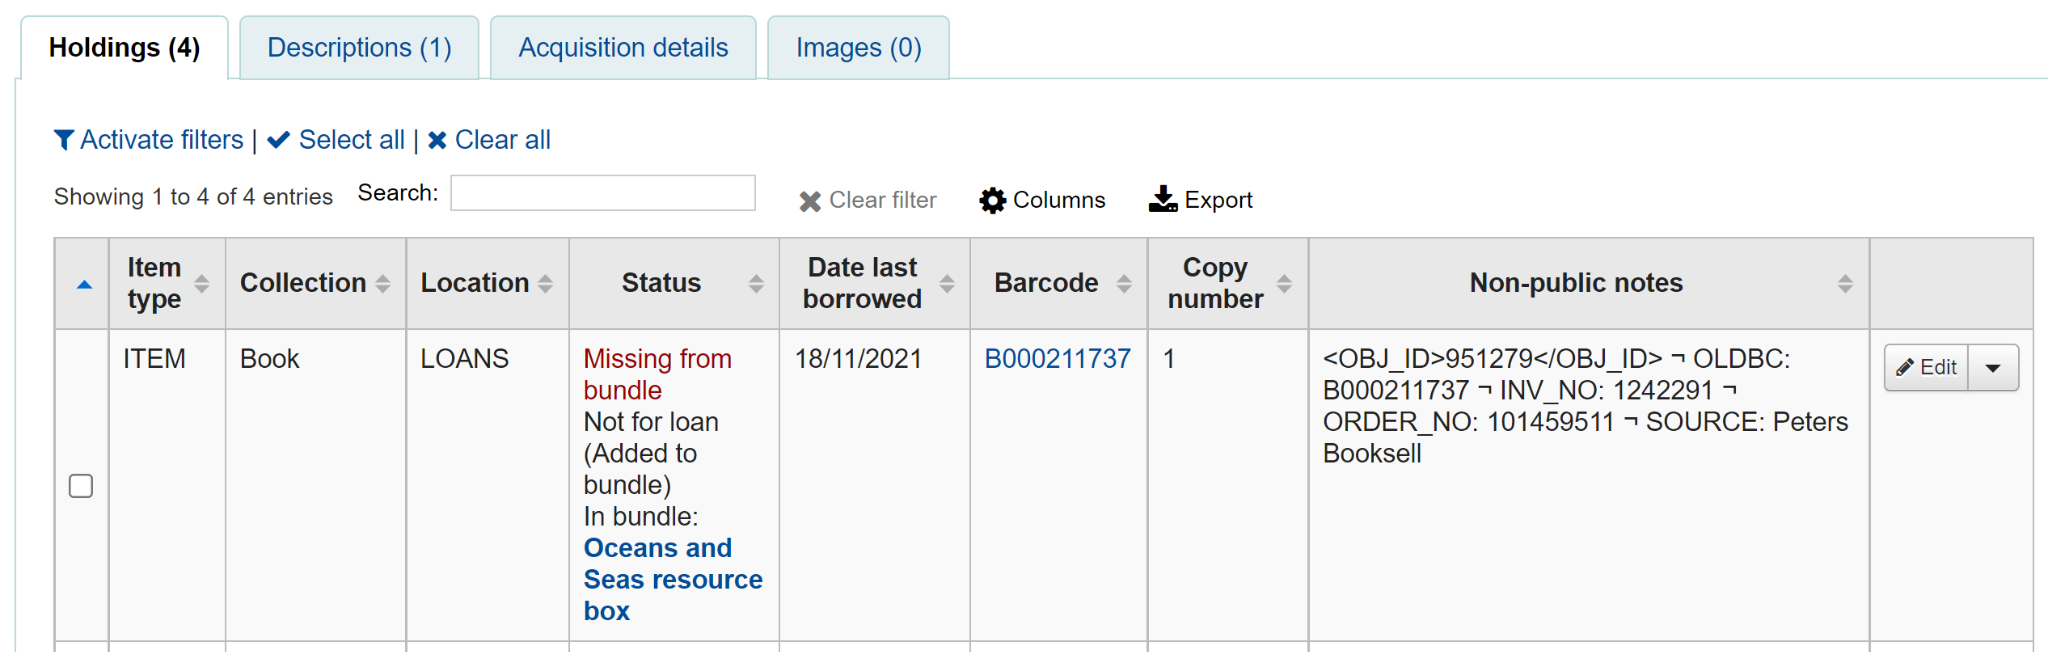
Items added to bundles are still attached to their permanent catalogue record, however, they cannot be checked out individually. When added to a bundle an item’s Not for Loan status is updated and can be viewed in the holdings table of the permanent record along with a link to the bundle. The Not for Loan status can be defined in the BundleNotLoanValue system preference.
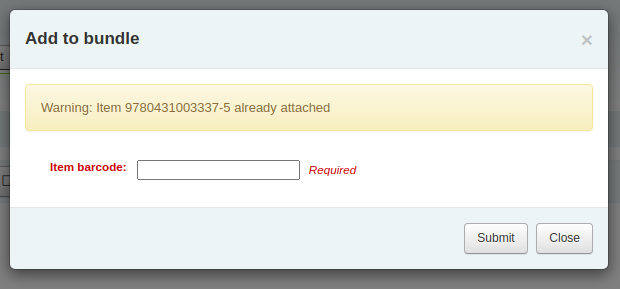
If an item is already found to be attached to the bundle, a warning message will be displayed.
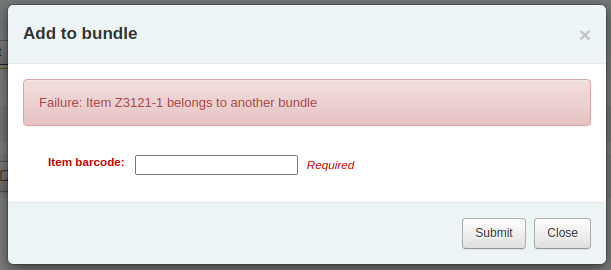
If an item cannot be added to the bundle for any other reason a failure message will display.
Removing items from bundles
To remove an individual item from a bundle you can click on the Remove button from the Actions column of the bundle contents list.
To remove multiple items from the bundle you have two options:
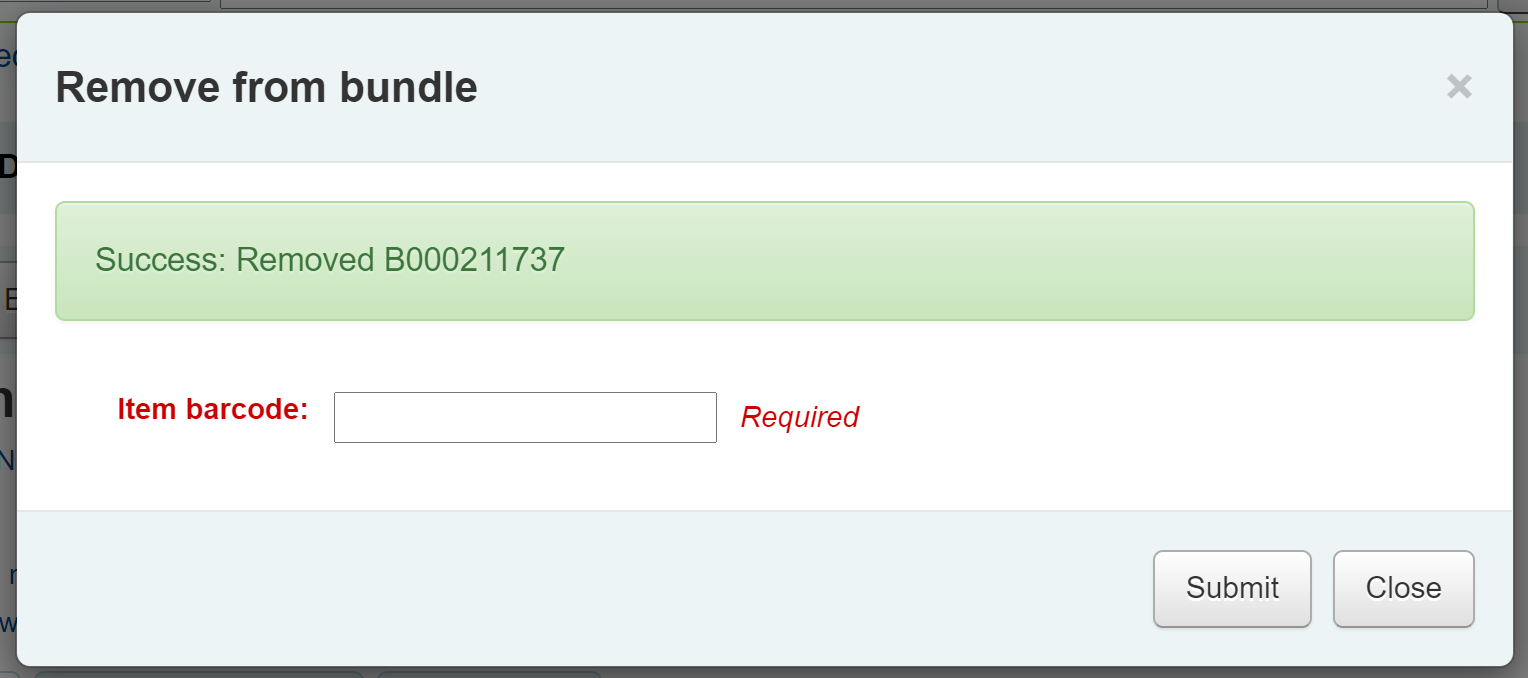
Use the ‘Remove from bundle’ button from within the Manage bundle display
Scan in barcodes in the same way as you add items to bundles. You will see a confirmation dialogue to let you know the item has been removed.
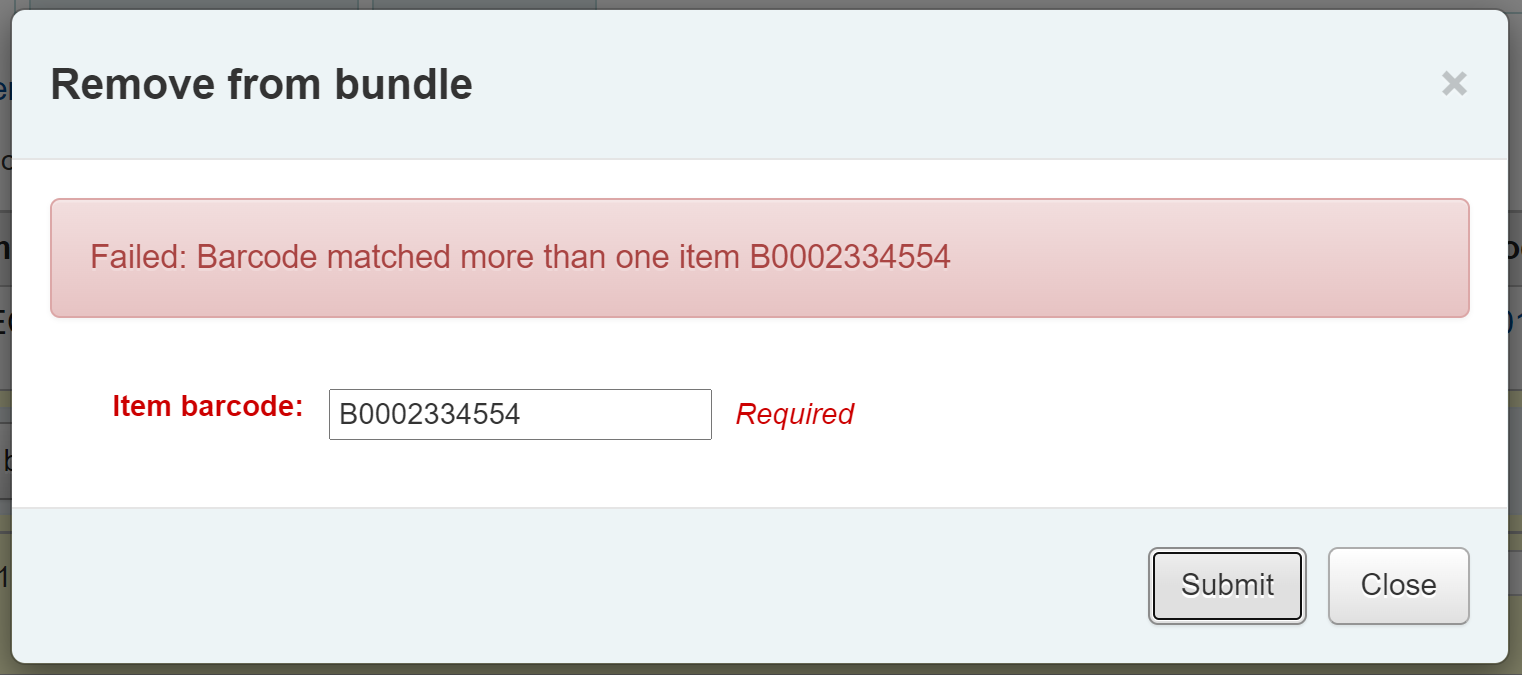
If the item couldn’t be removed you will see a Failure message.
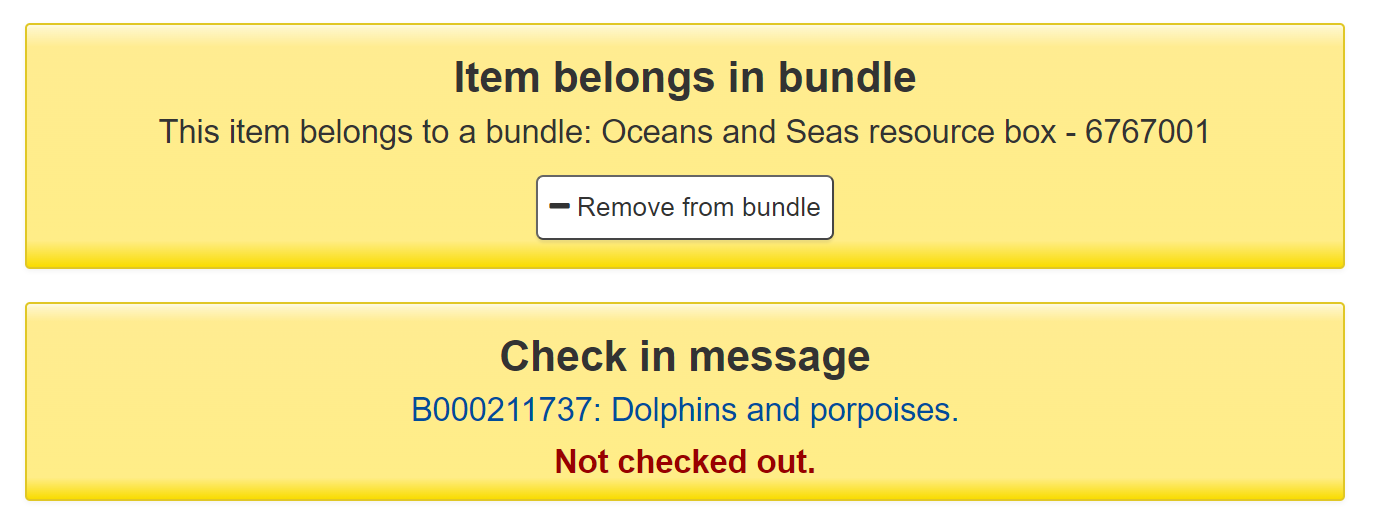
The second way to remove multiple items is to scan the barcode of the item into the checkin box and you will be given the option to remove the item from its bundle.
When you have finished working with a bundle you can close the contents list by clicking on the Manage bundle button again.
Circulating bundles
Checkout
You can checkout a bundle in the usual way from Circulation using the barcode of the bundle. If required you can create specific circulation rules for bundles based on their item type.
Remember, once an item is within a bundle it cannot be checked out individually. If you try to do this the following alert will be displayed.

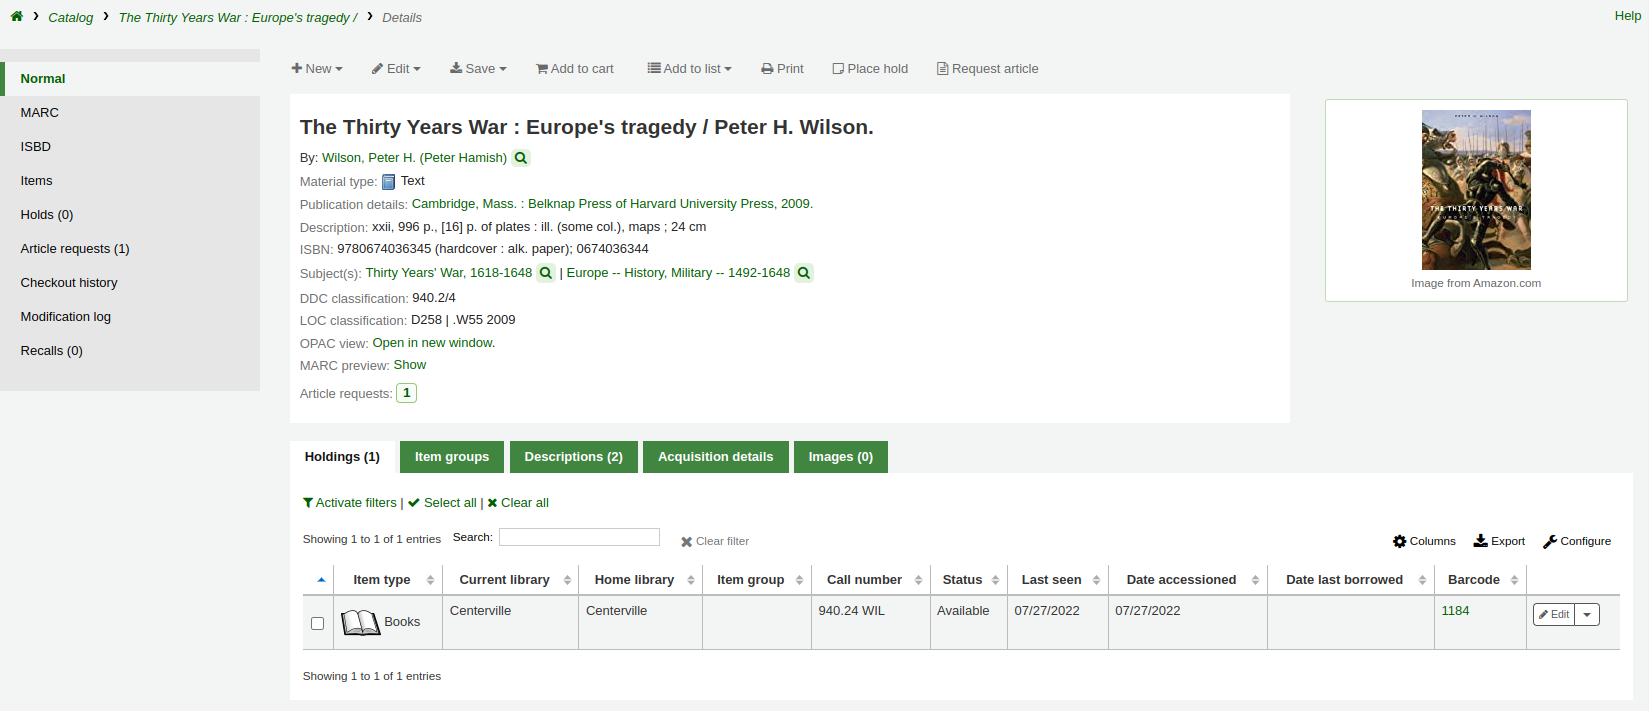
You can see the checkout from the patron’s list of checkouts.
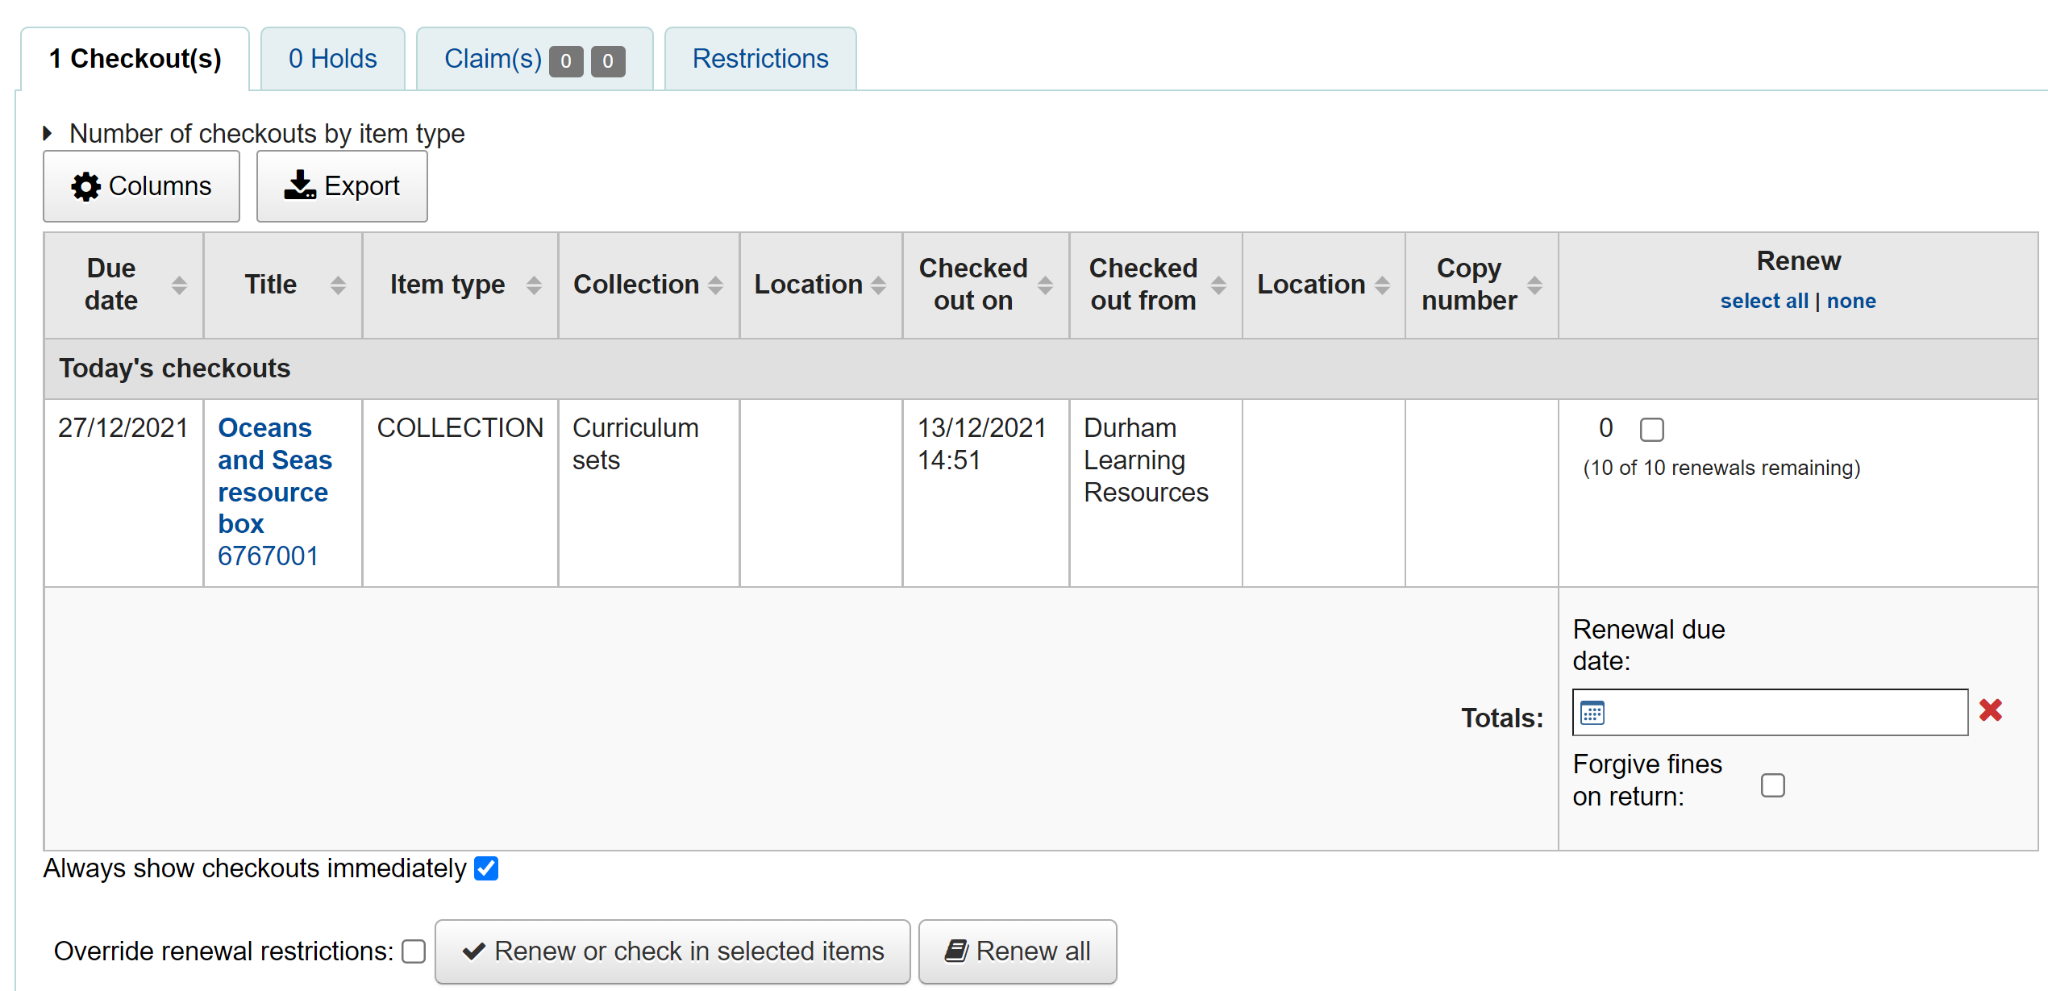
You can also see that the bundle is checked out from the status column of the Holdings table of the catalogue record.from the catalogue record display.
Checkin
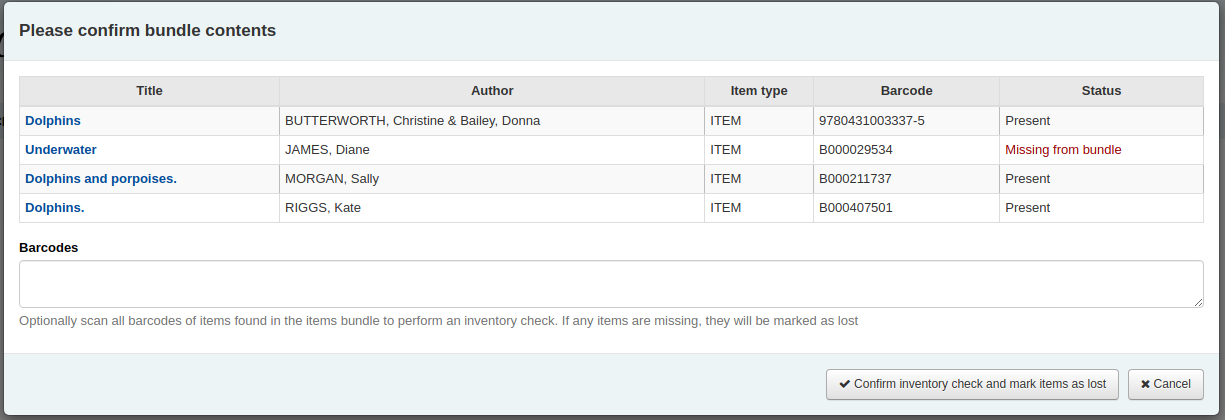
Check in bundles in the usual way from Circulation. You will then be prompted to verify the presence of each item that belongs in the bundle.
A list of the items currently attached to the bundle, and expected to be returned, will display at the top of the dialogue. Beneath the list will be a ‘Barcodes’ box where you are expected to scan the barcodes of the returned items one by one.
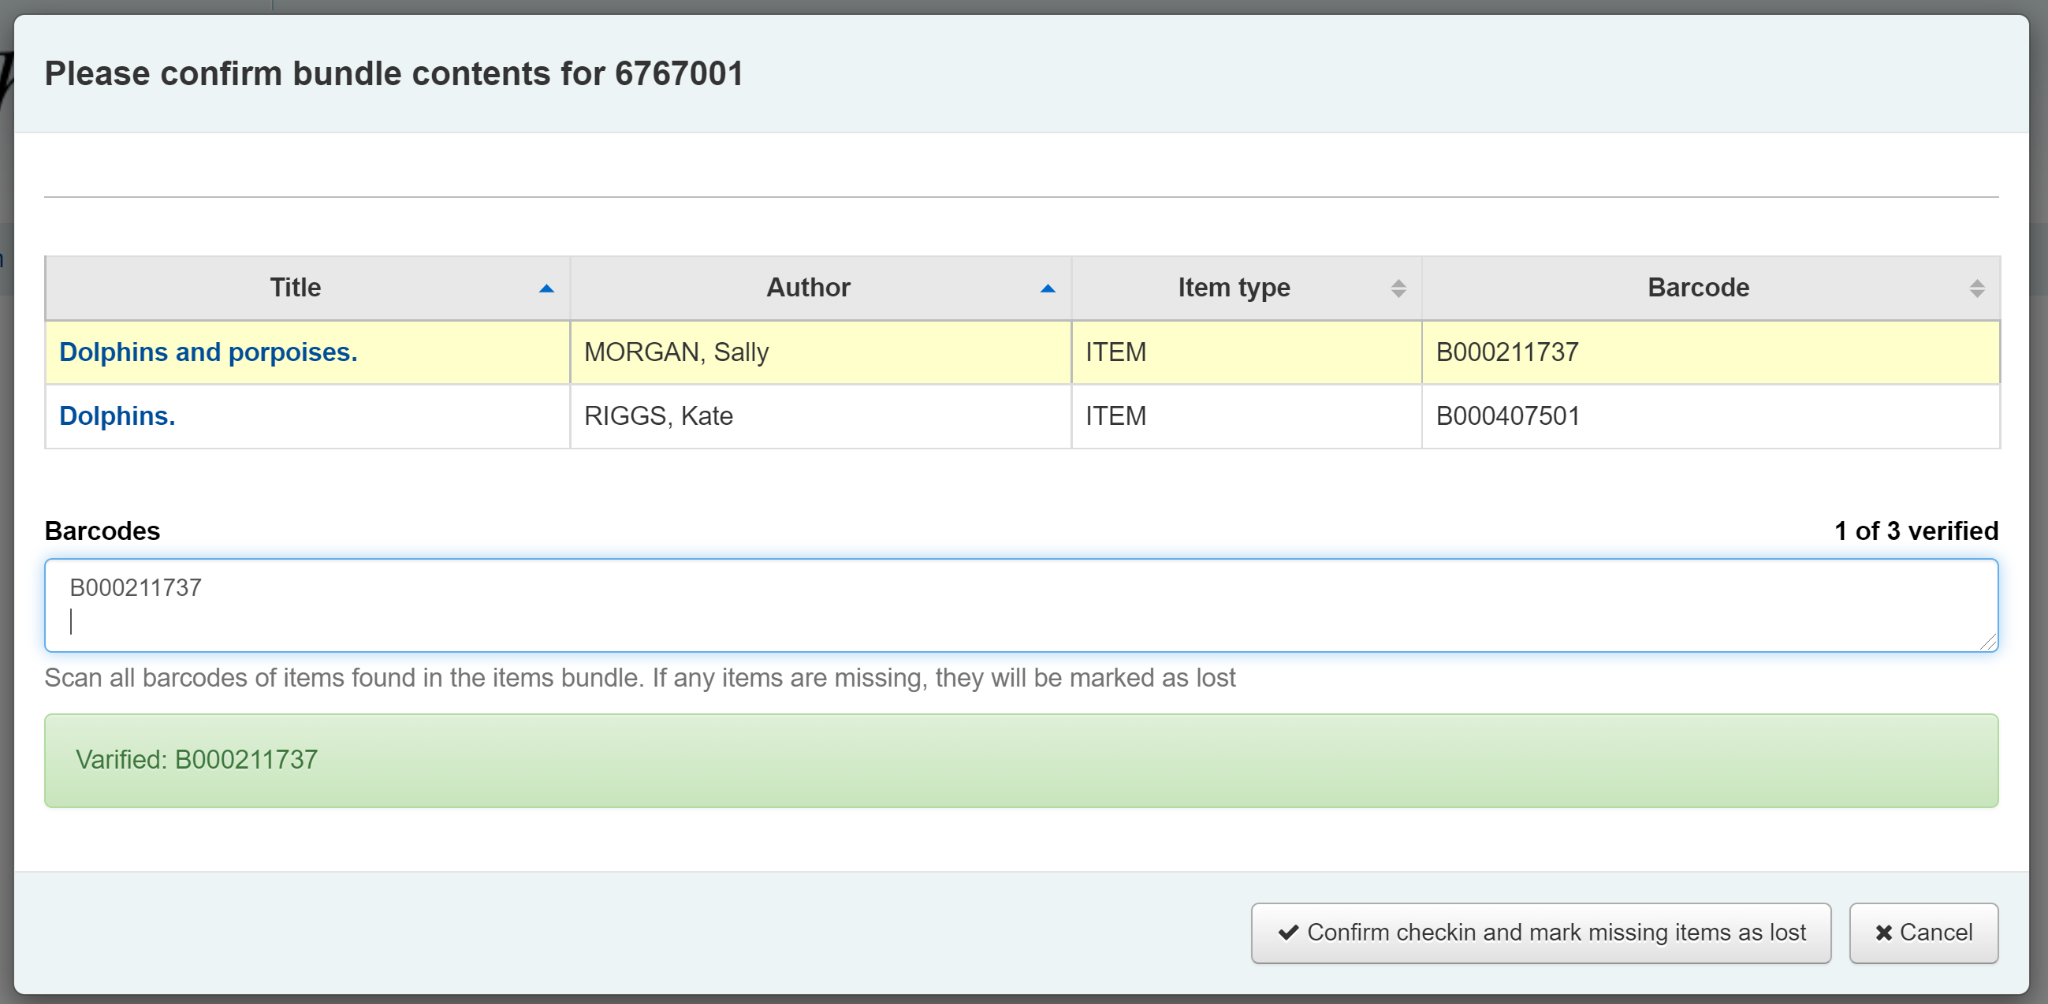
As you scan items, the matching row in the list will be highlighted to give some visual feedback. You also see a running total of items that have been checked in on the right hand side.
When you have finished scanning the returned items you can click on ‘Confirm checkin and mark missing items as lost’ or you can cancel the checkin.
If all the bundle items were marked as found you will be presented with a message to say the checkin is complete.

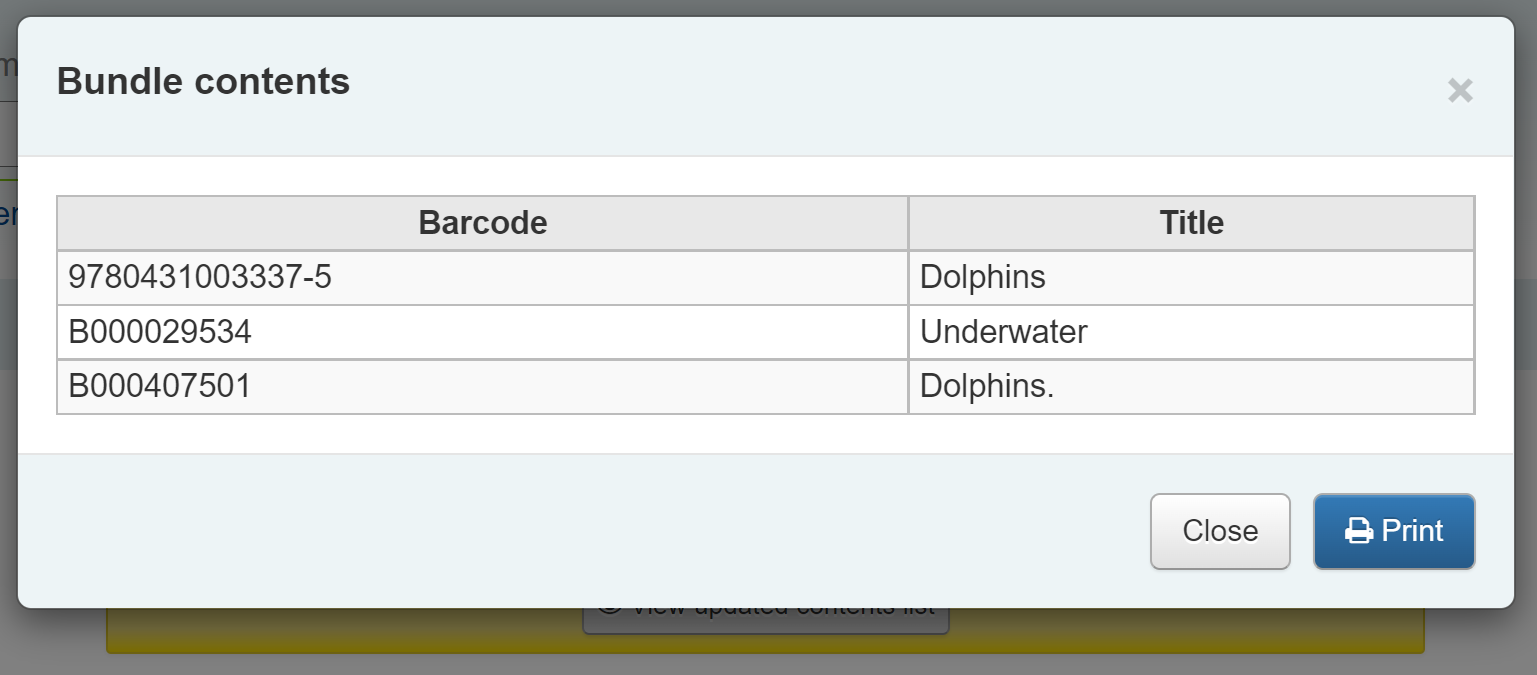
You can view and print a contents list.
Missing items
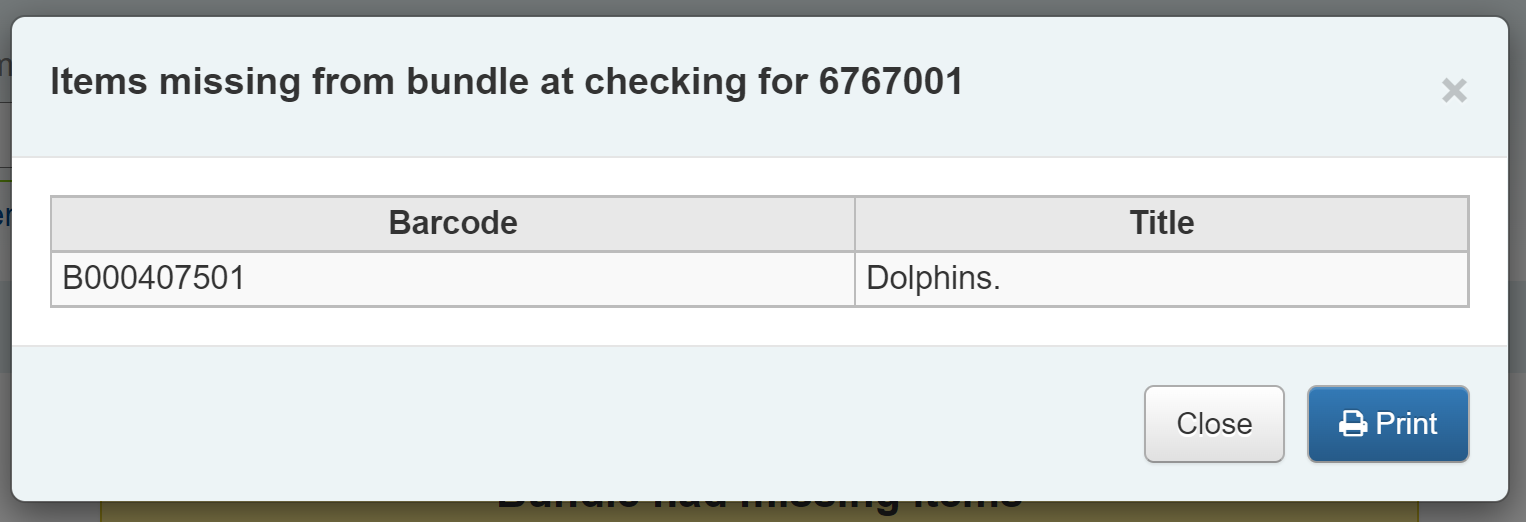
If some items were found to be missing during the verification stage the check in will proceed but you will be alerted to the fact that the bundle content has changed and you will be given the option to view and print an updated contents list.

You can also view a list of the missing items.
Any items that were missing during the verification stage will automatically be marked with an appropriate Lost status and a return claim added to track which checkout lost the contained item. You can add your own Lost statuses as authorized values and can control which lost status is used via the BundleLostValue system preference. For example a ‘Missing from bundle’ status as shown below.
In the Manage bundle contents view, the missing item displays with the date last seen.
Claims returned process
Within the patron record the missing items are listed as claims returned and can be viewed from the Claim(s) tab in the Checkouts table.
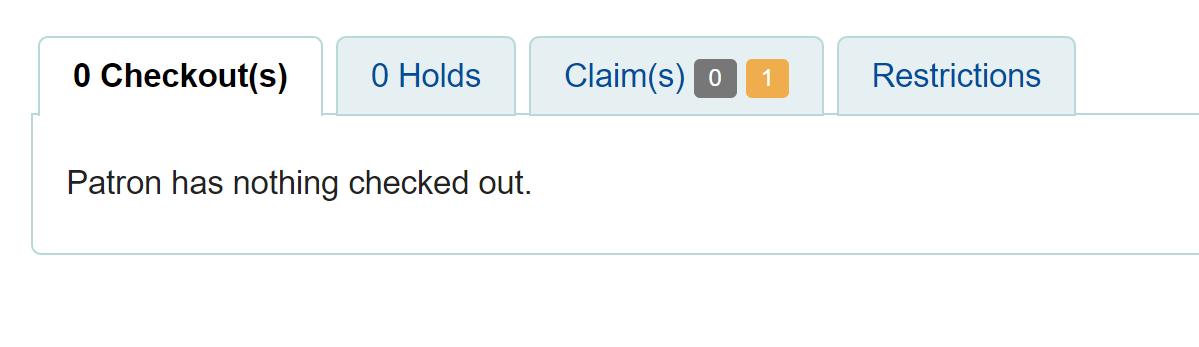
Click on the numbered square to view the missing items for the patron.
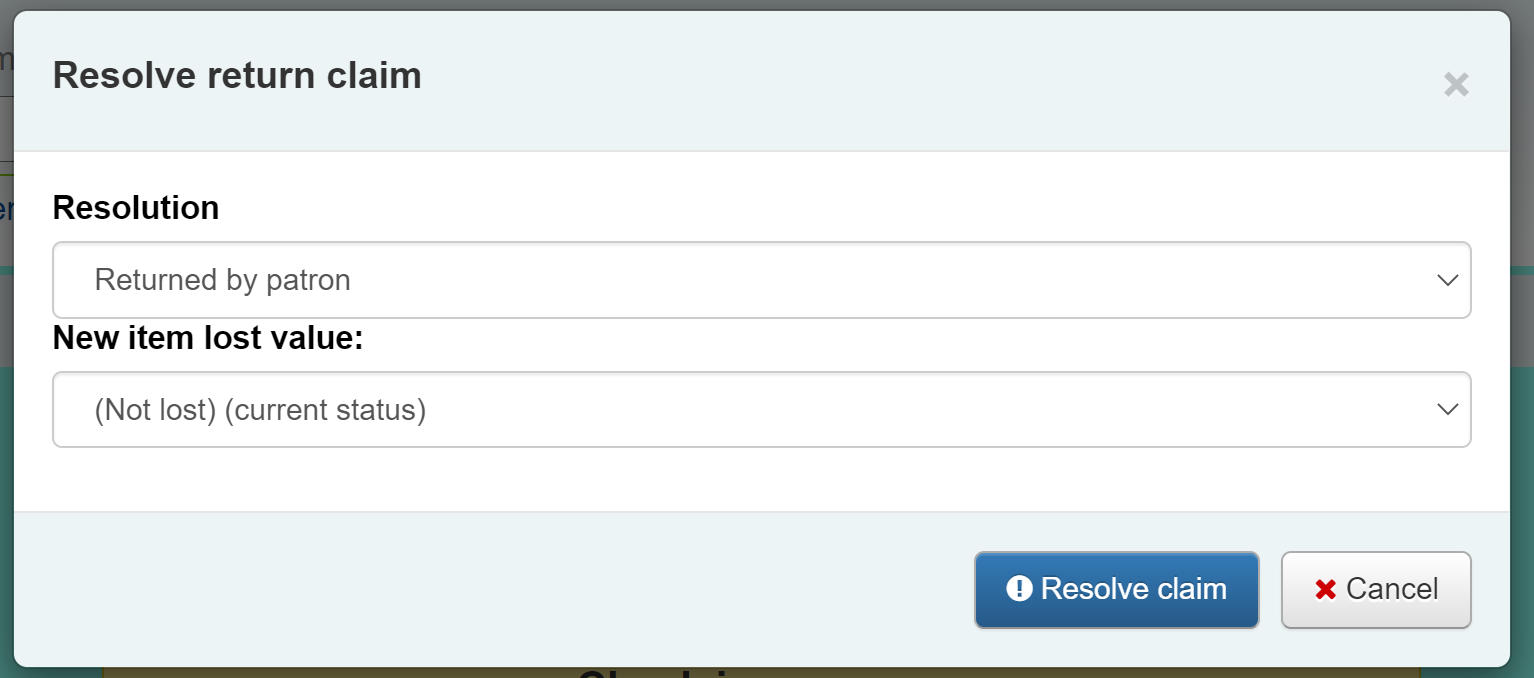
If an item is found it should be checked in. The checkin dialogue box will include a button to ‘Resolve’ the claim.

You are required to add a resolution reason and can optionally change the lost value of the item.
Inventory (checking bundle contents at any time)
A verification can be triggered at any time by checking the bundle in. If the system detects that the bundle was not checked out at this point, a modified confirmation dialogue is displayed which will include all items expected to be present in the bundle, even those currently marked as lost.
This allows for a quick view of what should be in the bundle and what’s currently marked as missing. You can optionally cancel the checkin or choose to rescan the items to perform the verification, marking items as found or subsequently missing. As this is a checkin that is not associated with a checkout, if new items are found to be missing, we will mark them as lost but cannot associate them with a checkout and returns claim.
Prenotazioni
Koha allows patrons to put things on hold. A “Hold” is a way to reserve an item. Depending on your circulation and fines rules and hold system preference settings, patrons will be able to place items on hold for pickup at the library at a later date and time.
Placing holds in the staff interface
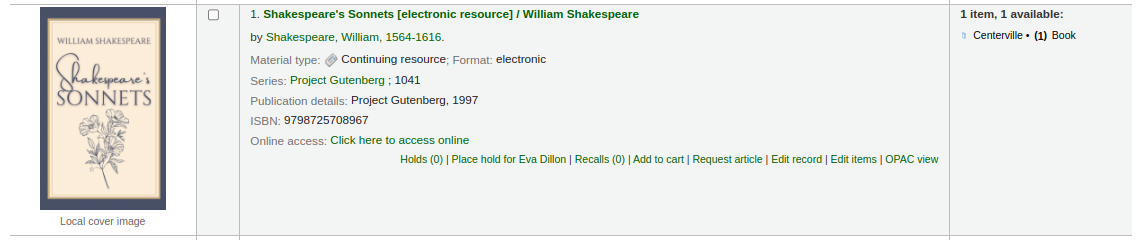
There are several ways to place holds from the staff interface. The most obvious is using the “Place hold” button at the top of any bibliographic record.
You can also click the smaller “Place hold” link found at the top of your catalog search results, or the “Holds” link found below each result.

To place holds on multiple titles at the same time, check the boxes next to the titles in the search results, and click the “Place hold” button at the top of the search results.
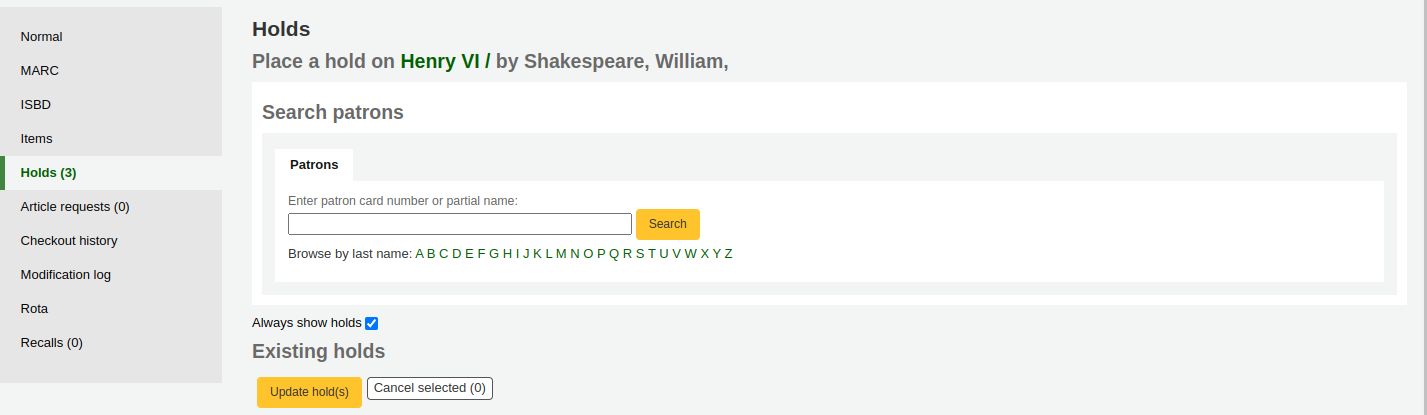
Per iniziare il processo, ti verrà chiesto di cercare un utente con il suo codice a barre o con parte del suo nome.
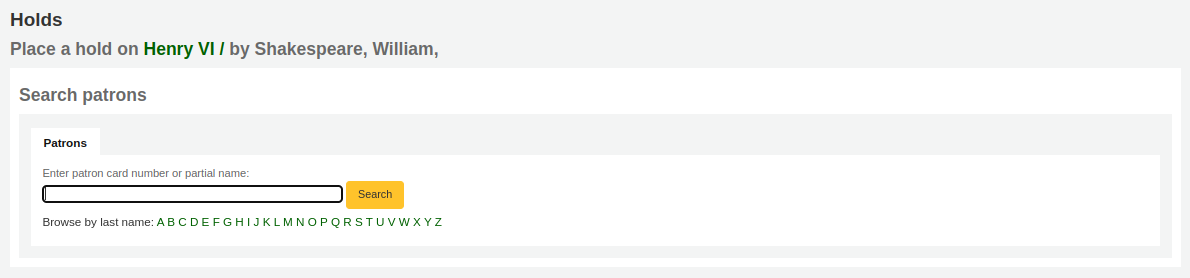
If you’d like to search for the patron first and then the bibliographic record for the hold, you can open the patron record and click on the “Search to Hold” button at the top of the patron record.

After clicking the button you will be brought to the catalog search page where you can find the title or titles you need to place a hold on. Under each title on the results you’ll see an option to “Place hold for (patron name).”
If you want to place a hold on multiple titles for this patron, check the boxes to the left of the titles, click the arrow to the right of the “Place Hold” button and choose “Place hold for (patron name)”.
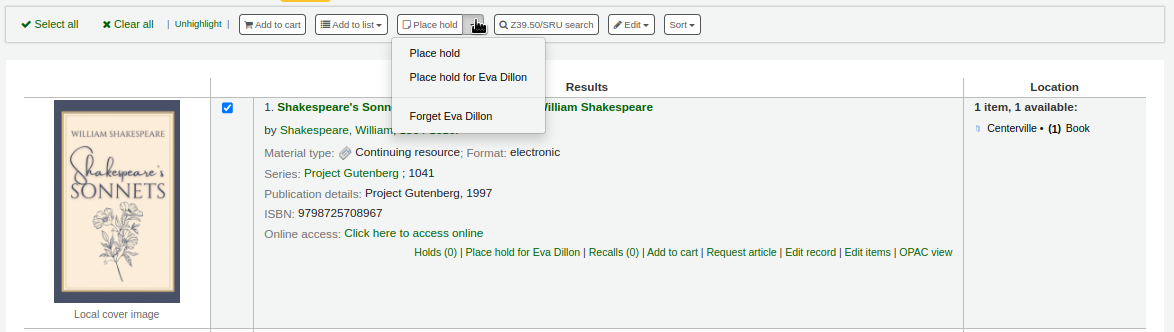
Nota
Once the holds are placed, you can choose to have Koha “forget” the patron’s name by clicking the arrow to the right of the “Place hold” button on the search results and choosing the “Forget (patron name)” option.
In funzione del numero di copie che intendi prenotare in una sola volta, ti verranno proposte differenti schermate di prenotazione. Se stai prenotando un’opera, vedrai una lista di tutte le copie che potrai prenotare.
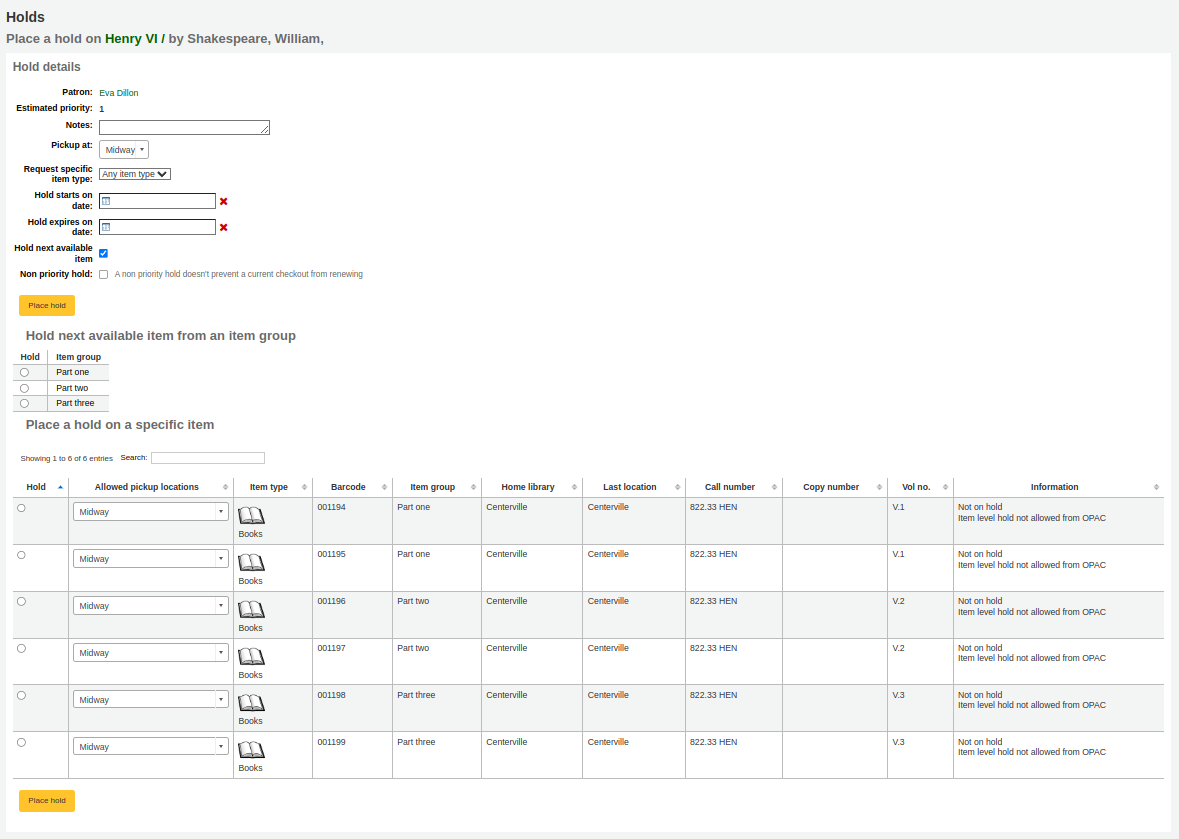
Patron: the patron’s name for whom this hold is
Estimated priority: this takes into account holds that are already placed on this title
Note: enter any notes that might apply to this hold
Pickup at: choose the library where the patron will pick up the item
Request specific item type: if the AllowHoldItemTypeSelection system preference is set to “Allow” there will be an option to choose to limit the hold to a specific item type
Hold starts on date: if the AllowHoldDateInFuture system preference is set to “Allow”, and the patron wants the hold to start on a date other than today, enter the date here
Hold expires on: if the patron has specified that they don’t want the item after a certain date, or if you have limits on hold lengths, you can enter an expiration date for the hold in the “Hold expires on date”
Nota
To cancel expired holds automatically you need to have the expired holds cron job set to run on a regular basis.
Hold next available item: check if the hold should on the next available item, if not, choose an item group in the “Hold next available item from an item group” section or a specific item in the “Place hold on a specific item” section below
Non-priority hold: if you are placing a hold for internal purposes, such as checking for missing pages or needing to add a label, check the “Non-priority hold” box. This type of hold will not prevent the patron who currently has the item to renew their checkout.
Hold next available item from an item group: if the EnableItemGroupHolds system preference is set to “Enable” and the record has item groups, you can choose to place a hold on the next available item of a group, rather than the next available item on the whole record or a specific item.
Place hold on a specific item: if the hold should be on a specific item rather than the next available item of the record or the group, select the item that should be placed on hold
Nota
The default pickup library for item-level holds is determined by the DefaultHoldPickupLocation system preference.
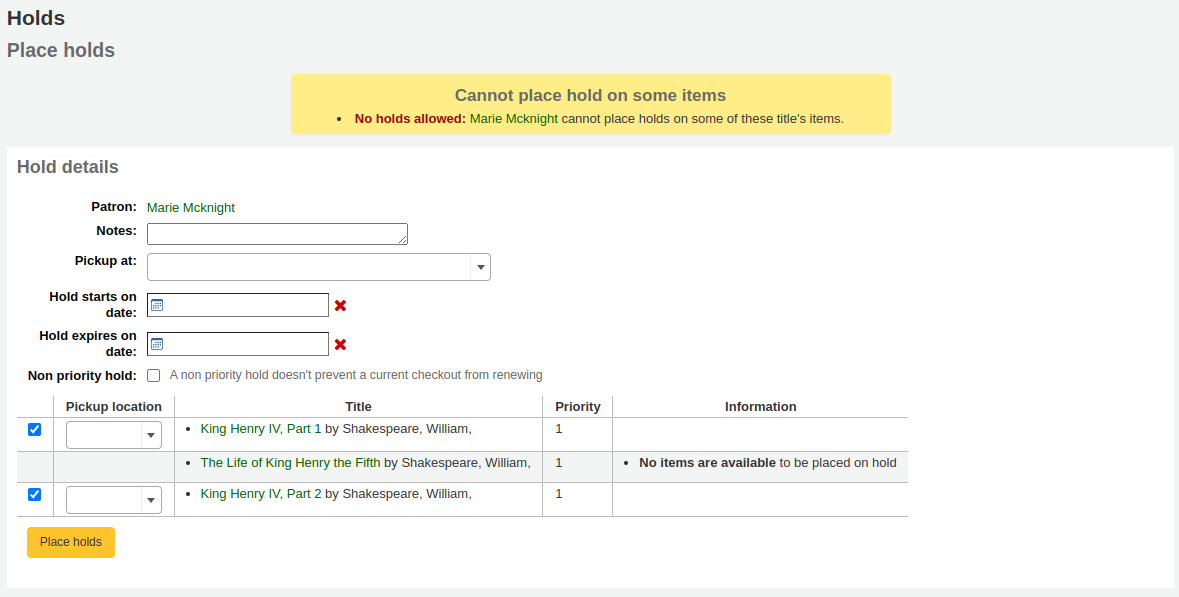
If you’re placing holds on multiple records you will be presented with the next available option for all titles. If no items are available for hold it will say so on the confirmation screen.
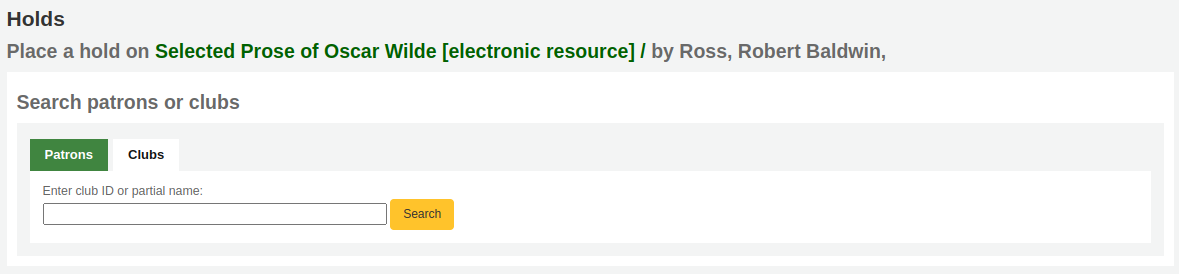
If your library uses the patron clubs feature, use the clubs tab to place a hold for a club.
To place a hold for a club, click the clubs tab, search for and select the club name, and click the “Place hold” button.
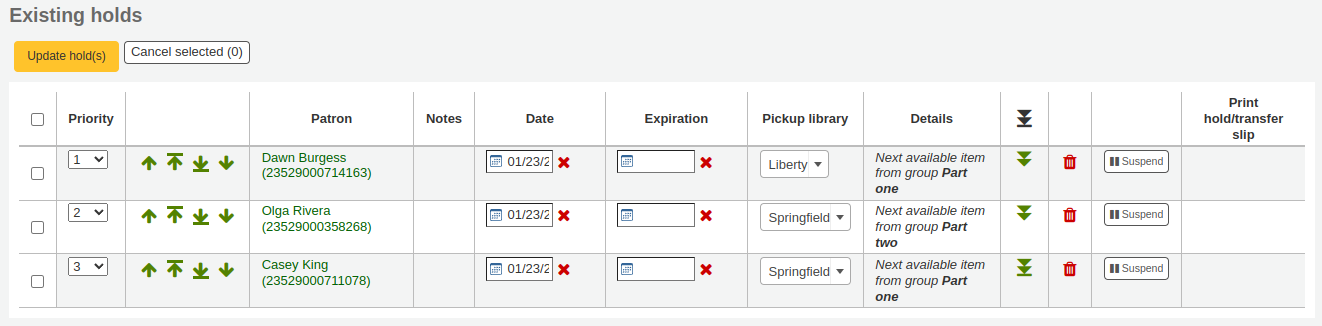
Managing holds
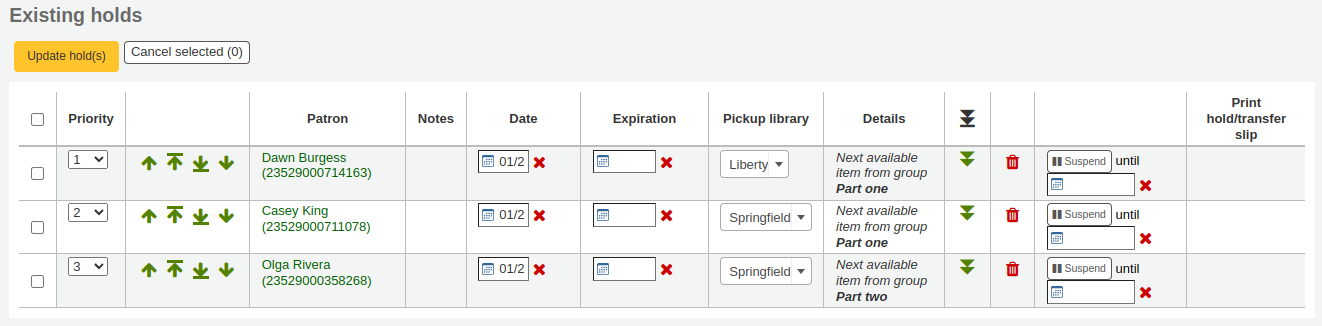
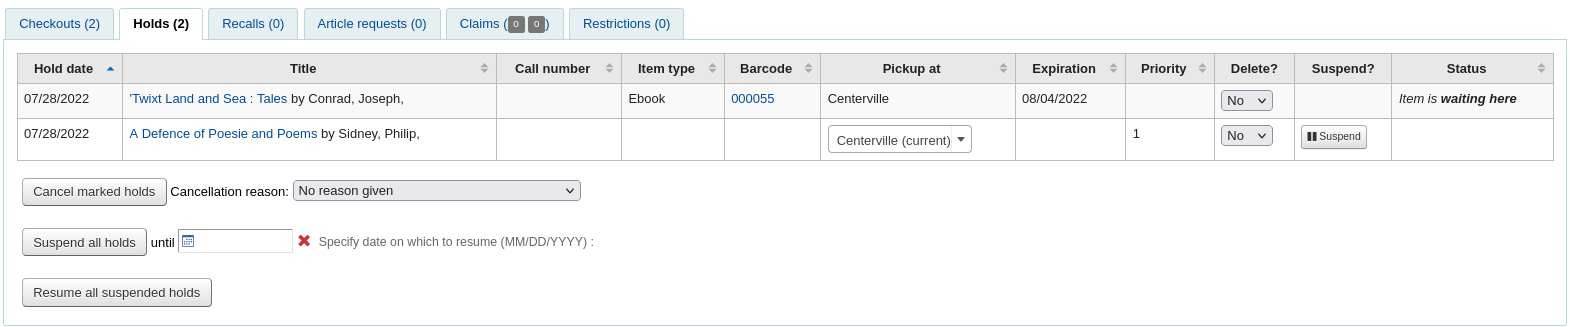
Holds can be altered and cancelled from the holds tab found on the left of the bibliographic record.
From the list of holds you can change the order of the holds, the pickup location, suspend, or cancel the hold.
Nota
If the HoldsSplitQueue system preference is set, you will see the holds list split across different tables by either pickup library, item type or both.
Nota
If the AllowHoldDateInFuture system preference is set to «Don’t allow», you will not have the option to edit the date the hold was placed (the column labelled Date).
Nota
Depending on how the HidePatronName system preference is set, the list may show card numbers instead of names in the patron column like in the image above.
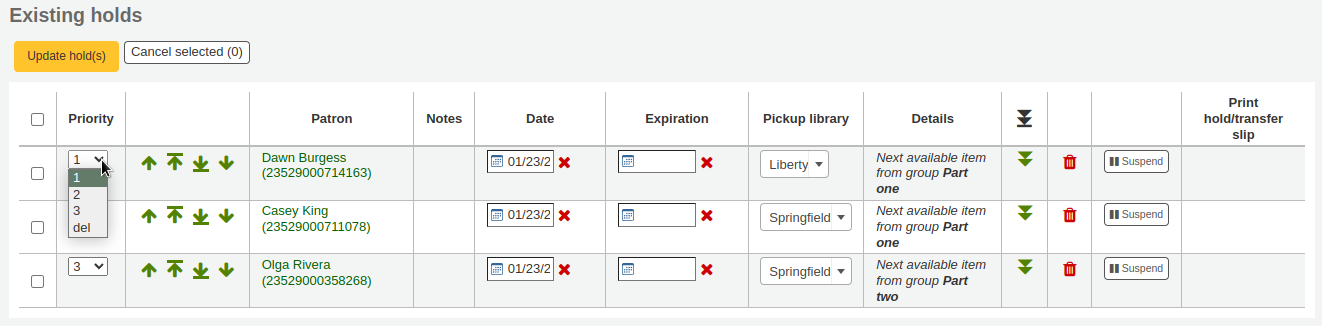
Changing the order of the holds
To rearrange holds, make a selection from the “Priority” drop-down or click the arrows to the right of the priority pull down.
Avvertimento
Clicking the double down arrow to the right of the hold will stick the hold at the bottom of the list even if more requests are made.
For example, if your library has home-bound patrons that are allowed to keep items out for months at a time, it would not be fair to other patrons if a home-bound patron were able to check out a brand new book and keep it for months. For this reason, the home-bound patron’s hold request would stay at the bottom of the queue until everyone else who wanted to read that book has already done so.
In the list of existing holds, lowest priority holds are indicated by the double down arrow with a line underneath.
Clicking the double arrow again will put the hold back in regular priority, in last place.
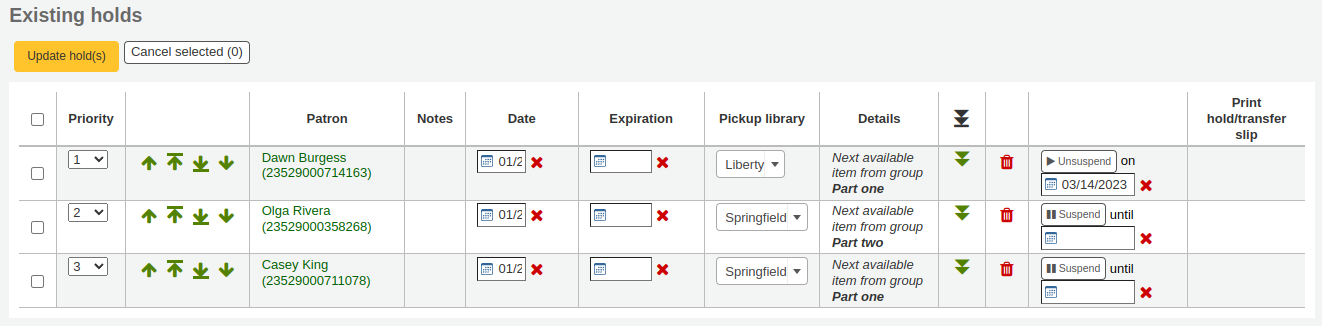
Suspending holds
If a patron asks to have their hold suspended and the SuspendHoldsIntranet system preference is set to “Allow”, you can do so by clicking the “Suspend” button at the far right.
If the patron gives you a date for the holds to resume, you can enter that in the date box and click the “Update hold(s)” button to save your changes.
Nota
If the AutoResumeSuspendedHolds system preference is set to «Don’t allow» there will not be the option to put an end date on the hold suspension.
Nota
The auto_unsuspend_holds.pl cron job is required to automatically resume suspended holds.
You can also unsuspend holds manually by clicking the “Unsusped” button.
If the SuspendHoldsOpac system preference is set to “Allow”, patrons will be able to suspend and unsuspend their own holds from their online account.
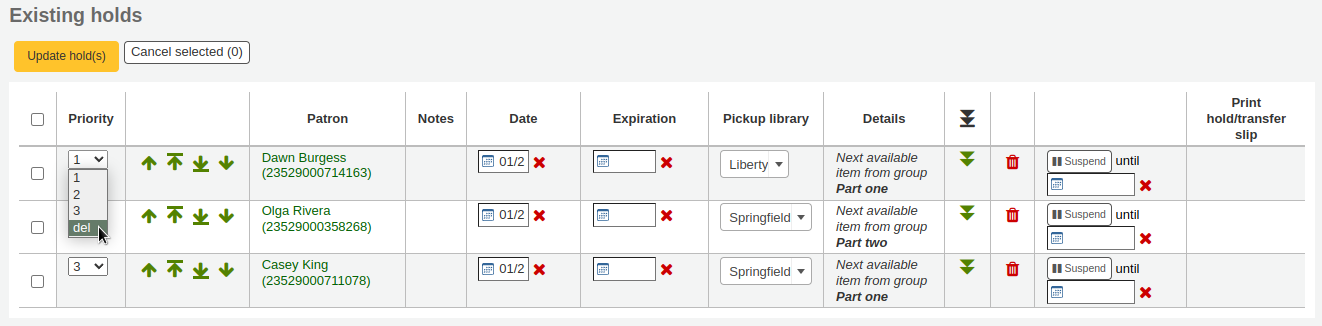
Deleting holds
To delete or cancel a hold, click the red trash can to the right of the hold line.
To delete/cancel a bunch of holds you can choose “del” from the drop-down menu on the left of each line and then click “Update hold(s)” at the bottom of the list.
Receiving holds
When items that are on hold are checked in or out the system will remind the circulation staff that the item is on hold and offer them options for managing the hold.
Quando rientra dal prestito una copia che ha una prenotazione su di essa, il sistema chiederà o di confermare e trasferire la copia
o semplicemente di confermare la prenotazione
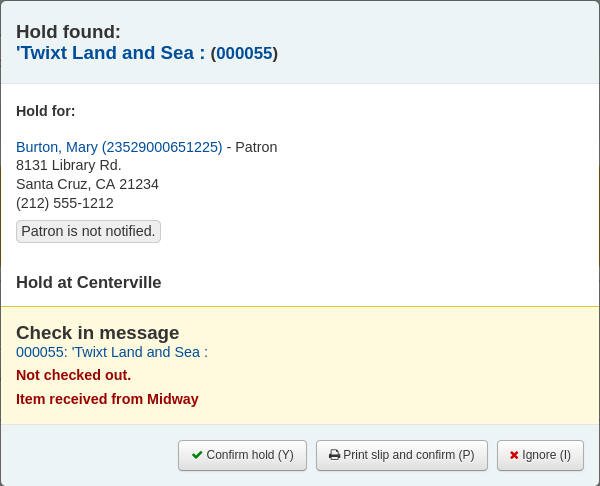
If the item needs to be transferred, clicking “Confirm and transfer” or “Print slip, transfer, and confirm” will mark the item as in transit to the proper library.
If the item is already at the pickup library, clicking the “Confirm” or the “Print slip and confirm” button will mark the item as ready for pickup by the patron.
Clicking “Ignore” will retain the hold, but allow the item to be checked out to another patron or change the status of the item (if it was returned damaged, for example).
The “Print slip and confirm” or “Print slip, transfer, and confirm” options will open a printable page that you can attach to the item with the necessary hold or transfer information.
Nota
The slip that is printed is the HOLD_SLIP notice. It can be modified with the Notices and slips tool.
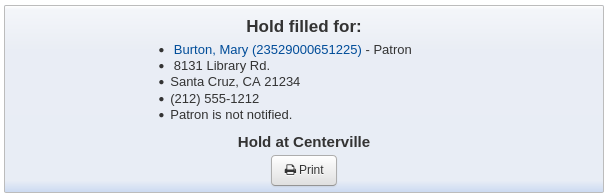
When the hold is confirmed, if the patron is notified, the “hold filled” notice will be sent to them.
Nota
The notice that is sent is the HOLD notice. It can be modified with the Notices and slips tool.
Nota
If the HoldsAutoFill system preference is enabled, the circulation staff will not have to confirm the hold, but they will have the option to print the hold or transfer slip.
If the HoldsAutoFillPrintSlip system preference is enabled, the print window to print the hold or transfer slip will open automatically.
Once confirmed, the hold will show as “waiting” on the patron record and on the checkout screen under the “Holds” tab.
La copia mostrerà che la copia è prenotata.

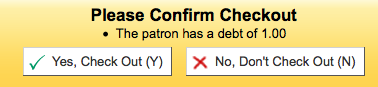
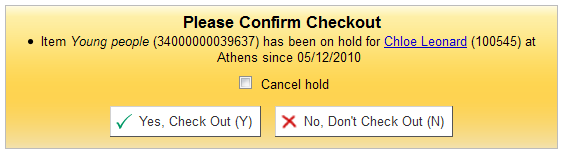
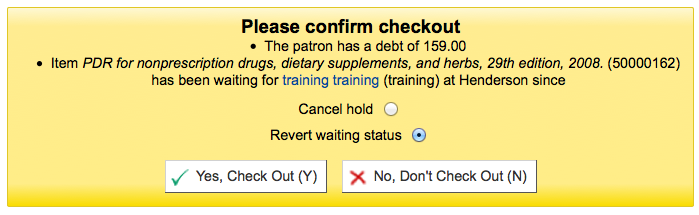
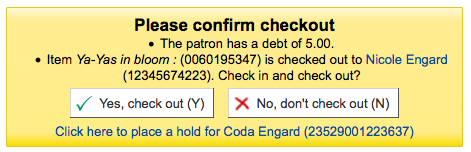
In some cases, a patron may come in to pick up a hold on behalf of someone else. In this case, make sure that the hold is cancelled when you check the item out to someone else. Alternatively, a check out might be attempted in error for an item that is already waiting for someone else. In this case you will be presented with a warning message.
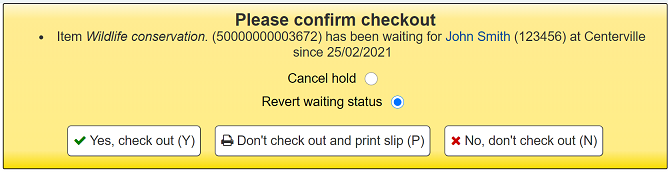
Cancel hold: in combination with “Yes, check out”, this option will cancel the current hold and check the item out to the new patron.
Revert waiting status: in combination with “Yes, check out”, this option will revert the waiting status of the hold (the patron who placed the hold will be back in first position in the queue) and check the item out to the new patron.
Yes, check out: this option will check the item out to the current patron.
Don’t check out and print slip: this option will open the print window to print the hold slip, the check out will be cancelled and the hold will remain.
No, don’t check out: this option will cancel the check out, the hold will remain.
If you try to check in an item that is already waiting to be picked up, a pop up indicating that a hold was found and the item is already waiting will appear.
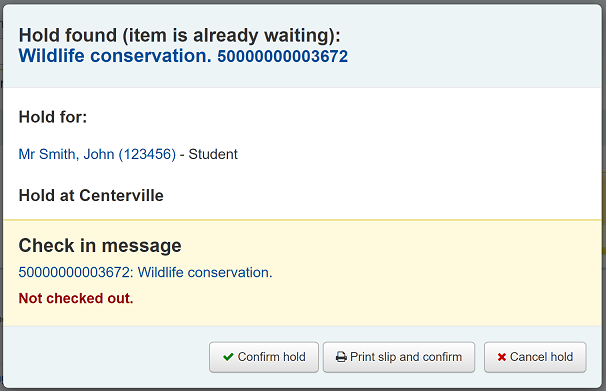
Confirm hold: this option will keep the existing hold.
Print slip and confirm: this option will open the print window to print the hold slip and keep the existing hold.
Cancel hold: this option will remove the hold.
If you cancel the hold and further holds exist for the item you will be presented with a new option to confirm the hold for the next patron.
Curbside pickups
Koha has an integrated curbside pickup module that can be used to schedule hold pickups by patrons.
Get there: Circulation > Curbside pickups
See the curbside pickup configuration section to learn how to set up curbside pickup.
Nota
Staff needs the manage_curbside_pickups permission (under circulate) in order to schedule and manage pickups.
Scheduling a pickup
Get there: Circulation > Curbside pickups > Schedule pickup
To schedule a pickup,
Click the “Schedule pickup” tab
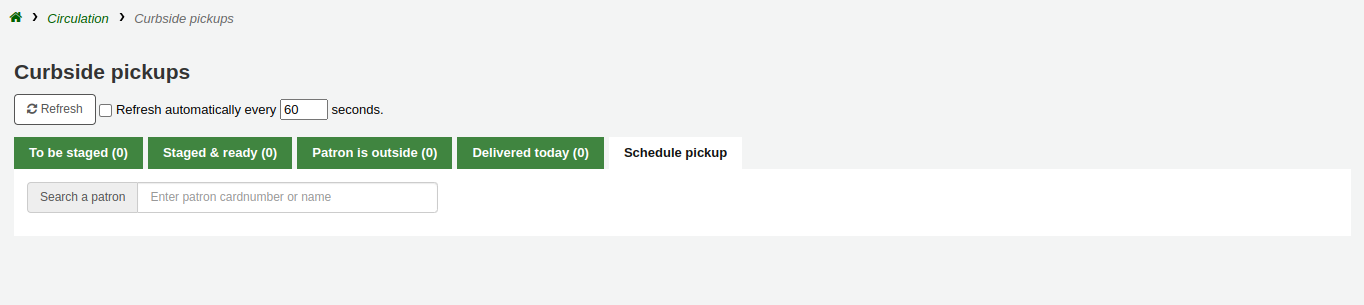
Search for the patron for whom to schedule a pickup, with either their name or their card number
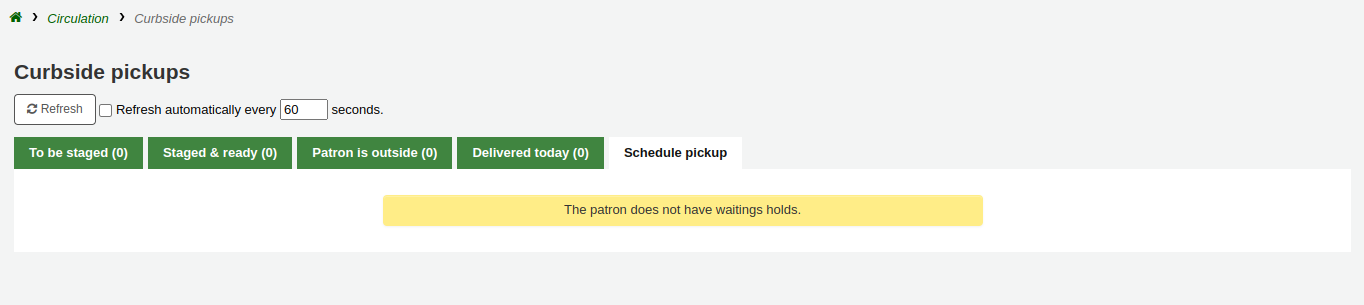
Avvertimento
If “Enable for waiting holds only” is set in the curbside pickup configuration for your library, and the patron has no waiting holds, there will be an error message.
Enter a date for the pickup
Nota
Only dates with available time slots will be displayed.
The possible pickup times will be displayed, depending on the day of the week
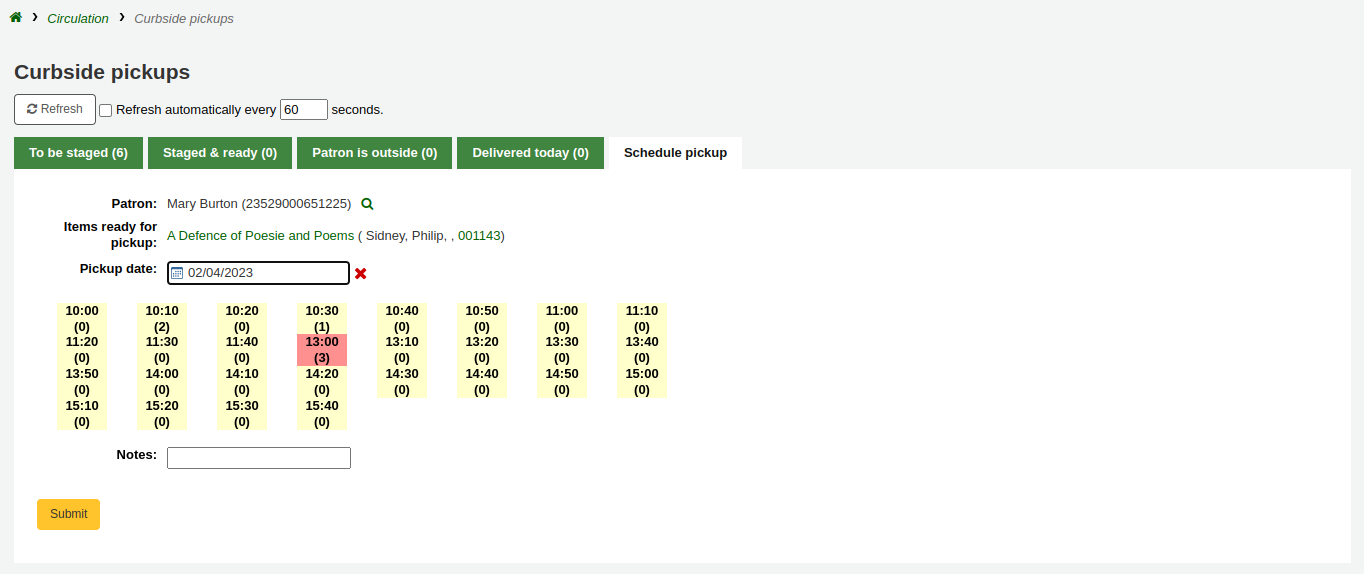
Nota
The number in parentheses under each time slot is the number of patrons who are currently scheduled for a pickup at that time. If the maximum number of appointments has been reached, based on the “Maximum patrons per interval” setting in the curbside pickup configuration, the time slot will be displayed in red and you will not be able to select it.
If needed, you can add a note concerning this pickup
Clicca “Invia”
Alternatively, you can schedule a pickup from the patron’s account.
Click “Schedule pickup” at the top of the patron’s detail page
Preparing for curbside pickups
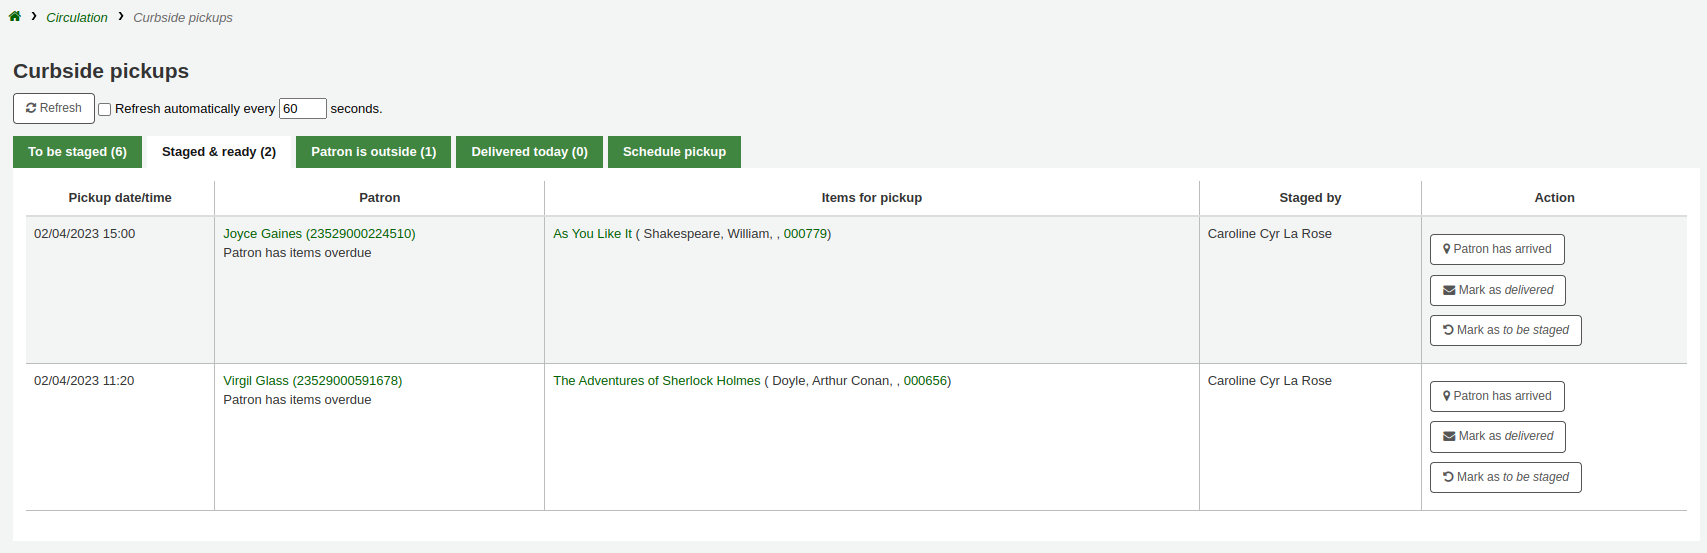
Get there: Circulation > Curbside pickups > To be staged
The “To be staged” tab contains all the curbside pickups still waiting to be prepared.
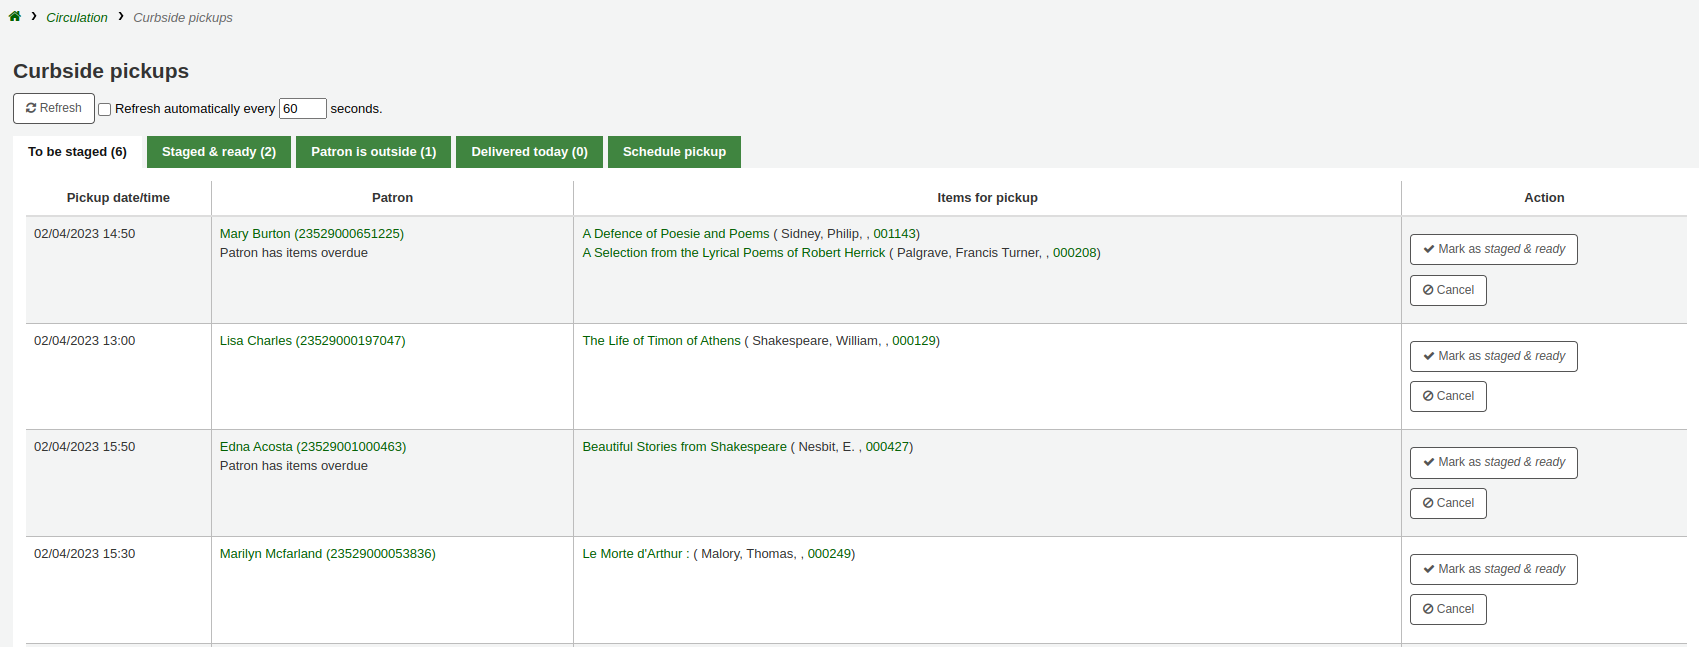
Nota
If the patron has overdues or restrictions, it will be shown here, under their name.
Once the items are prepared and ready to be picked up, click “Mark as staged & ready”. This will transfer the scheduled pickup appointment in the “Staged & ready” tab.
Nota
There is no need to checkout the item or items to the patron at this point. When delivering curbside pickups, the module will automatically check the items out.
Delivering curbside pickups
Get there: Circulation > Curbside pickups > Patron is outside
From the OPAC, the patron can alert that they are outside. Staff can also indicate that the patron has arrived by clicking on the “Patron has arrived” button from the “Staged & ready” tab.
At the designated time, meet the patron to give them their items. Then, click “Mark as delivered”. This will check out the item or items to the patron and transfer the curbside pickup appointment to the “Delivered today” tab.
Cancelling curbside pickups
Get there: Circulation > Curbside pickups > To be staged
If, for any reason, you need to cancel a curbside pickup appointment, click the “Cancel” button from the “To be staged” tab.
If the appointment has already progressed beyond the “To be staged” status, click “Mark as To be staged” to bring it back there in order to cancel it.
Recalls
The recalls feature allows users to recall items that are currently checked out. Once the recall is confirmed, the borrower who currently has the item checked out will be notified that their due date has been adjusted and they need to return their item. Once recalled items are returned, the recall requester will be notified that their item is awaiting pickup at their specified pickup location.
See the requesting recalls section to learn how to place a recall in the OPAC.
Setting up recalls in Koha
To use this feature:
Enable the UseRecalls system preference
Set the RecallsMaxPickUpDelay system preference
Optionally, enable the RecallsLog system preference
Modify the following sections in the relevant circulation rules
Recalls allowed (count)
Recalls per record (count)
On shelf recalls allowed
Recall due date interval (day)
Recall overdue fine amount
Recall pickup period
Make sure all the staff member who will be managing recalls have the superlibrarian or manage_recalls permission
Schedule the recalls cronjobs
Review the recalls notices and slips to make sure they have all the information needed
Managing recalls
The recalls feature is relatively automated. Staff do not have a lot of manipulations to do to manage recalls.
Recall statuses
The possible statuses for recalls are the following:
Requested
A new recall request has been made and the item must be returned by the patron who currently has it
Requested recalls appear in
the recalls queue
the recalls to pull list, if an available item can fulfill the recall
the “Recalls” tab of the bibliographic record
the “Recalls” tab of the patron’s file (and its equivalent in the OPAC)
the “Recalls history” tab of a patron’s file (and its equivalent in the OPAC)
Waiting
A recalled item is awaiting pickup at the requester’s chosen branch
Waiting recalls appear in
In transit
An item has been assigned to a recall and is in transit to the requester’s chosen pickup branch
In transit recalls appear in
Overdue
A recalled item is overdue to be returned by the patron who currently has it
Overdue recalls appear in
Fulfilled
A recalled item has been checked out to the recall requester, and the recall is complete
Fulfilled recalls appear in
Expired
The recall was not completed before a defined expiration date or the recall requester failed to pick up their waiting recall within the pickup period defined in RecallsMaxPickUpDelay
Expired recalls appear in
Cancelled
The recall request was cancelled.
Cancelled recalls appear in
Receiving recalled items
Upon checkin in an item that has been recalled, a pop up will appear asking the staff member to confirm or ignore the recall.
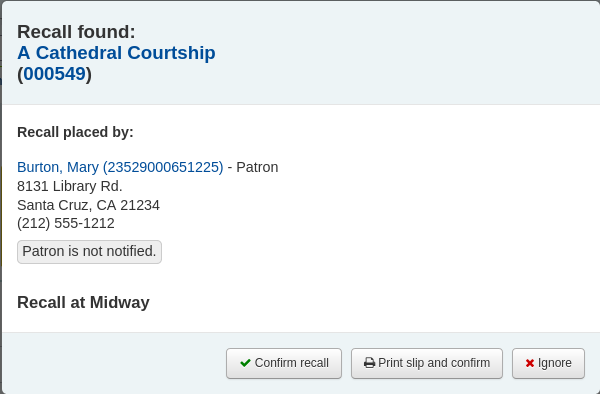
Confirm recall: this option will put the recall in “Waiting” status and, if the patron has an email address in their file, will notify them that their recalled item is now ready for pickup.
Nota
The notice sent is PICKUP_RECALLED_ITEM. You can modify it’s content in the notices and slips tool
Print slip and confirm: this option will print a slip you can attach to the item (similar to a hold slip) in addition to everything the “confirm recall” does (change the status and send the notice).
Nota
The slip is RECALL_REQUESTER_DET. You can modify it’s content in the notices and slips tool
Ignore: this option will check in the item, but the recall will not be set as awaiting pickup and the patron will not be notified.
If the patron asked to pick up their recalled item at a different library, a transfer will be triggered.
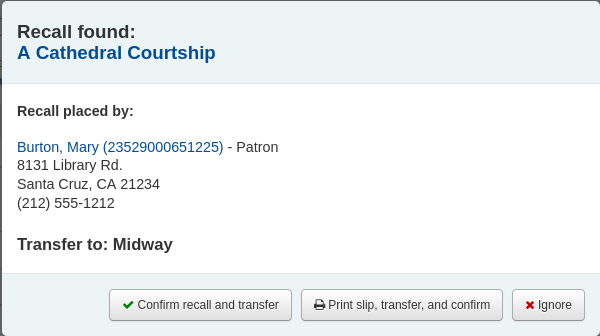
Confirm recall and transfer: this option will put the recall “In transit”.
Print slip, transfer, and confirm: this option will print a slip you can attach to the item (similar to a hold slip) in addition to setting the recall as “In transit”.
Ignore: this option will check in the item, but the recall will not be set as “In transit”
Nota
The patron will not be notified that their recall is ready for them with any of the above options.
Cancelling recalls
Nota
Only requested or overdue recalls can be cancelled.
It is not possible to cancel a recall that is currently awaiting pickup
Staff can cancel recalls from various screen in the staff interface.
Cancel from the recalls queue either individually by clicking the “Actions” button and selecting the “Cancel” option.
Or by selecting several recalls and clicking the “Cancel selected recalls” button at the bottom of the screen.
If the recalled item is currently in transit, the cancel option will also trigger a transfer back to the item’s home library.
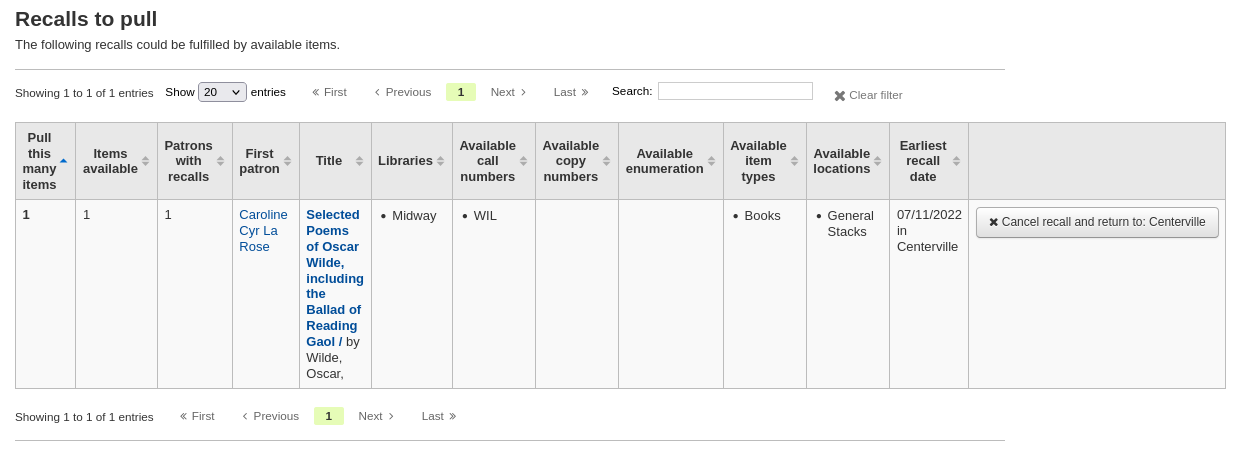
Cancel from the recalls to pull by clicking the “Cancel recall” button on the right
If the recalled item is currently in transit, the cancel option will also trigger a transfer back to the item’s home library.
Cancel from the overdue recalls list either individually by clicking the “Actions” button and selecting the “Cancel” option.
Or by selecting several recalls and clicking the “Cancel selected recalls” button at the bottom of the screen.
Cancel from the “Recalls” tab of a bibliographic record by clicking the “Actions” button and selecting the “Cancel” option.
Or by selecting several recalls and clicking the “Cancel selected recalls” button at the bottom of the screen.
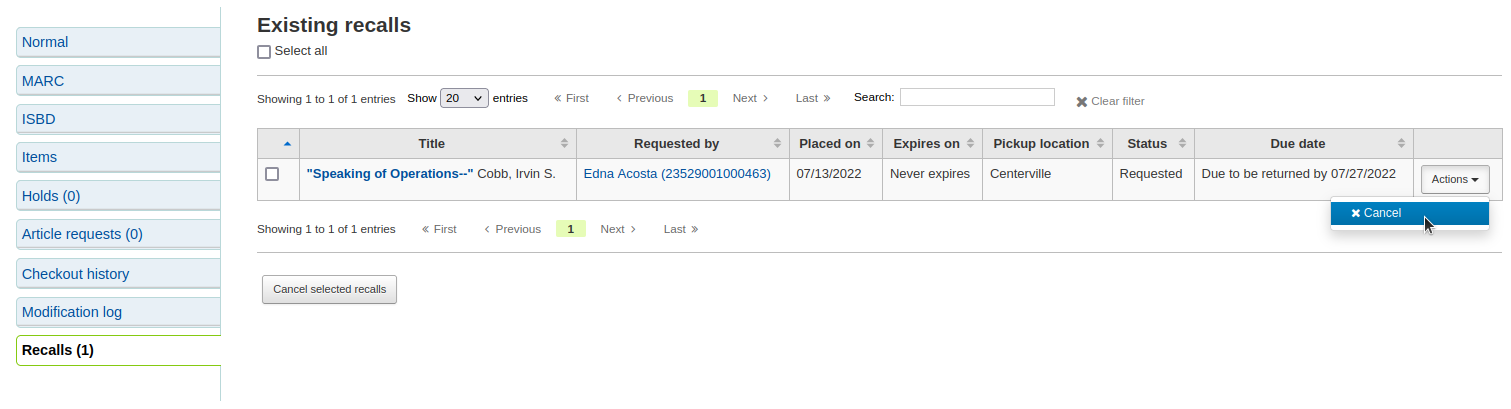
Cancel from the “Recalls” tab of a patron’s details page by clicking the “Actions” button and selecting the “Cancel” option.

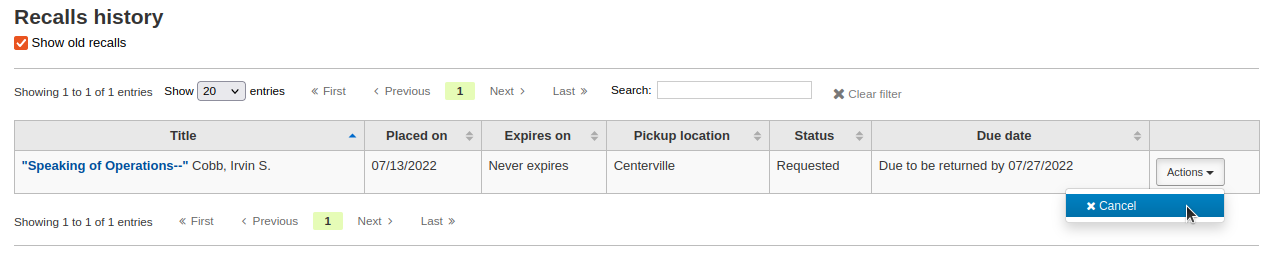
Cancel from the “Recalls history” tab of a patron’s file by clicking the “Actions” button and selecting the “Cancel” option.
Changing waiting recalls” status
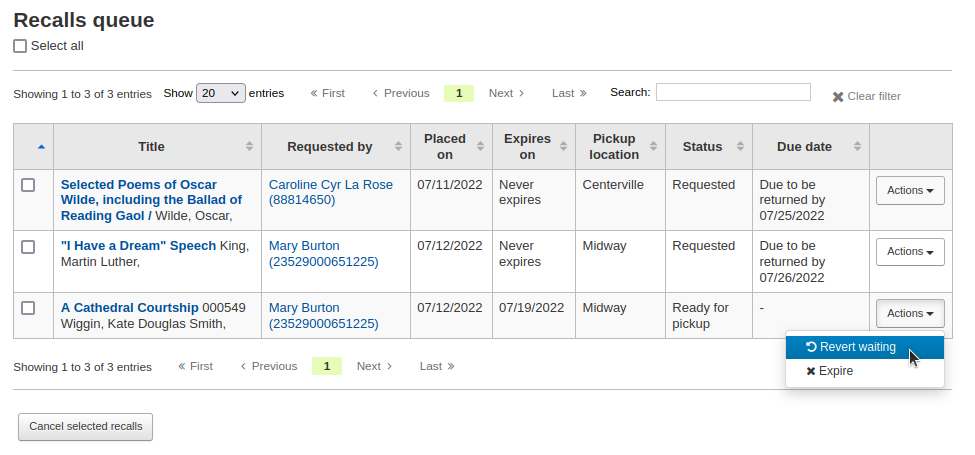
If a recall is currently awaiting pickup and for some reason the staff needs to change this status (for example, the requesting patron called and they won’t be picking up the recall), it is possible to revert the waiting status.
Revert the status from the recalls queue by clicking the “Actions” button and selecting the “Revert waiting” option.
Revert the status from the Recalls awaiting pickup list by clicking the “Revert waiting status” button on the right.

Marking recalls as overdue
If a recall is not checked in by the new due date, it should be marked as overdue by the overdue_recalls cronjob. However, it is possible to mark recalls as overdue manually.
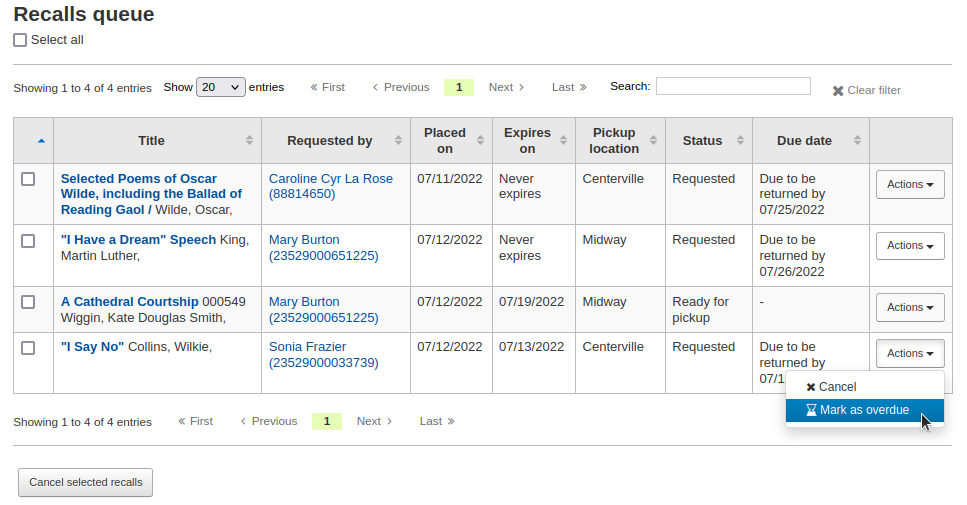
From the recalls queue, click the “Actions” button and selecting the “Mark as overdue” option.
Overdue recalls appear in the Overdue recalls list.
Expiring recalls
If a recall as been awaiting pickup for longer than the allowed period defined in RecallsMaxPickUpDelay, it should be expired automatically by the expire_recalls cronjob. However, it is possible to expire recalls manually.
From the recalls awaiting pickup list, click the “Expire recall” button on the right.
Recalls reports
Once recalls are set up, new sections will appear in the circulation module.
Get there: Circulation > Recalls
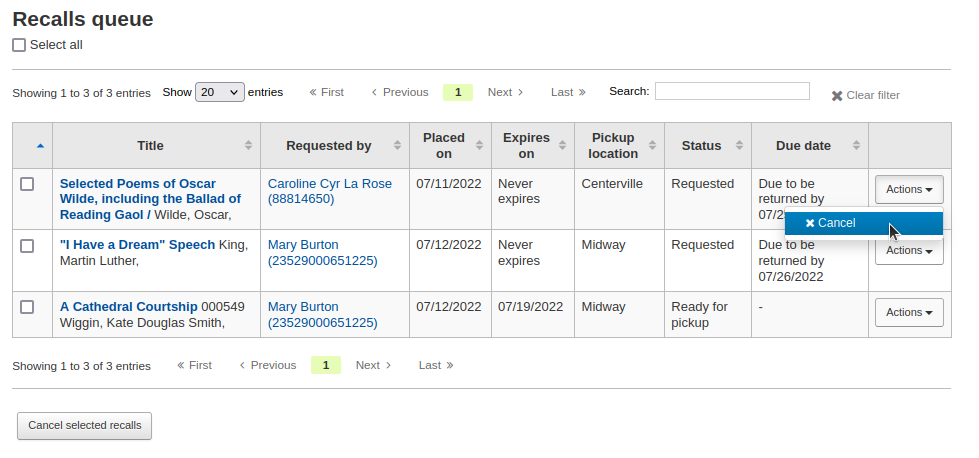
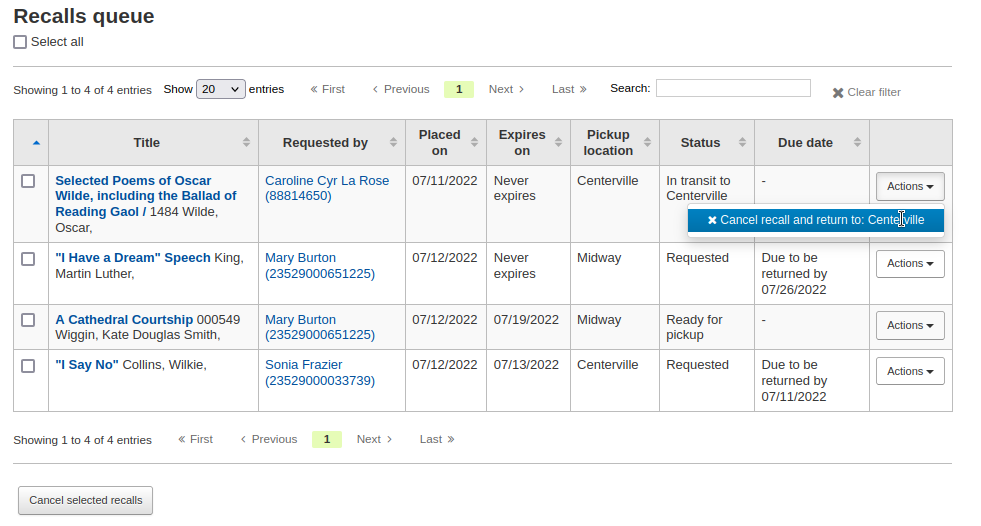
Recalls queue
The recalls queue shows all the current active recalls with their statuses.
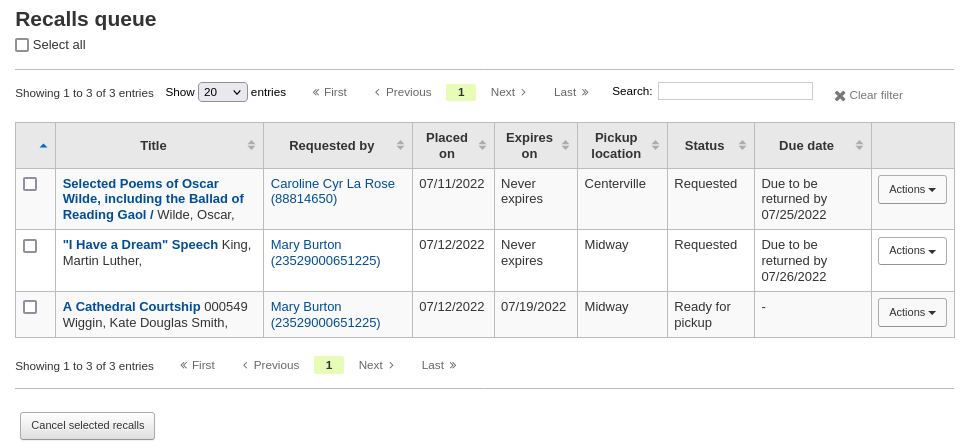
From the recalls queue, staff can cancel active recalls either individually by clicking the “Actions” button and selecting the “Cancel” option.
Or by selecting several recalls and clicking the “Cancel selected recalls” button at the bottom of the screen.
For recalls that are in transit, it is possible to cancel them and this will trigger a transfer back to their home library.
For recalls that are currently awaiting pickup, it is possible to revert the waiting status by clicking the “Actions” button and selecting the “Revert waiting” option.
For recalls that are overdue, it is possible to mark them as such from the recalls queue by clicking the “Actions” button and selecting the “Mark as overdue” option.
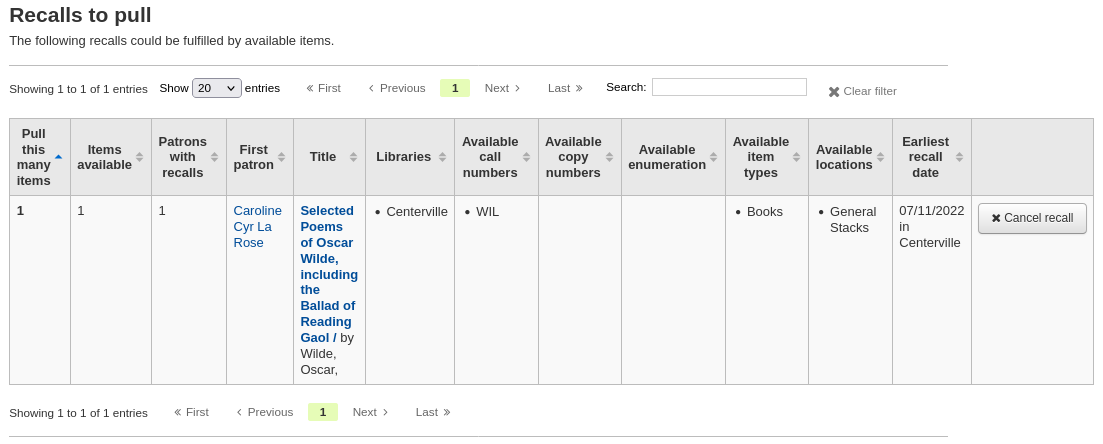
Recalls to pull
The recalls to pull list shows all the records that have been recalled but that have available items that could fulfill the request.
Staff can pick up these items from the shelves and check them in to fulfill the requests.
From the recalls to pull list, staff can cancel recalls if needed, by clicking the “Cancel recall” button on the right.
If the item is currently in transit, cancelling the recall will also trigger a transfer back the the item’s home library.
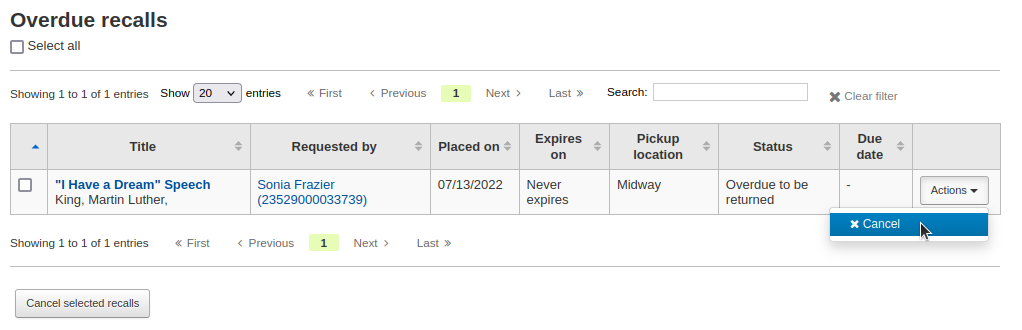
Overdue recalls
This list shows the items that have been recalled but have not been returned by the new due date.
Recalls can be marked as overdue automatically through the overdue_recalls cronjob or manually.
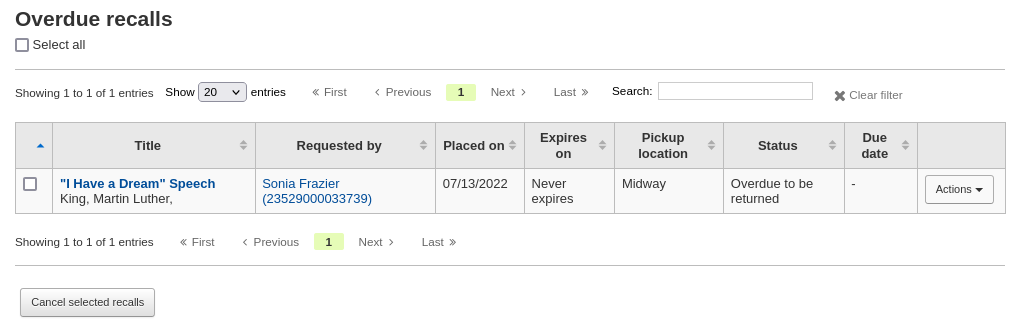
From this list, staff can cancel active recalls either individually by clicking the “Actions” button and selecting the “Cancel” option.
Or by selecting several recalls and clicking the “Cancel selected recalls” button at the bottom of the screen.
Recalls awaiting pickup
The recalls awaiting pickup list shows all the recalls that are currently waiting for the patron to come and get them.
This list is divided in two tabs:
Recalls waiting: shows all the recalls currently awaiting pickup.
Recalls waiting over x days: shows the recalls that have been waiting for more than the number of days specified in the RecallsMaxPickUpDelay system preference.
From this list, staff can revert waiting recalls by clicking on the “Revert waiting status” button on the right.
Staff can also manually expire recalls by clicking on the “Expire recall” button on the far right.
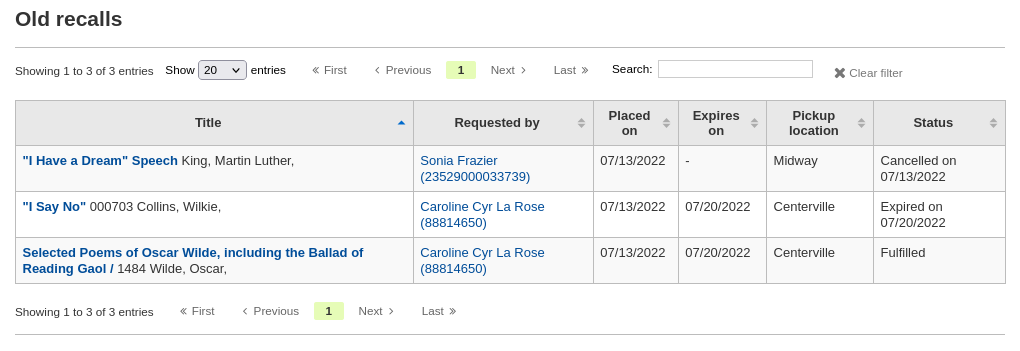
Old recalls
The old recalls list shows all the inactive recalls (completed, cancelled and expired).
Trasferimenti
Se lavori in un sistema a multi-biblioteche, potrai trasferire le copie da una biblioteca a un’altra usando lo strumento “Trasferisci”.
Vai a: Circolazione > Trasferimento
Per trasferire una copia
Nella pagina della circolazione, clicca su trasferisci
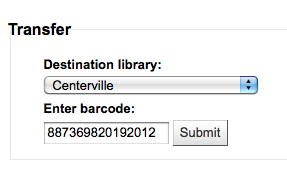
Dal menù a tendina scegli la biblioteca in cui vuoi trasferire il libro
Inserisci a mano o col lettore il codice a barre della copia che vuoi trasferire
Clicca “Invia”
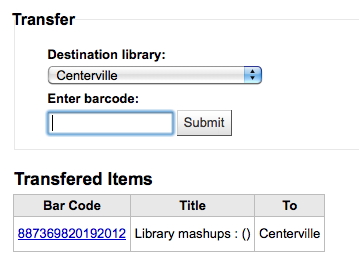
La copia ora ha l’informazione che è in transito

Quando la copia arriva all’altra biblioteca, il personale deve registrare l’entrata della copia per indicare che non è più in transito
La copia non verrà spostata definitivamente alla nuova biblioteca
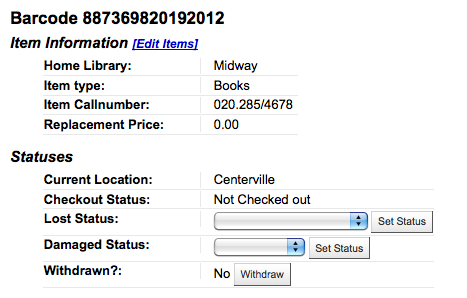
The item shows the same “Home library” but has updated the “Current location” to note where it resides at this time
Set library
By default you will enter the staff client as if you are at your home library. This library will appear in the top right of the staff client.

Questa è la biblioteca in cui hanno luogo tutte le operazioni di circolazione. Se sei in un’altra biblioteca (o in un biblio-bus) dovrai indicare il nome della biblioteca prima di effettuare prestiti. Per farlo, premi “Imposta” in alto a destra nella pagina della Circolazione.

Quando hai finito le modifiche, la nuova biblioteca apparirà in alto a destra.
Fast add cataloging
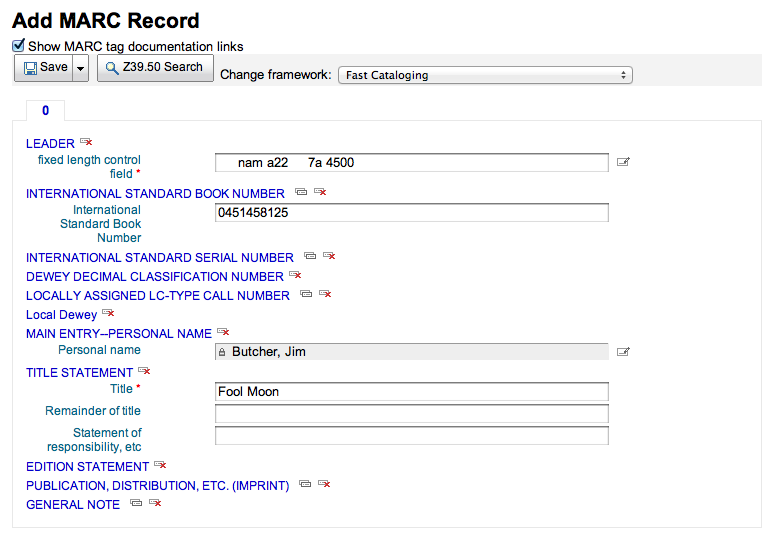
Sometimes circulation librarians need to quickly add a record to the system for an item they are about to check out. This is called “Fast add”. To allow circulation librarians access to the Fast add cataloging tool, simply make sure they have the fast_cataloging permissions. There are two ways to add titles via fast add. If you know that you’re about to check out an item that isn’t in you catalog you can go to the Circulation module and click “Fast cataloging.”
L’interfaccia per la catalogazione si aprirà con un breve record da catalogare:
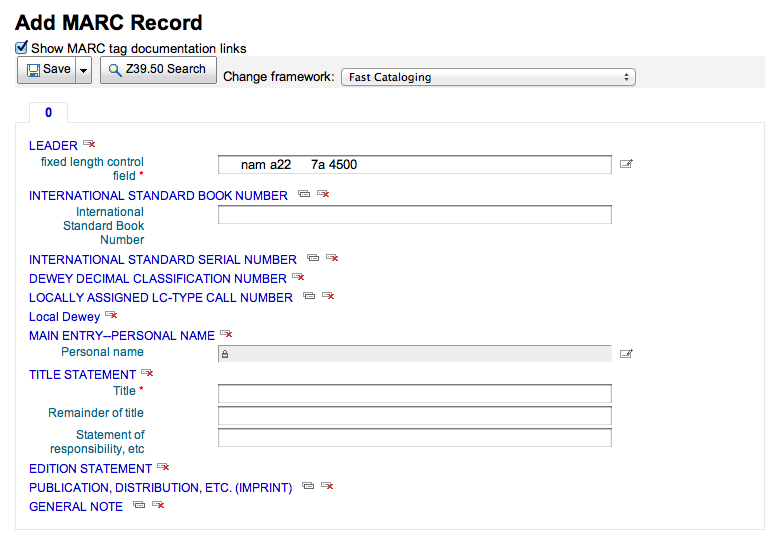
Dopo aver aggiunto i dati catalografici, ti sarà chiesto di immettere i dati di copia. Metti i barcodes, le collocazioni, etc. Poi salva le copie prima di dare in prestito.
L’altro modo per la Catalogazione veloce è partire dalla schermata di prestito. Quando indichi il barcode e Koha non lo trova, ti verrà proposto di di usare la Catalogazione veloce per aggiungere il record bibliografico.
Cliccando su “Catalogazione veloce” andrai alla griglia di catalogazione veloce dove potrai inserire le informazioni del titolo.
Dopo aver cliccato “Salva” andrai al record di copia. Il campo barcode sarà precompilato con il barcode che stai provando a prestare.
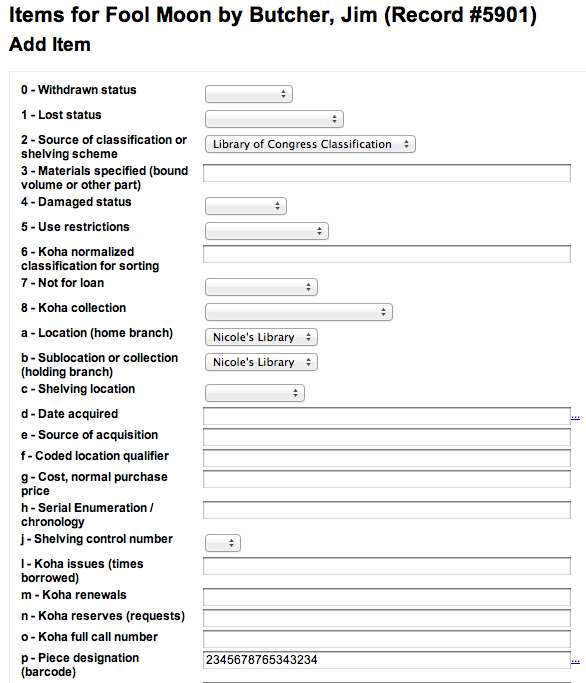
Dopo aver cliccato “Aggiungi copia” la copia verrà prestata in automatico all’utente a chi avevi provato a fare il prestito in origine.

Circulation reports
La maggior parte dei report possono essere trovati nel modulo dei report, ma alcuni dei più comuni sulla circolazione sono già disponibili nel modulo della circolazione, sulla destra.
Vai a:: Circolazione > Report della circolazione
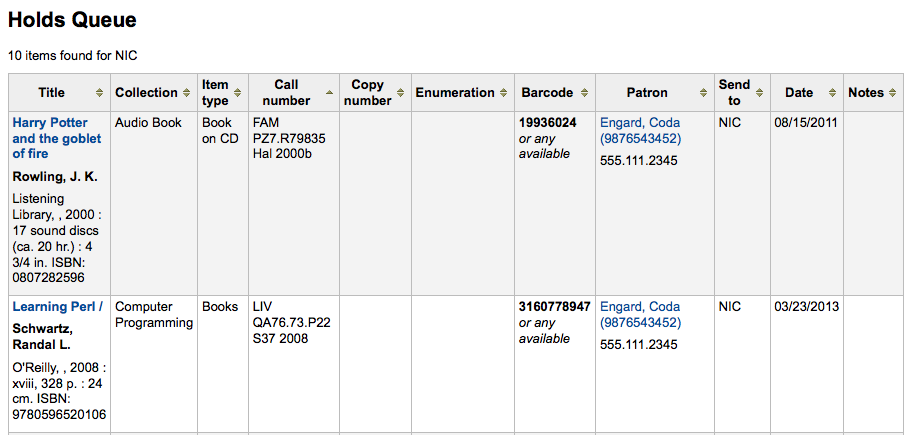
Holds queue
This report will show you all holds waiting to be pulled off the shelf at your library.
Nota
You can customize the columns of this table in the “Table settings” section of the Administration module (table id: holds-table).
To generate this report, you must have the Build holds queue cron job running. This cron job is a script that should be run periodically if your library system allows borrowers to place on-shelf holds. This script decides which library should be responsible for fulfilling a given hold request.
It’s behavior is controlled by the system preferences StaticHoldsQueueWeight, RandomizeHoldsQueueWeight and UseTransportCostMatrix.
Se non vuoi che tutte le tue biblioteche partecipino al processo di assegnazione di prenotazioni, devi comunque elencare qui le biblioteche che *vi prendono parte*, con una lista di codici di biblioteca separate da virgola (es.: «MPL,CPL,SPL,BML» ecc.).
By default, the holds queue will be generated such that the system will first attempt to hold fulfillment using items already at the pickup library if possible. If there are no items available at the pickup library to fill a hold, build_holds_queue.pl will then use the list of libraries defined in StaticHoldsQueueWeight. If RandomizeHoldsQueueWeight is disabled (which it is by default), the script will assign fulfillment requests in the order the branches are placed in the StaticHoldsQueueWeight system preference.
For example, if your system has three libraries, of varying sizes ( small, medium and large) and you want the burden of holds fulfillment to be on larger libraries before smaller libraries, you would want StaticHoldsQueueWeight to look something like «LRG,MED,SML».
Se vuoi che il carico delle prenotazioni venga suddiviso equamente tra le varie biblioteche del sistema, abilita la preferenza di sistema RandomizeHoldsQueueWeight. Quando è attiva, l’ordine delle biblioteche verrà rigenerato casualmente ogni volta che viene creata la loro lista.
An alternative to static and randomized is using the Tansport cost matrix. It takes precedence in controlling where holds are filled from and allows you to define the “cost” of transport between any two libraries. To use the Transport cost matrix simply set your UseTransportCostMatrix preference to “Use”.
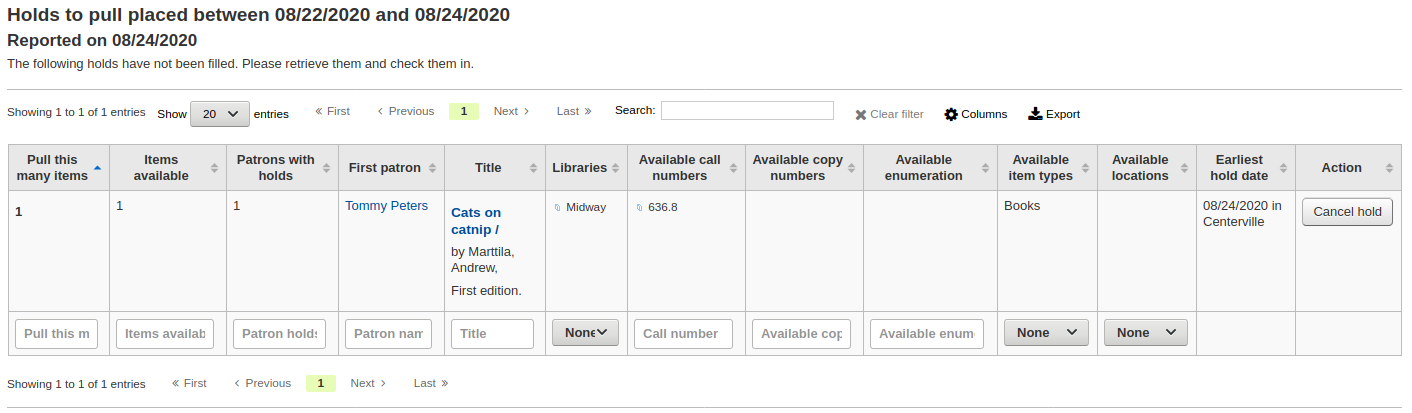
Prenotazioni da trattare
This report will show you all of the items that have holds on them that are available at the library for pulling. If the items are available at multiple libraries then all libraries with that item available will see the hold to pull until one library triggers the hold.
If enabled, clicking the Mark item as lost button will mark item as lost and notify the requesting patron depending on the value of the CanMarkHoldsToPullAsLost system preference.
Nota
You can customize the columns of this table in the “Table settings” section of the Administration module (table id: holds-to-pull).
You can choose which LOST value to set the item to with the UpdateItemWhenLostFromHoldList system preference.
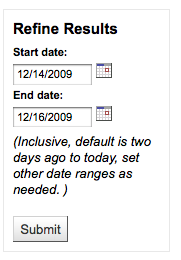
È possibile limitare i risultati visualizzati utilizzando la casella Affina sul lato sinistro della pagina:
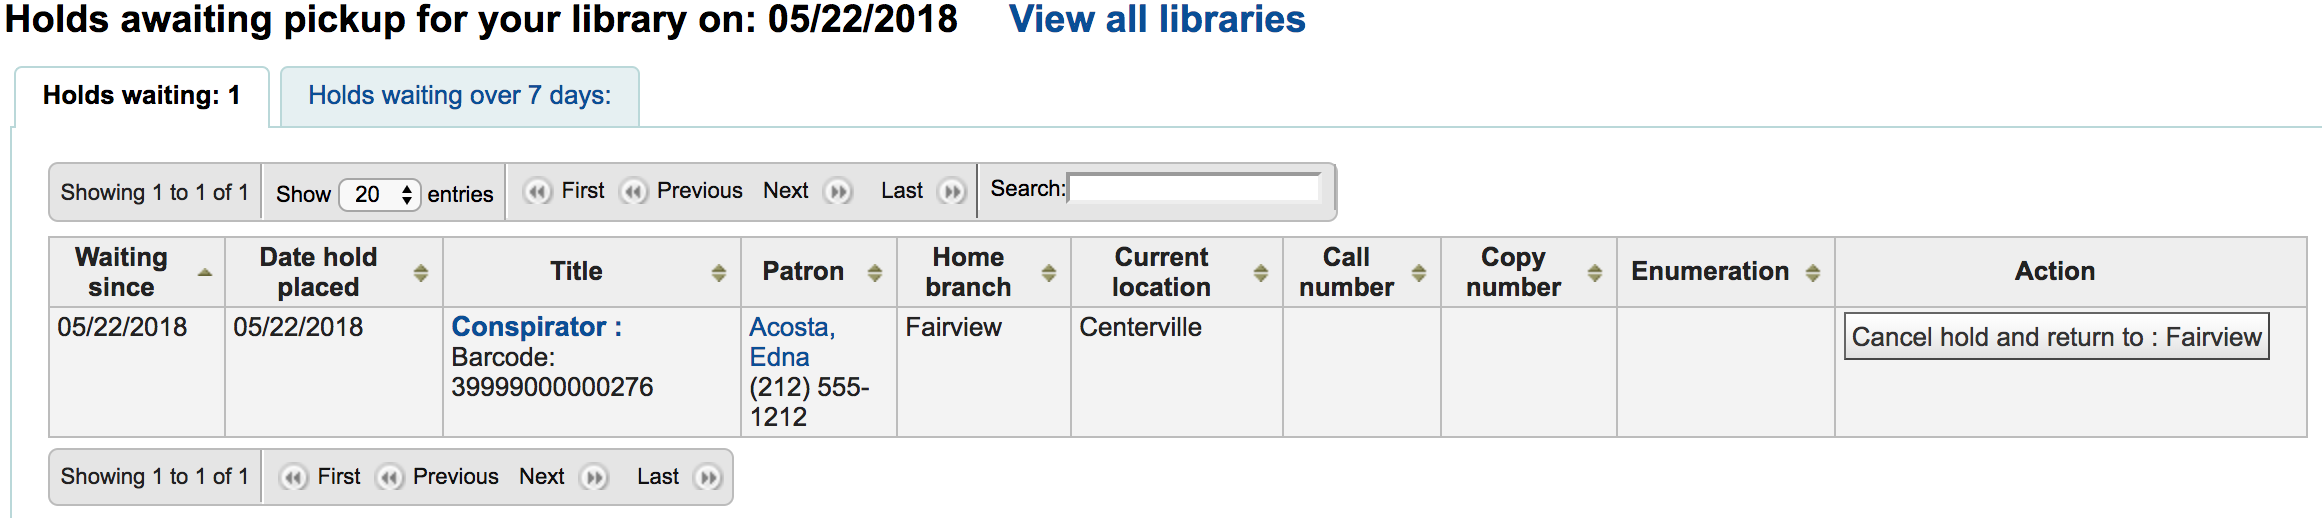
Prenotazioni in attesa di essere ritirate
Questo report elenca le copie in prenotazione in attesa di essere prelevate dai rispettivi utenti.
Nota
You can customize the columns of this table in the “Table settings” section of the Administration module (table id: holdst).
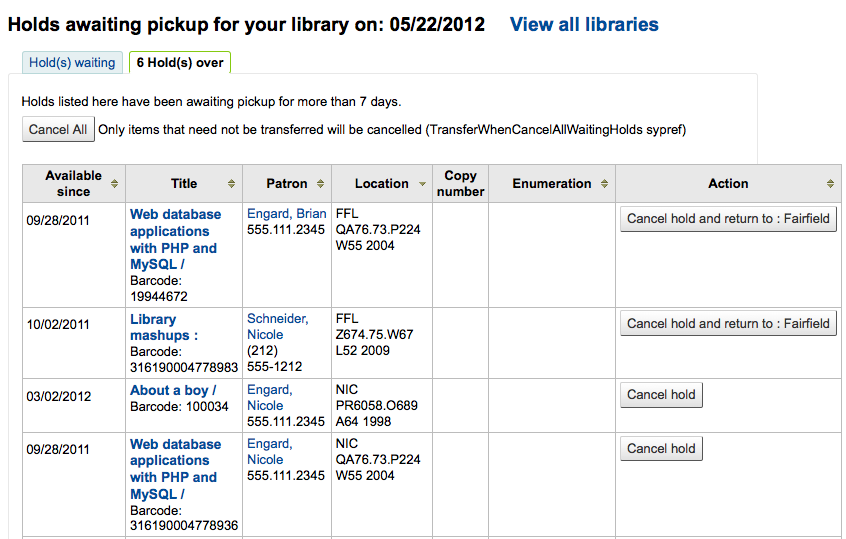
Items that have been on the hold shelf longer than you normally allow (based on the ReservesMaxPickUpDelay preference value) will appear on the “Holds over” tab, they will not automatically be cancelled unless you have set the cron job to do that for you, but you can cancel all holds using the button at the top of the list.
Nota
You can customize the columns of this table in the “Table settings” section of the Administration module (table id: holdso).
Distribuzione delle prenotazioni
I rapporti di prenotazione aiutano a sviluppare il posseduto. Con questo report potrai vedere quanti utenti hanno prenotazioni di copie e se ti occorre acquistarne altre. Per default è impostato a 3 il numero di copie per ogni prenotazione fatta. Il report ti dirà quante copie addizionali ti serve acquistare per raggiungere questa quota.

Nota
You can customize the columns of this table in the “Table settings” section of the Administration module (table id: holds-ratios).
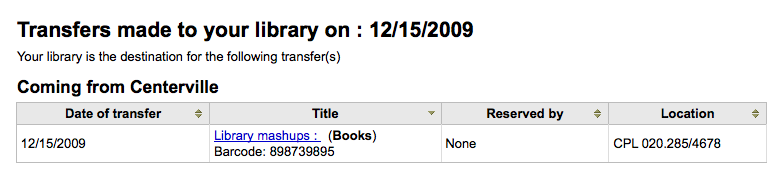
Trasferimenti da ricevere
Questo report elenca le copie che sono in transito nella tua biblioteca.
Se i tuoi trasferimenti tardano ad arrivarti, comparirà un messaggio con indicati i ritardi.
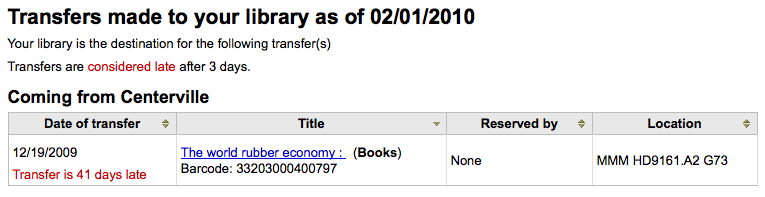
Importante
An item is considered late based on the number of days you have entered in the TransfersMaxDaysWarning system preference.
Article requests
Article requests are somewhat similar to holds, but are not requests for an item to check out. Instead, article requests are requests for a photocopy of a particular section of a book or an article from a serial issue. This is very common in academic libraries where researchers may request a copy of a single article found in a journal.
Setting up article requests
First, enable your system preference for ArticleRequests.
Set to “Enable” patrons to place article requests.
Poi dovrai decidere se i Tupi utenti possono eseguire richieste a livello di record, di copia o entrambi.
You can set 3 different system preferences for mandatory fields to be filled in depending on how your records are requested.
ArticleRequestsMandatoryFields: make the following fields mandatory for records that are record level or item level requestable
ArticleRequestsMandatoryFieldsItemsOnly make the following fields mandatory for records that are only item level requestable
ArticleRequestsMandatoryFieldsRecordOnly make the following fields mandatory for records that are only record level requestable
The ArticleRequestsOpacHostRedirection system preference is used if you create analytical records. If enabled, it will redirect the patron from the child record to the host record in the OPAC.
The ArticleRequestsSupportedFormats system preference determines the various formats patrons can request their articles in (either photocopy or scan).
Next you will want to go into your circulation and fines rules matrix and select each rule for which you want to allow requests.
You can allow requests to be made at the record level, item level, yes (which means both) and no (which means no article requests may be placed).
You can also limit the number of open article requests a patron can have at one time by patron category in the Default open article requests limit section of the circulation rules page.
You can set up a fee for each article request in the Default article request fees section of the circulation rules page.
Placing article requests
Ora puoi fare richieste sia sull’OPAC sia sull’interfaccia dello staff.
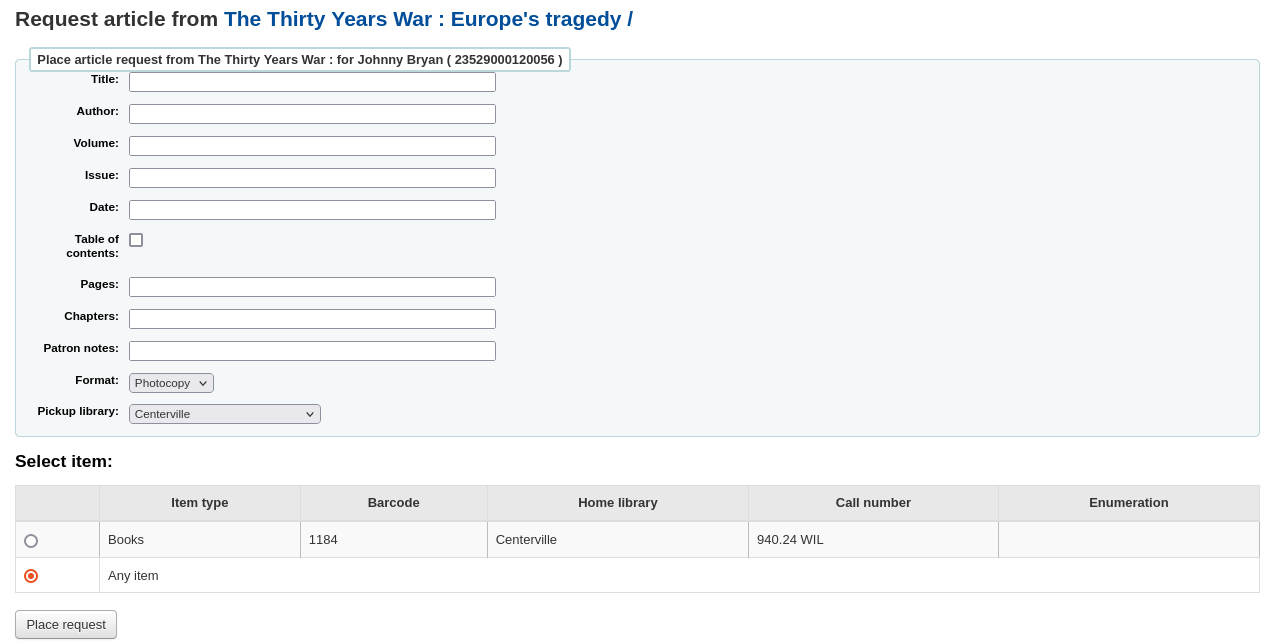
In the staff client, on the record details page, you will see a “Request article” button at the top and an “Article requests” tab to the left. The two options lead to the same page.
Just like a hold, you will be prompted to enter the patron’s card number or name.

If there is a fee, a message will appear to inform the staff member.

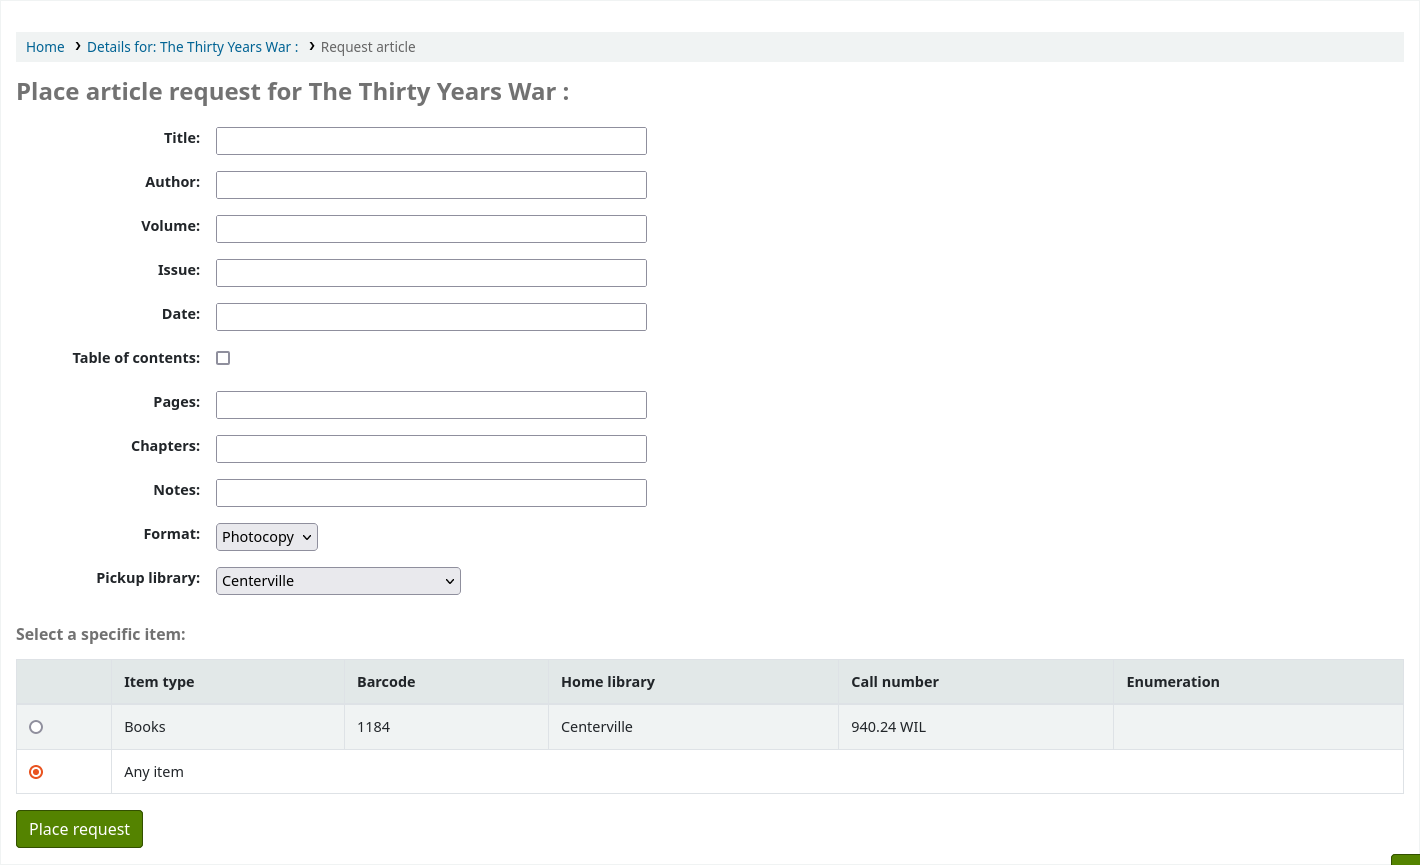
Fill in the form.
Nota
The mandatory fields are set through the three system preferences ArticleRequestsMandatoryFields, ArticleRequestsMandatoryFieldsItemsOnly, and ArticleRequestsMandatoryFieldsRecordOnly.
Title: enter the title of the requested article or chapter
Author: enter the author of the requested article or chapter
Volume: enter the volume in which this article or chapter is found
Issue: enter the issue in which this article is found
Date: enter the date of the issue in which this article is found
Table of contents: check to indicate the patron wants a copy of the table of contents
Pages: enter the pages to photocopy or scan
Chapters: enter the chapters to photocopy or scan
Patron notes: enter any relevant notes
Format: choose the format in which the patron wishes to receive this article or chapter
Nota
The possible formats are defined in the ArticleRequestsSupportedFormats system preference.
Pickup library: choose the library at which the patron wishes to pick up their photocopy
If allowed, choose the specific item to request.
Then, click on “Place request”.
From the OPAC, patrons can place requests themselves either from the results list
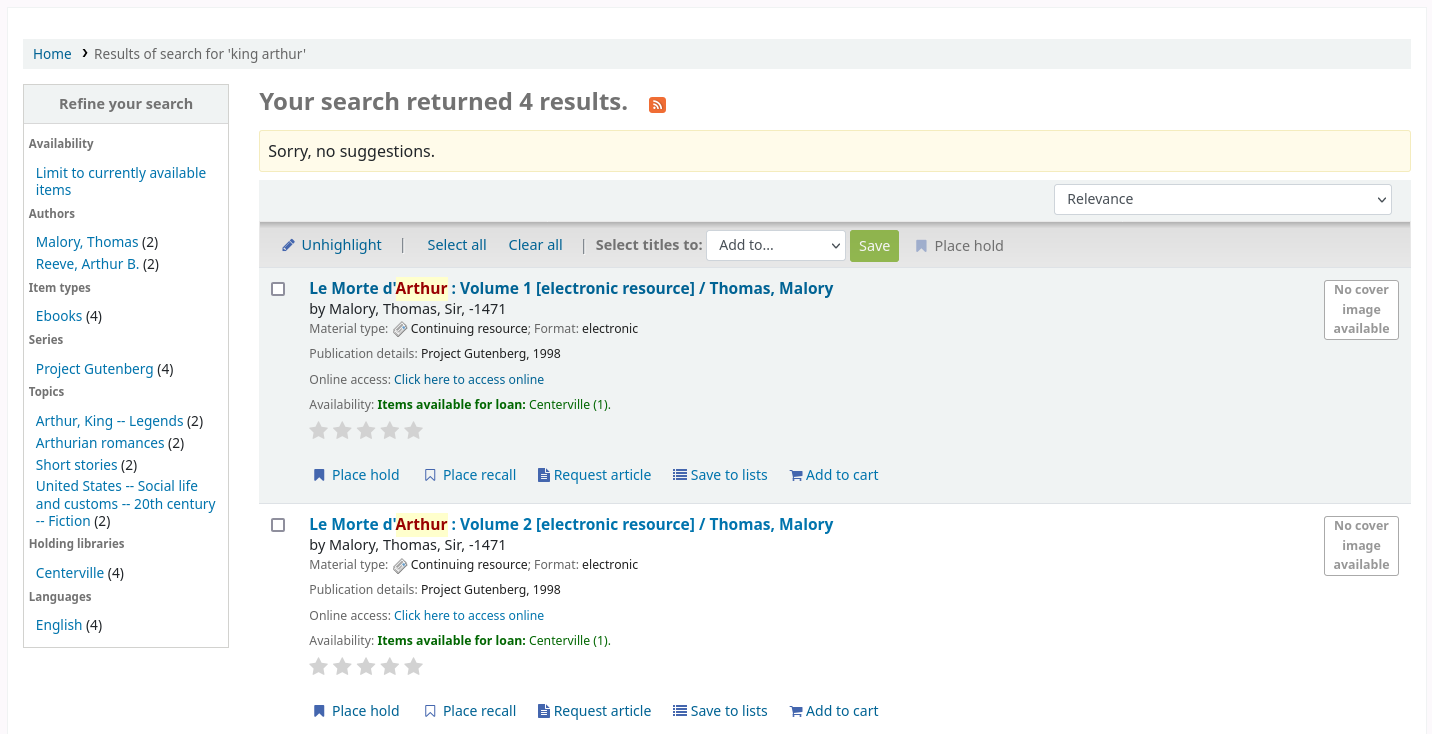
or by going to the detailed record.

As with a hold, if the patron is not logged in, they will be asked to do so.
The form is the same as the one in the staff interface.
If there is a fee, a message will appear to inform the patron.

If allowed, the patron can choose the specific item to request.
From their account, the patron will be able to follow the progress of their request from “new”

to “pending”, if necessary,

to “processing”.

The patron will also receive an email notification when the status of the request changes.
Once the request is completed the patron will receive an email notification and the article request will no longer appear in their account.
Email notifications can be customized in notices and slips.
Managing article requests
Una volta inoltrata la richiesta, lo staff la vedrà comparire al fondo della homepage dello staff (nella stessa posizione dei tags, dei commenti e delle modifiche).
Da qui lo staff sarà in grado di selezionare le richieste da elaborare.
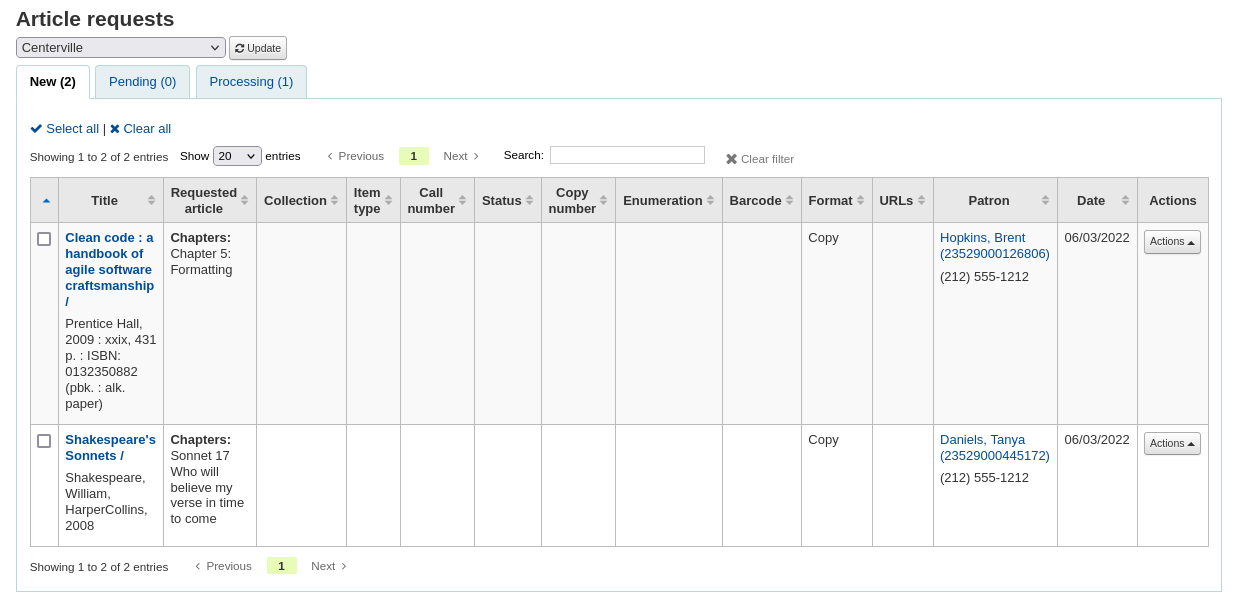
New requests are in the “New” tab.
The first step would be for a staff member to process the request, that moves the request to the processing tab and alerts other staff members that the request is in process. In the actions column, click on the dropdown menu and select “Process request”. This will move the request to the processing tab.
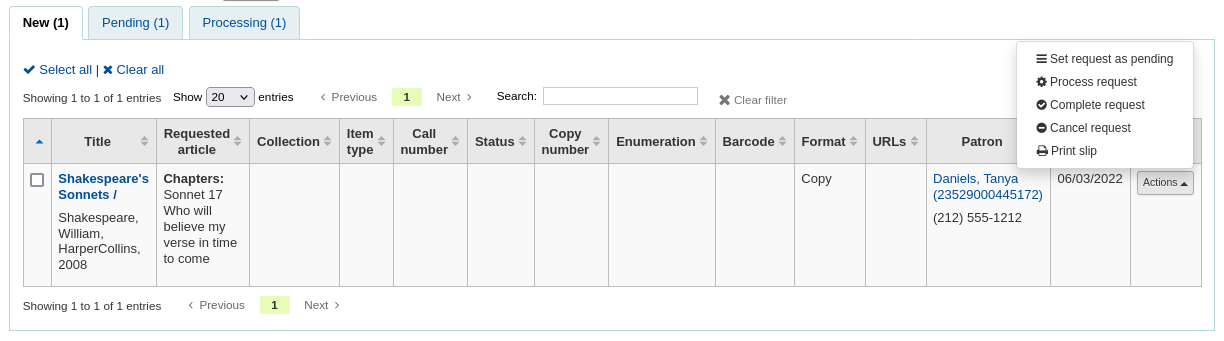
If for any reason, a request cannot be processed right away (for example, if the title is currently checked out), the status can be changed to “Pending”. This will send a notice to the patron indicating the request has been received and seen, but has yet to be processed.
Poi lo staff accederà allo scaffale e farà una copia dell’articolo richiesto.
Once that is complete, staff can print the article request slip (this can be customized in notices and slips under AR_SLIP) and staple or paper clip it to the article. In the actions column, you can select the dropdown and select print slip.
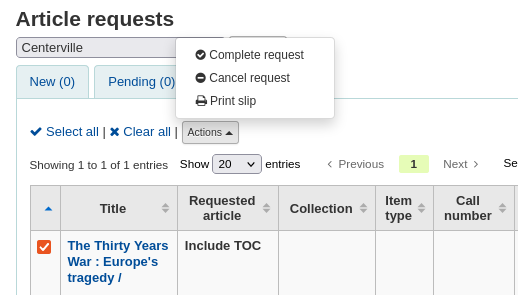
Infine, lo staff selezionerà completa la richiesta di articolo dalla tesina delle azioni che invierà un avviso all’utente per fargli sapere che la sua richiesta è pronta per essere ritirata.
Così verrà rimosso la richiesta di articolo dalla scheda di lavorazione.
Nota
Actions can also be made in bulk by checking the boxes next to the requests to process or by clicking “Select all”, and choosing the new status from the actions menu on top of the table.
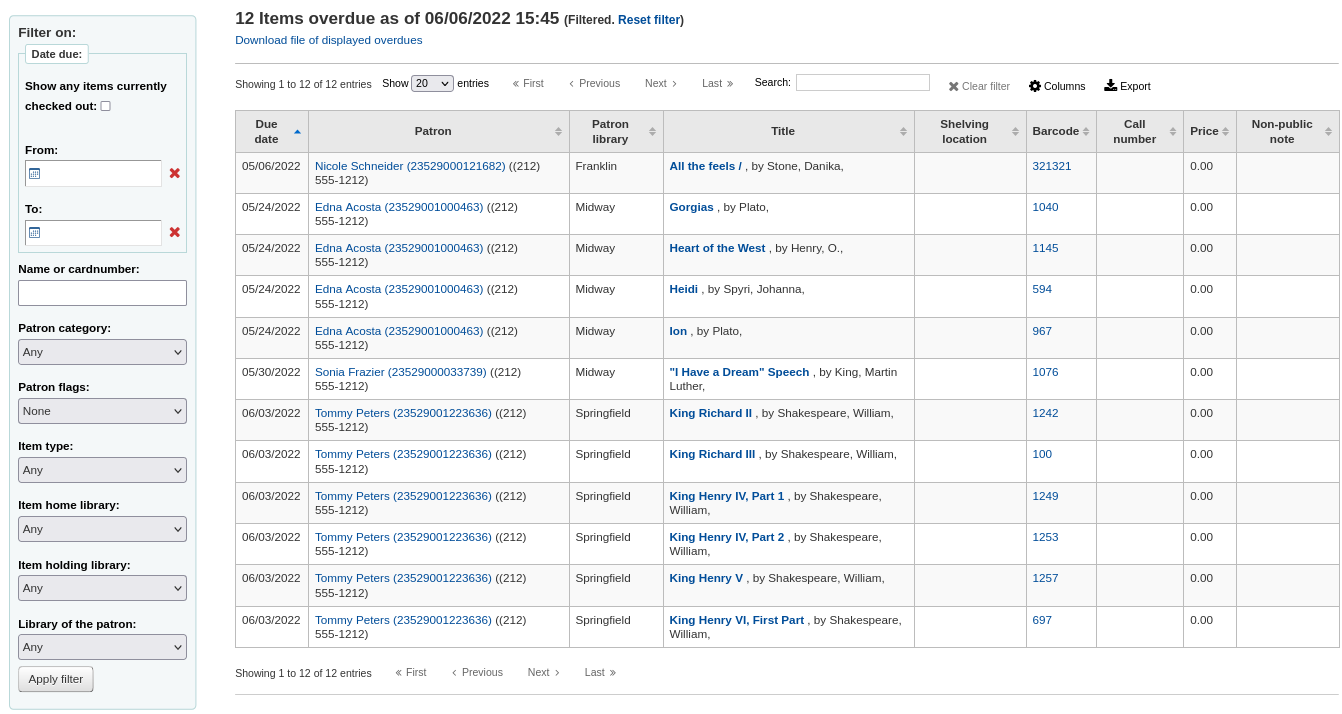
Ritardi
Questo report ti mostrerà tutte le copie prestate che sono in ritardo nella tua biblioteca.
Avvertimento
Per biblioteche con una grande numero di utenti, questo report può richiedere una notevole quantità di tempo per l’esecuzione.
Large libraries can choose to filter the report before it runs by setting the FilterBeforeOverdueReport system preference to “Require”.
Nota
You can customize the columns of this table in the “Table settings” section of the Administration module (table id: circ-overdues).
Il report può essere filtrato usando le opzioni del menù a sinistra del report.
Nota
La casella “Mostra tutte le copie attualmente in prestito” passa fondamentalmente da un report di ritardi a un report di prestiti in corso. Mostrerà tutti i titoli prestati indipendentemente dalla data di scadenza.
The report result can be downloaded via the “Download file of displayed overdues” link or the “Export” button at the top of the table.
Ritardi con sanzioni
Questo report ti mostra ogni ritardo nella tua biblioteca che ha generato una multa.
Se si desidera limitare il report, è possibile utilizzare il menu a discesa nella parte superiore per limitarlo a una collocazione a scaffalature della biblioteca. Per vedere prestiti in ritardo con multe di altre biblioteche, si dovrà cambiare biblioteca o fare login nell’altra biblioteca.
Importante
If you do not charge fines and/or don’t have the fines cron job running you will see no data on this report.
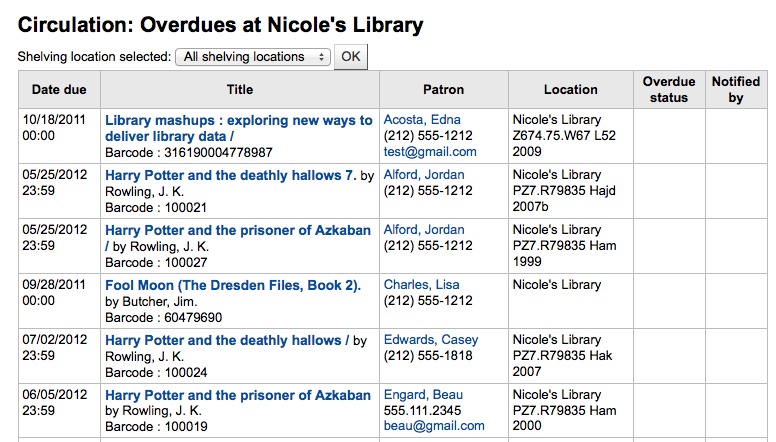
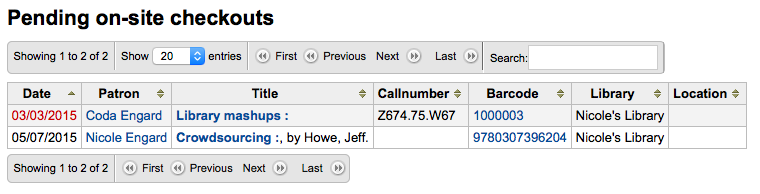
Consultazioni pendenti
If you are using the on site checkouts functionality (OnSiteCheckouts) then you’ll have a report to view all items that are currently checked out on site.
Questo elencherà la data di restitiuzione (i ritardi in rosso), chi ha la copia, informazioni sulla copia e qual biblioteca la detiene.
Tracking in-house use
Molte biblioteche tracciano l’utilizzo interno delle copie.
Nota
This is different from tracking on-site usage. In-house use is the use of items in the library by patrons without them having to check them out. On-site use is the use of items on site that must first be checked out. To learn more about on site usage please review the OnSiteCheckouts preference.
Tracciare l’uso delle copie dentro la biblioteca in Koha senza darle in prestito si può fare in due modi. Il primo è di creare uno o più Statistical Patrons <add-a-statistical-patron-label>. Quando si raggruppano le copie che sono state usate dentro la biblioteca, potrai darle in prestito al tuo utente statistico:
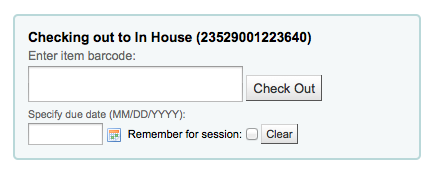
Invece di segnare la copia come “in prestito” il sistema registrerà che la copia è stata utilizzata internamente:

Ripetere questi passaggi per tutte le copie che sono state utilizzate all’interno della biblioteca per avere statistiche accurate sull’uso delle copie.
The other way to record local use of items is to set your RecordLocalUseOnReturn preference to “Record.” Then whenever you check an item in that is not checked out and not on hold a local use will be recorded.

Nota
If you have RecordLocalUseOnReturn set to “Record” you can still use your statistical patrons to record local use as well.
Self checkout
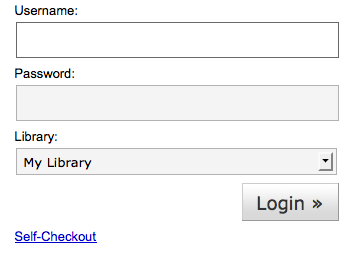
Koha comes with a very basic self checkout module. To enable this module you need to set the WebBasedSelfCheck system preference to “Enable.” To use this module you have to log in as a staff member with self_check permissions.
Nota
Crea un utente dello staff specifico per questa azione in modo che da non lasciare un vero login di un bibliotecario aperto tutto il giorno
There is no link to the Self checkout module, but a simple addition to the OPACUserJS system preference can add one.
$(document).ready(function(){
    $("#login .btn").parent().after("<p><a href=\"http://YOUR_KOHA_OPAC_URL/cgi-bin/koha/sco/sco-main.pl\" target=\"_blank\">Self-Checkout</a></p>");
});

**Important**

The code above has line breaks added to make it more readable,
please be sure to enter the above as one line in when putting it in
the system preference.
Il collegamento verrà quindi visualizzato nella parte inferiore della pagina di login:
You can also access this module by going to: http://YOUR_KOHA_OPAC_URL/cgi-bin/koha/sco/sco-main.pl
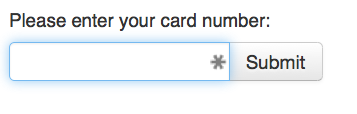
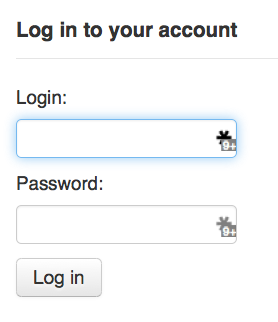
When on the self checkout page, depending on the value in your SelfCheckoutByLogin system preference you will be asked to enter your cardnumber
or your username and password
Una volta che hai effettuato l’accesso al modulo di auto-prestito, verrà chiesto di scansire le copie che si desidera prendere in prestito
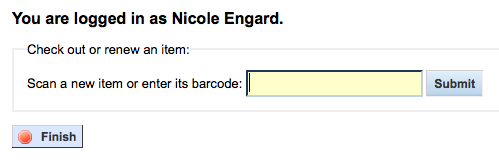
Durante la scansione delle copie, appariranno sotto la casella del codice a barre

Dopo aver terminato la scansione di elementi è importante fare clic sul pulsante “Fine”. Verrà stampata una ricevuta e si uscirà dal modulo di auto-prestito.
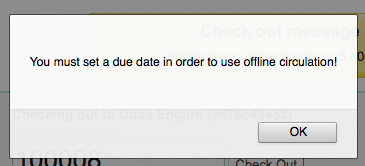
Quando si tenta di controllare prestare delle copie ci saranno alcuni casi in cui appariranno i messaggi di errore e l’utente dovrà andare dal bibliotecario. Ciò accadrà anche se si consente superare le restrizioni della circolazione. Solo un bibliotecario può superare un blocco di circolazione e così gli utenti devono andare al bibliotecario per un aiuto in queste situazioni.

Self check-in
In order to use the self check-in module, you must first set the :ref: SelfCheckInModule <selfscheckinmodule-label> system preference to “Enable”.
Then, you will have to create a patron with the self_checkin_module permission.
Nota
Create a staff patron specifically for this action so that you don’t leave a real staff client logged into a computer all day. You can give this patron only the aforementioned permission so it cannot be used for anything else.
Once this is done, you can head over to the self check-in page: http://YOUR_KOHA_OPAC_URL/cgi-bin/koha/sci/sci-main.pl
Log in with your staff patron with self check-in permissions
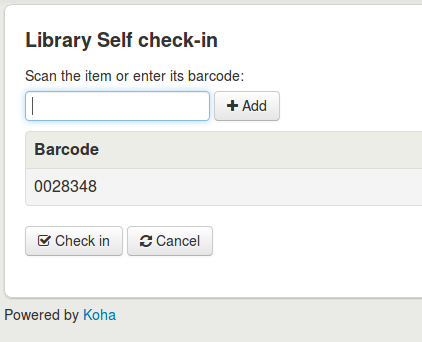
Once the computer or kiosk is set and the self check-in user logged in, patrons will be able to check-in their items themselves.

The patron will either scan the item’s barcode, if the computer is attached to a barcode scanner, or type in their item’s barcode in the box and click “Add” or press enter.
Nota
Most barcode scanners will automatically hit return after scanning.
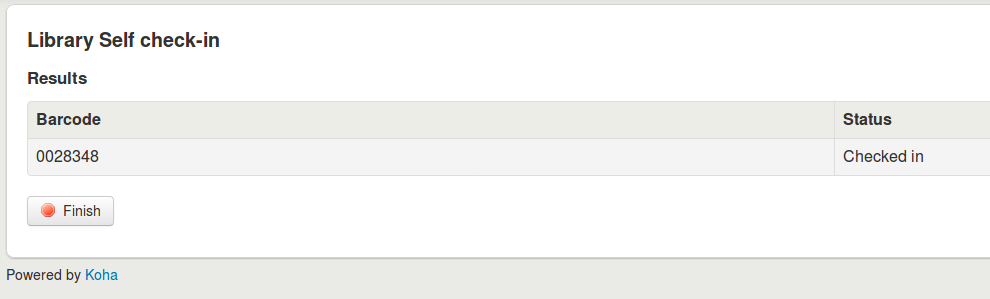
Once they have scanned or entered all their items” barcodes, they can click on the “Check-in” button to return all the items at once.
Importante
If the patron doesn’t click the “Check-in” button, the items will not be returned and will stay in their account.
Importante
The self check-in module will not warn user if the item is late, if they have fines, if the item is on hold for someone else, or if they have messages in their account.
They can then click “Finish” to return to the main self check-in page.
Nota
If the patron doesn’t click “Finish”, the screen will refresh after the timeout period specified in the SelfCheckInTimeout system preference.
Nota
Even if the patron doesn’t click “Finish” the item will still be checked in from their account.
You can customize the look of your self check-in screens by using the SelfCheckInUserCSS system preference or the SelfCheckInUserJS system preference.
You can add content, like instructions on how to use the self check-in system for example, by using the SelfCheckInMainUserBlock system preference.
Statistics about the transactions made through the self check-in module are logged into the action_logs table in the Koha database. You can therefore build a custom report to get the statistics you need.
Offline circulation utilities
Koha consente di continuare le azioni di circolazione mentre non si è in linea utilizzando una delle tre utilità.
Offline circulation in Koha
If the AllowOfflineCirculation preference is set to “Enable” the library staff can continue to perform circulation actions within Koha when the system is offline. You will want to visit http://your-koha-staff-client-url/cgi-bin/koha/circ/offline.pl at least once while online and bookmark that page. That is the page you will go to when you are offline.
Importante
L’interfaccia non in linea utilizza HTML LocalStorage, che a seconda del browser e l’impostazione utente, è limitato da 2,5 MB a 5MB per dominio. Ciò significa che i sistemi bibliotecari più grandi non saranno in grado di sincronizzare i propri dati e si raccomanda di utilizzare modulo di Firefox o il client offline per Windows.
Setup
Prima di andare off-line la priima volta, vai in Circolazione e clicca su “Crea l’interfaccia della circolazione offline”
Successivamente sincronizza i dati su ogni computer per la circolazione cliccando il link “Sincronizza” a destra dello schermo.
Importante
L’interfaccia non in linea utilizza HTML LocalStorage, che a seconda del browser e l’impostazione utente, è limitato da 2,5 MB a 5MB per dominio. Ciò significa che i sistemi bibliotecari più grandi non saranno in grado di sincronizzare i propri dati e si raccomanda di utilizzare modulo di Firefox o il client offline per Windows.
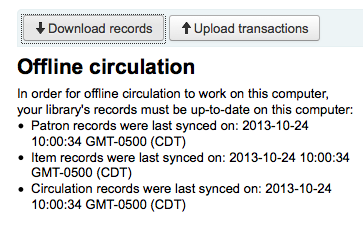
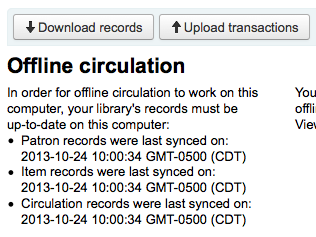
Questo ti permetterà di scaricare un copia in locale dei tuoi dati degli utenti e di circolazione. Clicca su “Scarica records” nella testata della pagina per sincronizzare i tuoi dati.
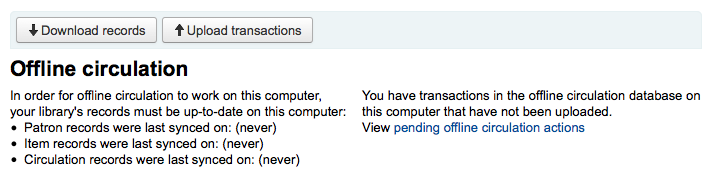
Una volta che i dati sono stati scaricati, vedrai le date dell’ultima sincronizzazione alla destra di ogni data set.
Questo dev’essere eseguito regolarmente per prevenire eventuali perdite di connessione impreviste.
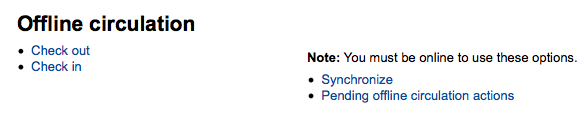
Circolazione
Quando il sistema va fuori linea visita la pagina di circolazione non in linea (http://your-koha-staff-client-url/cgi-bin/koha/circ/offline.pl) in Koha e fai clic su “Prestiti” o Restituzioni” per eseguire operazioni non in linea.
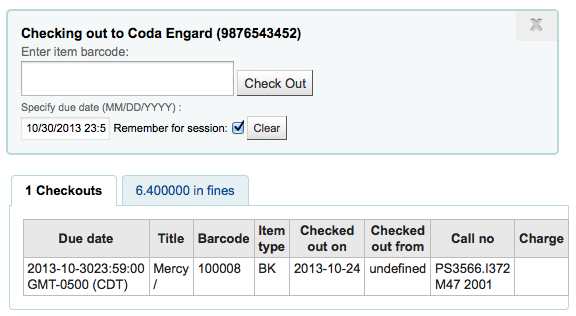
Il prestito viene fatto cercando l’utente per barcode o nome nell’apposito riquadro “Prestito”. Dopo aver selezionato un utente, ti verranno presentati i suoi dati, compresi prestiti e multe.
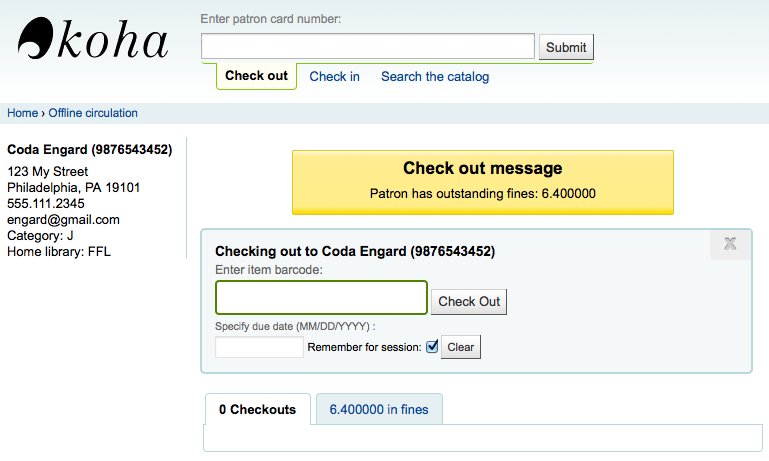
Leggi il barcode della copia che vuoi prestare e inserisci una data di restituzione. Se non inserisci la data, Koha te ne mostrerà una per te.
Una volta che la copia è andata in prestito, questa apparirà sotto le informazioni dell’utente.
Koha offline uploading
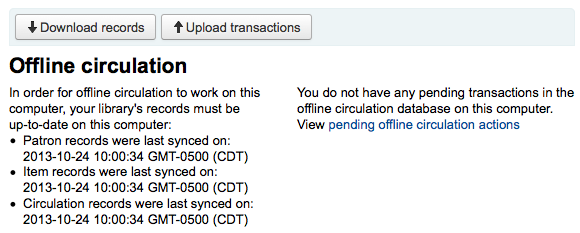
Once the system is back online visit the “Synchronize” page on the Offline circulation module and click “Upload transactions”
Dopo che i file sono stati caricati puoi cliccare su “Controlla le azioni della circolazione offline da fare” sulla destra.
Dopo aver cliccato “Controlla le azioni della circolazione offline da fare” verrai portato a una sintesi di tutte le azioni da caricare in Koha presenti nel file *.koc.
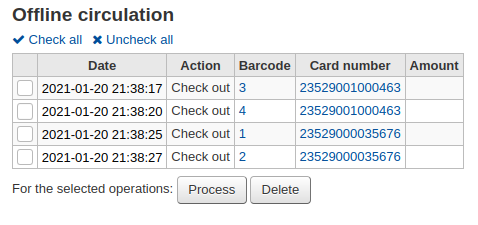
Quando tutti i log sulla circolazione saranno caricati, potrai scegliere quali vuoi processare in Koha.
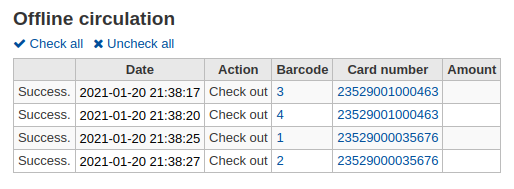
Click on the “Process” button and Koha will record every stored transaction one by one. For each transaction, the status will change to:
«Successo.» se la transazione è terminata correttamente
«Utente non trovato» se il numero di tessera dell’utente è errato
«Copia non trovata» se il barcode è errato
«Copia non prestata» se hai fatto rientrare una copia disponibile
Al termine avrai un sommario di tutte le transazioni
Firefox plugin
There is an offline circulation tool that you can add to your Firefox browser as an add-on. To do so, just go to https://addons.mozilla.org/en/firefox/addon/koct/ page and click on the «install now» button. You may have to confirm the installation, just click on «install now» and then restart Firefox to complete the installation.
Once you have installed the plugin and restarted Firefox, you will see the Koha logo in the download bar at the bottom right of Firefox.

Un clic sul logo aprirà lo strumento in una sua finestra.
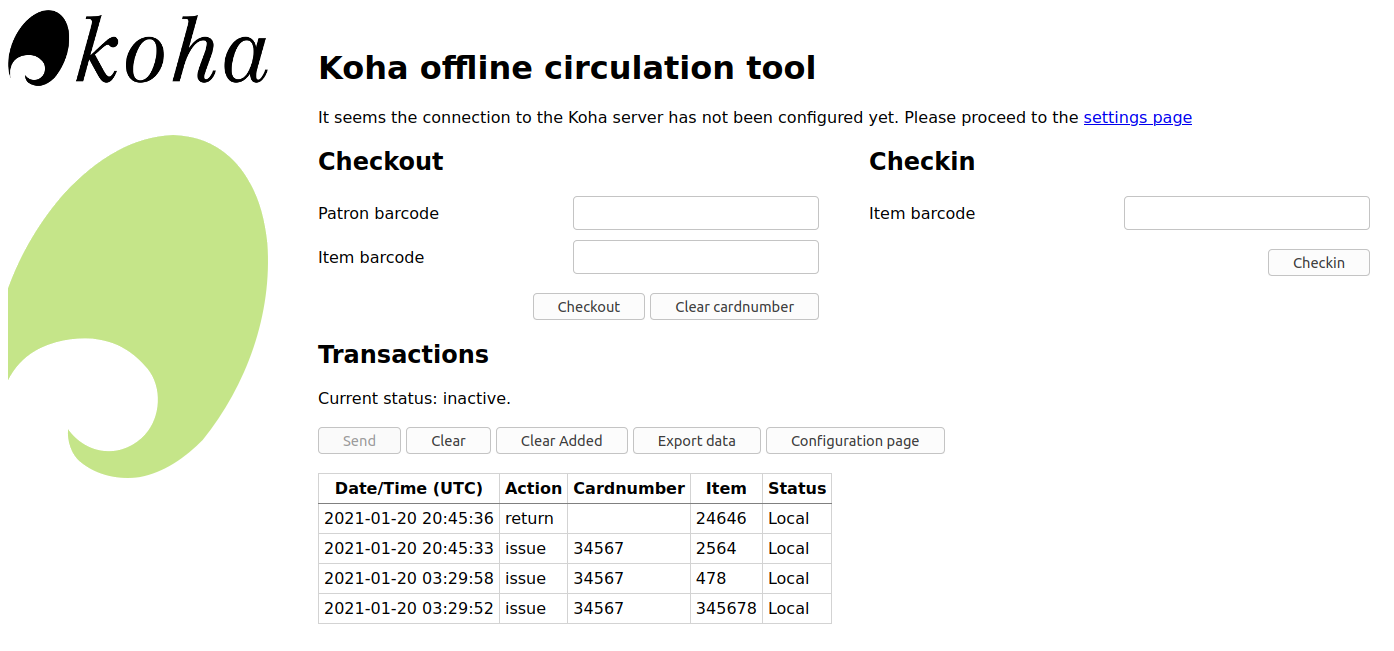
The plugin consists of three sections:
The “Check out” section is where you check out items
The “Check in” section is where you check in items
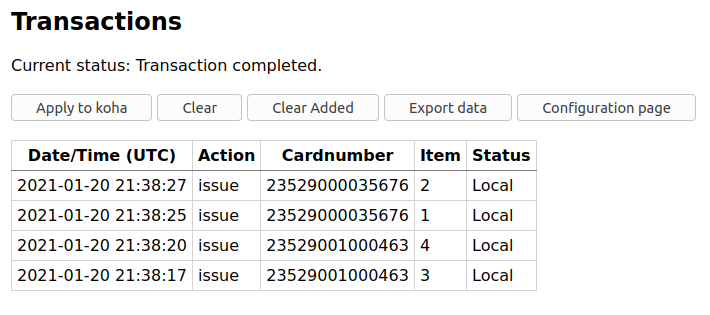
The ‘Transactions’ section is where you can track the transactions done while in offline mode
The transactions will keep information until you empty it.
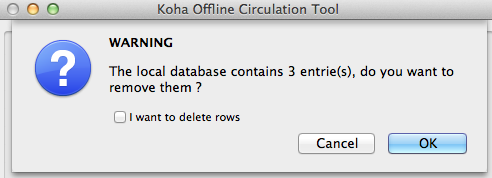
If you’d like to clear the transactions, click the “Clear” box before hitting the “OK” button.
The first thing you want to do then is to set up the plugin. Proceed to the settings page, linked in the top right of the page or under ‘Configuration page’ in the Transactions section.
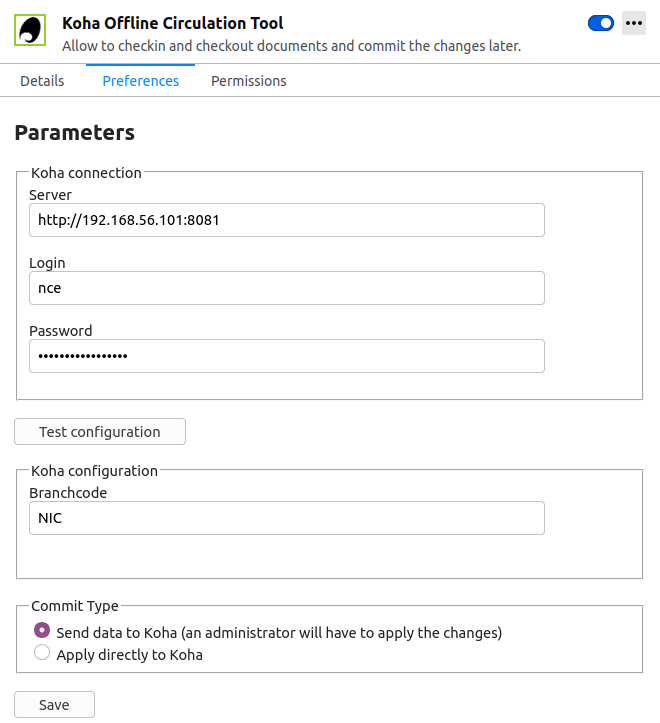
Answer the 5 questions presented:
Server = l’URL dell’interfaccia staff
Nome utente = il tuo account personale di accesso allo staff
Password = la password del proprio account dello staff
Branch code = the code for the branch where you are located
Commit Type = If you select ‘Send data to Koha’, your account will need to be approved by an administrator. If you select ‘Apply directly to Koha’, your account will not need to be approved.
Importante
Per salvare le impostazioni, sarà necessario chiudere la finestra del plugin e riaprirlo facendo clic di nuovo sul logo Koha nella barra degli add-on.
Nota
È possibile creare un account dello staff dedicato alla circolazione non in linea. In questo modo, non importa chi è al bancone della circolazione; tutti possono utilizzare lo stesso login. È anche possibile utilizzare un account di accesso di gruppo che hai già in vigore per la circolazione.
Una volta che hai tutto impostato è possibile avviare prestito e restituzione delle copie.
Prestito:
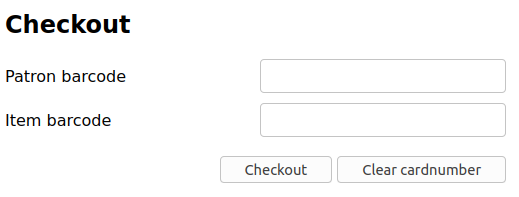
Under the “Checkout” heading
Eseguire la scansione del codice a barre dell’utente
Eseguire la scansione del codice a barre della copia
Click “Checkout”
Restituzione:
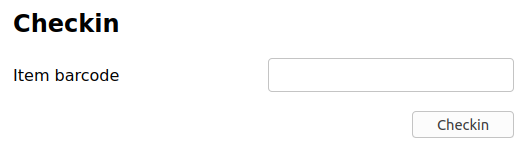
Under the “Checkin” heading
Eseguire la scansione del codice a barre della copia
Click “Checkin”
Each time, you check out or check in an item, a new transaction is recorded in the local plugin database. This is recorded in the Transactions section bellow.
Nota
Lo stato sarà «locale» fino a quando si è offline e non si elaborano le transazioni in Koha.
Quando la connessione a Internet ritorna attiva, si vuole riportare tali operazioni per Koha. Prima di elaborare tali operazioni è necessario essere a conoscenza di alcuni possibili inconvenienti.
Because you are not connected to your Koha database when using this plugin holds will need additional processing. If an item you check in while offline has a hold, the hold is kept on the item. Since, you can’t confirm holds found during the processing of every check in, the holds stay on the item and will need to be managed later. If you only checked in a few items you can just keep a record of them all. If you checked in a lot of items you can use the Holds queue once it rebuilds to see what holds made it to the shelf erroneously.
Allo stesso modo, se una scheda utente era scaduta, lo strumento di circolazione non in linea non lo può sapere, e il prestito verrà registrato indipendentemente dallo stato dell’account utente.
Sono disponibili due opzioni per l’aggiunta di tali dati a Koha
Apply to Koha
If you checked in/out on more than one computer at the same time, what you want is to process every transaction consistently. Let’s say for instance that one patron checked a book out on one computer and then checked the same book in on another computer. To be consistent, you need to record the check out first and then the check in. Not the opposite! To do so, you need to group every transaction in one place, sort them all and then, process everything. So, you need to use the «Apply to Koha» option from every plugin/computer you worked with. This way, the log will go to Koha and be accessible from the Offline Circulation page.
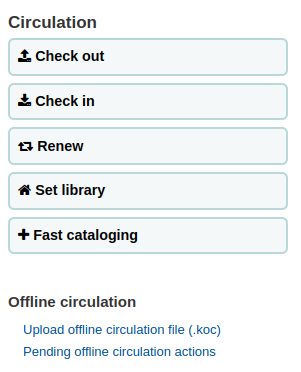
Vai a: Circolazione > Azioni di circolazione offline in attesa
Quando tutti i log sulla circolazione saranno caricati, potrai scegliere quali vuoi processare in Koha.
Clicca sul bottone “Processa” per registrare ogni transazione. Per ogni transazione, lo stato cambierà in:
«Successo.» se la transazione è terminata correttamente
«Utente non trovato» se il numero di tessera dell’utente è errato
«Copia non trovata» se il barcode è errato
«Copia non prestata» se hai fatto rientrare una copia disponibile
Al termine avrai un sommario di tutte le transazioni
Carica direttamente
Se hai fatto tutte le azioni di circolazione offline sempre sullo stesso computer allora tutto è già ordinato e così è possibile scegliere «Carica direttamente»
La colonna stato verrà aggiornata per farvi sapere se le transazioni sono state applicate
«Successo.» se la transazione è terminata correttamente
«Utente non trovato» se il numero di tessera dell’utente è errato
«Copia non trovata» se il barcode è errato
«Copia non prestata» se hai fatto rientrare una copia disponibile
Offline circulation tool for Windows
The Offline circulation utility can be downloaded at: https://github.com/bywatersolutions/koha-offline-circulation/releases
To generate a borrowers.db file for loading in to the Windows tool you will need to run the file generator via a cron job.
Upload offline circulation file
Lo strumento di circolazione non in linea per Windows genererà un file KOC che è possibile caricare in Koha quando il sistema sarà di nuovo in linea.
Nel menu circolazioen clicca su “Carica il file della circolazione offline (.koc)”
Cerca sul tuo computer file di tipo *.koc
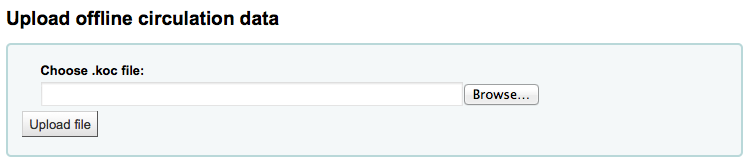
Dopo aver caricato il file, clicca per processare il file
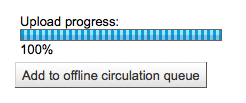
Quando il carico è completo, potrai caricare un altro file o portare avanti le altre operazioni della circolazione offline.
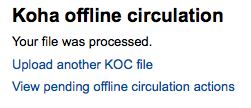
Dopo aver cliccato “Controlla le azioni della circolazione offline da fare” verrai portato a una sintesi di tutte le azioni da caricare in Koha presenti nel file *.koc.
Quando tutti i log sulla circolazione saranno caricati, potrai scegliere quali vuoi processare in Koha.
Clicca sul bottone “Processa” per registrare ogni transazione. Per ogni transazione, lo stato cambierà in:
«Successo.» se la transazione è terminata correttamente
«Utente non trovato» se il numero di tessera dell’utente è errato
«Copia non trovata» se il barcode è errato
«Copia non prestata» se hai fatto rientrare una copia disponibile
Al termine avrai un sommario di tutte le transazioni