Cirkulation
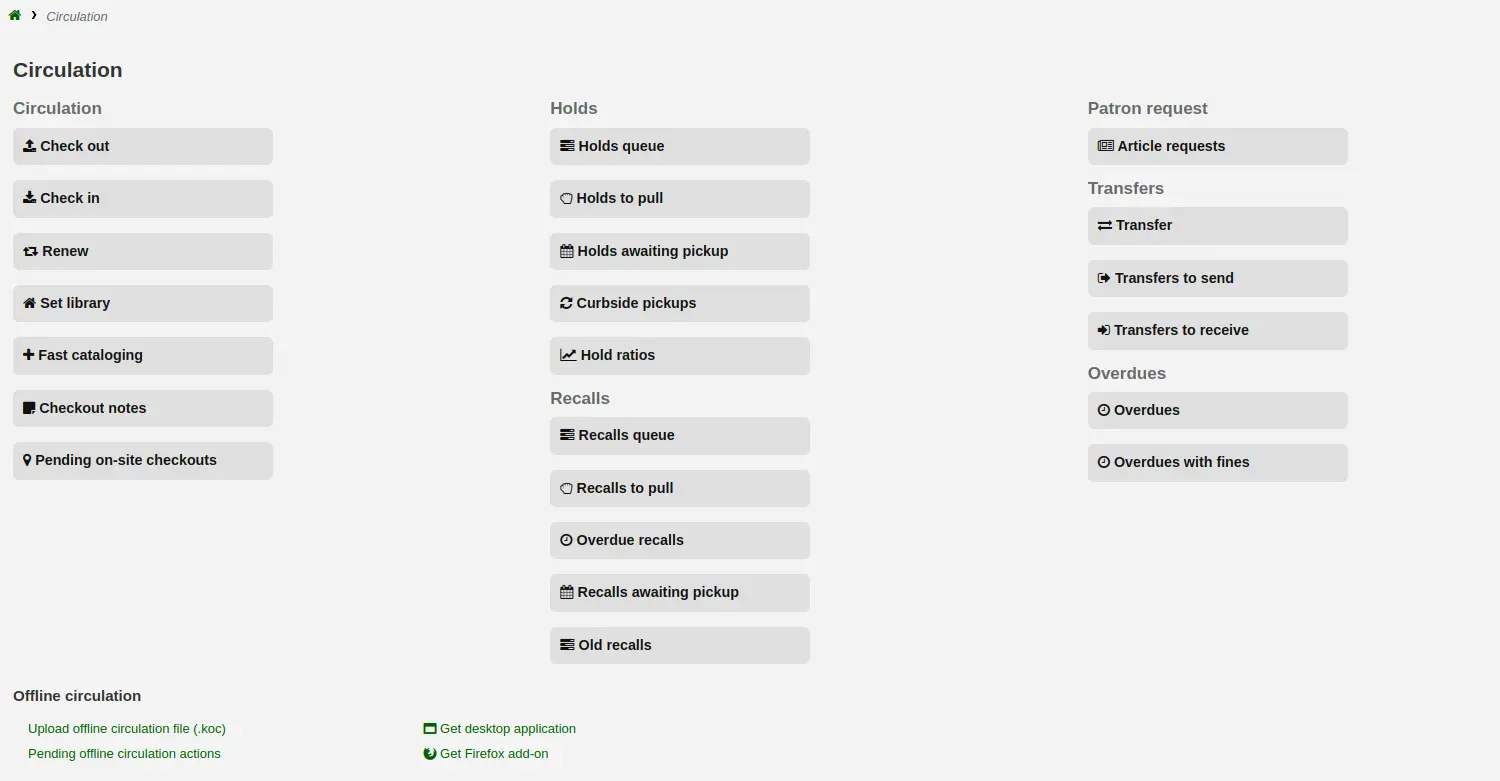
Cirkulationsfunktioner kan nås på flera olika sätt. På huvudsidan i personalklienten finns det en del snabblänkar i mitten av sidan för utlåning, återlämning och överföring. För en komplett lista över cirkulationsfunktionerna kan du gå till cirkulationssidan som finns länkad längst upp till vänster i varje sida eller från mitten av huvudsidan.
Innan samlingen kan cirkulera ställer ni in Globala systeminställningar, Grundparametrar och Regler för låntagare och cirkulation.
Under Cirkulation kan du växla mellan flikarna på rutan för snabbsökning längst upp i skärmen genom att använda följande snabbknappar:
Alt+Q: Search catalog
Alt+U: Check out
Alt+R: Check in
Alt+W: Renew
Observera
Staff members must have the circulate permission (or the superlibrarian permission) in order to be able to access circulation functions.
Check out (issuing)
To begin the checkout process you must enter the patron barcode or part of their name. The checkout option appears in three main places:
Check out option in the search bar at the top of the staff interface’s main page

Check out option in the search bar at the top of the main circulation page

Go to Circulation > Check out

Version
This option was added to Koha in version 25.05.
Those options are essentially a patron search. If you only have one result, Koha will automatically go to the patron’s file, in the ’Check out’ tab.
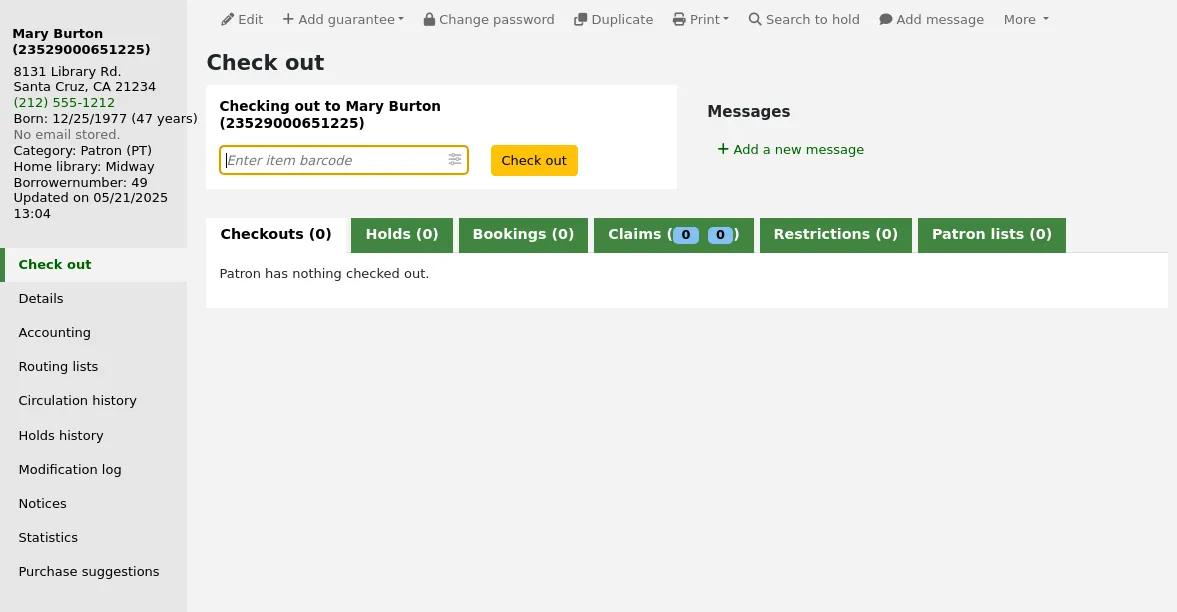
If your search gives you more than one result, it will ask you to choose which patron to check out to.
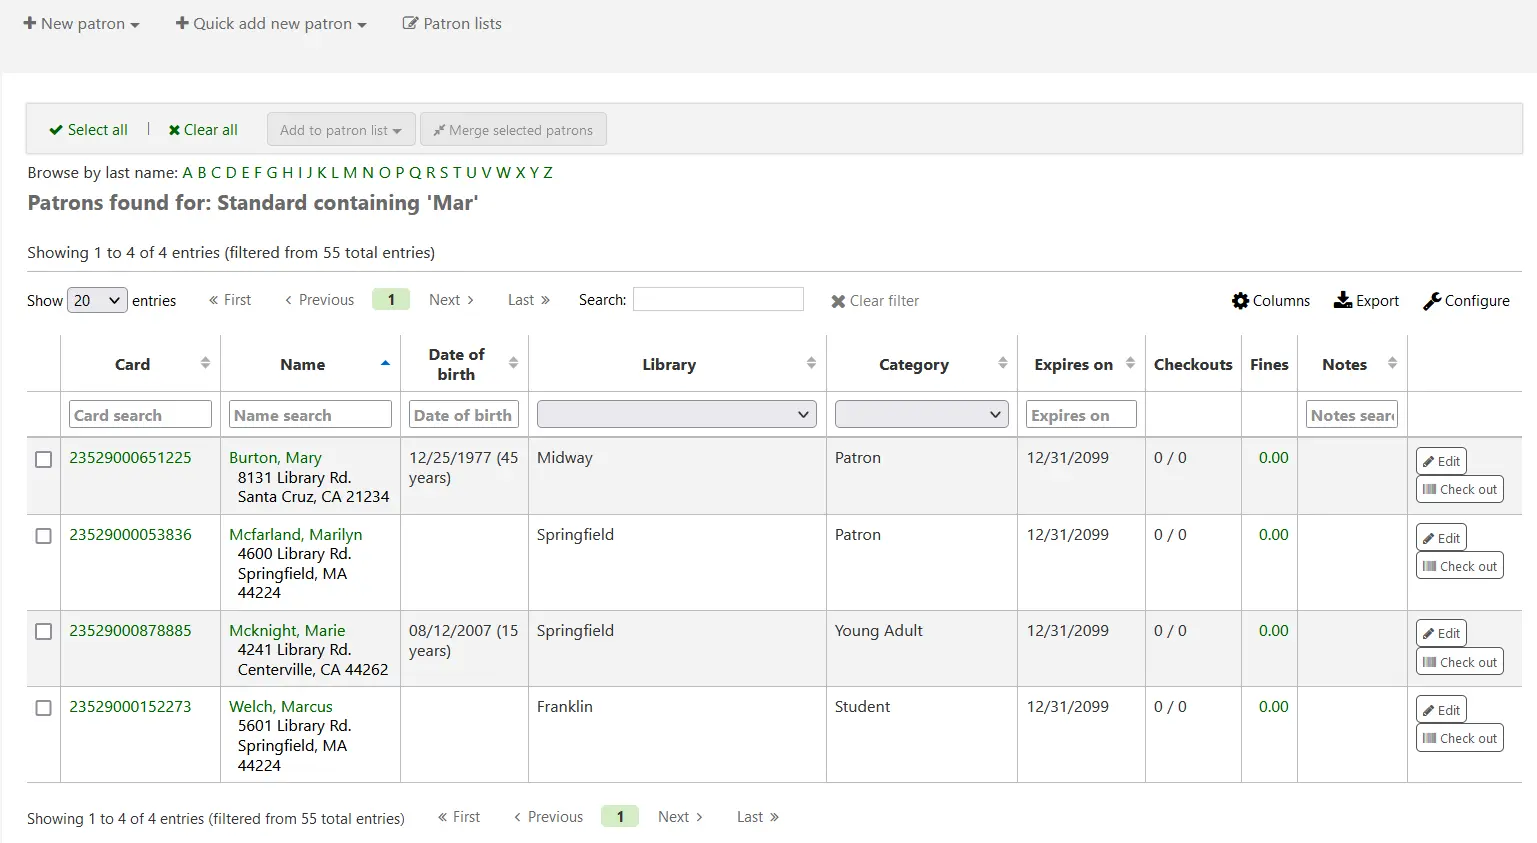
Observera
You can customize the columns of this table in the Table settings section of the Administration module, under the patrons tab (table id: memberresultst).
Clicking on a patron search result will bring you to the patron’s file, on the ’Details’ tab. Click the ’Check out’ tab to access the check out screen.
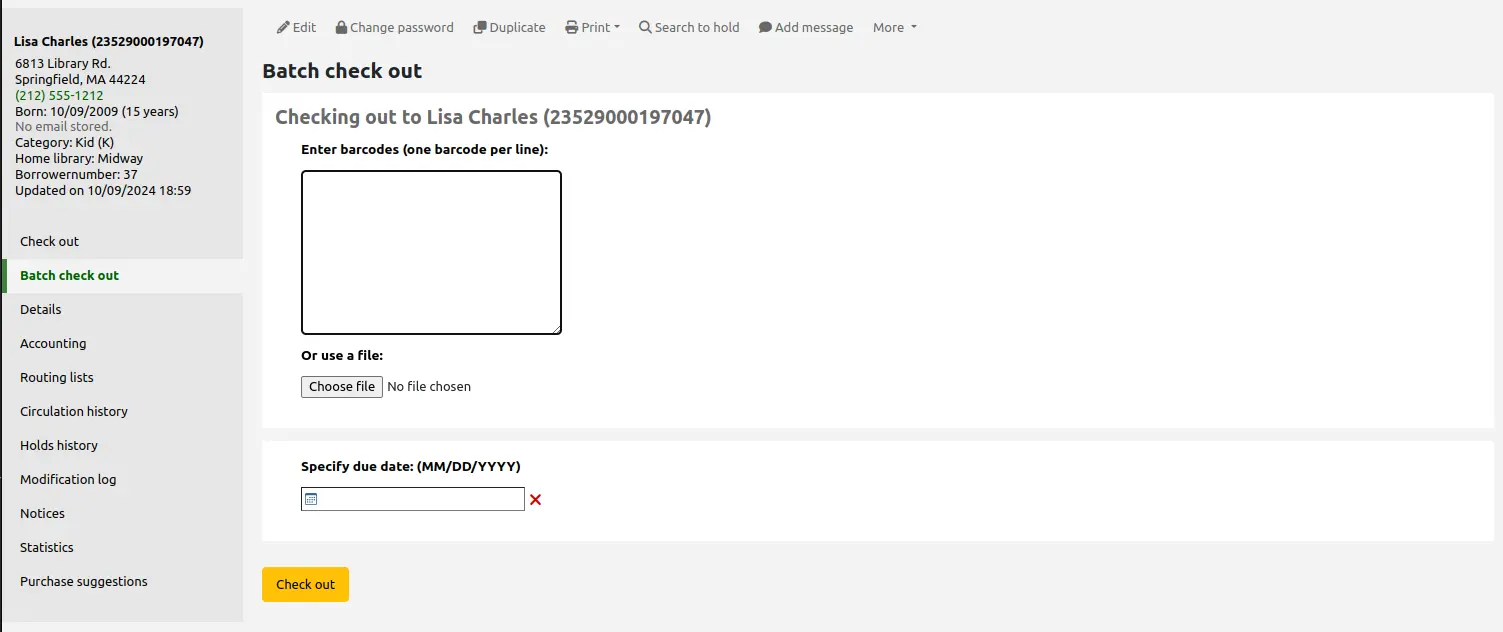
If you have enabled batch checkouts, click the batch check out tab on the patron record
Checking items out
För att låna ut ett exemplar till en låntagare söker du först efter låntagaren på ett av de många sätt som listas ovan. Sedan visas utlåningsskärmen.

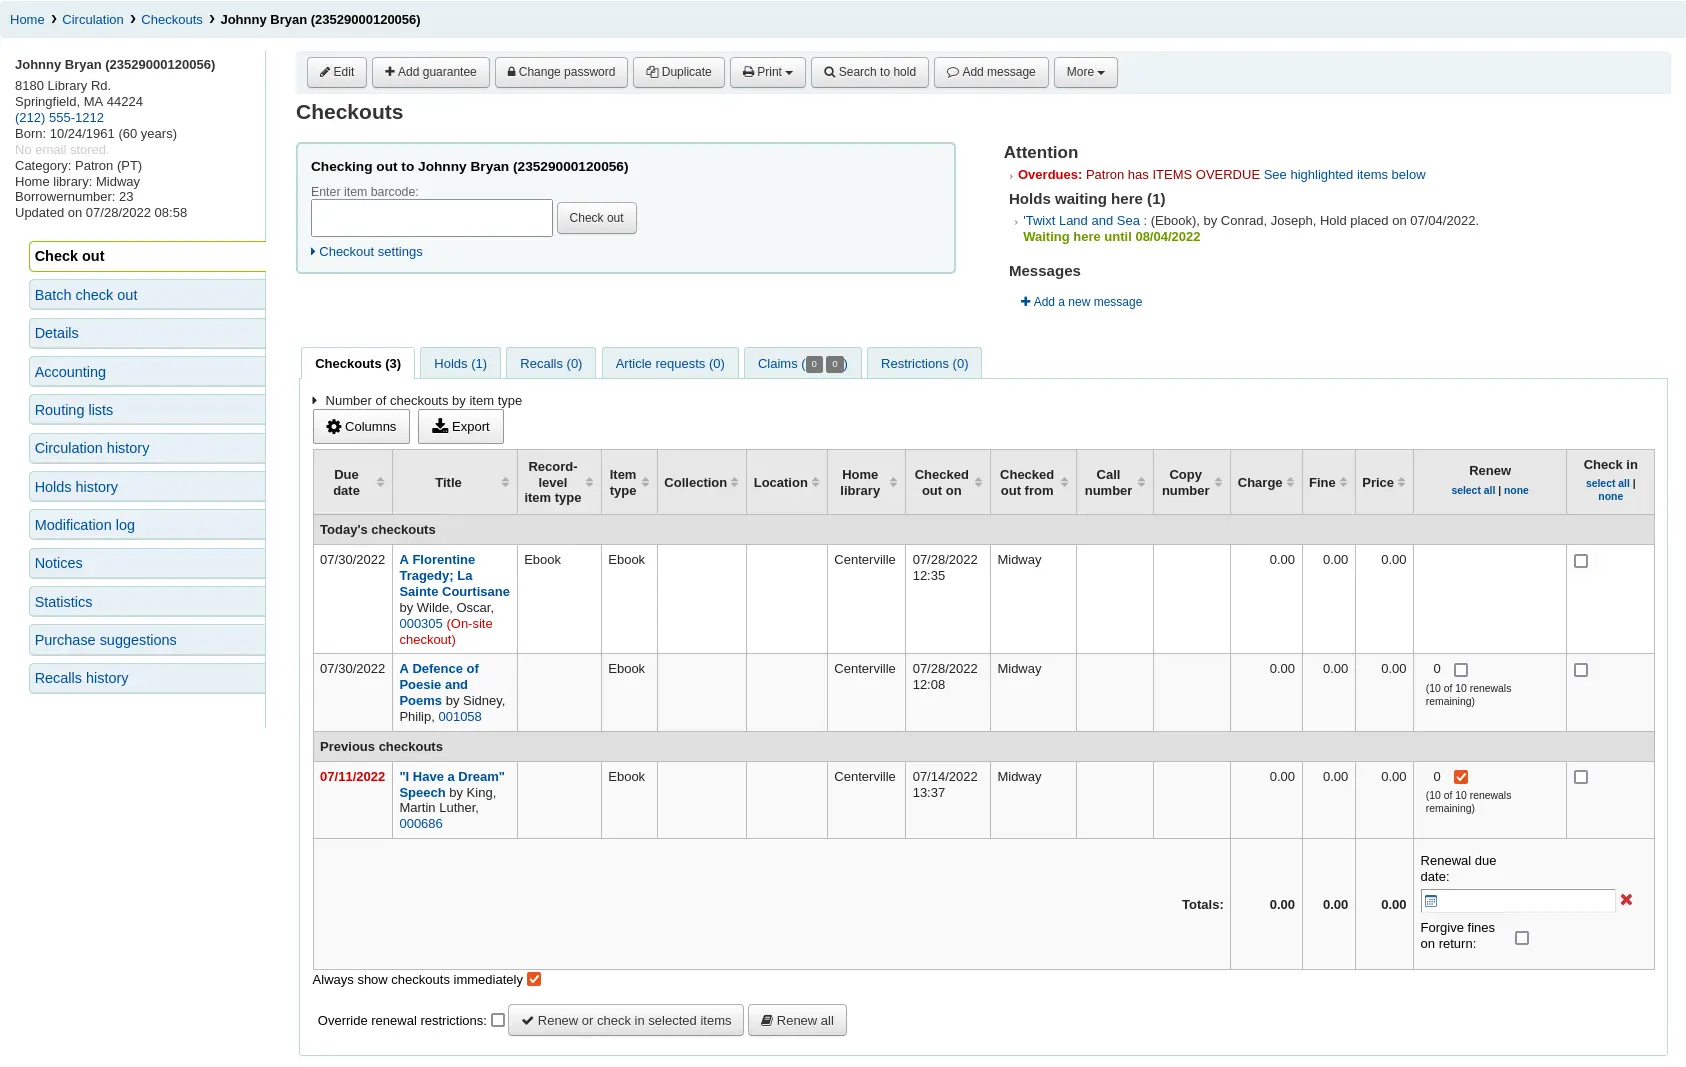
If ’Always show checkouts automatically’ is checked, you will see the list of current checkouts below the check out box.
Observera
The previousIssuesDefaultSortOrder system preference controls in which order these previous checkouts appear (earliest to latest, or latest to earliest).
Observera
You can customize the columns of this table in the Table settings section of the Administration module, under the circulation tab (table id: issues-table).
Observera
To prevent too many service queries when checking out a number of items in a row, you can use the LoadCheckoutsTableDelay system preference to delay the loading of the table and lighten the load on resources.
At the top of the check out screen is a field to type or scan the item’s barcode into.
Observera
Many modern barcode scanners will send a ’return’ to the browser, making it so that the ’Check out’ button is automatically clicked.
If the barcode is not found you will be prompted to use fast cataloging to add the item. Learn more about fast cataloging later in this manual.
If the itemBarcodeFallbackSearch system preference is set to ’Enable’, you can enter a keyword search in this box instead of just a barcode (this will make it possible to check out using title and/or call number).
If the AutoSwitchPatron system preference is set to ’Enable’, scanning a patron barcode here will take you to that patron’s file.
To see more checkout options click the ’Checkout settings’ link to expand the checkout area.
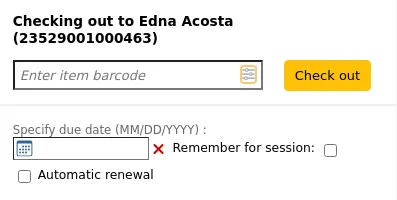
Specify due date: this option can be used to override the default due date for the item, as defined in the circulation and fines rules.
Observera
This option will only appear if the SpecifyDueDate system preference is set to allow staff to override the due date.
The red ’X’ is used to clear the date. If the ’specify due date’ field is empty, the default due date, as defined in the circulation and fines rules is used.
Remember for this session: check this box to use the same date for all checkouts. This will not only keep the specified due date for this patron but for all patrons, until you log out of the staff interface.
Automatic renewal: this option will allow this item to automatically be renewed
To use automatic renewals,
the automatic_renewals cron job must be running
the circulation and fines rules regarding automatic renewals must be defined
Just like regular renewals, the checkouts will not be automatically renewed if there is a hold on the item.
Don’t decrease checkout length based on holds: this option overrides the decreaseLoanHighHolds system preference.
Observera
This option will only appear if the decreaseLoanHighHolds system preference is enabled.
On-site checkout: this option indicates that this checkout is an on-site checkout.
Observera
This option will only appear if the checkout of items on site to patrons is allowed. These are usually items that are not for loan that you would like to check out for in-library use.
At the bottom of the page there is a summary of the patron’s current checked out items along with the due date (and time if the item is an hourly loan). Items checked out today will appear at the top, previously checked out items will be underneath.
Observera
The todaysIssuesDefaultSortOrder system preference controls in which order these new checkouts appear (earliest to latest, or latest to earliest).
Observera
Items that are hourly loan items will include the time with the due date.
If an item is checked out for on-site use, that information will be highlighted in red in the checkout summary.

Om det finns kommentarer i låntagarposten visas de till höger om utlåningsrutan

If the patron has a hold waiting at the library, that too will appear to the right of the check out box making it easy for the circulation staff to see that there is another item to give to the patron.
If you would like a more assertive hold warning, you can enable the WaitingNotifyAtCheckout system preference, which will generate a pop-up after each checkout to the patron who has waiting holds.
The details of the checkouts will appear on the record detail page in the staff interface as well.

Printing receipts
När du genomfört utlåning för en låntagare kan du skriva ut ett kvitto åt dem på två olika sätt.
If you have the CircAutoPrintQuickSlip preference set to ’open a print quick slip window’ you can simply hit enter on your keyboard or scan a blank piece of paper with your barcode scanner. The idea being that you’re ”checking out” a blank barcode which triggers Koha to print the ’Quick slip.’
If you have the DisplayClearScreenButton system preference set to ’Show print quick slip and clear buttons’ or ’Show print slip and clear buttons’, there will be a small printer button in the top right of the checkout box, which can be used to print the slip or quick slip.

Du kan även klicka på knappen Skriv ut längst upp i fönstret och välja ’Skriv ut kvittering’ eller ’Skriv ut snabbkvittering’.

If you choose ’Print slip’ it will print all of the items the patron has checked out, including those they checked out at an earlier date.
Observera
The slip uses the ISSUESLIP notice. You can customize the notice in the Notices and slips tool.
Choosing ’Print quick slip’ will print only the items that were checked out today.
Observera
The quick slip uses the ISSUEQSLIP notice. You can customize the notice in the Notices and slips tool.
’Print summary’ will generate a full page summary for the patron’s circulation information.
Observera
The summary cannot be customized.
However, the tables for the checkouts, holds, and charges are customizable in the Table settings section of the Administration module (table id: print-summary-checkouts, print-summary-holds, and print-summary-fines).
’Print account balance’ will generate a summary of outstanding charges and unused credits in the patron’s account.
Observera
The quick slip uses the ACCOUNTS_SUMMARY notice. You can customize the notice in the Notices and slips tool.
Observera
This option will only appear if the patron has charges in their Accounting tab.
’Print overdues’ will print out a slip that lists all items that are overdue.
Observera
The overdue slip uses the OVERDUE_SLIP notice. You can customize the notice in the Notices and slips tool.
’Print checkin slip’ will print out a slip that lists items that were checked in today.
Observera
The checkin slip uses the CHECKINSLIP notice. You can customize the notice in the Notices and slips tool.
Tips
You can add custom slips in this menu by adding a new notice in the notices and slips tool in the ’Patrons (custom slip)’ module.
For example, to have a slip with all the patron’s current holds,
Click ’New notice’, and choose ’Patrons (custom slip)’
Fill out the code and name for the slip. The name will be what appears in the ’Print’ menu.
In the ’Print’ template section, paste the code:
Patron has [% borrower.holds.count %] holds

List of holds:
[% FOREACH hold IN borrower.holds %]
===============================
Reserve id: [% hold.reserve_id %]
Title [% hold.biblio.title %]
[% END %]
Click ’Save’
Now, in a patron account, when you click on ’Print’ the new custom slip should be available.
Exporting checkouts
Other than printing a receipt, there are several ways to export a patron’s checkouts.
The ’Export’ button at the top of the table allows you to export the patron’s current checkouts in either Microsoft Excel or CSV format, or even copy or print their checkouts.

The CSV file exported this way will contain the columns of the table that are visible. You can click on the ’Columns’ button and remove some columns first, if needed.
If the ExportCircHistory system preference is enabled, there will be an ’Export’ column in the checkouts table. This is used to export the patron’s current checkouts in either MARC or CSV format.
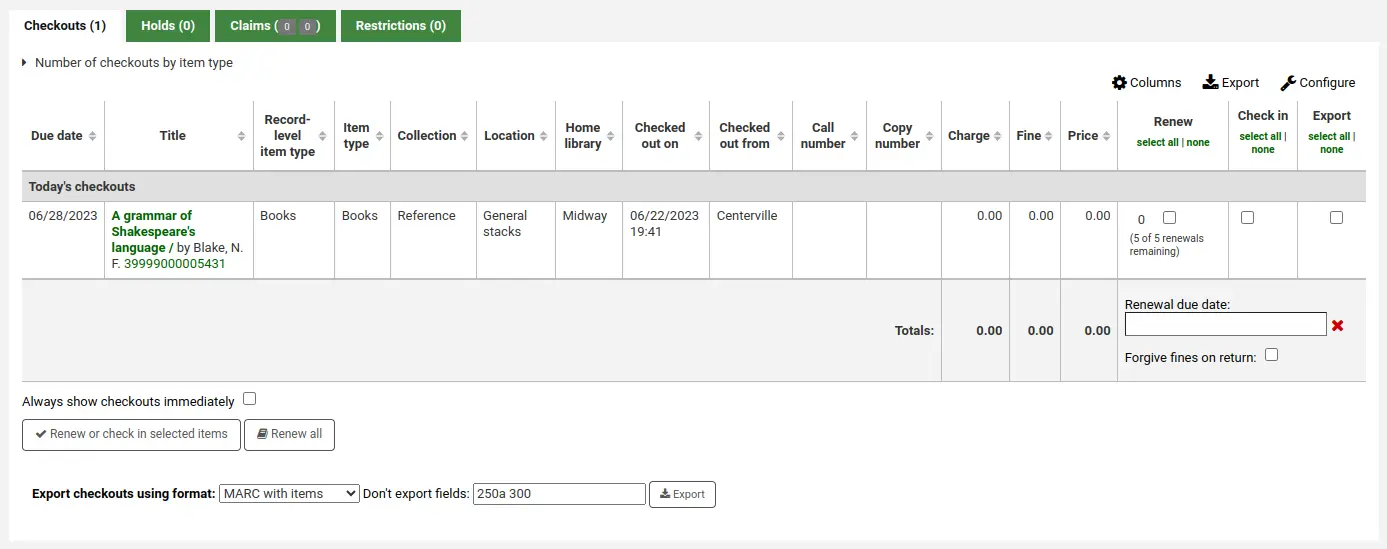
To export checkouts this way,
Select the checkouts to be exported using the checkboxes in the ’Export’ column.
At the bottom of the table, choose the options for the export
Export checkouts using format
MARC with items: this will export the MARC records of the checked out titles, including the item information.
MARC without items: this will export the MARC records of the checked out titles.
CSV: this will export a CSV file of checked out titles. When this option is selected, a new dropdown menu will appear to choose a CSV profile.
Export bundle contents: if the patron checked out a bundle, this option will export the parent record as well as all the child records.
Don’t export fields: optionally, you can enter MARC fields that are not to be exported.
Observera
The default values in the ”Don’t export field” field are set in the ExportRemoveFields system preference.
Clear patron information
When you’re done checking an item out if you have the DisplayClearScreenButton preference set to ’Show’ you can clear the current patron by clicking the X in the top right of the patron’s info to remove the current patron from the screen and start over.

If you have the CircAutoPrintQuickSlip preference set to ’clear the screen’ then you simply need to hit enter or scan a blank barcode and the screen will be cleared of the current patron.
Batch checkouts
If you would like to perform a batch check out you can do so by turning on the BatchCheckouts system preference and assigning the proper patron categories via the BatchCheckoutsValidCategories system preference. This will allow you to use an RFID pad that reads multiple barcodes or perform a batch check out for training internal use.
Access the batch checkout screen by going to the patron record and clicking the ’Batch check out’ tab on the left.

From this screen, you can scan several barcodes or load a file of barcodes.
If the SpecifyDueDate system preference is enabled, you will have the option to set a due date for the checkouts.
If the OnSiteCheckouts system preference is enabled, there will be an option to specify these are on-site checkouts.
Version
The on-site checkout option in batch check out was added to Koha in version 23.11.
If the items cannot be checked out, a warning will be provided on the following screen, with the option to uncheck the items that are not to be checked out.
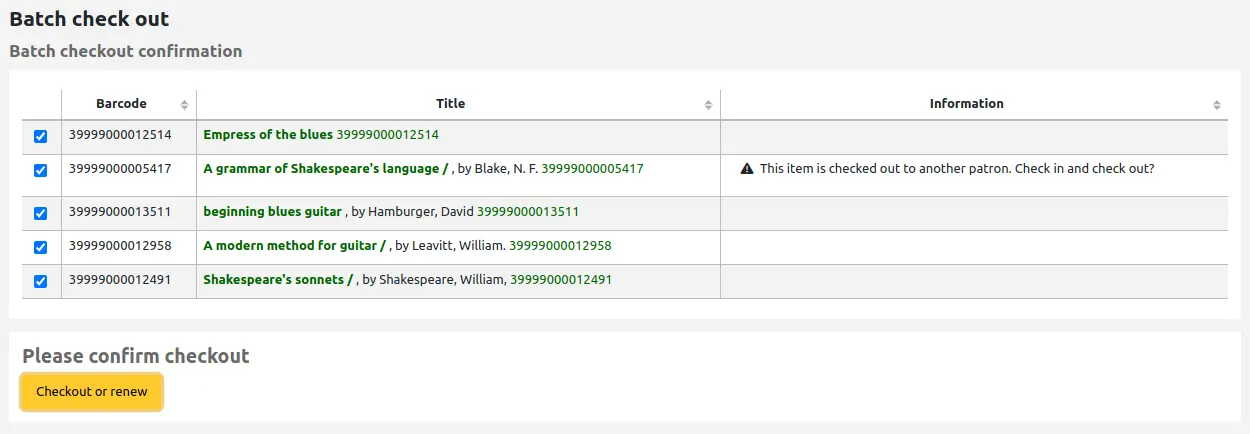
If you are using a statistical patron type to record in-house use, you’ll see that local use was recorded for each scanned item.

Check out messages
Om du lånar ut ett exemplar som består av flera delar, och du katalogiserat den informationen i underliggande fält 3 för exemplarsposten (i MARC21), kommer ett meddelande att visas när du lånar ut, med information om hur många delar som ska finnas.

Ibland kommer Koha att hindra en bibliotekarie från att låna ut exemplar till en låntagare. När det inträffar visas en varning som förklarar för bibliotekarien varför låntagaren inte får låna.
Patron owes too much in fines
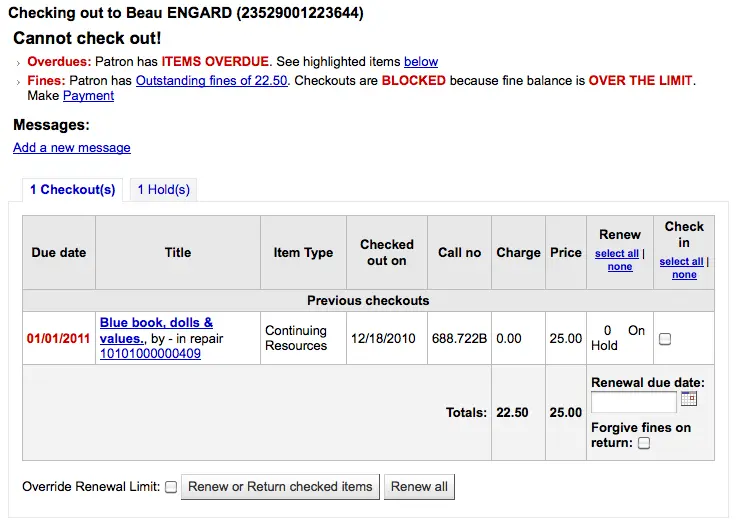
You can set the amount at which patron checkouts are blocked with the noissuescharge system preference
Patron has a restriction on their account

This can be set by the librarian editing a patron record and adding a restriction or by the Overdue/Notice Status Triggers
Staff with the force_checkout permission (or superlibrarian) will be able to temporarily override a restriction in order to check out anyway.

Patron needs to confirm their address

This can be set by the staff editing a patron record and adding a flag.
Patrons has lost their library card

This can be set by the staff editing a patron record and adding a flag.
’This item has been lost with a status of ”X”.’

This message appears if the IssueLostItem is set to ’display a message’ and the item being checked out has a lost status.
The item is checked out.
Check out warnings
Ibland kan utlåning utlösa varningsmeddelanden som visas i en gul ruta ovanför utlåningsfältet. Dessa varningar måste bekräftas innan du kan fortsätta med utlåningen.
Låntagare har obetalda böter

Exemplar reserverat för någon annan

Exemplaret bör vara på reservationshyllan i väntan på hämtning av någon annan

Item booked for someone else

Bookable items can be issued without a prior booking, in accordance with the circulation rules. If a booking on the item being checked out is due to start before the end of the loan period, this warning will appear.
Koha will automatically suggest to reduce the item due date to a new date prior to the start of the booking. You can adjust this before checking out.
Exemplar redan utlånat till denna låntagare

Exemplaret utlånat till annan låntagare

This warning will allow you to place a hold on the item for the patron you’re trying to check it out to.
Exemplaret lånas inte ut
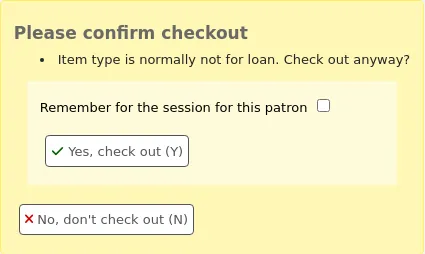
Patron has too many things checked out and AllowTooManyOverride is set to ’Allow’

Patron has too many things checked out and AllowTooManyOverride is set to ”Don’t allow”

Item cannot be renewed

This can be overridden with the AllowRenewalLimitOverride system preference
Streckkod ej funnen
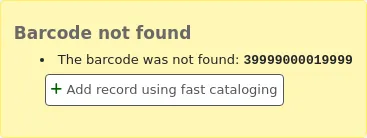
Learn more about fast cataloging later in this manual.
’This item has been lost with a status of ”X”. Check out anyway?’

This warning message appears if the IssueLostItem system preference is set to ’require confirmation’ and the item being checked out has a lost status.
Staff must click ’Yes, check out’ for the item to be checked out.
Exemplaret som lånas ut rekommenderas inte för en låntagare i denna ålder

Item being checked out meets the decreaseLoanHighHolds system preference criteria

Item has accompanying material (field 952$3, ’Materials specified’, is filled)

If CircConfirmItemParts is set to ’Require’, the staff member will have to confirm the checkout

If the CheckPrevCheckout system preference says to check the patron’s circulation history, a warning will show to indicate that the patron has already checked out the item

Checkout notes
Checkout notes are notes that patrons can add from the OPAC about a particular item they have checked out (for example: missing first page, or DVD is scratched, etc.).
To enable checkout notes, set the AllowCheckoutNotes system preference to ’Allow’.
Once the system preference is activated, a new column titled ’Report a problem’ will appear in the list of checkouts in the patron’s summary in the OPAC.
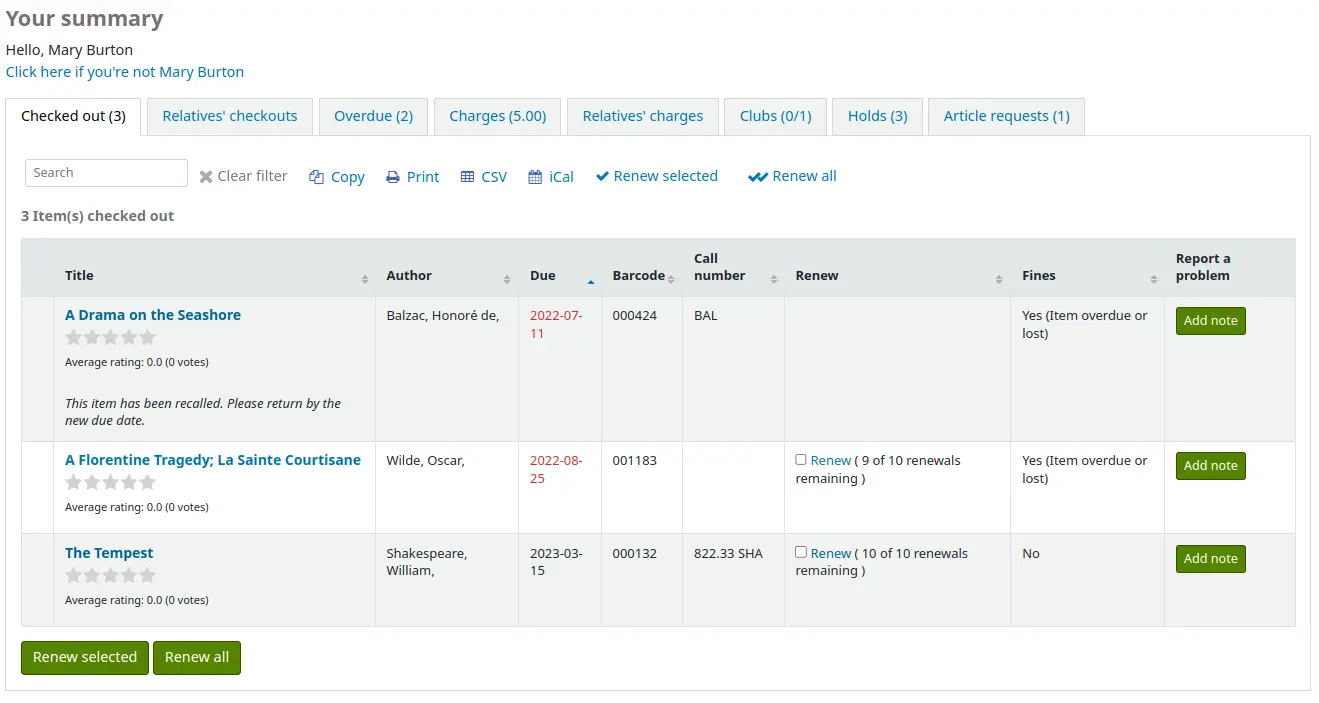
When the patron clicks on ’Add note’, they will be able to write a note about this checkout.
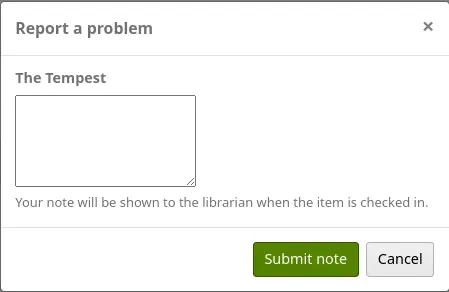
Staff will be alerted of new checkout notes in the section at the bottom of the staff interface’s home page, with other pending requests.

Observera
Only staff with the manage_checkout_notes permission (or the superlibrarian permission) will see the new checkout notes and have access to the checkout notes management page.
An email will also be sent to the email address in KohaAdminEmailAddress to alert the system administrator that a checkout note was added.
Observera
You can customize this message in the Notices and slips tool. The letter code is CHECKOUT_NOTE.
Checkout notes can be managed from the circulation module home page, under Circulation > Checkout notes, or by clicking on the message in the pending requests section of the staff interface home page.

From this page, staff can mark notes as seen, either individually by clicking the ’Mark seen’ button on the right, or in a batch by selecting the notes and clicking ’Mark seen’ at the top of the page. Marking the notes as seen will remove them from the pending requests section of the staff interface homepage.
Seen notes can be filtered out with the ’Hide seen’ link at the top of the table.
Checkout notes will also appear upon checkin.

Once the item is checked in, the note will be removed permanently from this page.
Renewing checkouts
Checked out items can be renewed (checked out for another period of time) based on your circulation rules and renewal preferences.
If you allow it, patrons can renew their own items via the OPAC, but sometimes you’ll need to help them by renewing their items via the staff interface.
To renew items checked out to a patron, you can do one of three things: renew from the patron’s checkout summary, renew from the search bar at the top of the page, or renew from the ’Renew’ section of the circulation module.
Renewing from the patron’s checkout summary
The first way to renew checkouts is to visit the patron’s details page or checkout page and view their checkout summary at the bottom.
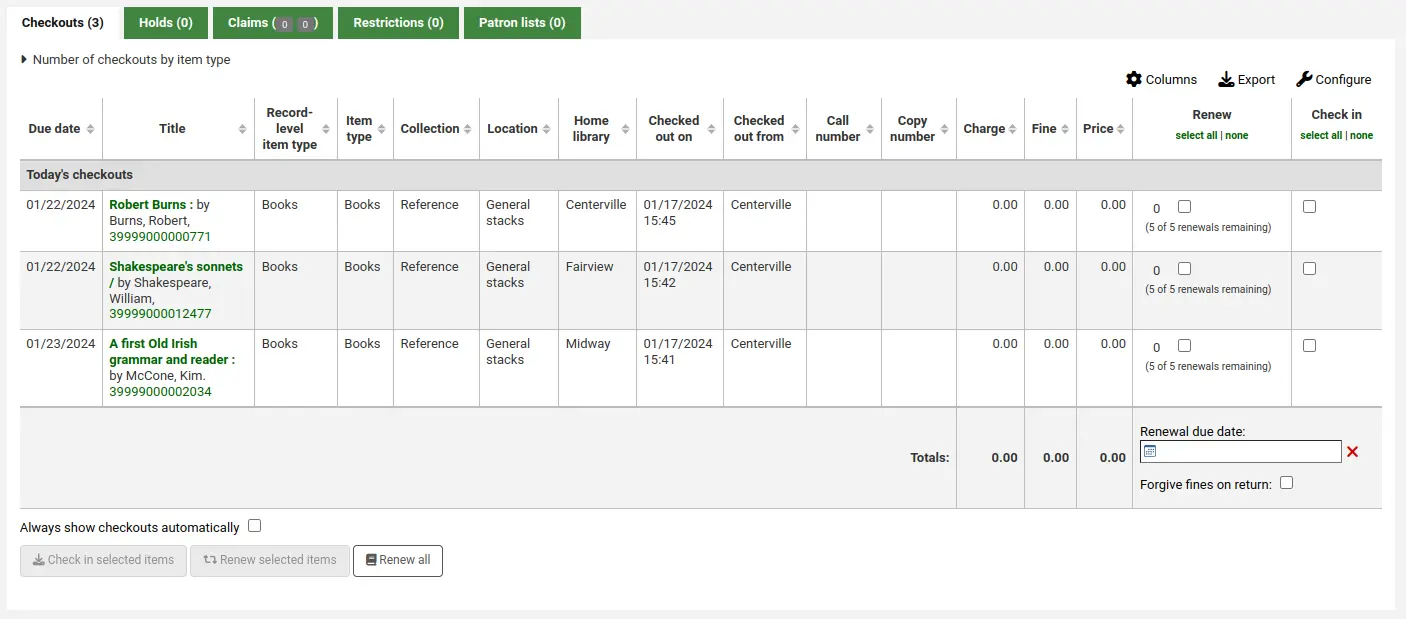
In the ’Renew’ column, you will see how many times each item has been renewed and a checkbox to renew the item for the patron. Check the box of the items you would like to renew and click the ’Renew selected items’ button. Alternatively, click the ’Renew all’ button to renew all items checked out to the patron.

Uppmärksamma
Prior to Koha version 23.11, the button was called ’Renew or check in selected items’ and served both for renewing and for checking in depending on which box was checked.
Observera
By default, items that are due today or already overdue are preselected.
Uppmärksamma
Prior to Koha version 24.11, only overdue items were preselected.
Sometimes renewals will be blocked based on your circulation rules. To override this block, the AllowRenewalLimitOverride system preference must be set to ’Allow’. If you allow renewal limit overrides, you will see a checkbox at the bottom left of the circulation summary. Checking that box will add checkboxes in the renew column above where before the item was not renewable.

Check that box, choose the items you would like to renew, and then click ’Renew selected items’.
You can also mark a renewal as ’unseen’, to differentiate between renewals where staff has actually seen the item, versus renewals where they didn’t see it (over the phone, for example). To do this, you must first enable the UnseenRenewals system preference. Once enabled, a checkbox will appear at the bottom left of the circulation summary. Check that box to mark the renewals as ’unseen’. Then click either ’Renew selected items’ or ’Renew all’.

If you need to renew the checkout for a period different than the standard renewal period, you can pick a due date in the ’Renewal due date’ box at the bottom of the ’Renewal’ column. Make sure to enter the date before clicking the ’Renew selected items’ button or the ’Renew all button’.
Renewing from the search bar
If you have the items in hand, you can select the ’Renew’ option in the search bar at the top of the page (or press Alt + w, or Option + w on Mac computers), and scan the barcode in the search field.

If renewing is permitted, the checkout will be renewed for the period specified in the circulation rules.
Observera
There is no way to specify a different renewal period or to override renewal limits from here. You need to use one of the other methods.
Renewing from the ’Renew’ page
Get there: Circulation > Renew
The last option to renew checkouts is to visit the ’Renew’ page found under the Circulation menu.
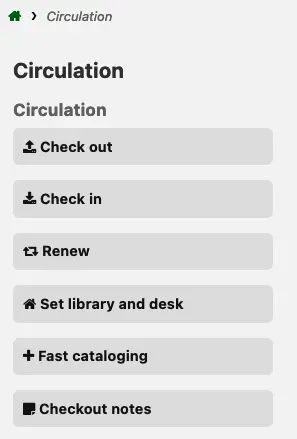
Scan the barcodes of the items you would like to renew.

If you need to renew the checkout for a period different than the standard renewal period, click the renewal settings icon in the field. This will open a ’Renewal due date’ date picker under the barcode field where you can pick a due date.

Viktigt
Make sure to enter the date before scanning the barcode.
Uppmärksamma
In versions of Koha prior to 25.05, the renewal date picker was always visible. The renewal settings icon was introduced in version 25.05 to make the interface consistent with other circulation pages in Koha.
If the item is renewed, you will receive a confirmation message.

If the barcode is not found, you will be presented with an error.
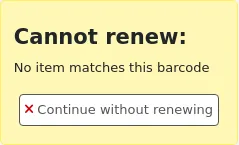
If the item is not actually checked out, you will also receive an error.

Checking items in (returning)
Checking items in can be performed from various locations: the search bar at the top of the staff interface, the ’Check in’ column in the patron’s checkout summary, or the dedicated ’Check in’ page of the Circulation module.
Koha also offers an automatic check-in feature, which can be set in item types and requires the automatic_checkin.pl cron job.
Checking in from the search bar
To quickly check in an item, you can select the ’Check in’ option in the search bar at the top of the page (or press Alt + r, or Option + r on Mac computers), and scan the barcode in the search field.

This will check in the item and bring you to the ’Check in’ section of the Circulation module to check in more items.
Observera
There is no way to specify a return date, use the book drop mode, or forgive fines from the search bar. You need to go to Circulation > Check in to have access to those options.
Checking in from the patron’s checkout summary
Another way to check in items is to visit the patron’s details page or checkout page and view their checkout summary at the bottom.

Check the box in the ’Check in’ column of the items you would like to check in and click the ’Check in selected items’ button.
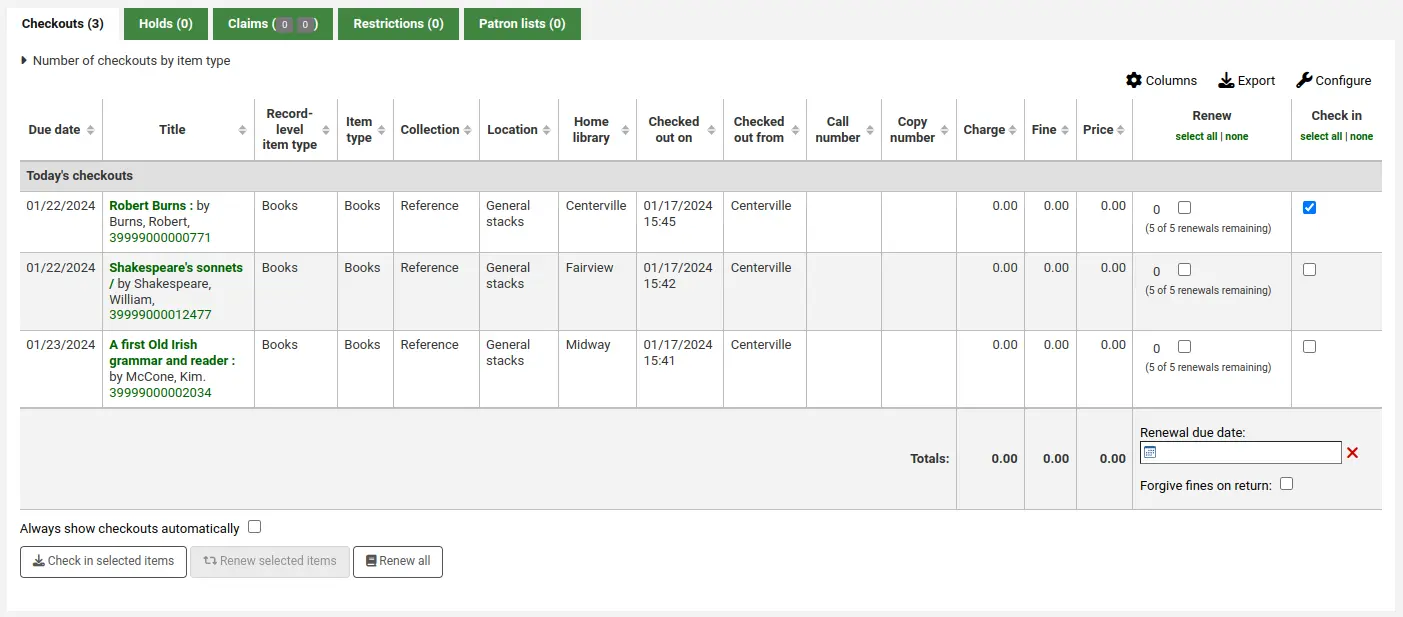
Uppmärksamma
Prior to Koha version 23.11, the button was called ’Renew or check in selected items’ and served both for renewing and for checking in depending on which box was checked.
Varning
This method doesn’t require staff to scan the barcode, which can lead to errors when selecting the items to check in. Be careful when using this method.
Checking in from the ’Check in’ page
Sökväg: Cirkulation > Återlämning
You can also check items in from the ’Check in’ section in the Circulation module.

To check an item in, scan the barcode of the item into the box provided.
A summary of all items checked in will appear below the check-in box.

Observera
You can customize the columns of this table in the Table settings section of the Administration module (table id: checkedintable).
Check-in settings are available by clicking on the settings icon in the barcode field. These are used for non-standard check-ins, for example, if you need to specify a different return date, or if you need to forgive all fines.

If the SpecifyReturnDate system preference is set to ’Allow’ you will be able to arbitrarily set the return date from below the check in box.
If you are checking items in that were put in the book drop while the library was closed, you can check the ’Book drop mode’ box before scanning items. This will effectively roll back the return date to the last date the library was open.

Observera
This requires that the closed days are added to the calendar tool.
Du kan också välja att efterskänka alla förseningsavgifter för exemplar du återlämnar genom att markera rutan ’Efterskänk förseningsavgifter’ innan exemplaren skannas.
Observera
This checkbox will only appear if you charge overdue fines, i.e., if the finesMode system preference is set to ’Calculate and charge’.
Check in messages
Flera meddelanden kan visas när exemplar återlämnas:
If the return policy dictates items need to be returned back to their home or holding library, a message will appear asking staff to transfer the item.
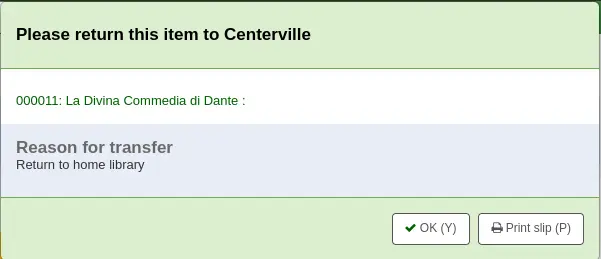
Observera
When set to ’Block’, the TransfersBlockCirc system preference will block all actions until the pop-up is confirmed.
When set to ”Don’t block”, the AutomaticConfirmTransfer system preference determines what happens if the pop-up is dismissed without confirming the transfer.
After this item is checked in and the transfer is confirmed, the status of the item will be changed in the catalog to ’in transit’.

To mark an item as back at the home or holding library, check the item in at that library.

A message will appear to tell you that the item is not checked out, but the status will now say available in the catalog. This step is necessary to mark items as received by the library.
Om du tar emot ett exemplar som består av flera olika delar visas ett meddelande med en varning om det antal delar du bör ha i handen

If CircConfirmItemParts is set to ’Require’, the staff member will have to confirm the checkin

If you’re checking an item in that has a hold on it, you will be prompted to confirm the hold
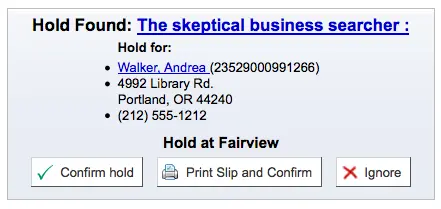
Klickar du på knappen Bekräfta reservation markeras exemplaret som i väntan på hämtning från biblioteket

Clicking the ’Print slip and confirm’ button will mark the item as waiting for pickup at the library and present the library with a receipt to print and place on the book with the patron’s information
Om reservationen ignoreras är exemplaret fortfarande reserverat, men med statusen Tillgänglig (reservationen annulleras inte)
If you’re checking in an item that has a hold on it at another branch you will be prompted to confirm and transfer the item
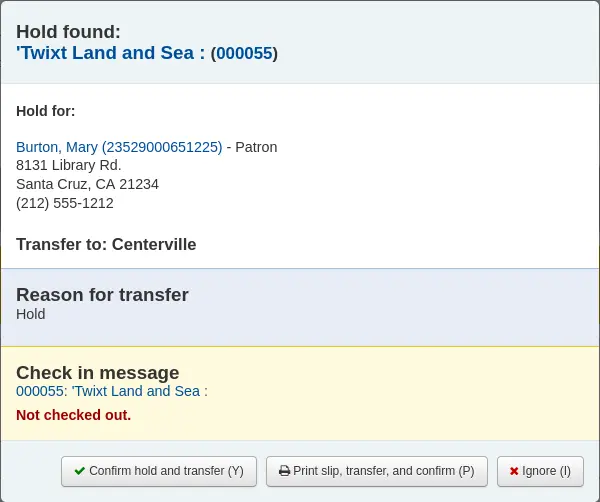
Clicking the ’Confirm hold and transfer’ button will mark the item as in transit to the library where the hold was placed

Clicking the ’Print slip, transfer and confirm’ button will mark the item as in transit to the library where the hold was placed and present the library with a receipt to print and place on the book with the patron’s information
Om reservationen ignoreras är exemplaret fortfarande reserverat, men med statusen Tillgänglig (reservationen annulleras inte)
If you have the system showing you fines at the time of checkin (FineNotifyAtCheckin) you will see a message telling you about the fine and providing you a link to the payment page for that patron

Claiming an item as returned
If the patron claims they returned something, you can mark that item as ’Claimed returned’ and track those claims.
In order to use this feature,
Add a new authorized value to the LOST category to represent items claimed as returned.
Enter the authorized value in the ClaimReturnedLostValue system preference (this enables the return claims feature).
Choose if a lost fee should be charged to the patron who claims an item as returned. Set a value in the ClaimReturnedChargeFee system preference (the default is to ask if a lost fee should be charged).
Optionally set a number of return claims a patron can make before a warning appears in their record in the ClaimReturnedWarningThreshold system preference.
Once the feature is enabled, a button to ’Claim returned’ will appear in the patron’s checkouts tab.
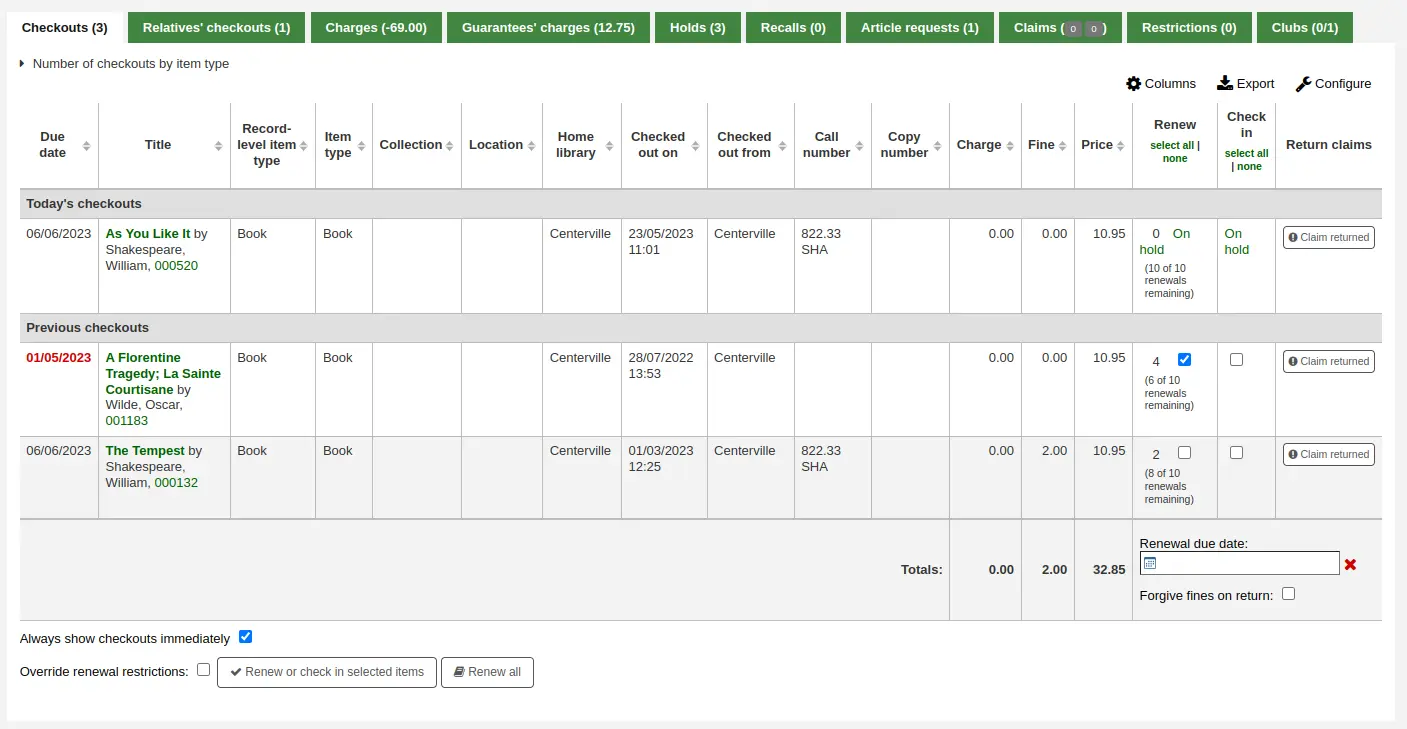
To claim an item as returned,
Click the ’Claim returned’ button next to the checkout.
In the pop-up, enter any notes about this claim.
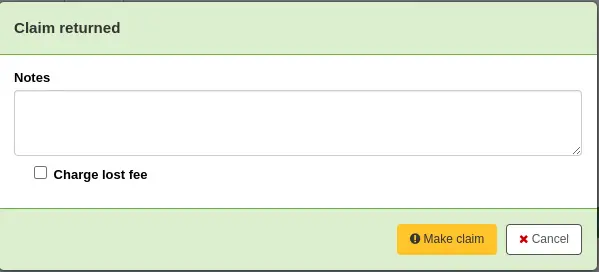
If the ClaimReturnedChargeFee system preference is set to ask whether or not the lost fee should be charged to the patron, there will be a checkbox to charge the fee.
Click ’Make claim’.
The claimed returned item will stay in the patron’s checkouts, and its lost status will be updated. The claim will also appear in the ’Claims’ tab.
Resolving a return claim
To resolve a claim,
Go to the patron’s record in the ’Claims’ tab.

Click ’Actions’ next to the item and choose ’Resolve’.
In the pop-up, choose a resolution and new lost status.
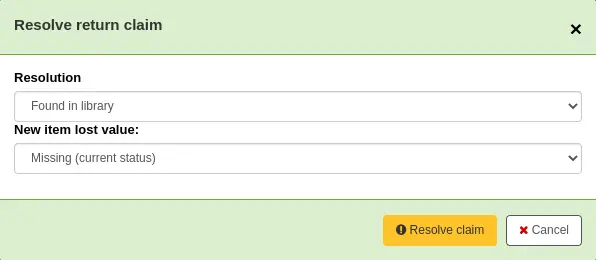
Resolution: the resolution is the reason this claim is being closed.
Observera
The values are managed in the RETURN_CLAIM_RESOLUTION authorized value category.
New item lost value: this is the new lost status for this item.
Observera
The values are managed in the LOST authorized value category.
Click ’Resolve claim’.
The resolved claim will stay in the patron’s record, unless they are purged by the cleanup_database.pl cron job after the number of days specified in the CleanUpDatabaseReturnClaims system preference.
Observera
It is possible to set up return claims to be automatically resolved when the item is checked in or checked out with the system preferences AutoClaimReturnStatusOnCheckin and AutoClaimReturnStatusOnCheckout.
Circulating bundles
This feature adds the ability to create bundles of items that can be checked out as a single entity. A bundle could for example be a box of related items from your library or a collection of musical scores which need to be circulated together.
You create a collection level bibliographic record and add items to it in the usual way. Those items can then be converted to a bundle by adding existing item records to them using their barcodes. The items will remain attached to their original records and be marked as ‘not for loan’.
Configuration
First you need to make some configuration choices.
Item types - you may want to create a separate item type to identify your bundles.
Circulation rules - you can optionally create circulation rules for your bundle item type.
There are two system preferences which control the status values used with bundles:
Creating bundles
The bundle functionality will only be displayed if you create a catalog record with the Leader, (000 MARC tag) position 7 set to ‘c’ for Collection.
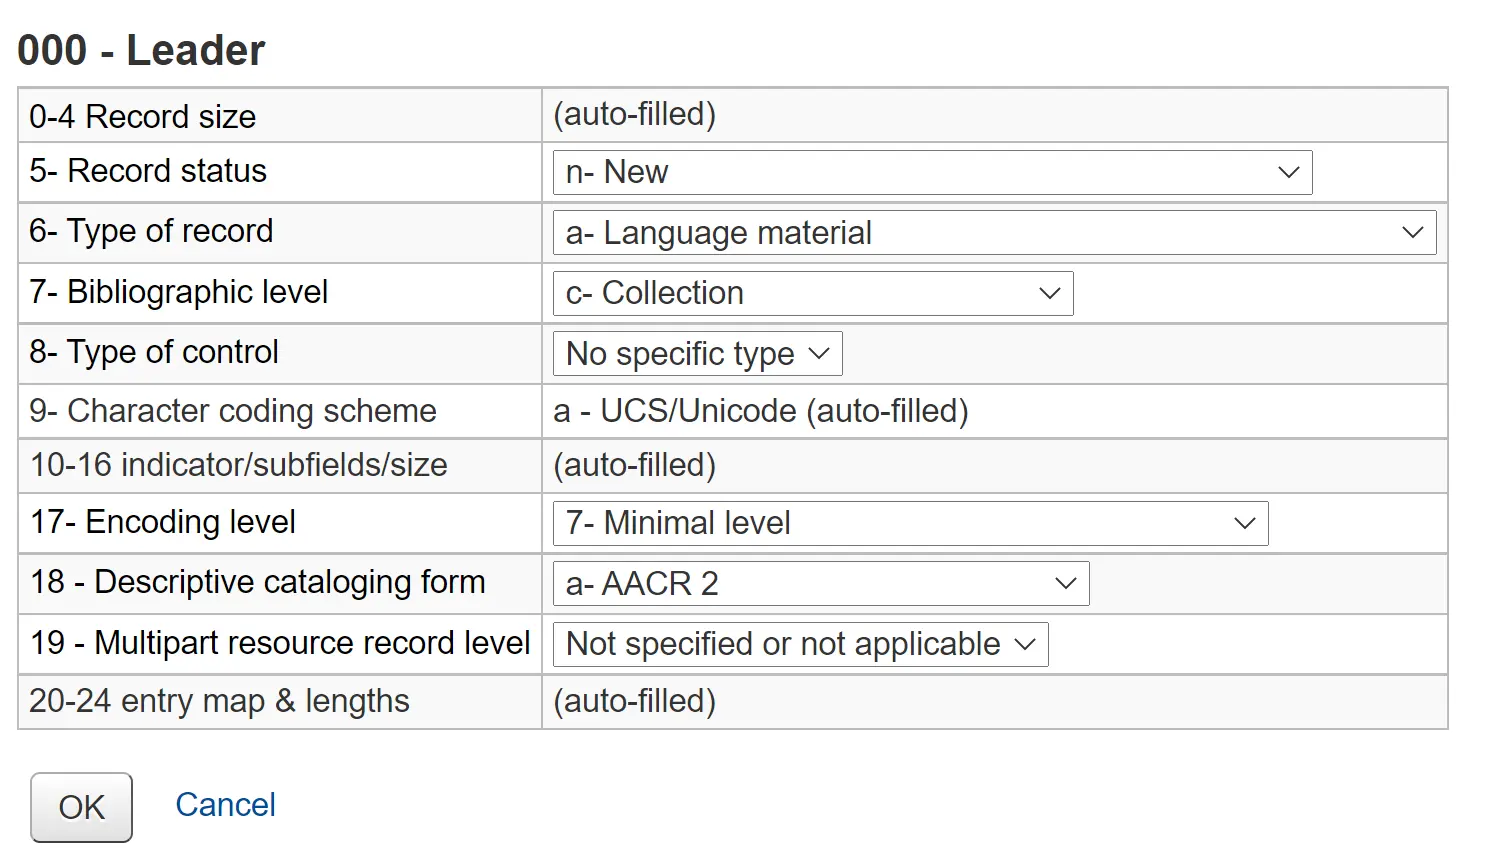
Observera
It might be useful to have a separate MARC bibliographic framework for bundles with the ‘c’ set as a default value if you will use bundles regularly. You can also add any custom fields to the template that might be unique to bundles such as size or weight.
Your catalog record will contain information to identify the content of the bundle.
For example, if the bundle is a box of resources for school children on the topic of oceans, the catalog record might look something like the one shown below.
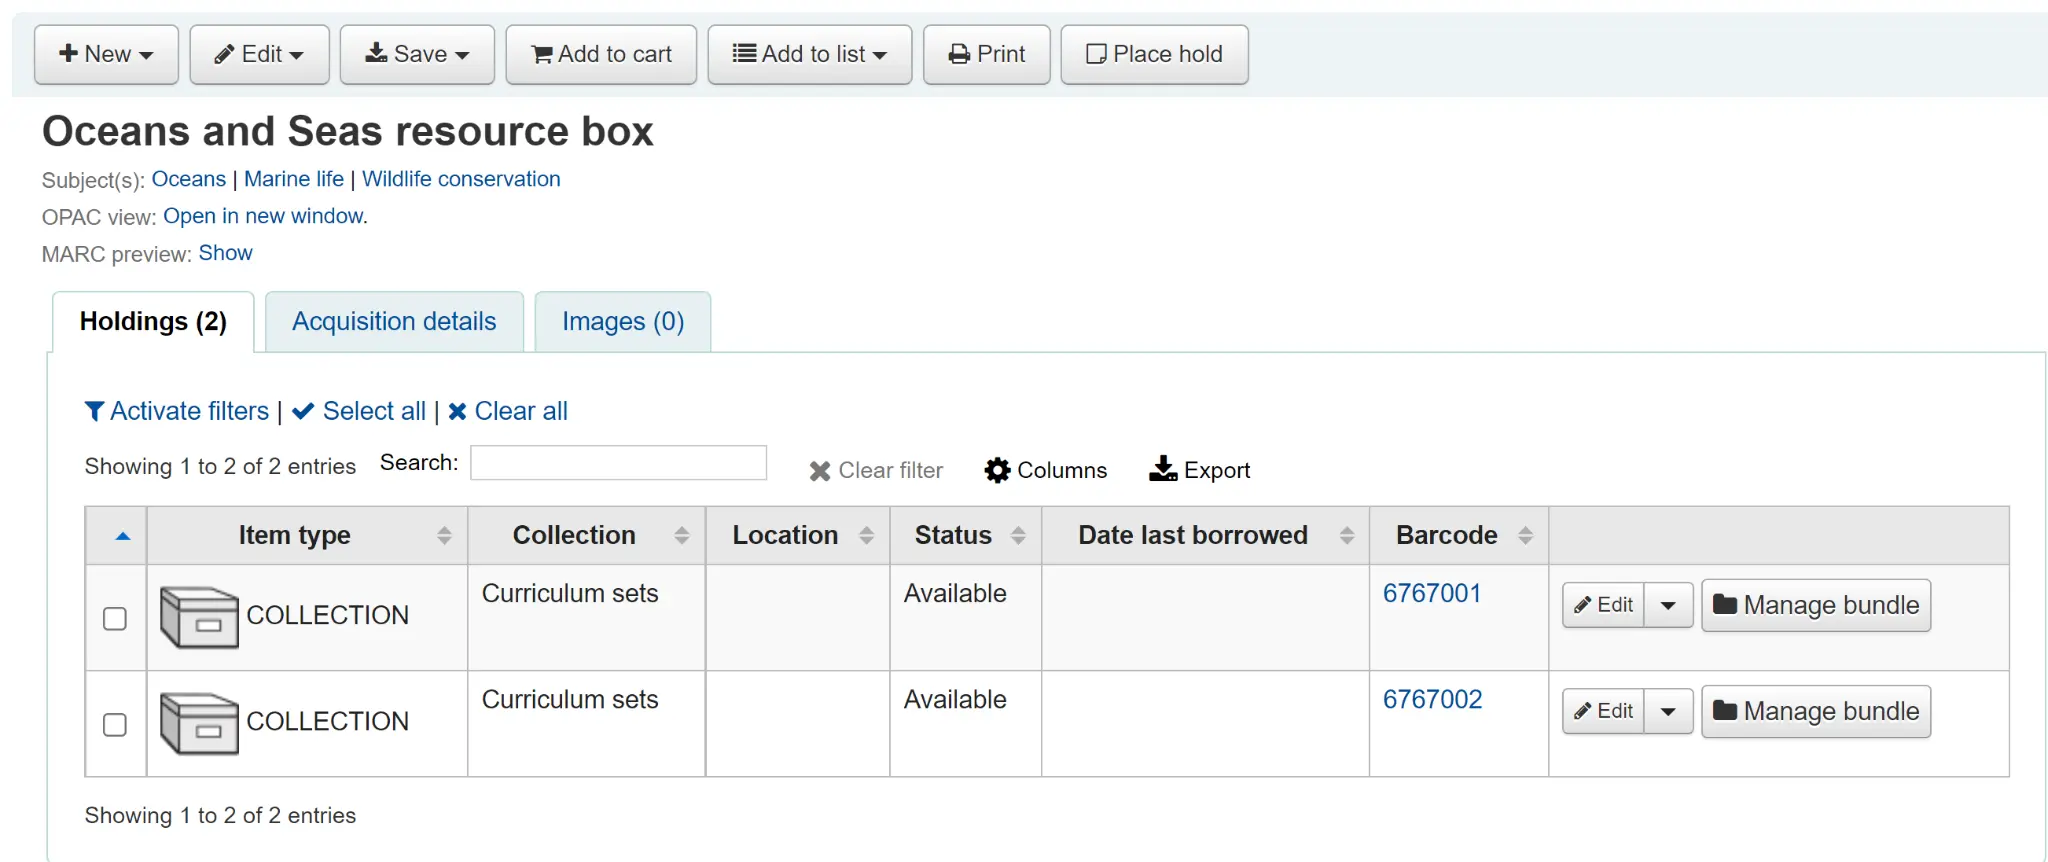
Add an item record for each physical bundle. It is likely that you will want a specific item type for bundles so that you can identify them easily and create circulation rules for them. In this case the bundle has the item type COLLECTION.
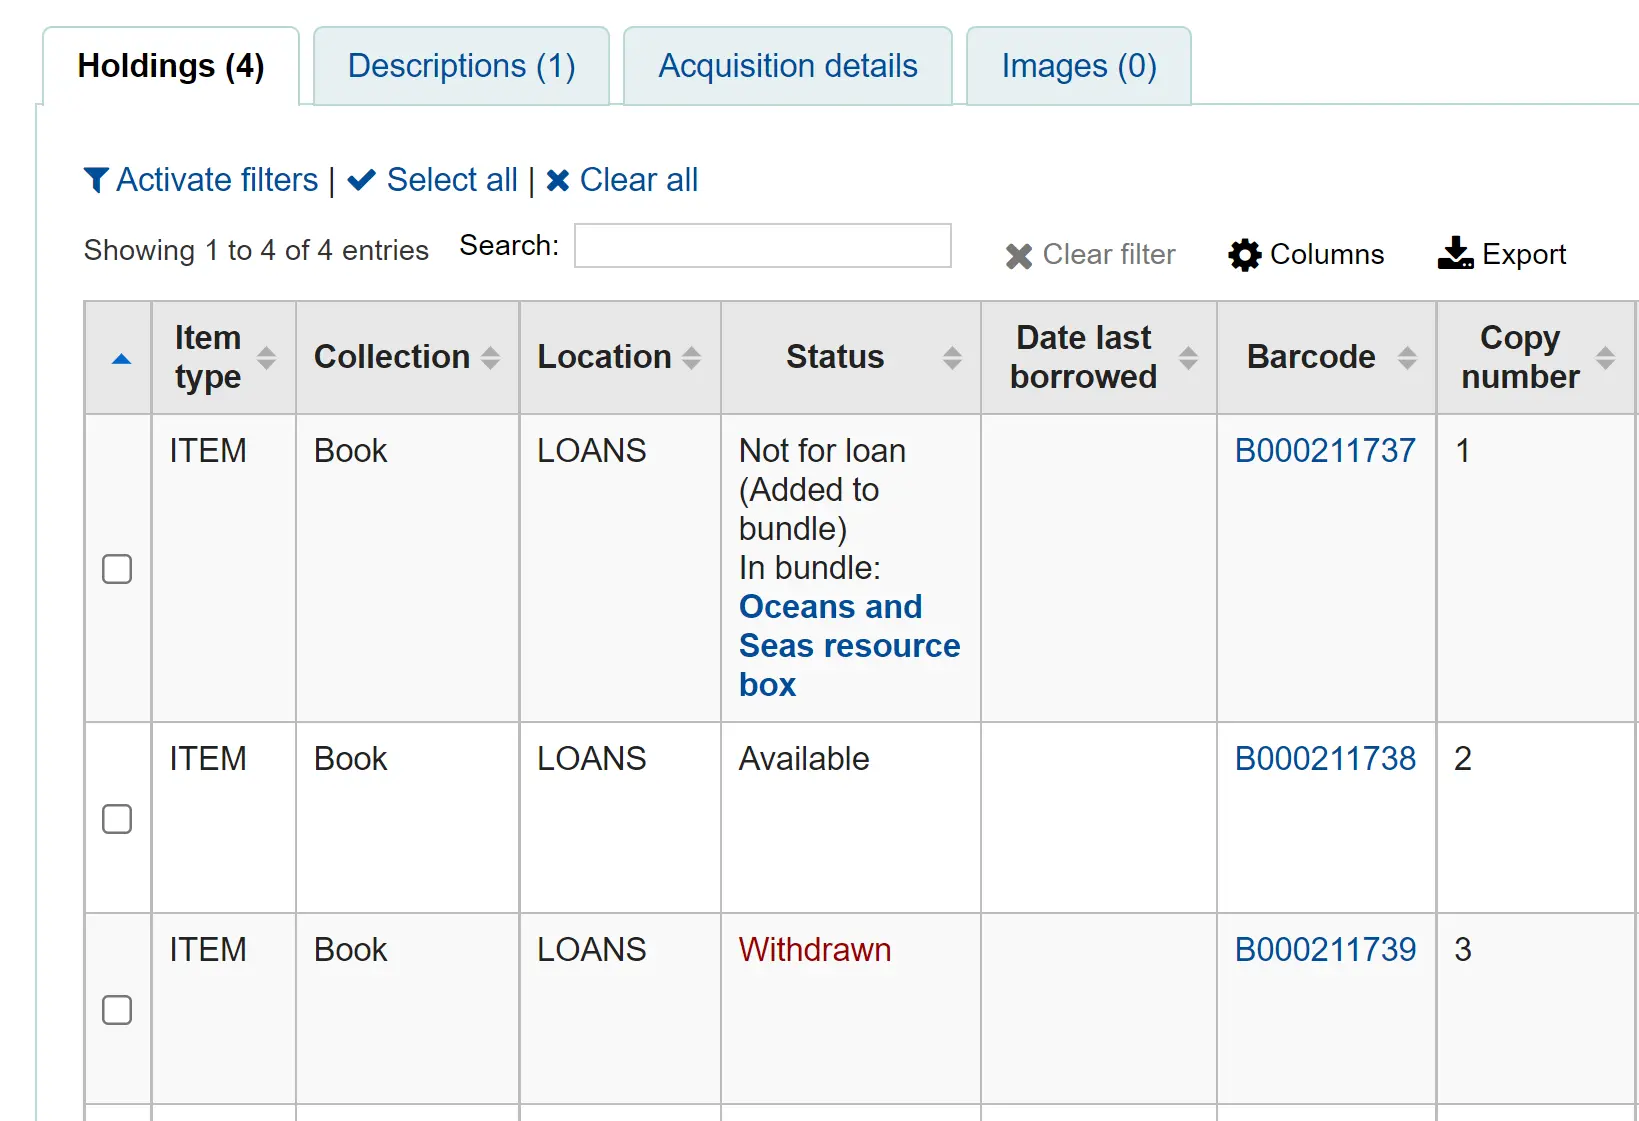
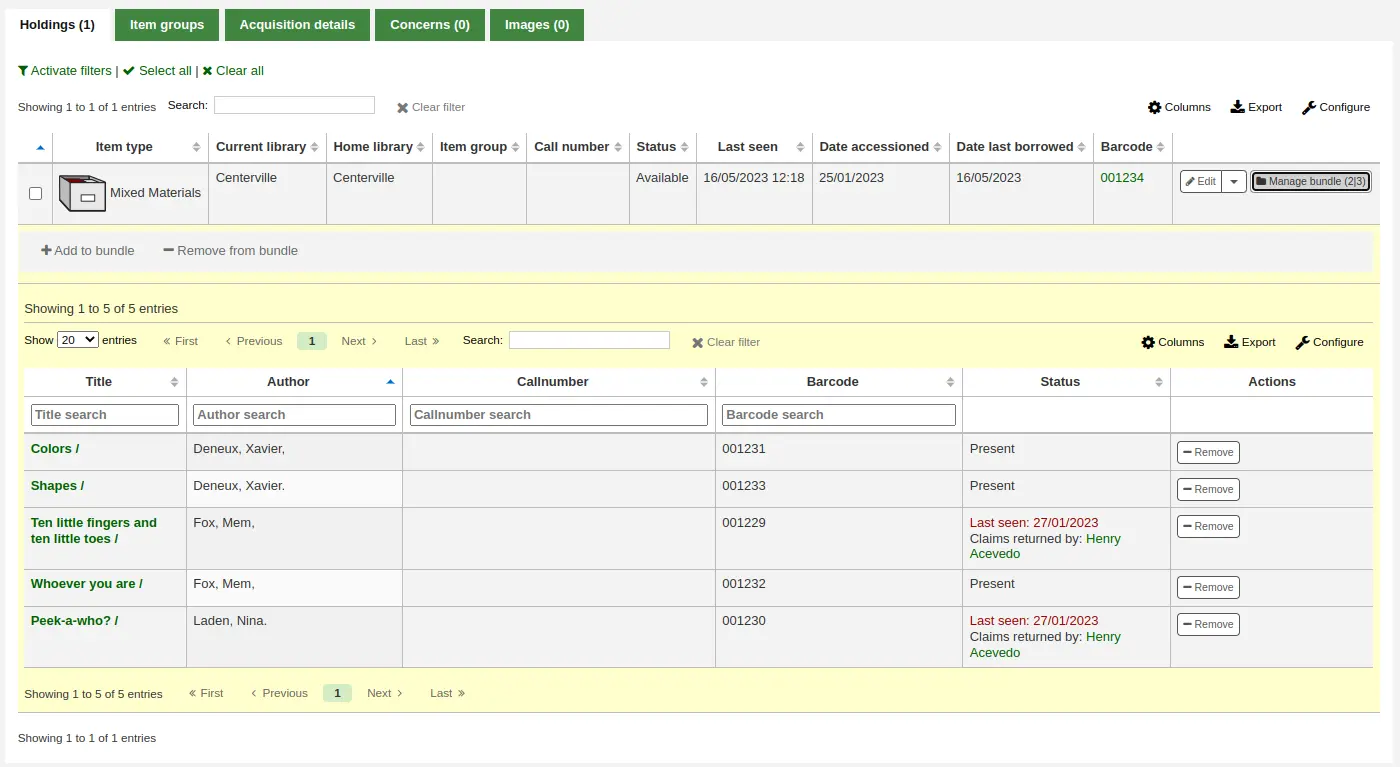
An item record attached to this type of catalog record can be converted into a bundle via the Manage bundle button on the far right-hand side of the holdings table for each item as shown below.
Adding items to bundles
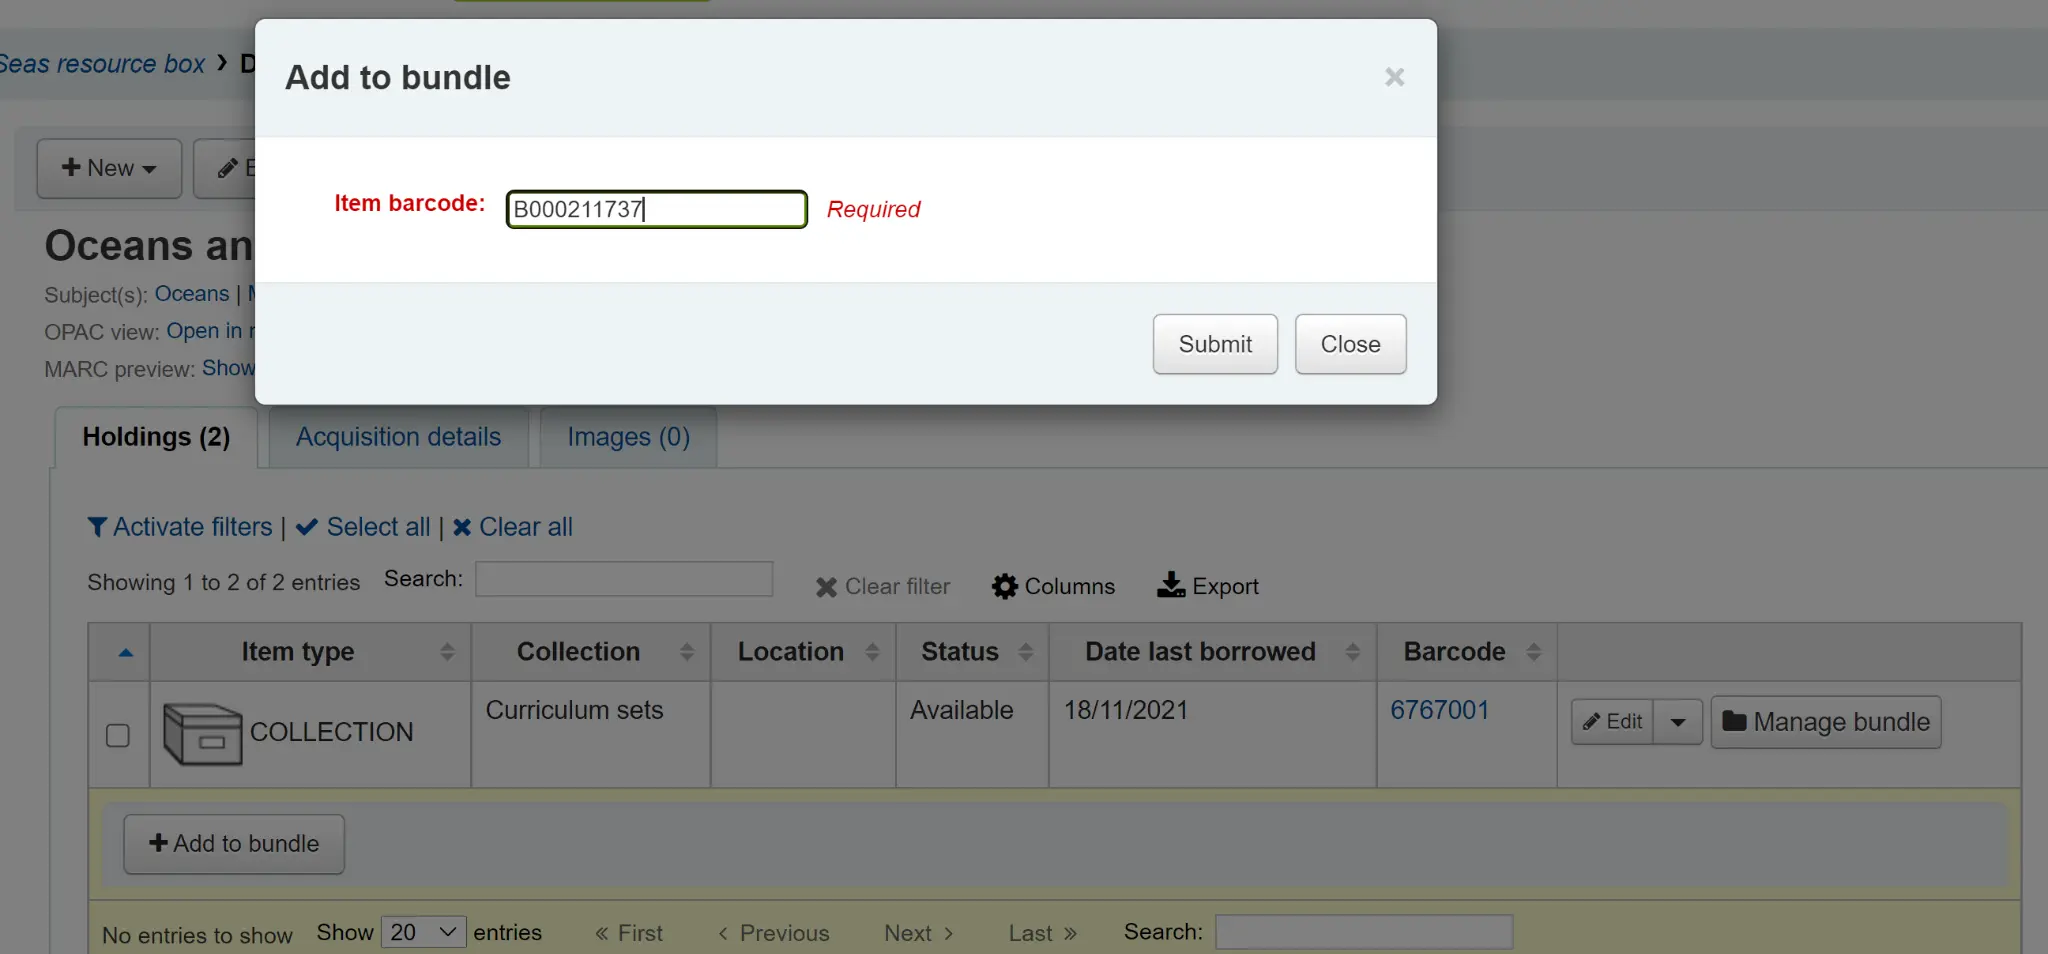
Click on Manage bundle and then the Add to bundle button to add items to the bundle using the barcode of the item.
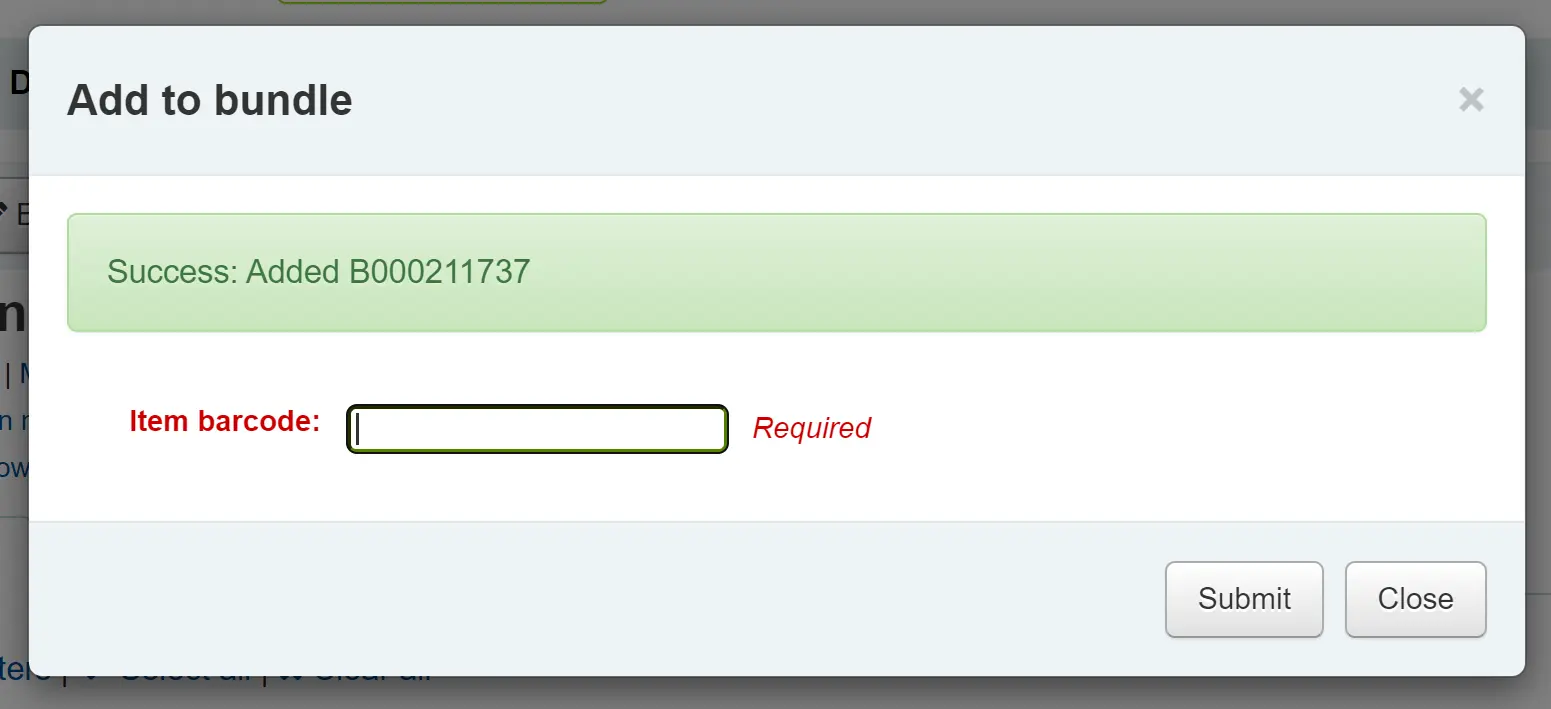
You will see a message telling you that the item has been added successfully.
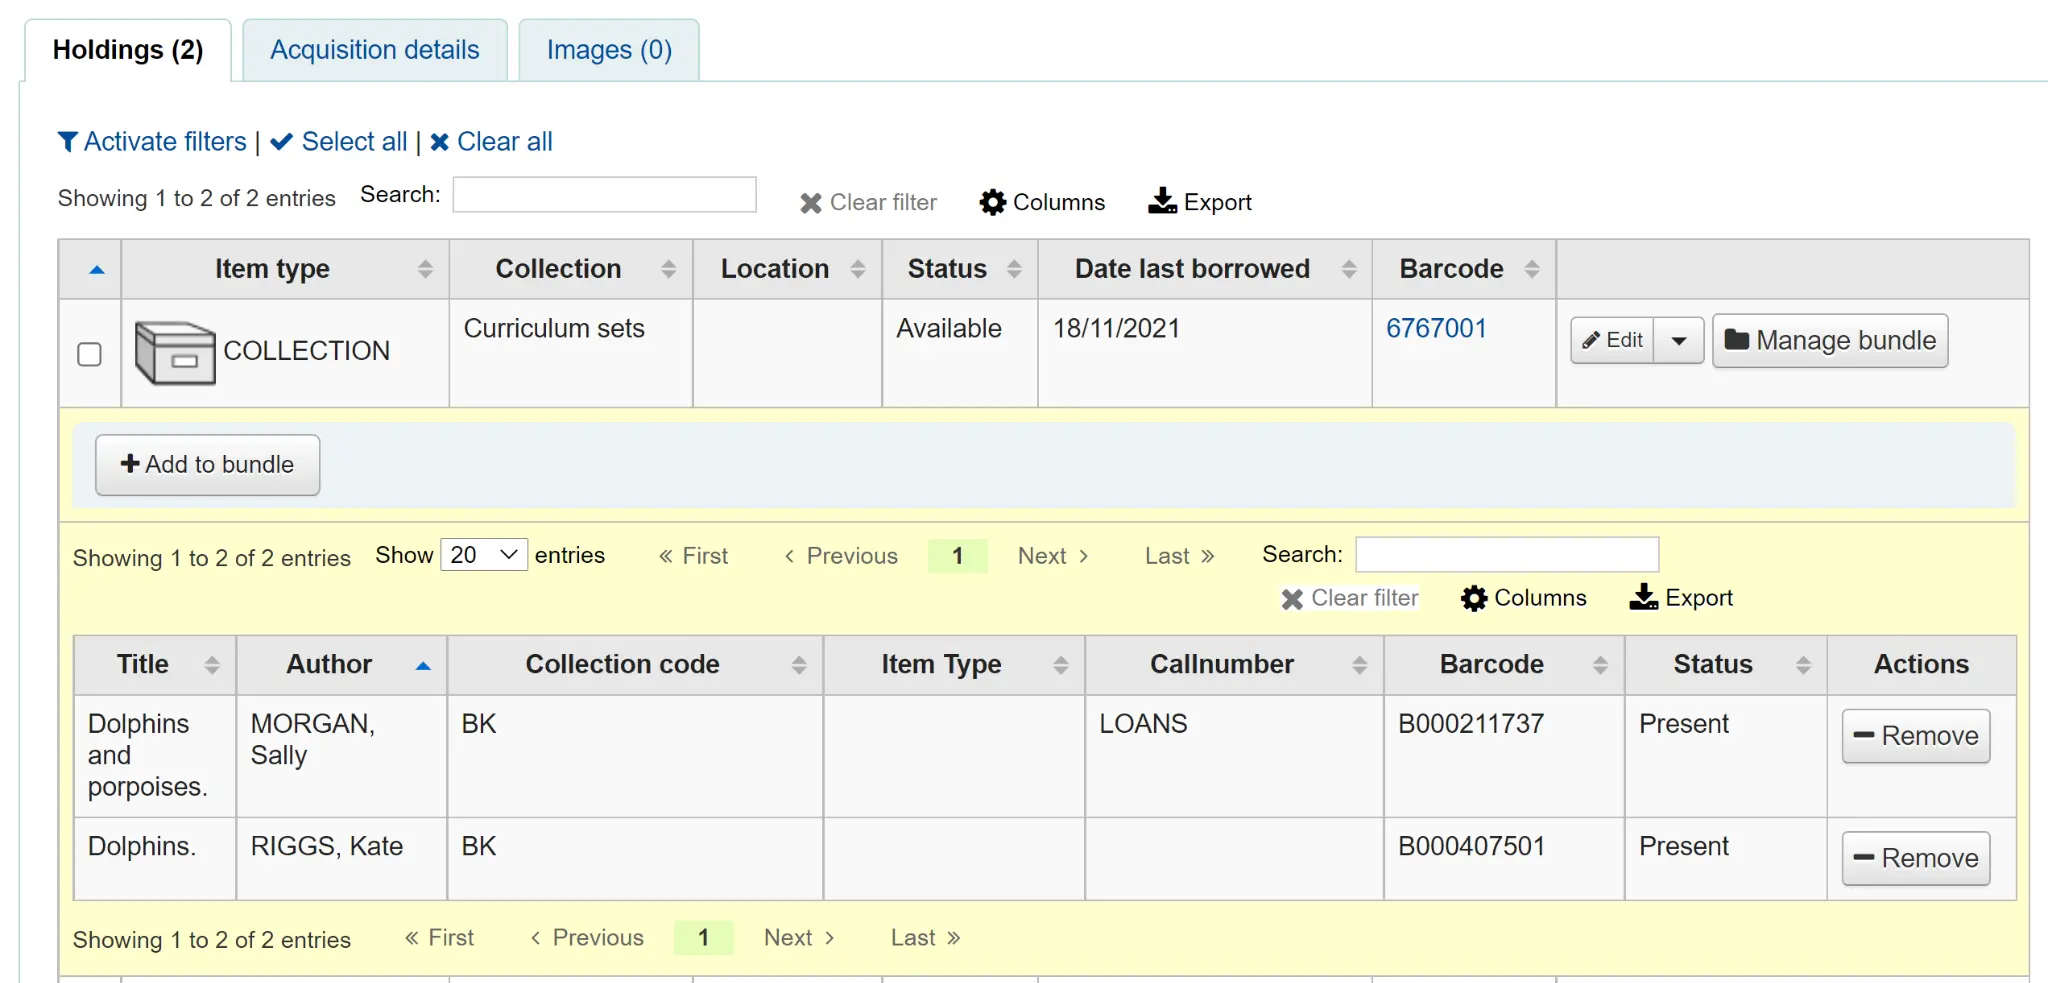
When you have finished scanning in items you can click on Close and view the bundle contents. The bundle contents list can be exported or printed if required.
Varning
Items added to bundles are still attached to their permanent catalog record, however, they cannot be checked out individually. When added to a bundle an item’s Not for Loan status is updated and can be viewed in the holdings table of the permanent record along with a link to the bundle. The Not for Loan status can be defined in the BundleNotLoanValue system preference.
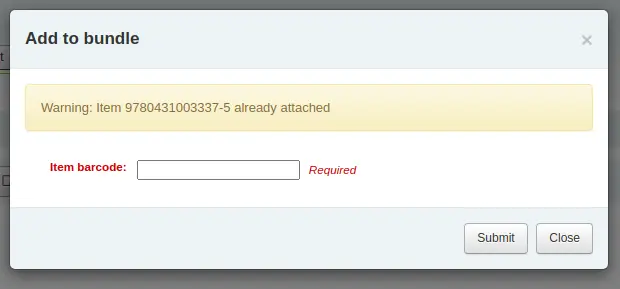
If an item is already found to be attached to the bundle, a warning message will be displayed.
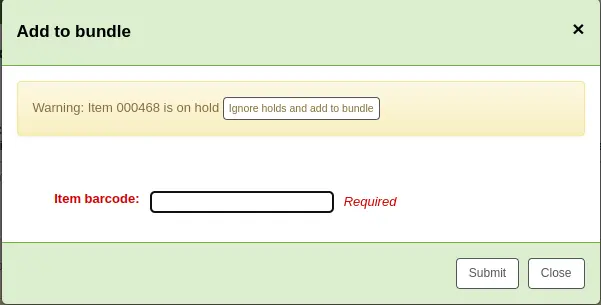
If an item has an item-level hold, a warning message will be displayed. To add the item to the bundle anyway, click ’Ignore holds and add to bundle’. To cancel, click ’Close’.
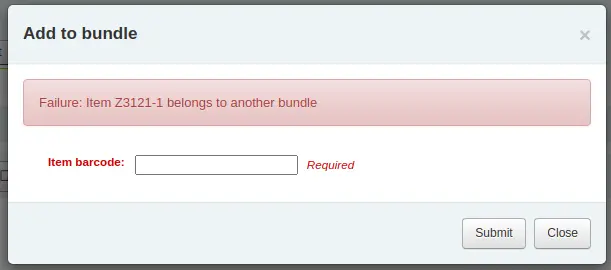
If an item cannot be added to the bundle for any other reason a failure message will display.
Removing items from bundles
To remove an individual item from a bundle you can click on the Remove button from the Actions column of the bundle contents list.
To remove multiple items from the bundle you have two options:
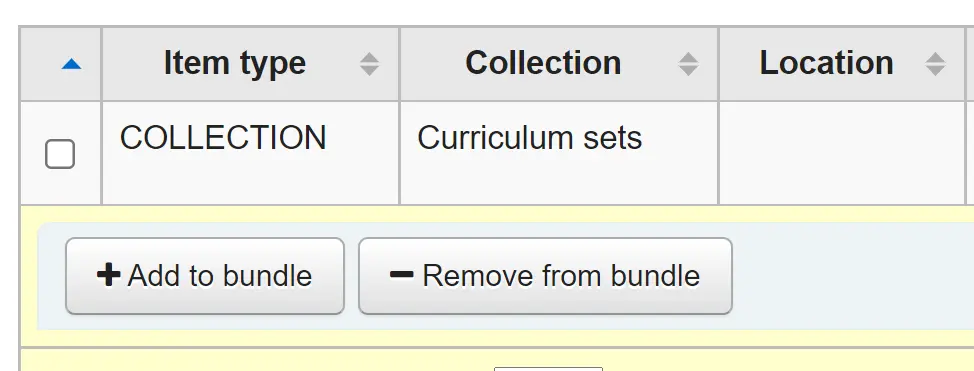
Use the ‘Remove from bundle’ button from within the Manage bundle display
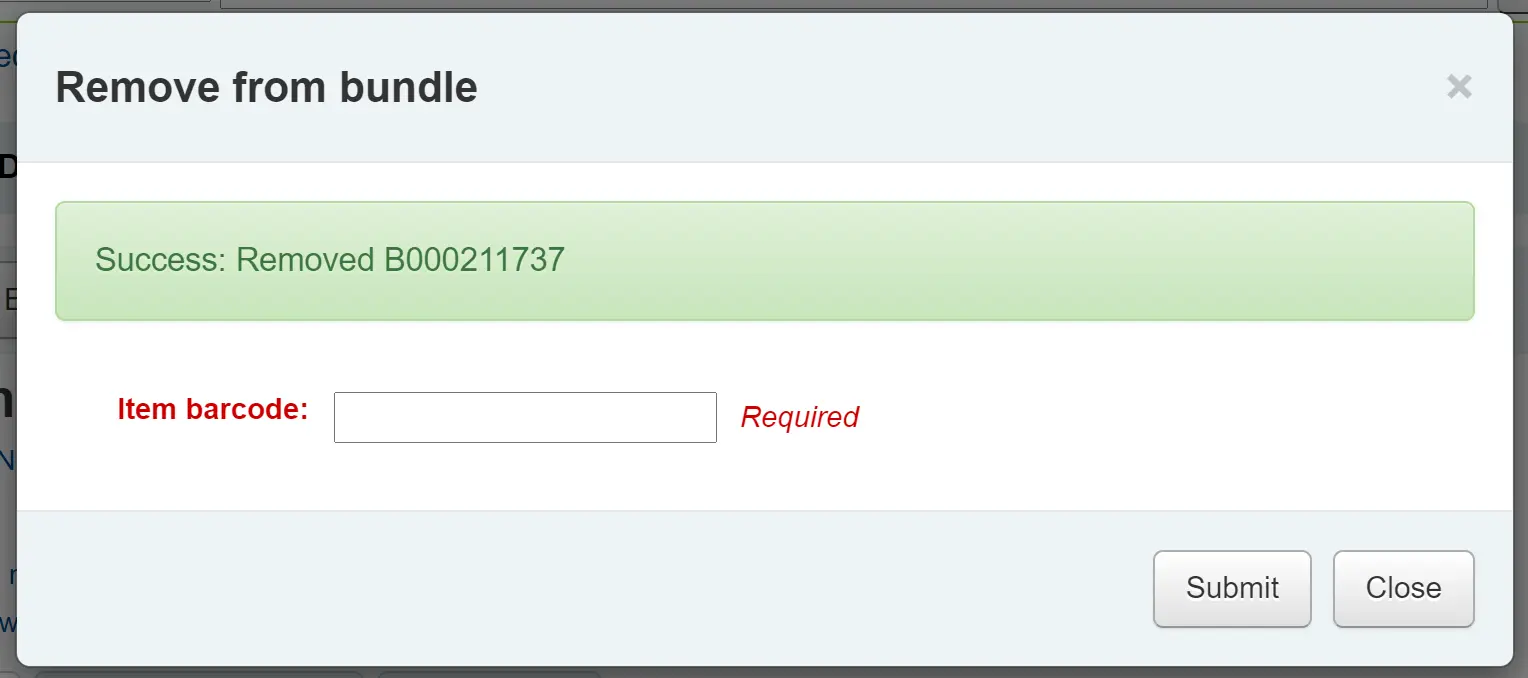
Scan in barcodes in the same way as you add items to bundles. You will see a confirmation dialogue to let you know the item has been removed.
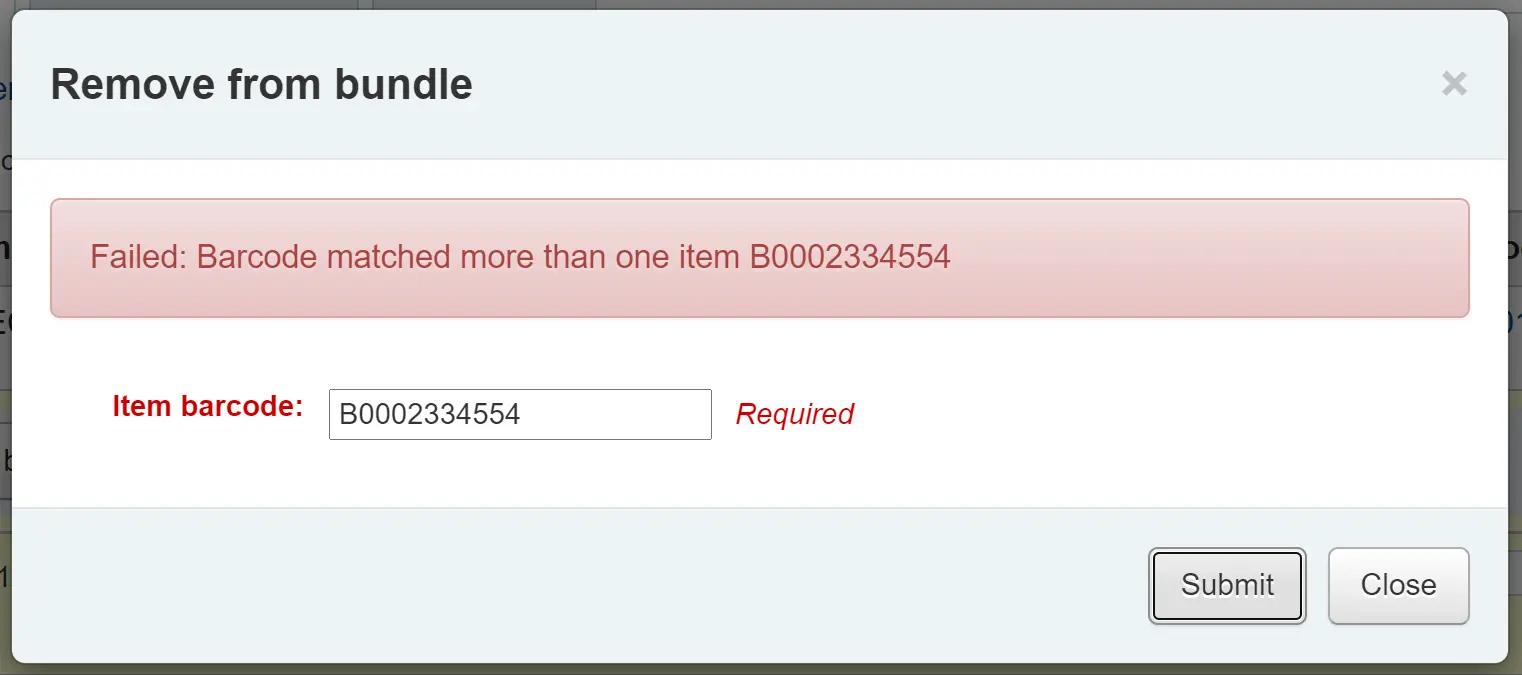
If the item couldn’t be removed you will see a Failure message.
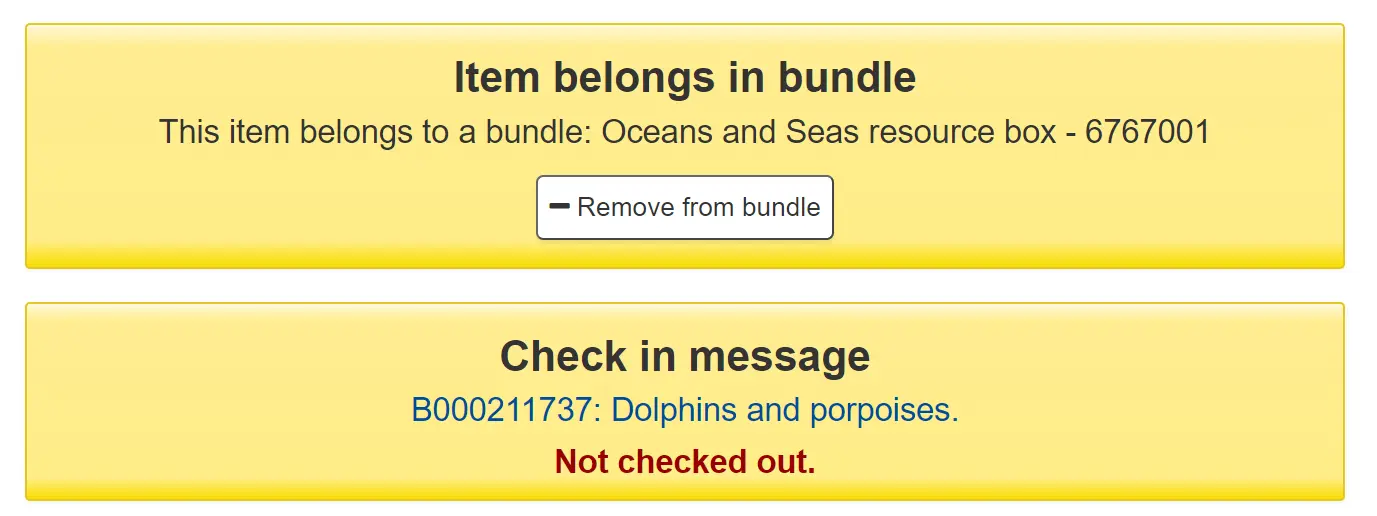
The second way to remove multiple items is to scan the barcode of the item into the checkin box and you will be given the option to remove the item from its bundle.
When you have finished working with a bundle you can close the contents list by clicking on the Manage bundle button again.
Circulating bundles
Checkout
You can checkout a bundle in the usual way from Circulation using the barcode of the bundle. If required you can create specific circulation rules for bundles based on their item type.
Remember, once an item is within a bundle it cannot be checked out individually. If you try to do this the following alert will be displayed.

You can see the checkout from the patron’s list of checkouts.
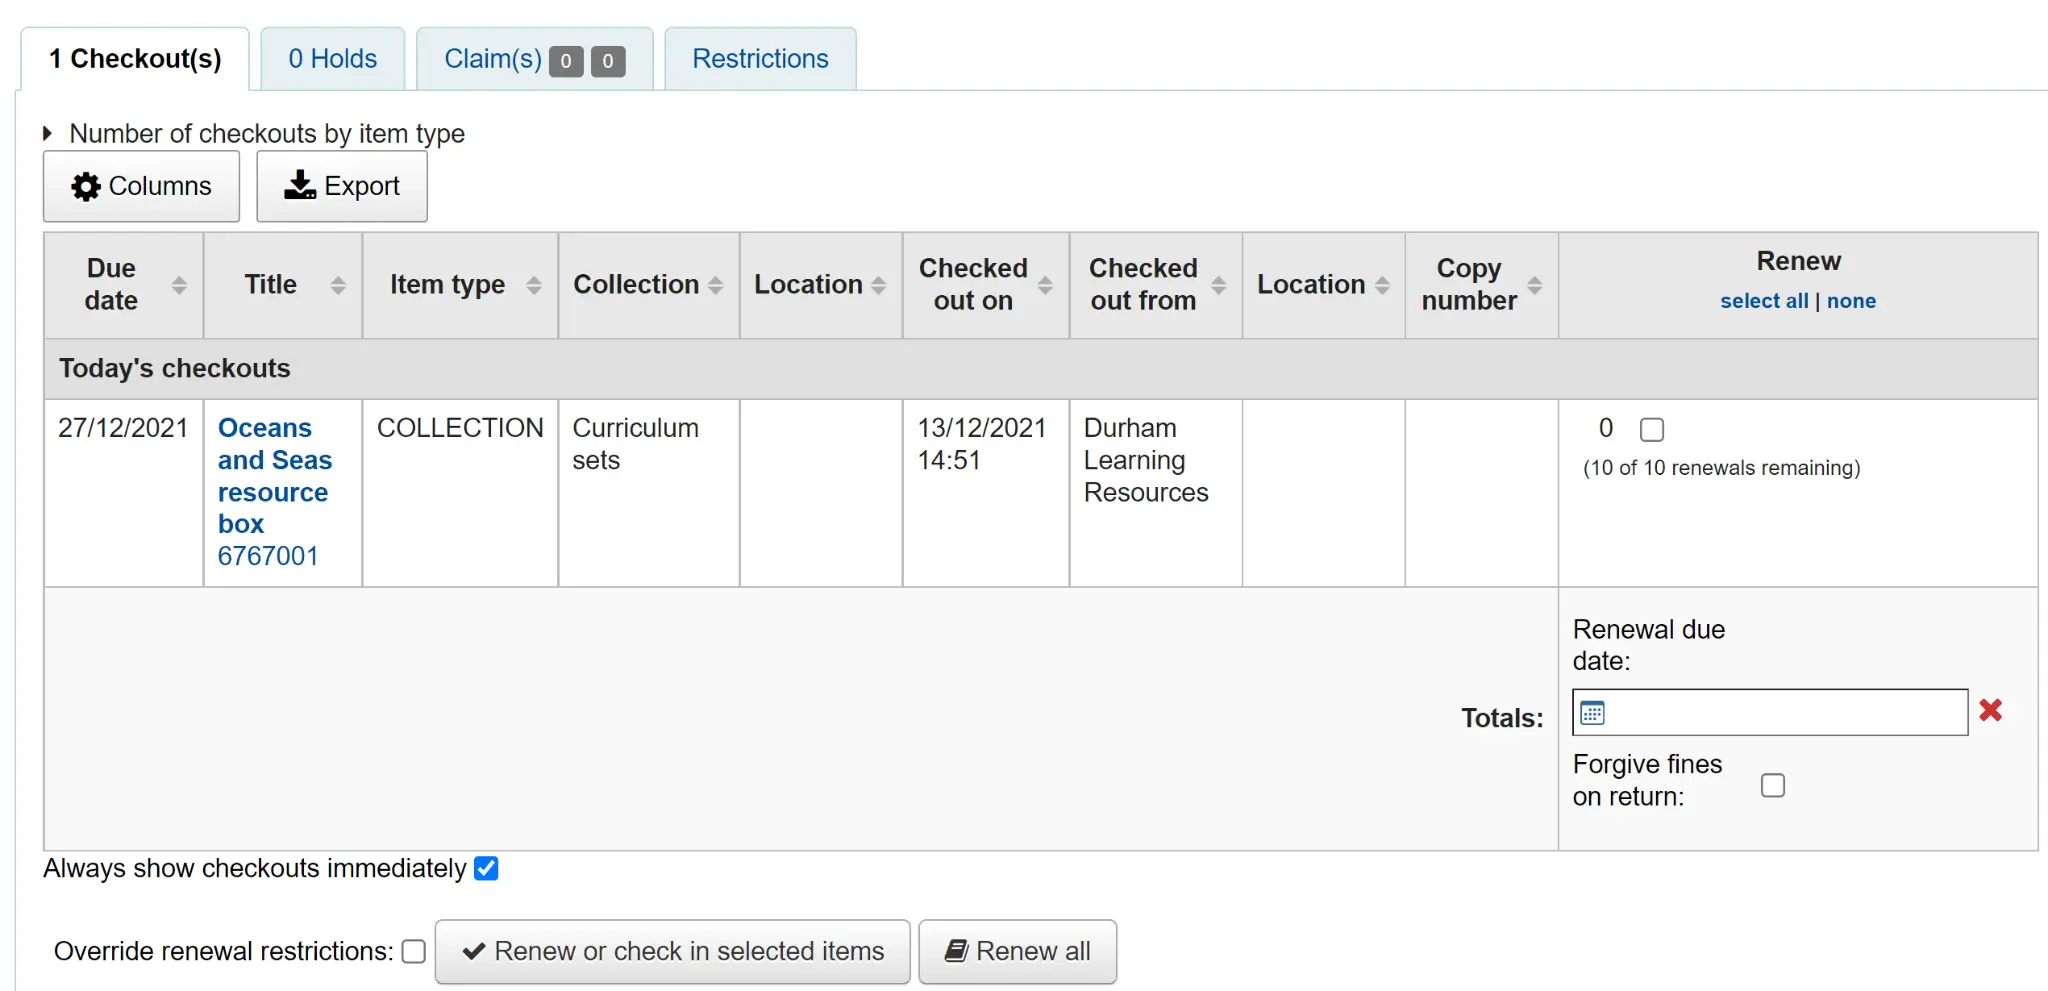
You can also see that the bundle is checked out from the status column of the Holdings table of the catalog record.

Checkin
Check in bundles in the usual way from Circulation. You will then be prompted to verify the presence of each item that belongs in the bundle.
If you need to skip the verification process, click the ’Confirm checkin without verifying bundle contents’ button. You will be able to verify the contents later.
A list of the items currently attached to the bundle, and expected to be returned, will display at the top of the dialogue. Beneath the list will be a ‘Barcodes’ box where you are expected to scan the barcodes of the returned items one by one.
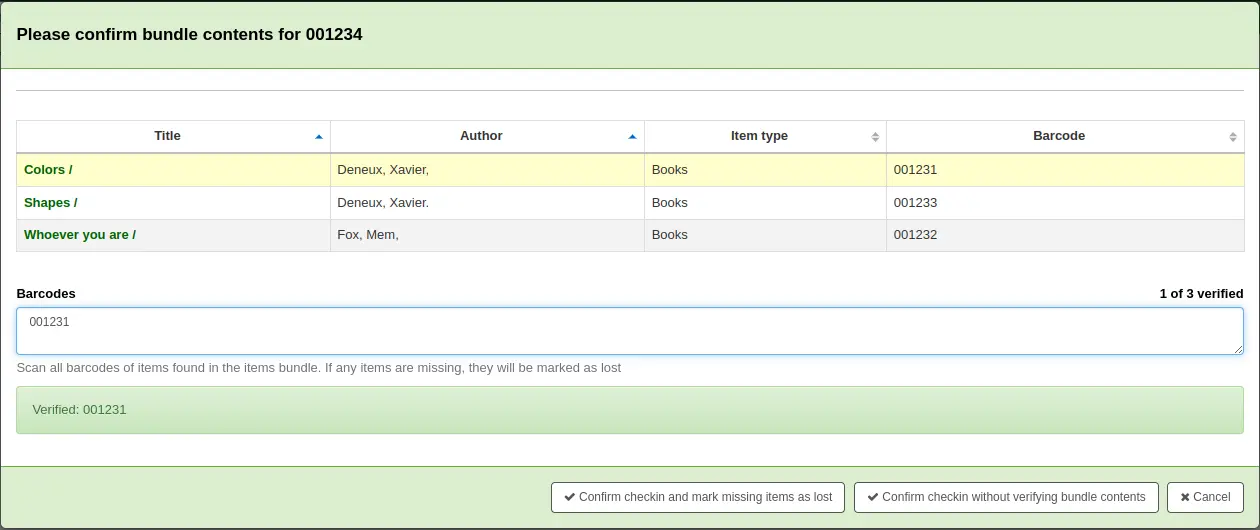
As you scan items, the matching row in the list will be highlighted to give some visual feedback. You also see a running total of items that have been checked in on the right hand side.
When you have finished scanning the returned items you can click on ‘Confirm checkin and mark missing items as lost’ or you can cancel the checkin.
If all the bundle items were marked as found you will be presented with a message to say the checkin is complete.

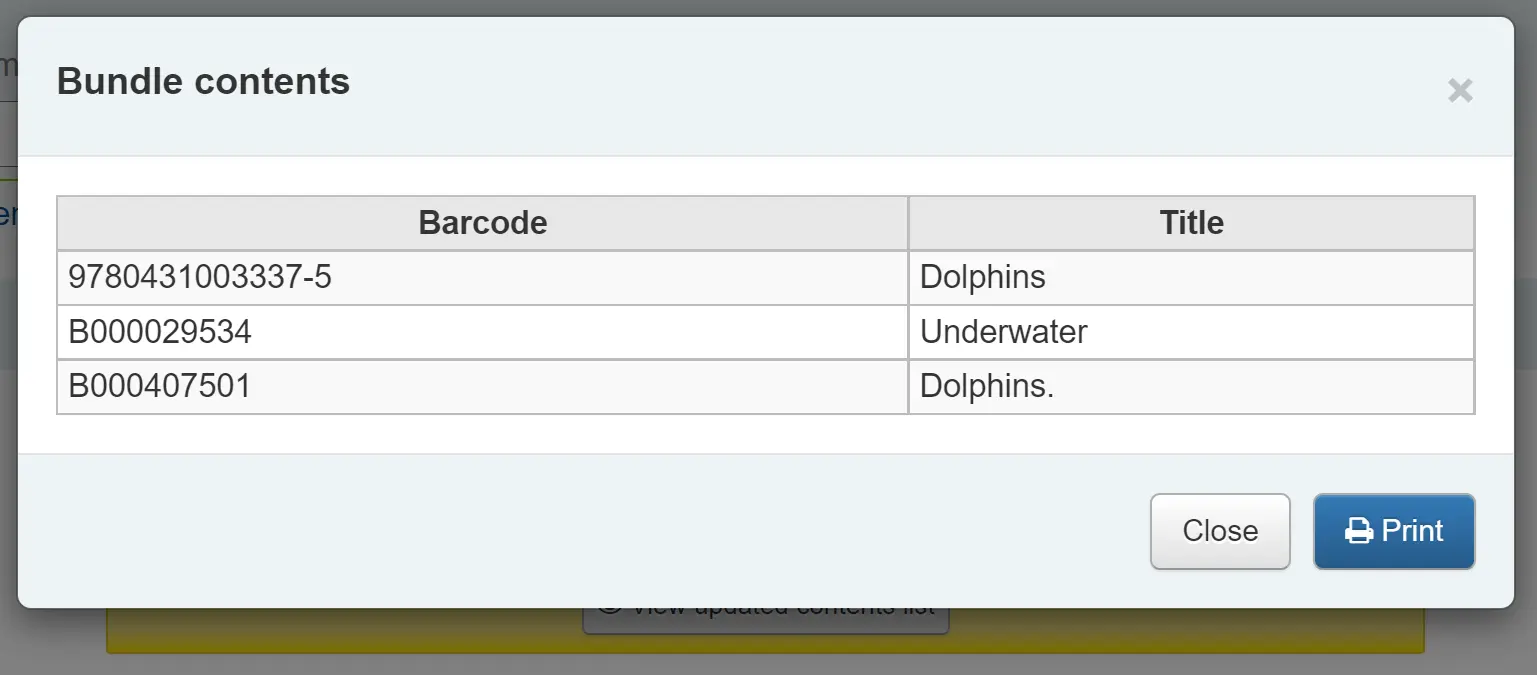
You can view and print a contents list.
Missing items
If some items were found to be missing during the verification stage the check in will proceed but you will be alerted to the fact that the bundle content has changed and you will be given the option to view and print an updated contents list.

You can also view a list of the missing items.
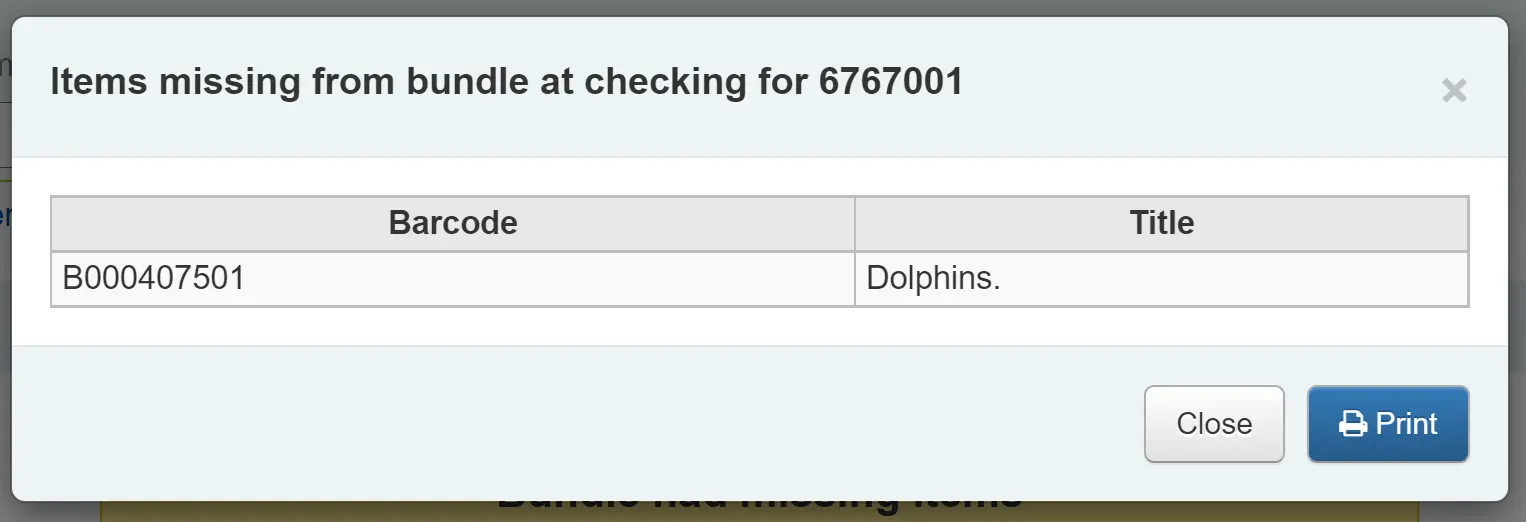
Any items that were missing during the verification stage will automatically be marked with an appropriate Lost status and a return claim added to track which checkout lost the contained item. You can add your own lost statuses in the LOST authorized value category and you can control which lost status is used via the BundleLostValue system preference. For example, a ‘Missing from bundle’ status as shown below.

In the Manage bundle contents view, the missing item displays with the date last seen.
Claims returned process
Within the patron record the missing items are listed as claims returned and can be viewed from the Claim(s) tab in the Checkouts table.

Click on the numbered square to view the missing items for the patron.
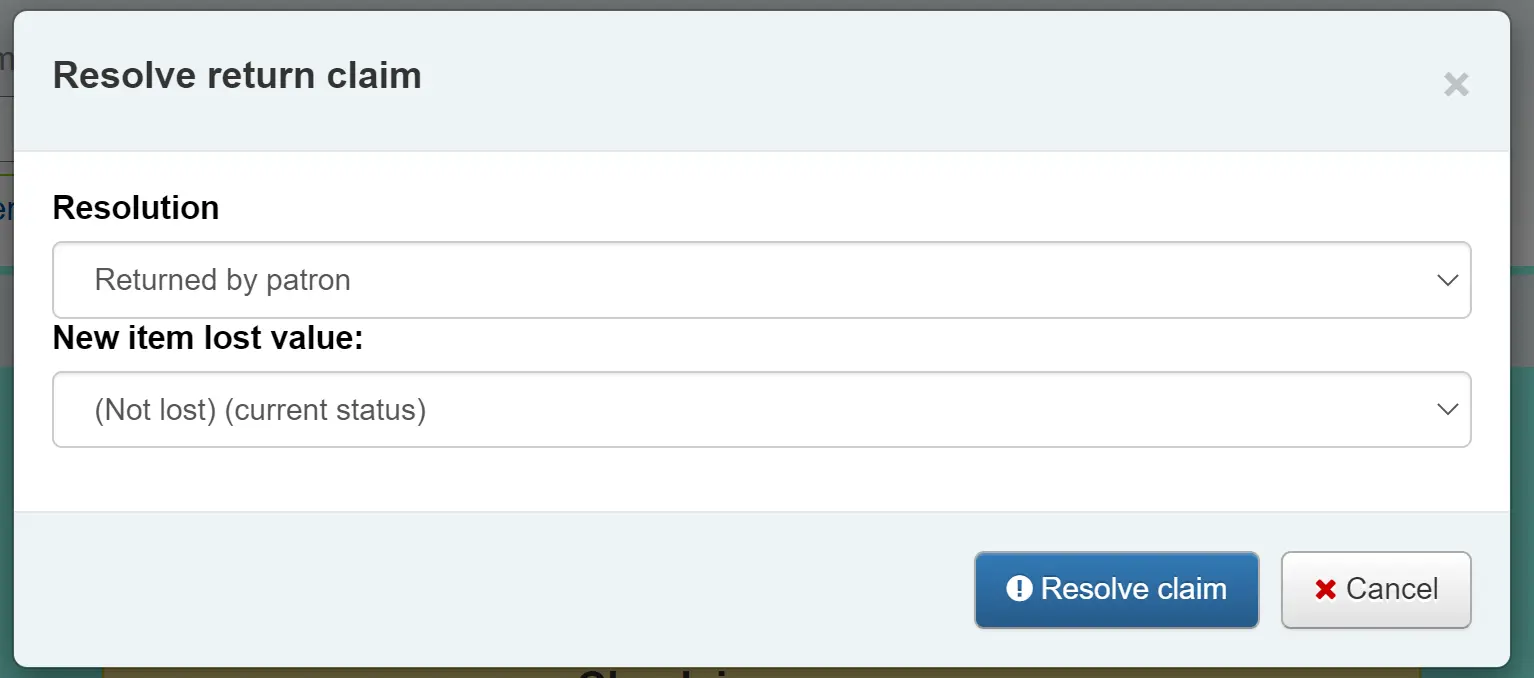
If an item is found it should be checked in. The checkin dialogue box will include a button to ‘Resolve’ the claim.

You are required to add a resolution reason and can optionally change the lost value of the item.
Inventory (checking bundle contents at any time)
A verification can be triggered at any time by checking the bundle in. If the system detects that the bundle was not checked out at this point, a modified confirmation dialogue is displayed which will include all items expected to be present in the bundle, even those currently marked as lost.
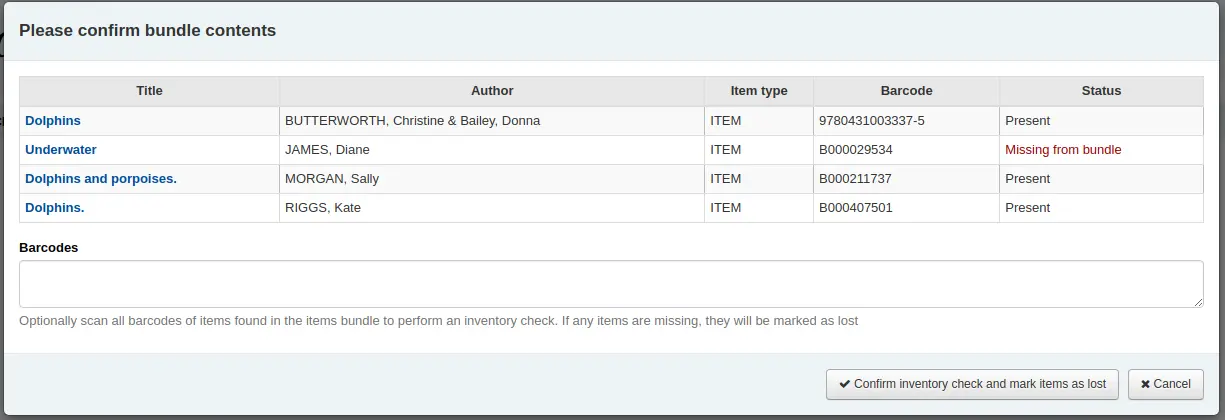
This allows for a quick view of what should be in the bundle and what’s currently marked as missing. You can optionally cancel the checkin or choose to rescan the items to perform the verification, marking items as found or subsequently missing. As this is a checkin that is not associated with a checkout, if new items are found to be missing, we will mark them as lost but cannot associate them with a checkout and returns claim.
Reservationer
Koha allows patrons to put things on hold. A ’Hold’ is a way to reserve an item. Depending on your circulation and fines rules and hold system preference settings, patrons will be able to place items on hold for pickup at the library at a later date and time.
See the section placing holds in the OPAC chapter to learn how to place holds from the OPAC.
Placing holds in the staff interface
Observera
Staff members must have the place_holds permission (or the superlibrarian permission) in order to be able to place holds.
There are several ways to place holds from the staff interface. The most obvious is using the ’Place hold’ button at the top of any bibliographic record.
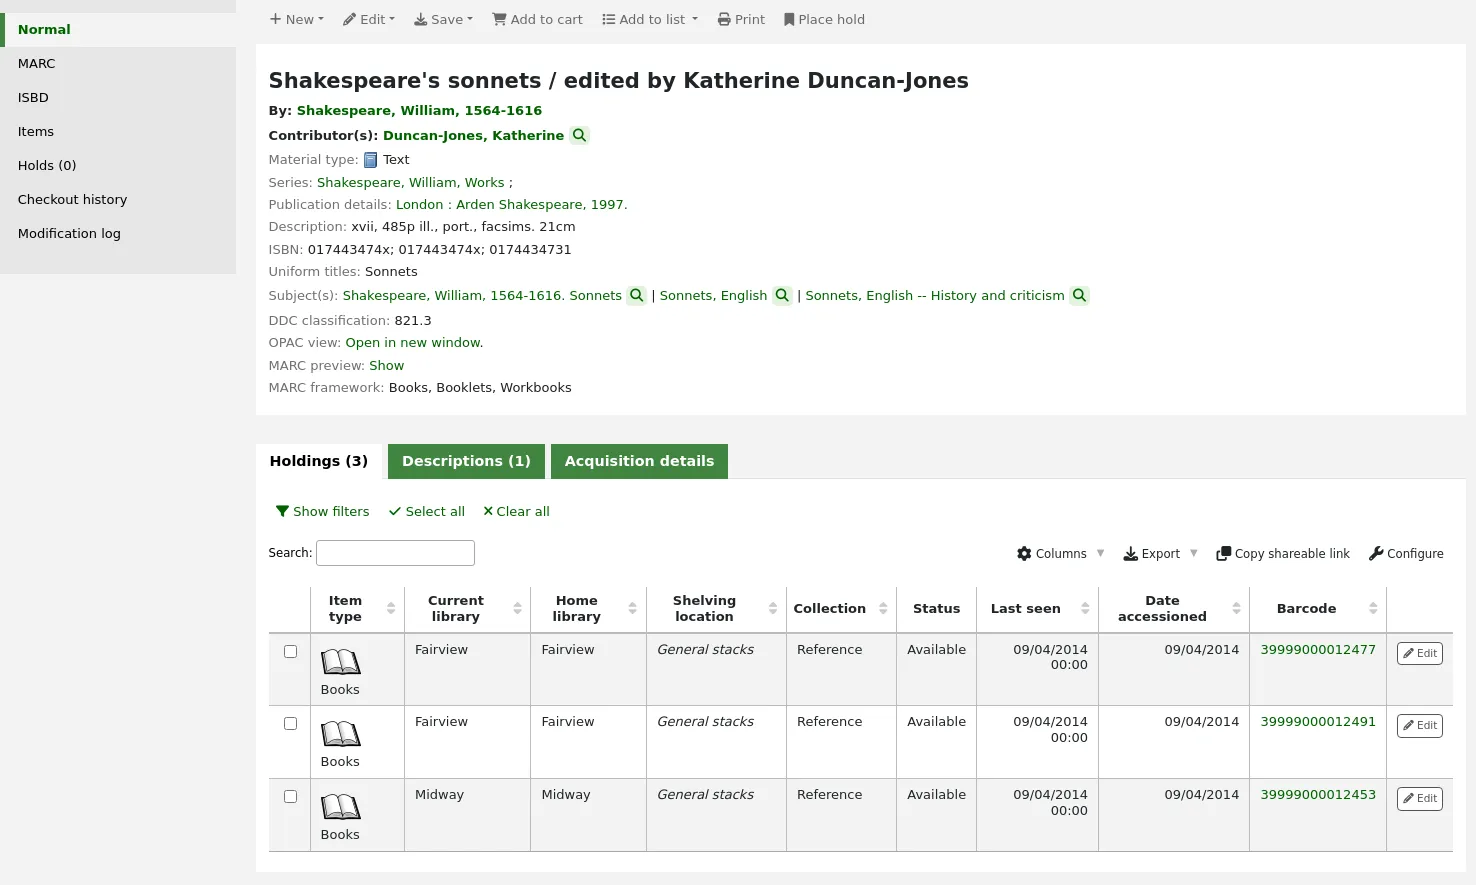
You can also click the smaller ’Place hold’ link found at the top of your catalog search results, or the ’Holds’ link found below each result.

To place holds on multiple titles at the same time, check the boxes next to the titles in the search results, and click the ’Place hold’ button at the top of the search results.
Observera
This feature can be disabled with the DisplayMultiPlaceHold system preference.
Du ombeds söka efter en låntagare med streckkod eller någon del av deras namn för att inleda reservationsprocessen.

If you’d like to search for the patron first and then the bibliographic record for the hold, you can open the patron record and click on the ’Search to Hold’ button at the top of the patron record.

After clicking the button, you will be brought to the catalog search page where you can find the title or titles you need to place a hold on. Under each title in the result list, there will be an option to ’Place hold for (patron name).’

If you want to place a hold on multiple titles for this patron, check the boxes to the left of the titles, click the arrow to the right of the ’Place Hold’ button and choose ’Place hold for (patron name)’.

Observera
Once the holds are placed, you can choose to have Koha ’forget’ the patron’s name by clicking the arrow to the right of the ’Place hold’ button on the search results and choosing the ’Forget (patron name)’ option.
Depending on how many items you choose to place a hold on at once, you will see a different place hold form. If you are placing a hold on one bibliographic record, you will see a list of all of the items you can place a hold on.
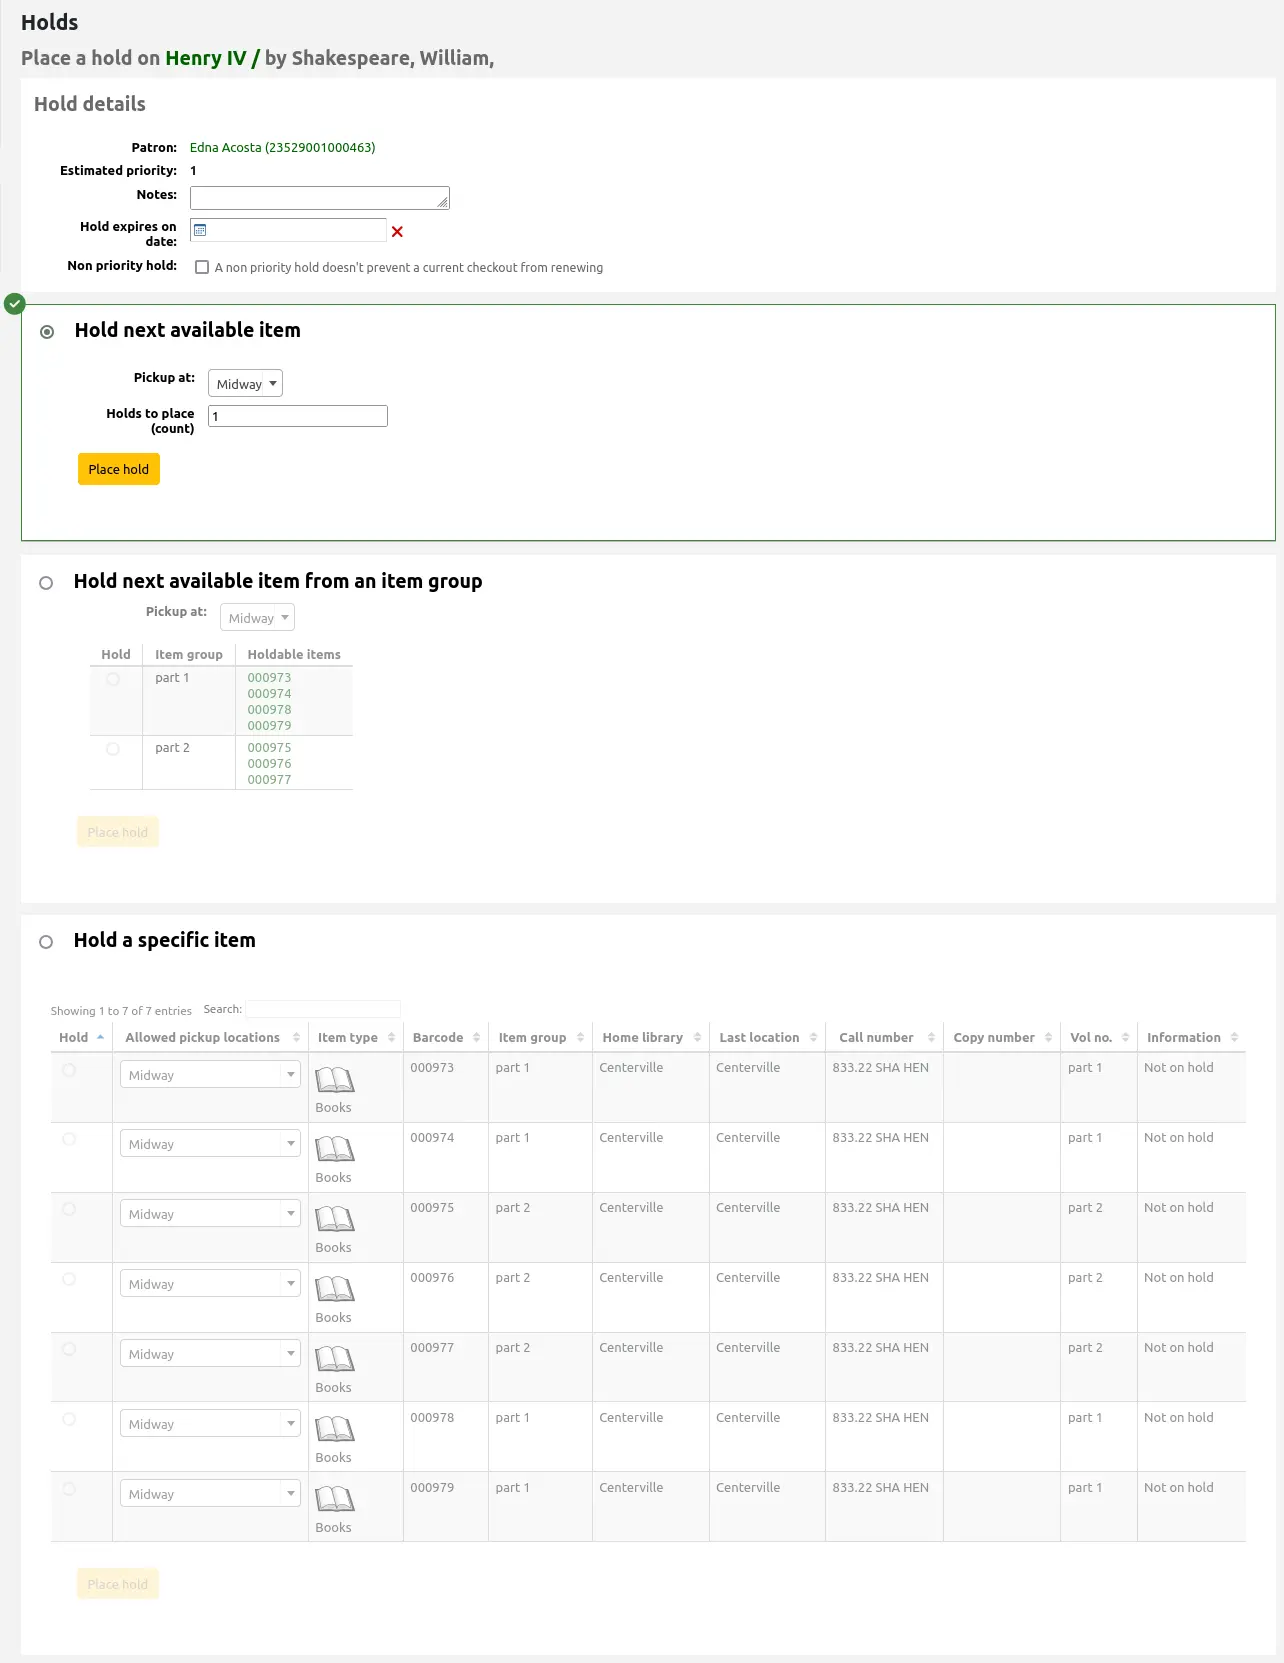
Patron: the patron’s name for whom this hold is
Estimated priority: this takes into account holds that are already placed on this title
Notes: enter any notes that might apply to this hold
Request specific item type: if the AllowHoldItemTypeSelection system preference is set to ’Allow’ there will be an option to choose to limit the hold to a specific item type
Hold starts on date: if the AllowHoldDateInFuture system preference is set to ’Allow’, and the patron wants the hold to start on a date other than today, enter the date here
Hold expires on: if the patron has specified that they don’t want the item after a certain date, or if you have limits on hold lengths, you can enter an expiration date for the hold in the ’Hold expires on date’
Observera
To cancel expired holds automatically, your system administrator needs to set the cancel_expired_holds.pl cronjob to run on a regular basis.
Non-priority hold: if you are placing a hold for internal purposes, such as checking for missing pages or needing to add a label, check the ’Non-priority hold’ box. This type of hold will not prevent the patron who currently has the item from renewing their checkout.
To place a hold on the next available item (default setting), fill the next part of the form. For more specific hold settings, choose an item group in the ’Hold next available item from an item group’ section or a specific item in the ’Hold a specific item’ section below.

Pickup at: choose the library where the patron will pick up the item
Observera
The default pickup library is determined by the DefaultHoldPickupLocation system preference.
Request specific item type: if the AllowHoldItemTypeSelection system preference is set to ’Allow’ there will be an option to choose to limit the hold to a specific item type
Holds to place (count): if multiple holds per record are allowed, you can enter a number in the ’Holds to place (count)’ text box to place that number of holds for the selected patron.
Observera
The ’Holds to place (count)’ text box will only appear if the Circulation and Fines rules are set to allow a ’Holds per record’ limit that is greater than 1, but not Unlimited, for this combination of item type and patron category.
To place a hold on the next available item from an item group, rather than the next available item on the whole record or a specific item, select this section and fill it out.

Observera
This section will only appear if the EnableItemGroupHolds system preference is set to ’Enable’ and the record has item groups. You can choose to place a hold on the next available item of a group.
Pickup at: choose the library where the patron will pick up the item
Observera
The default pickup library is determined by the DefaultHoldPickupLocation system preference.
Select an item group on which to place the hold.
To place a hold on a specific item, rather than the next available item on the whole record or the next available item in an item group, select this section and fill it out.
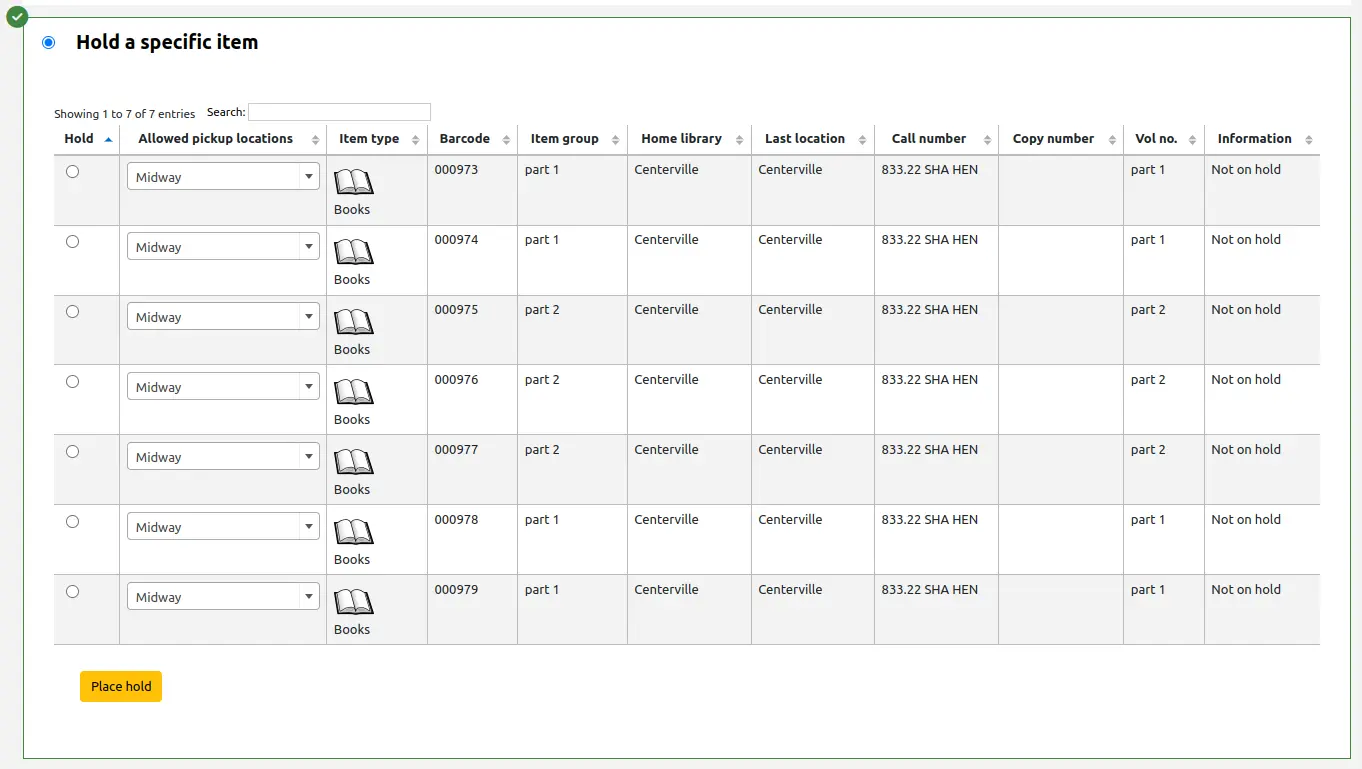
Select the item to place on hold.
Observera
Enabling the DisplayMultiItemHolds system preference will allow to select multiple individual items in this section to place multiple item-level holds at the same time for the same patron. If the system preference is enabled, the system will allow you to select more than one item.
If necessary, change the pickup location.
Observera
The default pickup library is determined by the DefaultHoldPickupLocation system preference.
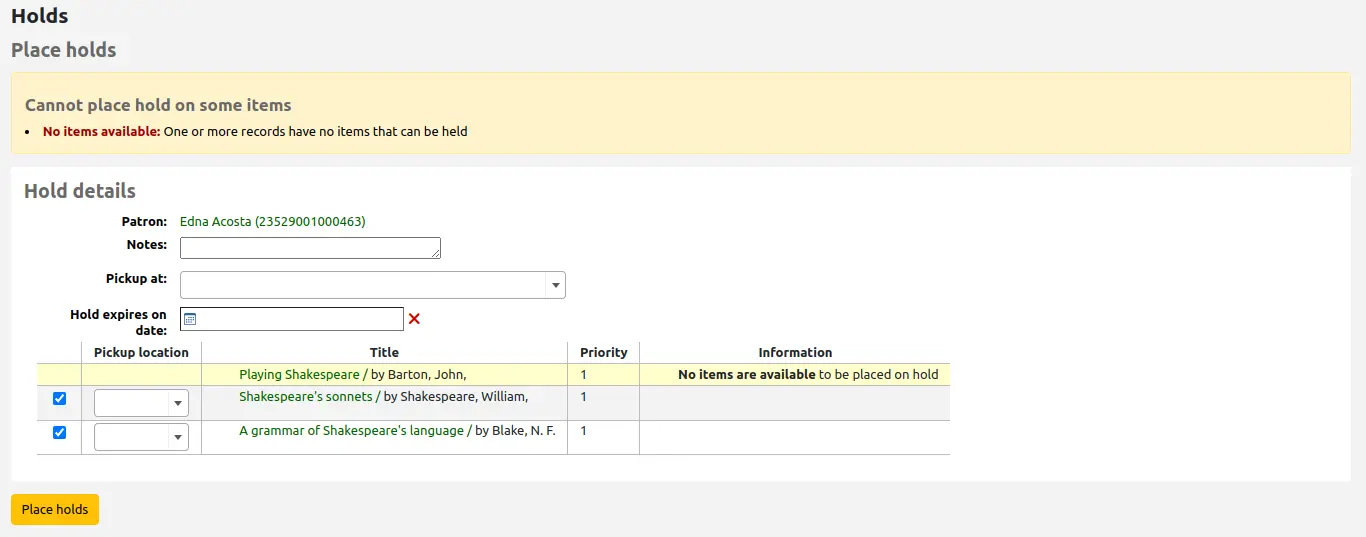
If you’re placing holds on multiple records, you will be presented with the next available option for all titles. If no items are available for hold it will say so on the confirmation screen.
If your library uses the patron clubs feature, use the ’Clubs’ tab to place a hold for a club.
To place a hold for a club, click the ’Clubs’ tab, search for and select the club name, and click the ’Place hold’ button.

Managing holds
Holds can be altered and canceled from the holds tab found on the left of the bibliographic record.

From the list of holds you can change the order of the holds, the pickup location, whether the hold is on a specific item or for the next available item, suspend, or cancel the hold.
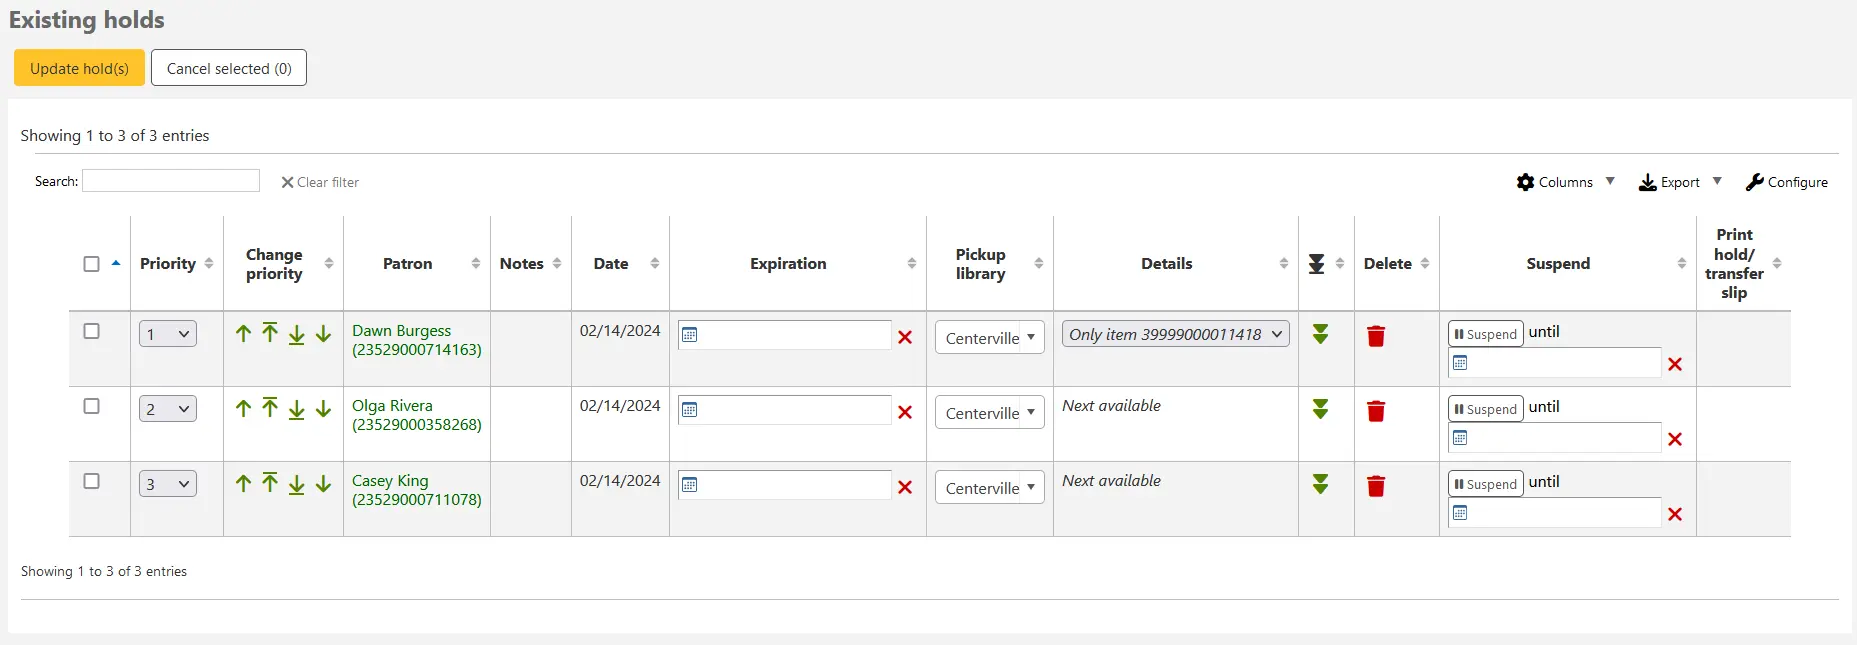
Observera
If the HoldsSplitQueue system preference is set, you will see the holds list split across different tables by either pickup library, item type or both.
Observera
If the AllowHoldDateInFuture system preference is set to ”Don’t allow”, you will not have the option to edit the date the hold was placed (the column labeled Date).
Observera
Depending on how the HidePatronName system preference is set, the list may show card numbers instead of names in the patron column like in the image above.
Changing the order of the holds
Observera
Staff members must have the modify_holds_priority permission (or the superlibrarian permission) in order to be able to change holds’ priorities.
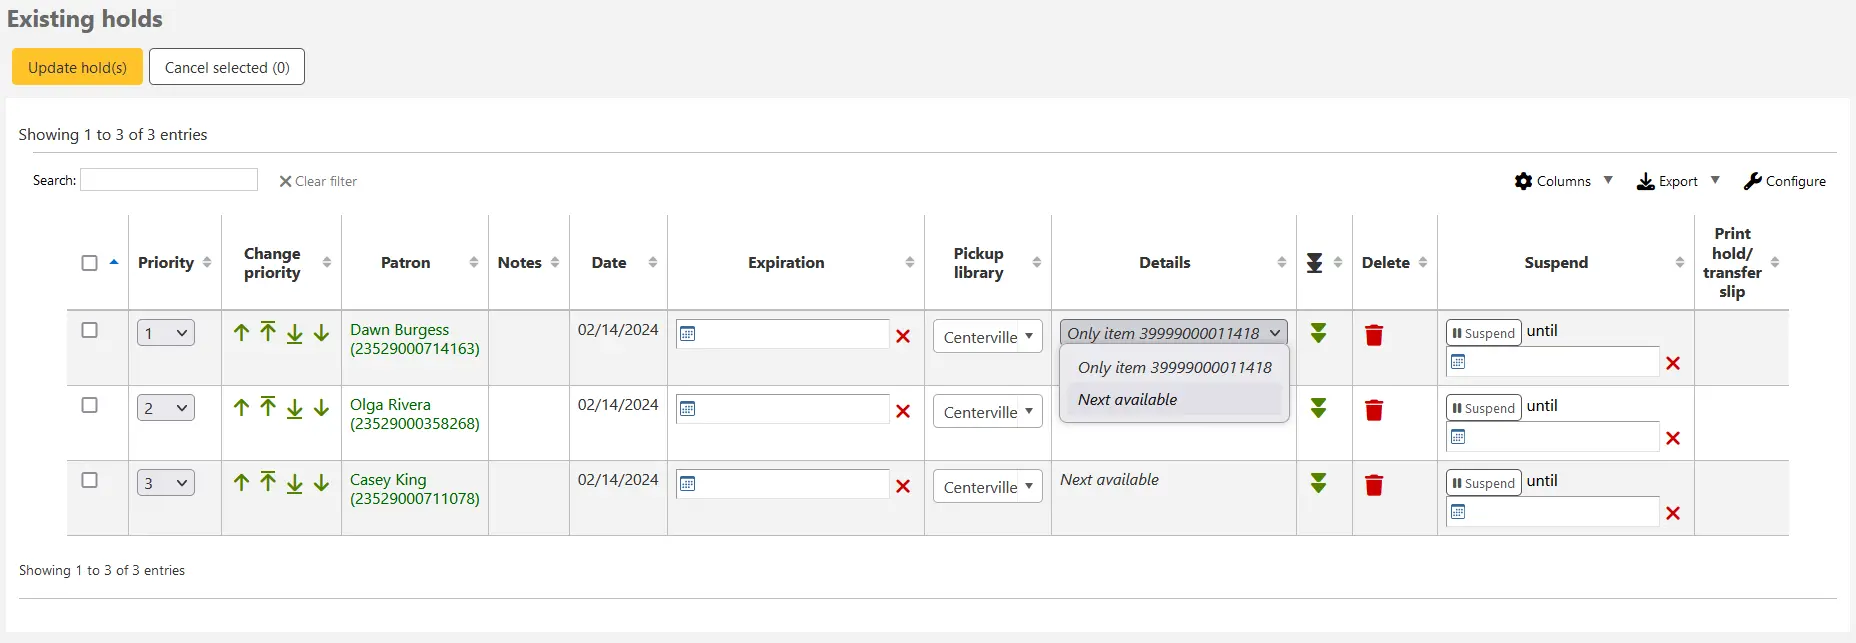
To rearrange holds, make a selection from the ’Priority’ drop-down or click the arrows to the right of the priority pull down.

Varning
Clicking the double down arrow to the right of the hold will stick the hold at the bottom of the list even if more requests are made.
For example, if your library has home-bound patrons that are allowed to keep items out for months at a time, it would not be fair to other patrons if a home-bound patron were able to check out a brand new book and keep it for months. For this reason, the home-bound patron’s hold request would stay at the bottom of the queue until everyone else who wanted to read that book has already done so.
In the list of existing holds, lowest priority holds are indicated by the double down arrow with a line underneath.

Clicking the double arrow again will put the hold back in regular priority, in last place.
Changing the level of a hold
Version
This feature was added in version 23.11 of Koha.
Sometimes it can be necessary to change a hold that has been made on a specific item (known as an item level hold) to a hold that is not specific to an item and will be filled as soon as the next item is returned (often referred to as a record level hold). To change the level of a hold, make a selection from the ’Details’ dropdown and confirm the change by clicking the ’Update hold(s)’ button above.
Suspending holds
If a patron asks to have their hold suspended and the SuspendHoldsIntranet system preference is set to ’Allow’, you can do so by clicking the ’Suspend’ button at the far right.
If the patron gives you a date for the holds to resume, you can enter that in the date box and click the ’Update hold(s)’ button to save your changes.

Observera
If the AutoResumeSuspendedHolds system preference is set to ”Don’t allow” there will not be the option to put an end date on the hold suspension.
Observera
The auto_unsuspend_holds.pl cron job is required to automatically resume suspended holds.
You can also unsuspend holds manually by clicking the ’Unsuspend’ button.
If the SuspendHoldsOpac system preference is set to ’Allow’, patrons will be able to suspend and unsuspend their own holds from their online account.
Deleting holds
To delete or cancel a hold, click the red trash can to the right of the hold line.
To delete/cancel a bunch of holds you can choose ’del’ from the drop-down menu on the left of each line and then click ’Update hold(s)’ at the bottom of the list.

Alternatively, you can select the holds to be canceled and click the ’Cancel selected’ button.
Receiving holds
When items that are on hold are checked in or out the system will remind the circulation staff that the item is on hold and offer them options for managing the hold.
When you check in an item that has a hold on it the system will ask you to either confirm and transfer the item

or just confirm the hold
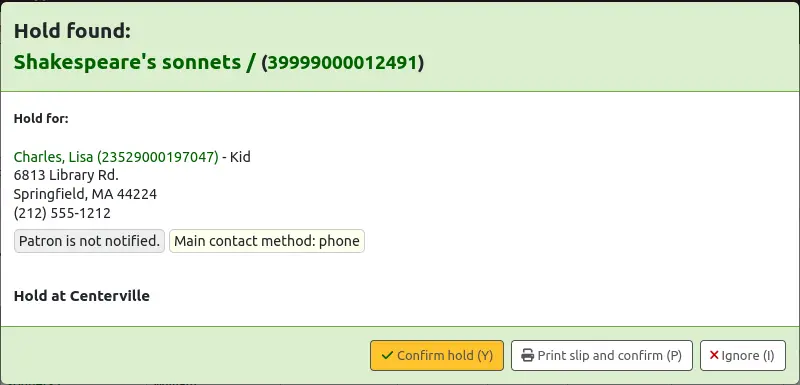
If the item needs to be transferred, clicking ’Confirm and transfer’ or ’Print slip, transfer, and confirm’ will mark the item as in transit to the proper library.
If the item is already at the pickup library, clicking the ’Confirm’ or the ’Print slip and confirm’ button will mark the item as ready for pickup by the patron.
Clicking ’Ignore’ will retain the hold, but allow the item to be checked out to another patron or change the status of the item (if it was returned damaged, for example).
The ’Print slip and confirm’ or ’Print slip, transfer, and confirm’ options will open a printable page that you can attach to the item with the necessary hold or transfer information.
Observera
The slip that is printed is the HOLD_SLIP notice. It can be modified with the Notices and slips tool.
When the hold is confirmed, if the patron is notified, the ’hold filled’ notice will be sent to them.
Observera
The notice that is sent is the HOLD notice. It can be modified with the Notices and slips tool.
Observera
If the HoldsAutoFill system preference is enabled, the circulation staff will not have to confirm the hold, but they will have the option to print the hold or transfer slip.

If the HoldsAutoFillPrintSlip system preference is enabled, the print window to print the hold or transfer slip will open automatically.
Once confirmed, the hold will show as ’waiting’ on the patron record and on the checkout screen under the ’Holds’ tab.

Exemplarposten kommer också att visa att exemplaret är reserverat.

In some cases, a patron may come in to pick up a hold on behalf of someone else. In this case, make sure that the hold is canceled when you check the item out to someone else. Alternatively, a check out might be attempted in error for an item that is already waiting for someone else. In this case you will be presented with a warning message.

Cancel hold: in combination with ’Yes, check out’, this option will cancel the current hold and check the item out to the new patron.
Revert waiting status: in combination with ’Yes, check out’, this option will revert the waiting status of the hold (the patron who placed the hold will be back in first position in the queue) and check the item out to the new patron.
Yes, check out: this option will check the item out to the current patron.
Don’t check out and print slip: this option will open the print window to print the hold slip, the check out will be canceled and the hold will remain.
No, don’t check out: this option will cancel the check out, the hold will remain.
If you check in an item that is already waiting to be picked up, a pop up indicating that a hold was found and the item is already waiting will appear. In addition to this, there is an option to allow staff to cancel the hold and choose a hold cancellation reason.
Observera
Hold cancellation reasons are connected to the HOLD_CANCELLATION authorized value category.
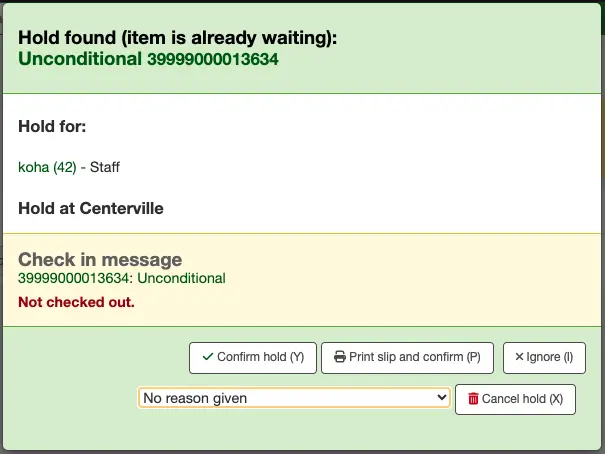
Confirm hold: this option will keep the existing hold.
Print slip and confirm: this option will open the print window to print the hold slip and keep the existing hold.
Cancel hold: this option will remove the hold.
If you cancel the hold and further holds exist for the item you will be presented with a new option to confirm the hold for the next patron.
A reason can be allocated to the cancellation of the hold. A notice can be sent to the patron explaining why this hold was canceled.
Varning
If you want to send a notice with the cancellation reason, you will need to add a new notice with code ”HOLD_CANCELLATION” if you do not have one already.
Bokningar
Version
This feature was first introduced in version 23.11 of Koha.
A ’booking’ in Koha is another way to reserve an item.
A hold is a reservation that joins a waiting list and is filled as soon as the item is available. The item is loaned for the period set in the circulation and fines rules for that library, patron category and item type.
A booking is an advance reservation filled for the dates specified. The booking period becomes the loan period.
Bookings may be especially useful for items such as models, story sacks, memory boxes, etc. that are used for events and programs at specific dates.
Observera
Staff members must have the manage_bookings permission (or the superlibrarian permission) in order to be able to place and manage bookings.
Make items bookable
Before items can be booked, they need to be set as ’bookable’.
Items can be made bookable individually:
From the bibliographic record, go to the Items tab and scroll down to the relevant item’s Priority section.
Set ’Bookable’ to ’Yes’ to make the item bookable.

Alternatively, you can make all items in an item type bookable by using the Item types parameters.
Version
The ’Bookable’ option for item types was first introduced in version 24.11 of Koha.
To avoid clashing requests on popular items, it is advised to make the item type used for bookable items unholdable.
Observera
Bookable items can still be issued without a prior booking, according to the circulation rules for the library, patron category and item type.
Place a booking
Bookings can only be placed in the staff interface and only on items set as bookable.
If at least one of the items on a bibliographic record is bookable, the ’Place booking’ button is displayed above the record view.
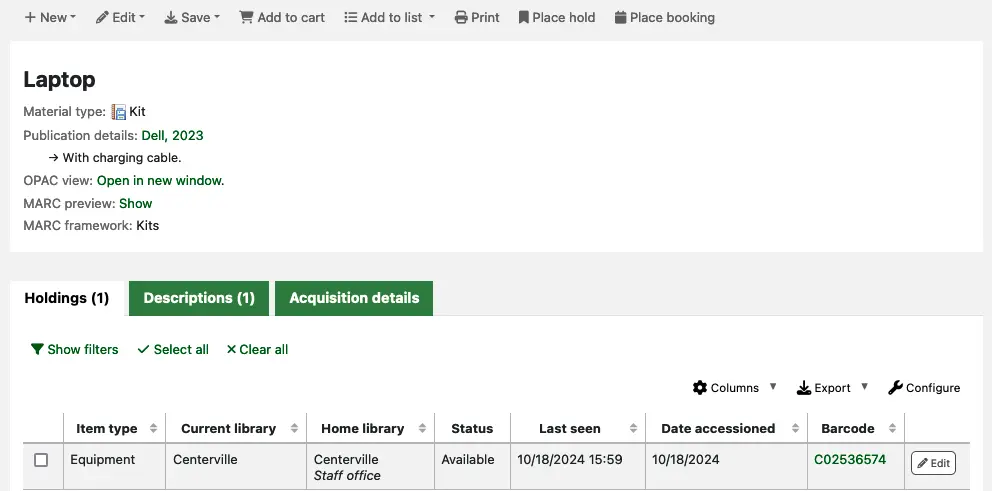
To place a booking, click the ’Place booking’ button. This opens the booking modal.
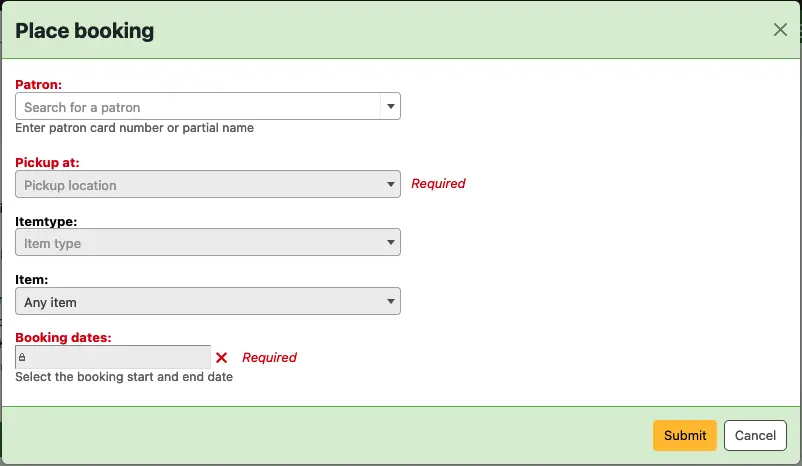
Patron: enter the card number or start typing the name of the patron this booking is for.
Pickup at: choose the library where the patron will pick up the item.
Version
This option was first introduced in version 24.05 of Koha.
Itemtype: optionally, select which item type the booking will target. This is useful when you have items of different types on the same record, each with different circulation rules.
Version
This option was first introduced in version 24.11 of Koha.
Item: optionally, choose whether the booking can be fulfilled by any item or only by the item whose barcode you select.
Observera
Despite these options being optional, either an itemtype or a specific item has to be selected in order to unlock the booking dates picker.
Booking dates: click on a date in the calendar to make it the booking’s start date; click on another date for the booking end date. Use the cross button on the right of the input field to clear dates and start again.
Bookings on the same item cannot overlap.
Dates for which there are existing bookings are marked on the calendar by blue dots.
Version
This feature was first introduced in version 24.05 of Koha.
You can set pre-processing and post-processing days in the Default holds and bookings policies by item type. These will appear on the calendar with a red background and an orange background respectively. They prevent bookings on the same item from being made too close to one another.
Version
This feature was first introduced in version 24.11 of Koha.
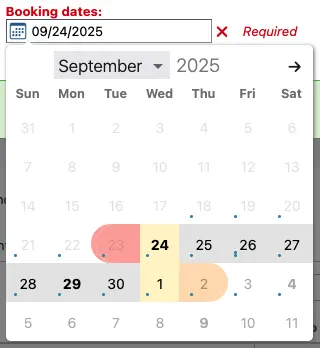
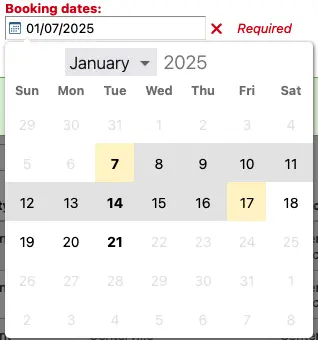
The booking cannot exceed the maximum loan period for that item type, patron category and library set out in the circulation rules. Once the booking start date is chosen, any dates beyond the maximum loan period are grayed out and cannot be selected.
Observera
The maximum loan period is calculated using: loan period + (renewal period * maximum number of renewals).
Dates that correspond to the end of the initial loan period and the renewal periods are highlighted in bold.
Version
This feature was first introduced in version 24.11 of Koha.
Placing a booking triggers the BOOKING_CONFIRMATION notice. This notice is sent to the patron to inform them of their new booking’s details. The notice can be edited in the Notices and slips tool.
Version
The BOOKING_CONFIRMATION notice was first introduced in version 24.11 of Koha.
Manage bookings
A list of all upcoming bookings can be viewed using the Bookings to collect report in the Circulation module.
Individual bookings can be viewed, altered and canceled from the Bookings link in the left-hand menu of the bibliographic record.
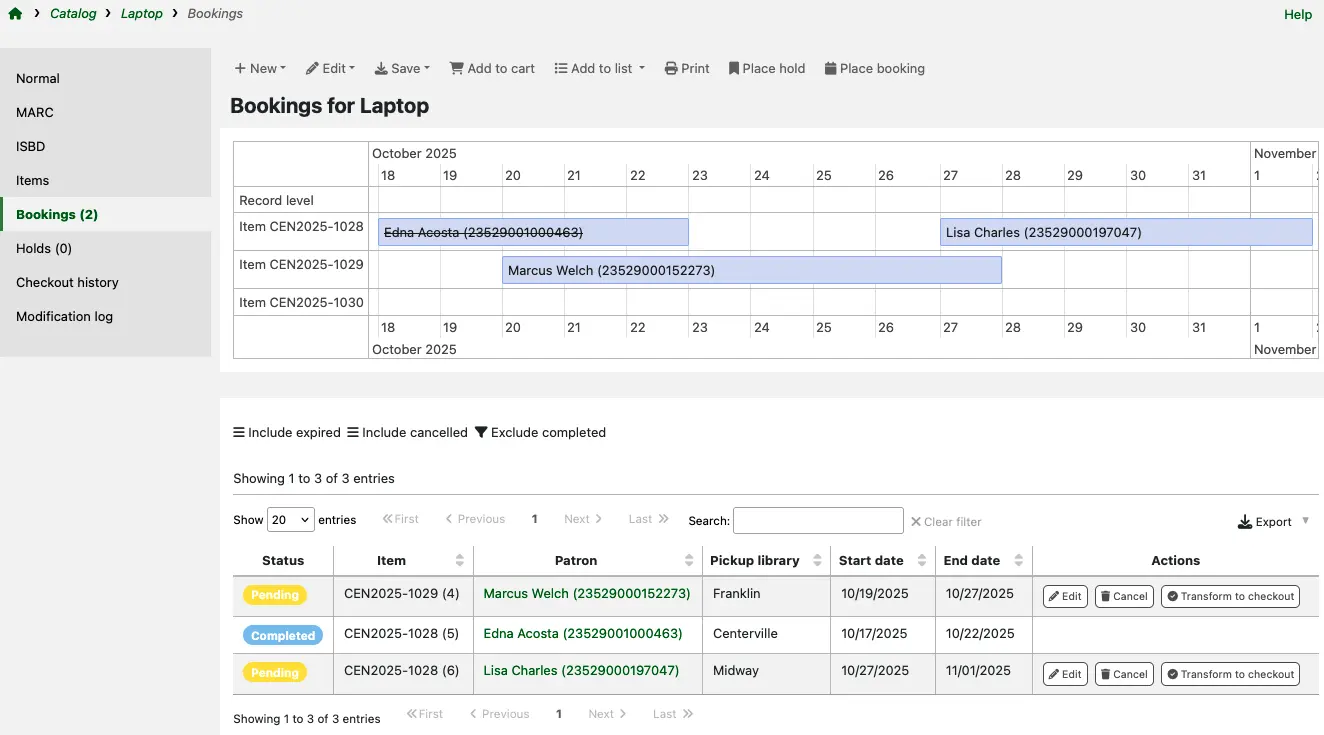
Use the buttons above the table to display expired, canceled and completed bookings.
Edit a booking
From the list of bookings, use the ’Edit’ button on the booking you want to alter. This opens a modal with the same options you have when placing a booking.
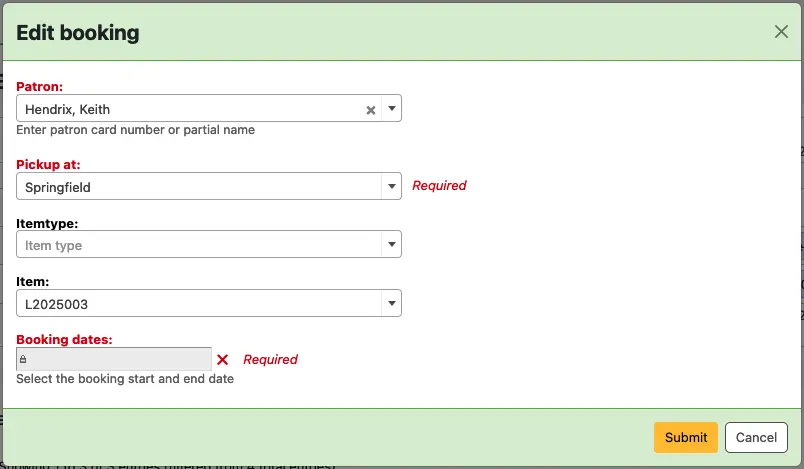
You can also edit a booking’s dates from the calendar view above the list of bookings.
Click on a booking’s placeholder; it turns yellow and the mouse cursor changes to four arrows.
Drag and drop the booking to match your new desired dates.

Amending a booking’s pickup library, start date or end date triggers the BOOKING_MODIFICATION notice. This notice is sent to the patron to inform them of the booking’s updated details. The notice can be edited in the Notices and slips tool.
Version
The BOOKING_MODIFICATION notice was first introduced in version 24.11 of Koha.
Cancel a booking
From the calendar view , click on a booking’s placeholder. When it turns yellow, use the red cross icon to its right.
From the list of bookings, use the ’Cancel’ button on the booking you want to alter.
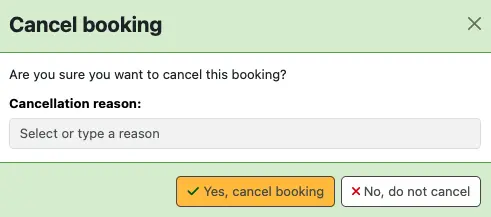
On the ’Cancel booking’ modal, you can optionally type a cancellation reason or select one from the dropdown menu.
Version
Cancellation reasons were first introduced in version 24.11 of Koha.
Observera
Values for the dropdown menu are managed in the BOOKING_CANCELLATION authorized value category.
After confirmation, the canceled booking will be hidden from both the calendar and the list of bookings. Use the ’Include cancelled’ filter above the table to see those bookings in the list.

Canceling a booking triggers the BOOKING_CANCELLATION notice. This notice is sent to the patron to inform them their booking has been canceled. The notice can be edited in the Notices and slips tool.
Version
The BOOKING_CANCELLATION notice was first introduced in version 24.11 of Koha.
Check out booked items
When a patron comes to collect one of their booked items, issue it following the standard checking out workflow.
Switch to Check out and search for the patron.
Scan the item barcode or enter it manually and click ’Check out’.
Observera
The booked item’s due date will be the booking end date.
If the patron tries to collect their item earlier than the booking start date, a check out warning will appear. You can decide whether to allow the early collection and check out the item or to decline the check out.

Observera
In case of an early collection, the due date will remain the original booking end date. The loan period will therefore be longer than the original booking.
Curbside pickups
Koha has an integrated curbside pickup module that can be used to schedule hold pickups by patrons.
Get there: Circulation > Curbside pickups
See the curbside pickup configuration section to learn how to set up curbside pickup.
Observera
Staff members must have the manage_curbside_pickups permission (or the superlibrarian permission) in order to schedule and manage pickups.
Scheduling a pickup
Get there: Circulation > Curbside pickups > Schedule pickup
To schedule a pickup,
Click the ’Schedule pickup’ tab

Search for the patron for whom to schedule a pickup, with either their name or their card number
Varning
If ’Enable for waiting holds only’ is set in the curbside pickup configuration for your library, and the patron has no waiting holds, there will be an error message.

Enter a date for the pickup
Observera
Only dates with available time slots will be displayed.
The possible pickup times will be displayed, depending on the day of the week
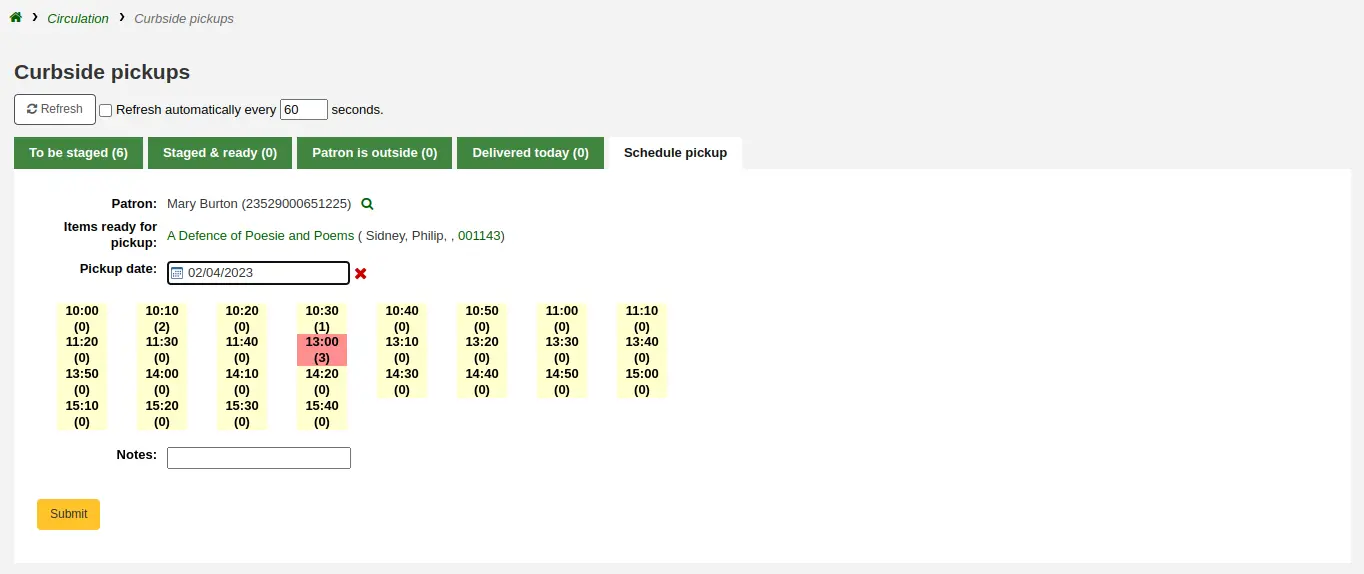
Observera
The number in parentheses under each time slot is the number of patrons who are currently scheduled for a pickup at that time. If the maximum number of appointments has been reached, based on the ’Maximum patrons per interval’ setting in the curbside pickup configuration, the time slot will be displayed in red and you will not be able to select it.
If needed, you can add a note concerning this pickup
Klicka på ’Skicka’
Alternatively, you can schedule a pickup from the patron’s account.
Click ’Schedule pickup’ at the top of the patron’s detail page

Observera
If the patron has chosen to receive the ’Hold filled’ notice by email, they will also get a notification when a curbside pickup is scheduled.
You can customize the notice by editing the NEW_CURBSIDE_PICKUP template in the Notices and slips tool.
Preparing for curbside pickups
Get there: Circulation > Curbside pickups > To be staged
The ’To be staged’ tab contains all the curbside pickups still waiting to be prepared.
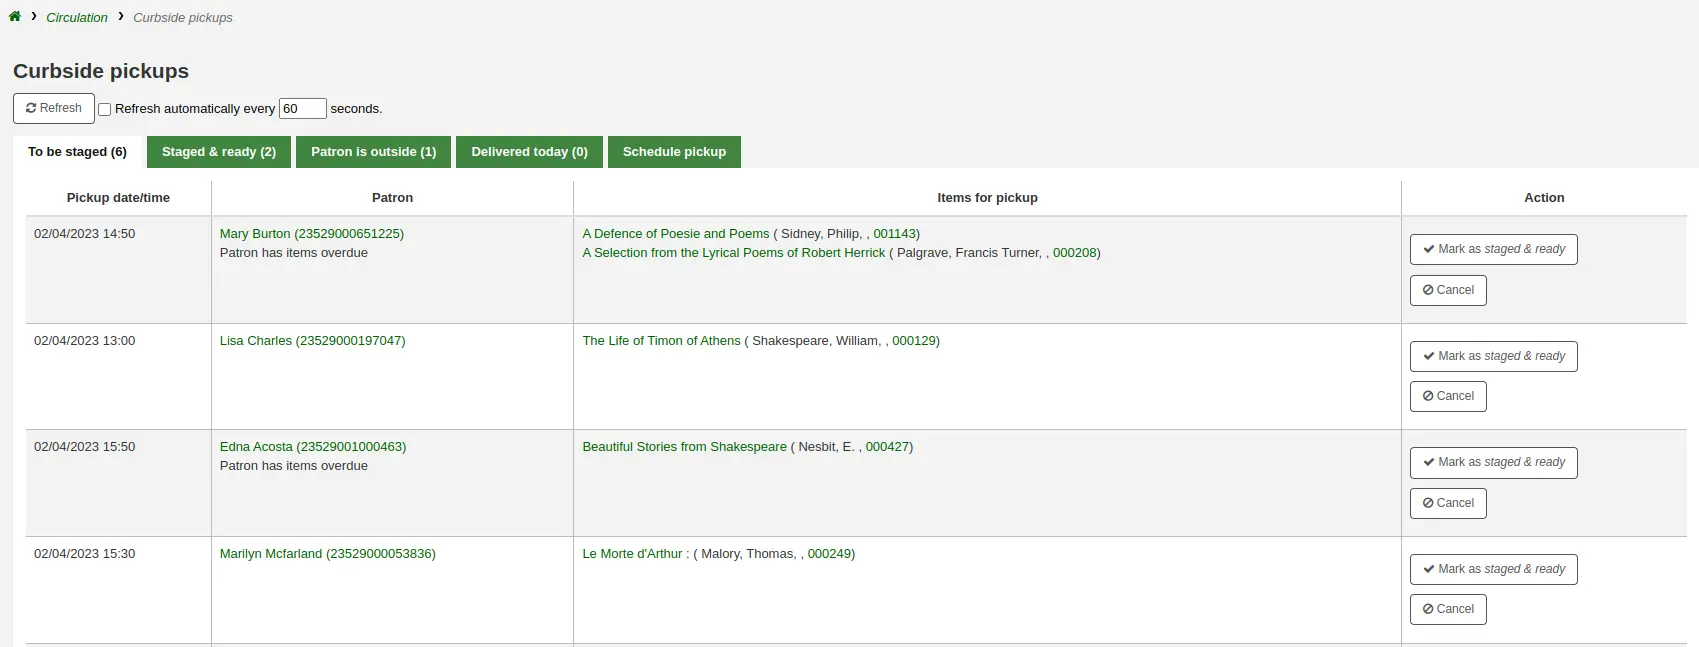
Observera
If the patron has overdues or restrictions, it will be shown here, under their name.
Once the items are prepared and ready to be picked up, click ’Mark as staged & ready’. This will transfer the scheduled pickup appointment in the ’Staged & ready’ tab.

Observera
There is no need to checkout the item or items to the patron at this point. When delivering curbside pickups, the module will automatically check the items out.
You have the option to refresh the list manually by clicking the ’Refresh’ button. You can also set up your session to refresh every X seconds. Check the box next to ’Refresh automatically every X seconds’ and enter the number of seconds.
Delivering curbside pickups
Get there: Circulation > Curbside pickups > Patron is outside
From the OPAC, the patron can alert that they are outside. Staff can also indicate that the patron has arrived by clicking on the ’Patron has arrived’ button from the ’Staged & ready’ tab.
At the designated time, meet the patron to give them their items. Then, click ’Mark as delivered’. This will check out the item or items to the patron and transfer the curbside pickup appointment to the ’Delivered today’ tab.
Canceling curbside pickups
Get there: Circulation > Curbside pickups > To be staged
If, for any reason, you need to cancel a curbside pickup appointment, click the ’Cancel’ button from the ’To be staged’ tab.

If the appointment has already progressed beyond the ’To be staged’ status, click ’Mark as To be staged’ to bring it back there in order to cancel it.
Recalls
The recalls feature allows users to recall items that are currently checked out. Once the recall is confirmed, the borrower who currently has the item checked out will be notified that their due date has been adjusted and they need to return their item. Once recalled items are returned, the recall requester will be notified that their item is awaiting pickup at their specified pickup location.
See the requesting recalls section to learn how to place a recall in the OPAC.
Setting up recalls in Koha
To use this feature:
Enable the UseRecalls system preference
Set the RecallsMaxPickUpDelay system preference
Optionally, enable the RecallsLog system preference
Modify the following sections in the relevant circulation rules
Recalls allowed (count)
Recalls per record (count)
On shelf recalls allowed
Recall due date interval (day)
Recall overdue fine amount
Recall pickup period
Make sure all the staff members who will be managing recalls have the manage_recalls permission (or the superlibrarian permission).
Schedule the recalls cronjobs
Review the recalls notices and slips to make sure they have all the information needed
Managing recalls
The recalls feature is relatively automated. Staff do not have a lot of manipulations to do to manage recalls.
Observera
Only staff with the manage_recalls permission (or the superlibrarian permission) will be able to access recall management.
Recall statuses
The possible statuses for recalls are the following:
Requested
A new recall request has been made and the item must be returned by the patron who currently has it
Requested recalls appear in
the recalls queue
the recalls to pull list, if an available item can fulfill the recall
the ’Recalls’ tab of the bibliographic record
the ’Recalls’ tab of the patron’s file (and its equivalent in the OPAC)
the ’Recalls history’ tab of a patron’s file (and its equivalent in the OPAC)
Waiting
A recalled item is awaiting pickup at the requester’s chosen branch
Waiting recalls appear in
In transit
An item has been assigned to a recall and is in transit to the requester’s chosen pickup branch
In transit recalls appear in
Overdue
A recalled item is overdue to be returned by the patron who currently has it
Overdue recalls appear in
Fulfilled
A recalled item has been checked out to the recall requester, and the recall is complete
Fulfilled recalls appear in
Expired
The recall was not completed before a defined expiration date or the recall requester failed to pick up their waiting recall within the pickup period defined in RecallsMaxPickUpDelay
Expired recalls appear in
Cancelled
The recall request was canceled.
Canceled recalls appear in
Receiving recalled items
Upon checkin in an item that has been recalled, a pop up will appear asking the staff member to confirm or ignore the recall.
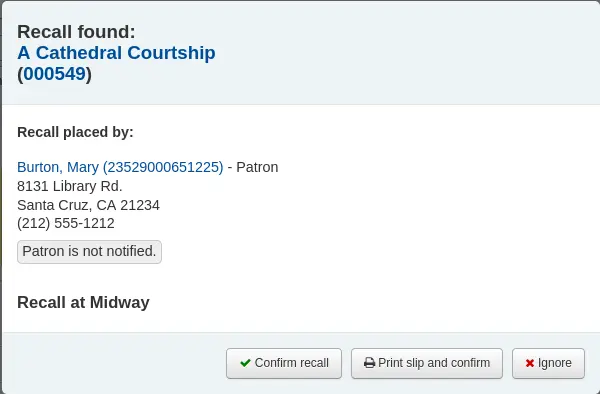
Confirm recall: this option will put the recall in ’Waiting’ status and, if the patron has an email address in their file, will notify them that their recalled item is now ready for pickup.
Observera
The notice sent is PICKUP_RECALLED_ITEM. You can modify it’s content in the notices and slips tool
Print slip and confirm: this option will print a slip you can attach to the item (similar to a hold slip) in addition to everything the ’confirm recall’ does (change the status and send the notice).
Observera
The slip is RECALL_REQUESTER_DET. You can modify it’s content in the notices and slips tool
Ignore: this option will check in the item, but the recall will not be set as awaiting pickup and the patron will not be notified.
If the patron asked to pick up their recalled item at a different library, a transfer will be triggered.
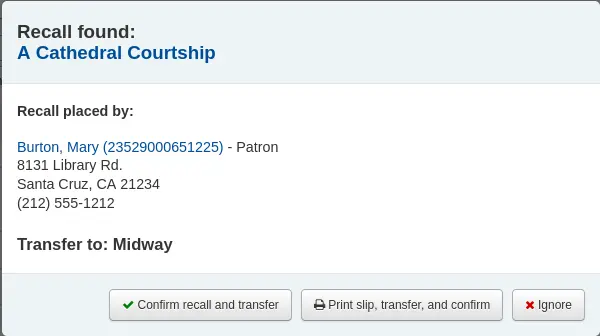
Confirm recall and transfer: this option will put the recall ’In transit’.
Print slip, transfer, and confirm: this option will print a slip you can attach to the item (similar to a hold slip) in addition to setting the recall as ’In transit’.
Ignore: this option will check in the item, but the recall will not be set as ’In transit’
Observera
The patron will not be notified that their recall is ready for them with any of the above options.
Canceling recalls
Observera
Only requested or overdue recalls can be canceled.
It is not possible to cancel a recall that is currently awaiting pickup
Staff can cancel recalls from various screen in the staff interface.
Cancel from the recalls queue either individually by clicking the ’Actions’ button and selecting the ’Cancel’ option.
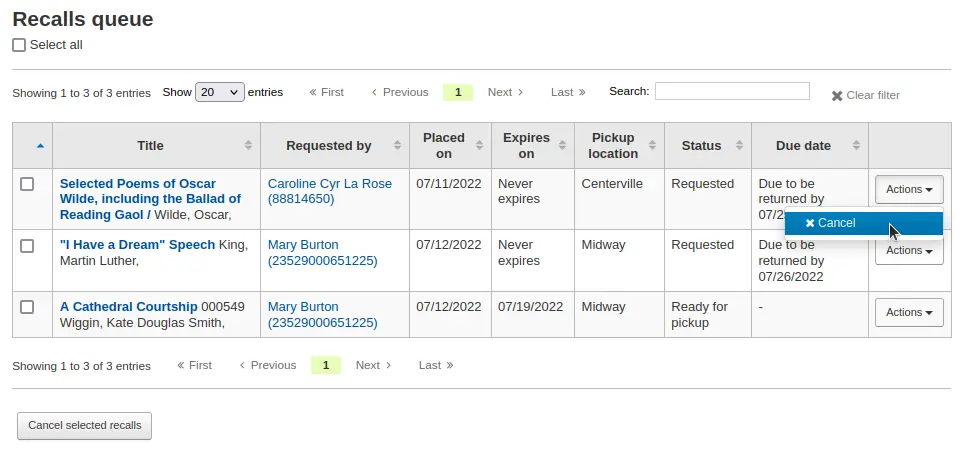
Or by selecting several recalls and clicking the ’Cancel selected recalls’ button at the bottom of the screen.
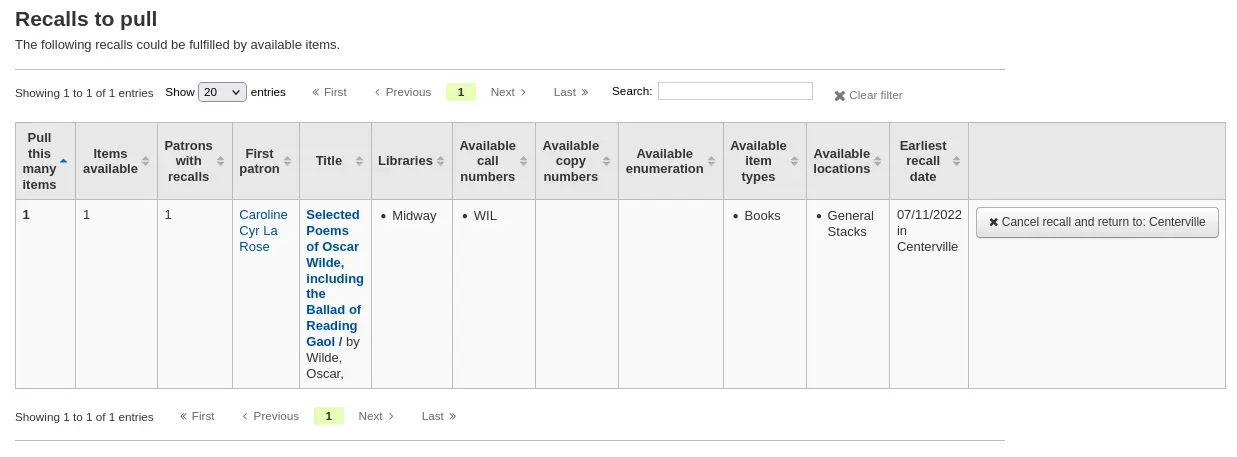
If the recalled item is currently in transit, the cancel option will also trigger a transfer back to the item’s home library.
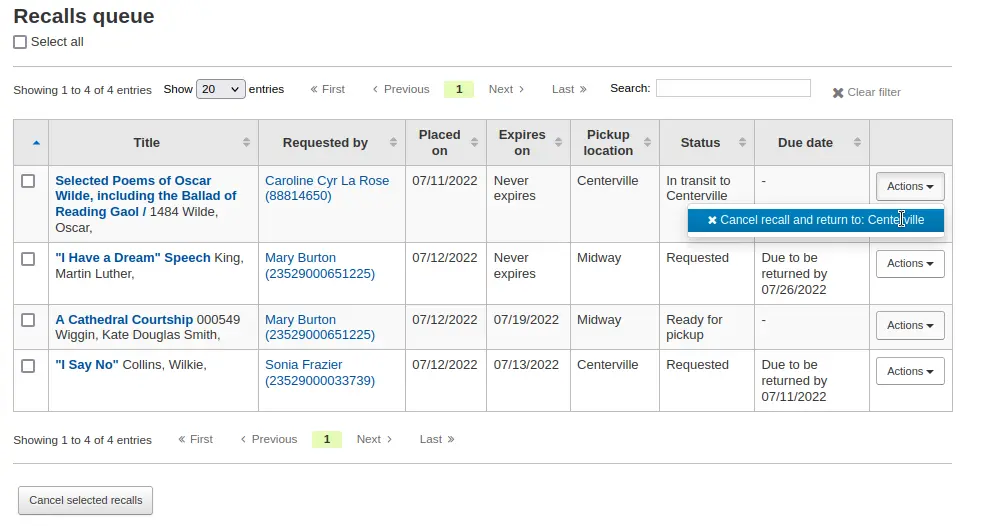
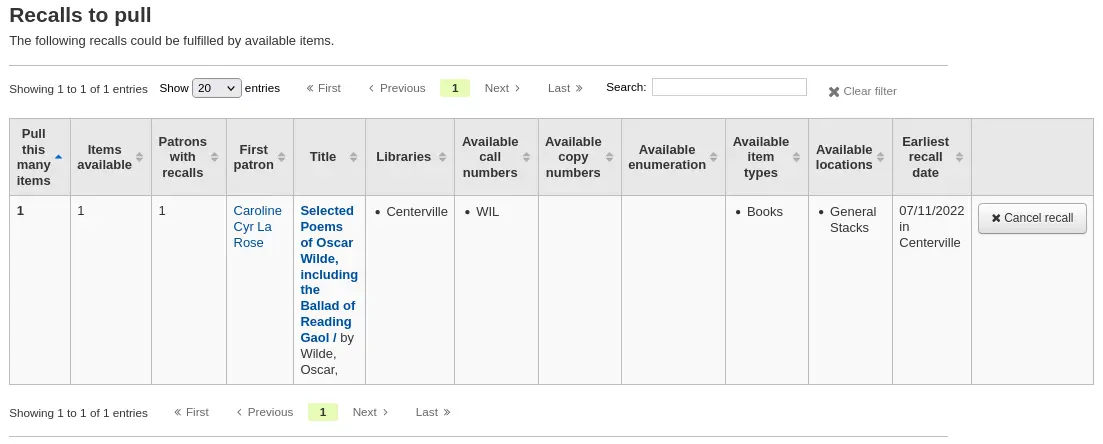
Cancel from the recalls to pull by clicking the ’Cancel recall’ button on the right
If the recalled item is currently in transit, the cancel option will also trigger a transfer back to the item’s home library.
Cancel from the overdue recalls list either individually by clicking the ’Actions’ button and selecting the ’Cancel’ option.

Or by selecting several recalls and clicking the ’Cancel selected recalls’ button at the bottom of the screen.
Cancel from the ’Recalls’ tab of a bibliographic record by clicking the ’Actions’ button and selecting the ’Cancel’ option.

Or by selecting several recalls and clicking the ’Cancel selected recalls’ button at the bottom of the screen.
Cancel from the ’Recalls’ tab of a patron’s details page by clicking the ’Actions’ button and selecting the ’Cancel’ option.

Cancel from the ’Recalls history’ tab of a patron’s file by clicking the ’Actions’ button and selecting the ’Cancel’ option.

Changing waiting recalls’ status
If a recall is currently awaiting pickup and for some reason the staff needs to change this status (for example, the requesting patron called and they won’t be picking up the recall), it is possible to revert the waiting status.
Revert the status from the recalls queue by clicking the ’Actions’ button and selecting the ’Revert waiting’ option.
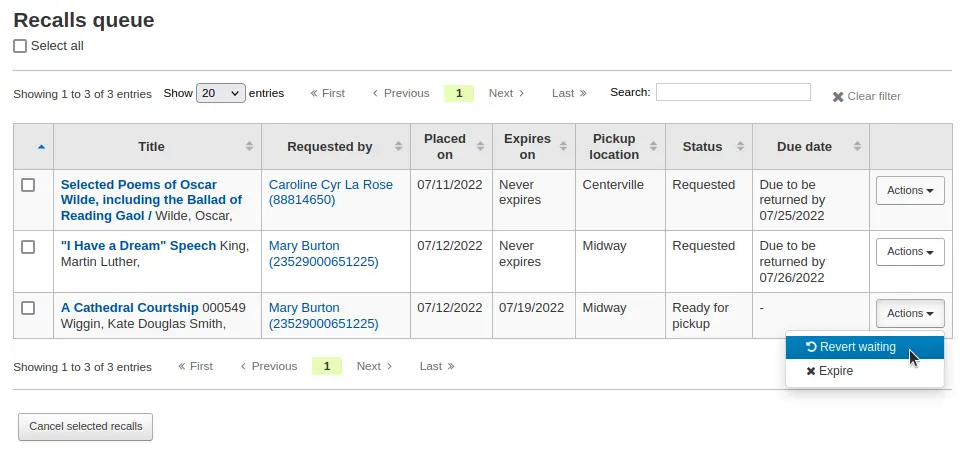
Revert the status from the Recalls awaiting pickup list by clicking the ’Revert waiting status’ button on the right.

Marking recalls as overdue
If a recall is not checked in by the new due date, it should be marked as overdue by the overdue_recalls cronjob. However, it is possible to mark recalls as overdue manually.
From the recalls queue, click the ’Actions’ button and selecting the ’Mark as overdue’ option.
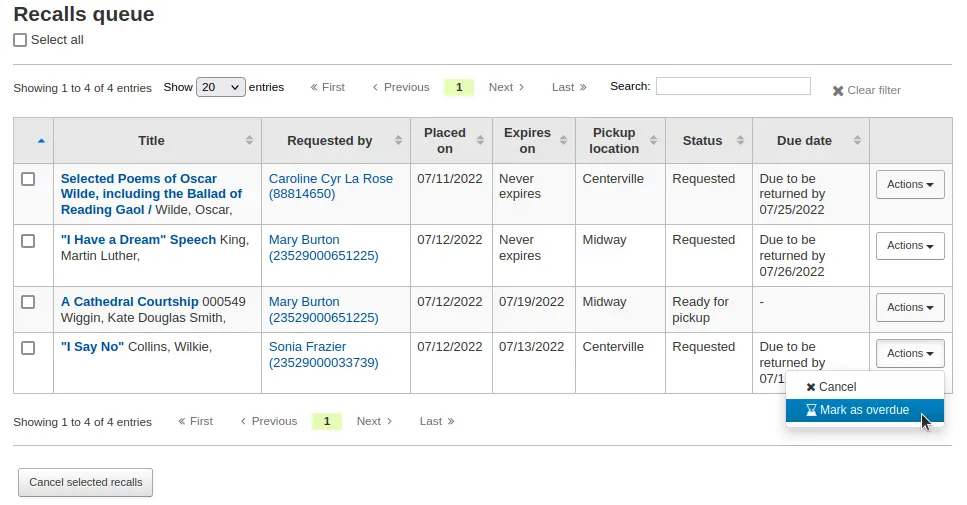
Overdue recalls appear in the Overdue recalls list.
Expiring recalls
If a recall as been awaiting pickup for longer than the allowed period defined in RecallsMaxPickUpDelay, it should be expired automatically by the expire_recalls cronjob. However, it is possible to expire recalls manually.
From the recalls awaiting pickup list, click the ’Expire recall’ button on the right.

Recalls reports
Once recalls are set up, new sections will appear in the circulation module.
Sökväg: Cirkulation > Återkrav
Recalls queue
The recalls queue shows all the current active recalls with their statuses.
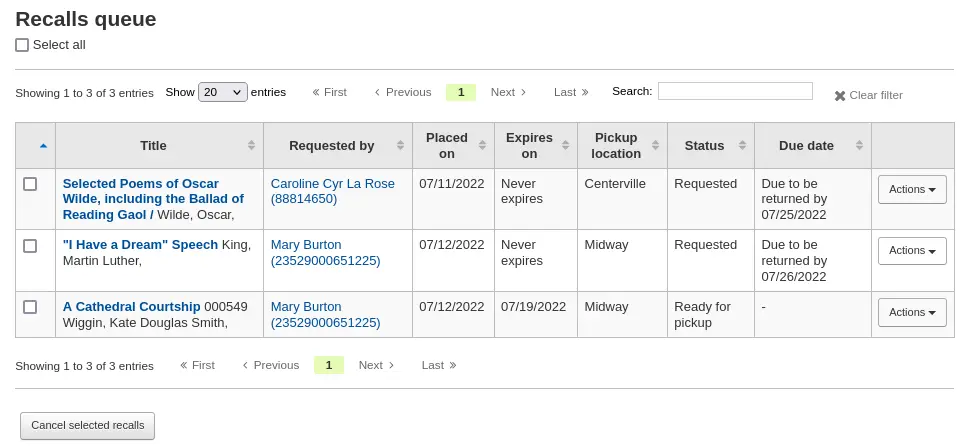
From the recalls queue, staff can cancel active recalls either individually by clicking the ’Actions’ button and selecting the ’Cancel’ option.

Or by selecting several recalls and clicking the ’Cancel selected recalls’ button at the bottom of the screen.
For recalls that are in transit, it is possible to cancel them and this will trigger a transfer back to their home library.

For recalls that are currently awaiting pickup, it is possible to revert the waiting status by clicking the ’Actions’ button and selecting the ’Revert waiting’ option.

For recalls that are overdue, it is possible to mark them as such from the recalls queue by clicking the ’Actions’ button and selecting the ’Mark as overdue’ option.

Recalls to pull
The recalls to pull list shows all the records that have been recalled but that have available items that could fulfill the request.

Staff can pick up these items from the shelves and check them in to fulfill the requests.
From the recalls to pull list, staff can cancel recalls if needed, by clicking the ’Cancel recall’ button on the right.
If the item is currently in transit, canceling the recall will also trigger a transfer back the the item’s home library.

Overdue recalls
This list shows the items that have been recalled but have not been returned by the new due date.
Recalls can be marked as overdue automatically through the overdue_recalls cronjob or manually.

From this list, staff can cancel active recalls either individually by clicking the ’Actions’ button and selecting the ’Cancel’ option.

Or by selecting several recalls and clicking the ’Cancel selected recalls’ button at the bottom of the screen.
Recalls awaiting pickup
The recalls awaiting pickup list shows all the recalls that are currently waiting for the patron to come and get them.

This list is divided in two tabs:
Recalls waiting: shows all the recalls currently awaiting pickup.
Recalls waiting over x days: shows the recalls that have been waiting for more than the number of days specified in the RecallsMaxPickUpDelay system preference.
From this list, staff can revert waiting recalls by clicking on the ’Revert waiting status’ button on the right.
Staff can also manually expire recalls by clicking on the ’Expire recall’ button on the far right.
Old recalls
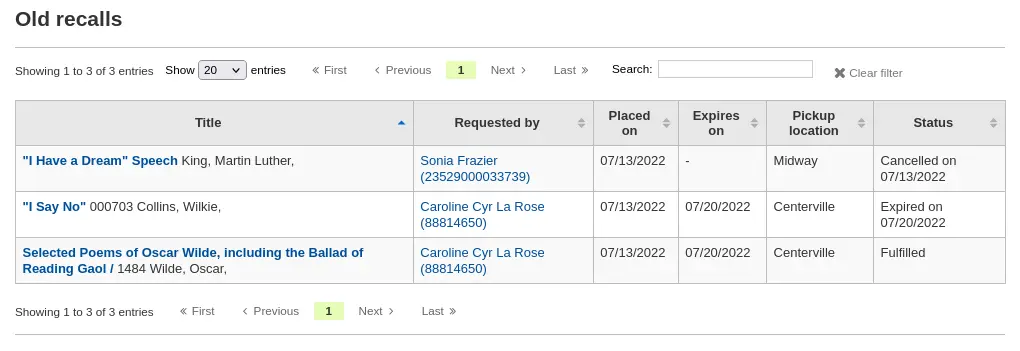
The old recalls list shows all the inactive recalls (completed, canceled and expired).
Överföringar
If you work in a multi-branch system, you can transfer items from one library to another by using the Transfer tool.
Sökväg: Cirkulation > Överföringar
To transfer an item,
Click ’Transfer’ on the Circulation page.
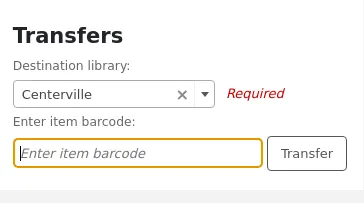
Select the library to transfer the item to.
Scan or type the barcode on the item to transfer.
Click ’Submit’.

The item will now say that it is in transit in the ’Status’ column of the holdings table in the staff interface and in the OPAC.

When the item arrives at the other library, the staff member must check the item in to acknowledge that it has arrived and is no longer in transit.

The item will not be permanently moved to the new library. The item will keep the same ’Home library’ and the ’Current location’ is updated to note where it resides at this time.

Staff can check the status of items in transit in the Transfers to receive report.
If you are using the stock rotation automation tool, you can check which items from your library are requested by the stock rotation tool for transfer to another library using the Transfers to send report.
Ställ in bibliotek
By default, you will enter the staff interface as if you are at your home library. This library will appear in the top right of the staff interface.

This is the library where all circulation transactions will take place. If you are at another library (or on a bookmobile) you will need to set the library before you start circulating items. To do this, click on your username and logged in library at the top right and choose ’Set library’ or click ’Set library’ on the main circulation page.

Observera
Only staff with the loggedinlibrary permission (or the superlibrarian permission) will be able to change the library they are logged in at.
This will bring you to a page where you can choose which library you are logged in to.
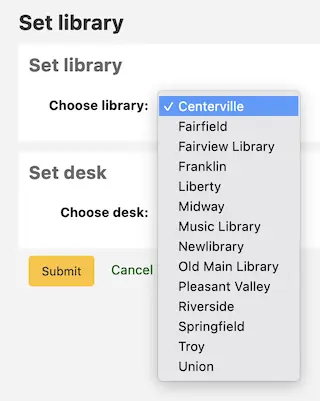
Once you save your changes, your new library will appear in the top right.
Observera
Only staff with the loggedinlibrary permission (or the superlibrarian permission) will be able to log into a library different from their home library.
Staff members who do not have this permission will only be able to log into their home library.
Fast cataloging
Observera
Staff members must have the fast_cataloging permission (or the superlibrarian permission) in order to be able to use the fast cataloging option.
Sometimes, circulation staff need to quickly add a record and item to the system for an item they are about to check out. This is called ’Fast cataloging’.
There are two ways to add records via fast cataloging: from the circulation home page or from checking out an item that is not currently in the system.
Fast cataloging from the circulation home page
Get there: Circulation > Fast cataloging
If you know that you’re about to check out an item that isn’t in your catalog, you can go to the Circulation module and click ’Fast cataloging’.

The cataloging interface will open up with the short cataloging record:
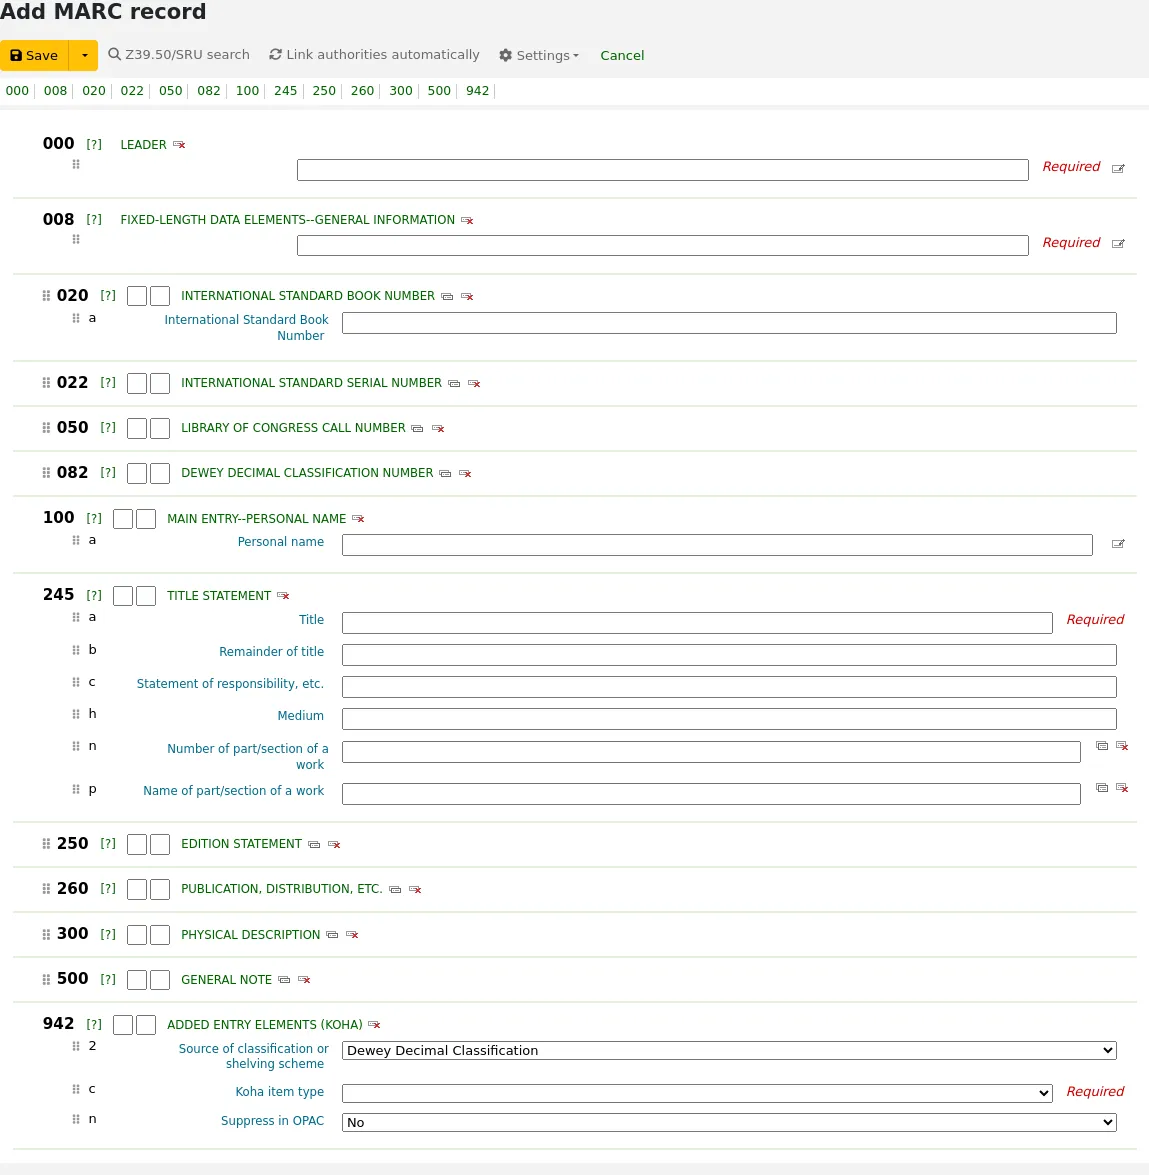
After adding the record data and clicking ’Save’, the item form will appear where you will be able to enter the item data.
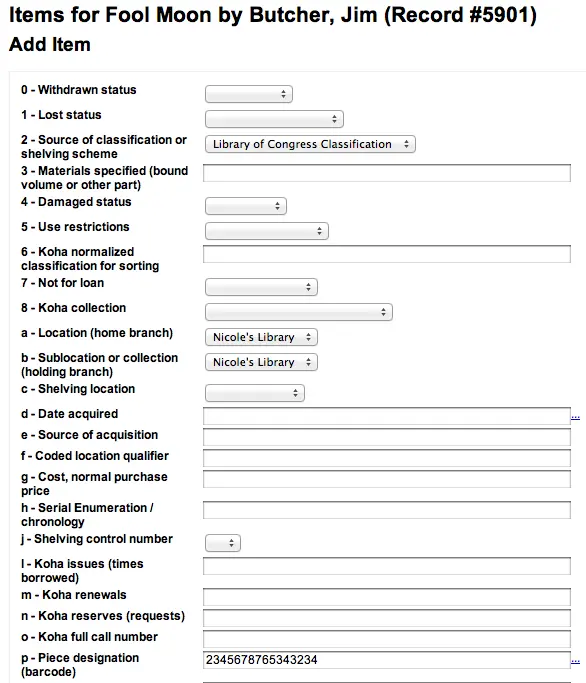
Enter the item’s information (at minimum, the barcode, home library, current library, and item type) and click ’Add item’.
You can then check out the item normally.
Fast cataloging by checking out
The other way to fast catalog is from the checkout screen. When you try to checkout a barcode that Koha can’t find, it will prompt you to use fast cataloging to add the item to Koha and check it out.

Clicking ’Add record using fast cataloging’ will bring you to the fast cataloging form where you can enter the record information.

After adding the record data and clicking ’Save’, the item form will appear where you will be able to enter the item data. The barcode will already be filled in with the barcode you tried to check out.
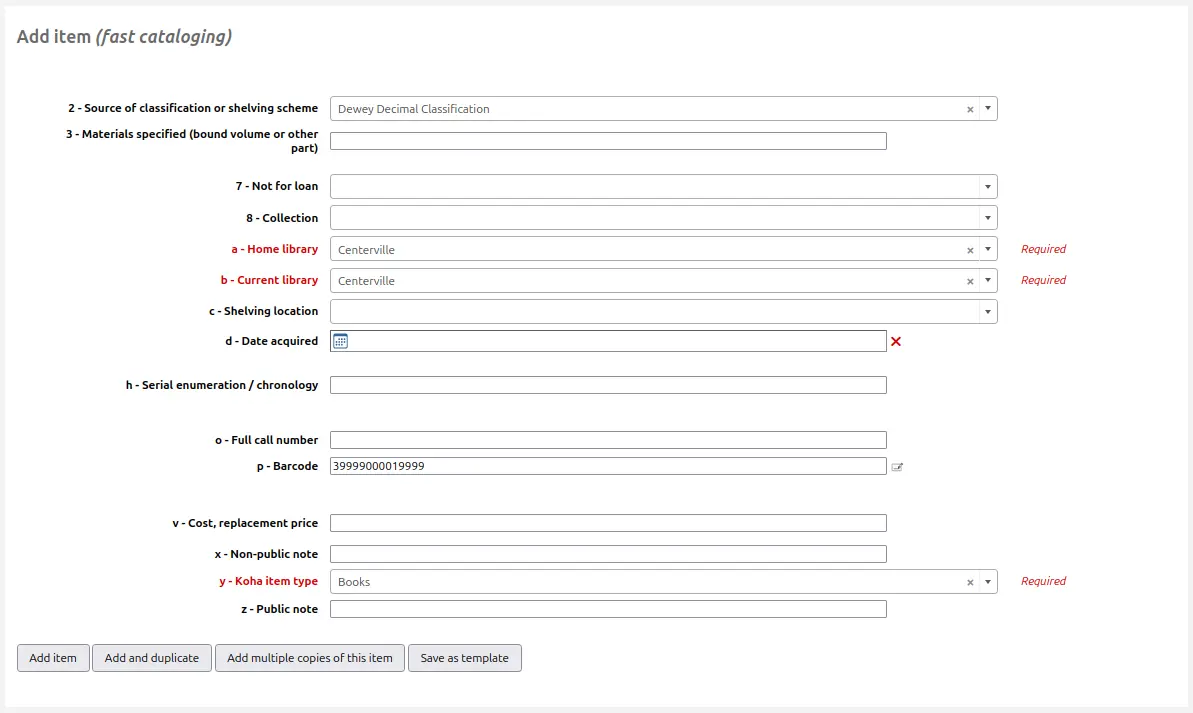
Enter the rest of the item’s information (at minimum, home library, current library, and item type) and click ’Add item’.
The item will automatically be checked out the patron you were trying to check the item out to originally.
Cirkulationsrapporter
Most reports can be found via the Reports module, but the more common circulation reports are available right from the Circulation module’s homepage.
Reservationskö
This report will show you all holds waiting to be pulled off the shelf at your library.
First, choose some filters for the report.

Then, the report will be displayed.
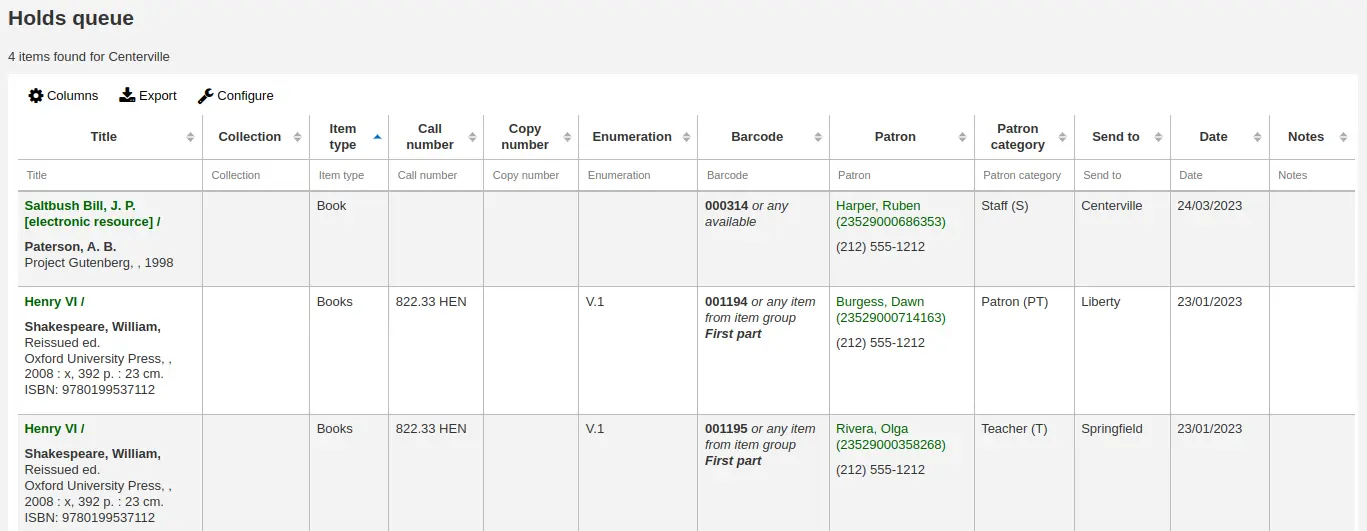
Observera
You can customize the columns of this table in the Table settings section of the Administration module (table id: holds-table).
To generate this report, you must either have the Build holds queue cron job running, or the RealTimeHoldsQueue system preference must be set to ’Enable’. Either of these will run a script that decides which library should be responsible for fulfilling a given hold request. This should be enabled if your library system allows borrowers to place on-shelf holds.
The holds queue behavior is controlled by the system preferences StaticHoldsQueueWeight, RandomizeHoldsQueueWeight and UseTransportCostMatrix.
If you do not want all of your libraries to participate in the on-shelf holds fulfillment process, you should list the libraries that *do* participate in the process here by inputting all the participating library’s branchcodes, separated by commas (e.g. ”MPL,CPL,SPL,BML” etc.).
By default, the holds queue will be generated such that the system will first attempt to hold fulfillment using items already at the pickup library if possible. If there are no items available at the pickup library to fill a hold, the system will then use the list of libraries defined in StaticHoldsQueueWeight. If RandomizeHoldsQueueWeight is disabled (which it is by default), the script will assign fulfillment requests in the order the libraries are placed in the StaticHoldsQueueWeight system preference.
For example, if your system has three libraries, of varying sizes (small, medium and large) and you want the burden of holds fulfillment to be on larger libraries before smaller libraries, you would want StaticHoldsQueueWeight to look something like ”LRG,MED,SML”.
If you want the burden of holds fulfillment to be spread out equally throughout your library system, simply enable RandomizeHoldsQueueWeight. When this system preference is enabled, the order in which libraries will be requested to fulfill an on-shelf hold will be randomized each time the list is regenerated.
An alternative to static and randomized is using the Transport cost matrix. It takes precedence in controlling where holds are filled from and allows you to define the ’cost’ of transport between any two libraries. To use the Transport cost matrix simply set your UseTransportCostMatrix preference to ’Use’.
Observera
Other system preferences will have an impact on prioritization in the holds queue, namely: LocalHoldsPriority, LocalHoldsPriorityPatronControl, LocalHoldsPriorityItemControl and HoldsQueuePrioritizeBranch.
Plocklista reservationer
This report will show you all of the items that have holds on them that are available at the library for pulling. If the items are available at multiple libraries then all libraries with that item available will see the hold to pull until one library triggers the hold.
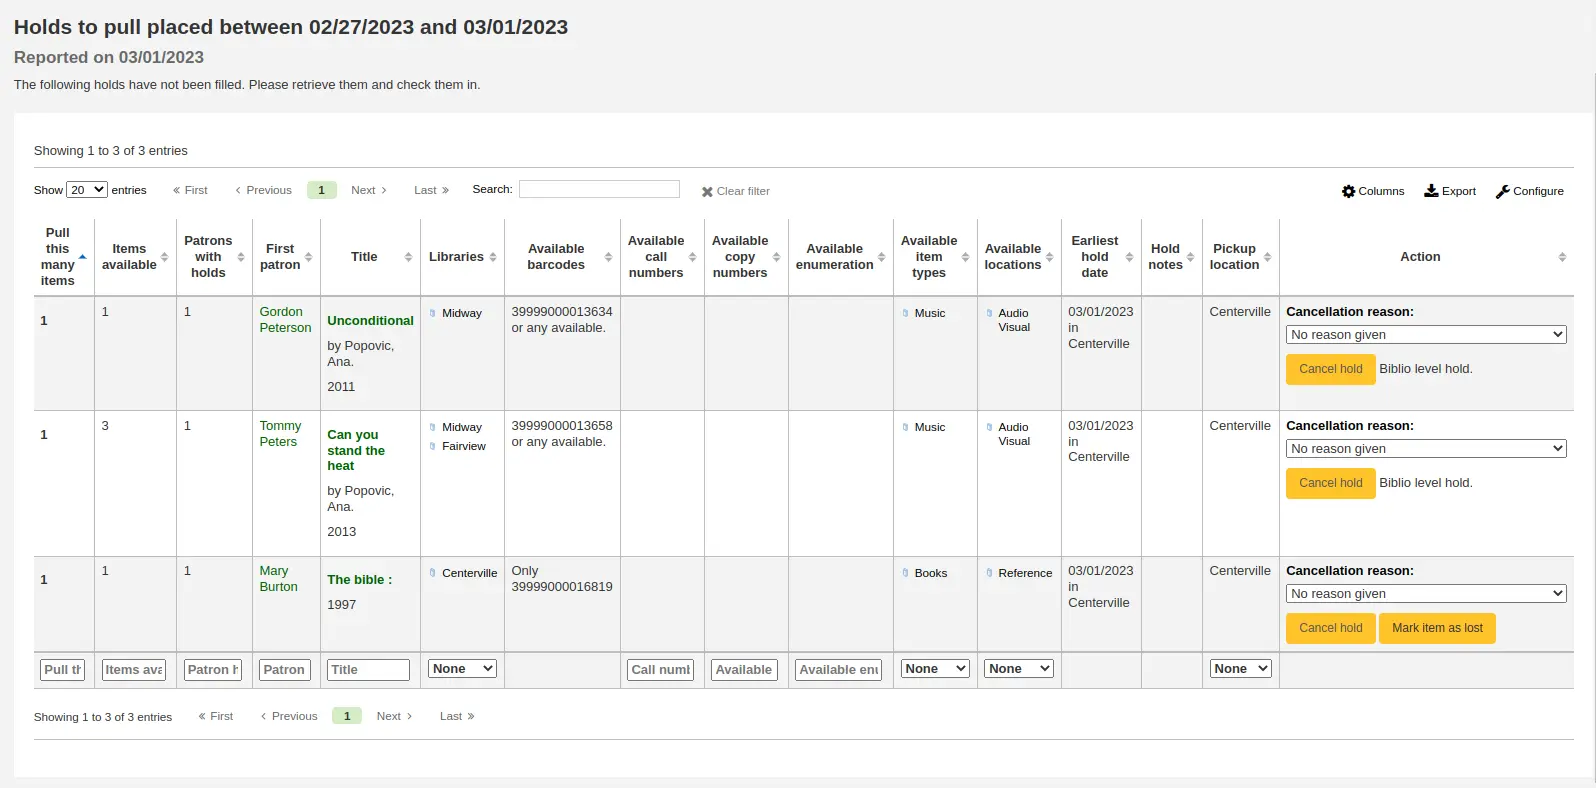
Observera
You can customize the columns of this table in the Table settings section of the Administration module (table id: holds-to-pull).
Depending on the value of the CanMarkHoldsToPullAsLost system preference, clicking the ”Mark item as lost” button or ”Mark item as lost and notify patron” button will mark item as lost and notify the requesting patron.
You can choose which LOST value to set the item to with the UpdateItemWhenLostFromHoldList system preference.
Varning
These buttons will only appear on item-level holds.
Observera
The notification sent to the patron will use the CANCEL_HOLD_ON_LOST template. It can be customized in the Notices and slips tool.
You can limit the results you see by using the Refine box on the left side of the page.
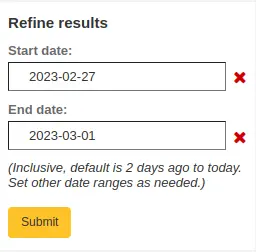
Observera
The default dates in the filters are determined by the HoldsToPullStartDate and ConfirmFutureHolds system preferences.
Reservationer väntar på hämtning
Denna rapport visar alla reservationer som ligger och väntar på hämtning.

Observera
You can customize the columns of this table in the Table settings section of the Administration module (table id: holdst).
You can cancel individual holds manually by clicking the ’Cancel hold’ button to the right of each hold, or you can cancel selected holds using the button at the top of the list.
Items that have been on the hold shelf longer than you normally allow (based on the ReservesMaxPickUpDelay system preference value or the ’Holds pickup delay’ rule in the circulation and fine rules) will appear on the ’Holds waiting past their expiration date’ tab.
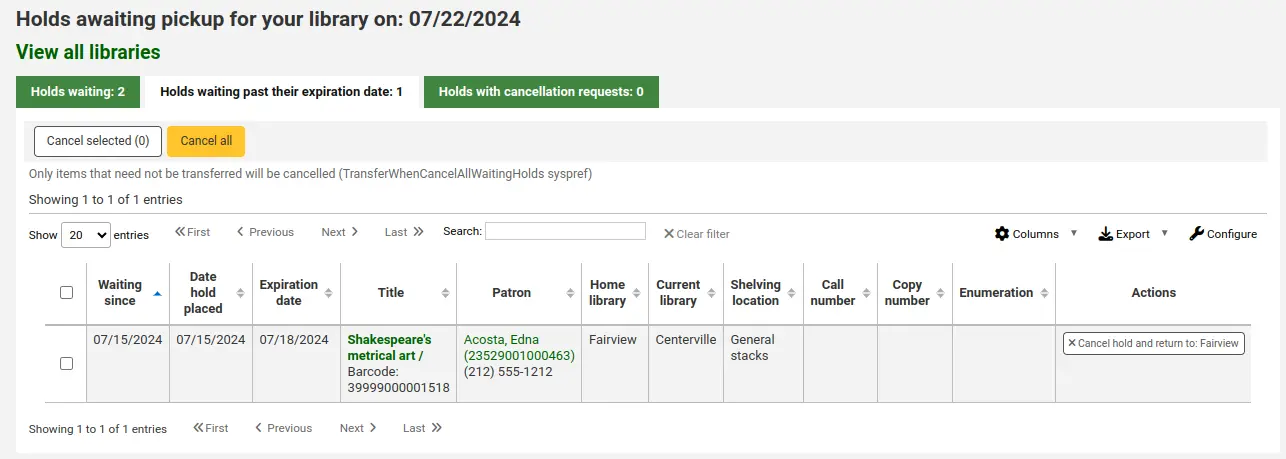
Observera
You can customize the columns of this table in the Table settings section of the Administration module (table id: holdso).
These holds will not automatically be canceled unless the ExpireReservesMaxPickUpDelay system preference is set to ’Allow’ and the cancel_expired_holds.pl cron job is scheduled to run regularly.
You can cancel individual holds manually by clicking the ’Cancel hold’ button to the right of each hold, or you can cancel selected holds using the button at the top of the list, or even cancel all holds.
The ’Holds with cancellation requests’ tab contains waiting holds that have been canceled by patrons through their account on the OPAC, if that is allowed by the waiting hold cancellation policy.
From this tab, staff can cancel the holds, and transfer them back to their home library, if that is the case.
Observera
Checking in the items will also cancel the holds with cancellation requests.
Reservationsförhållanden
Reservationsförhållanden hjälper till med utvecklingen av samlingar. Med denna rapport kan du se hur många av låntagarna som har reservationer liggande och om du behöver köpa fler. Som standard är den inställd på att ett bibliotek behöver tre exemplar per lagd reservation. Rapporten talar om hur många extra exemplar som måste köpas in för att uppfylla denna kvot.
Observera
You can change the default ratio with the HoldRatioDefault system preference.
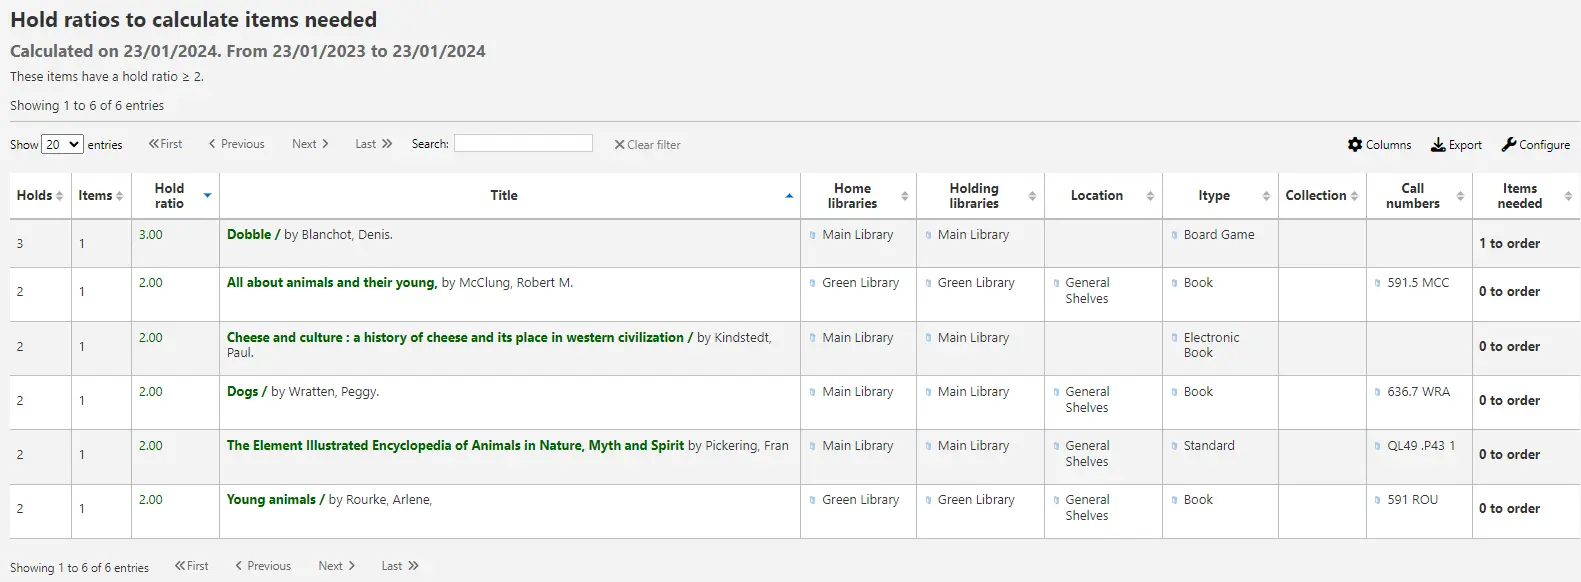
Observera
You can customize the columns of this table in the Table settings section of the Administration module (table id: holds-ratios).
Bookings to collect
Version
This feature was first introduced in version 24.11 of Koha.
This report will show you all upcoming bookings to be collected at the selected library for the specified dates.
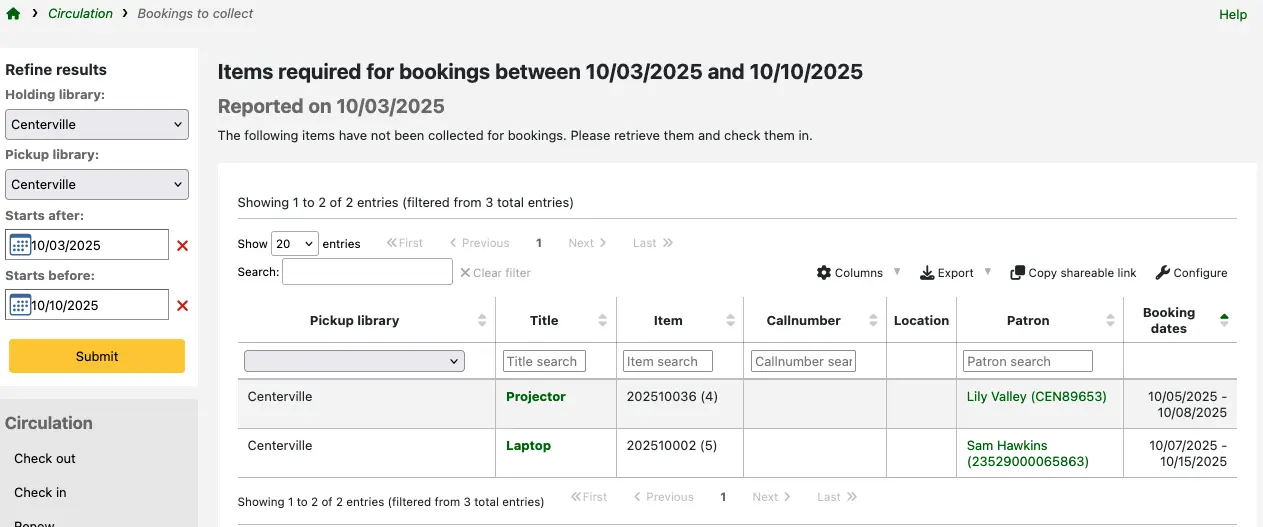
Observera
You can customize the columns of this table in the Table settings section of the Administration module (table id: bookings-to-collect).
By default:
the holding library and pickup library are set to the library you are logged in at;
the bookings displayed start after today and within the next 7 days.
You can update the selected libraries and dates using the filters to the left of the table.
Överföringar att ta emot
This report lists all the items that are in transit to your library.

If your transfers are late in arriving, you will see a message stating how late your items are.

Observera
A transfer is considered late based on the number of days entered in the TransfersMaxDaysWarning system preference.
Transfers to send
This report lists all the items that are requested from your library by the stock rotation tool.

Observera
This report will only be shown and filled if you are using the stock rotation automation tool.
Artikelbeställningar
Article requests are somewhat similar to holds, but are not requests for an item to check out. Instead, article requests are requests for a photocopy of a particular section of a book or an article from a serial issue. This is very common in academic libraries where researchers may request a copy of a single article found in a journal.
Setting up article requests
First, enable your system preference for ArticleRequests.
Set to ’Enable’ patrons to place article requests.
Next you will need to decide how your patrons will make requests, either record only, item only, or both record and item level.
You can set 3 different system preferences for mandatory fields to be filled in depending on how your records are requested.
ArticleRequestsMandatoryFields: make the following fields mandatory for records that are record level or item level requestable
ArticleRequestsMandatoryFieldsItemsOnly make the following fields mandatory for records that are only item level requestable
ArticleRequestsMandatoryFieldsRecordOnly make the following fields mandatory for records that are only record level requestable
The ArticleRequestsOpacHostRedirection system preference is used if you create analytical records. If enabled, it will redirect the patron from the child record to the host record in the OPAC.
The ArticleRequestsSupportedFormats system preference determines the various formats patrons can request their articles in (either photocopy or scan).
Next you will want to go into your circulation and fines rules matrix and select each rule for which you want to allow requests.
You can allow requests to be made at the record level, item level, yes (which means both) and no (which means no article requests may be placed).
You can also limit the number of open article requests a patron can have at one time by patron category in the Default open article requests limit section of the circulation rules page.
You can set up a fee for each article request in the Default article request fees section of the circulation rules page.
Placing article requests
Now you can place requests on both the staff client and OPAC.
In the staff client, on the record details page, you will see a ’Request article’ button at the top and an ’Article requests’ tab to the left. The two options lead to the same page.

Just like a hold, you will be prompted to enter the patron’s card number or name.

If there is a fee, a message will appear to inform the staff member.

Fill in the form.
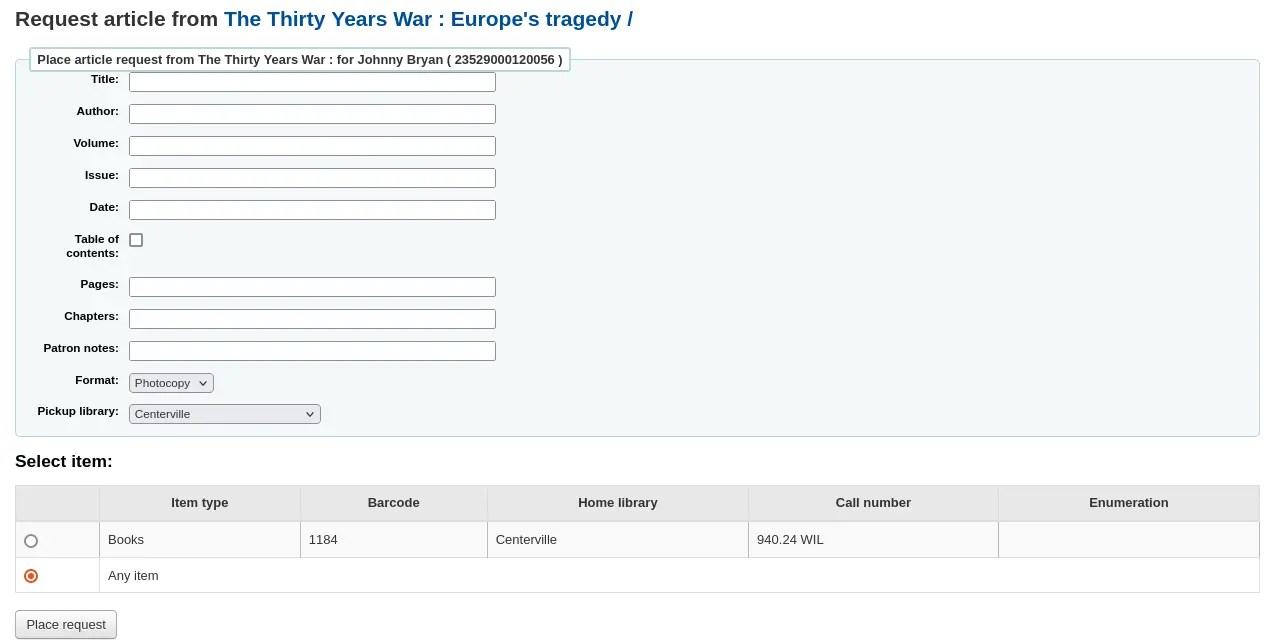
Observera
The mandatory fields are set through the three system preferences ArticleRequestsMandatoryFields, ArticleRequestsMandatoryFieldsItemsOnly, and ArticleRequestsMandatoryFieldsRecordOnly.
Title: enter the title of the requested article or chapter
Author: enter the author of the requested article or chapter
Volume: enter the volume in which this article or chapter is found
Issue: enter the issue in which this article is found
Date: enter the date of the issue in which this article is found
Table of contents: check to indicate the patron wants a copy of the table of contents
Pages: enter the pages to photocopy or scan
Chapters: enter the chapters to photocopy or scan
Patron notes: enter any relevant notes
Format: choose the format in which the patron wishes to receive this article or chapter
Observera
The possible formats are defined in the ArticleRequestsSupportedFormats system preference.
Pickup library: choose the library at which the patron wishes to pick up their photocopy
If allowed, choose the specific item to request.
Then, click on ’Place request’.
From the OPAC, patrons can place requests themselves either from the results list
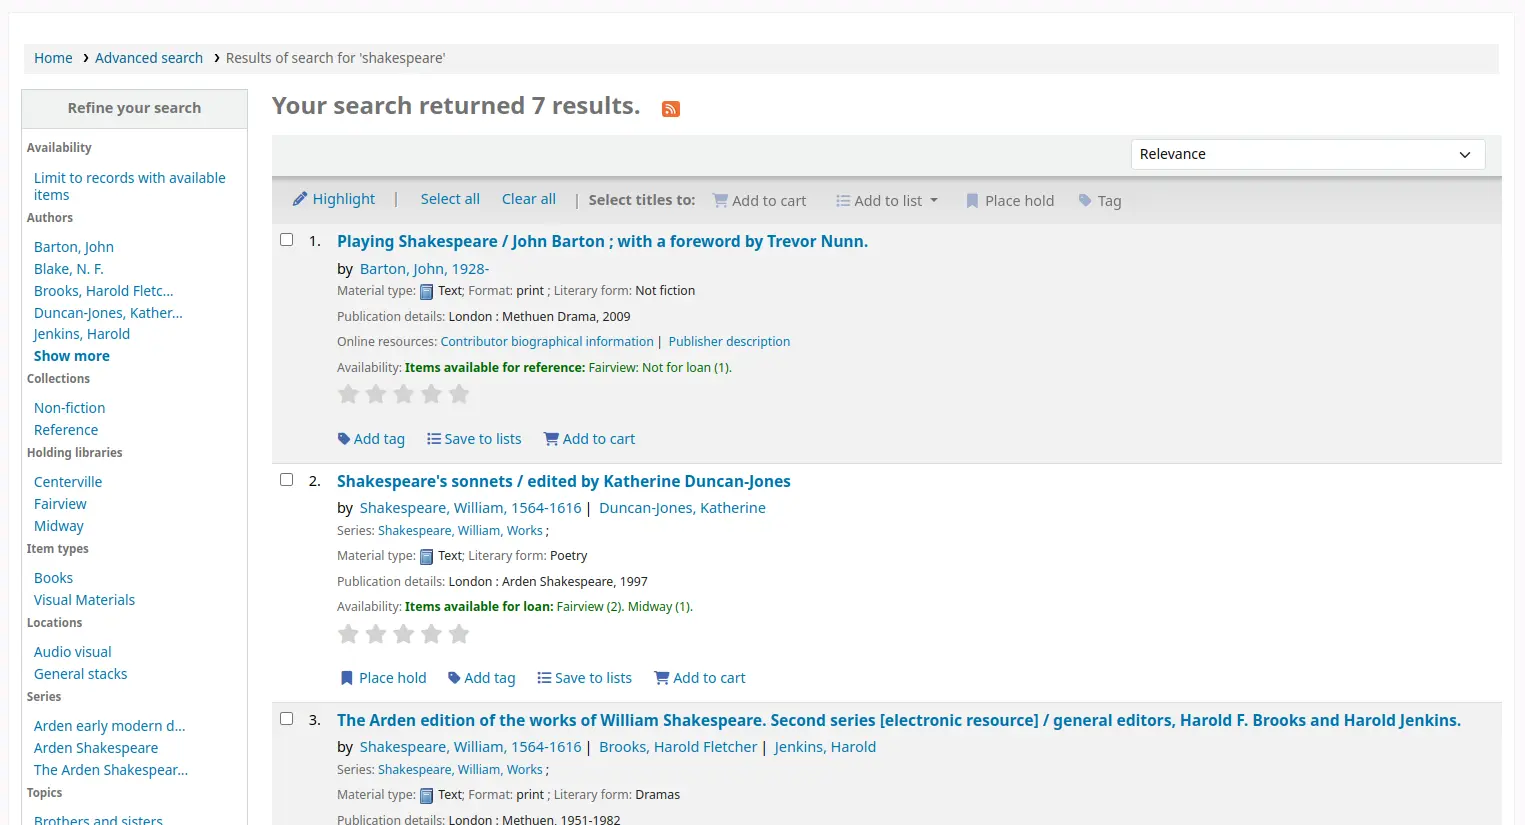
or by going to the detailed record.
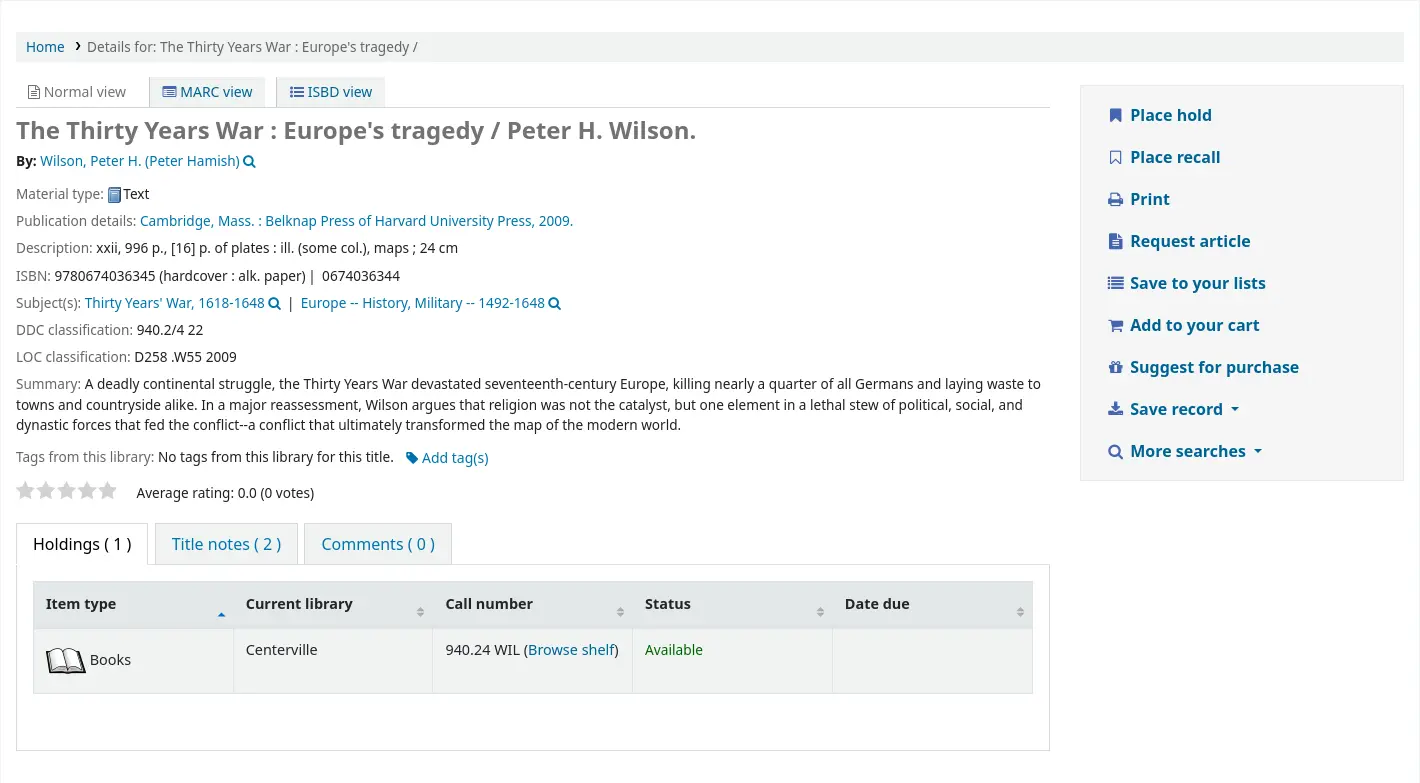
As with a hold, if the patron is not logged in, they will be asked to do so.
The form is the same as the one in the staff interface.
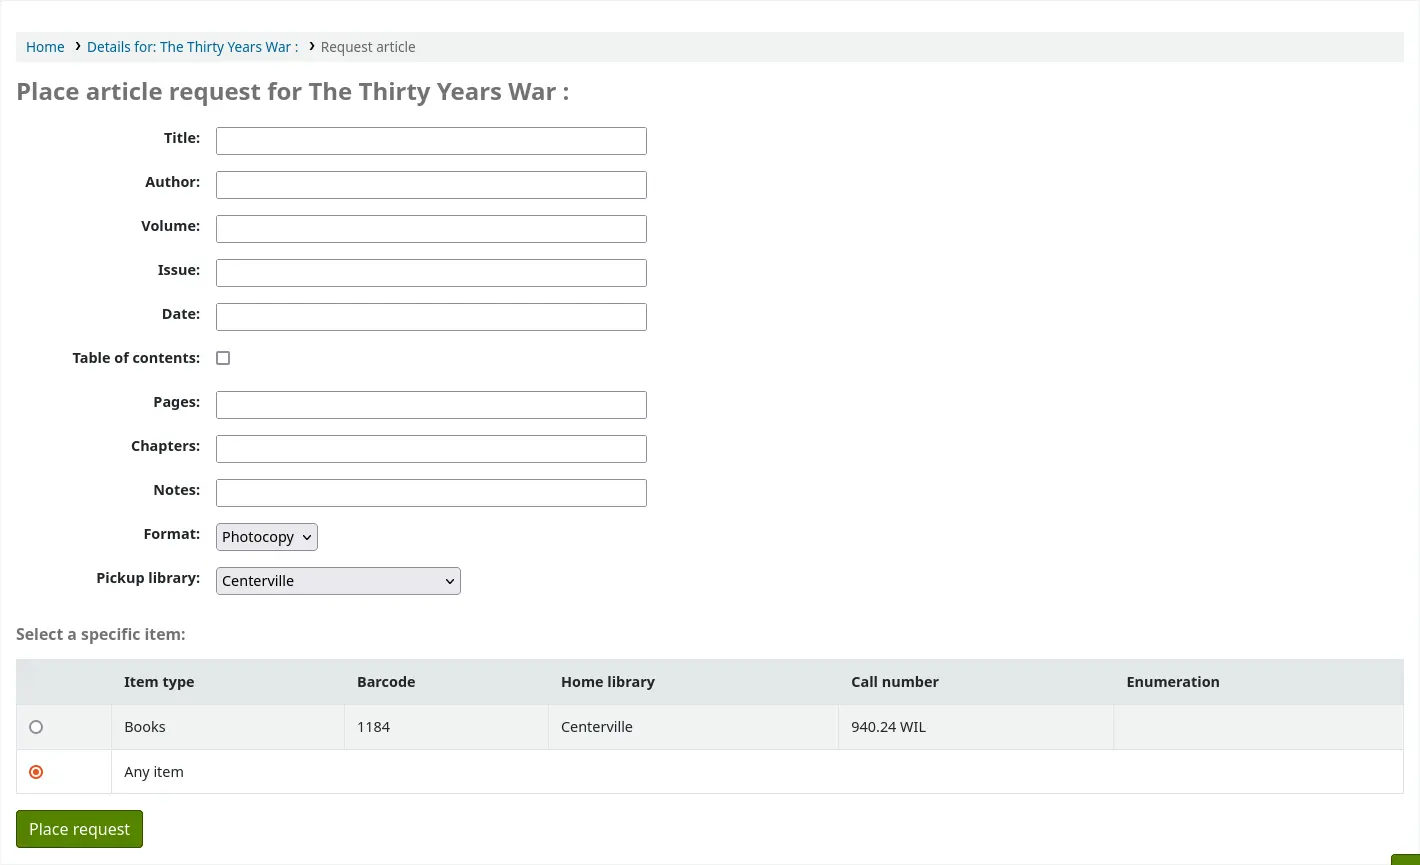
If there is a fee, a message will appear to inform the patron.

If allowed, the patron can choose the specific item to request.
From their account, the patron will be able to follow the progress of their request from ’new’

to ’pending’, if necessary,

to ’processing’.

The patron will receive an email notification after placing the request to confirm it as well as when the status of the request changes.
Observera
When placing an article request, the patron will receive a notification. The notice sent is based on the AR_REQUESTED template.
Each status is also linked to a notification. See below, under Managing article requests for the letter code for each status.
The content of any notification can be customized in the Notices and slips tool.
Once the request is completed the patron will receive an email notification and the article request will no longer appear in their account.
Observera
When staff marks the article request as ’Completed’, the patron will receive a notification. The notice sent is based on the AR_COMPLETED template. The content of this notification can be customized in the Notices and slips tool.
Managing article requests
Once the article request has been placed, staff will see new requests at the bottom of the home page on the staff client. (In the same location as tags, comments and modifications).

From there staff will be able to select requests to process.
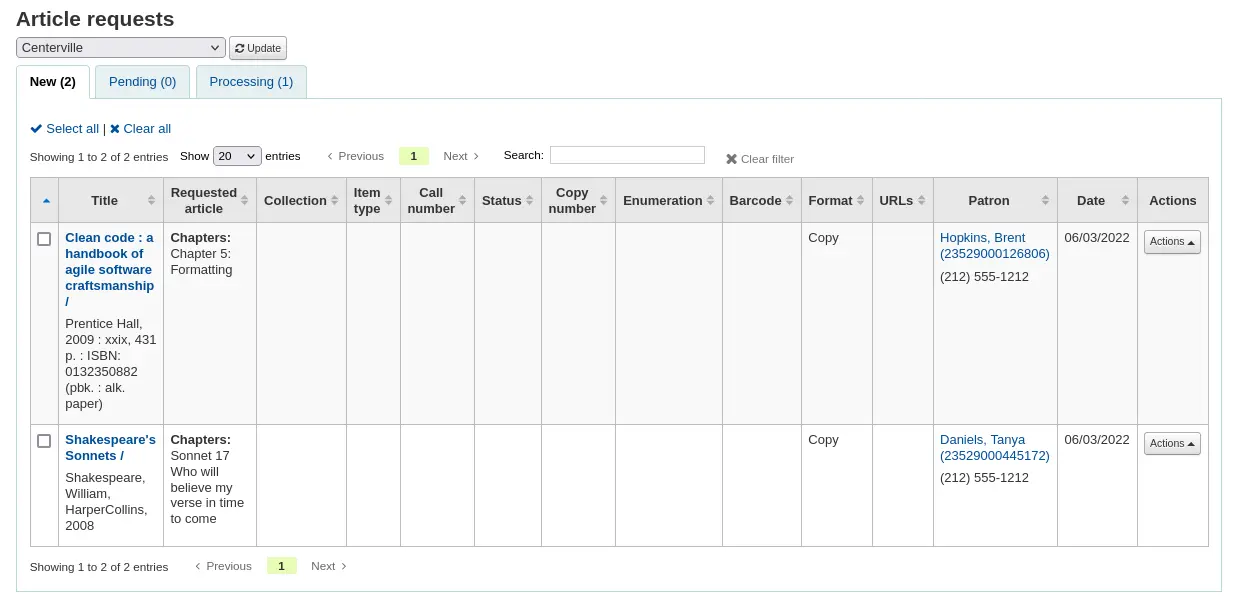
New requests are in the ’New’ tab.
The first step would be for a staff member to process the request, that moves the request to the processing tab and alerts other staff members that the request is in process. In the actions column, click on the dropdown menu and select ’Process request’. This will move the request to the processing tab.

Observera
Setting an article request to ’Processing’ will send a notification to the patron. The notice sent is based on the AR_PROCESSING template. The content of this notification can be customized in the Notices and slips tool.
If for any reason, a request cannot be processed right away (for example, if the title is currently checked out), the status can be changed to ’Pending’. This will send a notice to the patron indicating the request has been received and seen, but has yet to be processed.
Observera
Setting an article request to ’Pending’ will send a notification to the patron. The notice sent is based on the AR_PENDING template. The content of this notification can be customized in the Notices and slips tool.
Next staff will go to the shelf and make a copy of the requested article.
Once that is complete, staff can print the article request slip and staple or paper clip it to the article. In the actions column, you can select the dropdown and select print slip.
Observera
The slip used is based on the AR_SLIP template. The content of this slip can be customized in the Notices and slips tool.
Finally, staff will select the complete article request from the actions dropdown menu which will send a notice to the patron who made the request letting them know the request is ready for pickup.
This removes the article request from the processing tab.
Observera
Completing an article request will send a notification to the patron. The notice sent is based on the AR_COMPLETED template. The content of this notification can be customized in the Notices and slips tool.
If, for any reason, an article request must be canceled, staff can choose the ’Cancel request’ option from the ’Actions’ button.
Observera
Canceling an article request will send a notification to the patron. The notice sent is based on the AR_CANCELED template. The content of this notification can be customized in the Notices and slips tool.
Observera
Actions can also be made in bulk by checking the boxes next to the requests to process or by clicking ’Select all’, and choosing the new status from the actions menu on top of the table.
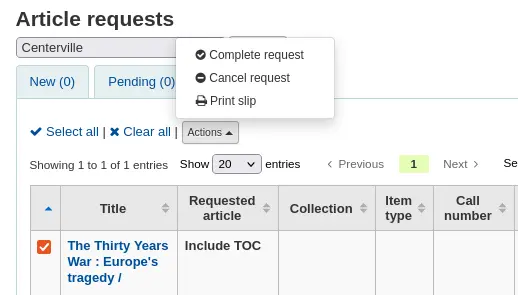
Försenade
Denna rapport listar alla exemplar som är försenade på ditt bibliotek.
Observera
Only staff with the overdues_report permission (or the superlibrarian permission) will be able to run this report.
Varning
For libraries with a large patron base, this report may take a significant amount of time to run.
Large libraries can choose to filter the report before it runs by setting the FilterBeforeOverdueReport system preference to ’Require’.
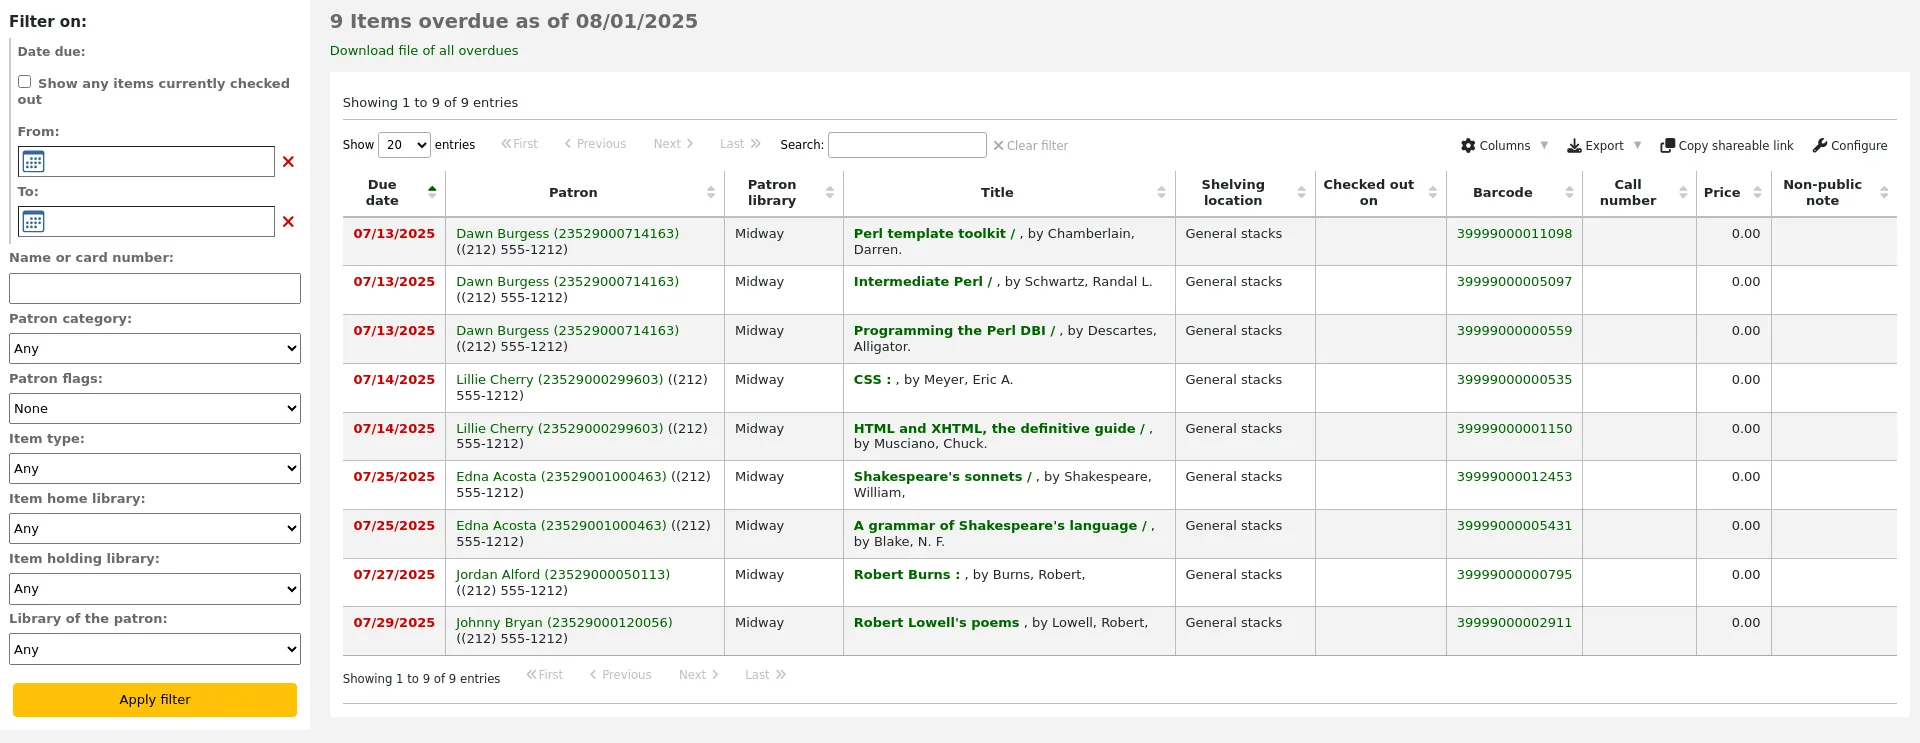
Observera
You can customize the columns of this table in the Table settings section of the Administration module (table id: circ-overdues).
Rapporten kan filtreras med menyalternativen som finns till vänster om rapporten.
Observera
The ’Show any items currently checked out’ checkbox basically switches this from a report of overdues to a report of checkouts. It will show all titles checked out regardless of due date.
The report result can be downloaded via the ’Download file of displayed overdues’ link or the ’Export’ button at the top of the table.
Försenade med böter
Denna rapport visar alla försenade exemplar på ditt bibliotek som har bötfällts.
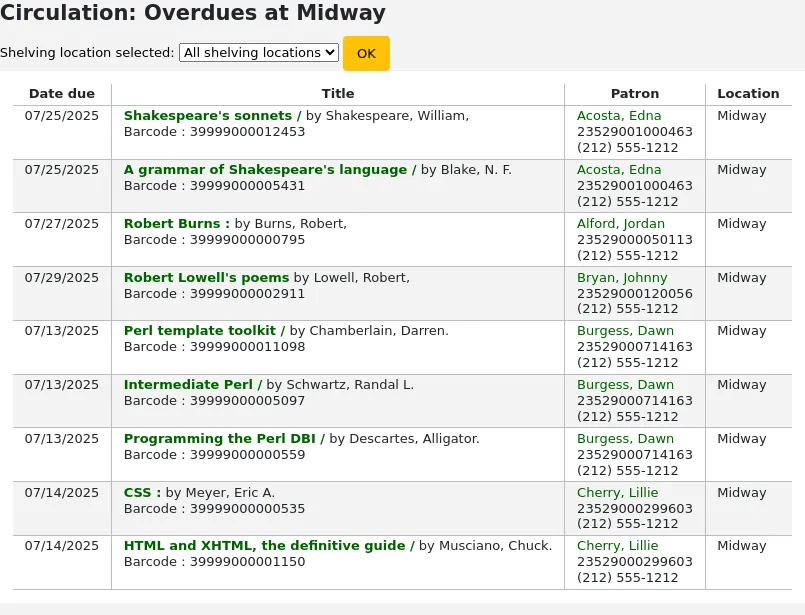
Observera
Only staff with the overdues_report permission (or the superlibrarian permission) will be able to run this report.
If you would like to limit the report you can use the pull down menu at the top to limit to a specific shelving location at your branch. To see overdues with fines at other branches you will have to change your branch or log in at that branch.
Viktigt
If you do not charge fines and/or don’t have the fines cron job running you will see no data on this report.
Väntande utlån på plats
If you are using the on site checkouts functionality (OnSiteCheckouts) then you’ll have a report to view all items that are currently checked out on site.

Detta listar återlämningsdatum (försenade i rött), vem som har exemplaret, exemplarinformation och på vilket bibliotek exemplaret finns.
Tracking in-house use
Many libraries track the use of items within the library.
Obs
This is different from tracking on-site usage. In-house use is the use of items in the library by patrons without them having to check them out. On-site use is the use of items on site that must first be checked out. To learn more about on site usage please review the OnSiteCheckouts preference.
Tracking the use of items in the library without checking them out can be done in Koha one of two ways. The first is to create one or more Statistical Patrons. When collecting items that have been used within the library, you will want to check them out to your statistical patron:
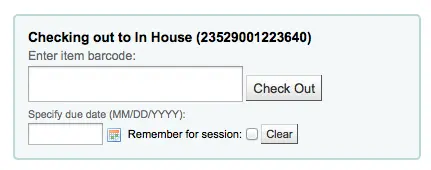
Instead of marking the item as ’checked out’ the system will record that the item was used in house:

Repeat these steps for all items that have been used within the library to keep accurate statistics for item use.
The other way to record local use of items is to set your RecordLocalUseOnReturn preference to ’Record.’ Then whenever you check an item in that is not checked out and not on hold a local use will be recorded.

Obs
If you have RecordLocalUseOnReturn set to ’Record’ you can still use your statistical patrons to record local use as well.
Self checkout
Koha comes with a very basic Web-based self checkout module where patrons can check out items to themselves.
Setting up the self checkout module
To enable this module, set the WebBasedSelfCheck system preference to ’Enable’.
To use this module you have to log in as a staff member with the self_checkout_module permission.
Observera
Create a staff patron specifically for this action so that you don’t leave a real staff user logged into a computer all day.
Furthermore, the self_checkout_module permission prevents the user from using the OPAC.
You can use the AutoSelfCheckAllowed, AutoSelfCheckID and AutoSelfCheckPass system preferences to log in automatically as this staff user.
You can add content, like instructions on how to use the self checkout system for example, by using the SCOMainUserBlock or the SelfCheckHelpMessage display locations in the HTML customizations tool.
Check the other self checkout module system preferences to make sure they work for your library.
Using the self checkout module
The module is available at: http://YOUR_KOHA_OPAC_URL/cgi-bin/koha/sco/sco-main.pl
Tips
There is no link to the self checkout module from the OPAC. You can use HTML customizations to add the link on the OPAC.
When on the self checkout page, depending on the value in the SelfCheckoutByLogin system preference you will be asked to enter either your card number

or your username and password.

Once you’re logged in to the self check module, you will be asked to scan the barcodes of the items to check out. A barcode scanner will usually do it automatically, but if you are entering the item barcode manually, hit ’Enter’ or click the ’Submit’ button after each barcode.

As you scan items they will appear in the ’Checkouts’ tab at the bottom of the page.
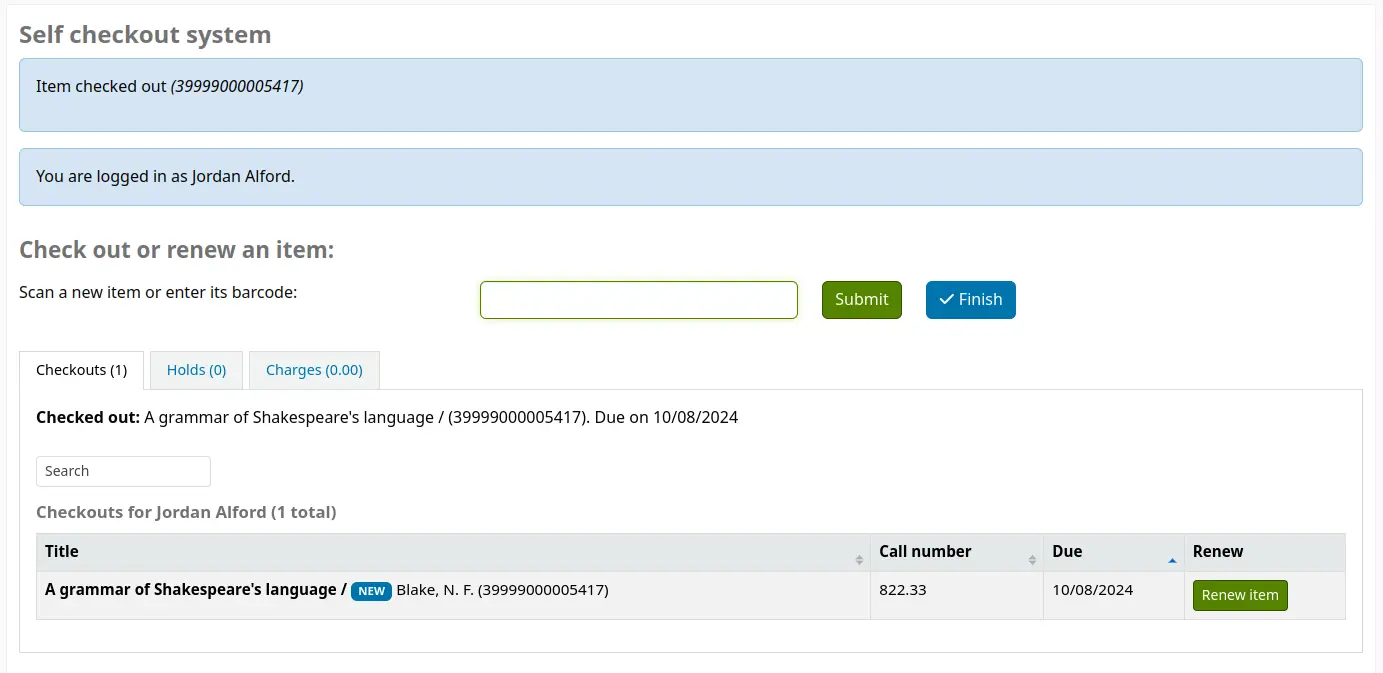
Observera
You can allow patrons from specific categories to check out several items at once with the SCOBatchCheckoutsValidCategories system preference.
When you are finished scanning items, click the ’Finish’ button. This will prompt you to print a receipt and log you out of the self check module.

When attempting to check items out, there are some instances where error messages will appear and the patron will be directed to the library staff. This will happen even if you are allowing overrides on circulation functions. Only a staff member can override a circulation block and so patrons must go to the library staff for help in these situations.
Observera
The self checkout module can also be used to check in items, if the SCOAllowCheckin system preference is set to ’Allow’.
Self check-in
In order to use the self check-in module, you must first set the SelfCheckInModule system preference to ’Enable’.
Then, you will have to create a patron with the self_checkin_module permission.
Obs
Create a staff patron specifically for this action so that you don’t leave a real staff client logged into a computer all day. You can give this patron only the aforementioned permission so it cannot be used for anything else.
Once this is done, you can head over to the self check-in page: http://YOUR_KOHA_OPAC_URL/cgi-bin/koha/sci/sci-main.pl
Log in with your staff patron with self check-in permissions
Once the computer or kiosk is set and the self check-in user logged in, patrons will be able to check-in their items themselves.
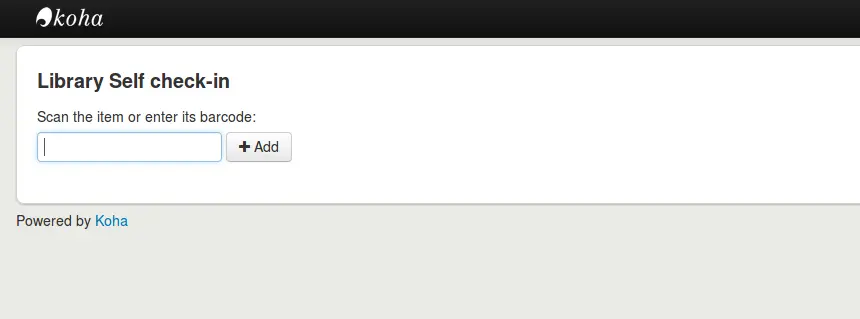
The patron will either scan the item’s barcode, if the computer is attached to a barcode scanner, or type in their item’s barcode in the box and click ’Add’ or press enter.
Obs
Most barcode scanners will automatically hit return after scanning.
Once they have scanned or entered all their items’ barcodes, they can click on the ’Check-in’ button to return all the items at once.
Viktigt
If the patron doesn’t click the ’Check-in’ button, the items will not be returned and will stay in their account.
Viktigt
The self check-in module will not warn user if the item is late, if they have fines, if the item is on hold for someone else, or if they have messages in their account.
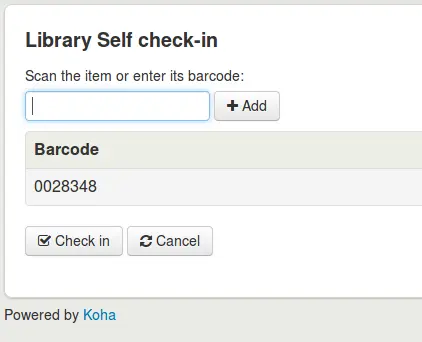
They can then click ’Finish’ to return to the main self check-in page.

Obs
If the patron doesn’t click ’Finish’, the screen will refresh after the timeout period specified in the SelfCheckInTimeout system preference.
Obs
Even if the patron doesn’t click ’Finish’ the item will still be checked in from their account.
You can customize the look of your self check-in screens by using the SelfCheckInUserCSS system preference or the SelfCheckInUserJS system preference.
You can add content, like instructions on how to use the self check-in system for example, by using the SelfCheckInMainUserBlock display location in the HTML customizations tool.
Statistics about the transactions made through the self check-in module are logged into the action_logs table in the Koha database. You can therefore build a custom report to get the statistics you need.
Offline circulation utilities
Koha allows for you to continue circulation actions while offline by using any one of three utilities.
Offline circulation in Koha
Uppmärksamma
The offline circulation module was deprecated in Koha version 23.11. Only the Firefox plugin and Windows tool are now supported.
If the AllowOfflineCirculation preference is set to ’Enable’ the library staff can continue to perform circulation actions within Koha when the system is offline. You will want to visit http://your-koha-staff-client-url/cgi-bin/koha/circ/offline.pl at least once while online and bookmark that page. That is the page you will go to when you are offline.
Viktigt
The offline interface uses HTML LocalStorage, which depending on the browser and user setting, is limited to 2.5MB or 5MB per domain. This means that larger systems will not be able to synchronize their data and are recommended to use either the Firefox or Windows application for offline circulation.
Inställning
Innan systemet försätts i läget offline för första gången går du till utlåning och väljer ’Inbyggt gränssnitt för offlinecirkulation’
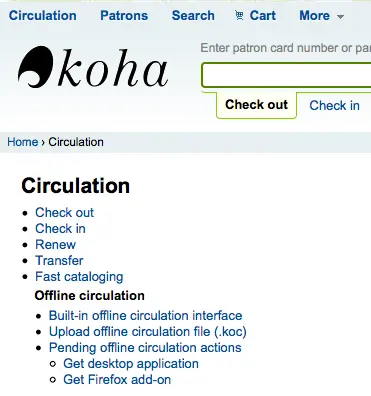
Synkronisera data på alla utlåningsdatorer genom att klicka på länken ’Synkronisera’ på skärmens högra sida.

Viktigt
The offline interface uses HTML LocalStorage, which depending on the browser and user setting, is limited to 2.5MB or 5MB per domain. This means that larger systems will not be able to synchronize their data and are recommended to use either the Firefox or Windows application for offline circulation.
Det gör att du kan ladda ner en lokal kopia av alla dina låntagardata och utlåningsdata. Klicka på länken ’Ladda ner poster’ längst upp i sidan för att synkronisera dina data.

När dina data är nedladdade visas de datum då data senast synkroniserades till höger om varje datauppsättning.
Detta ska göras regelbundet som förberedelse för oväntade anslutningsförluster.
Utlåning
When your system goes offline visit the Offline Circulation page (http://your-koha-staff-client-url/cgi-bin/koha/circ/offline.pl) in Koha and click ’Check out’ or ’Check in’ to perform offline actions.
Utlåning sker genom att man söker efter låntagaren med hjälp av streckkod eller namn längst upp i skärmen ’Utlåning’. När du valt låntagare visas synkroniserad låntagarinformation, inklusive böter och aktuella lån.
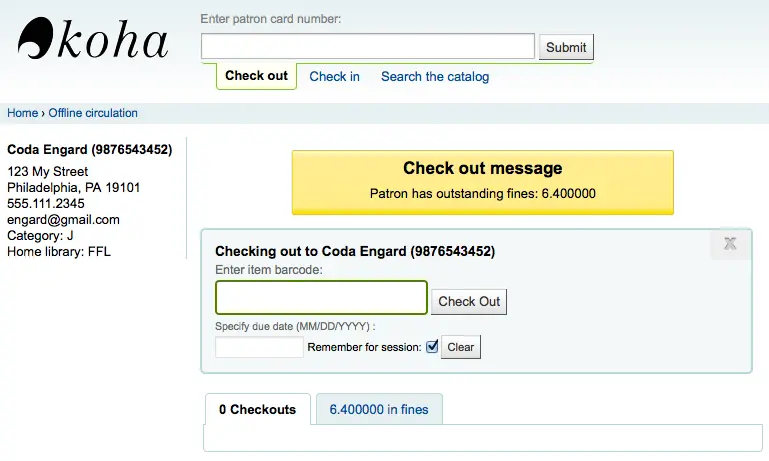
Skanna streckkoden för exemplaret du vill låna ut och ange ett återlämningsdatum. Om du inte anger ett återlämningsdatum frågar Koha efter ett.
När exemplaret lånats ut visas det under låntagarens information.
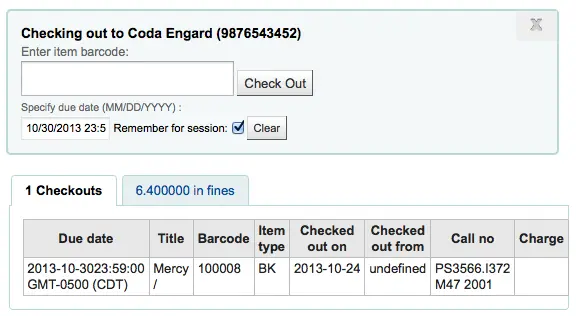
Koha offline uploading
Once the system is back online visit the ’Synchronize’ page on the Offline circulation module and click ’Upload transactions’
After the files are uploaded you can click ’View pending offline circulation actions’ on the right.
After clicking ’View pending offline circulation actions’ you will be brought to a summary of all of the actions you loaded in to Koha in your *.koc file.
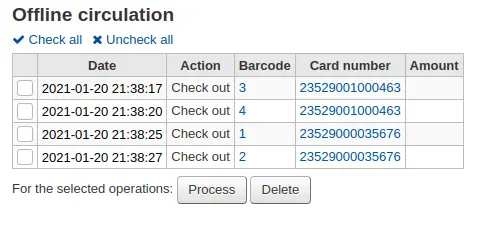
När alla loggar från alla utlåningsdatorer laddats kommer du att kunna välja alla eller bara välja de du vill bearbeta i Koha.
Click on the ’Process’ button and Koha will record every stored transaction one by one. For each transaction, the status will change to:
”Genomförd.” om transaktionen genomfördes korrekt
”Låntagare hittades inte.” om lånekortsnumret är felaktigt
”Exemplar hittades inte.” om exemplarets streckkod är felaktig
”Exemplar inte utlånat.” om du försökte återlämna ett tillgängligt exemplar
När du är klar visas en sammanfattning med alla dina transaktioner
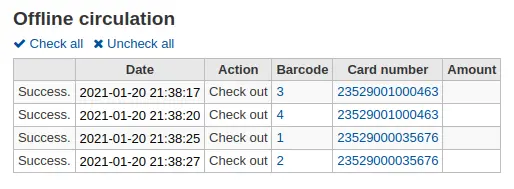
Firefox plugin
There is an offline circulation tool that you can add to your Firefox browser as an add-on. To do so, just go to https://addons.mozilla.org/en-US/firefox/addon/koct/ page and click on the ”install now” button. You may have to confirm the installation, just click on ”install now” and then restart Firefox to complete the installation.
Once you have installed the plugin and restarted Firefox, you will see the Koha logo in the download bar at the bottom right of Firefox.

A click on the logo will open the tool in its own window.
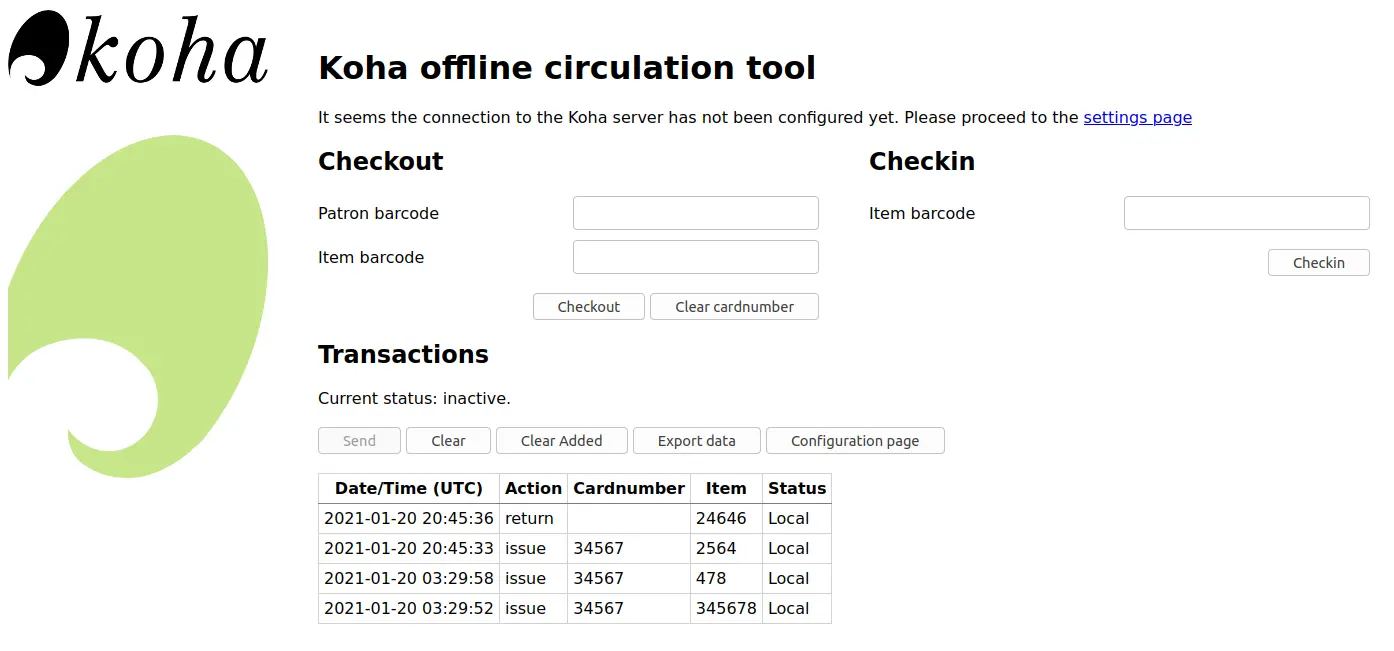
The plugin consists of three sections:
The ’Check out’ section is where you check out items
The ’Check in’ section is where you check in items
The ‘Transactions’ section is where you can track the transactions done while in offline mode
The transactions will keep information until you empty it.
If you’d like to clear the transactions, click the ’Clear’ box before hitting the ’OK’ button.
The first thing you want to do then is to set up the plugin. Proceed to the settings page, linked in the top right of the page or under ‘Configuration page’ in the Transactions section.
Answer the 5 questions presented:
Server = the URL of the librarian interface
Username = your staff account login
Password = your staff account password
Branch code = the code for the branch where you are located
Commit Type = If you select ‘Send data to Koha’, your account will need to be approved by an administrator. If you select ‘Apply directly to Koha’, your account will not need to be approved.
Viktigt
To save the settings, you will have to close the plugin window and re-open it by clicking again on the Koha logo in the add-on bar.
Obs
You can create a staff account dedicated to the offline circulation. So that, no matter who is at the circulation desk, they can all use the same login. Along those lines, you can use a group login that you already have in place for circulation as well.
Once you have everything set up you can start checking items in and out.
Checking out:
Under the ’Checkout’ heading
Scan the patron barcode
Scan the item barcode
Click ’Checkout’
Checking in:

Under the ’Checkin’ heading
Scan the item barcode
Click ’Checkin’
Each time, you check out or check in an item, a new transaction is recorded in the local plugin database. This is recorded in the Transactions section bellow.
Obs
The status will be ”Local.” as long as you are offline and don’t process the transactions into Koha.
When your Internet connection comes back up you will want to get these transactions in to Koha. Before processing these transactions you should be aware of a few issues.
Because you are not connected to your Koha database when using this plugin holds will need additional processing. If an item you check in while offline has a hold, the hold is kept on the item. Since, you can’t confirm holds found during the processing of every check in, the holds stay on the item and will need to be managed later. If you only checked in a few items you can just keep a record of them all. If you checked in a lot of items you can use the Holds queue once it rebuilds to see what holds made it to the shelf erroneously.
Similarly, if an patron card was expired, the offline circulation tool won’t know about it, so the checkout will be recorded regardless of the patron’s account being blocked normally.
You have two options for adding this data to Koha

Apply to Koha
If you checked in/out on more than one computer at the same time, what you want is to process every transaction consistently. Let’s say for instance that one patron checked a book out on one computer and then checked the same book in on another computer. To be consistent, you need to record the check out first and then the check in. Not the opposite! To do so, you need to group every transaction in one place, sort them all and then, process everything. So, you need to use the ”Apply to Koha” option from every plugin/computer you worked with. This way, the log will go to Koha and be accessible from the Offline Circulation page.
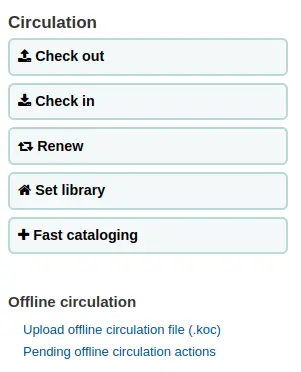
Kom dit: Cirkulation > Väntande offline cirkulationsåtgärder

När alla loggar från alla utlåningsdatorer laddats kommer du att kunna välja alla eller bara välja de du vill bearbeta i Koha.
Click on the Process button and Koha will record every stored transaction one by one. For each transaction, the status will change to:
”Genomförd.” om transaktionen genomfördes korrekt
”Låntagare hittades inte.” om lånekortsnumret är felaktigt
”Exemplar hittades inte.” om exemplarets streckkod är felaktig
”Exemplar inte utlånat.” om du försökte återlämna ett tillgängligt exemplar
När du är klar visas en sammanfattning med alla dina transaktioner

Tillämpa direkt
If you performed all of the circulation actions on one computer then everything is sorted already so you can choose to ”Apply directly”
The status column will be updated to let you know if the transactions were applied
”Genomförd.” om transaktionen genomfördes korrekt
”Låntagare hittades inte.” om lånekortsnumret är felaktigt
”Exemplar hittades inte.” om exemplarets streckkod är felaktig
”Exemplar inte utlånat.” om du försökte återlämna ett tillgängligt exemplar
Offline circulation tool for Windows
The Offline circulation utility can be downloaded at: https://github.com/bywatersolutions/koha-offline-circulation/releases
To generate a borrowers.db file for loading in to the Windows tool you will need to run the file generator via a cron job.
Upload offline circulation file
The offline circulation tool for Windows will generate a KOC file that you can upload into Koha once your system comes back up.
Klicka på ’Ladda upp offline-utlåningsfil ( .koc)’ på menyn Utlåning

Browse your computer for the *.koc file

När filen laddats upp klickar du för att bearbeta filen
När detta är klart kan du ladda upp en annan fil eller hantera andra åtgärder för offline-utlåning.
After clicking ’View pending offline circulation actions’ you will be brought to a summary of all of the actions you loaded in to Koha in your *.koc file.

När alla loggar från alla utlåningsdatorer laddats kommer du att kunna välja alla eller bara välja de du vill bearbeta i Koha.
Click on the Process button and Koha will record every stored transaction one by one. For each transaction, the status will change to:
”Genomförd.” om transaktionen genomfördes korrekt
”Låntagare hittades inte.” om lånekortsnumret är felaktigt
”Exemplar hittades inte.” om exemplarets streckkod är felaktig
”Exemplar inte utlånat.” om du försökte återlämna ett tillgängligt exemplar
När du är klar visas en sammanfattning med alla dina transaktioner
