Werkzeuge
Werkzeuge in Koha dienen einer bestimmten Funktion. Viele der Funktionen aus den Werkzeugen, werden in anderen Bibliothekssystemen bei Reports aufgelistet.
Get there: More > Tools
Patrons and circulation
Benutzerlisten
Get there: More > Tools > Patrons and circulation > Patron lists
Patron lists are a way to store a group of patrons for easy modification via the batch patron modification tool or reporting.

Über ‚Neue Benutzerliste‘ können Sie eine neue Benutzerliste anlegen
Enter a list name.
Checking the ‚Shared‘ box will make this list visible to all users with the manage_patron_lists permission.
Save the list.
Each list has an ‚Actions‘ menu with more list options.
To add patrons to the list click the ‚Add patrons‘ link in the ‚Actions‘ menu.
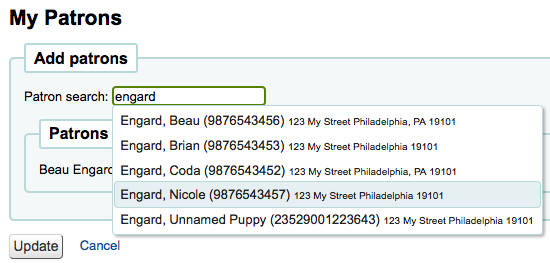
Geben Sie den Namen oder die Ausweisnummer in die Suchmaske ein und klicken Sie auf einen der Treffer um den Benutzer hinzuzufügen.
Alternatively, you can click on the ‚Enter multiple card numbers‘ link and scan (or type in) barcodes in the box.
Once you have all of the patrons you would like to add you can click the ‚Add patrons‘ button to save them to the list.
Hinweis
You can customize the columns of this table in the ‚Table settings‘ section of the Administration module (table id: patron-list-table).
Clubs
Get there: More > Tools > Patrons and circulation > Patron clubs
Patron clubs create clubs in which patrons may be enrolled. It is useful for tracking summer reading programs, book clubs and other such clubs.
Wichtig
Staff will need the clubs permissions to edit clubs, templates and enroll patrons. To learn how to set patron permissions, go to the patron permissions section of this manual.
Creating a new club template
Click on the ‚New club template‘ button. Here you can add fields that can be filled out at the time a new club is created based on the template, or a new enrollment is created for a given club based on the template.
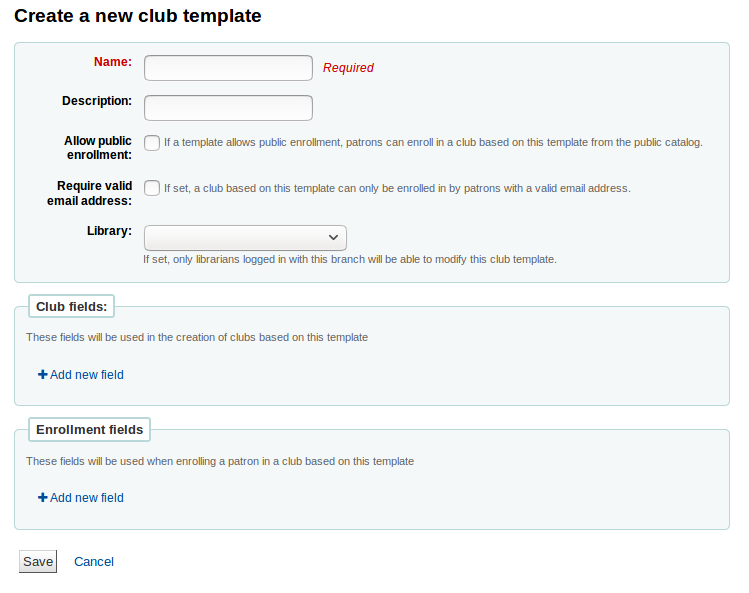
The name is required. This could be something like ‚Adult book club‘, ‚Children’s book club‘ or ‚Summer reading program‘. Remember these templates will be starting point for each club you create.
The description can be any additional information.
Allow public enrollment: if this box is checked it will allow patrons to enroll in a club based on this template from the OPAC.
Require valid email address: if this box is checked only patrons with a valid email address can enroll. So they will need a email address to enroll.
The library drop down gives you the flexibility to let staff from specific branches create clubs with this template. If you let it set to blank, staff from any branch will be able to create a new club using this template.
Club fields: these fields will be used when creating a club based on this template. For example, this can be the name of the club, the name of the animator, the theme, etc.
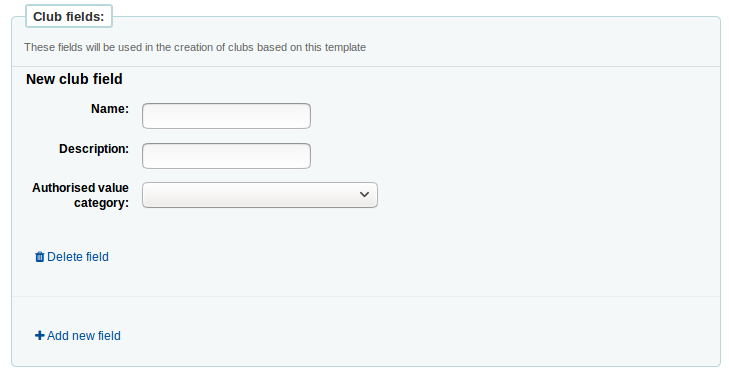
‚Name‘ is the label of the field
‚Description‘ is additional information about this field.
You can connect authorized values here.
Enrollment fields: you can add any additional fields you want to have filled out by your patrons when they enroll in a club base on this template.
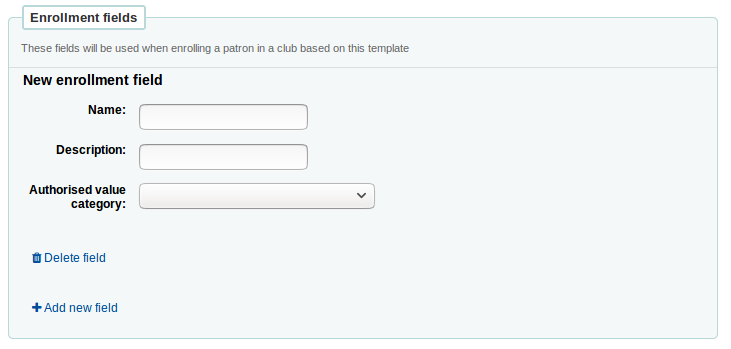
‚Name‘ is the label of the field
‚Description‘ is additional information about this field.
You can connect authorized values here.
Creating a new club based on a template
Click on the ‚New club‘ dropdown menu and select the template you want to use. Here you can add information about a new club using a template you created.
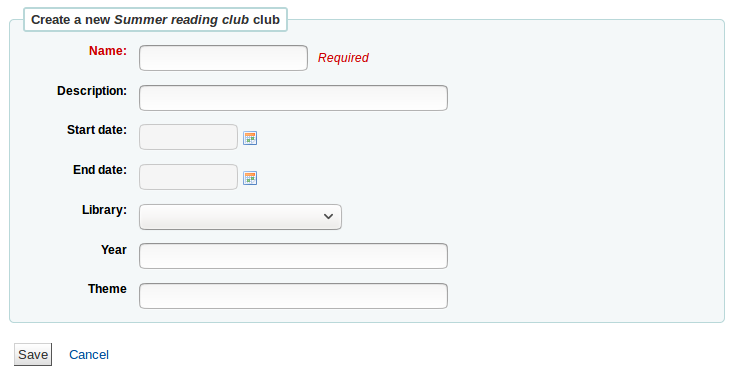
The name is required, this will be the name of the specific club using the template you created. For example, ‚Summer 2018 reading club‘.
The description can be any additional information.
Start and End date will depict when this club runs, the entire duration of the club. Once the club expires, enrollment will not be possible.
The library drop down gives you the flexibility to enroll patrons from specific branches. If you let it set to blank, patrons from any branch will be able to enroll.
Enrolling a patron in a club from the staff interface
To enroll a patron in a club from the staff client, go to the patron’s account.
On the ‚Details‘ page or the ‚Check out‘ page, click on the ‚Clubs‘ tab. All ongoing clubs will be displayed in this tab.

Click on the ‚Enroll‘ button and fill in the fields.
You can also cancel enrollment by clicking on the cancel enrollment.
Enrolling a patron in a club from the OPAC
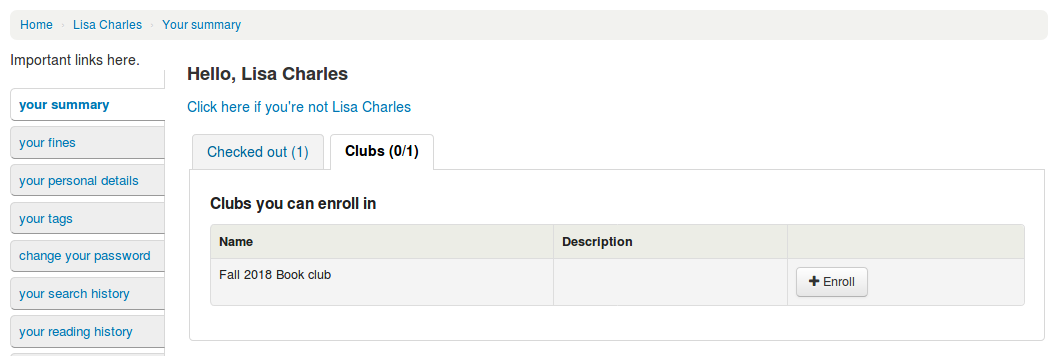
If you allow public enrollment, the club will be visible on the OPAC.
Patrons have to sign into their account. In the ‚Your summary‘ section, they will be able to click on the ‚Clubs‘ tab and enroll.
Viewing enrollments
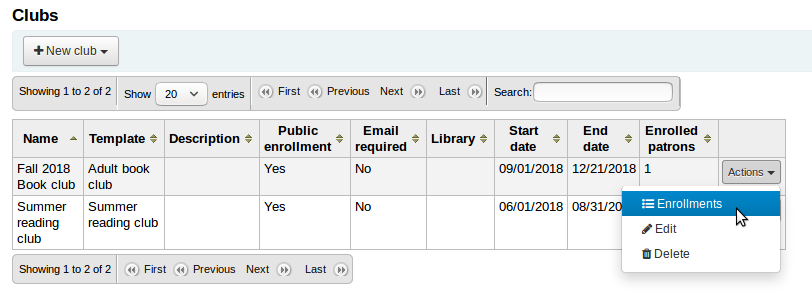
You can monitor the enrollments in each club by going to the ‚Patron clubs‘ tool page and choosing ‚Enrollment‘ from the ‚Actions‘ button.
Placing a hold for a patron club
You can place holds for a patron club - holds are placed for club members in a random order.
To place a hold for a patron club:
Go to the patron clubs tool (‚Home > Tools > Patron clubs‘).
Click the ‚Actions‘ button for the club and select ‚Search to hold‘.
Search for a title and select a record.
Select ‚Place hold for [CLUBNAME]‘ from either the action links for the record, or from the ‚Place hold‘ action in the menu bar.
The place holds page is displayed and lists the club members.
Click the ‚Place hold‘ button.
Result: Holds are placed for all club members.
Patron import
Get there: More > Tools > Patrons and circulation > Import patrons
Das Werkzeug für den Benutzerdatenimport kann jederzeit verwendet werden, um weitere Benutzer nachzuladen. Es wird häufig in Hochschulen und Schulen eingesetzt, wenn ein neuer Jahrgang von Studenten oder Schülern beginnt.
Creating a patron import file
You can download a blank CSV file with a header from the start page of the patron import tool that you can use as a template for your patron import. The header contains all fields that can be used with the patron import tool. You can delete fields and columns you don’t need with the exception of a few mandatory ones. When overlaying, if your new .csv includes blank columns, any existing values in patron records will be overwritten with blanks. It is best to remove any blank columns in a .csv to ensure no existing data is removed.
Wichtig
cardnumber, surname, and all fields you have defined in the BorrowerMandatoryField preference are required and must match valid entries in your database.
Wichtig
The ‚password‘ should be stored in plaintext, and will be converted to a Bcrypt hash.
Sprechen Sie mit Ihrem Systemadministrator über mögliche Optionen, wenn Ihre Passwörter bereits verschlüsselt vorliegen
Wichtig
Date formats should match your dateformat system preference, and must be zero-padded, e.g. ‚01/02/2008‘. Alternatively you can supply dates in ISO format (e.g. ‚2008-12-01‘).
Wichtig
If your data contains special characters or diacritics, make sure your file is encoded in UTF-8. Otherwise, the special characters will not be imported correctly.
Hinweis
If loading patron attributes, the ‚patron_attributes‘ field should contain a comma-separated list of attribute types and values.
The attribute type code and a colon should precede each value.
Zum Beispiel: „INSTID:12345,BASEBALL:Cubs“
Anführungszeichen sind notwendig, wenn mehrere Werte definiert werden.
Since values can contain spaces, additional doubled-quotes may be required:
„INSTID:12345,BASEBALL:Cubs,““BASEBALL:White Sox““
Hinweis
It’s possible to set restrictions using the patron import tool. If the expiration date and comment match an existing restriction, the one in the import file will be skipped. So a patron import can be repeated multiple times without creating duplicate restrictions. But if one of the criteria is different, a new restriction will be added.
Importing patrons
Once you have created your file, you can use the patron import tool to bring the data into Koha.
Choose your CSV file

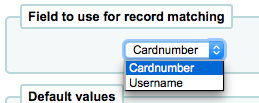
Choose to match on ‚cardnumber‘ or ‚username‘ to prevent adding of duplicate card numbers to the system. Additional matchpoints can be set up using patron attributes marked as unique.
Next you can choose default values to apply to all patrons you are importing
For example, if you’re importing patrons specific to one branch you can use the field on the import form to apply the branch code to all those you are importing.
Finally, you need to decide on what data you want to replace if there are duplicates.
Vorhandene Datensätze werden anhand des Feldes, das zum Abgleich angegeben wurde, gefunden, um Dubletten zu vermeiden

When using patron attributes in your installation, you can choose how they are handled on import. You can either decide to always overlay all patron attributes or you choose to only replace patron attributes included in your import file. This will leave other attributes untouched.

Notices & slips
Get there: More > Tools > Patrons and circulation > Notices & slips
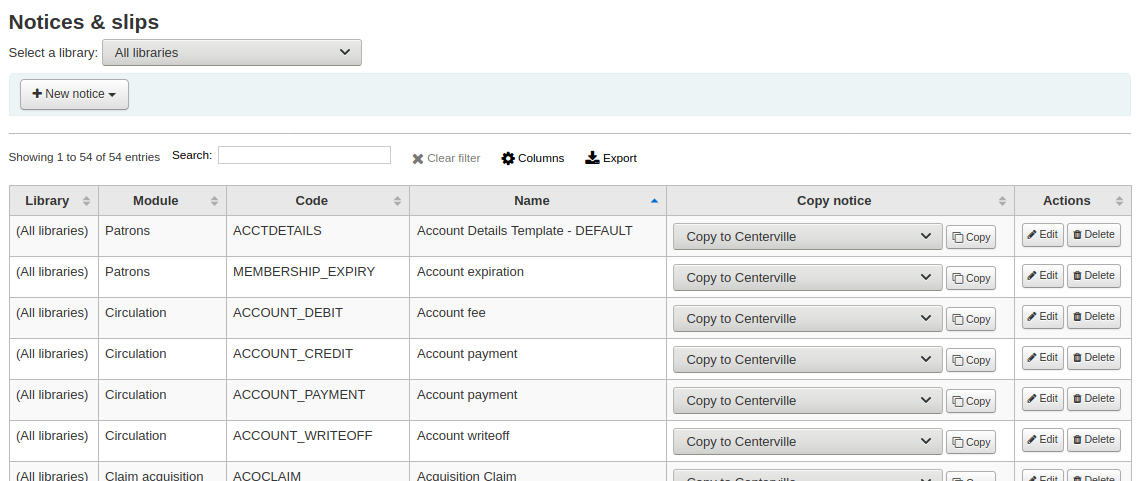
All notices and circulation receipts (or slips) generated by Koha can be customized using the Notices & slips tool. The system comes with several predefined templates that will appear when you first visit this tool.
Hinweis
You can customize the columns of this table in the ‚Table settings‘ section of the Administration module (table id: lettert).
Jede Benachrichtigung kann bearbeitet, aber nur einige wenige können endgültig gelöscht werden. Damit werden Fehler vermieden beim Versuch des Systems, eine Benachrichtigung ohne hinterlegtes Template zu generieren. Jede Benachrichtigung kann für jede Bibliothek bearbeitet werden. Standardmässig werden alle Benachrichtigungen für alle Bibliotheken angezeigt.
If you have a style you’d like applied to all slips you can point the SlipCSS preference to a stylesheet. The same is true for notices, using the NoticeCSS preference to define a stylesheet.
You will also want to review the Customising notices and slips wiki page for more information on formatting these notices.
Adding notices and slips
Eine neue Benachrichtigung oder Quittung erstellen
Click ‚New notice‘
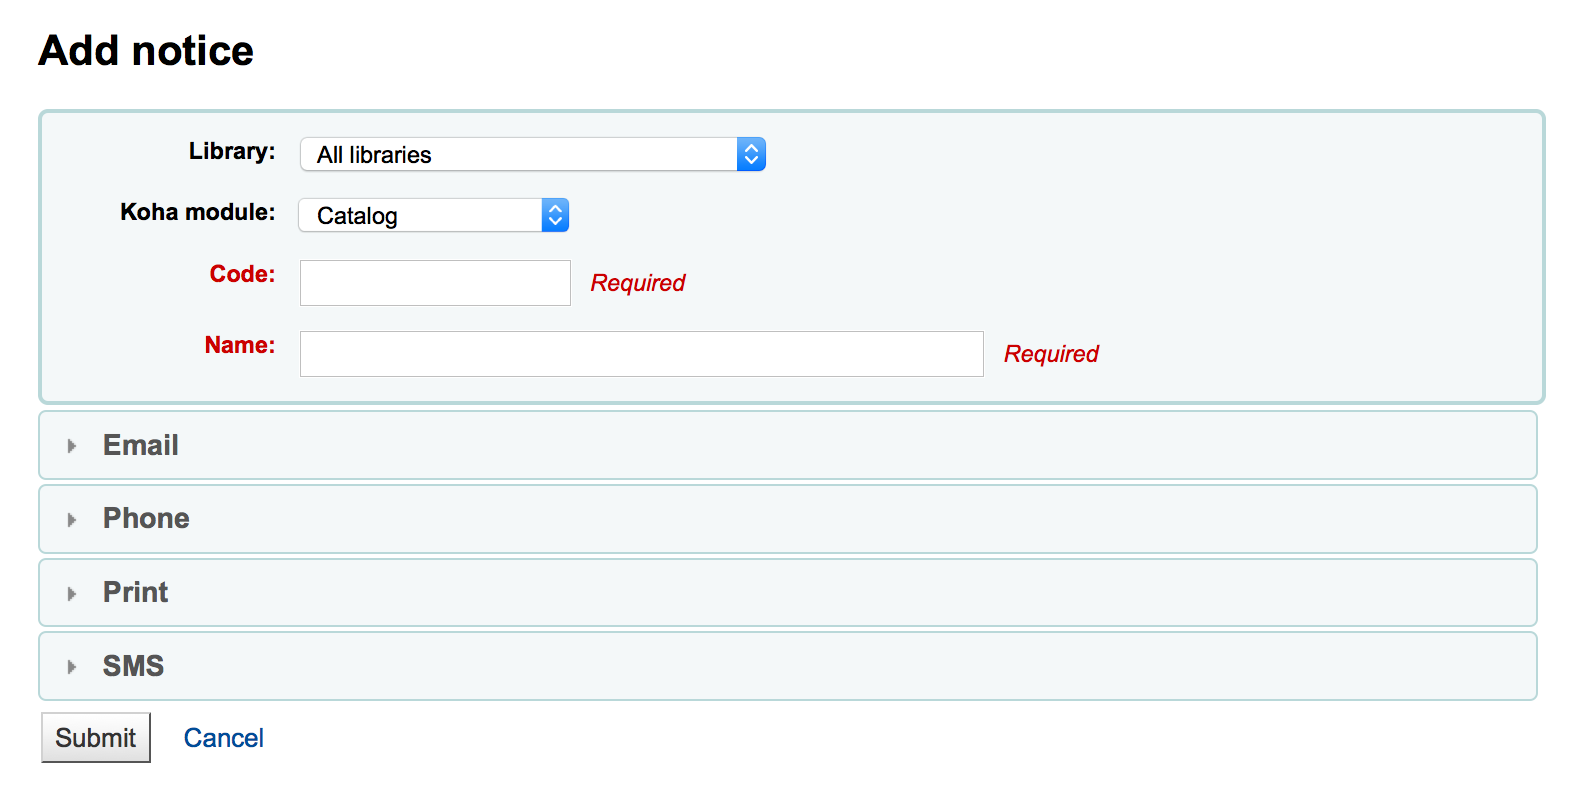
Wählen Sie, für welche Bibliothek diese Benachrichtigung oder Quittung ist
Wichtig
Not all notices can be branch specific for more information review the Customising notices and slips wiki page.
Wählen Sie das Modul, zu dem diese Benachrichtigung gehört
The Code is limited to 20 characters
Use the name field to expand on your Code
Hinweis
With overdue notices, be sure to put your branch name in the description as well so that it will be visible when setting up your triggers.
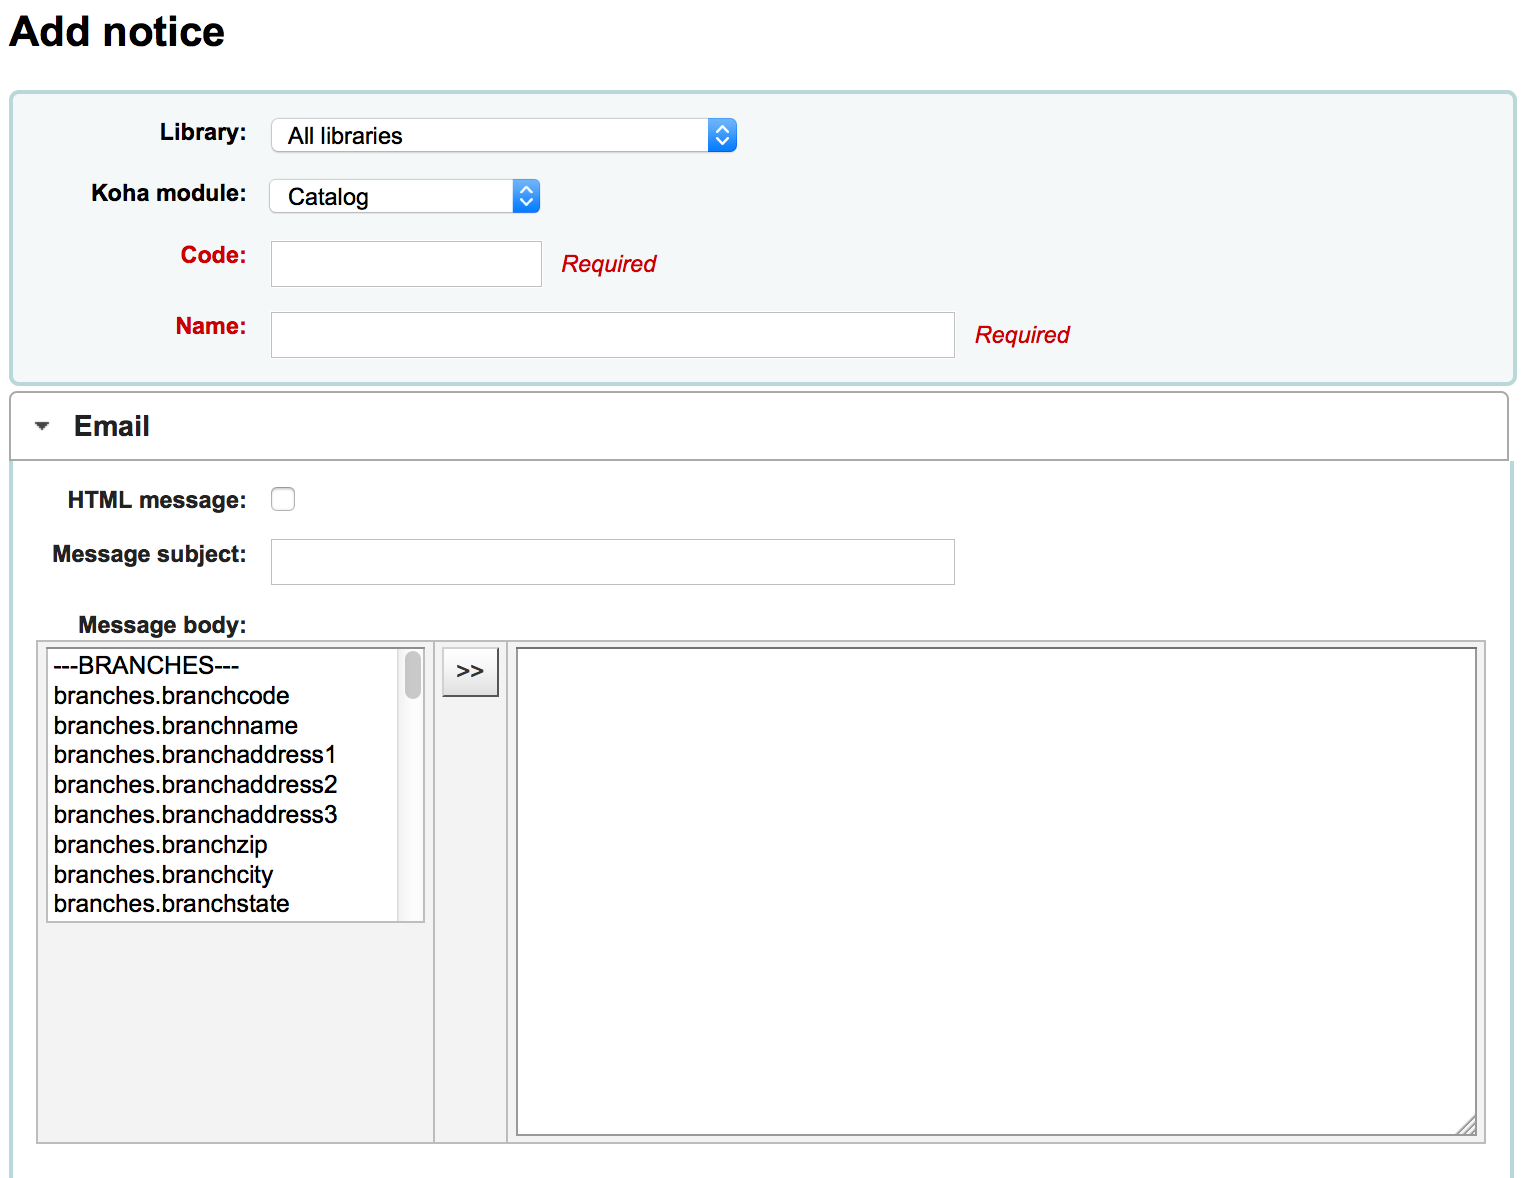
Next you can customize the notice for every possible delivery method
Für jede Benachrichtigung sollte ein Text für Email konfiguriert werden
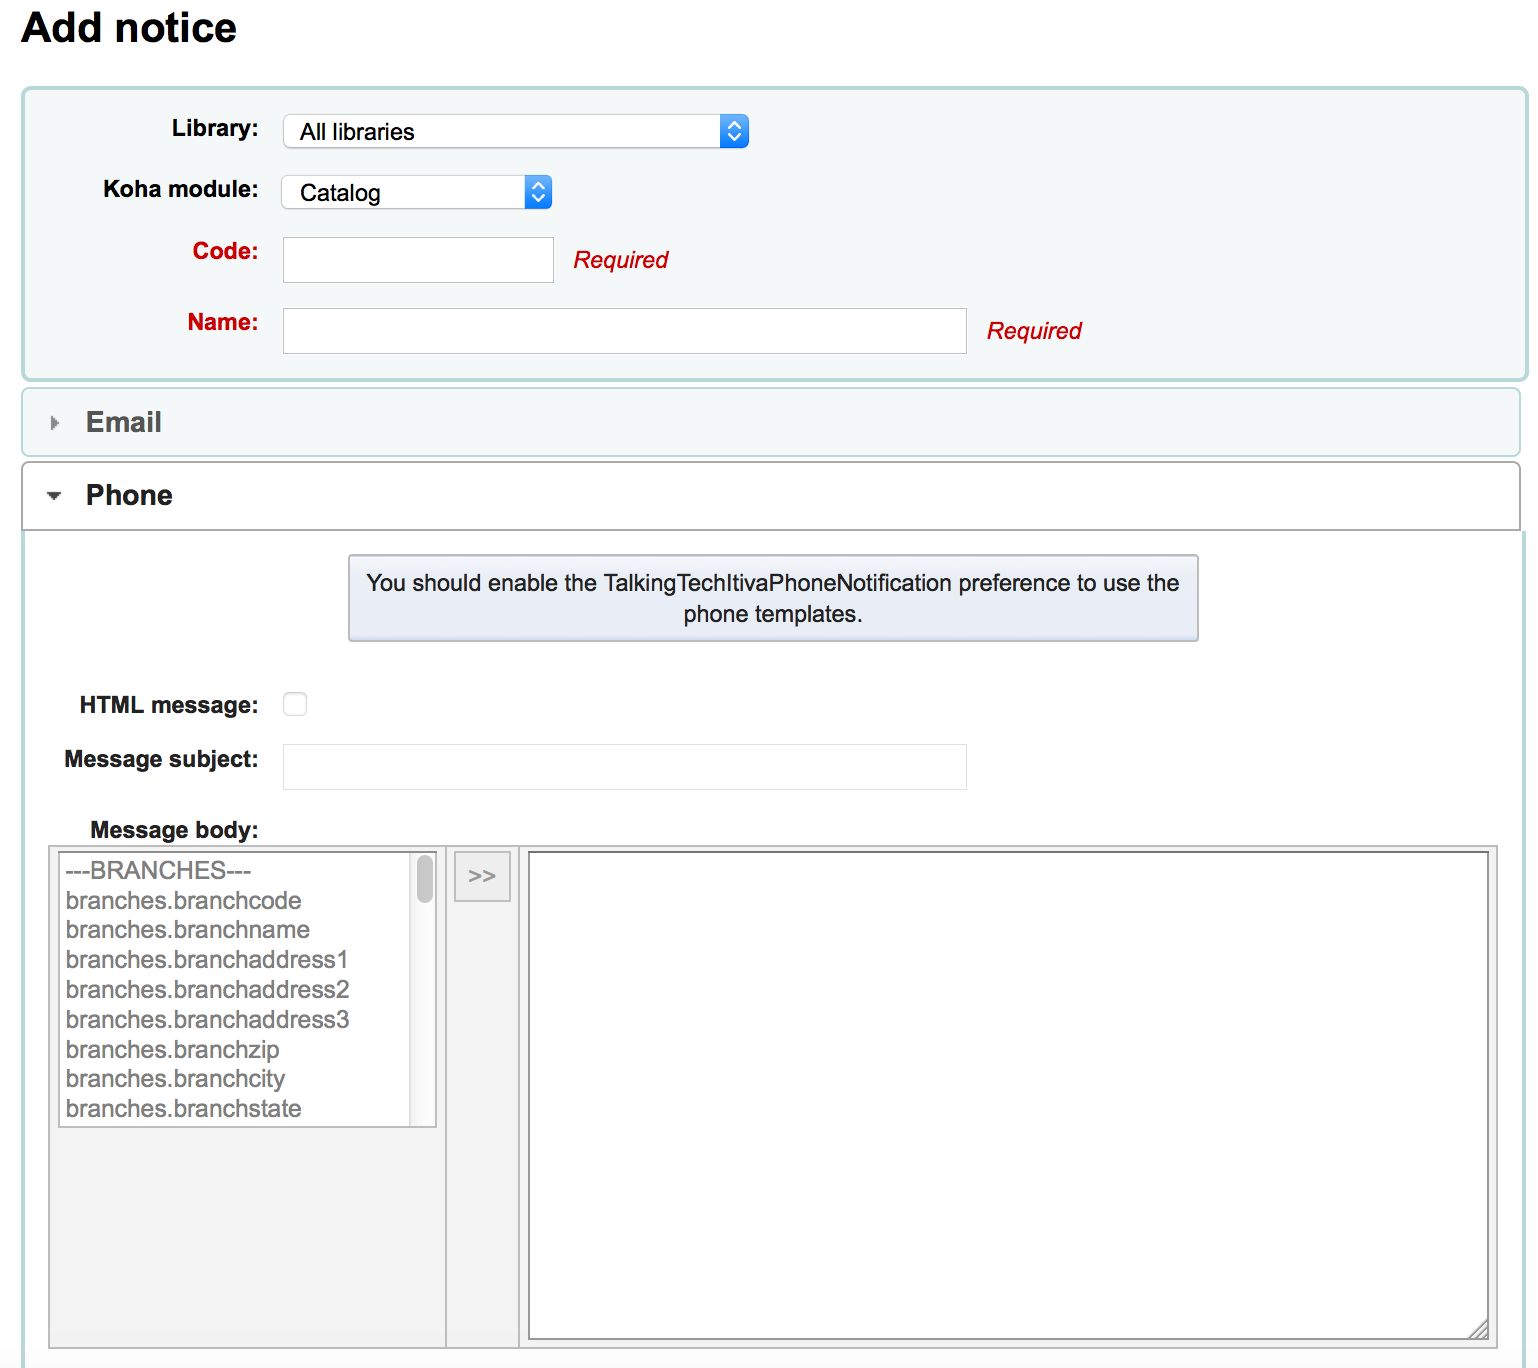
If you’re using the TalkingTechItivaPhoneNotification service you can set up a Phone notification
Wenn gedruckte Benachrichtigungen benötigt werden, können diese als nächstes konfiguriert werden
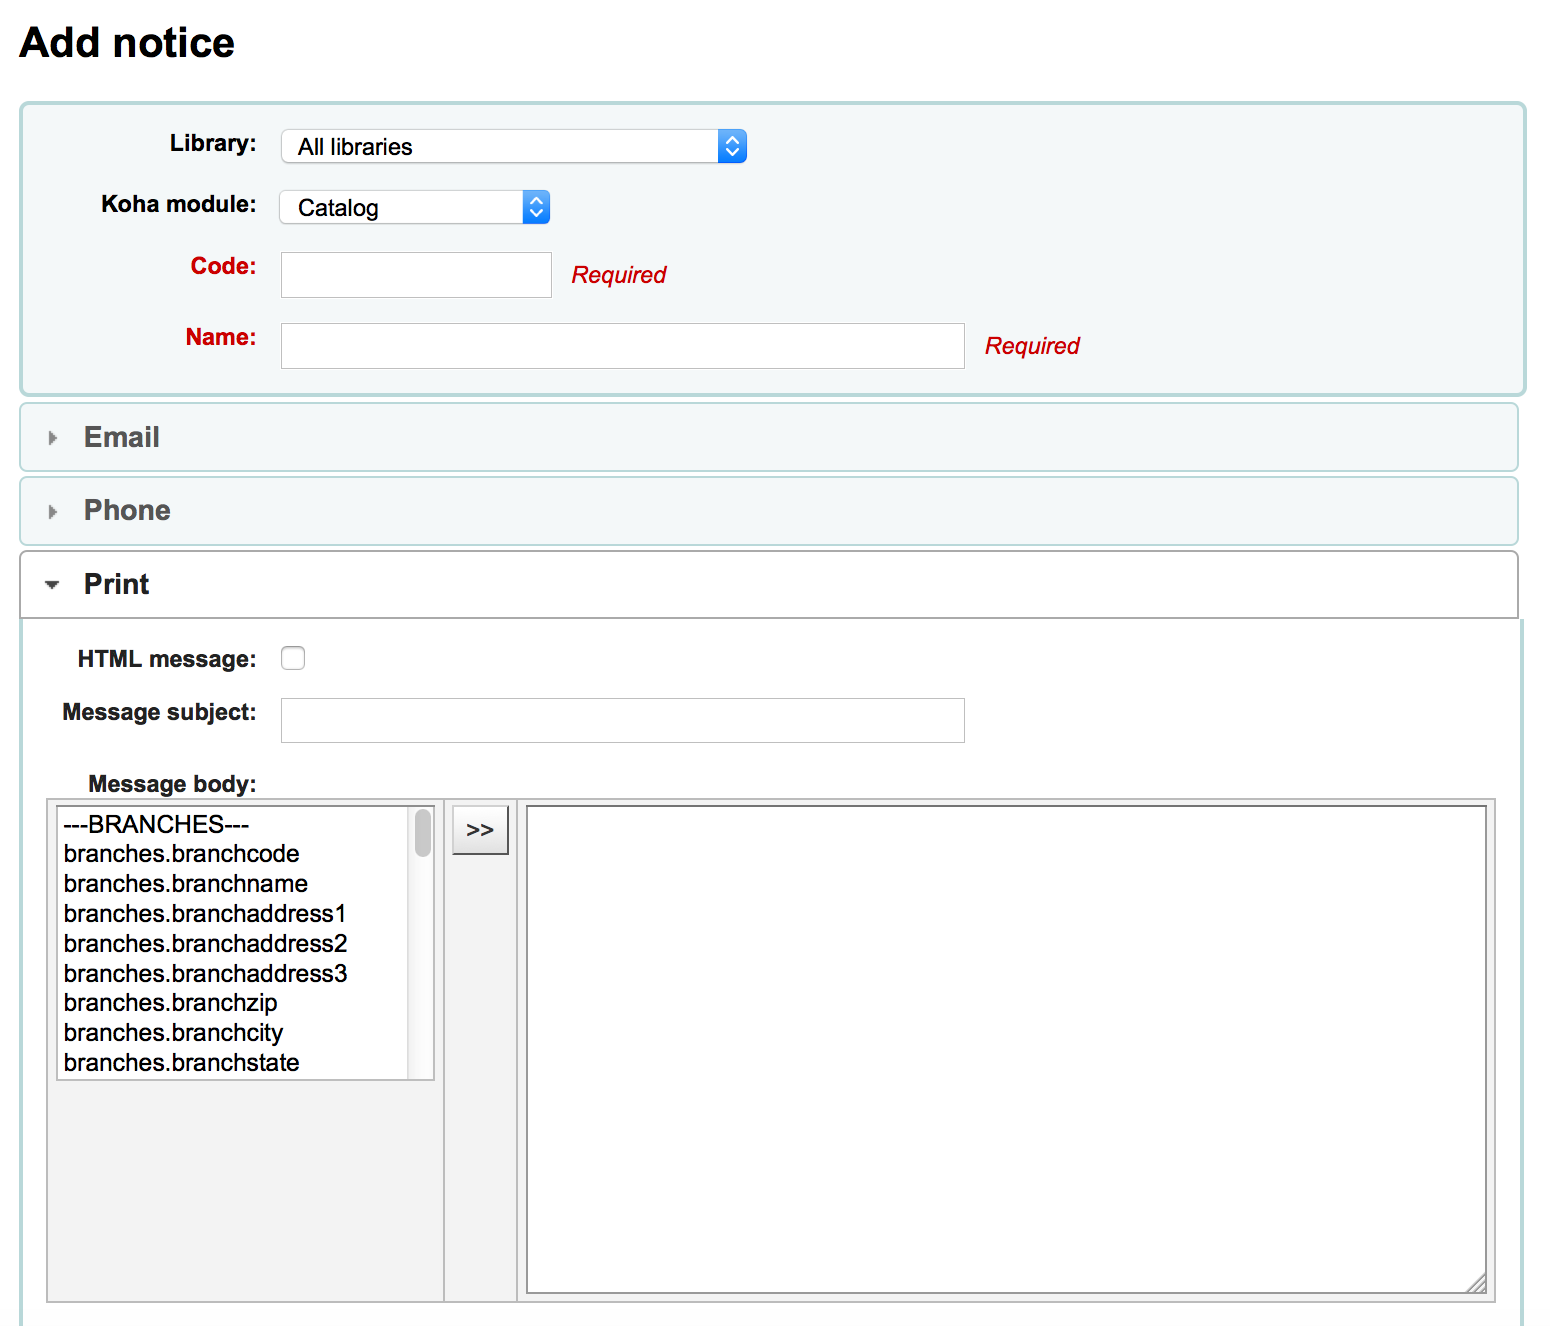
If you have enabled SMS notices with the SMSSendDriver preference you can set the text for your SMS notices next
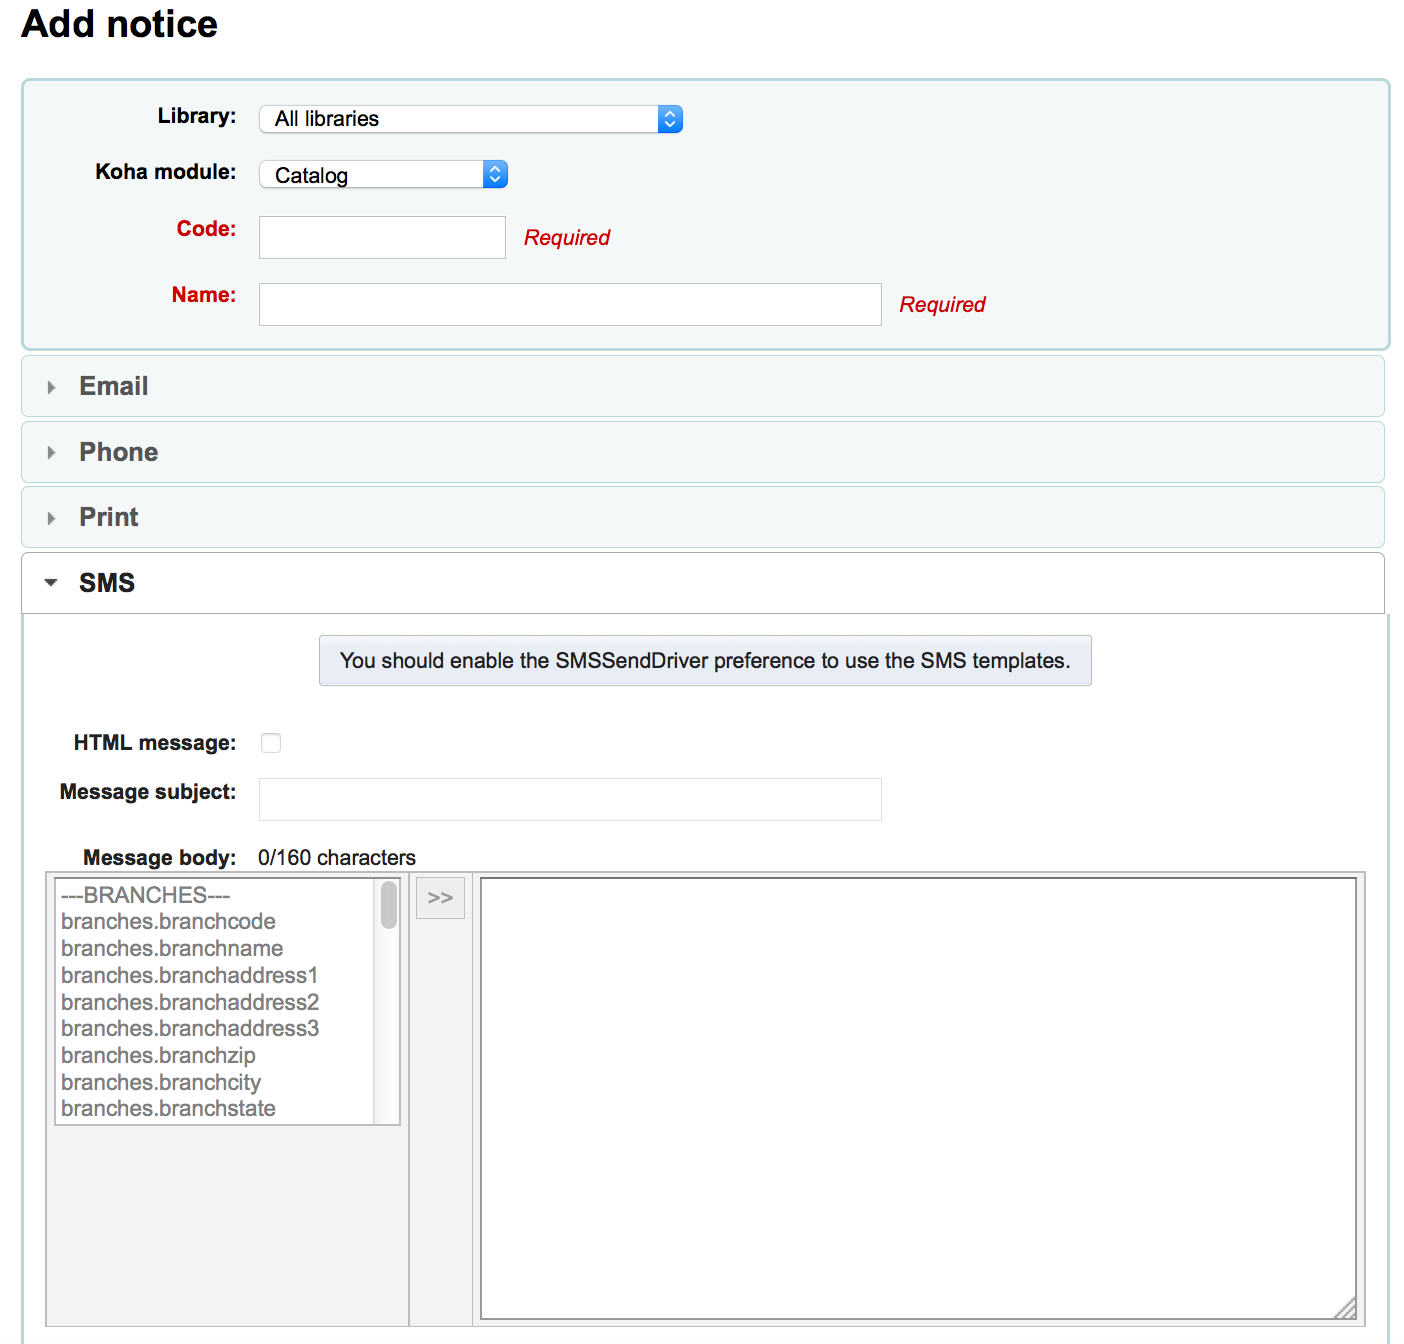
Each notice offers you the same options
If you plan on writing the notice or slip in HTML check the ‚HTML message‘ box, otherwise the content will be generated as plain text
Message subject is what will appear in the subject line of the email
In the message body feel free to type whatever message you feel is best, use the fields on the left hand side to enter individualized data from the from database.
Hinweis
Review the Customising notices and slips wiki page for more information.
Wichtig
Overdue notices can use <<items.content>> tags by themselves, or use <item></item> to span all of the tags. Learn more about the Overdue notice markup
On overdue notices make sure to use <<items.content>> tags to print out the data related to all items that are overdue.
The other option, only for overdue notices, is to use the <item></item> tags to span the line so that it will print out multiple lines. One example for the <item></item> tag option is:
<item>“<<biblio.title>>“ by <<biblio.author>>, <<items.itemcallnumber>>, Barcode: <<items.barcode>> , Checkout date: <<issues.issuedate>>, Due date: <<issues.date_due>> Fine: <<items.fine>> </item>
Wichtig
Only the overdue notices take advantage of the <item></item> tags, all other notices referencing items need to use <<items.content>>
Hinweis
To add today’s date you can use the <<today>> syntax
Hinweis
If you don’t want to print the patron’s full name on your slips or notice you can enter data in the Other name or Initials field for each patron and use that value instead.
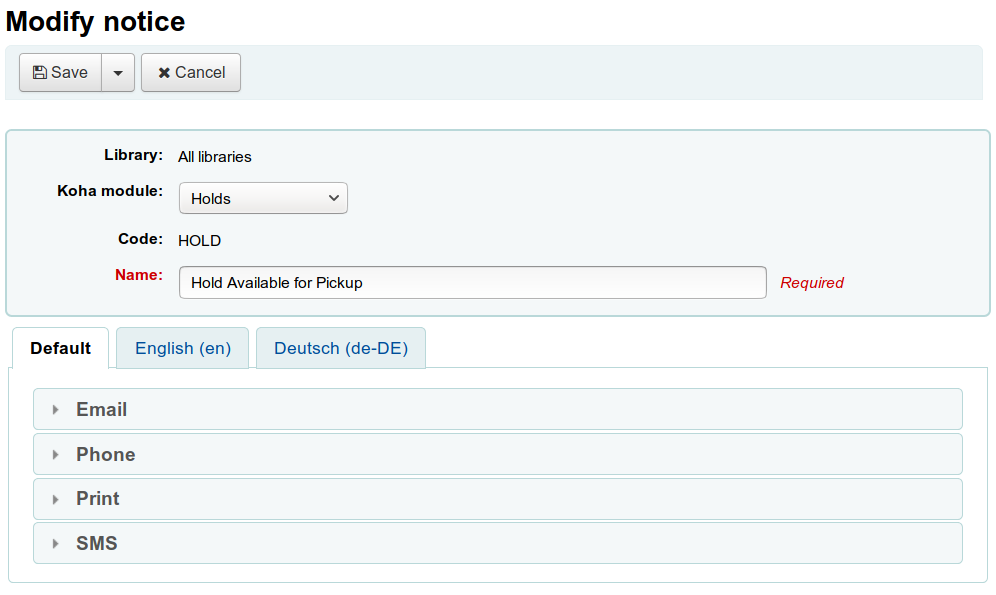
The system preference TranslateNotices will add tabs for each installed language to the notices editor. The notice defined in the ‚Default‘ tab will be used if there is no preferred language set for a patron.
Preview notice templates
For some notices it is possible to preview the notice template showing how it would look to a specified patron for a particular item or record.
If a notice template is previewable the notice template header will contain a field to enter preview data
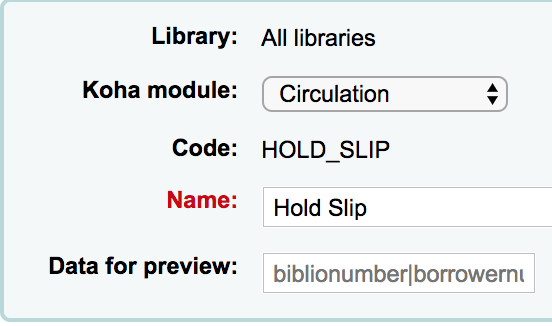
Fill in the necessary information for the template then click the Preview button below the message body. The preview dialog will indicate if there are any problems generating the notice template preview.
Overdue notice markup
When creating your overdue notices there are two tags in addition to the various database fields that you can use in your notices. You will also want to review the Customising notices and slips wiki page for information on formatting item information in these notices.
Wichtig
These new tags only work on the overdue notices, not other circulation related notices at this time.
These tags are <item> and </item> which should enclose all fields from the biblio, biblioitems, and items tables.
Ein Beispiel für die Verwendung dieser Tags in einer Benachrichtigung wäre:
The following item(s) is/are currently overdue:

<item>"<<biblio.title>>" by <<biblio.author>>, <<items.itemcallnumber>>, Barcode: <<items.barcode>> Fine: <<items.fine>></item>
Wenn zwei Exemplare überfällig sind, könnte die Mahnung so aussehen:
The following item(s) is/are currently overdue:

"A Short History of Western Civilization" by Harrison, John B, 909.09821 H2451, Barcode: 08030003 Fine: 3.50
"History of Western Civilization" by Hayes, Carlton Joseph Huntley, 909.09821 H3261 v.1, Barcode: 08030004 Fine: 3.50
Existing notices and slips
Among the default notices are notices for several common actions within Koha. All of these notices can be customized by altering their text via the Notices & slips tool and their style using the NoticeCSS preference to define a stylesheet. You will also want to review the Customising notices and slips wiki page for information on formatting item information in these notices. Here are some of what those notices do:
ACCEPTED
This notice is sent when a patron’s suggestion is accepted.
Note: If you don’t want to send this notice, just delete it.
ACCOUNT_PAYMENT
This notice is sent for each payment transaction in a patron’s account if the UseEmailReceipts system preference is set to ‚Send‘.
ACCOUNT_WRITEOFF
This notice is sent for each writeoff transaction in a patron’s account if the UseEmailReceipts system preference is set to ‚Send‘.
ACQCLAIM (Acquisition claim)
Used for claiming orders in the aquisitions module
ACQCLAIM is the code of the sample notice, but it’s possible to define several notices choosing any code. Only the module ‚Claim acquisition‘ will be taken into account. All notices with this module will appear in the pull down on the late orders page.
Get there: More > Acquisitions > Late orders
This notice is sent if several criteria are met:
The staff patron triggering the email has a valid email address.
The vendor contact marked as ‚Contact about late orders?‘ has a valid email address.
ACQORDER (Acquisition order)
Used in the acquisitions module to send order information to the vendor
The notice is triggered manually from the basket summary page using the ‚Email order‘ button in the toolbar.
This notice is sent if several criteria are met:
The staff patron triggering the email has a valid email address.
The vendor contact marked as ‚Primary acquisitions contact‘ and ‚Contact when ordering‘ has a valid email address.
ACQ_NOTIF_ON_RECEIV
Used in the acquisition module to inform patrons on receiving orders they have been added to.
AR_CANCELED
This notice is sent to the patron when an article request is cancelled by staff.
AR_COMPLETED
This notice is sent to the patron when an article request is marked as completed by staff.
AR_PENDING
This notice is sent to the patron when an article request is changed to ‚pending‘ status
AR_PROCESSING
This notice is sent to the patron when an article request is marked as being processed by staff.
AR_REQUESTED
This notice is sent to the patron when an article request has been made in order to confirm the request.
AUTO_RENEWALS
This notice is sent to the patron if automatic renewals are enabled and the patron has chosen to receive it in their messaging preferences.
In order to send this notice, you must set the AutoRenewalNotices system preference to „according to patron messaging preferences“.
This notice is set so that, depending on the result of the renewal, whether is was successful or not, the message will be different.
AUTO_RENEWALS_DGST
This notice is sent to the patron if automatic renewals are enabled and the patron has chosen to receive the digest in their messaging preferences.
In order to send this notice, you must set the AutoRenewalNotices system preference to „according to patron messaging preferences“.
This notice is set so that, depending on the result of the renewal, whether is was successful or not, the message will be different.
AVAILABLE
This notice is sent to the patron who made a suggestion, when the order created from the suggestion is received.
Note: If you don’t want to send this notice, just delete it.
CHECKIN
Diese Benachrichtigung wird als ‚Rückgabequittung‘ für alle zurückgegebenen Exemplare verschickt
This notice is used if two criteria are met:
The EnhancedMessagingPreferences is set to ‚Allow‘
The patron has requested to receive this notice
Get there:OPAC > Login > your messaging
Get there:Staff client > Patron record > Notices
CHECKINSLIP
This slip lists all items that were checked in today for this patron
To print this slip, click Print > Print checkin slip from the patron file
You can also print this slip from the Check in page
CHECKOUT
Diese Benachrichtigung wird als ‚Ausleihquittung‘ für alle Exemplare verschickt, die ausgeliehen wurden
This notice is used if two criteria are met:
The EnhancedMessagingPreferences is set to ‚Allow‘
The patron has requested to receive this notice
Get there:OPAC > Login > your messaging
Get there:Staff client > Patron record > Notices
DISCHARGE
This notice is used to generate a PDF to document a successful discharge request
The PDF can either be downloaded by the patron from their patron account or from the staff interface when discharging a patron
The discharge feature is controlled by the useDischarge system preference.
DUE
Diese Benachrichtigung wird als ‚Fälligkeitsbenachrichtigung‘ verschickt, wenn ein Exemplar an diesem Tag fällig wird
This notice is used if two criteria are met:
The EnhancedMessagingPreferences is set to ‚Allow‘
The patron has requested to receive this notice
Get there:OPAC > Login > your messaging
Get there:Staff client > Patron record > Notices
DUEDGST
Diese Benachrichtigung wird als ‚Fälligkeitsbenachrichtigung‘ für alle Exemplare die an diesem Tag fällig sind verschickt
This notice is used if two criteria are met:
The EnhancedMessagingPreferences is set to ‚Allow‘
The patron has requested to receive this notice as a digest
Get there:OPAC > Login > your messaging
Get there:Staff client > Patron record > Notices
HOLD (Hold available for pickup)
This notice is used if two criteria are met:
The EnhancedMessagingPreferences is set to ‚Allow‘
The patron has requested to receive this notice
Get there:OPAC > Login > your messaging
Get there:Staff client > Patron record > Notices
Wenn in dieser Benachrichtigung Felder für die Bibliothek verwendet werden, ist die Abholbibliothek gemeint.
HOLDPLACED (a notice to the library staff that a hold has been placed)
This notice requires the emailLibrarianWhenHoldIsPlaced system preference to be set to ‚Enable‘
Wenn in dieser Benachrichtigung Felder für die Bibliothek verwendet werden, ist die Abholbibliothek gemeint.
MEMBERSHIP_EXPIRY
This notice can be sent to patrons to warn them that their cards are expiring soon.
Requires that you have the MembershipExpiryDaysNotice set and the related cron job set.
NOTIFY_MANAGER
This notice is sent to a staff member when they are assigned as manager of a suggestion in the acquisitions module.
ODUE (Overdue notice)
This notice is used to send overdue notices to patrons
ODUE is the code of the sample notice, but it’s possible to use any code and define multiple different messages for different patron categories and notice levels
Requires that you set Overdue notice/status triggers
ORDERED
This notice is sent to the patron who made a suggestion, when the ‚from a suggestion‘ option is used to create an order from it.
Note: If you don’t want to send this notice, just delete it.
PASSWORD_RESET
This notice is sent when a patron requests a new password from the OPAC in order to validate the email address.
The password reset feature is controlled by the OpacResetPassword system preference.
PICKUP_RECALLED_ITEM
This notice is sent to the patron who has requested a recall when the item is ready for them to pick up.
PREDUE
Diese Benachrichtigung wird als ‚Erinnerungsbenachrichtigung‘ über fällige Exemplare verschickt
This notice is used if two criteria are met:
The EnhancedMessagingPreferences is set to ‚Allow‘
The patron has requested to receive this notice
Get there:OPAC > Login > your messaging
Get there:Staff client > Patron record > Notices
PREDUEDGST
Diese Benachrichtigung wird als ‚Erinnerungsbenachrichtigung‘ für alle Exemplare verschickt, die fällig sind
This notice is used if two criteria are met:
The EnhancedMessagingPreferences is set to ‚Allow‘
The patron has requested to receive this notice as a digest
Get there:OPAC > Login > your messaging
Get there:Staff client > Patron record > Notices
REJECTED
This notice is sent when a patron’s suggestion is rejected.
Note: If you don’t want to send this notice, just delete it.
RENEWAL
Diese Benachrichtigung wird als ‚Verlängerungsquittung‘ for alle verlängerten Exemplare verschickt
This notice is used if three criteria are met:
The EnhancedMessagingPreferences is set to ‚Allow‘
The RenewalSendNotice preference is set to ‚Send‘
The patron has requested to receive the checkout notice
Get there:OPAC > Login > your messaging
Get there:Staff client > Patron record > Notices
RETURN_RECALLED_ITEM
This notice is sent to the patron who currently has an item in their possession that has been recalled. It serves to notify them of the new due date for the checked out item.
SERIAL_ALERT (New serial issue)
Notice used in the serials module to notify patrons/staff of new issues of a serial. SERIAL_ALERT (RLIST in older versions) is provided as a sample notice, but the notice code can be chosen freely as only the module is taken into account. Multiple notices can also be managed.
Get there: More > Serials > New subscription
You have the option to select the notice used to inform the patron about a received serial issue for a subscription. Choose from the ‚Patron notification‘ drop down.
If a notice has been selected for a subscription, patrons can subscribe to the email notification from the subscription tab in the detail view in the OPAC.
Hinweis
Notice also that if you’d like to notify patrons of new serial issues, you can click on ‚define a notice‘ which will take you to the ‚Notices‘ tool
SHARE_ACCEPT
Wird verwendet, wenn ein Benutzer eine Einladung zum Teilen einer Liste akzeptiert hat.
Requires that you set OpacAllowSharingPrivateLists to ‚Allow‘
SHARE_INVITE
Wird verwendet, um einen Benutzer zu benachrichtigen, dass ein anderer Benutzer eine Liste mit ihm/ihr teilen möchte.
Requires that you set OpacAllowSharingPrivateLists to ‚Allow‘
SR_SLIP
Used to notify library staff of a particular branch of items that should be transferred to another branch in the context of stock rotation
Requires the stockrotation.pl
TO_PROCESS
Used to notify a staff member if a purchase suggestion has been moved to the fund they manage
Requires the notice_unprocessed_suggestions cron job
WELCOME
Sent to patrons when their account is set up if the AutoEmailNewUser preference is set to ‚Send‘
Bemerkung
For security reasons, it is not possible to send the patron’s password in a notice.
There are also a set of predefined slips (or receipts) listed on this page. All of these slips can be customized by altering their text via the Notices & slips tool and their style using the SlipCSS preference to define a stylesheet. Here is what those slips are used for:
AR_SLIP
Used to print a slip for an article request
The slip or receipt can be printed manually when managing article requests from the staff interface.
Get there: Circulation > Article requests > Actions > Print slip
ISSUEQSLIP
Wird verwendet um eine Kurzquittung in der Ausleihe zu drucken
Die Kurzquittung listet nur heute entliehene Exemplare auf
ISSUESLIP
Wird verwended um eine vollständige Quittung in der Ausleihe zu drucken
Die Quittung zeigt nicht nur heute entliehene, sondern alle aktuell entliehenen Exemplare
HOLD_SLIP
Wird verwendet um eine Vormerkquittung zu drucken
The holds slip is generated when a hold is confirmed and set to waiting.
OVERDUE_SLIP
Used to print an overdues slip
The overdues slip can be generated manually using the ‚print‘ menu in the patron account in staff. It will show all items overdue.
RECALL_REQUESTER_DET
Used to print the details of the patron who has requested a recall on an item.
TRANSFERSLIP
Wird verwendet um eine Transportquittung zu drucken
Die Transportquittung wird gedruckt, wenn ein Transport von einer Bibliothek zu einer anderen bestätigt wird
Overdue notice/status triggers
Get there: More > Tools > Patrons and circulation > Overdue notice/status triggers
In order to send the overdue notices that you defined using the Notices & slips tool, you need to first set the triggers to have these messages.
Wichtig
In order to have overdue notices sent to your patrons, you need to set that patron category to require overdue notices.
Wichtig
Depending on the value of your OverdueNoticeCalendar preference the delay may or may not include days the library is closed based on the holiday calendar.
The Overdue notice/status triggers tool gives the librarian the power to send up to three notices to each patron type notifying them of overdue items

Delay is the number of days after an issue is due before an action is triggered.
Wichtig
If you want Koha to trigger an action (send a letter or restrict member), a delay value is required.
Um weitere Benachrichtigungen zu verschicken, klicken Sie auf die Reiter ‚Zweite‘ und ‚Dritte‘ Benachrichtigung
If you would like to prevent a patron from checking items out because of their overdue items, check the ‚Restrict‘ box, this will put a notice on the patron’s record at checkout informing the librarian that the patron cannot check out due to overdue items.
If you choose to restrict a patron in this way you can also have Koha automatically remove that restriction with the AutoRemoveOverduesRestrictions preference.
Next you can choose the delivery method for the overdue notice. You can choose from Email, Phone (if you are using the iTiva Talking Tech service), Print and SMS (if you have set your SMSSendDriver).
Patron card creator
Get there: More > Tools > Patron card creator
The patron card creator allow you to use layouts and templates which you design to print your custom patron cards on your printer. Here are some of the features of the patron card creator module:
Customize patron card layouts with text retrieved from the Koha patron data
Design custom card templates for printed patron cards (to match the label sheets)
Build and manage batches of patron cards to print
Export (as PDF) single or multiple batches to print
Export (as PDF) single or multiple patron cards from within a batch
Layouts
Get there: More > Tools > Patron card creator > Manage > Layouts
Das Layout definiert den Text und die Bilder und an welcher Stelle sie auf dem Benutzerausweis gedruckt werden.
Hinweis
Up to three lines of text, the patron’s number in barcode representation and up to two images can be printed on to the card.
Add a layout
If you have no layouts defined, you will add a new layout by clicking the ‚New‘ button and choosing ‚Layout‘.
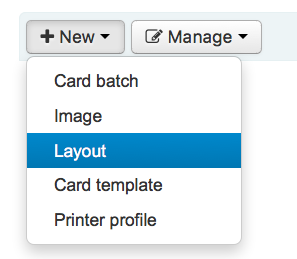
You may also choose to press ‚Manage layout‘ on the left side. Here you are offered a list of available layouts you can select for editing. But at the top of the page there is still the ‚New layout‘ button.
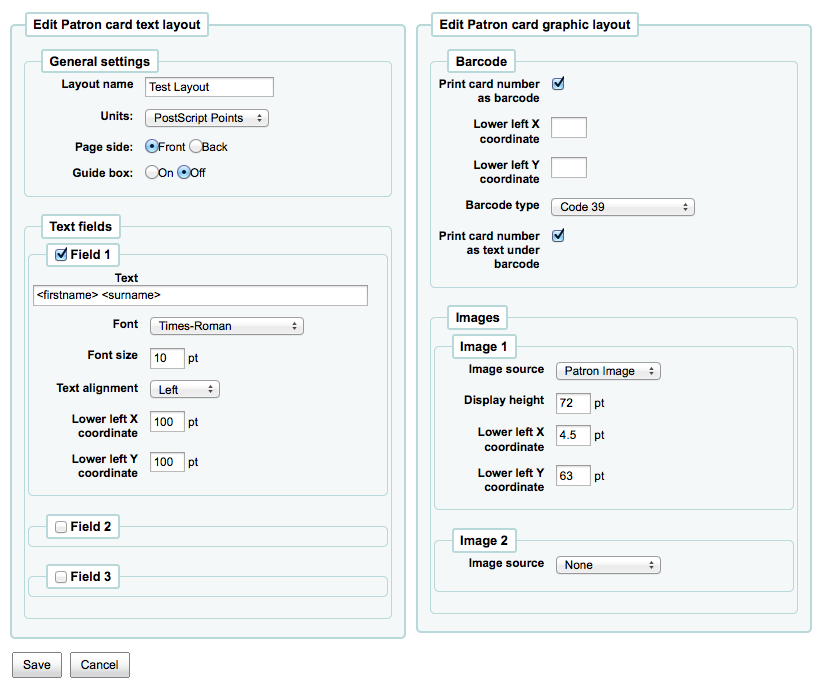
Der Name den Sie dem Layout geben dient Ihrer eigenen Orientierung. Benennen Sie es so, dass Sie es zu einem späteren Zeitpunkt einfach identifizieren können
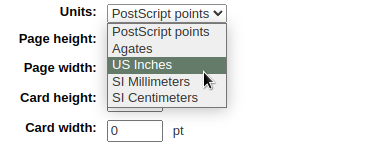
The Units pull down is used to define what measurement scale you’re going to be using for your layout.
Hinweis
A Postscript Point is 1/72“, an Adobe Agate is 1/64“, an Inch is 25.4 SI Millimeters
Next, note if this layout is for the front or the back of the patron card
Hinweis
You will need a layout for both the front and back of your card if you have 2-sided library cards, this option doesn’t allow you to print two sided cards, just lets you track which side of the card you’re designing.
You have the option of adding up to 3 lines of text to your card. Your text can be static text of your choosing and/or fields from the patron record. If you want to print fields from the patron record you want to put the field names in brackets like so - <firstname>
Hinweis
A full list of field names can be found in the database schema at http://schema.koha-community.org
Für jede Zeile Text können Sie die Schriftart, Schriftgröße und Position auf der Karte durch die Angabe der X- und Y-Koordinaten angeben.
In order to show the barcode and the patron card number you will need to check the ‚Print card number as barcode‘ option. This will turn the patron card number into a barcode. If you want the number to print in human readable format you will need to check the ‚Print card number as text under barcode‘ option.
Finally you can choose up to two images to print on the card.
One can be the patron image which you can resize to meet your needs.
The other image can be something like a library logo or symbol that you uploaded using the ‚manage images‘ module of the patron card creator Tool.
Wichtig
It is the designers responsibility to define textlines, barcode and images such that overlap is avoided.
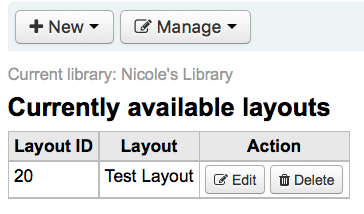
After saving, your layouts will appear on the ‚Manage layouts‘ page.
Templates
Get there: More > Tools > Patron card creator > Manage > Card templates
A template describes the arrangement of labels on the label sheet/card stock you are using. This might be Avery 5160 for address labels, Gaylord 47-284 for spine labels or Avery 28371 for your patron cards, just to give a couple of examples. All of the information you will need for setting up a template may be on the packaging, and if not it can usually be found on the vendor’s website or can be measured from a sample sheet.
Add a template
To add a new template click on the ‚New template‘ button at the top of your page which brings you to the Edit template form immediately. You may also choose to press ‚Manage templates‘ on the left side. Here you are offered a list of available templates you can select for editing. But in the top of the page there is still the ‚New template‘ button.
Using the form that appears after pressing either ‚Edit‘ or ‚New template‘ you can define the template for your sheet of labels or cards.
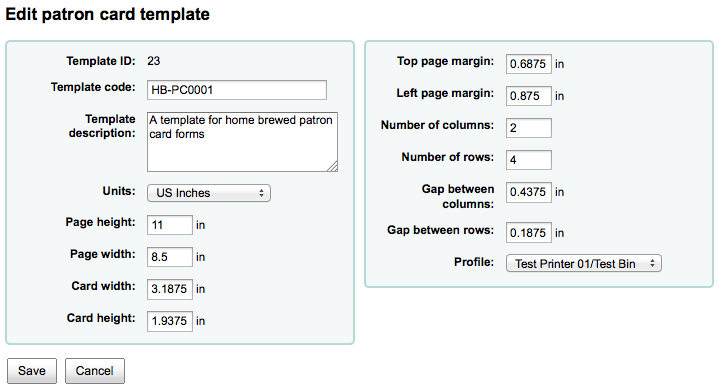
Template ID is simply a system generated unique id
Template code should be the name of this template to identify it on a list of templates
You can use the template description to add additional information about the template
The Units pull down is used to define what measurement scale you’re going to be using for the template.

Hinweis
A Postscript Point is 1/72“, an Adobe Agate is 1/64“, an Inch is 25.4 SI Millimeters
The measurements (page height, page width, card width, card height) may be on the packaging, and if not it can usually be found on the vendor’s website or can be measured from a sample sheet.
A profile is a set of „adjustments“ applied to a given template just prior to printing which compensates for anomalies unique and peculiar to a given printer (to which the profile is assigned).
Before defining a profile try printing some sample cards so that you can take measurements to define a profile to perform the right adjustments for your printer/template combination.
After finding and documenting any anomalies in the printed document, then you can create a profile and assign it to the template.
Wichtig
Do not specify a profile unless needed, i.e. do not click to define a printer profile. It is not possible to remove a profile from a template but you can switch to another profile.
Hinweis
If you are using different printers you may be required to define several templates that are identical only different profiles are specified.
After saving, your templates will appear on the ‚Manage templates‘ page.
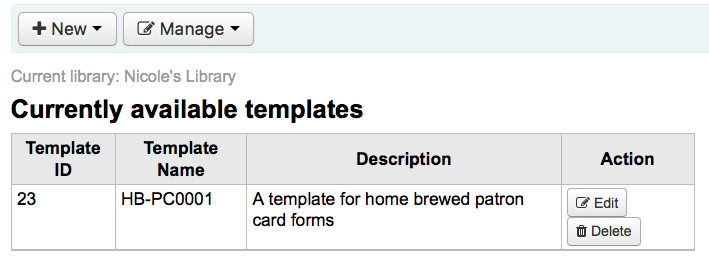
Profile
Get there: More > Tools > Patron card creator > Manage > Profiles
A profile is a set of „adjustments“ applied to a given template just prior to printing which compensates for anomalies unique and peculiar to a given printer. This means if you set a template up and then print a sample set of data and find that the items are not all aligned the same on each card, you need to set up a profile for each printer (or even different tray selections on the same printer) to make up for the differences in printing styles, such as the shifting of text to the left, right, top or bottom.
Wenn Ihre Ausweise bereits so gedruckt werden, wie Sie es möchten, benötigen Sie kein Profil.
Add a profile
To add a new profile, you want to click on the ‚Profiles‘ button at the top of your page and choose ‚New profile‘
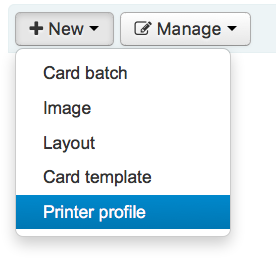
To add a new profile, you want to click on the ‚New profile‘ button at the top of your page. Using the form that appears you can define the values to correct the card misalignment on your label sheet. You may also choose ‚Manage profiles‘ on the left side and select one of the currently available profiles for editing.
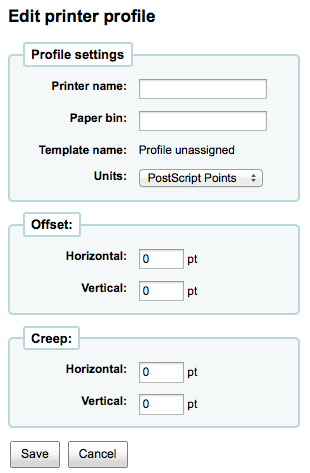
The Printer name and Paper bin do not have to match your printer exactly, they are for your reference so you can remember what printer you have set the profile for.
Hinweis
For example: if you want to use the Printer model number in printer name you can, or you can call it ‚the printer on my desk‘
Template will be filled in once you have chosen which template to apply the profile to on the template edit form
Die Auswahlliste Maße wird verwendet um festzulegen welche Maßeinheit Sie für Ihr Profil verwenden.

Hinweis
A Postscript Point is 1/72“, an Adobe Agate is 1/64“, an Inch is 25.4 SI Millimeters
Offset should be used when the entire image is off center either vertically or horizontally. Creep describes a condition where the distance between the labels changes across the page or up and down the page
For offset and creep values, negative numbers move the printed information up and to the left on the printed sheet and positive numbers move down and to the right
Example: the text is printed 0 .25“ from the left edge of the first label, 0 .28“ from the left edge of the second label and 0 .31“ from the left edge of the third label. This means the horizontal creep should be set to (minus) -0.03 “ to make up for this difference.
After saving, your profiles will appear on the ‚Manage printer profiles‘ page.
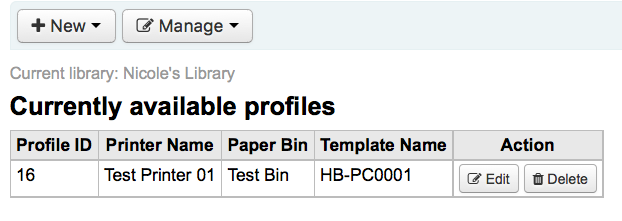
Nachdem Sie Ihr neues Profil gespeichert haben, können Sie zu der LIste der Templates zurückkehren und das Template für dieses Profil bearbeiten.
Stapel
Get there: More > Tools > Patron card creator > Manage > Card batches
Ein Stapel ist eine Sammlung an Benutzern, für die Sie Benutzerausweise drucken möchten.
Add a batch
To add a new batch, you want to click on the ‚New batches‘ button at the top of your page. Choosing the menu item ‚Manage batches‘ on the left a list of already defined batches is displayed. In this display you can either select a batch for editing or add a new batch.
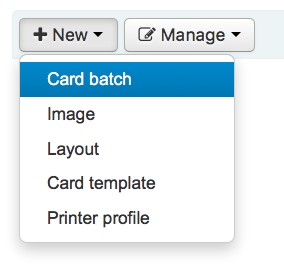
For a new batch a message pops up and directs you to select patrons to be processed in this batch.
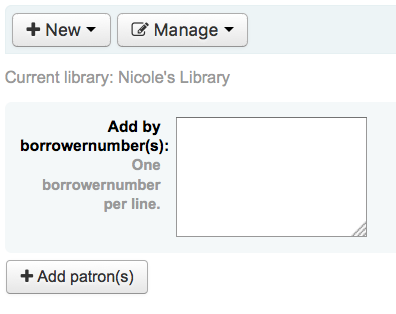
After choosing the ‚Add patron(s)‘ button the Patron Search window pops up.
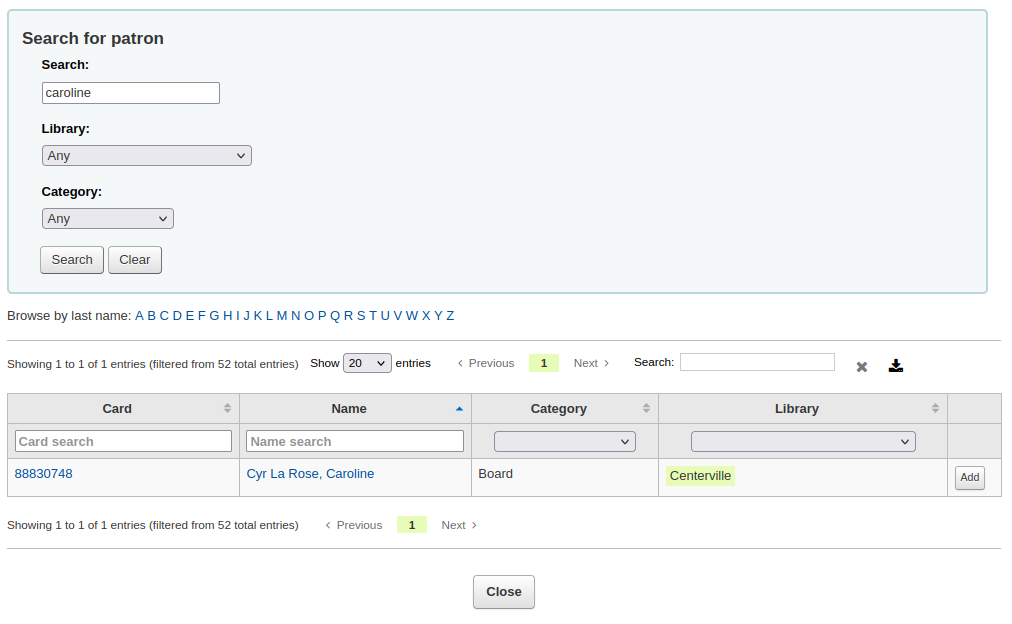
From here you can search for patrons to add to your batch by any part of their name, their category and/or library. Entering * in the search box will display all the patrons.
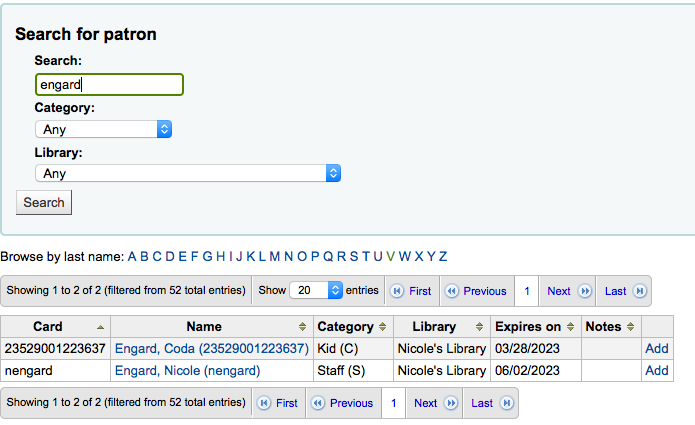
From the results you can add patrons to the batch by clicking the ‚Add‘ button. After adding patrons from the results you can start over and perform another search or click ‚Close‘ at the bottom of the screen to indicate that you are done. You will then be presented with your batch.
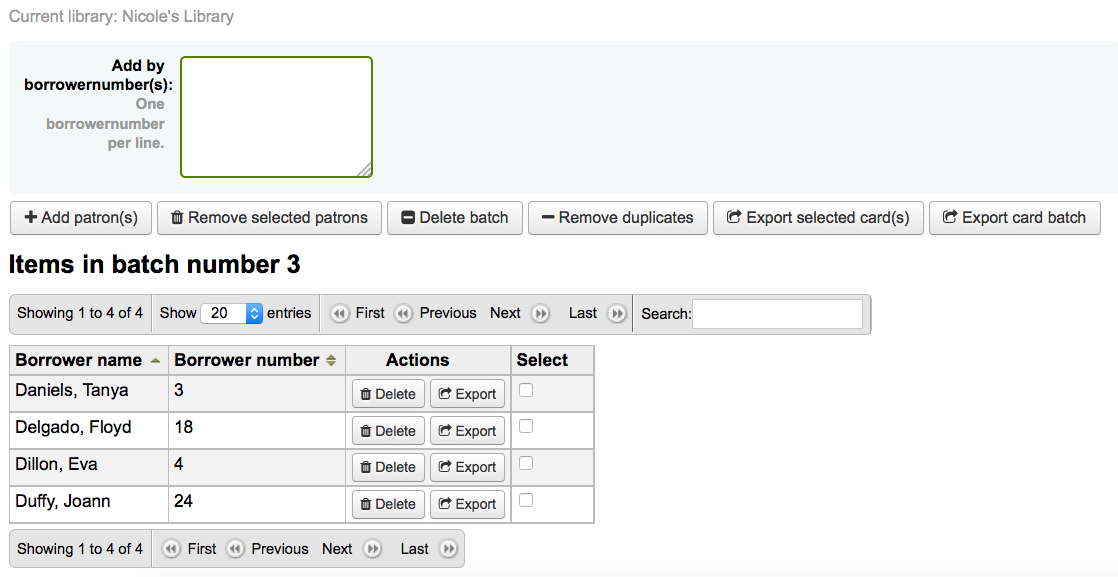 If you are satisfied with your batch you can proceed to export. If you
want to correct or even delete that batch the buttons to do so can be
found at the top of your screen. You can always come back here through
the ‚Manage > Card batches‘ button.
If you would like to export all patron cards you can click ‚Export card batch‘ otherwise you can choose specific patrons to print cards for by checking the box to the right of their names and then choose ‚Export selected card(s)‘ at the top.
The export menu will ask you to choose a template, a layout and starting position (where on the sheet should printing begin).
Hinweis
For the starting position if the first 6 labels have already been used on your sheet you can start printing on label in position 7 on the sheet. The labels are numbered left to right from top to bottom.

Once you click ‚Export‘ you will be presented with a PDF of your labels for printing
When you open the PDF you will see the cards for printing

The above image shows a layout that is made up of two textlines. The first one is just plain text, the second one is composed of the <firstname> <surname> fields. A patron image is printed (if available) and the barcode of patrons number is displayed in code 39. All this is printed on a template with three columns and 8 rows using position 1-3 here. When printing this PDF please take care that your printer doesn’t rescale the PDF (e.g do not fit to paper size) otherwise the printer will not be able to print to the right place per your templates.
Manage images
Get there: More > Tools > Patron card creator > Manage > Images
Images uploaded using this tool will appear on the menu when creating patron card layouts. You are limited in how many images you can upload (not counting patron images) by the ImageLimit system preference.
Wichtig
Die Dateigröße der Bilder muss unter 500k liegen.
Hinweis
Bilder, die mit diesem Werkzeug hochgeladen werden, sollten mindestens eine Qualität von 300dpi haben. Das ist das Minmum für Bilder, die gedruckt werden sollen.
In der Mitte der Seite ist ein einfaches Upload-Formular. Suchen Sie nach der Datei auf Ihrem Computer und geben Sie ihr einen Namen, den Sie später leicht erkennen.

Nachdem die Datei hochgeladen wurde, werden werden Sie aufgefordert den Upload zu bestätigen.

And the image will be listed with all of your others on the right hand side of the page.
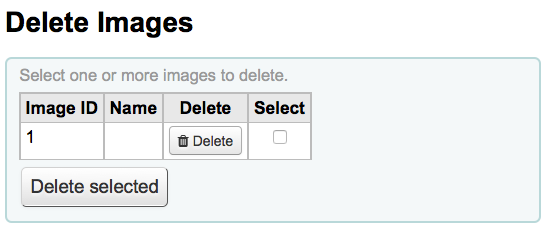
Um eines oder mehrere dieser Bilder zu löschen, klicken Sia auf die Auswahlbox rechts neben jedem Bild, das Sie löschen möchten, und klicken Sie auf den Schalter ‚Löschen‘.
Batch patron deletion/anonymization
Get there: More > Tools > Patrons and circulation > Batch patron deletion/anonymization
Mit diesem Werkzeug können Sie Benutzerausleihhistorien anonymisieren (dies bedeutet, dass die Exemplarausleihhistorie erhalten bleibt, aber die Verknüpfung zum Benutzer gelöscht wird) oder Benutzerdaten löschen (komplett aus dem System entfernen).
Wichtig
Patrons with outstanding fines or items checked out are not saved. They are not completely removed from the system (they are only moved to the delete_borrowers table), but this tool does not provide as many checks as one may desire.
Wichtig
Before using this tool it is recommended that you backup your database. Changes made here are permanent.
Wichtig
The anonymization will fail quietly if AnonymousPatron preference does not contain a valid value.
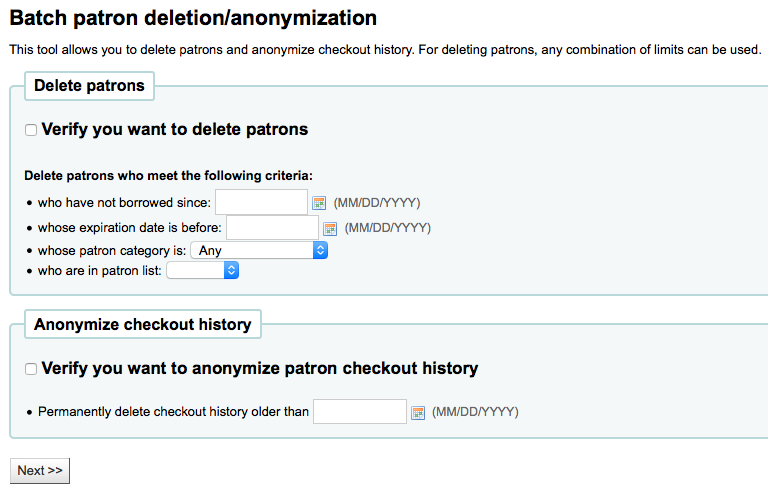
Um Benutzer entweder zu löschen oder zu anonymisieren
Check the ‚Verify‘ box on the task you would like to complete (delete or anonymize)
Geben Sie das Datum an, vor dem Sie die Daten ändern möchten
If deleting patrons you can also choose to find patrons who
have not borrowed since a specific date
have accounts that will expire before a specific date
are in a specific patron category
are in a patron list
Klicken Sie auf ‚Weiter‘
Sie werden aufgefordert, die Aktion zu bestätigen

Klicken Sie auf ‚Beenden‘ um die Daten zu löschen oder zu anonymisieren

Stapelbearbeitung von Benutzerdaten
Get there: More > Tools > Patrons and circulation > Batch patron modification
With this tool you can make edits to a batch of patron records. Simply load in a file of cardnumbers (one per line), choose from a list of patrons or scan patron card numbers in to the box provided.
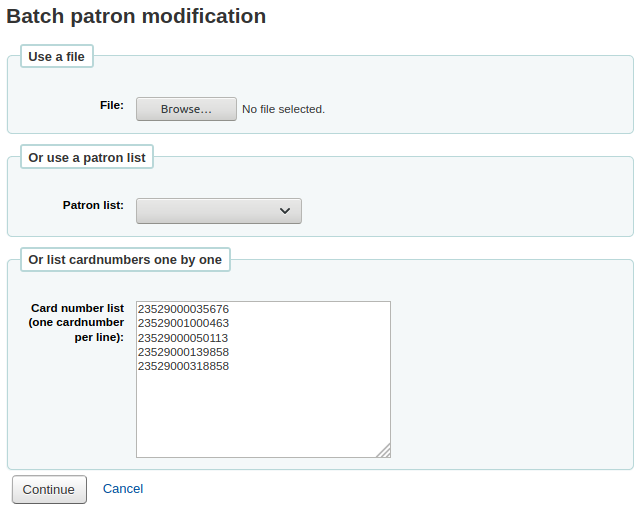
Nachdem Sie die Datei hochgeladen oder die Barcodes eingescannt haben, klicken Sie auf ‚Fortsetzen‘. Es wird eine Liste der Benutzer angezeigt und die Optionen um diese zu ändern.
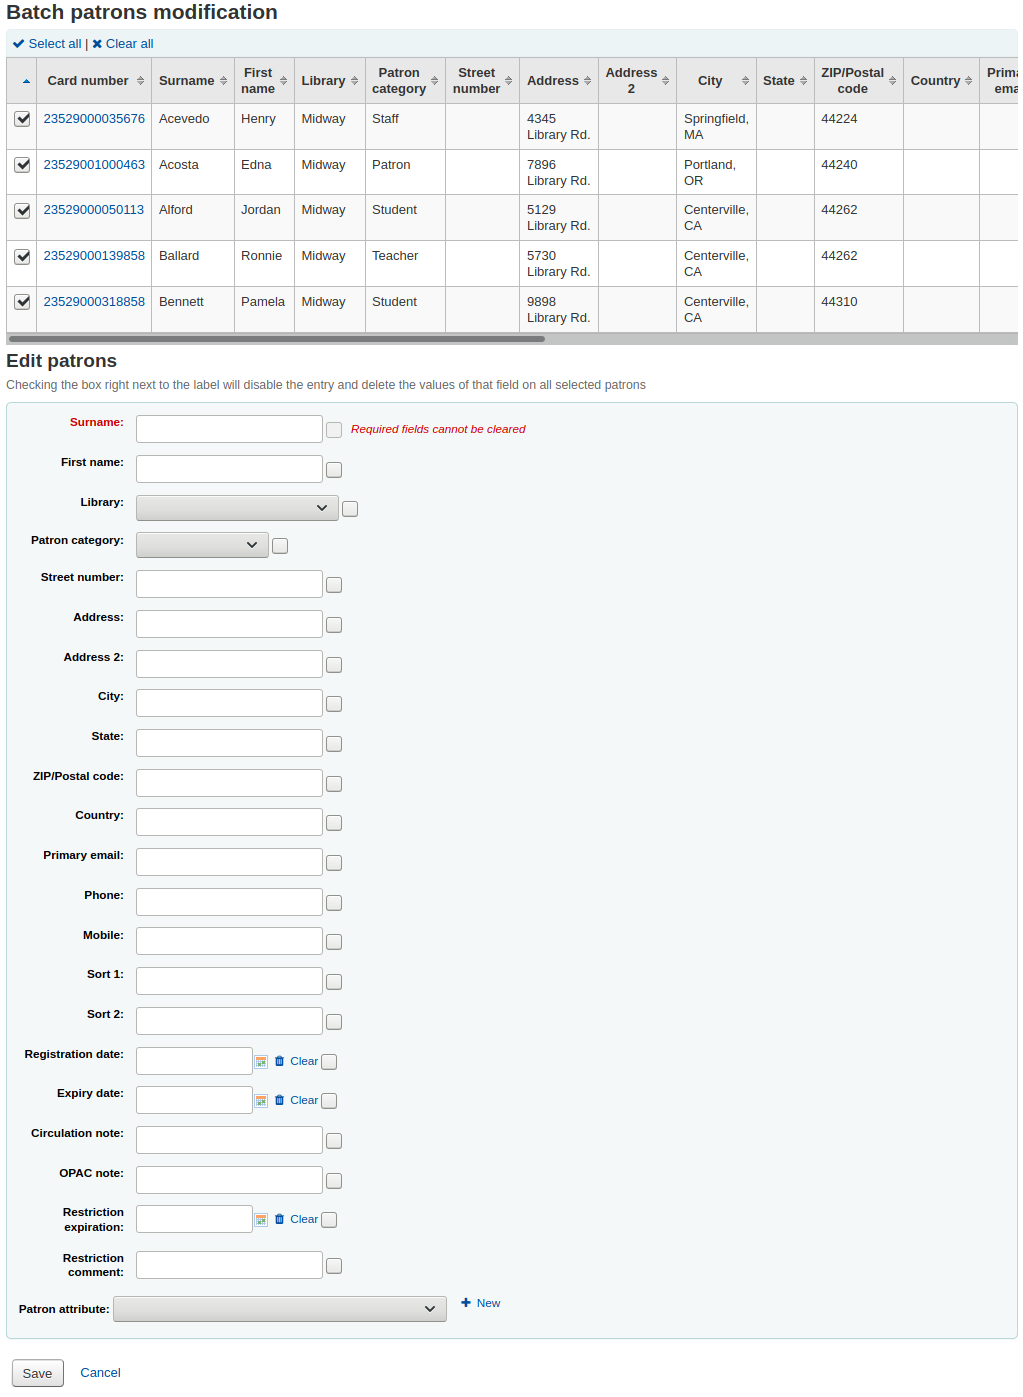
Auf der rechten Seite jedes Eingabefeldes ist eine Checkbox. Wenn Sie die Checkbox aktivieren, wird der Wert aus dem Feld gelöscht.
Wichtig
If the field is mandatory you will not be able to clear the value in it.
If you have multiple patron attributes you can change them all by using the ‚+ New‘ link to the right of the text box. This will allow you to add another attribute value.

Nachdem Sie die Änderungen durchgeführt haben, klicken Sie auf ‚Speichern‘ und Koha zeigt Ihnen die geänderten Benutzerdatensätze an.
Batch extend due dates
Get there: More > Tools > Patrons and circulation > Batch extend due dates
This tool allows you to update due dates in bulk, this can be useful if a library needs to close unexpectedly and cannot accept returns.
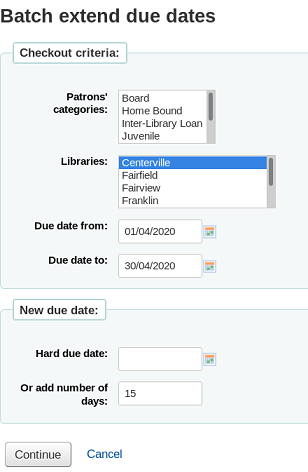
You can filter the selection of checkouts based on patron category, library or a combination of both. You can select multiple options in the dropdown lists if needed.
Next, specify a date range for the current due date of the materials on loan. For example, you may want to extend the due dates for recent checkouts but exclude long overdue loans.
Choose to extend the due dates either to a new hard due date or by a number of days. Using the number of days option can prevent large numbers of loans being due on the same date.
You can choose whether to preview the results of your selections.
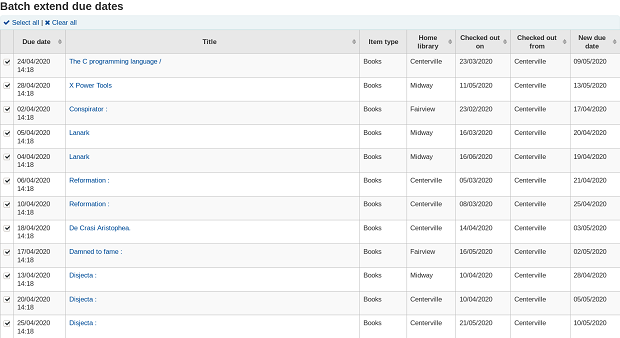
If you preview the results you will see a table which shows you the current due date and the new due date so that you can check your selections. You can untick checkouts if they are incorrect or go back and change your selection.
Click on the Modify selected checkouts button to see a confirmation screen showing the checkouts that have been modified.
Bemerkung
Access to this tool requires the Tools permission batch_extend_due_dates.
Tag moderation
Get there: More > Tools > Patrons and circulation > Tags
Depending on your tagging system preferences, librarians may need to approve tags before they are published on the OPAC. This is done via the tag moderation tool. If there are tags awaiting moderation they will be listed on the main staff dashboard under the module labels:

Wenn Sie das Werkzeug zum ersten mal verwenden, sehen Sie eine Liste der Tags, die darauf warten von einem Mitarbeiter zugelassen oder abgelehnt zu werden
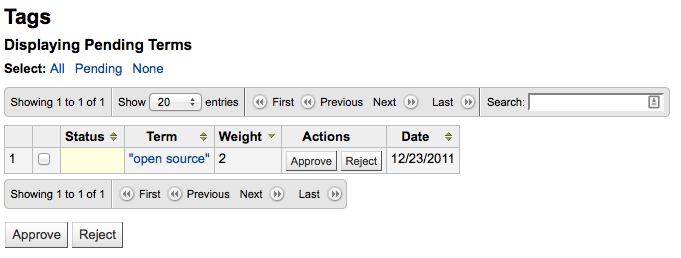
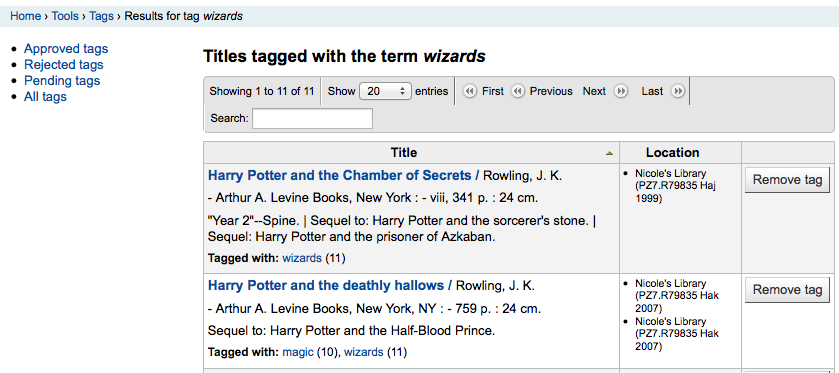
Klicken Sie auf den Begriff um alle Titel zu sehen, die mit diesem Begriff getaggt wurden

From this list of titles you can remove a tag without outright rejecting it from being used in the future by clicking the ‚Remove tag‘ button to the right of the title.
Um ein Tag zuzulassen, können Sie entweder auf ‚Akzeptieren‘ in der Zeile mit dem Wort klicken oder Sie haken alle Worte an, die Sie freigeben möchten und klicken auf ‚Akzeptieren‘ am Ende der Tabelle.
To reject a tag, you can either click the ‚Reject‘ button in line with the term, or check all terms you want to reject and click ‚Reject‘ below the table.
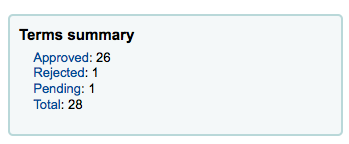
Nachdem ein Tag zugelassen oder abgelehnt wurde wird es auf die entsprechende Liste gesetzt. Eine Zusammenfassung aller Tags erscheint auf der rechten Seite des Bildschirms.
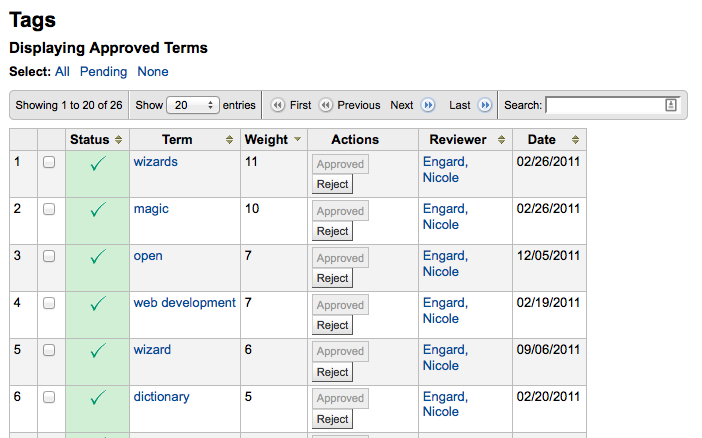
Even though a tag is approved or rejected, it can still be moved to another list. When viewing approved tags each tag has the option to reject:
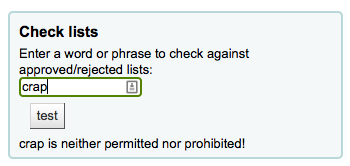
To check terms against the approved and rejected lists (and possibly against the dictionary you have assigned for tag moderation) simply enter the term into the search box on the bottom right of the screen to see the status of the term
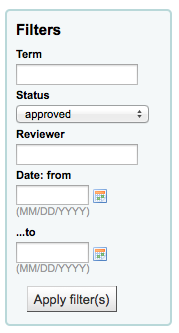
Finally you can find tags by using the filters on the left.
Upload patron images
Get there: More > Tools > Patrons and circulation > Upload patron images
Patron images can be uploaded in bulk if you are allowing patron images to be attached to patron records. These images can also be used when creating patron cards.
Erstellen Sie eine Textdatei mit dem Namen „DATALINK.TXT“ oder „IDLINK.TXT“
On each line in the text file enter the patron’s card number followed by comma (or tab) and then the image file name
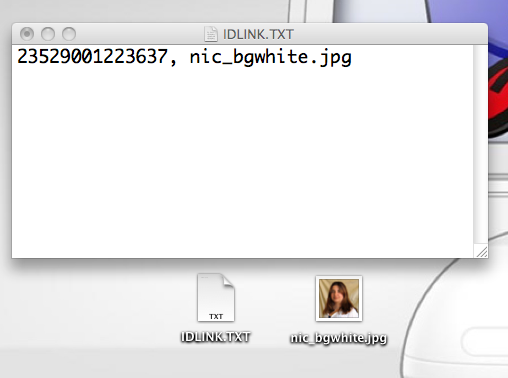
Stellen Sie sicher, dass Ihre TXT-Datei nur Klartext enthält und kein RTF.
Packen Sie die Text- und Grafikdateien
Go to the Upload patron images tool
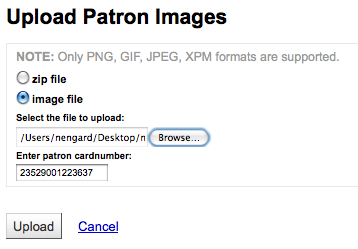
Für ein einzelnes Foto können Sie einfach die Datei auswählen und die Ausweisnummer angeben
Für mehrere Bilder können Sie eine zip-Datei hochladen
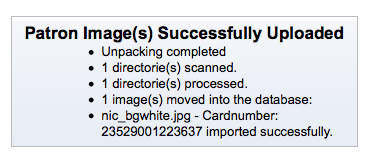
Nach dem Upload werden Sie aufgefordert, diesen zu bestätigen
Wichtig
Es gibt ein Limit von 100K für die Größe eines hochgeladenen Bildes, und es wird eine Bildgröße von 200x300 Pixeln empfohlen. Aber auch kleinere Bildern werden angezeigt.
Rotating collections
Get there: More > Tools > Catalog > Rotating collections
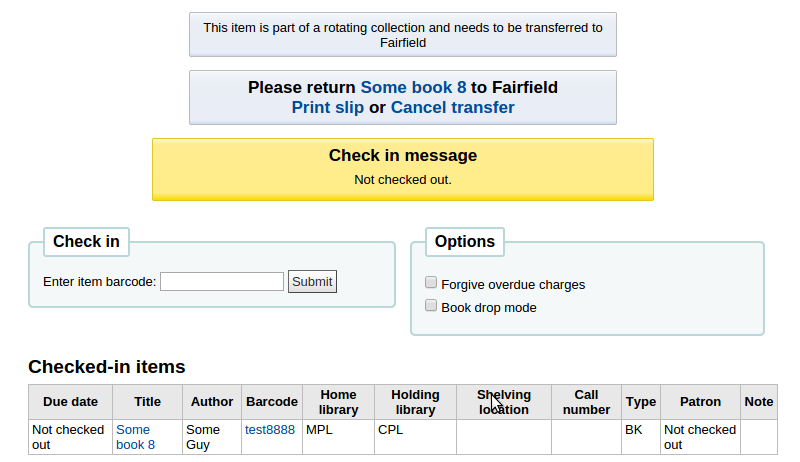
Rotating collections is a tool for managing collections of materials that frequently get shifted from library to library. It adds the ability to store not only an item’s home library and current location but also information about where it is supposed to be transferred to next to ensure that all items in the collection are sent to the correct library. When an item in a rotating collection is checked in, library staff is notified that the item is part of a rotating collection and which branch it should be sent to if it is not at the correct one.
Wichtig
The AutomaticItemReturn system preference must be set to „Don’t automatically transfer items to their home library when they are returned“ for rotating collections to function properly.
To create a new rotating collection, click the „New collection“ button, fill in the title and description, and click „Submit“. Once submitted you’ll see „Collection name added successfully“; click „Return to rotating collections home“ to return to the main Rotating collections management page (or click Rotating collections in the sidebar).
To add items to a collection, click „Actions“ and choose „Add or remove items“ next to the collection’s name in the list of collections. Under „Add or remove items“ scan or type in the barcode of the item you wish to add to the collection, and hit enter or click ‚Submit‘ if necessary.
To remove an item from a collection, either click ‚Remove‘ next to the item’s barcode in the list of items within the collection or check the „Remove item from collection“ box next to the Barcode text box under „Add or remove items“, and scan or type in the barcode, clicking „Submit“ or hitting Enter if necessary. Note: The „Remove item from collection“ checkbox will remain checked as long as you are on the „Add or remove items“ page, unless you uncheck it, to facilitate quickly removing a number of items at a time by scanning their barcodes.
Transfer a rotating collection
Der Transfer einer Sammlung löst Folgendes aus:
Aktuellen Standort der Exemplare auf Zielbibliothek des Transfers setzen
Einen Transfer von der Standort- zur Zielbibliothek auslösen. Wenn eine Bibliothek eine Sammlung empfängt muss sie für alle Exemplare eine „Rückgabe“ ausführen um den Transfer abzuschliessen.
Es gibt zwei Methoden um Sammlungen zu transferieren:
From the main Rotating collections page, click on „Actions“ and choose „Transfer“ next to the title of the collection you wish to transfer; choose the library you wish to transfer the collection to and click „Transfer collection“.
Or, from the „add or remove items“ page for a collection, you can click the „Transfer“ button, choose the library you wish to transfer the collection to and click „Transfer Collection“.
Wichtig
Um den Transfer abzuschliessen, muss die Zielbibliothek beim Empfang der Sammlung für alle Exemplare eine „Rückgabe“ ausführen. Dies wird den Status „Unterwegs“ zurücksetzen.
Wenn ein Exemplar bei einer anderen Bibliothek als dem aktuellen Standort der Sammlung zurückgegeben wird, erscheint ein entsprechender Hinweis mit der Aufforderung, das Exemplar an die aktuelle Standortbibliothek der Sammlung zu senden.
Additional tools
Kalender
Get there: More > Tools > Additional tools > Calendar
Libraries can define library closings and holidays to be used when calculating due dates. You can make use of the calendar by turning on the proper system preferences:
useDaysMode: Choose the method for calculating due date - either include days the library is closed in the calculation or don’t include them
finescalendar: This will check the holiday calendar before charging fines

Adding events
Before adding events, choose the library you would like to apply the closings to. When adding events you will be asked if you would like to apply the event to one branch or all branches. To add events, simply
Klicken Sie auf das Datum im Kalender, an dem Sie den Schließtag eintragen möchten
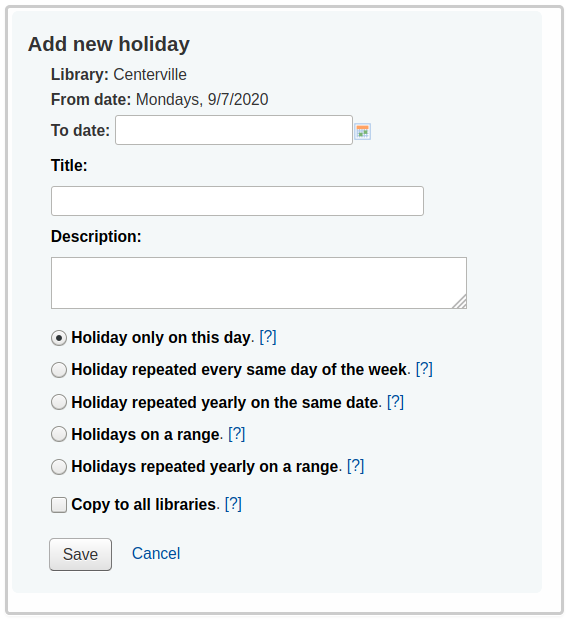
In the form that appears above the calendar, enter the closing information (for more info on each option click the question mark [?] to the right of the option)
Die Bibliothek wird automatisch ausgefüllt, abhängig von der Bibliothek, die Sie am Anfang der Seite aus der Auswahlliste gewählt haben.
Der Wochentag wird ebenfalls automatisch ausgefüllt, basierend auf dem Datum, dass Sie im Kalender angeklickt haben.
If this holiday extends on more than one day, enter the end date in ‚To date‘
In the ‚title‘ enter the name of the holiday or the reason for the closing
In the ‚description‘ enter more information about this holiday
Next you can choose if this event is a one time event or if it is repeatable.
‚Holiday only on this day‘: this is a one day holiday
‚Holiday repeated every same day of the week‘: this is a weekly closing (if you’re closed every Sunday, for example)
‚Holiday repeated yearly on the same date‘: this is an annual holiday closing (if you’re closed on January 1st each year, for example)
‚Holiday on a range‘: this is a holiday that extends on several days
Hinweis
Make sure to enter a ‚To Date‘ at the top if you choose ‚Holiday on a range‘
‚Holiday repeated yearly on a range‘: this is a holiday that extends on several days each year (such as summer holidays for schools)
Hinweis
Make sure to enter a ‚To Date‘ at the top if you choose ‚Holiday repeated yearly on a range‘
Finally decide if this event should be applied to all libraries or just the one you have originally selected
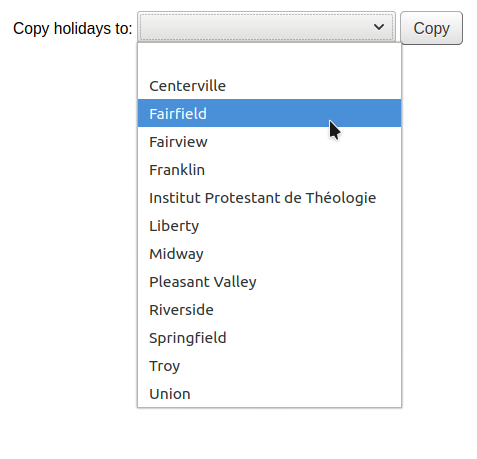
If you’d rather enter all the holidays and then copy them all to another branch all at once you can use the copy menu below the calendar
Nach dem Speichern wird der Schließtag auf der rechten Seite des Kalenders angezeigt
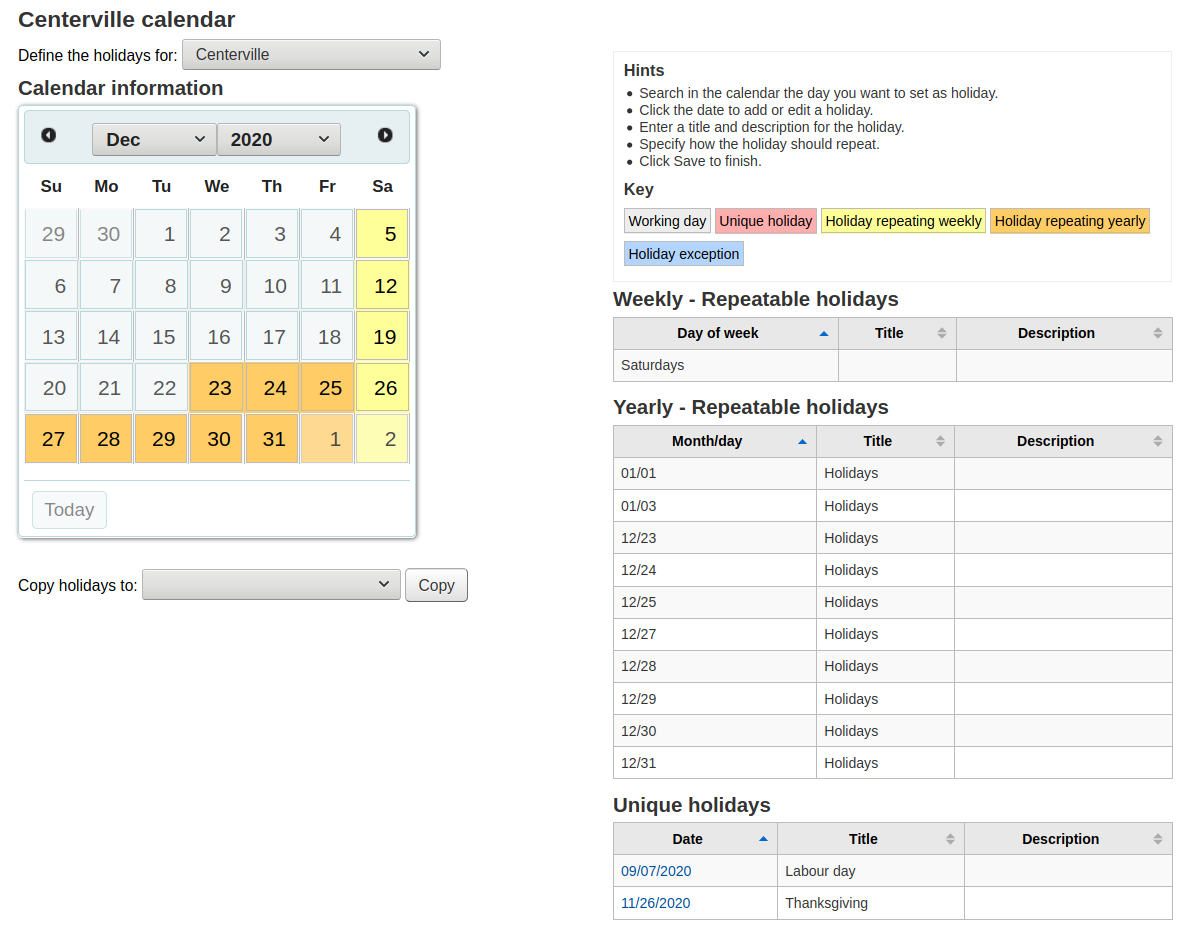
Editing events
Schließtage bearbeiten
Klicken Sie auf den Schließtag im Kalender, den Sie ändern möchten (klicken Sie dabei auf das Datum im Kalender, nicht auf den Schließtag in der Zusammenfassung)
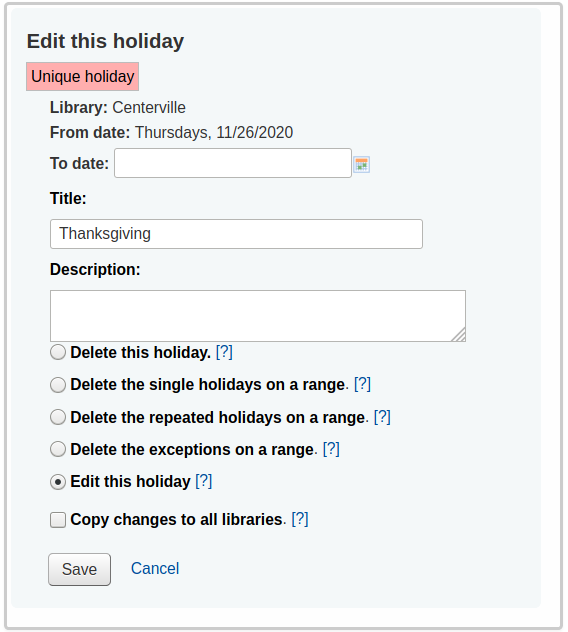
From this form you can make edits to the holiday or delete the holiday completely.
All actions require that you click ‚Save‘ before the change will be made.
Clicking on repeatable events will offer slightly different options
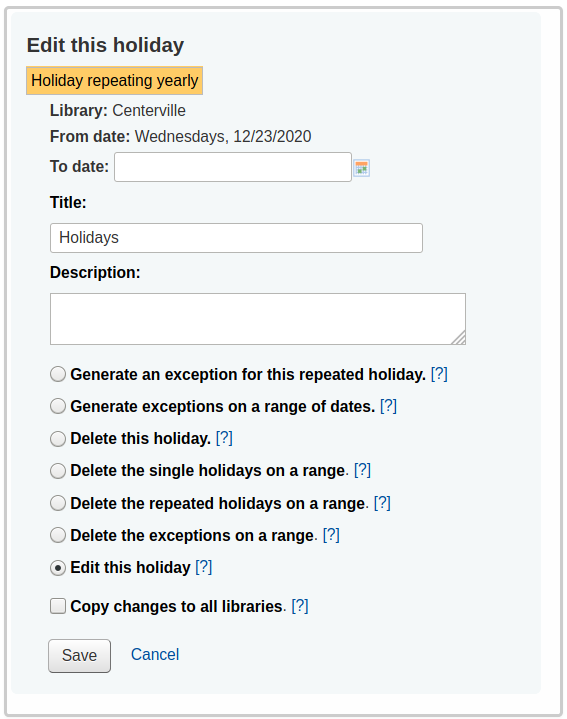
In the form above you will note that there is now an option to ‚Generate an exception for this repeated holiday‘ and ‚Generate exceptions on a range of dates‘ choosing one of these options will allow you to make it so that this date is not closed even though the library is usually closed on this date.
All actions require that you click ‚Save‘ before the change will be made.
Additional help
Wenn Sie Schließtage hinzufügen erhalten Sie zusätzliche Hilfestellung, indem Sie auf das Fragezeichen neben der jeweiligen Option klicken, um zusätzliche Hinweise zu erhalten

CSV profiles
Get there: More > Tools > Additional tools > CSV profiles
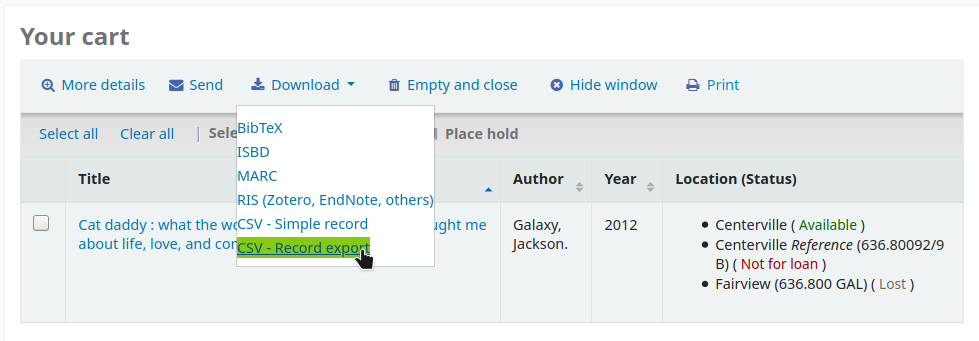
CSV profiles are created to define how you would like your cart or list to export.
Add CSV profiles
To add a CSV profile
Click on ‚New CSV profile‘
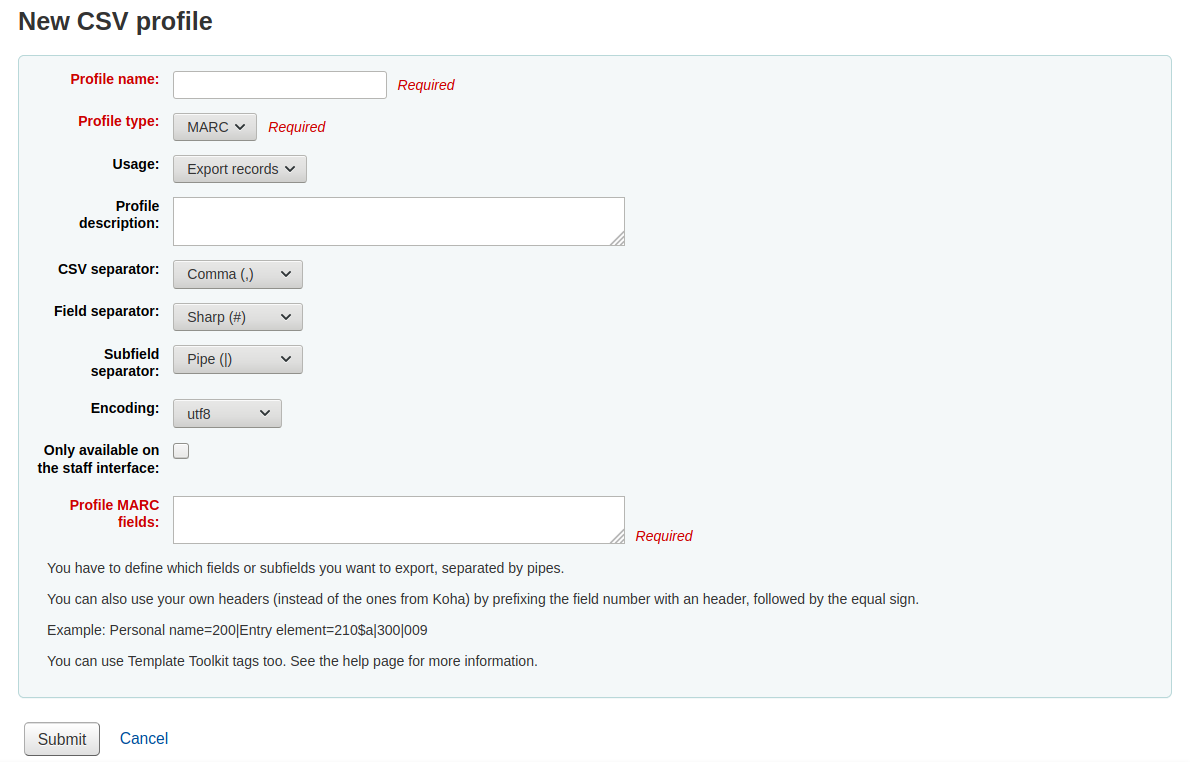
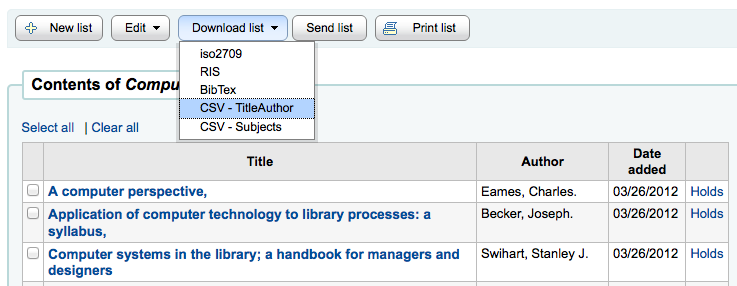
Der ‚Profilname‘ wird in der Auswahlliste angezeigt, wenn Sie im Korb oder in einer Liste ‚Download‘ auswählen
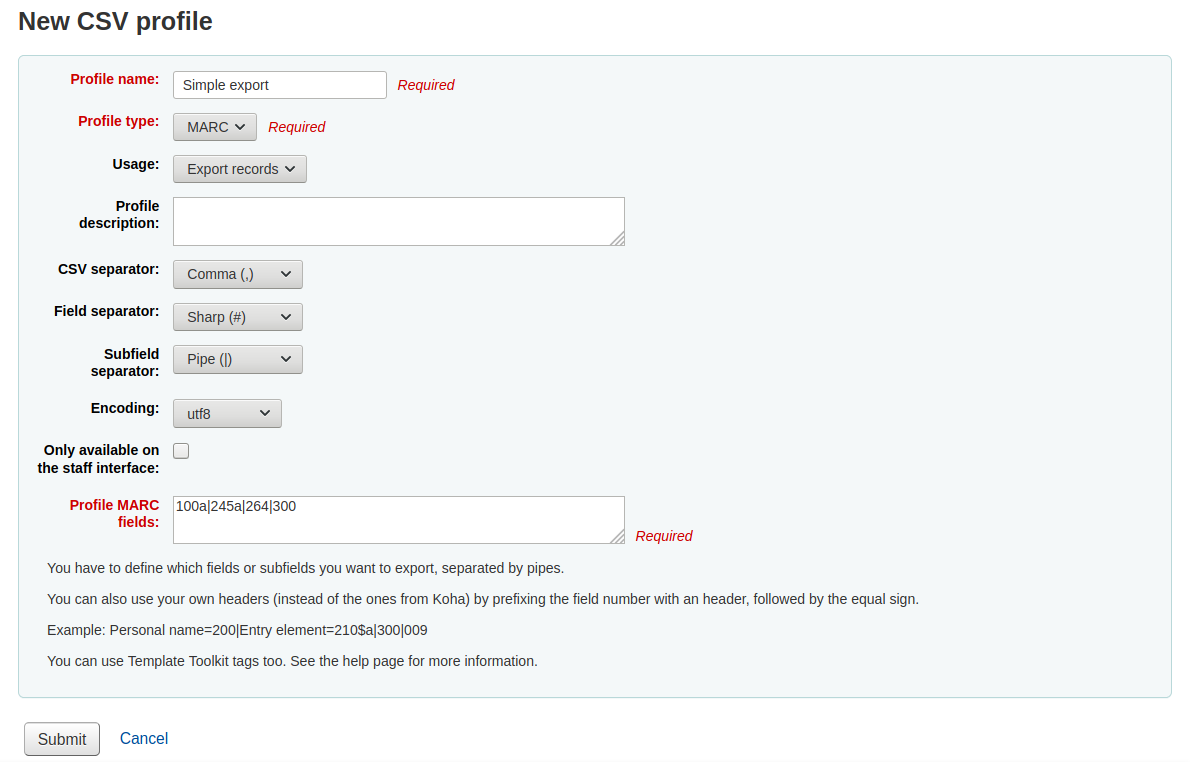
The ‚Profile type‘ determines what type of fields you plan to use (MARC or SQL) to define your profile
If you choose MARC then you will need to enter MARC fields
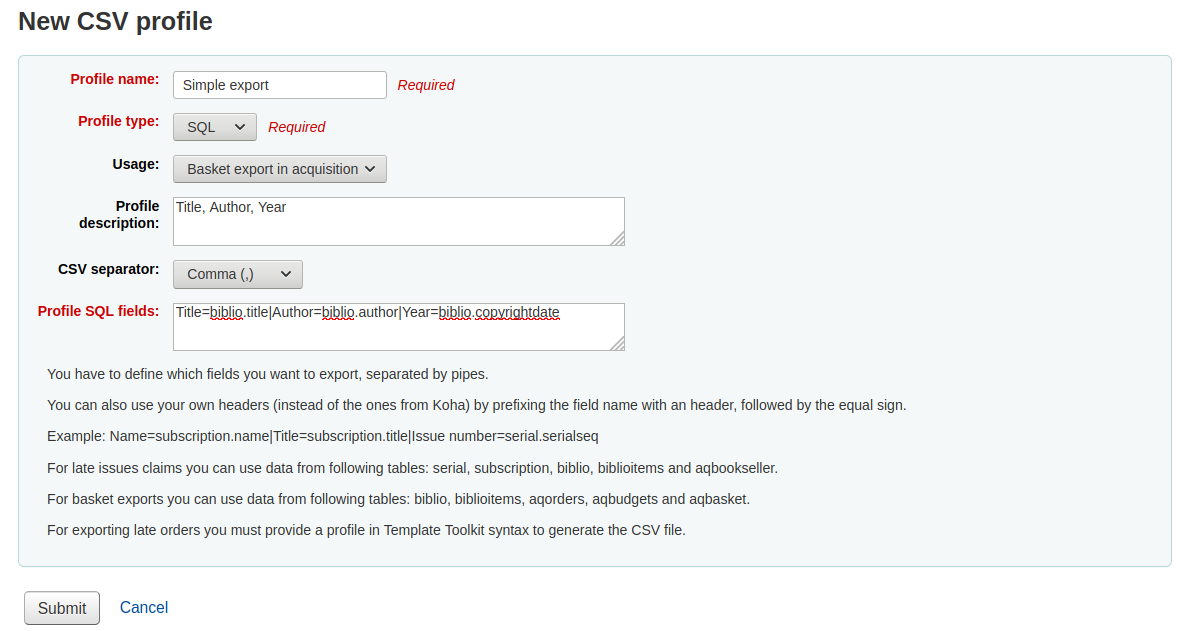
If you choose SQL then you will need to enter SQL database fields
The ‚Usage‘ field is used to indicate what type of report this CSV profile is used with
‚Export records‘ (only available with MARC profile type): this is used to export records from your cart or lists
‚Late serial issues claims‘ (only available with SQL profile type): this is used to export late issues of serial subscriptions
‚Export late orders‘ (only available with SQL profile type): this is used to export late orders in the acquisitions module
- ‚Basket export in acquisition‘ (only available with SQL profile
type): this is used to download records from acquisitions baskets
- ‚Export lost items in report‘ (only available with SQL profile
type): this is used to export a CSV from the lost items report
The ‚Profile description‘ is for your own benefit, but will also appear in the OPAC when patrons download content, so make sure it’s clear for your patrons as well
Das ‚CSV-Trennzeichen‘ ist das Zeichen, das verwendet wird um Werte und Wertegruppen voneinander zu trennen
Hinweis
Die am häufigsten verwendete Option an dieser Stelle ist das Komma, da die meisten Tabellenverarbeitungsprogramme Dateien mit kommagetrennten Werten öffnen können.
The ‚Field separator‘ is the character used to separate duplicate fields
Beispiel: Wenn mehrere 650-Felder vorhanden sind, wird dieses Zeichen als Trennzeichen zwischen den einzelnen Feldern verwendet

The ‚Subfield separator‘ is the character used to separate duplicate subfields
Beispiel: Sie können mehrere Unterfelder $a in einem Feld haben
Unter ‚Zeichensatz‘ können Sie den für Ihre Datei verwendeten Zeichensatz auswählen
The ‚Only available on the staff interface‘ checkbox (only for MARC profile types) lets you limit this CSV profile to staff interface only, meaning patrons will not be able to use this profile to export their cart or lists from the OPAC
Finally format your CSV file using the ‚Profile MARC fields‘ or ‚Profile SQL fields‘ box
Define which fields or subfields you want to export, separated by pipes. Example : 200|210$a|301 for MARC or biblio.title|biblio.author for SQL
Hinweis
You can also use your own headers (instead of the ones from Koha) by prefixing the field number with a header, followed by the equal sign. Example: Personal name=100|title=245$a|300
When you have entered in all of the information for your profile, simply click ‚Submit‘ and you will be presented with a confirmation that your profile has been saved.

Modify CSV profiles
Once you have created at least one CSV profile an ‚Edit profile‘ tab will appear next to the ‚New profile‘ button.
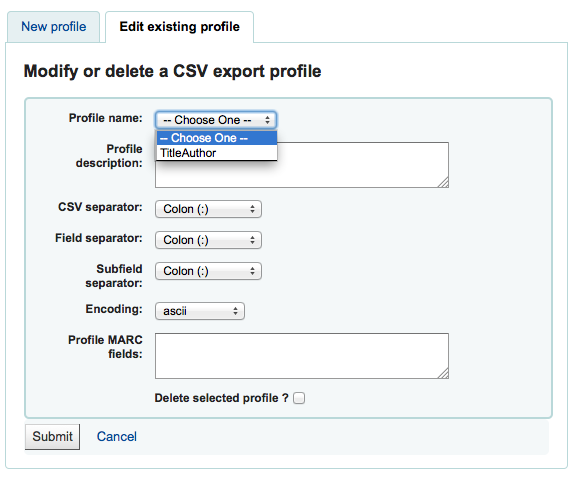
Wählen Sie das Profil, dass Sie ändern möchten und bearbeiten Sie die erforderlichen Felder.
Nachdem Sie die Änderungen gespeichert haben, wird eine Bestätigung am oberen Bildschirmrand angezeigt

Um ein Profil zu löschen, klicken Sie auf ‚Markiertes Profil löschen‘ bevor Sie auf ‚Abschicken‘ klicken

Using CSV profiles
Your CSV profiles will appear on the export list or cart menu under the ‚Download‘ button in both the staff client and the OPAC
Log viewer
Get there: More > Tools > Additional tools > Log viewer
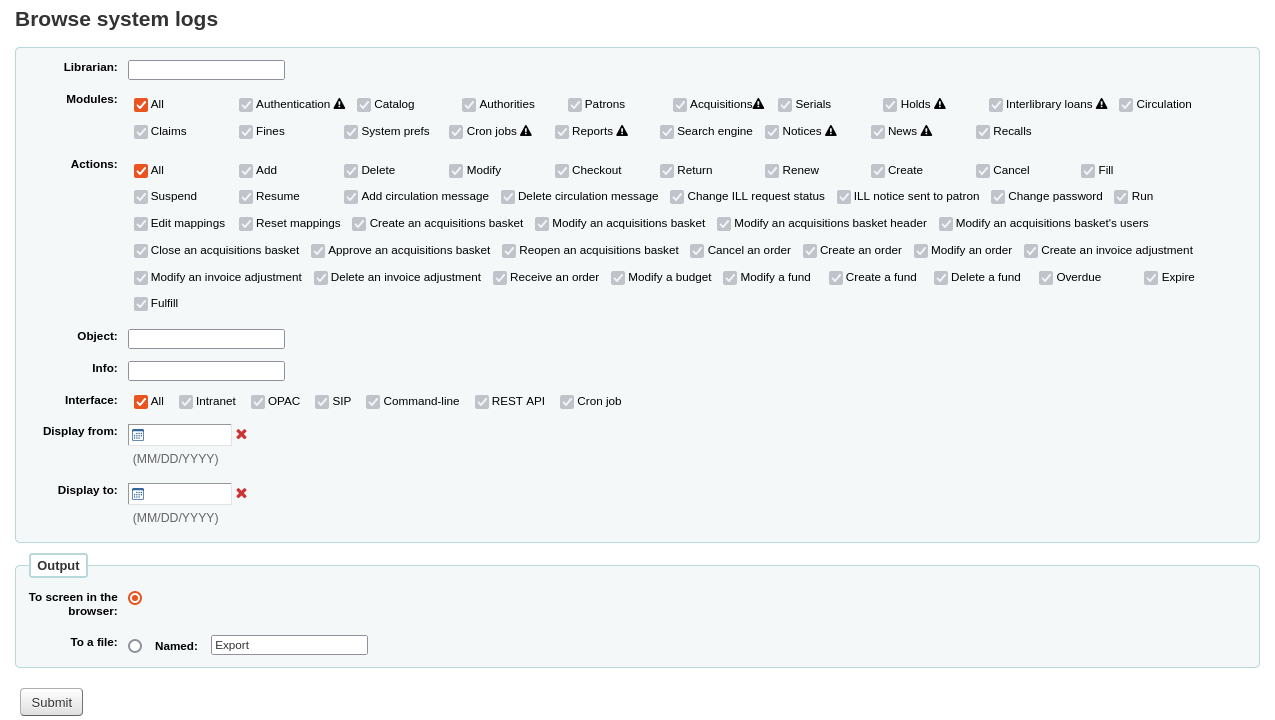
Actions within the Koha system are tracked in log files. Your system preferences can be changed to prevent the logging of different actions. These logs can be viewed using the log viewer.
Bemerkung
The warning sign next to a module name indicates that the actions in this module are not logged. Change your logs preferences to log actions from a module.
Durch Kombination der verschiedenen Suchoptionen erhalten Sie eine Logdatei für Ihre Anfrage
A query for all logs related to the Circulation module produces a result

Bemerkung
You can customize the columns of this table in the ‚Table settings‘ section of the Administration module (table id: logst).
Nachrichten
Get there: More > Tools > Additional tools > News
Mit dem Nachrichten-Modul können Mitarbeiter Neuigkeiten im OPAC und in der Dienstoberfläche veröffentlichen.

To add news to either the OPAC, the staff interface or a circulation receipt:
Click ‚New entry‘
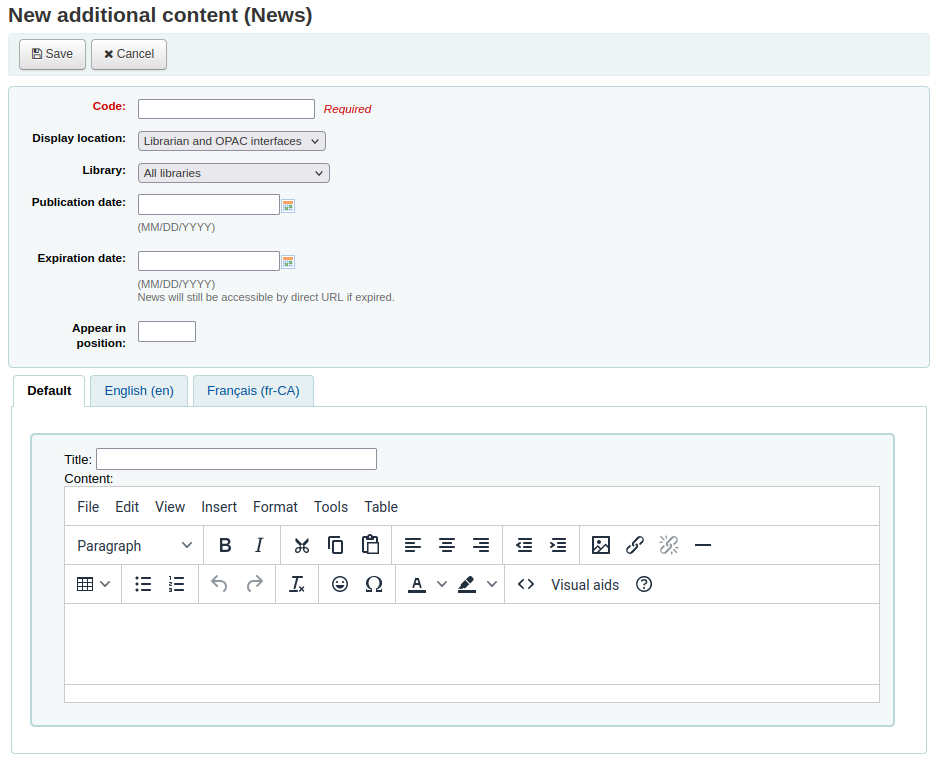
Code: enter a unique code for this news item
Display location: choose where to put the news
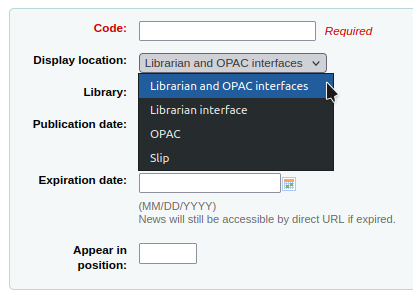
Librarian and OPAC interfaces: content will appear on the staff interface main page as well as in the news block on the OPAC
Librarian interface: content will appear on the staff interface main page
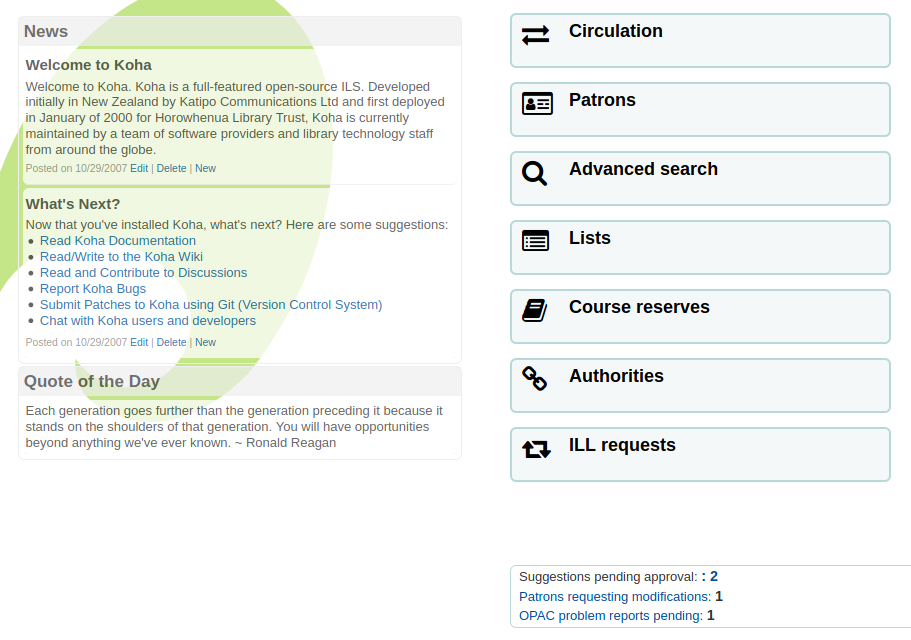
OPAC: content will appear in the top middle part of the OPAC page
Below the news in the OPAC there will be an RSS icon allowing you and your users to subscribe to library news

You can allow your users to choose to see branch-specific news with the OpacNewsLibrarySelect system preference
Slip: content will appear on the circulation receipts
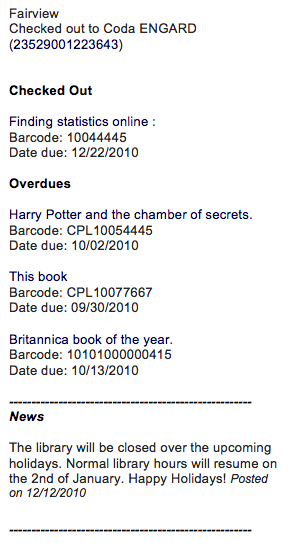
Bemerkung
This can be activated or deactivated in the Notices & slips tool
Library: choose the library for which this news item will be shown
Prior to end users logging in to the OPAC only new items listed to appear for ‚All libraries‘ will display unless your system administrator has configured an ‚OPAC_BRANCH_DEFAULT‘ override in virtual host configuration. See installation for details.
Publication date: use the publication date field to control from which date your news item appears
Examples: (these assume today’s date as 7 May 2019)
Publish on current date: set publication date as 7 May 2019
Schedule for publishing in future: set date later than 7 May 2019
Backdate the news item: set date earlier than 7 May 2019
Expiration date: use the expiration date field to automatically stop showing the news item when it is no longer relevant.
If this field is empty the news item will be shown until you remove it manually
Appear in position: you decide in what order your news items appear
If the field is left empty, the news will appear from newest to oldest
In this field, 0 is the top-most position; the larger the number, the lower in the list the news will appear
You can enter the news title and text for each language installed
Bemerkung
You can choose which type of editor to use here (either a text editor or a WYSIWYG (what you see is what you get) editor) with the AdditionalContentsEditor system preference.
Klicken Sie auf ‚Abschicken‘, nachdem Sie alle Felder ausgefüllt haben.
Depending on your choice for the NewsAuthorDisplay system preference, you will also see the person who created the news item (this uses the logged in person).
HTML customizations
Get there: More > Tools > Additional tools > HTML customizations
Koha’s HTML customizations tool allows staff to post content to the OPAC.
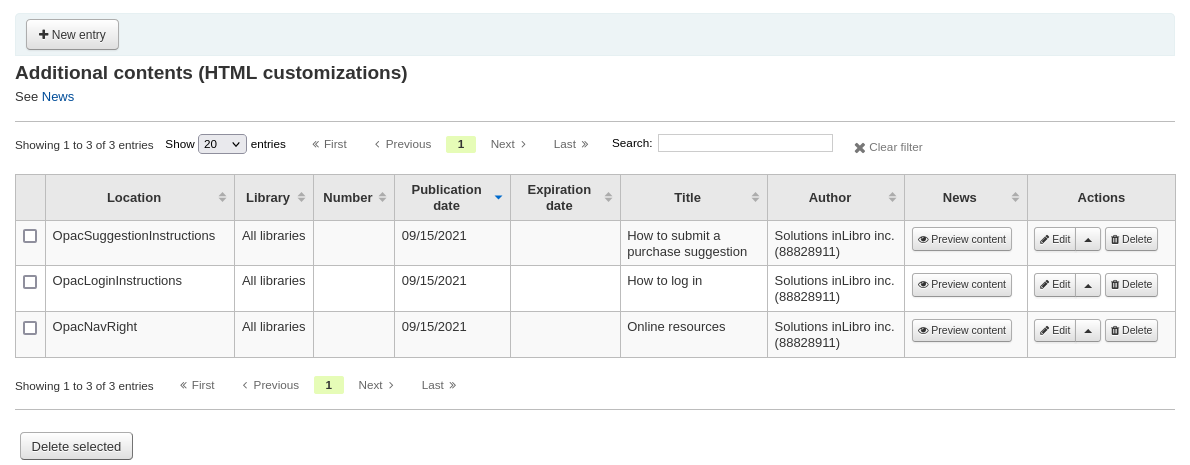
To add content to the OPAC:
Click ‚New entry‘
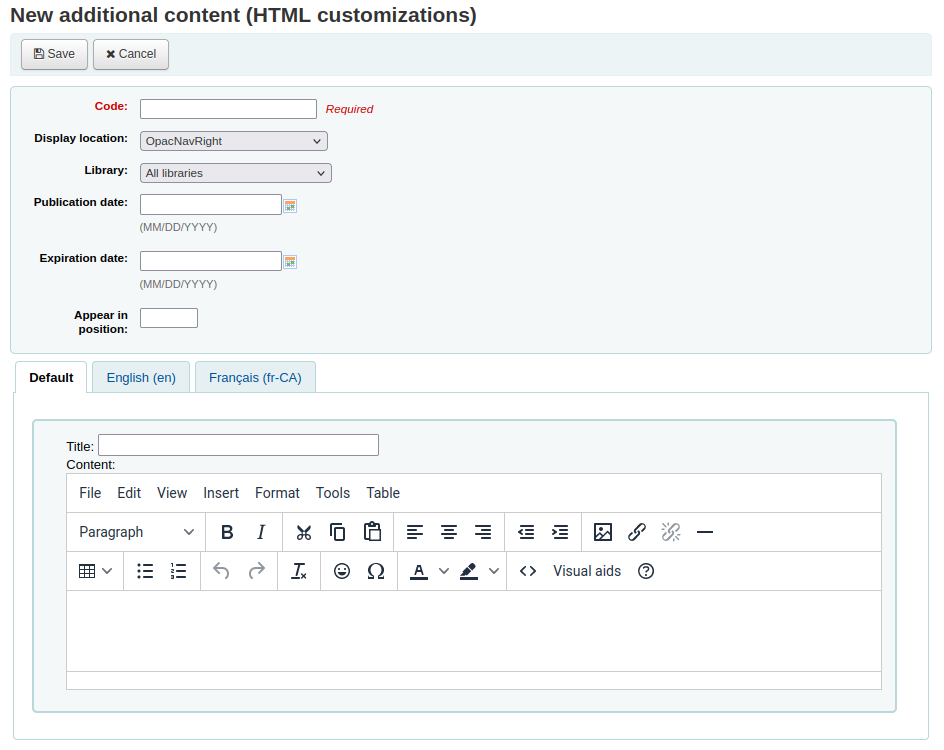
Code: enter a unique code for this additional content item
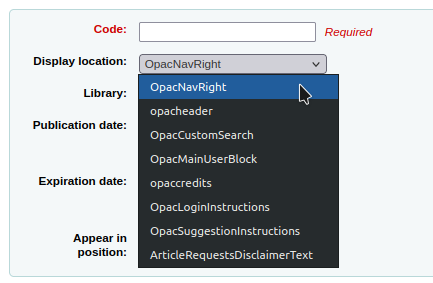
Display location: choose where to put the content
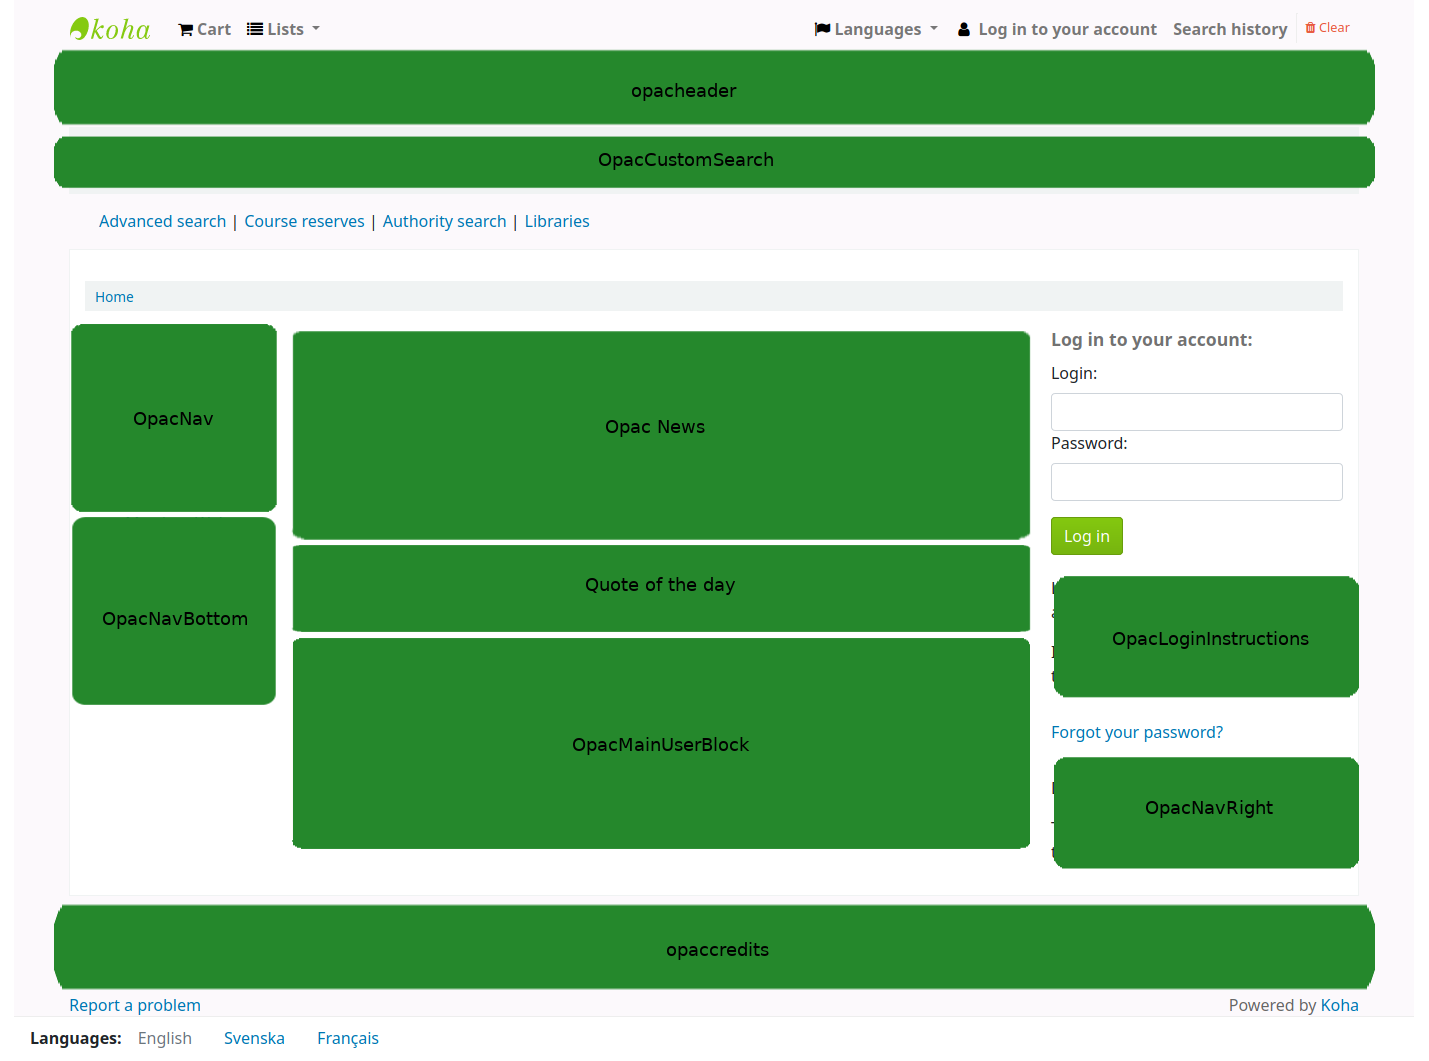
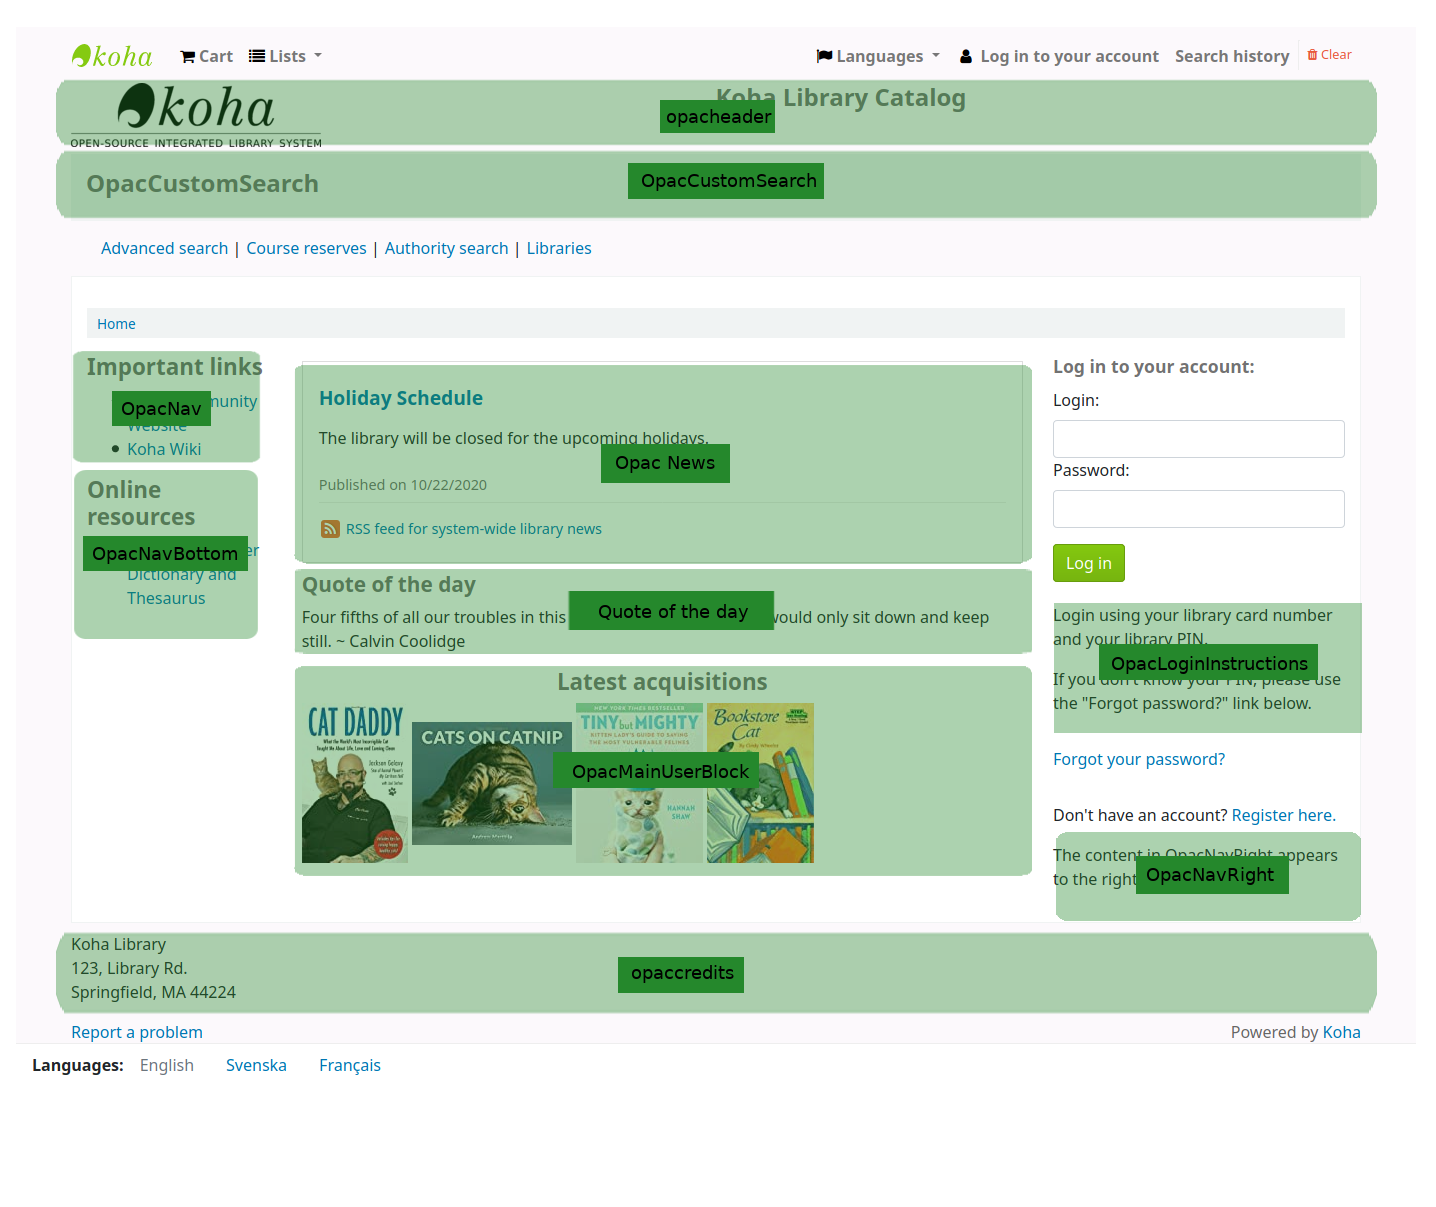
The following image shows where each block is displayed on the OPAC’s main page
Bemerkung
OpacNav and OpacNavBottom are system preferences and the Quote of the day feature is found in the tools module. The rest of the customizable blocks are managed in the HTML customizations tool.
OpacNavRight: content will appear on the right side of the OPAC page
opacheader: content will appear at the top of the OPAC page
OpacCustomSearch: content will replace the simple search bar at the top of the page
OpacMainUserBlock: content will appear in the middle of the OPAC’s main page
opaccredits: content will appear at the bottom of the page
OpacLoginInstructions: content will appear under the login box on the OPAC’s main page
OpacSuggestionInstructions: content will replace the text at the top of the purchase suggestion form on the OPAC
ArticleRequestsDisclaimerText: content will appear and patron will have to accept before they can continue to the article request form; use for any copyright/disclaimer patrons need to be aware of regarding photocopies or scans of articles or chapters
Library: choose the library for which this content will be shown
Prior to end users logging in to the OPAC only content blocks listed to appear for ‚All libraries‘ will display unless your system administrator has configured an ‚OPAC_BRANCH_DEFAULT‘ override in virtual host configuration.
Publication date: use the publication date field to control from which date your content appears
Examples: (these assume today’s date as 7 May 2019)
Publish on current date: set publication date as 7 May 2019
Schedule for publishing in future: set date later than 7 May 2019
Backdate the news item: set date earlier than 7 May 2019
Expiration date: use the expiration date field to automatically stop showing the content when it is no longer relevant.
If this field is empty the content will be shown until you remove it manually
Appear in position: you decide in what order your content appear, when there is more than one in the same display location
If the field is left empty, the content will appear from oldest to newest
In this field, 0 is the top-most position; the larger the number, the lower in the list the content will appear
You can enter the content title and text for each language installed
Bemerkung
The title is not shown for additional content. It mostly serves to know at a glance what the content is about when looking at the list of additional content items. If you want a title to appear, you must add it in the text portion.
Bemerkung
You can choose which type of editor to use here (either a text editor or a WYSIWYG (what you see is what you get) editor) with the AdditionalContentsEditor system preference.
Klicken Sie auf ‚Abschicken‘, nachdem Sie alle Felder ausgefüllt haben.
Pages
Get there: More > Tools > Additional tools > Pages
The pages tool is a tool to create custom additional pages in the OPAC and in the staff interface. It is based on the same tool as the news and the HTML customizations, therefore it works in the same way.

To add a new page:
Click ‚New entry‘
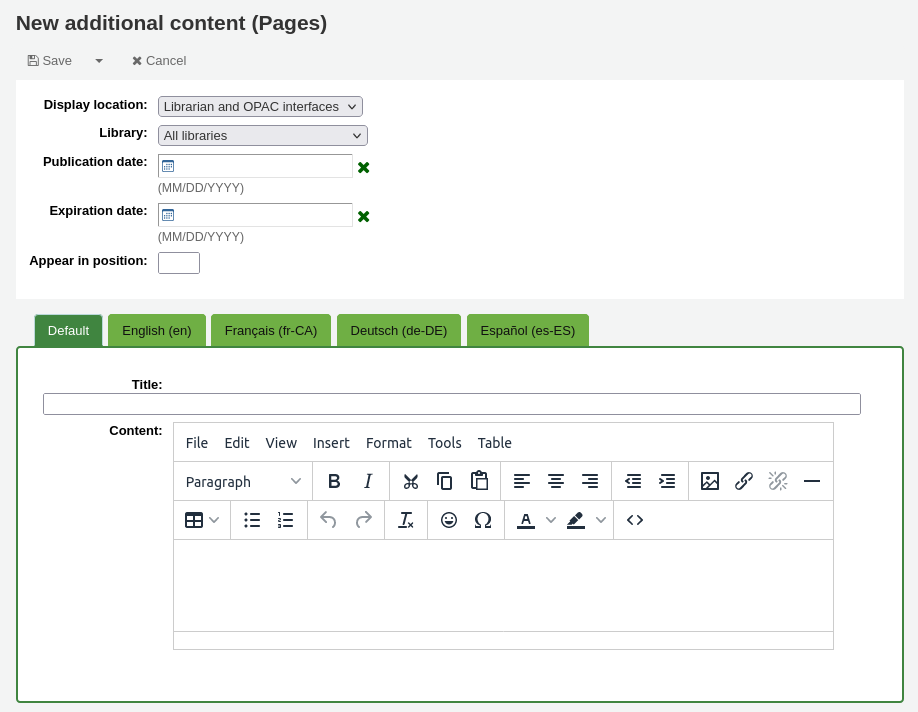
Display location: choose the interface from which this page should be accessed
Librarian and OPAC interfaces: two links will be created, one for the OPAC and one for the staff interface
Librarian interface: a link for the staff interface will be created
OPAC: a link for the OPAC will be created
Library: choose the library for which this page will be available
If an OPAC page is limited to a library, only logged in users whose home library matches the page library will be able to access the page.
Pages limited to a library will not be accessible to OPAC users who are not logged in, unless your system administrator has configured an ‚OPAC_BRANCH_DEFAULT‘ override in virtual host configuration.
If a staff interface page is limited to a library, only staff logged into that library will be able to access the page.
Publication date: use the publication date field to control from which date your page is accessible, if it should only be accessed at a future date.
Expiration date: use the expiration date field to remove the page after a specific date.
If this field is empty the page will be available until you remove it manually
Appear in position: this field does not affect pages, it is only used by other additional content
You can enter the page title and content for each language installed
Bemerkung
You can choose which type of editor to use here (either a text editor or a WYSIWYG (what you see is what you get) editor) with the AdditionalContentsEditor system preference.
Klicken Sie auf ‚Abschicken‘, nachdem Sie alle Felder ausgefüllt haben.
In the table, a link will be generated for the OPAC or the staff interface or both. Use this link in HTML customizations, news or system preferences such as IntranetNav or IntranetmainUserBlock so that the patrons or staff members can access the new page.
Task scheduler
Get there: More > Tools > Additional tools > Task scheduler
Der Aufgabenplaner ist ein Werkzeug um Reports zu bestimmten Zeitpunkten automatisch laufen zu lassen.
To schedule a task, visit the task scheduler and fill in the form
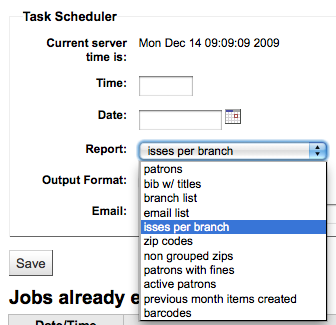
Aktuelle Serverzeit zeigt die Zeit auf Ihrem Server (planen Sie alle Ihre Reports nach dieser Zeit, nicht nach Ihrer lokalen Zeit)
Zeitangaben sollten in der Form hh:mm (jeweils zwei Ziffern für Stunden und Minuten) eingegeben werden
Das Datum sollte mit dem Kalender-Plugin eingetragen werden
Wählen Sie aus den Reports den Report den Sie planen möchten
Entscheiden Sie, ob Sie Text oder einen Link zu den Ergebnissen erhalten möchten
Im Feld Email geben Sie die E-Mail-Adresse der Person an, die den Report erhalten soll
Unter dem Formular des Aufgabenplaners ist eine Liste der geplanten Reports.

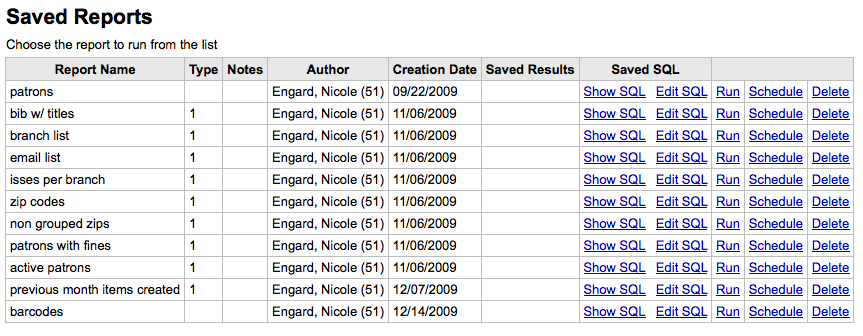
Sie können Reports auch aus der Liste der gespeicherten Reports heraus für einen festen Zeitpunkt einplanen, indem Sie auf ‚Termin einplanen‘ klicken
Problembehebung
Der Aufgabenplaner wird nicht korrekt arbeiten, wenn der Benutzer unter dem der Webserver läuft nicht die notwendigen Rechte hat ihn auszuführen. Um herauszufinden ob der Benutzer die benötigten Rechte hat, überprüfen Sie /etc/at.allow um zu sehen, welche Benutzer dort eingetragen sind. Wenn diese Datei bei Ihnen nicht vorhanden ist, überprüfen Sie etc/at.deny. Wenn at.deny existiert, aber leer ist, dann kann jeder Benutzer das Werkzeug verwenden. Sprechen Sie mit Ihrem Systemadministrator, um den Benutzer an den richtigen Stellen hinzuzufügen, so dass der Aufgabenplaner funktioniert.
Edit quotes for QOTD feature
Get there: More > Tools > Additional Tools > Edit quotes for QOTD feature
This tool will allow you to add and edit quotes to show on the OPAC or the staff interface.
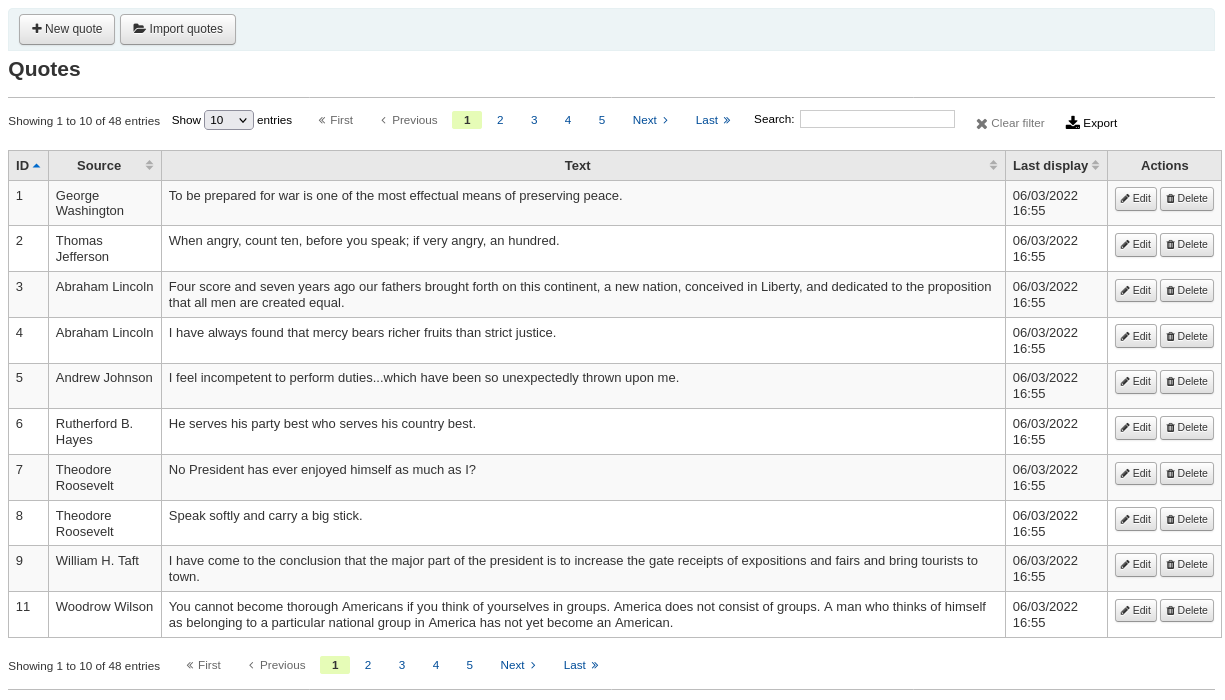
To turn this feature on set the QuoteOfTheDay system preference to either ‚OPAC‘, ‚staff interface‘, or both, and add at least one quote using this tool.
In the OPAC, the quotes will appear above the ‚OpacMainUserBlock‘ news block.
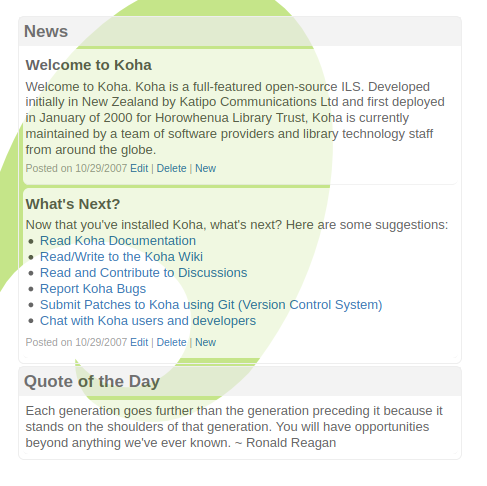
In the staff interface, the quotes will appear under the news on the left side.
Add a quote
To add a quote:
Click the ‚New quote‘ button in the toolbar.

Fill out the form.

Source: enter the source of the quote, e.g. the name of the person who said the quote
Text: enter the text of the quote
Warnung
Sowohl die ‚Quelle‘ als auch der ‚Text‘ müssen ausgefüllt sein, um ein neues Zitat zu speichern.
Click ‚Submit‘ to save the new quote.
The new quote should now be visible in the list.
Import quotes
You can import a batch of quotes as a CSV file. Your file must contain two columns in the form: „source“,“text“ with no header row.
Bemerkung
Sie werden aufgefordert, das Hochladen einer Datei, die grösser als 512MB ist, zu bestätigen.
To start the import process click the ‚Import quotes‘ button at the top of the screen

Once on the import quotes screen you can browse your computer for the file you would like to import

Nach der Auswahl der CSV-Datei wird diese durch die Schaltfläche ‚Öffnen‘ in eine temporäre Tabelle geladen, die Sie nun bearbeiten können.
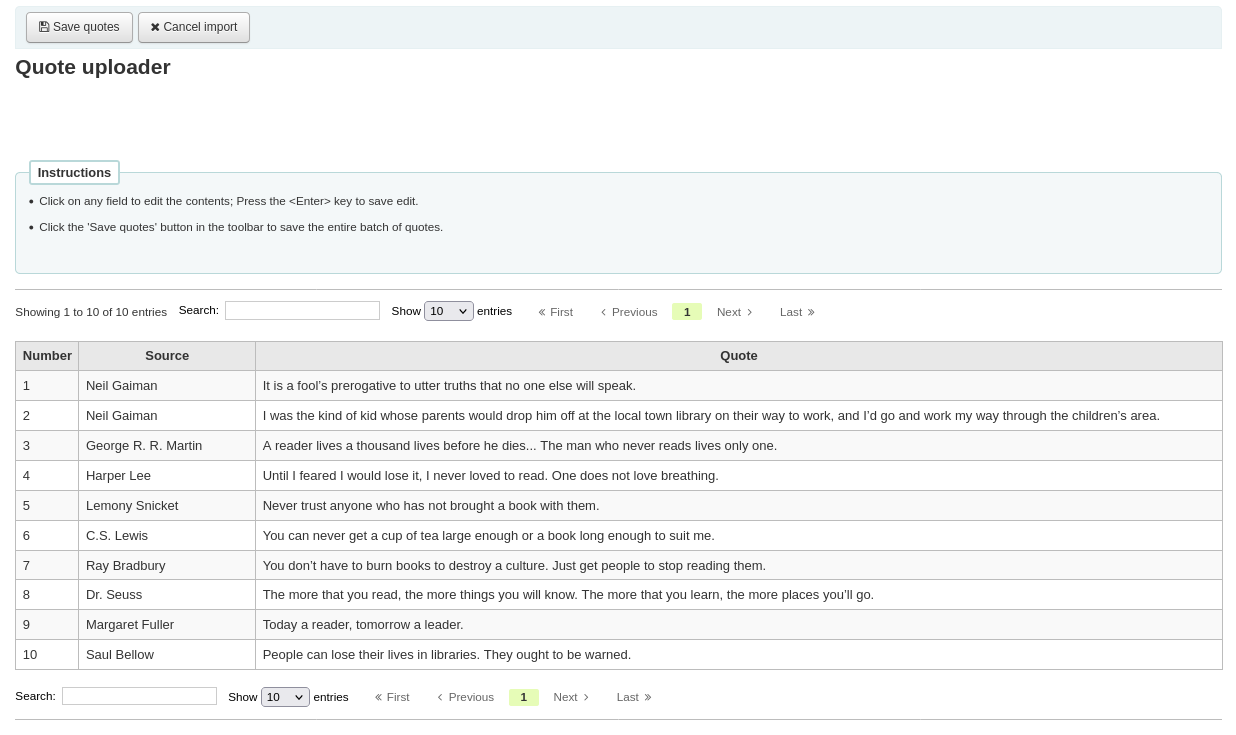
From the listing you can edit either the ‚Source‘ or ‚Text‘ fields by clicking on the desired field. When you are finished editing a field, press the <Enter> key on your keyboard to save the changes.

Once you are satisfied with the quotes, click the ‚Save quotes‘ button in the toolbar at the top and the quotes will be saved.

Edit a quote
To edit a quote, click on the ‚Edit‘ button to the right of the quote.

Edit either the ‚Source‘ or ‚Text‘ fields.
Click ‚Submit‘ to save the quote.
Delete a quote
To delete a quote, click on the ‚Delete‘ button to the right of the quote.

Confirm the deletion by clicking ‚Delete‘.

Upload
Get there: More > Tools > Additional Tools > Upload
This tool will allow you to upload files to your Koha system for selection from the Cataloging form.
Upload files
When you first visit the Upload tool you might see a warning about missing a category.
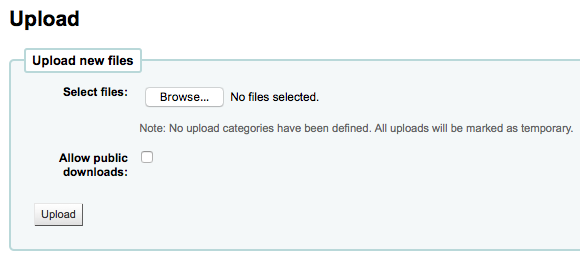
Categories are defined in the authorized value in the UPLOAD category. If you do not have upload categories then your files will be temporary and will be deleted the next time the server is rebooted. Once you have a value in the UPLOAD authorized value category you will see a Category pull down below the ‚Browse‘ button.

Browse your computer a file, choose a category and decide if the public will be able to download this file via the OPAC. Once your file is uploaded you will be presented with a confirmation.

Search files
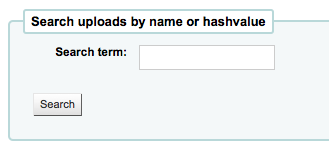
All uploaded files are searchable from below the upload form. Using the form you can search any part of the filename and/or the Hashvalue.Search uploaded files
You will be presented with the results of your search.
Access files
Get there: More > Tools > Additional Tools > Access files
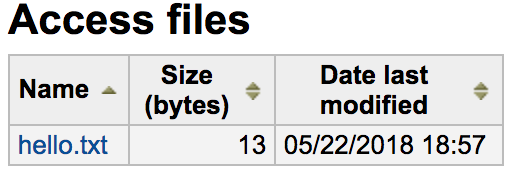
This option allows access to files stored on the server from the staff interface. The directories where the files are stored need to be defined in the koha-conf.xml file. In order to be able to access the tool, a staff patron requires the superlibrarian or access_files patron permission
OPAC problem reports
Get there: More > Tools > Additional tools > OPAC problem reports
This tool is used to manage the problem reports sent by patrons via the OPAC.
Hinweis
This tool only appears if you have enabled the OPACReportProblem system preference.
From this tool, you will see all the problems that were reported by patrons on the OPAC.
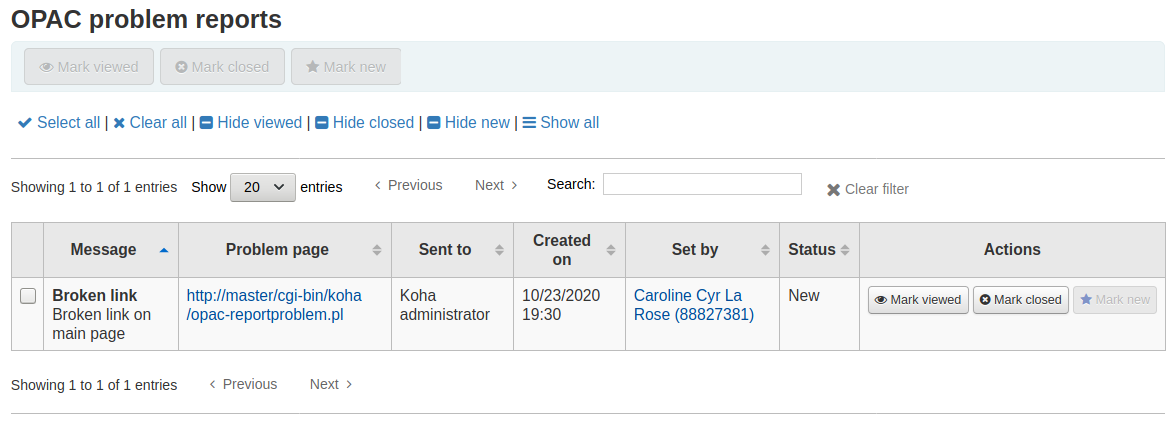
From the ‚Actions‘ column, you can
‚Mark viewed‘: mark this problem report as viewed, this will change the status of the problem report to ‚Viewed‘
‚Mark closed‘: close this problem report, this will change the status of the problem report to ‚Closed‘
‚Mark new‘: mark this problem as new (i.e. not viewed), this will revert the status back to ‚New‘.
You can also batch change statuses by checking the boxes next to the problem reports you want to change and use the button at the top of the page.
Cash management
Koha includes a number of options for dealing with monetary transactions and actions to allow for fine grained tracking of these processes for audit and analytic processes.
Cash registers
Cash registers can be used to track transactions to a specific location in your library. This can be especially helpful for detailing where cash has been taken for payments and then when this cash is subsequently removed and taken to the bank.
Setup
To enable the use of cash registers, you must turn on the UseCashRegisters system preference.
You can then configure cash registers for your library from the cash registers page in the administration module.
Cashup
The action of ‚cashing up‘ can be recorded against a cash register from both the library details and register details pages.
Clicking the Record cashup button will simply record the date and time that the action has taken place and is intended to allow the regular record of when money is collected from the cash register and taken to the bank.
Both of the above pages utilize the cashup record to limit the display of transactions/summaries to only pertinent information, since the last cashup.
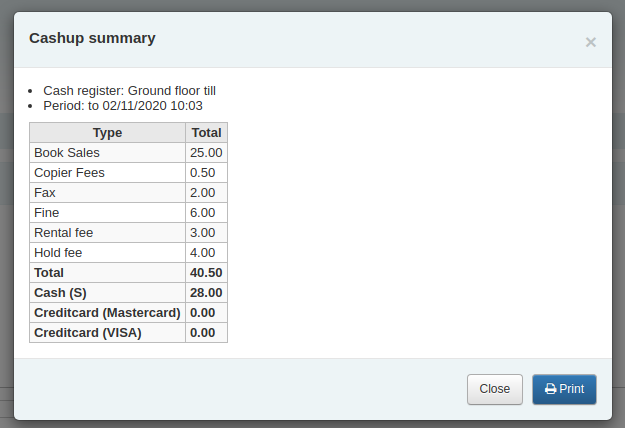
Once a cashup has taken place, a summary of the transactions taken during that cashup period is available for display, and printing, via the Summary link found next to the last cashup date on the register details page.
Cash summary for library
Get there: Home > Tools > Cash summary for library
A summary of transaction amounts associated to a libraries cash registers can be found under the ‚Cash summary for library‘ page tool.
The summary will list registers associated with your logged in branch alongside information about how much money should be found in each register, what is available to take to the bank and a breakdown of income vs outgoings.
Note: You can also access this page from the left hand menu available on the Point of sale page when that module is enabled.
Transaction history for register
Get there: Home > Tools > Cash management > Transaction history for register
A list of all transactions to have taken place at a register is available by clicking on the cash register name from the library details page.
If you have the correct permissions, you can re-print receipts, issue refunds and record cashups from this page.
Note: You can also access this page from the left hand menu available on the Point of sale page when that module is enabled.
Kommentare
Get there: More > Tools > Patrons and circulation > Comments
All comments added by patrons via the OPAC to bibliographic records require moderation by the librarians. If there are comments awaiting moderation they will be listed on the main page of the staff client below the module list:
|commentswaiting|
and next to the Comments tool on the Tools page
|commentswaitingtools|
To moderate comments click on the notification on the main dashboard or go directly to the Comments tool and click ‚Approve‘ or ‚Delete‘ to the right of the comments awaiting moderation.
|commentmoderation|
Wenn es keine Kommentare zu moderieren gibt, erhalten Sie eine Textmeldung mit dieser Information
|nocomments|
Mit der Schaltfläche ‚Freigegebene Kommentare‘ können früher freigegebene Kommentare moderiert und gegebenenfalls die Freigabe wieder zurückgezogen werden.
|commentapproved|