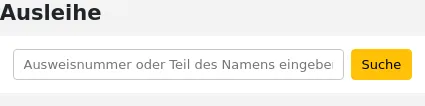
Ausleihe
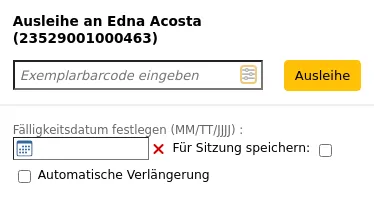
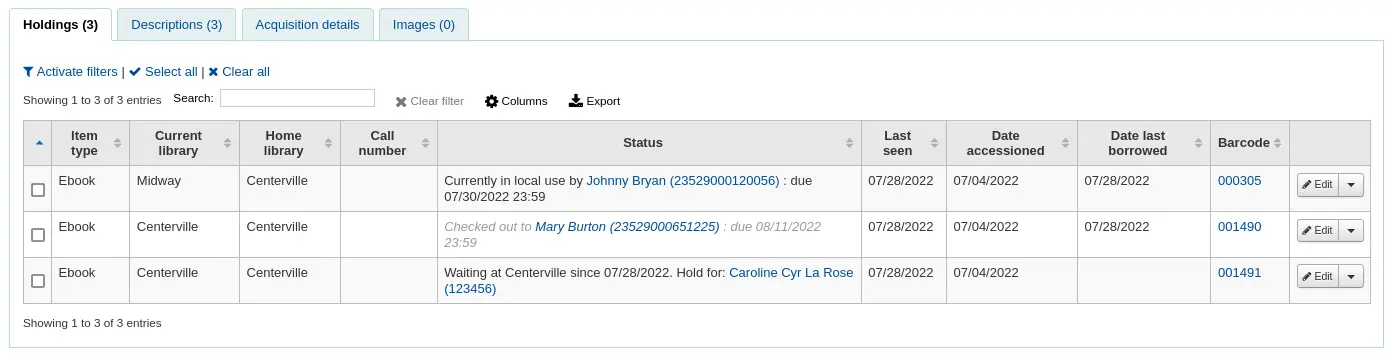
Ausleihe und Rückgabe können auf unterschiedlichen Wegen aufgerufen werden. Auf der Hauptseite der Dienstoberfläche gibt es direkte Links zu Ausleihe, Rückgabe und für das Setzen das Transportstatus. Über die Reiter Ausleihe und Rückgabe in der Suchleiste vieler Seiten können Sie die Funktion direkt ausführen und werden auf die entsprechende Seite weitergeleitet. Alle ausleihrelevanten Funktionen finden Sie auf der Startseite des Ausleihmoduls.
Bevor der Bestand entliehen werden kann, sollten die globalen Systemparameter, die Basisparameter und Ausleihkonditionen konfiguriert werden.
In der Ausleihe können Sie mit den folgenden Tastenkombinationen zwischen den Reitern am oberen Bildschirmrand springen:
Alt + Q: Katalog durchsuchen
Alt + U: Ausleihe
Alt + R: Rückgabe
Alt + W: Verlängern
Bemerkung
Bibliothekspersonal muss die Berechtigung circulate (oder die superlibrarian-Berechtigung) besitzen, um auf die Ausleihfunktionen zugreifen zu können.
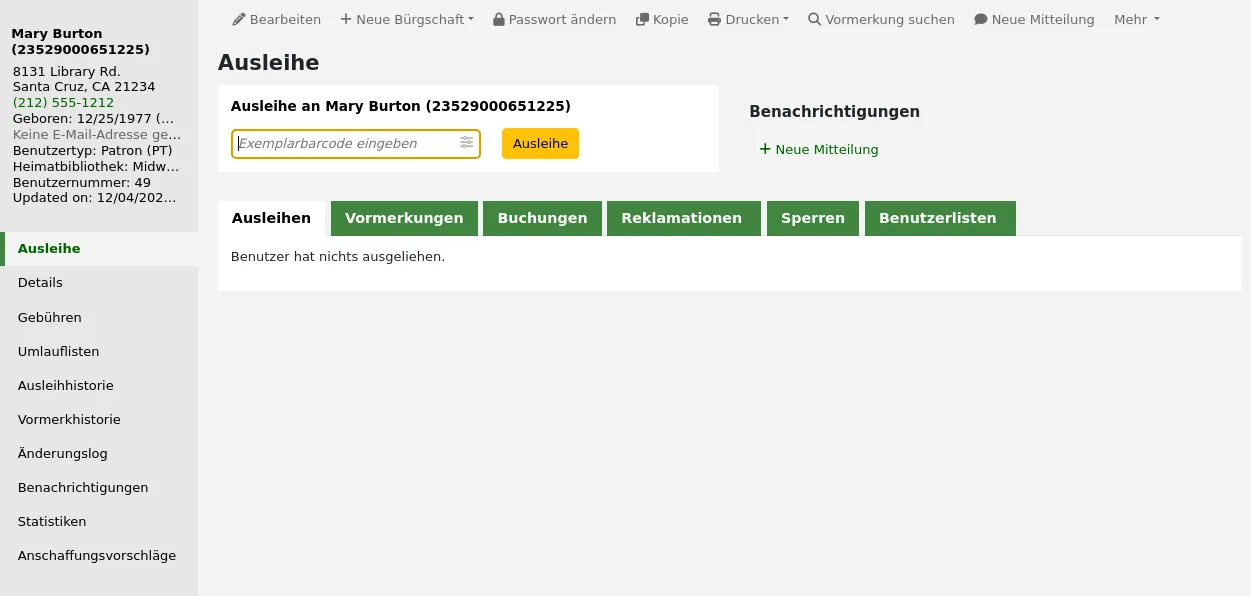
Ausleihe (Verbuchung)
Zu Beginn des Ausleihvorganges muss zuerst der Barcode des Benutzerausweises, oder ein Teil des Namens des Benutzers eingegeben werden. Die Option Ausleihe taucht hauptsächlich an drei verschiedenen Stellen auf:
Ausleihoption in der Kopfzeile auf der Startseite der Dienstoberfläche

Ausleihoption in der Kopfzeile auf der Startseite des Ausleihmoduls

Pfad in Koha: Ausleihe > Rückgabe
Version
Diese Option wurde erstmals in Version 25.05 von Koha eingeführt.
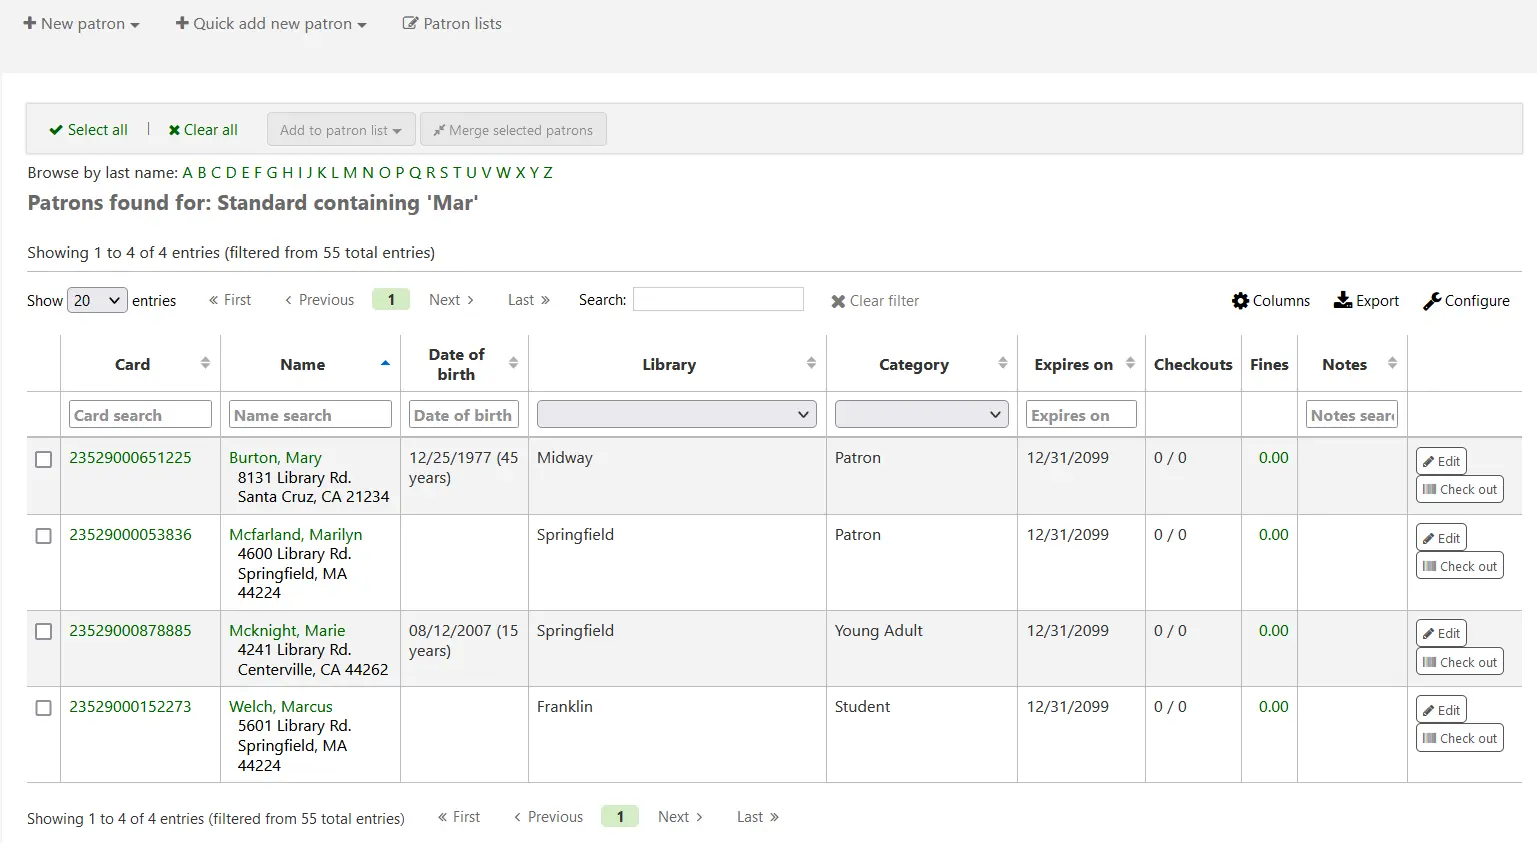
Diese beiden Optionen sind im Wesentlichen eine Benutzersuche. Wenn die Suche nur einen Treffer erzielt, springt Koha direkt zum Reiter „Ausleihen“ im Konto.
Wenn die Suche mehr als einen Treffer ergibt, werden Sie gefragt, an welchen Benutzer/welche Benutzerin ausgeliehen werden soll.
Bemerkung
You can customize the columns of this table in the Table settings section of the Administration module, under the patrons tab (table id: memberresultst).
Wenn Sie auf einen Treffer in der Benutzersuche klicken, gelangen Sie auf den Reiter „Details“ im zugehörigen Konto. Klicken Sie auf „Ausleihen“, um auf den Reiter „Ausleihen“ zu kommen.
Wenn Sie die Stapelverbuchung aktiviert haben, können Sie diesen Reiter auch im Konto auswählen
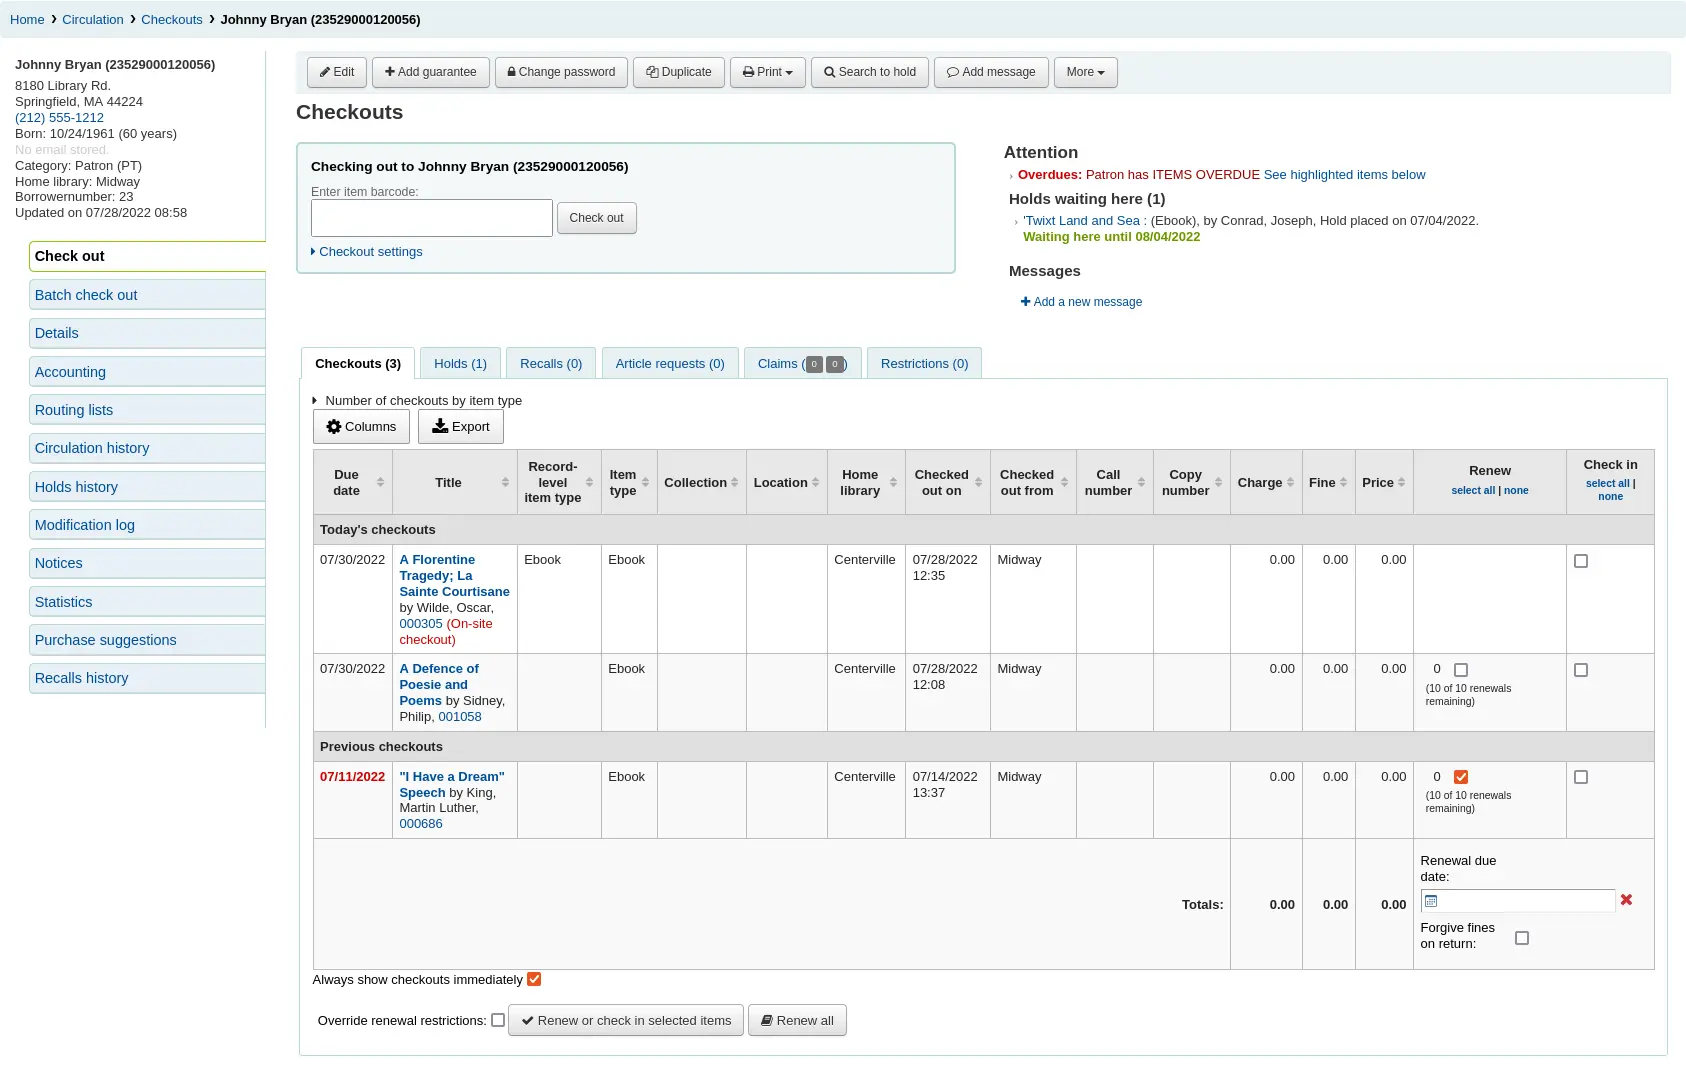
Ausleihen von Exemplaren
Um ein Exemplar an eine*n Benutzer*in auszuleihen, suchen Sie zunächst nach diesem/dieser Benutzer*in mit Hilfe der vielen oben angegebenen Optionen.
Wenn Sie die Checkbox bei „Ausleihen immer sofort anzeigen“ markiert haben, sehen Sie die Liste der aktuellen Ausleihen unter dem Ausleihfeld.
Bemerkung
Der Systemparameter previousIssuesDefaultSortOrder steuert, in welcher Reihenfolge die Ausleihen angezeigt werden (entweder neueste zur ältesten oder älteste zur neuesten).
Bemerkung
You can customize the columns of this table in the Table settings section of the Administration module, under the circulation tab (table id: issues-table).
Bemerkung
Um zu viele Serviceabfragen zu verhindern, wenn mehrere Exemplare nacheinander ausgeliehen werden, können Sie den Systemparameter LoadCheckoutsTableDelay nutzen und so den Aufbau der Tabelle verzögern und die Last zu verringern.
Am Anfang der Ausleihseite finden Sie ein Eingabefeld für die Eingabe oder das Einscannen des Exemplarbarcodes.
Bemerkung
Viele moderne Barcodescanner senden im Anschluss an den eingelesenen Barcode eine „Eingabetaste“ an den Browser, so dass die Schaltfläche „Ausleihe“ nicht extra angeklickt werden muss.
Wenn der Barcode nicht gefunden wird, werden Sie aufgefordert eine Schnellaufnahme zu erstellen. Mehr über Schnellaufnahmen erfahren Sie im entsprechenden Kapitel in diesem Handbuch.
Wenn der Systemparameter itemBarcodeFallbackSearch aktiviert ist, können Sie auch ein Stichwort in das Eingabefeld der Ausleihe statt der Mediennummer eingeben (dadurch können Sie auch über den Titel oder die Signatur ausleihen).
Wenn Sie den Systemparameter AutoSwitchPatron aktiviert haben, wird zum entsprechenden Konto gewechselt wenn eine Ausweisnummer eingescannt wird.
Für mehr Ausleihoptionen klicken Sie auf den Link ‚Ausleih-Parameter‘. Dieser Bereich wird dann erweitert.
Specify due date: this option can be used to override the default due date for the item, as defined in the circulation and fines rules.
Bemerkung
Diese Option wird nur angezeigt, wenn der Systemparameter SpecifyDueDate so eingerichtet ist, dass Bibliothekspersonal das Fälligkeitsdatum überschreiben können.
The red ‚X‘ is used to clear the date. If the ‚specify due date‘ field is empty, the default due date, as defined in the circulation and fines rules is used.
Für Sitzung speichern: markieren Sie diese Checkbox, um das angegebene Fälligkeitsdatum nicht nur für diese, sondern für alle Ausleihen beizubehalten, bis Sie sich von der Dienstoberfläche abmelden.
Automatische Verlängerung: diese Option ermöglicht die automatische Verlängerung des Exemplars
Um die automatische Verlängerung nutzen zu können,
muss der Cronjob automatic_renewals ausgeführt werden
the circulation and fines rules regarding automatic renewals must be defined
Genau wie bei gewöhnlichen Verlängerungen werden Ausleihen nicht automatisch verlängert, wenn das Medium vorgemerkt ist.
Verkürzung der Ausleihfrist aufgrund von Vormerkungen aussetzen: diese Option überschreibt den Systemparameter descreaseLoanHighHolds.
Bemerkung
Diese Möglichkeit erscheint nur, wenn der Systemparameter decreaseLoanHighHolds aktiviert ist.
Vor-Ort-Ausleihe: zeigt an, dass es sich bei dieser Ausleihe um eine Vor-Ort-Ausleihe handelt.
Bemerkung
Diese Möglichkeit wird nur angezeigt, wenn Benutzer*innen die Ausleihe vor Ort ermöglicht wird. In der Regel handelt es sich um nicht ausleihbare Medien, die für die Nutzung in der Bibliothek ausgeliehen werden.
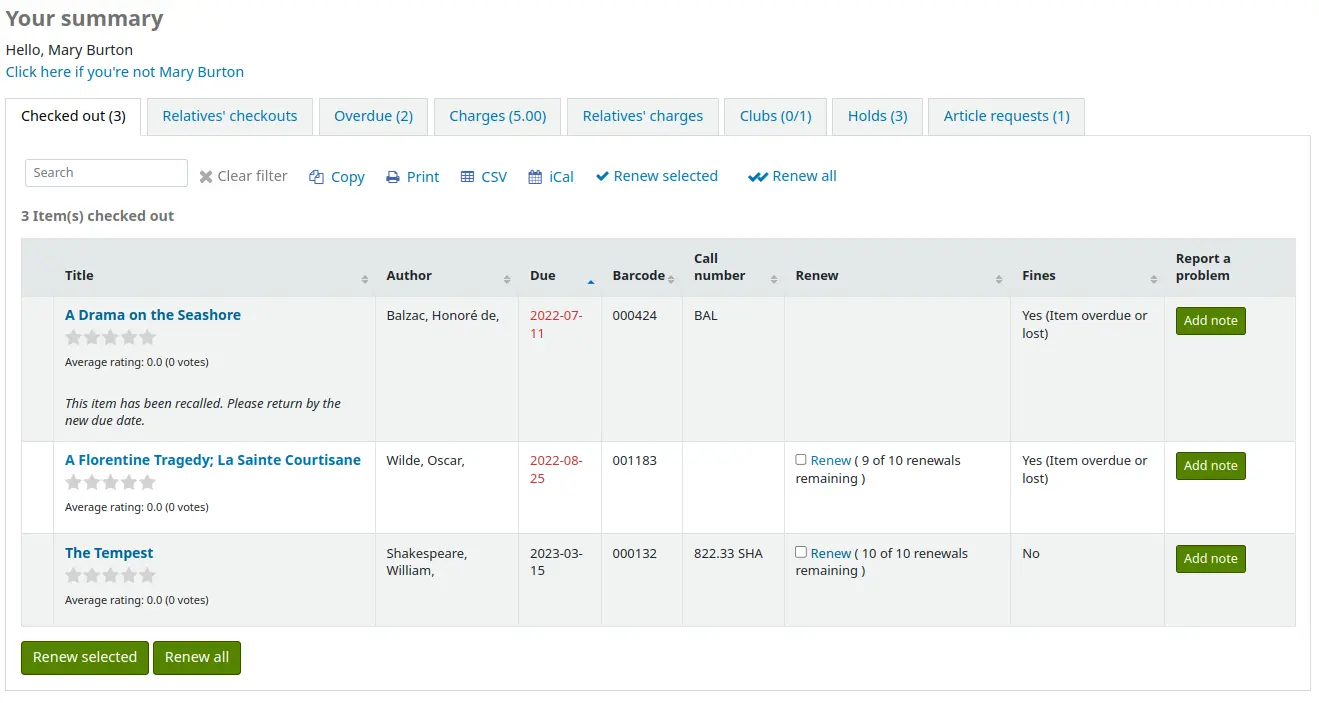
Im unteren Bereich der Seite finden Sie eine Übersicht über die aktuell ausgeliehenen Medien des/der Benutzer*in sowie das Fälligkeitsdatum (und die Uhrzeit, wenn es sich um eine stundenweise Ausleihe handelt). Die tagesaktuell ausgeliehenen Medien werden oben angezeigt, die früher ausgeliehenen Medien darunter.
Bemerkung
Der Systemparameter todaysIssuesDefaultSortOrder steuert, in welcher Reihenfolge die neuen Ausleihen angezeigt werden (entweder neueste zur ältesten oder älteste zur neuesten).
Bemerkung
Bei Exemplaren die nur für ein paar Stunden ausgeliehen werden können, wird neben dem Fälligkeitsdatum auch die Uhrzeit angezeigt.
Wenn ein Exemplar als „Vor-Ort-Ausleihe“ entliehen wurde, wird diese Information in der Liste der Ausleihen in rot hervorgehoben.

Wenn eine Notiz im Benutzerkonto eingetragen wurde, wird diese rechts neben dem Feld für die Ausleihe angezeigt
Wenn für den/die Benutzer*in eine Vormerkung zur Abholung bereit steht, wird dies ebenfalls rechts neben dem Feld für die Ausleihe angezeigt, so dass das Bibliothekspersonal an der Ausleihtheke leicht sehen kann, dass noch ein weiteres Exemplar an den/die Benutzer*in ausgegeben werden muss.
Wenn Sie einen deutlicheren Hinweis wünschen, können Sie den Systemparameter WaitingNotifyAtCheckout aktivieren, so dass nach jeder Ausleihe eines/einer Benutzer*in mit abholbaren Vormerkungen ein Pop-Up-Fenster erscheint.
Die Details der Ausleihen erscheinen auch in der Detailansicht der Dienstoberfläche.
Quittungen drucken
Wenn Sie alle Titel für den/die Benutzer*in verbucht haben, haben Sie zwei Möglichkeiten eine Ausleihquittung zu drucken.
Wenn Sie die Einstellung CircAutoPrintQuickSlip auf ‚ein Fenster für den Druck der Quittung öffnen“gesetzt haben, können Sie einfach die Eingabetaste auf Ihrer Tastatur drücken oder ein leeres Blatt Papier mit Ihrem Barcode-Scanner scannen. Die Idee dahinter ist, dass Sie einen leeren Barcode „ausleihen“, der Koha dazu veranlasst, die „Schnellquittung“ zu drucken
Wenn der Systemparameter DisplayClearScreenButton auf „Zeige Schaltflächen für Quittungsdruck und Leeren des Bildschirms“ oder „Zeige Schaltflächen für Kurzquittung und Leeren des Bildschirms“ eingestellt ist, wird in der oberen rechten Ecke des Ausleihfensters ein Drucker-Symbol dargestellt, über das Quittungen oder Kurzquittungen erstellt werden können.

Sie können auch am oberen Seitenrand über die Schaltfläche ‚Druck‘ die Funktionen ‚Quittung drucken‘ oder ‚Kurzquittung drucken‘ verwenden.
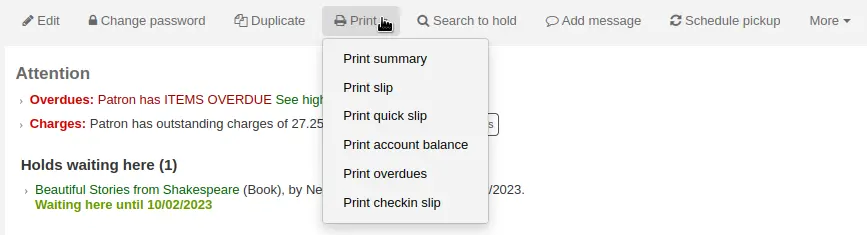
Wenn Sie ‚Quittung drucken‘ wählen, wird eine Auflistung aller Medien ausgedruckt, die der/die Benutzer*in aktuell auf sein/ihr Konto ausgeliehen hat.
Bemerkung
Die Quittung verwendet die Benachrichtigung ISSUESLIP. Sie können diese unter Benachrichtigungen und Quittungen angepassen.
Mit „Kurzquittung drucken“ wird nur eine Auflistung der heute ausgeliehenen Medien gedruckt.
Bemerkung
Die Quittung verwendet die Benachrichtigung ISSUEQSLIP. Sie kann unter Benachrichtigungen und Quittungen angepasst werden.
„Zusammenfassung drucken“ erzeugt eine ganzseitige Zusammenfassung der Ausleihdaten des Benutzers.
Bemerkung
Die Zusammenfassung kann nicht angepasst werden.
However, the tables for the checkouts, holds, and charges are customizable in the Table settings section of the Administration module (table id: print-summary-checkouts, print-summary-holds, and print-summary-fines).
„Gebührenauszug drucken“ liefert eine Übersicht über die aktuell ausstehenden Gebühren und das nicht genutzte Guthaben auf dem Benutzerkonto.
Bemerkung
Die Quittung verwendet die Benachrichtigung ACCOUNTS_SUMMARY. Sie kann unter Benachrichtigungen und Quittungen angepasst werden.
Bemerkung
Diese Option erscheint nur, wenn der/die Benutzer*in Gebühren in seinem/ihrem Benutzerkonto hat.
„Überfälligkeiten drucken“ erstellt eine Auflistung aller Medien, deren Ausleihzeitraum überschritten wurde.
Bemerkung
Der Aufbau des Formulars kann im Modul „Werkzeuge“ unter Benachrichtigungen und Quittungen angepasst werden. Der zugehörige Code ist „OVERDUES_SLIP“.
Mit „Rückgabequittung drucken“ wird eine Auflistung aller heute zurückgegebenen Medien erstellt.
Bemerkung
Der Aufbau der Quittung kann im Modul „Werkzeuge“ Benachrichtigungen und Quittungen angepasst werden. Der entsprechende Code ist „CHECKINSLIP“.
Tipp
Sie können benutzerdefinierte Quittungen in diesem Menü hinzufügen, indem Sie eine neuen Benachrichtigung im Werkzeug Benachrichtigungen & Quittungen im Modul „Benutzer (benutzerdefinierte Quittung)“ hinzufügen.
Zum Beispiel, um einen Beleg mit allen aktuellen Entleihungen des Nutzenden zu erhalten,
Klicke auf „Neue Benachrichtigung“ und wähle „Benutzer“ aus
Fülle die Felder „Code“ und „Name“ für den Beleg aus. Der „Name“ erscheint im „Drucken“-Menü.
In the ‚Print‘ template section, paste the code:
Patron has [% borrower.holds.count %] holds

List of holds:
[% FOREACH hold IN borrower.holds %]
===============================
Reserve id: [% hold.reserve_id %]
Title [% hold.biblio.title %]
[% END %]
Klicken Sie auf „Speichern“
Wenn Sie nun in einem Benutzerkonto auf „Drucken“ klicken, sollte der neudefinierte Beleg angezeigt werden.
Ausleihen exportieren
Außer dem Ausdruck einer Quittung gibt es mehrere weitere Möglichkeiten Ausleihen zu exportieren.
Die Schaltfläche „Export“ am Anfang der Tabelle erlaubt s die aktuellen Ausleihen des Benutzers für Microsoft Excel oder als CSV-Format zu exportieren, auch ein Speichern in der Zwischenablage oder Druck ist so möglich.
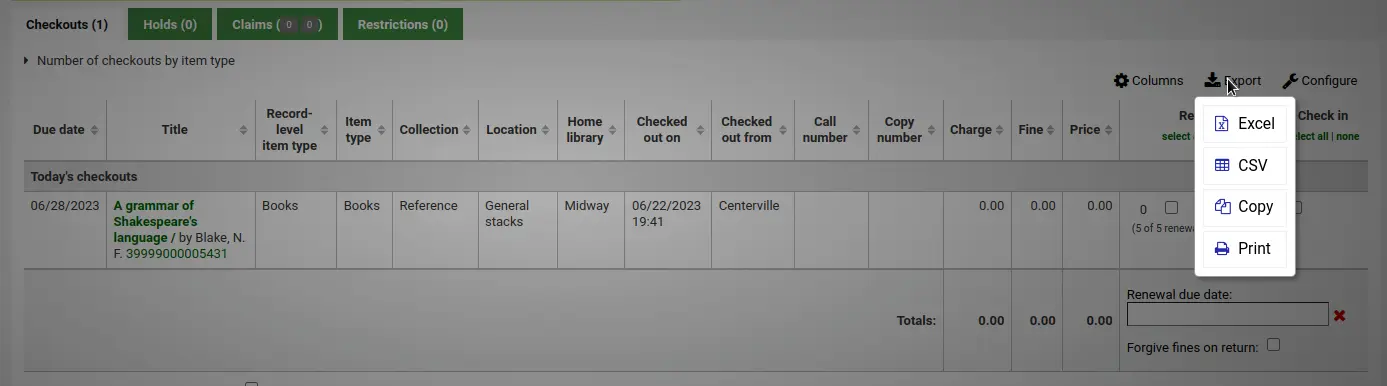
Beim Export als CSV-Datei werden alle angezeigten Tabellenspalten ausgegeben. Über die Schaltfläche „Spalten“ können bei Bedarf zunächst einige Spalten entfernt werden.
Wenn der Systemparameter ExportCircHistory aktiviert ist, gibt es in der Ausleihtabelle die Spalte „Export“. Diese wird verwendet, um die aktuellen Ausleihen des Benutzers entweder im MARC- oder CSV-Format zu exportieren.
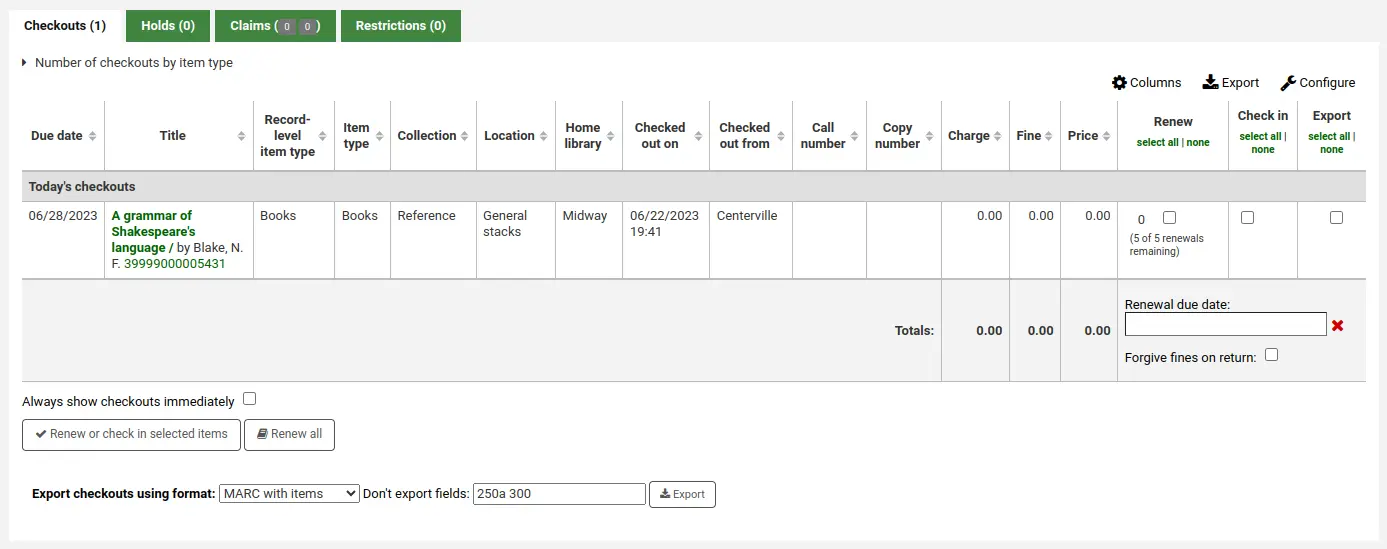
Um Ausleihen auf diesem Weg zu exportieren,
markieren Sie bei den entsprechenden Ausleihen die Checkbox in der Spalte „Export“.
Unterhalb der Tabelle können Exporteinstellungen vorgenommen werden
Exportiere Ausleihen in den Formaten
MARC mit Exemplaren: exportiert die MARC-Datensätze der ausgeliehenen Titel, einschließlich der Exemplarinformationen.
MARC ohne Exemplare: exportiert die MARC-Datensätze der ausgeliehenen Titel.
CSV: exportiert eine CSV-Datei der ausgeliehenen Titel. Wird diese Option ausgewählt, erscheint ein weiteres Dropdown-Menü zur Auswahl eines CSV-Profile.
Bundle-Inhalt exportieren: Wenn der/die Benutzer*in ein Bundle ausgeliehen hat, exportiert diese Option den übergeordneten Datensatz sowie alle untergeordneten Datensätze.
Felder unterdrücken: optional können MARC-Felder angegeben werden, die nicht exportiert werden sollen.
Bemerkung
Die voreingestellten Werte im Feld „Felder unterdrücken“ werden im Systemparameter ExportRemoveFields festgelegt.
Benutzerkonto schließen
Wenn Sie den Systemparameter DisplayClearScreenButton auf „Zeige“ gesetzt haben, können Sie nach Beenden des Ausleihvorgangs mit der Schaltfläche X in der oberen rechten Ecke der Benutzerdetails den/die aktuelle*n Benutzer*in vom Bildschirm entfernen und den nächsten Ausleihvorgang beginnen.
Wenn der Systemparameter CircAutoPrintQuickSlip auf ‚das Benutzerkonto geschlossen‘ gesetzt ist, können Sie einfach die Eingabetaste drücken oder einen leeren Barcode scannen, um die Daten des/der Benutzer*in vom Bildschirm zu entfernen.
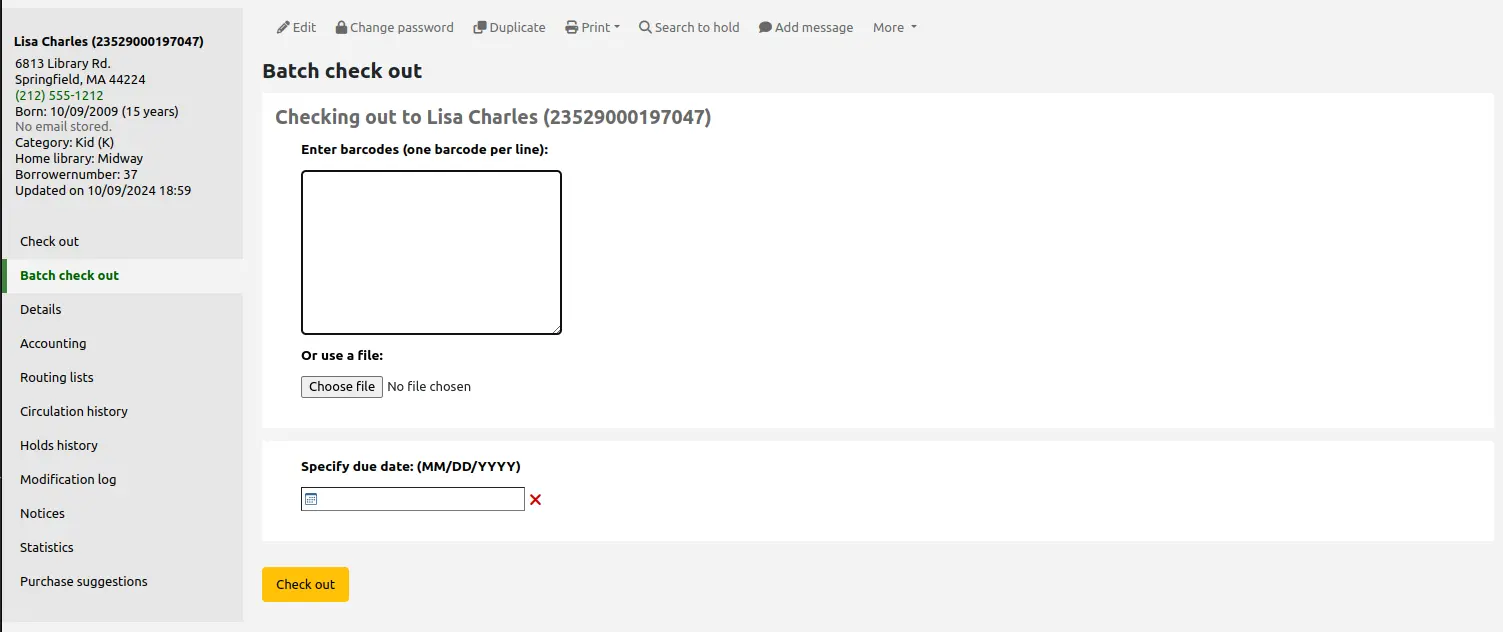
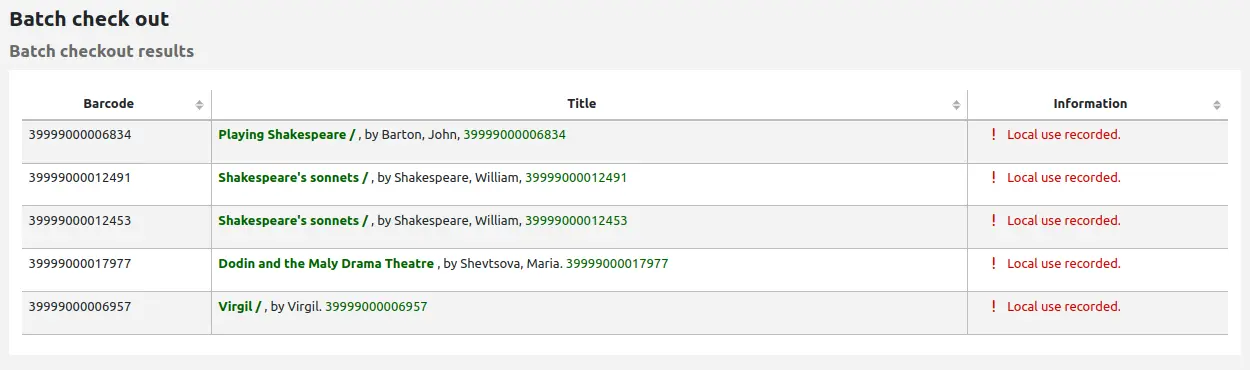
Stapelverbuchung
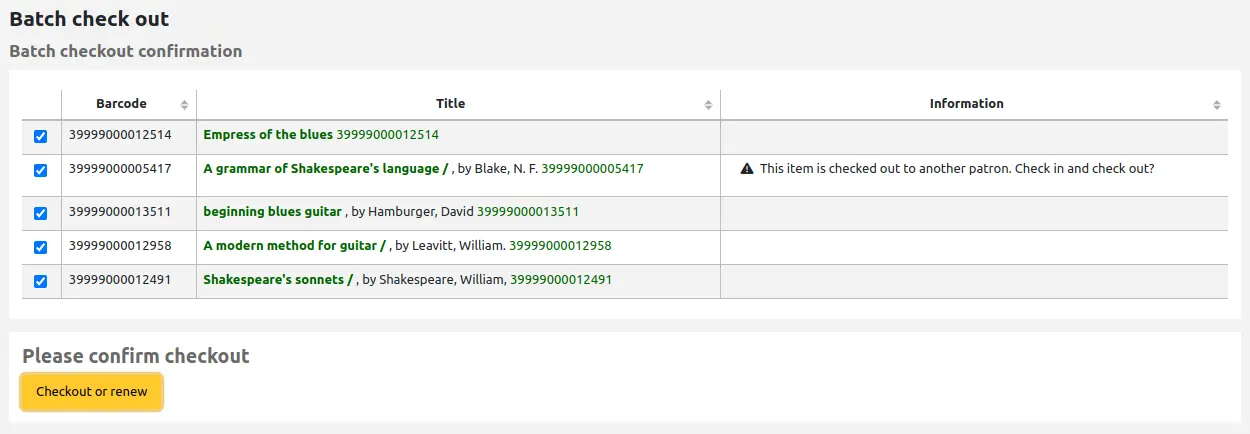
Um die Stapelverbuchung zu nutzen muss der Systemparameter BatchCheckouts aktiv sein und im Systemparameter BatchCheckoutsValidCategories festgelegt werden, welche Benutzertypen die Stapelverbuchung verwenden dürfen. Dies ermöglicht es mit Hilfe eines RFID-Gerätes mehre Barcodes auf einmal einzulesen oder die Stapelverbuchung für interne Schulungszwecke zu verwenden.
Rufen Sie den Bildschirm für die Stapelausleihe auf, indem Sie den Benutzerdatensatz aufrufen und auf den Reiter „Stapelausleihe“ auf der linken Seite klicken.
Von diesem Bildschirm aus können Sie mehrere Barcodes scannen oder eine Datei mit Barcodes laden.
Wenn der Systemparameter SpecifyDueDate aktiviert ist, können Sie ein Fälligkeitsdatum für Ausleihen festlegen.
Wenn der Systemparameter OnSiteCheckouts aktiviert ist, können Sie diese als Vor-Ort-Ausleihen definieren.
Version
Die Option der Vor-Ort-Ausleihe bei der Stapelausleihe wurde in Koha in Version 23.11 hinzugefügt.
Wenn Exemplare nicht ausgeliehen werden können, erscheint auf der folgenden Seite eine Warnung mit der Möglichkeit, die nicht ausleihbaren Exemplare abzuwählen.
Wenn Sie einen Benutzertyp mit der Kategorie ‚Statistisch‘ verwenden, um die Vor-Ort-Nutzung zu erfassen, wird die Vor-Ort-Benutzung für jedes eingescannte Exemplar protokolliert.
Meldungen bei der Ausleihe
Wenn Sie ein mehrteiliges Exemplar ausbuchen und diese Information im Unterfeld 3 des Exemplarsatzes (MARC 21) gespeichert haben, erscheint eine Nachricht, die zur Prüfung der entsprechenden Anzahl der Teile auffordert.

Es gibt Situationen in denen Koha die Ausleihe an eine*n Benutzer*in verhindert. In solchen Fällen wird eine Warnung angezeigt, die den/die Bibliotheksmitarbeiter*in darüber informiert, warum der/die Benutzer*in nicht ausleihen kann.
Der/die Benutzer*in hat zu hohe offene Gebühren
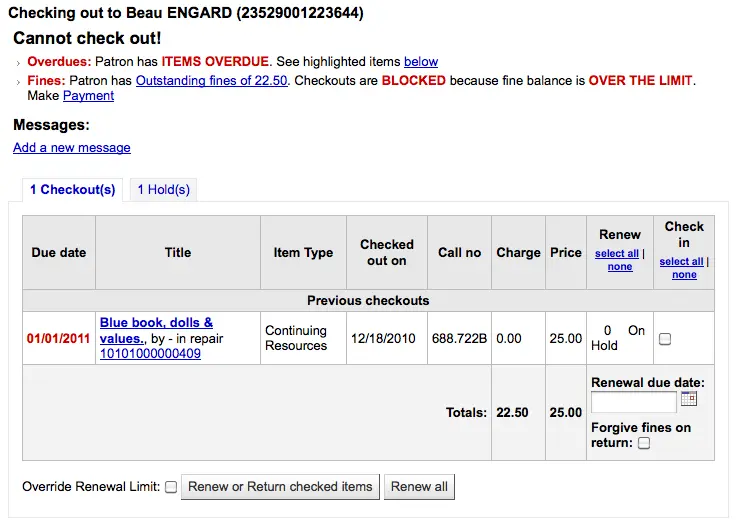
Sie können mit dem Systemparameter noissuescharge konfigurieren, ab welcher Gebührensumme Benutzer*innen für die Ausleihe gesperrt werden
Der/die Benutzer*in ist gesperrt

Dies kann durch den Bibliothekar festgelegt werden, der einen Benutzerdatensatz bearbeitet und eine Sperre hinzufügt oder durch die Mahntrigger
Bibliothekspersonal mit der Berechtigung force_checkout (oder der superlibrarian-Berechtigung) kann Beschränkungen vorübergehend außer Kraft setzen, um trotzdem zu entleihen.

Die Benutzeradresse muss geprüft werden

Diese kann gesetzt werden, indem das Bibliothekspersonal einen Benutzerdatensatz bearbeitet und eine Markierung hinzufügt.
Der/die Benutzer*in hat seinen/ihren Bibliotheksausweis verloren

Diese kann gesetzt werden, indem das Bibliothekspersonal einen Benutzerdatensatz bearbeitet und eine Markierung hinzufügt.
„Dieses Exemplar ist mit dem Status ‚X‘ verloren gegangen.“

Diese Meldung erscheint, wenn die Option IssueLostItem auf „eine Nachricht anzeigen“ gesetzt ist und das ausgeliehene Exemplar den Verluststatus hat.
Das Exemplar ist ausgeliehen.
Warnmeldungen
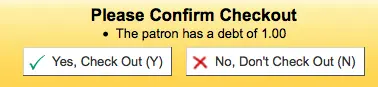
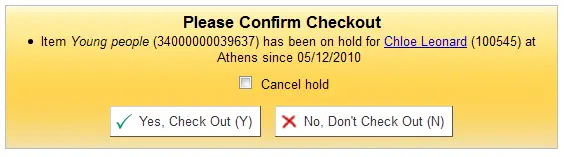
Manchmal werden bei der Ausleihe Warnhinweise in einem gelben Kasten über dem Ausleihfeld angezeigt. Diese Warnhinweise müssen bestätigt werden, bevor Sie den Ausleihvorgang fortsetzen können.
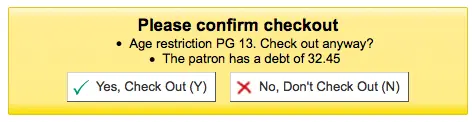
Benutzer*in hat offene Gebühren
Exemplar ist für jemand anderen vorgemerkt
Exemplar sollte für eine*n andere*n Benutzer*in im Abholregal stehen
Exemplar ist für jemand anderen gebucht
Buchbare Medien können gemäß den Ausleihregeln ohne vorherige Buchung ausgegeben werden. Wenn eine Vormerkung für das ausgeliehenen Medium vor Ablauf der Leihfrist erfolgen soll, wird diese Warnung angezeigt.
Koha wird automatisch vorschlagen, das Fälligkeitsdatum des Mediums auf ein neues Datum vor Beginn der Buchung zu reduzieren. Sie können dies vor dem Ausleihen anpassen.
Exemplar ist bereits an diese*n Benutzer*in ausgeliehen

Exemplar ist an eine*n andere*n Benutzer*in ausgeliehen
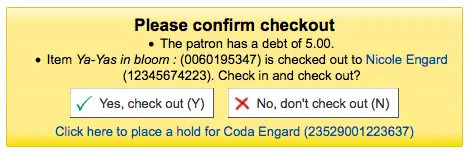
Diese Warnung erlaubt Ihnen eine Vormerkung für den/die aufgerufene*n Benutzer*in zu setzen.
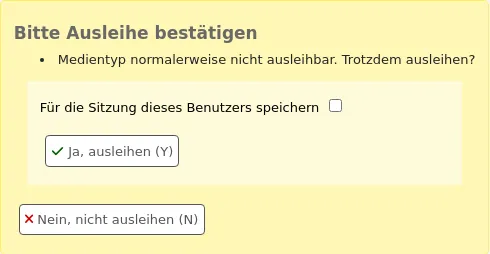
Exemplar nicht ausleihbar
Der/die Benutzer*in hat zu viele Ausleihen getätigt und AllowTooManyOverride ist auf „Erlaube“ gesetzt

Der/die Benutzer*in hat zu viele Ausleihen getätigt und AllowTooManyOverride ist auf „Erlaube nicht“ gesetzt

Das Exemplar kann nicht verlängert werden

Dies kann durch den Systemparameter AllowRenewalLimitOverride überschrieben werden
Barcode nicht gefunden
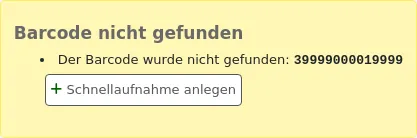
Erfahren Sie mehr über Schnellaufnahmen in diesem Handbuch.
„Dieses Exemplar ist mit dem Status ‚X‘ verloren gegangen. Trotzdem ausleihen?“

Diese Warnmeldung wird angezeigt, wenn der Systemparameter IssueLostItem auf „Bestätigung erforderlich“ eingestellt ist und das ausgeliehene Exemplar den Verluststatus hat.
Das Bibliothekspersonal muss auf „Ja, ausleihen“ klicken, damit das Exemplar ausgeliehen wird.
Das Exemplar ist für das Alter des Benutzers nicht empfohlen
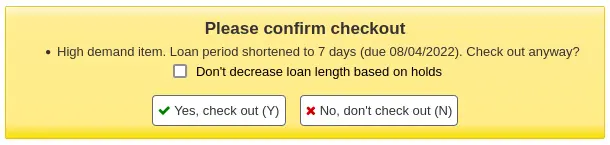
Exemplare, auf die bei der Ausleihe die Einstellungen in dem Systemparameter decreaseLoanHighHolds passen
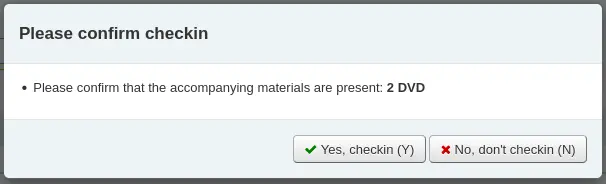
Exemplar mit Begleitmaterial (Feld 952$3, „Beilagenotiz“, ist belegt)

Wenn CircConfirmItemParts auf „erfordere eine“ eingestellt ist, muss das Bibliothekspersonal die Ausleihe bestätigen

Wenn der Systemparameter CheckPrevCheckout darauf eingestellt ist, dass die Ausleihhistorie des/der Benutzer*in überprüft werden soll, wird eine Warnung angezeigt, wenn der/die Benutzer*in den Artikel bereits ausgeliehen hat

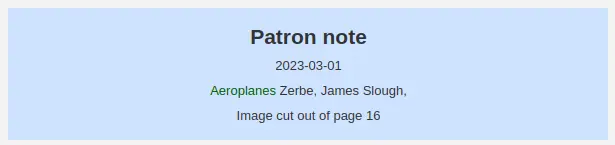
Ausleihnotizen
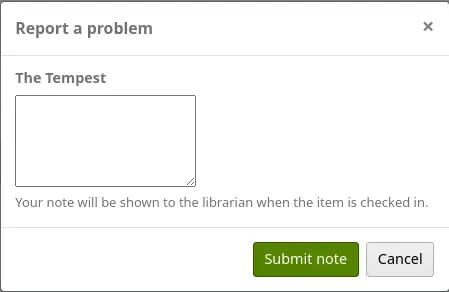
Benutzer*innen können im OPAC zu einem bestimmten von ihnen ausgeliehenen Medium Ausleihnotizen anlegen (z. B. erste Seite fehlt oder DVD ist verkratzt etc.).
Um Ausleihnotizen zu aktivieren, muss der Systemparameter AllowCheckoutNotes auf „Aktiviere“ gesetzt sein.
Sobald der Systemparameter aktiviert ist, erscheint eine neue Spalte mit dem Titel „Problem melden“ in der Liste der Ausleihvorgänge in der Benutzerzusammenfassung im OPAC.
Wenn der/die Benutzer*in auf „Notiz hinzufügen“ klickt, kann er/sie eine Notiz zu dieser Ausleihe schreiben.
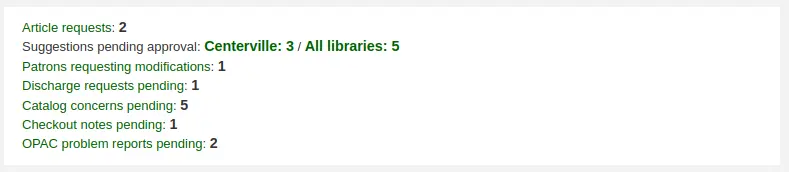
Das Bibliothekspersonal wird im unteren Bereich der Dienstoberfläche über neue Ausleihnotizen informiert, zusammen mit anderen offenen Anfragen.
Bemerkung
Nur Bibliothekspersonal mit der Berechtigung manage_checkout_notes (oder der superlibrarian-Berechtigung) sieht die neuen Ausleihmitteilungen und kann diese verwalten.
Außerdem wird eine E-Mail an die in KohaAdminEmailAddress angegebene E-Mail-Adresse gesendet, um den Systemadministrator darauf hinzuweisen, dass eine Ausleihnotiz hinzugefügt wurde.
Bemerkung
Die Mitteilung kann unter Benachrichtigungen und Quittungen angepasst werden. Der Code lautet CHECKOUT_NOTE.
Ausleihnotizen können im Modul Ausleihe unter Ausleihe > Ausleihnotizen verwaltet werden oder indem in der Dienstoberfläche auf die Nachricht im Bereich „offene Anfragen“ geklickt wird.
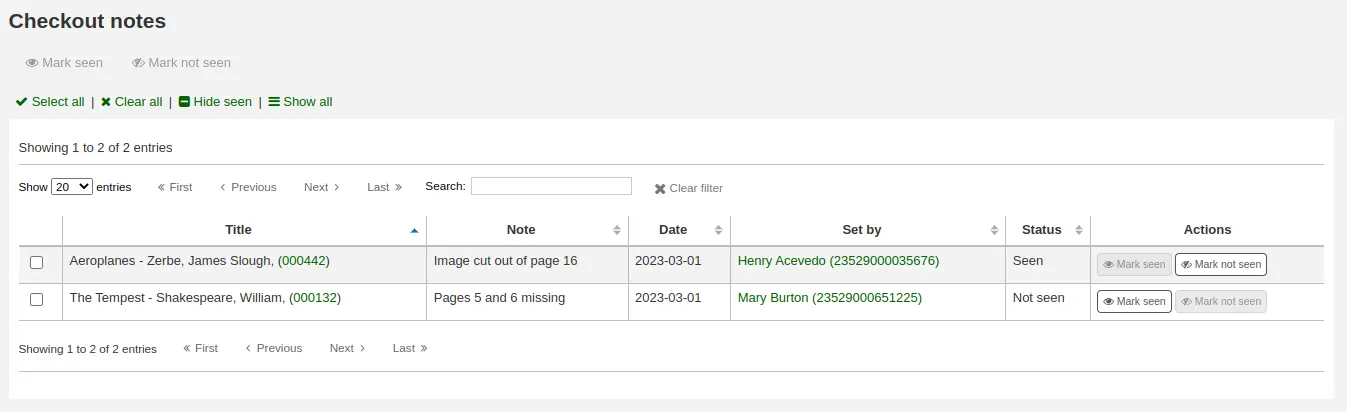
Von dieser Seite aus kann das Bibliothekspersonal Mitteilungen als gesehen markieren, entweder einzeln, indem es auf die Schaltfläche „Als gesehen markieren“ auf der rechten Seite klickt, oder in einem Stapel, indem es die Mitteilungen auswählt und oben auf der Seite auf „Als gesehen markieren“ klickt. Wenn Sie die Notizen als gesehen markieren, werden sie aus dem Bereich „Ausstehende Anfragen“ auf der Startseite der Dienstoberfläche entfernt.
Gesichtete Notizen können mit dem Link „Gesehene ausblenden“ am oberen Rand der Tabelle herausgefiltert werden.
Ausleihnotizen werden auch bei der Rückgabe angezeigt.
Sobald das Exemplar zurückgegeben wurde, wird die Notiz dauerhaft von dieser Seite entfernt.
Verlängerungen
Ausgeliehene Exemplare können verlängert (für eine weitere Periode ausgeliehen) werden, wenn die hinterlegten Ausleihkondtionen, und die Einstellung im Systemparameter RenewalPeriodBase entsprechend eingerichtet sind.
Wenn Sie Verlängerungen zulassen, können Benutzer*innen ausgeliehene Exemplare im OPAC verlängern, manchmal müssen die Medien aber über die Dienstoberfläche verlängert werden.
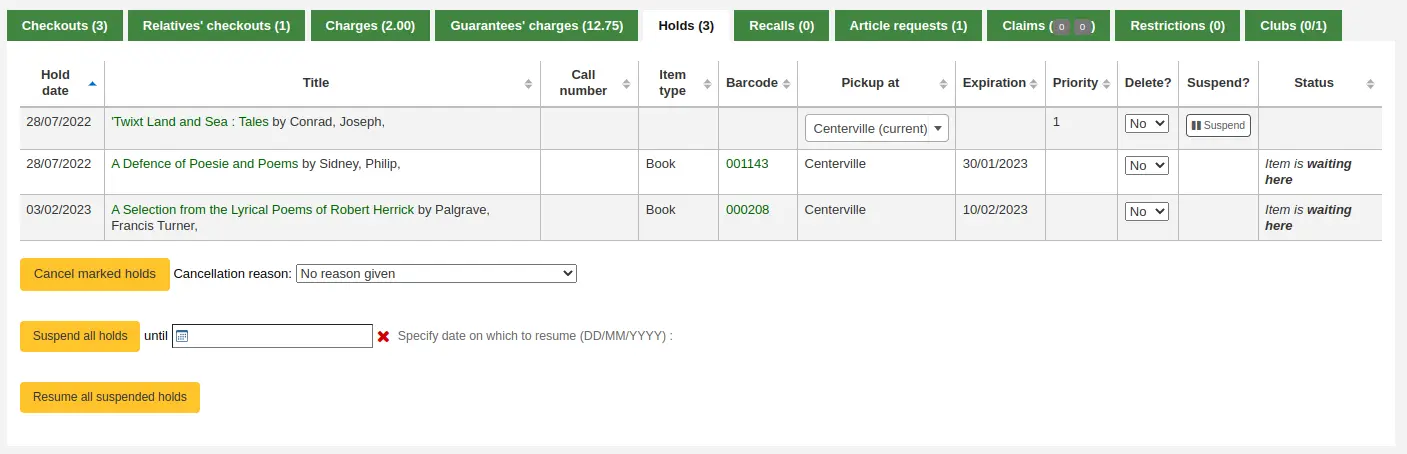
Es gibt drei Möglichkeiten, um ein ausgeliehenes Exemplar zu verlängern: über die Ausleihübersicht eines/einer Benutzer*in, über den Reiter „Verlängern“ in der Suchleiste oder über die Schaltfläche „Verlängern“ im Modul „Ausleihe“.
Verlängerung aus der Ausleihübersicht eines/einer Benutzer*in
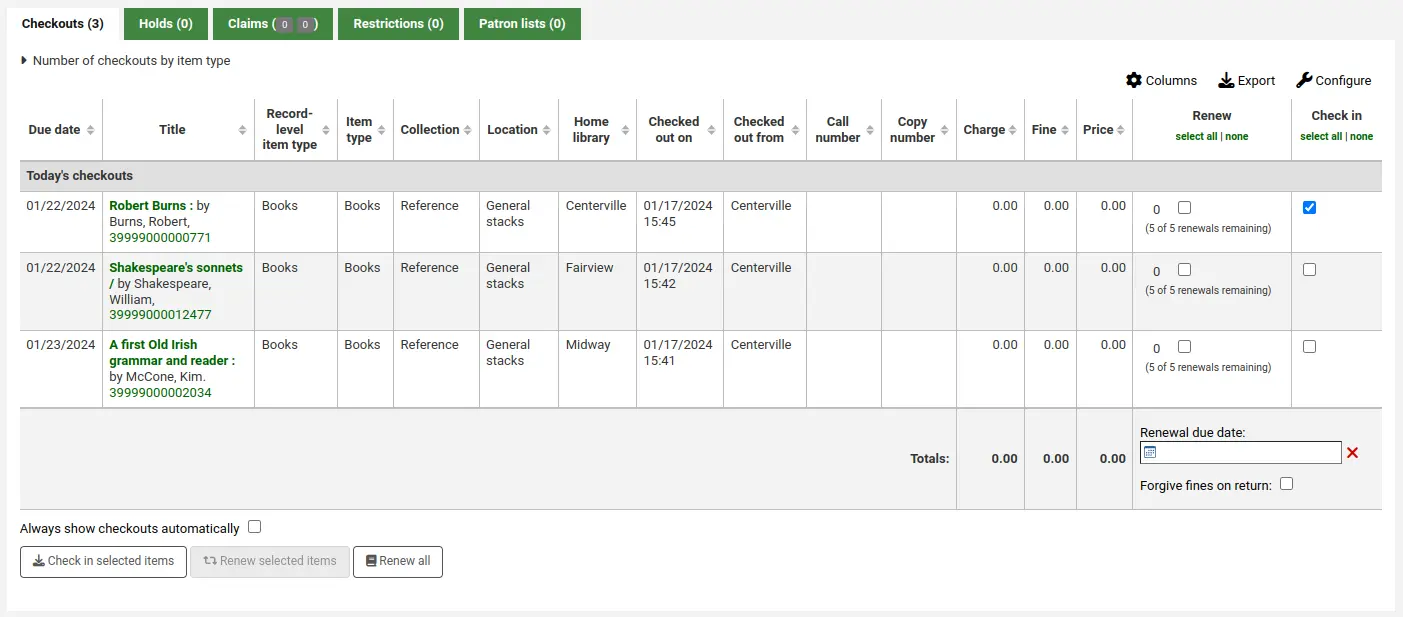
Die erste Möglichkeit besteht darin das Bibliothekskonto und dort die Liste der Ausleihen im unteren Bereich der Seite zu öffnen.
In der Spalte „Verlängern“ sehen Sie, wie oft ein Exemplar verlängert wurde, sowie eine Checkbox, um das Exemplar zu verlängern. Markieren Sie die Checkboxen der Exemplare, die verlängert werden sollen, und klicken Sie auf die Schaltfläche „Markierte Exemplare zurückgeben oder verlängern“. Um alle ausgeliehenen Exemplare zu verlängern klicken Sie auf „Alle verlängern“.

Achtung
Vor Koha Version 23.11 hieß die Schaltfläche „Markierte Exemplare zurückgeben oder verlängern“ und diente sowohl der Verlängerung als auch der Rückgabe, je nachdem welche Checkbox markiert war.
Bemerkung
By default, items that are due today or already overdue are preselected.
Achtung
Prior to Koha version 24.11, only overdue items were preselected.
Unter Umständen werden Verlängerungen blockiert, wenn Ihre Ausleihkonditionen entsprechend konfiguriert sind. Um diese Begrenzung beim Verlängern aufheben zu können, muss der Systemparameter AllowRenewalLimitOverride auf ‚Erlaube‘ gesetzt sein. Wenn Sie den Parameter so gesetzt haben, ist die Option ‚Verlängerungslimit überschreiben‘ unterhalb der Ausleihen vorhanden. Setzen Sie ein Häkchen in dieser Checkbox, und wählen Sie die Exemplare aus die Sie verlängern möchten.

Markieren Sie die Checkbox, wählen Sie die zu verlängernden Exemplare aus und klicken dann auf „Ausgewählte Exemplare verlängern“.
Sie können eine Verlängerung auch als „ungesehen“ kennzeichnen, um zwischen Verlängerungen zu unterscheiden, bei denen das Bibliothekspersonal das Exemplar tatsächlich gesehen haben, und Verlängerungen, bei denen sie es nicht gesehen haben (z. B. am Telefon). Dazu müssen Sie zunächst den Systemparameter UnseenRenewals aktivieren. Nach der Aktivierung erscheint unten links in der Ausleihübersicht ein Checkbox. Markieren Sie diese, um die Verlängerungen als „ungesehen“ zu kennzeichnen. Klicken Sie dann entweder auf „Ausgewählte Exemplare verlängern“ oder auf „Alle verlängern“.

Wenn Sie eine Verlängerung über einen anderen Zeitraum durchführen möchten, als die konfigurierte Verlängerungsfrist, können Sie das Feld „Verlängerungsdatum“ im unteren Bereich der Spalte „Verlängern“ ausfüllen. Stellen Sie sicher, dass Sie das Datum eingeben, bevor Sie auf die Schaltfläche „Markierte Exemplare verlängern“ oder „Alle verlängern“ klicken.
Verlängerung über die Suchleiste
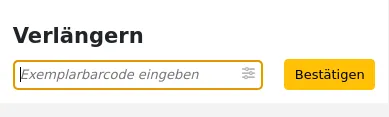
Wenn Ihnen das Exemplar vorliegt, können Sie auf „Verlängern“ in der Suchleiste im oberen Bereich der Seite klicken (oder Alt + w bzw. Option + w auf Mac-Computern drücken) und den Barcode einscannen.

Ist eine Verlängerung erlaubt, wird das Medium für den in den Ausleihkonditionen angegebenen Zeitraum verlängert.
Bemerkung
Es gibt keine Möglichkeit, von hier aus einen anderen Verlängerungszeitraum festzulegen oder Verlängerungsgrenzen außer Kraft zu setzen. Sie müssen eine der anderen Methoden verwenden.
Verlängerung über die Seite „Verlängern“
Pfad in Koha: Ausleihe > Verlängern
Die zweite Möglichkeit, Ausleihen zu verlängern, ist über den Menüpunkt ‚Verlängern‘ auf der Seite ‚Ausleihe‘.
Scannen Sie die Barcodes der Exemplare, die Sie verlängern möchten.
Wenn Sie eine Verlängerung über einen anderen Zeitraum durchführen möchten, als eingerichtet, können Sie das Feld „Verlängerungsdatum“ unterhalb des Felds für den Exemplarbarcode ausfüllen. Stellen Sie sicher, dass Sie das Datum eingeben, bevor Sie den Barcode scannen.
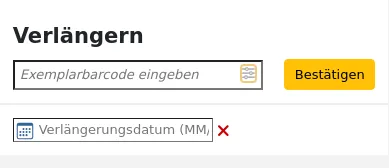
Wichtig
Make sure to enter the date before scanning the barcode.
Achtung
In versions of Koha prior to 25.05, the renewal date picker was always visible. The renewal settings icon was introduced in version 25.05 to make the interface consistent with other circulation pages in Koha.
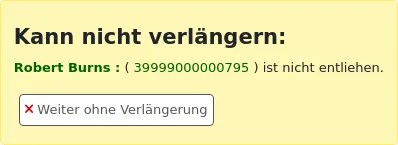
Wenn das Exemplar erfolgreich verlängert wurde erhalten Sie eine Bestätigungsmeldung.

Wenn der Barcode nicht gefunden wurde, erhalten Sie eine Fehlermeldung.
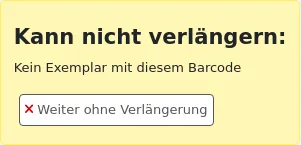
Wenn das Exemplar momentan nicht ausgeliehen ist, erhalten Sie ebenso eine Fehlermeldung.
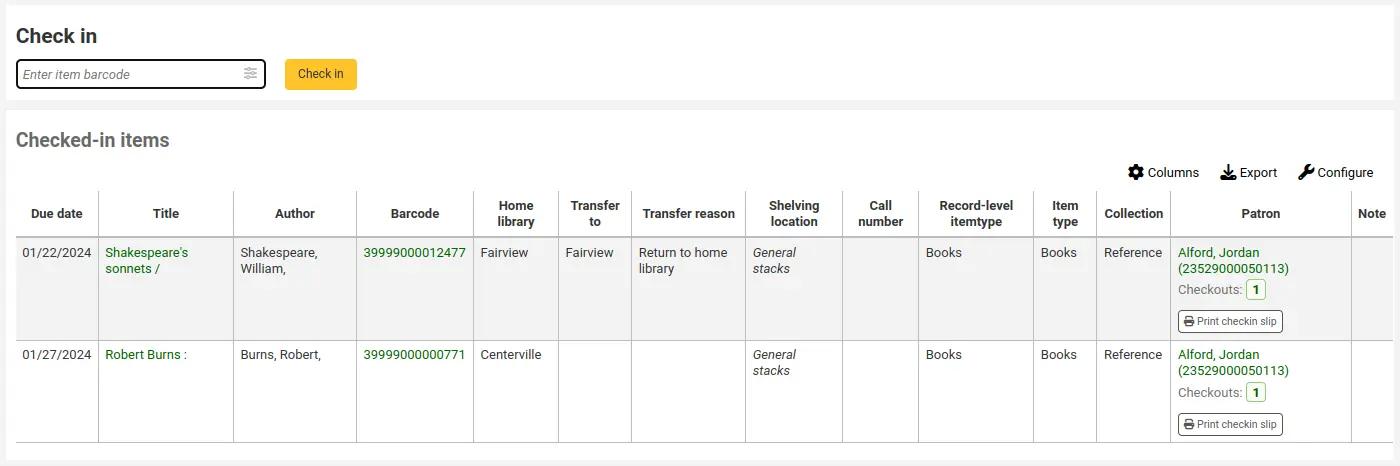
Rückgabe (Zurückbuchen)
Für die Rückgabe von Exemplaren gibt es mehrere Möglichkeiten: über die Suchleiste im oberen Bereich der Dienstoberfläche, die Spalte „Rückgabe“ in der Ausleihübersicht oder über die entsprechende Schaltfläche im Ausleihmodul.
Koha bietet auch eine automatische Rückgabe an, welche in den Exemplartypen eingestellt werden kann und den automatic_checkin.pl Cronjob erfordert.
Rückgabe über die Suchleiste
Um ein Exemplar schnell zurückzugeben, können Sie auf „Rückgabe“ in der Suchleiste im oberen Bereich der Seite klicken(oder Alt + r bzw. Option + r auf Mac-Computern drücken) und den Barcode einscannen.

Dadurch wird das Exemplar zurückgebucht und Sie gelangen zum Bereich „Rückgabe“ im Ausleihmoduls, um weitere Medien zurückzubuchen.
Bemerkung
Es gibt keine Möglichkeit, über die Suchleiste ein Rückgabedatum anzugeben, die Buchrückgabe zu verwenden oder Gebühren zu erlassen. Um Zugang zu diesen Optionen zu erhalten, müssen Sie zu Ausleihe > Rückgabe gehen.
Rückbuchung von der Ausleihübersicht eines Benutzers ausgehend
Eine andere Möglichkeit, Exemplare zurückzubuchen, ist, die Detailseite des Benutzers oder die Ausleihübersicht zu besuchen und die Zusammenfassung der Ausleihen am unteren Rand anzuzeigen.
Markieren Sie die Checkboxen der Exemplare, die Sie zurückbuchen möchten, in der Spalte „Rückgabe“ und klicken Sie auf „Markierte Exemplare zurückgeben“.
Achtung
Vor Koha Version 23.11 hieß die Schaltfläche „Markierte Exemplare zurückgeben oder verlängern“ und diente sowohl der Verlängerung als auch der Rückgabe, je nachdem welche Checkbox markiert war.
Warnung
Bei dieser Methode muss das Biliothekspersonal keinen Barcode scannen, was zu Fehlern bei der Auswahl der zurückzubuchenden Exemplare führen kann. Verwenden Sie diese Methode daher mit Vorsicht.
Rückbuchung von der Seite „Rückgabe“ ausgehend
Pfad in Koha: Ausleihe > Rückgabe
Sie können Exemplare auch über die Seite „Rückgabe“ im Modul „Ausleihe“ zurückbuchen.
Um ein Exemplar zurückzubuchen, scannen Sie den Barcode des Exemplars in das angebotene Feld ein.
Unter dem Feld zur Rückbuchung erscheint eine Übersicht aller zurückgebuchten Exemplare.
Bemerkung
You can customize the columns of this table in the Table settings section of the Administration module (table id: checkedintable).
Rückgabe-Einstellungen sind durch Klicken auf das Einstellungssymbol im Barcodefeld verfügbar. Diese werden für nicht standardmäßige Rückgaben verwendet, z. B. wenn Sie ein anderes Rückgabedatum angeben oder alle Gebühren erlassen möchten.

Wenn der Systemparameter SpecifyReturnDate auf ‚Erlaube‘ eingestellt ist, kann bei der Rückgabe das Rückgabedatum über ein Eingabefeld frei eingegeben werden.
Wenn Sie Bücher zurückbuchen, die über die Bücherbox zurück gegeben wurden während die Bibliothek geschlossen hatte, können Sie die Checkbox ‚Bücherboxrückgabe‘ markieren, bevor Sie die Exemplare einscannen. Das Rückgabedatum ist in diesem Fall das letzte Datum, an dem die Bibliothek vor dem aktuellen Datum geöffnet war.

Bemerkung
Hierfür ist es erforderlich, dass Ihre Schließtage im Modul Werkzeug „Kalender“ eingetragen sind.
Es ist möglich alle Mahngebühren zu erlassen, wenn Sie vor der Rückgabe die Option ‚Mahngebühren erlassen‘ auswählen.
Bemerkung
Diese Checkbox erscheint nur, wenn Sie Mahngebühren erheben, d.h. wenn der Systemparameter finesMode auf ‚Berechnen und erheben‘ gesetzt ist.
Meldungen bei der Rückgabe
Es gibt verschiedene Meldungen, die bei Rückgabe angezeigt werden können:
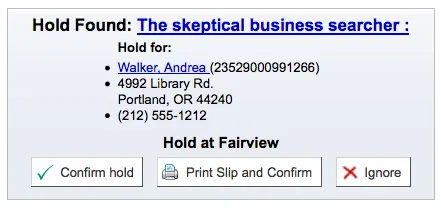
Wenn die Rückgaberichtlinie vorschreibt, dass Exemplare an ihre Heimat- oder Bestandsbibliothek zurückgegeben werden müssen, erscheint eine Meldung, die das Bibliothekspersonal auffordert, das Exemplar zu transferieren.
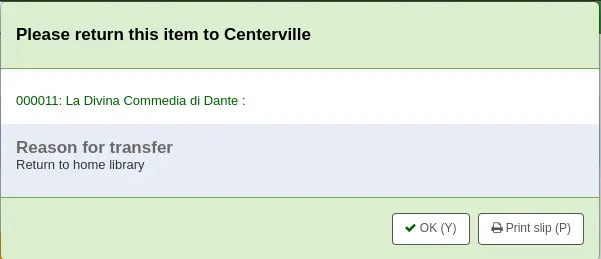
Bemerkung
Wenn der Systemparameter TransfersBlockCirc auf „Blockieren“ gesetzt ist, werden alle Aktionen blockiert, bis das Pop-up bestätigt wird.
Bei der Einstellung „Nicht blockieren“ legt der Systemparameter AutomaticConfirmTransfer fest, was passiert, wenn das Popup-Fenster ohne Bestätigung des Transfers geschlossen wird.
Nachdem dieser Artikel zurückgebucht und der Transport bestätigt wurde, wird der Status des Exemplars im Katalog auf „im Transit“ geändert.
Um ein Medium als zurück in der Heimat- oder Bestandsbibliothek zu kennzeichnen, buchen Sie das Medium in dieser Bibliothek zurück.

Es erscheint ein Hinweis, dass das Exemplar nicht ausgeliehen ist, aber durch das Rückbuchen verändert sich der Status im Katalog auf verfügbar. Dieser Schritt ist notwendig, damit das Exemplar als in der Bibliothek eingegangen vermerkt wird.
Wenn Sie ein Exemplar in einer anderen als der Heimatbibliothek zurückbuchen, wird eine Transportaufforderung zurück in die Heimatbibliothek angezeigt
Wenn CircConfirmItemParts auf „Erforderlich“ gesetzt ist, muss der/die Mitarbeiter*in die Rückgabe bestätigen
Wenn Sie ein Exemplar zurückbuchen, das vorgemerkt ist, werden Sie aufgefordert die Vormerkung zu bestätigen
Bestätigen Sie die Vormerkung, um das Exemplar als abholbereit zu kennzeichnen

Wenn Sie auf ‚Quittung drucken und bestätigen‘ klicken, wird das Exemplar als in der Bibliothek abholbereit markiert, und eine Quittung mit den Informationen über den/die Benutzer*in und die Vormerkung zur Einlage im Buch ausgedruckt
Wenn Sie die Vormerkung ignorieren bleibt die Vormerkung bestehen, aber das Exemplar behält den Status verfügbar (die Vormerkung wird nicht storniert)
Beim Zurückbuchen eines Exemplars, das durch jemanden von einer anderen Bibliothek vorgemerkt wurde, erhalten Sie eine Aufforderung, die Vormerkung und den Transport zu bestätigen
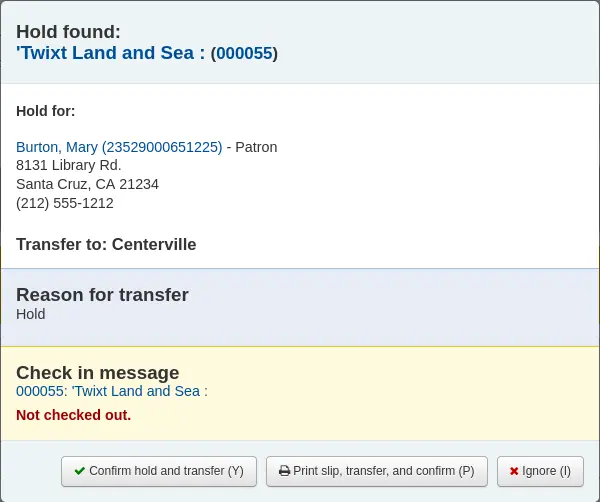
Bestätigen Sie die Vormerkung über ‚Bestätigen und transportieren‘, um das Exemplar in die Abholbibliothek zu schicken

Wenn Sie auf ‚Quittung drucken, Transport und bestätigen‘ klicken, wird das Exemplar als in Transport zu der Bibliothek, in der die Vormerkung gesetzt wurde, markiert, und eine Quittung mit den Informationen über den/die Benutzer*in und die Vormerkung zur Einlage im Buch ausgedruckt
Wenn Sie die Vormerkung ignorieren bleibt die Vormerkung bestehen, aber das Exemplar behält den Status verfügbar (die Vormerkung wird nicht storniert)
Wenn Sie Koha so konfiguriert haben, dass Gebühren des Benutzers bei der Rückgabe von Medien angezeigt werden (FineNotifyAtCheckin), wird ein Hinweis auf die Gebühr mit einem Link zum Gebührenkonto des Benutzers angezeigt

Angeben, dass ein Exemplar zurückgegeben wurde
Wenn ein*e Benutzer*in behauptet, etwas zurückgegeben zu haben, können Sie dieses Exemplar als „Angeblich zurückgegeben“ markieren und diese Angaben verfolgen.
Um diese Funktion zu nutzen,
Fügen einen neuen normierten Wert zur Kategorie LOST hinzu, um als angeblich zurückgegeben markierte Exemplare darzustellen.
Geben Sie den normierten Wert im Systemparameter ClaimReturnedLostValue ein (dadurch wird die Funktion für Rückgabebehauptungen aktiviert).
Wählen Sie, ob dem Benutzer, der eine Exemplar als angeblich zurückgegeben angegeben hat, eine Gebühr für den Verlust berechnet werden soll. Legen Sie einen Wert im Systemparameter ClaimReturnedChargeFee fest (standardmäßig wird gefragt, ob eine Gebühr für verlorene Exemplare erhoben werden soll).
Optional können Sie im Systemparameter ClaimReturnedWarningThreshold eine Anzahl von Rückgabebehauptungen festlegen, die ein*e Benutzer*in stellen kann, bevor eine Warnung in seinem Datensatz erscheint.
Sobald die Funktion aktiviert ist, erscheint im Reiter „Ausleihen“ des Benutzers eine Schaltfläche „Rückgabebehauptung“.
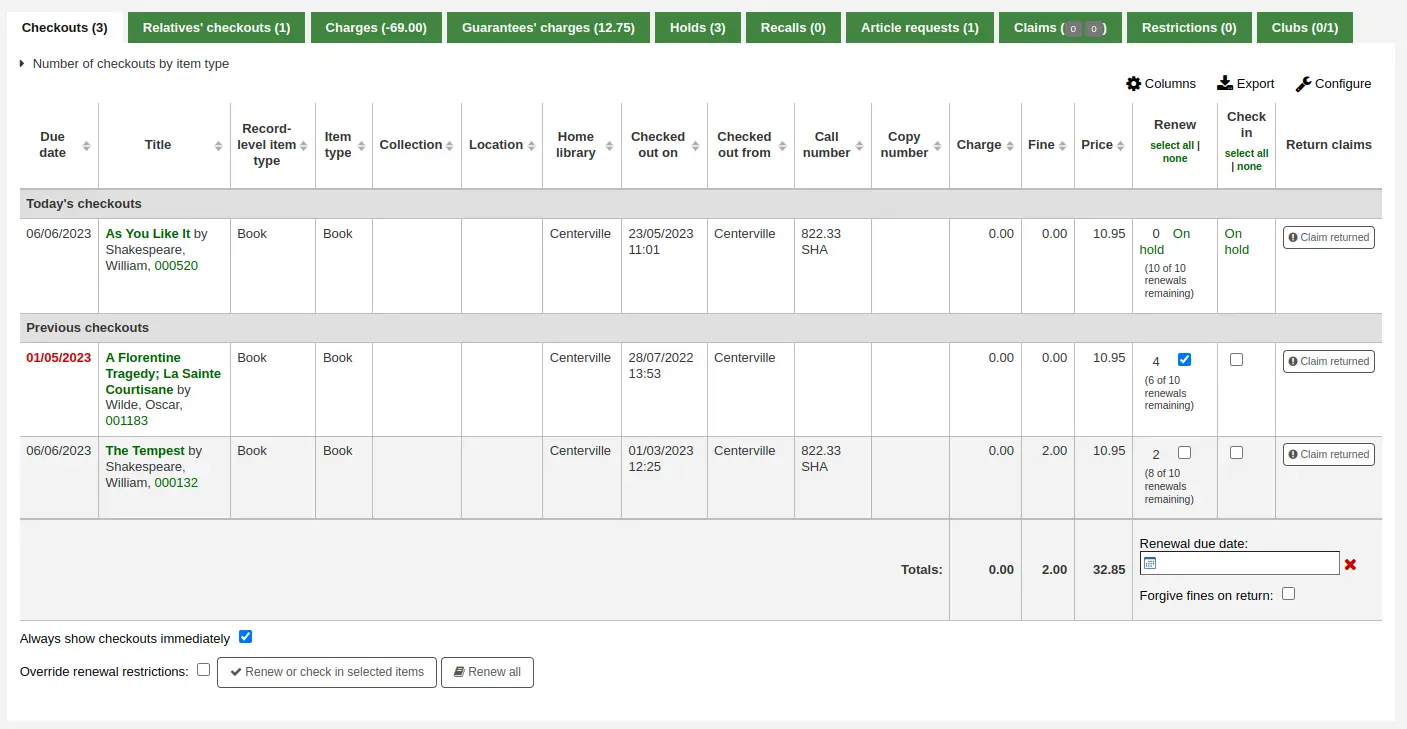
Um ein Exemplar als angeblich zurückgegeben anzugeben,
Klicken Sie die Schaltfläche „Angeblich zurückgegeben“ neben der Ausleihe.
Geben Sie im Pop-up jegliche Notizen zur Behauptung an.
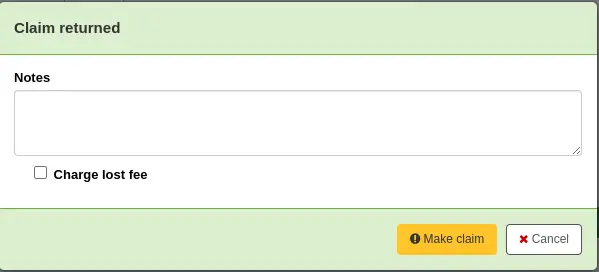
Wenn der Systemparameter ClaimReturnedChargeFee so eingestellt ist, dass der/die Benutzer*in gefragt wird, ob die Gebühr für den Verlust berechnet werden soll oder nicht, gibt es eine Checkbox zur Berechnung der Gebühr.
Klicken Sie auf „Forderung erstellen“.
Das angeblich zurückgegebene Exemplar verbleibt in den Ausleihen des Benutzers, und sein Verluststatus wird aktualisiert. Der Anspruch erscheint auch im Reiter „Rückgabebehauptungen“.
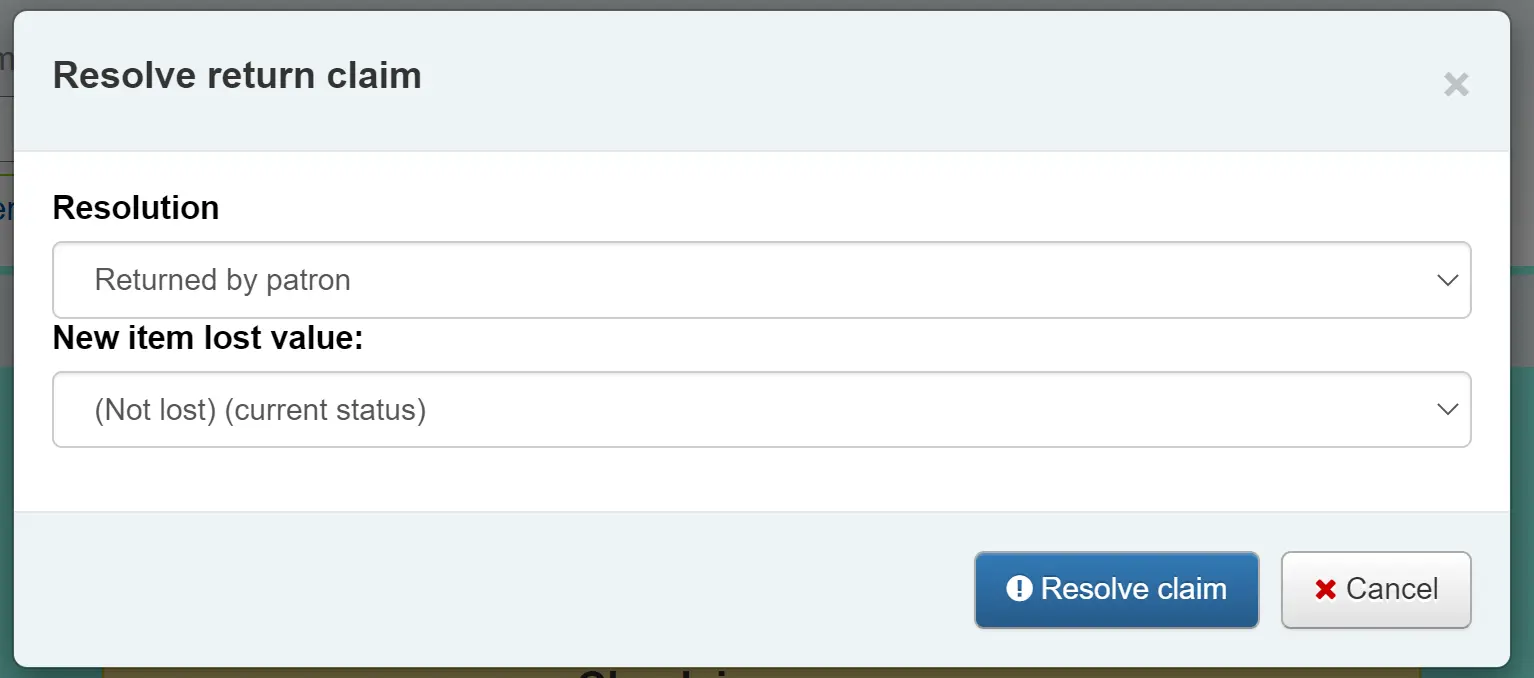
Eine Rückgabebehauptung lösen
Um eine Rückgabebehauptung zu lösen,
Rufen Sie den Benutzerdatensatz im Reiter „Rückgabebehauptungen“ auf.

Klicken Sie auf „Aktionen“ neben dem Exemplar und wählen Sie „Lösen“.
Wählen Sie im Pop-up eine Lösung und einen neuen Verluststatus.
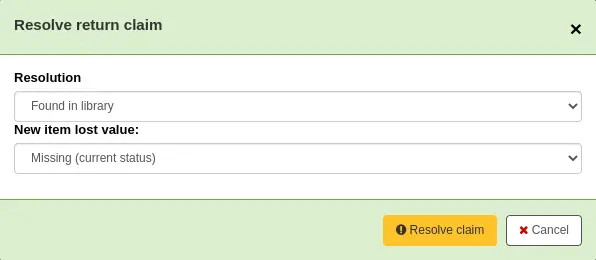
Lösung: Die Lösung ist der Grund für die Schließung der Rückgabebehauptung.
Bemerkung
Die Werte werden in der Kategorie RETURN_CLAIM_RESOLUTION der normierten Werte verwaltet.
Neuer Wert für verlorenes Exemplar: Dies ist der neue Verluststatus für dieses Exemplar.
Bemerkung
Die Werte werden in der Kategorie LOST der normierten Werte verwaltet.
Klicken Sie „Rückgabebehauptung lösen“.
Die gelöste Rückgabebehauptung bleibt im Datensatz des Benutzers, es sei denn, sie wird durch den Cronjob cleanup_database.pl nach der im Systemparameter CleanUpDatabaseReturnClaims angegebenen Anzahl von Tagen gelöscht.
Bemerkung
Mit dem Systemparameter AutoClaimReturnStatusOnCheckin und AutoClaimReturnStatusOnCheckout können Sie festlegen, dass Rückgabebehauptungen automatisch gelöst werden, wenn das Exemplar ausgeliehen oder zurückgebucht wird.
Pakete ausleihen
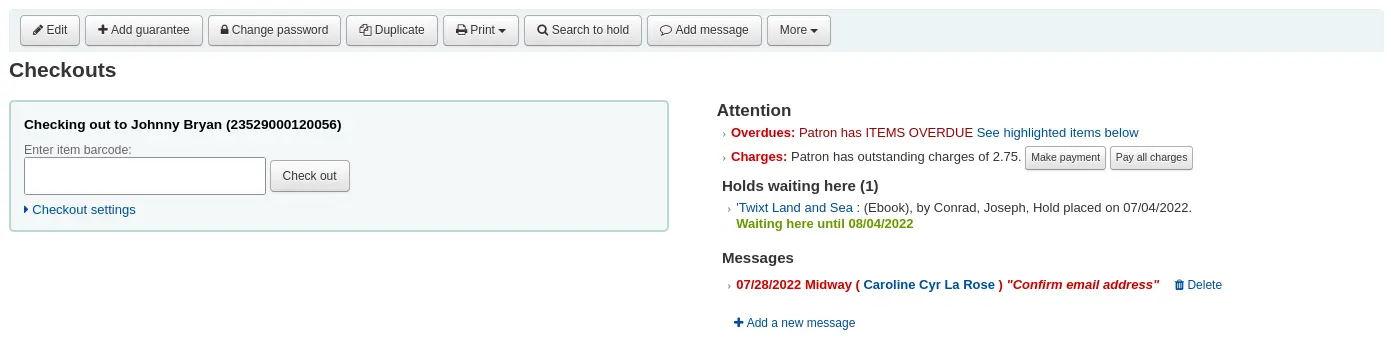
Mit dieser Funktion können Sie Pakete von Medien erstellen, die als eine Einheit ausgeliehen werden können. Ein Paket könnte zum Beispiel eine Kiste mit in Verbindung stehenden Exemplaren aus Ihrer Bibliothek oder eine Sammlung von Partituren sein, die gemeinsam ausgeliehen werden müssen.
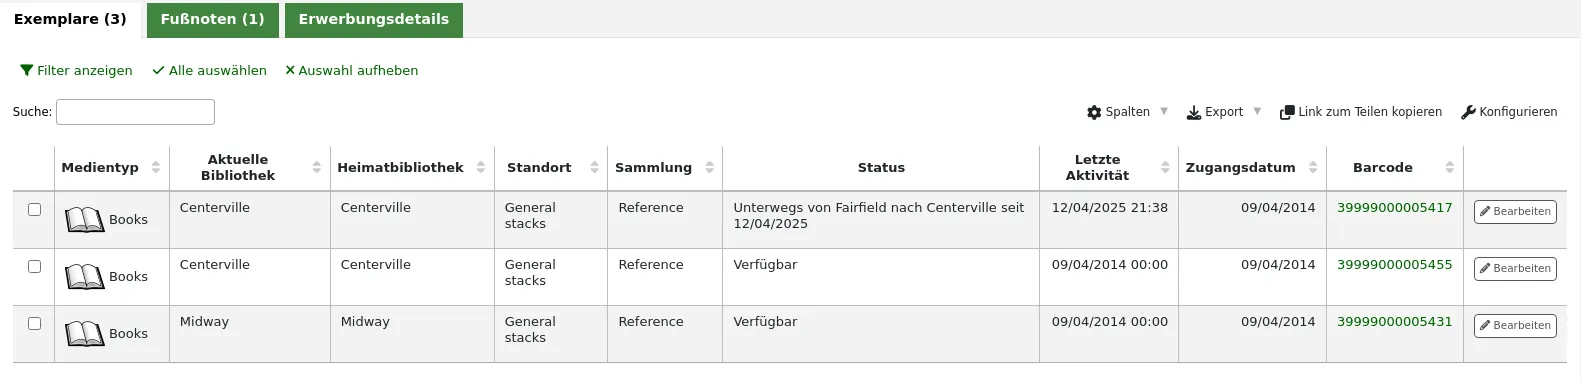
Sie erstellen einen bibliografischen Datensatz auf Sammlungsebene und fügen diesem auf die übliche Weise Exemplare hinzu. Diese Exemplare können dann in ein Paket umgewandelt werden, indem man ihnen bestehende Exemplardatensätze unter Verwendung ihrer Barcodes hinzufügt. Die Exemplare bleiben mit ihren ursprünglichen Datensätzen verbunden und werden als „nicht ausleihbar“ gekennzeichnet.
Konfiguration
Zunächst müssen Sie einige Konfigurationsentscheidungen treffen.
Item types - you may want to create a separate item type to identify your bundles.
Circulation rules - you can optionally create circulation rules for your bundle item type.
Es gibt zwei Systemparameter, die die mit Paketen verwendeten Statuswerte steuern:
Pakete erstellen
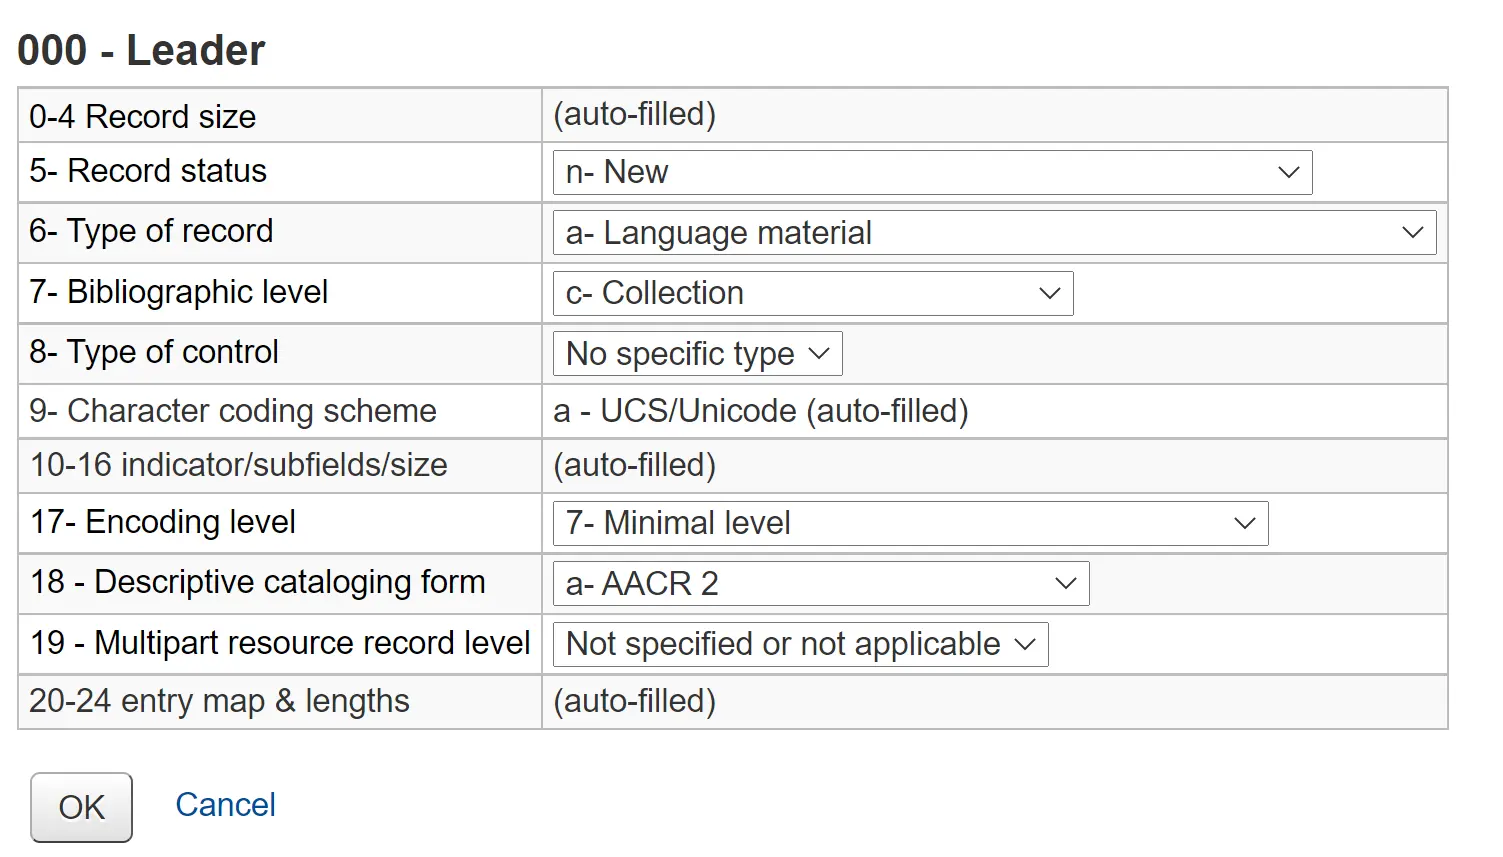
The bundle functionality will only be displayed if you create a catalog record with the Leader, (000 MARC tag) position 7 set to ‘c’ for Collection.
Bemerkung
Es kann sinnvoll sein, ein separates bibliografisches MARC-Framework für Pakete zu haben, in dem das „c“ als Standardwert festgelegt ist, wenn Sie regelmäßig Pakete verwenden werden. Sie können der Vorlage auch benutzerdefinierte Felder hinzufügen, die für Pakete einzigartig sind, wie z. B. Größe oder Gewicht.
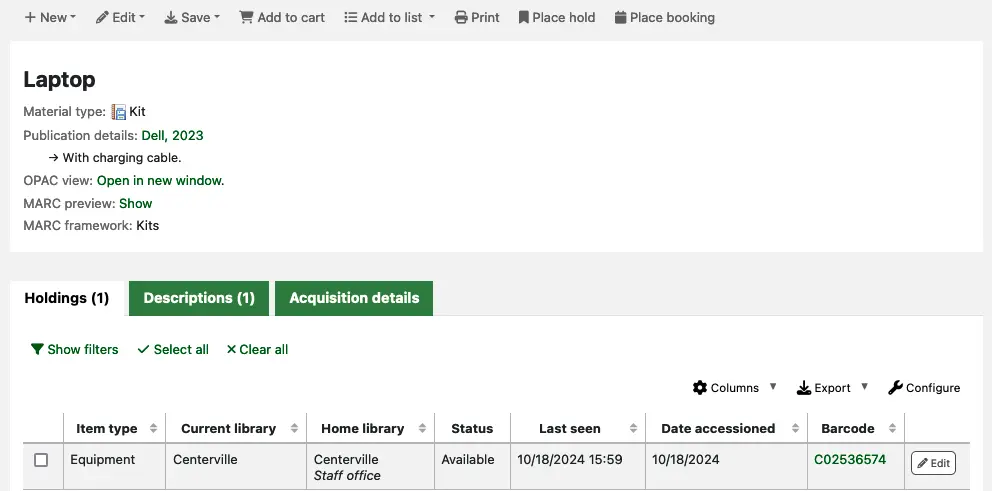
Your catalog record will contain information to identify the content of the bundle.
For example, if the bundle is a box of resources for school children on the topic of oceans, the catalog record might look something like the one shown below.
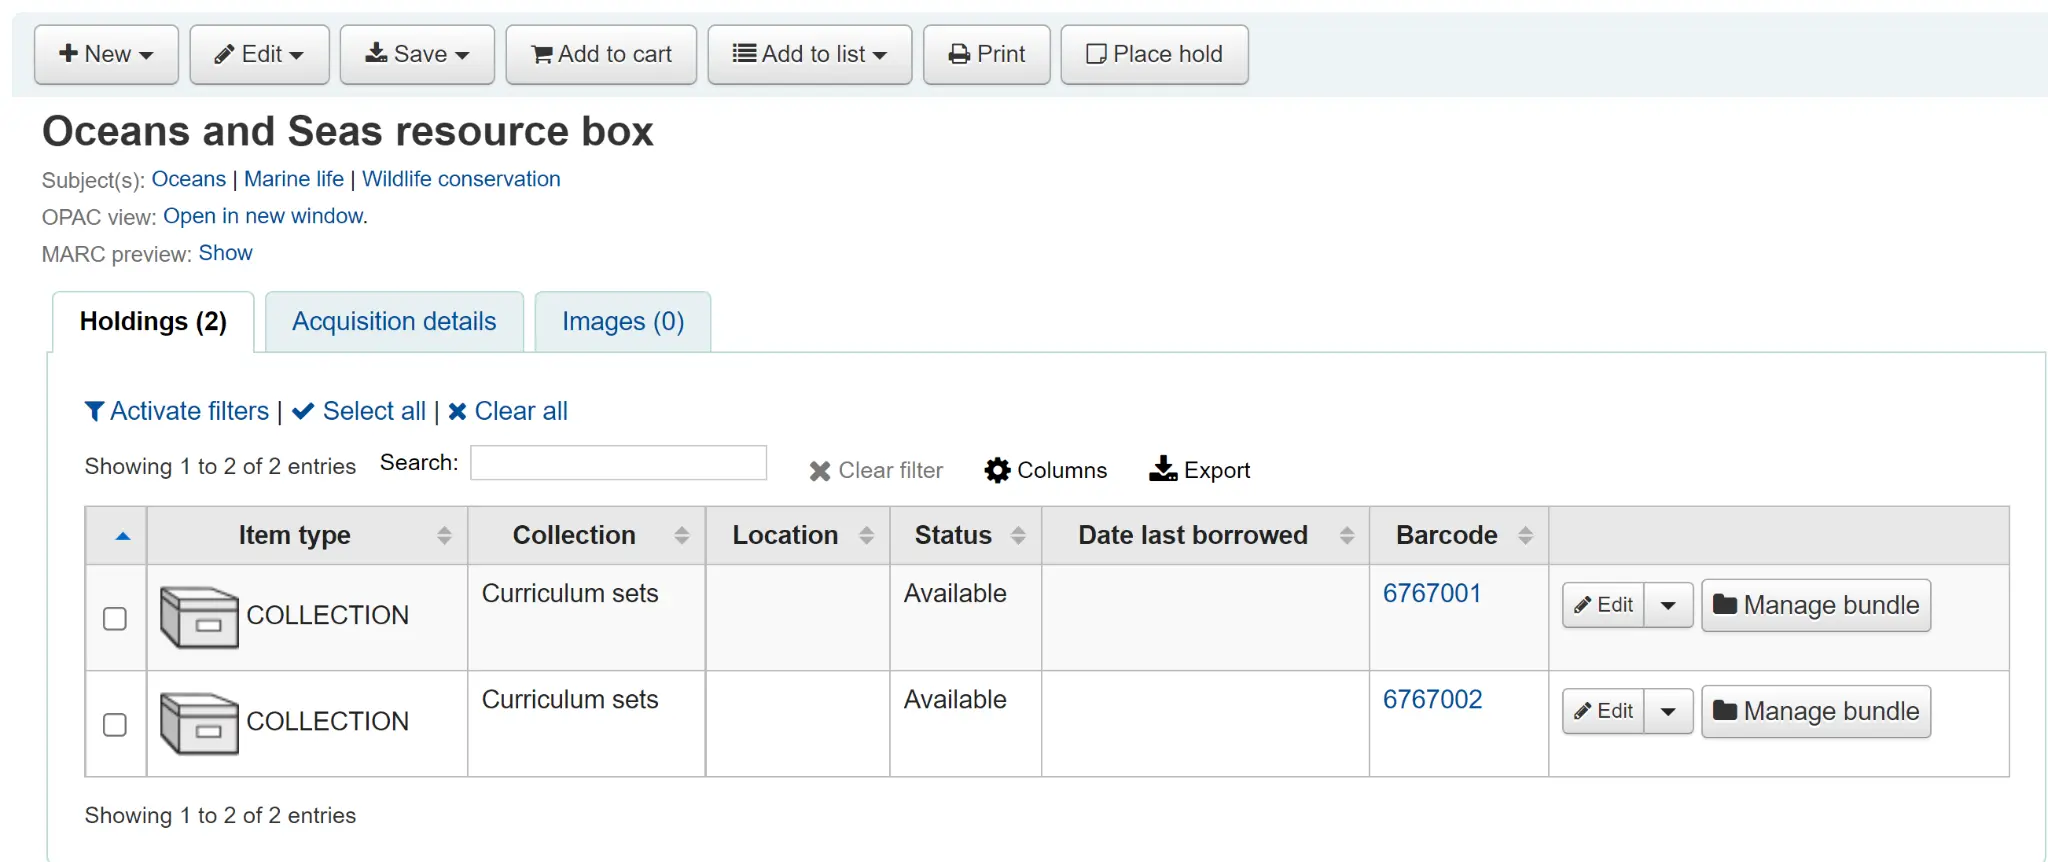
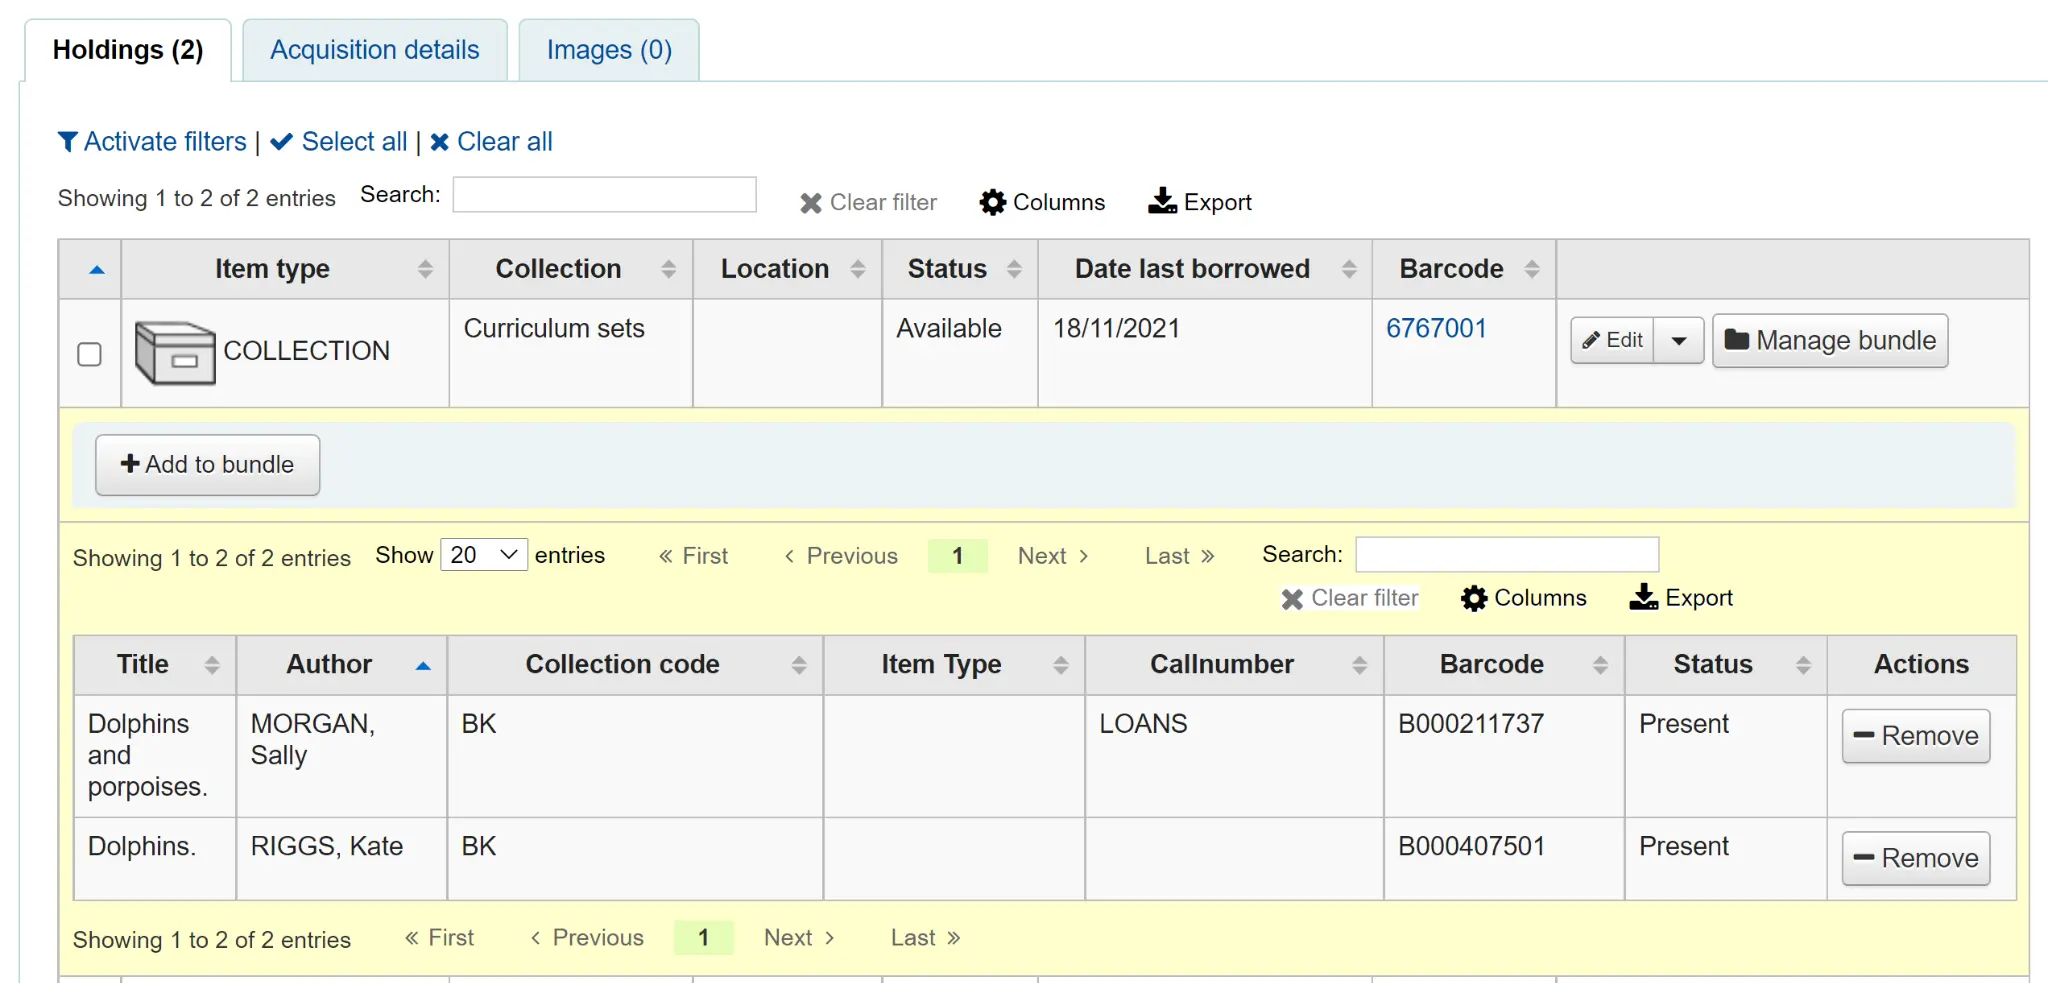
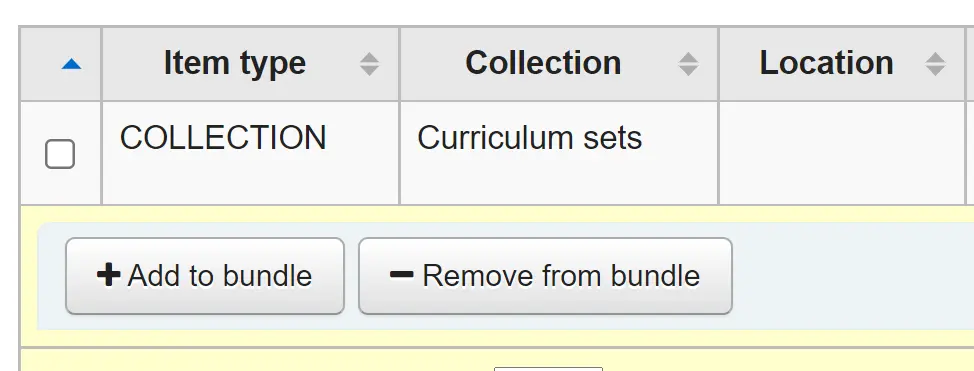
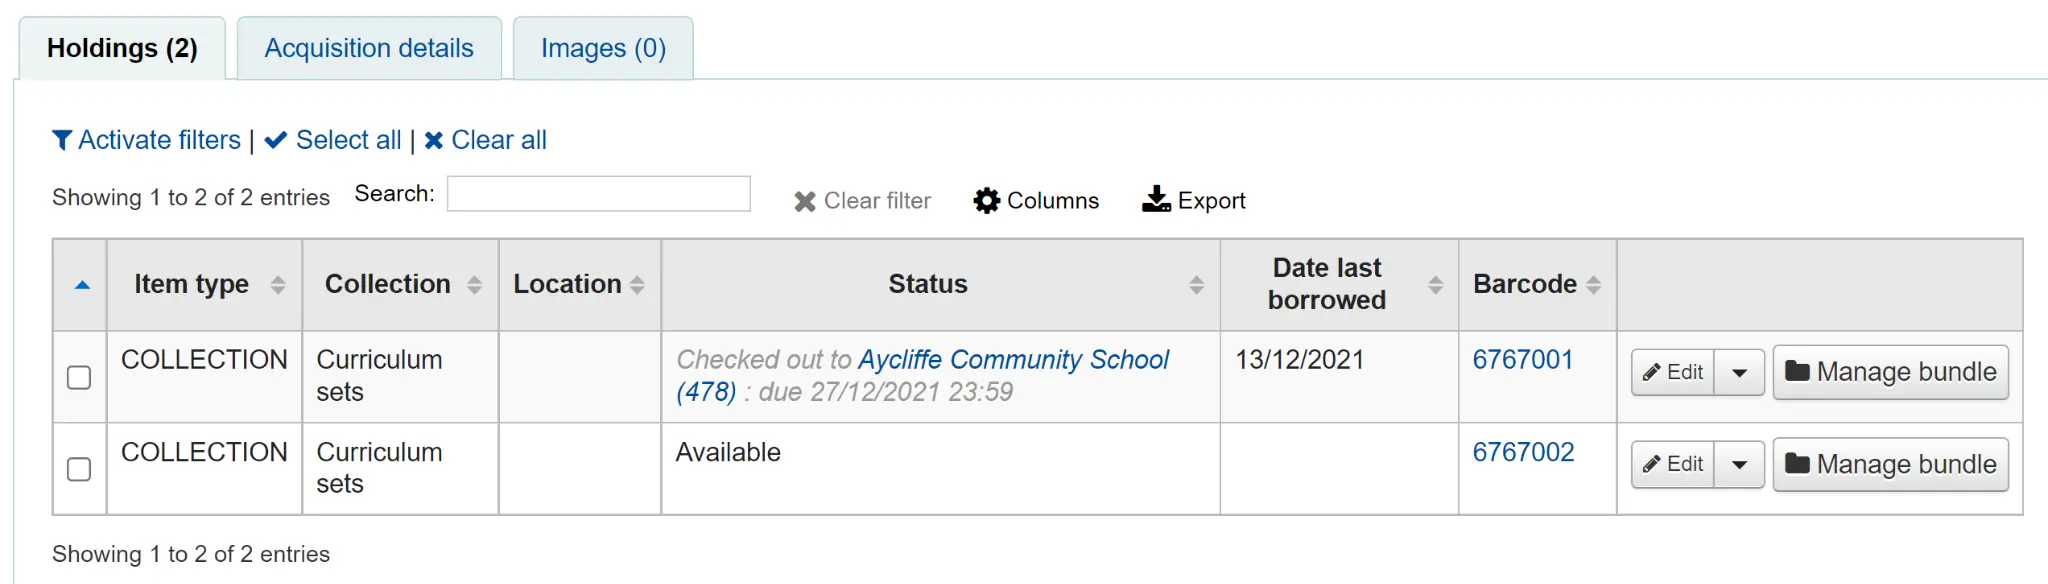
Fügen Sie für jedes physische Paket einen Exemplardatensatz hinzu. Es ist wahrscheinlich, dass Sie einen bestimmten Exemplartyp für Pakete wünschen, damit Sie sie leicht identifizieren und Ausleihregeln für sie erstellen können. In diesem Fall hat das Paket den Exemplartyp COLLECTION.
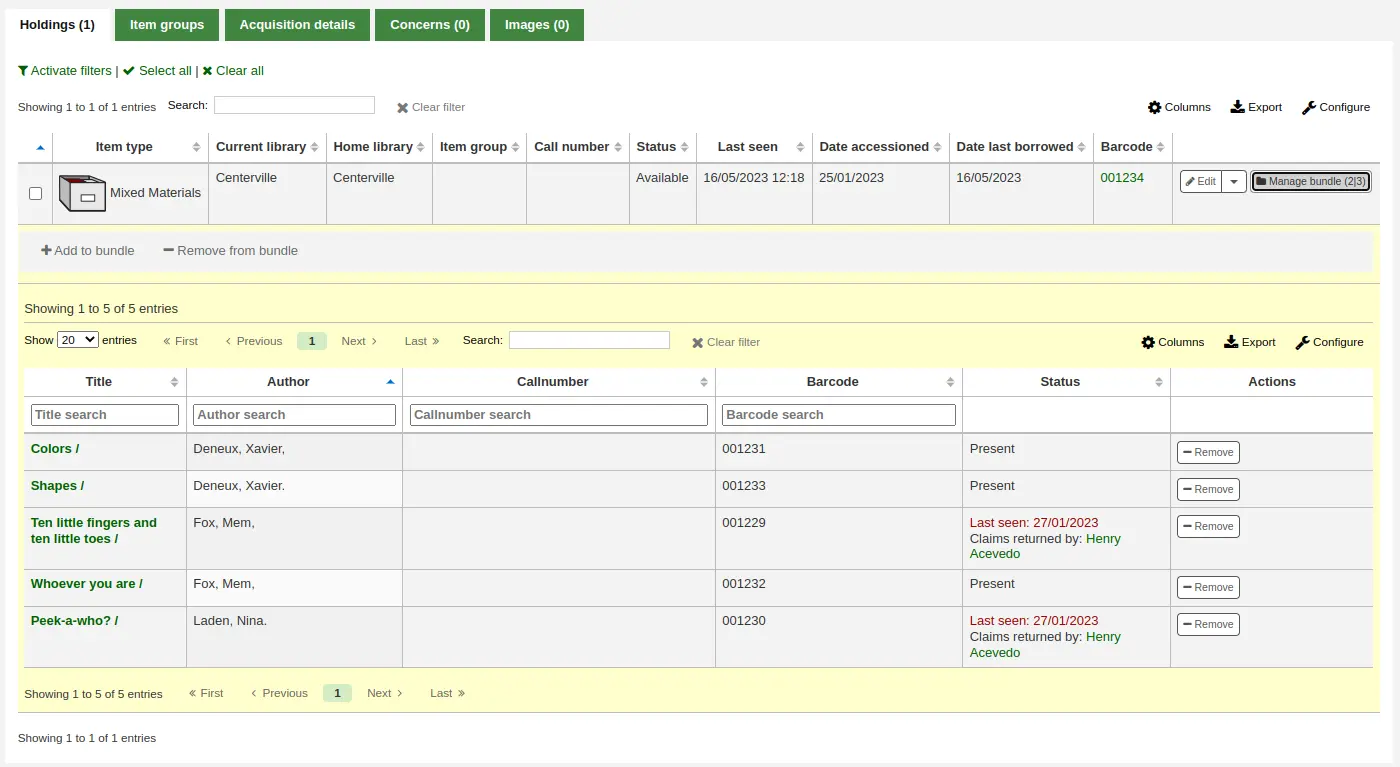
An item record attached to this type of catalog record can be converted into a bundle via the Manage bundle button on the far right-hand side of the holdings table for each item as shown below.
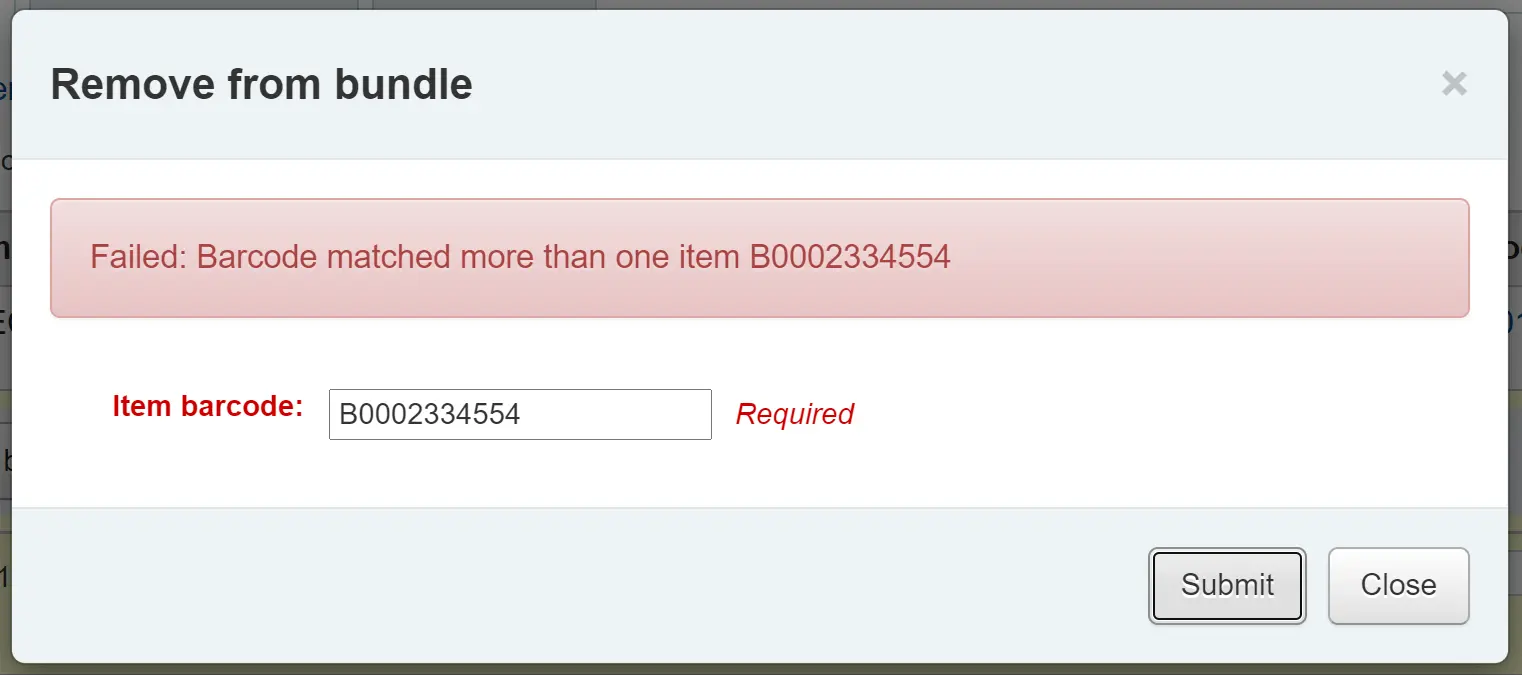
Exemplare zu Paketen hinzufügen
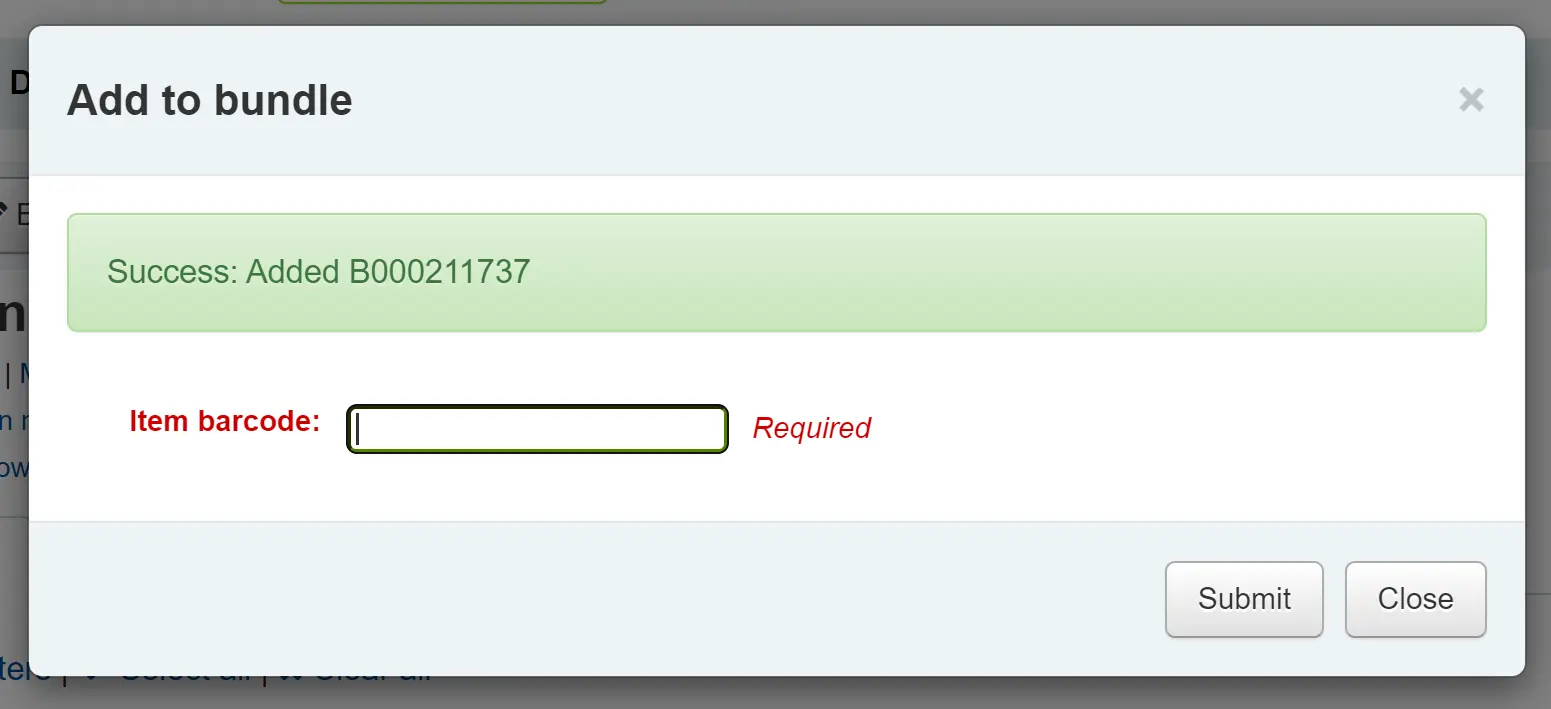
Klicken Sie auf „Paket verwalten“ und dann auf die Schaltfläche „Zum Paket hinzufügen“, um dem Paket anhand des Barcodes des Exemplars Exemplare hinzuzufügen.
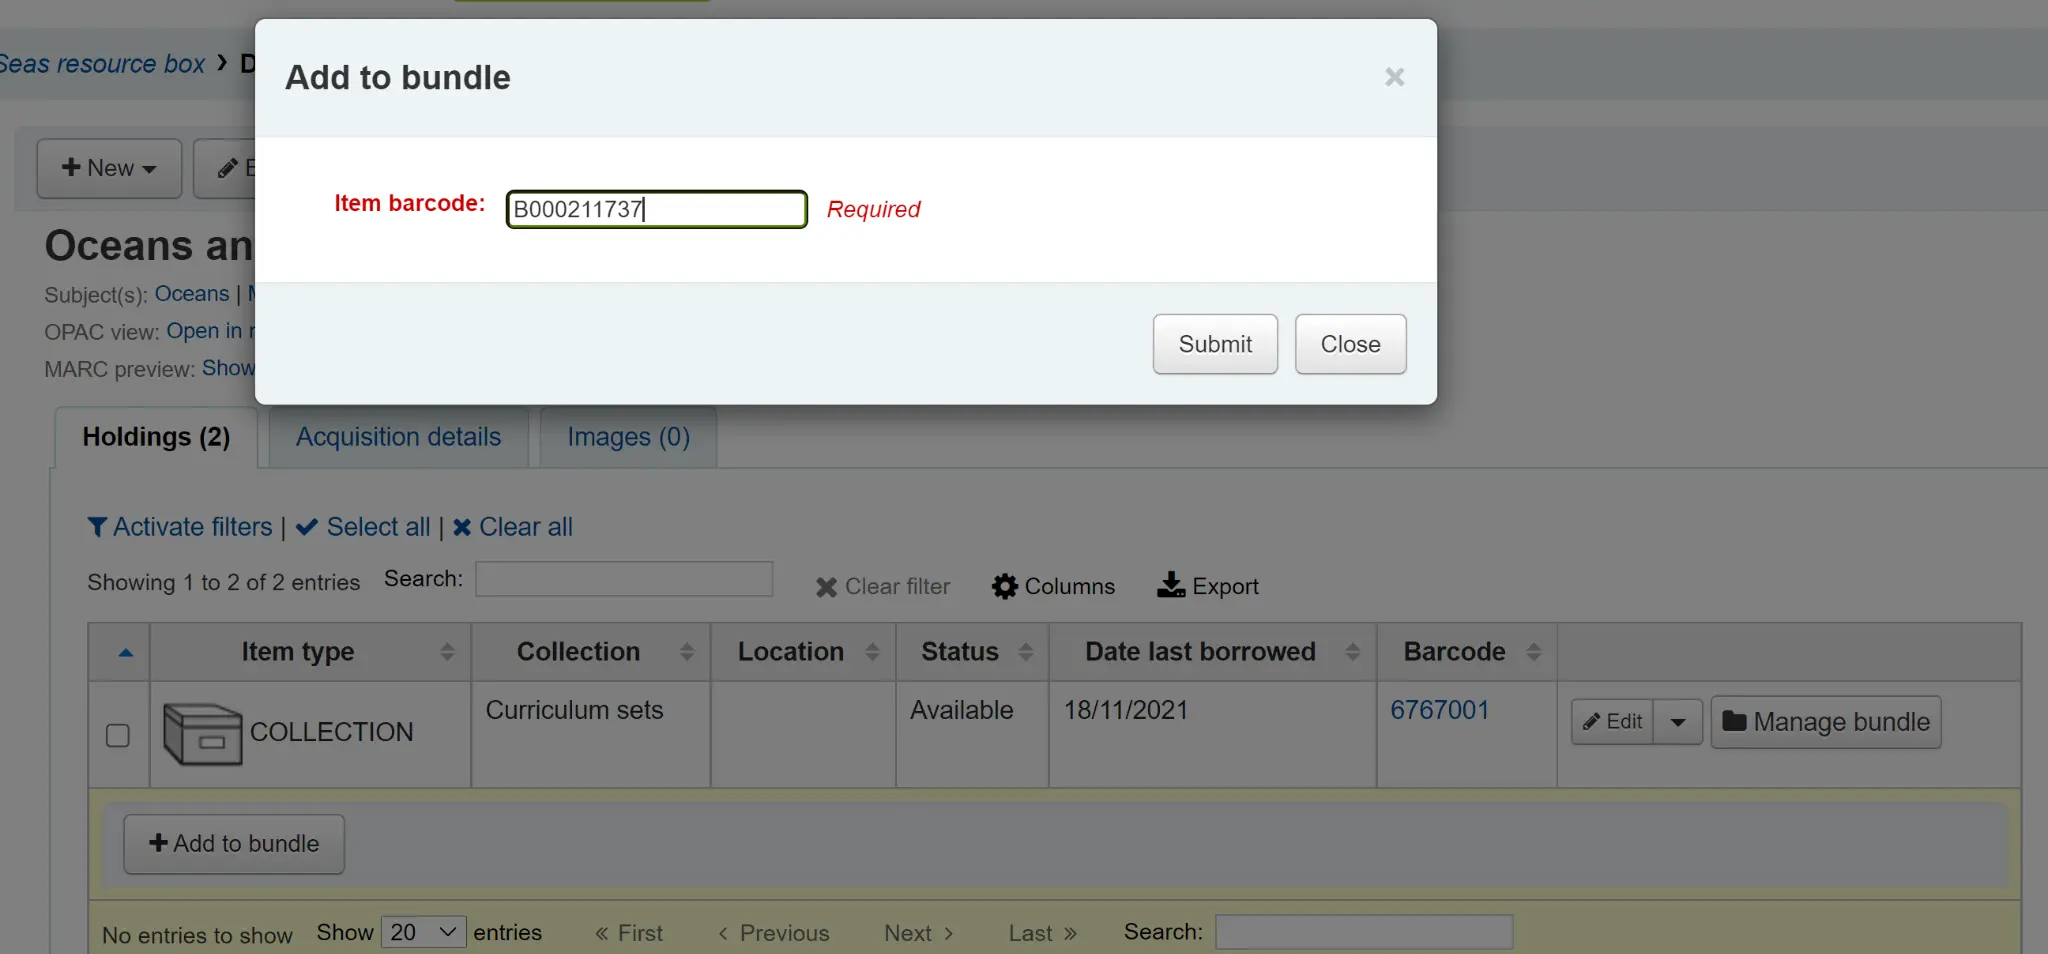
Sie erhalten eine Meldung, dass das Exemplar erfolgreich hinzugefügt wurde.
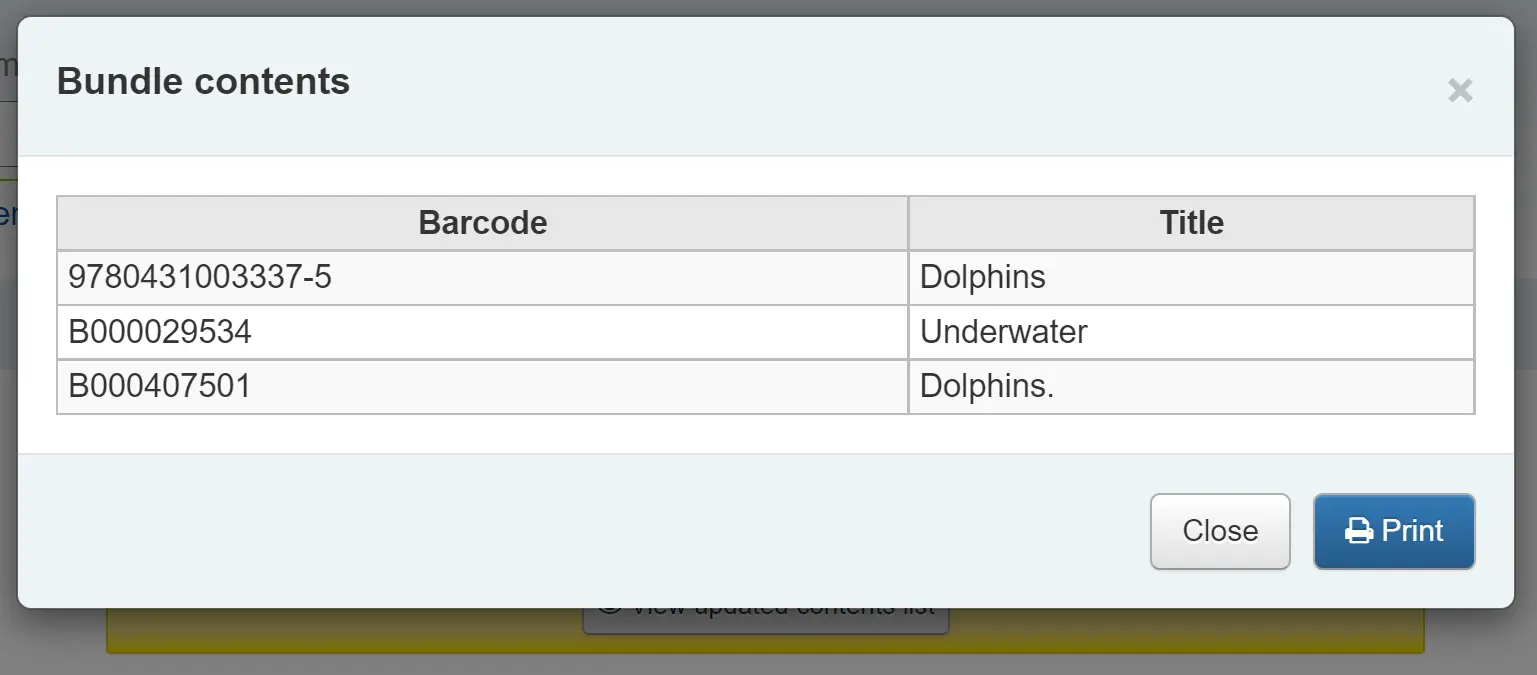
Wenn Sie mit dem Einscannen der Exemplare fertig sind, können Sie auf „Schließen“ klicken und den Inhalt des Pakets anzeigen. Die Liste der Paketinhalte kann bei Bedarf exportiert oder gedruckt werden.
Warnung
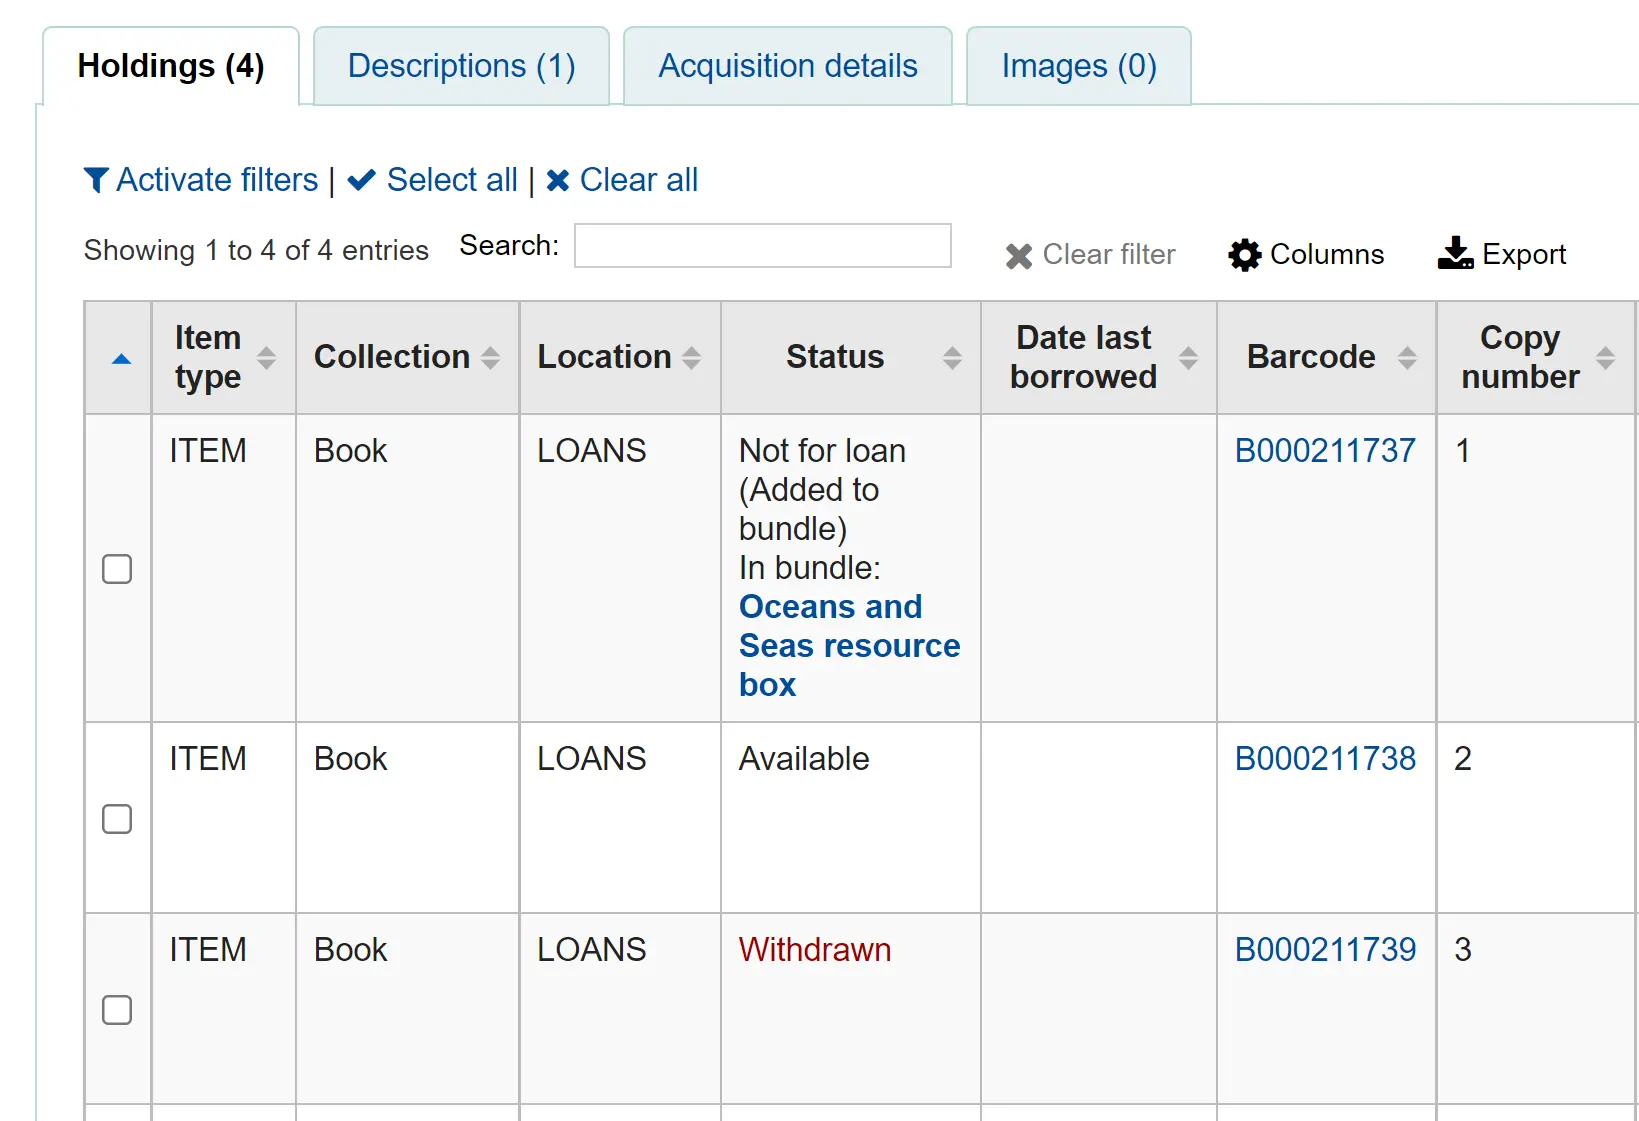
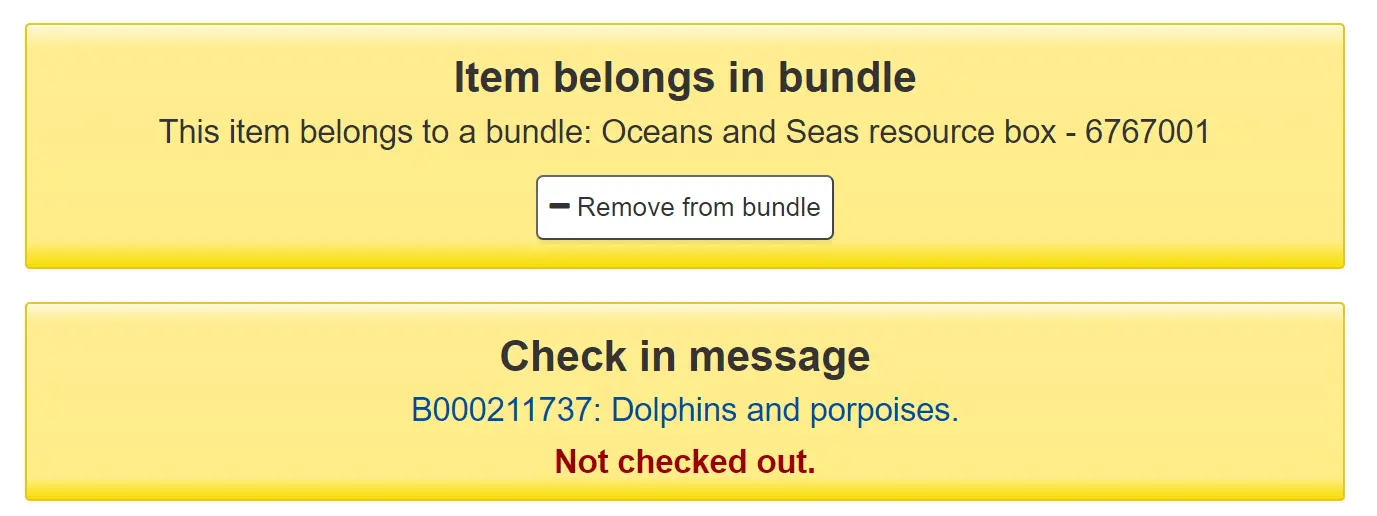
Items added to bundles are still attached to their permanent catalog record, however, they cannot be checked out individually. When added to a bundle an item’s Not for Loan status is updated and can be viewed in the holdings table of the permanent record along with a link to the bundle. The Not for Loan status can be defined in the BundleNotLoanValue system preference.
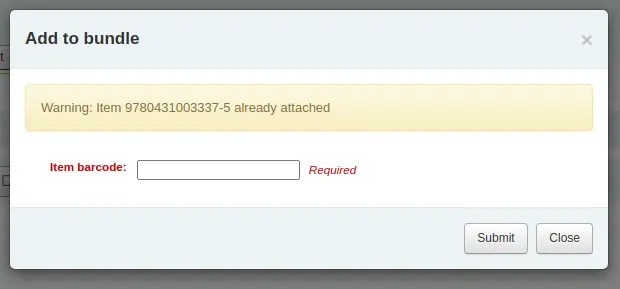
Wird festgestellt, dass ein Exemplar bereits mit dem Paket verbunden ist, wird eine Warnmeldung angezeigt.
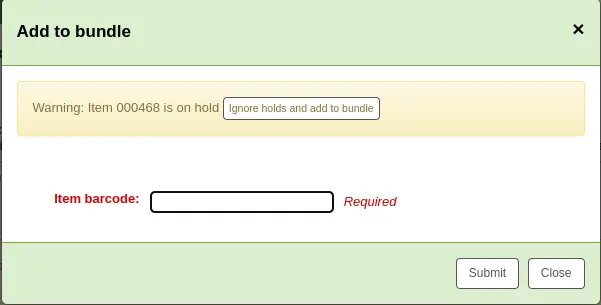
Wenn ein Exemplar auf Exemplarebene vorgemerkt ist, wird eine Warnmeldung angezeigt. Wenn Sie das Exemplar trotzdem zum Paket hinzufügen möchten, klicken Sie auf „Vormerkungen ignorieren und zum Paket hinzufügen“. Um den Vorgang abzubrechen, klicken Sie auf „Schließen“.
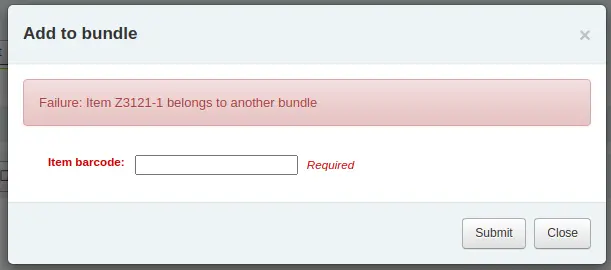
Wenn ein Exemplar aus einem anderen Grund nicht zum Paket hinzugefügt werden kann, wird eine Fehlermeldung angezeigt.
Exemplare aus Paketen entfernen
Um ein einzelnes Exemplar aus einem Paket zu entfernen, können Sie auf die Schaltfläche „Entfernen“ in der Spalte „Aktionen“ der Paket-Inhaltsliste klicken.
Um mehrere Exemplare aus dem Paket zu entfernen haben Sie zwei Optionen:
Nutzen Sie die Schaltfläche „Aus Paket entfernen“ in der Anzeige „Paket verwalten“
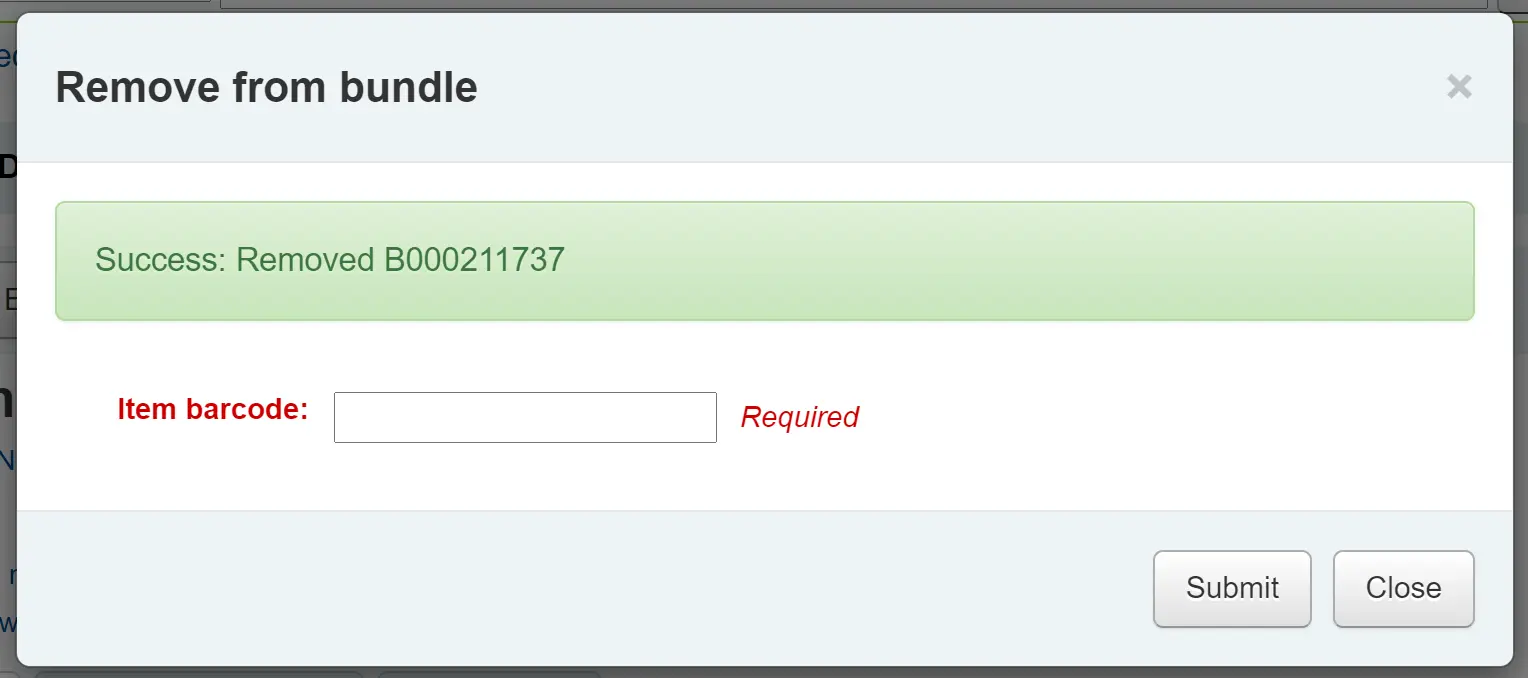
Scannen Sie Barcodes auf die gleiche Weise ein, wie Sie Exemplar zu Paketen hinzufügen. Es erscheint ein Bestätigungsdialog, der Sie darüber informiert, dass das Exemplar entfernt wurde.
Wenn das Exemplar nicht entfernt werden konnte, wird eine Fehlermeldung angezeigt.
Die zweite Möglichkeit, mehrere Exemplare zu entfernen, besteht darin, den Barcode des Exemplars in die Checkbox zu scannen, und Sie erhalten die Option, das Exemplar aus seinem Paket zu entfernen.
Wenn Sie die Arbeit am Paket beendet haben, können Sie die Inhaltsliste schließen, indem Sie erneut auf die Schaltfläche „Paket verwalten“ klicken.
Pakete ausleihen
Ausleihe
Sie können ein Paket wie gewohnt über den Barcode des Pakets in der Ausleihe ausleihen. Bei Bedarf können Sie spezielle Ausleihregeln für Pakete auf der Grundlage ihres Exemplartyps erstellen.
Denken Sie daran, dass ein Exemplar, das sich in einem Paket befindet, nicht mehr einzeln ausgeliehen werden kann. Wenn Sie dies versuchen, wird die folgende Warnung angezeigt.

Sie können die Ausleihen in der Liste der Ausleihen des Benutzers sehen.
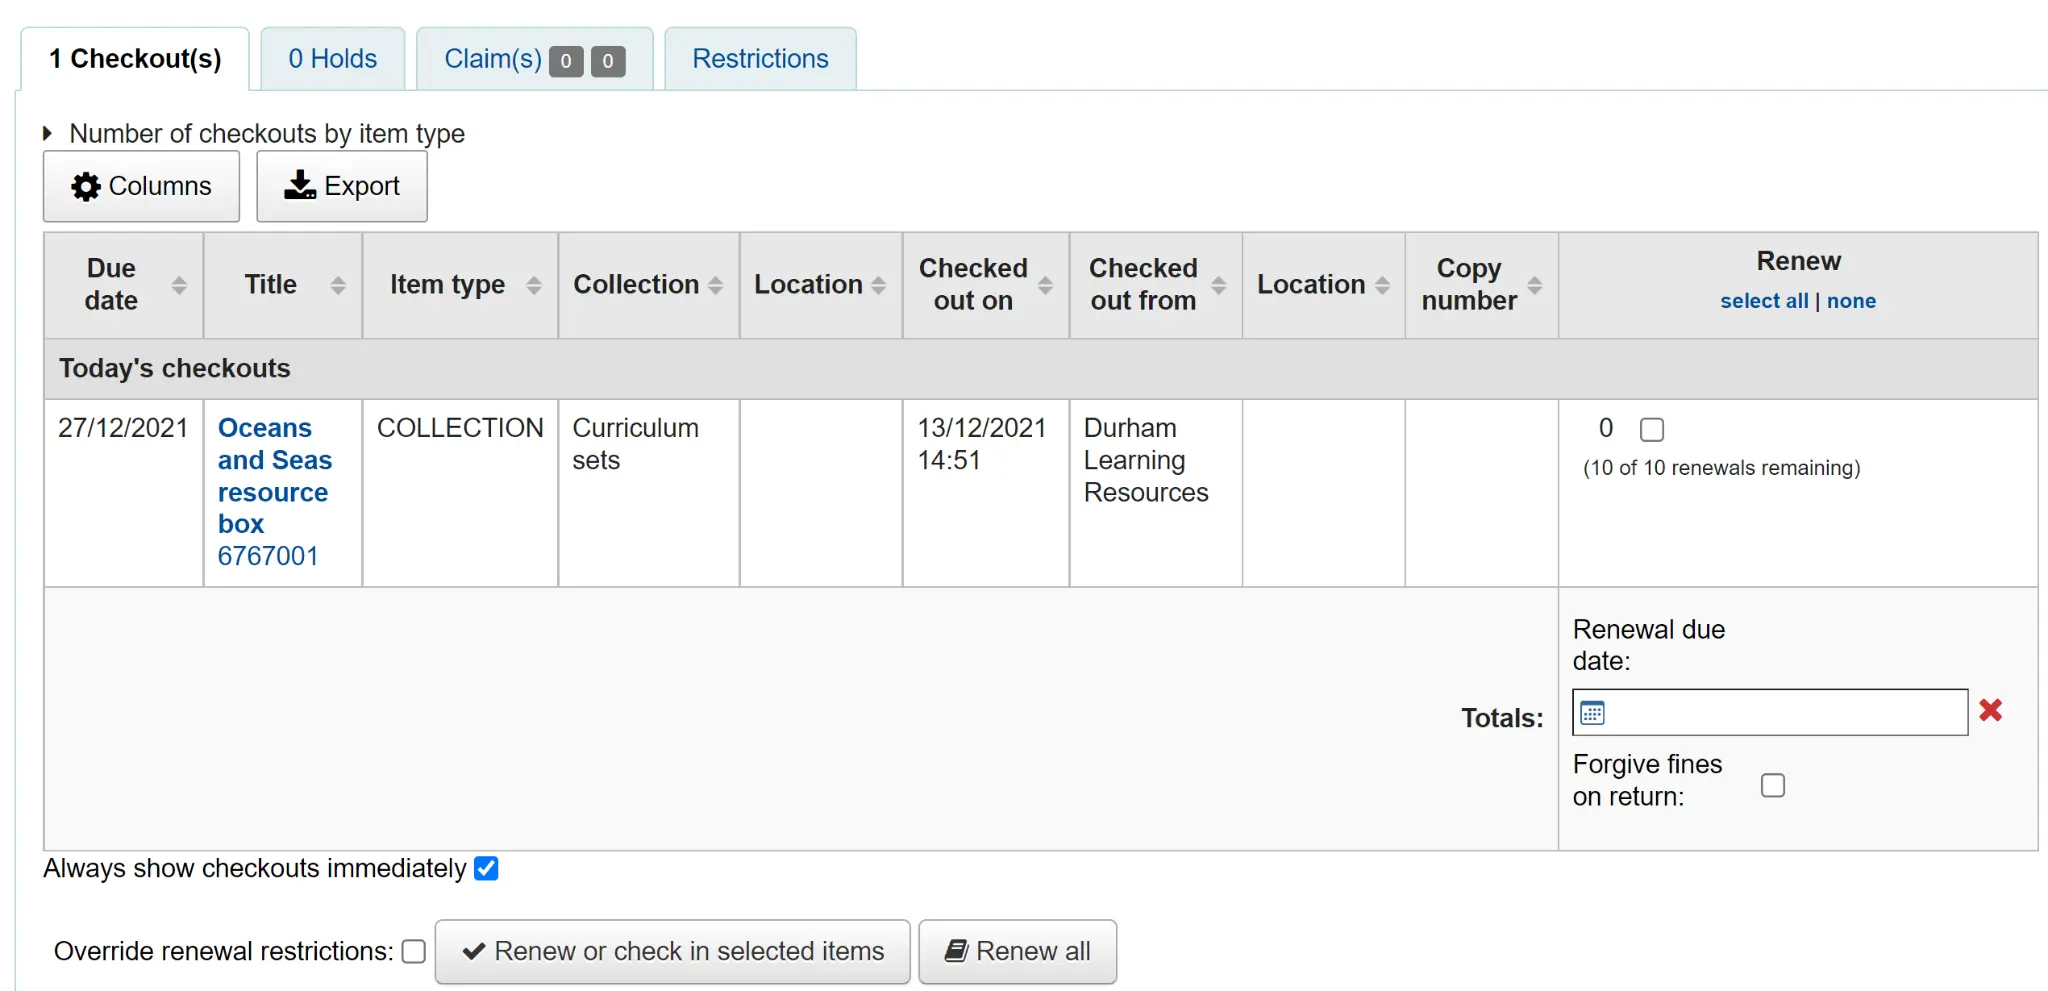
You can also see that the bundle is checked out from the status column of the Holdings table of the catalog record.
Rückgabe
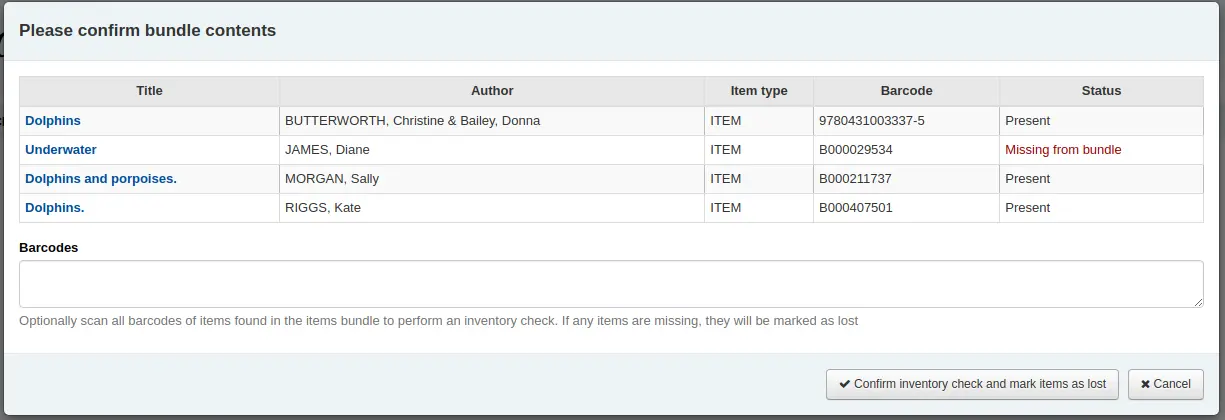
Buchen Sie die Pakete wie gewohnt in der Ausleihe zurück. Sie werden dann aufgefordert, das Vorhandensein jedes Exemplars, das in das Paket gehört, zu überprüfen.
Wenn Sie den Überprüfungsprozess überspringen möchten, klicken Sie auf die Schaltfläche „Rückbuchung ohne Überprüfung des Paket-Inhalts bestätigen“. Sie können den Inhalt später überprüfen.
Im oberen Teil des Dialogs wird eine Liste der Exemplare angezeigt, die derzeit mit dem Paket verbunden sind und zurückgegeben werden sollen. Unterhalb der Liste befindet sich ein Feld „Barcodes“, in dem Sie die Barcodes der zurückgegebenen Exemplare einzeln einscannen müssen.
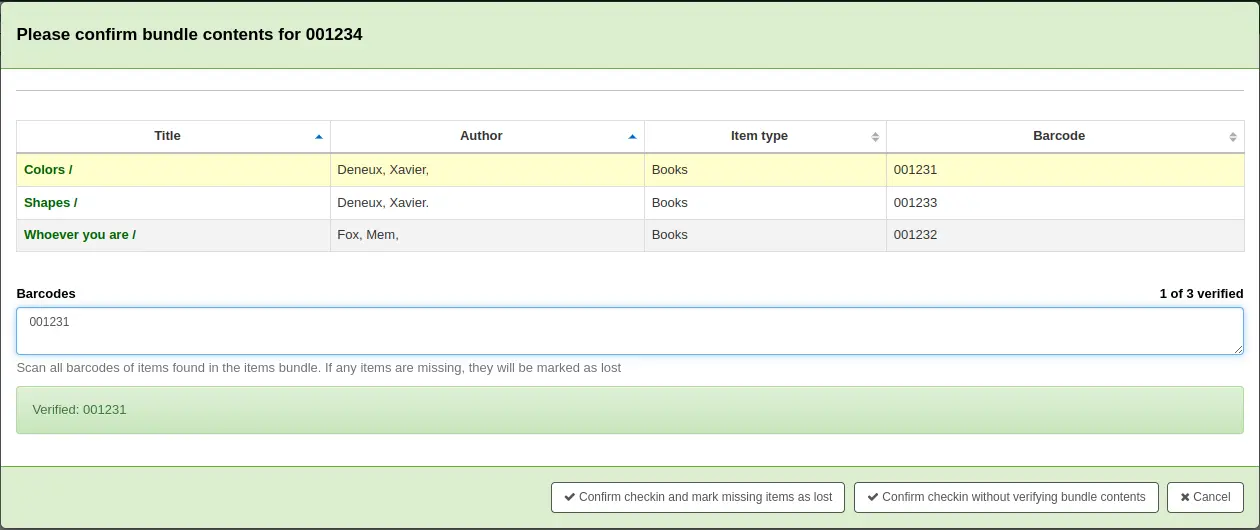
Beim Scannen von Exemplaren wird die entsprechende Zeile in der Liste hervorgehoben, um ein visuelles Feedback zu geben. Außerdem sehen Sie auf der rechten Seite eine laufende Gesamtsumme der zurückgebuchten Exemplare.
Wenn Sie mit dem Scannen der zurückgegebenen Exemplare fertig sind, können Sie auf „Rückbuchung bestätigen und fehlende Exemplare als verloren markieren“ klicken oder die Rückbuchung abbrechen.
Wenn alle Exemplare des Pakets als gefunden markiert wurden, erhalten Sie eine Meldung, dass die Rückbuchung abgeschlossen ist.

Sie können eine Inhaltsliste anzeigen und drucken.
Vermisste Exemplare
Wenn bei der Überprüfung festgestellt wird, dass einige Exemplare fehlen, wird die Rückbuchung fortgesetzt, aber Sie werden darauf aufmerksam gemacht, dass sich der Inhalt des Pakets geändert hat, und Sie erhalten die Möglichkeit, eine aktualisierte Inhaltsliste anzuzeigen und auszudrucken.

Sie können ebenfalls eine Liste der vermissten Exemplare ansehen.
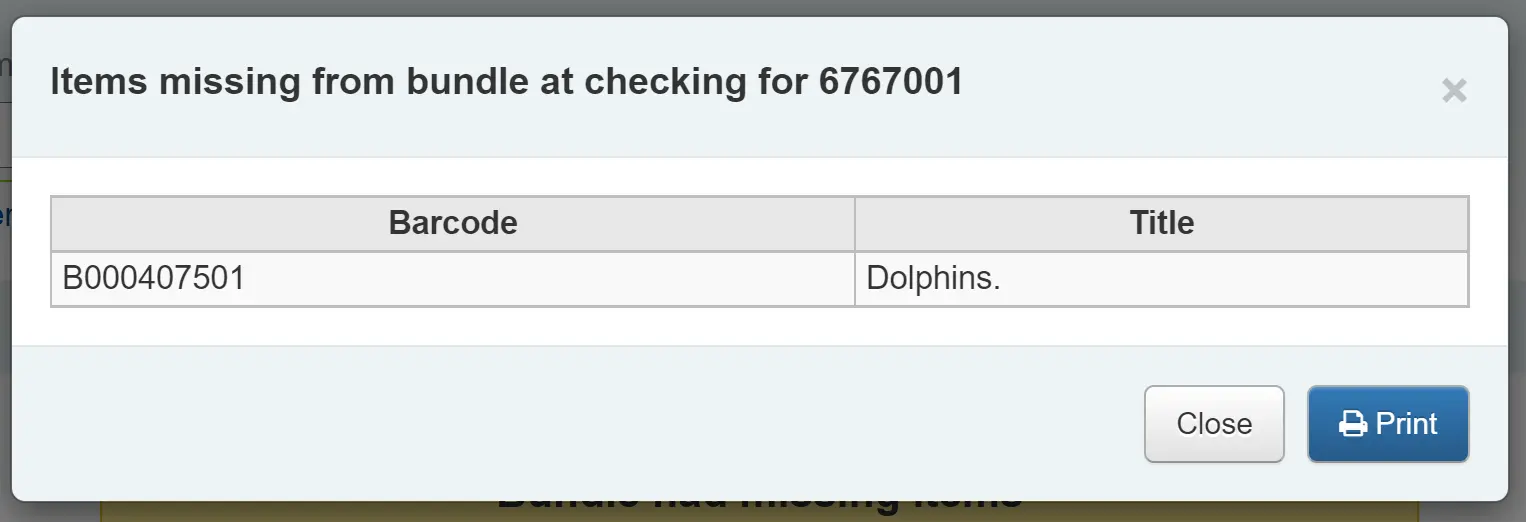
Alle Exemplare, die während der Überprüfungsphase fehlen, werden automatisch mit dem entsprechenden Status „Verlust“ gekennzeichnet und eine Rückgabebehauptung wird hinzugefügt, um zu verfolgen, welche Ausleihe das enthaltene Exemplar verloren hat. Sie können Ihre eigenen Verluststatus in der Kategorie LOST der Normierten Werte hinzufügen und Sie können steuern, welcher Verluststatus über den Systemparameter BundleLostValue verwendet wird. Beispiel: Der Status „Fehlt im Paket“ wie unten gezeigt.
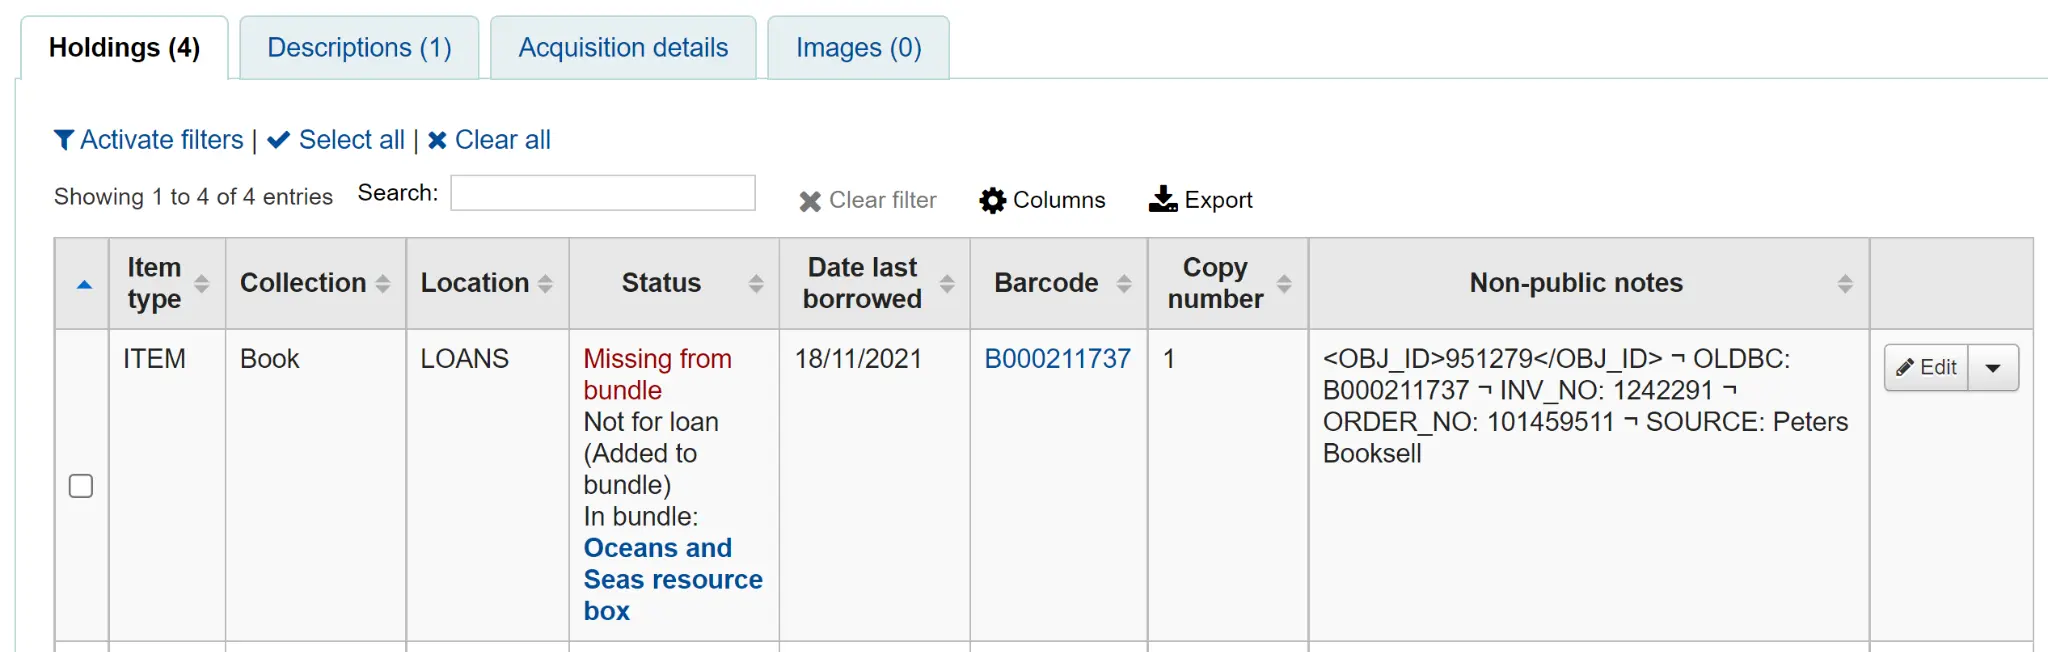
In der Ansicht „Paket-Inhalte verwalten“ wird das fehlende Exemplar mit dem Datum angezeigt, an dem es zuletzt gesehen wurde.
Prozess für Rückgabebehauptungen
Im Benutzerdatensatz werden die fehlenden Exemplare als Rückgabebehauptungen aufgelistet und können im Reiter „Rückgabebehauptungen“ in der Ausleihtabelle angezeigt werden.
Klicken Sie auf das nummerierte Quadrat, um die fehlenden Exemplare für den/die Benutzer*in anzuzeigen.
Wenn ein Exemplar gefunden wird, sollte es zurückgebucht werden. Das Dialogfeld zur Rückbuchung enthält eine Schaltfläche zum „Lösen“ der Behauptung.

Sie müssen einen Lösungsgrund angeben und können optional den Wert des verlorenen Exemplars ändern.
Inventur (Paketinhalte jederzeit prüfen)
Eine Überprüfung kann jederzeit durch Rückbuchung des Pakets ausgelöst werden. Wenn das System feststellt, dass das Paket zu diesem Zeitpunkt nicht ausgeliehen wurde, wird ein geänderter Bestätigungsdialog angezeigt, der alle im Paket erwarteten Exemplare enthält, auch die, die derzeit als verloren markiert sind.
Dies ermöglicht einen schnellen Überblick darüber, was im Paket enthalten sein sollte und was derzeit als fehlend markiert ist. Sie können die Ausleihe abbrechen oder die Exemplare erneut scannen, um die Überprüfung durchzuführen und die Exemplare als gefunden oder fehlend zu markieren. Da es sich um eine Rückbuchung handelt, die nicht mit einer Ausleihe verbunden ist, werden neue Exemplare, die als vermisst gemeldet werden, als verloren markiert, können aber nicht mit einer Ausleihe und einer Rückgabebehauptung verknüpft gebracht werden.
Vormerkungen
Koha erlaubt den Benutzer*innen mit entsprechender Konfiguration Exemplare vorzumerken. Über eine ‚Vormerkung‘ können Exemplare reserviert werden. Abhängig von den Ausleihkonditionen und den Vormerkregeln können Benutzer*innen Exemplare in der Bibliothek vormerken, die sie dann zu einem späteren Zeitpunkt abholen können.
Lesen Sie den Bereich Vormerkungen vornehmen im Kapitel „OPAC“, um zu erfahren, wie Sie im OPAC Vormerkungen durchführen können.
Vormerken in der Dienstoberfläche
Bemerkung
Mitarbeiter*innen müssen über die Berechtigung place_holds (oder die superlibrarian-Berechtigung) verfügen, um Vormerkungen durchführen zu können.
Es gibt verschiedene Möglichkeiten, Vormerkungen in der Dienstoberfläche zu setzen. Die einfachste ist die Vormerkschaltfläche am oberen Rand der Detailansicht eines bibliographischen Datensatzes.
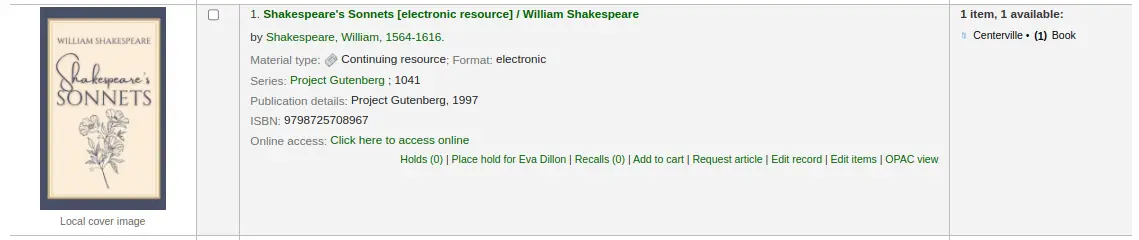
Sie können auch den Button ‚Vormerken‘ am oberen Rand der Trefferliste, oder den Link ‚Vormerkungen‘ unterhalb der einzelnen Treffer verwenden.

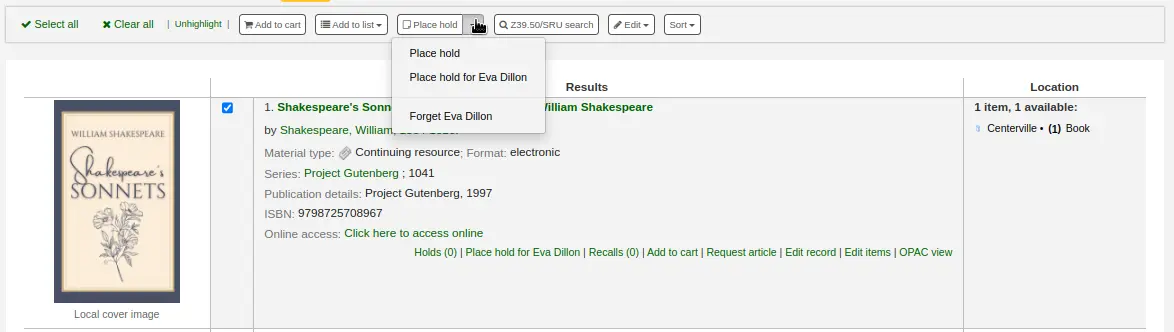
Wenn Sie Vormerkungen auf mehrere Exemplare gleichzeitig setzen möchten, können Sie die Checkboxen auf der linken Seite neben jedem Titel in den Suchergebnissen anklicken und dann die Schaltfläche „Vormerken“ oben in den Suchergebnissen klicken.
Bemerkung
Diese Funktion kann mit dem Systemparameter DisplayMultiPlaceHold deaktiviert werden.
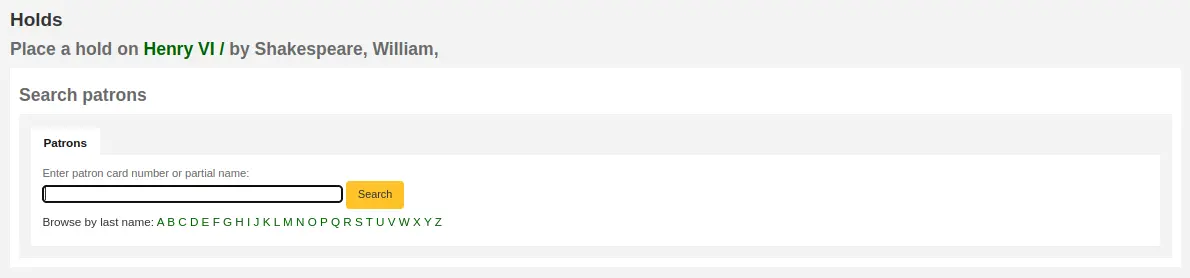
Sie werden aufgefordert nach der Ausweisnummer oder dem Namen eines Benutzers zu suchen, für den Sie die Vormerkung setzen möchten.
Wenn Sie zuerst nach dem/der Benutzer*in und dann nach dem bibliografischen Datensatz für den vorzumerkenden Titel suchen möchten, können Sie den Benutzerdatensatz öffnen und auf die Schaltfläche „Vormerkung suchen“ am oberen Rand des Benutzerdatensatzes klicken.

Nachdem Sie auf die Schaltfläche geklickt haben, werden Sie auf die Seite für die Katalogsuche weitergeleitet, wo Sie den oder die Titel finden können, die Sie vormerken möchten. Unter jedem Titel in der Ergebnisliste finden Sie die Option „Vormerken für (Name des Benutzers).“
Wenn Sie für diese*n Benutzer*in Vormerkungen auf mehrere Exemplare setzen möchten, können Sie die Checkboxen auf der linken Seite neben den Titeln anklicken und dann den Pfeil auf der rechten Seite der Vormerk-Schaltfläche und „Vormerkung für (Benutzername)“ auswählen.
Bemerkung
Nachdem die Vormerkungen gesetzt wurden, können Sie den/die Benutzer*in aus dem Speicher löschen, indem Sie in den Suchergebnissen auf den Pfeil rechts neben der Schaltfläche „Vormerken“ klicken und die Option „Vergessen (Benutzername)“ wählen.
Abhängig davon, wieviele Vormerkungen Sie auf einmal setzen möchten, sehen Sie unterschiedliche Formulare. Wenn Sie die Vormerkung auf einen bibliographischen Datensatz setzen, erhalten Sie eine Liste der Exemplare, auf die Sie auch exemplarbezogene Vormerkungen setzen können.
Benutzer: der Name des Benutzers, für den diese Vormerkung ist
Geschätzte Priorität: diese berücksichtigt die bereits auf diesen Titel gesetzten Vormerkungen
Notizen: Geben Sie Notizen zu dieser Vormerkung an
Anforderung eines bestimmten Exemplartyps: Wenn der Systemparameter AllowHoldItemTypeSelection auf „Zulassen“ gesetzt ist, gibt es eine Option, um die Vormerkung auf einen bestimmten Exemplartyp zu beschränken
Beginn der Vormerkung am Datum: Wenn der Systemparameter AllowHoldDateInFuture auf „Zulassen“ gesetzt ist und der/die Benutzer*in möchte, dass das Vormerken an einem anderen Datum als heute beginnt, geben Sie das Datum hier ein
Vormerkung läuft ab am: Wenn der/die Benutzer*in angegeben hat, dass er/sie den Titel nach einem bestimmten Datum nicht mehr benötigt, oder wenn die Dauer einer Vormerkung begrenzt ist, können Sie ein Ablaufdatum unter ‚Vormerkung läuft ab am‘ angeben
Bemerkung
Wenn abgelaufene Vormerkungen automatisch storniert werden sollen, muss Ihr Systemadministrator den Cronjob cancel_expired_holds.pl für die regelmäßige Ausführung festlegen.
Vormerkung ohne Priorität: Wenn Sie eine Vormerkung für interne Zwecke vornehmen, z. B. um zu prüfen, ob Seiten fehlen oder ein Etikett hinzugefügt werden muss, markieren Sie das Feld „Vormerkung ohne Priorität“. Diese Art der Vormerkung hindert den Benutzer, der das Exemplar aktuell besitzt, nicht daran, seine Ausleihe zu erneuern.
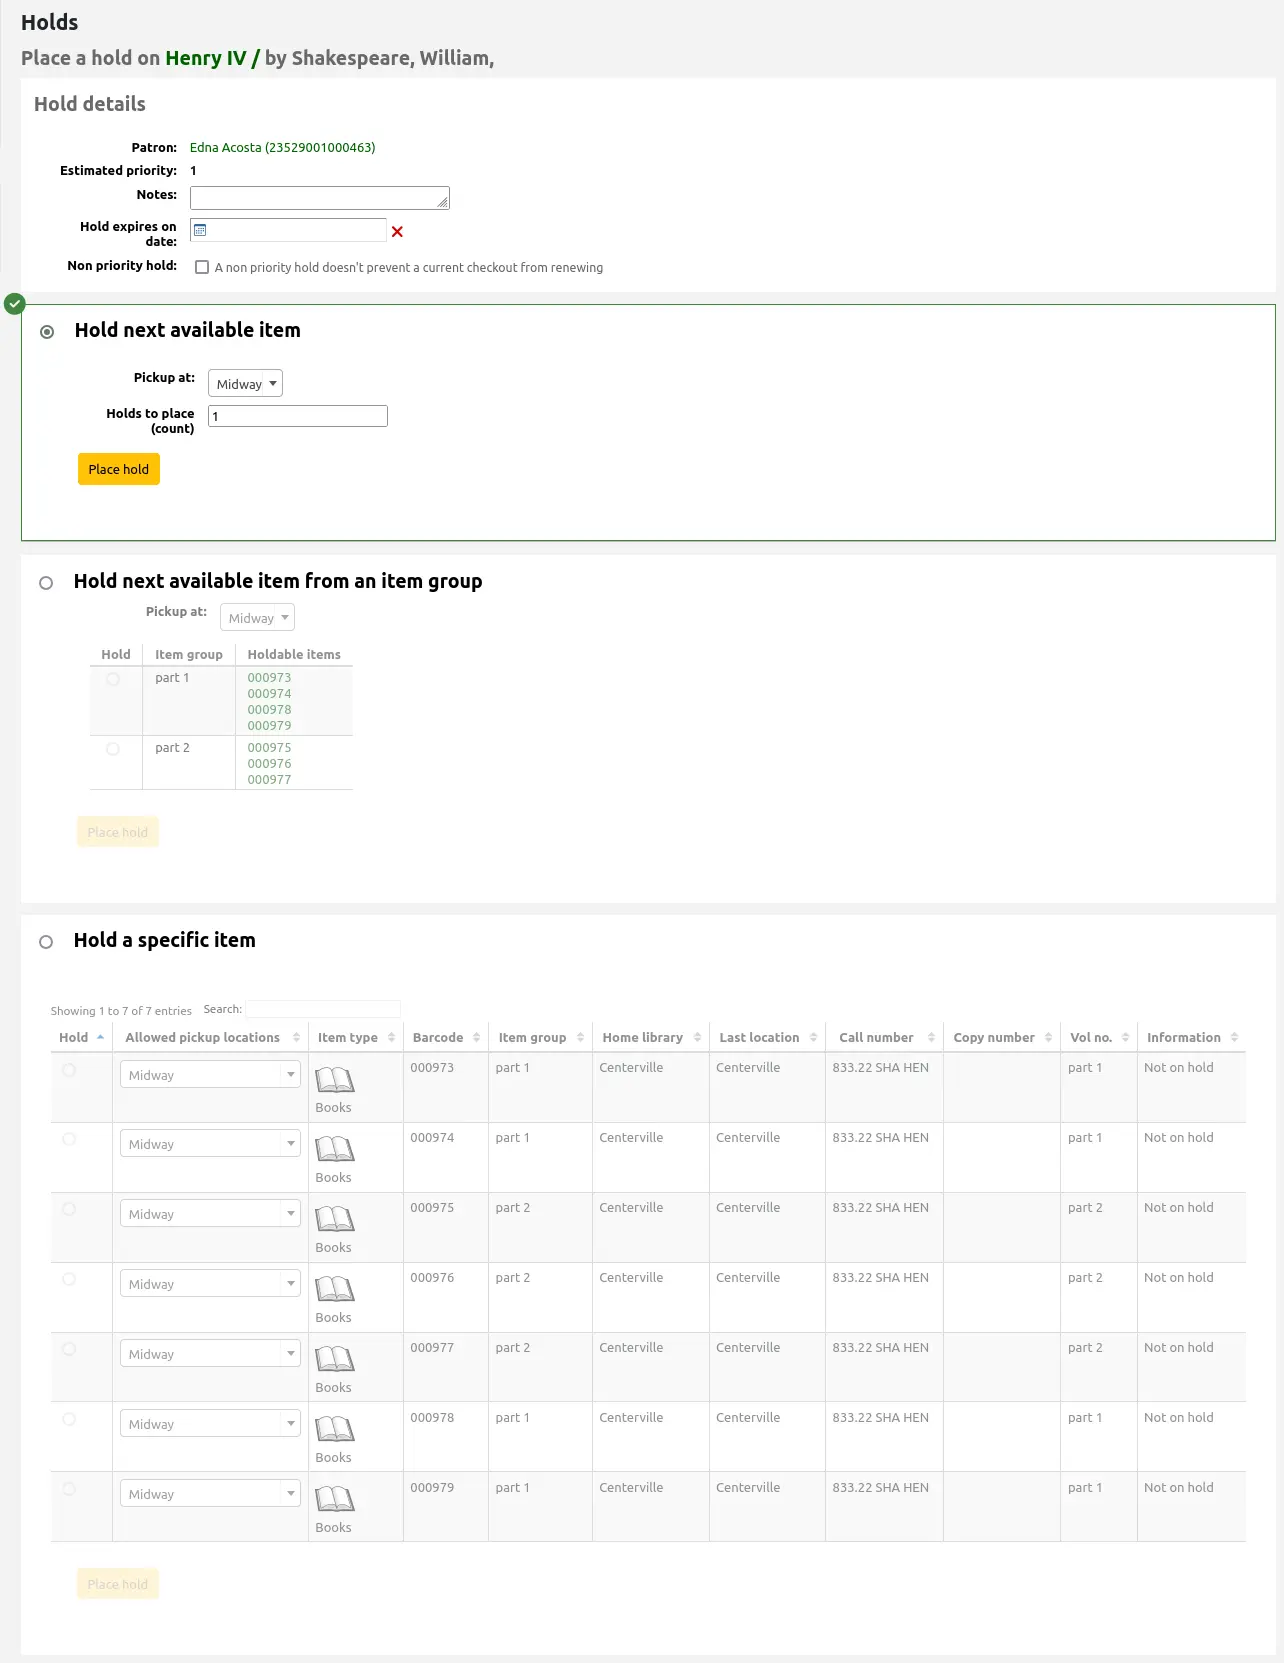
Wenn Sie das nächste verfügbare Exemplar vormerken möchten (Standardeinstellung), füllen Sie den nächsten Teil des Formulars aus. Für spezifischere Vormerkungseinstellungen wählen Sie eine Exemplargruppe im Bereich „Nächstes verfügbares Exemplar aus einer Exemplargruppe vormerken“ oder ein bestimmtes Exemplar im Bereich „Ein bestimmtes Exemplar vormerken“ unten.

Abholung in: Wählen Sie die Bibliothek, in welcher der/die Benutzer*in das Exemplar abholen wird
Bemerkung
Die Standardabholbibliothek wird durch den Systemparameter DefaultHoldPickupLocation bestimmt.
Anforderung eines bestimmten Exemplartyps: Wenn der Systemparameter AllowHoldItemTypeSelection auf „Zulassen“ gesetzt ist, gibt es eine Option, um die Vormerkung auf einen bestimmten Exemplartyp zu beschränken
Vorzunehmende Vormerkungen (Anzahl): Wenn mehrere Vormerkungen pro Datensatz zulässig sind, können Sie eine Zahl in das Textfeld „Vorzunehmende Vormerkungen (Anzahl)“ eingeben, um diese Anzahl an Vormerkungen für den/die ausgewählte*n Benutzer*in vorzunehmen.
Bemerkung
Das Textfeld „Vorzunehmende Vormerkungen (Anzahl)“ wird nur angezeigt, wenn die Ausleihe und Gebühren-Regeln so eingestellt sind, dass die Grenze für „Vormerkungen pro Datensatz“ größer als 1, aber nicht unbegrenzt ist, für diese Kombination von Medien- und Benutzertyp.
Wenn Sie das nächste verfügbare Exemplar einer Exemplargruppe und nicht das nächste verfügbare Exemplar des gesamten Datensatzes oder ein bestimmtes Exemplar vormerken möchten, wählen Sie diesen Bereich aus und füllen ihn aus.
Bemerkung
Dieser Bereich erscheint nur, wenn der Systemparameter EnableItemGroupHolds auf „Aktivieren“ gesetzt ist und der Datensatz Exemplargruppen hat. Sie können wählen, ob das nächste verfügbare Exemplar einer Gruppe vorgemerkt werden soll.
Abholung in: Wählen Sie die Bibliothek, in welcher der/die Benutzer*in das Exemplar abholen wird
Bemerkung
Die Standardabholbibliothek wird durch den Systemparameter DefaultHoldPickupLocation bestimmt.
Wählen Sie eine Exemplargruppe aus, auf die die Vormerkung vorgenommen werden soll.
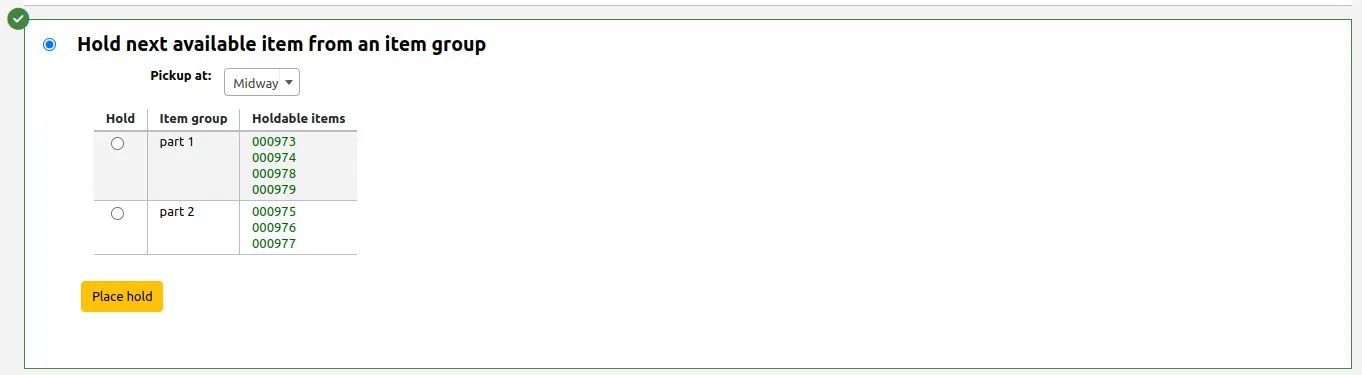
Wählen Sie diesen Bereich aus und füllen Sie ihn aus, um ein bestimmtes Exemplar vorzumerken und nicht das nächste verfügbare Exemplar im gesamten Datensatz oder das nächste verfügbare Exemplar in einer Exemplargruppe.
Wählen Sie das vorzumerkende Exemplar aus.
Bemerkung
Wenn Sie den Systemparameter DisplayMultiItemHolds aktivieren, können Sie in diesem Bereich mehrere einzelne Exemplare auswählen, um mehrere Exemplare gleichzeitig für denselben/dieselbe Benutzer*in vorzumerken. Wenn der Systemparameter aktiviert ist, können Sie mehr als ein Exemplar auswählen.
Ändern Sie, falls notwendig, den Abholort.
Bemerkung
Die Standardabholbibliothek wird durch den Systemparameter DefaultHoldPickupLocation bestimmt.
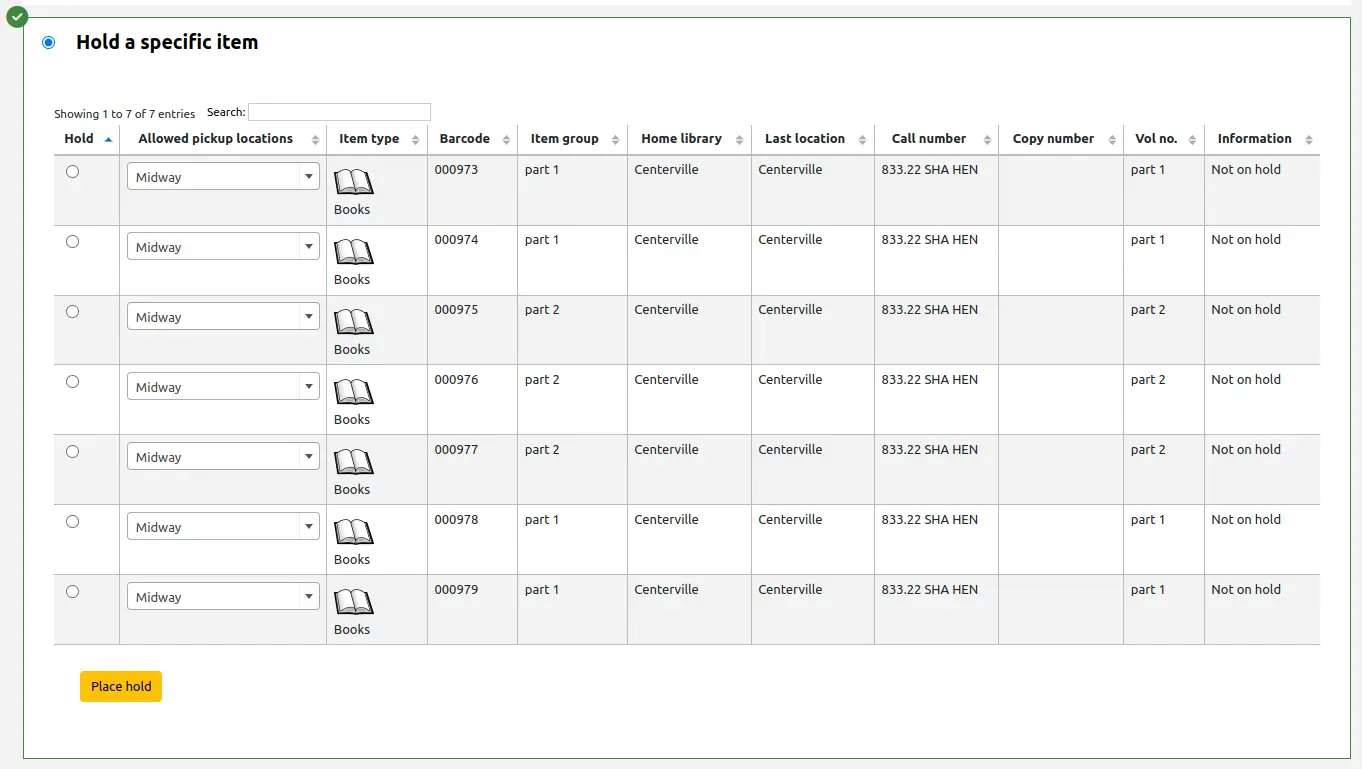
Wenn Sie mehrere Titel auf einmal vormerken, wird Ihnen jeweils die nächste mögliche Option für alle Titel angezeigt. Wenn keine Exemplare für eine Vormerkung verfügbar sind, wird Ihnen dies so angezeigt.
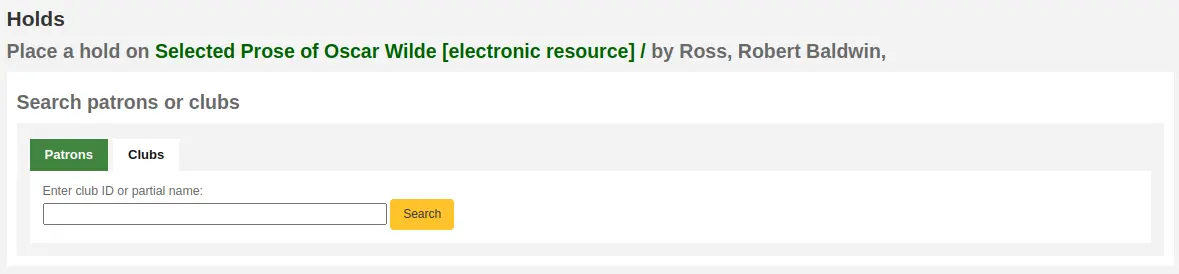
Wenn Ihre Bibliothek Clubs verwendet, können Sie den Reiter Clubs verwenden, um für einen solchen Vormerkungen zu setzen.
Um eine Vormerkung für einen Club vorzunehmen, klicken Sie auf den Reiter, suchen Sie nach dem Club und klicken Sie auf „Vormerken“.
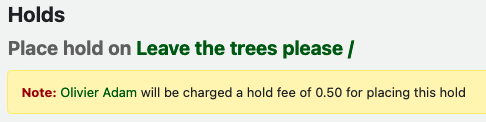
If your library has set hold fees in its circulation and fine rules and the patron will be charged for this hold, a note appears at the top of the page specifying the amount.
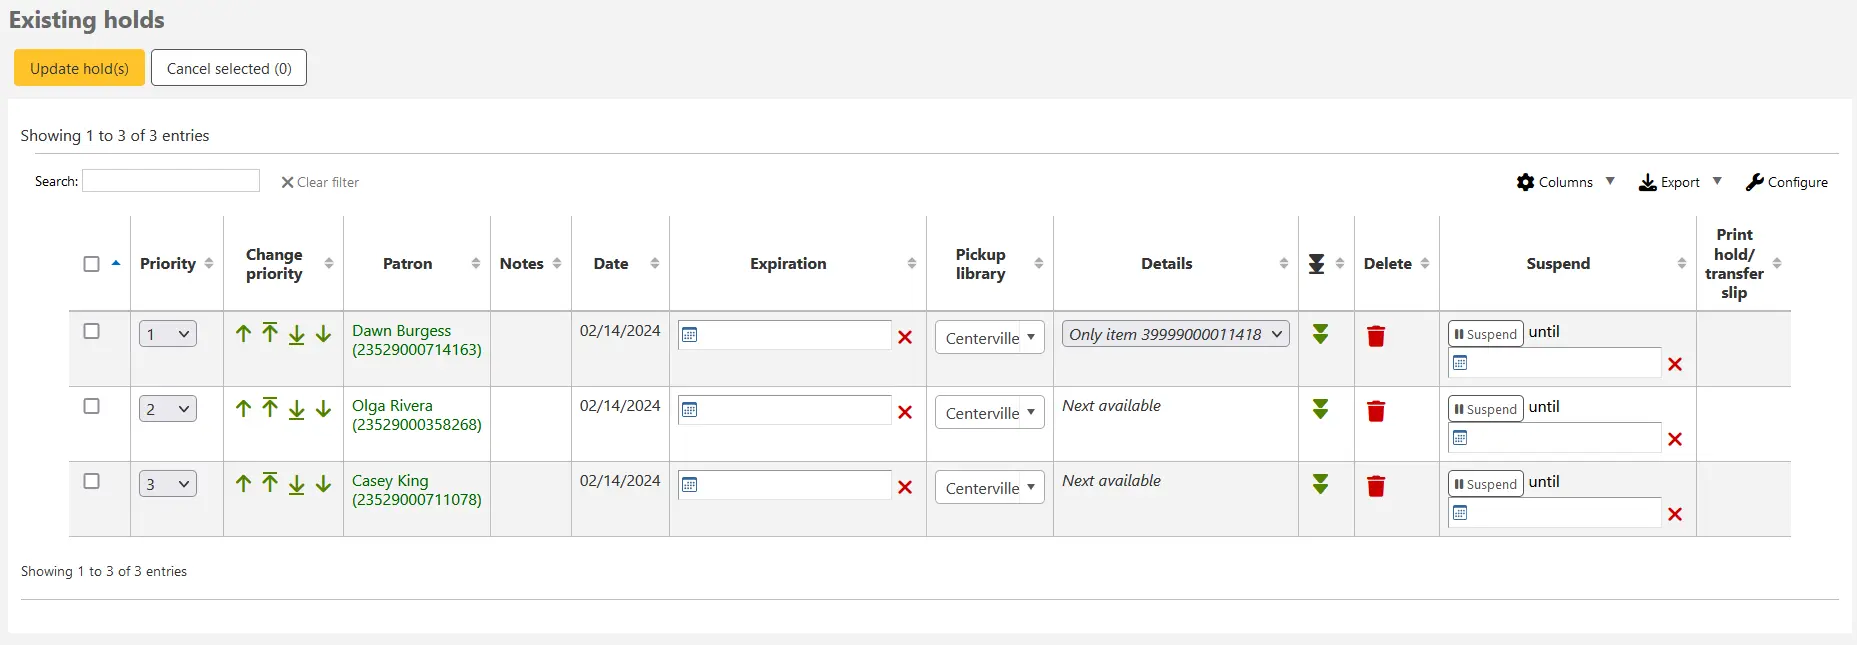
Vormerkungen verwalten
Holds can be altered and canceled from the holds tab found on the left of the bibliographic record.
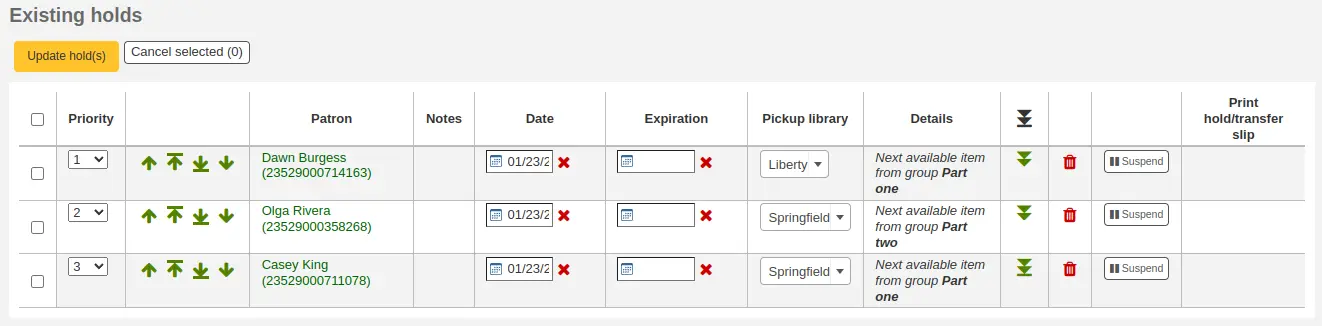
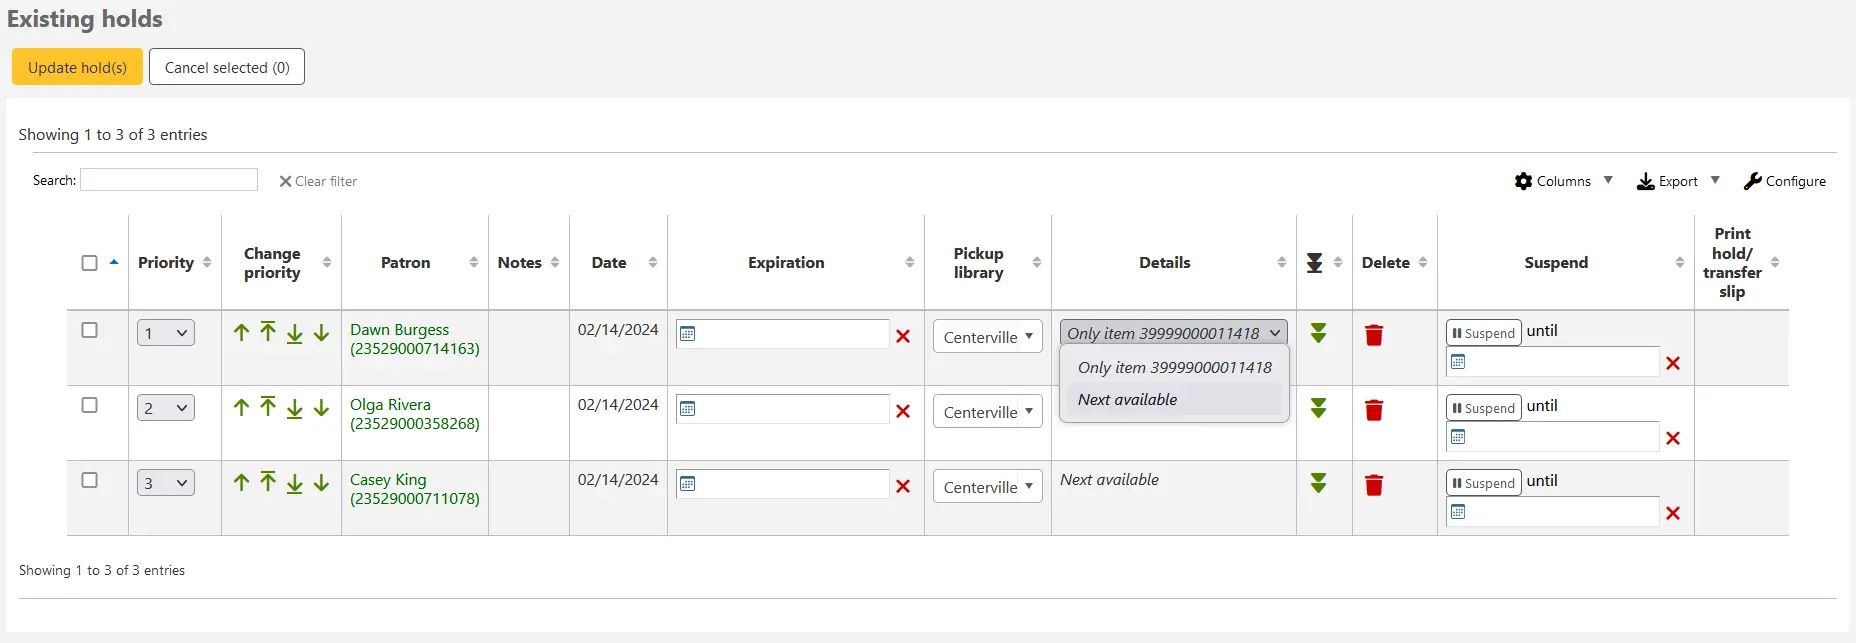
In der Liste der Vormerkungen können Sie die Reihenfolge der Vormerkungen oder die Abholbibliothek ändern, und festlegen, ob die Vormerkung auf ein bestimmtes Exemplar oder das nächste verfügbare Exemplar vorgenommen wird, sowie Vormerkungen aussetzen oder stornieren.
Bemerkung
Wenn der Systemparameter HoldsSplitQueue verwendet wird, wird die Liste der Vormerkungen in mehrere Tabellen nach Abholbibliothek, Exemplartyp oder beidem aufgeteilt.
Bemerkung
If the AllowHoldDateInFuture system preference is set to „Don’t allow“, you will not have the option to edit the date the hold was placed (the column labeled Date).
Bemerkung
Abhängig davon, wie der Systemparameter HidePatronName konfiguriert ist, werden entweder die Benutzernamen oder die Ausweisnummern in der Benutzerspalte angezeigt.
Die Reihenfolge der Vormerkungen ändern
Bemerkung
Um die Prioritäten von Vormerkungen ändern zu können, müssen die Mitarbeiter*innen über die Berechtigung modify_holds_priority (oder die superlibrarian-Berechtigung) verfügen.
Um Vormerkungen neu zu ordnen, wählen Sie aus der Dropdown-Liste „Priorität“ eine aus oder klicken Sie auf die Pfeile rechts neben der Prioritätsliste.
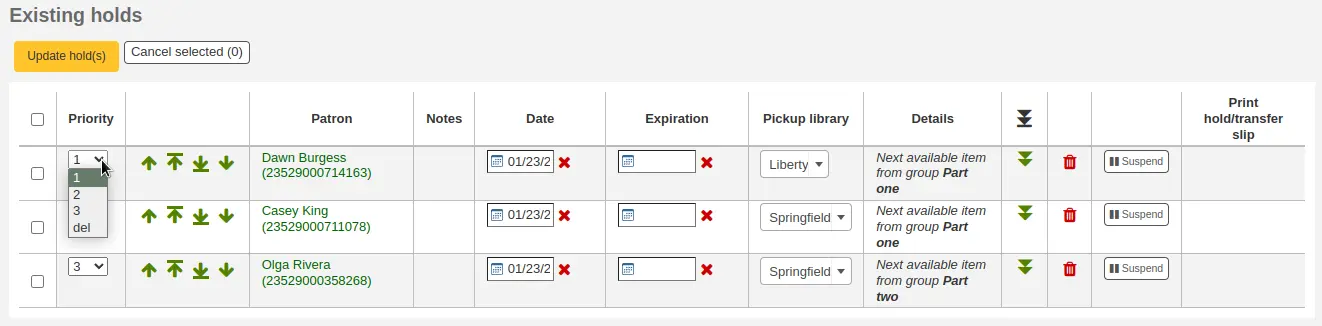
Warnung
Wenn Sie den Pfeil nach unten auf der rechten Seite der Vormerkung anklicken, wird die Vormerkung an die letzte Stelle der Warteliste verschoben und bleibt auch dann auf dieser Position, wenn weitere Vormerkungen auf den Titel gesetzt werden.
Beispiel: Ihre Bibliothek leiht Bücher an hausgebundene Benutzer*innen für mehrere Monate aus. Es ist nicht ganz gerecht gegenüber den anderen Benutzer*innen, wenn diese Benutzer*innen sehr aktuelle Literatur über mehrere Monate behalten könnten. Aus diesem Grund kann eine Vormerkung in diesem Fall dauerhaft an die letzte Position der Liste gesetzt werden, so dass zunächst alle anderen Benutzer*innen das Buch entleihen können.
In der Liste der vorhandenen Vormerkungen sind die Vormerkungen mit der niedrigsten Priorität durch einen Doppelpfeil nach unten und eine Linie darunter gekennzeichnet.
Wenn Sie erneut auf den Doppelpfeil klicken, wird die Vormerkung wieder in die reguläre Priorität zurückgesetzt, und zwar an letzter Stelle.
Die Ebene einer Vormerkung ändern
Version
Diese Funktion wurde in Koha-Version 23.11 hinzugefügt.
Manchmal kann es erforderlich sein, eine Vormerkung für ein bestimmtes Exemplar (so genannte Exemplar-Vormerkung) in eine Vormerkung umzuwandeln, die sich nicht auf ein bestimmtes Exemplar bezieht und erfüllt wird, sobald das nächste Exemplar zurückgegeben wird (oft als Datensatz-Vormerkung bezeichnet). Um die Ebene einer Vormerkung zu ändern, treffen Sie eine Auswahl aus dem Dropdown-Menü „Details“ und bestätigen die Änderung durch Klicken auf die Schaltfläche „Vormerkung(en) aktualisieren“ oben.
Vormerkungen aussetzen
Wenn ein*e Benutzer*in darum bittet, dass seine Vormerkung ausgesetzt wird und der Systemparameter SuspendHoldsIntranet auf „Zulassen“ gesetzt ist, können Sie dies tun, indem Sie auf die Schaltfläche „Aussetzen“ ganz rechts klicken.
Wenn der/die Benutzer*in Ihnen ein Datum für die Wiederaufnahme der Vormerkung angibt, können Sie dieses Datum in das Feld eintragen und auf die Schaltfläche „Vormerkung(n) aktualisieren“ klicken, um Ihre Änderungen zu speichern.
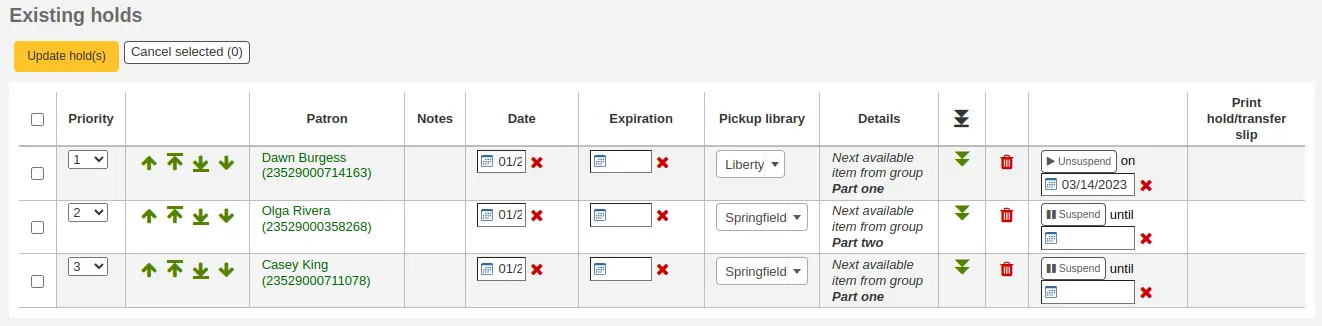
Bemerkung
Wenn der Systemparameter AutoResumeSuspendedHolds auf „Erlaube nicht“ gesetzt ist, kann kein Datum für die Reaktivierung der Vormerkung angegeben werden.
Bemerkung
Der Cron-Job auto_unsuspend_holds.pl wird benötigt, um ausgesetzte Vormerkungen automatisch wieder aufzunehmen.
Sie können die Aussetzung von Vormerkungen auch manuell aufheben, indem Sie auf die Schaltfläche „Aussetzung aufheben“ klicken.
Wenn der Systemparameter SuspendHoldsOpac auf „Zulassen“ gesetzt ist, können Benutzer*innen ihre eigenen Vormerkungen von ihrem Online-Konto aus aussetzen und wieder aufnehmen.
Vormerkungen löschen
Um eine Vormerkung zu löschen oder abzubrechen, klicken Sie auf den roten Mülleimer rechts neben der Vormerkungszeile.
Um mehrere Vormerkungen zu löschen oder zu stornieren, können Sie aus dem Dropdown-Menü links neben jeder Zeile „Löschen“ auswählen und dann unten in der Liste auf „Vormerkung(e) aktualisieren“ klicken.
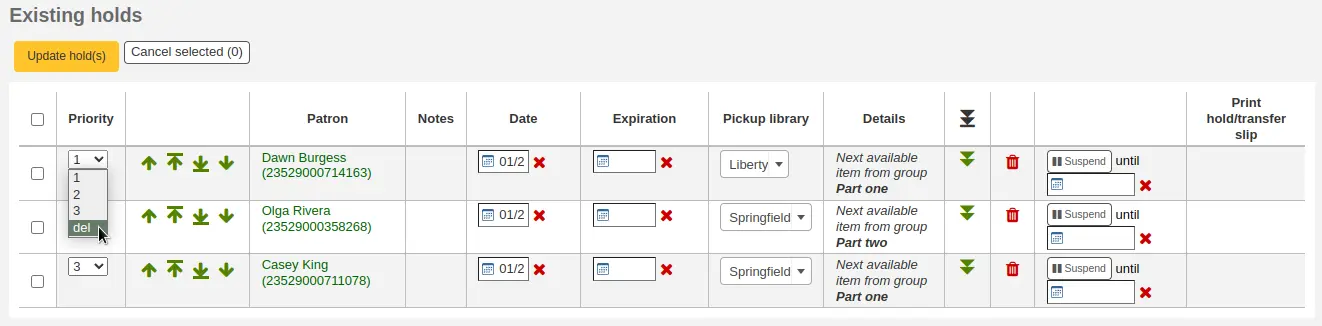
Alternatively, you can select the holds to be canceled and click the ‚Cancel selected‘ button.
Vormerkungen verbuchen
Wenn ein vorgemerktes Exemplar zurückgebucht oder ausgeliehen wird, wird das System das Bibliothekspersonal darauf aufmerksam machen, dass das Exemplar vorgemerkt ist, und Optionen für den Umgang mit der Vormerkung anzeigen.
Wenn Sie ein Exemplar zurückbuchen, das an einem anderen Standort vorgemerkt wurde, haben Sie die Möglichkeit die Vormerkung zu bestätigen und in den Transportstatus zu versetzen
oder die Vormerkung lediglich zu bestätigen

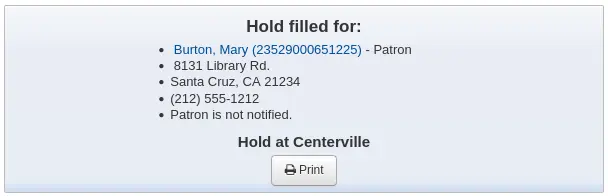
Wenn das Exemplar transferiert werden muss, klicken Sie auf „Bestätigen und transferieren“ oder „Quittung drucken, transferieren und bestätigen“, um das Exemplar als im Transfer an die richtige Bibliothek zu kennzeichnen.
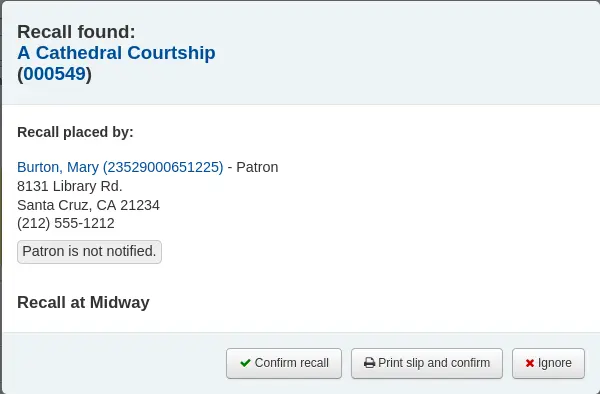
Befindet sich das Medium bereits in der Abholbibliothek, wird es durch Anklicken der Schaltfläche „Bestätigen“ oder „Quittung drucken und bestätigen“ als abholbereit für den/die Benutzer*in markiert.
Wenn Sie auf „Ignorieren“ klicken, bleibt die Vormerkung bestehen, aber Sie können das Exemplar an eine*n andere*n Benutzer*in ausleihen oder den Status des Exemplars ändern (wenn es z. B. beschädigt zurückgegeben wurde).
Mit den Optionen „Quittung drucken und bestätigen“ oder „Quittung drucken, transferieren und bestätigen“ wird eine druckbare Seite geöffnet, die Sie mit den erforderlichen Vormerkungs- oder Transferinformationen an das Exemplar anhängen können.
Bemerkung
Die Quittung, die gedruckt wird, ist die Quittung HOLD_SLIP. Sie kann mit dem Werkzeug Benachrichtigungen und Quittungen geändert werden.
Wenn die Vormerkung bestätigt wird, wird die Mitteilung „Vormerkung erfüllt“ an den/die Benutzer*in gesendet, wenn der/die Benutzer*in benachrichtigt wird.
Bemerkung
Die Benachrichtigung, die gesendet wird, ist die Benachrichtigung HOLD. Sie kann mit dem Werkzeug Benachrichtigungen und Quittungen geändert werden.
Bemerkung
Wenn der Systemparameter HoldsAutoFill aktiviert ist, muss das Ausleihpersonal die Vormerkung nicht bestätigen, sondern hat die Möglichkeit, die Vormerkungs- oder Transferquittung auszudrucken.
Wenn der Systemparameter HoldsAutoFillPrintSlip aktiviert ist, öffnet sich das Druckfenster zum Drucken der Vormerkungs- oder Transferquittung automatisch.
Once confirmed, the hold will show as ‚waiting‘ on the patron record and on the checkout screen under the ‚Holds‘ tab.
Im Exemplardatensatz wird die Vormerkung angezeigt.

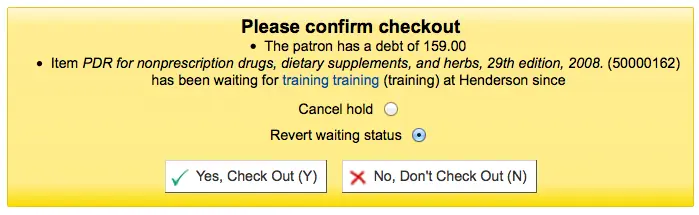
In some cases, a patron may come in to pick up a hold on behalf of someone else. In this case, make sure that the hold is canceled when you check the item out to someone else. Alternatively, a check out might be attempted in error for an item that is already waiting for someone else. In this case you will be presented with a warning message.
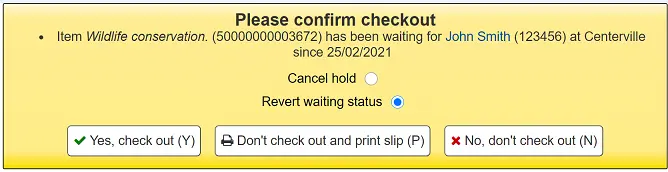
Vormerkung aufheben: In Kombination mit „Ja, ausleihen“ hebt diese Option die aktuelle Vormerkung auf und gibt das Exemplar an den/die neue*n Benutzer*in aus.
Wartestatus umkehren: In Kombination mit „Ja, ausleihen“ kehrt diese Option den Wartestatus des Exemplars um (der/die Benutzer*in, der/die das Exemplar vorgemerkt hat, steht wieder an erster Stelle in der Warteschlange) und leiht das Exemplar an den/die neue*n Benutzer*in aus.
Ja, ausleihen: Diese Option leiht das Exemplar an den/die aktuelle*n Benutzer*in aus.
Don’t check out and print slip: this option will open the print window to print the hold slip, the check out will be canceled and the hold will remain.
Nein, nicht ausleihen: Diese Option bricht die Ausleihe ab, die Vormerkung bleibt bestehen.
If you check in an item that is already waiting to be picked up, a pop up indicating that a hold was found and the item is already waiting will appear. In addition to this, there is an option to allow staff to cancel the hold and choose a hold cancellation reason.
Bemerkung
Die Gründe für die Stornierung von Vormerkungen sind mit der Kategorie HOLD_CANCELLATION der Normierten Werte verbunden.
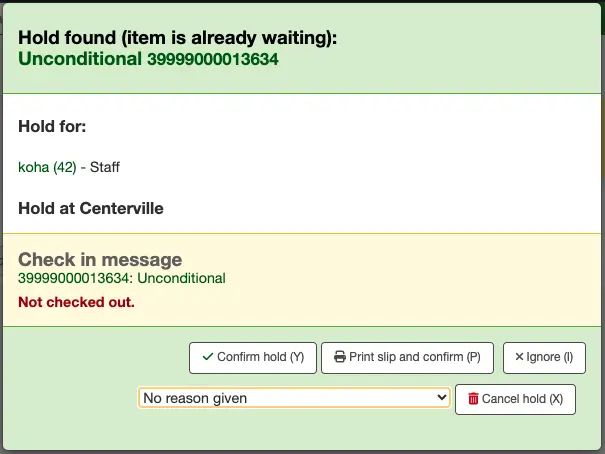
Vormerkung bestätigen: Die Option behält die bestehende Vormerkung bei.
Quittung drucken und bestätigen: Mit dieser Option wird das Druckfenster geöffnet, um die Vormerkungsquittung zu drucken und die bestehende Vormerkung beizubehalten.
Vormerkung stornieren: Diese Option entfernt die Vormerkung.
Wenn Sie die Vormerkung stornieren und weitere Vormerkungen für das Exemplar existieren, erhalten Sie eine weitere Option, um das Exemplar für den/die nächste*n Benutzer*in bereitzustellen.
A reason can be allocated to the cancellation of the hold. A notice can be sent to the patron explaining why this hold was canceled.
Warnung
Wenn Sie eine Benachrichtigung mit dem Stodnierungsgrund senden möchten, müssen Sie eine neue Benachrichtigung hinzufügen, mit dem Code „HOLD_CANCELLATION“, wenn Sie noch keine haben.
Buchungen
Version
Diese Funktion wurde erstmals in Version 23.11 von Koha eingeführt.
Eine „Buchung“ in Koha ist eine weitere Möglichkeit, ein Exemplar zu reservieren.
Eine Vormerkung ist eine Reservierung, die auf eine Warteliste gesetzt wird und erfüllt wird, sobald das Exemplar verfügbar ist. Das Exemplar wird für den Zeitraum ausgeliehen, der in den Ausleih- und Gebührenregeln für diese Bibliothek, diesen Benutzer- und diesen Exemplartyp festgelegt ist.
Eine Buchung ist eine Vorausbuchung, die für die angegebenen Daten vorgenommen wird. Der Buchungszeitraum wird zum Ausleihzeitraum.
Buchungen können besonders für Artikel wie Modelle, Geschichtensäcke, Memory-Boxen usw. nützlich sein, die für Veranstaltungen und Programme zu bestimmten Terminen verwendet werden.
Bemerkung
Enable the bookings feature using the EnableBookings system preference.
Mitarbeiter*innen müssen über die Berechtigung manage_bookings (oder die superlibrarian-Berechtigung) verfügen, um Buchungen vornehmen und verwalten zu können.
Exemplare buchbar machen
Bevor Exemplare gebucht werden können, müssen sie als „buchbar“ eingestuft werden.
Exemplare können einzeln buchbar gemacht werden:
Gehen Sie im bibliografischen Datensatz auf den Reiter „Exemplare“ und blättern Sie nach unten zum Bereich „Priorität“ des betreffenden Exemplars.
Setzen Sie „Buchbar“ auf „Ja“, um as Exemplar buchbar zu machen.

Alternativ können Sie alle Exemplare eines Exemplartyps buchbar machen, indem Sie die Parameter für Exemplartypen verwenden.
Version
Die Option „buchbar“ für Exemplartypen wurde erstmals in Version 24.11 von Koha eingeführt.
Um zu vermeiden, dass es bei beliebten Exemplaren zu Überschneidungen kommt, empfiehlt es sich, den für buchbare Exemplare verwendeten Exemplartyp als nicht vormerkbar zu hinterlegen.
Bemerkung
Buchbare Exemplare können auch ohne vorherige Reservierung ausgegeben werden, gemäß den Ausleihregeln für die Bibliothek, die Benutzer- und den Exemplartyp.
Eine Buchung vornehmen
Buchungen können nur in der Dienstoberfläche und nur für als buchbar hinterlegte Exemplare vorgenommen werden.
Wenn mindestens eines der Exemplare in einem bibliografischen Datensatz buchbar ist, wird die Schaltfläche „Buchung vornehmen“ über der Datensatzansicht angezeigt.
Um eine Buchung vorzunehmen, klicken Sie auf die Schaltfläche „Buchung vornehmen“. Dies öffnet das Buchungsformular.
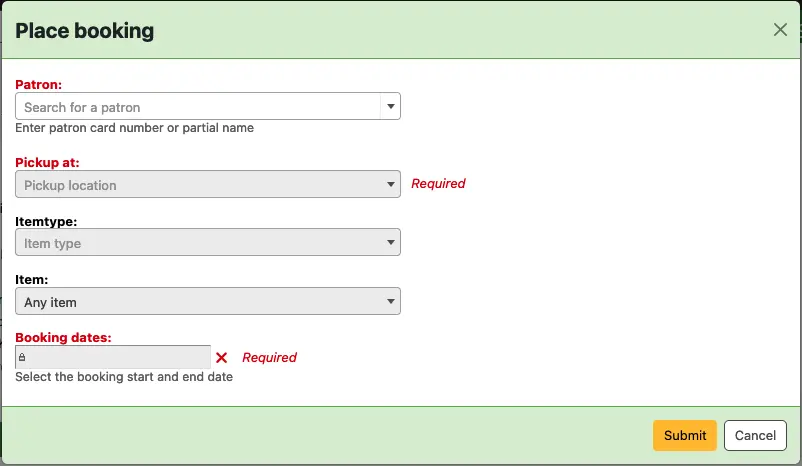
Benutzer: Geben Sie die Ausweisnummer ein oder beginnen Sie mit der Eingabe des Namens des Benutzers, für den diese Buchung bestimmt ist.
Abholung in: Wählen Sie die Bibliothek, in welcher der/die Benutzer*in das Exemplar abholen wird.
Version
Diese Option wurde erstmals in Version 24.05 von Koha eingeführt.
Exemplartyp: Wählen Sie optional aus, für welchen Exemplartyp die Buchung gelten soll. Dies ist nützlich, wenn Sie Exemplare verschiedener Typen im selben Datensatz haben, für die jeweils unterschiedliche Ausleihregeln gelten.
Version
Diese Option wurde erstmals in Version 24.11 von Koha eingeführt.
Exemplar: Wählen Sie optional aus, ob die Buchung von jedem Exemplar oder nur von dem Exemplar, dessen Barcode Sie auswählen, erfüllt werden kann.
Bemerkung
Obwohl diese Optionen optional sind, muss entweder ein Exemplartyp oder ein bestimmtes Exemplar ausgewählt werden, um die Auswahl der Buchungsdaten freizugeben.
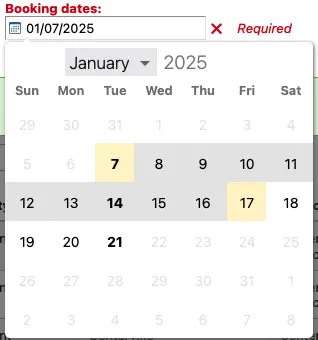
Buchungsdaten: Klicken Sie auf ein Datum im Kalender, um es zum Startdatum der Buchung zu machen; klicken Sie auf ein anderes Datum, um das Enddatum der Buchung festzulegen. Verwenden Sie die Kreuzschaltfläche rechts neben dem Eingabefeld, um die Daten zu löschen und neu zu beginnen.
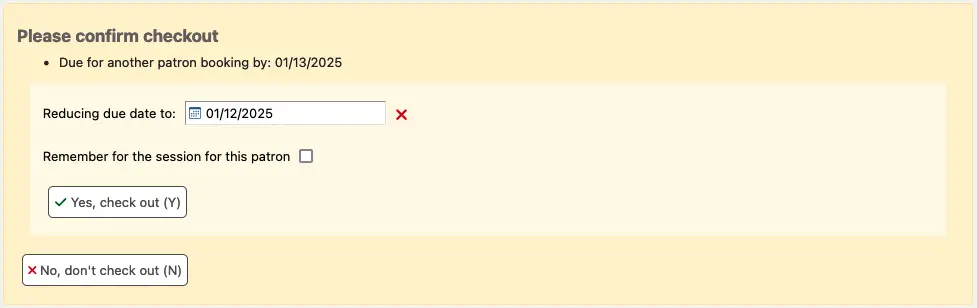
Buchungen für dasselbe Exemplar können sich nicht überschneiden.
Dates for which there are existing bookings are marked on the calendar by blue dots.
Version
Diese Funktion wurde erstmals in Version 24.05 von Koha eingeführt.
You can set pre-processing and post-processing days in the Default holds and bookings policies by item type. These will appear on the calendar with a red background and an orange background respectively. They prevent bookings on the same item from being made too close to one another.
Version
Dieses Feature kam in Koha-Version 24.11 hinzu.
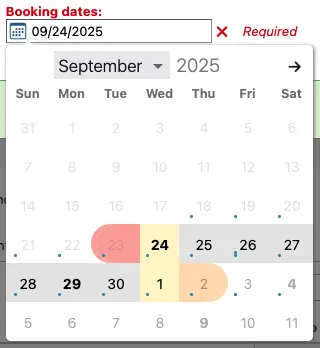
Die Buchung darf die maximale Leihfrist für den betreffenden Medien-, den Benutzertyp und die Bibliothek nicht überschreiten, die in den Ausleihregeln festgelegt ist. Sobald das Datum des Buchungsbeginns ausgewählt ist, werden alle Daten, die über die maximale Leihfrist hinausgehen, ausgegraut und können nicht ausgewählt werden.
Bemerkung
Die maximale Leihdauer wird wie folgt berechnet: Leihdauer + (Verlängerungsdauer * maximale Anzahl von Verlängerungen).
Daten, die dem Ende der ersten Leihfrist und den Verlängerungsfristen entsprechen, sind fett hervorgehoben.
Version
Dieses Feature kam in Koha-Version 24.11 hinzu.
Placing a booking triggers the BOOKING_CONFIRMATION notice. This notice is sent to the patron to inform them of their new booking’s details. The notice can be edited in the Notices and slips tool.
Version
The BOOKING_CONFIRMATION notice was first introduced in version 24.11 of Koha.
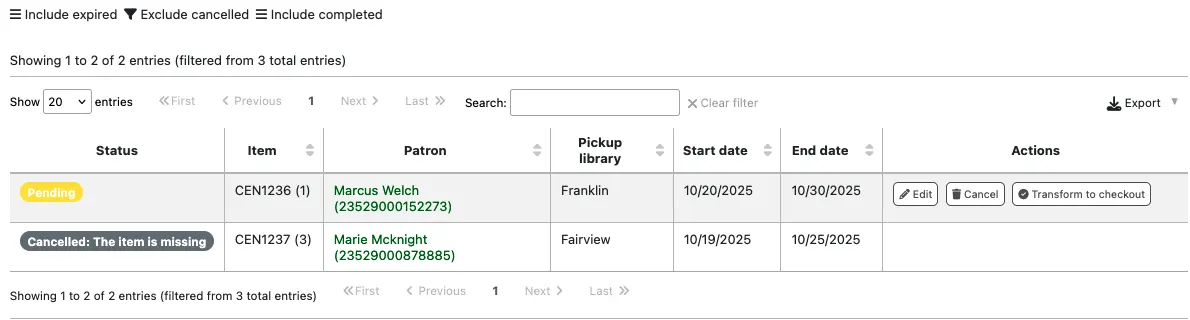
Buchungen verwalten
A list of all upcoming bookings can be viewed using the Bookings to collect report in the Circulation module.
Individual bookings can be viewed, altered and canceled from the Bookings link in the left-hand menu of the bibliographic record.
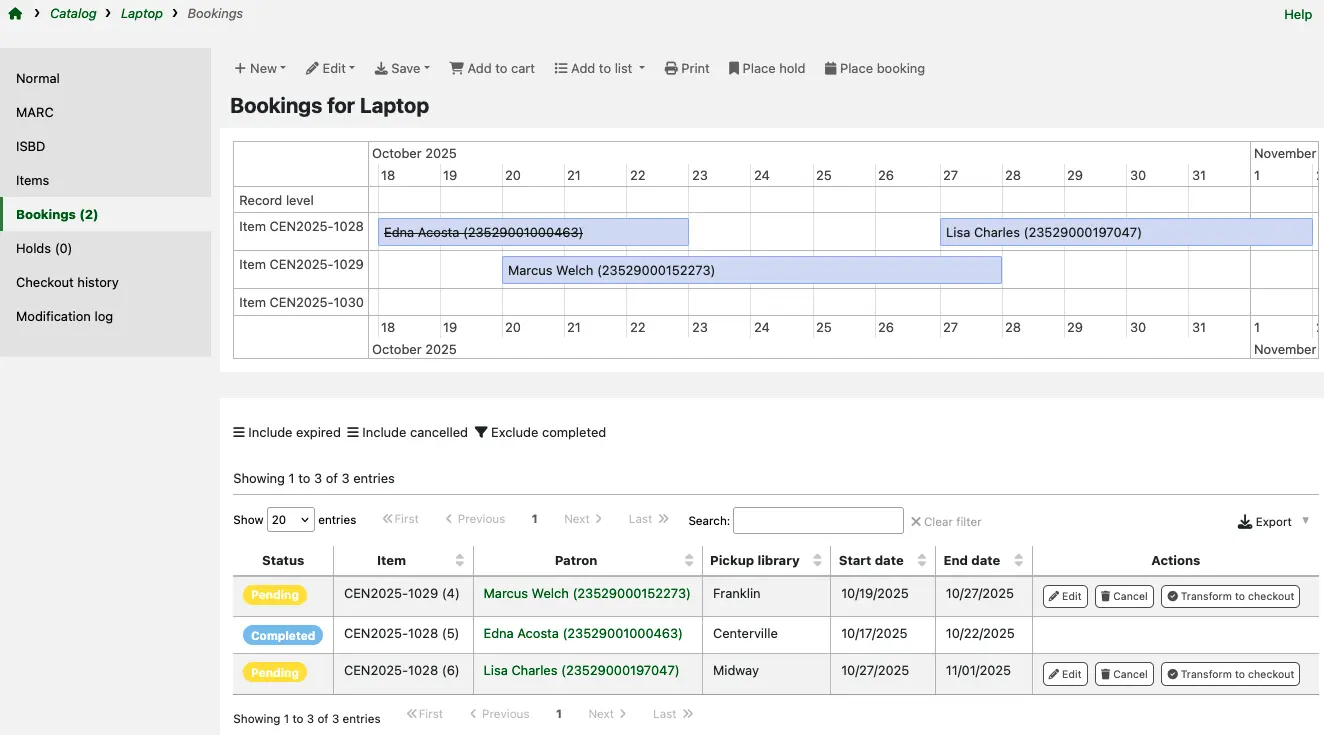
Use the buttons above the table to display expired, canceled and completed bookings.
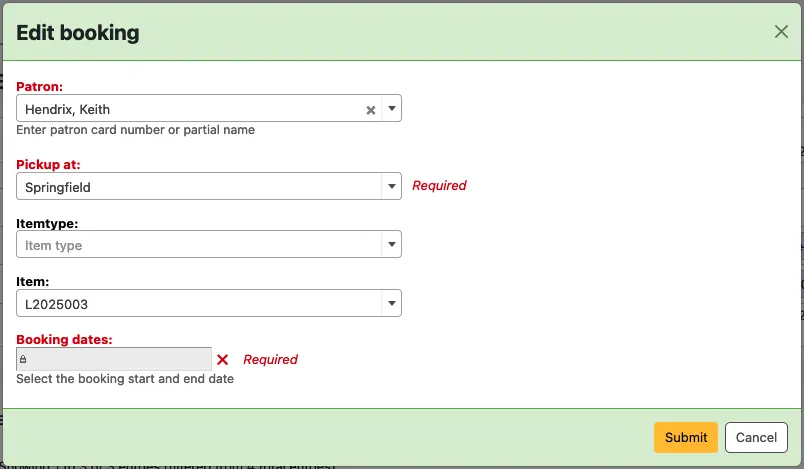
Eine Buchung bearbeiten
Klicken Sie in der Liste der Buchungen auf die Schaltfläche „Bearbeiten“ für die Buchung, die Sie ändern möchten. Dies öffnet ein Fenster mit den gleichen Optionen, die Sie haben, wenn Sie eine Buchung vornehmen.
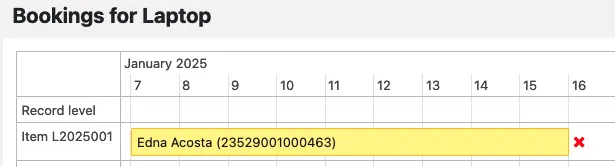
Sie können die Daten einer Buchung auch in der Kalenderansicht über der Liste der Buchungen bearbeiten.
Klicken Sie auf den Platzhalter einer Buchung; er wird gelb und der Mauszeiger ändert sich in vier Pfeile.
Ziehen Sie die Buchung per Drag & Drop auf Ihre neuen Wunschtermine.
Amending a booking’s pickup library, start date or end date triggers the BOOKING_MODIFICATION notice. This notice is sent to the patron to inform them of the booking’s updated details. The notice can be edited in the Notices and slips tool.
Version
The BOOKING_MODIFICATION notice was first introduced in version 24.11 of Koha.
Eine Buchung stornieren
Klicken Sie in der Kalenderansicht auf den Platzhalter einer Buchung. Wenn er gelb wird, verwenden Sie das rote Kreuzsymbol rechts daneben.
Klicken Sie in der Liste der Buchungen auf die Schaltfläche „Stornieren“ bei der Buchung, die Sie ändern möchten.
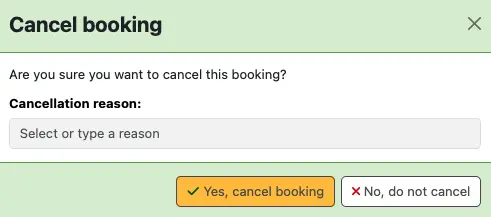
On the ‚Cancel booking‘ modal, you can optionally type a cancellation reason or select one from the dropdown menu.
Version
Cancellation reasons were first introduced in version 24.11 of Koha.
Bemerkung
Values for the dropdown menu are managed in the BOOKING_CANCELLATION authorized value category.
After confirmation, the canceled booking will be hidden from both the calendar and the list of bookings. Use the ‚Include cancelled‘ filter above the table to see those bookings in the list.
Canceling a booking triggers the BOOKING_CANCELLATION notice. This notice is sent to the patron to inform them their booking has been canceled. The notice can be edited in the Notices and slips tool.
Version
The BOOKING_CANCELLATION notice was first introduced in version 24.11 of Koha.
Gebuchte Exemplare ausleihen
Wenn ein*e Benutzer*in eines seiner/ihrer gebuchten Exemplare abholen möchte, geben Sie es nach dem Standard-Ausleihvorgang aus.
Exemplar ist an eine*n andere*n Benutzer*in ausgeliehen.
Scannen Sie den Barcode des Exemplars oder geben Sie ihn manuell ein und klicken Sie auf „Ausleihen“.
Bemerkung
Das Fälligkeitsdatum des gebuchten Exemplars ist das Enddatum der Buchung.
Wenn der/die Benutzer*in versucht, sein/ihr Exemplar vor dem Startdatum der Buchung abzuholen, wird eine Warnung angezeigt. Sie können entscheiden, ob Sie die vorzeitige Abholung zulassen und das Exemplar ausleihen oder die Ausleihe ablehnen.
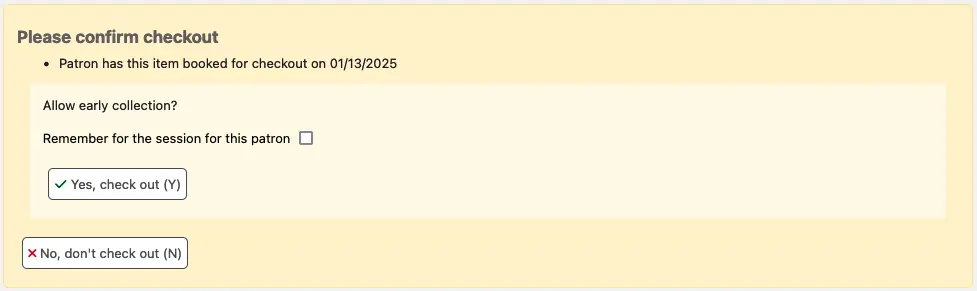
Bemerkung
Im Falle einer vorzeitigen Abholung bleibt das Fälligkeitsdatum das ursprüngliche Buchungsende. Die Leihfrist wird daher länger sein als die ursprüngliche Buchung.
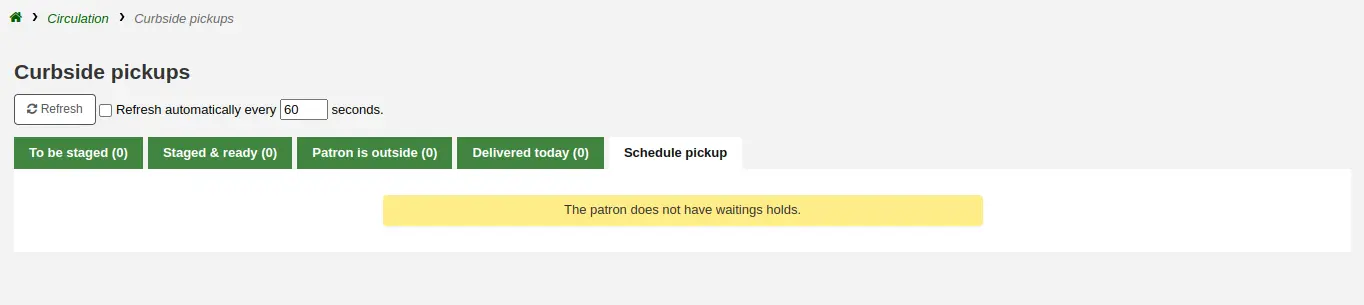
Abholungen
Koha verfügt über ein integriertes Modul für die Abholung, mit dem die Abholung von Vormerkungen durch Benutzer*innen geplant werden kann.
Pfad in Koha: Ausleihe > Abholungen
Im Bereich Konfiguration der Abholung erfahren Sie, wie Sie die Abholung einrichten können.
Bemerkung
Mitarbeiter*innen müssen über die Berechtigung manage_curbside_pickups (oder die superlibrarian-Berechtigung) verfügen, um Abholungen planen und verwalten zu können.
Eine Abholung planen
Pfad in Koha: Ausleihe > Abholungen > Abholung planen
Um eine Abholung zu planen,
Klicken Sie auf den Reiter „Abholung planen“
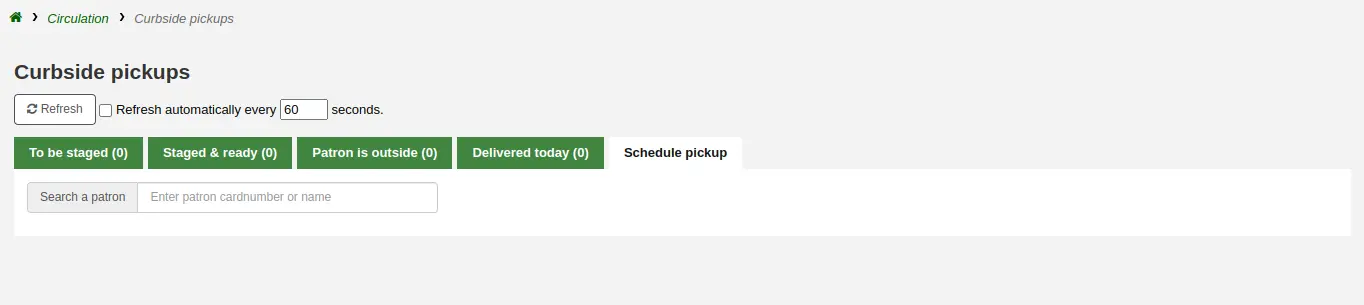
Suchen Sie nach dem Benutzer, für den eine Abholung geplant werden soll, entweder mit seinem Namen oder seiner Ausweisnummer
Warnung
If ‚Enable for waiting holds only‘ is set in the curbside pickup configuration for your library, and the patron has no waiting holds, there will be an error message.
Geben Sie ein Datum für die Abholung ein
Bemerkung
Es werden nur Tage mit verfügbaren Zeitfenstern angezeigt.
Die möglichen Abholzeiten werden abhängig vom Wochentag angezeigt
Bemerkung
The number in parentheses under each time slot is the number of patrons who are currently scheduled for a pickup at that time. If the maximum number of appointments has been reached, based on the ‚Maximum patrons per interval‘ setting in the curbside pickup configuration, the time slot will be displayed in red and you will not be able to select it.
Sie können, falls notwendig, eine Notiz zu dieser Abholung hinzufügen
Klicken Sie auf ‚Bestätigen‘
Alternativ können Sie eine Abholung auch vom Benutzerkonto aus planen.
Klicken Sie oben auf der Detailseite des Benutzers auf „Abholung planen“
Bemerkung
Wenn der/die Benutzer*in die Benachrichtigung „Vormerkung erfüllt“ per E-Mail erhält, wird er auch benachrichtigt, wenn eine Abholung geplant ist.
Sie können die Benachrichtigung anpassen, indem Sie die Vorlage NEW_CURBSIDE_PICKUP im Werkzeug Benachrichtigungen und Quittungen“ bearbeiten.
Abholungen vorbereiten
Pfad in Koha: Ausleihe > Abholungen > Bereitzustellen
Der Reiter „Bereitzustellen“ enthält alle Abholungen, die noch vorbereitet werden müssen.
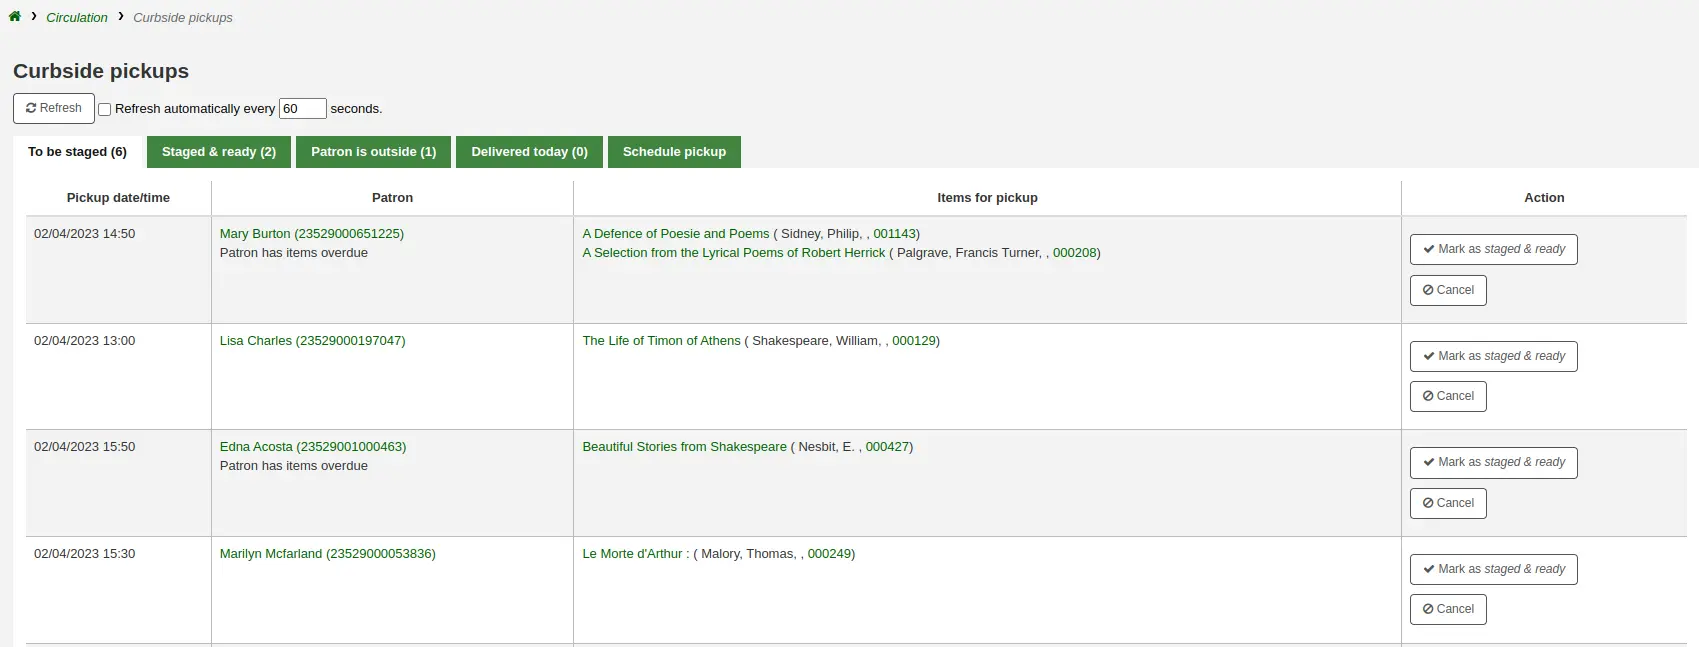
Bemerkung
Wenn der/die Benutzer*in Mahnungen oder Sperren hat, wird dies hier unter seinem/ihrem Namen angezeigt.
Sobald die Exemplare vorbereitet und abholbereit sind, klicken Sie auf „Als bereitgestellt und bereit markieren“. Dadurch wird der geplante Abholtermin im Reiter „Bereitgestellt & bereit“ übertragen.
Bemerkung
There is no need to checkout the item or items to the patron at this point. When delivering curbside pickups, the module will automatically check the items out.
Sie haben die Möglichkeit, die Liste manuell zu aktualisieren, indem Sie auf die Schaltfläche „Aktualisieren“ klicken. Sie können Ihre Sitzung auch so einrichten, dass sie alle X Sekunden aktualisiert wird. Markieren Sie die Checkbox neben „Alle X Sekunden automatisch aktualisieren“ und geben Sie die Anzahl der Sekunden ein.
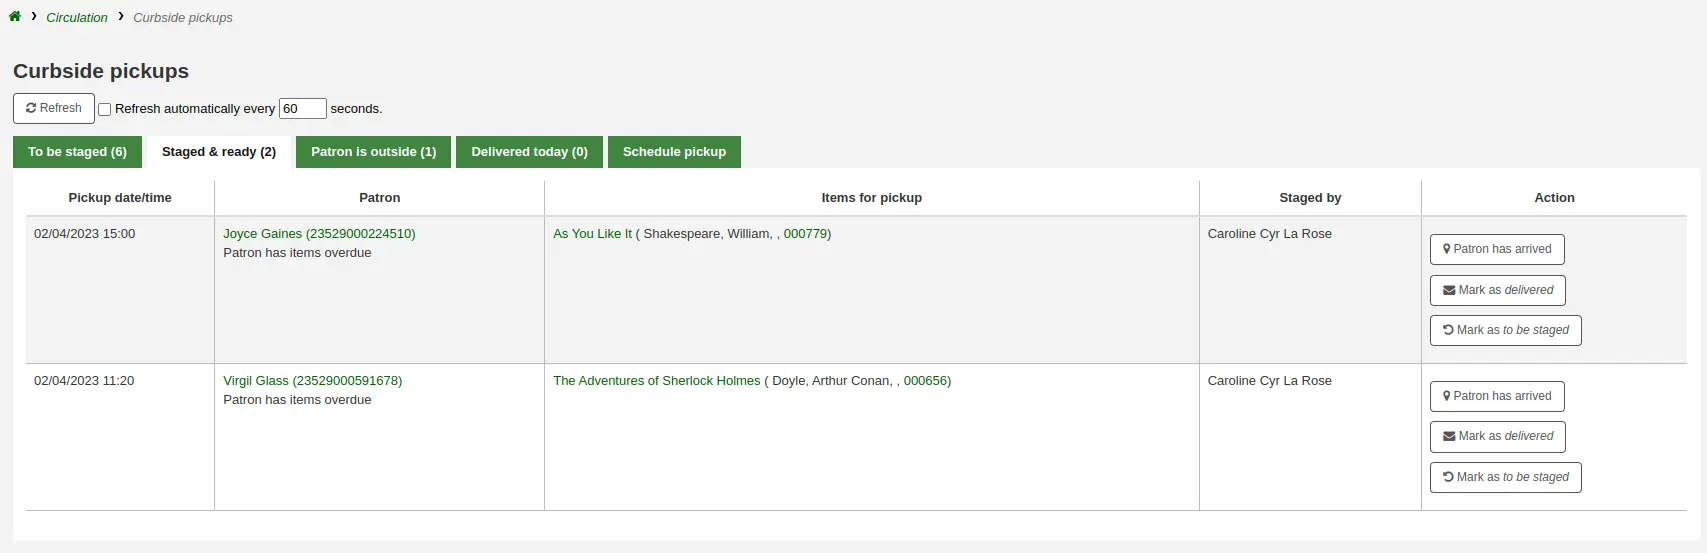
Lieferung von Abholungen
Pfad in Koha: Ausleihe > Abholungen > Benutzer wartet außen
Über den OPAC kann der/die Benutzer*in melden, dass er/sie draußen ist. Das Bibliothekspersonal kann auch anzeigen, dass der bzw. die Benutzer*in angekommen ist, indem es auf die Schaltfläche „Benutzer ist angekommen“ im Reiter „Bereitgestellt & bereit“ klickt.
Treffen Sie sich zur angegebenen Zeit mit dem/der Benutzer*in, um ihm die Exemplare zu übergeben. Klicken Sie dann auf „Als zugestellt markieren“. Dadurch werden die Exemplare an den/die Benutzer*in ausgeliehen und der Termin für die Abholung wird im Reiter „Heute zugestellt“ übertragen.
Canceling curbside pickups
Pfad in Koha: Ausleihe > Abholungen > Bereitzustellen
Wenn Sie aus irgendeinem Grund einen Termin für die Abholung stornieren müssen, klicken Sie im Reiter „Bereitzustellen“ auf die Schaltfläche „Stornieren“.
Wenn der Termin bereits über den Status „Bereitzustellen“ hinausgegangen ist, klicken Sie auf „Als Bereitzustellen markieren“, um den Termin zu stornieren.
Rückrufe
Mit der Rückruf-Funktion können Benutzer*innen Exemplare zurückrufen, die gerade ausgeliehen sind. Sobald die Rückrufaktion bestätigt ist, wird der/die Entleiher*in, der/die das Exemplar derzeit ausgeliehen hat, benachrichtigt, dass sein/ihr Fälligkeitsdatum angepasst wurde und er/sie das Exemplar zurückgeben muss. Sobald die zurückgerufenen Medien zurückgegeben wurden, wird der/die Rückrufer*in benachrichtigt, dass sein/ihr Medium zur Abholung an dem von ihm/ihr angegebenen Ort bereitsteht.
See the requesting recalls section to learn how to place a recall in the OPAC.
Rückrufe in Koha einrichten
Um diese Funktion zu nutzen:
Aktivieren Sie den Systemparameter UseRecalls
Legen Sie den Systemparameter RecallsMaxPickUpDelay fest
Aktivieren Sie optional den Systemparameter RecallsLog
Modify the following sections in the relevant circulation rules
Zulässige Rückrufe (Anzahl)
Rückrufe pro Datensatz (Anzahl)
Zulässige Rückrufe aus dem Regal
Fälligkeitsintervall des Rückrufs (Tag)
Rückruf von Mahngebühren
Abholfrist für den Rückruf
Vergewissern Sie sich, dass alle Mitarbeiter*innen, die Rückrufe verwalten sollen, die Berechtigung manage_recalls haben (oder die superlibrarian-Berechtigung).
Schedule the recalls cronjobs
Review the recalls notices and slips to make sure they have all the information needed
Rückrufe verwalten
Die Rückruf-Funktion ist relativ automatisch. Das Bibliothekspersonal muss nicht viel tun, um Rückrufe zu verwalten.
Bemerkung
Nur Bibliothekspersonal mit der Berechtigung manage_recalls (oder der superlibrarian-Berechtigung) kann auf die Rückrufverwaltung zugreifen.
Rückrufstatus
Folgende Status sind für Rückrufe möglich:
Angefordert
Es wurde ein neuer Rückruf angefordert, und das Exemplar muss von dem/der Benutzer*in zurückgegeben werden, der/die es derzeit hat
Angeforderte Rückrufe erscheinen in
the recalls queue
der Liste der zu ziehenden Rückrufe falls ein verfügbares Exemplar den Rückruf erfüllt
dem Reiter „Rückrufe“ im bibliographischen Datensatz
the ‚Recalls‘ tab of the patron’s file (and its equivalent in the OPAC)
the ‚Recalls history‘ tab of a patron’s file (and its equivalent in the OPAC)
Wartend
Ein zurückgerufenes Exemplar wartet auf die Abholung in der vom Antragsteller gewählten Zweigstelle
Wartende Rückrufe erscheinen in
Im Transport
Ein Exemplar wurde einem Rückruf zugewiesen und befindet sich auf dem Weg zu der vom Anforderer gewählten Abholbibliothek
Rückrufe, die sich im Transfer befinden, erscheinen in
Überfällig
Ein zurückgerufenes Exemplar ist überfällig und muss von dem/der Benutzer*in zurückgegeben werden, der es gerade hat
Überfällige Rückrufe erscheinen in
Erfüllt
Ein zurückgerufenes Exemplar wurde an den Anforderer des Rückrufs ausgeliehen, und der Rückruf ist abgeschlossen
Erfüllte Rückrufe erscheinen in
Abgelaufen
Der Rückruf wurde nicht vor einem bestimmten Ablaufdatum abgeschlossen oder der Rückrufanforderer hat seinen wartenden Rückruf nicht innerhalb der in RecallsMaxPickUpDelay definierten Abholfrist abgeholt
Abgelaufene Rückrufe erscheinen in
Storniert
The recall request was canceled.
Canceled recalls appear in
Erhalt zurückgerufener Exemplare
Upon checkin in an item that has been recalled, a pop up will appear asking the staff member to confirm or ignore the recall.
Rückruf bestätigen: Mit dieser Option wird der Rückruf in den Status „wartend“ versetzt und, falls der/die Benutzer*in eine E-Mail-Adresse in seiner/ihrer Benutzerdatei hat, wird er/sie benachrichtigt, dass sein/ihr zurückgerufenes Exemplar nun zur Abholung bereit steht.
Bemerkung
The notice sent is PICKUP_RECALLED_ITEM. You can modify it’s content in the notices and slips tool
Quittung drucken und bestätigen: Mit dieser Option wird eine Quittung gedruckt, die Sie an das Exemplar anhängen können (ähnlich wie eine Vormerkungsquittung), zusätzlich zu allem, was der „Rückruf bestätigen“ tut (den Status ändern und die Benachrichtigung senden).
Bemerkung
The slip is RECALL_REQUESTER_DET. You can modify it’s content in the notices and slips tool
Ignorieren: Mit dieser Option wird das Exemplar zurückgebucht, aber der Rückruf wird nicht als zur Abholung anstehend gekennzeichnet und der/die Benutzer*in wird nicht benachrichtigt.
If the patron asked to pick up their recalled item at a different library, a transfer will be triggered.
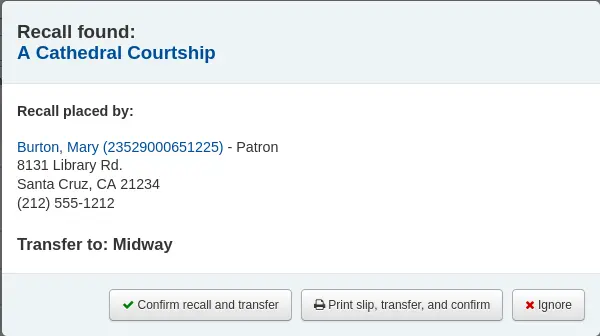
Rückruf und Transfer bestätigen: Mit dieser Option wird der Rückruf auf „In Transfer“ gesetzt.
Quittung drucken, transferieren und bestätigen: Mit dieser Option wird eine Quittung gedruckt, die Sie an das Exemplar anhängen können (ähnlich wie eine Vormerkungsquittung), und der Rückruf wird als „In Transfer“ gekennzeichnet.
Ignorieren: Mit dieser Option wird das Exemplar zurückgebucht, aber der Rückruf wird nicht als „Im Transfer“ gekennzeichnet
Bemerkung
Bei keiner der oben genannten Optionen wird der/die Benutzer*in benachrichtigt, dass sein/ihr Rückruf für ihn/sie bereit ist.
Canceling recalls
Bemerkung
Only requested or overdue recalls can be canceled.
Es ist nicht möglich, einen Rückruf, der derzeit auf Abholung wartet, zu stornieren
Das Bibliothekspersonal kann Rückrufe von verschiedenen Bildschirmen der Dienstoberfläche aus stornieren.
Cancel from the recalls queue either individually by clicking the ‚Actions‘ button and selecting the ‚Cancel‘ option.
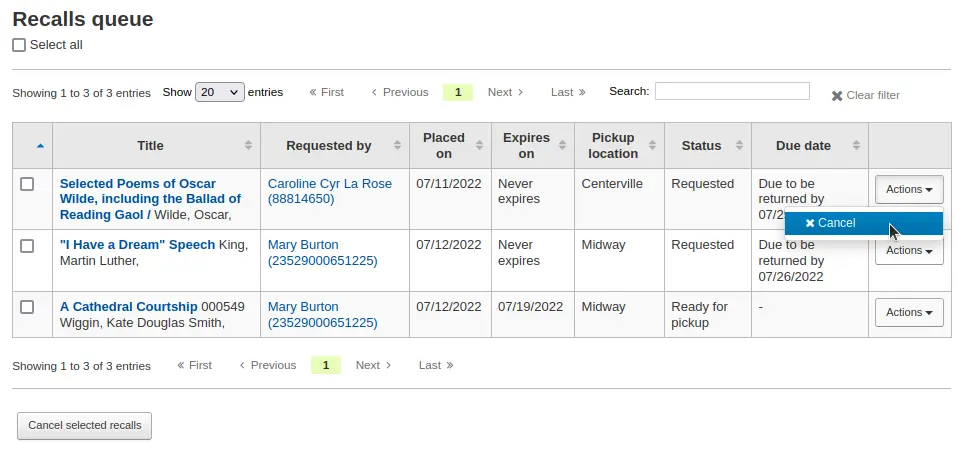
Oder Sie wählen mehrere Rückrufe aus und klicken auf die Schaltfläche „Ausgewählte Rückrufe stornieren“ am unteren Rand des Bildschirms.
Wenn sich das zurückgerufene Exemplar gerade im Transfer befindet, wird mit der Option „Stornieren“ auch ein Transfer zurück in die Heimatbibliothek des Exemplars ausgelöst.
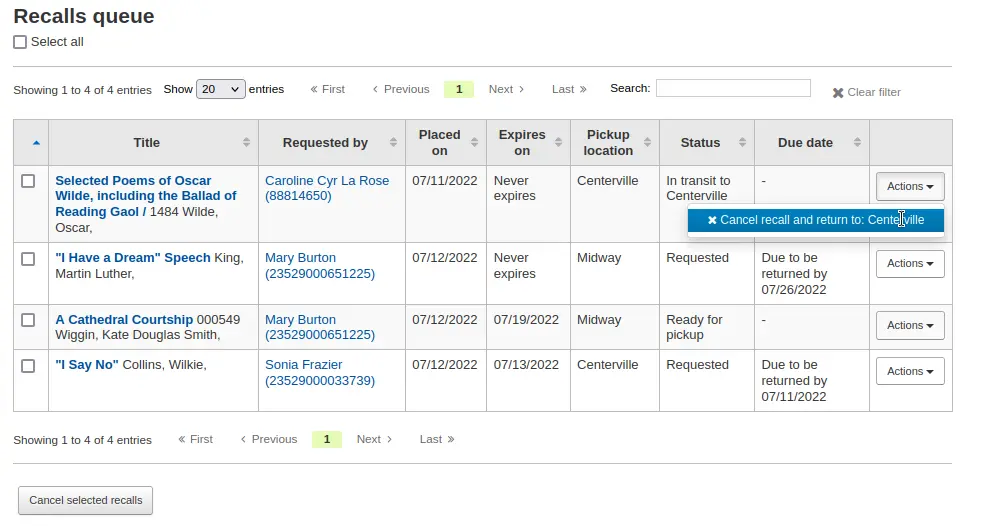
Cancel from the recalls to pull by clicking the ‚Cancel recall‘ button on the right
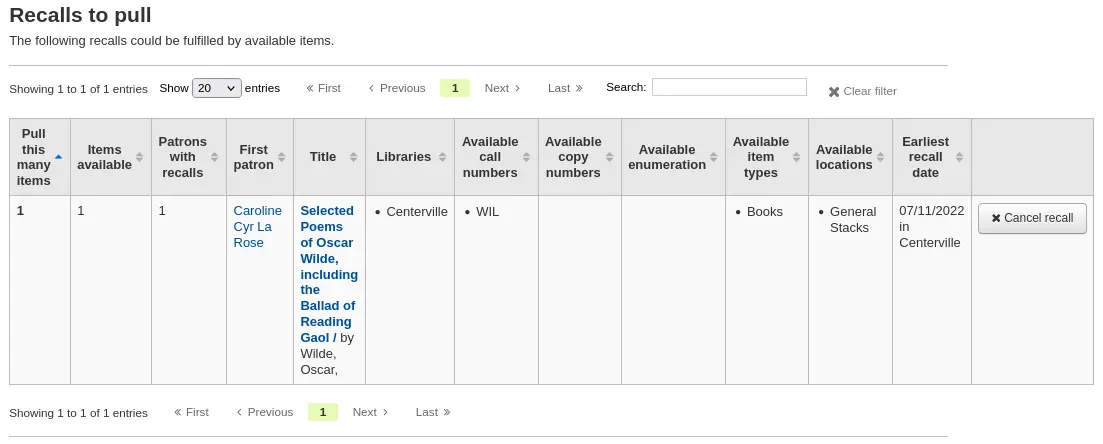
Wenn sich das zurückgerufene Exemplar gerade im Transfer befindet, wird mit der Option „Stornieren“ auch ein Transfer zurück in die Heimatbibliothek des Exemplars ausgelöst.
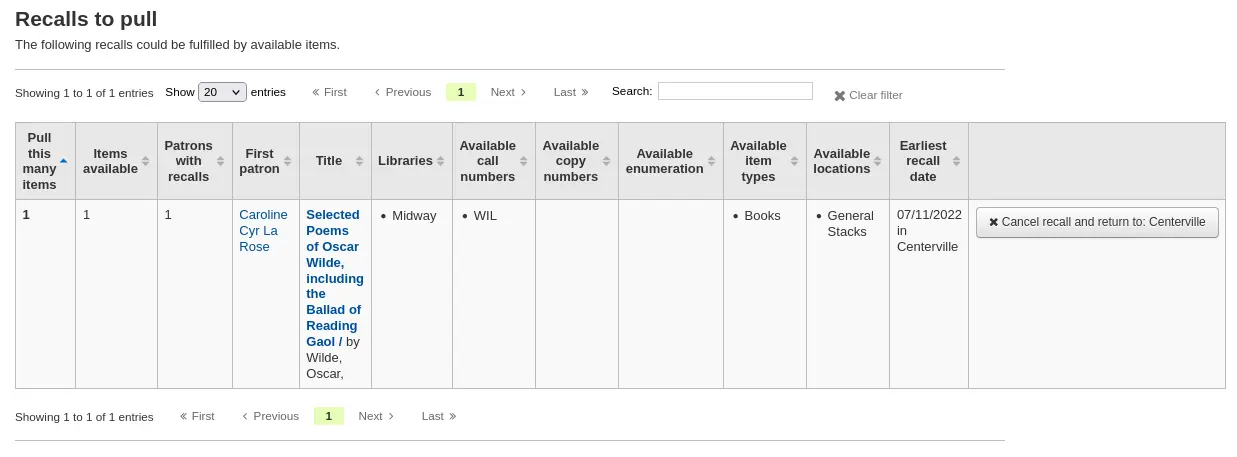
Cancel from the overdue recalls list either individually by clicking the ‚Actions‘ button and selecting the ‚Cancel‘ option.
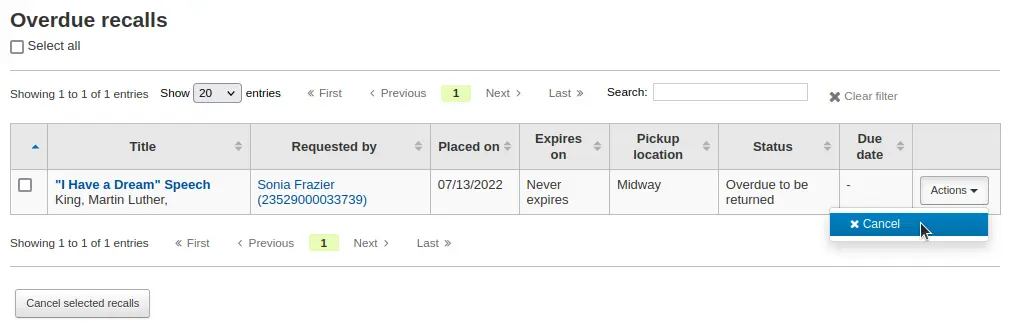
Oder Sie wählen mehrere Rückrufe aus und klicken auf die Schaltfläche „Ausgewählte Rückrufe stornieren“ am unteren Rand des Bildschirms.
Stornieren Sie im Reiter „Rückrufe“ eines bibliografischen Datensatzes, indem Sie auf die Schaltfläche „Aktionen“ klicken und die Option „Stornieren“ auswählen.
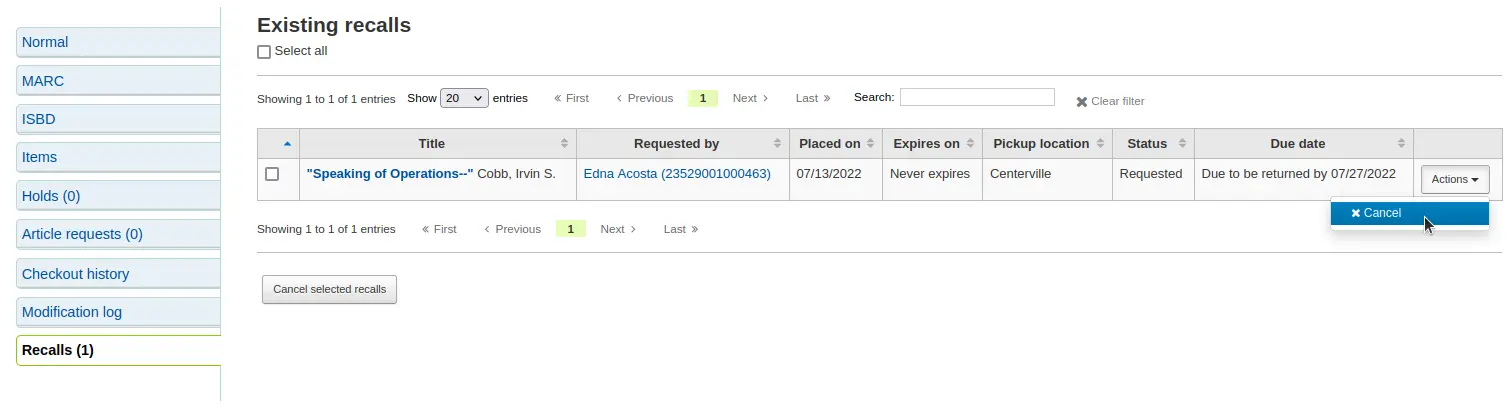
Oder Sie wählen mehrere Rückrufe aus und klicken auf die Schaltfläche „Ausgewählte Rückrufe stornieren“ am unteren Rand des Bildschirms.
Stornieren Sie im Reiter „Rückrufe“ auf der Detailseite eines Benutzers, indem Sie auf die Schaltfläche „Aktionen“ klicken und die Option „Stornieren“ auswählen.

Stornieren Sie im Reiter „Rückrufhistorie“ einer Benutzerdatei, indem Sie auf die Schaltfläche „Aktionen“ klicken und die Option „Stornieren“ auswählen.

Anpassung des Status wartender Rückrufe
Wenn ein Rückruf derzeit auf Abholung wartet und das Bibliothekspersonal diesen Status aus irgendeinem Grund ändern muss (z. B. weil der/die anfragende Benutzer*in angerufen hat und den Rückruf nicht abholen wird), ist es möglich, den Wartestatus zurückzusetzen.
Revert the status from the recalls queue by clicking the ‚Actions‘ button and selecting the ‚Revert waiting‘ option.
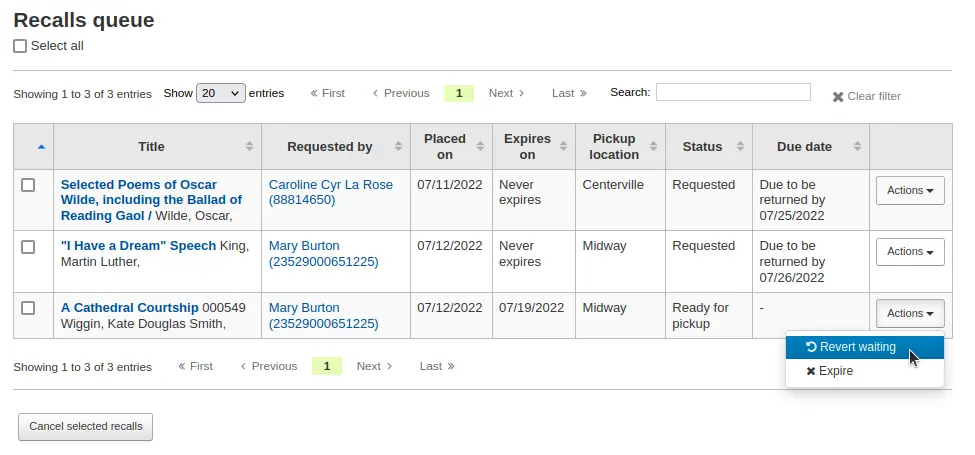
Revert the status from the Recalls awaiting pickup list by clicking the ‚Revert waiting status‘ button on the right.
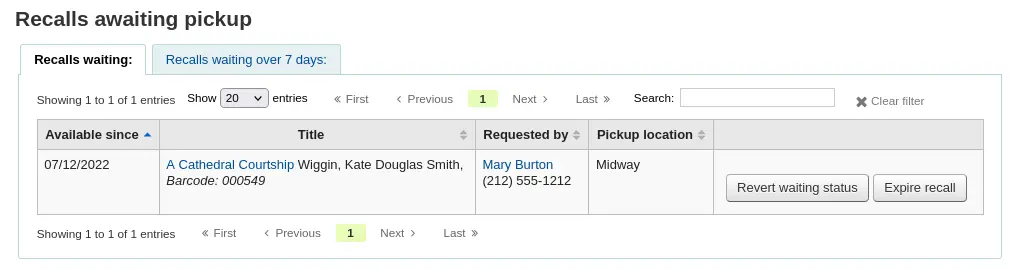
Rückrufe als überfällig kennzeichnen
If a recall is not checked in by the new due date, it should be marked as overdue by the overdue_recalls cronjob. However, it is possible to mark recalls as overdue manually.
From the recalls queue, click the ‚Actions‘ button and selecting the ‚Mark as overdue‘ option.
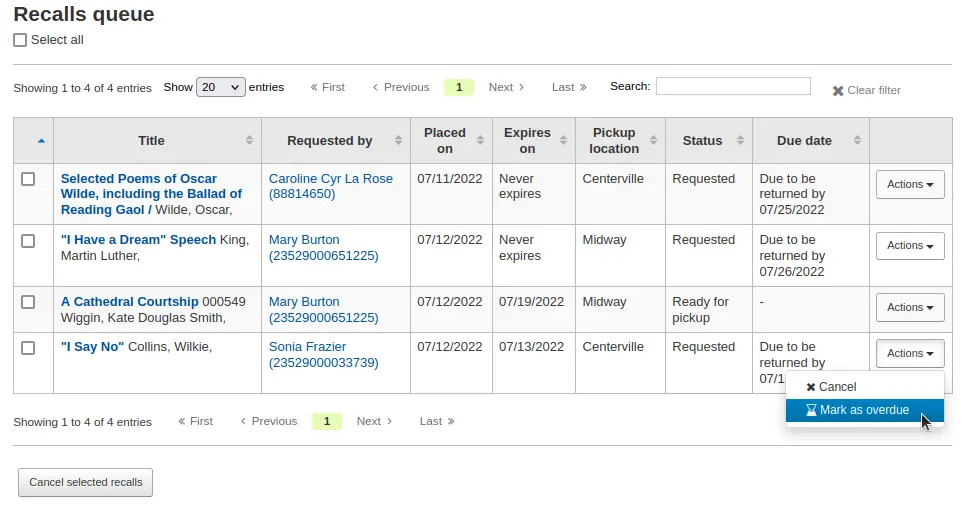
Overdue recalls appear in the Overdue recalls list.
Ablaufende Rückrufe
If a recall as been awaiting pickup for longer than the allowed period defined in RecallsMaxPickUpDelay, it should be expired automatically by the expire_recalls cronjob. However, it is possible to expire recalls manually.
From the recalls awaiting pickup list, click the ‚Expire recall‘ button on the right.
Rückruf-Reports
Once recalls are set up, new sections will appear in the circulation module.
Pfad in Koha: Ausleihe > Rückrufe
Warteschlange der Rückrufe
In der Rückruf-Warteschlange werden alle derzeit aktiven Rückrufe mit ihrem Status angezeigt.
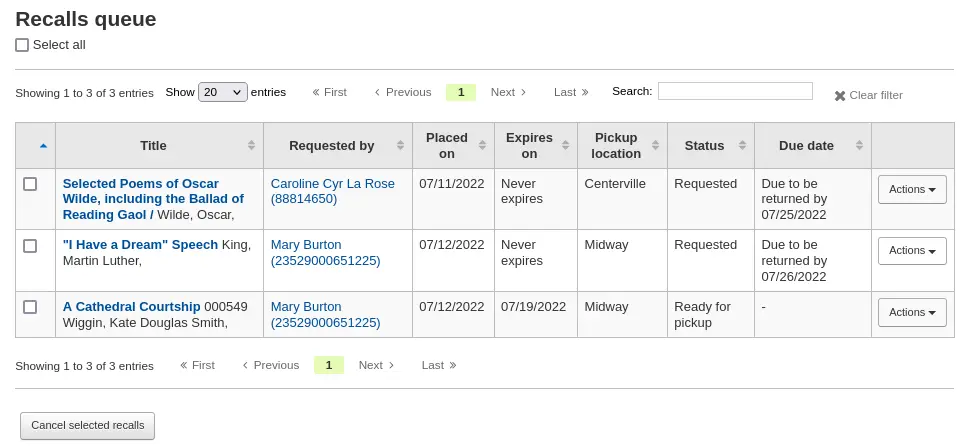
In der Rückruf-Warteschlange kann das Bibliothekspersonal aktive Rückrufe entweder einzeln stornieren, indem sie auf die Schaltfläche „Aktionen“ klicken und die Option „Stornieren“ auswählen.
Oder Sie wählen mehrere Rückrufe aus und klicken auf die Schaltfläche „Ausgewählte Rückrufe stornieren“ am unteren Rand des Bildschirms.
Für Rückrufe, die sich im Transfer befinden, ist es möglich, sie zu stornieren, was einen Transfer zurück in die Heimatbibliothek zur Folge hat.
Bei Rückrufen, die derzeit auf die Abholung warten, können Sie den Wartestatus zurücksetzen, indem Sie auf die Schaltfläche „Aktionen“ klicken und die Option „Warten zurücksetzen“ auswählen.
Überfällige Rückrufe können in der Rückruf-Warteschlange als solche gekennzeichnet werden, indem Sie auf die Schaltfläche „Aktionen“ klicken und die Option „Als überfällig kennzeichnen“ auswählen.
Zu ziehende Rückrufe
Die Liste „Rückrufe zum Ziehen“ zeigt alle Datensätze an, die zurückgerufen wurden, aber über verfügbare Exemplar verfügen, die die Anforderung erfüllen könnten.
Staff can pick up these items from the shelves and check them in to fulfill the requests.
In der Liste der zu ziehenden Rückrufe kann das Bibliothekspersonal die Rückrufe bei Bedarf stornieren, indem es auf die Schaltfläche „Rückruf stornieren“ auf der rechten Seite klickt.
If the item is currently in transit, canceling the recall will also trigger a transfer back the the item’s home library.
Überfällige Rückrufe
In dieser Liste sind die Exemplare aufgeführt, die zurückgerufen wurden, aber bis zum neuen Fälligkeitsdatum noch nicht zurückgegeben wurden.
Recalls can be marked as overdue automatically through the overdue_recalls cronjob or manually.
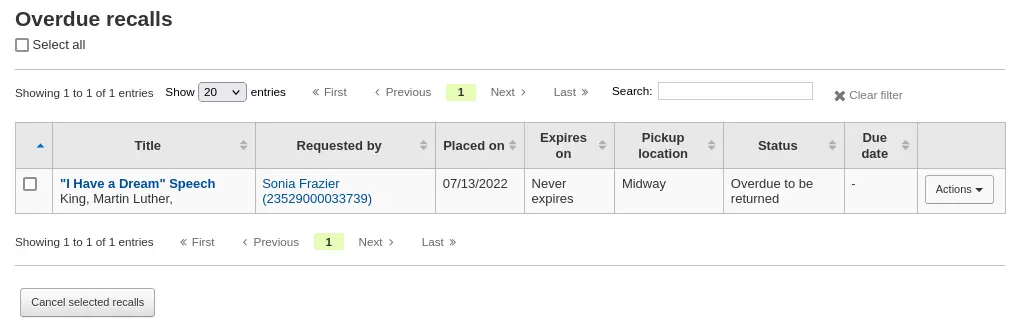
In dieser Liste das Bibliothekspersonal aktive Rückrufe entweder einzeln stornieren, indem es auf die Schaltfläche „Aktionen“ klickt und die Option „Stornieren“ auswählt.
Oder Sie wählen mehrere Rückrufe aus und klicken auf die Schaltfläche „Ausgewählte Rückrufe stornieren“ am unteren Rand des Bildschirms.
Rückrufe, die auf Abholung warten
Die Liste der Rückrufe, die zur Abholung bereitstehen, zeigt alle Rückrufe an, die derzeit darauf warten, dass der/die Benutzer*in sie abholt.
Diese Liste ist in zwei Reiter unterteilt:
Wartende Rückrufe: zeigt alle Rückrufe, die derzeit auf Abholung warten.
Rückrufe, die länger als x Tage warten: zeigt die Rückrufe an, die länger als die im Systemparameter RecallsMaxPickUpDelay angegebene Anzahl von Tagen gewartet haben.
From this list, staff can revert waiting recalls by clicking on the ‚Revert waiting status‘ button on the right.
Staff can also manually expire recalls by clicking on the ‚Expire recall‘ button on the far right.
Alte Rückrufe
The old recalls list shows all the inactive recalls (completed, canceled and expired).
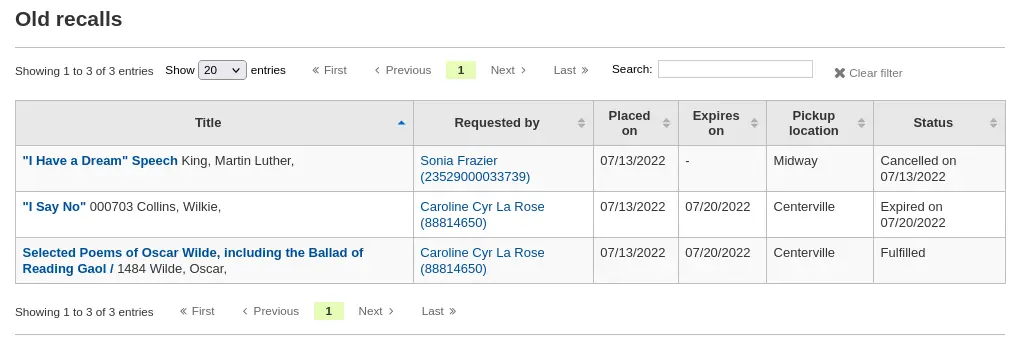
Transporte
Wenn Sie in einem Bibliothekssystem mit mehreren Zweigstellen arbeiten, können Sie Exemplare über das Werkzeug „Transfer“ von einer Bibliothek in eine andere schicken.
Pfad in Koha: Ausleihe > Transfer
Um ein Exemplar zu transferieren,
Klicken Sie auf „Transport“ auf der Ausleihseite.
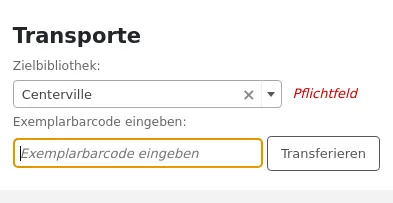
Wählen Sie die Bibliothek aus, zu der Sie das Exemplar transportieren möchten.
Scannen oder tippen Sie den Barcode des zu transportierenden Exemplars ein.
Klicken Sie auf ‚Absenden‘.
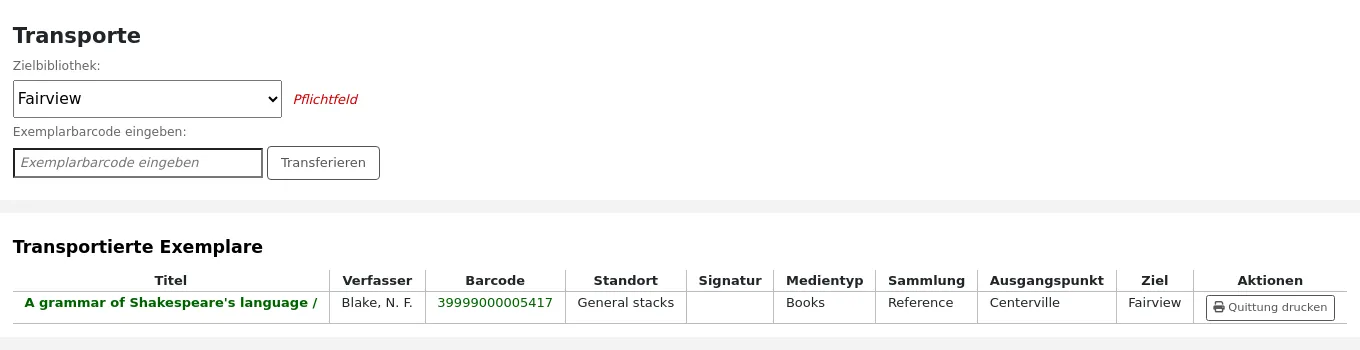
In der Spalte „Status“ der Bestandstabelle in der Dienstoberfläche und im OPAC wird nun angezeigt, dass sich das Exemplar in Transfer befindet.
Wenn das Exemplar in der anderen Bibliothek eintrifft, muss der/die Mitarbeiter*in das Exemplar zurückbuchen ankreuzen, um zu bestätigen, dass es angekommen ist und sich nicht mehr im Transport befindet.
Das Exemplar wird nicht dauerhaft in die neue Bibliothek verschoben. Das Exemplar behält dieselbe „Heimatbibliothek“ und der „Aktuelle Standort“ wird aktualisiert, um zu vermerken, wo es sich derzeit befindet.
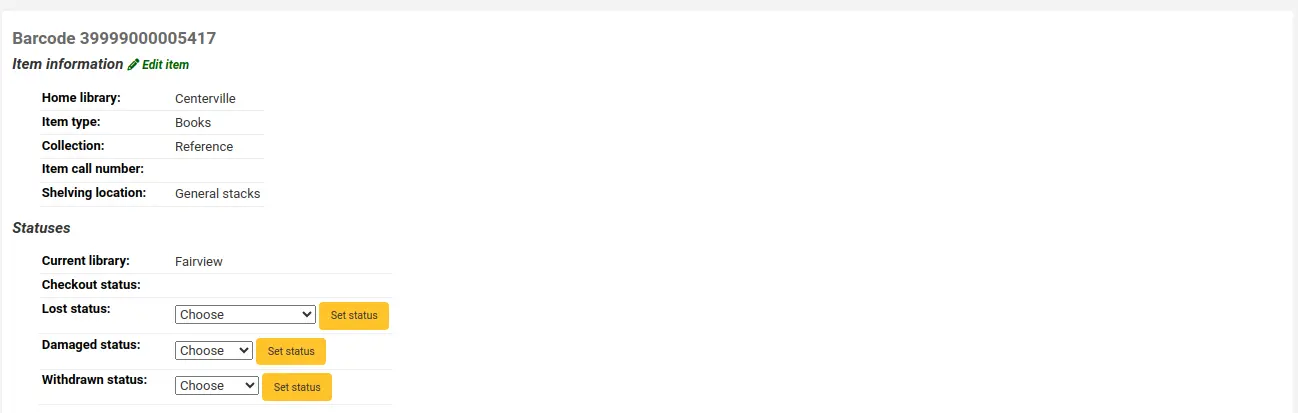
Das Bibliothekspersonal kann den Status der sich in Transfer befindlichen Exemplare im Report zu erhaltende Transfers überprüfen.
Wenn Sie das Automatisierungswerkzeug für die Bestandsrotation verwenden, können Sie mit dem Report zu sendende Tranfers überprüfen, welche Exemplare aus Ihrer Bibliothek vom Werkzeug für die Bestandsrotation zum Transfer in eine andere Bibliothek angefordert werden.
Bibliothek festlegen
Als Voreinstellung werden Sie automatisch für Ihre Heimatbibliothek angemeldet. Diese Bibliothek wird in der rechten oberen Ecke der Dienstoberfläche angezeigt.

Das ist die Bibliothek, in der die Ausleihvorgänge stattfinden werden. Wenn Sie sich in einer anderen Bibliothek (oder einem Bücherbus) befinden, sollten Sie die Bibliothek ändern, bevor Sie mit der Ausleihe beginnen. Sie tun dies, indem Sie in der oberen rechten Ecke des Bildschirms auf ‚Bibliothek auswählen‘ klicken oder diese Option auf der Hauptseite der Ausleihe anklicken.
Bemerkung
Nur Bibliothekspersonal mit der Berechtigung loggedinlibrary (oder der superlibrarian-Berechtigung) kann die Bibliothek, in der es angemeldet ist, ändern.
This will bring you to a page where you can choose which library you are logged in to.
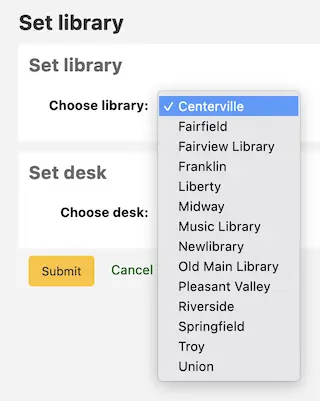
Nachdem Sie die Änderungen gespeichert haben, wird die neue Bibliothek in der oberen rechten Ecke angezeigt.
Bemerkung
Nur Bibliothekspersonal mit der Berechtigung loggedinlibrary (oder der superlibrarian-Berechtigung) kann sich in einer Bibliothek anmelden, die von der eigenen Heimatbibliothek abweicht.
Mitarbeiter*innen, die diese Berechtigung nicht haben, können sich nur in ihrer Heimatbibliothek anmelden.
Fast cataloging
Bemerkung
Um die Schnellaufnahme nutzen zu können, müssen die Mitarbeiter*innen die Berechtigung fast_cataloging (oder die superlibrarian-Berechtigung) haben.
Sometimes, circulation staff need to quickly add a record and item to the system for an item they are about to check out. This is called ‚Fast cataloging‘.
There are two ways to add records via fast cataloging: from the circulation home page or from checking out an item that is not currently in the system.
Fast cataloging from the circulation home page
Get there: Circulation > Fast cataloging
Es gibt zwei Möglichkeiten, Exemplare per Schnellaufnahme hinzuzufügen. Wenn Sie wissen, dass Sie ein Exemplare ausleihen möchten, das nicht in Ihrem Katalog enthalten ist, können Sie im Modul „Ausleihe“ auf „Schnellaufnahme“ klicken.
Es öffnet sich die Katalogisierungsmaske mit dem Framework für Schnellaufnahmen:
After adding the record data and clicking ‚Save‘, the item form will appear where you will be able to enter the item data.
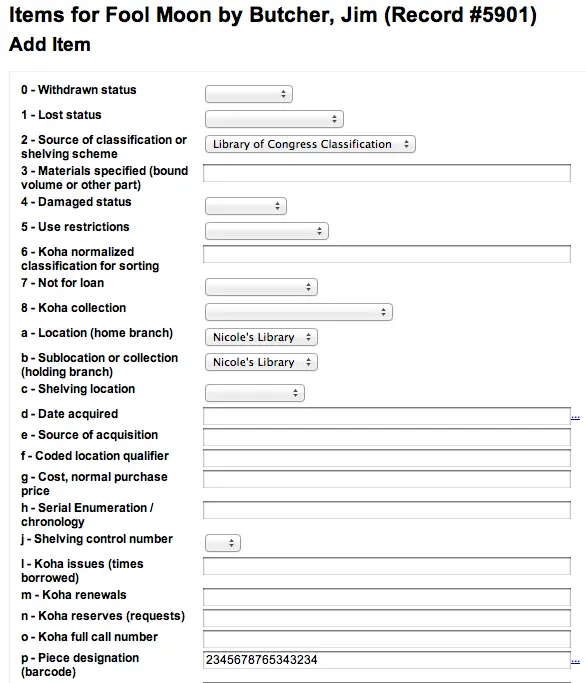
Enter the item’s information (at minimum, the barcode, home library, current library, and item type) and click ‚Add item‘.
You can then check out the item normally.
Fast cataloging by checking out
The other way to fast catalog is from the checkout screen. When you try to checkout a barcode that Koha can’t find, it will prompt you to use fast cataloging to add the item to Koha and check it out.
Klicken Sie auf ‚Schnellaufnahme‘ um in die entsprechende Katalogisierungsmaske zu gelangen.
After adding the record data and clicking ‚Save‘, the item form will appear where you will be able to enter the item data. The barcode will already be filled in with the barcode you tried to check out.
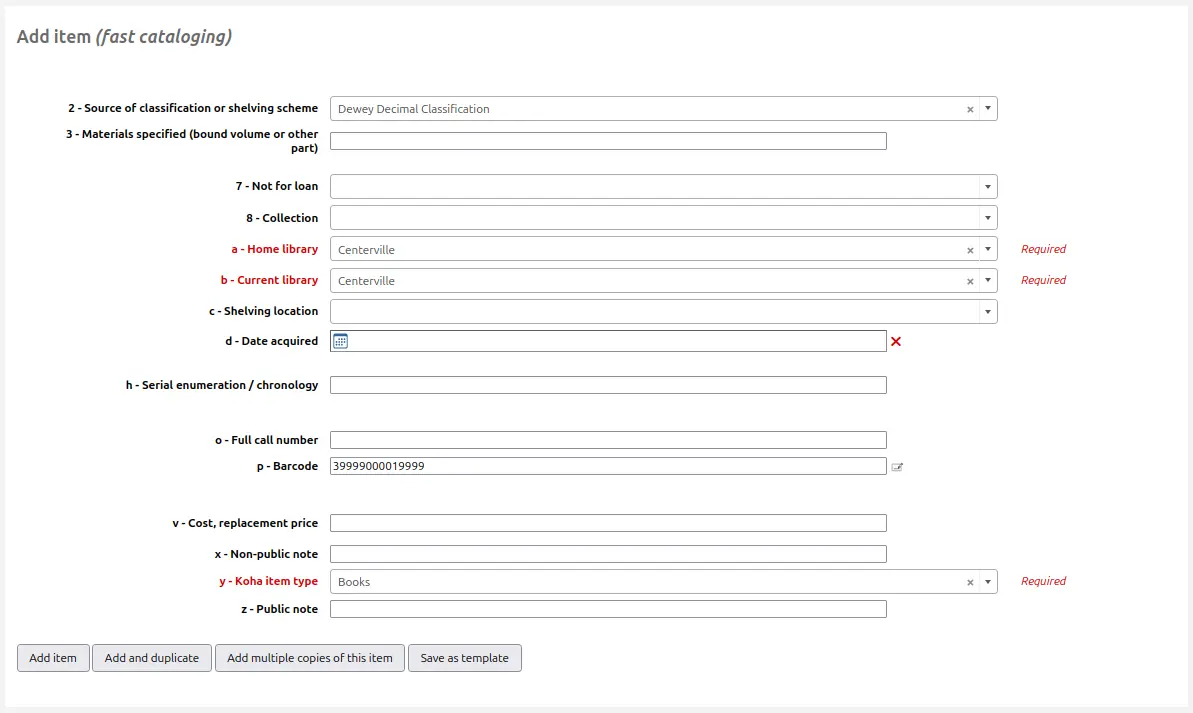
Enter the rest of the item’s information (at minimum, home library, current library, and item type) and click ‚Add item‘.
The item will automatically be checked out the patron you were trying to check the item out to originally.
Ausleihreports
Most reports can be found via the Reports module, but the more common circulation reports are available right from the Circulation module’s homepage.
Liste der Vormerkungen
Dieser Report zeigt alle Vormerkungen in Ihrer Bibliothek, die darauf warten aus dem Bestand bereitgestellt zu werden.
Wählen Sie zuerst einige Filter für den Report.
Dann wird der Report angezeigt.
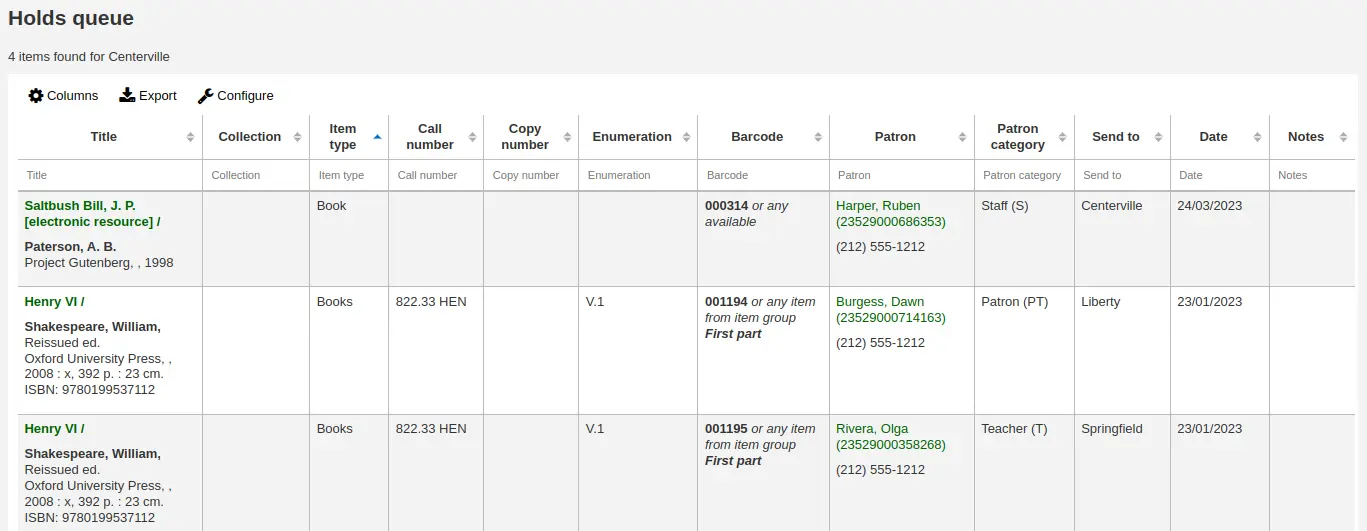
Bemerkung
You can customize the columns of this table in the Table settings section of the Administration module (table id: holds-table).
Um diesen Bericht zu erstellen, muss entweder der Cron-Job Build holds queue laufen, oder der Systemparameter RealTimeHoldsQueue muss auf „Aktivieren“ gesetzt sein. In beiden Fällen wird ein Skript ausgeführt, das entscheidet, welche Bibliothek für die Erfüllung einer bestimmten Vormerkung zuständig sein soll. Diese Option sollte aktiviert werden, wenn Ihr Bibliothekssystem Benutzer*innen die Möglichkeit bietet, Vormerkungen im Regal vorzunehmen.
Das Verhalten der Warteschlange wird durch den Systemparameter StaticHoldsQueueWeight, RandomizeHoldsQueueWeight und UseTransportCostMatrix gesteuert.
Wenn Sie nicht möchten, dass alle Ihre Bibliotheken am Prozess der Erfüllung von Vormerkungen im Regal teilnehmen, sollten Sie die Bibliotheken, die an diesem Prozess teilnehmen, hier auflisten, indem Sie alle Bibliothekscodes der teilnehmenden Bibliotheken durch Kommas getrennt eingeben (z. B. „MPL,CPL,SPL,BML“ usw.).
Standardmäßig wird die Warteschlange für Vormerkungen so generiert, dass das System zuerst versucht, die Vormerkung mit Exemplaren, die sich bereits in der Abholbibliothek befinden, zu erfüllen. Wenn in der Abholbibliothek keine Exemplare zur Verfügung stehen, um eine Vormerkung zu erfüllen, verwendet das System die Liste der Bibliotheken, die in StaticHoldsQueueWeight definiert ist. Wenn RandomizeHoldsQueueWeight deaktiviert ist (was standardmäßig der Fall ist), weist das Skript die Vormerkung in der Reihenfolge zu, in der die Bibliotheken im Systemparameter StaticHoldsQueueWeight platziert sind.
Wenn Sie ein System mit drei Bibliotheken unterschiedlicher Größe haben (klein, mittel, groß ) und Sie die Last der Vormerkungen auf die großen Bibliotheken, statt auf die kleinen verteilen möchten, können Sie im Systemparameter StaticHoldsQueueWeight zum Beispiel „LRG,MED,SML“ definieren.
Wenn Sie die Last der Vormerkungen gleichmäßig auf alle Bibliotheken verteilen wollen, schalten Sie den Systemparameter RandomizeHoldsQueueWeight ein. Auf diese Weise wird jedesmal, wenn die Liste generiert wird, die Reihenfolge der betroffenen Bibliotheken zufällig neu gemischt.
Eine Alternative zur statischen oder zufälligen Verteilung ist die Verwendung der Tansportkostenmatrix. Wenn Sie verwendet wird, übernimmt Sie die Verteilung der Vormerkungen durch die Definition von ‚Kosten‘ für den Transport zwischen zwei Bibliotheken. Um die Matrix zu verwenden, aktivieren Sie diese über den Systemparameter UseTransportCostMatrix.
Bemerkung
Andere Systemparameter wirken sich auf die Priorisierung in der Vormerkungs-Warteschlange aus, nämlich: LocalHoldsPriority, LocalHoldsPriorityPatronControl, LocalHoldsPriorityItemControl und HoldsQueuePrioritizeBranch.
Zu erledigende Vormerkungen
Dieser Report zeigt alle Exemplare mit Vormerkungen, die in Ihrer Bibliothek verfügbar sind und bereitgestellt werden können. Wenn in mehreren Bibliotheken Exemplare verfügbar sind, sehen diese Bibliotheken alle die Vormerkung, bis in einer der Bibliotheken die Vormerkung bereitgestellt wird.
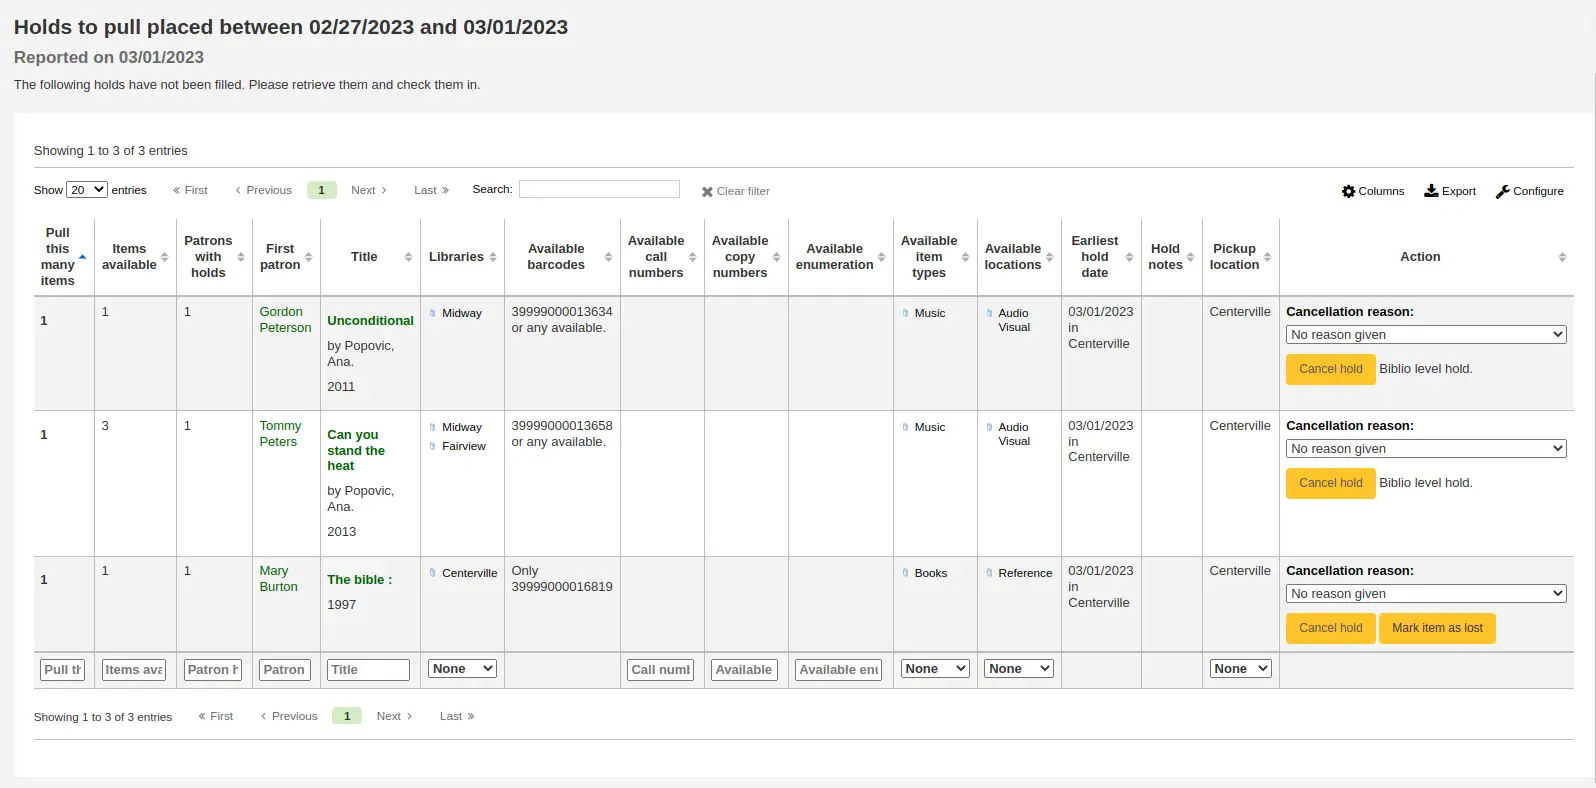
Bemerkung
You can customize the columns of this table in the Table settings section of the Administration module (table id: holds-to-pull).
Je nach dem Wert des Systemparameters CanMarkHoldsToPullAsLost wird durch Anklicken der Schaltfläche „Exemplar als verloren kennzeichnen“ oder „Exemplar als verloren kennzeichnen und Benutzer benachrichtigen“ das Exemplar als verloren markiert und der/die anfragende Benutzer*in benachrichtigt.
Sie können über den Systemparameter UpdateItemWhenLostFromHoldList festlegen, welcher Normierte Wert der Kategorie LOST verwendet wird.
Warnung
Diese Schaltflächen erscheinen bei Vormerkungen auf Exemplarebene.
Bemerkung
Die Benachrichtigung, die an den/die Benutzer*in gesendet wird, verwendet die Vorlage CANCEL_HOLD_ON_LOST. Sie kann im Werkzeug Benachrichtigungen und Quittungen angepasst werden.
Sie können die angezeigten Ergebnisse einschränken, indem Sie das Feld Verfeinern auf der linken Seite der Seite verwenden.
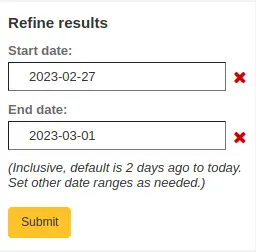
Bemerkung
Die Standarddaten in den Filtern werden durch die Systemparameter HoldsToPullStartDate und ConfirmFutureHolds bestimmt.
Bereitgestellte Vormerkungen
Dieser Bericht zeigt alle Vormerkungen, die auf das Abholen durch die Benutzer*innen warten.
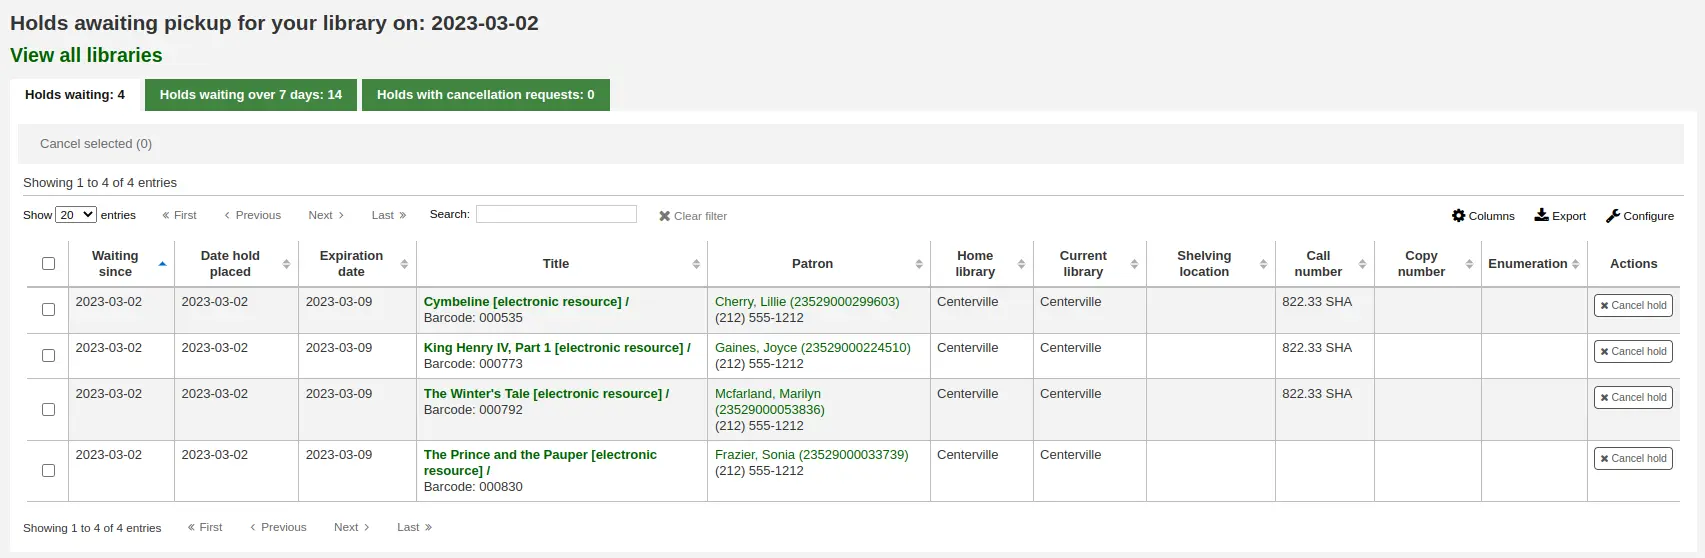
Bemerkung
You can customize the columns of this table in the Table settings section of the Administration module (table id: holdst).
Sie können einzelne Vormerkungen manuell stornieren, indem Sie auf die Schaltfläche „Vormerkung stornieren“ rechts neben jeder Vormerkung klicken, oder Sie können ausgewählte Vormerkungen über die Schaltfläche am oberen Rand der Liste abbrechen.
Exemplare, die schon länger im Abholregal stehen, als die definierte Abholfrist vorgibt (die Konfiguration basiert auf den Werten im Systemparameter ReservesMaxPickUpDelay oder der Regel ‚Verspätete Vormerkungsabholungen‘ in den Ausleih- und Gebührenregeln), werden im Reiter ‚Abgelaufene Vormerkungen‘ angezeigt.
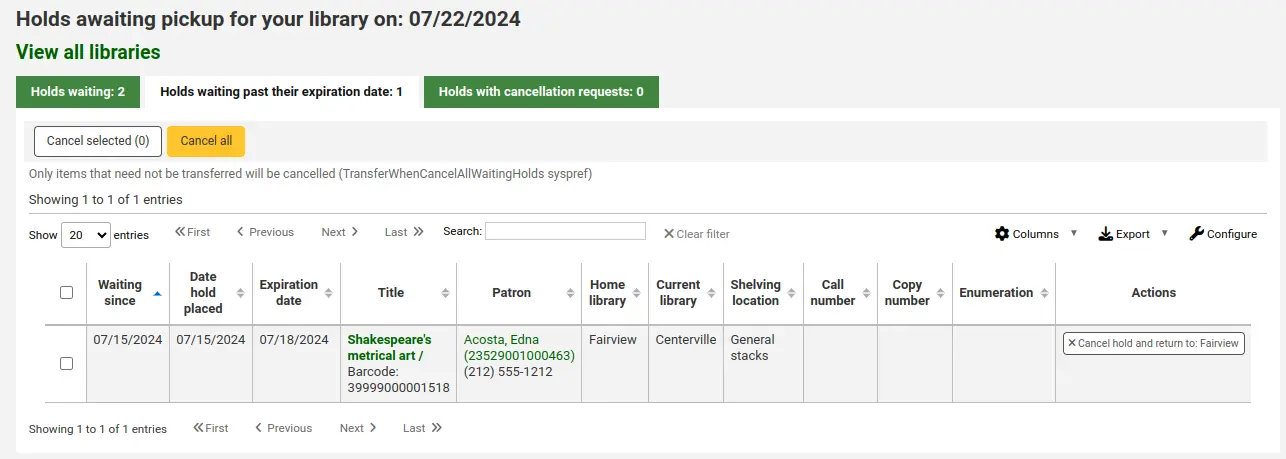
Bemerkung
You can customize the columns of this table in the Table settings section of the Administration module (table id: holdso).
Diese Vormerkungen werden nicht automatisch storniert, es sei denn, der Systemparameter ExpireReservesMaxPickUpDelay ist auf ‚Zulassen‘ gesetzt und der Cron-Job cancel_expired_holds.pl ist für eine regelmäßige Ausführung vorgesehen.
Sie können einzelne Vormerkungen manuell stornieren, indem Sie auf die Schaltfläche „Vormerkung stornieren“ rechts neben jeder Vormerkung klicken, oder Sie können ausgewählte Vormerkungen über die Schaltfläche oben in der Liste stornieren, oder sogar alle Vormerkungen stornieren.
Der Reiter „Vormerkungen mit Stornierungsanfragen“ enthält wartende Vormerkungen, die von Benutzern über ihr Konto im OPAC storniert wurden, wenn dies gemäß der Richtlinie für die Stornierung von wartenden Vormerkungen erlaubt ist.
In diesem Reiter kann das Bibliothekspersonal die vorgemerkten Medien stornieren und sie gegebenenfalls an ihre Heimatbibliothek zurücktransferieren.
Bemerkung
Eine Rückbuchung der Exemplare wird auch die Vormerkungen mit Stornierungsanfragen stornieren.
Vormerkrate
Vormerkungsraten helfen Ihnen bei der Entwicklung Ihrer Sammlung. Dieser Report erlaubt Ihnen zu sehen, wie viele Ihrer Benutzer*innen Vormerkungen auf Medien haben und ob Sie mehr kaufen sollten. Standardmäßig ist dies auf 3 Medien pro erfolgter Vormerkung festgelegt. Der Report teilt Ihnen mit, wie viele zusätzliche Medien gekauft werden müssen, um diese Quote zu erreichen.
Bemerkung
Sie können das Standardverhältnis mit dem Systemparameter HoldRatioDefault ändern.
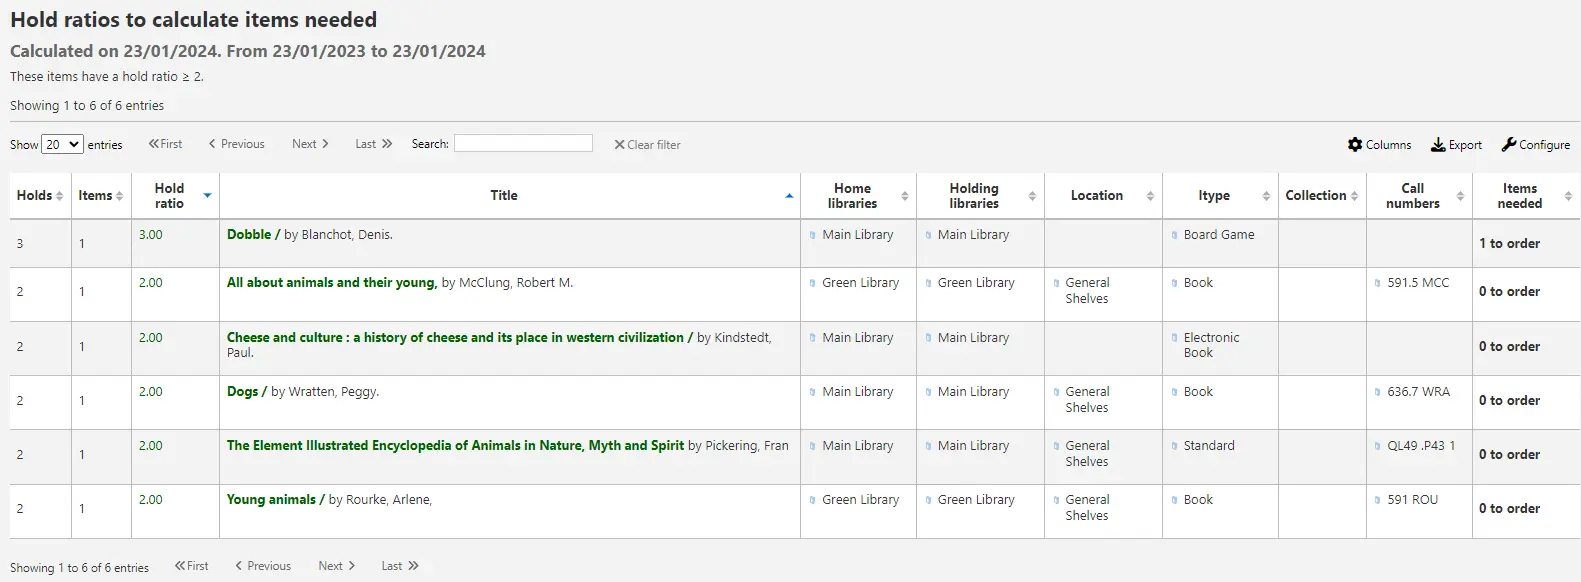
Bemerkung
You can customize the columns of this table in the Table settings section of the Administration module (table id: holds-ratios).
Zu bearbeitende Buchungen
Version
Dieses Feature kam in Koha-Version 24.11 hinzu.
This report will show you all upcoming bookings to be collected at the selected library for the specified dates.

Bemerkung
You can customize the columns of this table in the Table settings section of the Administration module (table id: bookings-to-collect).
By default:
the holding library and pickup library are set to the library you are logged in at;
the bookings displayed start after today and within the next 7 days.
You can update the selected libraries and dates using the filters to the left of the table.
Eingehende Transporte
Dieser Report listet alle Exemplare, die sich im Transfer zu Ihrer Bibliothek befinden.

Wenn ein Transfer in Ihre Bibliothek verspätet ist, wird eine Meldung mit der Verspätung angezeigt.

Bemerkung
Wichtig: Wann ein Transfer als verspätet gilt, hängt von der Zahl der Tage ab, die im Systemparameter TransfersMaxDaysWarning eingetragen wurden.
Zu versendende Transfers
Dieser Report zeigt alle Exemplare an, die vom Werkzeug „Bestandsrotation“ aus Ihrer Bibliothek angefordert wurden.
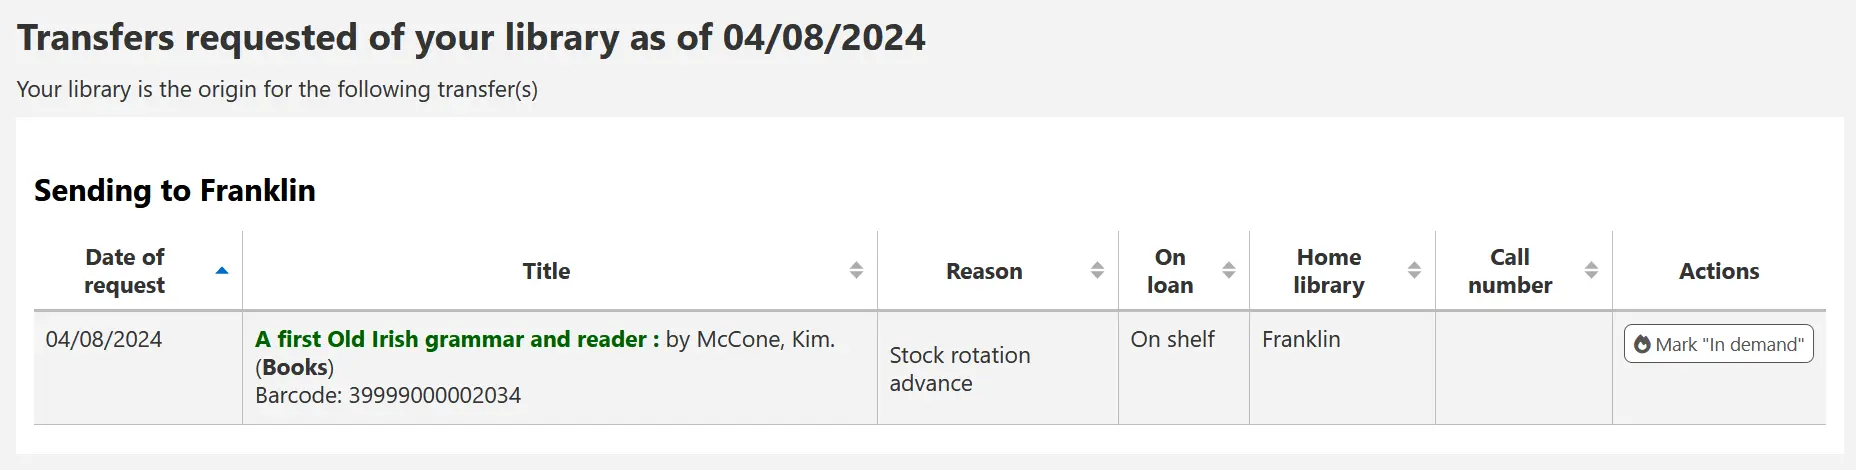
Bemerkung
Dieser Report wird nur angezeigt und ausgefüllt, wenn Sie das Automatisierungswerkzeug für die Bestandsrotation verwenden.
Artikelbestellungen
Artikelbestellungen funktionieren ähnlich wie Vormerkungen, sind aber keine Bestellungen auf Exemplare. Artikelbestellungen sind Kopieanforderungen für einen bestimmten Bereich eines Buches oder einen Artikel aus einer Zeitschrift. Das ist ein häufiger Vorgang in wissenschaftlichen Bibliotheken.
Artikelbestellungen einrichten
Aktivieren Sie zunächst den Systemparameter ArticleRequests.
auf ‚Aktiviere‘ die Artikelbestellung für Benutzer.
Als nächstes müssen Sie entscheiden, auf welcher Ebene die Benutzer*innen in der Lage sein sollen Bestellungen abzusetzen. Entweder auf der Titelebene, der Exemplarebene, oder auf Titel- und Exemplarebene.
Über drei verschiedene Systemparameter können Pflichtfelder definiert werden, je nachdem wie bestellt wird.
ArticleRequestsMandatoryFields: Pflichtfelder für Artikelbestellungen bei Datensätzen auf Titelebene oder Exemplarebene
ArticleRequestsMandatoryFieldsItemsOnly machen die folgenden Felder für Datensätze, die nur auf Exemplarebene angefordert werden können, obligatorisch
ArticleRequestsMandatoryFieldsRecordOnly Pflichtfelder für Datensätze die nur Artikelbestellungen auf Titelebene erlauben
Der Systemparameter ArticleRequestsOpacHostRedirection wird verwendet, wenn Sie analytische Datensätze erstellen. Wenn sie aktiviert ist, wird der/die Benutzer*in vom Kind-Datensatz zum Host-Datensatz im OPAC umgeleitet.
Der Systemparameter ArticleRequestsSupportedFormats bestimmt die verschiedenen Formate, in denen Benutzer*innen ihre Exemplare anfordern können (entweder als Fotokopie oder als Scan).
Außerdem muss in den Ausleihkonditionen entschieden werden, bei welchen Regeln Artikelbestellungen möglich sein sollen.
Sie haben hier vier verschiedene Möglichkeiten: ja (Artikelbestellungen auf Titel- und Exemplarebene), nur Exemplar, nur Titelsatz, oder Nein (keine Artikelbestellungen).
Sie können auch die Anzahl der offenen Artikelbestellungen, die ein*e Benutzer*in gleichzeitig haben kann, nach Benutzertyp im Bereich Standardbegrenzung für offene Artikelbestellungen auf der Seite mit den Ausleihregeln begrenzen.
You can set up a fee for each article request in the Default article request fees section of the circulation rules page.
Artikel bestellen
Bei einer positiven Eingabe können danach Artikelbestellungen in der Dienstoberfläche und im OPAC umgesetzt werden.
In der Dienstoberfläche, in der Detailansicht, sehen Sie dann die Schaltfläche „Artikel bestellen“ in der Menüleiste und einen Reiter „Artikelbestellungen“ auf der linken Seite. Beide Optionen führen auf die gleiche Seite.
Wie bei einer Vormerkung werden Sie aufgefordert die Ausweisnummer oder den Namen des Benutzers anzugeben.

Ist eine Gebühr zu entrichten, wird der/die Mitarbeiter*in durch eine Meldung darauf hingewiesen.

Füllen Sie das angezeigte Formular aus.
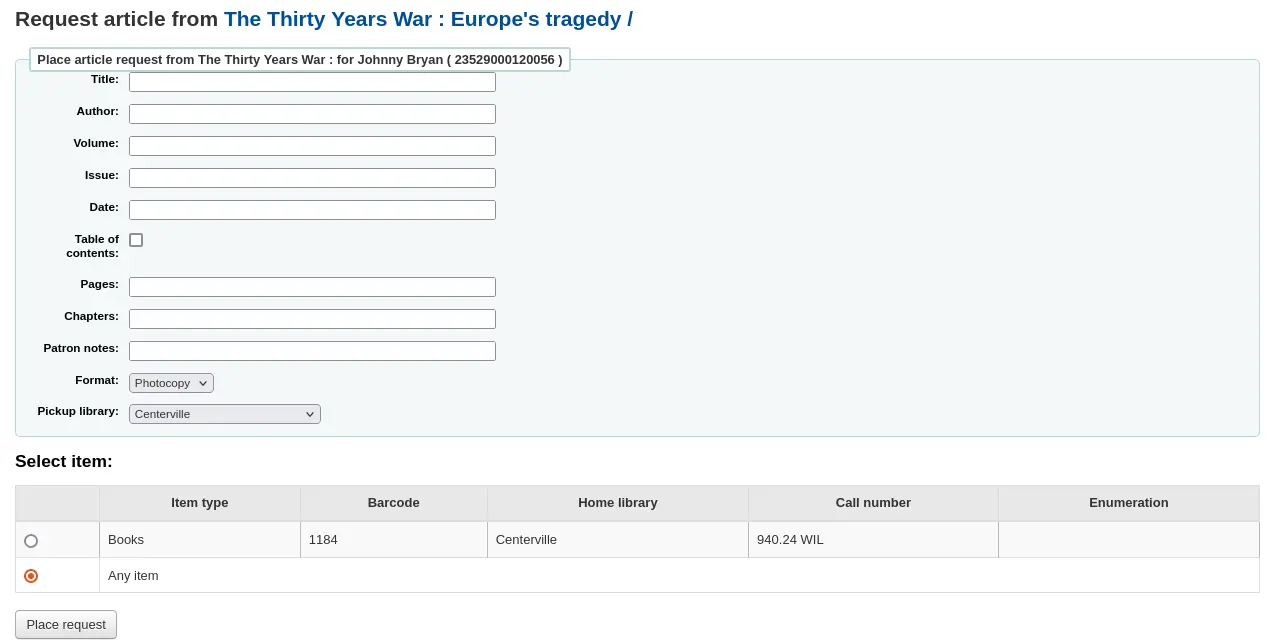
Bemerkung
Erinnerung: Die Pflichtfelder werden durch drei Systemparameter definiert: ArticleRequestsMandatoryFields, ArticleRequestsMandatoryFieldsItemsOnly, und ArticleRequestsMandatoryFieldsRecordOnly.
Titel: Geben Sie den Titel des angeforderten Artikels oder Kapitels ein
Autor: Geben Sie den Autor des angeforderten Artikels oder Kapitels ein
Band: Geben Sie den Band ein, in dem sich der Artikel oder das Kapitel befindet
Heft: Geben Sie das Heft ein, in dem sich der Artikel befindet
Datum: Geben Sie das Datum des Hefts ein, in dem sich der Artikel befindet
Inhaltsverzeichnis: Ankreuzen, um anzugeben, dass der/die Benutzer*in eine Kopie des Inhaltsverzeichnisses wünscht
Seiten: Geben Sie die zu kopierenden oder scannenden Seiten an
Kapitel: Geben Sie die zu kopierenden oder scannenden Kapitel an
Benutzernotizen: Geben Sie jegliche relevanten Hinweise an
Format: Geben Sie das Format an, in dem der/die Benutzer*in den Artikel oder das Kapitel erhalten möchte
Bemerkung
Die möglichen Formate sind im Systemparameter ArticleRequestsSupportedFormats definiert.
Abholbibliothek: Wählen Sie die Bibliothek, in welcher der/die Benutzer*in seine Fotokopie abholen möchte
Wenn erlaubt, wählen Sie die exemplarspezifische Bestellung.
Klicken Sie dann auf „Bestellen“.
Im OPAC können die Benutzer*innen selbst Vormerkungen entweder aus der Trefferliste
oder aus der Detailansicht heraus setzen.

Wie bei einer Vormerkung wird der/die Benutzer*in gebeten sich anzumelden, wenn er dies nicht bereits ist.
Das Formular ist das selbe wie in der Dienstoberfläche.
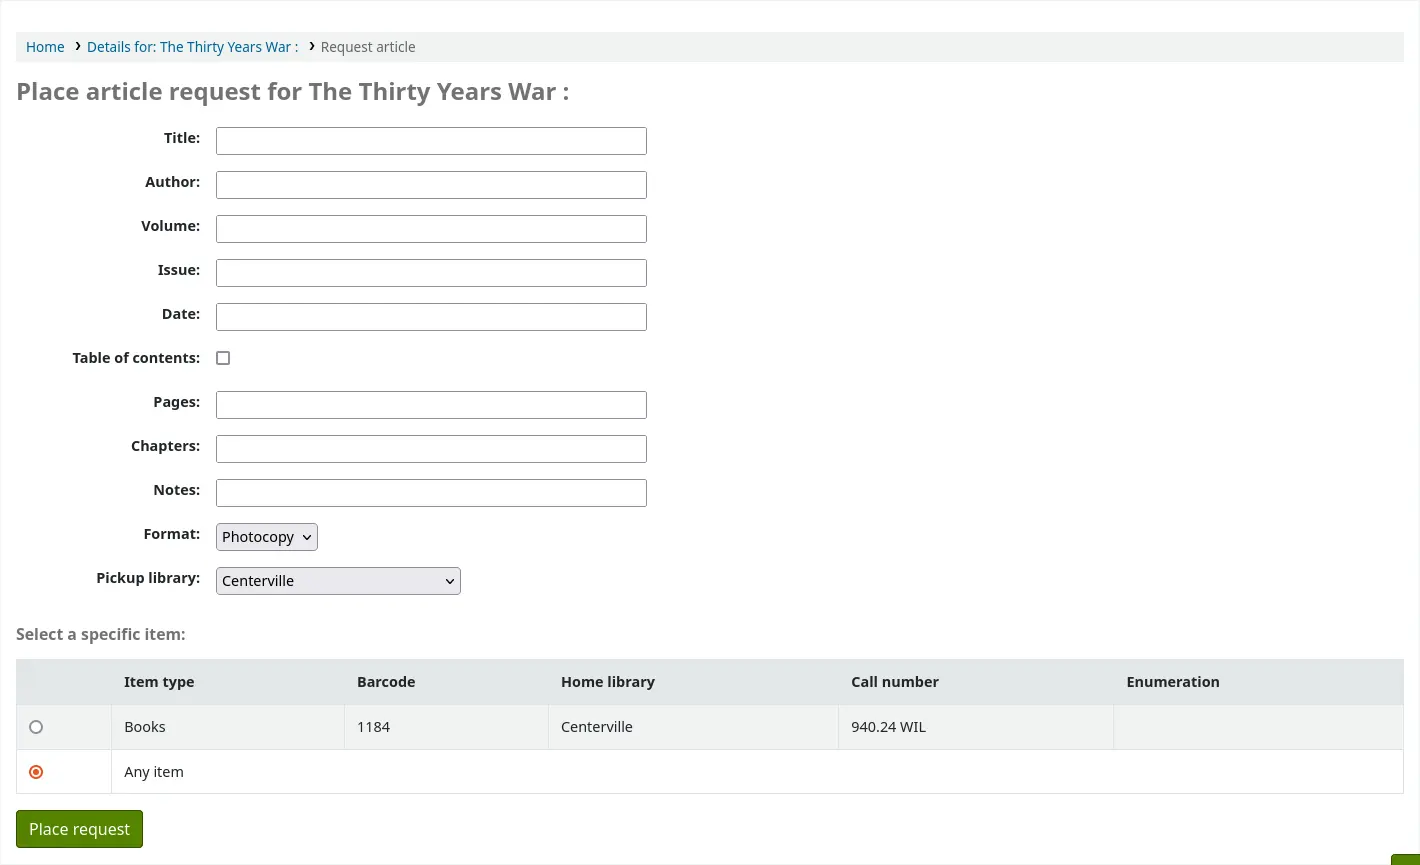
Wenn eine Gebühr erhoben wird, erscheint eine Meldung, die den/die Benutzer*in hierüber informiert.

Wenn erlaubt, kann der/die Benutzer*in ein spezifisches Exemplar für die Vormerkung auswählen.
Im Benutzerkonto kann der/die Benutzer*in den Fortschritt der Bestellung von „neu“ verfolgen

auf „ausstehend“, falls notwendig,

zu „In Bearbeitung“ mitverfolgen.

Der/die Benutzer*in erzählt eine E-Mail-Benachrichtigung nach Aufgeben der Bestellungen als Bestätigung sowie wenn sich der Status seiner Bestellung ändert.
Bemerkung
Bei der Bestellung eines Artikels erhält der/die Benutzer*in eine Benachrichtigung. Die gesendete Benachrichtigung basiert auf der Vorlage AR_REQUESTED.
Jeder Status ist auch mit einer Meldung verknüpft. Siehe unten, unter Verwaltung von Artikelanforderungen für den Buchstabencode für jeden Status.
Der Inhalt der Benachrichtigungen kann im Werkzeug Benachrichtigungen und Quittungen angepasst werden.
Sobald die Bestellung abgeschlossen ist, wird eine E-Mail-Benachrichtigung an den/die Benutzer*in verschickt und die Artikelbestellung wird nicht länger im Konto angezeigt.
Bemerkung
Wenn das Bibliothekspersonal die Artikelbestellung als ‚Erledigt‘ markiert, erhält der/die Benutzer*in eine Benachrichtigung. Die gesendete Benachrichtigung basiert auf der Vorlage AR_COMPLETED. Der Inhalt dieser Benachrichtigung kann im Werkzeug Benachrichtigungen und Quittungen angepasst werden.
Artikelbestellungen verwalten
Wenn die Artikelbestellung abgesetzt wurde, wird diese für das Bibliothekspersonal im unteren Bereich auf der Startseite der Dienstoberfläche auftauchen (wo auch die zu moderierenden Tags, Kommentare und Adressänderungwünsche auftauchen).
Hier kann das Bibliothekspersonal die zu bearbeitenden Bestellungen auswählen.
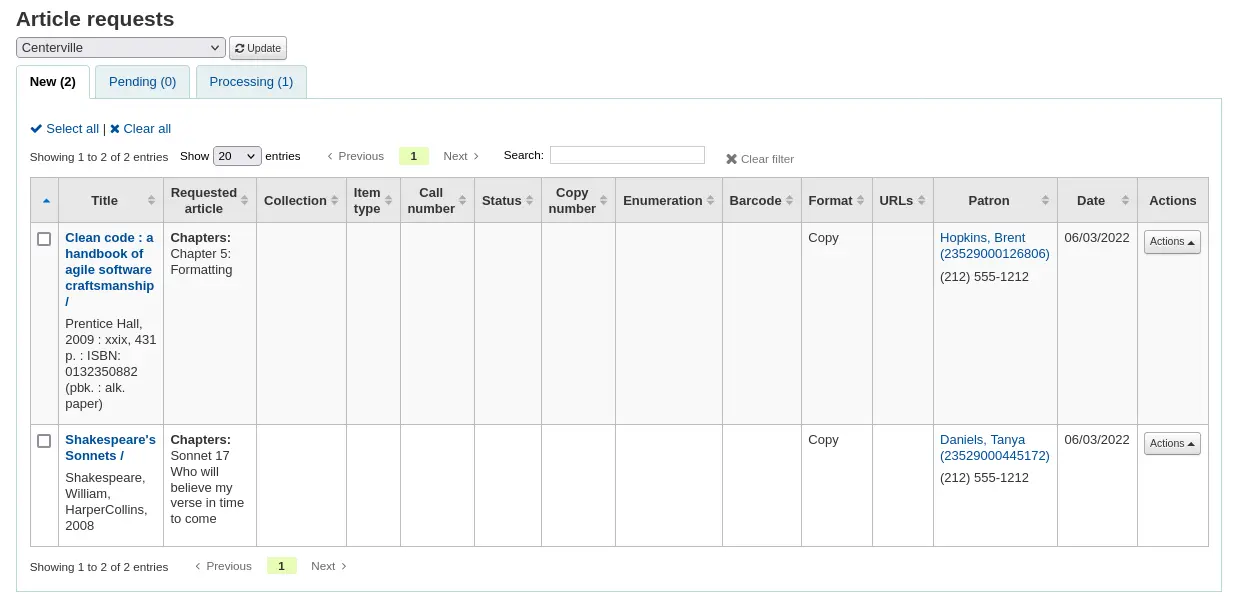
Neue Anfragen sind im Reiter „Neu“.
In einem ersten Schritt wird die Bestellung durch eine*n Bibliotheksmitarbeiter*in bearbeitet und verschiebt sich dadurch in einen anderen Reiter. In der Spalte Aktionen wird hierzu aus dem Auswahlmenü der Punkt „Bestellung bearbeiten“ ausgewählt.
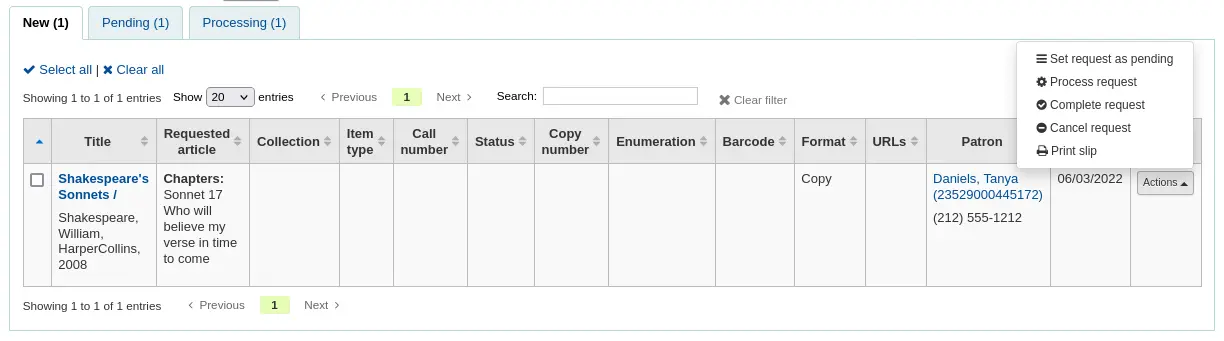
Bemerkung
Wenn Sie eine Artikelbestellung auf „in Bearbeitung“ setzen, wird eine Benachrichtigung an den/die Benutzer*in gesendet. Die gesendete Benachrichtigung basiert auf der Vorlage AR_PROCESSING. Der Inhalt dieser Benachrichtigung kann im Werkzeug Benachrichtigungen und Quittungen angepasst werden.
Wenn eine Anfrage aus irgendeinem Grund nicht sofort bearbeitet werden kann (z. B. wenn der Titel gerade ausgeliehen ist), kann der Status in „Ausstehend“ geändert werden. Dadurch erhält der/die Benutzer*in eine Mitteilung, dass die Anfrage empfangen und gesehen wurde, aber noch nicht bearbeitet werden kann.
Bemerkung
Wenn Sie eine Artikelbestellung auf „Ausstehend“ setzen, wird eine Benachrichtigung an den/die Benutzer*in gesendet. Die gesendete Benachrichtigung basiert auf der Vorlage AR_PENDING. Der Inhalt dieser Benachrichtigung kann im Werkzeug Benachrichtigungen und Quittungen angepasst werden.
Als nächstes kann das angeforderte Material aus dem Regal gezogen, und eine Kopie angefertigt werden.
Nachdem dies getan ist, kann das Bibliotheksperonal eine Quittung für die Artikelbestellung drucken und diese an den ausgedruckten Artikel heften. Im Menü ‚Aktionen‘ kann aus der Auswahlliste ‚Quittung drucken“ ausgewählt werden.
Bemerkung
Die genutzte Quittung basiert auf der Vorlage AR_SLIP. Der Inhalt dieser Quittung kann im Werkzeug Benachrichtigungen und Quittungen angepasst werden.
Zum Schluss wird in der Spalte Aktionen im Dropdownmenü auf ‚Bestellung abschließen‘ geklickt. Dadurch wird eine Benachrichtigung an den/die Benutzer*in geschickt, dass die Artikelbestellung abgeholt werden kann.
Dadurch wird die Artikelbestellung aus dem Reiter ‚in Bearbeitung‘ entfernt.
Bemerkung
Wenn eine Artikelbestellung abgeschlossen ist, wird eine Benachrichtigung an den/die Benutzer*in gesendet. Die gesendete Benachrichtigung basiert auf der Vorlage AR_COMPLETED. Der Inhalt dieser Benachrichtigung kann im Werkzeug Benachrichtigungen und Quittungen angepasst werden.
If, for any reason, an article request must be canceled, staff can choose the ‚Cancel request‘ option from the ‚Actions‘ button.
Bemerkung
Canceling an article request will send a notification to the patron. The notice sent is based on the AR_CANCELED template. The content of this notification can be customized in the Notices and slips tool.
Bemerkung
Es können über die Checkboxen oder durch Klick auf „Alle auswählen“ auch mehrere Bestellungen auf einmal bearbeitet und der neue Status aus der Auswahlliste am Anfang der Tabelle gewählt werden.
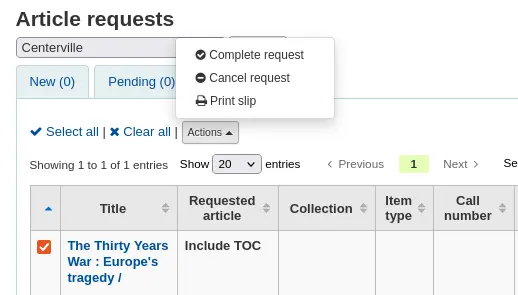
Überfälligkeiten
Diese Seite zeigt Ihnen alle Medien an, die in Ihrer Bibliothek überfällig sind.
Bemerkung
Nur Bibliothekspersonal mit der Berechtigung overdues_report (oder der superlibrarian-Berechtigung) können diesen Report ausführen.
Warnung
Wichtig: In Installationen mit sehr vielen Benutzern kann die Ausführung dieses Reports einige Zeit in Anspruch nehmen.
Tipp: Große Bibliotheken können den Report vor der Ausführung filtern, indem der Systemparameter FilterBeforeOverdueReport auf „Erforderlich“ gesetzt wird.
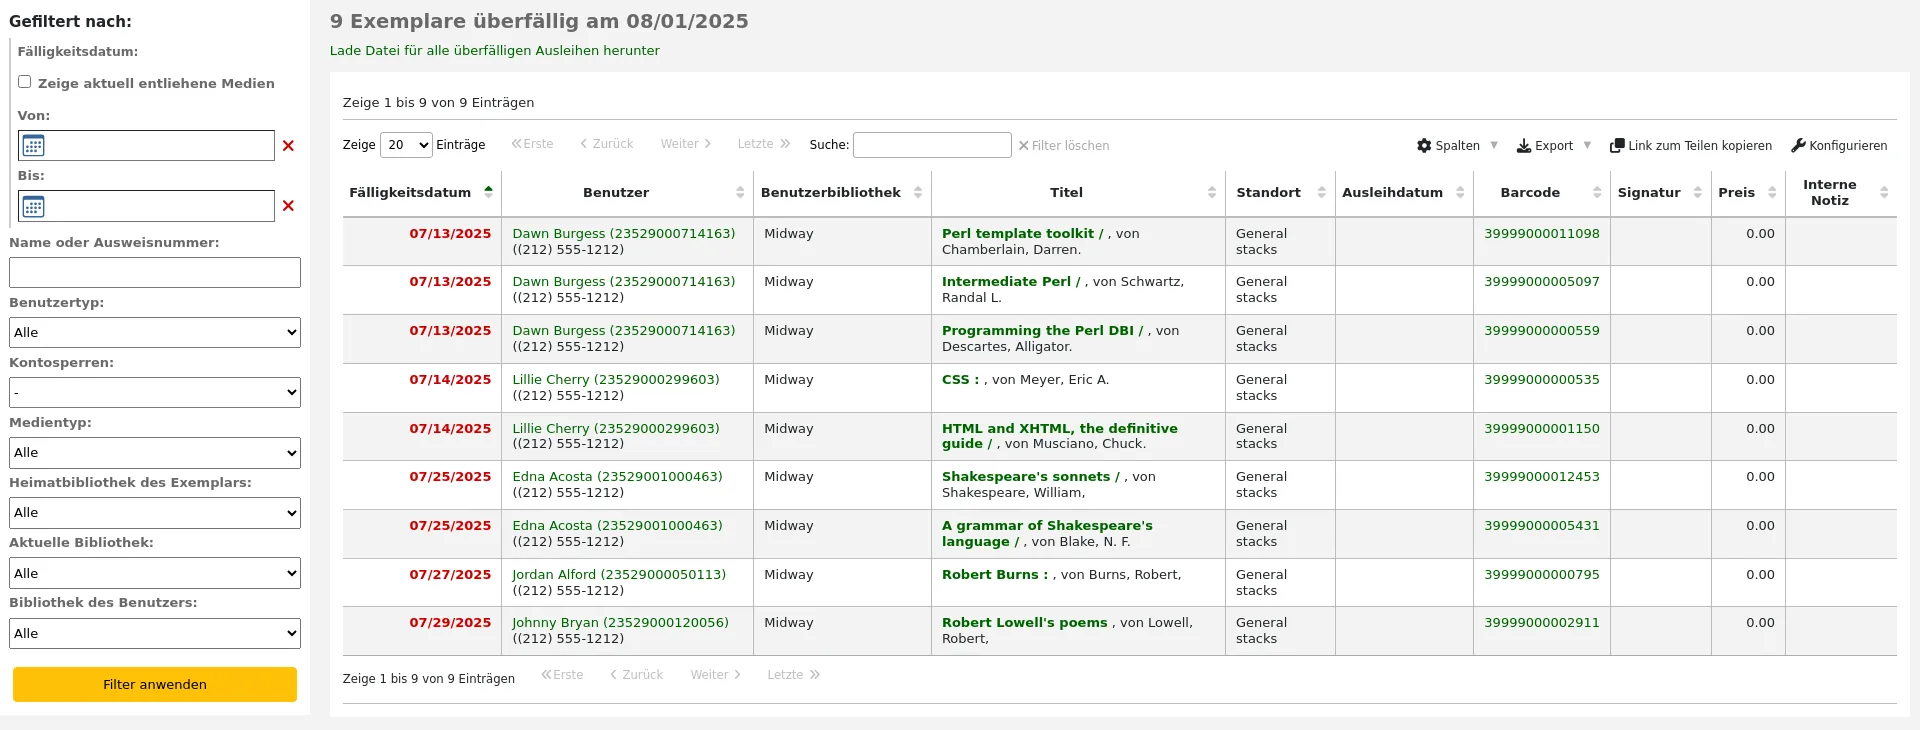
Bemerkung
You can customize the columns of this table in the Table settings section of the Administration module (table id: circ-overdues).
Der Bericht kann mit Hilfe der Menü-Optionen links neben dem Bericht gefiltert werden.
Bemerkung
Durch das Markieren der Checkbox ‚Zeige aktuell entliehene Medien‘ werden alle aktuell entliehenen Medien (unabhängig vom Fälligkeitsdatum) angezeigt.
Das Reportergebnis kann über den Link „Datei der angezeigten Überfälligkeiten herunterladen“ oder die Schaltfläche „Export“ oben in der Tabelle heruntergeladen werden.
Überfälligkeiten mit Gebühren
Dieser Report zeigt Ihnen alle überfälligen Medien in Ihrer Bibliothek, für die Mahngebühren generiert wurden.
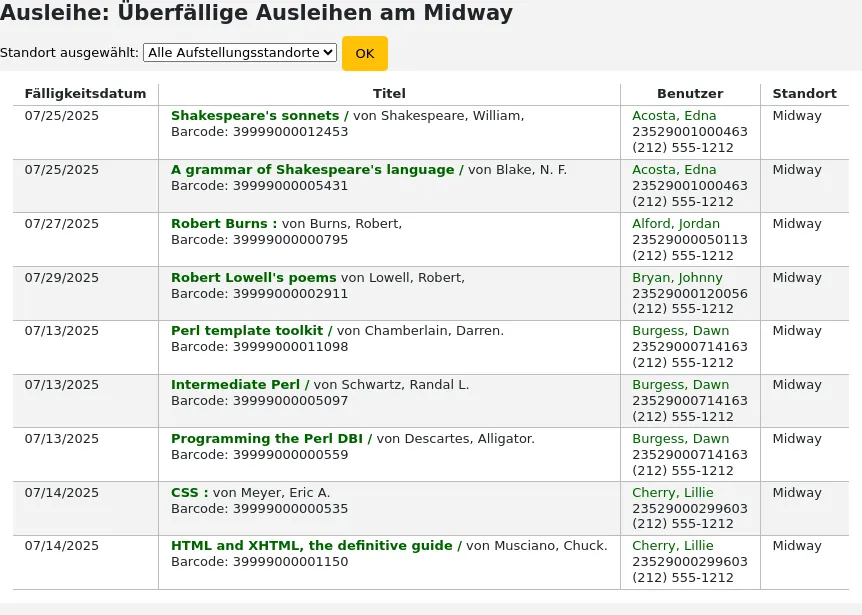
Bemerkung
Nur Bibliothekspersonal mit der Berechtigung overdues_report (oder der superlibrarian-Berechtigung) können diesen Report ausführen.
Wenn Sie den Report einschränken möchten, können Sie mit der Auswahlliste im Menü einen Standort in Ihrer Bibliothek auswählen. Um überfällige Medien anderer Bibliotheken zu sehen, müssen Sie die Bibliothek für die Sie eingeloggt sind wechseln.
Wichtig
Wenn Sie keine Gebühren erheben und/oder wenn der entsprechende Gebühren-Cronjob nicht eingerichtet ist, liefert dieser Report keine Daten.
Aktuelle Vor-Ort-Ausleihen
Wenn Sie die Vor-Ort-Ausleihe verwenden (OnSiteCheckouts), können Sie einen Bericht mit allen derzeit vor Ort ausgeliehenen Exemplaren erzeugen.
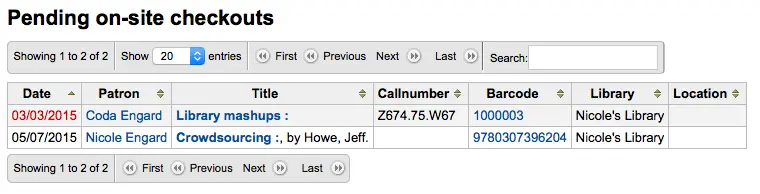
Es werden das Fälligkeitsdatum (überfällig in rot), der derzeitige Benutzer, Exemplarinformationen und die aktuelle Bibliothek angezeigt.
Vor-Ort-Benutzung protokollieren
Einige Bibliotheken protokollieren die Benutzung von Exemplaren innerhalb der Bibliothek.
Hinweis
Das unterscheidet sich von der Verfolgung der Vor-Ort-Nutzung. Bei der Benutzung vor Ort leihen die Benutzer*innen die Exemplare nicht aus. Bei der Vor-Ort-Ausleihe müssen die Exemplare zuerst ausgeliehen werden. Mehr dazu finden Sie unter OnSiteCheckouts.
Den Gebrauch von Exemplaren innerhalb der Bibliothek zu protokollieren ohne diese auszuleihen, dazu gibt es in Koha zwei Möglichkeiten. Die erste ist, einen oder mehrere sogenannte statistische Benutzer zu erfassen. Wenn dann die Exemplare eingesammelt werden die in Gebrauch waren, können diese an den statistischen Benutzer ausgeliehen werden:
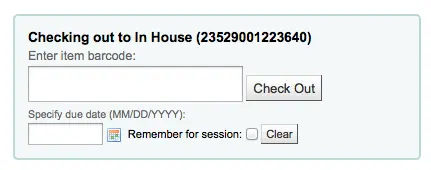
Allerdings wird as Exemplar nicht als ‚ausgeliehen‘ markiert, sondern als in Benutzung im Haus:

Wiederholen Sie diese Schritte für alle Exemplare die innerhalb der Bibliothek in Gebrauch waren.
Die zweite Möglichkeit die Benutzung von Exemplaren innerhalb der Bibliothek zu protokollieren ist, den Systemparameter RecordLocalUseOnReturn auf ‚Werte‘ zu setzen (die Rückgabe eines nicht entliehenen Exemplars als lokale Nutzung für die Statistik aus). In diesem Fall wird dann immer wenn ein Exemplar zurückgebucht wird, das nicht ausgeliehen oder vorgemerkt ist, eine Benutzung innerhalb der Bibliothek protokolliert.

Hinweis
Auch wenn Sie den Parameter RecordLocalUseOnReturn auf ‚Werte‘ (… aus) gesetzt haben, können Sie trotzdem auch einen statistischen Benutzer verwenden um den Gebrauch innerhalb der Bibliothek zu protokollieren.
Selbstverbuchung
Koha verfügt über ein sehr einfaches webbasiertes Modul zur Selbstverbuchung, mit dem die Benutzer*innen ihre Exemplare selbst ausleihen können.
Aufsetzen des Selbstverbuchungsmoduls
Um dieses Modul zu aktivieren, muss der Systemparameter WebBasedSelfCheck auf „Aktiviere“ gesetzt sein.
Um dieses Modul zu nutzen, müssen Sie sich als Mitarbeiter*in mit der Berechtigung self_checkout_module anmelden.
Bemerkung
Legen Sie eine*n Bibliotheksmitarbeiter*in speziell für diese Aktion an, damit ein*e echte*r Mitarbeiter*in nicht den ganzen Tag an einem Computer angemeldet bleibt.
Außerdem verhindert die Berechtigung self_checkout_module, dass der/die Benutzer*in den OPAC nutzen kann.
Sie können die Systemparameter AutoSelfCheckAllowed, AutoSelfCheckID und AutoSelfCheckPass verwenden, um sich automatisch als dieser Personalbenutzer anzumelden.
Sie können Inhalt hinzufügen z.B. Beschreibungen wie das Modul zu Selbstausleihe benutzt wird, über die Anzeigeort SCOMainUserBlock oder SelfCheckHelpMessage im Werkzeug HTML-Anpassungen.
Überprüfen Sie die anderen Systemparameter des Selbstverbuchungsmoduls, um sicherzustellen, dass sie für Ihre Bibliothek funktionieren.
Nutzung des Selbstverbuchungsmoduls
Das Modul ist verfügbar unter: http://YOUR_KOHA_OPAC_URL/cgi-bin/koha/sco/sco-main.pl
Tipp
Es gibt keinen Link zum Selbstverbuchungsmodul im OPAC. Sie können HTML-Anpassungen verwenden, um den Link im OPAC hinzuzufügen.
Abhängig von der Einstellung im Systemparameter SelfCheckoutByLogin werden Sie im Selbstverbuchungsmodul gebeten entweder die Ausweisnummmer einzugeben

oder Ihren Nutzernamen und das Passwort.

Sobald Sie im Selbstverbuchungsmodul angemeldet sind, werden Sie aufgefordert, die Barcodes der auszuleihenden Exemplare zu scannen. Ein Barcode-Scanner erledigt dies in der Regel automatisch. Wenn Sie den Barcode der Exemplare jedoch manuell eingeben, drücken Sie nach jedem Barcode auf „Enter“ oder klicken Sie auf die Schaltfläche „Senden“.
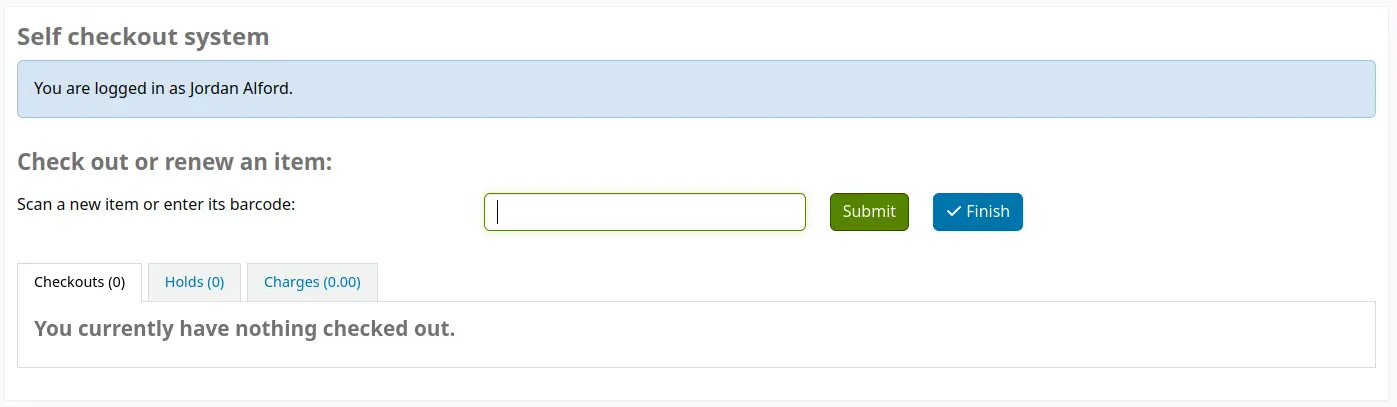
Wenn Sie Exemplare einscannen, erscheinen sie im Reiter „Ausleihen“ unten auf der Seite.

Bemerkung
Mit dem Systemparameter SCOBatchCheckoutsValidCategories können Sie Benutzer*innen aus bestimmten Kategorien erlauben, mehrere Exemplare auf einmal auszuleihen.
Es ist wichtig, auf ‚Beenden‘ zu klicken wenn Sie alle Exemplare eingescannt haben. Dadurch wird ein Quittungsdruck angestoßen und Sie werden aus dem Modul ausgeloggt.
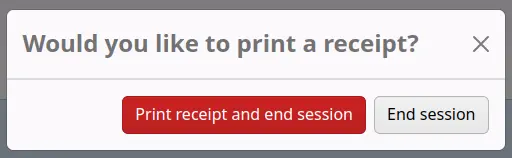
Unter Umständen tauchen beim Verbuchen von Exemplaren Fehlermeldungen auf, und der/die Benutzer*in wird um Kontakt mit dem Bibliothekspersonal gebeten. Das geschieht auch, wenn das Übergehen von Ausleihfunktionen erlaubt wird. Nur Bibliotheksmitarbeiter*innen können eine Meldung beim Verbuchen übergehen.
Bemerkung
Das Selbstausleihe-Modul kann auch zum Rückbuchen von Exemplaren verwendet werden, wenn der Systemparameter SCOAllowCheckin auf „Zulassen“gesetzt ist.
Selbstrückgabe
Um das Selbstrückgabemodul verwenden zu können, muss der Systemparameter SelfCheckInModule auf ‚Aktiviere‘. gesetzt sein.
Dann müssen Sie eine*n Benutzer*in anlegen mit der Berechtigung self_checkin_module.
Hinweis
Legen Sie am besten eine*n Bibliotheksmitarbeiter*in als Benutzer*in nur für diesen Bereich an, damit keine tatsächlich existierenden Mitarbeiter*innen mit ihrem Konto an diesem Computer permanent angemeldet sind. Sie können diesem Konto nur die zuvor genannte Berechtigung geben, dadurch kann das Konto nicht für etwas anderes verwendet werden.
Der für Ihre Institution anzupassende Link zur Selbstrückgabeseite lautet: http://YOUR_KOHA_OPAC_URL/cgi-bin/koha/sci/sci-main.pl
Loggen Sie sich mit Ihrem angelegten Bibliotheksmitarbeiterkonto mit der entsprechenden Berechtigung ein
Wenn der Computer oder Kiosk-PC eingerichtet und der Selbstverbuchungsnutzer angemeldet ist, können die Benutzer*innen die Exemplare selbst zurückbuchen.

Wenn ein Barcodescanner vorhanden ist, können die Benutzer*innen die Exemplare einscannen. Ansonsten können Sie den Barcode eintippen und auf ‚Hinzufügen‘ klicken oder Enter drücken.
Hinweis
Die meisten Barcodescanner aktivieren beim Scanvorgang automatisch die Entertaste.
Wenn alle Exemplarbarcodes gescannt oder eingetippt wurden, wird auf ‚Rückgabe‘ geklickt. Damit werden alle Exemplare zurückgegeben.
Wichtig
Wenn der/die Benutzer*in nicht auf ‚Rückgabe‘ klickt, werden die Exemplare nicht zurückgegeben und bleiben auf dem Konto.
Wichtig
Das Selbstrückgabemodul warnt nicht, wenn Exemplare überfällig sind, offene Gebühren anstehen, für jemanden vorgemerkt sind, oder wenn Nachrichten im Konto da sind.
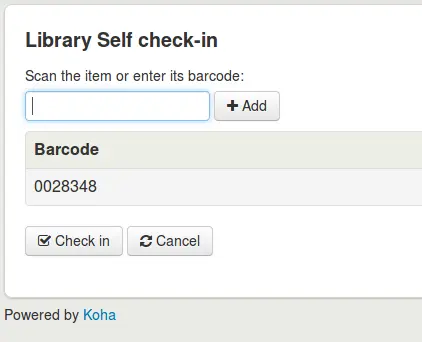
Mit ‚Beenden‘ gelangt man zurück zur Anfangsseite des Selbstrückgabemoduls.
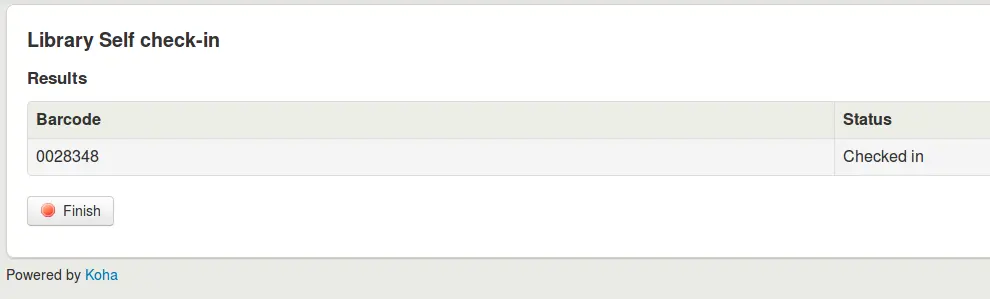
Hinweis
Wenn der/die Benutzer*in nicht auf ‚Beenden‘ klickt, wird der Bildschirm automatisch nach einer gewissen Zeit aktualisiert. Die Zeit kann im Systemparameter SelfCheckInTimeout festgelegt werden.
Hinweis
Auch wenn der/die Benutzer*in nicht auf ‚Beenden‘ klickt, wird das Exemplar zurückgegeben.
Die Ansicht des Selbstrückgabebildschirms kann über die Systemparameter SelfCheckInUserCSS oder SelfCheckInUserJS angepasst werden.
Sie können Inhalte hinzufügen, z. B. Beschreibungen wie das Modul zu Selbstausleihe benutzt wirds, indem Sie den Anzeigeort SelfCheckInMainUserBlock im Werkzeug HTML-Anpassungen verwenden.
Statistiken über die vorgenommenen Aktionen im Selbstrückgabemodul können über die action_logs abgerufen werden. Sie können daher einen individuellen Report anlegen um diese Daten aufzubereiten.
Offline-Verbuchungswerkzeuge
Mit einer dieser drei Offlineverbuchungswerkzeuge können Sie auch ohne Verbindung zum Netz Verbuchungen durchführen.
Offline-Verbuchung in Koha
Achtung
Das Offline-Ausleihmodul wurde in Koha Version 23.11 veraltet. Nur das Firefox-Plugin und Windowswerkzeug werden jetzt unterstützt.
Ist der Systemparameter AllowOfflineCirculation auf ‚Aktiviere‘ gesetzt, kann die Ausleihe in Koha fortgesetzt werden, auch wenn das System offline ist. Über die Seite http://your-koha-staff-client-url/cgi-bin/koha/circ/offline.pl - der Link muss entsprechend an Ihre Installation angepasst werden - können Sie die Offlineverbuchung aufrufen.
Wichtig
Das Offline-Interface verwendet einen Local Storage, der abhängig vom Browser und den Benutzereinstellungen beschränkt ist auf 2,5 MB bis 5 MB. Das bedeutet, das größere Systeme die Daten nicht synchronisieren können. Es wird empfohlen, in diesem Fall das Firefox oder Windows Tool für die Offlineverbuchung zu verwenden.
Konfiguration
Vor der ersten Verwendung im Offline-Modus gehen Sie bitte zu Ausleihe und wählen Sie ‚Integrierte Oberfläche für die Offline-Verbuchung‘
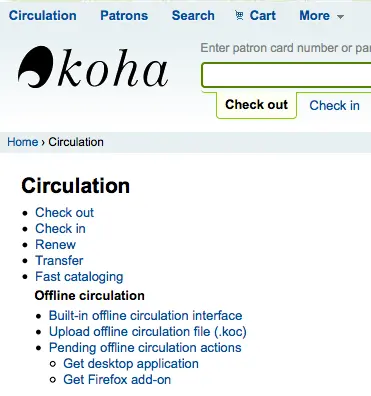
Nun können sie die Daten an jeder Ausleihstation mit der entsprechenden Schaltfläche im rechten Bereich synchronisieren.
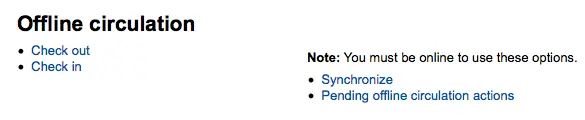
Wichtig
Das Offline-Interface verwendet einen Local Storage, der abhängig vom Browser und den Benutzereinstellungen beschränkt ist auf 2,5 MB bis 5 MB. Das bedeutet, das größere Systeme die Daten nicht synchronisieren können. Es wird empfohlen, in diesem Fall das Firefox oder Windows Tool für die Offlineverbuchung zu verwenden.
Dies erlaubt Ihnen eine lokale Kopie Ihrer Benutzer- und Ausleihdaten herunterzuladen. Klicken Sie auf ‚Datensätze herunterladen‘ am Anfang der Seite um die Daten zu synchronisieren.

Nachdem die Daten heruntergeladen wurden, sehen Sie bei jedem Datensatz im rechten Bereich das Datum der letzten Synchronisation.
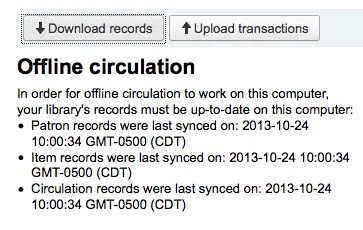
Dies sollte regelmäßig erfolgen um auf unerwartete Systemausfälle vorbereitet zu sein.
Ausleihe
Wenn das System offline ist, wechseln Sie in die Offline-Verbuchung (http://your-koha-staff-client-url/cgi-bin/koha/circ/offline.pl) und wählen Sie entsprechend ‚Ausleihe‘ oder ‚Rückgabe‘ für Verbuchungen.
Für die Ausleihe suchen Sie den/die Benutzer*in mit Barcode oder Namen in der Ausleihe. Sie erhalten dann die synchronisierten Benutzerinformationen inklusive Gebühren und Ausleihen.
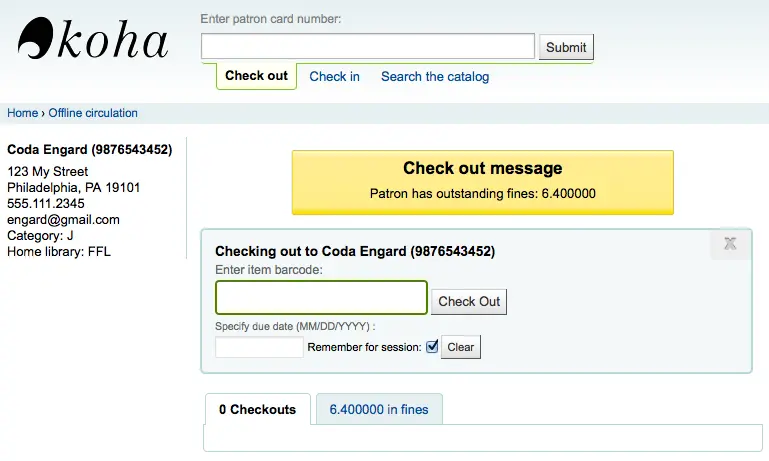
Geben Sie den Barcode des auszuleihenden Exemplars und ein Fälligkeitsdatum ein. Wenn Sie kein Fälligkeitsdatum eingeben, wird Koha nachfragen.

Das ausgeliehene Exemplar erscheint unter den Benutzerinformationen.
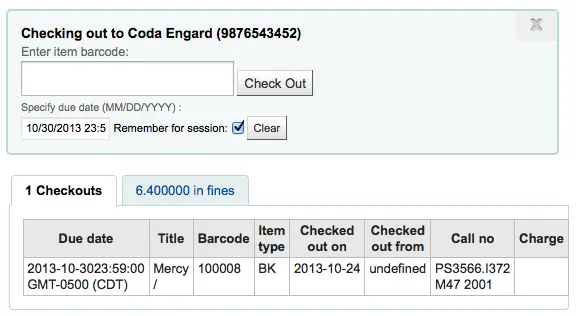
Koha Offline-Verbuchungs - Dateien hochladen
Sobald das System wieder online ist, gehen Sie im Offline-Modul auf die Funktion ‚Synchronisieren‘ und klicken Sie auf die Schaltfläche zum Hochladen der Verbuchungen
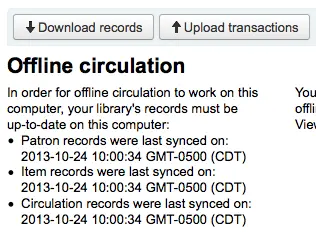
Nach dem Hochladen der Dateien können Sie sich noch offene Verbuchungen mit ‚Zeige nicht verarbeitete Offline-Verbuchungsaktionen‘ anzeigen lassen.
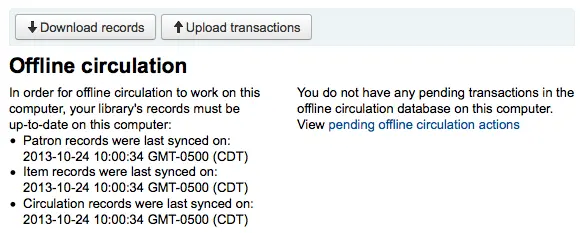
Anschließend gelangen Sie auf eine Seite mit einer Zusammenfassung aller Verbuchungen die Sie nach Koha als *.koc Datei hochgeladen haben.
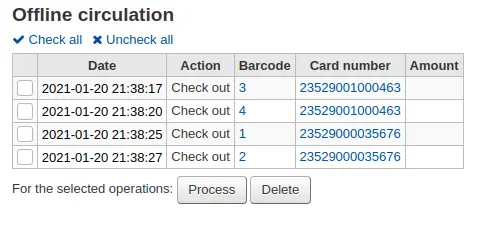
Wenn alle Offlineverbuchungsdateien der verschiedenen Arbeitsstationen geladen sind, können Sie alle oder nur ausgewählte Dateien Koha zur Verarbeitung übergeben.
Klicken Sie auf ‚Ausführen‘ und Koha wird jede gespeicherte Transaktionen einzeln nacheinander ausführen. Für jede Transaktion wechselt der Status nach:
„Erfolgreich.“ wenn die Transaktion korrekt ausgeführt wurde
„Benutzer nicht gefunden.“ wenn die Benutzernummer falsch ist
„Exemplar nicht gefunden.“ wenn der Exemplar-Barcode falsch ist
„Exemplar nicht entliehen.“ wenn ein verfügbares Exemplar zurückgegeben wurde
Nach der Abarbeitung erscheint eine Zusammenfassung aller Transaktionen
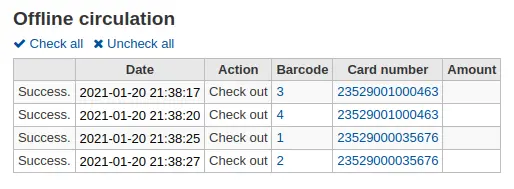
Firefox Plugin
There is an offline circulation tool that you can add to your Firefox browser as an add-on. To do so, just go to https://addons.mozilla.org/en-US/firefox/addon/koct/ page and click on the „install now“ button. You may have to confirm the installation, just click on „install now“ and then restart Firefox to complete the installation.
Sobald Sie das Plugin installiert und Firefox neu gestartet haben, sehen Sie das Koha-Logo in der Menüleiste auf der rechten Seite in Firefox.

Mit einem Klick auf das Logo öffnet sich das Tool in einem neuen Fenster.
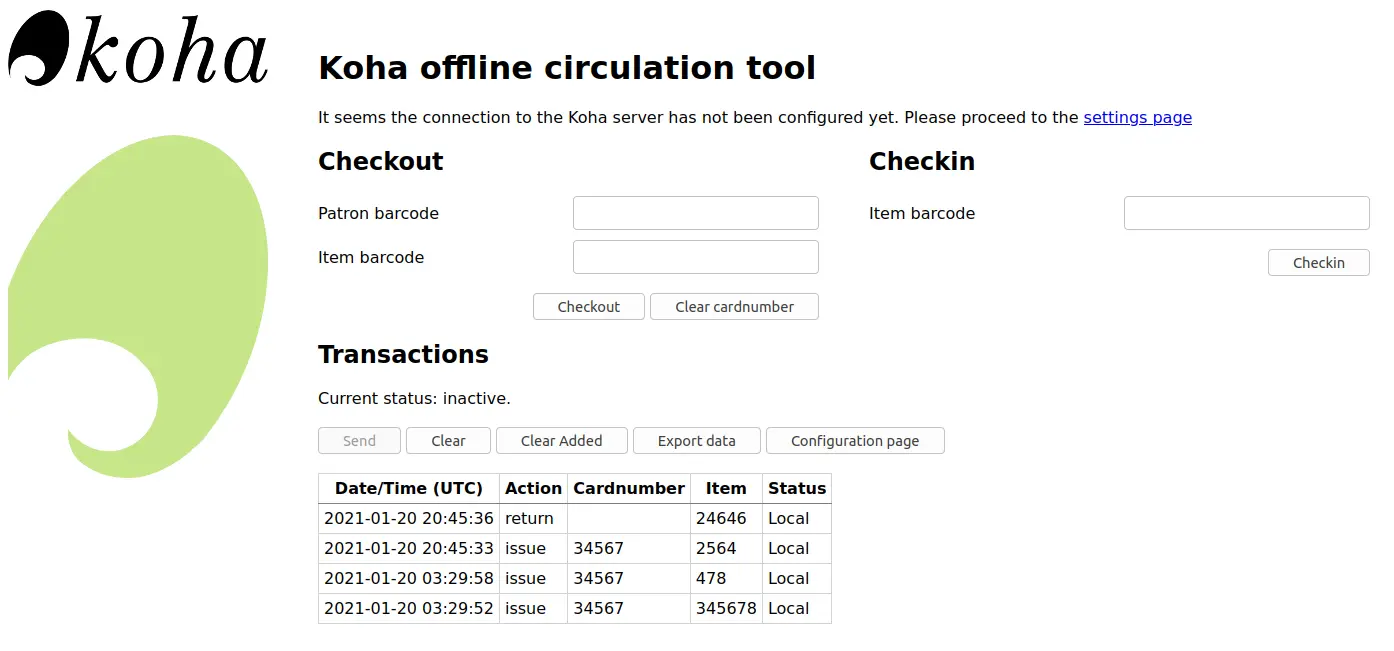
Das Plugin besteht aus drei Bereichen:
Im Reiter „Ausleihe“ werden die Exemplare ausgeliehen
Im Reiter „Rückgabe“ werden die Exemplare zurückgebucht
Im Reiter „Log“ können Sie jede Transaktion nachverfolgen, während Sie im Offline-Modus sind
Die Transaktionen werden gespeichert bis diese von Ihnen gelöscht werden.
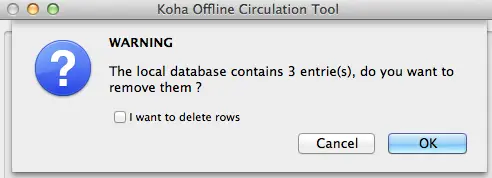
Wenn Sie die Transkationen löschen möchten, klicken Sie auf die Schaltfläche „Löschen“ bevor Sie auf „OK“ klicken.
Zunächst müssen Sie das Plugin einrichten. Dazu klicken Sie auf die Schaltfläche „Einstellungen“.
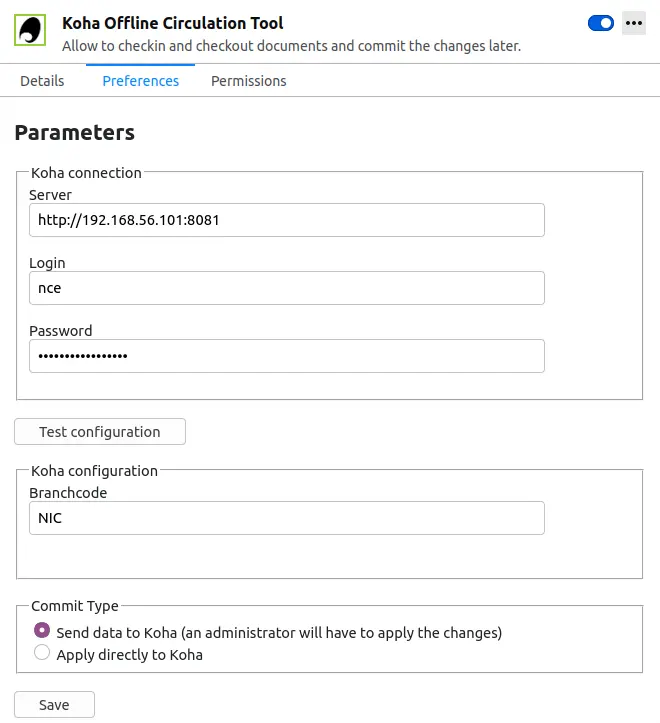
Beantworten Sie die 5 Fragen, die Ihnen angezeigt werden:
Server = Bibliotheks-URL
Benutzername = Mitarbeiterlogin
Password = Ihr Password für den Mitarbeiteraccount
Bibliothekskürzel = geben Sie hier den Code Ihres Bibliotheksstandortes ein
Einspielung = Wenn Sie „Daten an Koha senden…“ auswählen, werden die Daten zunächst nur zwischengespeichert und können anschließend in Koha eingespielt werden. Wählen Sie „Direkt in Koha einspielen“, um die Buchungen direkt durchzuführen.
Wichtig
Um die Einstellungen zu speichern müssen Sie das Plugin-Fenster schliessen und nochmals öffnen, indem Sie auf das Koha-Logo auf der Zusatzleiste klicken.
Hinweis
Erstellen Sie einen Mitarbeiteraccount für die Offline-Verbuchung. So dass jeder an der Ausleihverbuchung das gleiche Login benutzen kann. Sie können auch ein Gruppenlogin verwenden.
Wenn Sie alles eingerichtet haben, können Sie die Exemplare ausleihen und zurückbuchen.
Ausleihe:
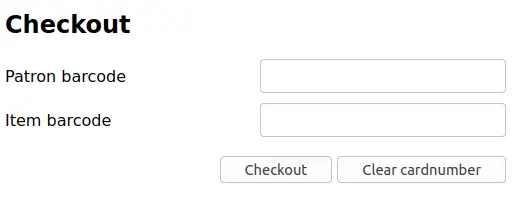
Unter der Überschrift „Ausleihe“
Scannen Sie den Benutzerbarcode ein
Scannen Sie den Exemplarbarcode ein
Klicken Sie auf „Ausleihe“
Rückgabe:
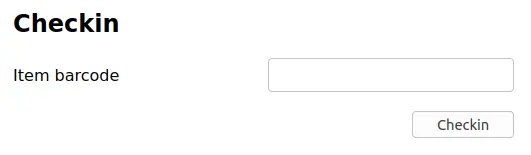
Unter der Überschrift „Rückgabe“
Scannen Sie den Exemplarbarcode ein
Klicken Sie auf „Rückgabe“
Jedes Mal wenn Sie ein Exemplar ausleihen oder zurückbuchen wird eine neue Transaktion in der lokalen Plugin-Datenbank aufgezeichnet. Die aufgezeichneten Aktionen sehen Sie unter Transaktionen darunter.
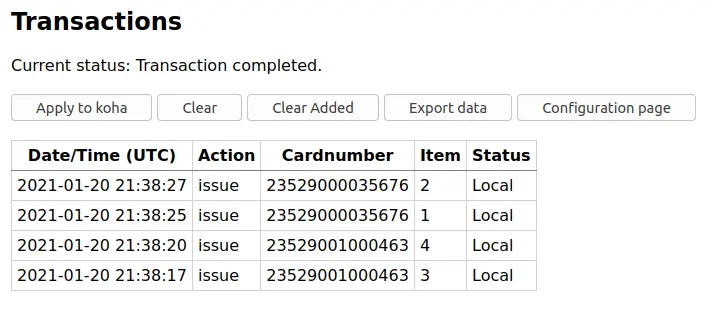
Hinweis
Der angezeigte Status steht auf „lokal“ solange Sie offline sind und die Transaktionen nicht in Koha aufbereiten.
Nach einem Backup Ihrer Internetverbindung, können Sie diese Transaktionen nach Koha übernehmen. Bevor Sie diese Transaktionen übernehmen sollten Sie auf einige Sachverhalte achten.
Da Sie nicht mit Ihrer Koha-Datenbank verbunden sind, während Sie das Plugin verwenden, braucht es eine zusätzliche Bearbeitung. Wenn das Exemplar, das Sie zurückgeben, während Sie offline sind, vorgemerkt ist, bleibt die Vormerkung auf dem Exemplar bestehen. Da Sie während jeder einzelnen Ausleihe gefundene Vormerkungen nicht bestätigen können, bleiben die Vormerkungen auf dem Exemplar bestehen und können erst später verwaltet werden. Wenn Sie nur wenige Exemplare ausgeliehen haben, können Sie einfach notieren, welche das sind. Haben Sie viele Exemplare ausgeliehen, können Sie die ‚Liste der Vormerkungen‘ benutzen, um nachvollziehen zu können, welche Vormerkungen irrtümlich im Regal gelandet sind.
Gleichermaßen weiß das Offlineverbuchungs-Tool nicht, wenn ein Benutzerausweis abgelaufen ist. So wird bei der Ausleihe nicht auf den Benutzeraccount geachtet, der normalerweise gesperrt werden würde.
Sie haben zwei Möglichkeiten diese Daten in Koha einzubinden
An Koha senden
Wenn Sie zur gleichen Zeit an mehreren Arbeitsplätzen ausleihen oder zurückbuchen, muss jede Transaktion in zeitlich korrekter Reihenfolge ausgeführt werden. Beispielsweise leiht ein*e Benutzer*in ein Buch an einem Arbeitsplatz aus und gibt dann dasselbe Buch an einem anderen Arbeitsplatz zurück. Um dies korrekt abzubilden, müssen Sie die Ausleihe vor der Rückgabe buchen. Nicht umgekehrt! Hierfür müssen Sie alle Transaktionen zunächst hochladen, sortieren und dann nacheinander abarbeiten. Benutzen Sie die „An Koha senden“ Option von jedem Arbeitsplatz mit dem Sie gearbeitet haben. So werden die Daten zunächst nur an Koha übermittelt und können dann gemeinsam über die Seite der Offline-Verbuchung in Koha eingespielt werden.
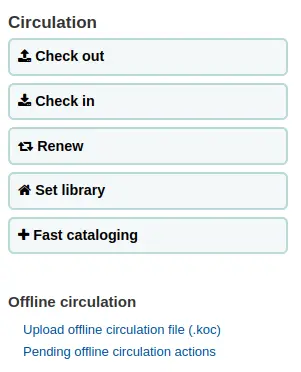
Klicken Sie hier: Ausleihe > Nicht verarbeitete Offline-Verbuchungsaktionen
Wenn alle Offlineverbuchungsdateien der verschiedenen Arbeitsstationen geladen sind, können Sie alle oder nur ausgewählte Dateien Koha zur Verarbeitung übergeben.
Klicken Sie auf ‚Ausführen‘ und Koha wird jede gespeicherte Transaktion einzeln nacheinander ausführen. Für jede Transaktion wechselt der Status zu:
„Erfolgreich.“ wenn die Transaktion korrekt ausgeführt wurde
„Benutzer nicht gefunden.“ wenn die Benutzernummer falsch ist
„Exemplar nicht gefunden.“ wenn der Exemplar-Barcode falsch ist
„Exemplar nicht entliehen.“ wenn ein verfügbares Exemplar zurückgegeben wurde
Nach der Abarbeitung erscheint eine Zusammenfassung aller Transaktionen
Direkt anwenden
Wurden alle Ausleihschritte auf einem Computer ausgeführt, ist alles bereits geordnet und Sie können direkt bestätigen
Die Statusspalte wird aktualisiert, damit Sie wissen, dass die Transaktionen ausgeführt wurden
„Erfolgreich.“ wenn die Transaktion korrekt ausgeführt wurde
„Benutzer nicht gefunden.“ wenn die Benutzernummer falsch ist
„Exemplar nicht gefunden.“ wenn der Exemplar-Barcode falsch ist
„Exemplar nicht entliehen.“ wenn ein verfügbares Exemplar zurückgegeben wurde
Offline-Ausleih-Tool für Windows
Die Gebrauchsanweisung für die Offline-Verbuchung kann unter folgender URL heruntergeladen werden: https://github.com/bywatersolutions/koha-offline-circulation/releases
Um eine borrowers.db Datei zu generieren, damit Sie sie ins Windowswerkzeug laden können, muss der Cronjob file generator laufen.
Offline-Ausleihdatei hochladen
Das Windows-Programm für die Offline-Verbuchung erstellt eine KOC-Datei, die Sie in Koha hochladen können, sobald Ihr System wieder erreichbar ist.
Klicken Sie auf der Startseite des Ausleihmoduls auf ‚Offline-Verbuchungsdatei hochladen (.koc)‘
Durchsuchen Sie Ihren Computer nach der *.koc Datei
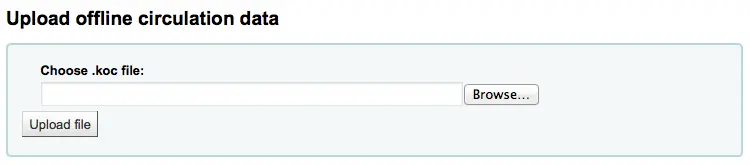
Klicken Sie auf ‚Datei verarbeiten‘ sobald die Datei vollständig hochgeladen wurde
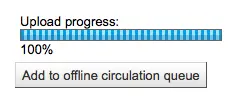
Wenn dieser Schritt abgeschlossen ist, kann eine weitere Datei hochgeladen oder es können die geladenen Offline-Ausleihvorgänge verarbeitet werden.

Anschließend gelangen Sie auf eine Seite mit einer Zusammenfassung aller Verbuchungen die Sie nach Koha als *.koc Datei hochgeladen haben.
Wenn alle Offlineverbuchungsdateien der verschiedenen Arbeitsstationen geladen sind, können Sie alle oder nur ausgewählte Dateien Koha zur Verarbeitung übergeben.
Klicken Sie auf ‚Ausführen‘ und Koha wird jede gespeicherte Transaktion einzeln nacheinander ausführen. Für jede Transaktion wechselt der Status zu:
„Erfolgreich.“ wenn die Transaktion korrekt ausgeführt wurde
„Benutzer nicht gefunden.“ wenn die Benutzernummer falsch ist
„Exemplar nicht gefunden.“ wenn der Exemplar-Barcode falsch ist
„Exemplar nicht entliehen.“ wenn ein verfügbares Exemplar zurückgegeben wurde
Nach der Abarbeitung erscheint eine Zusammenfassung aller Transaktionen