Installing Koha
Overview
Koha is server-based software than runs on a GNU/Linux operating system, such as Debian or Ubuntu. It is not a desktop application, and does not run natively on Windows or macOS.
Successfully using these installation instructions will result in a working Koha installation, suitable for testing and experimenting.
For production systems, and systems available on the internet, additional steps are required to manage and secure the server. These require specialist skills and are outside the scope of these instructions and support available from the Koha Community.
System requirements
Current system requirements and recommendations are available on the Koha wiki at https://wiki.koha-community.org/wiki/System_requirements_and_recommendations
Skill requirements
There are many specialist skills required to successfully run a GNU/Linux server-based application such as Koha. These include:
System administration: installing Debian and Ubuntu operating systems, using the command line, installing and configuring packages, managing backups, and securing services and hardening the server.
Web server administration: configuring and managing the Apache web server.
Database administration: configuring and managing a MariaDB or MySQL database server, including basic SQL and server optimization.
Search engine: configuring and managing the search engine used by Koha, such as Zebra (the default search engine), and Elasticsearch or Open Search (requires separate installation).
Caching services: configuring and managing caching services to help improve performance, such as memcached and Plack.
Message broker: managing background jobs and queues used by Koha, including RabbitMQ.
Email server administration: configuring and managing mail servers, used to send notices to patrons.
These skills can be learned, but expect a steep learning curve (and many challenges along the way) if you are not an experienced GNU/Linux system administrator.
Alternative options
Other options available to test Koha:
Demo servers: these are provided by Koha support providers, include sample data, but are reset each day.
Sandboxes: while primarily intended for testing changes to Koha, they do provide a functional Koha system, but are deleted when not in use.
Koha development environment (koha-testing-docker, or KTD): primarily intended for Koha development, the provide a fully configured system with sample data.
Installing locally in a virtual machine: it is possible to install Koha locally using virtual machines, such as Virtual Box, or using the Windows Subsystem for Linux (WSL).
At the current time there is no production-ready Docker container for Koha.
The main stages for installing Koha
The three main stages for installing Koha are:
Server install: Install Koha on a Debian or Ubuntu server using packages.
Web installer: Use the web installer to set up the database for Koha.
Onboarding tool: Use the onboarding tool to initially configure Koha.
Server install
The current instructions to install Koha on a Debian or Ubuntu server are available on the Koha wiki at https://wiki.koha-community.org/wiki/Koha_on_Debian_and_Ubuntu
Webový instalátor
Webový instalátor vytváří strukturu databáze, do které Koha ukládá všechna vaše data. Například data o pobočkách, čtenářch a jednotkách.
Webový instalátor začíná příhlášením pomocí účtu správce databáze.
The installer will then create the tables and fill the tables with data. The next step in the process is to set up a few mandatory first use settings, via the onboarding tool.
Přihlášení do webového instalátoru
Tato přihlašovací stránka je první kterou při instalaci systému Koha uvidíte.
Přihlášení do webového instalátoru
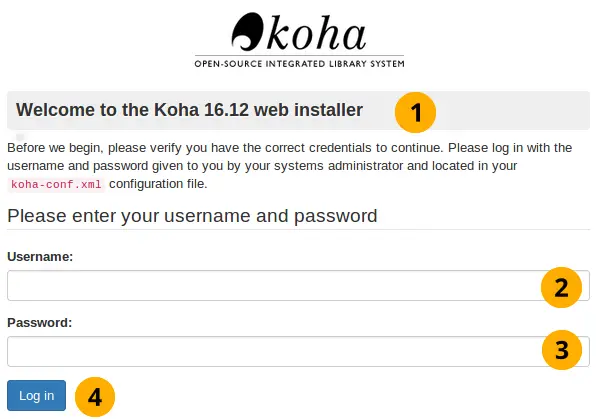
Verze systému Koha: Zde vidíte verzi systému, kterou se právě chystáte na instalovat.
Uživatelské jméno: Přihlašovací jméno databázového účtu, který bude systém Koha používat pro připojení do databáze. Výchozí jméno je koha_název-instance.
Password: This is the database administrator password which is password by default.
Přihlásit se: Tlačítko pro přihlášení do webového instalátoru
Výběr jazyka
Toto je první stránka, kterou uvidíte po přihlášení do webového instalátoru.
Úvodní stránka instalátoru
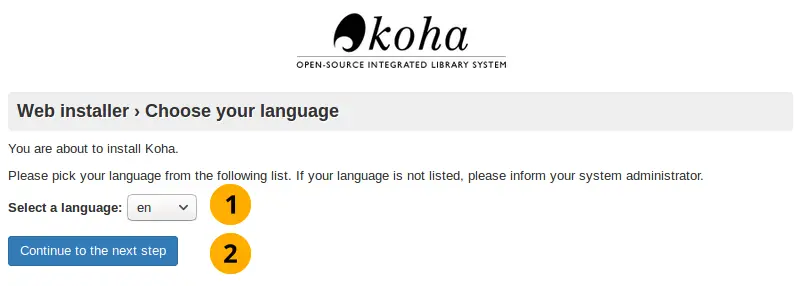
Výběr jazyka: Zde vyberte jazyk, který chcete použít během instalace.
Poznámka
Potřebný jazyk je třeba nejprve nainstalovat z příkazové řádky aby byl k dispozici pro výběr na této stránce.
Klikněte na tlačítko Pokračovat na další krok pro pokračování v instalaci.
Installer perl modules installed
Tato stránka vás informuje o tom, zdali máte nainstalované všechny moduly jazyka Perl. Pokud ano, je možné pokračovat k dalšímu kroku - vytvoření struktury databáze.
Moduly jazyka Perl jsou nainstalované
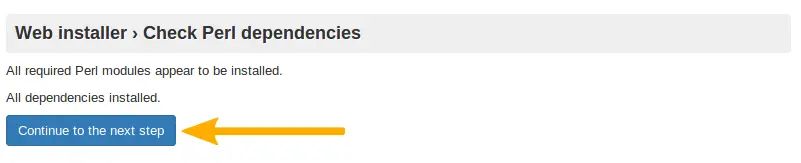
Click on the Continue to the next step button to load the next stage of the web installer.
Nastavení databáze
Tato stránka vás informuje o nastavení připojení k databázi a požaduje potvrzení, že je toto nastavení v pořádku. Pokud ano, stačí kliknout tlačítko Pokračovat k dalšímu kroku.
Poznámka
Pro většinu uživatelů budou nastavení v pořádku, pokud ne, kontaktujte vašeho poskytovatele.
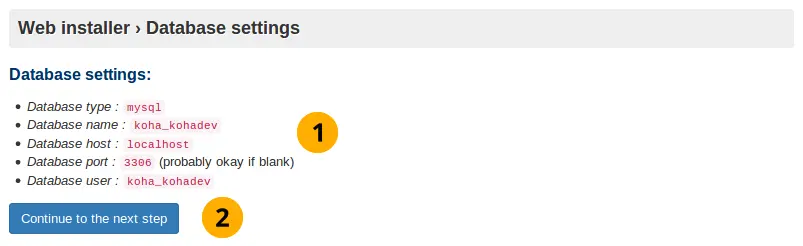
Nastavení databáze
Database settings: Check these database settings are correct.
Kliknutím na tlačítko Pokračovat k dalšímu kroku potvrdíte správnost údajů
Connection established
Po kliknutím na tlačítko Pokračovat bude potrzeno připojení k databázi:
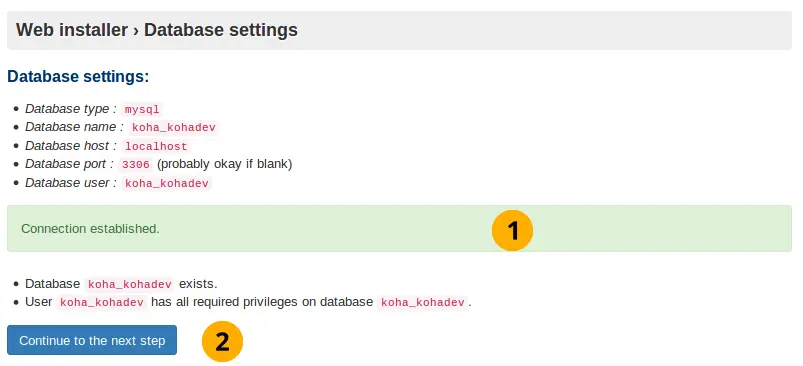
Spojení s databází bylo navázáno
Zpráva o navázání spojení: Tato zpráva vás informuje o tom, že spojení s databází proběhlo úspěšně.
Klikněte na tlačítko Pokračovat k dalšímu kroku
Poznámka
Pokud máte problémy s přípojením k databází, instalace nebude pokračovat. Zkontrolujte znovu údaje ze souboru koha-conf.xml a ujistěte se, že jsou v databázi samotné správně nastavená oprávnění.
Připraveno pro naplnění databáze
Tato stránka vás informuje, že vše je připraveno pro vytvoření struktury databáze.
Databáze připravena na nahrání dat

Klikněte na tlačítko Pokračovat k dalšímu kroku
Poznámka
Tento proces může chvíli trvat. Buďte trpělivý.
Databázové tabulky byly vytvořeny
Databázové tabulky byly vytvořeny
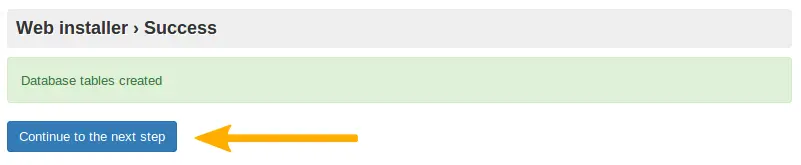
Klikněte na tlačítko Pokračovat k dalšímu kroku
Připraveno pro základní nastavení
Tato stránka vás dovede k základnímu nastavení nutnému pro provoz systému Koha.
Připraveno pro základní nastavení

Klikněte na tlačítko Pokračovat k dalšímu kroku
Výběr variantu formátu MARC
Je nutné vybrat variantu formátu MARC (formát pro ukládání bibliografických (katalogizačních) záznamu do databáze):
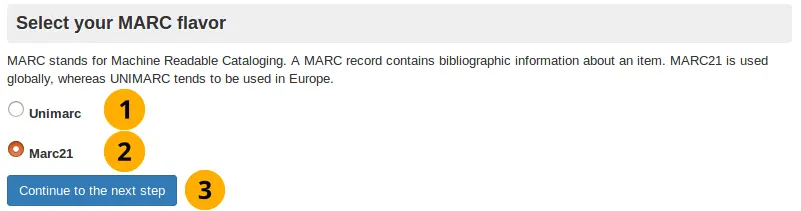
Unimarc: Používá se v některých evropských zemích (mimo např. Velkou Británii) jako například v Itálii.
MARC21: Přednastaveno jako výchozí volba, nejrozšířenější globální formát (v ČR se používá plošně od roku 2015).
Klikněte na tlačítko Pokračovat k dalšímu kroku pro potvrzení vaší volby
Nastavení pro MARC21 i UNIMARC
Poznámka
V předcházejícím kroku jste vybrali jednu vámi preferovanou variantu formátu MARC. Tento manuál popisuje nastavení pro obě varianty, dále postupujte podle toho, kterou variantu jste zvolili.
Nastavení pro MARC21
Nastavení pro MARC21
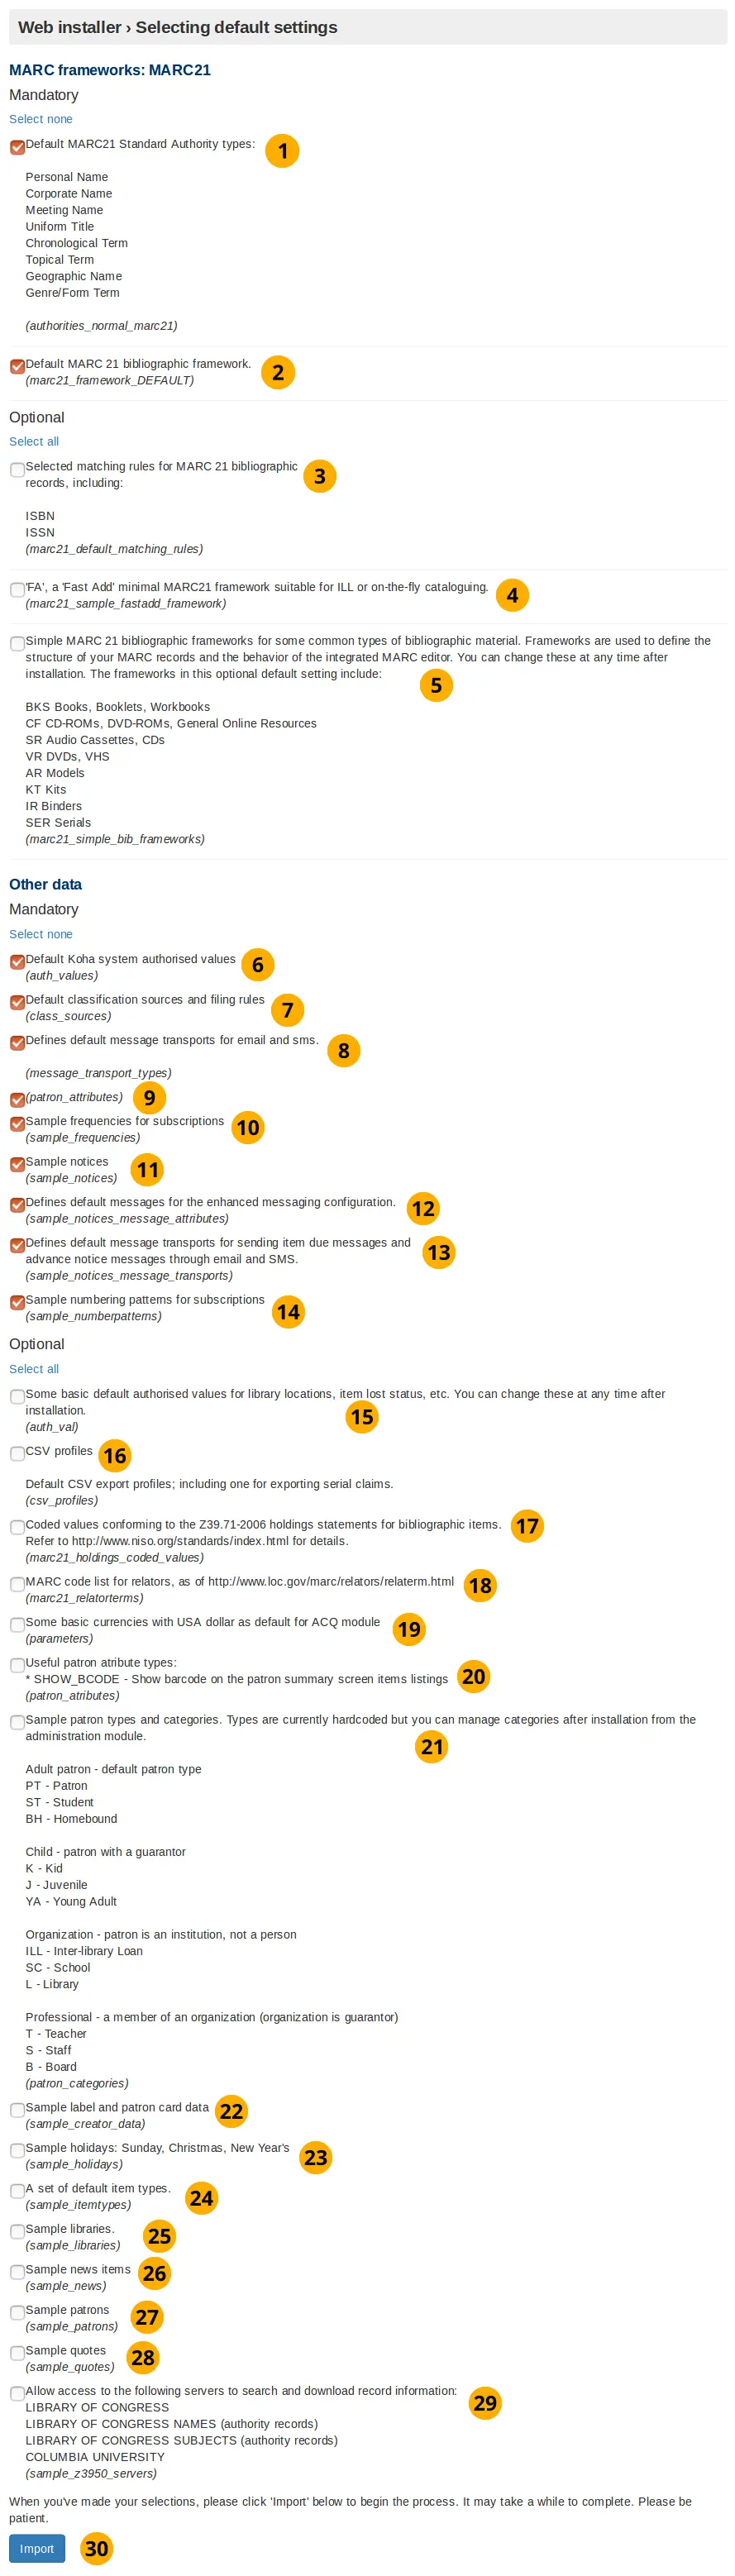
Default MARC21 standard authority types: An authority type is a template of an authority record (stores the search fields used to search an institutions catalog for an item). This option will install sample authority types.
Default MARC21 bibliographic framework: Following on from the MARC21 selection in the previous screen selecting this checkbox (and the Import button) will actually setup the MARC21 bibliographic framework as the desired MARC flavour.
Vybraná pravidla shody záznamů: Pravidla shody záznamů se používají pro rozpoznání shodných záznamů při importu nových záznamů do stávající databáze systému.
‚FA‘, a ‚fast add‘ minimal MARC21 framework suitable for ILL, or on the fly cataloging: The FA MARC framework displays fewer fields, and allows for faster cataloguing on the fly. Select this checkbox to install this minimal framework.
Vzorová biliografická šablona MARC21 pro některé základní typy bibliografických dokumentů: Toto volba nainstaluje šablonu, kterou budete moci použít k vytváření jednotek.
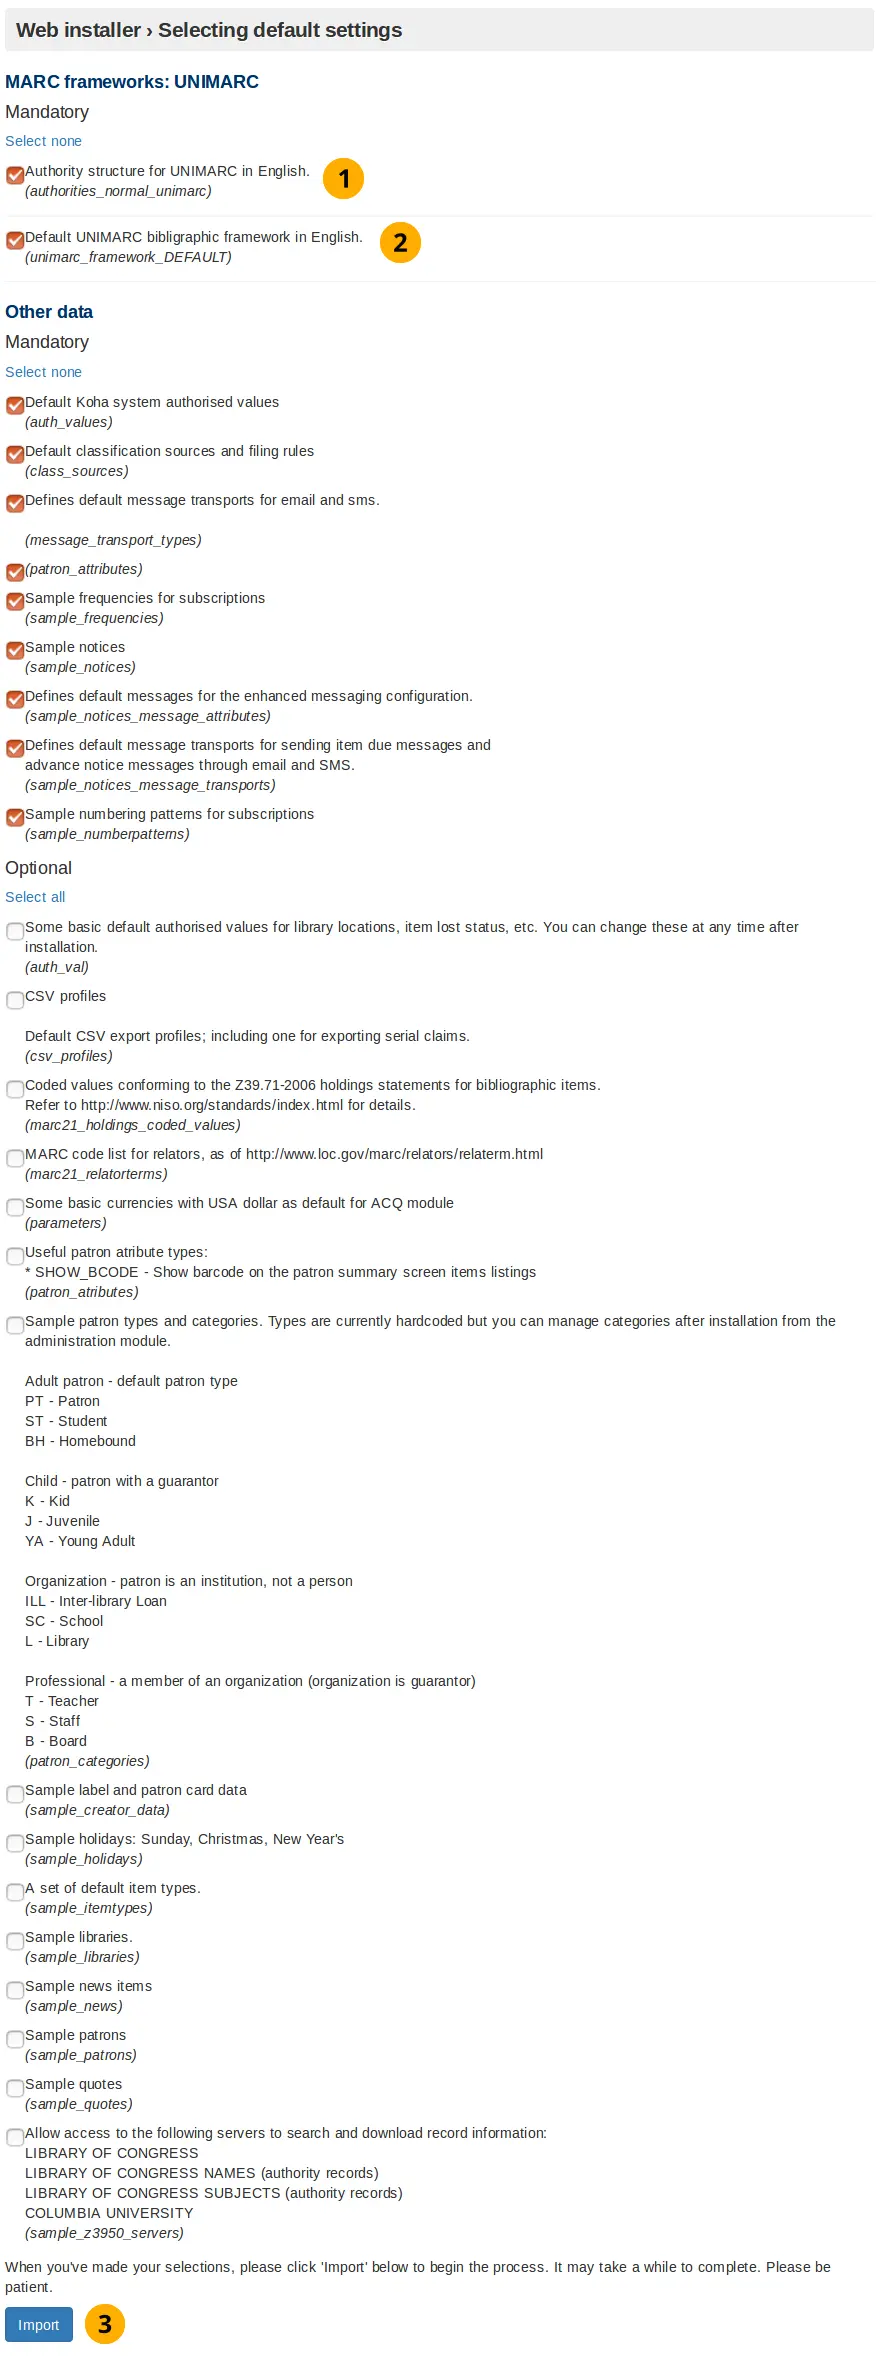
Default Koha system authorized values: This installs mandatory authorized values that every Koha installation needs.
Default classification sources and filling rules: This will insert several common library classification sources such as Dewey decimal.
Defines default message transports for email and SMS: This provides the option to the user of being able to change how the library contacts them. They can choose from the following: email address, printed message, SMS, or phone call. Notices will not work without these.
Patron attributes: This does not install any data, and it needs to be removed.
Sample frequencies for subscriptions: For items that arrive on a regular and predictable basis (e.g. monthly magazines), installing sample frequencies is useful because you can simply select a preinstalled sample frequency when you create the item.
Příklady textů upozornění: Vloží vzorová upozornění do databáze, doporučuje se však přizpůsobit je před použitím v produkčním prostředí. Nicméně jejich ruční vytváření může být velmi časově náročné a náchylné k chybám.
Defines default messages for the enhanced messaging configuration: The enhanced messaging configuration lets the user choose what messages they receive from the institution. Selecting this will insert sample message types for the due, predue, and advance notice message types.
Definice typů přenosu zpráv čtenářům: Tato možnost nainstaluje do vašeho systému nastavení pro odesílání zpráv formou e-mailů a SMS.
Příklady schémat číslování periodik pro předplatné: Tato možnost nainstaluje vzorová číslování, abyste je nemuseli ručně vkládat do časopisů a jiných periodik.
Some basic default authorized values for library locations, item lost status, etc. You can change these at any time after installation: This installs authorized values, which filter user inputs, to make sure they match specified criteria before the library or other object is created.
CSV profiles: Using Koha you can export items. The CSV profile defines how you want to export the item(s). CSV/tab exports will not work without these.
Coded values conforming to the Z39.71-2006 holdings statements for bibliographic items: Not required to use Koha. A holding statement tells the user if the library has a specific item and where it is located. Selecting will install sample code values for items in the holding statements.
MARC code list for relators: Not required to use Koha. A relator is a person who was involved in the development of the item (e.g. author). Selecting this will insert sample relator records into the database.
Some basic currencies with USA dollar as default for ACQ module: Install US dollar, Great British Pound, Canadian Dollar and Euro currencies. Set the US dollar as the default acquisition currency. Not installing these will mean that a currency will need to be defined before acquisitions can be used.
Useful patron attribute types: Not required to use Koha. Patrons have a barcode which identifies them. By clicking this checkbox you are making sure that this patron barcode is displayed on the patron summary screen.
Sample patron types and categories: Not required to use Koha. Selecting this will install sample patron categories into the database. This will mean the create patron category step in the onboarding tool is skipped.
Sample label and patron card data: Not required to use Koha, but recommended for most new installs. Selecting this will install sample data for labels and patron cards and will make it easier to create labels and patron cards in the future.
Příklady svátků a volných dnů: neděle, Vánoce, Nový rok Koha nevyžaduje jejich použití. Pokud povolíte tuto volbu dojde k vložení vzorových opakujících se svátků (například Vánoc) do databáze.
A set of default item types: Not required for Koha. Selecting this will insert sample item type data into the database, meaning the create item type step in the onboarding tool will be skipped.
Sample libraries: Not required for Koha. Selecting this will insert sample libraries into the database. Developers will often want this for demo or development purposes. Selecting this means the create library step in the onboarding tool will be skipped.
Sample news items: Not required for Koha. Selecting this will insert sample news items that are displayed on the OPAC (Online Public Access Catalog) and staff client into the database.
Sample patrons: Not required for Koha. Patrons are the people who use the Koha Library Management System, for example: library users and staff. Selecting this will insert a number of sample patrons into the database. Developers will often want this for demo or development purposes.
Sample quotes: Not required for Koha. Quotes of the day can be displayed to library users on the OPAC (Online Public Access Catalog) interface. Selecting this will install a few library related sample quotes.
Allow access to the following servers to search and download record information: Not required to use Koha, but recommended for most new installs. Selecting this configures Koha to allow access to a selection of Z39.50 targets, which allow searching the target servers for MARC21 records to import them into your Koha instance. This can avoid the need to manually input all record information manually, or greatly speed up the process.
Click the Import button to install the default and selected data values.
UNIMARC setup
There are only two data values in the UNIMARC advanced setup which are unique:
Authority structure for UNIMARC in English
Default UNIMARC bibliographic framework in English
Poznámka
Optional values are the same for both UNIMARC and MARC21, therefore their definition will not be repeated.
UNIMARC setup
Authority structure for UNIMARC in English: Authority records store the search terms used to find items in the database. Unlike MARC21, when using UNIMARC the authority structure needs to be compatible with UNIMARC. Selecting this option makes it compatible.
Default UNIMARC bibliographic framework in English: In the previous screen you clicked to use the UNIMARC flavour, now by selecting this option you are confirming you want to use that framework.
Click the Import button to install the sample data
Vybraná data byla vložena
After you have clicked the Import button in either the MARC21 or UNIMARC setup screen this screen will appear. It shows you if the selected/default data values were successfully inserted into the database.
Vybraná data byla vložena
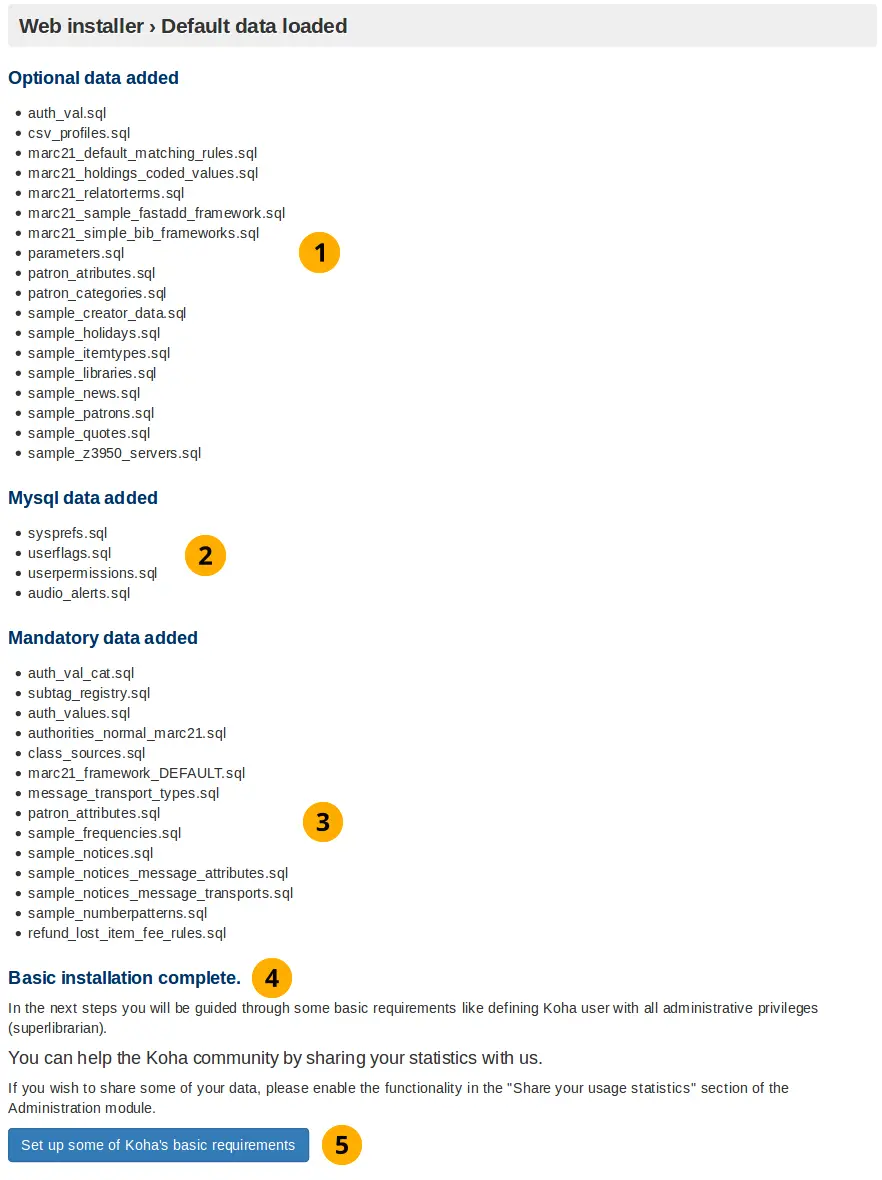
Optional data added: If you selected an optional data value then it will be displayed here. If you did not choose any optional data value then the optional data added title will not be displayed.
MySQL data added: These data values will always be installed and consequently displayed on this screen.
Mandatory data added: Same as above.
Installation message: Tells you if the Koha database was successfully created ready for you to use the onboarding tool.
Click the Set up some of Koha’s basic requirements button to go to a redirection screen, which in turn will take you to the onboarding tool.
Redirect to onboarding tool
If you wait for around 10 seconds this screen should redirect you to the onboarding tool start screen.
Redirect to onboarding tool

Poznámka
If after waiting you are not redirected select the link pointed out by the arrow in the above screenshot.
Asistované spuštění
Nástroj asistovaného spuštění zajístí, že budete mít definovanou alespoň jednu knihovnu, kategorii čtenářů, správce systému, typ jednotky a pravidlo výpůjček před tím, než začnete systém Koha používat.
Pokud jste během instalace zvolili možnost nahrání ukázkových dat knihoven, kategorií čtenářů nebo typů jednotek, kroky nastavující tato data budou přeskočeny.
Ale vždy je nutné vytvořit alespoň jeden čtenářský účet, který bude mít práva správce systému a jedno pravidlo výpůjček.
Create a library
The installer will prompt to create the first library or branch if the sample libraries were not installed.
A library in Koha is the digital representation of a „physical“ place. More libraries can be added later by going to Administration -> Libraries and groups.
Create library
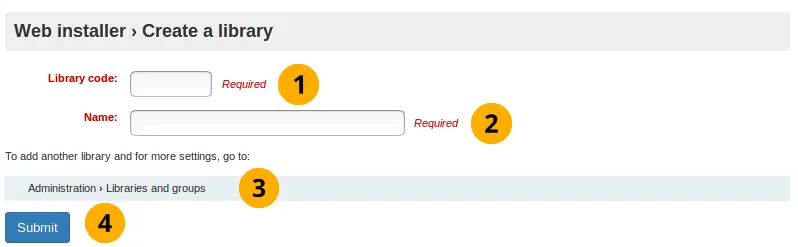
Library code: code consisting of up to 10 letters.
Name: Official name of the library, as it is commonly known.
Create more libraries: If more libraries are required, or changes need to be made to this freshly created library, go to Administration -> Libraries and groups
Click the Submit button to create a library.
Příklady:
Create library example
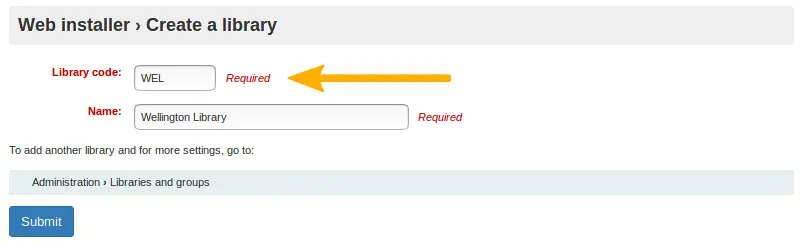
Library code: The regular expression that filters the acceptable inputs for library code only accepts up to 10 letters.
Create a patron category
All patrons in Koha must have a patron category. The patron category is like a jelly mold; multiple individual patron accounts can share common characteristics, such as circulation rules, notice frequency, holds allowed, and much more. Koha requires at least one patron category in order to add patrons.
A patron category requires:
Kód kategorie
Popis
Overdue notice required
Category type
Výchozí nastavení soukromí
Enrolment period: In months OR Until date
Create a patron category
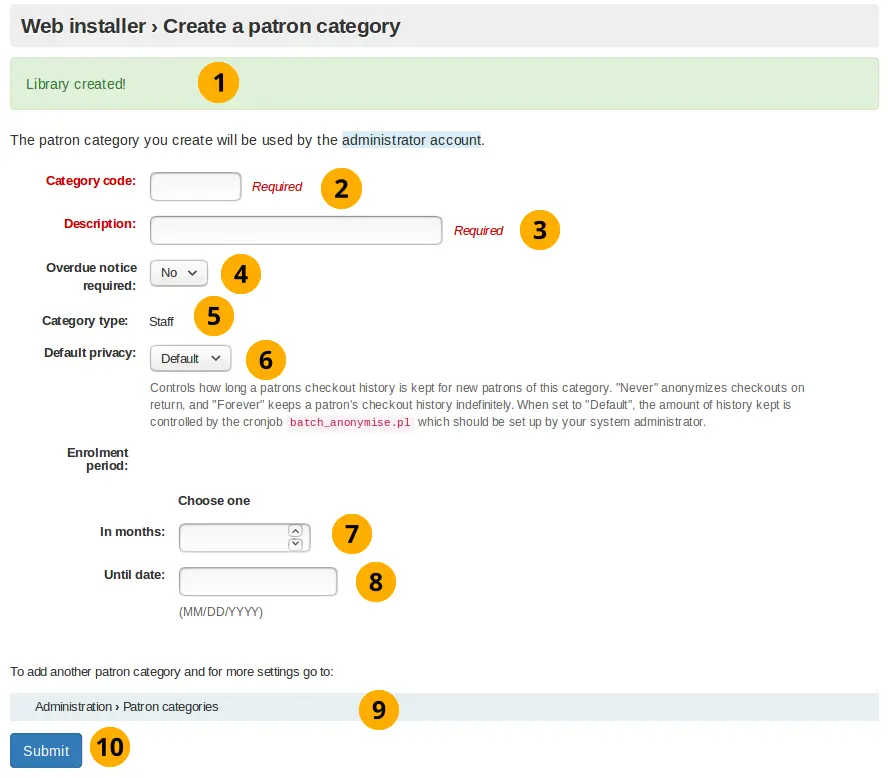
Library creation message: Indicates whether the library was created successfully.
Category code: Code consisting of up to 10 letters.
Description: Sentence describing what the patron category is.
Overdue notice required dropdown button: Set by default to ‚no‘. This specifies if you want the patron category to receive overdue notices.
Category type: This makes the category created a staff member.
Default privacy: Set by default to ‚default‘. The Default privacy controls the amount of time that the reading history of the patron is stored for.
Enrolment period - in months: This is the number of months that the patrons created from this patron category are enrolled for.
Enrolment period - until date: Select a date from the interactive datepicker calendar icon which appears when you click on this input box. The date you choose will be the enrolment end date for patrons created from this patron category.
Path to create patron category: More patron categories can be created or altered by going to Administration -> Patron categories.
Klikněte na tlačítko Uložit pro vytvoření kategorie čtenářů
Příklady:

Create a patron
A superlibrarian patron user is required to log into the Koha staff interface, once the onboarding process has been completed.
Poznámka
It is very important to document the username and password created here as they are the account credentials required to login as an administrator (superlibrarian) of Koha.
You will need to input/select:
Příjmení
Jméno
Číslo průkazky
Knihovna
Kategorie uživatelů
Uživatelské jméno:
Heslo
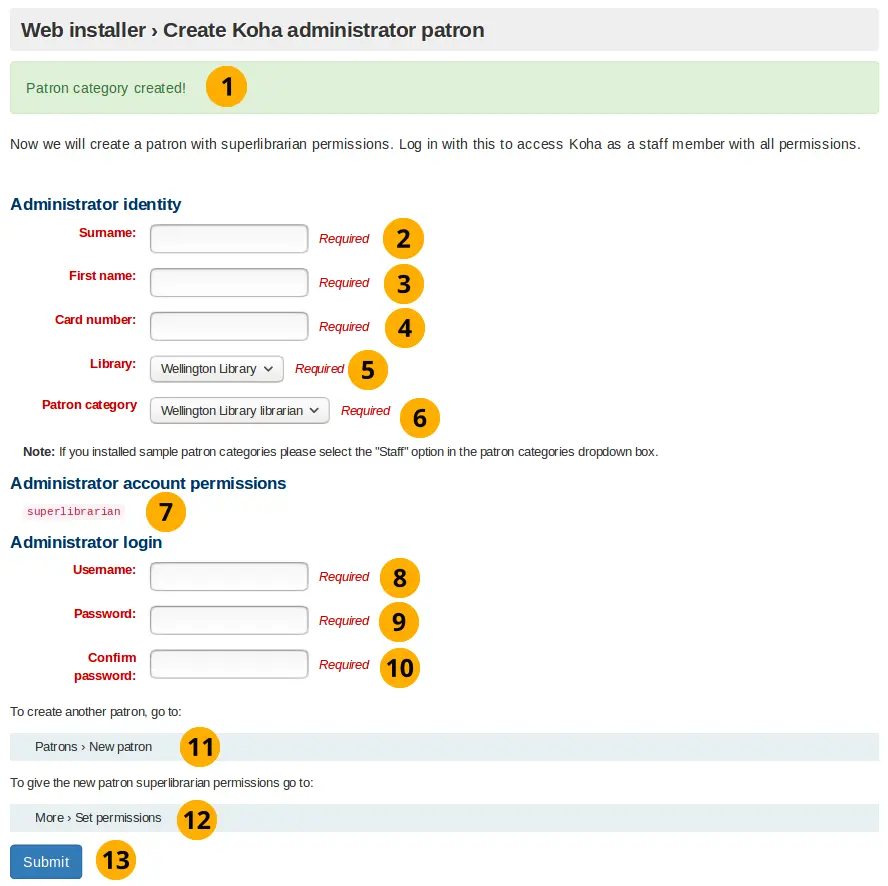
Create a patron
Patron category creation message: This indicates that if the patron category was created successfully.
Surname: Surname, or something descriptive
First name: First name, or something descriptive
Card number: This number must be unique
Library dropdown box: If a library has been created using this onboarding tool, it will be the only option. Otherwise select a random library from the sample libraries installed by the web installer.
Patron category dropdown box: If a patron category was created using this onboarding tool, it will be the only option. Otherwise select the Staff patron category.
Superlibrarian permission: This non-editable setting allows access to all librarian and web based Koha administration tasks in the staff interface. This user is the most powerful user in any Koha, so protect the credentials well.
Username: The username to log into the staff interface and OPAC (Online Patron Access Catalog) with.
Password: A password consisting of letters, numbers, and spaces only which is greater than 8 characters.
Confirm password: Repeat the above password again
Click the Submit button to create the patron account
Path to create patron: Patron’s can be created or altered by going to Patrons -> New patron
Assign patron permissions: After creating a patron go More -> Set permissions to assign permissions.
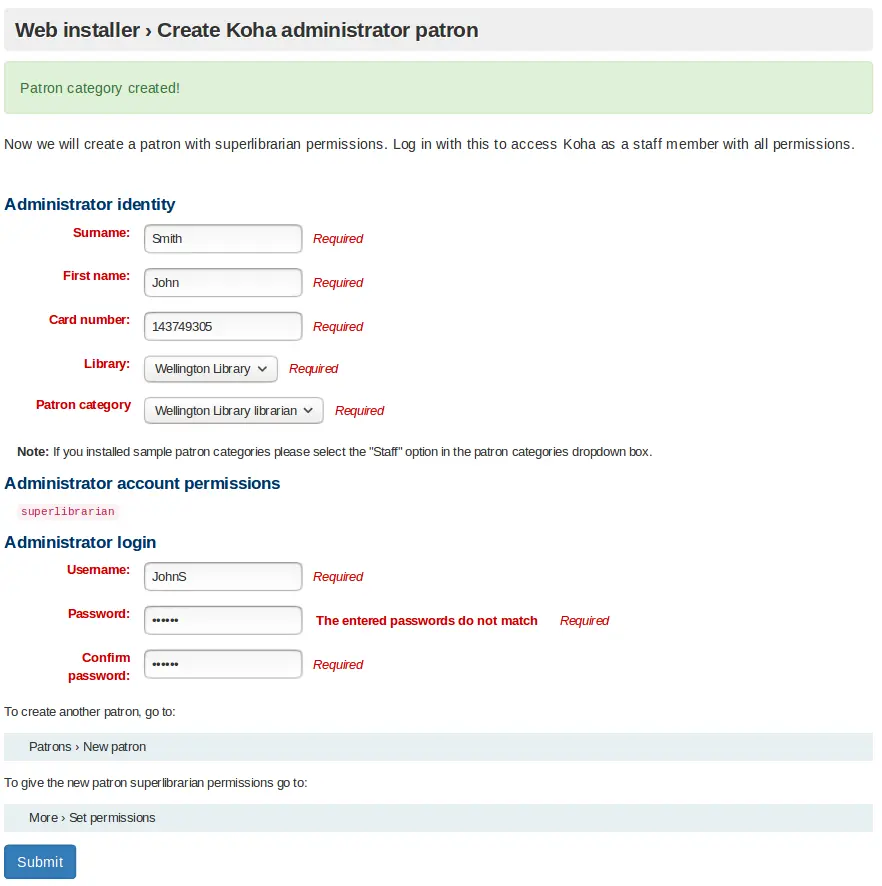
Příklady:
Create a patron example
Create an item type
If you did not install sample item types in the web installer then this screen will be displayed.
As with the patron category the item type is basically a template which you use to make multiple items with common characteristics.
You need to input:
Kód typu jednotky:
Popis

Create item type
Administrator account creation message: Indicates if the administrator patron was created successfully
Item type code: Code consisting of up to 10 letters
Description: Sentence describing what the item type is.
Path to create item type: Item types can be created or altered by going to Administrator->Item types
Click the Submit button to create the item type
Příklady:
Create item type example

Poznámka
The regular expression filtering item type code input will only accept letters.
Create a circulation rule
This screen will always be displayed no matter what sample data you installed with the web installer.
Here you are creating a rule which applies the predefined organizational decisions of your library as to what restrictions you place on patrons borrowing items.
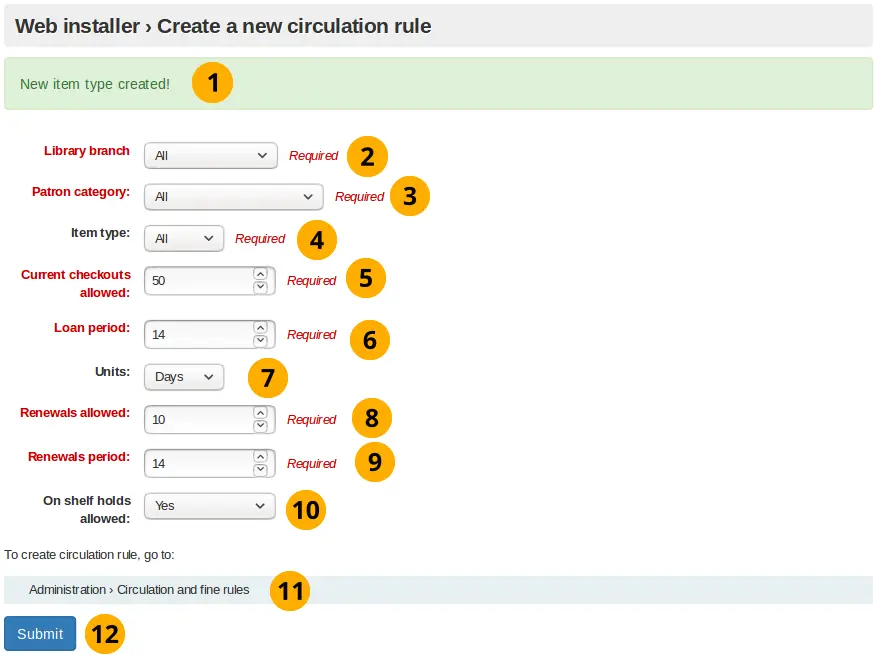
Create circulation rule
Poznámka
Numbers are the only valid input for all input fields in this form.
Item type creation message: Indicates if the item type was created successfully
Library branch dropdown box: This is the library (or libraries) you want to apply the circulation rule to. By default it is set to all, however you can select a singular library to apply the rule to from the dropdown box.
Patron categories dropdown box: This is the patron categories you want to apply the circulation rule to. As with library branch it is set to all by default but more options are available.
Item type dropdown box: This is the item types that you want the circulation rule to apply to. Again more options are available than the default selected all option.
Current checkouts allowed: This is the number of items allowed from the selected library, for selected patron categories and of the selected item type. Set to 50 by default.
Loan period: Number of days or hours that an item is allowed out for. Set to 14 by default.
Units dropdown box: Set by default to aays, the unit selecting in this field is applied to the numerical values written into loan period and renewals period
Renewals allowed: Number of times a item can be renewed. Set to 10 by default.
Renewals period: Number of days or hours that a renewal lasts for. Set to 14 by default.
On shelf holds allowed dropdown box: If items can be held whilst they are on the shelf.
Path to create circulation rule: Circulation rules can be created or altered by going to Administration -> Circulation and fines rules
Click the submit button to create the circulation rule.
Onboarding tool complete
This page tells you if the circulation rule was created successfully, and that the Koha installation is complete
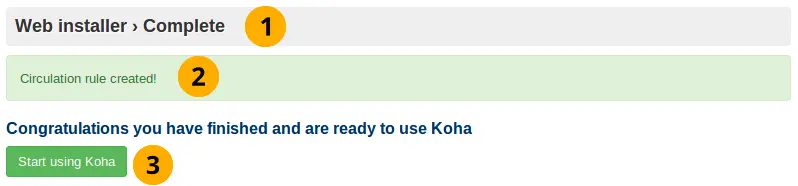
Web installer message: Indicates if the web installation is complete
Circulation rule creation message: Indicates if the circulation rule was created successfully.
Start using Koha: Click to login to Koha using the Koha administrator account you created using the onboarding tool.
Login to access staff interface
You have now finished using the onboarding tool and can log into the staff interface using the patron account credentials you created in the onboarding tool
Login screen
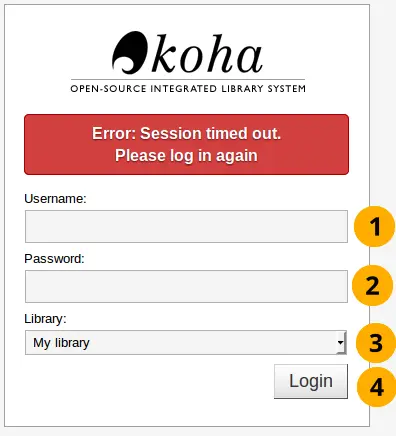
Username: Enter the username you created for the patron
Password: Enter the password you created
Library: This is the library staff interface you want to log into. The options are either: my library or the library you installed/created. Leaving the default selected option of my library is fine to log in with first time.
Poznámka
Only staff with the loggedinlibrary permission (or the superlibrarian permission) will be able to log into a library different from their home library.
Poznámka
The StaffLoginLibraryBasedOnIP and StaffLoginRestrictLibraryByIP system preferences can limit which library you can log into.
Click the login button to access the staff interface
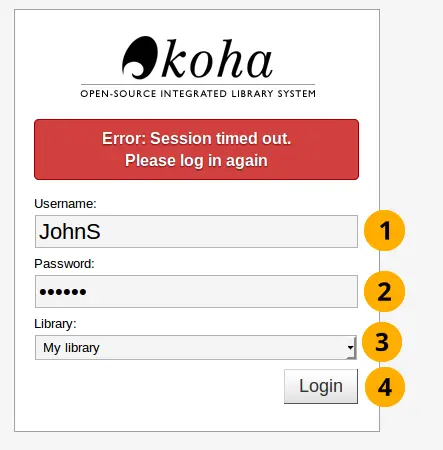
Příklady:
Login example
Staff interface
The staff interface should now appear

Advanced configuration
VirtualHost overrides
Koha allows for the override of some system settings at a VirtualHost level.
OPAC_BRANCH_DEFAULT
The OPAC_BRANCH_DEFAULT directive can be used to specify the default branch for anonymous users of the OPAC.
SetEnv OPAC_BRANCH_DEFAULT "CPL"
RequestHeader add X-Koha-SetEnv "OPAC_BRANCH_DEFAULT CPL"
Note: This override affects which News and HTML Customisation blocks a user will see prior to logging in to the OPAC.