ERM (Electronic resource management)
ई-संसाधन प्रबंधन (ERM) मॉड्यूल का उपयोग पुस्तकालय के इलेक्ट्रॉनिक सूचना संसाधनों के चयन, अधिग्रहण, लाइसेंसिंग, एक्सेस, रखरखाव, उपयोग, मूल्यांकन, प्रतिधारण और चयन को ट्रैक करने के लिए किया जाता है। इन संसाधनों में इलेक्ट्रॉनिक जर्नल, इलेक्ट्रॉनिक किताबें, स्ट्रीमिंग मीडिया, डेटाबेस, डेटासेट और कंप्यूटर सॉफ्टवेयर शामिल हो सकते हैं।।
ई-संसाधन प्रबंधन (ERM) मॉड्यूल का उपयोग करने के लिए, आपको सक्षम करना होगा ERMModule सिस्टम वरीयता।
टिप्पणी
Only staff with the erm permission (or the superlibrarian permission) will have access to this module.
ईआरएम होम पेज
वहाँ जाओ: अधिक> ई-संसाधन प्रबंधन
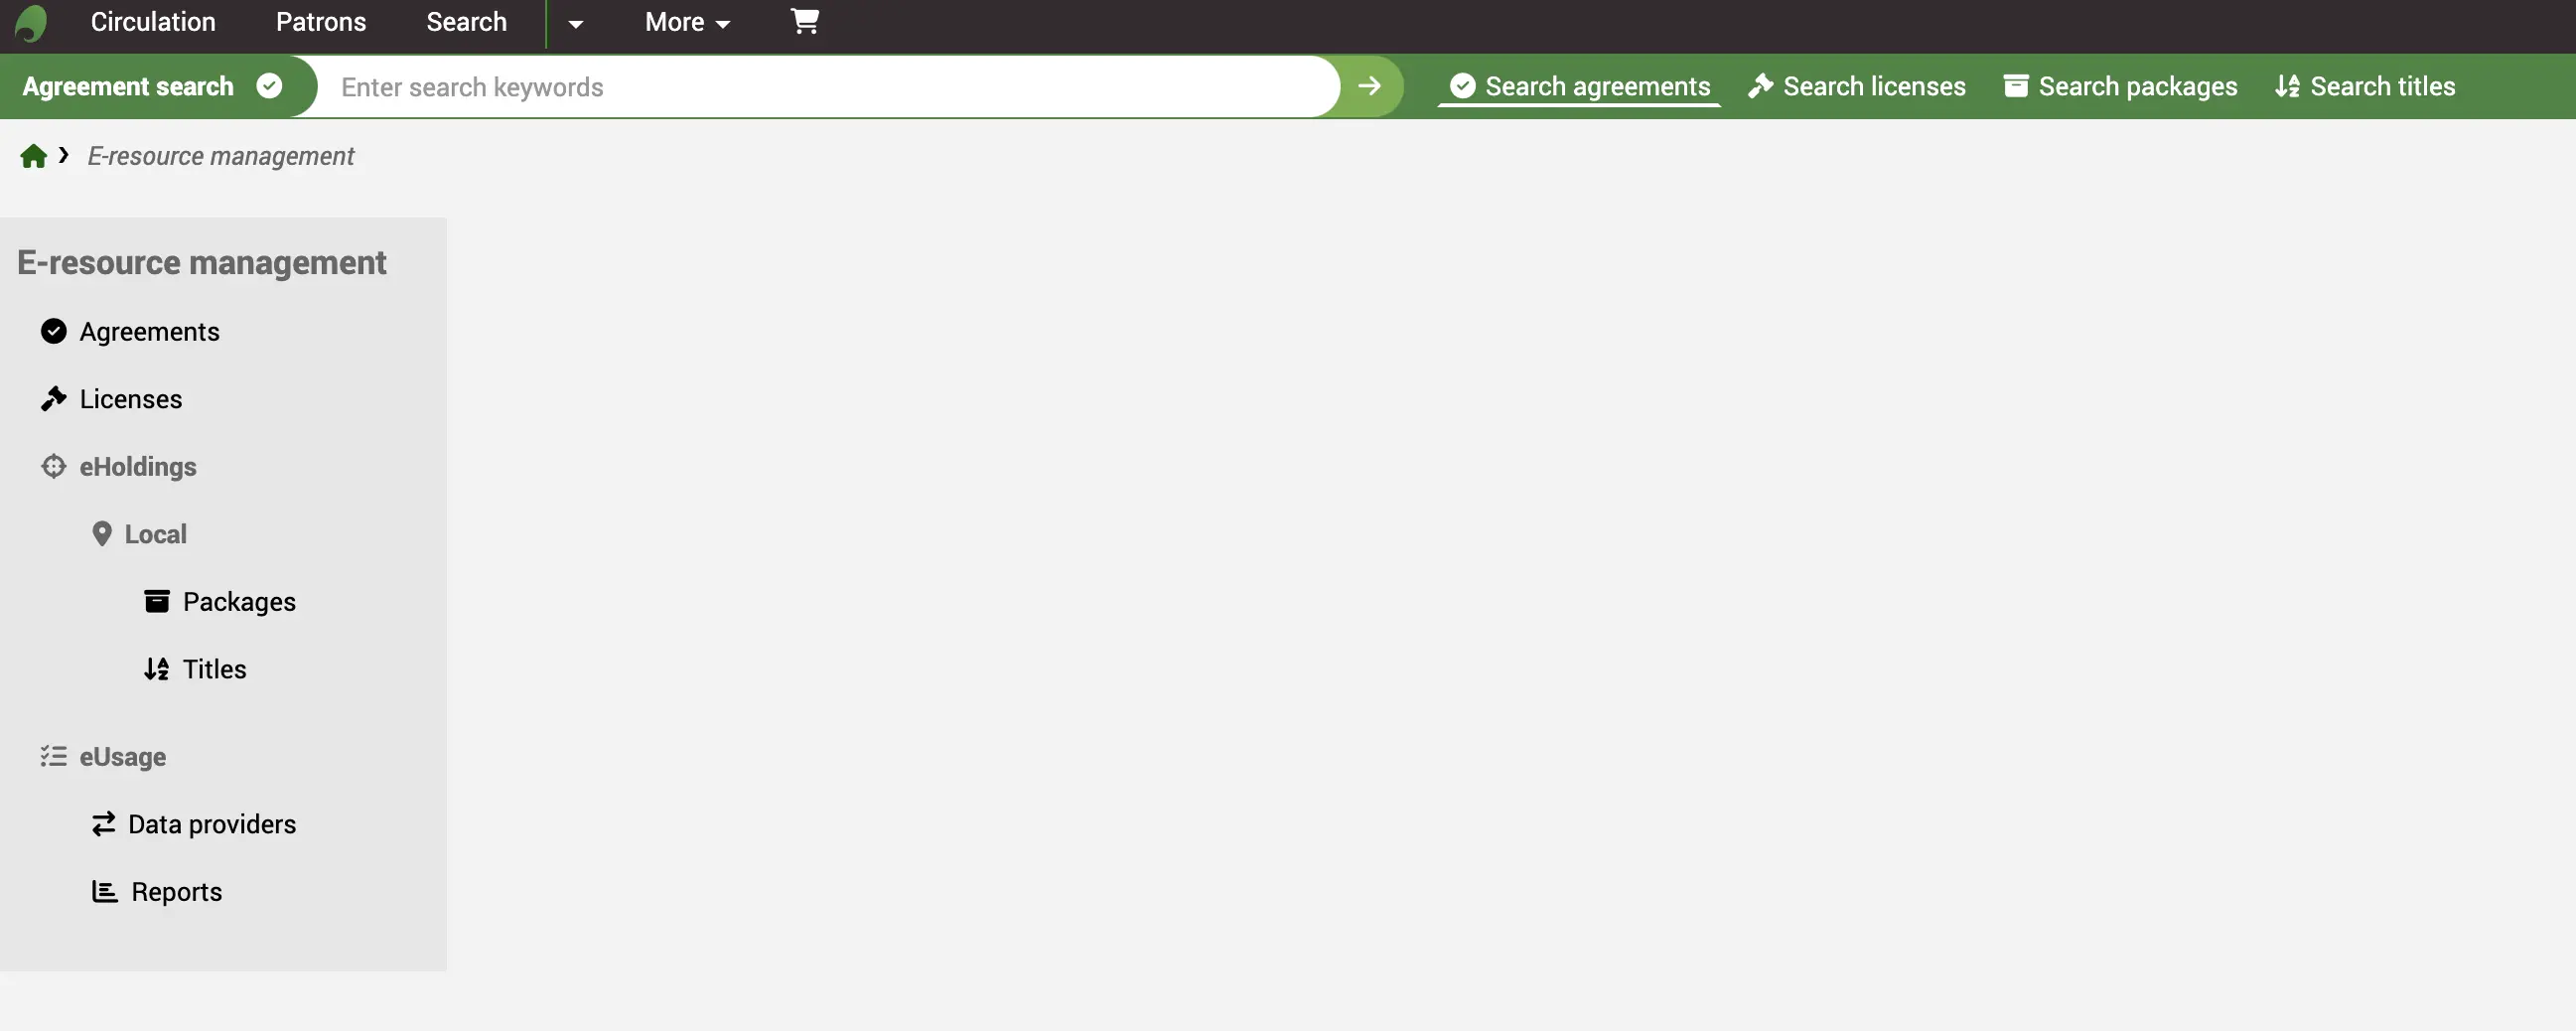
खोज बार
खोज बार आपको अनुबंध रिकॉर्ड और (स्थानीय) पैकेज या शीर्षक की जल्दी से खोज करने की अनुमति देता है।।
Packages or titles from third-party knowledge bases are not searchable from here; go to the eHoldings instead.

अनुबंध
ईआरएम शब्दों में, समझौतों का वर्णन है कि आप किस इलेक्ट्रॉनिक सदस्यता का उपयोग कर सकते हैं जबकि लाइसेंस का उपयोग यह वर्णन करने के लिए किया जाता है कि आप उन संसाधनों के साथ क्या कर सकते हैं।
टिप्पणी
Before you start to create new Agreement records, ensure your staff users have either the superlibrarian or the erm permission and that you have reviewed the ERM authorized values to suit your needs. Also, ensure you have reviewed the ERM system preferences.
एक समझौता रिकॉर्ड बनाएं
ईआरएम होम पेज से बाएं हाथ के मेनू में समझौते लिंक पर क्लिक करें
वहाँ जाओ: अधिक> ई-संसाधन प्रबंधन> समझौते
समझौते तालिका के शीर्ष पर + नए समझौते बटन का उपयोग करें
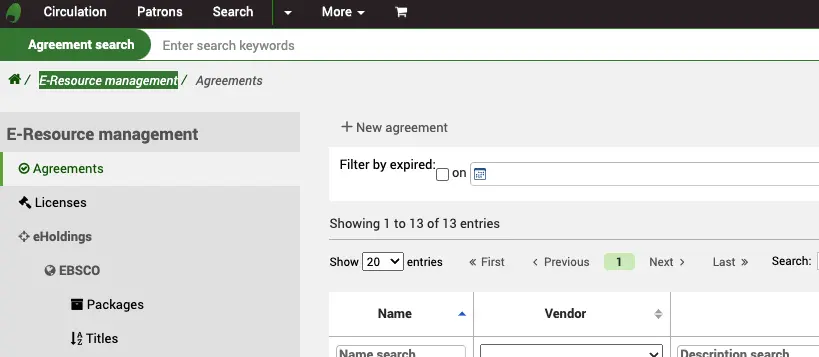
आपको समझौते को एक नाम, विवरण और स्थिति देने की आवश्यकता है। स्थिति यह निर्धारित करती है कि यह समझौता सक्रिय है या नहीं। अन्य सभी क्षेत्र वैकल्पिक हैं।
समझौता, वैकल्पिक रूप से, एक मौजूदा से जुड़ा हो सकता है विक्रेता रिकॉर्ड अधिग्रहण मॉड्यूल में। यह आपको ई-रिसोर्स की आपूर्ति करने वाले और इसके खिलाफ खरीद आदेश बनाने के लिए रिकॉर्ड रखने की अनुमति देता है।
क्लोजर कारण फ़ील्ड तब तक भूरा रहेगा जब तक आप समझौते को "बंद" की स्थिति नहीं देते, जिस बिंदु पर यह सक्रिय हो जाएगा।
लाइसेंस जानकारी बॉक्स का उपयोग यहां किया जा सकता है यदि आप ** का इरादा नहीं करते हैं तो ERM के लाइसेंस भाग का उपयोग करने का इरादा है लेकिन फिर भी समझौते के साथ लाइसेंस के बारे में जानकारी रिकॉर्ड करना चाहते हैं।
If you have any additional fields for ERM agreements (erm_agreements), they will be displayed here.
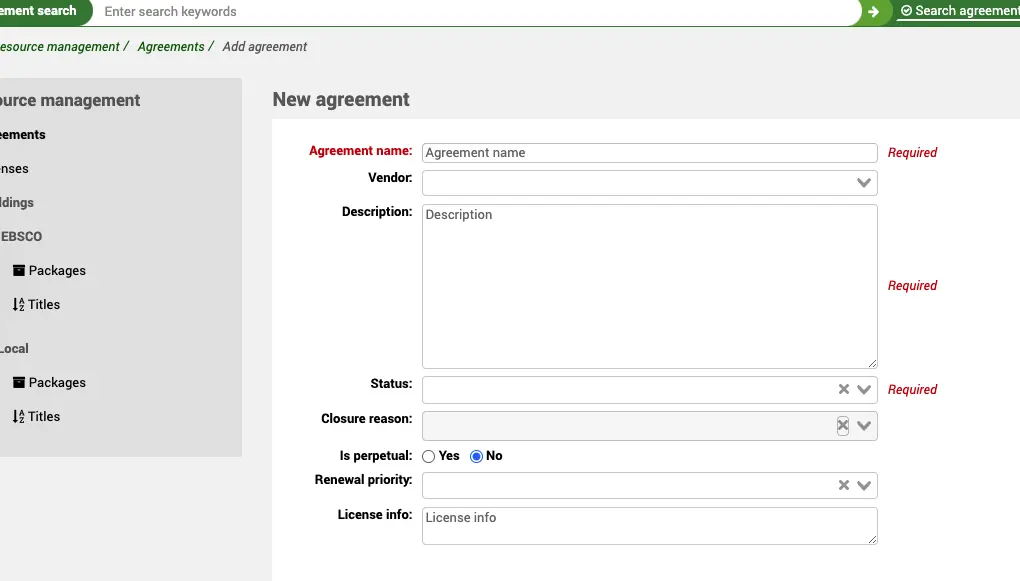
अवधियाँ
एकाधिक अवधियों को एक अनुबंध रिकॉर्ड से जोड़ा जा सकता है।।
अवधि आपके द्वारा प्रदाता के साथ होने वाले संबंध की अवधि का वर्णन करती है। हर बार जब आप एक समझौते को नवीनीकृत करते हैं, तो आप एक नई समझौते की अवधि रिकॉर्ड कर सकते हैं ताकि आपके पास एक ऐतिहासिक रिकॉर्ड हो कि कितनी बार इसे नवीनीकृत किया गया है। आप भविष्य की तारीखों के लिए समझौते की अवधि भी बना सकते हैं। इसलिए, उदाहरण के लिए, आपके पास एक वर्तमान अवधि, कुछ ऐतिहासिक अवधि और आगामी अवधि हो सकती है।
रद्दीकरण की समय सीमा का उपयोग रिपोर्टिंग में आपको आगामी अंत तिथियों के लिए सचेत करने के लिए किया जा सकता है और इसलिए आपको प्रदाता के साथ नवीकरण शुरू करने के लिए सचेत करते हैं।
उपयोगकर्ता
इस संदर्भ में, एक उपयोगकर्ता एक कर्मचारी उपयोगकर्ता है जो समझौते के साथ कुछ भागीदारी करता है। वे ई-संसाधन की खरीद में शामिल कर्मचारी हो सकते हैं, लाइसेंसिंग, विषय विशेषज्ञ आदि को सॉर्ट कर सकते हैं।।
आप कई उपयोगकर्ताओं को एक समझौते में संलग्न कर सकते हैं।।
In order to be attached to an agreement a staff user must have the erm permission (or the superlibrarian permission), otherwise they will not appear in the list when you try and select a user. This also keeps the list of patrons to a small, manageable, size by excluding your library patrons.
जब आप एक उपयोगकर्ता को संलग्न करते हैं तो आप उन्हें ERM_USER_ROLES अधिकृत मान से एक भूमिका भी देते हैं।।

लाइसेंस
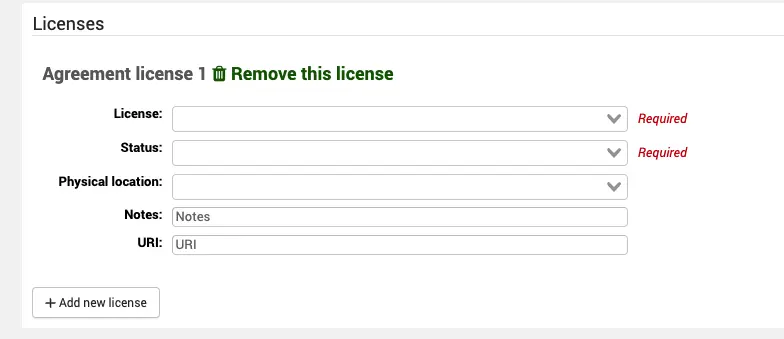
यदि आप लाइसेंस के तहत बनाए गए लाइसेंस रिकॉर्ड के लिए एक समझौते को लिंक करना चाहते हैं तो "नए लाइसेंस जोड़ें" बटन का उपयोग करें। एक समझौते को एक या अधिक लाइसेंस रिकॉर्ड से जोड़ा जा सकता है।।
उन लाइसेंसों की ड्रॉप-डाउन सूची से लाइसेंस नाम का चयन करें जिन्हें आपने पहले बनाया है और इसे एक स्थिति दे दी है।।
भौतिक स्थान यह है कि आपने अपने पुस्तकालय के भीतर दस्तावेज़ का एक पेपर संस्करण संग्रहीत किया है।।
आप नोट्स और यूआरआई को भी निर्दिष्ट कर सकते हैं (यदि लाइसेंस वास्तव में ऑनलाइन उपलब्ध है)।।
संबंधित समझौते
एक संबंधित समझौता कोई भी समझौता है जो सिस्टम में पहले से ही एक समझौते के लिए कुछ प्रासंगिकता है। उदाहरण के लिए, एक समझौता जिसने एक मौजूदा समझौते को समाप्त कर दिया है।
आप एक समझौते को एक या कई अन्य समझौतों से जोड़ सकते हैं।

समझौता दस्तावेज
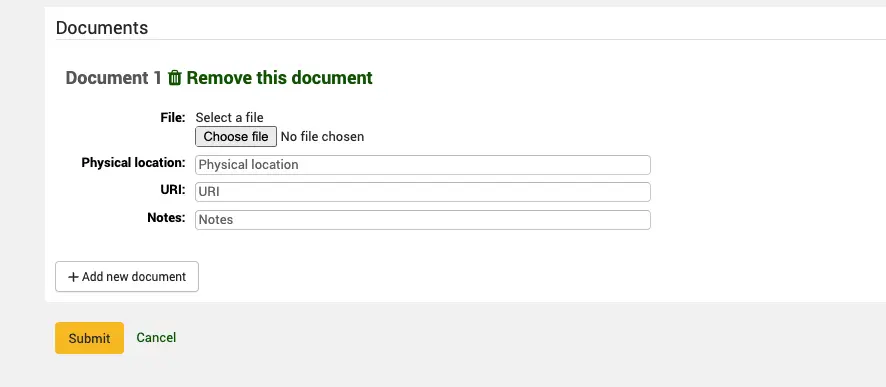
आप एक या अधिक दस्तावेजों को एक अनुबंध रिकॉर्ड में संलग्न कर सकते हैं।।
यह लाइसेंस दस्तावेजों (जो लाइसेंस रिकॉर्ड से जुड़े हैं) के लिए नहीं है, लेकिन एक प्रदाता के साथ अन्य पत्राचार, संसाधनों के बारे में जानकारी आदि। यदि आप केवल समझौते की जानकारी रिकॉर्ड करने का निर्णय लेते हैं और लाइसेंस नहीं तो आप निश्चित रूप से, लाइसेंस दस्तावेजों को भी संलग्न कर सकते हैं।
भौतिक स्थान वह जगह है जहां पत्राचार का कोई भी पेपर संस्करण लाइब्रेरी में आयोजित किया जाता है और URI किसी ऑनलाइन कॉपी के लिए लिंक होता है।
एक समझौता रिकॉर्ड खोजें और देखें
ईआरएम होम पेज से बाएं हाथ के मेनू में समझौते लिंक पर क्लिक करें
वहाँ जाओ: अधिक> ई-संसाधन प्रबंधन> समझौते
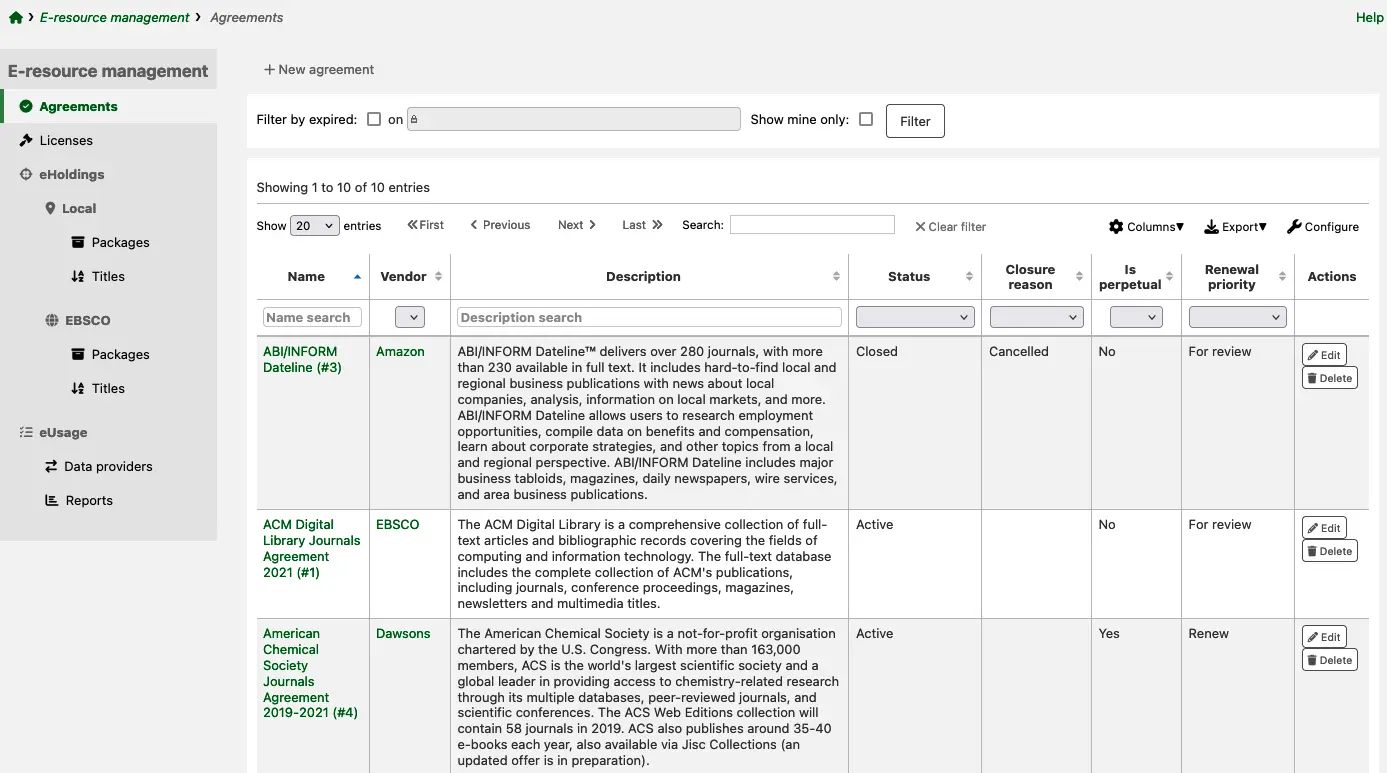
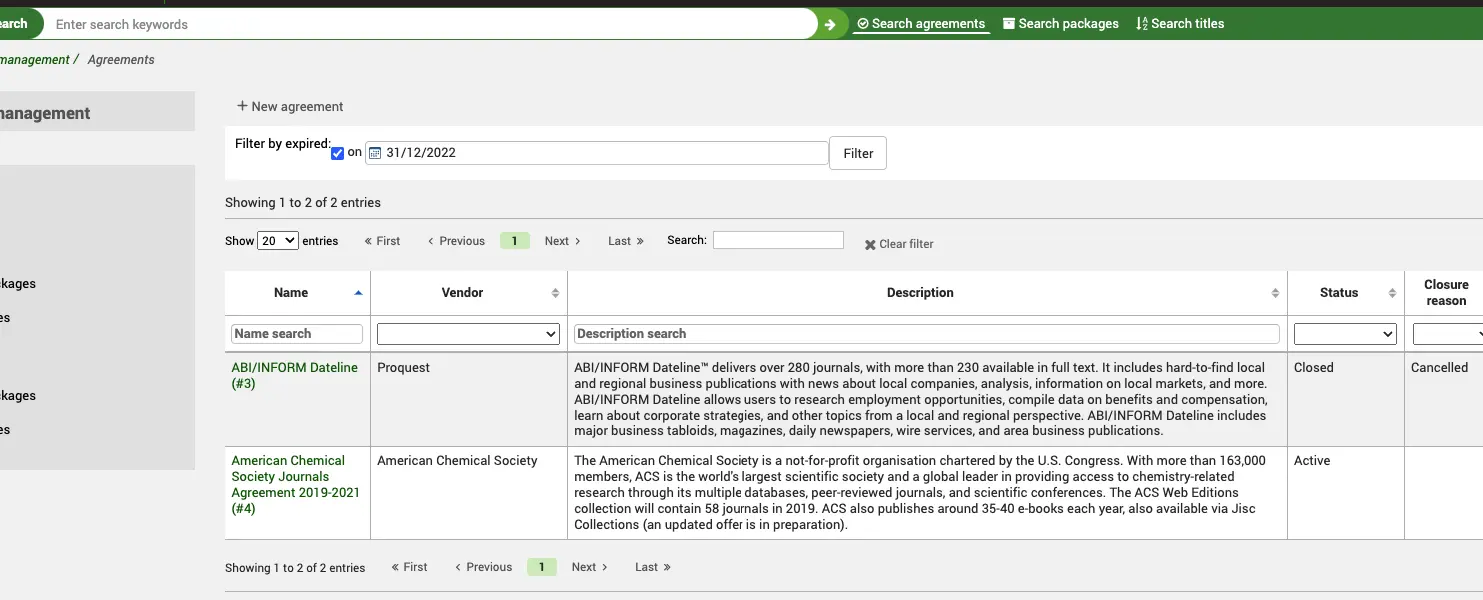
आपको समझौते के नाम से आदेश दिए गए सिस्टम में मौजूदा समझौतों की सूची के साथ प्रस्तुत किया जाएगा।।
To only view expired agreements, tick 'Filter by expired on' above the table. Enter a date and click 'Filter'.
To only see agreements linked to the account you are logged in as, tick 'Show mine only' and click 'Filter'.
You can also use the table or column filters to search and filter data you are looking for (for example, all agreements with the Status: closed).
टिप्पणी
आप इस तालिका के कॉलम को 'कन्फ़िगर' बटन पर क्लिक करके अनुकूलित कर सकते हैं। यह आपको एडमिनिस्ट्रेशन मॉड्यूल में ले जाएगा और विशेष रूप से 'टेबल आईडी: एग्रीमेंट्स' अनुभाग के लिए Table सेटिंग्स।।
समझौते के नाम पर क्लिक करने से आप पूर्ण दृश्य के माध्यम से ले जाएंगे।
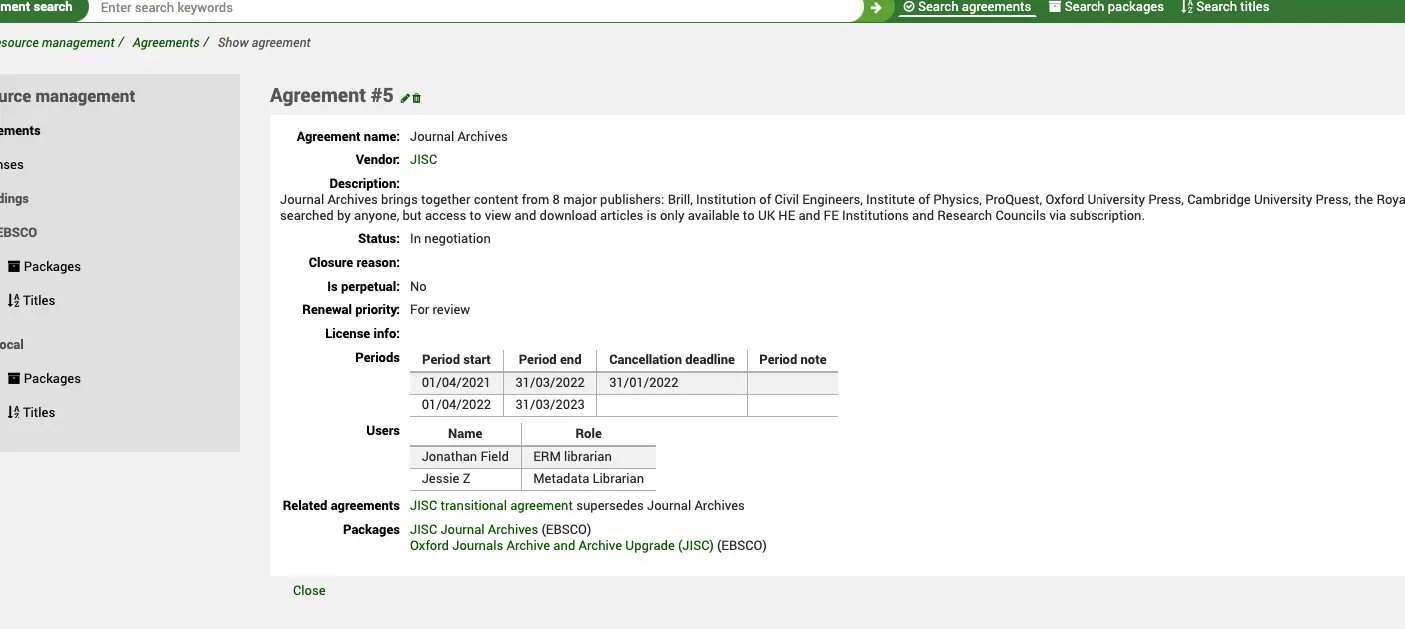
पूर्ण दृश्य आपके द्वारा दर्ज की गई सभी जानकारी को सारांशित करता है जब आप समझौते का निर्माण कर रहे थे। विक्रेता यह संलग्न है (जो कि विक्रेता रिकॉर्ड के लिए एक हाइपरटेक्स्ट लिंक है), स्थिति, किसी भी समझौते की अवधि, समझौते से जुड़े किसी भी उपयोगकर्ता, किसी भी संबंधित समझौते और, महत्वपूर्ण रूप से, समझौते को क्या शामिल करता है; यही है, कि कौन से विक्रेता पैकेज समझौते के हिस्से के रूप में शामिल हैं। आप देखेंगे कि 'संबंधित समझौते' क्षेत्र भी अन्य समझौते के लिए एक हाइपरटेक्स्ट लिंक है और यह द्विदिश है। पैकेज का लिंक भी एक हाइपरटेक्स्ट लिंक है और आपको ईहोल्डिंग सेक्शन में ले जाता है।
एक पैकेज ई-संसाधन शीर्षक का एक संग्रह है जिसे एक प्रदाता/विक्रेता द्वारा वितरण के लिए एक साथ बंडल किया गया है। एक ही शीर्षक का उपयोग करने के लिए आपको लाइसेंस बेचने के बजाय, एक विक्रेता आमतौर पर आपको एक नामित पैकेज (जैसे जर्नल आर्काइव्स) में एक साथ बंडल किए गए ई-संसाधन का चयन बेच देगा। इसमें अक्सर दसियों या सैकड़ों शीर्षक भी हो सकते हैं। प्रदाताओं के साथ दुनिया के विभिन्न हिस्सों में कस्टम पैकेजों को अक्सर स्थानीय रूप से बातचीत की जाती है। पैकेजों में खरीदने के लाभ का मतलब है कि लाइब्रेरी को विशिष्ट शीर्षकों के लिए प्रकाशकों के साथ व्यक्तिगत बातचीत करने की आवश्यकता नहीं है, यह प्रदाता के लिए छोड़ दिया जाता है।
समझौते के शीर्ष पर अनुबंध फ़िल्टर पृष्ठ के शीर्ष पर आप एक फ़िल्टर बॉक्स को नोटिस करेंगे। इसका उद्देश्य आपको समाप्त हो चुके समझौतों या समझौतों को जल्दी से फ़िल्टर करने की अनुमति देना है, जिसमें आगामी नवीकरण हो सकता है (और इसलिए कार्रवाई की आवश्यकता हो सकती है)।
लाइसेंस
एक लाइसेंस बताता है कि आप उस सामग्री के साथ क्या कर सकते हैं जिसे आपने सब्सक्राइब किया है। यह वास्तव में, अनुबंध या उपयोग की शर्तें है।
वहाँ जाओ: अधिक> ई-संसाधन प्रबंधन> लाइसेंस
लाइसेंस समझौतों के साथ काम करते हैं या, यदि आप केवल आपके पास लाइसेंस की सूची रिकॉर्ड करना पसंद करते हैं, तो यह अपने आप काम कर सकता है।
लाइसेंस रिकॉर्ड बनाएं
ईआरएम होम पेज से बाएं हाथ के मेनू में लाइसेंस लिंक पर क्लिक करें
वहाँ जाओ: अधिक> ई-संसाधन प्रबंधन> लाइसेंस
लाइसेंस तालिका के शीर्ष पर + नए लाइसेंस बटन का उपयोग करें
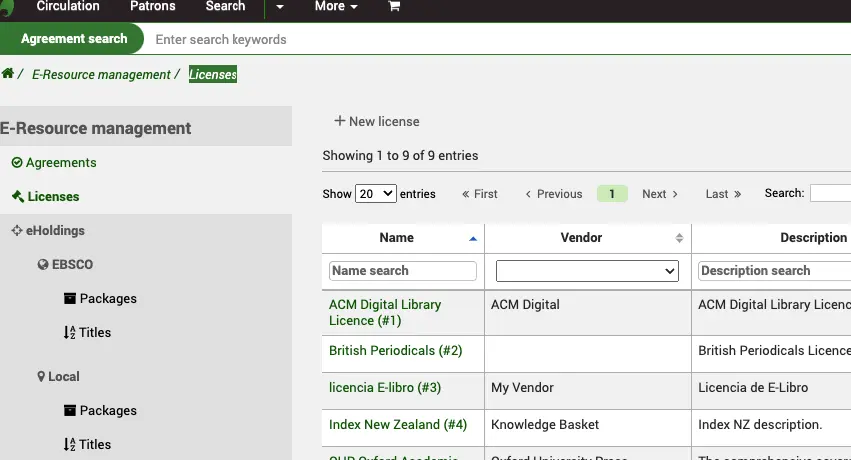
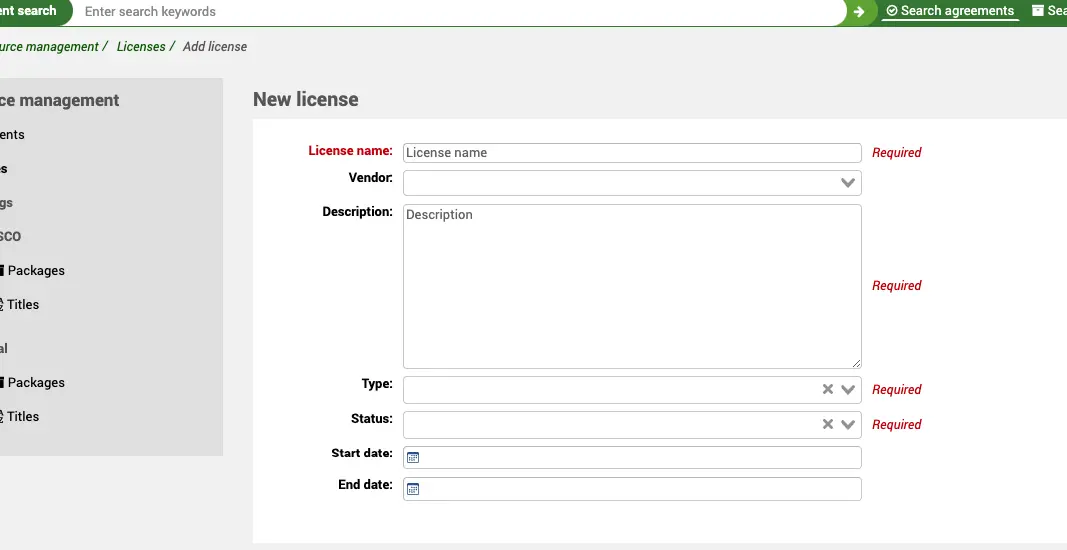
आपको लाइसेंस को नाम, विवरण, प्रकार और स्थिति देने की आवश्यकता है। स्थिति यह निर्धारित करती है कि यह समझौता सक्रिय है या नहीं। अन्य सभी क्षेत्र वैकल्पिक हैं।
लाइसेंस, वैकल्पिक रूप से, एक मौजूदा से जुड़ा हो सकता है विक्रेता रिकॉर्ड अधिग्रहण मॉड्यूल में। यह आपको एक रिकॉर्ड रखने की अनुमति देता है कि लाइसेंस किस विक्रेता के साथ है।
लाइसेंस की शुरुआत की तारीख और अंत दोनों तिथि होगी, ये एक समझौते की अवधि में तारीखों से भिन्न हो सकते हैं।
If you have any additional fields for ERM licenses (erm_licenses), they will be displayed here.
उपयोगकर्ता
इस संदर्भ में, एक उपयोगकर्ता एक कर्मचारी उपयोगकर्ता है जो लाइसेंस के साथ कुछ भागीदारी रखता है। वे उदाहरण के लिए लाइसेंस पर बातचीत या हस्ताक्षर करने में शामिल कर्मचारी हो सकते हैं।।
आप एकाधिक उपयोगकर्ताओं को लाइसेंस में संलग्न कर सकते हैं।।
In order to be attached to a license a staff user must have the erm permission (or the superlibrarian permission), otherwise they will not appear in the list when you try and select a user. This also keeps the list of patrons to a small, manageable, size by excluding your library patrons.
जब आप एक उपयोगकर्ता को संलग्न करते हैं तो आप उन्हें ERM_USER_ROLES अधिकृत मान से एक भूमिका भी देते हैं।।

लाइसेंस दस्तावेज
आप एक या एक से अधिक दस्तावेजों को लाइसेंस रिकॉर्ड में संलग्न कर सकते हैं। यहां से आप लाइसेंस या उपयोग की शर्तों की पीडीएफ प्रतियां संलग्न कर सकते हैं।
भौतिक स्थान वह जगह है जहां लाइब्रेरी में पत्राचार का कोई भी पेपर संस्करण आयोजित किया जाता है और URI किसी भी ऑनलाइन कॉपी के लिए एक लिंक प्रदान करता है।

टिप्पणी
लाइसेंस और समझौतों के लिए किसी भी अपलोड किए गए दस्तावेज़ों का फ़ाइल आकार आपके MariaDB कॉन्फ़िगरेशन फ़ाइल में * max_allowed_packet * आकार के मान तक सीमित है। यदि आप इस आकार से अधिक हैं तो आपको फ़ाइल आकार चेतावनी मिलेगी। इस मूल्य को बढ़ाने के लिए अपने सिस्टम व्यवस्थापक से बात करें।

लाइसेंस रिकॉर्ड खोजें और देखें
ईआरएम होम पेज से बाएं हाथ के मेनू में लाइसेंस लिंक पर क्लिक करें
वहाँ जाओ: अधिक> ई-संसाधन प्रबंधन> लाइसेंस
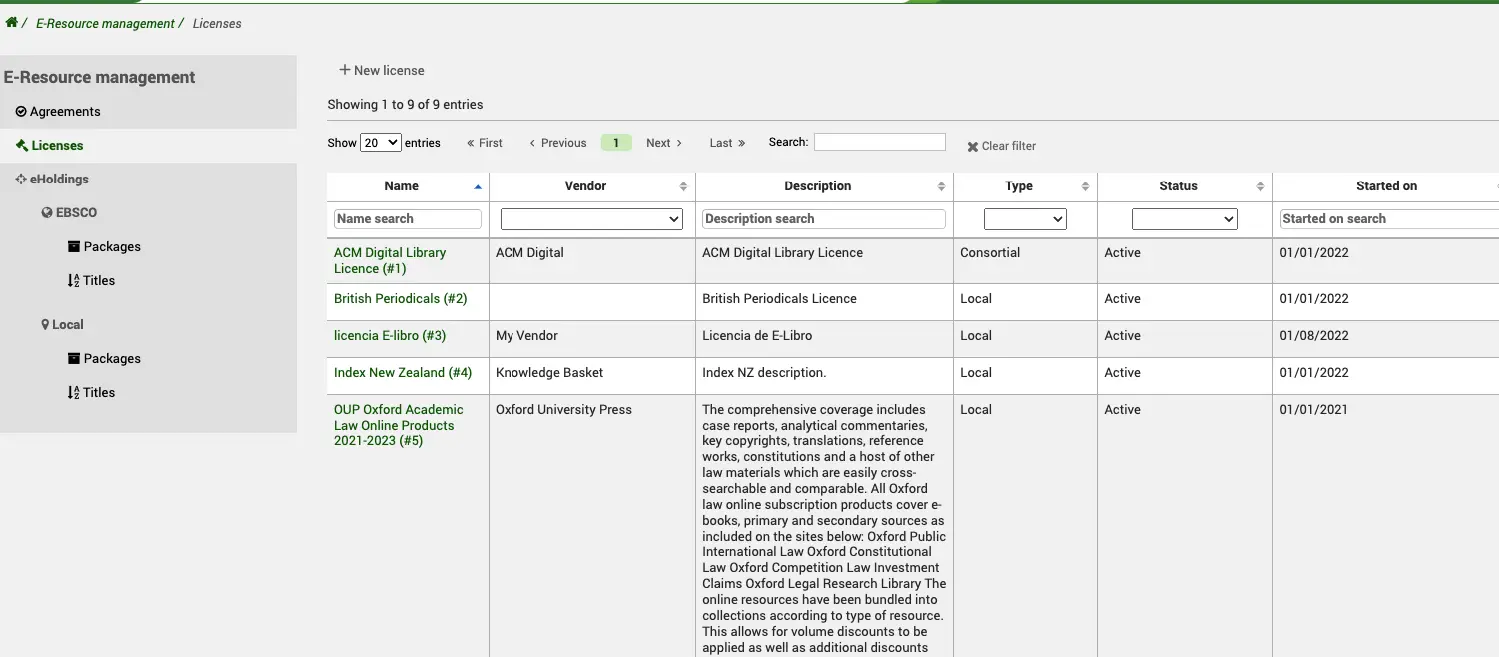
आपको लाइसेंस नाम द्वारा आदेशित सिस्टम में मौजूदा लाइसेंस की सूची के साथ प्रस्तुत किया जाएगा। आप खोज और फ़िल्टर डेटा के लिए तालिका या कॉलम फ़िल्टर का उपयोग कर सकते हैं जिसे आप खोज रहे हैं (उदाहरण के लिए, स्थिति के साथ सभी लाइसेंस: समाप्त हो गए)।
टिप्पणी
आप इस तालिका के कॉलम को 'कन्फ़िगर' बटन पर क्लिक करके अनुकूलित कर सकते हैं। यह आपको एडमिनिस्ट्रेशन मॉड्यूल में ले जाएगा और विशेष रूप से 'टेबल आईडी: लाइसेंस' अनुभाग के लिए Table सेटिंग्स।।
लाइसेंस के नाम पर क्लिक करने से आपको पूर्ण दृश्य तक ले जाया जाएगा।

पूर्ण दृश्य आपके द्वारा दर्ज किए गए सभी जानकारी को संक्षेप में प्रस्तुत करता है जब आप लाइसेंस बना रहे थे। विक्रेता यह (जो कि विक्रेता रिकॉर्ड के लिए एक हाइपरटेक्स्ट लिंक है), स्थिति, प्रकार, स्टार्ट और एंड डेट्स, लाइसेंस से जुड़े किसी भी उपयोगकर्ता और, महत्वपूर्ण रूप से, लाइसेंस दस्तावेज़ (ओं) के लिंक से जुड़ा हुआ है।
ईहोल्डिंग
शर्तों की परिभाषा:
संसाधन
एक संसाधन एक शीर्षक का एक उदाहरण है। नतीजतन एक संसाधन में एक पैकेज में शीर्षक की प्रत्येक घटना के लिए एक अलग संसाधन आईडी होगी।
उदाहरण के लिए: Teise / Law में है
DOAJ
पूर्ण पाठ के साथ आपराधिक न्याय सार
आदि.
Knowledge base (KB)
एक ज्ञान आधार एक व्यापक डेटाबेस है जो एक ज्ञान आधार आपूर्तिकर्ता (उदाहरण के लिए, EBSCO) द्वारा बनाए रखा जाता है, जिसमें इलेक्ट्रॉनिक संसाधनों जैसे कि शीर्षक सूची और कवरेज तिथियां आदि के बारे में जानकारी होती है। ज्ञान के आधार आमतौर पर एक सामग्री प्रदाता द्वारा प्रदान किए गए संसाधनों को संग्रह या डेटाबेस में व्यवस्थित करते हैं। विशिष्ट सामग्री प्रदाता प्रसाद को प्रतिबिंबित करें, उदाहरण के लिए ई-जर्नल, ई-बुक्स या अन्य सामग्रियों के पैकेज।
प्रदाता
ई-संसाधन प्रदाता, उदाहरण के लिए, विक्रेता, संघ या प्रकाशक।।
पैकेज
ई-संसाधन शीर्षक का एक संग्रह एक साथ बंडल किया गया और एक प्रदाता द्वारा वितरित किया गया।।
शीर्षक
व्यक्तिगत ई-संसाधन, उदाहरण के लिए एक जर्नल या ई-बुक, आमतौर पर एक पैकेज के भीतर निहित है।।
वहाँ जाओ: अधिक> ई-संसाधन प्रबंधन
बाएं हाथ के नेविगेशन मेनू पर आपको प्रत्येक प्रदाता के लिए लिंक दिखाई देंगे जिसे आपने ERMProviders सिस्टम वरीयता में कॉन्फ़िगर किया है।।
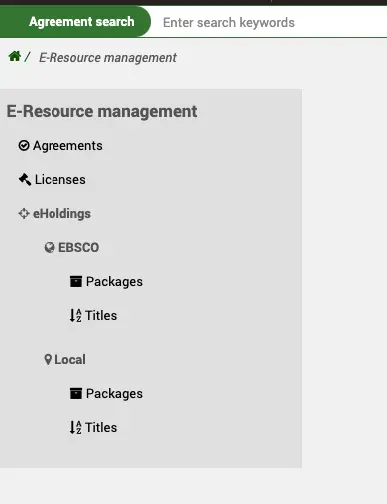
इब्सकों
EBSCO ग्लोबल नॉलेज बेस के साथ एकीकरण को उनके HoldingsIQ [https://developer.ebsco.com/knowledge-services/holdingsiq/reference] टूल के माध्यम से सुविधा दी जाती है। यह एक द्वि-दिशात्मक एपीआई है जो आपको लाखों शीर्षक के EBSCO के ज्ञान आधार से अपडेट या पढ़ने की अनुमति देता है। EBSCO नॉलेज बेस का आपका उदाहरण कॉन्फ़िगरेशन में अपने ग्राहक आईडी का उपयोग करके कोहा के माध्यम से खोज योग्य और प्रबंधनीय हो जाता है। याद रखें, नॉलेजबेस हमेशा EBSCO में बैठता है, आप इसे कोहा के माध्यम से उसी तरह से हेरफेर कर रहे हैं जैसे आप EBSCoadmin का उपयोग कर रहे थे। आपके कोहा सिस्टम में कोई भी सामग्री डेटा स्थानीय रूप से आयोजित नहीं किया जाता है।
पैकेज
वहाँ जाओ: अधिक> ई-संसाधन प्रबंधन>EBSCO> पैकेज
पैकेज होम स्क्रीन पर आपको एक खोज बॉक्स दिखाई देगा

Koha acts as a “proxy” for the EBSCO HoldingsIQ service so any search you do here is done in real time against the EBSCO knowledge base (using your Customer ID in the ERMProviderEbscoCustomerID system preference). There are two filters:
सामग्री प्रकार - यह फ़िल्टर EBSCO द्वारा उनके HoldingSIQ API के हिस्से के रूप में प्रदान किया जाता है और आपको अपनी खोज को एक विशेष सामग्री प्रकार (EBSCO द्वारा परिभाषित) के रूप में संकीर्ण करने की अनुमति देता है।
** स्टेटस का चयन करें ** - यह फ़िल्टर EBSCO द्वारा उनके होल्डिंगसिक एपीआई के हिस्से के रूप में प्रदान किया जाता है और आपको अपनी खोज को सामग्री में संकीर्ण करने की अनुमति देता है जिसे आप पहले से ही ebscoadmin के माध्यम से अपनी होल्डिंग्स में जोड़ सकते हैं। इसलिए, उदाहरण के लिए, आप उन पैकेजों की खोज कर सकते हैं जिन्हें आपने पहले ही सब्सक्राइब किया है।
कोई भी पैकेज जो पहले से चुना गया है, शीर्षक के दाहिने हाथ की तरफ एक चेक मार्क द्वारा इंगित किया गया है।

कोष्ठक में आप EBSCO पैकेज आईडी देख सकते हैं।
जब आप एक पैकेज लिंक पर क्लिक करते हैं तो आपको पैकेज के पूर्ण दृश्य पर ले जाया जाएगा।
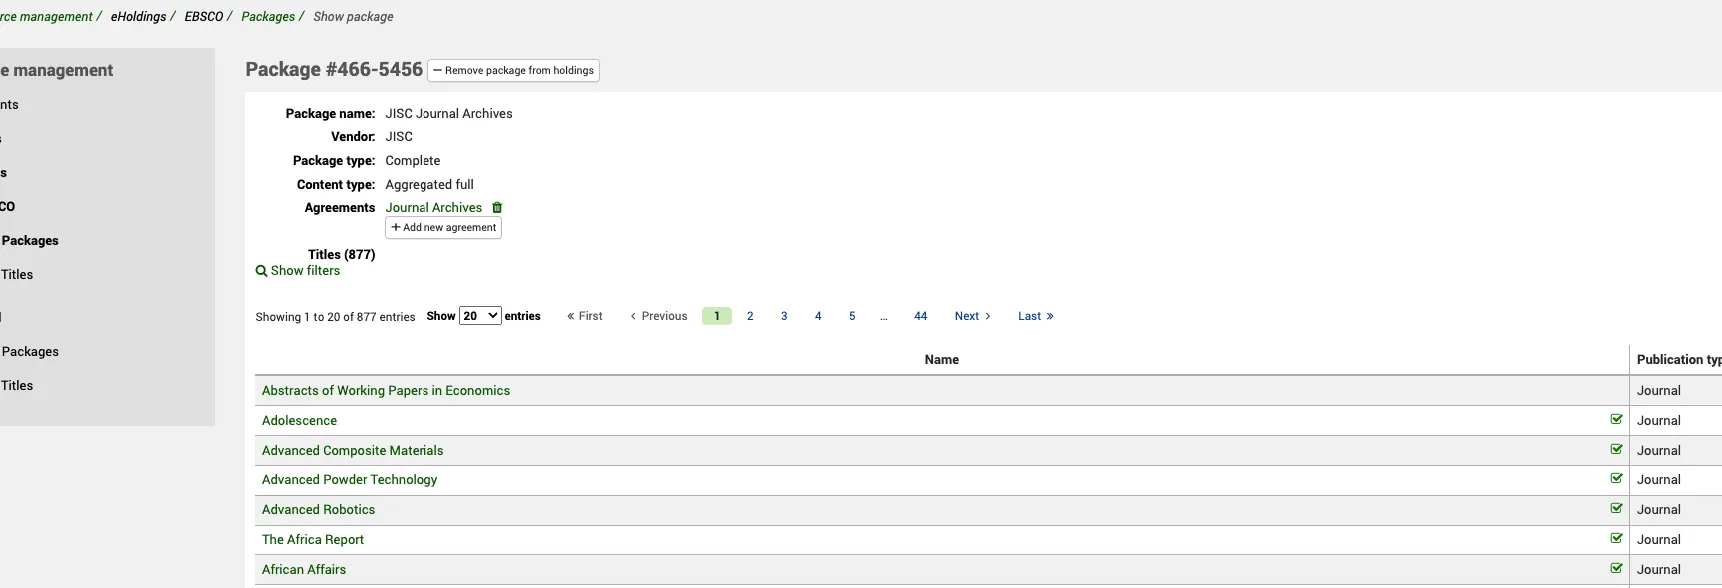
यहां प्रदर्शित की गई कुछ जानकारी होल्डिंग्सक एपीआई से लाई गई है, आप वेंडर को देख सकते हैं (यह कोहा विक्रेता नहीं है), सामग्री प्रकार और पैकेज प्रकार। आप इस स्क्रीन से यह भी देख सकते हैं कि पैकेज में (इस मामले में) 877 शीर्षक शामिल हैं। पैकेज सूची के साथ, आप यहां से (चेक मार्क्स द्वारा) देख सकते हैं कि कौन से शीर्षक चुने गए हैं और जो नहीं।
शो फ़िल्टर लिंक पर क्लिक करने से आपको कुछ अतिरिक्त फ़िल्टर मिलेंगे ताकि आप किसी विशेष शीर्षक या शीर्षक के समूह के लिए पैकेज के भीतर खोज कर सकें। यह प्रकाशन प्रकार, चयन स्थिति (पहले से चयनित शीर्षक, या नहीं, EbsCoadmin में) और एक शीर्षक खोज बॉक्स द्वारा हो सकता है।
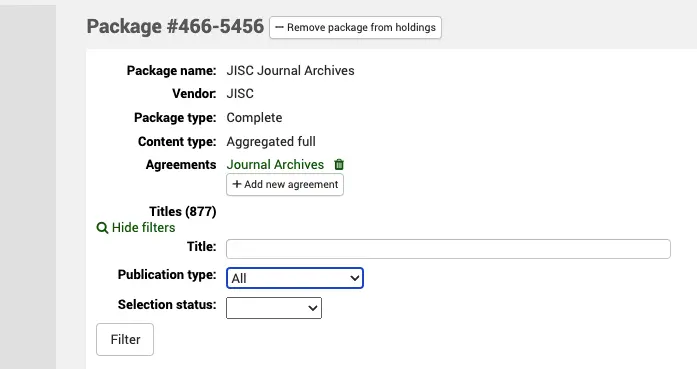
एक समझौते में पैकेज जोड़ें
ऊपर दिए गए उदाहरण में, आप देख सकते हैं कि यह पैकेज पहले ही कोहा में मौजूदा समझौते के रिकॉर्ड में जोड़ा जा चुका है (जिसे जर्नल आर्काइव्स कहा जाता है)। एक पैकेज को कई समझौते रिकॉर्ड में जोड़ा जा सकता है। हाइपरटेक्स्ट लिंक पर क्लिक करने से आप समझौते के रिकॉर्ड पर ले जाएंगे।
एक बार जब आप यह कनेक्शन बना लेते हैं तो आप समझौते के रिकॉर्ड पर सूचीबद्ध पैकेज देखेंगे।
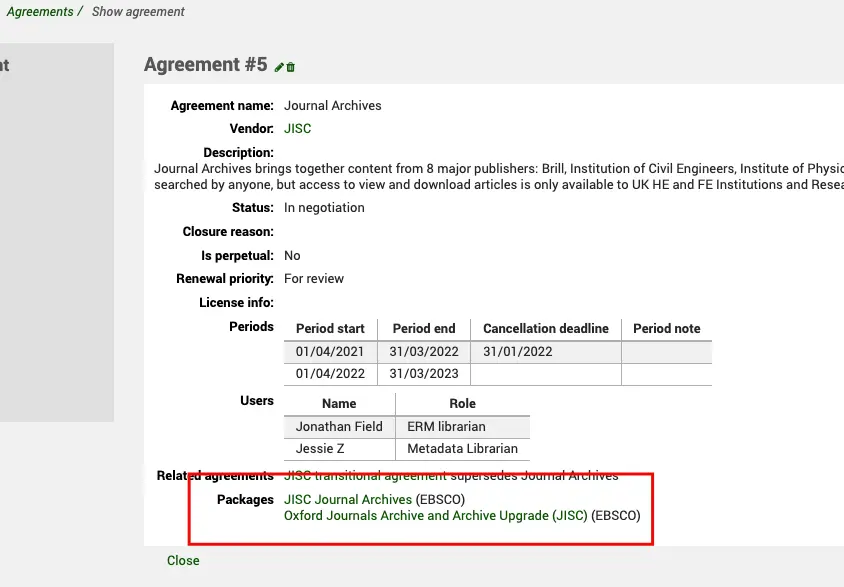
एक नए पैकेज में जोड़ने के लिए, नए समझौते के बटन पर क्लिक करें और आपको उन समझौतों की सूची के साथ एक संवाद बॉक्स में ले जाया जाएगा जिन्हें फ़िल्टर किया जा सकता है। दो रिकॉर्ड के बीच कनेक्शन बनाने के लिए चयन बटन का उपयोग करें।

एक समझौते से पैकेज निकालने के लिए डिलीट आइकन का उपयोग करें।
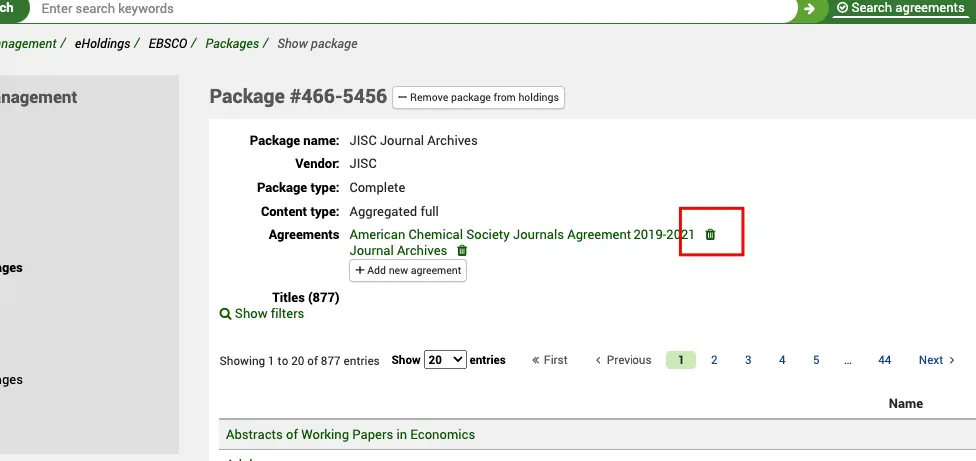
यदि आप एक से अधिक बार एक ही समझौते में एक पैकेज जोड़ने का प्रयास करते हैं तो आपको निम्न त्रुटि संदेश प्राप्त होगा: -

होल्डिंग्स से पैकेज जोड़ें / निकालें
पैकेज दृश्य से आप अपने EBSCO होल्डिंग्स से एक पूर्ण पैकेज जोड़ने या निकालने में भी सक्षम हैं।
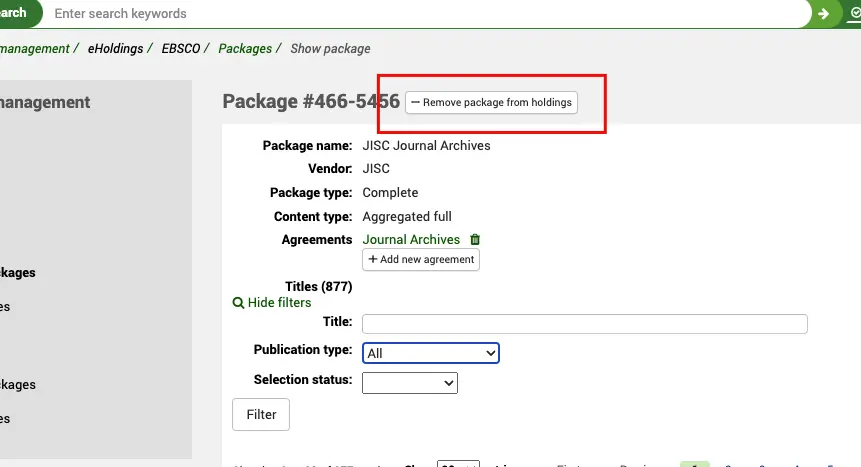
यह आपके EBSCO सेंट्रल होल्डिंग्स से पैकेज को जोड़ने या हटाने के लिए HoldingSIQ सेवा के माध्यम से API कॉल करता है। क्योंकि यह एक वास्तविक समय की कॉल है जिसे आपको अपनी होल्डिंग्स को EBSCoadmin में भी अपडेट करना चाहिए।
आप यहां एक शीर्षक लिंक पर भी क्लिक कर सकते हैं और एक पैकेज में एक विशिष्ट शीर्षक के विस्तार में जा सकते हैं।
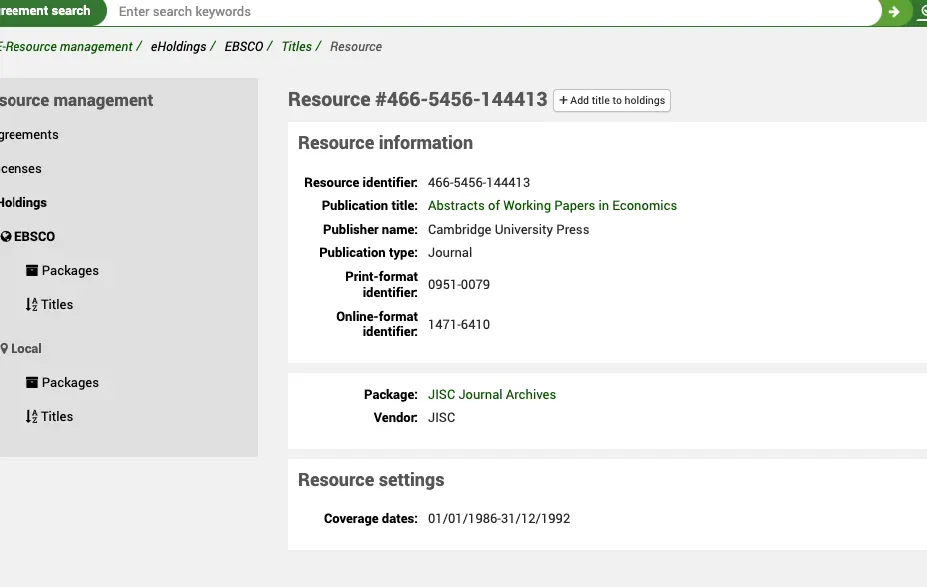
संसाधन # आप स्क्रीन के शीर्ष पर देख सकते हैं EBSCO संसाधन आईडी है। आपके द्वारा देखे जाने वाले मेटाडेटा को EBSCO नॉलेज बेस से होल्डिंग्सक एपीआई द्वारा भी लौटा दिया जाता है। आप प्रकाशन शीर्षक, नाम, प्रकाशन प्रकार और प्रिंट/ऑनलाइन आईडी और कवरेज तिथियों को देख सकते हैं। याद रखें कि शीर्षक की कवरेज की तारीखें उस पैकेज के आधार पर अलग हो सकती हैं, जिसमें शीर्षक शामिल है। आप विक्रेता और पैकेज दोनों को भी देख सकते हैं (जो कि आपके द्वारा आए पूर्ण पैकेज के लिए एक हाइपरटेक्स्ट लिंक है)।
पैकेज से शीर्षक जोड़ें / निकालें
आप एक पैकेज से एक शीर्षक जोड़ या हटा सकते हैं जिसे आप सब्सक्राइब कर रहे हैं
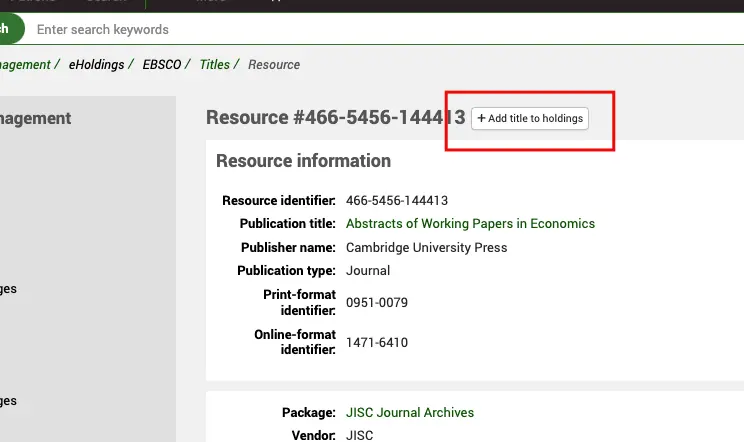
यद्यपि आप एक पूर्ण पैकेज की सदस्यता ले सकते हैं, लेकिन ऐसे व्यक्तिगत शीर्षक हो सकते हैं जिन्हें आप विशेष रूप से शामिल करना चाहते हैं/बाहर करना चाहते हैं।ऐसा करने के लिए Add/remove title to holdings’ बटन का उपयोग करें।
शीर्षक
वहाँ जाओ: अधिक> ई-संसाधन प्रबंधन> ईबीएससीओ> शीर्षक
शीर्षक होम स्क्रीन पर आपको एक खोज बॉक्स दिखाई देगा
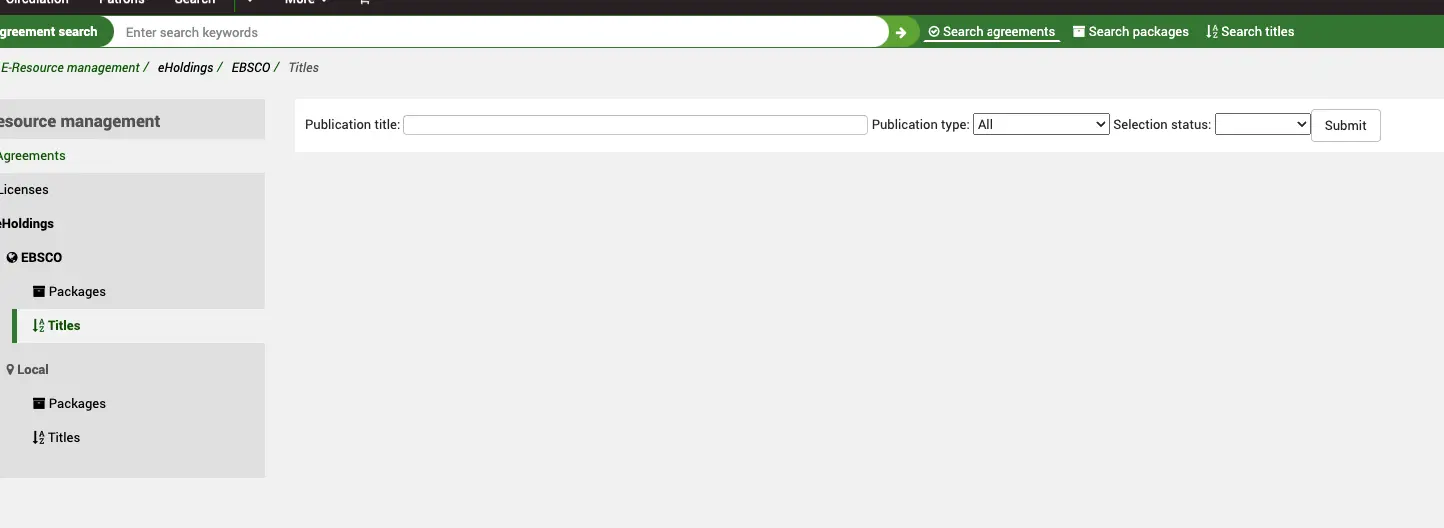
Koha acts as a “proxy” for the EBSCO HoldingsIQ service so any search you do here is done in real time against the EBSCO knowledge base (using your Customer ID in the ERMProviderEbscoCustomerID system preference). There are two filters:
प्रकाशन प्रकार: यह फ़िल्टर EBSCO द्वारा उनके होल्डिंगसिक एपीआई के हिस्से के रूप में प्रदान किया जाता है और आपको अपनी खोज को एक विशेष प्रकाशन प्रकार (EBSCO द्वारा परिभाषित) के रूप में संकीर्ण करने की अनुमति देता है।
स्थिति का चयन करें:यह फ़िल्टर EBSCO द्वारा उनके HoldingSIQ API के हिस्से के रूप में प्रदान किया जाता है और आपको अपनी खोज को उन शीर्षकों में संकीर्ण करने की अनुमति देता है, जिन्हें आप पहले से ही EBSCoadmin के माध्यम से अपनी होल्डिंग्स में जोड़ सकते हैं। इसलिए, उदाहरण के लिए, आप उन शीर्षकों की खोज कर सकते हैं जिन्हें आपने पहले ही सब्सक्राइब किया है।
कोई भी शीर्षक जो पहले से ही चुना गया है, शीर्षक के दाहिने हाथ की ओर एक चेक मार्क द्वारा इंगित किया गया है।

आप यह भी देखेंगे कि यह खोज EBSCO खिताब के अलावा स्थानीय शीर्षकों की खोज भी करती है। किसी भी स्थानीय शीर्षक को शीर्षक सूची के ऊपर इंगित किया जाएगा और यह आपको स्थानीय शीर्षक तालिका में ले जाने के लिए एक हाइपरटेक्स्ट लिंक है।
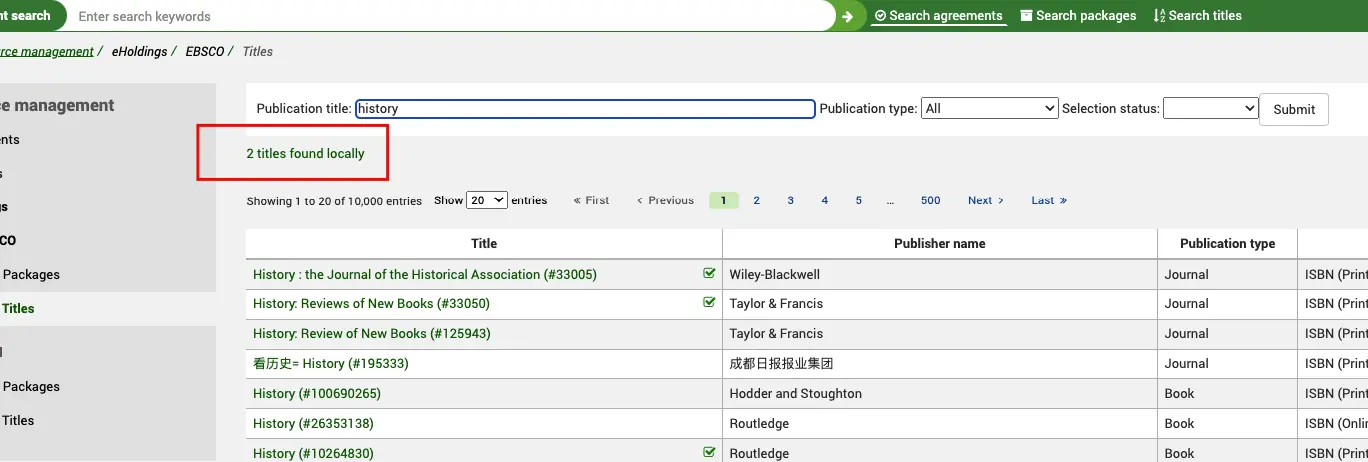
एक शीर्षक पर क्लिक करके आप इसके पूर्ण रिकॉर्ड दृश्य में जा सकते हैं।
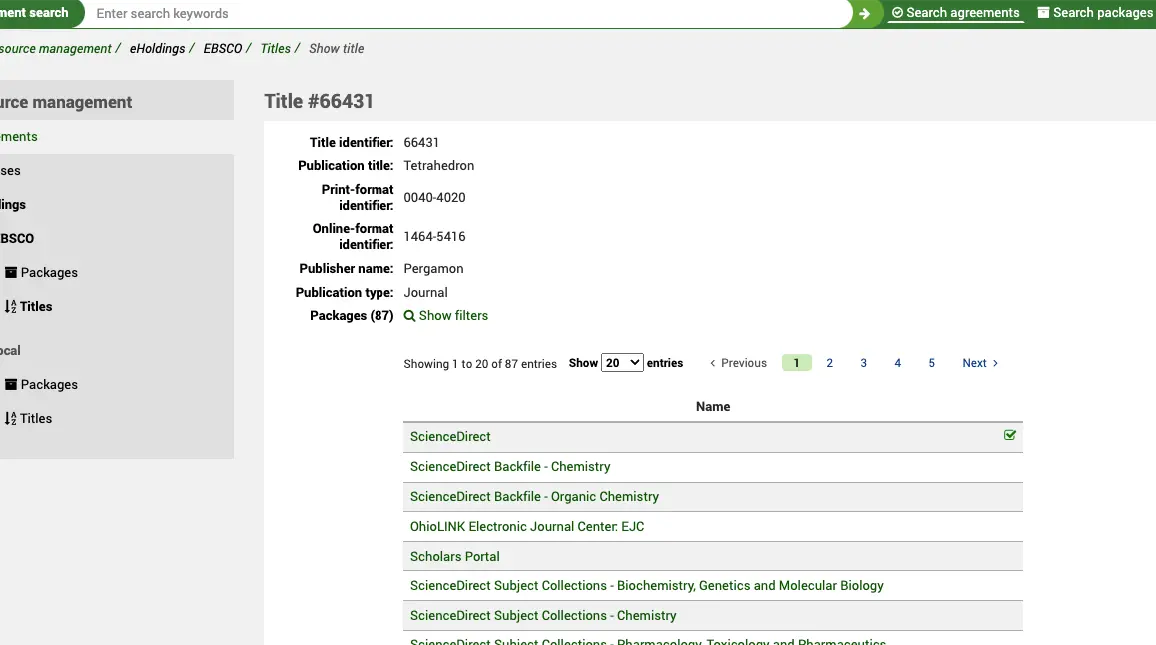
शीर्ष पर आप शीर्षक #देखते हैं। यह EBSCO शीर्षक संदर्भ है। बाकी मेटाडेटा सभी होल्डिंग्सक एपीआई से आता है और इसमें आईडी, प्रकाशक आदि जैसी चीजें शामिल हैं।
आप यहां हर पैकेज भी देख सकते हैं कि यह शीर्षक समाहित है। चेक मार्क इंगित करता है कि आप पहले से ही इस पैकेज की सदस्यता ले चुके हैं। इसलिए, ऊपर दिए गए उदाहरण में, हमारे पास यह शीर्षक विज्ञान पैकेज के माध्यम से है, लेकिन विद्वानों के पोर्टल नहीं।
यदि आप पैकेज लिंक पर क्लिक करते हैं तो आपको उस पैकेज के भीतर उस संसाधन का दृश्य दिखाई देगा।
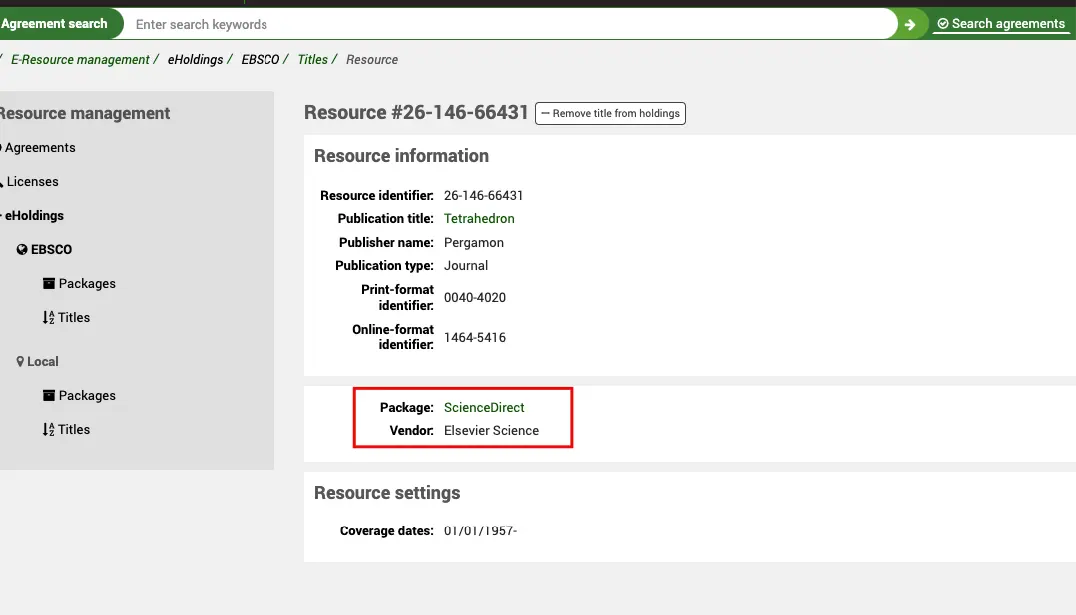
इसमें उस प्रदाता द्वारा प्रदान की गई कवरेज शामिल है।
यदि आप अपने पैकेज होल्डिंग्स से उस शीर्षक को चुनिंदा रूप से जोड़ना या हटाना चाहते हैं, तो आप इस स्क्रीन से ऐसा कर सकते हैं।
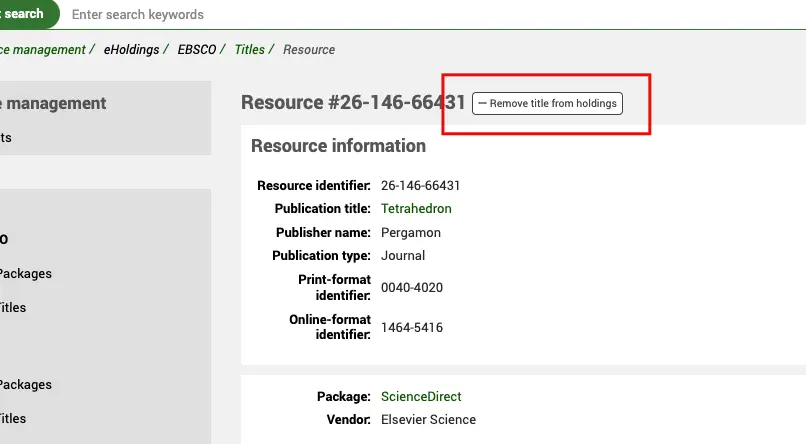
आप इस स्क्रीन पर EBSCO संसाधन आईडी भी देख सकते हैं। याद रखें कि संसाधन आईडी एक पैकेज के भीतर एक शीर्षक के उदाहरण का प्रतिनिधित्व करती है।
यदि आप शीर्षक रिकॉर्ड पर वापस जाना चाहते हैं तो आप शीर्षक लिंक पर क्लिक कर सकते हैं।
शीर्षक पृष्ठ पर आपको अपनी खोज को कम करने के लिए फिल्टर के साथ भी प्रदान किया जाता है। आप शो/छिपाने के फ़िल्टर लिंक पर क्लिक करके इसे प्राप्त करते हैं।
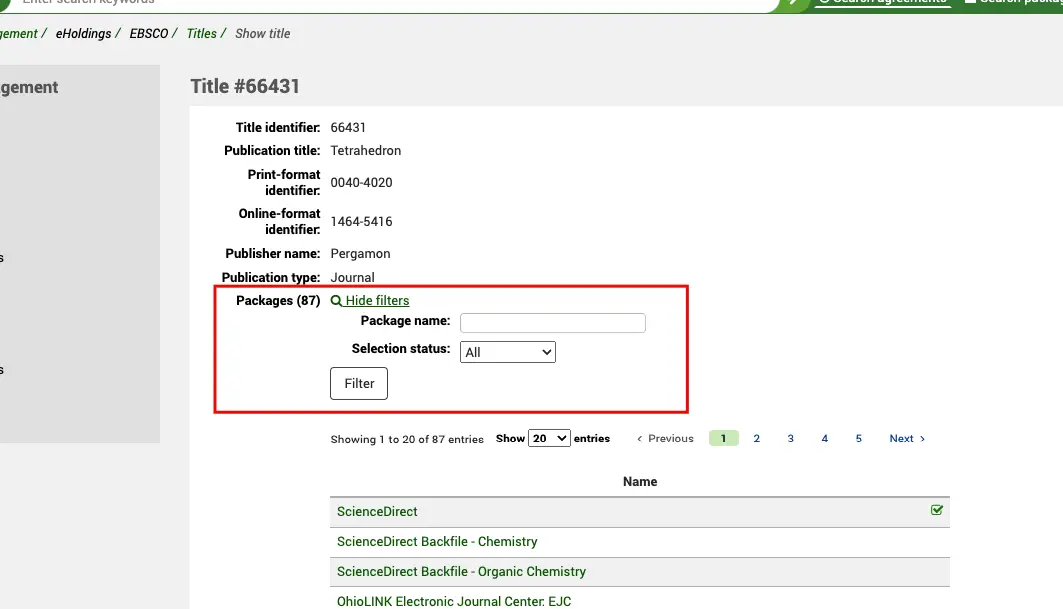
यह उपयोगी है यदि आप अपनी क्वेरी को किसी विशिष्ट पैकेज या पैकेजों में संकीर्ण करना चाहते हैं जो पहले से ही आपकी होल्डिंग्स में चुने गए हैं।
स्थानीय
स्थानीय होल्डिंग्स इलेक्ट्रॉनिक होल्डिंग्स हैं जो एक वैश्विक ज्ञान आधार में निहित नहीं हैं, लेकिन इसके बजाय (EBSCO होल्डिंग्स के विपरीत) स्थानीय कोहा डेटाबेस टेबल में संग्रहीत हैं (erm_eholdings_titles).
शीर्षक
वहाँ जाओ: अधिक> ई-संसाधन प्रबंधन> ईहोल्डिंग> स्थानीय> शीर्षक
स्थानीय शीर्षक होम स्क्रीन पर आपको वर्तमान में बनाए गए स्थानीय शीर्षक की एक सूची दिखाई देगी।

आप अपनी सूची को एक चयनित शीर्षक या शीर्षक के समूह में संकीर्ण करने के लिए तालिका और कॉलम फ़िल्टर का उपयोग कर सकते हैं।
टिप्पणी
आप इस तालिका के कॉलम को 'कन्फ़िगर' बटन पर क्लिक करके अनुकूलित कर सकते हैं। यह आपको एडमिनिस्ट्रेशन मॉड्यूल में ले जाएगा और विशेष रूप से 'टेबल आईडी: खिताब' अनुभाग के लिए Table सेटिंग्स।।
एक शीर्षक पर क्लिक करके आप रिकॉर्ड के पूर्ण दृश्य पर जा सकते हैं।
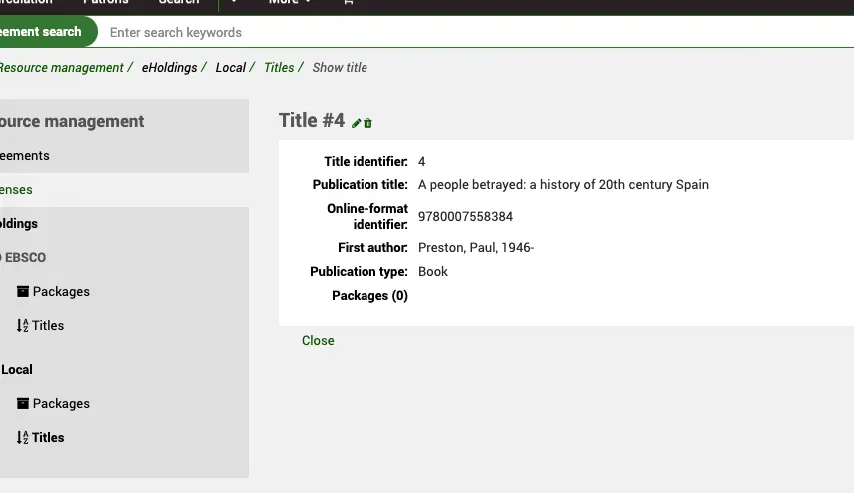
यहां से आप रिकॉर्ड को संपादित या हटा सकते हैं।
यदि रिकॉर्ड स्थानीय रूप से बनाए गए पैकेज से संबंधित है, तो आप उस जानकारी को यहां देखेंगे।
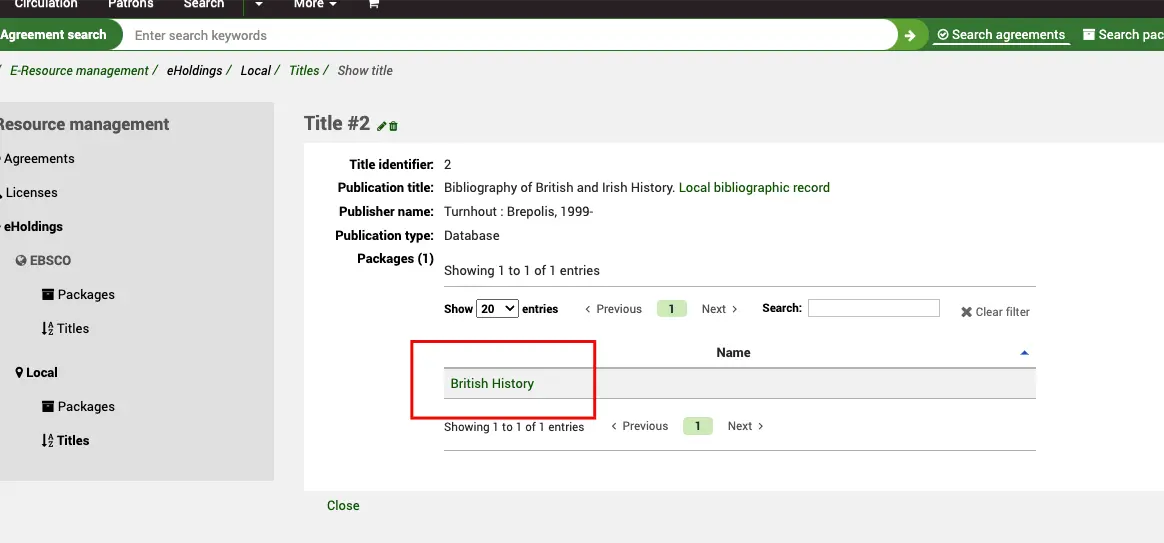
यदि शीर्षक एक से अधिक पैकेज का हिस्सा है, तो आप अपनी खोज को और अधिक प्रतिबंधित करने के लिए टेबल फिल्टर का उपयोग कर सकते हैं। पैकेज लिंक पर क्लिक करने से आप पैकेज के माध्यम से ही ले जाएंगे।
एक नया स्थानीय शीर्षक रिकॉर्ड बनाएं
ईआरएम होम पेज से स्थानीय के तहत बाएं हाथ के मेनू में शीर्षक लिंक पर क्लिक करें।
वहाँ जाओ: अधिक> ई-संसाधन प्रबंधन> ईहोल्डिंग> स्थानीय> शीर्षक
शीर्षक तालिका के शीर्ष पर 'नया शीर्षक' बटन का उपयोग करें।
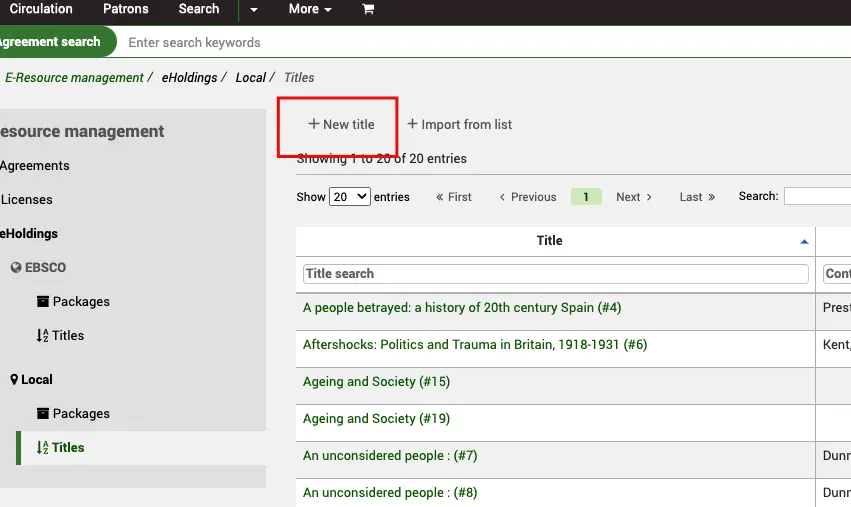
आपको मेटाडेटा टेम्पलेट देखना चाहिए। यह टेम्प्लेट KBART [https://www.niso.org/standards-committees/kbart] मेटाडेटा पर आधारित है।
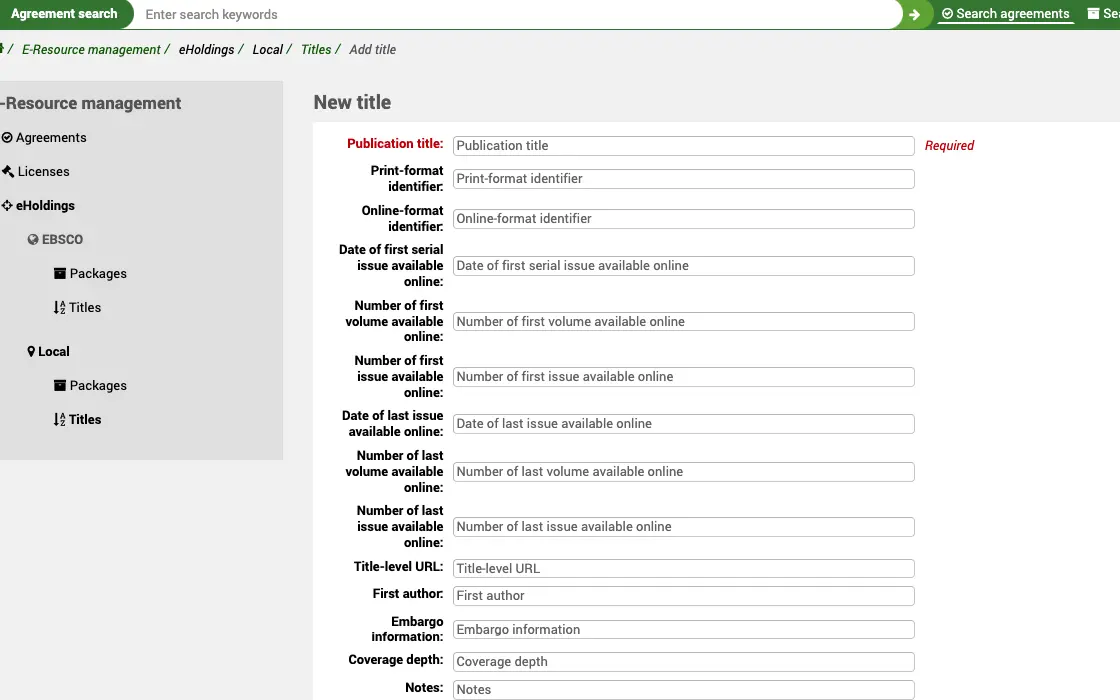
जब आप शीर्षक को सहेजते हैं, तो कोहा स्वचालित रूप से आपके लिए मेटाडेटा के रूप में अधिक से अधिक एक ग्रंथ सूची भी बनाएगा। हम निम्नलिखित तरीके से KBART मेटाडेटा को MARC21 में मैप करते हैं:
publication_title = biblio.title
print_identifier = 020$a||020$z||022$a||022$y
online_identifier = 020$a||020$z||022$a||022$y
date_first_issue_online = 866$a (before '-')
date_last_issue_online = 866$a (after '-')
num_first_vol_online = 863$a (before '-')
num_last_vol_online = 863$a (after '-')
title_url = 856$u
first_author = biblio.first_author
coverage_depth = title_url ? 'fulltext' : 'print'
टिप्पणियाँ = $852$z
publisher_name = 260$b
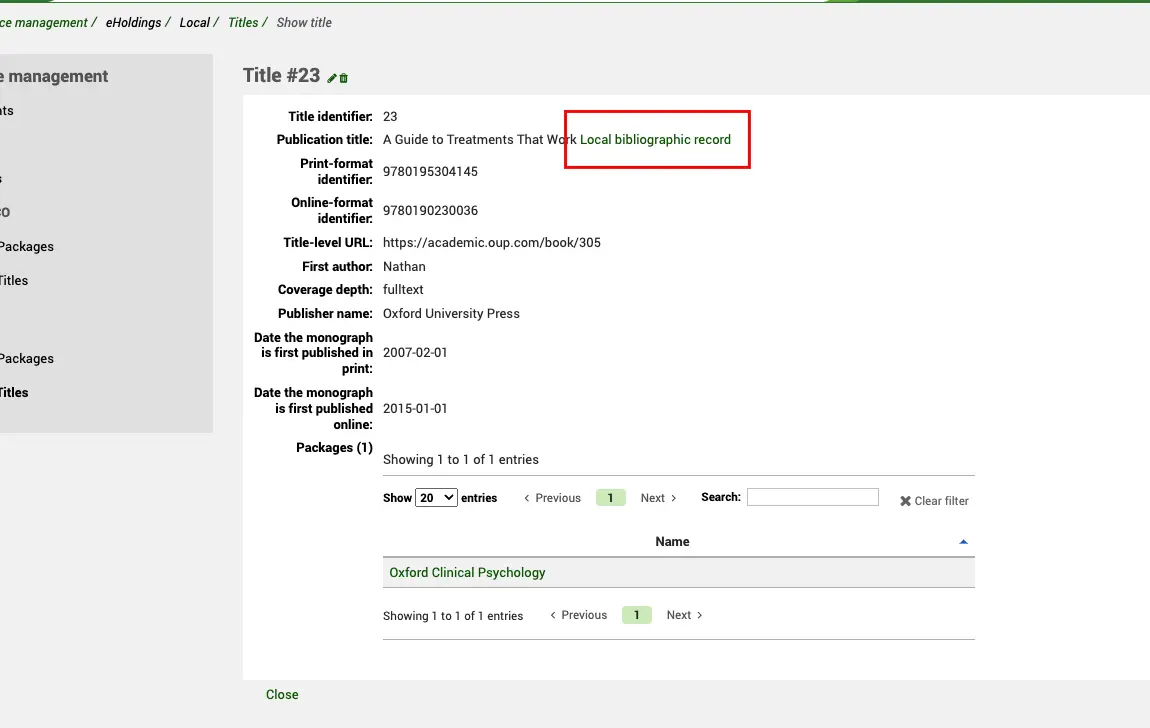
जब आप रिकॉर्ड को सहेजते हैं और पूर्ण दृश्य को देखते हैं तो आपको ग्रंथ सूची के रिकॉर्ड का लिंक दिखाई देगा।
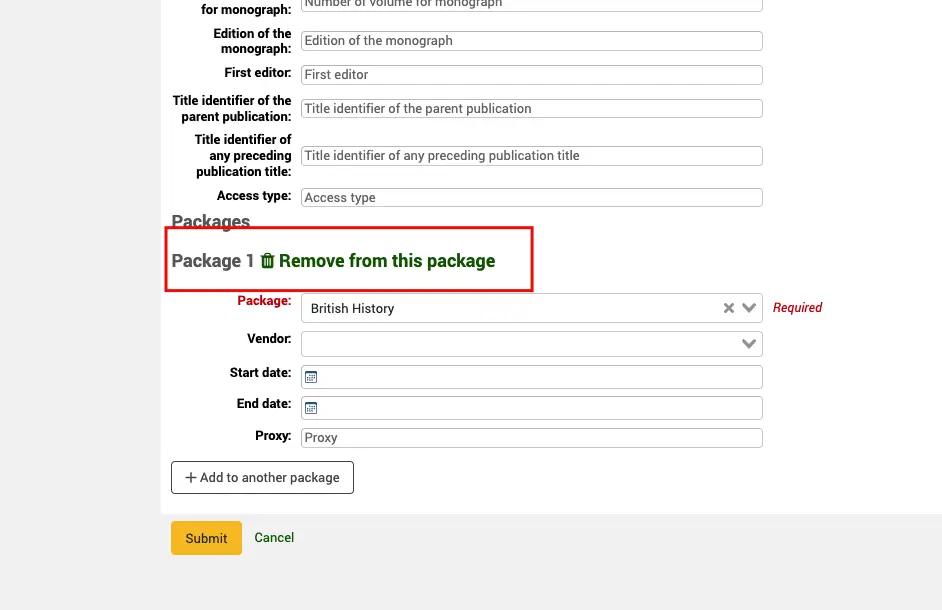
क्रिएशन/एडिट टेम्पलेट के निचले भाग में आपको स्थानीय पैकेज में शीर्षक जोड़ने का विकल्प दिखाई देगा।
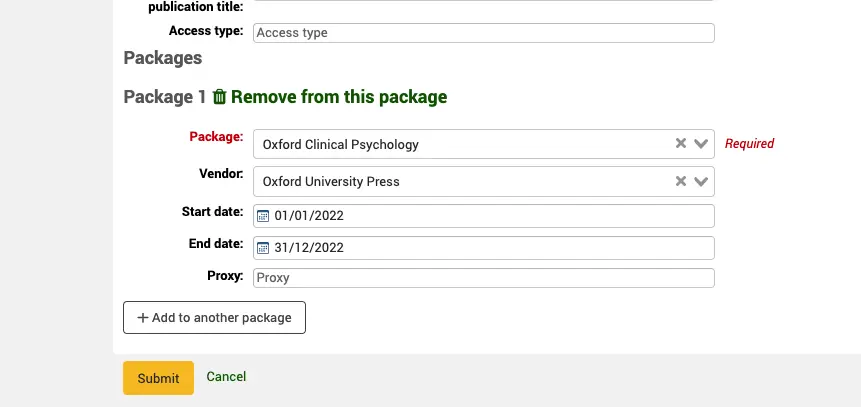
ड्रॉपडाउन मेनू से इसे लिंक करने का प्रयास करने से पहले पैकेज रिकॉर्ड पहले से ही मौजूद होना चाहिए। आप विक्रेता को भी निर्दिष्ट कर सकते हैं, तिथियां शुरू कर सकते हैं और एक प्रॉक्सी सर्वर के संदर्भ में यदि इस सेवा के लिए आवश्यक है (यह वर्तमान में कोहा में उपयोग नहीं किया गया है, केवल संदर्भ के लिए)।
एक शीर्षक कई पैकेजों से संबंधित हो सकता है।
एक सूची से एक नया स्थानीय शीर्षक रिकॉर्ड आयात करें
यदि आप जल्दी से अपने स्थानीय होल्डिंग्स में कई शीर्षक रिकॉर्ड जोड़ना चाहते हैं, तो आपके पास कोहा सूची से आयात करने का विकल्प है [https://koha-community.org/manual/latest/en/html/lists.html]।
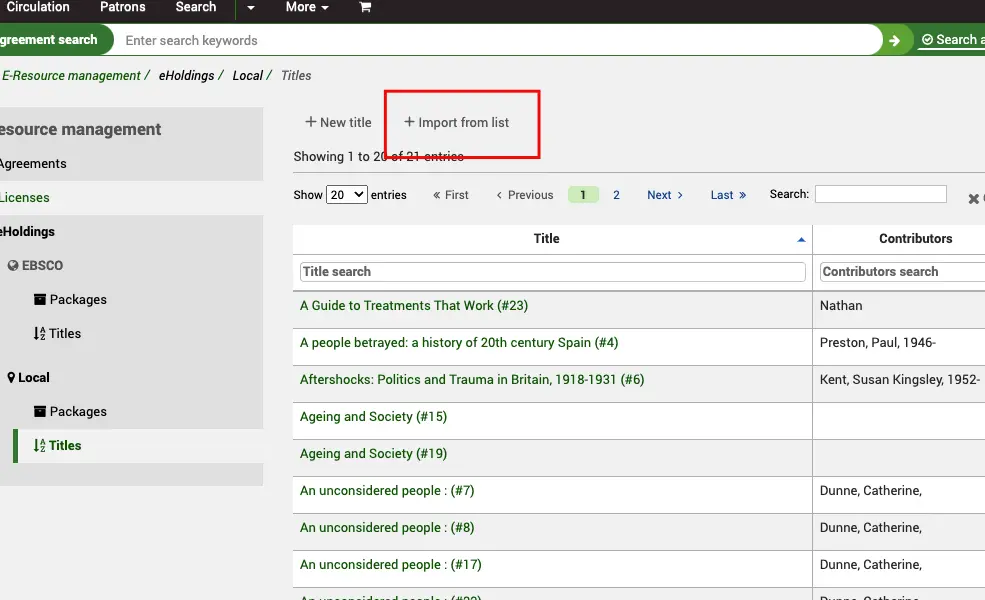
सबसे पहले, एक कोहा सूची बनाएं (जैसा कि इस मैनुअल में कहीं और वर्णित है) और इसमें कुछ ग्रंथ सूची की जानकारी जोड़ें (या तो रिकॉर्ड बनाकर मैन्युअल रूप से या इसे Z39.50 या स्टेज मार्क रिकॉर्ड के माध्यम से आयात करके)। एक बार सूची बन जाने के बाद, आप इसे तालिका चयन में देखेंगे।

पहले उस पैकेज का चयन करें जिसे आप शीर्षक जोड़ना चाहते हैं और फिर तालिका में चयन से सूची का चयन करें। उन्हें एक साथ जोड़ने के लिए आयात बटन का उपयोग करें।
आपको एक संदेश "प्रगति में आयात" दिखाई देगा और नौकरी कुछ क्षणों में पूरी होनी चाहिए। यदि आप प्रगति देखना चाहते हैं तो आप नौकरी संख्या पर क्लिक कर सकते हैं।
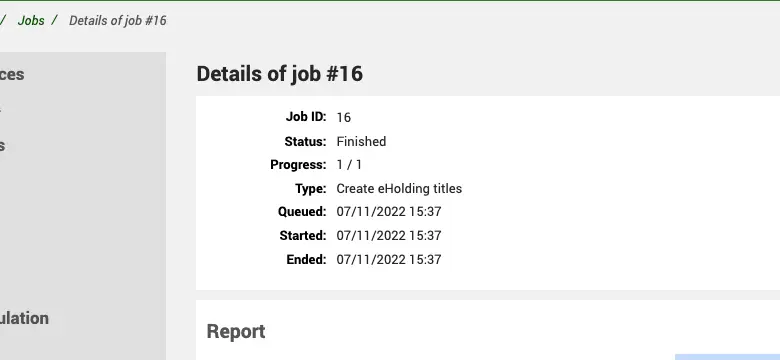
इस बिंदु पर आपको शीर्षक सूची दोनों में शीर्षक देखना चाहिए और अपने चयनित पैकेज से भी जुड़ा हुआ है।
Import a new local title record from a KBART file
संस्करण
This component of ERM was introduced in version 24.05 of Koha.
If you want to quickly add multiple title records to your Local holdings, and your vendor can provide KBART records, then this is a quick way to get eholdings records into Koha.
First of all, create a Local package to attach the title records to.
वहाँ जाओ: अधिक> ई-संसाधन प्रबंधन> ईहोल्डिंग> स्थानीय> पैकेज
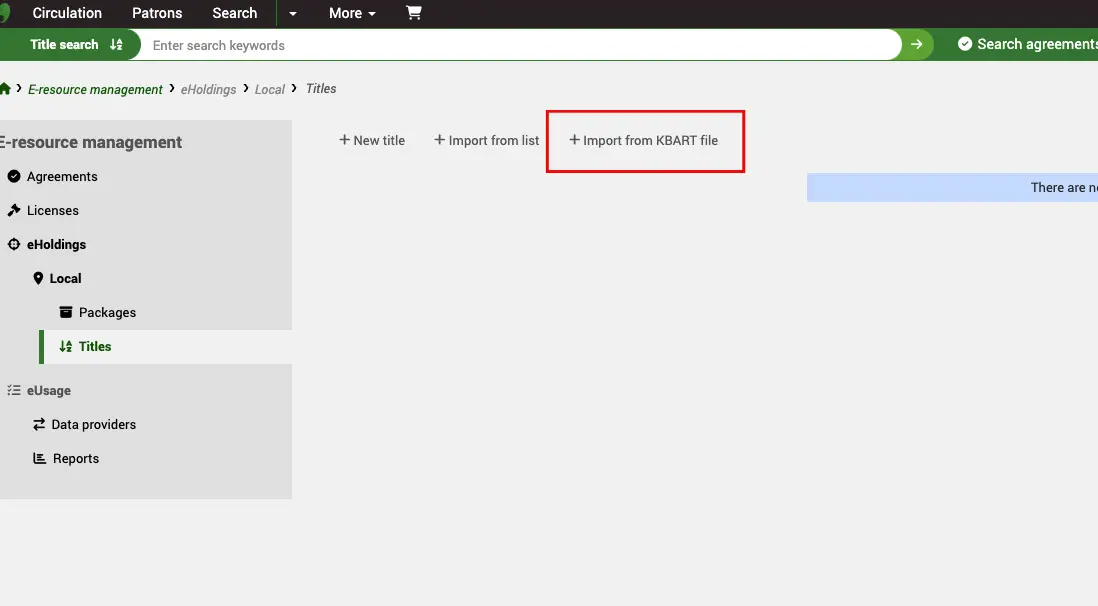
Once you have done that, go to your Local titles and use the button marked 'Import from KBART file'.
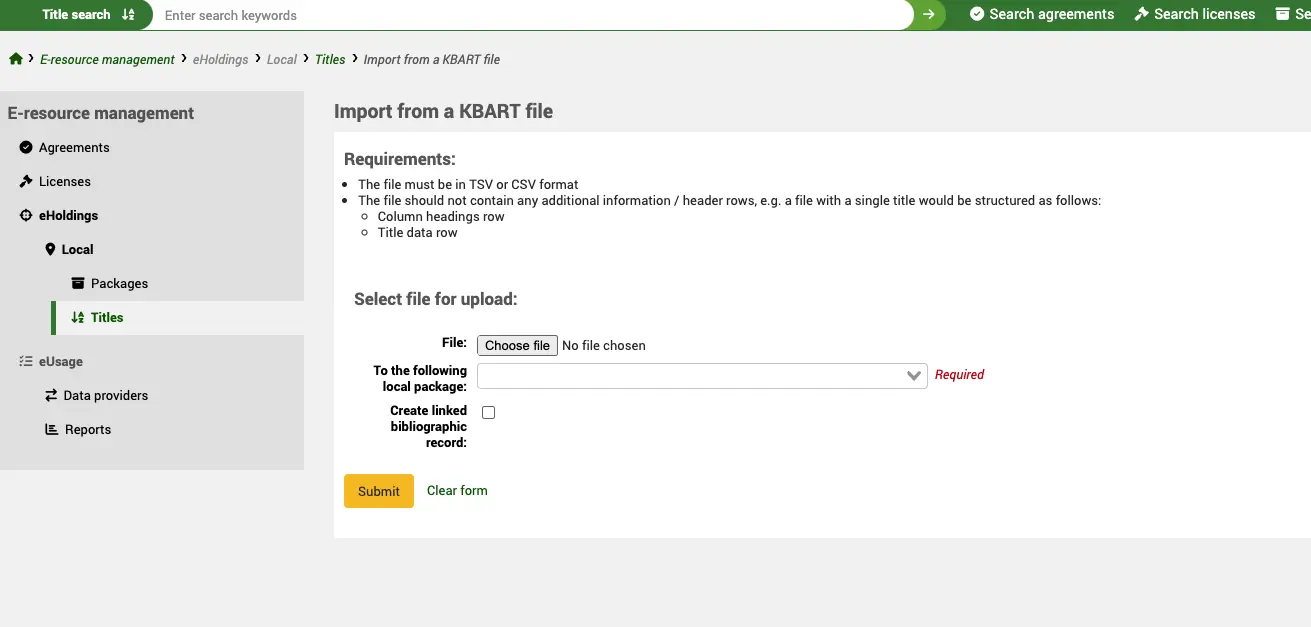
From here, use the File button to select a file of KBART files from your local device. Select the Package that you want to attach the titles to and, finally, select whether you want Koha to try and create basic bibliographic records from the data in the KBART file (this is optional).
Once the file is imported it will be sent to the background jobs for processing. You can check Background Jobs for progress but, once completed, the titles will appear in your Local title list.
Some useful resources:
KBART Standard [https://www.niso.org/standards-committees/kbart] NISO KBART Registry (good source for KBART files) [https://sites.google.com/niso.org/kbart-registry] Useful information on KBART format etc. [https://www.uksg.org/kbart/s5/guidelines]
टिप्पणी
The imported KBART file should be in TSV or CSV format
पैकेज
वहाँ जाओ: अधिक> ई-संसाधन प्रबंधन> ईहोल्डिंग> स्थानीय> पैकेज
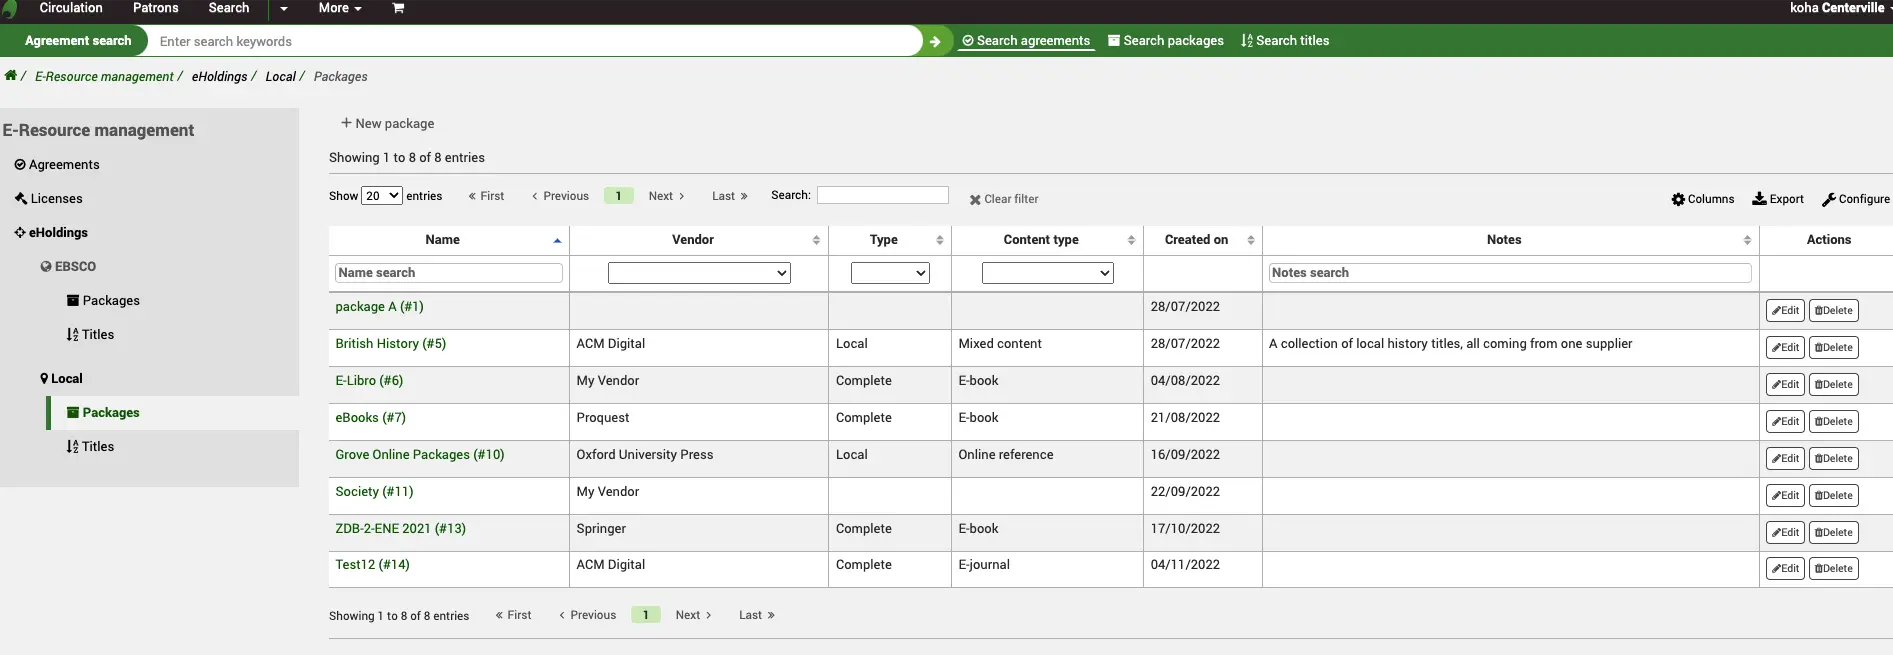
स्थानीय पैकेज होम स्क्रीन पर, आपको वर्तमान में बनाए गए स्थानीय पैकेजों की एक सूची दिखाई देगी।
टिप्पणी
आप इस तालिका के कॉलम को 'कन्फ़िगर' बटन पर क्लिक करके अनुकूलित कर सकते हैं। यह आपको प्रशासन मॉड्यूल में ले जाएगा और विशेष रूप से 'टेबल आईडी: पैकेज' अनुभाग के लिए Table सेटिंग्स।।
पैकेज के नाम पर क्लिक करने से आप पूर्ण दृश्य के माध्यम से ले जाएंगे।
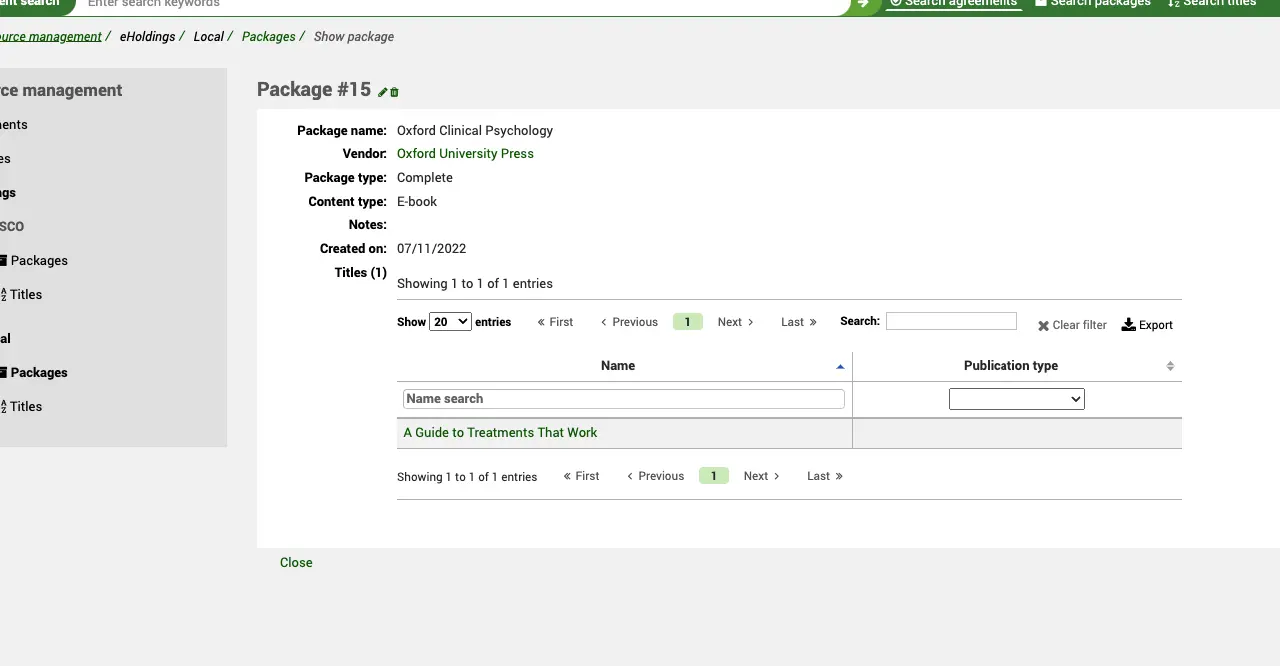
यदि आपको आवश्यकता हो तो शीर्षक को संकीर्ण करने के लिए आप टेबल फ़िल्टर का उपयोग कर सकते हैं।
शीर्षक पर क्लिक करने से आप पूर्ण दृश्य शीर्षक पर ले जाएंगे और विक्रेता पर क्लिक करने से आपको अधिग्रहण में विक्रेता रिकॉर्ड के माध्यम से ले जाएगा।
इस स्क्रीन से आप एडिट या डिलीट बटन का भी उपयोग कर सकते हैं।
जब आप एक पैकेज को संपादित करते हैं तो आपके पास आपके द्वारा पहले से बनाए गए एक समझौते में इसे संलग्न करने का विकल्प होता है।
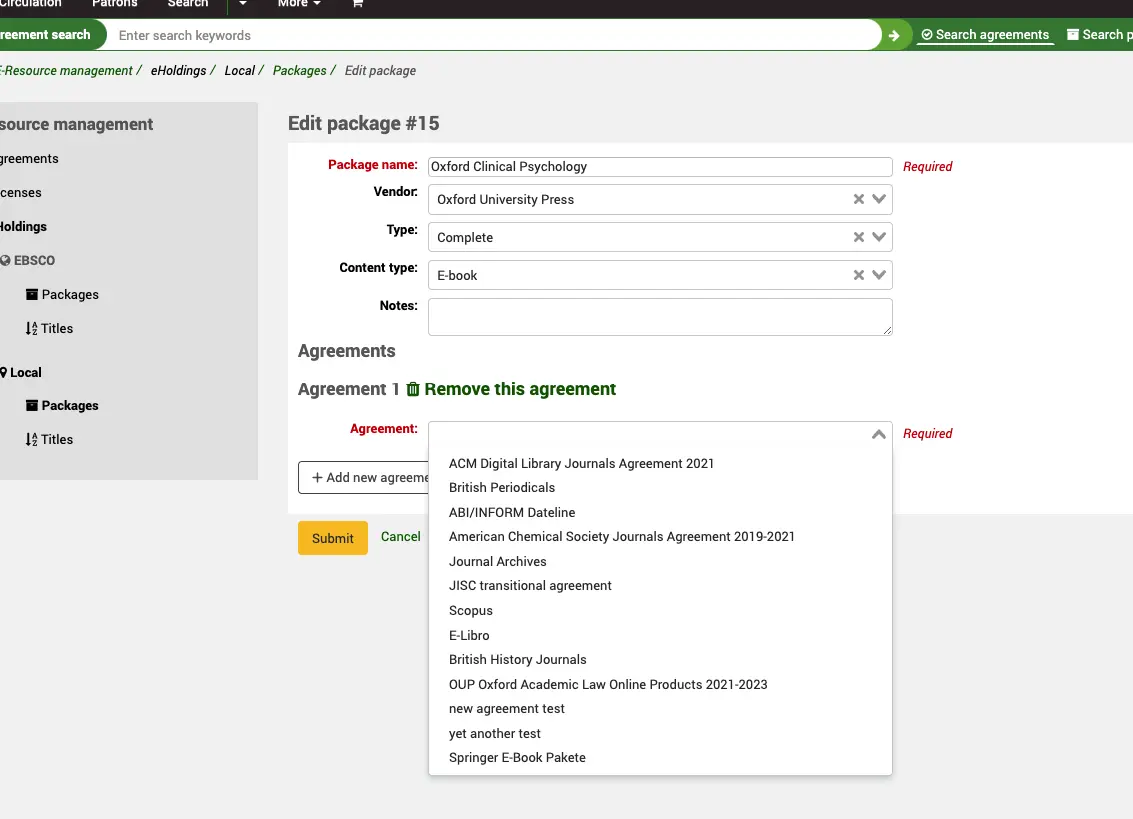
यह पैकेज तब समझौते के रिकॉर्ड पर देखा जाएगा।
एक नया स्थानीय पैकेज रिकॉर्ड बनाएं
वहाँ जाओ: अधिक> ई-संसाधन प्रबंधन> ईहोल्डिंग> स्थानीय> पैकेज
'नई पैकेज' बटन का चयन करें।।
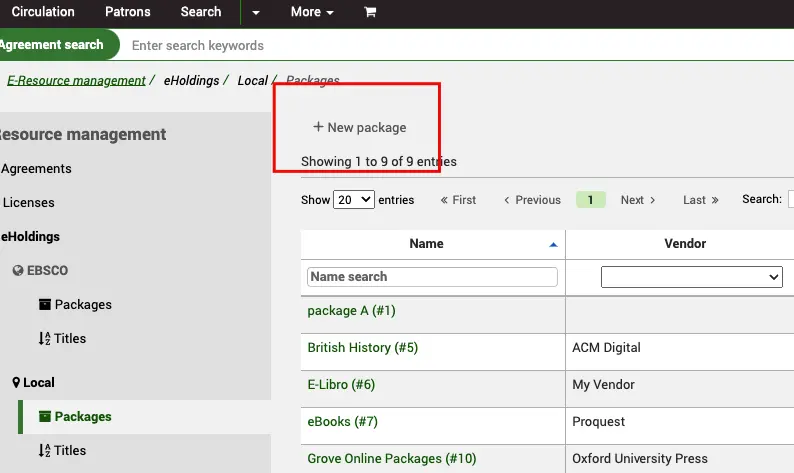
पैकेज का नाम एक आवश्यक फ़ील्ड है। आपने इसे पैकेज में संलग्न करने से पहले अपना समझौता पहले ही बनाया होगा।
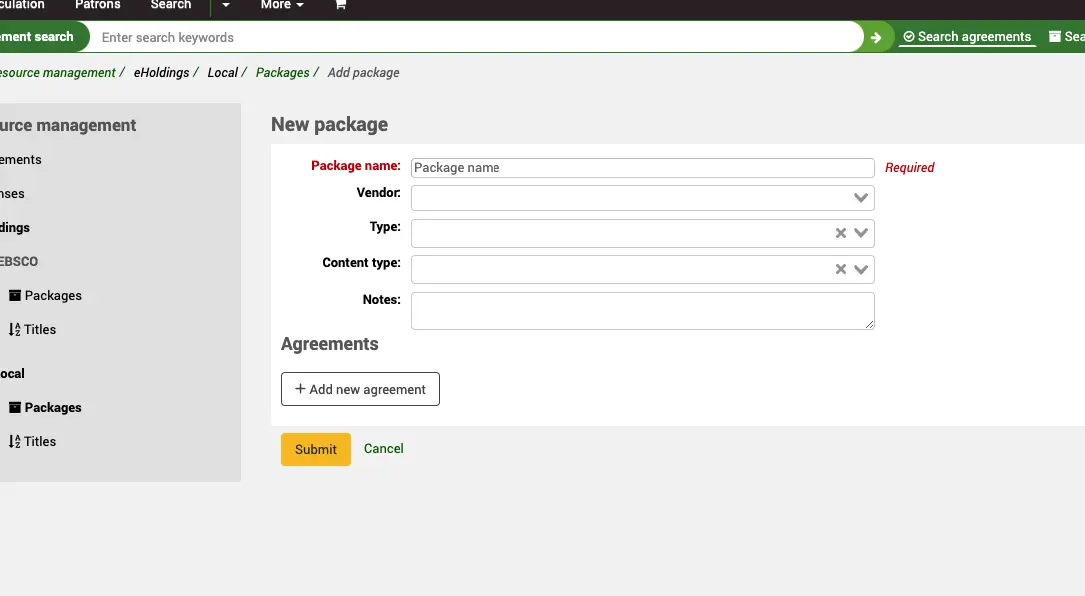
विक्रेता, प्रकार, सामग्री प्रकार और नोट्स फ़ील्ड वैकल्पिक हैं।
If you have any additional fields for ERM packages (erm_packages), they will be displayed here.
पैकेज रिकॉर्ड से एक स्थानीय शीर्षक निकालें
वहाँ जाओ: अधिक> ई-संसाधन प्रबंधन> ईहोल्डिंग> स्थानीय> शीर्षक
उस शीर्षक की खोज करें जिसे आप स्थानीय शीर्षक सूची से हटाना चाहते हैं।

Click through to the title detail and use the 'Edit' button.
At the bottom of the screen use the 'Remove from this package' link.
डेटा प्रदाता
संस्करण
ERM के इस घटक को कोहा के 23.11 संस्करण में पेश किया गया था।
डेटा प्रदाता (या डेटा प्लेटफॉर्म) वे संगठन हैं जो आपके इलेक्ट्रॉनिक संसाधनों के लिए उपयोग आंकड़े प्रदान करते हैं। यह एक विक्रेता या एक प्लेटफ़ॉर्म प्रदाता हो सकता है। डेटा प्रदाता रिकॉर्ड में एसयूएसएचआई क्रेडेंशियल्स और किसी भी काउंटर डेटा के बारे में जानकारी शामिल है जिसे प्रदाता से काटा गया है।।
Definitions:
SUSHI [https://www.niso.org/standards-committees/sushi] (Standardized Usage Statistics Harvesting Initiative) is an ANSI/NISO standard that defines the model for harvesting e-resource usage data. It is designed to work with COUNTER.
COUNTER provides the standard that enables the knowledge community to count the use of electronic resources. Known as the Code of Practice [https://www.projectcounter.org/code-of-practice-five-zero-two/], the standard ensures vendors and publishers can provide their library customers with consistent, credible and comparable usage data. Koha currently only supports version 5 of the COUNTER standard.
टिप्पणी
Before you start to create new Data provider records, ensure your staff users have the erm permission (or the superlibrarian permission) and that you have reviewed the ERM authorized values to suit your needs. Also, ensure you have reviewed the ERM system preferences.
Create a Data Provider record
From the ERM Home page click on the Data providers link in the left-hand menu.
Get there: More > E-resource management > Data providers
Use the 'New data provider' button at the top of the Data Providers table.
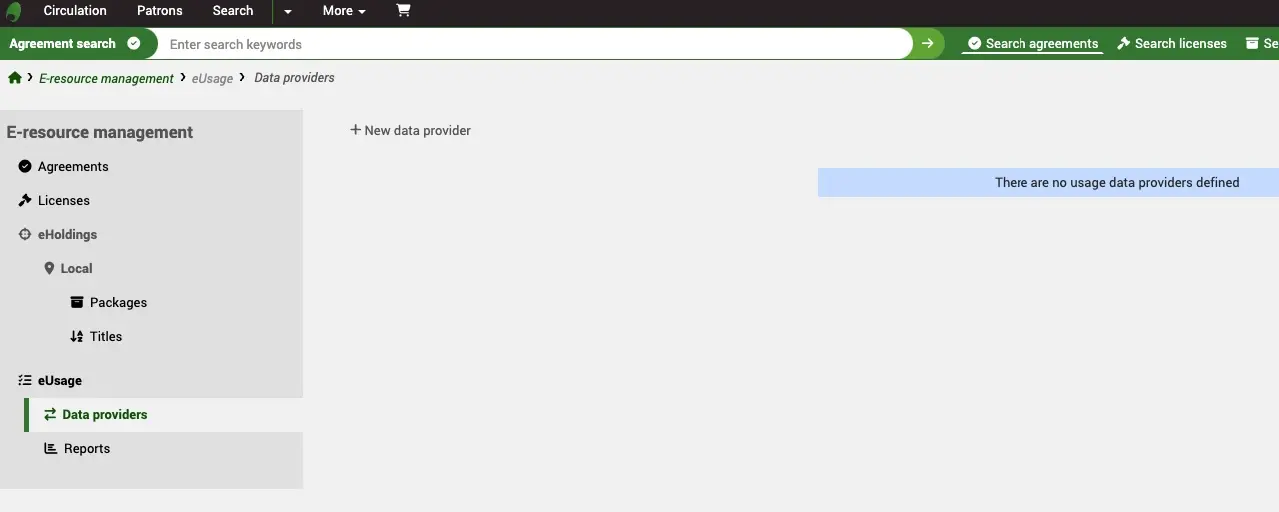
You are required to give the Data provider a name and list of report type(s). Koha, by default, will search the Project Counter Registry [https://registry.projectcounter.org/] and add the provider details automatically for you unless you select the 'Create manually' button.
प्रोजेक्ट काउंटर रजिस्ट्री [https://registry.projectcounter.org/] पर पंजीकृत प्रदाताओं की एक सूची देखने के लिए डेटा प्रदाता नाम बॉक्स में टाइप करना शुरू करें।
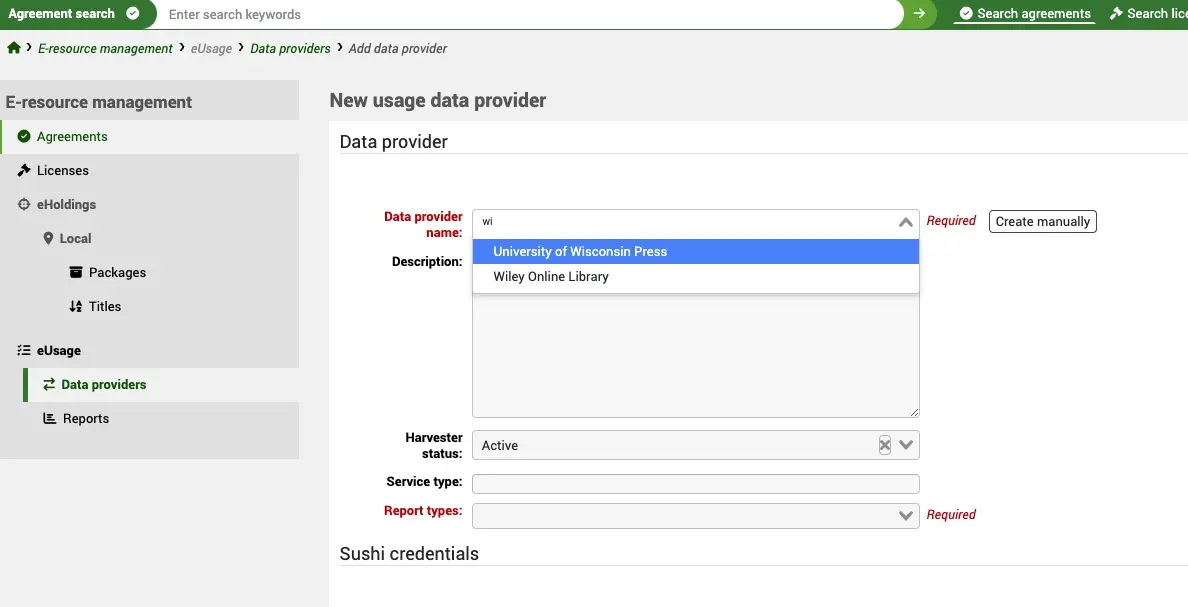
By setting the Harvester status to 'Active' it will be picked up by the background harvesting cronjob (erm_run_harvester.pl).
रिपोर्ट प्रकार एक आवश्यक क्षेत्र है और यह परिभाषित करता है कि किस प्रकार के डेटा को प्रदाता से काटा जाता है। यदि आपने प्रोजेक्ट काउंटर रजिस्ट्री से प्रदाता बनाया है तो समर्थित रिपोर्ट प्रकारों को स्वचालित रूप से रिपोर्ट प्रकार की सूची में खींच लिया जाएगा और आप उस सूची से चुन सकते हैं या ऑल चुन सकते हैं। रिपोर्ट प्रकारों के बारे में अधिक जानकारी के लिए, देखें here [https://cop5.projectcounter.org/en/5.1/04-reports/index.html] यदि आप अनिश्चित हैं जो आपके प्रदाता के समर्थन के प्रकार की रिपोर्ट करते हैं, और आप अपने प्रदाता को मैन्युअल रूप से बना रहे हैं, तो परियोजना काउंटर रजिस्ट्री की जांच करें और प्रदाता की तलाश करें।।
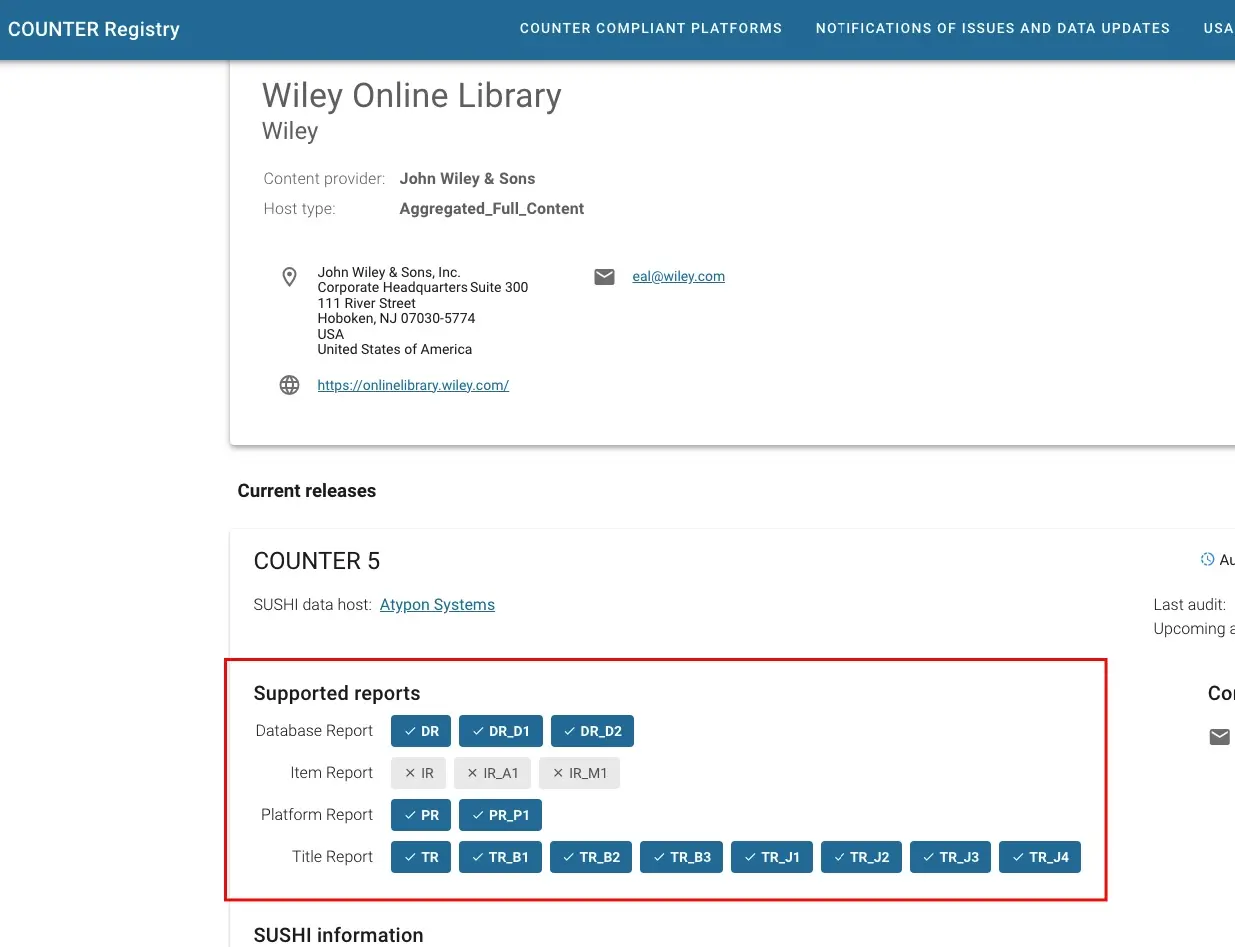
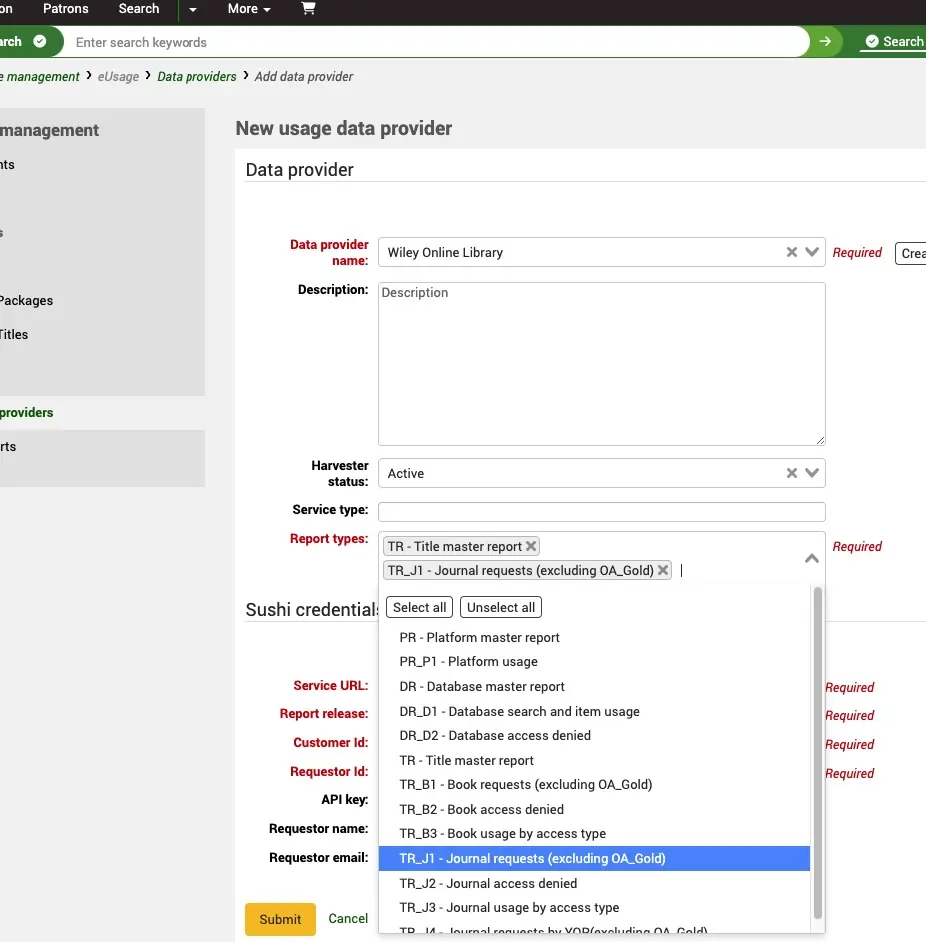
If you do not create the provider manually, the SUSHI credentials will be completed with information from the Registry. The 'Credentials information' is also pulled through to assist you with the information you need to request from the provider. This may include a Customer Id, Requester Id or API key. You may also be required to provide a requester name and email.

You can toggle between the 'Create manually' and 'Create from registry' buttons depending on whether you want to input the information yourself or take it from the registry. You can also take the information from the registry and then toggle to 'Create manually' if you want to update things like the name.
डेटा प्रदाता होम स्क्रीन
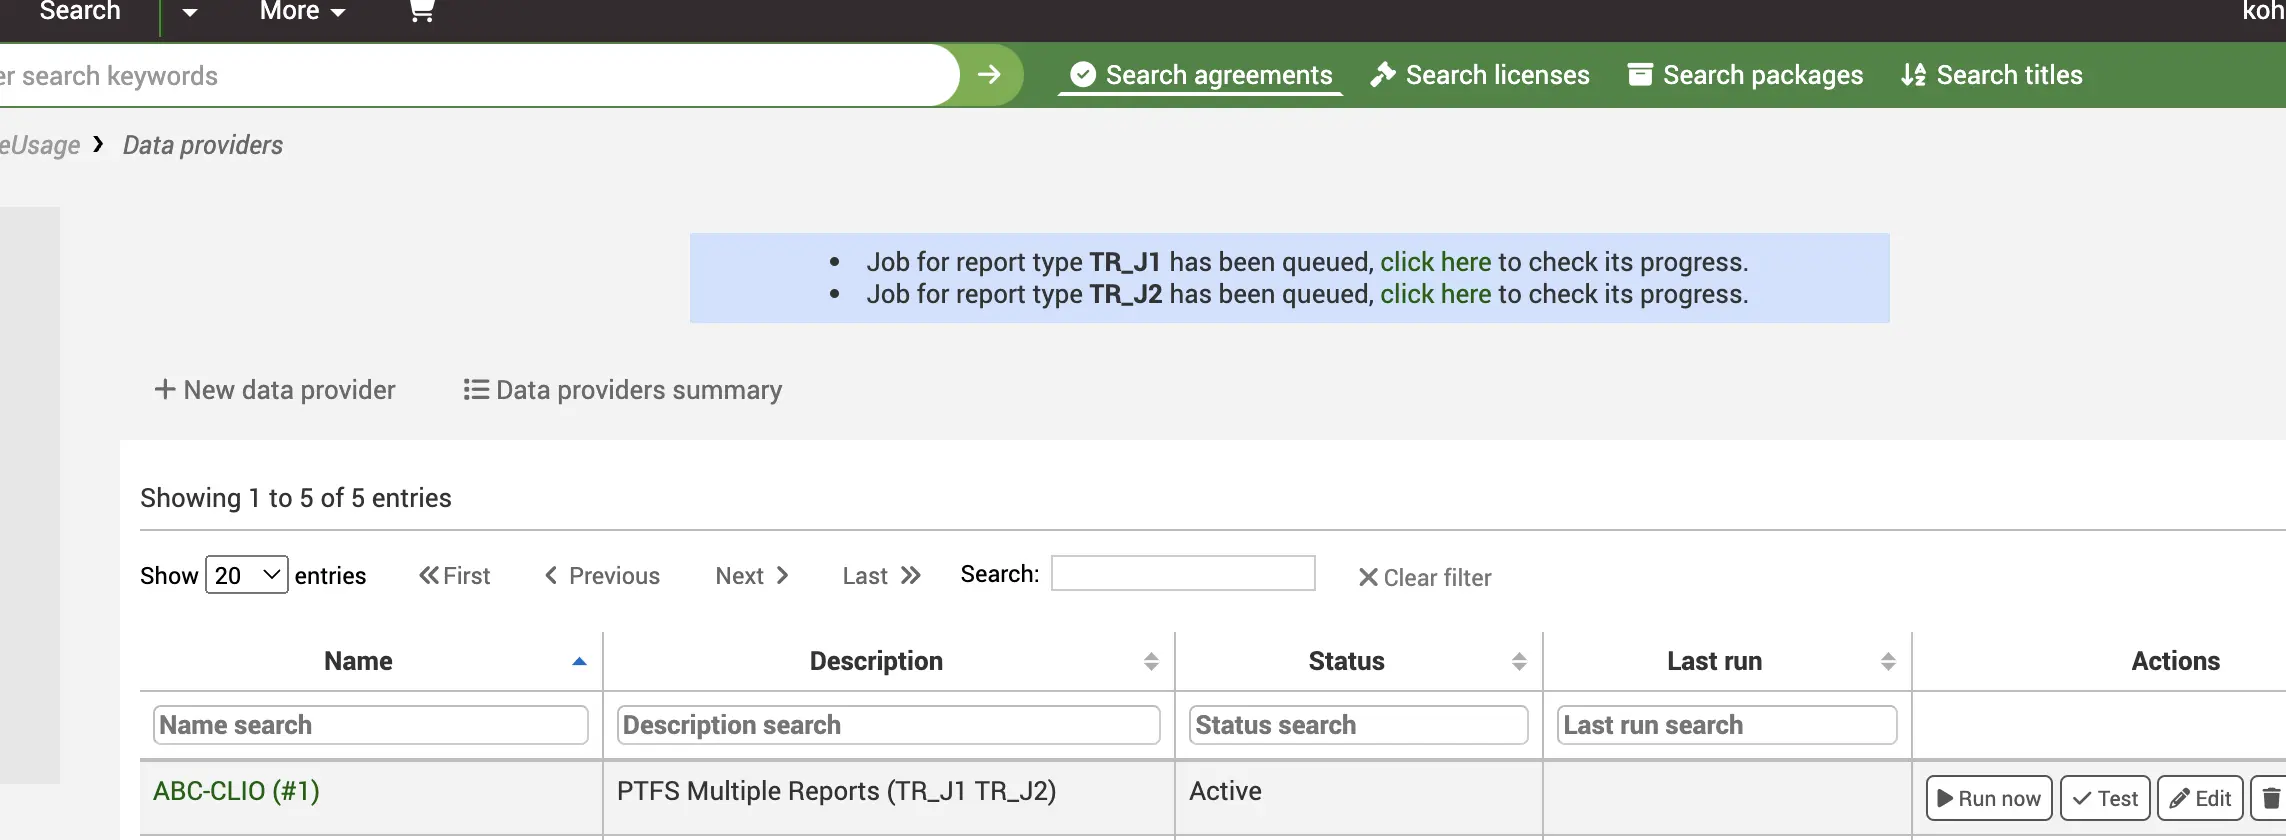
The Data providers home screen provides you with a list of your current data providers. You can see at a glance whether they are active or inactive and when the last harvest of that platform took place. Use the table filters to search for a specific Data provider. The four action buttons work as follows:
Test
The 'Test now' button will access the SUSHI endpoint you have configured and test your credentials to ensure they are valid. If the Data provider is inactive, you will receive a warning that the test cannot be completed.
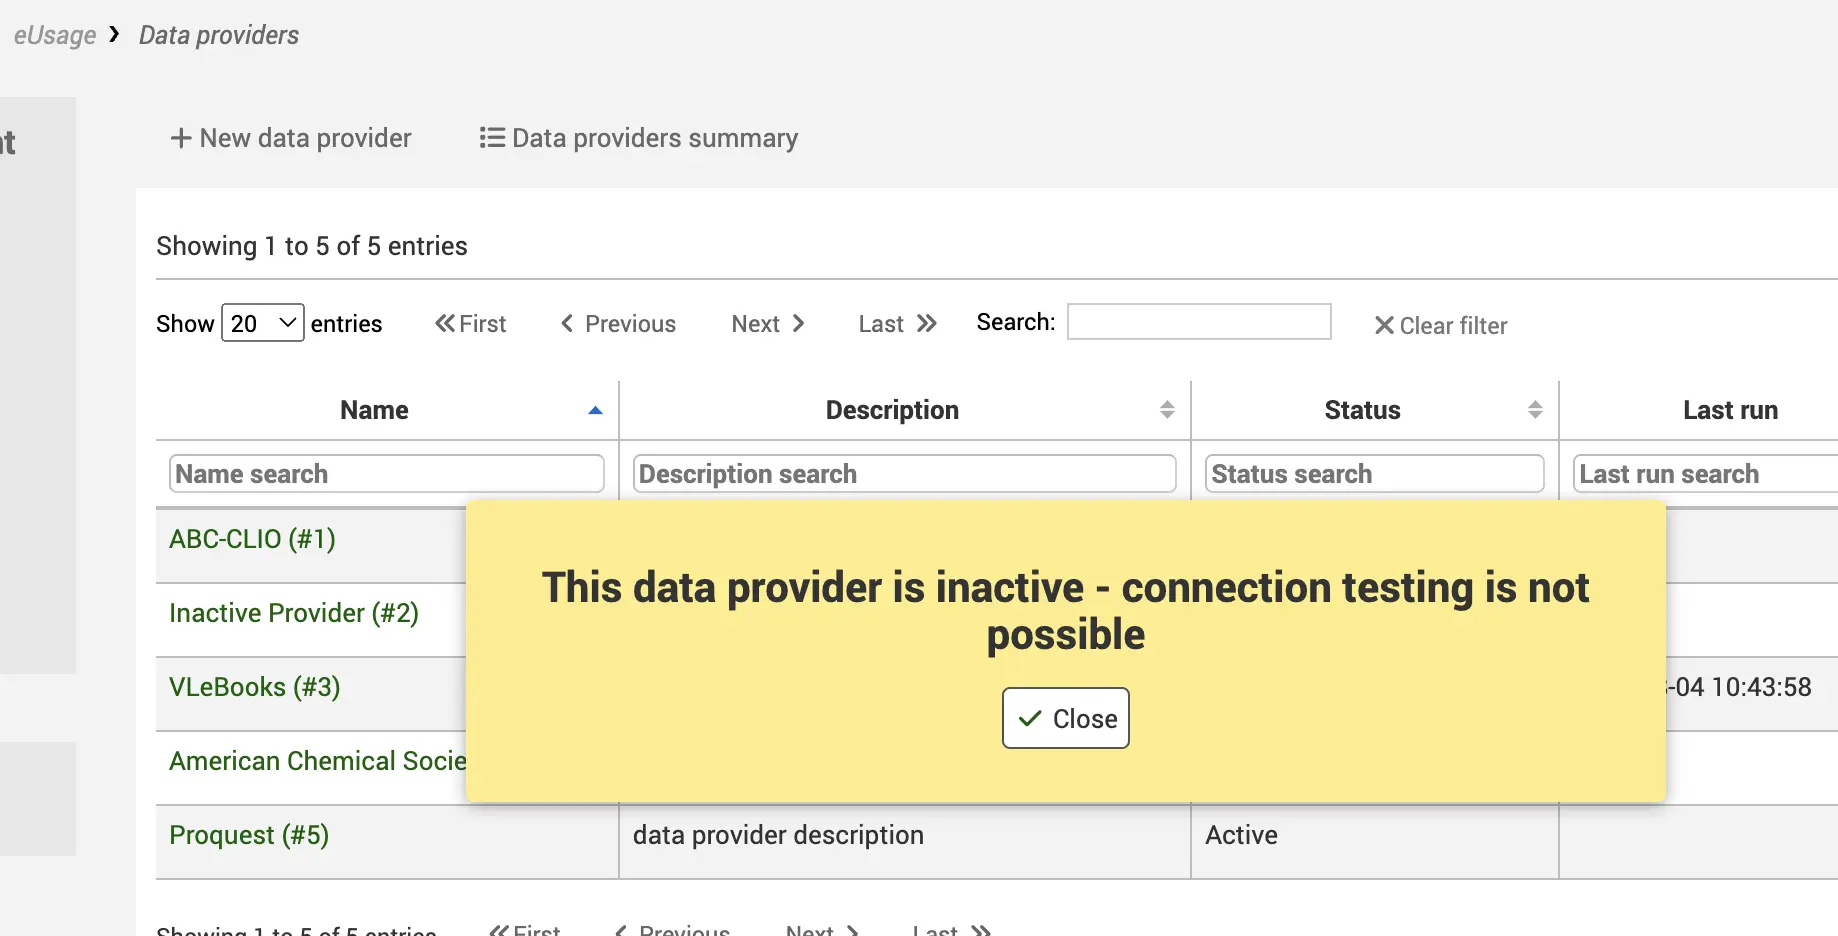
If the Data provider is active, you will receive a success or failure message.

Run now
यह स्रोत की तत्काल फसल को ट्रिगर करेगा। रन अब आपको एक शुरुआत और अंत हार्वेस्ट की तारीख प्रदान करने के लिए संकेत देता है।
सलाह
Instead of manually clicking 'Run now' for every provider when you need to check new usage statistics, you can set up the harvesting cron job on your server. The erm_run_harvester.pl script will harvest the SUSHI data for all active usage data providers at regular intervals.
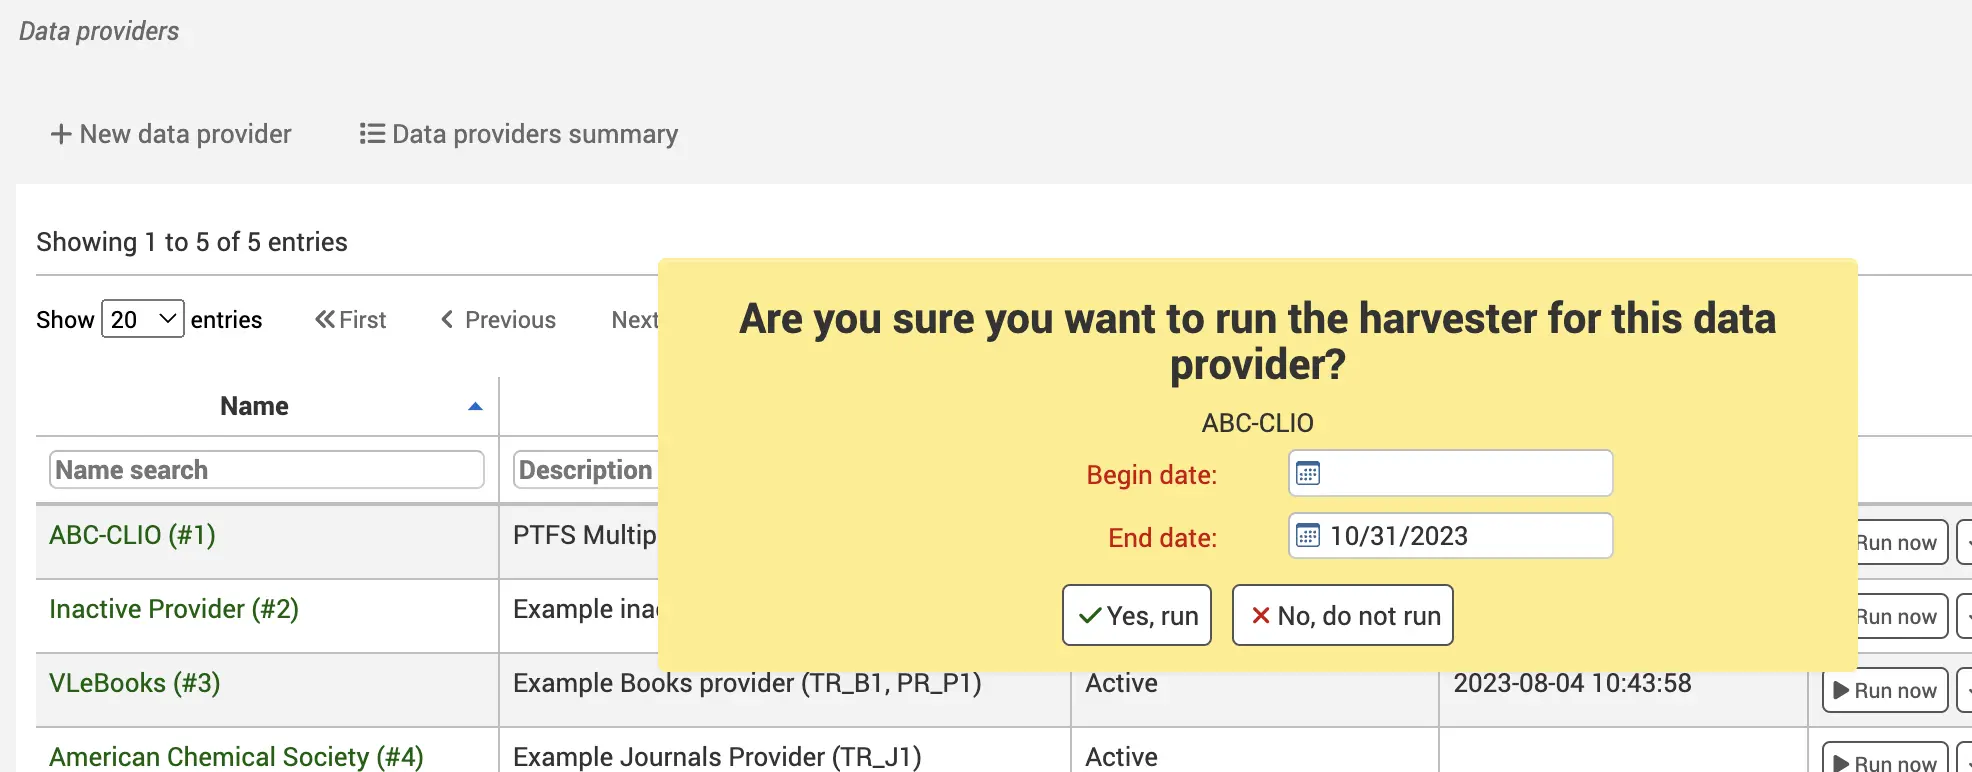
आपको बैकग्राउंड जॉब का लिंक भी दिखाई देगा। प्रति रिपोर्ट प्रकार एक पृष्ठभूमि नौकरी है।
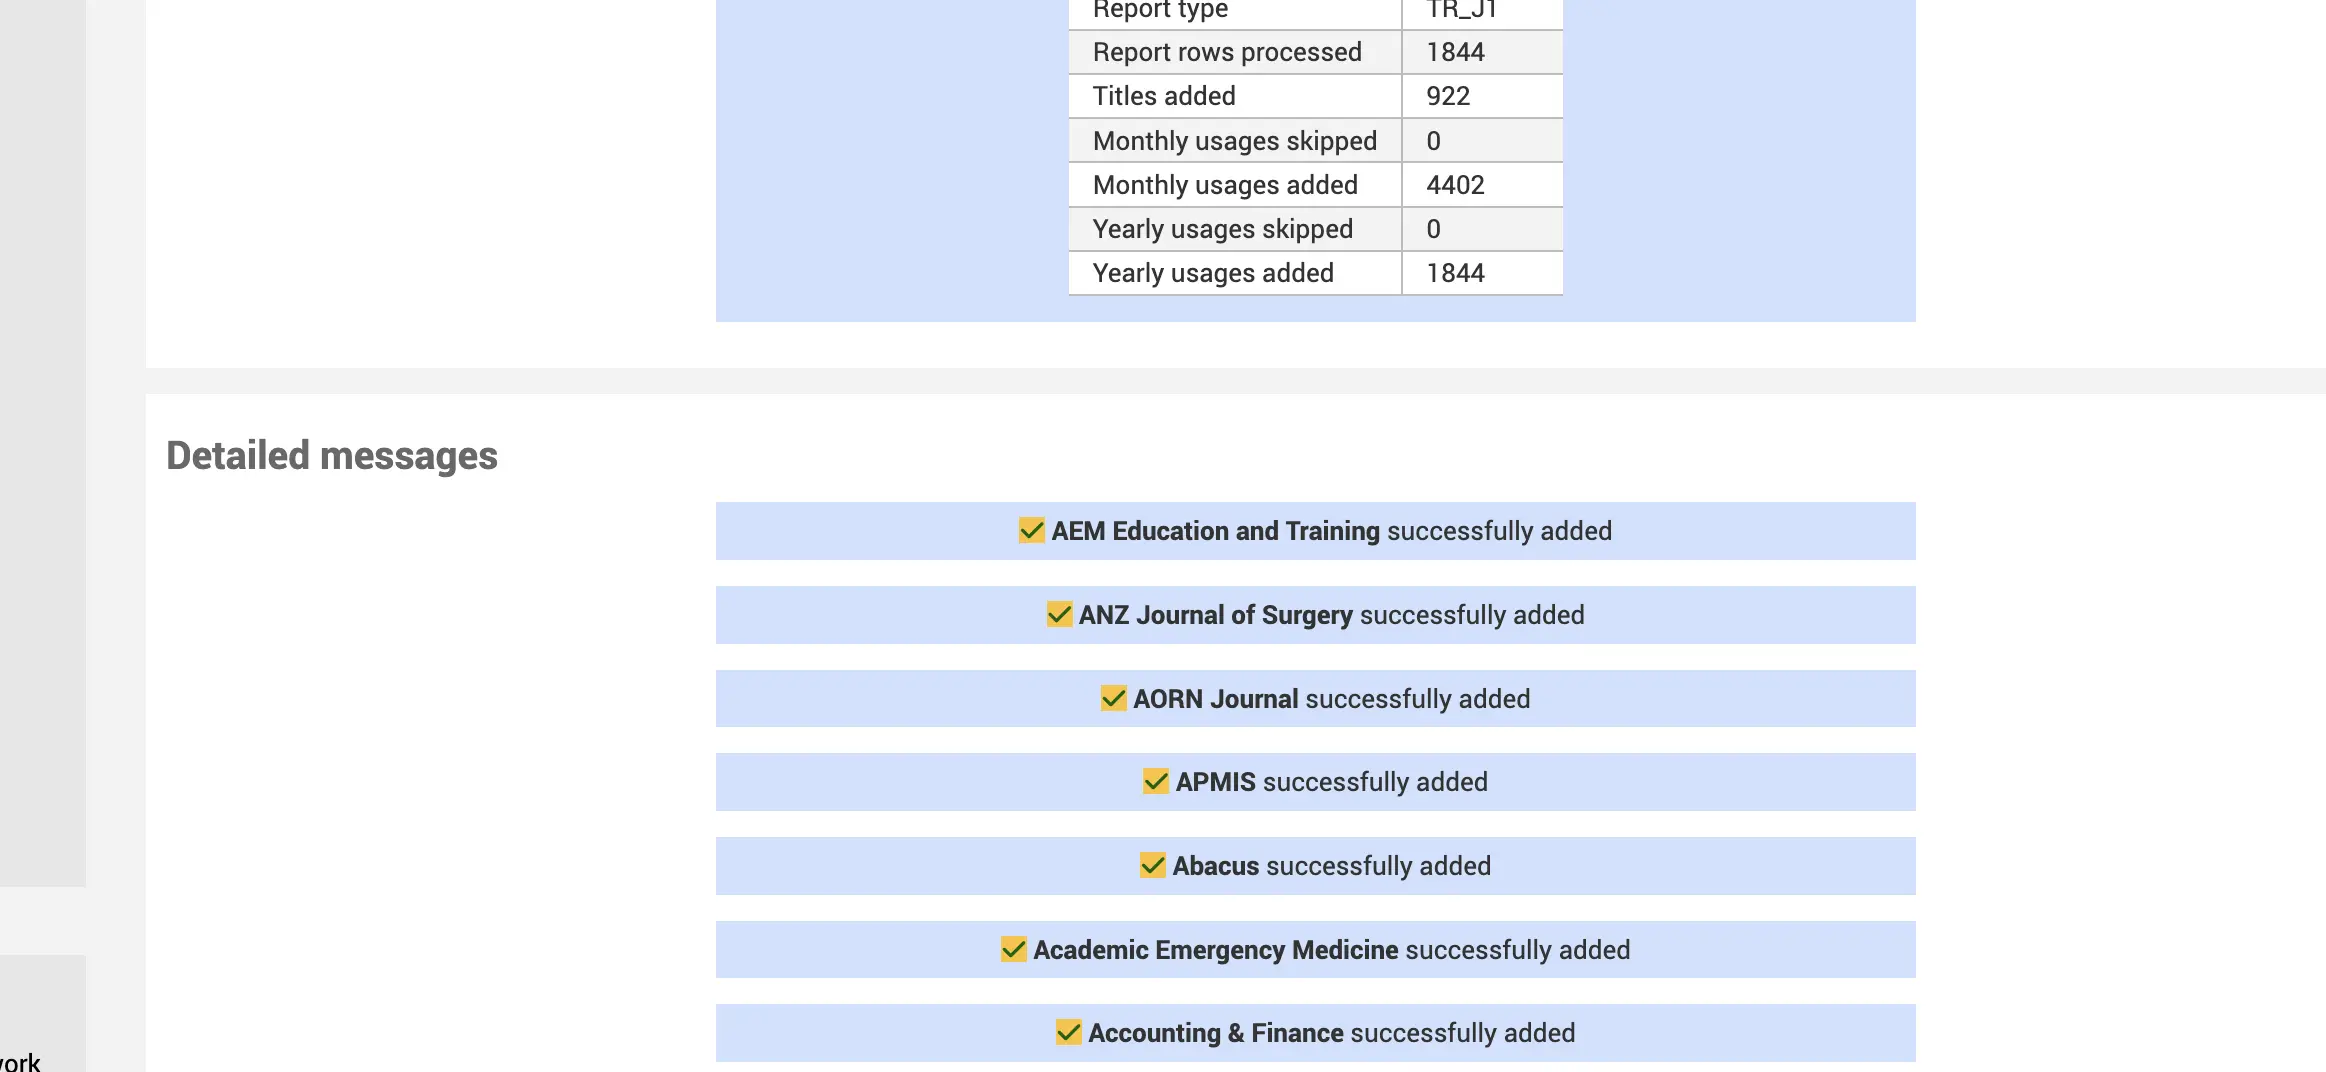
The summary page will give you a list of the report rows processed from the incoming COUNTER file and the number of provider title records imported into Koha. In addition it shows the amount of usage statistic counts that have been added to the data provider title tables. Each successfully added new title will have a check mark next to it to indicate it has been newly added.
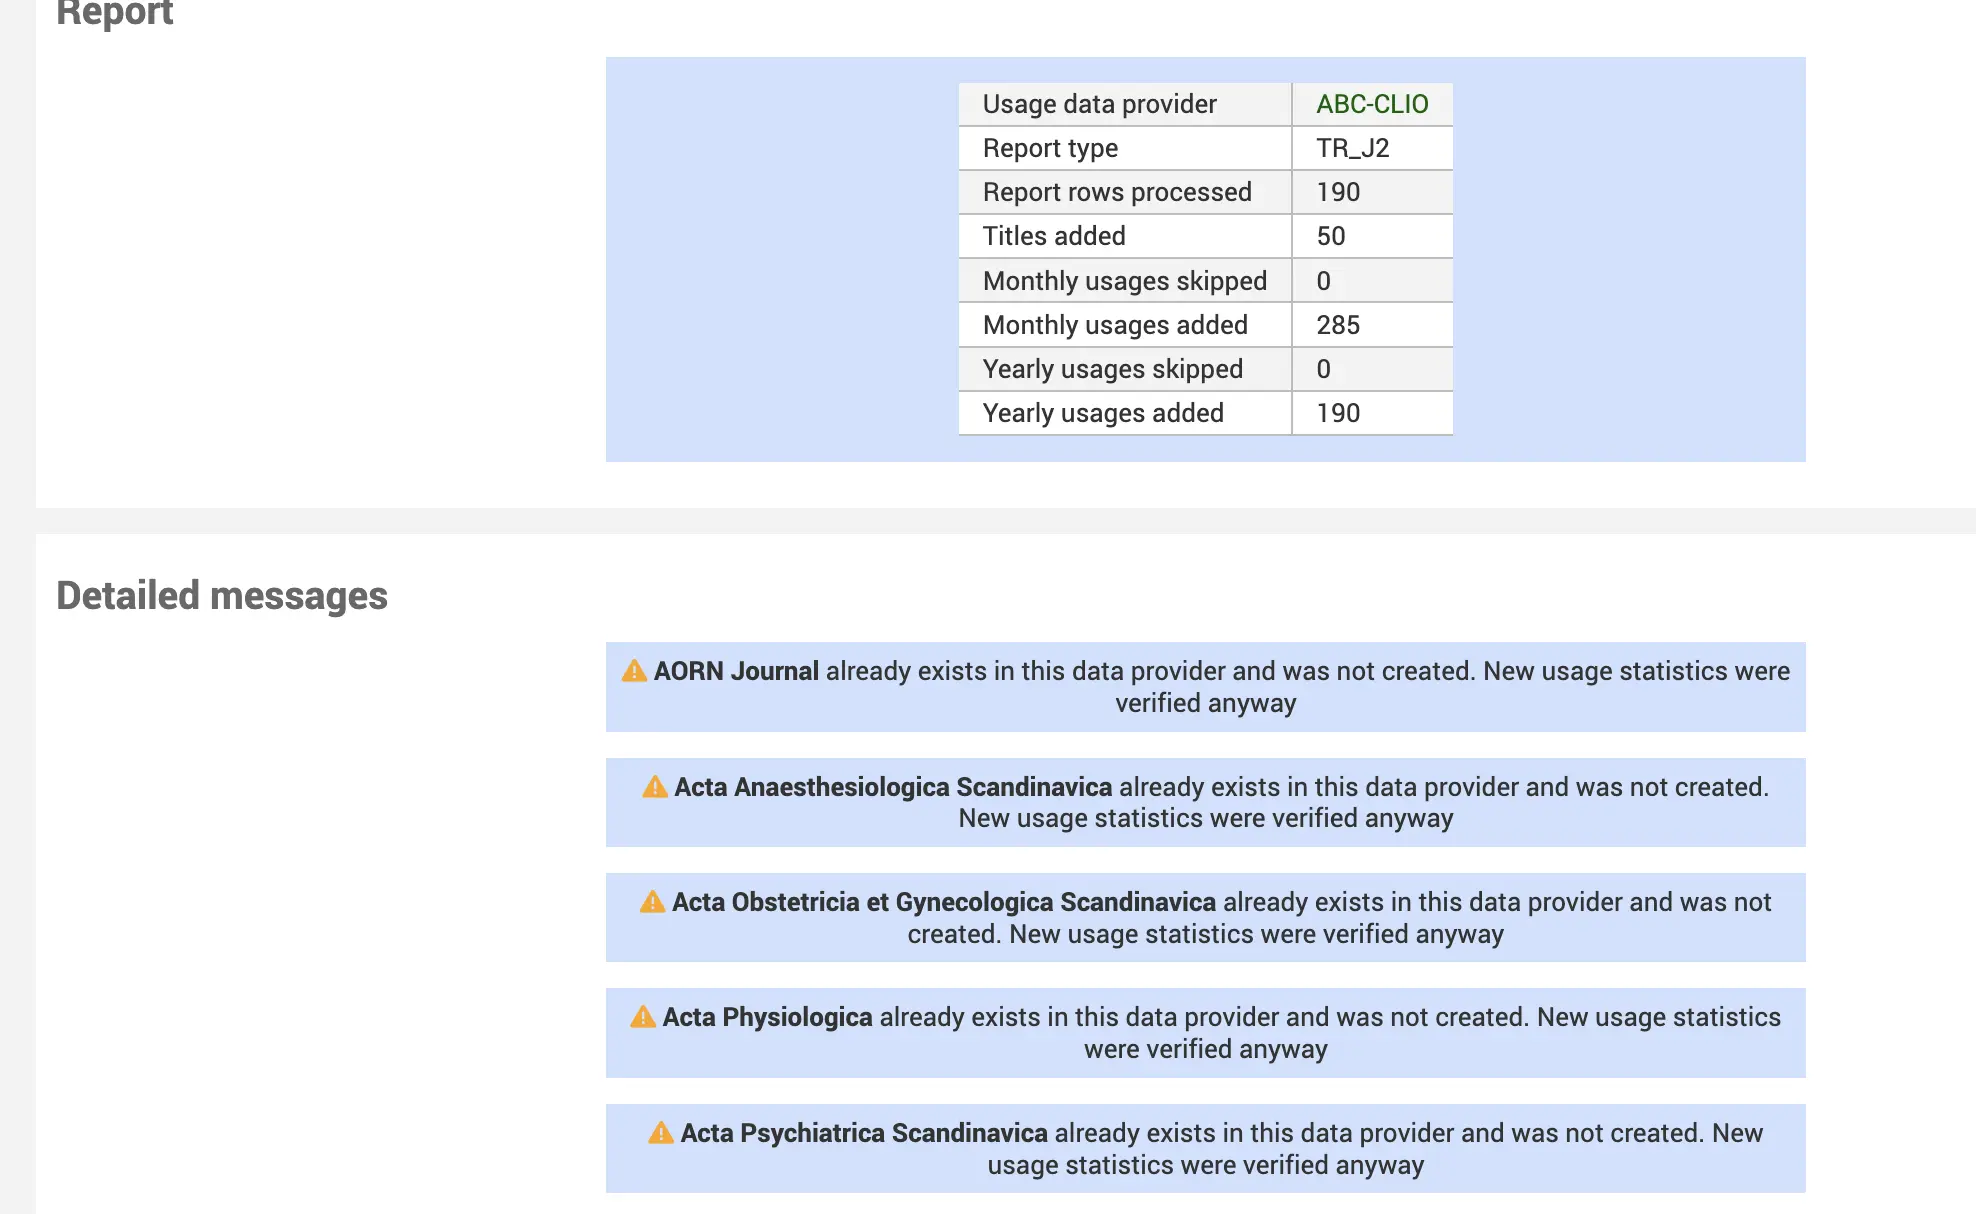
यदि शीर्षक पहले से ही कोहा में मौजूद है, तो आपको एक चेतावनी दिखाई देगी जो यह मौजूद है लेकिन किसी भी गणना को अपडेट किया गया है।
Edit
To edit an existing Data Provider
Delete
To delete a Data Provider
डेटा प्रदाता सारांश
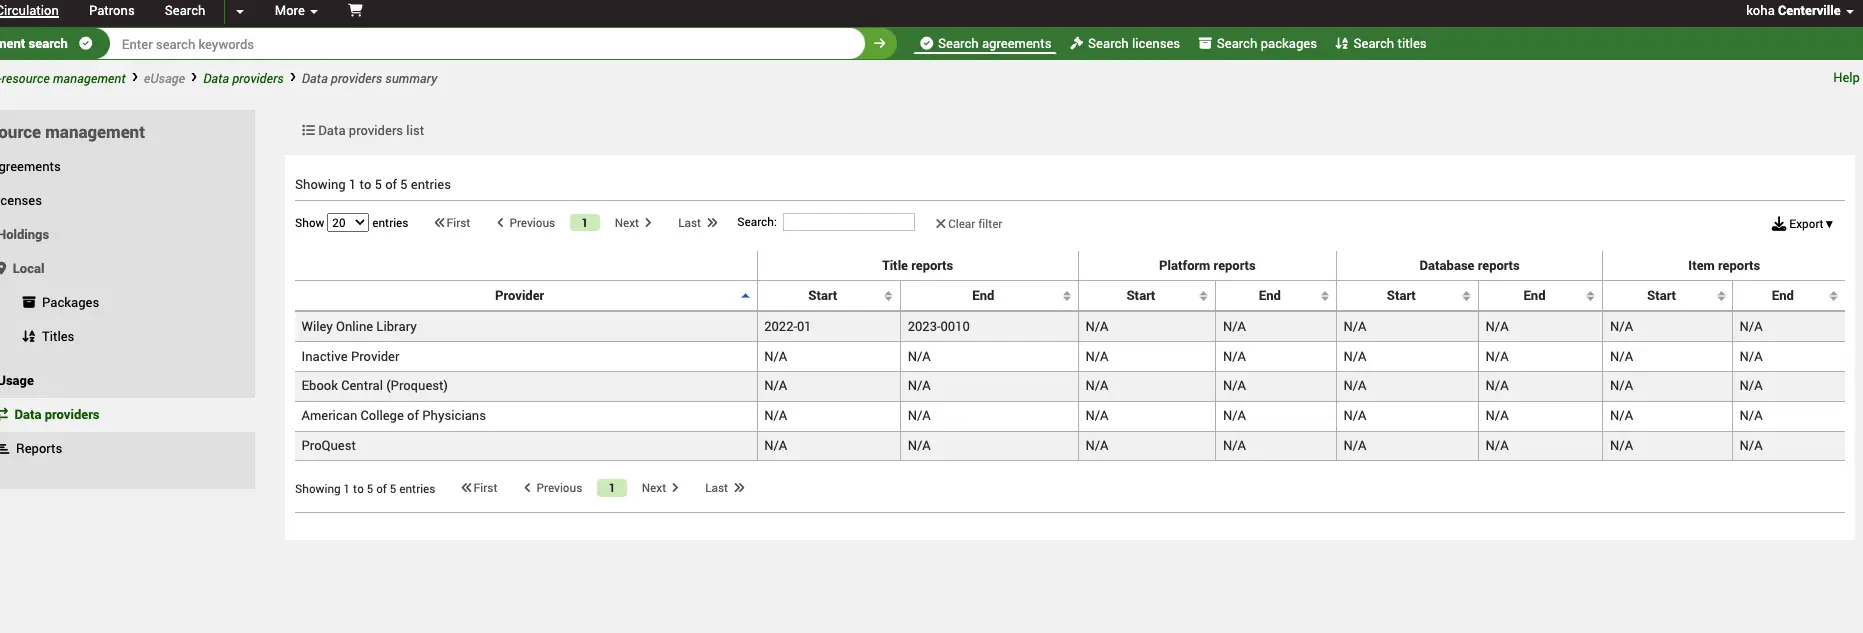
Next to the 'New data provider' button, you will see a link to the Data provider summary. This gives you an at-a-glance view of all your Data providers, and the earliest and most recent data you have for each report type.
Search and view a Data Provider record
From the ERM Home page click on the Data providers link in the left-hand menu.
Get there: More > E-resource management > Data providers
You will be presented with a list of existing Data providers in the system. You can use the table or column filters to search and filter data you are looking for (for example, all Data providers with the Status: Active).
Clicking on the Name of the Data providers will take you through to the full view.
यहां से आप रिपोर्ट प्रकारों और एसयूएसएचआई क्रेडेंशियल्स का सारांश भी देख सकते हैं लेकिन कुछ टैब जिनमें टाइटल्स (TR), प्लेटफॉर्म (PR), आइटम (IR) और डेटाबेस (DR) रिपोर्ट के लिए कटाई डेटा शामिल है।।
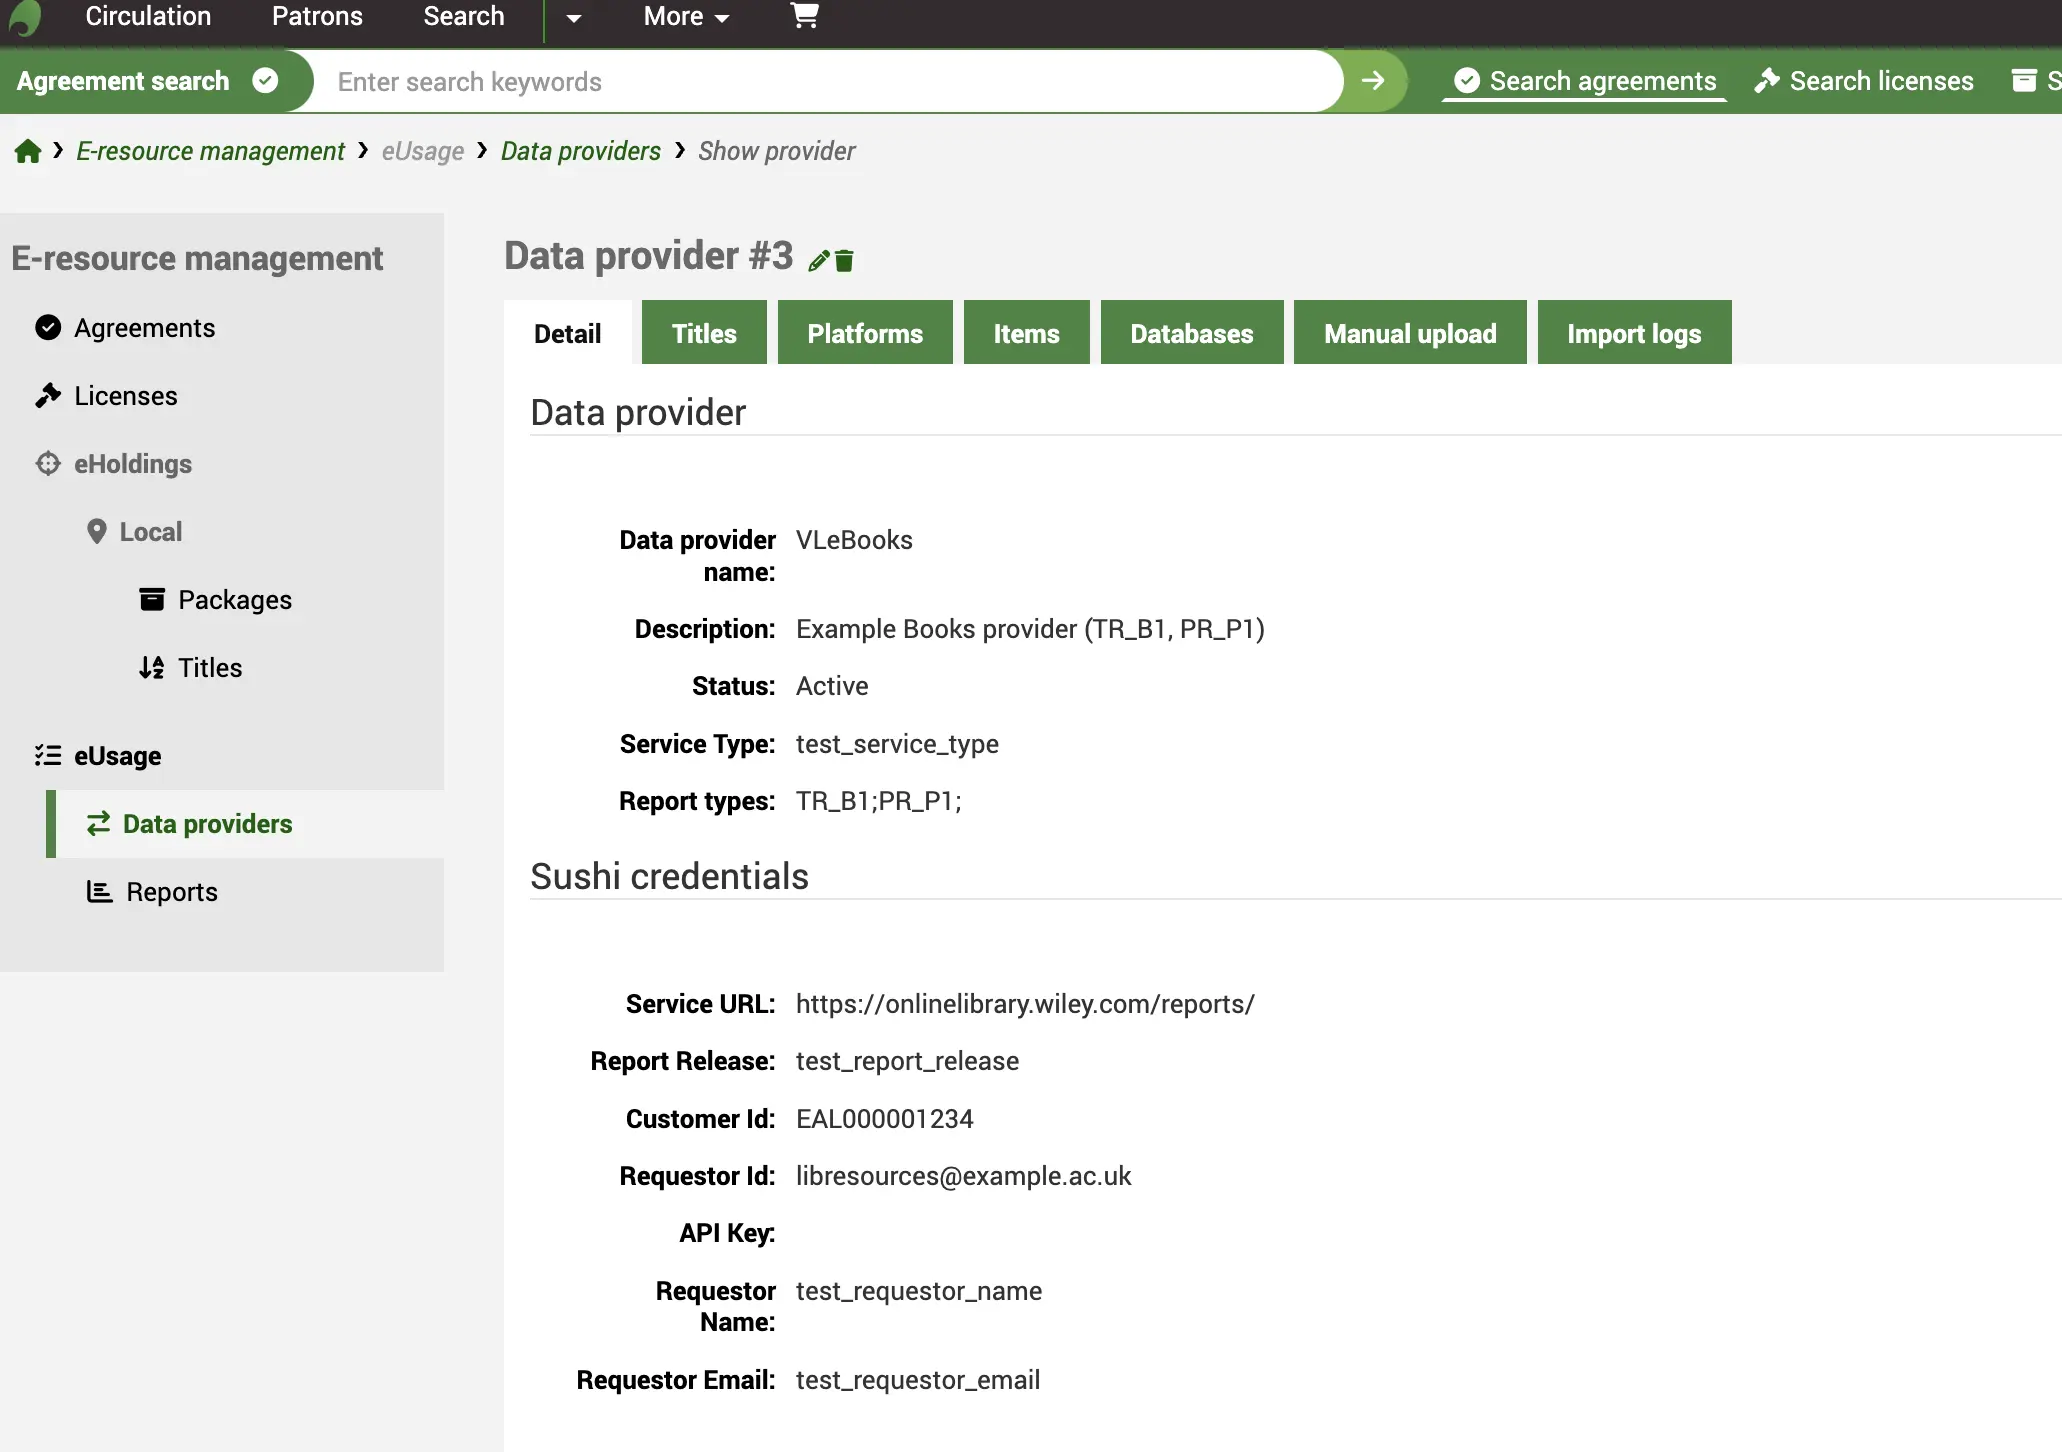
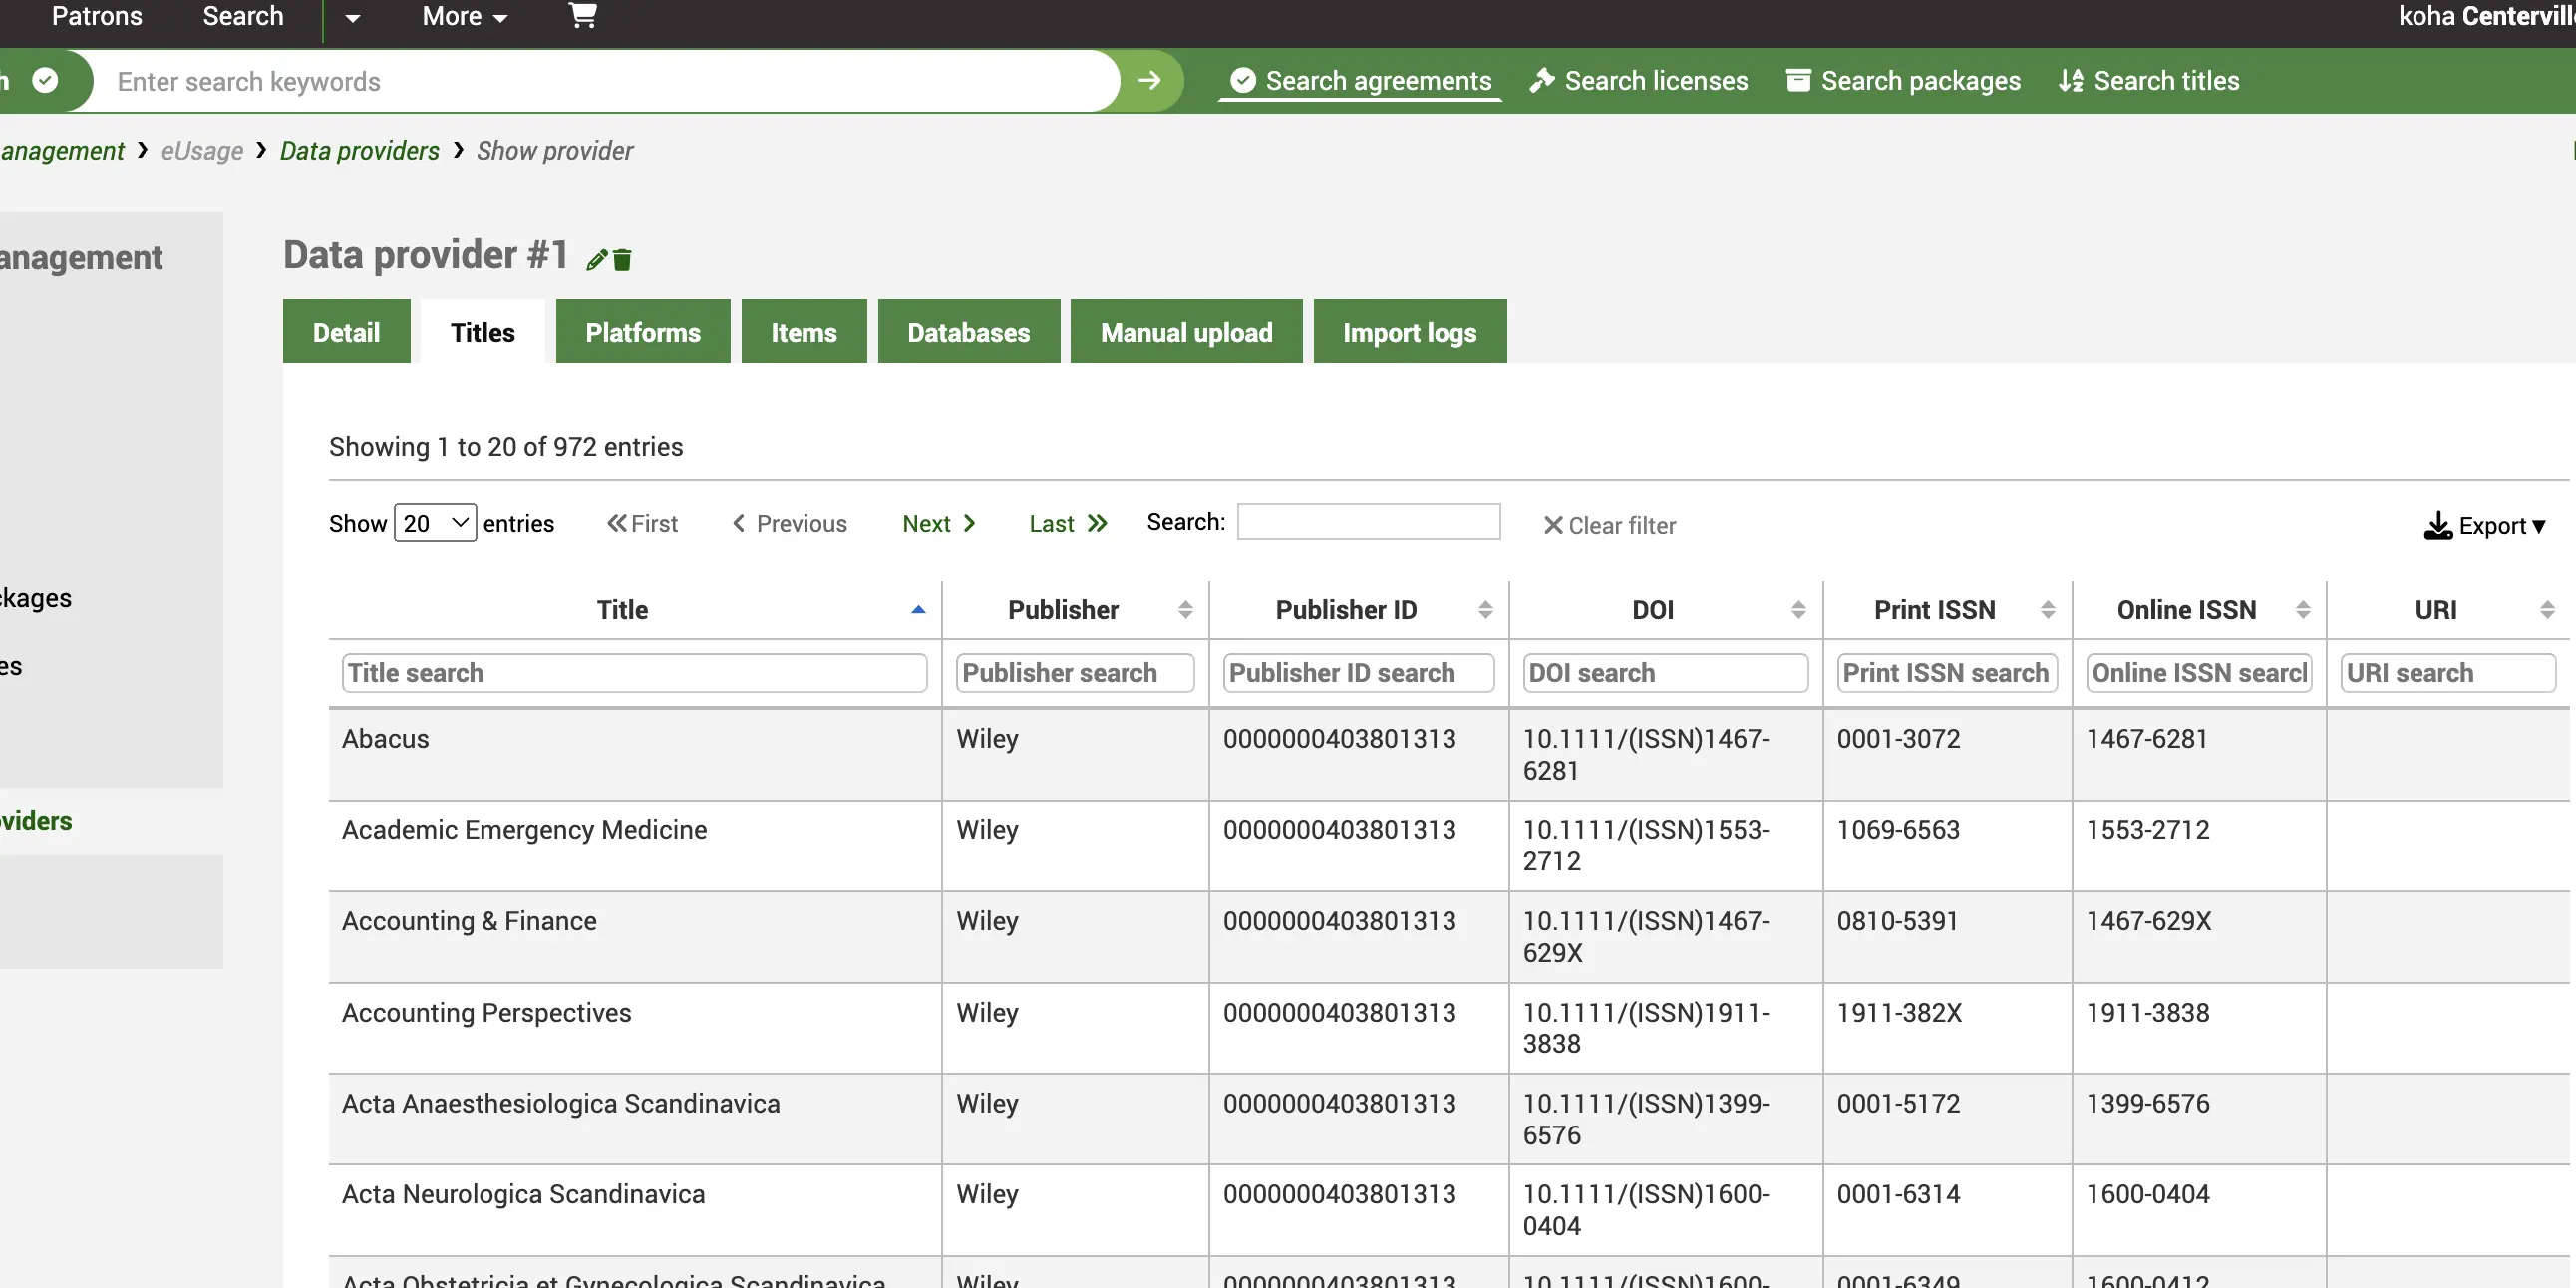
If we look at Titles, as an example, you can see a list of all harvested titles from this platform along with identifiers from the COUNTER report. Use the search boxes to narrow down your results.
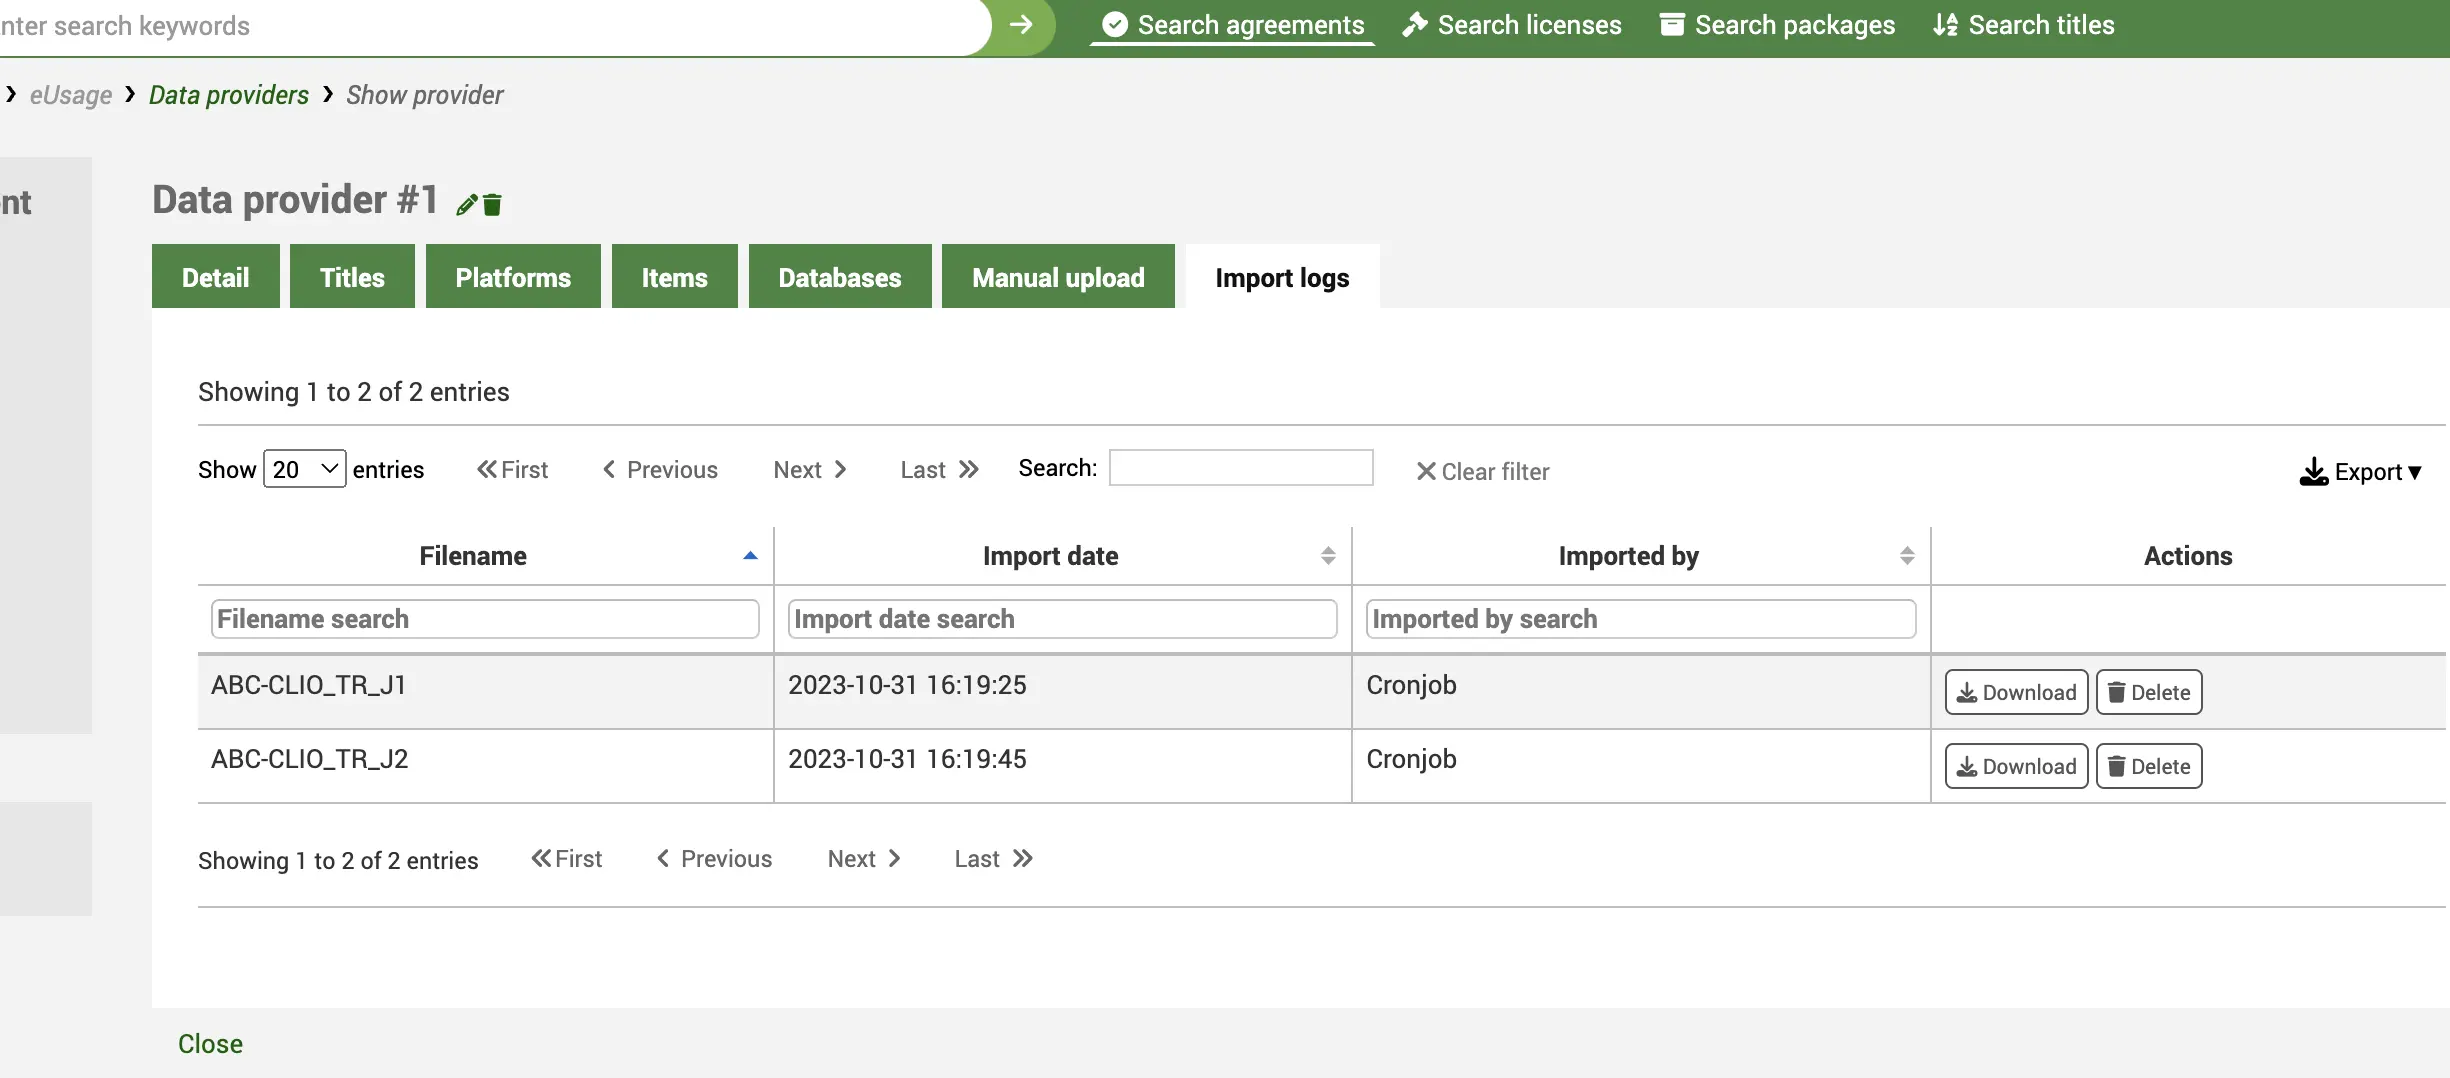
The Import logs tab gives an audit trail of all harvests including the import date and time. You will also see a 'Download' button which allows you to download the original COUNTER 5 file if you want to use it in another application or import it into a spreadsheet. You can also Delete the file from here along with the log entry.
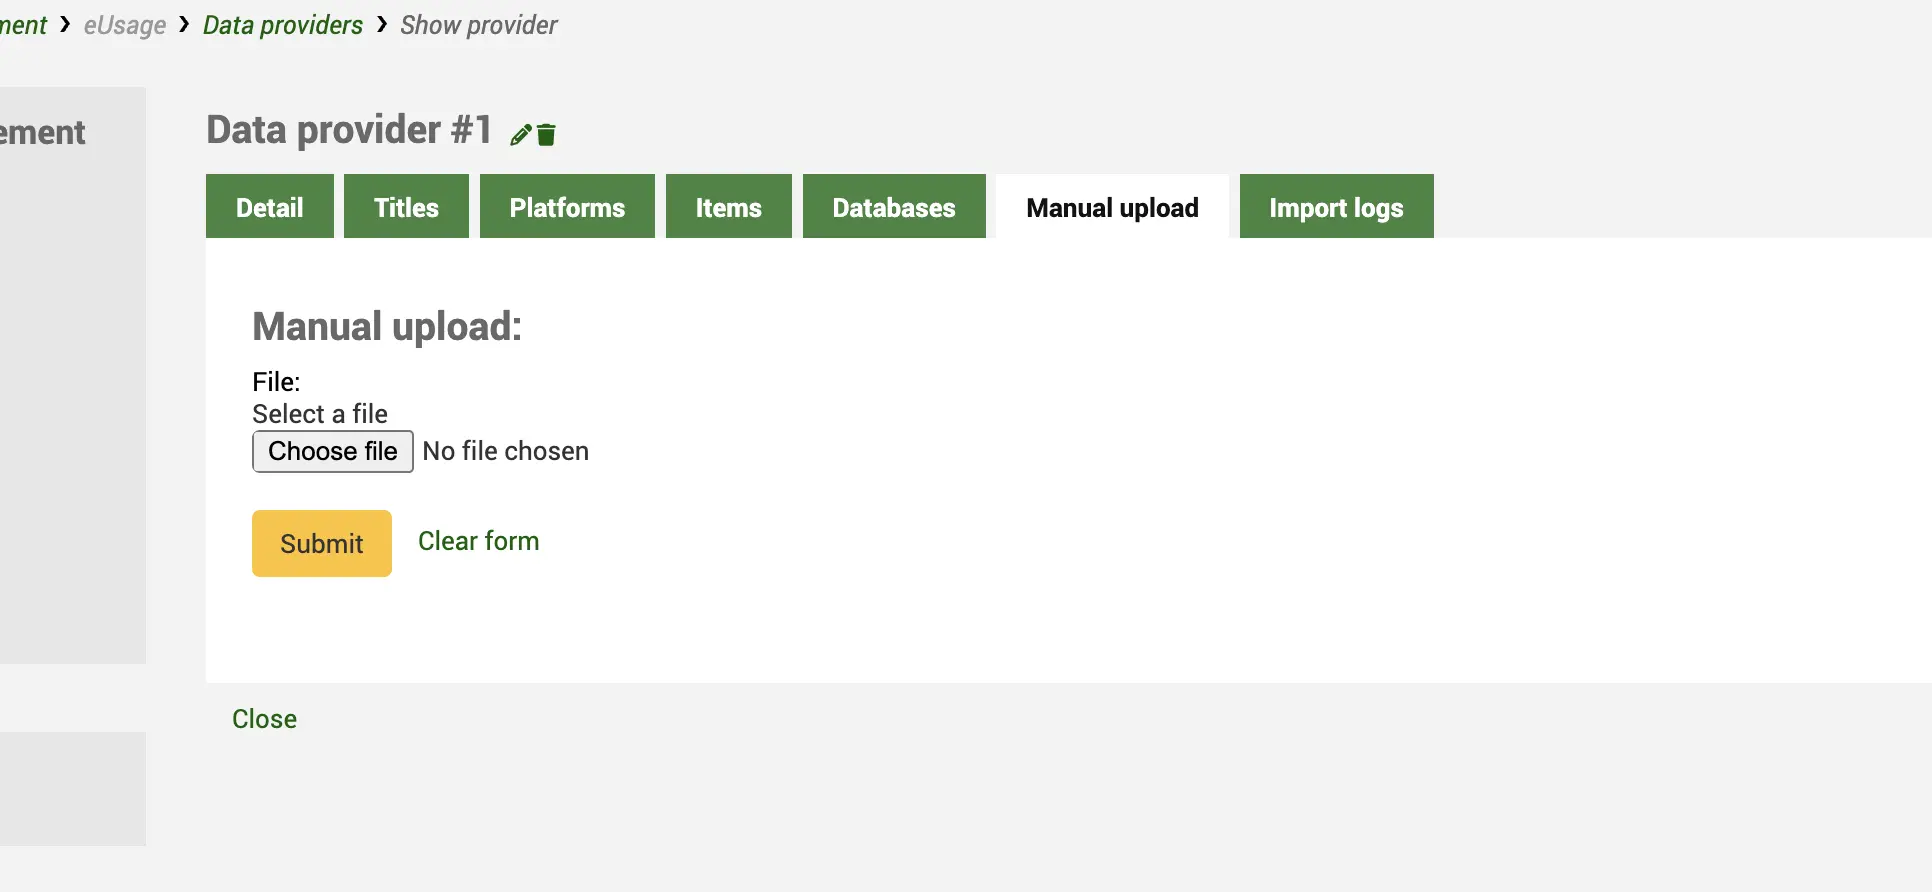
मैनुअल अपलोड टैब आपको अपने डेस्कटॉप से मैन्युअल रूप से एक काउंटर 5 फ़ाइल अपलोड करने की अनुमति देता है। प्रदाताओं के लिए इसका उपयोग करें जो एक सुशी एंडपॉइंट प्रदान नहीं करते हैं, लेकिन आपको ईमेल या कुछ अन्य तंत्र के माध्यम से काउंटर संगत फ़ाइलें प्रदान कर सकते हैं।
रिपोर्टों
From the ERM Home page click on the Reports link in the left-hand menu.
Get there: More > E-resource management > Reports
Click the 'Create Report' tab to create a new report.
On the Reports home page, you will see a list of any 'Saved reports' and also the ability to 'Create report'.
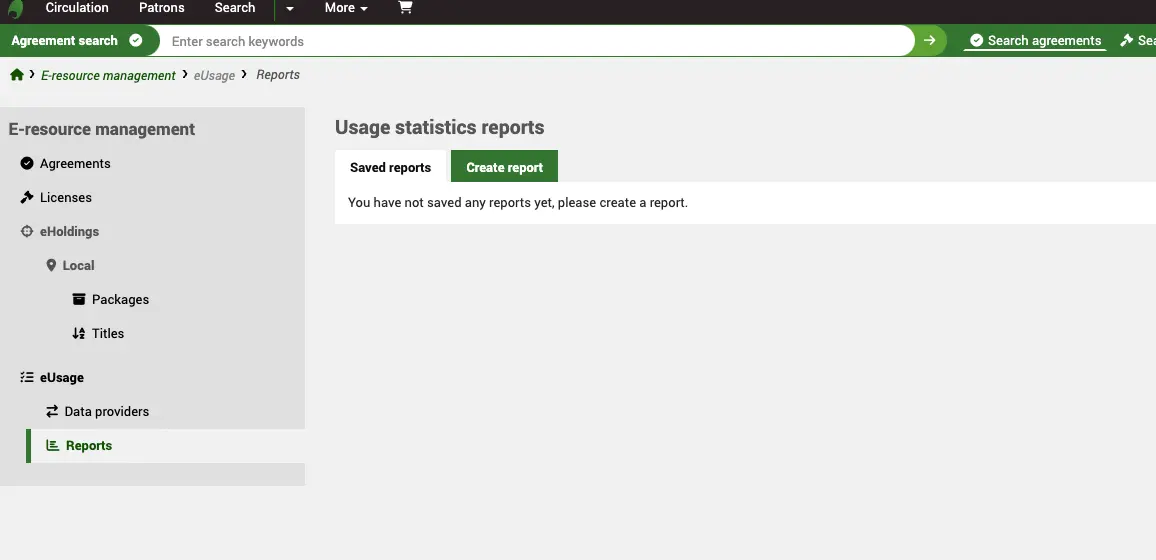
Create report
उपयोग सांख्यिकी रिपोर्ट सांख्यिकीय डेटा की अनूठी प्रकृति के कारण सामान्य कोआ रिपोर्टिंग मॉड्यूल के बजाय ERM मॉड्यूल के तहत स्थित हैं।।
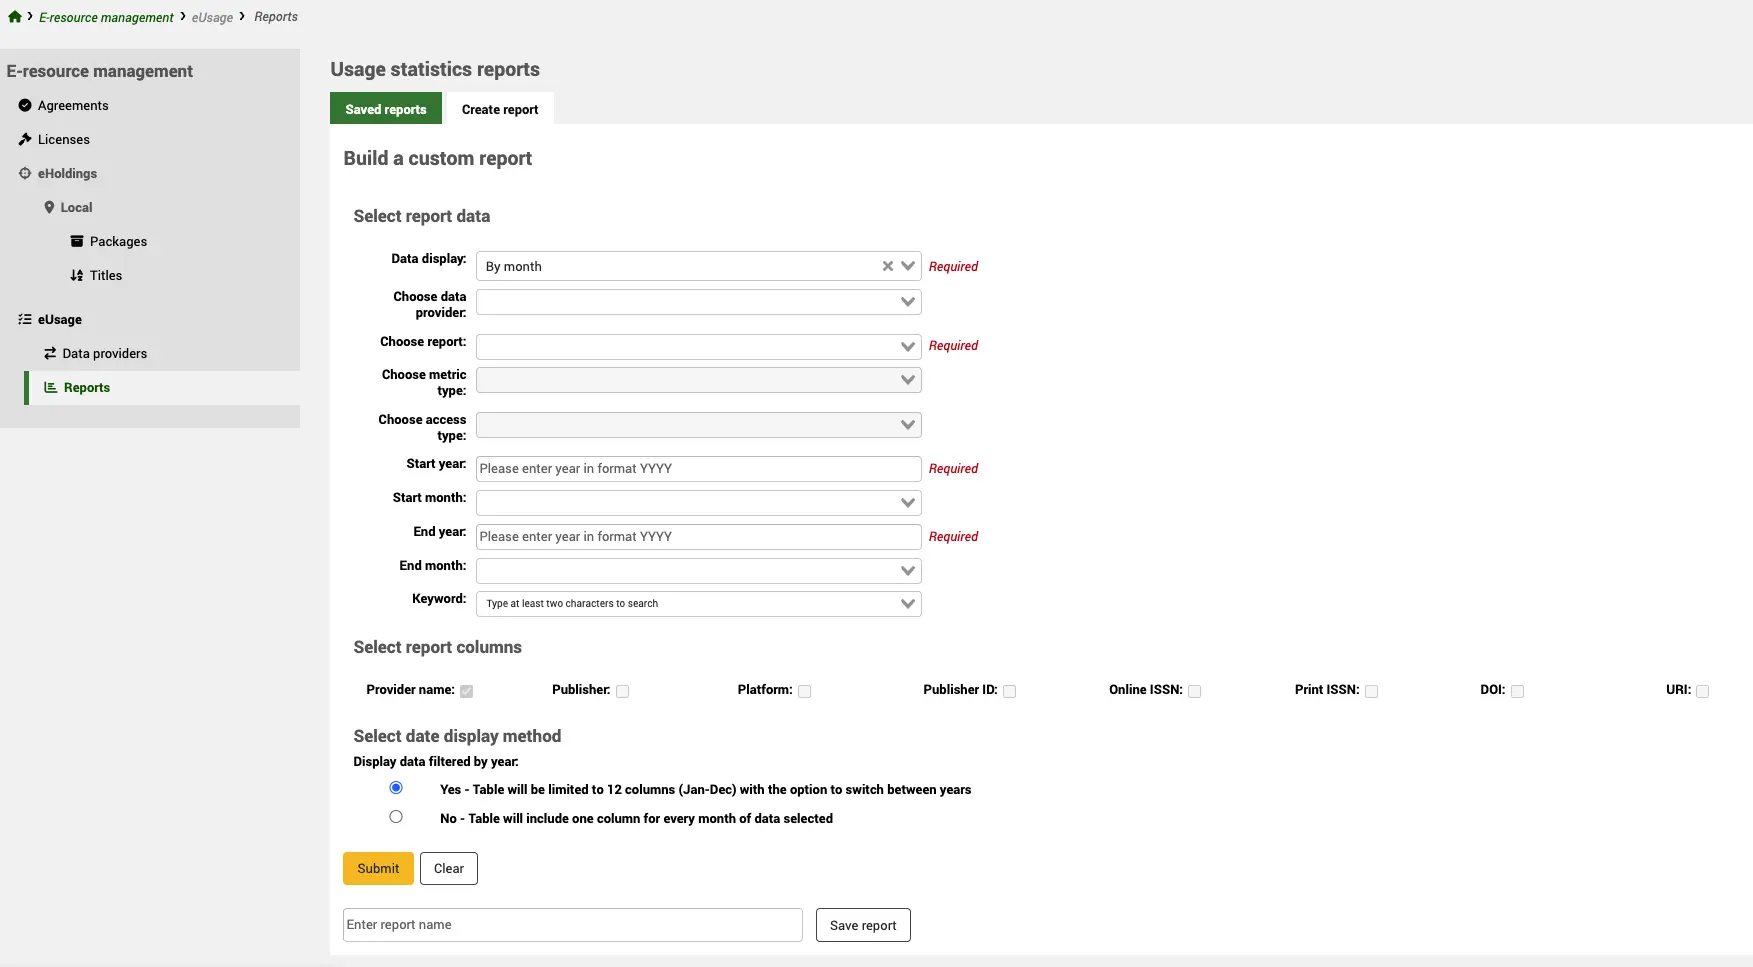
रिपोर्ट डेटा का चयन करें
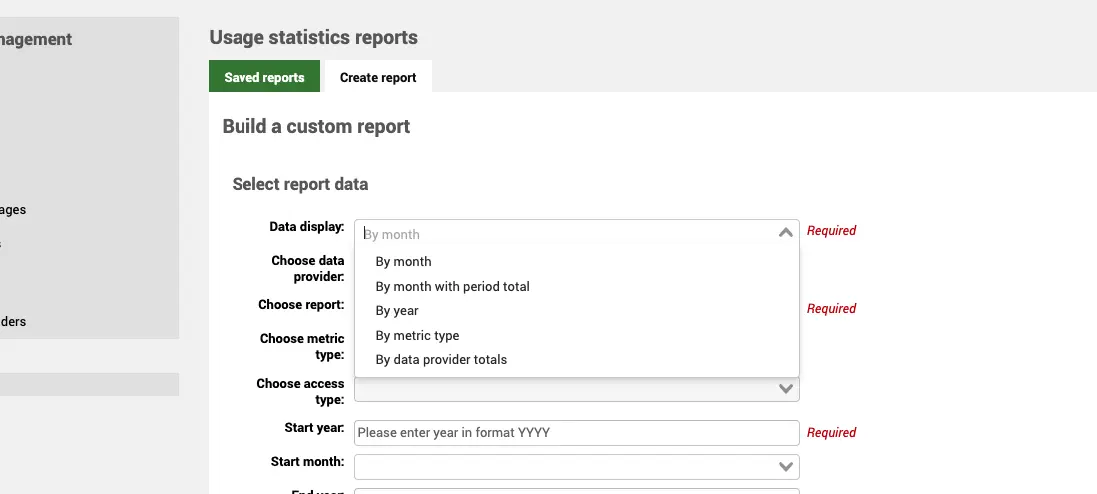
Data display (Required)
Depending on the nature of the data you are looking at, you have a number of data displays: both monthly and annual counts, with or without totals; counts by metric type, Total or Unique item requests. You can also use data provider totals to get a single overall count.
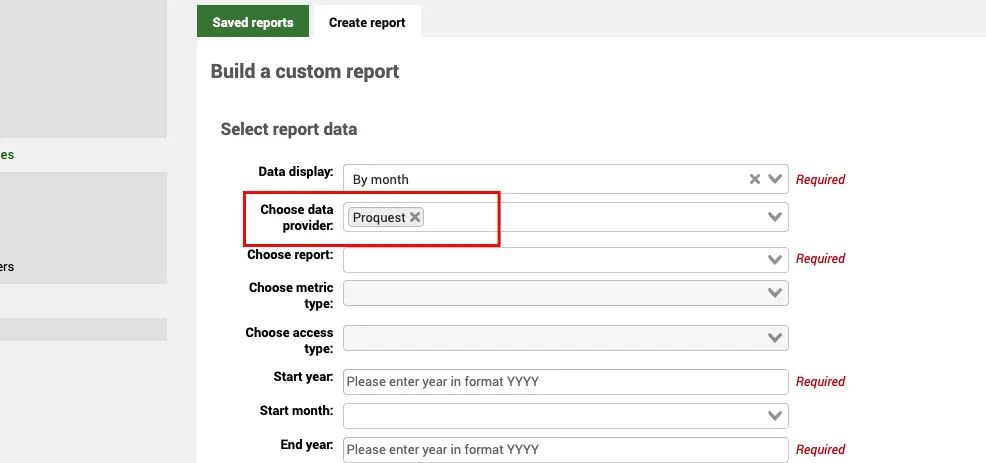
Choose data provider
You can specifically look at data for a single Data Provider (platform) by selecting the data provider from the dropdown list.
Choose report (Required)
Once you have selected a data provider, you can only select a report type that is in use in the data provider record. So, if the data provider supports TR_J1 and TR_J2 for example, these are the only report types you will see listed.
If you select the report type before the provider, this will limit the drop-down list of providers to those who support that report type.
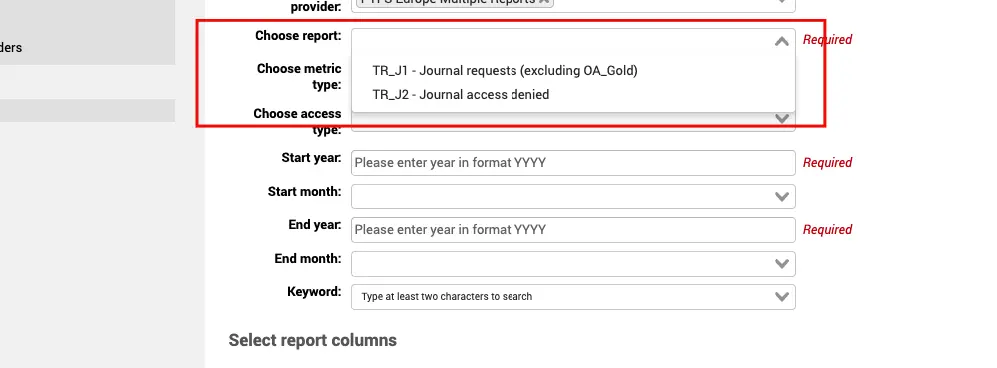
मीट्रिक प्रकार चुनें
The metric types which display depend on the report type you have selected. Some metric types only apply to certain report types. For example, TR_J1 supports Total Item Requests and Unique Item Requests whereas PR_P1 will give you Searches platform.
यदि आप एक मीट्रिक प्रकार का चयन नहीं करते हैं, तो आपकी रिपोर्ट में सभी मीट्रिक प्रकार प्रदर्शित किए जाएंगे।।

एक्सेस टाइप चुनें
For some very specific reports (e.g. TR_J3 and TR_B3) the data is broken down further into access types. When you select one of these reports, you will see that the access type field becomes active and offers an option of Controlled and OA_Gold.
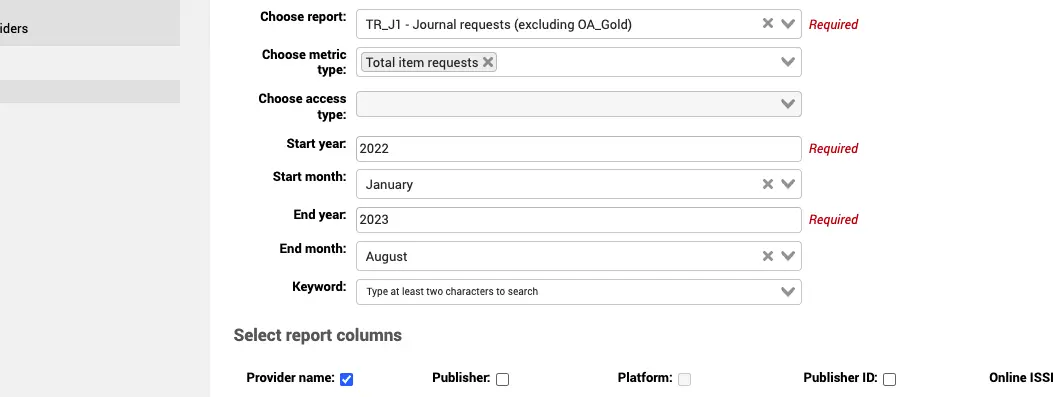
Start year (Required)
You must provide a start year for your report data.
प्रारंभ महीना
यदि आप किसी विशिष्ट अवधि के लिए डेटा देखने की कोशिश कर रहे हैं तो आप (वैकल्पिक रूप से) एक महीने निर्दिष्ट कर सकते हैं।
अंतिम वर्ष (आवश्यक)
You must provide an end year for your report data.
अंतिम वर्ष
यदि आप किसी विशिष्ट अवधि के लिए डेटा देखने की कोशिश कर रहे हैं तो आप (वैकल्पिक रूप से) एक महीने निर्दिष्ट कर सकते हैं।
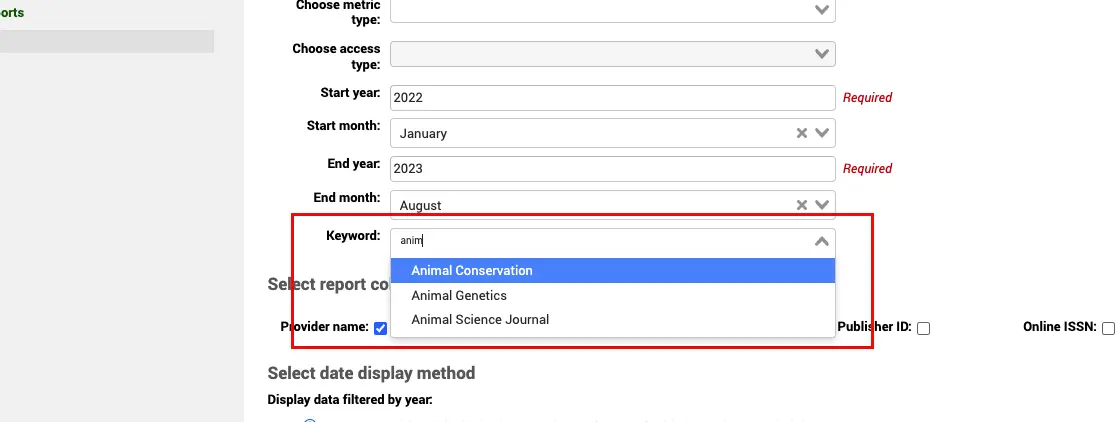
कीवर्ड
Once you have selected a specific data provider, you can use the Keyword option to search for a specific title. This allows you to see statistics for a particular publication.
रिपोर्ट कॉलम का चयन करें
By default, the Provider name is output to your report but you can also include additional data which is included in your COUNTER report such as Publisher, DOI, etc.

सभी काउंटर रिपोर्टों के बारे में जानकारी के लिए COUNTER प्रलेखन [https://cop5.projectcounter.org/en/5.1/04-reports/index.html] की जाँच करें।।
दिनांक प्रदर्शन विधि का चयन करें
When set to Yes, the data will always be listed by a 12-month period from January to December. This is to make the report readable on the screen. On the report output, you will have the option to toggle by year if you have selected data for more than one year.
When set to No, you will have one column for every month selected. Obviously, if you have many months selected you may be required to use your scroll bar to navigate the results on the page.
You can save your report by entering a name and selecting 'Save report'.
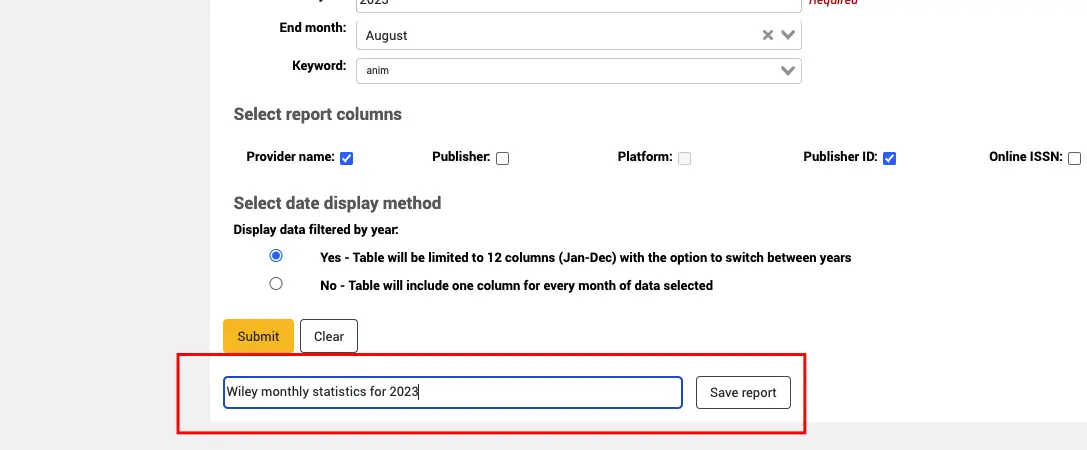
Saved reports
Once you have created a report, it will appear on the 'Saved reports' tab for future use.
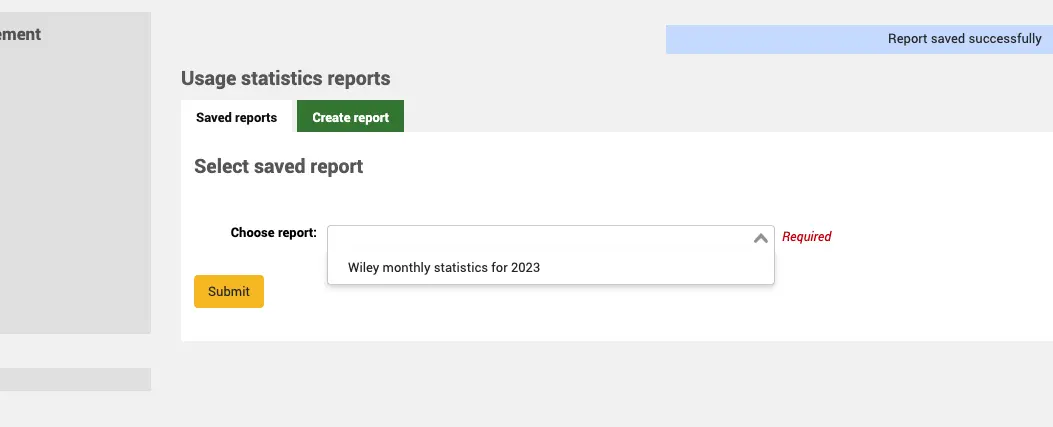
एक सहेजी गई रिपोर्ट को हटाने के लिए, सहेजी गई रिपोर्ट पृष्ठ पर डिलीट बटन का उपयोग करने के बाद आपको उस रिपोर्ट का चयन करना होगा जिसे आप हटाना चाहते हैं।।

एक बार जब आपकी रिपोर्ट निर्धारित हो जाती है तो क्वेरी को चलाने के लिए साइन अप करें। डेटा डिस्प्ले सेट के साथ एक रिपोर्ट हाँ इस तरह दिखेगा
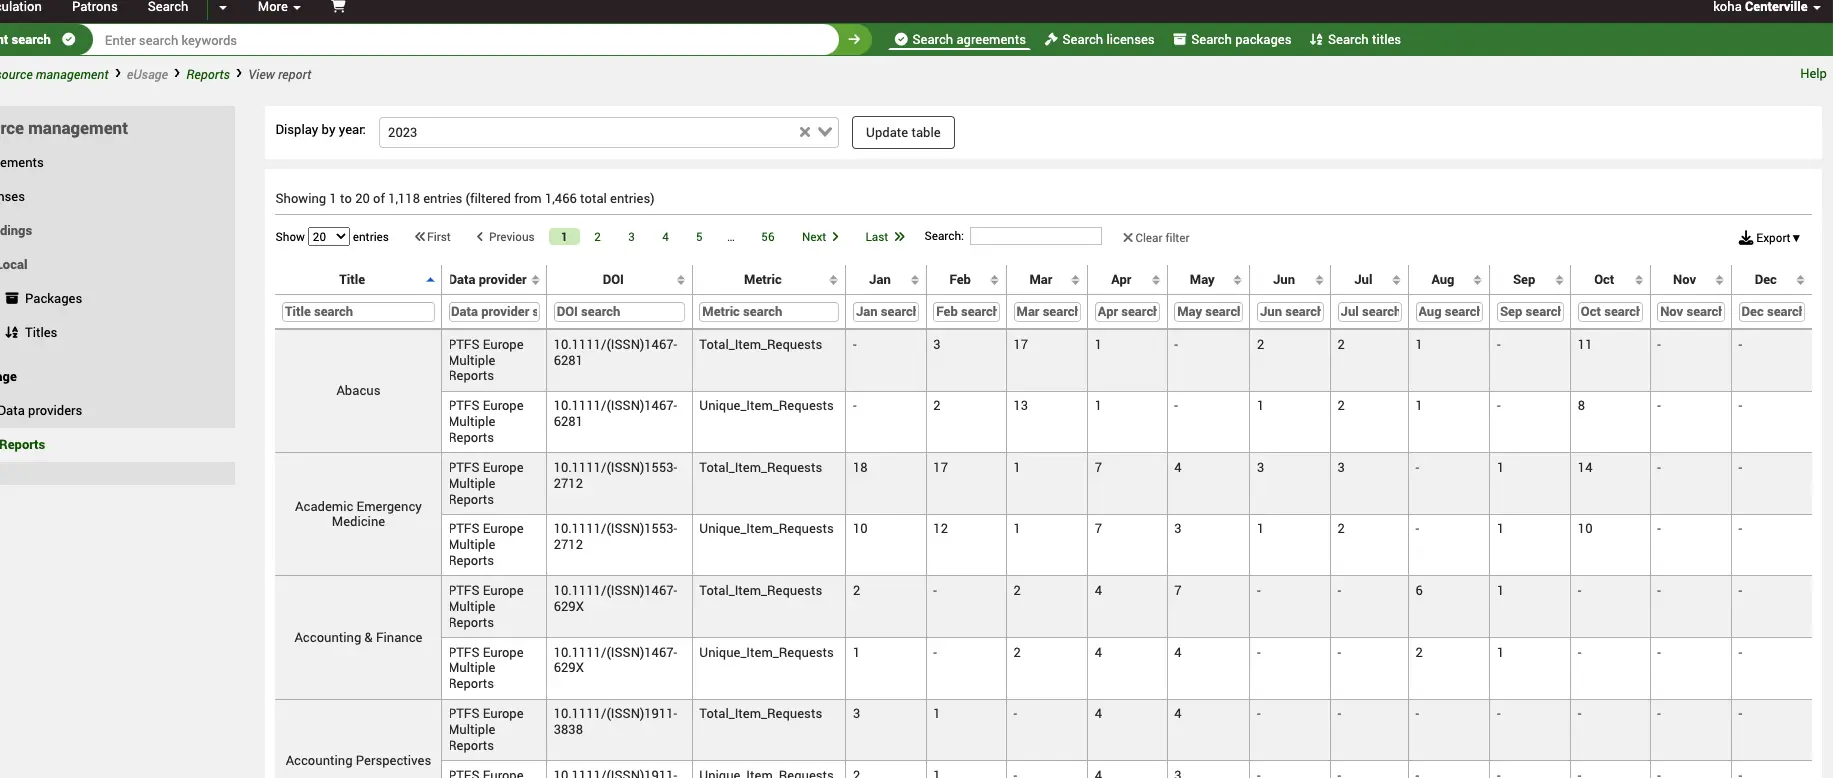
Take note of the 'Display by year' toggle at the top. If there is more than one year, you can use this to update the table with data from previous years.
जब आप NO का चयन करते हैं, तो आपको चुनने/अचयनित करने के लिए महीनों की एक सूची की पेशकश की जाएगी।
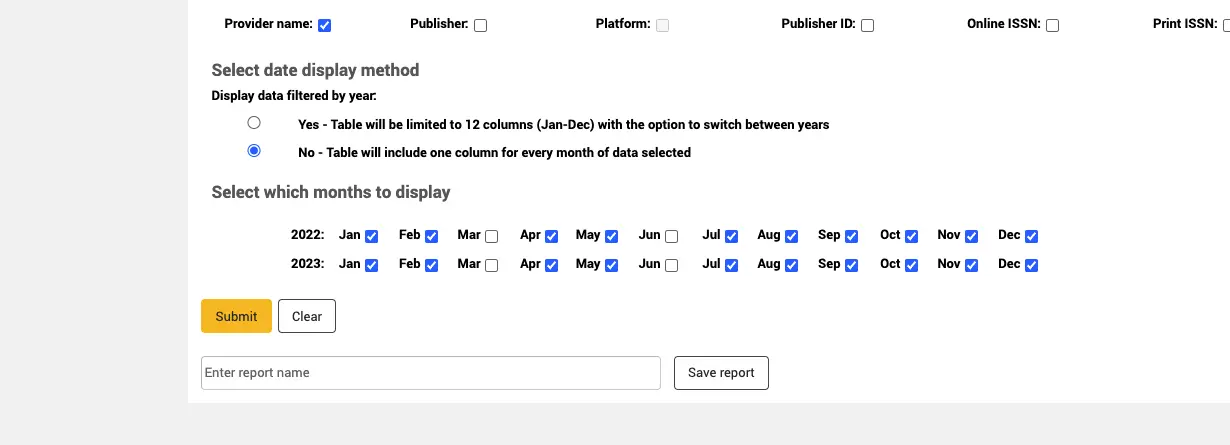
महीनों की संख्या के कारण रिपोर्ट आपके पृष्ठ के दाईं ओर स्क्रॉल कर सकती है।।
सलाह
Make sure you have harvested the latest data from your provider before you run the report. You can either do this manually by clicking 'Run now' in the data provider home screen, or you can use the harvesting cron job to automatically harvest data at regular intervals.