Installing Koha
Overview
Koha is server-based software than runs on a GNU/Linux operating system, such as Debian or Ubuntu. It is not a desktop application, and does not run natively on Windows or macOS.
Successfully using these installation instructions will result in a working Koha installation, suitable for testing and experimenting.
For production systems, and systems available on the internet, additional steps are required to manage and secure the server. These require specialist skills and are outside the scope of these instructions and support available from the Koha Community.
System requirements
Current system requirements and recommendations are available on the Koha wiki at https://wiki.koha-community.org/wiki/System_requirements_and_recommendations
Skill requirements
There are many specialist skills required to successfully run a GNU/Linux server-based application such as Koha. These include:
System administration: installing Debian and Ubuntu operating systems, using the command line, installing and configuring packages, managing backups, and securing services and hardening the server.
Web server administration: configuring and managing the Apache web server.
Database administration: configuring and managing a MariaDB or MySQL database server, including basic SQL and server optimization.
Search engine: configuring and managing the search engine used by Koha, such as Zebra (the default search engine), and Elasticsearch or Open Search (requires separate installation).
Caching services: configuring and managing caching services to help improve performance, such as memcached and Plack.
Message broker: managing background jobs and queues used by Koha, including RabbitMQ.
Email server administration: configuring and managing mail servers, used to send notices to patrons.
These skills can be learned, but expect a steep learning curve (and many challenges along the way) if you are not an experienced GNU/Linux system administrator.
Alternative options
Other options available to test Koha:
Demo servers: these are provided by Koha support providers, include sample data, but are reset each day.
Sandboxes: while primarily intended for testing changes to Koha, they do provide a functional Koha system, but are deleted when not in use.
Koha development environment (koha-testing-docker, or KTD): primarily intended for Koha development, the provide a fully configured system with sample data.
Installing locally in a virtual machine: it is possible to install Koha locally using virtual machines, such as Virtual Box, or using the Windows Subsystem for Linux (WSL).
At the current time there is no production-ready Docker container for Koha.
The main stages for installing Koha
The three main stages for installing Koha are:
Server install: Install Koha on a Debian or Ubuntu server using packages.
Web installer: Use the web installer to set up the database for Koha.
Onboarding tool: Use the onboarding tool to initially configure Koha.
Server install
The current instructions to install Koha on a Debian or Ubuntu server are available on the Koha wiki at https://wiki.koha-community.org/wiki/Koha_on_Debian_and_Ubuntu
वेब इंस्टालर
वेब इंस्टॉलर डेटाबेस टेबल सेट करता है जो कोहा में आपके द्वारा काम किए जाने वाले सभी डेटा को संग्रहीत करता है, उदाहरण के लिए लाइब्रेरी शाखाओं, संरक्षक और आइटम।
आपके लिए डेटाबेस व्यवस्थापक खाता क्रेडेंशियल्स दर्ज करने के लिए वेब इंस्टॉलर लॉगिन स्क्रीन से शुरू होता है।
इंस्टॉलर तब तालिकाओं का निर्माण करेगा और तालिकाओं को डेटा से भर देगा। प्रक्रिया में अगला कदम ऑनबोर्डिंग टूल के माध्यम से कुछ अनिवार्य पहले उपयोग सेटिंग्स को सेट करना है।
वेब इंस्टालर लॉगइन
यह लॉग इन स्क्रीन पहली स्क्रीन है जो कोहा स्थापित करते समय दिखाई देती है
वेब इंस्टालर लॉगइन
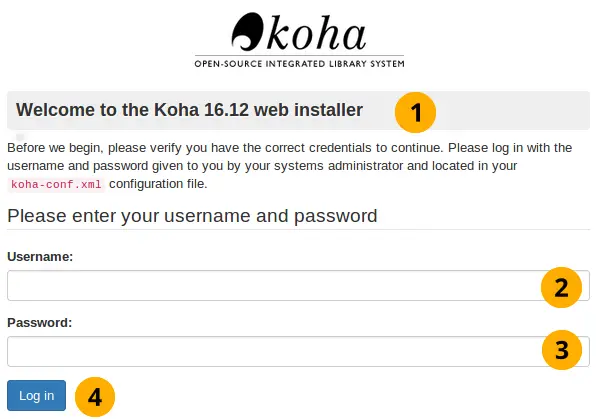
Koha version name: This will display whatever Koha version number you are installing.
Username: This is database administrator username which is koha_kohadev by default.
Password: This is the database administrator password which is password by default.
लॉग इन: लॉगिन करने के लिए इस बटन का चयन करें
भाषा पिकर
यह वेब इंस्टॉलर की पहली स्क्रीन है
वेब इंस्टॉलर शुरू स्क्रीन
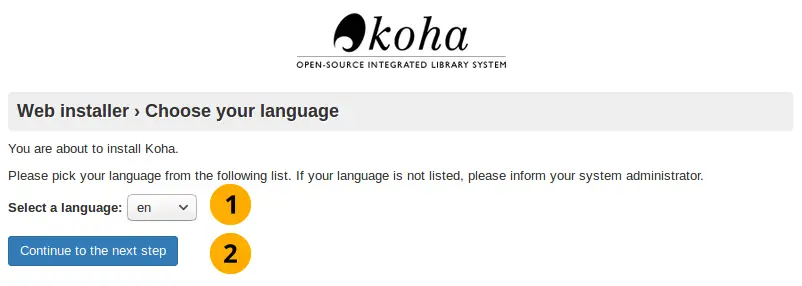
भाषा पिकर ड्रॉपडाउन बॉक्स: यह उस भाषा को निर्दिष्ट कर रहा है जिसे आप कोहा में रखना चाहते हैं
टिप्पणी
इंस्टॉलर (DE या FR, उदाहरण के लिए) के लिए अनुवाद करने वाली अन्य भाषाओं को स्थापित करना उन भाषाओं को वेब इंस्टॉलर के लिए उपयोग करने की अनुमति देगा
वेब इंस्टॉलर के अगले चरण को लोड करने के लिए अगला चरण बटन पर क्लिक करें बटन पर क्लिक करें।
इंस्टॉलर पर्ल मॉड्यूल स्थापित
यह स्क्रीन आपको बताती है कि अगली स्क्रीन में डेटाबेस बनाने के लिए इंस्टॉलर के पास सभी निर्भरताएं हैं, इसकी आवश्यकता है।
पर्ल मॉड्यूल स्थापित

वेब इंस्टॉलर के अगले चरण को लोड करने के लिए अगला चरण बटन पर जाएं पर क्लिक करें।
डाटाबेस सेटिंग्स
यह स्क्रीन आपको डेटाबेस सेटिंग्स के बारे में बताती है और अगले चरण बटन पर जारी रखें बटन पर क्लिक करके उन्हें पुष्टि करने के लिए कहती है।
टिप्पणी
अधिकांश उपयोगकर्ताओं के लिए ये सेटिंग्स सही होनी चाहिए, यदि नहीं, तो आपको अपने समर्थन प्रदाता से संपर्क करना चाहिए।
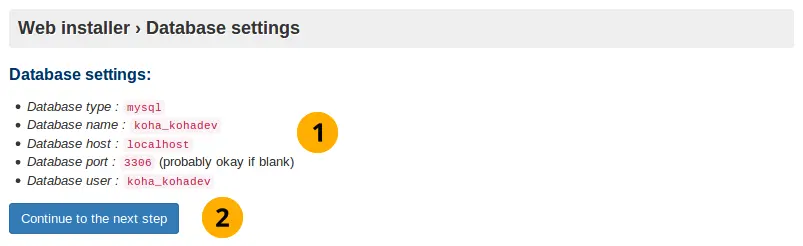
डाटाबेस सेटिंग्स
डाटाबेस सेटिंग्स: इन डेटाबेस सेटिंग्स की जाँच करें सही हैं.
डेटाबेस सेटिंग्स की पुष्टि करने के लिए अगला चरण बटन पर क्लिक करें बटन पर क्लिक करें
कनेक्शन की स्थापना की
आपके द्वारा अगला बटन पर क्लिक करने के बाद डेटाबेस कनेक्शन की पुष्टि की गई है:
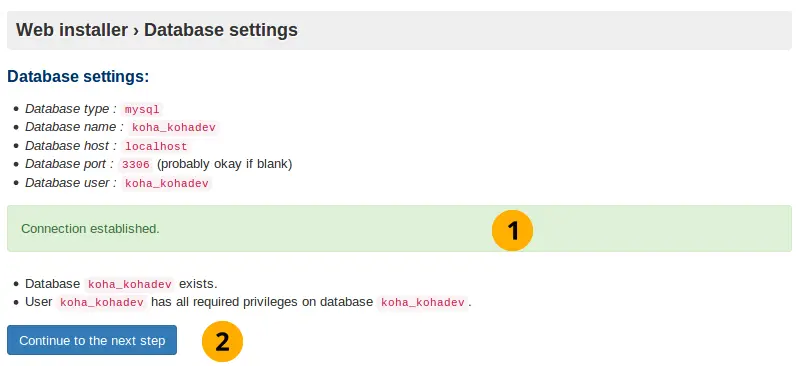
डेटाबेस कनेक्शन स्थापित
कनेक्शन स्थापित संदेश: यह आपको सूचित करता है कि डेटाबेस सफलतापूर्वक बनाया गया है।
अगले चरण को लोड करने के लिए अगला कदम बटन पर क्लिक करें पर क्लिक करें
टिप्पणी
यदि आपके पास यहां डेटाबेस कनेक्शन की समस्या है, तो इंस्टॉलर आगे बढ़ेगा नहीं। अपने koha-conf.xml फ़ाइल में कनेक्शन की जानकारी को दोहराएं, और सत्यापित करें कि डेटाबेस पर अनुमतियां और क्रेडेंशियल्स स्वयं सही हैं।
डेटा के साथ तालिकाओं को भरने के लिए तैयार
यह स्क्रीन आपको बता रही है कि आप अगले स्क्रीन में डेटाबेस तालिकाओं को बनाने के लिए सेट अप कर रहे हैं।
डेटा के लिए तैयार डाटाबेस

अगले चरण को लोड करने के लिए अगला कदम बटन पर क्लिक करें पर क्लिक करें
टिप्पणी
यह कदम कुछ समय ले सकता है। कृपया धैर्य रखें।
डाटाबेस सारणियां बनाया
डाटाबेस सारणियां बनाया
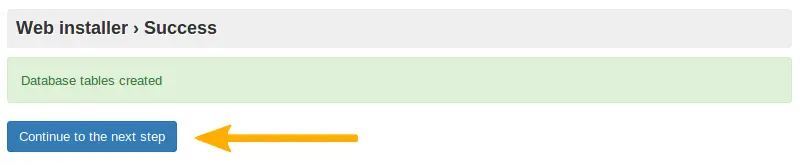
अगले चरण बटन पर जारी रखें बटन क्लिक करें
बुनियादी कॉन्फ़िगरेशन के लिए तैयार
यह स्क्रीन कोहा का उपयोग करने के लिए आवश्यक बुनियादी कॉन्फ़िगरेशन स्थापित करने की ओर अग्रसर है
बुनियादी कॉन्फ़िगरेशन के लिए तैयार

अगले चरण बटन पर जारी रखें बटन क्लिक करें
मार्क फ्लेवर चुनें
आपको इस स्क्रीन पर अपने मार्क स्वाद का चयन करना होगा (प्रारूप में आप बिब्लियोग्राफिक (कैटलॉग) अभिलेख को डेटाबेस में संग्रहीत करना चाहते हैं):
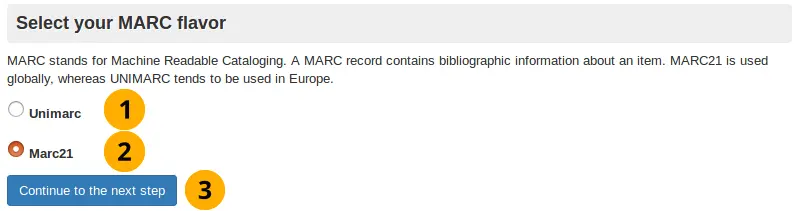
युनिमार्क: यह अक्सर यूरोपीय देशों (यूके को छोड़कर) जैसे कि इटली के रूप में उपयोग किया जाता है.
MARC21: Selected by default, as it is more commonly used globally than UNIMARC.
अपने विकल्पों की पुष्टि करने के लिए अगले चरण बटन पर जाएं पर क्लिक करें
मार्क21 और यूनिमार्क सेटअप
टिप्पणी
पिछली स्क्रीन में आप या तो मार्क21 या यूनिमार्क को अपनी एमएआरसी स्वाद के रूप में चुनते हैं। यह पृष्ठ दोनों की रूपरेखा है
मार्क21 सेटअप
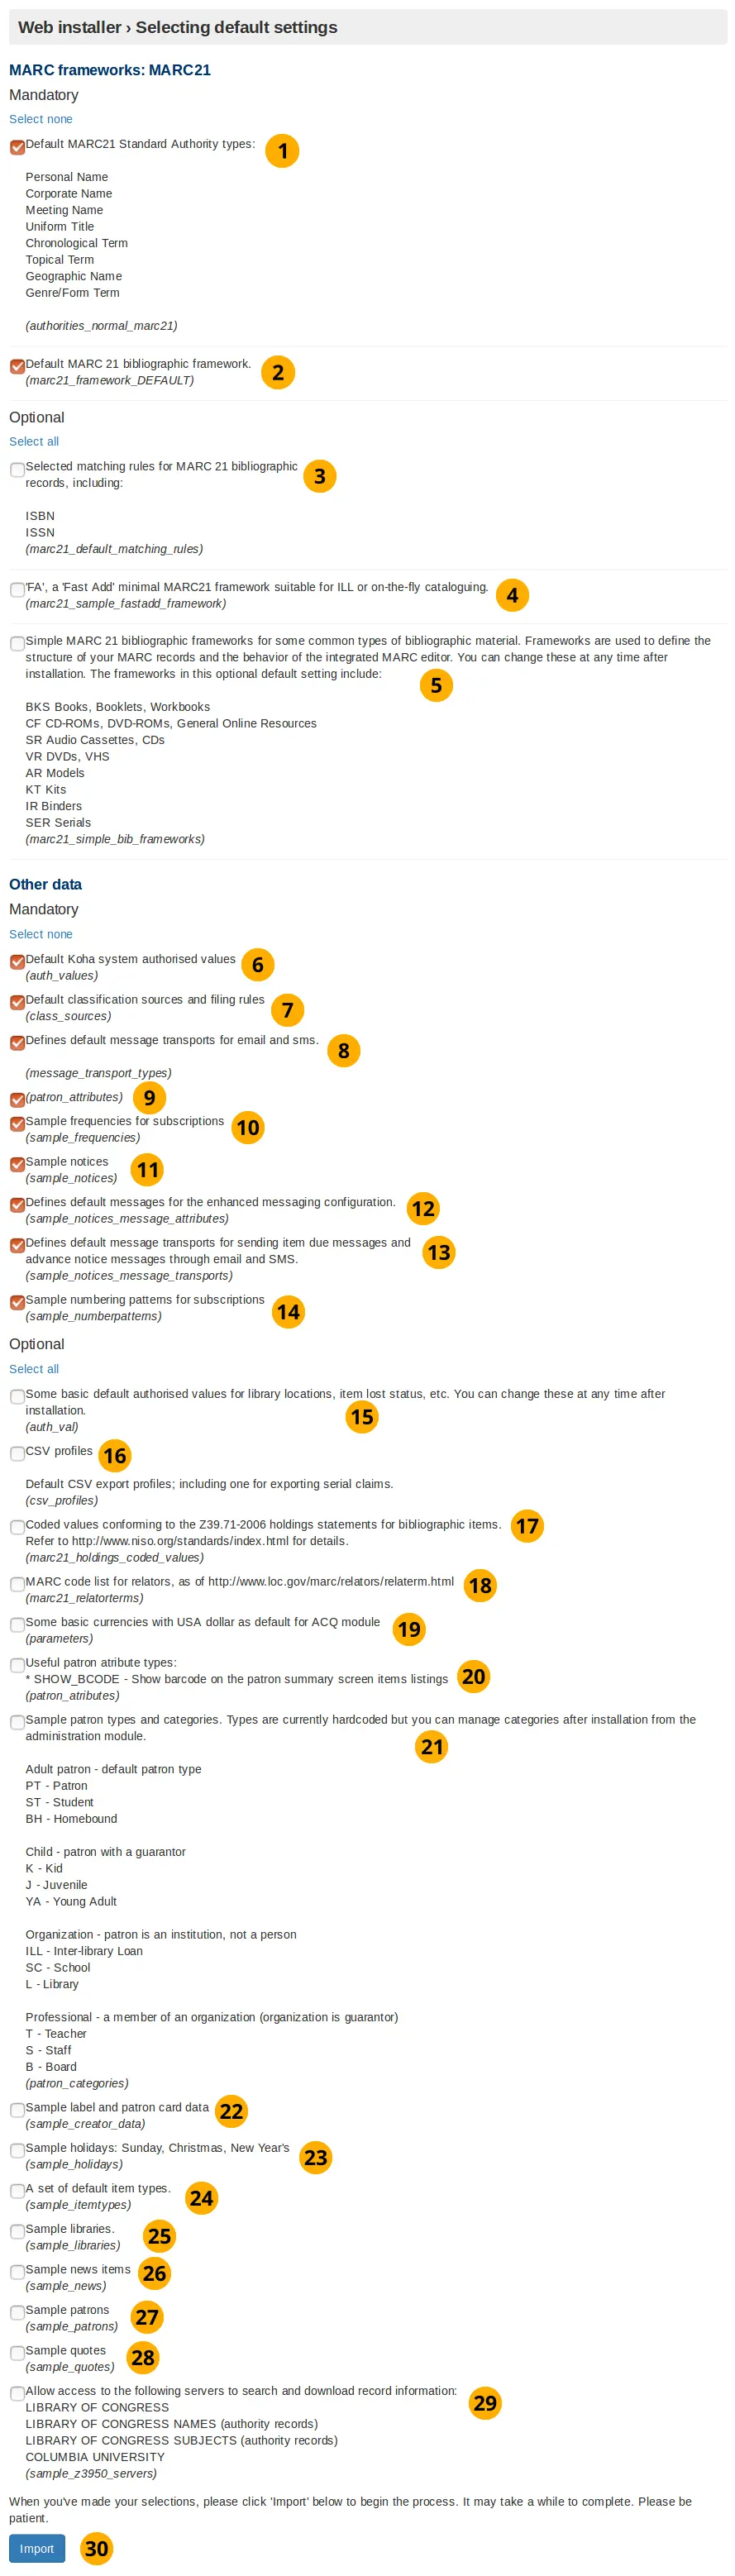
मार्क21 सेटअप
डिफ़ॉल्ट मार्क21 मानक प्राधिकरण प्रकार: प्राधिकरण का प्रकार प्राधिकारी रिकॉर्ड का एक टेम्प्लेट है (एक आइटम के लिए संस्था सूची खोज करने के लिए खोज फ़ील्ड को संग्रहीत करता है) यह विकल्प नमूना प्राधिकरण प्रकारों को स्थापित करेगा।
Default MARC21 bibliographic framework: Following on from the MARC21 selection in the previous screen selecting this checkbox (and the Import button) will actually setup the MARC21 bibliographic framework as the desired MARC flavour.
Selected matching rules for MARC21 bibliographic records: The MARC21 matching rules are used to find all the information about specific bibliographic records using the authority type search values.
'FA', a 'fast add' minimal MARC21 framework suitable for ILL, or on the fly cataloging: The FA MARC framework displays fewer fields, and allows for faster cataloguing on the fly. Select this checkbox to install this minimal framework.
Sample MARC21 bibliographic frameworks for some common types of bibliographic material: This installs the template you will use to create items.
Default Koha system authorized values: This installs mandatory authorized values that every Koha installation needs.
Default classification sources and filling rules: This will insert several common library classification sources such as Dewey decimal.
Defines default message transports for email and SMS: This provides the option to the user of being able to change how the library contacts them. They can choose from the following: email address, printed message, SMS, or phone call. Notices will not work without these.
Patron attributes: This does not install any data, and it needs to be removed.
Sample frequencies for subscriptions: For items that arrive on a regular and predictable basis (e.g. monthly magazines), installing sample frequencies is useful because you can simply select a preinstalled sample frequency when you create the item.
Sample notices: This inserts sample notices into the database, meaning all you have to do is customize these sample notices before you use them. Creating these by hand can be very time consuming and error prone.
Defines default messages for the enhanced messaging configuration: The enhanced messaging configuration lets the user choose what messages they receive from the institution. Selecting this will insert sample message types for the due, predue, and advance notice message types.
Defines default message transports for sending item due messages and advance notice messages through email and SMS: This inserts the SMS and email transport types. Mandatory if you want to send notices by email or SMS.
Sample numbering patterns for subscriptions: This option will install sample numbering patterns, saving you having to manually insert them for magazines and other periodicals.
Some basic default authorized values for library locations, item lost status, etc. You can change these at any time after installation: This installs authorized values, which filter user inputs, to make sure they match specified criteria before the library or other object is created.
CSV profiles: Using Koha you can export items. The CSV profile defines how you want to export the item(s). CSV/tab exports will not work without these.
Coded values conforming to the Z39.71-2006 holdings statements for bibliographic items: Not required to use Koha. A holding statement tells the user if the library has a specific item and where it is located. Selecting will install sample code values for items in the holding statements.
MARC code list for relators: Not required to use Koha. A relator is a person who was involved in the development of the item (e.g. author). Selecting this will insert sample relator records into the database.
Some basic currencies with USA dollar as default for ACQ module: Install US dollar, Great British Pound, Canadian Dollar and Euro currencies. Set the US dollar as the default acquisition currency. Not installing these will mean that a currency will need to be defined before acquisitions can be used.
Useful patron attribute types: Not required to use Koha. Patrons have a barcode which identifies them. By clicking this checkbox you are making sure that this patron barcode is displayed on the patron summary screen.
Sample patron types and categories: Not required to use Koha. Selecting this will install sample patron categories into the database. This will mean the create patron category step in the onboarding tool is skipped.
Sample label and patron card data: Not required to use Koha, but recommended for most new installs. Selecting this will install sample data for labels and patron cards and will make it easier to create labels and patron cards in the future.
Sample holidays: Sunday, Christmas, New Year’s Not required to use Koha. Selecting this will insert sample repeatable public holidays (e.g. Christmas) into the database.
A set of default item types: Not required for Koha. Selecting this will insert sample item type data into the database, meaning the create item type step in the onboarding tool will be skipped.
Sample libraries: Not required for Koha. Selecting this will insert sample libraries into the database. Developers will often want this for demo or development purposes. Selecting this means the create library step in the onboarding tool will be skipped.
Sample news items: Not required for Koha. Selecting this will insert sample news items that are displayed on the OPAC (Online Public Access Catalog) and staff client into the database.
Sample patrons: Not required for Koha. Patrons are the people who use the Koha Library Management System, for example: library users and staff. Selecting this will insert a number of sample patrons into the database. Developers will often want this for demo or development purposes.
Sample quotes: Not required for Koha. Quotes of the day can be displayed to library users on the OPAC (Online Public Access Catalog) interface. Selecting this will install a few library related sample quotes.
Allow access to the following servers to search and download record information: Not required to use Koha, but recommended for most new installs. Selecting this configures Koha to allow access to a selection of Z39.50 targets, which allow searching the target servers for MARC21 records to import them into your Koha instance. This can avoid the need to manually input all record information manually, or greatly speed up the process.
Click the Import button to install the default and selected data values.
यूनिमार्क सेटअप
युनिमार्क उन्नत सेटअप में केवल दो डेटा मान हैं जो अद्वितीय हैं:
अंग्रेजी में युनिमार्क के लिए प्राधिकरण संरचना
अंग्रेजी में डिफ़ॉल्ट युनिमार्क ग्रंथसूची ढांचा
टिप्पणी
यूनिमार्क और मार्क21 दोनों के लिए वैकल्पिक मूल्य समान हैं, इसलिए उनकी परिभाषा दोहराई नहीं जाएगी।
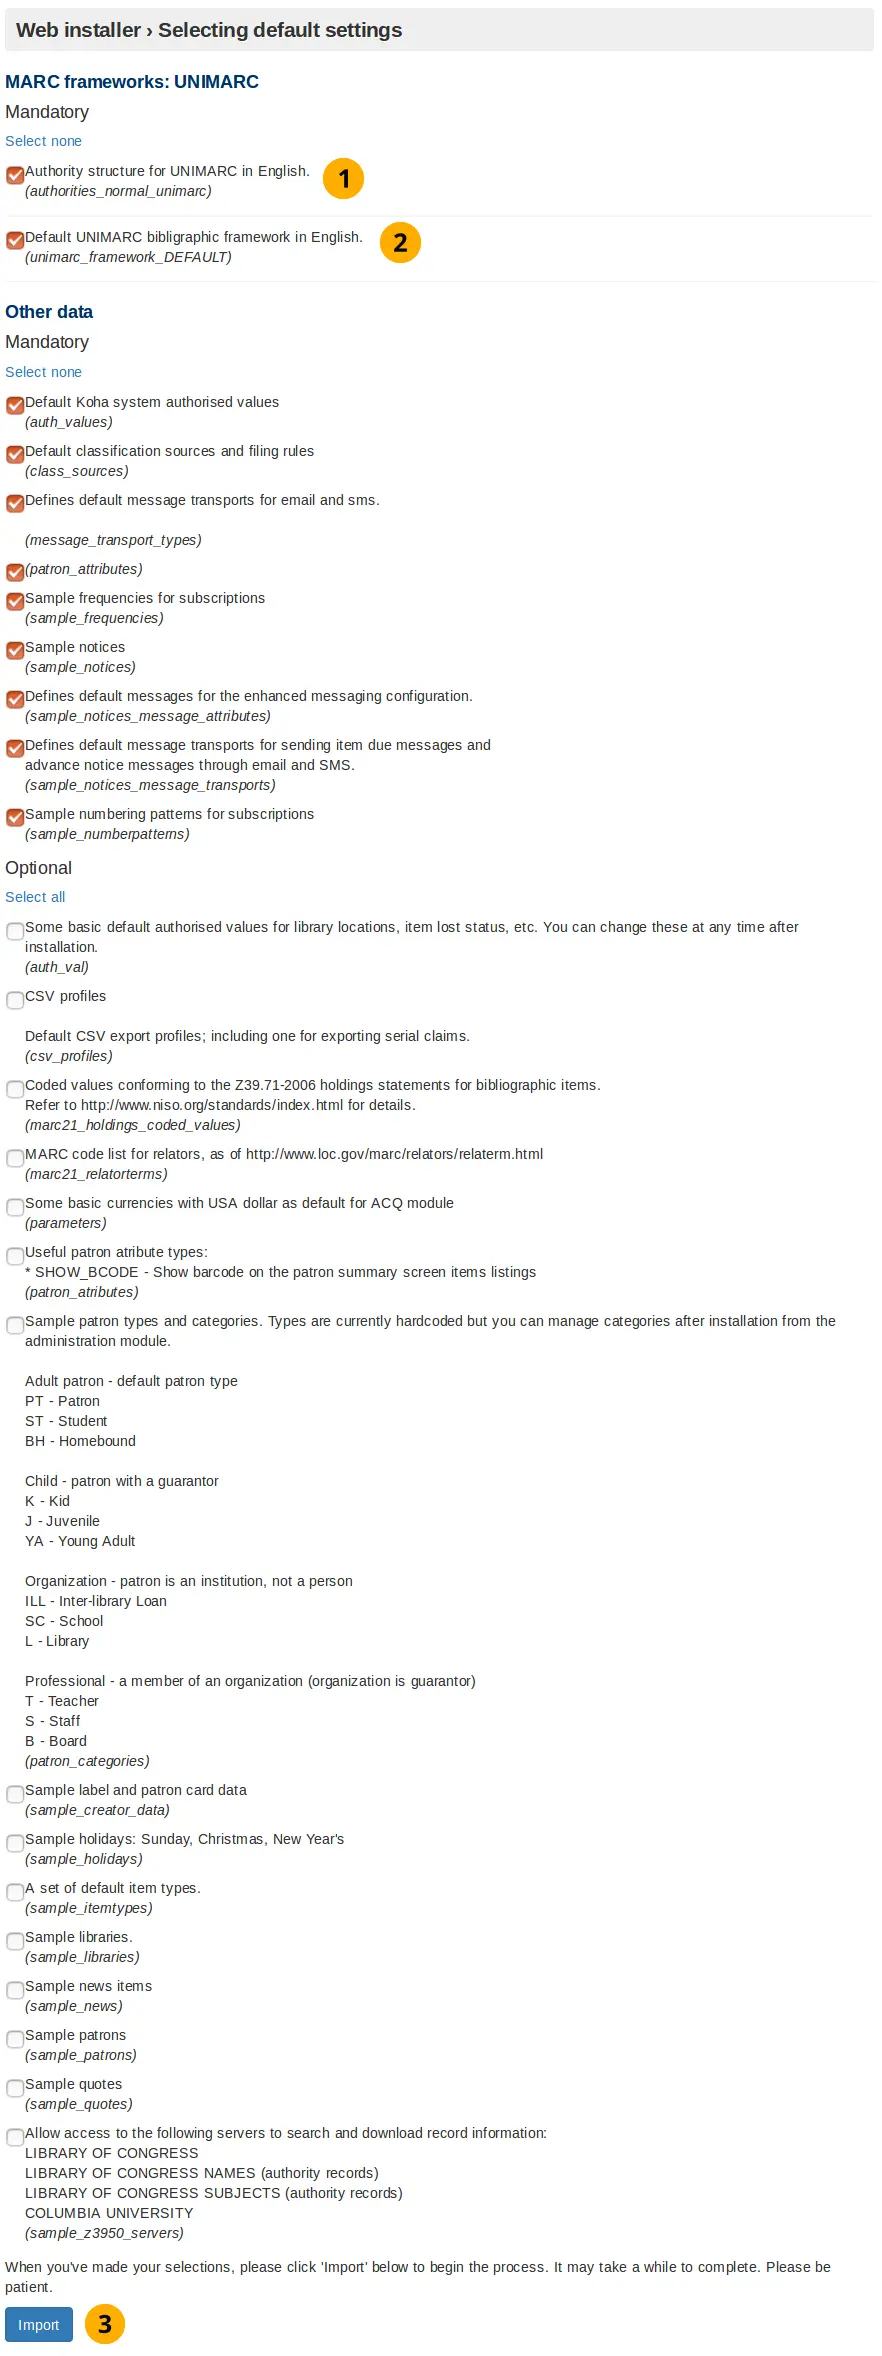
यूनिमार्क सेटअप
Authority structure for UNIMARC in English: Authority records store the search terms used to find items in the database. Unlike MARC21, when using UNIMARC the authority structure needs to be compatible with UNIMARC. Selecting this option makes it compatible.
Default UNIMARC bibliographic framework in English: In the previous screen you clicked to use the UNIMARC flavour, now by selecting this option you are confirming you want to use that framework.
Click the Import button to install the sample data
चयनित डेटा जोड़ा गया
After you have clicked the Import button in either the MARC21 or UNIMARC setup screen this screen will appear. It shows you if the selected/default data values were successfully inserted into the database.
चयनित डेटा जोड़ा गया
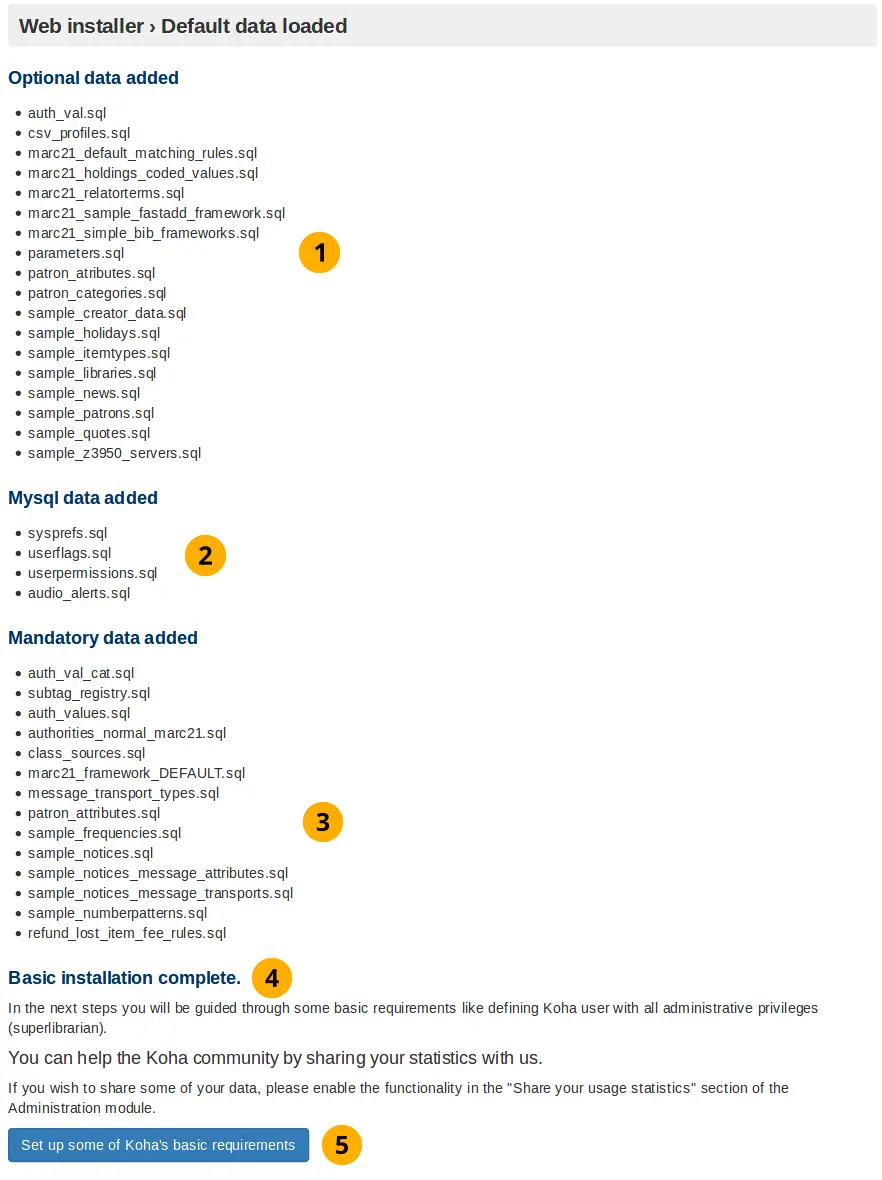
Optional data added: If you selected an optional data value then it will be displayed here. If you did not choose any optional data value then the optional data added title will not be displayed.
MySQL data added: These data values will always be installed and consequently displayed on this screen.
Mandatory data added: Same as above.
Installation message: Tells you if the Koha database was successfully created ready for you to use the onboarding tool.
Click the Set up some of Koha's basic requirements button to go to a redirection screen, which in turn will take you to the onboarding tool.
ऑनबोर्डिंग उपकरण पर रीडायरेक्ट करें
यदि आप लगभग 10 सेकंड तक प्रतीक्षा करते हैं तो इस स्क्रीन को आपको ऑनबोर्डिंग टूल स्टार्ट स्क्रीन पर रीडायरेक्ट करना चाहिए।
ऑनबोर्डिंग उपकरण पर रीडायरेक्ट करें

टिप्पणी
यदि प्रतीक्षा करने के बाद आपको रीडायरेक्ट नहीं किया गया है तो ऊपर दिए गए स्क्रीनशॉट में तीर द्वारा इंगित लिंक का चयन करें।
ऑनबोर्डिंग टूल
कोहा का उपयोग शुरू करने से पहले ऑनबोर्डिंग टूल सुनिश्चित करता है कि आपके पास कम से कम एक लाइब्रेरी, संरक्षक श्रेणी, संरक्षक, आइटम प्रकार और परिसंचरण नियम हैं
यदि आप लायब्रेरी, संरक्षक वर्ग और / या आइटम प्रकार के लिए नमूना डेटा स्थापित करते हैं, तो इन को बनाने के लिए स्क्रीन छोड़ दिए जाएंगे।
हालांकि, आपको हमेशा एक संरक्षक बनाना होगा (ऑनबोर्डिंग टूल के अंत में स्टाफ इंटरफेस में लॉग इन करने के लिए) और एक प्रचलन नियम।
एक पुस्तकालय बनाएँ
नमूना पुस्तकालय स्थापित नहीं किए जाने पर इंस्टॉलर पहली लाइब्रेरी या शाखा बनाने के लिए संकेत देगा।
कोहा में एक पुस्तकालय एक "भौतिक" जगह का डिजिटल प्रतिनिधित्व है। आगे जाकर अधिक पुस्तकालयों को जोड़ा जा सकता है प्रशासन -> पुस्तकालयों और समूहों।
लाइब्रेरी बनाएँ
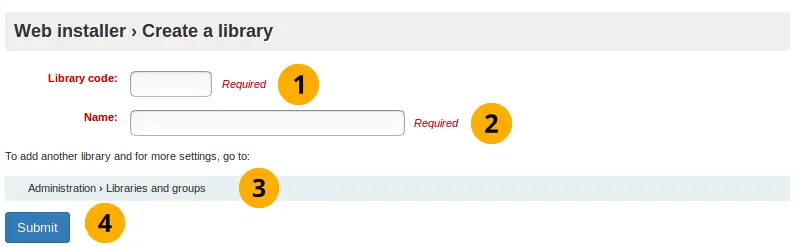
Library code: code consisting of up to 10 letters.
Name: Official name of the library, as it is commonly known.
Create more libraries: If more libraries are required, or changes need to be made to this freshly created library, go to Administration -> Libraries and groups
Click the Submit button to create a library.
उदाहरण के लिए:
पुस्तकालय उदाहरण बनाएँ
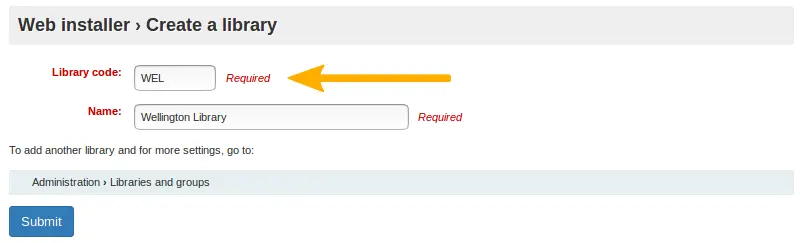
Library code: The regular expression that filters the acceptable inputs for library code only accepts up to 10 letters.
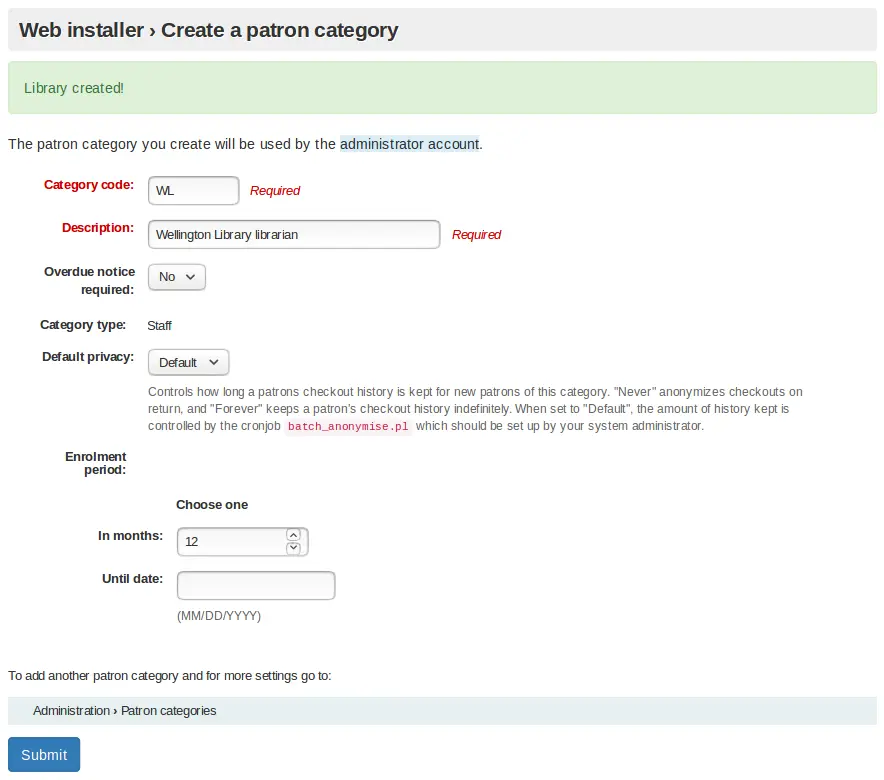
एक संरक्षक श्रेणी बनाएँ
कोहा में सभी संरक्षकों के पास संरक्षक श्रेणी होनी चाहिए। संरक्षक श्रेणी जेली मोल्ड की तरह है; कई व्यक्तिगत संरक्षक खाते सामान्य विशेषताओं को साझा कर सकते हैं, जैसे परिसंचरण नियम, नोटिस आवृत्ति, अनुमत अनुमति, और भी बहुत कुछ। संरक्षक जोड़ने के लिए कोहा को कम से कम एक संरक्षक श्रेणी की आवश्यकता होती है।
एक संरक्षक श्रेणी की आवश्यकता है:
श्रेणी कोड
विवरण
अतिदेय नोटिस आवश्यक
श्रेणी के प्रकार
डिफ़ॉल्ट निजता
नामांकन अवधि: महीनों या तारीख तक
एक संरक्षक श्रेणी बनाएँ
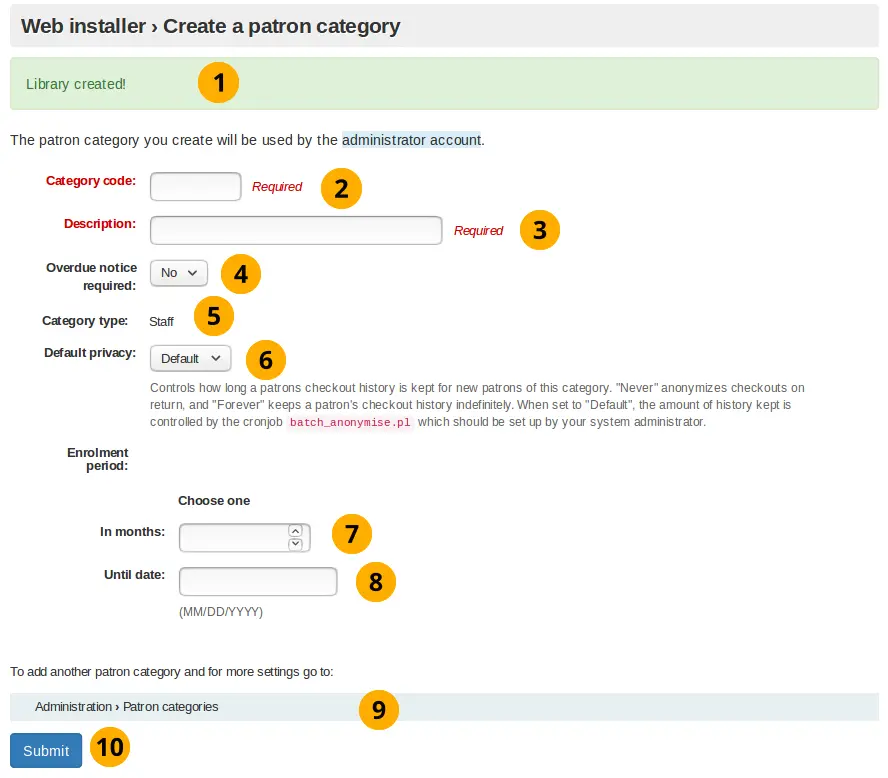
लाइब्रेरी निर्माण संदेश: इंगित करता है कि पुस्तकालय सफलतापूर्वक बनाया गया था या नहीं।
Category code: Code consisting of up to 10 letters.
Description: Sentence describing what the patron category is.
Overdue notice required dropdown button: Set by default to 'no'. This specifies if you want the patron category to receive overdue notices.
Category type: This makes the category created a staff member.
Default privacy: Set by default to 'default'. The Default privacy controls the amount of time that the reading history of the patron is stored for.
Enrolment period - in months: This is the number of months that the patrons created from this patron category are enrolled for.
Enrolment period - until date: Select a date from the interactive datepicker calendar icon which appears when you click on this input box. The date you choose will be the enrolment end date for patrons created from this patron category.
Path to create patron category: More patron categories can be created or altered by going to Administration -> Patron categories.
Click the Submit button to create the patron category.
उदाहरण के लिए:
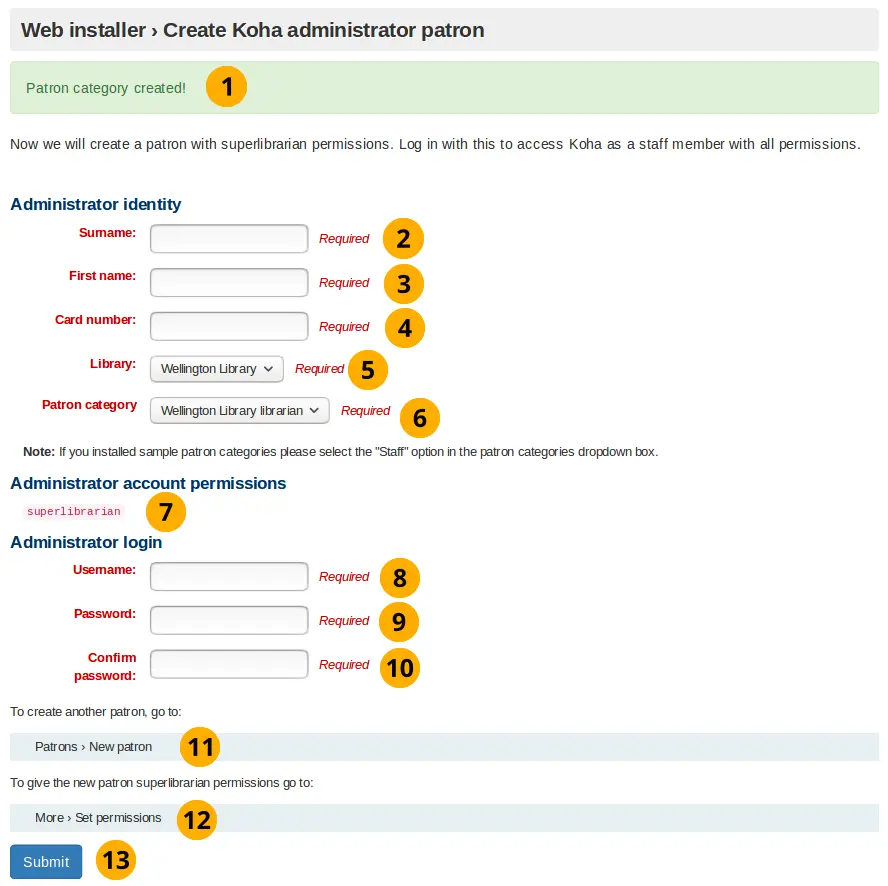
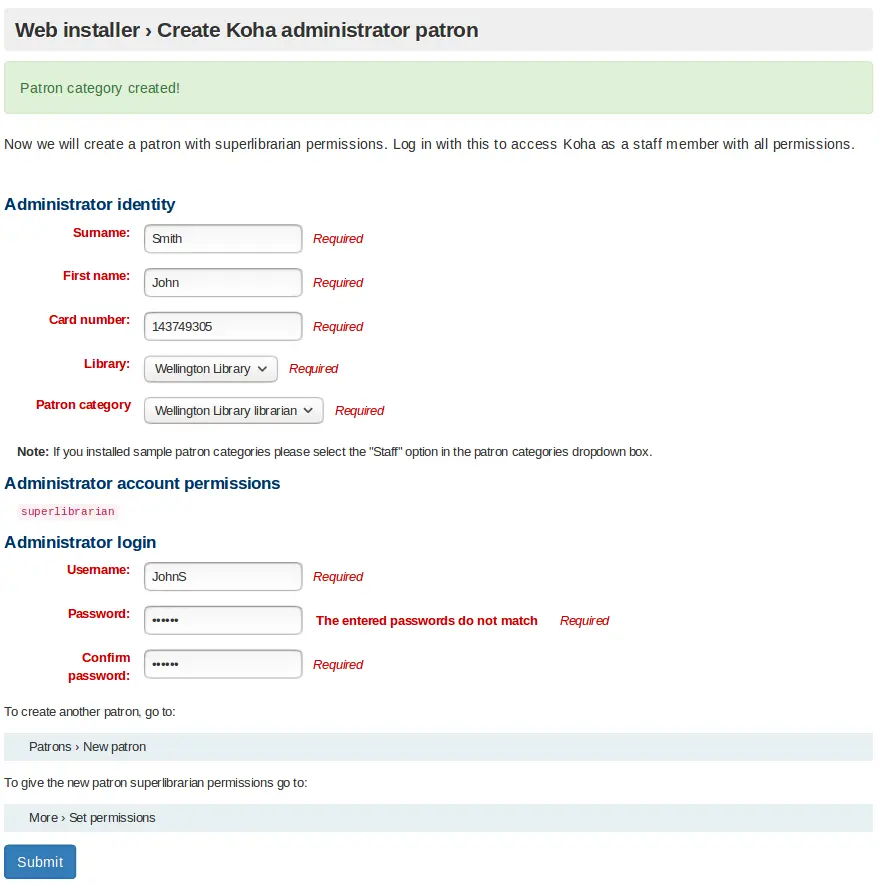
एक संरक्षक बनाए
एक बार ऑनबोर्डिंग प्रक्रिया पूरी होने के बाद, एक सुपरलाइब्रियन संरक्षक उपयोगकर्ता को कोहा स्टाफ इंटरफ़ेस में लॉग इन करने की आवश्यकता होती है।
टिप्पणी
यहां बनाए गए उपयोगकर्ता नाम और पासवर्ड को दस्तावेज़ करना बहुत महत्वपूर्ण है क्योंकि वे कोहा के व्यवस्थापक (सुपर लाइब्रेरियन) के रूप में लॉगिन करने के लिए आवश्यक खाता प्रमाण-पत्र हैं।
आपको इनपुट / चयन करने की आवश्यकता होगी:
उपनाम
प्रथम नाम
कार्ड संख्या
लाइब्रेरी
संरक्षक वर्ग
प्रयोक्ता नाम:
पासवर्ड
एक संरक्षक बनाए
Patron category creation message: This indicates that if the patron category was created successfully.
Surname: Surname, or something descriptive
First name: First name, or something descriptive
Card number: This number must be unique
Library dropdown box: If a library has been created using this onboarding tool, it will be the only option. Otherwise select a random library from the sample libraries installed by the web installer.
Patron category dropdown box: If a patron category was created using this onboarding tool, it will be the only option. Otherwise select the Staff patron category.
Superlibrarian permission: This non-editable setting allows access to all librarian and web based Koha administration tasks in the staff interface. This user is the most powerful user in any Koha, so protect the credentials well.
Username: The username to log into the staff interface and OPAC (Online Patron Access Catalog) with.
Password: A password consisting of letters, numbers, and spaces only which is greater than 8 characters.
Confirm password: Repeat the above password again
Click the Submit button to create the patron account
Path to create patron: Patron's can be created or altered by going to Patrons -> New patron
Assign patron permissions: After creating a patron go More -> Set permissions to assign permissions.
उदाहरण के लिए:
एक संरक्षक उदाहरण बनाएँ
एक आइटम प्रकार बनाएँ
यदि आपने वेब इंस्टॉलर में नमूना आइटम प्रकार इंस्टॉल नहीं किए हैं तो यह स्क्रीन प्रदर्शित की जाएगी।
संरक्षक श्रेणी के साथ आइटम प्रकार मूल रूप से एक टेम्पलेट है जिसका उपयोग आप सामान्य विशेषताओं वाले एकाधिक आइटम बनाने के लिए करते हैं।
आपको इनपुट करने की आवश्यकता है:
आइटम प्रकार कोड
विवरण
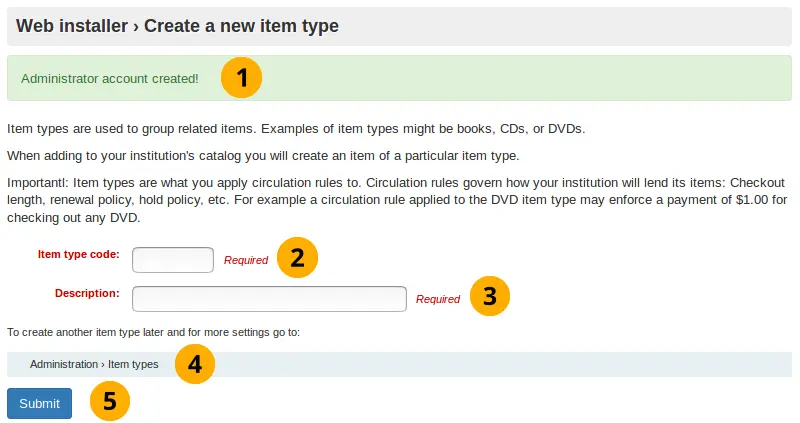
आइटम प्रकार बनाएँ
Administrator account creation message: Indicates if the administrator patron was created successfully
Item type code: Code consisting of up to 10 letters
Description: Sentence describing what the item type is.
Path to create item type: Item types can be created or altered by going to Administrator->Item types
Click the Submit button to create the item type
उदाहरण के लिए:
आइटम प्रकार उदाहरण बनाएँ
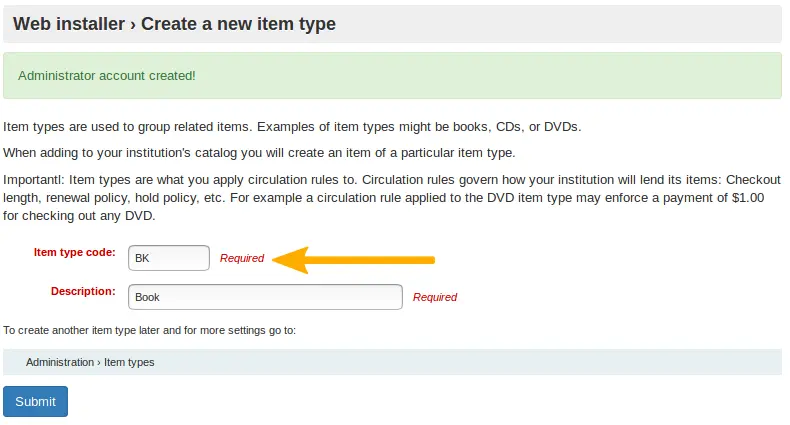
टिप्पणी
नियमित अभिव्यक्ति फ़िल्टरिंग आइटम प्रकार कोड इनपुट केवल अक्षरों को स्वीकार करेगा।
परिसंचरण नियम बनाएँ
यह स्क्रीन हमेशा प्रदर्शित की जाएगी चाहे आप वेब इंस्टॉलर के साथ किस नमूना डेटा को स्थापित करते हैं।
Here you are creating a rule which applies the predefined organizational decisions of your library as to what restrictions you place on patrons borrowing items.
परिसंचरण नियम बनाएँ
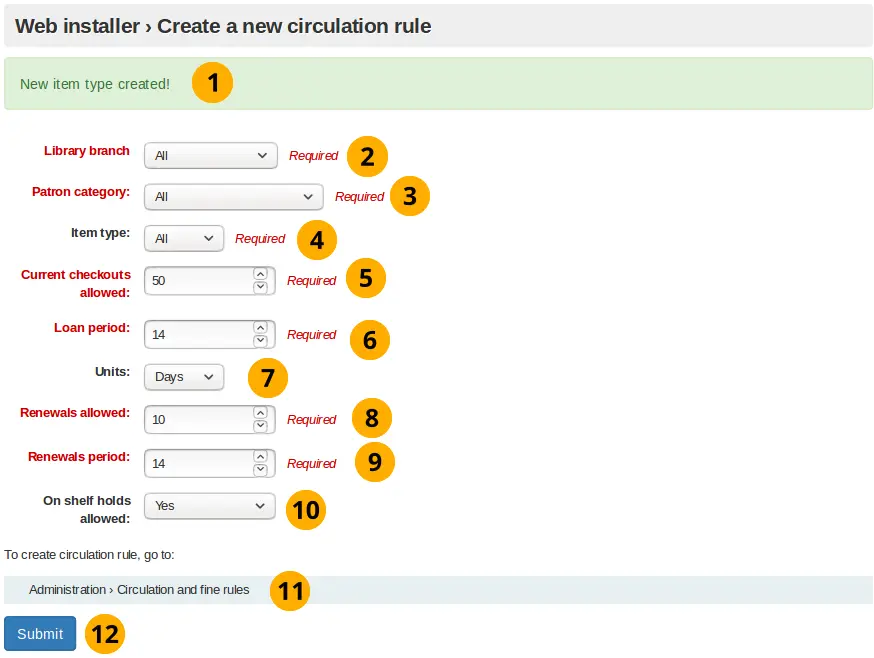
टिप्पणी
संख्या इस फ़ॉर्म में सभी इनपुट फ़ील्ड के लिए एकमात्र वैध इनपुट है।
Item type creation message: Indicates if the item type was created successfully
Library branch dropdown box: This is the library (or libraries) you want to apply the circulation rule to. By default it is set to all, however you can select a singular library to apply the rule to from the dropdown box.
Patron categories dropdown box: This is the patron categories you want to apply the circulation rule to. As with library branch it is set to all by default but more options are available.
Item type dropdown box: This is the item types that you want the circulation rule to apply to. Again more options are available than the default selected all option.
Current checkouts allowed: This is the number of items allowed from the selected library, for selected patron categories and of the selected item type. Set to 50 by default.
Loan period: Number of days or hours that an item is allowed out for. Set to 14 by default.
इकाइयों ड्रॉपडाउन बॉक्स: डिफ़ॉल्ट रूप से दिन पर सेट करें, इस क्षेत्र में चयन करने वाली इकाई ऋण अवधि और ** नवीनीकरण अवधि में लिखे गए संख्यात्मक मानों पर लागू होती है
Renewals allowed: Number of times a item can be renewed. Set to 10 by default.
Renewals period: Number of days or hours that a renewal lasts for. Set to 14 by default.
On shelf holds allowed dropdown box: If items can be held whilst they are on the shelf.
परिसंचरण नियम बनाने के लिए पथ: प्रशासन में जाकर परिसंचरण नियमों को बनाया या बदला जा सकता है -> परिसंचरण और जुर्माना नियम
Click the submit button to create the circulation rule.
ऑनबोर्डिंग उपकरण पूरा हो गया
यह पृष्ठ आपको बताता है कि परिसंचरण नियम सफलतापूर्वक बनाया गया था, और कोहा स्थापना पूर्ण हो गई है
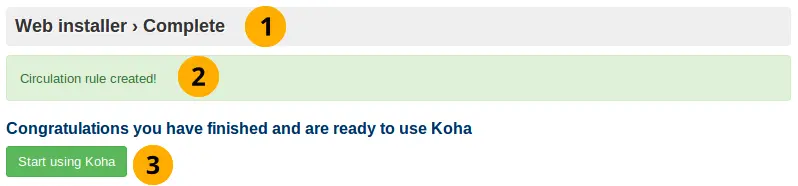
Web installer message: Indicates if the web installation is complete
परिसंचरण नियम निर्माण संदेश: इंगित करता है कि परिसंचरण नियम सफलतापूर्वक बनाया गया था या नहीं।
कोहा का उपयोग शुरू करें: कोबोर्ड पर आपके द्वारा बनाए गए कोहा व्यवस्थापक खाते का उपयोग करके कोहा में लॉगिन करने के लिए क्लिक करें।
स्टाफ इंटरफ़ेस तक पहुंचने के लिए लॉग इन करें
अब आप ऑनबोर्डिंग टूल का उपयोग कर समाप्त कर चुके हैं और ऑनबोर्डिंग टूल में बनाए गए संरक्षक खाता प्रमाण-पत्रों का उपयोग करके स्टाफ इंटरफ़ेस में लॉग इन कर सकते हैं
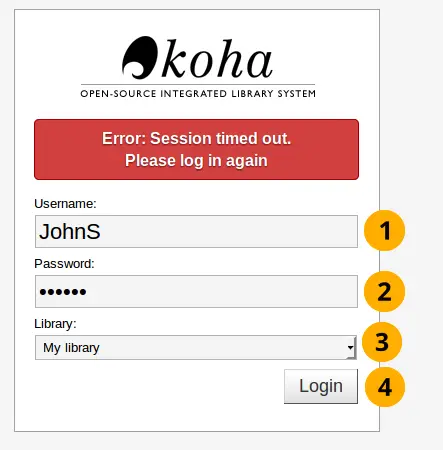
लॉगिन स्क्रीन
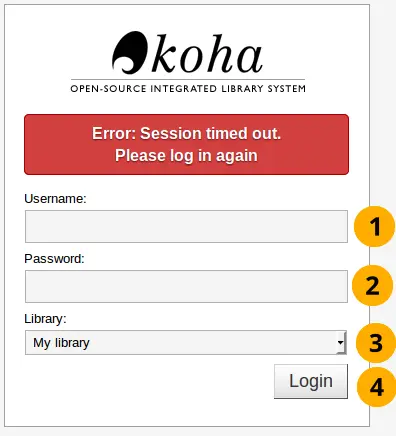
Username: Enter the username you created for the patron
Password: Enter the password you created
लाइब्रेरी: यह लाइब्रेरी स्टाफ इंटरफ़ेस है जिसे आप लॉग इन करना चाहते हैं। विकल्प या तो हैं: मेरी लाइब्रेरी या लाइब्रेरी जिसे आपने इंस्टॉल/बनाया है। मेरी लाइब्रेरी का डिफ़ॉल्ट चयनित विकल्प छोड़ना पहली बार लॉग इन करने के लिए ठीक है।
टिप्पणी
Only staff with the loggedinlibrary permission (or the superlibrarian permission) will be able to log into a library different from their home library.
टिप्पणी
The StaffLoginLibraryBasedOnIP and StaffLoginRestrictLibraryByIP system preferences can limit which library you can log into.
स्टाफ इंटरफ़ेस तक पहुंचने के लिए लॉगिन बटन पर क्लिक करें
उदाहरण के लिए:
लॉगिन उदाहरण
स्टाफ इंटरफेस
स्टाफ इंटरफ़ेस अब प्रकट होना चाहिए

Advanced configuration
वर्चुअलहोस्ट ओवरराइड करता है
कोहा वर्चुअलहोस्ट स्तर पर कुछ सिस्टम सेटिंग्स को ओवरराइड करने की अनुमति देता है।
OPAC_BRANCH_DEFAULT
OPAC के अनाम उपयोगकर्ताओं के लिए डिफ़ॉल्ट शाखा निर्दिष्ट करने के लिए OPAC_BRANCH_DEFAULT निर्देश का उपयोग किया जा सकता है।
SetEnv OPAC_BRANCH_DEFAULT "CPL"
RequestHeader add X-Koha-SetEnv "OPAC_BRANCH_DEFAULT CPL"
नोट: यह ओवरराइड प्रभावित करता है कि कौन से समाचार और एचटीएमएल अनुकूलन एक उपयोगकर्ता को ओपेक में लॉग इन करने से पहले दिखाई देगा।