採訪
Koha採訪模組藉以代理商與管理採購預算,讓圖書館紀錄訂單的位置。
到這: 其他 > 虛擬書架
設定
Before using the Acquisitions module you will want to make sure that you have completed all of the set up.
First, set your acquisitions system preferences and acquisitions administration to match your library’s workflow. Before setting your EDI accounts and 圖書館 EAN you will need to have entered your vendors.
從採訪首頁可看到圖書館基金的清單。
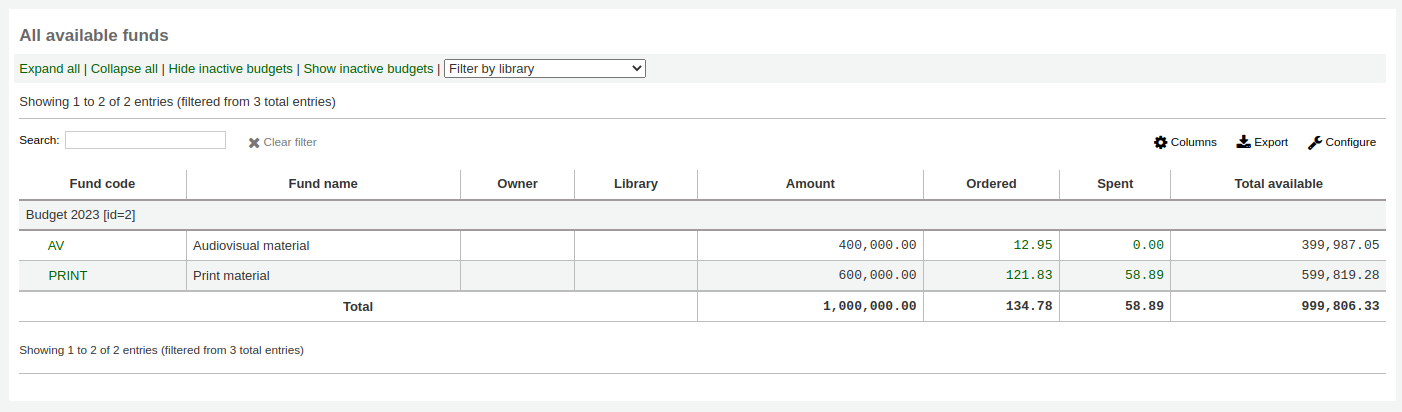
點選基金表單 『顯示啟用與未啟用』 旁的盒就能看到所有使用中的基金。
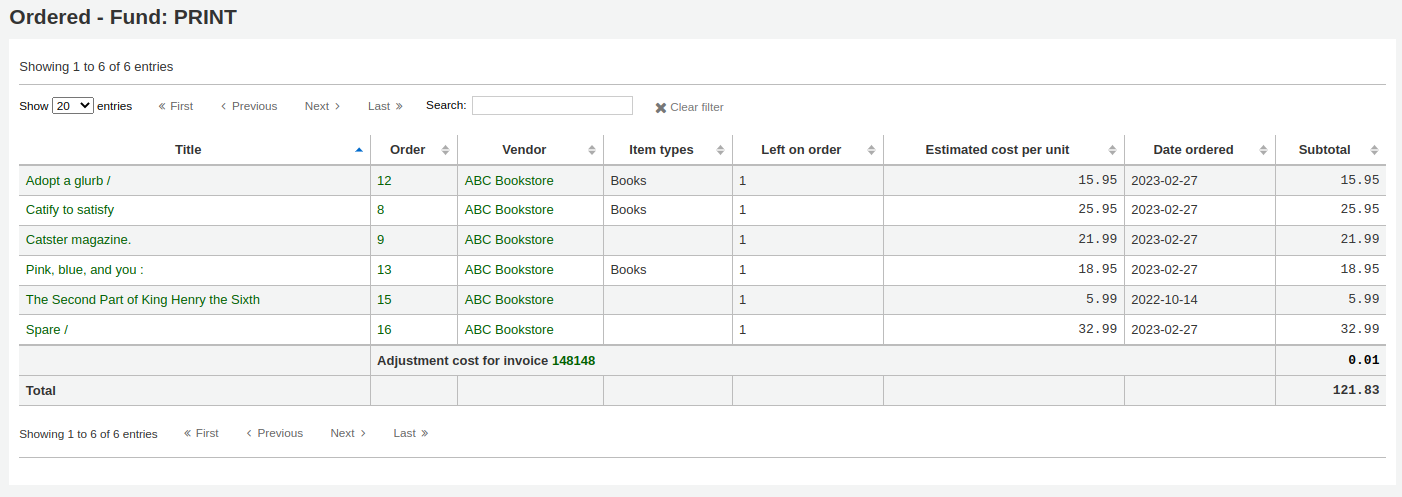
點選連結金額就會搜尋基金內的所有訂單記錄。
Learn more in the Budget/fund tracking section of this manual.
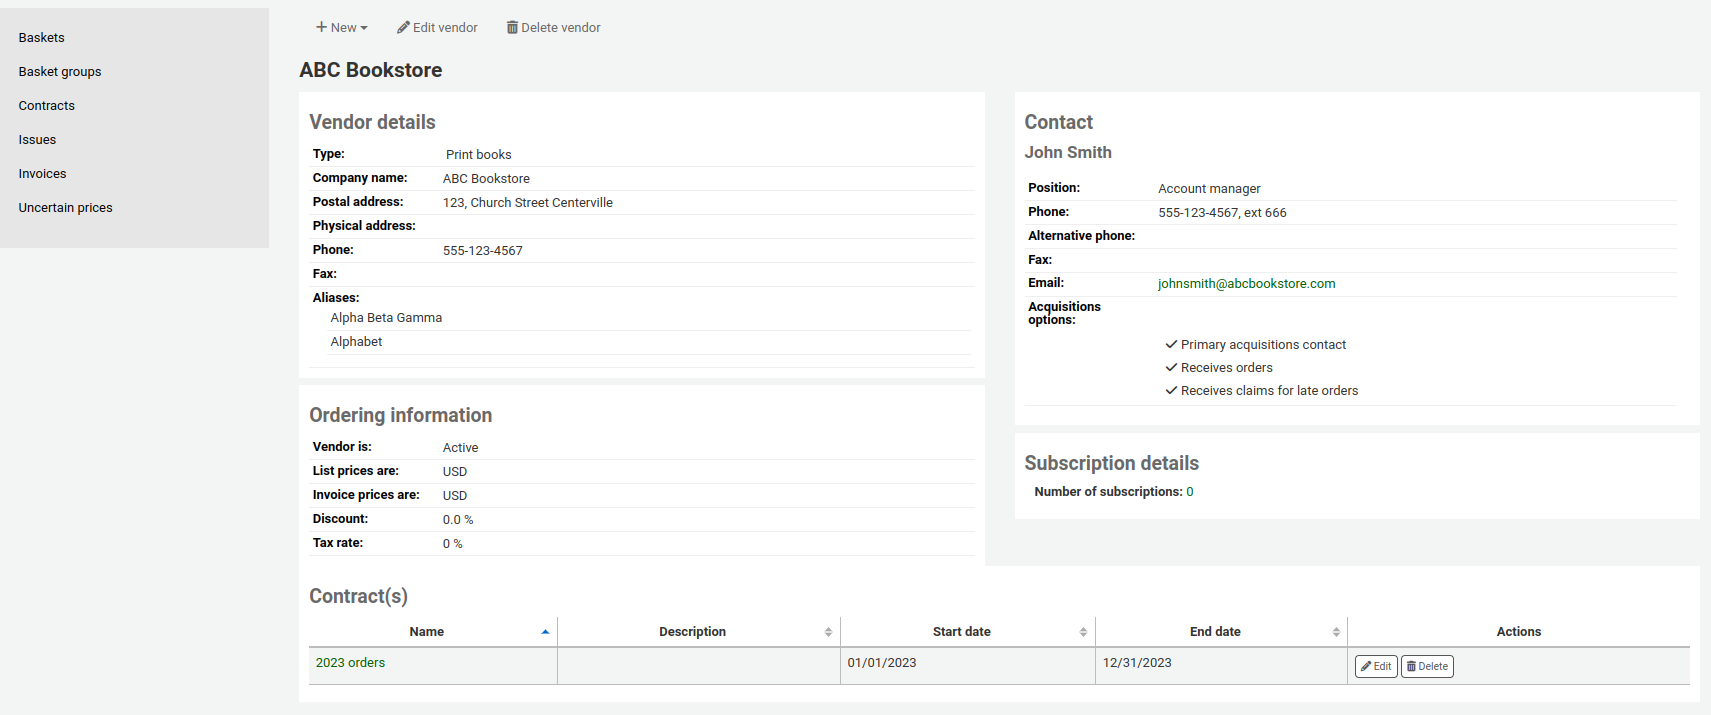
供應商
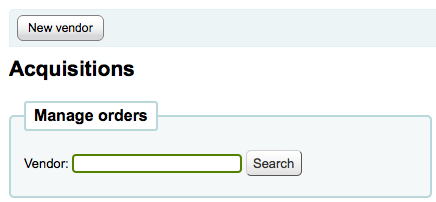
Before any orders can be placed you must first enter at least one vendor.
Add a vendor
To add a vendor click the 『New vendor』 button on the Acquisitions page
新增供應商表單分為三個部份
The first section is for basic information about the vendor
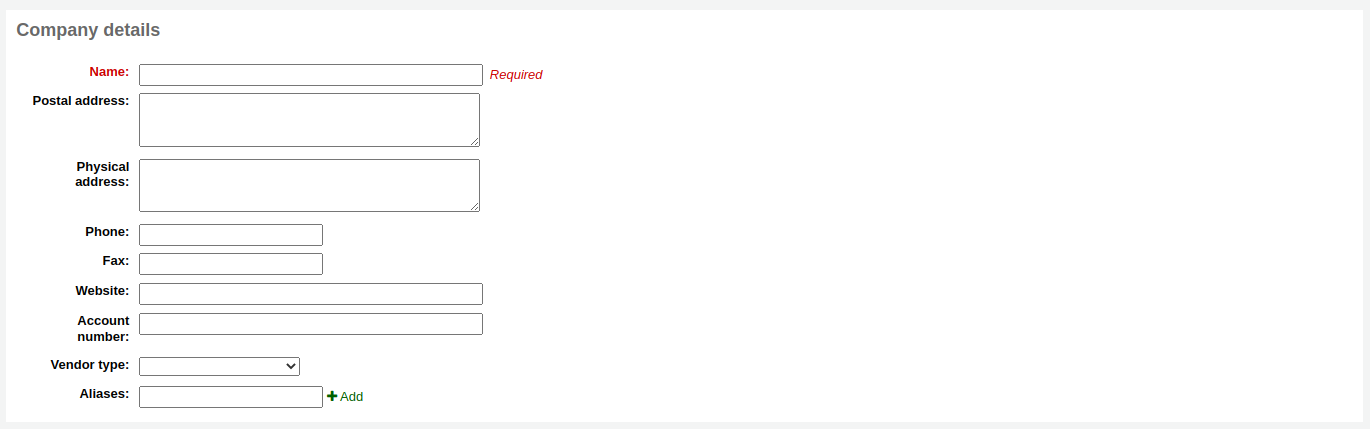
Of these fields, only the vendor name is required, the rest of the information should be added to help with generating claim letters and invoices
The second section is for information regarding your contact at the vendor’s office
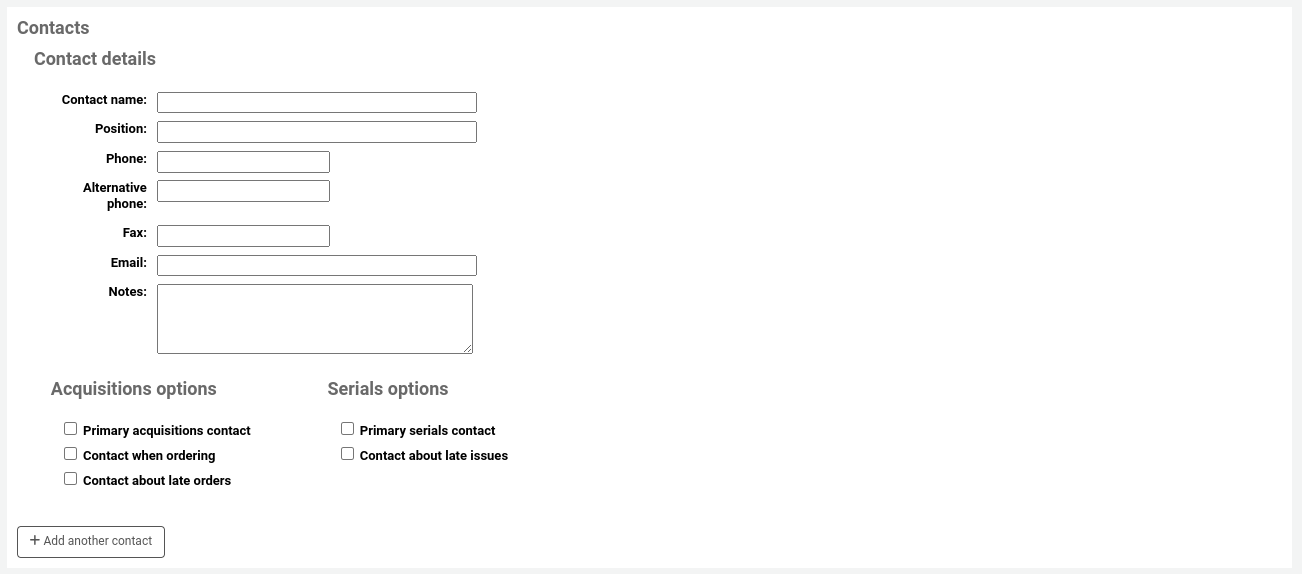
這些欄位都不是必備,祗對追蹤與供應商的連絡資訊有用
Primary acquisitions contact: check this box if this person is your primary contact regarding acquisitions from this vendor
Primary serials contact: check this box if this person is your primary contact regarding serial acquisitions from this vendor
Contact when ordering? check this box if you want to be able to send your orders by email directly to this person
Contact about late orders? check this box if you want to be able to send your acquisitions claims by email directly to this person
Contact about late issues? check this box if you want to be able to send your serials claims by email directly to this person
You can add more than one contact per vendor by clicking on the 『Add another contact』 button
最後的部份是對帳資訊
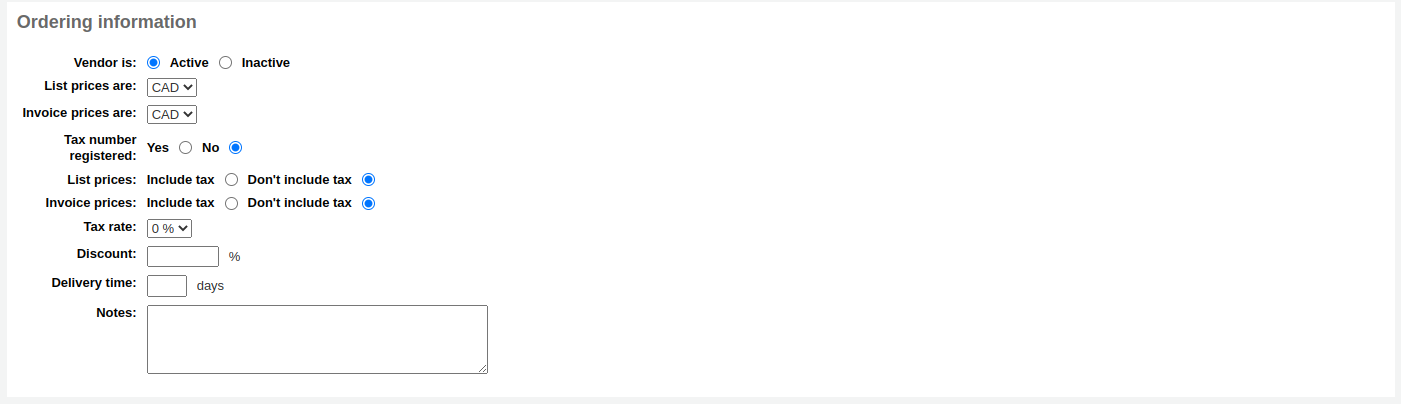
向供應商發出訂單前必須先 『啟用』 它
For list prices and invoice prices choose the currency
Currencies are assigned in the Currencies and exchange rates admin area
If your library is charged tax mark your tax number as registered
通知若定價與發票價含稅
若供應商提供固定折扣,鍵入於 『折扣』 欄位
規畫訂單時,可鍵入館藏的指定折扣
若圖書館稅額另計則鍵入稅率
若可以預估訂單到館日則鍵入送達時間。圖書館藉以控制遲到的訂單報表。
內部使用的通知
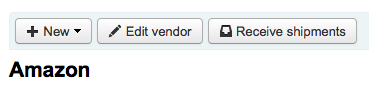
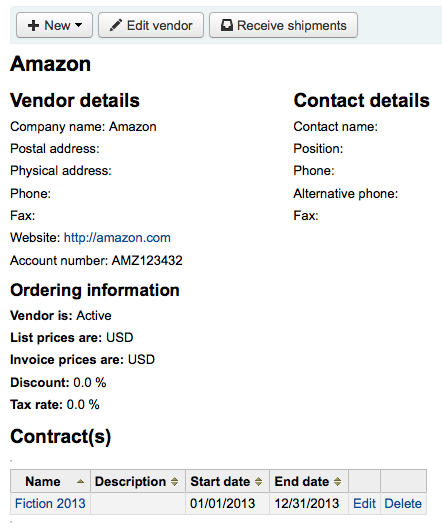
View/edit a vendor
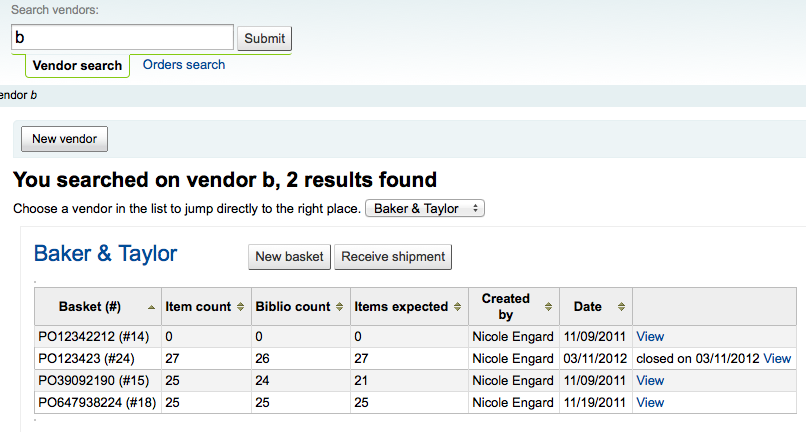
To view a vendor’s information page you must search for the vendor from the Acquisitions home page. Your search can be for any part of the vendor’s name:
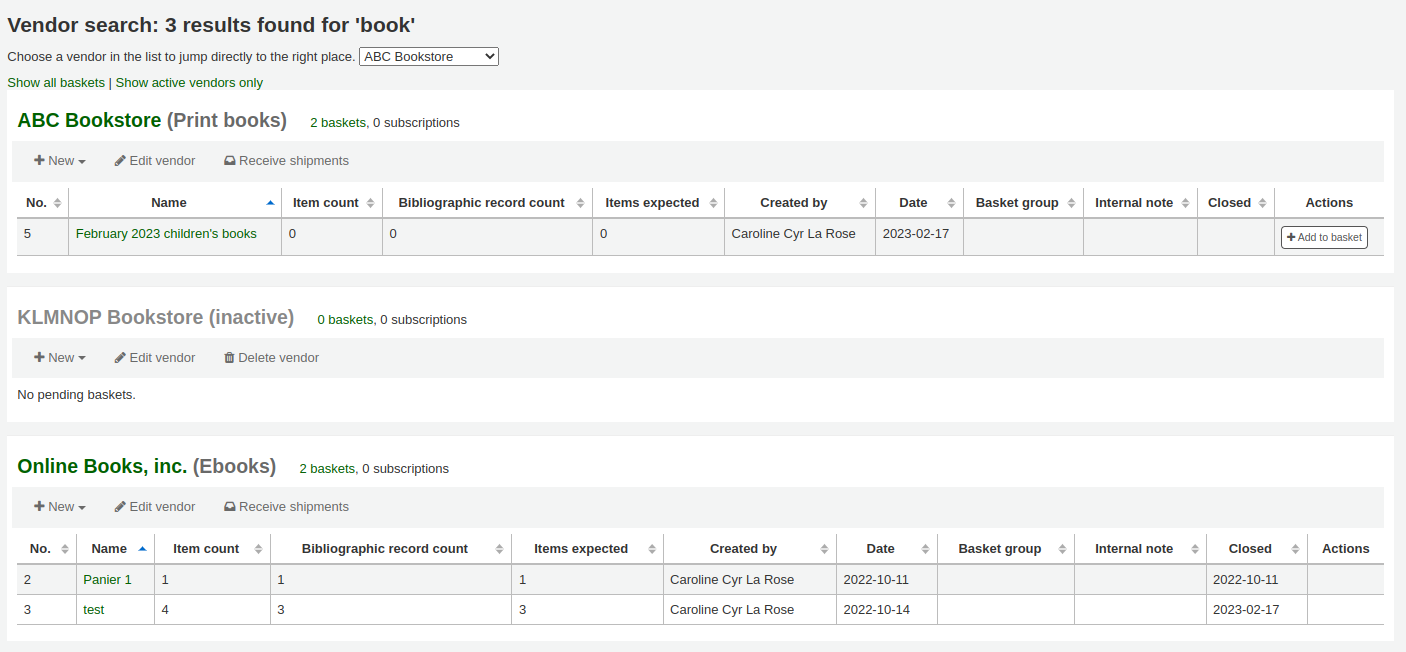
從結果內容,點選供應商名稱檢視或編輯它
點選 『編輯供應商』 鈕,就能改變該供應商。
若供應商供採購籃則可看到 『刪除供應商』 鈕就能刪除該供應商。否則就能看到 『簽收到館』 鈕。
Vendor contracts
可設定合約 (含開始與結束日期) 給供應商。年度結束時才可看出該供應商用了多少合約。有的圖書館,指定合約每年的最低與最高金額。
Add a contract
At the top of a vendor information Page, you will see a 『New contract』 button.
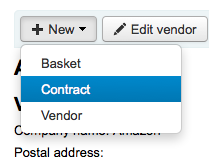
合約表單將要求基本資訊
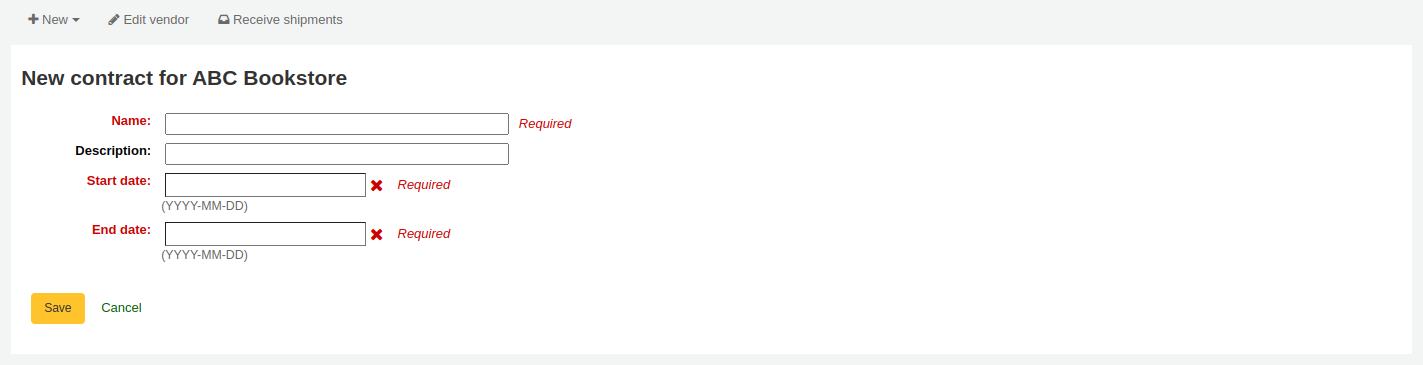
重要
不能鍵入過期合約的內容。結案日期不能早於今日。
合約儲存後,將出現於供應商資訊下方。
新增採購籃是選項
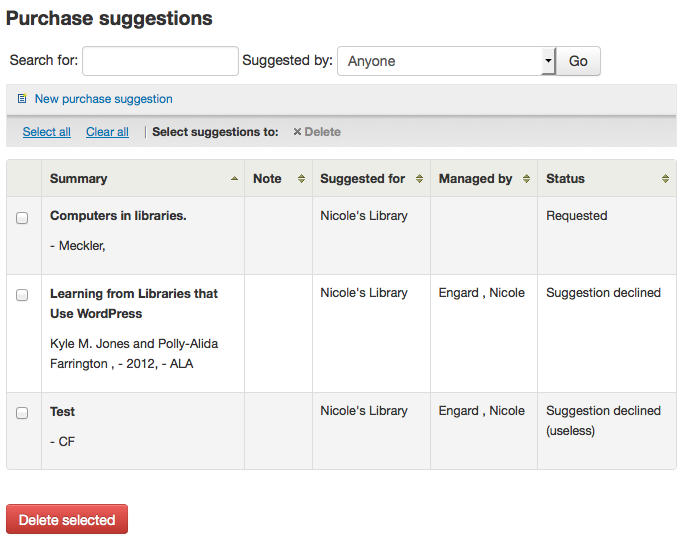
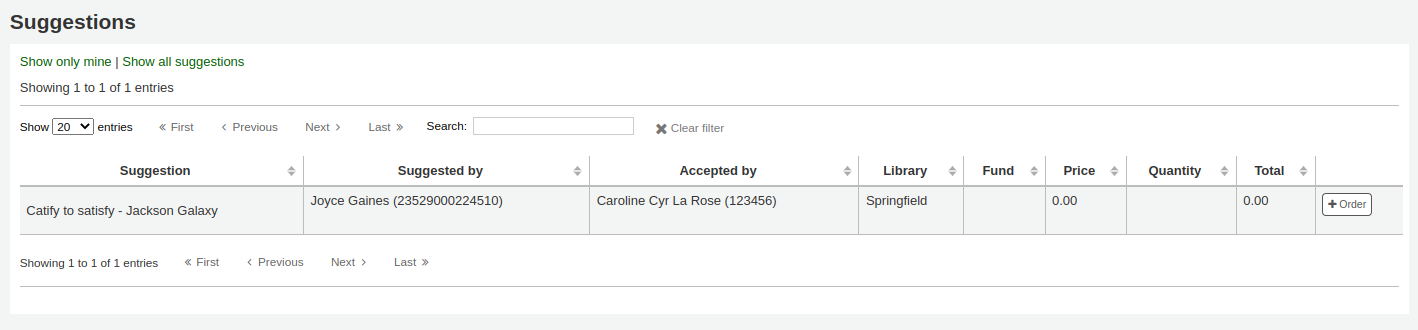
Managing purchase suggestions
Purchase suggestions can be generated in one of two ways. You can create suggestions via the staff client either for the library or on the patron’s behalf from their record. Depending on your settings in the suggestion system preference, patrons may also be able to make purchase suggestions via the OPAC.
說明
You need to be logged in as a staff member with the suggestions_manage acquisitions permission in order to view and work with purchase suggestions.
If you have the suggestions_manage permission but not Acquisitions permissions you can access the suggestion management tool from Suggestions under the More menu in the header bar.
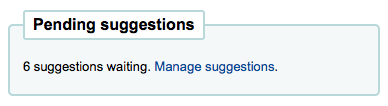
When a suggestion is waiting for library review, it will appear on the Acquisitions home page next to the vendor search. Clicking 『Manage suggestions』 will take you to the suggestion management tool.
同時顯示在館員面板的標籤模組之下:

If there are no pending suggestions you can access the suggestion management tool by clicking the 『Manage suggestions』 link on the menu on the left of the Acquisitions page.
說明
You can customize the columns of this table in the 『Table settings』 section of the Administration module (table id: suggestions).
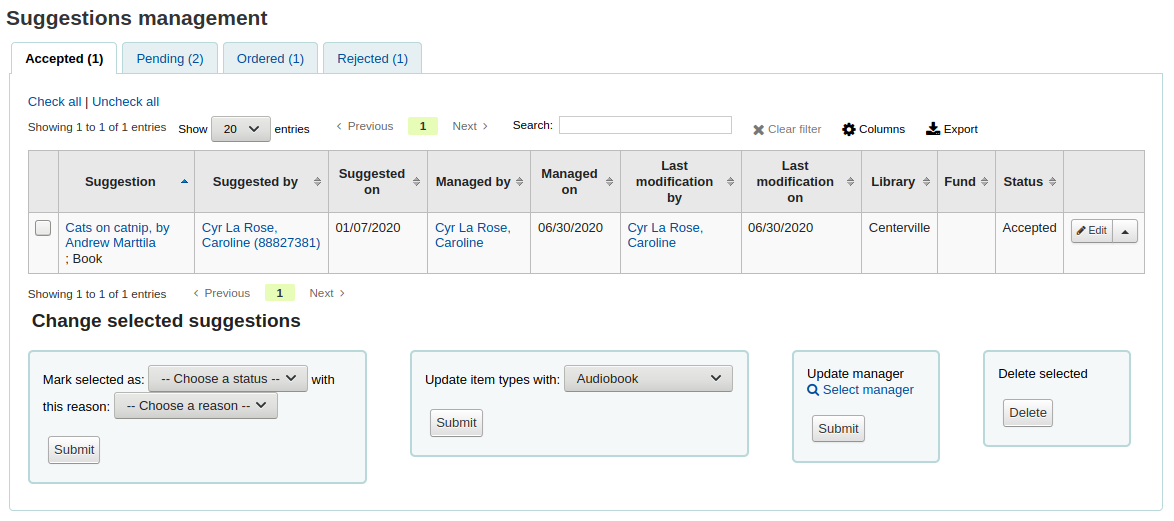
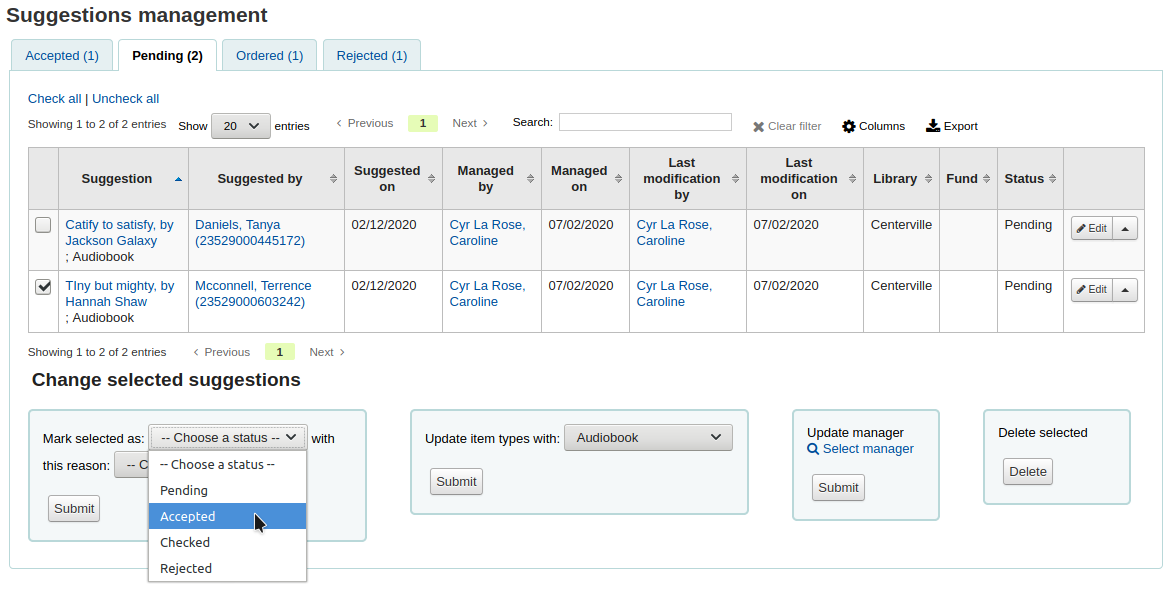
您的建議分別納入不同的分頁:接受、待決、檢查中、訂閱與拒絕。接受與拒絕建議時,將顯示管理該建議的館員姓名與理由 (在 『狀態』 中)。
於採訪的表單內被標記為 『接受』 的建議就是被 『接受』 的建議。』待決』 的建議就是等待圖書館員審核的建議。』審核中』 的建議就是被標記為尚待審核。’訂購中‘ 的建議就是已使用採購籃中的 『來自採訪建議』 連結發出訂單。』拒絕』 建議是被採訪建議清單下的表單標記為 『拒絕』 的建議。
建議很多的圖書館,在管理建議頁面左方有個篩選工具,限制螢幕顯示的建議筆數。
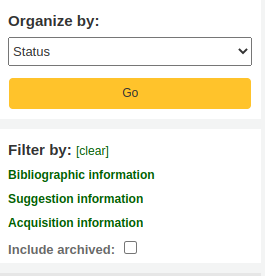
勾選藍色的標題,將擴展篩選的選項,勾選 『[清除]』 後,將清除所有的篩選並顯示全部建議。
說明
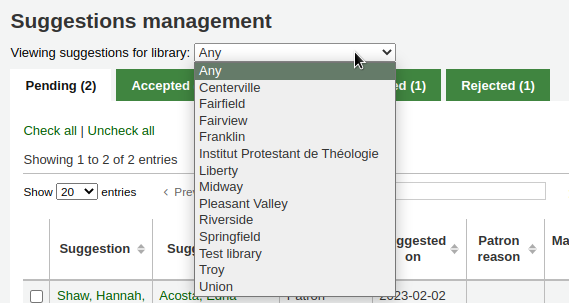
建議頁面自動限制祗能向所屬圖書館建議。勾選 『採訪資訊』 篩選器並改變圖書館就能看到全部 (或其他) 圖書館的建議。
When reviewing 『Pending』 suggestions you can choose to check the box next to the item(s) you want to approve/reject and then choose the status and reason for your selection.
接受或拒絕建議的理由列在 SUGGEST 容許值內。
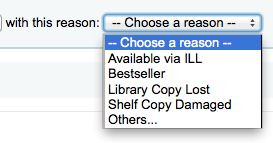
若選擇 『其他… 『 為理由時將提示將理由寫在文字盒內。勾選盒右方的 『取消』 將回到授權理由的下拉選單。

You can also change the item type of the suggestions by selecting them and choosing the new item type in the 『Update item types with』 drop down menu.
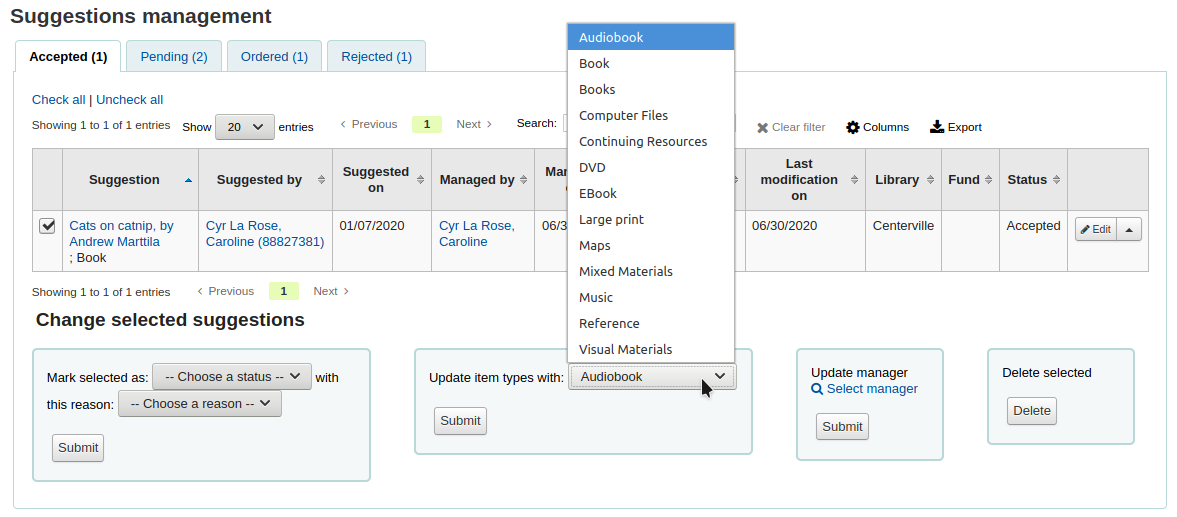
You can also change the manager of the selected suggestions by clicking the 『Select manager』 link and searching your user database. Note that only users who have the 『superlibrarian』 or the 『suggestions_manage』 permission will show in the results. The new manager will receive the NOTIFY_MANAGER notice.
You can also choose to completely delete the selected suggestions by clicking the 『Delete』 button in the the 『Delete selected』 box.
圖書館對建議清單的另個選項是逐一通過或拒絕該等建議,勾選建議的題名,打開包括購買理由在內的建議摘要。
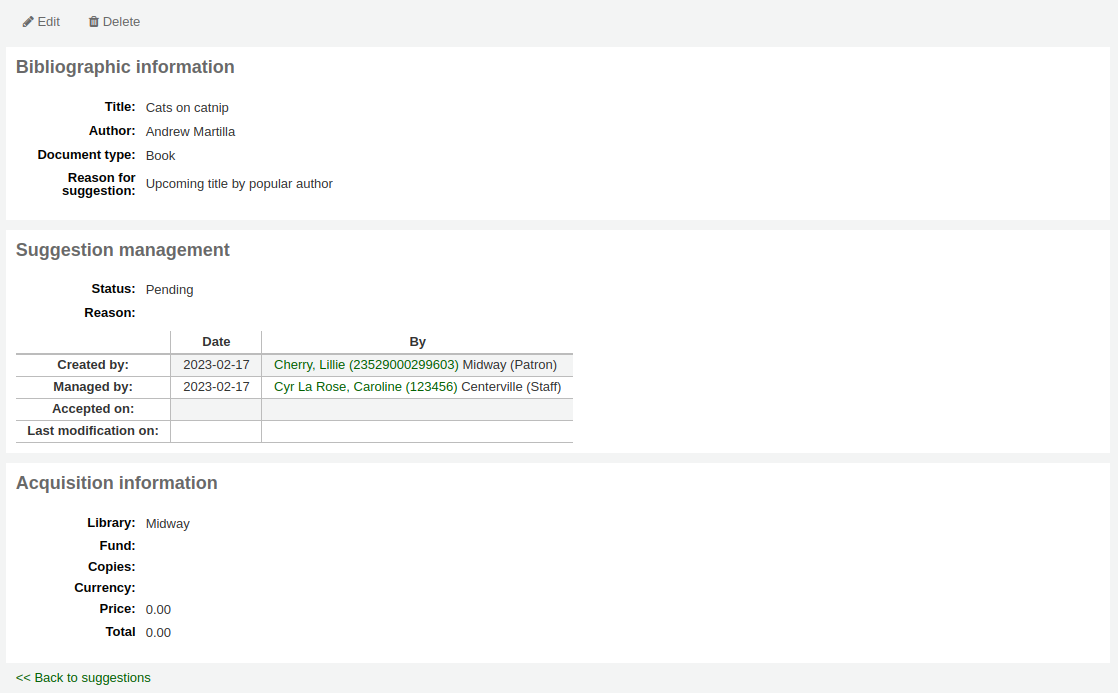
Clicking 『edit』 to the right of the suggested title or at the top of the suggestion detail page will open a suggestion editing page.
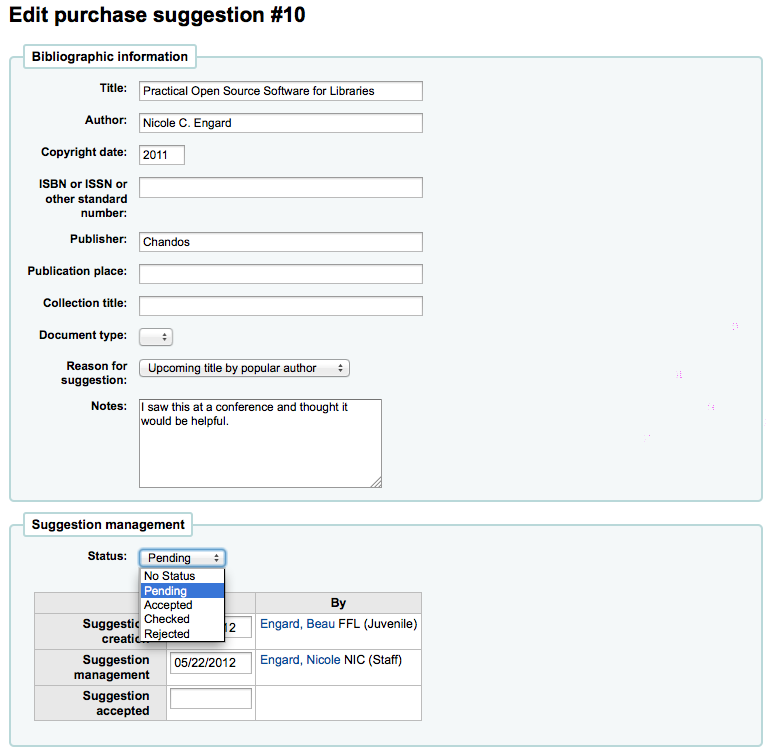
從此表單您可編輯建議 (新增更多詳情或更新不正確的資料)。也能選擇接受或拒絕個別的建議。
選擇標記為 『暫存』 的詢問,將把詢問移到 『暫存』 分頁。
您可將此採訪建議指定給基金。
This edit can trigger a notice (defined in the Notices & slips tool with the TO_PROCESS notice) to the fund owner that there is a suggestion ready for them to manage if you have turned on the cron job to generate these notices.
Once you have clicked 『Submit』 the suggestion will be moved to the matching tab. The status will also be updated on the patron’s account in the OPAC and an email notice will be sent to the patron using the template that matches the status you have chosen.
Once the suggestion has completed the acquisitions process, it is possible to archive it by clicking the small arrow next to the 『Edit』 button and choosing 『Archive』. This will remove it from the search results. If you have a lot of suggestions, and the page takes a long time to load, archiving old suggestions will improve the performance.
Placing orders
先搜尋發送訂單的供應商或經銷商,才能發出訂單。
重要
If you are planning on using EDIFACT to submit your order you will need to first set up your library’s EDI accounts and EANs.
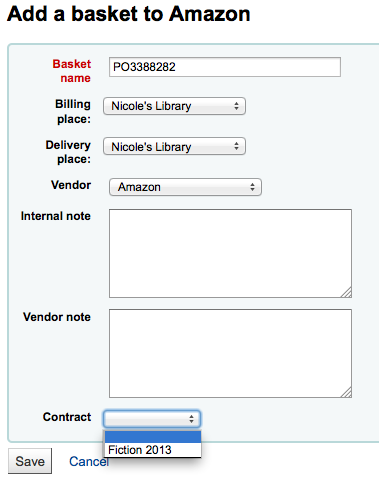
新增採購籃
說明
需在啟用 Koha 前先從代理商下載訂單表格,才能使用 EDI 採訪。
必須先搜尋發出訂單的供應商,才能新增採購籃:

點選供應商右方的 『新增採購籃』 鈕。
說明
You can also add to an existing basket by clicking the arrow next to the 『View』 button at the far right of each basket’s information in the results table, and choosing 『Add to basket』.

點選 『新增採購籃』 後,系統要求鍵入該訂單的資訊:
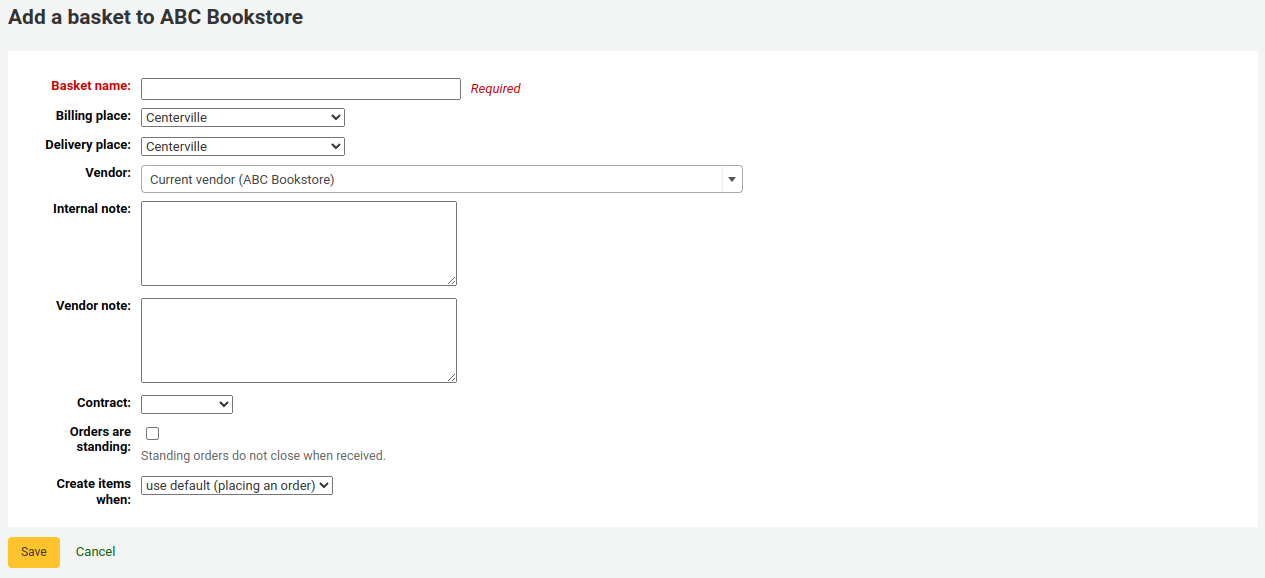
新增採購籃時,需給個容易辨識的名稱
Enter in the billing place and delivery place (this will default the library you’re logged in at)
從供應商下拉選單,可以改變訂單的供應商
說明欄位是選項,可以鍵入任何資訊
If you’re ordering standing items (items which arrive regularly) then you will want to check the 『Orders are standing』 box for this basket.
Note that any one basket cannot contain both firm and standing orders.
You can choose to create items either upon placing the order, upon receiving the order, or upon cataloging the item. If you choose an option other than the default, it will apply only to this basket. The default is set by the AcqCreateItem system preference.
若您 新增合約 至訂單來源的供應商,您也可以指定合約。
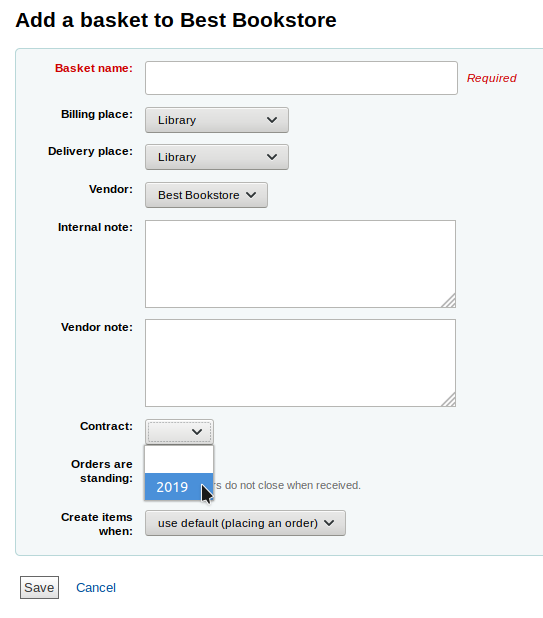
When finished, click 『Save』.
Once your basket is created, click on 『Add to basket』 you are presented with several options for adding items to the order.
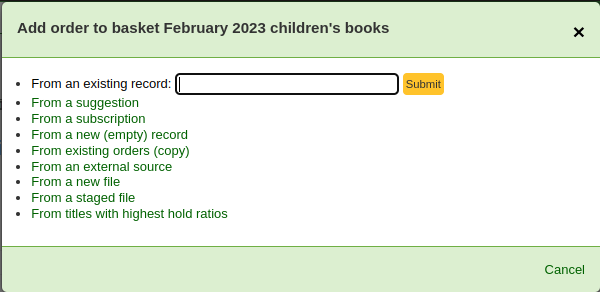
Adding materials to the basket
Order from an existing record
訂購館藏的複本時,祗需搜尋系統的紀錄。
From the results, you can click 『Add order』 to be brought to the order form.
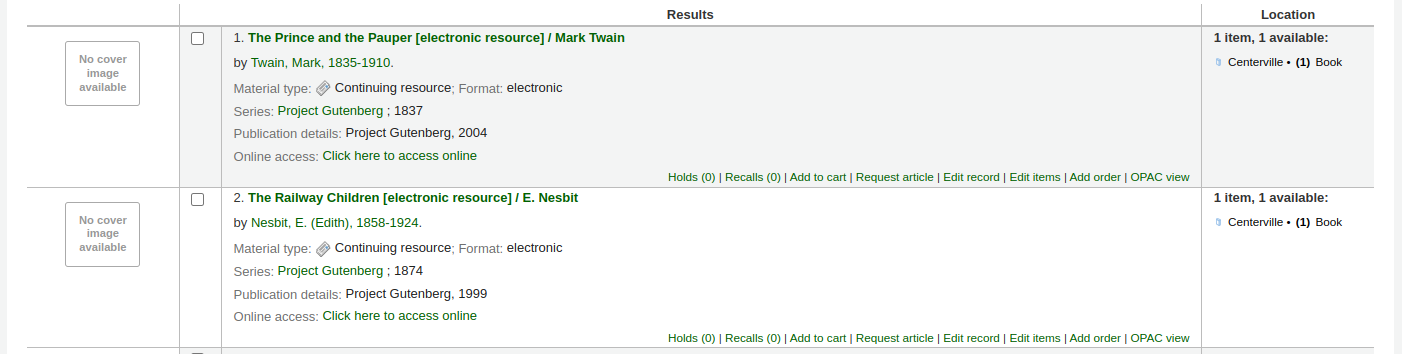
From the record’s detailed view, you can click on the 『Add order』 button.
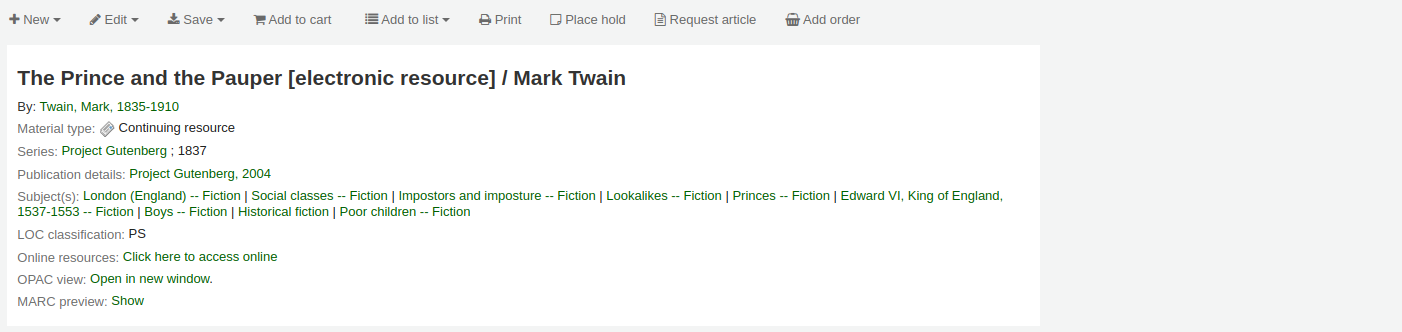
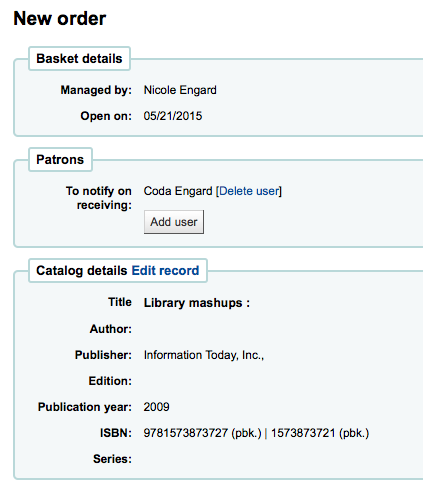
You will be brought to the order form
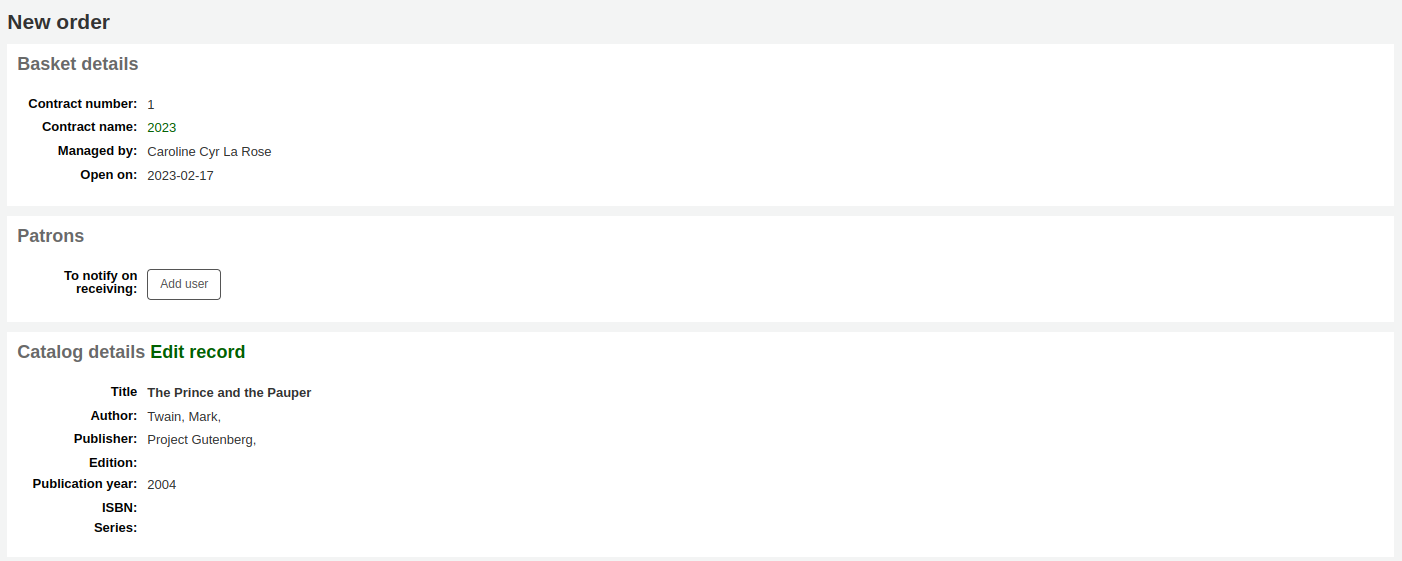
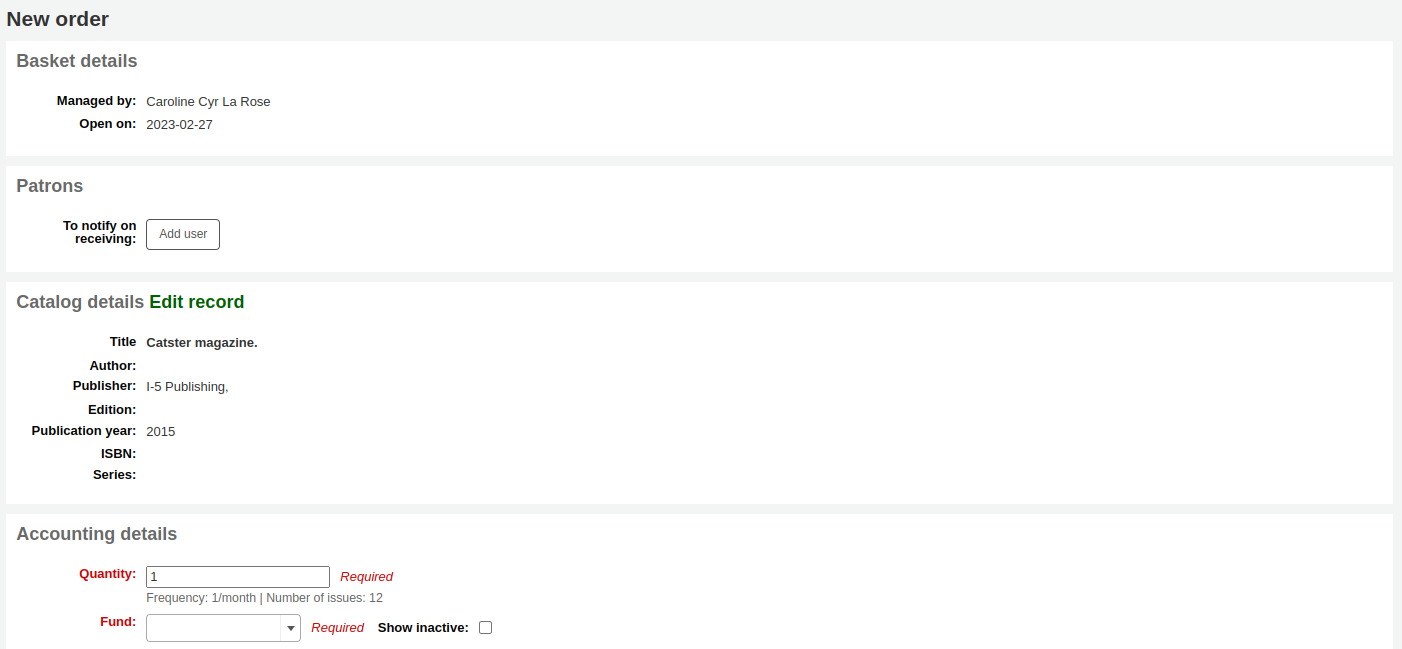
與館藏有關的詳情將列出 『目錄詳情』 之下。
Order from a purchase suggestion
If you allow patrons to make purchase suggestions (learn more in the managing purchase suggestions section of this manual), then you can place orders from those suggestions. In order to keep track of suggestions that have been ordered and received you must place the order using this link.
重要
Suggestions must be accepted before you can order them.
從結果裡,點選欲採購的館藏旁 『訂單』 鈕,出現包括連結至建議的訂單表單
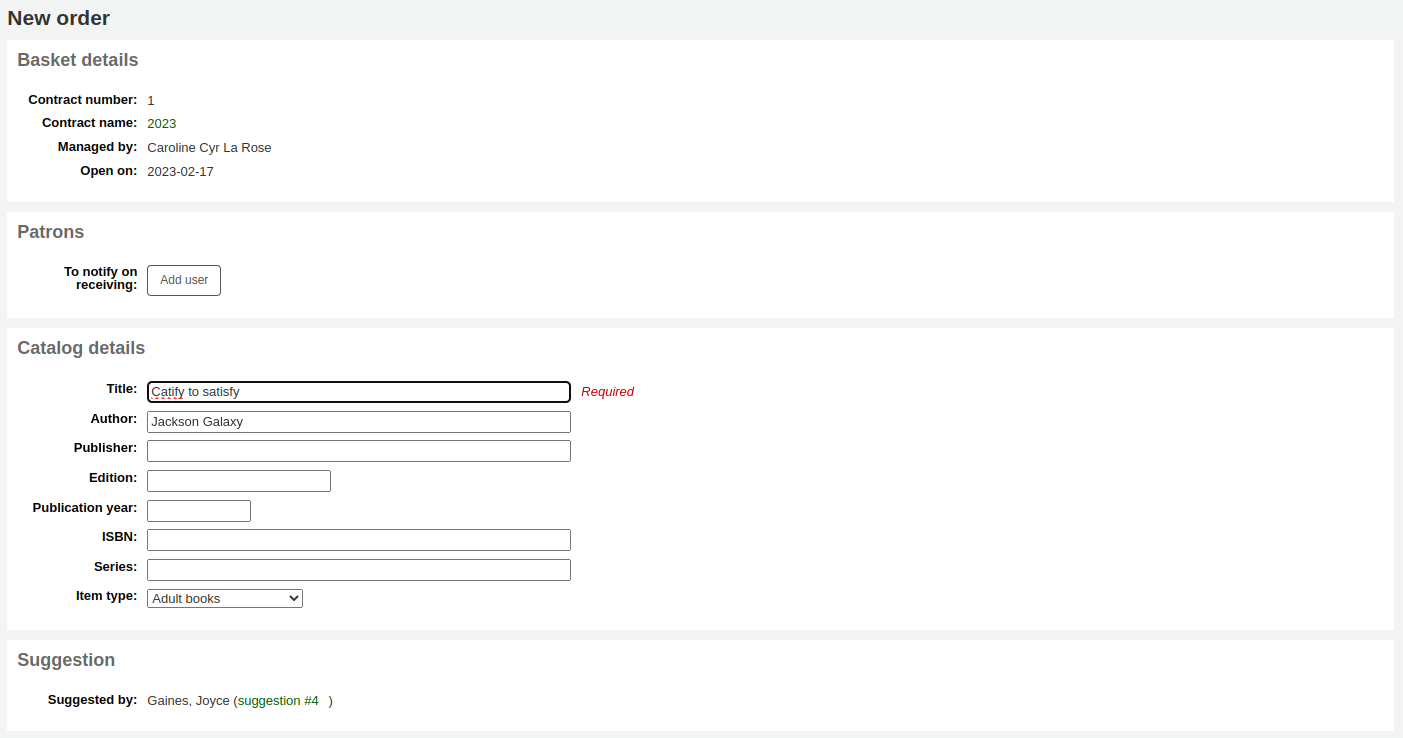
From this form you can make changes to the catalog details if necessary.
顯示在購物籃的館藏,將包括連結至採訪建議。

Orders added to the basket in this way will notify the patron via email that their suggestion has been ordered (with the 『ORDERED』 notice in Tools > Notices & slips) and will update the patron’s 『your purchase suggestions』 page in the OPAC.
Order from a serial subscription
若您使用 期刊 模組,就能選擇 『來自訂閱』 的訂單,連結訂購資訊至採訪
按了訂閱連結後您會被帶入搜尋頁面協助訂閱事宜
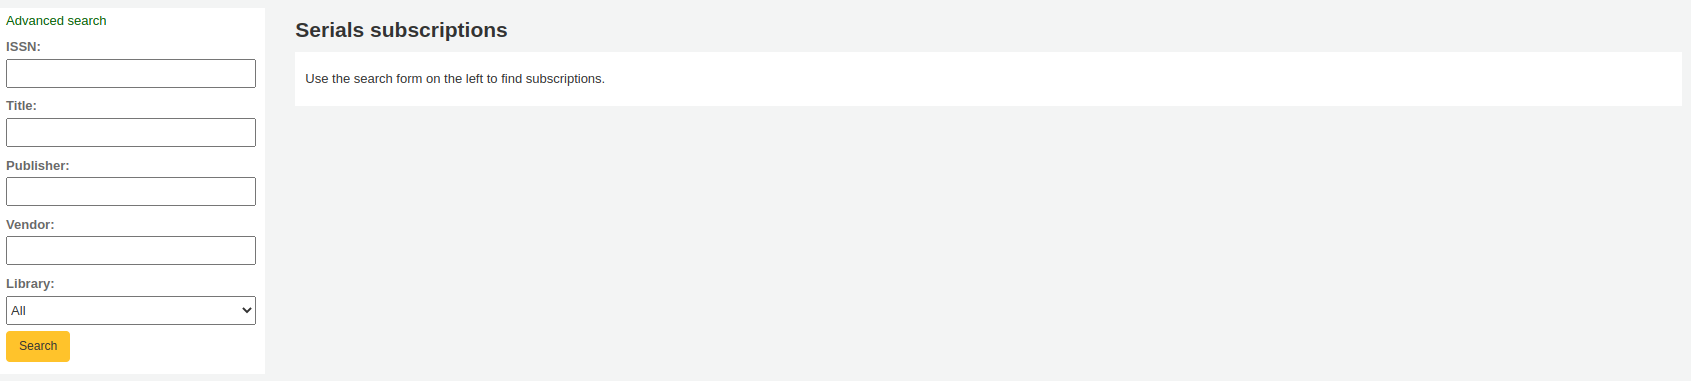
您的結果出現在表單右方且每筆訂閱的右方有 『訂單』 連結
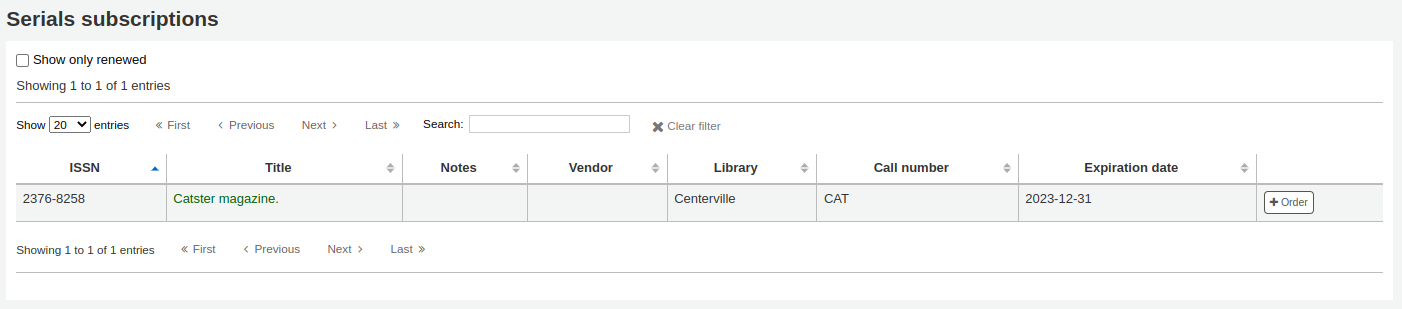
按 『訂單』 鈕將把訂閱資料帶入沒有 『新增館藏』 的表單
Order from a new (empty) record
To order from a record that can’t be found anywhere else, choose the 『From a new (empty) record』 option.
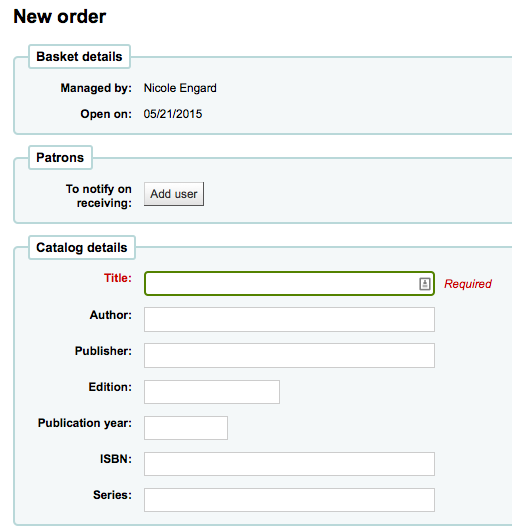
顯示空白的表單,可鍵入訂購該館藏的必要詳情。
說明
If the default form does not have catalog details fields necessary to place an order, enable the UseACQFrameworkForBiblioRecords preference which will allow the ACQ MARC framework to customize the display of fields when ordering.
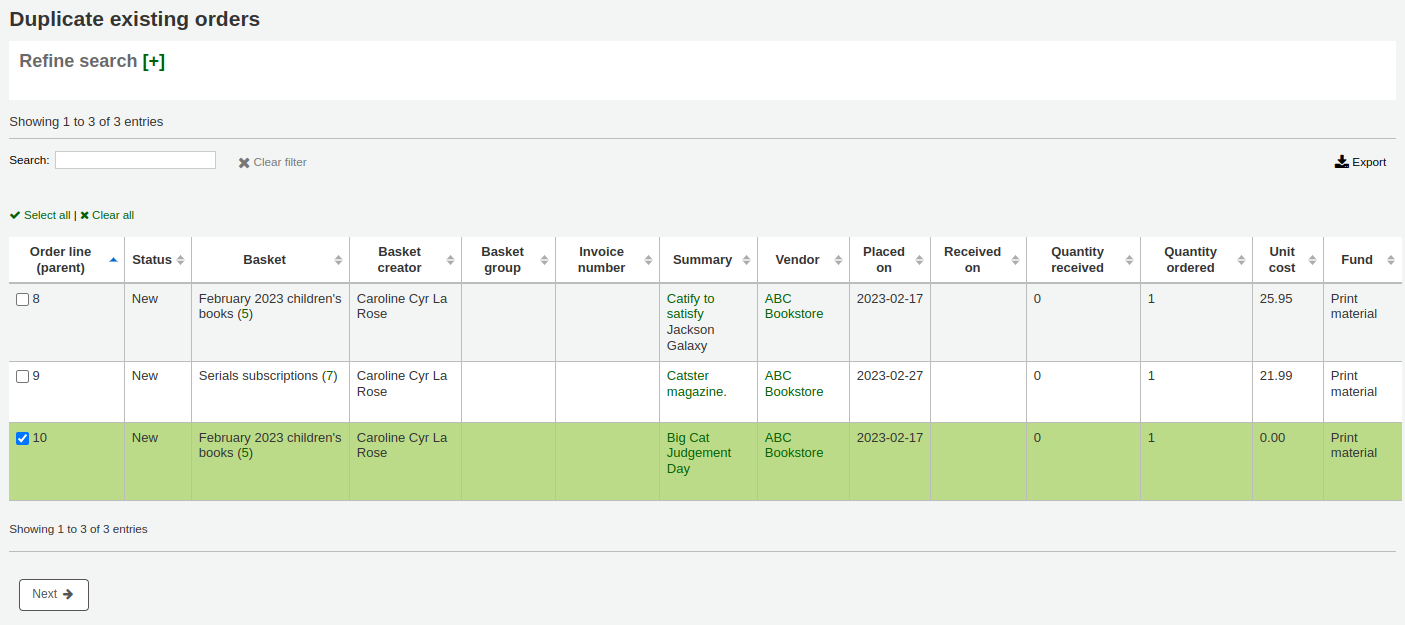
Duplicate orders (order from existing orders)
You can duplicate an existing order line by choosing the 『From existing orders (copy)』 option.
You will be presented with a search form to search your existing orders.

Check the boxes next to the order(s) you want to duplicate.
Order from an external source
若想搜尋其他圖書館的館藏供採購參考,您可使用 『來自外部資源』 選項,允許您使用經由 Z39.50 搜尋找到 MARC 記錄做為發訂單的依據。
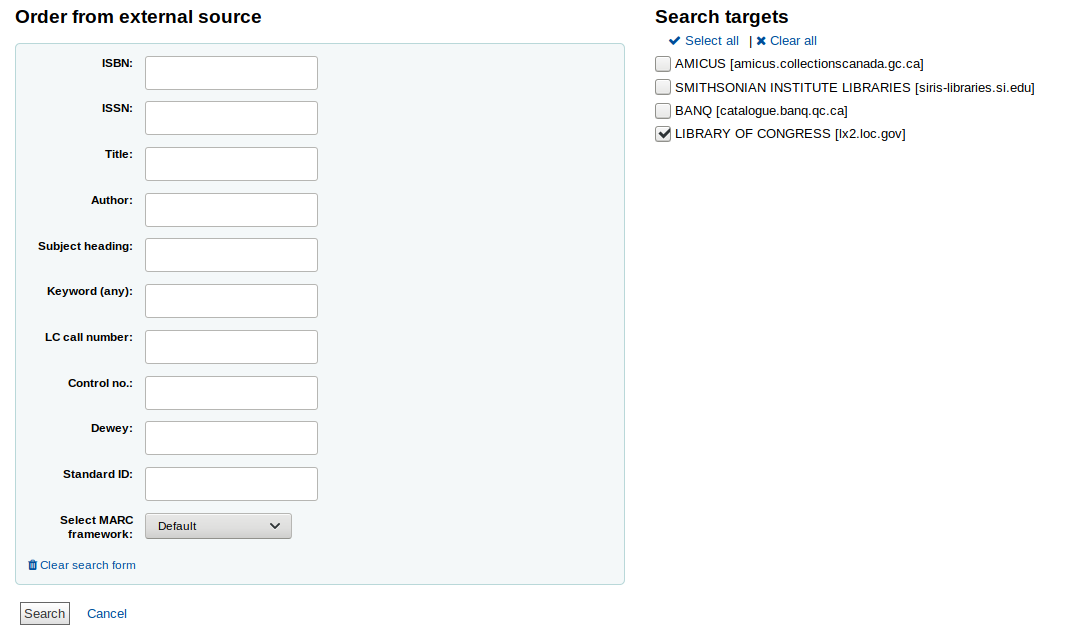
From the results, click the 『Order』 button next to the item you want to purchase.

經由外部資源訂購像這樣的館藏可能會重複時,Koha 將警示您並給您繼續作業的選項。
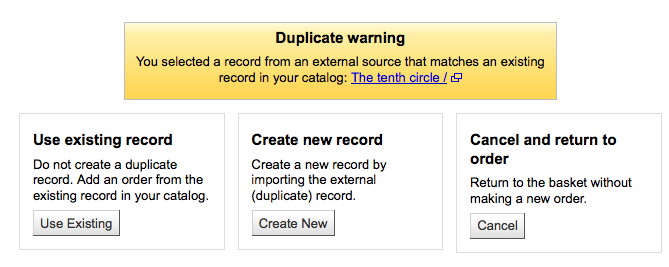
From the warning, you can choose to order another copy on the existing bibliographic record, create a new bibliographic record, or cancel your order of this item.
不能從彈出來的訂閱表單裡編輯目錄詳情。
Order from a new file
If your vendor sent you a record file (a .mrc file for example), you can add orders using the records in that file. Choose the 『From a new file』 option.
說明
Note that you need the stage_marc_import tool permission in order to be able order from a new file.
You will be taken to the Stage MARC records for import tool. Stage your file as described in that section.
Once the files are staged, you can click on the 『Add staged files to basket』 button.

Next to each title is a checkbox, check the items you would like to order, or choose 『Select all』 at the top. Depending on your settings in the MarcFieldsToOrder preference, Koha will populate the next screen with with the relevant Quantity, Price, Fund, Statistic 1, and Statistic 2 found within the staged file.
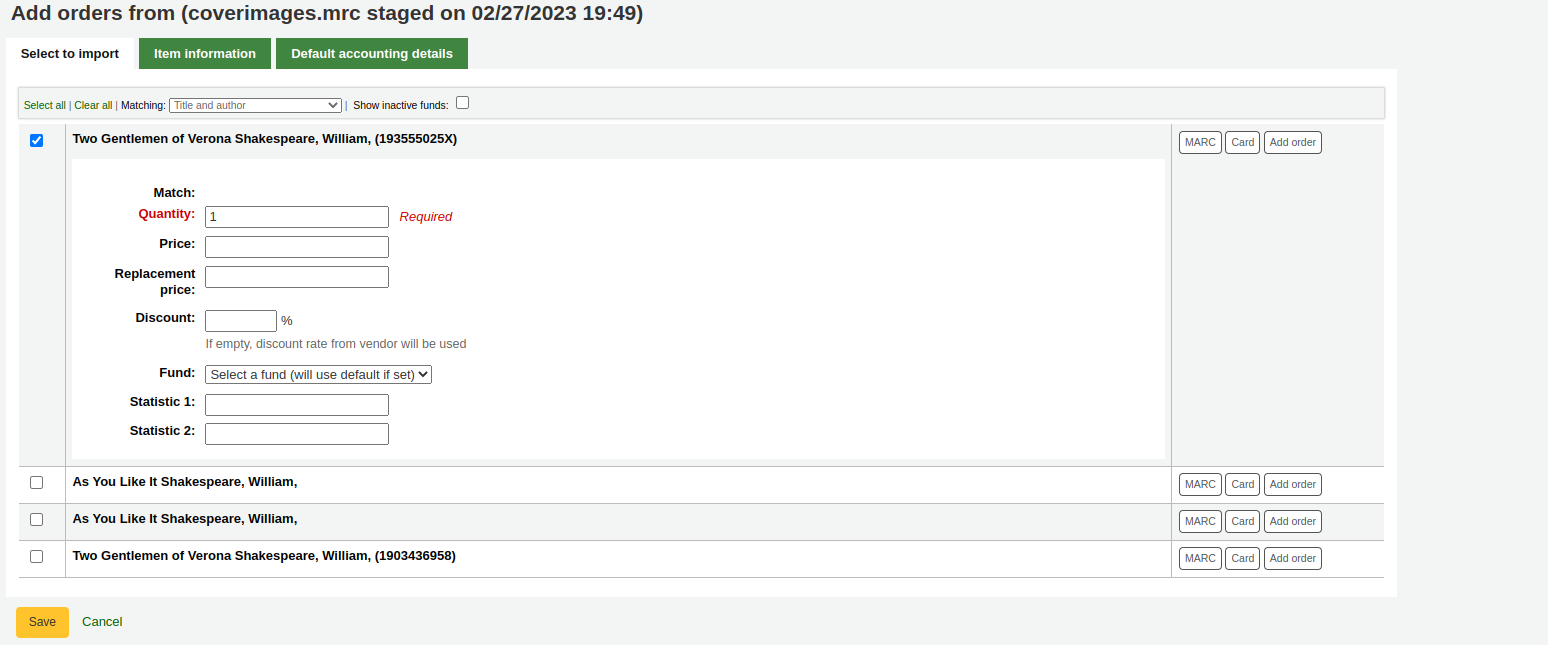
In the 『Item information』 tab you can enter information that will be added to every ordered item such as item type, collection code and not for loan status.
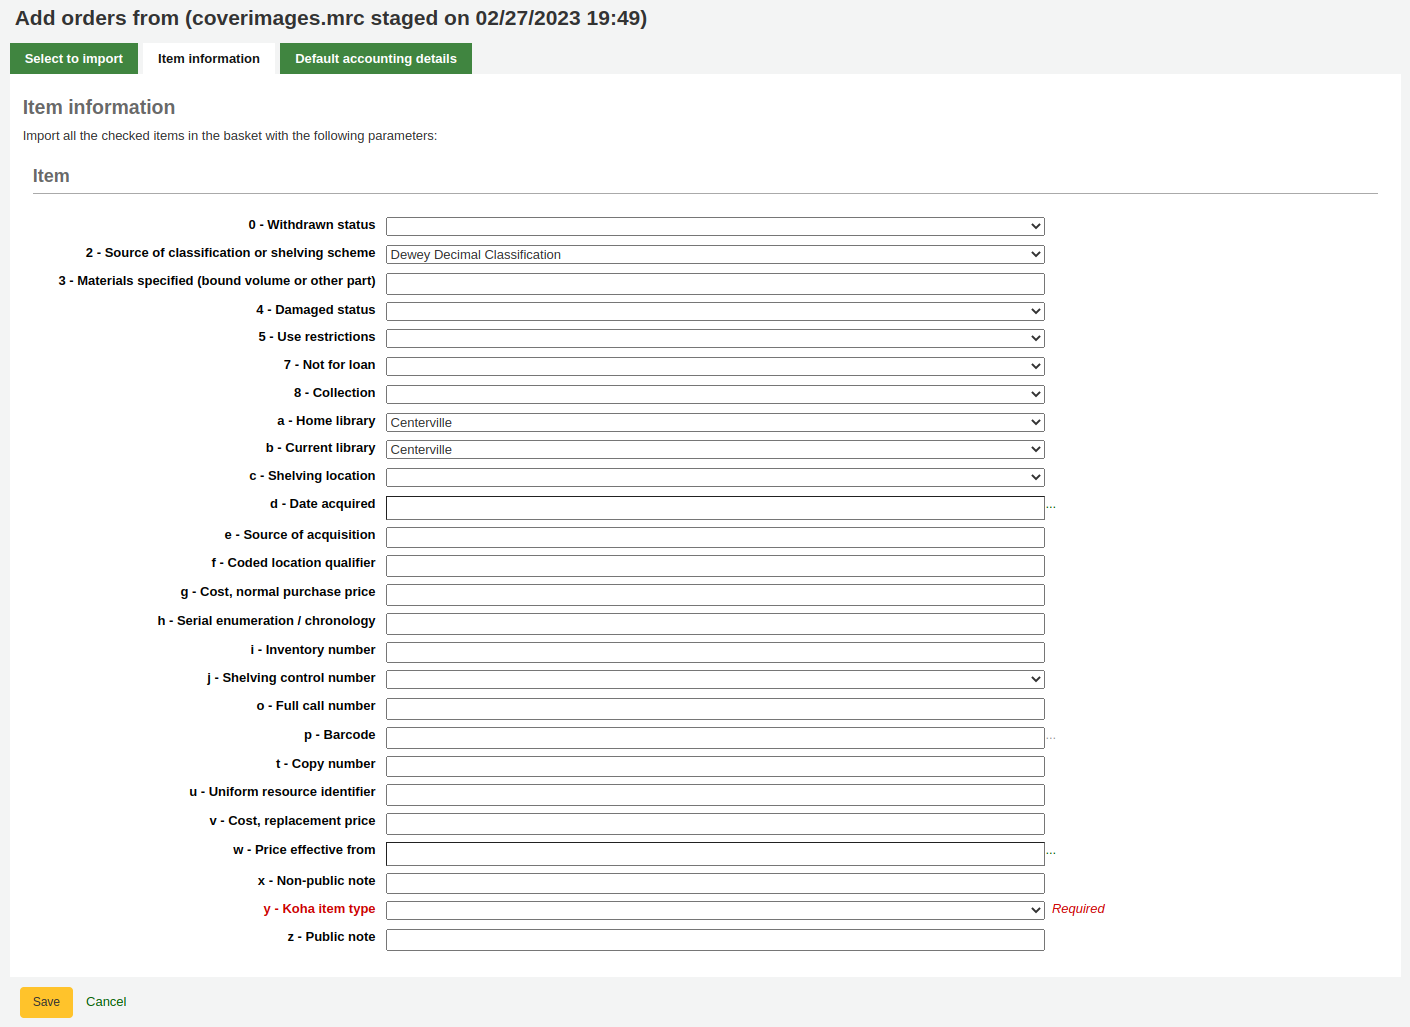
If no information is imported in the fund information from the MARC with the MarcFieldsToOrder preference, the 『Default accounting details』 tab can be used to apply values related to the accounting.

取自待處理檔案的訂單
This option is the same as the previous one, but in this case, your file has already been staged. Whether you choose to 『order from a new file』 or 『order from a staged file』 will depend on your acquisitions workflow or your permissions.
Once you click on 『From a staged file』, you will get a list of all the staged files in your system.
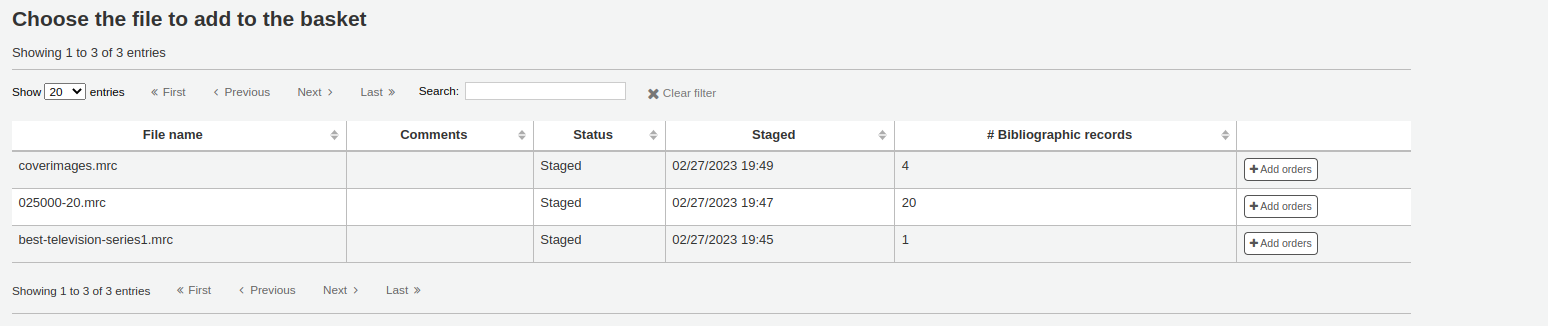
From the list of files you are presented with, click on the 『Add orders』 button to add the records in the staged file to your order.
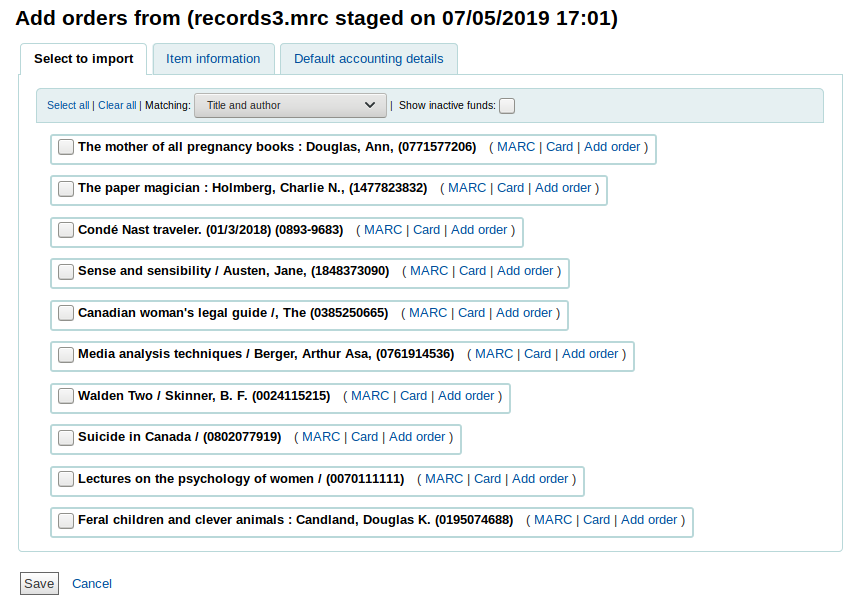
Next to each title is a checkbox, check the items you would like to order, or choose 『Select all』 at the top. Depending on your settings in the MarcFieldsToOrder preference, Koha will populate the next screen with with the relevant Quantity, Price, Fund, Statistic 1, and Statistic 2 found within the staged file.
In the 『Item information』 tab you can enter information that will be added to every ordered item such as item type, collection code and not for loan status.
If no information is imported in the fund information from the MARC with the MarcFieldsToOrder preference, the 『Default accounting details』 tab can be used to apply values related to the accounting.
Order from titles with highest hold ratios
訂單的最後一個選項是到館比率最高的清單
This option will take you to the holds ratio report where you can find items with a high hold ratio and order additional copies. Next to each title will be a button with the number of items to order, click that and it will add the item to your basket.

Setting patron notifications
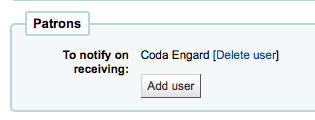
With any of the above ordering options you’re presented with an option to notify patrons of the new item when it’s received. The contents of that notification can be edited in the Notices & slips tool and will have the code of ACQ_NOTIF_ON_RECEIV. In the 『Patrons』 section you will see an option to 『Add user』. Click that button to add patrons who will be notified of the new issue.
搜尋讀者通知
In the window that pops up search for the patrons you’d like to notify and click 『Add』

完成後可關閉視窗並在 『讀者』 區看到讀者清單
Adding items to materials
After bringing in the record information (for all order methods except for the staged files), if your AcqCreateItem system preference is set to add an item when ordering you will enter the item information next. You need to fill out at least one item record and then click the 『Add item』 button at the bottom left of the item form.
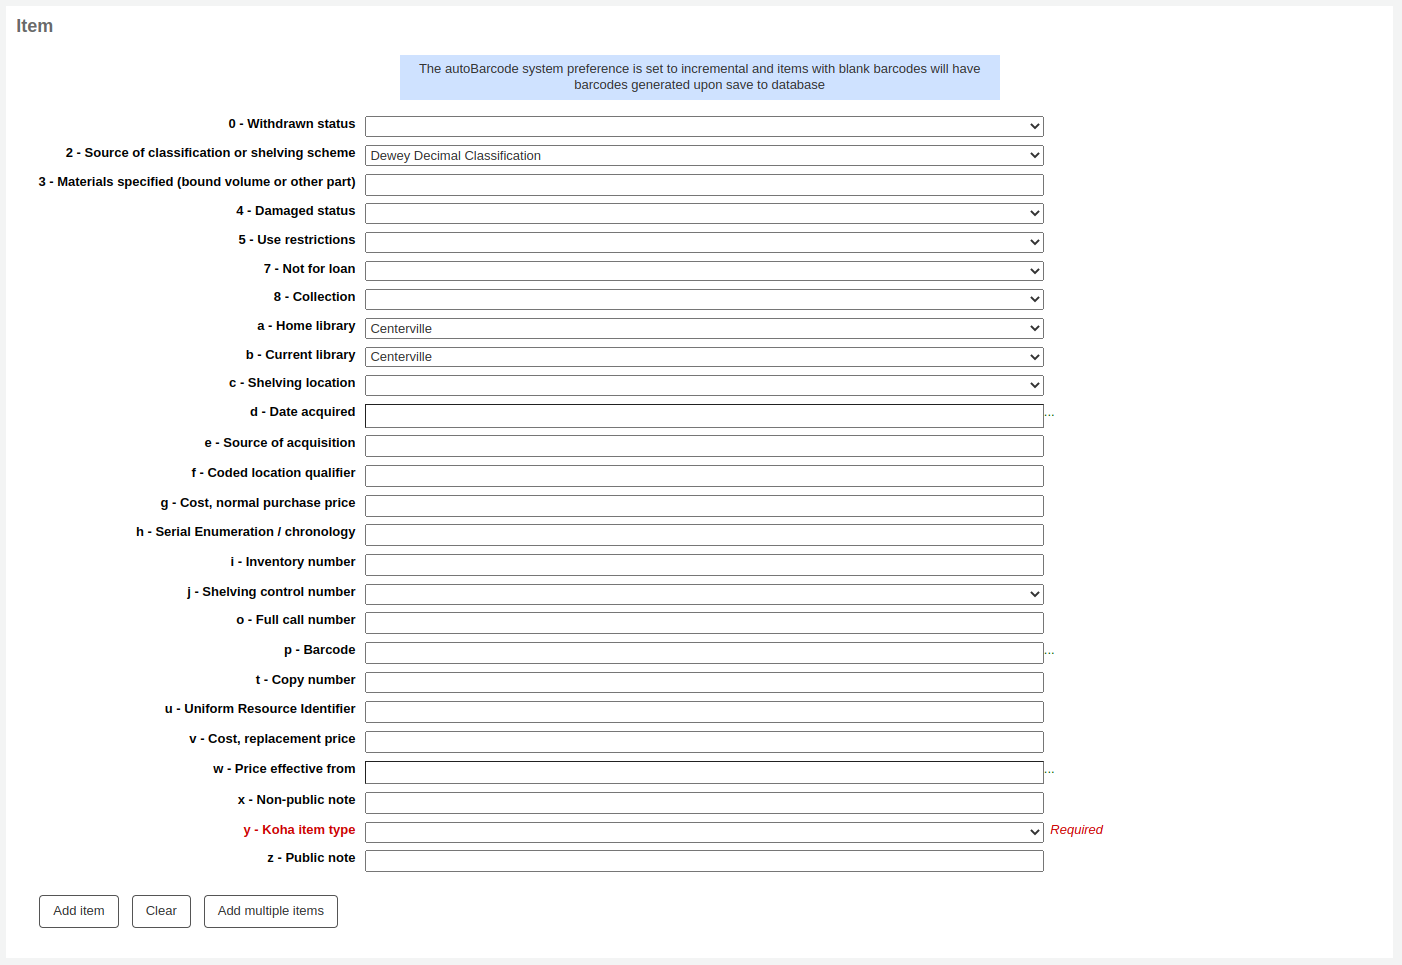
按下館藏記錄下方的 『新增館藏』 鈕後,該館藏將出現在表單之上,您可以同樣方式再新增下筆館藏 (若採購多筆複本)。

If you are ordering several items, you can click on the 『Add multiple items』 instead of adding them one by one. This will ask you how many items you want to add. Simply enter that number in the box and click on 『Add』.

Adding accounting details to materials
鍵入館藏的資訊後,還需要鍵入帳號資訊。
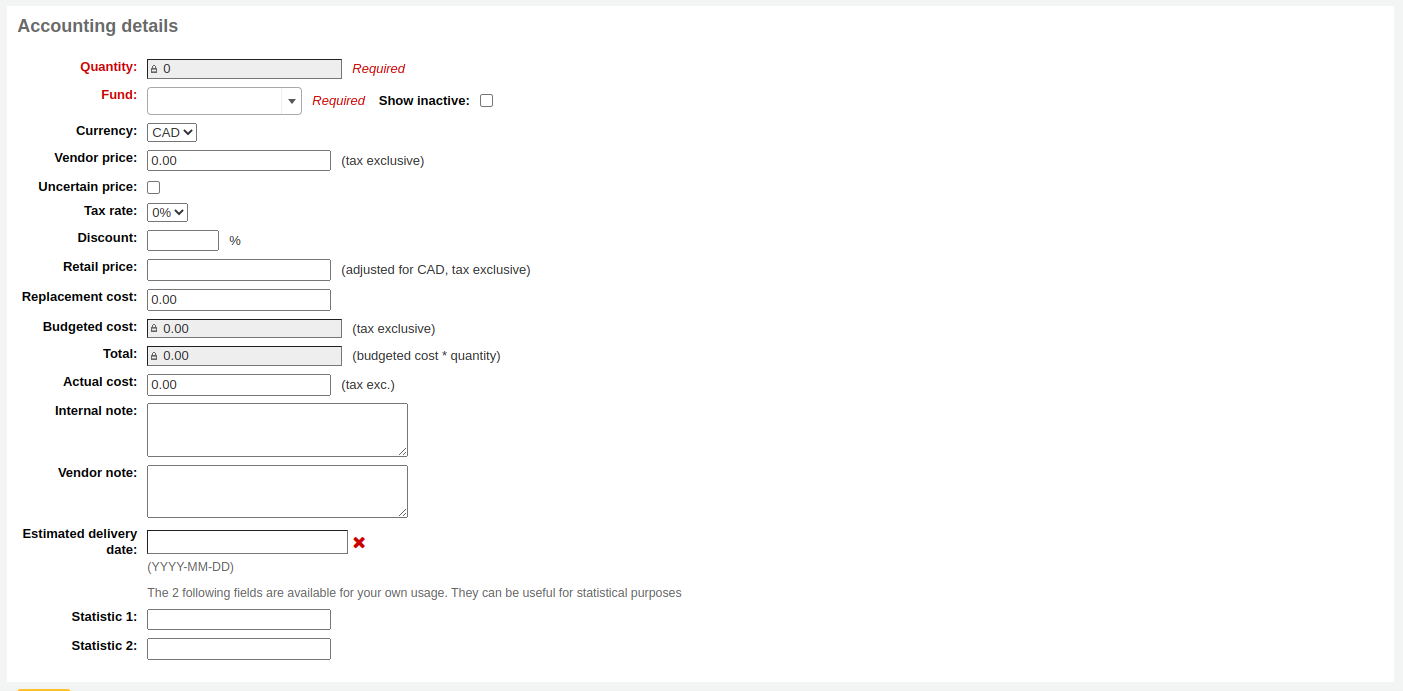
新增至以上訂閱的館藏數量。
重要
If the item is created upon ordering, you will not be able to edit the quantity manually, you must click 『Add item』 below the item form to add as many items as you’re ordering.
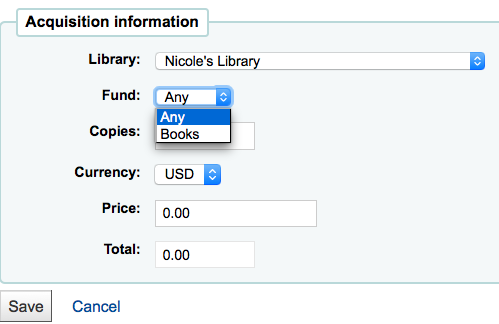
The list of funds is populated by the funds you have assigned in the Acquisitions administration area.
The currency pull down will have the currencies you set up in the Acquisitions administration area.
供應商價格是稅前或折扣前價格。
若價格未定,勾選價格未定盒。
說明
無法關閉包括未確定價格的採購項目。
If you are charged sales tax, choose that from the 『Tax rate』 field. This field is populated by the TaxRates system preference.
鍵入此訂單的折扣百分比,鍵入後,打下分頁鈕,Koha將計算以下的成本欄位。
Retail price is the recommended retail price (RRP), the price set by the publisher or the manufacturer as a recommendation to booksellers.
Replacement cost is the price it will cost to replace the item. This is the price charged to the user when an item is declared lost (if the WhenLostChargeReplacementFee system preference is set to 『Charge』).
Budgeted cost is the amount that will be removed from the 『spent』 budget. Whether this number includes or excludes taxes will depend on the 『List price』 setting for your vendor.
Total is the budgeted cost multiplied by the quantity of items ordered.
You can add an internal note. This will only appear in the acquisitions module and in the staff interface catalog, under the 『Acquisitions details』 tab in the detailed record.
You can also add a vendor note. This will appear in the acquisitions module as well as on the order when exported as CSV.
If you added statistical categories when creating the Fund, those values will appear in the two statistics fields.
所有欄位都填入資料後,按 『儲存』 鈕,新增館藏至採購籃。若您的總價超過基金可以金額,則要求您確認。

確認警示將允許您使用其他基金額度。
Editing the basket
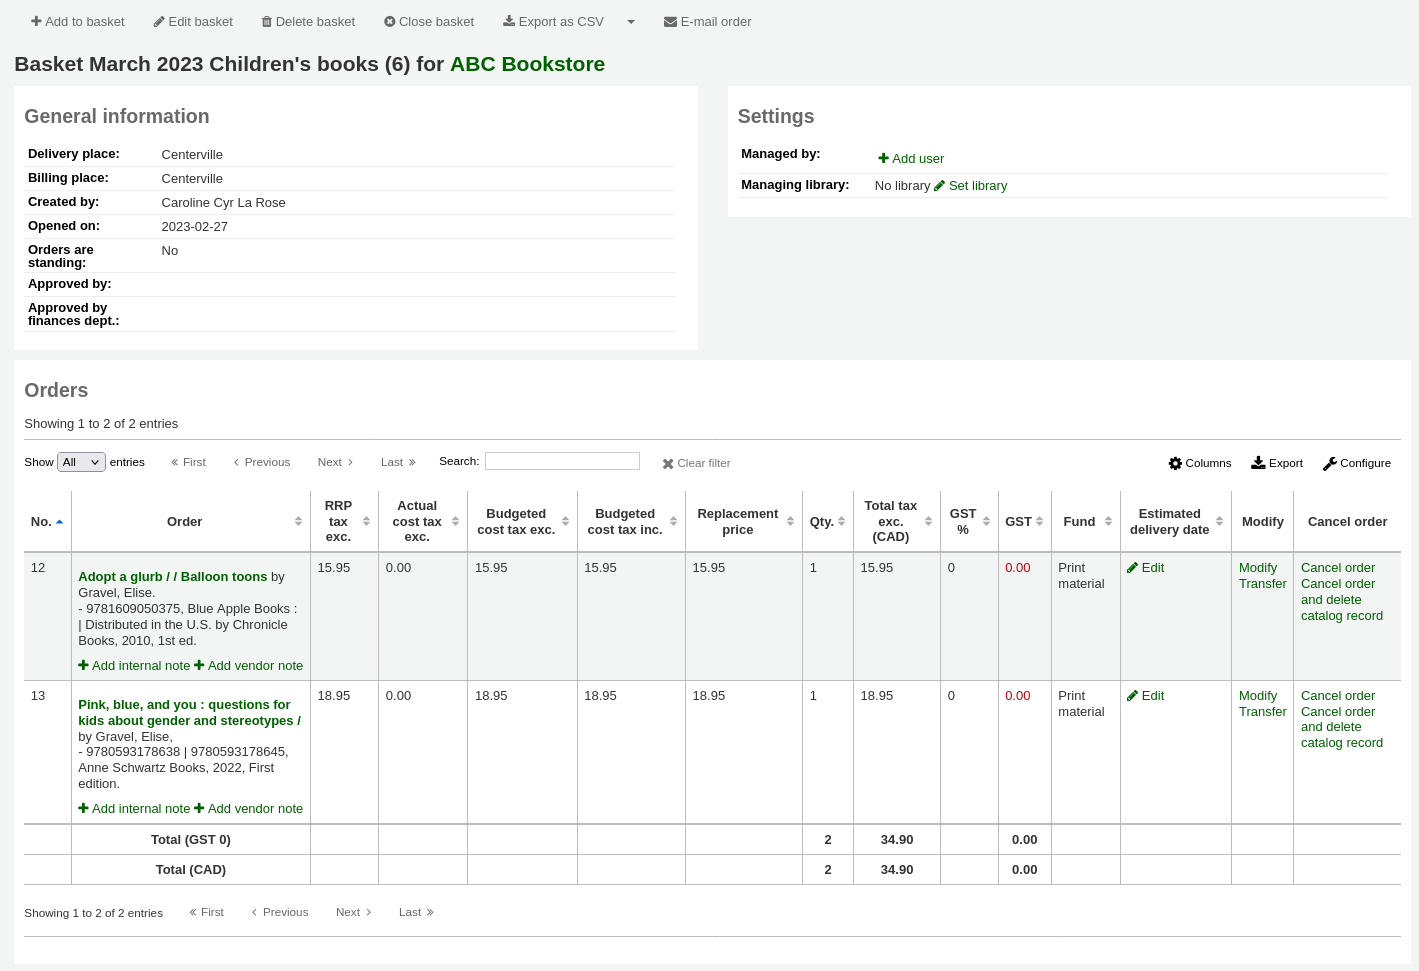
新增館藏入採購籃後,可在採購籃摘要看到它。
說明
You can customize the columns of this table in the 『Table settings』 section of the Administration module (table id: orders).
從此,您可編輯或移除曾經加入的館藏。
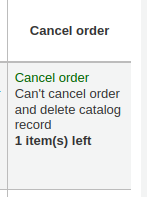
Choosing to 『Cancel the order』 will delete the order line but leave the record in the catalog.
Choosing to 『Cancel order and delete catalog record』 removes both the order line and the record in the catalog.
目錄紀錄不一定能刪除。您需要查看紀錄其原因的說明。
On the summary page, you also have the several option through the buttons at the top of the basket header.

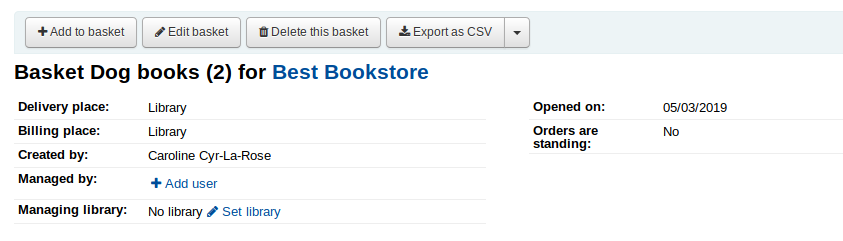
Edit basket: edit the basket information, such as the name or the billing place.
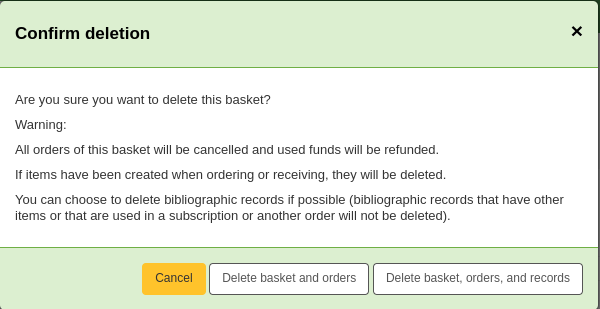
Delete this basket: if the basket is empty, you will get a simple confirmation message before deleting the basket. If the basket contains orders, you will get a confirmation message with several options.
Delete basket and orders: this will delete the basket, cancel the orders, refund the used funds, and delete the items (ordered or received).
Delete basket, orders, and records: this will delete all of the above plus the bibliographic records associated with the orders (except the ones which can’t be deleted because they have remaining items, orders or subscriptions attached).
Close this basket: closing the basket will enable you to add it to a basket group (this is optional) and receive its items.
Export as CSV: this will create a CSV file with all your orders from this basket. You can add several CSV profiles options by going to the CSV profiles tool.
E-mail order: this will send the order information to your contact for this vendor. Make sure your contact has a email address in the vendor profile.
使用 EDI 訂購時,送出檔案給代理商並關閉工作後,可點選 『新增 EDIFACT 訂單』。

Ordering/Closing the basket
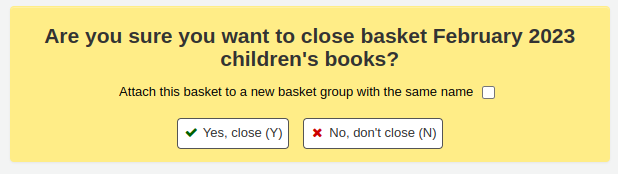
完成採購籃後,可以勾選 『關閉採購籃』 鈕,表示採購籃已處理好,並送交代理商。
重要
館藏到館之後,必須選定採購籃才能 簽收館藏。祗有在採購籃內的館藏才能被簽收。
若把 BasketConfirmations 偏好設為顯示確認,系統會詢問是否關閉此採購籃。
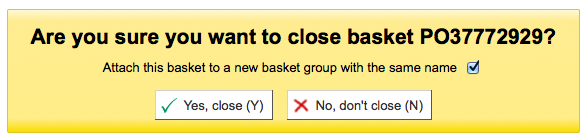
When closing the basket you can choose to add the basket to a group for easy printing and retrieval. If you check the box to 『Attach this basket to a new basket group』 you will be brought to the group list where you can export a PDF of the order.
重要
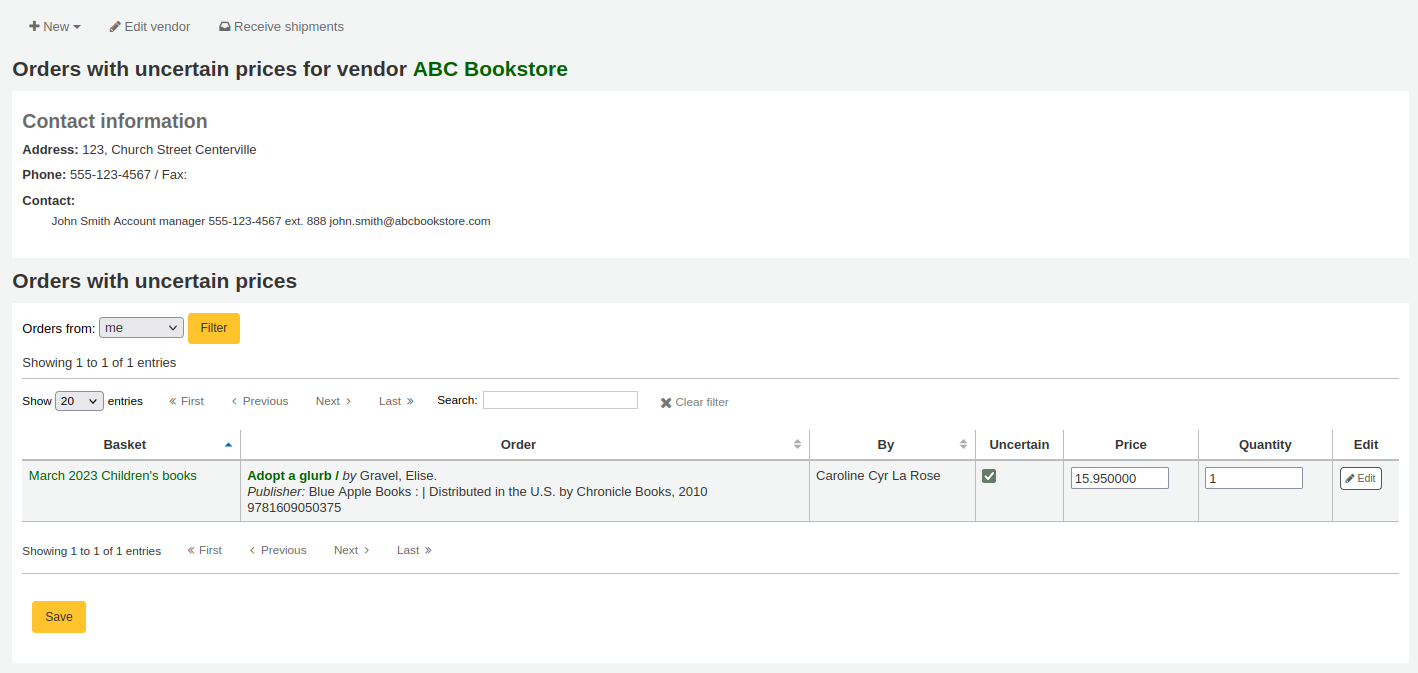
A basket with at least one item marked as 『uncertain price』 will not be allowed to be closed.
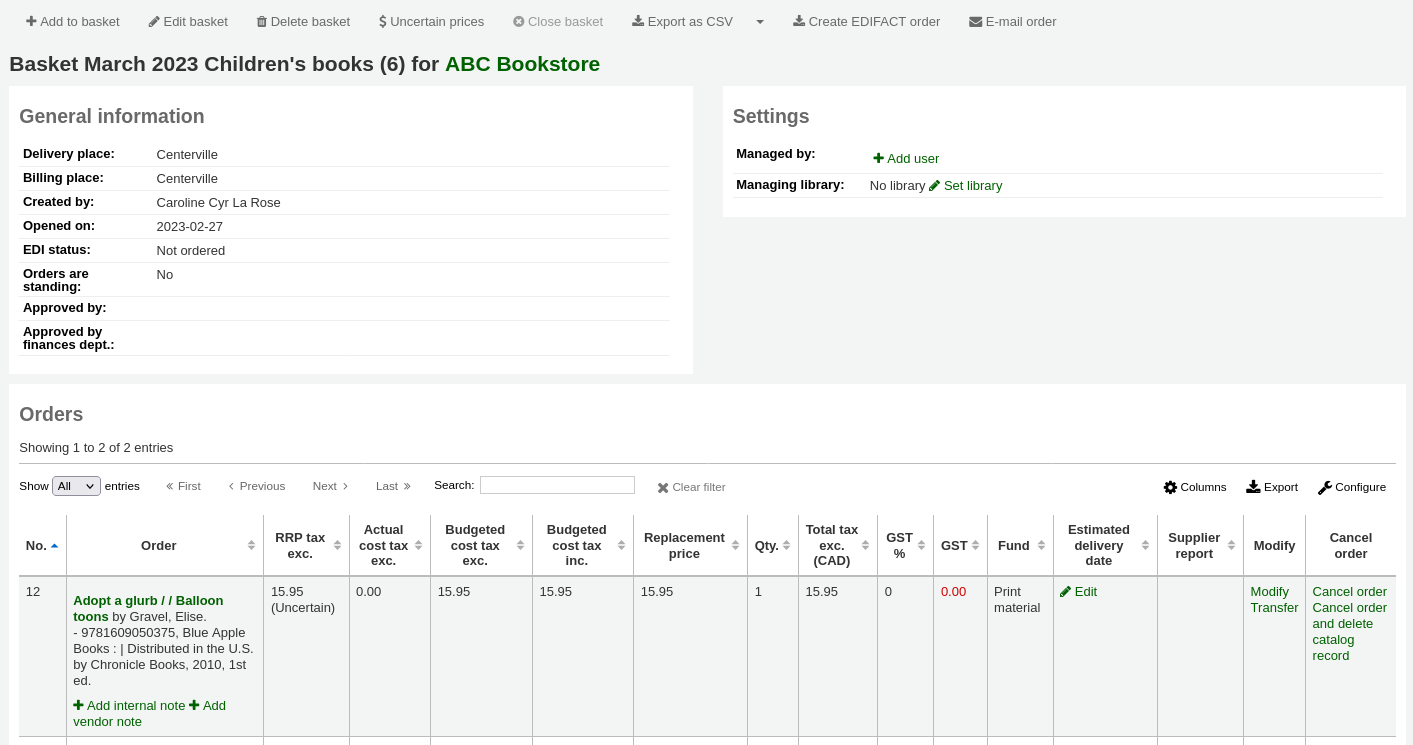
Clicking the 『Uncertain prices』 button will call up a list of items with uncertain prices to quick editing. From that list, you can quickly edit the items by entering new prices and quantities.
重要
The Uncertain prices page is independent of the basket. It is linked to the vendor so you will see all items on order with uncertain prices for that vendor.
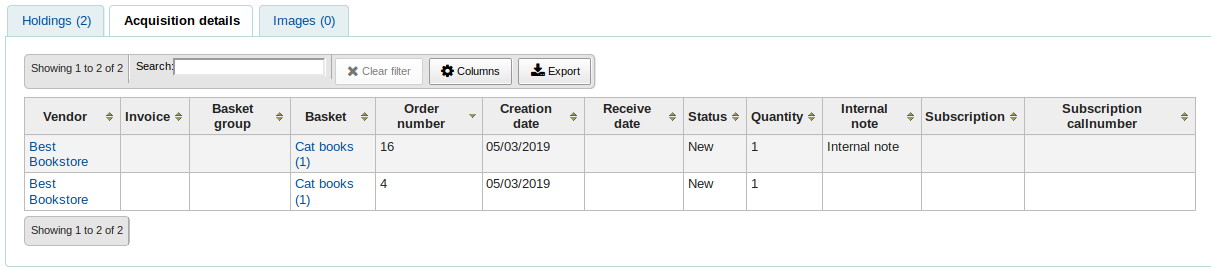
訂單建好後,(若已將 AcquisitionDetails 偏好設為 『顯示』),則可以經由館員介面的採訪或書目詳情面檢視它。
新增採購項目群組
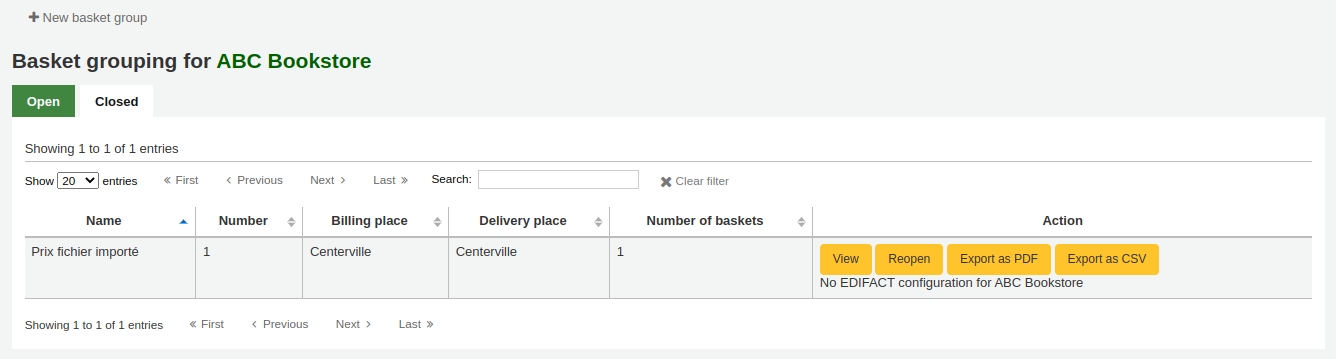
A basket group is simply a group of baskets. In some libraries, you have several staff members that create baskets, and, at the end of a period of time, someone then groups them together to send to the vendor in bulk. That said, it is possible to have one basket in a basket group, or no basket groups at all if that’s the workflow used in your library.
To create a basket group, go to the vendor detail page and click on the 『Basket groups』 tab on the left side.
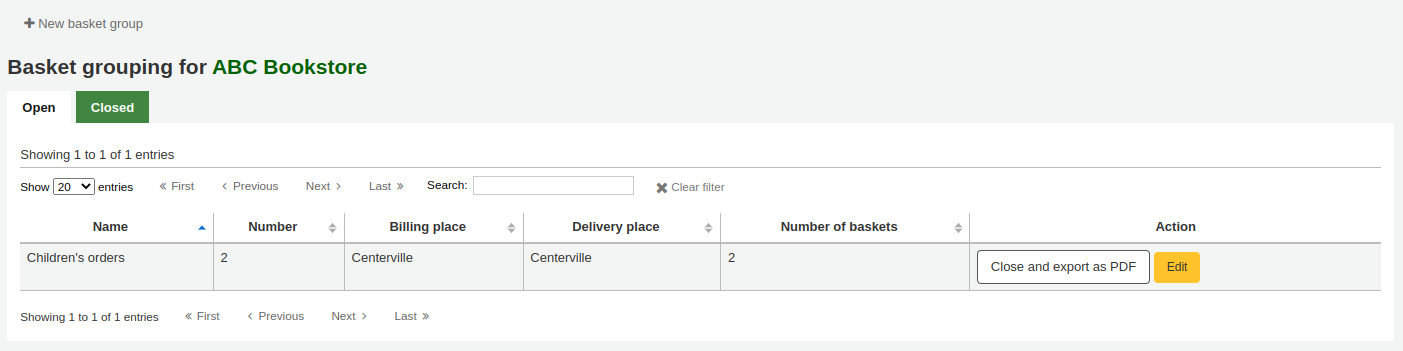
Click on the 『New basket group』 button.
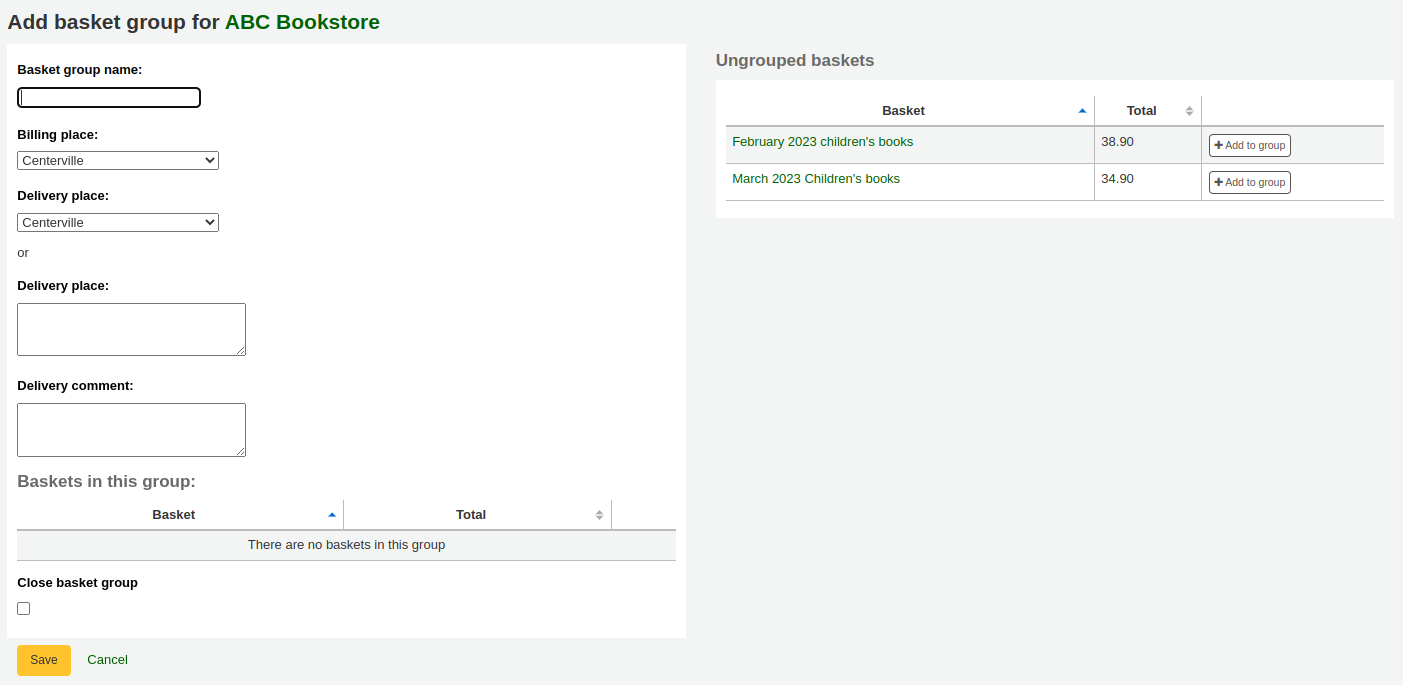
Basket group name: this is the name the basket group will go by in Koha
Billing place: this is the billing address that will appear on the basket group order
Delivery place: pick a library where these orders should be sent, this will appear on the basket group order under delivery address You can also enter a different address
Delivery comment: this comment will appear on the basket group order
Close basket group: if you know that once you’re done with this basket group, you will not be modifying it anymore, you can close it right away
Drag the ungrouped baskets to the 『Baskets in this group』 box to add baskets to the basket group.
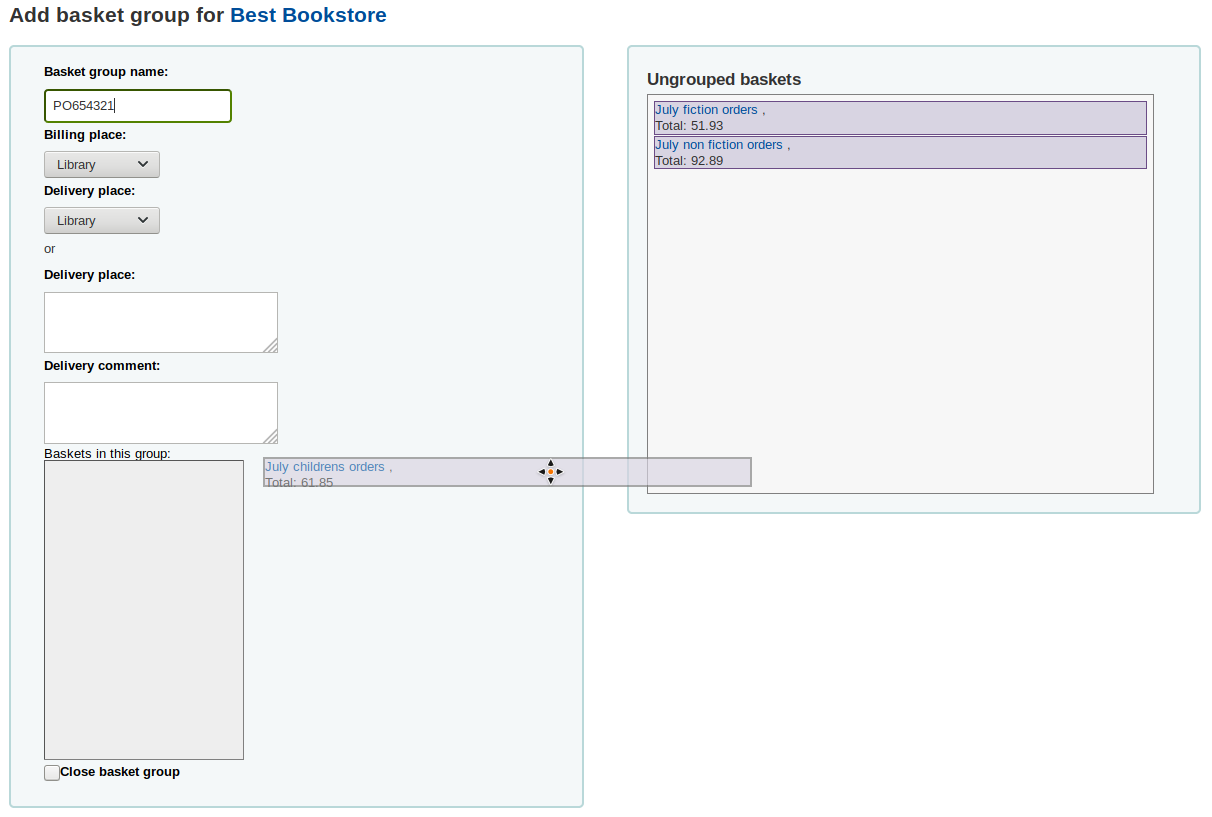
Click on 『Save』 to finish creating your basket.
From there, you can export your order as a PDF file to send to your vendor.

Receiving orders
重要
館藏到館之後,必須選定採購籃才能 簽收館藏。祗有在採購籃內的館藏才能被簽收。
可從供應商資訊頁面取得訂單
或供應商搜尋結果頁面
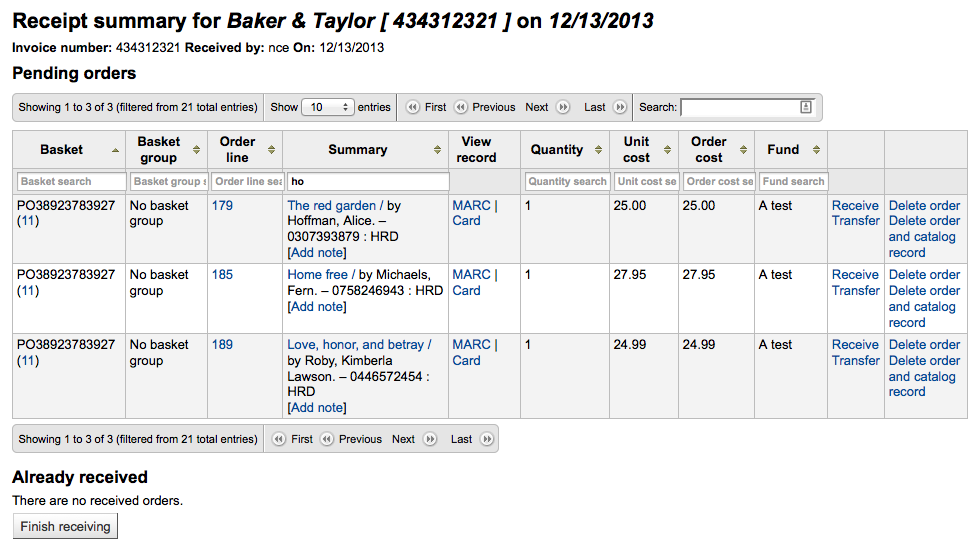
After clicking 『Receive shipment』 you will be asked to enter a vendor invoice number, a shipment received date, a shipping cost and a fund to subtract that shipping amount from.

簽收頁面將列出所有該供應商訂閱中的館藏,包括任何採購項目。
說明
If you have a lot of orders, you can filter the orders using the 『Filter』 box on the left, the 『Search』 box just above the table, of the filter boxes at the top of each table column.
You could, for example, scan the ISBN of the book you are receiving in the filter box and the table will only show the corresponding orders.
Just make sure to clear the filter boxes when you’re done, otherwise, the other items won’t appear.

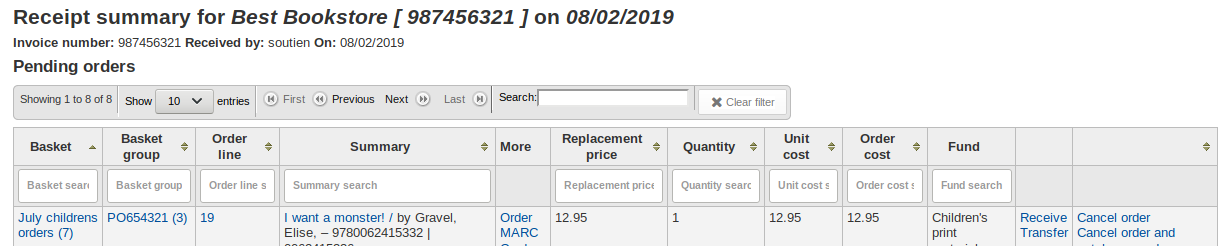
勾選館藏右方的 『簽收』 連結,就能簽收指定的館藏。
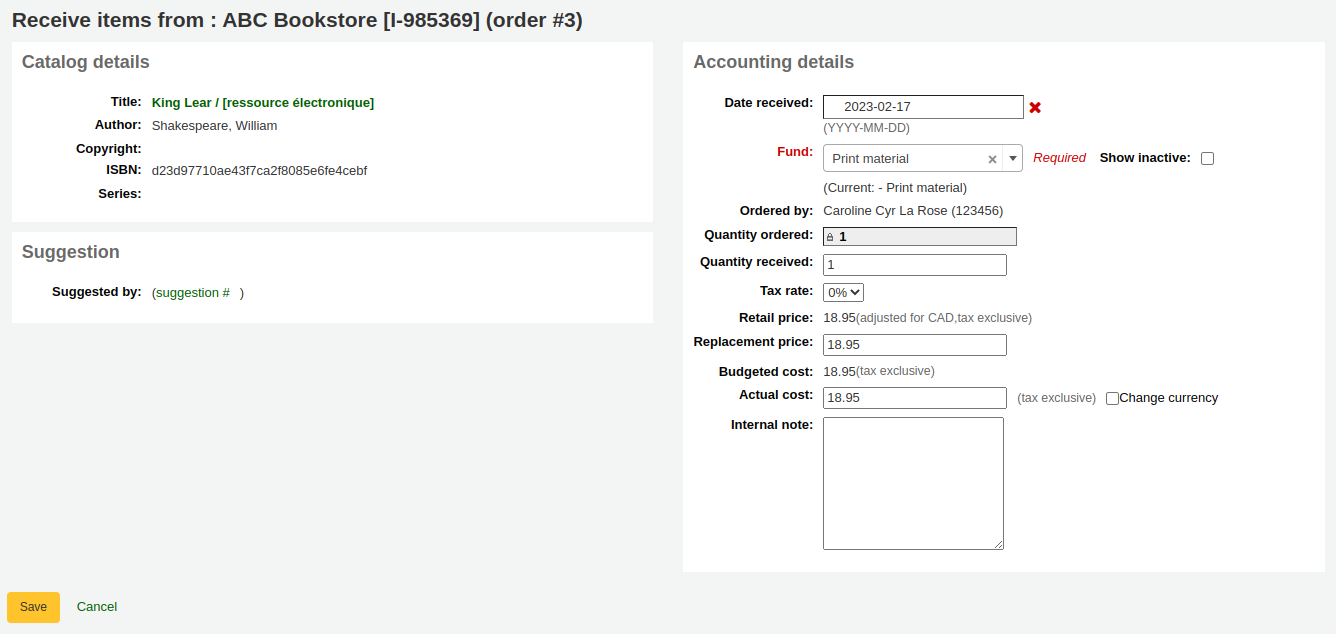
Depending on when you chose to create the item (either in the AcqCreateItem system preference, or upon creating your basket), the form will look slightly different.
If you chose to create your item when placing the order, you will have your item information on the left side and financial information on the right side.
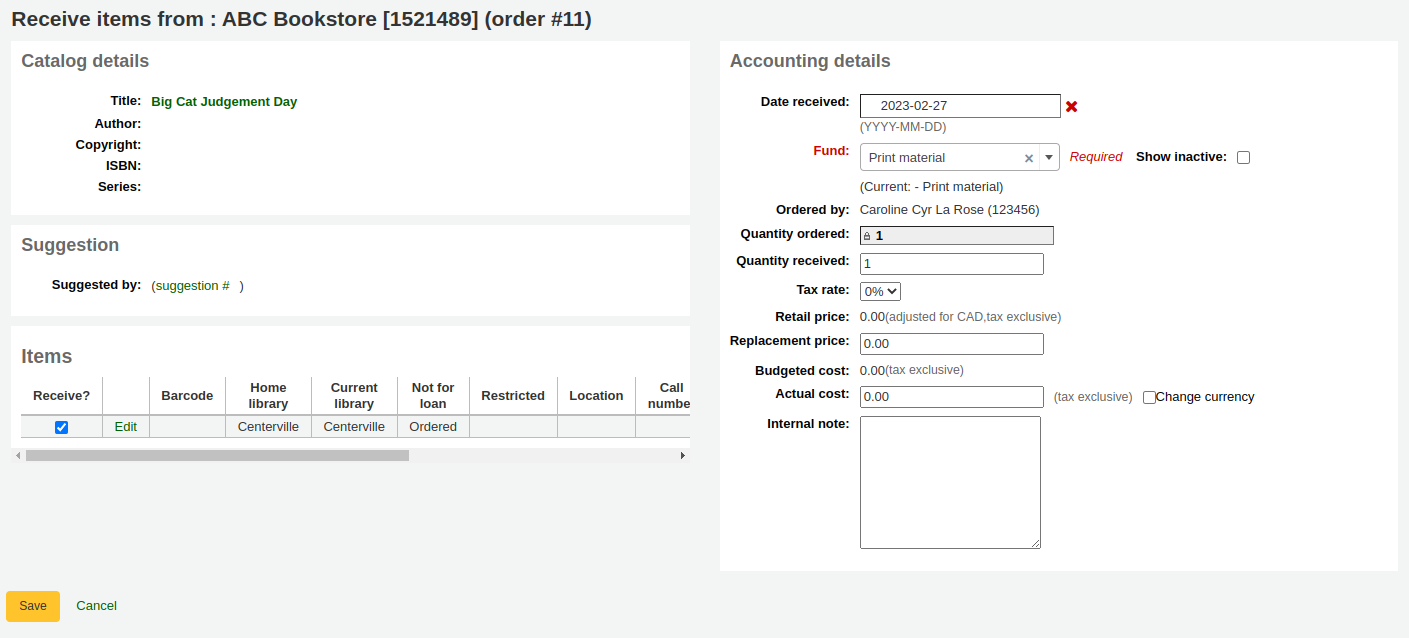
You can check the box next to the item to receive it, or fill out the 『Quantity received』 field on the left side.
Note You can choose to mark only part of the order as received if he vendor didn’t send your entire order by checking only the boxes next to the items on the left that you want to receive or by entering the right amount in the 『Quantity received』 field.
You can edit the item if needed by clicking on the 『Edit』 link. This will allow you to enter in accurate call numbers and barcodes if you’d like to do that at the point of receipt.
You can also alter the cost information (replacement cost and actual cost). The values you enter there will automatically populate the item record by filling in subfield v (Cost, replacement price) and subfield g (Cost, normal purchase price) on the item record after saving.
If you chose to create your item when receiving the order, you will see the item creation form on the left side and the financial information on the right side.
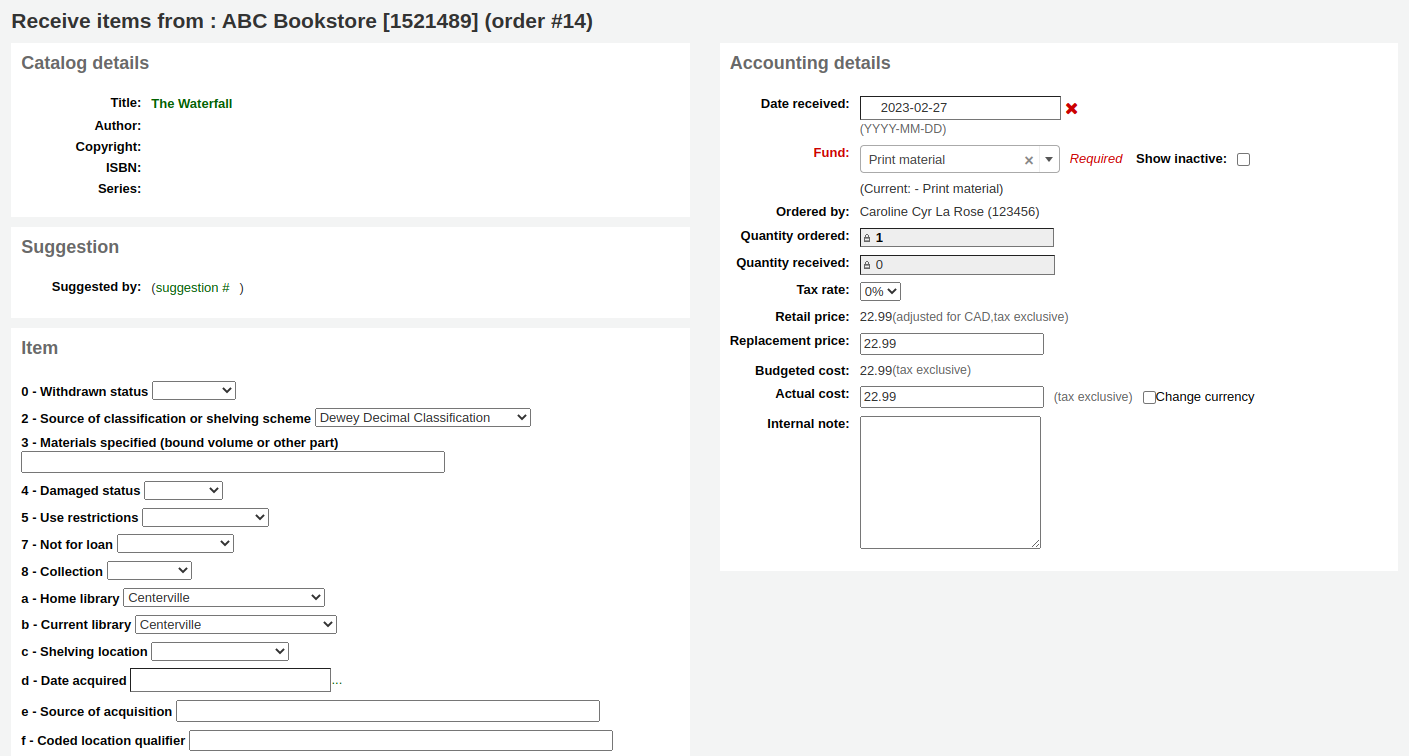
Important You must fill out the item form and click on 『Add item』 or 『Add multiple items』 in order to receive the order. You will not be able to simply change the 『Quantity received』 amount.
You can alter the cost information (replacement cost and actual cost). The values you enter there will automatically populate the item record by filling in subfield v (Cost, replacement price) and subfield g (Cost, normal purchase price) on the item record after saving.
Finally, if you chose to create your item when cataloging the record, you will only see the financial information on the right.
You can alter the cost information (replacement cost and actual cost).
Note The financial information will not be transferred to the item if the item is created when cataloging.
Once you have made any changes necessary (to the order and/or items, click 『Save』 to mark the item(s) as received.
說明
若把 AcqItemSetSubfieldsWhenReceived 偏好設為新增或簽收後改變內容,按下 『儲存』 鈕後將改變其內容。
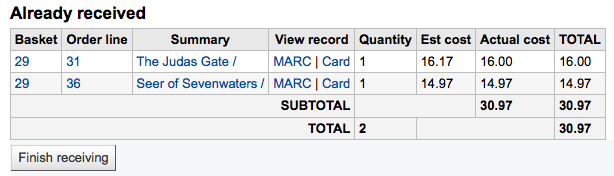
簽收館藏後,可離開此頁面,或按螢幕下方的 『完成簽收』 鈕。
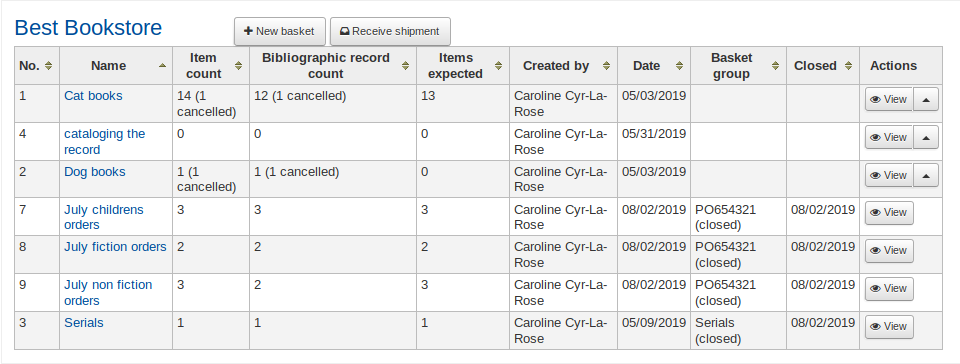
Received orders will have 『(received)』 before the title in the basket view.
Note When all the orders in a basket have been received, the basket will be removed from the list of baskets for that vendor. You can click 『Show all baskets』 to view the inactive baskets.


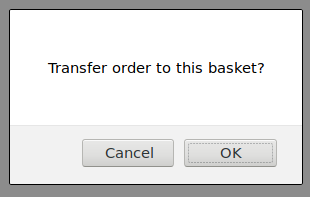
Transferring orders
若無法從此供應商取得館藏可以點選題名旁的 『轉移』 連結。彈出代理商搜尋盒。
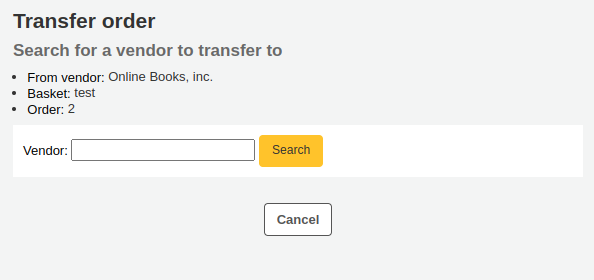
從此搜尋的供應商右方的 『選擇』 鈕您可以重新發出此館藏。
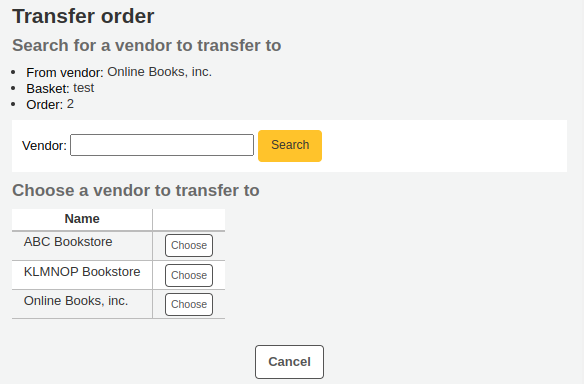
提出開放採購籃讓供應商從中挑選可以供應的館藏。點選採購籃右方的 『選擇』 鈕就可以新增館藏。
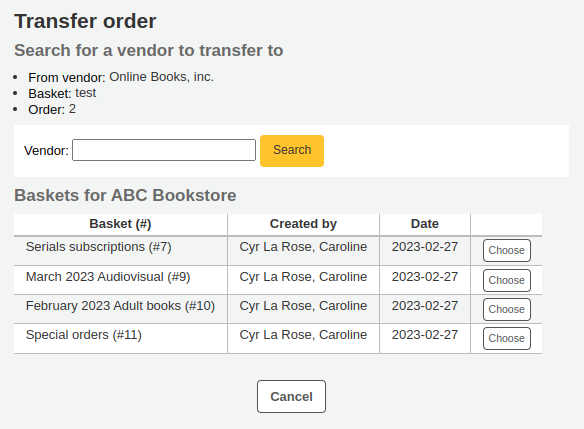
選定後就出現確認訊息。
You will see transferred orders when viewing the basket.
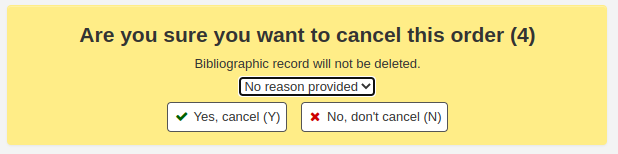
Canceling orders
找不到館藏時可以按最右方的 『刪除訂單』 鈕。系統將提示您鍵入刪除的理由並確認之。
You will also see that the item is canceled if you view the basket.
說明
Whilst it is possible to re-open your basket, cancel one or more orders and re-close the basket, this is not recommended. This procedure will update the 『basket closed』 date, which in turn will cause your 『late order』 calculations to be incorrect.
說明
You cannot re-open a basket that is attached to a basket group. The re-open basket button will be grayed out.
發票
簽收訂單後自動產生發票。勾選採旁頁面右方的 『發票』 可以搜尋發票。
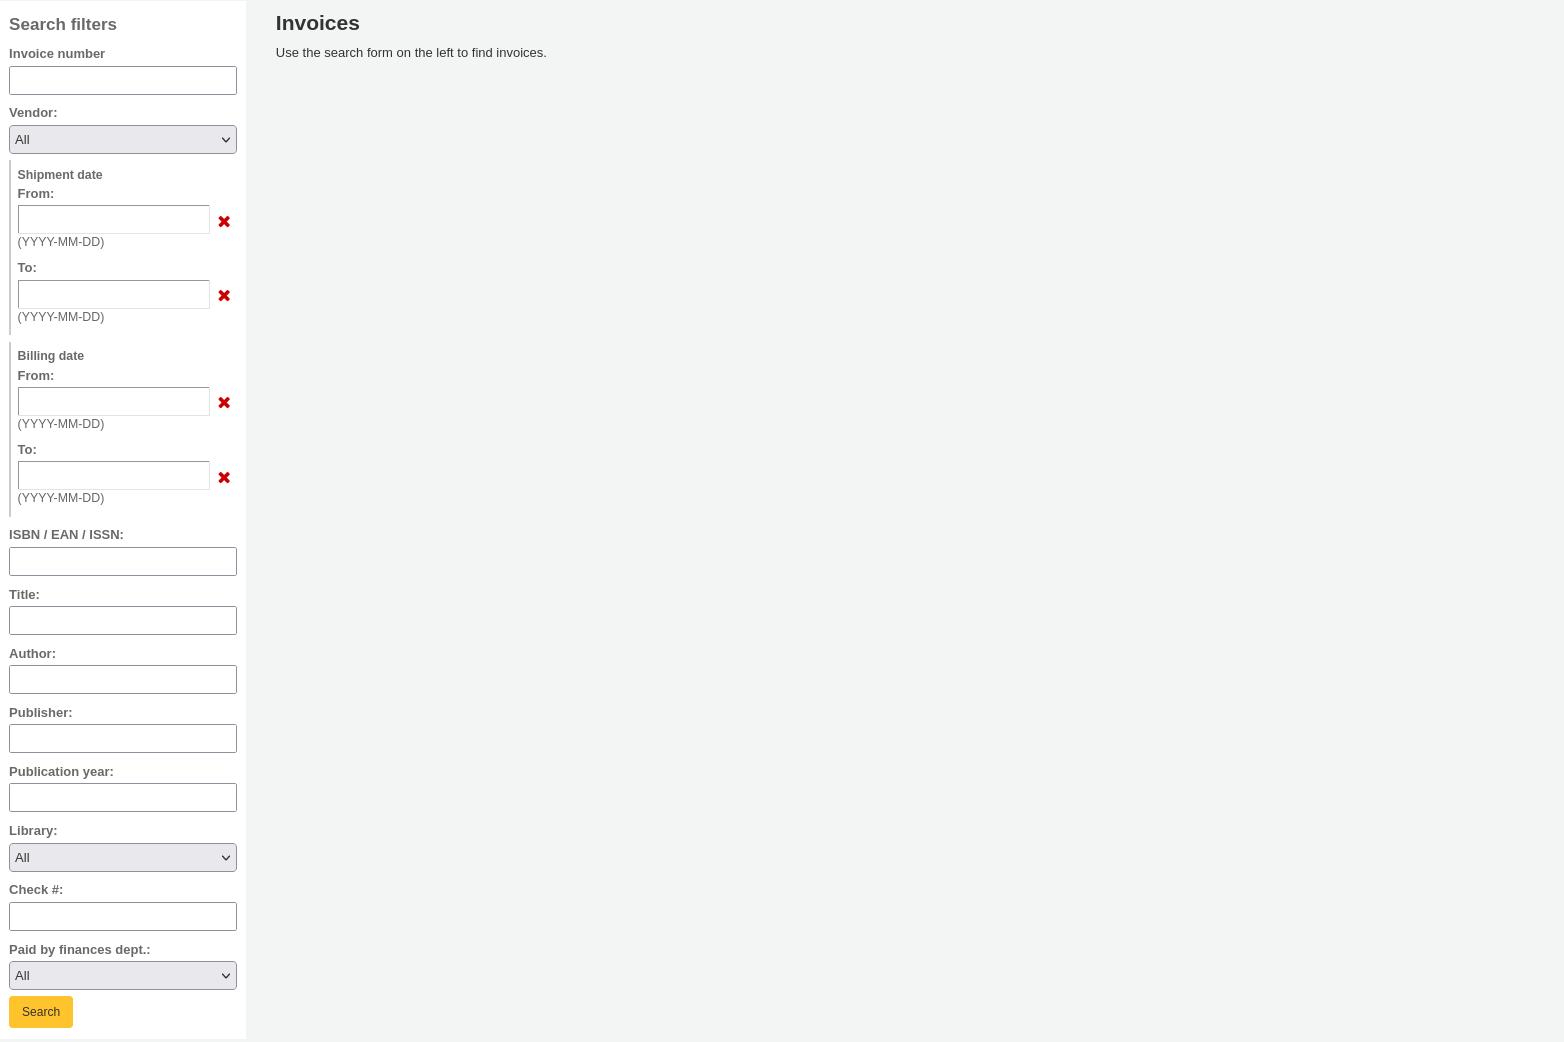
搜尋之後,結果顯示在搜尋選項右方。
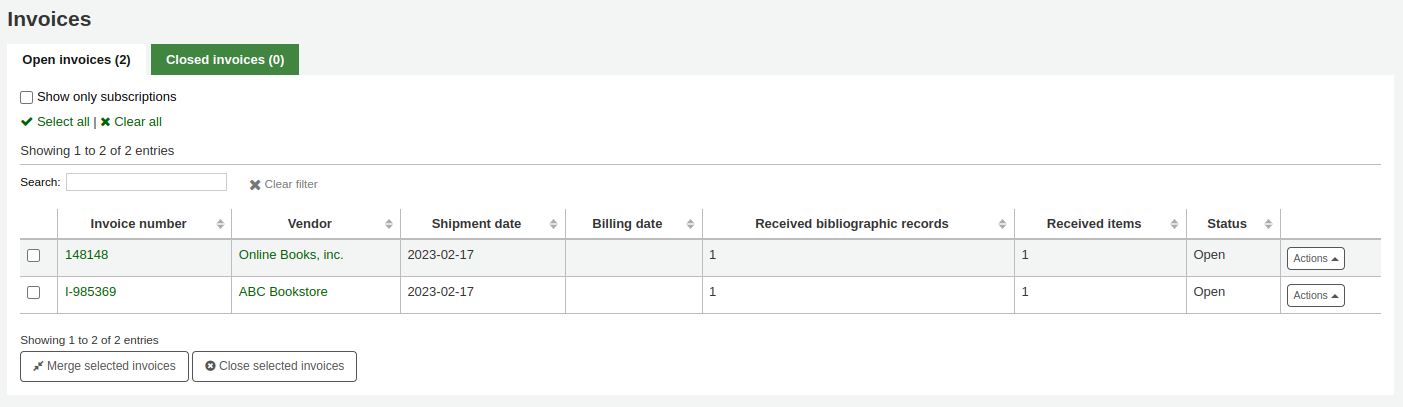
From the 『Actions』 button, you can click the 『Details』 link to see the full invoice or 『Close』 to note that the invoice is closed/paid for.

In the Adjustments section, you can add adjustments to your invoices. These adjustments can be for adjusting the price that is offset by rounding or adding a credit to the invoice, for example.
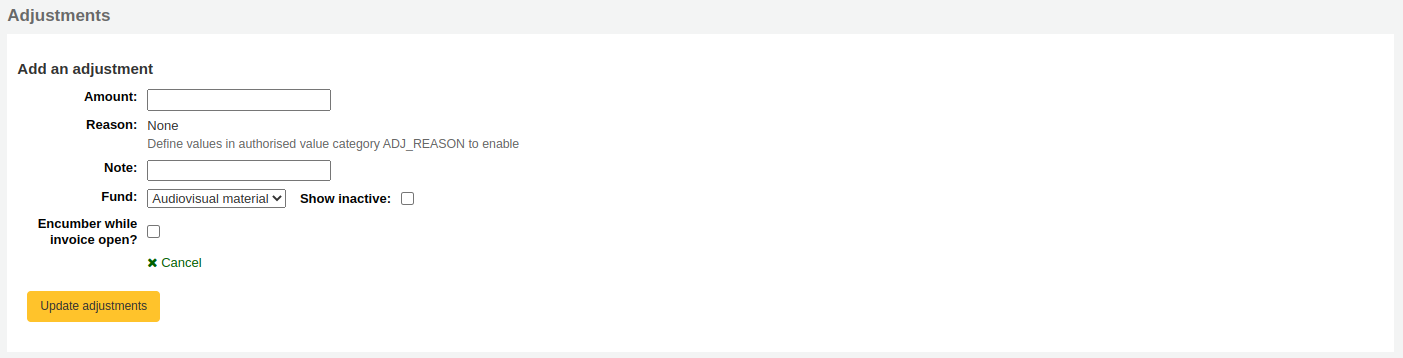
Click on 『Add an adjustment』
Enter the amount of the adjustment
Choose a reason, if needed
說明
The reasons are authorized values. Use the category ADJ_REASON to add custom reasons for adjustments.
Enter a note, if needed
Choose the fund from which the adjustment amount should be taken
If 『Encumber while invoice open』 is checked, the amount of the adjustment will be taken out of the fund immediately. If it isn’t checked, the amount will be subtracted only when the invoice is closed.
Click on 『Update adjustments』 to save your adjustments
If you need to change the adjustment afterwards, you can do so in the table and click on 『Update adjustments』.

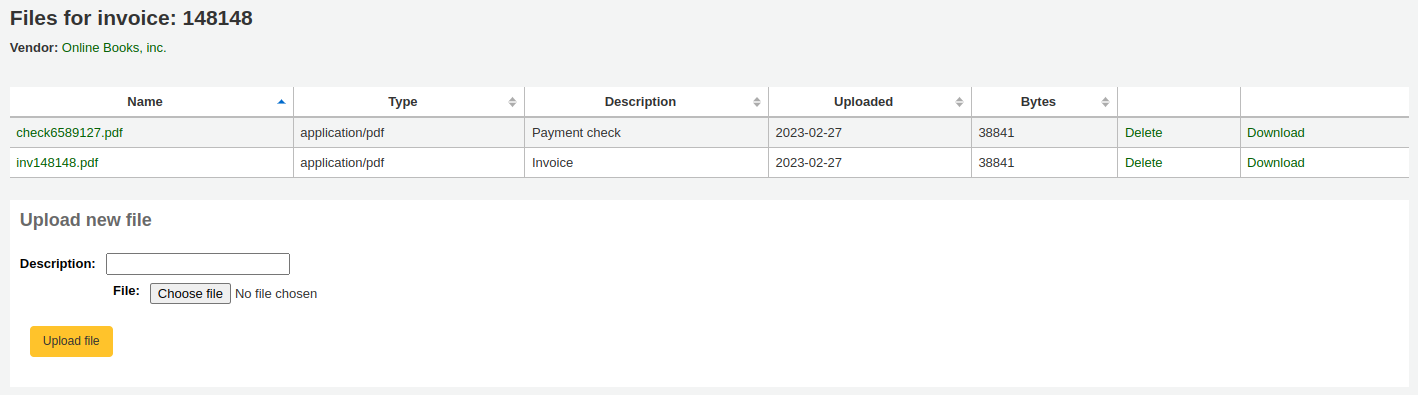
Attaching files to invoices
若從 AcqEnableFiles 偏好設定允許上傳採訪檔案,則可在 『進入收條頁面』 連結旁看到管理收據檔案

按 『管理發票檔案』 連結就可以看到或新增檔案
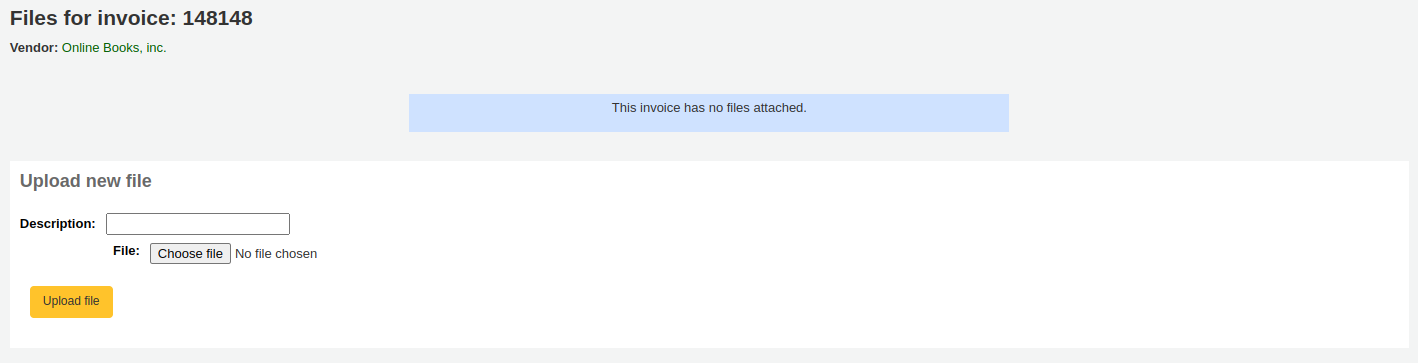
從此找到上傳的檔案且可看到已經附加的檔案。
Merging two invoices
可以合併從搜尋發票結果裡找到的發票。點選發票左方的小盒再按下方的 『合併發票』 鈕。就出現確認畫面:
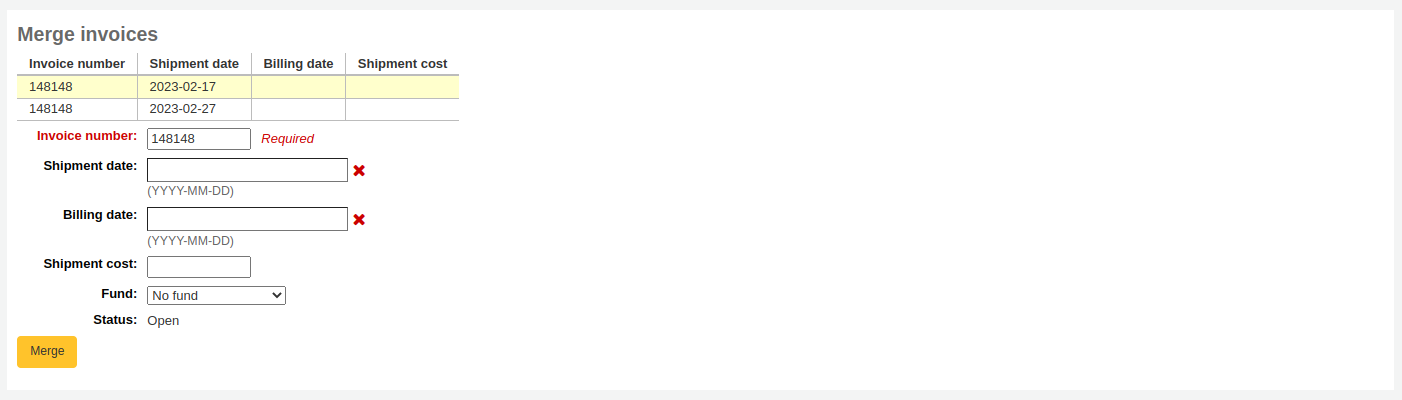
點選發票號碼列將其標示為黃色。於欄位內鍵入不同的帳單資訊並按 『合併』 鈕。兩張發票就合而為一。
Claims and late orders
在系統內建入供應商的電子郵件帳號,當訂單延遲時,就能夠發送催缺信件。當然還需設 採訪催缺通知 偏好。
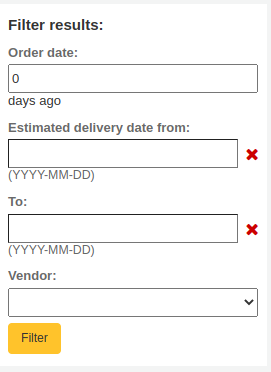
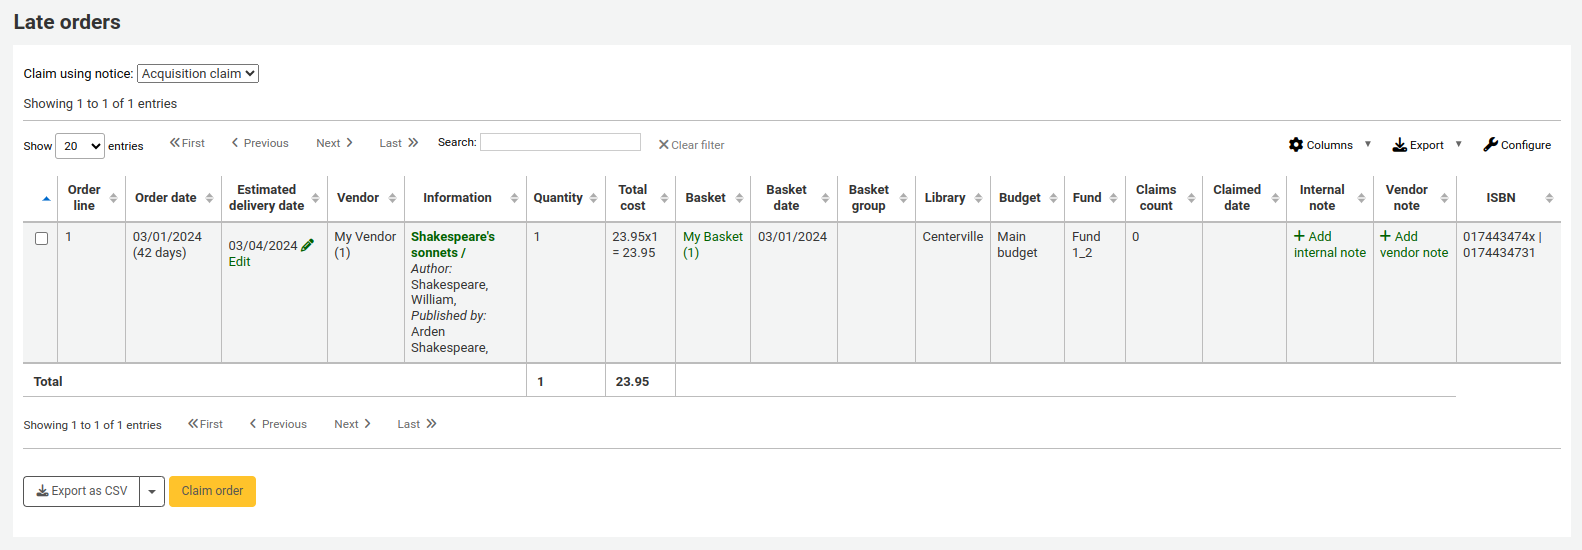
Upon clicking on the link to 『Late orders』 from the Acquisitions page you will be presented with a series of filter options on the left hand side. These filters will be applied only closed baskets.
說明
供應商下拉選單祗顯示遲到並關閉的採購項目。
篩選訂單後將列出延遲的館藏。
說明
You can customize the columns of this table in the 『Table settings』 section of the Administration module (table id: late_orders).
To the right of each late title you will be see a checkbox. Check off the ones you want a claim letter sent to and click 『Claim order』 at the bottom right of the list. This will automatically send an email to the vendor at the email address you have on file.
說明
The estimated delivery date is based on the delivery time value entered on the vendor record.
If you would rather use a different acquisition claim letter (other than the default) you can create that in the notices module and choose it from the menu above the list of late items.

Acquisition searches
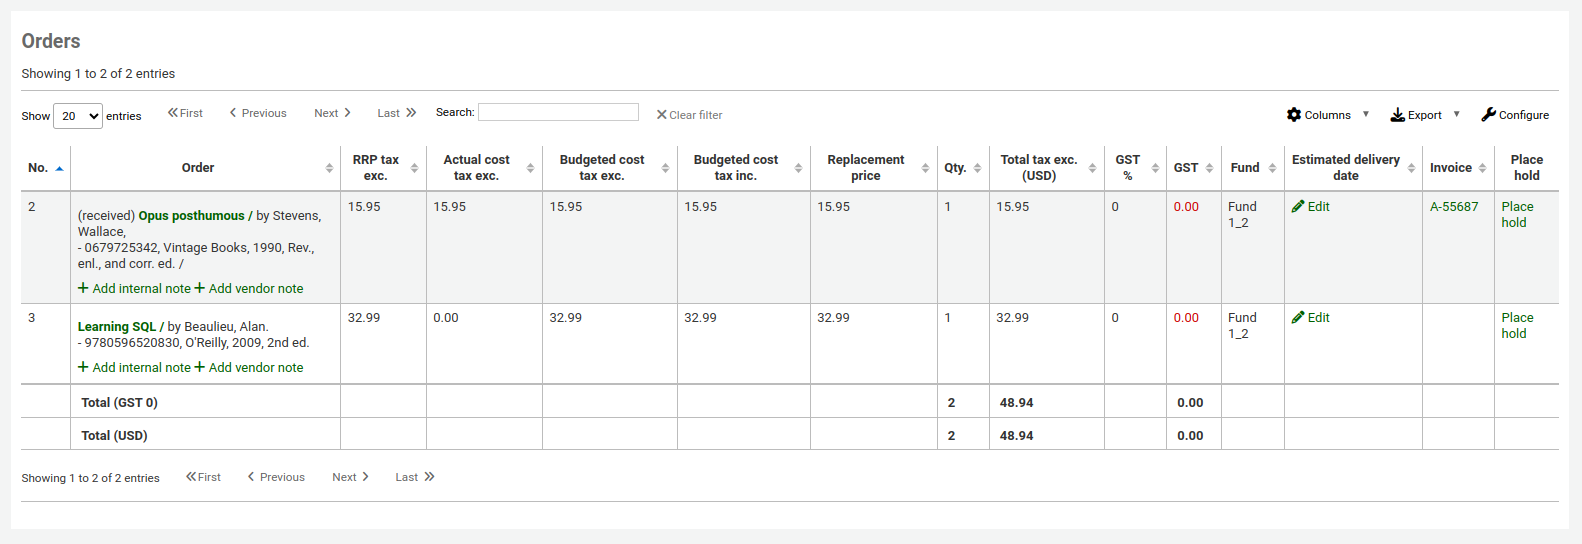
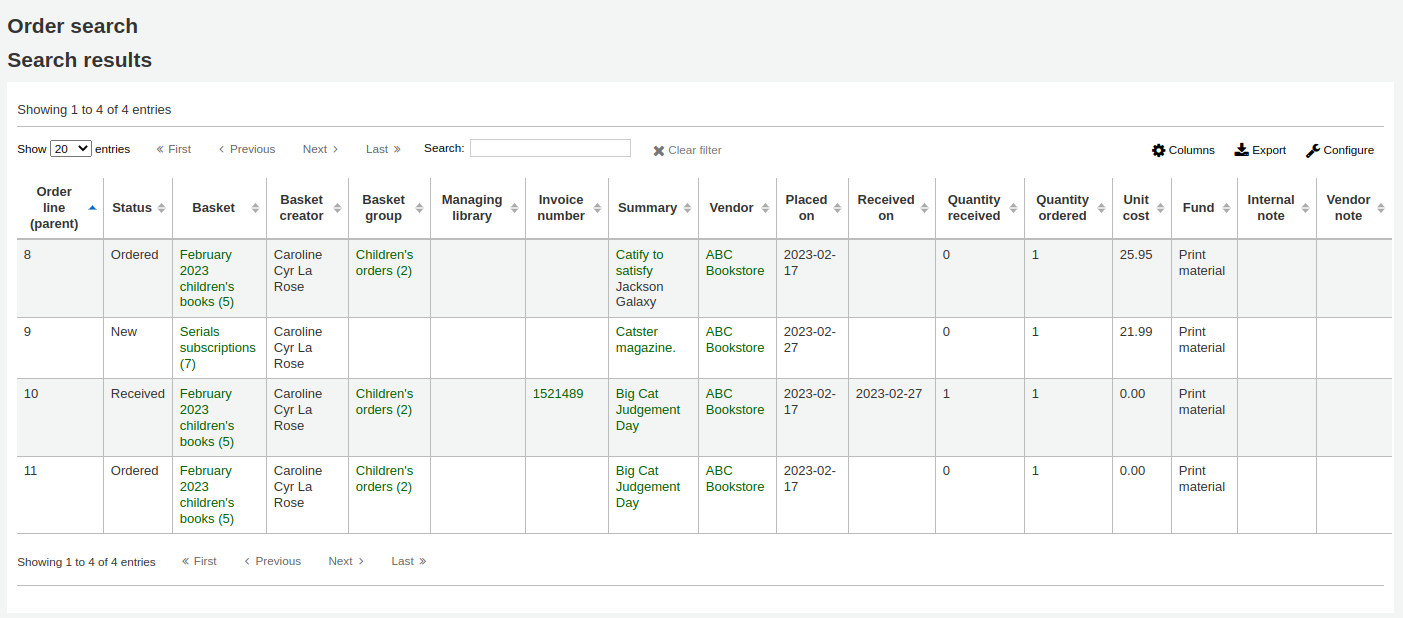
At the top of the various Acquisition pages there is a quick search box where you can perform either a Vendor search or an Order search.
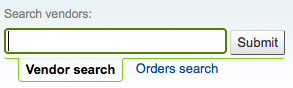
In the Vendor search you can enter any part of the vendor name to get results.
Using the Orders search you can search for items that have been ordered with or without the vendor.

可在一個或兩個欄位鍵入任何部份的題名或供應商名稱。
說明
You can customize the columns of this table in the 『Table settings』 section of the Administration module (table id: histsearcht).
勾選代理商搜尋盒右方的加號,將展開搜尋並允許搜尋額外的欄位。
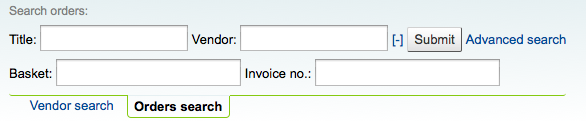
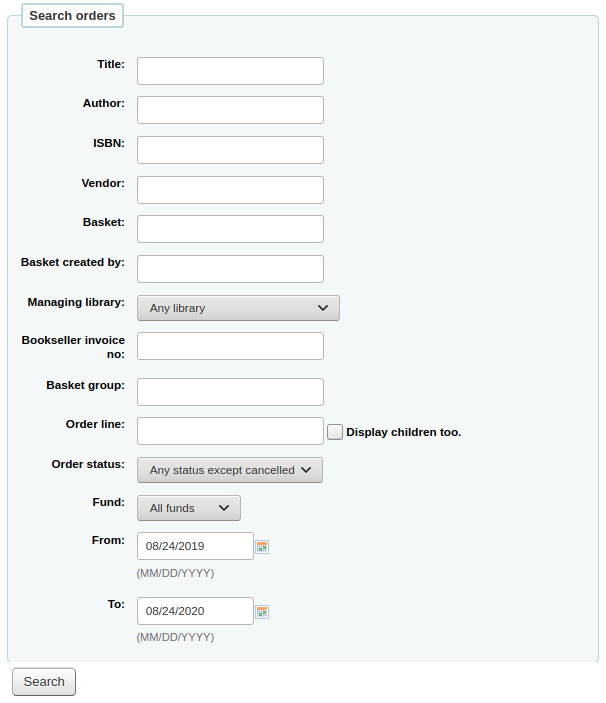
Clicking Advanced search to the right of the search button will give you all of the order search options available.
Budget/fund tracking
在採訪首頁有個表單顯示所有使用中的基金與訂購中與使用中的內容。
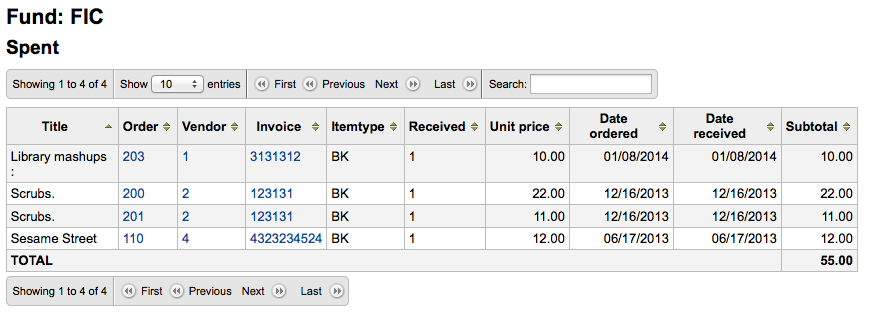
點選支出或訂閱的連結金額將顯示該預算內已訂閱/簽收的館藏摘要。
EDI process
前個區塊解釋所有的訂購選項,此區塊則拉出與 EDI 和 EDIFACT 相關的排序,幫助那些祗使用 EDI 訂購的人。
重要
電子採購時,Koha 使用 EDIFACT 標準,不使用 X12 標準。
EDI questions for vendors
設定 Koha 之前,先從代理商取得以下的資訊。
EDI accounts: This is the basic connection information for your vendor. This will be used to fill in the :ref:`EDI accounts` section.
供應商: 供應商的名稱
說明: 必要的簡單說明 (供應商有多個帳號時特別需要此說明)。
傳送: 供應商以 FTP、SFTP 或其他特別程式傳送 EDI 檔案?
遠端伺服器: FTP/SFTP 伺服器的 URL 或 IP
使用者名稱: 以上伺服器的使用者名稱
密碼: 以上伺服器的密碼
下載資料夾: 包括 Koha 及其程序所在的伺服器路徑
上傳資料夾: 供 Koha 上傳檔案給代理商續辦的伺服器路徑
提問者: 誰指定以下的 SAN?
選一個:
EAN International
(31B) US SAN Agency
供應商指定
買家指定
SAN: 供應商的識別碼
買家識別碼和 SAN 是選項。有的供應商要求必須具備第二個識別碼以及 EAN 帳號。
買家識別碼: 由誰指定以下的 SAN?
選一個:
EAN International
(31B) US SAN Agency
供應商指定
買家指定
買家 SAN: 圖書館的識別碼
Quotes enabled: [y/n] Does this vendor support sending and receiving quotes via EDIFACT and do you want to send and receive quotes via EDIFACT?
Orders enabled: [y/n] Does this vendor support sending and receiving orders via EDIFACT and do you want to send and receive orders via EDIFACT?
Invoices enabled:[y/n] Does this vendor support sending and receiving invoices via EDIFACT and do you want to send and receive invoices via EDIFACT?
訂單檔附件: 訂單檔的附件
報價檔附件: 報價檔的附件
發票檔附件: 發票檔的附件
帳號: (全部列出)
帳號說明: (說明此帳號的內容)
EANs: Each library using EDIFACT needs to specify a buyer identifier know as a SAN or EAN. This will fill in the :ref:`Library EANs <library-eans-label>` setting.
圖書館
EAN
選一個:
EAN International
(31B) US SAN Agency
供應商指定
買家指定
MARC order fields or grid ordering: These values will fill in the :ref:`MarcFieldsToOrder` preference.
價格: 記載館藏價格的 MARC21 欄位
數量: 記錄書目紀錄所屬館藏數的 MARC21 欄位
budget_code: 記載 Koha 預算代碼的 MARC21 欄位
折扣: 記載百分折扣的 MARC21 欄位
sort1: MARC21 field that will populate custom field sort1
排序2: 做為第2個排序順位的 MARC21 欄位
EDI setup
以 EDI 訂購前,應執行下列步驟:
詢問代理商/書商/經銷商,其 連結資訊
不妨向代理商取得幾個 EDIFACT 檔案的範本
Share with your vendor/bookseller/jobber your library codes, item type codes, fund codes, and any other codes or authorized values they might need for creating your MARC order records
與圖書館的支持者或社群溝通,需依照代理商的請求加入外掛
例如,ByWater Solutions 公司指定代理商的外掛程式:https://github.com/bywatersolutions/koha-plugin-edifact-enhanced
從採訪介面 進入代理商/書商/經銷商
Review your Acquisitions system preferences
在 MarcFieldsToOrder 偏好填入訂購檔案的值
鍵入 EDI 帳號
鍵入 圖書館 EAN
Turn on the EDI Cron so that it can process files
EDI ordering
從圖書代理商的網站啟動 EDI。每個代理商都有各自的方式,圖書館祗需把訂單置於其網站,然後下載 MARC 訂購檔就可以。有些網站包括 「採購籃」、」訂單」、」訂購盒」、和 「MARC 訂單」。取得 MARC 檔案後,才能登入 Koha 繼續作業。
Visit the Stage MARC records for import tool and upload your file. Once presented with the confirmation screen proceed to Acquisitions.
在採訪的 新增採訪籃 給供應商使用。從訪採訪籃,選擇 從待處理檔案發出訂單 並按從代理商下載檔案旁的 『訂購』 鈕。
在確認畫面可以看到與訂單相關的 MARC 檔案資料。若未看到基金與數量等欄位,應再次查看 MarcFieldsToOrder 偏好的設定。
把館藏加入採購籃後,就能按 『新增 EDIFACT 訂單』 鈕。
Sending the EDIFACT order
This will generate a pending file in the EDIFACT messages in Koha. The pending files will be processed by the EDI cron job and sent to your vendor.
EDI ordering with Quote files
If you have Quote files enabled you can place the order on the bookseller’s website and a Quote file will be automatically generated and made available to be collected and loaded to Koha. You will see the file listed in the EDIFACT messages in Koha with a status of 『Received』. The basket will have been created and records and items added to the basket. Once you have checked that the basket is correct you can click the 『Create EDIFACT order』 button. The process then completes as for Sending the EDIFACT order above.
EDI invoicing
When the book vendor is done processing your files they will send an invoice via EDI as well. The EDI cron job will grab invoices and mark items found in the invoice as received and update your funds without any need for manual intervention.
If you set the EdifactInvoiceImport preference to 『Don’t』 you can load invoice files manually.
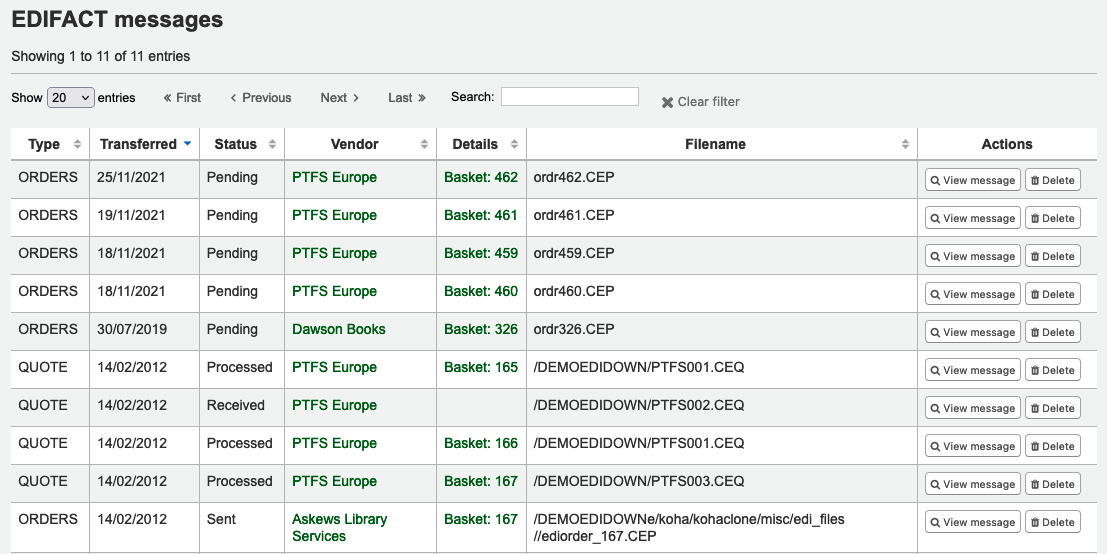
EDIFACT messages
A log of all messages sent and received via EDIFACT can be found under EDIFACT messages.