Administración
Parámetros básicos
Ir a: Más > Administración
Importante
Configure todos los “parámetros” en el orden que aparecen.
Bibliotecas
Al configurar su sistema Koha tendrá que completar la información para cada biblioteca que va a compartir su sistema. Estos datos son utilizados en diversas áreas de Koha.
Ir a: Más > Administración > Parámetros básicos > Bibliotecas
Al visitar esta página se presenta una lista de las bibliotecas que ya han sido añadidas al sistema.

Agregando una biblioteca
Agregar una nueva biblioteca
Haga clic en “Nueva biblioteca”
La parte superior del formulario solicita información básica sobre la biblioteca

El código de la biblioteca debe contener 10 o menos caracteres, sin blancos. Este código se utiliza como un identificador único en la base de datos.
El nombre se mostrará en el OPAC siempre que el nombre de la biblioteca se muestre al público y debe ser un nombre que tenga sentido para sus usuarios.
A continuación, puede introducir la información de contacto básica acerca de la sucursal
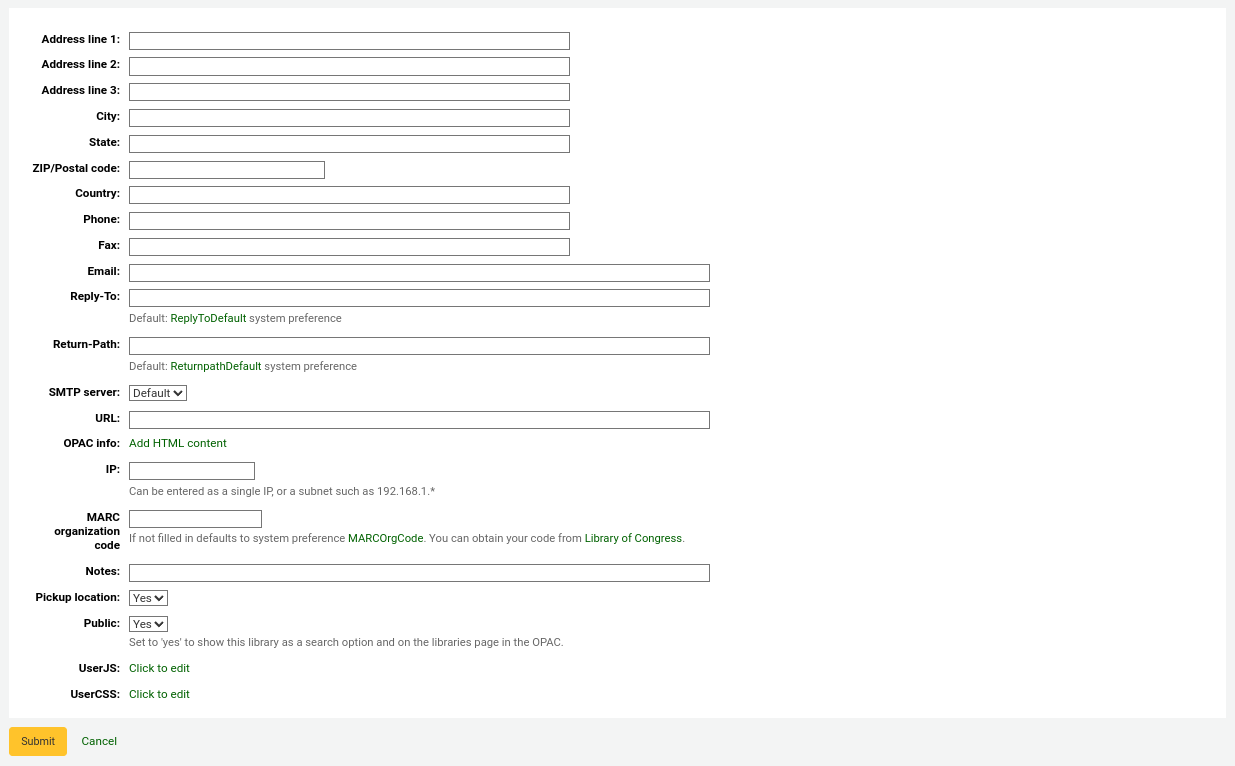
Los campos de dirección y contacto se pueden usar para poner notas personalizadas para cada biblioteca
El campo de dirección de correo electrónico no es obligatorio, pero debería ser cumplimentado para todas las bibliotecas del sistema
Importante
Asegúrese de ingresar la dirección de email de la biblioteca para asegurarse que los avisos se envían hacia y desde la dirección correcta
Si desea, usted puede introducir una dirección de email diferente en “Responder a”. Esta es la dirección de correo electrónico a la que se enviaran todas las respuestas.
Nota
Si no se completa este valor Koha utilizará la dirección de la preferencia ReplytoDefault
Si desea también puede ingresar una dirección de email diferente en “Return-Path”. Esta es la dirección de correo electrónico en la que irán todos los mensajes rebotados.
Nota
Si no se completa este valor Koha utilizará la dirección de la preferencia ReturnpathDefault
Si el campo URL se cumplimenta entonces el nombre de la biblioteca aparecerá enlazado cuando en el OPAC se muestre la tabla de ejemplares
El cuadro de información del OPAC es para poner información acerca de la biblioteca que aparecerá en el OPAC cuando se pase el ratón sobre el nombre de la sede en la tabla de existencias
IP does not have be filled in unless you plan on limiting access to your staff client to a specific IP Address
Importante
An IP address is required if you have enabled AutoLocation
If this library has a specific MARC organization code [http://www.loc.gov/marc/organizations/orgshome.html], you can enter it here. If left blank, the code entered in the MARCOrgCode preference will be used for this library.
If you have any notes you can put them here. These will not show in the OPAC
Finally, you can choose whether the library will display as an available pickup location for holds
Nota
De los campos de la lista, sólo “Código de biblioteca” y “Nombre” son obligatorios
Editing/deleting a library
Usted no podrá borrar bibliotecas que tengan usuarios o ítems asociados a ellas.

Cada biblioteca tiene un botón “Editar” a su derecha. Haga clic en este enlace para editar/alterar los detalles asociados con esa biblioteca.
Importante
Usted no podrá editar el “Código de Biblioteca”
Grupos de bibliotecas
Library groups are used in searches to limit the search to a group of libraries (for example in a neigbourhood).
Get there: More > Administration > Basic Parameters > Library groups
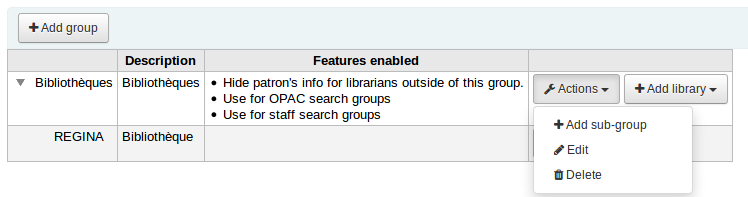
When visiting this page you are presented with a list of the groups that have already been added to the system.
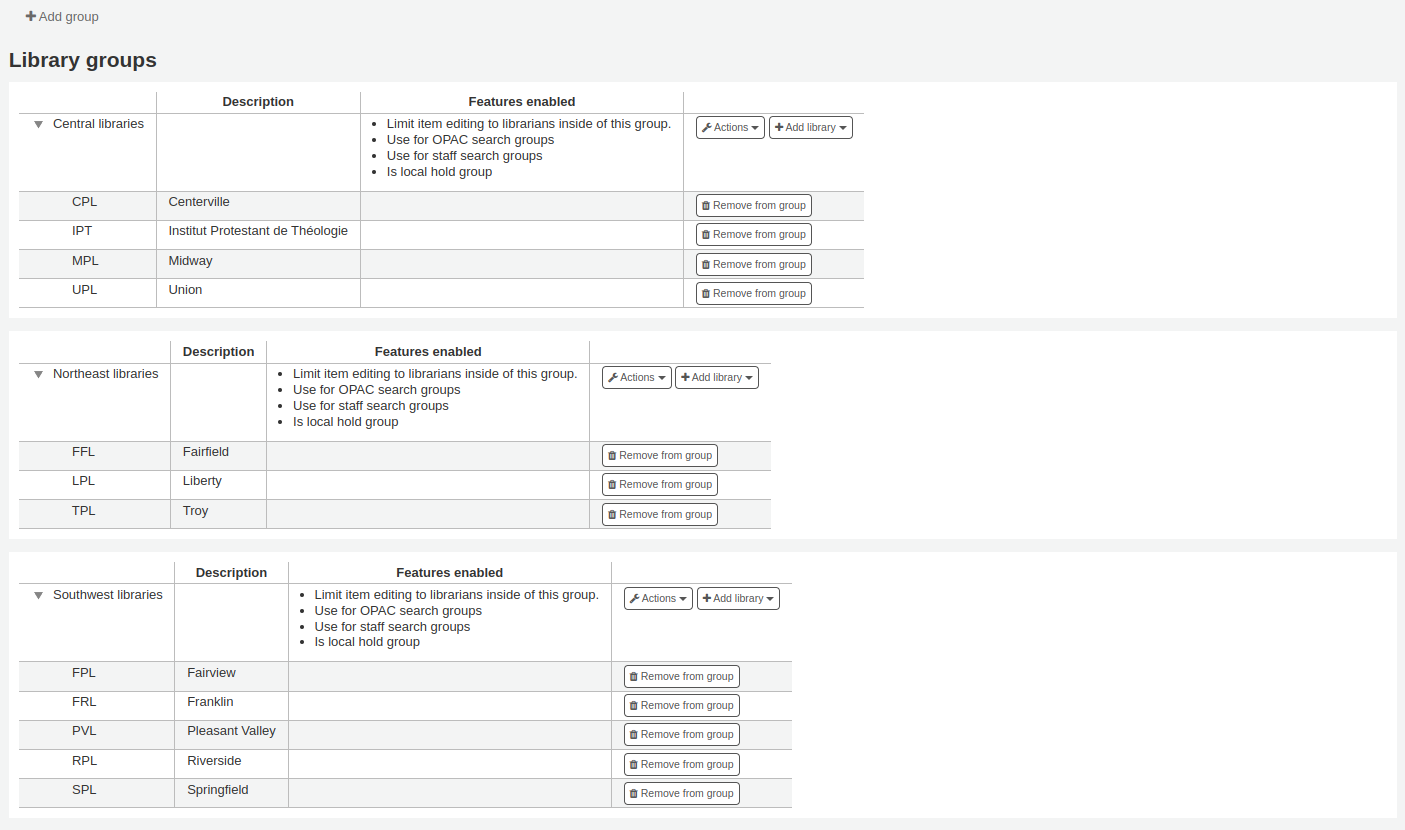
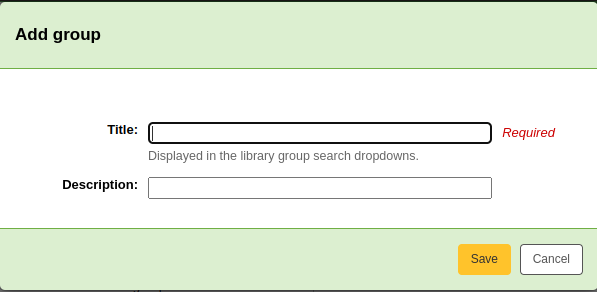
Agregando un grupo
Click the “Add Group” button at the top of the screen
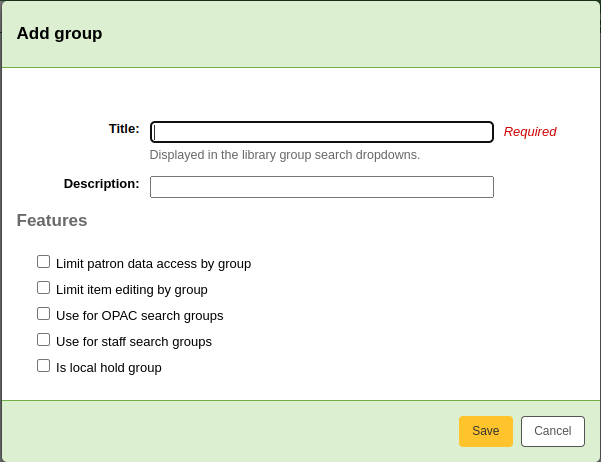
Give the group a title and a description. Only the title is mandatory as it will show up in the staff client and in the OPAC. The description is only used in this page to give an idea of what the group is used for.
You can limit staff from seeing other groups” patrons by checking the box next to the “Limit patron data access by group” option.
Nota
This can be overriden with the user permission view_borrower_infos_ from_any_libraries.
If you would like the group to show up in the library pulldown menu at the top of the OPAC (with OpacAddMastheadLibraryPulldown set to “Add”) and on the advanced search page you can check the “Use for OPAC search groups” box.
If you want the group to appear in the library pulldown in the staff client advanced search, check the “Use for staff search groups” box.
Adding a library to a group
Click on the “Add library” button next to the group to add a library to this group. You will be presented with a list of the libraries that are not already in the group.
Adding a sub-group
If your system is very large, you can create sub-groups. Click on the “Actions” button next to the group and select the “Add a sub-group” option. Fill in the title and the description (optional) of the sub-group. The features will be inherited from the parent group.
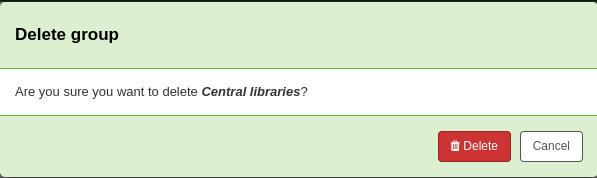
Deleting a group
To delete a group, click on the “Actions” button next to the group and select the “Delete” option.
Tipos de ítem
El Koha le permite organizar su colección por tipos de ítem y por códigos de colección.
Get there: More > Administration > Basic parameters > Item types
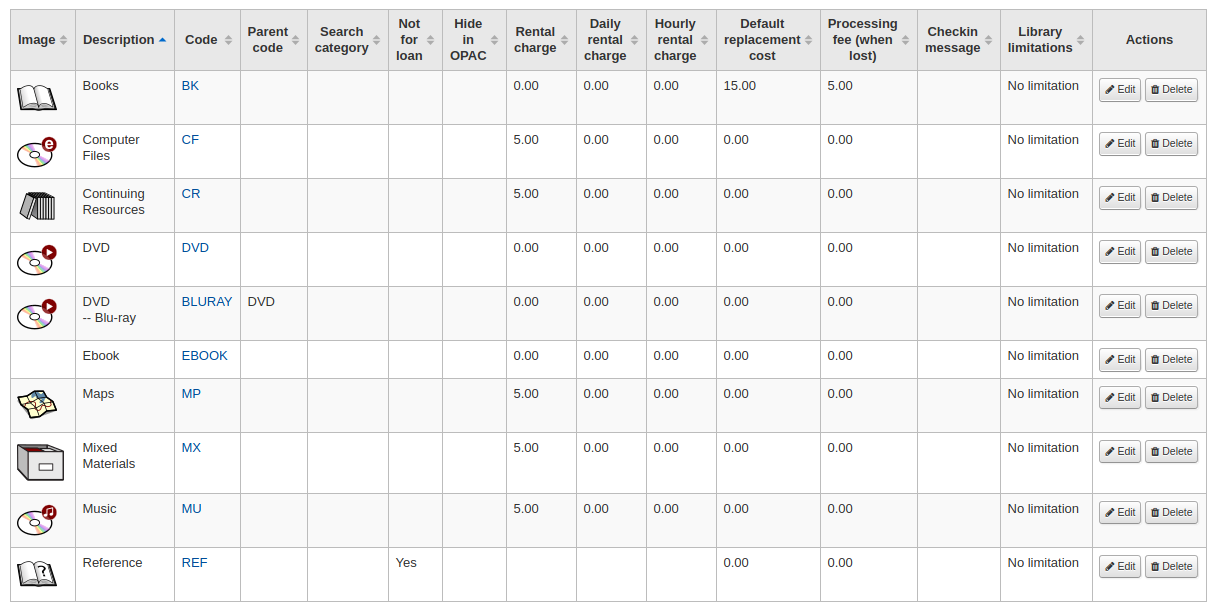
Los tipos de ítems típicamente se refieren al tipo de material (libros, CD, DVD, etc,), pero se pueden utilizar en la forma más conveniente para su biblioteca.
Adding item types
To add a new item type, simply click the “New item type” button at the top of the Item types page.
In the “Item type” field, enter a short code for your item type (maximum of 10 characters)
The description is the plain text definition of the item type (for those with multiple languages installed you can translate the item type description in to all of those languages using the “Translate in to other languages” link)
Item types can be grouped together for searching at the same time. For example you can put DVDs and Bluray in to a group called Movie and then they can be searched together. These groups are defined in the ITEMTYPECAT authorized value category.
Puede optar por tener una imagen asociada con el tipo de ítem
Usted puede elegir entre una serie de colecciones de imágenes
Usted pueda enlazar a una imagen remota
O simplemente no hay una imagen asociada con el tipo de ítem
Importante
To have your item type images appear in the OPAC you need to set noItemTypeImages to “Show”
Ir a: Más > Administración > Preferencias globales del sistema > Administración
For items that you are suppressing from the OPAC you can hide their item type from being searched in the OPAC
Note This will not prevent those items to appear in search results, it will simply remove the item type from the advanced search form.
If you want to completely hide items from a certain item type, let’s say that you have a professional library with books reserved for staff and you don’t want those to appear in the OPAC, use the OpacHiddenItems system preference.
Para los ítems que no circulan, marque la casilla “No para préstamo”
Los ítems marcados “No para préstamo” aparecerán en el catálogo, pero no pueden ser prestados a usuarios
For items that you charge a rental fee for, there are two ways that rental fees can be charged to a patron by item type. A flat rental charge (process fee) or a daily rental charge.
For items that a library would charge a flat rental charge (process fee) for, enter the total fee you charge in the ‘Rental charge’ field. This will charge the patron on checkout (and renewal).
For items that a rental charge will be charged by the number of days the item is checked out for, enter the daily fee in the “Daily Rental Charge”. This will be charged to the patron upon checkout - the cost per day and how many days this item can be checked out to the patron. This daily rental charge will also be applied if/when a renewal occurs.
For items that are loaned out hourly, enter the cost per hour in “Hourly rental charge”. Again, the total (hourly cost * number of hours loaned) will be charged to the patron upon checkout and renewal.
Each amount will charge the patron on checkout.
Importante
No introduzca símbolos en este campo, sólo números y puntos decimales (por ejemplo, €5,00 se debe introducir como 5 o 5.00)
You can add a default replacement cost for this type of item. This is the amount that will be charged to the patron when lost if the item doesn’t have a replacement cost. If the item has a replacement cost, that is the amount that will be charged to the patron.
- Importante
No introduzca símbolos en este campo, sólo números y puntos decimales (por ejemplo, €5,00 se debe introducir como 5 o 5.00)
You can also add a processing fee that will be added to the replacement cost.
Importante
No introduzca símbolos en este campo, sólo números y puntos decimales (por ejemplo, €5,00 se debe introducir como 5 o 5.00)
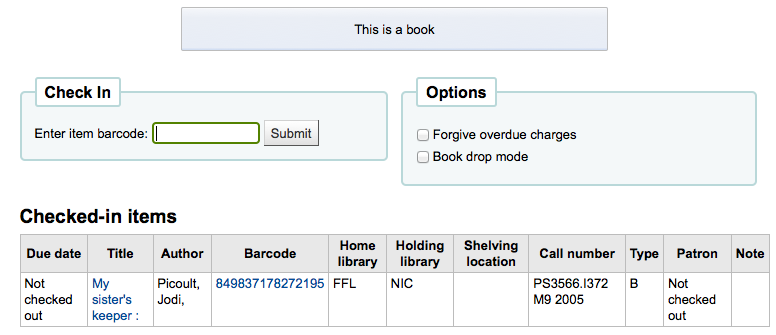
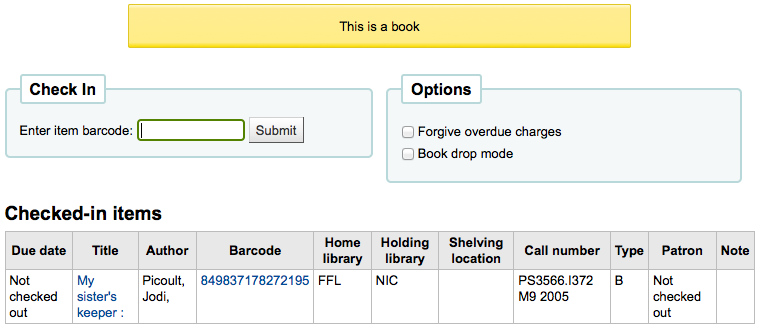
If you would like a message or alert to appear when items of this type are checked in you can enter that in the “Checkin message” box
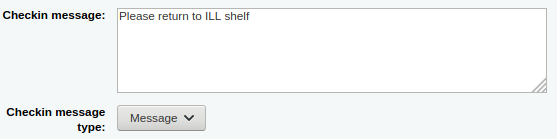
The Checkin message type can be a Message or an Alert. The only difference between these two is the styling. By default a Message is blue
and an Alert is yellow.
Some SIP devices need you to use a SIP-specific media type instead of Koha’s item type (usually lockers and sorters need this media type), if you use a device like this you’ll want to enter the SIP media type.
If this item type is only to be used in certain libraries only, you can select them here. Select “All libraries” if this item type is used across the library system.
Nota
If this is left blank, “All libraries” is assumed.
Nota
To select more than one library, hold the “Ctrl” key while selecting the libraries.
When finished, click “Save changes”
Nota
All fields, with the exception of the “Item type” will be editable from the Item types list
Su nuevo tipo de ítem aparecerá ahora en la lista

Editing item types
Each item type has an Edit button beside it. To edit an item simply click the “Edit” button.
Importante
You will not be able to edit the code you assigned as the “Item type” but you will be able to edit the description for the item.
Deleting item types
Each item has a Delete button beside it. To delete an item type, simply click the “Delete” button.
Importante
Usted no podrá borrar tipos de ítems que estén siendo usados por ítems dentro de su sistema.

Valores autorizados
Los valores autorizados se pueden utilizar en distintas áreas de Koha. Una de las razones para añadir alguna nueva categoría de valores autorizados sería la de controlar los valores que se pueden introducir en los campos MARC por parte de los catalogadores.
Get there: More > Administration > Basic parameters > Authorized values
Existing values
Koha se instala con valores predefinidos que su biblioteca probablemente utilizará, por ejemplo, “Lost”.
Asort1
Utilizado para adquisiciones con fines estadísticos
Asort2
Utilizado para adquisiciones con fines estadísticos
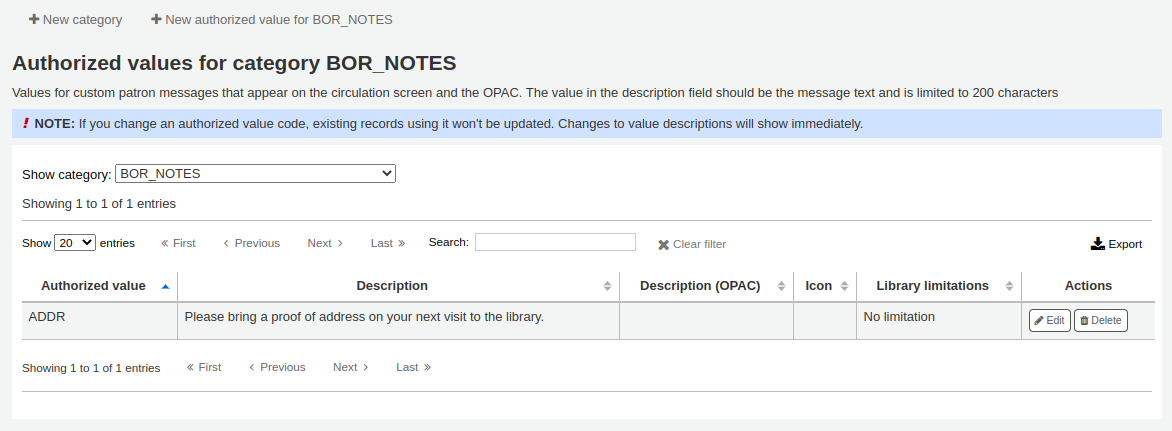
BOR_NOTES
Valores para mensajes personalizados a los usuarios que aparecen en la pantalla de circulación y en el OPAC. El valor en el campo Descripción es el texto del mensaje y está limitado a 200 caracteres.
Bsort1
Valores que se pueden introducir para cumplimentar el campo sort1
Bsort2
Valores que se pueden introducir para cumplimentar el campo sort2
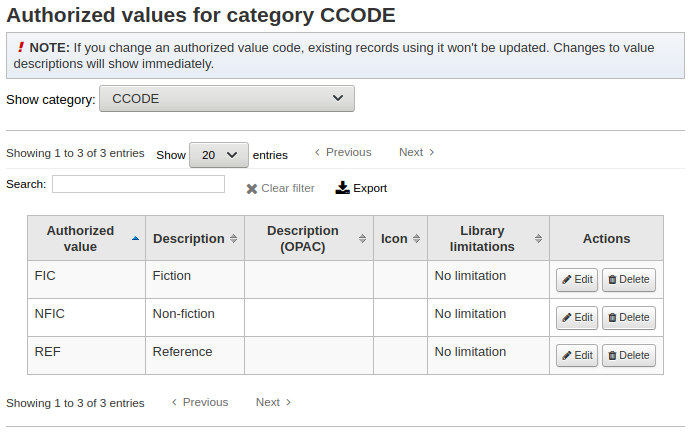
CCODE
Códigos de colección (aparece en la catalogación y al trabajar con los ítems)
CONTROL_NUM_SEQUENCE
Used to generate control numbers in the advanced cataloguing editor. Enter a string ending with a number as the authorized value and use the description to describe the type of number. For example: “sprLib0001” “Springfield library”. In the advanced editor this will activate a new widget that will allow you to choose the type of number and generate the next number in the sequence.
COUNTRY
Utilizado en UNIMARC 102 $a
DAMAGED
Descripciones para los ítems marcados como dañados (aparece en la catalogación y al trabajar con los ítems)
DEPARTMENT
Los Departamentos son requeridos por y serán utilizados en el módulo Reservas para Cursos
ETAT
Utilizado en instalaciones francesas con UNIMARC en el campo 995 $0 para identificar el estado del ítem. Similar a NOT_LOAN
HINGS_AS
Existencias generales: designador de estado de adquisición :: Este elemento de datos especifica el estado de adquisición de la unidad al momento del informe de existencias.
HINGS_C
Existencias generales: designador de integridad
HINGS_PF
Designadores de formato físico
HINGS_RD
Fondos generales: designador de retención :: estos datos especifican la política de retención de la unidad en el momento del informe de existencias.
HINGS_UT
Fondos generales: designador de tipo de unidad
HSBND_FREQ
Frecuencias utilizadas por el módulo de préstamo domiciliar. Son mostradas en la pestaña préstamo domiciliar en la cuenta del usuario en la intranet.
ITEMTYPECAT
Allows multiple Item types to be searched in a category. Categories can be entered into the Authorized value ITEMTYPECAT. To combine Item types to this category, enter this Search category to any Item types.
For example, an ITEMTYPECAT could be NEW, then in the Item type for NEW BOOKS NEW DVDS, etc the search category could be added NEW. This is helpful when a patron chooses the Search category of NEW, they could get Koha to search multiple Item types with a single search.
LANG
códigos de idioma estándar ISO 639-2
LOC
Ubicación en estantería (usualmente aparece cuando se agrega o edita un ítem). LOC se enlaza con items.location en la base de datos de Koha.
CARRETILLA
Is the shelving cart location, used by InProcessingToShelvingCart and ReturnToShelvingCart
PROC
The location to be used for NewItemsDefaultLocation (change description as desired), also the location expected by InProcessingToShelvingCart.
LOST
Descripciones de los ítems marcados como perdidos (aparece al agregar o editar un ítem)
Importante
Los valores dados a los status LOST deben ser numéricos y no alfabéticos para que aparezcan correctamente.
OPAC_SUG
Una lista de razones mostradas en el formulario de sugerencias en el OPAC.
NOT_LOAN
Motivos por los que un título no se presta
Importante
Los valores dados a los status LOST deben ser numéricos y no alfabéticos para que aparezcan correctamente.
Nota
Negative number values will still allow holds (use for on order statuses for example) where as positive numbers will not allow holds or checkouts. A value of 0 means “for loan”.
ORDER_CANCELLATION_REASON
Motivos por los que un pedido podría haber sido cancelado
PAYMENT_TYPE
Rellene una lista desplegable de tipos de pago personalizados al pagar multas
qualif
Códigos de función (autor, editor, colaborador, etc.) utilizados en UNIMARC 7XX $4 (Francés)
RELTERMS
Términos de relaciones franceses
REPORT_GROUP
Una forma de ordenar y filtrar los informes, los valores por defecto de esta categoría incluyen los módulos de Koha (Cuentas, Adquisiciones, Catálogo, Circulación, Usuarios)

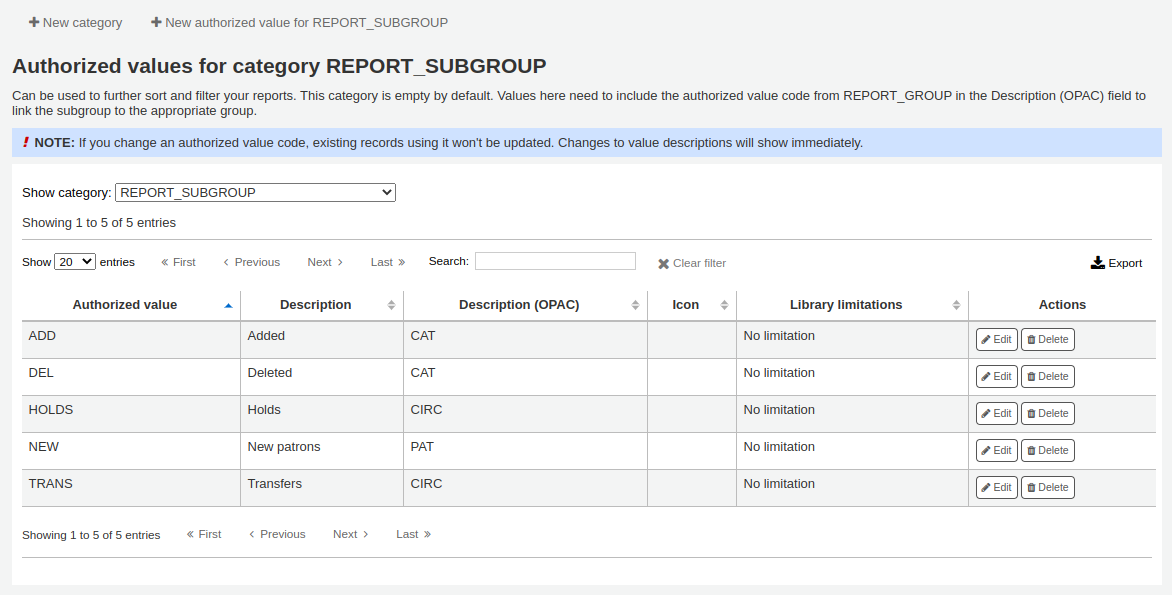
REPORT_SUBGROUP
Puede usarse para mayor orden y filtrado de sus informes. Esta categoría es vacía por defecto. Los valores deben incluir código de valor autorizado desde REPORT_GROUP en el campo Descripción (OPAC) para enlazar el subgrupo al grupo apropiado.
RESTRICTED
Estado de restricción para un ítem
ROADTYPE
Tipos de ruta a ser utilizadas en direcciones de usuarios
SIP_MEDIA_TYPE
SUGGEST
La lista de sugerencias de los usuarios de razones de rechazo o de aceptación (aparecen cuando se administran las sugerencias)
SUGGEST_FORMAT
Lista de tipos de ítems para mostrar en un menú despegable en el formulario de Sugerencia de compra en el OPAC. Cuando esté creando los valores autorizados para SUGGEST_FORMAT, ingrese una descripción en este formulario el cual será visible en el OPAC para los usuarios.
SUGGEST_STATUS
Una lista de valores de estado personalizados adicionales para sugerencias que se pueden usar además de los valores predeterminados.
STACK
Número de control de estantería
TERM
Terms to be used in Course Reserves module. Enter Terms that will show in the drop down menu when setting up a Course reserve. (For example: Spring, Summer, Winter, Fall).
WITHDRAWN
Descripción de un ítem retirado (aparece al agregar o editar un ítem)
YES_NO
Un valor genérico autorizado que se puede utilizar en cualquier lugar que necesite un simple menú desplegable sí/no.
Add new authorized value category
Además de las categorías existentes que vienen por defecto con Koha, los bibliotecarios pueden agregar sus propias categorías de valores autorizados para controlar los datos que se introducen en el sistema. Para añadir una nueva categoría:
Click “New category”

Limite su categoría a 10 caracteres (algo corto que deje claro para qué es la categoría)
Importante
La categoría no puede tener espacios ni caracteres especiales distintos de guion y guion bajo.
l añadir una nueva categoría se le pedirá que cree al menos un valor autorizado
Enter a code for your Authorized value into the “Authorized value” field
Importante
El valor autorizado está limitado a 80 caracteres y no puede contener espacios o caracteres especiales distintos del guion y guion bajo.
Utilizar el campo Descripción para el valor real que será mostrado. Si quiere mostrar algo diferente en el OPAC, ingrese una “Descripción OPAC”
Si quisiera limitar esta categoría de valores autorizados a una biblioteca específica, puede elegirla desde el menú “Limitación de sedes”. Para que se muestre para todas las bibliotecas elija “Todas las sedes” el principio de la lista.
If you have StaffAuthorisedValueImages and/or AuthorisedValueImages set to show images for authorized values you can choose the image under “Choose an icon”
Haga clic en “Guardar”
Your new category and value will appear on the list of Authorized values
Add new authorized value
Se puede agregar nuevos valores autorizados a cualquiera de las categorías ya existentes o nuevas. Para agregar un valor:
Haga clic en “Nuevos valores autorizados para …”

Enter a code for your authorized value into the “Authorized value” field
Importante
El valor autorizado está limitado a 80 caracteres y no puede contener espacios o caracteres especiales distintos del guion y guion bajo.
Utilizar el campo Descripción para el valor real que será mostrado. Si quiere mostrar algo diferente en el OPAC, ingrese una “Descripción OPAC”
Si quisiera limitar esta categoría de valores autorizados a una biblioteca específica, puede elegirla desde el menú “Limitación de sedes”. Para que se muestre para todas las bibliotecas elija “Todas las sedes” el principio de la lista.
If you have StaffAuthorisedValueImages and/or AuthorisedValueImages set to show images for authorized values you can choose the image under “Choose an icon”
Haga clic en “Guardar”
El nuevo valor aparecerá en la lista junto a los valores existentes
Usuarios y circulación
Ajustes para el control de la circulación y la información del usuario.
Categorías de usuario
Las categorías de usuarios le permiten organizar sus usuarios según diferentes roles, grupos de edad y los tipos de usuario.
Get there: More > Administration > Patrons and circulation > Patron categories
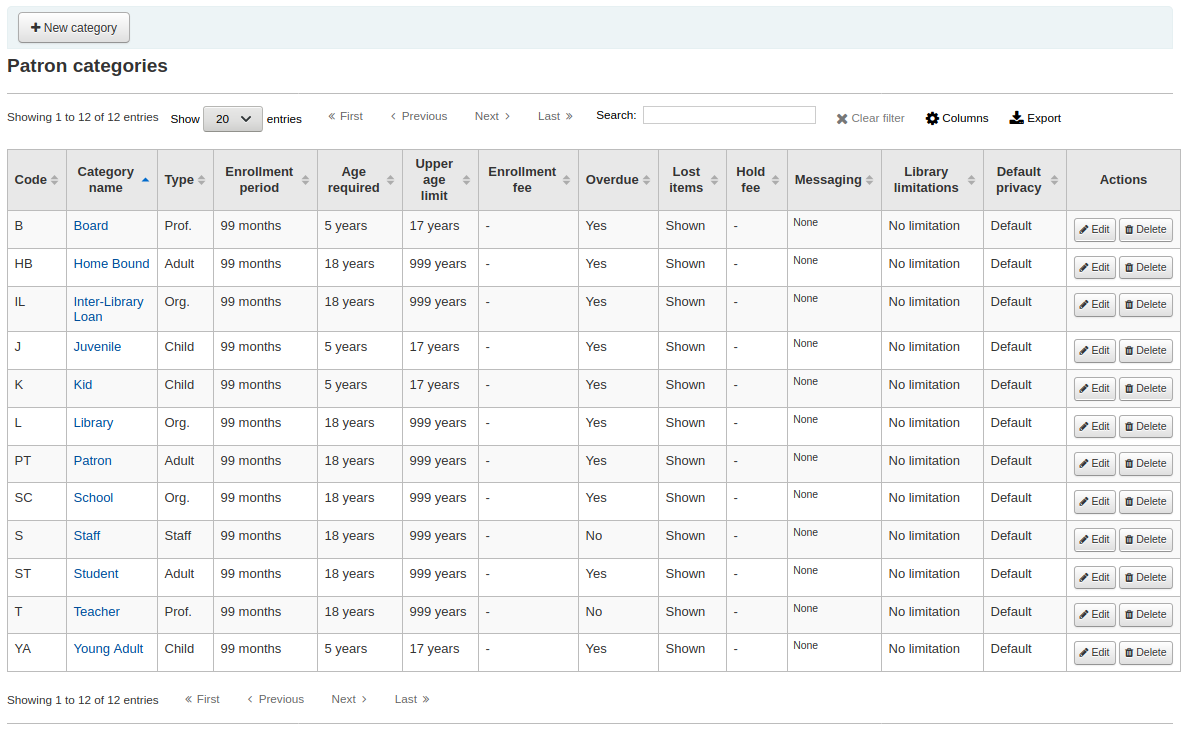
Los usuarios son asignados a una de las seis categorías principales:
Adulto
El tipo de usuario más común, usualmente se usa para una categoría llamada “Usuario.”
Niño
Los usuarios niños pueden tener un tutor al cual estar asociados.
Administrativo
Librarians (and library workers) should be assigned the staff category so that you can set their permissions and give them access to the staff client.
Organizacional
Un usuario institucional es una institución. Las instituciones pueden ser utilizadas como responsables para los usuarios Profesionales.
Profesional
Usuarios profesionales pueden estar enlazados a un Usuario Institución
Estadístico
Este tipo de usuario se utiliza estrictamente para fines estadísticos, como en el caso de uso de los ítems en la biblioteca.
Agregando una categoría de usuario
To add a new patron category click “New category” at the top of the page
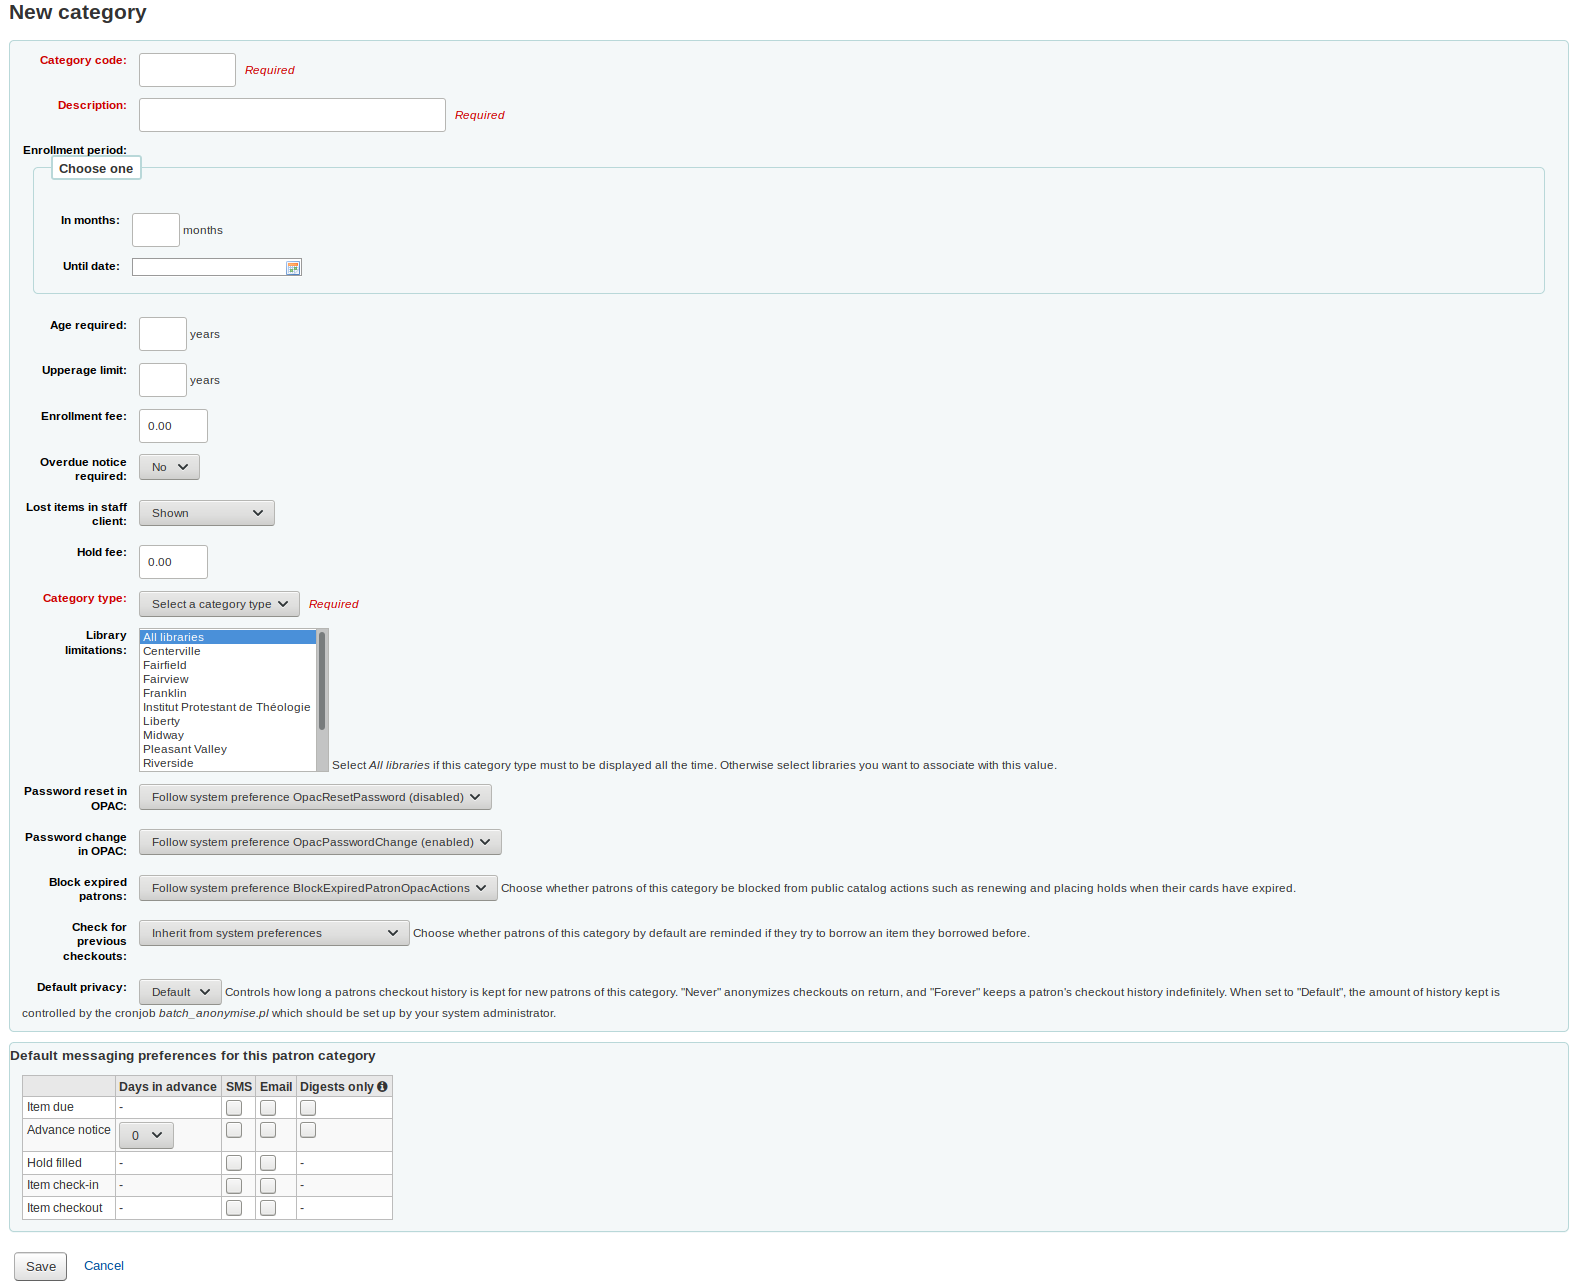
The “Category code” is an identifier for your new code.
Importante
The category code is limited to 10 characters (numbers and letters) and must be unique.
Importante
Este campo es obligatorio para guardar la categoría de usuario. Si se deja en blanco se mostrará un mensaje de error.
Ingrese una versión de texto de la categoría en el campo “Descripción”.
Importante
Este campo es obligatorio para guardar la categoría de usuario. Si se deja en blanco se mostrará un mensaje de error.
Enrollment period (in months) should be filled in if you have a limited enrollment period for your patrons (eg. Student cards expire after 9 months), otherwise, you can choose a date when the cards will expire (until date)
Importante
No se puede introducir simultaneamente un límite de meses y una fecha de expiración del carnet. Elegir uno u otro.
Importante
Este campo es obligatorio para guardar la categoría de usuario. Si se deja en blanco se mostrará un mensaje de error.
Algunas categorías de usuario pueden tener un requisito de edad mínima asociada a ellas, entrar esta edad en “Edad requerida”
Las categorías de usuarios también pueden tener una edad máxima asociada con ellas (como los niños), introducirlo en “Límite de edad superior”
Si se cobra una cuota de usuario (como los que viven en otra región) puede introducir la cantidad en el campo “Costo de asociación”.
Importante
Solo introduzca números y decimales en este campo
Nota
Depending on your value for the FeeOnChangePatronCategory preference this fee will be charged on patron renewal as well as when they are first enrolled.
If you want your patron to receive overdue notices, set the “Overdue notice required” to “Yes”. This will enable you to set the overdue notice triggers in the Tools module.
Usted puede decidir para cada categoría de usuarios si los ítems perdidos se muestran en la interfaz administrativa eligiendo esa opción en el menú desplegable de “Ítems perdidos en la interfaz administrativa”

Importante
Tenga en cuenta que esto sólo es aplicable para la interfaz administrativa, por lo que cambiar este valor en las categorías de usuarios que no tienen acceso a la interfaz administrativa no supondrá ningún cambio
Si se cobra a los usuarios por hacer reservas, introduzca la cantidad en el campo “Costo de reserva”
Importante
Solo introduzca números y decimales en este campo
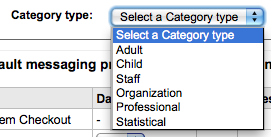
En el campo «Tipo de categoría», elija uno de los seis principales categorías superiores
Importante
Este campo es obligatorio para guardar la categoría de usuario. Si se deja en blanco se mostrará un mensaje de error.
The Branch limitations let you limit this patron category to only some branches in your library system. Select “All branches” if you would like any library to be able to use this category.
You can decide whether patrons of this category are allowed to reset their password through the OPAC’s “Forgotten password” function. By default, it will follow the rule set in the OpacResetPassword system preference.
You can decide whether patrons of this category are allowed to change their password through the OPAC. By default, it will follow the rule set in the OpacPasswordChange system preference.
You can decide if this patron category is blocked from performing actions in the OPAC if their card is expired using the next option. By default it will follow the rule set in the Bloquear preference

Next you can choose the default privacy settings for this patron category. This setting can be edited by the patron via the OPAC if you allow it with the OPACPrivacy system preference.

You can set the preference for checking the patron’s circulation history when checking out an item. This option will only be available if the CheckPrevCheckout system preference is set to “Unless overridden by patron category, do” or “Unless overridden by patron category, do not”. This setting can be overridden on a per-patron basis in their individual file.
Por último se puede asignar preferencias avanzadas de mensajería de forma predeterminada a una categoría de usuario
Importante
Requires that you have EnhancedMessagingPreferences enabled
Importante: Estos pueden ser cambiados por los usuarios individuales, esta opción es simplemente una forma predeterminada para que sea más fácil de configurar mensajes para toda una categoría
Nota
After setting the default for the patron category you can force those changes to all existing patrons by running the borrowers-force-messaging-defaults script found in the misc/maintenance folder. Ask your system administrator for assistance with this script.
Reglas de circulación y multas
Estas reglas definen cómo circulan los ítems, cómo y cuando se calculan las multas y cómo se manejan las reservas.
Get there: More > Administration > Patrons and circulation > Circulation and fines rules
Las normas se aplicarán de la más específica a la menos específica, utilizando la primera encontrada en este orden:
misma biblioteca, misma categoría de usuario, mismo tipo de ítem
misma biblioteca, misma categoría de usuario, todos los tipos de ítem
misma biblioteca, todas las categorías de usuario, mismo tipo de ítem
misma biblioteca, todas las categorías de usuario, todos los tipos de ítem
predeterminado (todas las bibliotecas), misma categoría usuario, mismo tipo de ítem
predeterminado (todas la bibliotecas), misma categoría de usuario, todos los tipos de ítem
predeterminado (todas las bibliotecas), todas las categorías de usuarios, mismo tipo de ítem
predeterminado (todas las bibliotecas), todas las categorías de usuarios, todos los tipos de ítems
The CircControl and HomeOrHoldingBranch also come in to play when figuring out which circulation rule to follow.
If CircControl is set to «the library you are logged in at» circulation rules will be selected based on the library you are logged in at
If CircControl is set to «the library the patron is from» circulation rules will be selected based on the patron’s library
If CircControl is set to «the library the item is from» circulation rules will be selected based on the item’s library where HomeOrHoldingBranch chooses if item’s home library is used or holding library is used.
Si la preferencia IndependentBranches está establecida en “Impedir” entonces el valor de HomeOrHoldingBranch se utiliza para determinar si el ejemplar puede ser prestado. Si la biblioteca de origen del ejemplar no coincide con la biblioteca cuya sesión está iniciada, dicho ejemplar no podrá ser prestado, a menos que usted sea un superbibliotecario.
Importante
At the very least you will need to set a default circulation rule. This rule should be set for all item types, all libraries and all patron categories. That will catch all instances that do not match a specific rule. When checking out if you do not have a rule for all libraries, all item types and all patron categories then you may see patrons getting blocked from placing holds.
Defining circulation rules
Using the issuing rules matrix you can define rules that depend on patron category/item type combos. To set your rules, choose a library from the pull down (or “Standard rules for all libraries” if you want to apply these rules to all branches):
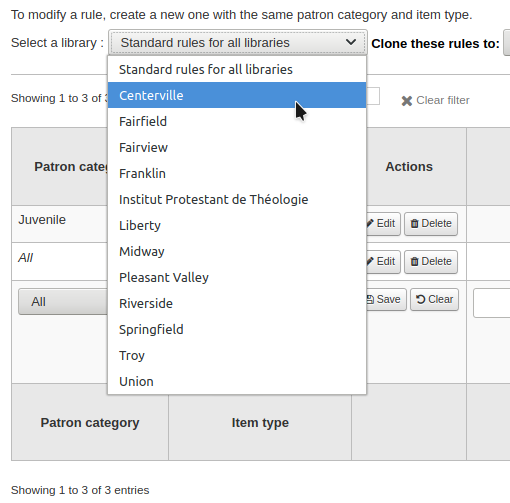
De la matriz usted puede seleccionar cualquier combinación de categorías de usuarios y tipos de ítem a los cuales aplicar la regla

Primero seleccione a cual categoría de usuario aplicará esta regla. Si deja esto en “Todas” se le aplicará a todas las categorías.
Choose the item type you would like this rule to apply to. If you leave this to “All” it will apply to all item types
Add notes about your circulation rule into the notes field. This can be helpful to remember why and when something was last changed.
Limit the number of items a patron can have checked out at the same time by entering a number in the “Current checkouts allowed” field.
If you’re allowing OnSiteCheckouts then you may also want to set a limit on the number of items patron’s can have onsite.
Nota
This setting also depends on the ConsiderOnSiteCheckoutsAsNormalCheckouts preference
Define el período de tiempo que un ítem puede ser prestado a un usuario ingresando el número de unidades (días u horas) en el campo “Período de Préstamo”.
Choose which unit of time, days or hours, that the loan period and fines will be calculated in in the “Unit” column
You can also define a hard due date for a specific patron category and item type. The hard due date offers three options:
Exactly on: The due date of any item checked out with this rule will be set to the hard due date.
Before: Koha will calculate the normal loan period. If the calculated due date would be after or on the hard due date, the hard due date will be used instead.
After: Koha will calculate the normal loan period. If the calculated due date would be before the hard due date, the hard due date will be used instead.
“Fine amount” should have the amount you would like to charge for overdue items.
Importante
Introducir sólo números enteros y decimales (no símbolos de monedas).
Enter the “Fine charging interval” in the unit you set (ex. charge fines every 1 day, or every 2 hours). The finesCalendar system preference controls wether the days the library is closed will be taken into account or not.
“When to charge” is most handy in libraries that have a fine charging interval of more than 1 day.
End of interval: Given a grace period of 2 days and a fine interval of 7 days, the first fine will appear 7 days after the due date, it will always take one fine interval (7 days), before the first fine is charged.
Start of interval: Given a grace period of 2 days and a fine interval of 7 days, the first fine will appear 2 days after the due date and the second fine 7 days after the due date.
The “Fine grace period” is the period of time an item can be overdue before you start charging fines. The FinesIncludeGracePeriod system preference controls if the grace period will be included when calculating the fine or not.
Importante
Este solo puede ser establecidos en días, no en horas
The “Overdue fines cap” is the maximum fine per item for this patron and item type combination.
Importante
If this field is left blank then Koha will not put a limit on the fines this item will accrue. A maximum fine amount can be set using the MaxFine system preference.
If you would like to prevent overcharging patrons for a lost items, you can check the box under “Cap fine at replacement price.” This will prevent the patron’s fines from going above the replacement price on the item.
Nota
If the “Overdue fines cap” is also set, the fine will be the lesser of the two, if both apply to the given overdue checkout.
If your library “fines” patrons by suspending their account you can enter the number of days their fine should be suspended in the “Suspension in days” field.
Importante
This can only be set for the Day unit, not in Hours-
You can also define the maximum number of days a patron will be suspended in the “Max suspension duration” setting-
Next decide if the patron can renew this item type and if so, enter how many times they can renew it in the “Renewals allowed” box.
If you’re allowing renewals you can control how long the renewal loan period will be (in the units you have chosen) in the “Renewal period” box.
Si usted está permitiendo renovaciones, puede controlar con qué antelación a la fecha de vencimiento los usuarios pueden renovar sus materiales con la casilla “No renovable antes de”.
Items can be renewed at any time if this value is left blank. Otherwise items can only be renewed if the item is due after the number in units (days/hours) entered in this box.
To control this value on a more granular level please set the NoRenewalBeforePrecision preference.
You can enable automatic renewals for certain items/patrons if you’d like. This will renew automatically following your circulation rules unless there is a hold on the item.
Importante
Necesitará habilitar la tarea programada para la renovación automática para que esto funcione.
Importante
This feature needs to have the «no renewal before» column filled in or it will auto renew everyday after the due date.
If you are using automatic renewals, you can use the “No automatic renewals after” to limit the time a patron can have the item independent: Example: Don’t allow automatic renewals after a checkout period of 80 days.
Similar to the hard due date setting, you can also stop automatic renwals after a specific date using the “No automatic renwal after (hard limit)” setting.
If the patron can place holds on this item type, enter the total numbers of items (of this type) that can be put on hold in the “Holds allowed” field.
You can also set a daily limit on the number of holds a patron can place.
While the two settings before limit the holds that can be placed across various records, the next setting is used to limit the number of holds that can be placed on one record at the same time. Example: For fiction books you might want to allow only one item to be placed on hold at the same time by the same user. But for serials where items represent different issues more than one hold at the same time is fine.
Next you can decide how the availability of items influences the ability to place a hold. The “On shelf holds allowed” option has three settings:
Yes: This will allow to place holds on items at all times. It doesn’t matter if they are available or checked out.
If any unavailable: This will allow to place a hold as soon as one or more items of the record are checked out. It doesn’t matter if there are still one or more items available on the shelf.
If all unavailable: This will allow to place a hold as soon as all items on the record are checked out that could fill the hold. This is especially useful for libraries that don’t offer the service of getting items placed on hold off the shelf for patrons.
You can also decide if patrons are allowed to place item specific holds on the item type in question. The options are:
Allow: Will allow patrons the option to choose next available or a specific item.
Don’t allow: Will only allow patrons to choose next available item.
Force: Will only allow patrons to choose a specific item.
If you want to allow patrons to be able to place article requests, you
Importante
If you want to use the article request functionality you need to enable it using the ArticleRequests system preference and configure the form using the other related preferences.
Por último, si cobra un costo de alquiler para el tipo de ítem y desea darle a una categoría de usuario específica un descuento en la tarifa, ingrese el porcentaje de descuento (sin el símbolo %) en el campo “Descuento en alquiler”
When finished, click “Save” to save your changes. To modify a rule, simply click the “Edit” link at the beginning or at the end of the row and edit the values that appear filled in at the bottom of the form.
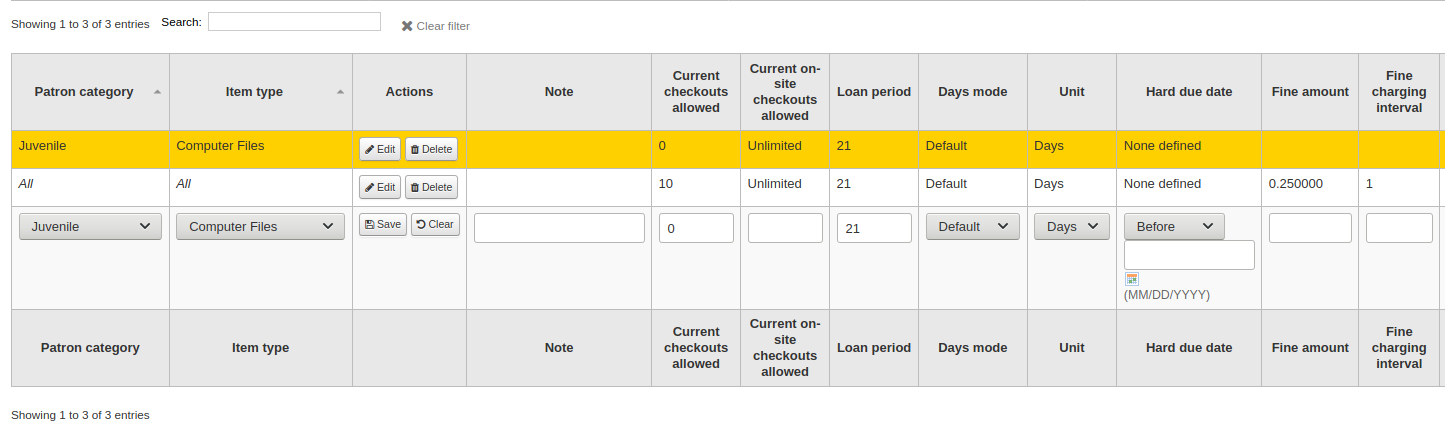
If you would like to delete your rule, click the “Delete” link at the beginning or at the end of the rule row.
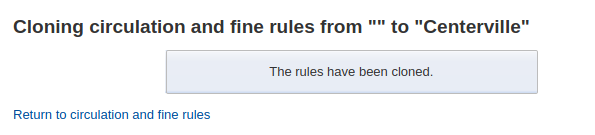
To save time you can clone rules from one library to another by choosing the clone option above the rules matrix. Please note that this will overwrite all rules already configured for that library.

Luego de elegir clonar, se le presentará un mensaje de confirmación.
Políticas predeterminadas de préstamo, reserva y devolución
You can set a default maximum number of checkouts, a default maximum number of holds and a hold policy that will be used if none is defined below for a particular item type or category. This is the fall back rule for defaults.

De este menú usted puede establecer un valor predeterminado para todos los tipos de ítems y usuarios de la biblioteca.
En “Total de préstamos simultaneos permitidos”, introducir el número total de ítems que los clientes pueden tener prestados en forma simultanea
In “Total current on-site checkouts allowed” enter the total number of items patrons can have checked out on site at a time (OnSiteCheckouts needs to be set to “Enable”)
In “Maximum total holds allowed (count)” enter the total number of pending holds patrons can have at the same time.
El control desde donde los usuarios pueden hacer reservas se puede hacer en el menú “Política de reservas”
Desde Cualquier Biblioteca: Usuarios de cualquier sede pueden reservar este ítem. (predeterminado si no se define)
Desde sede principal: Solo usuarios de la misma sede que el ítem pueden reservar este libro.
No se permiten reservas: ningún usuario puede reservar este libro.
Control if there is a limit to filling a hold based on the item’s library
a cualquier biblioteca.
biblioteca de origen del ítem.
biblioteca de la reserva
Nota
The patron’s home library should not affect whether a patron can place the hold, instead the hold will only be fillable when an item matching the pickup location becomes available.
El control a dónde va el ítem una vez devuelto
Sede de devolución de ítem
El ítem regresa a sede de préstamo
Ítem flotante
Cuando un ítem flota el permanece donde fue devuelto y puede no retornar a “casa”
Una vez que estableció su política, puede quitarla haciendo clic en el enlace “Eliminar” a la derecha de la regla
Default checkout and hold policy by patron cateogry
For this library, you can specify the maximum number of checkouts, on-site checkouts and holds that a patron of a given category can have, regardless of the item type.

Nota
If the total amount of checkouts, on-site checkout and holds for a given patron category is left blank, no limit applies, except possibly for a limit you define in the circulation rules above.
Por ejemplo, si usted tiene una regla en la matriz que dice que los usuarios Board se les permiten 10 libros y 5 DVDs, pero desea hacerlo de modo que los usuarios Board tengan solo un total de 12 ítems prestados a la vez. Si introduce 12 aquí y el usuario tiene 10 libros prestados entonces solo se le permitirán 2 DVDs que equivalen a los 12 permitidos en total.
Política predeterminada de reembolso de costo por ítem perdido y devolución
Here, you can specify the default policy for lost item fees on return. This policy will apply to this library. This rule is to be used with the RefundLostOnReturnControl system preference.
Default holds policy by item type
Para esta biblioteca, podrá editar las reglas para los tipos de ítem, independientemente de las categorías de socios.
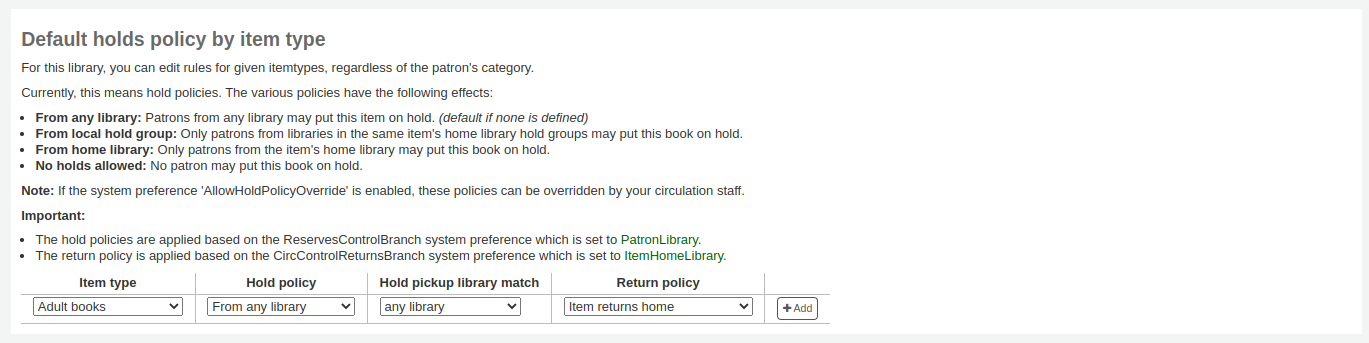
The various hold policies have the following effects:
From any library: Patrons from any library may put this item on hold. (default if none is defined)
From home library: Only patrons from the item’s home library may put this book on hold.
No holds allowed: No patron may put this book on hold.
Importante
Note that if the system preference AllowHoldPolicyOverride set to “allow”, these policies can be overridden by your circulation staff.
Importante
Estas políticas se basan en la sucursal de origen del usuario, no en la sucursal del miembro del personal que hace la reserva.
Control if there is a limit to filling a hold based on the item’s library
a cualquier biblioteca.
biblioteca de origen del ítem.
biblioteca de la reserva
Nota
The patron’s home library should not affect whether a patron can place the hold, instead the hold will only be fillable when an item matching the pickup location becomes available.
The various return policies have the following effects:
El ítem retorna a la sede de origen: El ítem requerirá del bibliotecario que transfiera el ítem a su biblioteca de origen
Importante
If the AutomaticItemReturn preference is set to automatically transfer the items home, then a prompt will not appear
El ítem retorna a la sede de préstamo: El ítem requerirá al bibliotecario que transfiera el ítem de nuevo a la biblioteca que lo prestó
Importante
If the AutomaticItemReturn preference is set to automatically transfer the items home, then a prompt will not appear
El ítem queda flotando: El ítem no será transferido desde la sucursal que lo recibió en devolución, al contrario, permanecerá allí hasta que sea transferido de forma manual o prestado en otra sucursal
Por ejemplo, puede permitir reservas en sus bibliotecas, pero no que los nuevos ítems o DVDs se reserven para otras sucursales de forma que se pueda establecer una “política de reservas” para “Desde la biblioteca propia” para que esos ítems se puedan reservar si biblioteca propietaria de los ítems y la biblioteca del usuario es la misma. También puede bloquear el préstamo por completo para tipos de ítem específicos en este formulario. Esta es también la forma en que puede configurar los tipos de ítem y tipos que permanecen en la biblioteca titular de los mismos.
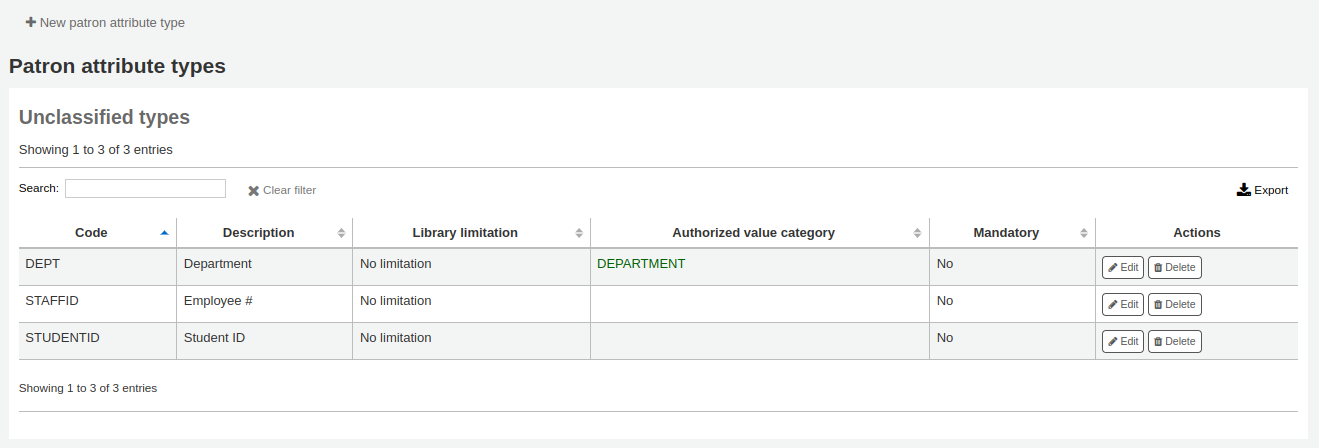
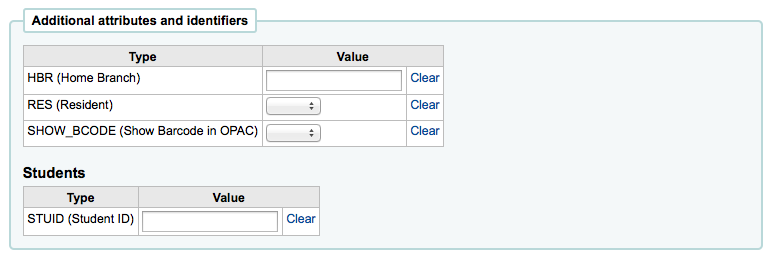
Tipos de atributo de usuario
Patron attributes can be used to define custom fields to associate with your patron records. In order to enable the use of custom fields you need to set the ExtendedPatronAttributes system preference.
Get there: More > Administration > Patrons and circulation > Patron attribute types
Un uso común para este campo sería el de contener el número de documento (ID) de un usuario/estudiante o el número de su Licencia de conducir.
Adding patron attributes
To add a new patron attribute type, click the “New patron attribute type” button at the top of the page
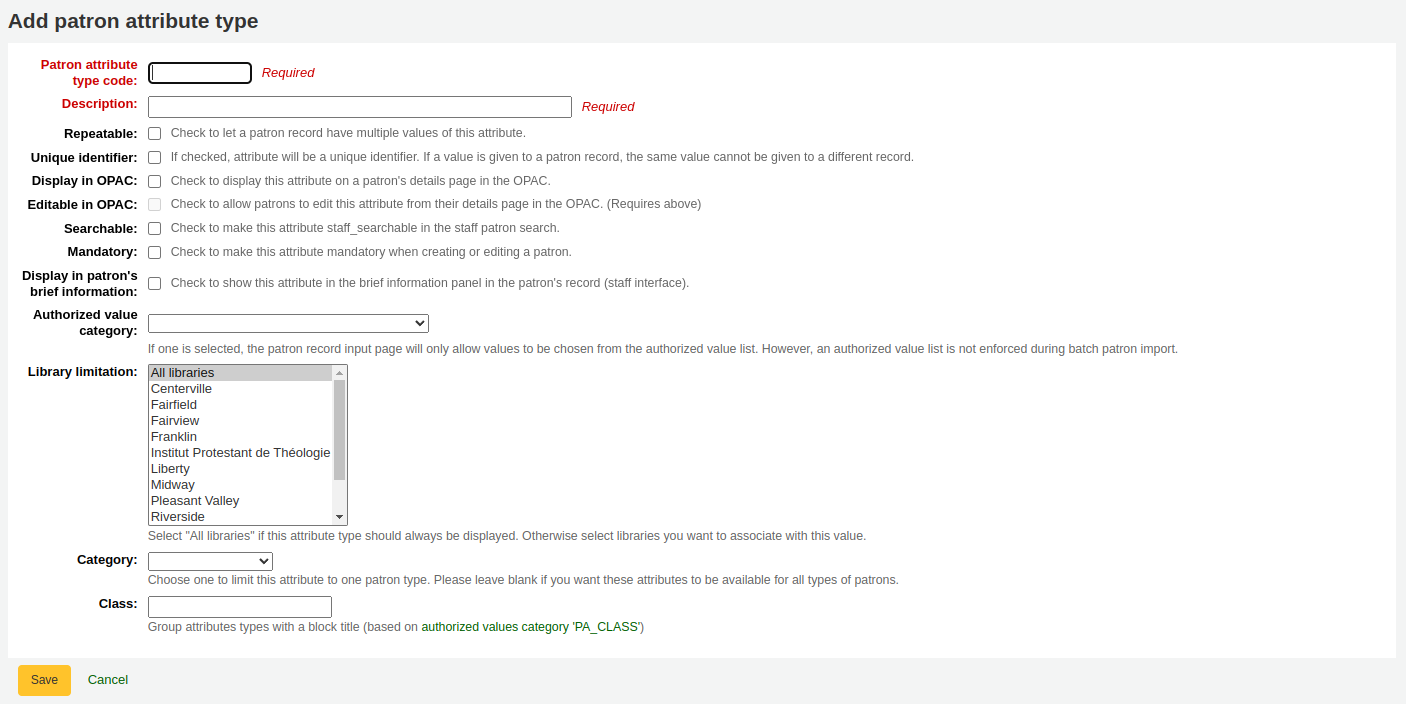
En el “Código de tipo de atributo del usuario”, introduzca un código
Importante
Este campo está limitado a 10 caracteres (letras y números solamente)
Importante
Este valor no puede ser cambiado después de que se define un atributo
En el campo “Descripción”, escriba una explicación (en texto) de lo que este campo contendrá
Marque la casilla junto a “Repetible” para que un registrode usuario pueda tener varios valores de este atributo.
Importante
Este valor no puede ser cambiado después de que se define un atributo
Si la casilla “Identificador único” está marcada, el atributo será un identificador único, lo cual significa que dos usuarios no pueden tener el mismo valor en este campo.
Los atributos únicos pueden ser utilizados como puntos de coincidencia en la herramienta de importación de usuarios
Importante
Este valor no puede ser cambiado después de que se define un atributo
Marcar “Permitir contraseña” para que sea posible asociar una contraseña a este atributo.
Marcar “Mostrar en el OPAC” para mostrar este atributo en la página de detalles del usuario del OPAC.
Marque “Buscable” para que este atributo sea buscable en la búsqueda de usuarios de la interfaz administrativa.
Marque “Mostrar al prestar” para hacer que este atributo esté visible en la pantalla corta de muestra de detalles del usuario a la izquierda de la pantalla de préstamo y otras páginas de usuarios
Categoría con valor autorizado; si uno es seleccionado, entonces en la página de ingreso del usuario solo se permitirán en este atributo valores a elegir entre la lista de valores autorizados.
En primer lugar, tendrá que añadir una lista de valores autorizados para que aparezca en este menú
Ir a:Más > Administración > Parámetros básicos > Valores autorizados
Importante
una lista de valores autorizados no se aplica durante la importación en lotes de usuarios.
Si desea que este atributo solo sea utilizado por sedes específica puede elegir dichas sedes desde la lista “Limitación de sedes”. Seleccione “Todas la sedes” para mostrarlo en todas las bibliotecas.
Importante
Note that items with locations already set on them will not be altered. The branch limitation only limits the choosing of an authorized value based on the home branch of the current staff login. All authorized values for item records (LOC, LOST, CCODE, etc) will show in the OPAC for all patrons.
Si desea mostrar solamente este atributo a usuarios de un tipo, seleccione ese tipo de usuario desde el desplegable “Categoría”
Si tiene muchos atributos puede ser útil agruparlos para encontrarlos fácilmente al editar. Si crea un Valor autorizado para PA_CLASS se mostrará en el desplegable “Clase” y podrá cambiar su página de atributos para tener secciones de atributos
Haga clic en Guardar para guardar su nuevo atributo
Una vez añadido el atributo aparecerá en la lista de atributos y también en el formulario de agregar o modificar usuarios
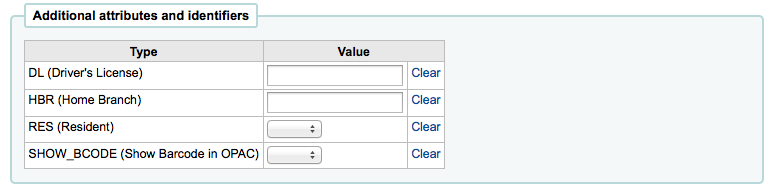
Si ha configurado para atributos organizativos ellos aparecerán de esa forma en el formulario para agregar/editar usuarios
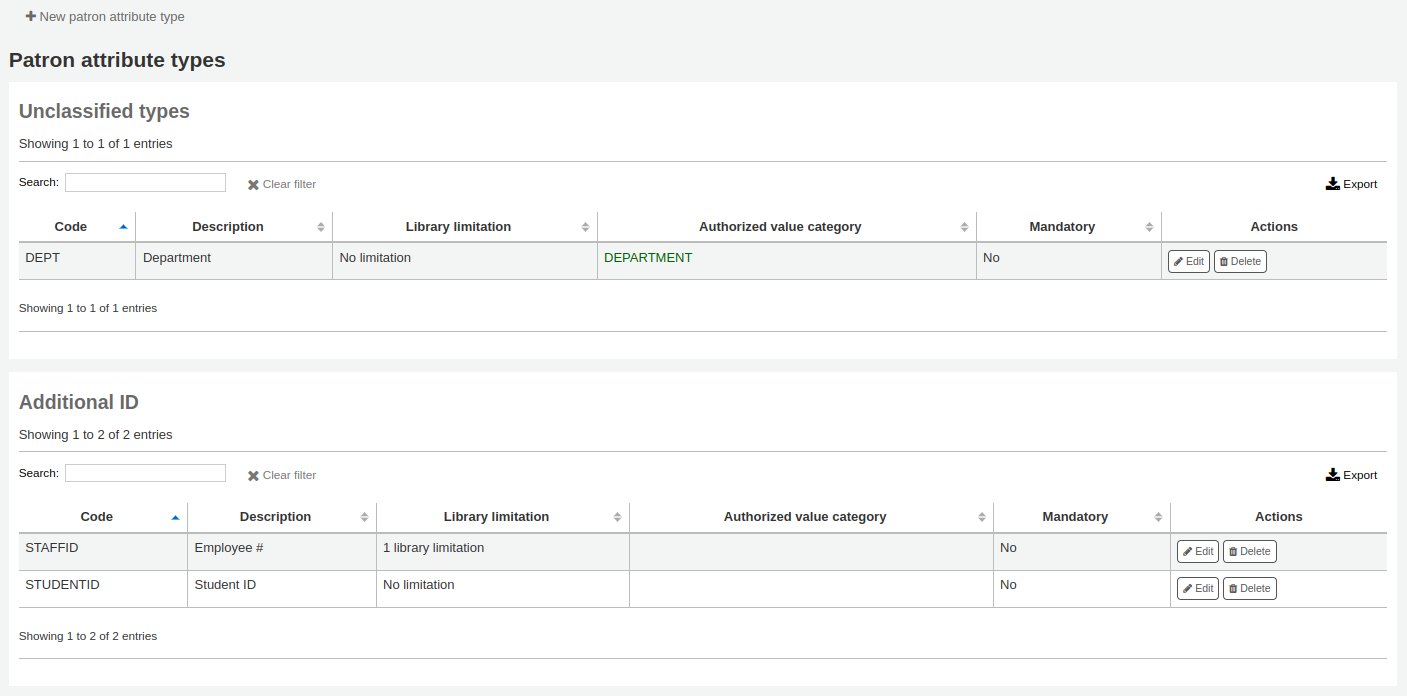
Editing/deleting patron attributes
Cada atributo de usuario tiene a su lado un enlace editar o eliminar en la lista de atributos.
Algunos de los campos en el atributo no se puede editar una vez creados:
Código de tipo de atributo de usuario
Repetible
Identificador único
Usted no podrá eliminar un atributo si está en uso.

Límites de transferencia de la biblioteca
Limitar la capacidad de transferir ítems entre bibliotecas basado en la biblioteca de origen, la biblioteca receptora y código de colección en cuestión.
Get there: More > Administration > Patrons and circulation > Library transfer limits
Estas reglas sólo entrarán en vigor si la preferencia UseBranchTransferLimits se configura en “forzar”.
Antes de comenzar querrá seleccionar para cual biblioteca está definiendo estos límites.

Los límites de transferencia se establecen sobre la base de los códigos de colección que se han aplicado a través del área de administración con el uso de Valores autorizados.
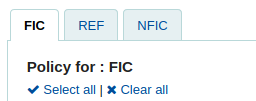
Los códigos de colección aparecerán como pestañas arriba de los recuadros de opciones:
Marque las casillas de las bibliotecas que aceptan devoluciones para el tipo de ítem que ha seleccionado (en el ejemplo de más abajo - FIC)
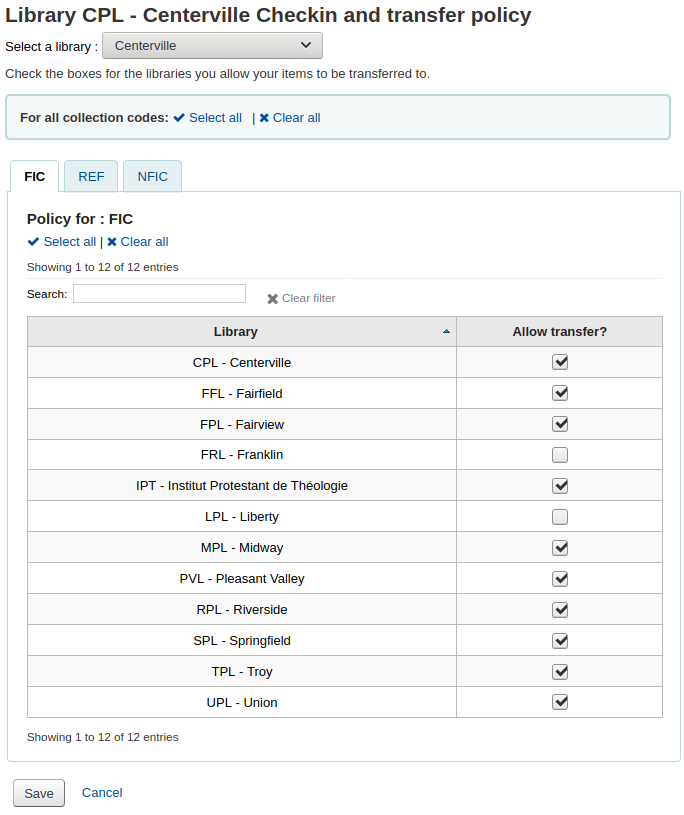
En el ejemplo anterior, la colección de Centerville permitirá a los usuarios devolver los ítems de todas las bibliotecas excepto los de Libertad y Franklin a sus sedes.
Matriz de costo de transporte
The transport cost matrix lets a library system define relative costs to transport books to one another. In order for the system to use this matrix you must first set the UseTransportCostMatrix preference to “Use”.
Importante
The transport cost matrix takes precedence in controlling where holds are filled from, if the matrix is not used then Koha checks the StaticHoldsQueueWeight.
Costos son valores decimales entre algún máximo arbitrario (ej. 1 o 100) y 0 el cual es el mínimo (sin) costo. Por ejemplo, puede utilizar la distancia entre cada biblioteca en kilómetros como su “costo”, si eso refleja adecuadamente el costo de transferencia. Tal vez oficinas postales sean una mejor medida. Bibliotecas que compartan una oficina postal pueden tener un costo 1, oficinas postales adyacentes un costo 2, etc.
Para ingresar costos de transporte simplemente haga clic en la celda que desea alterar, desmarque la casilla “Deshabilitar” e ingrese su “costo”
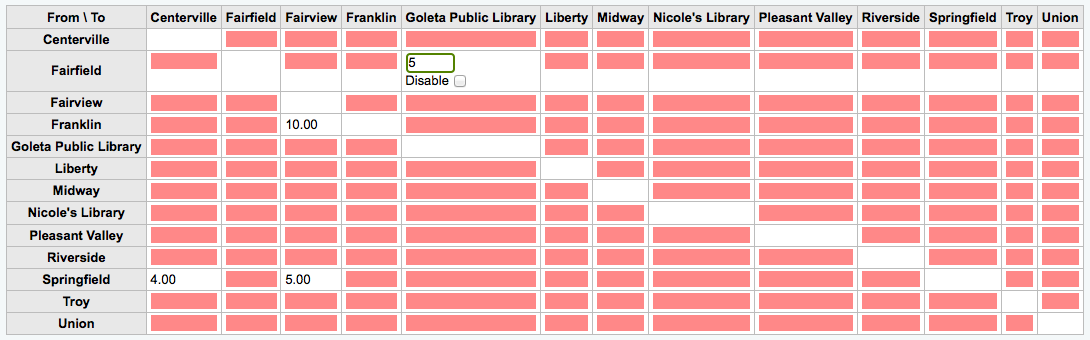
Luego de ingresar su costo, presione “Intro” en su teclado o haga clic en el botón “Guardar” al fondo de la matriz para guardar sus cambios.
Nota
A NULL value will make no difference where the From and To libraries are the same library. However, as a best practice, you should put a 0 in there. For all other To/From combinations, a NULL value will cause that relationship to act as if it has been disabled. So, in summary, don’t leave any of the values empty. It’s best to always put a number in there ( even if you choose to disable that given To/From option ).
Alertas de circulación de ítems
Las bibliotecas pueden decidir si quieren tener a los usuarios automáticamente notificados de eventos de circulación (préstamos y devoluciones).
Get there: More > Administration > Patrons and circulation > Item circulation alerts
Estas preferencias se establecen sobre la base de los tipos de usuario y los tipos de ítems.
Importante
Estas preferencias pueden ser anuladas cambiando las preferencias de mensajería individuales del usuario.
Para establecer alertas de circulación:
Elija su biblioteca desde el menú desplegable en la parte superior de la pantalla

Para establecer preferencias para todas las bibliotecas, mantenga el menú posicionado en “Predeterminado”
Por defecto, todos los tipos de ítems y usuarios se les informa de todos los préstamos y devoluciones. Para cambiar esto, haga clic sobre el tipo combinado ítem/usuario al cual quiere dejar de enviar avisos.
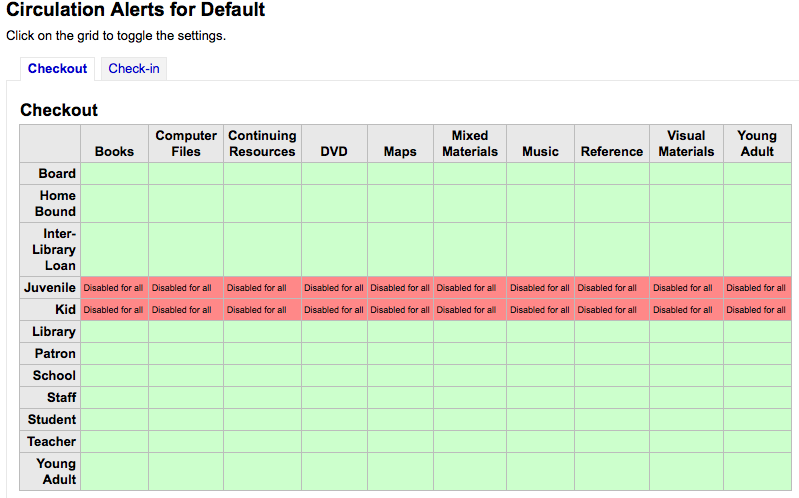
En el ejemplo anterior, los menores y de niños no recibirán avisos de circulación.
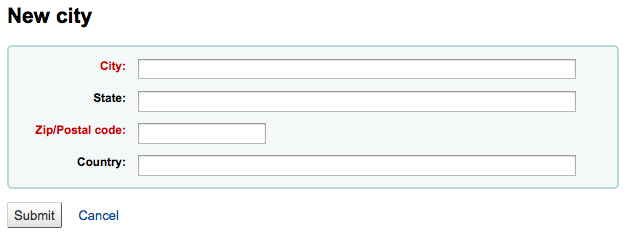
Ciudades y pueblos
Para estandarizar el ingreso de usuarios, puede definir ciudades o pueblos dentro de su región, para que cuando los nuevos usuarios sean agregados, los bibliotecarios simplemente seleccionarán la ciudad de una lista en lugar de tener que tipear la ciudad y el código postal.
Get there: More > Administration > Patrons and circulation > Cities and towns
Adding a city
To add a new city, click the “New city” button at the top of the page and enter the city name, state, zip/postal code and country.
One you click Submit, your city will be saved and will be listed on the Cities and towns page
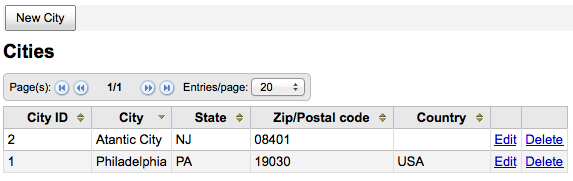
Las ciudades pueden ser modificadas o eliminadas en cualquier momento.
Viewing cities on patron add form
If you have defined local cities using the “New city” form, then when adding or editing a patron record you will see those cities in a pull down menu to make city selection easy.
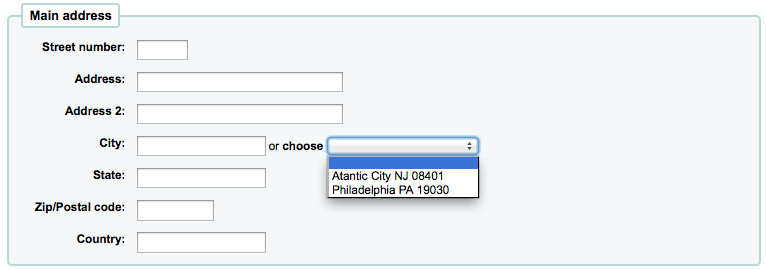
Esto permitirá facilitar la entrada de las ciudades en el registro de usuario sin correr el riesgo potencial de errores tipográficos o códigos postales equivocados.
Contabilidad
Get there: More > Administration > Accounting
This section deals with the parameters used in managing the patron accounts.
Tipos de débito
Get there: More > Administration > Accounting > Debit types
This is where you define the manual fees you can charge patrons.
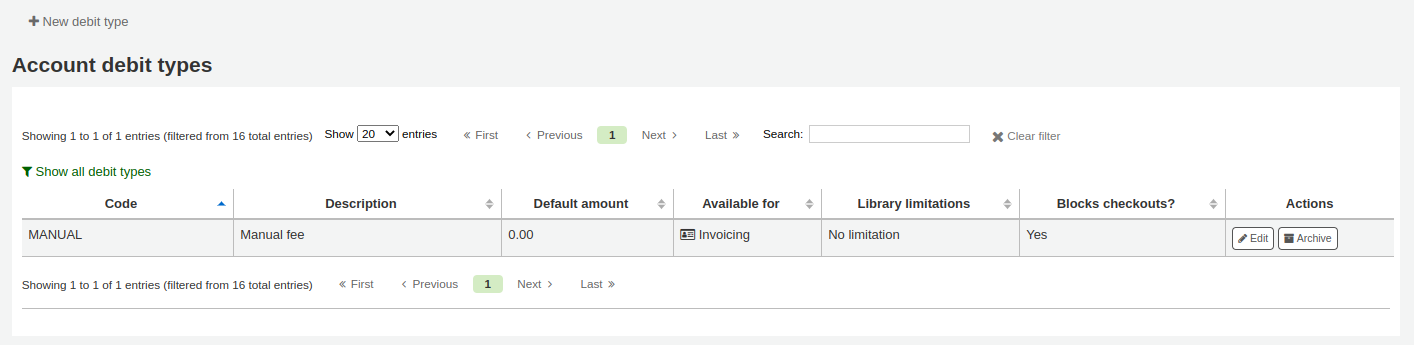
When you first get to the page, you will only see the manual fees that are already defined in your system.
You can see the default system fees by clicking «Show all debit types».
You can go back to seeing only the manual fees by clicking «Filter system debit types».
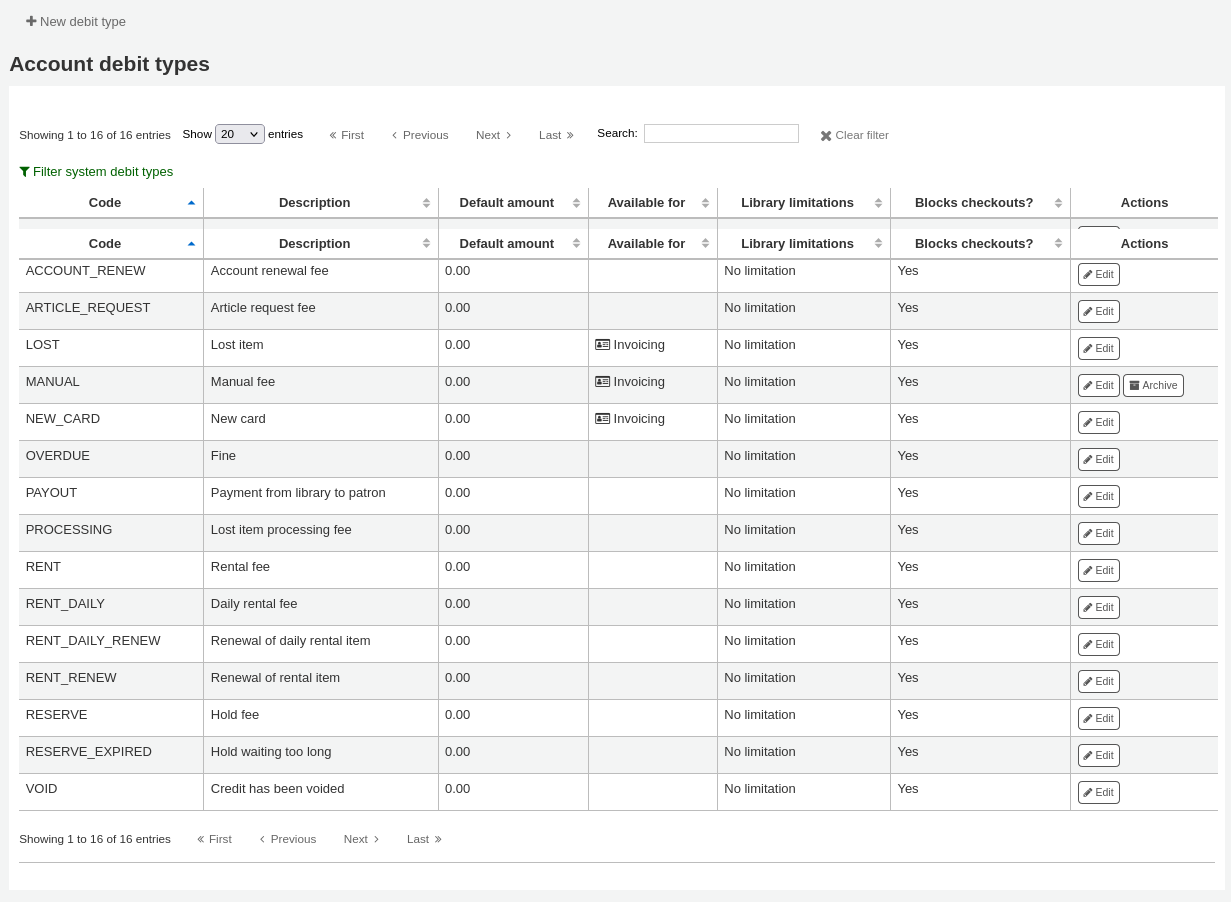
System debit types
Several debit types come installed with Koha. Most of them are automatic fees that are added according to the policies you set up elsewhere in Koha.
ACCOUNT (Account creation fee): this is charged to the patron’s account upon registration. The fee can be changed in the patron category settings under “Enrollment fee”.
ACCOUNT_RENEW (Account renewal fee): this is charged to the patron’s account when their account is renewed. Like the ACCOUNT debit type above, this can be changed in the patron category settings under “Enrollment fee”.
LOST (Lost item): this is charged to the patron’s account when an item in their file is declared lost. The amount depends on the item’s “replacement cost” field or on the item type’s default replacement cost. It can also be added manually in the manual invoices tab.
MANUAL (Manual fee): this is the default manual fee installed with Koha. This is not charged automatically by Koha, but can be added to a patron’s account manually in the manual invoices tab.
NEW_CARD (New card fee): this is another default manual fee installed with Koha. This will not be charged automatically by Koha, but can be added to a patron’s account manually in the manual invoices tab.
OVERDUE (Overdue fine): this is charged automatically to the patron’s account when they have overdue items. The amount for overdue fines are set in the circulation and fines rules.
PROCESSING (Lost item processing fee): this is charged automatically to the patron’s account when an item in their file is declared lost. The amount is set by item type under “Processing fee (when lost)”.
RENT (Rental fee): this is charged automatically to the patron’s account upon checkout if the item type has a rental charge.
RENT_DAILY (Daily rental fee): this is charged automatically to the patron’s account upon checkout if the item type has a daily rental charge.
RENT_DAILY_RENEW (Renewal of daily rental item): this is charged automatically to the patron’s account upon renewal if the item type has a daily rental charge.
RENT_RENEW (Renewal of rental item): this is charged automatically to the patron’s account upon renewal if the item type has a rental charge.
RESERVE (Hold fee): this is charged automatically to the patron’s account upon placing a hold. The amount depends on the “Hold fee” amount in the patron’s category settings.
RESERVE_EXPIRED (Hold waiting too long): this is charged automatically to the patron’s account if they haven’t picked up their hold after the number of days defined in the ExpireReservesMaxPickUpDelay system preference. The amount is set in the ExpireReservesMaxPickUpDelayCharge system preference.
Adding a new debit type
To add a new debit type:
Click “New debit type”
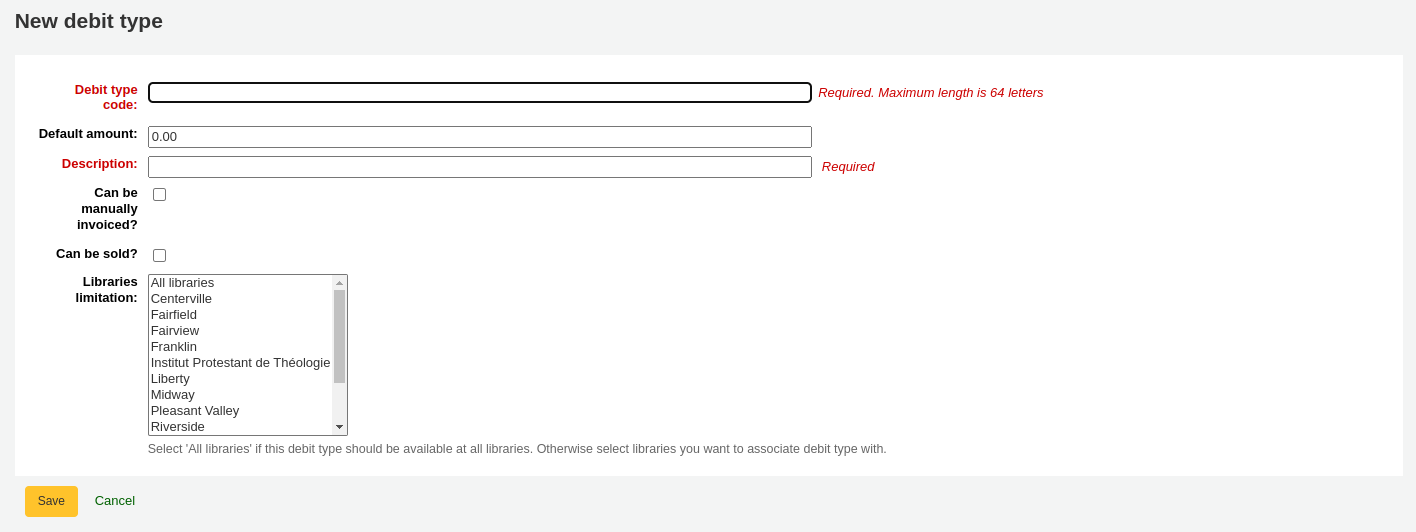
Enter a code (limited to 64 letters)
Enter the default amount
Nota
Staff will be able to change this amount when adding the charge to the patron’s account, if necessary
Nota
Do not enter currency symbols. Only write the amount with a decimal point (for example, 5 or 5.00 instead of $5)
Write a description
This description will be used in the drop-down menu when adding a new charge to a patron’s account as well as in their transaction history
If this debit type can be added manually by staff to a patron’s account via the manual invoices, check the “Can be added manually?” check box
If this debit type is only to be used in specific branches, you can select the libraries in “Libraries limitation”
Nota
You can select more than one library by pressing the “Ctrl” key while selecting.
Haga clic en “Guardar”
Editing an existing debit type
You can only modify the debit types you have added, as well as the “Manual fee”.
To edit a debit type:
Click the “Edit” button to the right of the debit type
Modify any field
Haga clic en “Guardar”
Archiving a debit type
If there is a debit type you don’t need anymore, you can archive it.
Nota
There is no way to delete a debit type since they are used in the patron’s accounting section.
To archive a debit type, simply click the “Archive” button to the right of the debit type.
Restoring an archived debit type
If you need to use an archived debit type again, simply click on the “Restore” button to the right of the debit type.
This will make it available again.
Cajas registradoras
Get there: More > Administration > Accounting > Cash registers
This feature is enabled through the UseCashRegisters system preference.
If you have no cash registers already defined, you will be invited to create one.
Otherwise, you will see the list of all your cash registers.
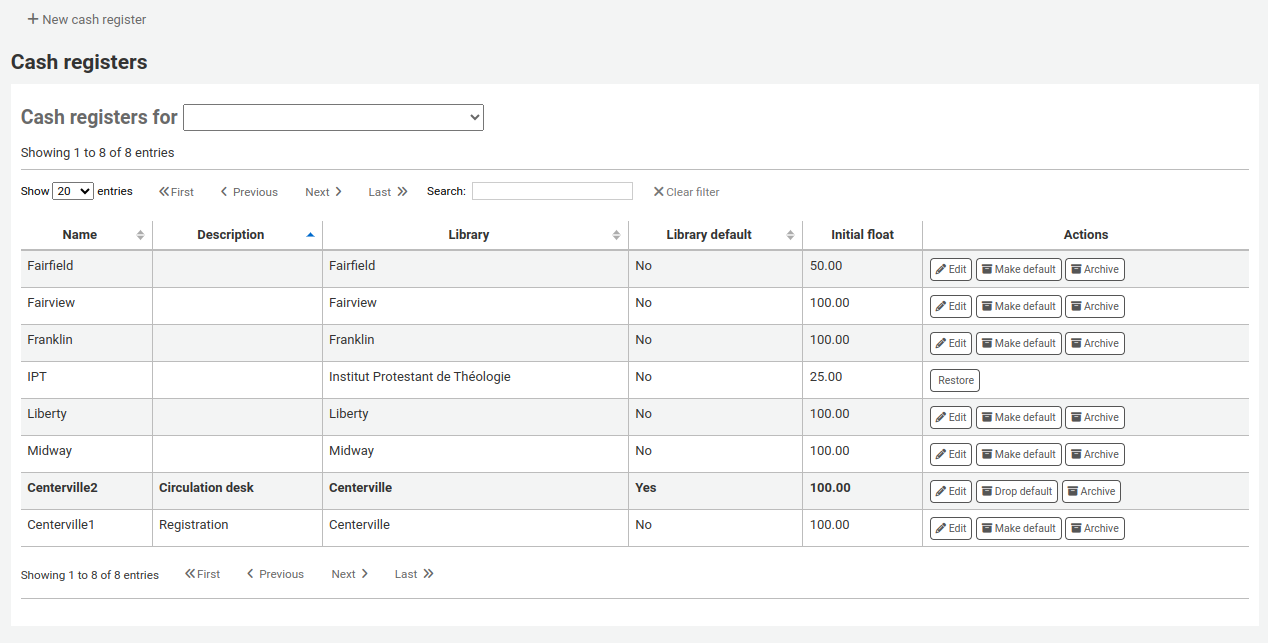
In the “Actions” columns, you can choose to edit your cash registers, make one of them default or remove the default status, and archive or restore an archived register.
The default status is only useful in libraries that have more than one register per branch. The default register will be pre-selected when entering a payment. If there is only one cash register per branch, the branch’s cash register will be selected when paying.
Adding a new cash register
Click on “New cash register”

Give your cash register a name
Optionally you can also add a description
Choose in which library this cash register is located
And finally, enter the initial float, i.e. the amount in the cash register
Click “Add”
Catalog administration
Establecer estos controles antes de empezar a catalogar en su sistema Koha.
Ir a: Más > Administración > Catalogo
MARC bibliographic frameworks
Think of frameworks as templates for creating new bibliographic records. Koha comes with some predefined frameworks that can be edited or deleted, and librarians can create their own frameworks for content specific to their libraries.
Get there: More > Administration > Catalog > MARC bibliographic frameworks
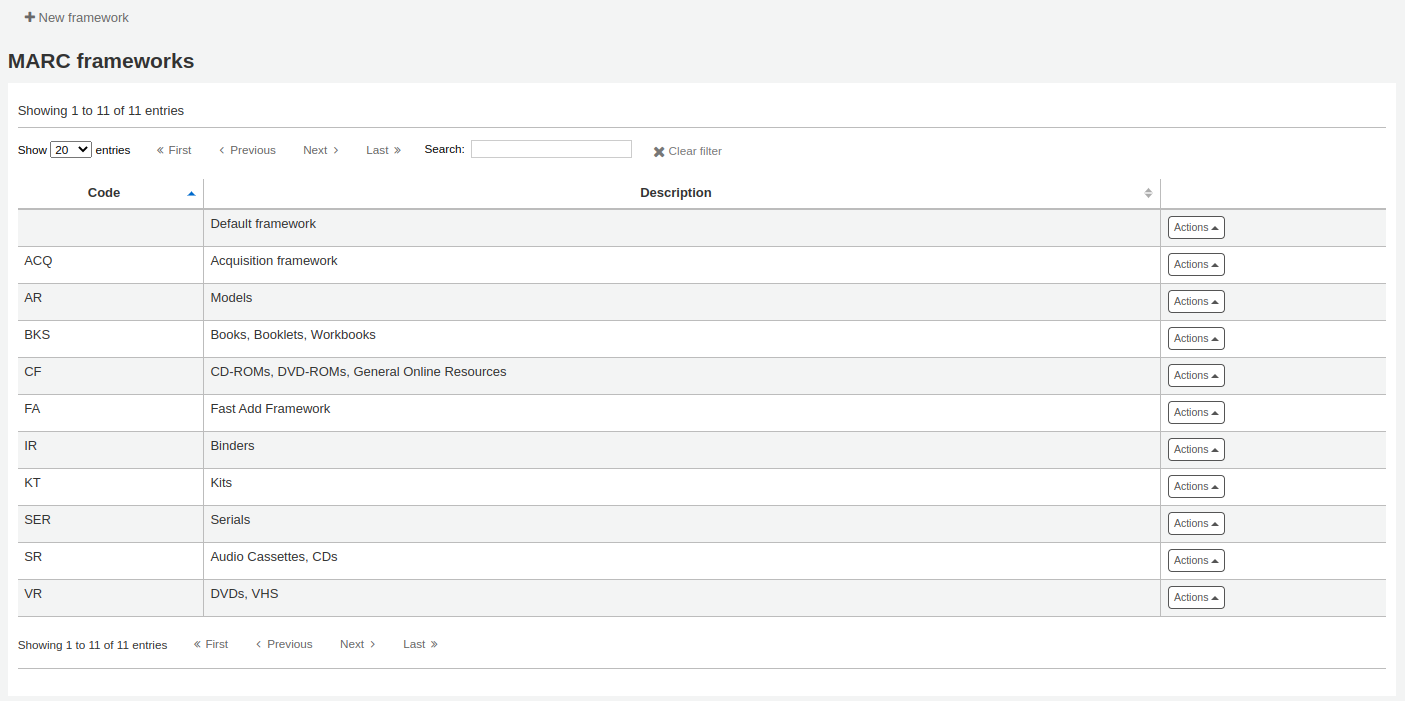
Importante
Do not delete or edit the Default framework since this will cause problems with your cataloging records - always create a new template based on the Default framework, or alter the other frameworks.
Add new framework
Para agregar una nueva hoja de trabajo
Click “New framework”

Ingrese un código de 4 o menos caracteres
Utilizar el campo Descripción para introducir una definición más detallada de su hoja de trabajo
Haga clic en “Enviar””
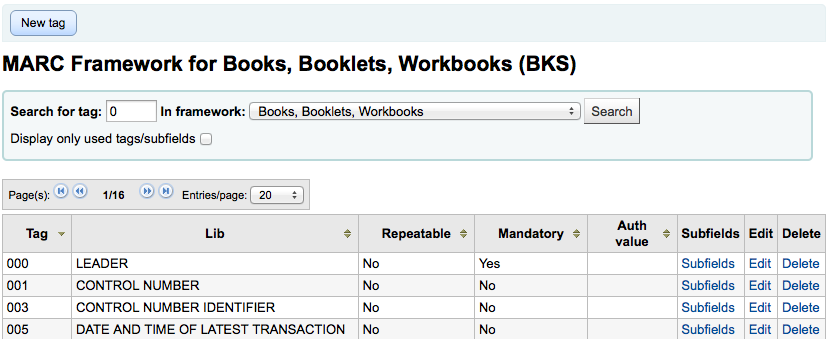
Once your framework is added click Actions then “MARC structure” to the right of it on the list of frameworks

You will be asked to choose a framework to base your new framework on, this will make it easier than starting from scratch
Una vez que su hoja de trabajo aparezca en la pantalla puede editar o eliminar cada campo siguiendo las instrucciones para editar campos y subcampos
Edit existing frameworks
Clicking Actions and then “Edit” to the right of a framework will only allow you to edit the description for the framework:

Para editar los campos y subcampos asociados con la Hoja de trabajo primero debe hacer click en “Estructura MARC” y luego seguir las instrucciones para editar campos y subcampos
Add fields to frameworks
If a framework doesn’t contain a field that you require you may need to add it. To add a field to a framework click the “New tag” button at the top of the framework definition
Esto abrirá un formulario en blanco para introducir los datos de campos MARC
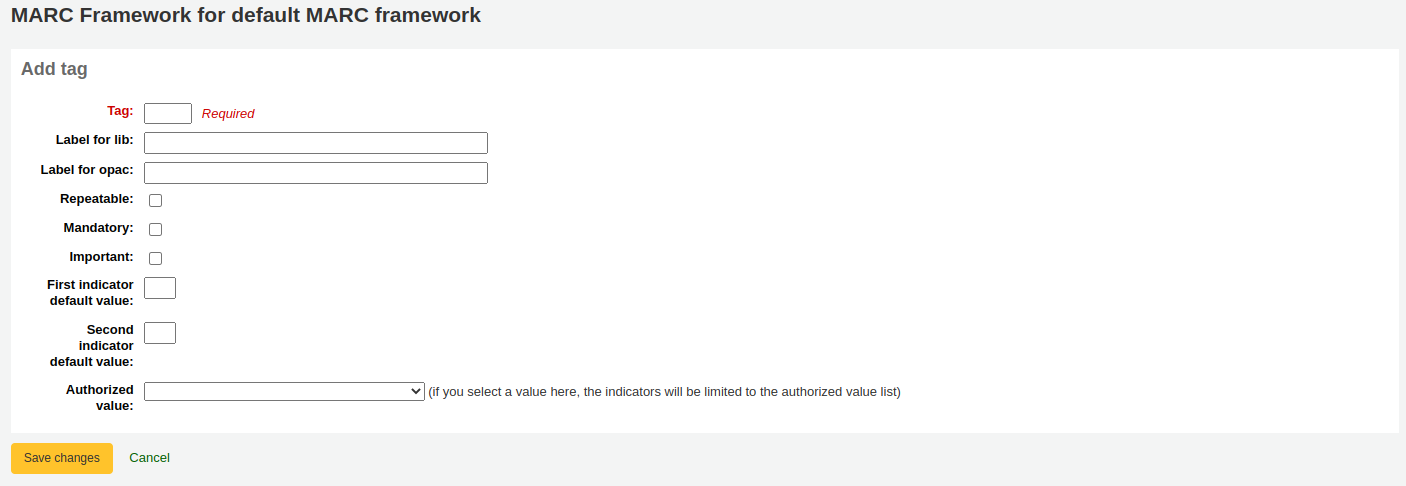
Ingrese la información correspondiente a su nueva etiqueta:
El “Campo” es el número de campo MARC
La “Etiqueta para biblioteca” es el texto que aparecerá en la interfaz del personal en el módulo de catalogación
La “Etiqueta para el OPAC” es el texto que aparecerá en el OPAC al ver la versión del registro MARC
Si este campo se puede repetir, marcar la caja “Repetible”
Si este campo es obligatorio, marcar la caja “Obligatorio”
Si desea que este campo sea un desplegable con un número limitado de respuestas posibles, elija que “Valor autorizado” desea utilizar
When you’re finished, click “Save changes” and your new tag will be displayed in the framework field list

A la derecha de un nuevo campo hay un enlace a Acciones y de ahí a “Subcampos”, usted necesitará agregar subcampos para que esta etiqueta aparezca en su editor de MARC. El proceso de introducción de los ajustes para el nuevo subcampo es el mismo que se encuentra en la sección editando campos y subcampos en hojas de trabajo de este manual
Edit framework fields and subfields
Frameworks are made up of MARC fields (tags) and subfields. To make edits to a MARC field click on Actions then “Edit” to the right of the field
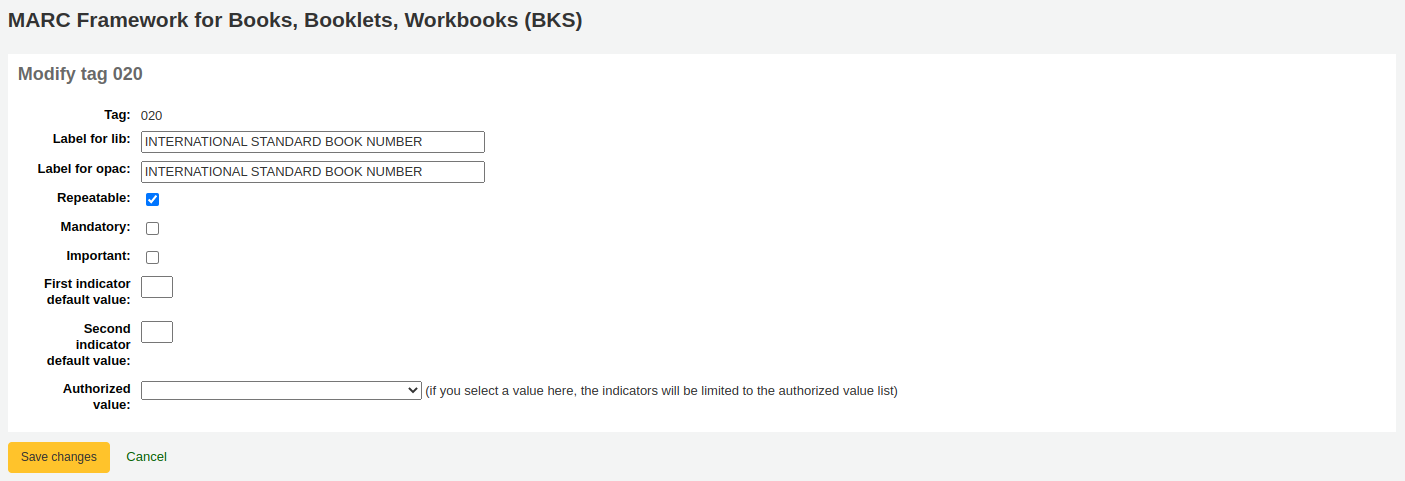
Cada campo tiene una etiqueta (la cual es la etiqueta MARC), esta no se puede editar
The “Label for lib” is what will show in the staff client if you have advancedMARCeditor set to display labels
La “Etiqueta de OPAC” es lo que se mostrará en la vista MARC en el OPAC
If you check “Repeatable” then the field will have an icon next to it allowing you to add multiples of that tag
If you check “Mandatory” the record cannot be saved unless you have a value assigned to tag. A “Required” flag will display as a prompt
If you add default values for indicators here these will be pre-filled to save time when cataloguing but can still be edited if required
“Valores autorizados” es donde se define una lista desplegable de valores autorizados para sus catalogadores
To edit the subfields associated with the tag, click Actions then “Subfields” to the right of the tag on the framework field list. Each subfield has its own tab which contains three sections - Basic constraints, Advanced constraints and Other options.
For each subfield you can set the following basic constraint values
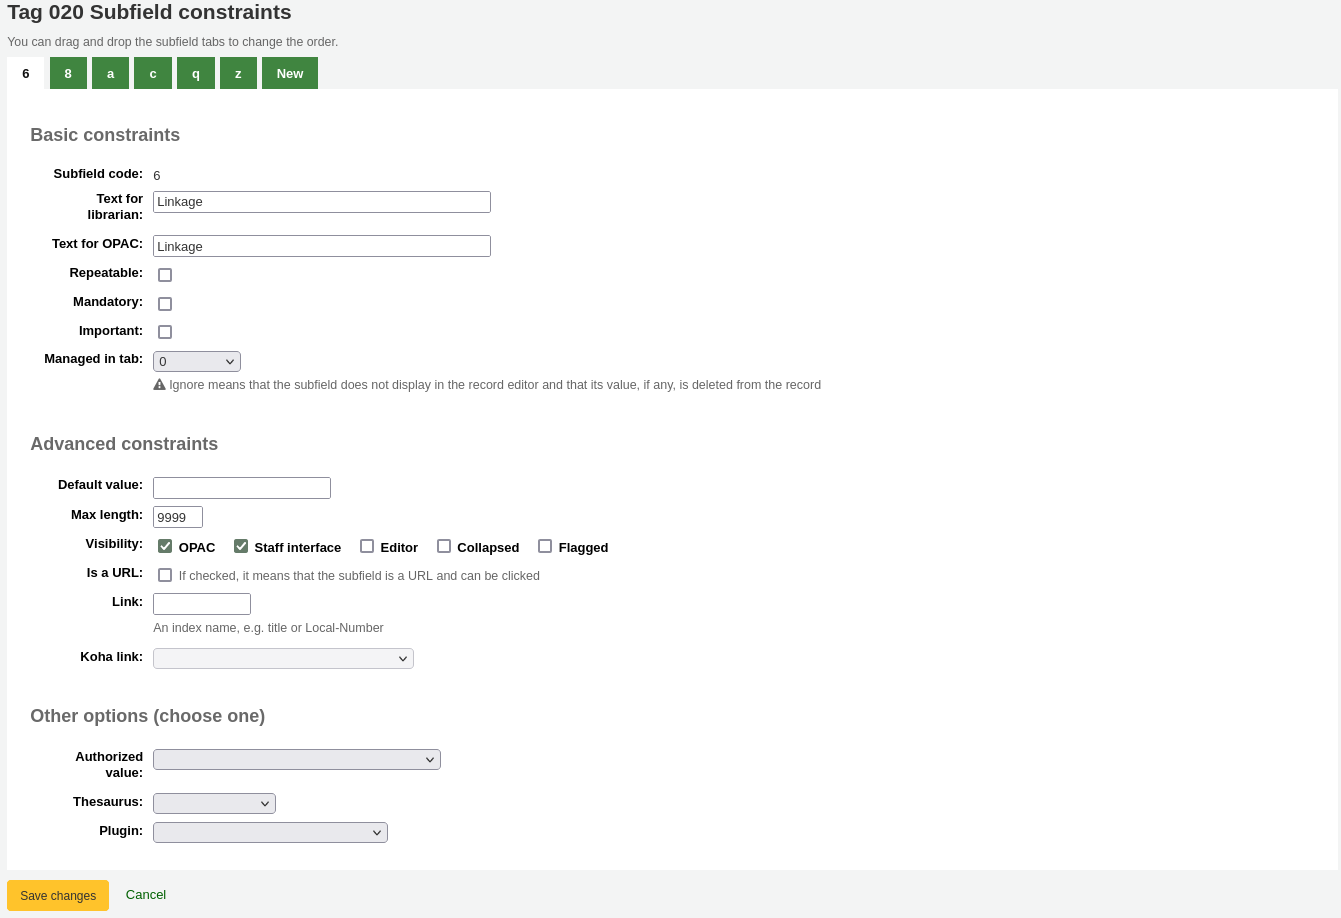
Subfield code (this wouldn’t usually be changed)
The MARC subfield code
Texto para el bibliotecario
lo que aparece antes del subcampo en el interfaz de bibliotecario
Texto para el OPAC
what appears before the field in the OPAC
Si queda vacío, el texto para el bibliotecario es usado en su lugar
Repetible
the field will have an icon next to it allowing you to add multiples of the subfield
Obligatorio
the record cannot be saved unless you have a value assigned to this subfield. A “Required” flag will display as a prompt
Administrado en pestaña
define la pestaña donde se muestra el subcampo. Todos los subcampos de un campo determinado debe estar en la misma pestaña o ignoradas. No haga caso significa que el subcampo no se gestiona.
For each subfield you can set the following advanced constraint values

Valor predeterminado
define lo que desea que aparezca en el campo de forma predeterminada, esto se puede editar, pero ahorra tiempo si usa la misma nota una y otra vez o el mismo valor en un campo a menudo.
Nota
If you would like a field to fill in with today’s date you can use the YYYY MM DD syntax in the “Default value”. For example: a default of «Year:YYYY Month:MM Day:DD» (without quotes) will print as «Year:2015 Month:11 Day:30»
Visibilidad
le permite seleccionar desde donde este subcampo es visible/ oculto, simplemente seleccione las casillas donde le gustaría que el campo sea mostrado y desactive las casillas donde le gustaría que sea oculto.
Nota
The Editor tickbox controls whether this subfield will display within cataloguing editor for this framework. If you tick Collapsed the subfield will be hidden in the editor but will be displayed if the field label is clicked to expand all subfields

Es una URL
si está seleccionado, significa que el subcampo es una URL y puede hacer clic sobre ella
Enlazar
Si usted introduce un campo/subcampo aquí (200b), un enlace aparece después del subcampo en la vista Detallada MARC. Esta vista está presente sólo en la interfaz del personal, no en el OPAC. Si el bibliotecario hace clic en el enlace, se realiza una búsqueda en la base de datos para el campo/subcampo con el mismo valor. Esto se puede utilizar principalmente por dos razones:
en un campo como el de autor (200f en UNIMARC), poner 200f aquí, será capaz de ver todos los libros del mismo autor.
en un campo que es un enlace (4xx) para alcanzar otro registro bibliográfico. Por ejemplo, poniendo 011a en 464$x, encontrará la serie que tiene este ISSN.
Advertencia
Este valor no debe cambiar después de que los datos han sido agregados a su catálogo. Si necesita cambiar este valor debe solicitar al administrador del sistema que ejecute misc/batchRebuildBiblioTables.pl.
Enlace Koha
Koha is multi-MARC compliant. So, it does not know what the 245$a means, neither what 200$f (those 2 fields being both the title in MARC21 and UNIMARC). So, in this list you can «map» a MARC subfield to its meaning. Koha constantly maintains consistency between a subfield and its meaning. When the user wants to search on «title», this link is used to find what is searched (245 if you’re MARC21, 200 if you’re UNIMARC).
Para cada subcampo puede establecer los siguientes valores de Otras opciones
Valor autorizado
significa que el valor no se ingresa manualmente, sino que debe ser seleccionado de una lista de valores generados a partir de una lista de ref:valore autorizados <authorized-values-label>
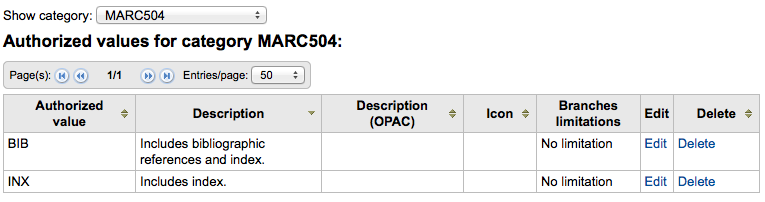
In the example above, the 504a field will show the MARC504 authorized values when cataloging

Tesauro
significa que el valor no es libre, pero puede ser buscado en la autoridad/tesauro de la categoría seleccionada
Plugin
significa que el valor se calcula o gestiona por un plugin. Los plugins puede hacer casi cualquier cosa.
Ejemplos:
Para las signaturas topográfica existe una opción para agregar un navegador de signaturas al lado del subcampo de la signatura topográfica, de manera que pued identificar cuáles están en uso y cuáles no. Simplemente elija el plugin cn_browser.pl. Obtenga más información en la sección de catalogación de este manual.
If you’d like to let file uploads via cataloging you can choose the upload.pl plugin and this will allow you to upload files to Koha to link to your records.
En UNIMARC hay plugins para cada campo 1xx codificado. El plugin es una ayuda enorme para el catalogador. También existen dos plugins (unimarc_plugin_210c y unimarc_plugin_225a) que pueden «mágicamente» encontrar el editor a partir del ISBN y la lista de la colección para el editor
To save your changes simply click the “Save changes”.
Import/export frameworks
Al lado de cada hoja de trabajo hay un enlace tanto para importar o exportar la hoja.
Export framework
Para exportar una hoja de trabajo simplemente haga clic en el enlace “Exportar” a la derecha del título de la hoja de trabajo.

Al hacer clic en “Exportar” se le pedirá que elija el formato para exportar el archivo.
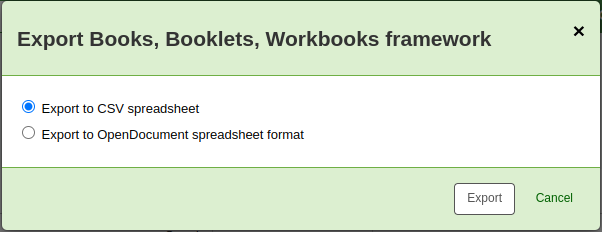
Una hoja de trabajo exportada de esta manera pude ser importada en cualquier otra instalación de Koha, esto se realiza utilizando la opción de importación de hoja de trabajo.
Import framework
Una forma fácil de crear una nueva hoja de trabajo es la de importar una creada desde otra instalación de Koha o desde la suya. Esta hoja de trabajo necesitará de ser exportada de otro sistema utilizando las instrucciones anteriores para que sea posible importarla en este punto.
Para importar una hoja de trabajo, primero necesitará crear una nueva hoja de trabajo. Una vez tenga esa hoja, haga clic en Acciones y luego en “Importar” a la derecha de la nueva hoja de trabajo.
Se le pedirá que busque un archivo en su ordenador para importar en la plantilla.
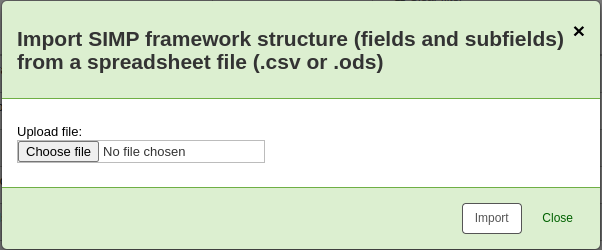
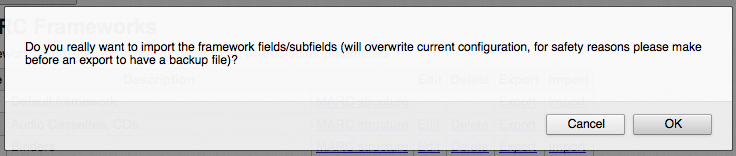
Se le solicitará que confirme sus acciones antes de importar el archivo.
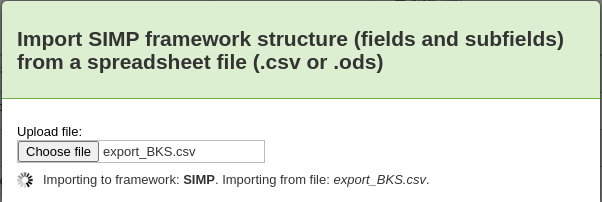
A medida que su archivo se cargará verá una imagen que confirma que el sistema está funcionando.
Una vez que su importación se ha completado usted será llevado a la herramienta de edición de hoja de trabajo donde se puede hacer cualquier cambio que necesite la hoja que ha importado.
Correspondencia Koha a MARC
While Koha stores the entire MARC record, it also stores common fields for easy access in various tables in the database. Koha to MARC mapping is used to tell Koha where to find these values in the MARC record. In many cases you will not have to change the default values set by in this tool on installation, but it is important to know that the tool is here and can be used at any time.
Get there: More > Administration > Catalog > Koha to MARC mapping
The table shows all the database fields that can be mapped to MARC fields.
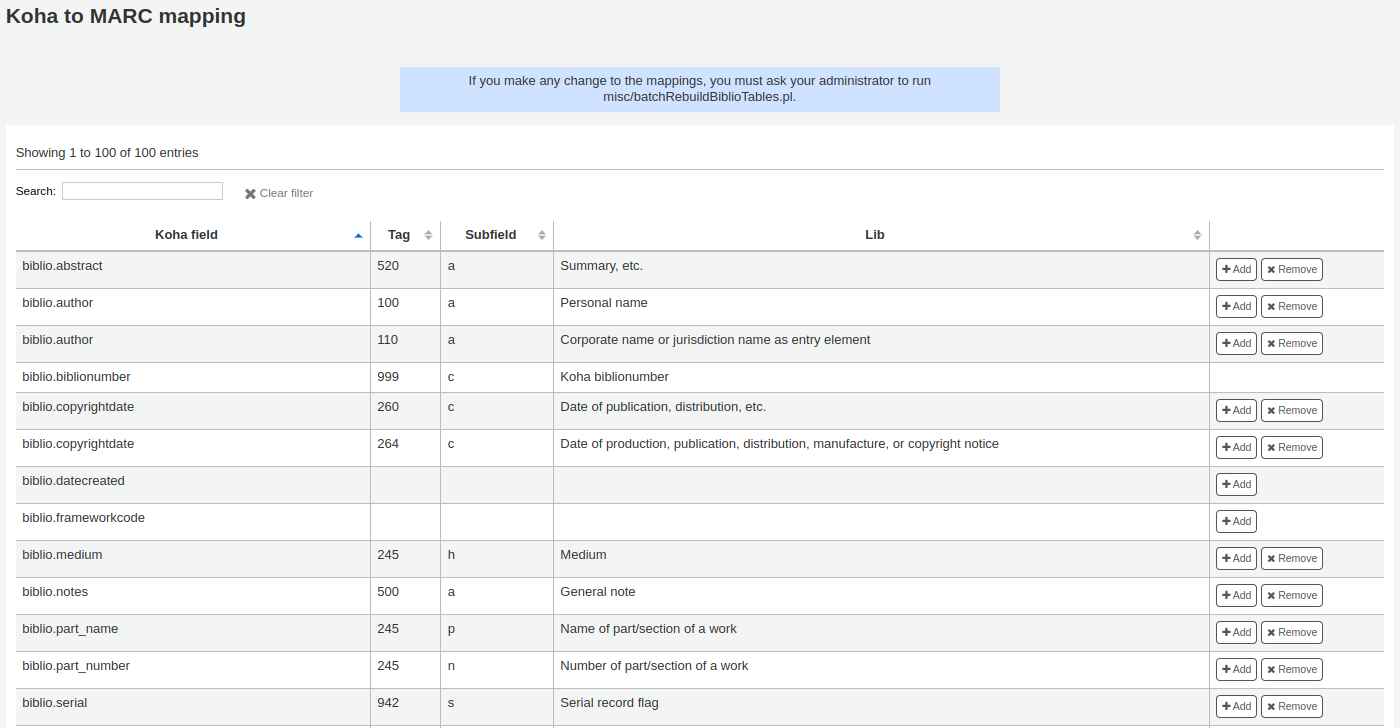
To add a new mapping, click on the “Add” button to the right of the appropriate field.
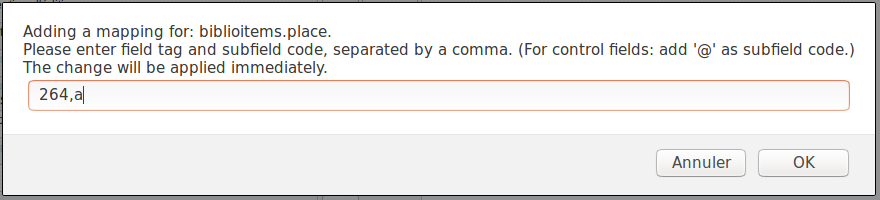
Write in the MARC field and subfield you would like to map, separated by a comma, to this Koha field and click the “OK” button.
Nota
It is possible to link more than one MARC field to a database field. For example, you could link both 260$a and 264$a to the biblioitems.place field.
If you would like to clear the mapping for a database field, click the “Remove” button.
Nota
All changes are immediate.
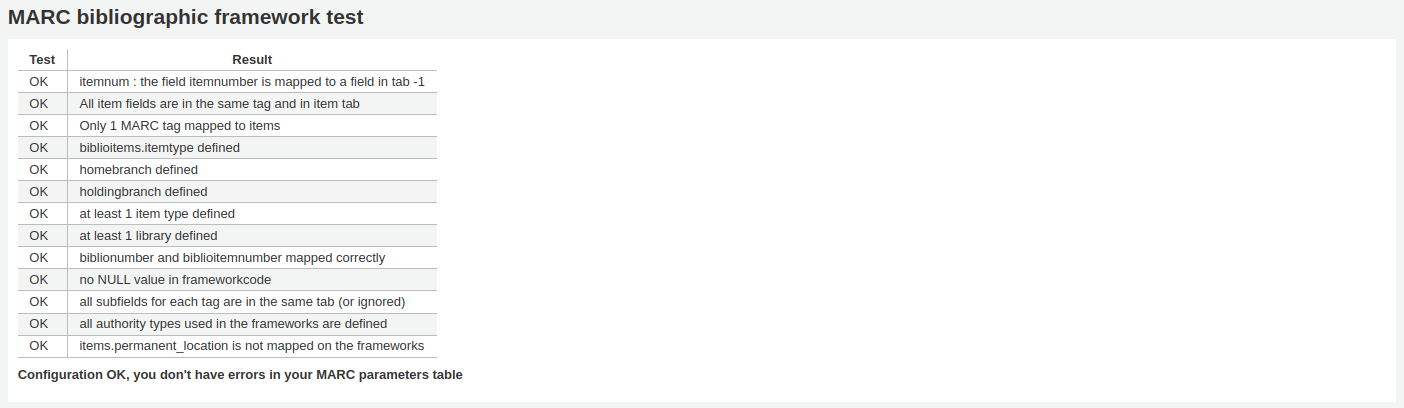
Prueba de las hojas de trabajo bibliográficas MARC
Verifica la estructura MARC
Get there: More > Administration > Catalog > MARC bibliographic framework test
If you change your MARC bibliographic framework it’s recommended that you run this tool to test for errors in your definition.
Fuentes de clasificación
Fuente de clasificación o esquema de estantería es una categoría de Valores autorizados que se asigna a los campos 952$2 y 942$2 en las hojas de trabajo MARC de Koha y se almacena en el campo items.cn_source dentro de la base de datos.
Ir a: Más > Administración > Catalogo > Fuentes de clasificación
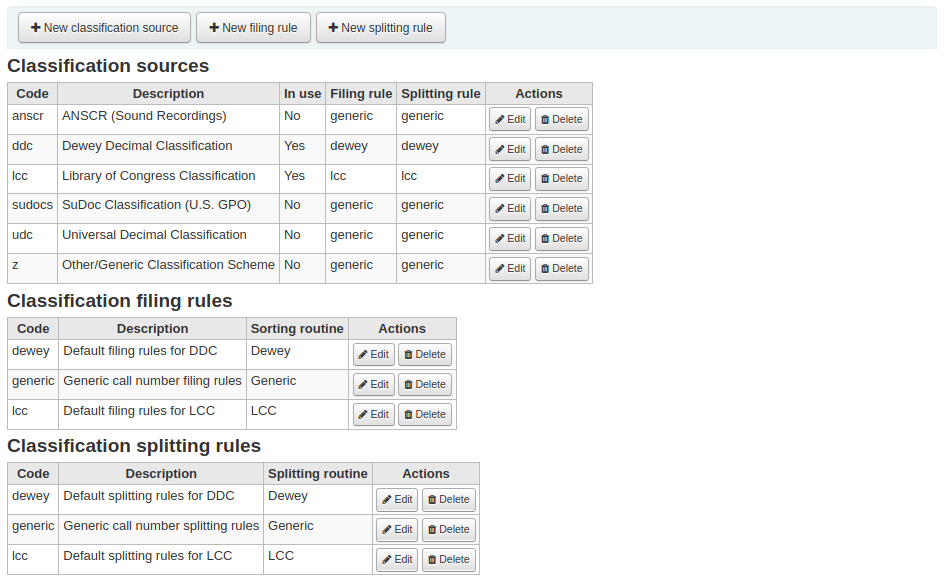
Los valores comúnmente usados de este campo son:
ddc - Clasificación Decimal Dewey
lcc - Clasificación de la Library of Congress
Si decide instalar las fuentes de la clasificación durante la instalación de Koha, vería también otros valores:
ANSCR (grabaciones sonoras)
Clasificación SuDOC
Clasificación decimal universal
Otra/Clasificación genérica
Adding/editing classification sources
You can add your own source of classification by using the “New classification source” button. To edit use the “Edit” button.
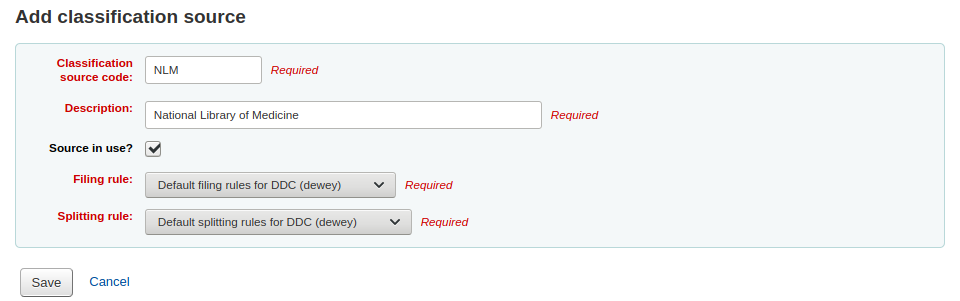
Cuando cree o edite:
Usted necesitará el ingresar un código y una descripción
Marque la casilla “Fuente en uso?” si desea que el valor aparezca en la lista desplegable para esta categoría.
Seleccione la regla de alfabetización adecuada del menú desplegable.
Reglas de ordenación de la clasificación
Reglas de ordenación determinan el orden en el cual los ítems se ubican en estantes.
Los valores pre-configurados en Koha son:
Dewey
LCC
Genérico
Las reglas de ordenación se conectan a Fuentes de clasificación. Puede configurar nuevas reglas de ordenación utilizando el botón “Nueva Regla de Ordenación”. Para editar utilice el botón “Editar”.
Cuando cree o edite:
Ingrese un código y una descripción
Seleccione una rutina de clasificación apropiada - dewey, genérica o lcc
Regla de coincidencia de registro
Las reglas de registros coincidentes se utilizan en la importación de registros MARC en Koha.
Get there: More > Administration > Catalog > Record matching rules
Las reglas que se configuran aquí serán referenciadas en Preparar registros MARC para la importación.
It is important to understand the difference between “Match points” and “Match checks” before adding new matching rules to Koha.
Match points are the criteria that you enter that must be met in order for an incoming record to match an existing MARC record in your catalog. You can have multiple match points on an import rule each with its own score. An incoming record will be compared against your existing records (“one record at a time”) and given a score for each match point. When the total score of the match points matches or exceeds the threshold given for the matching rule, Koha assumes a good match and imports/overlays according your specifications in the import process. An area to watch out for here is the sum of the match points. Double check that the matches you want will add up to a successful match.
Ejemplo:
Umbral de coincidencia: 100
Match point on 020$a 1000
Match point on 022$a 1000
Match point on 245$a 500
Match point on 100$a 100
In the example above, a match on either the 020$a or the 022$a will result in a successful match. A match on 245$a title and 100$a author (and not on 020$a or 022$a) will only add up to 600 and not be a match. And a match on 020$a and 245$a will result in 1500 and while this is a successful match, the extra 500 point for the 245$a title match are superfluous. The incoming record successfully matched on the 020$a without the need for the 245$a match. However, if you assigned a score of 500 to the 100$a Match Point, a match on 245$a title and 100$a author will be considered a successful match (total of 1000) even if the 020$a is not a match.
Match checks are not commonly used in import rules. However, they can serve a couple of purposes in matching records. First, match checks can be used as the matching criteria instead of the match points if your indexes are stale and out of date. The match checks go right for the data instead of relying on the data in the indexes. (If you fear your indexes are out of date, a rebuild of your indexes would be a great idea and solve that situation!) The other use for a match check is as a “double check” or “veto” of your matching rule. For example, if you have a matching rule as below:
Umbral de coincidencia: 100
Match point on 020$a 1000
Match check on 245$a
Koha will first look at the 020$a tag/subfield to see if the incoming record matches an existing record. If it does, it will then move on to the Match Check and look directly at the 245$a value in the incoming data and compare it to the 245$a in the existing “matched” record in your catalog. If the 245$a matches, Koha continues on as if a match was successful. If the 245$a does not match, then Koha concludes that the two records are not a match after all. The Match Checks can be a really useful tool in confirming true matches.
When looking to create matching rules for your authority records the following indexes will be of use:
Index name |
Matches MARC tag |
|---|---|
LC-cardnumber |
010$a |
Personal-name |
100$a |
Corporate-name-heading |
110$a |
Meeting-name |
111$a |
Title-uniform |
130$a |
Chronological-term |
148$a |
Subject-topical |
150$a |
Name-geographic |
151$a |
Term-genre-form |
155$a |
Table: Authority indexes
Adding matching rules
Para crear una nueva regla de coincidencia:
Click “New record matching rule”
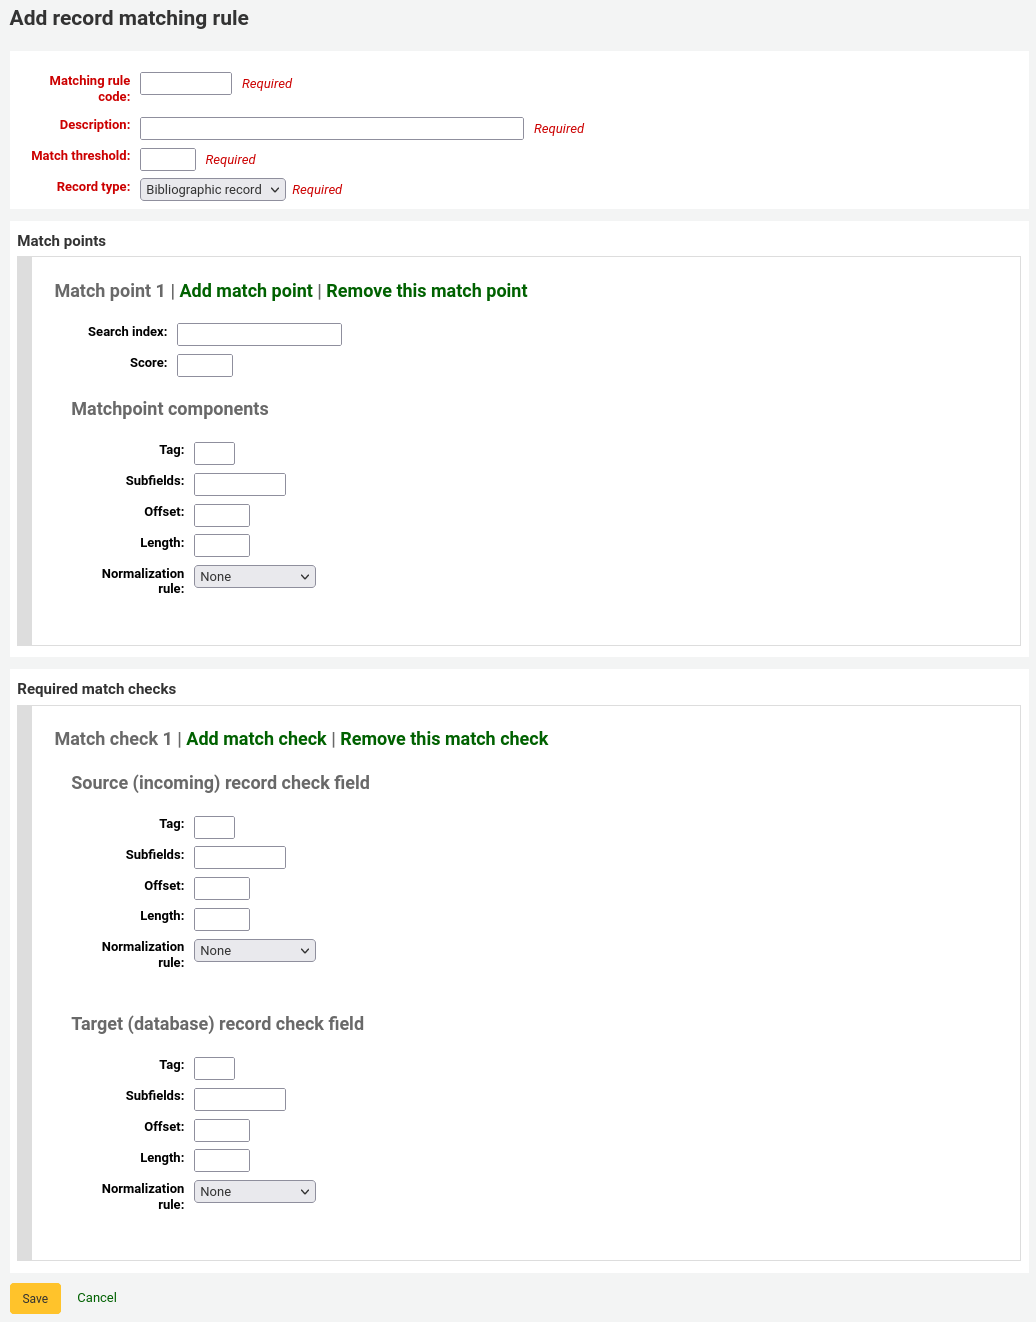
Seleccione un nombre único e ingréselo en el campo “Código de regla de coincidencia”
“Descripción” puede ser cualquier cosa que deje en claro qué regla está eligiendo
“Límite de coincidencia” - El total de “puntos” que debe sumar un registro para considerarse una “coincidencia”
“Record type” is the type of import this rule will be used for - either authority or bibliographic
Los puntos de coincidencia se establecen para determinar cuales campos deben coincidir
“Search index” can be found by looking at the ccl.properties file on your system which tells the zebra indexing what data to search for in the MARC data». Or you can review the index for standard index names used. Índices de búsqueda en Koha
“Puntaje” - La cantidad de “puntos” que vale la coincidencia en este campo. Si la suma de cada puntaje es superior al límite de coincidencia, el registro entrante se considera una coincidencia de un registro existente
Ingrese la etiqueta MARC que desee coincidir en el campo “Etiqueta”
Ingrese el subcampo de etiqueta MARC que desee coincidir en el campo “Subcampo”
“Offset” - Para usar en campos de control, 001-009
“Longitud” - Para usar en campos de control, 001-009
Koha sólo tiene una «regla de normalización» que elimina los caracteres adicionales, tales como comas y puntos y comas. El valor que introduzca en este campo es irrelevante para el proceso de normalización.
“Chequeos de coincidencia requeridos” - ??
Sample bibliographic record matching rule: Control number
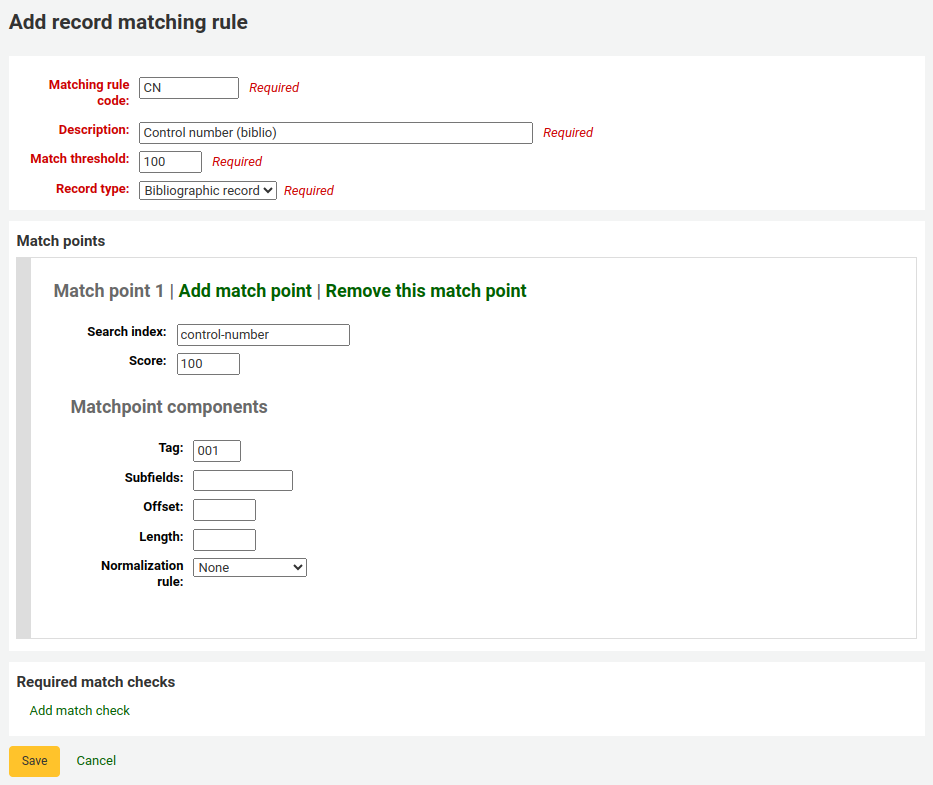
Umbral de coincidencia: 100
ctype:b Bibliografías
Nota
If you’d like a rule to match on the 001 in authority records you will need the repeat all of these values and change just the record type to “Authority record”
Puntos de coincidencia (solo uno):
Buscar en el índice: número de control
Puntaje: 101
Etiqueta: 001
Nota
este campo es para el número de control asignado por la organización a crear, usar o distribuir el registro
Subcampos: un
Offset: 0
Longitud: 0
Regla de normalización: número de control
Required match checks: none (remove the blank one)
Configuración de conjunto OAI
En esta página puede crear, modificar y eliminar conjuntos OAI-PMH
Crear un conjunto
Para crear un conjunto:
Haga clic en el enlace “Agregar un nuevo conjunto”
Rellene los campos obligatorios “setSpec” y “setName”
Entonces puede agregar descripciones para este conjunto. Para hacerlo haga clic en “Agregar descripción” y rellene la casilla de texto creada. Puede agregar cuantas descripciones desee.
Haga clic en al botón “Guardar”
Modify/delete a set
Para modificar un conjunto, haga clic en el enlace “Modificar” en la mísma línea del conjunto que desea modificar. Aparecerá un formulario similar al de creación y le permitirá modificar setSpec, setName y descripciones.
Para eliminar un conjunto, solo haga clic en el enlace “Eliminar” en la misma línea del conjunto que desea eliminar.
Defina correspondencias
Aquí puede definir como se construirá un conjunto(que registros pertenecerán al mismo) definiendo correspondencias. Correspondencias son una lista de coondiciones en contenidos del registro. Un registro requiere coincidir en una condición para pertenecer al conjunto.
Cumplimente los campos “Campo”, “Subcampo” y “Valor”. Por ejemplo si quiere incluir en este conjunto todos los registros que tengan un 999$9 con valor “XXX”. Cumplimente “Campo” con 999, “Subcampo” con 9 y “Valor” con XXX.
Si desea agregar otra condición, haga clic en el botón “OR” y repita el paso 1.
Haga clic en “Guardar”
Para eliminar una condición, solo deje al menos uno de “Campo”, “Subcampo” o “Valor” y haga clic en “Guardar”.
Nota
En realidad, una condición es verdadera si el valor en el subcampo correspondiente es estrictamente igual a lo que se define si “Valor”. Un registro que cuenta con 999$9 = “XXX YYY «no pertenecer a un conjunto donde la condición es de 999$9 =”XXX “.
Y es sensible a mayúsculas: un registro que tiene 999$9 = “xxx” no pertenecerá a un conjunto cuya condición sea 999$9 = “XXX”.
Crear conjuntos
Una vez haya configurado todos sus conjuntos, deberá construirlos. Este se hace invocando el script misc/migration_tools/build_oai_sets.pl.
Campos para búsqueda en ítems
Desde aquí se pueden agregar campos de búsqueda personalizados a la opción de búsqueda de ítem en la intranet.
To add a new search term simply click the “New search field” button
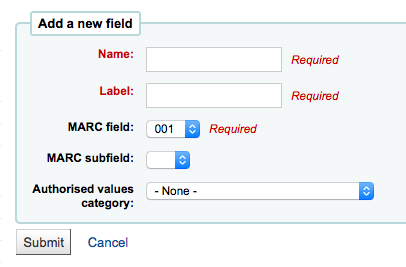
Nombre es un campo para identificar el término de búsqueda
Etiqueta es lo que aparecerá en la página de búsqueda de ítem
Campo MARC le permite escoger el campo en el que desea realizar la búsqueda
Subcampo MARC es el subcampo donde desea realizar la búsqueda
La categoría de valores autorizados puede ser utilizada para convertir este campo de búsqueda en un menú desplegable en lugar de un campo de texto libre
Una vez su nuevo campo es agregado, será visible en la parte superior de ésta página y en la página de búsqueda de ítem

Search engine configuration
Once you have switched to Elastic Search in your SearchEngine system preference, you’ll see a new link for Search engine configuration in the Catalog section of Administration. Here you will manage indexes, facets, and their mappings to MARC fields and subfields.
Adquisiciones
El módulo de adquisiciones de Koha proporciona una forma para que la biblioteca haga los pedidos a sus proveedores y gestione los presupuestos de adquisiciones.
Antes de utilizar el Módulo de Adquisiciones, debe asegurarse de que está configurado de acuerdo a sus necesidades.
Ir a: Más > Administración > Adquisiciones
Monedas y tipo de cambio
Si usted hace pedidos a más de un país debe completar la entrada de cambio de divisas para que el módulo de adquisiciones pueda calcular correctamente los totales.
Get there: More > Administration > Acquisitions > Currencies and exchange rates
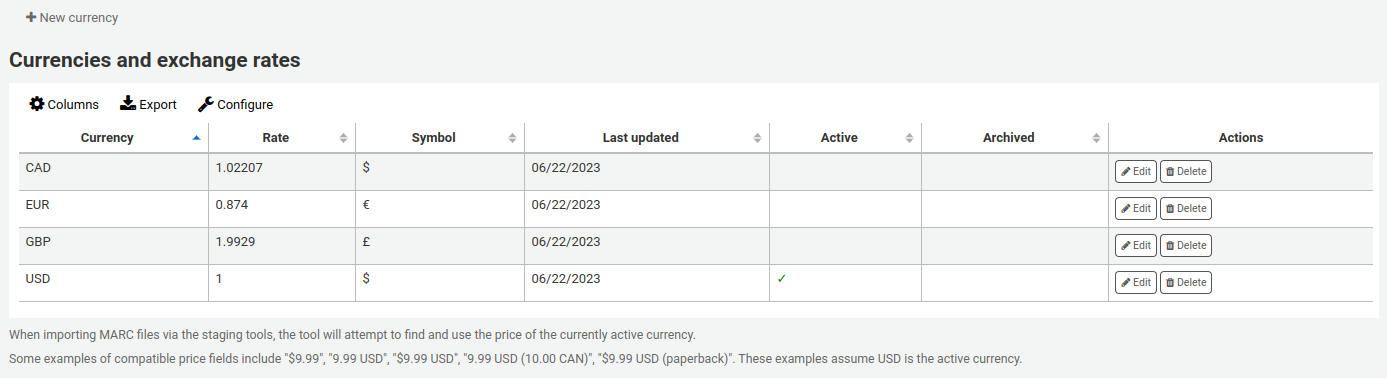
Nota
Estos datos no se actualizan automáticamente, así que asegúrese de mantenerlos al día para que su contabilidad se mantenga correcta.
El código ISO que ingrese será utilizado cuando importe archivos MARC con la herramienta de archivos prepareados, la misma intentará encontrar y utilizar el precio de la moneda activa.
La moneda activa es la principal moneda que se utiliza en su biblioteca. Su moneda activa tendrá una marca de verificación en la columna «Activo». Si usted no tiene una moneda activa se muestra un mensaje de error diciendo que elija una moneda de activa.

Presupuestos
Budgets are used for tracking accounting values related to acquisitions. For example you could create a budget for the current year (ex. 2015) and then break that into Fondos for different areas of the library (ex. Books, Audio, etc).
Ir a: Más > Administración > Adquisiciones > Presupuestos
Cuando visite la administración principal de presupuestos verá dos pestañas, una para presupuestos activos y otra para inactivos.
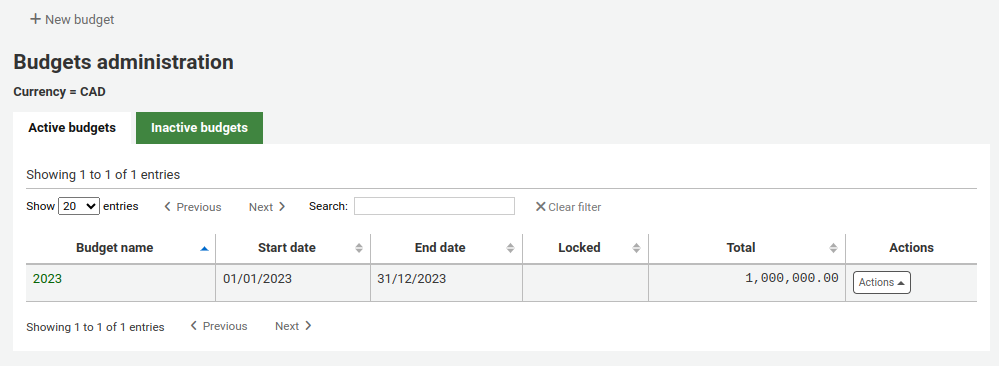
Adding budgets
Los presupuestos pueden ser creados tanto desde cero, como duplicando el presupuesto del año anterior o al cerrar el presupuesto de un año anterior.
Add a new budget
If you haven’t used Koha before for acquisitions then you’ll need to start fresh with a new budget. To add a new budget click the “New budget” button.
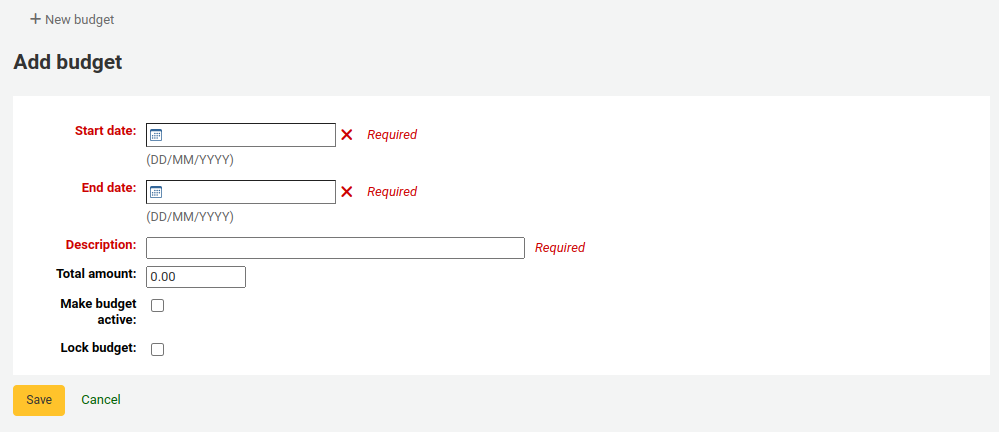
Seleccione el período de tiempo para este presupuesto, ya sea un año académico, un año fiscal, trimestre, etc.
The description should be something that will help you identify the budget when ordering
En la caja de cantidad no utilice ningún símbolo, simplemente ingrese la cantidad del presupuesto con números y decimales.
Marcando un presupuesto activo lo hace utilizable para generar pedidos en el módulo de adquisiciones, incluso si el pedido se realiza después de la fecha de finalización del presupuesto. Esto le permite registrar pedidos que fueron generados en el período presupuestario previo.
Locking a budget means that funds will not be able to be modified by librarians
Once you have made your edits, click the “Save changes” button. You will be brought to a list of your existing budgets.
Duplicate a budget
Para duplicar un presupuesto del año anterior, haga clic en el vínculo del nombre del presupuesto de la lista de los presupuestos
On the screen listing the budget breakdown click the “Edit” button at the top and choose to “Duplicate budget”
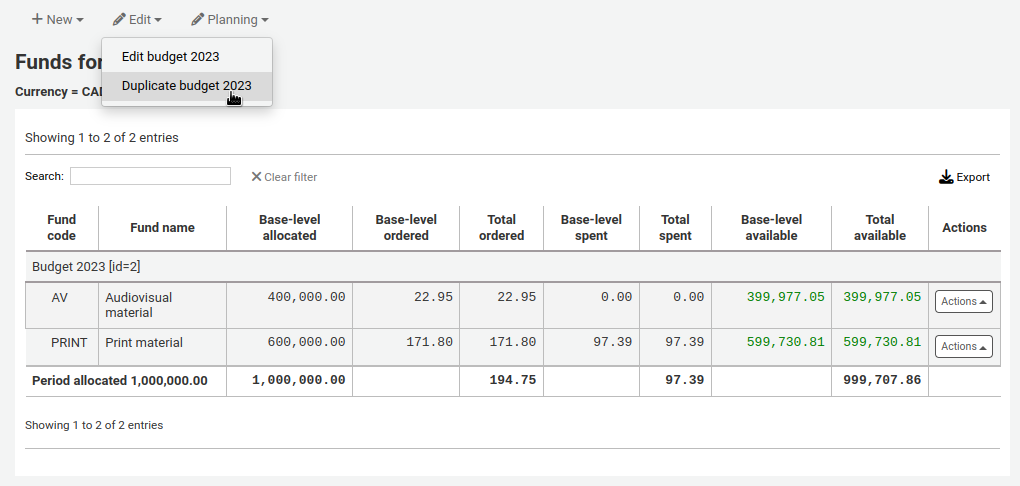
También puede hacer clic en el botón “Acciones” a la derecha del presupuesto y seleccionar “Duplicar”.
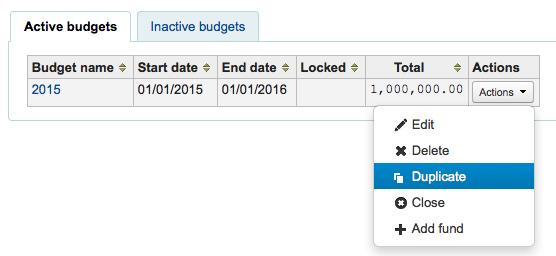
En ambos casos, se le presentará un formulario en el que, simplemente, necesitará ingresar las nuevas fechas de inicio y finalización y guardar el presupuesto.
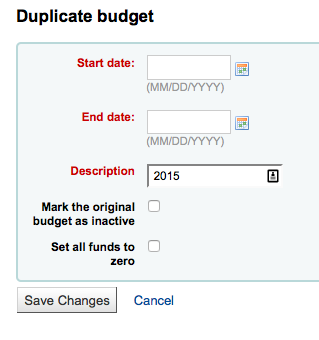
Seleccione la casilla “Marque el presupuesto original como inactivo” si ya no se va a utilizar el presupuesto original.
Seleccione la casilla “Establecer todos los fondos a cero” si desea que el nuevo presupuesto contenga todas las mismas estructuras de fondos como el presupuesto anterior, pero no las asignaciones, hasta que usted introduzca, manualmente, una cantidad en el fondo.
Esto no solo duplicará su presupuesto, sino que todos los fondos asociados con ese presupuesto de modo que pueda reutilizar presupuestos y fondos de año a año, de esta forma, se puedan mover pedidos sin recibir y, si se desea, fondos no gastados de un presupuesto previo al nuevo presupuesto.
Cerrar un presupuesto
Cierre un presupuesto para mover o pasar pedidos sin recibir y, si se desea, fondos no gastados de un presupuesto previo a un nuevo presupuesto. Antes de cerrar su presupuesto es posible que desee duplicar el presupuesto del año anterior para que tenga un lugar al cual pasar los pedidos sin recibir.
Encuentre el presupuesto anterior con pedidos sin recibir en la pestaña de Presupuestos activos o Presupuestos inactivos y seleccione “Cerrar” bajo “Acciones.”
Nota
In order for the unreceived orders to be automatically moved to the new budget, the fund structures in the previous budget must exist in the new budget. Budgets without unreceived orders cannot be closed.
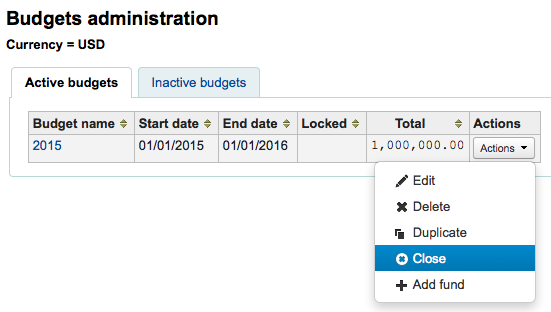
Al seleccionar “Cerrar” se le presentará un formulario.
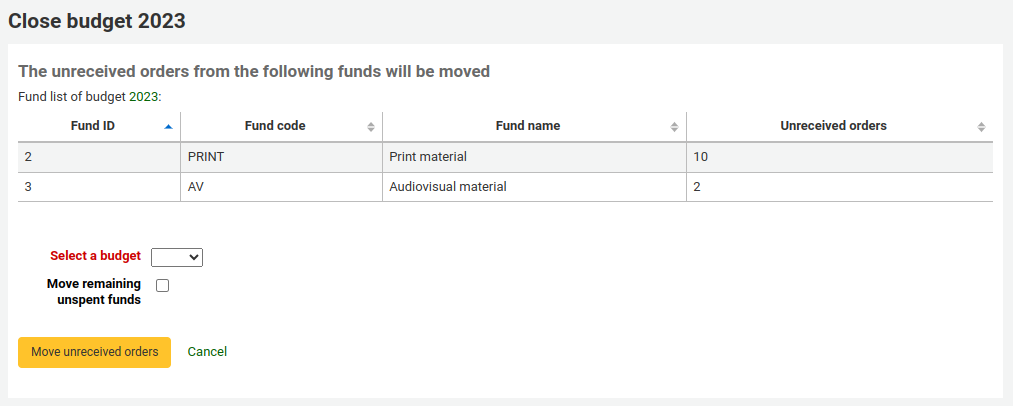
Utilice el desplegable “Seleccione un presupuesto” para elegir el nuevo presupuesto de los pedidos sin recibir.
Seleccione la casilla “Mueva fondos no gastados restantes” para mover los montos no gastados de los fondos del presupuesto que está por cerrarse al presupuesto seleccionado.
Una vez ha realizado sus elecciones, haga clic en el botón “Mueva pedidos sin recibir”. Se le presentará un cuadro de diálogo que dice: “Usted ha elegido mover todos los pedidos sin recibir desde “Presupuesto X” a “Presupuesto Y”. Esta acción no puede ser revertida. ¿Desea continuar?” Presupuesto X es el presupuesto que se va ha cerrar y Presupuesto Y es el presupuesto seleccionado.

Si todo parece correcto haga clic en “Aceptar” y los pedidos sin recibir y, si esta seleccionado, se trasladarán los fondos no gastados.
Espere hasta que el “Informe después de mover pedidos sin recibir del presupuesto X a Y” sea desplegado. Esto mostrará una lista de los números de pedido que han sido impactados (agrupados por el fondo) y detalla si el pedido sin recibir fue movido o si hubo un problema. Por ejemplo, si el nuevo presupuesto no contiene un fondo con el mismo nombre que el presupuesto anterior, el pedido no será movido.
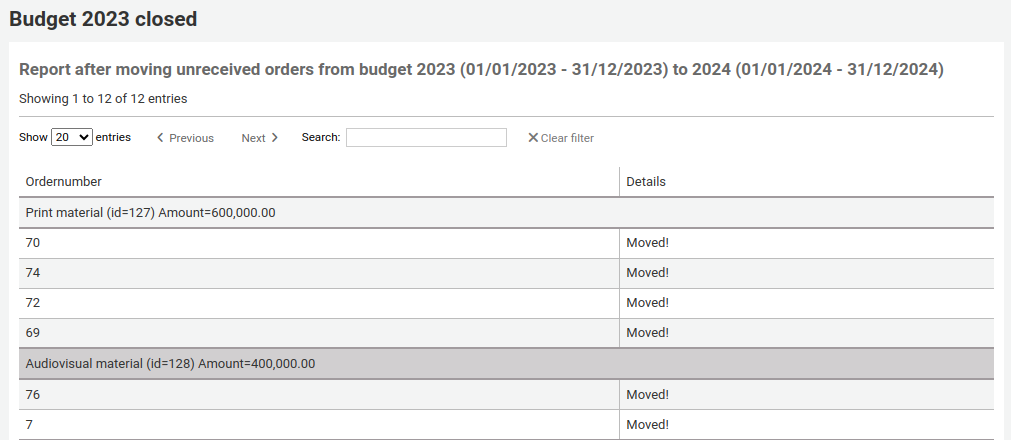
Fondos
Ir a: Más > Administración > Adquisiciones > Fondos
Agregar un fondo
Un fondo es añadido a un presupuesto.
Importante
Debe definirse un presupuesto antes de poder crear un fondo.
To add a new fund click the “New” button and then choose which budget you would like to add the fund to.
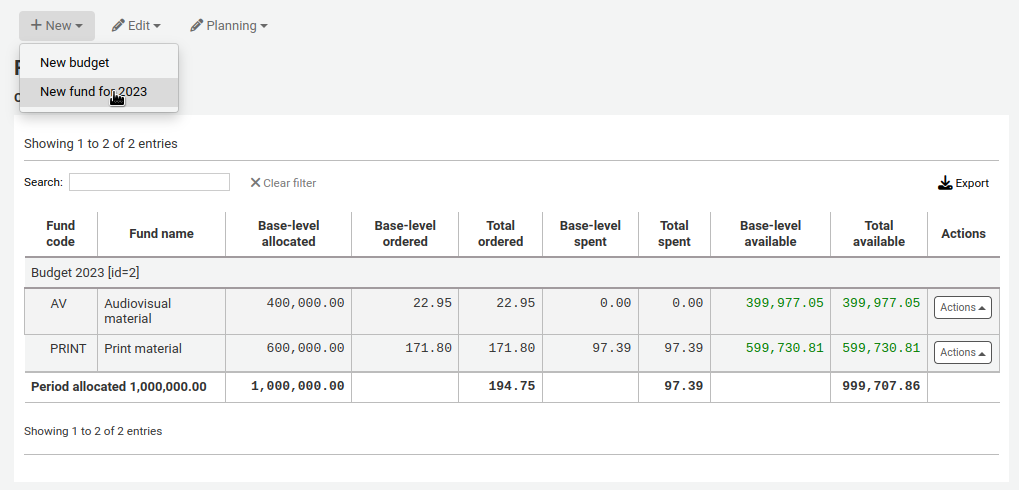
En el formulario que aparece, usted querrá ingresar los datos básicos sobre su fondo.
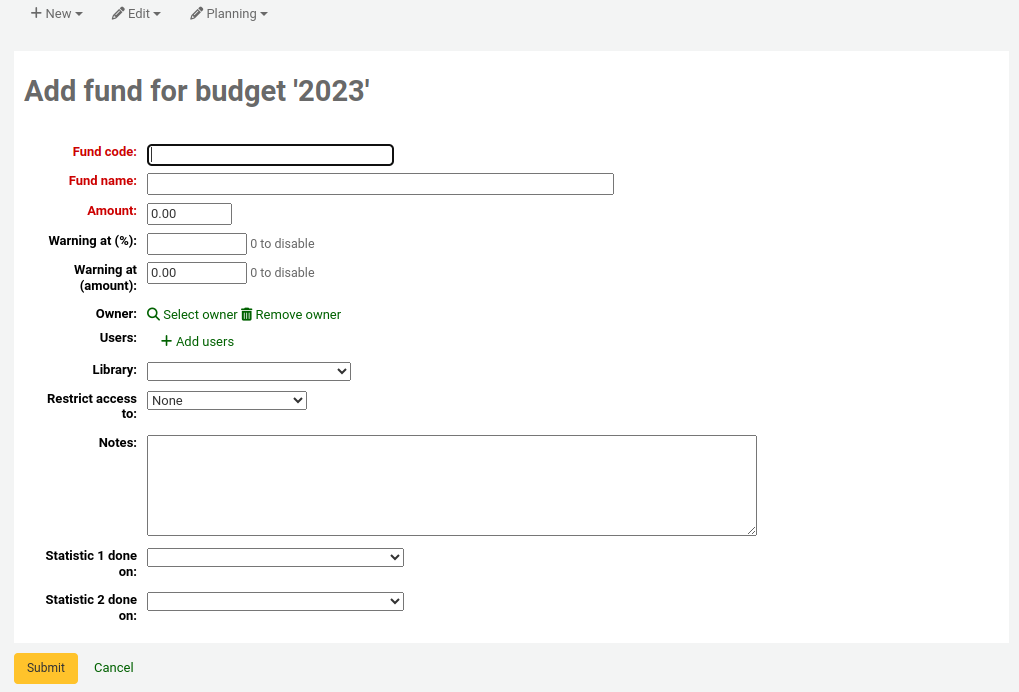
Los tres primeros campos son obligatorios, los restantes son opcionales
Fund code is a unique identifier for your fund
The fund name should be something that librarians will understand
La cantidad debe ser ingresada con números enteros y decimales, sin otros caracteres
Advertencia en (%) o Advertencia en (cantidad) se pueden llenar para hacer que Koha le avise antes de gastar un determinado porcentaje o la cantidad de su presupuesto. Esto le evitará un gasto excesivo.
You can choose to assign this fund to a librarian. Doing so will make it so that only that librarian can make changes to the fund
Elegir en qué biblioteca se utiliza este fondo
Puede restringir quién puede hacer pedidos desde un fondo, seleccionando un “propietario”, “propietario y usuarios” o “propietario, usuarios y biblioteca” desde el menú “Restringir acceso a”
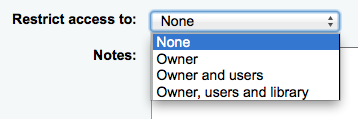
Importante
Importante: Sin un propietario, la restricción de acceso será ignorada, asegúrese de introducir un propietario, así como elegir una restricción
Las notas se usan para hacer descripciones. Es conveniente agregar notas para que los bibliotecarios sepan cuando usar este fondo
Planning categories are used for statistical purposes. If you will be using the Asort1 and/or Asort2 authorised values lists to track your orders you need to select them when setting up the fund. Select the Asort1/Asort2 option from the dropdown lists for the Statiscal 1 done on: and Statistical 2 done on: fields.
Para aprender más sobre categorías de planificación, consulte las:ref:FAQ de Categorías de planificación <faq-planning-categories-label>.
Cuando haya completado, haga clic en “Enviar” y será dirigido a una lista de los fondos del presupuesto.
The monetary columns in the fund table break down as follows:
Base-level allocated is the “Amount” value you defined when creating the fund
Base-level ordered is the ordered amount for this fund (without child funds)
Total ordered is the base-level ordered for this fund and all its child funds
Base-level spent is the spent amount for this fund (without child funds)
Total spent is the base-level spent for this fund and all its child funds
Base-level available is 1 - 2
Total available is 1 - 3
To the right of each fund you will find the “Actions” button under which you will find the “Edit,” “Delete,” and “Add child fund” options.
A child fund simply a sub-fund of the fund listed. An example would be to have a fund for “Fiction” and under that have a fund for “New releases” and a fund for “Science Fiction.” It is an optional way to further organize your finances.
Los fondos con sub-fondos asociados se mostrarán con una pequeña flecha a la izquierda. Al hacer clic se le mostrarán los fondos asociados.
Budget planning
Cuando vea la lista de fondos haga clic en el botón “Planificación” y seleccione como planifica gastar su presupuesto.

Si se elige “Planificación mensual” se podrá ver la cantidad presupuestada desglosada por meses:
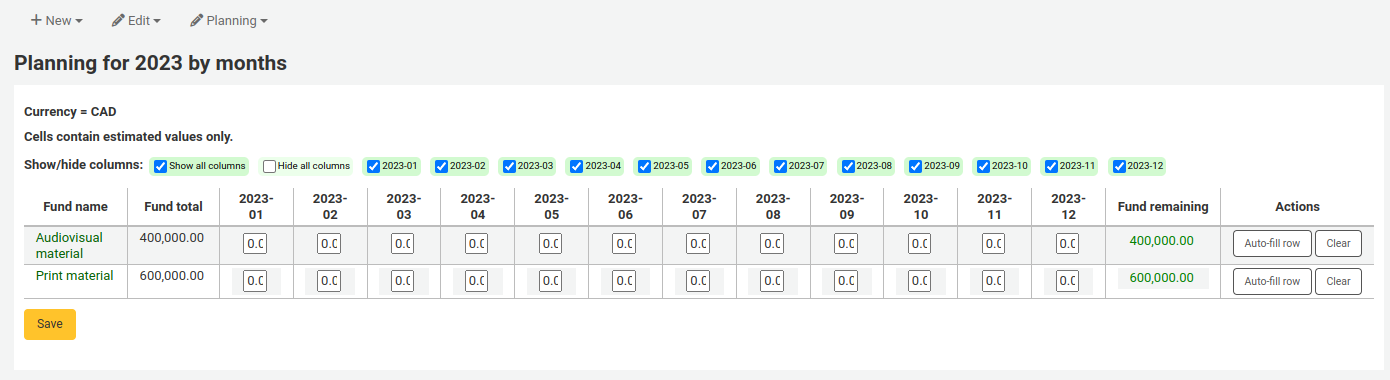
To hide some of the columns you can click the “hide” link to the right (or below as in the screenshot above) the dates. To add more columns you can click the “Show a column” link found below the “Fund remaining” heading.
Desde aquí usted puede planear su gasto presupuestario introduciendo manualmente los valores o haciendo clic en el botón “Auto-completar fila”. Si opta por auto-completar el formulario, el sistema tratará de dividir el monto correspondientemente, deberá realizar algunas ediciones para dividir más precisamente.
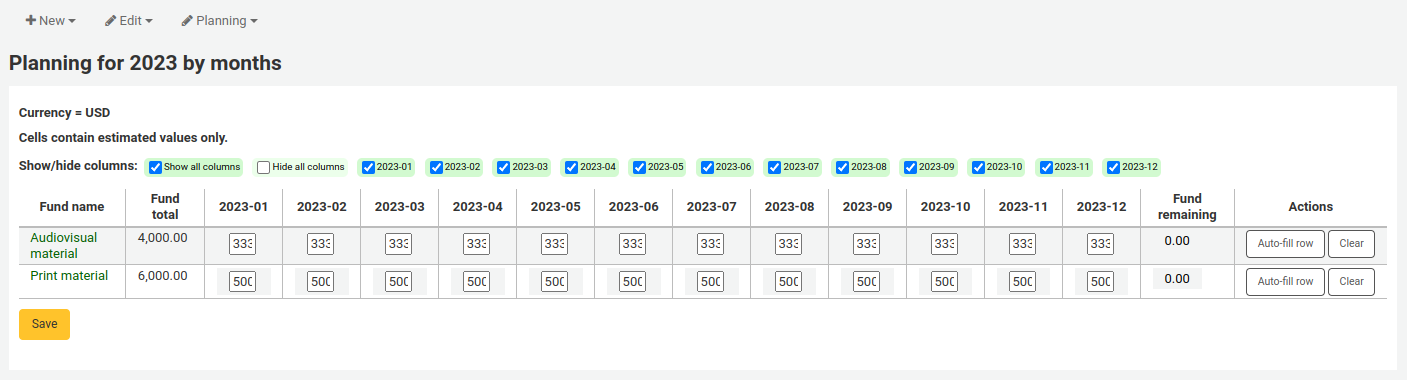
Una vez se hayan realizado los cambios, haga clic en el botón “Guardar”. Si desea exportar sus datos como un archivo CSV, ingrese el nombre el archivo en el campo “Salida a archivo de nombre” y haga clic en el botón “Exportar”.

Cuentas EDI
From here you can set up the information needed to connect to your acquisitions vendors.
Nota
Before you begin you will need at least one Vendor set up in Acquisitions.
To add account information click the “New account” button.
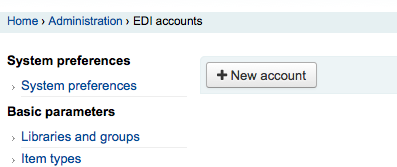
En el formulario que aparece deberá introducir al menos una fecha para realizar la búsqueda.
Confirmación de nueva cuenta
Cada proveedor tendrá una cuenta.
Biblioteca EANs
Una biblioteca EAN es el identificador que un proveedor proporciona a una biblioteca para devolver información a ellos, de esta manera, ellos saben cual cuenta usar cuando facturan. Una cuenta EDI puede tener varios EANs.
To add an EAN click the “New EAN” button.
New EAN
En el formulario que aparece deberá introducir al menos una fecha para realizar la búsqueda.
New EAN form
Parámetros adicionales
Get there: More > Administration > Additional parameters
Servidores Z39.50/SRU
Z39.50 is a client/server protocol for searching and retrieving information from remote computer databases, in short it’s a tool used for copy cataloging.
SRU- Search/Retrieve via URL - is a standard XML-based protocol for search queries, utilizing CQL - Contextual Query Language - a standard syntax for representing queries.
Using Koha you can connect to any Z39.50 or SRU target that is publicly available or that you have the log in information to and copy both bibliographic and/or authority records from that source.
Get there: More > Administration > Additional parameters > Z39.50/SRU servers
Koha comes with a default list of Z39.50/SRU targets set up that you can add to, edit or delete
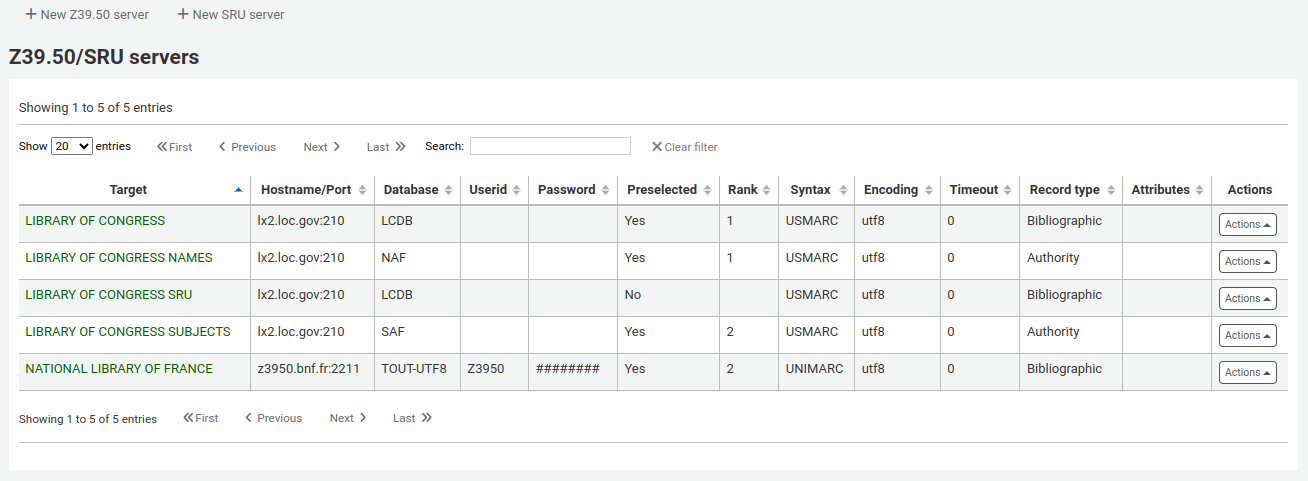
To find additional Z39.50 targets you use IndexData’s IRSpy: http://irspy.indexdata.com [http://irspy.indexdata.com/] or the Library of Congress’s list of targets http://www.loc.gov/z3950/
Add a Z39.50 target
From the main Z39.50 page, click “New Z39.50 server”
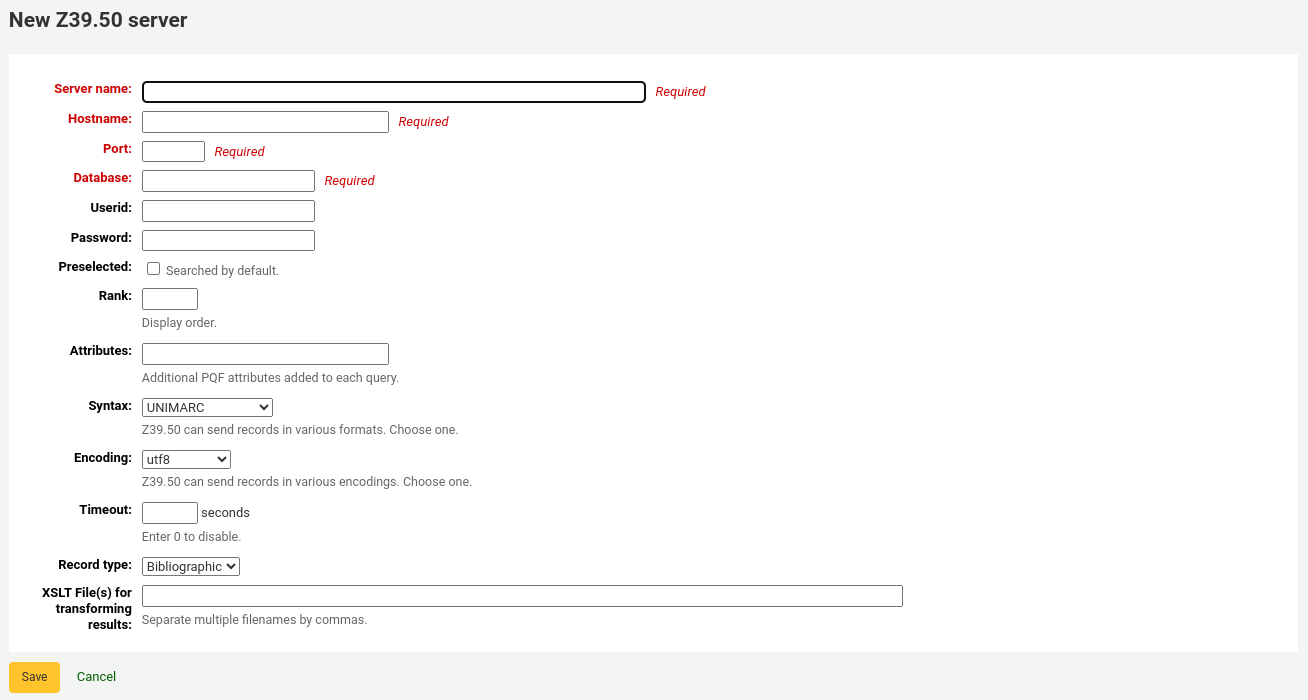
“servidor Z39.50” se debe completar con un nombre que le ayude a identificar la fuente (como el nombre de la biblioteca).
“Hostname” será la dirección del servidor Z39.50.
“Puerto” indica a Koha que puertos escuchar para obtener resultados de este servidor.
“ID de usuario” y “Contraseña” son solo requeridas para servidores que están protegidos por contraseñas.
Check the “Preselected” box if you want this target to always be selected by default.
“Rank” le permite ingresar dónde en la lista desea que aparezca este objetivo.
Si se deja en blanco los objetivos estarán en orden alfabético.
“Sintaxis” es el tipo de MARC que usted utiliza.
“Codificación” indica al sistema cómo leer caracteres especiales.
“Timeout” es útil para los servidores que toman mucho tiempo. Puede configurar el tiempo de espera para que no se siga intentando sobre el servidor si los resultados no se encuentran en un período razonable de tiempo.
“Tipo de registro” permite definir si se trata de un servidor bibliográfico o de uno de autoridades.
“XSLT file(s)” lets enter one or more (comma-separated) XSLT file names that you want to apply on the search results.
Al recuperar los registros de servidores externos puede que desee automatizar algunos cambios en esos registros. Los XSLTs le permiten hacer esto. Koha incluye algunos archivos XSLT de ejemplo listos para su uso en el directorio /koha-tmpl/intranet-tmpl/prog/en/xslt/:
Del952.xsl: Elimina ítems (MARC21/NORMARC)
Del995.xsl: Elimina ítems (UNIMARC)
Del9LinksExcept952.xsl: Remove $9 links. Skip item fields (MARC21/NORMARC)
Del9LinksExcept995.xsl: Remove $9 links. Skip item fields (UNIMARC)
Suggested bibliographic Z39.50 targets
Koha libraries with open Z39.50 targets can share and find connection information on the Koha wiki: http://wiki.koha-community.org/wiki/Koha_Open_Z39.50_Sources. You can also find open Z39.50 targets by visiting IRSpy: http://irspy.indexdata.com.
Los siguientes servidores se han utilizado con éxito en otras bibliotecas Koha (en las América):
ACCESS PENNSYLVANIA 205.247.101.11:210 INNOPAC
CUYAHOGA COUNTY PUBLIC webcat.cuyahoga.lib.oh.us:210 INNOPAC
GREATER SUDBURY PUBLIC 216.223.90.51:210 INNOPAC
HALIFAX PUBLIC catalogue.halifaxpubliclibraries.ca:210 horizon
HALTON HILLS PUBLIC cat.hhpl.on.ca:210 halton_hills
LIBRARY OF CONGRESS lx2.loc.gov: 210 LCDB
LONDON PUBLIC LIBRARY catalogue.londonpubliclibrary.ca:210 INNOPAC
MANITOBA PUBLIC library.gov.mb.ca:210 horizon
MILTON PL cat.mpl.on.ca:210 horizon
NATIONAL LIBRARY OF WALES cat.llgc.org.uk:210 default
NHUPAC 199.192.6.130:211 nh_nhupac
OCEAN STATE LIBRARIES (RI) catalog.oslri.net:210 INNOPAC
OHIOLINK olc1.ohiolink.edu:210 INNOPAC
PUBCAT prod890.dol.state.vt.us:2300 unicorn
SAN JOAQUIN VALLEY PUBLIC LIBRARY SYSTEM (CA) hip1.sjvls.org:210 ZSERVER
SEATTLE PUBLIC LIBRARY ZSERVER.SPL.ORG:210 HORIZON
TORONTO PUBLIC symphony.torontopubliclibrary.ca:2200 unicorn
TRI-UNI 129.97.129.194:7090 voyager
VANCOUVER PUBLIC LIBRARY z3950.vpl.ca:210 Horizon
Add a SRU target
From the main Z39.50/SRU page, click “New SRU server”
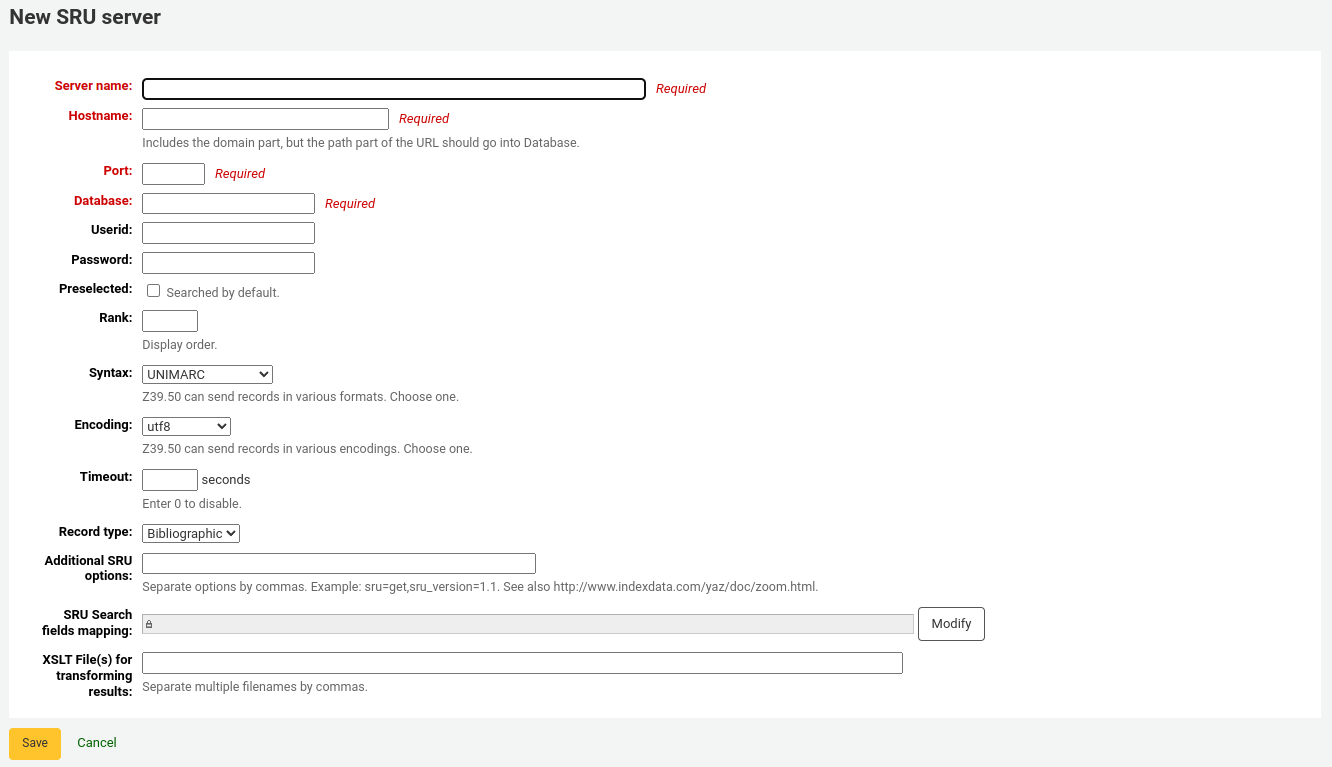
“Nombre del servidor” se debe completar con un nombre que le ayude a identificar la fuente (como el nombre de la biblioteca).
“Hostname” será la dirección del servidor Z39.50.
“Puerto” indica a Koha que puertos escuchar para obtener resultados de este servidor.
“ID de usuario” y “Contraseña” son solo requeridas para servidores que están protegidos por contraseñas.
Check the “Preselected” box if you want this target to always be selected by default.
“Rank” le permite ingresar dónde en la lista desea que aparezca este objetivo.
Si se deja en blanco los objetivos estarán en orden alfabético.
“Sintaxis” es el tipo de MARC que usted utiliza.
“Codificación” indica al sistema cómo leer caracteres especiales.
“Timeout” es útil para los servidores que toman mucho tiempo. Puede configurar el tiempo de espera para que no se siga intentando sobre el servidor si los resultados no se encuentran en un período razonable de tiempo.
“Opciones adicionales SRU” es donde se pueden introducir opciones adicionales del servidor externo, como sru_version=1.1 o schema=marc21, etc. Tenga en cuenta que estas opciones dependen del servidor.
“SRU Search field mapping” lets you add or update the mapping from the available fields on the Koha search form to the specific server dependent index names.
Para refinar aún más sus búsquedas, puede agregar los siguientes nombres de índice al Mapeo de campo de búsqueda SRU. Para ello, edite el servidor y haga clic en el botón Modificar junto a este campo.
Título
dc.title
ISBN
bath.isbn
Cualquiera
cql.anywhere
Autor
dc.author
ISSN
bath.issn
Tema
dc.author
ID estándar
bath.standardIdentifier
Table: SRU mapping
“XSLT file(s)” lets enter one or more (comma-separated) XSLT file names that you want to apply on the search results.
Al recuperar los registros de servidores externos puede que desee automatizar algunos cambios en esos registros. Los XSLTs le permiten hacer esto. Koha incluye algunos archivos XSLT de ejemplo listos para su uso en el directorio /koha-tmpl/intranet-tmpl/prog/en/xslt/:
Del952.xsl: Elimina ítems (MARC21/NORMARC)
Del995.xsl: Elimina ítems (UNIMARC)
Del9LinksExcept952.xsl: Remove $9 links. Skip item fields (MARC21/NORMARC)
Del9LinksExcept995.xsl: Remove $9 links. Skip item fields (UNIMARC)
¿Quiso decir?
Get there: More > Administration > Additional parameters > Did you mean?
Koha puede ofrecerle opciones “¿Quiso decir?” en búsquedas basadas en valores de sus:ref:autoridades<authorities-label>.
Importante
Did you mean? only works in the OPAC at this time. The intranet options are here for future development.
Utilizando esta página puede controlar cuales opciones presenta Koha a usuarios en sus resultados de búsqueda.
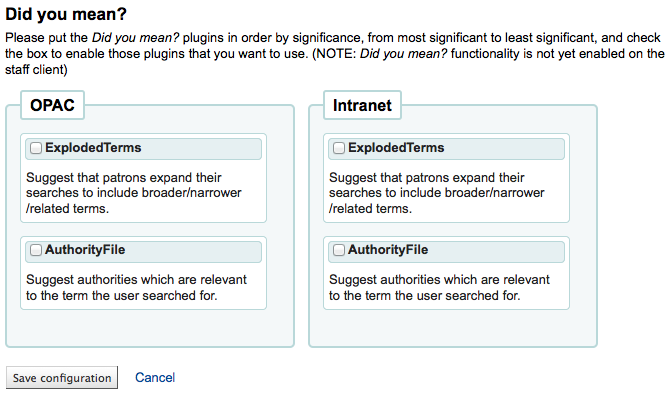
Para habilitar la barra “¿Quiso decir?” en sus resultados de búsqueda deberá seleccionar la casilla al lado de cada plugin que dese utilizar. Los dos plugins que tiene para elegir son:
El plugin ExplodedTerms sugiere que el usuario pruebe buscar por términos más generales/específicos/relacionados para una dada búsqueda (ej. un usuario buscando por «Nueva York (Estado)» puede hacer clic el enlace para términos específicos si está también interesado en «Nueva York (Ciudad)». Esto solo es relevante para bibliotecas con datos de autoridades altamente jerárquicos.
El plugin AuthorityFile busca el archivo de autoridades y sugiere que el usuario podría estar interesado en libros enlazados a las primeras 5 autoridades
Si desea que un plugin tenga prioridad sobre otro arrástrelo simplemente encima del otro.
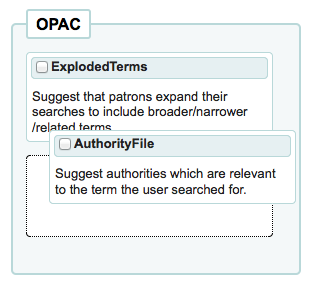
If you choose both plugins you will see several options at the top of your search results
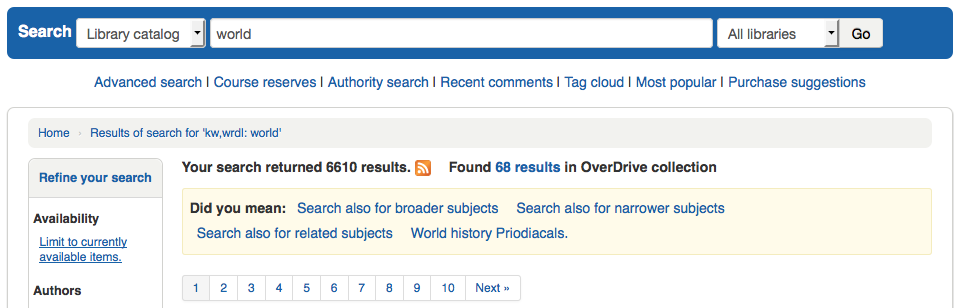
If you choose just the AuthorityFile you’ll see just authorities.
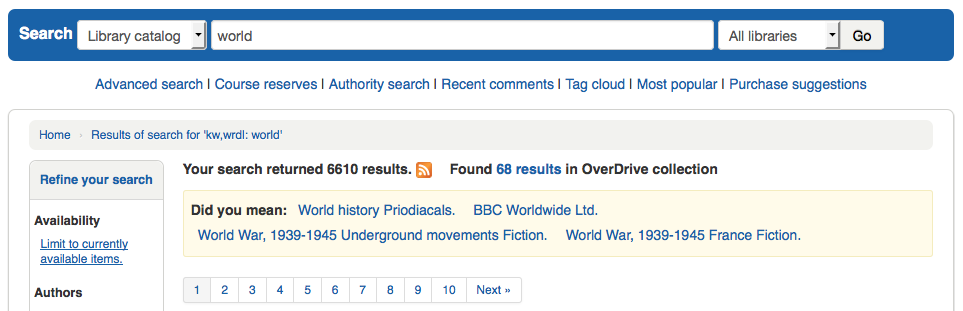
Column settings
This administration area will help you hide or display columns on fixed tables throughout the staff client and OPAC.
Get there: Administration > Additional parameters > Column settings
Al hacer clic en el módulo que desee editar las tablas, se le mostrará las opciones disponibles para usted.
This area lets you control the columns that show in the table in question. If nothing is hidden you will see no check marks in the “is hidden by default” column.
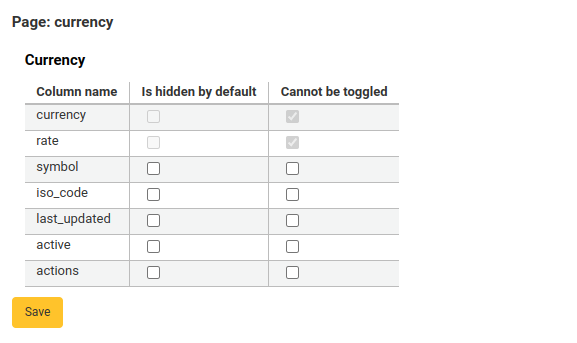
And will see all of the columns when viewing the table on its regular page.

If columns are hidden they will have checks in the “is hidden by default” column.
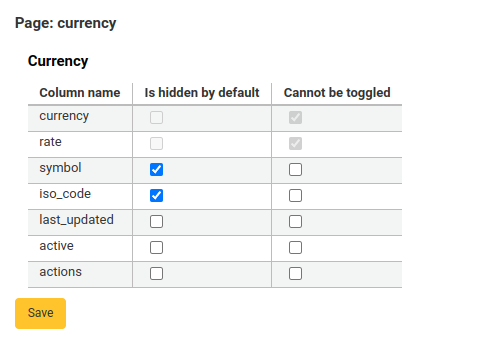
And hidden when you view the table.
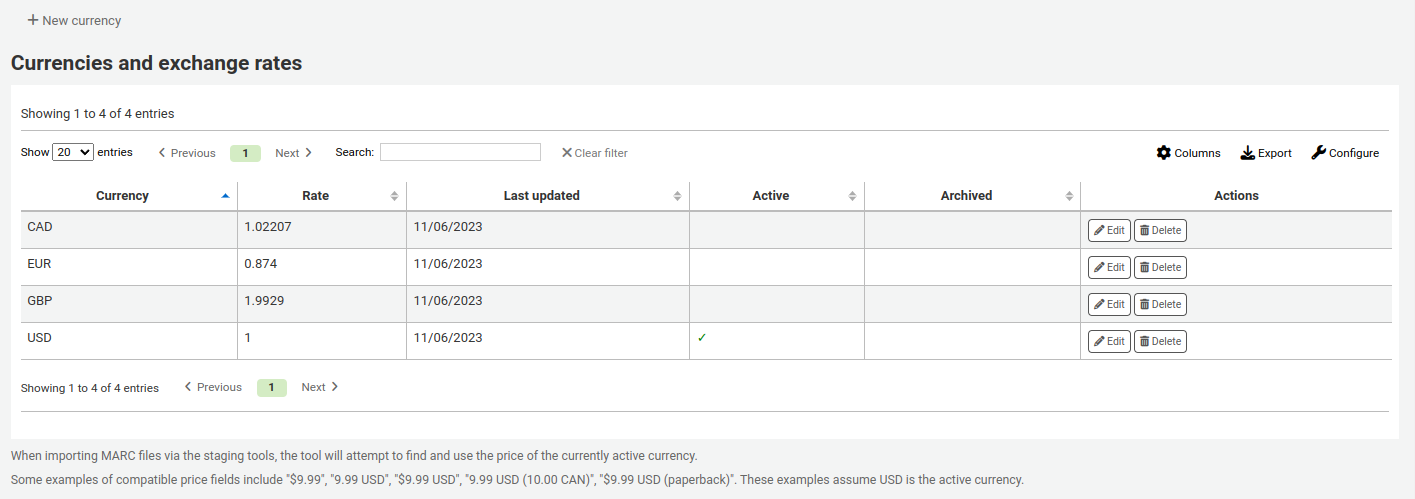
You can also toggle columns using the “Show/hide columns” button in the top right of the page

Módulo |
Tables |
|---|---|
Adquisiciones |
|
Administración |
|
Catálogo |
|
Catalogación |
|
Circulación |
|
Reservas para cursos |
|
Préstamos interbibliotecarios |
|
Usuarios |
|
Herramientas |
|
OPAC |
|
Informes |
|
Publicaciones periódicas |
|
Nota
Patrons in the OPAC can’t change the column visibility. For OPAC tables this feature only allows to control the visibility of columns.
Nota
Any tables with columns listed here also have the option to export to Excel, export to CSV, copy, or print within the table header.
Alertas audibles
If you have your AudioAlerts preference set to “Enable” you will be able to control the various alert sounds that Koha uses from this area.
Get there: More > Administration > Additional parameters > Audio alerts
Each dialog box in Koha has a CSS class assigned to it that can be used as a selector for a sound.
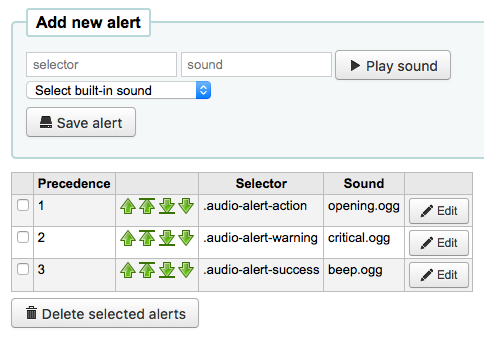
You can edit the defaults by clicking the “Edit” button to the right of each alert.
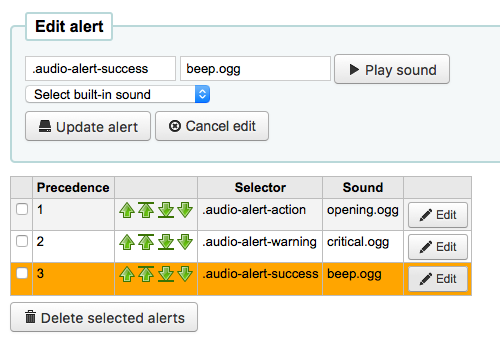
You can assign alerts to other CSS classes in Koha by entering that information in the selector box. For example if you enter
body:contains('Check in message')
Then when you visit the checkin page you will hear an alert.
Every page in Koha has a unique ID in the body tag which can be used to limit a sound to a specific page
Any ID selector (where HTML contains id=»name_of_id» ) and can also be a trigger as: #name_of_selector
Proveedores de telefonía móvil SMS
Importante
This option will only appear if the SMSSendDriver preference is set to “Email”
From here you can enter as many cellular providers as you need to send SMS notices to your patrons using the email protocol.

Algunos ejemplos de valores son:
Mobile Carrier |
SMS Gateway Domain |
|---|---|
Alltel |
sms.alltelwireless.com |
AT&T |
txt.att.net |
Boost Mobile |
sms.myboostmobile.com |
Project Fi |
msg.fi.google.com |
Predeterminado: pública |
text.republicwireless.com |
Sprint |
messaging.sprintpcs.com |
T-mobile |
tmomail.net |
U.S. Cellular |
email.uscc.net |
Verizon Wireless |
vtext.com |
Virgin Mobile |
vmobl.com |
Table: SMS provider examples
To add new providers enter the details in the form and click “Add new” to save.
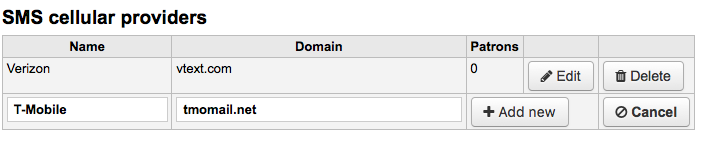
These options will appear in the OPAC for patrons to choose from on the messaging tab if you have EnhancedMessagingPreferences enabled.
Compartir contenido con Mana KB
Mana KB is a worldwide knowledge base used to share content specific to libraries. Koha is currently connected to Mana Kb in order to share serial subscription models and reports. This section is used to configure your connexion with Mana KB.
Get there: More > Administration > Additional parameters > Share content with Mana KB
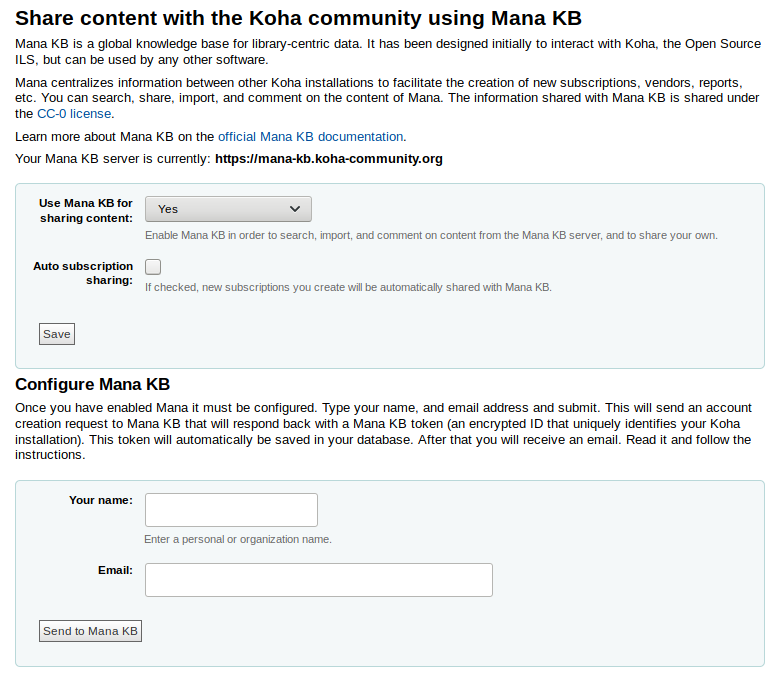
In the form, choose whether you want to use Mana KB to share content or not. The default is «No, let me think about it». If you do want to use Mana KB, change the option to «Yes». If you do not want to share with Mana KB, choose «No», this will remove the blue rectangle from the Administration home page.
The rest of this section assumes you chose «Yes».
Choose whether you want to share your subscription models automatically. This means that every time you create a subscription in the serials module, it will be automatically shared with Mana KB and other libraries will be able to copy it.
In order to configure Mana KB, you must get a Mana KB token to authenticate your Koha installation on the Mana KB server.
Enter your name or your organization’s name in the «Your name» field.
Enter your email in the «Email» field. Make sure you have access to this email inbox since you will receive further information by email.
Once you send your information to Mana KB, you will get a Mana KB token.
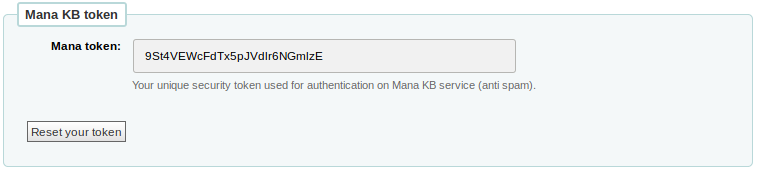
In the email your receive, click on the confirmation link and confirm you are not a robot to finish the Mana KB setup.
Campos adicionales
This section is used to add custom fields to serial subscriptions or order baskets.
To add a new field, first choose which table you want to add it to.
Order baskets (aqbasket): a field added to aqbasket will appear upon the creation of a new order basket or the modification of an existing order basket in the acquisitions module
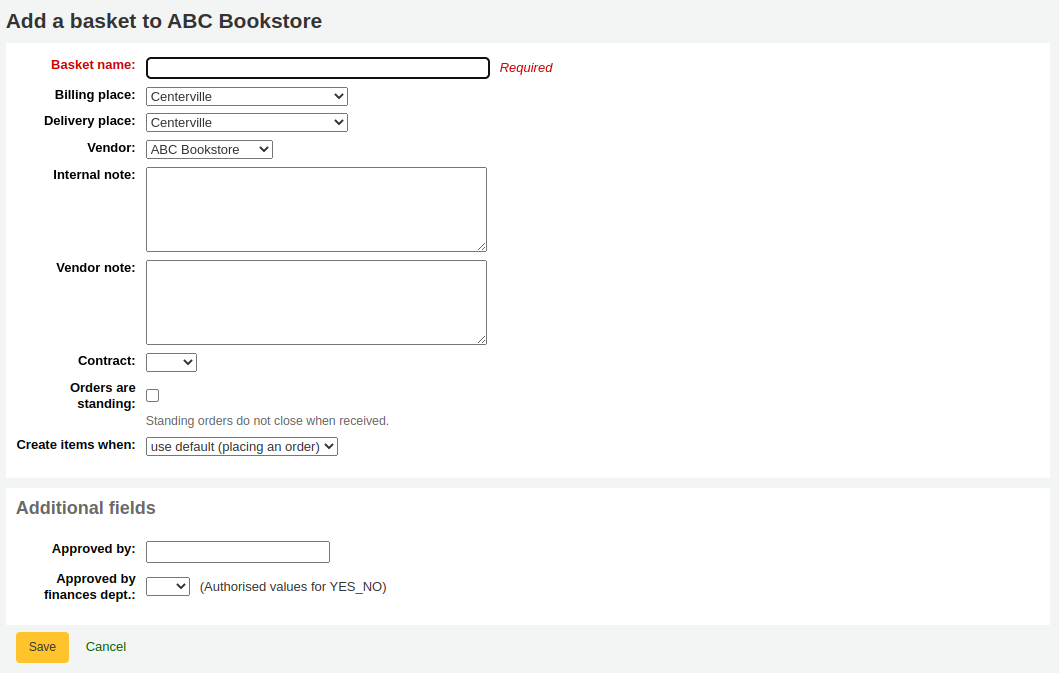
Subscriptions (subscription): a field added to subscription will appear when creating a new subscription or editing an existing subscription in the serials module
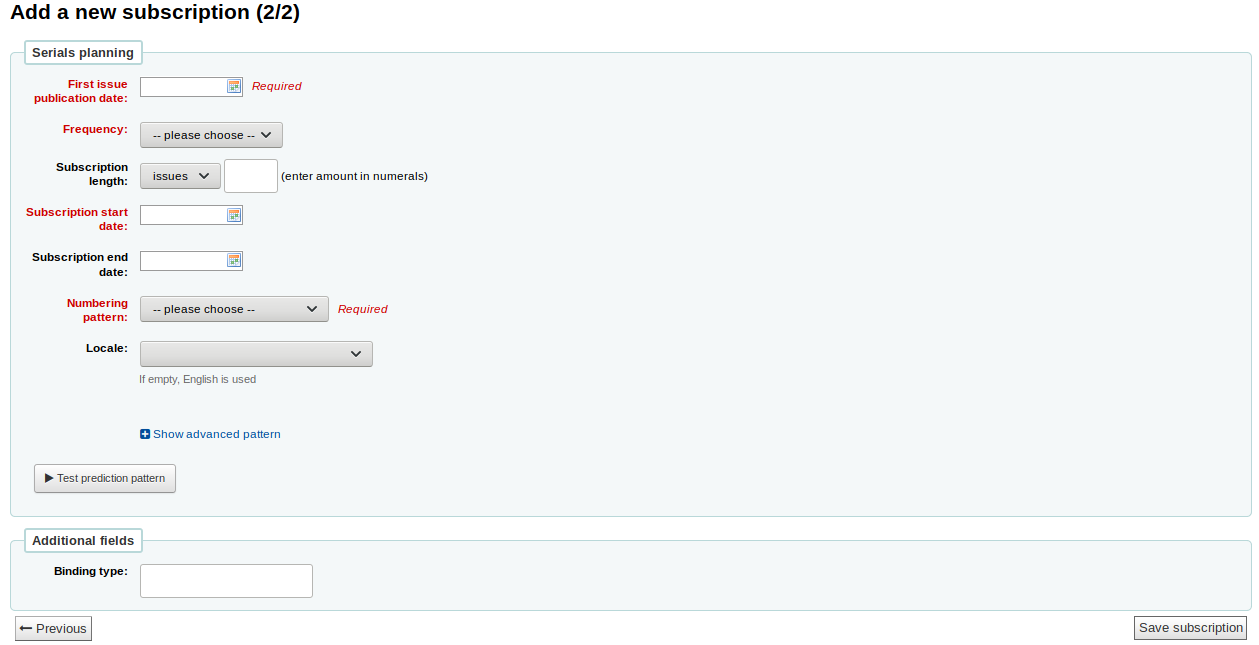
Click on «Create field»
Fill out the form
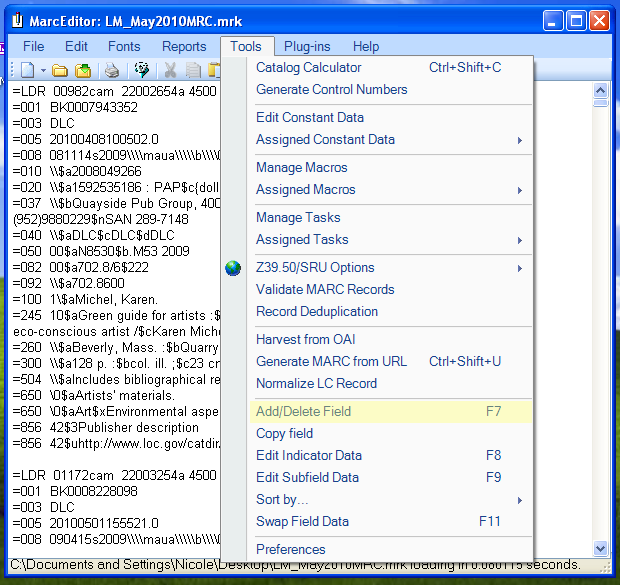
Name: this is the name of the field as you want it to appear
Authorized value category: if you want to add a drop-down menu to the field choose an authorized value category here (you can also create a new authorized value category if you need to)
MARC field: for additional subscription fields, it is possible to link the field to a MARC field. The additional field will be automatically populated with the corresponding record’s value for this MARC field.
Nota
You can only choose one of the two options (authorized value OR MARC field)
Importante
If you choose the MARC field, make sure you enter it in this format: field$subfield
For example: 590$a
Searchable: check this box if you want to be able to search baskets or subscriptions based on this field
Order basket searchable additional fields will be available in the orders advanced search form
Subscription searchable additional fields will be available in the subscription advanced search form
Examples of additional fields
Ejemplo 1: Campo para suscripción adicional usando valores autorizados
You might want to track which department you’re ordering this serial for
In the “Name” field, enter “Department”
In the “Authorized value category” field, choose DEPARTMENT
Check the “Searchable” box

When you are adding a subscription, the field will be in the “Additional fields” section with its authorized values drop-down menu.

When you view the subscription, the field will appear under “Additional fields”.

Because we made the field searchable, it will also be in the serials subscription search.

Example 2: Additional field using MARC field
This is particularly useful if you want to view bibliographic information in the subscription detail page. In this example, we will add the 521$a field, which is, in MARC21, the target audience note.
In the “Name” field, enter “Target audience”
In the “MARC field” field, enter “521$a”

Nota
You will not be able to edit this field from the subscription form. If you need to add or change the value in this field, you must go through the cataloging module.
When you view the subscription, the field and the information from the bibliographic record will appear under “Additional fields”.