अधिग्रहण
Koha अधिग्रहण मॉड्यूल पुस्तकालय विक्रेताओं से दिए गए आदेश रिकॉर्ड और खरीद बजट का प्रबंधन करने के लिए एक तरीका प्रदान करता है।
Get there: More > Acquisitions
सेटअप
अधिग्रहण मॉड्यूल का उपयोग करने से पहले आप यह सुनिश्चित करना चाहेंगे कि आपने सभी सेट अप पूरा कर लिया है।
First, set your acquisitions system preferences and acquisitions administration to match your library's workflow. Before setting your EDI खाते and लाइब्रेरी EANs you will need to have entered your vendors.
मुख्य अधिग्रहण पेज पर आप अपने पुस्तकालय के लिए धन सूचीबद्ध देखेंगे।
नोट
कुल लाइन धन भ्रामक है के लिए आप जोड़कर स्थापित किया है तुम इसे छिपा कर सकते हैं
#funds_total {display:none;}को IntranetUserCSS प्राथमिकता.
सभी सक्रिय निधियों को देखने के लिए आप के लिए धन की मेज के ऊपर 'सक्रिय और निष्क्रिय शो' अगले चेकबॉक्स क्लिक कर सकते हैं।
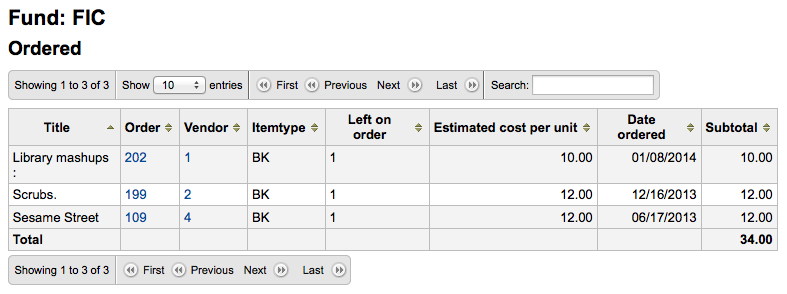
आप लिंक राशि पर क्लिक कर सकते हैं एक कोष में सभी आदेशों का एक इतिहास को देखने के लिए और यह आप के लिए एक खोज चलेंगे।
इस मैनुअल के संदर्भ:`बजट/फंड ट्रैकिंग' अनुभाग में अधिक जानें।
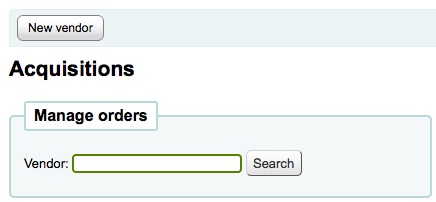
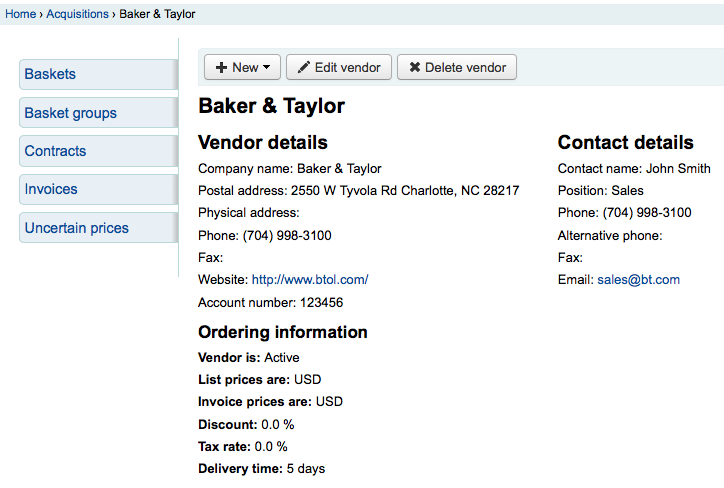
विक्रेता
इससे पहले किसी भी ऑर्डर दिया जा सकता है, आप पहली बार में कम से कम एक विक्रेता दर्ज करना होगा।
विक्रेता जोड़ें
विक्रेता जोड़ने के लिए अधिग्रहण पृष्ठ पर 'नया विक्रेता' बटन पर क्लिक करें
विक्रेता जोड़ते प्रपत्र तीन टुकड़ों में टूट गया है:
प्रथम खंड विक्रेता के बारे में बुनियादी जानकारी के लिए है।
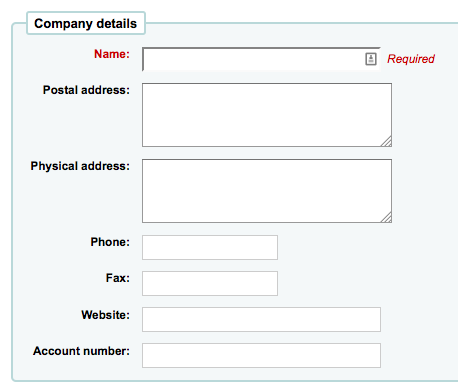
इन क्षेत्रों में से, केवल विक्रेता का नाम आवश्यक है, शेष जानकारी को दावा पत्र और चालान बनाने में मदद करने के लिए जोड़ा जाना चाहिए
दूसरा खंड विक्रेता के कार्यालय में आपके संपर्क के बारे में जानकारी के लिए है
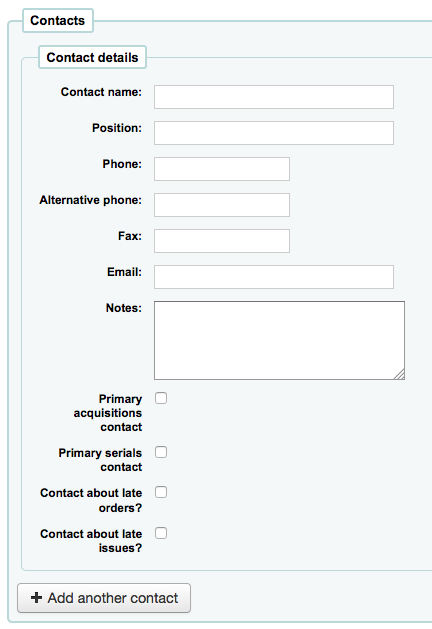
ये फ़ील्ड आवश्यक नहीं हैं, यदि आप Koha के भीतर आपके संपर्क की जानकारी का ट्रैक रखने के लिए चाहते हैं, तो वे केवल दर्ज किया जाना चाहिए
प्राथमिक अधिग्रहण संपर्क: इस विक्रेता को अधिग्रहण के संबंध में यह व्यक्ति आपका प्राथमिक संपर्क है, तो इस बॉक्स को चेक करें
प्राथमिक सीरियल संपर्क: इस विक्रेता को चेक करें यदि यह व्यक्ति इस विक्रेता से सीरियल अधिग्रहण के संबंध में आपका प्राथमिक संपर्क है
ऑर्डर करते समय संपर्क करें? यदि आप सीधे इस व्यक्ति को ईमेल द्वारा अपने ऑर्डर भेजने में सक्षम होना चाहते हैं तो इस बॉक्स को चेक करें
देर से आदेश के बारे में संपर्क करें? यदि आप सीधे इस व्यक्ति को ईमेल द्वारा अपने अधिग्रहण दावों को भेजने में सक्षम होना चाहते हैं तो इस बॉक्स को चेक करें
देर से इश्यूज के बारे में संपर्क करें? यदि आप सीधे इस व्यक्ति को ईमेल द्वारा अपने सीरियल दावों को भेजने में सक्षम होना चाहते हैं तो इस बॉक्स को चेक करें
आप 'एक और संपर्क जोड़ें' बटन पर क्लिक करके प्रति विक्रेता एक से अधिक संपर्क जोड़ सकते हैं
अंतिम खंड बिलिंग जानकारी के लिए है:
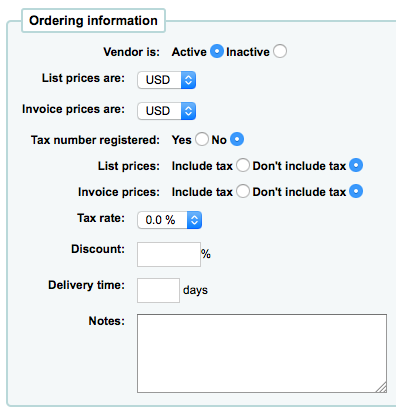
ऑर्डर करने के लिए एक विक्रेता से सक्षम होने के लिए आप उन्हें 'सक्रिय' करना चाहिए
सूची कीमतों और चालान की कीमतों के लिए, मुद्रा चुनें।
Currencies are assigned in the मुद्राओं और विनिमय दरें admin area
यदि आपकी लाइब्रेरी पर कर लगाया गया है तो पंजीकृत के रूप में अपना टैक्स नंबर अंकित करें
नोट: यदि आप की कीमतों की सूची और/या चालान मूल्यों में कर शामिल
विक्रेता एक सुसंगत खाली छूट प्रदान करता है, 'डिस्काउंट' फ़ील्ड में दर्ज है।
जब एक आदेश रखने आप आइटम विशिष्ट छूट प्रवेश कर सकते हैं
यदि आपकी लायब्रेरी के आदेश पर करों का वसूल किया है अपने कर की दर दर्ज करें।
तुम कितनी देर तक यह आम तौर पर आदेश लेता है इस विक्रेता से आने के बारे में पता है, तो आप एक डिलिवरी के समय प्रवेश कर सकते हैं। इस कोहा अनुमान लगाने के लिए जब आदेश देर आदेशों की रिपोर्ट पर अपने पुस्तकालय में आ जाएगा अनुमति देगा।
नोट्स आंतरिक उपयोग के लिए हैं
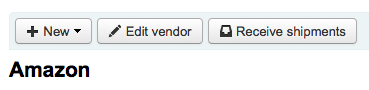
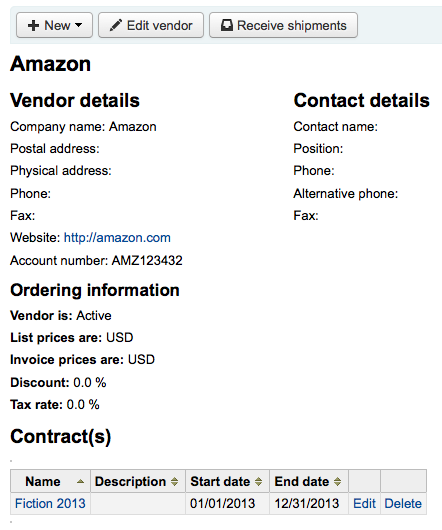
देखें/संपादित करें विक्रेता
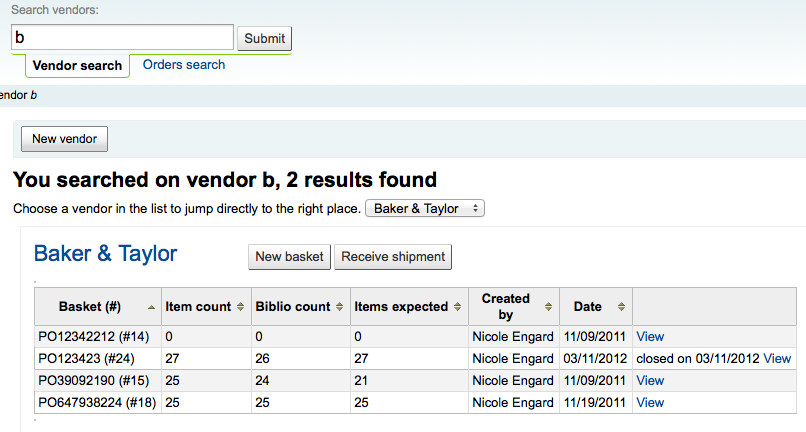
किसी विक्रेता के सूचना पृष्ठ को देखने के लिए आपको अधिग्रहण के मुख पृष्ठ से विक्रेता को खोजना होगा। आपकी खोज विक्रेता के नाम के किसी भी हिस्से के लिए हो सकती है:
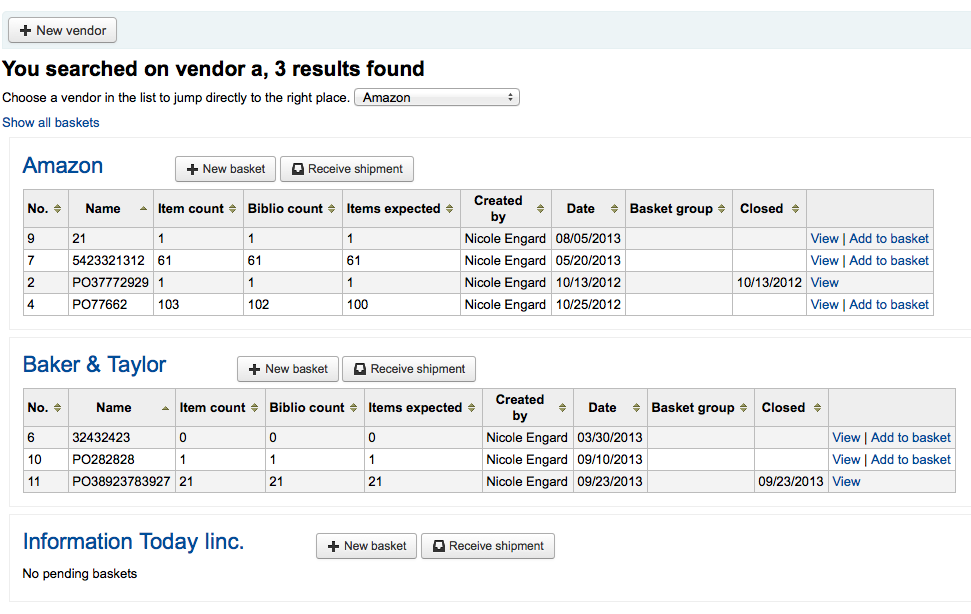
परिणामों से, आप देखना चाहते हैं विक्रेता के नाम या संपादित पर क्लिक करें
विक्रेता के लिए परिवर्तन करने के लिए, बस 'संपादन विक्रेता' बटन पर क्लिक करें।
विक्रेता कोई टोकरियों से जुड़ी यह तो है एक 'वेंडर हटाएँ' बटन भी दिखाई जाएगी और विक्रेता को हटाया जा सकता है। वरना आप एक 'शिपमेंट करे' बटन देखेंगे।
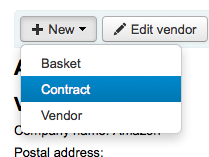
वेंडर अनुबन्ध
आप (एक आरंभ और समाप्ति तिथि के साथ) के ठेके को परिभाषित करने और उन्हें एक विक्रेता के लिए संलग्न कर सकते हैं। यह प्रयोग किया जाता है तो यह है कि साल के अंत में आप देख सकते हैं कि कितना आप एक विक्रेता के साथ एक विशेष अनुबंध पर खर्च किया। कुछ स्थानों में, ठेके एक न्यूनतम और अधिकतम वार्षिक राशि के साथ स्थापित कर रहे हैं।
एक अनुबंध जोड़े
एक विक्रेता जानकारी पृष्ठ के शीर्ष पर, आपको एक 'नया अनुबंध' बटन दिखाई देगा।
अनुबंध प्रपत्र अनुबंध के बारे में बहुत कुछ बुनियादी जानकारी के लिए पूछना होगा।
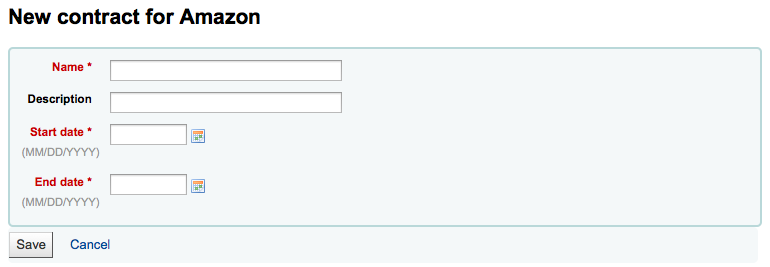
महत्वपूर्ण
आप एक अनुबंध पूर्वव्यापी प्रवेश नहीं कर सकते। अंतिम तिथि को आज की तारीख से पहले नहीं होना चाहिए।
एक बार अनुबंध सेव किया जाता है यह विक्रेता जानकारी नीचे दिखाई देगा।
यह भी एक विकल्प है जब एक बास्केट का निर्माण किया जाएगा
Managing purchase suggestions
Purchase suggestions can be generated in one of two ways. You can create suggestions via the staff client either for the library or on the patron's behalf from their record. Depending on your settings in the सुझाव system preference, patrons may also be able to make purchase suggestions via the OPAC.
नोट
You need to be logged in as a staff member with the suggestions_manage acquisitions permission in order to view and work with purchase suggestions.
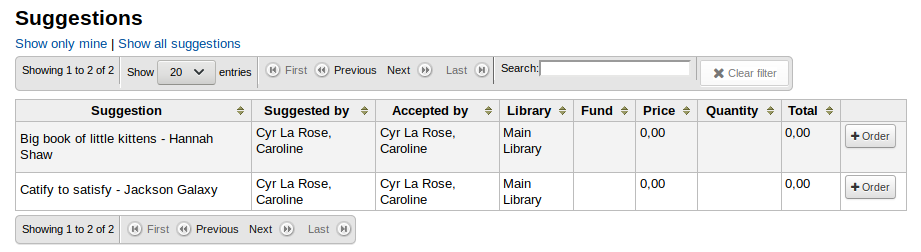
When a suggestion is waiting for library review, it will appear on the Acquisitions home page next to the vendor search.
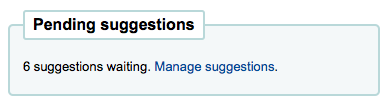
यह भी मॉड्यूल लेबल के अंतर्गत मुख्य स्टाफ डैशबोर्ड पर दिखाई देगा:

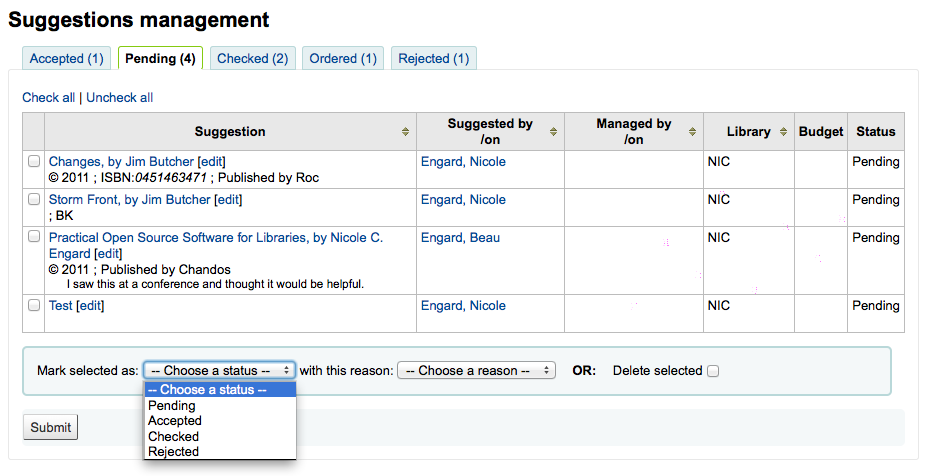
क्लिक करने के 'सुझावों प्रबंधित' करें सुझाव प्रबंधन उपकरण के लिए ले जाएगा। अगर कोई लंबित सुझाव हैं आप अधिग्रहण पेज के बाईं तरफ 'प्रबंधित सुझाव' मेनू पर लिंक पर क्लिक करके सुझाव प्रबंधन उपकरण का उपयोग कर सकते हैं।
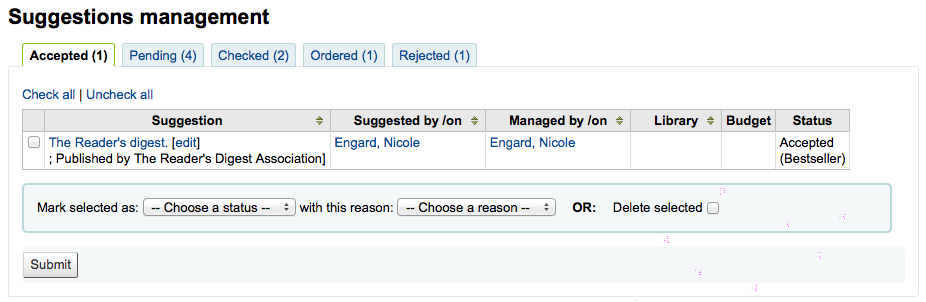
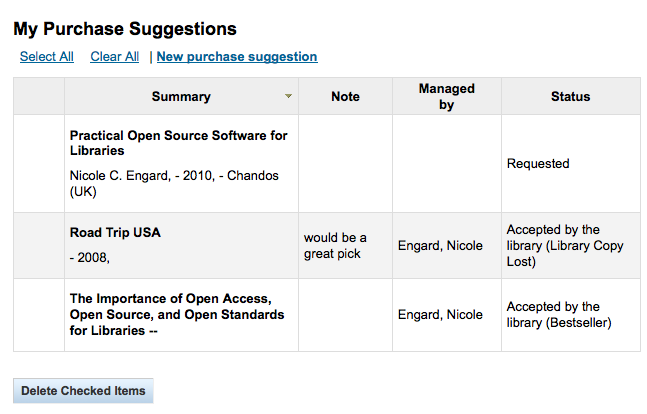
आपके सुझावों कई टैब में हल किया जाएगा: स्वीकृत, विचाराधीन, जाँच का आदेश दिया है और / या अस्वीकार कर दिया। प्रत्येक स्वीकार या अस्वीकार कर दिया सुझाव लाइब्रेरियन जो सुझाव और कारण वे स्वीकार करने या इसे खारिज करने के लिए दिया कामयाब के नाम दिखाएगा ( 'स्थिति' के तहत पाया जाता है)।
एक 'स्वीकृत' सुझाव उन सुझावों के नीचे दिए गए फॉर्म का उपयोग करके 'स्वीकृत' के रूप में चिह्नित किया गया है। एक 'लंबित' सुझाव एक है जो लाइब्रेरी से कार्रवाई का इंतजार कर रहा है। एक 'चेक' सुझाव एक है जिसे सुझावों के पहले फार्म का उपयोग करके 'चेक किया गया' के रूप में चिह्नित किया गया है। एक 'आदेश दिया गया' सुझाव उस पर किया गया है, जिसका उपयोग आपके टोकरी में '' खरीद सुझाव से लिया गया है, जो कि <#orderfromsuggestion>`__ ' एक 'अस्वीकृत' सुझाव उन सुझावों की सूची के नीचे दिए गए फॉर्म का उपयोग करके 'अस्वीकृत' पर चिह्नित किया गया है।
सुझावों के बहुत से पुस्तकालयों के लिए, वहाँ प्रबंधित सुझाव पृष्ठ के बाएं हाथ की ओर फिल्टर स्क्रीन पर प्रदर्शित खिताब की संख्या को सीमित करने में सहायता करने के लिए कर रहे हैं।
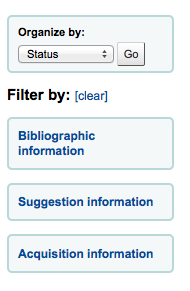
नीले रंग के शीर्षकों पर क्लिक करके विस्तार छानने के विकल्प और क्लिक '[स्पष्ट]' सभी फिल्टर साफ हो जाएगा और सभी सुझावों को दिखा देंगे।
नोट
सुझाव पेज स्वचालित रूप से अपने पुस्तकालय के लिए सुझाव के लिए सीमित हो जाएगा। सभी के लिए जानकारी देखने के लिए (या किसी भी अन्य) पुस्तकालयों 'अधिग्रहण जानकारी' फिल्टर पर क्लिक करें और पुस्तकालय बदल जाते हैं।

जब 'विचाराधीन' सुझावों की समीक्षा आप बॉक्स मद (s) आप अनुमोदन / अस्वीकार और फिर अपने चयन के लिए स्थिति और कारण का चयन करना चाहते करने के लिए अगले जांच करने के लिए चुन सकते हैं। आप यह भी पूरी तरह से 'हटाएँ चयनित' बॉक्स को चेक करके सुझाव नष्ट करने के लिए चुन सकते हैं।
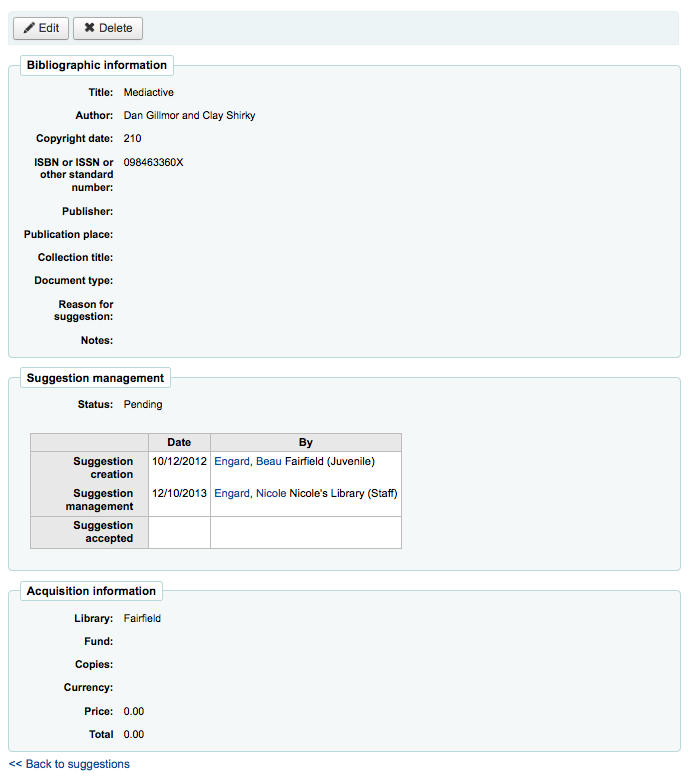
सुझावों की लंबी सूची के साथ पुस्तकालयों के लिए एक अन्य विकल्प के अनुमोदन या सुझाव का एक सारांश खोलने के बारे में जानकारी सहित यदि आइटम खरीदा गया था सुझाव के शीर्षक पर क्लिक करके एक ने सुझाव एक अस्वीकार करने के लिए है।
Clicking 'edit' to the right of the suggested title or at the top of the suggestion detail page will open a suggestion editing page.
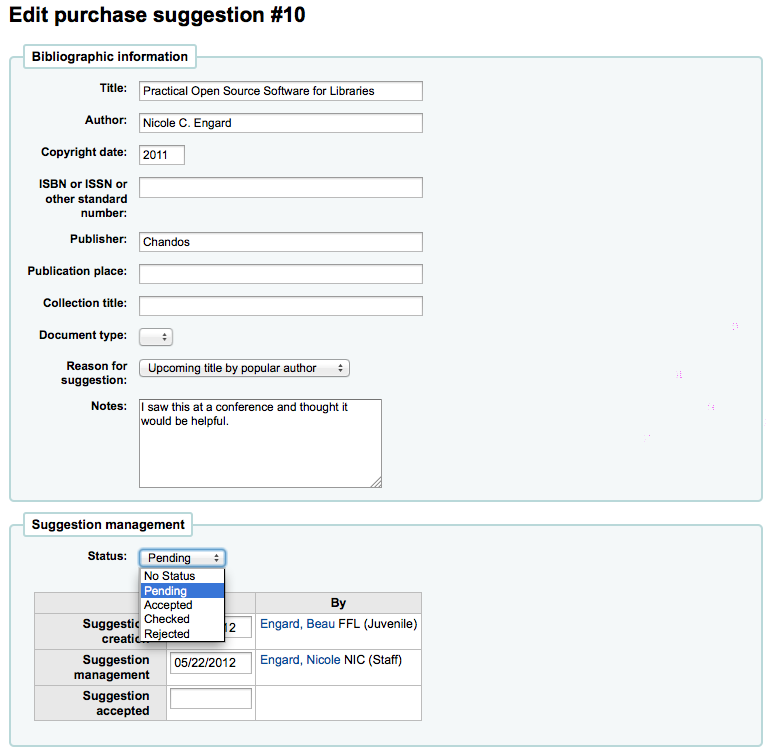
इस रूप से आप सुझाव (अधिक जानकारी जोड़ने या संरक्षक द्वारा प्रदान की गई गलत जानकारी को अद्यतन करने) के लिए संपादन कर सकते हैं। आप यह भी स्वीकार करते हैं या एक व्यक्तिगत आधार पर सुझाव को अस्वीकार करने के लिए चुन सकते हैं।
के रूप में 'लंबित' अनुरोध वापस 'विचाराधीन' टैब के लिए कदम होगा एक अनुरोध चिह्नित करने के लिए चुनना।
सुझावों को स्वीकार करने और अस्वीकार करने के कारण `SUGGEST 'द्वारा परिभाषित किए गए हैं<#suggestauthorized>`__ authorized value.
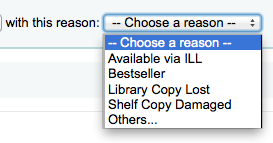
आप 'दूसरों ...' अपने कारण के रूप में चुनते हैं, तो आप एक टेक्स्ट बॉक्स में अपना दूसरा प्रवेश करने के लिए प्रेरित किया जाएगा। बॉक्स के दाईं अधिकृत कारणों के साथ नीचे खींच मेनू वापस लाना होगा करने के लिए क्लिक करने 'रद्द करें'।

तुम भी एक कोष के लिए इस सुझाव को असाइन कर सकते हैं।
This edit can trigger a notice (defined in the Notices & slips tool with the TO_PROCESS notice) to the fund owner that there is a suggestion ready for them to manage if you have turned on the cron job to generate these notices.
Once you have clicked 'Submit' the suggestion will be moved to the matching tab. The status will also be updated on the patron's account in the OPAC and an email notice will be sent to the patron using the template that matches the status you have chosen.
ऑर्डर देना
एक आदेश आप पहली विक्रेता या पुस्तक विक्रेता आप के लिए आदेश भेजने के लिए चाहते हैं के लिए खोज करना चाहिए जगह है।
महत्वपूर्ण
यदि आप अपना आदेश सबमिट करने के लिए EDIFACT का उपयोग करने की योजना बना रहे हैं तो आपको पहले अपनी लाइब्रेरी की आवश्यकता होगी :ref: ईडीआई लेखा और EANs.
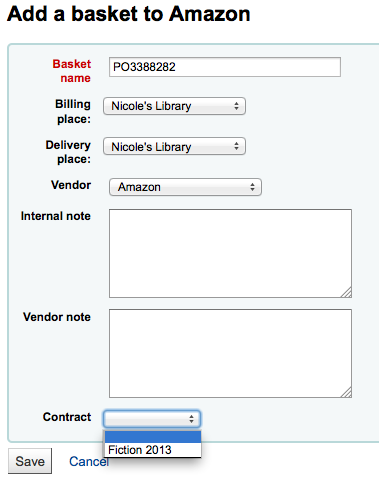
एक बास्केट बनाएं
नोट
यदि आप आदेश देने के लिए ईडीआई का उपयोग कर रहे हैं तो आप कोहा में प्रक्रिया शुरू करने से पहले अपने विक्रेता से अपना ऑर्डर रिकॉर्ड डाउनलोड करना चाहेंगे।
एक बास्केट आप पहली विक्रेता आप से आदेश दे रहे हैं के लिए खोज करना चाहिए बनाने के लिए:

और विक्रेता के नाम सही करने के लिए 'नई टोकरी' बटन पर क्लिक करें।
नोट
You can also add to an existing basket by clicking the arrow next to the 'View' button at the far right of each basket's information in the results table, and choosing 'Add to basket'.

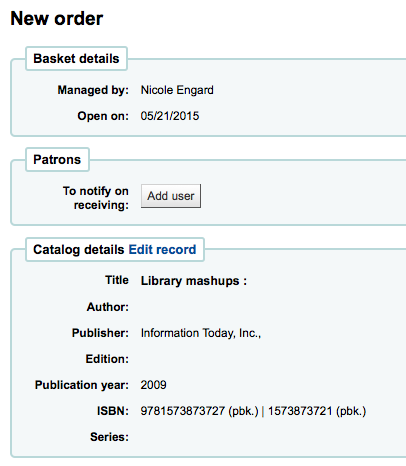
'न्यू टोकरी' क्लिक करने के बाद आप आदेश के बारे में कुछ जानकारी दर्ज करने के लिए कहा जाएगा:
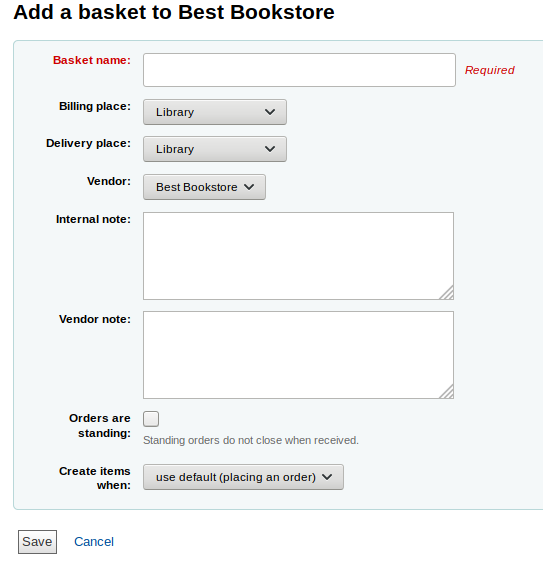
जब एक बास्केट पर आप इसे एक नाम आप इसे बाद में पहचान में मदद मिलेगी कि देना चाहता हूँ
बिलिंग स्थान और वितरण स्थान में दर्ज करें (यह आपके द्वारा लॉग इन की गई लाइब्रेरी को डिफ़ॉल्ट करेगा)
आप विक्रेता आप आदेश दे रहे हैं बदलने के लिए चाहते हैं, तो आप वेंडर पुल डाउन मेनू का उपयोग कर सकते से
नोटों क्षेत्रों वैकल्पिक हैं और सूचना के किसी भी प्रकार के हो सकते हैं
यदि आप स्थायी वस्तुओं (नियमित रूप से आने वाली वस्तुओं) का आदेश दे रहे हैं, तो आप इस बास्केट के लिए 'आदेश खड़े हैं' बॉक्स की जांच करना चाहेंगे।
ध्यान दें कि किसी भी एक बास्केट में फर्म और स्थायी आदेश दोनों नहीं हो सकते हैं।
You can choose to create items either upon placing the order, upon receiving the order, or upon cataloging the item. If you choose an option other than the default, it will apply only to this basket. The default is set by the AcqCreateItem system preference.
यदि आपके पास है :रेफरी: आप से ऑर्डर कर रहे विक्रेता को <add-a-contract-label> जोड़ा गया अनुबंध, आपके पास यह भी चुनने का विकल्प होगा कि आप इन मदों के तहत किस अनुबंध का आदेश दे रहे हैं
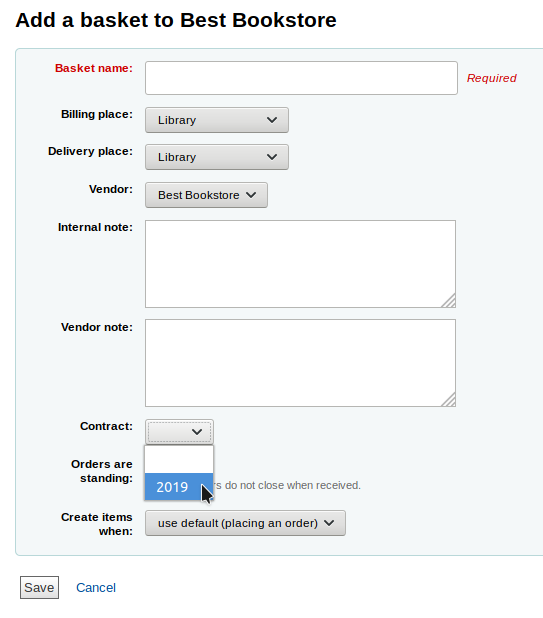
When finished, click 'Save'.
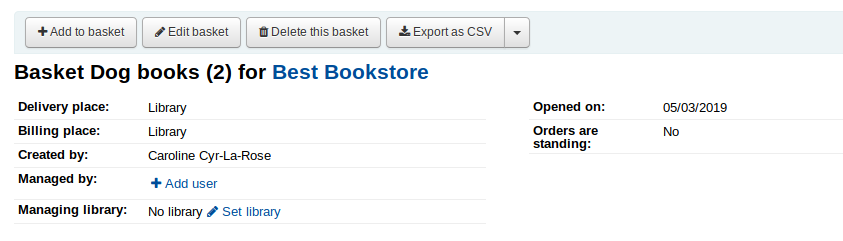
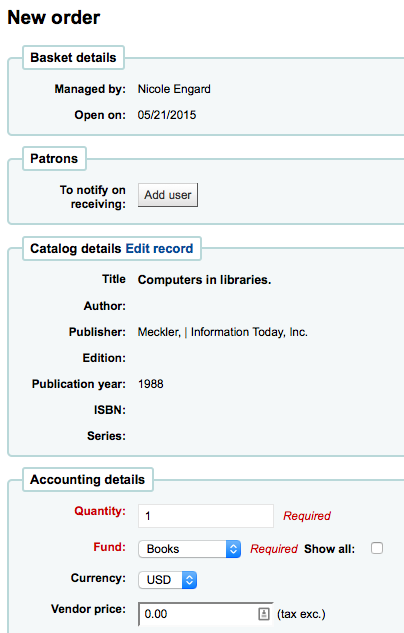
Once your basket is created, click on 'Add to basket' you are presented with several options for adding items to the order.
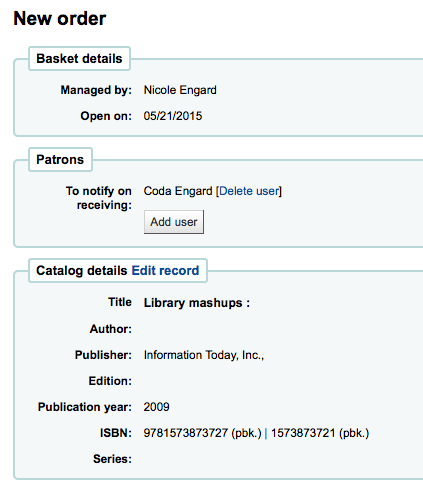
Order from an existing record
यदि आप एक मौजूदा मद की एक प्रतिलिपि आदेश दे रहे हैं, तो आप बस अपने सिस्टम में रिकार्ड के लिए खोज सकते हैं।
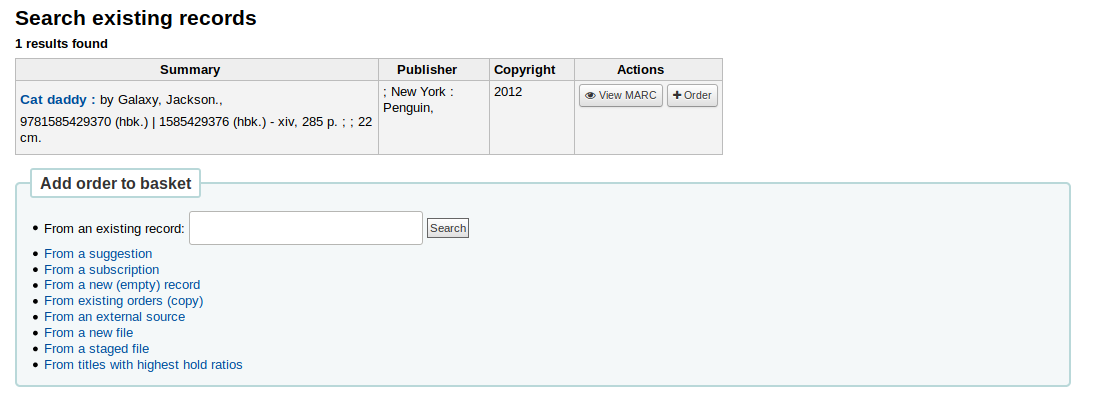
परिणामों से, 'आदेश' लिंक आइटम आप खरीद करना चाहते हैं पर क्लिक करें।
आइटम के साथ जुड़े विवरण के सभी पहले से ही के तहत सूचीबद्ध किया जाएगा 'कैटलॉग विवरण।'
Order from a purchase suggestion
If you allow patrons to make purchase suggestions (learn more in the managing purchase suggestions section of this manual), then you can place orders from those suggestions. In order to keep track of suggestions that have been ordered and received you must place the order using this link.
महत्वपूर्ण
Suggestions must be accepted before you can order them.
परिणामों से, 'आदेश' आइटम आप आदेश करना चाहते हैं पर क्लिक करें और आप सुझाव के लिए एक लिंक सहित आदेश फार्म के साथ प्रस्तुत किया जाएगा
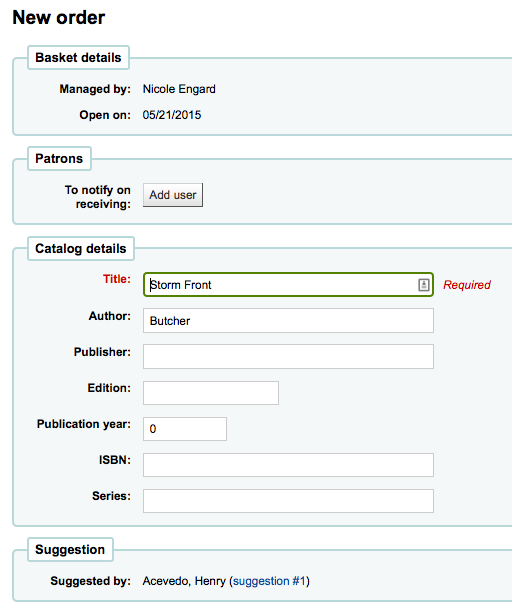
यदि आवश्यक हो तो इस फॉर्म से आप कैटलॉग के विवरण में बदलाव कर सकते हैं।
आइटम अपने बास्केट में प्रकट होता है जब यह सुझाव के लिए एक लिंक शामिल होंगे।
Orders added to the basket in this way will notify the patron via email that their suggestion has been ordered (with the 'ORDERED' notice in Tools > Notices & slips) and will update the patron's 'your purchase suggestions' page in the OPAC.
Order from a serial subscription
यदि आप सीरियल्स मॉड्यूल का उपयोग कर रहे हैं तो आप 'सदस्यता से' ऑर्डर करने का विकल्प चुनकर अधिग्रहण के लिए अपनी सदस्यता आदेश जानकारी लिंक कर सकते हैं
आदेश के लिंक पर क्लिक करने के बाद आप एक खोज पेज में मदद मिलेगी कि आप अपनी सदस्यता को खोजने के लिए लाया जाएगा
आपका परिणाम फार्म का सही करने के लिए दिखाई देगा और प्रत्येक सदस्यता सही करने के लिए एक 'ऑर्डर' लिंक होगा
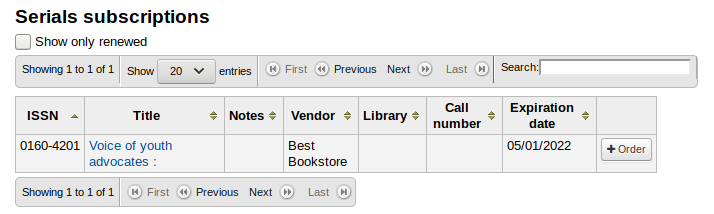
क्लिक 'ऑर्डर' एक 'आइटम जोड़ें' खंड के बिना आदेश फार्म के लिए सदस्यता जानकारी लाएगा, क्योंकि आप सिर्फ एक सदस्यता आदेश दे रहे हैं और एक आइटम की जरूरत नहीं है
Order from a new (empty) record
To order from a record that can't be found anywhere else, choose the 'From a new (empty) record' option.
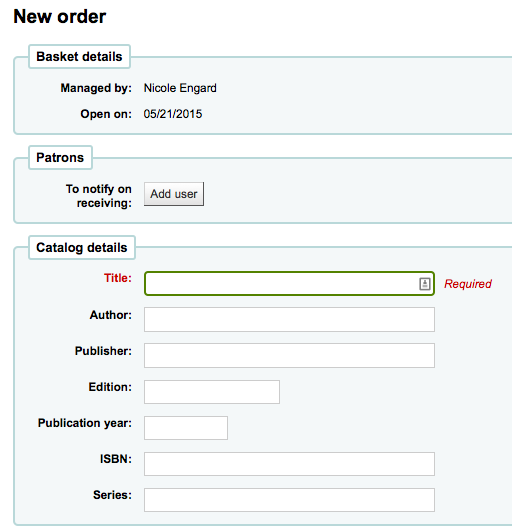
आप आइटम आप आदेश दे रहे हैं के बारे में आवश्यक जानकारी के सभी में भरने के लिए एक खाली फार्म के साथ प्रस्तुत किया जाएगा।
नोट
If the default form does not have catalog details fields necessary to place an order, enable the UseACQFrameworkForBiblioRecords preference which will allow the ACQ MARC framework to customize the display of fields when ordering.
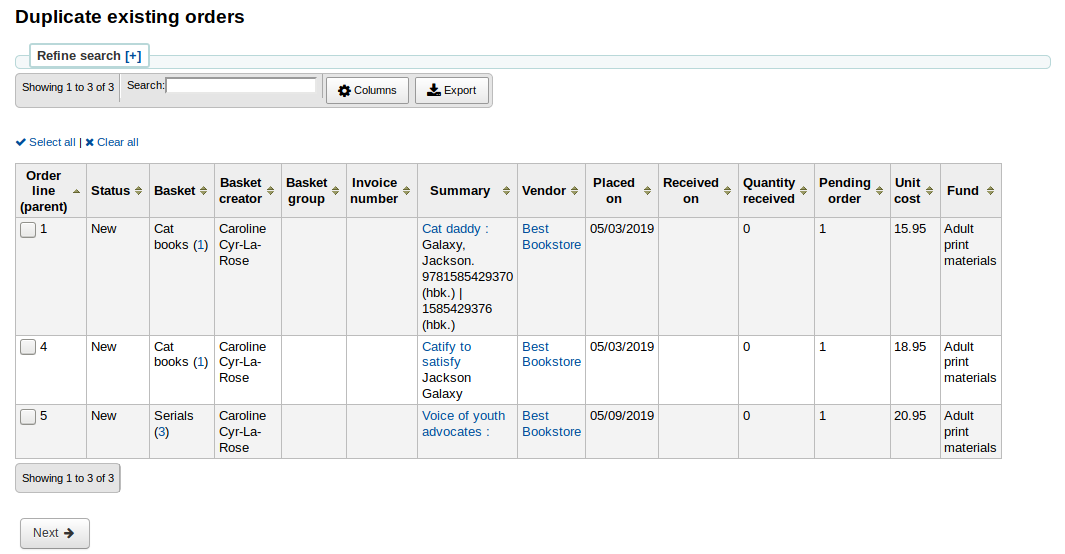
Duplicate orders (order from existing orders)
You can duplicate an existing order line by choosing the 'From existing orders (copy)' option.
You will be presented with a search form to search your existing orders.
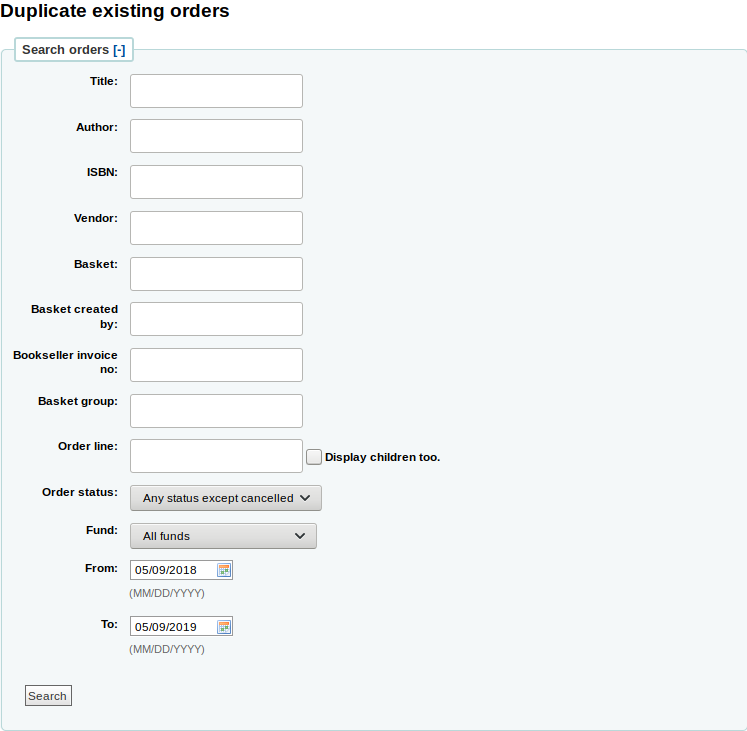
Check the boxes next to the order(s) you want to duplicate.
Order from an external source
आप खरीद करने के लिए एक आइटम के लिए अन्य पुस्तकालयों खोज करना चाहते हैं, तो आप 'एक बाहरी स्रोत से' विकल्प है कि आप एक Z39.50 खोज के माध्यम से पाया एक मार्क रिकॉर्ड से ऑर्डर करने की अनुमति देगा का उपयोग कर सकते हैं।
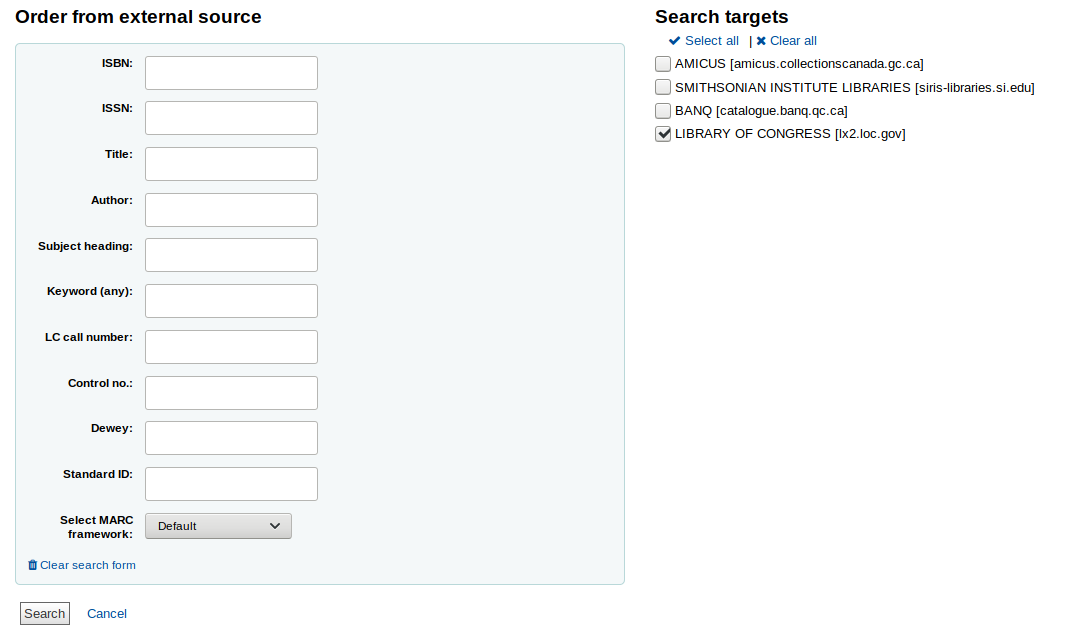
From the results, click the 'Order' button next to the item you want to purchase.

यदि आइटम आप एक बाहरी स्रोत से आदेश दे रहे हैं लगता है कि यह एक नकली हो सकता है, कोहा आपको चेतावनी देता है और आप कैसे आगे बढ़ना पर विकल्प दे देंगे।
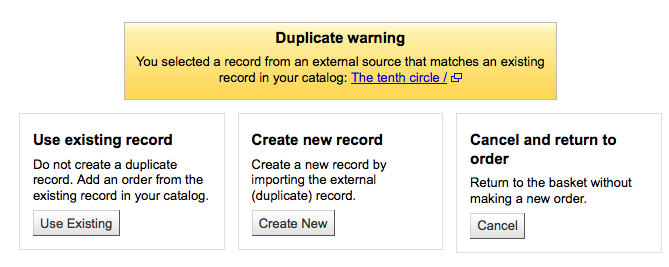
From the warning, you can choose to order another copy on the existing bibliographic record, create a new bibliographic record, or cancel your order of this item.
आदेश फार्म है कि ऊपर चबूतरे में, आप सूची विवरण को संपादित करने में सक्षम नहीं होगा।
Order from a new file
If your vendor sent you a record file (a .mrc file for example), you can add orders using the records in that file. Choose the 'From a new file' option.
नोट
Note that you need the stage_marc_import tool permission in order to be able order from a new file.
You will be taken to the Stage MARC records for import tool. Stage your file as described in that section.
Once the files are staged, you can click on the 'Add staged files to basket' button.
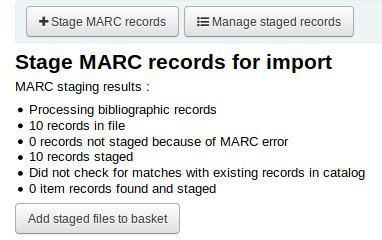
Next to each title is a checkbox, check the items you would like to order, or choose 'Select all' at the top. Depending on your settings in the MarcFieldsToOrder preference, Koha will populate the next screen with with the relevant Quantity, Price, Fund, Statistic 1, and Statistic 2 found within the staged file.

'आइटम की जानकारी' टैब में आप उन सूचनाओं को दर्ज कर सकते हैं जो हर ऑर्डर किए गए आइटम जैसे आइटम प्रकार, संग्रह कोड और ऋण स्थिति के लिए नहीं जोड़े जाएंगे।
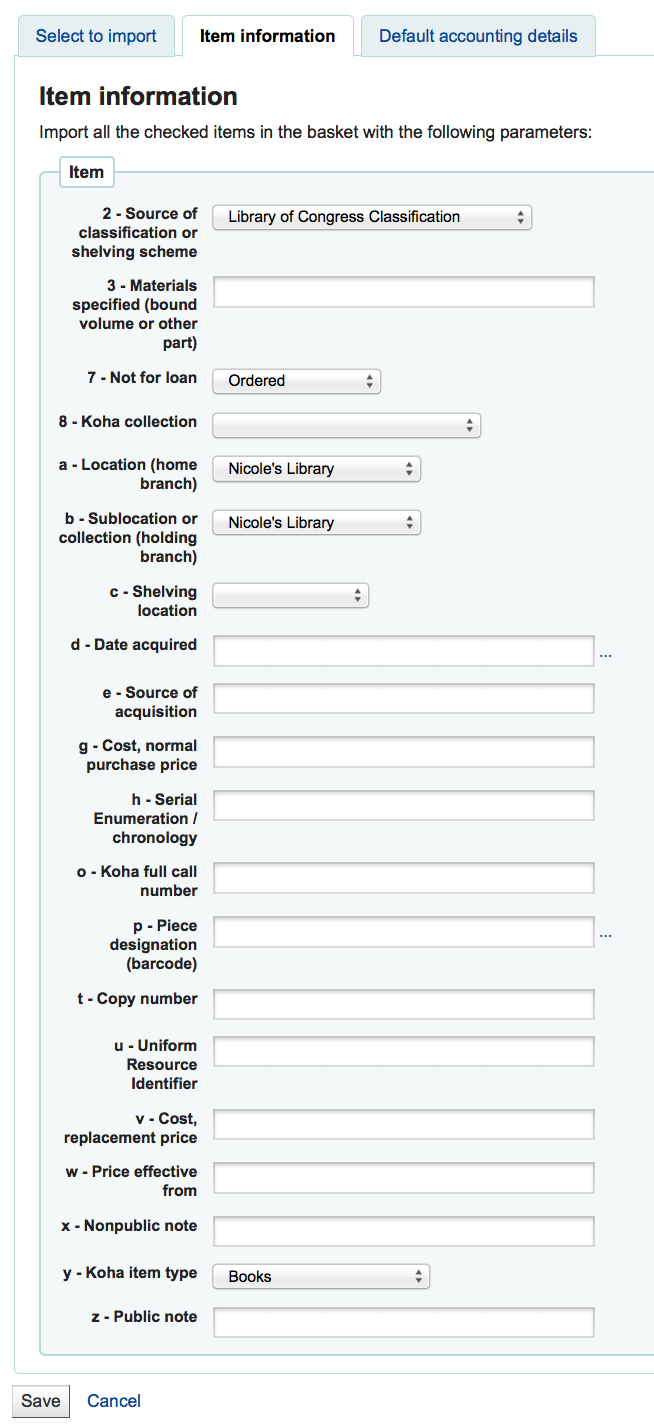
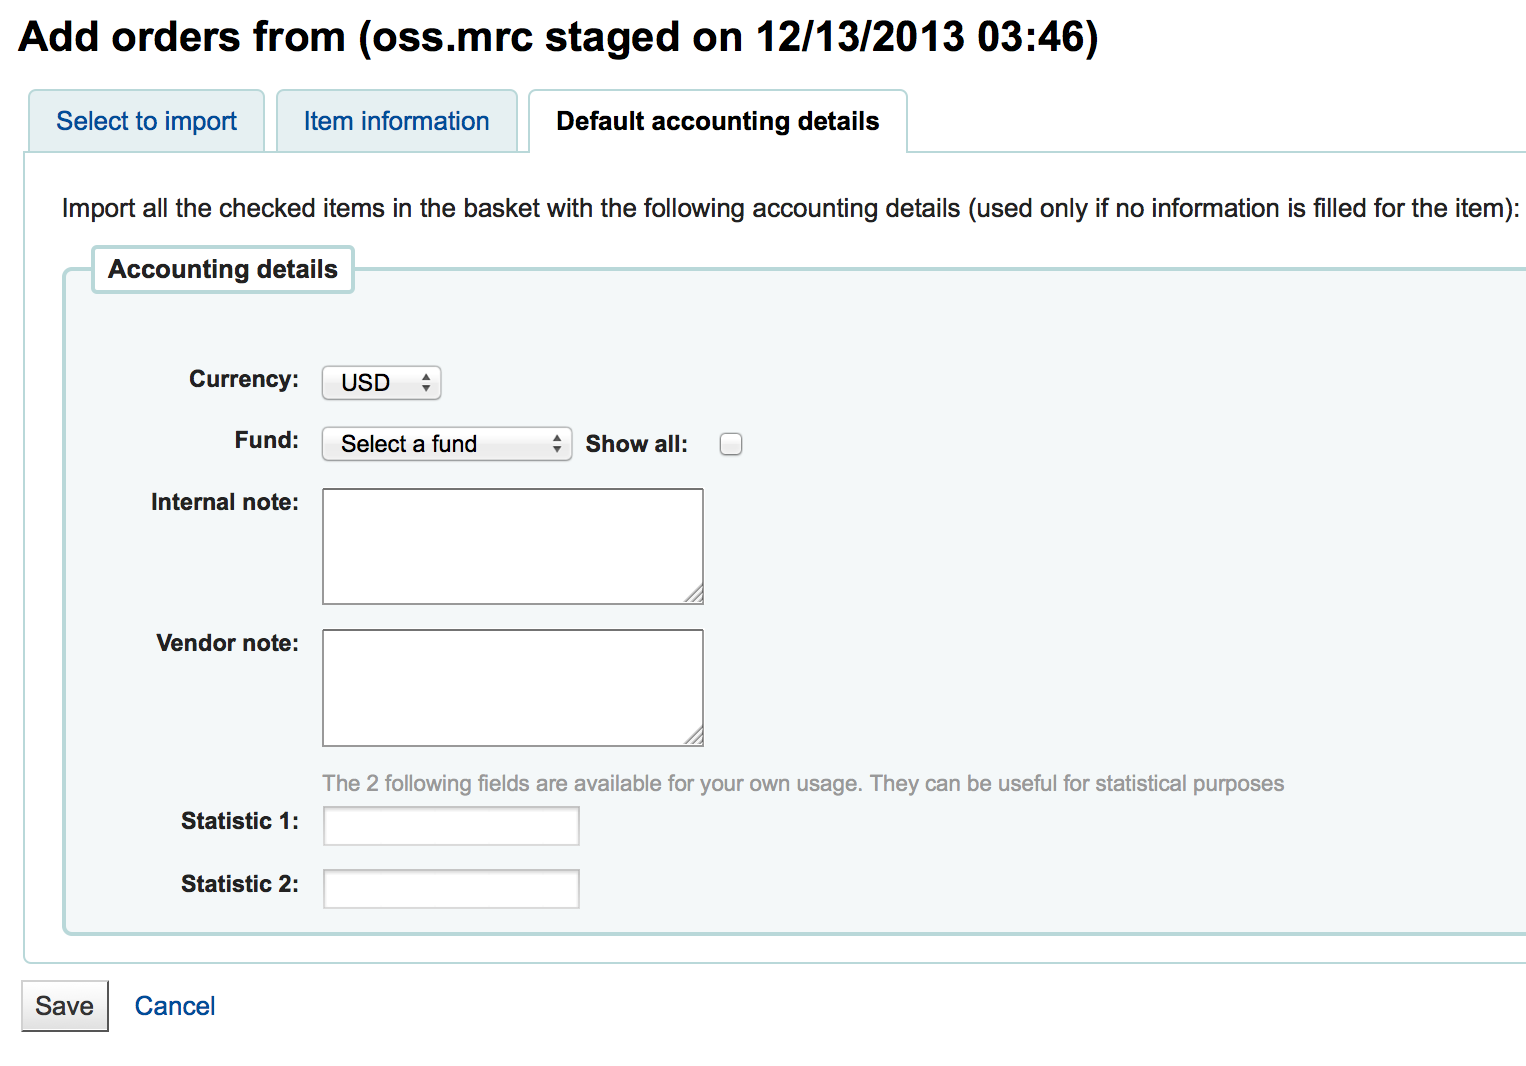
यदि एमएआरसी से फंड जानकारी में कोई जानकारी आयात नहीं की जाती है: ref: MarcFieldsToOrder वरीयता, 'डिफ़ॉल्ट लेखांकन विवरण' टैब का उपयोग लेखांकन से संबंधित मूल्यों को लागू करने के लिए किया जा सकता है।
एक स्टेज फ़ाइल से ऑर्डर करें
This option is the same as the previous one, but in this case, your file has already been staged. Whether you choose to 'order from a new file' or 'order from a staged file' will depend on your acquisitions workflow or your permissions.
Once you click on 'From a staged file', you will get a list of all the staged files in your system.
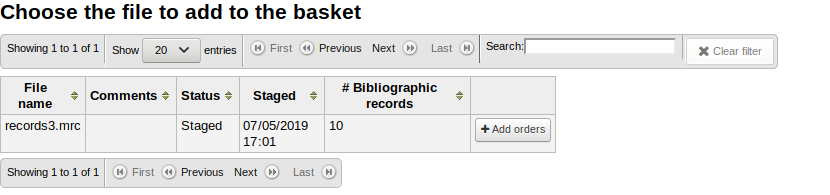
From the list of files you are presented with, click on the 'Add orders' button to add the records in the staged file to your order.
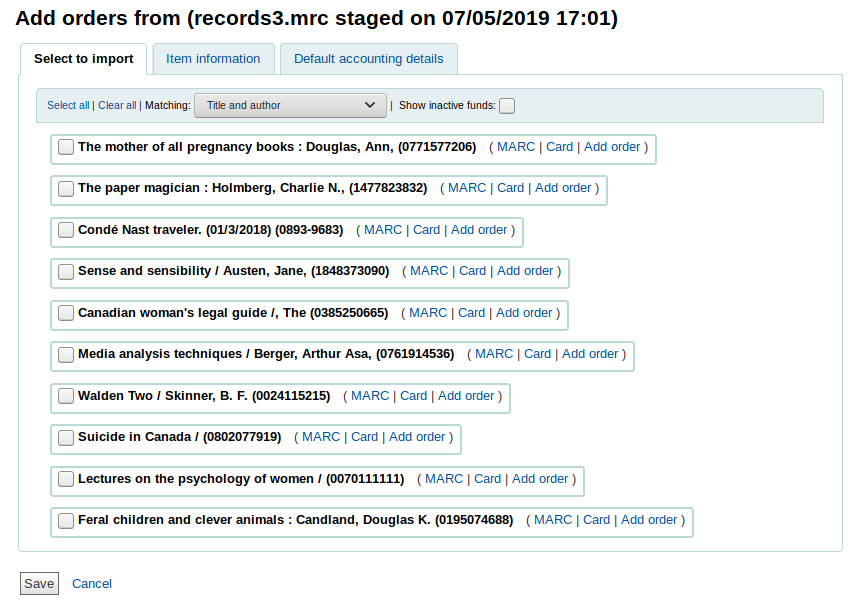
Next to each title is a checkbox, check the items you would like to order, or choose 'Select all' at the top. Depending on your settings in the MarcFieldsToOrder preference, Koha will populate the next screen with with the relevant Quantity, Price, Fund, Statistic 1, and Statistic 2 found within the staged file.
'आइटम की जानकारी' टैब में आप उन सूचनाओं को दर्ज कर सकते हैं जो हर ऑर्डर किए गए आइटम जैसे आइटम प्रकार, संग्रह कोड और ऋण स्थिति के लिए नहीं जोड़े जाएंगे।
यदि एमएआरसी से फंड जानकारी में कोई जानकारी आयात नहीं की जाती है: ref: MarcFieldsToOrder वरीयता, 'डिफ़ॉल्ट लेखांकन विवरण' टैब का उपयोग लेखांकन से संबंधित मूल्यों को लागू करने के लिए किया जा सकता है।
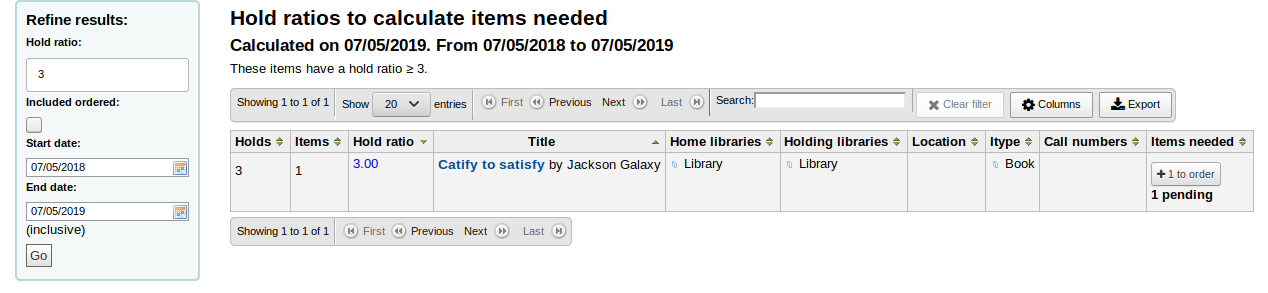
Order from titles with highest hold ratios
आदेश देने के लिए अंतिम विकल्प उच्चतम पकड़ अनुपात के साथ खिताब की एक सूची से आदेश है
This option will take you to the holds ratio report where you can find items with a high hold ratio and order additional copies. Next to each title will be a button with the number of items to order, click that and it will add the item to your basket.
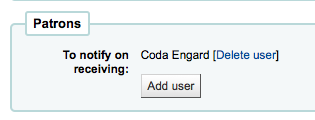
उपरोक्त आदेश विकल्पों में से किसी के साथ आपको प्राप्त होने वाले नए आइटम के संरक्षक को सूचित करने के लिए एक विकल्प दिया गया है। उस अधिसूचना की सामग्री को संदर्भ में संपादित किया जा सकता है :रेफरी: नोटिस और स्लिप्स उपकरण और उसके पास ACQ_NOTIF_ON_RECEIV. का कोड होगा। 'संरक्षक' अनुभाग में आपको 'उपयोगकर्ता जोड़ें' का विकल्प दिखाई देगा। संरक्षक जोड़ने के लिए उस बटन पर क्लिक करें, जिन्हें नए मुद्दे के बारे में सूचित किया जाएगा।
संरक्षक अधिसूचना खोज
In the window that pops up search for the patrons you'd like to notify and click 'Add'
एक बार जब आप कर रहे हैं आप विंडो बंद कर सकते हैं और आप 'संरक्षक' धारा के तहत संरक्षक की सूची दिखाई देगी
After bringing in the record information (for all order methods except for the staged files), if your AcqCreateItem system preference is set to add an item when ordering you will enter the item information next. You need to fill out at least one item record and then click the 'Add item' button at the bottom left of the item form.
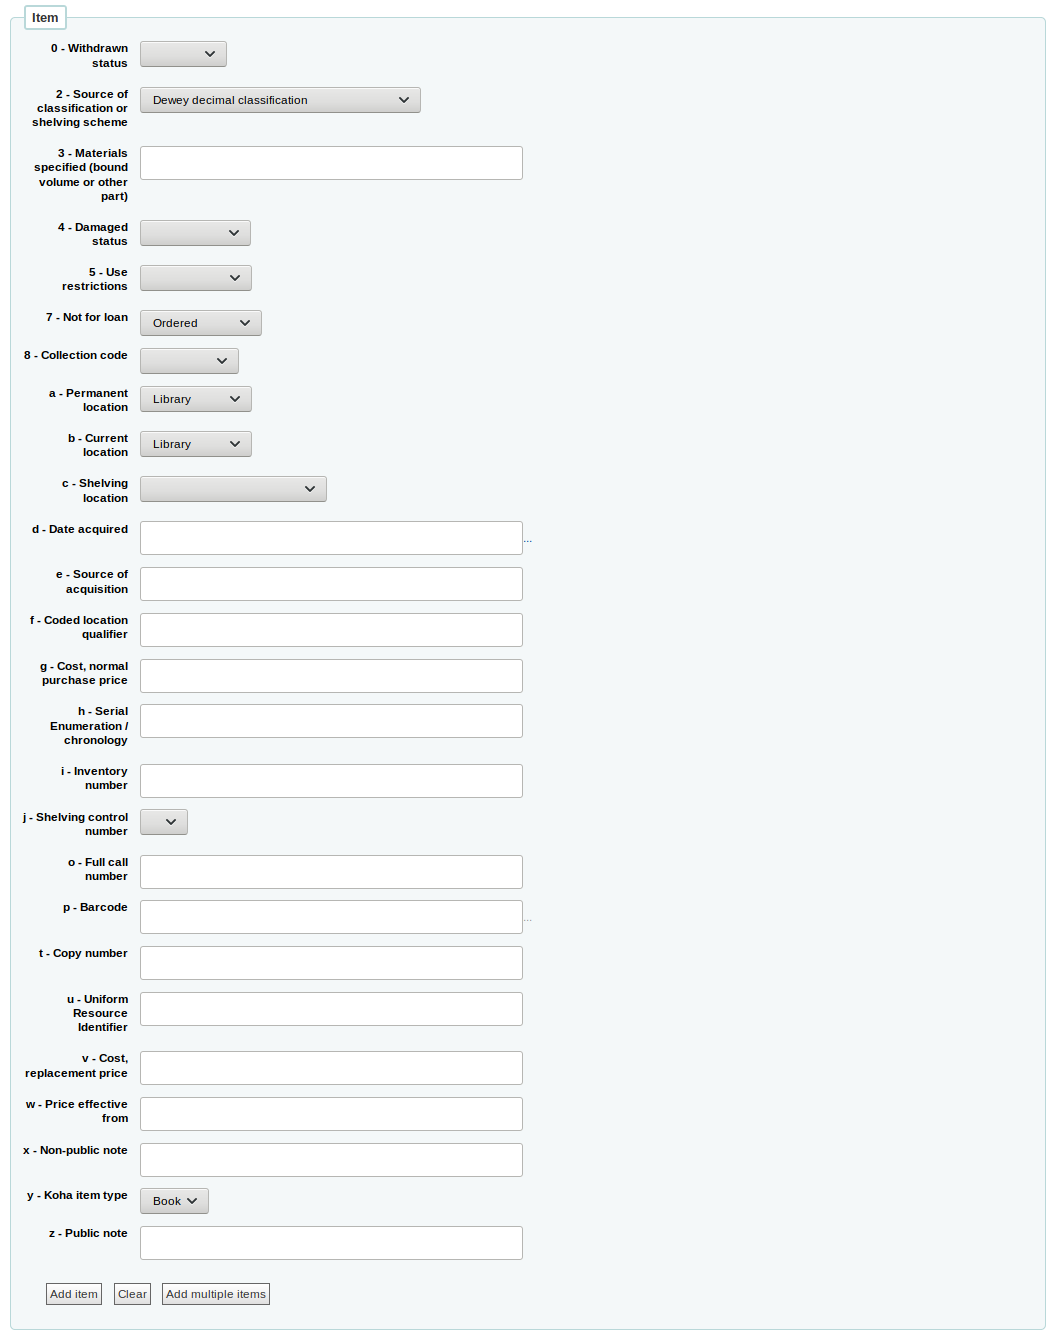
आइटम रिकॉर्ड नीचे 'आइटम जोड़ें' बटन पर क्लिक करने के बाद आइटम प्रपत्र के ऊपर दिखाई देगा और फिर आप अपने अगले आइटम एक ही रास्ता (एक से अधिक आइटम के आदेश देने के) में प्रवेश कर सकते हैं।
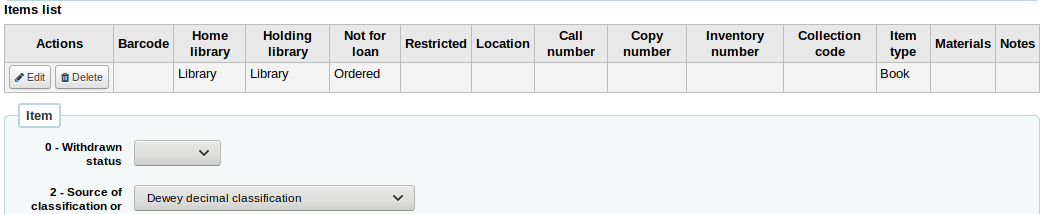
If you are ordering several items, you can click on the 'Add multiple items' instead of adding them one by one. This will ask you how many items you want to add. Simply enter that number in the box and click on 'Add'.

एक बार जब आप आइटम के बारे में जानकारी दर्ज किया है, आप लेखांकन जानकारी दर्ज करने की आवश्यकता है।
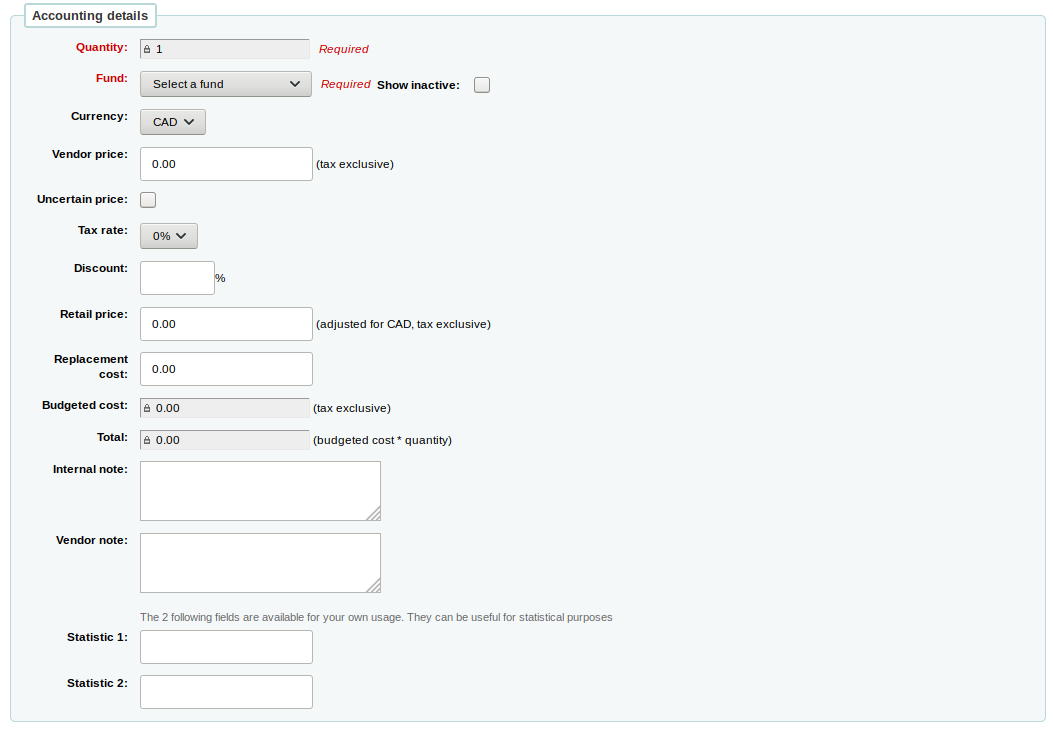
मात्रा में वस्तुओं आप ऊपर के आदेश को जोड़ दिया है की संख्या की आबादी है।
महत्वपूर्ण
If the item is created upon orderinf, you will not be able to edit the quantity manually, you must click 'Add item' below the item form to add as many items as you're ordering.
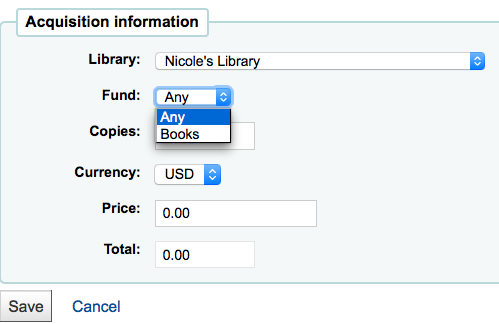
The list of funds is populated by the funds you have assigned in the Acquisitions administration area.
The currency pull down will have the currencies you set up in the Acquisitions administration area.
विक्रेता के मूल्य कीमत किसी भी करों या छूट लागू कर रहे हैं पहले है।
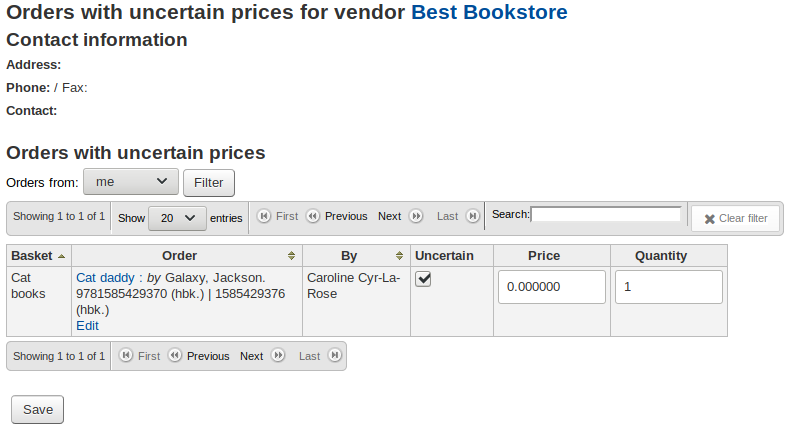
मूल्य अनिश्चित है, तो अनिश्चित कीमत बॉक्स की जाँच करें।
नोट
कम से कम एक अनिश्चित कीमत के साथ एक टोकरी बंद नहीं किया जा सकता है।
If you are charged sales tax, choose that from the 'Tax rate' field. This field is populated by the gist system preference.
आप इस आदेश पर प्राप्त कर रहे हैं प्रतिशत छूट दर्ज, एक बार आप इस प्रवेश, टैब मारा और Koha नीचे लागत क्षेत्रों के बाकी आबाद होगा।
खुदरा मूल्य अनुशंसित खुदरा मूल्य (आरआरपी) है, प्रकाशक या निर्माता द्वारा बुकसेलर्स की सिफारिश के रूप में निर्धारित मूल्य।
Replacement cost is the price it will cost to replace the item. This is the price charged to the user when an item is declared lost (if the WhenLostChargeReplacementFee system preference is set to 'Charge').
Budgeted cost is the amount that will be removed from the 'spent' budget. Whether this number includes or excludes taxes will depend on the 'List price' setting for your vendor.
कुल बजट की गई लागत को आदेशित वस्तुओं की मात्रा से गुणा किया जाता है।
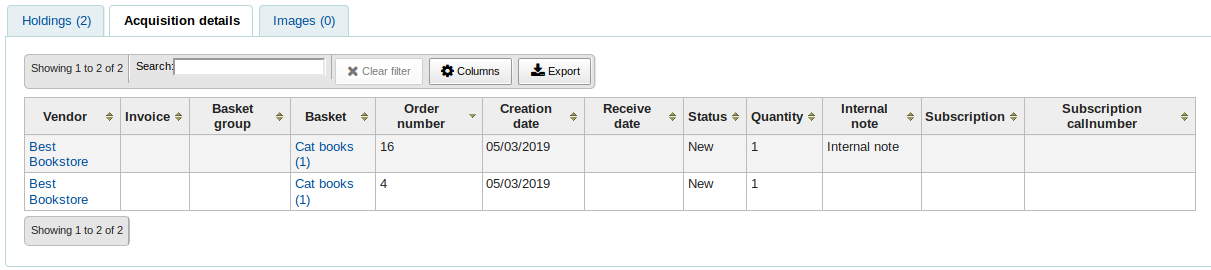
You can add an internal note. This will only appear in the acquisitions module and in the staff interface catalog, under the 'Acquisitions details' tab in the detailed record.
You can also add a vendor note. This will appear in the acquisitions module as well as on the order when exported as CSV.
If you added statistical categories when creating the Fund, those values will appear in the two statistics fields.
एक बार जब आप सभी क्षेत्रों में भरे हैं, तो आइटम को अपने टोकरी में जोड़ने के लिए 'सहेजें' पर क्लिक करें। यदि आपकी कीमत निधि में उपलब्ध राशि से अधिक हो जाती है तो आपको एक पुष्टिकरण के साथ प्रस्तुत किया जाएगा
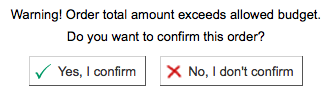
पुष्टि चेतावनी आप अपनी वापसी राशि पिछले आदेश अगर तुम ऐसा चुनाव की अनुमति देगा।
एक बार एक आइटम टोकरी में जोड़ा जाता है तुम एक टोकरी सारांश के साथ प्रस्तुत किया जाएगा।
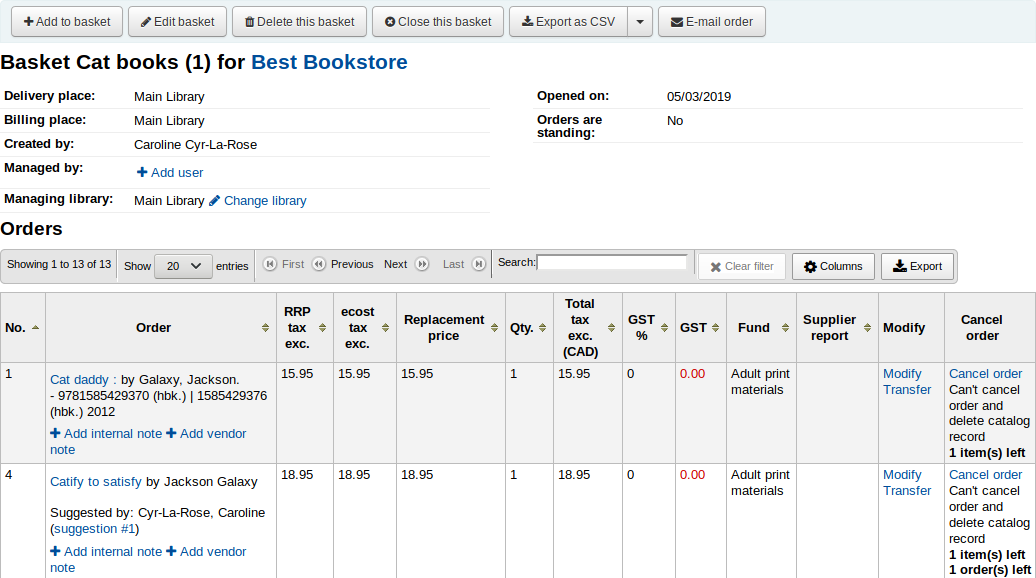
यहाँ से, आप संपादित या आइटम है कि आप जोड़ लिया है हटा सकते हैं।
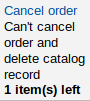
Choosing to 'Cancel the order' will delete the order line but leave the record in the catalog.
Choosing to 'Cancel order and delete catalog record' removes both the order line and the record in the catalog.
सूची रिकॉर्ड हमेशा हटाया नहीं जा सकता। आप नोट समझा क्यों देख सकते हैं।
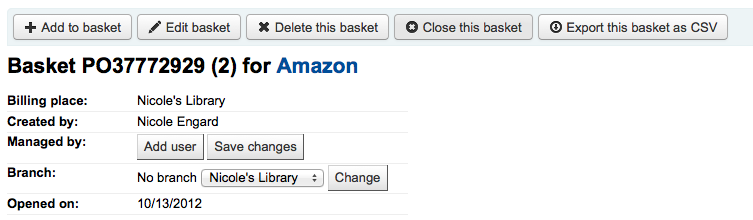
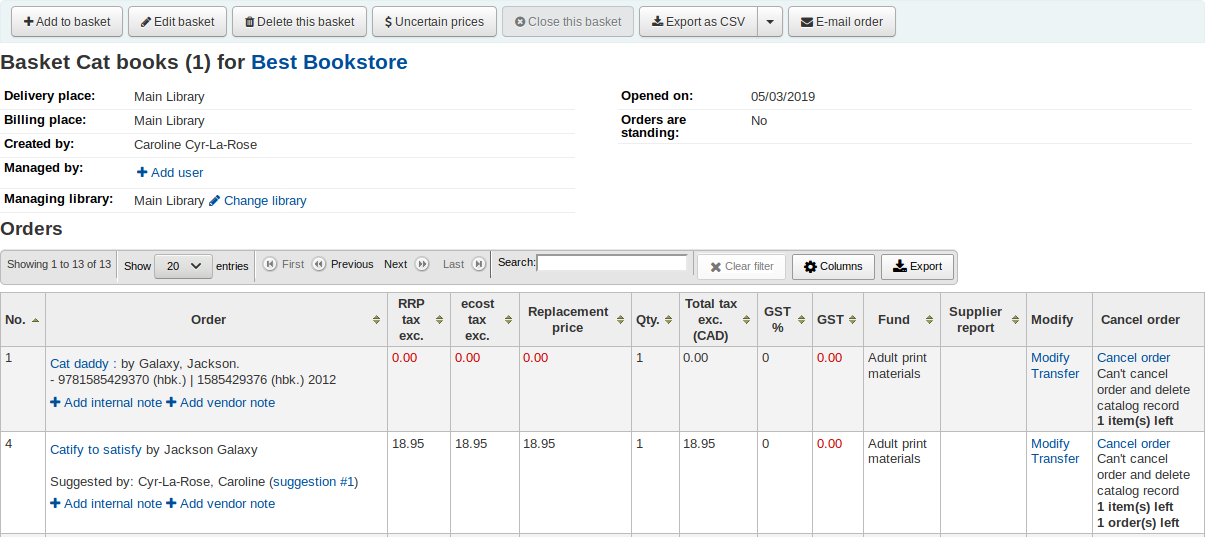
On the summary page, you also have the several option through the buttons at the top of the basket header.
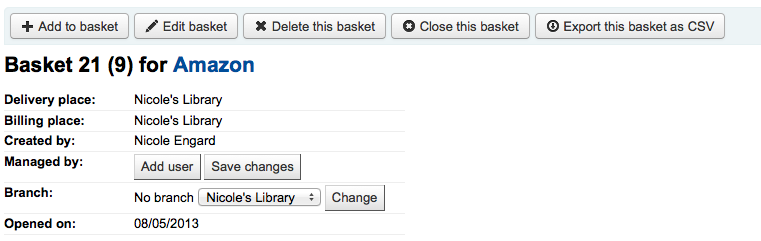
Edit basket: edit the basket information, such as the name or the billing place.
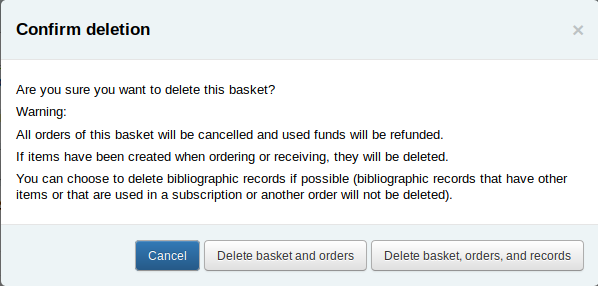
Delete this basket: if the basket is empty, you will get a simple confirmation message before deleting the basket. If the basket contains orders, you will get a confirmation message with several options.
Delete basket and orders: this will delete the basket, cancel the orders, refund the used funds, and delete the items (ordered or received).
Delete basket, orders, and records: this will delete all of the above plus the bibliographic records associated with the orders (except the ones which can't be deleted because they have remaining items, orders or subscriptions attached).
Close this basket: closing the basket will enable you to add it to a basket group (this is optional) and receive its items.
Export as CSV: this will create a CSV file with all your orders from this basket. You can add several CSV profiles options by going to the CSV profiles tool.
E-mail order: this will send the order information to your contact for this vendor. Make sure your contact has a email address in the vendor profile.
यदि आप अपने आदेश के लिए ईडीआई का उपयोग कर रहे हैं तो आप विक्रेता को फाइल भेजने के लिए और टोकरी को बंद करने के लिए 'अंपायर ऑर्डर करें' बटन पर क्लिक कर सकते हैं।

एक बार जब आप सुनिश्चित करें कि आपके टोकरी पूरा हो गया है कर रहे हैं, आप इंगित करने के लिए इस टोकरी पूरा हो गया है और विक्रेता के लिए भेज दिया गया है कि बटन 'इस टोकरी बंद' पर क्लिक कर सकते हैं।
महत्वपूर्ण
आपको बास्केट को बंद करनी होगी: रेफर: 'आइटम प्राप्त करना <receiving-orders-label>`जब पहुंचें केवल बंद बास्केट में आइटम प्राप्त करने के लिए तैयार के रूप में दिखाई देंगे।
यदि आपके पास है :रेफरी 'BasketConfirmations' की वरीयता एक पुष्टिकरण दिखाने के लिए सेट है, आपको पूछा जाएगा कि क्या आप टोकरी को बंद करने के बारे में निश्चित हैं।
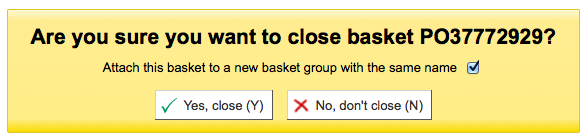
When closing the basket you can choose to add the basket to a group for easy printing and retrieval. If you check the box to 'Attach this basket to a new basket group' you will be brought to the group list where you can export a PDF of the order.
महत्वपूर्ण
A basket with at least one item marked as 'uncertain price' will not be allowed to be closed.
'अनिश्चित दाम' बटन पर क्लिक करना त्वरित संपादन करने के लिए अनिश्चित कीमतों के साथ आइटम की सूची में ऊपर से मुलाकात करेंगे। उस सूची से, आप जल्दी से नए मूल्य और मात्रा दर्ज करके आइटम संपादित कर सकते हैं।
महत्वपूर्ण
अनिश्चित दाम पेज बास्केट से स्वतंत्र है। यह विक्रेता से जुड़ा हुआ है तो आप उस विक्रेता के लिए अनिश्चित कीमतों के साथ आदेश पर सभी वस्तुओं को देखेंगे।
एक बार आपका ऑर्डर दर्ज हो जाने के बाद आप अधिग्रहण के माध्यम से इसके लिए खोज कर सकते हैं या स्टाफ क्लाइंट में बाइबिलियो विवरण पृष्ठ पर जानकारी देख सकते हैं (यदि : रेफर: अधिग्रहण विवरण 'वरीयता' के लिए निर्धारित है)।
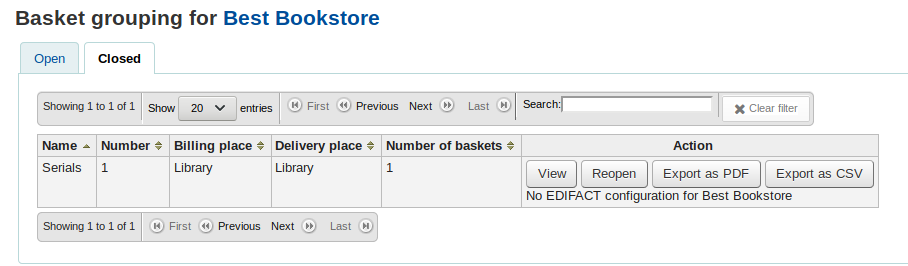
एक टोकरी समूह बनाएं
A basket group is simply a group of baskets. In some libraries, you have several staff members that create baskets, and, at the end of a period of time, someone then groups them together to send to the vendor in bulk. That said, it is possible to have one basket in a basket group, or no basket groups at all if that's the workflow used in your library.
To create a basket group, go to the vendor detail page and click on the 'Basket groups' tab on the left side.
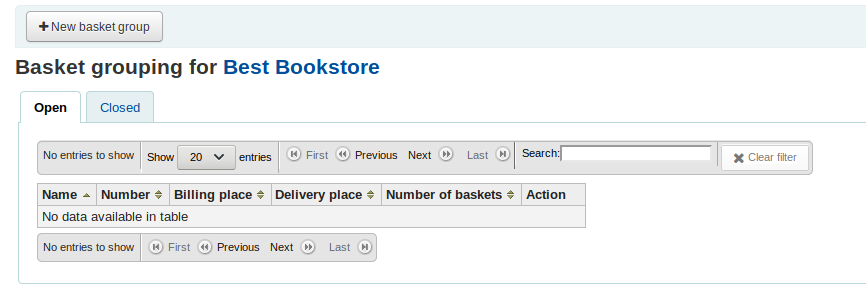
Click on the 'New basket group' button.
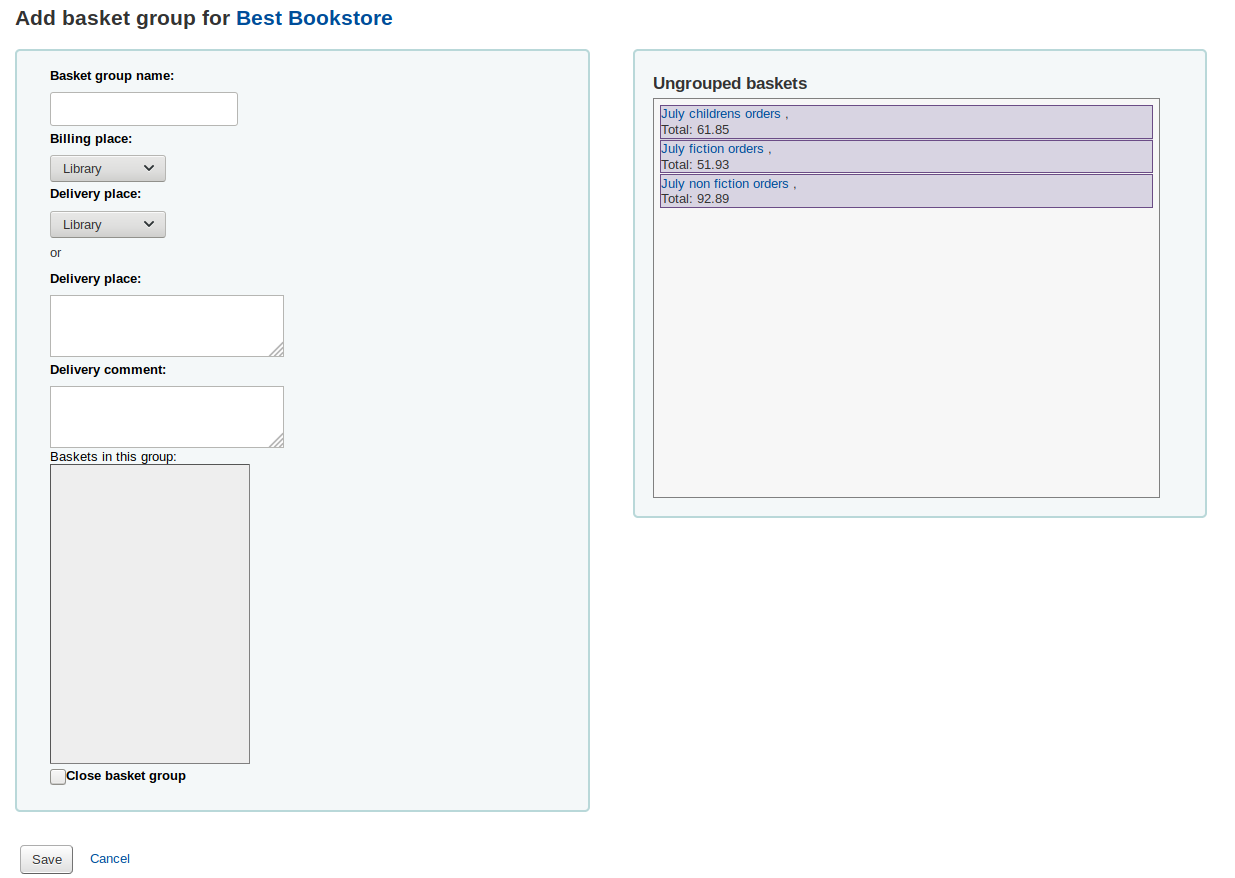
Basket group name: this is the name the basket group will go by in Koha
Billing place: this is the billing address that will appear on the basket group order
Delivery place: pick a library where these orders should be sent, this will appear on the basket group order under delivery address You can also enter a different address
Delivery comment: this comment will appear on the basket group order
Close basket group: if you know that once you're done with this basket group, you will not be modifying it anymore, you can close it right away
Drag the ungrouped baskets to the 'Baskets in this group' box to add baskets to the basket group.
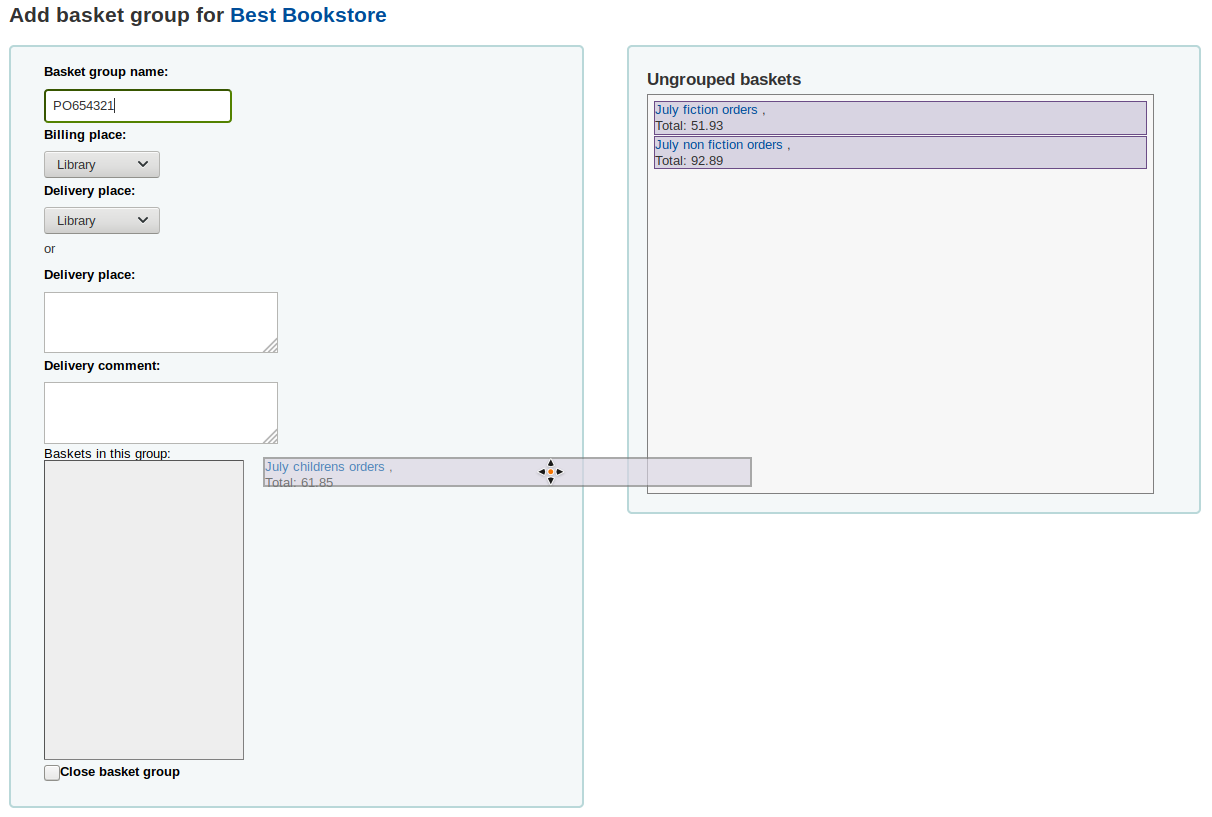
Click on 'Save' to finish creating your basket.
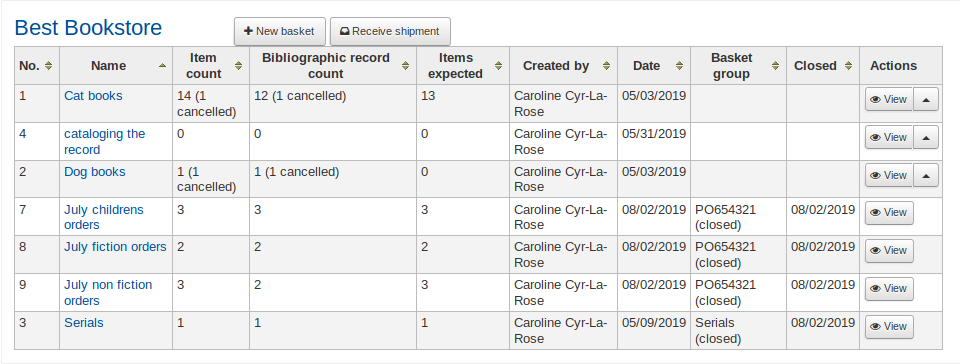
From there, you can export your order as a PDF file to send to your vendor.

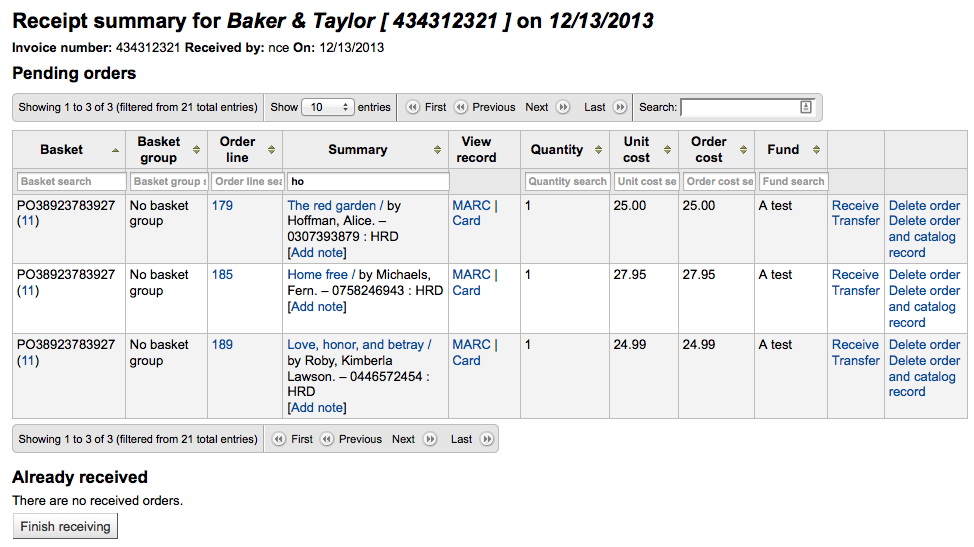
आदेश प्राप्त करना
महत्वपूर्ण
आपको बास्केट को बंद करनी होगी: रेफर: 'आइटम प्राप्त करना <receiving-orders-label>`जब पहुंचें केवल बंद बास्केट में आइटम प्राप्त करने के लिए तैयार के रूप में दिखाई देंगे।
आदेश विक्रेता जानकारी पेज से प्राप्त किया जा सकता है
या विक्रेता खोज परिणाम पृष्ठ
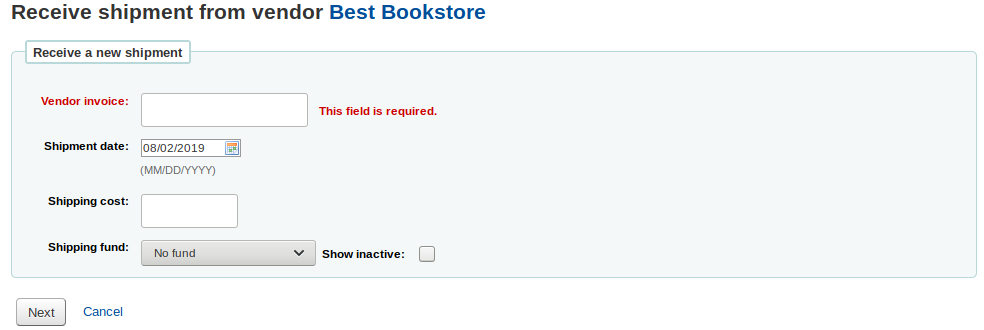
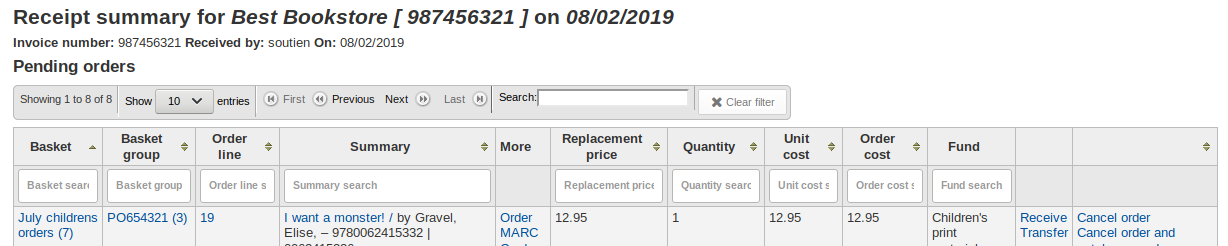
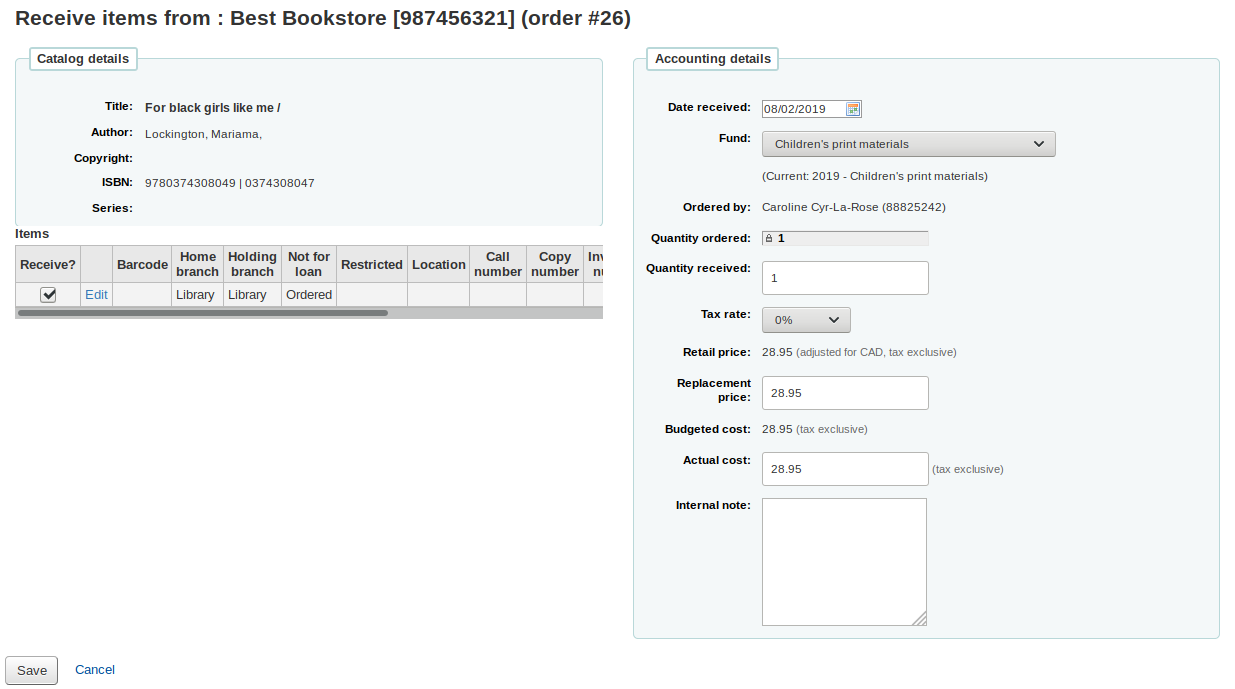
After clicking 'Receive shipment' you will be asked to enter a vendor invoice number, a shipment received date, a shipping cost and a fund to subtract that shipping amount from.
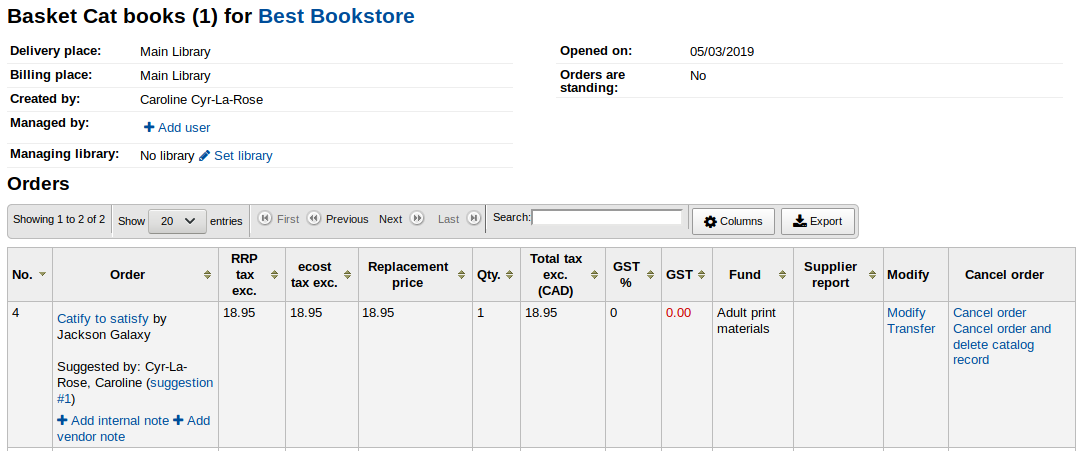
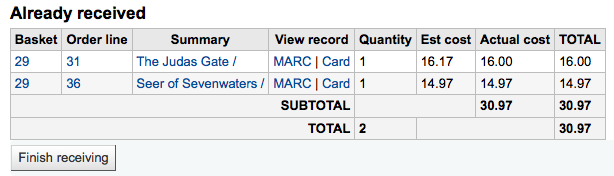
प्राप्त पेज विक्रेता के साथ आदेश पर अभी भी सभी मदों की सूची होगी बास्केट की परवाह किए बिना मद से है।
नोट
If you have a lot of orders, you can filter the orders using the 'Filter' box on the left, the 'Search' box just above the table, of the filter boxes at the top of each table column.
You could, for example, scan the ISBN of the book you are receiving in the filter box and the table will only show the corresponding orders.
Just make sure to clear the filter boxes when you're done, otherwise, the other items won't appear.

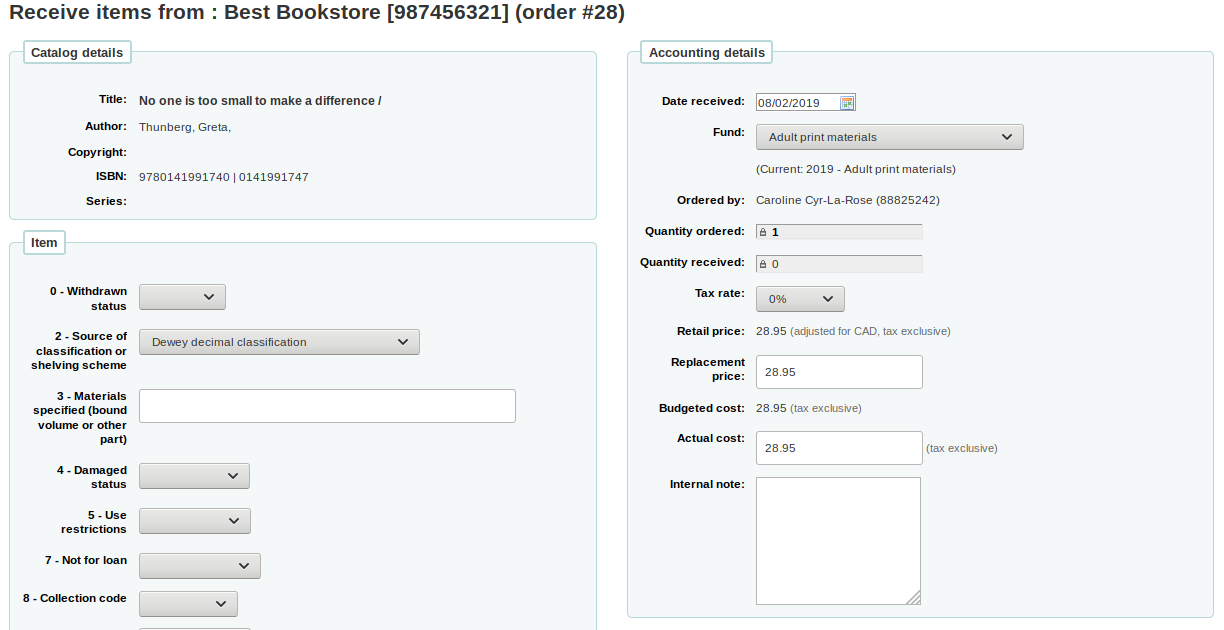
एक विशेष आइटम प्राप्त करने के लिए, आइटम के अधिकार के लिए 'प्राप्त' लिंक पर क्लिक करें।
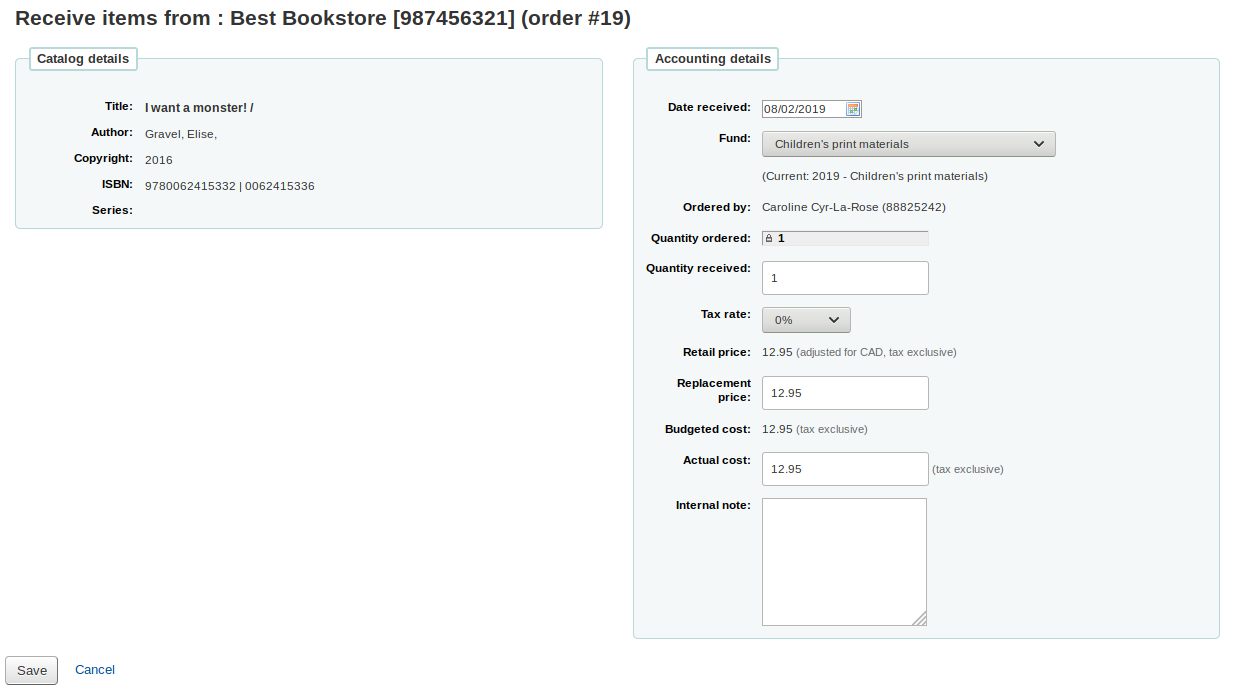
Depending on when you chose to create the item (either in the AcqCreateItem system preference, or upon creating your basket), the form will look slightly different.
If you chose to create your item when placing the order, you will have your item information on the left side and financial information on the right side.
You can check the box next to the item to receive it, or fill out the 'Quantity received' field on the left side.
Note You can choose to mark only part of the order as received if he vendor didn't send your entire order by checking only the boxes next to the items on the left that you want to receive or by entering the right amount in the 'Quantity received' field.
You can edit the item if needed by clicking on the 'Edit' link. This will allow you to enter in accurate call numbers and barcodes if you'd like to do that at the point of receipt.
You can also alter the cost information (replacement cost and actual cost). The values you enter there will automatically populate the item record by filling in subfield v (Cost, replacement price) and subfield g (Cost, normal purchase price) on the item record after saving.
If you chose to create your item when receiving the order, you will see the item creation form on the left side and the financial information on the right side.
Important You must fill out the item form and click on 'Add item' or 'Add multiple items' in order to receive the order. You will not be able to simply change the 'Quantity received' amount.
You can alter the cost information (replacement cost and actual cost). The values you enter there will automatically populate the item record by filling in subfield v (Cost, replacement price) and subfield g (Cost, normal purchase price) on the item record after saving.
Finally, if you chose to create your item when cataloging the record, you will only see the financial information on the right.
You can alter the cost information (replacement cost and actual cost).
Note The financial information will not be transferred to the item if the item is created when cataloging.
Once you have made any changes necessary (to the order and/or items, click 'Save' to mark the item(s) as received.
नोट
यदि आपके पास AcqItemSetSubfieldsWhenReceived वरीयता प्राप्त आइटम पर मूल्य जोड़ने या परिवर्तित करने के लिए सेट है, तो 'सहेजें' को दबाए जाने के बाद ये परिवर्तन होंगे।
जब आप आइटम प्राप्त समाप्त कर रहे हैं तो आप इस पेज से दूर नेविगेट या स्क्रीन के नीचे 'समाप्त प्राप्त' बटन पर क्लिक कर सकते हैं।
Received orders will have '(rcvd)' before the title in the basket view.
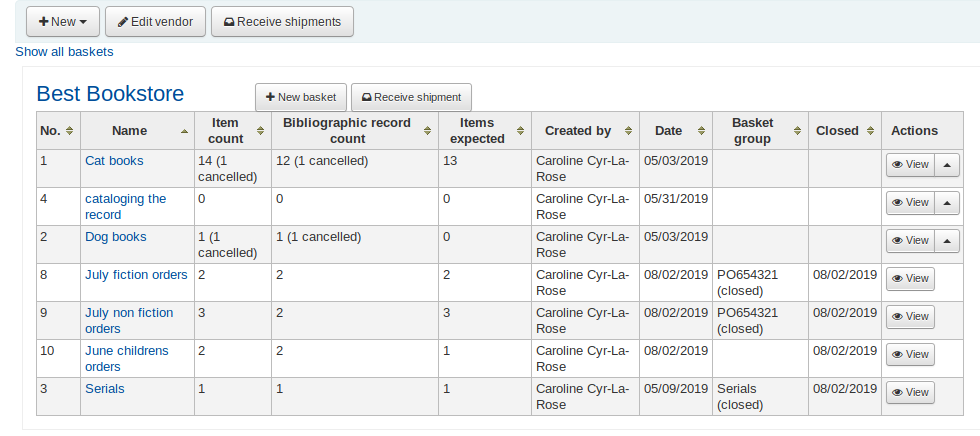
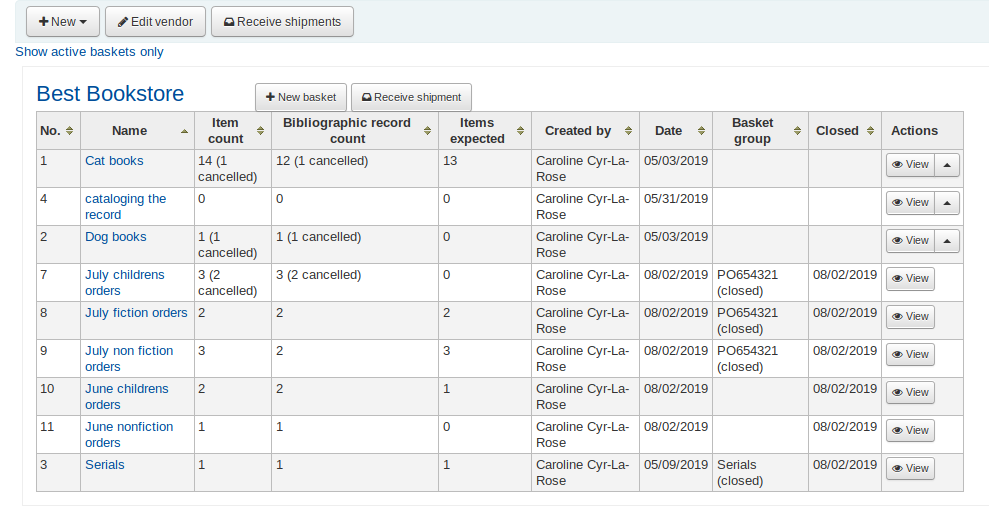
Note When all the orders in a basket have been received, the basket will be removed from the list of baskets for that vendor. You can click 'Show all baskets' to view the inactive baskets.
Transferring orders
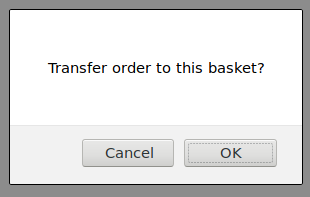
यदि आइटम नहीं रह गया है इस विक्रेता से उपलब्ध आप शीर्षक के अधिकार के लिए 'ट्रांसफर' लिंक पर क्लिक करके एक और विक्रेता की बास्केट में आदेश हस्तांतरण कर सकते हैं। यह एक विक्रेता खोज बॉक्स पॉप जाएगा।
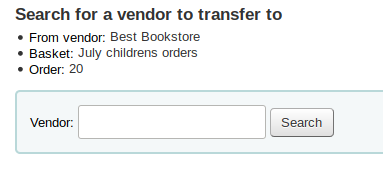
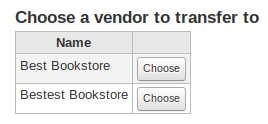
परिणाम आप विक्रेता के अधिकार के लिए 'चुनें' पर क्लिक कर सकते हैं से आप इस मद से पुन: व्यवस्थित करना चाहते हैं।
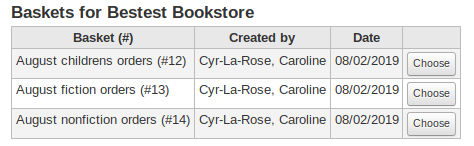
तब आप उस विक्रेता से चुनने के लिए खुला टोकरी के साथ प्रस्तुत किया जाएगा। स्थानांतरित करने के लिए आइटम बस बास्केट के अधिकार के लिए 'चुनें' पर क्लिक करने के लिए आप आइटम जोड़ने के लिए चाहते हैं।
एक बार जब आप चुना है तो आपको एक पुष्टिकरण संदेश के साथ प्रस्तुत किया जाएगा।
You will see transferred orders when viewing the basket.
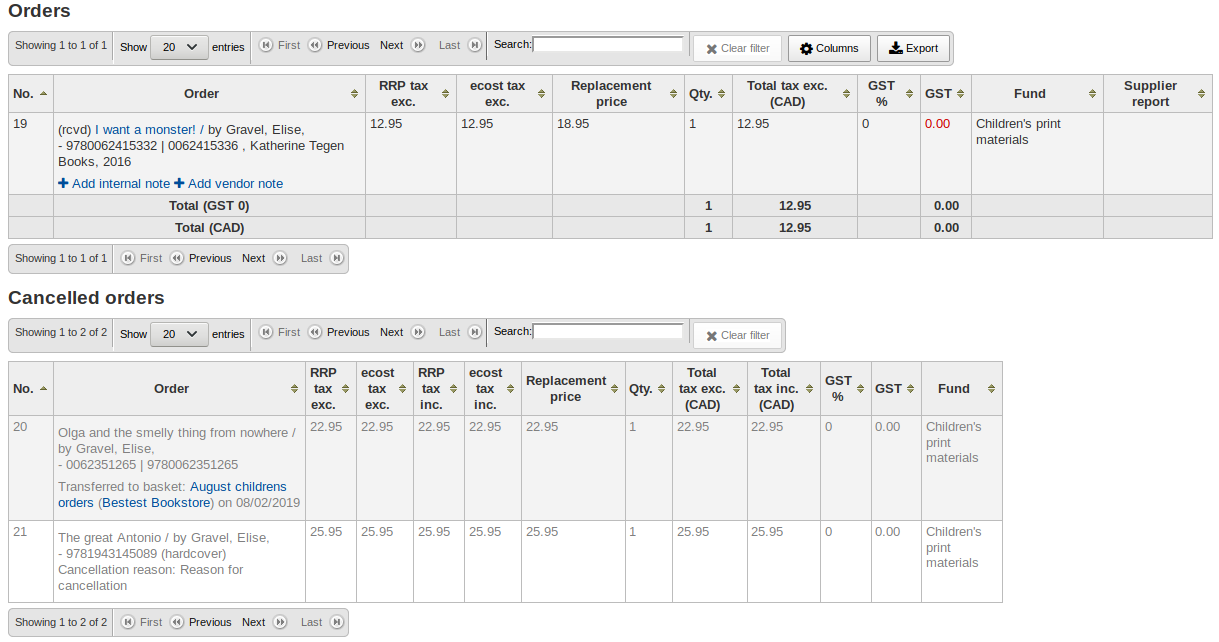
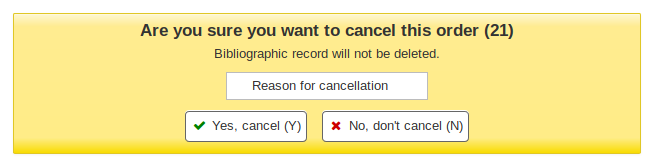
Cancelling orders
आइटम नहीं पाया जा सकता है, तो कहीं भी आप अभी तक सही करने के लिए 'आदेश हटाएँ' पर क्लिक करके आदेश को रद्द कर सकते हैं। यह आपके कारण दर्ज करें और रद्दीकरण की पुष्टि करने का संकेत होगा।
You will also see that the item is cancelled if you view the basket.
नोट
Whilst it is possible to re-open your basket, cancel one or more orders and re-close the basket, this is not recommended. This procedure will update the 'basket closed' date, which in turn will cause your 'late order' calculations to be incorrect.
चालान
जब आदेश प्राप्त कर रहे हैं चालान उत्पन्न कर रहे हैं। चालान अधिग्रहण पेज के बाईं में 'चालान' पर क्लिक करके खोजा जा सकता है।
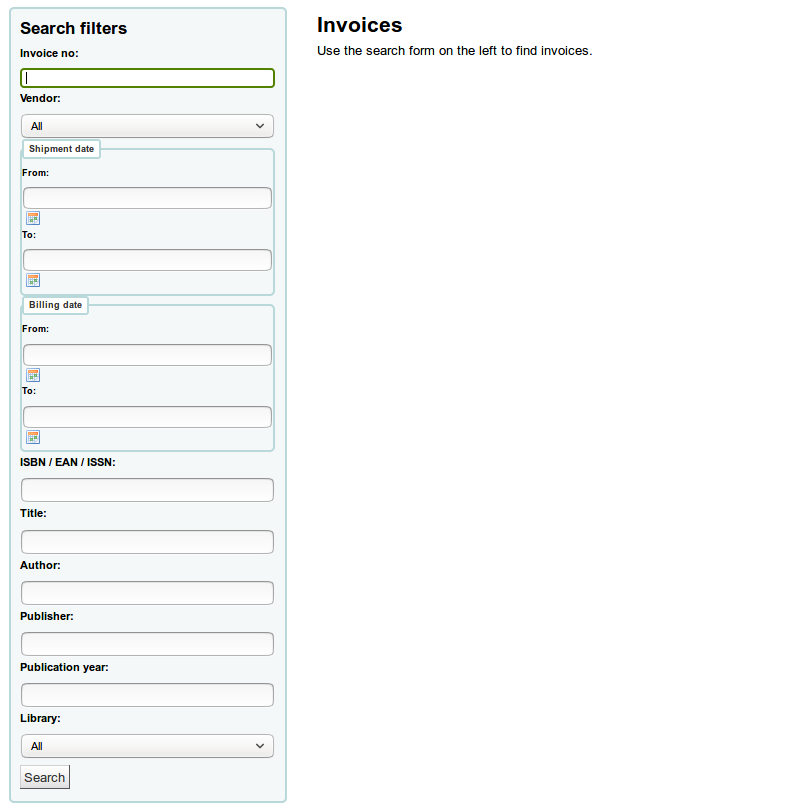
खोज के बाद, अपने परिणामों को खोज विकल्पों में से सही करने के लिए दिखाई देगा।
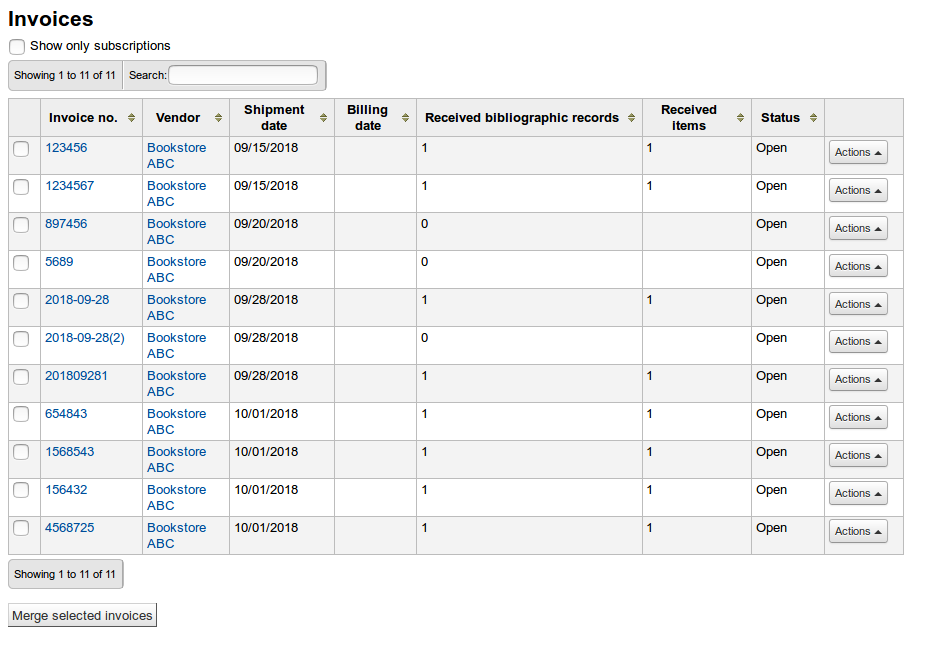
From the 'Actions' button, you can click the 'Details' link to see the full invoice or 'Close' to note that the invoice is closed/paid for.
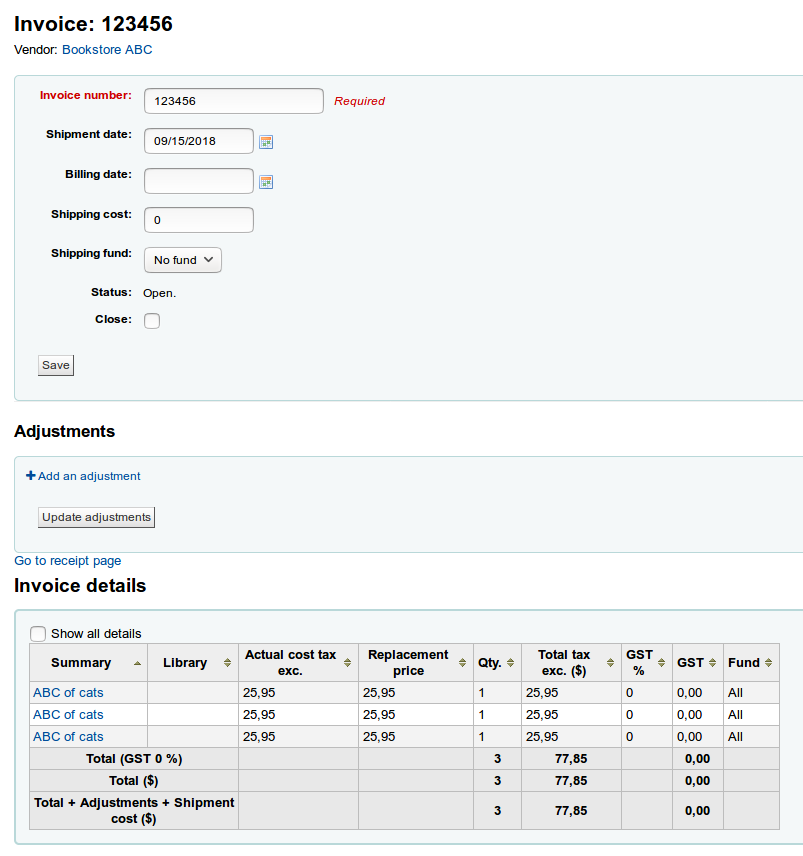
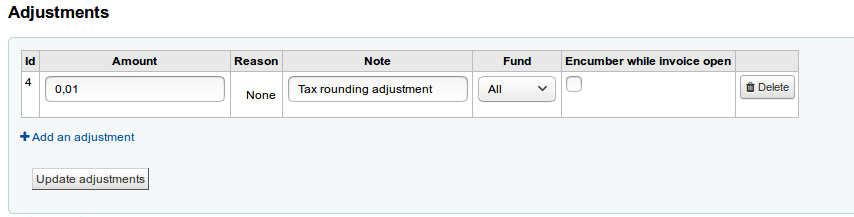
समायोजन अनुभाग में, आप अपने चालान में समायोजन जोड़ सकते हैं। ये समायोजन उस मूल्य को समायोजित करने के लिए हो सकते हैं, जो उदाहरण के लिए, राउंडिंग या क्रेडिट को जोड़कर ऑफसेट है।
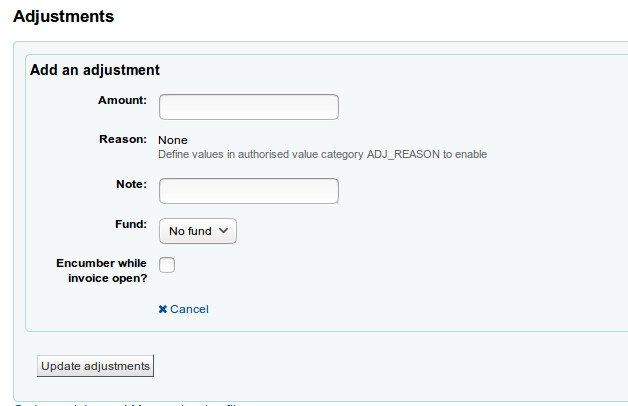
'एडजस्टमेंट एड करें' पर क्लिक करें
समायोजन की राशि दर्ज करें
जरूरत पड़ने पर एक कारण चुनें
नोट
कारण हैं अधिकृत मूल्य. समायोजन के लिए कस्टम कारण जोड़ने के लिए श्रेणी ADJ_REASON का उपयोग करें.
यदि आवश्यक हो, तो एक नोट दर्ज करें
फंड चुनें जिसमें से समायोजन राशि ली जानी चाहिए
अगर 'इनकाउंटर करते समय चालान खुला ’की जाँच की जाती है, तो समायोजन की राशि तुरंत निधि से निकाल ली जाएगी। यदि इसकी जाँच नहीं की जाती है, तो चालान बंद होने पर ही राशि को घटाया जाएगा।
अपने समायोजन को बचाने के लिए 'अपडेट समायोजन' पर क्लिक करें
यदि आपको बाद में समायोजन बदलने की आवश्यकता है, तो आप तालिका में ऐसा कर सकते हैं और 'अपडेट समायोजन' पर क्लिक कर सकते हैं।
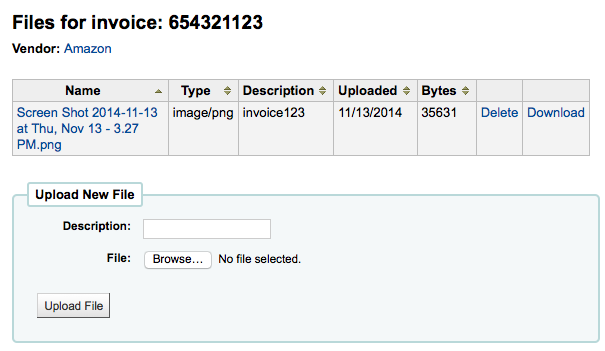
Attaching files to invoices
यदि आप अधिग्रहण फ़ाइलों को अपलोड करने की अनुमति दे रहे हैं AcqEnableFiles वरीयता आपको 'रसीद पृष्ठ पर जाएं' लिंक के आगे चालान फाइलों को प्रबंधित करने का विकल्प दिखाई देगा
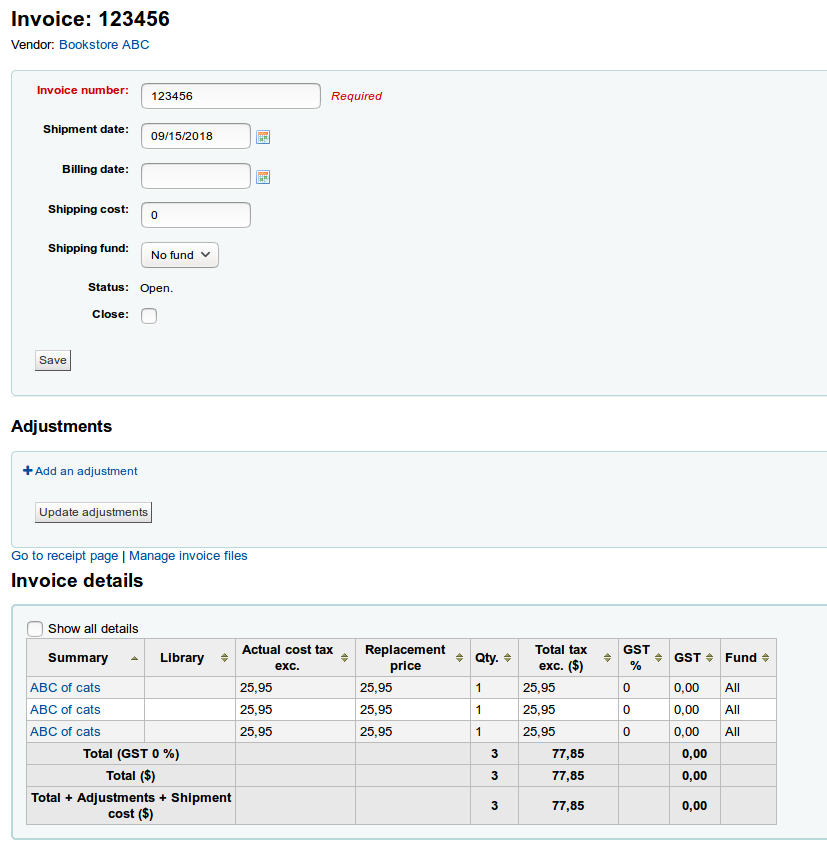
देखने के लिए या नई फ़ाइलों को संलग्न करने के लिए लिंक पर क्लिक करें 'चालान फ़ाइलें प्रबंधित करें'
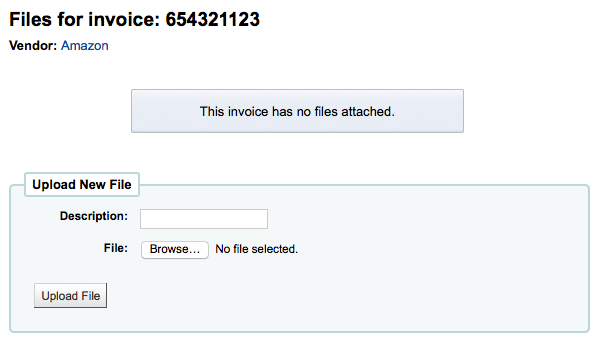
यहाँ से आप को अपलोड करने और/या फ़ाइलें आप पहले से ही जुड़ी है देखने के लिए एक फ़ाइल पा सकते हैं।
Merging two invoices
चालान खोज से परिणाम आप भी एक साथ विलय कर सकते हैं दो चालान आप करने की आवश्यकता चाहिए। सीधे शब्दों में चालान के बाईं आप विलय और पेज के नीचे 'मर्ज का चयन किया चालान' बटन पर क्लिक करने के लिए चाहते हैं के लिए चेकबॉक्स क्लिक करें। आप एक पुष्टिकरण स्क्रीन के साथ प्रस्तुत किया जाएगा:
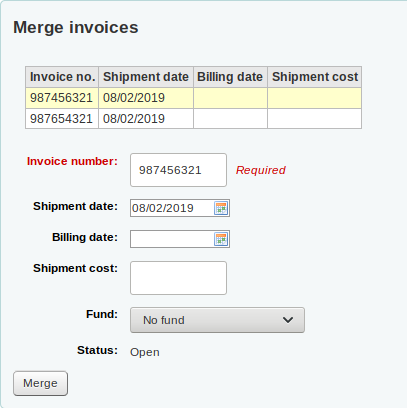
चालान संख्या की पंक्ति पर क्लिक करें आप रखने के लिए करना चाहते हैं और यह पीले रंग में प्रकाश डाला जाएगा। उपलब्ध कराए गए खाने में किसी भी अलग बिलिंग जानकारी दर्ज करें और 'मर्ज' पर क्लिक करें। दो चालान एक बन जाएगा।
Claims and late orders
यदि आपने अपने सिस्टम में विक्रेताओं के लिए एक ईमेल पता दर्ज किया है, तो आप उन्हें ऑर्डर करने के बाद ईमेल का दावा भेज सकते हैं। इससे पहले कि आप दावे भेज सकें, आपको एक अधिग्रहण दावे का नोटिस सेट करना होगा <#ACQCLAIM>`__.
अधिग्रहण पृष्ठ से 'लेट ऑर्डर' के लिंक पर क्लिक करने पर आपको बाएं हाथ पर फ़िल्टर विकल्पों की एक श्रृंखला के साथ प्रस्तुत किया जाएगा। ये फ़िल्टर केवल बंद बास्केट पर ही लागू होंगे।

नोट
विक्रेता के नीचे खींच ही बंद बास्केट कि देर कर रहे हैं के साथ विक्रेताओं से पता चलता है।
एक बार जब आप आप देर हो विचार आप चीजों को दिखाने के लिए अपने आदेश फ़िल्टर आप इन मदों की एक सूची के साथ प्रस्तुत किया जाएगा।
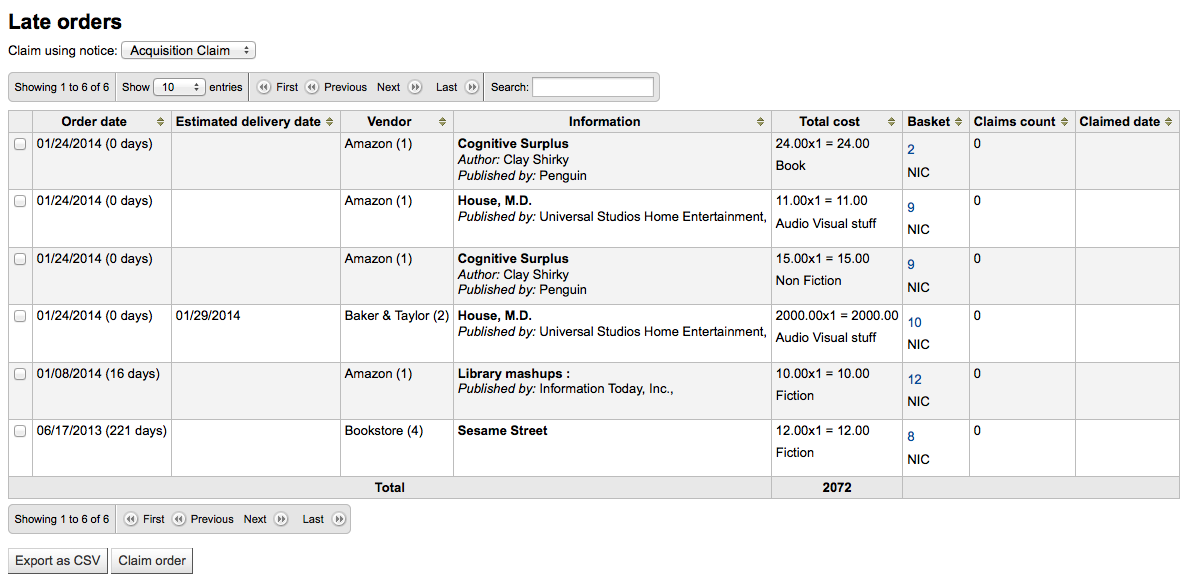
प्रत्येक देर शीर्षक का सही करने के लिए आप एक चेकबॉक्स को देखने के लिए किया जाएगा। लोगों को आप को भेजे गए एक पत्र का दावा चाहते बंद चेक करें और सूची के नीचे सही पर 'दावा आदेश' पर क्लिक करें। यह स्वचालित रूप से ईमेल पते फ़ाइल पर है पर विक्रेता के लिए एक ईमेल भेज देंगे।
नोट
अनुमानित डिलीवरी की तारीख वेंडर रिकॉर्ड पर दर्ज की गई डिलीवरी टाइम वैल्यू पर आधारित है।
If you would rather use a different acquisition claim letter (other than the default) you can create that in the notices module and choose it from the menu above the list of late items.

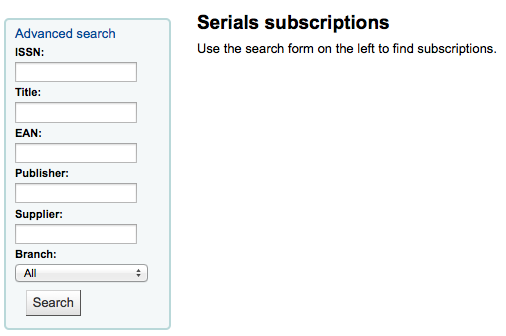
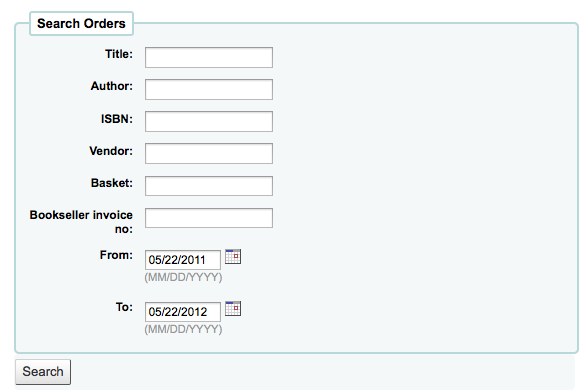
अधिग्रहण की खोजें
विभिन्न अधिग्रहण पृष्ठों के शीर्ष पर एक त्वरित खोज बॉक्स है जहां आप या तो वेंडर खोज या ऑर्डर खोज कर सकते हैं।
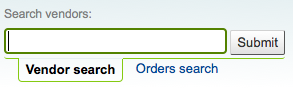
विक्रेता खोज में आप परिणाम प्राप्त करने के लिए विक्रेता नाम के किसी भी भाग में प्रवेश कर सकते हैं।
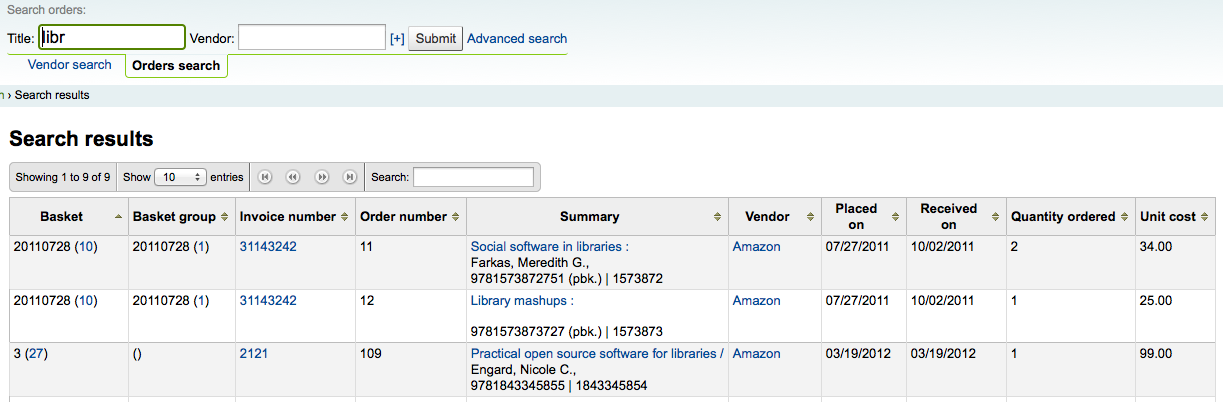
आदेश खोज का उपयोग करके आप उन वस्तुओं की खोज कर सकते हैं जिन्हें विक्रेता के साथ या उसके बिना आदेश दिया गया है।

आप एक या दोनों क्षेत्रों में जानकारी दर्ज कर सकते हैं और आप शीर्षक और / या विक्रेता के नाम के किसी भी हिस्से में प्रवेश कर सकते हैं।
वेंडर खोज बॉक्स खोज का विस्तार होगा की सही करने के लिए धन चिह्न पर क्लिक करें और आप अतिरिक्त क्षेत्रों के लिए खोज करने के लिए अनुमति देते हैं।
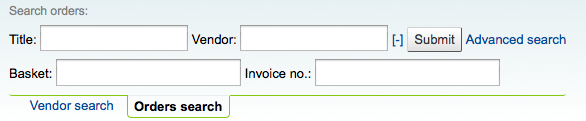
खोज बटन के दाईं ओर उन्नत खोज पर क्लिक करने से आपको सभी आदेश खोज विकल्प उपलब्ध होंगे।
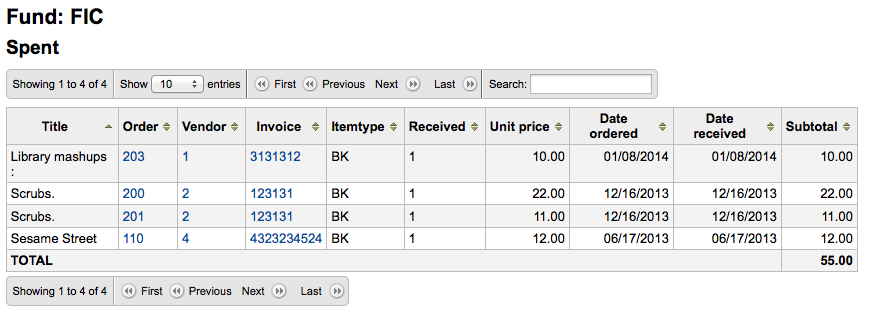
बजट/फंड ट्रैकिंग
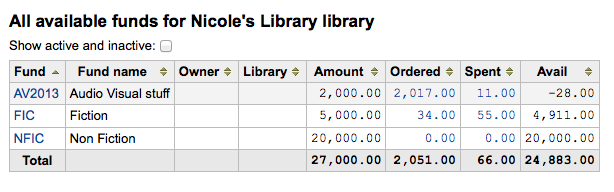
मुख्य अधिग्रहण पेज पर आप अपने सक्रिय धन के सभी और क्या आदेश दिया है या उनके खिलाफ खर्च किया गया है की एक टूटने दिखा एक तालिका के हो जाएगा।
लिंक्ड राशि खर्च या आप एक आदेश / कि बजट पर प्राप्त खिताब के सारांश दिखाएगा आदेश दिया अंतर्गत पर क्लिक करके।
ईडीआई प्रक्रिया
पिछला वर्ग सभी आदेश विकल्पों को समझाता है, इस अनुभाग में उन ईडीआई या ईडीआईएफएसीटी से संबंधित हिस्सों को खींच लिया गया है जो ऑर्डर करने के लिए केवल ईडीआई का उपयोग कर रहे हैं।
महत्वपूर्ण
कोहा इलेक्ट्रॉनिक आदेश के लिए X12 मानक नहीं EDIFACT मानक का उपयोग करता है।
विक्रेताओं के लिए ईडीआई प्रश्न
कोहा में सेट अप प्रक्रिया शुरू करने से पहले आप अपने विक्रेताओं से निम्नलिखित जानकारी एकत्र करना चाहेंगे।
** ईडीआई खातों: ** * यह आपके विक्रेता के लिए बुनियादी कनेक्शन जानकारी है इसे भरने के लिए इस्तेमाल किया जाएगा :रेफर: ईडीआई लेखा अनुभाग। *
** वेंडर: ** विक्रेता का नाम
** विवरण: ** एक संक्षिप्त विवरण अगर अतिरिक्त स्पष्टीकरण की आवश्यकता है (खासकर यदि आपके पास एक विक्रेता के लिए एकाधिक खाते हैं)।
** परिवहन: ** क्या FTP, SFTP, या कुछ और के द्वारा विक्रेता ईडीआई फाइलों को ट्रांसमिट करता है, इसके लिए विशेष प्रसंस्करण की ज़रूरत है?
** दूरस्थ होस्ट: ** FTP / SFTP सर्वर का यूआरएल या आईपी पता
** उपयोगकर्ता नाम: ** उपरोक्त सर्वर के लिए उपयोगकर्ता नाम
** पासवर्ड: ** उपरोक्त सर्वर के लिए पासवर्ड
** डाउनलोड निर्देशिका: ** डाउनलोड करने और प्रक्रिया करने के लिए Koha के लिए फ़ाइलें जिसमें सर्वर पर पथ
** निर्देशिका को अपलोड करें: ** सर्वर पर पथ कि Koha प्रक्रिया करने के लिए अपने विक्रेता के लिए फाइल अपलोड करेगा
** क्वालिफायर: ** किसने सैन को नीचें सौंपा?
निम्न में से किसी एक को चुनें:
EAN अंतर्राष्ट्रीय
(31 बी) अमेरिकी SAN एजेंसी
आपूर्तिकर्ता द्वारा सौंपा
खरीदार द्वारा सौंपा
** SAN: ** विक्रेता के लिए पहचानकर्ता
Buyer qualifier and SAN are optional. Some vendors require a second buyer identifier in addition to the account EAN.
**क्रेता क्वालिफायर. ** किसने SAN को नीचें सौंपा?
निम्न में से किसी एक को चुनें:
EAN अंतर्राष्ट्रीय
(31 बी) अमेरिकी SAN एजेंसी
आपूर्तिकर्ता द्वारा सौंपा
खरीदार द्वारा सौंपा
** खरीदार SAN: ** पुस्तकालय के लिए पहचानकर्ता
** उद्धरण सक्षम: ** [y/n] क्या इस विक्रेता ईडीआईएफ़एक्ट के जरिए उद्धरण भेजने और प्राप्त करने का समर्थन करता है और क्या आप EDIfact के जरिए उद्धरण भेजना और प्राप्त करना चाहते हैं?
आदेश सक्षम किए गए: [y/n] क्या यह विक्रेता EDIfact के माध्यम से ऑर्डर भेजने और प्राप्त करने का समर्थन करता है और क्या आप EDIfact के माध्यम से ऑर्डर भेजना और प्राप्त करना चाहते हैं?
चालान सक्षम: [y / n] क्या यह विक्रेता EDIfact द्वारा चालान भेजने और प्राप्त करने का समर्थन करता है और क्या आप EDIfact के माध्यम से चालान भेजना और प्राप्त करना चाहते हैं?
आदेश फ़ाइल प्रत्यय: आदेश फ़ाइलों के लिए फ़ाइल प्रत्यय
उद्धरण फ़ाइल प्रत्यय: उद्ध रणफ़ाइलों के लिए फ़ाइल प्रत्यय
** इनवॉइस फ़ाइल प्रत्यय: ** इनवॉइस फ़ाइलों के लिए फ़ाइल प्रत्यय
** खाता संख्या: ** (उन सभी को सूचीबद्ध करें)
** खाता वर्णन (ओं): ** (यह संख्या क्या है इसका सारांश)
ईएएन: * ईडीआईएफ़एक्ट का इस्तेमाल करते हुए प्रत्येक पुस्तकालय को खरीदार पहचानकर्ता को सैन या ईएएन के रूप में पता करने की आवश्यकता है। यह इसमें भर जाएगा: संदर्भ :ref:`लाइब्रेरी ईएएन <library-eans-label>`सेटिंग। *
लाइब्रेरी
EAN
निम्न में से किसी एक को चुनें:
EAN अंतर्राष्ट्रीय
(31 बी) अमेरिकी SAN एजेंसी
आपूर्तिकर्ता द्वारा सौंपा
खरीदार द्वारा सौंपा
मार्क ऑर्डर फील्ड्स या ग्रिड ऑर्डरिंग: * ये वैल्यू इन में भर जाएंगे MarcFieldsToOrder वरीयता। *
कीमत: एमएआरसी 21 फील्ड जिसमें आइटम की कीमत शामिल है
** मात्रा: ** MARC21 फ़ील्ड जिसमें दिए गए रिकार्ड के लिए आइटम की संख्या शामिल है I
budget_code: MARC21 फील्ड में डेबिट किए जाने वाले कोहा बजट कोड शामिल हैं
**डिस्काउंट ** मार्क21 फील्ड में डिस्काउंट एक प्रतिशत के रूप में शामिल होता है, जिसकी कीमत छूट दी जाएगी
sort1: MARC21 field that will populate custom field sort1
sort2: MARC21 फ़ील्ड जो कस्टम फ़ील्ड sort2 को पॉप्युलेट करेंगे
EDI सेटअप
ईडीआई का इस्तेमाल करने से पहले आप निम्न कदम उठा सकते हैं:
अपने विक्रेता/पुस्तक विक्रेता/नौकरीकर्ता से पूछिए कनेक्शन की जानकारी
यह विक्रेता से कुछ नमूना EDIFACT फ़ाइलों के लिए पूछने के लिए भी फायदेमंद हो सकता है
अपने विक्रेता/बुकसेलर/जॉबबर के साथ साझा करें : ref: लाइब्रेरी कोड <libraries-label>, आइटम प्रकार कोड, :ref:` फंड कोड <funds-label> , और कोई अन्य कोड या : ref: अधिकृत मान <authorized-values-label> 'उन्हें आपके मार्क ऑर्डर रिकॉर्ड बनाने की आवश्यकता हो सकती है
अपने समर्थन प्रदाता या समुदाय के साथ संवाद करें कि आपको अपने विक्रेता के उत्तरों के आधार पर प्लगइन की आवश्यकता होगी या नहीं
उदाहरण के लिए ByWater Solutions ने यहां विशिष्ट विक्रेताओं के लिए प्लगइन प्रकाशित किए हैं: https://github.com/bywatersolutions/koha-plugin-edifact-enhanced
विक्रेता / पुस्तक विक्रेता / नौकरी दर्ज करें अधिग्रहण में
Review your Acquisitions system preferences
भरना सुनिश्चित करें MarcFieldsToOrder आदेश फ़ाइलों के लिए मूल्यों के साथ वरीयता
अपना दर्ज करें :ref:`ईडीआई अकाउंट्स '
अपना दर्ज करें :ref:`लाइब्रेरी ईएएनएस'
Turn on the EDI Cron so that it can process files
ईडीआई आदेश
ईडीआई का उपयोग करने का क्रम में पहला कदम पुस्तक विक्रेता की वेबसाइट पर होता है। प्रत्येक विक्रेता अलग-अलग भाषा का उपयोग करेगा, लेकिन आपको अपनी साइट पर अपना ऑर्डर देना होगा और फिर मार्क ऑर्डर फ़ाइल डाउनलोड करना होगा। कुछ भाषा जो आप देख सकते हैं "बास्केट", "ऑर्डर", "कार्ट", और/या "मार्क ऑर्डर" शामिल हैं। एक बार जब आपके पास यह मार्क फ़ाइल आपके कंप्यूटर पर डाउनलोड हो जाए तो आप कोहा में लॉग इन करना चाहेंगे और वहां प्रक्रिया जारी रखेंगे।
यहां जाएं:ref:`आयात 'उपकरण के लिए चरण मार्क रिकॉर्ड्स और अपनी फ़ाइल अपलोड करें। पुष्टि स्क्रीन के साथ प्रस्तुत करने के बाद अधिग्रहण पर आगे बढ़ें.
अधिग्रहण में :ref:`आपके द्वारा आदेशित विक्रेता के लिए' टोकरी <create-a-basket-label> 'बनाएं। टोकरी से, एक स्टेज्ड फ़ाइल <#orderfromstagedfile>`__ से ऑर्डर करें और अपने विक्रेता से डाउनलोड की गई फ़ाइल के आगे 'ऑर्डर' पर क्लिक करें और कोहा में मंचित करें।
पुष्टिकरण स्क्रीन से आप अपने आदेश से संबंधित एमएआरसी फ़ाइल में सभी डेटा देखेंगे। यदि आप फंड और मात्रा जैसे फ़ील्ड नहीं देख रहे हैं तो पुष्टि करें कि आपका MarcFieldsToOrder वरीयता सही है।
एक बार जब आप बास्केट में सभी आइटम जोड़ देते हैं तो आप 'EDIFACT ऑर्डर बनाएं' बटन पर क्लिक कर सकते हैं।
EDIFACT आदेश
This will generate a pending file in the EDIFACT messages in Koha. The pending files will be processed by the EDI cron job and sent to your vendor.
ईडीआई चालान
When the book vendor is done processing your files they will send an invoice via EDI as well. The EDI cron job will grab invoices and mark items found in the invoice as received and update your funds without any need for manual intervention.
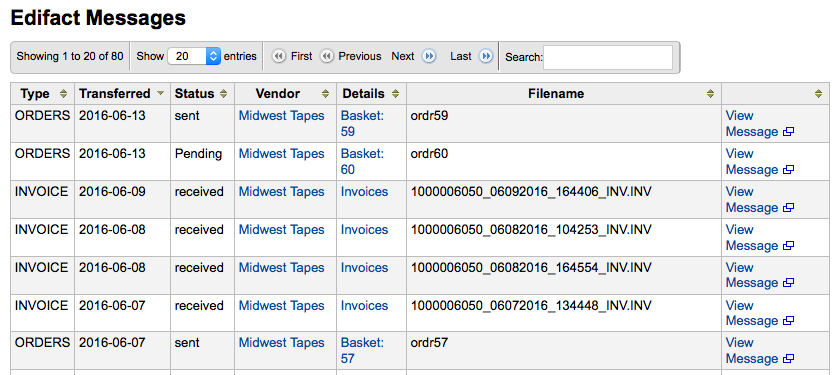
EDIFACT संदेश
EDIFACT के माध्यम सभी संदेशों की एक लॉगऔर प्राप्त EDIFACT संदेश के नीचे पाया जा सकता है।