編目¶
編目之前應參照 應用核對清單,先處理基本的設定,最重要的是確認您的 機讀編目格式書目框架 框架已設定完成,進入編目模組後,就不能新增或移除欄位與分欄。
有些 Koha 使用者訂購 OCLC 的線上編目工具 Connexion 取得書目記錄。詳情見 OCLC Connexion Gateway 設定附錄。
- 到那: 其他 > 編目
書目紀錄¶
Koha 的書目紀錄裡包括與資料有關的資訊。包括題名、著者、國際標準書號等。這些資訊儲存在 Koha 的機讀編目格式裡 (Koha 支援多種 MARC)。儲存後,就能加入館藏記錄 館藏紀錄。
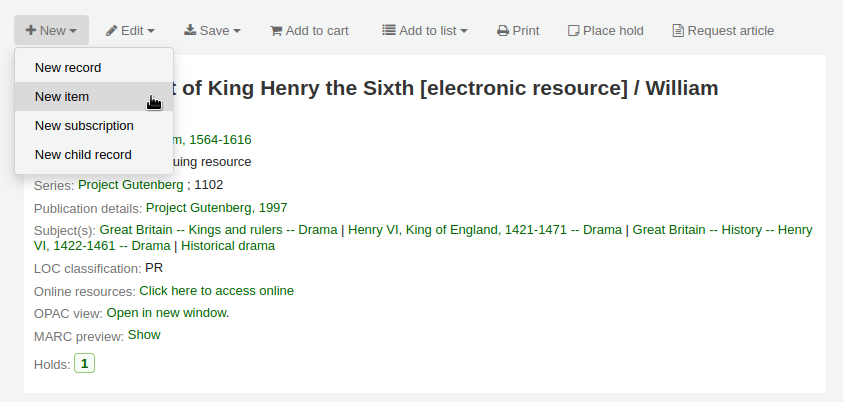
新增紀錄¶
經由原始編目或複本編目可以新增紀錄入 Koha。也可使用基本或進階編目介面。
您可在基本編輯器中使用空白的模板編目
勾選 『新增紀錄』
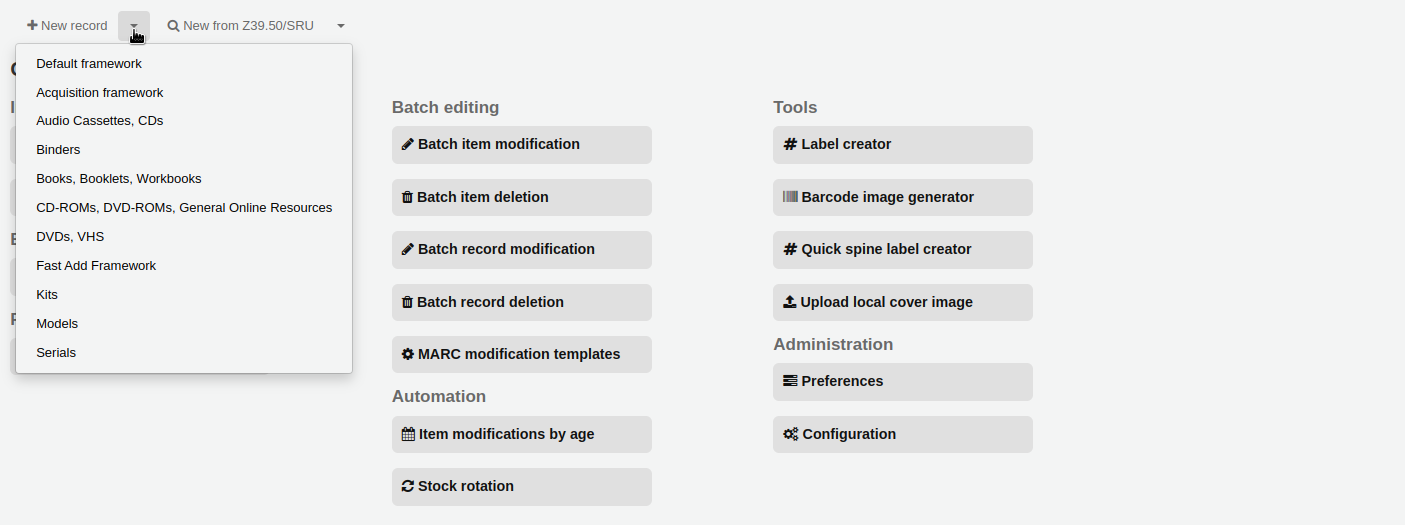
- 選擇編目基礎的框架
您可在進階編輯器中使用空白的模板編目
- 啟用 EnableAdvancedCatalogingEditor 偏好
- 按 『進階編輯器』 鈕

以上次使用的編輯器 (基本或進階), 依照其他圖書館既有的紀錄,編目新的紀錄
按 『新增自 Z39.50/SRU』
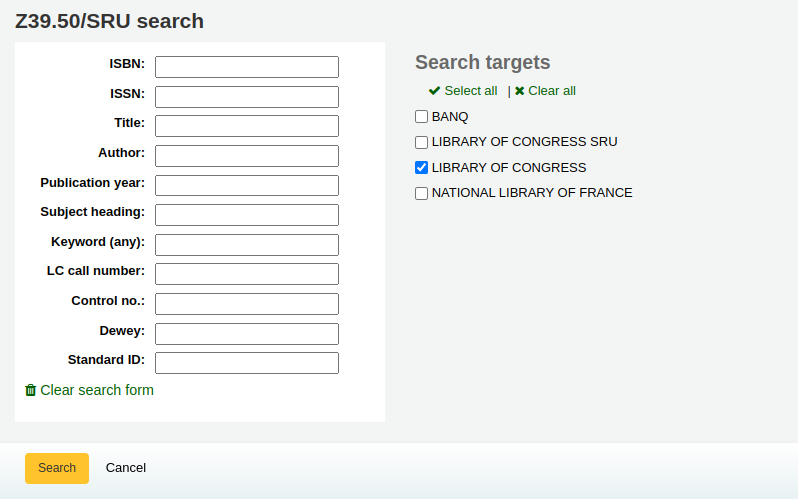
搜尋打算編目的館藏
說明
若找不到,試著搜尋較少的欄位,不是所有的 Z39.50 伺服器都接受所有欄位的搜尋。
從 Z39.50 管理 區塊改變搜尋的對象。
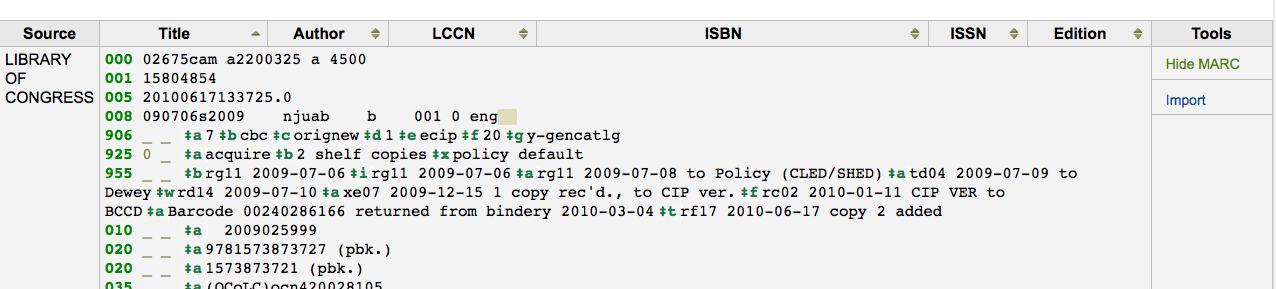
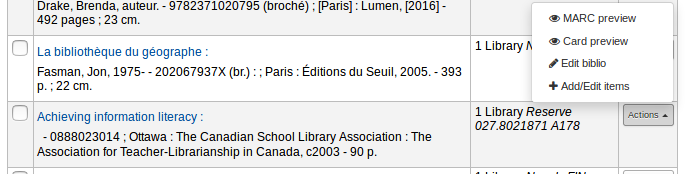
找到後可將用 MARC 或卡片格式檢視紀錄或選擇匯入 Koha
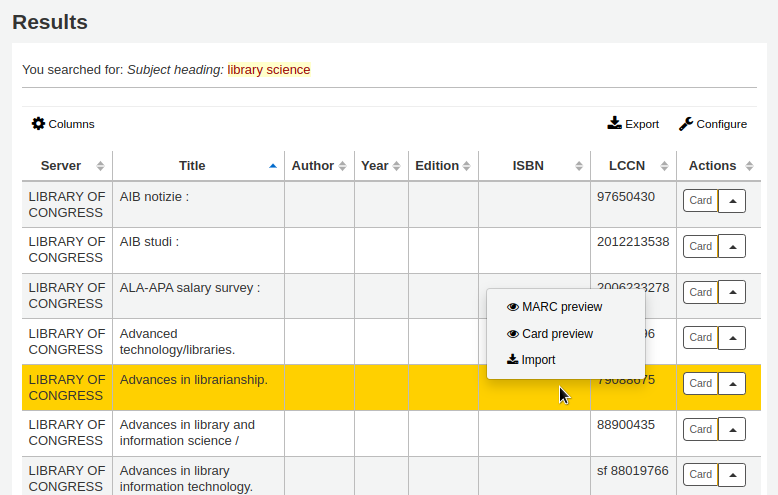
點選題名,彈出選單與連結,再選擇題名,就能正確匯入連結

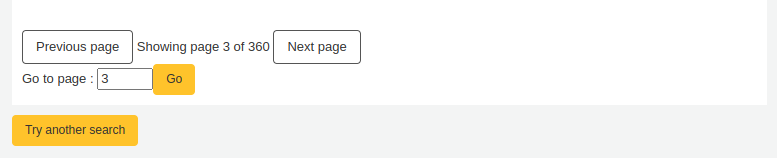
從 Z39.50 搜尋結果裡找不到預期的題名,可勾選左下方的 『其他搜尋』
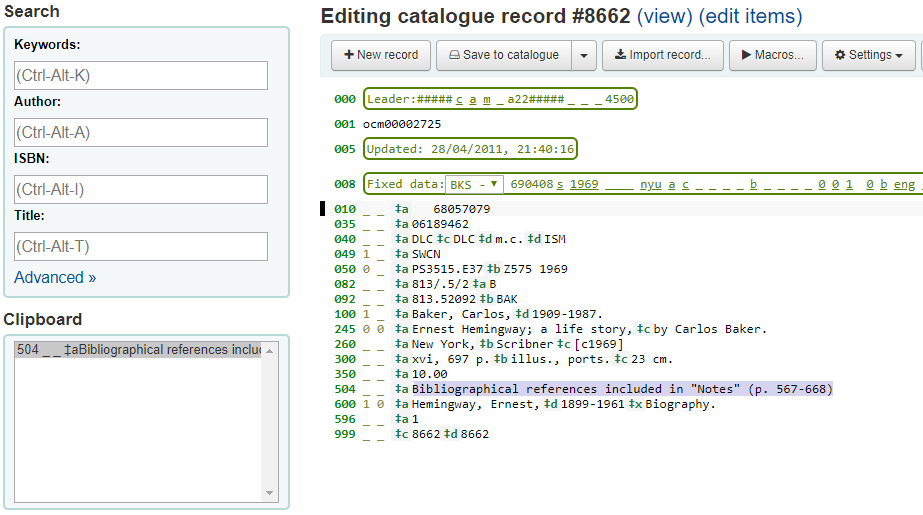
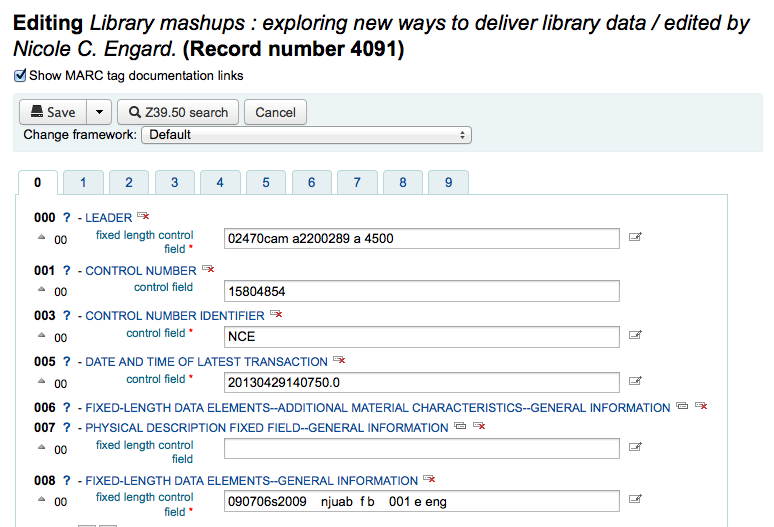
基本編目編輯器¶
在基本編輯器內,打開空白的框架或經由 Z39.50 匯入紀錄後,將出現繼續編目的表單
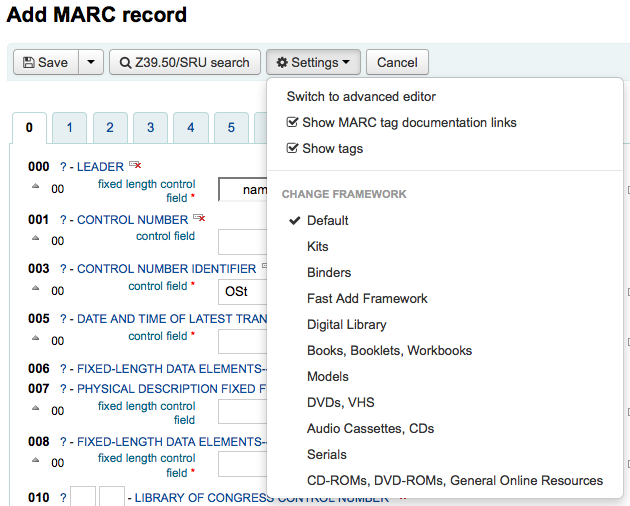
改變 hide_marc 系統偏好的值或按 『設定』 下的 『顯示欄號』 勾選盒,就可以不顯示 MARC 欄號。
按下欄號說明,就能展開欄號
按欄號旁的問號 (?) 就連結至美國國會圖書館有關該欄號的說明
- 若覺得螢幕太擁擠,可以不勾選 『設定』 下,位於 『顯示 MARC 欄號文件連結』 說明盒旁的勾選盒,就能隱藏問號
因為 BiblioAddsAuthorities 系統偏好設定的關係不能編輯部份的欄位。若將此偏好設為允許編目員鍵入控制的欄位則在欄位左方出現鎖符號。

若此圖示顯示,您必須勾選欄位旁的該圖示,以搜尋既有的權威紀錄。
從結果清單裡,點選 『選擇權威』,進入目錄紀錄

按欄號右方的 『重複此欄號』 圖示,就能複製此欄位

勾選欄位左方的向上箭,把分欄移到正確的位置
勾選欄位右方的複製 (按下刪除圖示,就能移除複製欄位) 圖示,就能複製分欄
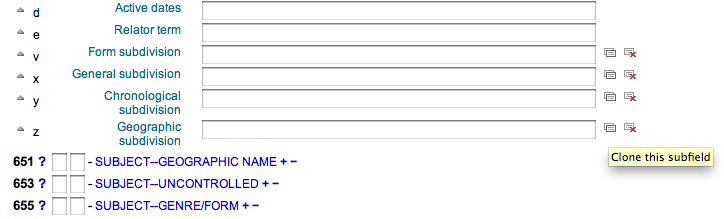
勾選欄位右方的 - (減號),就能刪除分欄 (若有多個同樣類型)
按欄位右方的圖示,啟用外掛程式
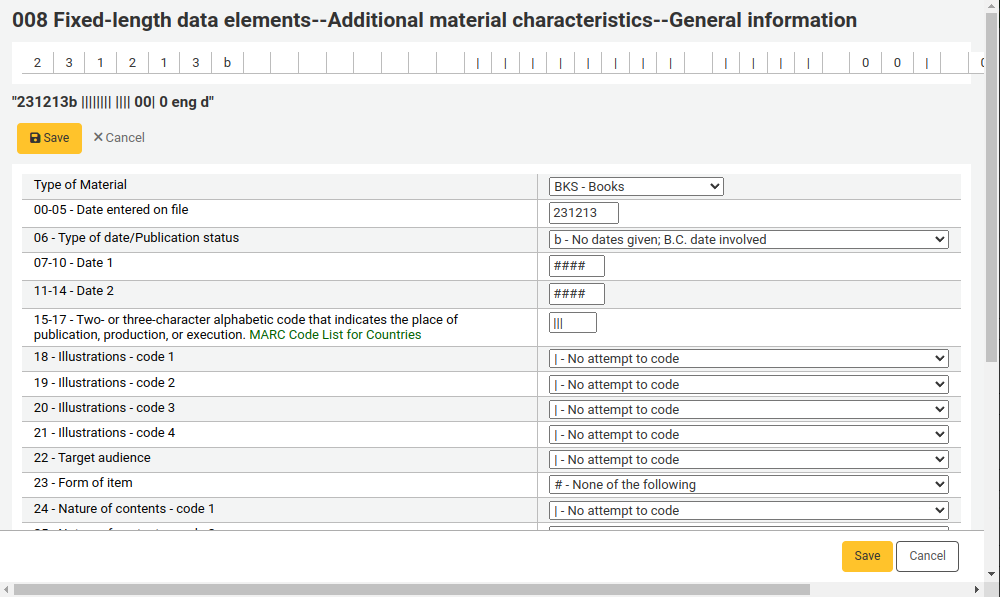
部份固定欄位有編輯器,根據編目的資料類型而改變(如:006與008欄位)
完成後,按上方的 『儲存』 鈕儲存並檢視剛才新增書目記錄,或繼續新增/編輯該筆書目記錄的館藏記錄
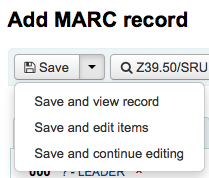
- 按下 『儲存與檢視記錄』 進入剛才編目的記錄
- 按下 『儲存與編輯館藏』 先儲存書目紀錄,再進入新增/編輯館藏表單
- 按下 『儲存與繼續編輯』 儲存書目記錄,並繼續編輯該書目記錄
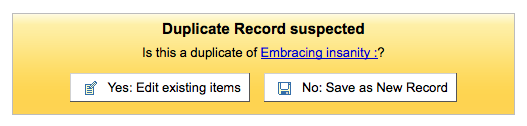
新增重複的紀錄時,系統會提示您先儲存
編目進階編輯器¶
必須啟用 EnableAdvancedCatalogingEditor 偏好才能使用進階編目編輯器。
重要
此功能還在實驗階段,其錯誤可能造成記錄不完全。也不支援 UNIMARC 或 NORMARC 的固定欄位。請協助我們測試並報告錯誤,責任自負。
在基本編輯器內,打開空白的框架或經由 Z39.50 匯入紀錄後,將出現繼續編目的表單

從左方的搜尋盒可執行 Z39.50 搜尋

從這些 Z39.50 結果按右方的連結可檢視 MARC 記錄
按 『匯入』 鈕將把記錄帶入編輯器供編輯之用
說明
在進階編輯器內新增欄位時,必須在空白的指標鍵入底線,並在前後加入空白。
說明
需在第一個分欄分隔符號前鍵入一個空白,但不必在其他分欄分隔符號前後加入空白。
在編輯器下方有來自美國國會圖書館的欄位說明。不合用的 MARC 將標示為紅色。祗以鍵盤編輯記錄時將提示快捷鍵供必要指令使用
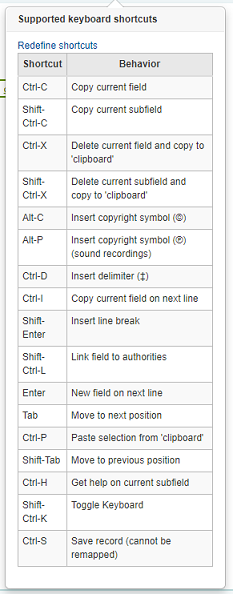
進階編目鍵盤快捷鍵¶
以下的鍵盤快捷鍵可用於進階編目模組以節省時間。
| 快捷鍵 | 行為 |
|---|---|
| Ctrl-D | 插入分隔符號 (‡) |
| Ctrl-H | 當前分欄的說明 |
| Ctrl-S | 儲存紀錄 |
| Ctrl-X | 刪除此分欄 |
| Ctrl-Shift-X | 刪除此分欄 |
| 輸入 | 新欄位在下一列 |
| Shift-Enter | 搜入斷列標記 |
| 定位鍵 | 移動至下個位置 |
| Shift-Tab | 移動至前個位置 |
進階編目巨集¶
記錄新的巨集:
- 選擇 「> 巨集…」 鈕
- 將彈出視窗。在此視窗內,選擇 「新增巨集…」,在彈出盒內鍵入新的巨集名稱並選擇 OK。
- 現在按數字 1 右方,並鍵入巨集的第一列。若有多列,如多欄位巨集,按歸位鍵才會出現數字2,並鍵入第二列/欄位等。
- 自動儲存您的巨集。做好後按 「x」 關閉視窗,或選擇編輯後要執行的記錄,或選擇其他要執行的巨集。
編輯既有的巨集:
- 選擇 「> 巨集…」 鈕
- 將彈出視窗。在此視窗內,選擇要編輯的巨集 & 變更它。
- 將自動儲存您的工作,並且在完成後選擇 「x」 關閉視窗,或選擇編輯後記錄內要執行的巨集,或選擇另個要執行的巨集。
巨集語言的基本語法:
- 新增 500=‡a以 Rancor 編輯
- 新增 500 欄位的 ‡a 分欄並 「以 Rancor 編輯」。
- 245c= by J.K. Rowling.
- 需要的話,在第一個 245 欄位的第一個 ‡c 分欄著錄 「by J.K. Rowling」。
- 082a={084a}
- 在第一個082欄位的 ‡a 分欄 (需要時新增分欄) 設定內容為第一個 084‡a。
- 指標=_1
- 將最後提及欄號的指標 (在此例是,082) 設為 「_」 與 「1」。
- 新增 090a=Z674.75.W67
- 新增第一個 900 欄位 (僅限已有該欄位) 的 ‡a 分欄並設定為 Z674.75.W67。
- 新增 090a 於 end=Z674.75.W67
- 同上。
- 在 a= a tale of might and magic / 之後新增 245a
- 在第一個分欄後面,新增 ‡b,並將其內容設定為 」 a tale of might and magic /」。
- 刪除 245b
- 刪除第一個 245 欄位的 ‡b 分欄
新增分析紀錄¶
有時圖書館需要以分析編目技術,處理期刊裡的論文或專書裡的章節,供讀者使用。分析編目可編目期刊、報紙或期刊等書目記錄的部份內容,包括論文、章節、段落等。分析編目時,每個題名都有獨立的書目紀錄,但並未脫離主館藏的實體。詳情見中國編目規則第十四章分析與 AACR2 第 13 章。
Koha 提供兩種編目分析的選擇。一個是 簡易分析;另個是 :ref:`分析強化流程 `。
簡易分析¶
簡易分析功能可輕易地連結多個分析記錄。首先,設定 EasyAnalyticalRecords 偏好為 『顯示』 並把 UseControlNumber 偏好設為 『不使用』。
編目分析紀錄後 (詳情見 新增記錄),在標準檢視模式下點選 『編輯』,並選擇 『連結至主館藏』
提示鍵入館藏的條碼,以連結至紀錄。
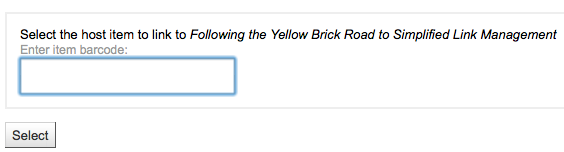
鍵入館藏條碼並按下 『選擇』 鈕後,出現確認訊息。

此紀錄的773欄位鍵入完整的連結。
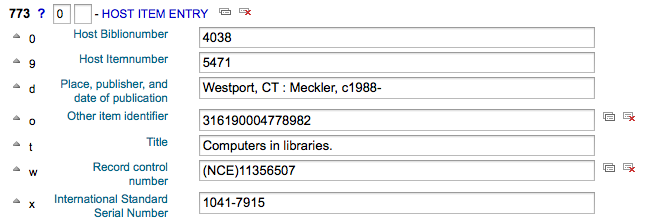
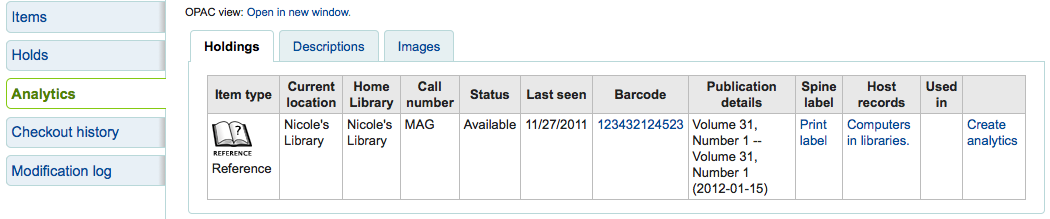
檢視與主紀錄連結的所有館藏、搜尋紀錄、勾選左方的分析分頁並分析每個條碼,顯示在 「使用於」 欄。

說明
在此畫面按 「新增分析」 也可新增分析紀錄
在正常檢視下,按紀錄上方的 『分析』 連結,可看到該紀錄的分析。
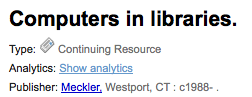
檢視分析記錄時,從 『分析』 分頁館藏表的 『主記錄』 欄裡,也可看到連結至主記錄的分析。
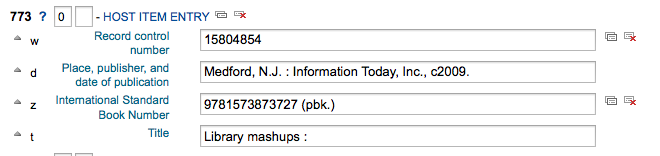
分析強化工作流程¶
以強化工作流程新增分析時,首先應設定:ref: EasyAnalyticalRecords 偏好為 『不顯示』 並把 UseControlNumber 偏好設為 『使用』。
編好原始記錄後 (詳情見 新增記錄),從標準檢視裡勾選 『新增』 並選擇 『新增子記錄』。

開啟空白的記錄供編目之用。祗需填入 773 欄位的內容建立連結就可以儲存。
檢視與主紀錄連結的所有館藏、搜尋紀錄、勾選左方的分析分頁並分析每個條碼,顯示在 「使用於」 欄。
在正常檢視下,按紀錄上方的 『分析』 連結,可看到該紀錄的分析。
檢視分析記錄時,從 『分析』 分頁館藏表的 『主記錄』 欄裡,也可看到連結至主記錄的分析。
編輯分析¶
若連結至分析紀錄錯誤,您可在分析紀錄 (不是主紀錄) 裡編輯該館藏,移除此連結。進入分析連結,勾選 『編輯』 鈕,選擇 『編輯館藏』,從每個館藏的左方,可以看到兩個選項。

- 勾選 『編輯主紀錄』,將允許您從主紀錄編輯館藏。
- 勾選 『不連結』,將移除 773 欄位以及分析與主紀錄的連結。
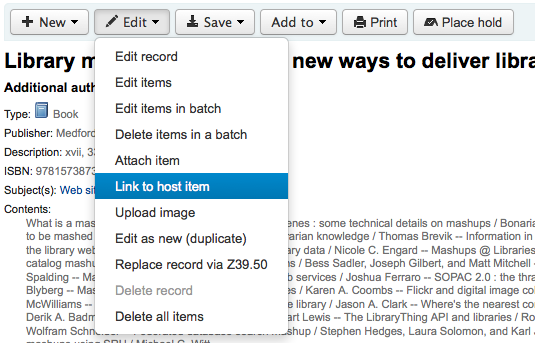
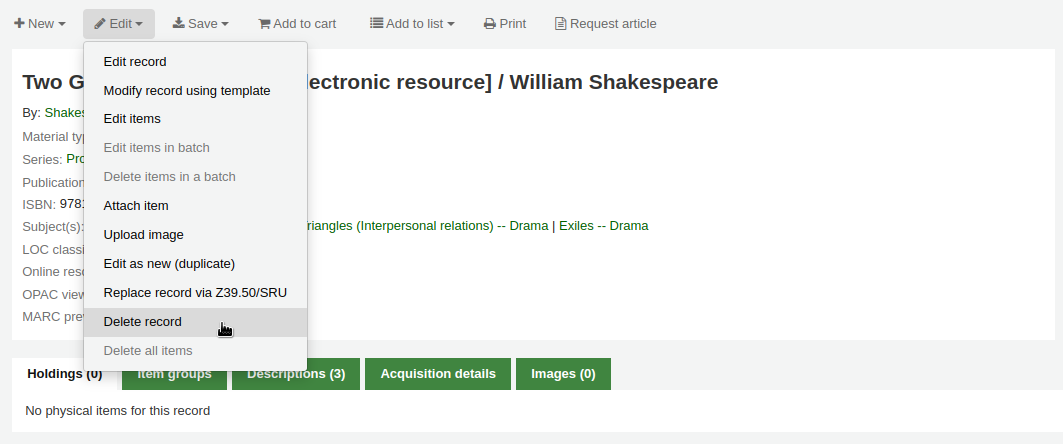
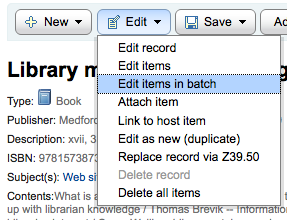
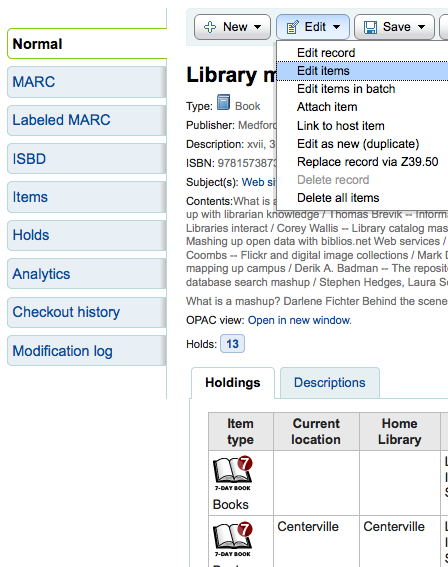
編輯記錄¶
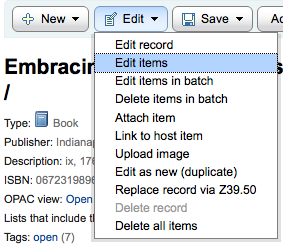
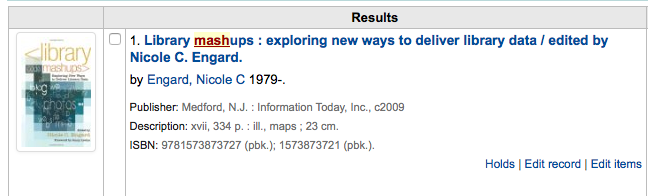
從編目頁面的搜尋結果點選 『編輯書目』 就能夠編輯記錄
或在書目記錄裡按編輯鈕並選擇 『編輯記錄』
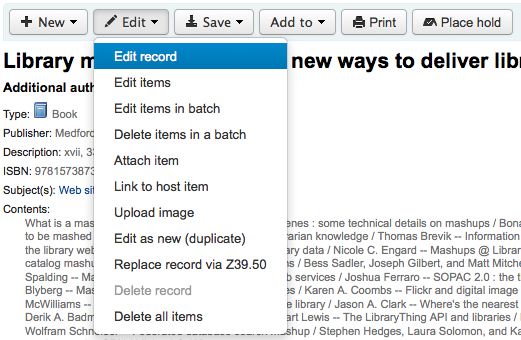
將以 MARC 編輯器打開此紀錄
另一個選項是經由 Z39.50 搜尋,以其他圖書館較完整的記錄覆蓋本館原來的記錄。從編輯選單裡,選取 『經由 Z39.50 覆蓋原記錄』。
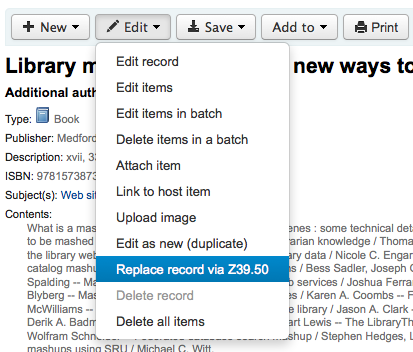
選定之後,進入Z39.50搜尋視窗,搜尋其他圖書館的紀錄。
編輯之後 (任何方式均可) 可按下編輯器左上方的 『儲存』 鈕。
若已經把 OPACLocalCoverImages 與 LocalCoverImages 設為 『顯示』 就可以從編輯選單裡,經由 『上傳封面』 使用客製化的封面。
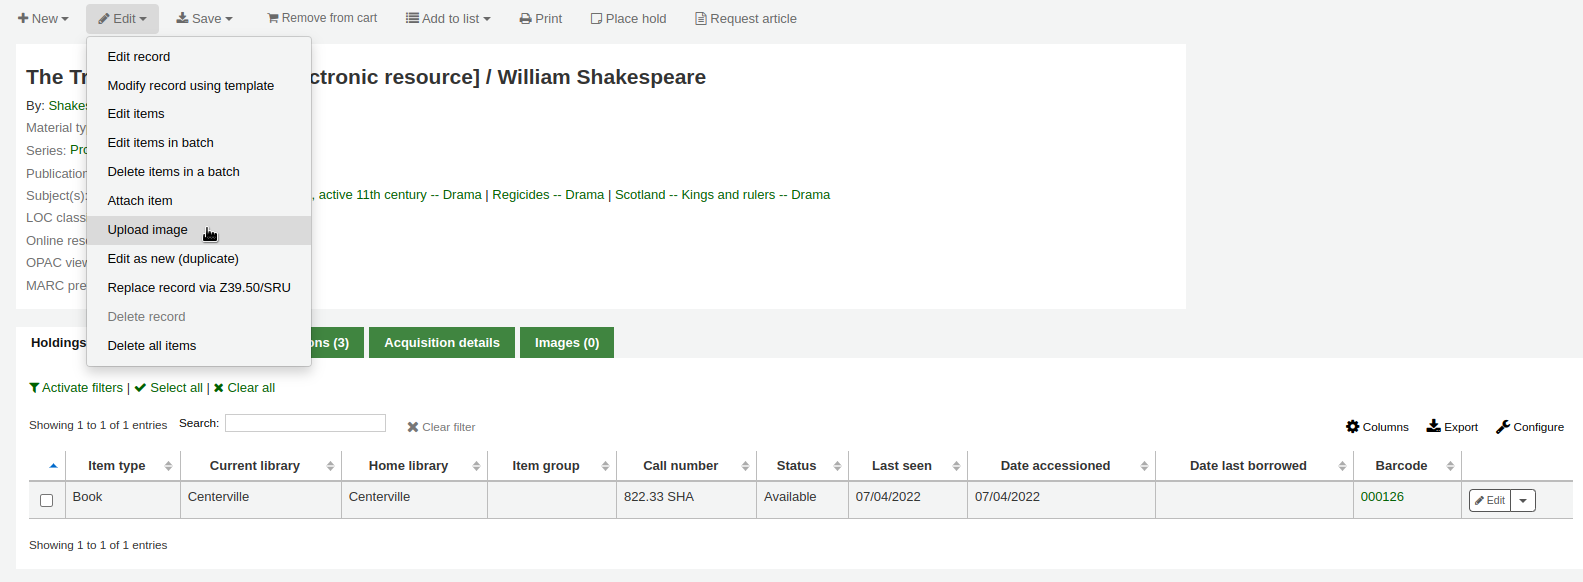
選擇 『上傳封面』 進入 上傳在地封面工具。
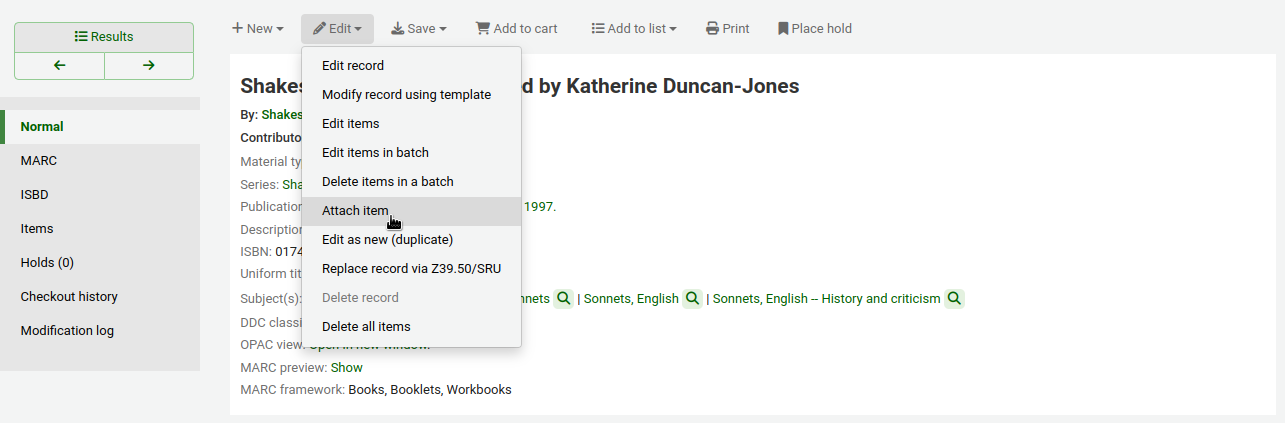
複製記錄¶
無法從 Z39.50 取得記錄。祗好複製一個類似的記錄,並編輯幾個必要的欄位產生新的紀錄。從書目錄的編輯選單裡,按 『編輯成新記錄 (複製)』 就可以做到
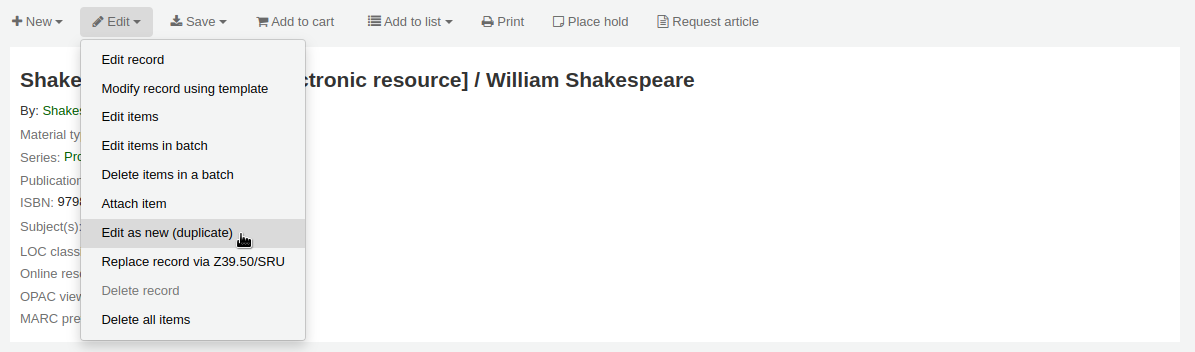
將從原來的書目紀錄複製所有的欄位及其值,開啟成新的 MARC 紀錄。
新增檔案掛載於紀錄¶
藉由幾個設定可以上傳檔案給 Koha。
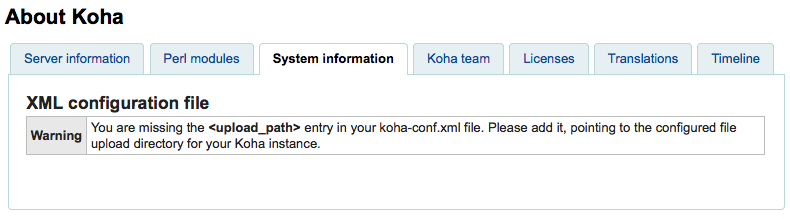
需要系統管理員設定 『upload_path』 變數指定檔案的儲存地
從關於 Koha > 系統資訊可查看上傳路徑。若有錯誤則在此顯示。
必須正確設定 OPACBaseURL 系統偏好
在一個 (或多個) 框架 中新增 upload.pl 於 856$u 內
設定後就可以正常編目。在 856$u 旁可看到外掛圖示點選後可開啟上傳或搜尋視窗

從這個選單點選瀏覽找到檔案並上傳,或可搜尋以搜尋盒上傳的檔案。從搜尋結果選擇上傳的檔案。
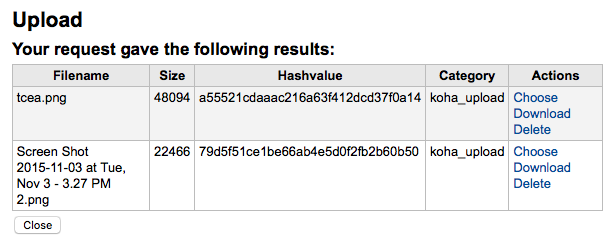
選定的檔案將出現在 MARC 記錄內及詳細顯示的連結。
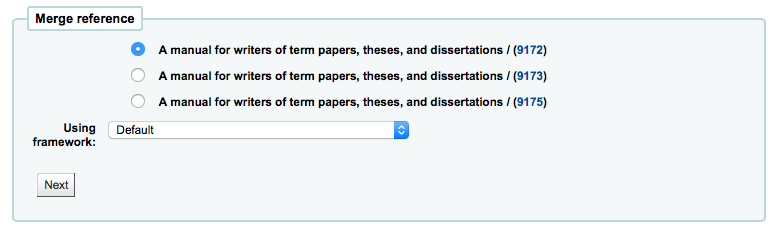
合併紀錄¶
從編目模組搜尋到欲合併的兩個書目記錄。
可勾選搜尋的重複結果,並按上方的 『合併館藏』 鈕。
選定合併的紀錄後,按上方的 『合併館藏』 鈕。系統會詢問何者為合併後保留的主要紀錄、何者為刪除的紀錄。若使用不同的框架,Koha 會詢問保留的框架。
顯示兩筆紀錄的 MARC 內容 (從標示欄號的分頁進入)。預設是勾選第一筆紀錄的所有欄位,可剔除不要進入合併後記錄 (目標) 的欄位,再移入第二個分頁,選擇要保留在合併後紀錄 (目標) 的欄位。
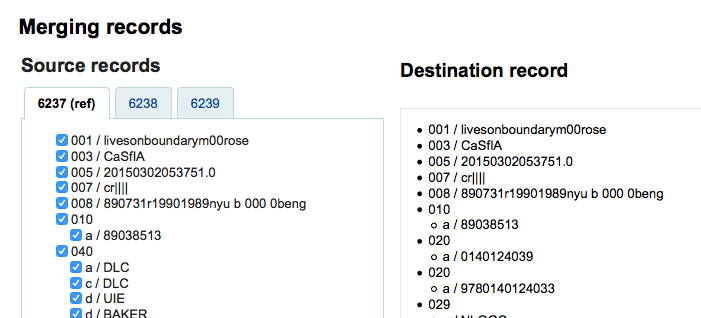
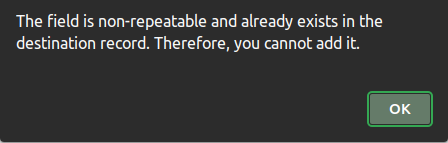
應試著新增不重複的欄位,兩個館藏 (如從紀錄 1 與紀錄 2 選擇 245 欄位) 將顯示錯誤
記錄之下可鍵入待合併的欄位。藉以控制在合併確認頁面出現的欄位:

未鍵入資料則出現確認書目號的訊息

鍵入欄位後可從確認頁面看到 (可以從 MergeReportFields 偏好)
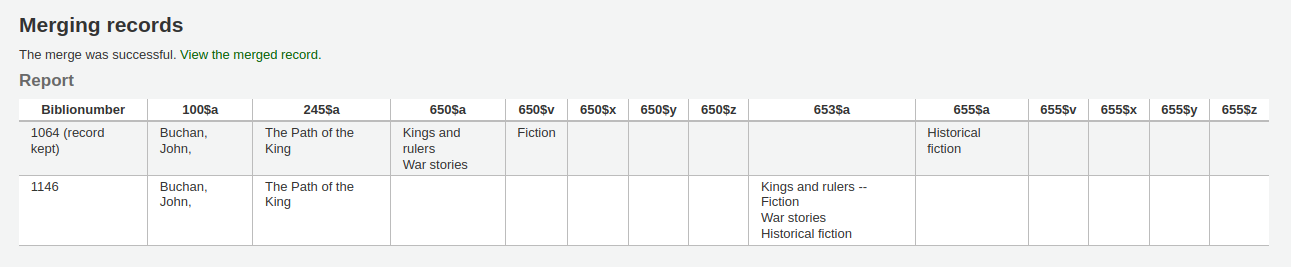
選好之後按下 『合併』 鈕。主要紀錄將包括您選定的資料以及兩筆書目紀錄的館藏資料,並刪除第二筆紀錄。
館藏紀錄¶
在 Koha 裡,每筆書目記錄可以有多筆館藏記錄。這些館藏記錄也被稱為館藏。每個館藏包括圖書館擁有該館藏的物理資訊。
新增館藏¶
儲存書目記錄後,進入空白的館藏資訊,可以新增附屬於該書目紀錄的館藏。從編目搜尋結果,勾選 『新增/編輯館藏』 即可
或者勾選書目記錄的 『新增』 再選新增 『館藏』
將顯示館藏編輯表單:
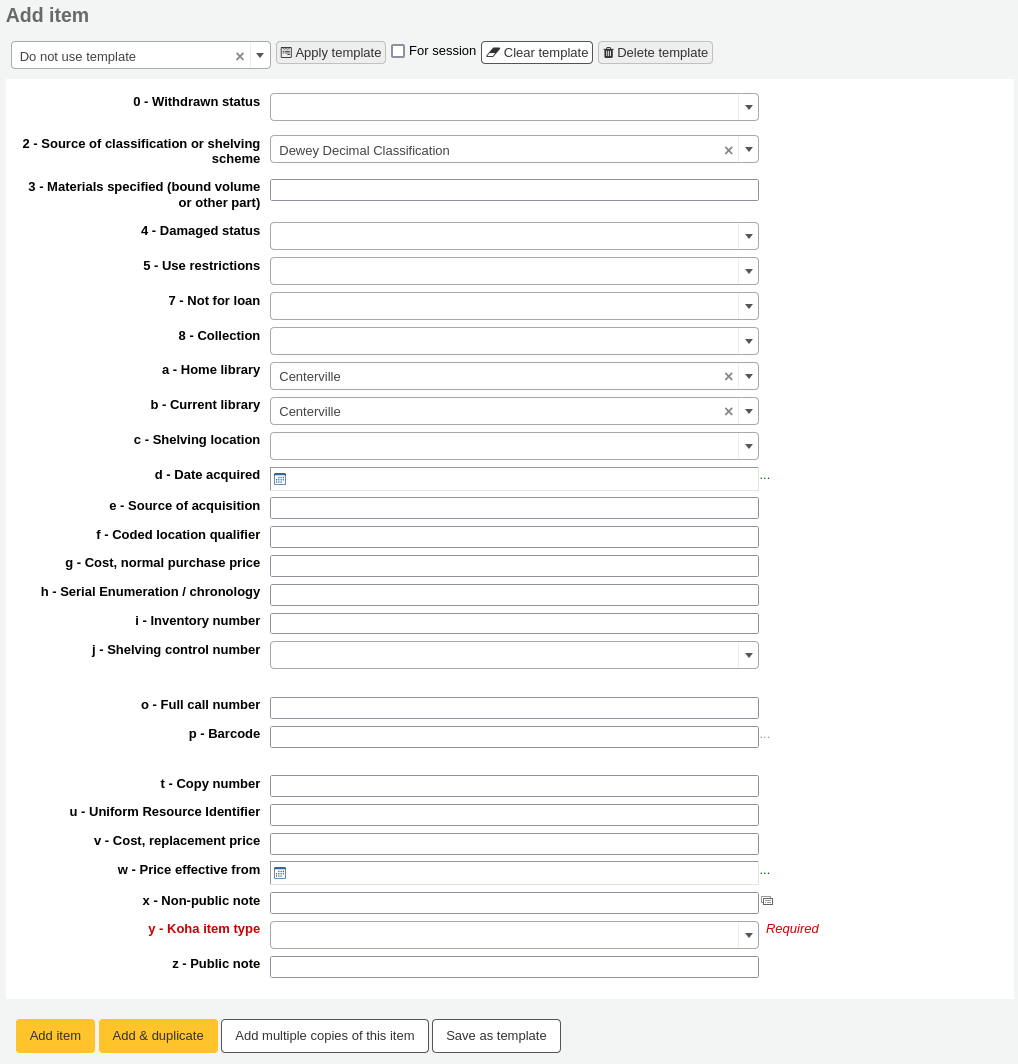
若打算借出館藏,以下欄位應鍵入新的館藏:
2- 分類法來源
a - 永久位置
b - 現在典藏地
o - 完整索書號
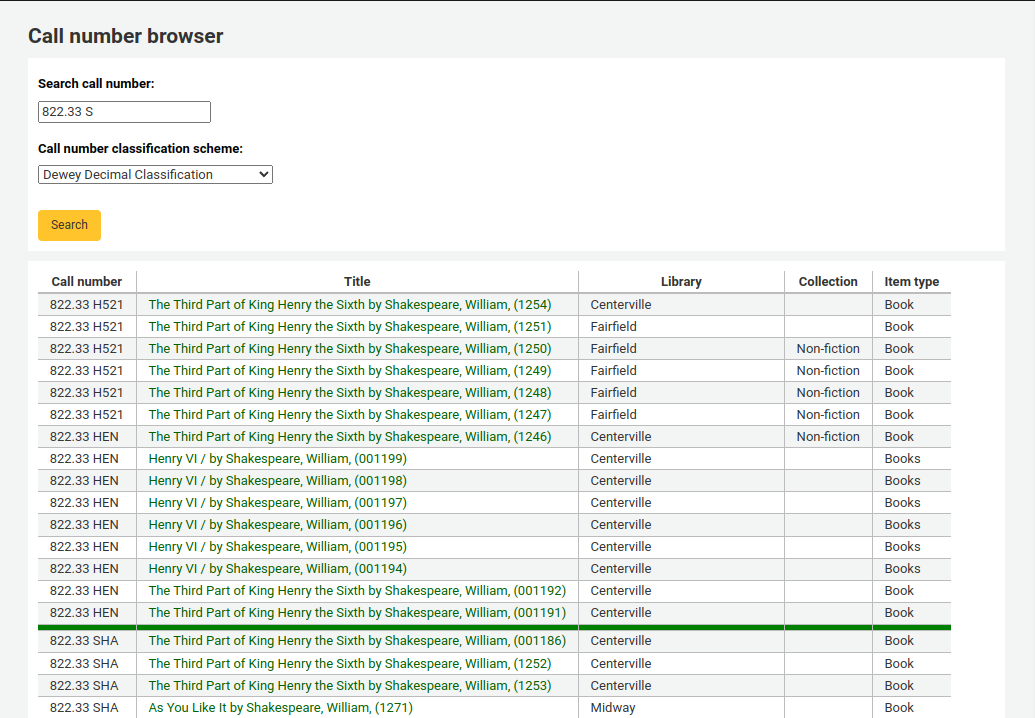
在這個欄位可以使用 瀏覽索書號外掛 軟體。啟用後可在欄位右方看到 … 之類的內容。點選後開啟索書號瀏覽視窗紅色表示索書號使用中,若為淡綠色則可以使用索書號。
p- 條碼
v - 價格,重置費用
- 借出的館藏被申報為 『遺失』 時,向讀者收取的費用
y - Koha館藏類型
可以在 框架 裡,把這些欄位設為必備,就會以紅色標示為 『必備』 標籤。必須鍵入資料才能儲存它。

說明
在 框架編輯器 裡編輯 952 欄位,才能讓館藏分欄設為必備。
在新增表單下有 3 個鈕可供新增館藏

- 新增館藏時祗新增一筆館藏
- 新增 & 複製將新增該館藏,並以相同的值填入新的表單供編輯
- 新增多筆館藏將詢問新增的館藏數,並將依館藏數對條碼號逐個加 1
送出後水,新增的館藏將顯示在新增表單上

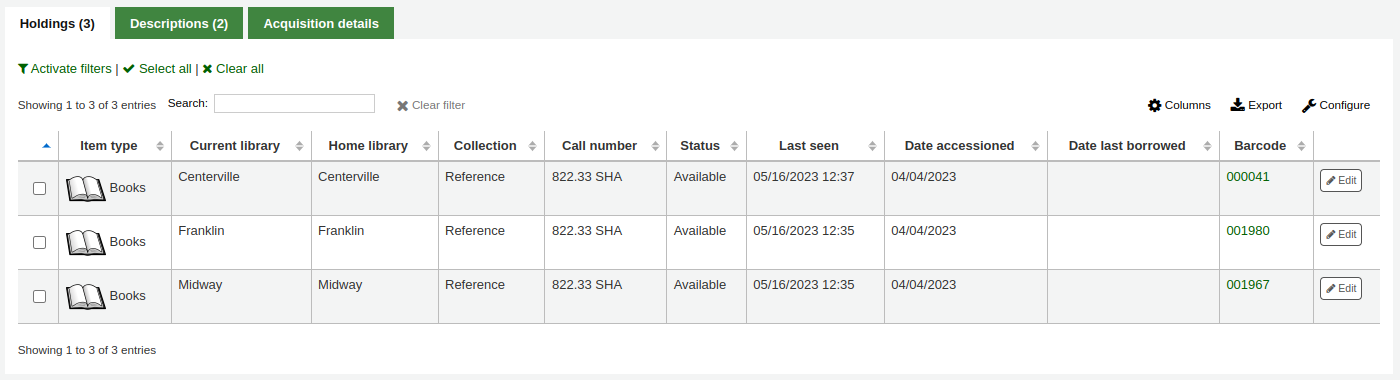
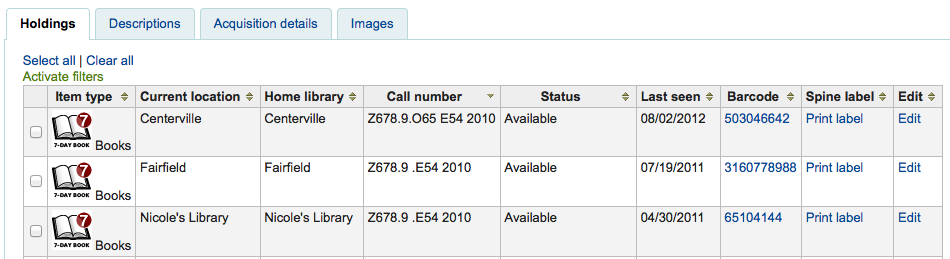
館藏將顯示在書目記錄頁面的書目詳情之下。
若將 SpineLabelShowPrintOnBibDetails 設為 『顯示』,在每個館藏旁有個連結至快速列印書標。
按下 『啟用篩選器』 就可篩選館藏表單的內容。將在頁面上方出現一列可以鍵入篩選的內容。
編輯館藏¶
館藏曾被多方編輯。
從書目紀錄內按 『編輯』 與 『編輯館藏』
打開館藏清單後,可按下館藏左方的 『作業』 鈕,選擇 『編輯』 並開始編輯該館藏。
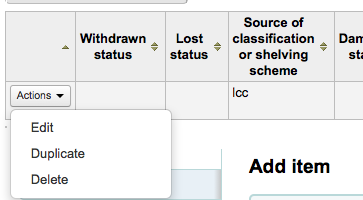
在館藏內按 『館藏』 分頁旁的 『編輯館藏』

將打開館藏編輯器供編輯之用
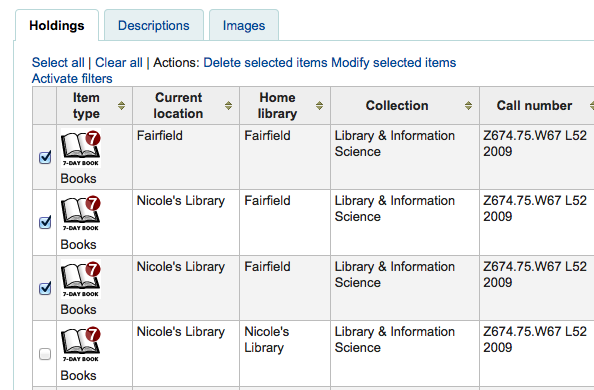
按 『編輯』 再按 『批次編輯館藏』
將彈出 批次修改館藏工具 編輯此筆書目記錄的所有館藏。
設定 StaffDetailItemSelection 偏好為啟用,在詳細顯示的館藏左方出現勾選用方塊。勾選要編輯的館藏,再點選上方的 『修改指定館藏』 鈕。
按館藏分頁內每個館藏右方的 『編輯』 鈕
館員介面的搜尋結果,也有編輯館藏的連結
最後您可使用 批次修改館藏 工具
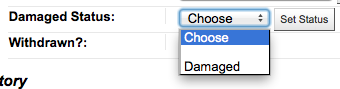
快速更新館藏狀態¶
流通館員的工作需要改變館藏的狀態為遺失或毀損。不需編輯整個館藏紀錄,祗要在借出摘要或還入紀錄裡勾選館藏條碼,進入館藏摘要,或勾選館藏分頁左方的書目詳情頁面,就能改變館藏狀態。
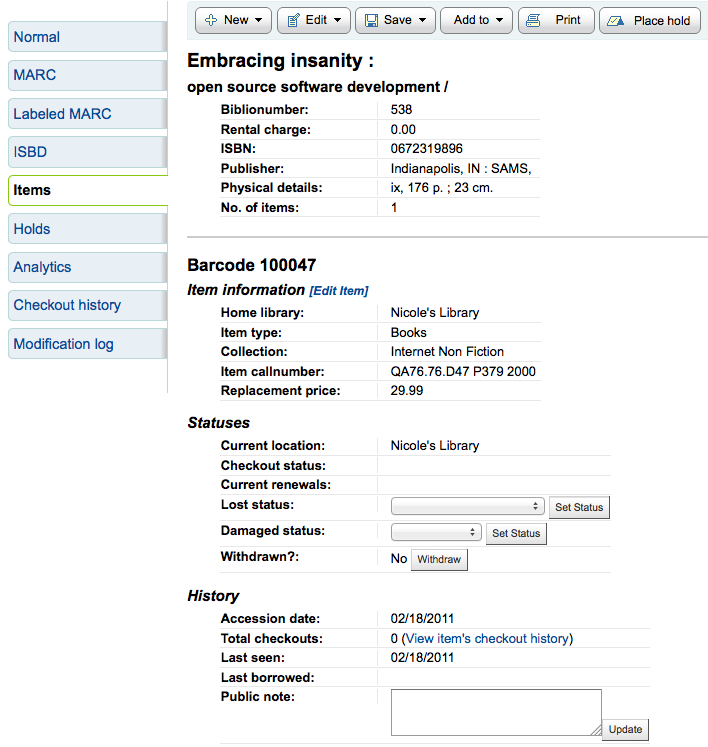
從這個檢視裡,可以從下拉選單的 『設定狀態』 鈕,指定館藏為遺失狀態。
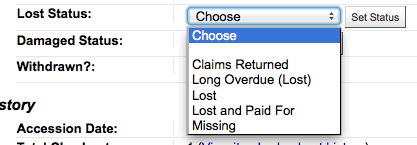
從下拉選單裡按 『設定狀態』 鈕,就能標記館藏為毀損。
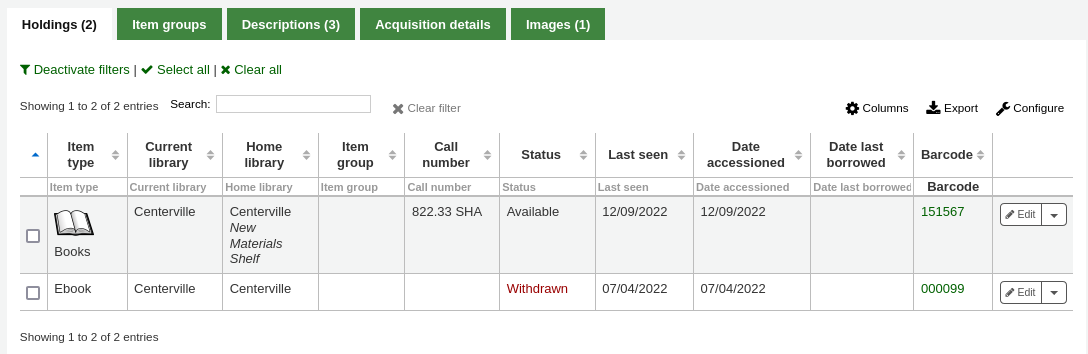
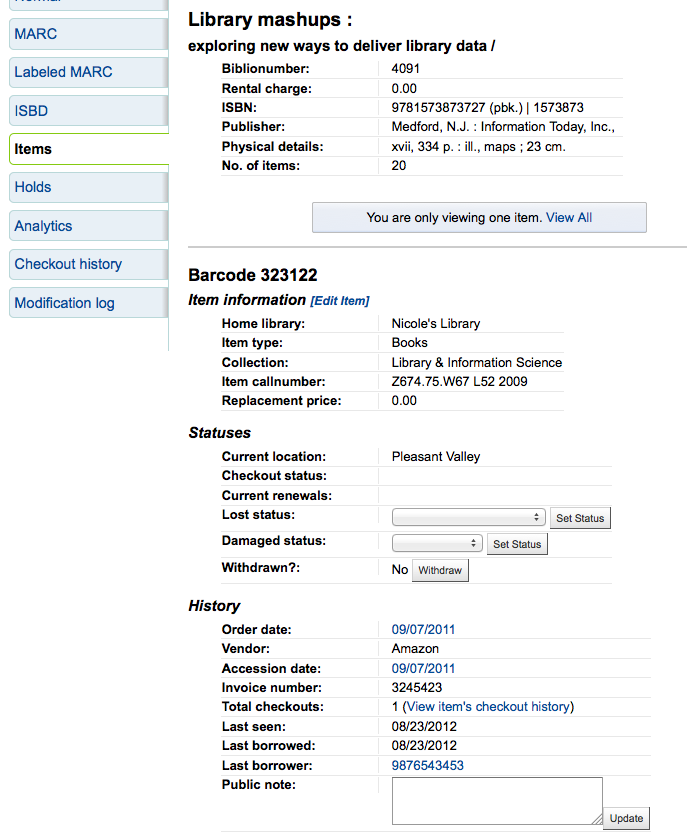
館藏資訊¶
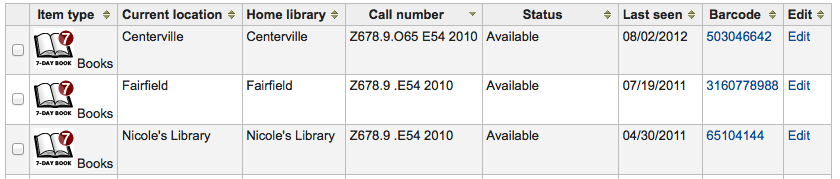
每個書目紀錄左方有個分頁可檢視館藏。
經由該分頁可檢視館藏的基本資訊。包括所屬圖書館、館藏類型、書架代碼、索書號與重置價格。並可編輯狀態資訊。若館藏被標記為遺失或撤架您可看到發生的日期。
在紀錄區塊可看到該館藏的借出紀錄,若經由採訪模組排序館藏則也抱括採訪的資訊。
若含採訪日期連結,按它就進入該館藏的採訪資訊。
移動館藏¶
附加館藏選項可以把館藏移至另個書目紀錄
進入書目紀錄並從 『編輯』 選單選取 『附加館藏』 就能把館藏加入此書目紀錄。
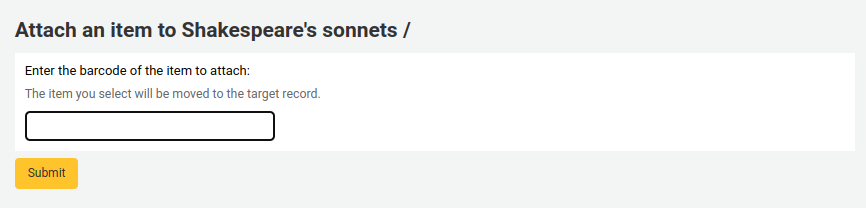
鍵入打算移動的館藏條碼,再點選 『選擇』
使用 合併紀錄工具 可以把新增書目紀錄的所有館藏置於一筆書目紀錄內。
刪除館藏¶
有很多方法刪除館藏紀錄,祗刪除一筆館藏紀錄時,可打開書目紀錄詳情,勾選上方的 『編輯』 鈕;從這書再勾選 『編輯館藏』。
顯示館藏清單,每個館藏旁有 『刪除』 連結。按下此連結,若該館藏未借出,則可刪除它。
若能確認附屬於書目紀錄的館藏都未借出,可以使用 『編輯選單』 下的 『刪除全部館藏』 選項,移除該紀錄的館藏。
也可以啟用 StaffDetailItemSelection 設定,在詳細顯示頁面每個館藏左方出現小方塊。勾選該等方塊,再按選單上方的 『刪除選定館藏』 鈕,即可刪除多筆館藏。
最後,使用 批次刪除工具 批次刪除館藏。
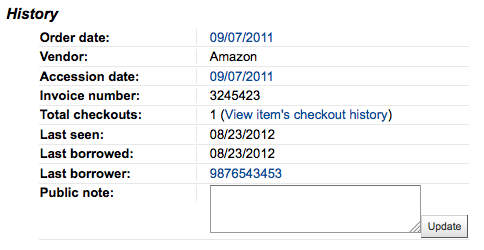
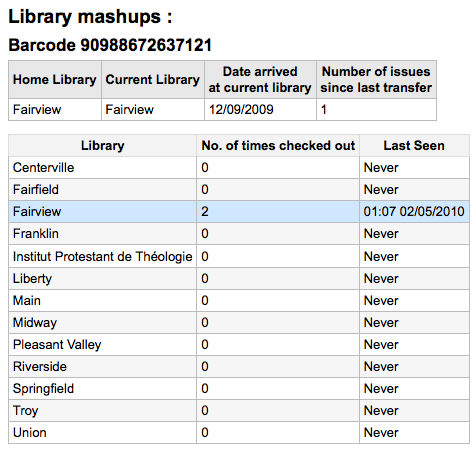
館藏的流通紀錄¶
每筆書目紀錄有其流通紀錄 (含或不含讀者資訊,視您的設定),但每筆館藏也有其自身的流通紀錄,勾選紀錄左方的 『館藏』 分頁,即可看到。
在 『紀錄』 標題下有個連結至 『檢視館藏借出紀錄』,點選之後,開啟館藏的紀錄,看起來與書目紀錄的頁面略有不同。
權威¶
權威紀錄是一種控制 MARC 紀錄欄位的方法。以權威紀錄控制主題標目、個人名稱與地名。
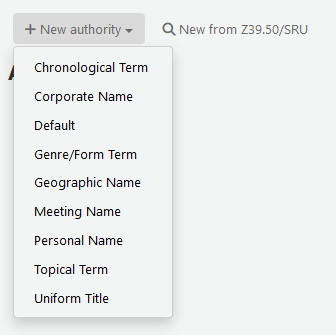
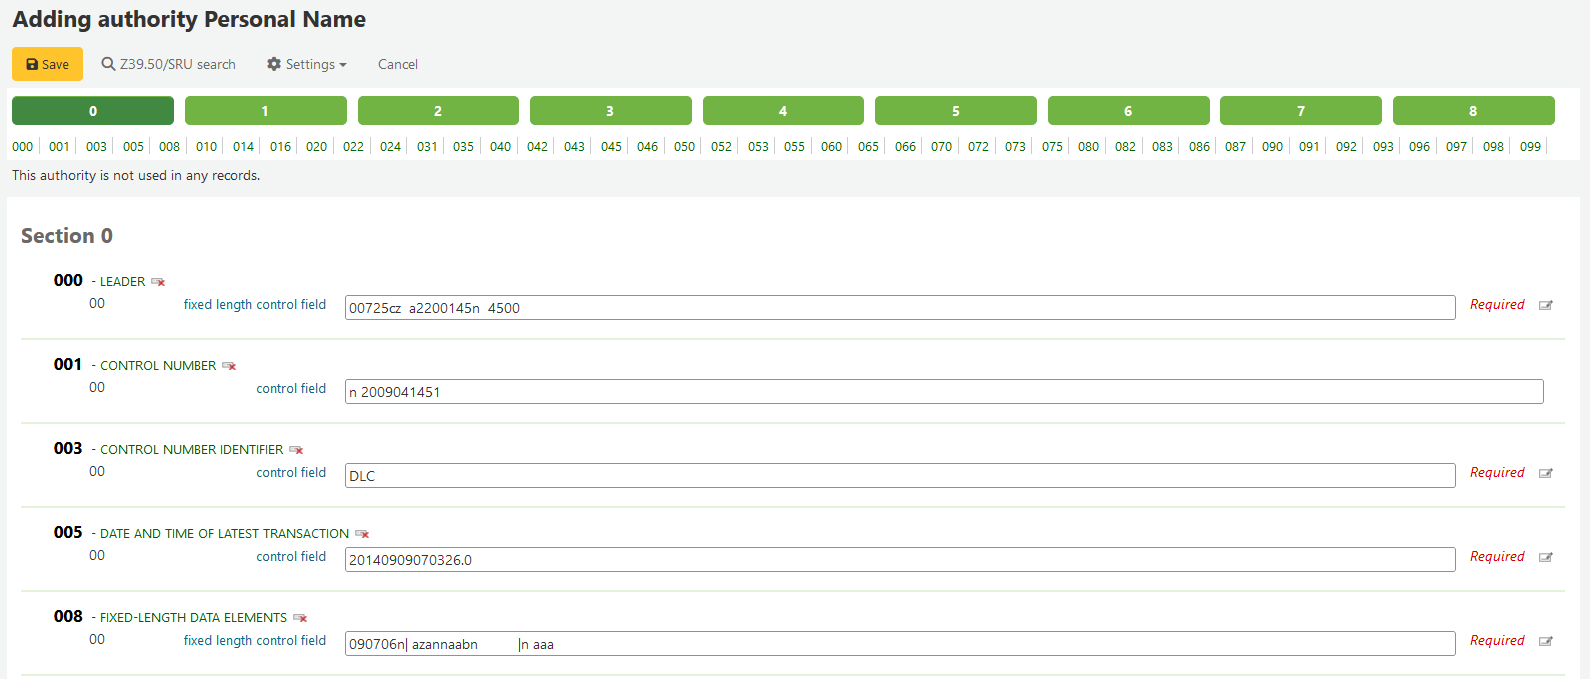
新增權威¶
勾選 『新增權威』 鈕,或點選 『從Z39.50新增』 鈕搜尋其他圖書館,就能新增權威紀錄。
顯示的表單允許您鍵入權威紀錄的所有必要詳情。
勾選題名出現分欄後,就能展開其值。勾選標籤右方的加號,就能複製欄位或分欄。勾選欄位右方的刪節號,就能使用外掛的說明。
連結權威至其他標目時,可按下欄位右方的刪節號,啟用權威尋找外掛程式。
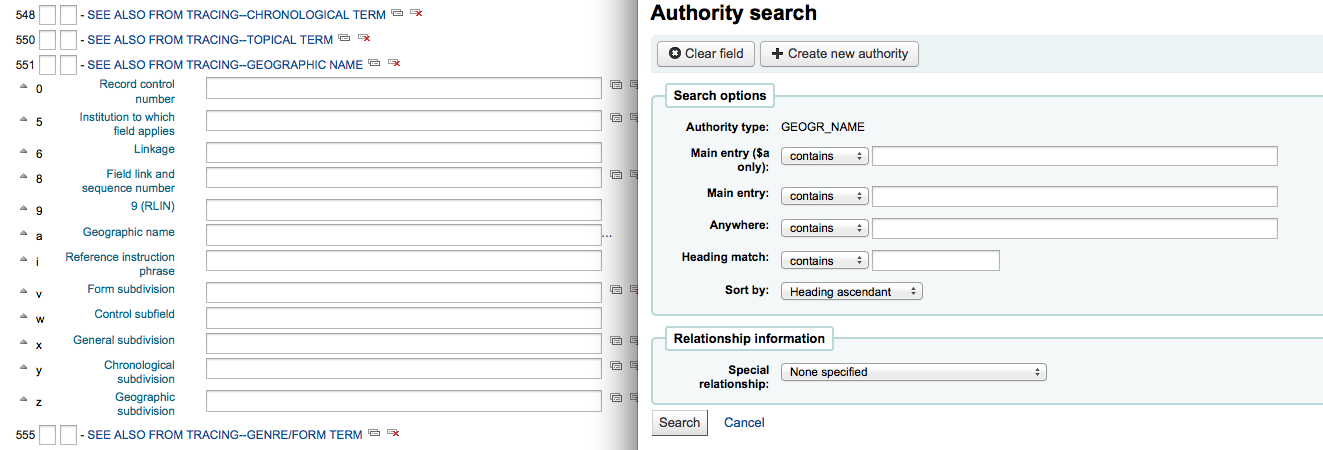
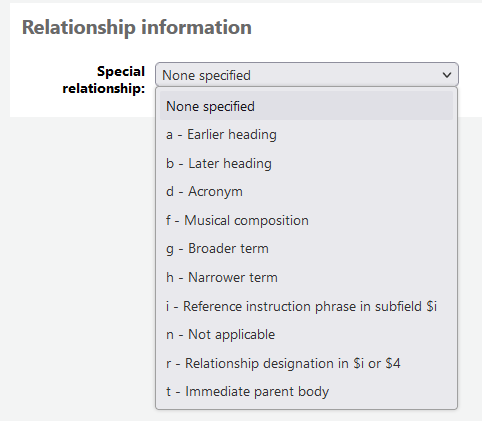
從此可搜尋權威紀錄檔找尋權威連結。若找不到,可點選 『新增』 鈕,加入必要的權威給此連結;此外掛程式允許您選擇權威間的關係。
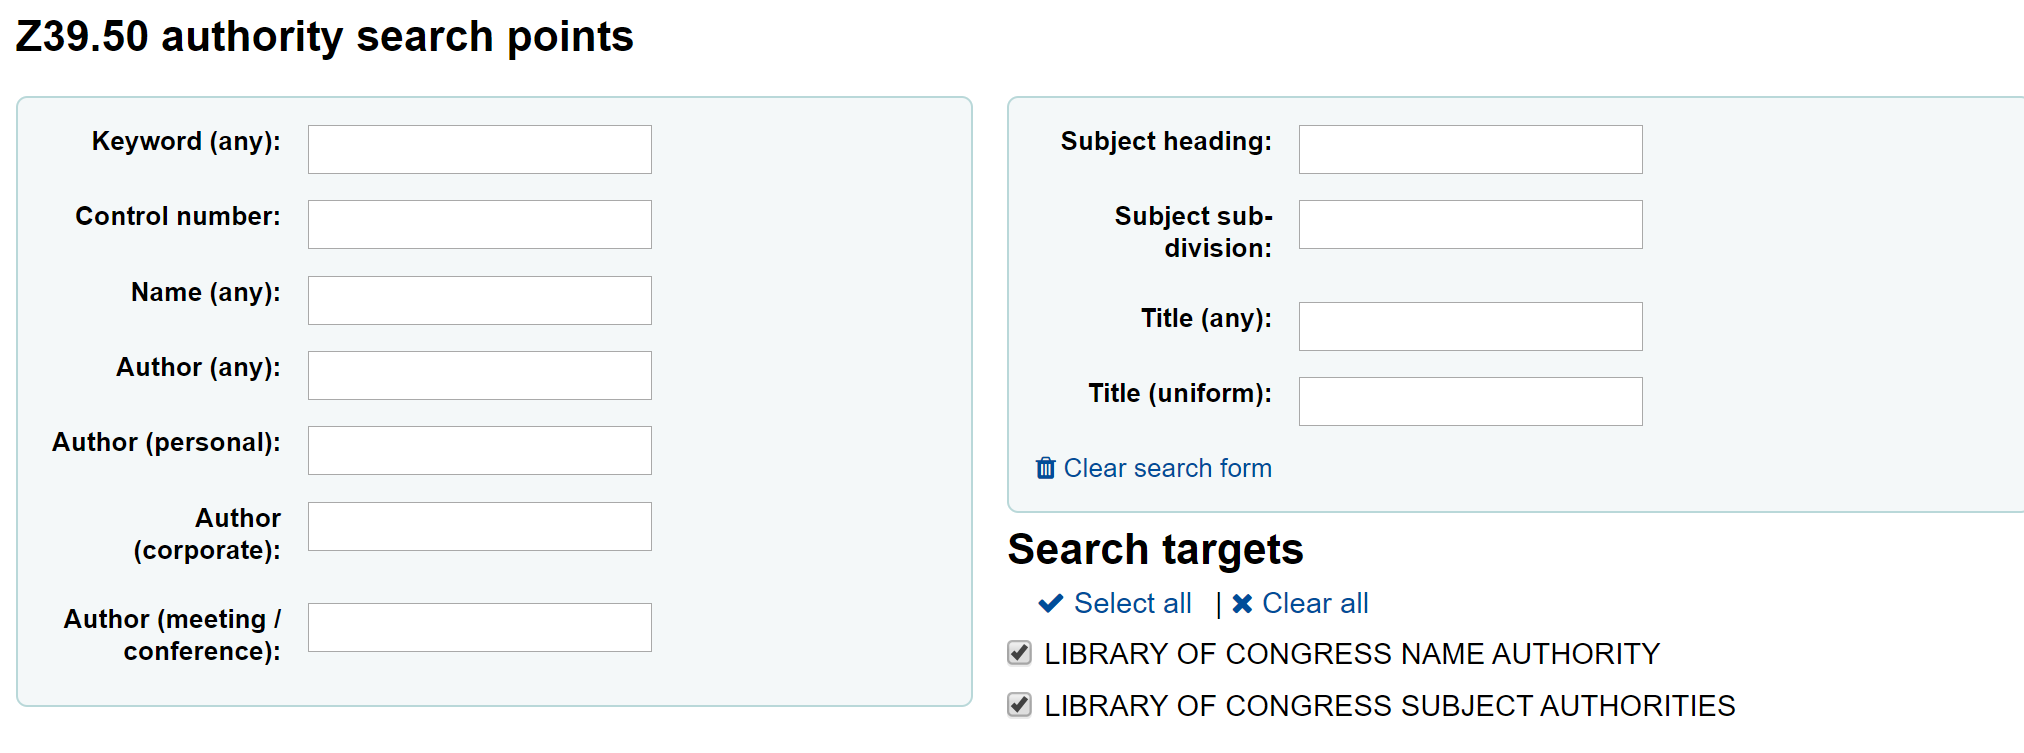
選擇搜尋其他圖書館的權威記錄,將出現該搜尋框
從結果頁面可以點選記錄右方的 『匯入』 連結,將資料加入 Koha
儲存之前顯示可編輯的權威表單
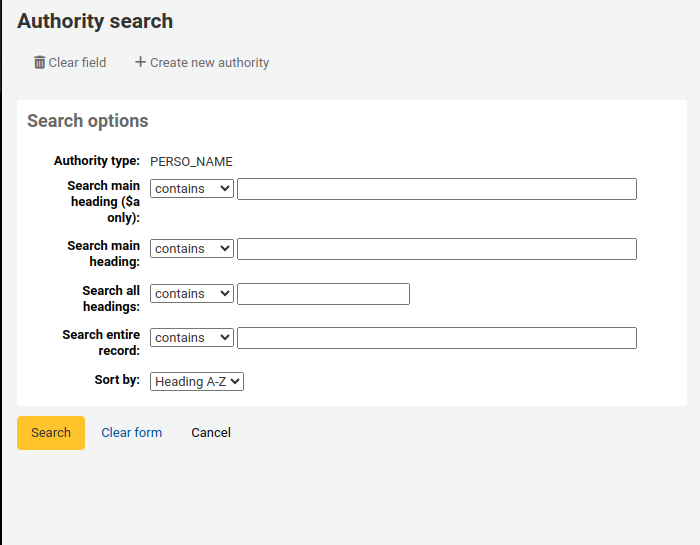
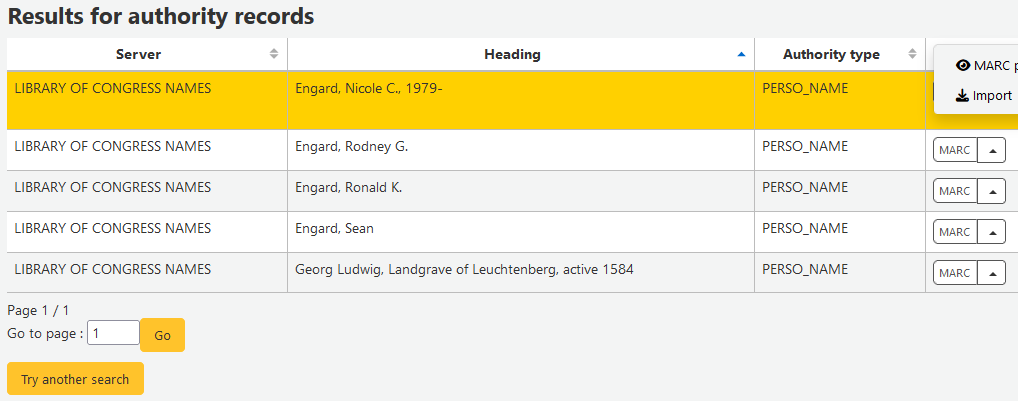
搜尋權威¶
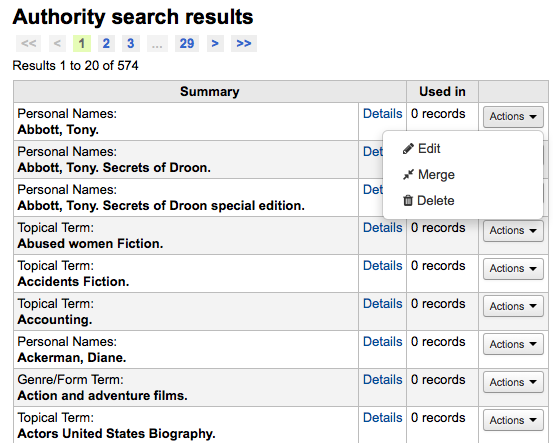
可從權威紀錄頁面搜尋既有的詞彙以及相關的書目紀錄。

從此結果,可看到附加在此權威記錄的書目記錄,』作業』 選單包括 :ref:` 編輯 <editing-authorities-label>`、合併 與 刪除 等連結 (若沒有任何書目記錄附加於此)。
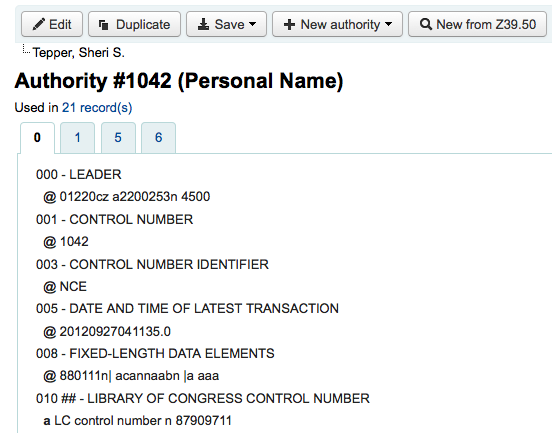
從權威紀錄摘要右方的詳情連結,打開完整的紀錄並可編輯該紀錄。
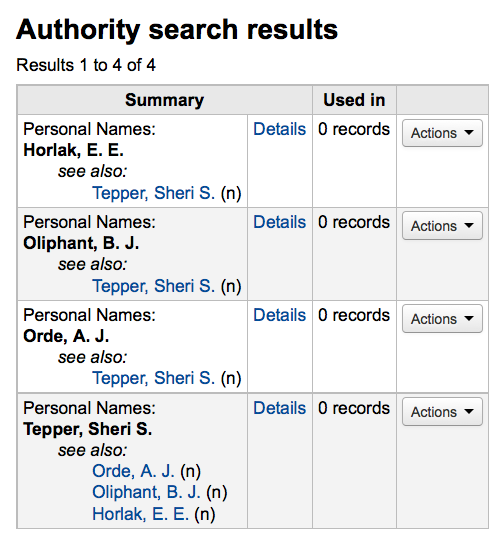
若權威紀錄包括參見,您將看到它們分列在搜尋結果,勾選連結的標題,將執行搜尋該標題。
編輯權威¶
從搜尋結果裡勾選權威摘要,再點選記錄上方的 『編輯』 鈕就可以編輯它。或點選搜尋結果內權威記錄左方的 『編輯』 連結。

編輯之後,按下 『儲存』 鈕並把 dontmerge 設為 『做』,Koha 立即更新權威紀錄資料以及與該權威有關的書目紀錄。若設定為 「不做」 Koha 不會編輯書目紀錄,而是在下次執行 merge_authority.pl 工作排程 時,才更新所有附加於該權威的書目記錄。
必須先確定沒有被任何書目紀錄連結,才能刪除權威紀錄。未被連結的權威紀錄在右方顯示 『刪除』 連結,點選後,出現權威紀錄摘要。
合併權威¶
重複的權威記錄,可以經由作業選單旁的 『合併』 連結,將兩筆記錄合併。

在第一筆結果按 『合併』 可看見在結果上方的權威清單。
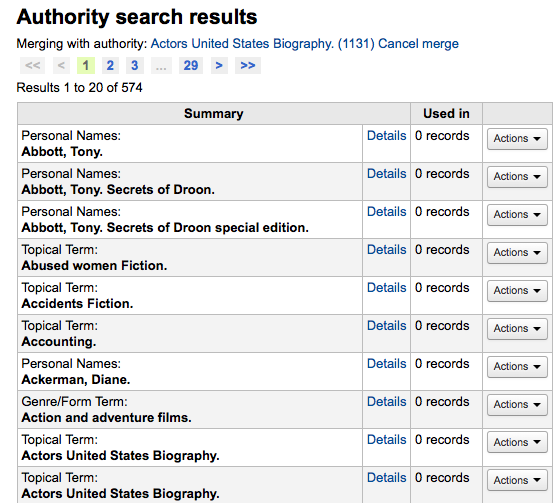
接著需按第二個結果旁的 『合併』 鈕。
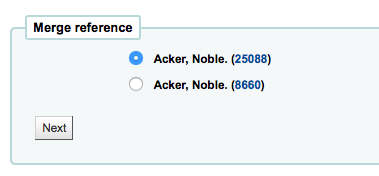
Koha 要求編目員指定合併後保留的紀錄與刪除的紀錄。
顯示兩筆紀錄的 MARC (從權威號碼的分頁進入)。預設是勾選第一筆紀錄的所有欄位,剔除不要的欄位;再移入第二個分頁,選擇要合併紀錄的欄位。
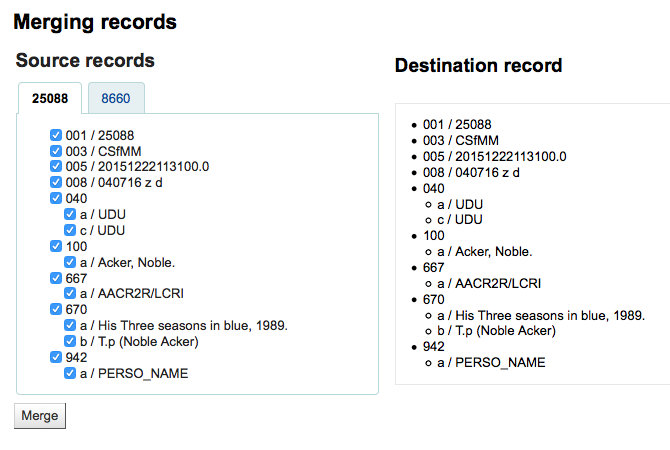
選好之後按 『合併』 鈕。主紀錄將保留而第二筆紀錄將被刪除。
編目指南¶
書目紀錄編目速查表¶
| Tag | Label | Description | Instructions |
|---|---|---|---|
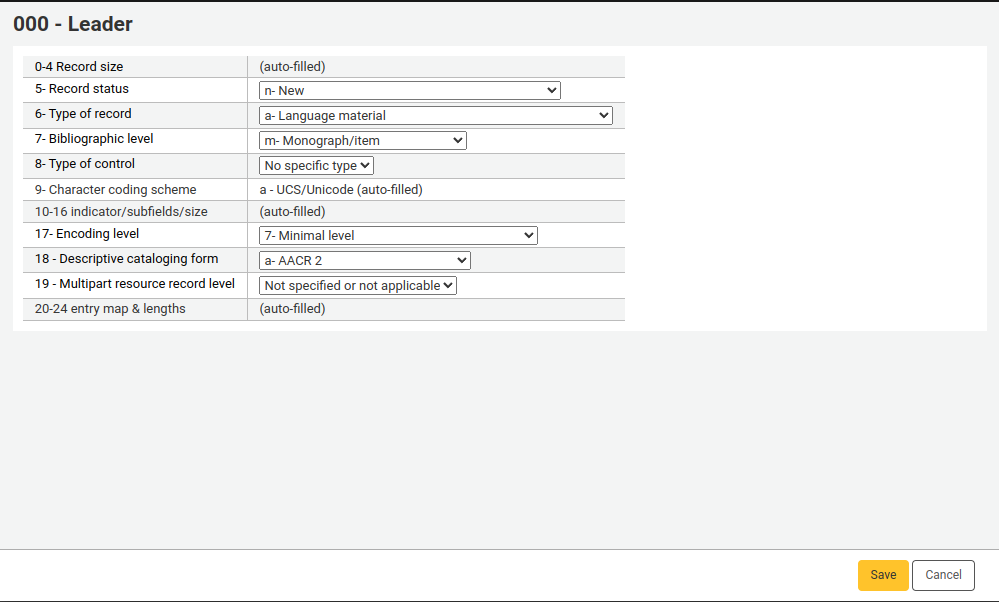
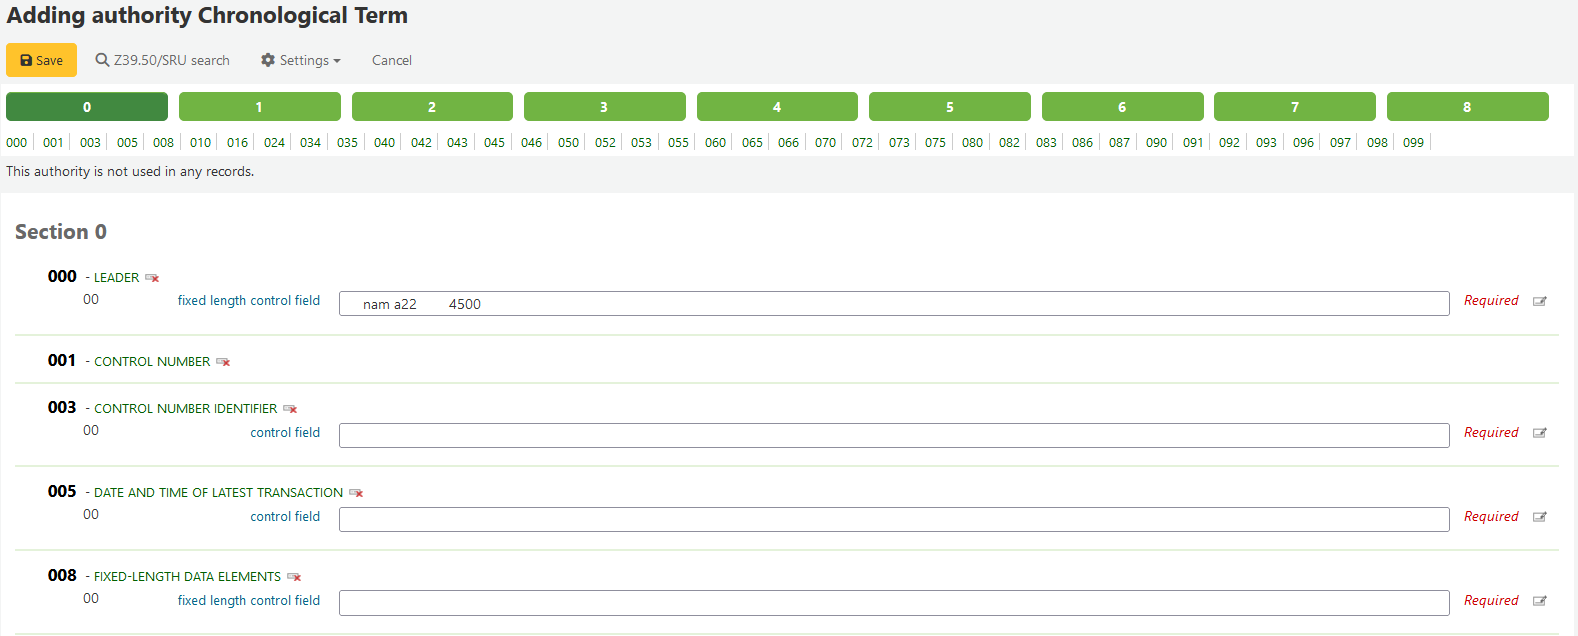
| 000 | LEADER | Describes the record(i.e. surrogate) – is it a record for a monograph? A serial? | Click in this field to fill it in. Then set 「Bibliographic level」 to 『a』 for articles or 『s』 for serials. Otherwise, leave everything as is. |
| 001 | CONTROL NUMBER | Accession number. | Enter the accession number written inside the item here. For articles and items which do not have accession numbers, leave blank. |
| 003 | CONTROL NUMBER IDENTIFIER | Your MARC Organizational Code | Click in this field to fill it in (will auto fill if you have your MARCOrgCode preference set). |
| 005 | D & T LATEST TRANSACTION | Current date and time. | Click in this field to fill it in. |
| 008 | FIXED-LENGTH DATA ELEMENTS | Field containing computer-readable representations of a number of things. | Generally you will only use 『s』 (single) or 『m』 (multiple) options for position 06- use the former when the item was published in a single year, the latter when it was published over the course of several. If there is a single date, only enter a date in the first date field (positions 07-10). Enter the three-digit country code in positions 15-17, being sure to add spaces if the country code is fewer than three characters long. If there is an index, note that fact in position 31. Enter the three-letter language code in positions 35-37. |
| 010 | LCCN | A number assigned by the Library of Congress to uniquely identify the work. | Check on the copyright page of the book (if it was published in the US) or the LC catalog for this number. If you can’t find it, don’t worry about it. |
| 020 | ISBN | Unique number used by publishers to identify books. | If this number isn’t listed on the book, there probably isn’t one. |
| 022 | ISSN | Unique number used by publishers to identify serials. | If this number isn’t listed on the book, there probably isn’t one. |
| 033 | DATE/TIME OF EVENT | Used for auction dates. Required for auction catalogs. | For auctions that took place on only one day, enter the date of the auction in the format YYYYMMDD in the subfield 『a』 and a 『0』 in the first indicator. For auctions that took place over two consecutive days or any number of non-consecutive days, create a subfield 『a』 for each day with the date in the format YYYYMMDD, and put a 『1』 in the first indicator. For auctions that took place over more than two consecutive days, create a subfield 『a』 (in format YYYYMMDD) for the first day and a subfield 『a』 (also in format YYYYMMDD) for the last day, and put a 『2』 in the first indicator. |
| 040 | CATALOGING SOURCE | Identifies which libraries created and modified the record. | For imported records, add a subfield 『d』 with your OCLC code as the value. For new records, make sure that the subfield 『c』 with your OCLC code as the value. |
| 041 | LANGUAGE CODE | Identifies all the languages used in an item, when two or more languages are present. | For significant portions of a text in a given language, there should be a subfield 『a』 with that language code. If there are only summaries or abstracts in a specific language, create a subfield 『b』 with that language code. |
| 100 | MAIN ENTRY–PERSONAL | Authorized form of the main author’s name | See Authorized headings sheet and AACR2. The first indicator should generally be a 『1』, to indicate that the entry is surname first. If the name consists only of a forename, however, the first indicator should be 『0』. |
| 110 | MAIN ENTRY–CORPORATE | Authorized form of the name of the main corporate author. Required for auction catalogs. | Auction catalogs should use a 110 field rather than a 100 field. See Authorized headings sheet and AACR2. Set the first indicator to 『2』. |
| 111 | MAIN ENTRY–MEETING | Authorized form of the name of a meeting which acted as a main offer (e.g. conference proceedings) | See Authorized headings sheet and AACR2. Set the first indicator to 『2』. |
| 245 | TITLE STATEMENT | Transcription of the title statement from the title page (or chief source of information) | Enter the title in subfield 『a』, the subtitle in subfield 『b』, and the statement of responsibility in subfield 『c』. If you are creating a record for a single volume or part of a multi-part item, you should put the part number in subfield 『n』 and the part title in subfield 『p.』 For auction catalogs, the date (in 『MM/DD/YYYY』 format) should be listed in square brackets in subfield 『f』. See ISBD punctuation sheet. Set the first indicator to 『0』 if there is no author, otherwise set it to 『1』. Set the second indicator to the number of non-filing characters (i.e. characters in an initial articles plus the space… for 「The 」 set the second indicator to 『4』). |
| 246 | VARYING FORM OF TITLE | Alternate form of title for searching and filing purposes | If the patron might look for the work under a different title, enter it here. Do not include initial articles. The first indicator should be 『3』, unless the title is merely a variant spelling, in which case the first indicator should be 『1』. |
| 250 | EDITION STATEMENT | Transcription of the edition statement from the title page (or chief source of information) | Transcribe the edition statement exactly as it appears on the title-page. You may abbreviate if the edition statement is very long. |
| 260 | PUBLICATION (IMPRINT) | Publication information. | Put the location of publication in subfield 『a』, the publisher in subfield 『b』, and the year (or probable year) in subfield 『c』. See ISBD punctuation sheet. |
| 300 | PHYSICAL DESCRIPTION | Physical description | Enter the pagination statement in subfield 『a』, a brief description of 「special」 contents such as illustrations or maps in subfield 『b』 (see AACR2), and the size of the item in subfield 『c』. See ISBD punctuation sheet. |
| 490 | SERIES STATEMENT | Shows the series statement exactly as it appears on the item. | Transcribe the series statement into subfield 『a』 with the volume number in subfield 『v』. See ISBD punctuation sheet. Set the first indicator to 『1』 if you are using an 830. As a general rule, you should do so. |
| 500 | GENERAL NOTE | Notes that don’t fit anywhere else. | Enter notes as full sentences, with a separate 500 field for each distinct topic. |
| 501 | WITH NOTE | Notes whether the work is bound with the works described by other records. | Put description of relationship in subfield 『a』. |
| 504 | BIBLIOGRAPHY, ETC. NOTE | Indicates whether the work includes a bibliography. | If the work includes a bibliography and index, put the text 「Includes bibliographical references (p. XXX-XXX) and index.」 in subfield 『a』. If the work does not include an index, remove that part of the sentence. If the references are scattered throughout the work and not gathered into a distinct sentence, remove the parenthetical statement. |
| 505 | FORMATTED CONTENTS | List of contents in a standard format. Unformatted contents can be listed in a 500 (General Note) field. | See ISBD punctuation sheet. Set the first indicator to 『0』. If you are separately coding authors and titles, set the second indicator to 『0』. Otherwise, leave the second indicator blank. |
| 518 | DATE/TIME OF EVENT NOTE | Used for auction dates. | For auction catalogs, enter the date of the auction in the format 『January 2, 1984』 in the subfield 『a』 |
| 520 | SUMMARY, ETC. | A brief summary or abstract of the book or article. | In general you do not need to write a summary. A summary might be called for, however, with items that cannot be easily reviewed by a patron, such as books with highly acidic paper or CD-ROMs. |
| 546 | LANGUAGE NOTE | Note describing the languages used in the work | Only needed for works in multiple languages. See ISBD punctuation sheet. |
| 561 | PROVENANCE INFORMATION | Describes the previous ownership of the item. | Used only for rare books. |
| 563 | BINDING INFORMATION | Describes the binding of the item. | Used only for rare books. |
| 590 | LOCAL NOTE | Local notes. Required for auction catalogs. | Used for auction catalogs to indicate what types of coins are sold in the auction- Roman, Greek, etc. |
| 600 | SUBJECT ADDED–PERSONAL | Authorized form of personal names for people discussed in the work | See Authorized headings sheet and AACR2. The first indicator should generally be a 『1』, to indicate that the entry is surname first. If the name consists only of a forename, however, the first indicator should be 『0』. If you found the name in the LC authority file, set the second indicator to 『0』. Otherwise set the second indicator to 『4』. |
| 610 | SUBJECT ADDED–CORPORATE | Authorized form of corporate names for organizations discussed in the work | See Authorized headings sheet and AACR2. Set the first indicator to 『2』. If you found the name in the LC authority file, set the second indicator to 『0』. Otherwise set the second indicator to 『4』. |
| 611 | SUBJECT ADDED–MEETING | Authorized form of meeting names for meetings discussed in the work | See Authorized headings sheet and AACR2. Set the first indicator to 『2』. If you found the name in the LC authority file, set the second indicator to 『0』. Otherwise set the second indicator to 『4』. |
| 630 | SUBJECT ADDED–UNIFORM TITLE | Authorized form of titles for other works discussed in the work | See Authorized headings sheet and AACR2. Set the first indicator to the number of non-filing characters (i.e. characters in an initial articles plus the space… for 「The 」 set the first indicator to 『4』). If you found the name in the LC authority file, set the second indicator to 『0』. Otherwise set the second indicator to 『4』. |
| 650 | SUBJECT ADDED–TOPICAL | Library of Congress Subject Heading terms describing the subject of the work | See Authorized headings sheet and AACR2. If you found the name in the LC authority file, set the second indicator to 『0』. Otherwise set the second indicator to 『4』. |
| 651 | SUBJECT ADDED–GEOGRAPHICAL | Library of Congress Subject Heading geographical terms describing the subject of the work | See Authorized headings sheet and AACR2. If you found the name in the LC authority file, set the second indicator to 『0』. Otherwise set the second indicator to 『4』. |
| 655 | INDEX TERM–GENRE/FORM | Describes what an item is as opposed to what the item is about. | Generally used only for auction catalogs, which should have the genre heading 「Auction catalogs.」 (make sure to find the authorized heading!) If you found the name in the LC authority file, set the second indicator to 『0』. If you are using a term from a specific thesaurus, set the second indicator to 『7』 and put the code for the thesaurus in subfield 『2』. Otherwise set the second indicator to 『4』. |
| 690 | LOCAL SUBJECT ADDED–TOPICAL | Used for headings from any custom subject authority file. | If there is no appropriate LCSH term, you can use a 690 with subject headings you find on other items in the catalog. |
| 691 | LOCAL SUBJECT ADDED–GEOGRAPHICAL | Used for headings from any custom subject authority file. | If there is no appropriate LCSH term, you can use a 691 with subject headings you find on other items in the catalog. |
| 700 | ADDED ENTRY–PERSONAL | Used for second authors and other persons related to the production of the work. | See Authorized headings sheet and AACR2. The first indicator should generally be a 『1』, to indicate that the entry is surname first. If the name consists only of a forename, however, the first indicator should be 『0』. |
| 710 | ADDED ENTRY–CORPORATE | Used for corporate bodies related to the production of the work (e.g. publishers). | See Authorized headings sheet and AACR2. Set the first indicator to 『2』. |
| 711 | ADDED ENTRY–MEETING | Used for meetings related to the production of the work (e.g. symposia that contributed to the work). | See Authorized headings sheet and AACR2. Set the first indicator to 『2』. |
| 730 | ADDED ENTRY–UNIFORM TITLE | Used for uniform titles related to the production of the work (e.g. a work that inspired the present work) | See Authorized headings sheet and AACR2. Set the first indicator to the number of non-filing characters (i.e. characters in an initial articles plus the space… for 「The 」 set the first indicator to 『4』). |
| 773 | HOST ITEM ENTRY | Describes the larger bibliographic unit that contains the work (e.g. book or journal containing the article being described in the current record) | If the host publication is author main entry, enter the authorized form of the author’s name in subfield 『a』. Put the title in subfield 『t』. If the host publication is an independent work, put publication information in subfield 『d』. When available, ISSN and ISBN should always be used in, in subfields 『x』 and 『z』 respectively. Relationship information (e.g. volume number, page number, etc.) goes in subfield 『g』. Subfield 『q』 contains an encoded representation of the location of the item: volume, issue, and section numbers are separated by colons, and the first page is entered following a 『<』 at the end of the subfield. See ISBD punctuation sheet. Set the first indicator to 『0』. If you want the label 「In:」 to be generated, leave the second indicator blank. If you want something else displayed before the 773 text, set the second indicator to 『8』 and add a subfield 『i』 with the label you want at the beginning of the field (e.g. 「$iOffprint from:」). |
| 830 | SERIES ENTRY–UNIFORM TITLE | Authorized form of the series name transcribed in the 490 field. Often this will just be the same as the 490. | See Authorized headings sheet and AACR2. Set the second indicator to the number of non-filing characters (i.e. characters in an initial articles plus the space… for 「The 」 set the second indicator to 『4』). |
| 852 | LOCATION/CALL NUMBER | Provides the section name for pre-barcode books, pamphlets, and some articles and serials. | Do not put anything in this field if you are cataloging a volume which gets only one record and a barcode. If the item does not get a barcode, or you are currently creating a record for an article in a volume, put the section in subfield 『a』 (see ANS cataloging documentation), and the call number in subfield 『i』. Set the first indicator to 『8』. |
| 856 | ELECTRONIC ACCESS | Links to material available online. | Put the URL of any electronic copies or summaries, etc. in subfield 『u』 and a link title in subfield 『y』. Set the first indicator to 『4』. |
| 942 | ADDED ENTRY ELEMENTS (KOHA) | Used for Koha-specific data. | Set the subfield 『c』 to the appropriate item type. |
表:編目指南
館藏紀錄編目指南¶
此表單的內容係指 Koha 預設的館藏記錄。此等資訊可用於匯出與匯入資料
| MARC21 Tag/subfield | Data Element | Description | Notes |
|---|---|---|---|
| 952$0 | Withdrawn status | Default values:
|
Coded value, matching Authorized Value category (『WITHDRAWN』 in default installation) |
| 952$1 | Lost status | Default values:
|
It’s possible to configure OPAC so that lost items don’t display with the hidelostitems system preference. Coded value, matching Authorized Value category (『LOST』 in default installation) |
| 952$2 | Classification | Classification scheme that defines filing rules used for sorting call numbers. | A choice of classification sources as they are defined in administration. If no classification scheme is entered, the system will use the value entered in the DefaultClassificationSource preference. |
| 952$3 | Materials specified | Specific issues of serials or multi-part items. | Displayed when items are checked out and in to tell the staff how many pieces the item has. Copy/volume data is stored in 952$h and $t for display in Normal views. |
| 952$4 | Damaged status | Default values:
|
Coded value, matching Authorized Value category (『DAMAGE』 in default installation) |
| 952$5 | Use restrictions | Default values:
|
Coded value, matching Authorized Value category (『RESTRICT』 in default installation). This value has no effect on circulation. |
| 952$7 | Not for loan | Default values:
|
Coded value, matching Authorized Value category (『NOT_LOAN』 in default installation). Negative number values can still be placed on hold. |
| 952$8 | Collection code | Coded value | Coded value, matching Authorized Value category (『CCODE』 in default installation) |
| 952$9 | Item number | System-generated item number. | Does not display in the item record. |
| 952$a | Owning Library ** | Branch code | Required. Code must be defined in Libraries, Branches and Groups |
| 952$b | Holding library ** (usually the same as 952$a ) | Branch code | Required. Code must be defined in Libraries, Branches and Groups |
| 952$c | Shelving location code | Coded value, matching Authorized Value category (『LOC』 in default installation) | |
| 952$d | Date acquired | YYYY-MM-DD | Date formats in the 952 subfields are required to be in the system internal format for data loading and subsequent item editing: YYYY-MM-DD |
| 952$e | Source of acquisition | Coded value or vendor string | Filled in automatically with the Koha assigned vendor id by Acquisitions when an item is received. |
| 952$g | Purchase price | Decimal number, no currency symbol (ex. 10.00) | Filled in automatically by Acquisitions when an item is received. |
| 952$h | Serial enumeration | Filled in automatically by Serials if the issue is received there. | |
| 952$o | Koha full call number | Can be filled in automatically based on the itemcallnumber system preference. | |
| 952$p | Barcode * | Max 20 characters | |
| 952$t | Copy number | Max 32 characters | |
| 952$u | Uniform Resource Identifier | Item specific URL | Full URL starting with http:// Only needed if your item has its own URL, not necessary if the bib record has a 856$u that applies to all items on the record. |
| 952$v | Replacement price | Decimal number, no currency symbol (ex. 10.00) | Filled in automatically by Acquisitions when an item is received. |
| 952$w | Price effective from | YYYY-MM-DD | Date formats in the 952 subfields are required to be in the system internal format for data loading and subsequent item editing: YYYY-MM-DD. Filled in automatically by Acquisitions when an item is received. |
| 952$x | Nonpublic note | This is a note field for notes that will not appear in the OPAC. Right now this note does not appear anywhere but in the item edit screen in the staff client. | |
| 952$y | Koha item type ** | Coded value, required field for circulation | Required. Coded value, must be defined in Item types |
| 952$z | Public note |
表:Koha 內建館藏資料
* - 流通必備
** - Koha 必備
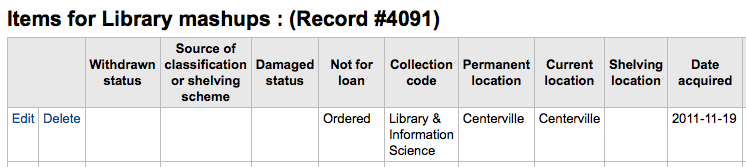
處理館藏訂購¶
若打算匯入採訪中 (還沒有簽收) 的 MARC 資訊,且允許讀者預約它們,在匯入前需先新增館藏記錄於 *.mrc 檔案。
最簡單的方式是先經由 MARCEdit 軟體執行書目記錄。下載 MARC 記錄,儲存於桌面或其他地方。若已安裝 MARCEdit,則以滑鼠在 MARC 記錄點兩下,就可以打開該記錄。
重要
以下的畫面擷取自 Windows XP 下的 MARCEdit 版本 5.2.3769.41641,可能與現在的內容略有不同。
自動載入原始檔案;選擇 MarcBreaker,按下 「執行」 鈕
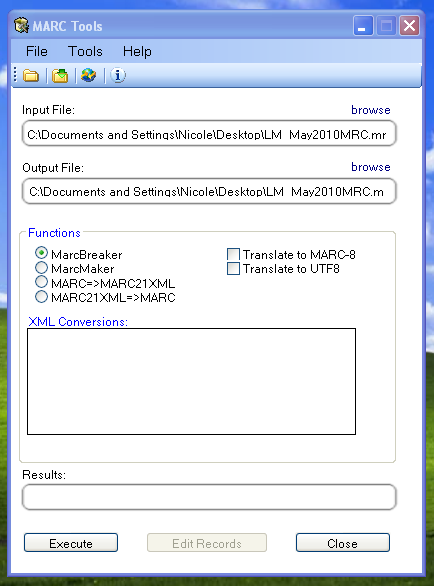
在螢幕下方將出現處理記錄的摘要
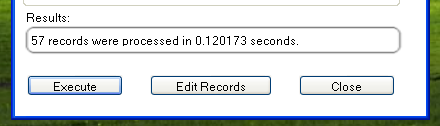
按 『編輯紀錄』 繼續新增館藏紀錄
畫面出現 MARC 記錄
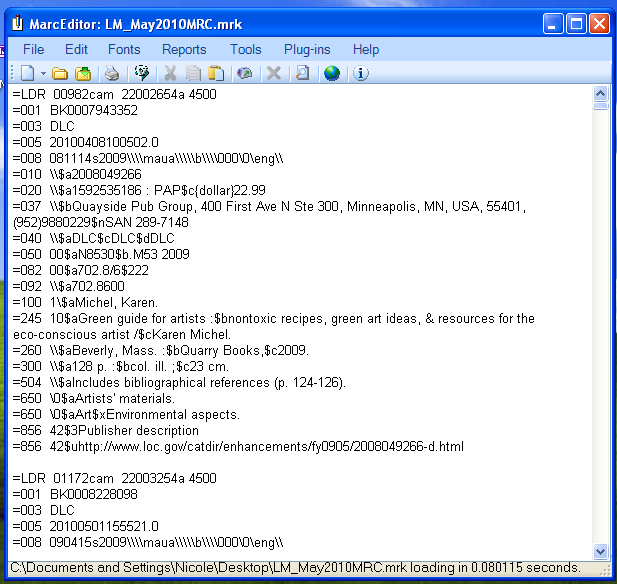
按工具 > 新增/編輯欄位

進入 Koha 的館藏資訊
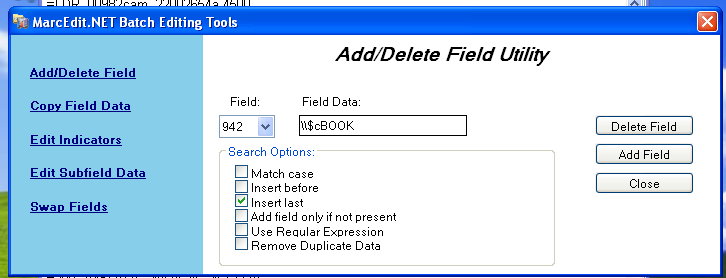
- 在欄位盒鍵入 942
- 在欄位資料盒,鍵入 \$c 及其館藏類型代碼 (在此例是 \$cBOOK)
- 按 『插入最後』 選項
- 按 『新增欄位』
鍵入館藏紀錄資料
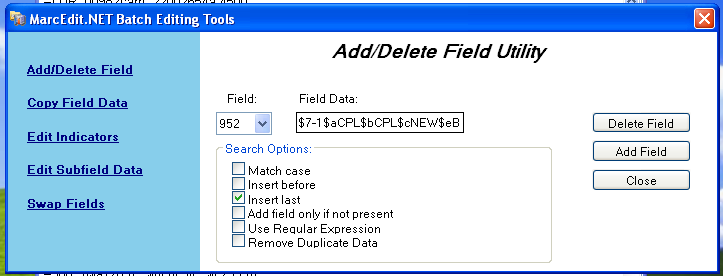
- 在欄位盒,鍵入 952
- 在欄位資料盒,鍵入 $7ORDERED_STATUS$aPERM_LOC$bCURR_LOC$cSHELVING_LOCATION$eSOURCE_OF_ACQ$yITEM_TYPE
- ex. $7-1$aCPL$bCPL$cNEW$eBrodart$yBOOK
- 安裝 Koha 時,-1 是訂購狀態的預設值
- 可以編修其他欄位的資料 – 如:改變館藏代碼,讓所有的館藏放在一起 (8)、自動填入採訪日期 (d)、填入公開附註 (z)。
- 使用 $ 做為分欄代碼;每列新增一個分欄讓多個館藏可以匯入 MARC 紀錄 (在上例中,四個館藏,各有對應的分欄)
- 確認在管理 > 容許值裡,在欄位鍵入正確的代碼
- ex. $7-1$aCPL$bCPL$cNEW$eBrodart$yBOOK
- 按 『插入最後』 選項
- 按 『新增欄位』
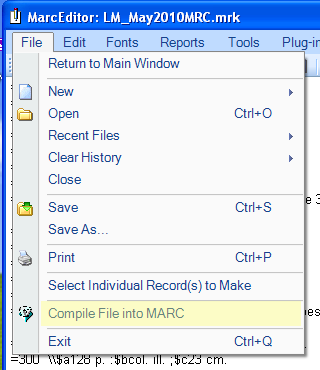
關閉欄位編輯視窗
按檔案 > 進入 MARC 編輯
選定儲存檔案的位置
進入 Koha 系統,遵照 匯入 MARC 紀錄 <stage-marc-records-for-import-label> 的指示。
進入之後,到館藏記錄並分別修改其條碼,將把館藏狀態由訂購中改為不外借欄位的空白列。
說明
向代理商取得館藏記錄時,可要求代理商提供 MARC 記錄;這樣,才能夠匯入它,覆寫原來的記錄,並自動置換需要的資料。