Web Hizmetleri
OAI-PMH
Metadata Harvesting (OAI-PMH) için Açık Arşivler Girişimi-Protokolü için iki ‘katılımcı’ grup vardır: Veri Sağlayıcıları ve Servis Sağlayıcıları. Veri Sağlayıcıları (açık arşivler, yazılım havuzu) metadata için ücretsiz erişim sağlar ve çok gerekli olmasa da diğer kaynaklara ya da tam metinlere de ücretsiz erişim imkanı sunabilir. OAI-PHM Veri Sağlayıcılar için kolay uygulanabilir, düşük bariyerli çözüm sağlar. Servis Sağlayıcılar metadata harvest etmek ve depolamak için Veri Sağlayıcılarının OAI arayüzlerini kullanırlar. Bunun Veri Sağlayıcılarına hiç bir canlı arama isteği olmayacağı anlamına geldiğini, hatta, hizmetlerin OAI-PMH aracılığıyla harvest edilen verilere dayandığını unutmayın.
Koha at present can only act as a Data Provider. It can not harvest from other repositories. The biggest stumbling block to having Koha harvest from other repositories is that MARC is the only metadata format that Koha indexes natively. Visit http://www.oaforum.org/tutorial/english/page3.htm for diagrams of how OAI-PMH works.
Learn more about OAI-PMH at: http://www.openarchives.org/pmh/
To enable OAI-PMH in Koha edit the OAI-PMH preference. Once enabled you can visit http://YOURKOHACATALOG/cgi-bin/koha/oai.pl to see your file.
Örnek OAI Yapılandırma Dosyası
       format:
         vs:
           metadataPrefix: vs
           metadataNamespace: http://veryspecial.tamil.fr/vs/format-pivot/1.1/vs
           schema: http://veryspecial.tamil.fr/vs/format-pivot/1.1/vs.xsd
           xsl_file: /usr/local/koha/xslt/vs.xsl
         marcxml:
           metadataPrefix: marxml
           metadataNamespace: http://www.loc.gov/MARC21/slim
http://www.loc.gov/standards/marcxml/schema/MARC21slim
           schema: http://www.loc.gov/MARC21/slim
http://www.loc.gov/standards/marcxml/schema/MARC21slim.xsd
         oai_dc:
           metadataPrefix: oai_dc
           metadataNamespace: http://www.openarchives.org/OAI/2.0/oai_dc/
           schema: http://www.openarchives.org/OAI/2.0/oai_dc.xsd
           xsl_file:
/usr/local/koha/koha-tmpl/intranet-tmpl/xslt/UNIMARCslim2OAIDC.xsl
REST hizmetleri
Koha can now be requested by REST http requests. BibLibre wrotes an external module to adds more possibilities than ILS-DI can provide.There is no authentication process, but authorized ips are listed in the config file. Services have been tested in 3.10, 3.12 and 3.14 koha versions. You can find more information about it into README file and opac/rest.pl documentation on http://git.biblibre.com. If you want to add features, send us a patch at dev_patches AT biblibre DOT com.
1.4 sürümünde sağlanan hizmetler şunlardır:
GET branches
GET user/byid/:borrowernumber/holds
GET user/:user_name/holds
GET user/byid/:borrowernumber/issues
GET user/:user_name/issues
GET user/:user_name/issues_history
GET user/byid/:borrowernumber/issues_history
GET user/today
GET user/all
POST user
PUT user/:user_name
GET biblio/:biblionumber/items
GET biblio/:biblionumber/holdable
GET biblio/:biblionumber/items_holdable_status
GET item/:itemnumber/holdable
PUT auth/change_password
GET /suggestions
GET /suggestions/:suggestionid
POST /suggestions
PUT /suggestions/:suggestionid
DELETE /suggestions/:suggestionid
SRU sunucusu kullanma
SRU sunucusu kullanma
Koha implements the Search/Retrieve via URL (SRU) protocol. More information about the protocol itself can be found at http://www.loc.gov/standards/sru/. The version implemented is version 1.1.
Açıkla
If you want to have information about the implementation of SRU on a given server, you should have access to the Explain file using a request to the server without any parameter. Like <http://myserver.com:9999/biblios/>. The response from the server is an XML file that should look like the following and will give you information about the default settings of the SRU server.
       <zs:explainResponse>
            <zs:version>1.1</zs:version>
            <zs:record>
                 <zs:recordSchema>http://explain.z3950.org/dtd/2.0/</zs:recordSchema>
                 <zs:recordPacking>xml</zs:recordPacking>
                 <zs:recordData>
                 <explain xml:base="zebradb/explain-biblios.xml">
                 <!--
                 try stylesheet url: http://./?stylesheet=docpath/sru2.xsl
                 -->
            <serverInfo protocol="SRW/SRU/Z39.50">
                 <host>biblibre</host>
                 <port>9999</port>
                 <database>biblios</database>
            </serverInfo>
            <databaseInfo>
                 <title lang="en" primary="true">Koha 3 Bibliographic SRU/SRW/Z39.50 server</title>
                 <description lang="en" primary="true">Koha 3 Bibliographic Server</description>
                 <links>
                      <sru>http://biblibre:9999</sru>
                 </links>
            </databaseInfo>
            <indexInfo>
                 <set name="cql" identifier="info:srw/cql-context-set/1/cql-v1.1">
                      <title>CQL Standard Set</title>
                 </set>
                 <index search="true" scan="true" sort="false">
                 <title lang="en">CQL Server Choice</title>
                 <map>
                      <name set="cql">serverChoice</name>
                 </map>
            <map>
               <attr type="1" set="bib1">text</attr>
               </map>
          </index>
      <index search="true" scan="true" sort="false">
         <title lang="en">CQL All</title>
             <map>
<name set="cql">all</name>
</map>
<map>
<attr type="1" set="bib1">text</attr>
</map>
</index>
<!-- Record ID index -->
<index search="true" scan="true" sort="false">
<title lang="en">Record ID</title>
<map>
<name set="rec">id</name>
</map>
<map>
<attr type="1" set="bib1">rec:id</attr>
<attr type="4" set="bib1">3</attr>
</map>
</index>
Ara
This url : http://myserver.com:9999/biblios?version=1.1&operation=searchRetrieve&query=reefs is composed of the following elements:
- SRU sunucusunun temel url’si: http://myserver.com:9999/biblios?
- search part with the 3 required parameters : version, operation and query. The parameters within the search part should be of the key=value form, and can be combined with the & character.
One can add optional parameters to the query, for instance maximumRecords indicating the maximum number of records to be returned by the server. So http://myserver.com:9999/biblios?version=1.1&operation=searchRetrieve&query=reefs&maximumRecords=5 will only get the first 5 results results from the server.
http://www.loc.gov/standards/sru/sru1-1archive/search-retrieve-operation.html gives more details about the search operations and in particular the list of optional parameters for searching.
Arama hakkında daha fazla bilgi
“Operation” anahtarı iki değer alabilir: scan ya da searchRetrieve.
If operation=searchRetrieve, then the search key should be query. As in : operation=searchRetrieve&query=reefs
If operation=scan, then the search key should be scanClause. As in : operation=scan&scanClause=reefs
etc/zebradb/biblios/etc/bib1.att sisteminizde mevcut olan Zebra/3950 dizinlerini tanımlar. Örneğin Konu ve Başlık dizinleri olduğunu göreceksiniz: att 21 konu ve att 4 başlık anılan sıraya göre.
In the pqf.properties file located under etc/zebradb/pqf.properties I see that an access point already uses my Subject index (index.dc.subject = 1=21) while another uses my Title index (index.dc.title = 1=4) I know this is my Subject index because as I’ve seen just before in my bib1.att file, it’s called with =1=21 in Z3950: so index.dc.subject = 1=21 correctly points to my Subject index. And Title was called with 1=4 so index.dc.title = 1=4 correctly points to my Title index. I can now construct my query just like I would in a search box, just preceding it with the “query” key: query=Subject=reefs and Title=coral searches “reefs” in the subject and “coral” in the title. The full url would be http://myserver.com:9999/biblios?version=1.1&operation=searchRetrieve&query=Subject=reefs and Title=coral If I want to limit the result set to just 5 records, I can do http://myserver.com:9999/biblios?version=1.1&operation=searchRetrieve&query=Subject=reefs and Title=coral&maximumRecords=5
Aynı zamanda kesme, ilişkiler, vs. gibi ayarları da inceleyebilirim. Bunlar pqf.properties dosyamda tanımlıdır. Örneğin şu şekilde tanımlanmış konum özelliklerini görebilirim:
 position.first              = 3=1 6=1
# "first in field"
 position.any                = 3=3 6=1
   # "any position in field"
So as an example if I want “coral” to be at the beginning of the title, I can do this query : http://myserver.com:9999/biblios?version=1.1&operation=searchRetrieve&query=Title=coral first
Retrieve
My search for http://univ_lyon3.biblibre.com:9999/biblios?version=1.1&operation=searchRetrieve&query=coral reefs&maximumRecords=1 retrieves just on record. The response looks like this:
          <zs:searchRetrieveResponse>
<zs:version>1.1</zs:version>
<zs:numberOfRecords>1</zs:numberOfRecords>
<zs:records>
<zs:record>
<zs:recordPacking>xml</zs:recordPacking>
<zs:recordData>
<record xsi:schemaLocation="http://www.loc.gov/MARC21/slim http://www.loc.gov/ standards/marcxml/schema/MARC21slim.xsd">
<leader> cam a22 4500</leader>
<datafield tag="010" ind1=" " ind2=" ">
<subfield code="a">2-603-01193-6</subfield>
<subfield code="b">rel.</subfield>
<subfield code="d">159 F</subfield>
</datafield>
<datafield tag="020" ind1=" " ind2=" ">
<subfield code="a">FR</subfield>
<subfield code="b">00065351</subfield>
</datafield>
<datafield tag="101" ind1="1" ind2=" ">
<subfield code="c">ita</subfield>
</datafield>
<datafield tag="105" ind1=" " ind2=" ">
<subfield code="a">a z 00|y|</subfield>
</datafield>
<datafield tag="106" ind1=" " ind2=" ">
<subfield code="a">r</subfield>
</datafield>
<datafield tag="100" ind1=" " ind2=" ">
<subfield code="a">20091130 frey50 </subfield>
</datafield>
<datafield tag="200" ind1="1" ind2=" ">
<subfield code="a">Guide des récifs coralliens / A Guide to Coral Reefs</subfield>
<subfield code="b">Texte imprimé</subfield>
<subfield code="e">la faune sous-marine des coraux</subfield>
<subfield code="f">A. et A. Ferrari</subfield>
</datafield>
<datafield tag="210" ind1=" " ind2=" ">
<subfield code="a">Lausanne</subfield>
<subfield code="a">Paris</subfield>
<subfield code="c">Delachaux et Niestlé</subfield>
<subfield code="d">cop. 2000</subfield>
<subfield code="e">impr. en Espagne</subfield>
</datafield>
<datafield tag="215" ind1=" " ind2=" ">
<subfield code="a">287 p.</subfield>
<subfield code="c">ill. en coul., couv. ill. en coul.</subfield>
<subfield code="d">20 cm</subfield>
</datafield>
......
<idzebra>
<size>4725</size>
<localnumber>2</localnumber>
<filename>/tmp/nw10BJv9Pk/upd_biblio/exported_records</filename>
</idzebra>
</record>
</zs:recordData>
<zs:recordPosition>1</zs:recordPosition>
</zs:record>
</zs:records>
</zs:searchRetrieveResponse>
OPAC için yeni başlık kaydırma butonu
Often times libraries will want to add a flowing widget with new materials at the library to their main public catalog page. To do this you can use a widget from any number of services (usually for a cost) or you can enable plugins in Koha and use the Cover Flow plugin which is based on the Flipster, a responsive jQuery coverflow plugin.
Eklenti yüklendikten sonra coverflow’un görünmesi için gerekli adımlar aşağıdaki gibidir:
Öncelikle, coverflow widget’lerinizin ya da widget’lerinizin temel alacağı bir ya da daha fazla genel rapor oluşturmanız gerekecektir. Widget içeriğinizin ne içermesi gerektiğini eklenti bu şekilde bilir. Her rapor için sadece üç sütun gerekir; başlık, bibliyo numarası ve isbn. Gerçekte kapağı almak için için kullanılan veri olmasından dolayı iyi ve geçerli bir isbn numarasına sahip olmanız önemlidir. Eklentinin yinelenmesinde Amazon kapak resimleri kullanıyoruz, ama ben eninde sonunda kapak resmi alıcısının yapılandırılabilir olacağına inanıyorum ve böylece kapak resmi almak için herhangi bir veri kaynağını kullanabileceğiz.
İkinci olarak, eklentiyi yapılandırmamız gerekir. Eklenti yapılandırma, yapılandırma seçeneklerini saklamak için YAML kullanan bir tek metin alanıdır (aslında bu bir YAML alt kümesi olan JSON’dır). Bu örnekte bu şuna benzer:
- id: 42
  selector: #coverflow
  options:
  style: coverflow
Bu örnekte eklentiye raporu id 42 ile birlikte kullanmasını, ve HTML elemanını id “coverflow” ile değiştirmek için bir coverflow widget’i oluşturması için kullanmasını söylüyoruz. Seçenekler listesi doğrudan Flipster’a geçirilir, bu nedenle Flipster tarafından desteklenen her seçenek, eklenti yapılandırmasından ayarlanabilir! Aslında, geleneksel coverflow’a ek olarak Flipster’ın coverflow’un çok daha kompakt bir versiyonu olan bir “carosel” modu vardır. Ayrıca diğer seçenekler arasında widget’in hangi kapaktan başlayacağını da yapılandırabilirsiniz.
Eklenti seçeneklerinin kaydedildiği ya da güncellendiği zaman eklenti, otomatik olarak Koha sistem tercihi OpacUserJS içinde depolanan bazı küçültülmüş JavaScript kodları üretecektir. Burada bir çıkış örneği verilmektedir:
/* JS for Koha CoverFlow Plugin
 This JS was added automatically by installing the CoverFlow plugin
 Please do not modify */$(document).ready(function(){$.getScript("/plugin/Koha/Plugin/Com/ByWaterSolutions/CoverFlow/jquery-flipster/src/js/jquery.flipster.min.js",function(data,textStatus,jqxhr){$("head").append("<link id='flipster-css' href='/plugin/Koha/Plugin/Com/ByWaterSolutions/CoverFlow/jquery-flipster/src/css/jquery.flipster.min.css' type='text/css' rel='stylesheet' />");$('#coverflow').load("/coverflow.pl?id=42",function(){var opt={'items':'.item','minfactor':15,'distribution':1.5,'scalethreshold':0,'staticbelowthreshold':false,'titleclass':'itemTitle','selectedclass':'selectedItem','scrollactive':true,'step':{'limit':4,'width':10,'scale':true}};$('#coverflow').flipster({style:'coverflow',});});});});
/* End of JS for Koha CoverFlow Plugin */
Bunu neden yapıyoruz? Hız için! Sayfa her yüklendiğinde bu kodu yeniden oluşturmak yerine, bunu bir kez oluşturabilir ve tekrar tekrar kullanabiliriz.
Kodu yakından incelerseniz, bunun bir “coverflow.pl” komut dosyasını referans aldığını fark edeceksiniz. Bu, coverflow eklentisi ile birlikte gelen bir betiktir. Buna OPAC’tan erişmemiz gerektiği için (ve herhangi bir XSS saldırısı alarmı başlatmak istemediğimiz için), web sunucusu yapılandırmasını genel katalog için değiştirmemiz ve izlemek için bunu eklememiz gerekir:
ScriptAlias /coverflow.pl "/var/lib/koha/mykoha/plugins/Koha/Plugin/Com/ByWaterSolutions/CoverFlow/coverflow.pl"
Bu satır bize OPAC’tan gelen coverflow.pl komut dosyasına erişim sağlar. Bu komut rapor verilerini alır ve coverflow widget oluşturmak için geri genel kataloğa geçirir. Koha::cache, widget’in mümkün olduğunca hızlı bir şekilde yüklenmesi için desteklenir!
Son adım seçici öğenizi genel katalog içinde bir yere yerleştirmektir. Bu örnekte OpacMainUserBlock sistem tercihi içine yerleştiriyorum:
<span id="coverflow">Loading...</span>
Once that is in place, you need only refresh your OPAC page, and there you have it, your very own catalog coverflow widget! Not only do these coverflows look great on a computer screen, but they look great on mobile platforms as well, and are even touch responsive!
Sistem Tercihi Varsayılanları
ISDB Varsayılanları
Default values for the ISBD preference.
MARC Varsayılanı
#100||{ 100a }{ 100b }{ 100c }{ 100d }{ 110a }{ 110b }{ 110c }{ 110d }{ 110e }{ 110f }{ 110g }{ 130a }{ 130d }{ 130f }{ 130g }{ 130h }{ 130k }{ 130l }{ 130m }{ 130n }{ 130o }{ 130p }{ 130r }{ 130s }{ 130t }|<br/><br/>
#245||{ 245a }{ 245b }{245f }{ 245g }{ 245k }{ 245n }{ 245p }{ 245s }{ 245h }|
#246||{ : 246i }{ 246a }{ 246b }{ 246f }{ 246g }{ 246n }{ 246p }{ 246h }|
#242||{ = 242a }{ 242b }{ 242n }{ 242p }{ 242h }|
#245||{ 245c }|
#242||{ = 242c }|
#250| - |{ 250a }{ 250b }|
#254|, |{ 254a }|
#255|, |{ 255a }{ 255b }{ 255c }{ 255d }{ 255e }{ 255f }{ 255g }|
#256|, |{ 256a }|
#257|, |{ 257a }|
#258|, |{ 258a }{ 258b }|
#260| - |{ 260a }{ 260b }{ 260c }|
#300| - |{ 300a }{ 300b }{ 300c }{ 300d }{ 300e }{ 300f }{ 300g }|
#306| - |{ 306a }|
#307| - |{ 307a }{ 307b }|
#310| - |{ 310a }{ 310b }|
#321| - |{ 321a }{ 321b }|
#340| - |{ 3403 }{ 340a }{ 340b }{ 340c }{ 340d }{ 340e }{ 340f }{ 340h }{ 340i }|
#342| - |{ 342a }{ 342b }{ 342c }{ 342d }{ 342e }{ 342f }{ 342g }{ 342h }{ 342i }{ 342j }{ 342k }{ 342l }{ 342m }{ 342n }{ 342o }{ 342p }{ 342q }{ 342r }{ 342s }{ 342t }{ 342u }{ 342v }{ 342w }|
#343| - |{ 343a }{ 343b }{ 343c }{ 343d }{ 343e }{ 343f }{ 343g }{ 343h }{ 343i }|
#351| - |{ 3513 }{ 351a }{ 351b }{ 351c }|
#352| - |{ 352a }{ 352b }{ 352c }{ 352d }{ 352e }{ 352f }{ 352g }{ 352i }{ 352q }|
#362| - |{ 362a }{ 351z }|
#440| - |{ 440a }{ 440n }{ 440p }{ 440v }{ 440x }|.
#490| - |{ 490a }{ 490v }{ 490x }|.
#800| - |{ 800a }{ 800b }{ 800c }{ 800d }{ 800e }{ 800f }{ 800g }{ 800h }{ 800j }{ 800k }{ 800l }{ 800m }{ 800n }{ 800o }{ 800p }{ 800q }{ 800r }{ 800s }{ 800t }{ 800u }{ 800v }|.
#810| - |{ 810a }{ 810b }{ 810c }{ 810d }{ 810e }{ 810f }{ 810g }{ 810h }{ 810k }{ 810l }{ 810m }{ 810n }{ 810o }{ 810p }{ 810r }{ 810s }{ 810t }{ 810u }{ 810v }|.
#811| - |{ 811a }{ 811c }{ 811d }{ 811e }{ 811f }{ 811g }{ 811h }{ 811k }{ 811l }{ 811n }{ 811p }{ 811q }{ 811s }{ 811t }{ 811u }{ 811v }|.
#830| - |{ 830a }{ 830d }{ 830f }{ 830g }{ 830h }{ 830k }{ 830l }{ 830m }{ 830n }{ 830o }{ 830p }{ 830r }{ 830s }{ 830t }{ 830v }|.
#500|<br/><br/>|{ 5003 }{ 500a }|
#501|<br/><br/>|{ 501a }|
#502|<br/><br/>|{ 502a }|
#504|<br/><br/>|{ 504a }|
#505|<br/><br/>|{ 505a }{ 505t }{ 505r }{ 505g }{ 505u }|
#506|<br/><br/>|{ 5063 }{ 506a }{ 506b }{ 506c }{ 506d }{ 506u }|
#507|<br/><br/>|{ 507a }{ 507b }|
#508|<br/><br/>|{ 508a }{ 508a }|
#510|<br/><br/>|{ 5103 }{ 510a }{ 510x }{ 510c }{ 510b }|
#511|<br/><br/>|{ 511a }|
#513|<br/><br/>|{ 513a }{513b }|
#514|<br/><br/>|{ 514z }{ 514a }{ 514b }{ 514c }{ 514d }{ 514e }{ 514f }{ 514g }{ 514h }{ 514i }{ 514j }{ 514k }{ 514m }{ 514u }|
#515|<br/><br/>|{ 515a }|
#516|<br/><br/>|{ 516a }|
#518|<br/><br/>|{ 5183 }{ 518a }|
#520|<br/><br/>|{ 5203 }{ 520a }{ 520b }{ 520u }|
#521|<br/><br/>|{ 5213 }{ 521a }{ 521b }|
#522|<br/><br/>|{ 522a }|
#524|<br/><br/>|{ 524a }|
#525|<br/><br/>|{ 525a }|
#526|<br/><br/>|{\n510i }{\n510a }{ 510b }{ 510c }{ 510d }{\n510x }|
#530|<br/><br/>|{\n5063 }{\n506a }{ 506b }{ 506c }{ 506d }{\n506u }|
#533|<br/><br/>|{\n5333 }{\n533a }{\n533b }{\n533c }{\n533d }{\n533e }{\n533f }{\n533m }{\n533n }|
#534|<br/><br/>|{\n533p }{\n533a }{\n533b }{\n533c }{\n533d }{\n533e }{\n533f }{\n533m }{\n533n }{\n533t }{\n533x }{\n533z }|
#535|<br/><br/>|{\n5353 }{\n535a }{\n535b }{\n535c }{\n535d }|
#538|<br/><br/>|{\n5383 }{\n538a }{\n538i }{\n538u }|
#540|<br/><br/>|{\n5403 }{\n540a }{ 540b }{ 540c }{ 540d }{\n520u }|
#544|<br/><br/>|{\n5443 }{\n544a }{\n544b }{\n544c }{\n544d }{\n544e }{\n544n }|
#545|<br/><br/>|{\n545a }{ 545b }{\n545u }|
#546|<br/><br/>|{\n5463 }{\n546a }{ 546b }|
#547|<br/><br/>|{\n547a }|
#550|<br/><br/>|{ 550a }|
#552|<br/><br/>|{ 552z }{ 552a }{ 552b }{ 552c }{ 552d }{ 552e }{ 552f }{ 552g }{ 552h }{ 552i }{ 552j }{ 552k }{ 552l }{ 552m }{ 552n }{ 562o }{ 552p }{ 552u }|
#555|<br/><br/>|{ 5553 }{ 555a }{ 555b }{ 555c }{ 555d }{ 555u }|
#556|<br/><br/>|{ 556a }{ 506z }|
#563|<br/><br/>|{ 5633 }{ 563a }{ 563u }|
#565|<br/><br/>|{ 5653 }{ 565a }{ 565b }{ 565c }{ 565d }{ 565e }|
#567|<br/><br/>|{ 567a }|
#580|<br/><br/>|{ 580a }|
#581|<br/><br/>|{ 5633 }{ 581a }{ 581z }|
#584|<br/><br/>|{ 5843 }{ 584a }{ 584b }|
#585|<br/><br/>|{ 5853 }{ 585a }|
#586|<br/><br/>|{ 5863 }{ 586a }|
#020|<br/><br/><label>ISBN: </label>|{ 020a }{ 020c }|
#022|<br/><br/><label>ISSN: </label>|{ 022a }|
#222| = |{ 222a }{ 222b }|
#210| = |{ 210a }{ 210b }|
#024|<br/><br/><label>Standard No.: </label>|{ 024a }{ 024c }{ 024d }{ 0242 }|
#027|<br/><br/><label>Standard Tech. Report. No.: </label>|{ 027a }|
#028|<br/><br/><label>Publisher. No.: </label>|{ 028a }{ 028b }|
#013|<br/><br/><label>Patent No.: </label>|{ 013a }{ 013b }{ 013c }{ 013d }{ 013e }{ 013f }|
#030|<br/><br/><label>CODEN: </label>|{ 030a }|
#037|<br/><br/><label>Source: </label>|{ 037a }{ 037b }{ 037c }{ 037f }{ 037g }{ 037n }|
#010|<br/><br/><label>LCCN: </label>|{ 010a }|
#015|<br/><br/><label>Nat. Bib. No.: </label>|{ 015a }{ 0152 }|
#016|<br/><br/><label>Nat. Bib. Agency Control No.: </label>|{ 016a }{ 0162 }|
#600|<br/><br/><label>Subjects–Personal Names: </label>|{\n6003 }{\n600a}{ 600b }{ 600c }{ 600d }{ 600e }{ 600f }{ 600g }{ 600h }{–600k}{ 600l }{ 600m }{ 600n }{ 600o }{–600p}{ 600r }{ 600s }{ 600t }{ 600u }{–600x}{–600z}{–600y}{–600v}|
#610|<br/><br/><label>Subjects–Corporate Names: </label>|{\n6103 }{\n610a}{ 610b }{ 610c }{ 610d }{ 610e }{ 610f }{ 610g }{ 610h }{–610k}{ 610l }{ 610m }{ 610n }{ 610o }{–610p}{ 610r }{ 610s }{ 610t }{ 610u }{–610x}{–610z}{–610y}{–610v}|
#611|<br/><br/><label>Subjects–Meeting Names: </label>|{\n6113 }{\n611a}{ 611b }{ 611c }{ 611d }{ 611e }{ 611f }{ 611g }{ 611h }{–611k}{ 611l }{ 611m }{ 611n }{ 611o }{–611p}{ 611r }{ 611s }{ 611t }{ 611u }{–611x}{–611z}{–611y}{–611v}|
#630|<br/><br/><label>Subjects–Uniform Titles: </label>|{\n630a}{ 630b }{ 630c }{ 630d }{ 630e }{ 630f }{ 630g }{ 630h }{–630k }{ 630l }{ 630m }{ 630n }{ 630o }{–630p}{ 630r }{ 630s }{ 630t }{–630x}{–630z}{–630y}{–630v}|
#648|<br/><br/><label>Subjects–Chronological Terms: </label>|{\n6483 }{\n648a }{–648x}{–648z}{–648y}{–648v}|
#650|<br/><br/><label>Subjects–Topical Terms: </label>|{\n6503 }{\n650a}{ 650b }{ 650c }{ 650d }{ 650e }{–650x}{–650z}{–650y}{–650v}|
#651|<br/><br/><label>Subjects–Geographic Terms: </label>|{\n6513 }{\n651a}{ 651b }{ 651c }{ 651d }{ 651e }{–651x}{–651z}{–651y}{–651v}|
#653|<br/><br/><label>Subjects–Index Terms: </label>|{ 653a }|
#654|<br/><br/><label>Subjects–Facted Index Terms: </label>|{\n6543 }{\n654a}{–654b}{–654x}{–654z}{–654y}{–654v}|
#655|<br/><br/><label>Index Terms–Genre/Form: </label>|{\n6553 }{\n655a}{–655b}{–655x }{–655z}{–655y}{–655v}|
#656|<br/><br/><label>Index Terms–Occupation: </label>|{\n6563 }{\n656a}{–656k}{–656x}{–656z}{–656y}{–656v}|
#657|<br/><br/><label>Index Terms–Function: </label>|{\n6573 }{\n657a}{–657x}{–657z}{–657y}{–657v}|
#658|<br/><br/><label>Index Terms–Curriculum Objective: </label>|{\n658a}{–658b}{–658c}{–658d}{–658v}|
#050|<br/><br/><label>LC Class. No.: </label>|{ 050a }{ / 050b }|
#082|<br/><br/><label>Dewey Class. No.: </label>|{ 082a }{ / 082b }|
#080|<br/><br/><label>Universal Decimal Class. No.: </label>|{ 080a }{ 080x }{ / 080b }|
#070|<br/><br/><label>National Agricultural Library Call No.: </label>|{ 070a }{ / 070b }|
#060|<br/><br/><label>National Library of Medicine Call No.: </label>|{ 060a }{ / 060b }|
#074|<br/><br/><label>GPO Item No.: </label>|{ 074a }|
#086|<br/><br/><label>Gov. Doc. Class. No.: </label>|{ 086a }|
#088|<br/><br/><label>Report. No.: </label>|{ 088a }|
UNIMARC Varsayılan
#200|<h2>Title : |{200a}{. 200c}{ : 200e}{200d}{. 200h}{. 200i}|</h2>
#461|<label class=”ipt”>A part of : </label>|<a href=”/cgi-bin/koha/catalogue/search.pl?op=do_search{&q=461t&idx=ti}”>{461t}</a>{N∞ 461h} {v. 461v}{(461d)}<br/>|
#200b|<label class=”ipt”>Material Designation : </label>| {200b }|<br/>
#101a|<label class=”ipt”>Language(s): </label>|<a href=”/cgi-bin/koha/catalogue/search.pl?op=do_search{&q=101a&idx=ln}”>{101a}</a>|<br/>
#200f|<label class=”ipt”>Authors : </label>|<a href=”/cgi-bin/koha/catalogue/search.pl?op=do_search{&q=200f&idx=au}”>{200f ; }</a>|<br/>
#200g|<label class=”ipt”>Co-authors : </label>|<a href=”/cgi-bin/koha/catalogue/search.pl?op=do_search{&q=200g&idx=au}”>{200g ; }</a>|<br/>
#210a|<br/><label class=”ipt”>Place of pubblication : </label>|<a href=”/cgi-bin/koha/catalogue/search.pl?op=do_search&idx=pl&q={210a}”>{210a}</a>|<br/>
#210c|<label class=”ipt”>Publisher : </label>|<a href=”/cgi-bin/koha/catalogue/search.pl?op=do_search&idx=pb&q={210c}”>{210c ; }</a>|<br/>
#210d|<label class=”ipt”>Date of pubblication : </label>|{ 210d}|<br/>
#215|<label class=”ipt”>Description : </label>|{215a}{ : 215c}{ ; 215d}{ + 215e}|<br/>
#225a|<label class=”ipt”>Series :</label>|<a href=”/cgi-bin/koha/catalogue/search.pl?op=do_search{&q=225a&idx=se}”>{225a ;}</a> |
#225||{ = 225d}{ : 225e}{. 225h}{. 225i}{ / 225f}{, 225x}{ ; 225v}|<br/>
#686|<label>Classification : </label>|{ 686a }|<br/>
#608|<label>Form, Genre : </label>|<a href=”/cgi-bin/koha/catalogue/search.pl?op=do_search&idx=su&q={608a}”><img border=”0” src=”/opac-tmpl/css/en/images/filefind.png” height=”15” title=”Search on {608a}”>{ 608a}</a>|<br/><br/>
#200||<label class=”ipt”>Subjects : </label><br/>|<ul>
#600|<label class=”ipt”>Person(s) </label><br/> |<li><a href=”/cgi-bin/koha/catalogue/search.pl?op=do_search&idx=su&q={600a}”><img border=”0” src=”/opac-tmpl/css/en/images/filefind.png” height=”15” title=”Search on {600a}”>{ 600a}</a></li>|<br/>
#601|<label class=”ipt”>Organisation(s) </label><br/>|<li><a href=”/cgi-bin/koha/catalogue/search.pl?op=do_search&idx=su&q={601a}”><img border=”0” src=”/opac-tmpl/css/en/images/filefind.png” height=”15” title=”Search on {601a}”>{ 601a}</a></li>|<br/>
#606|<label class=”ipt”>Term(s) </label><br/>|<li><a href=”/cgi-bin/koha/catalogue/search.pl?op=do_search&idx=su&q={606a}”><img border=”0” src=”/opac-tmpl/css/en/images/filefind.png” height=”15” title=”Search on {606a}”>{ 606a}</a></li>|<br/>
#607|<label class=”ipt”>Place(s) </label><br/>|<li><a href=”/cgi-bin/koha/catalogue/search.pl?op=do_search&idx=su&q={607a}”><img border=”0” src=”/opac-tmpl/css/en/images/filefind.png” height=”15” title=”Search on {607a}”>{ 607a}</a></li>|<br/>
#610|<label>Keywords</label><br/>|<li><a href=”/cgi-bin/koha/catalogue/search.pl?op=do_search&idx=su&q={610a}”><img border=”0” src=”/opac-tmpl/css/en/images/filefind.png” height=”15” title=”Search on {610a}”>{ 610a}</a></li>|
#200||</ul>|
#856|<label class=”ipt”>Electronic resource : </label>|<a href=”{856u}”>click here</a> to go to the external resource<br/>
#010|<label class=”ipt”>ISBN : </label>|{010a ;}|<br/>
#011|<label class=”ipt”>ISSN : </label>|{011a ;}|<br/>
#200||<label class=”ipt”>Notes : </label>|<br/><ul>
#300||<li>{300a}</li>|
#307||<li>{307a}</li>|
#310||<li>{310a}</li>|
#326||<li>{326a}</li>|
#327||<li>{327a}</li>|
#333|<li>Public : |{333a}</li>|
#200||</ul>|
#330||<label class=”ipt”>Abstract : </label>|<br/>
#330||{330a}|<br/>
#200||<br/><h2>Items</h2>|
#200|<table>|<th>Call number</th><th>Copy note</th><th>Fonds</th><th>Genre detail</th><th>Circulation type</th><th>Barcode</th>|
#995||<tr><td> {995k}</td><td> {995u}</td><td> {995y}</td><td>{995e} </td><td> {995o}</td><td>{995f}</td></tr>|</table>
OPACISBD Defaults
Default values for the OPACISBD preference.
MARC
#100||{ 100a }{ 100b }{ 100c }{ 100d }{ 110a }{ 110b }{ 110c }{ 110d }{ 110e }{ 110f }{ 110g }{ 130a }{ 130d }{ 130f }{ 130g }{ 130h }{ 130k }{ 130l }{ 130m }{ 130n }{ 130o }{ 130p }{ 130r }{ 130s }{ 130t }|<br/><br/>
#245||{ 245a }{ 245b }{245f }{ 245g }{ 245k }{ 245n }{ 245p }{ 245s }{ 245h }|
#246||{ : 246i }{ 246a }{ 246b }{ 246f }{ 246g }{ 246n }{ 246p }{ 246h }|
#242||{ = 242a }{ 242b }{ 242n }{ 242p }{ 242h }|
#245||{ 245c }|
#242||{ = 242c }|
#250| - |{ 250a }{ 250b }|
#254|, |{ 254a }| #255|, |{ 255a }{ 255b }{ 255c }{ 255d }{ 255e }{ 255f }{ 255g }| #256|, |{ 256a }|
#257|, |{ 257a }|
#258|, |{ 258a }{ 258b }|
#260| - |{ 260a }{ 260b }{ 260c }|
#300| - |{ 300a }{ 300b }{ 300c }{ 300d }{ 300e }{ 300f }{ 300g }|
#306| - |{ 306a }| #307| - |{ 307a }{ 307b }|
#310| - |{ 310a }{ 310b }|
#321| - |{ 321a }{ 321b }|
#340| - |{ 3403 }{ 340a }{ 340b }{ 340c }{ 340d }{ 340e }{ 340f }{ 340h }{ 340i }|
#342| - |{ 342a }{ 342b }{ 342c }{ 342d }{ 342e }{ 342f }{ 342g }{ 342h }{ 342i }{ 342j }{ 342k }{ 342l }{ 342m }{ 342n }{ 342o }{ 342p }{ 342q }{ 342r }{ 342s }{ 342t }{ 342u }{ 342v }{ 342w }|
#343| - |{ 343a }{ 343b }{ 343c }{ 343d }{ 343e }{ 343f }{ 343g }{ 343h }{ 343i }|
#351| - |{ 3513 }{ 351a }{ 351b }{ 351c }|
#352| - |{ 352a }{ 352b }{ 352c }{ 352d }{ 352e }{ 352f }{ 352g }{ 352i }{ 352q }|
#362| - |{ 362a }{ 351z }|
#440| - |{ 440a }{ 440n }{ 440p }{ 440v }{ 440x }|. #490| - |{ 490a }{ 490v }{ 490x }|.
#800| - |{ 800a }{ 800b }{ 800c }{ 800d }{ 800e }{ 800f }{ 800g }{ 800h }{ 800j }{ 800k }{ 800l }{ 800m }{ 800n }{ 800o }{ 800p }{ 800q }{ 800r }{ 800s }{ 800t }{ 800u }{ 800v }|.
#810| - |{ 810a }{ 810b }{ 810c }{ 810d }{ 810e }{ 810f }{ 810g }{ 810h }{ 810k }{ 810l }{ 810m }{ 810n }{ 810o }{ 810p }{ 810r }{ 810s }{ 810t }{ 810u }{ 810v }|.
#811| - |{ 811a }{ 811c }{ 811d }{ 811e }{ 811f }{ 811g }{ 811h }{ 811k }{ 811l }{ 811n }{ 811p }{ 811q }{ 811s }{ 811t }{ 811u }{ 811v }|.
#830| - |{ 830a }{ 830d }{ 830f }{ 830g }{ 830h }{ 830k }{ 830l }{ 830m }{ 830n }{ 830o }{ 830p }{ 830r }{ 830s }{ 830t }{ 830v }|.
#500|<br/><br/>|{ 5003 }{ 500a }|
#501|<br/><br/>|{ 501a }|
#502|<br/><br/>|{ 502a }|
#504|<br/><br/>|{ 504a }|
#505|<br/><br/>|{ 505a }{ 505t }{ 505r }{ 505g }{ 505u }|
#506|<br/><br/>|{ 5063 }{ 506a }{ 506b }{ 506c }{ 506d }{ 506u }|
#507|<br/><br/>|{ 507a }{ 507b }| #508|<br/><br/>|{ 508a }{ 508a }|
#510|<br/><br/>|{ 5103 }{ 510a }{ 510x }{ 510c }{ 510b }|
#511|<br/><br/>|{ 511a }|
#513|<br/><br/>|{ 513a }{513b }|
#514|<br/><br/>|{ 514z }{ 514a }{ 514b }{ 514c }{ 514d }{ 514e }{ 514f }{ 514g }{ 514h }{ 514i }{ 514j }{ 514k }{ 514m }{ 514u }|
#515|<br/><br/>|{ 515a }|
#516|<br/><br/>|{ 516a }|
#518|<br/><br/>|{ 5183 }{ 518a }|
#520|<br/><br/>|{ 5203 }{ 520a }{ 520b }{ 520u }|
#521|<br/><br/>|{ 5213 }{ 521a }{ 521b }|
#522|<br/><br/>|{ 522a }|
#524|<br/><br/>|{ 524a }|
#525|<br/><br/>|{ 525a }|
#526|<br/><br/>|{\n510i }{\n510a }{ 510b }{ 510c }{ 510d }{\n510x }|
#530|<br/><br/>|{\n5063 }{\n506a }{ 506b }{ 506c }{ 506d }{\n506u }|
#533|<br/><br/>|{\n5333 }{\n533a }{\n533b }{\n533c }{\n533d }{\n533e }{\n533f }{\n533m }{\n533n }|
#534|<br/><br/>|{\n533p }{\n533a }{\n533b }{\n533c }{\n533d }{\n533e }{\n533f }{\n533m }{\n533n }{\n533t }{\n533x }{\n533z }|
#535|<br/><br/>|{\n5353 }{\n535a }{\n535b }{\n535c }{\n535d }|
#538|<br/><br/>|{\n5383 }{\n538a }{\n538i }{\n538u }|
#540|<br/><br/>|{\n5403 }{\n540a }{ 540b }{ 540c }{ 540d }{\n520u }|
#544|<br/><br/>|{\n5443 }{\n544a }{\n544b }{\n544c }{\n544d }{\n544e }{\n544n }|
#545|<br/><br/>|{\n545a }{ 545b }{\n545u }| #546|<br/><br/>|{\n5463 }{\n546a }{ 546b }|
#547|<br/><br/>|{\n547a }| #550|<br/><br/>|{ 550a }|
#552|<br/><br/>|{ 552z }{ 552a }{ 552b }{ 552c }{ 552d }{ 552e }{ 552f }{ 552g }{ 552h }{ 552i }{ 552j }{ 552k }{ 552l }{ 552m }{ 552n }{ 562o }{ 552p }{ 552u }|
#555|<br/><br/>|{ 5553 }{ 555a }{ 555b }{ 555c }{ 555d }{ 555u }|
#556|<br/><br/>|{ 556a }{ 506z }| #563|<br/><br/>|{ 5633 }{ 563a }{ 563u }|
#565|<br/><br/>|{ 5653 }{ 565a }{ 565b }{ 565c }{ 565d }{ 565e }|
#567|<br/><br/>|{ 567a }|
#580|<br/><br/>|{ 580a }|
#581|<br/><br/>|{ 5633 }{ 581a }{ 581z }|
#584|<br/><br/>|{ 5843 }{ 584a }{ 584b }|
#585|<br/><br/>|{ 5853 }{ 585a }|
#586|<br/><br/>|{ 5863 }{ 586a }|
#020|<br/><br/><label>ISBN: </label>|{ 020a }{ 020c }|
#022|<br/><br/><label>ISSN: </label>|{ 022a }|
#222| = |{ 222a }{ 222b }|
#210| = |{ 210a }{ 210b }|
#024|<br/><br/><label>Standard No.: </label>|{ 024a }{ 024c }{ 024d }{ 0242 }|
#027|<br/><br/><label>Standard Tech. Report. No.: </label>|{ 027a }|
#028|<br/><br/><label>Publisher. No.: </label>|{ 028a }{ 028b }|
#013|<br/><br/><label>Patent No.: </label>|{ 013a }{ 013b }{ 013c }{ 013d }{ 013e }{ 013f }|
#030|<br/><br/><label>CODEN: </label>|{ 030a }|
#037|<br/><br/><label>Source: </label>|{ 037a }{ 037b }{ 037c }{ 037f }{ 037g }{ 037n }|
#010|<br/><br/><label>LCCN: </label>|{ 010a }|
#015|<br/><br/><label>Nat. Bib. No.: </label>|{ 015a }{ 0152 }|
#016|<br/><br/><label>Nat. Bib. Agency Control No.: </label>|{ 016a }{ 0162 }|
#600|<br/><br/><label>Subjects–Personal Names: </label>|{\n6003 }{\n600a}{ 600b }{ 600c }{ 600d }{ 600e }{ 600f }{ 600g }{ 600h }{–600k}{ 600l }{ 600m }{ 600n }{ 600o }{–600p}{ 600r }{ 600s }{ 600t }{ 600u }{–600x}{–600z}{–600y}{–600v}|
#610|<br/><br/><label>Subjects–Corporate Names: </label>|{\n6103 }{\n610a}{ 610b }{ 610c }{ 610d }{ 610e }{ 610f }{ 610g }{ 610h }{–610k}{ 610l }{ 610m }{ 610n }{ 610o }{–610p}{ 610r }{ 610s }{ 610t }{ 610u }{–610x}{–610z}{–610y}{–610v}|
#611|<br/><br/><label>Subjects–Meeting Names: </label>|{\n6113 }{\n611a}{ 611b }{ 611c }{ 611d }{ 611e }{ 611f }{ 611g }{ 611h }{–611k}{ 611l }{ 611m }{ 611n }{ 611o }{–611p}{ 611r }{ 611s }{ 611t }{ 611u }{–611x}{–611z}{–611y}{–611v}|
#630|<br/><br/><label>Subjects–Uniform Titles: </label>|{\n630a}{ 630b }{ 630c }{ 630d }{ 630e }{ 630f }{ 630g }{ 630h }{–630k }{ 630l }{ 630m }{ 630n }{ 630o }{–630p}{ 630r }{ 630s }{ 630t }{–630x}{–630z}{–630y}{–630v}|
#648|<br/><br/><label>Subjects–Chronological Terms: </label>|{\n6483 }{\n648a }{–648x}{–648z}{–648y}{–648v}| #650|<br/><br/><label>Subjects–Topical Terms: </label>|{\n6503 }{\n650a}{ 650b }{ 650c }{ 650d }{ 650e }{–650x}{–650z}{–650y}{–650v}|
#651|<br/><br/><label>Subjects–Geographic Terms: </label>|{\n6513 }{\n651a}{ 651b }{ 651c }{ 651d }{ 651e }{–651x}{–651z}{–651y}{–651v}|
#653|<br/><br/><label>Subjects–Index Terms: </label>|{ 653a }|
#654|<br/><br/><label>Subjects–Facted Index Terms: </label>|{\n6543 }{\n654a}{–654b}{–654x}{–654z}{–654y}{–654v}|
#655|<br/><br/><label>Index Terms–Genre/Form: </label>|{\n6553 }{\n655a}{–655b}{–655x }{–655z}{–655y}{–655v}|
#656|<br/><br/><label>Index Terms–Occupation: </label>|{\n6563 }{\n656a}{–656k}{–656x}{–656z}{–656y}{–656v}|
#657|<br/><br/><label>Index Terms–Function: </label>|{\n6573 }{\n657a}{–657x}{–657z}{–657y}{–657v}|
#658|<br/><br/><label>Index Terms–Curriculum Objective: </label>|{\n658a}{–658b}{–658c}{–658d}{–658v}|
#050|<br/><br/><label>LC Class. No.: </label>|{ 050a }{ / 050b }|
#082|<br/><br/><label>Dewey Class. No.: </label>|{ 082a }{ / 082b }|
#080|<br/><br/><label>Universal Decimal Class. No.: </label>|{ 080a }{ 080x }{ / 080b }|
#070|<br/><br/><label>National Agricultural Library Call No.: </label>|{ 070a }{ / 070b }|
#060|<br/><br/><label>National Library of Medicine Call No.: </label>|{ 060a }{ / 060b }|
#074|<br/><br/><label>GPO Item No.: </label>|{ 074a }|
#086|<br/><br/><label>Gov. Doc. Class. No.: </label>|{ 086a }|
#088|<br/><br/><label>Report. No.: </label>|{ 088a }|
Makbuz Yazıcılar Yapılandırma
Aşağıdaki talimatlar özel makbuz yazıcılar içindir, ama muhtemelen diğer markaların kurulumu için de yardım amaçlı kullanılabilir.
For Epson TM-T88III (3) & TM-T88IV (4) Printers
Yazdırma Sürücüsünde
For these instructions, we are using version 5,0,3,0 of the Epson TM-T88III print driver; the EPSON TM-T88IV version is ReceiptE4. Register at the EpsonExpert Technical Resource Center website to gain access to the drivers; go to Technical Resources, then choose the printer model from the Printers drop-down list.
Click Start > Printers and Faxes > Right click the receipt printer > Properties:
- Gelişmiş Sekme, Yazdırma Varsayılanları butonuna tıklayın
- Tasarım sekmesi: Kağıt boyutu: Rulo kağıt 80 x 297 mm
- TM-T88III: Düzen Sekmesi: Baskının yazdırılabilir bir genişliğe indirgendiğini kontrol edin
- TM-T88IV: İndirgenmiş baskı boyutunu kontrol edin; Ekrana gelen açılır pencerede TAMAM’ı tıklayın. Yazdırılabilir Genişliğe Sığdır otomatik olarak seçilmelidir.
- Çıkmak için Tamam’ı seçin.
Firefox’ta
Under File > Page Setup:
- Shrink to fit page on Format & Options tab
- 0,0,0,0 for Margins on Margins & Header/Footer Tab. This makes the receipts use all available space on the paper roll.
- Tüm Üstbilgi/Altbilgi’leri -boş- olarak ayarlayın. Bu işlem normalde bir Firefox baskısı üzerinde görebileceğiniz URL, sayfa numaraları, vs. gibi öğeleri kaldıracaktır.
- Tamam’ı tıklayın
Firefox’ta varsayılan yazıcı ayarlarını ayarlayın, böylece “Yazdır” diyaloğunu görmezsiniz:
Go to File > Print
Makbuz yazıcısı için yazıcı ayarlayın.
Gelişmiş (veya Özellikler) butonuna tıklayın
Tasarım sekmesi: Kağıt boyutu: Rulo kağıt 80 x 297 mm
TM-T88III: Düzen Sekmesi: Baskının yazdırılabilir bir genişliğe indirgendiğini kontrol edin
TM-T88IV: İndirgenmiş baskı boyutunu kontrol edin, ekrana gelen açılır pencereden TAMAM üzerine tıklayın. Yazdırılabilir Genişliğe Sığdır otomatik olarak seçilmiş olmalıdır.
Bitirince TAMAM üzerine tıklayın, devam edin ve bulunduğunuz sayfayı yazdırın.
Adres çubuğuna about:config yazın. Uyarı mesajında “Dikkatli olacağıma söz veriyorum!” üzerine tıklayın.
Filter içine print.always yazın.
Look for print.always_print_silent.
- Eğer tercih oradaysa, bu sefer değeri true olarak ayarlayın.
Eğer tercih orada değilse (ve çoğu web tarayıcıda olmaması gerekir) tercihi eklemeniz gerekir.
- Right click the preference area and select New > Boolean
- Type print.always_print_silent in the dialog box and set the value to True. This sets the print settings in Firefox to always use the same settings and print without showing a dialog box.
Warning
Setting the print.always_print_silent setting in about:config DISABLES the ability to choose a printer in Firefox.
Epson TM-T88II (2) Yazıcılar için
Register at the EpsonExpert Technical Resource Center website to gain access to the drivers; go to Technical Resources, then choose the printer model from the Printers drop-down list.
Firefox’ta
Under File > Page Setup:
- Shrink to fit page on Format & Options tab
- 0,0,0,0 for Margins on Margins & Header/Footer Tab. This makes the receipts use all available space on the paper roll.
- Tüm Üstbilgi/Altbilgi’leri -boş- olarak ayarlayın. Bu işlem normalde bir Firefox baskısı üzerinde görebileceğiniz URL, sayfa numaraları, vs. gibi öğeleri kaldıracaktır.
- Tamam’ı tıklayın
Firefox’ta varsayılan yazıcı ayarlarını ayarlayın, böylece “Yazdır” diyaloğunu görmezsiniz:
Go to File > Print
Makbuz yazıcısı için yazıcı ayarlayın.
Geçerli sayfayı yazdırın.
Adres çubuğuna about:config yazın. Uyarı mesajında “Dikkatli olacağıma söz veriyorum!” üzerine tıklayın.
Filter içine print.always yazın.
Look for, print.always_print_silent.
- Eğer tercih oradaysa, bu sefer değeri true olarak ayarlayın.
Eğer tercih orada değilse (ve çoğu web tarayıcıda olmaması gerekir) tercihi eklemeniz gerekir.
- Right click the preference area and select New > Boolean
- Type, print.always_print_silent in the dialog box and set the value to True. This sets the print settings in Firefox to always use the same settings and print without showing a dialog box.
Warning
Setting the print.always_print_silent setting in about:config DISABLES the ability to choose a printer in Firefox.
Star SP542 Yazıcılar İçin
Yazıcı Kurulumu
Aşağıdaki yorumlar Star SP542 makbuz yazıcısını esas alsa da, muhtemelen SP5xx serisindeki tüm yazıcılar için geçerli olacaktır.
The Star SP542 receipt printer works well with Koha and Firefox on Windows XP SP3. This printer, with either the parallel or USB interface, is fairly easy to install and configure. You will need the following executable file which is available from numerous places on the Internet:
linemode_2k-xp_20030205.exe
Bu yürütülebilir dosya aslında tüm yüklemeyi yapar; Microsoft Windows “Yazıcı Ekle” programına kullanmanıza gerek kalmayacaktır. Yükleme yapılırken software monitoring (yazılım izleme) seçeneğinin seçilmemesini tavsiye ediyoruz; Bu seçenek ile çıktı alırken önemli duraklamalar ve gecikmeler tecrübe ettik. Bunun yerine sadece monitoring seçeneği olmadan makbuz yazıcısı yüklemeyi seçin.
Additionally, the install program may not put the printer on the correct port, especially if using the USB interface. This is easily corrected by going to “Start -> Printers and Faxes -> Properties for the SP542 printer -> Ports”, then check the appropriate port.
Kurulum yazılımı veya işletim sistemi tarafından belirtilmese bile bir yeniden başlatma gerekli olabilir.
Windows 7 users should refer to this page: http://www.starmicronics.com/supports/win7.aspx.
Firefox tarayıcısını Makbuz Yazıcısı için yapılandırma
- Open File > Page Setup
- Tüm üst bilgileri ve alt bilgileri boş bırak
- Kenar boşlukları 0 (sıfır) olarak ayarla
- Firefox adres çubuğuna about:config yazın
- Search for print.always_print_silent and double click it
- Bunu false opsiyonundan true opsiyonuna değiştirin
- Bu işlem, ekrana gelen Yazdır açılır menüsünü atlamanızı, aynı zamanda TAMAM’ı tıklamanız gerektiren adımı da atlayarak otomatik olarak doğru ölçekli işlem fişini yazdırmanızı sağlar.
- If print.always_print_silent does not come up
- Tercih penceresinde boş bir alanı sağ tıklayın
- Select new > Boolean
- Enter “print.always_print_silent” as the name (without quotes)
- Tamam’ı tıklayın
- Değer için true opsiyonunu seçin
- You may also want to check what is listed for print.print_printer
- Sosyal/Salt Metin seçmek zorunda kalabilirsiniz (ya da makbuz yazıcınızın adı her ne olacaksa)
Notice & Slips Guides
Field Guide for Notices & Slips
Bu kılavuz bildirimler ve işlem fişi bilgilerini 3 kısıma ayıracaktır. Öncelikle size hangi dosyanın bildirimi oluşturacağını anlatacak, sonra karşınıza bu bildirimdeki materyal bilgisini getirecek ve son olarak bildirimin birimlere özel olup olmadığını gösterecektir.
| Letter Code | Used In | Detail tag | Can be branch specific |
|---|---|---|---|
| İADE TARİHİ | advance_notices.pl | <<items.content>> | Hayır |
| DUEDGST | advance_notices.pl | <<items.content>> | Hayır |
| PREDUE | advance_notices.pl | <<items.content>> | Hayır |
| PREDUEDGST | advance_notices.pl | <<items.content>> | Hayır |
| ODUE* | overdue_notices.pl | <<items.content>> or <item> </item> | Evet |
| ÖDÜNÇ | C4/Circulation.pm | N/A | Evet |
| RENEWAL | C4/Circulation.pm | N/A | Evet |
| TRANSFERSLIP | C4/Circulation.pm | N/A | Evet |
| ISSUESLIP | C4/Members.pm | <checkedout> </checkedout> <overdue> </overdue> <news> </news> |
Evet |
| ISSUEQSLIP | C4/Members.pm | <checkedout> </checkedout> | Evet |
| HOLDPLACED | C4/Reserves.pm | N/A | Evet |
| HOLD_SLIP | C4/Reserves.pm | N/A | Evet |
| ASKED | C4/Suggestions.pm | N/A | Evet |
| CHECKED | C4/Suggestions.pm | N/A | Evet |
| ACCEPTED | C4/Suggestions.pm | N/A | Evet |
| REJECTED | C4/Suggestions.pm | N/A | Evet |
| OPAC_REG_VERIFY | opac/opac-memberentry.pl | N/A | Hayır |
Örnek Bildirim
Nicole Engard
410 Library Rd.
Philadelphia, PA 19107
Sayın Nicole Engard (23529000035726),
Kayıtlarımıza göre bu bildirimi gönderdiğimiz süre zarfında üzerinizde süresi dolan materyaller bulunmaktadır. Lütfen gecikme cezanızın artış göstermemesi için üzerinizdeki materyallerin mümkün olan en kısa zamanda uzatmasını yapın ya da materyalleri iade edin.
Kütüphaneye şifreyle kayıtlıysanız, kütüphane kart numarasıyla birlikte bu şifreyle çevrimiçi yenileme yapabilirsiniz.
Aşağıdaki materyalleri iade ettiğinize inanıyorsanız, lütfen kütüphane personelini arayınız. Personel bu sorunu çözmek için yardımcı olacaktır.
Aşağıdaki materyal(ler)’in süresi dolmuştur:
07/08/2008 Creating drug-free schools and communities : 502326000054 Fox, C. Lynn.
06/27/2008 Eating fractions / 502326000022 McMillan, Bruce.
Saygılarımızla, Kütüphane Personeli
Örnek Süreli Yayınlar
Reader’s Digest (0034-0375)
Yılda 12 kez yayınlanır (aylık)
Cilt sayısı her 6 ayda bir değişir ve sayılar devam eder (gelişmiş örüntü gerektirir).

People Weekly (1076-0091)
- Haftalık yayınlanır
- Web sitesi “Ağustosun ilk haftası hariç Cumartesi günü, Şükran günü haftası, yılın ilk ve son haftaları” diyor, fakat bu 2007 ya da 2008 örüntüsü ile eşleşmiyor
- Temmuz-Aralık arası 26 dergi sayısı var
- Ocak-Haziran arası 25 dergi sayısı var (Ocak ayının ilk haftası için dergi sayısı yok)
İlk 26 sayı # üzerindeki düzensizlik bir haftayı atlamadığı için bu, 25. sayıdan sonra numaralandırma yeniden başlatmak için ayarlanır. Yılın ikinci yarısındaki 26. sayının tamamlayıcı olarak alınması gerekir.
Düzensizlik denetimi, 52 dergi sayısının beklendiğini ancak 25 tanesinin girildiğini ihbar edecektir. Mevcut düzensizlik denetimi yalnızca numaralandırma düzeninin ilk pozisyonunun, periyodikliğin beklenen dergi sayısı numarası ile eşleşmesini denetleyebilir. Ancak cilt üzerinde pozisyon yenilemeyi tetiklememiz gerekiyor, bu nedenle yılın son iki haftasını düzensizlik olarak tanımlamamız gerekmektedir. Bu yüzden ilk 50 hafta 50 dergi sayısı alıyoruz, sonra 51. hafta için numaralandırmayı tanımlandırmamız gereken bir tamamlayıcı dergi sayısı alıyoruz, bir sonraki beklenen dergi sayısı takip eden yılın ilk haftası olacaktır.
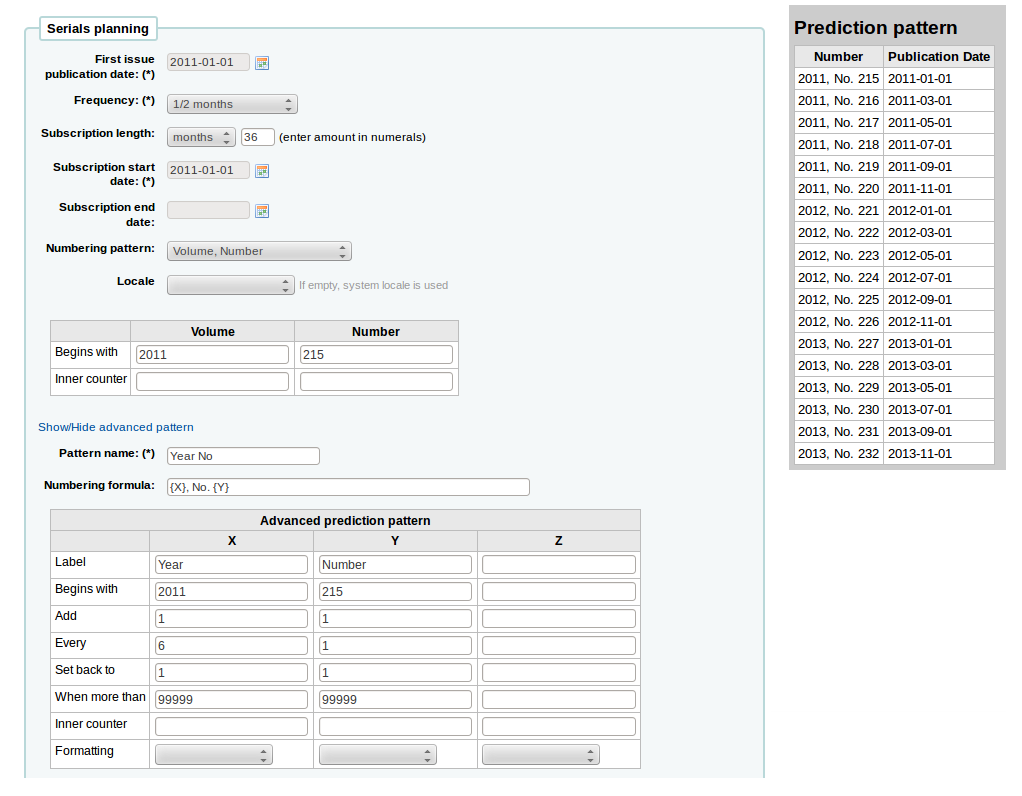
Et-Mol
Bu dergi aşağıdaki kurallar doğrultusunda yayınlanmaktadır:
- Bir yılda 6 sayı (her 2 ayda)
- her 6 sayıda yıl değişir
- 2011’de başlıyoruz
- Dergi sayısı numarası süresiz olarak gider
- sayı 215 den başlayarak
Planlama şu şekilde görünecektir:
Backpacker (0277-867X)
Bir yılda 9 kez düzensiz olarak yayınlandı. Dergi sayısı cilt ve numara her 9 sayıda pozisyon yenileyecek şekilde devam eder. Elinizde Cilt 41, Numara 3, Dergi sayısı 302 varsa, tahmin şu şekilde görünecektir:
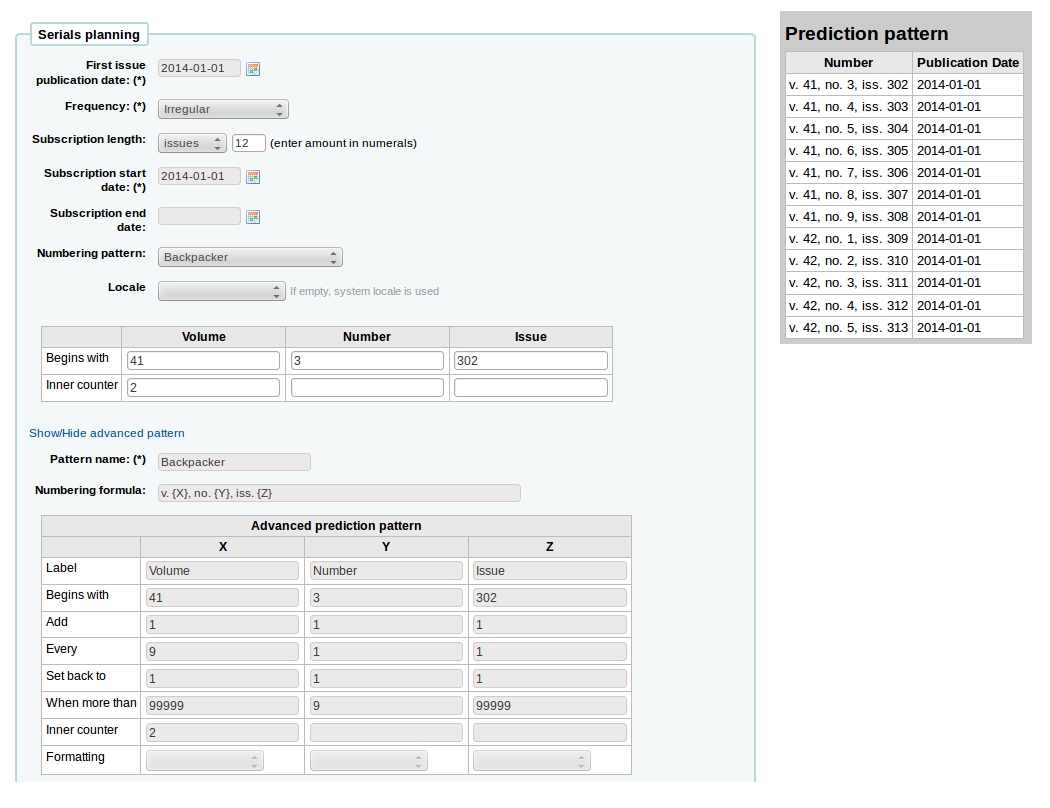
Ve alınan dergi sayıları şu şekilde numaralanacaktır:
- 41, no. 3, iss. 302
- 41, no. 4, iss. 303
- 41, no. 5, iss. 304
- 41, no. 6, iss. 305
- 41, no. 7, iss. 306
- 41, no. 8, iss. 307
- 41, no. 9, iss. 308
- 42, no. 1, iss. 309
- 42, no. 2, iss. 310
- 42, no. 3, iss. 311
- 42, no. 4, iss. 312
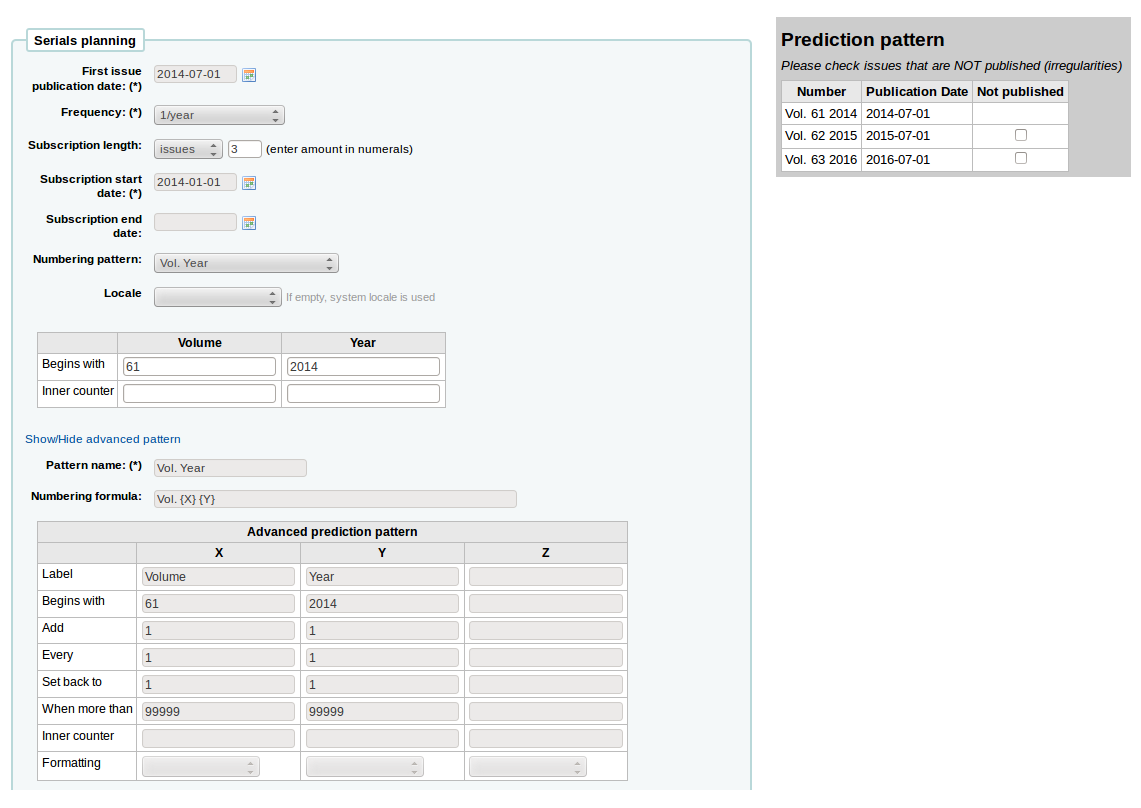
Keats-Shelley Journal (0453-4387)
This journal is published once per year in July. The numbering follows this pattern:
- Vol. 61 2013
- Vol. 62 2014
- Vol. 63 2015
Kurulum şu şekilde görünmelidir (Temmuz 2014’de başlıyorsanız):
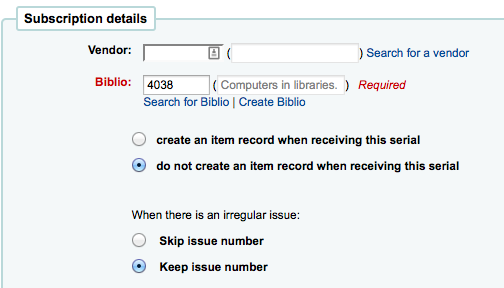
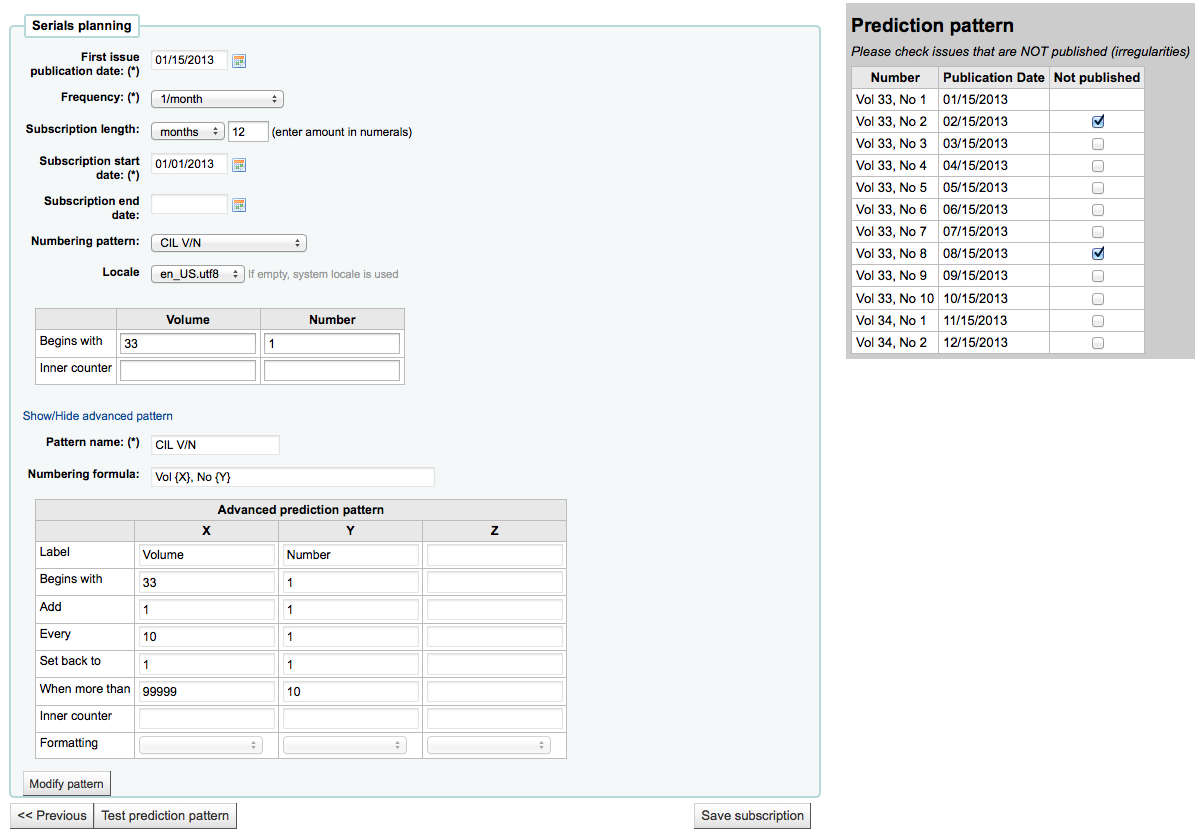
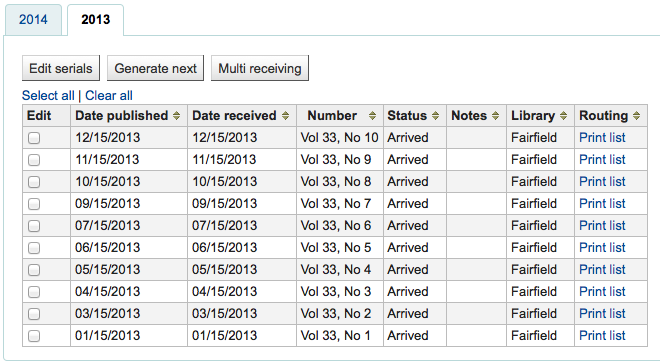
Kütüphanelerde Bilgisayarlar (1041-7915)
Computers in Libraries yılda on kez yayınlanır (aylık Ocak/Şubat ve Temmuz/Ağustos kombine sayıları ile birlikle).
Sample List & Cart Emails
Listeden Örnek E-Posta
Aşağıda, Koha’da bir listeden e-posta örneği görüyorsunuz.
Hi,

Here is your list called If You Like Jodi Picoult, sent from our online catalog.

Please note that the attached file is a MARC bibliographic records file
which can be imported into a Personal Bibliographic Software like EndNote,
Reference Manager or ProCite.
---------------------------------------------

Home safe : a novel /

by Berg, Elizabeth.

Published by: Random House,, 260 p. ;, 25 cm.
Copyright year: 2009
LCCN:   2008049247
In the online catalog:
    http://MYCATALOG/cgi-bin/koha/opac-detail.pl?biblionumber=12113
Items :
    North Branch FIC (FIC Ber) TVSN500088894O
    Main Library FIC (FIC Boh) TVSN5000921548
    South Branch FIC (FIC Boh) TVSN500092156A
    West Branch FIC (FIC Boh) TVSN5000921559

---------------------------------------------

Half a heart /

by Brown, Rosellen.

Published by: Farrar, Straus, and Giroux,, 402 p. ;, 24 cm.
Copyright year: 2000
LCCN:    00022926
In the online catalog:
    http://MYCATALOG/cgi-bin/koha/opac-detail.pl?biblionumber=12501
Items :
    East Branch  (813/.54)
    South Branch FIC (FIC Bro) TVSN5000451333
Sepetten e-posta örneği
Koha sepetindeki bir e-postanın nasıl görüneceği konusunda bir örnek aşağıdadır:
Hi,

   Joaquin D'Planque sent you a cart from our online catalog.

   Please note that the attached file is a MARC bibliographic records
   file which can be imported into personal bibliographic software like
   EndNote, Reference Manager or ProCite.

   ---------------------------------------------------------------------


     1.  Book /
       Author(s): Brookfield, Karen. ;
       Published by: Knopf : | Distributed by Random House, , 63 p. : ,
       29 cm.
       Copyright year: 1993
       Notes : Includes index.
       LCCN: 93018833 /AC

       In online catalog:
       http://MYCATALOG/cgi-bin/koha/opac-detail.pl?biblionumber=31644

       Items:

         *  East Branch (JNF 002 Bro) TVSN500017618A

       -----------------------------------------------------------------

     2.  The 1965 World book year book :

       Published by: Field Enterprises Educational Corp., , 628 p. : , 26
       cm.
       Copyright year: 1965
       Notes : Includes index. | Spine title: Year book, 1965. | Cover
       title: The World book year book, 1965.
       URL:
       http://www.archive.org/details/1965worldbookyea00chic%20%7C%20http://www.openlibrary.org/books/OL24199089M

       In online catalog:
       http://MYCATALOG/cgi-bin/koha/opac-detail.pl?biblionumber=88666

       -----------------------------------------------------------------
Koha’yı bir İçerik Yönetim Sistemi olarak kullanmak (CMS)
Kurulum
Bunlar Koha’nın bir varsayılan sürümünü alıp, küçük bir içerik yönetim sistemi olarak çalışabilmesine izin vermek için talimatlardır. Bu, Kütüphanenin isteğe bağlı sayıda bir şablonu temel alan sayfaları yayımlamasını sağlar. Bu örnek, ana opak sayfası şablonunu kullanır, ancak sadece biraz daha düzenleme ile istediğiniz herhangi bir şablonu da kullanabilirsiniz. Küçük bir kütüphaneniz varsa, kütüphanecilerin kolayca sayfa eklemelerinze izin vermek istiyorsanız ve tam bir CMS desteklemek istemiyorsanız bu sizin için uygun olabilir.
/usr/share/koha/opac/cgi-bin/opac/opac-main.pl to /usr/share/koha/opac/cgi-bin/opac/pages.pl (aynı dizin içerisine) kopyalayın
pages.pl’i bir düzenleyicide düzenlemek
Yaklaşık 33. satırda bu kodu değiştirin:
template_name => "opac-main.tt",
Bu koda:
template_name => "pages.tt",
Bu koddan sonra yaklaşık 62. satırda:
$template->param(
           koha_news       => $all_koha_news,
           koha_news_count => $koha_news_count,
           display_daily_quote => C4::Context->preference('QuoteOfTheDay'),
           daily_quote         => $quote,
           );
Bu satırları ekleyin:
my $page = "page_" . $input->param('p');          # go for "p" value in URL and do the concatenation
my $preference = C4::Context->preference($page);  # Go for preference
$template->{VARS}->{'page_test'} = $preference;   # pass variable to template pages.tt
Note pages.pl file must have Webserver user execution permissions, you can use chmod command if you are actually logged in as such user:
$chmod 755 pages.pl
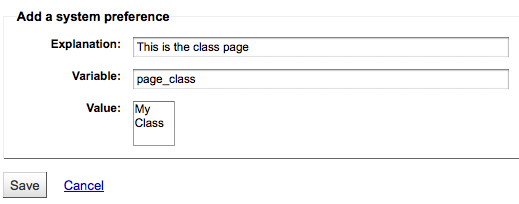
In the browser go to Home > Administration > System Preferences > Local Use and add a New Preference called “page_test”
Bunu olduğu gibi doldurun
- Açıklama: tiny cms sayfaları için test sayfası
- Variable: page_test
- Değer: Lorem ipsum
- TextArea bağlantısına tıklayın (ya da altındaki giriş alanına “TextArea” girin)
- variable options (last field): 80|50
Bir web tarayıcıda http://youraddress/cgi-bin/koha/pages.pl?p=test adresine gidin. Sayfa, sayfanın ana içerik alanında “Lorem ipsum” kelimeleri ile ekrana gelmelidir. (“youraddress” kısmını localhost, 127.0.0.1 ile, ya da Apache yapılandırma şeklinize bağlı olarak etki alanı adınız ile değiştiriniz.)
To add more pages simply create a system preference where the title begins with “page_” followed by any arbitrary letters. You can add any markup you want as the value of the field. Reference the new page by changing the value of the “p” parameter in the URL.
To learn more visit the Koha wiki page on this topic: http://wiki.koha-community.org/wiki/Koha_as_a_CMS
Sayfa şablonlarını düzenlemek
The file to create / edit for the pages template will depend on your opacthemes system preference setting
(Geçerli) ‘bootsrap’ tema şablonu düzenleme
Kopya /usr/share/koha/opac/htdocs/opac-tmpl/bootstrap/en/modules/opac-main.tt to /usr/share/koha/opac/htdocs/opac-tmpl/bootstrap/en/modules/pages.tt
Edit /usr/share/koha/opac/htdocs/opac-tmpl/bootstrap/en/modules/pages.tt
Yaklaşık olarak 61. satırda, bunu değiştirin:
[% IF ( OpacMainUserBlock ) %]<div id="opacmainuserblock">[% OpacMainUserBlock %]</div>[% END %]
Buna:
[% IF ( page_test ) %]<div id="opacmainuserblock">[% page_test %]</div>[% END %]
Remark: You may wish to disable your News block of these CMS style pages e.g. when you do not want it displayed on the CMS style pages or where the News block is long enough that it actually makes the ‘page_test’ include scroll outside the default viewport dimensions. In that case, remove the following code from your pages.tt template.
[% IF ( koha_news_count ) %]
    <div id="news">
    <table class="table table-bordered">
    [% FOREACH koha_new IN koha_news %]
      <thead><tr><th>[% koha_new.title %]</th></tr></thead>
      <tbody><tr><td><p>[% koha_new.new %]</p>
      <p class="newsfooter"><i>(published on [% koha_new.newdate %])</i></p></td></tr></tbody>
    [% END %]
    </table>
    </div>
   [% END %]
Sorun giderme
If you have problems check file permissions on pages.pl and pages.tt. They should have the same user and group as other Koha files like opac-main.pl.
Bonus Puanlar
http://youraddress/cgi-bin/koha/pages.pl?p=test adresini kullanmak yerine bu adresi http://youraddress/pages.pl?p=test olarak kısaltabilirsiniz. Sadece /etc/koha/koha-httpd.conf öğesini açın ve 13. satır civarında aşağıdaki kodu ekleyin:
ScriptAlias /pages.pl "/usr/share/koha/opac/cgi-bin/opac/pages.pl"
Sonra Apache’i yeniden başlatın.
Kullanım
Koha’yı Bir CMS olarak kurduktan sonra bu talimatları izleyerek yeni sayfalar oluşturabilirsiniz:
Sayfa Ekleme
Yeni bir sayfa eklemek için, Yerel Kullanım altında bir sistem tercihi eklemeniz gerekiyor.
Get there: More > Administration > Global System Preferences > Local Use
‘Yeni Tercih’ üzerine tıklayın
Açıklama alanına bir tanım girin
Enter a value that starts with ‘page_’ in the Variable field
Değer alanına HTML başlangıçı girin
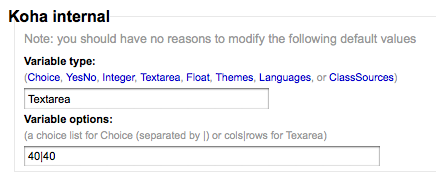
Değişken Türünü Texarea olarak ayarlayın
Set the Variable options to something like 20|20 for 20 rows and 20 columns
Sayfanızı görüntüleme
You can view your new page at http://YOUR-OPAC/cgi-bin/koha/pages.pl?p=PAGENAME where PAGENAME is the part you entered after ‘page_’ in the Variable field.
Örnek
Bu işlem Koha içinde tavsiye edilen okuma listeleri oluşturmak için kullanılabilir. Bu yüzden ‘CMS olarak Koha’ talimatlarına göre kod değişiklikleri yapıldıktan sonra, ‘Tavsiye Edilen Okuma Listeleri’ için bir sayfayı karşılamak için yukarıdaki ‘Yeni Sayfa Eklemek’ talimatlarını inceleyin.
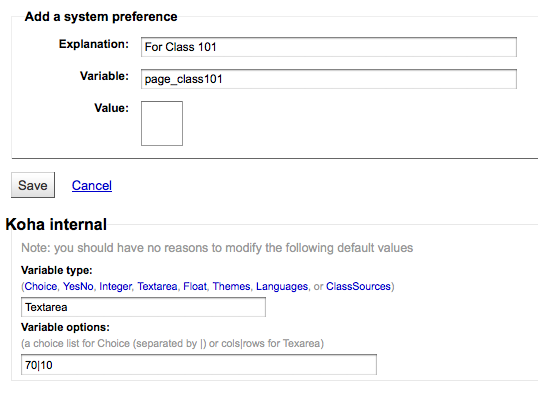
Sonra, çeşitli sınıflar (ya da kategoriler) için sayfalar oluşturmamız gerekir. Bunu yapmak için “Yeni sayfa ekleme” bölümüne dönün ve birinci sınıf için bir tercih oluşturun.
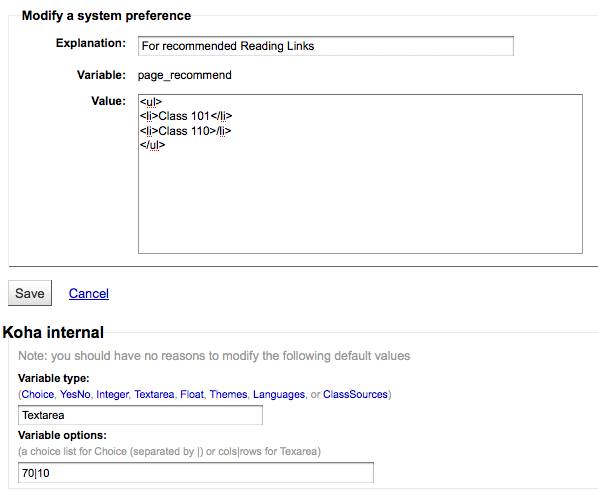
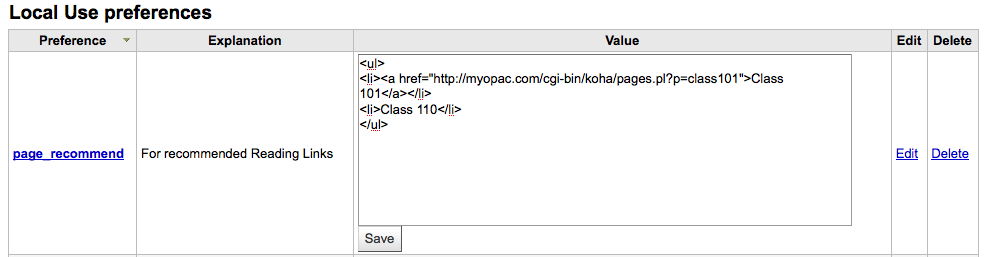
Next you’ll want to link your first page to your new second page, go to the page_recommend preference and click ‘Edit.’ Now you want to edit the HTML to include a link to your newest page:
Canlı Örnekler
- The Crawford Library at Dallas Christian College is using this method for their recommended reading lists: http://opac.dallas.edu/
Koha Veritabanının Sıfırlanması
These notes on how to reset the database for Koha were derived from the following email thread: http://lists.koha-community.org/pipermail/koha-devel/2009-January/008939.html and http://lists.katipo.co.nz/public/koha/2014-June/039701.html
Koha’yı örnek veri ile kuruyorsanız veritabanını sıfırlamak faydalı olabilir, ve daha sonra yazılımı yeniden yüklemeye gerek kalmadan gerçek veriyi kullanabilirsiniz.
Delete sample data from Tables
Use your preferred MySQL client to delete the following tables:
- bibio
- biblioitems
- materyaller
- auth_header
- oturumlar
- zebraqueue
You may need to disable foreign key checks to delete data from same tables. For instructions follow this thread: https://lists.katipo.co.nz/pipermail/koha/2013-July/036853.html.
Zebra Dizinini Sıfırlayın
Otoriteleri ve Zebra’nın dizinlediği bibliyoları sıfırlamak için aşağıdaki komutları çalıştırın.
$ zebraidx -c /etc/koha/zebradb/zebra-authorities-dom.cfg -g iso2709 -d authorities init
$ zebraidx -c /etc/koha/zebradb/zebra-biblios.cfg -g iso2709 -d biblios init
Bir paket yükleme çalıştırıyorsanız, bu sefer otoriteleri ve bibliyo Zebra dizinlerini sıfırlamak için bunun yerine aşağıdaki komutları çalıştırmak isteyeceksiniz:
$ sudo zebraidx -c /etc/koha/sites/YOURLIBRARY/zebra-authorities-dom.cfg  -g iso2709 -d authorities init
$ sudo zebraidx -c /etc/koha/sites/YOURLIBRARY/zebra-biblios.cfg  -g iso2709 -d biblios init
YOURLIBRARY’nin Koha kurulum adı ile değiştirilmesi.
Önemli Bağlantılar
Kurulum Rehberi
- Installing Koha 3 on Ubuntu - http://www.blazingmoon.org/guides/k3-on-u810-1.html
- Koha on Debian installation documentation - http://openlib.org/home/krichel/courses/lis508/doc/koha_installation_overview.html
- Koha 3.2 on Debian Squeeze - http://wiki.koha-community.org/wiki/Koha_3.2_on_Debian_Squeeze
Çeşitli
- Zotero - http://zotero.org
- SOPAC - http://thesocialopac.net
Koha XSLT Materyal Türleri
When you have any of the XSLT system preferences (OPACXSLTDetailsDisplay, OPACXSLTResultsDisplay, XSLTDetailsDisplay, and/or XSLTResultsDisplay) along with the DisplayOPACiconsXSLT and DisplayIconsXSLT preferences turned on you will see item type icons on the related screen.
Önemli
These images are coming from values found in your leader, if your leader is not cataloged properly it might be best to turn off the DisplayOPACiconsXSLT preference (which can be done while leaving the other XSLT preferences turned on).

- Kitap [BK]
- leader6 = a (ve aşağıdaki leader7 değerlerinden biri)
- leader7 = a
- leader7 = c
- leader7 = d
- leader7 = m
- leader6 = t
- leader6 = a (ve aşağıdaki leader7 değerlerinden biri)
- Bilgisayar Dosyası [CF]
- leader6 = m

- Süreğen Kaynak [CR]
- leader7 = b
- leader7 = i
- leader7 = s

- Harita [MP]
- leader6 = e
- leader6 = f

- Karma [MX]
- leader6 = p
- Ses [MU]
- leader6 = c
- leader6 = d
- leader6 = i
- leader6 = j
- Görsel Materyal [VM]
- leader6 = g
- leader6 = k
- leader6 = r

- Araç Gereç
- leader6 = o
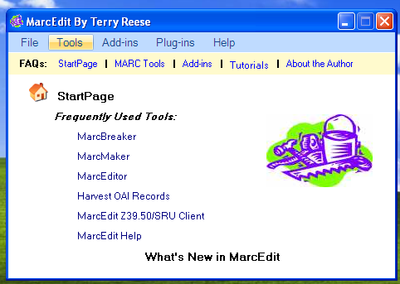
MarcEdit
Many libraries like to use MarcEdit for modifications or data cleanup. If you’d like to do this you will need to download it at: http://marcedit.reeset.net/
Önemli
Many of the actions described in this chapter can be done in Koha using Marc Modification Templates, but this section is here for those who are used to MarcEdit.
Yer numaralarına ön ek ekleme
Koha’ya veri getirirken, öncelikle bu verileri temizlemeniz gerekebilir. Koha kullanıcıları arasında yaygın bir eylem yer numarasına bir önek eklemektir.
MarcEdit’i Aç
‘MarcEditör’e tıkla
Go to Tools > Edit Subfield Data
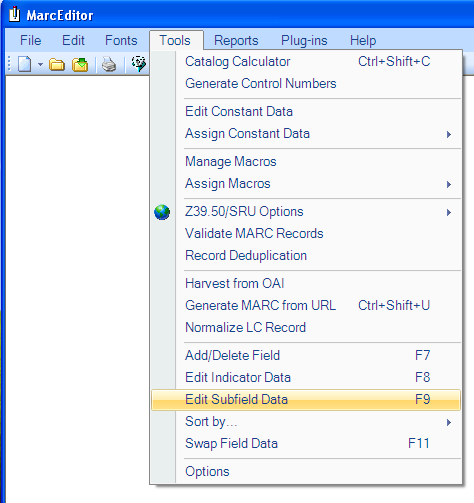
Başa veri eklemek için özel karakter: ^b Sadece bir alt alanın başlangıcına veri eklemek için, Alan Verisinin başına: metin kutusu ve değiştirme de başa eklenecek veriye ^b karakterini eklemeniz yeterlidir
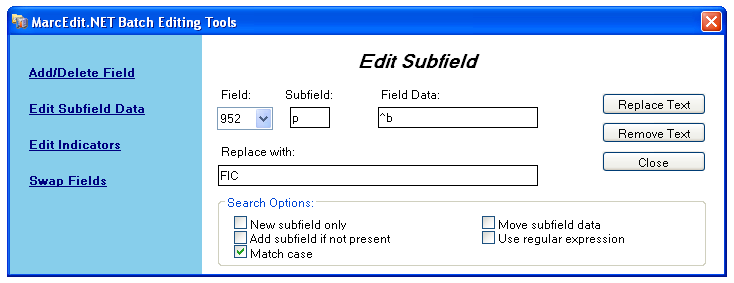
- Bir metin dizesi değiştirirken alt alan başlangıcına veri eklemek için, Alan Verisi Metin kutusunun başına ve metin kutusu ile değişimde başa eklenecek olan veriye ^b karakterini ekleyin [değiştirme dizesi].
Excel verilerini Koha’ya aktarma
Excel veri sayfası formatında kütüphaneye kayıtlarınız olduğunu ve bunları Koha’ya aktarmak istediğinizi varsayalım. Fakat bunu nasıl yapacaksınız? Koha, excel kayıtlarını doğrudan aktarmanıza izin vermez. Ama burada excel kayıtlarınızı kolaylıkla Koha’ya aktarmanızın çok basit bir çözümü var. Yapmamız gereken öncelikle excel dosyasını Marc dosyasına dönüştürmektir ve ondan sonra dönüştürdüğümüz bu dosyaları Koha’ya aktaracağız.
Excel kayıtlarınızı Koha’ya aktarmak için verilen adımları izleyin
Excel biçiminden .mrk biçimine dönüştürmek
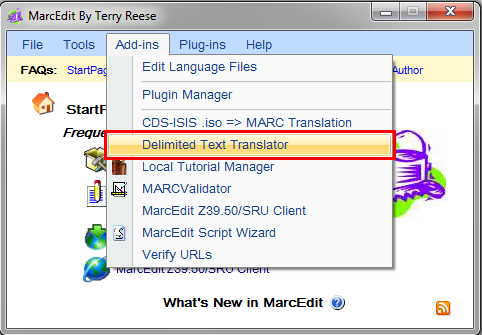
First, we will convert excel format into .mrk format. For this we will use MarcEdit. You can download it from http://marcedit.reeset.net/
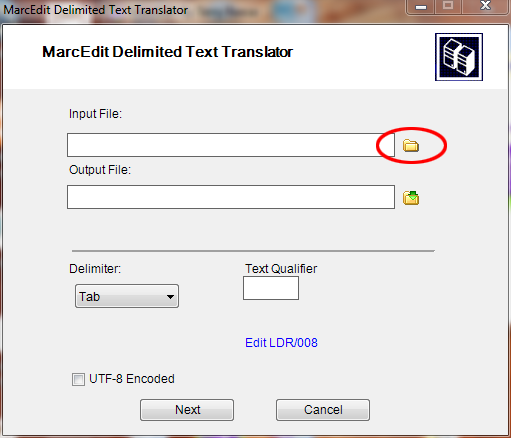
Now open it and select Add-ins–>Delimited Text Translator.
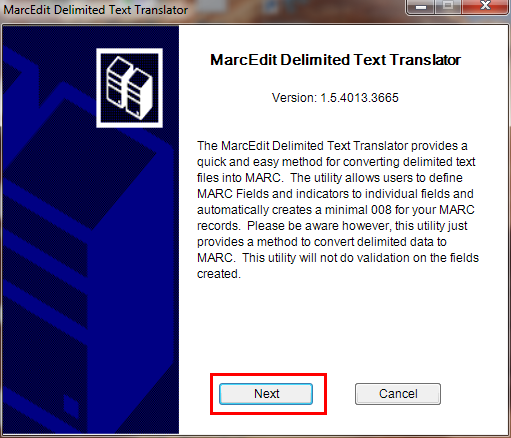
Aşağıdaki pencere görüntülendiğinde İleri’yi tıklayın.
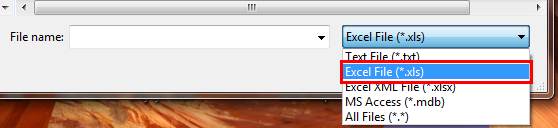
Excel dosyasını bulun.
Locate your excel file by choosing the format Excel File(*.xls).
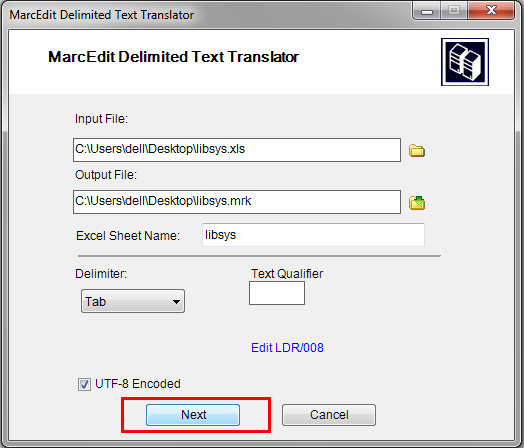
Benzer şekilde çıktı dosyası, Excel sayfa adı gibi diğer girdileri doldurun ve UTF-8 kodlu seçeneğini işaretleyin (gerekirse) ve İleri’yi tıklayın.
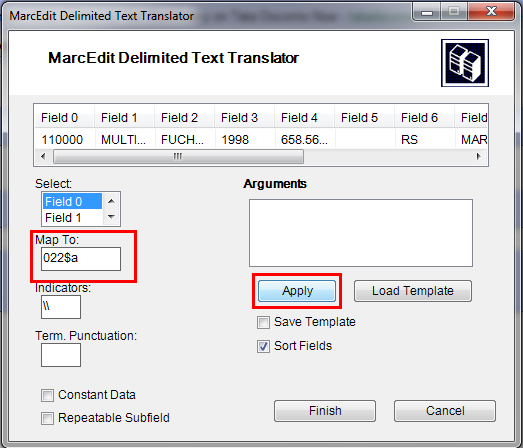
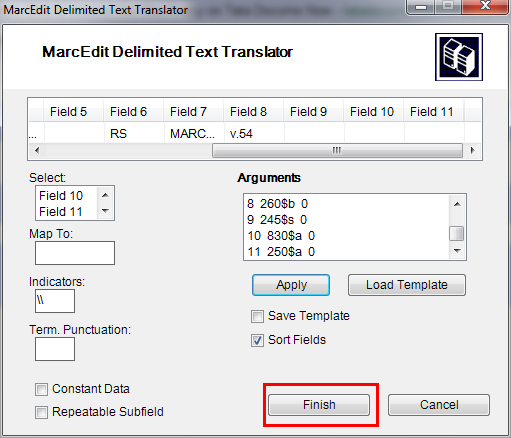
Şimdi alanları standart marc formatında tanımak için alanları eşleştirmeniz istenecektir.
Girdiğim ilk sütun olan 0 alanının şununla eşleştiğini var sayalım: 022$a(süreğen kaynak için geçerli ISSN) ve sonra uygula üzerine tıklayalım.
Not
You can customize Indicators and all other things, for more information on marc21 format visit the official library of congress site.
Benzer şekilde diğer tüm alanları eşleştirin ve daha sonra Bitir üzerine tıklayın.
And then a window will appear indicating that your Marc Text File(*.mrk) has been created.
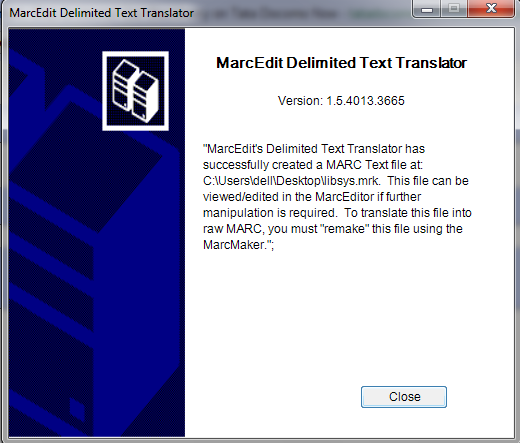
Kapat’ı tıklayın ve bu adımda .xls dosyasından bir .mrk dosyası oluşturduk. Dosyayı çift tıklatarak görüntüleyebilirsiniz.
.mrk dosyasını .mrc dosyasına dönüştür
Yukarıdaki adımda oluşturduğumuz .mrk dosyasını, doğrudan Koha’ya aktarılabilen ham Marc formatına dönüştüreceğiz.
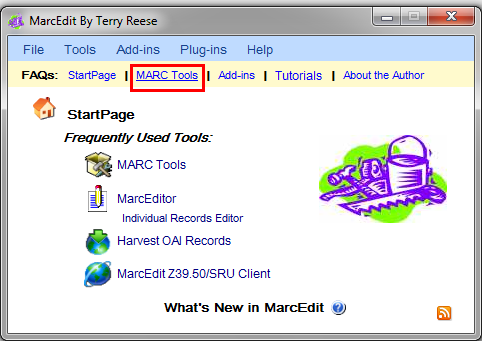
Bunun için yeniden MarcEdit’i açın ve MARC Araçlarını seçin.
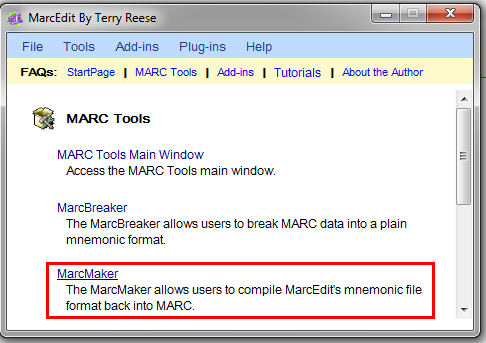
daha sonra .mrk dosyasını .mrc formatına dönüştürmek için MarcMaker’ı seçin.
Giriş dosyanızı bulun ve çıkış dosyanızı adlandırın. Sonra Çalıştır butonuna tıklayın.
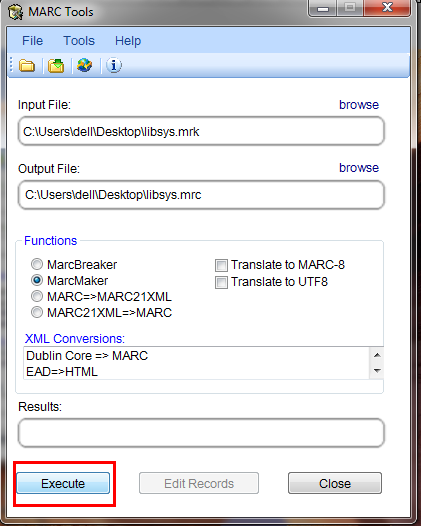
Ve size sonucu gösterecektir.
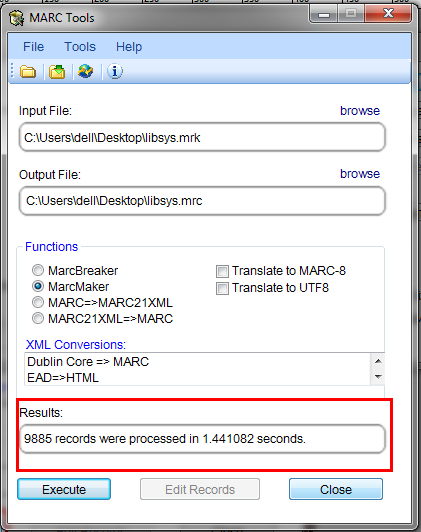
Kapat’ı tıklayın ve artık elimizde işlenmemiş Marc kayıtları olacaktır (.mrc dosyası)
.mrc dosyasını Koha’ya aktar
More information on importing records into Koha can be found in the ‘Stage MARC Records for Import’ section of this manual.
Son olarak yukarıda oluşturduğumuz .mrc dosyasını Koha’ya aktaracağız.
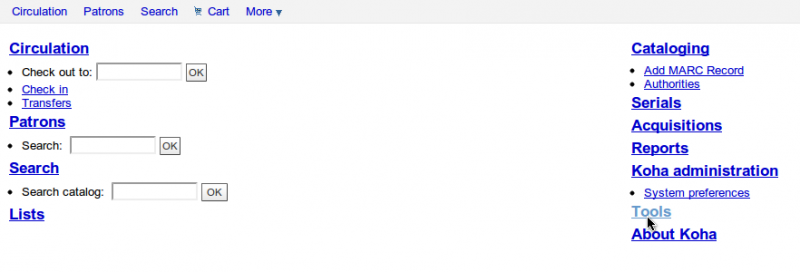
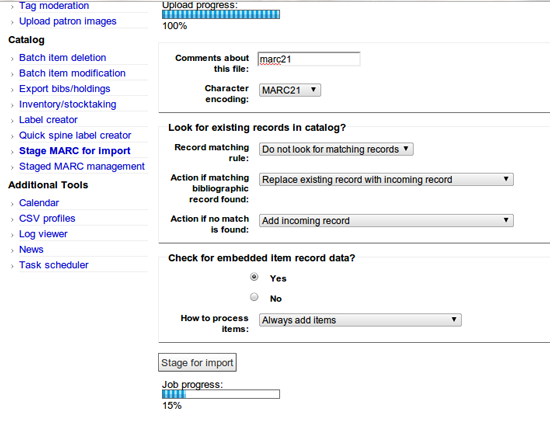
Koha personel istemcinizde Araçlar üzerine tıklayın.
Sonra, MARC Kayıtlarını İçe Aktarmak İçin Hazırla üzerine tıklayın.

Bu işlemden sonra, daha önce oluşturduğunuz .mrc dosyasını seçin ve Karşıya yükle üzerine tıklayın.
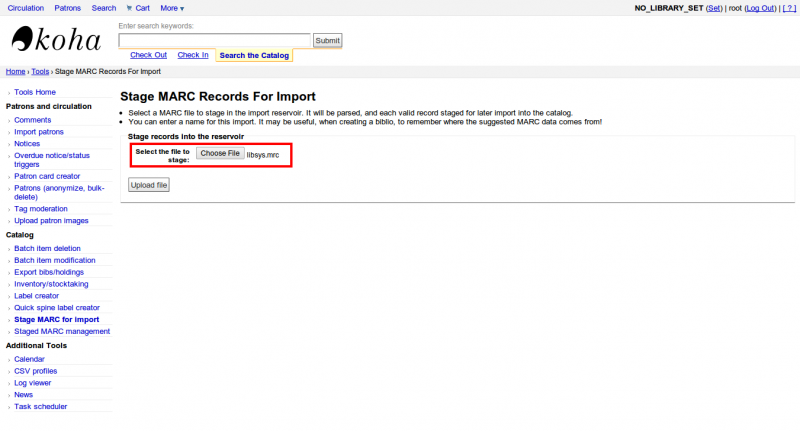
Aynı zamanda dosya hakında yorum eklebilir ve son olarak İçe Aktarmak İçin Hazırla üzerine tıklayabilirsiniz.
İçe aktarma tamamlanınca, şöyle bir sonuç elde edeceksiniz
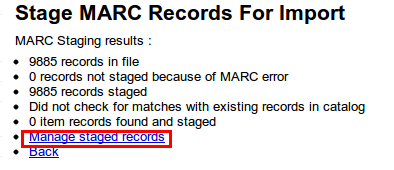
Sonra, Hazırlanmış kayıtları yönet üzerine tıklayın.
Burada eşleştirme kurallarını bile değiştirebilirsiniz.
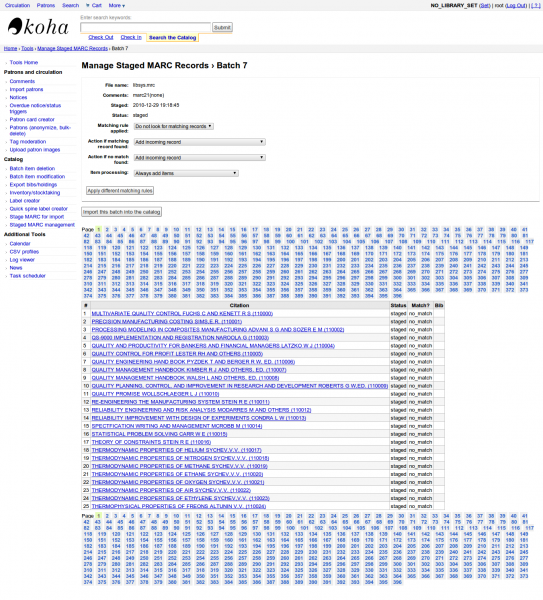
İşiniz bitince Bu grubu kataloğa aktar üzerine tıklayın.
Hepsi bu kadar. Tüm kayıtlar içe aktarıldıktan sonra Durum’u konrol edin, “aktarıldı” yazmalıdır.
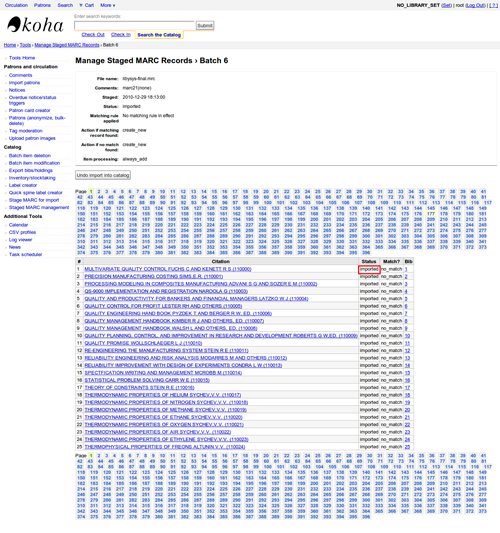
Hatta içe aktarma işlemini geri alabilirsiniz.
Ve bir kaç dakika içerisinde, Koha’da 10,000 civarında kayıt içe aktardık
Talking Tech
Talking Tech I-tiva is a third party, proprietary, product that libraries can subscribe to. Learn more here: http://www.talkingtech.com/solutions/library.
Yükleme ve Kurulum Talimatları
Gerekli veri paketini yüklemek için installer/data/mysql/atomicupdate/Bug-4246-Talking-Tech-itiva-phone-notifications.pl kurulumunu çalıştırdığınıza emin olun (new syspref, notice placeholders and messaging transport tercihleri)
To use, TalkingTechItivaPhoneNotification syspref must be turned on.
If you wish to process PREOVERDUE or RESERVES messages, you’ll need the EnhancedMessagingPreferences system preference turned on, and patrons to have filled in a preference for receiving these notices by phone.
For OVERDUE messages, overdue notice triggers must be configured under Koha -> Tools -> Overdue Notice Triggers. Either branch-specific triggers or the default level triggers may be used (script will select whichever is appropriate).
Bildirimler Dosyası Gönderme
- Add the TalkingTech_itiva_outbound.pl script to your crontab
- Çıktı dosyasını I-tiva sunucusuna göndermek için bir FTP/SFTP veya diğer bir taşıma yöntemi ekleyin
- Eğer isterseniz, gönderdikten sonra gönderilen bildirimler dosyasını başka bir dizinde arşivleyebilirsiniz
Run TalkingTech_itiva_outbound.pl –help for more information
Sonuçlar Dosyası Alma
- Koha sunucunuz üzerinde bilinen bir dizine sonuçlar dosyasını göndermek için bir FTP/SFTP veya diğer bir taşıma yöntemi ekleyin
- Add the TalkingTech_itiva_inbound.pl script to your crontab, aimed at that directory
- Eğer isterseniz, sonuçlar dosyasını işlendikten sonra başka bir dizinde arşivleyebilirsiniz
Run TalkingTech_itiva_inbound.pl –help for more information
Integrating SIP2 with Koha
SIP2 (Session Initiation Protocol) is a protocol for communication between devices.
In the context of Koha SIP2 is used for communication between Self Check (SC) machines i.e. self checkout machines, and the Automated Circulation System (also known as ACS which in this case is the server running Koha).
SIP2 communications consist of requests and responses.
The self checkout machines are ‘dumb’ and so they send requests to the Koha server which runs logic which determines a particular outcome which is sent as a response message back to the client self checkout machine, and this is then conveyed to the user.
Uyarı
Security notice regarding using SIP2 service: To ensure that your SIP2 traffic is secure as it passes over the internet you need to make sure that you are using a VPN or stunnel.
Setting up SIP2
If you installed Koha using Debian packages then SIP2 setup is easy, simply follow these steps:
1. In your terminal (in the root Koha directory) write in: sudo koha-enable-sip <instancename>
2. Now you need to configure the SIP2 settings, to do this you need to edit the SIPconfig.xml file which exists in the /etc/koha/sites/<instancename>/ directory. You will need to edit this file as root because it contains passwords (to do so write ‘sudo’ at the start of your command).
e.g. sudo vi /etc/koha/sites/<instancename>/SIPconfig.xml
Not
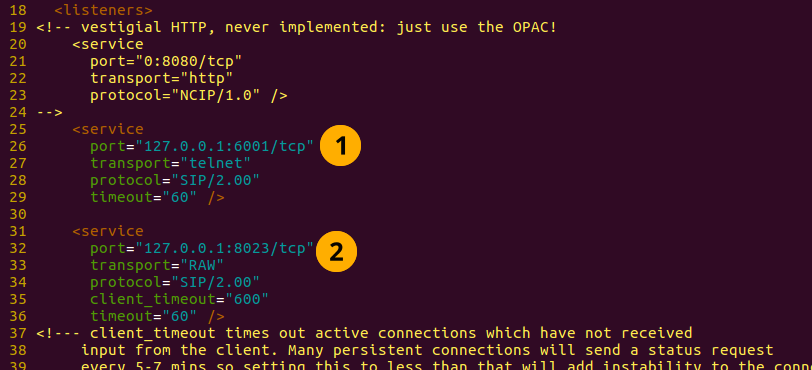
Important note: There are three areas of interest in the SIPconfig.xml file that you need to change. These are: service, account and institution.
Service
2.1 Change the port value near the top of the SIPconfig.xml file (identified by the number 1 in the below screen shot), so it has the same IP address as set further down the SIPconfig.xml file identified by 2.
Not
Make sure the two port values don’t have the same port number as you cannot have the same port being listened to by two different services. When deciding upon the port number make sure it is a high number (i.e. above 1000) because all ports below 1000 require root permissions.
Account
The account(s) you define in the SIPconfig.xml file are simply account(s) permitted to use the SIP2 service i.e. your defining who can send and receive SIP2 commands.
Uyarı
Account information that you write here must also exist in the Koha database i.e. you need to create a patron in the Koha staff interface with the same username, password (making sure to assign them circulate permissions) as the user account you write into the SIPconfig.xml file.
Not
It is highly recommended that you only write in Koha user accounts with circulate permissions.
The reason we want SIP2 users to only have circulate permissions rather than superlibrarian permissions is to reduce the access SIP2 users have to confidential patron data in case the system was compromised.
If the ACS or the SC were compromised then having all SIP2 users only having circulation permissions means that an intruder would only be able to access patron data via the terminal rather than the web interface as well (which would be available with superlibrarian permissions). So it is simply a matter of protecting your users.
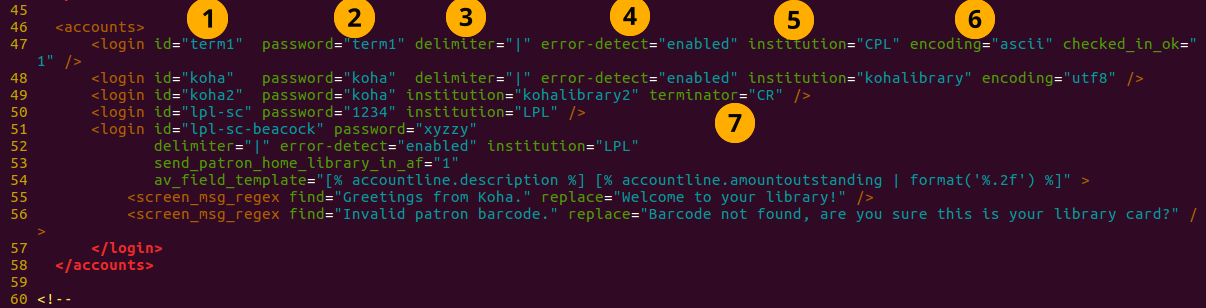
Account value definitions:
- Login id: This is the account username. - Modify this accordingly
- Password: Account password - Modify this accordingly
- Delimiter: The type of delimiter for account information - Leave as default
- error-detect - Leave as default
- Institution: This is the branchcode for the library that the user belongs to. NOTE: This institution needs to be defined further down in the institution area of the SIPconfig.xml file and it must also exist in the Koha database. i.e. you need to create a library with the same branchcode in Koha staff interface.
- encoding: This is the standard used to encode the account data
- Terminator: This needs to match the terminator value of the SIP2 server. - Modify this if you know the terminator value of the SIP2 server.
Institution
The institution information you define here must match a library created in the Koha staff interface.
Uyarı
You need to make sure all the institutions that accounts are assigned to further up in the SIPconfig.xml file are also defined in the institution area of the same file.

Institution value definitions:
1. Institution id: The branchcode of the library. - Modify this accordingly. Must be the same as created in Koha and the account area.
- Implementation: Defines the code that will be run. - Leave as default
3. Policy: Policy defines the permitted SIP2 commands allowed from SC’s in this institution. For example: renewal=”true” means that SC’s at that institution have permission to send renewal item SIP2 commands.
4. Starting SIP2 Simply write in the command: sudo koha-start-sip <instancename>
Not
Now you have a running SIP2 server.
Using SIP2
SIP2 is a communication protocol. The messages sent in SIP2 are either requests or responses. The SC’s send request messages to the ACS which will run some logic and send back the resulting value to the SC as a response message.
The request messages contain arguments, which are data values used by the ACS in its functions to perform the required task such as renewing items.
SIP2 commands
If you want to manually use/test SIP2 then you will be writing and receiving messages via the Linux terminal.
To be able to send and receive messages with the SIP2 server you need to use telnet to open a SIP2 connection. You need to specify the port number you want telnet to use.
To find this information look at the service area at the top of the SIPconfig.xml file (look for the port number as pointed out by the arrow in the below screenshot).

Write into the terminal
telnet localhost <portnumber>
e.g. telnet localhost 8023
Now write in the username and password set in one of the accounts in the SIPconfig.xml file.
Now you are connected to the SIP2 server you can start writing and sending request commands. The connection to the SIP2 server does time out fast so if haven’t finished writing and receiving commands simply write in:
telnet localhost <portnumber>
to restart the SIP2 connection.
SIP2 command syntax
Every SIP2 command has a 2 digit numerical prefix which defines what the command is doing.
e.g. To get information about a patron you start your command with the prefix: 63. The response from the server also has a corresponding numerical prefix.
Below is an example of a SIP2 request message to request patron information (in this example a Koha patron account with the user name ‘joe’, password ‘joes’, and card number ‘y76t5r43’ has been created in the Koha staff interface).
Additionally a library with the branchcode of ‘WEL’ has been created in the Koha staff interface and is also defined in the institution area of the SIPconfig.xml file):

So the format of this SIP2 request message is:

Not
The summary value is a 10 character value. If a Y is written in for the summary value then you will be able to get both a summary and more detailed informational output.
The value in the <YYYYMMDD> <HHMMSS> is the current datetime, by leaving a 4 space gap between the YYYYMMDD and HHMMSS this indicates you want to use local time rather than UTC.
Not
In this manual letter codes for the various fields are used where possible in describing the SIP2 message fields e.g. AO<institutionid>.
These letter codes can be written in the SIP2 commands into the Linux terminal, but make sure when substituting values in for the fields (values inside the <>) that you do not write in the <> brackets.
SIP2 messages:
Block patron
This uses the prefix 01 for request messages and 24 for response messages.
Request message:

Not
Card retained is a single character field of either ‘Y’ or ‘N’ which tells the ACS that a card has been retained by the self checkout machine.
Response message:

Not
<patronstatus> is a 14 character long value. The value Y in the string means true. Each position in this string (starting at 0) has a single corresponding value (Y or N) in the string.
e.g. a Y at position 1 (the second value in the string) means that the patrons renewal privileges are denied.
Check-in items
This uses the request message (messages sent to the ACS) prefix of 09 and the response prefix of 10 (sent to the SC).
Request message:

Not
- <no block (Offline)> is a single character field of either ‘Y’ or ‘N’ which indicates if the transaction is being performed offline. As offline transactions are not supported you need to write ‘N’ if you are testing this message out manually.
- <transactiondate> this is a 18 character field with the date is the format: YYYYMMDDZZZZHHMMSS.
ZZZZ is the timezone, if you want to set it to local you need to leave 4 blank spaces, but if you want to set it to the UTC (Coordinated Universal Time) then you need to write in 3 blank spaces and a Z.
Response message:

Not
Alert type could have one of several values: 00 : Unknown 01: local hold 02: remote hold 03: ILL Transfer 04: transfer 99: Other
If an item is resensitized then the value of <resentitize> should be Y otherwise it should be N. Rensensitizing items is done to ensure that if someone tries to steal the item they are detected.
Checkout items
This uses the request message prefix of 11 and the response message prefix of 12. It has similar syntax to the check-in command, outlined above except the prefixes are different.
Hold – May not yet be supported on some systems. This has a request message numerical prefix of 15 and a response message prefix of 16.
Request message:

Not
<holdmode> is a single character value. + means add a hold, - means delete a hold and * means change a hold.
Response message:

Not
- <ok> is a single length value which is either 0 (for hold is not permitted or was not successful) or 1 (for hold is permitted and was successful).
- <available> is a single length value which is either Y or N. Y means the item is currently in the library, whilst N means the item is currently on loan/someone else has created a hold on the item.
Item information: This uses the request command prefix of 17, and the response command prefix of 18
Request message:

Not
See the check-in items command (described above) to find out what the <xact_date> value is.
The terminal password is optional.
Response message:

Item status update This uses the request message prefix of 19 and the response message prefix of 20
Request message:

Not
<itemproperties> is not a fixed length value, and you can optionally write in values such as item size and these values will be stored in the Koha database for the item.
Response message:

Not
<itempropertiesok> is a single length character value which is either 0 or 1. 1 identifies that the <itemproperties> value defined in the item status update request message was successfully stored in the Koha database.
Patron status
This uses the request message prefix 23 and the response message prefix of 24.
Request message:

Response message:

Not
The value displayed for <patronvalidity> is Y (valid) and N (invalid) The value in the <YYYYMMDD> < HHMMSS> is the current date/time.
The reason for the gap between the two values is to define that you want to use localtime rather than UTC.
Patron enable - This is not yet supported. This uses the request message prefix of 25 and the response message prefix of 26
Not
This command undoes the block patron command.
Request message:

Response message:

Renew This uses the request message prefix of 29 and the response message prefix of 30
Request message:

Not
- <thirdpartyallowed> is a single character value which is either Y or N. If it is Y then third parties can renew items.
- <noblock> is a single character value which is either Y or N. If it is Y then this means that the item was checkin/out when the ACS was offline.
- <nbduedate> is the transaction date of checkin/checkout when the ACS was offline.
- <feeacknowledged> is a single character value which is either Y or N. This indicates if the user accepts the fee associated with the item they are renewing.
Response message:

Not
- <ok> is a single character value which is either 0 or 1. A value of 1 means the item was successfully renewed, 0 means item was not successfully renewed.
- <renewalok> is a single character value which is either Y or N. The logic for the setting of the value of <renewalok> is Y is set when the item is already checkout by the user and so it should be desensitized thereby renewing it, whereas N is set if the item is not already checkout to the patron and so it should not be renewed.
In other words don’t let patrons renew books when they are not currently checked out to them.
- <magneticmedia> is a single character value which is either Y (for yes), N ( for no), or U (for unknown).
- <mediatype> is a three numerical character long value. For a list of the values go to: http://multimedia.3m.com/mws/media/355361O/sip2-protocol.pdf
End session
This uses the request message prefix of 35 and the response message prefix of 36
Request message:

Response message:

Not
<success_or_failure> is either Y for success or N for failure.
Fee Paid – May not be implemented yet. This uses a request message prefix of 37 and a response message prefix of 38
Request message:

Not
- <feetype> is a two numerical character value which is between 01 and 99. To see a list of fee type values go to http://multimedia.3m.com/mws/media/355361O/sip2-protocol.pdf
- <paymenttype> is a two character numerical value between 00 and 99. 00 is cash, 01 is Visa, and 02 is credit card.
- <currencytype> is a 3 alphanumeric character long value identifying the currency the fee paid was in.
Response message:

Not
<paymentaccepted> is a single alphanumeric character long value which is either Y (payment has been accepted) or N (payment has not been accepted).
Patron information
This uses the request message prefix of 63 and the response message prefix of 64
Request message:

Response message:

Not
<valid patron> is Y for valid and N for not valid.
Not
<hold itemcount><overdueitemcount><chargeditemscount><fienitemscount><recallitemscount><unavaliableholdscount> are all 4 numerical character long values.
Renew all
This uses the request message prefix of 65 and the response message prefix of 66.
Request message:

Response message:

Not
- <renewedcount> is a 4 numerical character long value denoting the number of items that were renewed.
- <unrenewedcount>, has the same format as the <renewedcount> but it denotes the number of items not renewed.
Login
This uses the request message prefix of 93, and the response message prefix of 94.
Request message:

Not
<UIDalgorithm> and <PWDalgorithm> are one character long values indicating the type of algorithm to use to encrypt the loginuserid and loginpassword respectively.
Writing in the value of 0 means these values will not be encrypted.
Response message: 941 is a successful login. 940 is an unsuccessful login [connection closed by foreign host.] is a unsuccessful login
Resend
This requests the receiving device to resend its last message.
SC -> ACS resend request is 97
ACS -> SC resend request is 96
Status of the ACS and SC
This has the request message prefix of 99 and the response message prefix of 98.
Request message:

Not
The status code is one of 3 values. * 0: SC is ok * 1: SC is out of paper * 2: SC is shutting down max print width is a 3 character long value which is the integer number of characters the client can print Protocol version is a 4 character value in the format x.xx
Response message:

Not
If you get the response message ‘96’ this means that the request message is not valid/understood.
Troubleshooting SIP2
Can’t connect to remote host when writing in the command telnet localhost <portnumber>
3 solutions for this issue to try are:
1. Check the portnumber your writing in the above command is the port number written in the SIPconfig.xml file at the location indicated by the number 1. i.e. in the below example because the portnumber is 6001 the correct command would be: telnet localhost 6001
2. Check if any userid is written more than once in the SIPconfig.xml file. The userid (which is simply the username of the Koha user) needs to be unique within the SIPconfig.xml file. If you have the same userid multiple times in your SIPconfig.xml file this will cause the connection to SIP2 to fail before you get a chance to authenticate.
3. Check the account defined in the SIPconfig.xml file also exists in the Koha database with the same username, password and has circulate permissions. If you have dropped and recreated the Koha database after creating the patron account in the Koha staff interface and the SIPconfig.xml file then that patron account will not exist in the Koha database and so you will need to recreate them in the Koha staff interface.
Further troubleshooting
To access the SIP2 logs in your Koha home directory navigate to the following directory: /var/log/koha/<instancename>
Then view the output of the sip-error.log and the sip-output.log files which give more detailed information about the SIP2 error.
- cat sip-error.log
- cat sip-output.log
Useful links on SIP2 commands:
http://multimedia.3m.com/mws/media/355361O/sip2-protocol.pdf
Integrating LDAP with Koha
Setting up LDAP (Lightweight Directory Access Protocol) for Koha allows you to store all user information in a central database which is accessed both by your organisations Koha instance and for users to authenticate on other existing systems.
LDAP is a protocol used for file discovery over networks and network authentication.
LDAP configurations are powerful allowing you to customise how Koha and LDAP interact. LDAP can be configured so that new accounts created in LDAP can be synced down into the Koha database, additionally updates to the LDAP user account are synced down to the Koha database.
However Koha cannot sync data up to the LDAP server, thus the data traffic when using LDAP is only one directional.
Auth_By_Bind is set to 1 where a Microsoft Windows Active Directory system is in use in the LDAP database.
Before going through the steps to configure LDAP you will need the following information/actions from the organisation
- The organisation will need to open a port to allow access to their AD from the server.
- Information on the access to the AD server (IP address/hostname, port, SSL info)
- Information on the configuration of the AD server (relevant OUs, DCs, CN formats relative to usernames)
- Mapping between AD fields and Koha fields, including defaults
- Default values for things not provided by AD (categorycode, branchcode for example)
- To authenticate a user do we bind as them (seems to be common for AD) or do we use an account and login with that and then check? If the latter, we’ll need details of how to log in
- Do the existing usernames in Koha match the usernames that we’ll be using to look them up in AD? If so, good. If not, how will we deal with duplicate users?
Steps to set up LDAP with your Koha instance
1 In Linux terminal navigate to the directory containing the koha-conf.xml file which will either be in: * /etc/koha/sites/<instance-name>/ OR * /etc/koha/
2 Open the koha-conf.xml file with root permissions: sudo vi koha-conf.xml
3 Scroll down to the line containing ‘<useldapserver>0</useldapserver>’ and change it to: <useldapserver>1</useldapserver>
4 Then in the next line below write in the LDAP configurations below: Note all fields highlighted in yellow need to be replaced with the appropriate values for your organisations LDAP server.
<ldapserver id=”<ldapserverid>”>
<hostname><hostname></hostname>
<base>dc=<domaincontroller>,dc=<domaincontroller></base>
<user>cn=<nameofuser>, dc=<domaincontroller>,dc=<domaincontroller></user> <!–This is the username of user account with permissions to query the LDAP server –>
<pass><password></pass> <!– Bu, LDAP sunucusunu sorgulamak için izinlere sahip kullanıcı hesabının şifresidir–>
<replicate><either0or1></replicate> <!– add new users from LDAP to Koha database –>
<update><either0or1></update> <!– Koha veritabanında mevcut kullanıcıları güncelle –>
<auth_by_bind><either0or1></auth_by_bind> <!– şifre karşılaştırması yerine bağlama yoluyla kimlik doğrulaması yapmak için, örneğin Active Directory’yi kullanmak için 1 olarak ayarlayın –>
<principal_name><principalname></principal_name> <!– optional, for auth_by_bind: koha kullanıcı kimliği tarafından userPrincipalName oluşturmak için bir printf biçimi
<mapping> <!– match koha SQL field names to your LDAP record field names–>
<firstname is=”givenname”></firstname>
<surname is=”sn”></surname>
<address is=”postaladdress”></address>
<city is=”l”>Athens, OH</city> <!– Athens,OH is the default value for city of all users logging into Koha –>
<zipcode is=”postalcode”></zipcode>
<branchcode is=”branch”>Central</branchcode>
<userid is=”uid”></userid>
<password is=”userpassword”></password>
<email is=”mail”></email>
<categorycode is=”employeetype”>EM</categorycode>
<phone is=”telephonenumber”></phone>
</mapping>
</ldapserver>
5 Save and exit the koha-conf.xml file
6 Check the LDAP connection works by writing in:
ldapsearch -H ldaps://host.name -s base -x -w “” -d 1
Not
Ana makine adı hakkında not Ana makine adı, alfasayısal bir ad olabilir veya LDAP sunucusu IP adresi olabilir (bu, port numarasını yazmak için isteğe bağlıdır). Varsayılan olarak ldaps varsayılan port numarası 636’dır, ldap varsayılan port numarası 389’dur
Not
Kopyalama ve güncelleme alanları hakkında not koha-conf.xml dosyasındaki LDAP için çoğaltma LDAP yapılandırma alanı, bir kullanıcı Koha’ya (ya personel istemcisi ya da OPAC) oturum açtığında Koha veritabanının yeni bir okuyucu hesabıba eklenmesine izin verir. LDAP kullanıcı adı ve parolası (aynı kullanıcı adı ve parolanın zaten Koha veritabanında bulunmadığını varsayarak).
Güncelleme LDAP yapılandırma alanı (aynı dosyada izin verir), LDAP veritabanındaki kullanıcı bilgilerinin Koha veritabanına senkronize edilmesini sağlar. Örneğin. birisi evlenir ve soyadı değişirse, yeni soyadın varolan LDAP veritabanında güncellenmesi gerekir ve güncelleme yapılandırması 1 olarak ayarlanırsa Koha veritabanına otomatik olarak senkronize edilir.
Eşleme alanları hakkında (yeşil alan vurgulanan alanlar) <city is=”l”>Athens, OH</city>
Sol sütun adı (sarı vurgulu), LDAP veritabanındaki sütunun adıdır.
Tırnak işaretlerinin içindeki sütun adı (pembe vurgulu), Koha veritabanındaki sütunun adıdır. NOT: Koha veritabanında LDAP veritabanında olduğu gibi eşdeğer bir sütun adı yoksa, bu herhangi bir değerle doldurulabilir.
Camgöbeği vurgulanan değer, belirtilen Koha ve LDAP sütunlarının varsayılan değeridir. Yukarıdaki örnekte, Koha ve LDAP veritabanlarındaki tüm kullanıcı kayıtları varsayılan olarak ‘Athens, OH’ şehir değerine sahip olacak.
LDAP yapılandırmalarına örnek:
<useldapserver>1</useldapserver><!– see C4::Auth_with_ldap for extra configs you must add if you want to turn this on –>
<ldapserver id=”ldapserver” listenref=”ldapserver”>
<hostname>ldaps://example.co.au</hostname>
<base>ou=employees,dc=companya,dc=com,dc=au</base>
user></user> <!– DN, anonim değilse –>
<pass></pass> <!– şifre, anonim değilse –>
<auth_by_bind>1</auth_by_bind>
<replicate>1</replicate> <!–LDAP’den Koha veritabanına yeni kullanıcılar ekle –>
<update>0</update> <!– Koha veritabanındaki mevcut kullanıcıları güncelle –>
<principal_name>ou=employees,dc=companya,dc=com,dc=au</principal_name>
<mapping>
<userid is=”uid” ></userid>
<cardnumber is=”uid” ></cardnumber>
<email is=”mail” ></email>
<surname is=”sn” ></surname>
<firstname is=”givenname” ></firstname>
<categorycode is=”1”>EM</categorycode>
<branchcode is=”1”>SYD</branchcode>
</mapping>
</ldapserver>
The values in the mapping area are not always the same, and it depends on what is in your organisations LDAP database. For example some organisations do not use <userid> instead each user is only identified by the <email> field and so no <userid> is written.
Troubleshooting LDAP
The log that LDAP errors are printed to depends on several factors:
If plack is not disabled then LDAP errors are displayed in the plack-error.log file If plack is disabled then the location that LDAP errors are printed to is either the opac-error.log file (if the user is logging into the OPAC) or the intranet-error.log file (if the user is logging into the staff client) All of these three log files are accessible in the following directory:
/var/log/koha/<instance>/
OCLC Connexion Geçidi
Koha, OCLC Connextion ağ geçidi ile çalışmak için ayarlanabilir. Bu, kütüphanelerin kataloglama aracı olarak OCLC Connexion’u kullanmalarını ve sadece tek bir tıklama ile bu kayıtları Koha’ya göndermelerini sağlar. Aşağıdaki talimatlar OCLC Connexion Geçidi kurmanıza yardımcı olacaktır, Eğer bir sistem yöneticiniz varsa bu süreçte ona danışmanız gerekebilir.
Koha’da OCLC hizmetini kurma
İlk olarak sisteminiz içerisinde bir yerde konfigürasyon bilgileri ile bir dosya oluşturmanız gerekir. Bunu, hizmeti çalıştıracak olan hesap için görünür olan herhangi bir yere koyabilirsiniz.
Dosya 11 satır içerir. İlk 6 satır Koha sisteminiz hakkındadır:
host: The IP address of your Koha server
port: The port you want to use for the Connexion service. This port must be different from your SIP port, or any other service
koha: The full URL of your staff client
log: The location (full file specification) of your log for the service
user: The default Koha username to use for importing
password: The password that goes with that username
Geriye kalan satırlar hazırlamanın nasıl yapılacağını açıklar:
match: The name of the matching rule from your system to use
overlay_action: "replace", "create_new", or "ignore"-- what to do if there is a match
nomatch_action: "create_new" or "ignore"-- what to do if there is no match
item_action: "always_add","add_only_for_matches","add_only_for_new", or "ignore" -- what to do with embedded 952 item data
import_mode: "direct" or "stage"
Örnek bir dosya bu şekilde görünecektir:
host: 1.2.3.4
port: 8000
log: /home/koha/koha-dev/var/log/connexion.log
koha: http://kohastaff.myuniversity.edu
user: koha_generic_staff
password: password
match: 001
overlay_action: replace
nomatch_action: create_new
item_action: ignore
import_mode: direct
When choosing an ‘import_mode’ if you use “direct” then the staged record will be immediately imported into Koha, and should be searchable after your indexes catch up. If you choose “stage”, then the record will be placed in a staged batch for you to later go the Manage Staged MARC Records tool to finish the import.
Birden çok kayıt aktarırsanız, bu kayıtlar aktarılana kadar aynı grup içerisinde yer alacaktır, daha sonra yeni bir grup oluşturulacaktır.
“direkt” modunda, her kayıt kendi grubu içerisinde olacaktır.
Hizmeti başlatmak için komut dosyasını çalıştırın:
/location/of/connexion/import/daemon/connexion_import_daemon.pl -d -c /location/of/config/file.cnf
OCLC masaüstü istemcinizi kurma
Not
Ekran görüntüleri OCLC Connexion Client v.2.50, Koha v.3.12 sürümlerindendir
To set up the OCLC Connexion desktop client to connect to Koha, go to Tools > Options, then choose the Export tab.
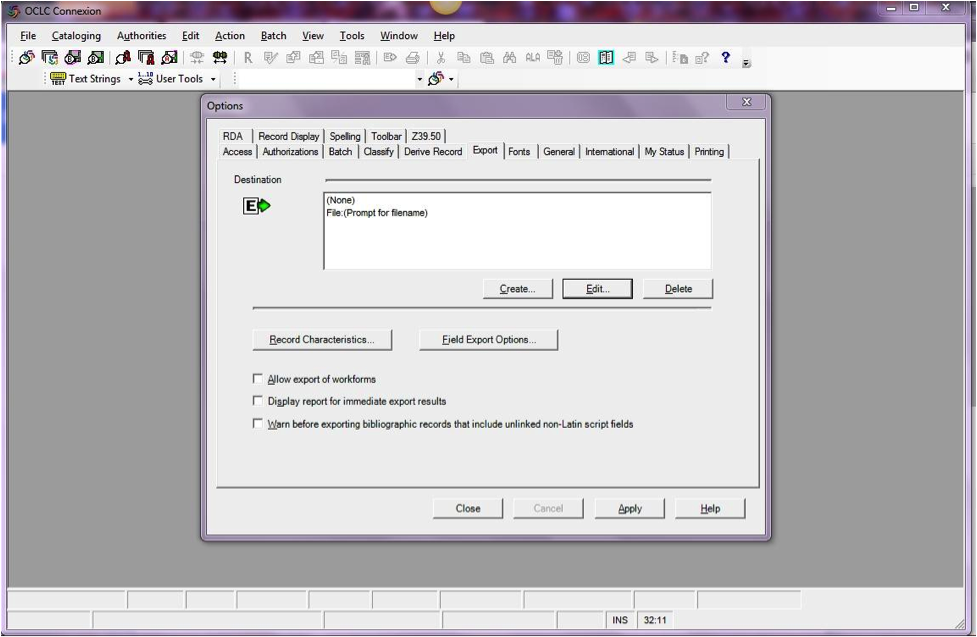
Yeni bir varış noktası kurmak için “Oluştur…” butonuna tıklayın, daha sonra “OCLC Ağ Geçidi Dışa Aktar”ı seçin ve TAMAM’ı tıklayın.
- Aşağıdaki bilgiyi girin:
- “Host Name:” Your catalog’s appropriate IP address (from your config file above)
- “Port:” Your catalog’s appropriate port number (from your config file above)
- “Oturum açma kimliği:” Katalogcu’nun Koha girişi
- “Parola:” Katalogcu’nun Koha parolası
- “Notify Host Before Disconnect” = checked,
- “Timeout” = 100, “Retries” = 3, “Delay” = 0 (zero),
- “Send Local System Logon ID Password” = checked.
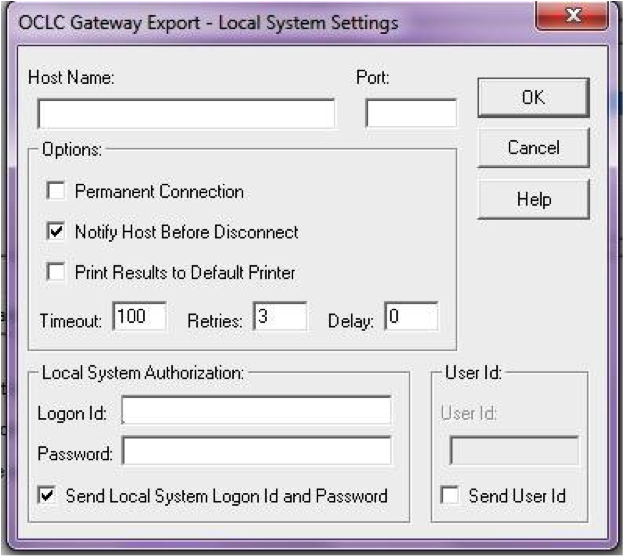
- Aşağıdaki bilgiyi girin:
Bittiğinde “TAMAM”ı seçin ve yeni “Ağ Geçidi Dışa Aktarma” seçeneğinin listelendiğini görebiliyor olmalısınız (Katalog IP adresi ve bağlantı noktası aşağıdaki ekran görüntüsünde karartılmıştır)
Ağ Geçidi Dışa Aktarma Eklendi
“Kayıt Özellikleri” üzerine tıklayın ve bibliyografik kayıtların MARC21, UTF-8 Unicode kullandığından emin olun, ve kaydetmek için Tamam’a tıklayın.
Kayıt Özellikleri
Artık başlamaya hazır olmalısınız! OCLC Connection İstemcisinden Koha’ya bir kayıt aktarmak için, kayıt ekranda açık durumda iken F5 tuşuna basın. Bir aktarım açılır diyalog penceresinin ekrana geldiğini ve Connexion programının Koha ile iletişime geçmeye çalıştığını göreceksiniz. Kaynakça numarası ve kayda doğrudan geçmek için web tarayıcınıza kopyalayabileceğiniz bir URL dahil olacak şekilde kaydın eklendiği ya da üzerine yazıldığına dair bir bildirim almalısınız.
OCLC Connexion Geçidini Kullanma
Kayıtlar Connexion’dan tek tek ya da toplu olarak aktarılabilir.
Kayıtları tek tek aktarmak
To export bibliographic records one by one, be sure your “Batch” options are correct: from the “Tools” menu, select “Options”, and select the “Batch” tab. In the “Perform local actions in batch” area, “Bibliographic Record Export” should be unchecked
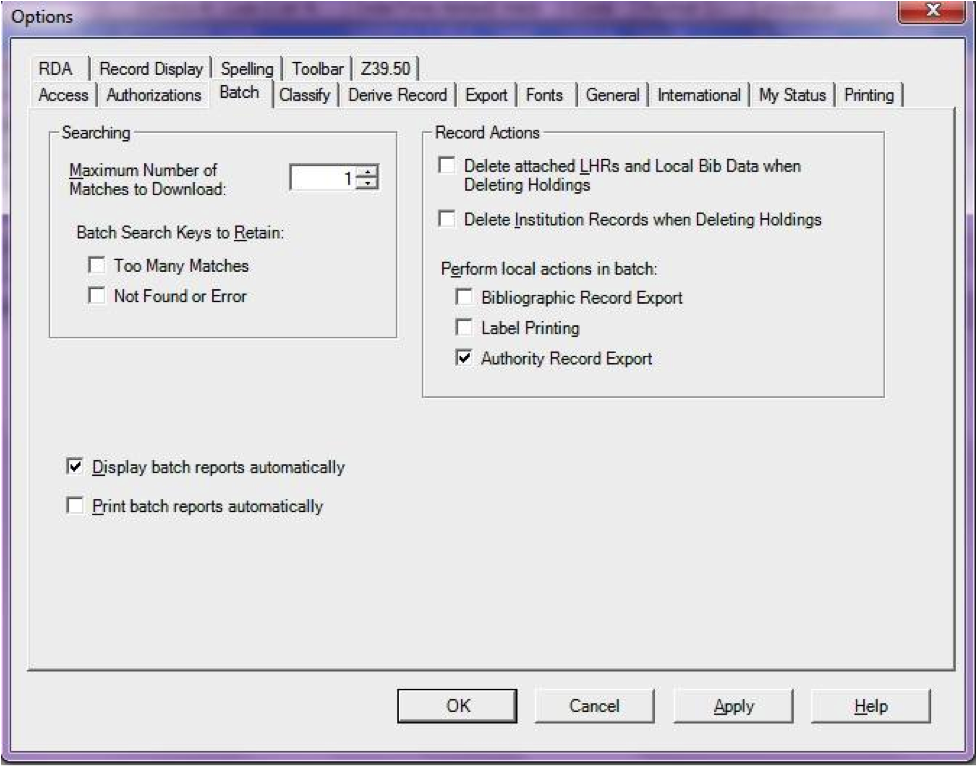
When ready to export, from the “Action” menu, select “Export” or use the F5 key. You will see a screen similar to the following if the import is successful and if the record is new to the Catalog; you may copy & paste the resulting URL into your Koha catalog to see the new record.
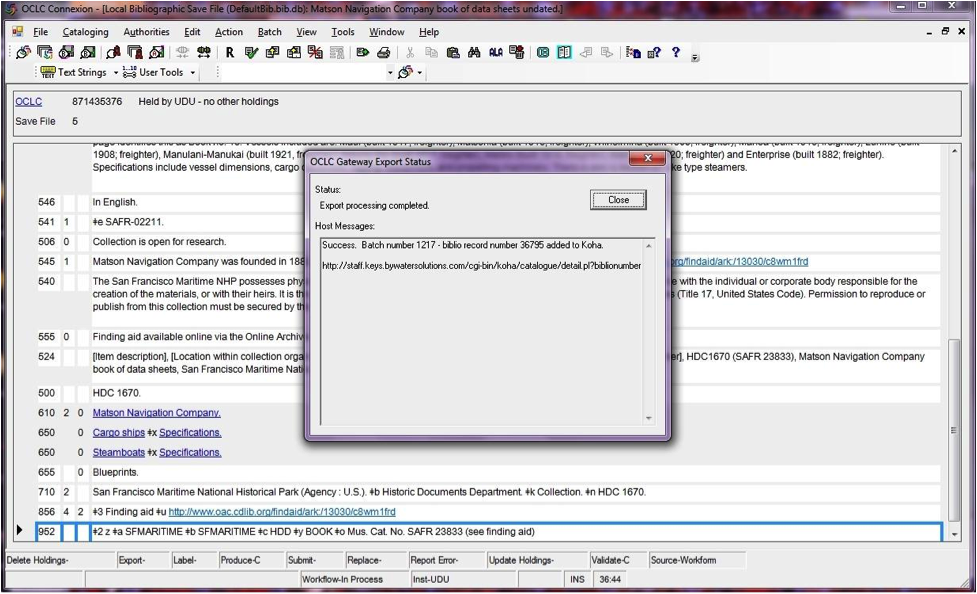
If the record was overlaid, you will see a message to that effect in the “OCLC Gateway Export Status” window
Kayıtların toplu olarak aktarımı
To export bibliographic records in a batch, be sure your “Batch” options are correct: from the “Tools” menu, select “Options”, and select the “Batch” tab. In the “Perform local actions in batch” area, “Bibliographic Record Export” should be checkedOCLC

Bir kayıt dışa aktarılmaya hazır olduğunda, ‘Eylem’ menüsünden “Dışa Aktar” seçeneğini seçin ya da F5 tuşunu kullanın ve dışa aktarma durumu “hazır” olacaktır.
When ready to export the batch, from the “Batch” menu, select “Process batch” and check the appropriate “Path” and “Export” boxes
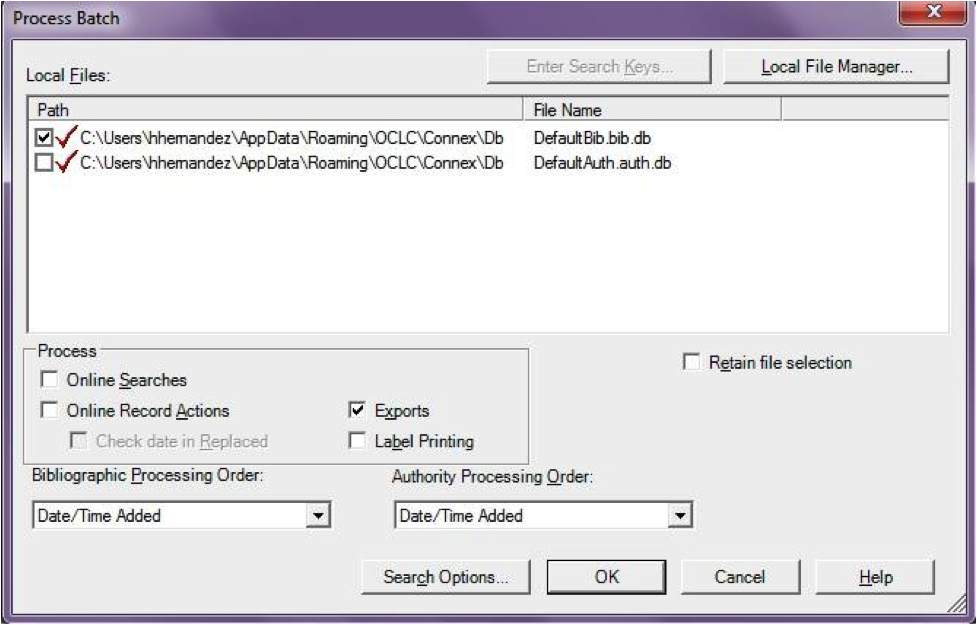
The export will begin, and the bib records will be exported & imported into Koha one by one; you will see “OCLC Gateway Export Status” windows, as above, showing you the results of each export. That window will stay there until you select “Close,” and then the next record’s export/import will begin. The process will continue until all records in the batch are completed. Then you may or may not see the Connexion Client export report (depending on your Client options for that).
OCLC’de ki materyaller
If you’d like to create your item records in OCLC you can do so by addding a 952 for each item to the bib record you’re cataloging. The Item/Holdings Cataloging Guide will break down what subfields you can use in the 952, but at the minimum you want to have subfield 2, a, b, and y on your items.
952 \$2CLASSIFICATION$aHOMEBRANCHCODE$bHOLDINGBRANCHCODE$yITEMTYPECODE
- The subfield 2 holds the classification code. This can be ddc for Dewey or lcc for Library of Congress or z for Custom. Other classification sources can be found in the Classification Sources area in administration
- Subfield a is your home library and needs to be the code for your home library, not the library name. You can find these codes in the Libraries & Groups administration area.
- Subfield b is your holding library and needs to be the code for your holding library, not the library name. You can find these codes in the Libraries & Groups administration area.
- Subfield y is your item type code. It needs to be the code, not the item type name. You can find these codes in the Item Types administration area.
952 \$2ddc$aMAIN$bMAIN$yBOOK
In addition to these required fields you can enter any other subfield you’d like. Most libraries will enter a call number in subfield o and a barcode in subfield p as well. Review the Item/Holdings Cataloging Guide for a full list of subfields and values.
SSS
Görüntüle
Özel Materyal Türü/Otorize Değer Simgeleri
Question: Can I have my own set of item type images (or authorized value icons)?
Answer:Absolutely. To add additional icons to your system you simply add a new directory to koha-tmpl/intranet-tmpl/prog/img/itemtypeimg/ and to koha-tmpl/opac-tmpl/prog/itemtypeimg and put your icons in the new directory. Your icons will show up in a new tab as soon as they are in the folders.
Not
Simgeleri her iki yere de koymayı unutmayın (OPAC ve intranet üzerinde).
Koha İmajları Özelleştirme
Question: Can I customize the images in the OPAC?
Answer: Absolutely. Koha comes with a series of original images that you can alter to meet your needs. The originals can be found in the misc/interface_customization/ directory.
OPAC Görüntü Alanları
Question: What MARC fields print to the different OPAC screens in Koha?
Answer: The XSLT preference must be set as follows for the following fields to show
- OPACXSLTResultsDisplay = using XSLT stylesheets
- OPACXSLTDetailsDisplay = using XSLT stylesheets
- DisplayOPACiconsXSLT = show
OPAC Sonuçlar sayfasının gösterdiği:
- 245
- 100, 110, 111
- 700, 710, 711
- 250
- 260
- 246
- 856
OPAC Ayrıntılar sayfasının gösterdiği:
- 245
- 100, 110, 111
- 700, 710, 711
- 440, 490
- 260
- 250
- 300
- 020
- 022
- 246
- 130, 240
- 6xx
- 856
- 505
- 773
- 520
- 866
- 775
- 780
- 785
- artı en alttaki Notlar sekmesindeki 5xx alanlarının tümü
Bibliyografik Kayıtlarda Alt Başlık Gösterilmesi
Question: How do I get the subtitle to display on the detail pages for my bib records?
Answer: Subtitle display now depends on there being a keyword mapping for the MARC field in question. Adding a mapping for “subtitle” -> “245b” for an item’s framework results in display of the subtitle in OPAC and staff client search and detail pages (although not in all instances where subtitles might be displayed, e.g. the Cart).
Kullanıcıların ödünç aldığı materyallerin barkodlarını göster
Question: Can patrons see the barcodes for the items they have checked out.
Answer: Not by default, but with a few edits to the patron record you can make a barcode column appear on the patron’s check out summary in the OPAC. You can set up a patron attribute with the value of SHOW_BCODE and authorized value of YES_NO to make this happen.
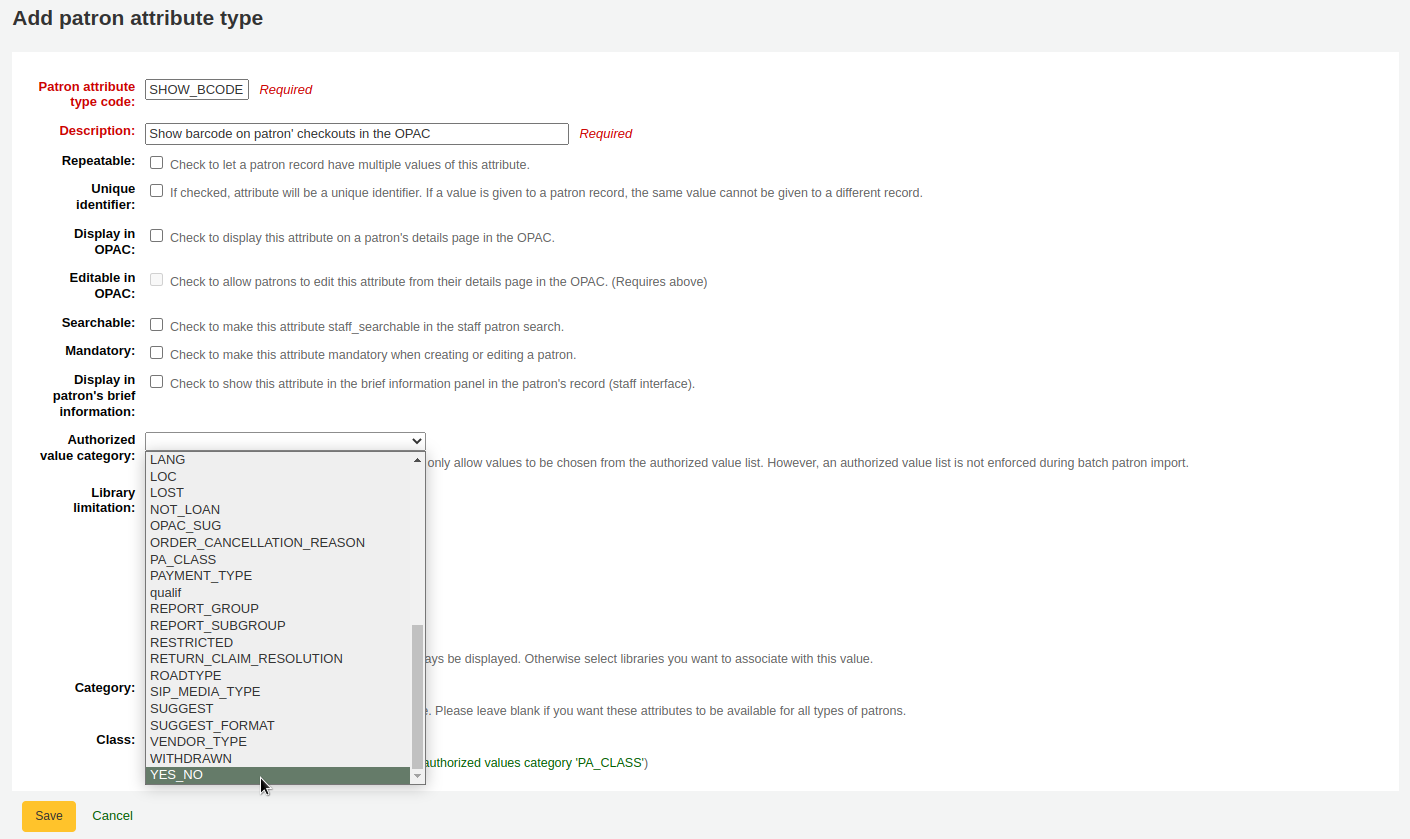
Then on the patron’s record set the value for SHOW_BCODE to yes.
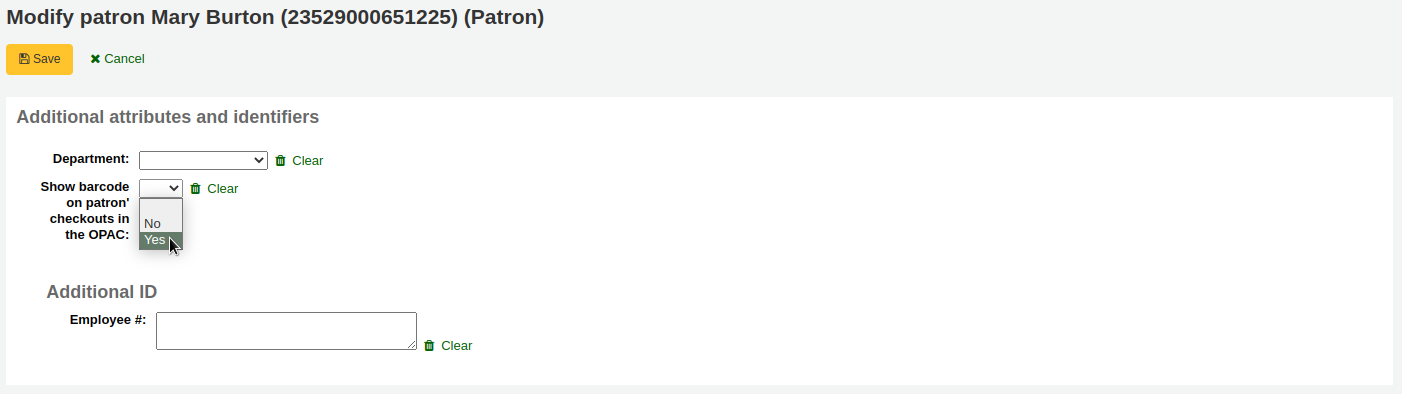
Bu, OPAC’da ödünç verme özetine kullanıcıların ödünç aldıkları materyallerin barkodlarını gösteren bir sütun ekleyecektir.
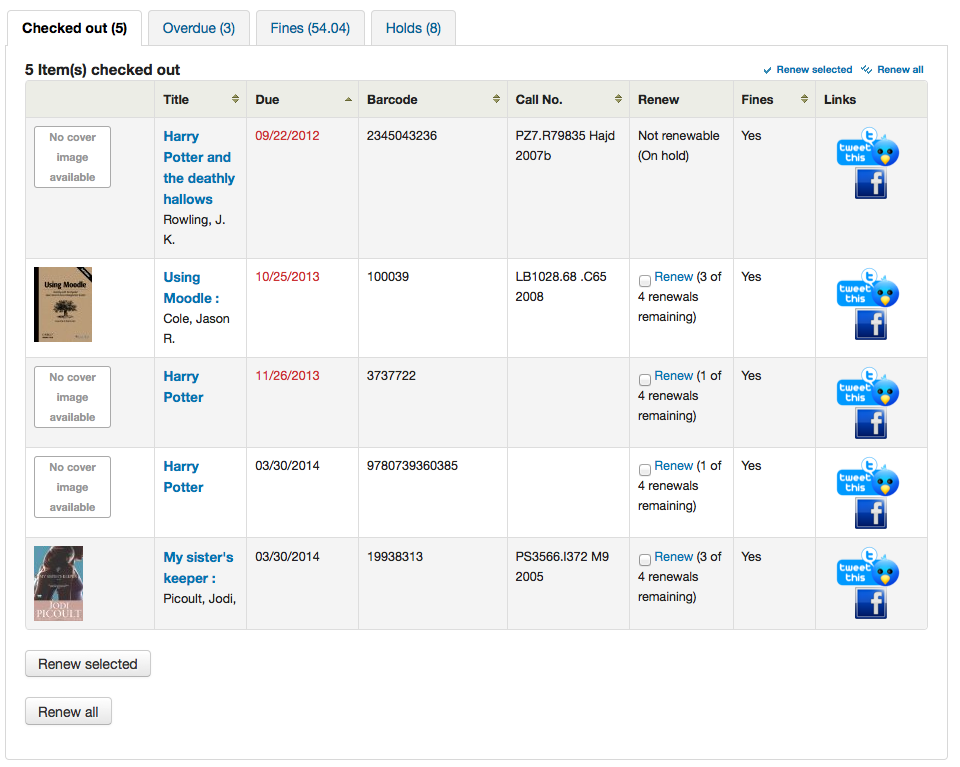
‘Gecikmişler’ sekmesine tıklamak, yalnızca gecikmeye kalan materyalleri gösterecektir.
Dolaşım/Bildirimler
Kitap bırakma Tarihi
Question: How is the book drop date is determined? Is it the last open date for the checkout branch? Is it today’s date minus one? Can the book drop checkin date be set?
Answer: If the library is closed for four days for renovations, for example, there would be more than one day needed for the book drop date. You will only have one book drop date and that will be the last day that the library open (determined by the holiday calendar) because there is no real way to know what day the books were dropped into the box during the 4 closed days. The only way to change the effective checkin date in book drop mode is to modify the calendar.
Onaylanacak Ayırtılanlar ve Ayırtılanlar Sırası
Question: What is the difference between the Holds Queue and Holds to Pull?
Answer: The holds to pull report gives a simple list of what holds need to be filled with available items. It should only be used in Koha installations where there is only one library.
The holds queue tries to do the same thing, but in a ‘smarter’ way. This allows it to split up the list by library, consult the transport cost matrix and refresh regularly to provide different pull lists to each library.
Gecikme Uyarılarını Yinele
Question: Why are patrons getting two overdue notices?
Answer: This tool takes all branches in the overdue rules and sent notifications to them. So, if you have a default rule & a branch rule, the notification will be generated twice. A quick fix is to discard “default rule” for instance.
Gecikme Uyarılarının Yazdırılması
Question: Can I print overdue notices for patrons without email addresses on file?
Answer: Yes. The overdue notice cron job has a setting to generate the overdue notices as HTML for printing. An example of this usage would be:
overdue_notices.pl -t -html /tmp/noticedir -itemscontent issuedate,date_due,title,barcode,author
Bu örnekte, bildirimlerimizde sadece belirli materyal alanlarını kullanmak istedik, bu nedenle cron girişinde itemscontent alanlarını belirttik; bu, özellik için bir gereklilik değildir.
The command line needs to specify a web-accessible directory where the print notices will go – they get a filename like notices-2009-11-24.html (or holdnotices-2009-11-24.html). The overdue notice itself can be formatted to fit a Z-mailer. Within the notice file, the text is spaced down or over to where it will print properly on the form. The script has code that wraps around the notice file to tell the HTML to obey the formatting, and to do a page break between notices. That’s so that when staff print it out, they get one per page. We had to add an extra syspref (PrintNoticesMaxLines) to specify page length because our client allows a _lot_ of checkouts which meant some notices were running onto multiple pages. That syspref says to truncate the print notice at that page length and put in a message about go check your OPAC account for the full list.
The print and email overdues use the same notice file. The print notices for holds are different – there’s a separate HOLD_PRINT notice file and the system uses it if there’s no email address. Then a nightly cron job runs to gather those up from the message queue and put them in an HTML file in the notice directory, as above.
The cron entry is gather_print_notices.pl /tmp/noticedir
Materyallerin süresi uzatılamadı
Question: We’re trying to renew some items for our patron. One of the items is on hold and ineligible for renewal, but the other two items refuse to renew even though they should be eligible. When I try to use the override renewal limit, it just returns a little message that says “renewal failed”. Any idea what’s going on here?
Answer: At the very least you will need to set an absolute default circulation rule. This rule should be set for the default itemtype, default branchcode and default patron category. That will catch anyone who doesn’t match a specific rule. Patrons who do not match a specific rule will get blocked from placing holds or renewing items, since there was no baseline number of holds or renewals to utilize.
Ayırma konulamadı
Question: Why can’t I place holds when I have all of the preferences turned on.
Answer: You probably need to set a default circulation rule. At the very least you will need to set an default circulation rule. This rule should be set for all item types, all branches and all patron categories. That will catch all instances that do not match a specific rule. When checking out if you do not have a rule for the default branch, default item and default patron category then you may see patrons getting blocked from placing holds.
Klavye Kısayolları
Question: Do I have to use my mouse to access the checkout, checkin and cataloging tabs at the top of the circulation pages?
Answer: You can jump between the tabs on the quick search box at the top of the screen by using the following hot keys (if the tab is available):
Alt+Q ile katalog aramaya geçin
Alt+U ile ödünç vermeye geçin
- bu, Mac kullanıcıları için çalışmayacaktır
Alt+R ile iade bölümüne geçin
Not
Mac kullanıcıları ALT yerine OPTION düğmesini kullanın
SMS Bildirimleri/İletileri
Question: I want Koha to send notices via SMS, what do I need to do?
Answer: First you need to choose a SMS service to use with Koha. There is a list available here: http://search.cpan.org/search?query=sms%3A%3Asend&mode=all Not all SMS services available to libraries have Perl drivers, so be sure to check this list to see if the provider you’re considering is listed. If not you want to ask your provider if they have a Perl module, if not you should consider another service. Some common options in the US (that have Perl drivers) are:
- AQL (www.aql.com)
- Wadja (wadja.com)
- Ipipi (ipipi.com)
- T-mobile
- SMSDiscount (smsdiscount.com)
- Clickatell
Question: What about in India?
Answer: India does not yet have too many options here. This is partly due to the Telecom regulatory authority’s (TRAI) stipulations about transactional SMSes and limits on the number of SMSes that may be sent / received per users per day. India specific drivers include:
- Unicel Technologies Pvt Ltd (unicel.in)
Kataloglama
Otorite Alanları
Question:Why can’t I edit 1xx, 6xx, or 7xx fields in my catalog record?
Answer: These fields are authority controlled and you probably have the BiblioAddsAuthorities set to “Don’t allow”. When it is set to “Don’t allow” these fields will be locked and require you to search for an existing authority record to populate the field with. To allow typing in these authority fields set BiblioAddsAuthorities to ‘Allow’.
Not
Bu tercih tarafından etkilenen alanlar içinde bir kilit simgesi gösterilir

Koha’dan MARC’a eşleştirme
Question: What’s the relationship between ‘Koha to MARC Mapping’ and ‘MARC Bibliographic Frameworks’?
Answer: Mapping can be defined through ‘MARC Bibliographic Frameworks’ OR ‘Koha to MARC Mapping’. ‘Koha to MARC Mapping’ is just a shortcut to speed up linkage. If you change a mapping in one of these modules, the mapping will change in the other as well. (In other words, the two modules ‘overwrite’ each other in order to prevent conflicts from existing in Koha).
Bibliyografik Kayıt başına materyal sayısı
Question: Is there a limit on the number of items I can attach to a bib record?
Answer: There is no explicit limit to the number of items you can attach to a bibliographic record, but if you attach enough of them, your MARC record will exceed the maximum file size limit for the ISO 2709 standard, which breaks indexing for that record. I’ve found this occurs somewhere between 600 and 1000 items on a ‘normal’ bibliographic record.
Analiz
Question: I am using the EasyAnalyticalRecords feature, but my links in the OPAC and Staff Client to ‘Show Analytics’ are not working.
Answer: If you plan on using EasyAnalyticalRecords you will want to make sure to set your UseControlNumber preference to “Don’t use,” this will prevent broken links.
Sağlama
Planlama Kategorileri
Question: What is a planning category?
Answer: When you plan in advance for the way your budget is going to be spent, you initially plan for how it’s going to be spent over time, that’s the most natural thing to do.
Böylece Ocak ayında $1000 olarak, Şubat ayında $1000 olarak, Mart ayında $3000, vb. olarak planlama yapıyorsunuz. Temelde ay yerine bir değerler listesi ile aynı şeyi yapabilirsiniz.
Bunun gibi bir listeniz olduğunuzu varsayalım:
- < 1 month
- < 6 months
- < 1 year
- < 3 years
- < 10 years
- > 10 years
The list is meant to represent when the books acquired where published. Then you plan for it, saying: we went to spend at list 40% of our budgets on books published less than a year ago, 10% on books more than 10 years old, etc.
Yeni materyali aldıktan sonra açılır menüdeki bu listeden belirli bir materyal için bir değer seçebileceksiniz. Daha sonra, materyalin alındığı yılın sonunda belirlediğiniz hedefleri karşılaştırmanız mümkün olacaktır.
Süreli Yayınlar
Gelişmiş Örüntüler
Question: What is the ‘inner counter’ on the advanced serials pattern interface?
Answer: I think it is better to give an example to understand this :
Bir aylık abonelik için örnek :
- İlk sayının yayınlanma tarihi: Nisan 2010
- Numaralandırma: No {X}, yıl {Y}
- İlk sayı: No 4, yıl 2010
Y yılı için: Ocak 2011 tarihinde yıl değişimi isteyeceksiniz
Yani, Y için gelişmiş örüntü şu şekilde olacaktır:
- Ekle: 1
- İnterval: 12
- 9999999’dan fazla olduğunda
- iç sayaç : 3
- Yeniden 0 olarak ayarlayın
- 2010 ile başlar
Nisan 2010’dan sonra 12 dergi sayısı aldıktan sonra yıl değişecek, yani iç sayacı ayarlamazsanız Nisan 2011’de. İç sayacı 3’e ayarlamak Koha’ya: 12-3 = 9 dergi sayısı aldıktan sonra yılı değiştirmesini söyleyecektir.
Koha ile alınmamış olsa bile, iç sayaç Koha’ya yılın ilk dergi sayılarını dikkate almasını söyler. Eğer yılın ilk dergi sayısı ile başlarsanız hiçbir şey yazmayın ya da 0 girin.
Raporlar
Veri tabanı içerisinde saklanan kodları tanımla
Para Cezaları Tablosu
Question: What do the codes in the accounttype field in the accountlines table stand for?
Answer:
- A = Hesap işletim ücreti
- C = Kredi
- F= Gecikme cezası
- FOR= Ceza silindi
- FU= Gecikme bedeli hala işliyor
- L = Kayıp materyal
- LR= Kayıp materyal iade edildi/ kayıp materyalin bedeli ödendi
- M= Muhtelif
- N = Yeni kart
- ÖDE = Ödeme
- W = Gecikme cezasını sil
İstatistikler Tablosu
Question:What are the possible codes for the type field in the statistics table?
Answer:
- localuse
- Kullanıcı istatistiğinde (kategori türü= ‘X’) ödünç verilmiş bir materyal iade edilmişse işlemi kayda geçer
- sayı
- İade
- Yenile
- Gecikme cezasını sil
- ödeme
- KrediXXX
- XXX farklı türde ücret kredileri depolar, bu nedenle bir sorgu hepsini yakalamak için “type LIKE ‘Credit%’” gibi bir yantümce içerir
Rezervler Tablosu
Question: What are the possible codes for the found field in the reserves and old_reserves tables?
Answer:
- BOŞ: bu kelime kullanıcının 1. kullanılabilir materyali istediğini ancak bu materyali kütüphane görevlisinin seçmediği anlamına gelir
- T= Aktarma: rezerv bir materyale bağlı fakat toplama birimine aktarım halinde
- W = Beklemede: Reserv bir materyale bağlı, alınacağı birimde ve ayırma rafında bekliyor
- F= Tamamlandı: rezerv tamamlandı ve yapıldı
Raporlar Sözlüğü Tablosu
Question: What are the possible codes for the area field in the reports_dictionary table?
Answer:
- 1 = Dolaşım
- 2 = Katalog
- 3 = Kullanıcılar
- 4 = Satın almalar
- 5 = Hesaplar
İletiler Tablosu
Question: What are the possible codes for the message_type field in the messages table?
Answer:
- L = Kütüphaneciler için
- B= Kullanıcılar/ Ödünç Alanlar İçin
Süreli Yayınlar Tablosu
Question: What are the possible codes for the status field in the serial table?
Answer:
- 1 = Beklenen
- 2 = Geldi
- 3 = Gecikmiş
- 4 = Kayıp
- 5 = Kullanılamaz
- 6 = Sil
- 7 = Claim edildi
- 8 = Durdu
- 41 = Yok (alınmadı)
- 42 = Yok (tükendi)
- 43 = Yok (hasarlı)
- 44 = Yok (kayıp)
Ödünç Alanlar Tablosu
Question: What are the possible codes for the privacy field in the borrowers table?
Answer:
- 0 = Sonsuza kadar
- 1 = Varsayılan
- 2 = Hiç
Mesajlaşma Tercihleri
Question: What are the possible codes in the message_attribute_id field in the borrower_message_preferences table?
Answer:
- 2 = gelişmiş bildirim
- 6 = materyal ödünç verme
- 4 = ayırtma onaylandı
- 1 = materyal iade tarihi
- 5 = materyal iade alma
Çalışma zamanı parametreleri
Question: Is there a way to filter my custom SQL reports before they run?
Answer: If you feel that your report might be too resource intensive you might want to consider using runtime parameters to your query. Runtime parameters basically make a filter appear before the report is run to save your system resources.
There is a specific syntax that Koha will understand as ‘ask for values when running the report’. The syntax is <<Question to ask|authorized_value>>.
- The << and >> are just delimiters. You must put << at the beginning and >> at the end of your parameter
- ‘Sorulacak soru’ girilecek metnin solunda görüntülenecektir.
- The authorized_value can be omitted if not applicable. If it contains an authorized value category, or branches or itemtype or categorycode or biblio_framework, a list with the Koha authorized values will be displayed instead of a free field Note that you can have more than one parameter in a given SQL Note that entering nothing at run time won’t probably work as you expect. It will be considered as “value empty” not as “ignore this parameter”. For example entering nothing for : “title=<<Enter title>>” will display results with title=’’ (no title). If you want to have to have something not mandatory, use “title like <<Enter title>>” and enter a % at run time instead of nothing
Örnekler:
SELECT surname,firstname FROM borrowers WHERE branchcode=<<Enter patrons library|branches>> AND surname like <<Enter filter for patron surname (% if none)>>
SELECT * FROM items WHERE homebranch = <<Pick your branch|branches>> and barcode like <<Partial barcode value here>>
SELECT title , author FROM biblio WHERE frameworkcode=<<Enter the frameworkcode|biblio_framework>>
Not
To generate a date picker calendar to the right of the field when running a report you can use the ‘date’ keyword like this: <<Enter Date|date>>
Not
Bir metin kutusuna ‘boş bırakmak için’ “%” yerleştirmelisiniz. Aksi halde alan değeri için gerçek anlamda “”(boş dizgi) arayacaktır.
Önemli
In addition to using any authorized value code to generate a dropdown, you can use the following values as well: Framework codes (biblio_framework), Branches (branches), Item Types (itemtypes) and Patron Categories (categorycode). For example a branch pull down would be generated like this <<Branch|branches>>

Kısıtlanmış Sonuçlar
Question: When I download my report it’s limited to 10,000 results, how do I get all of the results to download?
Answer: There is a limit of 10,000 records put on SQL statements entered in Koha. To get around this you want to add ‘LIMIT 100000’ to the end of your SQL statement (or any other number above 10,000.
Aranıyor
Gelişmiş Arama
Dizinleri Tara
Question: What does ‘scan indexes’ on the advanced search page mean?
Answer: When you choose an index, enter a term, click ‘scan indexes’ and do the search, Koha displays the searched term and the following terms found in this index with the number of corresponding records That is search is not made directly in the catalog, but first in the indexes It works only for one index at once, and only with no limit in Location (All libraries needed)
Bir karakter ile başlayan terimlerin aranması
Question: How do I search for all titles that start with the letter ‘C’?
Answer: You can choose to search for things that start with a character or series of characters by using the CCL ‘first-in-subfield’
- örnek: ti,first-in-subfield=C
Özel Sembol Arama
Question:What is the difference between a keyword search using the ‘*’ (asterisk) versus a keyword search using the ‘%’ (percent)? Both work in the catalog, but return different sets. Why?
Answer: A wildcard is a character (*,?,%,.) that can be used to represent one or more characters in a word. Two of the wildcard characters that can be used in Koha searches are the asterisk (‘*’) and the percent sign (‘%’). However, these two characters act differently when used in searching.
The ‘*’ is going to force a more exact search of the first few characters you enter prior to the ‘*’. The asterisk will allow for an infinite number of characters in the search as long as the first few characters designated by your search remain the same. For example, searching for authors using the term, Smi*, will return a list that may include Smith, Smithers, Smithfield, Smiley, etc depending on the authors in your database.
‘%’ işareti girdiğiniz kelimeleri “gibi” açısından değerlendirecektir. Yani Smi% olarak yapacağınız bir arama Smi gibi kelimeleri arayacaktır. Bu arama çok daha farklı sonuçlar listesiyle sonuçlanır. Örneğin Smi% üzerinde yapılan bir arama, Smothers, Smith, Smelley, Smithfield ve veri tabanınızda ne olduğuna bağlı olarak bunun gibi bir çok kelime içeren bir liste getirecektir.
The bottom line in searching with wildcards: ‘*’ is more exact while ‘%’ searches for like terms.
Eser Adı Arama
Question: Why does my Zebra title search for ‘Help’ not turn up ‘The help’ in the first pages of results?
Answer: When doing a title search, you actually want to search for the title (i.e., ‘the help’ rather than just ‘help’), and it will bubble right up to the top. If you’re just searching for ‘help’ then the relevance ranking is going to affect the results you see.
When it comes to relevance in Zebra, here’s what’s happening. First, the search is done. If you search for the title “help”, then any title that has “help” in it comes back. Then from those records, separately, it does relevance on the *whole* record. The more your word appears, the more relevant, and some MARC tags are worth more points than others. So a self-help book with 505 notes where “help” appears a *lot* will be at the top, regardless of keyword or title.
But when you add a *second word*, that helps it figure things out, as it’s weighing the relevance of both words and the phrase. Because of the way relevance works, if you search “the help”, then “the help” or “the help I need” are more relevant than “the way to help”, because they appear together in order. Likewise, “help the girl” would be lower relevance, because it’s out of order, and “help for the homeless” would be lower still, as they’re out of order, and apart.
Sözün özü, tek kelime arama, özellikle yaygın kelimelerde, daima biraz daha zahmetli olacaktır; çünkü yeterli veri vermediğiniz için aradaki alakayı çok iyi değerlendiremez.
Geliştirilmiş içerik
FRBRizing İçeriği
Question:At our public library we are running a Koha installation and we’ve tried to turn on all the nice functionalities in Koha such as the frbrising tool, but do not get the same result as Nelsonville public library.
Answer:In fact, this feature is quite tricky to make that right. First it looks at XISBN service. And then search in your database for that ISBN. So both XISBN and your internal ISBN (in biblio table) have to be normalized. You could therefore use the script misc/batchupdateISBNs.pl (it removes all the - in your local ISBNs)
Amazon
Tüm Amazon İçeriği
Question: I have all of the Amazon preferences turned on and have entered both of my keys, but none of the content appears in my system, why is that?
Answer: Amazon’s API checks your server time on all requests and if your server time is not set properly requests will be denied. To resolve this issue be sure to set your system time appropriately. Once that change in made Amazon content should appear immediately.
On Debian the the command is date -s “2010-06-30 17:21” (with the proper date and time for your timezone).
Sistem Yönetimi
Zebra Cron içerisindeki hatalar
Question: I am noticing some errors in the koha-zebradaemon-output.log file. When new records are added it takes a bit longer to index than we think they should. Running rebuild zebra is often faster. Zebra ends up indexing and search works, but I am concerned about the errors. Any ideas?
Answer: Rebuild_zebra.pl -r deletes all of the files in the Zebra db directories (such as reci-0.mf) and then recreates them. Thus, permissions will be lost, and the files will be owned by the user who ran rebuild_zebra.pl. If one rebuilds the zebra indexes as root, the daemons, which typically run under the user Koha, will not be able to update the indexes. Thus, it’s important then that the zebra rebuilds are put in the cronjob file of the user Koha, and not root. Also important is that other users, such as root, don’t manually execute rebuilds.
If one desires that another user be able to execute rebuild_zebra.pl, he should be given the permission to execute ‘sudo -u Koha …/rebuild_zebra.pl,’ (if you want to do this, you also have to edit the sudoers file to pass the PERL5LIB variable with the env_keep option as by default sudo strips away almost all environment variables). Or, as root user, one can use a simple ‘su koha’ and then the rebuild_zebra.pl command.
I’ve also tried to set the sticky bit on rebuild_zebra.pl, but for whatever reason it didn’t seem to work due to some problem with the PERL5LIB variable that I wasn’t able to figure. That seems to me the easiest thing to do, if anybody has any idea how to make it work. If it worked and were the default, I think it would help folks to avoid a great deal of the problems that come up with zebra.
Z39.50 hizmetini genel erişime açmak
Question: Could someone tell me the exact steps I need to take to configure Zebra to expose my Koha 3 db as a public Z39.50 service?
Answer: Edit the KOHA_CONF file that your Koha is using. Uncomment the publicserver line like:
<!– <listen id=”publicserver” >tcp:@:9999</listen> –>
olması için:
<listen id=”publicserver” >tcp:@:9999</listen>
Sonra zebasrv’ı yeniden başlatın ve belirtilen port (9999) üzerine bağlanın.
Raf Yeri Otorize Değerleri
Question: When editing an item, the new shelving location I created is not showing up by default in the items where I assigned it to.
Answer: This is because you created the new shelving location with a code value of 0 (zero) Just FYI the system interprets authorized values of 0 as equaling a null so when you edit a record in cataloging where the authorized value in a field was assigned where the code was 0, the value displays as null in the item editor (or MARC editor) instead of the value the library meant it to be.
Neden Otorize Değerlere ihtiyacım var?
Question: Why would I want to define authorized values for MARC tags?
Cevap: Otorize Değerler personeliniz için ‘kontrollü bir sözlük’ oluşturur. Örneğin eğer Koha kurulumunuz çeşitli kütüphaneler tarafından kullanılıyorsa ve siz MARC21 kullanıyorsanız, 850a MARC alt alanını bu kütüphaneler için belirlenmiş kurum kodlarına ayırabilirsiniz. Bu durumda, (belki “KURUM” adı vereceğiniz) yeni bir onaylanmış değer kategorisi belirleyebilir ve kurum kodlarını onaylanmış değerler olarak girebilirsiniz.MARC alanları yapınızda 850a alt alanı, KURUM onaylanmış değerler kategorisine bağlanınca katalogcularınızın burada belirlediğiniz listeden seçim yapması gerekir ve başka bir değer giremezler.
Not
Koha, otorize değer kategorilerini materyal türleriniz ve birim kodlarınız için otomatik olarak ayarlar, ve MARC tag yapısını ayarladığınızda bu otorize değerleri MARC alt alanlarına bağlayabilirsiniz.
Oturumlar tablosunu nasıl temizlerim?
Soru: Tablodan eski oturumları boşaltmak için çalıştırılabilecek düzenli bir iş var mı? Her gece tüm gereksiz oturum verilerini yedeklemek istemiyoruz.
Answer: You can run cleanup database cron job.
Or just before doing a backup command (mysqldump), you can truncate session table:
mysql -u<kohauser -p<password <koha-db-name -e 'TRUNCATE TABLE sessions'
Donanım
Barkod Tarayıcılar
Question: What barcode scanners have been known to work with Koha?
Answer: The simple rule of thumb is, does it act like a keyboard device?, if so, it will work. (i.e. can you take the scanner, scan a barcode and have it show up in a text editor, if so, it will work.)
Bilgisayarınıza bağlanan önemli kontrol noktaları vardır (USB ya da eski bilgisayarlarda faydalı olacak klavye ile paralel olarak bağlanan “klavye konektörü” olabilir ), ve kullandığınız barkod türünü tarar.
Eğer varsa bazı ‘kullanılmış’ barkodları, barkod tarayıcının eskimiş ya da hafif buruşmuş barkodları başarılı bir şekilde tarayıp tarayamayacağını görmek için test etmek iyi bir fikirdir. Çoğu tarayıcı birden fazla barkod türlerini okuma yeteneğine sahiptir - çok sayıda var, ve şartnamenin barkod tarayıcının okuyabileceklerini listelemesi gerekir. Önek ve sonek karakterleri veya bir ‘giriş’ karakteri göndermek isteyip istemediğiniz gibi gibi bazı parametreleri ayarlamanız gerekebilir.
Bir ipucu daha - Bazı tarayıcılar ‘her zaman açık’ olmalıdır ve bir taşıyıcı ile gelebilir; bazılarının kolu altında küçük tetikleyiciler vardır, bazılarının üstüne düğmeler vardır, bazıları kalem gibi tutulur. Seçim yapmadan önce bu donanımı kullanacak personeli düşünün, yanlış yerdeki bir düğme çalışmak için oldukça sıkıntı verebilir.
Yazıcılar
Koha kütüphaneleri tarafından kullanılan yazıcılar
- POS-X makbuz yazıcılar
- Genel/düz metin sürücüsü ile Star Micronics yazıcı (tam model bilinmiyor).
- Star SP2000 (Nelsonville)
- Star TSP-100 futurePRINT (Geauga)
- “Makbuz yazıcıları ile ilgili birçok soru olduğunu gördüm ve bu yazıcılarla ilgili kendi deneyimlerimi aktarmak istedim. Star TSP-100 futurePRINT yazıcısını test etmekteyiz. Bu yazıcıyı Koha için yapılandırmak gerçekten ÇOK kolay oldu. Hatta her makbuzun üzerine kendi sistem logomuzu (bir .gif uzantısı) ekleyerek yazdırma işini bile özelleştirmem mümkün oldu. Ayrıca Paint’de oluşturduğunuz bir bit eşlem ile her makbuzun en altına materyallerin ödünç alındığı kütüphane için iletişim bilgileri, çalışma saatleri ve web sayfası bilgilerini ekleyebildim.”
- Epson TM 88 IIIP termal makbuz yazıcılar
- Epson TM-T88IV
- Dymolabelwriter yazıcı kullanan 1 x 1 etiketler
Braille Desteği
Question: Are there any braille embosser or printer which has inbuilt braille converter and it is accessible with UNIX environment?
Answer: You may want to look into BRLTTY (http://www.emptech.info/product_details.php?ID=1232).
Koha’yı Genişletmek
Koha kütüphaneleri için Amazon arama komut dosyası
Materyallerimizin bir çoğunu Amazon’dan sipariş ediyoruz, bu nedenle alınması düşünülen bir kitabın zaten kataloğumuzda mevcut olup olmadığını söylemek için uygun bir yol arıyorum.
Greasemonkey & a custom user script fit the bill nicely:
Bazı uyarılar:
- Çoğu komut dizisi gibi bu da Firefox ile çalışmak için tasarlanmıştır; diğer web tarayıcılarda nasıl çalıştırılacağını araştırmadım.
- Ben bir JavaScript programcısı değilim - Bu başkalarının çalışmasından uyarlanmıştır. Komut dizisinin kataloğunuzla birlikte çalışması için yalnızca bir kaç satırın değiştirilmesi gerekiyor.
- Söz konusu materyal için ISBN numarasının mevcut olmasına bağlıdır, bu nedenle filmler, eski kitaplar, vb. çalışmayabilir.
Others have added all sorts of bells & whistles: XISBN lookups to search for related titles, custom messages based on the status of items (on order, on hold, etc.), … just search the UserScripts site for Amazon + library. For a later date!
Anahtar Kelime Bulutları
Koha mevcut geleneksel tag bulutuna ek olarak, Koha içindeki popüler konular için bulut oluşturmak için bir yol vardır.
The Author/Subject Cloud cron job is used to help with this process. This cron job sends its output to files.
- /home/koha/mylibrary/koharoot/koha-tmpl/cloud-author.html
- /home/koha/yourlibrary/koharoot/koha-tmpl/cloud-subject.html
This means that you can produce clouds for authors, collective author, all kind of subjects, classifications, etc. And since it works on zebra indexes, it is quick, even on large DBs. Tags clouds are sent to files. It’s up to library webmaster to deal with those files in order to include them in OPACMainUserBlock, or include them into their library CMS.
Hatta bazı kütüphaneler dosyayı, ağ yöneticilerinin nihayetinde bu dosyaları navigasyon widget ya da sayfaları içine entegre etmeden önce bir miktar temizlik yaptıkları Samba paylaşımlı klasörlere göndermektedirler.
En Yeni Başlıklar Açılır Menüsü
Çoğu kez kullanıcılarımızın en yeni materyaller için arama yapmaları için bir yol eklemek isteriz. Bu örnekte size materyal türüne göre en yeni materyallerin bir açılır menüsünün nasıl oluşturulacağını göstereceğim. Bu ipuçları (bir kaç değişiklik ile birlikte) koleksiyon kodları ve raf konumları için de işe yarayacaktır.
İlk olarak, Koha içerisinde yer alan her bağlantının kalıcı bir bağlantı olduğunu unutmamak gerekir. Bu, satın alma tarihine göre sıralanmış bir spesifik materyal ile ilgili herşeyi aradığımda ve bu URL’yi bookmark ettiğimde, bu bağlantı üzerine her tıkladığımda sonuçlar sayfasının ilk bir kaç sayfasında bu türdeki materyalleri göreceğim anlamına gelir.
Bu bilgiyi aldım ve bu işlevselliği dikkate alan bir form yazdım. Temelde sadece bir spesifik materyal türü için Koha kataloğunuzda bir arama yapar ve sonuçları satın alma tarihine göre sıralar.
Yaptığım ilk şey kendi materyal türlerimin bir listesini oluşturmak için bir MySQL ifadesi yazmak oldu - MySQL’in gücünü kullanabilirken neden kopyala yapıştır yapayım ki?
select concat('<option value=\"mc-itype:', itemtype, '\">',description,'</option>') from itemtypes
Yukarıdaki örnek materyal türleri tablosuna bakar ve gerekli HTML’leri her materyal türü etrafına ilave eder. Daha sonra bunları CSV olarak aktardım ve kendi metin editöründe açtım ve formun diğer bölümlerine ekledim.
<p><strong>New Items</strong></p>
<p><form name="searchform" method="get" action="/cgi-bin/koha/opac-search.pl">
<input name="idx" value="kw" type="hidden">
<input name="sort_by" value="acqdate_dsc" type="hidden">
<input name="do" value="OK" type="hidden">
<select name="limit" onchange="this.form.submit()">
<option>-- Please choose --</option>
<option value="mc-itype:BOOK">Book</option>
<option value="mc-itype:BOOKCD">Book on CD</option>
<option value="mc-itype:DVD">DVD</option>
<option value="mc-itype:LRG_PRINT">Large print book</option>
<option value="mc-itype:MAGAZINE">Magazine</option>
<option value="mc-itype:NEWSPAPER">Newspaper</option>
<option value="mc-itype:VIDEO">Videocassette</option>
</select>
</form>
</p>
Şimdi, bütün bunlar ne anlama geliyor? Önemli kısımlar şunlardır:
İlk önce formun başlangıcı.
<p><form name="searchform" method="get" action="/cgi-bin/koha/opac-search.pl">
Bu işlem web tarayıcısına seçtiğiniz her hangi bir değeri alıp bu web adresinin sonuna koymasını söyler http://YOURSITE/cgi-bin/koha/opac-search.pl. Bu formu kütüphane web sayfanız ile katıştırmak istiyorsanız (OPAC ile katışmayacak) tam OPAC URL’sini buraya koyabilirsiniz.
Sonra, arama işlemine sıralamayı satın alma tarihine göre azalan değerde (en yeni materyaller en üstte yer alacak şekilde ) yapmasını söyleyen gizli bir değer var:
<input name="sort_by" value="acqdate_dsc" type="hidden">
Ve nihayet kullanıcılarınızın aramasını istediğiniz her materyal türü için bir seçeneğiniz vardır.
<option value="mc-itype:BOOK">Book</option>
Bu seçeneklerin her birisi Koha’ya materyal türü araması yapmasını söyleyen “mc-itype:” dizgesini içerir.
Once you have all of that in place you can copy and paste the form to somewhere on your OPAC. The Farmington Public Libraries OPAC has a few examples of this on the left.
Renge göre kataloglama ve arama
Koha içinde yüklü simge setlerinden bir tanesi renkleri içerir. Eğer isterseniz bu set kataloglama ve renge göre arama yapmak için kullanılabilir. Bu rehber size bunu yapabilmeniz için Koha’da koleksiyon kodunu renge değiştirmenin yolunu gösterecektir.
Aşağıdaki SQL, bir toplu CCODE otorize değer kategorisine bu renkleri eklemek için kullanılabilir. Bu renkleri için başka bir yetkili değer için kullanmak istiyorsanız bu kategoriyi kullanmak için bu düzenleme gerekir:
insert into authorised_values (category, authorised_value, lib,
 lib_opac, imageurl) values ('CCODE','000000','Black','','colors/000000.png');
insert into authorised_values (category, authorised_value, lib,
 lib_opac, imageurl) values ('CCODE','66cc66','Bright Green','','colors/66cc66.png');
insert into authorised_values (category, authorised_value, lib,
 lib_opac, imageurl) values ('CCODE','99cc33','Olive','','colors/99cc33.png');
insert into authorised_values (category, authorised_value, lib,
 lib_opac, imageurl) values ('CCODE','3333cc','Dark Blue','','colors/3333cc.png');
insert into authorised_values (category, authorised_value, lib,
 lib_opac, imageurl) values ('CCODE','006600' ,'Dark Green','','colors/006600.png');
insert into authorised_values (category, authorised_value, lib,
 lib_opac, imageurl) values ('CCODE','6600cc','Plum','','colors/6600cc.png');
insert into authorised_values (category, authorised_value, lib,
 lib_opac, imageurl) values ('CCODE','6666cc','Purple','','colors/6666cc.png');
insert into authorised_values (category, authorised_value, lib,
 lib_opac, imageurl) values ('CCODE','9999cc','Light Purple','','colors/9999cc.png');
insert into authorised_values (category, authorised_value, lib,
 lib_opac, imageurl) values ('CCODE','660000' ,'Burgundy','','colors/660000.png');
insert into authorised_values (category, authorised_value, lib,
 lib_opac, imageurl) values ('CCODE','663333' ,'Brown','','colors/663333.png');
insert into authorised_values (category, authorised_value, lib,
 lib_opac, imageurl) values ('CCODE','990000' ,'Red','','colors/990000.png');
insert into authorised_values (category, authorised_value, lib,
 lib_opac, imageurl) values ('CCODE','996633' ,'Tan','','colors/996633.png');
insert into authorised_values (category, authorised_value, lib,
 lib_opac, imageurl) values ('CCODE','999999' ,'Gray','','colors/999999.png');
insert into authorised_values (category, authorised_value, lib,
 lib_opac, imageurl) values ('CCODE','cc66cc','Pink','','colors/cc66cc.png');
insert into authorised_values (category, authorised_value, lib,
 lib_opac, imageurl) values ('CCODE','cc99cc','Bubble Gum','','colors/cc99cc.png');
insert into authorised_values (category, authorised_value, lib,
 lib_opac, imageurl) values ('CCODE','cc3333' ,'Orange','','colors/cc3333.png');
insert into authorised_values (category, authorised_value, lib,
 lib_opac, imageurl) values ('CCODE','cc6666' ,'Peach','','colors/cc6666.png');
insert into authorised_values (category, authorised_value, lib,
 lib_opac, imageurl) values ('CCODE','cc9999' ,'Rose','','colors/cc9999.png');
insert into authorised_values (category, authorised_value, lib,
 lib_opac, imageurl) values ('CCODE','cccc00' ,'Gold','','colors/cccc00.png');
insert into authorised_values (category, authorised_value, lib,
 lib_opac, imageurl) values ('CCODE','ffff33' ,'Yellow','','colors/ffff33.png');
insert into authorised_values (category, authorised_value, lib,
 lib_opac, imageurl) values ('CCODE','ffffcc','Cream','','colors/ffffcc.png');
insert into authorised_values (category, authorised_value, lib,
 lib_opac, imageurl) values ('CCODE','ffffff','White','','colors/ffffff.png');
If you would like to choose the colors manually you can do that via the Yetkili Değerler administration area.
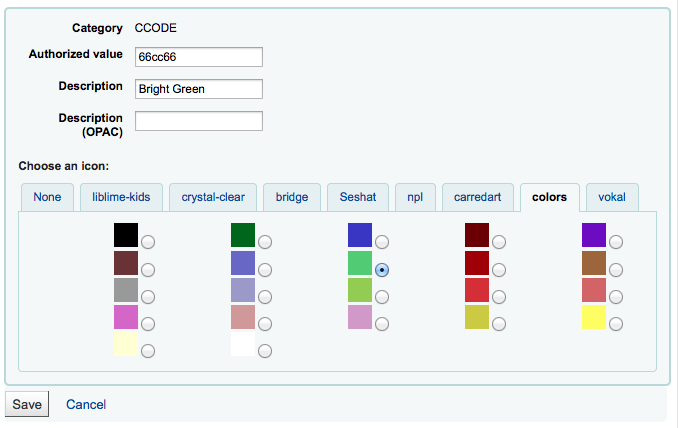
Next you’ll want to update the frameworks so that the 952$8 (if you’re using collection code) label to says Color.
Bunu bir kez yerleştirdikten sonra materyalleri renge göre kataloglamaya başlayabilirsiniz.
Son olarak aşağıdaki JQuery’i tercihlerinize ekleyin, böylece ‘Koleksiyon’ etiketi ‘Renk’ olarak yeniden etiketlendirilecektir
$(document).ready(function(){
    $("#advsearch-tab-ccode a:contains('Collection')").text("Color");
    $("#holdings th:contains('Collection')").text("Color");
    });
$(document).ready(function(){
    $("#advsearch-tab-ccode a:contains('Collection')").text("Color");
    $('#item_ccode').text("Color");
    });
Koha ve Web sayfanız
Bu ependiks, kütüphane web sayfanıza Koha entegre etmeniz ile ilgili ipuçları içerecektir.
Web sitenizde Koha arama
Genellikle kütüphane web sitenize bir Koha arama kutusu eklemek isteyeceksiniz. Bunu yapmak için sadece aşağıdaki kodu kopyalayıp kütüphane web sitenize yapıştırın ve YOURCATALOG bit’ini kataloğunuzun URL’si ile güncelleyin ve başlamak için hazırsınız.
<form name="searchform" method="get" action="http://YOURCATLOG/cgi-bin/koha/opac-search.pl" id="searchform">
<input id="transl1" name="q" type="text"><p>
<select name="idx" id="masthead_search">
<option value="kw">Keyword</option>
<option value="ti">Title</option>
<option value="au">Author</option>
<option value="su">Subject</option>
<option value="nb">ISBN</option>
<option value="se">Series</option>
<option value="callnum">Call Number</option>
</select>
<input value="Search" id="searchsubmit" type="submit">
</p></form>