Kataloglama¶
Before you start cataloging in Koha you’re going to want to do some basic setup. Refer to the Uygulama Kontrol listesi for a full list of these things. Most importantly you’re going to want to make sure that your MARC Bibliyografik Çerçeveleri are all defined the way you want. Once in the cataloging module you will not be able to add or remove fields and subfields so your frameworks must be ready before you start cataloging.
You can also use OCLC Connexion to send records directly in to Koha. For more information on that please review the OCLC Connexion Gateway setup Appendix.
- Get there: More > Cataloging
Bibliyografik Kayıtlar¶
In Koha the bibliographic record contains the main information related to the material. This includes things like the title, author, ISBN, etc. This information is stored in Koha in Marc (different flavors of Marc are supported in Koha). Once this information is saved, Materyal Kayıtları can be attached.
Kayıt Ekleme¶
Kayıtlar Koha’ya orijinal ya da kopya kataloglama yoluyla eklenebilir. Aynı zamanda temel ya da gelişmiş kataloglama arayüzünü tüm çalışmanız için kullanmayı seçebilirsiniz.
Bir kaydı temel düzenleyici içindeki bir boş şablonu kullanarak kataloglamak isterseniz
‘Yeni Kayıt’ a tıklayınız
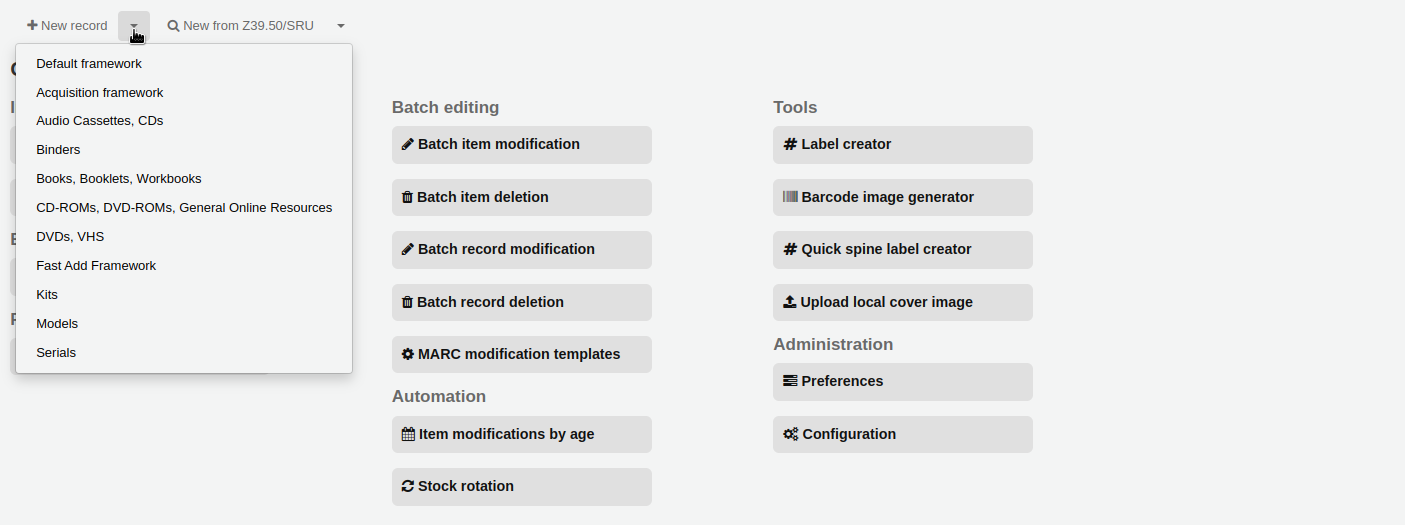
- Kaydınızı temellendirmek istediğiniz çerçeveyi seçin
Bir kaydı gelişmiş düzenleyici içindeki bir boş şablonu kullanarak kataloglamak isterseniz
- Enable the EnableAdvancedCatalogingEditor preference
- Click the ‘Advanced editor’ button

En son kullandığınız düzenleyicideki başka bir kitaplıktaki mevcut bir kaydı temel alan bir kaydı kataloglamak isterseniz (temel veya gelişmiş)
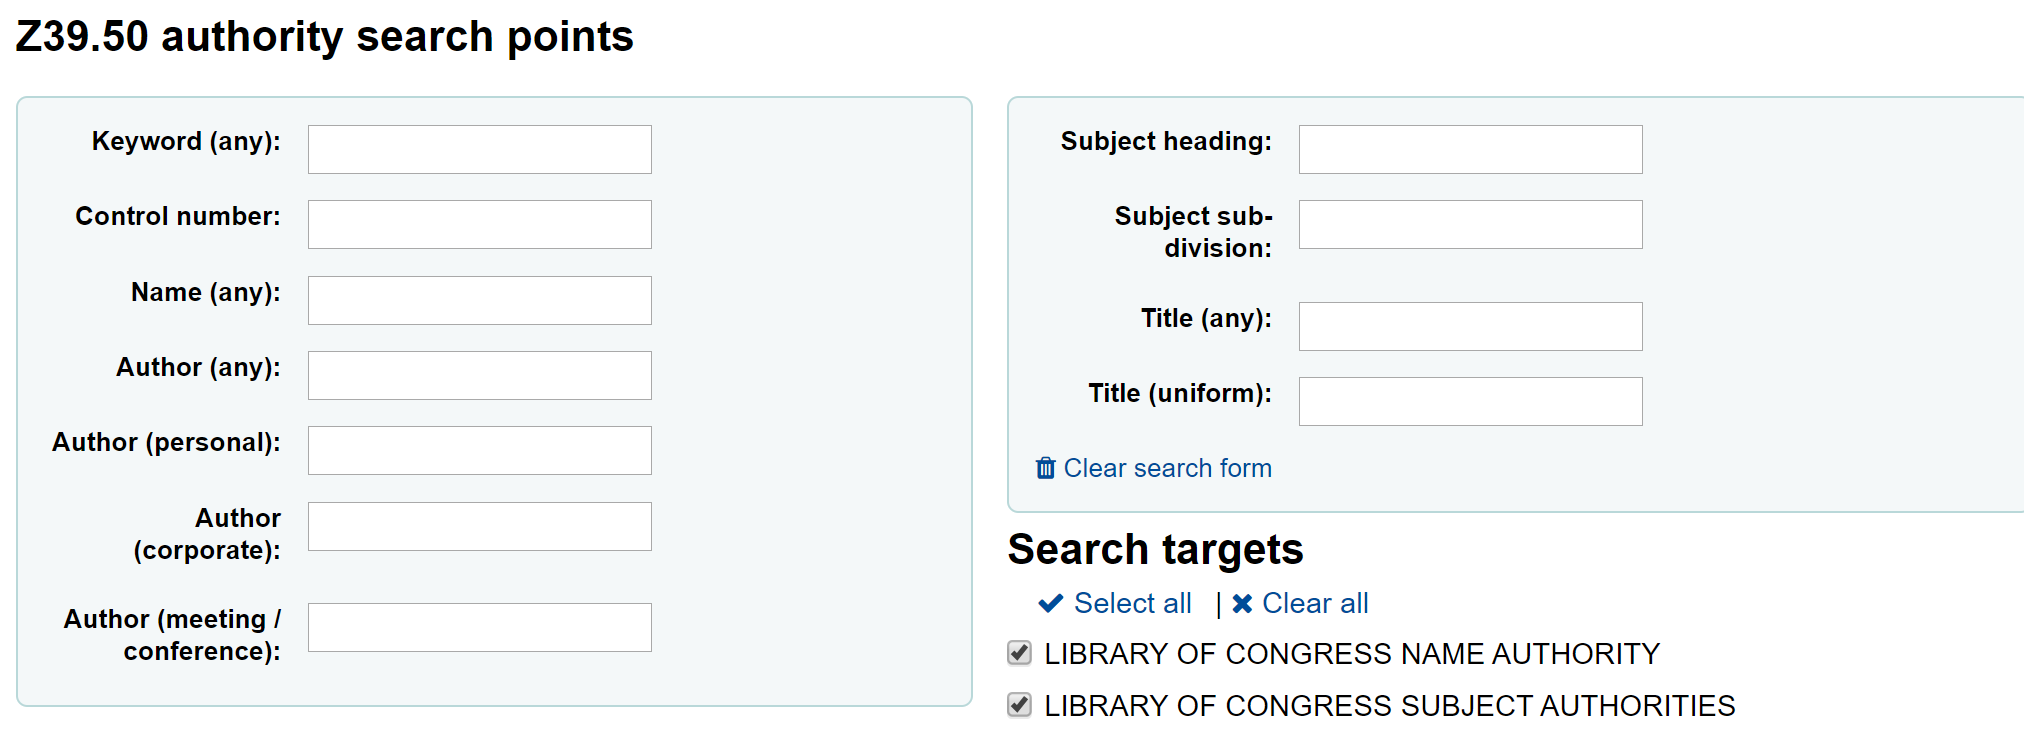
‘Z39.50/SRU’dan Yeni’ üzerine tıklayın
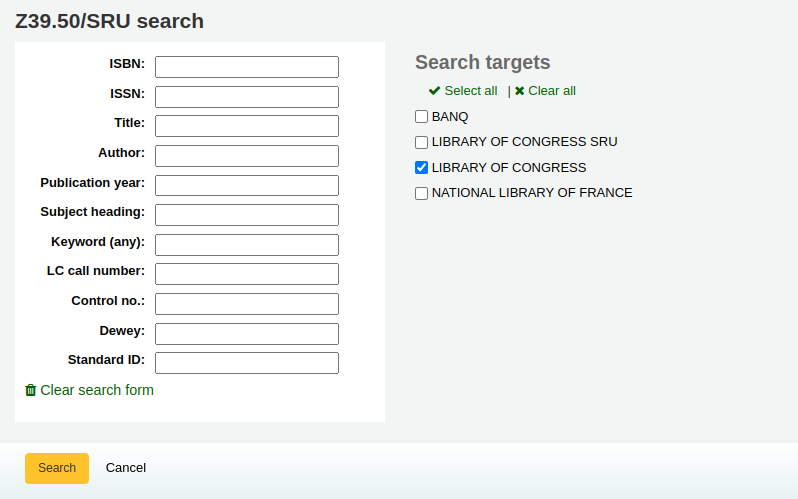
Kataloglamak istediğiniz materyal için arama yapın
Not
Eğer hiç bir sonuç bulunamazsa daha az alanlar için arama yapmayı deneyin, Bazı Z39.50 hedefleri, yukarıdaki alanların tümü için arama yapamayabilir.
Search targets can be altered by using the Z39.50 Admin area.
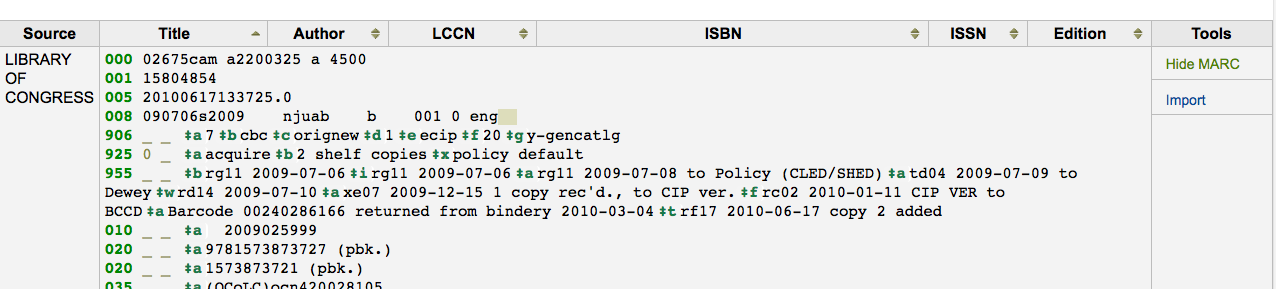
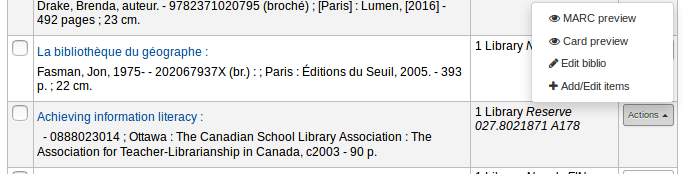
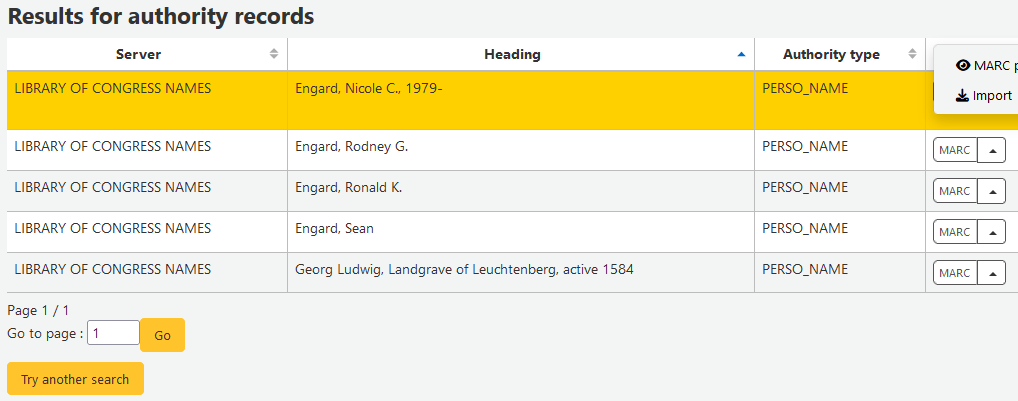
Arama sonuçlarından MARC ya da Kart görünümünü açabilir veya Koha’ya aktarmayı seçebilirsiniz
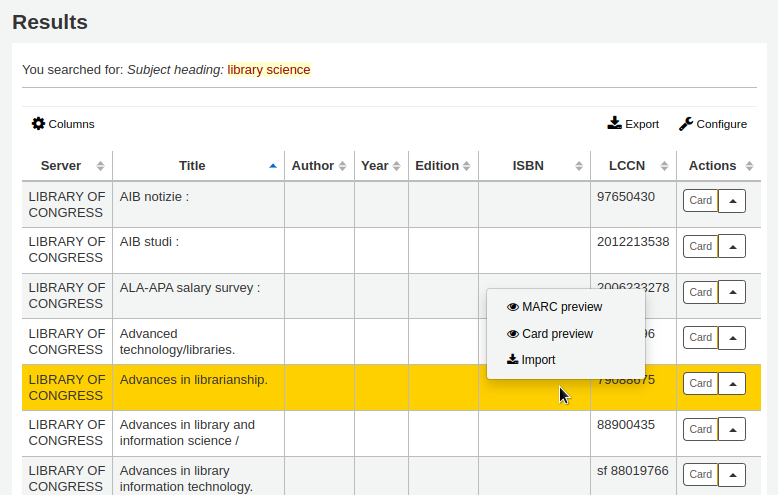
Her başlığın sağındaki ‘İçe aktar’ bağlantısına ek olarak, ilgilendiğiniz başlık üzerine tıklayabilirsiniz. Böylece kaydı görüntülemek ve içe aktarmak için bir menü açılacaktır.

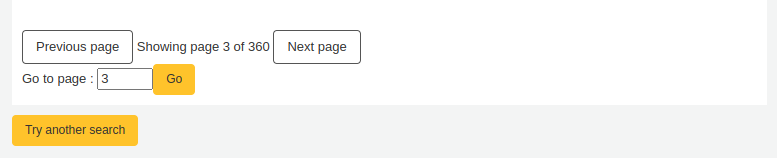
Z39.50 arama sonuçlarınızda ihtiyacınız olan başlığı bulamıyorsanız, sonuçlarınızın sol altındaki ‘ Diğer aramayı dene’ butonuna tıklayabilirsiniz.
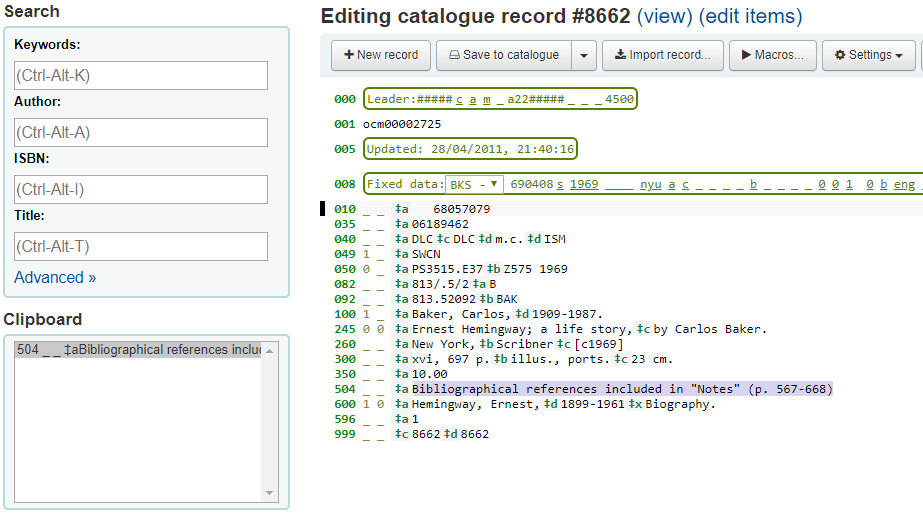
Basic Editor Cataloging¶
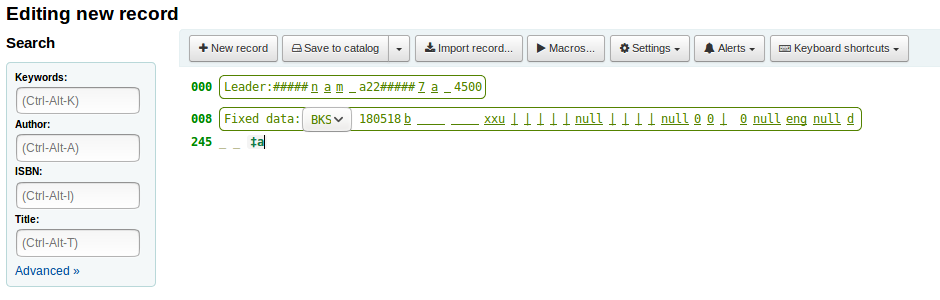
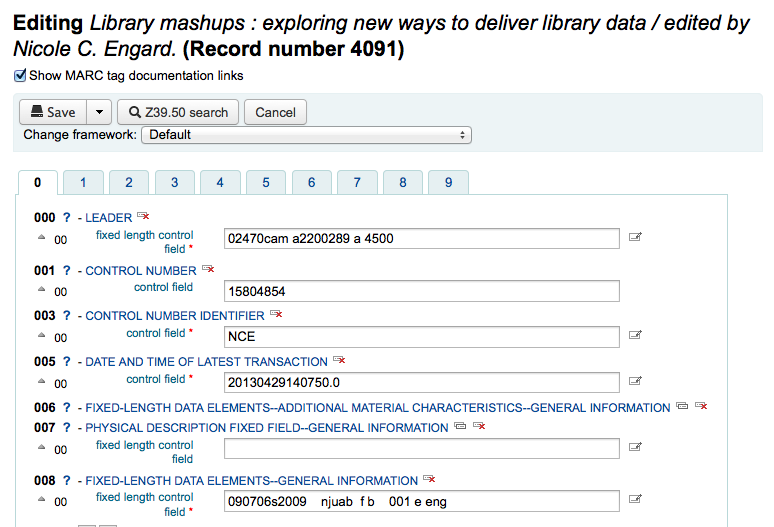
Temel düzenleyicide boş bir çerçeve açtığınızda ya da Z39.50 yoluyla kayıt aktardığınızda, size kataloglamaya devam etmeniz için bir form sunulacaktır

If you would rather not see the MARC tag numbers you can change the value in your hide_marc system preference or each user can check the box next to ‘Show tags’ found under ‘Settings’.
Daraltılmış bir etiketi açmak için etiket tanımına tıklayın.
Bir Marc tag’i üzerinde Kongre Kütüphanesi’nden yardım almak için, her alan numarasının sağındaki soru işaretine (?) tıklayın
- Bunun ekranı karıştırdığını düşünüyorsanız, ‘Ayarlar’ bölümünde bulunan ‘MARC tag dokümantasyon bağlantılarını göster’ notunun yanındaki kutunun işaretini kaldırarak soru işaretlerini gizleyebilirsiniz.
Sometimes fields may not be editable due to the value in your BiblioAddsAuthorities system preference. If you have this preference set to not allow catalogers to type in fields controlled by authorities you may see a lock symbol to the left of the field.

Bu ikon ekrana gelirse, mevcut otoriteyi aramak için alanın sağındaki ikona tıklamanız gerekir.
Sonuçlar listesinden, bu sonucu katalog kaydına taşımanız için ‘Otorite seç’e tıklayın.

Bir alanı çoğaltmak için tag’in sağındaki ‘bu tag’i yinele’ simgesi üzerine tıklayın

Alt alanları doğru bir düzene sokmak için, yukarı oku alanın soluna tıklayın.
Bir alt alanı çoğaltmak için alanın sağındaki kopyala simgesine tıklayın. (Kopyalanmış bir alanı kaldırmak için kopyayı sil simgesine tıklayın )
Bir alt alanı kaldırmak için, (aynı türden birden fazla mevcutsa ), alanın sağındaki - (eksi işaretine)tıklayın.
Bir eklenti kullanmak için alanın sağındaki simge üzerine tıklayın
Bazı sabit alanların katalogladığınız materyal tipine bağlı olarak (örneğin 006 ve 008 alanları) değişecek metin düzenleyicileri mevcuttur.
Bitirdikten sonra, en üstteki ‘Kaydet’ düğmesine tıklayarak oluşturduğunuz bib. kaydı görüntülemek ve kaydetmek veya kayda bağlı materyaller ekleme/düzenleme yapmaya devam etmek isteyip istemediğinizi seçin
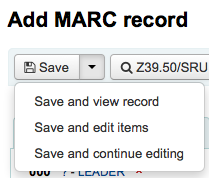
- ‘Kaydı kaydet ve göster’ seçeneği sizi kataloglamış olduğunuz son kayda götürecektir
- ‘Materyalleri kaydet ve düzenle’ seçeneği size materyal ekle/düzenle formu getirecektir böylece kaydı kaydettikten sonra ayırma ekleyebileceksiniz
- Choosing ‘Save and continue editing’ will allow you to save your work so far and keep you in the editor to continue working
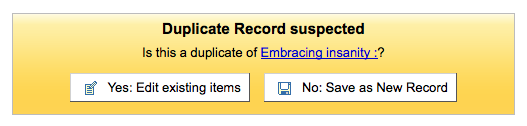
Sisteme dublike kaydı eklemek üzereyseniz, kaydetmeden önce uyarılacaksınız.
Advanced Editor Cataloging¶
In order to use the Advanced cataloging editor you need to enable the EnableAdvancedCatalogingEditor preference.
Önemli
Bu özellik şu anda deneyseldir ve kayıtların bozulmasına neden olabilecek hataları olabilir. Ayrıca UNIMARC veya NORMARC sabit alanları için herhangi bir destek içermez. Lütfen bunu test etmemize yardımcı olun ve karşılaştığınız program hatalarını bize gönderin, ancak tüm risklerin size ait olduğunu unutmayın.
In the advanced editor once you’ve opened a blank framework or imported a record via Z39.50 you will be presented with the form to continue cataloging
Soldaki arama kutusunu kullanarak Z39.50 aramaları gerçekleştirebilirsiniz

Ve bu Z39.50 sonuçlarında, sağdaki bağlantıyı tıklayarak marc kaydını görüntüleyebilirsiniz
‘İçe Aktar’ı tıkladığınızda, düzenlemeyi düzenleme yapabileceğiniz editöre götürürsünüz
Not
Gelişmiş Düzenleyiciye yeni bir alan eklerken boş bir gösterge için alt çizgiyi tuşlamanız ve göstergeleri boşluklarla çevrelemeniz gerekir.
Not
İlk alt alan sınırlayıcıdan önce bir boşluk tuşlamanız gerekir, ancak alanda diğer alt alan sınırlayıcılarının öncesinde veya sonrasında bir boşluk bırakmanız gerekmez.
Editörün altında, bulunduğunuz alan için Kongre Kütüphanesi’nden yardım göreceksiniz. MARC’nızın geçersiz olduğu durumlarda, kırmızı vurgulama görürsünüz. Kaydı yalnızca klavye işlevlerini kullanarak düzenlemek için, Klavye kısayolları düğmesi gerekli komutları size bildirecektir
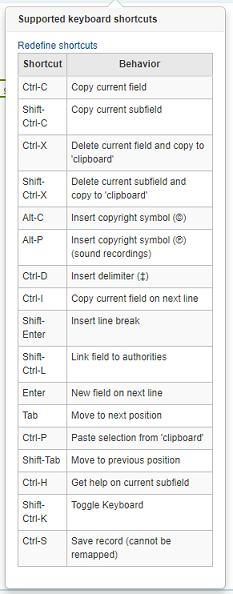
Advanced Cataloging Keyboard Shortcuts¶
Aşağıdaki klavye kısayolları, tıklama ve zamandan kazanmak için gelişmiş kataloglama modülünde kullanılabilir.
| Kısayol | Davranış |
|---|---|
| Ctrl-D | Sınırlayıcı ekle (‡) |
| Ctrl-H | Geçerli alt alan hakkında yardım alın |
| Ctrl-S | Kaydı kaydet |
| Ctrl-X | Mevcut alanı sil |
| Ctrl-Shift-X | Geçerli alt alanı sil |
| Giriş | Bir sonraki satırda yeni alan |
| Shift-Enter | Satır sonu ekle |
| Sekme | Bir sonraki konuma taşı |
| Shift-Tab | Bir önceki konuma taşı |
Macros in Advanced Cataloging¶
Yeni bir makro kaydetmek için:
- Select the “> Macros…” button
- Bir pencere açılacaktır. Bu pencerede, “Yeni makro…” seçeneğini seçin ve açılan kutuya yeni makronun adını girin ve Tamam’ı seçin.
- Şimdi küçük sayı 1’in sağına tıklayın ve makronuzun ilk satırını tuşlayın. Çok satırlı, yani çok alanlı bir makro için, enter tuşuna basın böylece küçük bir 2 sayısı görünür, ve ikinci satır/alan vb. Tuşlayın.
- Makrolarınız otomatik olarak kaydedilecektir. İşlemi tamamladığınızda pencereyi kapatmak için “x” i seçebilirsiniz veya düzenlediğiniz kayıtta çalıştırılacak bir makro seçin veya çalıştırmak için başka bir makro seçin.
Mevcut bir makroyu düzenlemek için:
- Select the “> Macros…” button
- A window will pop up. In this window, select the macro that you wish to edit & make your changes.
- Çalışmanız otomatik olarak kaydedilecektir ve işiniz bittiğinde pencereyi kapatmak için “x” i seçebilirsiniz veya düzenlediğiniz kayıtta çalıştırmak için bir makro seçin veya çalıştırmak için başka bir makro seçin.
Makro dilinin temel söz dizimi:
- yeni 500=‡aRancor ile düzenlenmiş
- ‡a alt alanı olan yeni bir 500 oluşturur ve onu “Rancor ile Düzenlendi” olarak ayarlar.
- 245c= by J.K. Rowling.
- Kayıttaki ilk 245 etiketinin ilk ‡c alt alanını, “J.K. Rowling tarafından” olarak ayarlar ve gerekirse onu oluşturur.
- 082a={084a}
- İlk 082 tag’inin ‡a alt alanını (gerekirse alt alanı oluşturarak) ilk 084‡a’nın içeriğine ayarlar.
- indicators=_1
- Sets the indicators of the last mentioned tag (in this case, 082) to “_” and “1”.
- yeni 090a=Z674.75.W67
- İlk 090’da yeni bir ‡a alt alanı oluşturur (sadece o alan zaten varsa) ve onu Z674.75.W67 olarak ayarlar.
- sonuna yeni 090a=Z674.75.W67
- Yukarıdaki ile aynı.
- yeni 245b sonra a = a tale of might and magic /
- İlk a alt alanının ardından yeni bir ‡b oluşturur ve onu “a tale of might and magic /” öğesine ayarlar.
- 245b alanını sil
- İlk 245’teki ilk ‡b alt alanını ‡b’ye siler
Analitik Kayıtları Ekleme¶
Kütüphaneler bazen monografi ve süreli yayınlar içerisindeki makalelere analitik kataloglama aracılığıyla kullanıcıların erişmesini sağlarlar. Analitik kataloglama, bir kitap, bir süreli yayın ya da bir gazete içerisinde yer alan makale gibi daha geniş bir kaynağın içerisinde bulunan bu makaleler, bölümler, kesitler, vb. için ayrı bibliyografik kayıtlar oluşturur. Analitik kataloglamada başlık için ayrı bir bibliyografik kayıt oluşturulsa da bu kayıt kaynak materyalden fiziksel olarak ayrılmaz. Analitikler hakkında AACR2’nin 13. bölümünde daha ayrıntılı bilgi bulabilirsiniz.
If you would like to catalog analytic records there are two options. One is to use the Kolay Analitikler funtion; the other is the Analitik Gelişmiş İş Akışı.
Kolay Analitikler¶
The Easy Analytics feature makes linking analytic records together easier. The first thing you need to do is set the EasyAnalyticalRecords preference to ‘Display’ and the UseControlNumber preference to ‘Don’t use.’
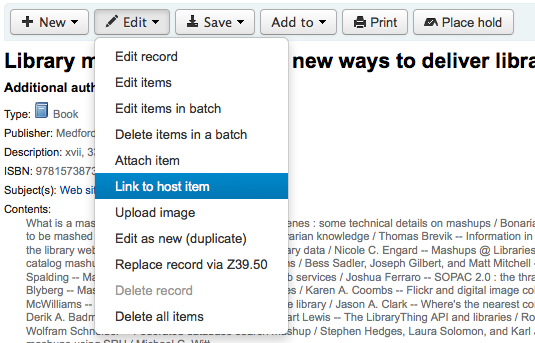
After cataloging your analytic record (see Adding Records for more on creating records) click ‘Edit’ from the normal view and choose to ‘Link to Host Item’
Bu, bu kaydın bağlı olması gerektiği materyale barkot girmeniz için hatırlatma yapacaktır.
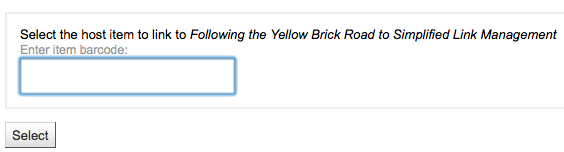
Materyalin barkodunu girip ‘Seç’ üzerine tıkladıktan sonra karşınıza bir onay mesajı gelecektir.

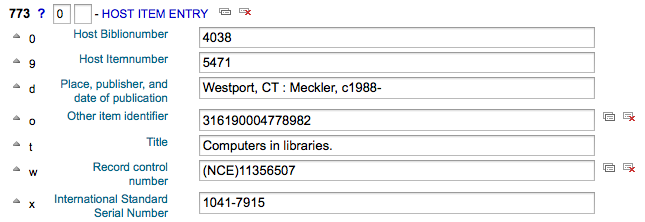
Mevcut bağlantıyı düzgünce tamamlamak üzere kaydın şu anda 773 alanını dolduracak
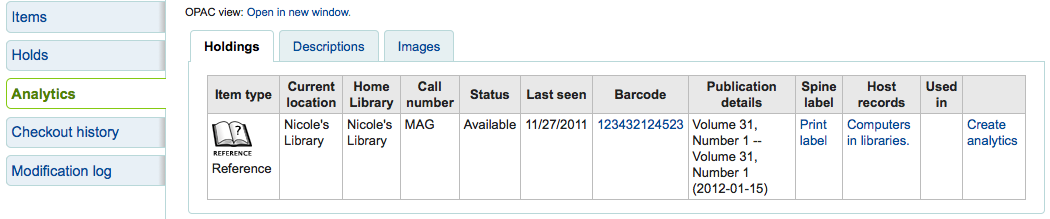
Ana kayda bağlı materyallerin hepsini görüntülemek için kayıt için arama yapınız, soldaki Analiz sekmesine tıklayınız ve ardından her barkoda bağlı analizler “Kullanılanlar” sütunun altında gösterilecektir.

Not
“Analitik oluştur” üzerine tıklayarak bu ekrandan analitik kayıtlar oluşturmak da mümkündür
‘Analizi Göster’ bağlantısı kaydın en üstüne doğru tıklayarak normal görünümde bu kayda ekli analizleri de görebilirsiniz.
When looking at the analytic record you will also see a link to the host item under the ‘Host records’ column in the holdings table when viewing the ‘Analytics’ tab.
Analitik Gelişmiş İş Akışı¶
To use the Enhanced Workflow method of adding analytics, the first thing you need to do is set the EasyAnalyticalRecords preference to ‘Don’t display’ and the UseControlNumber preference to ‘Use.’
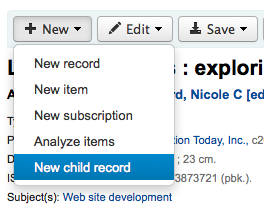
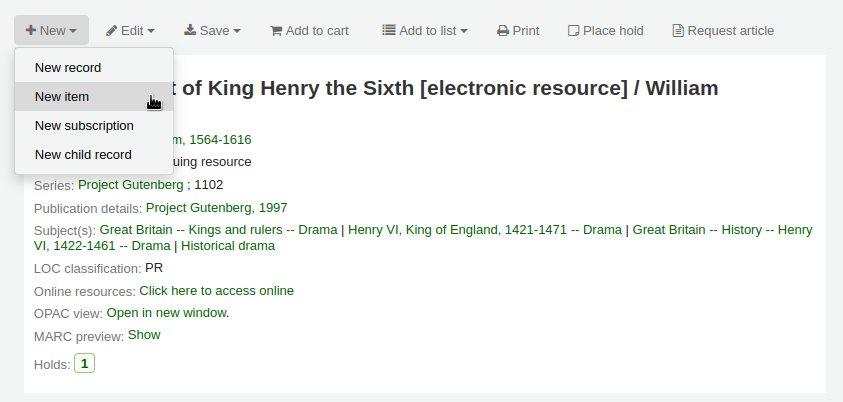
After cataloging your original record (see Adding Records for more on creating records) click ‘New’ from the normal view and choose to ‘New child record.’
Bu, kataloglama için boş bir yeni kayıt açacaktır. Boş kayıtta sadece kayıt kaydedildikten sonra bağlantıyı tamamlamak için uygun şekilde doldurulmuş 773 alanı olacaktır.

Ana kayda bağlı materyallerin hepsini görüntülemek için kayıt için arama yapınız, soldaki Analiz sekmesine tıklayınız ve ardından her barkoda bağlı analizler “Kullanılanlar” sütunun altında gösterilecektir.
‘Analizi Göster’ bağlantısı kaydın en üstüne doğru tıklayarak normal görünümde bu kayda ekli analizleri de görebilirsiniz.
When looking at the analytic record you will also see a link to the host item under the ‘Host records’ column in the holdings table when viewing the ‘Analytics’ tab.
Analizleri Düzenleme¶
Bir analitik kaydının bağlantısını yanlış bir şekilde yaptıysanız, o bağlantıyı analitik kayıttaki (sunucu kaydı değil) materyali düzenleyerek kaldırabilirsiniz. Bunu yapmak için, analitik kayda gidiniz ve ‘Düzenle’ butonuna tıklayınız ve ‘Materyalleri düzenle’yi seçiniz. Her bir materyalin solunda, iki seçenek göreceksiniz.

- ‘Sunucuda düzenleme yap’a tıklamak sunucu kaydındaki materyali düzenlemenize imkan tanıyacaktır.
- ‘Bağlantıyı kaldır’a tıklamak 773 alanın ve analitik ile sunucu arasındaki bağlantıyı silecektir.
Kayıtları Düzenleme¶
Bir kaydı düzenlemek için kataloglama sayfasındaki arama sonuçlarından ‘Bibliyo Düzenle’ üzerine tıklayabilirsiniz
ya da Bibliyografik Kayıt üzerindeki Düzenle butonunu tıklayıp ‘Kaydı Düzenle’ opsiyonunu seçebilirsiniz
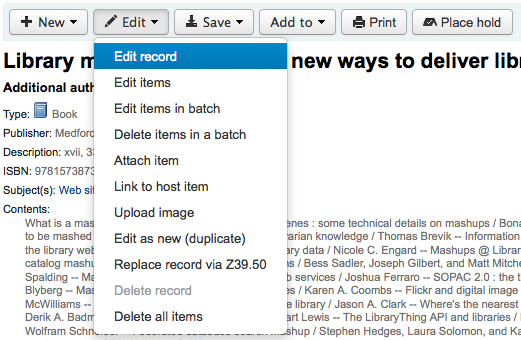
Kayıt MARC editöründe açılacaktır
Alternatif yöntem ise kaydınızın üzerine başka bir kütüphanede bulunan bir fuller kayıt yüklemek için Z39.50 üzerinden arama yapmaktır. Bu işlemi “Düzenle” menüsünden ‘Kaydı Z39.50 üzerinden değiştir’ opsiyonunu seçerek yapabilirsiniz.
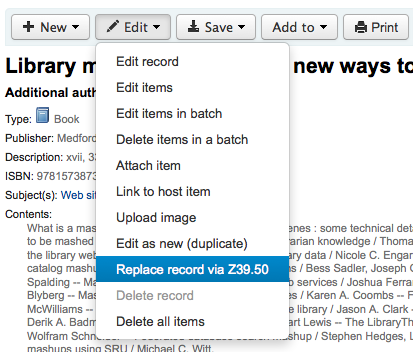
Bunu seçtiğinizde, söz konusu kaydı diğer kütüphanelerde aramak için Z39.50 arama penceresine yönlendirileceksiniz.
Düzenlemelerinizi yaptığınızda (ya da metot yoluyla), metin düzenleyicinin en üst solundaki ‘Kaydet’e tıklayabilirsiniz.
You can also use the edit menu to add your own custom cover image if you have either OPACLocalCoverImages and/or LocalCoverImages set to ‘Display’ by choosing ‘Upload Image’ from the menu.
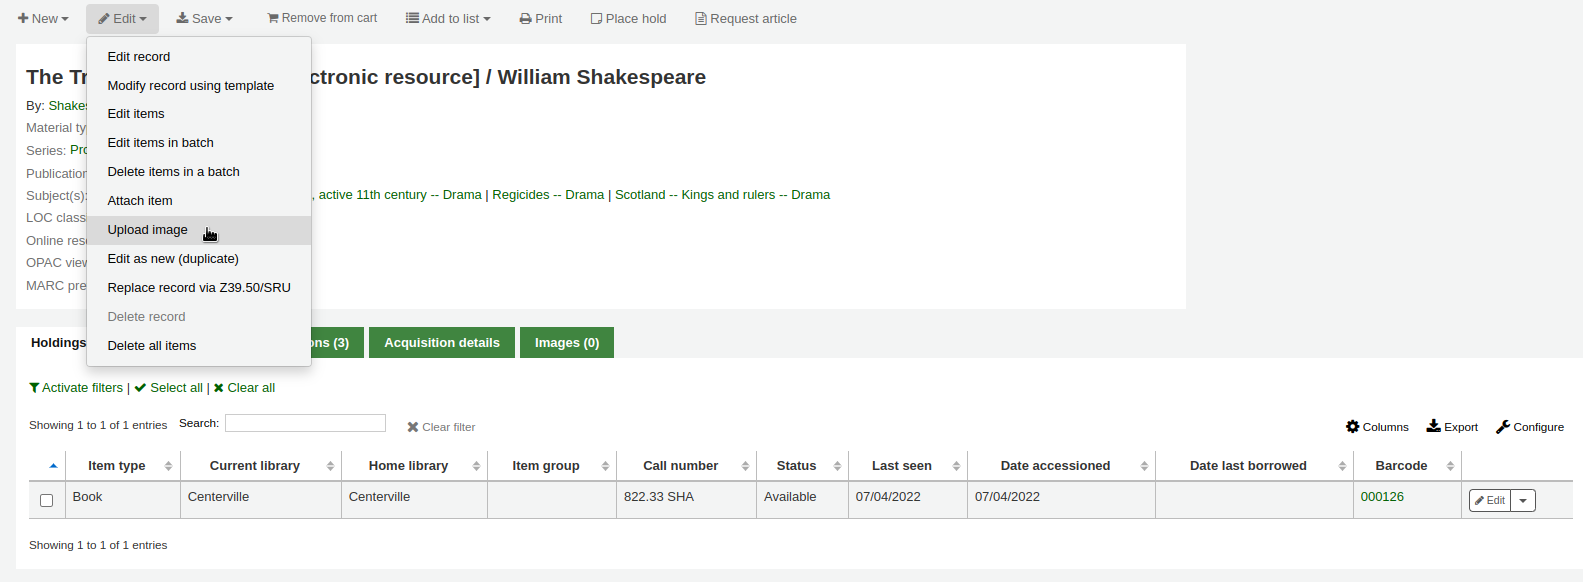
Choosing to ‘Upload Image’ will take you to the Upload Local Cover Image Tool.
Kayıtları Çoğaltmak¶
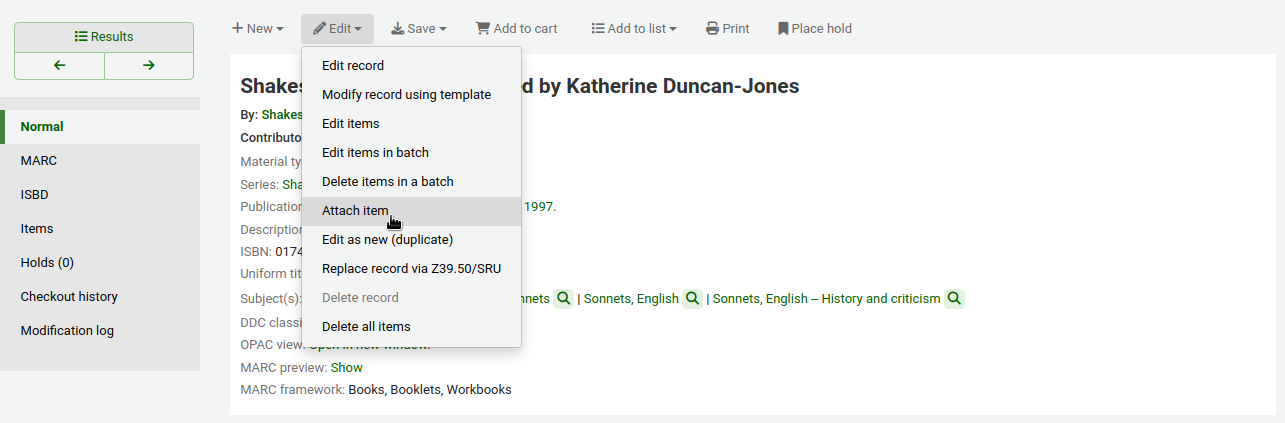
Bazen kataloglamak için gereken kaydın bir kopyası Z39.50 üzerinden bulunamayabilir. Bu gibi durumlarda benzer kaydı çoğaltabilir ve yeni bir kayıt oluşturmak için gerekli parçaları düzenleyebilirsiniz. Var olan bir kaydı çoğaltmak için Bibliyografik Kayıt üzerinde Düzenle menüsünden ‘Yeni olarak düzenle (Çoğalt)’ seçeneğini tıklayın
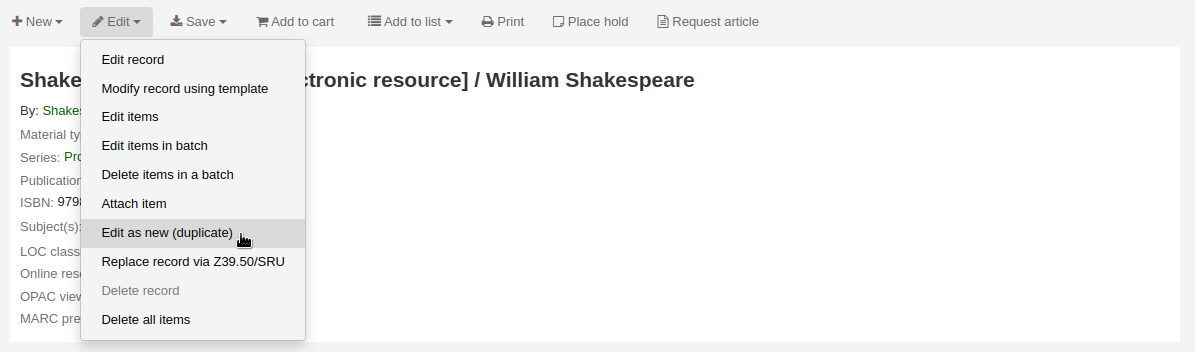
Bu, alanları özgün bibliyografik kaydın değerleriyle dolu olarak yeni bir MARC kaydı açar.
Attaching files to Records¶
Koha’ya dosya yüklemek isterseniz bunu birkaç ayarlarla yapabilirsiniz.
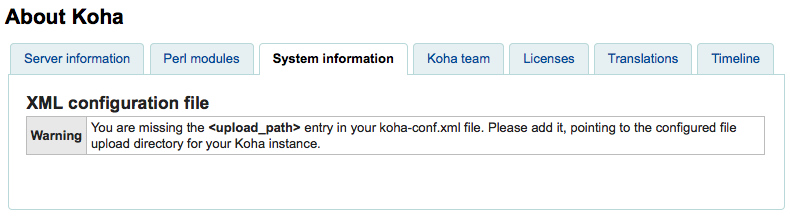
You will need to ask your system administrator to set the ‘upload_path’ config variable to point to where the files will be stored
You can see if your upload path is set correctly by visiting About Koha > System Information. If there is an error you will see it there.
You will want to be sure that your OPACBaseURL system preference is set appropriately
You will want to add the upload.pl plugin to the 856$u subfield in one (or multiple) of your frameworks
Once you are all set up you can continue with cataloging as regular. You will see a plugin icon next to the 856$u that will open up the upload and/or search window
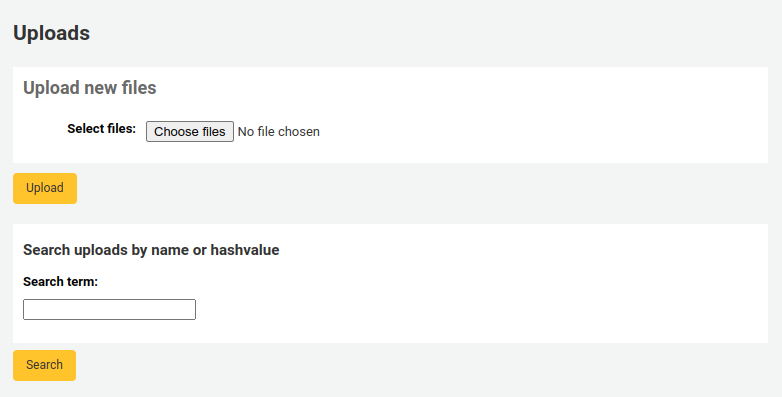
From this menu you can click browse to find a file and attach it, or you can search files you have uploaded previously using the search box. From the search results you can choose which file to attach.
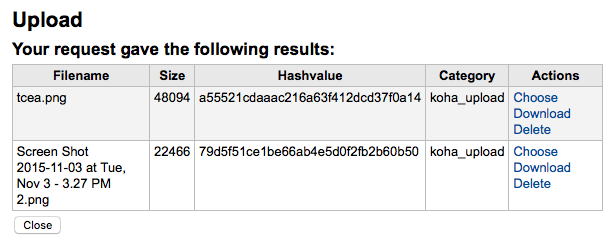
Dosya seçildikten sonra MARC kaydında ve detay ekranında bir bağlantı olarak görünür.
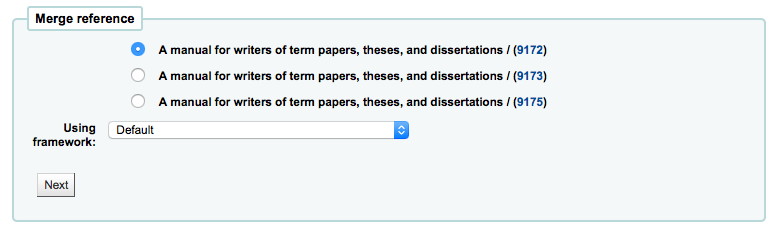
Merging Records¶
Bibliyografik kayıtları bir arada birleştirmek için Kataloglama modülüne gidin ve bir arama gerçekleştirin.
Arama sonuçları ekranında kopyalar görürseniz, kopyaların yanındaki kutuları işaretleyebilir ve sonuçların üst kısmındaki ‘Seçilenleri birleştir’ düğmesini tıklayabilirsiniz.
Birleştirmek istediğiniz kayıtları seçtikten sonra listenin en üstündeki ‘Seçilenleri Birleştir’ butonuna tıklayın. İki kayıttan hangisini birincil kayıt olarak tutmak istediğiniz ve hangisi kayıtın birleştirme işleminden sonra silineceği sorulacaktır. Eğer kayıtlar farklı çerçeveler kullanılarak oluşturuldu ise, Koha aynı zamanda yeni birleştirilen kayıtın hangi çerçeveyi kullanmasını istediğinizi de soracaktır.
Size her iki kayıt için MARC sunulacak ( bu kayıtların her birine bibliyografik kayıt numaralarıyla etiketlenmiş sekmelerle ulaşılabilir ). Varsayılan olarak birinci kaydın tamamı seçilecektir, son (hedef dosya) kayıttaki istemediğiniz alanların onay işaretini kaldırınız ardından son (hedef dosya) kayıtta olması gereken alanları seçmek için ikinci sekmeye ilerleyiniz.
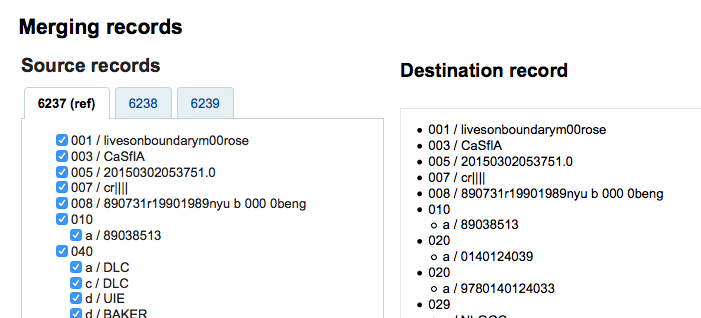
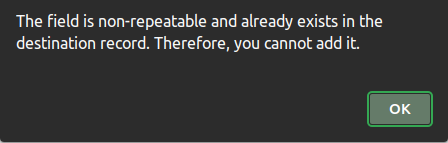
İki defa tekrar edilmeyen bir alan eklemeye çalışıyorsanız (245. alandan hem 1 nolu hem de 2 nolu kaydı seçmek gibi)size hata mesajı verilecektir.
Birleşmekte olduğunuz kayıtların altında, raporlanacak alanları girmek için bir seçenek var. Bu, birleştirme onay sayfasında hangi alanları gördüğünüzü kontrol etmenizi sağlayacaktır:

Hiçbir şey girmezseniz karşınıza yalnızca bibliyo numaralarının onayı gelecektir

If you enter fields you will see those on the confirmation page (you can set defaults with the MergeReportFields preference)
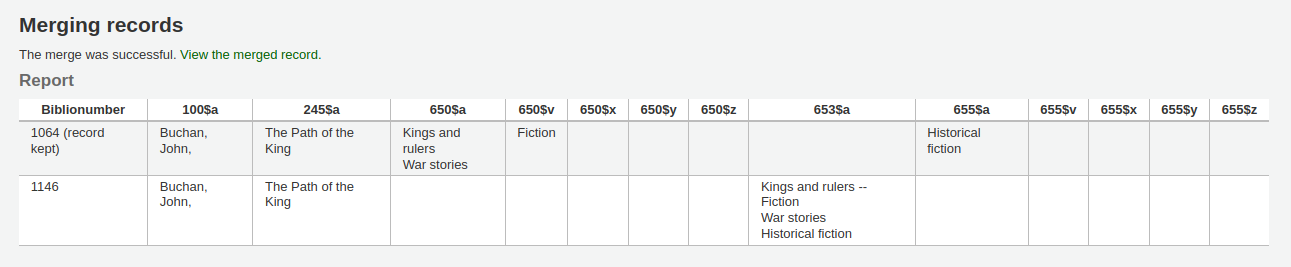
Seçimlerinizi tamamladıktan sonra ‘birleştir’ butonuna basın. Birincil kayıt, her iki bibliyografik kayıttaki tüm materyaller/ayırtmaların yanı sıra kendisi için seçtiğiniz veriyi İÇERECEK ve ikinci kayıt silinecektir.
Önemli
Kayıtları birleştirdikten sonra zebra dizinini hemen yeniden oluşturmanız önemlidir. Eğer silinmiş bir kayıt için bir arama gerçekleştirilirse, kullanıcılar Koha’da OPAC hatası ile karşılaşırlar.
Not
If you would like you can also use the Listeler tool for merging records together. Learn more here.
Kayıtların Silinmesi¶
Bir bibliyografik kaydı silmek için ‘Düzenle’ butonuna tıklayıp ‘Kaydı sil’ seçeneğini seçmeniz yeterlidir.
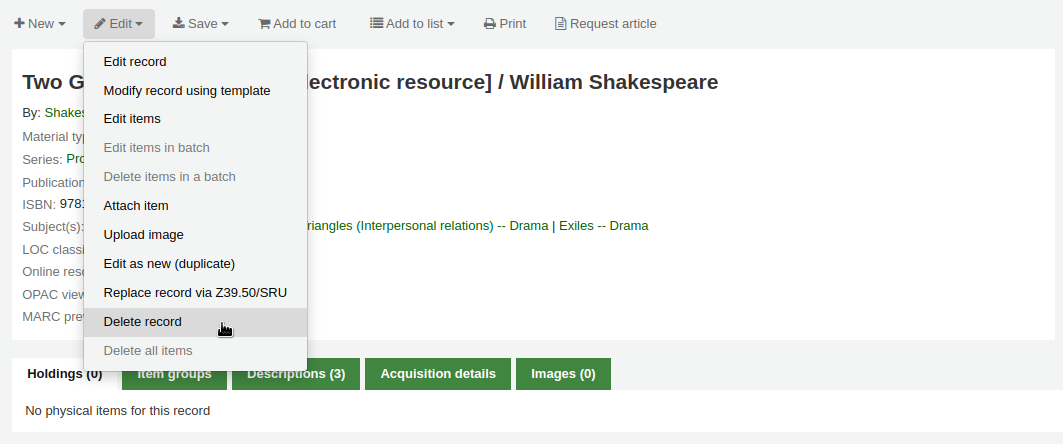
Bibliyografik kayıtlar sadece tüm materyaller silindikten sonra silinebilir. Halen bir materyalin bağlı olduğu bir bibliyografik kaydı silmeye çalıştığınızda silme seçeneğinin devre dışı olduğunu göreceksiniz.

Materyal Kayıtları¶
Koha içerisinde her bibliyografik kayda bir ya da daha fazla materyal bağlanabilir. Bu materyaller bazen ayırmalar olarak adlandırılır. Her materyal, kütüphanede bulunan fiziksel kopya ile ilgili bilgi içerir.
Materyal Ekleme¶
Yeni bir bibliyografik kaydı kaydettikten sonra boş bir materyal kaydına yönlendirileceksiniz, böylece bibliyografik kayda bir materyal bağlayabileceksiniz. Aynı zamanda katalog arama sonuçlarından ‘Materyal Ekle/Düzenle’ üzerine tıklayabilirsiniz.
ya da bibliyografik kayıt üzerinde ‘Yeni’ bağlantısına tıklayıp ‘Yeni Materyal’ seçeneğini seçerek istediğiniz zaman yeni materyal ekleyebilirsiniz
Materyal düzenleme formu gözükecektir:
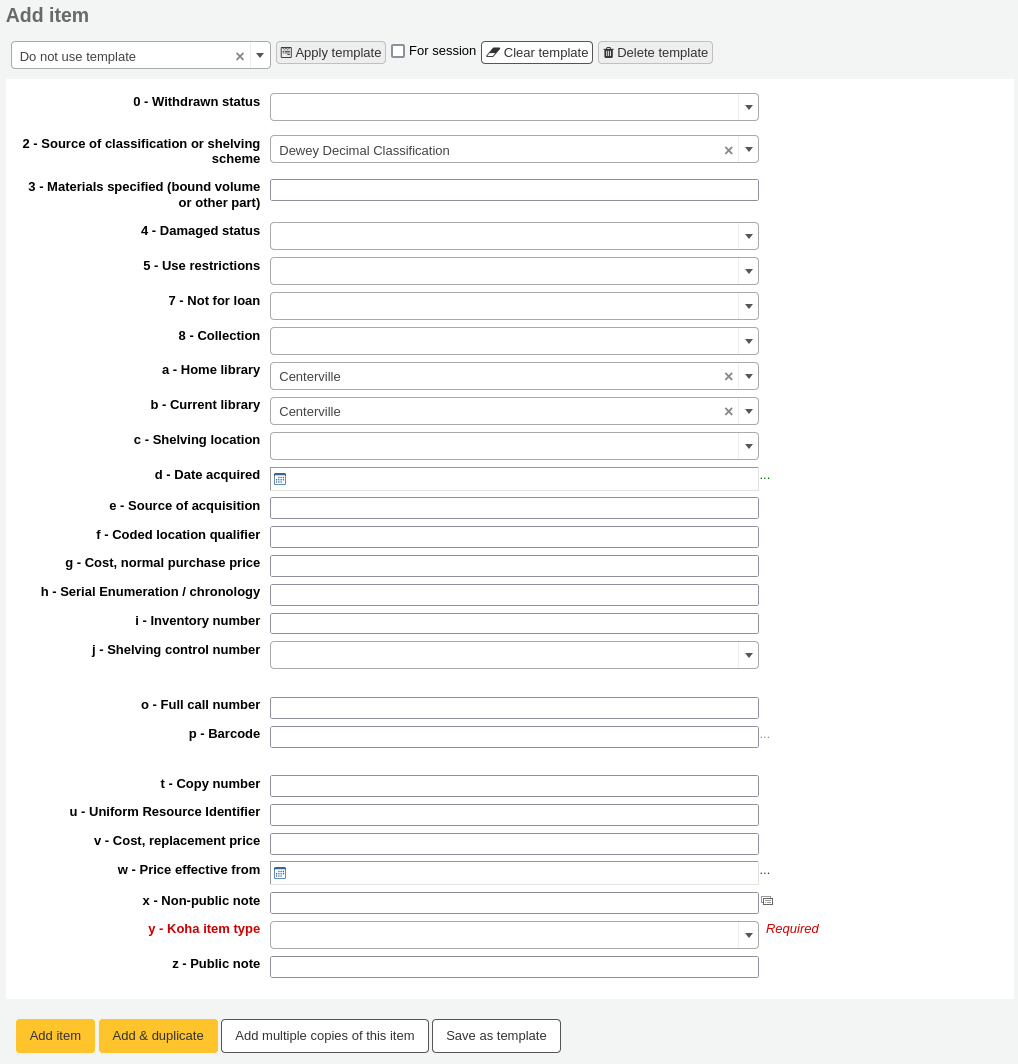
Materyali dolaşıma koymak istiyorsanız, en azından aşağıdaki alanları doldurmanız gerekir:
2 - Sınıflama kaynağı
a- Kalıcı yer
b- Geçerli konum
0- Tam çağrı numarası
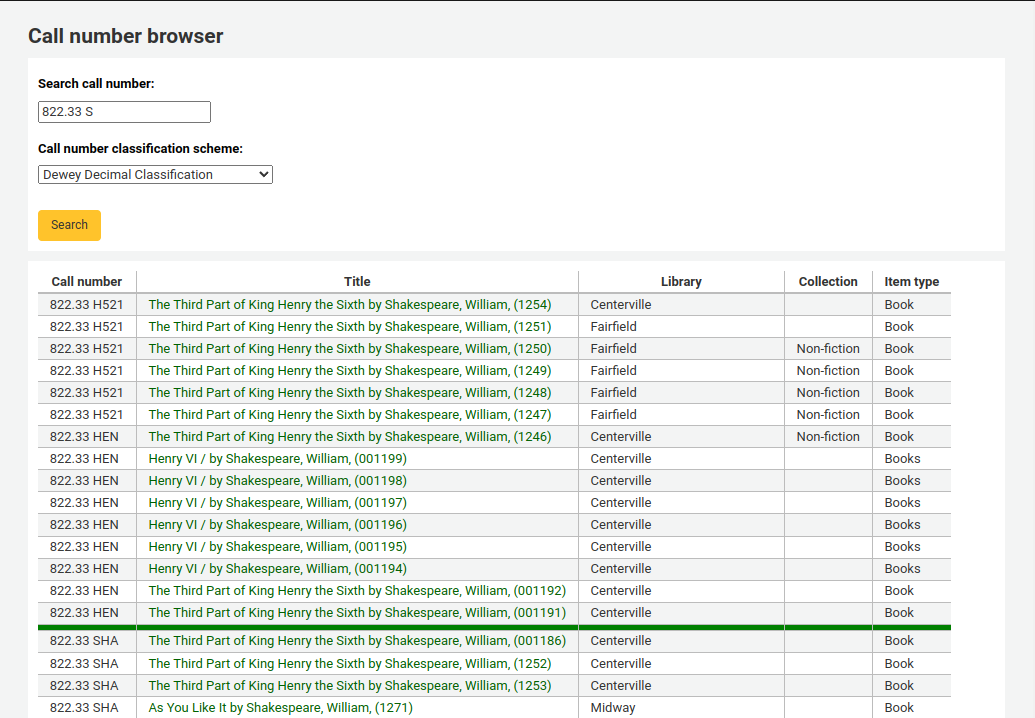
If you’d like you can use the call number browser plugin for this field. If it’s enabled you’ll see a … to the right of the field. When clicked that will open a call number browser window if the row is highlighted in Red then the call number is in use, if there is a thin Green line instead then the call number can be used.
p- Barkod
v - Maliyet, yerine koyma fiyatı
- Bu değer, ödünç aldıkları materyali ‘Kayıp’ olarak işaretlediğinizde kullanıcılardan tahsil edilecektir
y - Koha materyal türü
To make sure that these values are filled in you can mark them as mandatory in the framework you’re using and then they will appear in red with a ‘required’ label. The item will not save until the required fields are filled in.

Not
To make item subfields required in a framework you’ll want to edit the 952 field in the framework editor.
Ekle formunun altında materyali ekleyen 3 buton mevcuttur

- Materyal ekle yalnızca bir materyal ekleyecektir
- Add & Duplicate will add the item and fill in a new form with the same values for your to alter
- Çoklu Materyal Ekle seçeneği kaç tane materyalin ekleneceğini soracak ve o materyal sayısını her barkodun özgün olması için barkoda +1 ekleyerek ekleyecektir
Eklemiş olduğunuz materyaller gönderdildikten sonra ekleme formunun üst kısmında görünecektir

Materyalleriniz aynı zamanda bibliyografik kayıt görüntüsü üzerindeki bibliyografik ayrıntılar altında görünecektir.
If you have SpineLabelShowPrintOnBibDetails set to ‘Display’ then there will also be a link to print a quick spine label next to each item.

Ayrıca ‘Filtreleri Etkinleştir’ bağlantısına tıklayarak ayırmayalar tablonuzun içeriğini filtreleyebilirsiniz. Bu işlem en üstte, tablodaki sonuçları filtrelemek için herhangi bir sütun içerisine yazabileceğiniz bir satır gösterecektir.
Materyallerin Düzenlenmesi¶
Materyaller çeşitli şekillerde düzenlenebilir.
Bibliyografik kayıttan ‘Düzenle’ ya da ‘Materyalleri Düzenle’ üzerine tıklamak
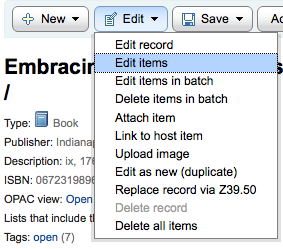
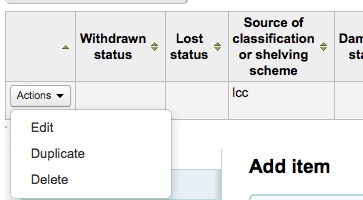
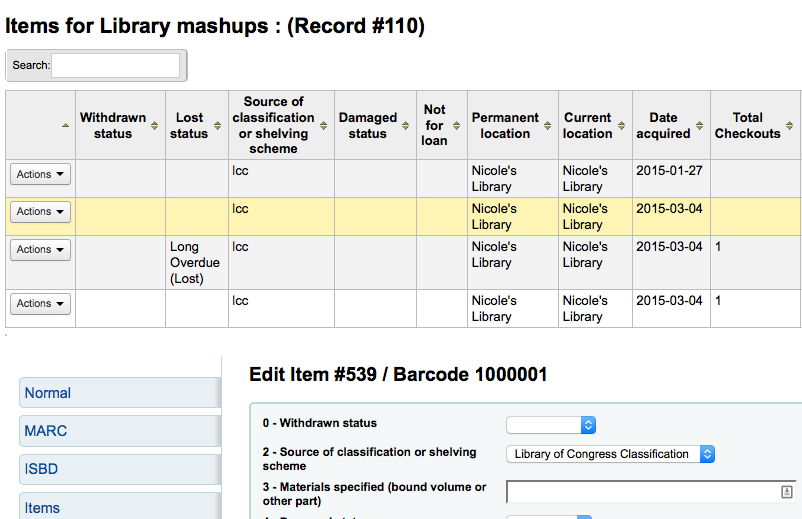
Düzenlemek istediğiniz belirli materyalin solundaki ‘İşlemler’ düğmesini tıklayıp ‘Düzenle’yi seçebileceğiniz bir materyal listesi açar.
‘Materyaller’ sekmesi üzerindeki materyalin yanında bulunan ‘Materyalleri Düzenle’ üzerine tıklamak
Bu, düzenlemek istediğiniz materyal üzerinde editörü açacaktır
‘Düzenle’ ve sonra ‘Materyalleri toplu olarak düzenle’ üzerine tıklamak
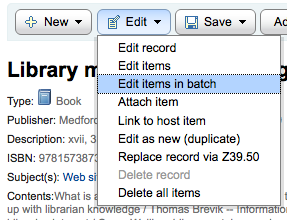
This will open up the batch item modification tool where you can edit all of the items on this record as a batch.
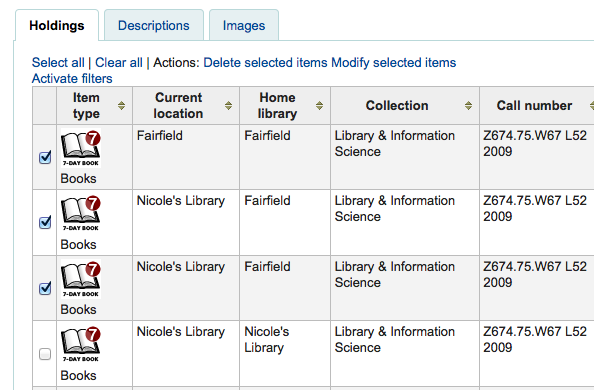
You can also enable StaffDetailItemSelection to have checkboxes appear to the left of each item on the detail display. You can then check off the items you would like to edit and click ‘Modify selected items’ at the top of the list.
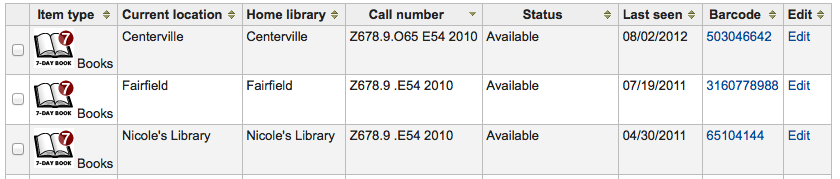
You can click ‘Edit’ to the right of each item in the Holdings tab
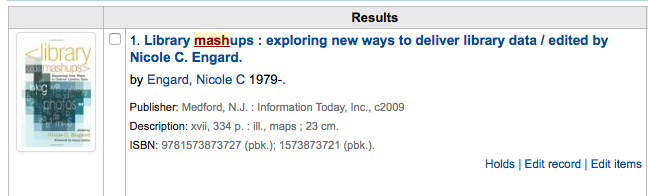
There is also a link to Edit items from the search results in the staff client
Finally you can use the Batch Item Modification tool
Hızlı Materyal Durum Güncellemesi¶
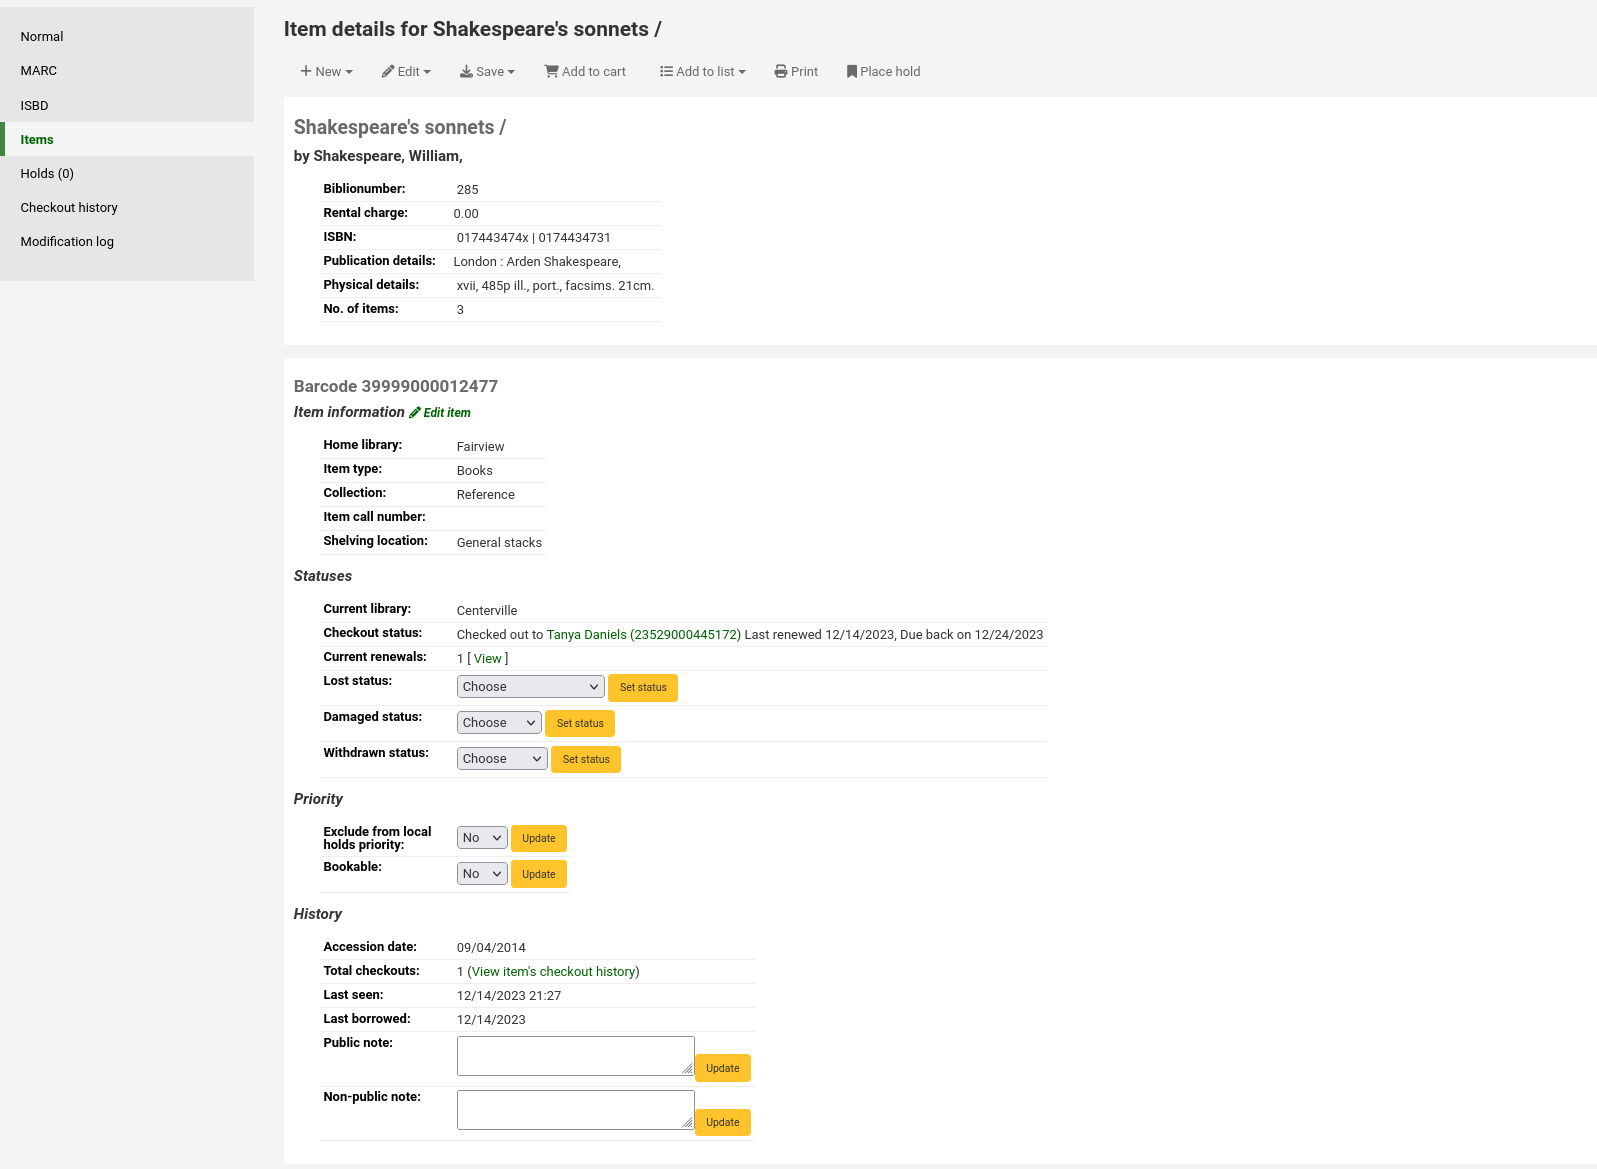
Dolaşım personeli Kayıp ya da Hasarlı bir materyalin durumunu sıklıkla değiştirmek durumunda kalmaktadır. Bu, materyal kaydının tamamını düzeltmenizi gerektirmez. Bunun yerine, materyal barkodundaki ödünç verme özetine ya da iade alma geçmişine tıklamak size materyal özetini sunacaktır. Bibliyografik kayıt detay sayfasının solundaki materyal sekmesine tıklayarak da materyal özetini alabilirsiniz.
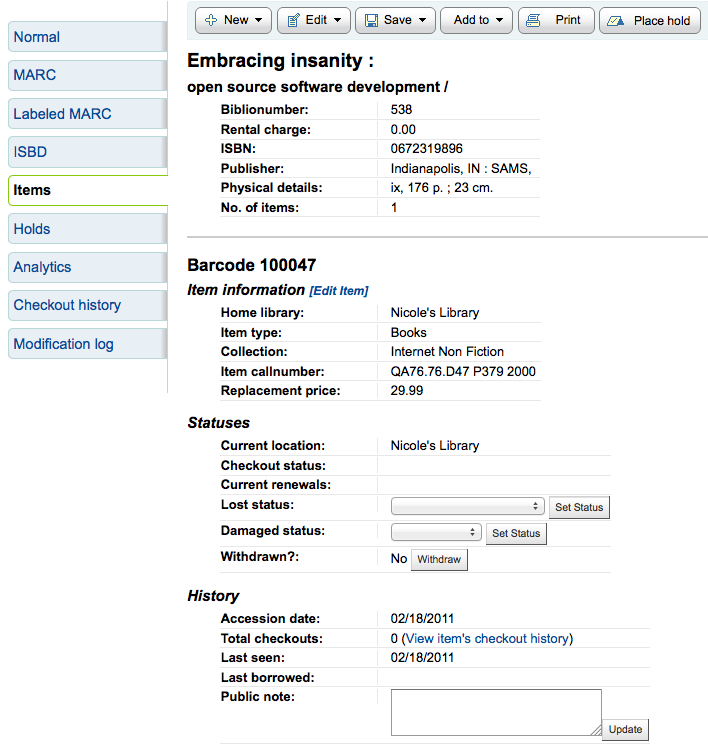
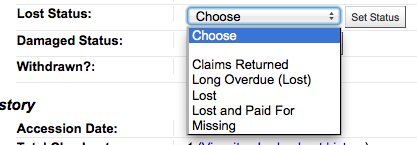
Bu görünümden, çekme menüden kayıp durumunu seçerek ve ‘Durumu Ayarla’ butonuna tıklayarak kayıp bir materyali işaretleyebilirsiniz.
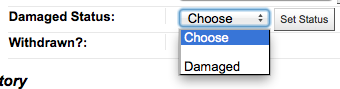
Aynı zamanda açılır menüden menüden hasarlı durumu seçerek ve ‘Durumu Ayarla’ butonuna tıklayarak bir materyali hasarlı olarak seçebilirsiniz.
Duplicating Items¶
Materyalleri düzenleme ekranında her materyalin solundaki ‘İşlem’ düğmesini tıklayarak her bir materyali kolayca çoğaltabilirsiniz.
Buradan materyali ‘Çoğalt’ opsiyonunu seçebilirsiniz ve form seçtiğiniz materyalin değerleri ile doldurulur.
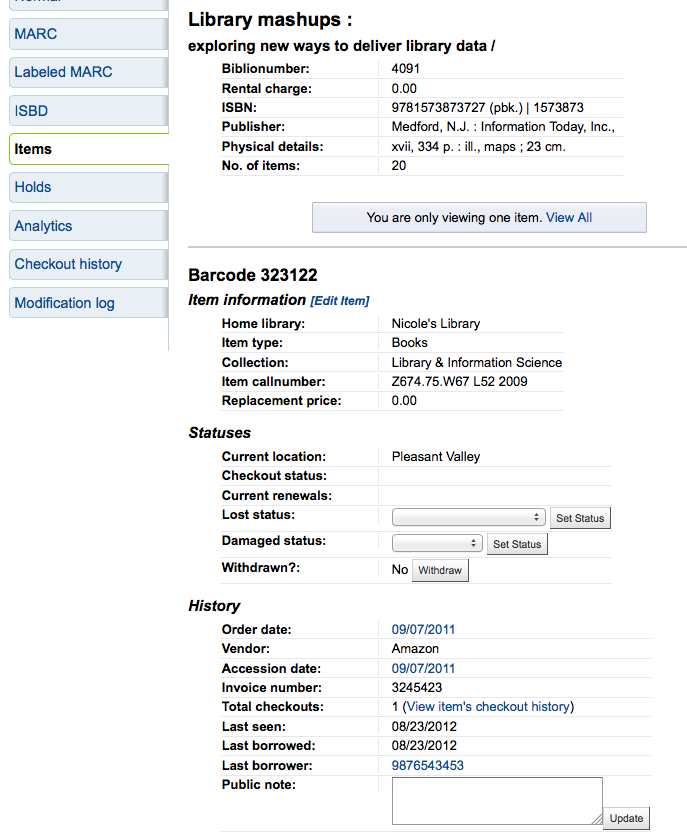
Materyal Bilgisi¶
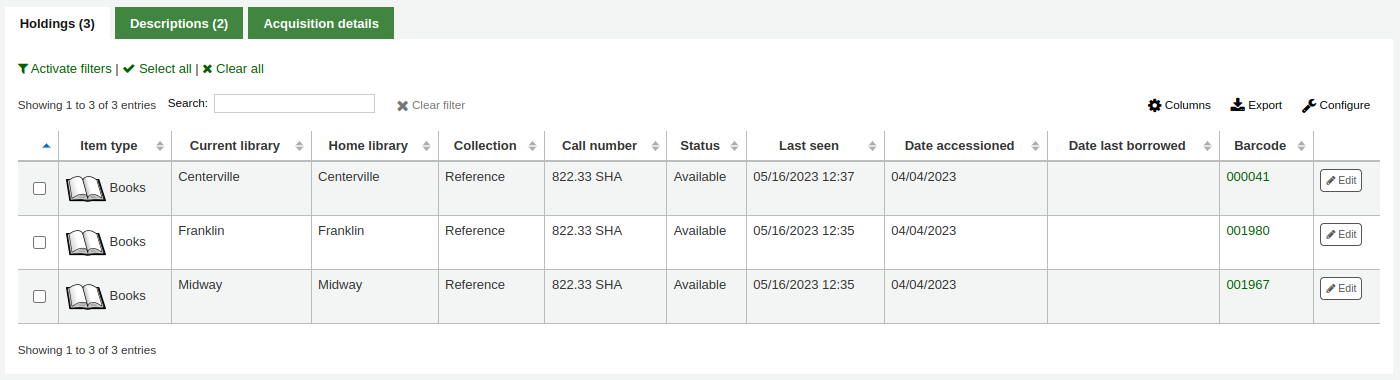
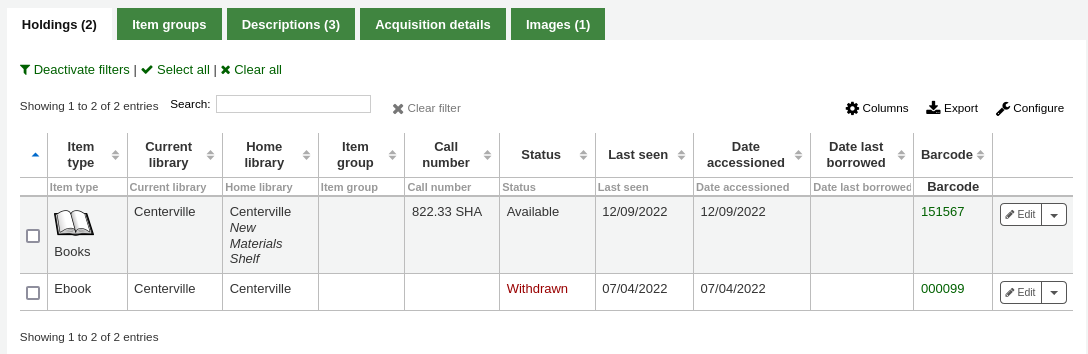
Her bibliyografik kaydın solunda materyalleri görüntülemek için bir sekme vardır.
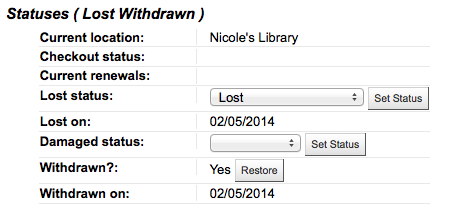
Bu sekme üzerine tıklamak materyaller hakkında temek bilgi verecektir. Buradan materyaller hakkında ana kütüphane, materyal türü, koleksiyon kodu, yer numarası ve yenileme bedeli gibi temel bilgileri görebilirsiniz. Aynı zamanda durum bilgisini görebilir ve düzenleyebilirsiniz. Eğer bir materyal kayıp ya da sistemden düşülmüş olarak işaretlenmiş ise, ayrıca durumun uygulandığı tarihi de göreceksiniz.
In the History section you will see information about the check out history of the item and if you ordered the item via the acquisitions module then this section will include information about the order.
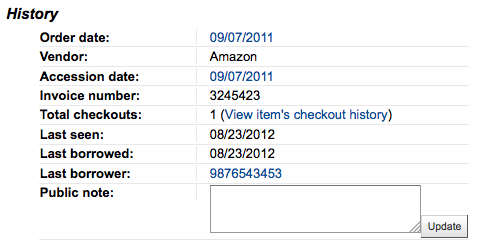
Sipariş ya da Sağlama tarihi bağlantılı ise, bu bağlantı üzerine tıklayınca materyal ile ilgili sağlama bilgisi ekrana gelecektir.
Materyalleri Taşıma¶
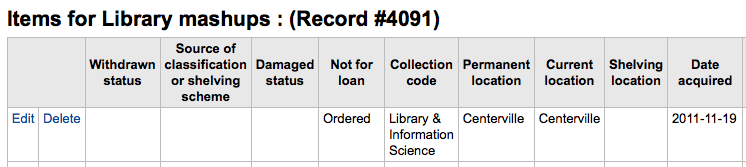
Materyaller bir bibliyografik kayıttan diğerine Materyal Ekle seçeneği kullanarak taşınabilir
Materyale eklemek istediğiniz bibliyografik kayda gidin ve ‘Düzenle’ menüsünden ‘Materyal Ekle’ seçeneğini seçin.
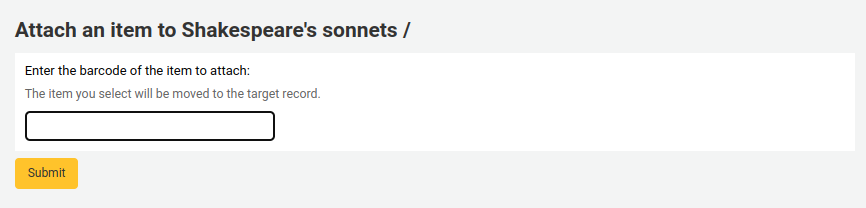
Taşımak istediğiniz materyalin barkodunu girin ve ‘Seç’e tıklayın
If you want to move all items to a new record creating only one bibliographic record you can use the Merge Records tool instead.
Materyalleri Silme¶
Materyal kayıtlarını silmek için birçok yöntem mevcuttur. Sadece bir materyal silmek gerekiyorsa, bu işlemi bibliyografik kaydı detay sayfasını açarak ve en üstteki ‘Düzenle’ butonuna tıklayarak yapabilirsiniz. Buradan, ‘Materyalleri düzenle’yi seçebilirsiniz.

Size bir materyal listesi sunulacak ve her birinin yanında ‘Sil’ etiketli bağlantı bulunacak. O bağlantıya tıklayınız ve materyal ödünç verilmediyse, bağlantı o materyali silecektir.
Kaydınıza eklenen tüm materyallerin şu anda ödünç verilmediğini biliyorsanız, ‘Menüyü düzenle’nin altındaki ‘Tüm materyalleri sil’ seçeneğini kullanabilirsiniz ve bu işlem kayıttaki tüm materyalleri silecektir.
You can also enable StaffDetailItemSelection to have checkboxes appear to the left of each item on the detail display. You can then check off the items you would like to delete and click ‘Delete selected items’ at the top of the list.
Finally you can use the batch delete tool to delete a batch of items.
Item Specific Circulation History¶
Her bibliyografik kaydın dolaşım geçmişi mevcuttur (ayarlarınıza bağlı olarak kullanıcı bilgisiyle ya da kullanıcı bilgisi olmaksızın ) fakat her materyalin kendisine ait dolaşım geçmiş sayfası mevcuttur. Bunu görmek için, görüntülediğiniz kaydın solundaki ‘Materyaller’ sekmesine tıklayınız.
‘Geçmiş’ başlığının altında ‘Materyalin iade geçmişine göz at’ bağlantısı mevcuttur. Bu bağlantıya tıklayınca, bibliyografik kayıt geçmiş sayfasından biraz farklı görünen materyalin geçmişi ortaya çıkacaktır.

Otoriteler¶
Otorite kayıtları MARC kayıtlarınızdaki alanları kontrol etmenin bir yoludur. Otorite kayıtlarını kullanmak konu başlıklarının, personel isimlerinin ve konumların kontrolünün sizin elinizde olmasını sağlayacaktır.
Otorite Kaydı Ekleniyor¶
Yeni bir otorite kaydı eklemek için ‘Yeni otorite’ butonundan otorite türünü seçebilir veya ‘Z39.50’den yeni otorite’ butonunu tıklayarak başka bir kütüphane içerisinde arama yapabilirsiniz.

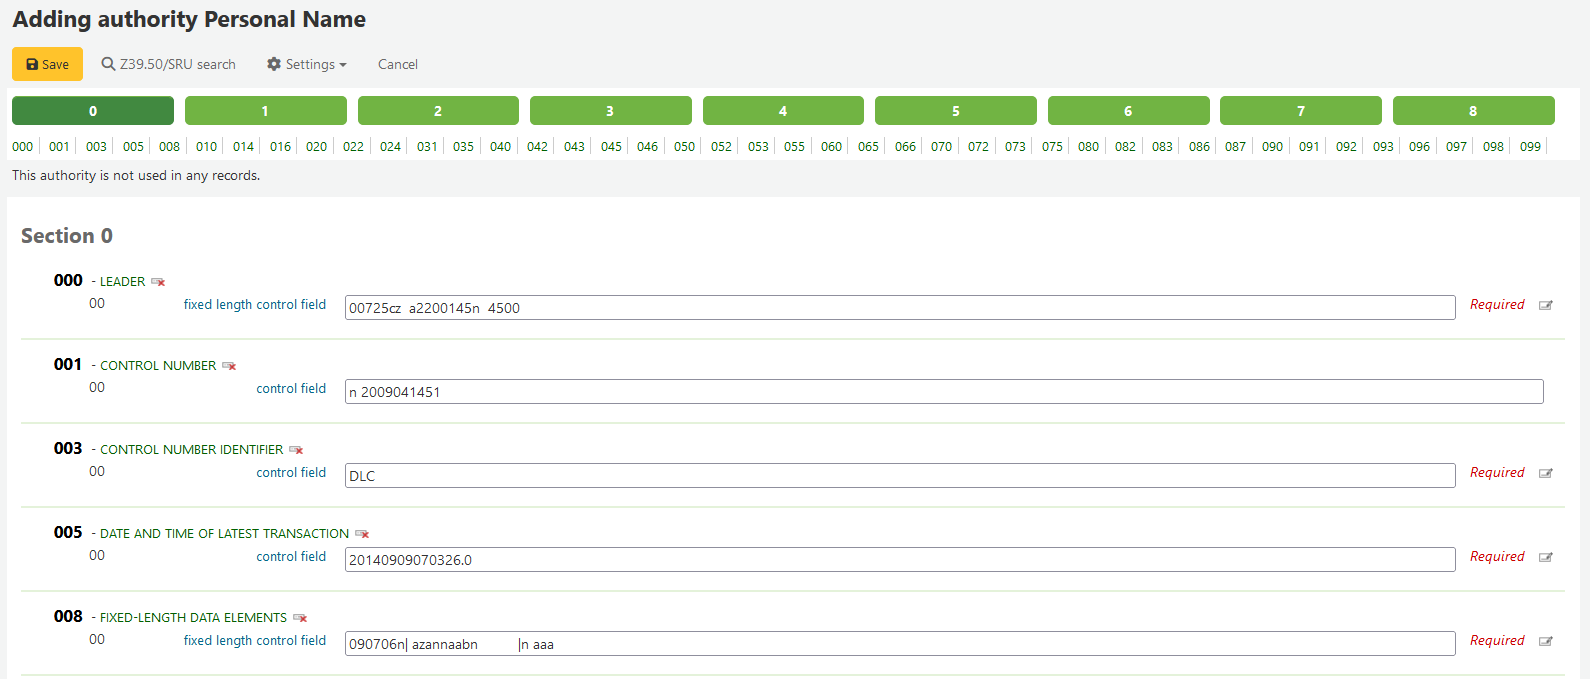
Eğer sıfırdan yeni bir otorite girmeyi seçerseniz, ekranda görünen form size otorite kaydınızla ilgili gerekli detayları girmenize imkan verecektir.
Daraltılmış değerleri genişletmek için, başlığa tıklayınız daha sonra alt alanlar gözükecektir. Bir alanı ya da alt alanı kopyalamak için, etiketin sağındaki artı işaretine (+) tıklayınız. Alan yardımcı eklentilerini kullanmak için alanın sağındaki üç noktaya (…) tıklayınız.
Otoriteleri diğer başlıklara bağlarken, alanın sağındaki üç noktaya (…) tıklayarak otorite arayıcı eklentisini kullanabilirsiniz.
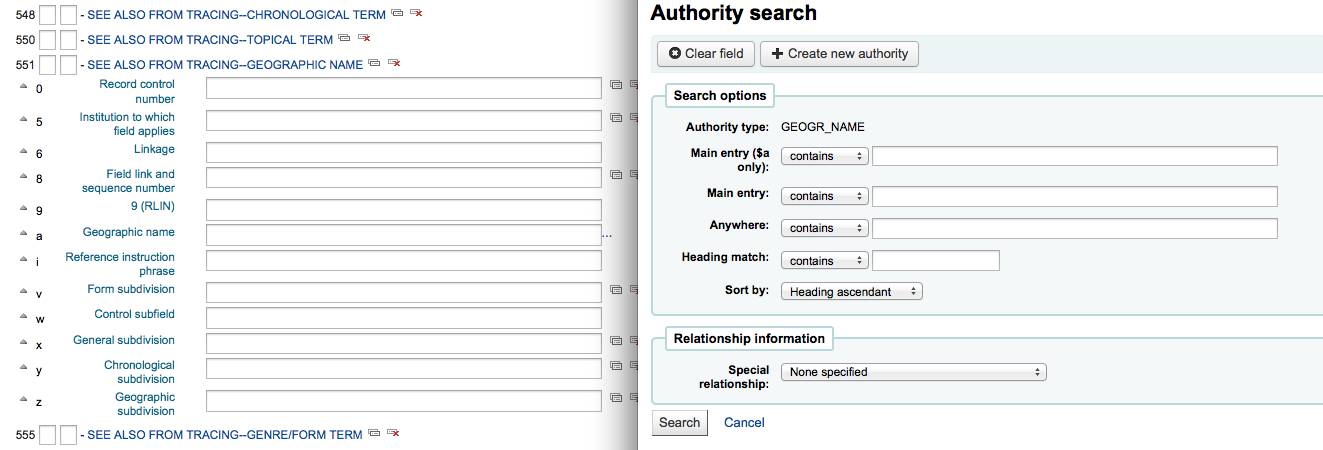
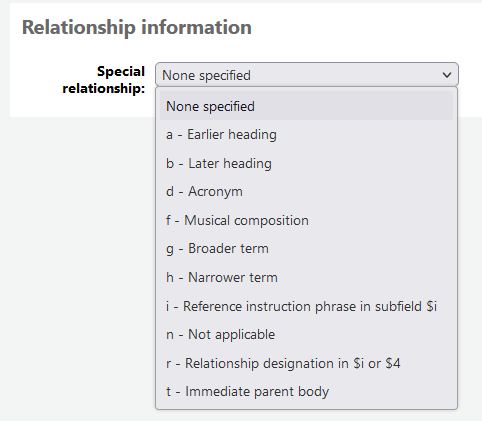
Buradan, otorite bağlantısı kurmak için otorite dosyanızı araştırabilirsiniz. Otorite bağlantısı kurmak için bağlantı bulamıyorsanız, ‘Yeni oluştur’ butonuna tıklayabilirsiniz ve bağlantı için gerekli otoriteyi ekleyebilirsiniz. Bu eklenti size aynı zamanda otoriteler arasındaki bağlantı ilişkisini seçmenize de imkan tanır.
Eğer otorite kayıt için başka bir kütüphane üzerinde arama yapmak isterseniz, size bir arama kutusu getirilecektir.
Sonuçlardan, Koha’ya eklemek istediğiniz kayıtın sağ tarafında bulunan “İçe aktar” linkini tıklamayı seçebilirsiniz.
Sonra size sisteminize kaydetmeden önce otorite ile ilgili değişiklikler yapabileceğiniz bir form sunulacak
Otoriteler Aranıyor¶
Otoriteler sayfasından mevcut ifadeleri ve bunlara eklenen bibliyografik kayıtları araştırabilirsiniz.

From the results you will see the authority record, how many bibliographic records it is attached to, an ‘Actions’ menu that includes the ability to edit, merge and delete (if there are no bibliographic records attached).
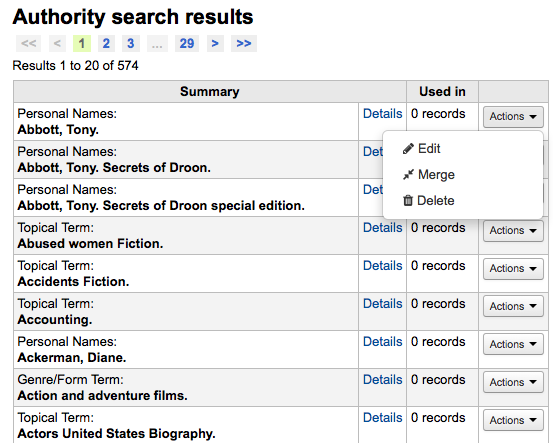
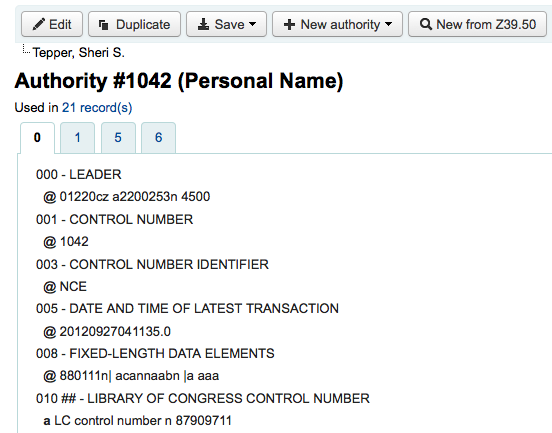
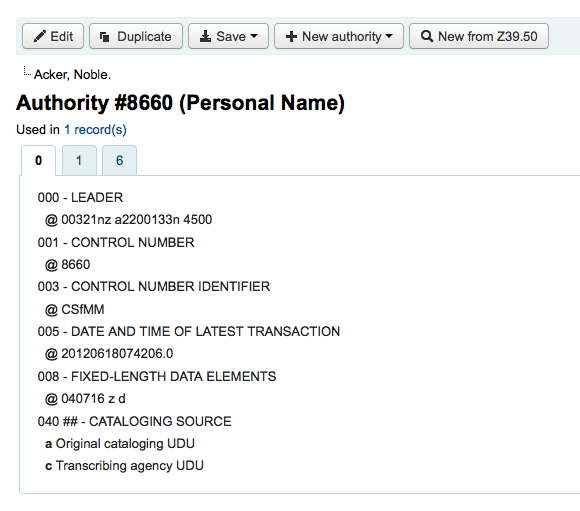
Otorite kayıt özetinin sağındaki Ayrıntılar bağlantısına tıklayınca, kaydı düzenleme seçeneği ile birlikte kaydın tamamı açılacaktır.
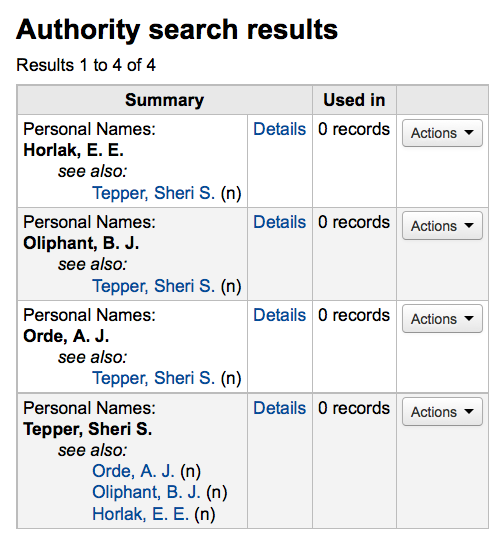
Otoritede ‘Ayrıca bakınız bağlantıları’ mevcutsa, bunları arama sonuçlarında çıktığında göreceksiniz, bağlantılı başlıklara tıklamak o başlık yerine bir araştırma başlatacaktır.
Otoriteler Düzenleniyor¶
Otoriteler, arama sonuçlarından otorite özeti üzerine tıklanarak ve sonra kaydın üzerindeki ‘Düzenle’ üzerine tıklanarak düzenlenebilir. Ya da arama sonuçlarında otoritenin solunda yer alan ‘Düzenle’ bağlantısı üzerine tıklanarak düzenlenebilir.
Once you’ve made the necessary edits, simply click ‘Save’ and dontmerge is set to ‘Do’, Koha will immediately update all of the bib records linked to the authority with the new authority record’s data. If dontmerge is set to “Don’t” then Koha won’t edit bib records when changes are made to authorities, rather, this is done later by the merge_authority.pl cronjob.
Bir yetki kaydını silmek istiyorsanız öncelikle herhangi bir bibliyografik kayda bağlantısı olmadığına emin olmalısınız. Herhangi bir bibliyografik kayıt tarafından kullanılmıyorsa ‘Sil’ bağlantısı yetki kaydının özetine tıkladıktan sonra bir buton olarak arama sonuçlarında kaydın sağında belirecektir.
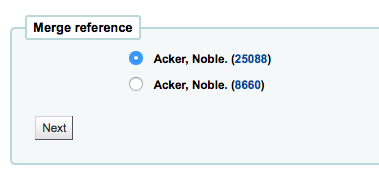
Otoriteleri Birleştirme¶
Yinelenen otorite kayıtlarınız varsa, eylemler menüsünde bulunan, bir otorite aramasındaki iki sonucun yanında bulunan ‘Birleştir’ bağlantısını tıklayarak onları bir araya getirebilirsiniz.

İlk sonuca ‘Birleştir’i tıkladıktan sonra, o otoritenin sonuçların en üstünde listelendiğini göreceksiniz.
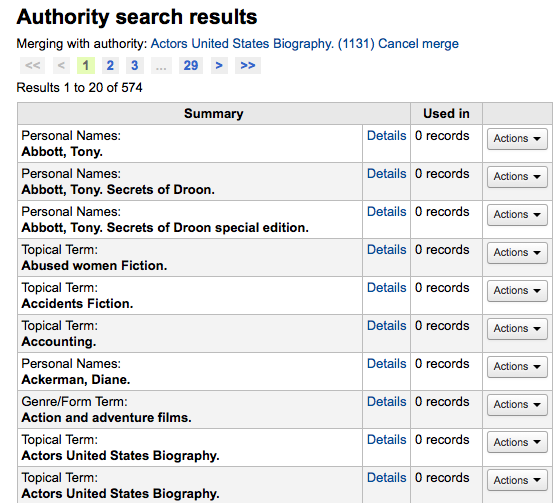
Ardından, birleştirmek istediğiniz ikinci sonucun yanındaki ‘Birleştir’i tıklayın.
Birleştirme sonunda iki kayıttan hangi kaydı esas kayıt olarak saklamak istediğiniz ve hangi kaydın silineceği sorulacaktır.
Size her iki kayıt için MARC sunulacak (bu kayıtların her birine bibliyografik kayıt numaralarıyla adlandırılmış sekmelerle ulaşılabilir ). Varsayılan olarak birinci kaydın tamamı seçilecektir, son (hedef dosya) kayıttaki istemediğiniz alanların onay işaretini kaldırınız, ardından son (hedef dosya) kayıtta olması gereken alanları seçmek için ikinci sekmeye geçiniz.

Seçimlerinizi tamamladıktan sonra ‘Birleştir’ butonuna tıklayın. Birincil kayıt şimdi kendisi için seçtiğiniz veriyi içerecektir ve ikinci kayıt silinecektir.
Kataloglama Rehberleri¶
Bibliyografik Kayıt Kataloglama Cheat Sheet¶
| Tag | Label | Description | Instructions |
|---|---|---|---|
| 000 | LEADER | Describes the record(i.e. surrogate) – is it a record for a monograph? A serial? | Click in this field to fill it in. Then set “Bibliographic level” to ‘a’ for articles or ‘s’ for serials. Otherwise, leave everything as is. |
| 001 | CONTROL NUMBER | Accession number. | Enter the accession number written inside the item here. For articles and items which do not have accession numbers, leave blank. |
| 003 | CONTROL NUMBER IDENTIFIER | Your MARC Organizational Code | Click in this field to fill it in (will auto fill if you have your MARCOrgCode preference set). |
| 005 | D & T LATEST TRANSACTION | Current date and time. | Click in this field to fill it in. |
| 008 | FIXED-LENGTH DATA ELEMENTS | Field containing computer-readable representations of a number of things. | Generally you will only use ‘s’ (single) or ‘m’ (multiple) options for position 06- use the former when the item was published in a single year, the latter when it was published over the course of several. If there is a single date, only enter a date in the first date field (positions 07-10). Enter the three-digit country code in positions 15-17, being sure to add spaces if the country code is fewer than three characters long. If there is an index, note that fact in position 31. Enter the three-letter language code in positions 35-37. |
| 010 | LCCN | A number assigned by the Library of Congress to uniquely identify the work. | Check on the copyright page of the book (if it was published in the US) or the LC catalog for this number. If you can’t find it, don’t worry about it. |
| 020 | ISBN | Unique number used by publishers to identify books. | If this number isn’t listed on the book, there probably isn’t one. |
| 022 | ISSN | Unique number used by publishers to identify serials. | If this number isn’t listed on the book, there probably isn’t one. |
| 033 | DATE/TIME OF EVENT | Used for auction dates. Required for auction catalogs. | For auctions that took place on only one day, enter the date of the auction in the format YYYYMMDD in the subfield ‘a’ and a ‘0’ in the first indicator. For auctions that took place over two consecutive days or any number of non-consecutive days, create a subfield ‘a’ for each day with the date in the format YYYYMMDD, and put a ‘1’ in the first indicator. For auctions that took place over more than two consecutive days, create a subfield ‘a’ (in format YYYYMMDD) for the first day and a subfield ‘a’ (also in format YYYYMMDD) for the last day, and put a ‘2’ in the first indicator. |
| 040 | CATALOGING SOURCE | Identifies which libraries created and modified the record. | For imported records, add a subfield ‘d’ with your OCLC code as the value. For new records, make sure that the subfield ‘c’ with your OCLC code as the value. |
| 041 | LANGUAGE CODE | Identifies all the languages used in an item, when two or more languages are present. | For significant portions of a text in a given language, there should be a subfield ‘a’ with that language code. If there are only summaries or abstracts in a specific language, create a subfield ‘b’ with that language code. |
| 100 | MAIN ENTRY–PERSONAL | Authorized form of the main author’s name | See Authorized headings sheet and AACR2. The first indicator should generally be a ‘1’, to indicate that the entry is surname first. If the name consists only of a forename, however, the first indicator should be ‘0’. |
| 110 | MAIN ENTRY–CORPORATE | Authorized form of the name of the main corporate author. Required for auction catalogs. | Auction catalogs should use a 110 field rather than a 100 field. See Authorized headings sheet and AACR2. Set the first indicator to ‘2’. |
| 111 | MAIN ENTRY–MEETING | Authorized form of the name of a meeting which acted as a main offer (e.g. conference proceedings) | See Authorized headings sheet and AACR2. Set the first indicator to ‘2’. |
| 245 | TITLE STATEMENT | Transcription of the title statement from the title page (or chief source of information) | Enter the title in subfield ‘a’, the subtitle in subfield ‘b’, and the statement of responsibility in subfield ‘c’. If you are creating a record for a single volume or part of a multi-part item, you should put the part number in subfield ‘n’ and the part title in subfield ‘p.’ For auction catalogs, the date (in ‘MM/DD/YYYY’ format) should be listed in square brackets in subfield ‘f’. See ISBD punctuation sheet. Set the first indicator to ‘0’ if there is no author, otherwise set it to ‘1’. Set the second indicator to the number of non-filing characters (i.e. characters in an initial articles plus the space… for “The ” set the second indicator to ‘4’). |
| 246 | VARYING FORM OF TITLE | Alternate form of title for searching and filing purposes | If the patron might look for the work under a different title, enter it here. Do not include initial articles. The first indicator should be ‘3’, unless the title is merely a variant spelling, in which case the first indicator should be ‘1’. |
| 250 | EDITION STATEMENT | Transcription of the edition statement from the title page (or chief source of information) | Transcribe the edition statement exactly as it appears on the title-page. You may abbreviate if the edition statement is very long. |
| 260 | PUBLICATION (IMPRINT) | Publication information. | Put the location of publication in subfield ‘a’, the publisher in subfield ‘b’, and the year (or probable year) in subfield ‘c’. See ISBD punctuation sheet. |
| 300 | PHYSICAL DESCRIPTION | Physical description | Enter the pagination statement in subfield ‘a’, a brief description of “special” contents such as illustrations or maps in subfield ‘b’ (see AACR2), and the size of the item in subfield ‘c’. See ISBD punctuation sheet. |
| 490 | SERIES STATEMENT | Shows the series statement exactly as it appears on the item. | Transcribe the series statement into subfield ‘a’ with the volume number in subfield ‘v’. See ISBD punctuation sheet. Set the first indicator to ‘1’ if you are using an 830. As a general rule, you should do so. |
| 500 | GENERAL NOTE | Notes that don’t fit anywhere else. | Enter notes as full sentences, with a separate 500 field for each distinct topic. |
| 501 | WITH NOTE | Notes whether the work is bound with the works described by other records. | Put description of relationship in subfield ‘a’. |
| 504 | BIBLIOGRAPHY, ETC. NOTE | Indicates whether the work includes a bibliography. | If the work includes a bibliography and index, put the text “Includes bibliographical references (p. XXX-XXX) and index.” in subfield ‘a’. If the work does not include an index, remove that part of the sentence. If the references are scattered throughout the work and not gathered into a distinct sentence, remove the parenthetical statement. |
| 505 | FORMATTED CONTENTS | List of contents in a standard format. Unformatted contents can be listed in a 500 (General Note) field. | See ISBD punctuation sheet. Set the first indicator to ‘0’. If you are separately coding authors and titles, set the second indicator to ‘0’. Otherwise, leave the second indicator blank. |
| 518 | DATE/TIME OF EVENT NOTE | Used for auction dates. | For auction catalogs, enter the date of the auction in the format ‘January 2, 1984’ in the subfield ‘a’ |
| 520 | SUMMARY, ETC. | A brief summary or abstract of the book or article. | In general you do not need to write a summary. A summary might be called for, however, with items that cannot be easily reviewed by a patron, such as books with highly acidic paper or CD-ROMs. |
| 546 | LANGUAGE NOTE | Note describing the languages used in the work | Only needed for works in multiple languages. See ISBD punctuation sheet. |
| 561 | PROVENANCE INFORMATION | Describes the previous ownership of the item. | Used only for rare books. |
| 563 | BINDING INFORMATION | Describes the binding of the item. | Used only for rare books. |
| 590 | LOCAL NOTE | Local notes. Required for auction catalogs. | Used for auction catalogs to indicate what types of coins are sold in the auction- Roman, Greek, etc. |
| 600 | SUBJECT ADDED–PERSONAL | Authorized form of personal names for people discussed in the work | See Authorized headings sheet and AACR2. The first indicator should generally be a ‘1’, to indicate that the entry is surname first. If the name consists only of a forename, however, the first indicator should be ‘0’. If you found the name in the LC authority file, set the second indicator to ‘0’. Otherwise set the second indicator to ‘4’. |
| 610 | SUBJECT ADDED–CORPORATE | Authorized form of corporate names for organizations discussed in the work | See Authorized headings sheet and AACR2. Set the first indicator to ‘2’. If you found the name in the LC authority file, set the second indicator to ‘0’. Otherwise set the second indicator to ‘4’. |
| 611 | SUBJECT ADDED–MEETING | Authorized form of meeting names for meetings discussed in the work | See Authorized headings sheet and AACR2. Set the first indicator to ‘2’. If you found the name in the LC authority file, set the second indicator to ‘0’. Otherwise set the second indicator to ‘4’. |
| 630 | SUBJECT ADDED–UNIFORM TITLE | Authorized form of titles for other works discussed in the work | See Authorized headings sheet and AACR2. Set the first indicator to the number of non-filing characters (i.e. characters in an initial articles plus the space… for “The ” set the first indicator to ‘4’). If you found the name in the LC authority file, set the second indicator to ‘0’. Otherwise set the second indicator to ‘4’. |
| 650 | SUBJECT ADDED–TOPICAL | Library of Congress Subject Heading terms describing the subject of the work | See Authorized headings sheet and AACR2. If you found the name in the LC authority file, set the second indicator to ‘0’. Otherwise set the second indicator to ‘4’. |
| 651 | SUBJECT ADDED–GEOGRAPHICAL | Library of Congress Subject Heading geographical terms describing the subject of the work | See Authorized headings sheet and AACR2. If you found the name in the LC authority file, set the second indicator to ‘0’. Otherwise set the second indicator to ‘4’. |
| 655 | INDEX TERM–GENRE/FORM | Describes what an item is as opposed to what the item is about. | Generally used only for auction catalogs, which should have the genre heading “Auction catalogs.” (make sure to find the authorized heading!) If you found the name in the LC authority file, set the second indicator to ‘0’. If you are using a term from a specific thesaurus, set the second indicator to ‘7’ and put the code for the thesaurus in subfield ‘2’. Otherwise set the second indicator to ‘4’. |
| 690 | LOCAL SUBJECT ADDED–TOPICAL | Used for headings from any custom subject authority file. | If there is no appropriate LCSH term, you can use a 690 with subject headings you find on other items in the catalog. |
| 691 | LOCAL SUBJECT ADDED–GEOGRAPHICAL | Used for headings from any custom subject authority file. | If there is no appropriate LCSH term, you can use a 691 with subject headings you find on other items in the catalog. |
| 700 | ADDED ENTRY–PERSONAL | Used for second authors and other persons related to the production of the work. | See Authorized headings sheet and AACR2. The first indicator should generally be a ‘1’, to indicate that the entry is surname first. If the name consists only of a forename, however, the first indicator should be ‘0’. |
| 710 | ADDED ENTRY–CORPORATE | Used for corporate bodies related to the production of the work (e.g. publishers). | See Authorized headings sheet and AACR2. Set the first indicator to ‘2’. |
| 711 | ADDED ENTRY–MEETING | Used for meetings related to the production of the work (e.g. symposia that contributed to the work). | See Authorized headings sheet and AACR2. Set the first indicator to ‘2’. |
| 730 | ADDED ENTRY–UNIFORM TITLE | Used for uniform titles related to the production of the work (e.g. a work that inspired the present work) | See Authorized headings sheet and AACR2. Set the first indicator to the number of non-filing characters (i.e. characters in an initial articles plus the space… for “The ” set the first indicator to ‘4’). |
| 773 | HOST ITEM ENTRY | Describes the larger bibliographic unit that contains the work (e.g. book or journal containing the article being described in the current record) | If the host publication is author main entry, enter the authorized form of the author’s name in subfield ‘a’. Put the title in subfield ‘t’. If the host publication is an independent work, put publication information in subfield ‘d’. When available, ISSN and ISBN should always be used in, in subfields ‘x’ and ‘z’ respectively. Relationship information (e.g. volume number, page number, etc.) goes in subfield ‘g’. Subfield ‘q’ contains an encoded representation of the location of the item: volume, issue, and section numbers are separated by colons, and the first page is entered following a ‘<’ at the end of the subfield. See ISBD punctuation sheet. Set the first indicator to ‘0’. If you want the label “In:” to be generated, leave the second indicator blank. If you want something else displayed before the 773 text, set the second indicator to ‘8’ and add a subfield ‘i’ with the label you want at the beginning of the field (e.g. “$iOffprint from:”). |
| 830 | SERIES ENTRY–UNIFORM TITLE | Authorized form of the series name transcribed in the 490 field. Often this will just be the same as the 490. | See Authorized headings sheet and AACR2. Set the second indicator to the number of non-filing characters (i.e. characters in an initial articles plus the space… for “The ” set the second indicator to ‘4’). |
| 852 | LOCATION/CALL NUMBER | Provides the section name for pre-barcode books, pamphlets, and some articles and serials. | Do not put anything in this field if you are cataloging a volume which gets only one record and a barcode. If the item does not get a barcode, or you are currently creating a record for an article in a volume, put the section in subfield ‘a’ (see ANS cataloging documentation), and the call number in subfield ‘i’. Set the first indicator to ‘8’. |
| 856 | ELECTRONIC ACCESS | Links to material available online. | Put the URL of any electronic copies or summaries, etc. in subfield ‘u’ and a link title in subfield ‘y’. Set the first indicator to ‘4’. |
| 942 | ADDED ENTRY ELEMENTS (KOHA) | Used for Koha-specific data. | Set the subfield ‘c’ to the appropriate item type. |
Table: Cataloging Guide
Materyal/Ayırtma Kayıt Kataloglama Kılavuzu¶
Bu tablo Koha’da ki varsayılan yerleşik ayırtma verilerini temsil eder. Bu bilgiler geçiş ya da veri aktarımı amaçları için kullanılabilir
| MARC21 Tag/subfield | Data Element | Description | Notes |
|---|---|---|---|
| 952$0 | Withdrawn status | Default values:
|
Coded value, matching Authorized Value category (‘WITHDRAWN’ in default installation) |
| 952$1 | Lost status | Default values:
|
It’s possible to configure OPAC so that lost items don’t display with the hidelostitems system preference. Coded value, matching Authorized Value category (‘LOST’ in default installation) |
| 952$2 | Classification | Classification scheme that defines filing rules used for sorting call numbers. | A choice of classification sources as they are defined in administration. If no classification scheme is entered, the system will use the value entered in the DefaultClassificationSource preference. |
| 952$3 | Materials specified | Specific issues of serials or multi-part items. | Displayed when items are checked out and in to tell the staff how many pieces the item has. Copy/volume data is stored in 952$h and $t for display in Normal views. |
| 952$4 | Damaged status | Default values:
|
Coded value, matching Authorized Value category (‘DAMAGE’ in default installation) |
| 952$5 | Use restrictions | Default values:
|
Coded value, matching Authorized Value category (‘RESTRICT’ in default installation). This value has no effect on circulation. |
| 952$7 | Not for loan | Default values:
|
Coded value, matching Authorized Value category (‘NOT_LOAN’ in default installation). Negative number values can still be placed on hold. |
| 952$8 | Collection code | Coded value | Coded value, matching Authorized Value category (‘CCODE’ in default installation) |
| 952$9 | Item number | System-generated item number. | Does not display in the item record. |
| 952$a | Owning Library ** | Branch code | Required. Code must be defined in Libraries, Branches and Groups |
| 952$b | Holding library ** (usually the same as 952$a ) | Branch code | Required. Code must be defined in Libraries, Branches and Groups |
| 952$c | Shelving location code | Coded value, matching Authorized Value category (‘LOC’ in default installation) | |
| 952$d | Date acquired | YYYY-MM-DD | Date formats in the 952 subfields are required to be in the system internal format for data loading and subsequent item editing: YYYY-MM-DD |
| 952$e | Source of acquisition | Coded value or vendor string | Filled in automatically with the Koha assigned vendor id by Acquisitions when an item is received. |
| 952$g | Purchase price | Decimal number, no currency symbol (ex. 10.00) | Filled in automatically by Acquisitions when an item is received. |
| 952$h | Serial enumeration | Filled in automatically by Serials if the issue is received there. | |
| 952$o | Koha full call number | Can be filled in automatically based on the itemcallnumber system preference. | |
| 952$p | Barcode * | Max 20 characters | |
| 952$t | Copy number | Max 32 characters | |
| 952$u | Uniform Resource Identifier | Item specific URL | Full URL starting with http:// Only needed if your item has its own URL, not necessary if the bib record has a 856$u that applies to all items on the record. |
| 952$v | Replacement price | Decimal number, no currency symbol (ex. 10.00) | Filled in automatically by Acquisitions when an item is received. |
| 952$w | Price effective from | YYYY-MM-DD | Date formats in the 952 subfields are required to be in the system internal format for data loading and subsequent item editing: YYYY-MM-DD. Filled in automatically by Acquisitions when an item is received. |
| 952$x | Nonpublic note | This is a note field for notes that will not appear in the OPAC. Right now this note does not appear anywhere but in the item edit screen in the staff client. | |
| 952$y | Koha item type ** | Coded value, required field for circulation | Required. Coded value, must be defined in Item types |
| 952$z | Public note |
Table: Koha Embedded Holdings Data
* - required for circulation
** - required by Koha
Siparişte olan ve Ayırtılmış materyallerin idaresi¶
If you tend to import your MARC records when you have ordered the book (as opposed to when you receive the books), and allow patrons to place holds on those books, you may need to add item records to the *.mrc file before importing.
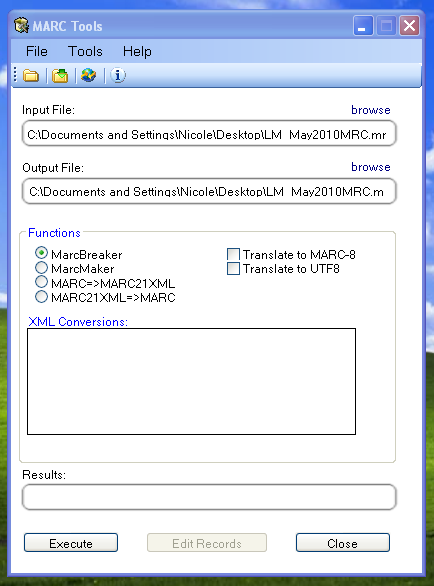
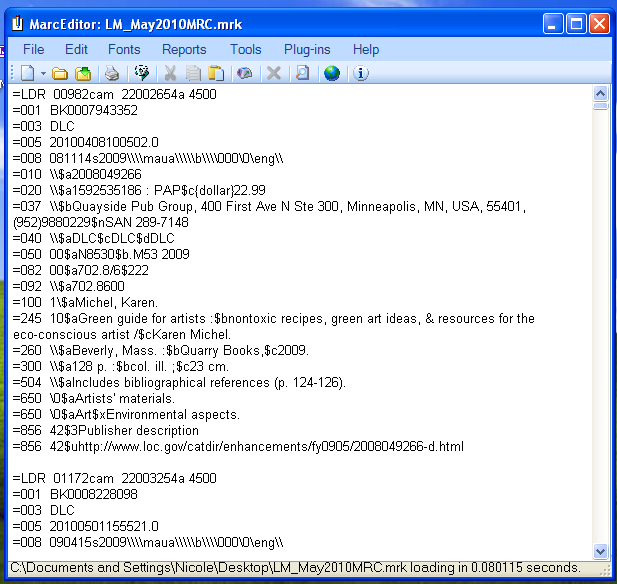
The easiest way to import your latest order is to first run your records through MARCEdit. Download your MARC records, saving them to your desktop or some other location you use/will remember. If you have MARCEdit already installed you should simply have to double click on your MARC records, and they will automatically open in MARCEdit.
Önemli
Bu öğretici, Windows XP üzerinde MARCEdit sürüm 5.2.3769.41641 ile yazılmıştır, işletim sisteminiz ya da sürümünüz farklı ise talimatlar farklı olabilir.
Özgün dosyanız otomatik olarak girdi içerisinde olacaktır; MarcBreaker’ın seçili olduğundan emin olun ve “Çalıştır” üzerine tıklayın
Ekranın en alt kısmına işlenen kayıtların bir özeti gelecek
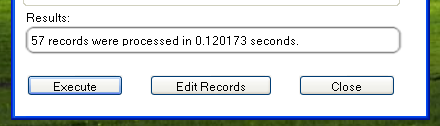
materyal kayıtları eklemeye devam etmek için ‘Kayıtları Düzenle’ üzerine tıklayın
Ekran MARC kayıtlarını içeren daha geniş bir ekran ile değiştirilecektir
Click on Tools > Add/Edit Field

Koha özel materyal bilgisi içine girin
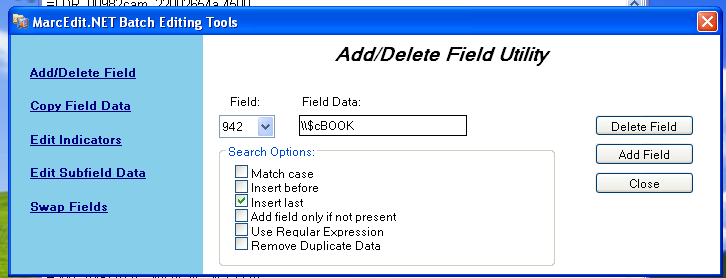
- Alan kutusu içine 942 yazın
- In the Field Data box, type \$c and the item type code (\$cBOOK in this example)
- ‘Insert last’ seçeneğini işaretleyin
- ‘Alan Ekle’ üzerine tıklayın
Materyal kayıt verisi içine girin
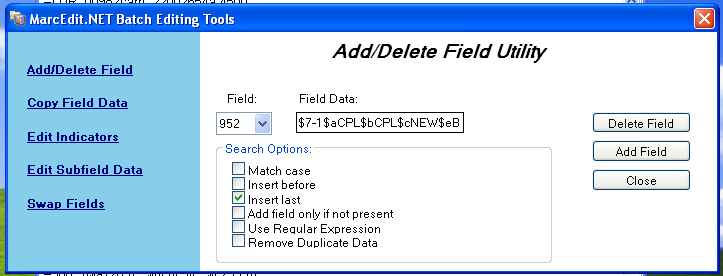
- Alan kutusu içine 952 yazın
- In the Field Data box, type
$7ORDERED_STATUS$aPERM_LOC$bCURR_LOC$cSHELVING_LOCATION$eSOURCE_OF_ACQ$yITEM_TYPE
- ör. $7-1$aCPL$bCPL$cNEW$eBrodart$yBOOK
- Varsayılan Koha kurulumunda -1 Sipariş edildi durumu değeridir
- İçerisindeki veriler üzerinde düzenleme yapmak istediğiniz diğer alt alanlara bakmak isteyebilirsiniz – örneğin, tüm materyalleri aynı koleksiyona yerleştirmek için koleksiyon kodunu değiştirmek (8), sağlama tarihini otomatik olarak değiştirmek (d), ya da genel bir not girmek (z).
- Alt alanları ayırmak için $ işareti kullandığınızdan emin olun; her alt alanı ayrı bir satır üzerine eklemek MARC kayıtlarınızla birlikte bir çok materyalin içe aktarılmasına neden olacaktır (yukarıdaki örnekte, her biri bu alt alanların bir tanesine sahip olan dört materyal düzeltilmiştir)
- Make sure you look at the Administration > Authorized Values in Koha to put the correct code into the field
- ör. $7-1$aCPL$bCPL$cNEW$eBrodart$yBOOK
- ‘Insert last’ seçeneğini işaretleyin
- ‘Alan Ekle’ üzerine tıklayın
Editör penceresini kapat
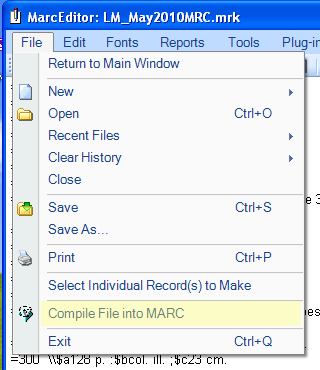
Click on File > Compile into MARC
Dosyanızın kaydedileceği konumu seçin
Now you want to go into your Koha system and follow the instructions for importing MARC records.
Materyal geldikten sonra, bir kez materyal kaydına gidip materyalleri doğru barkoda sahip olması için tek tek değiştirmeniz, ve materyal durumunu manuel olarak Siparişte durumundan Ödünç Verilmez alanındaki boş satıra değiştirmeniz gerekecektir.
Not
Kataloglanmış materyal kayıtlarınızı satın aldıysanız sağlayıcınızdan ihtiyaç duyduğunuz bilgileri MARC kayıtlarına girmesini isteyebilirsiniz; bu şekilde sağlayıcı tarafından düzenlenmiş bilgileri içe aktarabilir, mevcut kaydın üzerine yazarak verileri otomatik olarak ihtiyacınız olanlarla değiştirebilirsiniz.