Aquisições
O módulo de Aquisições do Koha fornece uma forma para os técnicos registrarem encomendas a fornecedores e gerir os orçamentos.
- Get there: More > Acquisitions
Configurar
Antes de suar o módulo de Aquisições, tenha certeza que você realizou todas as suas configurações.
First, set your Acquisitions System Preferences and Acquisitions Administration to match your library’s workflow. Before setting your EDI Accounts and Library EANs you will need to have entered your vendors.
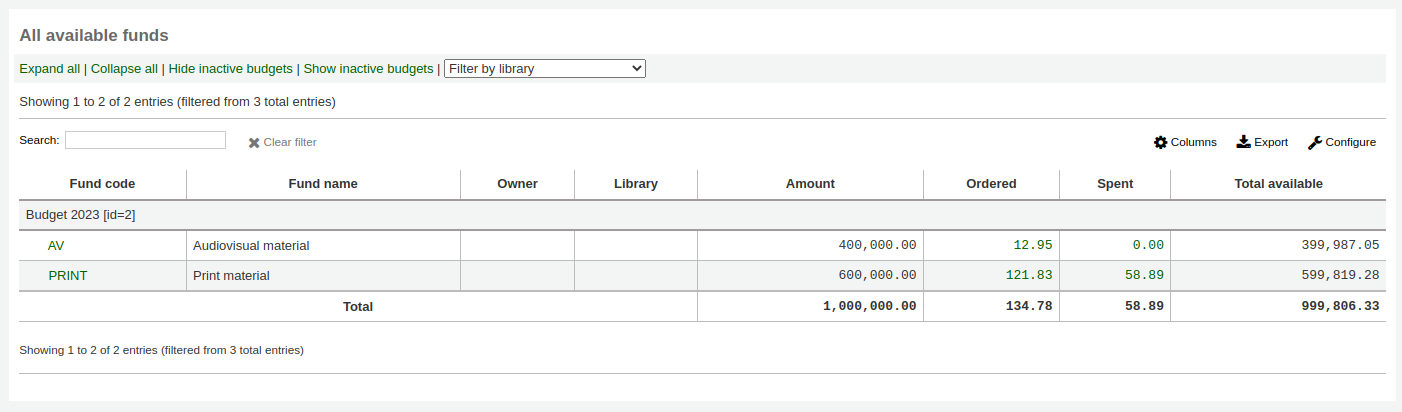
On the main acquisitions page you will see your library’s funds listed.
Note
Se desejar que a linha da tabela correspondente ao Total não apareça configure
#funds_total {display:none;}to the IntranetUserCSS preference.
To see all active funds you can click the checkbox next to ‘Show active and inactive’ above the funds table.
To see a history of all orders in a fund you can click on the linked amount and it will run a search for you.
Learn more in the Budget/Fund Tracking section of this manual.
Fornecedores
Antes de adicionar os pedidos, você precisa cadastrar ao menos um fornecedor.
Adicionar um fornecedor
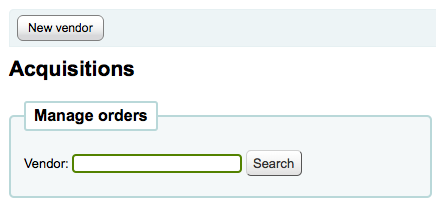
Para adicionar um fornecedor, clique no botão ‘Novo Fornecedor’ na página de Aquisição.
The vendor add form is broken into three pieces
The first section is for basic information about the Vendor
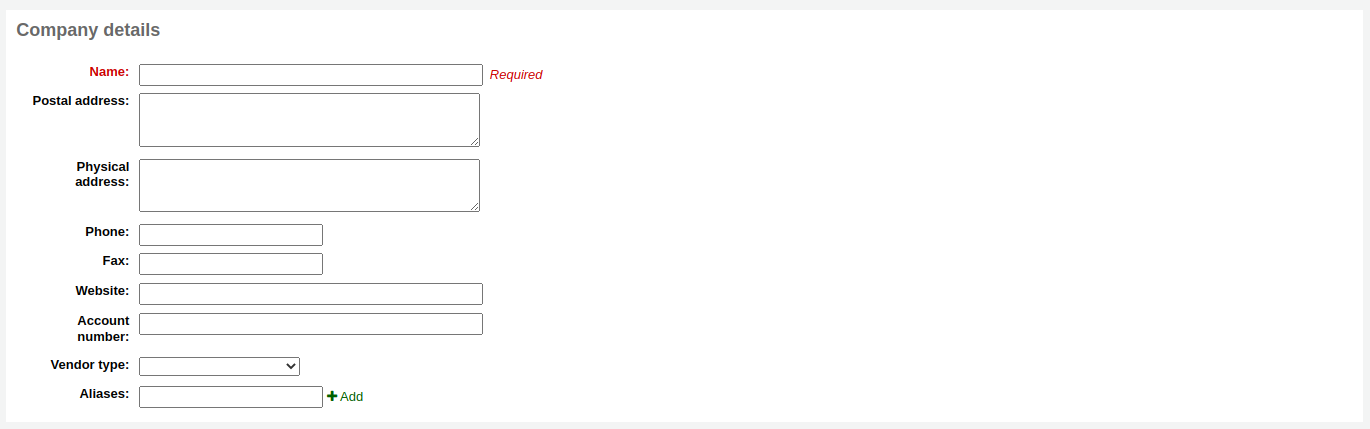
- Destes campos, apenas o nome do fornecedor é obrigatório, o restante das informações pode ser preenchido para ajudar a geração de mensagens de reclamações e faturas.
A segunda seção são informações a respeito do representante comercial do fornecedor.
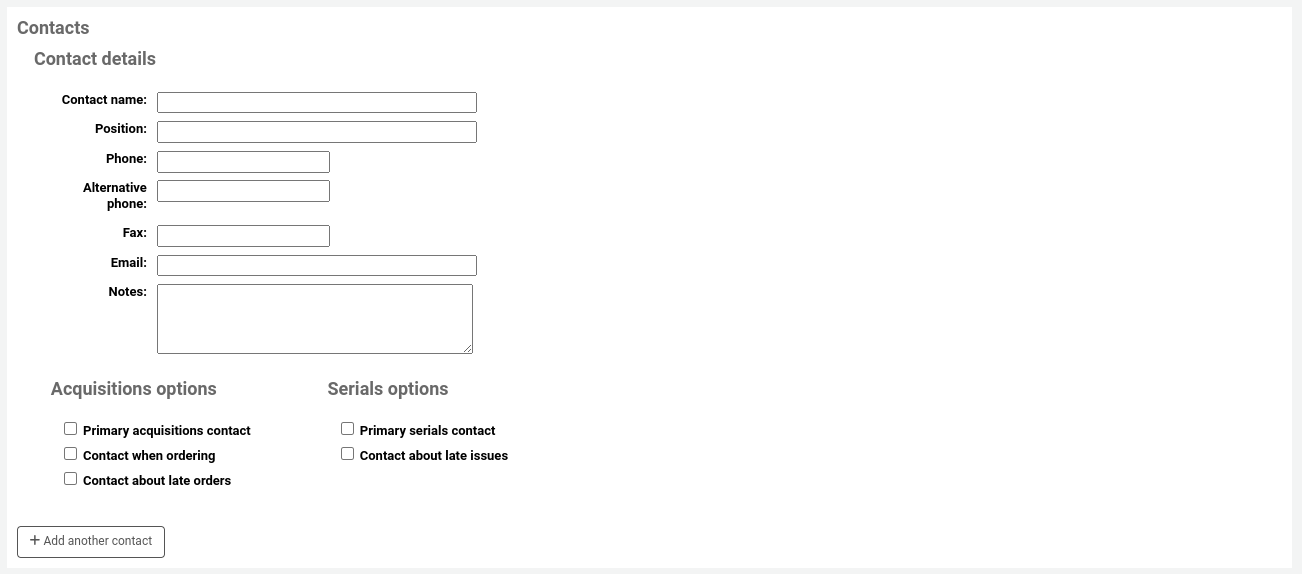
Nenhum destes campos é obrigatório, eles devem ser preenchidos apenas se você quiser rastrear as informações de seus contatos no Koha
- Primary acquisitions contact: check this box if this person is your primary contact regarding acquisitions from this vendor
- Primary serials contact: check this box if this person is your primary contact regarding serial acquisitions from this vendor
- Contact when ordering? check this box if you want to be able to send your orders by email directly to this person
- Contact about late orders? check this box if you want to be able to send your acquisitions claims by email directly to this person
- Contact about late issues? check this box if you want to be able to send your serials claims by email directly to this person
You can add more than one contact per vendor by clicking on the ‘Add another contact’ button
A última seção são informações sobre faturamento
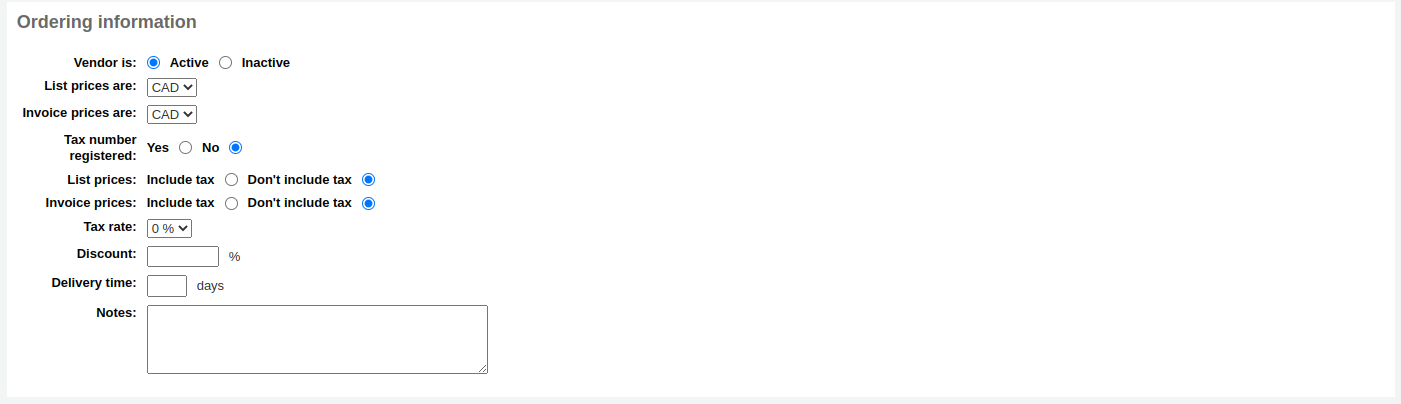
- Para poder fazer pedidos a um fornecedor, é preciso registrá-lo como ‘Ativo’
- Para Lista de Preços e Preço da Fatura escolha a moeda.
- Currencies are assigned in the Currencies & Exchange Rates admin area
- Se a biblioteca tem obrigações tributárias (CNPJ) marque ‘Sim’
- Marque se sua Lista de Preços e/ou Preço da Fatura incluem impostos.
- If the vendor offers a consistent blank discount, enter that in
the ‘Discount’ field
- Você pode inserir um desconto específico para um exemplar quando fizer a reserva
- Enter your tax rate if your library is charged taxes on orders
- Se você possuir uma estimativa do tempo para entrega pelo o fornecedor, insira o tempo de entrega. Desta forma, o Koha poderá estimar quando o pedido chegará à biblioteca ao gerar o relatório de pedidos.
- Notas são para uso interno
Visualizar/Editar um fornecedor
Para ver a página de informações do fornecedor você precisa pesquisar pelo fornecedor na página principal do módulo Aquisições. A sua busca pode ser feita a partir de qualquer parte do nome do Fornecedor.
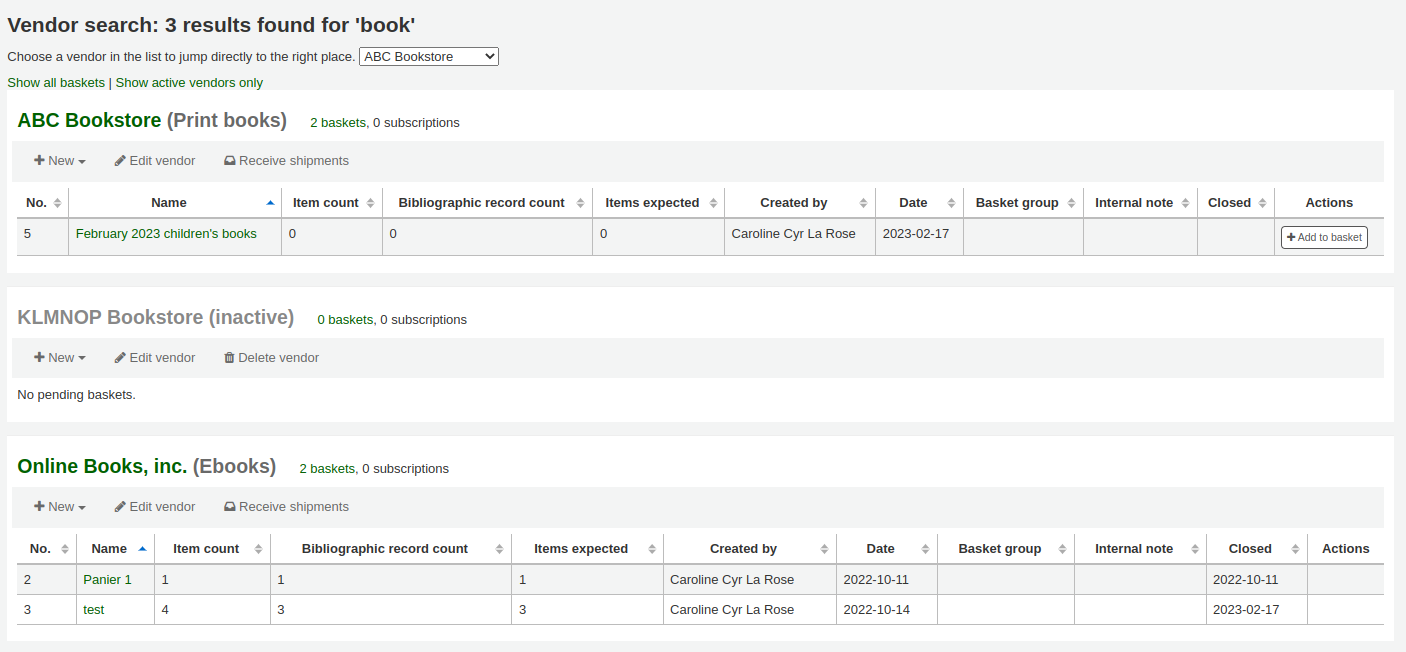
From the results, click on the name of the vendor you want to view or edit

Para alterar as informações do fornecedor, clique no botão ‘Editar fornecedor’.
Se o fornecedor não possui pedidos a ele vinculados, então o botão ‘Excluir fornecedor’ ficará visível e será possível exclui-lo. Caso contrário, o botão que estará visível será o ‘Receber remessa’.

Vendor Contracts
Você pode definir contratos (com data de início e fim) e relacioná-lo a um fornecedor. Isto é utilizado para permitir que você estime quanto foi gasto em um contrato específico de um fornecedor. Em alguns locais, contratos são configurados para um gasto máximo e mínimo por ano.
Adicionar um Contrato
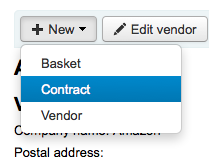
No topo da página de informação de fornecedores, você verá um botão ‘Novo Contrato’.
The contract form will ask for some very basic information about the contract
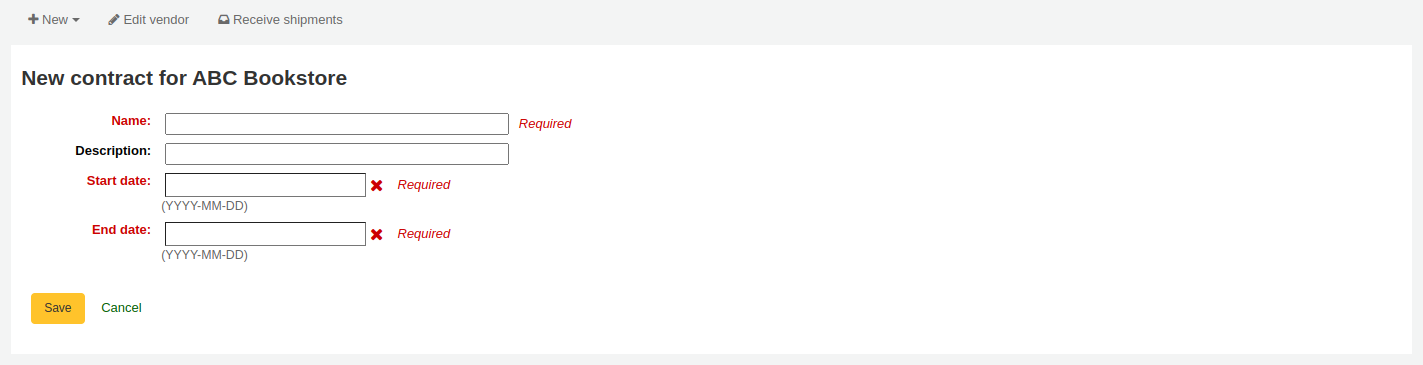
Important
You cannot enter a contract retrospectively. The end date must not be before today’s date.
Quando o contrato for salvo, ele aparecerá abaixo das informações do fornecedor.
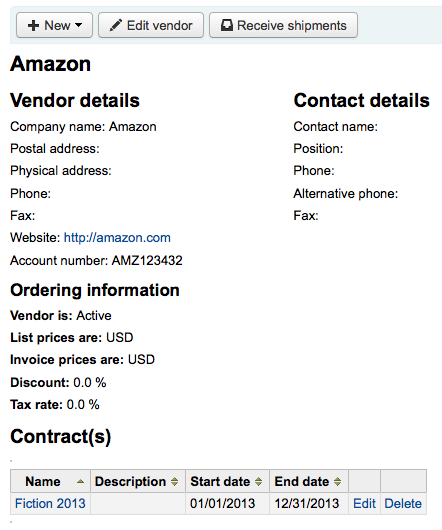
It will also be an option when creating a basket
Managing Suggestions
Purchase suggestions can be generated in one of two ways. You can create suggestions via the staff client either for the library or on the patron’s behalf from their record. Depending on your settings in the sugestão system preference, patrons may also be able to make purchase suggestions via the OPAC. When a suggestion is waiting for library review, it will appear on the Acquisitions home page under the vendor search.
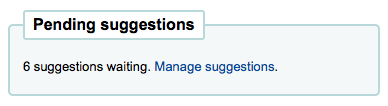
It will also appear on the main staff dashboard under the module labels:

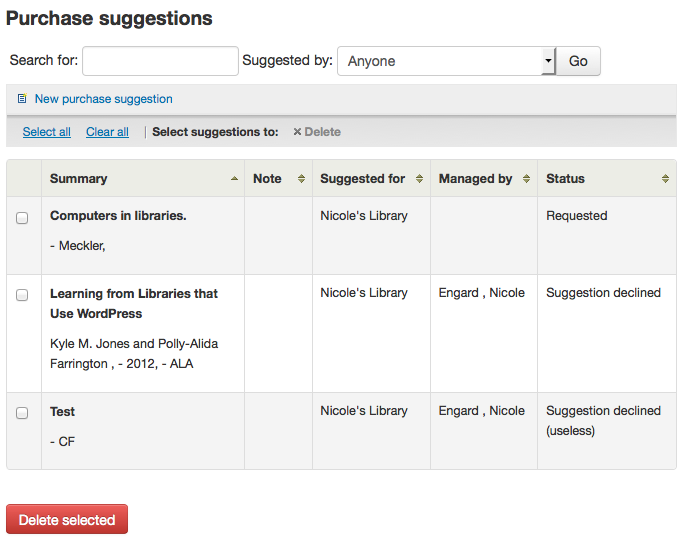
Clicando ‘Gerenciar sugestões’ te levará a ferramenta de gerenciamento de sugestões. Se não existirem sugestões pendentes você poderá acessar a ferramenta de gerenciamento de sugestões clicando no link ‘Gerenciar sugestões’ a esquerda na página de Aquisições.
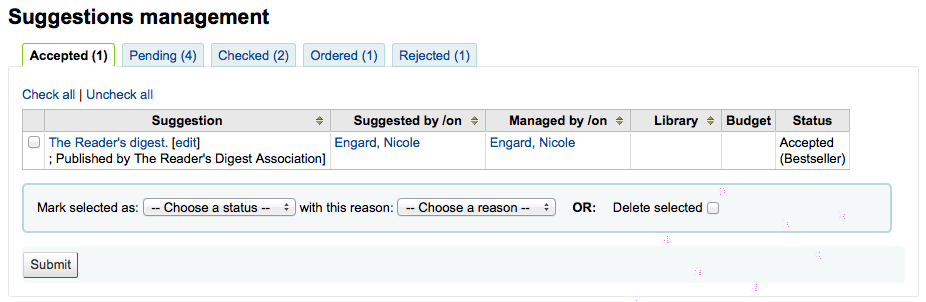
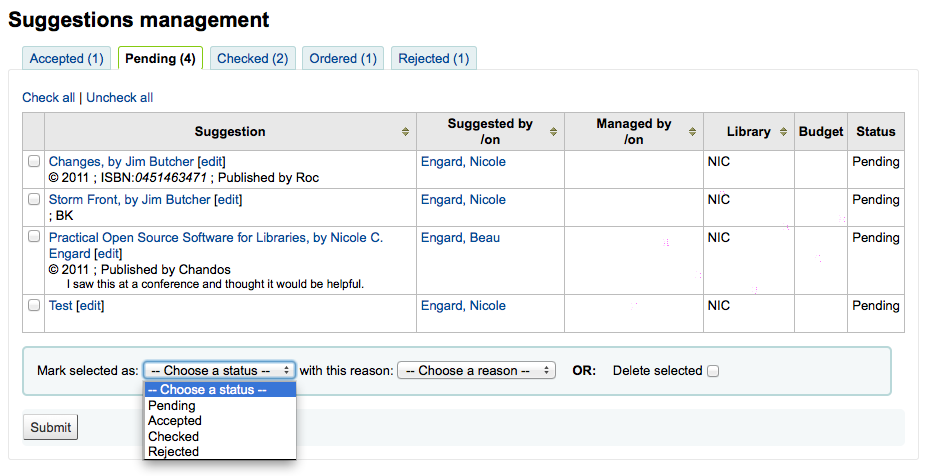
Suas sugestões serão organizadas em três categorias: Aprovado, Pendente e Rejeitado. Cada sugestão aprovada ou rejeitada terá o nome do funcionário que analisou a sugestão e a razão para aprovar ou rejeitar (encontrada em ‘Status’).
An ‘Accepted’ suggestion is one that you have marked as ‘Accepted’ using the form below the suggestions. A ‘Pending’ suggestion is one that is awaiting action from the library. A ‘Checked’ suggestion is one that has been marked as ‘Checked’ using the form before the suggestions. An ‘Ordered’ suggestion is on that has been ordered using the ‘From a purchase suggestion’ link in your basket. A ‘Rejected’ suggestion is one that you have marked at ‘Rejected’ using the form below the list of suggestions.
Para bibliotecas com muitas sugestões, há filtros no lado esquerdo da página ‘Gerir sugestões’ para ajudar a limitar o número de títulos exibidos na tela.
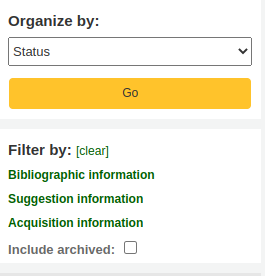
Clicando nos cabeçalhos azuis irá expandir as opções de filtragem e clicando ‘[limpar]’ irá eliminar os filtros e exibir todas as sugestões.
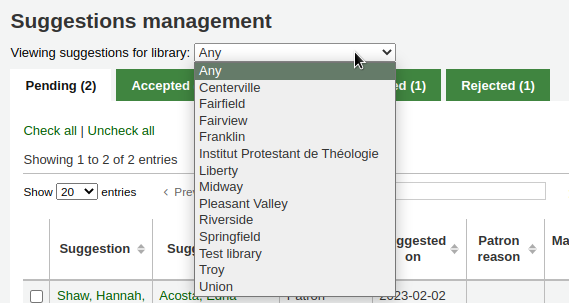
Note
A página de sugestões será automaticamente limitada para sugestões de sua biblioteca. Para ver informações para todas as biblioteca (ou qualquer uma delas) clique em filtro de ‘Informações de aquisições’ altere a biblioteca.
Quando revisar as sugestões ‘Pendentes’ você pode escolher clicar na caixa próxima ao exemplar que deseja aprovar/rejeitar e escolher o status e a razão da sua escolha. Você pode também escolher apagar completamente a sugestão clicando na caixa ‘Excluir selecionados’.
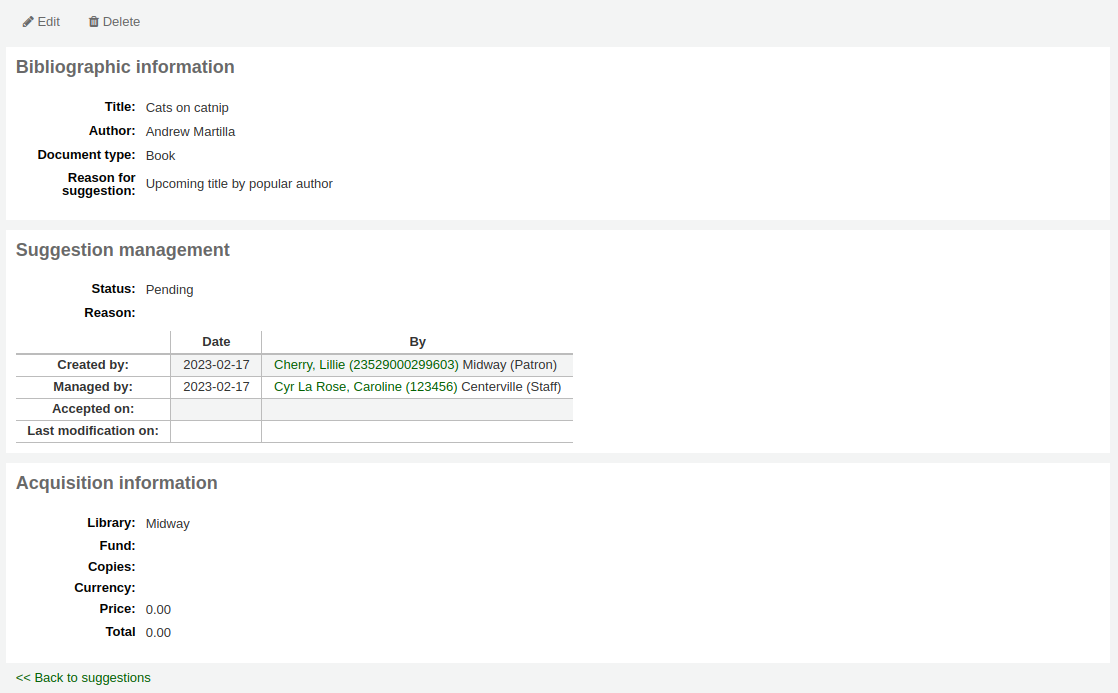
Uma outra opção para bibliotecas com uma longa lista de sugestões é aprovar ou rejeitar sugestões uma a uma clicando no título da sugestão para abrir a página de edição da sugestão.
Clicking ‘edit’ to the right of the suggested title or at the to pof the suggestion detail page will open a suggestion editing page.
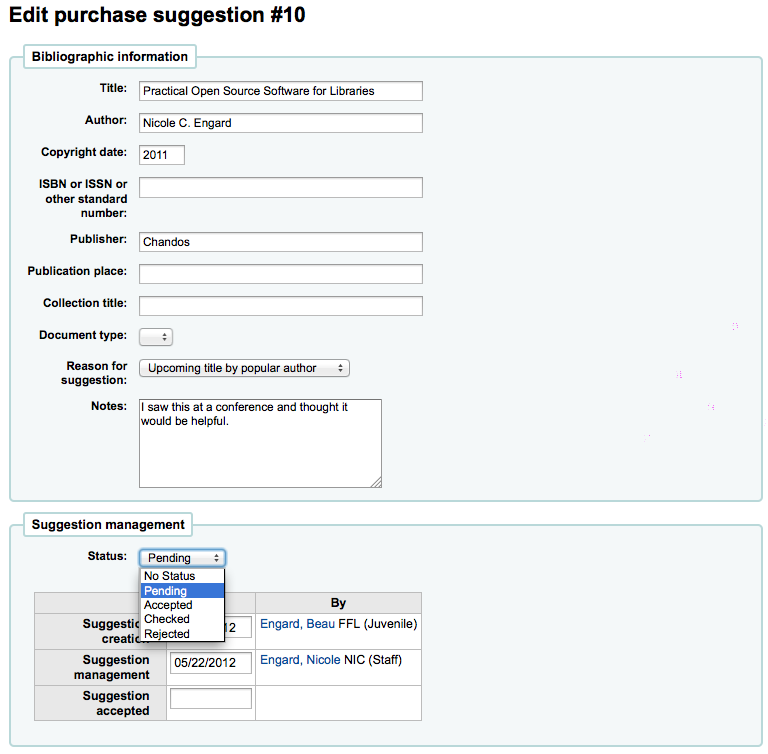
Neste formulário você pode fazer editar as sugestões (adicionando mais detalhes ou atualizando informações incorretas fornecidas pelo usuário). Você também pode optar por aceitar ou rejeitas a sugestão.
- Marcar uma solicitação como ‘Pendente’ fará com que o solicitação volte para a aba ‘Pendente’.
Reasons for accepting and rejecting suggestions are defined by the SUGGEST authorized value.

Se você selecionar ‘Outros…’ como uma razão, surgirá um campo de texto para você digitar o motivo. Clicando ‘Cancelar’ no lado direito da caixa irá trazer uma lista com as razões pré-definidas.

You can also assign this suggestion to a fund.
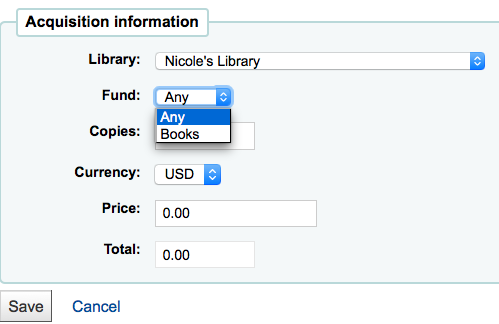
This edit can trigger a notice (defined in the Notices & Slips tool with the TO_PROCESS notice) to the fund owner that there is a suggestion ready for them to manage if you have turned on the cron job to generate these notices.
Once you have clicked ‘Submit’ the suggestion will be moved to the matching tab. The status will also be updated on the patron’s account in the OPAC and an email notice will be sent to the patron using the template that matches the status you have chosen.
Placing Orders
To place an order you must first search for the vendor or bookseller you want to send the order to.
Important
If you are planning on using EDIFACT to submit your order you will need to first set up your library’s EDI Accounts and EANs.
Create a basket
Note
If you’re using EDI for ordering you will want to download your order record from your vendor before starting the process in Koha.
To create a basket you must first search for the vendor you’re ordering from:
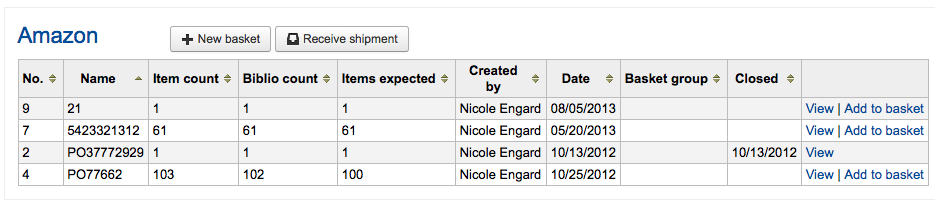
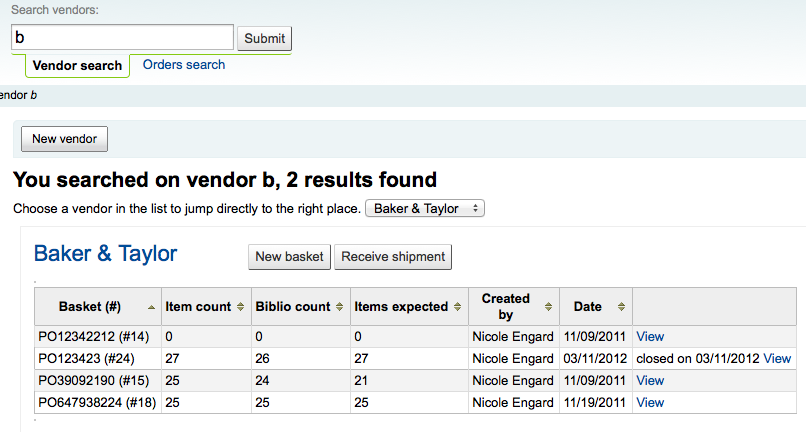
And click the ‘New basket’ button to the right of the vendor name.
Note
You can also add to an existing basket by clicking the ‘Add to basket’ link to the far right of each basket’s information in the results table.
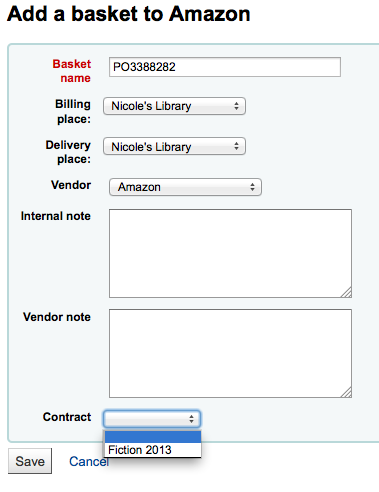
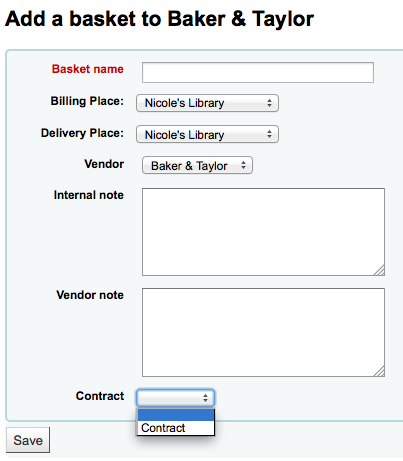
After clicking ‘New basket’ you will be asked to enter some information about the order:
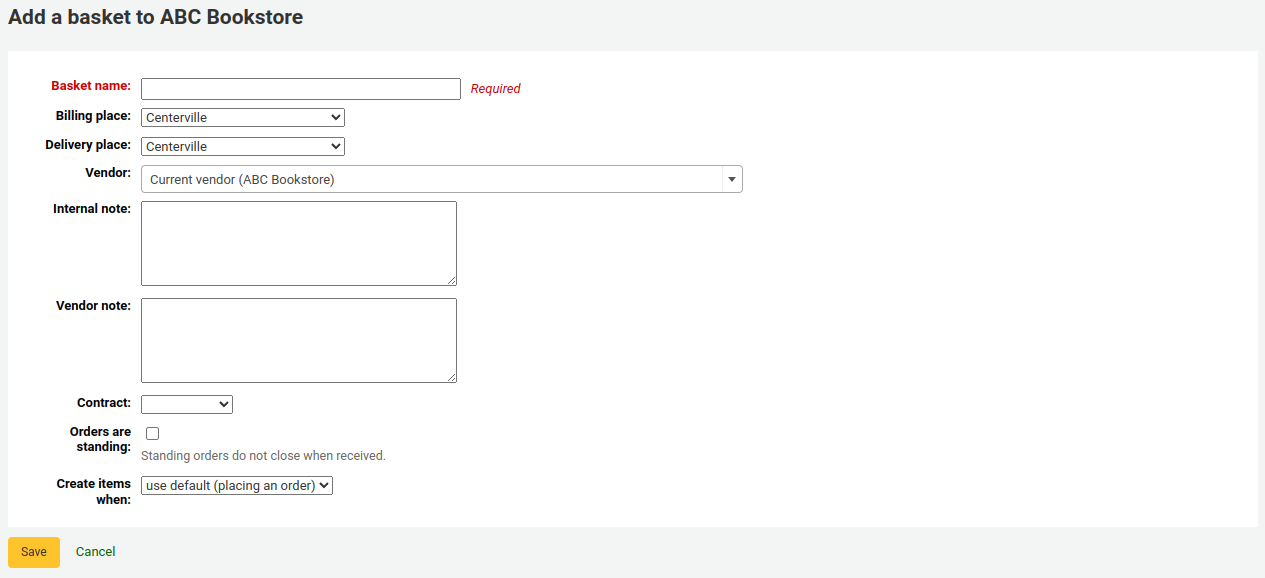
- Quando adicionar um grupo de pedidos, você pode dar-lhe um nome que o ajudará a identificá-lo posteriormente
- Digite o Local de faturamento e o Local de entrega (será definido como padrão para a biblioteca que você está logado)
- Caso você queira trocar o fornecedor do qual você está fazendo um pedido, você pode utilizar o menu suspenso de fornecedores
- Os campos de notas são opcionais e pode conter qualquer tipo de informação
- If you’re ordering standing items (items which arrive regularly) then you will want to check the ‘Orders are standing’ box for this basket
If you have added contracts to the vendor you’re ordering from, you will also have an option to choose which contract you’re ordering these items under.
Quando terminar, clique em ‘Guardar’
Quando seu pedido for criado, você será levado a várias opções para adicionar exemplares ao pedido.
Se você estiver fazendo o pedido para um novo exemplar de um registro que já existe, você pode simplesmente buscar pelo registro em seu sistema.
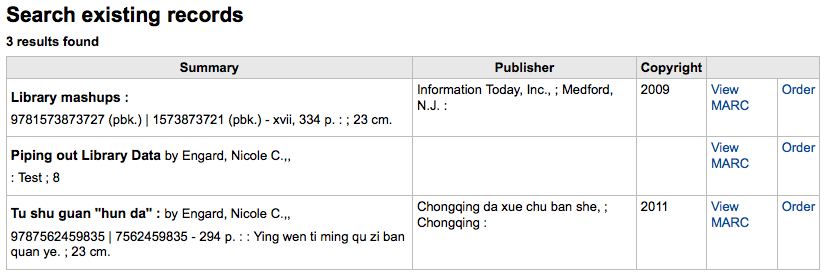
Nos resultados, clique em ‘Pedido’ para ser levado ao formulário de pedido.
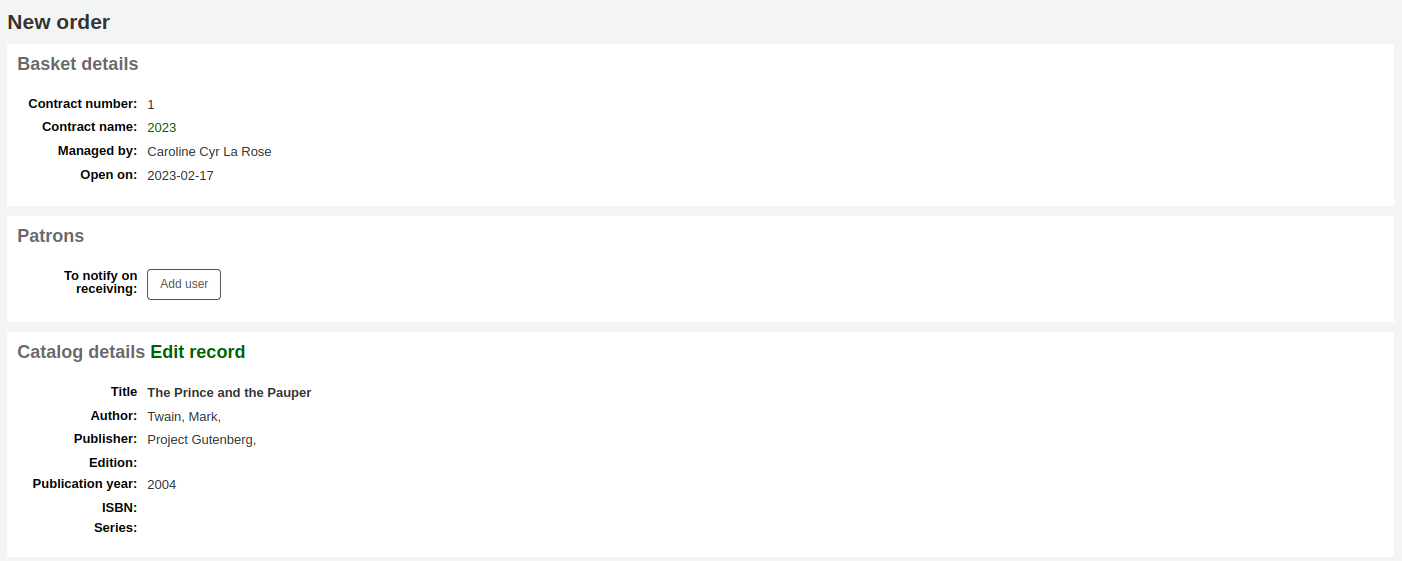
- Todos os detalhes associados ao exemplar também serão listados em ‘Detalhes do catálogo’
If you allow patrons to make purchase suggestions (learn more in the Managing Suggestions section of this manual), then you can place orders from those suggestions. In order to keep track of suggestions that have been ordered and received you must place the order using this link.
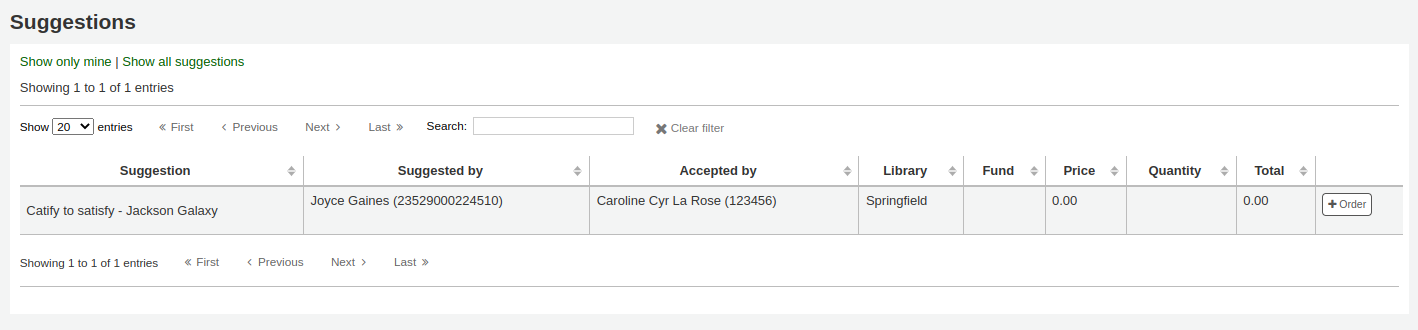
From the results, click ‘Order’ next to the item you want to order and you will be presented with the order form including a link to the suggestion

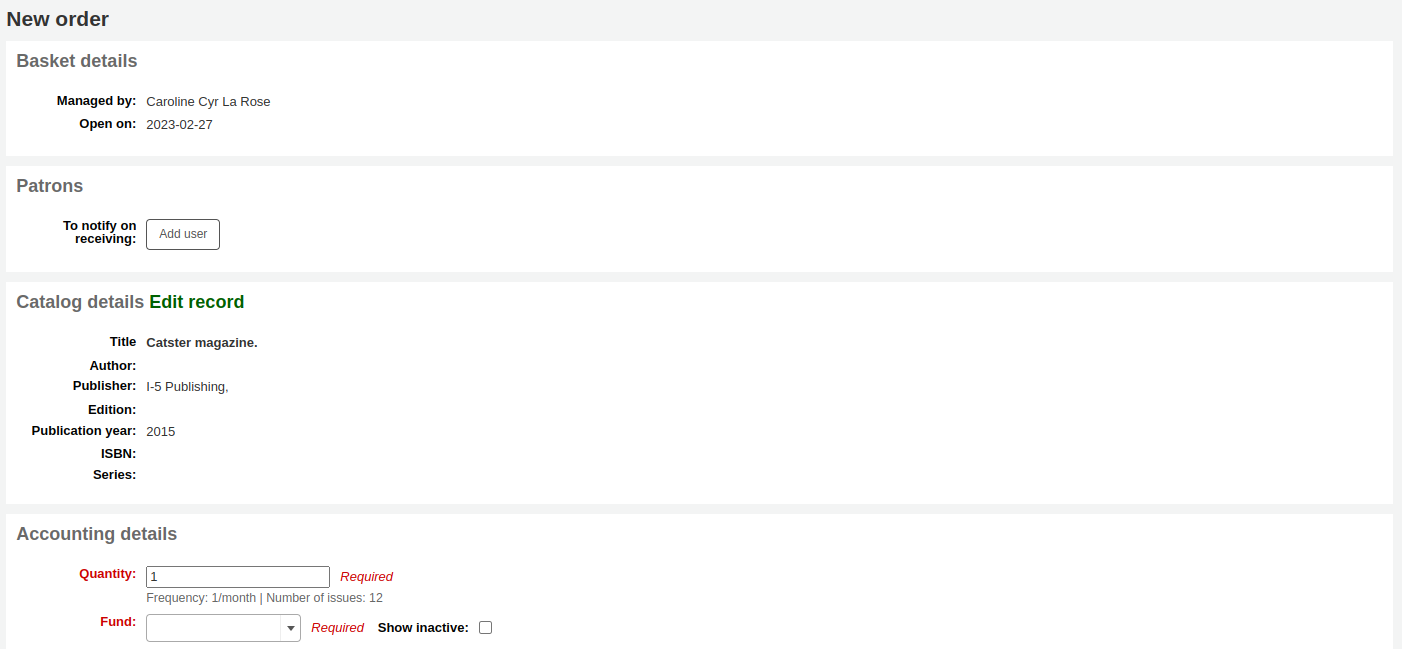
Neste formulário você pode fazer alterações nos detalhes do catálogo se necessário.
Quando o exemplar aparece no seu grupo de pedidos, ele inclui um link para a sugestão.

Orders added to the basket in this way will notify the patron via email that their suggestion has been ordered and will update the patron’s ‘My purchase suggestions’ page in the OPAC.
If you’re using the Serials module you can link your subscription order information to acquisitions by choosing to order ‘From a subscription’
Depois de clicar no link de ordem que você será levado a uma página de pesquisa que irá ajudá-lo a encontrar a sua assinatura
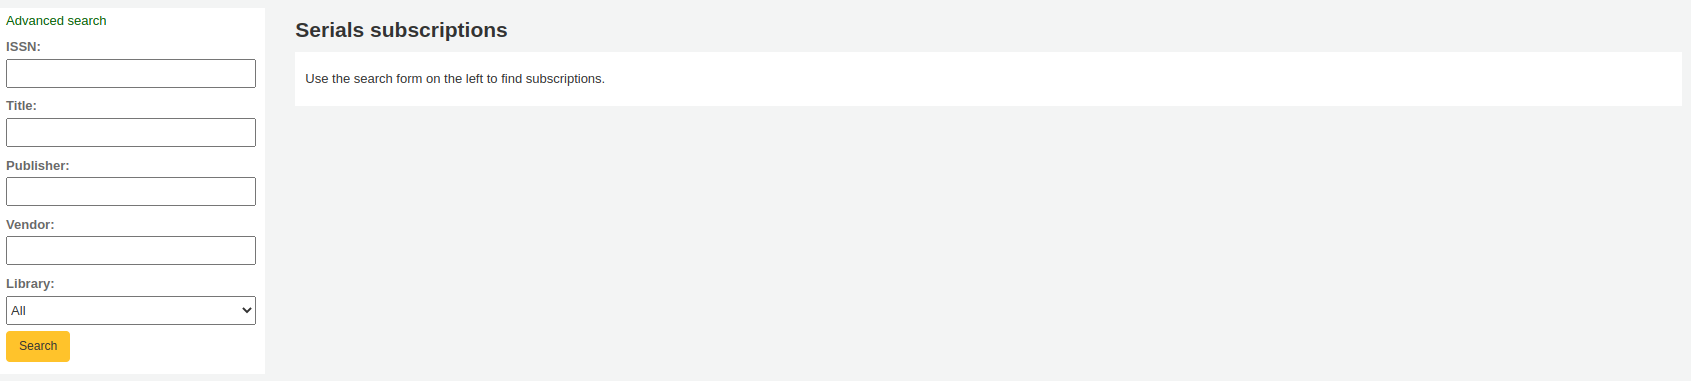
Aparecerá seus resultados à direita do formulário Cada assinatura e terá um link ‘Ordem’ à direita
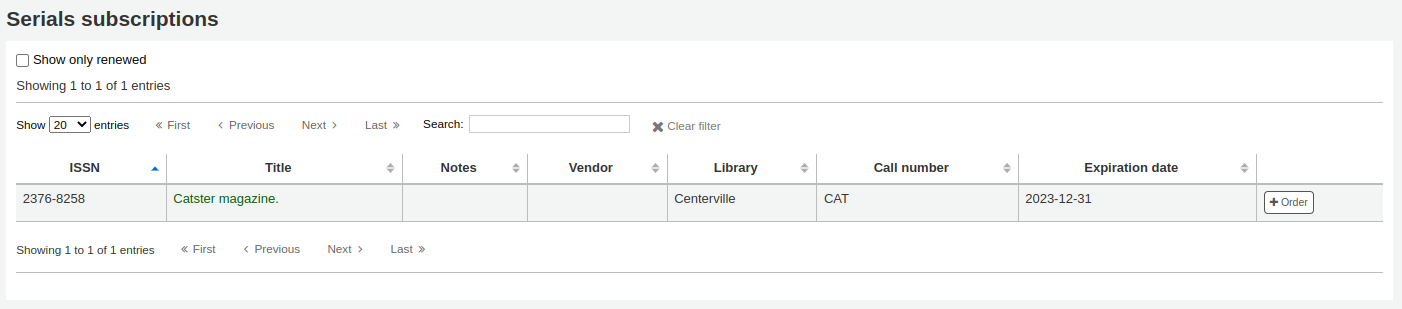
Clicando “Ordem” vai trazer a informação de inscrição para o formulário de pedido sem uma secção de ‘Adicionar item de ‘ já que você está apenas encomendar uma assinatura e um item não é necessário
Para fazer um pedido com base em um registro de outro lugar, selecione ‘A partir de um novo registro (vazio)’
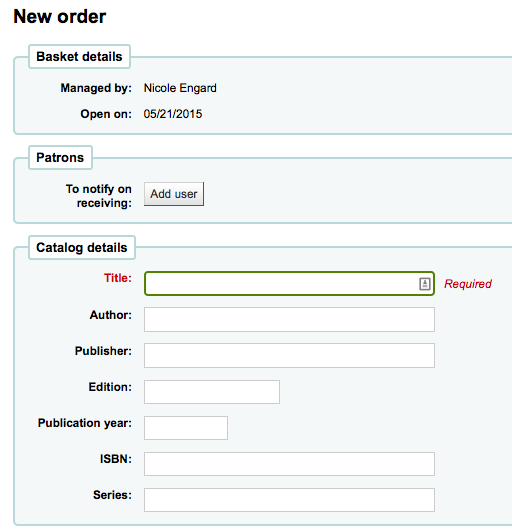
- Você será levado a um formulário em branco para preencher os detalhes necessários sobre o exemplar que está solicitando.
If you want to search other libraries for an item to purchase, you can use the ‘From an external source’ option that will allow you to order from a MARC record found via a Z39.50 search.
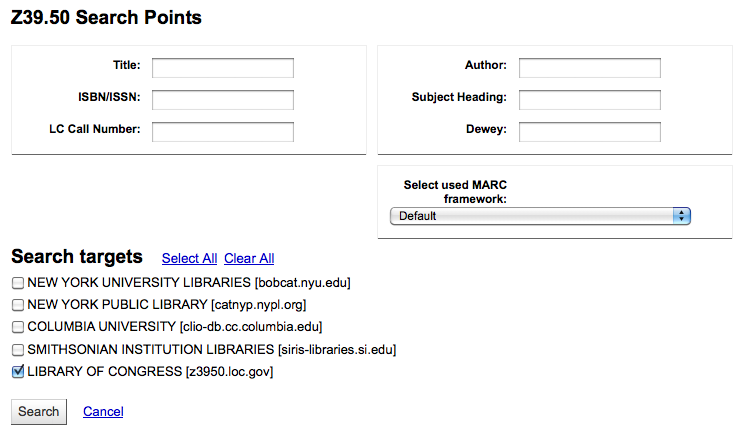
Nos resultados, clique no link ‘Pedido’ ao lado do tem que você deseja adquirir.

If the item you’re ordering from an external source looks like it might be a duplicate, Koha will warn you and give you options on how to proceed.
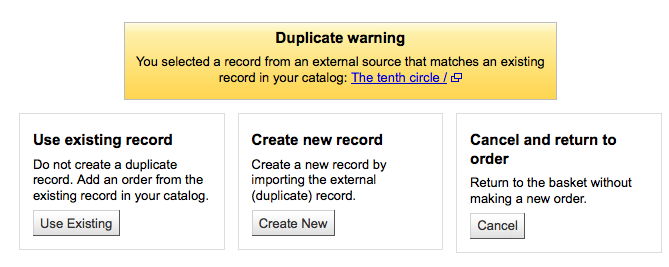
- No aviso você pode optar por apenas pedir outra cópia de um registro bibliográfico existente, criar um novo registro bibliográfico ou cancelar seu pedido para este exemplar.
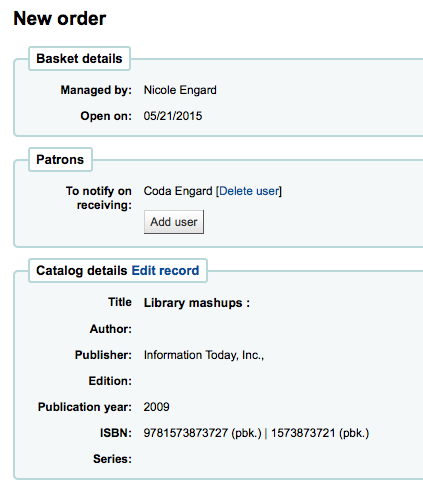
No formulário de pedido que surgir você não poderá editar detalhes do catálogo.
The next option for ordering is to order from a staged record (learn more about staging records).
Note
This is the option you will choose if you have an order file from your vendor.
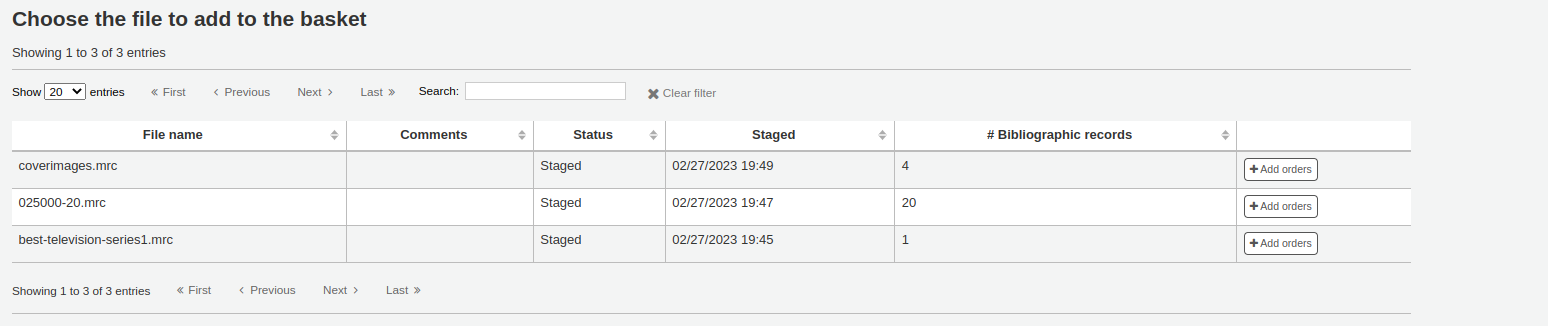
Order from a staged file
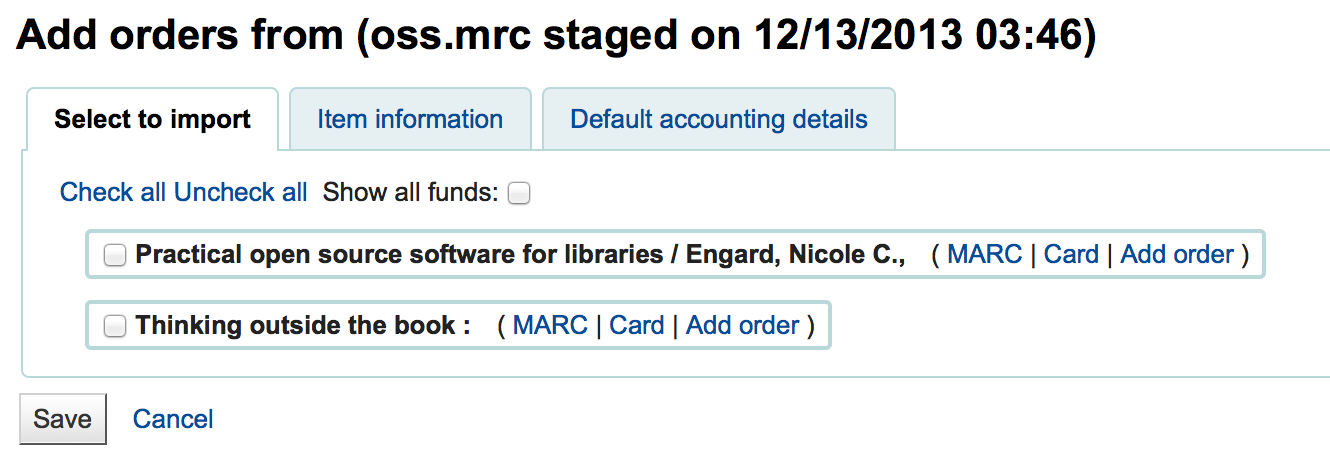
From the list of files you are presented with, choose the ‘Add orders’ link to add the records in the staged file to your order.
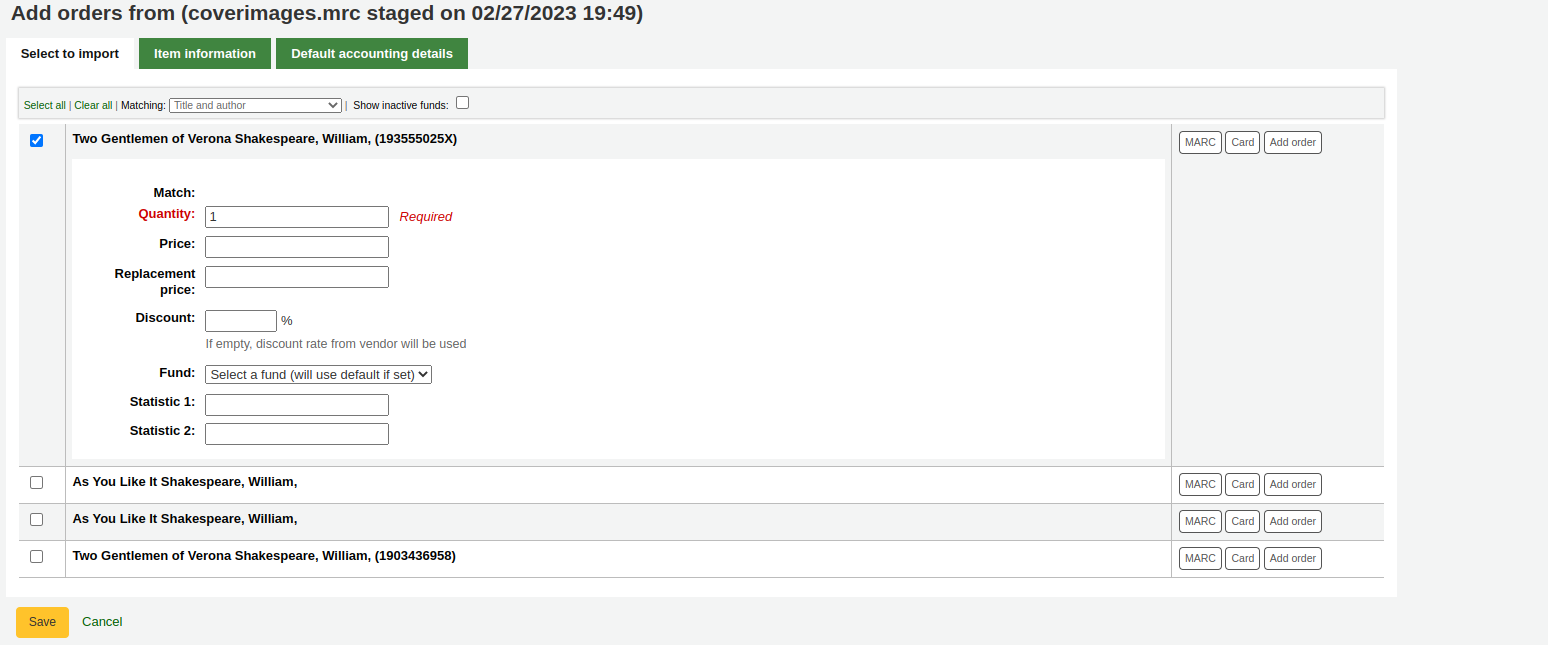
Next to each title is a checkbox, check the items you would like to order, or choose ‘Check all’ at the top. Depending on your settings in the MarcFieldsToOrder preference Koha will populate the next screen with with the relevant Quantity, Price, Fund, Statistic 1, and Statistic 2 found within the staged file.
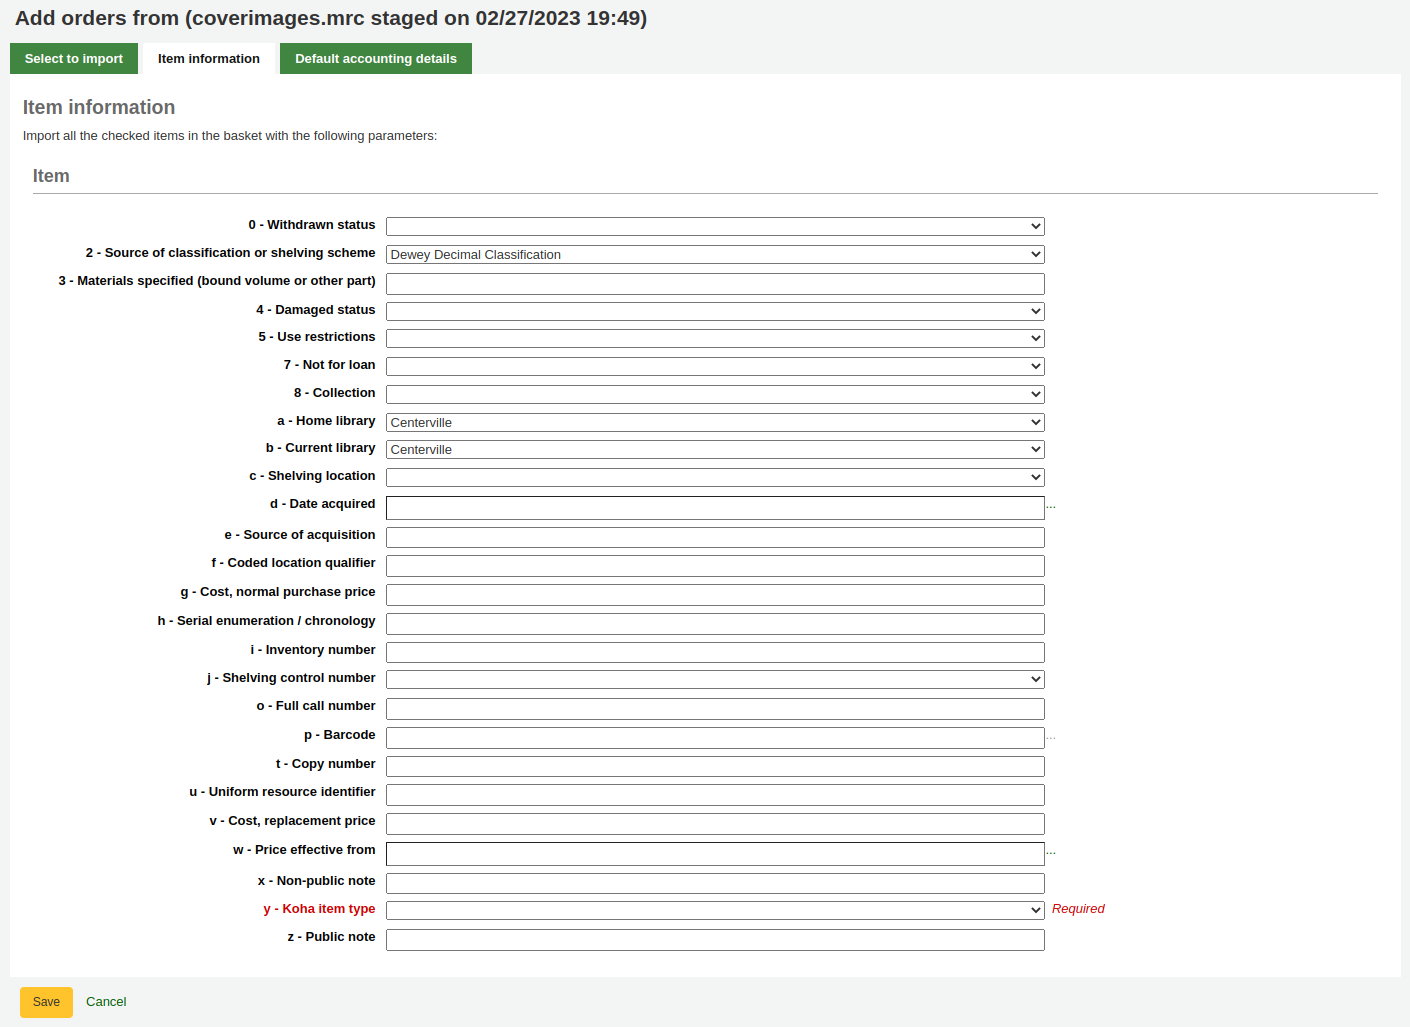
In the ‘Item Information’ tab you can enter information that will be added to every ordered item such as item type, collection code and not for loan status.
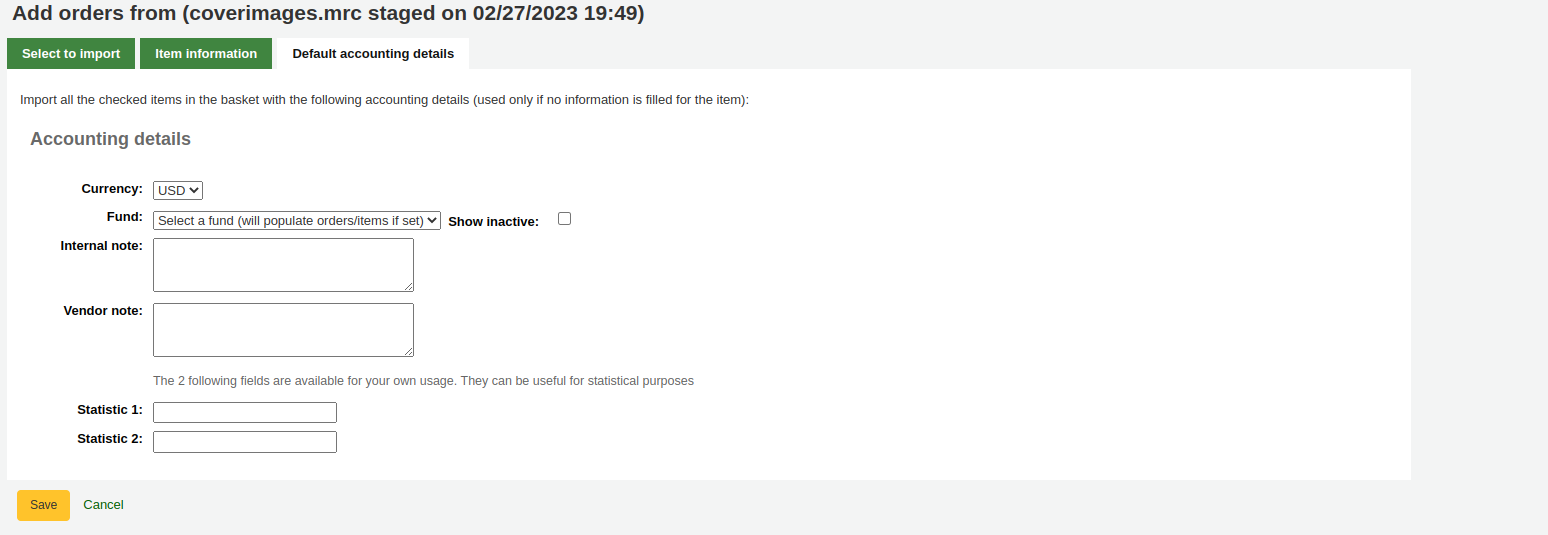
If no information is imported from the MARC record regarding fund information the ‘Default accounting details’ tab can be used to apply values related to the accounting.
The final option for ordering is to order from a list of titles with the highest hold ratios
This option will take you to the Holds Ratio report where you can find items with a high hold ratio and order additional copies. Next to each title will be a link with the number of items to order, click that and it will add the item to your basket.

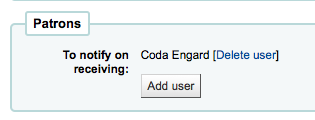
With any of the above ordering options you’re presented with an option to notify patrons of the new item when it’s received. The contents of that notification can be edited in the Avisos & Etiquetas rápidas tool and will have the code of ACQ_NOTIF_ON_RECEIV. In the ‘Patrons’ section you will see an option to ‘Add user’. Click that button to add patrons who will be notified of the new issue.
Patron notification search
Entre com o código de barras para o exemplar que você deseja mover e clique ‘Selecionar’
Once you’re done you can close the window and you’ll see the list of patrons under the ‘Patrons’ section
After bringing in the bib information (for all import methods except for the staged file), if your AcqCreateItem system preference is set to add an item when ordering you will enter the item info next. You need to fill out at least one item record and then click the ‘Add’ button at the bottom left of the item form.
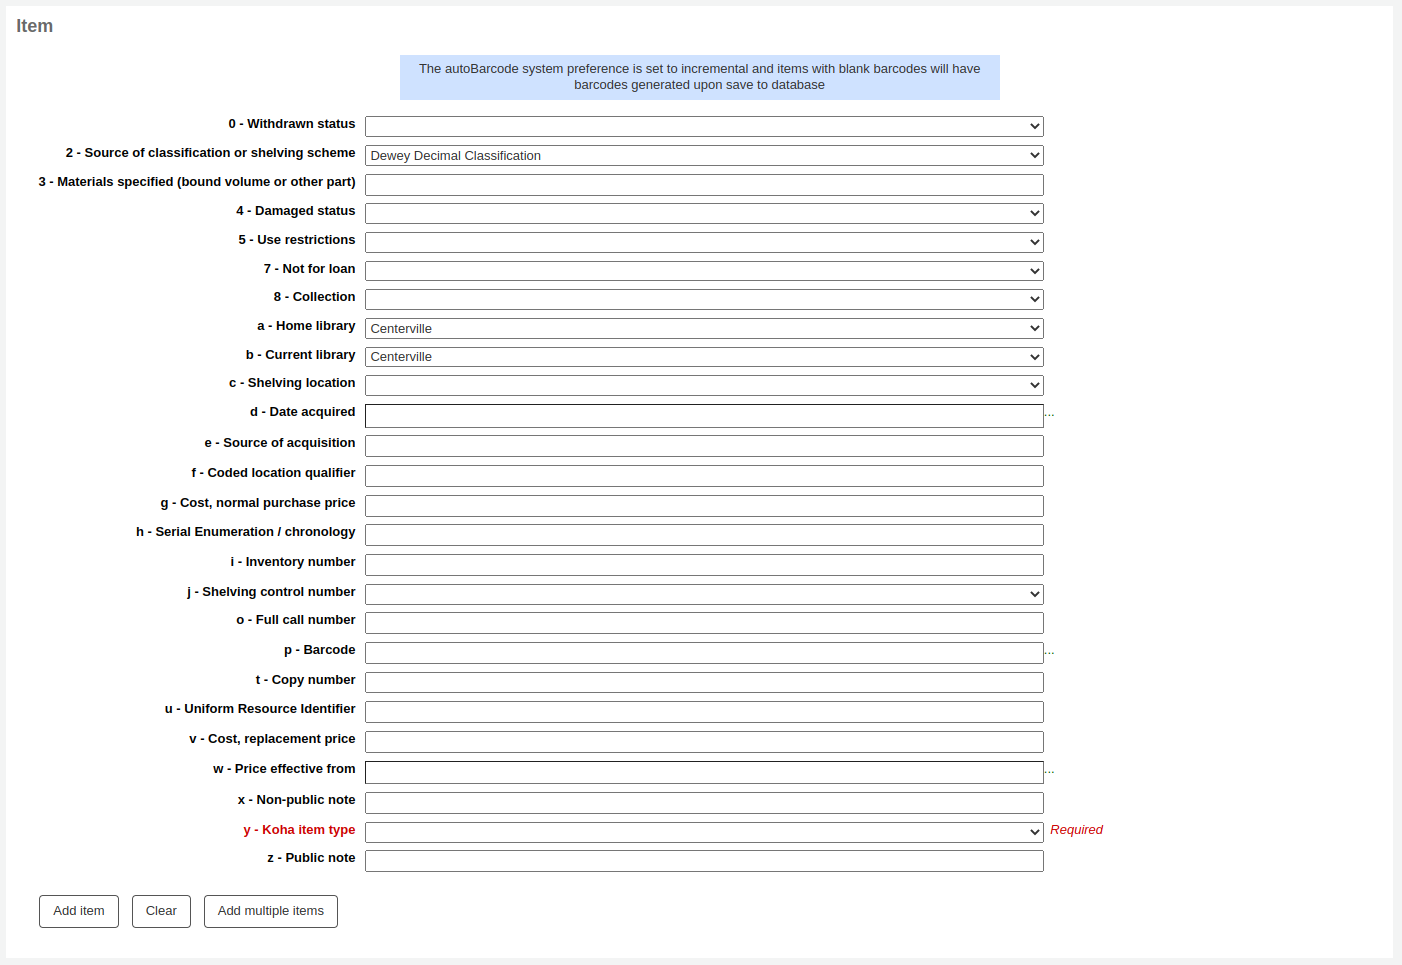
After clicking the ‘Add item’ button below the item record the item will appear above the form and then you can enter your next item the same way (if ordering more than one item).

Quando você tiver adicionado a informação sobre o exemplar, você precisará adicionar a informação sobre a conta.
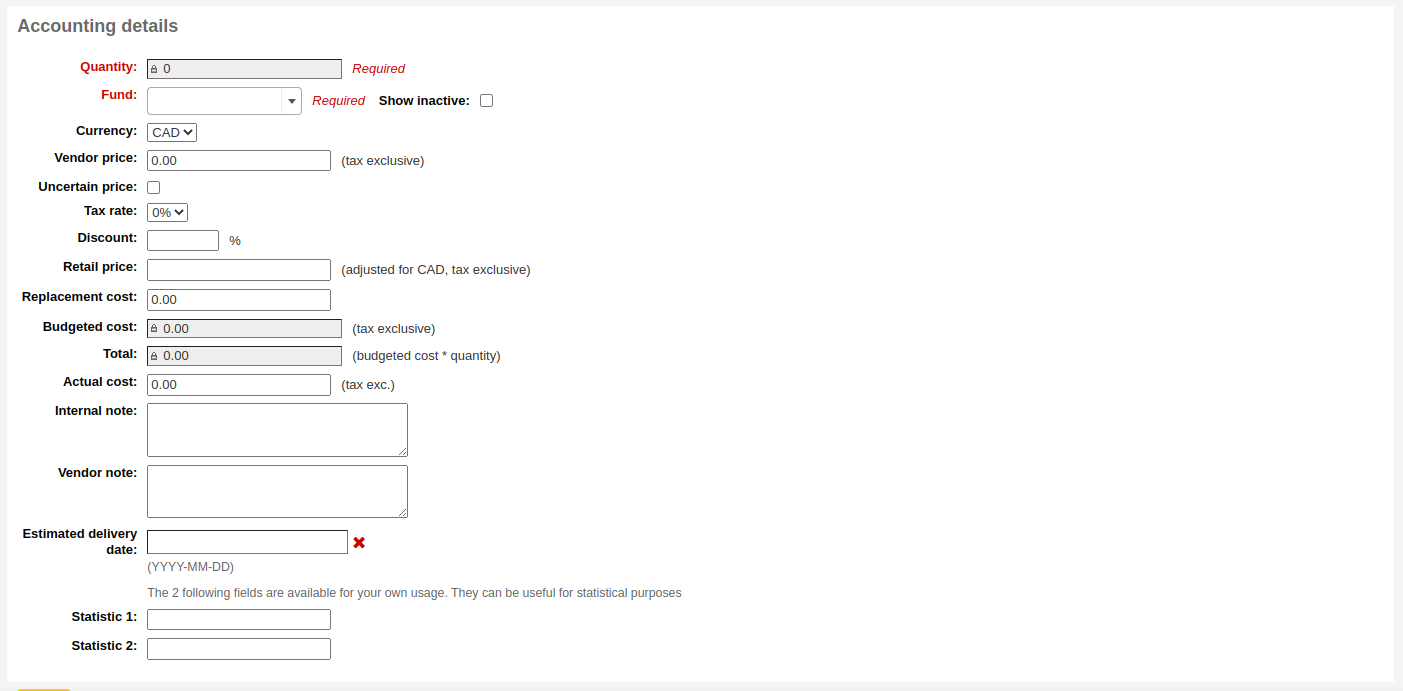
A quantidade é definida a partir do número de exemplares que você adicionou no pedido acima.
Important
You cannot edit the quantity manually, you must click ‘Add’ below the item form to add as many items as you’re ordering.
The list of funds is populated by the funds you have assigned in the Acquisitions Administration area.
The currency pull down will have the currencies you set up in the Acquisitions Administration area.
O preço do fornecedor é o preço anterior a impostos ou descontos.
If the price is uncertain, check the uncertain price box.
- Um cesto com pelo menos um valor incerto não pode ser fechado.
Se há taxas cobradas nas vendas, escolha qual no campo gstrate
Digite a porcentagem de desconto que você recebeu neste pedido, uma vez feito isso, clique na aba e o Koha preencherá os campos de custo abaixo.
If you added Planning Values when creating the Fund, those values will appear in the two Planning Value fields.
Once you have filled in all of the fields click ‘Save’ to add the item to your basket. If your price goes over the amount available in the fund you will be presented with a confirmation.

The confirmation warning will allow you order past your fund amount if you so choose.
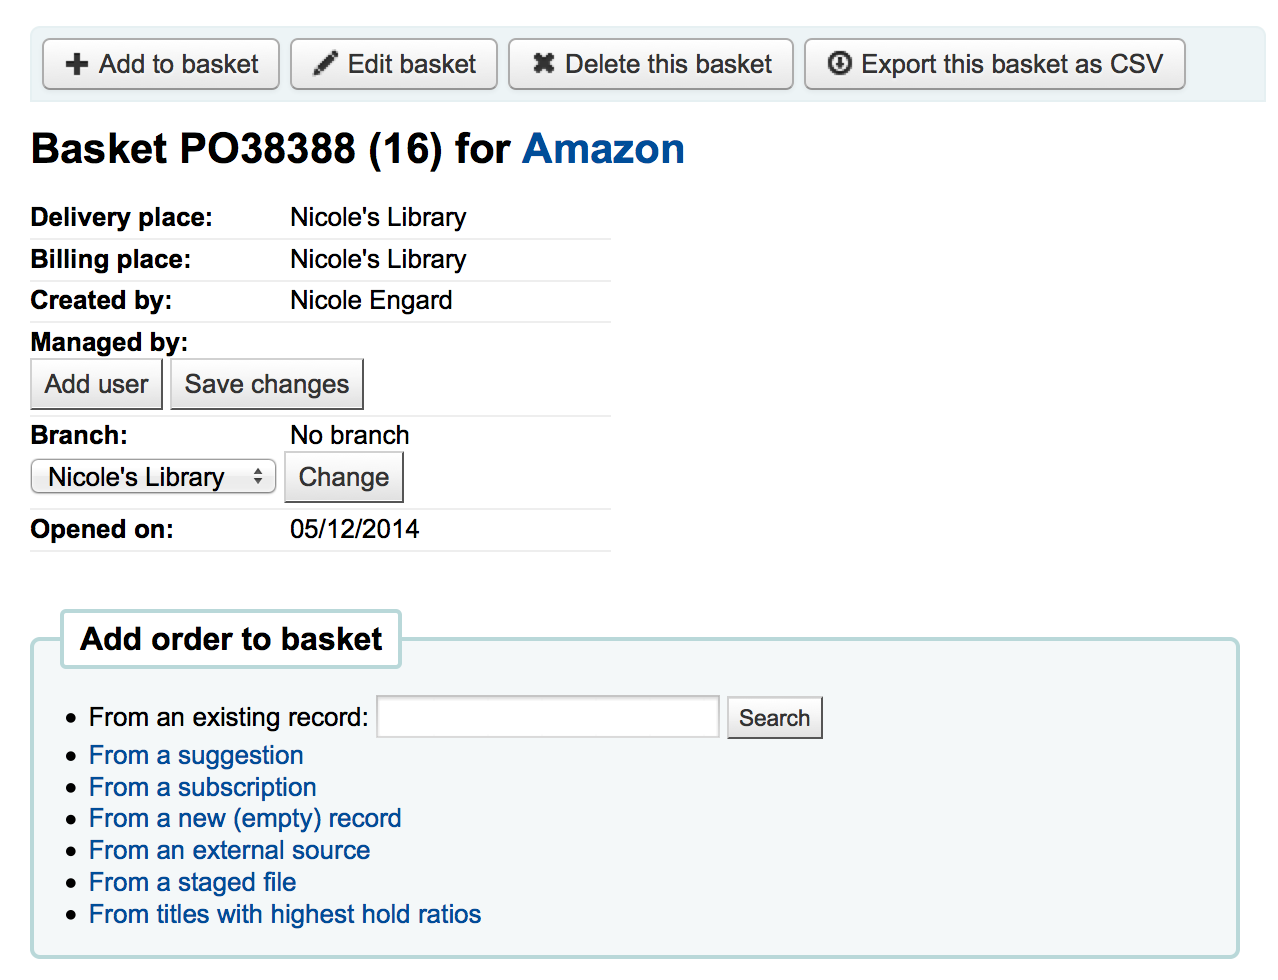
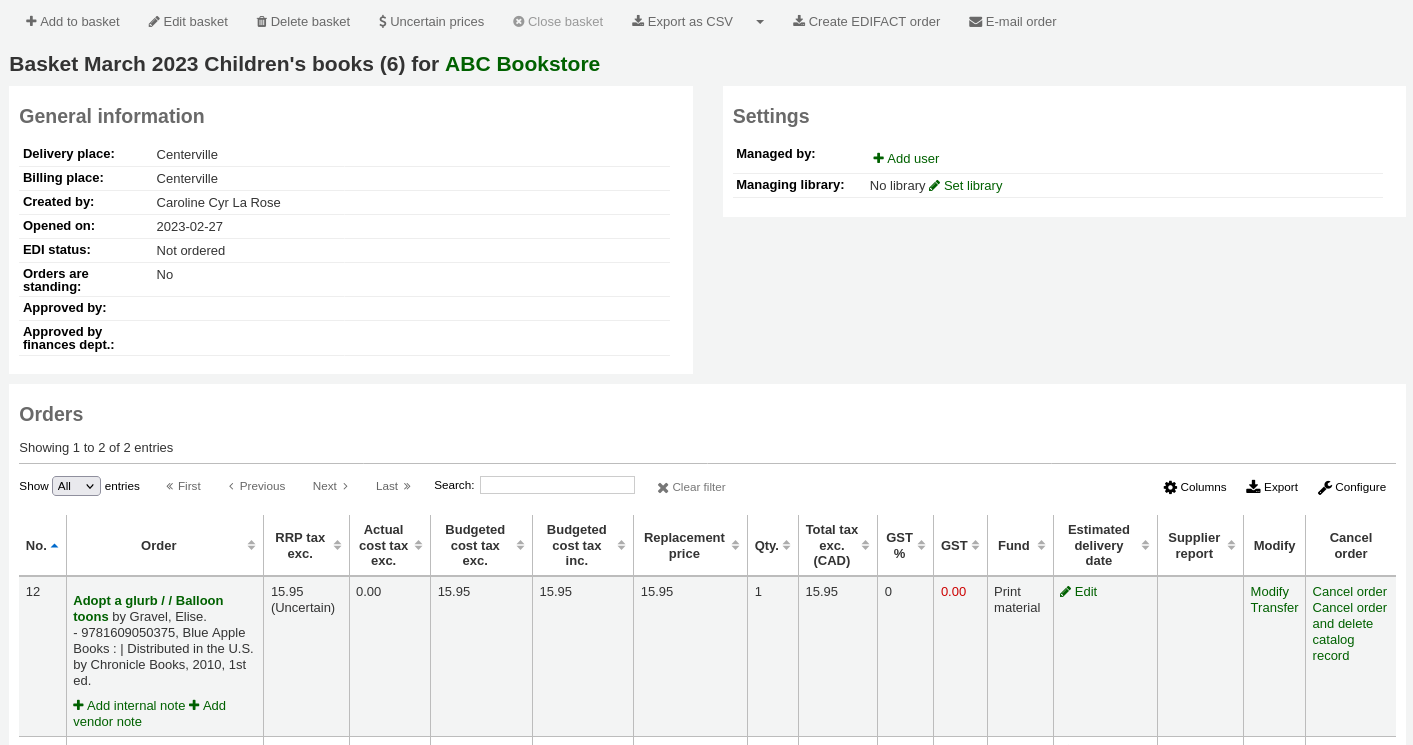
After an item is added to the basket you will be presented with a basket summary.
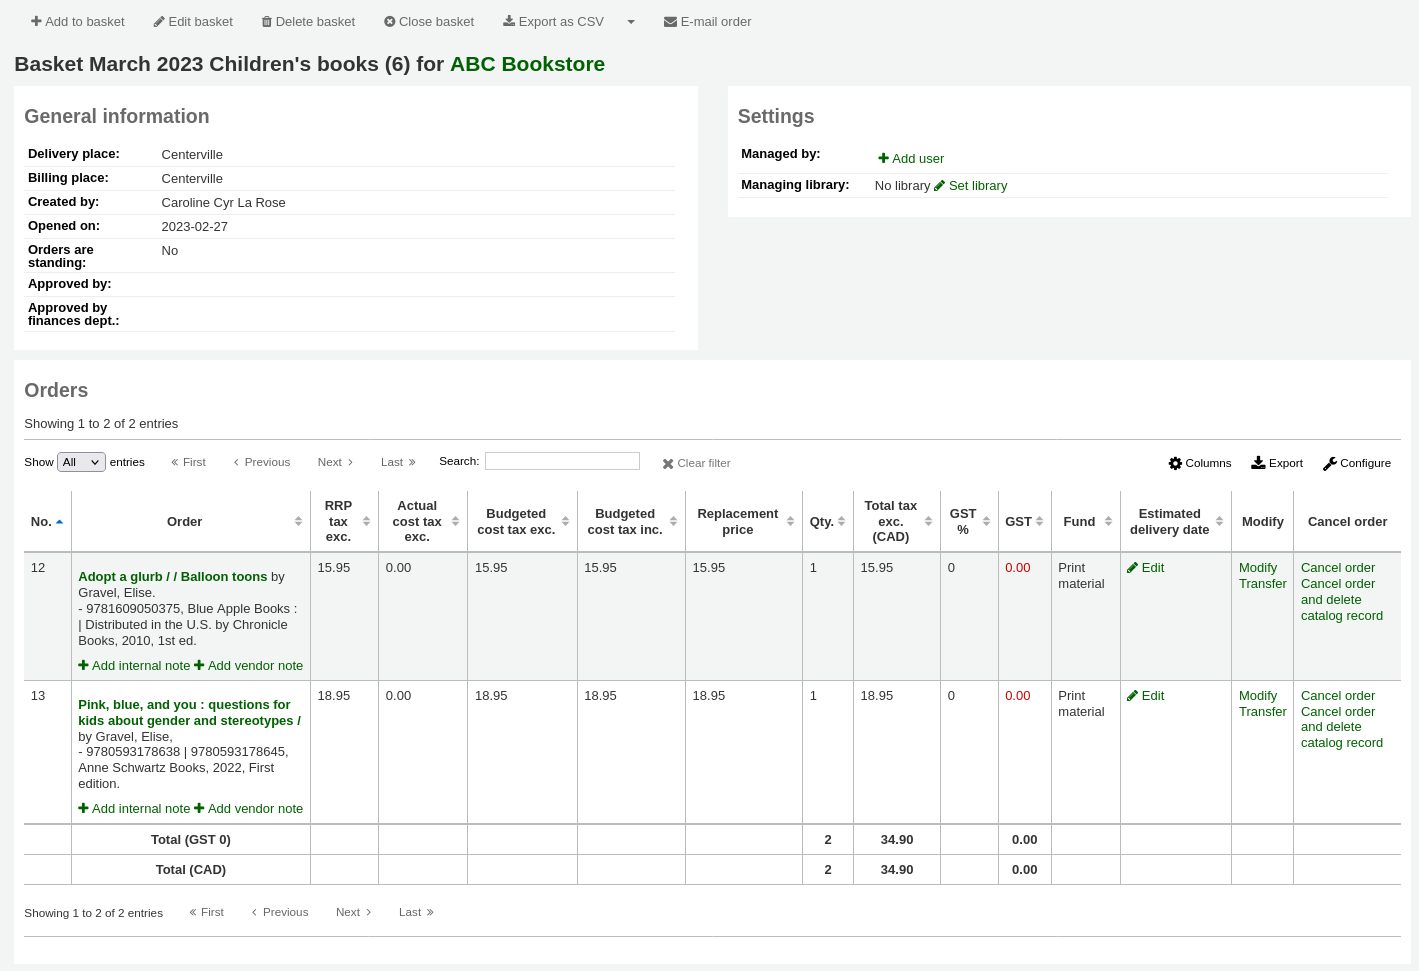
If you would like to see more details you can check the ‘Show all details’ checkbox
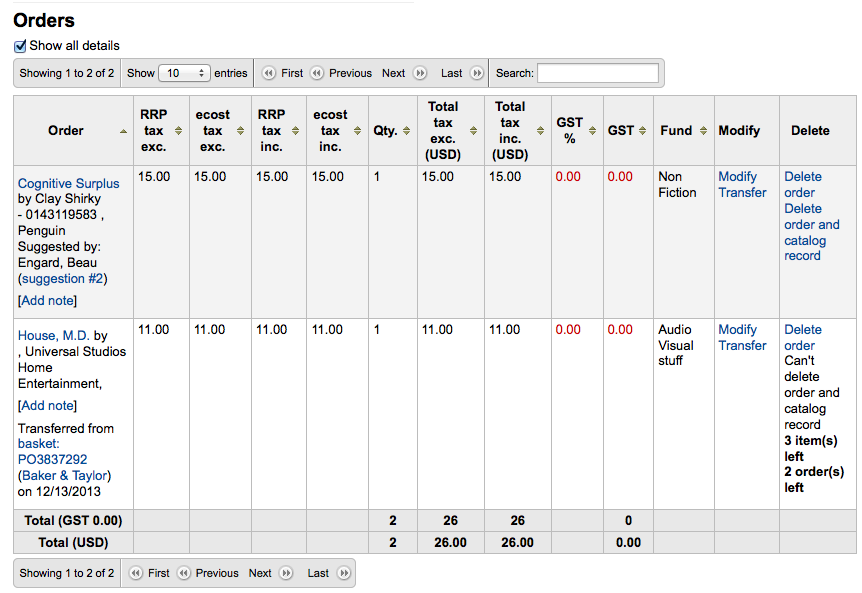
Aqui, você pode editar ou remover exemplares que tenha adicionado.
Escolhendo ‘Excluir o pedido’, será excluído o pedido mas será mantido o registro no catálogo.
Choosing to ‘Delete order and catalog record’ removes both the order line and the record in the catalog.
O registo do catálogo nem sempre pode ser excluído. Você pode ver as notas que explicam porquê.
Na página do sumário você também tem a opção de editar a informação sobre o cesto clicando no botão ‘Editar informação do cabeçalho do cesto’. Pode excluir o cesto clicando no botão ‘Excluir este cesto’ ou exportar seu cesto como um arquivo CSV clicando no botão ‘Exportar este cesto como CSV’.

If you’re using EDI for your order you can click the ‘Create EDIFACT order’ button when you’re done to send the file to the vendor and close the basket.

Quando você tiver completado seu pedido, você pode clicar em ‘Fechar pedido’ para indicar que este pedido está terminado e que foi enviado ao fornecedor.
Important
You must close the basket to be able to receive items when they arrive. Only items in closed baskets will show as ready to receive.
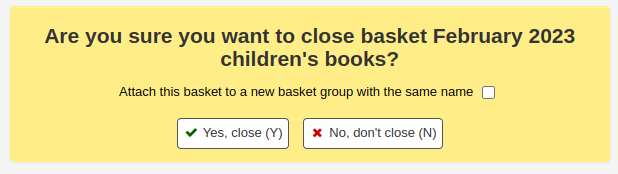
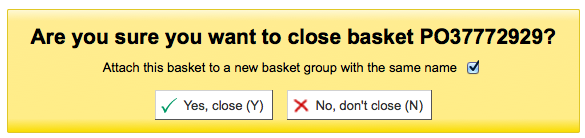
If you have your BasketConfirmations preference set to show a confirmation, you will be asked if you are sure about closing the basket.
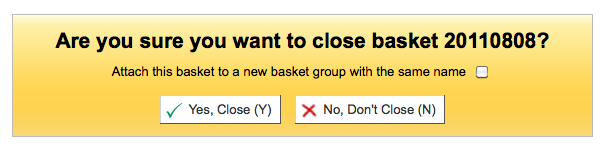
When closing the basket you can choose to add the basket to a group for easy printing and retrieval. If you check the box to ‘Attach this basket to a new basket group’ you will be brought to the group list where you can print a PDF of the order.
Important
A basket with at least one item marked as ‘uncertain price’ will not be able to be closed.
Clicking the ‘Uncertain Prices’ button will call up a list of items with uncertain prices to quick editing. From that list, you can quickly edit the items by entering new prices and quantities.
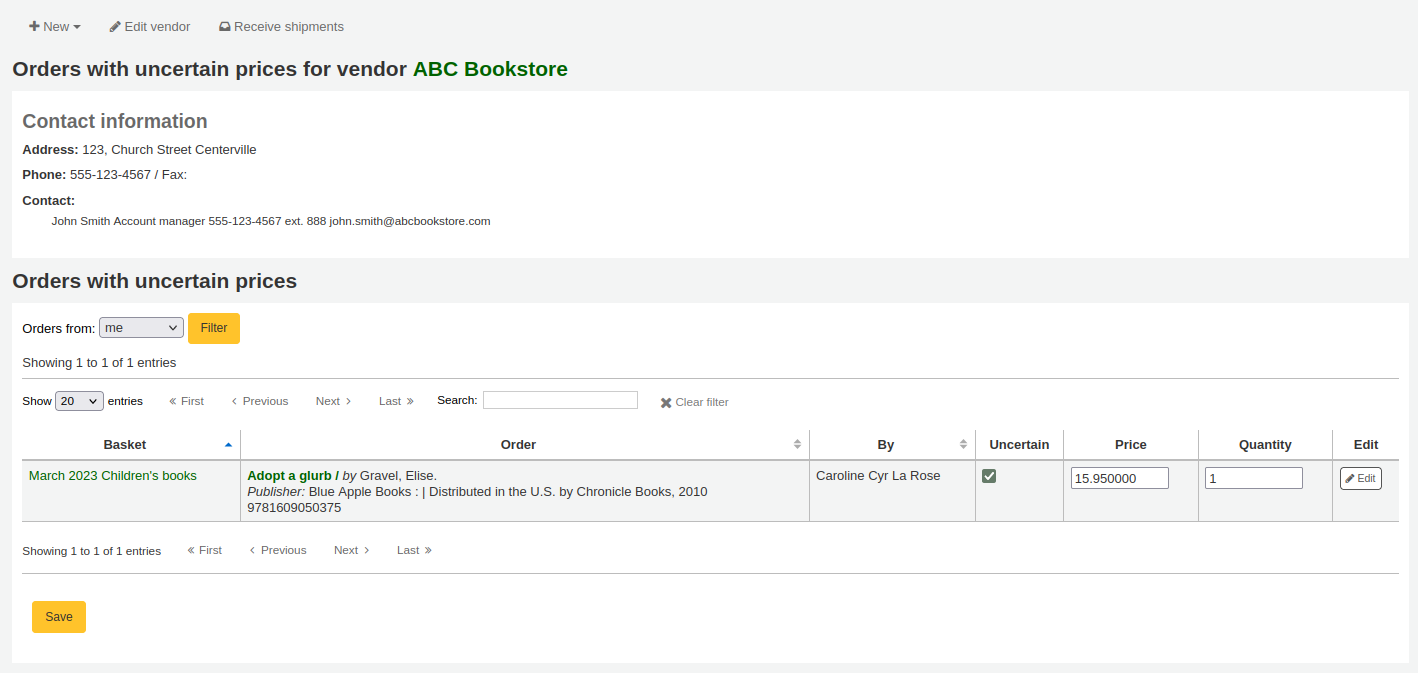
Important
A página de Preços Indefinidos é independente do pedido, sendo ligada pelo fornecedor, assim você pode ver todos os exemplares de um determinado fornecedor que estão com preços indefinidos.
Once your order is entered you can search for it through acquisitions or view the information on the biblio detail page in the staff client (if the AcquisitionDetails preference is set to ‘Display).

Criar um grupo de cestos
Um grupo de pedidos é simplesmente um agrupamento dos pedidos. Em algumas bibliotecas, é possível que haja muitos funcionários criando pedidos e, depois de um certo tempo, alguém pode agrupar estes pedidos para envio ao fornecedor de uma só vez. Assim, é possível ter um pedido em um grupo de pedidos se assim for o esquema de trabalho empregado em sua biblioteca.
Printing baskets
When you are finished adding items to your basket, click ‘Close this Basket.’
You will be asked if you want to ‘Attach this basket to a new basket group with the same name’. A basket group is necessary if you want to be able to print PDFs of your orders.
O seu pedido completo será listado no grupo de pedidos para impressão ou posterior modificação.
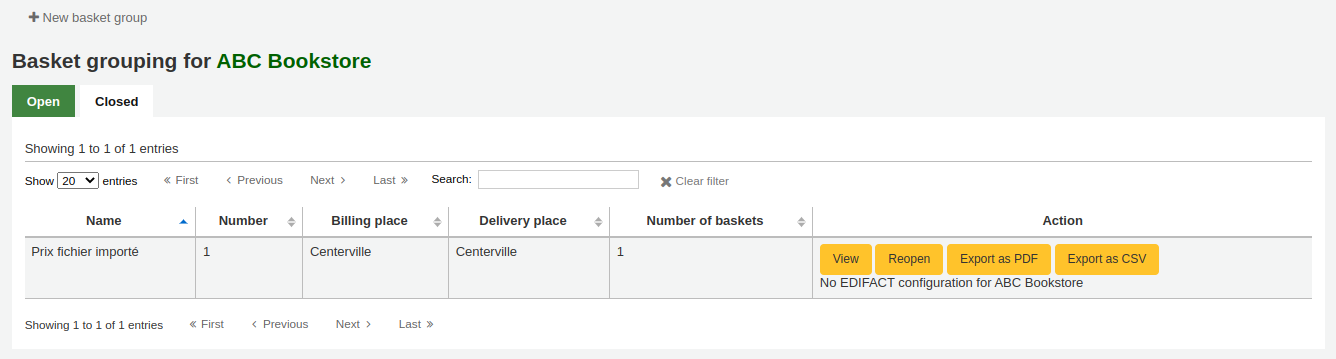
If you closed the basket before generating the EDIFACT order you can do so from the basket grouping page.
Basket Grouping EDIFACT
Clicking the ‘Print’ button next to your order will generate a PDF for printing, which will have all of your library information followed by the items in your order.

Recebendo pedidos
Important
You must close the basket to be able to receive items when they arrive. Only items in closed baskets will show as ready to receive.
Orders can be received from the vendor information page
or the vendor search results page
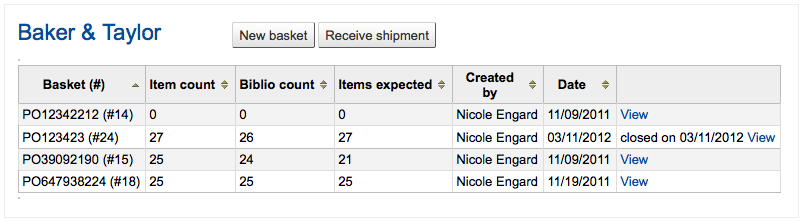
Depois de clicar em ‘Receber remessa’ você será questionado para inserir o número do pedido do fornecedor e a data de recebimento da remessa.

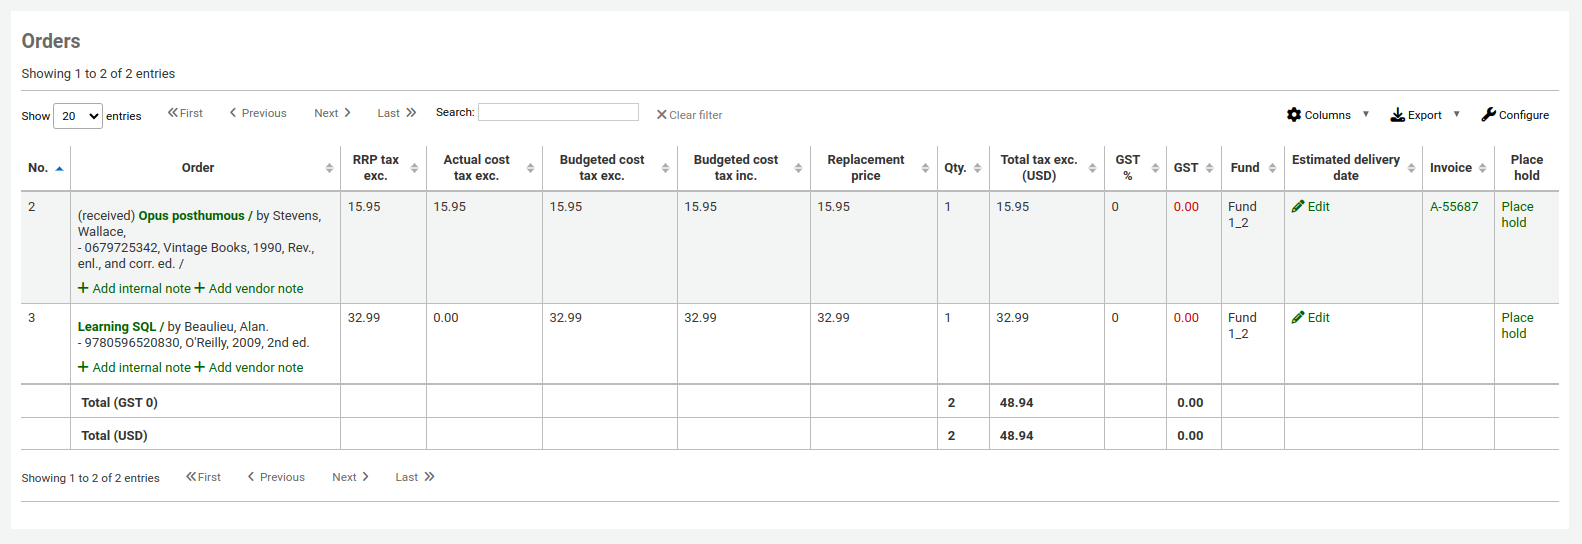
A página de recebimento irá listar todos os exemplares que foram pedidos ao fornecedor independente do grupo ao qual o exemplar pertence.
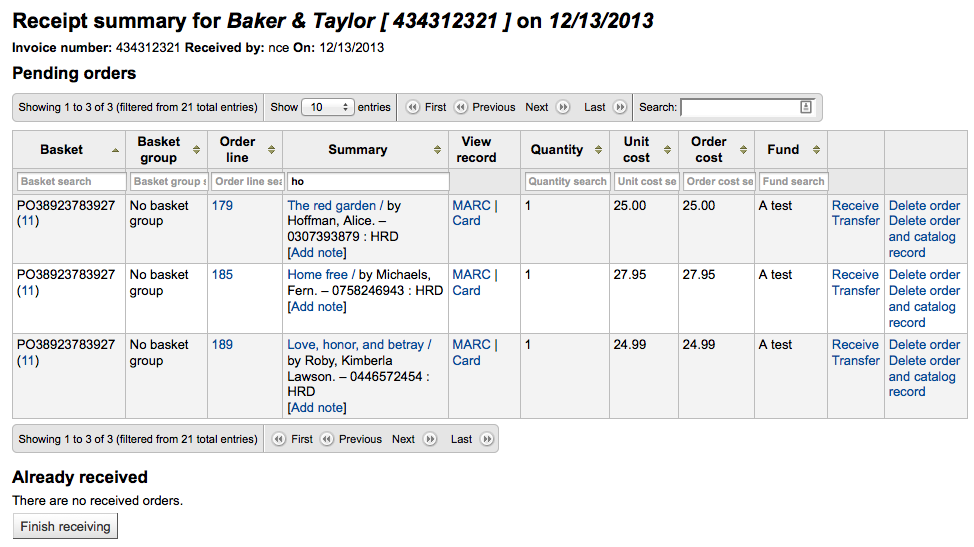
Para receber um exemplar específico, clique em ‘Receber’ no lado direito do exemplar.
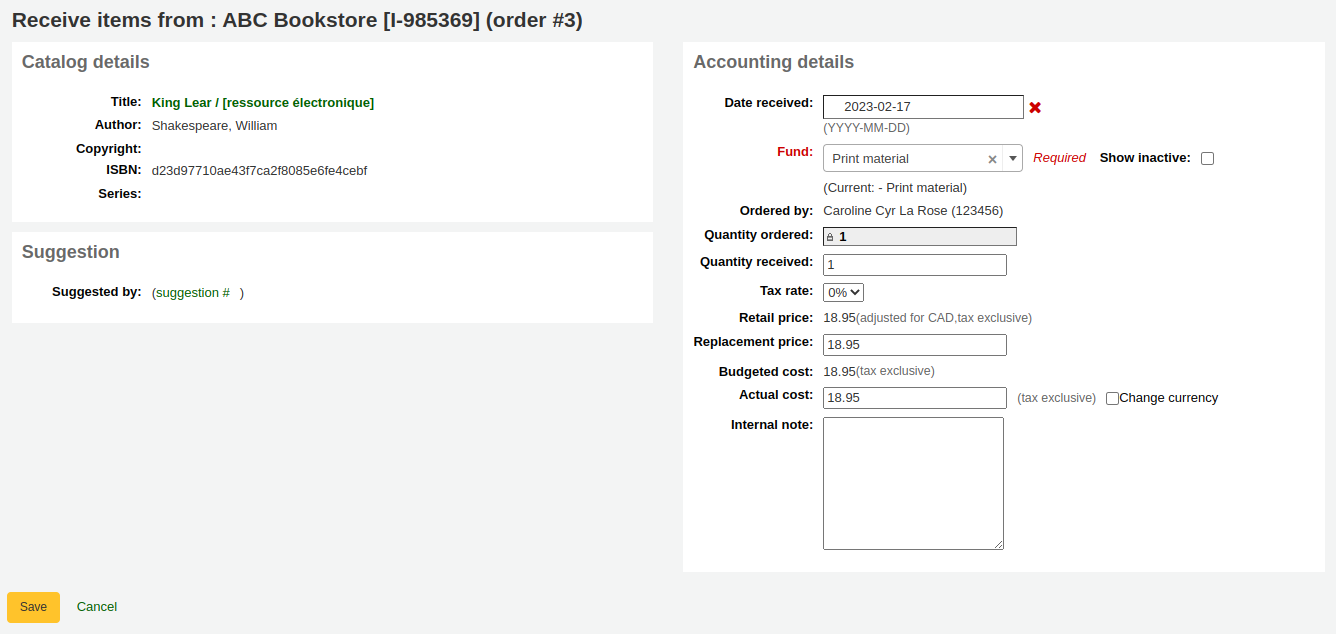
Neste formulário você pode alterar a informação de custo. Você também pode escolher marcar apenas uma parte do pedido como recebida caso o fornecedor não tenham entregue o pedido na íntegra selecionando apenas as caixas ao lado dos exemplares recebidos. Os valores que você inserir em ‘Custo de reposição’ e ‘Custo atual’ irão automaticamente ser preenchidos no registro do exemplar no subcampo v (Custo, preço de reposição) e subcampo g (Custo, valor normal de compra) no registro antes de salvar.

Você também pode editar os exemplares neste formulário clicando no link ‘Editar’ ao lado de cada exemplar. Isto permitirá que você adicione número de chamadas precisos e códigos de barras caso você deseje fazer isso no momento do recebimento. Assim que fizer as alterações necessárias (para o pedido e/ou para os exemplares) clique ‘Salvar’ para marcar o exemplar como recebido.
Note
If you have your AcqItemSetSubfieldsWhenReceived preference set to add or change values on received items those changes will take place after you hit ‘Save’.
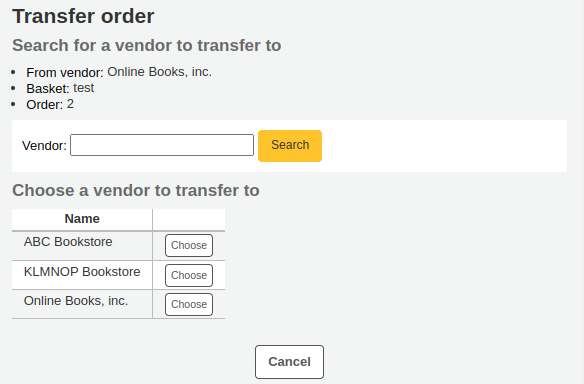
If the item is no longer available from this vendor you can transfer the order to another vendor’s basket by clicking the ‘Transfer’ link to the right of the title. This will pop up a vendor search box.

From the results you can click ‘Choose’ to the right of the vendor you would like to reorder this item from.
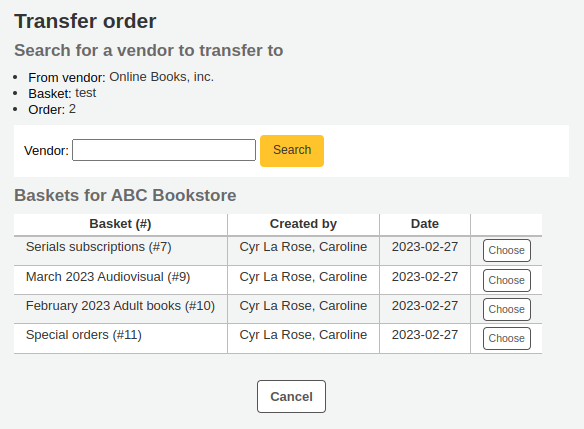
You will then be presented with the open baskets for that vendor to choose from. To move the item simply click ‘Choose’ to the right of the basket you would like to add the item to.
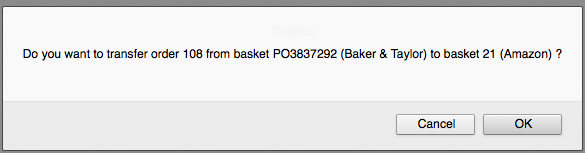
Once you have chosen you will be presented with a confirmation message.
Quando terminar de receber os exemplares, você poderá navegar para fora desta página ou clicar no botão ‘Finalizar recebimento, na parte inferior da tela.
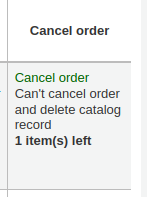
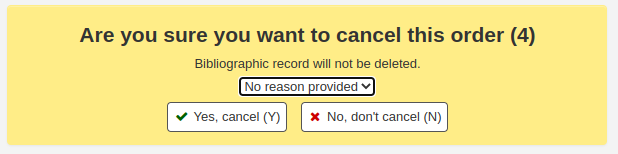
If the item cannot be found anywhere you can cancel the order by clicking ‘Delete order’ to the far right. This will prompt you to enter your reason and confirm cancellation.
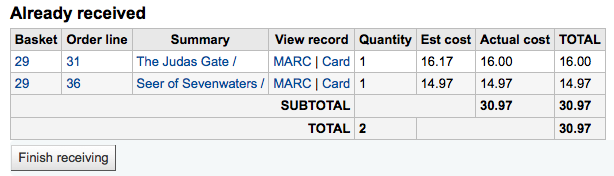
Você também pode verificar se um exemplar foi recebido se você visualizar o pedido.
Faturas
Quando pedidos são recebidos, comprovantes são gerados. Comprovantes podem ser localizados clicando no link ‘Comprovantes’ no lado esquerdo da página de Aquisições.
Após pesquisar, seus resultados irão aparecer a direita das opções de pesquisa.
A partir dos resultados você pode clicar em ‘Detalhes’ para ver a fatura completa ou ‘Fechar’ para anotar que a fatura foi fechada/paga.
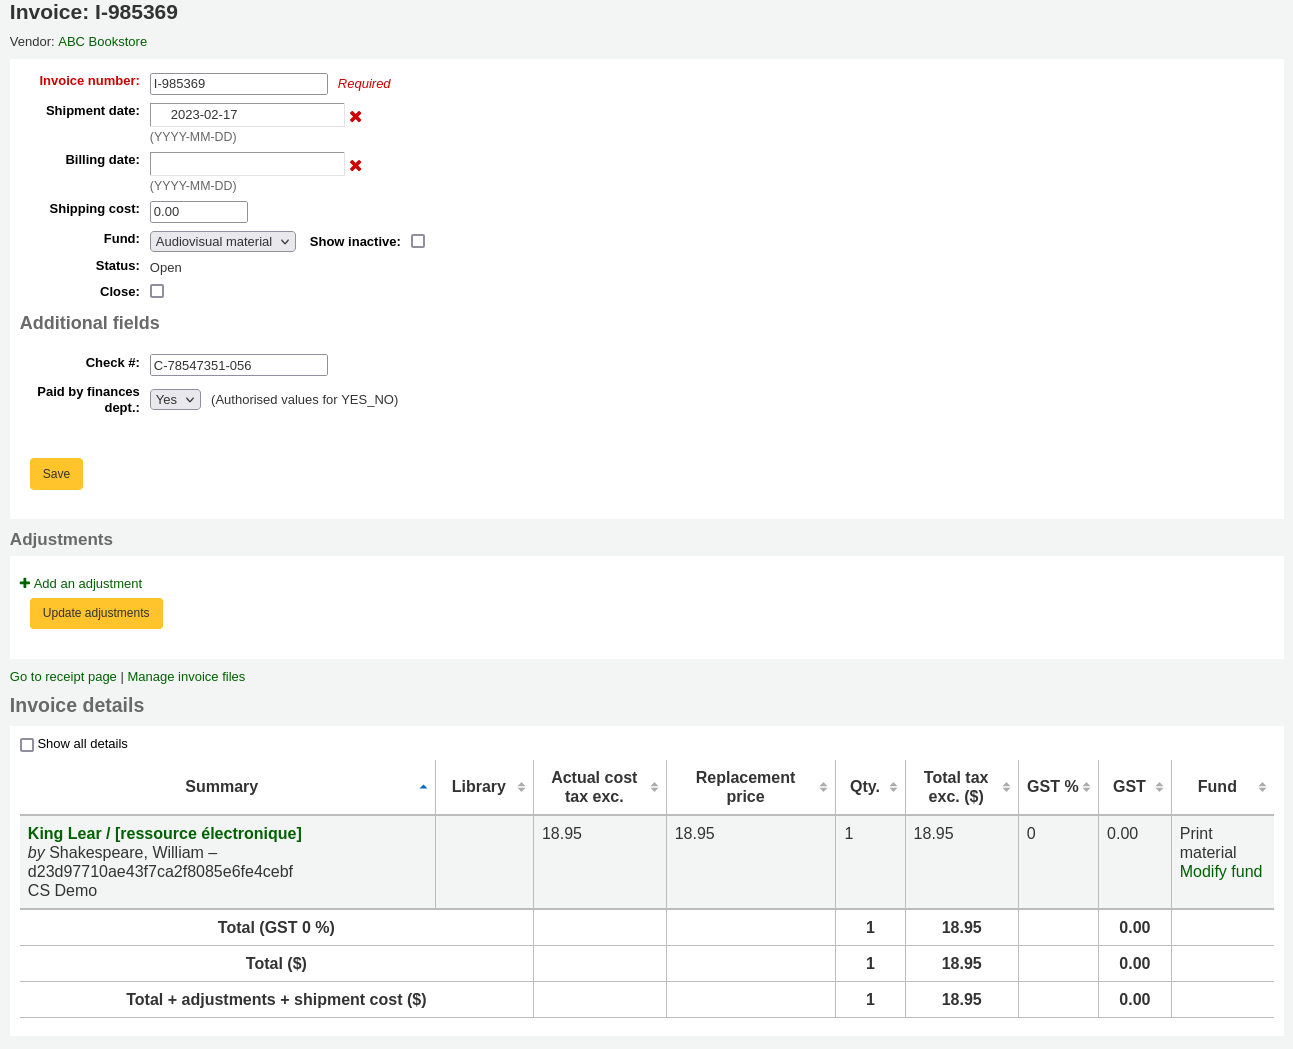
If you’re allowing the uploading of acquisitions files with the AcqEnableFiles preference you will see the option to manage invoice files next to the link to ‘Go to receipt page’

To see or attach new files click the ‘Manage invoice files’ link

From here you can find a file to upload and/or see the files you have already attached.

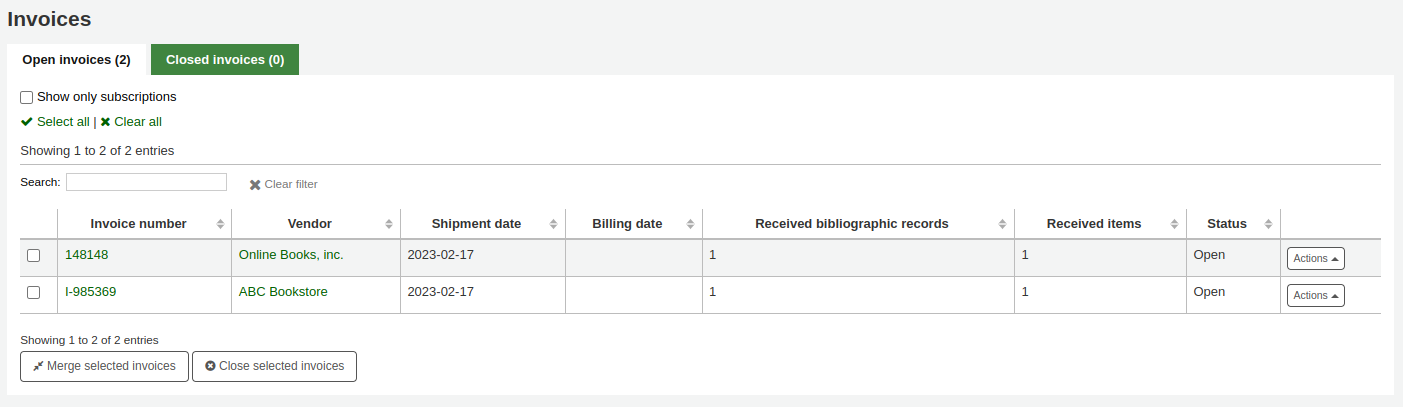
From the invoice search results you can also merge together two invoices should you need to. Simply click the checkbox to the left of the invoices you would like to merge and click the ‘Merge selected invoices’ button at the bottom of the page. You will be presented with a confirmation screen:

Click on the row of the invoice number you would like to keep and it will be highlighted in yellow. Enter any different billing information in the fields provided and click ‘Merge’. The two invoices will become one.
Reclamações e pedidos atrasados
If you have entered in an email address for the vendors in your system you can send them claim emails when an order is late. Before you can send claims you will need to set up an acquisitions claim notice.
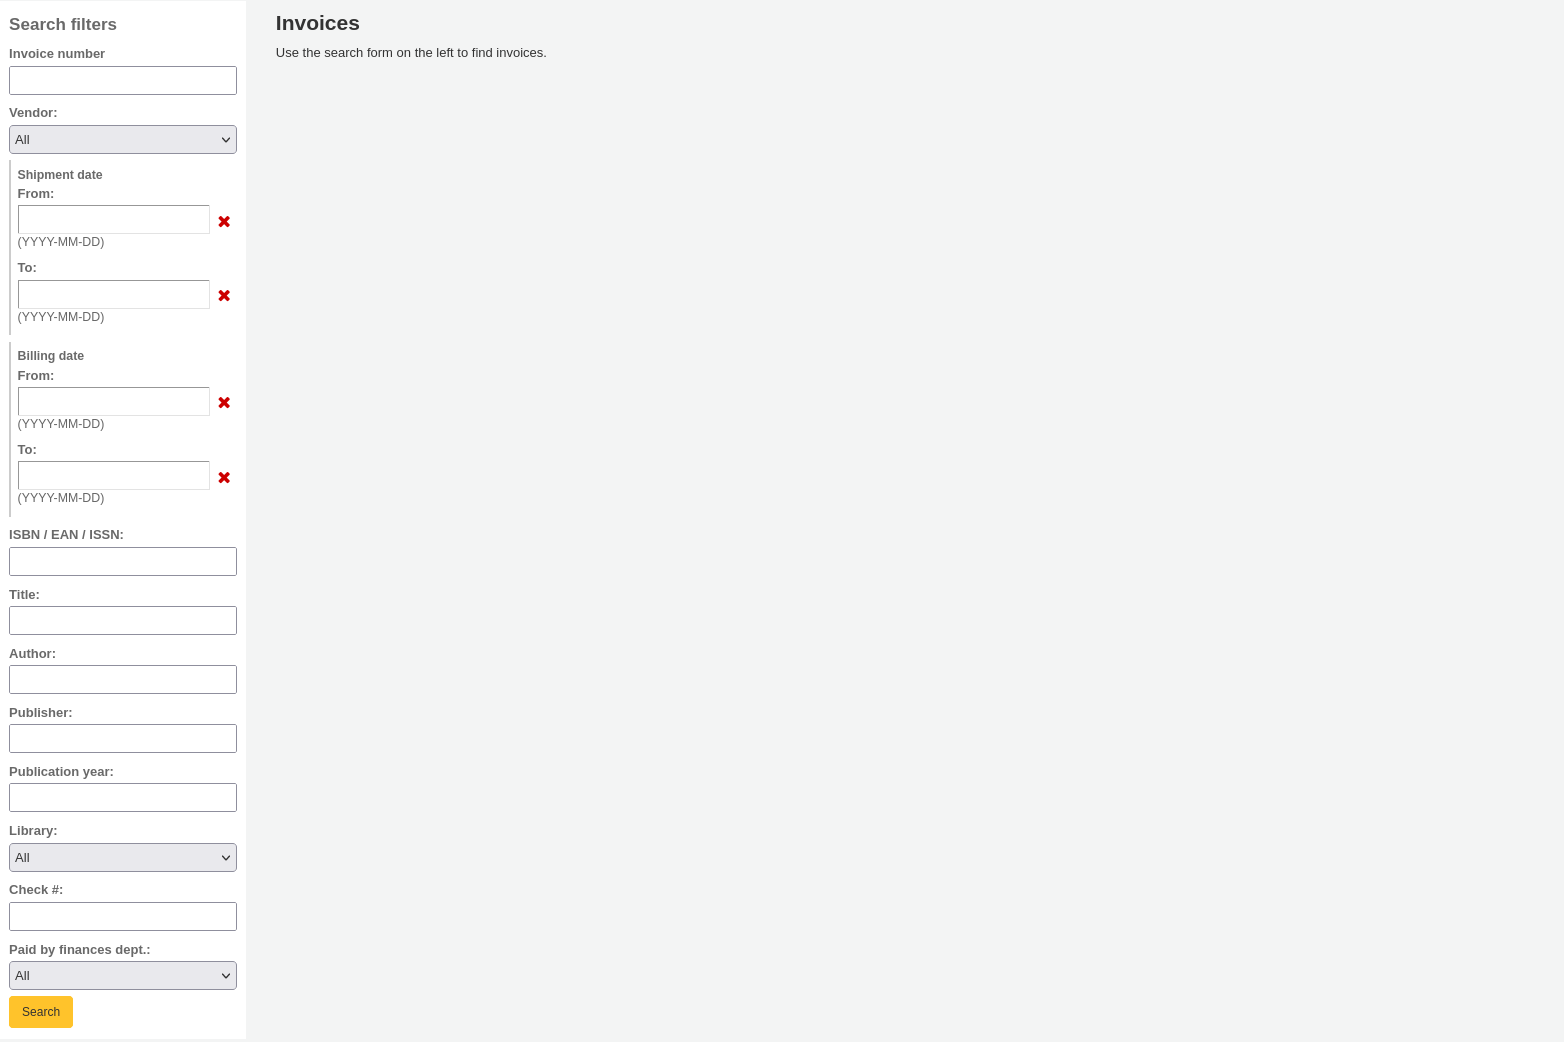
Upon clicking on the link to ‘Late Orders’ from the Acquisitions page you will be presented with a series of filter options on the left hand side. These filters will be applied only closed baskets.
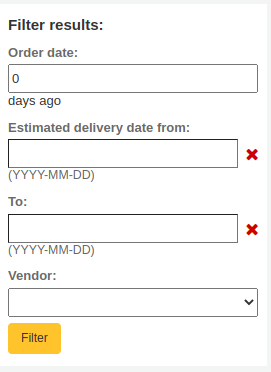
Note
O menu de fornecedores somente exibirá fornecedores com pedidos fechados que estão atrasados.
Quando você filtrar seus pedidos para exibir os materiais que você considera em atraso você será levado a uma lista destes exemplares.
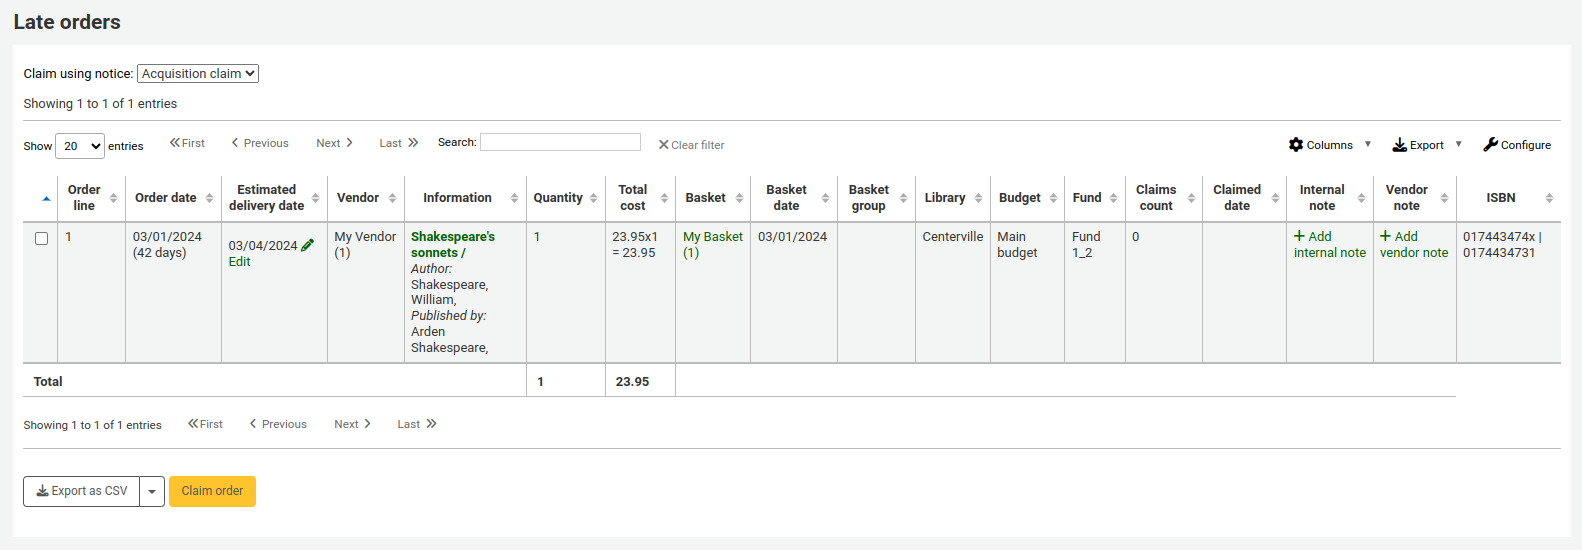
To the right of each late title you will be see a checkbox. Check off the ones you want a claim letter sent to and click ‘Claim Order’ at the bottom right of the list. This will automatically send an email to the vendor at the email address you have on file.
Note
A Data estimada de recebimento é baseada no tempo de entrega informado no registro do fornecedor.
If you would rather use a different acquisition claim letter (other than the default) you can create that in the notices module and choose it from the menu above the list of late items.

Acquisition Searches
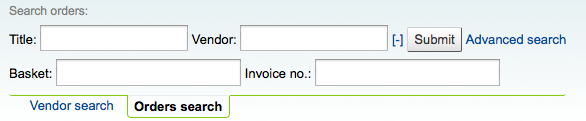
No topo das páginas de Aquisição há uma caixa de pesquisa na qual você pode buscar por Fornecedores ou Pedidos.
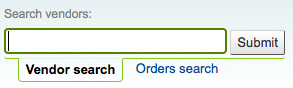
Na busca de Fornecedor você pode digitar qualquer parte do nome do fornecedor para obter resultados.
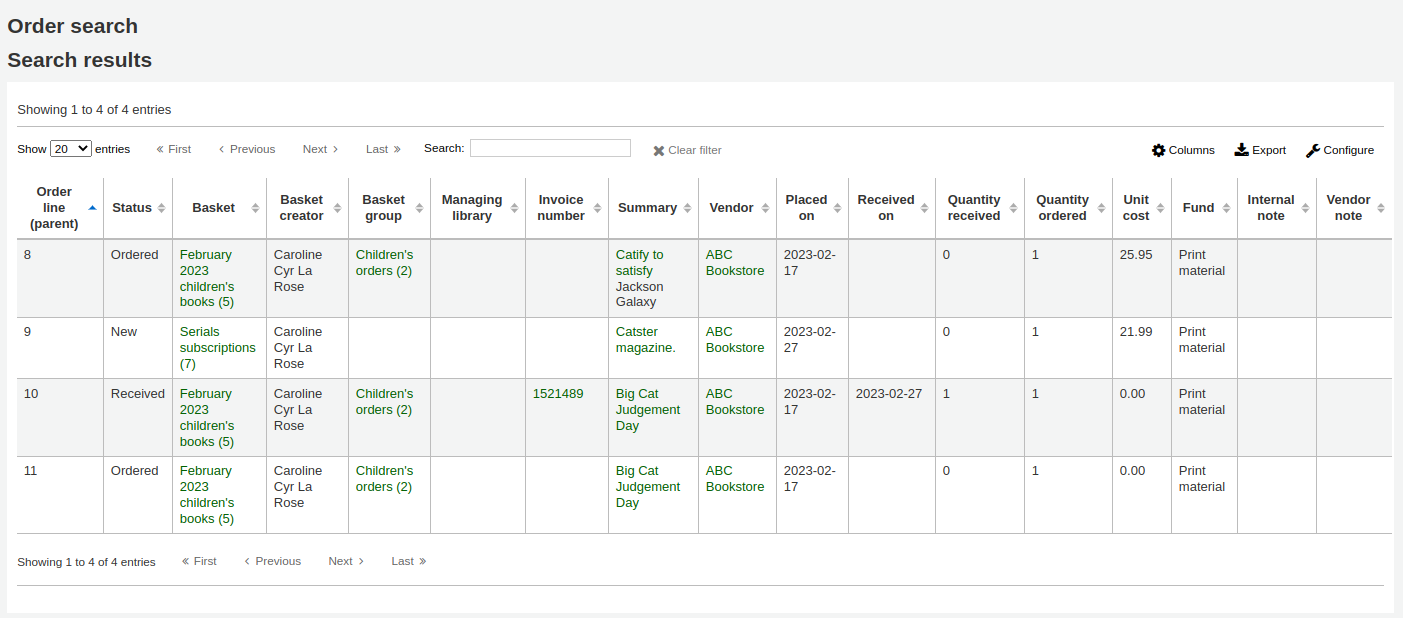
Usando a Pesquisa de Pedidos você pode procurar por materiais que tenham sido encomendado com ou sem o fornecedor.

Pode inserir a informação em um ou ou ambos os campos e pode inserir qualquer parte do título e/ou nome do fornecedor.
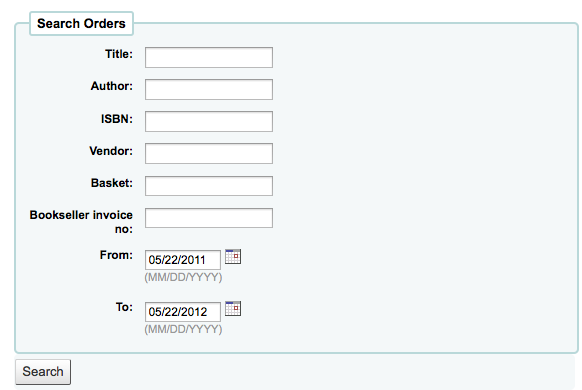
Ao clicar no sinal de adição (+) à direita do caixa de pesquisa de fornecedor irá expandir a busca e permitir que você pesquise por campos adicionais.
Clicando em Busca Avançada à direita do botão de busca lhe dará todos os tipos de opções de ordenação disponíveis.
Budget/Fund Tracking
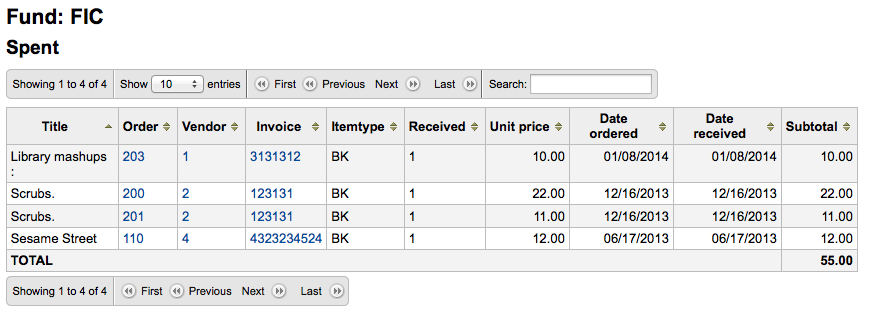
On the main acquisitions page there will be a table showing you all of your active funds and a breakdown of what has been ordered or spent against them.
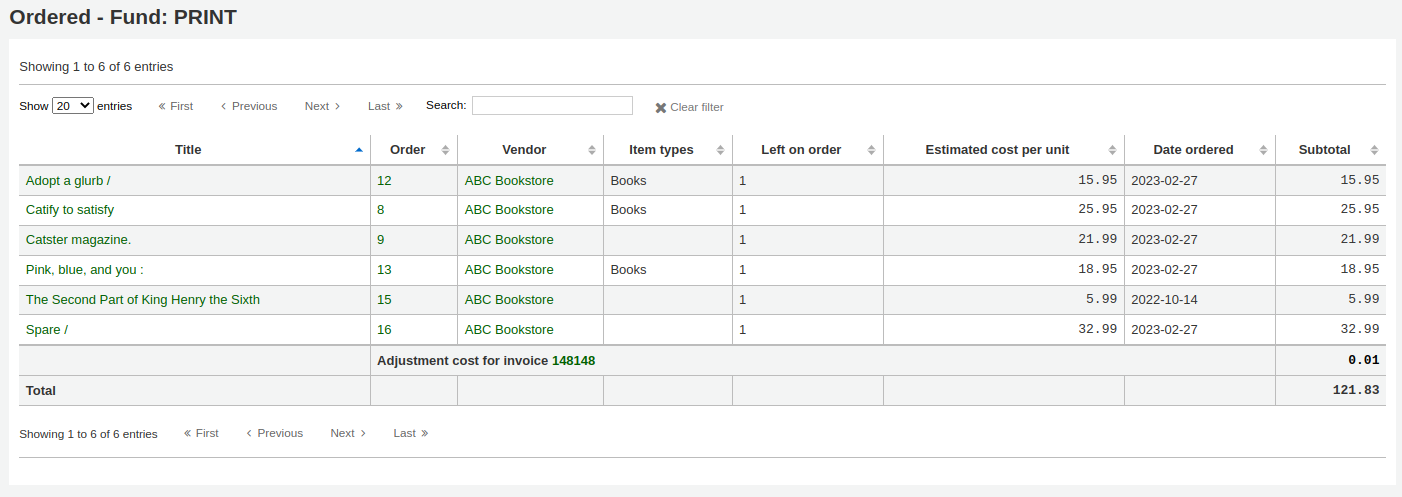
Clicking on the linked amounts under spent or ordered will show you a summary of the titles ordered/received on that budget.
EDI Process
Previous sections explain all ordering options, this section pulls out the parts related to EDI or EDIFACT ordering to help those who are only using EDI for ordering.
Important
Koha uses the EDIFACT standard not the X12 standard for electronic ordering.
EDI Questions for Vendors
You will want to gather the following information from your vendors before beginning the set up process in Koha.
EDI Accounts: This is the basic connection information for your vendor. This will be used to fill in the :ref:`EDI Accounts` section.
Vendor: The name of the vendor
Description: A short description if additional explanation is needed ( especially if you have multiple accounts for one vendor ).
Transport: Does the vendor transmit EDI files via FTP, SFTP, or something else the requires special processing?
Remote host: The URL or IP address of the FTP/SFTP server
Username: The username for the above server
Password: The password for the above server
Download directory: The path on the server that contains files for Koha to download and process
Upload directory: The path on the server that Koha will upload files to for your vendor to process
Qualifier: Who assigned the SAN below?
Choose one of the following:
- EAN International
(31B) US SAN Agency
- Assigned by supplier
- Assigned by buyer
SAN: The identifier for the vendor
Buyer qualifier and SAN are optional. Some vendors require a second buyer identifier in addition to the account EAN.
Buyer qualifier: Who assigned the SAN below?
Choose one of the following:
- EAN International
(31B) US SAN Agency
- Assigned by supplier
- Assigned by buyer
Buyer SAN: The identifier for the library
Quotes enabled: [y/n] Does this vendor support sending and receiving quotes via EDIfact and do you want to send and receive quotes via EDIfact?
Orders enabled: [y/n] Does this vendor support sending and receiving orders via EDIfact and do you want to send and receive orders via EDIfact?
Invoices enabled:[y/n] Does this vendor support sending and receiving invoices via EDIfact and do you want to send and receive invoices via EDIfact?
Order file suffix: The file suffix for order files
Quote file suffix: The file suffix for quote files
Invoice file suffix: The file suffix for invoice files
Account number(s): (list them all)
Account description(s): (the summary of what this number is for)
EANs: Each library using EDIfact needs to specify a buyer identifier know as a SAN or EAN. This will fill in the :ref:`Library EANs <library-eans-label>` setting.
Library
EAN
Choose one of the following:
- EAN International
(31B) US SAN Agency
- Assigned by supplier
- Assigned by buyer
MARC Order Fields or Grid Ordering: These values will fill in the :ref:`MarcFieldsToOrder` preference.
- price: MARC21 field that contains the item price
- quantity: MARC21 field that contains the number of items for the given record
- budget_code: MARC21 field that contains the Koha budget code to be debited
- discount: MARC21 field the contains the discount as a percentage the the price will be discounted by
- sort2: MARC21 field that will populate custom field sort1
- sort2: MARC21 field that will populate custom field sort2
EDI Setup
Before you begin ordering using EDI you will want to take the following steps:
- Ask your vendor/bookseller/jobber for connection
information
- It might also be beneficial to ask for a few sample EDIFACT files from the vendor
- Share with your vendor/bookseller/jobber your library codes, item type codes, fund codes, and any other codes or authorized values they might need for creating your MARC order records
- Communicate with your support provider or the community about whether
you will need a plugin based on your vendor’s answers
- For example ByWater Solutions has published plugins for specific vendors here: https://github.com/bywatersolutions/koha-plugin-edifact-enhanced
- Enter the vendor/bookseller/jobber in Acquisitions
- Review your Acquisitions system preferences
- Be sure to fill in the MarcFieldsToOrder preference with values for order files
- Enter your EDI Accounts
- Enter your Library EANs
- Turn on the EDI Cron so that it can process files
EDI Ordering
The first step in ordering using EDI happens on the book vendor’s website. Each seller will use different language, but you will need to place your order on their site and then download the MARC order file. Some language that you might see included “basket”, “order”, “cart”, and/or “MARC order.” Once you have this MARC file downloaded to your computer you will want to log in to Koha and continue the process there.
Visit the Stage MARC Records for Import tool and upload your file. Once presented with the confirmation screen proceed to Acquisitions.
In Acquisitions create a basket for the vendor you ordered from. From the basket, choose to order from a staged file and click ‘Order’ next to the file you downloaded from your vendor and staged in Koha.
From the confirmation screen you will see all of the data in the MARC file related to your order. If you are not seeing fields such as fund and quantity filled in then be sure to confirm that your MarcFieldsToOrder preference is set right.
Once you have added all of the items to the basket you can click the ‘Create EDIFACT order’ button.
EDIFACT Order
This will generate a pending file in the EDIFACT Messages in Koha. The pending files will be processed by the EDI Cron Job and sent to your vendor.
EDI Invoicing
When the book vendor is done processing your files they will send an invoice via EDI as well. The EDI Cron Job will grab invoices and mark items found in the invoice as received and update your funds without any need for manual intervention.
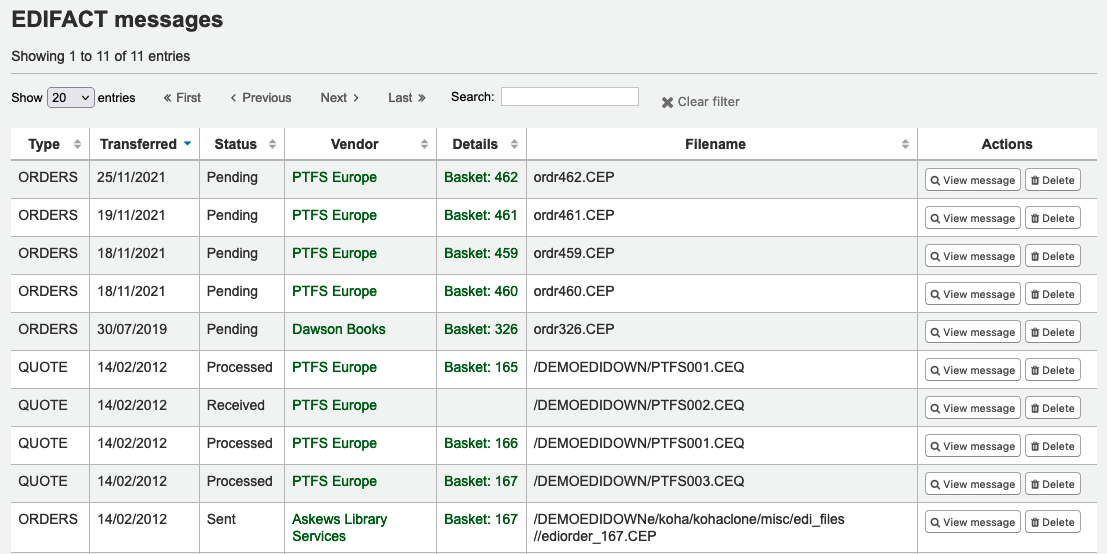
EDIFACT Messages
A log of all messages sent and received via EDIFACT can be found under EDIFACT Messages.