Reports
I reports in Koha sono un modo per raccogliere i dati. Essi sono usati per generare statistiche, liste di utenti, liste di collocazioni sugli scaffali o ogni tipo di lista dei dati presenti nel database.
- Get there: More > Reports
Report personalizzati
Koha’s data is stored in a MySQL database which means that librarians can generate nearly any report they would like by either using the Guided Reports Wizard or writing their own SQL query.
Aggiungi un report personalizzato
Wizard guidato per report
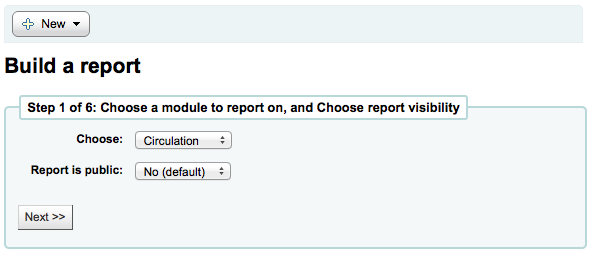
Il wizard ti guida in 6 passi per creare un report.
Passo 1: Scegli il modulo a cui si riferisce il report. Verranno determinate le tabelle e i campi disponibili per la query.
“Report is public” should be left to the default of “No” in most cases especially if the report contains patron or other sensitive information. A public report can be accessed using the JSON reports services by anyone and without authentication.
Nota
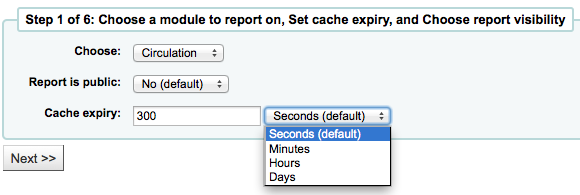
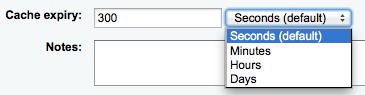
If your system administrator has set up memcache on your server you might see one more option for the Cache expiry. This is related to your public reports. If you make the report public then it’s constantly running and will cause a large load on your system. Setting this value prevents that.
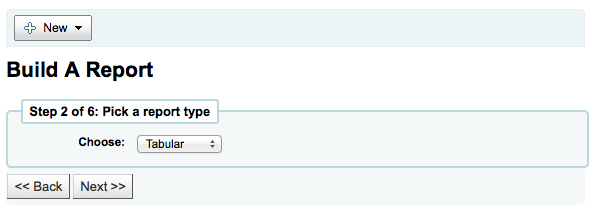
Passo 2: Scegli il tipo di report. Per adesso, l’unica scelta possibile è tabulare.
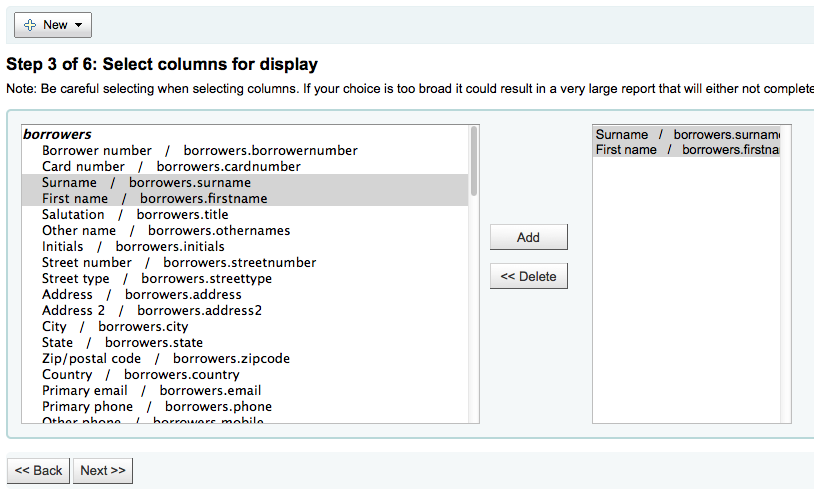
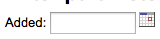
Passo 3: Scegli i campi che vuoi nel report. Puoi selezionare più campi e aggiungerli tutti insieme usando ctrl-click (cmd-click per Mac) su ciascuno prima di premere il bottone Aggiungi.
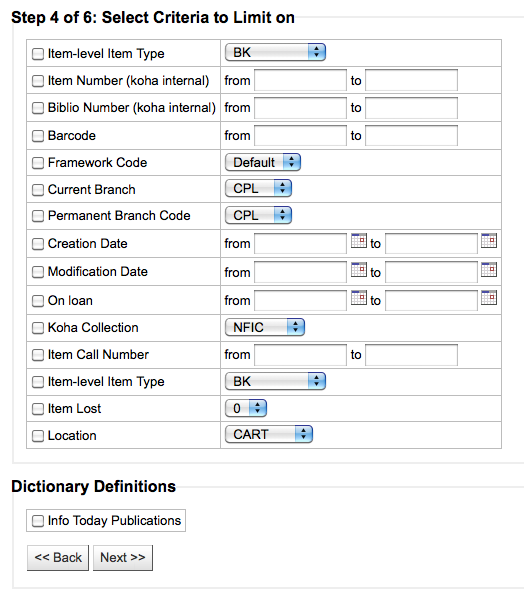
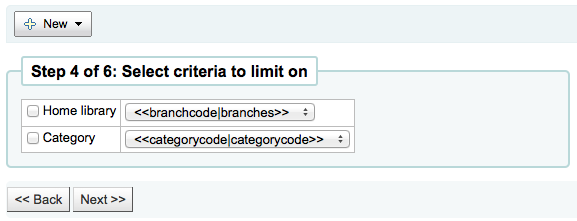
Passo 4: Scegli eventuali limiti per il report (per esempio tipi di copie o biblioteche). Se non ti servono limiti, premi direttamente su Successivo.
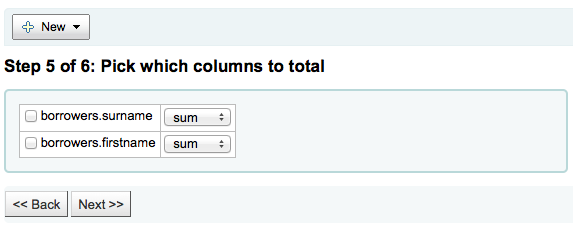
Passo 5: Eseguire funzioni matematiche. Se non vuoi fare calcoli, semplicemente fai clic su Avanti invece selezionare un’opzione.
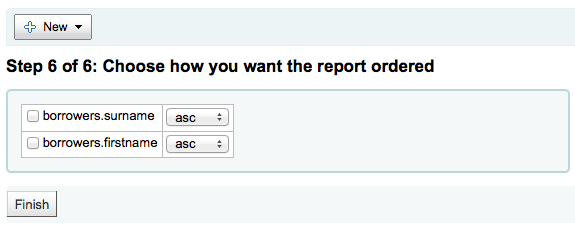
Passo 6: Scegli l’ordine dei dati. Se vuoi estrarre i dati nello stesso ordine presente sul db, semplicemente clicca su “Fine”
Quando hai finito, ti verrà mostrato l’SQL generato. Da qui puoi scegliere di salvare il report cliccando “Salva” o copiare l’SQL per modificarlo a mano.
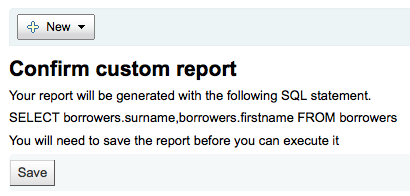
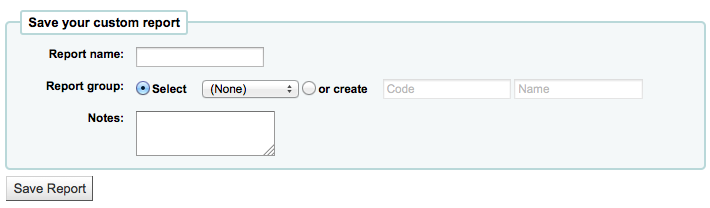
Se scegli di salvare il report, ti sarà chiesto di dargli un nome, di eventualmento di assegnarlo a un gruppo e a un sottogruppo, di eventualmente inserire delle note
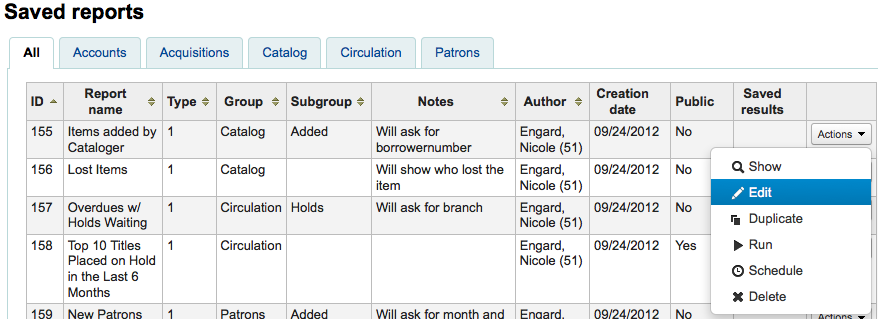
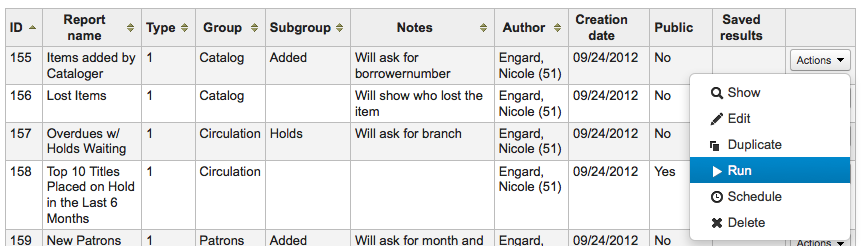
Una volta salvato, il report apparirà nella pagina “Report salvati”.
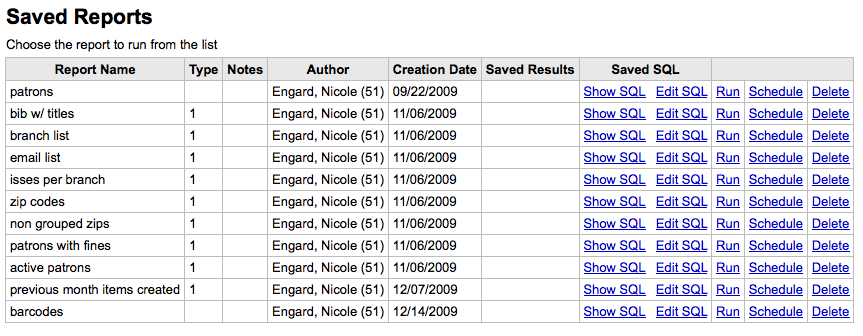
Da qui puoi fare modifiche, far eseguire un report o pianificare l’elaborazione di un report. Per trovare il report che hai creato puoi ordinare la tabella per il valore di ogni colonna cliccando sulla testata. Uno degli ordinamenti migliore è quello per data di creazione. Puoi anche filtrare i risultati usando il menu sulla sinistra o usare le tabulazioni per vedere i tuoi raggruppamenti.
Report from SQL
In addition to the report wizard, you have the option to write your own queries using SQL. To find reports written by other Koha users, visit the Koha Wiki: http://wiki.koha-community.org/wiki/SQL_Reports_Library. You can also find your database structure in /installer/data/mysql/kohastructure.sql or online at: http://schema.koha-community.org.
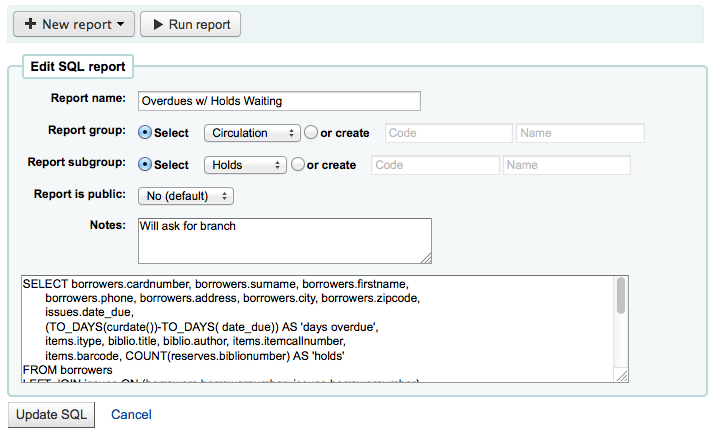
Per aggiungere la tua query, clicca sul link “Crea da SQL” sul modulo principale dei Report o il bottone “Nuovo report” in testa alla pagina dei Report salvati.

Compila nel form presentato
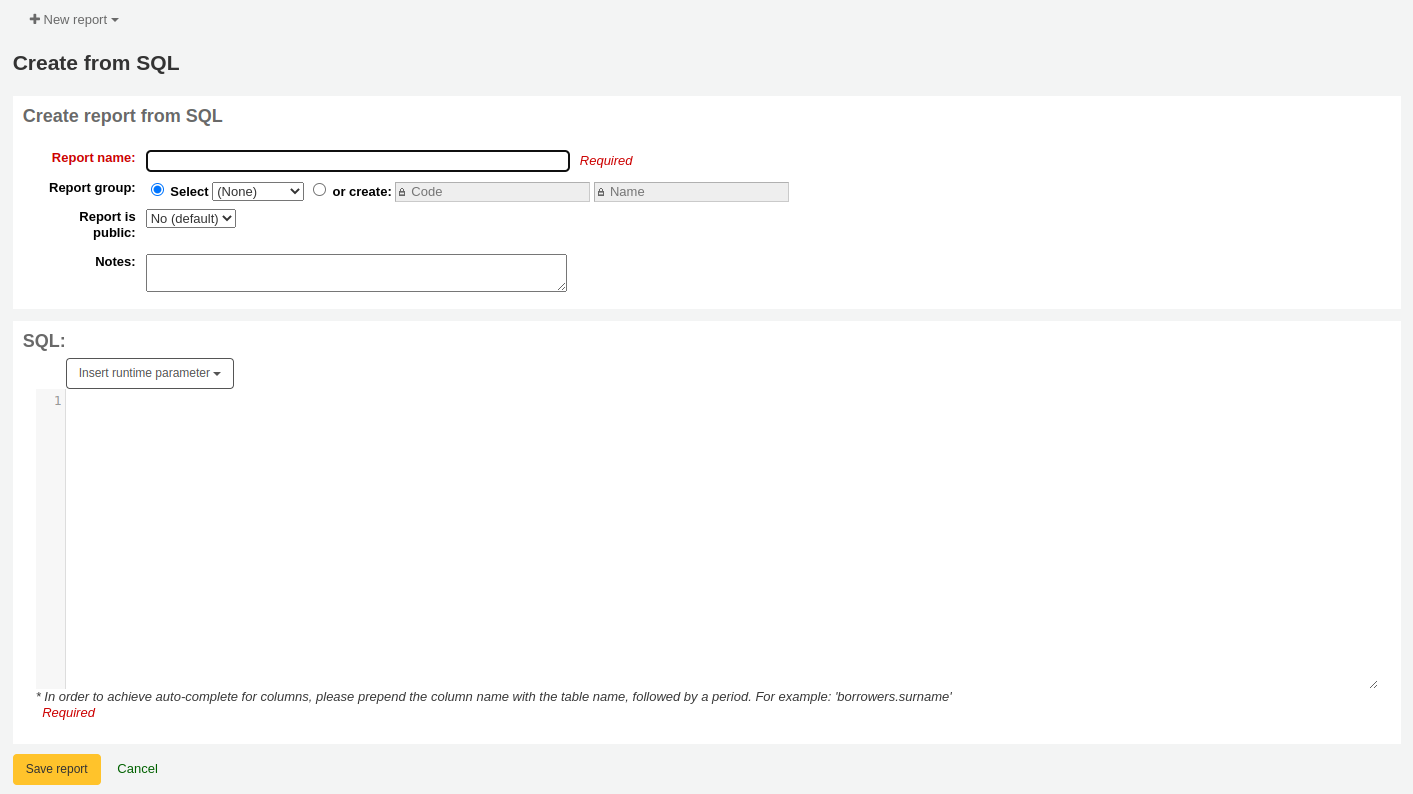
Il nome apparirà nella pagina dei Report salvati per aiutarti a ritrovare il report in futuro. Il report sarà anche ricercabile usando i filtri presenti a sinistra della pagina Report salvati.
You can use the “Report group” to organize your reports so that you can easily filter reports by groups. Report groups are set in the REPORT_GROUP authorized value category or can be added on the fly when creating the report by choosing the “or create” radio button.

Report groups set up in the authorised value category need to have unique authorised values and descriptions.
Nota
Se stai aggiungendo un gruppo di report sul momento, ricorda di dare un codice al gruppo di meno di 10 caratteri e che non includa caratteri speciali o spazi.
You can use “Report subgroup” to further organize your reports so that you can easily filter reports by groups and subgroups. Report subgroups are set in the REPORT_SUBGROUP authorized value category or can be added on the fly when creating the report by choosing the “or create” radio button. Report Subgroups are set up with unique values in Authorised Value, and Description. The Description (OPAC) field needs to contain the authorised value for the Report Group that the Subgroup falls under.

Nota
Se stai aggiungendo un sottogruppo di report sul momento, ricorda di dare un codice al sottogruppo di meno di 10 caratteri e che non includa caratteri speciali o spazi.
- “Report is public” should be left to the default of “No” in most cases
especially if the report contains patron or other sensitive information. A public report can be accessed using the JSON reports services by anyone and without authentication.
Le note appariranno anche nella pagina dei reports salvati, posso essere usate per fornire maggiori dettagli sul report o suggerimenti sui valori da inserire quando lo si lancia
Il tipo deve essere sempre “tabulare”, dato che gli altri formati non sono ancora stati realizzati
Nel riquadro SQL puoi scrivere o incollare le istruzioni SQL per il report
Se pensi che il tuo report pesi troppo sull macchina oppure tu voi mettere dei filtri, Koha ti permette di definire dei valori parametrici da inserire prima dell’esecuzione. In pratica questi valori funzionano da filtro e definiscono meglio i risultati che ottieni.
There is a specific syntax that Koha will understand as “ask for values when running the report”. The syntax is <<Question to ask|authorized_value>>.
- The << and >> are just delimiters. You must put << at the beginning and >> at the end of your parameter
- La “Questione da chiedere” verrà mostrata alla sinistra della stringa da inserire.
- The authorized_value can be omitted if not applicable. If it contains an authorized value category, or branches or itemtype or categorycode or biblio_framework, a list with the Koha authorized values will be displayed instead of a free field Note that you can have more than one parameter in a given SQL Note that entering nothing at run time won’t probably work as you expect. It will be considered as «value empty» not as «ignore this parameter». For example entering nothing for : «title=<<Enter title>>» will display results with title=”” (no title). If you want to have to have something not mandatory, use «title like <<Enter title>>» and enter a % at run time instead of nothing
Esempi per MARC 21:
SELECT surname,firstname FROM borrowers WHERE branchcode=<<Enter patrons library|branches>> AND surname like <<Enter filter for patron surname (% if none)>>
SELECT * FROM items WHERE homebranch = <<Pick your branch|branches>> and barcode like <<Partial barcode value here>>
SELECT title , author FROM biblio WHERE frameworkcode=<<Enter the frameworkcode|biblio_framework>>
Nota
To generate a date picker calendar to the right of the field when running a report you can use the “date” keyword like this: <<Enter Date|date>>
Nota
Devi mettere «%» in una casella di testo affinchè il sistema non la consideri nella query. Altrimenti il campo verrà considerato «» (stringa vuota o NULL), che è diverso da non considerare il filtro nella query SQL.
Importante
In addition to using any authorized value code to generate a dropdown, you can use the following values as well: Framework codes (biblio_framework), Branches (branches), Item Types (itemtypes) and Patron Categories (categorycode). For example a branch pull down would be generated like this <<Branch|branches>>

Nota
C’è un limite di 10.000 negli statement SQL passati a Koha. Il limite è superabile indicando per esempio “LIMIT 100000” (o altro valore superiore a 10.000) al termine dello statement SQL.
Nota
If your system administrator has set up memcache on your server you might see one more option for the Cache expiry. This is related to your public reports. If you make the report public then it’s constantly running and will cause a large load on your system. Setting this value prevents that.
Once everything is entered click the “Save Report” button and you’ll be presented with options to run it. Once a report is saved you do not have to recreate it you can simply find it on the Saved Reports page and run or edit it.
Duplica il report
I reports possono essere aggiunti duplicando un report esistente. Visita la pagina “Reports salvati” per vedere tutti i reports che il tuo sistema ha già.

To the right of every report there is an “Actions” pull down. Clicking that and choose “Duplicate” to use an existing report as the basis for your new report. That will populate the new report form with the existing SQL for easy editing and resaving.
Modifica report personalizzati
Ogni report può essere modficato usando la lista dei reports, Per vedere la lista, clicca su “Vedi salvati”.
Per trovare il report che hai vuoi moodificare puoi ordinare la tabella per il valore di ogni colonna cliccando sulla testata. Puoi anche filtrare i risultati usando il menu sulla sinistra o usare le tabulazioni per vedere i tuoi raggruppamenti.
Da questa lista puoi modificare ogni report personalizzato cliccando “Azioni” a destra del report e successivamente “Modifica” nel menu che appare.
Apparirà il form per modificare il report.
Esegui i report personalizzati
Una volta che un report è salvato, puoi usarlo andando nella pagina “report salvati”, cliccando sul bottone “Azioni” posto a destra del report e scegliendo la voce “Esegui”.
Quando si esegue un report verrà chiesto sia di immettere alcuni valori
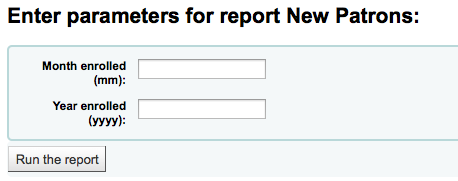
o di vedere subito i risultati

Dai risultati puoi scegliere di far girare di nuovo il report cliccando su “Elabora il report”, modificarlo cliccando “Modifica” o andare oltre creandone un nuovo cliccando su “Nuovo. Puoi anche scaricare i risultati scegliendo un tipo di file in fondo, vicino a “Scarica il report”, e cliccando “Scarica”
Nota
Un file di testo separato da virgole è un file CSV e può essere aperto da qualsiasi applicazione di foglio di calcolo.
Rapporti statistici
Statistic reports will show you counts and sums. These reports are all about numbers and statistics, for reports that return more detailed data, use the Wizard guidato per report. These reports are limited in what data they can look at, so it’s often recommended to use custom reports for official end of the year statistics.
Acquisitions Statistics
Nota
These reports are limited in what data they can look at, so it’s often recommended to use custom reports for official end of the year statistics.
Usando la maschera fornita, scegli quale valore dovrà apparire nella Colonna e quale nella Riga.
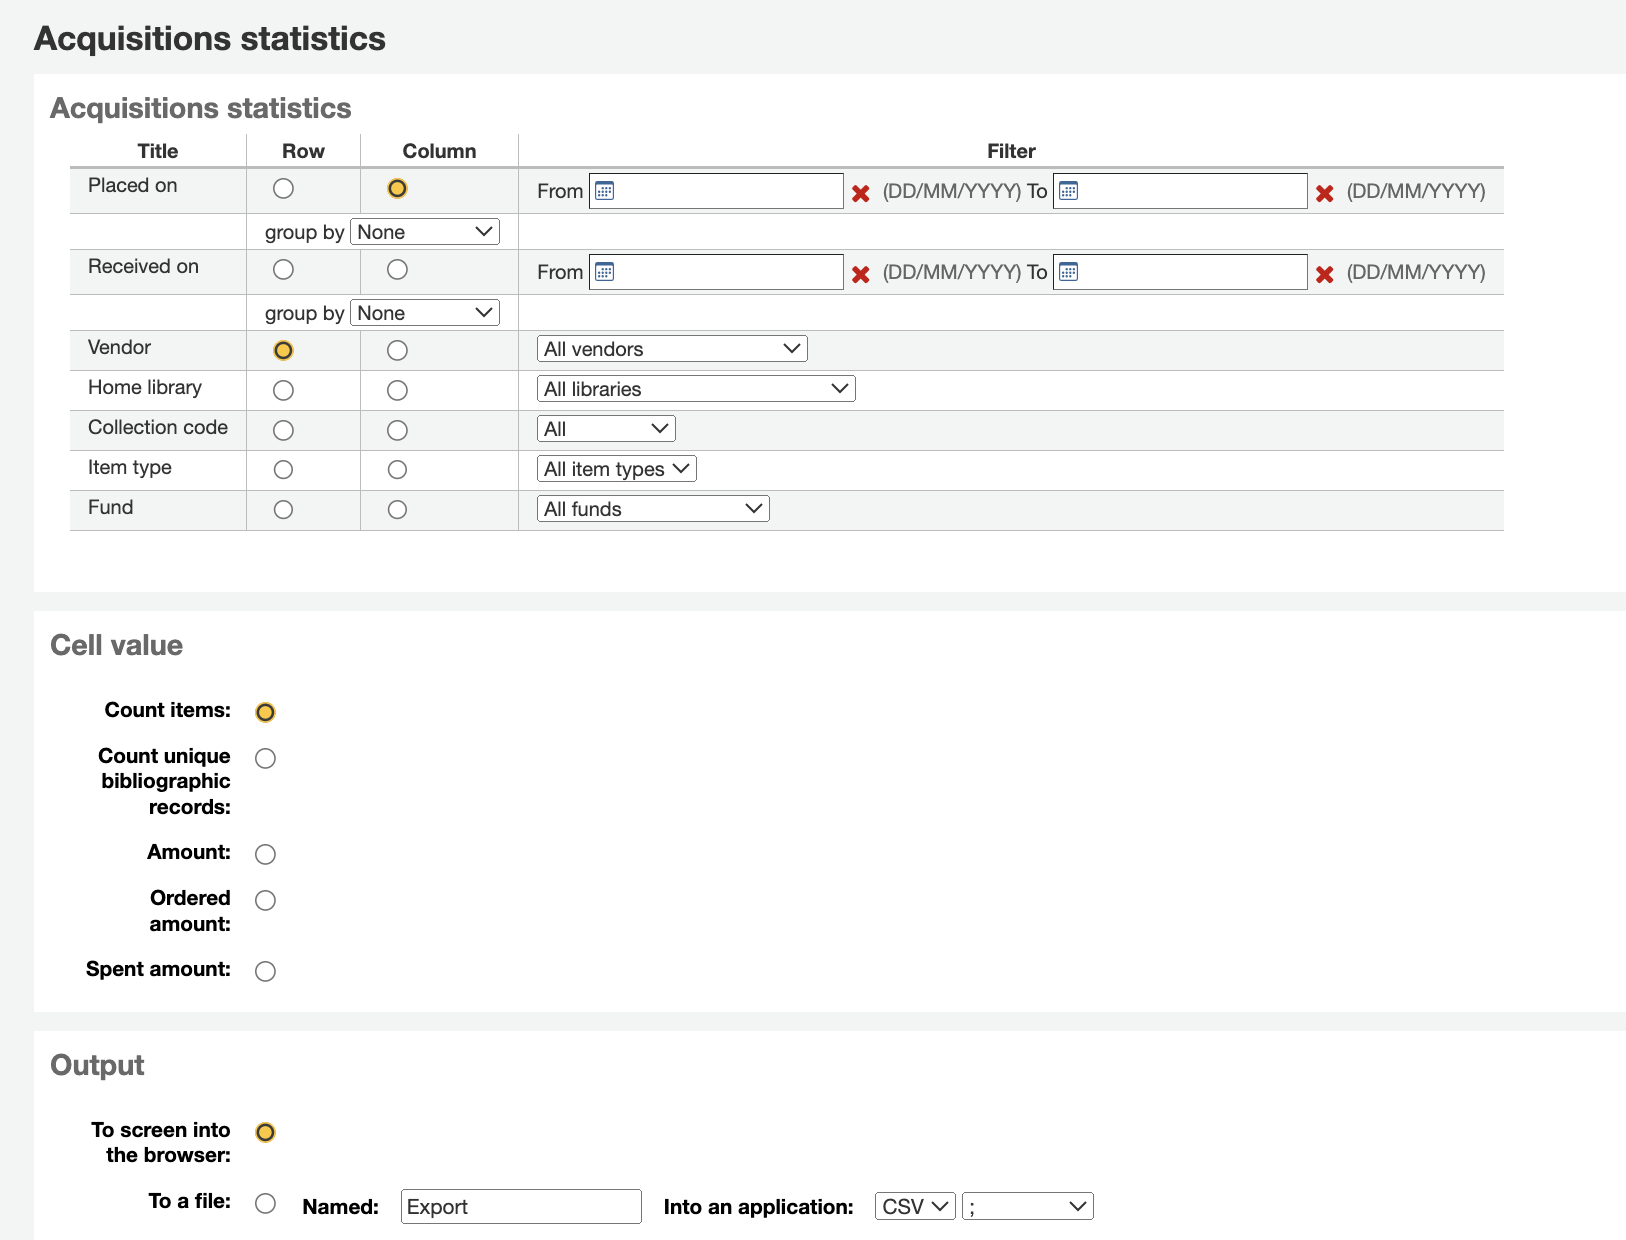
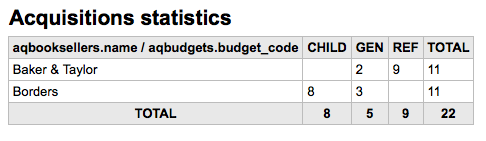
Se scegli l’output sul browser, i risultati verranno presentati sullo schermo.
Puoi anche scegliere di esportare in un fai che puoi manipolare secondo le tue esigenze.
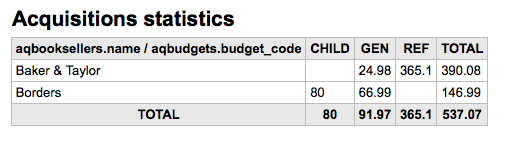
Quando generi il report, puoi scegliere tra contare o sommare i valori.
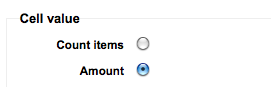
Scegliendo ammontare mostrerà i risultati come somma degli ammontare spesi.
Statistiche degli utenti
Nota
These reports are limited in what data they can look at, so it’s often recommended to use custom reports for official end of the year statistics.
Usando la maschera fornita, scegli quale valore dovrà apparire nella Colonna e quale nella Riga.
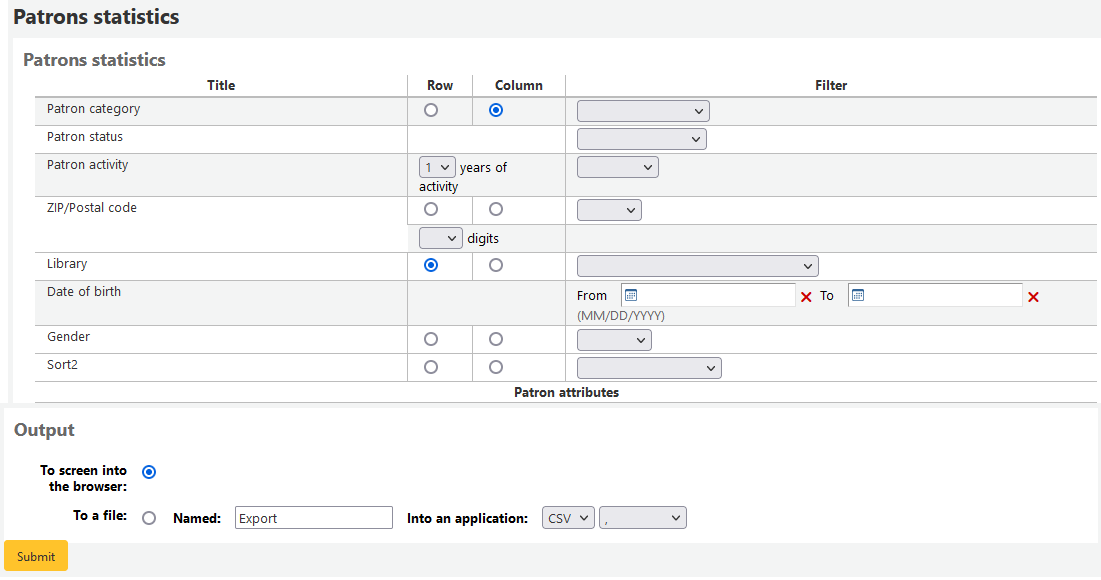
Se scegli l’output sul browser, i risultati verranno presentati sullo schermo.
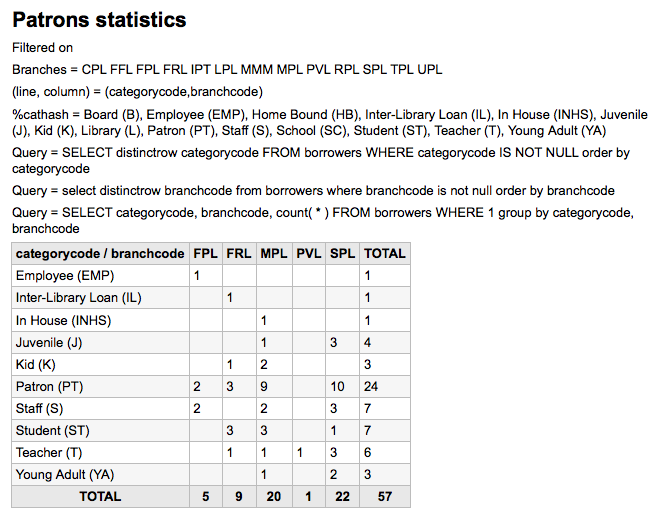
A seconda della tua selezione, potresti vedere qualche richiesta di informazioni sopra la tabella dei risultati. Potresti anche scegliere di esportare in un file da manipolare per le tue necessità
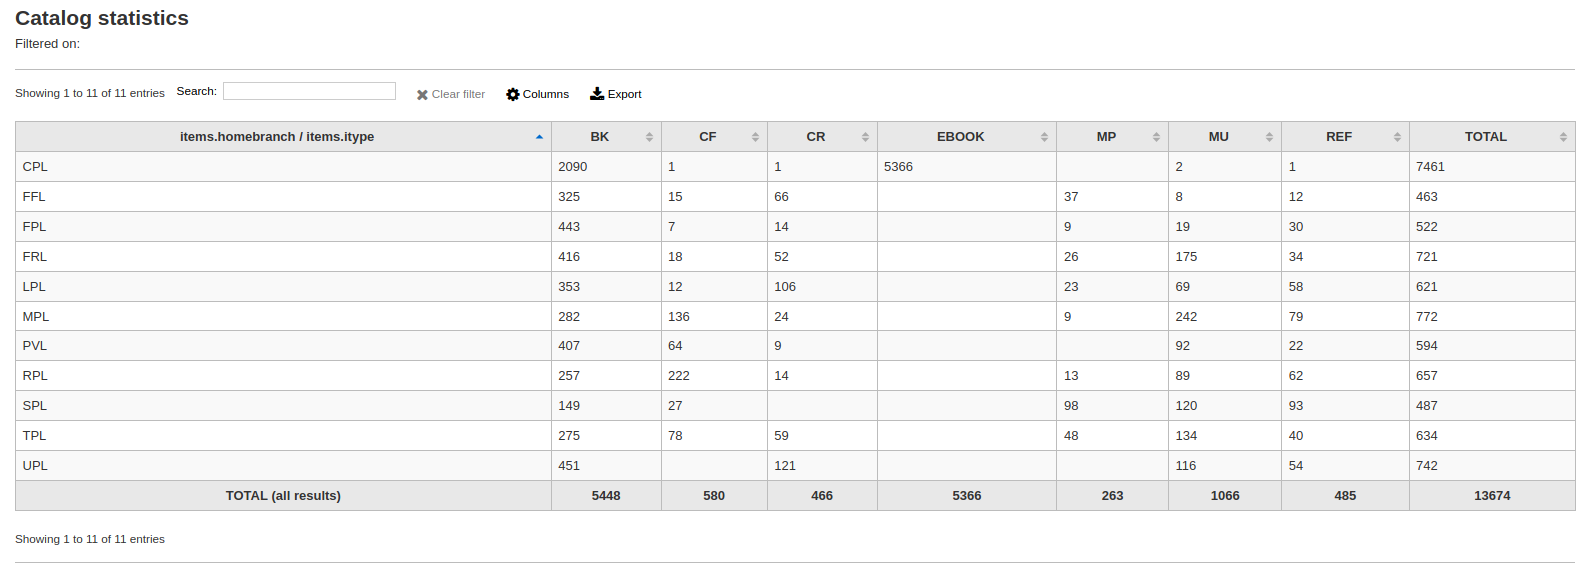
Statistiche del catalogo
Nota
These reports are limited in what data they can look at, so it’s often recommended to use custom reports for official end of the year statistics.
Usando la maschera fornita, scegli quale valore dovrà apparire nella Colonna e quale nella Riga.
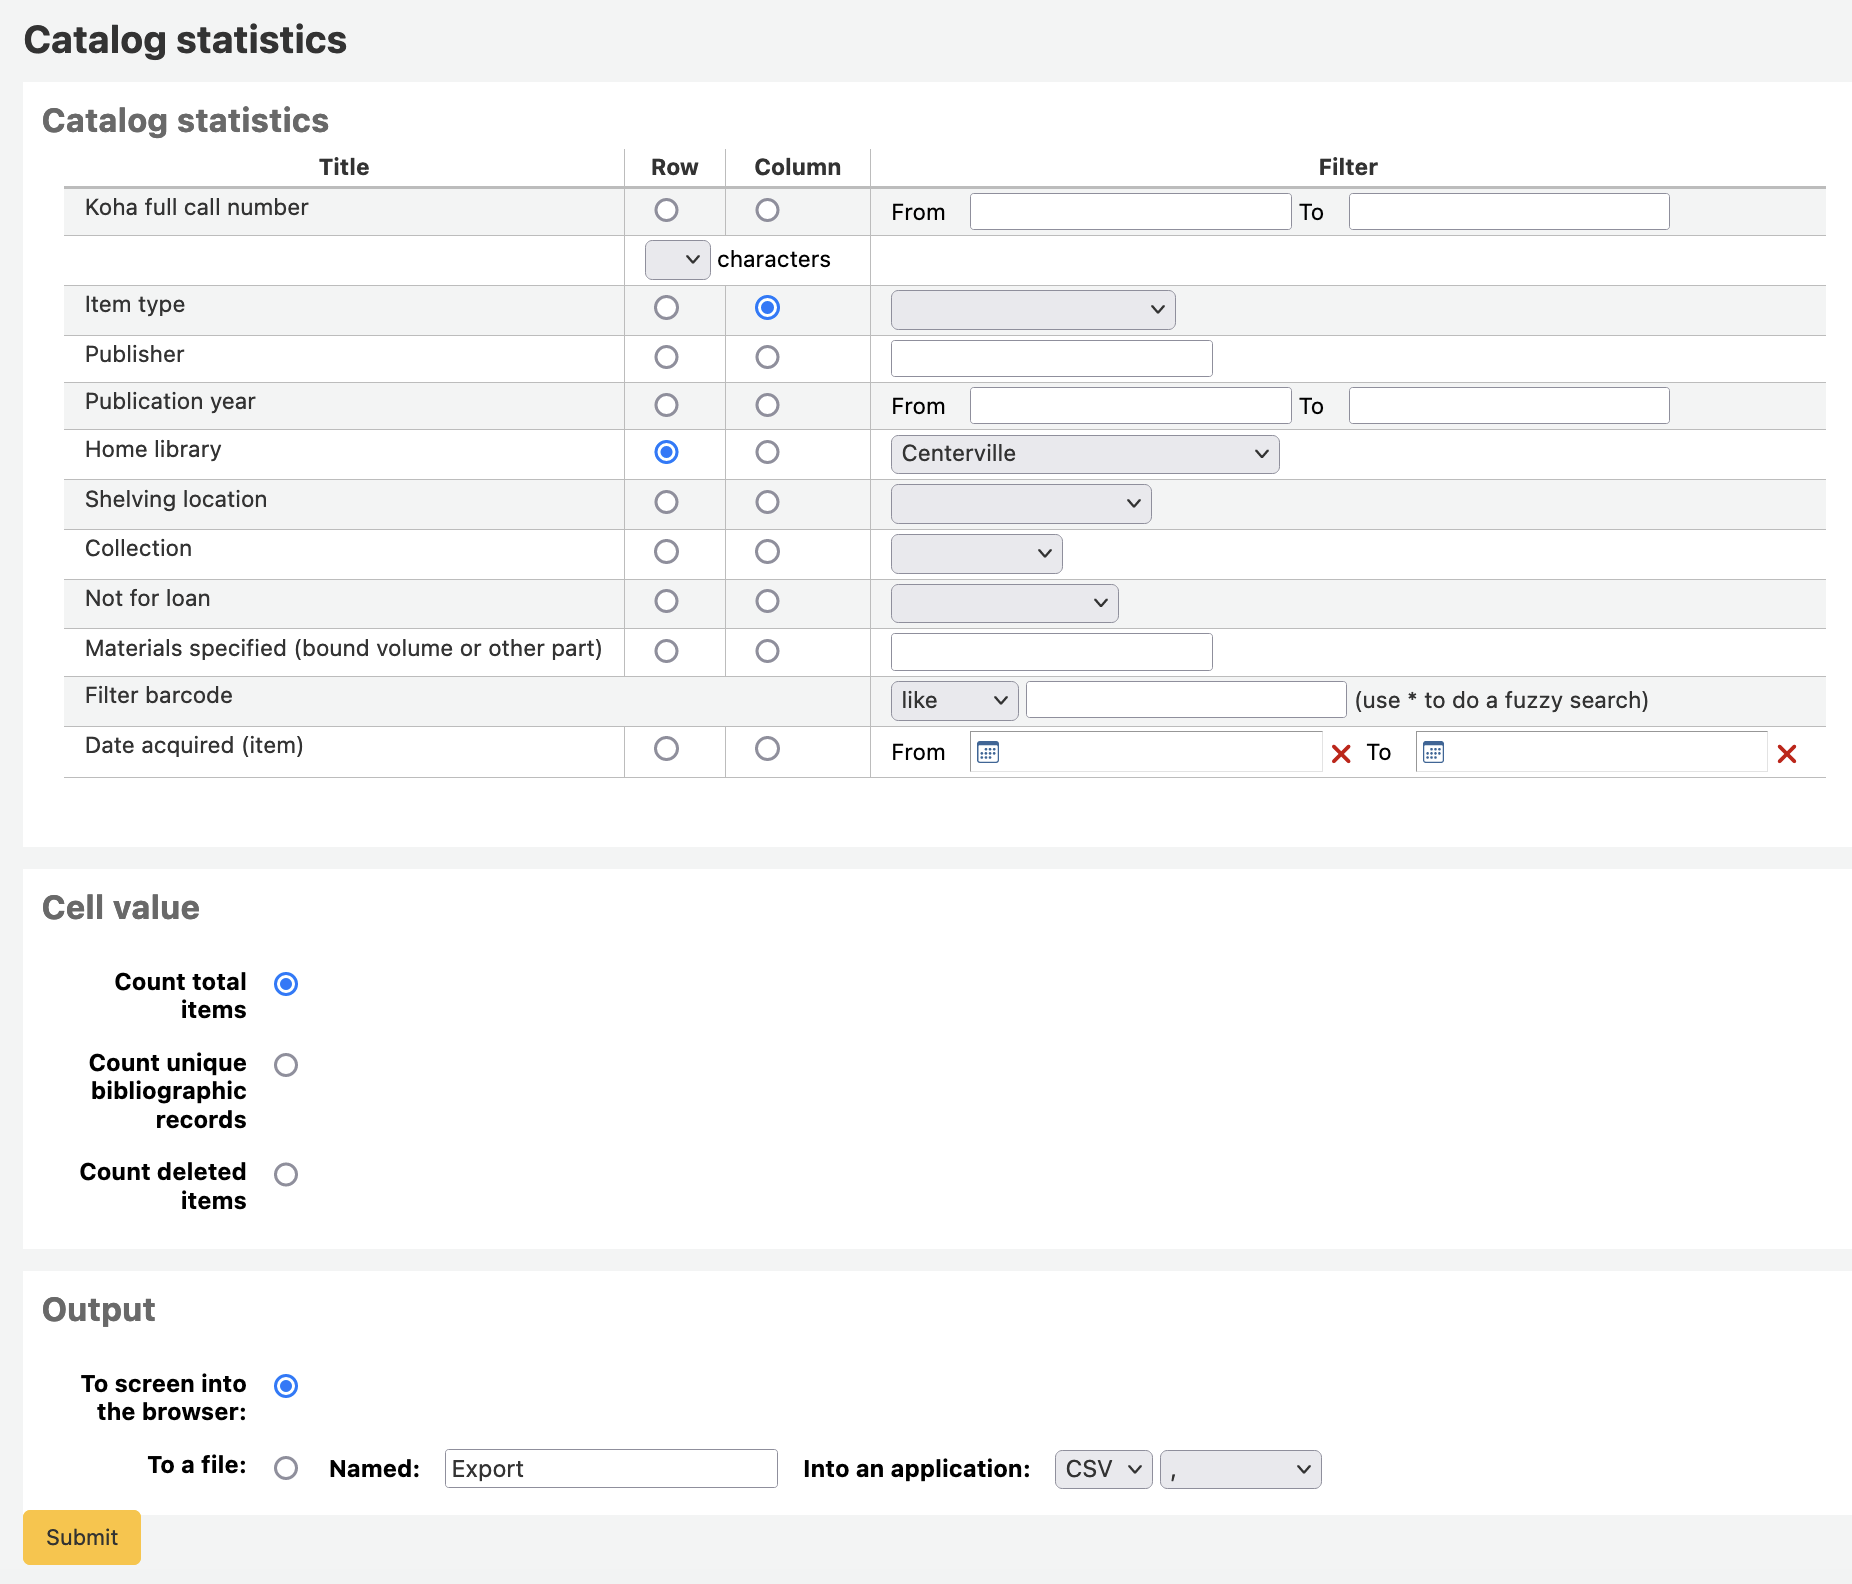
Se scegli l’output sul browser, i risultati verranno presentati sullo schermo.
Puoi anche scegliere di esportare in un fai che puoi manipolare secondo le tue esigenze.
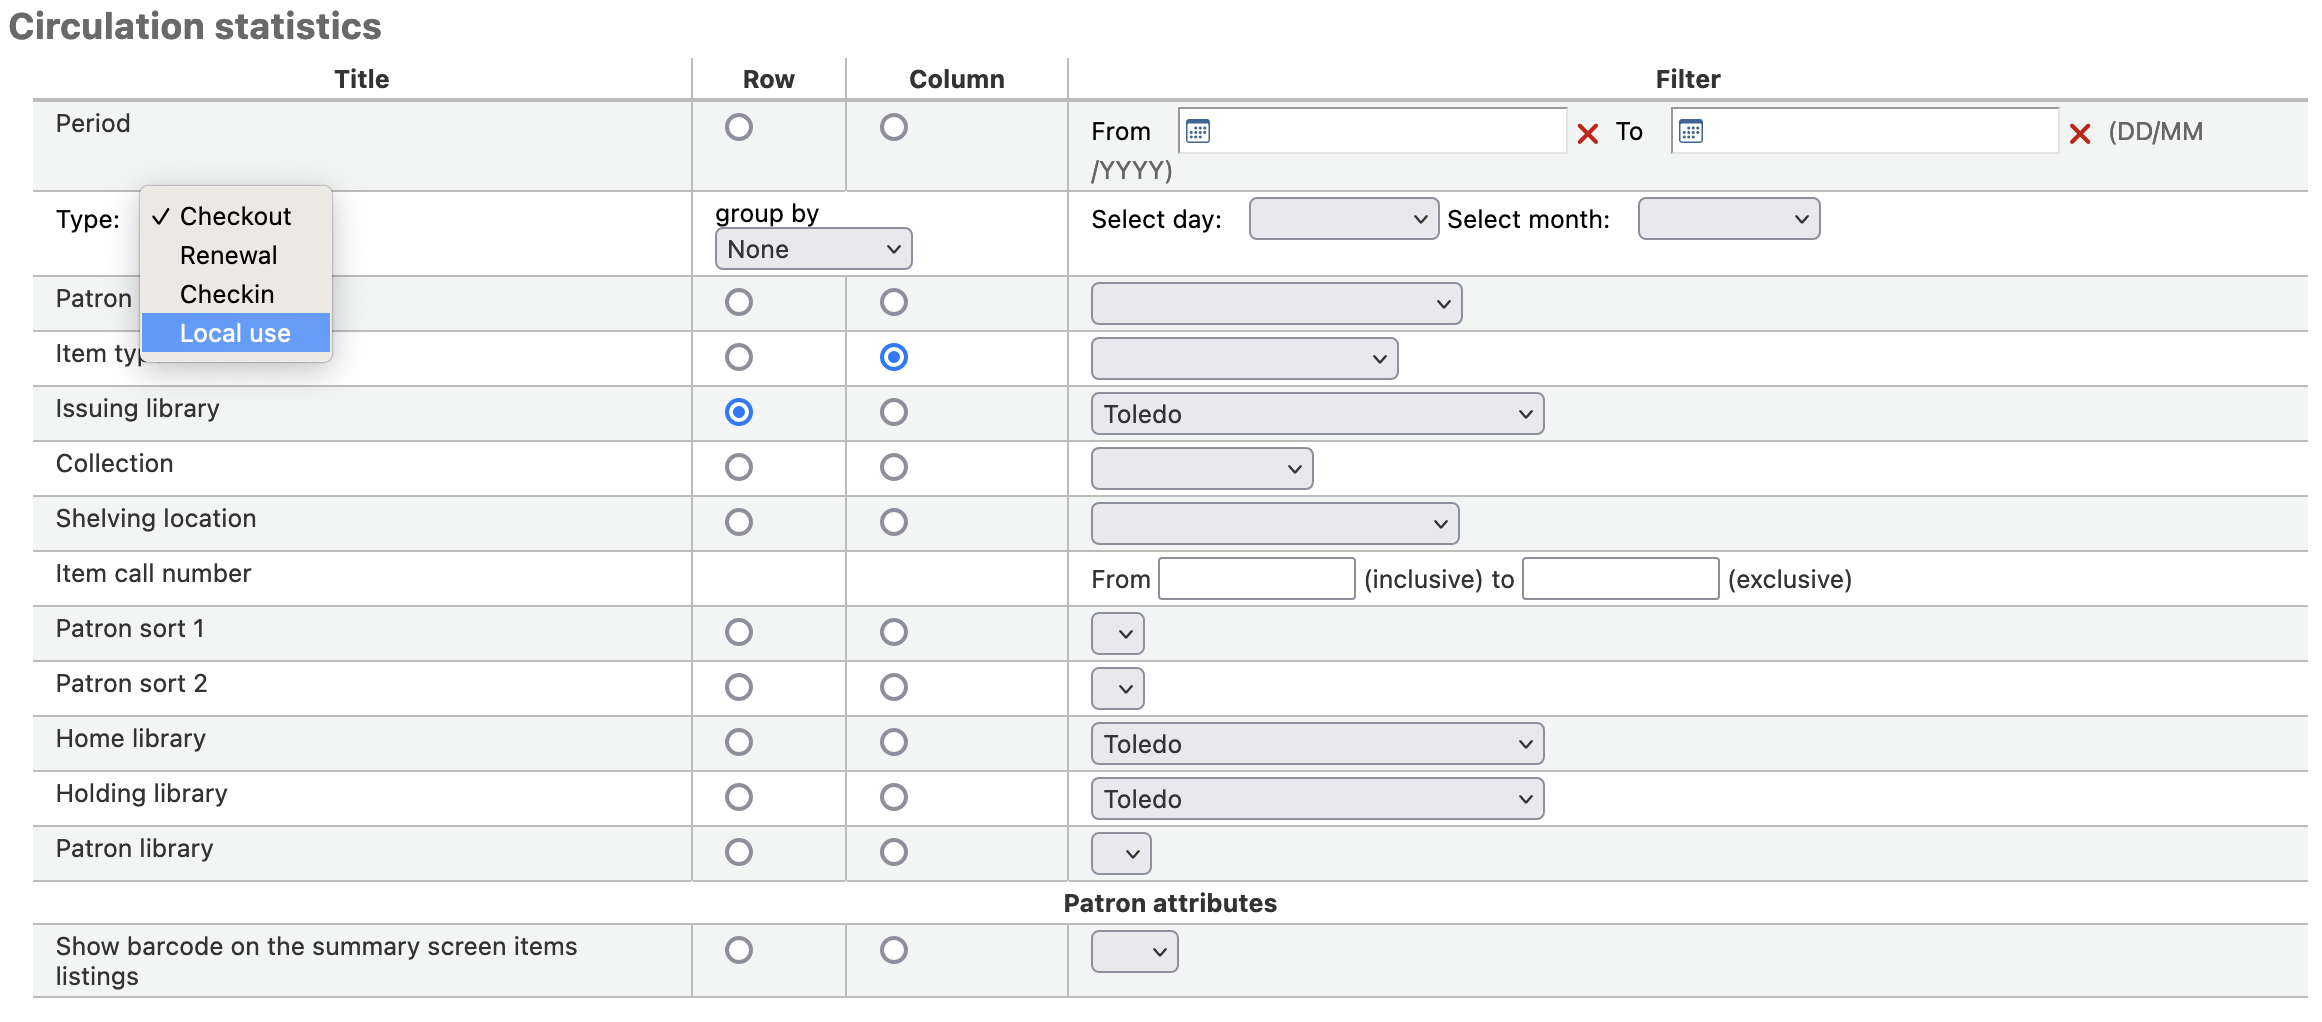
Circulation Statistics
Nota
These reports are limited in what data they can look at, so it’s often recommended to use custom reports for official end of the year statistics.
Usando la maschera fornita, scegli quale valore dovrà apparire nella Colonna e quale nella Riga.
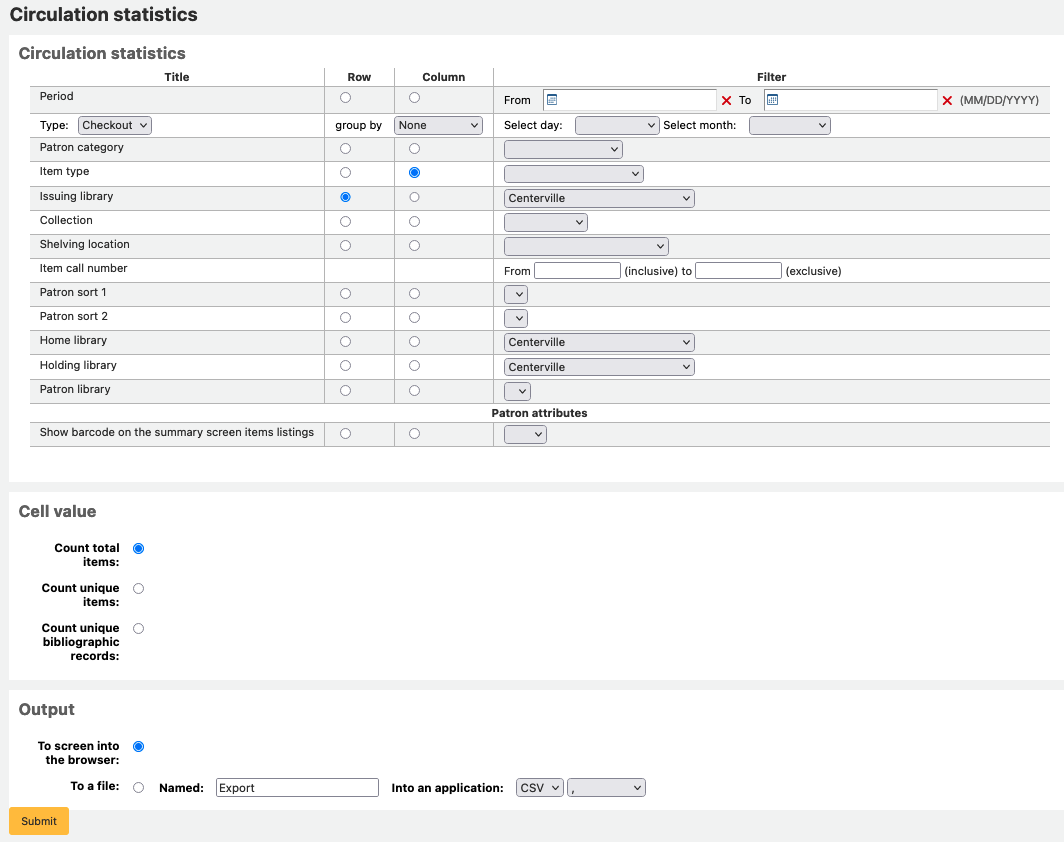
Se scegli l’output sul browser, i risultati verranno presentati sullo schermo.
Puoi anche scegliere di esportare in un fai che puoi manipolare secondo le tue esigenze.
Nota
Per ottenere un quadro completo della vostra circolazione mensile o giornaliera, è possibile eseguire il report due volte, una volta per “Tipo” di “Prestito” e un’altra per “Rinnovo”.
Questo report utilizza “Periodo”, o data, filtro che consente di limitare a un mese semplicemente selezionando dal primo giorno del primo mese fino al primo giorno del mese successivo. Ad esempio, 10/1 a 11/1 a trovare le statistiche per il mese di ottobre.
- To find daily statistics, set your date range.</br> Example: «I want circulation data starting with date XXX up to, but not including, date XXX.»
- Per estrarre tutto un mese puoi indicare: 01/11/2009 a 01/12/2009
- Per estrarre un anno intero puoi mettere ad esempio: 01/01/2009 a 01/01/2010
- Per un giorno solo puoi inserire così: 15/11/2009 a 16/11/2009. Con questo avrai la circolazione del giorno 15.
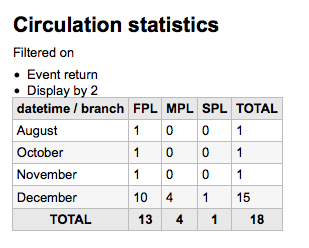
Tracciare la consultazione in loco
Utilizzando il motore di report statistiche circolazione è possibile eseguire reports sulla consultazione semplicemente scegliendo “Consultazione” dal menu a discesa “Tipo”:
Serials Statistics
Nota
These reports are limited in what data they can look at, so it’s often recommended to use custom reports for official end of the year statistics.
Usando la maschera fornita, scegli come elencare le risorse in continuazione nel tuo sistema.
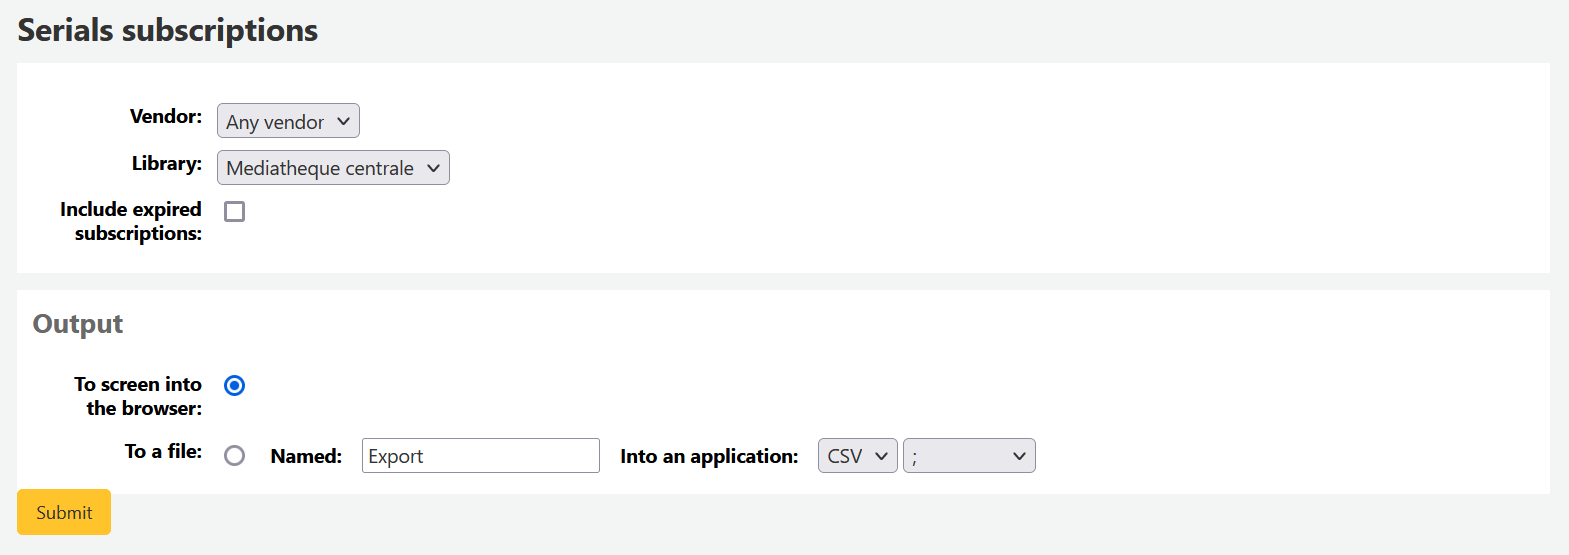
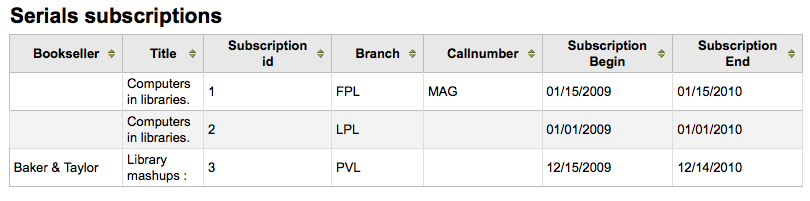
Se scegli l’output sul browser, i risultati verranno presentati sullo schermo.
Puoi anche scegliere di esportare in un fai che puoi manipolare secondo le tue esigenze.
Statistiche prenotazioni
Nota
These reports are limited in what data they can look at, so it’s often recommended to use custom reports for official end of the year statistics.
Usando la form puoi vedere le statistiche delle prenotazioni, fatte, riempite, cancellate ecc. della tua biblioteca. Dalla form scegli che cosa vuoi mostrare nella colonna, e quali valori avere nella riga. Puoi anche usare i filtri a destra della form.
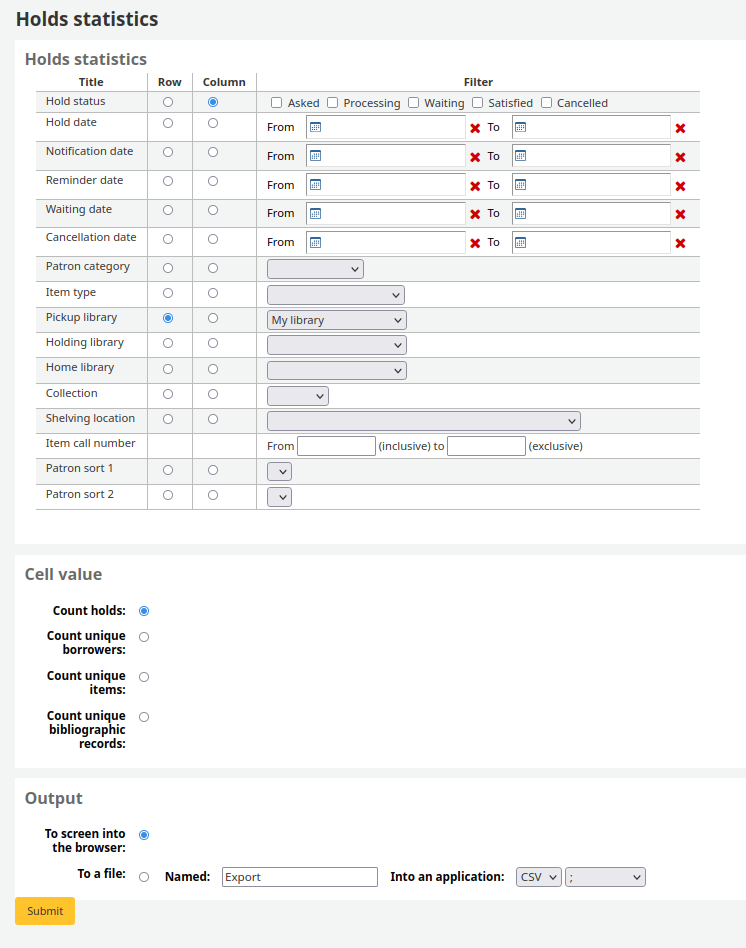
Se scegli l’output sul browser, i risultati verranno presentati sullo schermo.

Puoi anche scegliere di esportare in un fai che puoi manipolare secondo le tue esigenze.
Utenti con più prestiti
Il report guidato ti mostrerà gli utenti con più prestiti.
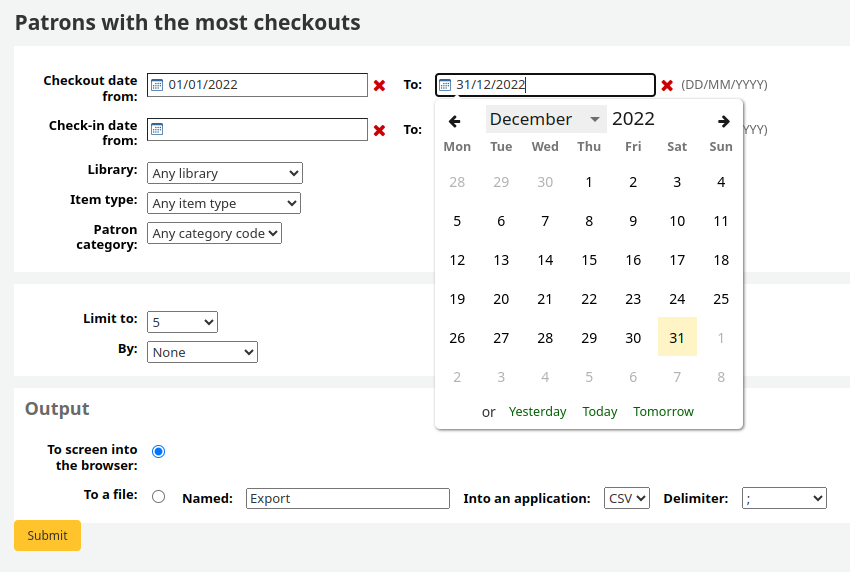
Se scegli l’output sul browser, i risultati verranno presentati sullo schermo.
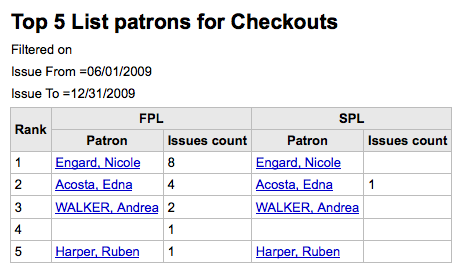
Puoi anche scegliere di esportare in un fai che puoi manipolare secondo le tue esigenze.
Copie con maggiore circolazione
Il report guidato ti mostrerà le copie che sono state prestate maggiormente.
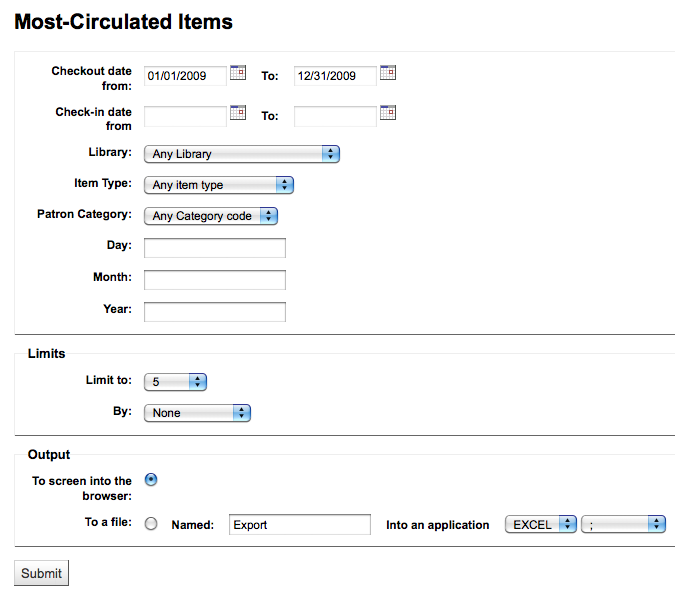
Se scegli l’output sul browser, i risultati verranno presentati sullo schermo.
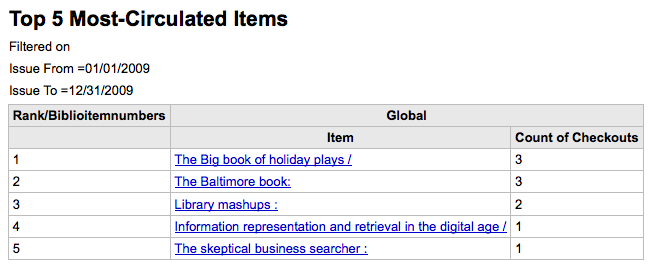
Puoi anche scegliere di esportare in un fai che puoi manipolare secondo le tue esigenze.
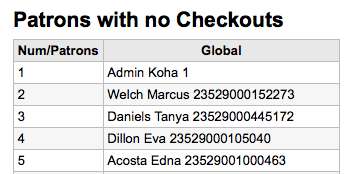
Patrons with no checkouts
Il report guidato ti mostrerà quali utenti non hanno preso prestiti.
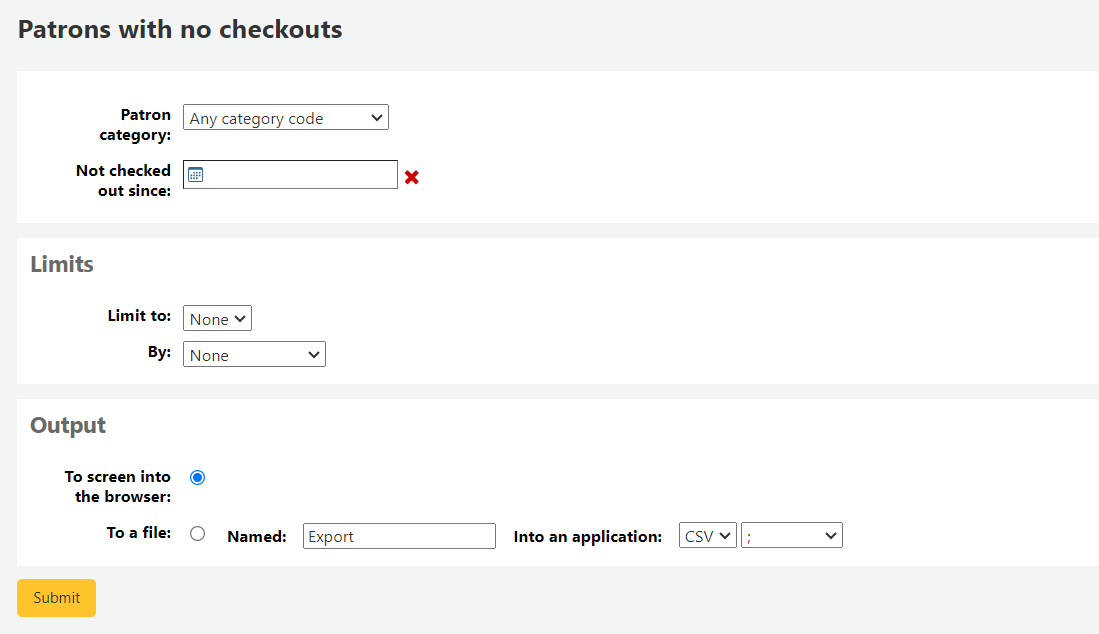
Se scegli l’output sul browser, i risultati verranno presentati sullo schermo.
Puoi anche scegliere di esportare in un fai che puoi manipolare secondo le tue esigenze.
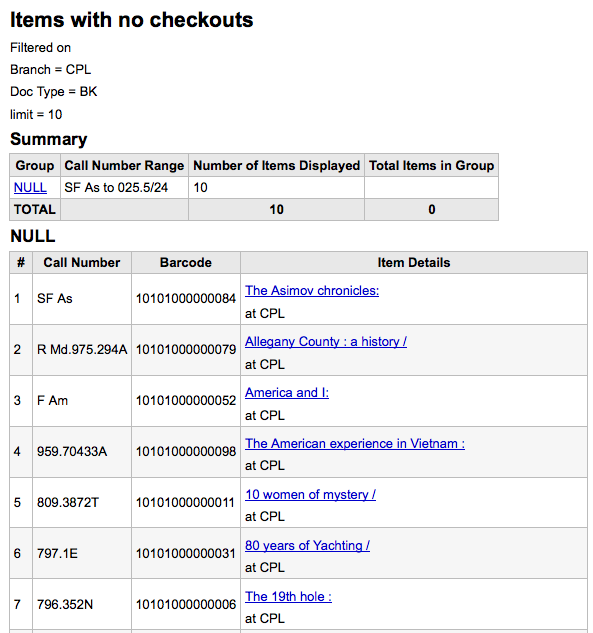
Items with no checkouts
Questo report ti mostrerà le copie mai andate in prestito.
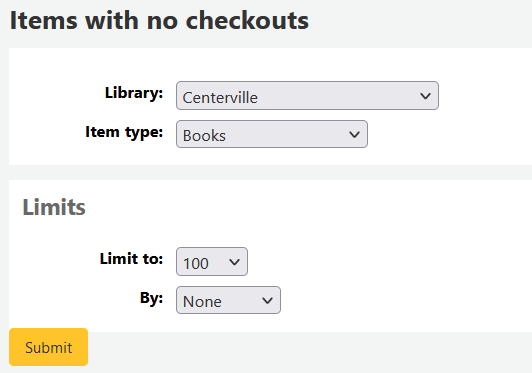
Se scegli l’output sul browser, i risultati verranno presentati sullo schermo.
Puoi anche scegliere di esportare in un fai che puoi manipolare secondo le tue esigenze.
Catalog by Item Type
Questo report ti mostrerà i totali di copie per tipologia in una biblioteca.
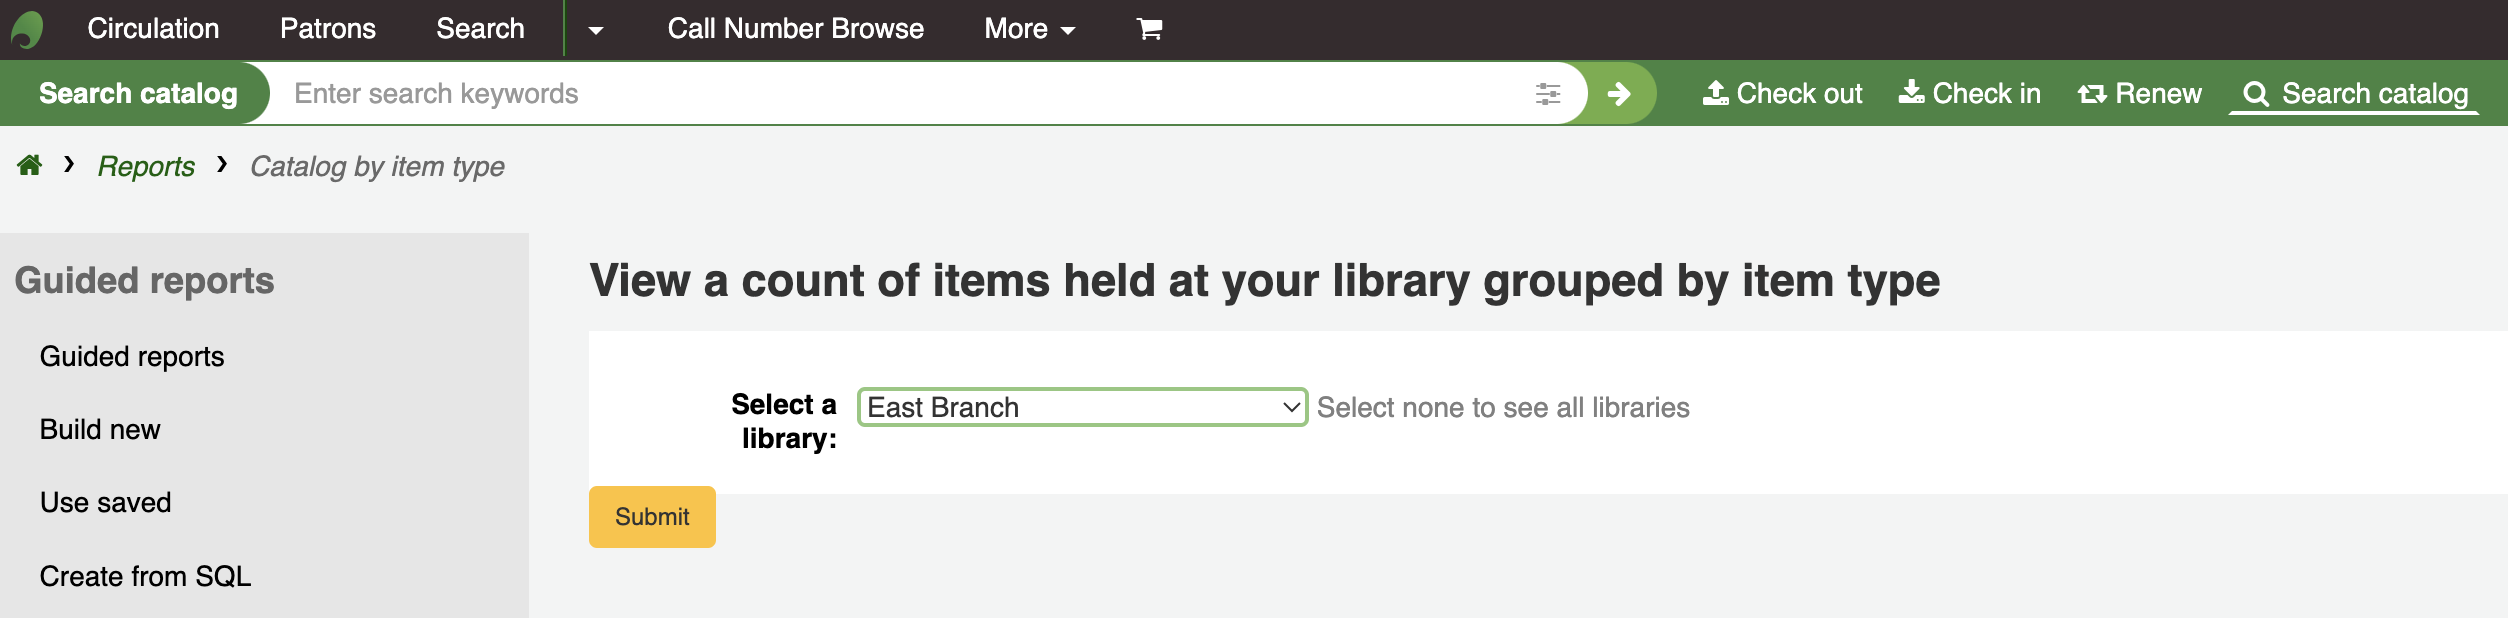
Se scegli l’output sul browser, i risultati verranno presentati sullo schermo.
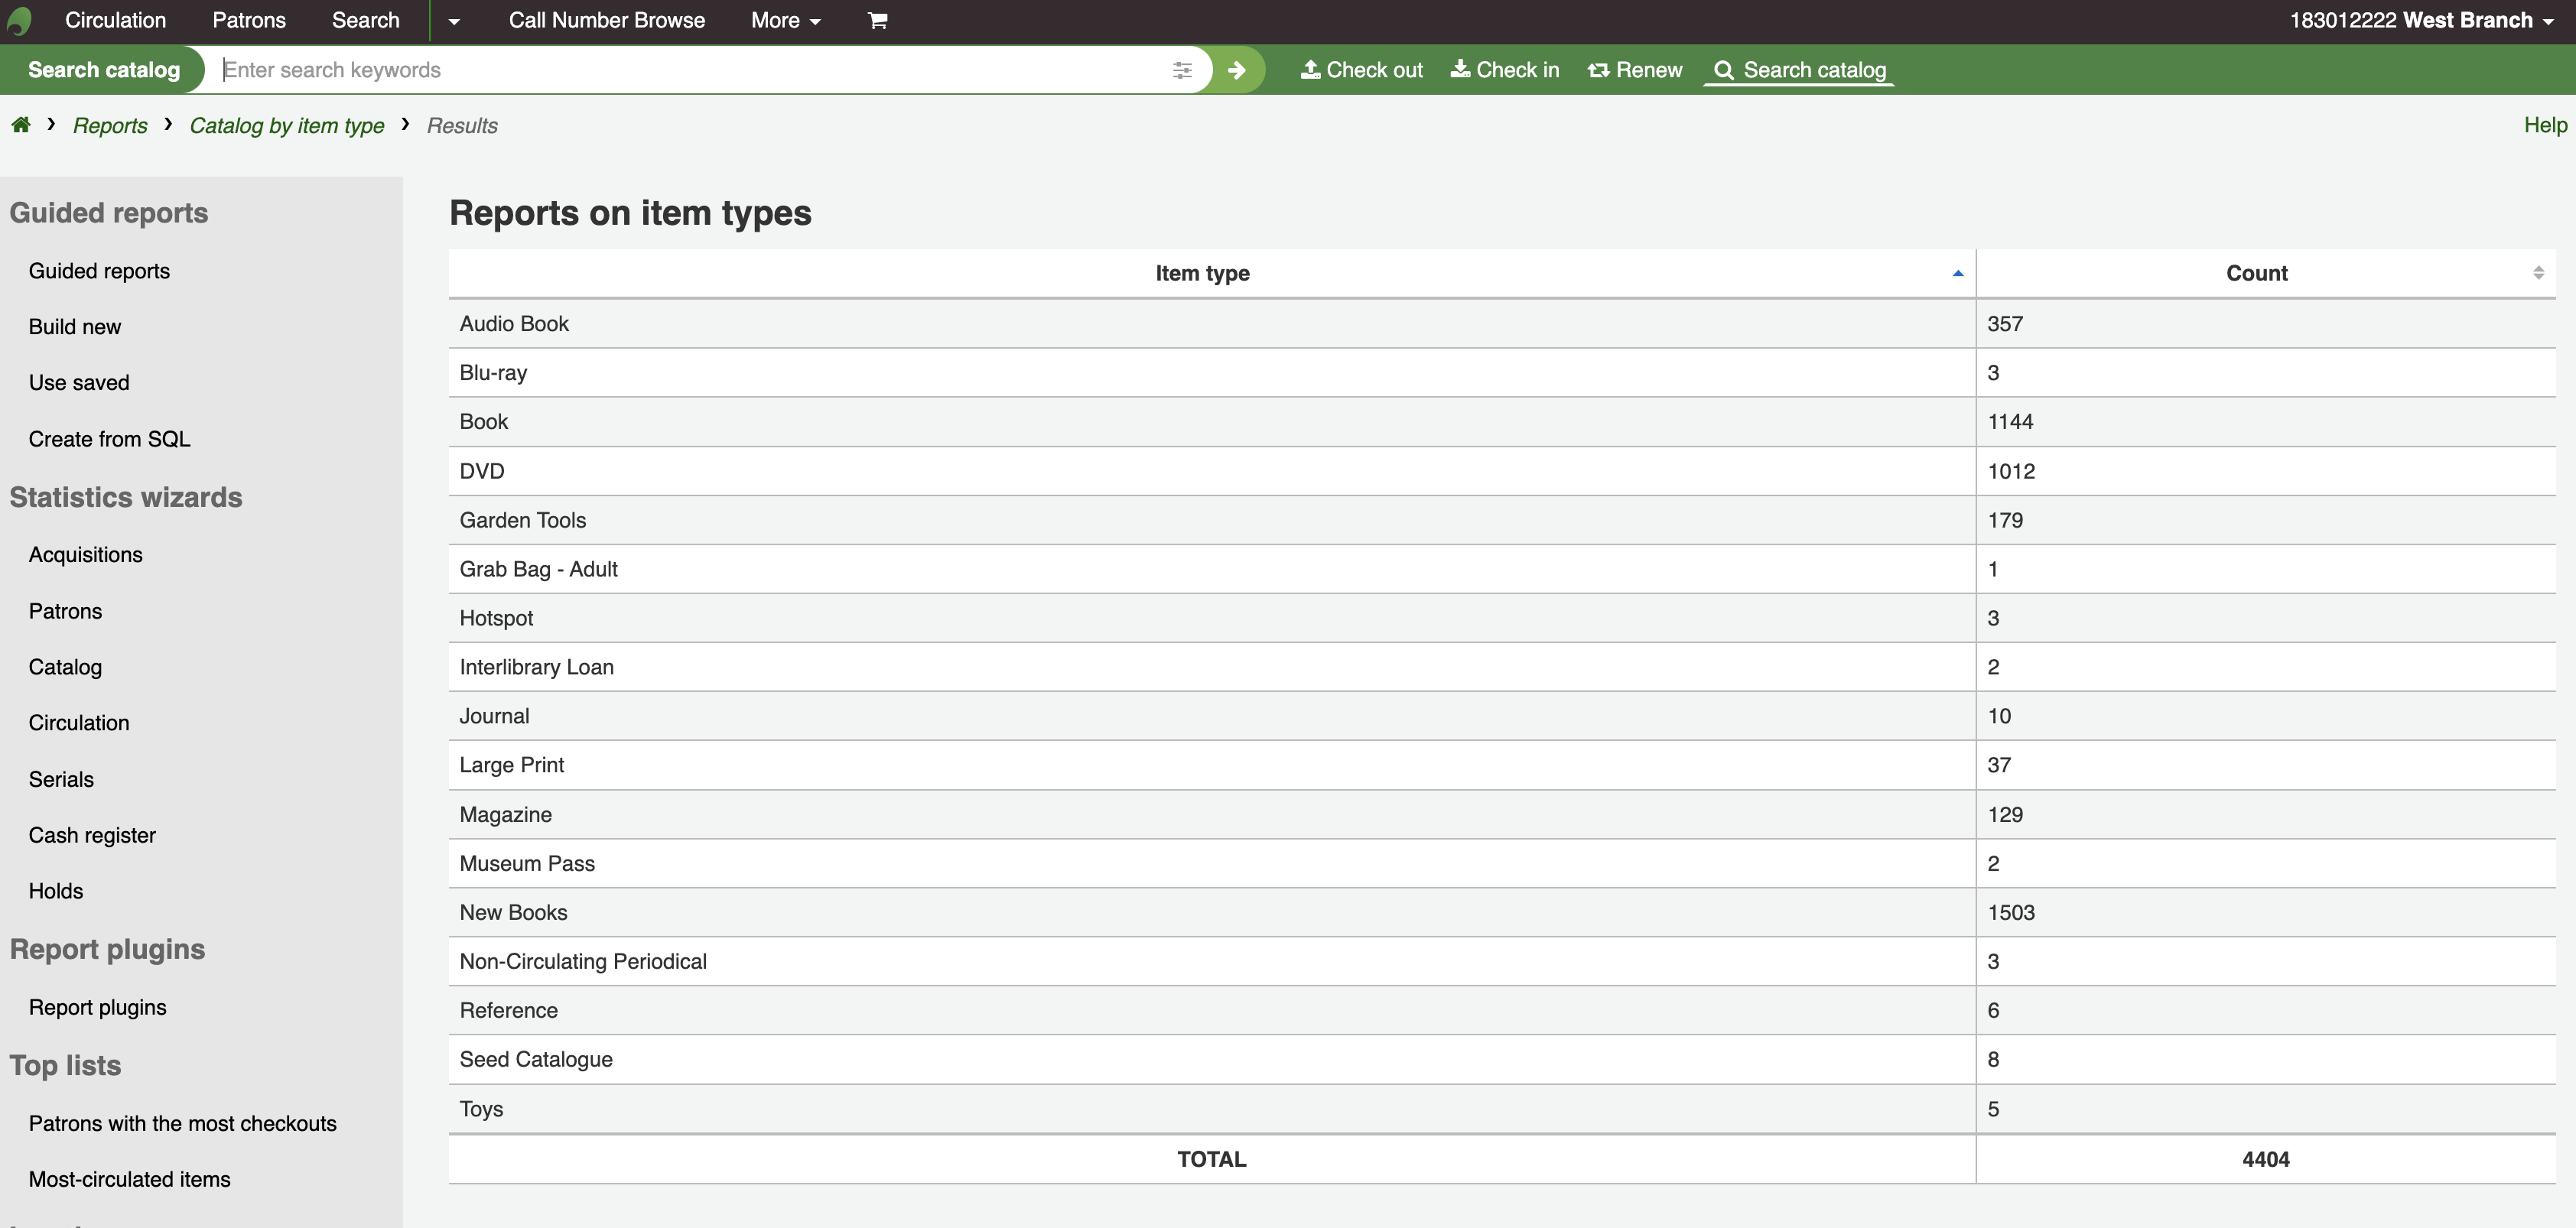
Puoi anche scegliere di esportare in un fai che puoi manipolare secondo le tue esigenze.
Copie smarrite
Questo rapporto vi permetterà di generare un elenco di copie che sono stati contrassegnate con la tipologia “Lost” (smarrite) all’interno del sistema

Durata media del prestito
Questo report ti dirà quanto stammo in media in prestito le copie secondo i criteri che inserirai nella maschera:
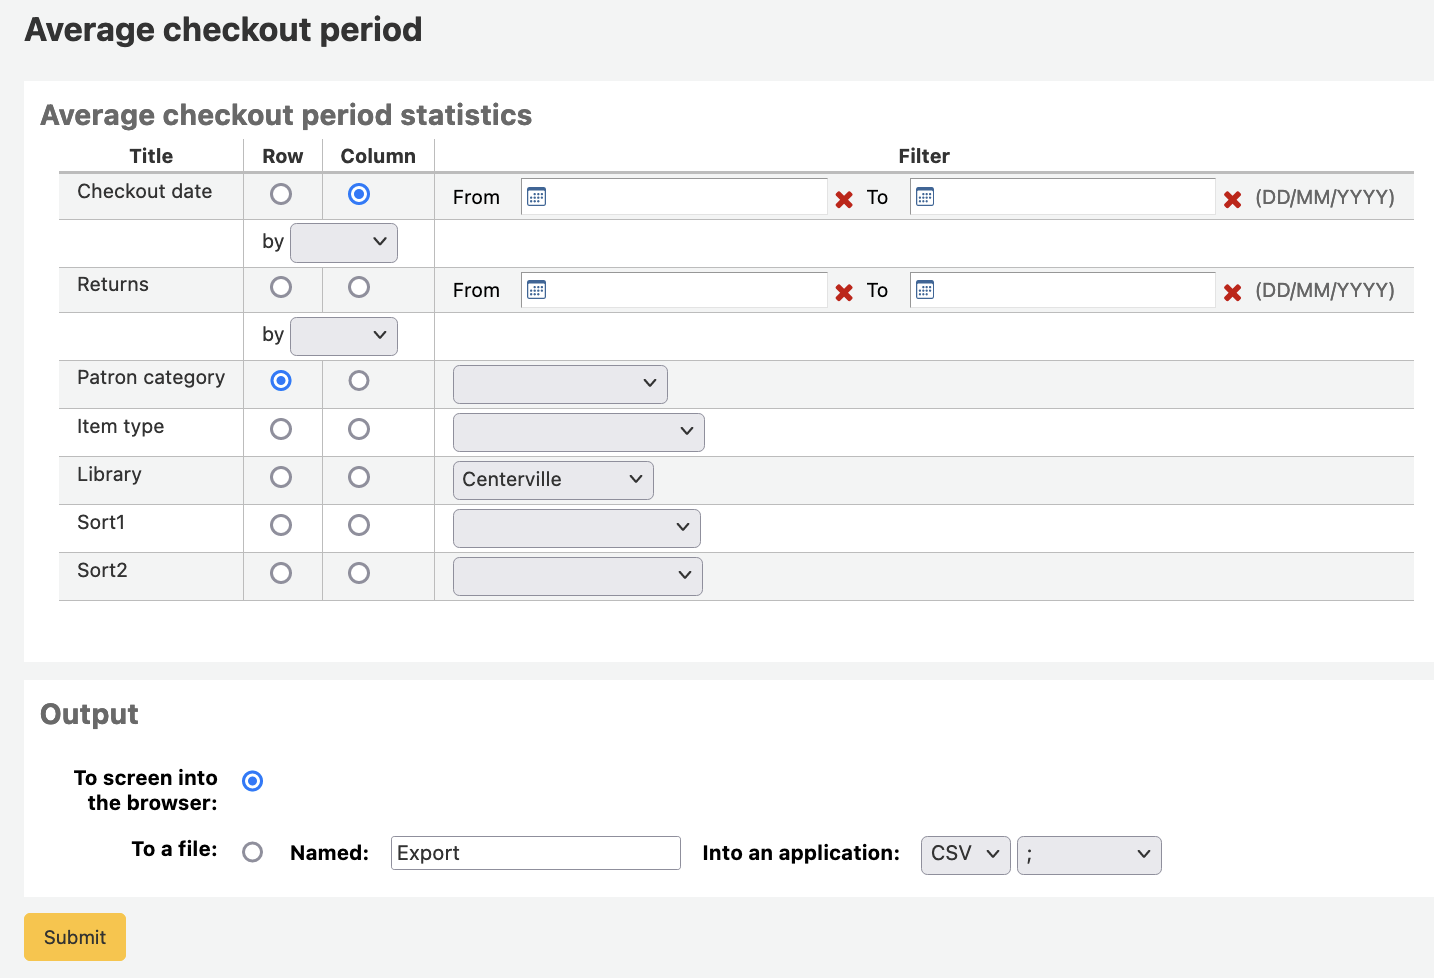
Se scegli l’output sul browser, i risultati verranno presentati sullo schermo.
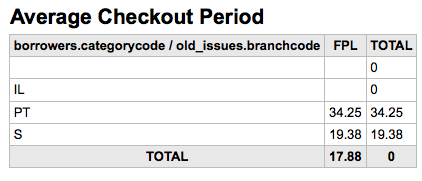
Puoi anche scegliere di esportare in un fai che puoi manipolare secondo le tue esigenze.
Dizionario dei report
Il Dizionario dei report è un modo per preparare filtri da applicare a più di un report. E” un modo comodo per definire filtri che il sistema di creazione report non prevede per default. Per aggiungere una nuova definizione di filtro, clicca “Nuova definizione” nella pagina del Dizionario dei report e segui i quattro passi.
Passo 1: dai un nome alla definizione e fornisci una descrizione, se occorre

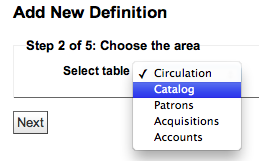
Passo 2: Scegli il modulo che vuoi interrogare.
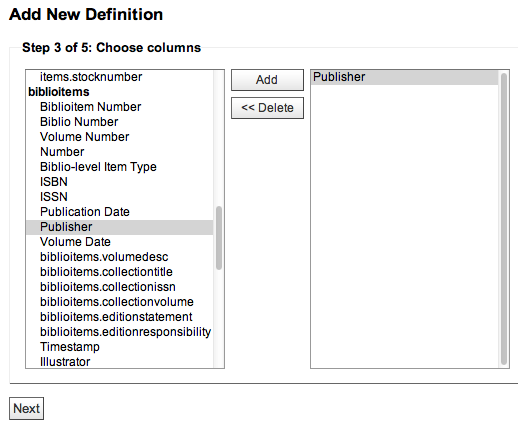
Passo 3: scegli le colonne da estrarre dall’elenco delle tabelle.
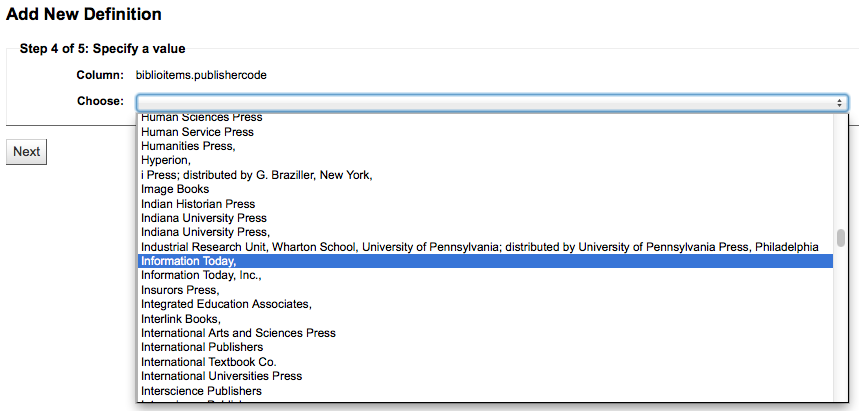
Passo 4: scegli il valore(i) dal campo(i). Saranno automaticamente popolati con le opzioni disponibili nel database.
Conferma le scelte per salvare la definizione.
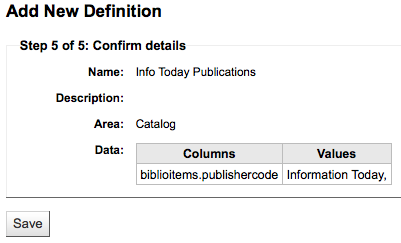
Le tue definizioni compariranno nella pagina del Dizionario dei report

Cosi, quando genererai dei reports con il modulo a cui hai collegato il dizionario, vedrai una nuova opzione per filtrare i risultati dopo i filtri usuali.