Services Web
OAI-PMH
Concernant le <emphasis role= »italic »> »Open Archives Initiative-Protocol for Metadata Harvesting »</emphasis> (OAI-PMH) il y a deux groups de « participants »: les fournisseurs de données, et les fournisseurs de services. Les fournisseurs de données (archives ouvertes, dépôts numériques) offrent un accès gratuit aux métadonnées, et peuvent parfois offrir un accès gratuit à des pleins-textes et autres ressources. OAI-PMH offre une solution facile a intégrer avec peu de barrières pour les fournisseurs de données. Les fournisseurs de services utilisent les interfaces OAI des fournisseurs de données pour accumuler et emmagasiner des métadonnées. Notez que ceci signifie qu’il n’y a pas de demande de recherche en direct aux fournisseurs de données; plutôt, les services sont basés sur les données accumulées par le OAI-PMH.
Koha at present can only act as a Data Provider. It can not harvest from other repositories. The biggest stumbling block to having Koha harvest from other repositories is that MARC is the only metadata format that Koha indexes natively. Visit http://www.oaforum.org/tutorial/english/page3.htm for diagrams of how OAI-PMH works.
Learn more about OAI-PMH at: http://www.openarchives.org/pmh/
To enable OAI-PMH in Koha edit the OAI-PMH preference. Once enabled you can visit http://YOURKOHACATALOG/cgi-bin/koha/oai.pl to see your file.
Échantillon de Fichier de Configuration OAI
       format:
         vs:
           metadataPrefix: vs
           metadataNamespace: http://veryspecial.tamil.fr/vs/format-pivot/1.1/vs
           schema: http://veryspecial.tamil.fr/vs/format-pivot/1.1/vs.xsd
           xsl_file: /usr/local/koha/xslt/vs.xsl
         marcxml:
           metadataPrefix: marxml
           metadataNamespace: http://www.loc.gov/MARC21/slim
http://www.loc.gov/standards/marcxml/schema/MARC21slim
           schema: http://www.loc.gov/MARC21/slim
http://www.loc.gov/standards/marcxml/schema/MARC21slim.xsd
         oai_dc:
           metadataPrefix: oai_dc
           metadataNamespace: http://www.openarchives.org/OAI/2.0/oai_dc/
           schema: http://www.openarchives.org/OAI/2.0/oai_dc.xsd
           xsl_file:
/usr/local/koha/koha-tmpl/intranet-tmpl/xslt/UNIMARCslim2OAIDC.xsl
Services REST
Koha can now be requested by REST http requests. BibLibre wrotes an external module to adds more possibilities than ILS-DI can provide.There is no authentication process, but authorized ips are listed in the config file. Services have been tested in 3.10, 3.12 and 3.14 koha versions. You can find more information about it into README file and opac/rest.pl documentation on http://git.biblibre.com. If you want to add features, send us a patch at dev_patches AT biblibre DOT com.
Les services fournis dans la version 1.4 sont:
GET branches
GET user/byid/:borrowernumber/holds
GET user/:user_name/holds
GET user/byid/:borrowernumber/issues
GET user/:user_name/issues
GET user/:user_name/issues_history
GET user/byid/:borrowernumber/issues_history
GET user/today
GET user/all
POST user
PUT user/:user_name
GET biblio/:biblionumber/items
GET biblio/:biblionumber/holdable
GET biblio/:biblionumber/items_holdable_status
GET item/:itemnumber/holdable
PUT auth/change_password
GET /suggestions
GET /suggestions/:suggestionid
POST /suggestions
PUT /suggestions/:suggestionid
DELETE /suggestions/:suggestionid
Utiliser le serveur SRU
Utiliser le serveur SRU
Koha implements the Search/Retrieve via URL (SRU) protocol. More information about the protocol itself can be found at http://www.loc.gov/standards/sru/. The version implemented is version 1.1.
Explications
If you want to have information about the implementation of SRU on a given server, you should have access to the Explain file using a request to the server without any parameter. Like <http://myserver.com:9999/biblios/>. The response from the server is an XML file that should look like the following and will give you information about the default settings of the SRU server.
       <zs:explainResponse>
            <zs:version>1.1</zs:version>
            <zs:record>
                 <zs:recordSchema>http://explain.z3950.org/dtd/2.0/</zs:recordSchema>
                 <zs:recordPacking>xml</zs:recordPacking>
                 <zs:recordData>
                 <explain xml:base="zebradb/explain-biblios.xml">
                 <!--
                 try stylesheet url: http://./?stylesheet=docpath/sru2.xsl
                 -->
            <serverInfo protocol="SRW/SRU/Z39.50">
                 <host>biblibre</host>
                 <port>9999</port>
                 <database>biblios</database>
            </serverInfo>
            <databaseInfo>
                 <title lang="en" primary="true">Koha 3 Bibliographic SRU/SRW/Z39.50 server</title>
                 <description lang="en" primary="true">Koha 3 Bibliographic Server</description>
                 <links>
                      <sru>http://biblibre:9999</sru>
                 </links>
            </databaseInfo>
            <indexInfo>
                 <set name="cql" identifier="info:srw/cql-context-set/1/cql-v1.1">
                      <title>CQL Standard Set</title>
                 </set>
                 <index search="true" scan="true" sort="false">
                 <title lang="en">CQL Server Choice</title>
                 <map>
                      <name set="cql">serverChoice</name>
                 </map>
            <map>
               <attr type="1" set="bib1">text</attr>
               </map>
          </index>
      <index search="true" scan="true" sort="false">
         <title lang="en">CQL All</title>
             <map>
<name set="cql">all</name>
</map>
<map>
<attr type="1" set="bib1">text</attr>
</map>
</index>
<!-- Record ID index -->
<index search="true" scan="true" sort="false">
<title lang="en">Record ID</title>
<map>
<name set="rec">id</name>
</map>
<map>
<attr type="1" set="bib1">rec:id</attr>
<attr type="4" set="bib1">3</attr>
</map>
</index>
Rechercher
This url : http://myserver.com:9999/biblios?version=1.1&operation=searchRetrieve&query=reefs is composed of the following elements:
- base url du serveur SRU : http://myserver.com:9999/biblios?
- search part with the 3 required parameters : version, operation and query. The parameters within the search part should be of the key=value form, and can be combined with the & character.
One can add optional parameters to the query, for instance maximumRecords indicating the maximum number of records to be returned by the server. So http://myserver.com:9999/biblios?version=1.1&operation=searchRetrieve&query=reefs&maximumRecords=5 will only get the first 5 results results from the server.
http://www.loc.gov/standards/sru/sru1-1archive/search-retrieve-operation.html gives more details about the search operations and in particular the list of optional parameters for searching.
Plus de détails à propos de la Recherche
La clé « opération » peut prendre deux valeurs: scan ou searchRetrieve.
If operation=searchRetrieve, then the search key should be query. As in : operation=searchRetrieve&query=reefs
If operation=scan, then the search key should be scanClause. As in : operation=scan&scanClause=reefs
etc/zebradb/biblios/etc/bib1.att définit les index Zebra/3950 qui existent dans votre système. Par exemple, vous verrez que nous avons des index pour Sujet et pour Titre: att 21 Subject and att 4 Title respectivement.
In the pqf.properties file located under etc/zebradb/pqf.properties I see that an access point already uses my Subject index (index.dc.subject = 1=21) while another uses my Title index (index.dc.title = 1=4) I know this is my Subject index because as I’ve seen just before in my bib1.att file, it’s called with =1=21 in Z3950: so index.dc.subject = 1=21 correctly points to my Subject index. And Title was called with 1=4 so index.dc.title = 1=4 correctly points to my Title index. I can now construct my query just like I would in a search box, just preceding it with the « query » key: query=Subject=reefs and Title=coral searches « reefs » in the subject and « coral » in the title. The full url would be http://myserver.com:9999/biblios?version=1.1&operation=searchRetrieve&query=Subject=reefs and Title=coral If I want to limit the result set to just 5 records, I can do http://myserver.com:9999/biblios?version=1.1&operation=searchRetrieve&query=Subject=reefs and Title=coral&maximumRecords=5
Je peux aussi le faire avec des troncatures, relations, etc… Elles aussi définies dans mon fichier pqf.properties. Je peux voir par exemple les propriétés de position définies comme:
 position.first              = 3=1 6=1
# "first in field"
 position.any                = 3=3 6=1
   # "any position in field"
So as an example if I want « coral » to be at the beginning of the title, I can do this query : http://myserver.com:9999/biblios?version=1.1&operation=searchRetrieve&query=Title=coral first
Récupérer
My search for http://univ_lyon3.biblibre.com:9999/biblios?version=1.1&operation=searchRetrieve&query=coral reefs&maximumRecords=1 retrieves just on record. The response looks like this:
          <zs:searchRetrieveResponse>
<zs:version>1.1</zs:version>
<zs:numberOfRecords>1</zs:numberOfRecords>
<zs:records>
<zs:record>
<zs:recordPacking>xml</zs:recordPacking>
<zs:recordData>
<record xsi:schemaLocation="http://www.loc.gov/MARC21/slim http://www.loc.gov/ standards/marcxml/schema/MARC21slim.xsd">
<leader> cam a22 4500</leader>
<datafield tag="010" ind1=" " ind2=" ">
<subfield code="a">2-603-01193-6</subfield>
<subfield code="b">rel.</subfield>
<subfield code="d">159 F</subfield>
</datafield>
<datafield tag="020" ind1=" " ind2=" ">
<subfield code="a">FR</subfield>
<subfield code="b">00065351</subfield>
</datafield>
<datafield tag="101" ind1="1" ind2=" ">
<subfield code="c">ita</subfield>
</datafield>
<datafield tag="105" ind1=" " ind2=" ">
<subfield code="a">a z 00|y|</subfield>
</datafield>
<datafield tag="106" ind1=" " ind2=" ">
<subfield code="a">r</subfield>
</datafield>
<datafield tag="100" ind1=" " ind2=" ">
<subfield code="a">20091130 frey50 </subfield>
</datafield>
<datafield tag="200" ind1="1" ind2=" ">
<subfield code="a">Guide des récifs coralliens / A Guide to Coral Reefs</subfield>
<subfield code="b">Texte imprimé</subfield>
<subfield code="e">la faune sous-marine des coraux</subfield>
<subfield code="f">A. et A. Ferrari</subfield>
</datafield>
<datafield tag="210" ind1=" " ind2=" ">
<subfield code="a">Lausanne</subfield>
<subfield code="a">Paris</subfield>
<subfield code="c">Delachaux et Niestlé</subfield>
<subfield code="d">cop. 2000</subfield>
<subfield code="e">impr. en Espagne</subfield>
</datafield>
<datafield tag="215" ind1=" " ind2=" ">
<subfield code="a">287 p.</subfield>
<subfield code="c">ill. en coul., couv. ill. en coul.</subfield>
<subfield code="d">20 cm</subfield>
</datafield>
......
<idzebra>
<size>4725</size>
<localnumber>2</localnumber>
<filename>/tmp/nw10BJv9Pk/upd_biblio/exported_records</filename>
</idzebra>
</record>
</zs:recordData>
<zs:recordPosition>1</zs:recordPosition>
</zs:record>
</zs:records>
</zs:searchRetrieveResponse>
Nouveau curseur de titres pour l’OPAC
Often times libraries will want to add a flowing widget with new materials at the library to their main public catalog page. To do this you can use a widget from any number of services (usually for a cost) or you can enable plugins in Koha and use the Cover Flow plugin which is based on the Flipster, a responsive jQuery coverflow plugin.
Une fois le plugin installé, les étapes pour obtenir l’affichage du coverflow (= interface utilisateur tridimensionnelle servant à naviguer dans une bibliothèque (de musique, d’image, …) via des représentations graphiques signifiantes) sont les suivantes:
Vous devrez d’abord créer un ou plusieurs rapports publiques pour votre widget coverflow ou les widgets basés dessus. C’est de cette façon que le plugin connait le contenu de votre widget. Chaque rapport doit contenir trois colonnes: titre, numéro de notice et isbn. Il est important que vous ayez un isbn valide afin que la donnée puisse aller rechercher la couverture. Pour l’itération du plugin, nous utilisons les images de couverture d’Amazon, mais nous ferons en sorte d’améliorer le plugin afin de pouvoir utiliser n »importe quelle source de données pour la recherche d’images de couverture.
Puis, il faudra configurer le plugin. La configuration du plugin est une zone de texte simple qui utilise YAML (c’est en fait JSON qui est une partie de YAML) pour stocker les options de configuration. Dans cet exemple, il ressemble à cela:
- id: 42
  selector: #coverflow
  options:
  style: coverflow
Dans cet exemple, nous disons au plugin d’utiliser le rapport avec id 42 et de l’utiliser pour créer un widget coverflow pour remplacer l’élément HTML avec l’id “coverflow“. La liste des options est directement passée sur Flipster, donc n’importe quelles options gérées par Flipster peuvent être paramétrées à partir de la configuration du plugin! En fait, en plus du coverflow traditionnel, Flipster a un mode “manège” qui a une version plus compacte du coverflow. Vous pouvez aussi configurer quelle couverture aura le widget au démarrage, parmi les autres options.
Au moment où les options des plugins sont sauvegardés ou mises à jour, le plugin générera quelques codes JavaScript amoindris qui seront automatiquement stockés dans la préférence système Koha OpacUserJS. Voici un exemple d’affichage:
/* JS for Koha CoverFlow Plugin
 This JS was added automatically by installing the CoverFlow plugin
 Please do not modify */$(document).ready(function(){$.getScript("/plugin/Koha/Plugin/Com/ByWaterSolutions/CoverFlow/jquery-flipster/src/js/jquery.flipster.min.js",function(data,textStatus,jqxhr){$("head").append("<link id='flipster-css' href='/plugin/Koha/Plugin/Com/ByWaterSolutions/CoverFlow/jquery-flipster/src/css/jquery.flipster.min.css' type='text/css' rel='stylesheet' />");$('#coverflow').load("/coverflow.pl?id=42",function(){var opt={'items':'.item','minfactor':15,'distribution':1.5,'scalethreshold':0,'staticbelowthreshold':false,'titleclass':'itemTitle','selectedclass':'selectedItem','scrollactive':true,'step':{'limit':4,'width':10,'scale':true}};$('#coverflow').flipster({style:'coverflow',});});});});
/* End of JS for Koha CoverFlow Plugin */
Pourquoi faire tout cela ? Question de rapidité! Plutôt que de générer ce code à chaque fois que la page charge, il est possible de le générer une seule fois et de l’utiliser à maintes reprises.
Si vous examinez le code de plus près, vous remarquerez qu’il fait référence au script “coverflow.pl”. C’est un script inclus dans le plugin coverflow. Puisque nous avons besoin d’y accéder depuis l’OPAC (et que nous ne voulons pas déclencher des alarmes d’attaque XSS), nous devons modifier la configuration du serveur web pour le catalogue publique et y ajouter ce qui suit:
ScriptAlias /coverflow.pl "/var/lib/koha/mykoha/plugins/Koha/Plugin/Com/ByWaterSolutions/CoverFlow/coverflow.pl"
Cette ligne nous donne accès au script coverflow.pl depuis l’OPAC. Ce script récupère les données du rapport et les transfère dans le catalogue publique pour créer le widget coverflow. Koha::Cache est soutenu afin de charger le widget aussi rapidement que possible!
La dernière étape est de mettre votre élément sélectionneur quelque part dans votre catalogue publique. Dans cet exemple, j’ai mis ce qui suit dans la préférence système OpacMainUserBlock:
<span id="coverflow">Loading...</span>
Once that is in place, you need only refresh your OPAC page, and there you have it, your very own catalog coverflow widget! Not only do these coverflows look great on a computer screen, but they look great on mobile platforms as well, and are even touch responsive!
Préférence système par défaut
ISBD par déaut
Default values for the ISBD preference.
MARC par défaut
#100||{ 100a }{ 100b }{ 100c }{ 100d }{ 110a }{ 110b }{ 110c }{ 110d }{ 110e }{ 110f }{ 110g }{ 130a }{ 130d }{ 130f }{ 130g }{ 130h }{ 130k }{ 130l }{ 130m }{ 130n }{ 130o }{ 130p }{ 130r }{ 130s }{ 130t }|<br/><br/>
#245||{ 245a }{ 245b }{245f }{ 245g }{ 245k }{ 245n }{ 245p }{ 245s }{ 245h }|
#246||{ : 246i }{ 246a }{ 246b }{ 246f }{ 246g }{ 246n }{ 246p }{ 246h }|
#242||{ = 242a }{ 242b }{ 242n }{ 242p }{ 242h }|
#245||{ 245c }|
#242||{ = 242c }|
#250| - |{ 250a }{ 250b }|
#254|, |{ 254a }|
#255|, |{ 255a }{ 255b }{ 255c }{ 255d }{ 255e }{ 255f }{ 255g }|
#256|, |{ 256a }|
#257|, |{ 257a }|
#258|, |{ 258a }{ 258b }|
#260| - |{ 260a }{ 260b }{ 260c }|
#300| - |{ 300a }{ 300b }{ 300c }{ 300d }{ 300e }{ 300f }{ 300g }|
#306| - |{ 306a }|
#307| - |{ 307a }{ 307b }|
#310| - |{ 310a }{ 310b }|
#321| - |{ 321a }{ 321b }|
#340| - |{ 3403 }{ 340a }{ 340b }{ 340c }{ 340d }{ 340e }{ 340f }{ 340h }{ 340i }|
#342| - |{ 342a }{ 342b }{ 342c }{ 342d }{ 342e }{ 342f }{ 342g }{ 342h }{ 342i }{ 342j }{ 342k }{ 342l }{ 342m }{ 342n }{ 342o }{ 342p }{ 342q }{ 342r }{ 342s }{ 342t }{ 342u }{ 342v }{ 342w }|
#343| - |{ 343a }{ 343b }{ 343c }{ 343d }{ 343e }{ 343f }{ 343g }{ 343h }{ 343i }|
#351| - |{ 3513 }{ 351a }{ 351b }{ 351c }|
#352| - |{ 352a }{ 352b }{ 352c }{ 352d }{ 352e }{ 352f }{ 352g }{ 352i }{ 352q }|
#362| - |{ 362a }{ 351z }|
#440| - |{ 440a }{ 440n }{ 440p }{ 440v }{ 440x }|.
#490| - |{ 490a }{ 490v }{ 490x }|.
#800| - |{ 800a }{ 800b }{ 800c }{ 800d }{ 800e }{ 800f }{ 800g }{ 800h }{ 800j }{ 800k }{ 800l }{ 800m }{ 800n }{ 800o }{ 800p }{ 800q }{ 800r }{ 800s }{ 800t }{ 800u }{ 800v }|.
#810| - |{ 810a }{ 810b }{ 810c }{ 810d }{ 810e }{ 810f }{ 810g }{ 810h }{ 810k }{ 810l }{ 810m }{ 810n }{ 810o }{ 810p }{ 810r }{ 810s }{ 810t }{ 810u }{ 810v }|.
#811| - |{ 811a }{ 811c }{ 811d }{ 811e }{ 811f }{ 811g }{ 811h }{ 811k }{ 811l }{ 811n }{ 811p }{ 811q }{ 811s }{ 811t }{ 811u }{ 811v }|.
#830| - |{ 830a }{ 830d }{ 830f }{ 830g }{ 830h }{ 830k }{ 830l }{ 830m }{ 830n }{ 830o }{ 830p }{ 830r }{ 830s }{ 830t }{ 830v }|.
#500|<br/><br/>|{ 5003 }{ 500a }|
#501|<br/><br/>|{ 501a }|
#502|<br/><br/>|{ 502a }|
#504|<br/><br/>|{ 504a }|
#505|<br/><br/>|{ 505a }{ 505t }{ 505r }{ 505g }{ 505u }|
#506|<br/><br/>|{ 5063 }{ 506a }{ 506b }{ 506c }{ 506d }{ 506u }|
#507|<br/><br/>|{ 507a }{ 507b }|
#508|<br/><br/>|{ 508a }{ 508a }|
#510|<br/><br/>|{ 5103 }{ 510a }{ 510x }{ 510c }{ 510b }|
#511|<br/><br/>|{ 511a }|
#513|<br/><br/>|{ 513a }{513b }|
#514|<br/><br/>|{ 514z }{ 514a }{ 514b }{ 514c }{ 514d }{ 514e }{ 514f }{ 514g }{ 514h }{ 514i }{ 514j }{ 514k }{ 514m }{ 514u }|
#515|<br/><br/>|{ 515a }|
#516|<br/><br/>|{ 516a }|
#518|<br/><br/>|{ 5183 }{ 518a }|
#520|<br/><br/>|{ 5203 }{ 520a }{ 520b }{ 520u }|
#521|<br/><br/>|{ 5213 }{ 521a }{ 521b }|
#522|<br/><br/>|{ 522a }|
#524|<br/><br/>|{ 524a }|
#525|<br/><br/>|{ 525a }|
#526|<br/><br/>|{\n510i }{\n510a }{ 510b }{ 510c }{ 510d }{\n510x }|
#530|<br/><br/>|{\n5063 }{\n506a }{ 506b }{ 506c }{ 506d }{\n506u }|
#533|<br/><br/>|{\n5333 }{\n533a }{\n533b }{\n533c }{\n533d }{\n533e }{\n533f }{\n533m }{\n533n }|
#534|<br/><br/>|{\n533p }{\n533a }{\n533b }{\n533c }{\n533d }{\n533e }{\n533f }{\n533m }{\n533n }{\n533t }{\n533x }{\n533z }|
#535|<br/><br/>|{\n5353 }{\n535a }{\n535b }{\n535c }{\n535d }|
#538|<br/><br/>|{\n5383 }{\n538a }{\n538i }{\n538u }|
#540|<br/><br/>|{\n5403 }{\n540a }{ 540b }{ 540c }{ 540d }{\n520u }|
#544|<br/><br/>|{\n5443 }{\n544a }{\n544b }{\n544c }{\n544d }{\n544e }{\n544n }|
#545|<br/><br/>|{\n545a }{ 545b }{\n545u }|
#546|<br/><br/>|{\n5463 }{\n546a }{ 546b }|
#547|<br/><br/>|{\n547a }|
#550|<br/><br/>|{ 550a }|
#552|<br/><br/>|{ 552z }{ 552a }{ 552b }{ 552c }{ 552d }{ 552e }{ 552f }{ 552g }{ 552h }{ 552i }{ 552j }{ 552k }{ 552l }{ 552m }{ 552n }{ 562o }{ 552p }{ 552u }|
#555|<br/><br/>|{ 5553 }{ 555a }{ 555b }{ 555c }{ 555d }{ 555u }|
#556|<br/><br/>|{ 556a }{ 506z }|
#563|<br/><br/>|{ 5633 }{ 563a }{ 563u }|
#565|<br/><br/>|{ 5653 }{ 565a }{ 565b }{ 565c }{ 565d }{ 565e }|
#567|<br/><br/>|{ 567a }|
#580|<br/><br/>|{ 580a }|
#581|<br/><br/>|{ 5633 }{ 581a }{ 581z }|
#584|<br/><br/>|{ 5843 }{ 584a }{ 584b }|
#585|<br/><br/>|{ 5853 }{ 585a }|
#586|<br/><br/>|{ 5863 }{ 586a }|
#020|<br/><br/><label>ISBN: </label>|{ 020a }{ 020c }|
#022|<br/><br/><label>ISSN: </label>|{ 022a }|
#222| = |{ 222a }{ 222b }|
#210| = |{ 210a }{ 210b }|
#024|<br/><br/><label>Standard No.: </label>|{ 024a }{ 024c }{ 024d }{ 0242 }|
#027|<br/><br/><label>Standard Tech. Report. No.: </label>|{ 027a }|
#028|<br/><br/><label>Publisher. No.: </label>|{ 028a }{ 028b }|
#013|<br/><br/><label>Patent No.: </label>|{ 013a }{ 013b }{ 013c }{ 013d }{ 013e }{ 013f }|
#030|<br/><br/><label>CODEN: </label>|{ 030a }|
#037|<br/><br/><label>Source: </label>|{ 037a }{ 037b }{ 037c }{ 037f }{ 037g }{ 037n }|
#010|<br/><br/><label>LCCN: </label>|{ 010a }|
#015|<br/><br/><label>Nat. Bib. No.: </label>|{ 015a }{ 0152 }|
#016|<br/><br/><label>Nat. Bib. Agency Control No.: </label>|{ 016a }{ 0162 }|
#600|<br/><br/><label>Subjects–Personal Names: </label>|{\n6003 }{\n600a}{ 600b }{ 600c }{ 600d }{ 600e }{ 600f }{ 600g }{ 600h }{–600k}{ 600l }{ 600m }{ 600n }{ 600o }{–600p}{ 600r }{ 600s }{ 600t }{ 600u }{–600x}{–600z}{–600y}{–600v}|
#610|<br/><br/><label>Subjects–Corporate Names: </label>|{\n6103 }{\n610a}{ 610b }{ 610c }{ 610d }{ 610e }{ 610f }{ 610g }{ 610h }{–610k}{ 610l }{ 610m }{ 610n }{ 610o }{–610p}{ 610r }{ 610s }{ 610t }{ 610u }{–610x}{–610z}{–610y}{–610v}|
#611|<br/><br/><label>Subjects–Meeting Names: </label>|{\n6113 }{\n611a}{ 611b }{ 611c }{ 611d }{ 611e }{ 611f }{ 611g }{ 611h }{–611k}{ 611l }{ 611m }{ 611n }{ 611o }{–611p}{ 611r }{ 611s }{ 611t }{ 611u }{–611x}{–611z}{–611y}{–611v}|
#630|<br/><br/><label>Subjects–Uniform Titles: </label>|{\n630a}{ 630b }{ 630c }{ 630d }{ 630e }{ 630f }{ 630g }{ 630h }{–630k }{ 630l }{ 630m }{ 630n }{ 630o }{–630p}{ 630r }{ 630s }{ 630t }{–630x}{–630z}{–630y}{–630v}|
#648|<br/><br/><label>Subjects–Chronological Terms: </label>|{\n6483 }{\n648a }{–648x}{–648z}{–648y}{–648v}|
#650|<br/><br/><label>Subjects–Topical Terms: </label>|{\n6503 }{\n650a}{ 650b }{ 650c }{ 650d }{ 650e }{–650x}{–650z}{–650y}{–650v}|
#651|<br/><br/><label>Subjects–Geographic Terms: </label>|{\n6513 }{\n651a}{ 651b }{ 651c }{ 651d }{ 651e }{–651x}{–651z}{–651y}{–651v}|
#653|<br/><br/><label>Subjects–Index Terms: </label>|{ 653a }|
#654|<br/><br/><label>Subjects–Facted Index Terms: </label>|{\n6543 }{\n654a}{–654b}{–654x}{–654z}{–654y}{–654v}|
#655|<br/><br/><label>Index Terms–Genre/Form: </label>|{\n6553 }{\n655a}{–655b}{–655x }{–655z}{–655y}{–655v}|
#656|<br/><br/><label>Index Terms–Occupation: </label>|{\n6563 }{\n656a}{–656k}{–656x}{–656z}{–656y}{–656v}|
#657|<br/><br/><label>Index Terms–Function: </label>|{\n6573 }{\n657a}{–657x}{–657z}{–657y}{–657v}|
#658|<br/><br/><label>Index Terms–Curriculum Objective: </label>|{\n658a}{–658b}{–658c}{–658d}{–658v}|
#050|<br/><br/><label>LC Class. No.: </label>|{ 050a }{ / 050b }|
#082|<br/><br/><label>Dewey Class. No.: </label>|{ 082a }{ / 082b }|
#080|<br/><br/><label>Universal Decimal Class. No.: </label>|{ 080a }{ 080x }{ / 080b }|
#070|<br/><br/><label>National Agricultural Library Call No.: </label>|{ 070a }{ / 070b }|
#060|<br/><br/><label>National Library of Medicine Call No.: </label>|{ 060a }{ / 060b }|
#074|<br/><br/><label>GPO Item No.: </label>|{ 074a }|
#086|<br/><br/><label>Gov. Doc. Class. No.: </label>|{ 086a }|
#088|<br/><br/><label>Report. No.: </label>|{ 088a }|
UNIMARC par défaut
#200|<h2>Title : |{200a}{. 200c}{ : 200e}{200d}{. 200h}{. 200i}|</h2>
#461|<label class= »ipt »>A part of : </label>|<a href= »/cgi-bin/koha/catalogue/search.pl?op=do_search{&q=461t&idx=ti} »>{461t}</a>{N∞ 461h} {v. 461v}{(461d)}<br/>|
#200b|<label class= »ipt »>Material Designation : </label>| {200b }|<br/>
#101a|<label class= »ipt »>Language(s): </label>|<a href= »/cgi-bin/koha/catalogue/search.pl?op=do_search{&q=101a&idx=ln} »>{101a}</a>|<br/>
#200f|<label class= »ipt »>Authors : </label>|<a href= »/cgi-bin/koha/catalogue/search.pl?op=do_search{&q=200f&idx=au} »>{200f ; }</a>|<br/>
#200g|<label class= »ipt »>Co-authors : </label>|<a href= »/cgi-bin/koha/catalogue/search.pl?op=do_search{&q=200g&idx=au} »>{200g ; }</a>|<br/>
#210a|<br/><label class= »ipt »>Place of pubblication : </label>|<a href= »/cgi-bin/koha/catalogue/search.pl?op=do_search&idx=pl&q={210a} »>{210a}</a>|<br/>
#210c|<label class= »ipt »>Publisher : </label>|<a href= »/cgi-bin/koha/catalogue/search.pl?op=do_search&idx=pb&q={210c} »>{210c ; }</a>|<br/>
#210d|<label class= »ipt »>Date of pubblication : </label>|{ 210d}|<br/>
#215|<label class= »ipt »>Description : </label>|{215a}{ : 215c}{ ; 215d}{ + 215e}|<br/>
#225a|<label class= »ipt »>Series :</label>|<a href= »/cgi-bin/koha/catalogue/search.pl?op=do_search{&q=225a&idx=se} »>{225a ;}</a> |
#225||{ = 225d}{ : 225e}{. 225h}{. 225i}{ / 225f}{, 225x}{ ; 225v}|<br/>
#686|<label>Classification : </label>|{ 686a }|<br/>
#608|<label>Form, Genre : </label>|<a href= »/cgi-bin/koha/catalogue/search.pl?op=do_search&idx=su&q={608a} »><img border= »0 » src= »/opac-tmpl/css/en/images/filefind.png » height= »15 » title= »Search on {608a} »>{ 608a}</a>|<br/><br/>
#200||<label class= »ipt »>Subjects : </label><br/>|<ul>
#600|<label class= »ipt »>Person(s) </label><br/> |<li><a href= »/cgi-bin/koha/catalogue/search.pl?op=do_search&idx=su&q={600a} »><img border= »0 » src= »/opac-tmpl/css/en/images/filefind.png » height= »15 » title= »Search on {600a} »>{ 600a}</a></li>|<br/>
#601|<label class= »ipt »>Organisation(s) </label><br/>|<li><a href= »/cgi-bin/koha/catalogue/search.pl?op=do_search&idx=su&q={601a} »><img border= »0 » src= »/opac-tmpl/css/en/images/filefind.png » height= »15 » title= »Search on {601a} »>{ 601a}</a></li>|<br/>
#606|<label class= »ipt »>Term(s) </label><br/>|<li><a href= »/cgi-bin/koha/catalogue/search.pl?op=do_search&idx=su&q={606a} »><img border= »0 » src= »/opac-tmpl/css/en/images/filefind.png » height= »15 » title= »Search on {606a} »>{ 606a}</a></li>|<br/>
#607|<label class= »ipt »>Place(s) </label><br/>|<li><a href= »/cgi-bin/koha/catalogue/search.pl?op=do_search&idx=su&q={607a} »><img border= »0 » src= »/opac-tmpl/css/en/images/filefind.png » height= »15 » title= »Search on {607a} »>{ 607a}</a></li>|<br/>
#610|<label>Keywords</label><br/>|<li><a href= »/cgi-bin/koha/catalogue/search.pl?op=do_search&idx=su&q={610a} »><img border= »0 » src= »/opac-tmpl/css/en/images/filefind.png » height= »15 » title= »Search on {610a} »>{ 610a}</a></li>|
#200||</ul>|
#856|<label class= »ipt »>Electronic resource : </label>|<a href= »{856u} »>click here</a> to go to the external resource<br/>
#010|<label class= »ipt »>ISBN : </label>|{010a ;}|<br/>
#011|<label class= »ipt »>ISSN : </label>|{011a ;}|<br/>
#200||<label class= »ipt »>Notes : </label>|<br/><ul>
#300||<li>{300a}</li>|
#307||<li>{307a}</li>|
#310||<li>{310a}</li>|
#326||<li>{326a}</li>|
#327||<li>{327a}</li>|
#333|<li>Public : |{333a}</li>|
#200||</ul>|
#330||<label class= »ipt »>Abstract : </label>|<br/>
#330||{330a}|<br/>
#200||<br/><h2>Items</h2>|
#200|<table>|<th>Call number</th><th>Copy note</th><th>Fonds</th><th>Genre detail</th><th>Circulation type</th><th>Barcode</th>|
#995||<tr><td> {995k}</td><td> {995u}</td><td> {995y}</td><td>{995e} </td><td> {995o}</td><td>{995f}</td></tr>|</table>
OPACISBD Par-Défaut
Default values for the OPACISBD preference.
MARC
#100||{ 100a }{ 100b }{ 100c }{ 100d }{ 110a }{ 110b }{ 110c }{ 110d }{ 110e }{ 110f }{ 110g }{ 130a }{ 130d }{ 130f }{ 130g }{ 130h }{ 130k }{ 130l }{ 130m }{ 130n }{ 130o }{ 130p }{ 130r }{ 130s }{ 130t }|<br/><br/>
#245||{ 245a }{ 245b }{245f }{ 245g }{ 245k }{ 245n }{ 245p }{ 245s }{ 245h }|
#246||{ : 246i }{ 246a }{ 246b }{ 246f }{ 246g }{ 246n }{ 246p }{ 246h }|
#242||{ = 242a }{ 242b }{ 242n }{ 242p }{ 242h }|
#245||{ 245c }|
#242||{ = 242c }|
#250| - |{ 250a }{ 250b }|
#254|, |{ 254a }| #255|, |{ 255a }{ 255b }{ 255c }{ 255d }{ 255e }{ 255f }{ 255g }| #256|, |{ 256a }|
#257|, |{ 257a }|
#258|, |{ 258a }{ 258b }|
#260| - |{ 260a }{ 260b }{ 260c }|
#300| - |{ 300a }{ 300b }{ 300c }{ 300d }{ 300e }{ 300f }{ 300g }|
#306| - |{ 306a }| #307| - |{ 307a }{ 307b }|
#310| - |{ 310a }{ 310b }|
#321| - |{ 321a }{ 321b }|
#340| - |{ 3403 }{ 340a }{ 340b }{ 340c }{ 340d }{ 340e }{ 340f }{ 340h }{ 340i }|
#342| - |{ 342a }{ 342b }{ 342c }{ 342d }{ 342e }{ 342f }{ 342g }{ 342h }{ 342i }{ 342j }{ 342k }{ 342l }{ 342m }{ 342n }{ 342o }{ 342p }{ 342q }{ 342r }{ 342s }{ 342t }{ 342u }{ 342v }{ 342w }|
#343| - |{ 343a }{ 343b }{ 343c }{ 343d }{ 343e }{ 343f }{ 343g }{ 343h }{ 343i }|
#351| - |{ 3513 }{ 351a }{ 351b }{ 351c }|
#352| - |{ 352a }{ 352b }{ 352c }{ 352d }{ 352e }{ 352f }{ 352g }{ 352i }{ 352q }|
#362| - |{ 362a }{ 351z }|
#440| - |{ 440a }{ 440n }{ 440p }{ 440v }{ 440x }|. #490| - |{ 490a }{ 490v }{ 490x }|.
#800| - |{ 800a }{ 800b }{ 800c }{ 800d }{ 800e }{ 800f }{ 800g }{ 800h }{ 800j }{ 800k }{ 800l }{ 800m }{ 800n }{ 800o }{ 800p }{ 800q }{ 800r }{ 800s }{ 800t }{ 800u }{ 800v }|.
#810| - |{ 810a }{ 810b }{ 810c }{ 810d }{ 810e }{ 810f }{ 810g }{ 810h }{ 810k }{ 810l }{ 810m }{ 810n }{ 810o }{ 810p }{ 810r }{ 810s }{ 810t }{ 810u }{ 810v }|.
#811| - |{ 811a }{ 811c }{ 811d }{ 811e }{ 811f }{ 811g }{ 811h }{ 811k }{ 811l }{ 811n }{ 811p }{ 811q }{ 811s }{ 811t }{ 811u }{ 811v }|.
#830| - |{ 830a }{ 830d }{ 830f }{ 830g }{ 830h }{ 830k }{ 830l }{ 830m }{ 830n }{ 830o }{ 830p }{ 830r }{ 830s }{ 830t }{ 830v }|.
#500|<br/><br/>|{ 5003 }{ 500a }|
#501|<br/><br/>|{ 501a }|
#502|<br/><br/>|{ 502a }|
#504|<br/><br/>|{ 504a }|
#505|<br/><br/>|{ 505a }{ 505t }{ 505r }{ 505g }{ 505u }|
#506|<br/><br/>|{ 5063 }{ 506a }{ 506b }{ 506c }{ 506d }{ 506u }|
#507|<br/><br/>|{ 507a }{ 507b }| #508|<br/><br/>|{ 508a }{ 508a }|
#510|<br/><br/>|{ 5103 }{ 510a }{ 510x }{ 510c }{ 510b }|
#511|<br/><br/>|{ 511a }|
#513|<br/><br/>|{ 513a }{513b }|
#514|<br/><br/>|{ 514z }{ 514a }{ 514b }{ 514c }{ 514d }{ 514e }{ 514f }{ 514g }{ 514h }{ 514i }{ 514j }{ 514k }{ 514m }{ 514u }|
#515|<br/><br/>|{ 515a }|
#516|<br/><br/>|{ 516a }|
#518|<br/><br/>|{ 5183 }{ 518a }|
#520|<br/><br/>|{ 5203 }{ 520a }{ 520b }{ 520u }|
#521|<br/><br/>|{ 5213 }{ 521a }{ 521b }|
#522|<br/><br/>|{ 522a }|
#524|<br/><br/>|{ 524a }|
#525|<br/><br/>|{ 525a }|
#526|<br/><br/>|{\n510i }{\n510a }{ 510b }{ 510c }{ 510d }{\n510x }|
#530|<br/><br/>|{\n5063 }{\n506a }{ 506b }{ 506c }{ 506d }{\n506u }|
#533|<br/><br/>|{\n5333 }{\n533a }{\n533b }{\n533c }{\n533d }{\n533e }{\n533f }{\n533m }{\n533n }|
#534|<br/><br/>|{\n533p }{\n533a }{\n533b }{\n533c }{\n533d }{\n533e }{\n533f }{\n533m }{\n533n }{\n533t }{\n533x }{\n533z }|
#535|<br/><br/>|{\n5353 }{\n535a }{\n535b }{\n535c }{\n535d }|
#538|<br/><br/>|{\n5383 }{\n538a }{\n538i }{\n538u }|
#540|<br/><br/>|{\n5403 }{\n540a }{ 540b }{ 540c }{ 540d }{\n520u }|
#544|<br/><br/>|{\n5443 }{\n544a }{\n544b }{\n544c }{\n544d }{\n544e }{\n544n }|
#545|<br/><br/>|{\n545a }{ 545b }{\n545u }| #546|<br/><br/>|{\n5463 }{\n546a }{ 546b }|
#547|<br/><br/>|{\n547a }| #550|<br/><br/>|{ 550a }|
#552|<br/><br/>|{ 552z }{ 552a }{ 552b }{ 552c }{ 552d }{ 552e }{ 552f }{ 552g }{ 552h }{ 552i }{ 552j }{ 552k }{ 552l }{ 552m }{ 552n }{ 562o }{ 552p }{ 552u }|
#555|<br/><br/>|{ 5553 }{ 555a }{ 555b }{ 555c }{ 555d }{ 555u }|
#556|<br/><br/>|{ 556a }{ 506z }| #563|<br/><br/>|{ 5633 }{ 563a }{ 563u }|
#565|<br/><br/>|{ 5653 }{ 565a }{ 565b }{ 565c }{ 565d }{ 565e }|
#567|<br/><br/>|{ 567a }|
#580|<br/><br/>|{ 580a }|
#581|<br/><br/>|{ 5633 }{ 581a }{ 581z }|
#584|<br/><br/>|{ 5843 }{ 584a }{ 584b }|
#585|<br/><br/>|{ 5853 }{ 585a }|
#586|<br/><br/>|{ 5863 }{ 586a }|
#020|<br/><br/><label>ISBN: </label>|{ 020a }{ 020c }|
#022|<br/><br/><label>ISSN: </label>|{ 022a }|
#222| = |{ 222a }{ 222b }|
#210| = |{ 210a }{ 210b }|
#024|<br/><br/><label>Standard No.: </label>|{ 024a }{ 024c }{ 024d }{ 0242 }|
#027|<br/><br/><label>Standard Tech. Report. No.: </label>|{ 027a }|
#028|<br/><br/><label>Publisher. No.: </label>|{ 028a }{ 028b }|
#013|<br/><br/><label>Patent No.: </label>|{ 013a }{ 013b }{ 013c }{ 013d }{ 013e }{ 013f }|
#030|<br/><br/><label>CODEN: </label>|{ 030a }|
#037|<br/><br/><label>Source: </label>|{ 037a }{ 037b }{ 037c }{ 037f }{ 037g }{ 037n }|
#010|<br/><br/><label>LCCN: </label>|{ 010a }|
#015|<br/><br/><label>Nat. Bib. No.: </label>|{ 015a }{ 0152 }|
#016|<br/><br/><label>Nat. Bib. Agency Control No.: </label>|{ 016a }{ 0162 }|
#600|<br/><br/><label>Subjects–Personal Names: </label>|{\n6003 }{\n600a}{ 600b }{ 600c }{ 600d }{ 600e }{ 600f }{ 600g }{ 600h }{–600k}{ 600l }{ 600m }{ 600n }{ 600o }{–600p}{ 600r }{ 600s }{ 600t }{ 600u }{–600x}{–600z}{–600y}{–600v}|
#610|<br/><br/><label>Subjects–Corporate Names: </label>|{\n6103 }{\n610a}{ 610b }{ 610c }{ 610d }{ 610e }{ 610f }{ 610g }{ 610h }{–610k}{ 610l }{ 610m }{ 610n }{ 610o }{–610p}{ 610r }{ 610s }{ 610t }{ 610u }{–610x}{–610z}{–610y}{–610v}|
#611|<br/><br/><label>Subjects–Meeting Names: </label>|{\n6113 }{\n611a}{ 611b }{ 611c }{ 611d }{ 611e }{ 611f }{ 611g }{ 611h }{–611k}{ 611l }{ 611m }{ 611n }{ 611o }{–611p}{ 611r }{ 611s }{ 611t }{ 611u }{–611x}{–611z}{–611y}{–611v}|
#630|<br/><br/><label>Subjects–Uniform Titles: </label>|{\n630a}{ 630b }{ 630c }{ 630d }{ 630e }{ 630f }{ 630g }{ 630h }{–630k }{ 630l }{ 630m }{ 630n }{ 630o }{–630p}{ 630r }{ 630s }{ 630t }{–630x}{–630z}{–630y}{–630v}|
#648|<br/><br/><label>Subjects–Chronological Terms: </label>|{\n6483 }{\n648a }{–648x}{–648z}{–648y}{–648v}| #650|<br/><br/><label>Subjects–Topical Terms: </label>|{\n6503 }{\n650a}{ 650b }{ 650c }{ 650d }{ 650e }{–650x}{–650z}{–650y}{–650v}|
#651|<br/><br/><label>Subjects–Geographic Terms: </label>|{\n6513 }{\n651a}{ 651b }{ 651c }{ 651d }{ 651e }{–651x}{–651z}{–651y}{–651v}|
#653|<br/><br/><label>Subjects–Index Terms: </label>|{ 653a }|
#654|<br/><br/><label>Subjects–Facted Index Terms: </label>|{\n6543 }{\n654a}{–654b}{–654x}{–654z}{–654y}{–654v}|
#655|<br/><br/><label>Index Terms–Genre/Form: </label>|{\n6553 }{\n655a}{–655b}{–655x }{–655z}{–655y}{–655v}|
#656|<br/><br/><label>Index Terms–Occupation: </label>|{\n6563 }{\n656a}{–656k}{–656x}{–656z}{–656y}{–656v}|
#657|<br/><br/><label>Index Terms–Function: </label>|{\n6573 }{\n657a}{–657x}{–657z}{–657y}{–657v}|
#658|<br/><br/><label>Index Terms–Curriculum Objective: </label>|{\n658a}{–658b}{–658c}{–658d}{–658v}|
#050|<br/><br/><label>LC Class. No.: </label>|{ 050a }{ / 050b }|
#082|<br/><br/><label>Dewey Class. No.: </label>|{ 082a }{ / 082b }|
#080|<br/><br/><label>Universal Decimal Class. No.: </label>|{ 080a }{ 080x }{ / 080b }|
#070|<br/><br/><label>National Agricultural Library Call No.: </label>|{ 070a }{ / 070b }|
#060|<br/><br/><label>National Library of Medicine Call No.: </label>|{ 060a }{ / 060b }|
#074|<br/><br/><label>GPO Item No.: </label>|{ 074a }|
#086|<br/><br/><label>Gov. Doc. Class. No.: </label>|{ 086a }|
#088|<br/><br/><label>Report. No.: </label>|{ 088a }|
Configuration des imprimantes à reçus
Les instructions suivantes sont spécifiques aux imprimantes à reçus, mais peuvent aussi bien aider à la configuration des imprimantes d’autres marques.
For Epson TM-T88III (3) & TM-T88IV (4) Printers
Dans la commande de l’imprimante
For these instructions, we are using version 5,0,3,0 of the Epson TM-T88III print driver; the EPSON TM-T88IV version is ReceiptE4. Register at the EpsonExpert Technical Resource Center website to gain access to the drivers; go to Technical Resources, then choose the printer model from the Printers drop-down list.
Click Start > Printers and Faxes > Right click the receipt printer > Properties:
- Onglet Avancé, cliquez sur le bouton “Défauts d’impression”
- Onglet Disposition: Taille du papier: Rouleau papier 80 x 297mm
- TM-T88III: Onglet Disposition: Vérifier à réduire l’impression et ajuster la largeur de l’impression
- TM-T88IV: Vérifiez la réduction de la taille de l’impression; cliquez sur OK sur la fenêtre pop-up qui apparaît. L’ajustement de la largeur de l’impression sera automatiquement sélectionnée.
- Cliquez sur OK pour sortir.
Dans Firefox
Under File > Page Setup:
- Shrink to fit page on Format & Options tab
- 0,0,0,0 for Margins on Margins & Header/Footer Tab. This makes the receipts use all available space on the paper roll.
- Définissez tous les En-tête/Pieds de page sur -vide-. Cela supprime toute les petites caractéristiques inutiles que vous pouvez trouver pour une impression depuis Firefox, comme l’URL, nombre de pages, etc…
- Cliquez sur OK
Définissez les paramètres de l’imprimante par défaut dans Firefox afin de ne pas voir la fenêtre de dialogue « Imprimer »:
Go to File > Print
Paramétrez l’imprimante pour l »impression de reçus.
Cliquez sur le bouton Avancé (ou Propriétés)
Onglet Disposition: Taille du papier: Rouleau papier 80 x 297mm
TM-T88III: Onglet Disposition: Vérifier à réduire l’impression et ajuster la largeur de l’impression
TM-T88IV: Vérifiez la taille réduite d’impression; cliquez sur OK sur la fenêtre popup qui apparaît. Le réglage de la largeur de l’impression est automatiquement sélectionné.
Cliquez sur OK pour sortir, et imprimez n’importe quelle page.
Saisissez about: config, dans la barre d’adresse. Cliquez sur “Je serai prudent, je le promets! » sur le message d’avertissement qui s’affiche.
Saisissez, print.always dans Filtre
Look for print.always_print_silent.
- Si la préférence système s’affiche, définissez alors la valeur sur vrai.
Si la préférence système ne s’affiche pas (et elle ne devrait pas s’afficher dans la plupart des navigateurs), vous devrez ajouter la préférence système.
- Right click the preference area and select New > Boolean
- Type print.always_print_silent in the dialog box and set the value to True. This sets the print settings in Firefox to always use the same settings and print without showing a dialog box.
Warning
Setting the print.always_print_silent setting in about:config DISABLES the ability to choose a printer in Firefox.
Pour les imprimantes Epson TM-T88II (2)
Register at the EpsonExpert Technical Resource Center website to gain access to the drivers; go to Technical Resources, then choose the printer model from the Printers drop-down list.
Dans Firefox
Under File > Page Setup:
- Shrink to fit page on Format & Options tab
- 0,0,0,0 for Margins on Margins & Header/Footer Tab. This makes the receipts use all available space on the paper roll.
- Définissez tous les En-tête/Pieds de page sur -vide-. Cela supprime toute les petites caractéristiques inutiles que vous pouvez trouver pour une impression depuis Firefox, comme l’URL, nombre de pages, etc…
- Cliquez sur OK
Définissez les paramètres de l’imprimante par défaut dans Firefox afin de ne pas voir la fenêtre de dialogue « Imprimer »:
Go to File > Print
Paramétrez l’imprimante pour l »impression de reçus.
Imprimez n’importe quelle page.
Saisissez about: config, dans la barre d’adresse. Cliquez sur “Je serai prudent, je le promets! » sur le message d’avertissement qui s’affiche.
Saisissez, print.always dans Filtre
Look for, print.always_print_silent.
- Si la préférence système s’affiche, définissez alors la valeur sur vrai.
Si la préférence système ne s’affiche pas (et elle ne devrait pas s’afficher dans la plupart des navigateurs), vous devrez ajouter la préférence système.
- Right click the preference area and select New > Boolean
- Type, print.always_print_silent in the dialog box and set the value to True. This sets the print settings in Firefox to always use the same settings and print without showing a dialog box.
Warning
Setting the print.always_print_silent setting in about:config DISABLES the ability to choose a printer in Firefox.
Pour les imprimantes Star SP542
Installez l’imprimante
Bien que les conseils suivants s’appliquent sur les imprimantes à reçus Star SP542, ils peuvent aussi bien s’appliquer sur toutes les imprimantes, des séries SP5xx.
The Star SP542 receipt printer works well with Koha and Firefox on Windows XP SP3. This printer, with either the parallel or USB interface, is fairly easy to install and configure. You will need the following executable file which is available from numerous places on the Internet:
linemode_2k-xp_20030205.exe
Cet exécutable vous fait en réalité toute l’installation; vous n’aurez pas besoin d’utiliser le programme « Ajouter imprimante » de Microsoft Windows. Nous vous recommandons pendant l’installation, de ne pas sélectionner l’option du moniteur du logiciel; nous avons noté que cela déclenchait de longues pauses et des retards dans l’impression. Choisissez plutôt d’installer l’imprimante à reçus sans le moniteur.
Additionally, the install program may not put the printer on the correct port, especially if using the USB interface. This is easily corrected by going to « Start -> Printers and Faxes -> Properties for the SP542 printer -> Ports », then check the appropriate port.
Il est conseillé de redémarrer l’ordinateur, même si ce n’est pas indiqué par le logiciel d’installation ou le système d’exploitation.
Windows 7 users should refer to this page: http://www.starmicronics.com/supports/win7.aspx.
Configurer Firefox pour imprimer sur l’imprimante à reçus
- Open File > Page Setup
- Laissez toutes les en-têtes et pieds de page vides
- Définissez les marges sur 0 (zéro)
- Dans la barre d’adresse de Firefox, saisissez about:config
- Search for print.always_print_silent and double click it
- Modifiez celui-ci de faux à vrai
- Cela permet d’éviter la fenêtre popup d’impression qui s’affiche, et de sauter l’étape où vous devez cliqué sur OK, et imprime automatiquement le ticket à la bonne taille.
- If print.always_print_silent does not come up
- Cliquez à droite dans une zone vide de la fenêtre de la préférence système
- Select new > Boolean
- Enter « print.always_print_silent » as the name (without quotes)
- Cliquez sur OK
- Sélectionnez vrai comme valeur
- You may also want to check what is listed for print.print_printer
- Vous devrez choisir Générique/Texte seulement (ou comment votre imprimante à reçus pourrait être nommée)
Notice & Slips Guides
Field Guide for Notices & Slips
Ce guide décomposera les informations sur les notices et les tickets de 3 manières. D’abord, il vous expliquera quel fichier génère le ticket, ensuite la manière dont les informations sont présentées sur ce ticket, et pour finir, si la notification peut être à destination d’un site spécifique ou pas.
| Letter Code | Used In | Detail tag | Can be branch specific |
|---|---|---|---|
| DUE | advance_notices.pl | <<items.content>> | Non |
| DUEDGST | advance_notices.pl | <<items.content>> | Non |
| PREDUE | advance_notices.pl | <<items.content>> | Non |
| PREDUEDGST | advance_notices.pl | <<items.content>> | Non |
| ODUE* | overdue_notices.pl | <<items.content>> or <item> </item> | Oui |
| CHECKOUT | C4/Circulation.pm | N/A | Oui |
| RENEWAL | C4/Circulation.pm | N/A | Oui |
| TRANSFERSLIP | C4/Circulation.pm | N/A | Oui |
| ISSUESLIP | C4/Members.pm | <checkedout> </checkedout> <overdue> </overdue> <news> </news> |
Oui |
| ISSUEQSLIP | C4/Members.pm | <checkedout> </checkedout> | Oui |
| HOLDPLACED | C4/Reserves.pm | N/A | Oui |
| HOLD_SLIP | C4/Reserves.pm | N/A | Oui |
| ASKED | C4/Suggestions.pm | N/A | Oui |
| CHECKED | C4/Suggestions.pm | N/A | Oui |
| ACCEPTED | C4/Suggestions.pm | N/A | Oui |
| REJECTED | C4/Suggestions.pm | N/A | Oui |
| OPAC_REG_VERIFY | opac/opac-memberentry.pl | N/A | Non |
Exemple de notification
Nicole Engard
410 rue de la Bibliothèque
Philadelphia, PA 19107
Chère Nicole Engard (23529000035726),
Selon notre système informatisé, à l’instant de ce message, vous avez des documents en retard. Merci de les retourner ou les renouveler dès que possible afin d’éviter des pénalités de retard croissantes.
Si vous avez un mot de passe, vous pourrez l’utiliser avec votre numéro de carte de bibliothèque afin d’effectuer des renouvellements en ligne.
Si vous pensez avoir rendu les documents ci-dessous, veuillez contacter la bibliothèque. Le personnel vous aidera à résoudre ce problème.
L”(es) exemplaire(s) suivant(s) sont en retard :
07/08/2008 Creating drug-free schools and communities : 502326000054 Fox, C. Lynn.
06/27/2008 Eating fractions / 502326000022 McMillan, Bruce.
Cordialement, Les bibliothécaires
Exemple de périodiques
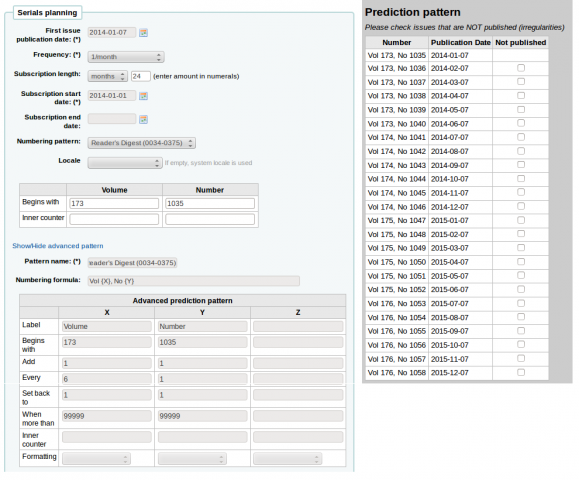
Reader’s Digest (0034-0375)
Publié 12 fois par an (mensuel)
Le numéro de volume change tous les 6 mois et les numéros continuent (requiert un modèle avancé).
People Weekly (1076-0091)
- Publication hebdomadaire
- Le site web dit que « le samedi sauf la première semaine d’Août, la semaine de Thanksgiving, la première et la dernière semaine de l’année », mais cela ne correspond pas au modèle de 2007 ou 2008
- De juillet à décembre, il y a 26 numéros
- De janvier à juin, il y a 25 numéros (pas de numéro la première semaine de janvier)
S’il y a une irrégularité dans les 26 premiers numéros, la numérotation se réinitialisera à partir du numéro 25. Le numéro 26 sera reçu dans la seconde moitié de l’année comme un supplément.
Le contrôle d’irrégularité montre que 52 numéros sont attendus, mais seulement 25 ont été enregistrés. On peut seulement vérifier que la première position du modèle de numérotation corresponde bien à la périodicité du numéro attendu. Il n’est pas nécessaire de recommencer la numérotation du volume, il faut juste définir les deux dernières semaines de l’année comme des irrégularités. Nous recevrons donc 50 numéros les 50 premières semaines, puis un numéro supplémentaire la semaine 51, puis le prochain numéro arrivera la première semaine de l’année suivante.
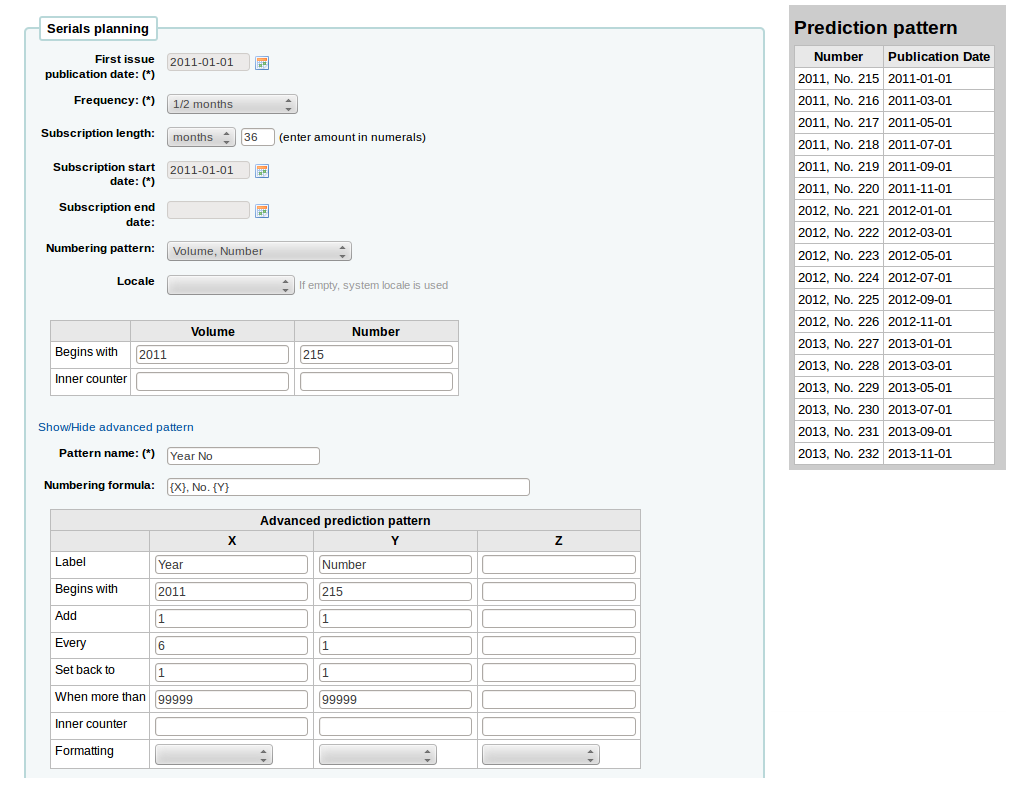
Et-Mol
Ce journal est publié avec les règles suivantes:
- 6 numéros par an (tous les 2 mois)
- l’année change tous les 6 numéros
- nous commençons en 2011
- le numéro du fascicule augmente indéfiniment
- commencer à partir du numéro 215
Le calendrier établi devrait ressembler à ceci:
Backpacker (0277-867X)
Publié irrégulièrement 9 fois par an. Les numéros continuent d’arriver et la numérotation se renouvelle tous les 9 numéros. Si vous avez en main le Volume 41, Numéro 3, Fascicule 302, la prévision ressemblera à ceci:
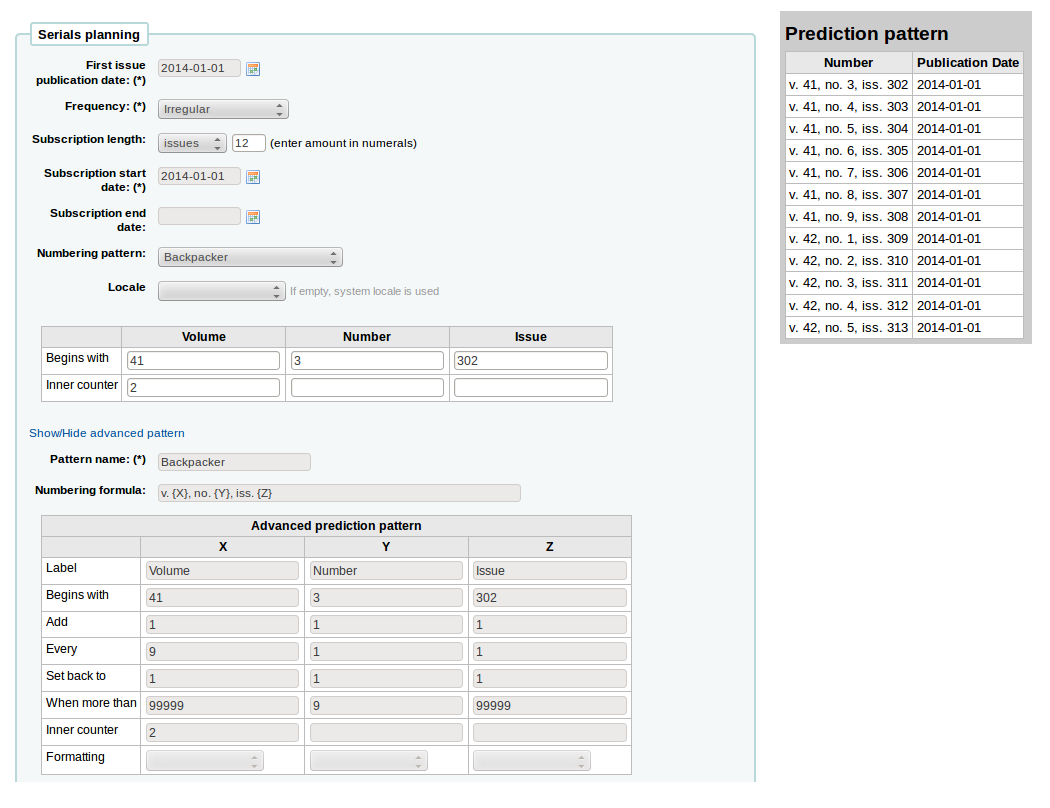
Et les numéros reçus seront numérotés comme ceci:
- 41, no. 3, iss. 302
- 41, no. 4, iss. 303
- 41, no. 5, iss. 304
- 41, no. 6, iss. 305
- 41, no. 7, iss. 306
- 41, no. 8, iss. 307
- 41, no. 9, iss. 308
- 42, no. 1, iss. 309
- 42, no. 2, iss. 310
- 42, no. 3, iss. 311
- 42, no. 4, iss. 312
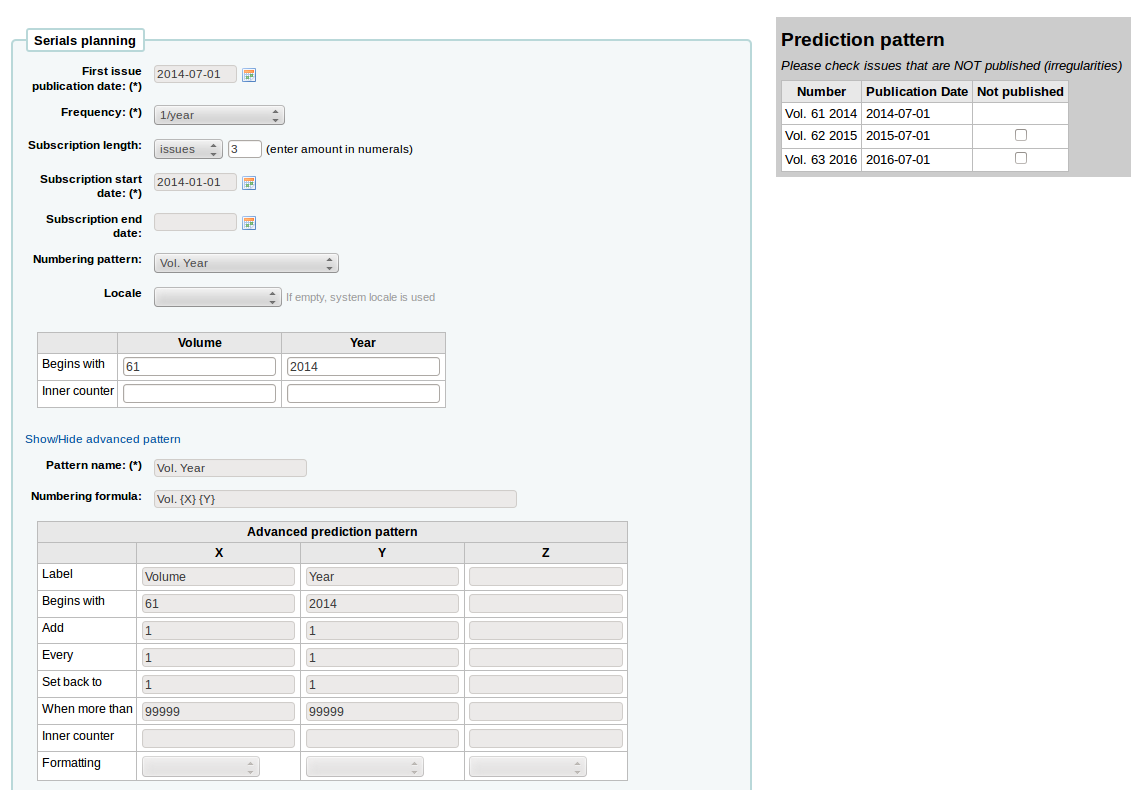
Keats-Shelley Journal (0453-4387)
This journal is published once per year in July. The numbering follows this pattern:
- Vol. 61 2013
- Vol. 62 2014
- Vol. 63 2015
La configuration aura cet aspect (si vous commencez en juillet 2014):
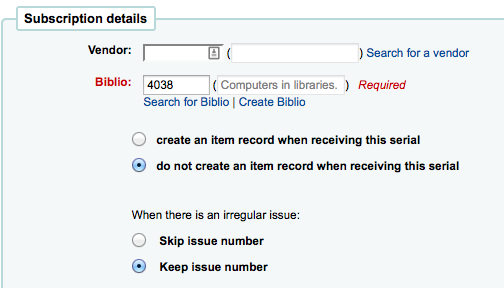
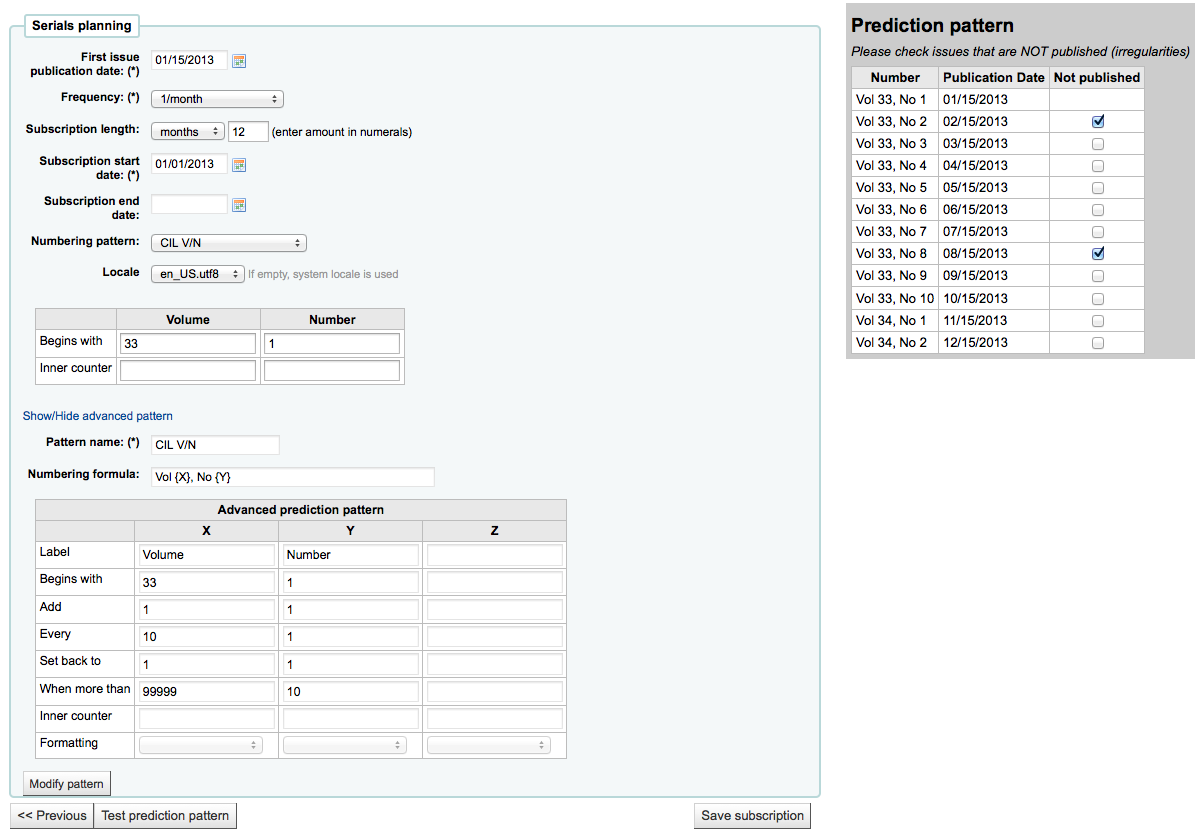
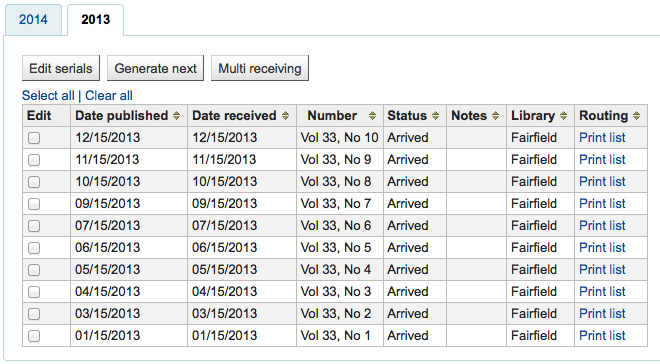
Computers in Libraries (1041-7915)
Computers in Libraries est publié 10 fois par an (mensuel incluant janvier/février et juillet/août combinant les numéros).
Sample List & Cart Emails
Exemple d’e-mail à partir de liste
Voici ci-dessous un exemple d’e-mail depuis une liste dans Koha.
Hi,

Here is your list called If You Like Jodi Picoult, sent from our online catalog.

Please note that the attached file is a MARC bibliographic records file
which can be imported into a Personal Bibliographic Software like EndNote,
Reference Manager or ProCite.
---------------------------------------------

Home safe : a novel /

by Berg, Elizabeth.

Published by: Random House,, 260 p. ;, 25 cm.
Copyright year: 2009
LCCN:   2008049247
In the online catalog:
    http://MYCATALOG/cgi-bin/koha/opac-detail.pl?biblionumber=12113
Items :
    North Branch FIC (FIC Ber) TVSN500088894O
    Main Library FIC (FIC Boh) TVSN5000921548
    South Branch FIC (FIC Boh) TVSN500092156A
    West Branch FIC (FIC Boh) TVSN5000921559

---------------------------------------------

Half a heart /

by Brown, Rosellen.

Published by: Farrar, Straus, and Giroux,, 402 p. ;, 24 cm.
Copyright year: 2000
LCCN:    00022926
In the online catalog:
    http://MYCATALOG/cgi-bin/koha/opac-detail.pl?biblionumber=12501
Items :
    East Branch  (813/.54)
    South Branch FIC (FIC Bro) TVSN5000451333
Exemple d’e-mail depuis le panier
Voici ci-dessous un exemple d’e-mail depuis le panier dans Koha:
Hi,

   Joaquin D'Planque sent you a cart from our online catalog.

   Please note that the attached file is a MARC bibliographic records
   file which can be imported into personal bibliographic software like
   EndNote, Reference Manager or ProCite.

   ---------------------------------------------------------------------


     1.  Book /
       Author(s): Brookfield, Karen. ;
       Published by: Knopf : | Distributed by Random House, , 63 p. : ,
       29 cm.
       Copyright year: 1993
       Notes : Includes index.
       LCCN: 93018833 /AC

       In online catalog:
       http://MYCATALOG/cgi-bin/koha/opac-detail.pl?biblionumber=31644

       Items:

         *  East Branch (JNF 002 Bro) TVSN500017618A

       -----------------------------------------------------------------

     2.  The 1965 World book year book :

       Published by: Field Enterprises Educational Corp., , 628 p. : , 26
       cm.
       Copyright year: 1965
       Notes : Includes index. | Spine title: Year book, 1965. | Cover
       title: The World book year book, 1965.
       URL:
       http://www.archive.org/details/1965worldbookyea00chic%20%7C%20http://www.openlibrary.org/books/OL24199089M

       In online catalog:
       http://MYCATALOG/cgi-bin/koha/opac-detail.pl?biblionumber=88666

       -----------------------------------------------------------------
Utilisation de Koha comme un Système de gestion des contenus (CMS)
Configuration
Ce sont les instructions pour que l’installation par défaut de Koha puisse fonctionner comme un petit système de gestion des contenus. Il autorisera une bibliothèque à publier un nombre de pages arbitraire basé sur le modèle. Cet exemple utilise le modèle pour la page principale de l’OPAC, mais vous pouvez aussi utiliser d’autres modèles si vous le souhaitez, avec une légère modification. C’es plus pratique pour les petites bibliothèques qui autorisent le personnel à ajouter facilement des pages, qui ne souhaite pas installer de CMS entier.
Copy /usr/share/koha/opac/cgi-bin/opac/opac-main.pl to /usr/share/koha/opac/cgi-bin/opac/pages.pl (dans le même répertoire)
Editer les pages.pl avec un éditeur
A la ligne 33 à peu près, modifier ce code:
template_name => "opac-main.tt",
Et mettez ce code:
template_name => "pages.tt",
A la ligne 62 à peu près, après ce code:
$template->param(
           koha_news       => $all_koha_news,
           koha_news_count => $koha_news_count,
           display_daily_quote => C4::Context->preference('QuoteOfTheDay'),
           daily_quote         => $quote,
           );
Ajoutez ces lignes:
my $page = "page_" . $input->param('p');          # go for "p" value in URL and do the concatenation
my $preference = C4::Context->preference($page);  # Go for preference
$template->{VARS}->{'page_test'} = $preference;   # pass variable to template pages.tt
Note pages.pl file must have Webserver user execution permissions, you can use chmod command if you are actually logged in as such user:
$chmod 755 pages.pl
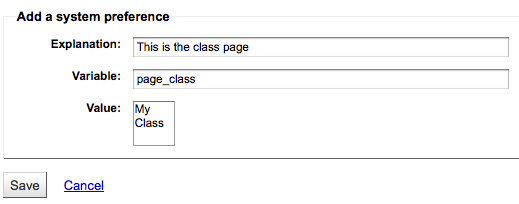
In the browser go to Home > Administration > System Preferences > Local Use and add a New Preference called « page_test »
Remplissez-le ainsi:
- Explication: page de test pour les pages du petit cms
- Variable: page_test
- Valeur: Lorem ipsum
- Cliquez sur le lien TextArea (ou saisissez « TextArea » dans le champ d’entrée en dessous de celui-ci)
- variable options (last field): 80|50
A partir d’un navigateur, allez sur http://youraddress/cgi-bin/koha/pages.pl?p=test Sur toute la page principale s’afficheront les mots « Lorem ipsum ». (remplacer « youraddress » avec 127.0.0.1, ou avec un nom de domaine. Cela dépend comment Apache est installé).
To add more pages simply create a system preference where the title begins with « page_ » followed by any arbitrary letters. You can add any markup you want as the value of the field. Reference the new page by changing the value of the « p » parameter in the URL.
To learn more visit the Koha wiki page on this topic: http://wiki.koha-community.org/wiki/Koha_as_a_CMS
Modifier le modèle des pages
The file to create / edit for the pages template will depend on your Themes system preference setting
Modifier le thème du modèle courant du “bootstrap”
Copy /usr/share/koha/opac/htdocs/opac-tmpl/bootstrap/en/modules/opac-main.tt to /usr/share/koha/opac/htdocs/opac-tmpl/bootstrap/en/modules/pages.tt
Edit /usr/share/koha/opac/htdocs/opac-tmpl/bootstrap/en/modules/pages.tt
A la ligne 61 à peu près, changez cela:
[% IF ( OpacMainUserBlock ) %]<div id="opacmainuserblock">[% OpacMainUserBlock %]</div>[% END %]
Et mettez ceci:
[% IF ( page_test ) %]<div id="opacmainuserblock">[% page_test %]</div>[% END %]
Remark: You may wish to disable your News block of these CMS style pages e.g. when you do not want it displayed on the CMS style pages or where the News block is long enough that it actually makes the “page_test” include scroll outside the default viewport dimensions. In that case, remove the following code from your pages.tt template.
[% IF ( koha_news_count ) %]
    <div id="news">
    <table class="table table-bordered">
    [% FOREACH koha_new IN koha_news %]
      <thead><tr><th>[% koha_new.title %]</th></tr></thead>
      <tbody><tr><td><p>[% koha_new.new %]</p>
      <p class="newsfooter"><i>(published on [% koha_new.newdate %])</i></p></td></tr></tbody>
    [% END %]
    </table>
    </div>
   [% END %]
Problème
If you have problems check file permissions on pages.pl and pages.tt. They should have the same user and group as other Koha files like opac-main.pl.
Points bonus
Au lieu d’utiliser l’adresse http://youraddress/cgi-bin/koha/pages.pl?p=test vous pouvez la raccourcir comme ceci http://youraddress/pages.pl?p=test Ouvrez /etc/koha/koha-httpd.conf et ajoutez la ligne 13 suivante:
ScriptAlias /pages.pl "/usr/share/koha/opac/cgi-bin/opac/pages.pl"
Puis redémarrez Apache.
Utilisation
Après avoir installé Koha comme CMS, vous pouvez créer de nouvelles pages en suivant ces instructions:
Ajout de pages
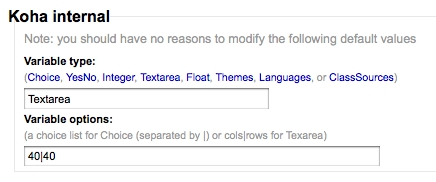
Pour ajouter une nouvelle page, vous devez une préférence système dans “Usage local ».
Get there: More > Administration > Global System Preferences > Local Use
Cliquez sur “Ajouter préférence”
Saisissez une description dans le champ Explication
Enter a value that starts with “page_” in the Variable field
Saisissez du code HTML dans le champ Valeur
Définissez le type de la variable sur Textarea
Set the Variable options to something like 20|20 for 20 rows and 20 columns
Consultez votre page
You can view your new page at http://YOUR-OPAC/cgi-bin/koha/pages.pl?p=PAGENAME where PAGENAME is the part you entered after “page_” in the Variable field.
Exemple
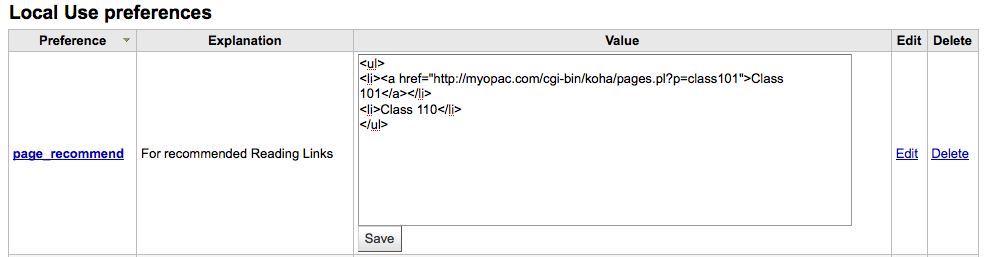
Ce processus est utilisé pour créer des listes de lecture recommandée dans Koha. Alors, une fois que Koha a été paramétré pour être utilisé comme CMS, allez sur “Ajouter une nouvelle page” situé au-dessus pour créer des “Listes de lecture recommandée”.
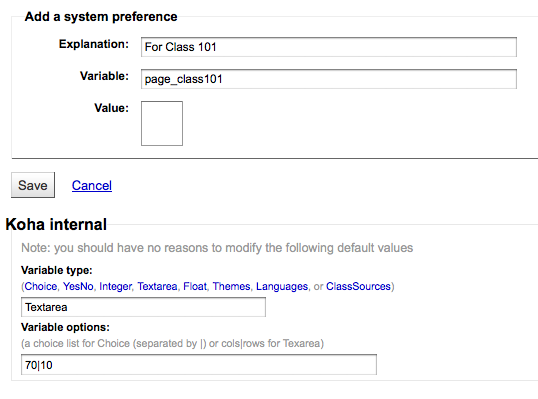
Nous devrons ensuite créer des pages pour diverses classes (ou catégories). Pour cela, retournez sur la section “Ajouter une nouvelle page” et créez une préférence système pour la première classe.
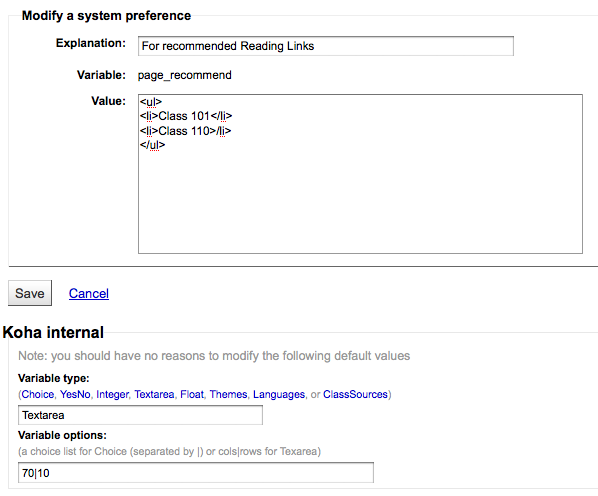
Next you’ll want to link your first page to your new second page, go to the page_recommend preference and click “Edit.” Now you want to edit the HTML to include a link to your newest page:
Exemples concrets
- The Crawford Library at Dallas Christian College is using this method for their recommended reading lists: http://opac.dallas.edu/
Réinitialiser la base de données de Koha
These notes on how to reset the database for Koha were derived from the following email thread: http://lists.koha-community.org/pipermail/koha-devel/2009-January/008939.html and http://lists.katipo.co.nz/public/koha/2014-June/039701.html
La réinitialisation de la base de données peut être utile si vous avez installé Koha avec les données d’exemple d’installation, et si vous souhaitez ensuite utiliser des données réelles sans réinstaller le logiciel.
Supprimer échantillons des tables
Use your preferred MySQL client to delete the following tables:
- bibio
- biblioitems
- Exemplaires
- auth_header
- sessions
- zebraqueue
You may need to disable foreign key checks to delete data from same tables. For instructions follow this thread: https://lists.katipo.co.nz/pipermail/koha/2013-July/036853.html.
Réinitialiser l’index de Zebra
Exécutez les commandes suivantes pour réinitialiser les index bibliographiques et les autorités de Zebra.
$ zebraidx -c /etc/koha/zebradb/zebra-authorities-dom.cfg -g iso2709 -d authorities init
$ zebraidx -c /etc/koha/zebradb/zebra-biblios.cfg -g iso2709 -d biblios init
Si vous exécutez un package d’installation, vous devrez alors exécuter les commandes suivantes pour réinitialiser les index bibliographiques et les autorités de Zebra:
$ sudo zebraidx -c /etc/koha/sites/YOURLIBRARY/zebra-authorities-dom.cfg  -g iso2709 -d authorities init
$ sudo zebraidx -c /etc/koha/sites/YOURLIBRARY/zebra-biblios.cfg  -g iso2709 -d biblios init
Remplacer YOURLIBRARY avec le nom de votre installation Koha.
Liens importants
Guides d’installation
- Installing Koha 3 on Ubuntu - http://www.blazingmoon.org/guides/k3-on-u810-1.html
- Koha on Debian installation documentation - http://openlib.org/home/krichel/courses/lis508/doc/koha_installation_overview.html
- Koha 3.2 on Debian Squeeze - http://wiki.koha-community.org/wiki/Koha_3.2_on_Debian_Squeeze
Divers
- Zotero - http://zotero.org
- SOPAC - http://thesocialopac.net
Types d’exemplaire XSLT de Koha
When you have any of the XSLT system preferences (sans XSLT, sans utiliser XSLT, XSLTDetailsDisplay, and/or XSLTResultsDisplay) along with the Afficher and Affiché sur preferences turned on you will see item type icons on the related screen.
Important
These images are coming from values found in your leader, if your leader is not cataloged properly it might be best to turn off the Afficher preference (which can be done while leaving the other XSLT preferences turned on).

- Livre [BK]
- leader6 = a (et une des valeurs de leader7 plus basse)
- leader7 = a
- leader7 = c
- leader7 = d
- leader7 = m
- leader6 = t
- leader6 = a (et une des valeurs de leader7 plus basse)

- Fichier informatique [CF]
- leader6 = m

- Ressource continue [CR]
- leader7 = b
- leader7 = i
- leader7 = s

- Map [MP]
- leader6 = e
- leader6 = f

- Divers [MX]
- leader6 = p
- Son [MU]
- leader6 = c
- leader6 = d
- leader6 = i
- leader6 = j
- Matériel visuel [VM]
- leader6 = g
- leader6 = k
- leader6 = r

- Kit
- leader6 = o
MarcEdit
Many libraries like to use MarcEdit for modifications or data cleanup. If you’d like to do this you will need to download it at: http://marcedit.reeset.net/
Important
Many of the actions described in this chapter can be done in Koha using Marc Modification Templates, but this section is here for those who are used to MarcEdit.
Ajouter un préfixe aux cotes
Lorsque vous importez des données dans Koha, vous voudrez peut-être les ordonner d’abord. Les utilisateurs de Koha ajoutent souvent un préfixe à la cote.
Ouvrir MarcEdit
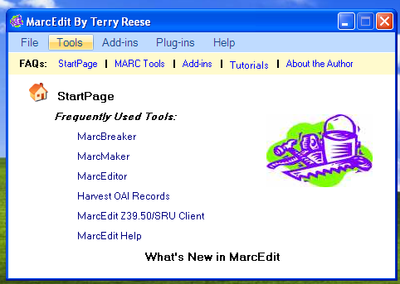
Cliquez sur “MarcEditor”
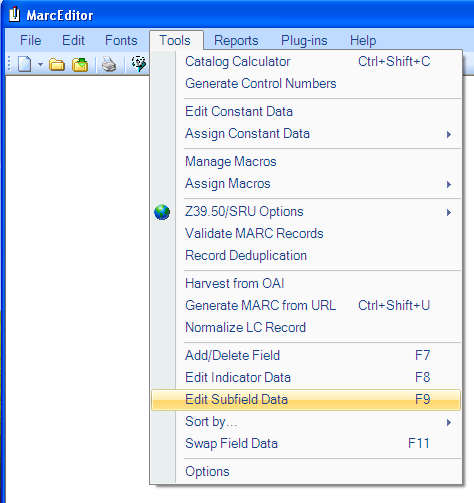
Go to Tools > Edit Subfield Data
Pour ajouter les données avant, le caractère spécial est: ^b Pour ajouter les données avant au début du sous-champ, ajoutez ^b aux données du champ: cadre du texte et les données seront ajoutés dans Remplacer
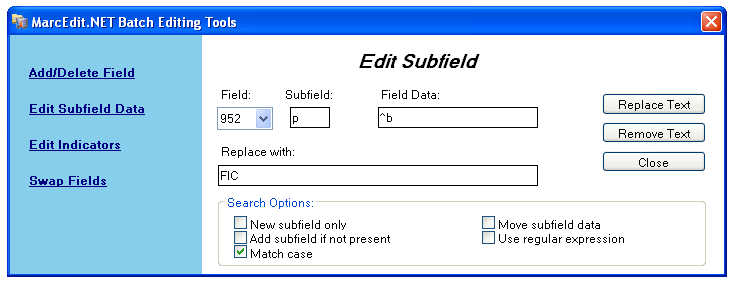
- Pour ajouter les données avant le début du sous-champ alors qu’il remplace une chaîne de caractères, ajoutez ^b (chaîne à remplacer) au cadre de texte Field Data et les données s’ajouteront dans Remplacement avec la cadre de texte.
Importer des données Excel dans Koha
Supposons que vous ayez des notices de votre bibliothèque rédigées sur un feuille Excel, et que vous voulez les importer dans Koha. Comment procéder ? Koha ne vous autorisera pas à importer les notices Excel directement. Il existe une solution simple. Nous convertirons d’abord le fichier Excel en fichier Marc, puis nous l’importerons dans Koha.
Suivez les étapes suivantes pour importer les notices Excel dans Koha
Convertir un format Excel en format .mrk
First, we will convert excel format into .mrk format. For this we will use MarcEdit. You can download it from http://marcedit.reeset.net/
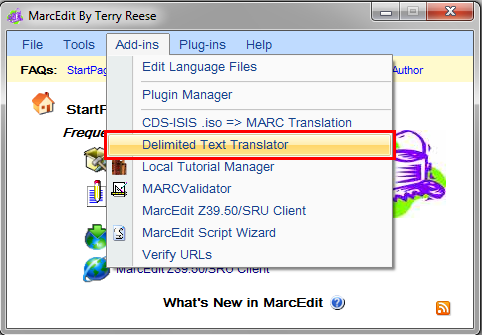
Now open it and select Add-ins–>Delimited Text Translator.
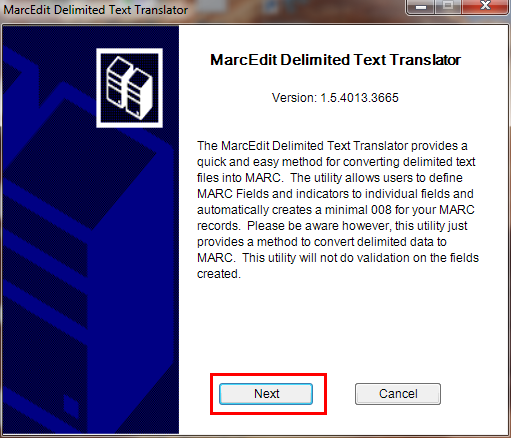
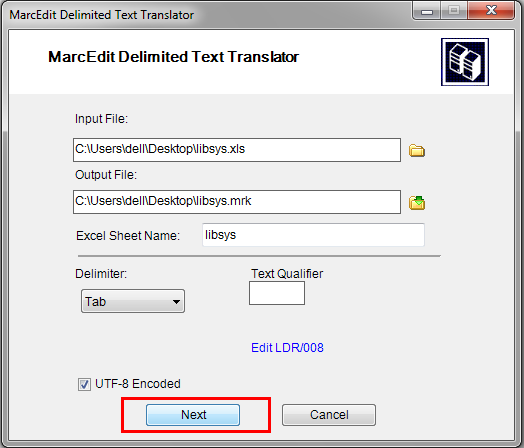
Cliquez sur “Suivant” lorsque la fenêtre suivante s’affiche.
Repérez votre fichier Excel.

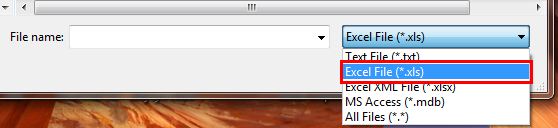
Locate your excel file by choosing the format Excel File(*.xls).
De la même manière, remplissez les autres entrées telles que Output File, Excel Sheet Name et cochez la codification UTF-8 (si obligatoire), puis cliquez sur “Suivant”.
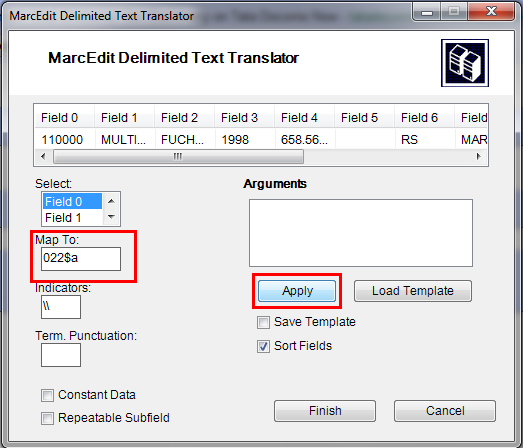
Il vous sera demandé d’ajouter une correspondance aux champs pour reconnaître ces derniers par le format standard marc.
Supposons que pour le Champ 0 qui est la première colonne Map à: 0022$a (un ISSN valide pour la ressource continue), cliquez ensuite sur “Appliquer”.
Note
You can customize Indicators and all other things, for more information on marc21 format visit the official library of congress site.
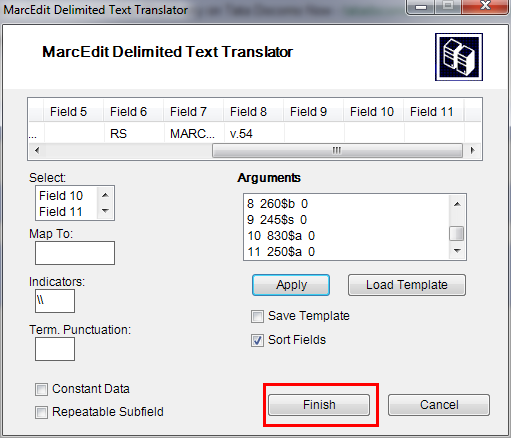
De la même manière, ajoutez une correspondance aux autres champs, et cliquez sur “Finir”.
And then a window will appear indicating that your Marc Text File(*.mrk) has been created.
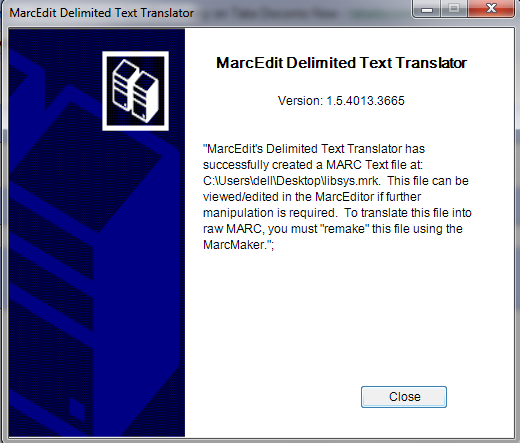
Cliquez sur “Fermer”. Vous avez pour l’instant créé un fichier .mrk depuis un fichier .xls. Vous pouvez regarder le contenu du fichier en double-cliquant dessus.
Convertir un fichier .mrk en .mrc
Nous convertirons le fichier .mrk que nous avons créé dans l’étape ci-dessus en un fichier de format Marc brut qui pourra être directement importé dans Koha.
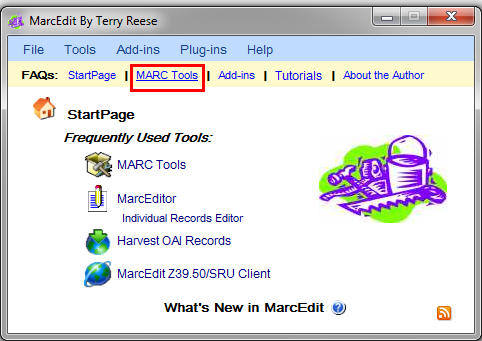
Pour cela, ouvrez encore une fois MarcEdit et sélectionnez Outils MARC.
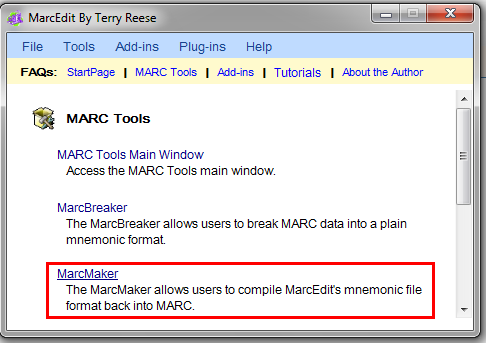
Sélectionnez MarcMaker pour convertir le fichier .mrk en format .mrc.
Localisez votre fichier d’entrée et le nom de votre fichier de sortie. Cliquez ensuite sur “Exécuter”.
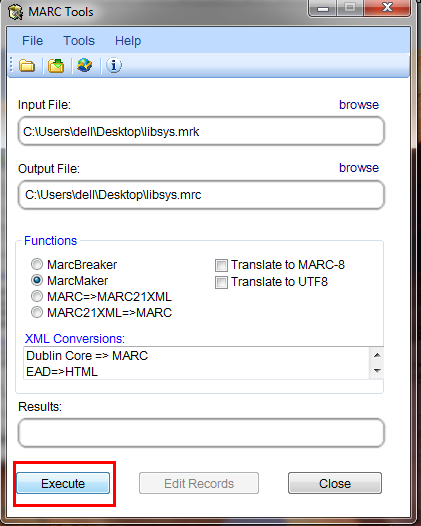
Cela affichera le Résultat.
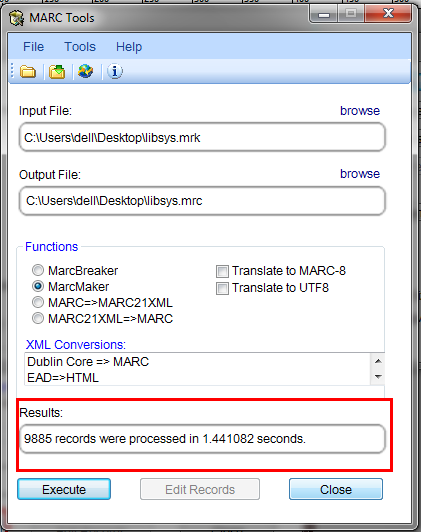
Cliquez sur “Fermer”. Vous avez maintenant vos notices Marc brut (fichier.mrc).
Importer .mrc dans Koha
More information on importing records into Koha can be found in the “Télécharger des notices MARC dans le réservoir” section of this manual.
Pour finir, nous importerons le fichier.mrc créé dans Koha.
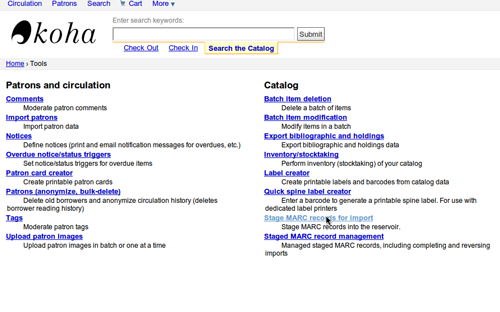
Cliquez sur Outils dans votre interface professionnelle.
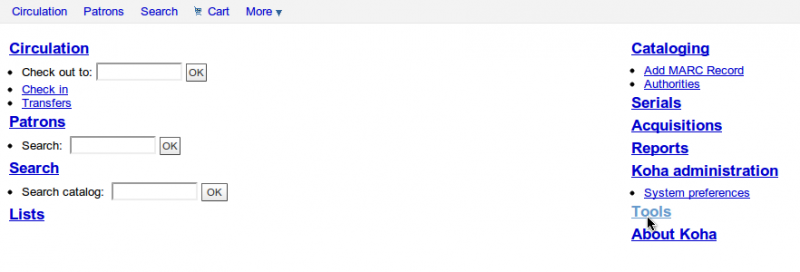
Cliquez ensuite sur “Télécharger des notices MARC dans le réservoir”.
Choisissez ensuite votre fichier.mrc précédemment créé, et cliquez sur “Télécharger”.
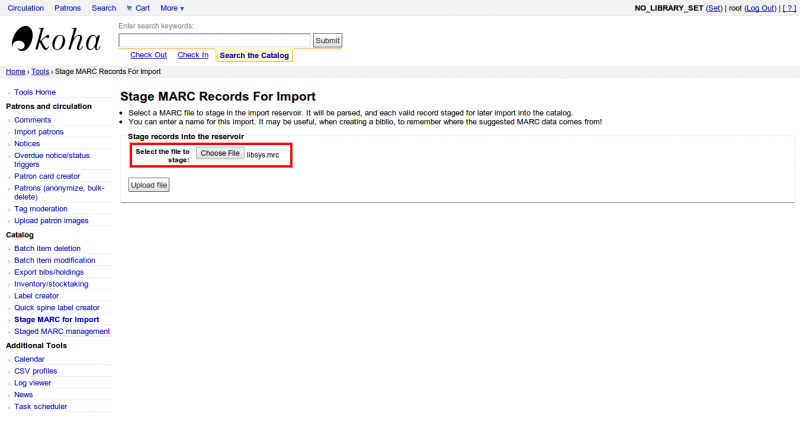
Vous pouvez aussi ajouter un commentaire à propos du fichier, puis cliquez sur “Télécharger dans le réservoir”.
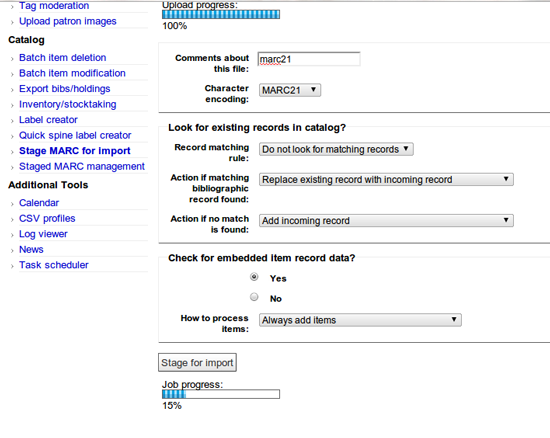
Une fois l’importation effectuée, vous obtiendrez un résultat comme ceci:
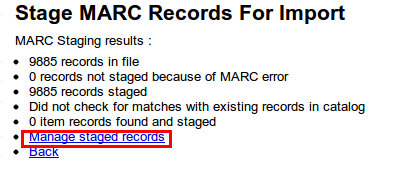
Cliquez ensuite sur “Gestion des notices téléchargées”.
Ici, vous pouvez changer les règles de correspondance.
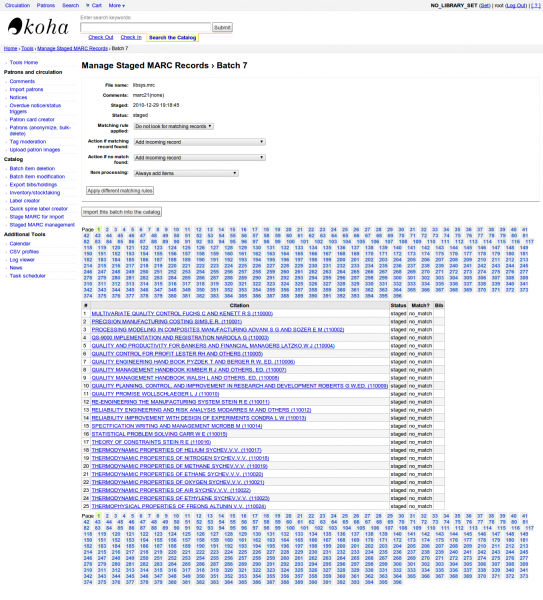
Cliquez sur “Importer ce lot dans le catalogue” lorsque vous avez terminé.
Après avoir importé toutes les notices, vérifiez le statut, il doit y avoir marqué « importé »
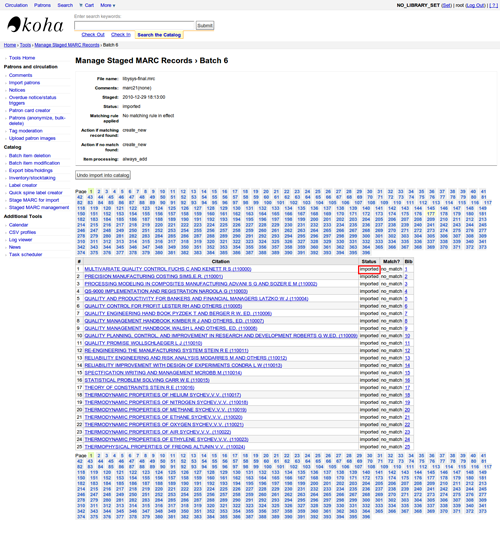
Vous pouvez même annuler l’opération d’importation.
En l’espace de quelques minutes, nous aurons importé à peu près 10 000 notices dans Koha
Talking Tech
Talking Tech I-tiva is a third party, proprietary, product that libraries can subscribe to. Learn more here: http://www.talkingtech.com/solutions/library.
Instructions d’installation et de configuration
Assurez-vous que vous avez exécuté installer/data/mysql/atomicupdate/Bug-4246-Talking-Tech-itiva-phone-notifications.pl pour installer le pack de données requis (new syspref, notice placeholders and messaging transport preferences)
To use, Activer syspref must be turned on.
If you wish to process PREOVERDUE or RESERVES messages, you’ll need the La préférence système EnhancedMessagingPreferences est activée. system preference turned on, and patrons to have filled in a preference for receiving these notices by phone.
For OVERDUE messages, overdue notice triggers must be configured under Koha -> Tools -> Overdue Notice Triggers. Either branch-specific triggers or the default level triggers may be used (script will select whichever is appropriate).
Envoyer un fichier de notices
- Add the TalkingTech_itiva_outbound.pl script to your crontab
- Ajouter un FTP/SFTP ou une autre méthode de transport pour envoyer le fichier de sortie au serveur I-tiva
- Si vous le souhaitez, archivez le fichier des notices envoyées dans un autre répertoire après l’envoi
Run TalkingTech_itiva_outbound.pl –help for more information
Réception du fichier des résultats
- Ajoutez un FTP/SFTP ou une autre méthode de transport pour envoyer le fichier des résultats dans un répertoire précis dans votre serveur Koha
- Add the TalkingTech_itiva_inbound.pl script to your crontab, aimed at that directory
- Si vous le souhaitez, archivez le fichier des résultats dans un autre répertoire après le processus
Run TalkingTech_itiva_inbound.pl –help for more information
Integrating SIP2 with Koha
SIP2 (Session Initiation Protocol) is a protocol for communication between devices.
In the context of Koha SIP2 is used for communication between Self Check (SC) machines i.e. self checkout machines, and the Automated Circulation System (also known as ACS which in this case is the server running Koha).
SIP2 communications consist of requests and responses.
The self checkout machines are ‘dumb’ and so they send requests to the Koha server which runs logic which determines a particular outcome which is sent as a response message back to the client self checkout machine, and this is then conveyed to the user.
Avertissement
Security notice regarding using SIP2 service: To ensure that your SIP2 traffic is secure as it passes over the internet you need to make sure that you are using a VPN or stunnel.
Setting up SIP2
If you installed Koha using Debian packages then SIP2 setup is easy, simply follow these steps:
1. In your terminal (in the root Koha directory) write in: sudo koha-enable-sip <instancename>
2. Now you need to configure the SIP2 settings, to do this you need to edit the SIPconfig.xml file which exists in the /etc/koha/sites/<instancename>/ directory. You will need to edit this file as root because it contains passwords (to do so write ‘sudo’ at the start of your command).
e.g. sudo vi /etc/koha/sites/<instancename>/SIPconfig.xml
Note
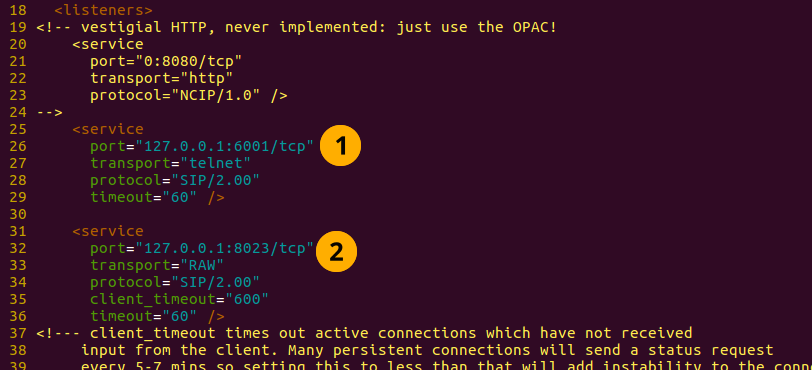
Important note: There are three areas of interest in the SIPconfig.xml file that you need to change. These are: service, account and institution.
Service
2.1 Change the port value near the top of the SIPconfig.xml file (identified by the number 1 in the below screen shot), so it has the same IP address as set further down the SIPconfig.xml file identified by 2.
Note
Make sure the two port values don’t have the same port number as you cannot have the same port being listened to by two different services. When deciding upon the port number make sure it is a high number (i.e. above 1000) because all ports below 1000 require root permissions.
Account
The account(s) you define in the SIPconfig.xml file are simply account(s) permitted to use the SIP2 service i.e. your defining who can send and receive SIP2 commands.
Avertissement
Account information that you write here must also exist in the Koha database i.e. you need to create a patron in the Koha staff interface with the same username, password (making sure to assign them circulate permissions) as the user account you write into the SIPconfig.xml file.
Note
It is highly recommended that you only write in Koha user accounts with circulate permissions.
The reason we want SIP2 users to only have circulate permissions rather than superlibrarian permissions is to reduce the access SIP2 users have to confidential patron data in case the system was compromised.
If the ACS or the SC were compromised then having all SIP2 users only having circulation permissions means that an intruder would only be able to access patron data via the terminal rather than the web interface as well (which would be available with superlibrarian permissions). So it is simply a matter of protecting your users.
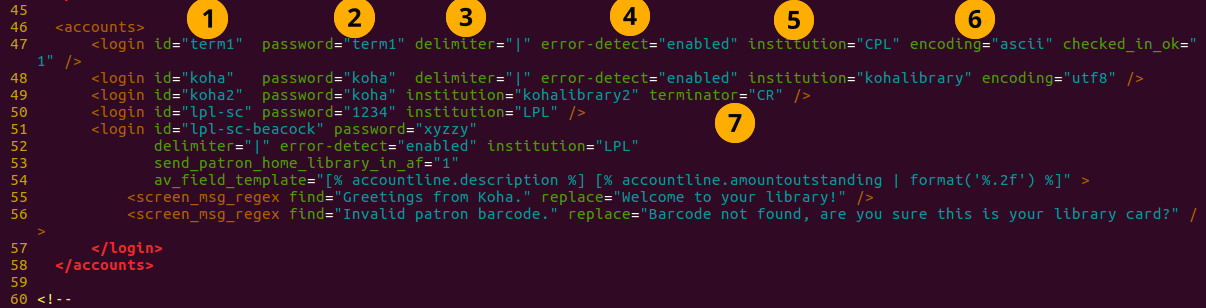
Account value definitions:
- Login id: This is the account username. - Modify this accordingly
- Password: Account password - Modify this accordingly
- Delimiter: The type of delimiter for account information - Leave as default
- error-detect - Leave as default
- Institution: This is the branchcode for the library that the user belongs to. NOTE: This institution needs to be defined further down in the institution area of the SIPconfig.xml file and it must also exist in the Koha database. i.e. you need to create a library with the same branchcode in Koha staff interface.
- encoding: This is the standard used to encode the account data
- Terminator: This needs to match the terminator value of the SIP2 server. - Modify this if you know the terminator value of the SIP2 server.
Institution
The institution information you define here must match a library created in the Koha staff interface.
Avertissement
You need to make sure all the institutions that accounts are assigned to further up in the SIPconfig.xml file are also defined in the institution area of the same file.

Institution value definitions:
1. Institution id: The branchcode of the library. - Modify this accordingly. Must be the same as created in Koha and the account area.
- Implementation: Defines the code that will be run. - Leave as default
3. Policy: Policy defines the permitted SIP2 commands allowed from SC’s in this institution. For example: renewal=”true” means that SC’s at that institution have permission to send renewal item SIP2 commands.
4. Starting SIP2 Simply write in the command: sudo koha-start-sip <instancename>
Note
Now you have a running SIP2 server.
Using SIP2
SIP2 is a communication protocol. The messages sent in SIP2 are either requests or responses. The SC’s send request messages to the ACS which will run some logic and send back the resulting value to the SC as a response message.
The request messages contain arguments, which are data values used by the ACS in its functions to perform the required task such as renewing items.
SIP2 commands
If you want to manually use/test SIP2 then you will be writing and receiving messages via the Linux terminal.
To be able to send and receive messages with the SIP2 server you need to use telnet to open a SIP2 connection. You need to specify the port number you want telnet to use.
To find this information look at the service area at the top of the SIPconfig.xml file (look for the port number as pointed out by the arrow in the below screenshot).

Write into the terminal
telnet localhost <portnumber>
e.g. telnet localhost 8023
Now write in the username and password set in one of the accounts in the SIPconfig.xml file.
Now you are connected to the SIP2 server you can start writing and sending request commands. The connection to the SIP2 server does time out fast so if haven’t finished writing and receiving commands simply write in:
telnet localhost <portnumber>
to restart the SIP2 connection.
SIP2 command syntax
Every SIP2 command has a 2 digit numerical prefix which defines what the command is doing.
e.g. To get information about a patron you start your command with the prefix: 63. The response from the server also has a corresponding numerical prefix.
Below is an example of a SIP2 request message to request patron information (in this example a Koha patron account with the user name ‘joe’, password ‘joes’, and card number ‘y76t5r43’ has been created in the Koha staff interface).
Additionally a library with the branchcode of ‘WEL’ has been created in the Koha staff interface and is also defined in the institution area of the SIPconfig.xml file):

So the format of this SIP2 request message is:

Note
The summary value is a 10 character value. If a Y is written in for the summary value then you will be able to get both a summary and more detailed informational output.
The value in the <YYYYMMDD> <HHMMSS> is the current datetime, by leaving a 4 space gap between the YYYYMMDD and HHMMSS this indicates you want to use local time rather than UTC.
Note
In this manual letter codes for the various fields are used where possible in describing the SIP2 message fields e.g. AO<institutionid>.
These letter codes can be written in the SIP2 commands into the Linux terminal, but make sure when substituting values in for the fields (values inside the <>) that you do not write in the <> brackets.
SIP2 messages:
Block patron
This uses the prefix 01 for request messages and 24 for response messages.
Request message:

Note
Card retained is a single character field of either ‘Y’ or ‘N’ which tells the ACS that a card has been retained by the self checkout machine.
Response message:

Note
<patronstatus> is a 14 character long value. The value Y in the string means true. Each position in this string (starting at 0) has a single corresponding value (Y or N) in the string.
e.g. a Y at position 1 (the second value in the string) means that the patrons renewal privileges are denied.
Check-in items
This uses the request message (messages sent to the ACS) prefix of 09 and the response prefix of 10 (sent to the SC).
Request message:

Note
- <no block (Offline)> is a single character field of either ‘Y’ or ‘N’ which indicates if the transaction is being performed offline. As offline transactions are not supported you need to write ‘N’ if you are testing this message out manually.
- <transactiondate> this is a 18 character field with the date is the format: YYYYMMDDZZZZHHMMSS.
ZZZZ is the timezone, if you want to set it to local you need to leave 4 blank spaces, but if you want to set it to the UTC (Coordinated Universal Time) then you need to write in 3 blank spaces and a Z.
Response message:

Note
Alert type could have one of several values: 00 : Unknown 01: local hold 02: remote hold 03: ILL Transfer 04: transfer 99: Other
If an item is resensitized then the value of <resentitize> should be Y otherwise it should be N. Rensensitizing items is done to ensure that if someone tries to steal the item they are detected.
Checkout items
This uses the request message prefix of 11 and the response message prefix of 12. It has similar syntax to the check-in command, outlined above except the prefixes are different.
Hold – May not yet be supported on some systems. This has a request message numerical prefix of 15 and a response message prefix of 16.
Request message:

Note
<holdmode> is a single character value. + means add a hold, - means delete a hold and * means change a hold.
Response message:

Note
- <ok> is a single length value which is either 0 (for hold is not permitted or was not successful) or 1 (for hold is permitted and was successful).
- <available> is a single length value which is either Y or N. Y means the item is currently in the library, whilst N means the item is currently on loan/someone else has created a hold on the item.
Item information: This uses the request command prefix of 17, and the response command prefix of 18
Request message:

Note
See the check-in items command (described above) to find out what the <xact_date> value is.
The terminal password is optional.
Response message:

Item status update This uses the request message prefix of 19 and the response message prefix of 20
Request message:

Note
<itemproperties> is not a fixed length value, and you can optionally write in values such as item size and these values will be stored in the Koha database for the item.
Response message:

Note
<itempropertiesok> is a single length character value which is either 0 or 1. 1 identifies that the <itemproperties> value defined in the item status update request message was successfully stored in the Koha database.
Patron status
This uses the request message prefix 23 and the response message prefix of 24.
Request message:

Response message:

Note
The value displayed for <patronvalidity> is Y (valid) and N (invalid) The value in the <YYYYMMDD> < HHMMSS> is the current date/time.
The reason for the gap between the two values is to define that you want to use localtime rather than UTC.
Patron enable - This is not yet supported. This uses the request message prefix of 25 and the response message prefix of 26
Note
This command undoes the block patron command.
Request message:

Response message:

Renew This uses the request message prefix of 29 and the response message prefix of 30
Request message:

Note
- <thirdpartyallowed> is a single character value which is either Y or N. If it is Y then third parties can renew items.
- <noblock> is a single character value which is either Y or N. If it is Y then this means that the item was checkin/out when the ACS was offline.
- <nbduedate> is the transaction date of checkin/checkout when the ACS was offline.
- <feeacknowledged> is a single character value which is either Y or N. This indicates if the user accepts the fee associated with the item they are renewing.
Response message:

Note
- <ok> is a single character value which is either 0 or 1. A value of 1 means the item was successfully renewed, 0 means item was not successfully renewed.
- <renewalok> is a single character value which is either Y or N. The logic for the setting of the value of <renewalok> is Y is set when the item is already checkout by the user and so it should be desensitized thereby renewing it, whereas N is set if the item is not already checkout to the patron and so it should not be renewed.
In other words don’t let patrons renew books when they are not currently checked out to them.
- <magneticmedia> is a single character value which is either Y (for yes), N ( for no), or U (for unknown).
- <mediatype> is a three numerical character long value. For a list of the values go to: http://multimedia.3m.com/mws/media/355361O/sip2-protocol.pdf
End session
This uses the request message prefix of 35 and the response message prefix of 36
Request message:

Response message:

Note
<success_or_failure> is either Y for success or N for failure.
Fee Paid – May not be implemented yet. This uses a request message prefix of 37 and a response message prefix of 38
Request message:

Note
- <feetype> is a two numerical character value which is between 01 and 99. To see a list of fee type values go to http://multimedia.3m.com/mws/media/355361O/sip2-protocol.pdf
- <paymenttype> is a two character numerical value between 00 and 99. 00 is cash, 01 is Visa, and 02 is credit card.
- <currencytype> is a 3 alphanumeric character long value identifying the currency the fee paid was in.
Response message:

Note
<paymentaccepted> is a single alphanumeric character long value which is either Y (payment has been accepted) or N (payment has not been accepted).
Patron information
This uses the request message prefix of 63 and the response message prefix of 64
Request message:

Response message:

Note
<valid patron> is Y for valid and N for not valid.
Note
<hold itemcount><overdueitemcount><chargeditemscount><fienitemscount><recallitemscount><unavaliableholdscount> are all 4 numerical character long values.
Renew all
This uses the request message prefix of 65 and the response message prefix of 66.
Request message:

Response message:

Note
- <renewedcount> is a 4 numerical character long value denoting the number of items that were renewed.
- <unrenewedcount>, has the same format as the <renewedcount> but it denotes the number of items not renewed.
Login
This uses the request message prefix of 93, and the response message prefix of 94.
Request message:

Note
<UIDalgorithm> and <PWDalgorithm> are one character long values indicating the type of algorithm to use to encrypt the loginuserid and loginpassword respectively.
Writing in the value of 0 means these values will not be encrypted.
Response message: 941 is a successful login. 940 is an unsuccessful login [connection closed by foreign host.] is a unsuccessful login
Resend
This requests the receiving device to resend its last message.
SC -> ACS resend request is 97
ACS -> SC resend request is 96
Status of the ACS and SC
This has the request message prefix of 99 and the response message prefix of 98.
Request message:

Note
The status code is one of 3 values. * 0: SC is ok * 1: SC is out of paper * 2: SC is shutting down max print width is a 3 character long value which is the integer number of characters the client can print Protocol version is a 4 character value in the format x.xx
Response message:

Note
If you get the response message ‘96’ this means that the request message is not valid/understood.
Troubleshooting SIP2
Can’t connect to remote host when writing in the command telnet localhost <portnumber>
3 solutions for this issue to try are:
1. Check the portnumber your writing in the above command is the port number written in the SIPconfig.xml file at the location indicated by the number 1. i.e. in the below example because the portnumber is 6001 the correct command would be: telnet localhost 6001
2. Check if any userid is written more than once in the SIPconfig.xml file. The userid (which is simply the username of the Koha user) needs to be unique within the SIPconfig.xml file. If you have the same userid multiple times in your SIPconfig.xml file this will cause the connection to SIP2 to fail before you get a chance to authenticate.
3. Check the account defined in the SIPconfig.xml file also exists in the Koha database with the same username, password and has circulate permissions. If you have dropped and recreated the Koha database after creating the patron account in the Koha staff interface and the SIPconfig.xml file then that patron account will not exist in the Koha database and so you will need to recreate them in the Koha staff interface.
Further troubleshooting
To access the SIP2 logs in your Koha home directory navigate to the following directory: /var/log/koha/<instancename>
Then view the output of the sip-error.log and the sip-output.log files which give more detailed information about the SIP2 error.
- cat sip-error.log
- cat sip-output.log
Useful links on SIP2 commands:
http://multimedia.3m.com/mws/media/355361O/sip2-protocol.pdf
Integrating LDAP with Koha
Setting up LDAP (Lightweight Directory Access Protocol) for Koha allows you to store all user information in a central database which is accessed both by your organisations Koha instance and for users to authenticate on other existing systems.
LDAP is a protocol used for file discovery over networks and network authentication.
LDAP configurations are powerful allowing you to customise how Koha and LDAP interact. LDAP can be configured so that new accounts created in LDAP can be synced down into the Koha database, additionally updates to the LDAP user account are synced down to the Koha database.
However Koha cannot sync data up to the LDAP server, thus the data traffic when using LDAP is only one directional.
Auth_By_Bind is set to 1 where a Microsoft Windows Active Directory system is in use in the LDAP database.
Before going through the steps to configure LDAP you will need the following information/actions from the organisation
- The organisation will need to open a port to allow access to their AD from the server.
- Information on the access to the AD server (IP address/hostname, port, SSL info)
- Information on the configuration of the AD server (relevant OUs, DCs, CN formats relative to usernames)
- Mapping between AD fields and Koha fields, including defaults
- Default values for things not provided by AD (categorycode, branchcode for example)
- To authenticate a user do we bind as them (seems to be common for AD) or do we use an account and login with that and then check? If the latter, we’ll need details of how to log in
- Do the existing usernames in Koha match the usernames that we’ll be using to look them up in AD? If so, good. If not, how will we deal with duplicate users?
Steps to set up LDAP with your Koha instance
1 In Linux terminal navigate to the directory containing the koha-conf.xml file which will either be in: * /etc/koha/sites/<instance-name>/ OR * /etc/koha/
2 Open the koha-conf.xml file with root permissions: sudo vi koha-conf.xml
3 Scroll down to the line containing ‘<useldapserver>0</useldapserver>’ and change it to: <useldapserver>1</useldapserver>
4 Then in the next line below write in the LDAP configurations below: Note all fields highlighted in yellow need to be replaced with the appropriate values for your organisations LDAP server.
<ldapserver id= »<ldapserverid> »>
<hostname><hostname></hostname>
<base>dc=<domaincontroller>,dc=<domaincontroller></base>
<user>cn=<nameofuser>, dc=<domaincontroller>,dc=<domaincontroller></user> <!–This is the username of user account with permissions to query the LDAP server –>
<pass><password></pass> <!– This is password of the user account with permissions to query the LDAP server–>
<replicate><either0or1></replicate> <!– add new users from LDAP to Koha database –>
<update><either0or1></update> <!– update existing users in Koha database –>
<auth_by_bind><either0or1></auth_by_bind> <!– set to 1 to authenticate by binding instead of password comparison, e.g., to use Active Directory –>
<principal_name><principalname></principal_name> <!– optional, for auth_by_bind: a printf format to make userPrincipalName from koha userid –>
<mapping> <!– match koha SQL field names to your LDAP record field names–>
<firstname is= »givenname »></firstname>
<surname is= »sn »></surname>
<address is= »postaladdress »></address>
<city is= »l »>Athens, OH</city> <!– Athens,OH is the default value for city of all users logging into Koha –>
<zipcode is= »postalcode »></zipcode>
<branchcode is= »branch »>Central</branchcode>
<userid is= »uid »></userid>
<password is= »userpassword »></password>
<email is= »mail »></email>
<categorycode is= »employeetype »>EM</categorycode>
<phone is= »telephonenumber »></phone>
</mapping>
</ldapserver>
5 Save and exit the koha-conf.xml file
6 Check the LDAP connection works by writing in:
ldapsearch -H ldaps://host.name -s base -x -w « » -d 1
Note
Note about hostname Hostname can either be a alphanumerical name or it can be the LDAP server IP address (its optional to write port number). By default the ldaps default port number is 636, whilst ldap default port number is 389
Note
Note about the replicate and update fields The replicate LDAP config field for LDAP in the koha-conf.xml file allow the Koha database to be added to with a new borrower account whenever a user logs into Koha (either the staff client or OPAC) with their LDAP username and password (assuming the same username and password does not already exist in the Koha database).
Whereas the update LDAP config field (in the same file allows) allows for user information in the LDAP database to be synced down to the Koha database. e.g. if someone gets married and their surname changes then the new surname only needs to be updated in the existing LDAP database and that will be synced down to the Koha database automatically if the update configuration is set to 1.
About the mapping fields (the fields highlighted green) <city is= »l »>Athens, OH</city>
The left hand column name (highlighted yellow) is the name of the column in the LDAP database.
The column name inside quote marks (highlighted pink) is the name of the column in the Koha database. NOTE: This can be filled with any value if there is no equivalent column name in the Koha database as exists in the LDAP database.
The value highlighted cyan is the default value for the specified Koha and LDAP columns. So in the above example all user records in the Koha and LDAP databases will by default have the city value of ‘Athens, OH’.
Example of the LDAP configurations:
<useldapserver>1</useldapserver><!– see C4::Auth_with_ldap for extra configs you must add if you want to turn this on –>
<ldapserver id= »ldapserver » listenref= »ldapserver »>
<hostname>ldaps://example.co.au</hostname>
<base>ou=employees,dc=companya,dc=com,dc=au</base>
<user></user> <!– DN, if not anonymous –>
<pass></pass> <!– password, if not anonymous –>
<auth_by_bind>1</auth_by_bind>
<replicate>1</replicate> <!– add new users from LDAP to Koha database –>
<update>0</update> <!– update existing users in Koha database –>
<principal_name>ou=employees,dc=companya,dc=com,dc=au</principal_name>
<mapping>
<userid is= »uid » ></userid>
<cardnumber is= »uid » ></cardnumber>
<email is= »mail » ></email>
<surname is= »sn » ></surname>
<firstname is= »givenname » ></firstname>
<categorycode is= »1 »>EM</categorycode>
<branchcode is= »1 »>SYD</branchcode>
</mapping>
</ldapserver>
The values in the mapping area are not always the same, and it depends on what is in your organisations LDAP database. For example some organisations do not use <userid> instead each user is only identified by the <email> field and so no <userid> is written.
Troubleshooting LDAP
The log that LDAP errors are printed to depends on several factors:
If plack is not disabled then LDAP errors are displayed in the plack-error.log file If plack is disabled then the location that LDAP errors are printed to is either the opac-error.log file (if the user is logging into the OPAC) or the intranet-error.log file (if the user is logging into the staff client) All of these three log files are accessible in the following directory:
/var/log/koha/<instance>/
OCLC Connexion Gateway
Koha peut être configuré pour travailler avec OCLC Connextion Gateway. Cela permet aux bibliothèques d’utiliser OCLC Connexion comme outil de catalogage et envoyer simplement ces notices à Koha en un seul clic. Les instructions suivantes vous aideront à configurer le portail de connexion OCLC, si vous avez un administrateur du système, vous pourrez les consulter sur ce processus.
Configuration du service OCLC dans Koha
Vous devrez d’abord créer un fichier quelque part dans votre système avec l’information de configuration. Vous pouvez le mettre n’importe où, du moment qu’il est visible par le compte qui exécutera le service.
Le fichier contient 11 lignes. Les 6 premières lignes concernent le système de Koha:
host: The IP address of your Koha server
port: The port you want to use for the Connexion service. This port must be different from your SIP port, or any other service
koha: The full URL of your staff client
log: The location (full file specification) of your log for the service
user: The default Koha username to use for importing
password: The password that goes with that username
Les lignes restantes décrivent la mise en place:
match: The name of the matching rule from your system to use
overlay_action: "replace", "create_new", or "ignore"-- what to do if there is a match
nomatch_action: "create_new" or "ignore"-- what to do if there is no match
item_action: "always_add","add_only_for_matches","add_only_for_new", or "ignore" -- what to do with embedded 952 item data
import_mode: "direct" or "stage"
Voici un exemple de fichier:
host: 1.2.3.4
port: 8000
log: /home/koha/koha-dev/var/log/connexion.log
koha: http://kohastaff.myuniversity.edu
user: koha_generic_staff
password: password
match: 001
overlay_action: replace
nomatch_action: create_new
item_action: ignore
import_mode: direct
When choosing an “import_mode” if you use « direct » then the staged record will be immediately imported into Koha, and should be searchable after your indexes catch up. If you choose « stage », then the record will be placed in a staged batch for you to later go the Manage Staged MARC Records tool to finish the import.
Si vous importez plusieurs notices, elles seront dans le même lot jusqu’à que celui-ci soit importé; puis un nouveau lot sera créé.
En mode « direct », chaque notice sera dans son propre lot.
Pour démarrer le service, exécutez le script:
/location/of/connexion/import/daemon/connexion_import_daemon.pl -d -c /location/of/config/file.cnf
Paramétrer votre client du bureau OCLC
Note
Les captures d’écrans sont client de la connexion OCLC v.2.50, Koha v.3.12
To set up the OCLC Connexion desktop client to connect to Koha, go to Tools > Options, then choose the Export tab.
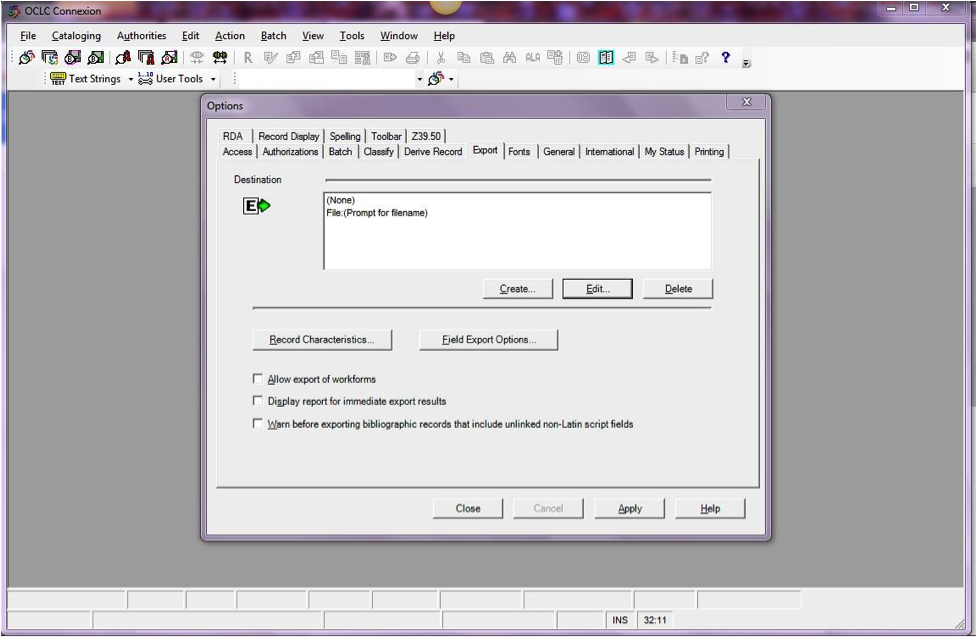
Cliquez sur le bouton « Créer… » pour paramétrer une nouvelle définition, puis choisissez « Export du portail OCLC » et cliquez sur OK.
- Saisissez l’information suivante:
- « Host Name: » Your catalog’s appropriate IP address (from your config file above)
- « Port: » Your catalog’s appropriate port number (from your config file above)
- « Login ID: » Connexion Koha du catalogueur
- « Password: » Mot de passe Koha du catalogueur
- « Notify Host Before Disconnect » = checked,
- « Timeout » = 100, « Retries » = 3, « Delay » = 0 (zero),
- « Send Local System Logon ID Password » = checked.
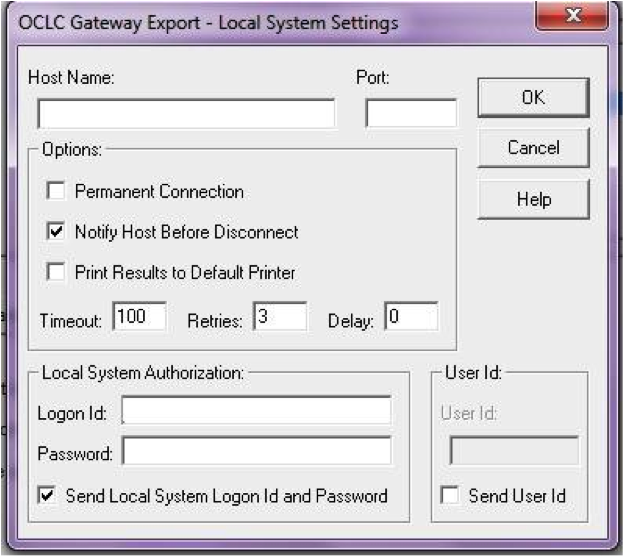
- Saisissez l’information suivante:
Sélectionnez « OK » lorsque vous avez terminé et vous verrez l’option “Exportation de la passerelle » (l’adresse IP du catalogue et du port est noircie sur la capture d’écran suivante)
Paramètres d’export de la passerelle OCLC
Cliquez sur « Caractéristiques de la notice » et assurez-vous que les notices bibliographiques utilisent MARC21, UTF-8 Unicode, et cliquez sur OK pour enregistrer.
Caractéristiques de la notice
Vous devrez être prêt! Pour exporter une notice depuis le client de connexion OCLC à Koha, tapez sur F5 pendant que la notice est sur l’écran. Le dialogue d’exportation s’ouvrira, et vous verrez la tentative de connexion OCLC avec Koha. Un message annoncera que la notice a bien été ajoutée ou recouverte, en incluant son numéro biblio et un URL que vous pourrez copier dans votre navigateur pour pouvoir accéder directement à la notice.
Utilisation de la connexion OCLC
Les notices peuvent être exportées depuis Connexion OCLC par lot, ou une par une.
Exporter des notices une par une
To export bibliographic records one by one, be sure your « Batch » options are correct: from the « Tools » menu, select « Options », and select the « Batch » tab. In the « Perform local actions in batch » area, « Bibliographic Record Export » should be unchecked
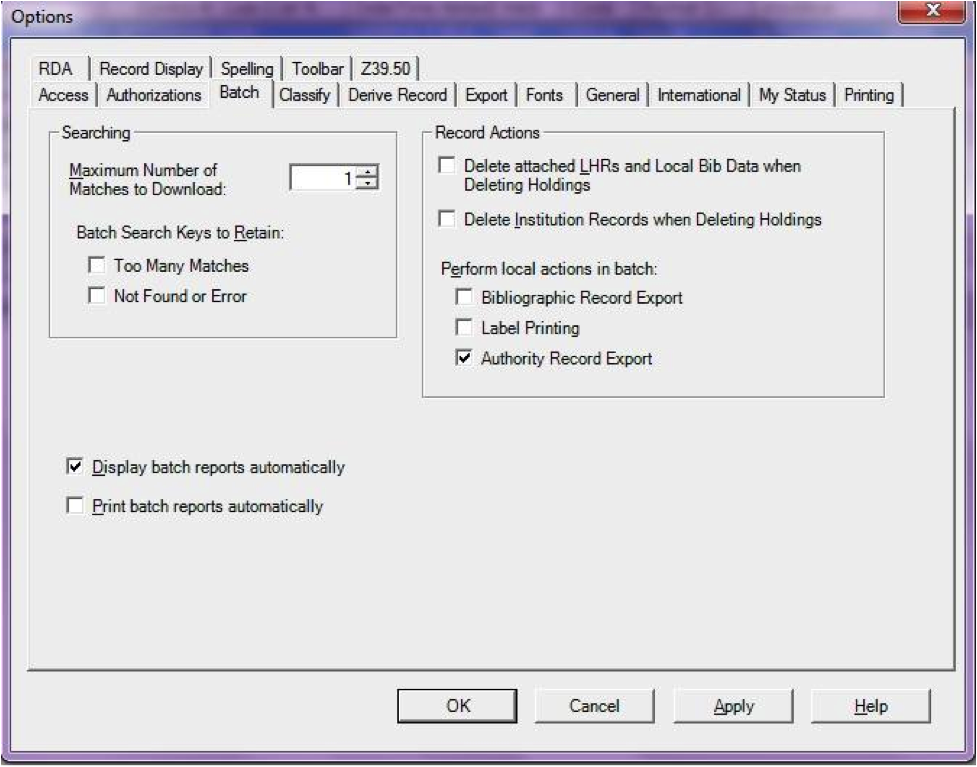
When ready to export, from the « Action » menu, select « Export » or use the F5 key. You will see a screen similar to the following if the import is successful and if the record is new to the Catalog; you may copy & paste the resulting URL into your Koha catalog to see the new record.
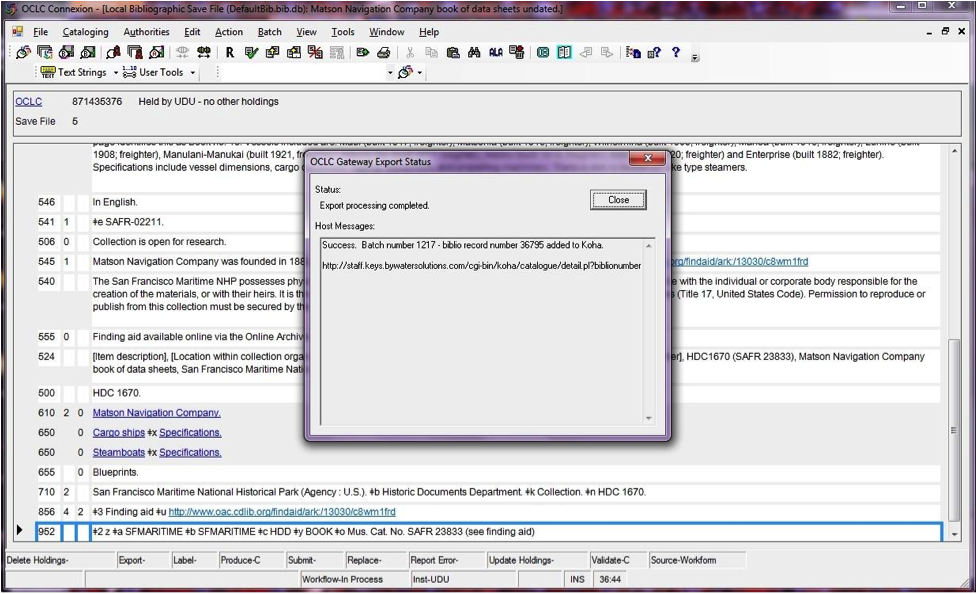
If the record was overlaid, you will see a message to that effect in the « OCLC Gateway Export Status » window
Exporter des notices par lot
To export bibliographic records in a batch, be sure your « Batch » options are correct: from the « Tools » menu, select « Options », and select the « Batch » tab. In the « Perform local actions in batch » area, « Bibliographic Record Export » should be checkedOCLC
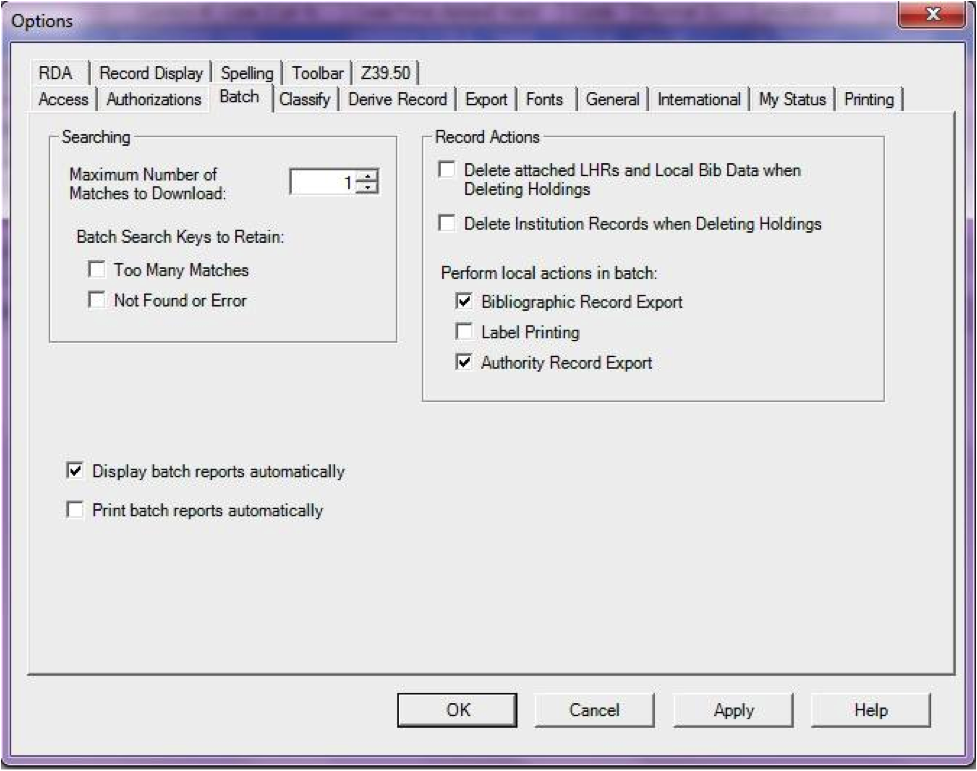
Lorsqu’une notice est prête à être exportée, sélectionnez « Exportation » ou utilisez la touche F5 depuis le menu « Action ». Le statut d’exportation sera marqué de « prêt ».
When ready to export the batch, from the « Batch » menu, select « Process batch » and check the appropriate « Path » and « Export » boxes
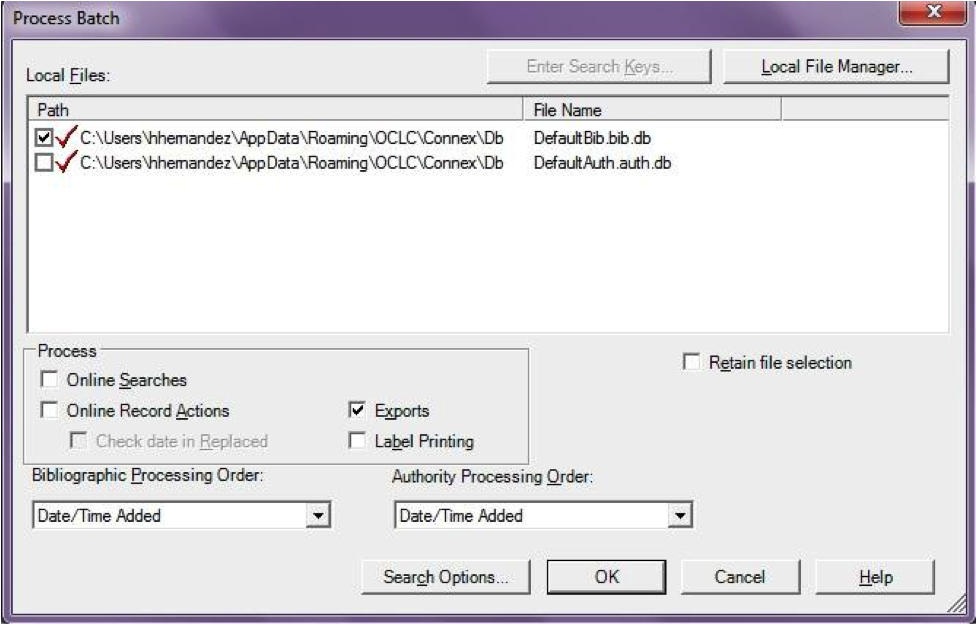
The export will begin, and the bib records will be exported & imported into Koha one by one; you will see « OCLC Gateway Export Status » windows, as above, showing you the results of each export. That window will stay there until you select « Close, » and then the next record’s export/import will begin. The process will continue until all records in the batch are completed. Then you may or may not see the Connexion Client export report (depending on your Client options for that).
Exemplaires dans OCLC
If you’d like to create your item records in OCLC you can do so by addding a 952 for each item to the bib record you’re cataloging. The Item/Holdings Cataloging Guide will break down what subfields you can use in the 952, but at the minimum you want to have subfield 2, a, b, and y on your items.
952 \$2CLASSIFICATION$aHOMEBRANCHCODE$bHOLDINGBRANCHCODE$yITEMTYPECODE
- The subfield 2 holds the classification code. This can be ddc for Dewey or lcc for Library of Congress or z for Custom. Other classification sources can be found in the Classification Sources area in administration
- Subfield a is your home library and needs to be the code for your home library, not the library name. You can find these codes in the Libraries & Groups administration area.
- Subfield b is your holding library and needs to be the code for your holding library, not the library name. You can find these codes in the Libraries & Groups administration area.
- Subfield y is your item type code. It needs to be the code, not the item type name. You can find these codes in the Item Types administration area.
952 \$2ddc$aMAIN$bMAIN$yBOOK
In addition to these required fields you can enter any other subfield you’d like. Most libraries will enter a call number in subfield o and a barcode in subfield p as well. Review the Item/Holdings Cataloging Guide for a full list of subfields and values.
FAQs
Affichage
Îcones de type personnalisé d’objet/Valeur autorisée
Question: Can I have my own set of item type images (or authorized value icons)?
Answer:Absolutely. To add additional icons to your system you simply add a new directory to koha-tmpl/intranet-tmpl/prog/img/itemtypeimg/ and to koha-tmpl/opac-tmpl/prog/itemtypeimg and put your icons in the new directory. Your icons will show up in a new tab as soon as they are in the folders.
Note
N’oubliez pas de mettre les images/icônes aux deux endroits (OPAC et intranet).
Personnaliser les images de Koha
Question: Can I customize the images in the OPAC?
Answer: Absolutely. Koha comes with a series of original images that you can alter to meet your needs. The originals can be found in the misc/interface_customization/ directory.
Affichage des champs dans l’OPAC
Question: What MARC fields print to the different OPAC screens in Koha?
Answer: The XSLT preference must be set as follows for the following fields to show
- sans utiliser XSLT = using XSLT stylesheets
- sans XSLT = using XSLT stylesheets
- Afficher = show
La page des résultats OPAC affiche:
- 245
- 100, 110, 111
- 700, 710, 711
- 250
- 260
- 246
- 856
La page de détails de l’OPAC affiche:
- 245
- 100, 110, 111
- 700, 710, 711
- 440, 490
- 260
- 250
- 300
- 020
- 022
- 246
- 130, 240
- 6xx
- 856
- 505
- 773
- 520
- 866
- 775
- 780
- 785
- plus tous les champs 5xx dans l’onglet Notes en bas
Affichage du sous-titre dans les notices bibliographiques
Question: How do I get the subtitle to display on the detail pages for my bib records?
Answer: Subtitle display now depends on there being a keyword mapping for the MARC field in question. Adding a mapping for « subtitle » -> « 245b » for an item’s framework results in display of the subtitle in OPAC and staff client search and detail pages (although not in all instances where subtitles might be displayed, e.g. the Cart).
Afficher les codes à barres des exemplaires qu’ils ont empruntés
Question: Can patrons see the barcodes for the items they have checked out.
Answer: Not by default, but with a few edits to the patron record you can make a barcode column appear on the patron’s check out summary in the OPAC. You can set up a patron attribute with the value of SHOW_BCODE and authorized value of YES_NO to make this happen.
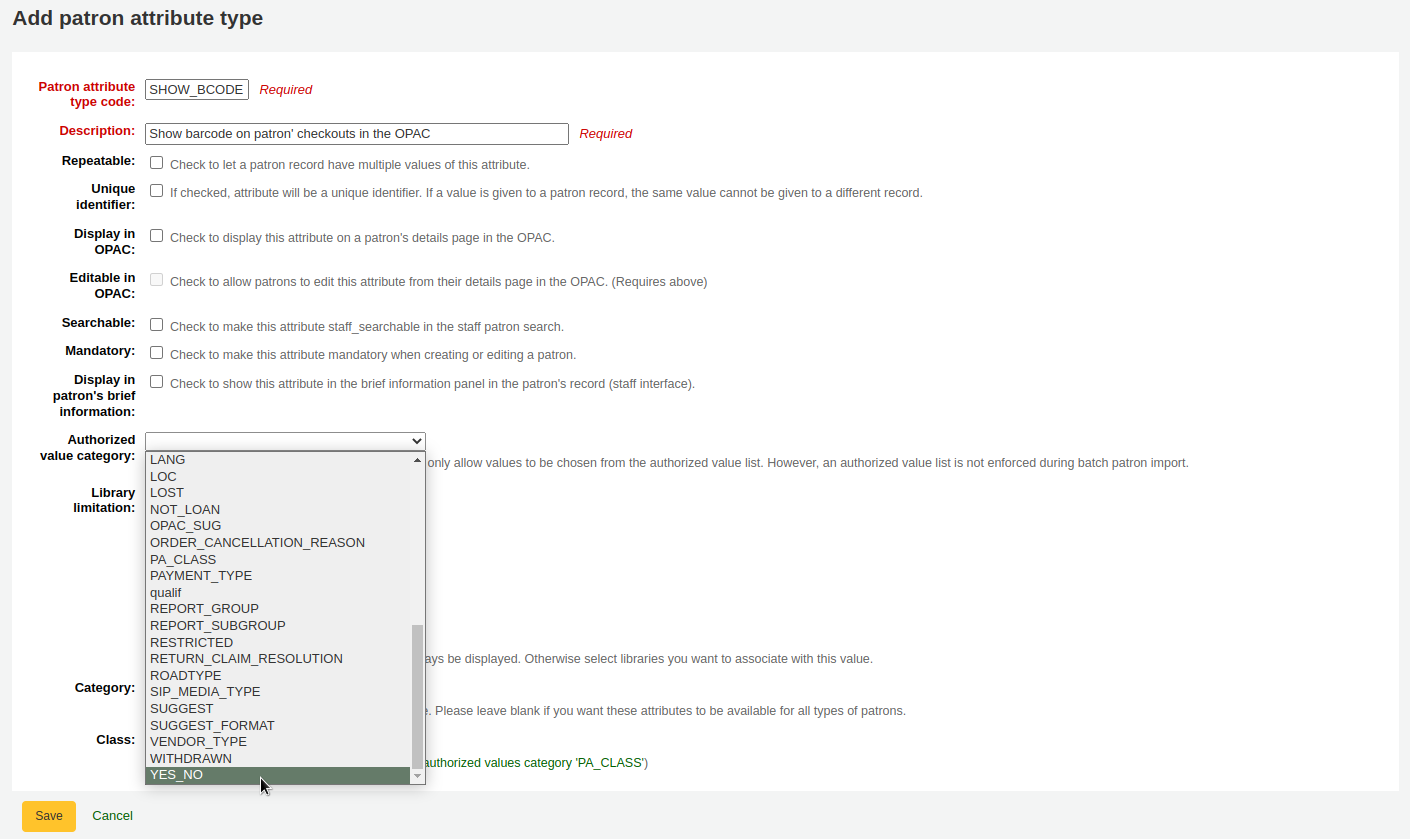
Then on the patron’s record set the value for SHOW_BCODE to yes.
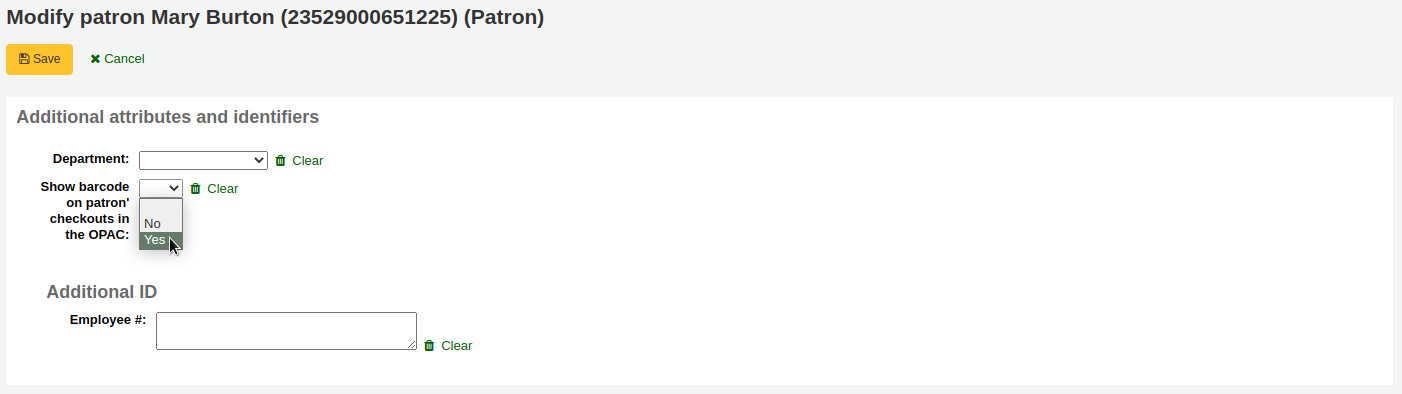
Cela ajoutera une colonne au tableau de résumé de l’OPAC qui affichera les code à barres des documents empruntés.
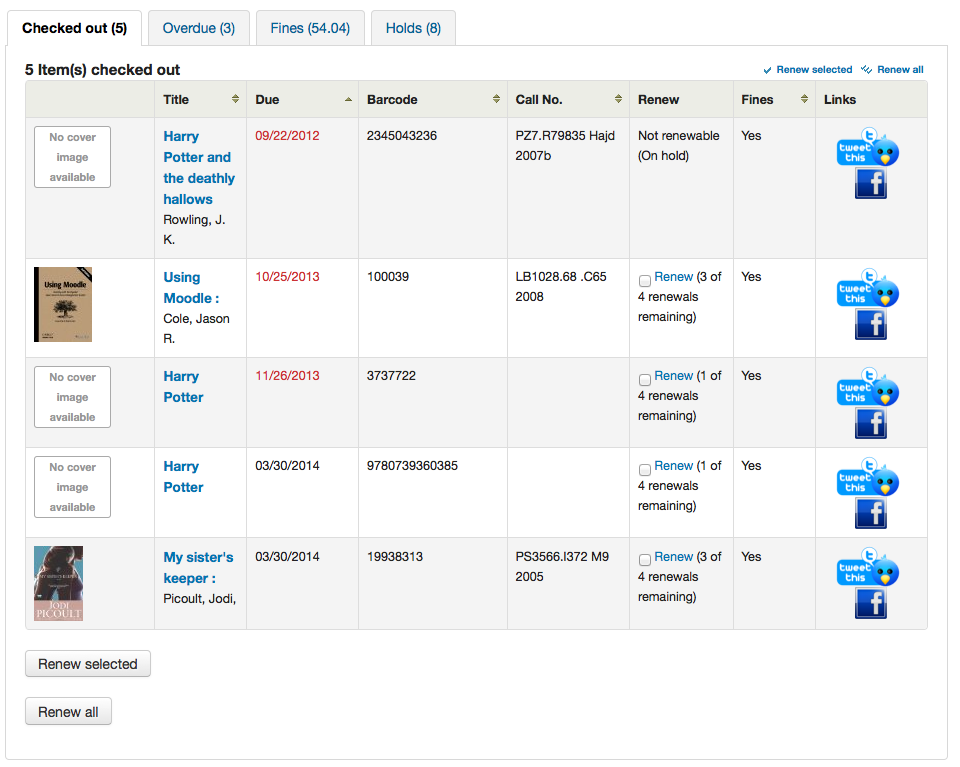
Si vous cliquez sur l’onglet “Retards”, cela affichera tous les documents en retard.
Circulation/Notifications
Date pour dépôt dans la boîte de retour
Question: How is the book drop date is determined? Is it the last open date for the checkout branch? Is it today’s date minus one? Can the book drop checkin date be set?
Answer: If the library is closed for four days for renovations, for example, there would be more than one day needed for the book drop date. You will only have one book drop date and that will be the last day that the library open (determined by the holiday calendar) because there is no real way to know what day the books were dropped into the box during the 4 closed days. The only way to change the effective checkin date in book drop mode is to modify the calendar.
Réservations à traiter et file d’attente des réservations
Question: What is the difference between the Holds Queue and Holds to Pull?
Answer: The holds to pull report gives a simple list of what holds need to be filled with available items. It should only be used in Koha installations where there is only one library.
The holds queue tries to do the same thing, but in a “smarter” way. This allows it to split up the list by library, consult the transport cost matrix and refresh regularly to provide different pull lists to each library.
Notifications de retard dupliquées
Question: Why are patrons getting two overdue notices?
Answer: This tool takes all branches in the overdue rules and sent notifications to them. So, if you have a default rule & a branch rule, the notification will be generated twice. A quick fix is to discard « default rule » for instance.
Impression des notifications de retard
Question: Can I print overdue notices for patrons without email addresses on file?
Answer: Yes. The overdue notice cron job has a setting to generate the overdue notices as HTML for printing. An example of this usage would be:
overdue_notices.pl -t -html /tmp/noticedir -itemscontent issuedate,date_due,title,barcode,author
Dans cet exemple, nous voulons seulement utiliser certains champs d’exemplaires dans nos notifications, il faut donc spécifier les champs de itemscontent dans l’accès au cron, ce qui n’est pas obligatoire pour cette fonction.
The command line needs to specify a web-accessible directory where the print notices will go – they get a filename like notices-2009-11-24.html (or holdnotices-2009-11-24.html). The overdue notice itself can be formatted to fit a Z-mailer. Within the notice file, the text is spaced down or over to where it will print properly on the form. The script has code that wraps around the notice file to tell the HTML to obey the formatting, and to do a page break between notices. That’s so that when staff print it out, they get one per page. We had to add an extra syspref (PrintNoticesMaxLines) to specify page length because our client allows a _lot_ of checkouts which meant some notices were running onto multiple pages. That syspref says to truncate the print notice at that page length and put in a message about go check your OPAC account for the full list.
The print and email overdues use the same notice file. The print notices for holds are different – there’s a separate HOLD_PRINT notice file and the system uses it if there’s no email address. Then a nightly cron job runs to gather those up from the message queue and put them in an HTML file in the notice directory, as above.
The cron entry is gather_print_notices.pl /tmp/noticedir
Impossible de renouveler les exemplaires
Question: We’re trying to renew some items for our patron. One of the items is on hold and ineligible for renewal, but the other two items refuse to renew even though they should be eligible. When I try to use the override renewal limit, it just returns a little message that says « renewal failed ». Any idea what’s going on here?
Answer: At the very least you will need to set an absolute default circulation rule. This rule should be set for the default itemtype, default branchcode and default patron category. That will catch anyone who doesn’t match a specific rule. Patrons who do not match a specific rule will get blocked from placing holds or renewing items, since there was no baseline number of holds or renewals to utilize.
Impossible de faire des réservations
Question: Why can’t I place holds when I have all of the preferences turned on.
Answer: You probably need to set a default circulation rule. At the very least you will need to set an default circulation rule. This rule should be set for all item types, all branches and all patron categories. That will catch all instances that do not match a specific rule. When checking out if you do not have a rule for the default branch, default item and default patron category then you may see patrons getting blocked from placing holds.
Raccourcis clavier
Question: Do I have to use my mouse to access the checkout, checkin and cataloging tabs at the top of the circulation pages?
Answer: You can jump between the tabs on the quick search box at the top of the screen by using the following hot keys (if the tab is available):
activer l’onglet de recherche dans le catalogue avec Alt+Q
activer l’onglet de prêt avec Alt+U
- cela ne fonctionnera pas pour les utilisateurs de Mac
activer l’onglet de prêt avec Alt+R
Note
Les utilisateurs de Mac utilisent le bouton OPTION à la place du ALT
Notifications/Messages SMS
Question: I want Koha to send notices via SMS, what do I need to do?
Answer: First you need to choose a SMS service to use with Koha. There is a list available here: http://search.cpan.org/search?query=sms%3A%3Asend&mode=all Not all SMS services available to libraries have Perl drivers, so be sure to check this list to see if the provider you’re considering is listed. If not you want to ask your provider if they have a Perl module, if not you should consider another service. Some common options in the US (that have Perl drivers) are:
- AQL (www.aql.com)
- Wadja (wadja.com)
- Ipipi (ipipi.com)
- T-mobile
- SMSDiscount (smsdiscount.com)
- Clickatell
Question: What about in India?
Answer: India does not yet have too many options here. This is partly due to the Telecom regulatory authority’s (TRAI) stipulations about transactional SMSes and limits on the number of SMSes that may be sent / received per users per day. India specific drivers include:
- Unicel Technologies Pvt Ltd (unicel.in)
Catalogage
Champs d’autorité
Question:Why can’t I edit 1xx, 6xx, or 7xx fields in my catalog record?
Answer: These fields are authority controlled and you probably have the BiblioAddsAuthorities set to « Don’t allow ». When it is set to « Don’t allow » these fields will be locked and require you to search for an existing authority record to populate the field with. To allow typing in these authority fields set BiblioAddsAuthorities to “Allow”.
Note
Les champs affectés par cette préférence système afficheront un petit cadenas

Liens Koha => MARC
Question: What’s the relationship between “Koha to MARC Mapping” and “MARC Bibliographic Frameworks”?
Answer: Mapping can be defined through “MARC Bibliographic Frameworks” OR “Koha to MARC Mapping”. “Koha to MARC Mapping” is just a shortcut to speed up linkage. If you change a mapping in one of these modules, the mapping will change in the other as well. (In other words, the two modules “overwrite” each other in order to prevent conflicts from existing in Koha).
Nombre d’exemplaires par notice bibliographique
Question: Is there a limit on the number of items I can attach to a bib record?
Answer: There is no explicit limit to the number of items you can attach to a bibliographic record, but if you attach enough of them, your MARC record will exceed the maximum file size limit for the ISO 2709 standard, which breaks indexing for that record. I’ve found this occurs somewhere between 600 and 1000 items on a “normal” bibliographic record.
Notices de dépouillement
Question: I am using the EasyAnalyticalRecords feature, but my links in the OPAC and Staff Client to “Show Analytics” are not working.
Answer: If you plan on using EasyAnalyticalRecords you will want to make sure to set your UseControlNumber preference to « Don’t use, » this will prevent broken links.
Acquisitions
Catégories de planification
Question: What is a planning category?
Answer: When you plan in advance for the way your budget is going to be spent, you initially plan for how it’s going to be spent over time, that’s the most natural thing to do.
Donc si vous planifiez 1000€ en Janvier, 1000€ en Février, 3000€ en Mars etc… Vous pouvez faire à peu prés la même chose avec une liste de valeurs au lieu des mois.
Disons que vous avez une liste comme celle-ci:
- < 1 month
- < 6 months
- < 1 year
- < 3 years
- < 10 years
- > 10 years
The list is meant to represent when the books acquired where published. Then you plan for it, saying: we went to spend at list 40% of our budgets on books published less than a year ago, 10% on books more than 10 years old, etc.
Durant l’acquisition de nouveaux documents, vous devrez sélectionner une valeur de cette liste dans le menu déroulant, pour un document donné. Puis, une fois le document acquis, vous pourrez comparer à la fin de l’année les objectifs fixés avec ce qui a été réellement accompli.
Périodiques
Modèles avancés
Question: What is the “inner counter” on the advanced serials pattern interface?
Answer: I think it is better to give an example to understand this :
Exemple pour un abonnement mensuel :
- Première date de publication : Avril 2015
- Numérotation : Num {X}, année {Y}
- Premier numéro : Num 4, année 2015
Pour l’année Y : vous voulez changer l’année en Janvier 2016
Donc le modèle avancé pour Y sera :
- Ajouter : 1
- tous les : 12
- Quand plus de 9999999
- compteur interne : 3
- Retarder à 0
- Commence avec 2015
L’année changera après réception des 12 numéros à partir d’Avril 2015; c’est-à-dire en Avril 2016 si vous n’avez pas paramétré le compteur interne. Définir le compteur interne sur 3, dira à Koha : changer d’année après 12-3 = 9 numéros reçus.
Le compteur interne dit à Koha de prendre en compte les premiers numéros de l’année, même s’ils ne sont pas réceptionnés dans Koha. Si vous commencez avec le premier numéro de l’année, n’écrivez rien ou juste 0.
Rapports
Définir les codes stockés dans la base de données
Table des amendes
Question: What do the codes in the accounttype field in the accountlines table stand for?
Answer:
- A = Coût d’inscription
- C = Crédit
- F = Amende pour retard
- FOR = Dette remise
- FU = Amende de retard, toujours en cours d’accroissement
- L = Exemplaire perdu
- LR = Exemplaire perdu remboursé ou rendu
- M = Frais divers
- N = Nouvelle carte
- PAY = Paiement
- W = Passé en pertes et profits
Table Statistiques
Question:What are the possible codes for the type field in the statistics table?
Answer:
- localuse
- S’enregistre si un document qui avait été prêté à un usager de type statistique (type de catégorie = “X”) est retourné
- issue
- return
- renew
- writeoff
- payment
- CreditXXX
- Le XXX contient différents types d’amendes, donc une requête pour tous les bloquer inclura une clause comme « type LIKE “Credit%” »
Table de réserves
Question: What are the possible codes for the found field in the reserves and old_reserves tables?
Answer:
- NULL: l’adhérent a réservé le premier exemplaire disponible, et nous ne l’avons pas encore choisi
- T = En transit: la réservation est liée à un exemplaire, mais est en transit vers le site de retrait
- W = En attente: la réservation est liée à un exemplaire, qui est en attente de retrait sur le site de destination
- F = Close: le document réservé a été remis au lecteur, la réservation est close
Table dictionnaire des rapports
Question: What are the possible codes for the area field in the reports_dictionary table?
Answer:
- 1 = Circulation
- 2 = Catalogue
- 3 = Adhérents
- 4 = Acquisitions
- 5 = Comptes lecteurs
Table des messages
Question: What are the possible codes for the message_type field in the messages table?
Answer:
- L = pour les Bibliothécaires
- B = pour les adhérents
Table des périodiques
Question: What are the possible codes for the status field in the serial table?
Answer:
- 1 = Attendu
- 2 = Arrivé
- 3 = En retard
- 4 = Manquant
- Non disponible
- 6 = Supprimé
- 7 = Réclamé
- 8 = Arrêté
- 41 = Manquant (non reçu)
- 42 = Manquant (épuisé)
- 43 = Manquant (endommagé)
- 44 = Manquant (Perdu)
Table des adhérents
Question: What are the possible codes for the privacy field in the borrowers table?
Answer:
- 0 = Toujours
- 1 = Par défaut
- 2 = Jamais
Préférences système des notifications
Question: What are the possible codes in the message_attribute_id field in the borrower_message_preferences table?
Answer:
- 2 = préavis de rappel
- 6 = prêt de l’exemplaire
- 4 = Réservation mise de côté
- 1 = exemplaire à retourner à la date prévue
- 5 = retour de l’exemplaire
Paramètres d’exécution
Question: Is there a way to filter my custom SQL reports before they run?
Answer: If you feel that your report might be too resource intensive you might want to consider using runtime parameters to your query. Runtime parameters basically make a filter appear before the report is run to save your system resources.
There is a specific syntax that Koha will understand as “ask for values when running the report”. The syntax is <<Question to ask|authorized_value>>.
- The << and >> are just delimiters. You must put << at the beginning and >> at the end of your parameter
- La “Question to ask” sera affichée devant la chaîne de caractères à saisir.
- The authorized_value can be omitted if not applicable. If it contains an authorized value category, or branches or itemtype or categorycode or biblio_framework, a list with the Koha authorized values will be displayed instead of a free field Note that you can have more than one parameter in a given SQL Note that entering nothing at run time won’t probably work as you expect. It will be considered as « value empty » not as « ignore this parameter ». For example entering nothing for : « title=<<Enter title>> » will display results with title=”” (no title). If you want to have to have something not mandatory, use « title like <<Enter title>> » and enter a % at run time instead of nothing
Exemples:
SELECT surname,firstname FROM borrowers WHERE branchcode=<<Enter patrons library|branches>> AND surname like <<Enter filter for patron surname (% if none)>>
SELECT * FROM items WHERE homebranch = <<Pick your branch|branches>> and barcode like <<Partial barcode value here>>
SELECT title , author FROM biblio WHERE frameworkcode=<<Enter the frameworkcode|biblio_framework>>
Note
To generate a date picker calendar to the right of the field when running a report you can use the “date” keyword like this: <<Enter Date|date>>
Note
Vous devez mettre « % » dans la barre de texte pour “le laisser vide”. Autrement, il cherchera littéralement « » (chaîne vide) comme valeur pour le champ.
Important
In addition to using any authorized value code to generate a dropdown, you can use the following values as well: Framework codes (biblio_framework), Branches (branches), Item Types (itemtypes) and Patron Categories (categorycode). For example a branch pull down would be generated like this <<Branch|branches>>

Résultats limités
Question: When I download my report it’s limited to 10,000 results, how do I get all of the results to download?
Answer: There is a limit of 10,000 records put on SQL statements entered in Koha. To get around this you want to add “LIMIT 100000” to the end of your SQL statement (or any other number above 10,000.
Recherche
Recherche avancée
Parcourir les index
Question: What does “scan indexes” on the advanced search page mean?
Answer: When you choose an index, enter a term, click “scan indexes” and do the search, Koha displays the searched term and the following terms found in this index with the number of corresponding records That is search is not made directly in the catalog, but first in the indexes It works only for one index at once, and only with no limit in Location (All libraries needed)
Recherche de termes commençant par un caractère
Question: How do I search for all titles that start with the letter “C”?
Answer: You can choose to search for things that start with a character or series of characters by using the CCL “first-in-subfield”
- exemple: ti,first-in-subfield=C
Recherche avec caractères de substitution (jokers)
Question:What is the difference between a keyword search using the “*” (asterisk) versus a keyword search using the “%” (percent)? Both work in the catalog, but return different sets. Why?
Answer: A wildcard is a character (*,?,%,.) that can be used to represent one or more characters in a word. Two of the wildcard characters that can be used in Koha searches are the asterisk (“*”) and the percent sign (“%”). However, these two characters act differently when used in searching.
The “*” is going to force a more exact search of the first few characters you enter prior to the “*”. The asterisk will allow for an infinite number of characters in the search as long as the first few characters designated by your search remain the same. For example, searching for authors using the term, Smi*, will return a list that may include Smith, Smithers, Smithfield, Smiley, etc depending on the authors in your database.
Le “%” traitera les mots que vous avez saisi avec le terme « est comme ». Donc une recherche pour Smi% recherchera des mots comme Smi. Une liste de résultats variés s’affichera. Par exemple, une recherche avec Smi% affichera une liste contenant Smothers, Smith, Smelley, Smithfield etc… selon ce que vous avez dans la base de données.
The bottom line in searching with wildcards: “*” is more exact while “%” searches for like terms.
Recherche de titres
Question: Why does my Zebra title search for “Help” not turn up “The help” in the first pages of results?
Answer: When doing a title search, you actually want to search for the title (i.e., “the help” rather than just “help”), and it will bubble right up to the top. If you’re just searching for “help” then the relevance ranking is going to affect the results you see.
When it comes to relevance in Zebra, here’s what’s happening. First, the search is done. If you search for the title « help », then any title that has « help » in it comes back. Then from those records, separately, it does relevance on the *whole* record. The more your word appears, the more relevant, and some MARC tags are worth more points than others. So a self-help book with 505 notes where « help » appears a *lot* will be at the top, regardless of keyword or title.
But when you add a *second word*, that helps it figure things out, as it’s weighing the relevance of both words and the phrase. Because of the way relevance works, if you search « the help », then « the help » or « the help I need » are more relevant than « the way to help », because they appear together in order. Likewise, « help the girl » would be lower relevance, because it’s out of order, and « help for the homeless » would be lower still, as they’re out of order, and apart.
La morale de l’histoire est que les recherches de mot simple, en particulier des mots basiques soulèveront toujours un peu de conflit. Il ne peut pas bien évaluer la pertinence car vous ne lui avez pas donné de données suffisantes.
Contenu enrichi
Contenu FRBRisant
Question:At our public library we are running a Koha installation and we’ve tried to turn on all the nice functionalities in Koha such as the frbrising tool, but do not get the same result as Nelsonville public library.
Answer:In fact, this feature is quite tricky to make that right. First it looks at XISBN service. And then search in your database for that ISBN. So both XISBN and your internal ISBN (in biblio table) have to be normalized. You could therefore use the script misc/batchupdateISBNs.pl (it removes all the - in your local ISBNs)
Amazon
Tous les contenus d’Amazon
Question: I have all of the Amazon preferences turned on and have entered both of my keys, but none of the content appears in my system, why is that?
Answer: Amazon’s API checks your server time on all requests and if your server time is not set properly requests will be denied. To resolve this issue be sure to set your system time appropriately. Once that change in made Amazon content should appear immediately.
On Debian the the command is date -s « 2010-06-30 17:21 » (with the proper date and time for your timezone).
Administration du système
Les erreurs dans le cron de Zebra
Question: I am noticing some errors in the koha-zebradaemon-output.log file. When new records are added it takes a bit longer to index than we think they should. Running rebuild zebra is often faster. Zebra ends up indexing and search works, but I am concerned about the errors. Any ideas?
Answer: Rebuild_zebra.pl -r deletes all of the files in the Zebra db directories (such as reci-0.mf) and then recreates them. Thus, permissions will be lost, and the files will be owned by the user who ran rebuild_zebra.pl. If one rebuilds the zebra indexes as root, the daemons, which typically run under the user Koha, will not be able to update the indexes. Thus, it’s important then that the zebra rebuilds are put in the cronjob file of the user Koha, and not root. Also important is that other users, such as root, don’t manually execute rebuilds.
If one desires that another user be able to execute rebuild_zebra.pl, he should be given the permission to execute “sudo -u Koha …/rebuild_zebra.pl,” (if you want to do this, you also have to edit the sudoers file to pass the PERL5LIB variable with the env_keep option as by default sudo strips away almost all environment variables). Or, as root user, one can use a simple “su koha” and then the rebuild_zebra.pl command.
I’ve also tried to set the sticky bit on rebuild_zebra.pl, but for whatever reason it didn’t seem to work due to some problem with the PERL5LIB variable that I wasn’t able to figure. That seems to me the easiest thing to do, if anybody has any idea how to make it work. If it worked and were the default, I think it would help folks to avoid a great deal of the problems that come up with zebra.
Rendre la cible Z39.50 publique
Question: Could someone tell me the exact steps I need to take to configure Zebra to expose my Koha 3 db as a public Z39.50 service?
Answer: Edit the KOHA_CONF file that your Koha is using. Uncomment the publicserver line like:
<!– <listen id= »publicserver » >tcp:@:9999</listen> –>
pour être:
<listen id= »publicserver » >tcp:@:9999</listen>
Puis, réinitialisez zebasrv et connectez-vous sur le port spécifique (9999).
Valeurs autorisées de localisation
Question: When editing an item, the new shelving location I created is not showing up by default in the items where I assigned it to.
Answer: This is because you created the new shelving location with a code value of 0 (zero) Just FYI the system interprets authorized values of 0 as equaling a null so when you edit a record in cataloging where the authorized value in a field was assigned where the code was 0, the value displays as null in the item editor (or MARC editor) instead of the value the library meant it to be.
Pourquoi ai-je besoin de valeurs autorisées ?
Question: Why would I want to define authorized values for MARC tags?
Answer: Authorized Values create a “controlled vocabulary” for your staff. As an example, let us assume that your Koha installation is used by several libraries, and you use MARC 21. You might want to restrict the 850a MARC subfield to the institution codes for just those libraries. In that case, you could define an authorized values category (perhaps called « INST ») and enter the institution codes as the authorized values for that category.
Note
Koha définit automatiquement des catégories de valeurs autorisées pour vos types d’exemplaires et les codes de sites, et vous pouvez lier ces valeurs autorisées aux sous-champs MARC lorsque vous établissez la structure des champs MARC.
Comment puis-je nettoyer la table des sessions ?
Question: Is there a periodic job that can be run to cull old sessions from the table? We don’t want to backup all the useless session data every night.
Answer: You can run cleanup database cron job.
Or just before doing a backup command (mysqldump), you can truncate session table:
mysql -u<kohauser -p<password <koha-db-name -e 'TRUNCATE TABLE sessions'
Matériel informatique
Scanners de codes à barres
Question: What barcode scanners have been known to work with Koha?
Answer: The simple rule of thumb is, does it act like a keyboard device?, if so, it will work. (i.e. can you take the scanner, scan a barcode and have it show up in a text editor, if so, it will work.)
Les points importants à vérifier sont qu’il se connecte bien à votre PC (ce peut-être USB ou « connecteur de clavier », ce qui signifie qu’il se connecte en ligne avec le clavier, ce qui est utile avec les anciens ordinateurs), et il scanne le type de code à barres que vous utilisez.
Pourquoi ne pas tester quelques codes à barres “utilisés” si vous en avez, pour voir si le scanner peut lire avec succès ceux qui sont rayés ou légèrement froissés. La plupart des scanners peuvent lire plusieurs types de codes à barres, la spécification listerait tous ceux qui peuvent être lus. Vous aurez besoin de régler quelques paramètres, tels que les préfixes et suffixes de caractères, ou si vous souhaitez envoyer un caractère “entrée” ou pas.
Une chose de plus à savoir: quelques scanners peut être “toujours activés” et viennent avec un support; d’autres ont des petites gâchettes sous la poignée, des boutons sur le dessus, d’autres encore se tiennent comme des stylos. Pensez bien au personnel qui travaillera avec le matériel avant de choisir. Un bouton à la mauvaise place n’est vraiment pas pratique à utiliser.
Imprimantes
Imprimantes utilisées par les bibliothèques Koha
- POS-X imprimante de reçus
- Imprimante Star Micronics (modèle exacte inconnu) avec un contrôleur de texte générique/sans format.
- Star SP2000 (Nelsonville)
- Star TSP-100 futurePRINT (Geauga)
- « J’ai vu qu’il y avait eu beaucoup de questions au sujet des imprimantes de reçus donc je voulais transmettre mon expérience. Nous avons testé la Star TSP-100 futurePRINT. J’ai trouvé que cette imprimante était vraiment facile à configurer pour Koha. J’ai même pu personnaliser le travail d’impression en ajoutant le logo de notre système (a .gif) en haut de chaque reçu. Aussi, avec un bitmap créé dans Paint, il est possible d’ajouter un message en bas de chaque reçu avec les informations de contact, les heures et le site web de la bibliothèque pour laquelle le matériel a été prêté ».
- Epson TM 88 IIIP imprimantes de reçus thermique
- Epson TM-T88IV
- 1x1 étiquettes utilisant une imprimante Dymolabelwriter
Support braille
Question: Are there any braille embosser or printer which has inbuilt braille converter and it is accessible with UNIX environment?
Answer: You may want to look into BRLTTY (http://www.emptech.info/product_details.php?ID=1232).
Support supplémentaire
Extension de Koha
Script de recherche dans Amazon pour les bibliothèques Koha
Nous commandons la majorité des documents à Amazon, j’ai donc cherché une façon plus pratique de dire si un livre choisi comme acquisition est déjà dans notre catalogue ou non.
Greasemonkey & a custom user script fit the bill nicely:
Quelques avertissements:
- Comme la plupart des scripts, celui-ci a été désigné pour travailler avec Firefox; je n’ai pas encore essayer avec d’autres navigateurs.
- Je ne suis pas un programmateur de JavaScript; cela a été adapté depuis le travail des autres. Quelques lignes seulement devront être changées pour obtenir le script qui travaillera avec votre catalogue.
- Selon l’existence de l’ISBN pour l’exemplaire en question, cela ne fonctionnera pas pour les anciens films et livres etc…
Others have added all sorts of bells & whistles: XISBN lookups to search for related titles, custom messages based on the status of items (on order, on hold, etc.), … just search the UserScripts site for Amazon + library. For a later date!
Nuages de mots-clés
En plus du nuage de tags traditionnel disponible dans Koha, il existe un moyen de générer des nuages pour des sujets populaires dans Koha.
The Author/Subject Cloud cron job is used to help with this process. This cron job sends its output to files.
- /home/koha/mylibrary/koharoot/koha-tmpl/cloud-author.html
- /home/koha/yourlibrary/koharoot/koha-tmpl/cloud-subject.html
This means that you can produce clouds for authors, collective author, all kind of subjects, classifications, etc. And since it works on zebra indexes, it is quick, even on large DBs. Tags clouds are sent to files. It’s up to library webmaster to deal with those files in order to include them in OPACMainUserBlock, or include them into their library CMS.
Quelques bibliothèques envoient même le fichier dans Samba, un dossier partagé où l’administrateur informatique les prend, les nettoie éventuellement, avant de les intégrer dans les pages ou widgets de navigation.
Menu déroulant des nouveaux titres
Souvent, nous souhaitons avoir un moyen pour que nos adhérents recherchent de nouveaux exemplaires. Dans cet exemple, nous verrons comment créer un menu déroulant des nouveaux exemplaires par type d’exemplaire. Ce processus fonctionnera (avec des changements) sur les codes de collection ou les localisations.
D’abord, il est important de noter que tous les liens dans Koha sont des liens permanents. Cela signifie que si je fais une recherche pour tous types d’exemplaires spécifiques triés par date d’acquisition et que je mets cet URL dans mes favoris; à chaque fois que je cliquerais dessus, je pourrais voir les nouveaux exemplaires de ce type sur les premières pages des résultats.
J’ai retenu cette idée et j’ai rédigé un formulaire qui prend en compte cette fonctionnalité. Cela recherche simplement dans le catalogue Koha un type spécifique d’exemplaire et trie les résultats par date d’acquisition.
La première chose a été d’écrire une requête MySQL pour générer une liste des types d’exemplaires pour moi; pourquoi copier et coller lorsqu’on peut utiliser les fonctionnalités de MySQL ?
select concat('<option value=\"mc-itype:', itemtype, '\">',description,'</option>') from itemtypes
Le code de dessus apparaît dans la table itemtypes ainsi que le code HTML nécessaire autour de chaque type d’exemplaire. Je l’ai ensuite exporté en CSV, je l’ai ouvert dans mon éditeur de texte et j’ai ajouté les autres parties du formulaire.
<p><strong>New Items</strong></p>
<p><form name="searchform" method="get" action="/cgi-bin/koha/opac-search.pl">
<input name="idx" value="kw" type="hidden">
<input name="sort_by" value="acqdate_dsc" type="hidden">
<input name="do" value="OK" type="hidden">
<select name="limit" onchange="this.form.submit()">
<option>-- Please choose --</option>
<option value="mc-itype:BOOK">Book</option>
<option value="mc-itype:BOOKCD">Book on CD</option>
<option value="mc-itype:DVD">DVD</option>
<option value="mc-itype:LRG_PRINT">Large print book</option>
<option value="mc-itype:MAGAZINE">Magazine</option>
<option value="mc-itype:NEWSPAPER">Newspaper</option>
<option value="mc-itype:VIDEO">Videocassette</option>
</select>
</form>
</p>
Que signifie tous ces codes ? Les parties les plus importantes sont:
D’abord, le début du formulaire.
<p><form name="searchform" method="get" action="/cgi-bin/koha/opac-search.pl">
Ce code indique au navigateur de prendre n’importe quelle valeur sélectionnée et de la mettre à la fin de ceci http://YOURSITE/cgi-bin/koha/opac-search.pl. Si vous souhaitez intégrer ce formulaire dans le site internet de votre bibliothèque (et non dans votre OPAC), vous pouvez mettre l’URL entier de l’OPAC ici.
Ensuite, il y a une valeur cachée qui dit que la recherche est triée par date d’acquisition dans l’ordre décroissant (les tous nouveaux exemplaires en haut):
<input name="sort_by" value="acqdate_dsc" type="hidden">
Enfin, vous avez une option pour chaque type d’exemplaire que vous souhaitez rechercher.
<option value="mc-itype:BOOK">Book</option>
Chacune de ces options incluent la chaîne de caractères « mc-itype: », qui indique à Koha de faire une recherche de type d’exemplaire.
Once you have all of that in place you can copy and paste the form to somewhere on your OPAC. The Farmington Public Libraries OPAC has a few examples of this on the left.
Catalogage et recherche par couleur
Un des icônes installés dans Koha, inclut une série de couleurs. Cet icône peut être utilisé pour cataloguer et rechercher par couleur. Ce guide vous orientera pour changer de couleur le code de collection dans Koha.
Le code SQL suivant peut être utilisé pour ajouter ces couleurs par lot à la catégorie de valeur autorisée CCODE. Si vous souhaitez utiliser ces couleurs pour une autre valeur autorisée, vous devrez modifier ceci pour utiliser cette catégorie:
insert into authorised_values (category, authorised_value, lib,
 lib_opac, imageurl) values ('CCODE','000000','Black','','colors/000000.png');
insert into authorised_values (category, authorised_value, lib,
 lib_opac, imageurl) values ('CCODE','66cc66','Bright Green','','colors/66cc66.png');
insert into authorised_values (category, authorised_value, lib,
 lib_opac, imageurl) values ('CCODE','99cc33','Olive','','colors/99cc33.png');
insert into authorised_values (category, authorised_value, lib,
 lib_opac, imageurl) values ('CCODE','3333cc','Dark Blue','','colors/3333cc.png');
insert into authorised_values (category, authorised_value, lib,
 lib_opac, imageurl) values ('CCODE','006600' ,'Dark Green','','colors/006600.png');
insert into authorised_values (category, authorised_value, lib,
 lib_opac, imageurl) values ('CCODE','6600cc','Plum','','colors/6600cc.png');
insert into authorised_values (category, authorised_value, lib,
 lib_opac, imageurl) values ('CCODE','6666cc','Purple','','colors/6666cc.png');
insert into authorised_values (category, authorised_value, lib,
 lib_opac, imageurl) values ('CCODE','9999cc','Light Purple','','colors/9999cc.png');
insert into authorised_values (category, authorised_value, lib,
 lib_opac, imageurl) values ('CCODE','660000' ,'Burgundy','','colors/660000.png');
insert into authorised_values (category, authorised_value, lib,
 lib_opac, imageurl) values ('CCODE','663333' ,'Brown','','colors/663333.png');
insert into authorised_values (category, authorised_value, lib,
 lib_opac, imageurl) values ('CCODE','990000' ,'Red','','colors/990000.png');
insert into authorised_values (category, authorised_value, lib,
 lib_opac, imageurl) values ('CCODE','996633' ,'Tan','','colors/996633.png');
insert into authorised_values (category, authorised_value, lib,
 lib_opac, imageurl) values ('CCODE','999999' ,'Gray','','colors/999999.png');
insert into authorised_values (category, authorised_value, lib,
 lib_opac, imageurl) values ('CCODE','cc66cc','Pink','','colors/cc66cc.png');
insert into authorised_values (category, authorised_value, lib,
 lib_opac, imageurl) values ('CCODE','cc99cc','Bubble Gum','','colors/cc99cc.png');
insert into authorised_values (category, authorised_value, lib,
 lib_opac, imageurl) values ('CCODE','cc3333' ,'Orange','','colors/cc3333.png');
insert into authorised_values (category, authorised_value, lib,
 lib_opac, imageurl) values ('CCODE','cc6666' ,'Peach','','colors/cc6666.png');
insert into authorised_values (category, authorised_value, lib,
 lib_opac, imageurl) values ('CCODE','cc9999' ,'Rose','','colors/cc9999.png');
insert into authorised_values (category, authorised_value, lib,
 lib_opac, imageurl) values ('CCODE','cccc00' ,'Gold','','colors/cccc00.png');
insert into authorised_values (category, authorised_value, lib,
 lib_opac, imageurl) values ('CCODE','ffff33' ,'Yellow','','colors/ffff33.png');
insert into authorised_values (category, authorised_value, lib,
 lib_opac, imageurl) values ('CCODE','ffffcc','Cream','','colors/ffffcc.png');
insert into authorised_values (category, authorised_value, lib,
 lib_opac, imageurl) values ('CCODE','ffffff','White','','colors/ffffff.png');
If you would like to choose the colors manually you can do that via the Valeurs autorisées administration area.

Next you’ll want to update the frameworks so that the 952$8 (if you’re using collection code) label to says Color.
Une fois cela en place, vous pouvez commencer à cataloguer les exemplaires par couleur.
Enfin, vous ajouterez le JQuery suivant à vos préférences système afin de réétiqueter “Collection” en “Couleur”
$(document).ready(function(){
    $("#advsearch-tab-ccode a:contains('Collection')").text("Color");
    $("#holdings th:contains('Collection')").text("Color");
    });
$(document).ready(function(){
    $("#advsearch-tab-ccode a:contains('Collection')").text("Color");
    $('#item_ccode').text("Color");
    });
Koha et votre site web
Cet appendice inclut des conseils pour intégrer Koha au site web de votre bibliothèque.
Recherche Koha dans votre site
Souvent, vous devrez ajouter une barre de recherche Koha au site web de votre bibliothèque. Pour cela, copiez-collez le code suivant dans le site web de votre bibliothèque et mettez à jour la partie YOURCATALOG avec l’URL de votre catalogue.
<form name="searchform" method="get" action="http://YOURCATLOG/cgi-bin/koha/opac-search.pl" id="searchform">
<input id="transl1" name="q" type="text"><p>
<select name="idx" id="masthead_search">
<option value="kw">Keyword</option>
<option value="ti">Title</option>
<option value="au">Author</option>
<option value="su">Subject</option>
<option value="nb">ISBN</option>
<option value="se">Series</option>
<option value="callnum">Call Number</option>
</select>
<input value="Search" id="searchsubmit" type="submit">
</p></form>