Servicios Web
OAI-PMH
Para el Open Archives Initiative-Protocol for Metadata Harvesting (OAI-PMH) hay dos grupos de “participantes”: Proveedores de datos y Proveedores de servicios. Los Proveedores de datos (archivos abiertos, repositorios) proveen acceso libre a metadatos, y muchos, aunque no necesariamente, ofrecen acceso libre a textos completos y otros recursos. OAI-PMH provee una solución fácil de implementar y sencilla para Proveedores de datos. Los Proveedores de servicios utilizan la interfaz OAI de los Proveedores de datos para cosechar y almacenar metadatos. Note que esto significa que no hay pedidos de búsqueda directas a los Proveedores de datos; mas bien los servicios se basan en los datos cosechados via OAI-PMH.
Koha at present can only act as a Data Provider. It can not harvest from other repositories. The biggest stumbling block to having Koha harvest from other repositories is that MARC is the only metadata format that Koha indexes natively. Visit http://www.oaforum.org/tutorial/english/page3.htm for diagrams of how OAI-PMH works.
Learn more about OAI-PMH at: http://www.openarchives.org/pmh/
To enable OAI-PMH in Koha edit the OAI-PMH preference. Once enabled you can visit http://YOURKOHACATALOG/cgi-bin/koha/oai.pl to see your file.
Muestra de archivo de configuración OAI
       format:
         vs:
           metadataPrefix: vs
           metadataNamespace: http://veryspecial.tamil.fr/vs/format-pivot/1.1/vs
           schema: http://veryspecial.tamil.fr/vs/format-pivot/1.1/vs.xsd
           xsl_file: /usr/local/koha/xslt/vs.xsl
         marcxml:
           metadataPrefix: marxml
           metadataNamespace: http://www.loc.gov/MARC21/slim
http://www.loc.gov/standards/marcxml/schema/MARC21slim
           schema: http://www.loc.gov/MARC21/slim
http://www.loc.gov/standards/marcxml/schema/MARC21slim.xsd
         oai_dc:
           metadataPrefix: oai_dc
           metadataNamespace: http://www.openarchives.org/OAI/2.0/oai_dc/
           schema: http://www.openarchives.org/OAI/2.0/oai_dc.xsd
           xsl_file:
/usr/local/koha/koha-tmpl/intranet-tmpl/xslt/UNIMARCslim2OAIDC.xsl
Servicios REST
Koha can now be requested by REST http requests. BibLibre wrotes an external module to adds more possibilities than ILS-DI can provide.There is no authentication process, but authorized ips are listed in the config file. Services have been tested in 3.10, 3.12 and 3.14 koha versions. You can find more information about it into README file and opac/rest.pl documentation on http://git.biblibre.com. If you want to add features, send us a patch at dev_patches AT biblibre DOT com.
Los servicios proveídos en las versión 1.4 son:
GET branches
GET user/byid/:borrowernumber/holds
GET user/:user_name/holds
GET user/byid/:borrowernumber/issues
GET user/:user_name/issues
GET user/:user_name/issues_history
GET user/byid/:borrowernumber/issues_history
GET user/today
GET user/all
POST user
PUT user/:user_name
GET biblio/:biblionumber/items
GET biblio/:biblionumber/holdable
GET biblio/:biblionumber/items_holdable_status
GET item/:itemnumber/holdable
PUT auth/change_password
GET /suggestions
GET /suggestions/:suggestionid
POST /suggestions
PUT /suggestions/:suggestionid
DELETE /suggestions/:suggestionid
Utilizando el servidor SRU
Utilizando el servidor SRU
Koha implements the Search/Retrieve via URL (SRU) protocol. More information about the protocol itself can be found at http://www.loc.gov/standards/sru/. The version implemented is version 1.1.
Explain
If you want to have information about the implementation of SRU on a given server, you should have access to the Explain file using a request to the server without any parameter. Like <http://myserver.com:9999/biblios/>. The response from the server is an XML file that should look like the following and will give you information about the default settings of the SRU server.
       <zs:explainResponse>
            <zs:version>1.1</zs:version>
            <zs:record>
                 <zs:recordSchema>http://explain.z3950.org/dtd/2.0/</zs:recordSchema>
                 <zs:recordPacking>xml</zs:recordPacking>
                 <zs:recordData>
                 <explain xml:base="zebradb/explain-biblios.xml">
                 <!--
                 try stylesheet url: http://./?stylesheet=docpath/sru2.xsl
                 -->
            <serverInfo protocol="SRW/SRU/Z39.50">
                 <host>biblibre</host>
                 <port>9999</port>
                 <database>biblios</database>
            </serverInfo>
            <databaseInfo>
                 <title lang="en" primary="true">Koha 3 Bibliographic SRU/SRW/Z39.50 server</title>
                 <description lang="en" primary="true">Koha 3 Bibliographic Server</description>
                 <links>
                      <sru>http://biblibre:9999</sru>
                 </links>
            </databaseInfo>
            <indexInfo>
                 <set name="cql" identifier="info:srw/cql-context-set/1/cql-v1.1">
                      <title>CQL Standard Set</title>
                 </set>
                 <index search="true" scan="true" sort="false">
                 <title lang="en">CQL Server Choice</title>
                 <map>
                      <name set="cql">serverChoice</name>
                 </map>
            <map>
               <attr type="1" set="bib1">text</attr>
               </map>
          </index>
      <index search="true" scan="true" sort="false">
         <title lang="en">CQL All</title>
             <map>
<name set="cql">all</name>
</map>
<map>
<attr type="1" set="bib1">text</attr>
</map>
</index>
<!-- Record ID index -->
<index search="true" scan="true" sort="false">
<title lang="en">Record ID</title>
<map>
<name set="rec">id</name>
</map>
<map>
<attr type="1" set="bib1">rec:id</attr>
<attr type="4" set="bib1">3</attr>
</map>
</index>
Buscar
This url : http://myserver.com:9999/biblios?version=1.1&operation=searchRetrieve&query=reefs is composed of the following elements:
- URL base del servidor SRU: http://myserver.com:9999/biblios?
- search part with the 3 required parameters : version, operation and query. The parameters within the search part should be of the key=value form, and can be combined with the & character.
One can add optional parameters to the query, for instance maximumRecords indicating the maximum number of records to be returned by the server. So http://myserver.com:9999/biblios?version=1.1&operation=searchRetrieve&query=reefs&maximumRecords=5 will only get the first 5 results results from the server.
http://www.loc.gov/standards/sru/sru1-1archive/search-retrieve-operation.html gives more details about the search operations and in particular the list of optional parameters for searching.
Más información sobre Search
La clave «operation» puede tomar dos valores: scan o searchRetrieve.
If operation=searchRetrieve, then the search key should be query. As in : operation=searchRetrieve&query=reefs
If operation=scan, then the search key should be scanClause. As in : operation=scan&scanClause=reefs
etc/zebradb/biblios/etc/bib1.att define los índices Zebra/3950 que existen en el sistema. Por ejemplo usted verá que tenemos índices por Materia y por Título: att 21 Subject y att Title 4, respectivamente.
In the pqf.properties file located under etc/zebradb/pqf.properties I see that an access point already uses my Subject index (index.dc.subject = 1=21) while another uses my Title index (index.dc.title = 1=4) I know this is my Subject index because as I’ve seen just before in my bib1.att file, it’s called with =1=21 in Z3950: so index.dc.subject = 1=21 correctly points to my Subject index. And Title was called with 1=4 so index.dc.title = 1=4 correctly points to my Title index. I can now construct my query just like I would in a search box, just preceding it with the «query» key: query=Subject=reefs and Title=coral searches «reefs» in the subject and «coral» in the title. The full url would be http://myserver.com:9999/biblios?version=1.1&operation=searchRetrieve&query=Subject=reefs and Title=coral If I want to limit the result set to just 5 records, I can do http://myserver.com:9999/biblios?version=1.1&operation=searchRetrieve&query=Subject=reefs and Title=coral&maximumRecords=5
También puedo hacerlo con truncamiento, relaciones, etc. Éstas se definen también en el archivo pqf.properties. Se puede ver por ejemplo las propiedades de posición definidas como:
 position.first              = 3=1 6=1
# "first in field"
 position.any                = 3=3 6=1
   # "any position in field"
So as an example if I want «coral» to be at the beginning of the title, I can do this query : http://myserver.com:9999/biblios?version=1.1&operation=searchRetrieve&query=Title=coral first
Retrieve
My search for http://univ_lyon3.biblibre.com:9999/biblios?version=1.1&operation=searchRetrieve&query=coral reefs&maximumRecords=1 retrieves just on record. The response looks like this:
          <zs:searchRetrieveResponse>
<zs:version>1.1</zs:version>
<zs:numberOfRecords>1</zs:numberOfRecords>
<zs:records>
<zs:record>
<zs:recordPacking>xml</zs:recordPacking>
<zs:recordData>
<record xsi:schemaLocation="http://www.loc.gov/MARC21/slim http://www.loc.gov/ standards/marcxml/schema/MARC21slim.xsd">
<leader> cam a22 4500</leader>
<datafield tag="010" ind1=" " ind2=" ">
<subfield code="a">2-603-01193-6</subfield>
<subfield code="b">rel.</subfield>
<subfield code="d">159 F</subfield>
</datafield>
<datafield tag="020" ind1=" " ind2=" ">
<subfield code="a">FR</subfield>
<subfield code="b">00065351</subfield>
</datafield>
<datafield tag="101" ind1="1" ind2=" ">
<subfield code="c">ita</subfield>
</datafield>
<datafield tag="105" ind1=" " ind2=" ">
<subfield code="a">a z 00|y|</subfield>
</datafield>
<datafield tag="106" ind1=" " ind2=" ">
<subfield code="a">r</subfield>
</datafield>
<datafield tag="100" ind1=" " ind2=" ">
<subfield code="a">20091130 frey50 </subfield>
</datafield>
<datafield tag="200" ind1="1" ind2=" ">
<subfield code="a">Guide des récifs coralliens / A Guide to Coral Reefs</subfield>
<subfield code="b">Texte imprimé</subfield>
<subfield code="e">la faune sous-marine des coraux</subfield>
<subfield code="f">A. et A. Ferrari</subfield>
</datafield>
<datafield tag="210" ind1=" " ind2=" ">
<subfield code="a">Lausanne</subfield>
<subfield code="a">Paris</subfield>
<subfield code="c">Delachaux et Niestlé</subfield>
<subfield code="d">cop. 2000</subfield>
<subfield code="e">impr. en Espagne</subfield>
</datafield>
<datafield tag="215" ind1=" " ind2=" ">
<subfield code="a">287 p.</subfield>
<subfield code="c">ill. en coul., couv. ill. en coul.</subfield>
<subfield code="d">20 cm</subfield>
</datafield>
......
<idzebra>
<size>4725</size>
<localnumber>2</localnumber>
<filename>/tmp/nw10BJv9Pk/upd_biblio/exported_records</filename>
</idzebra>
</record>
</zs:recordData>
<zs:recordPosition>1</zs:recordPosition>
</zs:record>
</zs:records>
</zs:searchRetrieveResponse>
Deslizante para nuevos títulos en el OPAC
Algunas veces, las bibliotecas quieren agregar widget de flujo con nuevos materiales de la biblioteca en la página principal de sus catálogos públicos. Para hacer esto usted puede utilizar un widget para cualquier número de servicios (usualmente para costos) o usted puede habilitar plugins o complementos en Koha y utilizar el plugin Cover Flow el cual está basado en`Flipster <https://github.com/drien/jquery-flipster>`__, un plugin JQuery responsivo de flujo de cubiertas.
Una vez el plugin está instalado, los pasos para conseguir que su flujo de cubiertas sea mostrado es de la manera siguiente:
Primeramente, necesitará crear uno o más informes públicos para su widget de flujo de cubiertas o utilizar widgets en los que se pueda basar. Esta es la forma en la que conoce cuál es el contenido que su widget debe contener. Cada informe necesita solamente tres columnas; título, biblionumber e isbn. Es importante que posea isbns buenos y válidos, ya que son los datos utilizados para actualizar y recoger las cubiertas. Para iteración del plugin, se utilizan las imágenes de cubiertas de Amazon, pero se cree que al final, se hará que la recogida de cubiertas sea configurable, así que se podrá utilizar cualquier fuente de datos para capturar las cubiertas de las imágenes.
Seguidamente, se necesitará de configurar el plugin. La configuración del plugin es un simple área de texto que utiliza YAML (actualmente, es JSON, el cual es un subconjunto de YAML) para guardar las opciones de configuración. En este ejemplo luce como este:
- id: 42
  selector: #coverflow
  options:
  style: coverflow
En este ejemplo, se le esta diciendo al plugin que utilice el informe con id 42 y es utilizado para crear el widget de flujo de cubiertas y remplazar los elemento HTML con id «coverflow». La lista de opciones es pasada directamente a Flipster, ¡así que cualquier opción soportada por Flipster puede ser configurada desde la configuración del plugin! De hecho, además del tradicional flujo de cubiertas, Flipster posee el modo «carrusel», el cual es una versión mucho más compacta del flujo de cubiertas. También, usted puede configurar con cuál cubierta deber comenzar el widget, entre otras opciones.
En el momento que las opciones del plugin son guardadas y actualizadas, el plugin generará un código JavaScript minificado que es guardado automáticamente en la preferencia del sistema OpacUserJS de Koha. Aquí hay un ejemplo de la salida generada:
/* JS for Koha CoverFlow Plugin
 This JS was added automatically by installing the CoverFlow plugin
 Please do not modify */$(document).ready(function(){$.getScript("/plugin/Koha/Plugin/Com/ByWaterSolutions/CoverFlow/jquery-flipster/src/js/jquery.flipster.min.js",function(data,textStatus,jqxhr){$("head").append("<link id='flipster-css' href='/plugin/Koha/Plugin/Com/ByWaterSolutions/CoverFlow/jquery-flipster/src/css/jquery.flipster.min.css' type='text/css' rel='stylesheet' />");$('#coverflow').load("/coverflow.pl?id=42",function(){var opt={'items':'.item','minfactor':15,'distribution':1.5,'scalethreshold':0,'staticbelowthreshold':false,'titleclass':'itemTitle','selectedclass':'selectedItem','scrollactive':true,'step':{'limit':4,'width':10,'scale':true}};$('#coverflow').flipster({style:'coverflow',});});});});
/* End of JS for Koha CoverFlow Plugin */
¿Por qué hacer esto? ¡Por velocidad! es mejor que generar este código cada vez que la página es cargada, se puede generar una sola vez y usarlo una y otra vez de nuevo.
Si usted inspecciona el código más de cerca, se dará cuenta que referencia al script «coverflow.pl». Este es un script que es incluido con el plugin de flujo de cubiertas. Puesto que se necesita tener acceso desde el OPAC (y no queremos hacer estallar cualquier alarma de ataque XSS), necesitamos modificar la configuración del servidor web para el catálogo público y agregarle lo siguiente:
ScriptAlias /coverflow.pl "/var/lib/koha/mykoha/plugins/Koha/Plugin/Com/ByWaterSolutions/CoverFlow/coverflow.pl"
Esta línea proporcionará acceso al script coverflow.pl desde el OPACj. Este script recupera los datos del informe y los pasa al catálogo público para crear el widget flujo de cubiertas. ¡Koha::Cache es soportado con el fin de hacer que el widget cargue tan rápido como sea posible!
El último paso es colocar su elemento selector en alguna parte en su catálogo público. En este ejemplo, es puesto en la siguiente preferencia de sistema OpacMainUserBlock:
<span id="coverflow">Loading...</span>
Once that is in place, you need only refresh your OPAC page, and there you have it, your very own catalog coverflow widget! Not only do these coverflows look great on a computer screen, but they look great on mobile platforms as well, and are even touch responsive!
Preferencias del sistema predeterminadas
ISBD Predeterminada
Default values for the ISBD preference.
MARC Predeterminada
#100||{ 100a }{ 100b }{ 100c }{ 100d }{ 110a }{ 110b }{ 110c }{ 110d }{ 110e }{ 110f }{ 110g }{ 130a }{ 130d }{ 130f }{ 130g }{ 130h }{ 130k }{ 130l }{ 130m }{ 130n }{ 130o }{ 130p }{ 130r }{ 130s }{ 130t }|<br/><br/>
#245||{ 245a }{ 245b }{245f }{ 245g }{ 245k }{ 245n }{ 245p }{ 245s }{ 245h }|
#246||{ : 246i }{ 246a }{ 246b }{ 246f }{ 246g }{ 246n }{ 246p }{ 246h }|
#242||{ = 242a }{ 242b }{ 242n }{ 242p }{ 242h }|
#245||{ 245c }|
#242||{ = 242c }|
#250| - |{ 250a }{ 250b }|
#254|, |{ 254a }|
#255|, |{ 255a }{ 255b }{ 255c }{ 255d }{ 255e }{ 255f }{ 255g }|
#256|, |{ 256a }|
#257|, |{ 257a }|
#258|, |{ 258a }{ 258b }|
#260| - |{ 260a }{ 260b }{ 260c }|
#300| - |{ 300a }{ 300b }{ 300c }{ 300d }{ 300e }{ 300f }{ 300g }|
#306| - |{ 306a }|
#307| - |{ 307a }{ 307b }|
#310| - |{ 310a }{ 310b }|
#321| - |{ 321a }{ 321b }|
#340| - |{ 3403 }{ 340a }{ 340b }{ 340c }{ 340d }{ 340e }{ 340f }{ 340h }{ 340i }|
#342| - |{ 342a }{ 342b }{ 342c }{ 342d }{ 342e }{ 342f }{ 342g }{ 342h }{ 342i }{ 342j }{ 342k }{ 342l }{ 342m }{ 342n }{ 342o }{ 342p }{ 342q }{ 342r }{ 342s }{ 342t }{ 342u }{ 342v }{ 342w }|
#343| - |{ 343a }{ 343b }{ 343c }{ 343d }{ 343e }{ 343f }{ 343g }{ 343h }{ 343i }|
#351| - |{ 3513 }{ 351a }{ 351b }{ 351c }|
#352| - |{ 352a }{ 352b }{ 352c }{ 352d }{ 352e }{ 352f }{ 352g }{ 352i }{ 352q }|
#362| - |{ 362a }{ 351z }|
#440| - |{ 440a }{ 440n }{ 440p }{ 440v }{ 440x }|.
#490| - |{ 490a }{ 490v }{ 490x }|.
#800| - |{ 800a }{ 800b }{ 800c }{ 800d }{ 800e }{ 800f }{ 800g }{ 800h }{ 800j }{ 800k }{ 800l }{ 800m }{ 800n }{ 800o }{ 800p }{ 800q }{ 800r }{ 800s }{ 800t }{ 800u }{ 800v }|.
#810| - |{ 810a }{ 810b }{ 810c }{ 810d }{ 810e }{ 810f }{ 810g }{ 810h }{ 810k }{ 810l }{ 810m }{ 810n }{ 810o }{ 810p }{ 810r }{ 810s }{ 810t }{ 810u }{ 810v }|.
#811| - |{ 811a }{ 811c }{ 811d }{ 811e }{ 811f }{ 811g }{ 811h }{ 811k }{ 811l }{ 811n }{ 811p }{ 811q }{ 811s }{ 811t }{ 811u }{ 811v }|.
#830| - |{ 830a }{ 830d }{ 830f }{ 830g }{ 830h }{ 830k }{ 830l }{ 830m }{ 830n }{ 830o }{ 830p }{ 830r }{ 830s }{ 830t }{ 830v }|.
#500|<br/><br/>|{ 5003 }{ 500a }|
#501|<br/><br/>|{ 501a }|
#502|<br/><br/>|{ 502a }|
#504|<br/><br/>|{ 504a }|
#505|<br/><br/>|{ 505a }{ 505t }{ 505r }{ 505g }{ 505u }|
#506|<br/><br/>|{ 5063 }{ 506a }{ 506b }{ 506c }{ 506d }{ 506u }|
#507|<br/><br/>|{ 507a }{ 507b }|
#508|<br/><br/>|{ 508a }{ 508a }|
#510|<br/><br/>|{ 5103 }{ 510a }{ 510x }{ 510c }{ 510b }|
#511|<br/><br/>|{ 511a }|
#513|<br/><br/>|{ 513a }{513b }|
#514|<br/><br/>|{ 514z }{ 514a }{ 514b }{ 514c }{ 514d }{ 514e }{ 514f }{ 514g }{ 514h }{ 514i }{ 514j }{ 514k }{ 514m }{ 514u }|
#515|<br/><br/>|{ 515a }|
#516|<br/><br/>|{ 516a }|
#518|<br/><br/>|{ 5183 }{ 518a }|
#520|<br/><br/>|{ 5203 }{ 520a }{ 520b }{ 520u }|
#521|<br/><br/>|{ 5213 }{ 521a }{ 521b }|
#522|<br/><br/>|{ 522a }|
#524|<br/><br/>|{ 524a }|
#525|<br/><br/>|{ 525a }|
#526|<br/><br/>|{\n510i }{\n510a }{ 510b }{ 510c }{ 510d }{\n510x }|
#530|<br/><br/>|{\n5063 }{\n506a }{ 506b }{ 506c }{ 506d }{\n506u }|
#533|<br/><br/>|{\n5333 }{\n533a }{\n533b }{\n533c }{\n533d }{\n533e }{\n533f }{\n533m }{\n533n }|
#534|<br/><br/>|{\n533p }{\n533a }{\n533b }{\n533c }{\n533d }{\n533e }{\n533f }{\n533m }{\n533n }{\n533t }{\n533x }{\n533z }|
#535|<br/><br/>|{\n5353 }{\n535a }{\n535b }{\n535c }{\n535d }|
#538|<br/><br/>|{\n5383 }{\n538a }{\n538i }{\n538u }|
#540|<br/><br/>|{\n5403 }{\n540a }{ 540b }{ 540c }{ 540d }{\n520u }|
#544|<br/><br/>|{\n5443 }{\n544a }{\n544b }{\n544c }{\n544d }{\n544e }{\n544n }|
#545|<br/><br/>|{\n545a }{ 545b }{\n545u }|
#546|<br/><br/>|{\n5463 }{\n546a }{ 546b }|
#547|<br/><br/>|{\n547a }|
#550|<br/><br/>|{ 550a }|
#552|<br/><br/>|{ 552z }{ 552a }{ 552b }{ 552c }{ 552d }{ 552e }{ 552f }{ 552g }{ 552h }{ 552i }{ 552j }{ 552k }{ 552l }{ 552m }{ 552n }{ 562o }{ 552p }{ 552u }|
#555|<br/><br/>|{ 5553 }{ 555a }{ 555b }{ 555c }{ 555d }{ 555u }|
#556|<br/><br/>|{ 556a }{ 506z }|
#563|<br/><br/>|{ 5633 }{ 563a }{ 563u }|
#565|<br/><br/>|{ 5653 }{ 565a }{ 565b }{ 565c }{ 565d }{ 565e }|
#567|<br/><br/>|{ 567a }|
#580|<br/><br/>|{ 580a }|
#581|<br/><br/>|{ 5633 }{ 581a }{ 581z }|
#584|<br/><br/>|{ 5843 }{ 584a }{ 584b }|
#585|<br/><br/>|{ 5853 }{ 585a }|
#586|<br/><br/>|{ 5863 }{ 586a }|
#020|<br/><br/><label>ISBN: </label>|{ 020a }{ 020c }|
#022|<br/><br/><label>ISSN: </label>|{ 022a }|
#222| = |{ 222a }{ 222b }|
#210| = |{ 210a }{ 210b }|
#024|<br/><br/><label>Standard No.: </label>|{ 024a }{ 024c }{ 024d }{ 0242 }|
#027|<br/><br/><label>Standard Tech. Report. No.: </label>|{ 027a }|
#028|<br/><br/><label>Publisher. No.: </label>|{ 028a }{ 028b }|
#013|<br/><br/><label>Patent No.: </label>|{ 013a }{ 013b }{ 013c }{ 013d }{ 013e }{ 013f }|
#030|<br/><br/><label>CODEN: </label>|{ 030a }|
#037|<br/><br/><label>Source: </label>|{ 037a }{ 037b }{ 037c }{ 037f }{ 037g }{ 037n }|
#010|<br/><br/><label>LCCN: </label>|{ 010a }|
#015|<br/><br/><label>Nat. Bib. No.: </label>|{ 015a }{ 0152 }|
#016|<br/><br/><label>Nat. Bib. Agency Control No.: </label>|{ 016a }{ 0162 }|
#600|<br/><br/><label>Subjects–Personal Names: </label>|{\n6003 }{\n600a}{ 600b }{ 600c }{ 600d }{ 600e }{ 600f }{ 600g }{ 600h }{–600k}{ 600l }{ 600m }{ 600n }{ 600o }{–600p}{ 600r }{ 600s }{ 600t }{ 600u }{–600x}{–600z}{–600y}{–600v}|
#610|<br/><br/><label>Subjects–Corporate Names: </label>|{\n6103 }{\n610a}{ 610b }{ 610c }{ 610d }{ 610e }{ 610f }{ 610g }{ 610h }{–610k}{ 610l }{ 610m }{ 610n }{ 610o }{–610p}{ 610r }{ 610s }{ 610t }{ 610u }{–610x}{–610z}{–610y}{–610v}|
#611|<br/><br/><label>Subjects–Meeting Names: </label>|{\n6113 }{\n611a}{ 611b }{ 611c }{ 611d }{ 611e }{ 611f }{ 611g }{ 611h }{–611k}{ 611l }{ 611m }{ 611n }{ 611o }{–611p}{ 611r }{ 611s }{ 611t }{ 611u }{–611x}{–611z}{–611y}{–611v}|
#630|<br/><br/><label>Subjects–Uniform Titles: </label>|{\n630a}{ 630b }{ 630c }{ 630d }{ 630e }{ 630f }{ 630g }{ 630h }{–630k }{ 630l }{ 630m }{ 630n }{ 630o }{–630p}{ 630r }{ 630s }{ 630t }{–630x}{–630z}{–630y}{–630v}|
#648|<br/><br/><label>Subjects–Chronological Terms: </label>|{\n6483 }{\n648a }{–648x}{–648z}{–648y}{–648v}|
#650|<br/><br/><label>Subjects–Topical Terms: </label>|{\n6503 }{\n650a}{ 650b }{ 650c }{ 650d }{ 650e }{–650x}{–650z}{–650y}{–650v}|
#651|<br/><br/><label>Subjects–Geographic Terms: </label>|{\n6513 }{\n651a}{ 651b }{ 651c }{ 651d }{ 651e }{–651x}{–651z}{–651y}{–651v}|
#653|<br/><br/><label>Subjects–Index Terms: </label>|{ 653a }|
#654|<br/><br/><label>Subjects–Facted Index Terms: </label>|{\n6543 }{\n654a}{–654b}{–654x}{–654z}{–654y}{–654v}|
#655|<br/><br/><label>Index Terms–Genre/Form: </label>|{\n6553 }{\n655a}{–655b}{–655x }{–655z}{–655y}{–655v}|
#656|<br/><br/><label>Index Terms–Occupation: </label>|{\n6563 }{\n656a}{–656k}{–656x}{–656z}{–656y}{–656v}|
#657|<br/><br/><label>Index Terms–Function: </label>|{\n6573 }{\n657a}{–657x}{–657z}{–657y}{–657v}|
#658|<br/><br/><label>Index Terms–Curriculum Objective: </label>|{\n658a}{–658b}{–658c}{–658d}{–658v}|
#050|<br/><br/><label>LC Class. No.: </label>|{ 050a }{ / 050b }|
#082|<br/><br/><label>Dewey Class. No.: </label>|{ 082a }{ / 082b }|
#080|<br/><br/><label>Universal Decimal Class. No.: </label>|{ 080a }{ 080x }{ / 080b }|
#070|<br/><br/><label>National Agricultural Library Call No.: </label>|{ 070a }{ / 070b }|
#060|<br/><br/><label>National Library of Medicine Call No.: </label>|{ 060a }{ / 060b }|
#074|<br/><br/><label>GPO Item No.: </label>|{ 074a }|
#086|<br/><br/><label>Gov. Doc. Class. No.: </label>|{ 086a }|
#088|<br/><br/><label>Report. No.: </label>|{ 088a }|
UNIMARC Predeterminado
#200|<h2>Title : |{200a}{. 200c}{ : 200e}{200d}{. 200h}{. 200i}|</h2>
#461|<label class=»ipt»>A part of : </label>|<a href=»/cgi-bin/koha/catalogue/search.pl?op=do_search{&q=461t&idx=ti}»>{461t}</a>{N∞ 461h} {v. 461v}{(461d)}<br/>|
#200b|<label class=»ipt»>Material Designation : </label>| {200b }|<br/>
#101a|<label class=»ipt»>Language(s): </label>|<a href=»/cgi-bin/koha/catalogue/search.pl?op=do_search{&q=101a&idx=ln}»>{101a}</a>|<br/>
#200f|<label class=»ipt»>Authors : </label>|<a href=»/cgi-bin/koha/catalogue/search.pl?op=do_search{&q=200f&idx=au}»>{200f ; }</a>|<br/>
#200g|<label class=»ipt»>Co-authors : </label>|<a href=»/cgi-bin/koha/catalogue/search.pl?op=do_search{&q=200g&idx=au}»>{200g ; }</a>|<br/>
#210a|<br/><label class=»ipt»>Place of pubblication : </label>|<a href=»/cgi-bin/koha/catalogue/search.pl?op=do_search&idx=pl&q={210a}»>{210a}</a>|<br/>
#210c|<label class=»ipt»>Publisher : </label>|<a href=»/cgi-bin/koha/catalogue/search.pl?op=do_search&idx=pb&q={210c}»>{210c ; }</a>|<br/>
#210d|<label class=»ipt»>Date of pubblication : </label>|{ 210d}|<br/>
#215|<label class=»ipt»>Description : </label>|{215a}{ : 215c}{ ; 215d}{ + 215e}|<br/>
#225a|<label class=»ipt»>Series :</label>|<a href=»/cgi-bin/koha/catalogue/search.pl?op=do_search{&q=225a&idx=se}»>{225a ;}</a> |
#225||{ = 225d}{ : 225e}{. 225h}{. 225i}{ / 225f}{, 225x}{ ; 225v}|<br/>
#686|<label>Classification : </label>|{ 686a }|<br/>
#608|<label>Form, Genre : </label>|<a href=»/cgi-bin/koha/catalogue/search.pl?op=do_search&idx=su&q={608a}»><img border=»0» src=»/opac-tmpl/css/en/images/filefind.png» height=»15» title=»Search on {608a}»>{ 608a}</a>|<br/><br/>
#200||<label class=»ipt»>Subjects : </label><br/>|<ul>
#600|<label class=»ipt»>Person(s) </label><br/> |<li><a href=»/cgi-bin/koha/catalogue/search.pl?op=do_search&idx=su&q={600a}»><img border=»0» src=»/opac-tmpl/css/en/images/filefind.png» height=»15» title=»Search on {600a}»>{ 600a}</a></li>|<br/>
#601|<label class=»ipt»>Organisation(s) </label><br/>|<li><a href=»/cgi-bin/koha/catalogue/search.pl?op=do_search&idx=su&q={601a}»><img border=»0» src=»/opac-tmpl/css/en/images/filefind.png» height=»15» title=»Search on {601a}»>{ 601a}</a></li>|<br/>
#606|<label class=»ipt»>Term(s) </label><br/>|<li><a href=»/cgi-bin/koha/catalogue/search.pl?op=do_search&idx=su&q={606a}»><img border=»0» src=»/opac-tmpl/css/en/images/filefind.png» height=»15» title=»Search on {606a}»>{ 606a}</a></li>|<br/>
#607|<label class=»ipt»>Place(s) </label><br/>|<li><a href=»/cgi-bin/koha/catalogue/search.pl?op=do_search&idx=su&q={607a}»><img border=»0» src=»/opac-tmpl/css/en/images/filefind.png» height=»15» title=»Search on {607a}»>{ 607a}</a></li>|<br/>
#610|<label>Keywords</label><br/>|<li><a href=»/cgi-bin/koha/catalogue/search.pl?op=do_search&idx=su&q={610a}»><img border=»0» src=»/opac-tmpl/css/en/images/filefind.png» height=»15» title=»Search on {610a}»>{ 610a}</a></li>|
#200||</ul>|
#856|<label class=»ipt»>Electronic resource : </label>|<a href=»{856u}»>click here</a> to go to the external resource<br/>
#010|<label class=»ipt»>ISBN : </label>|{010a ;}|<br/>
#011|<label class=»ipt»>ISSN : </label>|{011a ;}|<br/>
#200||<label class=»ipt»>Notes : </label>|<br/><ul>
#300||<li>{300a}</li>|
#307||<li>{307a}</li>|
#310||<li>{310a}</li>|
#326||<li>{326a}</li>|
#327||<li>{327a}</li>|
#333|<li>Public : |{333a}</li>|
#200||</ul>|
#330||<label class=»ipt»>Abstract : </label>|<br/>
#330||{330a}|<br/>
#200||<br/><h2>Items</h2>|
#200|<table>|<th>Call number</th><th>Copy note</th><th>Fonds</th><th>Genre detail</th><th>Circulation type</th><th>Barcode</th>|
#995||<tr><td> {995k}</td><td> {995u}</td><td> {995y}</td><td>{995e} </td><td> {995o}</td><td>{995f}</td></tr>|</table>
OPACISBD Defaults
Default values for the OPACISBD preference.
MARC
#100||{ 100a }{ 100b }{ 100c }{ 100d }{ 110a }{ 110b }{ 110c }{ 110d }{ 110e }{ 110f }{ 110g }{ 130a }{ 130d }{ 130f }{ 130g }{ 130h }{ 130k }{ 130l }{ 130m }{ 130n }{ 130o }{ 130p }{ 130r }{ 130s }{ 130t }|<br/><br/>
#245||{ 245a }{ 245b }{245f }{ 245g }{ 245k }{ 245n }{ 245p }{ 245s }{ 245h }|
#246||{ : 246i }{ 246a }{ 246b }{ 246f }{ 246g }{ 246n }{ 246p }{ 246h }|
#242||{ = 242a }{ 242b }{ 242n }{ 242p }{ 242h }|
#245||{ 245c }|
#242||{ = 242c }|
#250| - |{ 250a }{ 250b }|
#254|, |{ 254a }| #255|, |{ 255a }{ 255b }{ 255c }{ 255d }{ 255e }{ 255f }{ 255g }| #256|, |{ 256a }|
#257|, |{ 257a }|
#258|, |{ 258a }{ 258b }|
#260| - |{ 260a }{ 260b }{ 260c }|
#300| - |{ 300a }{ 300b }{ 300c }{ 300d }{ 300e }{ 300f }{ 300g }|
#306| - |{ 306a }| #307| - |{ 307a }{ 307b }|
#310| - |{ 310a }{ 310b }|
#321| - |{ 321a }{ 321b }|
#340| - |{ 3403 }{ 340a }{ 340b }{ 340c }{ 340d }{ 340e }{ 340f }{ 340h }{ 340i }|
#342| - |{ 342a }{ 342b }{ 342c }{ 342d }{ 342e }{ 342f }{ 342g }{ 342h }{ 342i }{ 342j }{ 342k }{ 342l }{ 342m }{ 342n }{ 342o }{ 342p }{ 342q }{ 342r }{ 342s }{ 342t }{ 342u }{ 342v }{ 342w }|
#343| - |{ 343a }{ 343b }{ 343c }{ 343d }{ 343e }{ 343f }{ 343g }{ 343h }{ 343i }|
#351| - |{ 3513 }{ 351a }{ 351b }{ 351c }|
#352| - |{ 352a }{ 352b }{ 352c }{ 352d }{ 352e }{ 352f }{ 352g }{ 352i }{ 352q }|
#362| - |{ 362a }{ 351z }|
#440| - |{ 440a }{ 440n }{ 440p }{ 440v }{ 440x }|. #490| - |{ 490a }{ 490v }{ 490x }|.
#800| - |{ 800a }{ 800b }{ 800c }{ 800d }{ 800e }{ 800f }{ 800g }{ 800h }{ 800j }{ 800k }{ 800l }{ 800m }{ 800n }{ 800o }{ 800p }{ 800q }{ 800r }{ 800s }{ 800t }{ 800u }{ 800v }|.
#810| - |{ 810a }{ 810b }{ 810c }{ 810d }{ 810e }{ 810f }{ 810g }{ 810h }{ 810k }{ 810l }{ 810m }{ 810n }{ 810o }{ 810p }{ 810r }{ 810s }{ 810t }{ 810u }{ 810v }|.
#811| - |{ 811a }{ 811c }{ 811d }{ 811e }{ 811f }{ 811g }{ 811h }{ 811k }{ 811l }{ 811n }{ 811p }{ 811q }{ 811s }{ 811t }{ 811u }{ 811v }|.
#830| - |{ 830a }{ 830d }{ 830f }{ 830g }{ 830h }{ 830k }{ 830l }{ 830m }{ 830n }{ 830o }{ 830p }{ 830r }{ 830s }{ 830t }{ 830v }|.
#500|<br/><br/>|{ 5003 }{ 500a }|
#501|<br/><br/>|{ 501a }|
#502|<br/><br/>|{ 502a }|
#504|<br/><br/>|{ 504a }|
#505|<br/><br/>|{ 505a }{ 505t }{ 505r }{ 505g }{ 505u }|
#506|<br/><br/>|{ 5063 }{ 506a }{ 506b }{ 506c }{ 506d }{ 506u }|
#507|<br/><br/>|{ 507a }{ 507b }| #508|<br/><br/>|{ 508a }{ 508a }|
#510|<br/><br/>|{ 5103 }{ 510a }{ 510x }{ 510c }{ 510b }|
#511|<br/><br/>|{ 511a }|
#513|<br/><br/>|{ 513a }{513b }|
#514|<br/><br/>|{ 514z }{ 514a }{ 514b }{ 514c }{ 514d }{ 514e }{ 514f }{ 514g }{ 514h }{ 514i }{ 514j }{ 514k }{ 514m }{ 514u }|
#515|<br/><br/>|{ 515a }|
#516|<br/><br/>|{ 516a }|
#518|<br/><br/>|{ 5183 }{ 518a }|
#520|<br/><br/>|{ 5203 }{ 520a }{ 520b }{ 520u }|
#521|<br/><br/>|{ 5213 }{ 521a }{ 521b }|
#522|<br/><br/>|{ 522a }|
#524|<br/><br/>|{ 524a }|
#525|<br/><br/>|{ 525a }|
#526|<br/><br/>|{\n510i }{\n510a }{ 510b }{ 510c }{ 510d }{\n510x }|
#530|<br/><br/>|{\n5063 }{\n506a }{ 506b }{ 506c }{ 506d }{\n506u }|
#533|<br/><br/>|{\n5333 }{\n533a }{\n533b }{\n533c }{\n533d }{\n533e }{\n533f }{\n533m }{\n533n }|
#534|<br/><br/>|{\n533p }{\n533a }{\n533b }{\n533c }{\n533d }{\n533e }{\n533f }{\n533m }{\n533n }{\n533t }{\n533x }{\n533z }|
#535|<br/><br/>|{\n5353 }{\n535a }{\n535b }{\n535c }{\n535d }|
#538|<br/><br/>|{\n5383 }{\n538a }{\n538i }{\n538u }|
#540|<br/><br/>|{\n5403 }{\n540a }{ 540b }{ 540c }{ 540d }{\n520u }|
#544|<br/><br/>|{\n5443 }{\n544a }{\n544b }{\n544c }{\n544d }{\n544e }{\n544n }|
#545|<br/><br/>|{\n545a }{ 545b }{\n545u }| #546|<br/><br/>|{\n5463 }{\n546a }{ 546b }|
#547|<br/><br/>|{\n547a }| #550|<br/><br/>|{ 550a }|
#552|<br/><br/>|{ 552z }{ 552a }{ 552b }{ 552c }{ 552d }{ 552e }{ 552f }{ 552g }{ 552h }{ 552i }{ 552j }{ 552k }{ 552l }{ 552m }{ 552n }{ 562o }{ 552p }{ 552u }|
#555|<br/><br/>|{ 5553 }{ 555a }{ 555b }{ 555c }{ 555d }{ 555u }|
#556|<br/><br/>|{ 556a }{ 506z }| #563|<br/><br/>|{ 5633 }{ 563a }{ 563u }|
#565|<br/><br/>|{ 5653 }{ 565a }{ 565b }{ 565c }{ 565d }{ 565e }|
#567|<br/><br/>|{ 567a }|
#580|<br/><br/>|{ 580a }|
#581|<br/><br/>|{ 5633 }{ 581a }{ 581z }|
#584|<br/><br/>|{ 5843 }{ 584a }{ 584b }|
#585|<br/><br/>|{ 5853 }{ 585a }|
#586|<br/><br/>|{ 5863 }{ 586a }|
#020|<br/><br/><label>ISBN: </label>|{ 020a }{ 020c }|
#022|<br/><br/><label>ISSN: </label>|{ 022a }|
#222| = |{ 222a }{ 222b }|
#210| = |{ 210a }{ 210b }|
#024|<br/><br/><label>Standard No.: </label>|{ 024a }{ 024c }{ 024d }{ 0242 }|
#027|<br/><br/><label>Standard Tech. Report. No.: </label>|{ 027a }|
#028|<br/><br/><label>Publisher. No.: </label>|{ 028a }{ 028b }|
#013|<br/><br/><label>Patent No.: </label>|{ 013a }{ 013b }{ 013c }{ 013d }{ 013e }{ 013f }|
#030|<br/><br/><label>CODEN: </label>|{ 030a }|
#037|<br/><br/><label>Source: </label>|{ 037a }{ 037b }{ 037c }{ 037f }{ 037g }{ 037n }|
#010|<br/><br/><label>LCCN: </label>|{ 010a }|
#015|<br/><br/><label>Nat. Bib. No.: </label>|{ 015a }{ 0152 }|
#016|<br/><br/><label>Nat. Bib. Agency Control No.: </label>|{ 016a }{ 0162 }|
#600|<br/><br/><label>Subjects–Personal Names: </label>|{\n6003 }{\n600a}{ 600b }{ 600c }{ 600d }{ 600e }{ 600f }{ 600g }{ 600h }{–600k}{ 600l }{ 600m }{ 600n }{ 600o }{–600p}{ 600r }{ 600s }{ 600t }{ 600u }{–600x}{–600z}{–600y}{–600v}|
#610|<br/><br/><label>Subjects–Corporate Names: </label>|{\n6103 }{\n610a}{ 610b }{ 610c }{ 610d }{ 610e }{ 610f }{ 610g }{ 610h }{–610k}{ 610l }{ 610m }{ 610n }{ 610o }{–610p}{ 610r }{ 610s }{ 610t }{ 610u }{–610x}{–610z}{–610y}{–610v}|
#611|<br/><br/><label>Subjects–Meeting Names: </label>|{\n6113 }{\n611a}{ 611b }{ 611c }{ 611d }{ 611e }{ 611f }{ 611g }{ 611h }{–611k}{ 611l }{ 611m }{ 611n }{ 611o }{–611p}{ 611r }{ 611s }{ 611t }{ 611u }{–611x}{–611z}{–611y}{–611v}|
#630|<br/><br/><label>Subjects–Uniform Titles: </label>|{\n630a}{ 630b }{ 630c }{ 630d }{ 630e }{ 630f }{ 630g }{ 630h }{–630k }{ 630l }{ 630m }{ 630n }{ 630o }{–630p}{ 630r }{ 630s }{ 630t }{–630x}{–630z}{–630y}{–630v}|
#648|<br/><br/><label>Subjects–Chronological Terms: </label>|{\n6483 }{\n648a }{–648x}{–648z}{–648y}{–648v}| #650|<br/><br/><label>Subjects–Topical Terms: </label>|{\n6503 }{\n650a}{ 650b }{ 650c }{ 650d }{ 650e }{–650x}{–650z}{–650y}{–650v}|
#651|<br/><br/><label>Subjects–Geographic Terms: </label>|{\n6513 }{\n651a}{ 651b }{ 651c }{ 651d }{ 651e }{–651x}{–651z}{–651y}{–651v}|
#653|<br/><br/><label>Subjects–Index Terms: </label>|{ 653a }|
#654|<br/><br/><label>Subjects–Facted Index Terms: </label>|{\n6543 }{\n654a}{–654b}{–654x}{–654z}{–654y}{–654v}|
#655|<br/><br/><label>Index Terms–Genre/Form: </label>|{\n6553 }{\n655a}{–655b}{–655x }{–655z}{–655y}{–655v}|
#656|<br/><br/><label>Index Terms–Occupation: </label>|{\n6563 }{\n656a}{–656k}{–656x}{–656z}{–656y}{–656v}|
#657|<br/><br/><label>Index Terms–Function: </label>|{\n6573 }{\n657a}{–657x}{–657z}{–657y}{–657v}|
#658|<br/><br/><label>Index Terms–Curriculum Objective: </label>|{\n658a}{–658b}{–658c}{–658d}{–658v}|
#050|<br/><br/><label>LC Class. No.: </label>|{ 050a }{ / 050b }|
#082|<br/><br/><label>Dewey Class. No.: </label>|{ 082a }{ / 082b }|
#080|<br/><br/><label>Universal Decimal Class. No.: </label>|{ 080a }{ 080x }{ / 080b }|
#070|<br/><br/><label>National Agricultural Library Call No.: </label>|{ 070a }{ / 070b }|
#060|<br/><br/><label>National Library of Medicine Call No.: </label>|{ 060a }{ / 060b }|
#074|<br/><br/><label>GPO Item No.: </label>|{ 074a }|
#086|<br/><br/><label>Gov. Doc. Class. No.: </label>|{ 086a }|
#088|<br/><br/><label>Report. No.: </label>|{ 088a }|
Configuración de impresoras
Las siguientes instrucciones son para impresoras específicas, pero probablemente sirva de ayuda para configurar otras marcas.
For Epson TM-T88III (3) & TM-T88IV (4) Printers
En el controlador de la impresora
Para estas instrucciones, estamos usando la versión 5,0,3,0 del controlador de impresión Epson TM-T88III, la versión EPSON TM-T88IV es ReceiptE4. Regístrese en el sitio web EpsonExpert Technical Resource Center para acceder a los controladores, vaya a Technical Resources, a continuación, elija el modelo de impresora de la lista desplegable de impresoras.
Haga clic en Inicio > Impresoras y faxesw > haga clic con el botón derecho en la impresora de recibos > Propiedades:
- Pestaña Avanzado, haga clic en el botón Valores por defecto de impresión
- Pestaña diseño: Tamaño de papel: Roll Paper 80 x 297mm
- TM-T88III: Pestaña diseño: Chequear reducir impresión y ajustar ancho de impresión
- TM-T88IV: Chequear reducir tamaño de impresión; Hacer clic en OK en cuadro emergente que aparece. El ajuste de ancho de impresión debería seleccionarse automáticamente.
- Seleccione OK para salir.
En Firefox
En Archivo > Configuración de página:
- Shrink to fit page on Format & Options tab
- 0,0,0,0 for Margins on Margins & Header/Footer Tab. This makes the receipts use all available space on the paper roll.
- Ponga todos Encabezados/Pies de página a -vacío-. Esto elimina toda la suciedad que normalmente podría encontrar en una impresión de Firefox, tales como la dirección, número de páginas, etc.
- Haga clic en aceptar
Establezca los parámetros de la impresora por defecto en Firefox para que usted no vea un cuadro de diálogo «Imprimir»:
Ir a Archivo > Imprimir
Ajuste la impresora para la impresora de recibos.
Haga clic en el botón avanzado (o propiedades)
Pestaña diseño: Tamaño de papel: Roll Paper 80 x 297mm
TM-T88III: Pestaña diseño: Chequear reducir impresión y ajustar ancho de impresión
TM-T88IV: Chequear tamaño reducido de impresión, haga clic en aceptar en la ventana emergente que aparece. El ajustar al ancho imprimible debería seleccionarse automáticamente.
Acepte para salir, siga adelante e imprima cualquier página.
Escriba about:config en la barra de direcciones. Haga clic en «Tendré cuidado, lo prometo!» en el mensaje de advertencia.
Escriba, print.always en Filtrar.
Look for print.always_print_silent.
- Si la preferencia está entonces fije el valor a verdadero.
Si la preferencia no está allí (y no debería ocurrir en la mayoría de navegadores) hay que añadir la preferencia.
- Haga clic derecho en el área de preferencia y seleccione Nuevo > Booleano
- Type print.always_print_silent in the dialog box and set the value to True. This sets the print settings in Firefox to always use the same settings and print without showing a dialog box.
Warning
Setting the print.always_print_silent setting in about:config DISABLES the ability to choose a printer in Firefox.
Para impresoras Epson TM-T88II (2)
Registrese en el EpsonExpert Technical Resource Center website para tener acceso a los drivers; vaya a Technical Resources, entonces elija el modelo de su impresora en la lista desplegable de Impresoras.
En Firefox
En Archivo > Configuración de página:
- Shrink to fit page on Format & Options tab
- 0,0,0,0 for Margins on Margins & Header/Footer Tab. This makes the receipts use all available space on the paper roll.
- Ponga todos Encabezados/Pies de página a -vacío-. Esto elimina toda la suciedad que normalmente podría encontrar en una impresión de Firefox, tales como la dirección, número de páginas, etc.
- Haga clic en aceptar
Establezca los parámetros de la impresora por defecto en Firefox para que usted no vea un cuadro de diálogo «Imprimir»:
Ir a Archivo > Imprimir
Ajuste la impresora para la impresora de recibos.
Imprimir cualquier página que se encuentra.
Escriba about:config en la barra de direcciones. Haga clic en «Tendré cuidado, lo prometo!» en el mensaje de advertencia.
Escriba, print.always en Filtrar.
Look for, print.always_print_silent.
- Si la preferencia está entonces fije el valor a verdadero.
Si la preferencia no está allí (y no debería ocurrir en la mayoría de navegadores) hay que añadir la preferencia.
- Haga clic derecho en el área de preferencia y seleccione Nuevo > Booleano
- Type, print.always_print_silent in the dialog box and set the value to True. This sets the print settings in Firefox to always use the same settings and print without showing a dialog box.
Warning
Setting the print.always_print_silent setting in about:config DISABLES the ability to choose a printer in Firefox.
Para impresoras Star SP542
Instalación de la impresora
Mientras que las siguientes observaciones se basan en el la impresora de recibos Star SP542, probablemente se aplican a todas las impresoras de la serie SP5xx.
The Star SP542 receipt printer works well with Koha and Firefox on Windows XP SP3. This printer, with either the parallel or USB interface, is fairly easy to install and configure. You will need the following executable file which is available from numerous places on the Internet:
linemode_2k-xp_20030205.exe
Este ejecutable en realidad hace todo la instalación, no se tendrá que utilizar el programa «Agregar impresora» de Microsoft Windows. Le recomendamos que cuando lo instale, no seleccione la opción de monitorización de software, hemos experimentado importantes pausas y retrasos al imprimir con ello. En su lugar, sólo tiene que elegir la instalación de la impresora de recibos sin el monitor.
Additionally, the install program may not put the printer on the correct port, especially if using the USB interface. This is easily corrected by going to «Start -> Printers and Faxes -> Properties for the SP542 printer -> Ports», then check the appropriate port.
Es posible que requiera reiniciar, incluso si no lo indica el instalador o el sistema operativo.
Windows 7 users should refer to this page: http://www.starmicronics.com/supports/win7.aspx.
Configurar Firefox para imprimir en la impresora de recibos
- Abrir archivo > Configuración de página
- Dejar todos los encabezados y pies de página en blanco
- Establezca los márgenes a 0 (cero)
- En la barra de direcciones de Firefox, escriba about: config
- Search for print.always_print_silent and double click it
- Cambiarlo de falso a verdadero
- Esto le permite saltar cuadro emergente de impresión que aparece, así como saltarse el paso donde usted tiene que hacer clic en Aceptar, imprimiento de forma automática la hoja de tamaño adecuado.
- If print.always_print_silent does not come up
- Haga clic en el botón derecho en un área vacía de la ventana de preferencias
- Seleccione nuevo > Booleano
- Enter «print.always_print_silent» as the name (without quotes)
- Haga clic en aceptar
- Seleccione verdadero para el valor
- You may also want to check what is listed for print.print_printer
- Es posible que tenga que elegir Genérico / Sólo texto (o como sea que se llame su impresora de recibos)
Notice & Slips Guides
Field Guide for Notices & Slips
Esta guía desglosará la información sobre avisos y recibos de tres maneras. En primer lugar, le dirá, qué archivo genera los avisos, después, cómo presentará la información sobre el ítem en ese aviso y, finalmente, si el aviso puede ser para una sede específica o no.
| Letter Code | Used In | Detail tag | Can be branch specific |
|---|---|---|---|
| DUE | advance_notices.pl | <<items.content>> | No |
| DUEDGST | advance_notices.pl | <<items.content>> | No |
| PREDUE | advance_notices.pl | <<items.content>> | No |
| PREDUEDGST | advance_notices.pl | <<items.content>> | No |
| ODUE* | overdue_notices.pl | <<items.content>> or <item> </item> | Sí |
| CHECKOUT | C4/Circulation.pm | N/D | Sí |
| RENEWAL | C4/Circulation.pm | N/D | Sí |
| TRANSFERSLIP | C4/Circulation.pm | N/D | Sí |
| ISSUESLIP | C4/Members.pm | <checkedout> </checkedout> <overdue> </overdue> <news> </news> |
Sí |
| ISSUEQSLIP | C4/Members.pm | <checkedout> </checkedout> | Sí |
| HOLDPLACED | C4/Reserves.pm | N/D | Sí |
| HOLD_SLIP | C4/Reserves.pm | N/D | Sí |
| ASKED | C4/Suggestions.pm | N/D | Sí |
| CHECKED | C4/Suggestions.pm | N/D | Sí |
| ACCEPTED | C4/Suggestions.pm | N/D | Sí |
| REJECTED | C4/Suggestions.pm | N/D | Sí |
| OPAC_REG_VERIFY | opac/opac-memberentry.pl | N/D | No |
Ejemplo de aviso
Nicole Engard
410 Library Rd.
Filadelfia, PA 19107
Estimada Nicole Engard (23529000035726),
Según nuestros registros, en el momento de esta notificación, tiene ítems que están atrasados. Por favor, devolver o renovar tan pronto como le sea posible para evitar el aumento de multas por demora.
Si ha registrado una contraseña en la biblioteca, es posible usarla con su número de carné de biblioteca para renovaciones por Internet.
Si usted cree que ha devuelto el ítem por favor llame al personal de la biblioteca y ellos le ayudarán a resolver el problema.
El/los siguiente(s) ítem(s) están retrasados:
07/08/2008 Creando escuelas y comunidades libres de drogas: 502326000054 Fox, C. Lynn.
06/27/2008 Comiendo Fracciones / 502326000022 McMillan, Bruce.
Sinceramente, Personal de la Biblioteca
Muestra de Publicaciones Seriadas
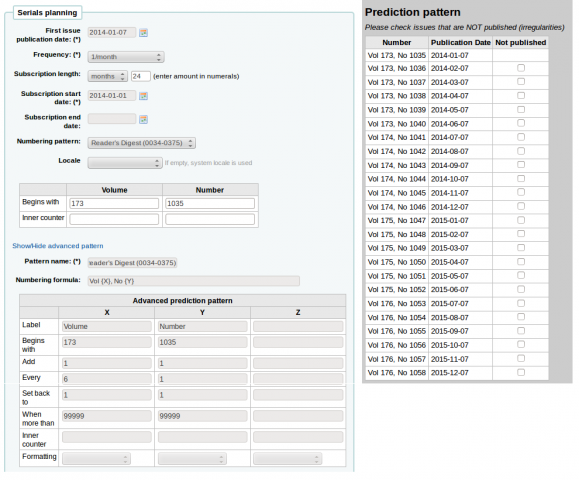
Reader’s Digest (0034-0375)
Publicada 12 veces al año (mensual)
El número de volumen cambia cada 6 meses y los números continúan (requiere un patrón avanzado).
People Weekly (1076-0091)
- Publicación semanal
- El sitio web dice que «el sábado, salvo la primera semana de agosto, la semana de Acción de Gracias, la primera y la última semana del año», pero esto no coincide con el patrón para el año 2007 o 2008
- En julio-diciembre hay 26 números
- En enero-junio hay 25 números (no hay un número en la primera semana de enero)
Debido a la irregularidad de los primeros 26 números se establece que se reinicie la numeración después del número 25. La número 26 en la segunda mitad del año tendría que ser recibido como un suplemento.
La irregularidad hará que el sistema note que se recibió un número menor de los 52 números que se esperaban. Pero necesitamos comenzar de nuevo la numeración en el volumen, por lo que necesitamos para definir las dos últimas semanas del año a las irregularidades. Por lo tanto, recibirá los 50 númneros de las primeras 50 semanas, y luego un número suplementario en la semana 51, que tenemos que definir la enumeración, entonces el próximo número se prevé para la primera semana del año siguiente.
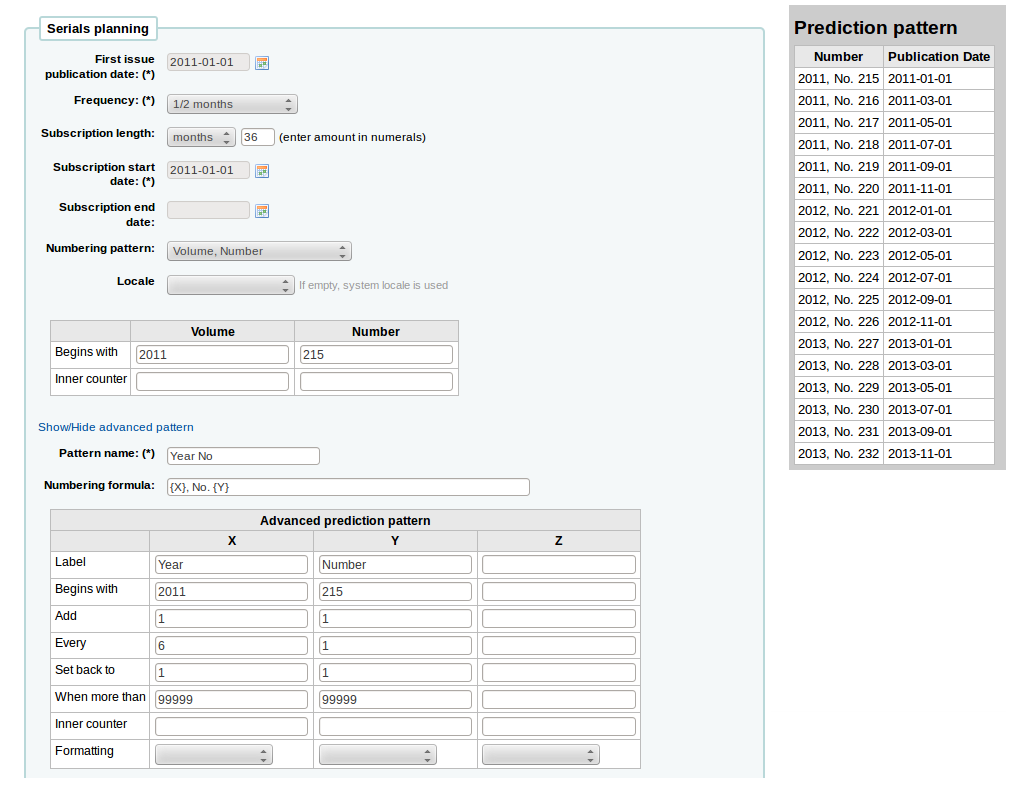
Et-Mol
Esta revista se publica con las siguientes reglas:
- 6 números al año (cada 2 meses)
- El año cambia cada 6 números
- empezamos en 2011
- el número de ejemplares aumenta de forma indefinida
- comenzando desde el número 215
La planificación sería algo así:
Backpacker (0277-867X)
Publicado 9 veces al año en forma irregular. Las entregas continúan, mientras el volumen y el número se reinician cada nueve entregas. Si usted posee el Volumen 41, Número 3, Entrega 302 a la mano la predicción tendría el siguiente aspecto:
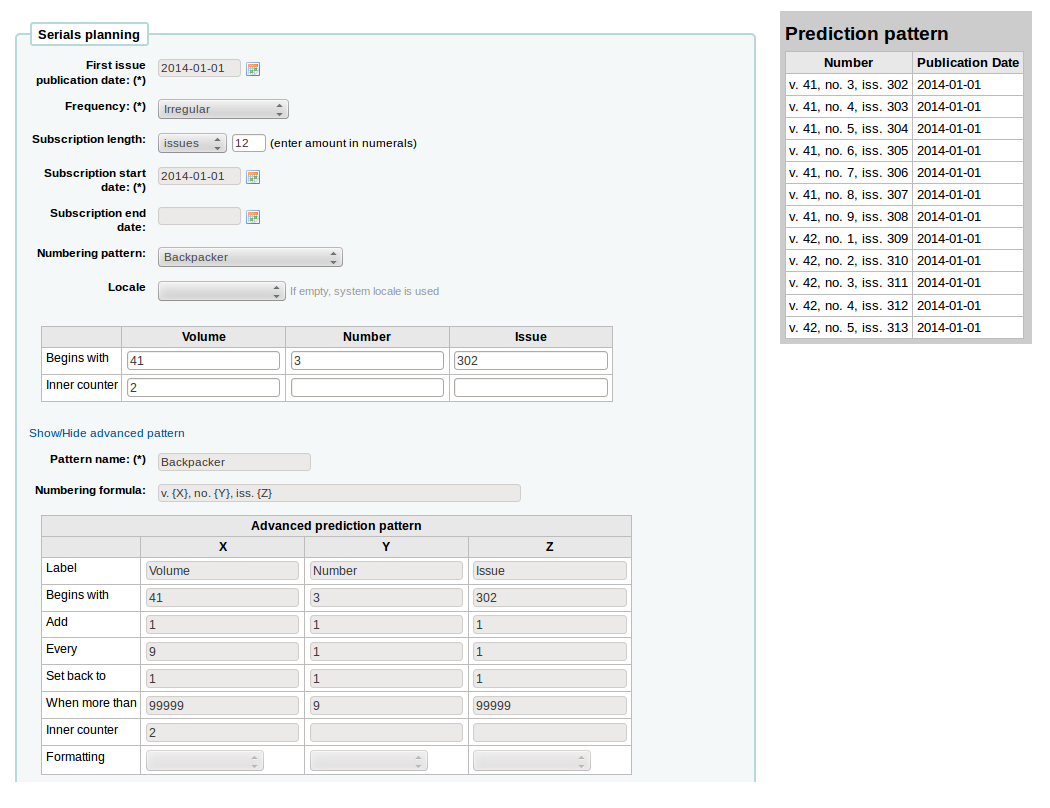
Y las entregas recibidas se numerarían así:
- 41, no. 3, iss. 302
- 41, no. 4, iss. 303
- 41, no. 5, iss. 304
- 41, no. 6, iss. 305
- 41, no. 7, iss. 306
- 41, no. 8, iss. 307
- 41, no. 9, iss. 308
- 42, no. 1, iss. 309
- 42, no. 2, iss. 310
- 42, no. 3, iss. 311
- 42, no. 4, iss. 312
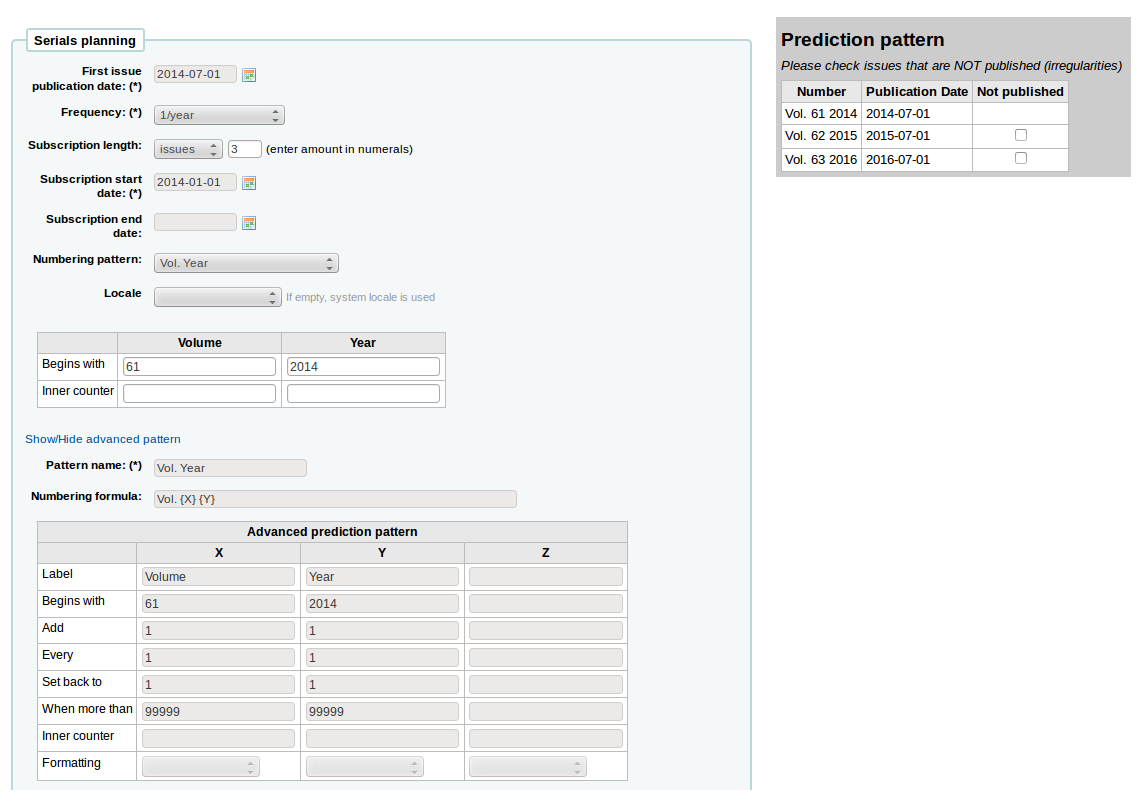
Keats-Shelley Journal (0453-4387)
This journal is published once per year in July. The numbering follows this pattern:
- Vol. 61 2013
- Vol. 62 2014
- Vol. 63 2015
La configuración tendría el siguiente aspecto (si está empezando en julio de 2014):
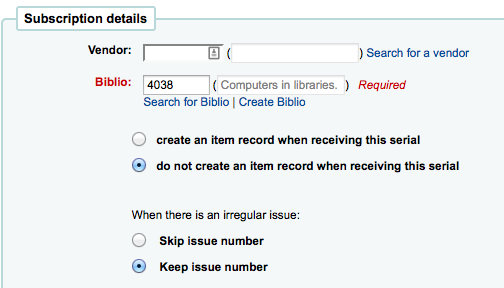
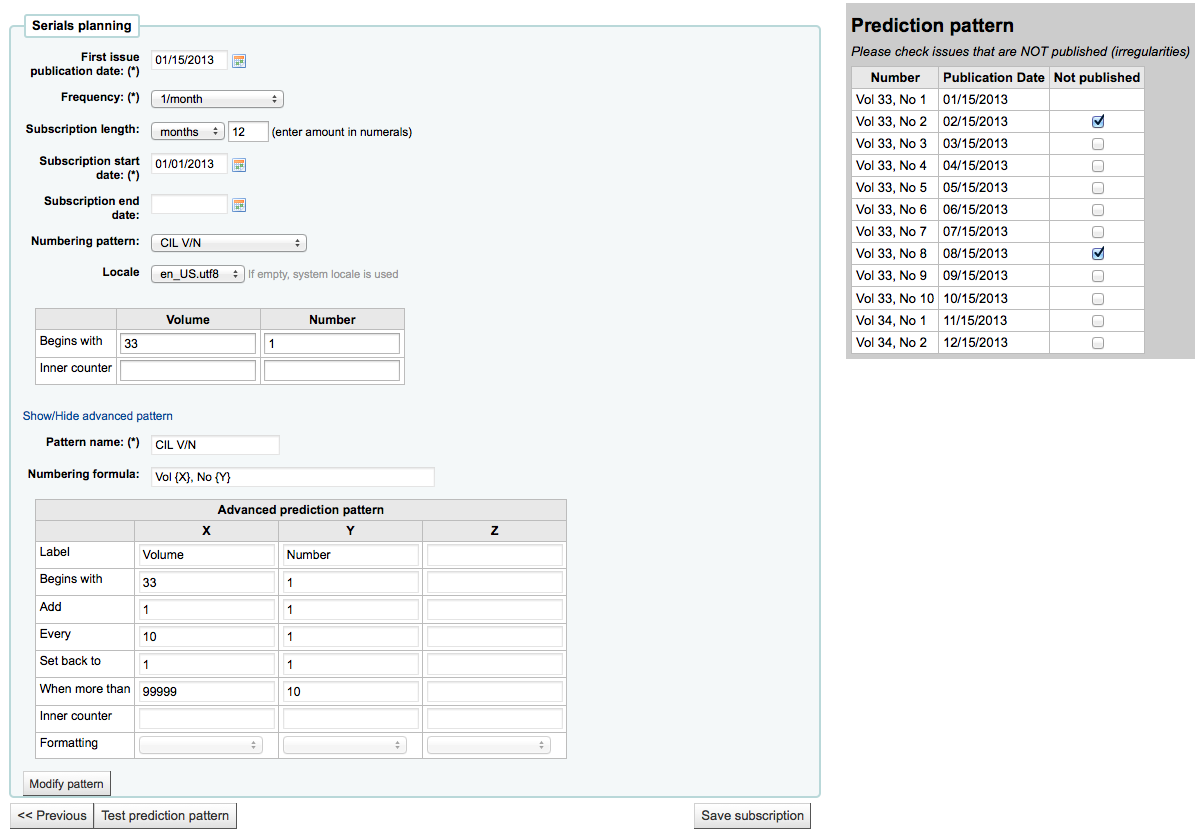
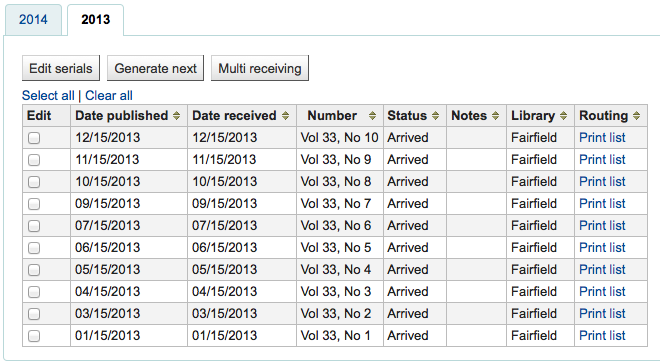
Computers in Libraries (1041-7915)
Computers in Libraries es publicada diez veces al año (mensual con enero/febrero y julio/agosto entregas combinadas).
Sample List & Cart Emails
Ejemplo de correo electrónico desde una lista
A continuación hay un ejemplo de un correo electrónico desde una lista en Koha.
Hi,

Here is your list called If You Like Jodi Picoult, sent from our online catalog.

Please note that the attached file is a MARC bibliographic records file
which can be imported into a Personal Bibliographic Software like EndNote,
Reference Manager or ProCite.
---------------------------------------------

Home safe : a novel /

by Berg, Elizabeth.

Published by: Random House,, 260 p. ;, 25 cm.
Copyright year: 2009
LCCN:   2008049247
In the online catalog:
    http://MYCATALOG/cgi-bin/koha/opac-detail.pl?biblionumber=12113
Items :
    North Branch FIC (FIC Ber) TVSN500088894O
    Main Library FIC (FIC Boh) TVSN5000921548
    South Branch FIC (FIC Boh) TVSN500092156A
    West Branch FIC (FIC Boh) TVSN5000921559

---------------------------------------------

Half a heart /

by Brown, Rosellen.

Published by: Farrar, Straus, and Giroux,, 402 p. ;, 24 cm.
Copyright year: 2000
LCCN:    00022926
In the online catalog:
    http://MYCATALOG/cgi-bin/koha/opac-detail.pl?biblionumber=12501
Items :
    East Branch  (813/.54)
    South Branch FIC (FIC Bro) TVSN5000451333
Ejemplo de correo electrónico desde el carrito
A continuación hay un ejemplo de cómo luciría un correo electrónico desde el carrito en Koha:
Hi,

   Joaquin D'Planque sent you a cart from our online catalog.

   Please note that the attached file is a MARC bibliographic records
   file which can be imported into personal bibliographic software like
   EndNote, Reference Manager or ProCite.

   ---------------------------------------------------------------------


     1.  Book /
       Author(s): Brookfield, Karen. ;
       Published by: Knopf : | Distributed by Random House, , 63 p. : ,
       29 cm.
       Copyright year: 1993
       Notes : Includes index.
       LCCN: 93018833 /AC

       In online catalog:
       http://MYCATALOG/cgi-bin/koha/opac-detail.pl?biblionumber=31644

       Items:

         *  East Branch (JNF 002 Bro) TVSN500017618A

       -----------------------------------------------------------------

     2.  The 1965 World book year book :

       Published by: Field Enterprises Educational Corp., , 628 p. : , 26
       cm.
       Copyright year: 1965
       Notes : Includes index. | Spine title: Year book, 1965. | Cover
       title: The World book year book, 1965.
       URL:
       http://www.archive.org/details/1965worldbookyea00chic%20%7C%20http://www.openlibrary.org/books/OL24199089M

       In online catalog:
       http://MYCATALOG/cgi-bin/koha/opac-detail.pl?biblionumber=88666

       -----------------------------------------------------------------
Utilizando Koha como un sistema de gestión de contenidos (CMS)
Configuración
Estas son las instrucciones para que una instalación por defecto de Koha pueda funcionar como un pequeño sistema de gestión de contenidos. Esto permitirá a una biblioteca publicar un número arbitrario de páginas basadas en una plantilla. En este ejemplo se utiliza la plantilla para la página principal del OPAC, pero se puede utilizar también cualquier otra plantilla que se desee con un poco más de edición. Puede ser adecuado para una biblioteca pequeña que quiera que los bibliotecarios agreguen páginas fácilmente y no quieran instalar un CMS completo.
Copiar /usr/share/koha/opac/cgi-bin/opac/opac-main.pl a /usr/share/koha/opac/cgi-bin/opac/pages.pl (en el mismo directorio)
Editar pages.pl en un editor
Aproximadamente en la línea 33 cambie este código:
template_name => "opac-main.tt",
Por este código:
template_name => "pages.tt",
Aproximadamente en la línea 62 después de este código:
$template->param(
           koha_news       => $all_koha_news,
           koha_news_count => $koha_news_count,
           display_daily_quote => C4::Context->preference('QuoteOfTheDay'),
           daily_quote         => $quote,
           );
Agregar estas líneas:
my $page = "page_" . $input->param('p');          # go for "p" value in URL and do the concatenation
my $preference = C4::Context->preference($page);  # Go for preference
$template->{VARS}->{'page_test'} = $preference;   # pass variable to template pages.tt
Dese cuenta que el archivo pages.pl debe tener permisos de ejecución del usuario Webserver, puede utilizar el comando chmod si usted esta actualmente conectado como tal usuario:
$chmod 755 pages.pl
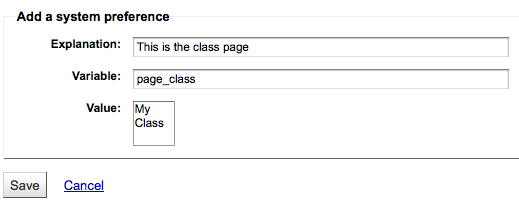
In the browser go to Home > Administration > System Preferences > Local Use and add a New Preference called «page_test»
Llénela de esta forma
- Explicación: página de prueba para las páginas del diminuto cms
- Variable: page_test
- Valor: Lorem ipsum
- Haga clic en el enlace TextArea (o escriba «TextArea» en el campo de entrada por debajo de él)
- variable options (last field): 80|50
En un navegador vaya a http://youraddress/cgi-bin/koha/pages.pl?p=test La página debería aparecer con las palabras «Lorem ipsum» en el área de contenido principal de la página. (Reemplace «youraddress» con localhost, 127.0.0.1, o su nombre de dominio en función de cómo haya configurado Apache.)
To add more pages simply create a system preference where the title begins with «page_» followed by any arbitrary letters. You can add any markup you want as the value of the field. Reference the new page by changing the value of the «p» parameter in the URL.
To learn more visit the Koha wiki page on this topic: http://wiki.koha-community.org/wiki/Koha_as_a_CMS
Editando las páginas plantilla (template)
The file to create / edit for the pages template will depend on your opacthemes system preference setting
Editando plantilla del tema “bootstrap” (actual)
Copiar /usr/share/koha/opac/htdocs/opac-tmpl/bootstrap/en/modules/opac-main.tt a /usr/share/koha/opac/htdocs/opac-tmpl/bootstrap/en/modules/pages.tt
Editar /usr/share/koha/opac/htdocs/opac-tmpl/bootstrap/en/modules/pages.tt
Aproximadamente en la línea 61, cambie esto:
[% IF ( OpacMainUserBlock ) %]<div id="opacmainuserblock">[% OpacMainUserBlock %]</div>[% END %]
A esto:
[% IF ( page_test ) %]<div id="opacmainuserblock">[% page_test %]</div>[% END %]
Remark: You may wish to disable your News block of these CMS style pages e.g. when you do not want it displayed on the CMS style pages or where the News block is long enough that it actually makes the “page_test” include scroll outside the default viewport dimensions. In that case, remove the following code from your pages.tt template.
[% IF ( koha_news_count ) %]
    <div id="news">
    <table class="table table-bordered">
    [% FOREACH koha_new IN koha_news %]
      <thead><tr><th>[% koha_new.title %]</th></tr></thead>
      <tbody><tr><td><p>[% koha_new.new %]</p>
      <p class="newsfooter"><i>(published on [% koha_new.newdate %])</i></p></td></tr></tbody>
    [% END %]
    </table>
    </div>
   [% END %]
Solución de problemas
If you have problems check file permissions on pages.pl and pages.tt. They should have the same user and group as other Koha files like opac-main.pl.
Puntos de Bonus
En vez de utilizar la dirección http://youraddress/cgi-bin/koha/pages.pl?p=test puede acortarla a http://youraddress/pages.pl?p=test solamente abra /etc/koha/koha-httpd.conf y agregue lo siguiente cerca de la línea 13:
ScriptAlias /pages.pl "/usr/share/koha/opac/cgi-bin/opac/pages.pl"
A continuación, reinicie Apache.
Utilización
Después de configurar Koha como CMS puede crear nuevas páginas siguiendo estas instrucciones:
Agregar páginas
Para agregar una nueva página es necesario añadir una preferencia del sistema en Uso Local.
Ir a: Más > Administración > Preferencias globales del sistema > Uso local
Haga clic en “Nueva preferencia”
Introduzca una descripción en el campo Explicación
Enter a value that starts with “page_” in the Variable field
Teclee en el campo Valor comenzando con HTML
Establezca el tipo de variable a Textarea
Set the Variable options to something like 20|20 for 20 rows and 20 columns

Viendo su página
You can view your new page at http://YOUR-OPAC/cgi-bin/koha/pages.pl?p=PAGENAME where PAGENAME is the part you entered after “page_” in the Variable field.
Ejemplo
Este proceso puede ser usado para crear listas de lecturas recomendadas en Koha. Así cuando hemos configurado Koha para ser usado como CMS podemos ir a “Agregar una nueva página” para hacer una “Listas de lecturas recomendadas”
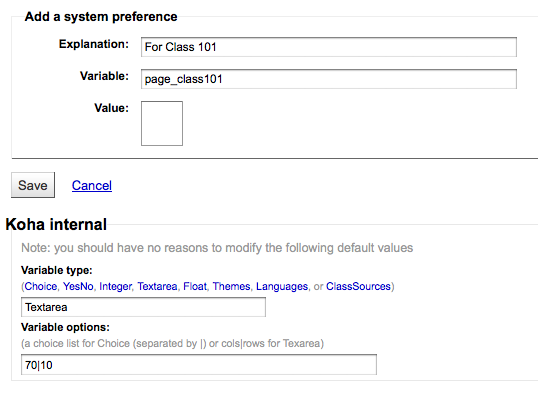
Lo siguiente que necesitamos es crear páginas para nuestras diferentes clases (o categorías). Para ello, vuelva a la sección “Agregar una nueva página” y cree una preferencia para la primera clase.
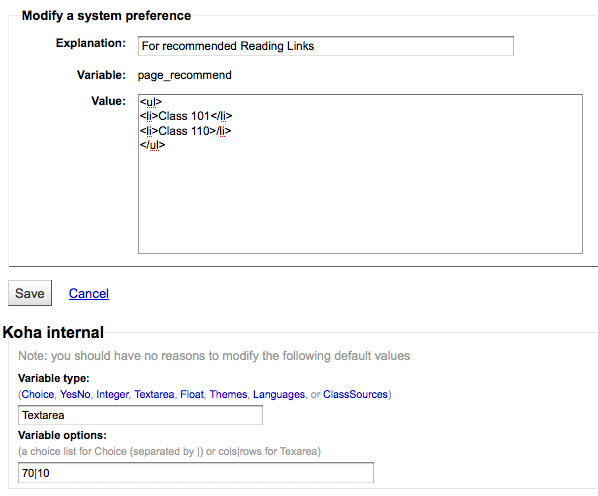
Next you’ll want to link your first page to your new second page, go to the page_recommend preference and click “Edit.” Now you want to edit the HTML to include a link to your newest page:

Ejemplos en vivo
- The Crawford Library at Dallas Christian College is using this method for their recommended reading lists: http://opac.dallas.edu/
Reinicializar la base de datos de Koha
These notes on how to reset the database for Koha were derived from the following email thread: http://lists.koha-community.org/pipermail/koha-devel/2009-January/008939.html and http://lists.katipo.co.nz/public/koha/2014-June/039701.html
La reinicialización de la base de datos puede ser útil si se instala Koha con los datos de ejemplo que viene en la instalación y después se quieren usar datos reales sin reinstalar el software.
Delete sample data from Tables
Utilice el cliente de MySQL de su preferencia para eliminar las siguientes tablas:
- biblio
- biblioitems
- items
- auth_header
- sessions
- zebraqueue
You may need to disable foreign key checks to delete data from same tables. For instructions follow this thread: https://lists.katipo.co.nz/pipermail/koha/2013-July/036853.html.
Reinicializar el índice de Zebra
Ejecute los siguientes comandos para reiniciar los índices bibliográficos y de las autoridades de Zebra.
$ zebraidx -c /etc/koha/zebradb/zebra-authorities-dom.cfg -g iso2709 -d authorities init
$ zebraidx -c /etc/koha/zebradb/zebra-biblios.cfg -g iso2709 -d biblios init
Si está ejecutando un paquete de instalación a continuación, usted querrá ejecutar los siguientes comandos para reiniciar los índices bibliográficos y de las autoridades de Zebra en vez de lo anterior:
$ sudo zebraidx -c /etc/koha/sites/YOURLIBRARY/zebra-authorities-dom.cfg  -g iso2709 -d authorities init
$ sudo zebraidx -c /etc/koha/sites/YOURLIBRARY/zebra-biblios.cfg  -g iso2709 -d biblios init
Sustituya YOURLIBRARY con el nombre de su instalación de Koha.
Enlaces importantes
Guías de instalación
- Installing Koha 3 on Ubuntu - http://www.blazingmoon.org/guides/k3-on-u810-1.html
- Koha on Debian installation documentation - http://openlib.org/home/krichel/courses/lis508/doc/koha_installation_overview.html
- Koha 3.2 on Debian Squeeze - http://wiki.koha-community.org/wiki/Koha_3.2_on_Debian_Squeeze
Miscelánea
- Zotero - http://zotero.org
- SOPAC - http://thesocialopac.net
Tipos de ítem XSLT de Koha
When you have any of the XSLT system preferences (OPACXSLTDetailsDisplay, OPACXSLTResultsDisplay, XSLTDetailsDisplay, and/or XSLTResultsDisplay) along with the DisplayOPACiconsXSLT and DisplayIconsXSLT preferences turned on you will see item type icons on the related screen.
Important
These images are coming from values found in your leader, if your leader is not cataloged properly it might be best to turn off the DisplayOPACiconsXSLT preference (which can be done while leaving the other XSLT preferences turned on).

- Libro [BK]
- leader6 = a (y uno de los valores de leader7 más abajo)
- leader7 = a
- leader7 = c
- leader7 = d
- leader7 = m
- leader6 = t
- leader6 = a (y uno de los valores de leader7 más abajo)
- Fichero de ordenador[CF]
- leader6 = m

- Publicaciones periódicas [CR]
- leader7 = b
- leader7 = i
- leader7 = s

- Mapa [MP]
- leader6 = e
- leader6 = f

- Mixtos [MX]
- leader6 = p
- Sonido [MU]
- leader6 = c
- leader6 = d
- leader6 = i
- leader6 = j
- Material visual [VM]
- leader6 = g
- leader6 = k
- leader6 = r

- Equipo
- leader6 = o
MarcEdit
Many libraries like to use MarcEdit for modifications or data cleanup. If you’d like to do this you will need to download it at: http://marcedit.reeset.net/
Important
Many of the actions described in this chapter can be done in Koha using Marc Modification Templates, but this section is here for those who are used to MarcEdit.
Agregar un prefijo a las signaturas topográficas
Cuando quiera importar datos a Koha, probablemente quiera limpiarlos primero. Algo común entre los usuarios de Koha es añadir un prefijo a la signatura topográfica.
Abrir MarcEdit
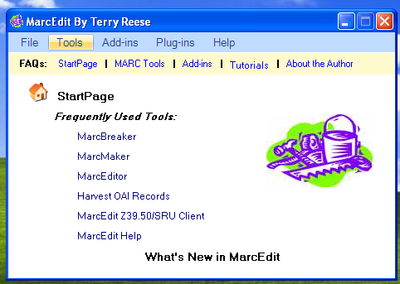
Haga clic en “MarcEditor”
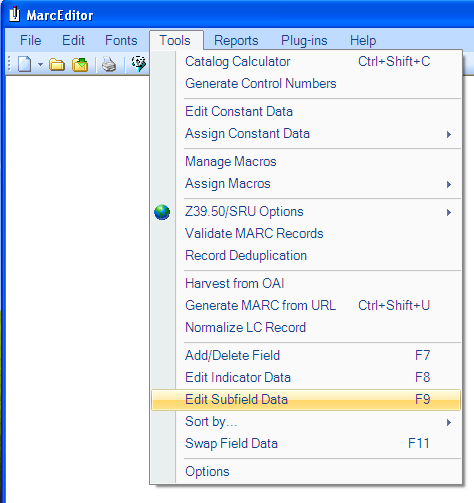
Ir a Tools > Edit Subfield Data
Para anteponer datos el carácter especial es: ^b Para anteponer simplemente datos al principio de un subcampo, agregar ^b al Campo de datos: cuadro de texto y los datos que se incluirán al dar a Replace
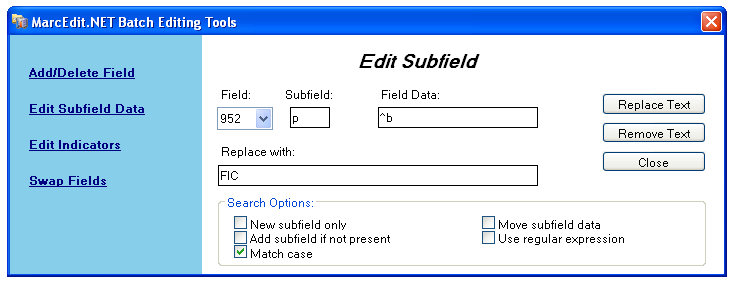
- Para anteponer datos al principio del subcampo mientras sustituye una cadena de texto, agregue ^b[cadena a reemplazar] al cuadro de texto Field Data y los datos que se agregarán en el cuadro de texto Replace With.
Importando datos de Excel en Koha
Suponga que tiene registros de su biblioteca en formato de hoja de datos excel y quiere importarlos en Koha. Pero, ¿cómo se puede hacer esto? Koha no le permitirá importar archivos de Excel directamente. Bueno, aquí hay una solución muy simple para que usted le permitirá importar sus archivos de Excel en Koha fácilmente. En primer lugar, vamos a convertir el archivo de Excel en un archivo Marc y luego importarlo a Koha.
Siga los pasos que se indican para importar sus archivos de Excel en Koha
Convirtiendo desde el formato de Excel al formato .mrk
First, we will convert excel format into .mrk format. For this we will use MarcEdit. You can download it from http://marcedit.reeset.net/
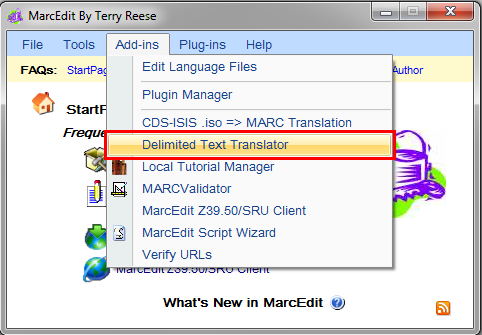
Ahora ábralo y seleccione Add-ins–>Delimited Text Translator.
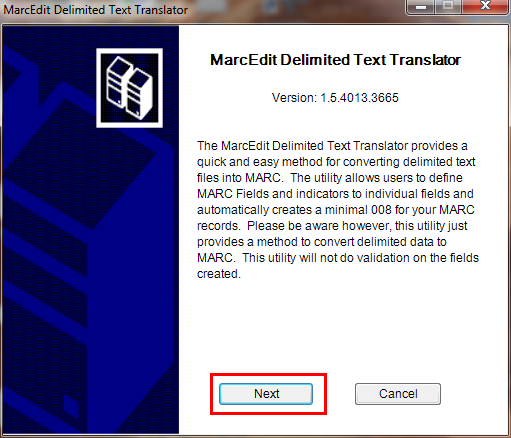
Haga clic en Next cuando aparezca la siguiente ventana.
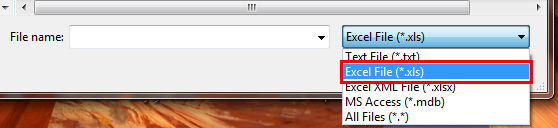
Busque su archivo Excel.
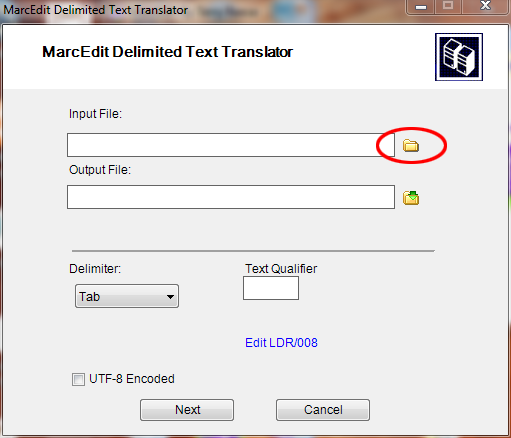
Locate your excel file by choosing the format Excel File(*.xls).
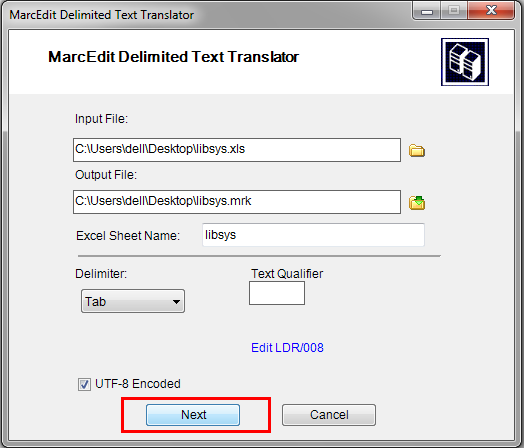
Del mismo modo, cumplimente el resto de entradas como Output File, Excel Sheet Name y marque codificación UTF-8 (si es necesario) y haga clic en Next.
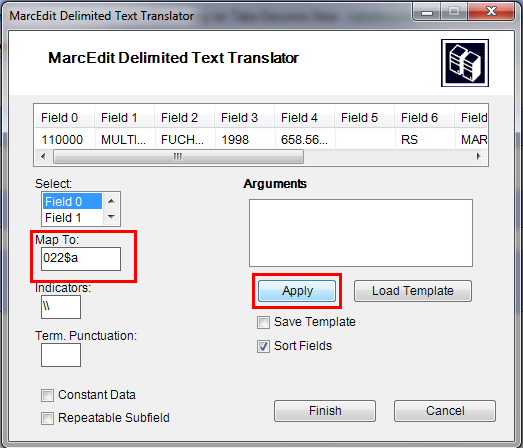
Ahora se le pedirá el mapeo de los campos con los campos de formato MARC estándar.
Suponga que para el Campo 0 que es la primera columna Mapee a: 022$a ( un ISSN válido para el recurso continuo) y luego haga clic en Apply.
Note
Puede personalizar indicadores y las demás cosas, para más información del formato marc21 visite official library of congress site.
Del mismo modo mapee todos los demás campos y haga clic en Finalizar.
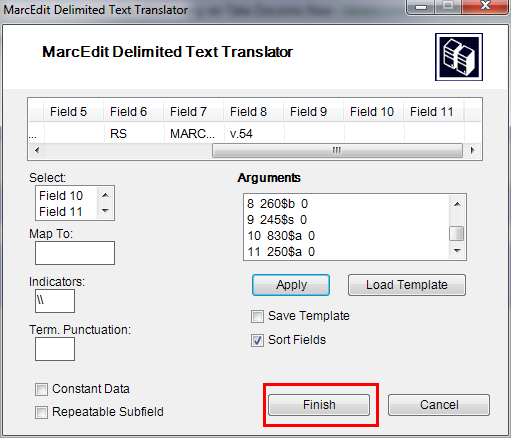
And then a window will appear indicating that your Marc Text File(*.mrk) has been created.
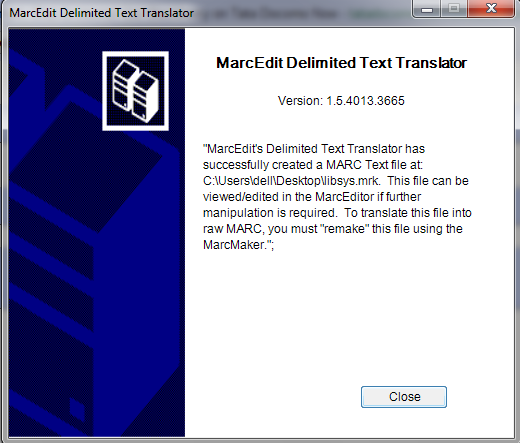
Haga clic en Cerrar y hemos creado un archivo. mrk de. xls en este paso. Puede ver el archivo haciendo doble clic sobre él.
Convertir archivo .mrk a .mrc
Vamos a convertir el archivo .mrk que hemos creado en el paso anterior en formato Marc puro que se puede importar directamente en Koha.
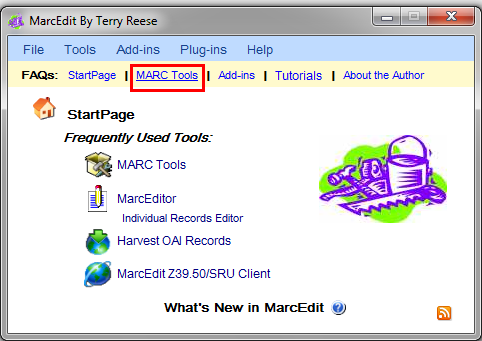
Para esto de nuevo abra MarcEdit y seleccione MARC Tools.
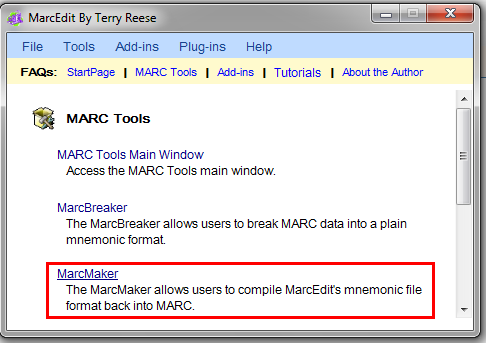
A continuación seleccione MarcMaker para convertir un archivo .mrk a uno con formato .mrc.
Localice el archivo de entrada y el nombre de archivo de salida. Luego haga clic en Execute.
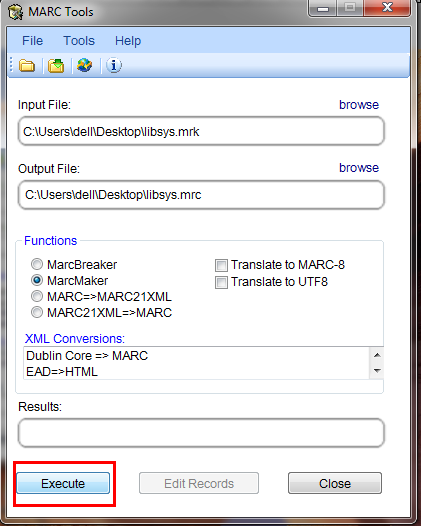
Y se le mostrará el Resultado.
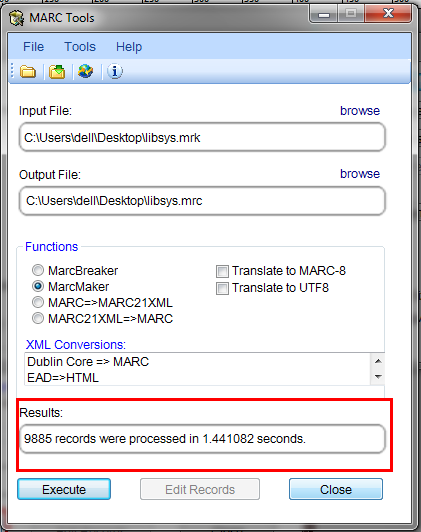
Haga clic en Cerrar y ahora tenemos registros MARC nativos ( archivos .mrc).
Importar .mrc a Koha
More information on importing records into Koha can be found in the “Stage MARC Records for Import” section of this manual.
Por último vamos a importar el archivo anterior .mrc a Koha.
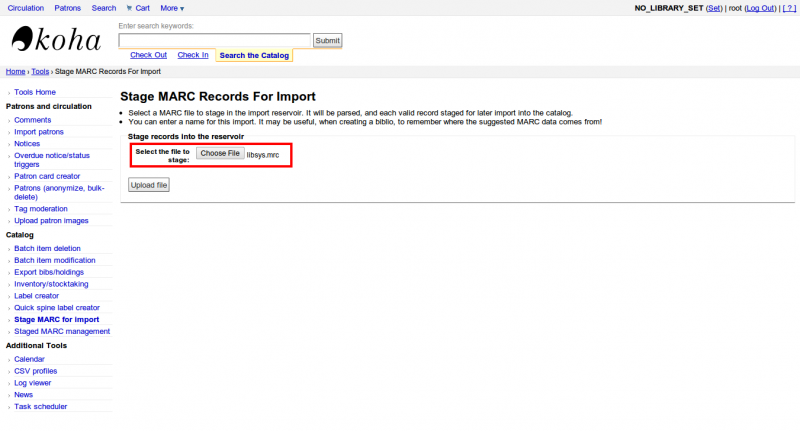
Haga clic en Herramientas en la interfaz de administración de Koha.
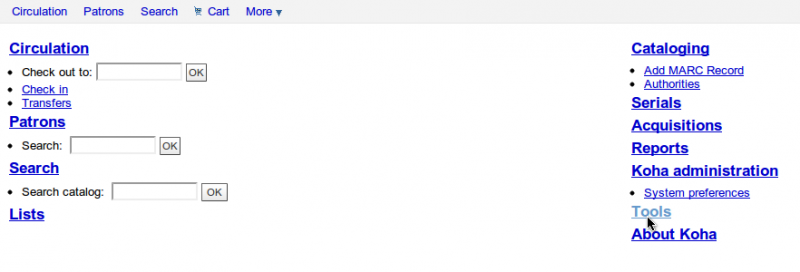
A continuación haga clic en Registros MARC preparados para importar
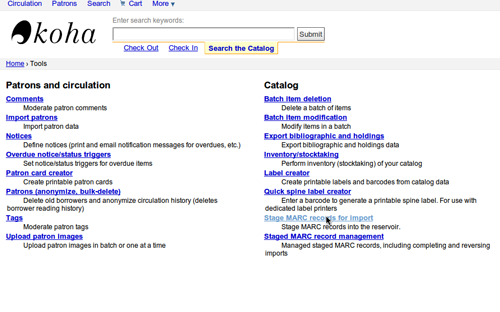
Después elija el archivo creado previamente .mrc y haga clic en Subir.
También puede agregar un comentario sobre del archivo y, finalmente, haga clic en Preparado para la importación.
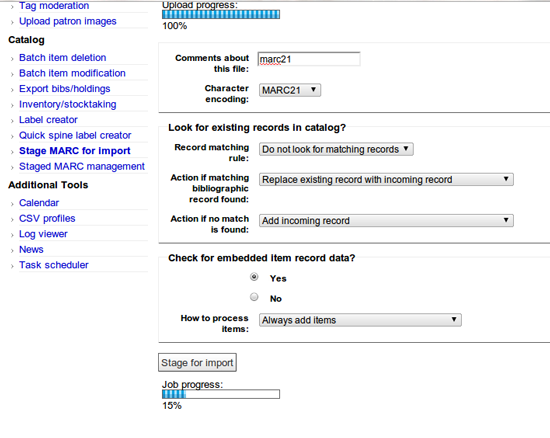
Cuando la importación este hecha, obtendrá un resultado como este
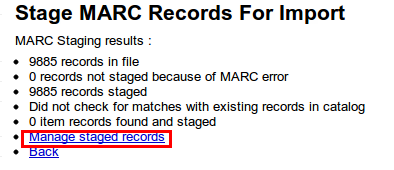
A continuación, haga clic en gestionar registros preparados.
Aquí usted puede incluso cambiar las reglas de la importación.
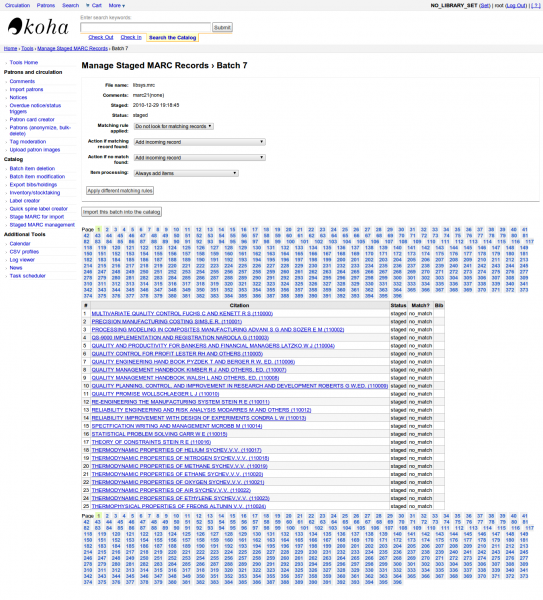
Haga clic en Importar por lotes a este catálogo cuando haya terminado.
Eso es todo. Después de que todos los registros se hayan importado, compruebe el estado y debería leerse «importado»
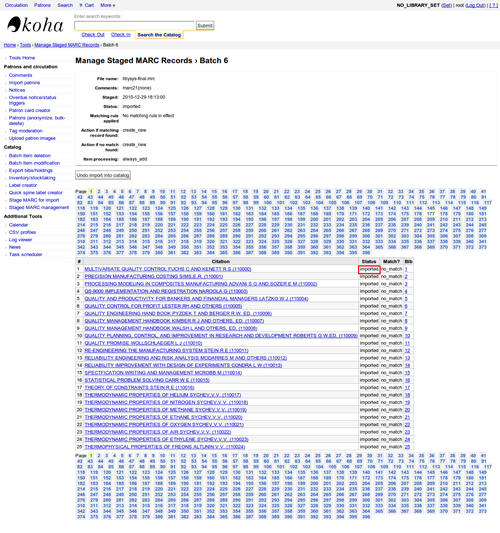
Incluso puede deshacer la operación de importación.
Y en algunos minutos, hemos importado alrededor de 10.000 registros a Koha
Talking Tech
Talking Tech I-tiva is a third party, proprietary, product that libraries can subscribe to. Learn more here: http://www.talkingtech.com/solutions/library.
Instrucciones de instalación y configuración
Asegúrese de que ha ejecutado installer/data/mysql/atomicupdate/Bug-4246-Talking-Tech-itiva-phone-notifications.pl, requerido para instalar los paquetes de datos (new syspref, notice placeholders and messaging transport preferences)
To use, TalkingTechItivaPhoneNotification syspref must be turned on.
If you wish to process PREOVERDUE or RESERVES messages, you’ll need the EnhancedMessagingPreferences system preference turned on, and patrons to have filled in a preference for receiving these notices by phone.
For OVERDUE messages, overdue notice triggers must be configured under Koha -> Tools -> Overdue Notice Triggers. Either branch-specific triggers or the default level triggers may be used (script will select whichever is appropriate).
Enviando archivo de avisos
- Add the TalkingTech_itiva_outbound.pl script to your crontab
- Agregar un FTP/SFTP u otro método de transporte para enviar un archivo de salida al servidor I-tiva
- Si lo desea, guarde los archivos de avisos enviados en otro directorio después del envío.
Run TalkingTech_itiva_outbound.pl –help for more information
Recepción de archivo de resultados
- Agregar un FTP/SFTP u otro método de transporte para enviar el archivo de resultados a un directorio conocido en su servidor Koha
- Add the TalkingTech_itiva_inbound.pl script to your crontab, aimed at that directory
- Si desea, guarde el archivo de resultados en otro directorio después de su procesamiento
Run TalkingTech_itiva_inbound.pl –help for more information
Integrating SIP2 with Koha
SIP2 (Session Initiation Protocol) is a protocol for communication between devices.
In the context of Koha SIP2 is used for communication between Self Check (SC) machines i.e. self checkout machines, and the Automated Circulation System (also known as ACS which in this case is the server running Koha).
SIP2 communications consist of requests and responses.
The self checkout machines are ‘dumb’ and so they send requests to the Koha server which runs logic which determines a particular outcome which is sent as a response message back to the client self checkout machine, and this is then conveyed to the user.
Advertencia
Security notice regarding using SIP2 service: To ensure that your SIP2 traffic is secure as it passes over the internet you need to make sure that you are using a VPN or stunnel.
Setting up SIP2
If you installed Koha using Debian packages then SIP2 setup is easy, simply follow these steps:
1. In your terminal (in the root Koha directory) write in: sudo koha-enable-sip <instancename>
2. Now you need to configure the SIP2 settings, to do this you need to edit the SIPconfig.xml file which exists in the /etc/koha/sites/<instancename>/ directory. You will need to edit this file as root because it contains passwords (to do so write ‘sudo’ at the start of your command).
e.g. sudo vi /etc/koha/sites/<instancename>/SIPconfig.xml
Nota
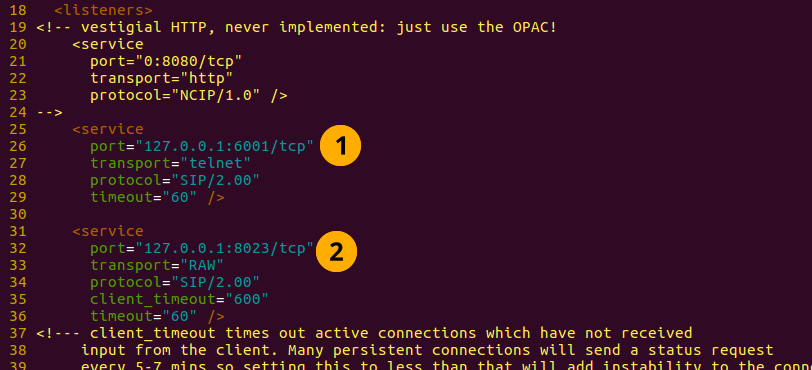
Important note: There are three areas of interest in the SIPconfig.xml file that you need to change. These are: service, account and institution.
Service
2.1 Change the port value near the top of the SIPconfig.xml file (identified by the number 1 in the below screen shot), so it has the same IP address as set further down the SIPconfig.xml file identified by 2.
Nota
Make sure the two port values don’t have the same port number as you cannot have the same port being listened to by two different services. When deciding upon the port number make sure it is a high number (i.e. above 1000) because all ports below 1000 require root permissions.
Account
The account(s) you define in the SIPconfig.xml file are simply account(s) permitted to use the SIP2 service i.e. your defining who can send and receive SIP2 commands.
Advertencia
Account information that you write here must also exist in the Koha database i.e. you need to create a patron in the Koha staff interface with the same username, password (making sure to assign them circulate permissions) as the user account you write into the SIPconfig.xml file.
Nota
It is highly recommended that you only write in Koha user accounts with circulate permissions.
The reason we want SIP2 users to only have circulate permissions rather than superlibrarian permissions is to reduce the access SIP2 users have to confidential patron data in case the system was compromised.
If the ACS or the SC were compromised then having all SIP2 users only having circulation permissions means that an intruder would only be able to access patron data via the terminal rather than the web interface as well (which would be available with superlibrarian permissions). So it is simply a matter of protecting your users.
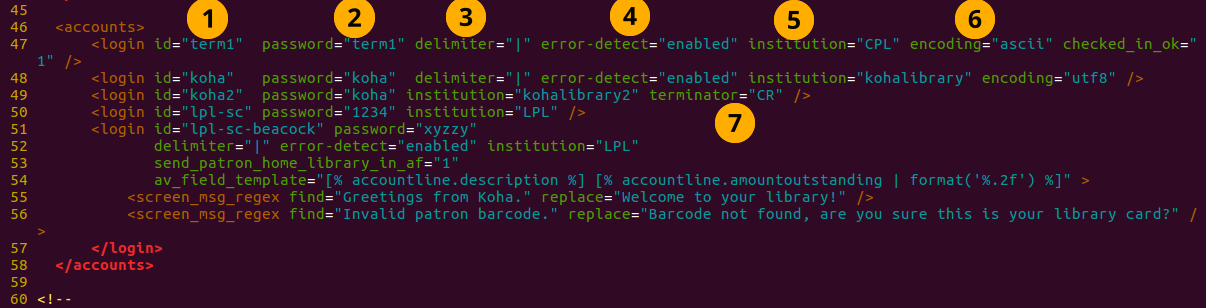
Account value definitions:
- Login id: This is the account username. - Modify this accordingly
- Password: Account password - Modify this accordingly
- Delimiter: The type of delimiter for account information - Leave as default
- error-detect - Leave as default
- Institution: This is the branchcode for the library that the user belongs to. NOTE: This institution needs to be defined further down in the institution area of the SIPconfig.xml file and it must also exist in the Koha database. i.e. you need to create a library with the same branchcode in Koha staff interface.
- encoding: This is the standard used to encode the account data
- Terminator: This needs to match the terminator value of the SIP2 server. - Modify this if you know the terminator value of the SIP2 server.
Institution
The institution information you define here must match a library created in the Koha staff interface.
Advertencia
You need to make sure all the institutions that accounts are assigned to further up in the SIPconfig.xml file are also defined in the institution area of the same file.

Institution value definitions:
1. Institution id: The branchcode of the library. - Modify this accordingly. Must be the same as created in Koha and the account area.
- Implementation: Defines the code that will be run. - Leave as default
3. Policy: Policy defines the permitted SIP2 commands allowed from SC’s in this institution. For example: renewal=”true” means that SC’s at that institution have permission to send renewal item SIP2 commands.
4. Starting SIP2 Simply write in the command: sudo koha-start-sip <instancename>
Nota
Now you have a running SIP2 server.
Using SIP2
SIP2 is a communication protocol. The messages sent in SIP2 are either requests or responses. The SC’s send request messages to the ACS which will run some logic and send back the resulting value to the SC as a response message.
The request messages contain arguments, which are data values used by the ACS in its functions to perform the required task such as renewing items.
SIP2 commands
If you want to manually use/test SIP2 then you will be writing and receiving messages via the Linux terminal.
To be able to send and receive messages with the SIP2 server you need to use telnet to open a SIP2 connection. You need to specify the port number you want telnet to use.
To find this information look at the service area at the top of the SIPconfig.xml file (look for the port number as pointed out by the arrow in the below screenshot).

Write into the terminal
telnet localhost <portnumber>
e.g. telnet localhost 8023
Now write in the username and password set in one of the accounts in the SIPconfig.xml file.
Now you are connected to the SIP2 server you can start writing and sending request commands. The connection to the SIP2 server does time out fast so if haven’t finished writing and receiving commands simply write in:
telnet localhost <portnumber>
to restart the SIP2 connection.
SIP2 command syntax
Every SIP2 command has a 2 digit numerical prefix which defines what the command is doing.
e.g. To get information about a patron you start your command with the prefix: 63. The response from the server also has a corresponding numerical prefix.
Below is an example of a SIP2 request message to request patron information (in this example a Koha patron account with the user name ‘joe’, password ‘joes’, and card number ‘y76t5r43’ has been created in the Koha staff interface).
Additionally a library with the branchcode of ‘WEL’ has been created in the Koha staff interface and is also defined in the institution area of the SIPconfig.xml file):

So the format of this SIP2 request message is:

Nota
The summary value is a 10 character value. If a Y is written in for the summary value then you will be able to get both a summary and more detailed informational output.
The value in the <YYYYMMDD> <HHMMSS> is the current datetime, by leaving a 4 space gap between the YYYYMMDD and HHMMSS this indicates you want to use local time rather than UTC.
Nota
In this manual letter codes for the various fields are used where possible in describing the SIP2 message fields e.g. AO<institutionid>.
These letter codes can be written in the SIP2 commands into the Linux terminal, but make sure when substituting values in for the fields (values inside the <>) that you do not write in the <> brackets.
SIP2 messages:
Block patron
This uses the prefix 01 for request messages and 24 for response messages.
Request message:

Nota
Card retained is a single character field of either ‘Y’ or ‘N’ which tells the ACS that a card has been retained by the self checkout machine.
Response message:

Nota
<patronstatus> is a 14 character long value. The value Y in the string means true. Each position in this string (starting at 0) has a single corresponding value (Y or N) in the string.
e.g. a Y at position 1 (the second value in the string) means that the patrons renewal privileges are denied.
Check-in items
This uses the request message (messages sent to the ACS) prefix of 09 and the response prefix of 10 (sent to the SC).
Request message:

Nota
- <no block (Offline)> is a single character field of either ‘Y’ or ‘N’ which indicates if the transaction is being performed offline. As offline transactions are not supported you need to write ‘N’ if you are testing this message out manually.
- <transactiondate> this is a 18 character field with the date is the format: YYYYMMDDZZZZHHMMSS.
ZZZZ is the timezone, if you want to set it to local you need to leave 4 blank spaces, but if you want to set it to the UTC (Coordinated Universal Time) then you need to write in 3 blank spaces and a Z.
Response message:

Nota
Alert type could have one of several values: 00 : Unknown 01: local hold 02: remote hold 03: ILL Transfer 04: transfer 99: Other
If an item is resensitized then the value of <resentitize> should be Y otherwise it should be N. Rensensitizing items is done to ensure that if someone tries to steal the item they are detected.
Checkout items
This uses the request message prefix of 11 and the response message prefix of 12. It has similar syntax to the check-in command, outlined above except the prefixes are different.
Hold – May not yet be supported on some systems. This has a request message numerical prefix of 15 and a response message prefix of 16.
Request message:

Nota
<holdmode> is a single character value. + means add a hold, - means delete a hold and * means change a hold.
Response message:

Nota
- <ok> is a single length value which is either 0 (for hold is not permitted or was not successful) or 1 (for hold is permitted and was successful).
- <available> is a single length value which is either Y or N. Y means the item is currently in the library, whilst N means the item is currently on loan/someone else has created a hold on the item.
Item information: This uses the request command prefix of 17, and the response command prefix of 18
Request message:

Nota
See the check-in items command (described above) to find out what the <xact_date> value is.
The terminal password is optional.
Response message:

Item status update This uses the request message prefix of 19 and the response message prefix of 20
Request message:

Nota
<itemproperties> is not a fixed length value, and you can optionally write in values such as item size and these values will be stored in the Koha database for the item.
Response message:

Nota
<itempropertiesok> is a single length character value which is either 0 or 1. 1 identifies that the <itemproperties> value defined in the item status update request message was successfully stored in the Koha database.
Patron status
This uses the request message prefix 23 and the response message prefix of 24.
Request message:

Response message:

Nota
The value displayed for <patronvalidity> is Y (valid) and N (invalid) The value in the <YYYYMMDD> < HHMMSS> is the current date/time.
The reason for the gap between the two values is to define that you want to use localtime rather than UTC.
Patron enable - This is not yet supported. This uses the request message prefix of 25 and the response message prefix of 26
Nota
This command undoes the block patron command.
Request message:

Response message:

Renew This uses the request message prefix of 29 and the response message prefix of 30
Request message:

Nota
- <thirdpartyallowed> is a single character value which is either Y or N. If it is Y then third parties can renew items.
- <noblock> is a single character value which is either Y or N. If it is Y then this means that the item was checkin/out when the ACS was offline.
- <nbduedate> is the transaction date of checkin/checkout when the ACS was offline.
- <feeacknowledged> is a single character value which is either Y or N. This indicates if the user accepts the fee associated with the item they are renewing.
Response message:

Nota
- <ok> is a single character value which is either 0 or 1. A value of 1 means the item was successfully renewed, 0 means item was not successfully renewed.
- <renewalok> is a single character value which is either Y or N. The logic for the setting of the value of <renewalok> is Y is set when the item is already checkout by the user and so it should be desensitized thereby renewing it, whereas N is set if the item is not already checkout to the patron and so it should not be renewed.
In other words don’t let patrons renew books when they are not currently checked out to them.
- <magneticmedia> is a single character value which is either Y (for yes), N ( for no), or U (for unknown).
- <mediatype> is a three numerical character long value. For a list of the values go to: http://multimedia.3m.com/mws/media/355361O/sip2-protocol.pdf
End session
This uses the request message prefix of 35 and the response message prefix of 36
Request message:

Response message:

Nota
<success_or_failure> is either Y for success or N for failure.
Fee Paid – May not be implemented yet. This uses a request message prefix of 37 and a response message prefix of 38
Request message:

Nota
- <feetype> is a two numerical character value which is between 01 and 99. To see a list of fee type values go to http://multimedia.3m.com/mws/media/355361O/sip2-protocol.pdf
- <paymenttype> is a two character numerical value between 00 and 99. 00 is cash, 01 is Visa, and 02 is credit card.
- <currencytype> is a 3 alphanumeric character long value identifying the currency the fee paid was in.
Response message:

Nota
<paymentaccepted> is a single alphanumeric character long value which is either Y (payment has been accepted) or N (payment has not been accepted).
Patron information
This uses the request message prefix of 63 and the response message prefix of 64
Request message:

Response message:

Nota
<valid patron> is Y for valid and N for not valid.
Nota
<hold itemcount><overdueitemcount><chargeditemscount><fienitemscount><recallitemscount><unavaliableholdscount> are all 4 numerical character long values.
Renew all
This uses the request message prefix of 65 and the response message prefix of 66.
Request message:

Response message:

Nota
- <renewedcount> is a 4 numerical character long value denoting the number of items that were renewed.
- <unrenewedcount>, has the same format as the <renewedcount> but it denotes the number of items not renewed.
Login
This uses the request message prefix of 93, and the response message prefix of 94.
Request message:

Nota
<UIDalgorithm> and <PWDalgorithm> are one character long values indicating the type of algorithm to use to encrypt the loginuserid and loginpassword respectively.
Writing in the value of 0 means these values will not be encrypted.
Response message: 941 is a successful login. 940 is an unsuccessful login [connection closed by foreign host.] is a unsuccessful login
Resend
This requests the receiving device to resend its last message.
SC -> ACS resend request is 97
ACS -> SC resend request is 96
Status of the ACS and SC
This has the request message prefix of 99 and the response message prefix of 98.
Request message:

Nota
The status code is one of 3 values. * 0: SC is ok * 1: SC is out of paper * 2: SC is shutting down max print width is a 3 character long value which is the integer number of characters the client can print Protocol version is a 4 character value in the format x.xx
Response message:

Nota
If you get the response message ‘96’ this means that the request message is not valid/understood.
Troubleshooting SIP2
Can’t connect to remote host when writing in the command telnet localhost <portnumber>
3 solutions for this issue to try are:
1. Check the portnumber your writing in the above command is the port number written in the SIPconfig.xml file at the location indicated by the number 1. i.e. in the below example because the portnumber is 6001 the correct command would be: telnet localhost 6001
2. Check if any userid is written more than once in the SIPconfig.xml file. The userid (which is simply the username of the Koha user) needs to be unique within the SIPconfig.xml file. If you have the same userid multiple times in your SIPconfig.xml file this will cause the connection to SIP2 to fail before you get a chance to authenticate.
3. Check the account defined in the SIPconfig.xml file also exists in the Koha database with the same username, password and has circulate permissions. If you have dropped and recreated the Koha database after creating the patron account in the Koha staff interface and the SIPconfig.xml file then that patron account will not exist in the Koha database and so you will need to recreate them in the Koha staff interface.
Further troubleshooting
To access the SIP2 logs in your Koha home directory navigate to the following directory: /var/log/koha/<instancename>
Then view the output of the sip-error.log and the sip-output.log files which give more detailed information about the SIP2 error.
- cat sip-error.log
- cat sip-output.log
Useful links on SIP2 commands:
http://multimedia.3m.com/mws/media/355361O/sip2-protocol.pdf
Integrating LDAP with Koha
Setting up LDAP (Lightweight Directory Access Protocol) for Koha allows you to store all user information in a central database which is accessed both by your organisations Koha instance and for users to authenticate on other existing systems.
LDAP is a protocol used for file discovery over networks and network authentication.
LDAP configurations are powerful allowing you to customise how Koha and LDAP interact. LDAP can be configured so that new accounts created in LDAP can be synced down into the Koha database, additionally updates to the LDAP user account are synced down to the Koha database.
However Koha cannot sync data up to the LDAP server, thus the data traffic when using LDAP is only one directional.
Auth_By_Bind is set to 1 where a Microsoft Windows Active Directory system is in use in the LDAP database.
Before going through the steps to configure LDAP you will need the following information/actions from the organisation
- The organisation will need to open a port to allow access to their AD from the server.
- Information on the access to the AD server (IP address/hostname, port, SSL info)
- Information on the configuration of the AD server (relevant OUs, DCs, CN formats relative to usernames)
- Mapping between AD fields and Koha fields, including defaults
- Default values for things not provided by AD (categorycode, branchcode for example)
- To authenticate a user do we bind as them (seems to be common for AD) or do we use an account and login with that and then check? If the latter, we’ll need details of how to log in
- Do the existing usernames in Koha match the usernames that we’ll be using to look them up in AD? If so, good. If not, how will we deal with duplicate users?
Steps to set up LDAP with your Koha instance
1 In Linux terminal navigate to the directory containing the koha-conf.xml file which will either be in: * /etc/koha/sites/<instance-name>/ OR * /etc/koha/
2 Open the koha-conf.xml file with root permissions: sudo vi koha-conf.xml
3 Scroll down to the line containing ‘<useldapserver>0</useldapserver>’ and change it to: <useldapserver>1</useldapserver>
4 Then in the next line below write in the LDAP configurations below: Note all fields highlighted in yellow need to be replaced with the appropriate values for your organisations LDAP server.
<ldapserver id=»<ldapserverid>»>
<hostname><hostname></hostname>
<base>dc=<domaincontroller>,dc=<domaincontroller></base>
<user>cn=<nameofuser>, dc=<domaincontroller>,dc=<domaincontroller></user> <!–This is the username of user account with permissions to query the LDAP server –>
<pass><password></pass> <!– This is password of the user account with permissions to query the LDAP server–>
<replicate><either0or1></replicate> <!– add new users from LDAP to Koha database –>
<update><either0or1></update> <!– update existing users in Koha database –>
<auth_by_bind><either0or1></auth_by_bind> <!– set to 1 to authenticate by binding instead of password comparison, e.g., to use Active Directory –>
<principal_name><principalname></principal_name> <!– optional, for auth_by_bind: a printf format to make userPrincipalName from koha userid –>
<mapping> <!– match koha SQL field names to your LDAP record field names–>
<firstname is=»givenname»></firstname>
<surname is=»sn»></surname>
<address is=»postaladdress»></address>
<city is=»l»>Athens, OH</city> <!– Athens,OH is the default value for city of all users logging into Koha –>
<zipcode is=»postalcode»></zipcode>
<branchcode is=»branch»>Central</branchcode>
<userid is=»uid»></userid>
<password is=»userpassword»></password>
<email is=»mail»></email>
<categorycode is=»employeetype»>EM</categorycode>
<phone is=»telephonenumber»></phone>
</mapping>
</ldapserver>
5 Save and exit the koha-conf.xml file
6 Check the LDAP connection works by writing in:
ldapsearch -H ldaps://host.name -s base -x -w «» -d 1
Nota
Note about hostname Hostname can either be a alphanumerical name or it can be the LDAP server IP address (its optional to write port number). By default the ldaps default port number is 636, whilst ldap default port number is 389
Nota
Note about the replicate and update fields The replicate LDAP config field for LDAP in the koha-conf.xml file allow the Koha database to be added to with a new borrower account whenever a user logs into Koha (either the staff client or OPAC) with their LDAP username and password (assuming the same username and password does not already exist in the Koha database).
Whereas the update LDAP config field (in the same file allows) allows for user information in the LDAP database to be synced down to the Koha database. e.g. if someone gets married and their surname changes then the new surname only needs to be updated in the existing LDAP database and that will be synced down to the Koha database automatically if the update configuration is set to 1.
About the mapping fields (the fields highlighted green) <city is=»l»>Athens, OH</city>
The left hand column name (highlighted yellow) is the name of the column in the LDAP database.
The column name inside quote marks (highlighted pink) is the name of the column in the Koha database. NOTE: This can be filled with any value if there is no equivalent column name in the Koha database as exists in the LDAP database.
The value highlighted cyan is the default value for the specified Koha and LDAP columns. So in the above example all user records in the Koha and LDAP databases will by default have the city value of ‘Athens, OH’.
Example of the LDAP configurations:
<useldapserver>1</useldapserver><!– see C4::Auth_with_ldap for extra configs you must add if you want to turn this on –>
<ldapserver id=»ldapserver» listenref=»ldapserver»>
<hostname>ldaps://example.co.au</hostname>
<base>ou=employees,dc=companya,dc=com,dc=au</base>
<user></user> <!– DN, if not anonymous –>
<pass></pass> <!– password, if not anonymous –>
<auth_by_bind>1</auth_by_bind>
<replicate>1</replicate> <!– add new users from LDAP to Koha database –>
<update>0</update> <!– update existing users in Koha database –>
<principal_name>ou=employees,dc=companya,dc=com,dc=au</principal_name>
<mapping>
<userid is=»uid» ></userid>
<cardnumber is=»uid» ></cardnumber>
<email is=»mail» ></email>
<surname is=»sn» ></surname>
<firstname is=»givenname» ></firstname>
<categorycode is=»1»>EM</categorycode>
<branchcode is=»1»>SYD</branchcode>
</mapping>
</ldapserver>
The values in the mapping area are not always the same, and it depends on what is in your organisations LDAP database. For example some organisations do not use <userid> instead each user is only identified by the <email> field and so no <userid> is written.
Troubleshooting LDAP
The log that LDAP errors are printed to depends on several factors:
If plack is not disabled then LDAP errors are displayed in the plack-error.log file If plack is disabled then the location that LDAP errors are printed to is either the opac-error.log file (if the user is logging into the OPAC) or the intranet-error.log file (if the user is logging into the staff client) All of these three log files are accessible in the following directory:
/var/log/koha/<instance>/
OCLC Connexion Gateway
Koha se puede configurar para trabajar con OCLC Connextion Gateway. Esto permite a las bibliotecas utilizar la OCLC Connextion como su herramienta de catalogación y simplemente enviar los registros a Koha con un solo clic. Las siguientes instrucciones le ayudarán a configurar la puerta de enlace de OCLC Connextion, si usted tiene un administrador de sistemas tendrá que consultar con ellos en este proceso.
Configurando el servicio OCLC en Koha
Primeramente, necesitará crear un archivo en algún lugar de sus sistema con la información de configuración. Usted podrá colocar esto en cualquier lugar el cual será visible por la cuenta que ejecutará el servicio.
El archivo contiene 11 líneas. Las primeras 6 serán acerca de sus sistema Koha:
host: The IP address of your Koha server
port: The port you want to use for the Connexion service. This port must be different from your SIP port, or any other service
koha: The full URL of your staff client
log: The location (full file specification) of your log for the service
user: The default Koha username to use for importing
password: The password that goes with that username
Las líneas restantes describen cómo hacer la puesta en escena:
match: The name of the matching rule from your system to use
overlay_action: "replace", "create_new", or "ignore"-- what to do if there is a match
nomatch_action: "create_new" or "ignore"-- what to do if there is no match
item_action: "always_add","add_only_for_matches","add_only_for_new", or "ignore" -- what to do with embedded 952 item data
import_mode: "direct" or "stage"
Un archivo de ejemplo luciría como este:
host: 1.2.3.4
port: 8000
log: /home/koha/koha-dev/var/log/connexion.log
koha: http://kohastaff.myuniversity.edu
user: koha_generic_staff
password: password
match: 001
overlay_action: replace
nomatch_action: create_new
item_action: ignore
import_mode: direct
When choosing an “import_mode” if you use «direct» then the staged record will be immediately imported into Koha, and should be searchable after your indexes catch up. If you choose «stage», then the record will be placed in a staged batch for you to later go the Manage Staged MARC Records tool to finish the import.
Si importa múltiples registros, entrarán en el mismo lote, hasta que ese lote sea importado, a continuación se creará un nuevo lote.
En modo «direct», cada registro entrará en su propio lote.
Para iniciar el servicio, ejecute el script:
/location/of/connexion/import/daemon/connexion_import_daemon.pl -d -c /location/of/config/file.cnf
Configurar el cliente de escritorio de OCLC
Note
La captura de pantalla muestra la OCLC Connexion Client v.2.50, Koha v.3.12
To set up the OCLC Connexion desktop client to connect to Koha, go to Tools > Options, then choose the Export tab.
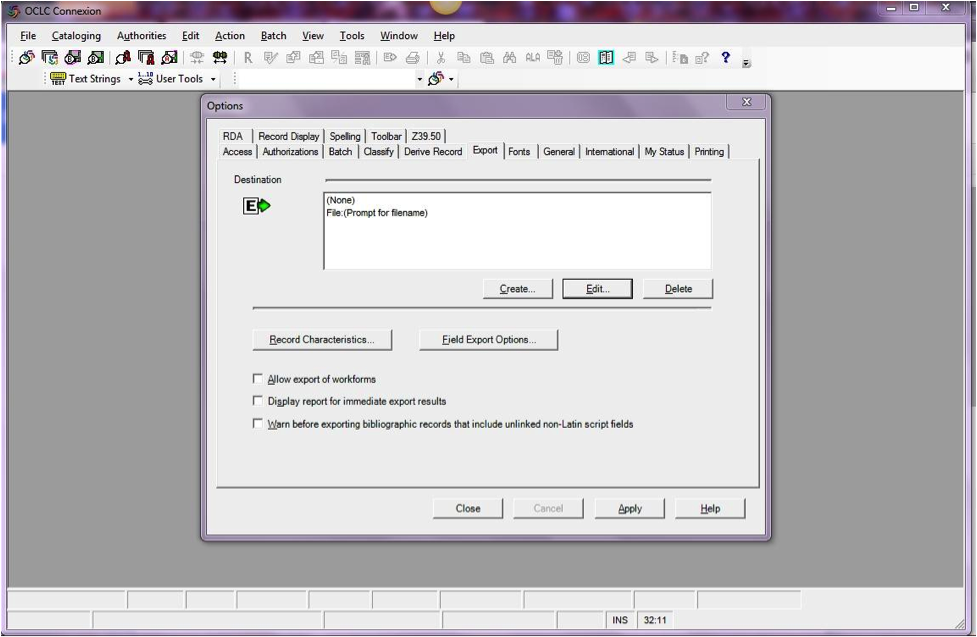
Haga clic en el botón «Crear …» para configurar un nuevo destino, a continuación, seleccione «Exportar Gateway OCLC» y haga clic en OK.
- Ingrese la siguiente información:
- «Host Name:» Your catalog’s appropriate IP address (from your config file above)
- «Port:» Your catalog’s appropriate port number (from your config file above)
- «Login ID:» El usuario Koha del catalogador
- «Password:» La clave Koha del catalogador
- «Notify Host Before Disconnect» = chequeado,
- «Timeout» = 100, «Retries» = 3, «Delay» = 0 (cero),
- «Send Local System Logon ID Password» = chequeado.
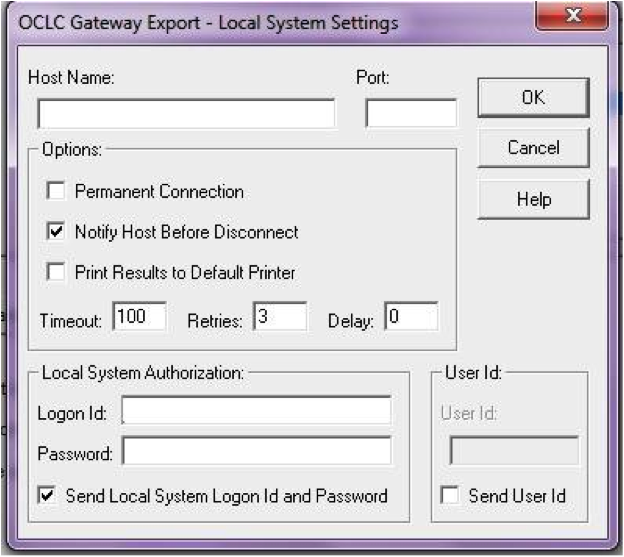
- Ingrese la siguiente información:
Seleccione «OK» cuando haya finalizado, y usted podrá ver su nueva opción «Gateway Export» listada (La dirección IP y el puerto están bloqueados en la siguiente captura de pantalla)
Gateway Export agregado
Haga clic en «Características del registro» y asegúrese que los registros bibliográficos utilizan MARC21, UTF-8 Unicode, y haga clic en Aceptar para guardar.
Características del registro
¡Usted ya debería estar preparado! Para exportar un registro desde el cliente de OCLC Connexion a Koha, solo tiene que presionar F5 mientras el registro está en la pantalla. El cuadro de diálogo de exportación se abrirá, y usted verá a OCLC Connexion intentando establecer conexión con Koha. Usted debe recibir un mensaje de que el registro fue añadido o superpuesto, incluyendo su número biblio, y una dirección URL que puede copiar en su navegador web para acceder directamente al registro.
Utilizando el OCLC Connexion Gateway
Los Registros pueden ser exportados desde el Connexion ya sea en lote o uno por uno.
Exportando registros uno por uno
To export bibliographic records one by one, be sure your «Batch» options are correct: from the «Tools» menu, select «Options», and select the «Batch» tab. In the «Perform local actions in batch» area, «Bibliographic Record Export» should be unchecked
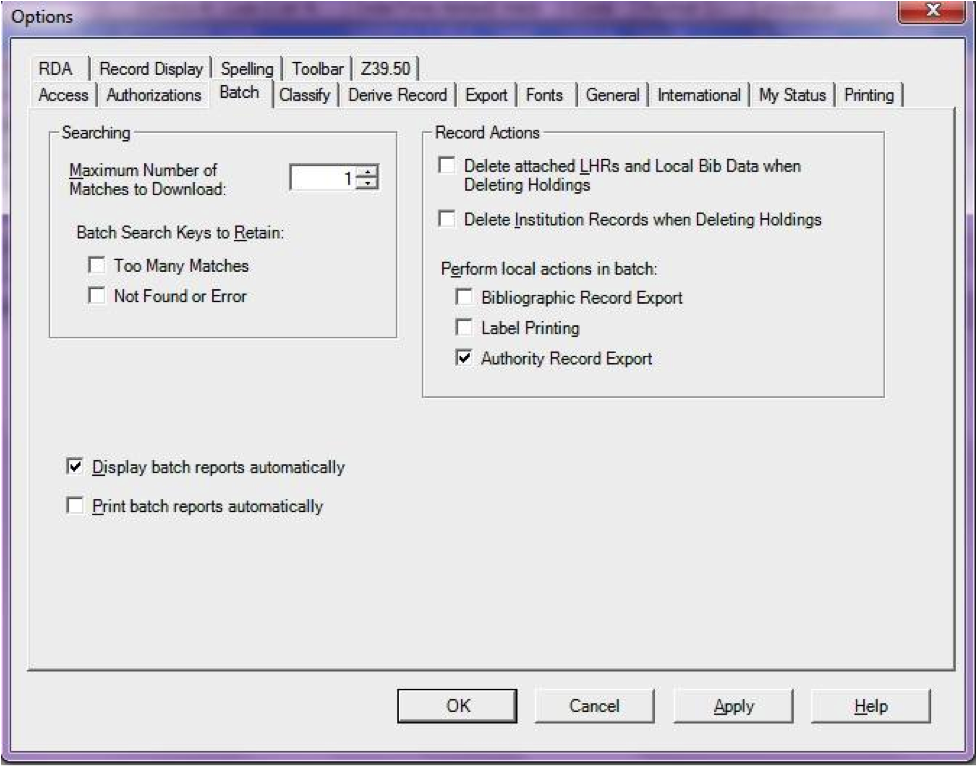
When ready to export, from the «Action» menu, select «Export» or use the F5 key. You will see a screen similar to the following if the import is successful and if the record is new to the Catalog; you may copy & paste the resulting URL into your Koha catalog to see the new record.
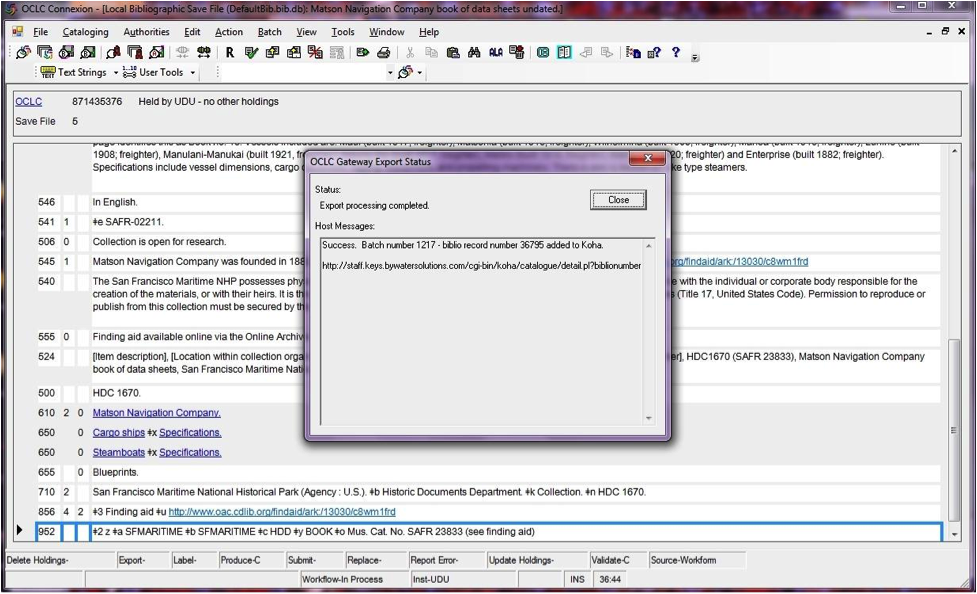
If the record was overlaid, you will see a message to that effect in the «OCLC Gateway Export Status» window
Exportando registro en lote
To export bibliographic records in a batch, be sure your «Batch» options are correct: from the «Tools» menu, select «Options», and select the «Batch» tab. In the «Perform local actions in batch» area, «Bibliographic Record Export» should be checkedOCLC
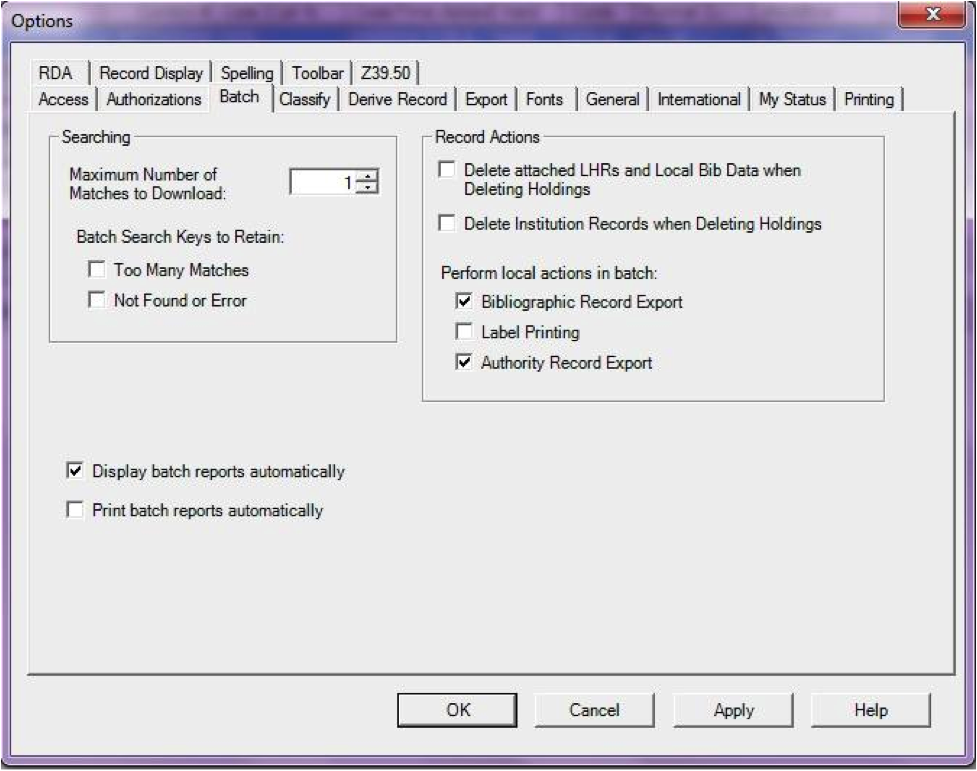
Cuando un registro esta listo para ser exportado, desde el menú «Action», seleccione «Export» o utilice la tecla F5, y el estado de exportación debe estar en «ready».
When ready to export the batch, from the «Batch» menu, select «Process batch» and check the appropriate «Path» and «Export» boxes
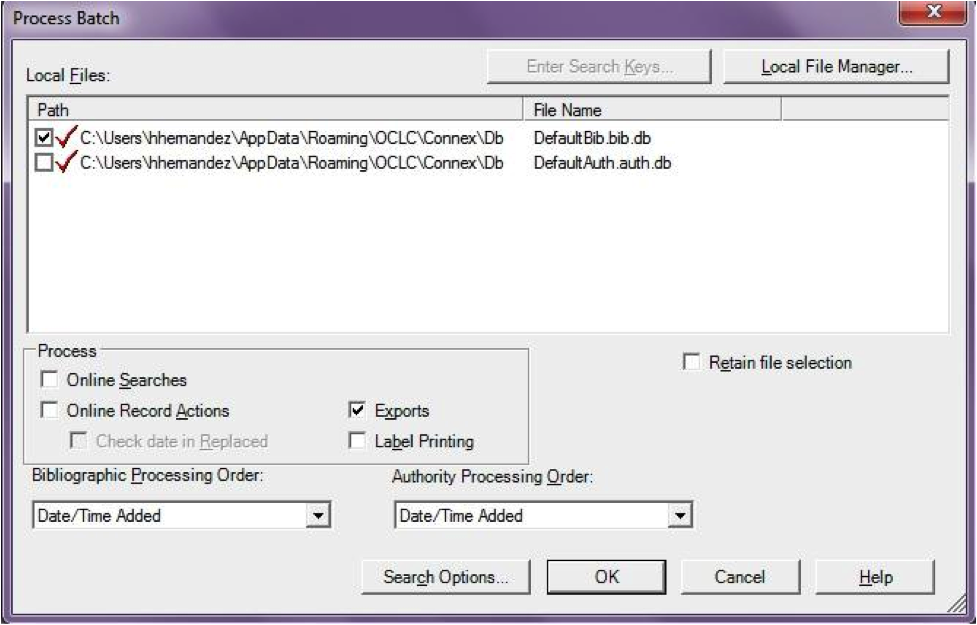
The export will begin, and the bib records will be exported & imported into Koha one by one; you will see «OCLC Gateway Export Status» windows, as above, showing you the results of each export. That window will stay there until you select «Close,» and then the next record’s export/import will begin. The process will continue until all records in the batch are completed. Then you may or may not see the Connexion Client export report (depending on your Client options for that).
Ejemplares en OCLC
If you’d like to create your item records in OCLC you can do so by addding a 952 for each item to the bib record you’re cataloging. The Item/Holdings Cataloging Guide will break down what subfields you can use in the 952, but at the minimum you want to have subfield 2, a, b, and y on your items.
952 \$2CLASSIFICATION$aHOMEBRANCHCODE$bHOLDINGBRANCHCODE$yITEMTYPECODE
- The subfield 2 holds the classification code. This can be ddc for Dewey or lcc for Library of Congress or z for Custom. Other classification sources can be found in the Classification Sources area in administration
- Subfield a is your home library and needs to be the code for your home library, not the library name. You can find these codes in the Libraries & Groups administration area.
- Subfield b is your holding library and needs to be the code for your holding library, not the library name. You can find these codes in the Libraries & Groups administration area.
- Subfield y is your item type code. It needs to be the code, not the item type name. You can find these codes in the Item Types administration area.
952 \$2ddc$aMAIN$bMAIN$yBOOK
In addition to these required fields you can enter any other subfield you’d like. Most libraries will enter a call number in subfield o and a barcode in subfield p as well. Review the Item/Holdings Cataloging Guide for a full list of subfields and values.
FAQs
Mostrar
Imágenes personalizadas de tipos de ítem/valores autorizados
Question: Can I have my own set of item type images (or authorized value icons)?
Answer:Absolutely. To add additional icons to your system you simply add a new directory to koha-tmpl/intranet-tmpl/prog/img/itemtypeimg/ and to koha-tmpl/opac-tmpl/prog/itemtypeimg and put your icons in the new directory. Your icons will show up in a new tab as soon as they are in the folders.
Note
Recuerde poner los iconos en ambos lugares (en el OPAC y la intranet).
Personalizando las imágenes de Koha
Question: Can I customize the images in the OPAC?
Answer: Absolutely. Koha comes with a series of original images that you can alter to meet your needs. The originals can be found in the misc/interface_customization/ directory.
Campos mostrados en el OPAC
Question: What MARC fields print to the different OPAC screens in Koha?
Answer: The XSLT preference must be set as follows for the following fields to show
- OPACXSLTResultsDisplay = using XSLT stylesheets
- OPACXSLTDetailsDisplay = using XSLT stylesheets
- DisplayOPACiconsXSLT = show
La página de resultados OPAC muestra:
- 245
- 100, 110, 111
- 700, 710, 711
- 250
- 260
- 246
- 856
The OPAC Details page shows:
- 245
- 100, 110, 111
- 700, 710, 711
- 440, 490
- 260
- 250
- 300
- 020
- 022
- 246
- 130, 240
- 6xx
- 856
- 505
- 773
- 520
- 866
- 775
- 780
- 785
- más todos los campos 5xx en la pestaña de notas al final
Visualización del subtítulo en los registros bibliográficos
Question: How do I get the subtitle to display on the detail pages for my bib records?
Answer: Subtitle display now depends on there being a keyword mapping for the MARC field in question. Adding a mapping for «subtitle» -> «245b» for an item’s framework results in display of the subtitle in OPAC and staff client search and detail pages (although not in all instances where subtitles might be displayed, e.g. the Cart).
Mostrar a los usuarios los códigos de barras de los ítems que tienen prestados
Question: Can patrons see the barcodes for the items they have checked out.
Answer: Not by default, but with a few edits to the patron record you can make a barcode column appear on the patron’s check out summary in the OPAC. You can set up a patron attribute with the value of SHOW_BCODE and authorized value of YES_NO to make this happen.

Then on the patron’s record set the value for SHOW_BCODE to yes.
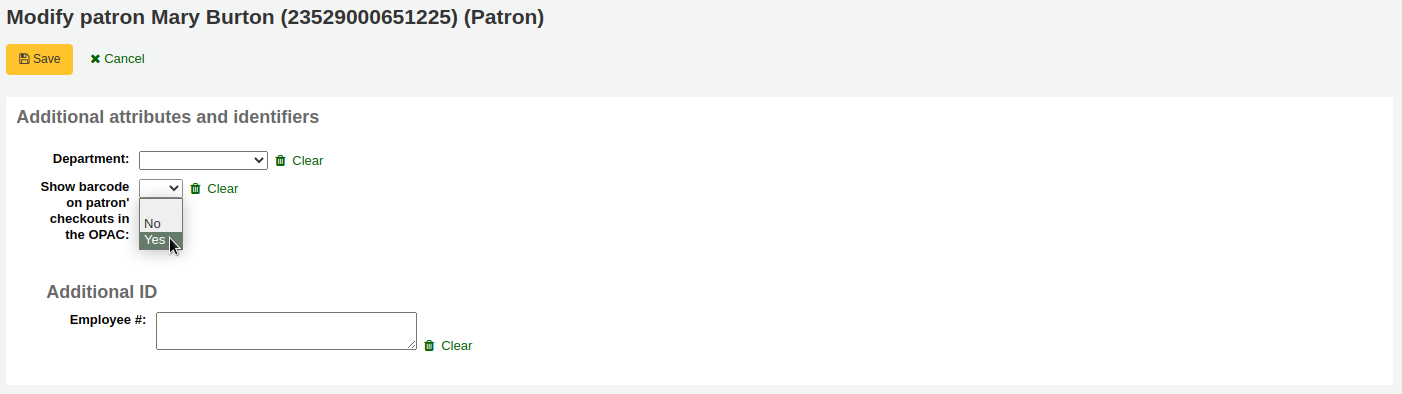
Esto agregará una columna al resumen de préstamos en el OPAC que muestra a los usuarios los códigos de barra de los ítems que tienen prestados.
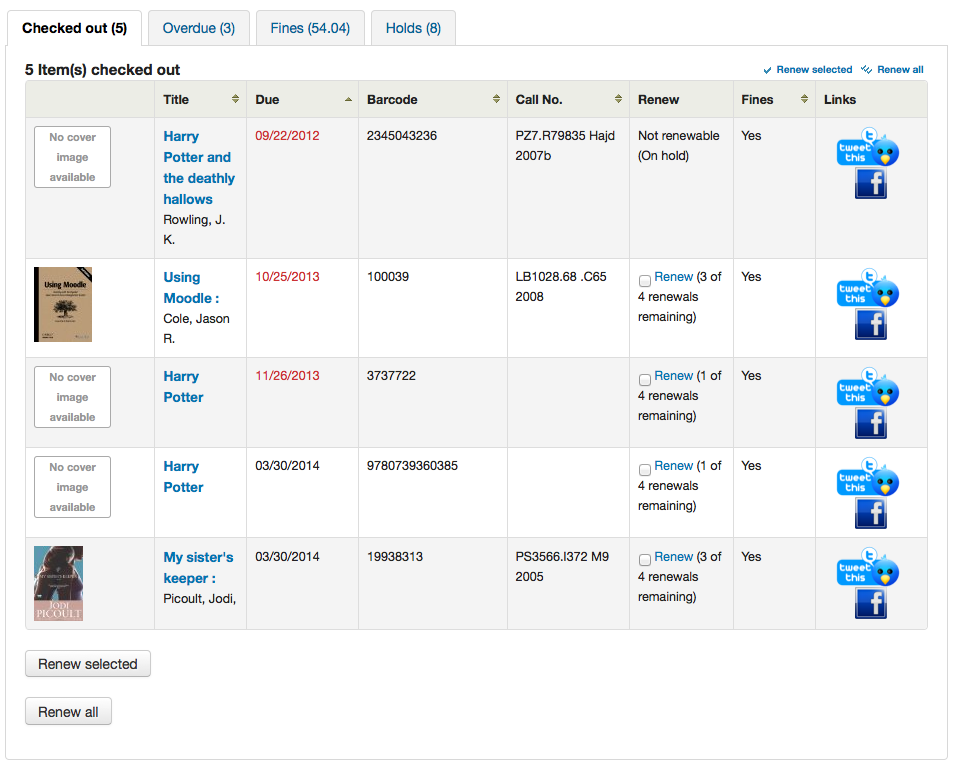
Al hacer clic en la pestaña “Atrasado” sólo se mostrarán los ítems que están atrasados.
Circulación/Avisos
Fecha de modo buzón
Question: How is the book drop date is determined? Is it the last open date for the checkout branch? Is it today’s date minus one? Can the book drop checkin date be set?
Answer: If the library is closed for four days for renovations, for example, there would be more than one day needed for the book drop date. You will only have one book drop date and that will be the last day that the library open (determined by the holiday calendar) because there is no real way to know what day the books were dropped into the box during the 4 closed days. The only way to change the effective checkin date in book drop mode is to modify the calendar.
Reservas a preparar y cola de reservas
Question: What is the difference between the Holds Queue and Holds to Pull?
Answer: The holds to pull report gives a simple list of what holds need to be filled with available items. It should only be used in Koha installations where there is only one library.
The holds queue tries to do the same thing, but in a “smarter” way. This allows it to split up the list by library, consult the transport cost matrix and refresh regularly to provide different pull lists to each library.
Avisos duplicados de retrasos
Question: Why are patrons getting two overdue notices?
Answer: This tool takes all branches in the overdue rules and sent notifications to them. So, if you have a default rule & a branch rule, the notification will be generated twice. A quick fix is to discard «default rule» for instance.
Impresión de avisos de retrasos
Question: Can I print overdue notices for patrons without email addresses on file?
Answer: Yes. The overdue notice cron job has a setting to generate the overdue notices as HTML for printing. An example of this usage would be:
overdue_notices.pl -t -html /tmp/noticedir -itemscontent issuedate,date_due,title,barcode,author
En este ejemplo, solo se quiere utilizar algunos campos de ítem en los avisos, por tanto, se especifican los campos itemscontent en la entrada de cron; eso no es un requisito para la función.
The command line needs to specify a web-accessible directory where the print notices will go – they get a filename like notices-2009-11-24.html (or holdnotices-2009-11-24.html). The overdue notice itself can be formatted to fit a Z-mailer. Within the notice file, the text is spaced down or over to where it will print properly on the form. The script has code that wraps around the notice file to tell the HTML to obey the formatting, and to do a page break between notices. That’s so that when staff print it out, they get one per page. We had to add an extra syspref (PrintNoticesMaxLines) to specify page length because our client allows a _lot_ of checkouts which meant some notices were running onto multiple pages. That syspref says to truncate the print notice at that page length and put in a message about go check your OPAC account for the full list.
The print and email overdues use the same notice file. The print notices for holds are different – there’s a separate HOLD_PRINT notice file and the system uses it if there’s no email address. Then a nightly cron job runs to gather those up from the message queue and put them in an HTML file in the notice directory, as above.
The cron entry is gather_print_notices.pl /tmp/noticedir
No se puede renovar ítems
Question: We’re trying to renew some items for our patron. One of the items is on hold and ineligible for renewal, but the other two items refuse to renew even though they should be eligible. When I try to use the override renewal limit, it just returns a little message that says «renewal failed». Any idea what’s going on here?
Answer: At the very least you will need to set an absolute default circulation rule. This rule should be set for the default itemtype, default branchcode and default patron category. That will catch anyone who doesn’t match a specific rule. Patrons who do not match a specific rule will get blocked from placing holds or renewing items, since there was no baseline number of holds or renewals to utilize.
No se pueden reservar ítems
Question: Why can’t I place holds when I have all of the preferences turned on.
Answer: You probably need to set a default circulation rule. At the very least you will need to set an default circulation rule. This rule should be set for all item types, all branches and all patron categories. That will catch all instances that do not match a specific rule. When checking out if you do not have a rule for the default branch, default item and default patron category then you may see patrons getting blocked from placing holds.
Atajos de teclado
Question: Do I have to use my mouse to access the checkout, checkin and cataloging tabs at the top of the circulation pages?
Answer: You can jump between the tabs on the quick search box at the top of the screen by using the following hot keys (if the tab is available):
saltar a la búsqueda en el catálogo con Alt + Q
Saltar a prestamos con Alt + U
- esto no funciona para usuarios de Mac
saltar a préstamo con Alt + R
Note
Los usuarios Mac utilizan el botón OPCIÓN en lugar de ALT
Avisos/mensajes SMS
Question: I want Koha to send notices via SMS, what do I need to do?
Respuesta: Primero tendrá que elegir un servicio de SMS para utilizar con Koha. Hay una lista disponible aquí: http://search.cpan.org/search?query=sms%3A%3Asend&mode=all No todos los servicios de SMS disponibles para bibliotecas disponen de controladores en Perl, así que asegúrese de revisar esta lista para ver si el proveedor que está considerando aparece en la lista. Si no, debería solicitar a su proveedor si tienen un módulo Perl, si no inténte otro servicio. Algunas opciones comunes en los EE.UU. (que tienen drivers Perl) son:
- AQL (www.aql.com)
- Wadja (wadja.com)
- Ipipi (ipipi.com)
- T-mobile
- SMSDiscount (smsdiscount.com)
- Clickatell
Question: What about in India?
Answer: India does not yet have too many options here. This is partly due to the Telecom regulatory authority’s (TRAI) stipulations about transactional SMSes and limits on the number of SMSes that may be sent / received per users per day. India specific drivers include:
- Unicel Technologies Pvt Ltd (unicel.in)
Catalogación
Campos de autoridad
Question:Why can’t I edit 1xx, 6xx, or 7xx fields in my catalog record?
Answer: These fields are authority controlled and you probably have the BiblioAddsAuthorities set to «Don’t allow». When it is set to «Don’t allow» these fields will be locked and require you to search for an existing authority record to populate the field with. To allow typing in these authority fields set BiblioAddsAuthorities to “Allow”.
Note
Los campos afectados por esta preferencia se mostrará un símbolo de candado en ellos

Correspondencia Koha a MARC
Question: What’s the relationship between “Koha to MARC Mapping” and “MARC Bibliographic Frameworks”?
Answer: Mapping can be defined through “MARC Bibliographic Frameworks” OR “Koha to MARC Mapping”. “Koha to MARC Mapping” is just a shortcut to speed up linkage. If you change a mapping in one of these modules, the mapping will change in the other as well. (In other words, the two modules “overwrite” each other in order to prevent conflicts from existing in Koha).
Número de ítems por registro bibliográfico
Question: Is there a limit on the number of items I can attach to a bib record?
Answer: There is no explicit limit to the number of items you can attach to a bibliographic record, but if you attach enough of them, your MARC record will exceed the maximum file size limit for the ISO 2709 standard, which breaks indexing for that record. I’ve found this occurs somewhere between 600 and 1000 items on a “normal” bibliographic record.
Analíticas
Question: I am using the EasyAnalyticalRecords feature, but my links in the OPAC and Staff Client to “Show Analytics” are not working.
Answer: If you plan on using EasyAnalyticalRecords you will want to make sure to set your UseControlNumber preference to «Don’t use,» this will prevent broken links.
Adquisiciones
Planificación de categorías
Question: What is a planning category?
Answer: When you plan in advance for the way your budget is going to be spent, you initially plan for how it’s going to be spent over time, that’s the most natural thing to do.
Así usted planeará €1000 en enero €1000 en febrero, €3.000 en marzo, etc. Básicamente, usted puede hacer lo mismo con una lista de valores en lugar de meses.
Digamos que tienes una lista como ésta:
- < 1 month
- < 6 months
- < 1 year
- < 3 years
- < 10 years
- > 10 años
The list is meant to represent when the books acquired where published. Then you plan for it, saying: we went to spend at list 40% of our budgets on books published less than a year ago, 10% on books more than 10 years old, etc.
Al adquirir nuevos materiales, usted podrá elegir, para un ítem determinado, un valor de esta lista en un menú desplegable. Entonces, después de que el material haya sido adquirido, al final del año, usted podrá comparar los metas fijadas, con lo que se ha alcanzado.
Publicaciones periódicas
Patrones avanzados
Question: What is the “inner counter” on the advanced serials pattern interface?
Answer: I think it is better to give an example to understand this :
Ejemplo para una suscripción mensual:
- Fecha de publicación del primer número: abril 2010
- Numeración: Num. {X}, año {Y}
- Primer número: Num. 4, año 2010
Para el año Y: usted querrá que cambie al año en enero 2011
Así, el patrón avanzado para Y será:
- Agregar: 1
- una vez cada: 12
- Cuando más de 9999999
- contador interno: 3
- Retrasar a 0
- Comienza con 2010
El año va a cambiar después de 12 números recibidos desde abril de 2010, es decir, en abril de 2011 si no se establece contador interno. Al establecer el contador interno a 3 le estará diciendo a Koha: cambia de año después de recibir 12-3 = 9 números.
El contador interno le dice a Koha que para tener en la cuenta los primeros números del año, incluso si no se reciben en Koha. Si se comienza con el primer número del año no escriba nada o un 0.
Informes
Definir los códigos almacenados en la base de datos
Tabla de multas
Question: What do the codes in the accounttype field in the accountlines table stand for?
Answer:
- A = Costo de administración de cuenta
- C = Crédito
- F = Multa por retraso
- FOR = Perdonado
- FU = Retrasado, aun acumulando
- L = Ejemplar perdido
- LR = Ejemplar perdido regresado/devuelto
- M = Diverso
- N = Nuevo carné
- PAY = Pago
- W = Writeoff
Tablas estadísticas
Question:What are the possible codes for the type field in the statistics table?
Answer:
- localuse
- Registra si un ejemplar prestado al usuario estadístico (categoría = “X”) es devuelto
- préstamo
- devolución
- renovación
- writeoff
- Pago
- CreditXXX
- El XXX almacena diferentes tipos de crédito de cargos, entonces una búsqueda para capturarlos a todos incluirá una cláusula como «type LIKE “Credit%”»
Tabla de reservas
Question: What are the possible codes for the found field in the reserves and old_reserves tables?
Answer:
- NULL: significa que el usuario solicitó el primero disponible, y no hemos elegido el ítem
- T = Tránsito: la reserva está enlazada a un ejemplar pero está en tránsito a la sede de retiro
- W = Esperando: la reserva esta vinculada a un ejemplar, está la sede de retiro, y esta esperando en la estantería de reservas
- F = Finalizada: la reserva se ha completado, y está hecha
Tabla del diccionario de informes
Question: What are the possible codes for the area field in the reports_dictionary table?
Answer:
- 1 = Circulación
- 2 = Catálogo
- 3 = Usuarios
- 4 = Adquisiciones
- 5 = Cuentas
Tabla de mensajes
Question: What are the possible codes for the message_type field in the messages table?
Answer:
- L = Para bibliotecarios
- B = Para usuarios/Lectores
Tabla de publicaciones periódicas
Question: What are the possible codes for the status field in the serial table?
Answer:
- 1 = Esperado
- 2 = Recibido
- 3 = Retrasado
- 4 = Adquisiciones
- 5 = No disponible
- 6 = Eliminar
- 7 = Reclamado
- 8 = Detenido
- 41 = Extraviado (no se recibió)
- 42 = Extraviado (liquidado)
- 43 = Extraviado (dañado)
- 44 = Extraviado (perdido)
Tabla de usuarios
Question: What are the possible codes for the privacy field in the borrowers table?
Answer:
- 0 = Para siempre
- 1 = Predeterminado
- 2 = Nunca
Preferencias de mensajería
Question: What are the possible codes in the message_attribute_id field in the borrower_message_preferences table?
Answer:
- 2 = aviso previo
- 6 = ítem prestado
- 4 = reserva completada
- 1= Ítem vence
- 5 = Ítem devuelto
Parámetros en tiempo de ejecución
Question: Is there a way to filter my custom SQL reports before they run?
Answer: If you feel that your report might be too resource intensive you might want to consider using runtime parameters to your query. Runtime parameters basically make a filter appear before the report is run to save your system resources.
There is a specific syntax that Koha will understand as “ask for values when running the report”. The syntax is <<Question to ask|authorized_value>>.
- The << and >> are just delimiters. You must put << at the beginning and >> at the end of your parameter
- La “Pregunta a hacer” se mostrará a la izquierda de la cadena a ingresar.
- The authorized_value can be omitted if not applicable. If it contains an authorized value category, or branches or itemtype or categorycode or biblio_framework, a list with the Koha authorized values will be displayed instead of a free field Note that you can have more than one parameter in a given SQL Note that entering nothing at run time won’t probably work as you expect. It will be considered as «value empty» not as «ignore this parameter». For example entering nothing for : «title=<<Enter title>>» will display results with title=”” (no title). If you want to have to have something not mandatory, use «title like <<Enter title>>» and enter a % at run time instead of nothing
Ejemplos:
SELECT surname,firstname FROM borrowers WHERE branchcode=<<Enter patrons library|branches>> AND surname like <<Enter filter for patron surname (% if none)>>
SELECT * FROM items WHERE homebranch = <<Pick your branch|branches>> and barcode like <<Partial barcode value here>>
SELECT title , author FROM biblio WHERE frameworkcode=<<Enter the frameworkcode|biblio_framework>>
Note
To generate a date picker calendar to the right of the field when running a report you can use the “date” keyword like this: <<Enter Date|date>>
Note
Debe poner «%» en la caja de texto y “dejarlo en blanco”. De otra manera, literalmente buscará «» (cadena vacía) como el valor para el campo.
Important
In addition to using any authorized value code to generate a dropdown, you can use the following values as well: Framework codes (biblio_framework), Branches (branches), Item Types (itemtypes) and Patron Categories (categorycode). For example a branch pull down would be generated like this <<Branch|branches>>

Resultados limitados
Question: When I download my report it’s limited to 10,000 results, how do I get all of the results to download?
Answer: There is a limit of 10,000 records put on SQL statements entered in Koha. To get around this you want to add “LIMIT 100000” to the end of your SQL statement (or any other number above 10,000.
Buscar
Búsqueda avanzada
Escanear los índices
Question: What does “scan indexes” on the advanced search page mean?
Answer: When you choose an index, enter a term, click “scan indexes” and do the search, Koha displays the searched term and the following terms found in this index with the number of corresponding records That is search is not made directly in the catalog, but first in the indexes It works only for one index at once, and only with no limit in Location (All libraries needed)
Búsqueda de términos que comienzan con un carácter
Question: How do I search for all titles that start with the letter “C”?
Answer: You can choose to search for things that start with a character or series of characters by using the CCL “first-in-subfield”
- ejemplo: ti,first-in-subfield=C
Búsqueda truncada
Question:What is the difference between a keyword search using the “*” (asterisk) versus a keyword search using the “%” (percent)? Both work in the catalog, but return different sets. Why?
Answer: A wildcard is a character (*,?,%,.) that can be used to represent one or more characters in a word. Two of the wildcard characters that can be used in Koha searches are the asterisk (“*”) and the percent sign (“%”). However, these two characters act differently when used in searching.
The “*” is going to force a more exact search of the first few characters you enter prior to the “*”. The asterisk will allow for an infinite number of characters in the search as long as the first few characters designated by your search remain the same. For example, searching for authors using the term, Smi*, will return a list that may include Smith, Smithers, Smithfield, Smiley, etc depending on the authors in your database.
El “%” tratará las palabras que son ingresadas en términos de «es semejante». Así que una búsqueda bajo Smi% buscará palabras como Smi. Esto se traduce en una lista de resultados mucho más variada. Por ejemplo, una búsqueda bajo Smi% devolverá una lista conteniendo Smothers, Smith, Smelley, Smithfield y muchos otros resultados dependiendo de qué esta en su base de datos.
The bottom line in searching with wildcards: “*” is more exact while “%” searches for like terms.
Búsqueda por títulos
Question: Why does my Zebra title search for “Help” not turn up “The help” in the first pages of results?
Answer: When doing a title search, you actually want to search for the title (i.e., “the help” rather than just “help”), and it will bubble right up to the top. If you’re just searching for “help” then the relevance ranking is going to affect the results you see.
When it comes to relevance in Zebra, here’s what’s happening. First, the search is done. If you search for the title «help», then any title that has «help» in it comes back. Then from those records, separately, it does relevance on the *whole* record. The more your word appears, the more relevant, and some MARC tags are worth more points than others. So a self-help book with 505 notes where «help» appears a *lot* will be at the top, regardless of keyword or title.
But when you add a *second word*, that helps it figure things out, as it’s weighing the relevance of both words and the phrase. Because of the way relevance works, if you search «the help», then «the help» or «the help I need» are more relevant than «the way to help», because they appear together in order. Likewise, «help the girl» would be lower relevance, because it’s out of order, and «help for the homeless» would be lower still, as they’re out of order, and apart.
La moraleja de la historia es que las búsquedas de una sola palabra, sobre todo en palabras comunes, siempre proporciona un poco de conflicto; no se puede evaluar la relevancia bien, porque no se han dado datos suficientes.
Contenido mejorado
FRBRizando contenidos
Question:At our public library we are running a Koha installation and we’ve tried to turn on all the nice functionalities in Koha such as the frbrising tool, but do not get the same result as Nelsonville public library.
Answer:In fact, this feature is quite tricky to make that right. First it looks at XISBN service. And then search in your database for that ISBN. So both XISBN and your internal ISBN (in biblio table) have to be normalized. You could therefore use the script misc/batchupdateISBNs.pl (it removes all the - in your local ISBNs)
Amazon
Todo el contenido de Amazon
Question: I have all of the Amazon preferences turned on and have entered both of my keys, but none of the content appears in my system, why is that?
Answer: Amazon’s API checks your server time on all requests and if your server time is not set properly requests will be denied. To resolve this issue be sure to set your system time appropriately. Once that change in made Amazon content should appear immediately.
On Debian the the command is date -s «2010-06-30 17:21» (with the proper date and time for your timezone).
Administración del sistema
Los errores en el cron de Zebra
Question: I am noticing some errors in the koha-zebradaemon-output.log file. When new records are added it takes a bit longer to index than we think they should. Running rebuild zebra is often faster. Zebra ends up indexing and search works, but I am concerned about the errors. Any ideas?
Answer: Rebuild_zebra.pl -r deletes all of the files in the Zebra db directories (such as reci-0.mf) and then recreates them. Thus, permissions will be lost, and the files will be owned by the user who ran rebuild_zebra.pl. If one rebuilds the zebra indexes as root, the daemons, which typically run under the user Koha, will not be able to update the indexes. Thus, it’s important then that the zebra rebuilds are put in the cronjob file of the user Koha, and not root. Also important is that other users, such as root, don’t manually execute rebuilds.
If one desires that another user be able to execute rebuild_zebra.pl, he should be given the permission to execute “sudo -u Koha …/rebuild_zebra.pl,” (if you want to do this, you also have to edit the sudoers file to pass the PERL5LIB variable with the env_keep option as by default sudo strips away almost all environment variables). Or, as root user, one can use a simple “su koha” and then the rebuild_zebra.pl command.
I’ve also tried to set the sticky bit on rebuild_zebra.pl, but for whatever reason it didn’t seem to work due to some problem with the PERL5LIB variable that I wasn’t able to figure. That seems to me the easiest thing to do, if anybody has any idea how to make it work. If it worked and were the default, I think it would help folks to avoid a great deal of the problems that come up with zebra.
Haciendo Z39.50 un proveedor público
Question: Could someone tell me the exact steps I need to take to configure Zebra to expose my Koha 3 db as a public Z39.50 service?
Answer: Edit the KOHA_CONF file that your Koha is using. Uncomment the publicserver line like:
<!– <listen id=»publicserver» >tcp:@:9999</listen> –>
que sea:
<listen id=»publicserver» >tcp:@:9999</listen>
A continuación, reinicie zebasrv y conéctese al puerto especificado (9999).
Valores autorizados de localización de estanterías
Question: When editing an item, the new shelving location I created is not showing up by default in the items where I assigned it to.
Answer: This is because you created the new shelving location with a code value of 0 (zero) Just FYI the system interprets authorized values of 0 as equaling a null so when you edit a record in cataloging where the authorized value in a field was assigned where the code was 0, the value displays as null in the item editor (or MARC editor) instead of the value the library meant it to be.
¿Por qué necesito valores autorizados?
Question: Why would I want to define authorized values for MARC tags?
Answer: Authorized Values create a “controlled vocabulary” for your staff. As an example, let us assume that your Koha installation is used by several libraries, and you use MARC 21. You might want to restrict the 850a MARC subfield to the institution codes for just those libraries. In that case, you could define an authorized values category (perhaps called «INST») and enter the institution codes as the authorized values for that category.
Note
Koha automáticamente establece categorías de valores autorizados para los tipos de ítem y los códigos de sucursal, y puede enlazar estos valores autorizados a los subcampos de MARC cuando usted establece la estructura de campos MARC.
¿Cómo puedo limpiar la tabla de sesiones?
Question: Is there a periodic job that can be run to cull old sessions from the table? We don’t want to backup all the useless session data every night.
Answer: You can run cleanup database cron job.
Or just before doing a backup command (mysqldump), you can truncate session table:
mysql -u<kohauser -p<password <koha-db-name -e 'TRUNCATE TABLE sessions'
Hardware
Escáneres de código de barras
Question: What barcode scanners have been known to work with Koha?
Answer: The simple rule of thumb is, does it act like a keyboard device?, if so, it will work. (i.e. can you take the scanner, scan a barcode and have it show up in a text editor, if so, it will work.)
Los principales puntos a comprobar son que se conecta a su PC convenientemente (puede ser USB o «un conector de teclado», lo cual significa que se conecta en línea con el teclado, que es útil con los equipos más antiguos), y que escanea el tipo de código de barras que que esté utilizando.
Es una buena idea probar algunos códigos de barras “usados”, si dispone de algunos, para ver si el escáner puede leer con éxito códigos de barras raspados o ligeramente arrugados. La mayoría de los escáneres son capaces de leer varios tipos de códigos de barras - hay muchos, y la especificación debe enumerarse los que puede leer. Es posible que necesite ajustar la configuración de algo, como prefijo y sufijo de caracteres, o si desea enviar un caracter de “enter” o no.
Un consejo más - algunos se pueden establecer como “siempre activo” y pueden venir con un soporte, algunos tienen interruptores debajo del mango, algunos tienen botones en la parte superior, algunos se cogen como un lapicero. Piense en el personal que trabaja con el hardware antes de elegir, un botón en el lugar equivocado puede ser muy difícil de usar.
Impresoras
Impresoras utilizadas por las bibliotecas Koha
- POS-X impresora de recibos
- Star Micronics impresora (se desconoce el modelo exacto) con un controlador de texto genérico/sin formato.
- Star SP2000 (Nelsonville)
- Star TSP-100 futurePRINT (Geauga)
- «Sé que ha habido muchas preguntas sobre impresoras de recibos, así que pensé en pasar mis conclusiones. Hemos estado probando Star TSP-100 futurePRINT. He encontrado esta impresora muy fácil de configurar para Koha. Yo era aún capaz de personalizar el trabajo de impresión mediante la adición de nuestro logotipo del sistema (un archivo .gif) en la parte superior de cada recibo. También con un mapa de bits creado en Paint fui capaz de escribir un mensaje en la parte inferior de cada recibo con la información de contacto, hora y el sitio web de la biblioteca que el material que fue prestado.»
- Epson TM 88 IIIP impresoras de recibos térmica
- Epson TM-T88IV
- 1x1 etiquetas usando una impresora Dymolabelwriter
Soporte Braille
Question: Are there any braille embosser or printer which has inbuilt braille converter and it is accessible with UNIX environment?
Answer: You may want to look into BRLTTY (http://www.emptech.info/product_details.php?ID=1232).
Soporte adicional
Extendiendo Koha
Script de búsqueda en Amazon para bibliotecas Koha
Nosotros adquirimos la mayoría los materiales de Amazon, así que he estado buscando una manera conveniente de saber si un libro que se esté considerando adquirir ya está en nuestro catálogo.
Greasemonkey & a custom user script fit the bill nicely:
Algunas advertencias:
- Como la mayoría de los scripts, éste fue diseñado para funcionar con Firefox; no he probado su funcionamiento con otros navegadores.
- No soy un programador de JavaScript –esto fue adaptado del trabajo de otros. Solo unas pocas líneas tendría que cambiarse para obtener un script que trabaje con su catálogo.
- Depende de la existencia de ISBN para el ítem en cuestión, por lo que no funciona para películas, libros antiguos, etc.
Others have added all sorts of bells & whistles: XISBN lookups to search for related titles, custom messages based on the status of items (on order, on hold, etc.), … just search the UserScripts site for Amazon + library. For a later date!
Nubes de palabras clave
Además de la tradicional nube de etiquetas disponible en Koha, existe una forma de generar nubes de materias comunes en de Koha.
The Author/Subject Cloud cron job is used to help with this process. This cron job sends its output to files.
- /home/koha/mylibrary/koharoot/koha-tmpl/cloud-author.html
- /home/koha/yourlibrary/koharoot/koha-tmpl/cloud-subject.html
This means that you can produce clouds for authors, collective author, all kind of subjects, classifications, etc. And since it works on zebra indexes, it is quick, even on large DBs. Tags clouds are sent to files. It’s up to library webmaster to deal with those files in order to include them in OPACMainUserBlock, or include them into their library CMS.
Algunas bibliotecas incluso envían el archivo a una carpeta compartida Samba donde los toma el webmaster, finalmente limpiarlos un poco antes de su integración en widgets de navegación o en determinadas páginas.
Desplegable de nuevos títulos
A menudo queremos añadir una forma de que nuestros socios hagan búsquedas de los nuevos ítems. Les mostraremos cómo crear un menú desplegable con los nuevos ítems por el tipo de ítem. Estos trucos funcionan (con un par de cambios) para códigos de colección o localizaciones también.
En primer lugar, es importante tener en cuenta que todos los enlaces en Koha son enlaces permanentes. Esto significa que si hago una búsqueda por todo lo de un tipo de ítem específico ordenado por la fecha de adquisición y guardado ese marcador, cada vez que haga clic en él voy a ver los nuevos ítems de ese tipo en las primeras páginas de los resultados.
Cogí esta idea y escribí un formulario que tenía esta funcionalidad. Básicamente, hace una búsqueda de su catálogo Koha para un tipo de ítem específico y ordena los resultados por fecha de adquisiciones.
Lo primero que hice fue escribir una consulta MySQL para generar una lista de tipos de ítems para mí - ¿por qué copiar y pegar cuando se puede usar el poder de MySQL?
select concat('<option value=\"mc-itype:', itemtype, '\">',description,'</option>') from itemtypes
Lo anterior se ve en la tabla itemtypes y tiene el código HTML necesario al lado de cada tipo de ítem. Luego exporté a CSV y lo abrí en mi editor de texto y añadí las otras partes del formulario.
<p><strong>New Items</strong></p>
<p><form name="searchform" method="get" action="/cgi-bin/koha/opac-search.pl">
<input name="idx" value="kw" type="hidden">
<input name="sort_by" value="acqdate_dsc" type="hidden">
<input name="do" value="OK" type="hidden">
<select name="limit" onchange="this.form.submit()">
<option>-- Please choose --</option>
<option value="mc-itype:BOOK">Book</option>
<option value="mc-itype:BOOKCD">Book on CD</option>
<option value="mc-itype:DVD">DVD</option>
<option value="mc-itype:LRG_PRINT">Large print book</option>
<option value="mc-itype:MAGAZINE">Magazine</option>
<option value="mc-itype:NEWSPAPER">Newspaper</option>
<option value="mc-itype:VIDEO">Videocassette</option>
</select>
</form>
</p>
Ahora, ¿qué significa todo eso? Las partes importantes son las siguientes:
Primero el inicio de la formulario.
<p><form name="searchform" method="get" action="/cgi-bin/koha/opac-search.pl">
Esto le indica al navegador que tome cualquier valor seleccionado y lo coloque al final de http://YOURSITE/cgi-bin/koha/opac-search.pl. Si desea insertar este formulario en el sitio web de su biblioteca (y no en su OPAC) usted puede poner el URL completo del OPAC allí.
A continuación, hay un valor oculto que está diciendo que la búsqueda se ordene descendente por fecha de adquisición (ítems más recientes en la parte superior):
<input name="sort_by" value="acqdate_dsc" type="hidden">
Y finalmente tiene una opción para cada tipo de ítem que desea se pueda buscar.
<option value="mc-itype:BOOK">Book</option>
Estas opciones incluyen cada uno la cadena «mc-iType:» que le dice a Koha que haga una búsqueda por tipo de ítem.
Una vez que tenga todo esto en su lugar, puede copiar y pegar el formulario en alguna parte en su OPAC. El OPAC de la Bibliotecas Públicas Farmington tiene algunos ejemplos de esto en la izquierda.
Catalogando y buscando por color
Uno de los grupos de iconos instalado en Koha incluye una serie de colores. Este grupo se puede utilizar para catalogar y buscar por color si lo desea. Esta guía le orientará en cambiar los códigos de colección a colores en Koha de forma que pueda hacerlo.
El siguiente SQL se puede utilizar para agregar en lote estos colores a la categoría de valores autorizados CCODE. Si desea utilizar estos colores para otros valore autorizados tendría que modificarlo para esa categoría:
insert into authorised_values (category, authorised_value, lib,
 lib_opac, imageurl) values ('CCODE','000000','Black','','colors/000000.png');
insert into authorised_values (category, authorised_value, lib,
 lib_opac, imageurl) values ('CCODE','66cc66','Bright Green','','colors/66cc66.png');
insert into authorised_values (category, authorised_value, lib,
 lib_opac, imageurl) values ('CCODE','99cc33','Olive','','colors/99cc33.png');
insert into authorised_values (category, authorised_value, lib,
 lib_opac, imageurl) values ('CCODE','3333cc','Dark Blue','','colors/3333cc.png');
insert into authorised_values (category, authorised_value, lib,
 lib_opac, imageurl) values ('CCODE','006600' ,'Dark Green','','colors/006600.png');
insert into authorised_values (category, authorised_value, lib,
 lib_opac, imageurl) values ('CCODE','6600cc','Plum','','colors/6600cc.png');
insert into authorised_values (category, authorised_value, lib,
 lib_opac, imageurl) values ('CCODE','6666cc','Purple','','colors/6666cc.png');
insert into authorised_values (category, authorised_value, lib,
 lib_opac, imageurl) values ('CCODE','9999cc','Light Purple','','colors/9999cc.png');
insert into authorised_values (category, authorised_value, lib,
 lib_opac, imageurl) values ('CCODE','660000' ,'Burgundy','','colors/660000.png');
insert into authorised_values (category, authorised_value, lib,
 lib_opac, imageurl) values ('CCODE','663333' ,'Brown','','colors/663333.png');
insert into authorised_values (category, authorised_value, lib,
 lib_opac, imageurl) values ('CCODE','990000' ,'Red','','colors/990000.png');
insert into authorised_values (category, authorised_value, lib,
 lib_opac, imageurl) values ('CCODE','996633' ,'Tan','','colors/996633.png');
insert into authorised_values (category, authorised_value, lib,
 lib_opac, imageurl) values ('CCODE','999999' ,'Gray','','colors/999999.png');
insert into authorised_values (category, authorised_value, lib,
 lib_opac, imageurl) values ('CCODE','cc66cc','Pink','','colors/cc66cc.png');
insert into authorised_values (category, authorised_value, lib,
 lib_opac, imageurl) values ('CCODE','cc99cc','Bubble Gum','','colors/cc99cc.png');
insert into authorised_values (category, authorised_value, lib,
 lib_opac, imageurl) values ('CCODE','cc3333' ,'Orange','','colors/cc3333.png');
insert into authorised_values (category, authorised_value, lib,
 lib_opac, imageurl) values ('CCODE','cc6666' ,'Peach','','colors/cc6666.png');
insert into authorised_values (category, authorised_value, lib,
 lib_opac, imageurl) values ('CCODE','cc9999' ,'Rose','','colors/cc9999.png');
insert into authorised_values (category, authorised_value, lib,
 lib_opac, imageurl) values ('CCODE','cccc00' ,'Gold','','colors/cccc00.png');
insert into authorised_values (category, authorised_value, lib,
 lib_opac, imageurl) values ('CCODE','ffff33' ,'Yellow','','colors/ffff33.png');
insert into authorised_values (category, authorised_value, lib,
 lib_opac, imageurl) values ('CCODE','ffffcc','Cream','','colors/ffffcc.png');
insert into authorised_values (category, authorised_value, lib,
 lib_opac, imageurl) values ('CCODE','ffffff','White','','colors/ffffff.png');
If you would like to choose the colors manually you can do that via the Valores autorizados administration area.

Next you’ll want to update the frameworks so that the 952$8 (if you’re using collection code) label to says Color.
Una vez tenga eso en su sitio usted puede comenzar a catalogar ítems por colores.
Finalmente usted querrá agregar el siguiente JQuery a sus preferencias para que se reetiquetar “Colección” a “Color”
$(document).ready(function(){
    $("#advsearch-tab-ccode a:contains('Collection')").text("Color");
    $("#holdings th:contains('Collection')").text("Color");
    });
$(document).ready(function(){
    $("#advsearch-tab-ccode a:contains('Collection')").text("Color");
    $('#item_ccode').text("Color");
    });
Koha y su sitio web
En este apéndice se incluyen consejos para la integración de Koha en la página web de la biblioteca.
Búsqueda Koha en su sitio
A menudo, usted querrá agregar un cuadro de búsqueda Koha a su sitio web de la biblioteca. Para ello, basta con copiar y pegar el siguiente código en su sitio web de la biblioteca y actualizar la porción de SUCATALOGO con la URL de su catálogo y ya estará listo.
<form name="searchform" method="get" action="http://YOURCATLOG/cgi-bin/koha/opac-search.pl" id="searchform">
<input id="transl1" name="q" type="text"><p>
<select name="idx" id="masthead_search">
<option value="kw">Keyword</option>
<option value="ti">Title</option>
<option value="au">Author</option>
<option value="su">Subject</option>
<option value="nb">ISBN</option>
<option value="se">Series</option>
<option value="callnum">Call Number</option>
</select>
<input value="Search" id="searchsubmit" type="submit">
</p></form>