Katalogizace¶
Before you start cataloging in Koha you’re going to want to do some basic setup. Refer to the Seznam úkonů implementace for a full list of these things. Most importantly you’re going to want to make sure that your Bibliografická šablona MARC are all defined the way you want. Once in the cataloging module you will not be able to add or remove fields and subfields so your frameworks must be ready before you start cataloging.
You can also use OCLC Connexion to send records directly in to Koha. For more information on that please review the OCLC Connexion Gateway setup Appendix.
- Get there: More > Cataloging
Bibliografické záznamy¶
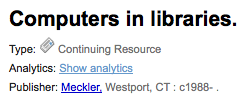
In Koha the bibliographic record contains the main information related to the material. This includes things like the title, author, ISBN, etc. This information is stored in Koha in Marc (different flavors of Marc are supported in Koha). Once this information is saved, Záznamy jednotek (exemplářů) can be attached.
Přidávání záznamů¶
Records can be added to Koha via original or copy cataloging. You can also choose to use the basic or advanced cataloging interface for all of your work.
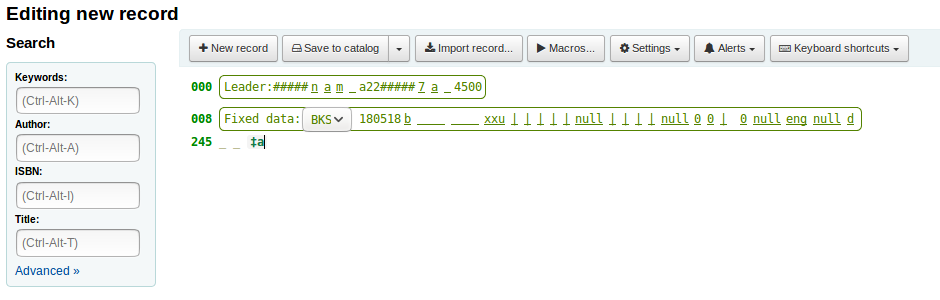
If you would like to catalog a record using a blank template in the basic editor
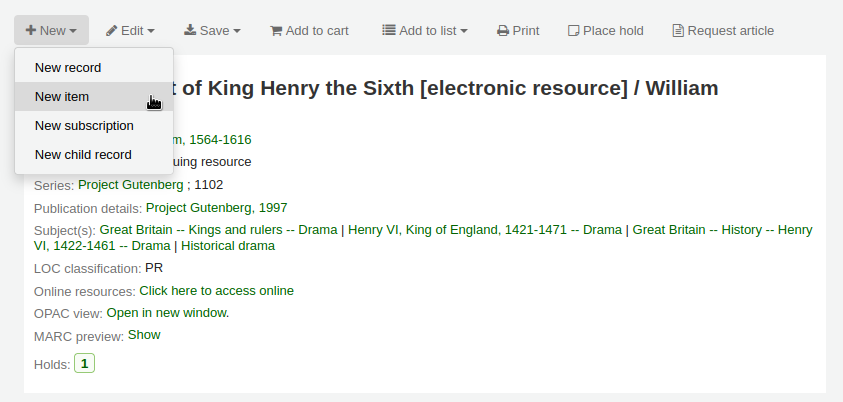
Klikněte na tlačítko ‚Nový záznam‘
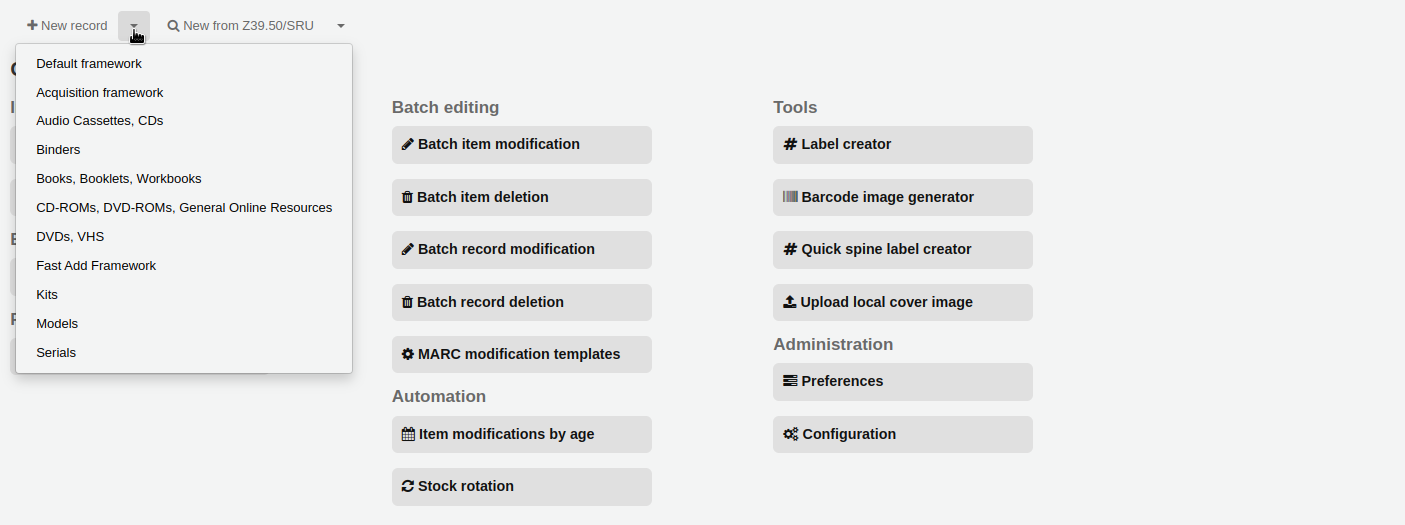
- Vyberte šablonu, na které chcete založit váš záznam
If you would like to catalog a record using a blank template in the advanced editor
- Enable the EnableAdvancedCatalogingEditor preference
- Click the ‚Advanced editor‘ button

If you want to catalog a record based on an existing record at another library in the editor you last used (basic or advanced)
Click ‚New from Z39.50/SRU‘
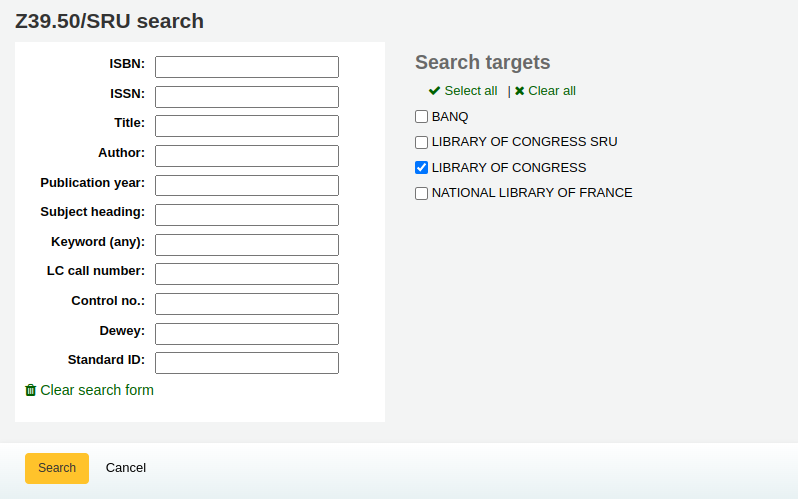
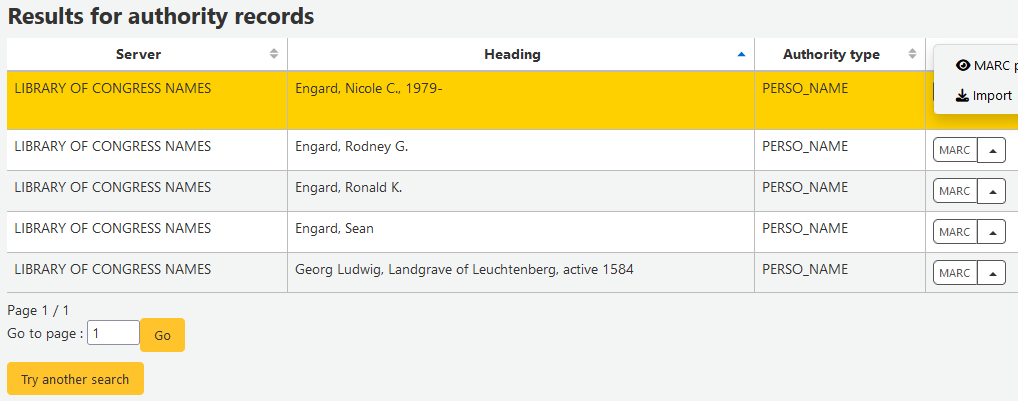
Hledat položku, kterou byste rádi katalogizovali
Note
Pokud nejsou nalezeny žádné výsledky, zkuste hledat s méně poli, ne všechny Z39.50 cíle jsou schopny hledat ve všech polích výše uvedených.
Search targets can be altered by using the Z39.50 Admin area.
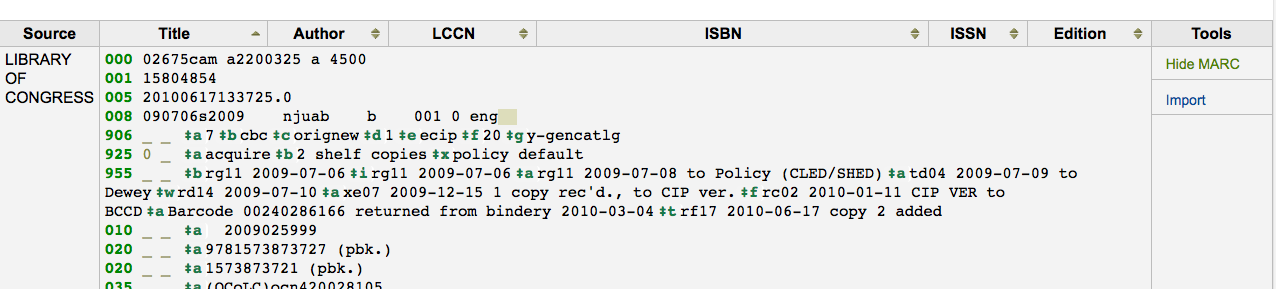
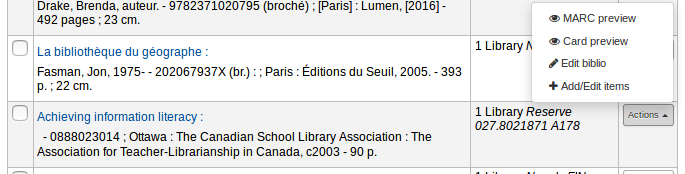
Z výsledků si můžete prohlédnout MARC nebo lístové zobrazení záznamu nebo se rozhodnete je mportovat do Koha
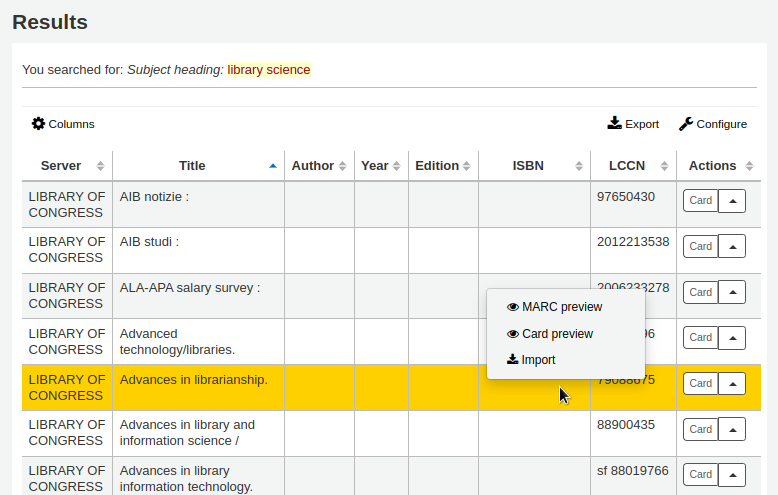
Kromě odkazu Importovat napravo od každého titulu lze kliknout přímo na titul, který vás zajímá a objeví se nabídka s odkazy na náhled záznamu a jeho import

Pokud nelalézáte titul, který potřebujete vyhledat pomocí Z39.50, můžete kliknout na tlačítko „Zkuste nové hledání“ v levém dolním rohu z vašich výsledků

Basic Editor Cataloging¶
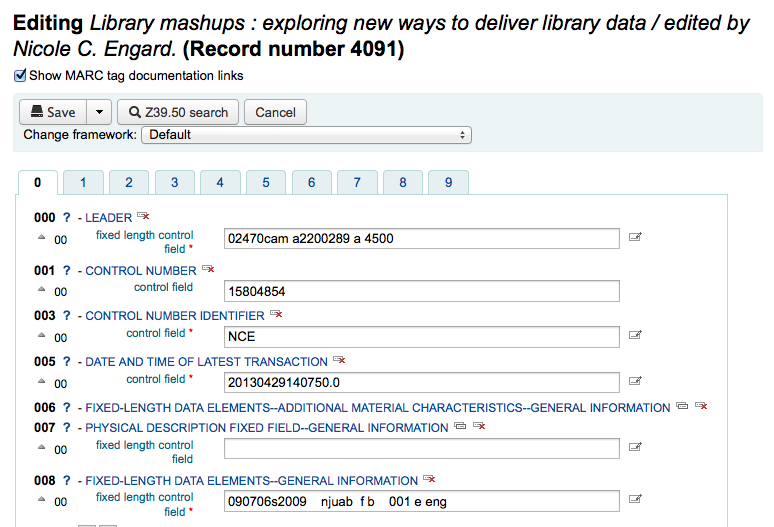
In the basic editor once you’ve opened a blank framework or imported a record via Z39.50 you will be presented with the form to continue cataloging
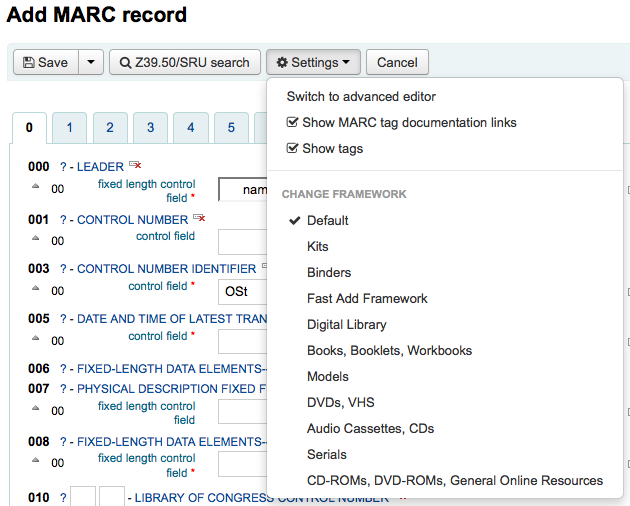
If you would rather not see the MARC tag numbers you can change the value in your hide_marc system preference or each user can check the box next to ‚Show tags‘ found under ‚Settings‘.
Chcete-li rozbalit sbalené tagy, klikněte na tag popis
Chcete-li získat nápovědu z Kongresové knihovny USA o tagu MARC, klepněte na otazník (?) na pravé straně čísla pole
- If you feel that this clutters the screen you can hide the question marks by unchecking the box next to the ‚Show MARC tag documentation links‘ note found under ‚Settings‘
Sometimes fields may not be editable due to the value in your BiblioAddsAuthorities system preference. If you have this preference set to not allow catalogers to type in fields controlled by authorities you may see a lock symbol to the left of the field.

Pokud se tato ikona objeví, musíte kliknout na ikonu vpravo od pole vyhledání existující autority

V seznamu výsledků klikněte na ‚Vybrat autoritu‘ pro přenos do katalogizačního záznamu.

K vytvoření opakování tohoto pole klikněte na ikonku „Opakovat tento tag“ vpravo od názvu tagu

Chcete-li přesunout podpole ve správném pořadí, klepněte na šipku nahoru na levé straně pole
Chcete-li duplikovat podpole, klikněte na klonovací ikonu (odstranit kopírované pole, klepněte na tlačítko Odstranit ikonu klonu) vpravo od pole
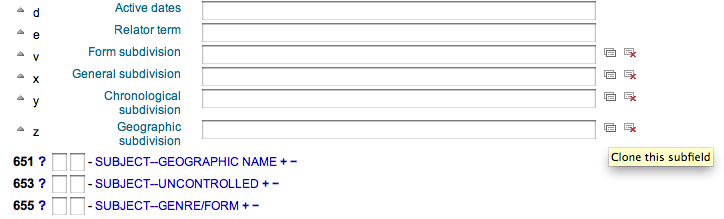
Chcete-li odstranit podpole (pokud existuje více než jedno stejného typu), klepněte na znaménko mínus (-) na pravé straně pole
K použití pluginu klikněte na ikonku vpravo od pole
Některá pole pevné délky mají editory, které se mění v závislosti na druhu materiálu který katalogizujete (například pole 006 a 008)
Až budete hotovi, klikněte na tlačítko „Uložit“ v horní části a vyberte, zda chcete uložit a zobrazit bibliografický záznam, který jste vytvořili nebo pokračovat v přidávání/editaci jednotek připojených k záznamu
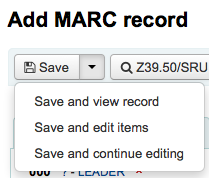
- Choosing ‚Save and view record‘ will bring you right to the record you just cataloged
- Choosing ‚Save and edit items‘ will bring you to the add/edit item form after saving the bib record so that you can attach holdings
- Choosing ‚Save and continue editing‘ will allow you to save your work so far and keep you in the editor to continue working
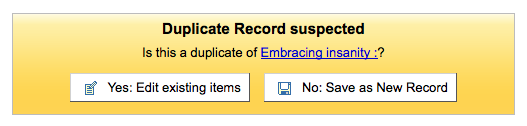
Pokud se chystáte přidat duplicitní záznam do systému budete varováni před uložením
Advanced Editor Cataloging¶
In order to use the Advanced cataloging editor you need to enable the EnableAdvancedCatalogingEditor preference.
Important
This feature is currently experimental, and may have bugs that cause corruption of records. It also does not include any support for UNIMARC or NORMARC fixed fields. Please help us test it and report any bugs, but do so at your own risk.
In the advanced editor once you’ve opened a blank framework or imported a record via Z39.50 you will be presented with the form to continue cataloging
Using the search box on the left you can perform Z39.50 searches

And from those Z39.50 results you can view the marc record by clicking the link to the right
Clicking ‚Import‘ will bring the record in to the editor where you can perform your edits
Note
When adding a new field in the Advanced Editor, you need to key underscores for a blank indicator, and surround the indicators with spaces.
Note
You need to key a space before the first subfield delimiter, but not before or after other subfield delimiters in the field.
At the bottom of the editor you will see help from the Library of Congress for the field you are on. In cases where your MARC is invalid you will see red highlighting. To edit the record using only keyboard functions the Keyboard shortcuts button will inform you of the necessary commands
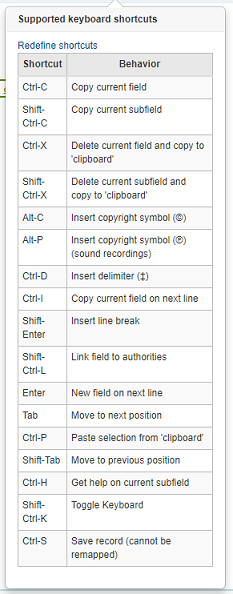
Advanced Cataloging Keyboard Shortcuts¶
The following keyboard shortcuts can be used in the advanced cataloging module to save time and clicking.
| Zkratka | Chování |
|---|---|
| Ctrl-D | Vložit oddělovač (‡) |
| Ctrl-H | Nápověda pro aktuální podpole |
| Ctrl-S | Uložit záznam |
| Ctrl-X | Odstranit aktuální pole |
| Ctrl-Shift-X | Odstranit aktuální podpole |
| Enter | Nové pole na dalším řádku |
| Shift-Enter | Vložit konec řádku |
| Tab | Posun na daší pozici |
| Shift-Tab | Posun na předchozí pozici |
Macros in Advanced Cataloging¶
To record a new macro:
- Select the „> Macros…“ button
- A window will pop up. In this window, select „New macro…,“ key the new macro’s name in the pop-up box and select OK.
- Now click to the right of the little number 1, and key the first line of your macro. For a multi-line, i.e., multi-field macro, hit the return key so that a little number 2 appears, and key the second line/field, etc.
- Your macros will be automatically saved. When finished you can select the „x“ to close the window, or select a macro to run on the record that you’re editing, or select another macro to run.
To edit an existing macro:
- Select the „> Macros…“ button
- A window will pop up. In this window, select the macro that you wish to edit & make your changes.
- Your work will automatically be saved, and when finished you can select the „x“ to close the window, or select a macro to run on the record that you’re editing, or select another macro to run.
The basic syntax of the macro language:
- new 500=‡aEdited with Rancor
- Creates a new 500 with a ‡a subfield and sets it to „Edited with Rancor“.
- 245c= by J.K. Rowling.
- Sets the first ‡c subfield of the first 245 tag in the record to “ by J.K. Rowling“, creating it if necessary.
- 082a={084a}
- Sets the ‡a subfield of the first 082 tag (creating the subfield if necessary) to the contents of the first 084‡a.
- indicators=_1
- Sets the indicators of the last mentioned tag (in this case, 082) to „_“ and „1“.
- new 090a=Z674.75.W67
- Creates a new ‡a subfield on the first 090 (but only if that field already exists) and sets it to Z674.75.W67.
- new 090a at end=Z674.75.W67
- Same as above.
- new 245b after a= a tale of might and magic /
- Creates a new ‡b after the first a subfield and sets it to “ a tale of might and magic /“.
- delete 245b
- Deletes the first ‡b subfield on the first 245 to ‡b
Přidání analytických záznamů¶
Knihovny někdy zpřístupňují novinové články a části v rámci monografií a časopisů knihovním čtenářům prostřednictvím analytické katalogizace. Analytická katalogizace vytváří samostatné bibliografické záznamy o těchto článcích, kapitolách a sekcích, atd. které najdete uvnitř většího zdroje, jako jsou knihy, časopisy, noviny. V analytické katalogizaci, ačkoli je vytvořen samostatný bibliografický záznam pro článek, není fyzicky oddělen od hostitelské položky. Další informace o Analytické katalogizaci viz v kapitole 13 AACR2.
If you would like to catalog analytic records there are two options. One is to use the Usnadnění analytiky funtion; the other is the Rozšířený analytický Workflow.
Usnadnění analytiky¶
The Easy Analytics feature makes linking analytic records together easier. The first thing you need to do is set the EasyAnalyticalRecords preference to ‚Display‘ and the UseControlNumber preference to ‚Don’t use.‘
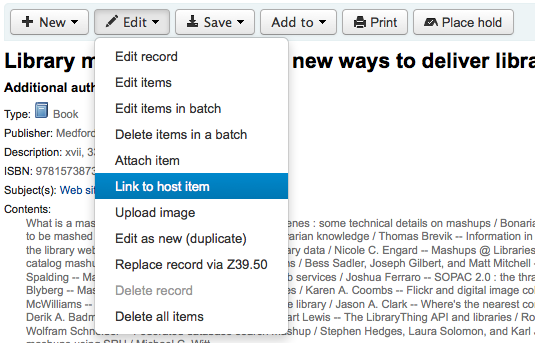
After cataloging your analytic record (see Adding Records for more on creating records) click ‚Edit‘ from the normal view and choose to ‚Link to Host Item‘
To vás vyzve k zadání čárového kódu pro výtisky, které by měly být napojeny na tento záznam.
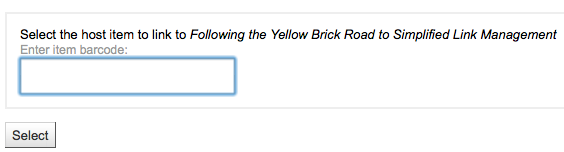
Po vložení čárového kódu jednotky a kliknutí na tlačítko ‚Vybrat‘ obdržíte potvrzující zprávu.

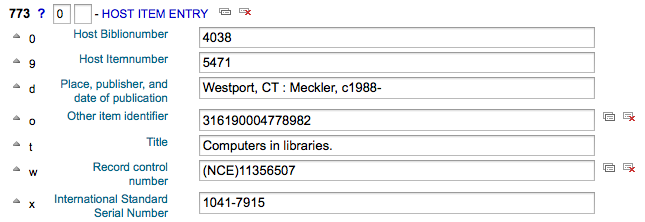
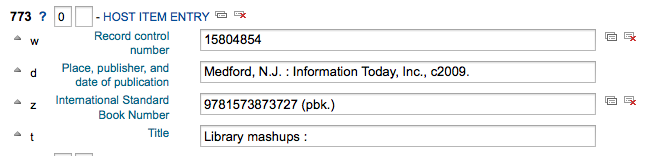
Záznam bude mít nyní pole 773 správně vyplněné, tak aby se uskutečnit odkaz na zdrojový dokument.
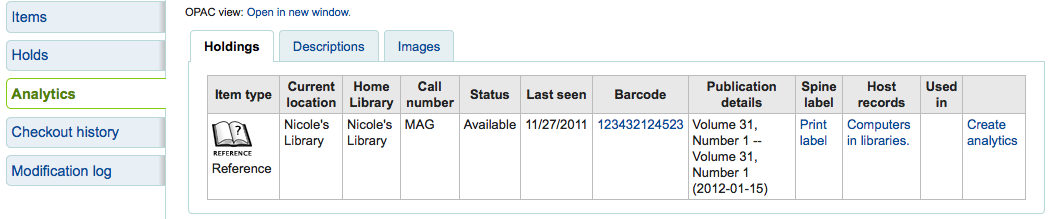
Chcete-li zobrazit všechny položky vázané na záznam hostitelského (zdrojového) dokumentu, proveďte vyhledání záznamu, klepněte na kartu Analytika na levé straně a analytika navázaná na každý čárový kód se zobrazí ve sloupci pod „Používáno v“.

Note
Je také možné vytvářet analytické záznamy z této obrazovky kliknutím na „Vytvořit analytiku“
Můžete se také podívat na analytiku napojenou na tento záznamu kliknutím na odkaz „Ukázat analytiku“ na horní části záznamu v normálním zobrazení.
When looking at the analytic record you will also see a link to the host item under the ‚Host records‘ column in the holdings table when viewing the ‚Analytics‘ tab.
Rozšířený analytický Workflow¶
To use the Enhanced Workflow method of adding analytics, the first thing you need to do is set the EasyAnalyticalRecords preference to ‚Don’t display‘ and the UseControlNumber preference to ‚Use.‘
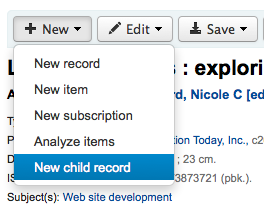
After cataloging your original record (see Adding Records for more on creating records) click ‚New‘ from the normal view and choose to ‚New child record.‘
Tím se otevře nový prázdný záznam pro katalogizaci. Prázdný záznam bude mít jen pole 773 správně vyplněno k dokončení odkazu, jakmile je záznam uložen.
Chcete-li zobrazit všechny položky vázané na záznam hostitelského (zdrojového) dokumentu, proveďte vyhledání záznamu, klepněte na kartu Analytika na levé straně a analytika navázaná na každý čárový kód se zobrazí ve sloupci pod „Používáno v“.
Můžete se také podívat na analytiku napojenou na tento záznamu kliknutím na odkaz „Ukázat analytiku“ na horní části záznamu v normálním zobrazení.
When looking at the analytic record you will also see a link to the host item under the ‚Host records‘ column in the holdings table when viewing the ‚Analytics‘ tab.
Editace analytik¶
Pokud jste propojili analytický záznam nesprávně, můžete odstranit tento odkaz úpravou výtisku na analytickém záznamu (nikoliv na záznamu hostitele). Chcete-li toto provést, přejděte na analytický záznam a klikněte na tlačítko „Upravit“ a zvolte ‚Upravit výtisky“. Na levé straně každého výtisku, uvidíte dvě možnosti.

- Kliknutím na „Editovat zdroj“ povolí editovat položku zdrojového dokumentu.
- Kliknutím na „Zrušit odkaz“ odstraní pole 773 a propojení mezi analytickým záznamem a zdrojovým dokumentem.
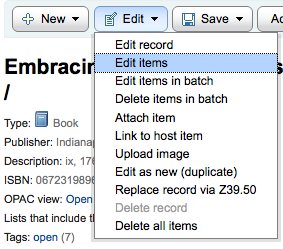
Editace záznamů¶
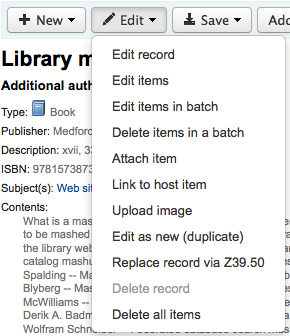
K editaci záznamu klikněte na „Upravit bibilo“ na stránce výsledků vyhledání na stránkách katalogizace
nebo kliknutím na tlačítko „Upravit“ v bibliografickém záznamu a vybráním „Upravit záznam“
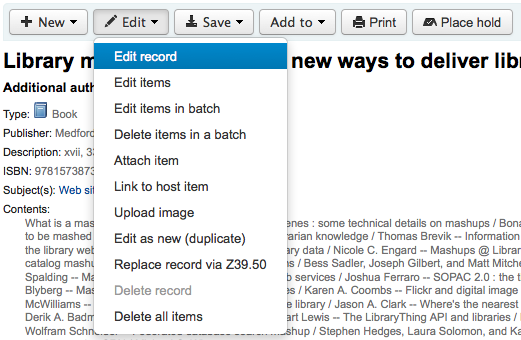
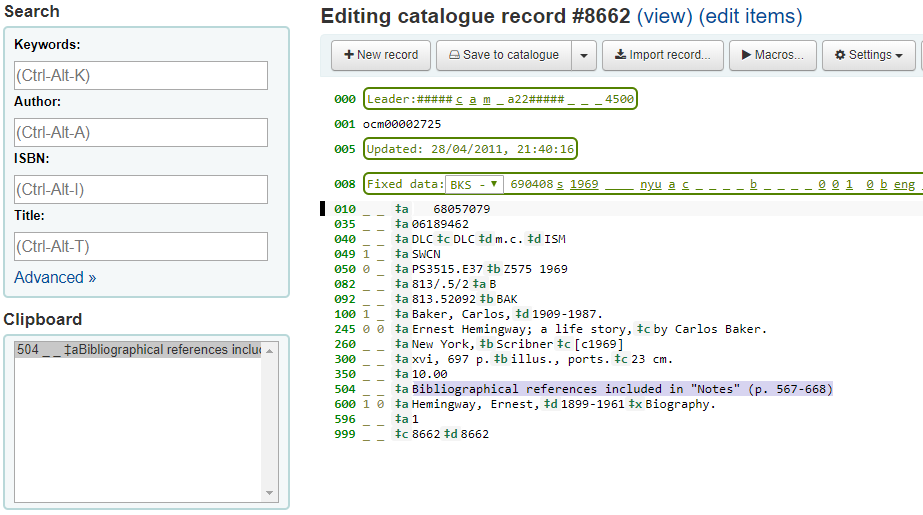
Záznam bude otevřen v editoru MARC
Alternativou je hledat přes protokol Z39.50 a překrýt váš záznam s plnějším záznamem nalezeným v jiné knihovně. Můžete to udělat pomocí volby „Nahradit záznam pomocí Z39.50 “ z menu Úpravy.
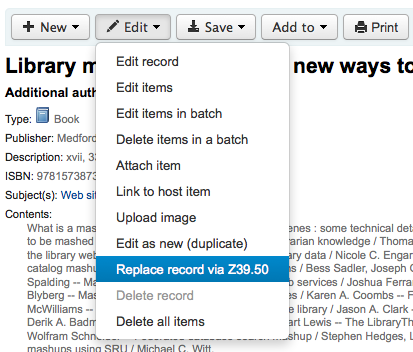
Pokud zvolíte toto, budete přeneseni do vyhledávacího okna Z39.50, kde můžete vyhledávat záznamy i v jiných knihovnách.
Pokud jste dokončili úpravy (jakoukoliv metodou), můžete kliknout na ‚Uložit‘, nahoře vlevo v editoru.
You can also use the edit menu to add your own custom cover image if you have either OPACLocalCoverImages and/or LocalCoverImages set to ‚Display‘ by choosing ‚Upload Image‘ from the menu.
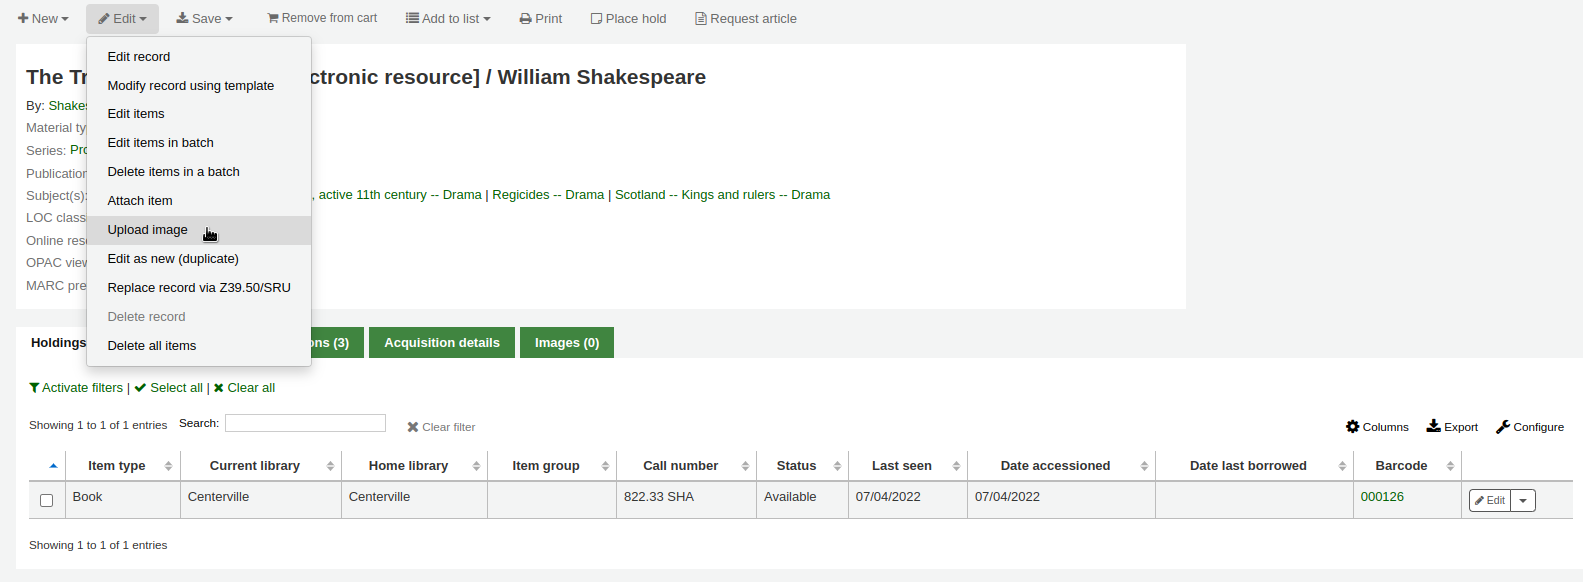
Choosing to ‚Upload Image‘ will take you to the Upload Local Cover Image Tool.
Duplikování záznamů¶
Někdy kopii záznamu nelze nalézt přes Z39.50. V těchto případech můžete vytvořit duplikát podobného záznamu a upravit potřebné části pro vytvoření nového záznamu. Chcete-li duplikovat existující záznam klepněte na tlačítko „Upravit jako nový (duplicitní)“ v nabídce Úpravy bibliografického záznamu
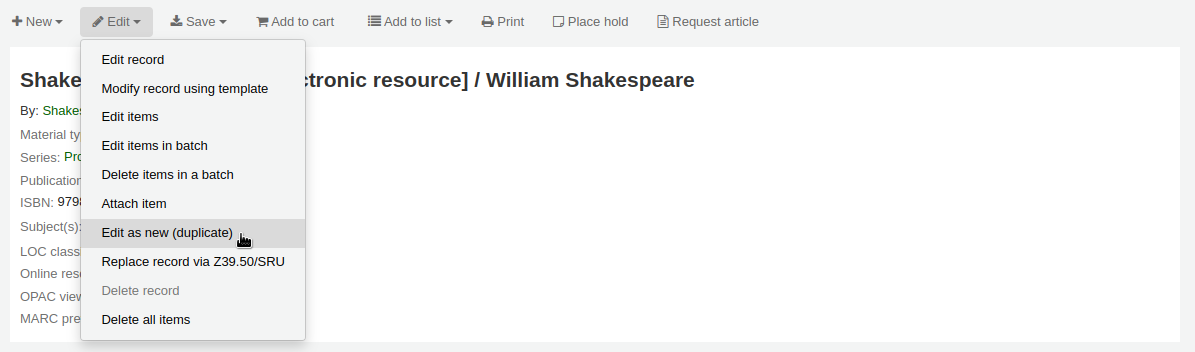
Tím se otevře nový MARC záznam s poli vyplněnými hodnotami z původního bibliografického záznamu.
Attaching files to Records¶
If you would like to upload files to Koha you can do so with a few settings.
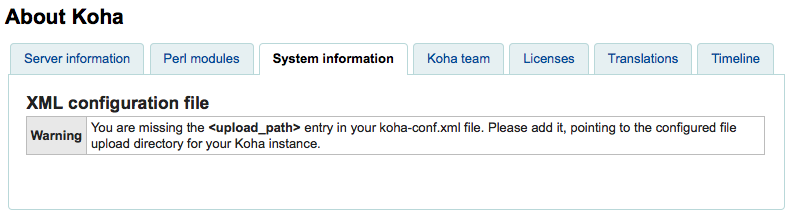
You will need to ask your system administrator to set the ‚upload_path‘ config variable to point to where the files will be stored
You can see if your upload path is set correctly by visiting About Koha > System Information. If there is an error you will see it there.
You will want to be sure that your OPACBaseURL system preference is set appropriately
You will want to add the upload.pl plugin to the 856$u subfield in one (or multiple) of your frameworks
Once you are all set up you can continue with cataloging as regular. You will see a plugin icon next to the 856$u that will open up the upload and/or search window
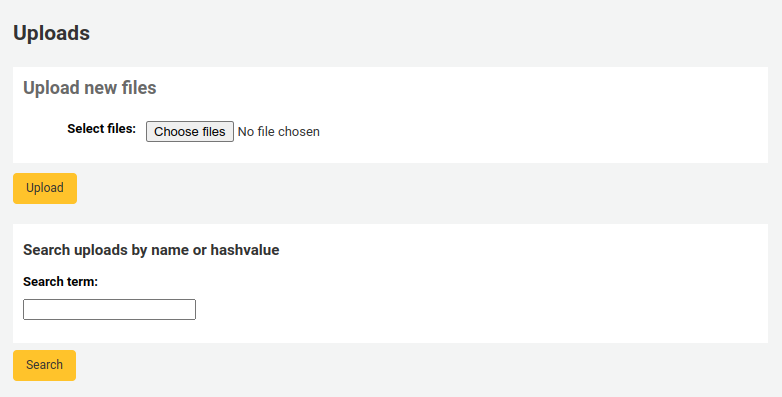
From this menu you can click browse to find a file and attach it, or you can search files you have uploaded previously using the search box. From the search results you can choose which file to attach.
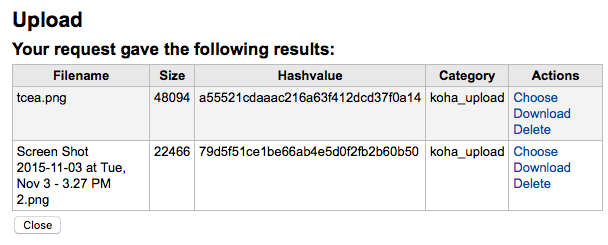
Once the file is chosen it will appear as a link in the MARC record and on the detail display.
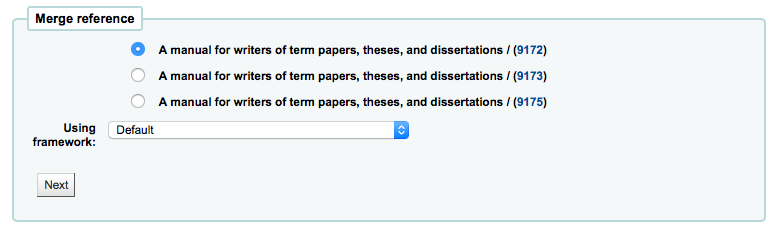
Merging Records¶
To merge bibliographic records together you will want to go to the Cataloging module and perform a search.
If you see duplicates on that search results screen you can check the boxes next to the duplicates and click the ‚Merge selected‘ button at the top of the results.
Once you have selected the records you want to merge, click the ‚Merge selected‘ button at the top of the list. You will be asked which of the records you would like to keep as your primary record and which will be deleted after the merge. If the records were created using different frameworks, Koha will also ask you what Framework you would like the newly merged record to use.
You will be presented with the MARC for all of the records (each accessible by tabs labeled with the bib numbers for those records). By default the entire first record will be selected, uncheck the fields you don’t want in the final (destination) record and then move on to the second tab to choose which fields should be in the final (destination) record.
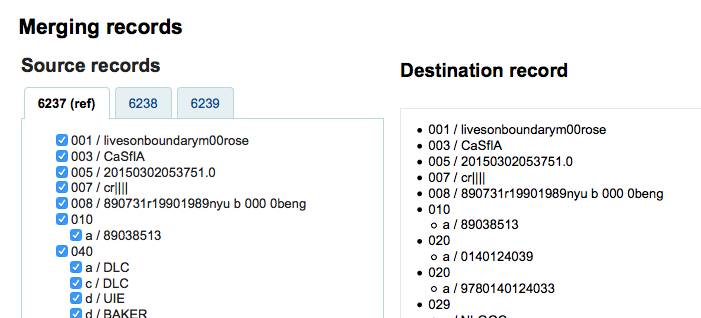
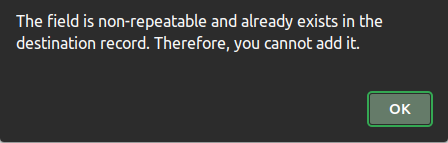
Pokud se pokusíte přidat pole, které není opakovatelné dvakrát (jako výběr 245 pole z obou záznamu # 1 a # 2), které budou prezentovány s chybou
Below the records you are merging is an option to enter fields to report on. This will allow you to control what fields you see on the merge confirmation page:

If you enter nothing you will be presented with a confirmation of biblionumbers only

If you enter fields you will see those on the confirmation page (you can set defaults with the MergeReportFields preference)
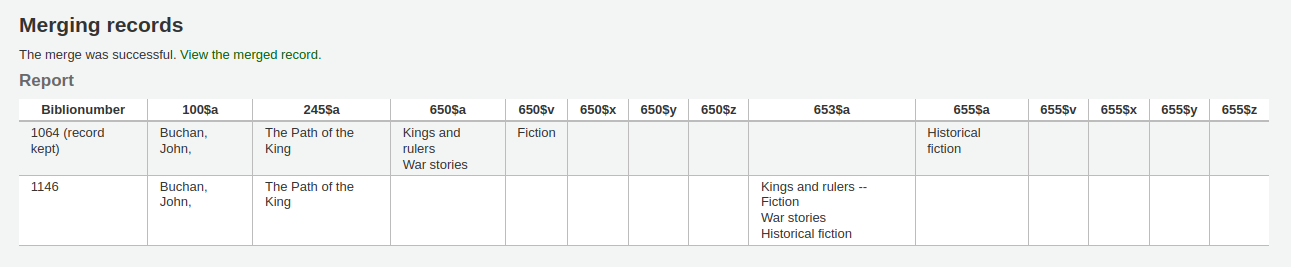
Jakmile jste s výběrem polí spokojeni, klikněte na tlačítko „Sloučit“. Základní záznam bude obsahovat data, která jste vybrali a také všechny jednotky od obou záznamu. Druhý záznam bude odstraněn.
Important
Je důležité znovu reindexovat zebra ihned po sloučení záznamů. Pokud se vyhledává záznam, který byl smazán, Koha ohlásí čtenáři v OPACu chybu.
Note
If you would like you can also use the Seznamy tool for merging records together. Learn more here.
Smazání záznamů¶
Chcete-li odstranit bibliografický záznam, vyberte možnost „Edit“ a zvolte „Smazat záznam“
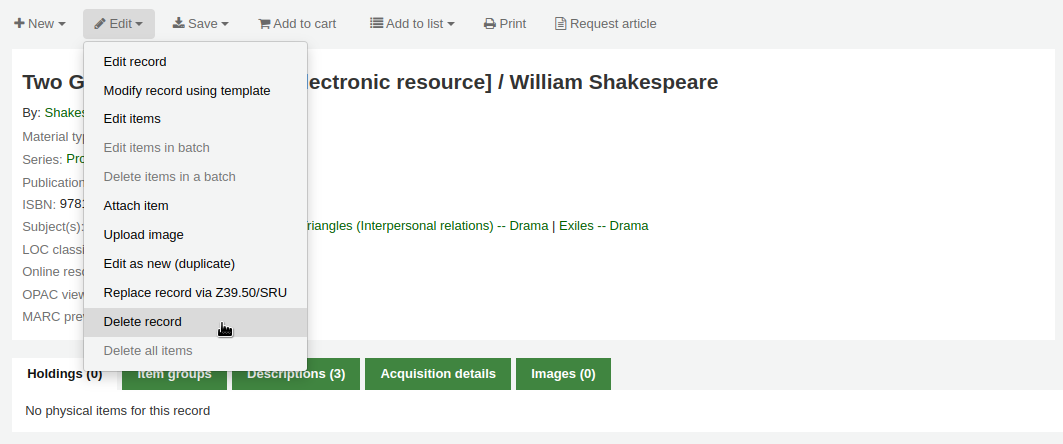
Bibliografické záznamy mohou být odstraněny pouze když byly odstraněny všechny jednotky na ně navázané. Pokud se pokusíte odstranit bibliografický záznam se stále připojenými jednotkami uvidíte, že možnost vymazání je vyšedlá.
Záznamy jednotek (exemplářů)¶
V Koha každý bibliografický záznam může mít připojenou jednu nebo více jednotek (exemplářů). Tyto jednotky jsou někdy odkazovány jako exempláře (výtisky). Každá jednotka obsahuje informace o fyzickém výtisku, který má knihovna ve fondu.
Přidání jednotek (exemplářů)¶
Po uložení nového bibliografického záznamu, budete přesměrováni na prázdný záznam jednotky (exempláře), takže můžete připojit jednotku k bibliografickému záznamu. Můžete také kliknout na „Přidat/Upravit jednotky“ z výsledků katalogizačního vyhledávání
nebo můžete přidat novou jednotku kdykoliv kliknutím na „Nový“ v bibliografickém záznamu a vybráním „Nová jednotka“
Objeví se editační tormulář:
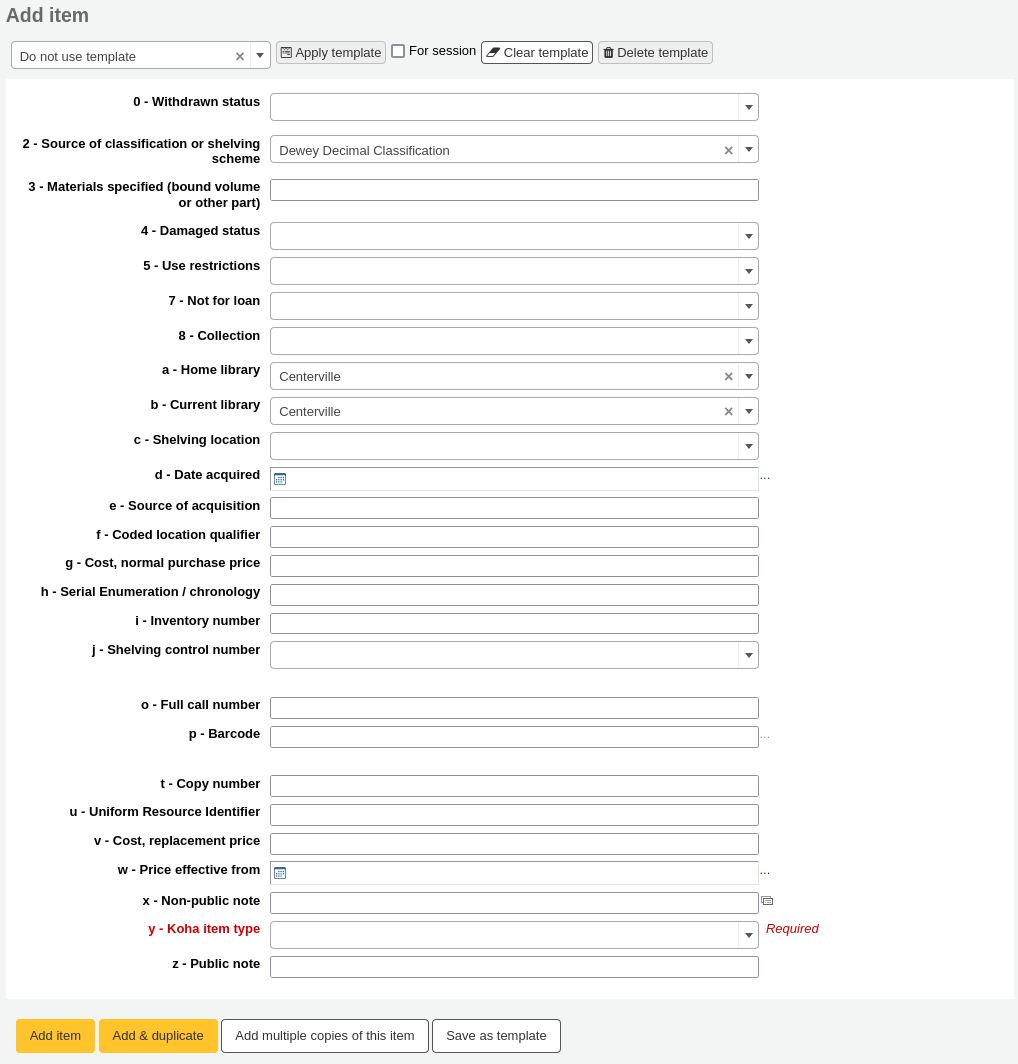
Pokud plánujete vydání jednotky do oběhu, měli byste vyplnit alespoň následující pole pro nové jednotky:
2 - Zdroj klasifikace
a - Trvalé umístění
b- Aktuální umístění
o - Plná signatura
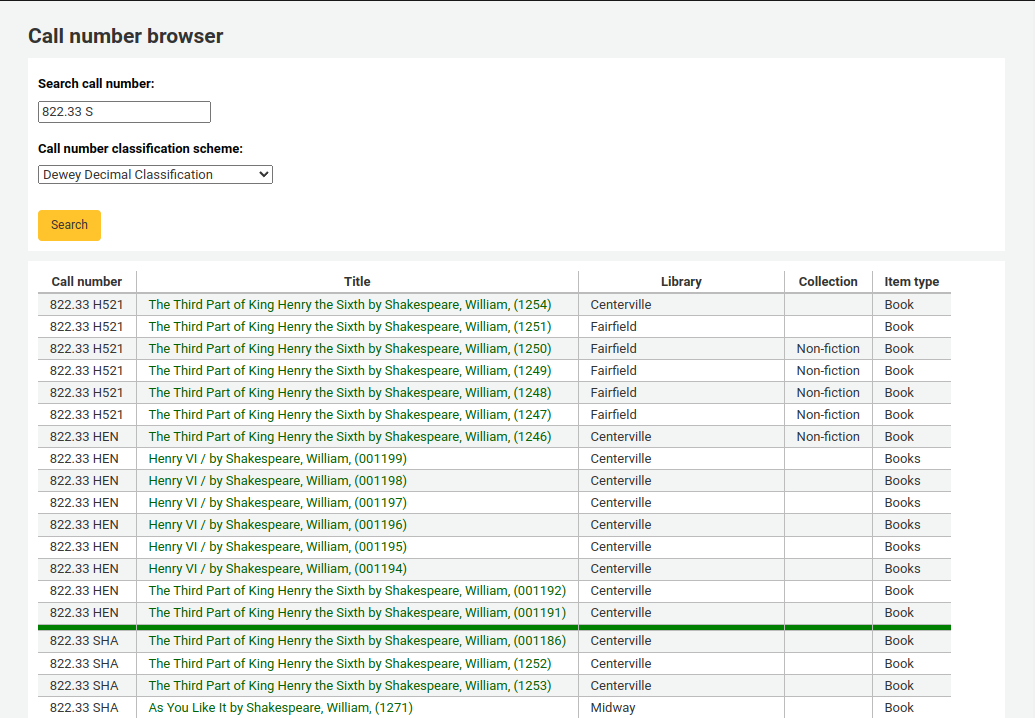
If you’d like you can use the call number browser plugin for this field. If it’s enabled you’ll see a … to the right of the field. When clicked that will open a call number browser window if the row is highlighted in Red then the call number is in use, if there is a thin Green line instead then the call number can be used.
p - Čárový kód
V - Cena, cena pro náhradu, reprodukční pořizovací cena
- Tato hodnota bude účtována čtenáři když označíte jednotku, kterou měl vypůjčnou, jako ztracenou
y - typ jednotky Koha
To make sure that these values are filled in you can mark them as mandatory in the framework you’re using and then they will appear in red with a ‚required‘ label. The item will not save until the required fields are filled in.

Note
To make item subfields required in a framework you’ll want to edit the 952 field in the framework editor.
Pod formulářem jsou 3 tlačítka pro vložení jednotky

- Přidat jednotku, přidá právě jednu jednotku (exemplář)
- Add & Duplicate will add the item and fill in a new form with the same values for your to alter
- ‚Přidat víc jednotek‘ se zeptá, kolik jednotek a poté přidá dané číslo +1 do čárového kódu, aby byl každý kód unikátní
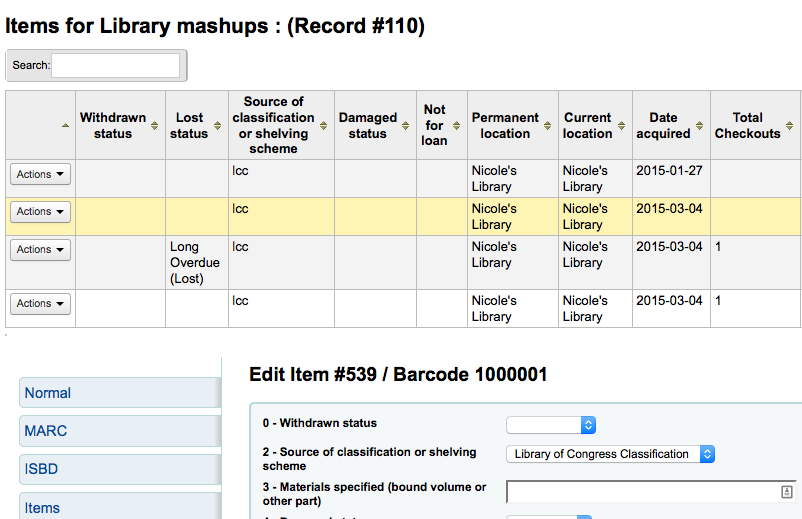
Vaše přidané jednotky se zobrazí nad přidávacím formulářem, jakmile bude předložen

Vaše jednotky se také objeví pod bibliografickými detaily v zobrazení bibliografického záznamu.

If you have SpineLabelShowPrintOnBibDetails set to ‚Display‘ then there will also be a link to print a quick spine label next to each item.
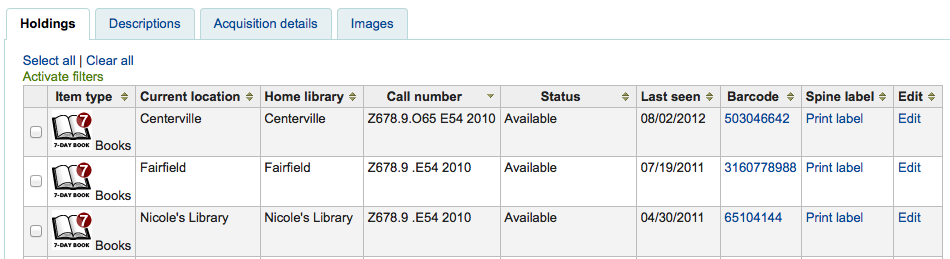
Můžete také filtrovat obsah vaší tabulky jednotek (exemplářů) kliknutím na odkazy „Aktivovat filtry“. Toto se zobrazí v horním řádku, kde můžete zadat v každém sloupci filtrování výsledků v tabulce.
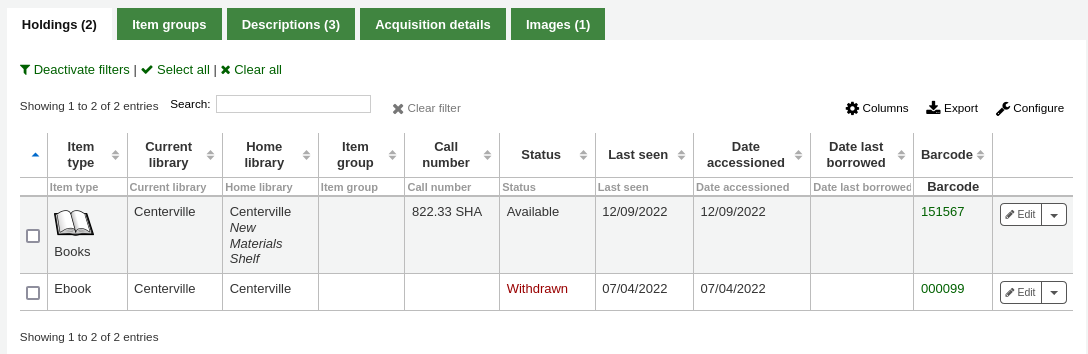
Editace jednotek (exemplářů)¶
Jednotky lze upravovat různými způsoby.
Kliknutí na „Upravit“ a „Upravit jednotky“ v bibliografickém záznamu
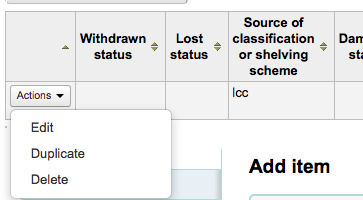
Which will open up a list of items where you can click the ‚Actions‘ button to the left of the specific item you would like to edit and choose ‚Edit‘.
Kliknutí „Upravit jednotky“ vedle jednotky (exempláře) v tabulce jednotek (exemplářů)
Zaškrtněte políčko vlevo od jednotky, na kterou chcete umístit rezervaci
Kliknutí na „Upravit“ a pak „Upravit v dávce“
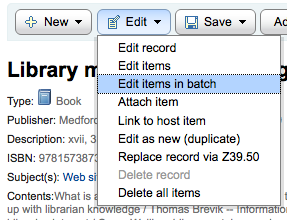
This will open up the batch item modification tool where you can edit all of the items on this record as a batch.
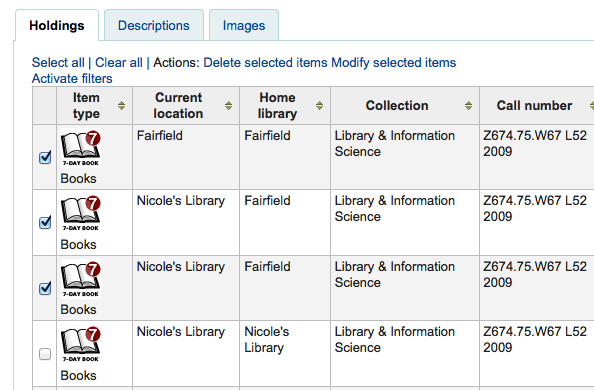
You can also enable Povolit to have checkboxes appear to the left of each item on the detail display. You can then check off the items you would like to edit and click ‚Modify selected items‘ at the top of the list.
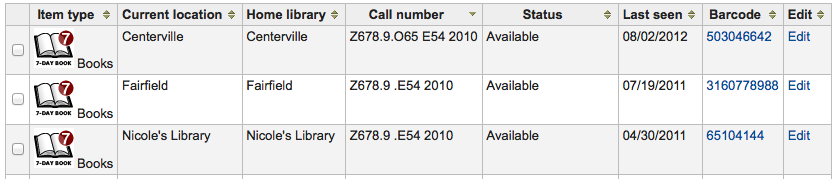
You can click ‚Edit‘ to the right of each item in the Holdings tab
There is also a link to Edit items from the search results in the staff client
Finally you can use the Batch Item Modification tool
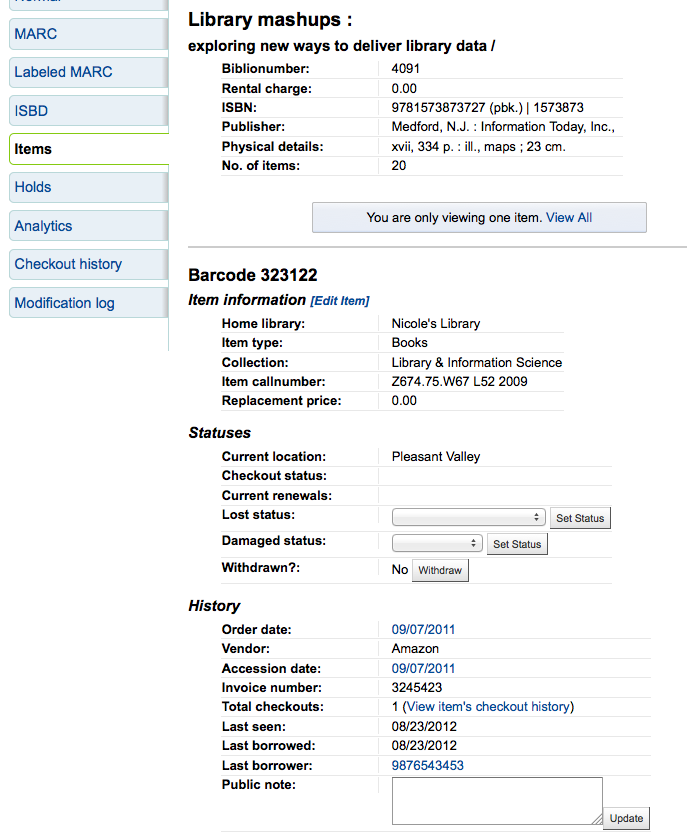
Rychlá aktualizace stavu exemplářů¶
Knihovníci často potřebují změnit stav jednotky na „Ztraceno“ nebo „Poškozeno“. K tomu není potřeba upravovat úplný záznam. Kliknutím na čárový kód jednotky na souhrnu nebo v historii výpůjček se dostanete na přehled položky. Na přehled jednotky se také můžete dostat kliknutím na kartu „Jednotky“ vlevo na stránce s podrobným záznamem jednotky.
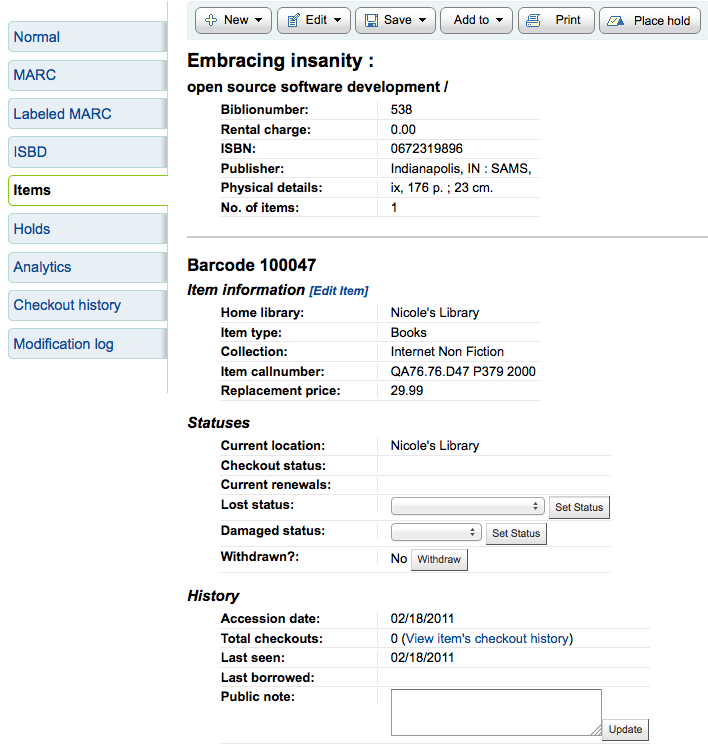
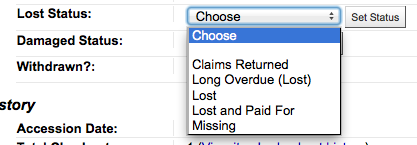
V tomto náhledu můžete označit jednotu za ztracenou zvolením stavu ztraceno v rolovací nabídce a kliknutím na tlačítko ‚Nastavit stav‘.
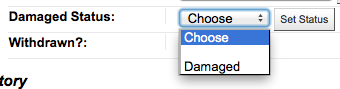
Můžete také označit jednotku jako poškozenou, výběrem „Poškozený stav“ z roletky a klepnutím na tlačítko ‚Nastavit stav‘.
Duplicating Items¶
You can easily duplicate each item by clicking the ‚Action‘ button the left of each item on the edit items screen
From here you can choose to ‚Duplicate‘ the item and this will populate the form with the values from the item you chose.
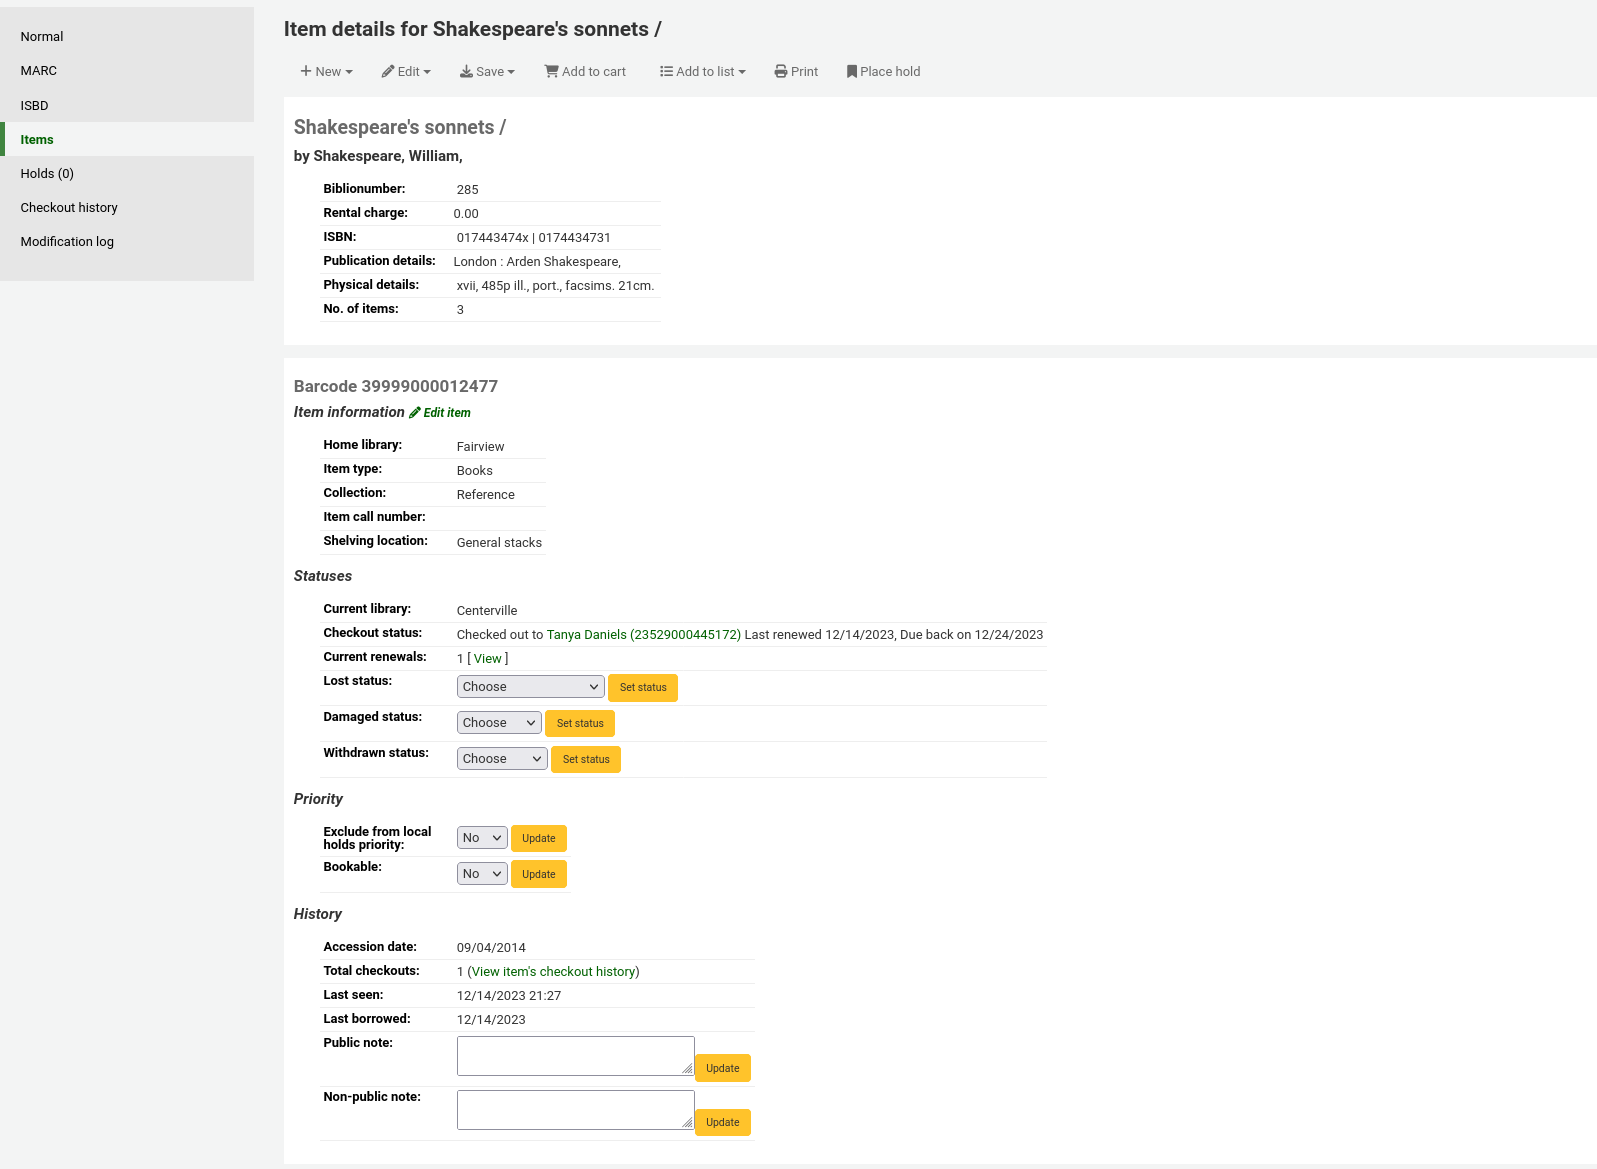
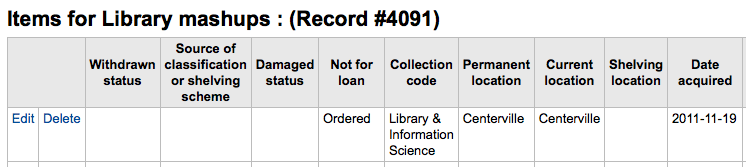
Informace o jednotce¶
Na levé straně každého bibliografického záznamu je záložka, která slouží k zobrazení jednotek.
Clicking that tab will give you basic information about the items. From here you can see basic information about the item such as the home library, item type, collection code, call number and replacement price. You can also see and edit the status information. If an item is marked lost or withdrawn you will also see the date that status was applied.

In the History section you will see information about the check out history of the item and if you ordered the item via the acquisitions module then this section will include information about the order.
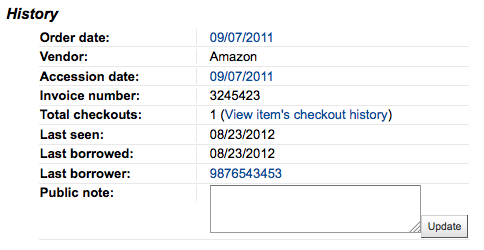
Pokud objednávka nebo den přistoupení je propojena, kliknutím na něj se dostanete na akviziční informace pro tuto jednotku.
Přesun jednotek¶
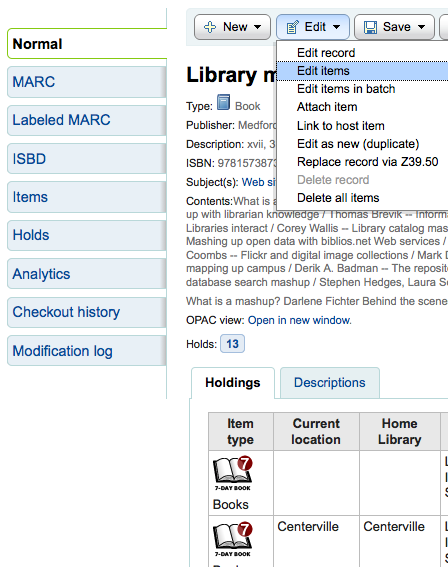
jednotky lze přesouvat z jednoho bibliografického záznamu do jiného pomocí volby Připojení jednotky
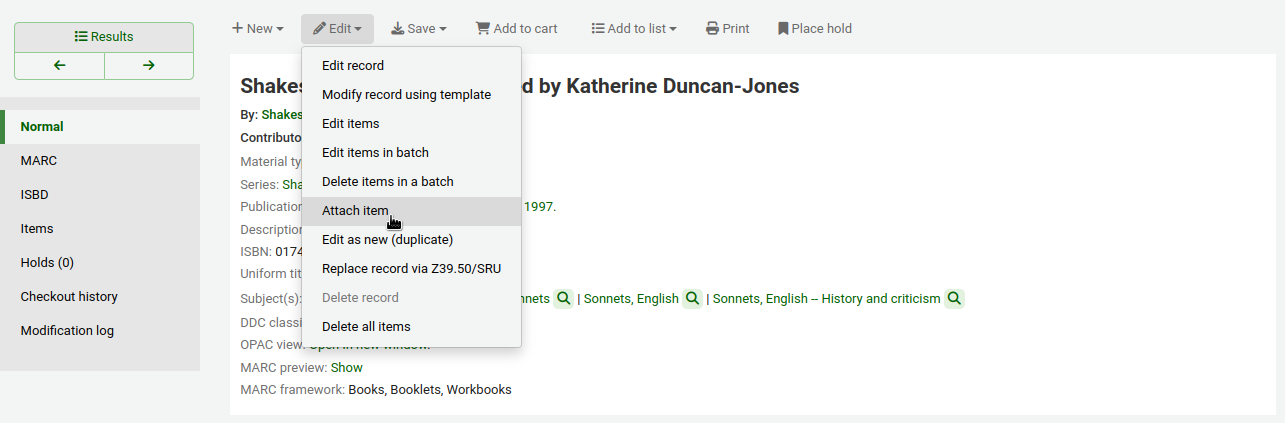
Navštivte bibliografický záznam, ke kterému chcete připojit jednotku a zvolte „Připojit jednotku“ z menu „Úpravy“.
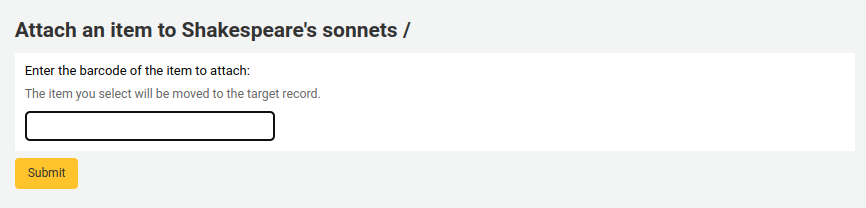
jednoduše vložte čárový kód pro výtisk, který chcete přesunout a klikněte na „Vybrat“
If you want to move all items to a new record creating only one bibliographic record you can use the Merge Records tool instead.
Smazat exempláře¶
Existuje mnoho způsobů, jak odstranit záznamy o výtisku. Pokud potřebujete odstranit jen jeden výtisk, můžete to udělat tím, že se otevře stránka s detaily bibliografického záznamu a kliknete na tlačítko „Upravit“ v horní části. Odtud si můžete vybrat „Upravit výtisky“.
Bude vám prezentován seznam jednotek a vedle každé z nich bude odkaz označený „Delete“. Klikněte na tento odkaz a pokud jednotka není vypůjčená, tato jednotka bude odstraněna.
Pokud víte, že všechny výtisky připojené k vašemu záznamu nejsou v současné době vypůjčené, můžete použít volbu „Odstranit všechny výtisky“ pod menu „Editace“ a odstranit všechny výtisky ze záznamu.
You can also enable Povolit to have checkboxes appear to the left of each item on the detail display. You can then check off the items you would like to delete and click ‚Delete selected items‘ at the top of the list.
Finally you can use the batch delete tool to delete a batch of items.
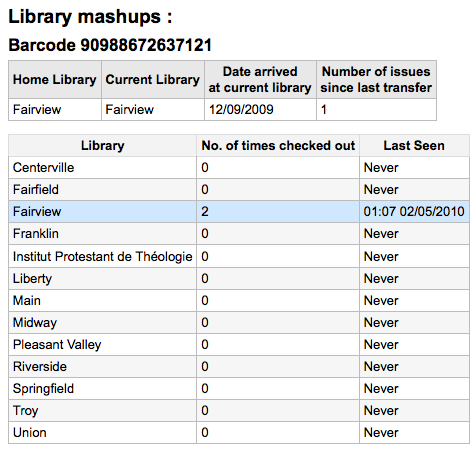
Item Specific Circulation History¶
U každého bibliografického záznamu se uchovává výpis oběhu (podle vašich nastavení včetně informace o čtenáři nebo bez něho), ale každá jednotka má svoji vlastní stránku výpisu oběhu. Pro její prohlížení klikněte na záložku ‚Jednotky‘ nalevo od seznamu, na který se právě díváte.
Pod záhlavím ‚Historie‘ je odkaz na zobrazení historie výpůjček dané jednotky. Kliknutím na něj se dostanete na stránku, která je jen mírně odlišná od stránky s historií bibliografického záznamu.
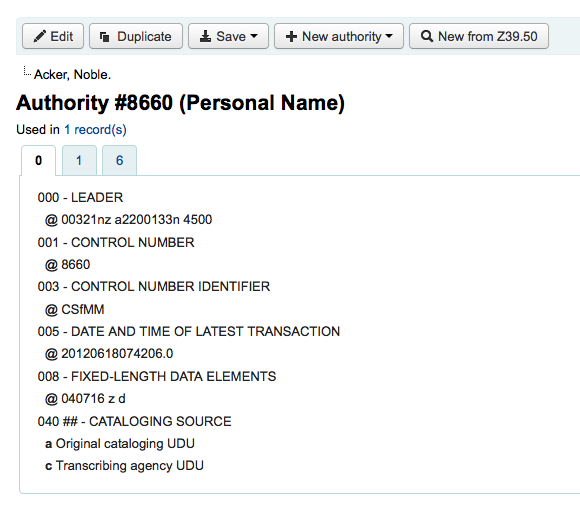
Autority¶
Záznamy autorit jsou způsob, jak kontrolovat pole ve Vašich MARC záznamech. Použití záznamů autorit Vám umožní kontrolu nad záhlavími předmětů, osobními jmény a místy.
Přidávání autorit¶
Chcete-li přidat nový autoritní záznam, můžete buď zvolit typ vytvářené autority tlačítkem „Nová autorita“, nebo stáhnout záznam pomocí Z39.50.
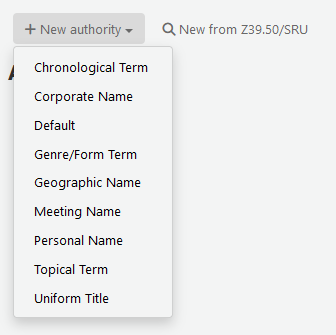
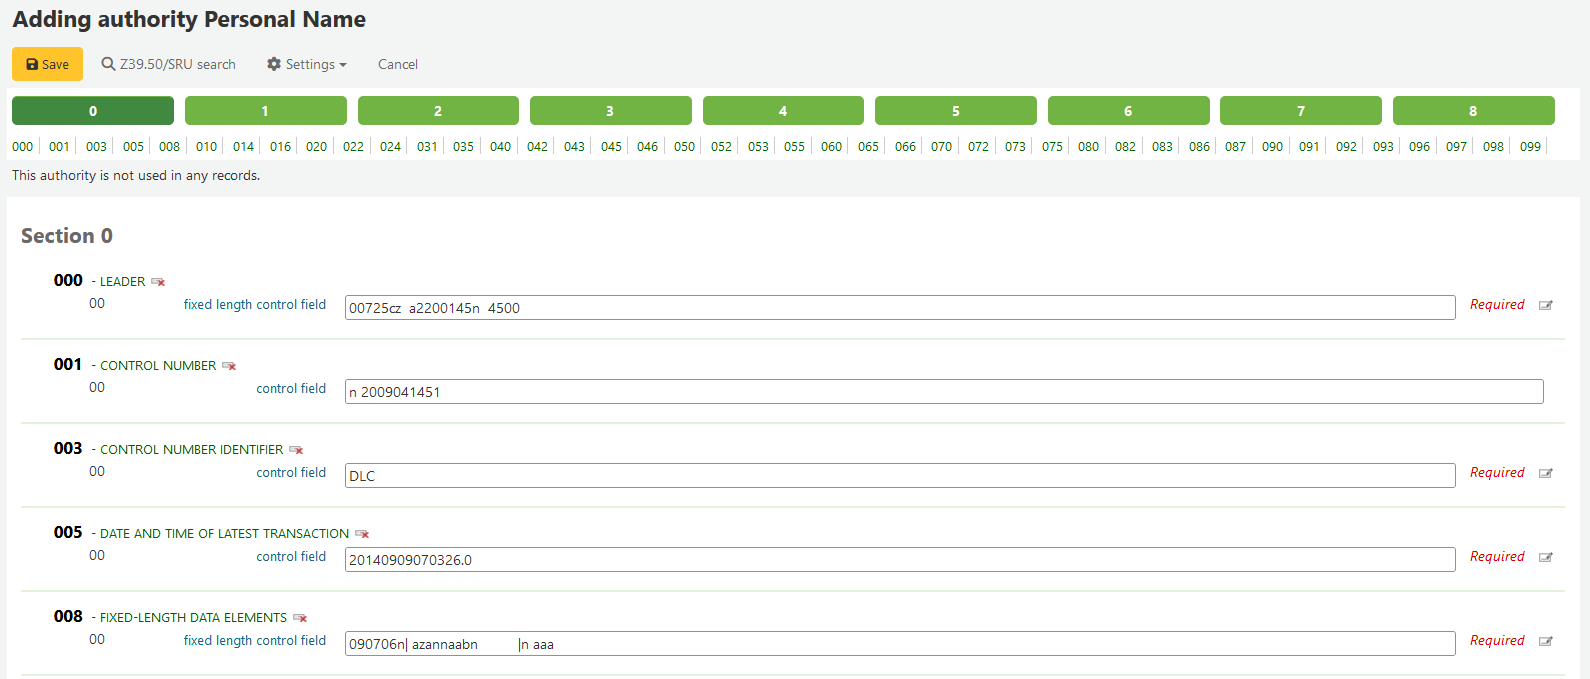
Pokud si zvolíte vytvářet zcela nový záznam, objeví se čistý formulář, který vám umožní zadat všechny potřebné údaje.
Chcete-li rozbalit sbalené hodnoty stačí kliknout na název a podpole se objeví. Chcete-li duplikovat pole nebo podpole, stačí kliknout na znaménko plus (+) na pravé straně štítku. Chcete-li používat pluginy pole pomocné jednoduše klepněte na tlačítko elipsy (…) na pravé straně pole.
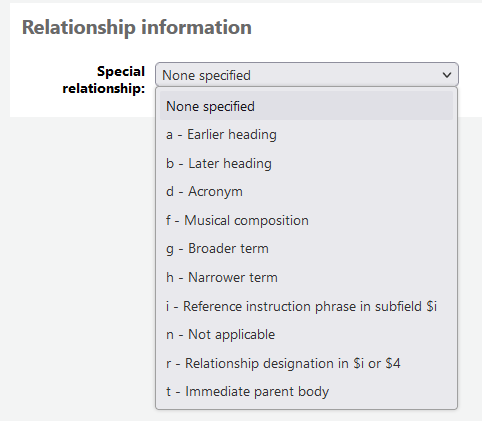
Při propojování autorit na jiná záhlaví, můžete použít plugin vyhledávače autorit klepnutím na tlačítko s třemi tečkami (…) na pravé straně pole.
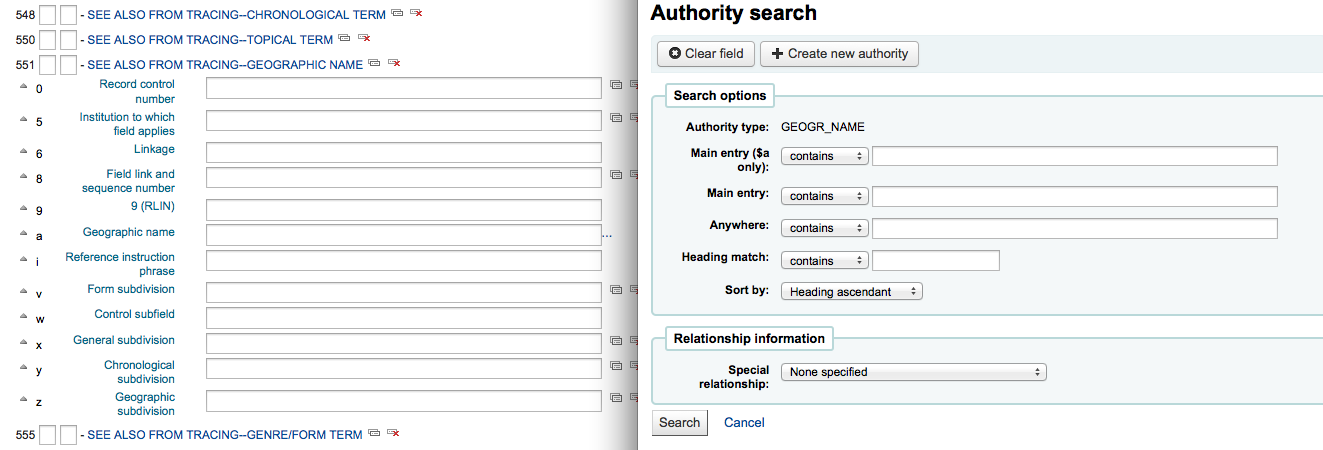
Zde můžete vyhledat autoritu ve Vašem souboru autorit a následně ji propojit s bibliografickým záznamem. Pokud nenajdete vyhovující autoritu, klikněte na tlačítko ‚Vytvořit novou‘ a přidejte ji. Tento zásuvný modul také umožňuje nastavit vztahy mezi autoritami.
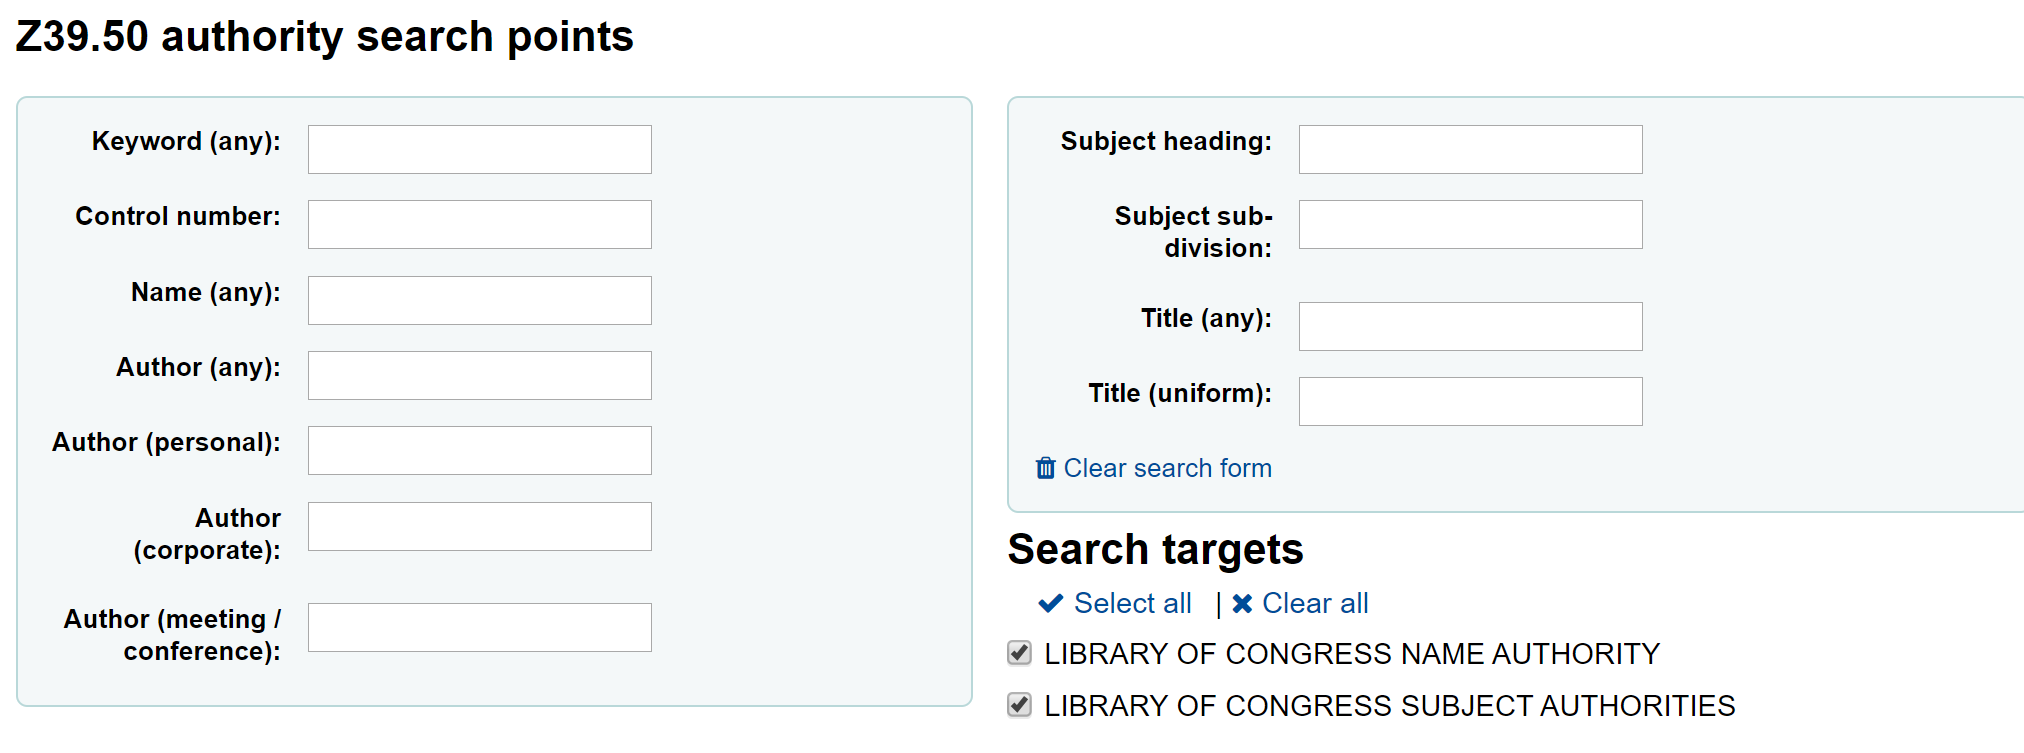
Pokud zvolíte stažení autoritního záznamu, bude zobrazen vyhledávací formulář.
Jednotlivé záznamy můžete stáhnout do systému Koha pomocí odkazu „Importovat“ napravo.
Bude zobrazen formulář, ve kterém budete moci upravit autoritní záznam předtím, než bude uložen do systému.
Hledání Autorit¶
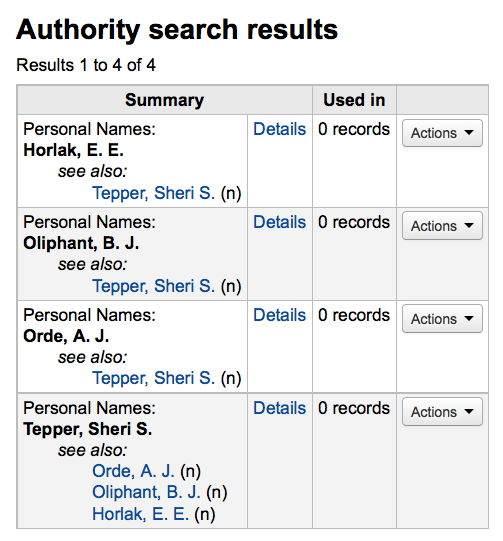
Ze stránky autorit můžete vyhledávat existující termíny a bibliografické záznamy, ke kterým jsou přiřazené.

From the results you will see the authority record, how many bibliographic records it is attached to, an ‚Actions‘ menu that includes the ability to edit, merge and delete (if there are no bibliographic records attached).
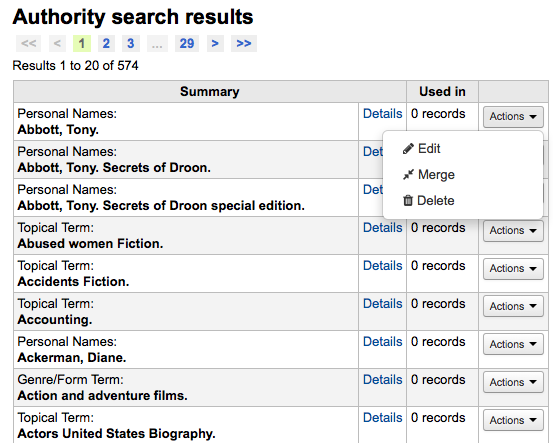
Kliknutím na obsah záznamu autority se otevře plný záznam a možnost upravení záznamu.
Pokud má autoritní záznam odkazy viz též, uvidíte je vyznačené je výsledcích vyhledání, klepnutím na ně se spustí vyhledávání na toto viz též.
Úpravy autorit¶
Autority mohou být upraveny kliknutím na souhrn o autoritě ve výsledcích vyhledávání a potom kliknutím na tlačítko ‚Upravit‘ nad záznamem.

Once you’ve made the necessary edits, simply click ‚Save‘ and dontmerge is set to ‚Do‘, Koha will immediately update all of the bib records linked to the authority with the new authority record’s data. If dontmerge is set to „Don’t“ then Koha won’t edit bib records when changes are made to authorities, rather, this is done later by the merge_authority.pl cronjob.
Chcete-li odstranit autoritní záznam musíte se nejprve ujistit, že není spojen s bibliografickým záznamem. Pokud není používán žádnými bibliografickými záznamy odkaz pro „Delete“ se zobrazí v pravé části záznamu o výsledcích vyhledávání jako tlačítko, které se objeví po kliknutí na shrnutí autoritního záznamu.
Hledání Autorit¶
If you have duplicate authority records you can merge them together by clicking the ‚Merge‘ link, found in the actions menu, next to two results on an authority search.

After clicking ‚Merge‘ on the first result you will see that authority listed at the top of the results.
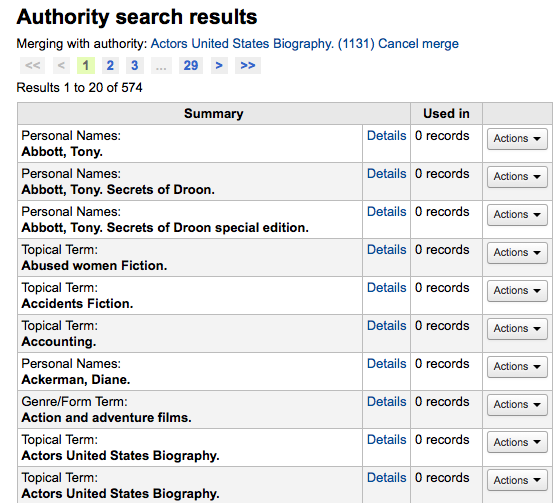
Next you need to click ‚Merge‘ next to the second result you’d like to merge.
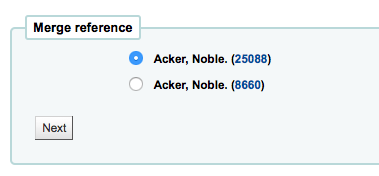
Pokud chcete vybrané záznamy sloučit, klikněte na tlačítko ‚Sloučit vybrané položky‘. Budete dotázáni, který ze dvou záznamů bude zachován jako primární a který má být po sloučení smazán.
Zobrazí se Vám oba záznamy MARC. Ve výchozím stavu je vybrán celý první záznam, odškrtněte pole která nechcete mít ve výsledném záznamu a potom se přesuňte k druhému záznamu a vyberte pole, která mají být ve výsledném záznamu.
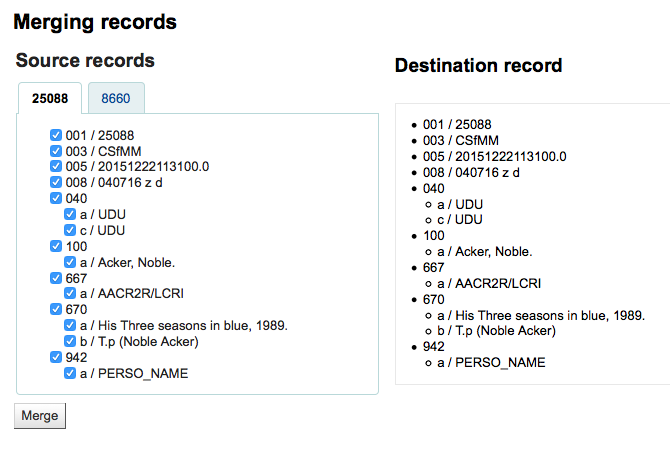
Jakmile jste dokončili svůj výběr, klikněte na tlačítko „Sloučit“. Primární záznam bude nyní obsahovat údaje, které jste pro něj zvolili, stejně jako všechny jednotky/exempláře z obou bibliografických záznamů a druhý záznam bude vymazán.
Průvodce katalogizací¶
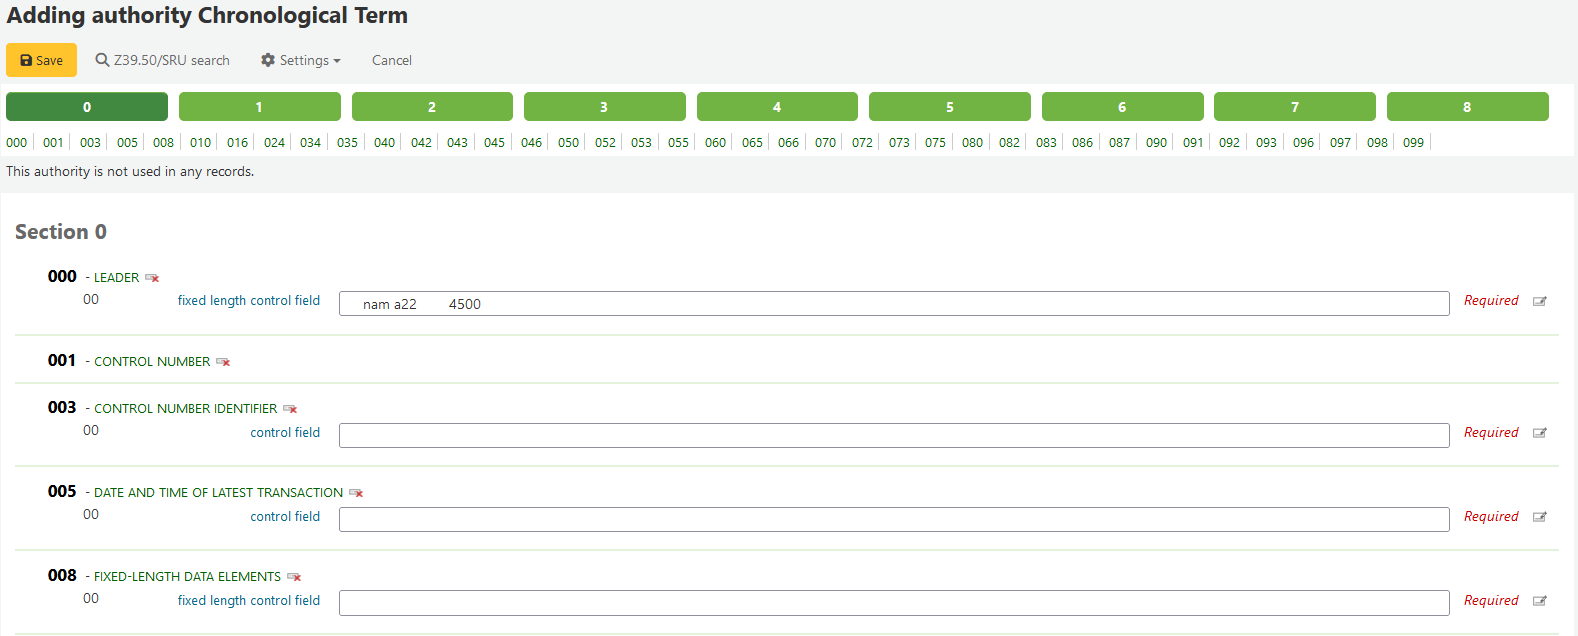
Nápověda ke katalogizaci listu bibliografického záznamu¶
| Tag | Label | Description | Instructions |
|---|---|---|---|
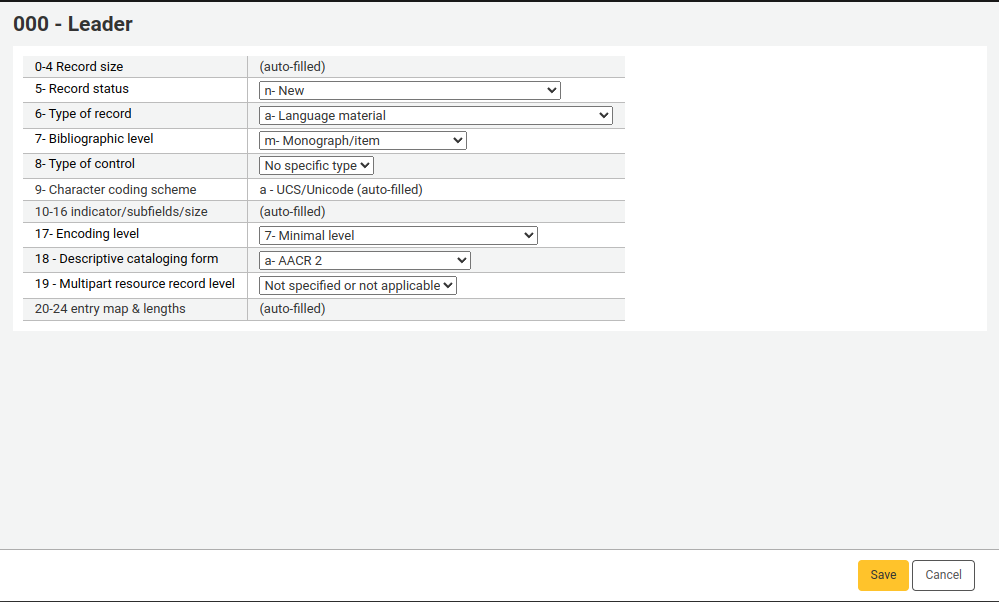
| 000 | LEADER | Describes the record(i.e. surrogate) – is it a record for a monograph? A serial? | Click in this field to fill it in. Then set „Bibliographic level“ to ‚a‘ for articles or ‚s‘ for serials. Otherwise, leave everything as is. |
| 001 | CONTROL NUMBER | Accession number. | Enter the accession number written inside the item here. For articles and items which do not have accession numbers, leave blank. |
| 003 | CONTROL NUMBER IDENTIFIER | Your MARC Organizational Code | Click in this field to fill it in (will auto fill if you have your MARCOrgCode preference set). |
| 005 | D & T LATEST TRANSACTION | Current date and time. | Click in this field to fill it in. |
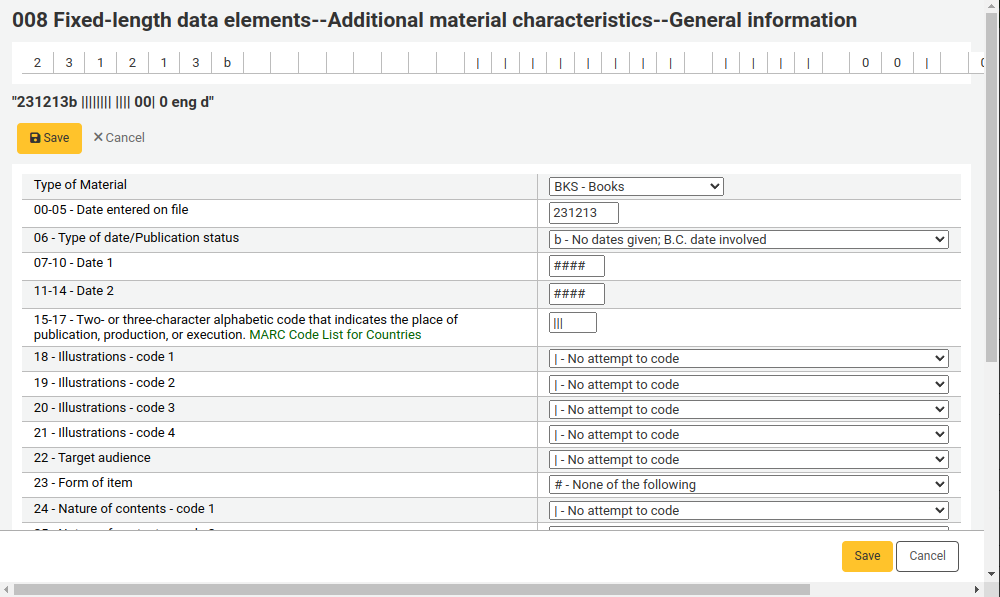
| 008 | FIXED-LENGTH DATA ELEMENTS | Field containing computer-readable representations of a number of things. | Generally you will only use ‚s‘ (single) or ‚m‘ (multiple) options for position 06- use the former when the item was published in a single year, the latter when it was published over the course of several. If there is a single date, only enter a date in the first date field (positions 07-10). Enter the three-digit country code in positions 15-17, being sure to add spaces if the country code is fewer than three characters long. If there is an index, note that fact in position 31. Enter the three-letter language code in positions 35-37. |
| 010 | LCCN | A number assigned by the Library of Congress to uniquely identify the work. | Check on the copyright page of the book (if it was published in the US) or the LC catalog for this number. If you can’t find it, don’t worry about it. |
| 020 | ISBN | Unique number used by publishers to identify books. | If this number isn’t listed on the book, there probably isn’t one. |
| 022 | ISSN | Unique number used by publishers to identify serials. | If this number isn’t listed on the book, there probably isn’t one. |
| 033 | DATE/TIME OF EVENT | Used for auction dates. Required for auction catalogs. | For auctions that took place on only one day, enter the date of the auction in the format YYYYMMDD in the subfield ‚a‘ and a ‚0‘ in the first indicator. For auctions that took place over two consecutive days or any number of non-consecutive days, create a subfield ‚a‘ for each day with the date in the format YYYYMMDD, and put a ‚1‘ in the first indicator. For auctions that took place over more than two consecutive days, create a subfield ‚a‘ (in format YYYYMMDD) for the first day and a subfield ‚a‘ (also in format YYYYMMDD) for the last day, and put a ‚2‘ in the first indicator. |
| 040 | CATALOGING SOURCE | Identifies which libraries created and modified the record. | For imported records, add a subfield ‚d‘ with your OCLC code as the value. For new records, make sure that the subfield ‚c‘ with your OCLC code as the value. |
| 041 | LANGUAGE CODE | Identifies all the languages used in an item, when two or more languages are present. | For significant portions of a text in a given language, there should be a subfield ‚a‘ with that language code. If there are only summaries or abstracts in a specific language, create a subfield ‚b‘ with that language code. |
| 100 | MAIN ENTRY–PERSONAL | Authorized form of the main author’s name | See Authorized headings sheet and AACR2. The first indicator should generally be a ‚1‘, to indicate that the entry is surname first. If the name consists only of a forename, however, the first indicator should be ‚0‘. |
| 110 | MAIN ENTRY–CORPORATE | Authorized form of the name of the main corporate author. Required for auction catalogs. | Auction catalogs should use a 110 field rather than a 100 field. See Authorized headings sheet and AACR2. Set the first indicator to ‚2‘. |
| 111 | MAIN ENTRY–MEETING | Authorized form of the name of a meeting which acted as a main offer (e.g. conference proceedings) | See Authorized headings sheet and AACR2. Set the first indicator to ‚2‘. |
| 245 | TITLE STATEMENT | Transcription of the title statement from the title page (or chief source of information) | Enter the title in subfield ‚a‘, the subtitle in subfield ‚b‘, and the statement of responsibility in subfield ‚c‘. If you are creating a record for a single volume or part of a multi-part item, you should put the part number in subfield ‚n‘ and the part title in subfield ‚p.‘ For auction catalogs, the date (in ‚MM/DD/YYYY‘ format) should be listed in square brackets in subfield ‚f‘. See ISBD punctuation sheet. Set the first indicator to ‚0‘ if there is no author, otherwise set it to ‚1‘. Set the second indicator to the number of non-filing characters (i.e. characters in an initial articles plus the space… for „The “ set the second indicator to ‚4‘). |
| 246 | VARYING FORM OF TITLE | Alternate form of title for searching and filing purposes | If the patron might look for the work under a different title, enter it here. Do not include initial articles. The first indicator should be ‚3‘, unless the title is merely a variant spelling, in which case the first indicator should be ‚1‘. |
| 250 | EDITION STATEMENT | Transcription of the edition statement from the title page (or chief source of information) | Transcribe the edition statement exactly as it appears on the title-page. You may abbreviate if the edition statement is very long. |
| 260 | PUBLICATION (IMPRINT) | Publication information. | Put the location of publication in subfield ‚a‘, the publisher in subfield ‚b‘, and the year (or probable year) in subfield ‚c‘. See ISBD punctuation sheet. |
| 300 | PHYSICAL DESCRIPTION | Physical description | Enter the pagination statement in subfield ‚a‘, a brief description of „special“ contents such as illustrations or maps in subfield ‚b‘ (see AACR2), and the size of the item in subfield ‚c‘. See ISBD punctuation sheet. |
| 490 | SERIES STATEMENT | Shows the series statement exactly as it appears on the item. | Transcribe the series statement into subfield ‚a‘ with the volume number in subfield ‚v‘. See ISBD punctuation sheet. Set the first indicator to ‚1‘ if you are using an 830. As a general rule, you should do so. |
| 500 | GENERAL NOTE | Notes that don’t fit anywhere else. | Enter notes as full sentences, with a separate 500 field for each distinct topic. |
| 501 | WITH NOTE | Notes whether the work is bound with the works described by other records. | Put description of relationship in subfield ‚a‘. |
| 504 | BIBLIOGRAPHY, ETC. NOTE | Indicates whether the work includes a bibliography. | If the work includes a bibliography and index, put the text „Includes bibliographical references (p. XXX-XXX) and index.“ in subfield ‚a‘. If the work does not include an index, remove that part of the sentence. If the references are scattered throughout the work and not gathered into a distinct sentence, remove the parenthetical statement. |
| 505 | FORMATTED CONTENTS | List of contents in a standard format. Unformatted contents can be listed in a 500 (General Note) field. | See ISBD punctuation sheet. Set the first indicator to ‚0‘. If you are separately coding authors and titles, set the second indicator to ‚0‘. Otherwise, leave the second indicator blank. |
| 518 | DATE/TIME OF EVENT NOTE | Used for auction dates. | For auction catalogs, enter the date of the auction in the format ‚January 2, 1984‘ in the subfield ‚a‘ |
| 520 | SUMMARY, ETC. | A brief summary or abstract of the book or article. | In general you do not need to write a summary. A summary might be called for, however, with items that cannot be easily reviewed by a patron, such as books with highly acidic paper or CD-ROMs. |
| 546 | LANGUAGE NOTE | Note describing the languages used in the work | Only needed for works in multiple languages. See ISBD punctuation sheet. |
| 561 | PROVENANCE INFORMATION | Describes the previous ownership of the item. | Used only for rare books. |
| 563 | BINDING INFORMATION | Describes the binding of the item. | Used only for rare books. |
| 590 | LOCAL NOTE | Local notes. Required for auction catalogs. | Used for auction catalogs to indicate what types of coins are sold in the auction- Roman, Greek, etc. |
| 600 | SUBJECT ADDED–PERSONAL | Authorized form of personal names for people discussed in the work | See Authorized headings sheet and AACR2. The first indicator should generally be a ‚1‘, to indicate that the entry is surname first. If the name consists only of a forename, however, the first indicator should be ‚0‘. If you found the name in the LC authority file, set the second indicator to ‚0‘. Otherwise set the second indicator to ‚4‘. |
| 610 | SUBJECT ADDED–CORPORATE | Authorized form of corporate names for organizations discussed in the work | See Authorized headings sheet and AACR2. Set the first indicator to ‚2‘. If you found the name in the LC authority file, set the second indicator to ‚0‘. Otherwise set the second indicator to ‚4‘. |
| 611 | SUBJECT ADDED–MEETING | Authorized form of meeting names for meetings discussed in the work | See Authorized headings sheet and AACR2. Set the first indicator to ‚2‘. If you found the name in the LC authority file, set the second indicator to ‚0‘. Otherwise set the second indicator to ‚4‘. |
| 630 | SUBJECT ADDED–UNIFORM TITLE | Authorized form of titles for other works discussed in the work | See Authorized headings sheet and AACR2. Set the first indicator to the number of non-filing characters (i.e. characters in an initial articles plus the space… for „The “ set the first indicator to ‚4‘). If you found the name in the LC authority file, set the second indicator to ‚0‘. Otherwise set the second indicator to ‚4‘. |
| 650 | SUBJECT ADDED–TOPICAL | Library of Congress Subject Heading terms describing the subject of the work | See Authorized headings sheet and AACR2. If you found the name in the LC authority file, set the second indicator to ‚0‘. Otherwise set the second indicator to ‚4‘. |
| 651 | SUBJECT ADDED–GEOGRAPHICAL | Library of Congress Subject Heading geographical terms describing the subject of the work | See Authorized headings sheet and AACR2. If you found the name in the LC authority file, set the second indicator to ‚0‘. Otherwise set the second indicator to ‚4‘. |
| 655 | INDEX TERM–GENRE/FORM | Describes what an item is as opposed to what the item is about. | Generally used only for auction catalogs, which should have the genre heading „Auction catalogs.“ (make sure to find the authorized heading!) If you found the name in the LC authority file, set the second indicator to ‚0‘. If you are using a term from a specific thesaurus, set the second indicator to ‚7‘ and put the code for the thesaurus in subfield ‚2‘. Otherwise set the second indicator to ‚4‘. |
| 690 | LOCAL SUBJECT ADDED–TOPICAL | Used for headings from any custom subject authority file. | If there is no appropriate LCSH term, you can use a 690 with subject headings you find on other items in the catalog. |
| 691 | LOCAL SUBJECT ADDED–GEOGRAPHICAL | Used for headings from any custom subject authority file. | If there is no appropriate LCSH term, you can use a 691 with subject headings you find on other items in the catalog. |
| 700 | ADDED ENTRY–PERSONAL | Used for second authors and other persons related to the production of the work. | See Authorized headings sheet and AACR2. The first indicator should generally be a ‚1‘, to indicate that the entry is surname first. If the name consists only of a forename, however, the first indicator should be ‚0‘. |
| 710 | ADDED ENTRY–CORPORATE | Used for corporate bodies related to the production of the work (e.g. publishers). | See Authorized headings sheet and AACR2. Set the first indicator to ‚2‘. |
| 711 | ADDED ENTRY–MEETING | Used for meetings related to the production of the work (e.g. symposia that contributed to the work). | See Authorized headings sheet and AACR2. Set the first indicator to ‚2‘. |
| 730 | ADDED ENTRY–UNIFORM TITLE | Used for uniform titles related to the production of the work (e.g. a work that inspired the present work) | See Authorized headings sheet and AACR2. Set the first indicator to the number of non-filing characters (i.e. characters in an initial articles plus the space… for „The “ set the first indicator to ‚4‘). |
| 773 | HOST ITEM ENTRY | Describes the larger bibliographic unit that contains the work (e.g. book or journal containing the article being described in the current record) | If the host publication is author main entry, enter the authorized form of the author’s name in subfield ‚a‘. Put the title in subfield ‚t‘. If the host publication is an independent work, put publication information in subfield ‚d‘. When available, ISSN and ISBN should always be used in, in subfields ‚x‘ and ‚z‘ respectively. Relationship information (e.g. volume number, page number, etc.) goes in subfield ‚g‘. Subfield ‚q‘ contains an encoded representation of the location of the item: volume, issue, and section numbers are separated by colons, and the first page is entered following a ‚<‘ at the end of the subfield. See ISBD punctuation sheet. Set the first indicator to ‚0‘. If you want the label „In:“ to be generated, leave the second indicator blank. If you want something else displayed before the 773 text, set the second indicator to ‚8‘ and add a subfield ‚i‘ with the label you want at the beginning of the field (e.g. „$iOffprint from:“). |
| 830 | SERIES ENTRY–UNIFORM TITLE | Authorized form of the series name transcribed in the 490 field. Often this will just be the same as the 490. | See Authorized headings sheet and AACR2. Set the second indicator to the number of non-filing characters (i.e. characters in an initial articles plus the space… for „The “ set the second indicator to ‚4‘). |
| 852 | LOCATION/CALL NUMBER | Provides the section name for pre-barcode books, pamphlets, and some articles and serials. | Do not put anything in this field if you are cataloging a volume which gets only one record and a barcode. If the item does not get a barcode, or you are currently creating a record for an article in a volume, put the section in subfield ‚a‘ (see ANS cataloging documentation), and the call number in subfield ‚i‘. Set the first indicator to ‚8‘. |
| 856 | ELECTRONIC ACCESS | Links to material available online. | Put the URL of any electronic copies or summaries, etc. in subfield ‚u‘ and a link title in subfield ‚y‘. Set the first indicator to ‚4‘. |
| 942 | ADDED ENTRY ELEMENTS (KOHA) | Used for Koha-specific data. | Set the subfield ‚c‘ to the appropriate item type. |
Table: Cataloging Guide
Návod na katalogizaci jednotek/exemplářů¶
Tato tabulka představuje výchozí uložené údaje o jednotkách/exemplářích v Koha. Tyto informace mohou být použity pro účely migrace nebo importu dat
| MARC21 Tag/subfield | Data Element | Description | Notes |
|---|---|---|---|
| 952$0 | Withdrawn status | Default values:
|
Coded value, matching Authorized Value category (‚WITHDRAWN‘ in default installation) |
| 952$1 | Lost status | Default values:
|
It’s possible to configure OPAC so that lost items don’t display with the hidelostitems system preference. Coded value, matching Authorized Value category (‚LOST‘ in default installation) |
| 952$2 | Classification | Classification scheme that defines filing rules used for sorting call numbers. | A choice of classification sources as they are defined in administration. If no classification scheme is entered, the system will use the value entered in the DefaultClassificationSource preference. |
| 952$3 | Materials specified | Specific issues of serials or multi-part items. | Displayed when items are checked out and in to tell the staff how many pieces the item has. Copy/volume data is stored in 952$h and $t for display in Normal views. |
| 952$4 | Damaged status | Default values:
|
Coded value, matching Authorized Value category (‚DAMAGE‘ in default installation) |
| 952$5 | Use restrictions | Default values:
|
Coded value, matching Authorized Value category (‚RESTRICT‘ in default installation). This value has no effect on circulation. |
| 952$7 | Not for loan | Default values:
|
Coded value, matching Authorized Value category (‚NOT_LOAN‘ in default installation). Negative number values can still be placed on hold. |
| 952$8 | Collection code | Coded value | Coded value, matching Authorized Value category (‚CCODE‘ in default installation) |
| 952$9 | Item number | System-generated item number. | Does not display in the item record. |
| 952$a | Owning Library ** | Branch code | Required. Code must be defined in Libraries, Branches and Groups |
| 952$b | Holding library ** (usually the same as 952$a ) | Branch code | Required. Code must be defined in Libraries, Branches and Groups |
| 952$c | Shelving location code | Coded value, matching Authorized Value category (‚LOC‘ in default installation) | |
| 952$d | Date acquired | YYYY-MM-DD | Date formats in the 952 subfields are required to be in the system internal format for data loading and subsequent item editing: YYYY-MM-DD |
| 952$e | Source of acquisition | Coded value or vendor string | Filled in automatically with the Koha assigned vendor id by Acquisitions when an item is received. |
| 952$g | Purchase price | Decimal number, no currency symbol (ex. 10.00) | Filled in automatically by Acquisitions when an item is received. |
| 952$h | Serial enumeration | Filled in automatically by Serials if the issue is received there. | |
| 952$o | Koha full call number | Can be filled in automatically based on the itemcallnumber system preference. | |
| 952$p | Barcode * | Max 20 characters | |
| 952$t | Copy number | Max 32 characters | |
| 952$u | Uniform Resource Identifier | Item specific URL | Full URL starting with http:// Only needed if your item has its own URL, not necessary if the bib record has a 856$u that applies to all items on the record. |
| 952$v | Replacement price | Decimal number, no currency symbol (ex. 10.00) | Filled in automatically by Acquisitions when an item is received. |
| 952$w | Price effective from | YYYY-MM-DD | Date formats in the 952 subfields are required to be in the system internal format for data loading and subsequent item editing: YYYY-MM-DD. Filled in automatically by Acquisitions when an item is received. |
| 952$x | Nonpublic note | This is a note field for notes that will not appear in the OPAC. Right now this note does not appear anywhere but in the item edit screen in the staff client. | |
| 952$y | Koha item type ** | Coded value, required field for circulation | Required. Coded value, must be defined in Item types |
| 952$z | Public note |
Table: Koha Embedded Holdings Data
* - required for circulation
** - required by Koha
Správa objednávek jednotek a rezervací¶
If you tend to import your MARC records when you have ordered the book (as opposed to when you receive the books), and allow patrons to place holds on those books, you may need to add item records to the *.mrc file before importing.
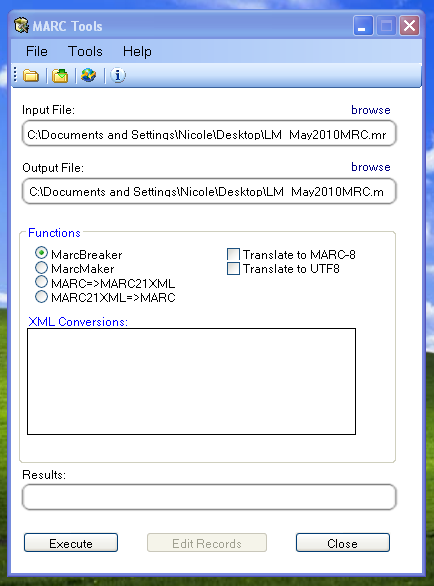
The easiest way to import your latest order is to first run your records through MARCEdit. Download your MARC records, saving them to your desktop or some other location you use/will remember. If you have MARCEdit already installed you should simply have to double click on your MARC records, and they will automatically open in MARCEdit.
Important
Tento návod byl napsán s MARCEditem verze 5.2.3769.41641 v systému Windows XP; pokyny mohou být odlišné, pokud vaše verze MARCEditu nebo operační systém je jiná.
Váše původní soubor bude automaticky vstupem a zajistěte aby byl vybrán MarcBreaker, a poté klepněte na tlačítko „Execute“
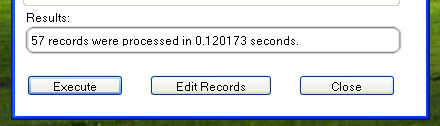
V dolní části obrazovky vám bude zobrazen přehled zpracovávaných záznamů
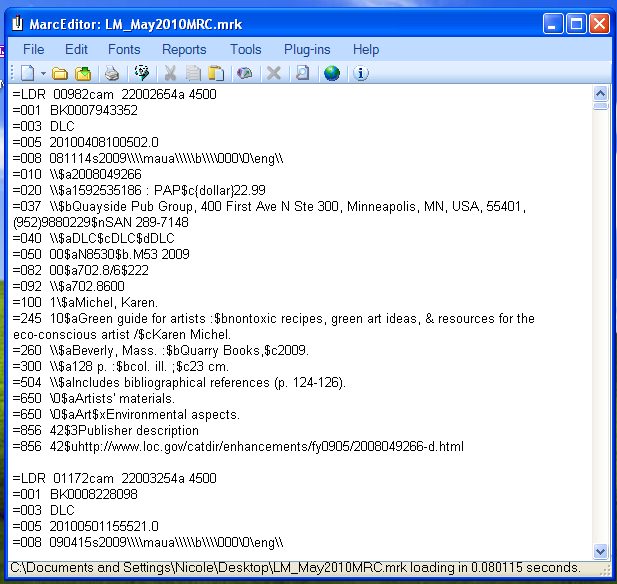
Klikněte na „Úprava záznamů“ pro pokračování v přidání záznamů jednotek
Obrazovka bude nahrazena větší obrazovkou obsahující záznamy MARC
Click on Tools > Add/Edit Field

Vložte do Koha specifickou informaci o jednotce
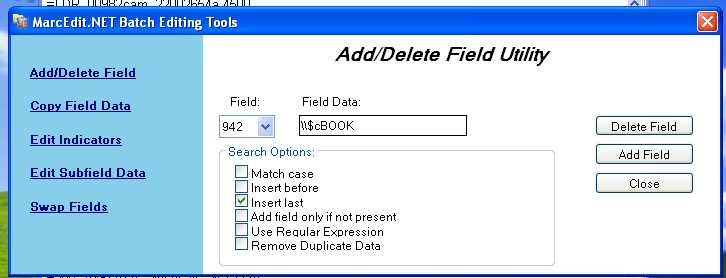
- Do pole zadejte 942
- In the Field Data box, type \$c and the item type code (\$cBOOK in this example)
- Zaškrtněte volbu „Vložit poslední“
- Klikněte na „Přidat pole“
Vložte do záznamu jednotky data
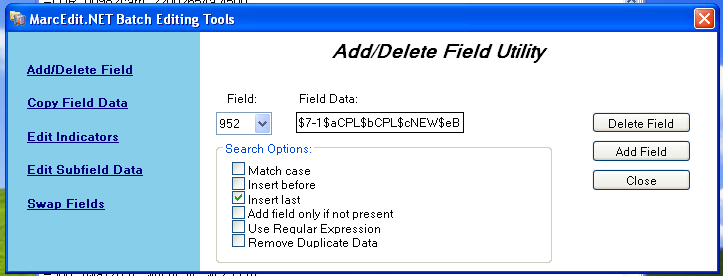
- Do políčka Field napište 952
- In the Field Data box, type
$7ORDERED_STATUS$aPERM_LOC$bCURR_LOC$cSHELVING_LOCATION$eSOURCE_OF_ACQ$yITEM_TYPE
- např. $7-1$aCPL$bCPL$cNEW$eBrodart$yBOOK
- Ve výchozí instalaci systému Koha hodnota statusu Objednáno je -1
- Možná se budete chtít podívat na jiné podpole, které byste chtěli doplnit - například změna kódu sbírky pro všechny jednotky ve stejné sbírce (8), automaticky vyplnit datum akvizice (d), nebo zapsat veřejnou poznámku (z).
- Ujistěte se, že používáte $ na oddělování podpolí; přidání každého podpole na samostatném řádku způsobí, že mnoho položek musí být importováno s MARC záznamem (ve výše uvedeném příkladu, čtyři jednotky, z nichž každá má jedno z těchto podpolí opravené)
- Make sure you look at the Administration > Authorized Values in Koha to put the correct code into the field
- např. $7-1$aCPL$bCPL$cNEW$eBrodart$yBOOK
- Zaškrtněte volbu „Vložit poslední“
- Klikněte na „Přidat pole“
Zavřete okno editoru polí
Click on File > Compile into MARC
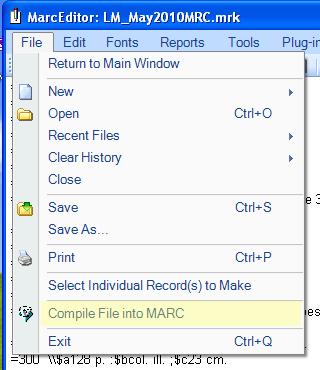
Vyberte kam uložíte váš soubor
Now you want to go into your Koha system and follow the instructions for importing MARC records.
Jakmile přijde jednotka, budete muset jít do záznamu jednotky a individuálně změnit jednotku, aby měla správný čárový kód, a ručně změnit stav z Objednáno na prázdný řádek v poli Ne pro výpůjčku.
Note
Zakoupíte-li si katalogizované záznamy, můžete požádat vašeho dodavatele, aby dodal informace, které potřebujete do MARC záznamů, abyste tak mohli importovat záznamy upravené od dodavatele a přepsat aktuální záznam a automaticky nahradit data tím, co potřebujete.