خدمات الويب
OAI-PMH
For the Open Archives Initiative-Protocol for Metadata Harvesting (OAI-PMH) there are two groups of 'participants': Data Providers and Service Providers. Data Providers (open archives, repositories) provide free access to metadata, and may, but do not necessarily, offer free access to full texts or other resources. OAI-PMH provides an easy to implement, low barrier solution for Data Providers. Service Providers use the OAI interfaces of the Data Providers to harvest and store metadata. Note that this means that there are no live search requests to the Data Providers; rather, services are based on the harvested data via OAI-PMH.
Koha at present can only act as a Data Provider. It can not harvest from other repositories. The biggest stumbling block to having Koha harvest from other repositories is that MARC is the only metadata format that Koha indexes natively. Visit http://www.oaforum.org/tutorial/english/page3.htm for diagrams of how OAI-PMH works.
Learn more about OAI-PMH at: http://www.openarchives.org/pmh/
To enable OAI-PMH in Koha edit the OAI-PMH preference. Once enabled you can visit http://YOURKOHACATALOG/cgi-bin/koha/oai.pl to see your file.
عينة الملف OAI Conf
       format:
         vs:
           metadataPrefix: vs
           metadataNamespace: http://veryspecial.tamil.fr/vs/format-pivot/1.1/vs
           schema: http://veryspecial.tamil.fr/vs/format-pivot/1.1/vs.xsd
           xsl_file: /usr/local/koha/xslt/vs.xsl
         marcxml:
           metadataPrefix: marxml
           metadataNamespace: http://www.loc.gov/MARC21/slim
http://www.loc.gov/standards/marcxml/schema/MARC21slim
           schema: http://www.loc.gov/MARC21/slim
http://www.loc.gov/standards/marcxml/schema/MARC21slim.xsd
         oai_dc:
           metadataPrefix: oai_dc
           metadataNamespace: http://www.openarchives.org/OAI/2.0/oai_dc/
           schema: http://www.openarchives.org/OAI/2.0/oai_dc.xsd
           xsl_file:
/usr/local/koha/koha-tmpl/intranet-tmpl/xslt/UNIMARCslim2OAIDC.xsl
REST services
Koha can now be requested by REST http requests. BibLibre wrotes an external module to adds more possibilities than ILS-DI can provide.There is no authentication process, but authorized ips are listed in the config file. Services have been tested in 3.10, 3.12 and 3.14 koha versions. You can find more information about it into README file and opac/rest.pl documentation on http://git.biblibre.com. If you want to add features, send us a patch at dev_patches AT biblibre DOT com.
Services provided in 1.4 version are:
GET branches
GET user/byid/:borrowernumber/holds
GET user/:user_name/holds
GET user/byid/:borrowernumber/issues
GET user/:user_name/issues
GET user/:user_name/issues_history
GET user/byid/:borrowernumber/issues_history
GET user/today
GET user/all
POST user
PUT user/:user_name
GET biblio/:biblionumber/items
GET biblio/:biblionumber/holdable
GET biblio/:biblionumber/items_holdable_status
GET item/:itemnumber/holdable
PUT auth/change_password
GET /suggestions
GET /suggestions/:suggestionid
POST /suggestions
PUT /suggestions/:suggestionid
DELETE /suggestions/:suggestionid
إستخدام مخدم SRU
إستخدام مخدم SRU
Koha implements the Search/Retrieve via URL (SRU) protocol. More information about the protocol itself can be found at http://www.loc.gov/standards/sru/. The version implemented is version 1.1.
التوضيح
If you want to have information about the implementation of SRU on a given server, you should have access to the Explain file using a request to the server without any parameter. Like <http://myserver.com:9999/biblios/>. The response from the server is an XML file that should look like the following and will give you information about the default settings of the SRU server.
       <zs:explainResponse>
            <zs:version>1.1</zs:version>
            <zs:record>
                 <zs:recordSchema>http://explain.z3950.org/dtd/2.0/</zs:recordSchema>
                 <zs:recordPacking>xml</zs:recordPacking>
                 <zs:recordData>
                 <explain xml:base="zebradb/explain-biblios.xml">
                 <!--
                 try stylesheet url: http://./?stylesheet=docpath/sru2.xsl
                 -->
            <serverInfo protocol="SRW/SRU/Z39.50">
                 <host>biblibre</host>
                 <port>9999</port>
                 <database>biblios</database>
            </serverInfo>
            <databaseInfo>
                 <title lang="en" primary="true">Koha 3 Bibliographic SRU/SRW/Z39.50 server</title>
                 <description lang="en" primary="true">Koha 3 Bibliographic Server</description>
                 <links>
                      <sru>http://biblibre:9999</sru>
                 </links>
            </databaseInfo>
            <indexInfo>
                 <set name="cql" identifier="info:srw/cql-context-set/1/cql-v1.1">
                      <title>CQL Standard Set</title>
                 </set>
                 <index search="true" scan="true" sort="false">
                 <title lang="en">CQL Server Choice</title>
                 <map>
                      <name set="cql">serverChoice</name>
                 </map>
            <map>
               <attr type="1" set="bib1">text</attr>
               </map>
          </index>
      <index search="true" scan="true" sort="false">
         <title lang="en">CQL All</title>
             <map>
<name set="cql">all</name>
</map>
<map>
<attr type="1" set="bib1">text</attr>
</map>
</index>
<!-- Record ID index -->
<index search="true" scan="true" sort="false">
<title lang="en">Record ID</title>
<map>
<name set="rec">id</name>
</map>
<map>
<attr type="1" set="bib1">rec:id</attr>
<attr type="4" set="bib1">3</attr>
</map>
</index>
البحث
This url : http://myserver.com:9999/biblios?version=1.1&operation=searchRetrieve&query=reefs is composed of the following elements:
- عنوان الرابط الأساسي لمخدم SRU هو : http://myserver.com:9999/biblios?
- search part with the 3 required parameters : version, operation and query. The parameters within the search part should be of the key=value form, and can be combined with the & character.
One can add optional parameters to the query, for instance maximumRecords indicating the maximum number of records to be returned by the server. So http://myserver.com:9999/biblios?version=1.1&operation=searchRetrieve&query=reefs&maximumRecords=5 will only get the first 5 results results from the server.
http://www.loc.gov/standards/sru/sru1-1archive/search-retrieve-operation.html gives more details about the search operations and in particular the list of optional parameters for searching.
مزيد من التفاصيل حول البحث
يمكن لمفتاح "العمليات" أن يتخذ قيمتين: فحص أو searchRetrieve.
If operation=searchRetrieve, then the search key should be query. As in : operation=searchRetrieve&query=reefs
If operation=scan, then the search key should be scanClause. As in : operation=scan&scanClause=reefs
etc/zebradb/biblios/etc/bib1. يحدد Zebra/3950 الفهارس الموجودة على النظام الخاص بك. على سبيل المثال سترى أن لدينا فهارس عن الموضوع والعنوان: 21 ATT الموضوع والعنوان ATT 4 على التوالي.
In the pqf.properties file located under etc/zebradb/pqf.properties I see that an access point already uses my Subject index (index.dc.subject = 1=21) while another uses my Title index (index.dc.title = 1=4) I know this is my Subject index because as I've seen just before in my bib1.att file, it's called with =1=21 in Z3950: so index.dc.subject = 1=21 correctly points to my Subject index. And Title was called with 1=4 so index.dc.title = 1=4 correctly points to my Title index. I can now construct my query just like I would in a search box, just preceding it with the "query" key: query=Subject=reefs and Title=coral searches "reefs" in the subject and "coral" in the title. The full url would be http://myserver.com:9999/biblios?version=1.1&operation=searchRetrieve&query=Subject=reefs and Title=coral If I want to limit the result set to just 5 records, I can do http://myserver.com:9999/biblios?version=1.1&operation=searchRetrieve&query=Subject=reefs and Title=coral&maximumRecords=5
أنا يمكن أن أوؤدية مع إقتطاع, العلاقة, وما الى ذلك. هذه يمكن أن تحدد الملف pqf.properties الخاص بي. يمكنني ان أرى على سبيل المثال خصائص الوضع كما هومحدد.
 position.first              = 3=1 6=1
# "first in field"
 position.any                = 3=3 6=1
   # "any position in field"
So as an example if I want "coral" to be at the beginning of the title, I can do this query : http://myserver.com:9999/biblios?version=1.1&operation=searchRetrieve&query=Title=coral first
الإسترجاع
My search for http://univ_lyon3.biblibre.com:9999/biblios?version=1.1&operation=searchRetrieve&query=coral reefs&maximumRecords=1 retrieves just on record. The response looks like this:
          <zs:searchRetrieveResponse>
<zs:version>1.1</zs:version>
<zs:numberOfRecords>1</zs:numberOfRecords>
<zs:records>
<zs:record>
<zs:recordPacking>xml</zs:recordPacking>
<zs:recordData>
<record xsi:schemaLocation="http://www.loc.gov/MARC21/slim http://www.loc.gov/ standards/marcxml/schema/MARC21slim.xsd">
<leader> cam a22 4500</leader>
<datafield tag="010" ind1=" " ind2=" ">
<subfield code="a">2-603-01193-6</subfield>
<subfield code="b">rel.</subfield>
<subfield code="d">159 F</subfield>
</datafield>
<datafield tag="020" ind1=" " ind2=" ">
<subfield code="a">FR</subfield>
<subfield code="b">00065351</subfield>
</datafield>
<datafield tag="101" ind1="1" ind2=" ">
<subfield code="c">ita</subfield>
</datafield>
<datafield tag="105" ind1=" " ind2=" ">
<subfield code="a">a z 00|y|</subfield>
</datafield>
<datafield tag="106" ind1=" " ind2=" ">
<subfield code="a">r</subfield>
</datafield>
<datafield tag="100" ind1=" " ind2=" ">
<subfield code="a">20091130 frey50 </subfield>
</datafield>
<datafield tag="200" ind1="1" ind2=" ">
<subfield code="a">Guide des récifs coralliens / A Guide to Coral Reefs</subfield>
<subfield code="b">Texte imprimé</subfield>
<subfield code="e">la faune sous-marine des coraux</subfield>
<subfield code="f">A. et A. Ferrari</subfield>
</datafield>
<datafield tag="210" ind1=" " ind2=" ">
<subfield code="a">Lausanne</subfield>
<subfield code="a">Paris</subfield>
<subfield code="c">Delachaux et Niestlé</subfield>
<subfield code="d">cop. 2000</subfield>
<subfield code="e">impr. en Espagne</subfield>
</datafield>
<datafield tag="215" ind1=" " ind2=" ">
<subfield code="a">287 p.</subfield>
<subfield code="c">ill. en coul., couv. ill. en coul.</subfield>
<subfield code="d">20 cm</subfield>
</datafield>
......
<idzebra>
<size>4725</size>
<localnumber>2</localnumber>
<filename>/tmp/nw10BJv9Pk/upd_biblio/exported_records</filename>
</idzebra>
</record>
</zs:recordData>
<zs:recordPosition>1</zs:recordPosition>
</zs:record>
</zs:records>
</zs:searchRetrieveResponse>
New titles slider for OPAC
Often times libraries will want to add a flowing widget with new materials at the library to their main public catalog page. To do this you can use a widget from any number of services (usually for a cost) or you can enable plugins in Koha and use the Cover Flow plugin which is based on the Flipster, a responsive jQuery coverflow plugin.
Once the plugin is installed, the steps to get your coverflow to show up are as follows:
First, you need to create one or more public reports for your coverflow widget or widgets to be based on. This is how the plugin knows what the content of your widget should contain. Each report needs only three columns; title, biblionumber, and isbn. It is important that you have a good and valid isbn, as that is the datum used to actually fetch the cover. In the iteration of the plugin, we are using Amazon cover images, but I believe in the end I will make the cover image fetcher configurable so we can use any data source for cover image fetching.
Second, we need to configure the plugin. The plugin configuration is a single text area that uses YAML ( actually, it’s JSON, whcih is a subset of YAML ) to store the configuration options. In this example it looks like this:
- id: 42
  selector: #coverflow
  options:
  style: coverflow
In this example, we are telling the plugin to use the report with id 42, and use it to create a coverflow widget to replace the HTML element with the id “coverflow”. The options list is passed directly to Flipster, so any options supported by Flipster can be set from the plugin configuration! In fact, in addition to the traditional coverflow, Flipster has a “carousel” mode which is a much more compact version of the coverflow. You can also configure which cover the widget will start on, among other options.
At the time the plugins options are saved or updated, the plugin will then generate some minified JavaScript code that is automatically stored in the Koha system preference OPACUserJS. Here is an example of the output:
/* JS for Koha CoverFlow Plugin
 This JS was added automatically by installing the CoverFlow plugin
 Please do not modify */$(document).ready(function(){$.getScript("/plugin/Koha/Plugin/Com/ByWaterSolutions/CoverFlow/jquery-flipster/src/js/jquery.flipster.min.js",function(data,textStatus,jqxhr){$("head").append("<link id='flipster-css' href='/plugin/Koha/Plugin/Com/ByWaterSolutions/CoverFlow/jquery-flipster/src/css/jquery.flipster.min.css' type='text/css' rel='stylesheet' />");$('#coverflow').load("/coverflow.pl?id=42",function(){var opt={'items':'.item','minfactor':15,'distribution':1.5,'scalethreshold':0,'staticbelowthreshold':false,'titleclass':'itemTitle','selectedclass':'selectedItem','scrollactive':true,'step':{'limit':4,'width':10,'scale':true}};$('#coverflow').flipster({style:'coverflow',});});});});
/* End of JS for Koha CoverFlow Plugin */
Why do this? For speed! Rather than regenerating this code each and every time the page loads, we can generate it once, and use it over and over again.
If you inspect the code closely, you’ll notice it references a script “coverflow.pl”. This is a script that is included with the coverflow plugin. Since we need to access this from the OPAC ( and we don’t want to set off any XSS attack alarms ), we need to modify the web server configuration for the public catalog and add the followup to it:
ScriptAlias /coverflow.pl "/var/lib/koha/mykoha/plugins/Koha/Plugin/Com/ByWaterSolutions/CoverFlow/coverflow.pl"
This line gives us access to the coverflow.pl script from the OPAC. This script retrieves the report data and passes it back to the public catalog for creating the coverflow widget. Koha::Cache is supported in order to make the widget load as quickly as possible!
The final step is to put your selector element somewhere in your public catalog. In this example, I put the following in the system preference OpacMainUserBlock:
<span id="coverflow">Loading...</span>
Once that is in place, you need only refresh your OPAC page, and there you have it, your very own catalog coverflow widget! Not only do these coverflows look great on a computer screen, but they look great on mobile platforms as well, and are even touch responsive!
تفضيلات النظام الأفتراضية
إفتراضيات ISBD
Default values for the ISBD preference.
إفتراضيات مارك
#100||{ 100a }{ 100b }{ 100c }{ 100d }{ 110a }{ 110b }{ 110c }{ 110d }{ 110e }{ 110f }{ 110g }{ 130a }{ 130d }{ 130f }{ 130g }{ 130h }{ 130k }{ 130l }{ 130m }{ 130n }{ 130o }{ 130p }{ 130r }{ 130s }{ 130t }|<br/><br/>
#245||{ 245a }{ 245b }{245f }{ 245g }{ 245k }{ 245n }{ 245p }{ 245s }{ 245h }|
#246||{ : 246i }{ 246a }{ 246b }{ 246f }{ 246g }{ 246n }{ 246p }{ 246h }|
#242||{ = 242a }{ 242b }{ 242n }{ 242p }{ 242h }|
#245||{ 245c }|
#242||{ = 242c }|
#250| - |{ 250a }{ 250b }|
#254|, |{ 254a }|
#255|, |{ 255a }{ 255b }{ 255c }{ 255d }{ 255e }{ 255f }{ 255g }|
#256|, |{ 256a }|
#257|, |{ 257a }|
#258|, |{ 258a }{ 258b }|
#260| - |{ 260a }{ 260b }{ 260c }|
#300| - |{ 300a }{ 300b }{ 300c }{ 300d }{ 300e }{ 300f }{ 300g }|
#306| - |{ 306a }|
#307| - |{ 307a }{ 307b }|
#310| - |{ 310a }{ 310b }|
#321| - |{ 321a }{ 321b }|
#340| - |{ 3403 }{ 340a }{ 340b }{ 340c }{ 340d }{ 340e }{ 340f }{ 340h }{ 340i }|
#342| - |{ 342a }{ 342b }{ 342c }{ 342d }{ 342e }{ 342f }{ 342g }{ 342h }{ 342i }{ 342j }{ 342k }{ 342l }{ 342m }{ 342n }{ 342o }{ 342p }{ 342q }{ 342r }{ 342s }{ 342t }{ 342u }{ 342v }{ 342w }|
#343| - |{ 343a }{ 343b }{ 343c }{ 343d }{ 343e }{ 343f }{ 343g }{ 343h }{ 343i }|
#351| - |{ 3513 }{ 351a }{ 351b }{ 351c }|
#352| - |{ 352a }{ 352b }{ 352c }{ 352d }{ 352e }{ 352f }{ 352g }{ 352i }{ 352q }|
#362| - |{ 362a }{ 351z }|
#440| - |{ 440a }{ 440n }{ 440p }{ 440v }{ 440x }|.
#490| - |{ 490a }{ 490v }{ 490x }|.
#800| - |{ 800a }{ 800b }{ 800c }{ 800d }{ 800e }{ 800f }{ 800g }{ 800h }{ 800j }{ 800k }{ 800l }{ 800m }{ 800n }{ 800o }{ 800p }{ 800q }{ 800r }{ 800s }{ 800t }{ 800u }{ 800v }|.
#810| - |{ 810a }{ 810b }{ 810c }{ 810d }{ 810e }{ 810f }{ 810g }{ 810h }{ 810k }{ 810l }{ 810m }{ 810n }{ 810o }{ 810p }{ 810r }{ 810s }{ 810t }{ 810u }{ 810v }|.
#811| - |{ 811a }{ 811c }{ 811d }{ 811e }{ 811f }{ 811g }{ 811h }{ 811k }{ 811l }{ 811n }{ 811p }{ 811q }{ 811s }{ 811t }{ 811u }{ 811v }|.
#830| - |{ 830a }{ 830d }{ 830f }{ 830g }{ 830h }{ 830k }{ 830l }{ 830m }{ 830n }{ 830o }{ 830p }{ 830r }{ 830s }{ 830t }{ 830v }|.
#500|<br/><br/>|{ 5003 }{ 500a }|
#501|<br/><br/>|{ 501a }|
#502|<br/><br/>|{ 502a }|
#504|<br/><br/>|{ 504a }|
#505|<br/><br/>|{ 505a }{ 505t }{ 505r }{ 505g }{ 505u }|
#506|<br/><br/>|{ 5063 }{ 506a }{ 506b }{ 506c }{ 506d }{ 506u }|
#507|<br/><br/>|{ 507a }{ 507b }|
#508|<br/><br/>|{ 508a }{ 508a }|
#510|<br/><br/>|{ 5103 }{ 510a }{ 510x }{ 510c }{ 510b }|
#511|<br/><br/>|{ 511a }|
#513|<br/><br/>|{ 513a }{513b }|
#514|<br/><br/>|{ 514z }{ 514a }{ 514b }{ 514c }{ 514d }{ 514e }{ 514f }{ 514g }{ 514h }{ 514i }{ 514j }{ 514k }{ 514m }{ 514u }|
#515|<br/><br/>|{ 515a }|
#516|<br/><br/>|{ 516a }|
#518|<br/><br/>|{ 5183 }{ 518a }|
#520|<br/><br/>|{ 5203 }{ 520a }{ 520b }{ 520u }|
#521|<br/><br/>|{ 5213 }{ 521a }{ 521b }|
#522|<br/><br/>|{ 522a }|
#524|<br/><br/>|{ 524a }|
#525|<br/><br/>|{ 525a }|
#526|<br/><br/>|{\n510i }{\n510a }{ 510b }{ 510c }{ 510d }{\n510x }|
#530|<br/><br/>|{\n5063 }{\n506a }{ 506b }{ 506c }{ 506d }{\n506u }|
#533|<br/><br/>|{\n5333 }{\n533a }{\n533b }{\n533c }{\n533d }{\n533e }{\n533f }{\n533m }{\n533n }|
#534|<br/><br/>|{\n533p }{\n533a }{\n533b }{\n533c }{\n533d }{\n533e }{\n533f }{\n533m }{\n533n }{\n533t }{\n533x }{\n533z }|
#535|<br/><br/>|{\n5353 }{\n535a }{\n535b }{\n535c }{\n535d }|
#538|<br/><br/>|{\n5383 }{\n538a }{\n538i }{\n538u }|
#540|<br/><br/>|{\n5403 }{\n540a }{ 540b }{ 540c }{ 540d }{\n520u }|
#544|<br/><br/>|{\n5443 }{\n544a }{\n544b }{\n544c }{\n544d }{\n544e }{\n544n }|
#545|<br/><br/>|{\n545a }{ 545b }{\n545u }|
#546|<br/><br/>|{\n5463 }{\n546a }{ 546b }|
#547|<br/><br/>|{\n547a }|
#550|<br/><br/>|{ 550a }|
#552|<br/><br/>|{ 552z }{ 552a }{ 552b }{ 552c }{ 552d }{ 552e }{ 552f }{ 552g }{ 552h }{ 552i }{ 552j }{ 552k }{ 552l }{ 552m }{ 552n }{ 562o }{ 552p }{ 552u }|
#555|<br/><br/>|{ 5553 }{ 555a }{ 555b }{ 555c }{ 555d }{ 555u }|
#556|<br/><br/>|{ 556a }{ 506z }|
#563|<br/><br/>|{ 5633 }{ 563a }{ 563u }|
#565|<br/><br/>|{ 5653 }{ 565a }{ 565b }{ 565c }{ 565d }{ 565e }|
#567|<br/><br/>|{ 567a }|
#580|<br/><br/>|{ 580a }|
#581|<br/><br/>|{ 5633 }{ 581a }{ 581z }|
#584|<br/><br/>|{ 5843 }{ 584a }{ 584b }|
#585|<br/><br/>|{ 5853 }{ 585a }|
#586|<br/><br/>|{ 5863 }{ 586a }|
#020|<br/><br/><label>ISBN: </label>|{ 020a }{ 020c }|
#022|<br/><br/><label>ISSN: </label>|{ 022a }|
#222| = |{ 222a }{ 222b }|
#210| = |{ 210a }{ 210b }|
#024|<br/><br/><label>Standard No.: </label>|{ 024a }{ 024c }{ 024d }{ 0242 }|
#027|<br/><br/><label>Standard Tech. Report. No.: </label>|{ 027a }|
#028|<br/><br/><label>Publisher. No.: </label>|{ 028a }{ 028b }|
#013|<br/><br/><label>Patent No.: </label>|{ 013a }{ 013b }{ 013c }{ 013d }{ 013e }{ 013f }|
#030|<br/><br/><label>CODEN: </label>|{ 030a }|
#037|<br/><br/><label>Source: </label>|{ 037a }{ 037b }{ 037c }{ 037f }{ 037g }{ 037n }|
#010|<br/><br/><label>LCCN: </label>|{ 010a }|
#015|<br/><br/><label>Nat. Bib. No.: </label>|{ 015a }{ 0152 }|
#016|<br/><br/><label>Nat. Bib. Agency Control No.: </label>|{ 016a }{ 0162 }|
#600|<br/><br/><label>Subjects--Personal Names: </label>|{\n6003 }{\n600a}{ 600b }{ 600c }{ 600d }{ 600e }{ 600f }{ 600g }{ 600h }{--600k}{ 600l }{ 600m }{ 600n }{ 600o }{--600p}{ 600r }{ 600s }{ 600t }{ 600u }{--600x}{--600z}{--600y}{--600v}|
#610|<br/><br/><label>Subjects--Corporate Names: </label>|{\n6103 }{\n610a}{ 610b }{ 610c }{ 610d }{ 610e }{ 610f }{ 610g }{ 610h }{--610k}{ 610l }{ 610m }{ 610n }{ 610o }{--610p}{ 610r }{ 610s }{ 610t }{ 610u }{--610x}{--610z}{--610y}{--610v}|
#611|<br/><br/><label>Subjects--Meeting Names: </label>|{\n6113 }{\n611a}{ 611b }{ 611c }{ 611d }{ 611e }{ 611f }{ 611g }{ 611h }{--611k}{ 611l }{ 611m }{ 611n }{ 611o }{--611p}{ 611r }{ 611s }{ 611t }{ 611u }{--611x}{--611z}{--611y}{--611v}|
#630|<br/><br/><label>Subjects--Uniform Titles: </label>|{\n630a}{ 630b }{ 630c }{ 630d }{ 630e }{ 630f }{ 630g }{ 630h }{--630k }{ 630l }{ 630m }{ 630n }{ 630o }{--630p}{ 630r }{ 630s }{ 630t }{--630x}{--630z}{--630y}{--630v}|
#648|<br/><br/><label>Subjects--Chronological Terms: </label>|{\n6483 }{\n648a }{--648x}{--648z}{--648y}{--648v}|
#650|<br/><br/><label>Subjects--Topical Terms: </label>|{\n6503 }{\n650a}{ 650b }{ 650c }{ 650d }{ 650e }{--650x}{--650z}{--650y}{--650v}|
#651|<br/><br/><label>Subjects--Geographic Terms: </label>|{\n6513 }{\n651a}{ 651b }{ 651c }{ 651d }{ 651e }{--651x}{--651z}{--651y}{--651v}|
#653|<br/><br/><label>Subjects--Index Terms: </label>|{ 653a }|
#654|<br/><br/><label>Subjects--Facted Index Terms: </label>|{\n6543 }{\n654a}{--654b}{--654x}{--654z}{--654y}{--654v}|
#655|<br/><br/><label>Index Terms--Genre/Form: </label>|{\n6553 }{\n655a}{--655b}{--655x }{--655z}{--655y}{--655v}|
#656|<br/><br/><label>Index Terms--Occupation: </label>|{\n6563 }{\n656a}{--656k}{--656x}{--656z}{--656y}{--656v}|
#657|<br/><br/><label>Index Terms--Function: </label>|{\n6573 }{\n657a}{--657x}{--657z}{--657y}{--657v}|
#658|<br/><br/><label>Index Terms--Curriculum Objective: </label>|{\n658a}{--658b}{--658c}{--658d}{--658v}|
#050|<br/><br/><label>LC Class. No.: </label>|{ 050a }{ / 050b }|
#082|<br/><br/><label>Dewey Class. No.: </label>|{ 082a }{ / 082b }|
#080|<br/><br/><label>Universal Decimal Class. No.: </label>|{ 080a }{ 080x }{ / 080b }|
#070|<br/><br/><label>National Agricultural Library Call No.: </label>|{ 070a }{ / 070b }|
#060|<br/><br/><label>National Library of Medicine Call No.: </label>|{ 060a }{ / 060b }|
#074|<br/><br/><label>GPO Item No.: </label>|{ 074a }|
#086|<br/><br/><label>Gov. Doc. Class. No.: </label>|{ 086a }|
#088|<br/><br/><label>Report. No.: </label>|{ 088a }|
UNIMARC الأفتراضي
#200|<h2>Title : |{200a}{. 200c}{ : 200e}{200d}{. 200h}{. 200i}|</h2>
#461|<label class="ipt">A part of : </label>|<a href="/cgi-bin/koha/catalogue/search.pl?op=do_search{&q=461t&idx=ti}">{461t}</a>{N∞ 461h} {v. 461v}{(461d)}<br/>|
#200b|<label class="ipt">Material Designation : </label>| {200b }|<br/>
#101a|<label class="ipt">Language(s): </label>|<a href="/cgi-bin/koha/catalogue/search.pl?op=do_search{&q=101a&idx=ln}">{101a}</a>|<br/>
#200f|<label class="ipt">Authors : </label>|<a href="/cgi-bin/koha/catalogue/search.pl?op=do_search{&q=200f&idx=au}">{200f ; }</a>|<br/>
#200g|<label class="ipt">Co-authors : </label>|<a href="/cgi-bin/koha/catalogue/search.pl?op=do_search{&q=200g&idx=au}">{200g ; }</a>|<br/>
#210a|<br/><label class="ipt">Place of pubblication : </label>|<a href="/cgi-bin/koha/catalogue/search.pl?op=do_search&idx=pl&q={210a}">{210a}</a>|<br/>
#210c|<label class="ipt">Publisher : </label>|<a href="/cgi-bin/koha/catalogue/search.pl?op=do_search&idx=pb&q={210c}">{210c ; }</a>|<br/>
#210d|<label class="ipt">Date of pubblication : </label>|{ 210d}|<br/>
#215|<label class="ipt">Description : </label>|{215a}{ : 215c}{ ; 215d}{ + 215e}|<br/>
#225a|<label class="ipt">Series :</label>|<a href="/cgi-bin/koha/catalogue/search.pl?op=do_search{&q=225a&idx=se}">{225a ;}</a> |
#225||{ = 225d}{ : 225e}{. 225h}{. 225i}{ / 225f}{, 225x}{ ; 225v}|<br/>
#686|<label>Classification : </label>|{ 686a }|<br/>
#608|<label>Form, Genre : </label>|<a href="/cgi-bin/koha/catalogue/search.pl?op=do_search&idx=su&q={608a}"><img border="0" src="/opac-tmpl/css/en/images/filefind.png" height="15" title="Search on {608a}">{ 608a}</a>|<br/><br/>
#200||<label class="ipt">Subjects : </label><br/>|<ul>
#600|<label class="ipt">Person(s) </label><br/> |<li><a href="/cgi-bin/koha/catalogue/search.pl?op=do_search&idx=su&q={600a}"><img border="0" src="/opac-tmpl/css/en/images/filefind.png" height="15" title="Search on {600a}">{ 600a}</a></li>|<br/>
#601|<label class="ipt">Organisation(s) </label><br/>|<li><a href="/cgi-bin/koha/catalogue/search.pl?op=do_search&idx=su&q={601a}"><img border="0" src="/opac-tmpl/css/en/images/filefind.png" height="15" title="Search on {601a}">{ 601a}</a></li>|<br/>
#606|<label class="ipt">Term(s) </label><br/>|<li><a href="/cgi-bin/koha/catalogue/search.pl?op=do_search&idx=su&q={606a}"><img border="0" src="/opac-tmpl/css/en/images/filefind.png" height="15" title="Search on {606a}">{ 606a}</a></li>|<br/>
#607|<label class="ipt">Place(s) </label><br/>|<li><a href="/cgi-bin/koha/catalogue/search.pl?op=do_search&idx=su&q={607a}"><img border="0" src="/opac-tmpl/css/en/images/filefind.png" height="15" title="Search on {607a}">{ 607a}</a></li>|<br/>
#610|<label>Keywords</label><br/>|<li><a href="/cgi-bin/koha/catalogue/search.pl?op=do_search&idx=su&q={610a}"><img border="0" src="/opac-tmpl/css/en/images/filefind.png" height="15" title="Search on {610a}">{ 610a}</a></li>|
#200||</ul>|
#856|<label class="ipt">Electronic resource : </label>|<a href="{856u}">click here</a> to go to the external resource<br/>
#010|<label class="ipt">ISBN : </label>|{010a ;}|<br/>
#011|<label class="ipt">ISSN : </label>|{011a ;}|<br/>
#200||<label class="ipt">Notes : </label>|<br/><ul>
#300||<li>{300a}</li>|
#307||<li>{307a}</li>|
#310||<li>{310a}</li>|
#326||<li>{326a}</li>|
#327||<li>{327a}</li>|
#333|<li>Public : |{333a}</li>|
#200||</ul>|
#330||<label class="ipt">Abstract : </label>|<br/>
#330||{330a}|<br/>
#200||<br/><h2>Items</h2>|
#200|<table>|<th>Call number</th><th>Copy note</th><th>Fonds</th><th>Genre detail</th><th>Circulation type</th><th>Barcode</th>|
#995||<tr><td> {995k}</td><td> {995u}</td><td> {995y}</td><td>{995e} </td><td> {995o}</td><td>{995f}</td></tr>|</table>
OPACISBD Defaults
Default values for the OPACISBD preference.
مارك
#100||{ 100a }{ 100b }{ 100c }{ 100d }{ 110a }{ 110b }{ 110c }{ 110d }{ 110e }{ 110f }{ 110g }{ 130a }{ 130d }{ 130f }{ 130g }{ 130h }{ 130k }{ 130l }{ 130m }{ 130n }{ 130o }{ 130p }{ 130r }{ 130s }{ 130t }|<br/><br/>
#245||{ 245a }{ 245b }{245f }{ 245g }{ 245k }{ 245n }{ 245p }{ 245s }{ 245h }|
#246||{ : 246i }{ 246a }{ 246b }{ 246f }{ 246g }{ 246n }{ 246p }{ 246h }|
#242||{ = 242a }{ 242b }{ 242n }{ 242p }{ 242h }|
#245||{ 245c }|
#242||{ = 242c }|
#250| - |{ 250a }{ 250b }|
#254|, |{ 254a }| #255|, |{ 255a }{ 255b }{ 255c }{ 255d }{ 255e }{ 255f }{ 255g }| #256|, |{ 256a }|
#257|, |{ 257a }|
#258|, |{ 258a }{ 258b }|
#260| - |{ 260a }{ 260b }{ 260c }|
#300| - |{ 300a }{ 300b }{ 300c }{ 300d }{ 300e }{ 300f }{ 300g }|
#306| - |{ 306a }| #307| - |{ 307a }{ 307b }|
#310| - |{ 310a }{ 310b }|
#321| - |{ 321a }{ 321b }|
#340| - |{ 3403 }{ 340a }{ 340b }{ 340c }{ 340d }{ 340e }{ 340f }{ 340h }{ 340i }|
#342| - |{ 342a }{ 342b }{ 342c }{ 342d }{ 342e }{ 342f }{ 342g }{ 342h }{ 342i }{ 342j }{ 342k }{ 342l }{ 342m }{ 342n }{ 342o }{ 342p }{ 342q }{ 342r }{ 342s }{ 342t }{ 342u }{ 342v }{ 342w }|
#343| - |{ 343a }{ 343b }{ 343c }{ 343d }{ 343e }{ 343f }{ 343g }{ 343h }{ 343i }|
#351| - |{ 3513 }{ 351a }{ 351b }{ 351c }|
#352| - |{ 352a }{ 352b }{ 352c }{ 352d }{ 352e }{ 352f }{ 352g }{ 352i }{ 352q }|
#362| - |{ 362a }{ 351z }|
#440| - |{ 440a }{ 440n }{ 440p }{ 440v }{ 440x }|. #490| - |{ 490a }{ 490v }{ 490x }|.
#800| - |{ 800a }{ 800b }{ 800c }{ 800d }{ 800e }{ 800f }{ 800g }{ 800h }{ 800j }{ 800k }{ 800l }{ 800m }{ 800n }{ 800o }{ 800p }{ 800q }{ 800r }{ 800s }{ 800t }{ 800u }{ 800v }|.
#810| - |{ 810a }{ 810b }{ 810c }{ 810d }{ 810e }{ 810f }{ 810g }{ 810h }{ 810k }{ 810l }{ 810m }{ 810n }{ 810o }{ 810p }{ 810r }{ 810s }{ 810t }{ 810u }{ 810v }|.
#811| - |{ 811a }{ 811c }{ 811d }{ 811e }{ 811f }{ 811g }{ 811h }{ 811k }{ 811l }{ 811n }{ 811p }{ 811q }{ 811s }{ 811t }{ 811u }{ 811v }|.
#830| - |{ 830a }{ 830d }{ 830f }{ 830g }{ 830h }{ 830k }{ 830l }{ 830m }{ 830n }{ 830o }{ 830p }{ 830r }{ 830s }{ 830t }{ 830v }|.
#500|<br/><br/>|{ 5003 }{ 500a }|
#501|<br/><br/>|{ 501a }|
#502|<br/><br/>|{ 502a }|
#504|<br/><br/>|{ 504a }|
#505|<br/><br/>|{ 505a }{ 505t }{ 505r }{ 505g }{ 505u }|
#506|<br/><br/>|{ 5063 }{ 506a }{ 506b }{ 506c }{ 506d }{ 506u }|
#507|<br/><br/>|{ 507a }{ 507b }| #508|<br/><br/>|{ 508a }{ 508a }|
#510|<br/><br/>|{ 5103 }{ 510a }{ 510x }{ 510c }{ 510b }|
#511|<br/><br/>|{ 511a }|
#513|<br/><br/>|{ 513a }{513b }|
#514|<br/><br/>|{ 514z }{ 514a }{ 514b }{ 514c }{ 514d }{ 514e }{ 514f }{ 514g }{ 514h }{ 514i }{ 514j }{ 514k }{ 514m }{ 514u }|
#515|<br/><br/>|{ 515a }|
#516|<br/><br/>|{ 516a }|
#518|<br/><br/>|{ 5183 }{ 518a }|
#520|<br/><br/>|{ 5203 }{ 520a }{ 520b }{ 520u }|
#521|<br/><br/>|{ 5213 }{ 521a }{ 521b }|
#522|<br/><br/>|{ 522a }|
#524|<br/><br/>|{ 524a }|
#525|<br/><br/>|{ 525a }|
#526|<br/><br/>|{\n510i }{\n510a }{ 510b }{ 510c }{ 510d }{\n510x }|
#530|<br/><br/>|{\n5063 }{\n506a }{ 506b }{ 506c }{ 506d }{\n506u }|
#533|<br/><br/>|{\n5333 }{\n533a }{\n533b }{\n533c }{\n533d }{\n533e }{\n533f }{\n533m }{\n533n }|
#534|<br/><br/>|{\n533p }{\n533a }{\n533b }{\n533c }{\n533d }{\n533e }{\n533f }{\n533m }{\n533n }{\n533t }{\n533x }{\n533z }|
#535|<br/><br/>|{\n5353 }{\n535a }{\n535b }{\n535c }{\n535d }|
#538|<br/><br/>|{\n5383 }{\n538a }{\n538i }{\n538u }|
#540|<br/><br/>|{\n5403 }{\n540a }{ 540b }{ 540c }{ 540d }{\n520u }|
#544|<br/><br/>|{\n5443 }{\n544a }{\n544b }{\n544c }{\n544d }{\n544e }{\n544n }|
#545|<br/><br/>|{\n545a }{ 545b }{\n545u }| #546|<br/><br/>|{\n5463 }{\n546a }{ 546b }|
#547|<br/><br/>|{\n547a }| #550|<br/><br/>|{ 550a }|
#552|<br/><br/>|{ 552z }{ 552a }{ 552b }{ 552c }{ 552d }{ 552e }{ 552f }{ 552g }{ 552h }{ 552i }{ 552j }{ 552k }{ 552l }{ 552m }{ 552n }{ 562o }{ 552p }{ 552u }|
#555|<br/><br/>|{ 5553 }{ 555a }{ 555b }{ 555c }{ 555d }{ 555u }|
#556|<br/><br/>|{ 556a }{ 506z }| #563|<br/><br/>|{ 5633 }{ 563a }{ 563u }|
#565|<br/><br/>|{ 5653 }{ 565a }{ 565b }{ 565c }{ 565d }{ 565e }|
#567|<br/><br/>|{ 567a }|
#580|<br/><br/>|{ 580a }|
#581|<br/><br/>|{ 5633 }{ 581a }{ 581z }|
#584|<br/><br/>|{ 5843 }{ 584a }{ 584b }|
#585|<br/><br/>|{ 5853 }{ 585a }|
#586|<br/><br/>|{ 5863 }{ 586a }|
#020|<br/><br/><label>ISBN: </label>|{ 020a }{ 020c }|
#022|<br/><br/><label>ISSN: </label>|{ 022a }|
#222| = |{ 222a }{ 222b }|
#210| = |{ 210a }{ 210b }|
#024|<br/><br/><label>Standard No.: </label>|{ 024a }{ 024c }{ 024d }{ 0242 }|
#027|<br/><br/><label>Standard Tech. Report. No.: </label>|{ 027a }|
#028|<br/><br/><label>Publisher. No.: </label>|{ 028a }{ 028b }|
#013|<br/><br/><label>Patent No.: </label>|{ 013a }{ 013b }{ 013c }{ 013d }{ 013e }{ 013f }|
#030|<br/><br/><label>CODEN: </label>|{ 030a }|
#037|<br/><br/><label>Source: </label>|{ 037a }{ 037b }{ 037c }{ 037f }{ 037g }{ 037n }|
#010|<br/><br/><label>LCCN: </label>|{ 010a }|
#015|<br/><br/><label>Nat. Bib. No.: </label>|{ 015a }{ 0152 }|
#016|<br/><br/><label>Nat. Bib. Agency Control No.: </label>|{ 016a }{ 0162 }|
#600|<br/><br/><label>Subjects--Personal Names: </label>|{\n6003 }{\n600a}{ 600b }{ 600c }{ 600d }{ 600e }{ 600f }{ 600g }{ 600h }{--600k}{ 600l }{ 600m }{ 600n }{ 600o }{--600p}{ 600r }{ 600s }{ 600t }{ 600u }{--600x}{--600z}{--600y}{--600v}|
#610|<br/><br/><label>Subjects--Corporate Names: </label>|{\n6103 }{\n610a}{ 610b }{ 610c }{ 610d }{ 610e }{ 610f }{ 610g }{ 610h }{--610k}{ 610l }{ 610m }{ 610n }{ 610o }{--610p}{ 610r }{ 610s }{ 610t }{ 610u }{--610x}{--610z}{--610y}{--610v}|
#611|<br/><br/><label>Subjects--Meeting Names: </label>|{\n6113 }{\n611a}{ 611b }{ 611c }{ 611d }{ 611e }{ 611f }{ 611g }{ 611h }{--611k}{ 611l }{ 611m }{ 611n }{ 611o }{--611p}{ 611r }{ 611s }{ 611t }{ 611u }{--611x}{--611z}{--611y}{--611v}|
#630|<br/><br/><label>Subjects--Uniform Titles: </label>|{\n630a}{ 630b }{ 630c }{ 630d }{ 630e }{ 630f }{ 630g }{ 630h }{--630k }{ 630l }{ 630m }{ 630n }{ 630o }{--630p}{ 630r }{ 630s }{ 630t }{--630x}{--630z}{--630y}{--630v}|
#648|<br/><br/><label>Subjects--Chronological Terms: </label>|{\n6483 }{\n648a }{--648x}{--648z}{--648y}{--648v}| #650|<br/><br/><label>Subjects--Topical Terms: </label>|{\n6503 }{\n650a}{ 650b }{ 650c }{ 650d }{ 650e }{--650x}{--650z}{--650y}{--650v}|
#651|<br/><br/><label>Subjects--Geographic Terms: </label>|{\n6513 }{\n651a}{ 651b }{ 651c }{ 651d }{ 651e }{--651x}{--651z}{--651y}{--651v}|
#653|<br/><br/><label>Subjects--Index Terms: </label>|{ 653a }|
#654|<br/><br/><label>Subjects--Facted Index Terms: </label>|{\n6543 }{\n654a}{--654b}{--654x}{--654z}{--654y}{--654v}|
#655|<br/><br/><label>Index Terms--Genre/Form: </label>|{\n6553 }{\n655a}{--655b}{--655x }{--655z}{--655y}{--655v}|
#656|<br/><br/><label>Index Terms--Occupation: </label>|{\n6563 }{\n656a}{--656k}{--656x}{--656z}{--656y}{--656v}|
#657|<br/><br/><label>Index Terms--Function: </label>|{\n6573 }{\n657a}{--657x}{--657z}{--657y}{--657v}|
#658|<br/><br/><label>Index Terms--Curriculum Objective: </label>|{\n658a}{--658b}{--658c}{--658d}{--658v}|
#050|<br/><br/><label>LC Class. No.: </label>|{ 050a }{ / 050b }|
#082|<br/><br/><label>Dewey Class. No.: </label>|{ 082a }{ / 082b }|
#080|<br/><br/><label>Universal Decimal Class. No.: </label>|{ 080a }{ 080x }{ / 080b }|
#070|<br/><br/><label>National Agricultural Library Call No.: </label>|{ 070a }{ / 070b }|
#060|<br/><br/><label>National Library of Medicine Call No.: </label>|{ 060a }{ / 060b }|
#074|<br/><br/><label>GPO Item No.: </label>|{ 074a }|
#086|<br/><br/><label>Gov. Doc. Class. No.: </label>|{ 086a }|
#088|<br/><br/><label>Report. No.: </label>|{ 088a }|
تهيئة الطابعات للإستلام
التعليمات التالية لإستلام محدد للطابعات ، ولكن من المحتمل أن تستخدم للمساعدة وكذلك في تنصيب الماركات الأخرى.
For Epson TM-T88III (3) & TM-T88IV (4) Printers
في برنامج تشغيل الطباعة
For these instructions, we are using version 5,0,3,0 of the Epson TM-T88III print driver; the EPSON TM-T88IV version is ReceiptE4. Register at the EpsonExpert Technical Resource Center website to gain access to the drivers; go to Technical Resources, then choose the printer model from the Printers drop-down list.
Click Start > Printers and Faxes > Right click the receipt printer > Properties:
- تبويب خيارات متقدمة، انقر للطباعة فوق الزر الافتراضي
- تبويب التخطيط: حجم الورق: لفة الورق 80 في 297 ملم
- TM-T88III: تبويب التخطيط: التأكد من حدود الطبع و ملائمة العرض للطباعة
- TM-T88IV: التأكد من تصغير حجم الطباعة; انقر فوق موافق في النافذة المنبثقة التي ستظهر. ملائمة العرض للطباعة يجب أن يكون محدد تلقائياً.
- الموافقة طريقك للخروج من هنا.
في الجدار الناري
Under File > Page Setup:
- Shrink to fit page on Format & Options tab
- 0,0,0,0 for Margins on Margins & Header/Footer Tab. This makes the receipts use all available space on the paper roll.
- تعيين كل رؤوس الصفحات / التذيلات الى -الفارغة-. هذا سيحذف كل من gunk وعادة في بعض الإحيان قد ترسل على الطباعة من فايرفوكس، مثل رابط، عدد الصفحات، الخ.
- إنقر موافق
تعيين إعدادات الطابعة الافتراضية في فايرفوكس حتى لا ترى مربع حوار "طباعة":
Go to File > Print
تعيين الطابعة إلى إستلام الطباعة.
انقر فوق الخيارات المتقدمة أو زر (الخصائص)
تبويب التخطيط: حجم الورق: لفة الورق 80 في 297 ملم
TM-T88III: تبويب التخطيط: التأكد من حدود الطبع و ملائمة العرض للطباعة
TM-T88IV: التأكد من حدود حجم الطباعة; انقر فوق موافق في النافذة المنبثقة التي ستظهر. ملائمة العرض للطباعة يجب أن يكون محدد تلقائيا.
الموافقة طريقك للخروج، والمضي قدماً وطباعة كل ما على الصفحة مهما كان.
حول الأنواع : التهيئة، في شريط العنوان. انقر على زر "سأكون دقيق، وأعد بذلك!" على رسالة التنبية.
الأنواع, print.always في التصفية.
Look for print.always_print_silent.
- إذا كان التفضيل هناك هو بتعيين القيمة إلى صحيحة.
إذا كان التفضيل ليس هناك (و لايجب أن يكون في معظم المستعرضات) لديك لإضافة التفضيل.
- Right click the preference area and select New > Boolean
- Type print.always_print_silent in the dialog box and set the value to True. This sets the print settings in Firefox to always use the same settings and print without showing a dialog box.
Warning
Setting the print.always_print_silent setting in about:config DISABLES the ability to choose a printer in Firefox.
For Epson TM-T88II (2) Printers
Register at the EpsonExpert Technical Resource Center website to gain access to the drivers; go to Technical Resources, then choose the printer model from the Printers drop-down list.
في الجدار الناري
Under File > Page Setup:
- Shrink to fit page on Format & Options tab
- 0,0,0,0 for Margins on Margins & Header/Footer Tab. This makes the receipts use all available space on the paper roll.
- تعيين كل رؤوس الصفحات / التذيلات الى -الفارغة-. هذا سيحذف كل من gunk وعادة في بعض الإحيان قد ترسل على الطباعة من فايرفوكس، مثل رابط، عدد الصفحات، الخ.
- إنقر موافق
تعيين إعدادات الطابعة الافتراضية في فايرفوكس حتى لا ترى مربع حوار "طباعة":
Go to File > Print
تعيين الطابعة إلى إستلام الطباعة.
الطباعة مهما كانت الصفحة.
حول الأنواع : التهيئة، في شريط العنوان. انقر على زر "سأكون دقيق، وأعد بذلك!" على رسالة التنبية.
الأنواع, print.always في التصفية.
Look for, print.always_print_silent.
- إذا كان التفضيل هناك هو بتعيين القيمة إلى صحيحة.
إذا كان التفضيل ليس هناك (و لايجب أن يكون في معظم المستعرضات) لديك لإضافة التفضيل.
- Right click the preference area and select New > Boolean
- Type, print.always_print_silent in the dialog box and set the value to True. This sets the print settings in Firefox to always use the same settings and print without showing a dialog box.
Warning
Setting the print.always_print_silent setting in about:config DISABLES the ability to choose a printer in Firefox.
للحصول على Star SP542 الطابعات
تنصيب الطابعات
في حين الملاحظات التالية تستند على Star SP542 إستلام الطابعة, إنها ربما تنطبق على جميع الطابعات من نوع هذه السلسلة SP5xx.
The Star SP542 receipt printer works well with Koha and Firefox on Windows XP SP3. This printer, with either the parallel or USB interface, is fairly easy to install and configure. You will need the following executable file which is available from numerous places on the Internet:
linemode_2k-xp_20030205.exe
هذا الملف القابل للتنفيذ في الواقع كل ما تحتاجه للتنصيب, وسوف لن تحتاج إلى استخدام نظام التشغيل Microsoft Windows لبرنامج "إضافة طابعة". من المستحسن أنه عند التنصيب, الخيار لبرنامج جهاز العرض لا يتم اختياره، ونحن قد شهدنا توقف هام والتأخير في الطباعة معها. بدلا من ذلك، ببساطة اختار لتنصيب الطابعة بدون استلام جهاز العرض.
Additionally, the install program may not put the printer on the correct port, especially if using the USB interface. This is easily corrected by going to "Start -> Printers and Faxes -> Properties for the SP542 printer -> Ports", then check the appropriate port.
قد تكون هناك حاجة لإعادة التشغيل، حتى لو لم يشر اليها برنامج التنصيب أو نظام التشغيل.
Windows 7 users should refer to this page: http://www.starmicronics.com/supports/win7.aspx.
Configuring Firefox to Print to Receipt Printer
- Open File > Page Setup
- تجعل كل رؤوس وتذيل الصفحات فارغة
- تعيين الهوامش إلى 0 (صفر)
- في شريط العناوين في متصفح الفايرفوكس، حول النوع: التهيئة
- Search for print.always_print_silent and double click it
- تغييره من الخطأ الى الصواب
- هذا يتيح لك تخطي مربع الطباعة التالي, وكلك تخطي خطوة حيث عليك أن تنقر موافق, الطباعة تلقائياً يمين حجم القسيمة.
- If print.always_print_silent does not come up
- انقر بزر الماوس الأيمن على مساحة فارغة من نافذة تفضيل
- Select new > Boolean
- Enter "print.always_print_silent" as the name (without quotes)
- إنقر موافق
- إختر الصواب للقيمة
- You may also want to check what is listed for print.print_printer
- قد يتوجب عليكان تختار عام / نص فقط (أو ما يمكن أن يسمى إستلام الطابعة)
Notice & Slips Guides
Field Guide for Notices & Slips
This guide will break down the notices and slips information in 3 ways. First it will tell you what file generates the notice, then how you will present the item info in that notice and finally if the notice can be branch specific or not.
| Letter Code | Used In | Detail tag | Can be branch specific |
|---|---|---|---|
| DUE | advance_notices.pl | <<items.content>> | لا |
| DUEDGST | advance_notices.pl | <<items.content>> | لا |
| PREDUE | advance_notices.pl | <<items.content>> | لا |
| PREDUEDGST | advance_notices.pl | <<items.content>> | لا |
| ODUE* | overdue_notices.pl | <<items.content>> or <item> </item> | نعم |
| CHECKOUT | C4/Circulation.pm | غير معرّف | نعم |
| RENEWAL | C4/Circulation.pm | غير معرّف | نعم |
| TRANSFERSLIP | C4/Circulation.pm | غير معرّف | نعم |
| ISSUESLIP | C4/Members.pm | <checkedout> </checkedout> <overdue> </overdue> <news> </news> |
نعم |
| ISSUEQSLIP | C4/Members.pm | <checkedout> </checkedout> | نعم |
| HOLDPLACED | C4/Reserves.pm | غير معرّف | نعم |
| HOLD_SLIP | C4/Reserves.pm | غير معرّف | نعم |
| ASKED | C4/Suggestions.pm | غير معرّف | نعم |
| CHECKED | C4/Suggestions.pm | غير معرّف | نعم |
| ACCEPTED | C4/Suggestions.pm | غير معرّف | نعم |
| REJECTED | C4/Suggestions.pm | غير معرّف | نعم |
| OPAC_REG_VERIFY | opac/opac-memberentry.pl | غير معرّف | لا |
مثال على الإشعار
نيكول إنجارد
مكتبة ار دي 410.
Philadelphia, PA 19107
العزيز Nicole Engard (23529000035726),
طبقا لسجلاتنا ، في وقت هذا الإشعار ،يتبين أن لديك مواد متأخرة.فالرجاء إعادتها أو تجديدها في أقرب وقت ممكن لتجنب زيادة غرامة التأخير.
إذا كنت قد سجلت على كلمة السر مع المكتبة، يمكنك استخدامه مع رقم بطاقة مكتبتك للتجديد عبر الإنترنت.
اذا كنت تعتقد أنك قد أعدت المواد أدناه الرجاء الاتصال و موظفي المكتبة سيكونون مسرورين للمساعدة في حل المسألة.
المواد (المادة) التالية هي حاليا المتأخرة:
07/08/2008 خلق بيئة خالية من المخدرات في المدارس والمجتمعات المحلية : 502326000054 Fox, C. Lynn.
06/27/2008 Eating fractions / 502326000022 McMillan, Bruce.
مع خالص التقدير، موظفي المكتبة
عينة التداول
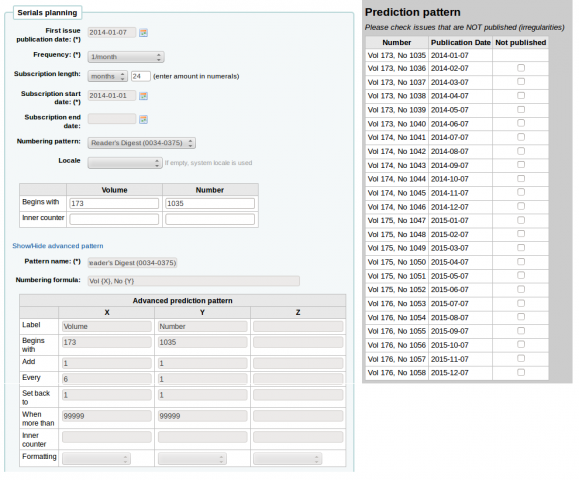
مجلة ريدرز دايجست (0034-0375)
نَشرتْ 12 مرةُ في السّنة (شهرية)
رقم الحجم يتغير كل 6 أشهر والأرقام تستمر (يتطلب وجود نمط متقدم).
مجلة الناس إسبوعية (1076-0091)
- تنَشرَ إسبوعياً
- The website says "on Saturday except the first week of August, Thanksgiving week, the first and last weeks of the year" but this does not match the pattern for 2007 or 2008
- في يوليو ديسمبر هناك 26 عدد
- في يناير يونيو هناك 25 عدد (لا يوجد عدد في الأسبوع الأول من يناير)
Since the irregularity on the first # 26 does not skip a week, this would be set up as to roll over on issue 25. The 26th issue in the second half of the year would have to be received as a supplemental.
The irregularity check will complain that 52 issues were expected, but 25 entered. The current irregularity check can only check that the first position of the numbering pattern matches the expected issue count of the periodicity. But we do need to trigger the rollover on the volume, so we need to define the last two weeks of the year as irregularities. So we receive 50 issues the first 50 weeks, then one supplemental issue in week 51, which we have to define the enumeration for, then the next predicted issue will be the following year's first week.
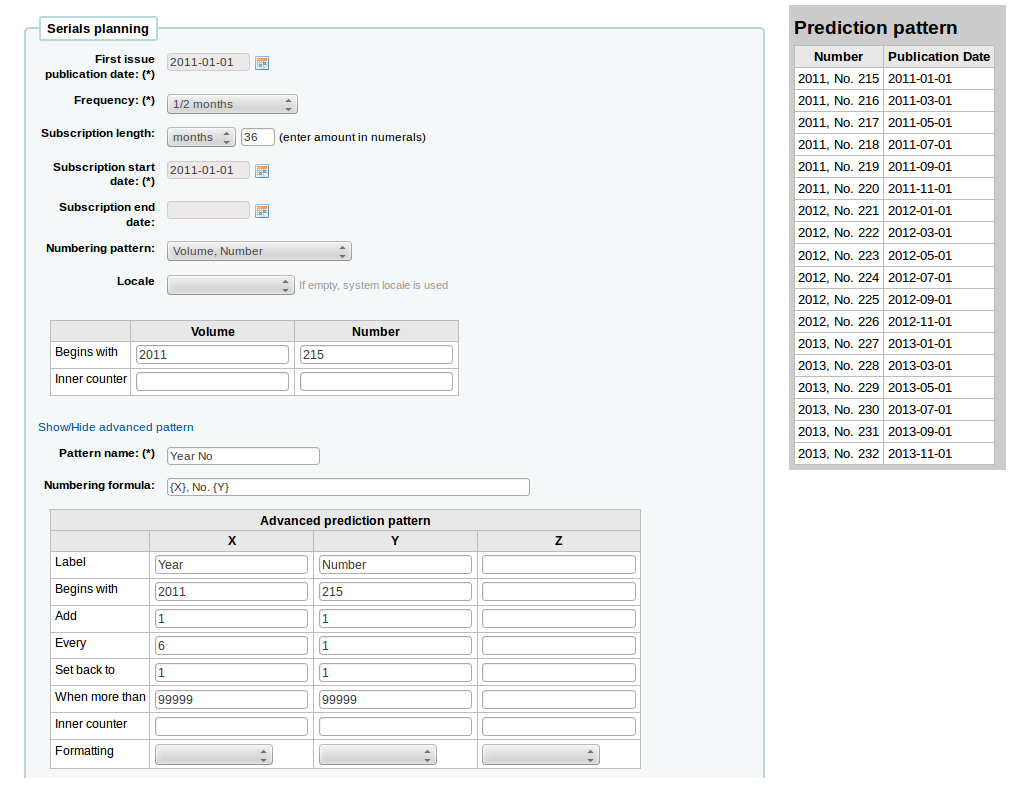
Et-Mol
يتم نشر هذه المجلة حسب القواعد التالية:
- 6 أعداد في السنة (كل شهرين)
- يتغير كل سنة 6 أعداد
- بدأت في عام 2011
- والعدد يبدأ بالصُعود إلى ما لا نهاية
- بدءا من عدد 215
التخطيط يَبْدو مثل هذا:
Backpacker (0277-867X)
Published 9 times a year irregularly. The issues continues while the volume and number rolls over every 9 issues. If you're holding Volume 41, Number 3, Issue 302 in your hand the prediction would look like this:
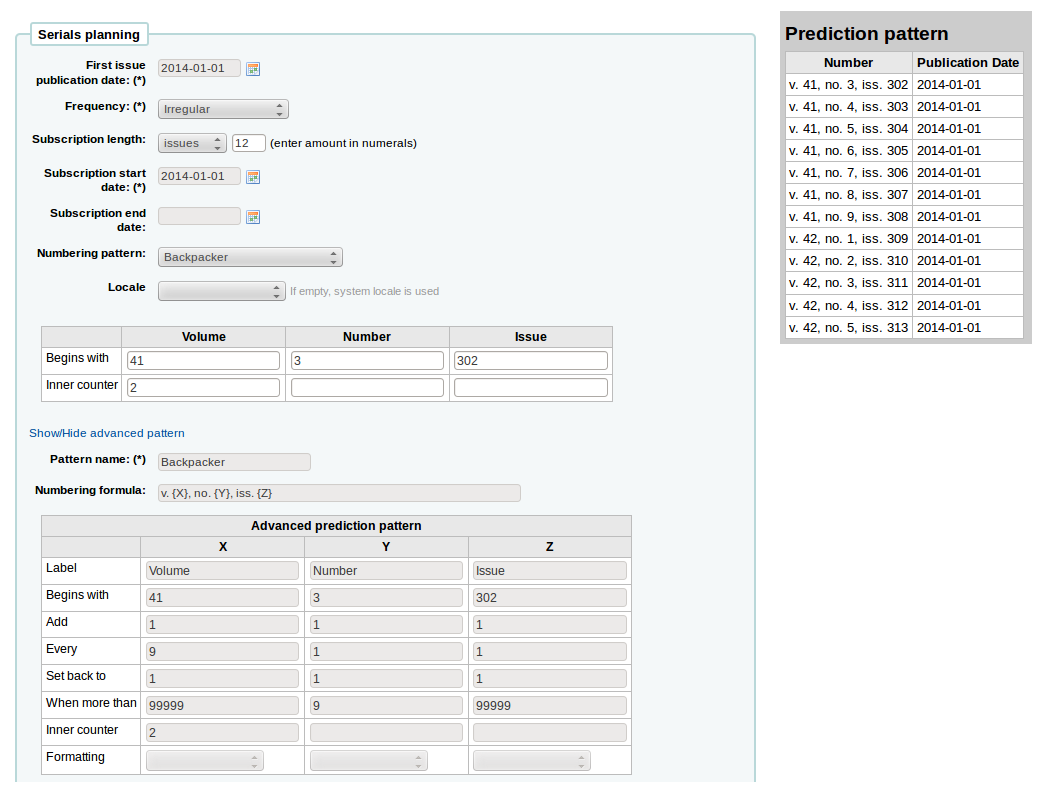
And the received issues would number like this:
- 41, no. 3, iss. 302
- 41, no. 4, iss. 303
- 41, no. 5, iss. 304
- 41, no. 6, iss. 305
- 41, no. 7, iss. 306
- 41, no. 8, iss. 307
- 41, no. 9, iss. 308
- 42, no. 1, iss. 309
- 42, no. 2, iss. 310
- 42, no. 3, iss. 311
- 42, no. 4, iss. 312
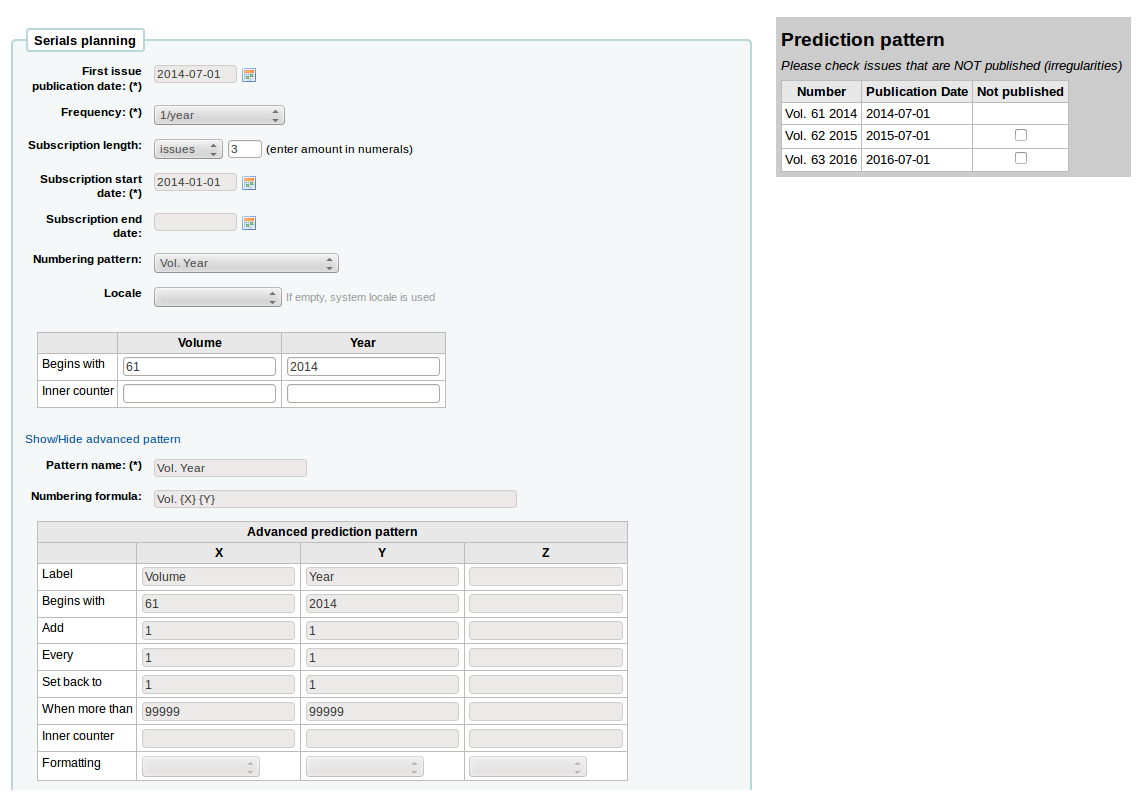
Keats-Shelley Journal (0453-4387)
This journal is published once per year in July. The numbering follows this pattern:
- Vol. 61 2013
- Vol. 62 2014
- Vol. 63 2015
Setup should look like this (if you're starting in July 2014):
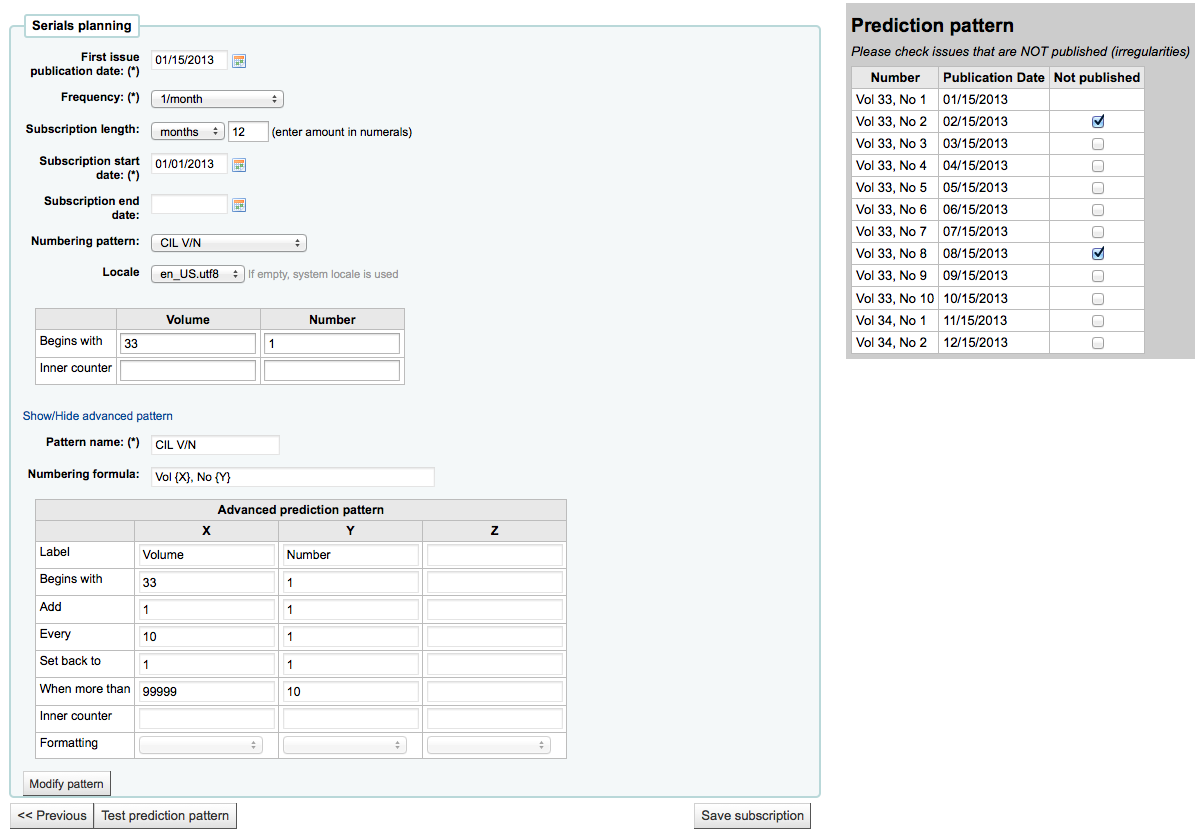
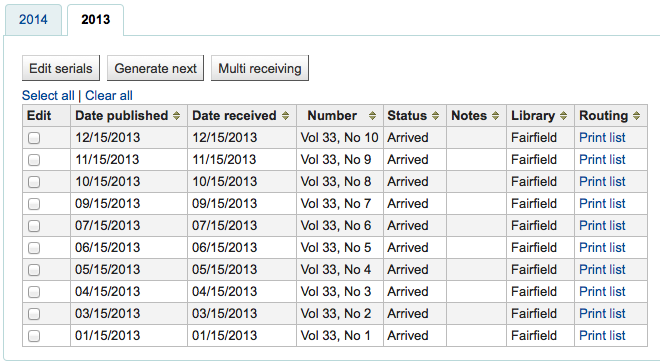
Computers in Libraries (1041-7915)
Computers in Libraries is published ten times per year (monthly with January/February and July/August combined issues).

Sample List & Cart Emails
Example Email from List
Below is an example of an email from a list in Koha.
Hi,

Here is your list called If You Like Jodi Picoult, sent from our online catalog.

Please note that the attached file is a MARC bibliographic records file
which can be imported into a Personal Bibliographic Software like EndNote,
Reference Manager or ProCite.
---------------------------------------------

Home safe : a novel /

by Berg, Elizabeth.

Published by: Random House,, 260 p. ;, 25 cm.
Copyright year: 2009
LCCN:   2008049247
In the online catalog:
    http://MYCATALOG/cgi-bin/koha/opac-detail.pl?biblionumber=12113
Items :
    North Branch FIC (FIC Ber) TVSN500088894O
    Main Library FIC (FIC Boh) TVSN5000921548
    South Branch FIC (FIC Boh) TVSN500092156A
    West Branch FIC (FIC Boh) TVSN5000921559

---------------------------------------------

Half a heart /

by Brown, Rosellen.

Published by: Farrar, Straus, and Giroux,, 402 p. ;, 24 cm.
Copyright year: 2000
LCCN:    00022926
In the online catalog:
    http://MYCATALOG/cgi-bin/koha/opac-detail.pl?biblionumber=12501
Items :
    East Branch  (813/.54)
    South Branch FIC (FIC Bro) TVSN5000451333
Example Email from Cart
Below is a sample of what an email from the Cart in Koha will look like:
Hi,

   Joaquin D'Planque sent you a cart from our online catalog.

   Please note that the attached file is a MARC bibliographic records
   file which can be imported into personal bibliographic software like
   EndNote, Reference Manager or ProCite.

   ---------------------------------------------------------------------


     1.  Book /
       Author(s): Brookfield, Karen. ;
       Published by: Knopf : | Distributed by Random House, , 63 p. : ,
       29 cm.
       Copyright year: 1993
       Notes : Includes index.
       LCCN: 93018833 /AC

       In online catalog:
       http://MYCATALOG/cgi-bin/koha/opac-detail.pl?biblionumber=31644

       Items:

         *  East Branch (JNF 002 Bro) TVSN500017618A

       -----------------------------------------------------------------

     2.  The 1965 World book year book :

       Published by: Field Enterprises Educational Corp., , 628 p. : , 26
       cm.
       Copyright year: 1965
       Notes : Includes index. | Spine title: Year book, 1965. | Cover
       title: The World book year book, 1965.
       URL:
       http://www.archive.org/details/1965worldbookyea00chic%20%7C%20http://www.openlibrary.org/books/OL24199089M

       In online catalog:
       http://MYCATALOG/cgi-bin/koha/opac-detail.pl?biblionumber=88666

       -----------------------------------------------------------------
لإستخدام نظام كوها لنظام إدارة المحتوى (CMS)
التنصيب
These are instructions for taking a default install of Koha and allowing it to function as a little content management system. This will allow a library to publish an arbitrary number of pages based on a template. This example uses the template for the main opac page, but you could just as well use any template you wish with a bit more editing. This may be appropriate if you have a small library, want to allow librarians to easily add pages, and do not want to support a complete CMS.
إنسخ الى المسار /usr/share/koha/opac/cgi-bin/opac/opac-main.pl to /usr/share/koha/opac/cgi-bin/opac/pages.pl (في نفس الدليل)
التعديل على الـpages.pl بإستخدام المحرر
At approximately line 33 change this code:
template_name => "opac-main.tt",
لهذا الكود:
template_name => "pages.tt",
At approximately line 62 after this code:
$template->param(
           koha_news       => $all_koha_news,
           koha_news_count => $koha_news_count,
           display_daily_quote => C4::Context->preference('QuoteOfTheDay'),
           daily_quote         => $quote,
           );
:اضف الى القائمة
my $page = "page_" . $input->param('p');          # go for "p" value in URL and do the concatenation
my $preference = C4::Context->preference($page);  # Go for preference
$template->{VARS}->{'page_test'} = $preference;   # pass variable to template pages.tt
Note pages.pl file must have Webserver user execution permissions, you can use chmod command if you are actually logged in as such user:
$chmod 755 pages.pl
In the browser go to Home > Administration > System Preferences > Local Use and add a New Preference called "page_test"
تعبئته بحيث
- التوضيح: لصفحة الإختبار لصفحات tiny cms
- Variable: page_test
- القيمة: أبجد هوز
- اضغط على رابط ناحية النص (أو إدخل "ناحية النص" في حقل الإدخال تحته)
- variable options (last field): 80|50
In a browser go to http://youraddress/cgi-bin/koha/pages.pl?p=test The page should come up with the words "Lorem ipsum" in the main content area of the page. (replace "youraddress" with localhost, 127.0.0.1, or your domain name depending on how you have Apache set up.)
To add more pages simply create a system preference where the title begins with "page_" followed by any arbitrary letters. You can add any markup you want as the value of the field. Reference the new page by changing the value of the "p" parameter in the URL.
To learn more visit the Koha wiki page on this topic: http://wiki.koha-community.org/wiki/Koha_as_a_CMS
Editing the pages template
The file to create / edit for the pages template will depend on your opacthemes system preference setting
Editing 'bootstrap' theme template (current)
إنسخ الى المسار /usr/share/koha/opac/cgi-bin/opac/opac-main.pl to /usr/share/koha/opac/cgi-bin/opac/pages.pl (في نفس الدليل)
Edit /usr/share/koha/opac/htdocs/opac-tmpl/bootstrap/en/modules/pages.tt
At approximately line 61, change this:
[% IF ( OpacMainUserBlock ) %]<div id="opacmainuserblock">[% OpacMainUserBlock %]</div>[% END %]
لهذا:
[% IF ( page_test ) %]<div id="opacmainuserblock">[% page_test %]</div>[% END %]
Remark: You may wish to disable your News block of these CMS style pages e.g. when you do not want it displayed on the CMS style pages or where the News block is long enough that it actually makes the 'page_test' include scroll outside the default viewport dimensions. In that case, remove the following code from your pages.tt template.
[% IF ( koha_news_count ) %]
    <div id="news">
    <table class="table table-bordered">
    [% FOREACH koha_new IN koha_news %]
      <thead><tr><th>[% koha_new.title %]</th></tr></thead>
      <tbody><tr><td><p>[% koha_new.new %]</p>
      <p class="newsfooter"><i>(published on [% koha_new.newdate %])</i></p></td></tr></tbody>
    [% END %]
    </table>
    </div>
   [% END %]
أستكشاف الخطأ و إصلاحه
If you have problems check file permissions on pages.pl and pages.tt. They should have the same user and group as other Koha files like opac-main.pl.
نقاط العلاوة
Instead of using the address http://youraddress/cgi-bin/koha/pages.pl?p=test you can shorten it to http://youraddress/pages.pl?p=test Just open up /etc/koha/koha-httpd.conf and add the follow at about line 13:
ScriptAlias /pages.pl "/usr/share/koha/opac/cgi-bin/opac/pages.pl"
ثم أعد تشغيل برنامج الأباتشي.
الإستخدام
بعد إعداد نظام كوها بإعتبارها CMS يمكنك إنشاء صفحات جديدة باتباع التعليمات التالية:
إضافة الصفحات
لإضافة صفحة جديدة تحتاج إلى إضافة تفضيل النظام تحت الإستخدام المحلي.
Get there: More > Administration > Global System Preferences > Local Use
انقر "تفضيل جديد '
إدخل وصفاُ في حقل التوضيح
Enter a value that starts with 'page_' in the Variable field
إبدأ إدخال الـHTML فية حقل القيمة
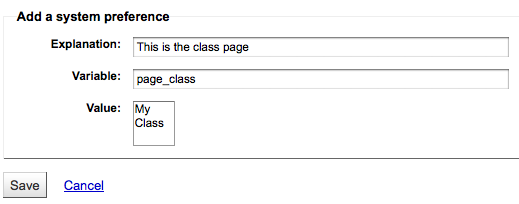
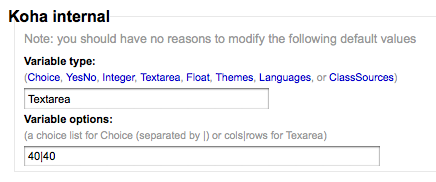
تعيين نوع متغير لناحية النص
Set the Variable options to something like 20|20 for 20 rows and 20 columns
عرض َصفحتِك
You can view your new page at http://YOUR-OPAC/cgi-bin/koha/pages.pl?p=PAGENAME where PAGENAME is the part you entered after 'page_' in the Variable field.
مثال
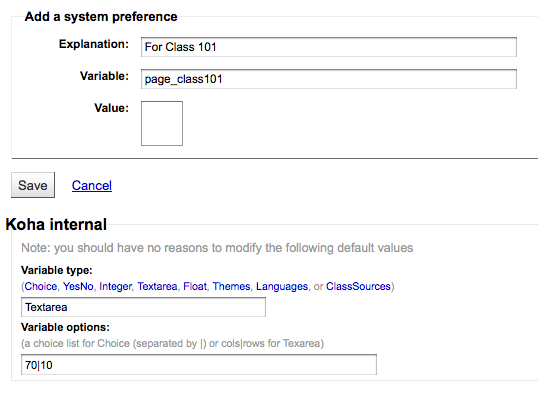
This process can be used to create recommended reading lists within Koha. So once the code changes have been made per the instructions on 'Koha as a CMS' you go through the 'Adding a New Page' instructions above to great a page for 'Recommended Reading Lists'
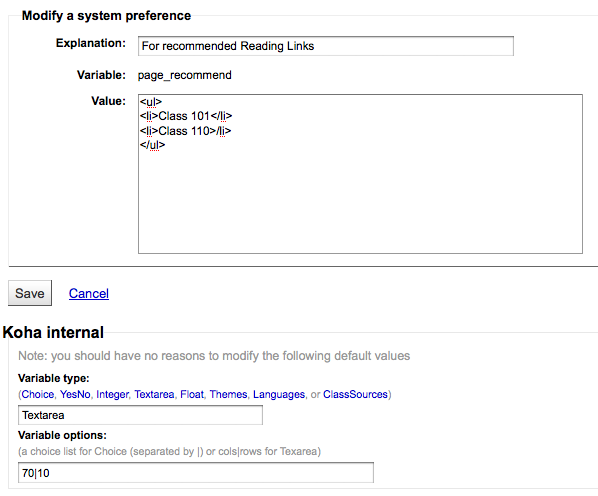
ثم نأتي إلى إنشاء صفحات الفئات المختلفة لدينا (أو الفئات). للقيام بذلك، والعودة إلى "إضافة صفحة جديد ' القسم وإنشاء تفضيل من الدرجة الأولى.
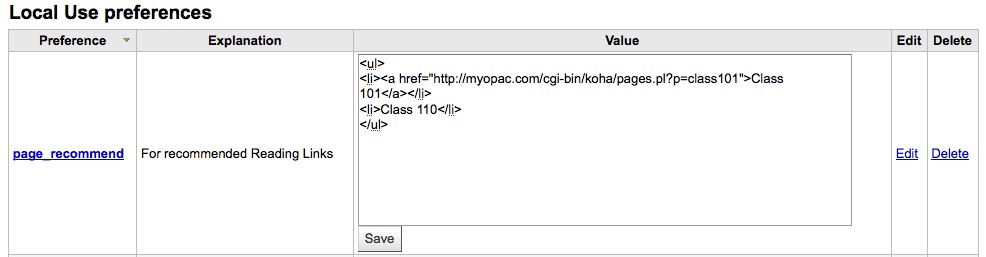
Next you'll want to link your first page to your new second page, go to the page_recommend preference and click 'Edit.' Now you want to edit the HTML to include a link to your newest page:
الأمثلة المباشرة
- The Crawford Library at Dallas Christian College is using this method for their recommended reading lists: http://opac.dallas.edu/
إعادة تعيين قاعدة بيانات نظام كوها
These notes on how to reset the database for Koha were derived from the following email thread: http://lists.koha-community.org/pipermail/koha-devel/2009-January/008939.html and http://lists.katipo.co.nz/public/koha/2014-June/039701.html
إعادة تعيين قاعدة البيانات قد يكون مفيدا إذا قمت بتنصيب نظاك كوها مع نموذج البيانات، وبعد ذلك أتمنى استخدام بيانات حقيقية بدون إعادة تنصيب البرنامج.
Delete sample data from Tables
Use your preferred MySQL client to delete the following tables:
- الببليوغرافية
- مواد الببليوغرافية
- المواد
- auth_header
- الجلسات
- قائمة إنتظار زيبرا
You may need to disable foreign key checks to delete data from same tables. For instructions follow this thread: https://lists.katipo.co.nz/pipermail/koha/2013-July/036853.html.
إعادة تعيين فهرس زيبرا
Run the following commands to reset the authorities and biblios Zebra indices.
$ zebraidx -c /etc/koha/zebradb/zebra-authorities-dom.cfg -g iso2709 -d authorities init
$ zebraidx -c /etc/koha/zebradb/zebra-biblios.cfg -g iso2709 -d biblios init
If you are running a package install then you'll want to run the following commands to reset the authorities and biblios Zebra indices instead:
$ sudo zebraidx -c /etc/koha/sites/YOURLIBRARY/zebra-authorities-dom.cfg  -g iso2709 -d authorities init
$ sudo zebraidx -c /etc/koha/sites/YOURLIBRARY/zebra-biblios.cfg  -g iso2709 -d biblios init
Replacing YOURLIBRARY with your Koha installation name.
مواقع مهمة
تنصيب الدليل
- Installing Koha 3 on Ubuntu - http://www.blazingmoon.org/guides/k3-on-u810-1.html
- Koha on Debian installation documentation - http://openlib.org/home/krichel/courses/lis508/doc/koha_installation_overview.html
- Koha 3.2 on Debian Squeeze - http://wiki.koha-community.org/wiki/Koha_3.2_on_Debian_Squeeze
Misc
- Zotero - http://zotero.org
- SOPAC - http://thesocialopac.net
أنواع مواد نظام كوها الــ XSLT
When you have any of the XSLT system preferences (OPACXSLTDetailsDisplay, OPACXSLTResultsDisplay, XSLTDetailsDisplay, and/or XSLTResultsDisplay) along with the DisplayOPACiconsXSLT and DisplayIconsXSLT preferences turned on you will see item type icons on the related screen.
Important
These images are coming from values found in your leader, if your leader is not cataloged properly it might be best to turn off the DisplayOPACiconsXSLT preference (which can be done while leaving the other XSLT preferences turned on).

- كتاب [بي كي]
- الفاتح6= a (و واحدة من قيم الفاتح 7 أدناه)
- الفاتح7 = a
- الفاتح7 = c
- الفاتح7 = d
- الفاتح7 = m
- الفاتح6 = t
- الفاتح6= a (و واحدة من قيم الفاتح 7 أدناه)
- ملف الكمبيوتر [سي أف]
- الفاتح6 = m

- إستمرار المصدر [سي أر]
- الفاتح7 = b
- الفاتح7 = i
- الفاتح7 = s

- الخريطة[أم بي]
- الفاتح6 = e
- الفاتح6 = f

- المختلطة[أم أكس]
- الفاتح6 = p

- الصوت[أم يو]
- الفاتح6 = c
- الفاتح6 = d
- الفاتح6 = i
- الفاتح6 = j
- المواد المرئية [في أم]
- الفاتح6 = g
- الفاتح6 = k
- الفاتح6 = r

- عدة
- الفاتح6 = o
MarcEdit
Many libraries like to use MarcEdit for modifications or data cleanup. If you'd like to do this you will need to download it at: http://marcedit.reeset.net/
Important
Many of the actions described in this chapter can be done in Koha using Marc Modification Templates, but this section is here for those who are used to MarcEdit.
Adding a prefix to call numbers
عندما يتم جلب البيانات إلى نظام كوها، ربما قد تريد تنظيفة أولاً. عمل مشترك واحد بين مستخدمي نظام كوها هو إضافة بادئة إلى رقم الاستدعاء.
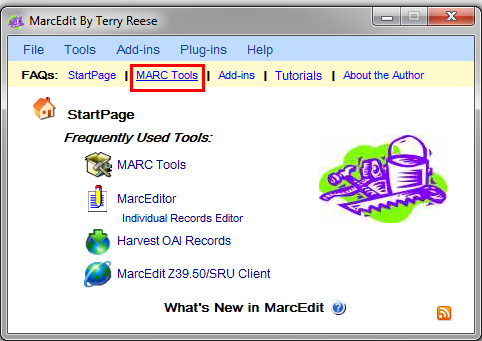
افتح MarcEdit
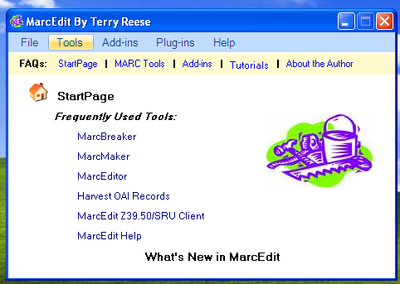
انقر على 'MarcEditor'
Go to Tools > Edit Subfield Data
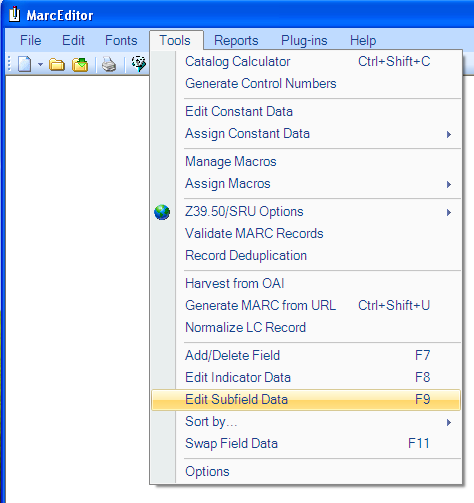
To prepend data the special character is: ^b To simply prepend data to the beginning of a subfield, add ^b to the Field Data: textbox and the data to be appended in the Replace
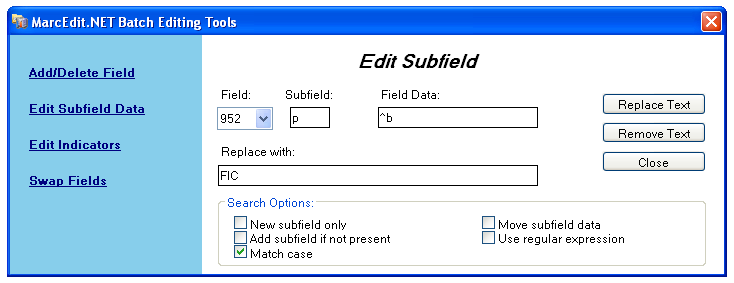
- To prepend data to the beginning of the subfield while replacing a text string, add ^b[string to replace] to the Field Data textbox and the data to be appended in the Replace With textbox.
Importing Excel data into Koha
Suppose you have records of your library in excel data sheet format and want them to import into Koha. But how will you do this? Koha will not let you import excel records directly. Well here is a very simple solution for you which will let you import your excel records in Koha easily. First, we will convert excel file into Marc file and then will import it into Koha.
إتبع الخطوات الواردة في إستيراد سجلات الأكسل في نظام كوها
Converting from Excel format into .mrk format
First, we will convert excel format into .mrk format. For this we will use MarcEdit. You can download it from http://marcedit.reeset.net/
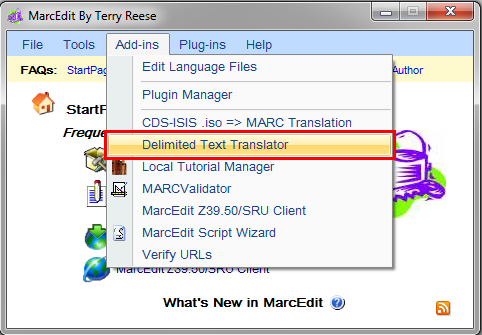
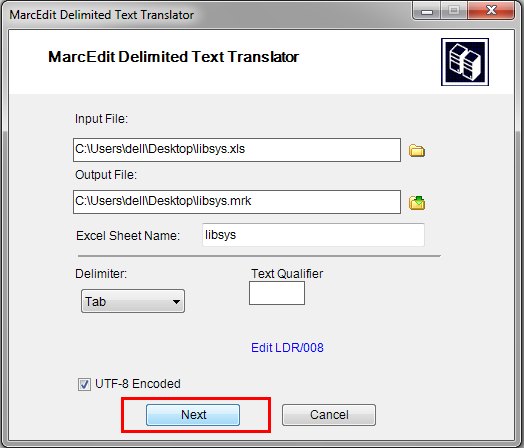
Now open it and select Add-ins-->Delimited Text Translator.
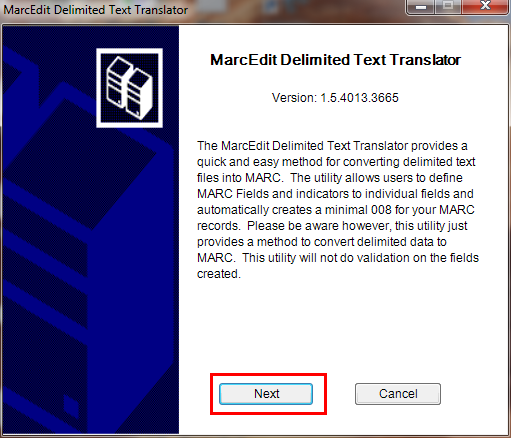
إنقر فوق التالي عندما تظهر النافذة التالية.
إستعرض لملف الأكسل الخاص بك.
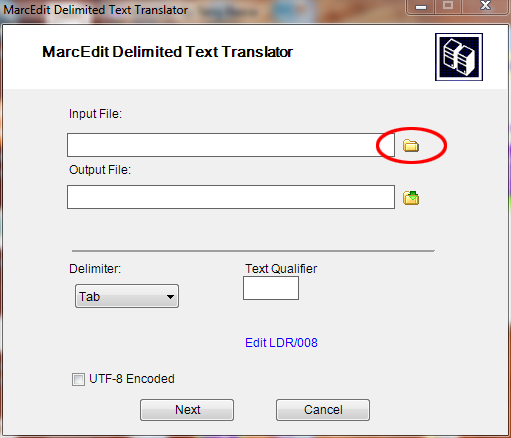
Locate your excel file by choosing the format Excel File(*.xls).
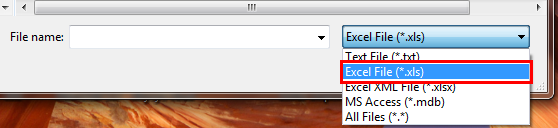
وبالمثل، ملئ جميع المداخل الآخرى مثل ملف الإخراج، إكسل اسم الورقة والتأكد من إن التشفير من نوع UTF-8 (إذا لزم الأمر) ثم انقر فوق التالي.
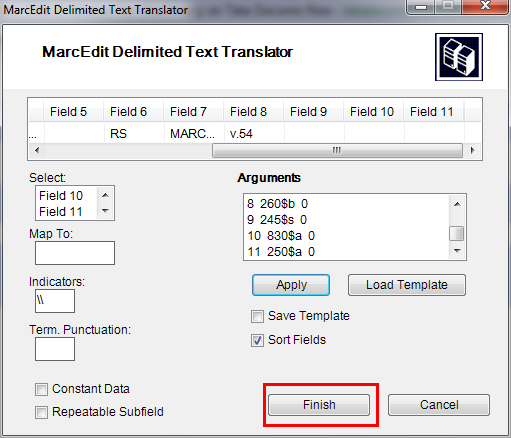
والآن يتم مطالبتك لرسم خرائط الحقول إلى الأعتراف بالحقول عن طريق تنسيقات مارك القياسية.
لنفترض للحقل 0 يتم إدخال الخريطة في العمود الأول لـ: 022 دولار (ISSN صالحة لمواصلة المصدر)، ثم انقر على تطبيق.

Note
You can customize Indicators and all other things, for more information on marc21 format visit the official library of congress site.
وبالمثل خريطة جميع الحقول الأخرى ومن ثم انقر على إنهاء.
And then a window will appear indicating that your Marc Text File(*.mrk) has been created.
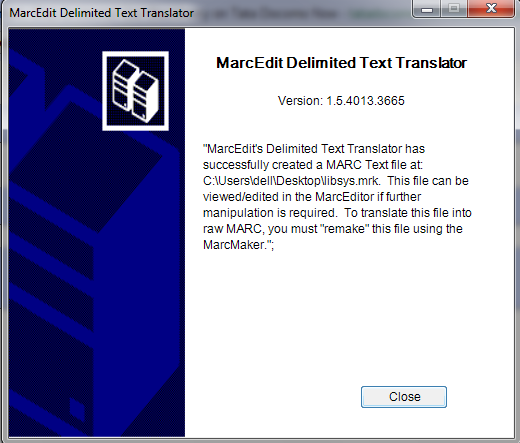
انقر فوق إغلاق وأنشأ ملف مارك. MRK من ملف الأكسل XLS. في هذه الخطوة. يمكنك عرض الملف بالنقر المزدوج عليه.
تحويل ملف. MRK إلى ملف. MRC
سوف نقوم بتحويل ملف. MRK الذي قمنا بإنشائه في الخطوة أعلاه في شكل مارك الخام الذي يمكن استيراده مباشرة في نظام كوها.
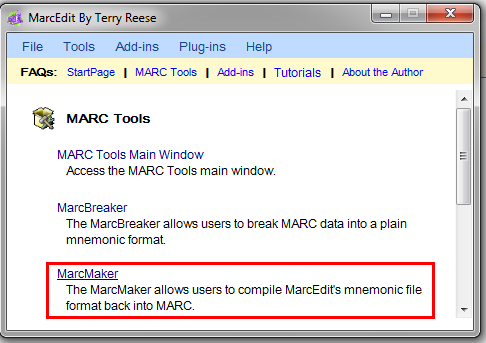
نعيد فتح برنامج محرر مارك مرةً آخرى و نختار أدوات مارك.
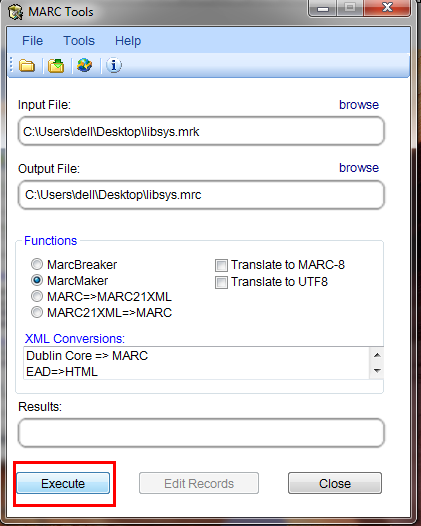
التالي إختر برنامج مارك لتحويل الملف من .mrk الى هيئة .mrc.
تحديد موقع ملف الإدخال واسم الملف الإخراج الخاص بك. انقر فوق تنفيذ.
وسوف تظهر لك النتيجة.
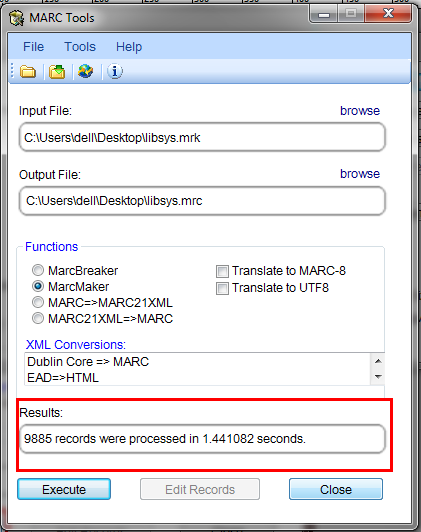
انقر فوق إغلاق والآن لدينا سجلات مارك الخام معنا (الملف.MRC ).
إستيراد ملف.MRC في نظام كوها
More information on importing records into Koha can be found in the 'Stage MARC Records for Import' section of this manual.
وأخيرا سوف نستورد ملف.mrc الذي تم إنشاؤه أعلاه في نظام كوها.
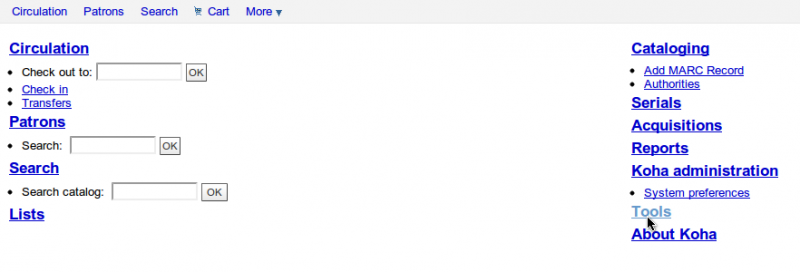
انقر على الأدوات في عميل الموظفين الخاص بك بنظام كوها.
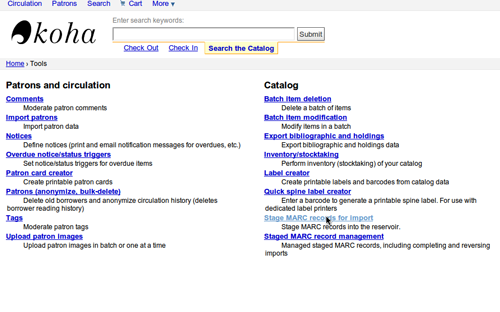
بعدها إضغط على تنظيم تسجيلات مارك للإستيراد.
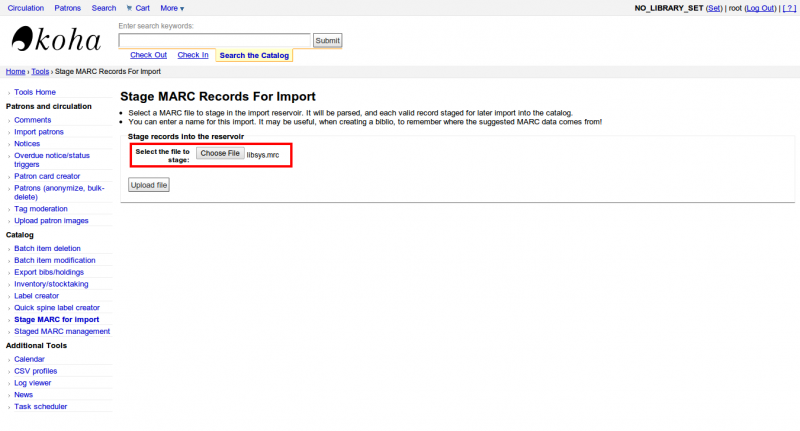
بعد ذلك، اختير ملف .mrc الذي تم إنشاؤه مسبقاً. وانقر على تحميل.
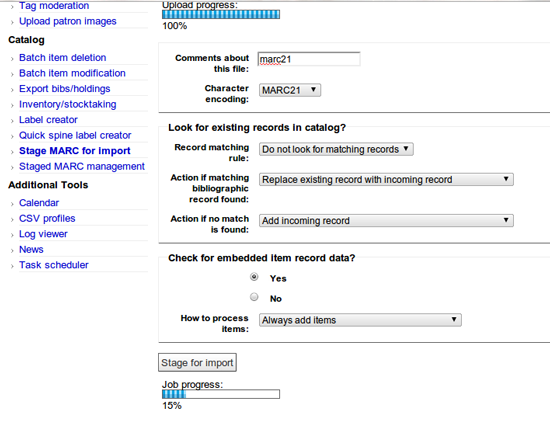
يمكنك أيضاً إضافة تعليق حول الملف وأخيرا انقر على تنظيم للإستيراد.
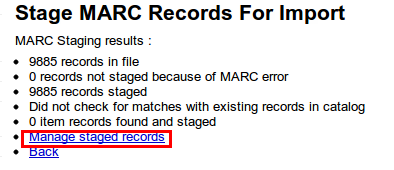
عندما يتم الإستيراد, سوف تحصل على نتيجة شيء من مثل هذا
التالي، انقر على إدارة تنظيم السجلات.
هنا يمكنك تغيير حتى قواعد المطابقة.
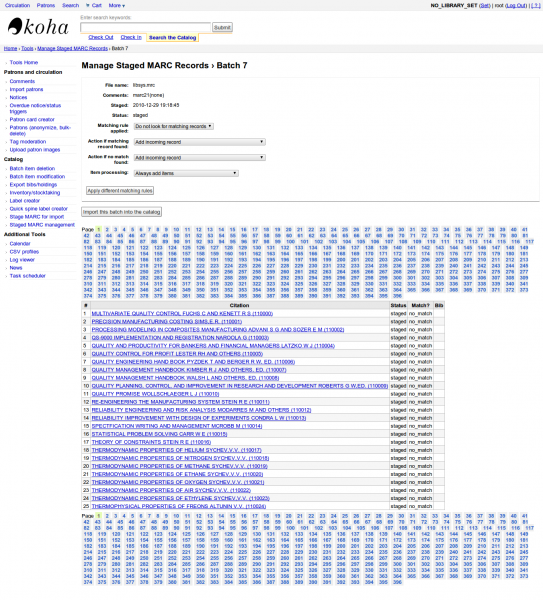
انقر على إستيراد هذه الدفعة في الفهرس عند الانتهاء.
بعد هذا. بعد الحصول على كافة السجلات المستوردة تأكد من الحالة ويجب ان تصبح "مستوردة"
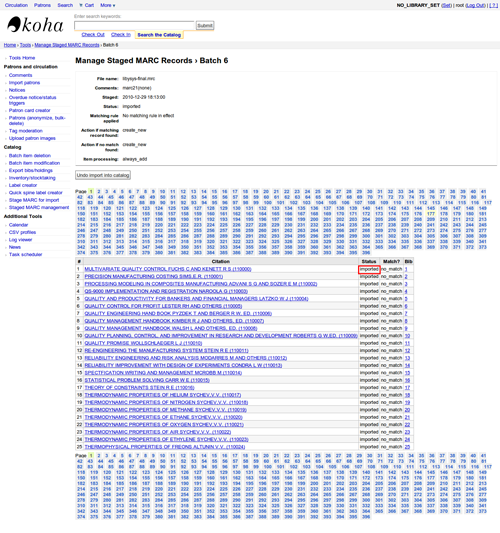
يمكنك حتى التراجع عن عملية الإستيراد.
وفي غضون دقائق قليلة، استوردنا حوالي 10،000 من السجلات في نظام كوها
تقنية التحدث الى
Talking Tech I-tiva is a third party, proprietary, product that libraries can subscribe to. Learn more here: http://www.talkingtech.com/solutions/library.
Installation and Setup Instructions
تأكد من أنك قمت بتنفيذinstaller/data/mysql/atomicupdate/Bug-4246-Talking-Tech-itiva-phone-notifications.pl لتنصيب حزمة البيانات المطلوبة (جديد syspref, إشعارات المواد النائبة ورسائل نقل التفضيلات)
To use, TalkingTechItivaPhoneNotification syspref must be turned on.
If you wish to process PREOVERDUE or RESERVES messages, you'll need the EnhancedMessagingPreferences system preference turned on, and patrons to have filled in a preference for receiving these notices by phone.
For OVERDUE messages, overdue notice triggers must be configured under Koha -> Tools -> Overdue Notice Triggers. Either branch-specific triggers or the default level triggers may be used (script will select whichever is appropriate).
إرسال إشعارات الملف
- Add the TalkingTech_itiva_outbound.pl script to your crontab
- إضافة FTP / SFTP أو غيرها من طريق النقل لإرسال ملف الإخراج إلى مخدم I-TIVA
- إذا كنت ترغب في ذلك،إشعارات أرشفة الملفات ترسل في دليل آخر بعد الإرسال
Run TalkingTech_itiva_outbound.pl --help for more information
إستِلام ملفِ النَتائِجِ
- إضافة FTP / SFTP أو غيرها من طريق النقل لإرسال الملف النتائج إلى دليلك المعروف على مخدم نظام كوها
- Add the TalkingTech_itiva_inbound.pl script to your crontab, aimed at that directory
- إذا كنت ترغب في ذلك، ملف نتائج الأرشيف في دليل آخر بعد المعالجة
Run TalkingTech_itiva_inbound.pl --help for more information
Integrating SIP2 with Koha
SIP2 (Session Initiation Protocol) is a protocol for communication between devices.
In the context of Koha SIP2 is used for communication between Self Check (SC) machines i.e. self checkout machines, and the Automated Circulation System (also known as ACS which in this case is the server running Koha).
SIP2 communications consist of requests and responses.
The self checkout machines are ‘dumb’ and so they send requests to the Koha server which runs logic which determines a particular outcome which is sent as a response message back to the client self checkout machine, and this is then conveyed to the user.
Warning
Security notice regarding using SIP2 service: To ensure that your SIP2 traffic is secure as it passes over the internet you need to make sure that you are using a VPN or stunnel.
Setting up SIP2
If you installed Koha using Debian packages then SIP2 setup is easy, simply follow these steps:
1. In your terminal (in the root Koha directory) write in: sudo koha-enable-sip <instancename>
2. Now you need to configure the SIP2 settings, to do this you need to edit the SIPconfig.xml file which exists in the /etc/koha/sites/<instancename>/ directory. You will need to edit this file as root because it contains passwords (to do so write ‘sudo’ at the start of your command).
e.g. sudo vi /etc/koha/sites/<instancename>/SIPconfig.xml
Note
Important note: There are three areas of interest in the SIPconfig.xml file that you need to change. These are: service, account and institution.
Service
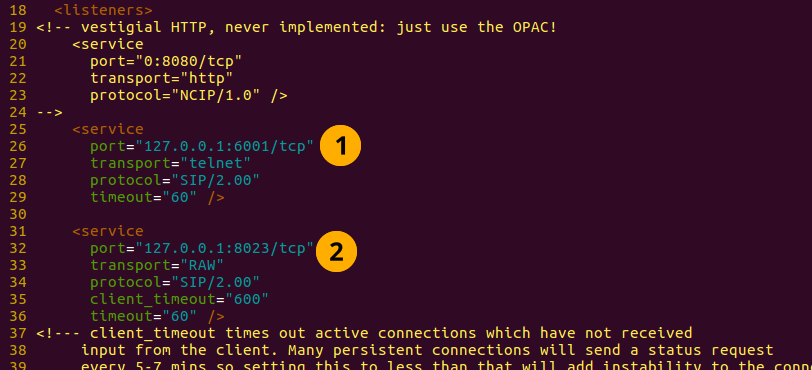
2.1 Change the port value near the top of the SIPconfig.xml file (identified by the number 1 in the below screen shot), so it has the same IP address as set further down the SIPconfig.xml file identified by 2.
Note
Make sure the two port values don’t have the same port number as you cannot have the same port being listened to by two different services. When deciding upon the port number make sure it is a high number (i.e. above 1000) because all ports below 1000 require root permissions.
Account
The account(s) you define in the SIPconfig.xml file are simply account(s) permitted to use the SIP2 service i.e. your defining who can send and receive SIP2 commands.
Warning
Account information that you write here must also exist in the Koha database i.e. you need to create a patron in the Koha staff interface with the same username, password (making sure to assign them circulate permissions) as the user account you write into the SIPconfig.xml file.
Note
It is highly recommended that you only write in Koha user accounts with circulate permissions.
The reason we want SIP2 users to only have circulate permissions rather than superlibrarian permissions is to reduce the access SIP2 users have to confidential patron data in case the system was compromised.
If the ACS or the SC were compromised then having all SIP2 users only having circulation permissions means that an intruder would only be able to access patron data via the terminal rather than the web interface as well (which would be available with superlibrarian permissions). So it is simply a matter of protecting your users.
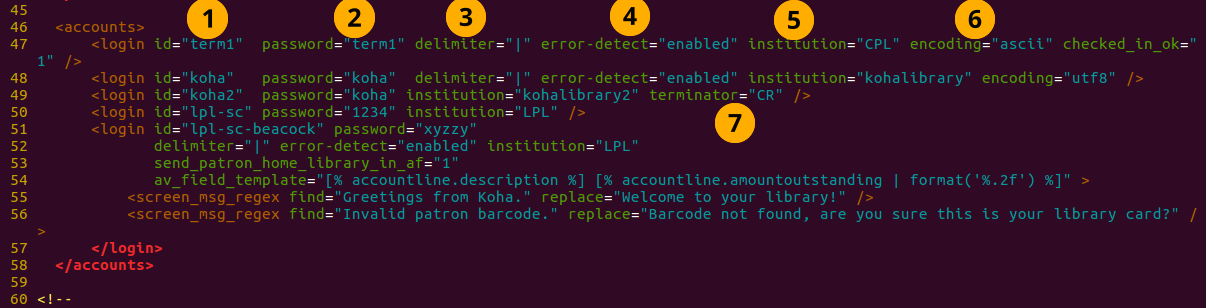
Account value definitions:
- Login id: This is the account username. - Modify this accordingly
- Password: Account password - Modify this accordingly
- Delimiter: The type of delimiter for account information - Leave as default
- error-detect - Leave as default
- Institution: This is the branchcode for the library that the user belongs to. NOTE: This institution needs to be defined further down in the institution area of the SIPconfig.xml file and it must also exist in the Koha database. i.e. you need to create a library with the same branchcode in Koha staff interface.
- encoding: This is the standard used to encode the account data
- Terminator: This needs to match the terminator value of the SIP2 server. - Modify this if you know the terminator value of the SIP2 server.
Institution
The institution information you define here must match a library created in the Koha staff interface.
Warning
You need to make sure all the institutions that accounts are assigned to further up in the SIPconfig.xml file are also defined in the institution area of the same file.

Institution value definitions:
1. Institution id: The branchcode of the library. - Modify this accordingly. Must be the same as created in Koha and the account area.
- Implementation: Defines the code that will be run. - Leave as default
3. Policy: Policy defines the permitted SIP2 commands allowed from SC’s in this institution. For example: renewal=”true” means that SC’s at that institution have permission to send renewal item SIP2 commands.
4. Starting SIP2 Simply write in the command: sudo koha-start-sip <instancename>
Note
Now you have a running SIP2 server.
Using SIP2
SIP2 is a communication protocol. The messages sent in SIP2 are either requests or responses. The SC’s send request messages to the ACS which will run some logic and send back the resulting value to the SC as a response message.
The request messages contain arguments, which are data values used by the ACS in its functions to perform the required task such as renewing items.
SIP2 commands
If you want to manually use/test SIP2 then you will be writing and receiving messages via the Linux terminal.
To be able to send and receive messages with the SIP2 server you need to use telnet to open a SIP2 connection. You need to specify the port number you want telnet to use.
To find this information look at the service area at the top of the SIPconfig.xml file (look for the port number as pointed out by the arrow in the below screenshot).

Write into the terminal
telnet localhost <portnumber>
e.g. telnet localhost 8023
Now write in the username and password set in one of the accounts in the SIPconfig.xml file.
Now you are connected to the SIP2 server you can start writing and sending request commands. The connection to the SIP2 server does time out fast so if haven’t finished writing and receiving commands simply write in:
telnet localhost <portnumber>
to restart the SIP2 connection.
SIP2 command syntax
Every SIP2 command has a 2 digit numerical prefix which defines what the command is doing.
e.g. To get information about a patron you start your command with the prefix: 63. The response from the server also has a corresponding numerical prefix.
Below is an example of a SIP2 request message to request patron information (in this example a Koha patron account with the user name ‘joe’, password ‘joes’, and card number ‘y76t5r43’ has been created in the Koha staff interface).
Additionally a library with the branchcode of ‘WEL’ has been created in the Koha staff interface and is also defined in the institution area of the SIPconfig.xml file):

So the format of this SIP2 request message is:

Note
The summary value is a 10 character value. If a Y is written in for the summary value then you will be able to get both a summary and more detailed informational output.
The value in the <YYYYMMDD> <HHMMSS> is the current datetime, by leaving a 4 space gap between the YYYYMMDD and HHMMSS this indicates you want to use local time rather than UTC.
Note
In this manual letter codes for the various fields are used where possible in describing the SIP2 message fields e.g. AO<institutionid>.
These letter codes can be written in the SIP2 commands into the Linux terminal, but make sure when substituting values in for the fields (values inside the <>) that you do not write in the <> brackets.
SIP2 messages:
Block patron
This uses the prefix 01 for request messages and 24 for response messages.
Request message:

Note
Card retained is a single character field of either ‘Y’ or ‘N’ which tells the ACS that a card has been retained by the self checkout machine.
Response message:

Note
<patronstatus> is a 14 character long value. The value Y in the string means true. Each position in this string (starting at 0) has a single corresponding value (Y or N) in the string.
e.g. a Y at position 1 (the second value in the string) means that the patrons renewal privileges are denied.
Check-in items
This uses the request message (messages sent to the ACS) prefix of 09 and the response prefix of 10 (sent to the SC).
Request message:

Note
- <no block (Offline)> is a single character field of either ‘Y’ or ‘N’ which indicates if the transaction is being performed offline. As offline transactions are not supported you need to write ‘N’ if you are testing this message out manually.
- <transactiondate> this is a 18 character field with the date is the format: YYYYMMDDZZZZHHMMSS.
ZZZZ is the timezone, if you want to set it to local you need to leave 4 blank spaces, but if you want to set it to the UTC (Coordinated Universal Time) then you need to write in 3 blank spaces and a Z.
Response message:

Note
Alert type could have one of several values: 00 : Unknown 01: local hold 02: remote hold 03: ILL Transfer 04: transfer 99: Other
If an item is resensitized then the value of <resentitize> should be Y otherwise it should be N. Rensensitizing items is done to ensure that if someone tries to steal the item they are detected.
Checkout items
This uses the request message prefix of 11 and the response message prefix of 12. It has similar syntax to the check-in command, outlined above except the prefixes are different.
Hold – May not yet be supported on some systems. This has a request message numerical prefix of 15 and a response message prefix of 16.
Request message:

Note
<holdmode> is a single character value. + means add a hold, - means delete a hold and * means change a hold.
Response message:

Note
- <ok> is a single length value which is either 0 (for hold is not permitted or was not successful) or 1 (for hold is permitted and was successful).
- <available> is a single length value which is either Y or N. Y means the item is currently in the library, whilst N means the item is currently on loan/someone else has created a hold on the item.
Item information: This uses the request command prefix of 17, and the response command prefix of 18
Request message:

Note
See the check-in items command (described above) to find out what the <xact_date> value is.
The terminal password is optional.
Response message:

Item status update This uses the request message prefix of 19 and the response message prefix of 20
Request message:

Note
<itemproperties> is not a fixed length value, and you can optionally write in values such as item size and these values will be stored in the Koha database for the item.
Response message:

Note
<itempropertiesok> is a single length character value which is either 0 or 1. 1 identifies that the <itemproperties> value defined in the item status update request message was successfully stored in the Koha database.
Patron status
This uses the request message prefix 23 and the response message prefix of 24.
Request message:

Response message:

Note
The value displayed for <patronvalidity> is Y (valid) and N (invalid) The value in the <YYYYMMDD> < HHMMSS> is the current date/time.
The reason for the gap between the two values is to define that you want to use localtime rather than UTC.
Patron enable - This is not yet supported. This uses the request message prefix of 25 and the response message prefix of 26
Note
This command undoes the block patron command.
Request message:

Response message:

Renew This uses the request message prefix of 29 and the response message prefix of 30
Request message:

Note
- <thirdpartyallowed> is a single character value which is either Y or N. If it is Y then third parties can renew items.
- <noblock> is a single character value which is either Y or N. If it is Y then this means that the item was checkin/out when the ACS was offline.
- <nbduedate> is the transaction date of checkin/checkout when the ACS was offline.
- <feeacknowledged> is a single character value which is either Y or N. This indicates if the user accepts the fee associated with the item they are renewing.
Response message:

Note
- <ok> is a single character value which is either 0 or 1. A value of 1 means the item was successfully renewed, 0 means item was not successfully renewed.
- <renewalok> is a single character value which is either Y or N. The logic for the setting of the value of <renewalok> is Y is set when the item is already checkout by the user and so it should be desensitized thereby renewing it, whereas N is set if the item is not already checkout to the patron and so it should not be renewed.
In other words don’t let patrons renew books when they are not currently checked out to them.
- <magneticmedia> is a single character value which is either Y (for yes), N ( for no), or U (for unknown).
- <mediatype> is a three numerical character long value. For a list of the values go to: http://multimedia.3m.com/mws/media/355361O/sip2-protocol.pdf
End session
This uses the request message prefix of 35 and the response message prefix of 36
Request message:

Response message:

Note
<success_or_failure> is either Y for success or N for failure.
Fee Paid – May not be implemented yet. This uses a request message prefix of 37 and a response message prefix of 38
Request message:

Note
- <feetype> is a two numerical character value which is between 01 and 99. To see a list of fee type values go to http://multimedia.3m.com/mws/media/355361O/sip2-protocol.pdf
- <paymenttype> is a two character numerical value between 00 and 99. 00 is cash, 01 is Visa, and 02 is credit card.
- <currencytype> is a 3 alphanumeric character long value identifying the currency the fee paid was in.
Response message:

Note
<paymentaccepted> is a single alphanumeric character long value which is either Y (payment has been accepted) or N (payment has not been accepted).
Patron information
This uses the request message prefix of 63 and the response message prefix of 64
Request message:

Response message:

Note
<valid patron> is Y for valid and N for not valid.
Note
<hold itemcount><overdueitemcount><chargeditemscount><fienitemscount><recallitemscount><unavaliableholdscount> are all 4 numerical character long values.
Renew all
This uses the request message prefix of 65 and the response message prefix of 66.
Request message:

Response message:

Note
- <renewedcount> is a 4 numerical character long value denoting the number of items that were renewed.
- <unrenewedcount>, has the same format as the <renewedcount> but it denotes the number of items not renewed.
Login
This uses the request message prefix of 93, and the response message prefix of 94.
Request message:

Note
<UIDalgorithm> and <PWDalgorithm> are one character long values indicating the type of algorithm to use to encrypt the loginuserid and loginpassword respectively.
Writing in the value of 0 means these values will not be encrypted.
Response message: 941 is a successful login. 940 is an unsuccessful login [connection closed by foreign host.] is a unsuccessful login
Resend
This requests the receiving device to resend its last message.
SC -> ACS resend request is 97
ACS -> SC resend request is 96
Status of the ACS and SC
This has the request message prefix of 99 and the response message prefix of 98.
Request message:

Note
The status code is one of 3 values. * 0: SC is ok * 1: SC is out of paper * 2: SC is shutting down max print width is a 3 character long value which is the integer number of characters the client can print Protocol version is a 4 character value in the format x.xx
Response message:

Note
If you get the response message ‘96’ this means that the request message is not valid/understood.
Troubleshooting SIP2
Can’t connect to remote host when writing in the command telnet localhost <portnumber>
3 solutions for this issue to try are:
1. Check the portnumber your writing in the above command is the port number written in the SIPconfig.xml file at the location indicated by the number 1. i.e. in the below example because the portnumber is 6001 the correct command would be: telnet localhost 6001
2. Check if any userid is written more than once in the SIPconfig.xml file. The userid (which is simply the username of the Koha user) needs to be unique within the SIPconfig.xml file. If you have the same userid multiple times in your SIPconfig.xml file this will cause the connection to SIP2 to fail before you get a chance to authenticate.
3. Check the account defined in the SIPconfig.xml file also exists in the Koha database with the same username, password and has circulate permissions. If you have dropped and recreated the Koha database after creating the patron account in the Koha staff interface and the SIPconfig.xml file then that patron account will not exist in the Koha database and so you will need to recreate them in the Koha staff interface.
Further troubleshooting
To access the SIP2 logs in your Koha home directory navigate to the following directory: /var/log/koha/<instancename>
Then view the output of the sip-error.log and the sip-output.log files which give more detailed information about the SIP2 error.
- cat sip-error.log
- cat sip-output.log
Useful links on SIP2 commands:
http://multimedia.3m.com/mws/media/355361O/sip2-protocol.pdf
Integrating LDAP with Koha
Setting up LDAP (Lightweight Directory Access Protocol) for Koha allows you to store all user information in a central database which is accessed both by your organisations Koha instance and for users to authenticate on other existing systems.
LDAP is a protocol used for file discovery over networks and network authentication.
LDAP configurations are powerful allowing you to customise how Koha and LDAP interact. LDAP can be configured so that new accounts created in LDAP can be synced down into the Koha database, additionally updates to the LDAP user account are synced down to the Koha database.
However Koha cannot sync data up to the LDAP server, thus the data traffic when using LDAP is only one directional.
Auth_By_Bind is set to 1 where a Microsoft Windows Active Directory system is in use in the LDAP database.
Before going through the steps to configure LDAP you will need the following information/actions from the organisation
- The organisation will need to open a port to allow access to their AD from the server.
- Information on the access to the AD server (IP address/hostname, port, SSL info)
- Information on the configuration of the AD server (relevant OUs, DCs, CN formats relative to usernames)
- Mapping between AD fields and Koha fields, including defaults
- Default values for things not provided by AD (categorycode, branchcode for example)
- To authenticate a user do we bind as them (seems to be common for AD) or do we use an account and login with that and then check? If the latter, we'll need details of how to log in
- Do the existing usernames in Koha match the usernames that we'll be using to look them up in AD? If so, good. If not, how will we deal with duplicate users?
Steps to set up LDAP with your Koha instance
1 In Linux terminal navigate to the directory containing the koha-conf.xml file which will either be in: * /etc/koha/sites/<instance-name>/ OR * /etc/koha/
2 Open the koha-conf.xml file with root permissions: sudo vi koha-conf.xml
3 Scroll down to the line containing ‘<useldapserver>0</useldapserver>’ and change it to: <useldapserver>1</useldapserver>
4 Then in the next line below write in the LDAP configurations below: Note all fields highlighted in yellow need to be replaced with the appropriate values for your organisations LDAP server.
<ldapserver id="<ldapserverid>">
<hostname><hostname></hostname>
<base>dc=<domaincontroller>,dc=<domaincontroller></base>
<user>cn=<nameofuser>, dc=<domaincontroller>,dc=<domaincontroller></user> <!--This is the username of user account with permissions to query the LDAP server -->
<pass><password></pass> <!-- This is password of the user account with permissions to query the LDAP server-->
<replicate><either0or1></replicate> <!-- add new users from LDAP to Koha database -->
<update><either0or1></update> <!-- update existing users in Koha database -->
<auth_by_bind><either0or1></auth_by_bind> <!-- set to 1 to authenticate by binding instead of password comparison, e.g., to use Active Directory -->
<principal_name><principalname></principal_name> <!-- optional, for auth_by_bind: a printf format to make userPrincipalName from koha userid -->
<mapping> <!-- match koha SQL field names to your LDAP record field names-->
<firstname is="givenname"></firstname>
<surname is="sn"></surname>
<address is="postaladdress"></address>
<city is="l">Athens, OH</city> <!-- Athens,OH is the default value for city of all users logging into Koha -->
<zipcode is="postalcode"></zipcode>
<branchcode is="branch">Central</branchcode>
<userid is="uid"></userid>
<password is="userpassword"></password>
<email is="mail"></email>
<categorycode is="employeetype">EM</categorycode>
<phone is="telephonenumber"></phone>
</mapping>
</ldapserver>
5 Save and exit the koha-conf.xml file
6 Check the LDAP connection works by writing in:
ldapsearch -H ldaps://host.name -s base -x -w "" -d 1
Note
Note about hostname Hostname can either be a alphanumerical name or it can be the LDAP server IP address (its optional to write port number). By default the ldaps default port number is 636, whilst ldap default port number is 389
Note
Note about the replicate and update fields The replicate LDAP config field for LDAP in the koha-conf.xml file allow the Koha database to be added to with a new borrower account whenever a user logs into Koha (either the staff client or OPAC) with their LDAP username and password (assuming the same username and password does not already exist in the Koha database).
Whereas the update LDAP config field (in the same file allows) allows for user information in the LDAP database to be synced down to the Koha database. e.g. if someone gets married and their surname changes then the new surname only needs to be updated in the existing LDAP database and that will be synced down to the Koha database automatically if the update configuration is set to 1.
About the mapping fields (the fields highlighted green) <city is="l">Athens, OH</city>
The left hand column name (highlighted yellow) is the name of the column in the LDAP database.
The column name inside quote marks (highlighted pink) is the name of the column in the Koha database. NOTE: This can be filled with any value if there is no equivalent column name in the Koha database as exists in the LDAP database.
The value highlighted cyan is the default value for the specified Koha and LDAP columns. So in the above example all user records in the Koha and LDAP databases will by default have the city value of ‘Athens, OH’.
Example of the LDAP configurations:
<useldapserver>1</useldapserver><!-- see C4::Auth_with_ldap for extra configs you must add if you want to turn this on -->
<ldapserver id="ldapserver" listenref="ldapserver">
<hostname>ldaps://example.co.au</hostname>
<base>ou=employees,dc=companya,dc=com,dc=au</base>
<user></user> <!-- DN, if not anonymous -->
<pass></pass> <!-- password, if not anonymous -->
<auth_by_bind>1</auth_by_bind>
<replicate>1</replicate> <!-- add new users from LDAP to Koha database -->
<update>0</update> <!-- update existing users in Koha database -->
<principal_name>ou=employees,dc=companya,dc=com,dc=au</principal_name>
<mapping>
<userid is="uid" ></userid>
<cardnumber is="uid" ></cardnumber>
<email is="mail" ></email>
<surname is="sn" ></surname>
<firstname is="givenname" ></firstname>
<categorycode is="1">EM</categorycode>
<branchcode is="1">SYD</branchcode>
</mapping>
</ldapserver>
The values in the mapping area are not always the same, and it depends on what is in your organisations LDAP database. For example some organisations do not use <userid> instead each user is only identified by the <email> field and so no <userid> is written.
Troubleshooting LDAP
The log that LDAP errors are printed to depends on several factors:
If plack is not disabled then LDAP errors are displayed in the plack-error.log file If plack is disabled then the location that LDAP errors are printed to is either the opac-error.log file (if the user is logging into the OPAC) or the intranet-error.log file (if the user is logging into the staff client) All of these three log files are accessible in the following directory:
/var/log/koha/<instance>/
OCLC Connexion Gateway
Koha can be set to work with the OCLC Connextion Gateway. This allows libraries to use OCLC Connexion as their cataloging tool and simply send those records to Koha with a single click. The following instructions will help you set up the OCLC Connexion Gateway, if you have a system administrator you will want to consult with them on this process.
Setting up OCLC service on Koha
First, you'll need to create a file somewhere on your system with configuration information. You could put this anywhere that is visible to the account that will be running the service.
The file contains 11 lines. The first 6 will be about your Koha system:
host: The IP address of your Koha server
port: The port you want to use for the Connexion service. This port must be different from your SIP port, or any other service
koha: The full URL of your staff client
log: The location (full file specification) of your log for the service
user: The default Koha username to use for importing
password: The password that goes with that username
The remaining lines describe how to do the staging:
match: The name of the matching rule from your system to use
overlay_action: "replace", "create_new", or "ignore"-- what to do if there is a match
nomatch_action: "create_new" or "ignore"-- what to do if there is no match
item_action: "always_add","add_only_for_matches","add_only_for_new", or "ignore" -- what to do with embedded 952 item data
import_mode: "direct" or "stage"
التخطيط يَبْدو مثل هذا:
host: 1.2.3.4
port: 8000
log: /home/koha/koha-dev/var/log/connexion.log
koha: http://kohastaff.myuniversity.edu
user: koha_generic_staff
password: password
match: 001
overlay_action: replace
nomatch_action: create_new
item_action: ignore
import_mode: direct
When choosing an 'import_mode' if you use "direct" then the staged record will be immediately imported into Koha, and should be searchable after your indexes catch up. If you choose "stage", then the record will be placed in a staged batch for you to later go the Manage Staged MARC Records tool to finish the import.
If you import multiple records, they'll be in the same batch, until that batch is imported, then a new batch will be created.
In "direct" mode, each record will be in its' own batch.
ثم أبدأ الحصاد:
/location/of/connexion/import/daemon/connexion_import_daemon.pl -d -c /location/of/config/file.cnf
Setting up your OCLC desktop client
Note
Screenshots are OCLC Connexion Client v.2.50, Koha v.3.12
To set up the OCLC Connexion desktop client to connect to Koha, go to Tools > Options, then choose the Export tab.
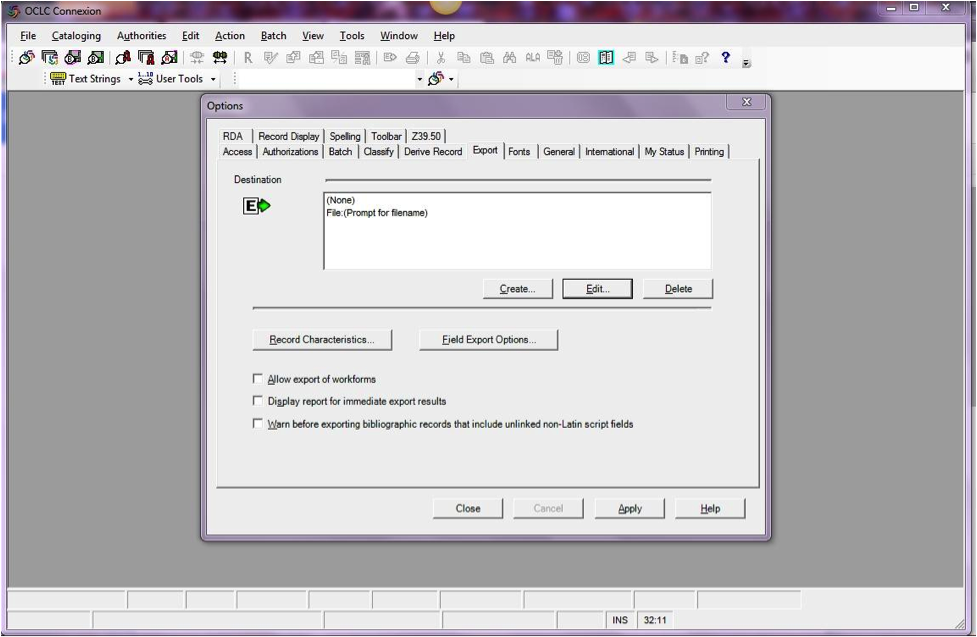
Click the "Create..." button to set up a new destination, then choose "OCLC Gateway Export" and click OK.
- ومن ثم أدخل معلومات الاتصال
- "Host Name:" Your catalog’s appropriate IP address (from your config file above)
- "Port:" Your catalog's appropriate port number (from your config file above)
- "Login ID:" The cataloger's Koha login
- كلمة المرور= كلمة مرور حساب الموظفين الخاص بك
- "Notify Host Before Disconnect" = checked,
- "Timeout" = 100, "Retries" = 3, "Delay" = 0 (zero),
- "Send Local System Logon ID Password" = checked.
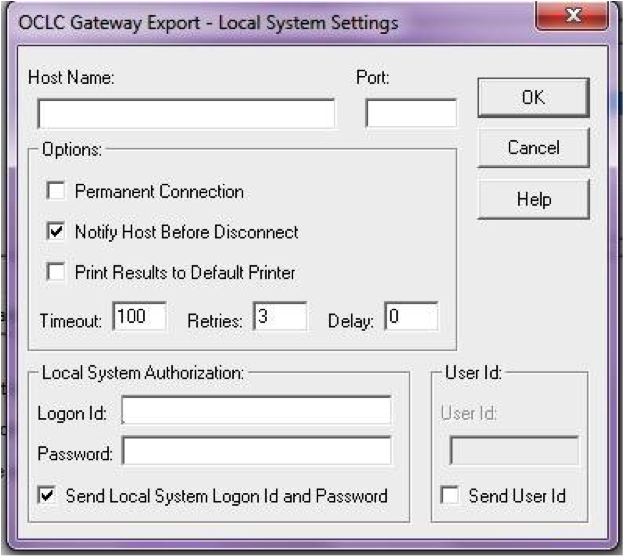
- ومن ثم أدخل معلومات الاتصال
Select "OK" when finished, and you should see your new "Gateway Export" option listed (The catalog's IP address and port are blacked out in the following screenshot)
التاريخ المضاف
Click on "Record Characteristics" and make sure that the bibliographic records are using MARC21, UTF-8 Unicode, and click OK to save.
خصائص التنسيق الخاصة
You should be ready to go! To export a record from OCLC Connexion Client to Koha, just press F5 while the record is on-screen. The export dialog will pop up, and you'll see Connexion attempting to talk to Koha. You should get a message that the record was added or overlaid, including its biblio number, and a URL that you can copy into your web browser to jump straight to the record.
Using the OCLC Connexion Gateway
Records can be exported from Connexion either in a batch or one by one.
Exporting records one by one
To export bibliographic records one by one, be sure your "Batch" options are correct: from the "Tools" menu, select "Options", and select the "Batch" tab. In the "Perform local actions in batch" area, "Bibliographic Record Export" should be unchecked
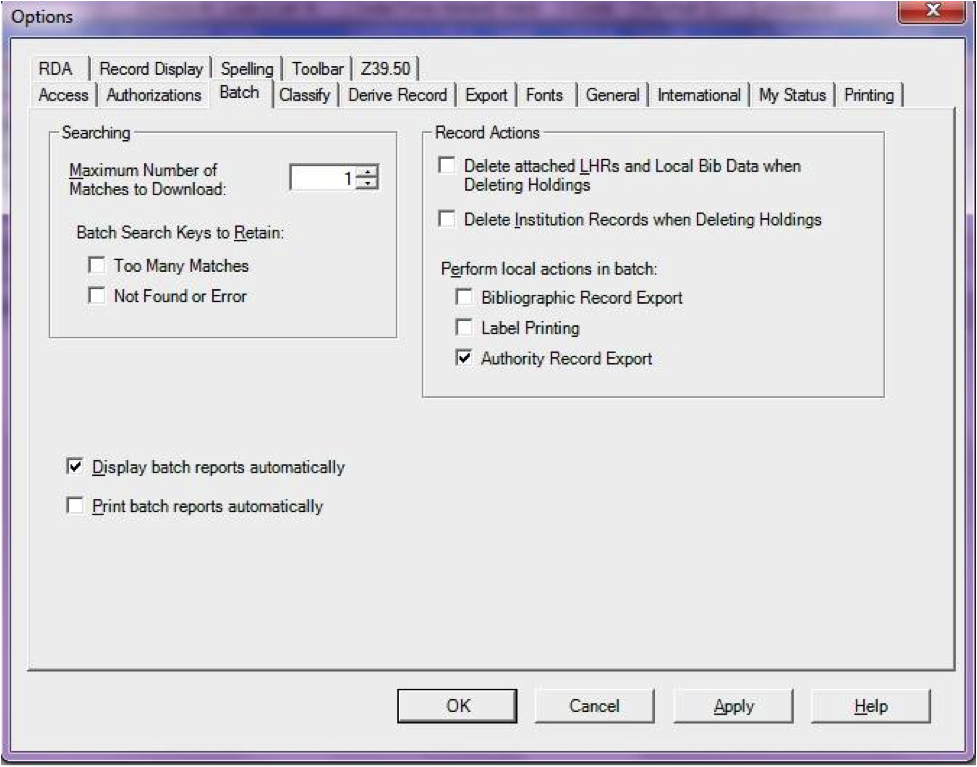
When ready to export, from the "Action" menu, select "Export" or use the F5 key. You will see a screen similar to the following if the import is successful and if the record is new to the Catalog; you may copy & paste the resulting URL into your Koha catalog to see the new record.
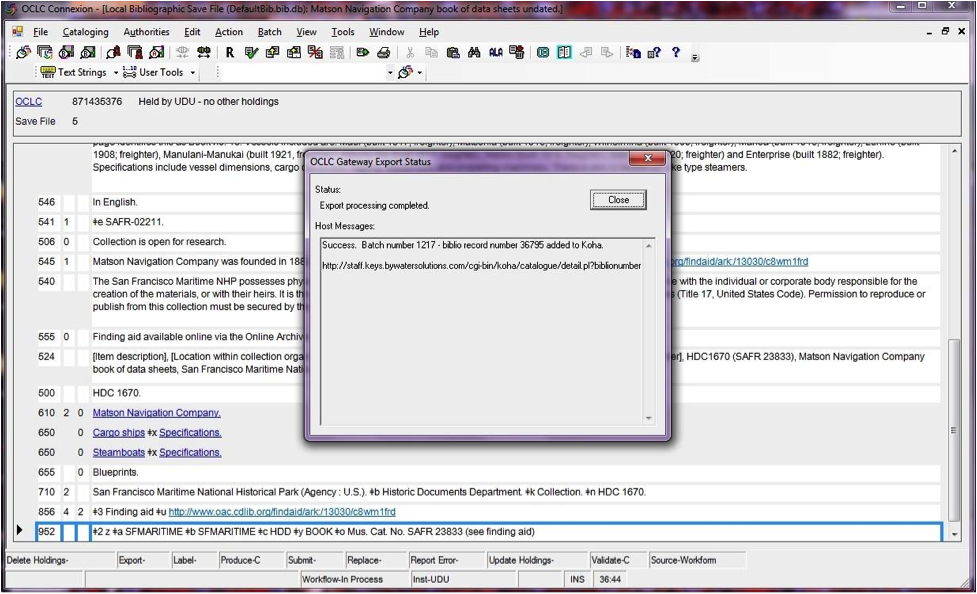
If the record was overlaid, you will see a message to that effect in the "OCLC Gateway Export Status" window
Exporting records in a batch
To export bibliographic records in a batch, be sure your "Batch" options are correct: from the "Tools" menu, select "Options", and select the "Batch" tab. In the "Perform local actions in batch" area, "Bibliographic Record Export" should be checkedOCLC
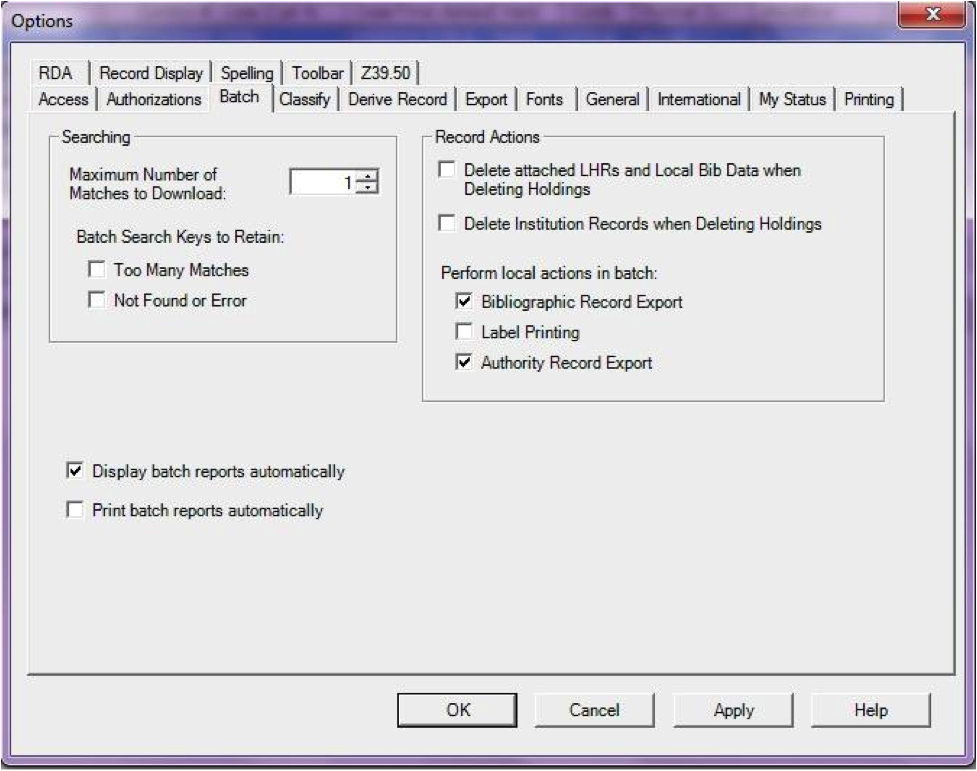
When a record is ready to export, from the "Action" menu, select "Export" or use the F5 key, and it’s export status will be "ready."
When ready to export the batch, from the "Batch" menu, select "Process batch" and check the appropriate "Path" and "Export" boxes
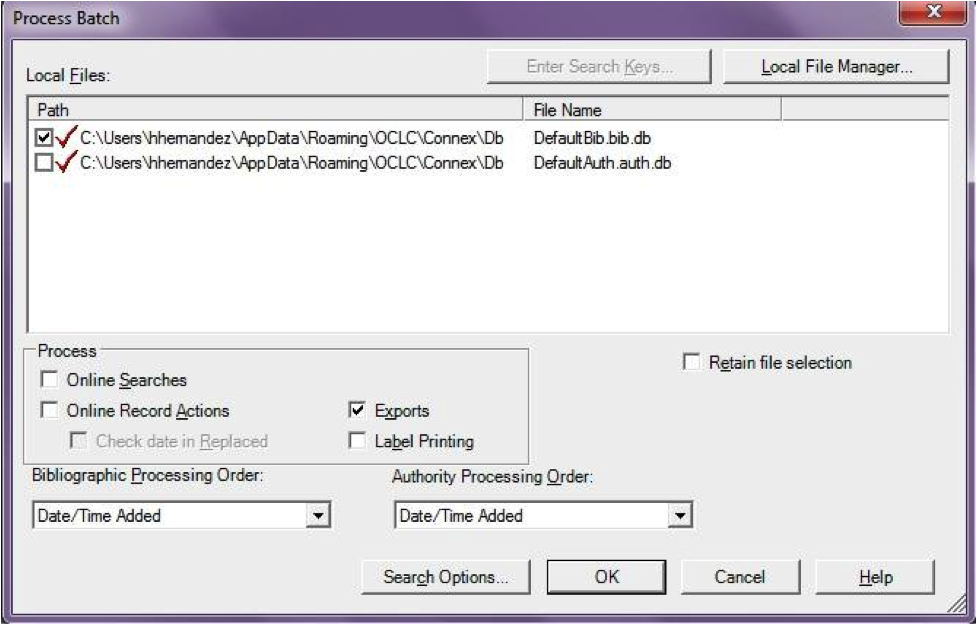
The export will begin, and the bib records will be exported & imported into Koha one by one; you will see "OCLC Gateway Export Status" windows, as above, showing you the results of each export. That window will stay there until you select "Close," and then the next record’s export/import will begin. The process will continue until all records in the batch are completed. Then you may or may not see the Connexion Client export report (depending on your Client options for that).
Items in OCLC
If you'd like to create your item records in OCLC you can do so by addding a 952 for each item to the bib record you're cataloging. The Item/Holdings Cataloging Guide will break down what subfields you can use in the 952, but at the minimum you want to have subfield 2, a, b, and y on your items.
952 \\$2CLASSIFICATION$aHOMEBRANCHCODE$bHOLDINGBRANCHCODE$yITEMTYPECODE
- The subfield 2 holds the classification code. This can be ddc for Dewey or lcc for Library of Congress or z for Custom. Other classification sources can be found in the Classification Sources area in administration
- Subfield a is your home library and needs to be the code for your home library, not the library name. You can find these codes in the Libraries & Groups administration area.
- Subfield b is your holding library and needs to be the code for your holding library, not the library name. You can find these codes in the Libraries & Groups administration area.
- Subfield y is your item type code. It needs to be the code, not the item type name. You can find these codes in the Item Types administration area.
952 \\$2ddc$aMAIN$bMAIN$yBOOK
In addition to these required fields you can enter any other subfield you'd like. Most libraries will enter a call number in subfield o and a barcode in subfield p as well. Review the Item/Holdings Cataloging Guide for a full list of subfields and values.
الأسئلة المتكررة كثيراً
العرض
Custom Item Type/Authorized Value Icons
Question: Can I have my own set of item type images (or authorized value icons)?
Answer:Absolutely. To add additional icons to your system you simply add a new directory to koha-tmpl/intranet-tmpl/prog/img/itemtypeimg/ and to koha-tmpl/opac-tmpl/prog/itemtypeimg and put your icons in the new directory. Your icons will show up in a new tab as soon as they are in the folders.
Note
تذكير لوضع الإيقونات في كلا من الأماكن (على الأوباك والشبكة الداخلية).
تخصيص نظام كوها للصور
Question: Can I customize the images in the OPAC?
Answer: Absolutely. Koha comes with a series of original images that you can alter to meet your needs. The originals can be found in the misc/interface_customization/ directory.
عرض الحقول في الأوباك
Question: What MARC fields print to the different OPAC screens in Koha?
Answer: The XSLT preference must be set as follows for the following fields to show
- OPACXSLTResultsDisplay = using XSLT stylesheets
- OPACXSLTDetailsDisplay = using XSLT stylesheets
- DisplayOPACiconsXSLT = show
صفحة نتائج الأوباك تظهر:
- 245
- 100, 110, 111
- 700, 710, 711
- 250
- 260
- 246
- 856
صفحة تفاصيل الأوباك تظهر:
- 245
- 100, 110, 111
- 700, 710, 711
- 440, 490
- 260
- 250
- 300
- 020
- 022
- 246
- 130, 240
- 6xx
- 856
- 505
- 773
- 520
- 866
- 775
- 780
- 785
- بالإضافة إلى كل من حقول 5xx في تبويب ملاحظات في الأسفل
عرض العنوان الثاوي على سجلات الببليوغرافية
Question: How do I get the subtitle to display on the detail pages for my bib records?
Answer: Subtitle display now depends on there being a keyword mapping for the MARC field in question. Adding a mapping for "subtitle" -> "245b" for an item's framework results in display of the subtitle in OPAC and staff client search and detail pages (although not in all instances where subtitles might be displayed, e.g. the Cart).
Show patrons the barcodes of items they have checked out
Question: Can patrons see the barcodes for the items they have checked out.
Answer: Not by default, but with a few edits to the patron record you can make a barcode column appear on the patron's check out summary in the OPAC. You can set up a patron attribute with the value of SHOW_BCODE and authorized value of YES_NO to make this happen.
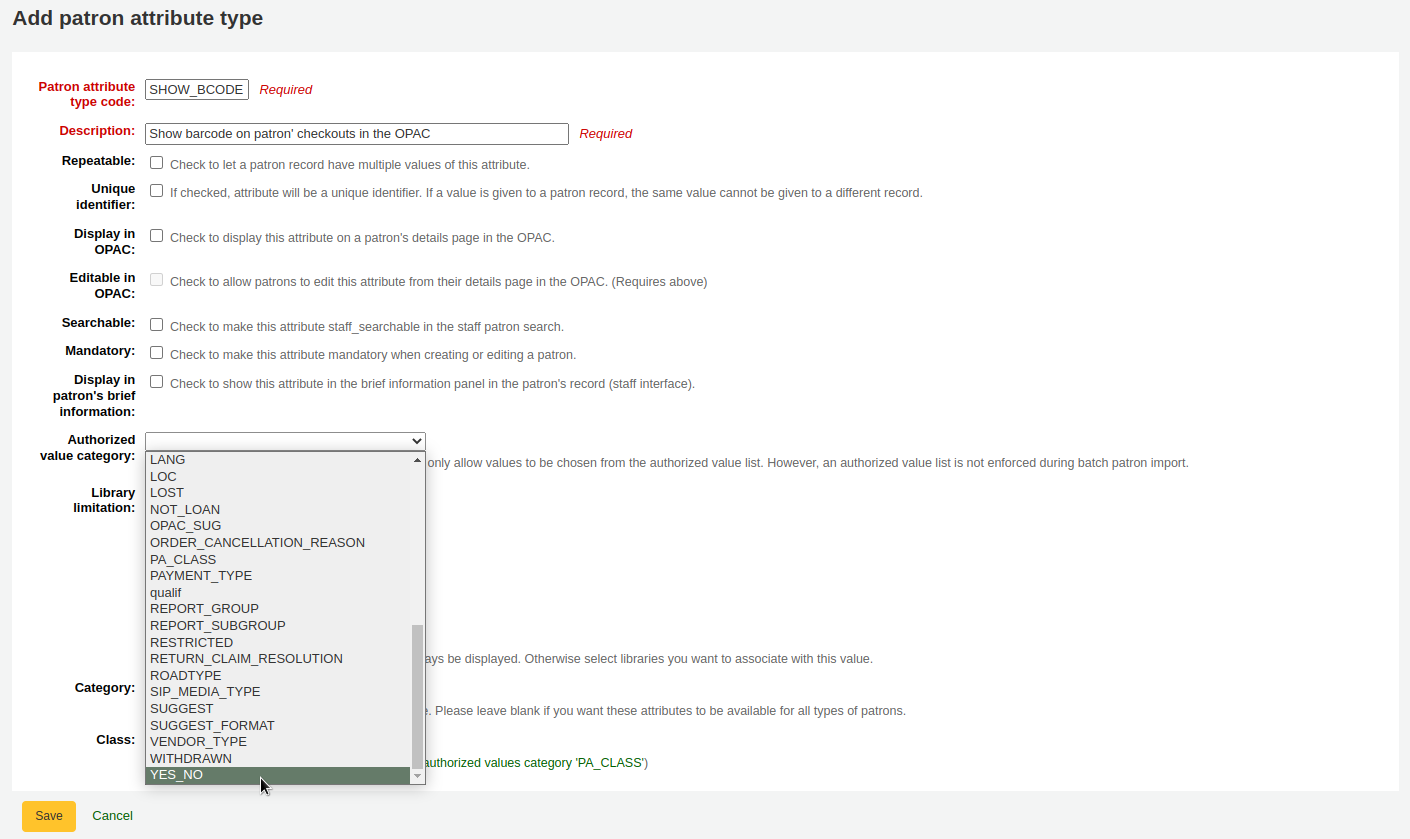
Then on the patron's record set the value for SHOW_BCODE to yes.
وهذا إضافة عمود إلى ملخص المواد المُعارة في الأوباك يبين المستفيدين من باركود المواد التي المٌعارة.
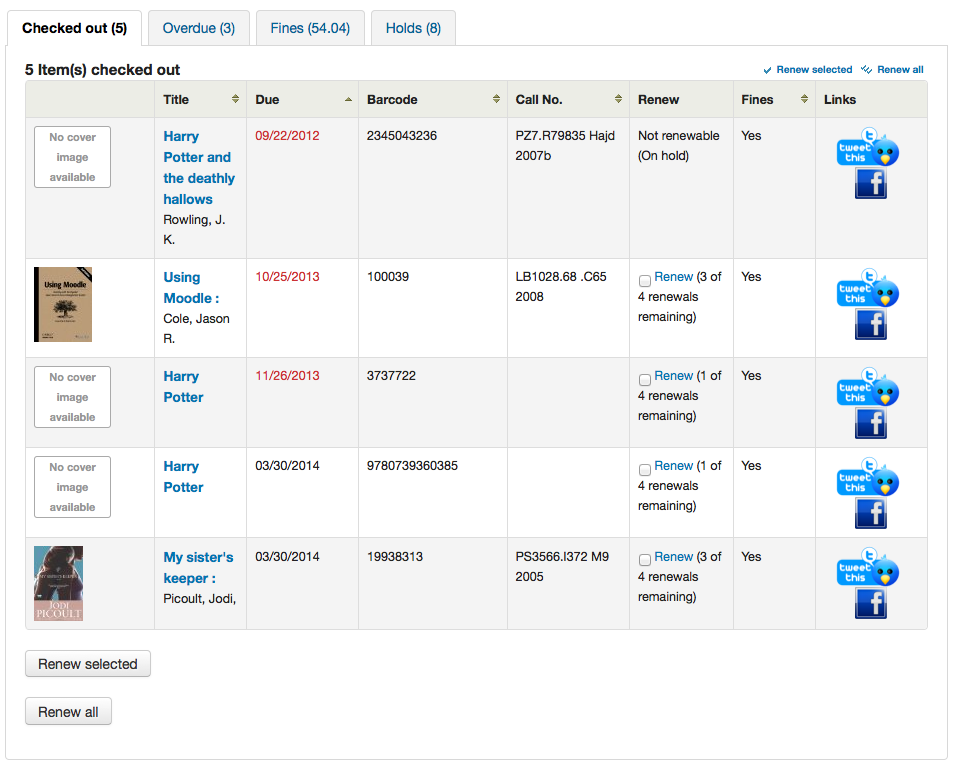
انقر على تبويب "المتأخرة" سوف تظهر فقط المواد التي وصلت متأخرة.
تداول / إشعارات
Book drop Date
Question: How is the book drop date is determined? Is it the last open date for the checkout branch? Is it today's date minus one? Can the book drop checkin date be set?
Answer: If the library is closed for four days for renovations, for example, there would be more than one day needed for the book drop date. You will only have one book drop date and that will be the last day that the library open (determined by the holiday calendar) because there is no real way to know what day the books were dropped into the box during the 4 closed days. The only way to change the effective checkin date in book drop mode is to modify the calendar.
Holds to Pull and Holds Queue
Question: What is the difference between the Holds Queue and Holds to Pull?
Answer: The holds to pull report gives a simple list of what holds need to be filled with available items. It should only be used in Koha installations where there is only one library.
The holds queue tries to do the same thing, but in a 'smarter' way. This allows it to split up the list by library, consult the transport cost matrix and refresh regularly to provide different pull lists to each library.
تكرار الإشعارات المتأخرة
Question: Why are patrons getting two overdue notices?
Answer: This tool takes all branches in the overdue rules and sent notifications to them. So, if you have a default rule & a branch rule, the notification will be generated twice. A quick fix is to discard "default rule" for instance.
طباعة الإشعارات المتأخرة
Question: Can I print overdue notices for patrons without email addresses on file?
Answer: Yes. The overdue notice cron job has a setting to generate the overdue notices as HTML for printing. An example of this usage would be:
overdue_notices.pl -t -html /tmp/noticedir -itemscontent issuedate,date_due,title,barcode,author
In this example, we wanted to use only certain item fields in our notices, so we specified itemscontent fields in the cron entry; that's not a requirement for the feature.
The command line needs to specify a web-accessible directory where the print notices will go -- they get a filename like notices-2009-11-24.html (or holdnotices-2009-11-24.html). The overdue notice itself can be formatted to fit a Z-mailer. Within the notice file, the text is spaced down or over to where it will print properly on the form. The script has code that wraps around the notice file to tell the HTML to obey the formatting, and to do a page break between notices. That's so that when staff print it out, they get one per page. We had to add an extra syspref (PrintNoticesMaxLines) to specify page length because our client allows a _lot_ of checkouts which meant some notices were running onto multiple pages. That syspref says to truncate the print notice at that page length and put in a message about go check your OPAC account for the full list.
The print and email overdues use the same notice file. The print notices for holds are different -- there's a separate HOLD_PRINT notice file and the system uses it if there's no email address. Then a nightly cron job runs to gather those up from the message queue and put them in an HTML file in the notice directory, as above.
The cron entry is gather_print_notices.pl /tmp/noticedir
غير قادر على تَجديد الموادِ
Question: We're trying to renew some items for our patron. One of the items is on hold and ineligible for renewal, but the other two items refuse to renew even though they should be eligible. When I try to use the override renewal limit, it just returns a little message that says "renewal failed". Any idea what's going on here?
Answer: At the very least you will need to set an absolute default circulation rule. This rule should be set for the default itemtype, default branchcode and default patron category. That will catch anyone who doesn't match a specific rule. Patrons who do not match a specific rule will get blocked from placing holds or renewing items, since there was no baseline number of holds or renewals to utilize.
غير قادر على تَثبيت الحجوزاتِ
Question: Why can't I place holds when I have all of the preferences turned on.
Answer: You probably need to set a default circulation rule. At the very least you will need to set an default circulation rule. This rule should be set for all item types, all branches and all patron categories. That will catch all instances that do not match a specific rule. When checking out if you do not have a rule for the default branch, default item and default patron category then you may see patrons getting blocked from placing holds.
إختصارات لوحة المفاتيح
Question: Do I have to use my mouse to access the checkout, checkin and cataloging tabs at the top of the circulation pages?
Answer: You can jump between the tabs on the quick search box at the top of the screen by using the following hot keys (if the tab is available):
الانتقال إلى البحث في الفهرس مع ALT + Q
الانتقال إلى الخروج مع ALT + U
- هذا لن يعمل لمستخدم ماك
الانتقال إلى الاعارة مع ALT + R
Note
مستخدمي ماك يستخدمون زر الخيار في مكان ALT
إشعارات الرسائل القصيرة / رسائل
Question: I want Koha to send notices via SMS, what do I need to do?
Answer: First you need to choose a SMS service to use with Koha. There is a list available here: http://search.cpan.org/search?query=sms%3A%3Asend&mode=all Not all SMS services available to libraries have Perl drivers, so be sure to check this list to see if the provider you're considering is listed. If not you want to ask your provider if they have a Perl module, if not you should consider another service. Some common options in the US (that have Perl drivers) are:
- AQL (www.aql.com)
- Wadja (wadja.com)
- Ipipi (ipipi.com)
- تي - موبايل
- SMSDiscount (smsdiscount.com)
- Clickatell
Question: What about in India?
Answer: India does not yet have too many options here. This is partly due to the Telecom regulatory authority's (TRAI) stipulations about transactional SMSes and limits on the number of SMSes that may be sent / received per users per day. India specific drivers include:
- Unicel Technologies Pvt Ltd (unicel.in)
الفهرسة
إدارة الحقول
Question:Why can't I edit 1xx, 6xx, or 7xx fields in my catalog record?
Answer: These fields are authority controlled and you probably have the BiblioAddsAuthorities set to "Don't allow". When it is set to "Don't allow" these fields will be locked and require you to search for an existing authority record to populate the field with. To allow typing in these authority fields set BiblioAddsAuthorities to 'Allow'.
Note
Fields affected by this preference will show a lock symbol in them

كوها لتعيين مارك
Question: What's the relationship between 'Koha to MARC Mapping' and 'MARC Bibliographic Frameworks'?
Answer: Mapping can be defined through 'MARC Bibliographic Frameworks' OR 'Koha to MARC Mapping'. 'Koha to MARC Mapping' is just a shortcut to speed up linkage. If you change a mapping in one of these modules, the mapping will change in the other as well. (In other words, the two modules 'overwrite' each other in order to prevent conflicts from existing in Koha).
Number of Items Per Bib Record
Question: Is there a limit on the number of items I can attach to a bib record?
Answer: There is no explicit limit to the number of items you can attach to a bibliographic record, but if you attach enough of them, your MARC record will exceed the maximum file size limit for the ISO 2709 standard, which breaks indexing for that record. I've found this occurs somewhere between 600 and 1000 items on a 'normal' bibliographic record.
مداخل تحليلية
Question: I am using the EasyAnalyticalRecords feature, but my links in the OPAC and Staff Client to 'Show Analytics' are not working.
Answer: If you plan on using EasyAnalyticalRecords you will want to make sure to set your UseControlNumber preference to "Don't use," this will prevent broken links.
التزويد
تخطيط الفئات
Question: What is a planning category?
Answer: When you plan in advance for the way your budget is going to be spent, you initially plan for how it's going to be spent over time, that's the most natural thing to do.
So you plan for $1000 in Jan. $1000 in Feb., $3000 in March, etc. You can basically do the same thing with a list of values in lieu of the months.
يقول لديك قائمة مثل هذه:
- < 1 month
- < 6 months
- < 1 year
- < 3 years
- < 10 years
- > 10 years
The list is meant to represent when the books acquired where published. Then you plan for it, saying: we went to spend at list 40% of our budgets on books published less than a year ago, 10% on books more than 10 years old, etc.
Upon acquiring new material, you'll be able to select, for a given item, a value from this list in a drop down. Then, after the material has been acquired, at the end of the year, you'll be able to compare the goals set, with what's been achieved.
الدوريات
الأنماط المتقدّمة
Question: What is the 'inner counter' on the advanced serials pattern interface?
Answer: I think it is better to give an example to understand this :
المثال للاشتراك الشهري:
- تاريخ نشر أول منشور: أبريل 2010
- الترقيم: لا {X}, السنة {Y}
- العدد الأول: رقم 4، عام 2010
لسنة Y: هل تريد تغيير السنة في يناير 2011
لذا، النمط المتقدّم لـY سَيَكُونُ:
- أضفْ: 1
- مرَّة في كلِّ: 12
- عندما يكون أكثر مِنْ 9999999
- العدّاد الداخلي: 3
- تعيين إلى 0
- يَبْدأُ بــ 2010
Year is going to change after 12 received issues from April 2010, that is in April 2011 if you don't set inner counter. Set inner counter to 3 will say to Koha : change year after 12-3 = 9 received issues.
Inner counter says to Koha to take into account the first issues of the year, even if they are not received with Koha. If you begin with first issue of the year write nothing or 0.
التقارير
تحديد الأكواد المُخزنة في قاعدة البيانات
غرامات الجدول
Question: What do the codes in the accounttype field in the accountlines table stand for?
Answer:
- A = رسم إدارة الحساب
- C = الاعتماد / الائتمان المالي
- F = غرامة التأخير
- FOR = معفو عنه
- FU = متأخر، لا يزال يتراكم
- L = مادة ضائعة
- LR = مادة ضائعة عائدة/مردودة
- M = متنوع
- N = بطاقة جديدة
- PAY = الدفع
- W = شطب
جدول الإحصاءات
Question:What are the possible codes for the type field in the statistics table?
Answer:
- localuse
- يسجل إذا تمت إعادة مادة كانت معارة إلى مستفيد إحصائي (نوع الفئة = 'x')
- إصدار
- إعادة
- تجديد
- شطب
- الدفع
- CreditXXX
- يقوم ال XXXبتخزين الأنواع المختلفة من ائتمانات الرسوم، لذا سيشمل الاستعلام لالتقاطها جملة كـ "type LIKE 'Credit%%'"
جدول الإحتياطيات
Question: What are the possible codes for the found field in the reserves and old_reserves tables?
Answer:
- لاغي: يعني بأن المستفيد طلب المتاح اولا، ولم نقم باختيار مادة
- T = النقل: تم ربط الحجز بمادة لكنها في النقل إلى فرع الالتقاط
- W = في الانتظار: تم ربط الحجز بمادة، موجود في فرع الالتقاط، وفي الانتظار في رف الحجز.
- F= انتهي: تم اكتمال الحجز، وانتهائه.
جدول تقارير القاموس
Question: What are the possible codes for the area field in the reports_dictionary table?
Answer:
- 1 = الإعارة
- 2 = الفهرس
- 3 = المستفيدون
- 4 = التزويد
- 5 = الحسابات
جدول الرسائل
Question: What are the possible codes for the message_type field in the messages table?
Answer:
- L = لموظفي المكتبة
- B = للمستفيدين / المستعيرين
الجدول المتسلسل
Question: What are the possible codes for the status field in the serial table?
Answer:
- 1 = متوقع
- 2 = وصل
- 3 = متأخر
- 4 = مفقود
- 5 = Not available
- 6 = حذف
- 7 = مطالب به
- 8 = متوقف
- 41 = Missing (not received)
- 42 = Missing (sold out)
- 43 = Missing (damaged)
- 44 = Missing (lost)
عناوين المستعيرين
Question: What are the possible codes for the privacy field in the borrowers table?
Answer:
- إلى الأبد
- إفتراضى
- أبداً
Messaging Preferences
Question: What are the possible codes in the message_attribute_id field in the borrower_message_preferences table?
Answer:
- الإشعارات المتقدمة
- تم إعارة المادة
- لا حجوز مسموحة
- اذهب إلى تفاصيل المادة
- غير قادر على الرد
بارامترات وقتِ التشغيل
Question: Is there a way to filter my custom SQL reports before they run?
Answer: If you feel that your report might be too resource intensive you might want to consider using runtime parameters to your query. Runtime parameters basically make a filter appear before the report is run to save your system resources.
There is a specific syntax that Koha will understand as 'ask for values when running the report'. The syntax is <<Question to ask|authorized_value>>.
- The << and >> are just delimiters. You must put << at the beginning and >> at the end of your parameter
- The 'Question to ask' will be displayed on the left of the string to enter.
- The authorized_value can be omitted if not applicable. If it contains an authorized value category, or branches or itemtype or categorycode or biblio_framework, a list with the Koha authorized values will be displayed instead of a free field Note that you can have more than one parameter in a given SQL Note that entering nothing at run time won't probably work as you expect. It will be considered as "value empty" not as "ignore this parameter". For example entering nothing for : "title=<<Enter title>>" will display results with title='' (no title). If you want to have to have something not mandatory, use "title like <<Enter title>>" and enter a % at run time instead of nothing
أمثلة:
SELECT surname,firstname FROM borrowers WHERE branchcode=<<Enter patrons library|branches>> AND surname like <<Enter filter for patron surname (% if none)>>
SELECT * FROM items WHERE homebranch = <<Pick your branch|branches>> and barcode like <<Partial barcode value here>>
SELECT title , author FROM biblio WHERE frameworkcode=<<Enter the frameworkcode|biblio_framework>>
Note
To generate a date picker calendar to the right of the field when running a report you can use the 'date' keyword like this: <<Enter Date|date>>
Note
نصيحة: لديك لوضع "%%" في مربع النص ل'تركه فارغا'. خلاف ذلك، يبدو حرفيا ل "" (سلسلة فارغة) كقيمة الحقل.
Important
In addition to using any authorized value code to generate a dropdown, you can use the following values as well: Framework codes (biblio_framework), Branches (branches), Item Types (itemtypes) and Patron Categories (categorycode). For example a branch pull down would be generated like this <<Branch|branches>>

نتائج محدودة
Question: When I download my report it's limited to 10,000 results, how do I get all of the results to download?
Answer: There is a limit of 10,000 records put on SQL statements entered in Koha. To get around this you want to add 'LIMIT 100000' to the end of your SQL statement (or any other number above 10,000.
البحث
البحث المتقدم
فحص الفهارس
Question: What does 'scan indexes' on the advanced search page mean?
Answer: When you choose an index, enter a term, click 'scan indexes' and do the search, Koha displays the searched term and the following terms found in this index with the number of corresponding records That is search is not made directly in the catalog, but first in the indexes It works only for one index at once, and only with no limit in Location (All libraries needed)
Searching for Terms that Start With a Character
Question: How do I search for all titles that start with the letter 'C'?
Answer: You can choose to search for things that start with a character or series of characters by using the CCL 'first-in-subfield'
- مثال: ti,first-in-subfield=C
بحث الأحرف البديلة
Question:What is the difference between a keyword search using the '*' (asterisk) versus a keyword search using the '%' (percent)? Both work in the catalog, but return different sets. Why?
Answer: A wildcard is a character (*,?,%,.) that can be used to represent one or more characters in a word. Two of the wildcard characters that can be used in Koha searches are the asterisk ('*') and the percent sign ('%'). However, these two characters act differently when used in searching.
The '*' is going to force a more exact search of the first few characters you enter prior to the '*'. The asterisk will allow for an infinite number of characters in the search as long as the first few characters designated by your search remain the same. For example, searching for authors using the term, Smi*, will return a list that may include Smith, Smithers, Smithfield, Smiley, etc depending on the authors in your database.
The '%' will treat the words you enter in the terms of "is like". So a search of Smi% will search for words like Smi. This results in a much more varied results list. For example, a search on Smi% will return a list containing Smothers, Smith, Smelley, Smithfield and many others depending on what is your database.
The bottom line in searching with wildcards: '*' is more exact while '%' searches for like terms.
البحث
Question: Why does my Zebra title search for 'Help' not turn up 'The help' in the first pages of results?
Answer: When doing a title search, you actually want to search for the title (i.e., 'the help' rather than just 'help'), and it will bubble right up to the top. If you're just searching for 'help' then the relevance ranking is going to affect the results you see.
When it comes to relevance in Zebra, here's what's happening. First, the search is done. If you search for the title "help", then any title that has "help" in it comes back. Then from those records, separately, it does relevance on the *whole* record. The more your word appears, the more relevant, and some MARC tags are worth more points than others. So a self-help book with 505 notes where "help" appears a *lot* will be at the top, regardless of keyword or title.
But when you add a *second word*, that helps it figure things out, as it's weighing the relevance of both words and the phrase. Because of the way relevance works, if you search "the help", then "the help" or "the help I need" are more relevant than "the way to help", because they appear together in order. Likewise, "help the girl" would be lower relevance, because it's out of order, and "help for the homeless" would be lower still, as they're out of order, and apart.
The moral of the story is that single word searches, particularly on common words, will always struggle a bit; it can't evaluate relevance well, because you've not given it enough input.
المحتوى المحسَّن
محتويات FRBRizing
Question:At our public library we are running a Koha installation and we've tried to turn on all the nice functionalities in Koha such as the frbrising tool, but do not get the same result as Nelsonville public library.
Answer:In fact, this feature is quite tricky to make that right. First it looks at XISBN service. And then search in your database for that ISBN. So both XISBN and your internal ISBN (in biblio table) have to be normalized. You could therefore use the script misc/batchupdateISBNs.pl (it removes all the - in your local ISBNs)
أمازون
جَميِع مُحتويَات الأمازونِ
Question: I have all of the Amazon preferences turned on and have entered both of my keys, but none of the content appears in my system, why is that?
Answer: Amazon's API checks your server time on all requests and if your server time is not set properly requests will be denied. To resolve this issue be sure to set your system time appropriately. Once that change in made Amazon content should appear immediately.
On Debian the the command is date -s "2010-06-30 17:21" (with the proper date and time for your timezone).
نظام الإدارة
الأخطاء في كرون زيبرا
Question: I am noticing some errors in the koha-zebradaemon-output.log file. When new records are added it takes a bit longer to index than we think they should. Running rebuild zebra is often faster. Zebra ends up indexing and search works, but I am concerned about the errors. Any ideas?
Answer: Rebuild_zebra.pl -r deletes all of the files in the Zebra db directories (such as reci-0.mf) and then recreates them. Thus, permissions will be lost, and the files will be owned by the user who ran rebuild_zebra.pl. If one rebuilds the zebra indexes as root, the daemons, which typically run under the user Koha, will not be able to update the indexes. Thus, it's important then that the zebra rebuilds are put in the cronjob file of the user Koha, and not root. Also important is that other users, such as root, don't manually execute rebuilds.
If one desires that another user be able to execute rebuild_zebra.pl, he should be given the permission to execute 'sudo -u Koha .../rebuild_zebra.pl,' (if you want to do this, you also have to edit the sudoers file to pass the PERL5LIB variable with the env_keep option as by default sudo strips away almost all environment variables). Or, as root user, one can use a simple 'su koha' and then the rebuild_zebra.pl command.
I've also tried to set the sticky bit on rebuild_zebra.pl, but for whatever reason it didn't seem to work due to some problem with the PERL5LIB variable that I wasn't able to figure. That seems to me the easiest thing to do, if anybody has any idea how to make it work. If it worked and were the default, I think it would help folks to avoid a great deal of the problems that come up with zebra.
جعل Z39.50 الهدف العام
Question: Could someone tell me the exact steps I need to take to configure Zebra to expose my Koha 3 db as a public Z39.50 service?
Answer: Edit the KOHA_CONF file that your Koha is using. Uncomment the publicserver line like:
<!-- <listen id="publicserver" >tcp:@:9999</listen> -->
أن يكون:
<listen id="publicserver" >tcp:@:9999</listen>
ثم أعد تشغيل zebasrv وأتصل على المنفذ المحدد (9999).
موقع الرفوف لقيم الصلاحيات
Question: When editing an item, the new shelving location I created is not showing up by default in the items where I assigned it to.
Answer: This is because you created the new shelving location with a code value of 0 (zero) Just FYI the system interprets authorized values of 0 as equaling a null so when you edit a record in cataloging where the authorized value in a field was assigned where the code was 0, the value displays as null in the item editor (or MARC editor) instead of the value the library meant it to be.
لماذا أحتاج قيم الصلاحيات؟
Question: Why would I want to define authorized values for MARC tags?
Answer: Authorized Values create a 'controlled vocabulary' for your staff. As an example, let us assume that your Koha installation is used by several libraries, and you use MARC 21. You might want to restrict the 850a MARC subfield to the institution codes for just those libraries. In that case, you could define an authorized values category (perhaps called "INST") and enter the institution codes as the authorized values for that category.
Note
يقوم كوها آليا بتنصيب فئات قيم استناد لأنواع المادة ورموز الفرع , ويمكنك ربط قيم الاستناد هذه إلى حقول مارك الفرعية حين تقوم بتنصيب بنية رؤوس مارك الخاصة بك.
How do I clean up the sessions table?
Question: Is there a periodic job that can be run to cull old sessions from the table? We don't want to backup all the useless session data every night.
Answer: You can run cleanup database cron job.
Or just before doing a backup command (mysqldump), you can truncate session table:
mysql -u<kohauser -p<password <koha-db-name -e 'TRUNCATE TABLE sessions'
الأجهزة
باركود الماسحات الضوئية
Question: What barcode scanners have been known to work with Koha?
Answer: The simple rule of thumb is, does it act like a keyboard device?, if so, it will work. (i.e. can you take the scanner, scan a barcode and have it show up in a text editor, if so, it will work.)
The main points to check are that it connects to your PC conveniently (can be USB or "keyboard wedge" which means it connects in line with the keyboard, which is useful with older computers), and that it scans the barcode type that you are using.
It is a good idea to test some 'used' barcodes if you have any, to see whether the scanner can read scuffed or slightly wrinkled ones successfully. Most scanners are capable of reading several barcode types - there are many, and the specification should list the ones it can read. You may need to adjust settings slightly, such as prefix and suffix characters, or whether you want to send an 'enter' character or not.
One more tip - some can be set 'always on' and may come with a stand, some have triggers under the handle, some have buttons on top, some are held like a pen. Think about the staff working with the hardware before choosing, as a button in the wrong place can be very awkward to use.
طابعات
Printers used by Koha libraries
- POS-X إستلام الطابعة
- Star Micronics printer (exact model unknown) with a generic/plain text driver.
- Star SP2000 (Nelsonville)
- Star TSP-100 futurePRINT (Geauga)
- "I know there have been a lot of questions on receipt printers so I thought I'd pass on my findings. We have been testing the Star TSP-100 futurePRINT. I found this print to be VERY easy to configure for Koha. I was even able to customize the print job by adding our system logo (a .gif) to the top of every receipt. Also with a bitmap created in Paint was able to add a message at the bottom of each receipt with the contact information, hours and website for the library that the materials were checked out at."
- Epson TM 88 IIIP طابعات الإيصالات الحرارية
- Epson TM-T88IV
- 1x1 labels using a Dymolabelwriter printer
طريقة بريل للدعم
Question: Are there any braille embosser or printer which has inbuilt braille converter and it is accessible with UNIX environment?
Answer: You may want to look into BRLTTY (http://www.emptech.info/product_details.php?ID=1232).
تمديد نظام كوها
Amazon lookup script for Koha libraries
We order most of our materials from Amazon, so I've been looking for a convenient way to tell if a book under consideration is in our catalog already.
Greasemonkey & a custom user script fit the bill nicely:
بعض التحذيرات
- Like most scripts, this one was designed to work with Firefox; I haven't explored getting it to work with other browsers.
- I'm not a JavaScript programmer -- this was adapted from others' work. Just a few lines would have to be changed to get the script to work with your catalog.
- It depends on the existence of ISBN for the item in question, so movies, older books, etc. would not work.
Others have added all sorts of bells & whistles: XISBN lookups to search for related titles, custom messages based on the status of items (on order, on hold, etc.), ... just search the UserScripts site for Amazon + library. For a later date!
الكلمات السحابية
In addition to the traditional tag cloud available in Koha, there is a way to generate clouds for popular subjects within Koha.
The Author/Subject Cloud cron job is used to help with this process. This cron job sends its output to files.
- /home/koha/mylibrary/koharoot/koha-tmpl/cloud-author.html
- /home/koha/yourlibrary/koharoot/koha-tmpl/cloud-subject.html
This means that you can produce clouds for authors, collective author, all kind of subjects, classifications, etc. And since it works on zebra indexes, it is quick, even on large DBs. Tags clouds are sent to files. It's up to library webmaster to deal with those files in order to include them in OPACMainUserBlock, or include them into their library CMS.
Some libraries even send the file into a Samba shared folder where webmaster take them, eventually clean them a little bit before integrating them into navigation widgets or pages.
أحدث العناوين المنسدلة
Often we want to add a way for our patrons to do searches for the newest items. In this example I'll show you how to create a pull down menu of the newest items by item type. These tips will work (with a couple changes) for collection codes or shelving locations as well.
First, it's important to note that every link in Koha is a permanent link. This means if I do a search for everything of a specific item type sorted by the acquisitions date and bookmark that URL, whenever I click it I'll see the newest items of that type on the first few pages of the results.
I took this knowledge and wrote a form takes this functionality in to consideration. It basically just does a search of your Koha catalog for a specific item type and sorts the results by acquisitions date.
The first thing I did was write a MySQL statement to generate a list of item types for me - why copy and paste when you can use the power of MySQL?
select concat('<option value=\"mc-itype:', itemtype, '\">',description,'</option>') from itemtypes
The above looks at the itemtypes table and slaps the necessary HTML around each item type for me. I then exported that to CSV and opened it in my text editor and added the other parts of the form.
<p><strong>New Items</strong></p>
<p><form name="searchform" method="get" action="/cgi-bin/koha/opac-search.pl">
<input name="idx" value="kw" type="hidden">
<input name="sort_by" value="acqdate_dsc" type="hidden">
<input name="do" value="OK" type="hidden">
<select name="limit" onchange="this.form.submit()">
<option>-- Please choose --</option>
<option value="mc-itype:BOOK">Book</option>
<option value="mc-itype:BOOKCD">Book on CD</option>
<option value="mc-itype:DVD">DVD</option>
<option value="mc-itype:LRG_PRINT">Large print book</option>
<option value="mc-itype:MAGAZINE">Magazine</option>
<option value="mc-itype:NEWSPAPER">Newspaper</option>
<option value="mc-itype:VIDEO">Videocassette</option>
</select>
</form>
</p>
الآن، ماذا يعني كل ذلك؟ أهمية البتات هذه هي :
أولاً ابتدء من النموذج.
<p><form name="searchform" method="get" action="/cgi-bin/koha/opac-search.pl">
This tells the browser to take any value selected and put it at the end of this http://YOURSITE/cgi-bin/koha/opac-search.pl. If you want to embed this form on your library website (and not on your OPAC) you can put the full OPAC URL in there.
Next, there is a hidden value that is telling the search to sort by acquisitions date descending (newest items at the top):
<input name="sort_by" value="acqdate_dsc" type="hidden">
And finally you have an option for each item type you want people to search.
<option value="mc-itype:BOOK">Book</option>
These options each include the string "mc-itype:" which tells Koha to do an item type search.
Once you have all of that in place you can copy and paste the form to somewhere on your OPAC. The Farmington Public Libraries OPAC has a few examples of this on the left.
Cataloging and Searching by Color
One of the icon sets installed in Koha includes a series of colors. This set can be used to catalog and search by color if you'd like. This guide will walk you use changing collection code to color in Koha so that you can do this.
The following SQL could be used to add these colors to the CCODE authorized value category in a batch. If you wanted to use these colors for another authorized value you'd have to edit this to use that category:
insert into authorised_values (category, authorised_value, lib,
 lib_opac, imageurl) values ('CCODE','000000','Black','','colors/000000.png');
insert into authorised_values (category, authorised_value, lib,
 lib_opac, imageurl) values ('CCODE','66cc66','Bright Green','','colors/66cc66.png');
insert into authorised_values (category, authorised_value, lib,
 lib_opac, imageurl) values ('CCODE','99cc33','Olive','','colors/99cc33.png');
insert into authorised_values (category, authorised_value, lib,
 lib_opac, imageurl) values ('CCODE','3333cc','Dark Blue','','colors/3333cc.png');
insert into authorised_values (category, authorised_value, lib,
 lib_opac, imageurl) values ('CCODE','006600' ,'Dark Green','','colors/006600.png');
insert into authorised_values (category, authorised_value, lib,
 lib_opac, imageurl) values ('CCODE','6600cc','Plum','','colors/6600cc.png');
insert into authorised_values (category, authorised_value, lib,
 lib_opac, imageurl) values ('CCODE','6666cc','Purple','','colors/6666cc.png');
insert into authorised_values (category, authorised_value, lib,
 lib_opac, imageurl) values ('CCODE','9999cc','Light Purple','','colors/9999cc.png');
insert into authorised_values (category, authorised_value, lib,
 lib_opac, imageurl) values ('CCODE','660000' ,'Burgundy','','colors/660000.png');
insert into authorised_values (category, authorised_value, lib,
 lib_opac, imageurl) values ('CCODE','663333' ,'Brown','','colors/663333.png');
insert into authorised_values (category, authorised_value, lib,
 lib_opac, imageurl) values ('CCODE','990000' ,'Red','','colors/990000.png');
insert into authorised_values (category, authorised_value, lib,
 lib_opac, imageurl) values ('CCODE','996633' ,'Tan','','colors/996633.png');
insert into authorised_values (category, authorised_value, lib,
 lib_opac, imageurl) values ('CCODE','999999' ,'Gray','','colors/999999.png');
insert into authorised_values (category, authorised_value, lib,
 lib_opac, imageurl) values ('CCODE','cc66cc','Pink','','colors/cc66cc.png');
insert into authorised_values (category, authorised_value, lib,
 lib_opac, imageurl) values ('CCODE','cc99cc','Bubble Gum','','colors/cc99cc.png');
insert into authorised_values (category, authorised_value, lib,
 lib_opac, imageurl) values ('CCODE','cc3333' ,'Orange','','colors/cc3333.png');
insert into authorised_values (category, authorised_value, lib,
 lib_opac, imageurl) values ('CCODE','cc6666' ,'Peach','','colors/cc6666.png');
insert into authorised_values (category, authorised_value, lib,
 lib_opac, imageurl) values ('CCODE','cc9999' ,'Rose','','colors/cc9999.png');
insert into authorised_values (category, authorised_value, lib,
 lib_opac, imageurl) values ('CCODE','cccc00' ,'Gold','','colors/cccc00.png');
insert into authorised_values (category, authorised_value, lib,
 lib_opac, imageurl) values ('CCODE','ffff33' ,'Yellow','','colors/ffff33.png');
insert into authorised_values (category, authorised_value, lib,
 lib_opac, imageurl) values ('CCODE','ffffcc','Cream','','colors/ffffcc.png');
insert into authorised_values (category, authorised_value, lib,
 lib_opac, imageurl) values ('CCODE','ffffff','White','','colors/ffffff.png');
If you would like to choose the colors manually you can do that via the القيم الإستنادية administration area.
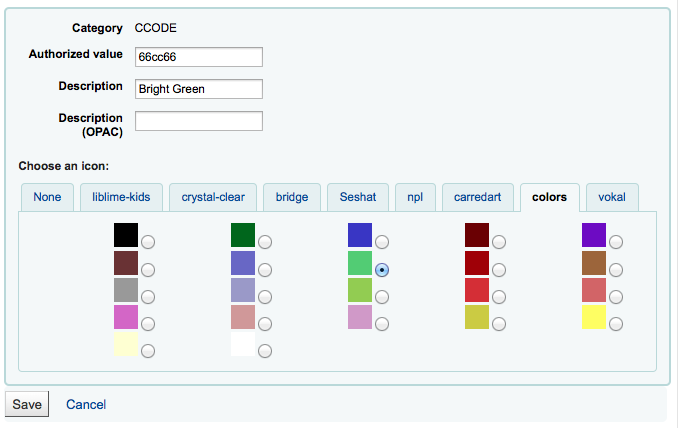
Next you'll want to update the frameworks so that the 952$8 (if you're using collection code) label to says Color.
Once you have that in place you can start to catalog items by color.
Finally you'll want to add the following JQuery to your preferences so that it will relabel 'Collection' to 'Color'
$(document).ready(function(){
    $("#advsearch-tab-ccode a:contains('Collection')").text("Color");
    $("#holdings th:contains('Collection')").text("Color");
    });
$(document).ready(function(){
    $("#advsearch-tab-ccode a:contains('Collection')").text("Color");
    $('#item_ccode').text("Color");
    });
نظام كوها وموقع الويب الخاص بك
This appendix will include tips for integrating Koha in to your library website.
بحث نظام كوها على موقع الويب الخاص بك
Often you'll want to add a Koha search box to your library website. To do so, just copy and paste the following code in to your library website and update the YOURCATALOG bit with your catalog's URL and you're set to go.
<form name="searchform" method="get" action="http://YOURCATLOG/cgi-bin/koha/opac-search.pl" id="searchform">
<input id="transl1" name="q" type="text"><p>
<select name="idx" id="masthead_search">
<option value="kw">Keyword</option>
<option value="ti">Title</option>
<option value="au">Author</option>
<option value="su">Subject</option>
<option value="nb">ISBN</option>
<option value="se">Series</option>
<option value="callnum">Call Number</option>
</select>
<input value="Search" id="searchsubmit" type="submit">
</p></form>